

Sony Ipela PCS-XG55, Ipela PCS-XG55S, Ipela PCS-XG80, Ipela PCS-XG80S Quick Connection Manual
HD Visual Communication System PCS-XG80/XG80S/XG55/XG55S
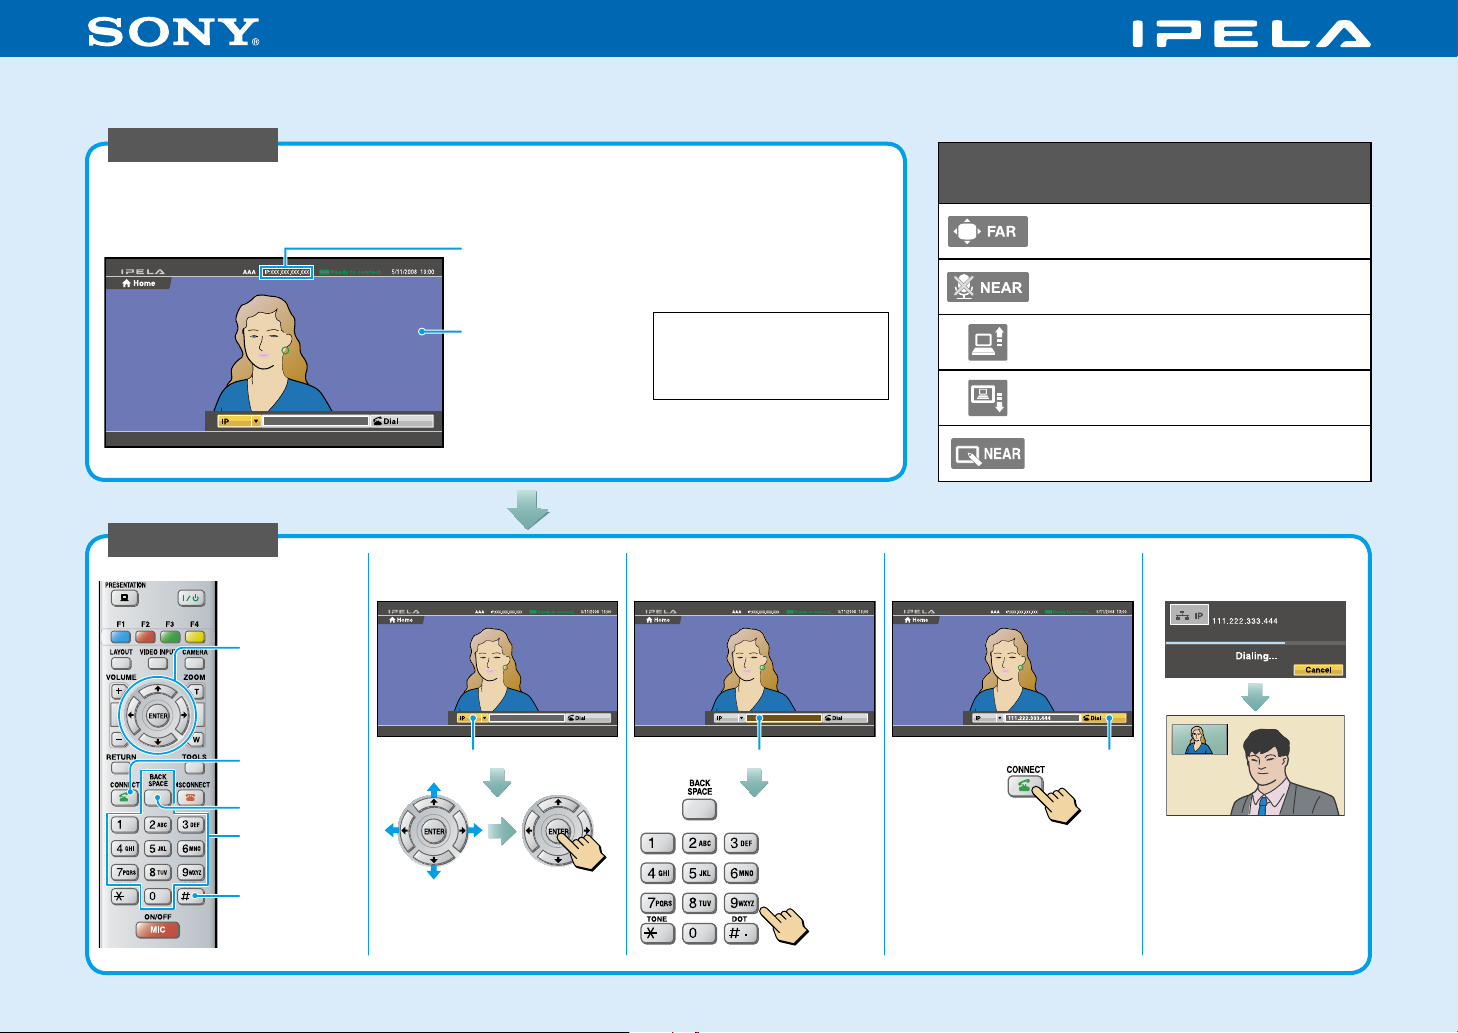
Quick Connection Guide Using Direct Dial
For details on operations, refer to the Operating Instructions
(stored in the supplied CD-ROM).
To begin with
Turn on your HD Visual Communication System and TV monitor, and check the following to ensure that
connection is possible.
Is the IP address of
the local system* or
the ISDN line number
displayed?
Is the picture of your
camera (local picture)
on the monitor
screen?
Note: Connection to a remote
party is not possible if neither
the IP address * nor ISDN line
number is not displayed.
* You can hide the IP address of
the local system using the setup
menu.
After checking...
Let’s connect
/// (arrow)
buttons and
ENTER button
Select the Line I/F and
1
press ENTER.*
Select the number text
2
box and press ENTER.
Main indicators that appear during
communication
Controlling a remote camera
Local microphone is turned off.
Presentation (transmission) is being
executed.
Presentation (reception) is being
executed.
Local party has a drawing right of
annotation.
Select “Dial” and press
3
ENTER.
The system establishes
communication.
CONNECT button
BACK SPACE
button
Buttons used for
number input
DOT button
Line I/F
Select the Line
I/F to use.
* The Line I/F cannot be selected
depending on the system setup.
Press.
Number text box Dial
Or, press .
Enter the IP
address or
ISDN line
number of a
remote party.
4-179-435-11 (1)©2010 Sony Corporation
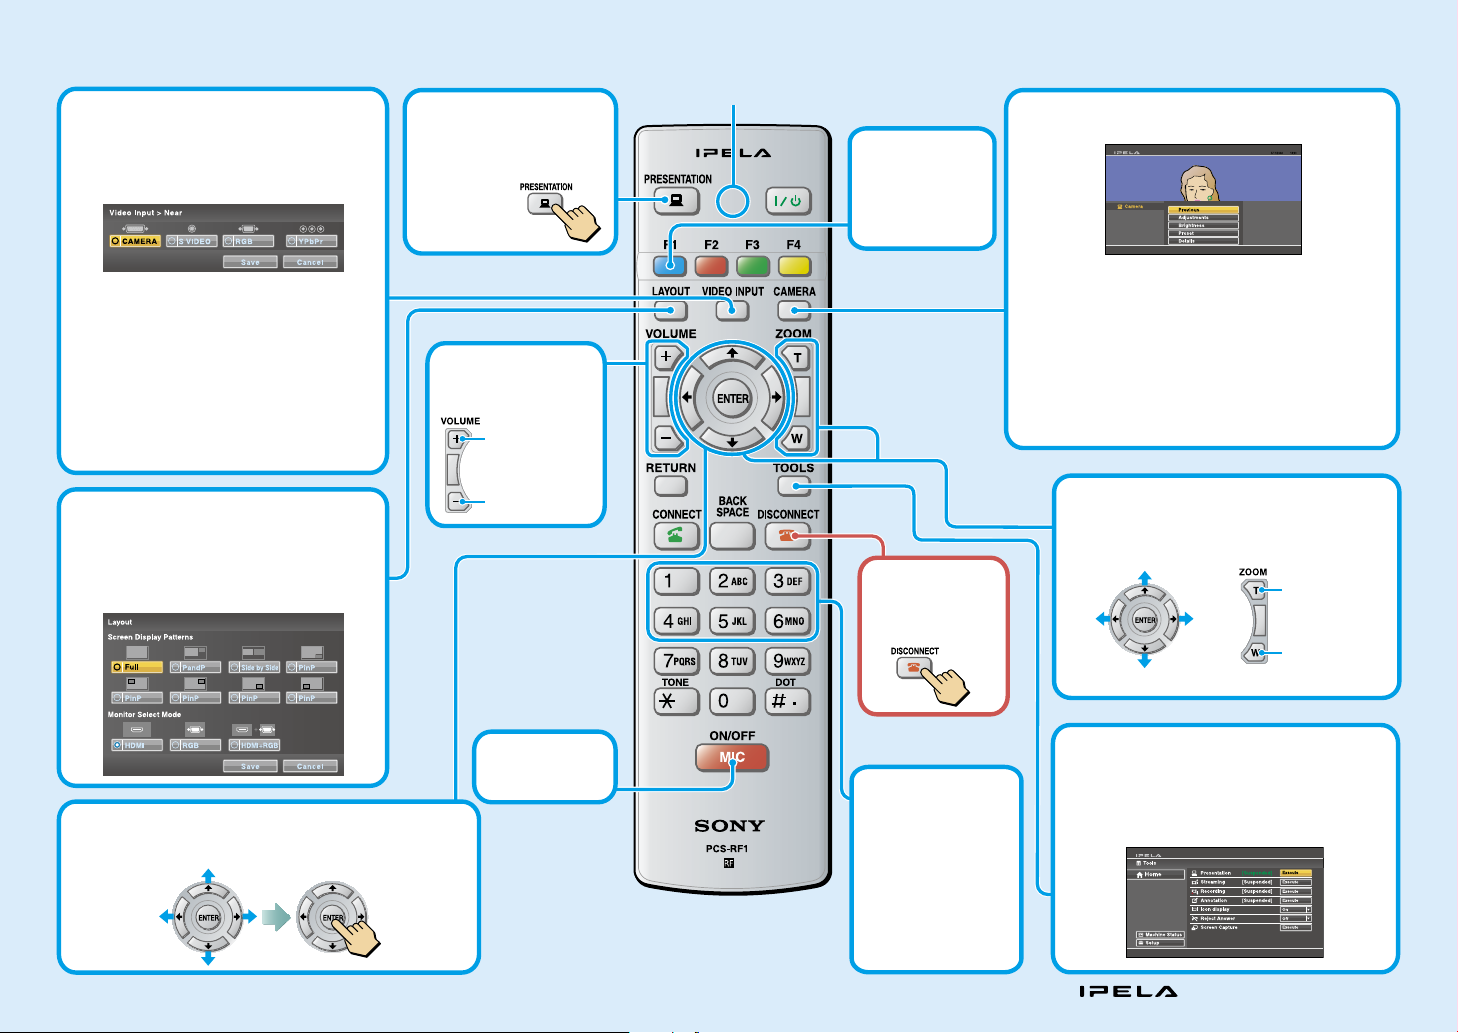
Remote Commander Guide: Operations available during communication
For details on operations, refer to the Operating Instructions (stored in the supplied CD-ROM).
Selecting the input picture
Press the VIDEO INPUT button to display the
Video Input menu.
Select the video input using /// and
ENTER buttons.
Transmitting a picture
for presentation
You can transmit a picture
from the computer
connected
to the RGB IN
connector to a
remote party.
LED
Displaying Camera menu
Press the CAMERA button to display the Camera menu.
Switching the
local camera
and remote
camera to be
controlled
CAMERA: Video input from the camera
connected to CAMERA connector
S VIDEO*:
RGB: Video input from the equipment
YPbPr: Video input from the equipment
* This function is not available on the PCS-
XG55/XG55S.
Video input from the camera or
equipment connected to S VIDEO IN connector
connected to RGB IN connector
connected to VIDEO IN YPbPr jacks
Switching the picture on the TV monitor
Press the LAYOUT button to display the
Layout menu.
Select the screen display pattern of the local
and remote pictures using /// and
ENTER buttons.
Operating the menu
Select the setting item in the menu displayed on the
screen, and confirm the selection.
Select the
setting item.
Confirm the
selection.
Adjusting the
sound volume of
the remote party
To increase the
volume
To decrease the
volume
Switching on/
off the local
microphone
Ending the
communication
and
disconnecting
Recalling the
Preset Camera
Angle
Select “Preset” in
the Camera menu
to display the Preset
Setting List.
Press button 1 to 6 to
move the camera to
the preset position.
Select the menu item using /// and ENTER
buttons, and the selected adjustment menu is
displayed.
Adjustments: for angle and zoom adjustments
Brightness: for brightness adjustment
Preset: for presetting and recalling the camera angle
and zoom
Details: for focus adjustment, white balance adjustment
and backlight compensation, digital zoom, Bright
Face and noise reduction filter functions
Adjusting the camera angle and zoom
To move the camera
angle
Up
To enlarge the
Left Right
Down
picture
To reduce the
picture
Displaying Tools menu
Press the TOOLS button to display the Tools
menu.
Select the menu item using
buttons, and you can use the selected function
such as “Annotation.”
///
and ENTER
“IPELA” and are trademarks of Sony Corporation
 Loading...