

Sony IPELA PCSA-CXA55 Operating Instructions Manual
* I -42743 0102Y*
Sony Corporation Printed in Japan
© 2011 Sony Corporation
JP
GB
4-274-301-02(1)
HD Camera Unit
取扱説明書
Operating Instructions
Mode d’emploi
Bedienungsanleitung
Manual de instrucciones
Istruzioni per l’uso
Instruções de Operação
お買い上げいただきありがとうございます。
電気製品は安全のための注意事項を守らないと、
火災や人身事故になることがあります。
この取扱説明書には、事故を防ぐための重要な注意事項と製品の
取り扱いかたを示してあります。この取扱説明書をよくお読みの
うえ、製品を安全にお使いください。お読みになったあとは、い
つでも見られるところに必ず保管してください。
ご使用にあたっては、HD ビジュアルコミュニケーションシステ
ム PCS-XG80/XG80S/XG55/XG55S/XA80/XA55 の取
扱説明書もあわせてご覧ください。
FR
DE
ES
IT
CS
PT
PCSA-CXA55
安全のために
ソニー製品は正しく使用すれば事故が起きないよう
に、安全には充分配慮して設計されています。しか
し、電気製品は、まちがった使いかたをすると、火
災や感電などにより死亡や大けがなど人身事故につ
ながることがあり、危険です。
事故を防ぐために次のことを必ずお守りください。
安全のための注意事項を守る
4 〜 6 ページの注意事項をよくお読みください。製品
全般および設置の注意事項が記されています。
定期点検を実施する
長期間、安全にお使いいただくために、定期点検を
することをおすすめします。点検の内容や費用につ
いては、お買い上げ店またはソニーのサービス窓口
にご相談ください。
故障したら使用を中止する
すぐに、お買い上げ店またはソニーのサービス窓口
にご連絡ください。
万一、異常が起きたら
・ 煙が出たら
・ 異常な音、においがしたら
・ 内部に水、異物が入ったら
・ 製品を落としたりキャビネットを破損したときは
m
1 接続している HD ビジュアルコミュニケーション
システムの電源を切る。
2 接続ケーブルを抜く。
3 お買い上げ店またはソニーのサービス窓口に連絡
する。
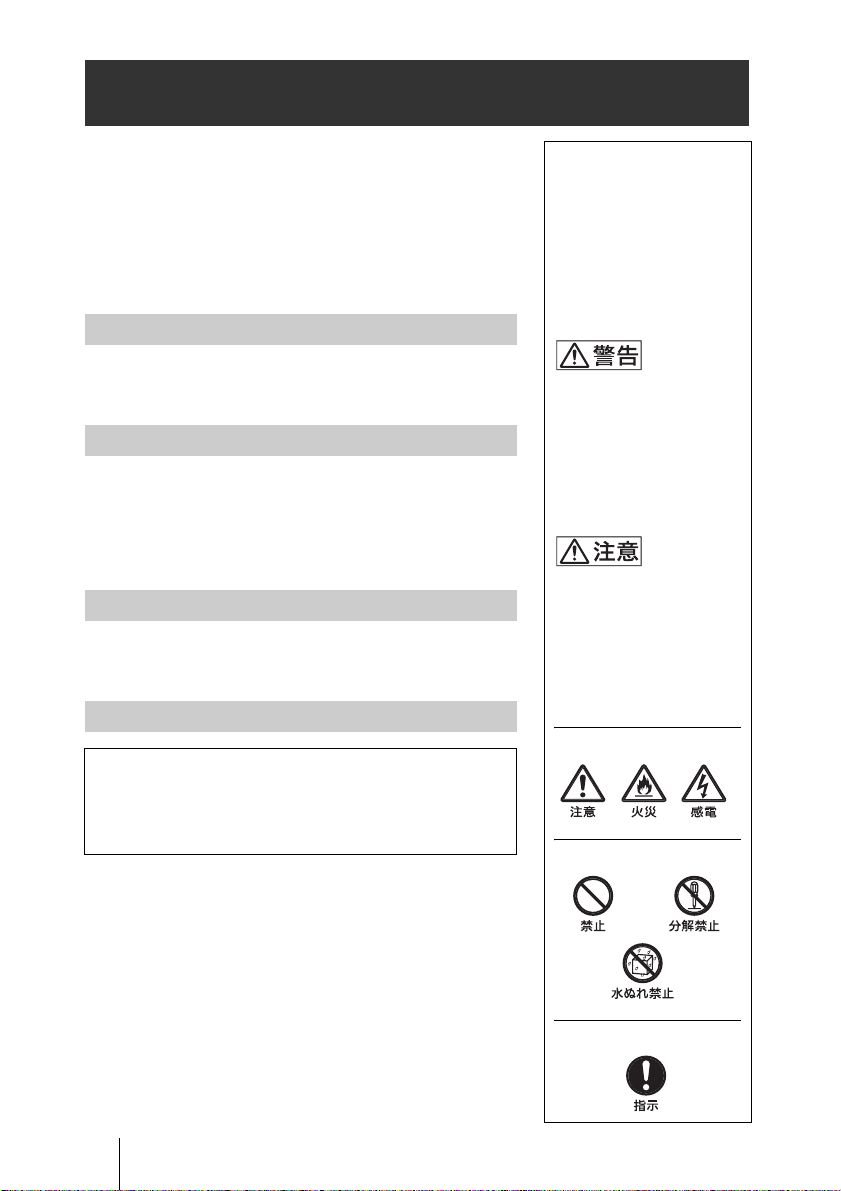
警告表示の意味
取扱説明書および製品
では、次のような表示
をしています。表示の
内容をよく理解してか
ら本文をお読みくださ
い。
この表示の注意事項を
守らないと、火災や感
電などにより死亡や大
けがなど人身事故につ
ながることがありま
す。
この表示の注意事項を
守らないと、感電やそ
の他の事故によりけが
をしたり周辺の物品に
損害を与えたりするこ
とがあります。
注意を促す記号
行為を禁止する記号
行為を指示する記号
2
安全のために
目次
警告.................................................................4
注意.................................................................5
本機の性能を維持するために...............7
CMOS 特有の現象.........................................8
特長 ..........................................................................8
各部の名称と働き..........................................9
設置する ............................................................10
モニター用テレビに設置する.... 10
映像の撮影状態を一時的に
停止する ....................................................12
故障かな?と思ったら............................13
仕様 .......................................................................14
保証とアフターサービスに
ついて..........................................................15
JP
目次
3
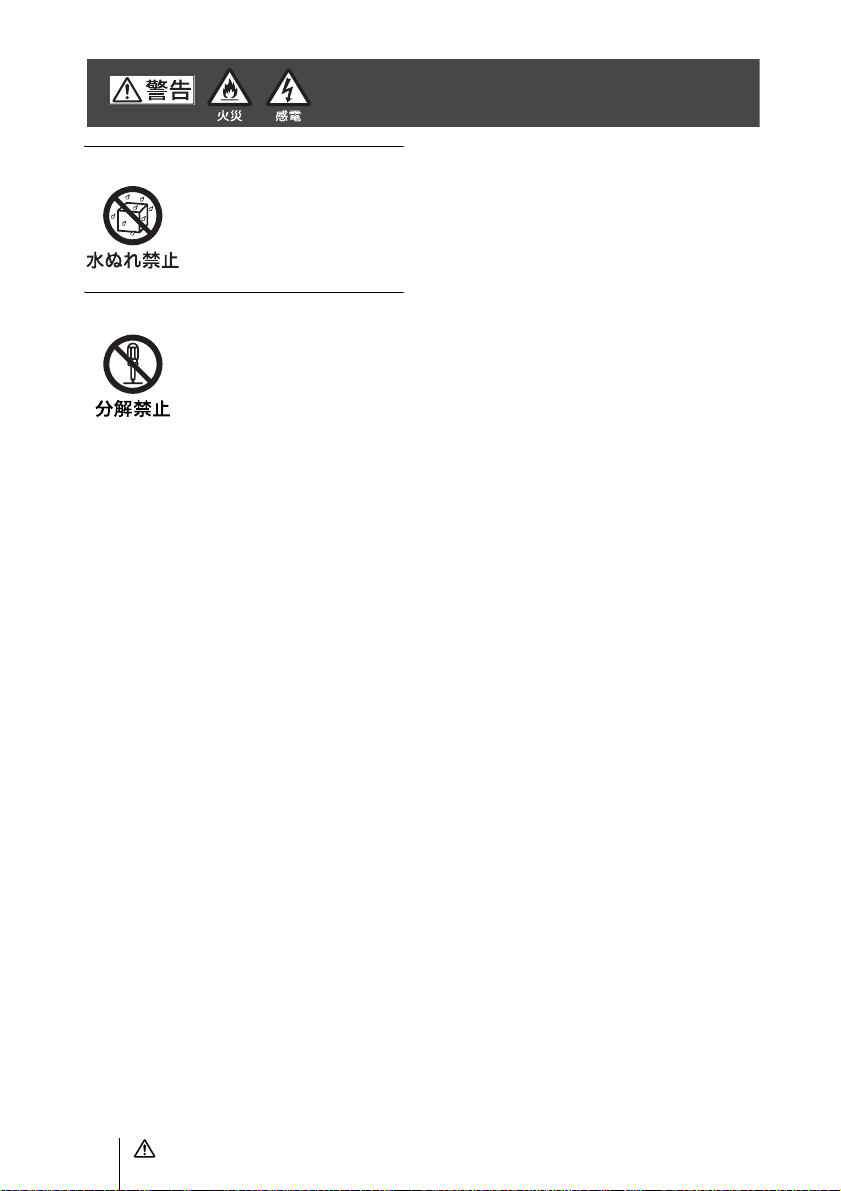
警告
水にぬれる場所で使用しない
水ぬれすると、漏電による感
電、発火の原因となることがあ
ります。
分解や改造をしない
分解や改造をすると、火災や感
電、けがの原因となることがあ
ります。
内部の点検や修理は、お買い上
げ店またはソニーのサービス
窓口にご依頼ください。
下記の注意を守らないと、火災や感電により
死亡や大けがにつながることがあります。
4
警告
注意
下記の注意を守らないと、けがをしたり周辺の物品に
損害を与えることがあります。
付属の接続ケーブルを使う
付属の接続ケーブルを使わな
いと、火災や感電の原因となる
ことがあります。
コード類は正しく配置する
接続ケーブルは、足に引っかけ
ると本機の落下や転倒などに
よりけがの原因となることが
あります。十分注意して接続・
配置してください。
指定されたカメラケーブルなどの接
続ケーブルを使う
この取扱説明書に記されてい
るカメラケーブルなどの接続
ケーブルを使わないと、火災や
故障の原因となることがあり
ます。
内部に水や異物を入れない
水や異物が入ると、火災の原因
となります。
万一、水や異物が入ったとき
は、すぐに接続している HD コ
ミュニケーションシステムの
電源を切り、接続ケーブルを抜
いて、お買い上げ店またはソ
ニーのサービス窓口にご相談
ください。
接続ケーブルを傷つけない
接続ケーブルを傷つけると、火
災や感電の原因となります。
• コードを加工したり、傷つけ
たりしない
• 重い物をのせたり、引っ張っ
たりしない
• 熱器具に近づけたり、加熱し
たりしない
• コードを抜くときは、必ずプ
ラグを持って抜く
万一、コードが傷んだら、ソ
ニーのサービス窓口に交換を
ご依頼ください。
お手入れの際は、電源を切る
電源を接続したままお手入れ
をすると、感電の原因となるこ
とがあります。
運搬時には、接続ケーブルを取り外
す
本機を運搬する際には、接続
ケーブルを必ず取り外してく
ださい。接続ケーブルに引っか
かると、転倒や落下の原因とな
ることがあります。
雨のあたる場所や、油煙、湯気、湿
気、ほこりの多い場所には設置しな
い
上記のような場所やこの取扱
説明書に記されている仕様条
件以外の環境に設置すると、動
作不良をはじめ、火災や感電の
原因となることがあります。
注意
5
注意
設置は専門の工事業者に依頼する
設置については、必ずお買い上
げ店またはソニーのサービス
窓口にご相談ください。
高所への設置は、本機の重量に
充分耐えられる強度があるこ
とをお確かめの上、確実に取り
付けてください。充分な強度が
ないと、落下して、大けがの原
因となります。
また、1年に一度は、取り付けが
ゆるんでいないことを点検し
てください。また、使用状況に
応じて点検の間隔を短くして
ください。
不安定な場所に設置しない
次のような場所に設置すると
倒れたり落ちたりして、けがの
原因になることがあります。
• ぐらついた台の上
• 傾いたところ
• 振動や衝撃のかかるところ
また、設置・取り付け場所の強
度を充分にお確かめください。
6
注意
本機の性能を維持す
るために
使用・保管場所について
次のような場所での使用および保管は
避けてください。故障の原因となりま
す。
・ 極端に暑い所や寒い所 ( 使用温度は
5℃ 〜 3 5 ℃ )
・ 直射日光があたる場所や暖房器具の
近く
・ 強い磁気を発するものの近く
・ 強力な電波を発するテレビやラジオ
の送信所の近く
・ 振動や衝撃のある所
本体のお手入れ
・ レンズの表面に付着したごみやほこ
りは、ブロアーで払ってください。
・ 汚れがひどいときは、水でうすめた中
性洗剤に柔らかい布をひたし、固くし
ぼってから汚れを拭き取り、乾いた布
で仕上げてください。
・ アルコール、シンナー、ベンジンなど
は使わないでください。変質したり、
塗装がはげたりすることがあります。
・ 化学ぞうきんをご使用の際は、その注
意書に従ってください。
・ 殺虫剤のような揮発性の物をかけた
り、ゴムやビニール製品に長時間接触
させると、変質したり、塗装がはげた
りすることがあります。
放熱について
動作中は布などで包まないでください。
内部の温度が上がり、故障や事故の原
因となります。
コミュニケーションシステムとの接
続について
HD ビジュアルコミュニケーションシ
ステムと接続するとき、コミュニケー
ションシステムの電源を入れたまま、
ケーブルをつながないでください。故
障の原因となったり、映像が映らない
ことがあります。
輸送について
輸送するときは、付属のカートンと
クッション、または同等品で梱包し、
強い衝撃を与えないようにしてくださ
い。
定期メンテナンスについて
本機は駆動部を持つ製品であるため、
使用条件により、磨耗やグリス切れに
よる異音が発生する場合があります。
性能を維持するため、定期メンテナン
スを行うことをおすすめします。異音
などが発生した場合は、ソニーのサー
ビス窓口にご連絡ください。
レーザービームについてのご注意
レーザービームは CMOS に損傷を与
えることがあります。レーザービーム
を使用した撮影環境では、CMOS 表面
にレーザービームが照射されないよう
に充分注意してください。
本機の性能を維持するために
7

CMOS 特有の現象
撮影画面に出る下記の現象は、CMOS
(ComplementaryMetalOxide
Semiconductor)特有の現象で、故障で
はありません。
白点
CMOS 撮像素子は非常に精密な技術で
作られていますが、宇宙線などの影響
により、まれに画面上に微小な白点が
発生する場合があります。
これは CMOS 撮像素子の原理に起因す
るもので故障ではありません。
また、下記の場合、白点が見えやすく
なります。
・ 高温の環境で使用するとき
・ GAIN(感度)を上げたとき
本機においては、接続している HD ビ
ジュアルコミュニケーションシステム
の電源を切り、再び電源を入れること
で現象が改善することがあります。
折り返しひずみ
細かい模様、線などを撮影すると、ぎ
ざぎざやちらつきが見えることがあり
ます。
特長
本機は、ソニーの HD ビジュアルコ
ミュニケーションシステム PCS-XG80/
XG80S/XG55/XG55S/XA80/XA55 の
専用カメラです。
本機の電源は、コミュニケーションシ
ステムから供給されます。本機の調整、
設定などについては PCS-XG80/
XG80S/XG55/XG55S/XA80/XA55 の
取扱説明書をご覧ください。
800 万画素 CMOS による高画質
有効画素数 800 万画素の CMOS 採用
で、高精細なハイビジョン映像を撮影
できます。
マイク内蔵
カメラとマイクの一体型で、スペース
をとりません。
撮影不要時にレンズを覆うレンズカ
バー
システムを起動したままでも、レンズ
を覆うカバーで、映像の撮影状態を一
時的に停止できます。
吸盤による簡単着脱
モニター用テレビには、吸盤で取り付
けます。可動式リンクアームにより、
多くのモニター用テレビに着脱可能で
す。(一部装着できない機器がありま
す。)
8
CMOS 特有の現象/特長
HD に対応したビデオフォーマット
ハイビジョン放送で使用されている
HD(720p)の撮影が可能です。
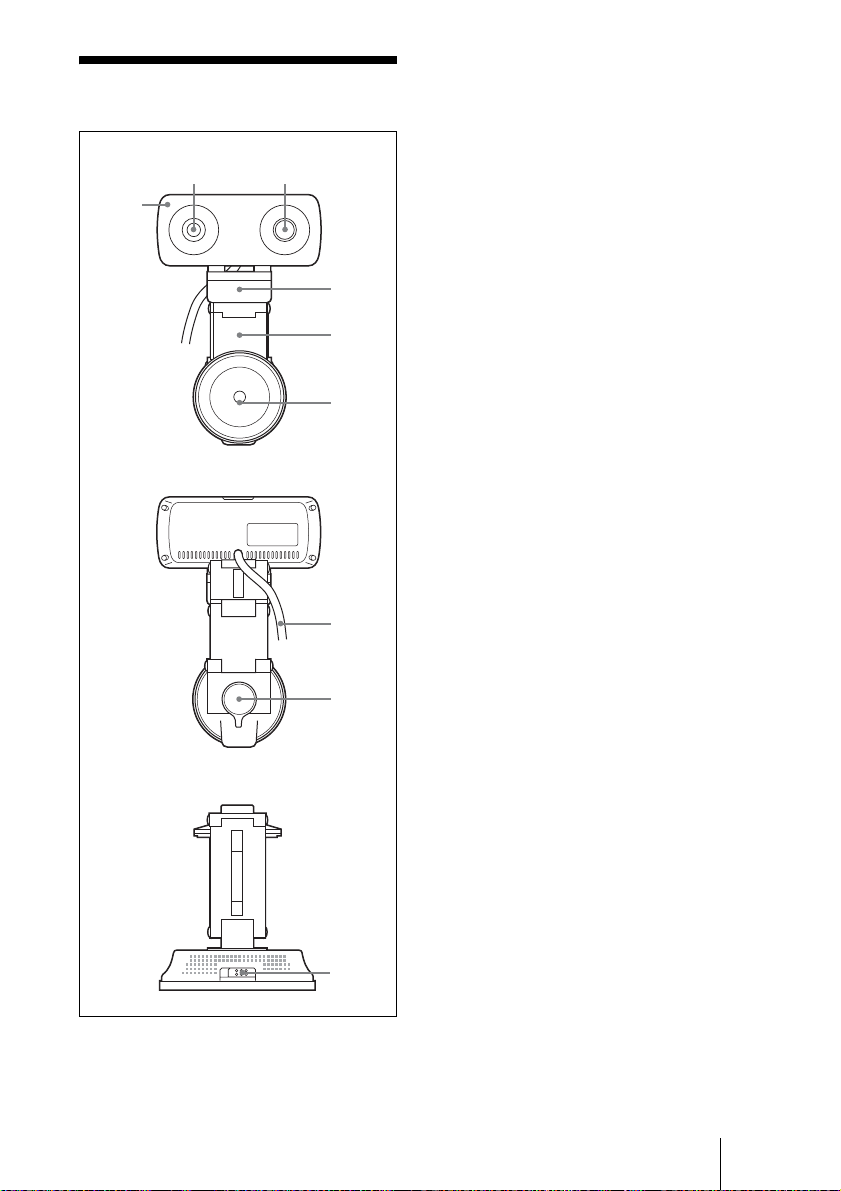
各部の名称と働き
1
2
前面
3
後面
4
5
6
7
8
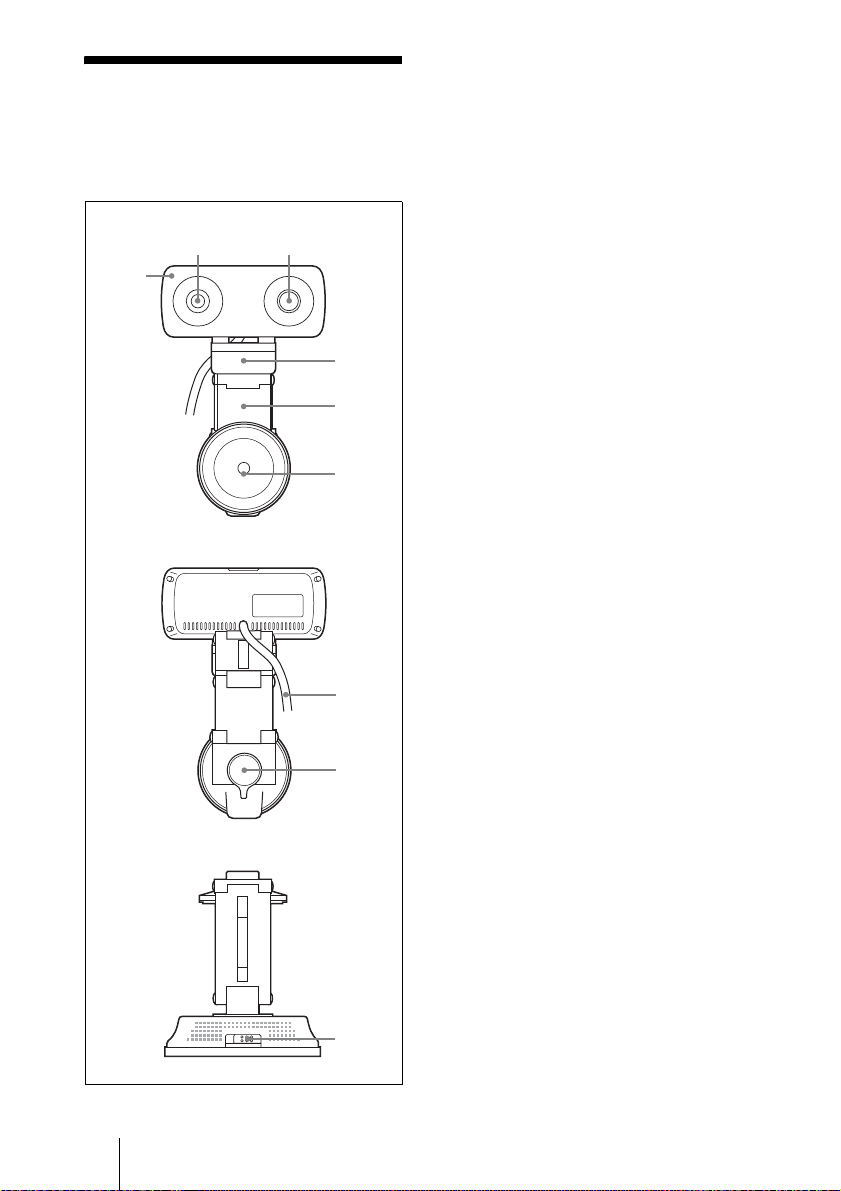
a レンズ
デジタル 3 倍ズームレンズです。
b マイク
カメラユニットに内蔵のモノラルマ
イクです。
c タリーランプ
会議中に、カメラの映像が相手側に
送信されているときに点灯します。
d チルトベース
モニター用テレビの上部に乗せて、
カメラユニットを支えます。
e リンクアーム
下部についている吸盤を、お使いの
モニター用テレビの背面にぴったり
と合わせるように動かします。
f 吸盤
モニター用テレビの背面や机上に固
定します。
モニター用テレビ背面、吸着がしづ
らい机上には、付属のシールを貼っ
ておきます。
上面
9
g 接続ケーブル
HD ビジュアルコミュニケーション
システムの CAMERA 端子に接続
します。
h 吸盤レバー
中央を強く押しながらレバーを回し
て、吸盤でカメラユニットを装着し
ます。取り外すときもレバーを回し
ます。
i レンズカバー開閉レバー
レンズを隠すカバーを開閉します。
各部の名称と働き
9
設置する
設置は確実に
設置については、必ずお買い
上げ店またはソニーのサービ
ス窓口にご相談ください。
設置は、本機の重量に充分耐
えられる強度があることをお
確かめください。充分な強度
がないと、落下して、大けが
の原因となります。
また、1 年に一度は、取り付
けがゆるんでいないかを点検
してください。
モニター用テレビに設置する
このカメラユニットはモニター用テレ
ビの上に設置します。
1 本機の吸盤から、吸盤保護カバー
を外す。
2 本機の吸盤を取り付ける位置を決
める。
本機のチルトベースをモニター用テ
レビに載せ、リンクアームを調整
し、吸盤の位置を決めてください。
・ モニター用テレビの通気孔をふさが
ないように設置してください。
・ 以下のようなモニター用テレビの場
合は、吸盤がしっかり吸着しないこ
とがあります。このような場合に
は、付属のシールをモニター用テレ
ビに貼り付けてから、その上にカメ
ラユニットを取り付けてください。
シールを使用しないと、吸盤がしっ
かりと吸着しないことがあります。
また、モニター用テレビが変形した
り、破損するおそれがあります。
−指で押すと変形するような柔らか
い材質の場合
−表面のシボ加工(しわや凹凸)が
粗い場合
・ シールの貼り付け位置は慎重に選ん
でください。
シールは接着力が強いため、モニ
ター用テレビに一度貼り付けると簡
単にはがすことができません。無理
にはがそうとすると、モニター用テ
レビが変形したり、破損するおそれ
があります。
・ シールを確実に接着させるため、
シールを貼り付けて 24 時間以上
経ってからカメラユニットを取り付
けてください。
ご注意
・ モニター用テレビをチルト方向に
±20°以上傾けてご使用になるこ
とはできません。(カメラユニット
のチルト調節範囲(± 20
えてしまいます。)
・ モニター用テレビによっては高温に
なる部分があります。できるだけ、
高温部を避けて設置してください。
10
設置する
°)を超

・ 一度はがしたシールは、接着力が弱
くなっていますので、貼り直しはで
きません。
モニター用テレビ背面
付属のシール
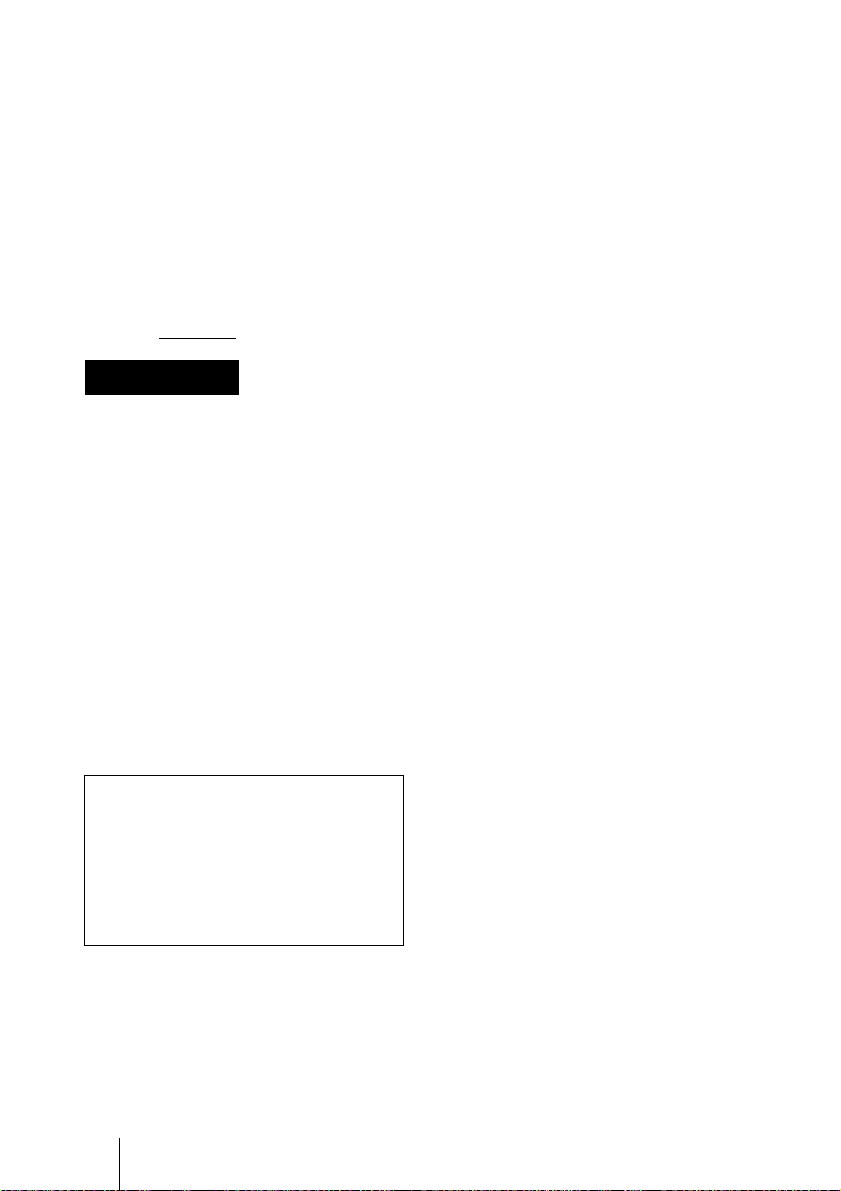
3 本機を吸盤で固定する。
吸盤レバーの中央を強く押しなが
ら、吸盤レバーを図の方向(LOCK
方向)に回します。
回す
取り外すときは
吸盤レバーを、反対の方向
(RELEASE 方向)に回します。
ご注意
・ 吸盤とモニター用テレビの間に指など
を入れて、吸盤を無理にはがさないで
ください。吸盤の破損の原因となるこ
とがあります。
・ 本機を取り外したときは、必ず吸盤保
護カバーを取り付けてください。吸盤
の吸着面が汚れたり、傷がついたりす
ると、吸盤の吸着力が弱くなることが
あります。
・ 吸盤の吸着面が汚れたら、柔らかくて
毛羽立たない布を湿らせ、なでるよう
にして汚れを取り除いてください。た
だし、以下のご注意をお守りください。
−洗剤などは使わない。
−次に取り付けるときは、吸着面に湿
気が残っていないことを確認してか
ら取り付ける。
−故障の原因になるので、モニター用
テレビの内部に水分が入らないよう
に注意する。
強く押しながら
ご注意
・ 本機を天井や壁に取り付けることはで
きません。
・ 吸盤レバーの中央を押す際の力が弱い
と、吸盤レバーのロックが解除してし
まうことがあります。その場合、上記
の吸盤の固定作業を再度行ってくださ
い。
設置する
11
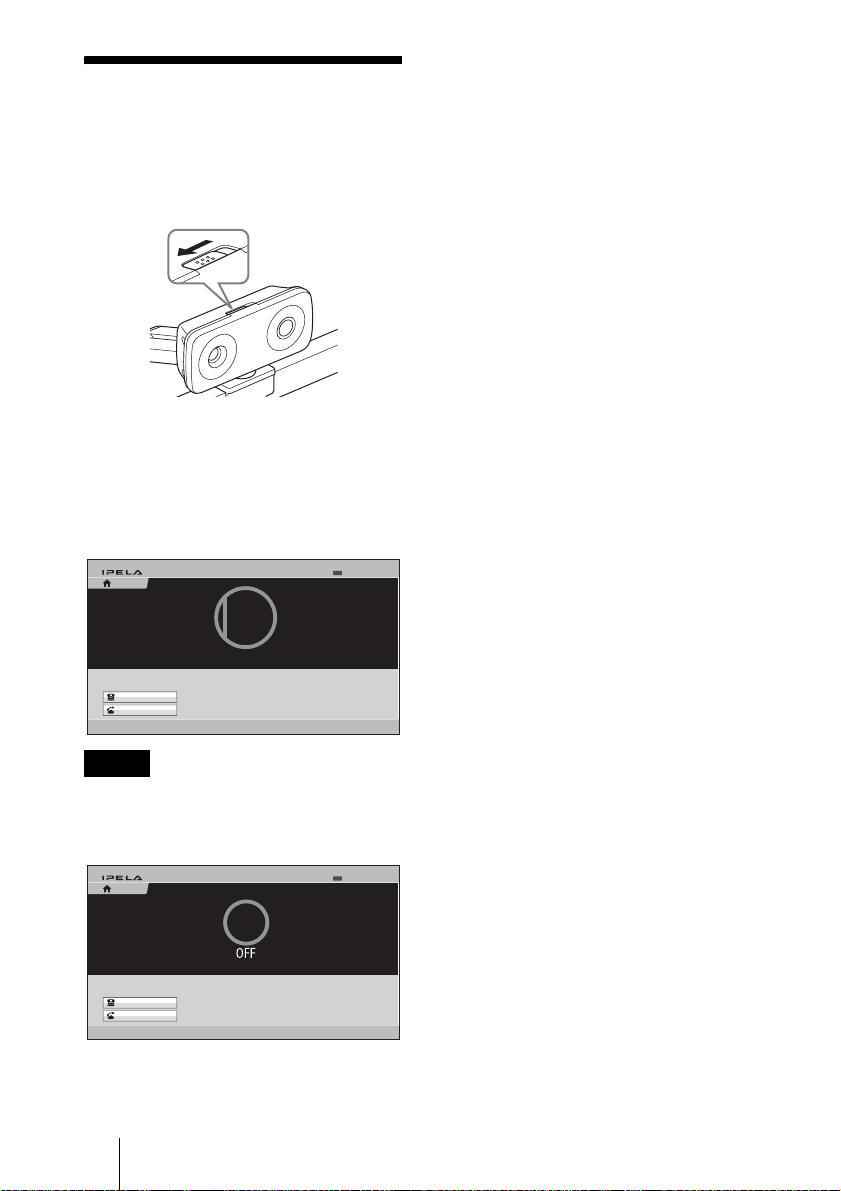
映像の撮影状態を一
時的に停止する
本機のレンズカバー開閉レバーを正面
から見て左側にスライドします。
レンズカバーが閉まっているときに会
議を行うと、相手側には黒画面が表示
されます。
レンズカバーが閉まっているときは、
ホーム画面が次のように表示されます。
自分端末名
ホーム
IP:XXX.XXX.XXX.XXX
Closed
接続することができます
正常
5/11/2008 13:00
カメラ
接続
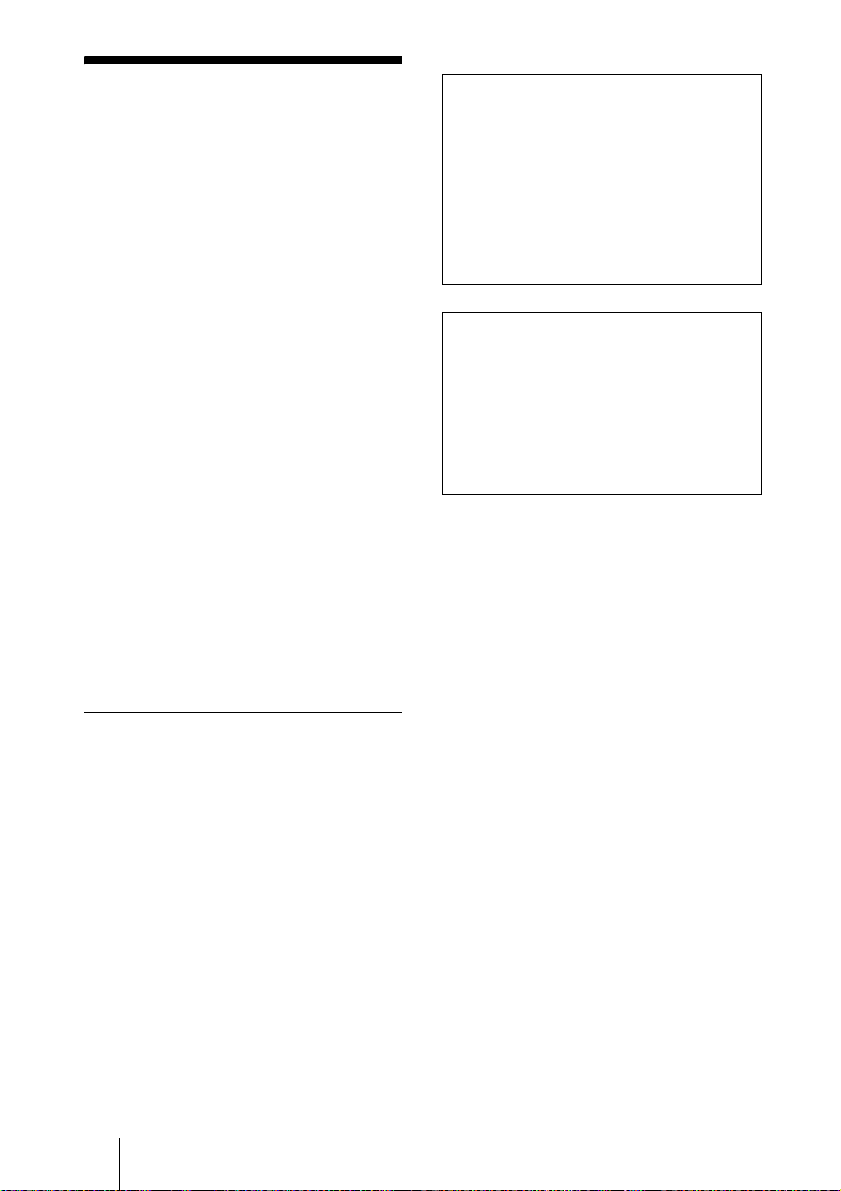
ご注意
カメラユニットへの電源供給がとだえる
と、ホーム画面が次のように表示されま
す。
自分端末名
ホーム
カメラ
接続
IP:XXX.XXX.XXX.XXX
正常
5/11/2008 13:00
リモコン操作を行うと、再びカメラユ
ニットに電源が供給されます。
12
映像の撮影状態を一時的に停止する

故障かな?と思ったら
故障とお考えになる前に下記の項目を
もう一度チェックしてみてください。
それでも具合の悪いときは、ソニーの
サービス窓口にご相談ください。
症状 原因 処置
電源が入らない。 カメラケーブルが HD ビジュアル
コミュニケーションシステムの
CAMERA 端子にしっかり接続さ
れていない。
HD ビジュアルコミュ
ニケーションシステム
からの操作が正常にで
きない。
― コミュニケーションシステムの電源を
コミュニケーションシステムの接続を
確認してください。
一度切り、しばらくしてから再度電源
を入れ直してください。
故障かな?と思ったら
13
仕様
映像信号 720p/30
同期方式 内部同期方式
映像素子 5.7mm(1/3.2 型)、CMOS
約 800 万画素
レンズ f=2.94mm(35mm 換算で
22 mm)F2.8
水平画角80.1°
垂直画角62.7°
最至近撮影距離
80 mm(WIDE 端)
パン・チルト
水平± 20°、垂直± 20°、
手動
入力電圧 DC19.5 V
消費電力 4W以下
動作温度 5℃〜35℃
保存温度 −20℃〜+60℃
最大外形寸法
116 × 50 × 225mm
(幅/高さ/奥行き)
質量 約 500g
この装置は、クラス A 情報技術装置
です。この装置を家庭環境で使用す
ると電波妨害を引き起こすことがあ
ります。この場合には使用者が適切
な対策を講ずるよう要求されること
があります。
VCCI-A
お使いになる前に、必ず動作確認を
行ってください。故障その他に伴う
営業上の機会損失等は保証期間中お
よび保証期間経過後にかかわらず、
補償はいたしかねますのでご了承く
ださい。
付属品
吸盤用シール(1)
取扱説明書(1)
本機の仕様および外観は、改良のため
予告なく変更することがありますが、
ご了承ください。
14
仕様

保証とアフターサー
ビスについて
調子が悪いときはまずチェックを
この取扱説明書をもう一度ご覧になっ
てお調べください。
それでも具合の悪いときはサービス
へ
お買い上げ店またはソニーのサービス
窓口にご相談ください。
保証期間と保証条件
本機の保証期間および保証条件は、販
売地域(国内、海外)によって異なる
ことがあります。お手数ですが、お買
い上げ店にお問い合わせ、ご確認いた
だきますようお願い申し上げます。
保証とアフターサービスについて
15
Before operating the unit, please read this
manual thoroughly and retain it for future
reference.
Owner’s Record
The model and serial numbers are located on
the rear side. Record these numbers in the
spaces provided below.
Refer to these numbers whenever you call
upon your Sony dealer regarding this
product.
Model No. PCSA-CXA55
Serial No.
WARNING
To reduce the risk of fire or electric
shock, do not expose this
apparatus to rain or moisture.
To avoid electrical shock, do not
open the cabinet. Refer servicing to
qualified personnel only.
NOTICE:
This Camera Unit is an accessory and to be
used exclusively with PCS-XG80/XG80S/
XG55/XG55S/XA80/XA55 HD Visual
Communication System.
IMPORTANT
The nameplate is located on the rear side.
For customers in the U.S.A.
This device complies with Part 15 of the
FCC Rules.
Operation is subject to the following two
conditions: (1) This device may not cause
harmful interference, and (2) this device
must accept any interference received,
including interference that may cause
undesired operation.
equipment generates, uses, and can radiate
radio frequency energy and, if not installed
and used in accordance with the instruction
manual, may cause harmful interference to
radio communications. Operation of this
equipment in a residential area is likely to
cause harmful interference in which case the
user will be required to correct the
interference at his own expense.
You are cautioned that any changes or
modifications not expressly approved in this
manual could void your authority to operate
this equipment.
For the customers in Canada
This Class A digital apparatus complies with
Canadian ICES-003.
For the customers in Europe
The manufacturer of this product is Sony
Corporation, 1-7-1 Konan, Minato-ku,
Tokyo, Japan. The Authorized
Representative for EMC and product safety
is Sony Deutschland GmbH, Hedelfinger
Strasse 61, 70327 Stuttgart, Germany. For
any service or guarantee matters please refer
to the addresses given in separate service or
guarantee documents.
For the customers in Europe,
Australia and New Zealand
WARNING
This is a Class A product. In a domestic
environment, this product may cause radio
interference in which case the user may be
required to take adequate measures.
In the case that interference should occur,
consult your nearest authorized Sony service
facility.
This apparatus shall not be used in the
residential area.
This equipment has been tested and found to
comply with the limits for a Class A digital
device, pursuant to Part 15 of the FCC
Rules. These limits are designed to provide
reasonable protection against harmful
interference when the equipment is operated
in a commercial environment. This
16
Table of Contents
Precautions .......................................18
Phenomena Specific to CMOS Image
Sensors ..........................................19
Features ............................................19
Location and Functions of Parts and
Controls ........................................20
Installing the Camera .......................21
Mounting the Camera on the TV
Monitor ...........................21
Temporarily Stopping Image
Capture ..........................................22
Troubleshooting ...............................23
Specifications ...................................24
GB
Table of Contents
17

Precautions
camera for a long period of time. Doing so
may damage the finish.
Operating or storage location
Operating or storing the camera in the
following locations may cause damage to
the camera:
• Extremely hot or cold places (Operating
temperature: 5°C to 35°C [41°F to 95°F])
• Exposed in direct sunlight, or close to
heating equipment (e.g., near heaters)
• Close to sources of strong magnetism
• Close to sources of powerful
electromagnetic radiation, such as radios
or TV transmitters
• Locations subject to vibration or shock
Ventilation
To prevent heat buildup, do not block air
circulation around the camera.
Connecting to the Communication
System
Do not connect the camera cable to the HD
Visual Communication System while the
Communication System is turned on.
Otherwise, the camera and System may
suffer damage, or the picture may not be
displayed.
Maintenance
The camera mechanism may cause abnormal
noise due to wear and lubrication loss after a
long period of use. To maintain optimum
performance, we recommend periodical
maintenance. If abnormal noise occurs,
consult with your Sony dealer.
Note on laser beams
Laser beams may damage the CMOS. If
you shoot a scene that includes a laser
beam, be careful not to let a laser beam
become directed into the CMOS of the
camera.
Transportation
When transporting the camera, repack it as
originally packed at the factory or in
materials equal in quality.
Cleaning the main unit
• Use a blower to remove dust from the lens.
• When the body of the camera is dirty,
clean it with a soft cloth that is soaked with
a diluted neutral detergent and tightly
wrung. Then finish with a dry cloth.
• Do not use any type of solvents, which
may damage the finish.
• When you use a chemical cloth, follow its
instructions.
• Do not sprinkle volatile matter such as
pesticide over your camera nor allow
rubber or vinyl to come in contact with the
18 Precautions

Phenomena Specific
to CMOS Image
Sensors
The following phenomena that may appear
in images are specific to CMOS
(Complementary Metal Oxide
Semiconductor) image sensors. They do not
indicate malfunctions.
White flecks
Although the CMOS image sensors are
produced with high-precision technologies,
fine white flecks may be generated on the
screen in rare cases, caused by cosmic rays,
etc. This is related to the principle of CMOS
image sensors and is not a malfunction.
White flecks tend to be seen particularly in
the following cases:
• during operation at a high environmental
temperature
• when you have raised the gain (sensitivity)
This phenomena may be improved by
turning the camera off and then on again.
Aliasing
When fine patterns, stripes, or lines are shot,
they may appear jagged or flicker.
Features
The camera is designed to be used
exclusively with the Sony PCS-XG80/
XG80S/XG55/XG55S/XA80/XA55 HD
Visual Communication System.
The power is supplied to the camera by the
HD Visual Communication System. For
adjustments and settings of the camera, refer
to the Operating Instructions of the PCSXG80/XG80S/XG55/XG55S/XA80/XA55.
CMOS camera with high image
quality
The camera unit incorporates 8,000,000
effective picture elements (pixels) that can
shoot high-definition images to offer
superior picture quality.
Built-in microphone
With a built-in microphone, the camera
leaves a small footprint.
Lens cover for when image capture is
not required
Hiding the lens with the lens cover allows
you to temporarily stop image capture while
leaving the system running.
Simple suction cup mounting
Mount the camera to the TV monitor with a
single suction cup. The adjustable link arm
allows mounting on a wide range TV
monitors. (Mounting may not be possible on
some TV monitors.)
Video format compatible with HD
The camera allows you to shoot an image
using the 720p high definition video format,
which is equivalent to an HD-TV broadcast.
Phenomena Specific to CMOS Image Sensors / Features
19
Location and
1
2
Functions of Parts
and Controls
Front
3
a Lens
3× digital zoom lens.
b Microphone
Built-in monaural microphone.
c Tally lamp
Lights when camera images are being
sent to the remote party during
conferences.
d Tilt base
Rests on the top of the TV monitor, and
supports the camera unit.
Rear
Top
4
5
6
7
8
e Link arm
Adjust this so that the suction cup at the
bottom aligns properly to the rear of the
TV monitor.
f Suction cup
Attaches to the rear of the TV monitor or
to a desk.
If the suction cup does not adhere
properly, affix the supplied adhesive
disc to the rear of the TV monitor or to
the desk beforehand.
g Connection cable
Connects to the CAMERA connector on
the HD Visual Communication System.
h Suction cup lever
Turn this lever while pressing down hard
on it to attach the suction cup. Simply
turn the lever to release the suction cup.
i Lens cover lever
Opens or closes the lens cover.
9
20 Location and Functions of Parts and Controls
Installing the
Camera
Mounting the Camera on the
TV Monitor
Mount this camera unit to the top of the TV
monitor.
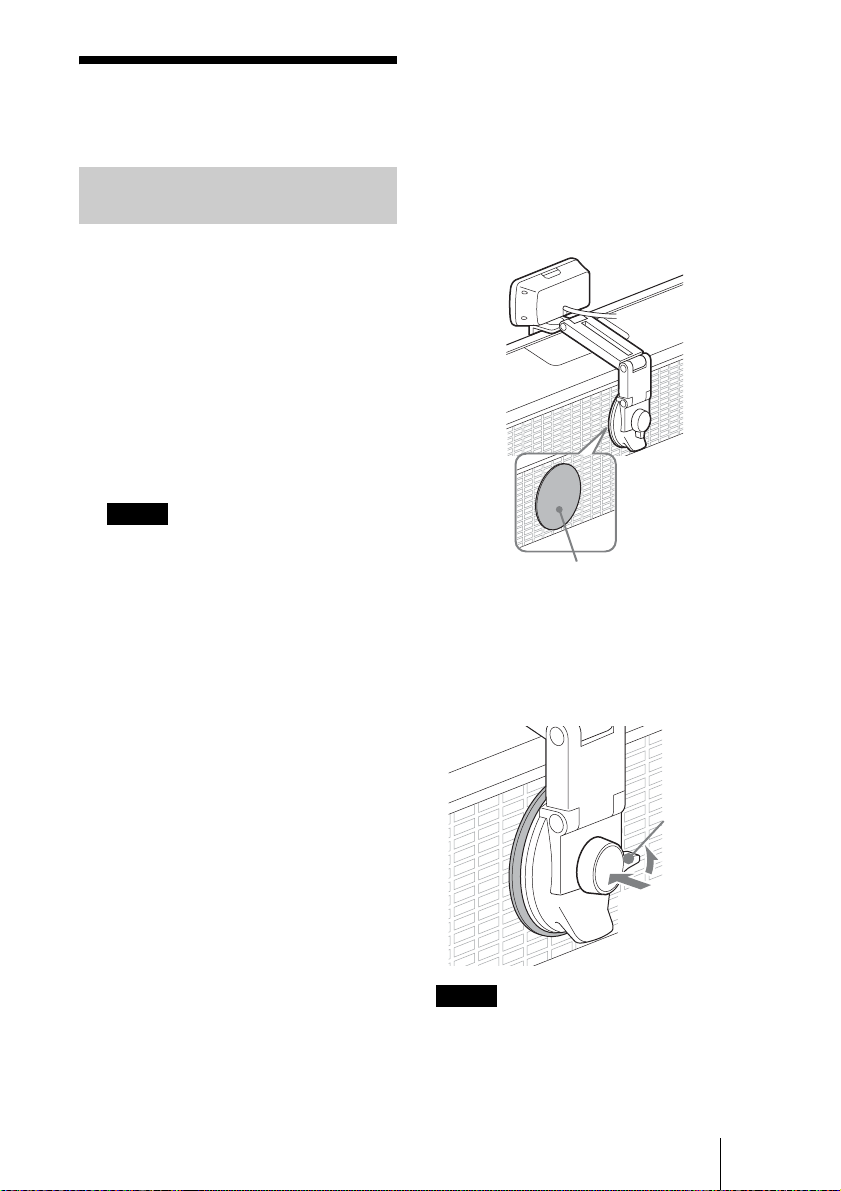
1 Remove the protective cover from the
suction cup.
2 Determine the location to which the
suction cup will be attached.
To determine a location for the suction
cup, rest the camera unit on the top of the
TV monitor, and move the adjustable
link arm.
Notes
• Do not tilt the TV monitor 20 degrees or
more in the forward or back direction.
(This will exceed the camera unit’s tilt
range (±20 degrees).)
• Depending on the TV monitor model,
certain areas may get hot. Avoid these
areas when determining a location for
mounting.
• Do not obstruct the ventilation holes of
the TV monitor when mounting the
camera.
• The suction cup may not attach securely
on the following types of TV monitors.
In such cases, affix the supplied ad hesive
disc to the TV monitor, and then attach
the camera unit to the disc.
If you do not use the adhesive disc, the
suction cup may not attach securely, or
the TV monitor may be warped or
damaged.
– TV monitors made of soft materials
that bend to the touch
– TV monitors with rough surfaces
• Select the location to affix the adhesive
disc carefully.
As the disc is highly adhesive, it cannot
be easily removed once it is affixed to
the TV monitor. Attempting to remove
the disc with excessive force may warp
or damage the TV monitor.
• Wait at least 24 hours for the adhesive
disc to fully adhere to the surface before
attaching the camera unit to the disc.
• Once removed, the adhesive disc cannot
be affixed again, as its adhesive
properties are reduced.
TV monitor rear
Supplied adhesive disc
3 Secure the camera unit to the TV
monitor with the suction cup.
While pressing down hard on the center
of the suction cup lever, turn it in the
direction illustrated (LOCK direction).
Turn.
Press down hard.
Notes
• The camera unit cannot be mounted on
ceilings or walls.
• If you do not apply enough pressure when
pressing down on the center of the suction
cup lever, the suction cup lever may become
Installing the Camera
21
unlocked. In such cases, perform the above
step for securing the suction cup again.
To release the suction cup
Turn the suction cup lever in the opposite
direction (RELEASE direction).
Notes
• Do not forcibly remove the suction cup by
inserting your fingers or other objects
between the suction cup and the TV monitor.
Doing so may damage the suction cup.
• When the camera unit is not mounted, always
attach the protective cover to the suction cup.
The adhesive strength of the suction cup will
decrease if its surface is dirty or scratched.
• If the surface of the suction cup becomes
dirty, gently wipe the surface with a soft,
non-abrasive cloth that has been moistened
with water. In addition, adhere to the
following precautions.
– Do not use detergents and other cleaning
solutions.
– Make sure that the suction cup is
completely dry before attaching it again.
– To prevent damage, do not allow water to
enter the inside of the TV monitor.
Temporarily
Stopping Image
Capture
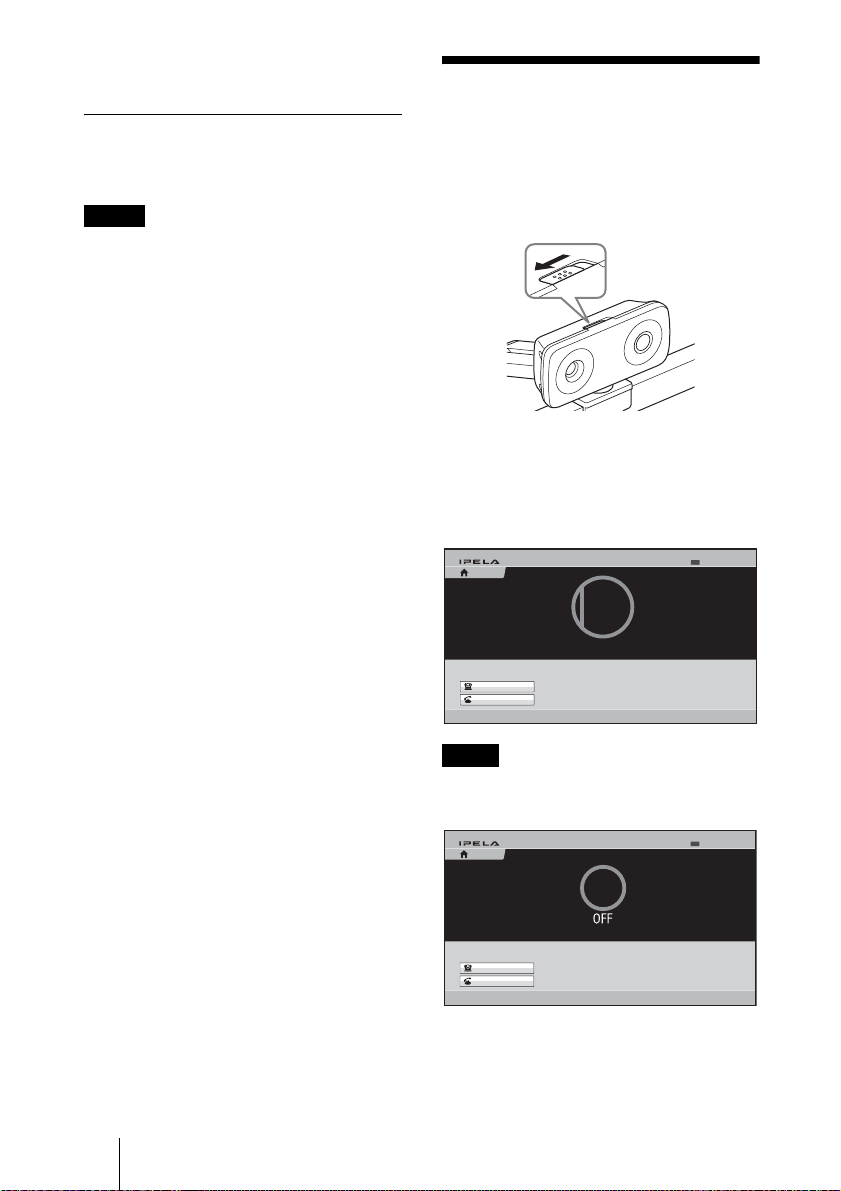
Slide the lens cover lever to the left (when
facing the front of the camera unit).
If a conference is conducted with the lens
cover closed, only a black screen will be
visible to the remote party.
When the lens cover is closed, the Home
menu appears as follows.
Home
AAA
IP:XXX.XXX.XXX.XXX
Ready to connect.
Ready
5/11/2008 13:00
22 Temporarily Stopping Image Capture
Closed
Camera
Connect
Note
When the power supply to the camera unit is
disabled, the Home menu appears as follows.
Ready
Home
Camera
Connect
AAA
IP:XXX.XXX.XXX.XXX
OFF
Ready to connect.
5/11/2008 13:00
Operate the Remote Commander to restore
power supply to the camera unit.

Troubleshooting
Before bringing in your camera for service,
check the following as a guide to
troubleshooting the problem. If the
problem cannot be corrected, consult with
your Sony dealer.
Symptom Cause Remedy
The power of the camera is
not turned on.
The HD Visual
Communication System
cannot control the camera
correctly.
The camera cable is not
inserted firmly to the
CAMERA connector on
the HD Visual
Communication System.
— Turn off the power of the
Insert the camera cable firmly into the
CAMERA connector on the
Communication System.
Communication System, and turn it on
again after a while.
Troubleshooting
23
Specifications
Video signal 720p/30
Synchronization
Image device 1/3.2 type (5.7 mm), CMOS
Lens f = 2.94 mm (22 mm in 35 mm
Minimum object distance
Pan/tilt action
Input voltage 19.5 V DC
Power consumption
Operating temperature
Storage temperature
Dimensions 116 × 50 × 225 mm
Mass Approx. 500 g (1 lb 2 oz)
Supplied accessories
Adhesive disc for suction cup (1)
Operating Instructions (1)
Internal synchronization
Approx. 8,000,000 pixels
equivalent) F2.8
Horizontal angle: 80.1 degrees
Vertical angle: 62.7 degrees
80 mm (WIDE end)
Horizontal: ±20 degrees,
Vertical: ±20 degrees, manual
operation
4 W or less
5ºC to 35ºC (41ºF to 95ºF)
–20ºC to +60ºC (–4ºF to +140ºF)
5
(4
/8 × 2 × 87/8 inches) (w/h/d)
Note
Always verify that the unit is operating
properly before use. SONY WILL NOT
BE LIABLE FOR DAMAGES OF ANY
KIND INCLUDING, BUT NOT
LIMITED TO, COMPENSATION OR
REIMBURSEMENT ON ACCOUNT
OF THE LOSS OF PRESENT OR
PROSPECTIVE PROFITS DUE TO
FAILURE OF THIS UNIT, EITHER
DURING THE WARRANTY PERIOD
OR AFTER EXPIRATION OF THE
WARRANTY, OR FOR ANY OTHER
REASON WHATSOEVER.
Design and specifications are subject to
change without notice.
24 Specifications

Specifications
25

Avant d’utiliser l’appareil, veuillez lire
attentivement ce manuel et le conserver pour
future référence.
AVERTISSEMENT
Afin de réduire les risques
d’incendie ou d’électrocution, ne
pas exposer cet appareil à la pluie
ou à l’humidité.
Afin d’écarter tout risque
d’électrocution, garder le coffret
fermé. Ne confier l’entretien de
l’appareil qu’à un personnel qualifié.
IMPORTANT
La plaque signalétique se situe sur l’arrière.
Pour les clients au Canada
Cet appareil numérique de la classe A est
conforme à la norme NMB-003 du Canada.
Pour les clients en Europe
Le fabricant de ce produit est Sony
Corporation, 1-7-1 Konan, Minato-ku,
Tokyo, Japon.
Le représentant autorisé pour EMC et la
sécurité des produits est Sony Deutschland
GmbH, Hedelfinger Strasse 61, 70327
Stuttgart, Allemagne. Pour toute question
concernant le service ou la garantie, veuillez
consulter les adresses indiquées dans les
documents de service ou de garantie séparés.
Pour les utilisateurs en Europe,
Australie et Nouvelle-Zélande
AVERTISSEMENT
Il s’agit d’un produit Classe A. Dans un
environnement domestique, cet appareil
peut provoquer des interférences radio, dans
ce cas l’utilisateur peut être amené à prendre
des mesures appropriées.
Si des interférences se produisent, contactez
votre service après-vente agréé Sony.
Ne pas utiliser cet appareil dans une zone
résidentielle.
26
 Loading...