

Page 1
3-867-898-12 (1)
English
English
Français
AV Cordless IR
Receiver
Operating Instructions
Mode d´emploi
Bedienungsanleitung
Manual de instrucciones
IFT-R10
Sony Corporation C 1999 Printed in Japan
For the customers in the U.S.A.
Owner’s Record
The model number and the serial number are
located at the rear. Record these numbers in the
spaces provided below. Refer to them whenever
you call upon your Sony dealer regarding this
product.
Model No. IFT-R10
Serial No. _____________________________
WARNING
This equipment has been tested and found to
comply with the limits for a Class B digital
device, pursuant to Part 15 of the FCC Rules.
These limits are designed to provide reasonable
protection against harmful interference in a
residential installation. This equipment
generates, uses, and can radiate radio frequency
energy and, if not installed and used in
accordance with the instructions, may cause
harmful interference to radio communications.
However, there is no guarantee that interference
will not occur in a particular installation. If this
equipment does cause harmful interference to
radio or television reception, which can be
determined by turning the equipment off and
on, the user is encouraged to try to correct the
interference by one or more of the following
measures:
— Reorient or relocate the receiving antenna.
— Increase the separation between the
equipment and receiver.
— Connect the equipment into an outlet on a
circuit different from that to which the
receiver is connected.
— Consult the dealer or an experienced radio/
TV technician for help.
This device complies with Part 15 of the FCC
Rules. Operations is subject to the following two
conditions : (1) This device may not cause
harmful interference, and (2) this device must
accept any interference received, including
interference that may cause undesired operation.
You are cautioned that any changes or
modifications not expressly approved in this
manual could void your authority to operate this
equipment.
A
ab
c
B
IR sensor
Capteur infrarouge
2
DC IN 6 V
AUDIO OUT
1
VIDEO OUT
1
IN
VIDEO
AUDIO
Signal flow
Sens du signal
C
1
2
3
Before operating this unit, read this manual thoroughly
and retain it for future use.
WARNING
To prevent fire or shock hazard, do not expose the
unit to rain or moisture.
Features
This AV cordless IR receiver uses infrared rays. If your
camcorder has LASER LINK* function you will be able
to use it in combination with this unit, and have the
picture and sound transmitted optically. Cords no longer
being in the way, making any AV unit setup possible.
• The camcorder can be a maximum of 16 feet
distance from its source.
• The sound and picture quality is not inferior to
using a cord type unit.
* LASER LINK is a system which transmits and
receives a picture by using infrared rays. LASER
LINK is a trademark of Sony Corporation.
Notes
•Do not block the space between the receivers IR
sensor and the camcorder’s transmitter. If you do
the picture and sound will not function.
•The infrared rays will not penetrate walls or
opaque glass, the infrared receiver must be used
within the “in sight” area of the camcorder.
•Do not position the camcorder and receiver too
close. Noise and beats will appear as a result.
•Do not use this unit in combination with cordless
headphones or another unit of the same type.
Signal cancellation will result.
•The brightness of the camcorder’s infrared ray
emitter is not necessarily stabilized. This is not a
malfunction and does not affect the infrared
coverage distance.
•Be sure that no strong light sources such as direct
sunlight, inverter light, or powerful remote
signals block the path of the IR sensor on the
receiver. If it does the picture and sound will not
function, or distortion may result.
•Do not use in areas of strong electrical currents
Operation
•Do not place the unit in a location where it is:
– Extremely hot or cold
– Dusty or dirty
– Very humid
– Vibrating
•Do not apply mechanical shock or drop the unit.
On cleaning and care
•Clean the cabinet with a soft cloth slightly
moistened with water or mild detergent solution.
•Do not use alcohol, benzene, or thinner to clean
the cabinet, as they may mar the finish.
For customers in European countries
If your TV has a 21-pin connector (EUROCONNECTOR),
use the 21-pin connector supplied with the camcorder.or
radio waves. If you do clear playback is not possible.
•Do not use near a AM radio or tuner. If you do
radio or tuner interference will result.
•During use the unit will heat up, this is normal.
Contents
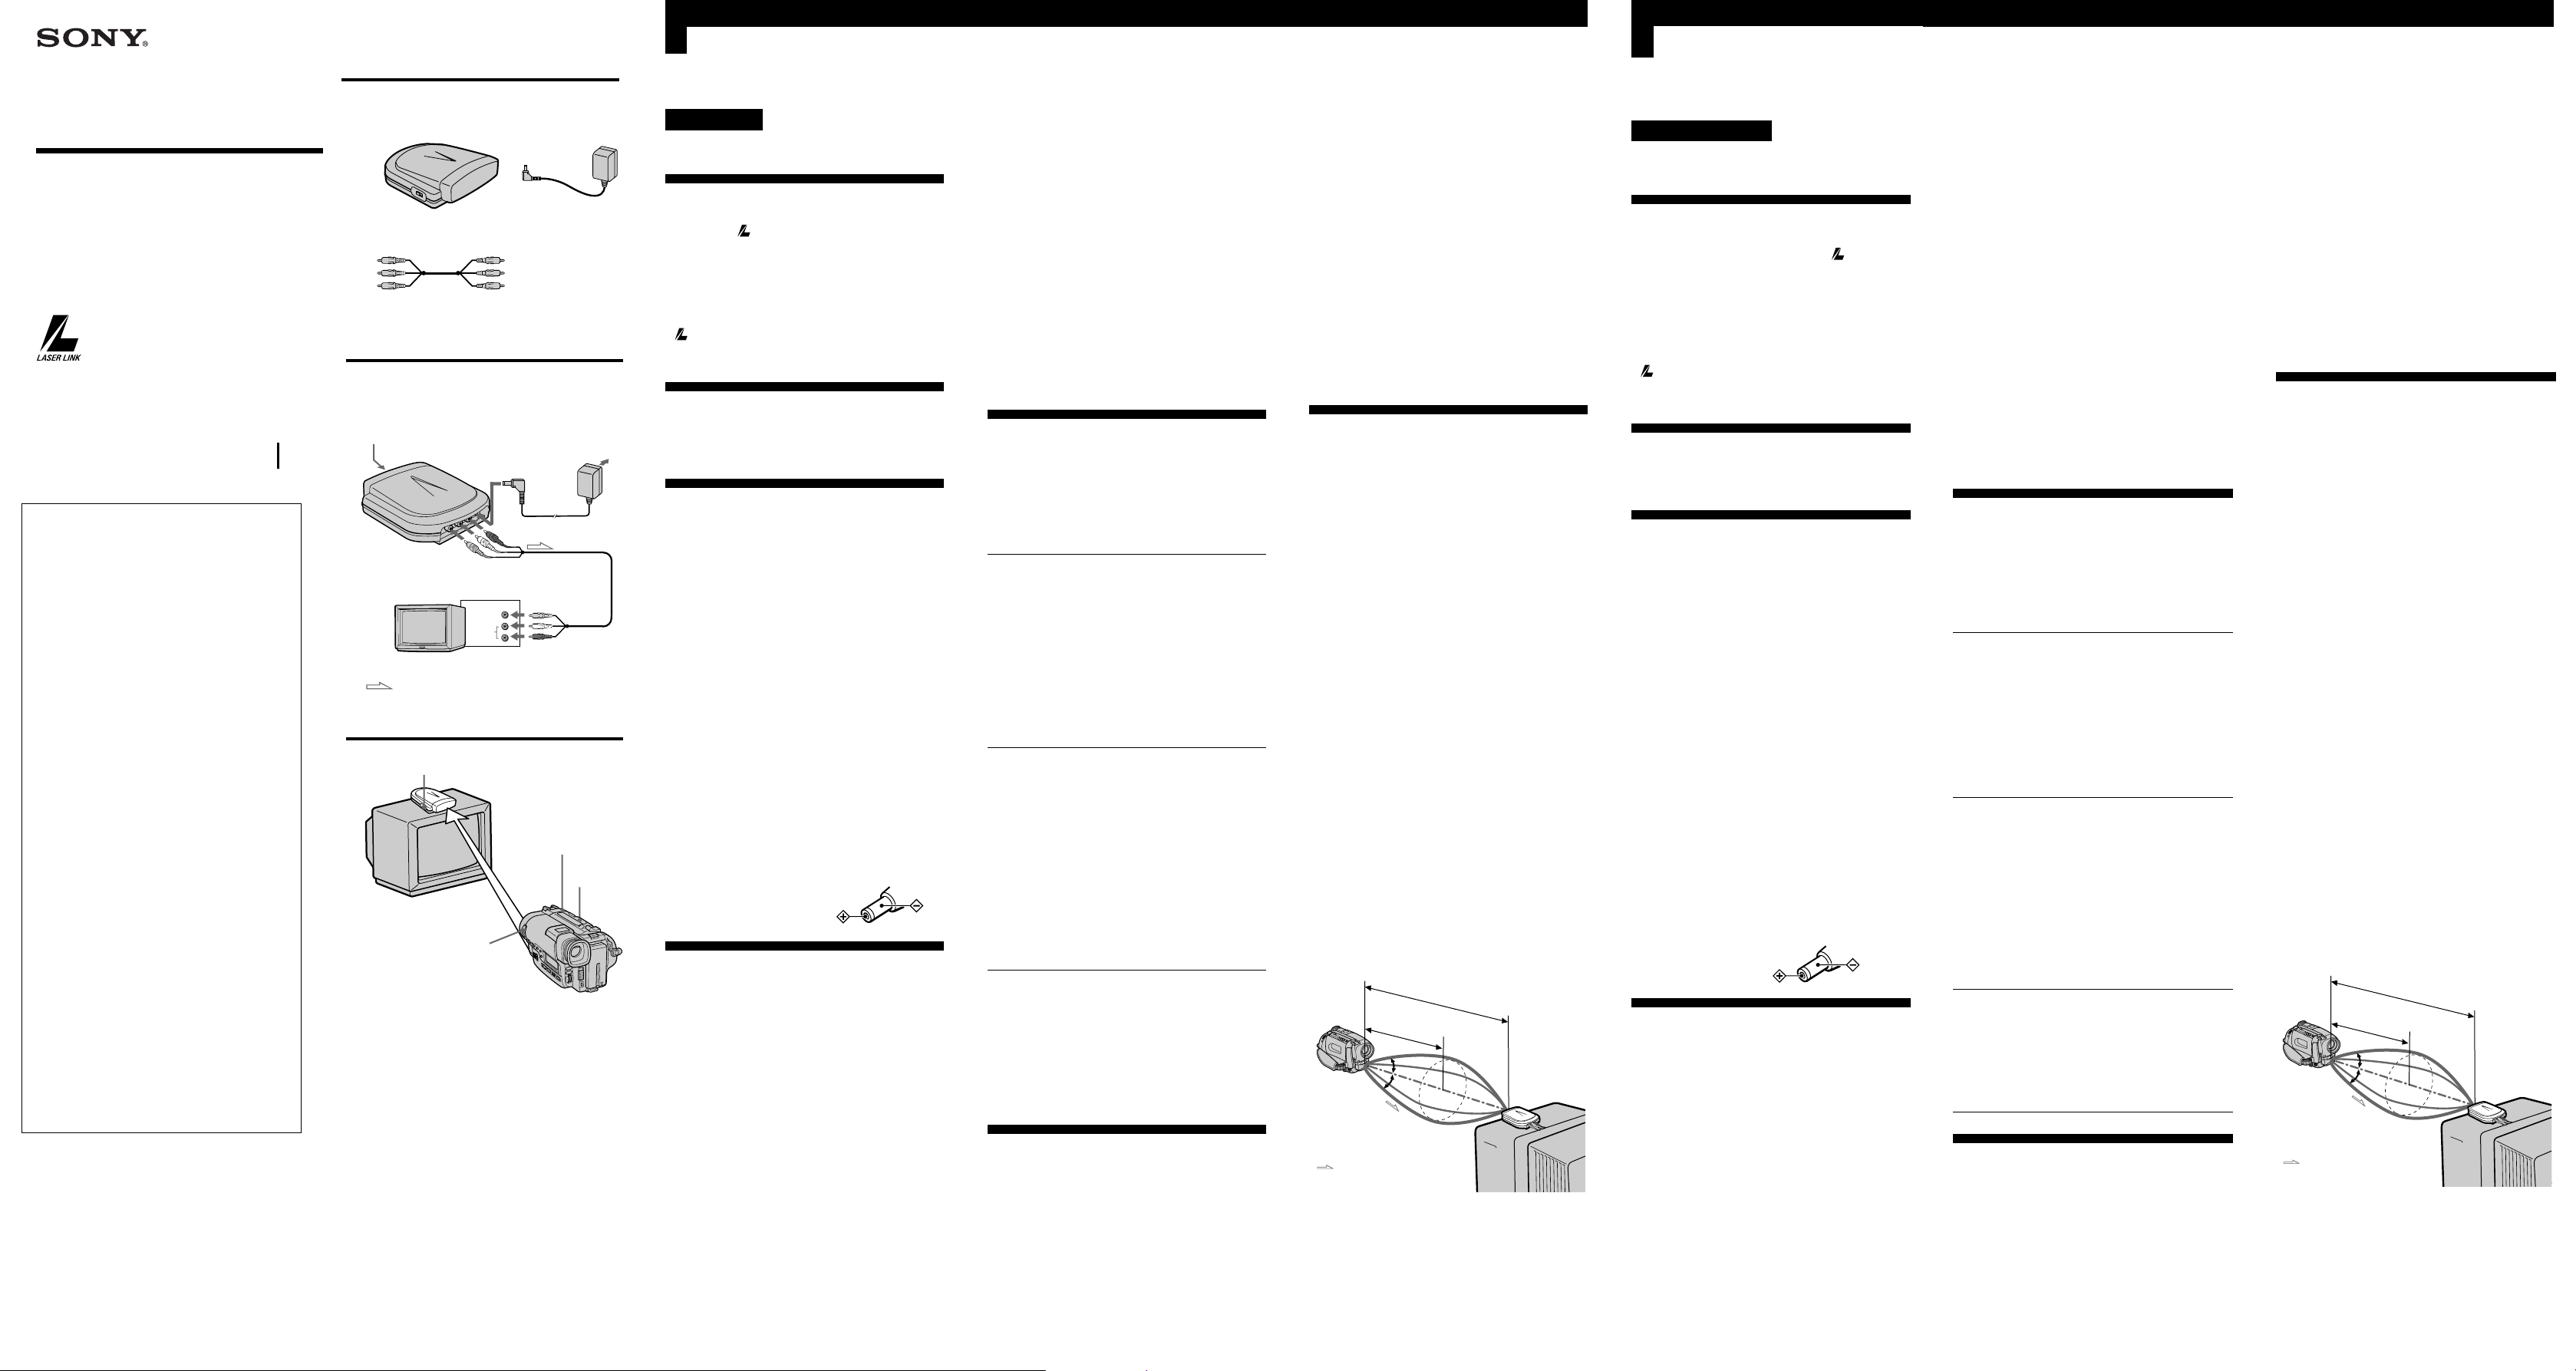
See illustration A
2
a Receiver b AC power adaptor
c A/V connecting cable
Preparation
See illustration B
1 Connect the receiver to a TV with the
supplied A/V connecting cable.
Yellow plug : VIDEO
White plug : AUDIO L
Red plug : AUDIO R
2 Connect the supplied AC power adaptor
to the DC IN 6V jack then connect to an
AC outlet.
If your TV is already connected to a VCR
Connect the receiver to the VCR’s LINE IN. Set the input
selector on the VCR to LINE.
If your TV or VCR is a monaural type
Connect the yellow plug for video and connect only the
white plug for audio on both the receiver and the TV or
VCR. With this connection the sound is monaural.
Note
When connecting the receiver to a power source use only
4
6
the supplied AC power adaptor because the polarity of
the supplied adaptor is opposite that of conventional
adaptors. Do not use the supplied AC power adaptor for
other electric appliances with a DC IN 6V jack.
Polarity of the plug
Troubleshooting
If you run into any problem using the unit, first check the
power supply source. Then use the following table for
troubleshooting. Should the difficulty persist disconnect
the power source and contact your Sony dealer or local
authorized Sony service facility.
Trouble Cause and/or remedy
No picture and no sound at all
•The AC power adaptor is not
connected to an AC outlet.
b Connect the AC power adaptor to
an AC outlet.
•Connecting cord is not connected
correctly.
b Connect the connecting cord
correctly.
•Direct sunlight is shining on the
infrared sensor of the receiver.
b Avoid direct sunlight.
The infrared transmission system does not
operate
•The power of the receiver is turned
off (OFF).
b Press the power button to turn the
receiver (ON).
•The camcorder’s transmitter and the
receiver are not facing each other.
b Adjust the position and angle of
both units.
•The receiver is positioned too far
from the camcorder’s transmitter.
b Use the transmitter near the
infrared receiver.
Specifications
Receiver
VIDEO output Phono jack (1): 1 Vp-p,
AUDIO output Phono jacks (2:L,R): 327 mV,
DC input DC 6V
Operating temperature
Storage temperature –4°F to 140°F (–20°C to 60°C)
Dimensions Approx. 4
Mass Approx. 6
AC power adaptor
For models purchased in the United States or Canada
Input AC 120 V 60 Hz
Output DC 6 V 400 mA
For models purchased in the United Kingdom
Input AC 220 – 230 V 50/60 Hz
Output DC 6 V 700 mA
For models purchased in other European countries
Input AC 220 – 230 V 50 Hz
Output DC 6 V 400 mA
For models purchased in Australia
Input AC 240 V 50 Hz
Output DC 6 V 700 mA
Supplied accessories AC power adaptor (1)
Design and specifications are subject to change without
notice.
Coverage of the infrared rays
Zone de couverture des rayons infrarouges
75 ohms unbalanced,
sync negative
(when POWER is ON)
output impedance: less than 2.2
kilohms (when POWER is ON)
32°F to 104°F (0°C to 40°C)
4
inches (121 × 41 × 128 mm) (w/
h/d)
A/V connecting cable (1)
/5 × 1 5/8 × 5 1/
1
/2 oz (185 gm)
5
Using a cordless AV
system
See illustration C
Before playback insert a cassette in the camcorder.
(1)Set the power switch on the receiver to ON.
(2)Turn the TV on and set the TV/VCR selector on
the TV to VCR.
(3)Set the power switch on the camcorder to VTR
(PLAYER).
(4)Press LASER LINK on the camcorder. The lamp
for LASER LINK lights.
(5)Adjust the angle and direction of both the
camcorder and receiver.
If the picture on the TV is distortion, press N
then adjust the position of the camcorder.
(6)Press N on the camcorder to start playback.
To release LASER LINK
Press LASER LINK on the camcorder again. When not
using turn the receiver POWER OFF.
(Continued)
Background noise and unclear picture
•The camcorder’s transmitter and
receiver are not facing each other.
b Adjust the position and angle and
unclear picture of both units.
•Another infrared emitting appliance
is operating.
b Stop operating it.
Precautions
On safety
•Unplug the AC power adaptor from the AC
outlet when it will not be used for a long period
of time. To disconnect the AC power adaptor,
pull it out by the plug. Never pull on the cord
itself.
•Do not open the cabinet. Refer servicing to
qualified personnel only.
•Be sure that nothing metallic comes into contact
with the metal parts of the AC power adaptor. If
it does a short may occur and the unit may be
damaged.
Camcorder
Signal flow
approx.16 ft. (5 m)
approx.9 ft. (3 m)
5˚
5˚
Receiver
Avant la mise en service de cet appareil, prière de lire
attentivement ce mode d’emploi que l’on conservera pour
toute référence future.
AVERTISSEMENT
Pour éviter tout risque d’incendie ou de décharge
électrique, ne pas exposer cet appareil à la pluie ou à
l’humidité.
Caractéristiques
Le récepteur infrarouge AV utilise les rayons infrarouges.
Si votre camescope est doté de la fonction LASER
LINK*, vous pourrez l’utiliser avec à cet appareil. L’image
et le son seront retransmis optiquement, avec pour
avantage l’élimination de cordons encombrants et la
possibilité d’opter pour différentes configurations
d’appareils audiovisuels.
• Le camescope peut être installé à environ 5 mètres de la
source.
• La qualité de l’image et du son est exactement identique
à celle obtenue avec une liaison classique.
LASER LINK est un système de transmission et
*
réception d’images utilisant les rayons infrarouges.
LASER LINK est une marque de fabrique de Sony
Corporation.
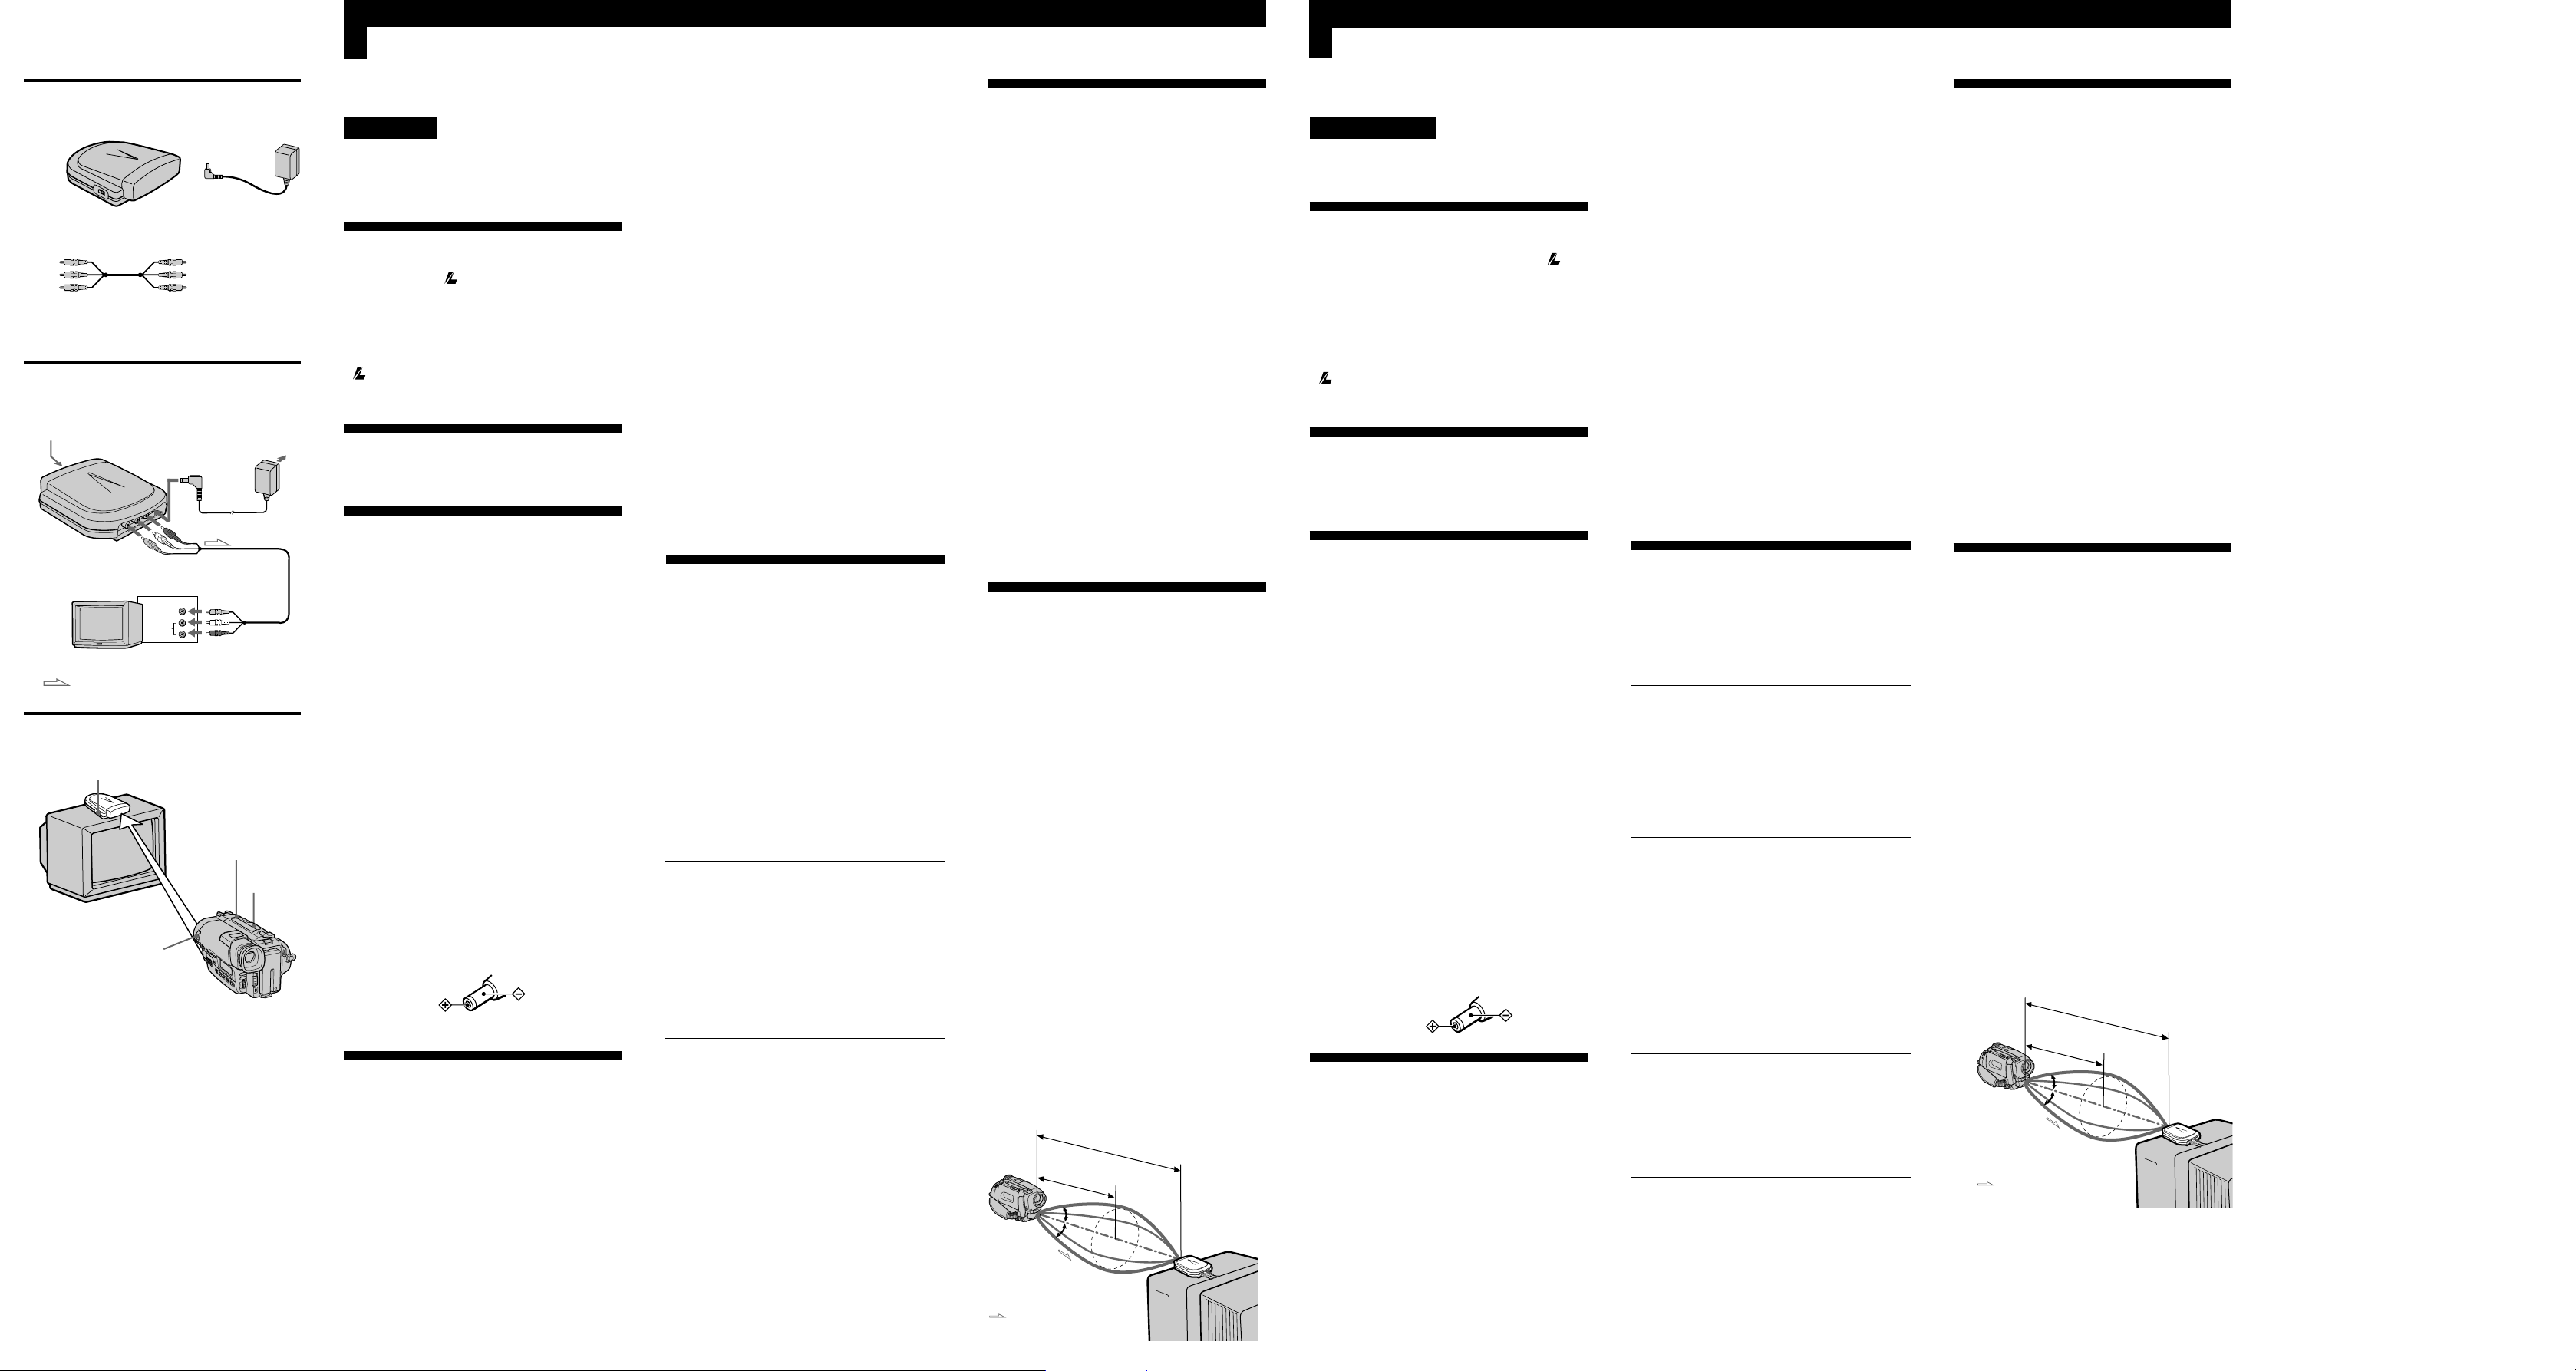
Contenu Voir l’illustration A
a Récepteur
b Adaptateur d’alimentation secteur
c Cordon de liaison audio/vidéo
Préparatifs Voir l’illustration B
1 Raccordez le récepteur à un téléviseur
avec le cordon de liaison audio/vidéo
fourni.
Fiche jaune: VIDEO
Fiche blanche: AUDIO L (gauche)
Fiche rouge: AUDIO R (droite)
2 Raccordez l’adaptateur d’alimentation
secteur fourni à la prise DC IN 6V puis à
une prise murale.
Si le téléviseur est déjà raccordé à un
magnétoscope
Raccordez le récepteur à la prise LINE IN du
magnétoscope et réglez le sélecteur d’entrée du
magnétoscope sur LINE.
Si le téléviseur ou magnétoscope est de
type monophonique
Raccordez la fiche jaune pour l’image et seulement la fiche
blanche pour le son au récepteur et au téléviseur ou
magnétoscope. Avec cette liaison, le son est
monophonique.
Remarque
N’utilisez que l’adaptateur d’alimentation secteur fourni
pour raccorder le récepteur au courant secteur, car la
polarité de l’adaptateur fourni est l’opposé de celle des
adaptateurs classiques. Ne pas utiliser l’adaptateur
d’alimentation secteur fourni pour d’autres appareils
électriques équipés d’une prise DC IN 6V.
Polarité de la fiche
Utilisation du système
infrarouge audio/vidéo
Avant de commencer la lecture, insérez une cassette dans
le camescope.
(1) Réglez l’interrupteur d’alimentation du récepteur sur
ON.
(2) Allumez le téléviseur et réglez le sélecteur téléviseur/
magnétoscope du téléviseur sur magnétoscope.
(3) Réglez l’interrupteur d’alimentation du camescope sur
VTR (PLAYER).
(4) Appuyez sur LASER LINK sur le camescope. Le
voyant LASER LINK s’allume.
(5) Ajustez l’angle et la direction du camescope et du
récepteur.
Si l’image sur le téléviseur présente de la distorsion,
appuyez sur N puis ajustez la position du camescope.
(6) Appuyez sur N du camescope pour commencer la
lecture.
Pour désactiver la fonction LASER LINK
Appuyez à nouveau sur LASER LINK sur le camescope.
Quand vous n’utilisez pas le récepteur, éteignez-le.
Voir l’illustration C
(Voir page suivante)
Remarques
• Ne pas obstruer l’espace entre le capteur infrarouge du
récepteur et l’émetteur du camescope, sinon l’image et le
son n’apparaîtront pas.
• Les rayons infrarouges ne traversent pas les murs ni le
verre opaque. Le récepteur doit être “en vue” du
camescope.
• Ne pas trop rapprocher le camescope du récepteur. Des
parasites et battements apparaissent quand le récepteur
et le camescope sont trop rapprochés.
• Ne pas utiliser le récepteur avec un casque sans fil ou
tout autre appareil de même type. Les signaux risquent
de s’annuler.
• La luminosité de l’émetteur du camescope de rayons
infrarouges n’est pas forcément stable. Il ne s’agit pas
d’un mauvais fonctionnement et la portée des rayons
infrarouges n’en est pas affectée.
• Assurez-vous qu’aucune source de lumière puissante,
soleil, lampe à circuit inverseur, signaux de
télécommande puissants, etc. ne bloquent les signaux
infrarouges envoyés par le récepteur, sinon l’image et le
son n’apparaîtront pas, ou ils présenteront de la
distorsion.
• Ne pas utiliser le récepteur dans les endroits exposés à
des courants électriques puissants ou aux ondes radio,
car il ne sera pas possible d’obtenir une lecture claire.
• Ne pas utiliser près d’une station radio AM ou d’un
tuner, sinon des interférences perturberont la réception
radio ou le tuner.
• Le récepteur chauffe quand il est allumé, mais c’est tout
à fait normal.
Guide de dépannage
En cas de problème, vérifiez la source d’alimentation et
reportez-vous au tableau suivant pour essayer de trouver
l’origine du problème. Si la difficulté persiste, malgré les
vérifications suivantes, débranchez le récepteur de la
source d’alimentation et contactez votre revendeur Sony
ou un centre de réparations agréé Sony.
Problème Causes et ou remèdes
Aucune image ni aucun son.
• L’adaptateur d’alimentation secteur n’est
pas branché sur une prise secteur.
b Raccordez-le à une prise secteur.
• Le cordon de liaison n’est pas
correctement raccordé.
b Raccordez-le correctement.
• La lumière du soleil atteint le capteur
infrarouge du récepteur.
b Évitez d’installer le récepteur en plein
soleil.
Le système de transmission infrarouge ne
fonctionne pas.
• Le récepteur est éteint (OFF).
b Appuyez sur l’interrupteur
d’alimentation pour allumer le
récepteur (ON).
• L’émetteur du camescope et le capteur du
récepteur ne sont pas face à face.
b Ajustez la position et l’angle des deux
appareils.
• Le récepteur est trop loin de l’émetteur du
camescope.
b Rapprochez le camescope du récepteur.
Bruit de fond et image floue.
• L’émetteur du camescope et le capteur du
récepteur ne sont pas face à face.
b Ajustez la position et l’angle des deux
appareils.
• Un autre appareil émettant des rayons
infrarouges est utilisé.
b Éteignez cet appareil.
Précautions
Sécurité
• Débranchez l’adaptateur d’alimentation secteur de la
prise murale si vous prévoyez de ne pas l’utiliser
pendant longtemps. Pour débrancher l’adaptateur, tirez
sur la prise. Ne jamais tirer sur le cordon.
• Ne pas ouvrir le coffret. Pour toute réparation, faites
appel à un professionnel seulement.
• Veillez à ce qu’aucun objet métallique ne touche les
parties métalliques de l’adaptateur. Il pourrait être
endommagé par un court-circuit.
Fonctionnement
• Ne pas installer le récepteur dans un endroit exposé:
– à des températures extrêmes
– à une poussière extrême
– à une humidité extrême
– à des vibrations
• Ne pas soumettre le récepteur à des chocs mécaniques et
ne pas le laisser tomber.
Nettoyage et entretien
• Nettoyez le coffret avec un chiffon doux légèrement
mouillé d’eau ou d’une solution détergente neutre.
• Ne pas utiliser d’alcool ni de diluant pour nettoyer le
coffret, car ils pourraient endommager la finition.
Pour les utilisateurs dans les pays
européens
Si votre téléviseur a une prise de péritélévision à 21
broches (Euroconnecteur), utilisez le connecteur à 21
broches livré avec le camescope.
Spécifications
Récepteur
Sortie VIDEO Prise cinch (1): 1 Vc-c
Sortie AUDIO Prises cinch (2: gauche et
Entrée DC DC 6 V
Température de fonctionnement
Température d’entreposage
Dimensions Env. 121 × 41 × 128 mm
Poids Env. 185 g (6,5 on.)
Adaptateur d’alimentation secteur
Pour les modèles achetés aux Etats-Unis ou au Canada
Entrée Secteur 120 V, 60 Hz
Sortie CC 6 V, 400 mA
Pour les modèles achetés au Royaume-Uni
Entrée Secteur 220 – 230 V, 50/60 Hz
Sortie CC 6 V, 700 mA
Pour les modèles achetés dans d’autres pays d’Europe
Entrée Secteur 220 – 230 V, 50 Hz
Sortie CC 6 V, 400 mA
Pour les modèles achetés en Australie
Entrée Secteur 240 V, 50 Hz
Sortie CC 6 V, 700 mA
Accessoires fournis Adaptateur d’alimentation
La conception et les spécifications peuvent être modifiées
sans préavis.
Coverage of the infrared rays
Zone de couverture des rayons infrarouges
Camescope Récepteur
Sens du signal
5˚
75 ohms, asymétrique, sync.
négative (sous tension)
droite): 327 mV,
impédance de sortie: inférieure
à 2,2 kilohms (sous tension)
0°C à 40°C (32°F à 104°F)
–20°C à 60°C (–4°F à 140°F)
4
/5 × 1 5/8 × 5 1/5 pouces)
(4
(l/h/p)
secteur (1)
Cordon de liaison audio/vidéo
(1)
Env. 5 m (16 pi.)
Env. 3 m (9 pi.)
5˚
Page 2
Deutsch
Español
A
ab
c
B
Infrarood-sensor/
Infrarödgivare
2
DC IN 6 V
AUDIO OUT
1
VIDEO OUT
1
IN
VIDEO
AUDIO
: Signaalstroom/Signalflöde
C
1
4
2
3
Lesen Sie vor der Inbetriebnahme diese Anleitung
sorgfältig durch, und bewahren Sie sie zum späteren
Nachschlagen gut auf.
VORSICHT
Um Feuergefahr und die Gefahr eines
elektrischen Schlages zu vermeiden, darf das
Gerät weder Regen noch Feuchtigkeit
ausgesetzt werden.
Merkmale
Der IFT-R10 kann die Bild- und Tonsignale eines
Camcorders, der mit
ausgestattet ist, empfangen. Sie können also Ihre
Videofilme jederzeit bequem wiedergeben, ohne Audio-/
Videokabel an den Camcorder an schließen zu müssen.
• Camcorder und Empfänger können bis zu 5 m entfernt
sein.
• Bild und Ton sind von gleich hoher Qualität wie bei
einem Kabelanschluß.
LASER LINK ist ein Infrarot-Übertragungssystem
*
für Bild- und Tonsignale. LASER LINK ist ein
Warenzeichen der Sony Corporation.
2
Bestandteile Siehe Abbildung A
a Empfänger b Netzadapter
c A/V-Verbindungskabel
LASER LINK*-Funktion
Vorbereitung
Siehe Abbildung B
1 Schließen Sie den Empfänger über das
mitgelieferte A/V-Verbindungskabel an
das TV-Gerät an.
Gelber Stecker: an VIDEO
Weißer Stecker: an AUDIO L
Roter Stecker: an AUDIO R
2 Schließen Sie den mitgelieferten
Netzadapter an die DC IN 6V-Buchse und
dann an die Steckdose an.
Wenn Ihr TV-Gerät an einen
Videorecorder angeschlossen ist
Schließen Sie den Empfänger an die LINE IN-Buchse des
Videorecorders an, und stellen Sie den Eingangswähler
am Videorecorder auf LINE.
Bei einem monauralen Fernseher oder
Videorecorder
Schließen Sie außer dem gelben Stecker (Videosignal) nur
noch den weißen Stecker (Audiosignal) an den Empfänger
und den Fernseher bzw. Videorecorder an. Der Ton wird
dann monaural wiedergegeben.
6
Hinweis
Verwenden Sie zur Stromversorgung des Empfängers nur
den mitgelieferten Netzadapter, da die Steckerpolarität
von anderen Netzadaptern möglicherweise umgekehrt ist.
Außerdem darf der mitgelieferte Netzadapter auch nicht
zur Stromversorgung von anderen Geräten verwendet
werden, selbst wenn sie eine DC IN 6V-Buchse besitzen.
Steckerpolarität
Zum Abschalten der LASER LINKÜbertragung
Drücken Sie LASER LINK am Camcorder erneut. Wenn
der Empfänger nicht verwendet wird, stellen Sie den
Betriebsschalter auf OFF.
Hinweise
• Achten Sie darauf, daß sich zwischen dem
Infrarotsensor des Empfängers und dem Sendeelement
des Camcorders kein Hindernis befindet, da sonst die
Bild- und Tonübertragung beeinträchtigt wird.
• Infrarotstrahlen können Wände und Milchglas nicht
durchdringen. Zwischen dem Empfänger und dem
Camcorder muß “Sichtkontakt” bestehen.
• Stellen Sie Camcorder und Empfänger nicht zu dicht
zusammen, da es sonst zu Pfeif- und anderen
Störgeräuschen kommen kann.
• Betreiben Sie nicht gleichzeitig ein weiteres InfrarotÜbertragungssystem (Infrarot-Kopfhörersystem usw.),
da sich die Systeme gegenseitig stören können.
• Die Helligkeit der Infrarotstrahler am Camcorder kann
variieren. Es handelt sich dabei nicht um einen Defekt
und auch auf die Reichweite hat dies keinen Einfluß.
• Achten Sie darauf, daß der Infrarotsensor keinem
direkten Sonnenlicht, keinem Licht von einer
Leuchtstoffröhre oder anderen hellen Lichtquellen
ausgesetzt ist und daß keine anderen Komponenten, von
denn Infrarotstrahlen ausgehen, vorhanden sind.
Ansonsten kann die Infrarot-Übertragung gestört oder
unterbrochen sein.
• Durch starke elektromagnetische Felder kann die
Übertragung beeinträchtigt sein. Betreiben Sie das
System nicht in der Nähe eines Senders usw.
• Betreiben Sie das System nicht in der Nähe eines MWRadios, da es den Empfang stören kann.
• Während des Betriebs erwärmt sich das System; es
handelt sich dabei nicht um einen Defekt.
Störungsüberprüfungen
Überprüfen Sie bei einer Störung zunächst die
Stromquelle, und gehen Sie dann die folgende
Störungsliste durch. Wenn das Problem nicht behoben
werden kann, trennen Sie die Stromquelle ab, und wenden
Sie sich an Ihren Sony Händler oder ein Sony ServiceCenter.
Störung Ursache und/oder Abhilfe
Kein Bild und kein Ton.
• Der Netzadapter ist nicht an der
Steckdose angeschlossen.
b Den Netzadapter an der Steckdose
anschließen.
• Das Netzkabel ist nicht richtig
angeschlossen
b Das Netzkabel richtig anschließen.
• Der Infrarotsensor des Empfängers ist
direktem Sonnenlicht ausgesetzt.
b Das Sonnenlicht abschatten.
Die Infrarot-Übertragung arbeitet nicht.
• Der Betriebsschalter des Empfängers ist
ausgeschaltet (OFF).
b Den Betriebsschalter einschalten (ON).
• Das Sendeelement des Camcorders ist
nicht auf den Infrarotsensor des
Empfängers ausgerichtet.
b Position und Winkel ändern.
• Camcorder und Empfänger sind zu weit
voneinander entfernt.
b Mit dem Camcorder dichter an den
Empfänger herangehen.
Zur Besonderen Beachtung
Sicherheit
• Trennen Sie bei längerer Nichtverwendung den
Netzadapter von der Steckdose ab. Zum Abziehen des
Netzadapters fassen Sie stets am Stecker und niemals
am Kabel an.
• Öffnen Sie das Gehäuse nicht. Überlassen Sie
Wartungsarbeiten nur einem Fachmann.
• Achten Sie darauf, daß die Metallkontakte des
Netzadapters nicht mit Metallgegenständen in
Berührung kommen, da es sonst durch Kurzschluß zu
Beschädigungen kommen kann.
Betrieb
• Betreiben Sie das System nicht an folgenden Plätzen:
– Sehr warme oder kalte Plätze.
– Staubige oder schmutzige Plätze.
– Feuchte Plätze.
– Plätze, die Vibrationen ausgesetzt sind.
• Stoßen Sie den Empfänger nirgends an, und lassen Sie
ihn nicht fallen.
Reinigung und Pflege
• Reinigen Sie das Gehäuse mit einem weichen, leicht mit
Wasser oder einem milden Haushaltsreiniger
angefeuchteten Tuch.
• Alkohol, Benzin oder Verdünner dürfen nicht
verwendet werden, da diese Materialien das Gehäuse
angreifen.
Hinweis zur Europa-Version
Wenn Ihr TV-Gerät eine 21pol-Buchse
(EUROCONNECTOR) besitzt, verwenden Sie zum
Anschluß den beim Camcorder mitgelieferten 21polAdapter.
Technische Daten
Empfänger
VIDEO-Ausgang Cinchbuchse (1): 1 Vss, 75 Ohm
AUDIO-Ausgang Cinchbuchsen (2, L/R): 327 mV,
DC IN 6V-Buchse Stromversorgungsbuchse (6 V
Betriebstemperaturbereich
Lagertemperaturbereich
Abmessungen ca. 121 x 41 x 128 mm (B/H/T)
Gewicht ca. 185 g
Netzadapter
Großbritannien-Modell
Eingangsspannung 220 – 230 V Wechselspannung,
Ausgangsspannung und -strom
Modell für andere europäische Länder
Eingangsspannung 220 – 230 V Wechselspannung,
Ausgangsspannung und -strom
Mitgeliefertes Zubehör
unsymmetrisch, negatives
Synchronsignal (bei
eingeschaltetem Betriebsschalter)
Ausgangsimpedanz: unter 2,2
kOhm (bei eingeschaltetem
Betriebsschalter)
Gleichspannung)
0 °C bis 40 °C
–20 °C bis +60 °C
50/60Hz
6 V Gleichspannung, 700 mA
50 Hz
6 V Gleichspannung, 400 mA
Netzadapter (1)
A/V-Verbindungskabel (1)
Gestörtes und unklares Bild.
Betrieb des drahtlosen AVSystems
Legen Sie vor der Wiedergabe die Cassette in den
Camcorder ein.
(1) Stellen Sie den Betriebsschalter am Empfänger auf
ON.
(2) Schalten Sie das TV-Gerät ein, und stellen Sie den TV/
VCR-Wähler am TV-Gerät auf VCR (Videobetrieb).
(3) Stellen Sie den Betriebsschalter am Camcorder auf
VTR (PLAYER).
(4) Drücken Sie LASER LINK am Camcorder. Die LASER
LINK-Lampe leuchtet auf.
(5) Richten Sie Camcorder und Empfänger aufeinander
aus.
Wenn nach Drücken von N das Bild auf dem TVSchirm nicht einwandfrei ist, ändern Sie die Position
des Camcorders.
(6) Drücken N am Camcorder, um die Wiedergabe zu
starten.
Siehe Abbildung C
• Das Sendeelement des Camcorders ist
nicht auf den Infrarotsensor des
Empfängers ausgerichtet.
b Position und Winkel ändern.
• In der Nähe wird noch ein weiteres
Infrarotsystem betrieben.
b Das andere Infrarotsystem ausschalten.
Änderungen, die dem technischen Fortschritt dienen,
bleiben vorbehalten.
Infrarotstrahlbereich
ca. 5 m
ca. 3 m
5˚
Camcorder
: Signalfluß
5˚
Empfänger
Antes de utilizar la unidad, lea cuidadosamente este
manual de instrucciones, y consérvelo para futuras
referencias.
ADVERTENCIA
Para evitar incendios o el riesgo de descargas
eléctricas, no exponga esta unidad a la lluvia ni a la
humedad.
Características
Éste es un receptor de rayos infrarrojos inalámbrico para
audio/vídeo. Si su videocámara posee la función
LASER LINK*, podrá utilizarla en combinación con esta
unidad, y transmitir ópticamente imágenes y sonido. Ya
no tendrá que preocuparse por cables molestos para poder
utilizar cualquier combinación de unidades de audio/
vídeo.
• La videocámara podrá utilizarse a a una distancia
máxima de unos 5 metros de su fuente.
• La calidad del sonido y las imágenes no será inferior
que en el caso de utilizar cables.
LASER LINK es un sistema que transmite y recibe
*
imágenes utilizando rayos infrarrojos. LASER LINK e
marca comercial de Sony Corporation.
Contenido
Consulte la ilustración A
a Receptor b Adaptador de alimentación de CA
c Cable conector de audio/vídeo
Preparativos
Consulte la ilustración B
1 Conecte el receptor a un televisor con el
cable conector de audio/vídeo
suministrado.
Clavija amarilla: VIDEO
Clavija blanca: AUDIO L
Clavija roja: AUDIO R
2 Conecte el adaptador de alimentación de
CA a la toma DC IN 6V, y después
conéctelo a un tomacorriente de CA.
Si su televisor ya está conectado a una
videograbadora
Conecte el receptor a LINE IN de la videograbadora.
Ponga el selector de la videograbadora en LINE.
Si su televisor o videograbadora es de
tipo monoaural
Conecte la clavija amarilla para vídeo, y conecte
solamente la clavija blanca para audio al receptor y al
televisor o a la videograbadora. Con esta conexión el
sonido será monoaural.
Nota
Para conectar el receptor a una fuente de alimentación
utilice solamente el adaptador de alimentación de CA
suministrado porque la polaridad de la clavija de este
adaptador es opuesta a la de los adaptadores
convencionales. No utilice el adaptador de alimentación
de CA para otros aparatos eléctricos con toma DC IN 6V.
Polaridad de la clavija
Utilización de un sistema
de audio/vídeo inalámbrico
Consulte la ilustración C
Antes de iniciar la reproducción, inserte un videocassette
en la videograbadora.
(1) Conecte la alimentación del receptor.
(2) Conecte la alimentación del televisor y ponga el
selector TV/VCR del televisor en VCR.
(3) Ponga el selector de alimentación de la videocámara
en VTR (PLAYER).
(4) Presione LASER LINK de la videocámara. La lámpara
LASER LINK se encenderá.
(5) Ajuste el ángulo y la orientación de la videocámara y
del receptor.
Si las imágenes del televisor se ven distorsionadas,
presione N y después ajuste la posición de la
videocámara.
(6) Para iniciar la reproducción, presione N de la
videocámara.
Para desactivar LASER LINK
Vuelva a presionar LASER LINK de la videocámara.
Cuando no vaya a utilizar el receptor, póngalo en POWER
OFF.
Notas
• No bloquee la trayectoria entre el sensor de rayos
infrarrojos del receptor y el transmisor de la
videocámara. Si lo hiciese, no podría obtener imágenes
ni sonido.
• Los rayos infrarrojos no pueden traspasar paredes ni
vidrios opacos. El receptor de rayos infrarrojos deberá
estar en el área de “línea visual” de la videocámara.
• No coloque la videocámara y el receptor demasiado
cerca. Si lo hiciese, podrían producirse ruidos y batidos.
• No utilice esta unidad en combinación con auriculares
inalámbricos ni con otra unidad del mismo tipo. Podría
producirse la cancelación de la señal.
• El brillo del emisor de rayos infrarrojos de la
videocámara no estará necesariamente estabilizado.
Esto no significa mal funcionamiento, y no influirá en el
alcance de los rayos infrarrojos.
• Cerciórese de que fuentes de iluminación intensa, como
la luz solar directa, lámparas con inversor, o señales
potentes de telemandos, bloqueen la trayectoria hacia el
sensor de rayos infrarrojos del receptor. En caso
contrario, no obtendría imágenes ni sonido, o éste
podría distorsionarse.
• No utilice esta unidad en lugares en los que haya
corrientes eléctricas intensas ni ondas radioeléctricas. Si
lo hiciese no podría una recepción clara.
• No utilice la unidad cerca de una radio ni un
sintonizador de AM. Si lo hiciese, podrían producirse
interferencias en tales unidades.
• Durante la utilización de la unidad, ésta se calentará,
pero es normal.
Solución de problemas
Si tiene algún problema al utilizar la unidad, compruebe
en primer lugar la fuente de alimentación. Después utilice
la tabla de solución de problemas siguiente. Si la
dificultad persiste, desconecte la fuente de alimentación y
póngase en contacto con su proveedor Sony o con un
centro de reparaciones autorizado por Sony.
Problema Causa y/o solución
No hay imágenes ni sonido en absoluto.
• El adaptador de alimentación no está
conectado en un tomacorriente de CA.
b Conéctelo a un tomacorriente de CA.
• El cable conector no está correctamente
conectado.
b Conéctelo correctamente.
• La luz solar directa está incidiendo en el
sensor de rayos infrarrojos del receptor.
b Evite la luz solar directa.
El sistema de transmisión de rayos infrarrojos
no funciona.
• La alimentación del receptor está
desconectada (OFF).
b Presione el botón de alimentación para
conectar (ON) la alimentación del
receptor.
• El transmisor de la videocámara y el
receptor no están encarados entre sí.
b Ajuste la posición y el ángulo de ambas
unidades.
• El receptor está demasiado alejado de
transmisor de la videocámara.
b Utilice el transmisor cerca del receptor
de rayos infrarrojos.
Ruido de fondo e imágenes poco claras.
• El transmisor de la videocámara y el
receptor no están encarados entre sí.
b Ajuste la posición y el ángulo de ambas
unidades.
• Está utilizando otra unidad que emite
rayos infrarrojos.
b Deje de hacerlo.
Precauciones
Seguridad
• Cuando no vaya a utilizar el adaptador de alimentación
de CA durante mucho tiempo, desconéctelo del
tomacorriente de CA. Para desconectar el adaptador de
CA, tire del enchufe. No tire nunca del propio cable.
• No abra la caja. En caso de avería, solicite los servicios
de personal cualificado solamente.
• Cerciórese de que ningún objeto metálico entre en
contacto con las partes metálicas del adaptador de
alimentación de CA. De lo contrario podría producirse
un cortocircuito y la unidad se dañaría.
Operación
• No coloque la unidad en un lugar:
– Extremadamente cálido o frío
– polvoriento o sucio
– Muy húmedo
– Con vibraciones
• No golpee ni deje caer la unidad.
Limpieza y cuidados
• Limpie la caja con un paño suave ligeramente
humedecido en agua o en una solución muy diluida de
detergente.
• Para limpiar la caja, no utilice alcohol, bencina, ni
diluidor de pintura, ya que podría dañar el acabado.
Para los clientes de los paeíses europeos
Si su televisor dispone de conector de 21 terminales
(EUROCONNECTOR), utilice el conector de 21 terminales
xuministrado scon la videocámara.
Especificaciones
Receptor
Salida VIDEO Toma fono (1): 1 Vp-p, 75 ohmios,
Salida AUDIO Tomas fono (2: L,R): 327 mV,
Entrada de CC CC 6 V
Temperatura de funcionamiento
Temperatura de almacenamiento
Dimensiones Aprox. 121 x 41 x 128 mm (an/al/prf)
Masa Aprox. 185 g
Adaptador de alimentación de CA
Para los modelos adquiridos en el Reino Unido
Entrada 220 – 230 V CA, 50/60 Hz
Salida 6 V CC, 700 mA
Para los modelos adquiridos en otros países europeos
Entrada 220 – 230 V CA, 50 Hz
Salida 6 V CC, 400 mA
Accesorios suministrados
El diseño y las especificaciones están sujetos a cambio sin
previo aviso.
Cobertura de los rayos infrarrojos
Videocámara
desequilibrada, sincronismo negativo
(Con POWER en ON)
impedancia de salida: menos de 2,2
kiloohmios (con POWER en ON)
0 a 40°C
–20 a 60°C
Adaptador de alimentación de CA (1)
Cable conector de audio/vídeo (1)
aprox. 3 m
5˚
5˚
: Flujo de la señal
aprox. 5 m
Receptor
 Loading...