

Page 1

SONY
LW/MW/SW/FM Stereo
PLL Synthesized Receiver
3-75M55-2a (1)
ICF-SW7600
Operating Instructions page 2
Before operating the unit, please read this manual thoroughly and
retain it for future reference.
Owner’s Record
The model number is located on the front panel and the serial
number is under the rear stand. Record the serial number in the
space provided below. Refer to these numbers whenever you call
upon your Sony dealer regarding this product.
Model No. ICF-SW7600 Serial No..
PROPERTY Cf lui
NATiOKAL TECHNICAL DEPT.
Mode d’emploi
Avant de faire fonctionner cet appareil, prière de lire attentivement
ce mode d'emploi et de le conserver à titre de référence ultérieure.
page 36
©1989 by Sony Corporation
FILE СОРУ
Page 2

WARNING
Table of Contents
To prevent fire or shock hazard, do not expose
the unit to rain or moisture.
To avoid electrical shock, do not open the
cabinet. Refer servicing to qualified personnel
only.
INFORMATION
This equipment generates and uses radio frequency energy and if
not installed and used properly, that is, in strict accordance with the
manufacturer’s instructions, may cause inteference to radio and
television reception. It has been type tested and found to comply
with the limits for a Class B computing device in accordance with the
specifications in Subpart J of Part 15 of FCC Rules, which are
designed to provide reasonable protection against such interference
in a residential installation. However, there is no guarantee that
interference will not occur in a particular installation. If this
equipment does cause interference to radio or television reception,
which can be determined by turning the equipment off and on, the
user is encouraged to try to correct the interference by one or more
of the following measures:
Reorient the receiving antenna
Relocate the equipment with respect to the receiver
Move the equipment away from the receiver
Plug the equipment into a different outlet so that equipment and
receiver are on different branch circuits.
If necessary, the user should consult the dealer or an experienced
radio/television te^nicpn additional suggestions. The user may
fiitftl^ fCIc^ng ^klel; prepared by the Federal Communications
Cc^ml|sl^\ljslpf|4 .1 i
to Identify and Resolve Radio-TV Interference Problems”. This
booklet is available from the U.S. Government Printing Office,
Washington, DC 20402, Stock No. 004-0004X»45-4.
Features .................................................................
Precautions..............................................................
Location and function of controls
Power sources
Batteries .............................................................
House current
12 V car battery
How to set the clock
How to change the MW channel step
Direct tuning
Manual tuning..........................................................
Scan tuning
Preset tuning ..........................................................
How to preset a station .......................................
To tune in a preset station
How to tune in precisely
How to tune in SSB trsmsmissions
Having the radio turned on automatically................
How to set the sleep timer.......................................
How to use the su):^ijed SW compact antenna
How to use an optional antenna..............................
Using the supplied antenna connector
For FM reception
For AM reception ................................................
Recording radio programs.......................................
To start recording at a desired time
Specifications .........................................................
Troubleshooting guide.............................................
.......................................................
......................................................
...................................................
................................................
............................................................
............................................................
................................................
............................
.....................
...................................
..........................................
.........................
................
.....................
For the customers in Canada
This apparatus complies with the Class B limits for radio noise
emissions set out in Radio InterfererKe Regulations.
Page 3

• An LW/MW/SW/FM stereo receiver with wotid-wide band coverage.
• Quartz controlled PLL (Phase Locked Loop) synthesizer system
using a microcomputer for easy pinpoint tuning. The tuned
frequency is digitally displayed.
• Fine tuning control for precise tuning
• SSB (Single side band) can be received # .
• Provided with a recording output and a remote control jack.
Connecting the unit to the optional Sony TCM-27 cassette-corder
using these jacks, you can start recording programs at a desired
time #.
• Various ways of tuning
Direct tuning ... Tuning in the station by inputting the frequency of
Manual tuning .. Even if you don’t know the frequency of the
Scan tuning . . . . An automatic searching of a station #
Preset tuning . Up to 10 stations can be preset for button-touch
• Other features
Timer standby . The function to receive a desired station at a
Sleep timer .... Turning the radio off automatically In 65 minutes
Power sources . Three different power sources: internal batteries,
the station directly #
station, you can tune in the station precisely %
tuning 0
desired time #
•
house current, car battery #
For battery operation, use four size AA (R6) batteries.
For AC operation, use the AC power adaptor supplied with this
unit; do not use any other type.
For car battery operation, use the car battery cord recommended
for this unit; do not use any other type.
• Do not leave the unit in a location near heat sources, or in a place
subject to direct sunlight, excessive dust, or mechanical shock.
• Use the unit within a temperature range of 0®C to 40®C (32®F to
104®F). If it is used in temperatures outside this range, there may
be trouble with the frequency and clock display. If it is used in
temperatures lower than this range, the displayed numbers may
change very slowly. This is not an internal malfunction. The display
will recover when the unit is used within the recommended
temperature.
• Should any solid object or liquid fall into the unit, remove the
batteries, and have the unit checked by qualified personnel before
operating it any further.
• Since a strong magnet is used for the speaker, keep personal
credit cards using magnetic coding or spring-wound watches away
from the unit to prevent them from possible damage caused by the
magnet.
• Reception around 1.8 MHz and 3.6 MHz may be difficult because
of internal spurious signals generated by the built-in oscillators.
• When the casing becomes soiled, clean it with a soft cloth
dampened with mild detergent solution. Never use abrasive
cleansers or chemical solvents, as they may mar the casing.
If you have any question or problem concerning your unit that is not
covered in this manual, please consult the nearest Sony dealer.
Page 4
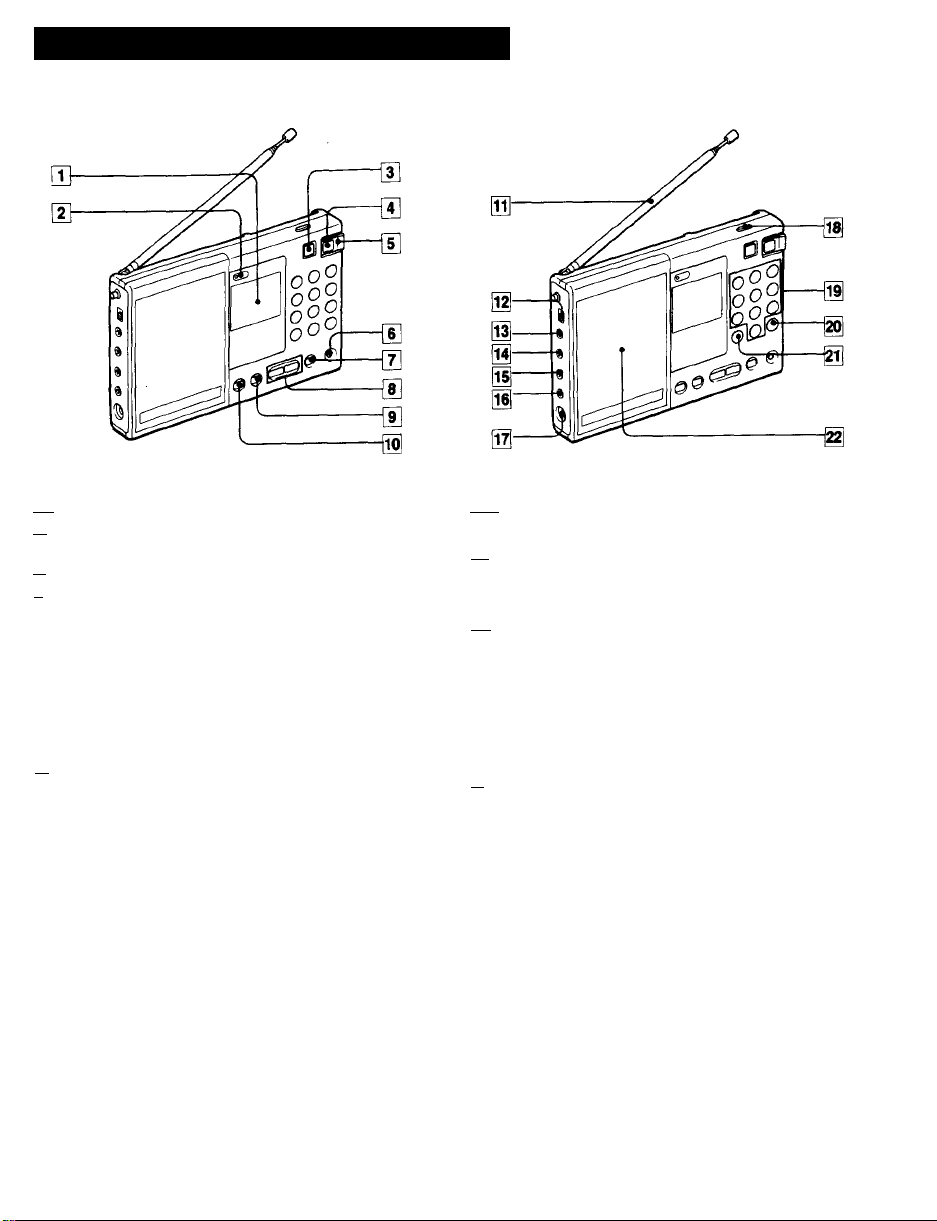
Location and Function of Cont rols
Refer to the pages Indicated in • for details.
[T] Display window
ri1 TUNE (tuning) indicator
Lights up when a station is tuned in.
[y| SLEEP (sleep timer) button •
in ON/OFF (power) button
[5] POWER/LOCK switch
Set this switch to POWER, then press the ON/OFF button to turn on
the radio. Set the switch to LOCK when carrying the radio. When this
switch is set to LOCK, the power will not be turned on even if you
press the ON/OFF button.
[i] KEY PROTECT»-, button •
[7] SCAN TUNING START STOP/STANDBY button # #
[|] MANUAL TUNING/SET button # # #
[9] BANDfALARM (alarm set) button # # #
[lS ENTERITIME (time set) button • 0
ITT] Telescopic antenna
[m SENS DX* - LOCAL (FM/AM sensitivity) selector #
R3I EXT ANT (external antenna) jack
0 TAPE REMOTE jack #
511 TAPE REC OUT jack #
111 a (headphones) jack
[[3 DC IN 6 V ®-<S-Q (external power input) jack
111 LIGHT button
Press to illuminate the display window for about 15 seconds.
¡Tl PRESET/DIRECT TUNING buttons ee
H FM/EXECUTE button 0
ilj AM/EXECUTE button •
I2I Speaker
Page 5
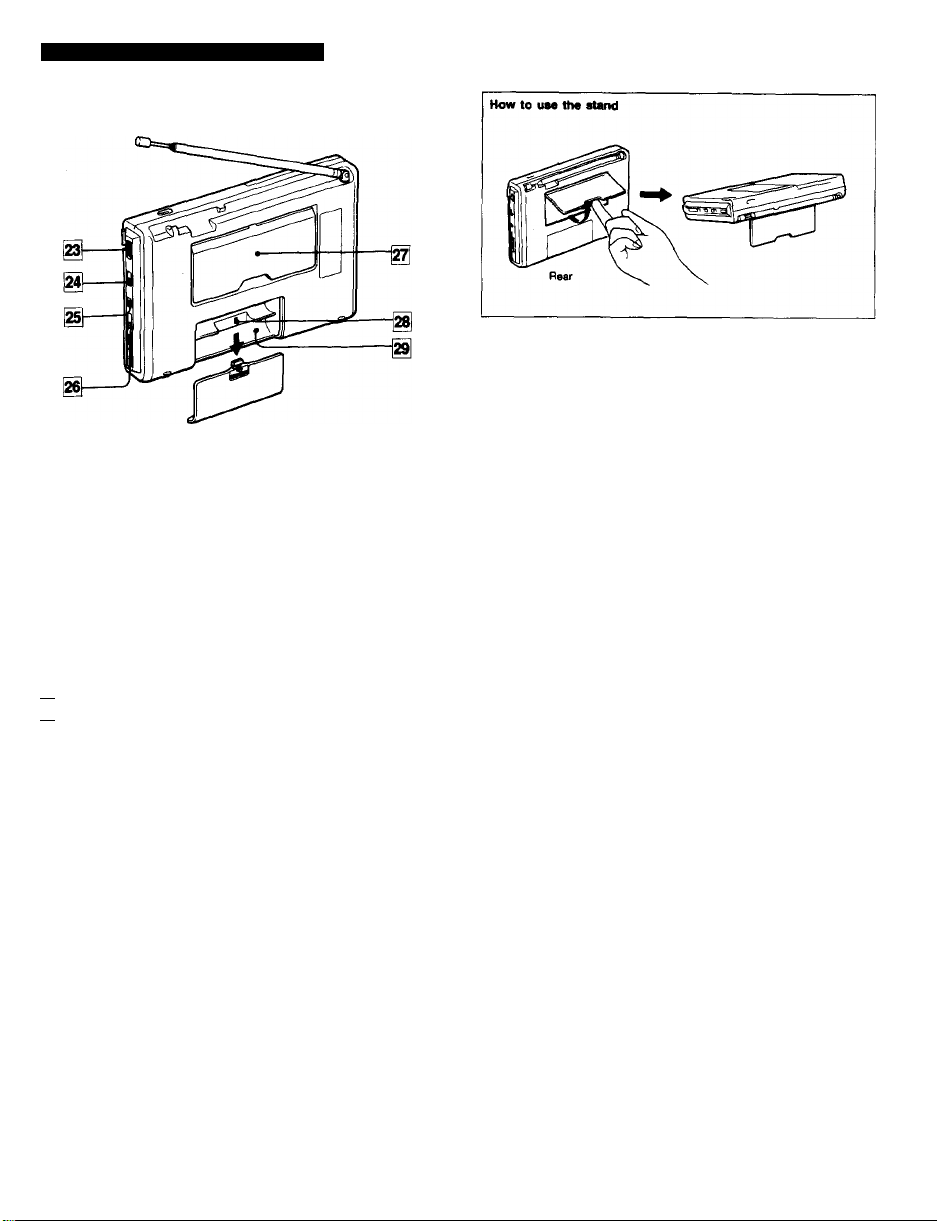
Location and Function of Controls
HH FINE TUNING control • •
m AM MODE selector • •
m] TONE selector •
MUSfC; for Ustening to mush
NEWS: for listening to news
!ii VOLUME control
ItI stand
lail MW CH STEP (MW channel step) selector •
|2^ Battery compartment
Page 6
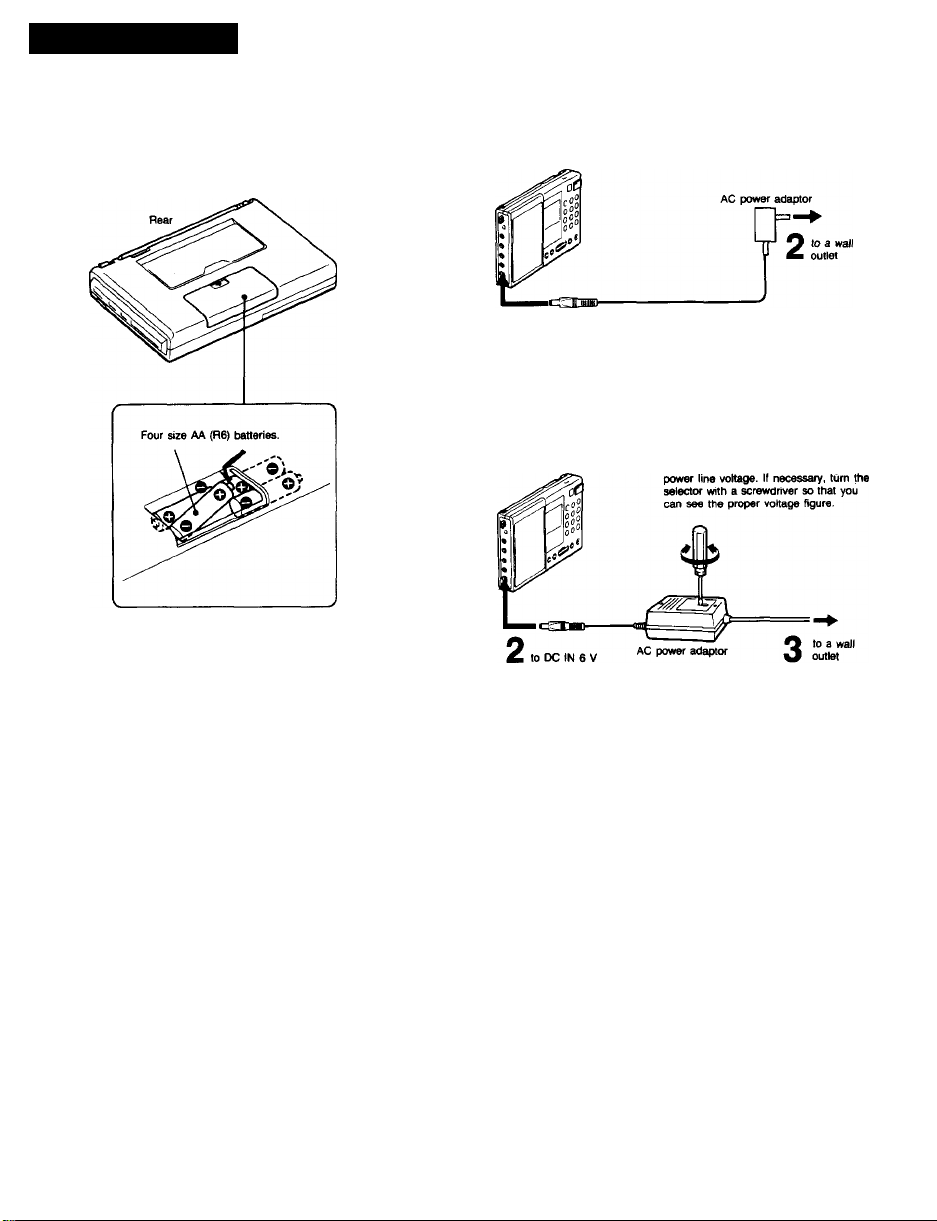
Power Sources
Before installing the batteries, be sure to check that tne MW CH
STEP selector is set correctly (see page #).
For the customers In the U.S.A.
Use the supplied AOD4M AC power adaptor.
to DC IN 6 V
1
For the customers in Canada
Use the supplied AC-240 AC power adaptor. The adaptor operates
on either 110 (99-121)* *, 120 (108-132), 220 (198 - 242), or 240 V
(216 - 264 V) AC, 50/60 Hz.
* Range of voltage allowable shown in parentheses.
Before connecting the adaptor to a wall
outlet, check to see that the input
1
selector is correctly set to your local
Battery replacement
Replace all the batteries with new ones when the sound becomes weak or
distorted.
Do it within ten minutes since the preset statior« and the current time will be
erased when more than ten minutes have passed.
If they are erased, preset the stations and set the time again.
Notes
• Keep the batteries installed for the built-in computer back-up even if you
use the external power sources, if you don't, the preset stations and current
time will be erased.
• The irttemal batteries are automatically disconnected when the AC power
adaptor or the car battery cord is connected to the DC IN 6 V jack.
Page 7

Power Sources
For use on 12 V car battery, connect the Sony DCC-127A car
battery cord (optional) to the DC IN 6 V jack.
How to Set the Clock
1 Set POWER/LOCK to POWER.
2 Press SET while keeping TIME pressed to adjust
the clock to the current time.
Each press on SET advances the time digit by one.
To advance the time digits rapidly, keep SET
pressed.
Current time
Blinking
3 Release TIME.
The clock will begin to operate.
Note
Use only the recommended AC power adaptor or car battery cord
manufactured by Sony. Polarity of the plugs of other manufacturers may be
different.
Polarity ol the Sony plug
Setting the clock while listening to the radio
You cannot set the clock while you are listening to the radio. Be sure to
press ON/OFF to turn the radio off and set the clock.
The display when the radio Is turned off
The current time is displayed.
Zero second adjustment
if you want to adjust the time exactly to the second with a telephone time
signal, proceed as in the following example.
Example; To set to 15:15
1 Adjust the time indication to 15:15 and keep TIME pressed.
2 Release TIME simultaneously with the telephone time signal.
The clock will then begin to show the precise time.
Page 8

How to Change the MW Chan nel Step
I
i?» >ij:jJW3WO«fle8 t
■ - } t
The MW channel step is factory-set to 9 (10) kHz to
match the frequency allocation system of the country. If
you use the radio where the frequency allocation system
is based on a 10 (9) kHz interval, set the MW CH STEP
selector in the battery compartment to 10 (9) kHz.
1 Set POWER/LOCK to LOCK.
2 open the battery compartment and take out the
batteries.
3 Change MW CH STEP.
4 Install the batteries and close the battery
compartment.
5 Set POWER/LOCK to POWER.
The frequency allocation of the area
North America, South America
Other countries
Notes
Change the MW CH STEP within 10 minutes
If more than 10 minutes have passed after batteries were removed, the
current time will be erased. In this case, set the time again.
The preset stations will be erased
When you change the MW channel step, the preset stations will be erased.
In such a case, preset the Nations again.
Area
Frequency allocation system
10 kHz step
9 kHz step
Page 9

Direct Tuning —when you know the freq | ^
To improve receiving condition
if you input a wrong frequency
Press FM/EXECUTE or AM/EXECUTE again and input the correct frequency.
if you do not press RM or AM/EXECUTE within 5 seconds after
you Input a fr^uency
The frequency indicatitm turns to the previous one and you will hear the
station of its frequency.
When the frequency near the input frequency is displayed
The frequencies which this radio receives are allocated in the following
intervals depending on the broadcast band.
If you input a frequency that does not match these intervals, the frequency
just below the one that you input will be tuned in and will be displayed.
FM 0.05 or 0.1 MHz
MW 10 kHz*
* Possible to change to 9 kHz depending on the country where used (see.
page#).
H TRY AQAINI Indication appeata
If you input the frequency outside the frequency rar>ge. TRY AGAIN! blinks.
When you press FM/EXECUTE or AM/EXECUTE again, this indication will
disappear. If you do not press the button, it will disappear after 5 seconds
and the frequertcy of the previousiy tuned station will appear.
When the sound is distorted
Normally set SENS to DX, however, when the sound is distorted set it to
LOCAL.
When you are listening to the news
Set TONE to NEWS. Human voice will be heard more clearly. When you are
listening to music, set it to MUSIC.
SW 5 kHz
LW 3 kHz
Page 10

Manual Tuning—if yo
the frequency of a desired station
Scan Tuning
------
To have a station scanned automatically
1 Set POWER/LOCK to POWER.
2 Press ON/OFF.
The radio is turned on.
3 Press MANUAL TUNING (+ or -) repeatedly while
keeping BAND pressed to search for the
approximate frequency of a desired station.
The lowest frequency of each band or the meter band
of SW appears iri the display.
If you keep MANUAL TUNING pressed, the band
changes continuously.
4 Press MANUAL TUNING (+ or -) repeatedly to
search for a desired station.
'.iei.
To prevent accidental change of the receiving station
Press KEY PROTECT. The mark appears in the display window and all
the buttons on the front panel will not work.
To release the KEY PROTECT function, press KEY PROTECT again.
When the station is tuned in
The TUNE indicator lights up.
Frequency band changes continuously
If you keep MANUAL TUNING ( + ) pressed, the frequency band being tuned
in will change from LW to MW. SW, FM and then back to LW.
What is meter band?
SW is devided into 13 bands by the wave length (meter).
Each band is called meter band (see page #).
-
--------
it. -------...j
1 Set POWER/LOCK to POWER.
4
2 Press ON/OFF.
t
i
3 Receive a broadcast band by pressing MANUAL
TUNING while keeping BAND pressed, or by pressing
PRESET/DIRECT TUNING. (Refer to the table on the
right page for the frequency range of each broadcast
band.)
4 Press SCAN TUNING START/STOP.
Within the frequency range of the table on page #,
scan tuning will begin and stop automatically for 1.5
seconds when a station is received and then the
tuning indicator lights up.
5 Press SCAN TUNING START/STOP again to listen to
the station being received.
e Tune in the station more precisely by MANUAL
TUNING (+ or -), if necessary.
НП
-p
Page 11

Scan Tuning
preset Tuning—ropres
frequency of a desired station
The frequency range and the tuning Interval of each broadcaat band
Broadcast band
LW
•1 Some of the LW stations are not tuned in with the 3 kHz interval. When
you try to tune In them, first tune in the frequency near them and then
tune in precisely with FINE TUNING (see page 0).
*2 These frequencies can be tuned in either by direct tuning or manual
tuning but cannot be eeiected by pressing both BAND and MANUAL
TUNING.
*3 Except tor Saudi Arabia
*4 France, Germany, Scandinavian counthes and Saudi Arabia
•5 Countries «her than * *4
Frequency range
150—285 kHz
SO—528 kHz
531—1611 kHz
530—1610 kHz
1615—2245 kHz
2250—2550 kHz
3150—3450 kHz
3850—4050 kHz
4700—5100 kHz
5900—6250 kHz
7000—7400 kHz
9400—10000 kHz
11500—12150 kHz
13500—13900 kHz
15000—15700 kHz
17450—18000 kHz
21400—21950 kHz
25600—26100 kHz
26105—299^ kHz
87.50—108.00 MHz
76.00—108.00 MHz
Frequency
allocation
3 kHz step*i
9 kHz step
10 kHz step
5 kHz step
O.OS MHz step
0.1 MHz step
When scanning stops too often
Set SENS to LOCAL.
How to Preset a Station
1 Sat POWER/LOCK to POWER.
2 Praas ON/OFF. 3 Tuna In a dealred atatlon. 4 Preaa one of the PRESET/D1RECT TUNING buttona
while keeping ENTER preaaed.
The desired station is stored on that button.
e.g. To preset FM 89.0 MHz on the button 1
Slinks while ENTER is pressed.
----------
" 8EDO"
The number of the etatlone you can preaat
Up to 10 FM and AM stations in total can be preset on the
PRESET/DIRECT TUNING buttons. You can store only one station
on each button.
* o a n n-«
1
0 3UU
Page 12

Preset Tuning
To Tune in a Preset Station
1 Set POWER/LOCK to POWER.
2 Press ON/OFF.
3 Press a desired PRESET/DIRECT TUNING button.
The preset station will be tuned in.
To check the preset station
Press PRESET/DIRECT TUNING while pressing BAND. The frequency of the
preset station is displayed. You can check anytime even if another station is
tuned In.
To change the preset station
Store a station on a desired PRESET/DIRECT TUNING button. The station
previously stored on the button is erased.
How to Tune in Precisely
------
Using the FINE TUNING control
This radio receives the station at the interval of frequency
shown in the list on pages 0 and 0. To receive a station
whose frequency does not coincide with this interval, it is
necessary to adjust the tuning in approx. ±5 kHz range
by FINE TUNING. In this case, the frequency display will
not change.
2 Adjust the tuning with FINE TUNING.
+: For a frequency up to approx. 5 kHz higher
-; For a frequency up to approx. 5 kHz lower
Note
FM band cannot be adjusted with FINE TUNING.
Page 13

How to Tune in SSB Transmis sions
FINE TUNING
•L58 f-
ЛГ1
•—uieJ
ШВ
1
§°§
§§§
1 Set AM MODE to LSB or USB.
Position
NORM
FINE
LSB’’
USB"”
*t Lower side Band
*2 Upper Side Band
2 Tune in a frequency near the broadcast you want to
listen to by using mamiai tuning (Page direct
tuning (Page #), or preset tuning (Page #).
3 Adjust the tuning with RNE TUNING.
When not using FINE TUNING or when
not listening to SSB transmissions
When adjusting LW, MW, or SW band
(DSB-Ooubie Side Band) precisely with
FINE TUNING
When tuning in ham and CW transmissions
below 10 MHz
When tuning in ham and business radio
above 10 MHz
Type of broadcast
SSB (Single Side Bmd)
SSB Is very popular among ham and business radio and will be
found on all of the amateur bands because of its signal
inteiligibility. This results from that it transmits signals with half
bandwidth of OS6 (Ooubie Side Band).
Typical AM (MW. LW. SW) band uses DSB. In DSB
transmission, the amplitude of a carrier is modulated according
to transmitted frequencies as shown below.
Amplitude
Carrier
LSB
Time
Ampiitude
Audio signals are included both in USB and LSB. These signals
included in USB and LSB are the same ones except that they
are in the opposite phase relation.
This means that trsmsmission can be done using only one of
USB and LSB. SSB transmission is the system in which such a
method is used, in general, SSB transmissions up to 10 MHz
shall employ LSB modulation, and those above this frequency
shall use USB. To receive SSB transmission, the unit with the
BFO (Beat Frequency Oscillator) circuits is needed to convert
SSB signals into audio signals. SSB cannot be heard with the
radio which has no such circuits.
CW (Continuous Wave)
CW is also popular among ham and business radio. In CW
transmission, the amplitude of a carrier is not modulated while
that of other systems is modulated. CW conveys information by
interrupting a carrier using Morse code. It can be heard as a
beat sound only with the unit equipped with the BFO circuits. To
understand information transmitted by CW, you need to learn
the Morse code.
Я1
Frequency
Page 14

Having th6 Radio Turned on | Automatically —Timer standby function
4 Set the time by pressing SET <+ or -) whiie keeping
ALARM pressed.
If you keep SET pressed, the time will change
continuously.
STANDBY indicator
flickers.
5 Release ALARM. The current time appears in the display.
6 Press STANDBY. The STANDBY indicator stops liickering.
When the radio is turned on at the preset time
The radio vrill be turned off after about 65 minutes.
To cancel the standby mode
Press STANDBY.
Timer setting time
-•ViJaCr.
C^n n
S3.00‘
m
After setting the timer, if you tune in another station and turn off the radio,
the station tuned in last will be received when the timer turns the radio on.
Once you set the time
The radio is turned on at the same time everyday.
To check the preset time
Press ALARM.
To change the preset time
Set the desired alarm time. The time previously set i:
When POWER/LOCK is set to LOCK
The timer standby function does not work.
Page 15

How to Set the Sleep Timer
When you press SLEEP while listening to the radio
The radk) will be turned off automatically after about 65 minutes.
To turn off the radio before the sleep time
Press ON/OFF.
How to have the radio turned off and turned on automatically
You can have the radio turned off and turried on automatically using both the
sleep timer and timer standby function. First set the standby function (page
#), then press SLEEP.
9
Page 16

ow to Use the Supplied SW Com pact Antenna—For better sw reception
i ^
sualty the telescopic antenna is sufficient for SW reception. However, in t
etal or concrete building, the use of the supplied SW compact antenna is
commended.
How to Use an Optional Anten
I Anl«IUW Q>HB*ClBrfe:g
Connect an optional coaxial cable to the supplied antenna connector.
Connect the antenna connector to the EXT ANT jack of the ICF-SW7600.
Shield braid
1
a steel-frame building, a mountainous area, at a distance from the
ansmitter or in a location where ignition noise is severe, FM reception may
e unsatisfactory with the telescopic antenna. In this case, connect a
ommercially available external FM antenna with a 75-ohm coaxial cable.
1 Fully pull out the cord from the case.
2 Attach the coupler to the telescopic antenna.
3 When the window can be oper>ed:
Extend the cord and the case out through the window, after making sure
there is no danger.
When the window cannot be opened:
Fully exter>d the cord along the frvne of the window.
After using
Method A
With a connecting cord, connect the OUTPUT jack of the antenna controller
(supplied with the AN-1 or the AN-102) and the EXT ANT jack of the
ICF-SW7600,
Method B (for LW/MW reception onty)
1 With a connecting cord, connect the OUTPUT jack of the antenna
controller and the INPUT jack of the antenna coupler (supplied with the
AN-1 or AN-102).
2 Put the antenna coupler near the ICF-SW7600.
Example: When the AN-1 is used.
Notes
• When receiving MW or LW broadcasts without an external antenna, be sure
to disconnect a SW external antenna. Otherwise, you cannot receive them
as the built-in ferrite bar antenna does not function.
• If there is lightening, do not touch the wire of an external antenna and
disconnect its AC power adaptor (if connected) immediately.
• When using an external antenna, retract the telescopic antenna.
• Locate an outdoor antenna as far away from the street as possible.
• For details about an external antenna, refer to its instruction manual.
Page 17

Recording Radio Programs
Specifications
Cassette recorder
to MIC
Coop)
00
am.
You can start recording programs at the desired time by connecting the radio
to the Sony TCM-27 cassette-corder.
RK-G69 (optional)
to REC OUT i;
ICF-SW7600
1
Tune in a desired station.
2 Set the standby function (page #).
3 Connect the radio to the cassette-corder as shown above.
4 Set the standby function of the cassette-corder.
For details, see the operating instructions of the cassette-corder.
Notes on recording with the timer
• You cannot start recording at a desired time if you use the cassette-corder
not equipped with the timer star>dby switch.
• When you use the Sony TCM-25, the optional RM-43 synchronizing
recording unit is required.
Circuit system
Frequency range
France. Germany. Scandinavian countries tmd
Saudi Arabia
FM*
Other countries
Saudi Arabia
LW
Other countries
With the MW CH STEP selector at 9 kHz
MW
With the MW CH STEP selector at 10 kHz
Saudi Arabia
SW
Other countries
■Stereo reception when using stereo earphones
Speaker
Power output
Power requirements
Weight
Accessories supplied
Design and specifications subject to change without notice.
Optk»rwt
Car battery cord
Connecting cord
Plug adaptor
Cassette<order
LW/MW/SW wide range antenna
FM: Superheterodyne
AM; Dual conversion superheterodyne
Telescopic antenna (FM/SW)
Buitt-in ferrite bar antenna (MW/LW)
Approx. 77 mm (31/9 inches) dia. 8 ohms
400 mW (at 10% harmonic distortion)
Recording output jack (minijack)
output level 0.775 mV (-60 dB)
ou^ut impedance 1 kilohm
Headphone jack (stereo minijack) for
16 ohm stereo earphones
6 V DC
Four size AA (R6) batteries
Supplied AC power adaptor
For the U.S.A. model: 120 V AC, 50/60 Hz
For the Canadian model: 110, 120, 220, or 240 V AC
adjustable, 50/60 Hz
Optional OCC-127A car battery cord for use
with 12 V car battery
Optional DCC-240 car battery cord for use
with 24 V car battery
Approx. 10 hours of listening for four hours
a day at a normal volume, using Sony SUM-3 (NS)
batteries
Approx. 191.2 X 118 X 32.3 mm (w/h/d)
(7®/g X 43/4 X i5/,g inches)
including protecting parts aiKl controla
Approx. 615 g (1 lb. 5.7 oz.) including batteries
Stereo earphones (1), Ear adaptor (2), AC power adaptor (1).
Compact antenna (1). Antenna connector (I).
Carrying case (1), Wave handbook (1)
DCC-127A. DCC-240
RK-G69 (minipiug to mir\iplug, no resistor type)
PC-261 M
TCM-27
AN-1, AN-102
87.5-108 MHz
76-108 MHz
150 - 285 kHz
150 - 528 kHz
531-1611 kHz
530-1610 kHz
1615 - 26100 kHz
1615 - 29995 kHz
Page 18

Troubieshooting Guide
fi
Th« power is not turned on even if you press the ON/OPF button.
• Weak batteries.
• Incorrect polarity of batteries. See page #.
• The POWER/LOCK switch is set to LOCK.
• The AC power adaptor or a car battery cord is not connected on
AC operation.
• Battery operation is attempted while an AC power adaptor or a car
battery cord is connected to the unit, but not to a wall outlet or
cigarette lighter socket.
No display in the time display
• Incorrect polarity of batteries. See page #.
• Weak batteries.
Display is dim.
• Weak batteries.
Replace all batteries with new ones for the frequency display or
the time display.
• The unit is being used in extremely high temperatures or in a
place will excessive moisture.
Sound is not heard at all.
• The VOLUME control is turned down completely.
• The stereo earphones are plugged in.
• Incorrect polarity of batteries. See page #.
Very weak or interrupted sound, or unsatisfactory reception.
• Weak batteries.
• Tuning or antenna adjustment is not correct.
^ Tune in correctly with manual tuning. See page #. For antenna
adjustment, see page #.
• Weak signal. ^ When in a vehicle or in a building, listen near a
window.
• Figures on the frequency display differ a little from the acted
station frequency. ^ Tune more precisely with the FINE TUNING
control. See page 0.
• The SENS selector is set to LOCAL ^ Set to DX.
• The AM MODE selector is set to FINE, LSB or USB. Set to
NORM.
Frequency cannot be input during direct tuning.
FM or AM/EXECUTE was not pressed within 5 seconds after the
preset keys have been pressed.
Stations have not been stored.
You made wrong operaticxi when you store stations. ^ To store
stations, press one of the PRESET/DIRECT TUNING buttons while
holding down the ENTER button.
No key input is acceptable.
The KEY PROTECT button has been pressed, -e press this button
again to make ^ mark disappear.
The preset station cannot be received during preset tuning.
• Incorrect PRESHT^ITtECT TUNING button bas been preset.
• The preset station was erased. ^ After replacing the batteries,
store the station again.
The radio is not turned on at the timer-setting time.
• The STANDBY button has not been pressed.
• When it took more than 10 minutes to replace batteries, the timer
setting-time was erased.
^ After replacing the batteries, set the timer again.
• The POWER/LOCK switch is set to LOCK.
 Loading...