

Page 1

SONY
3-859-292-11 (1)
FMI5W1-9ÌMW
11 Band Receiver
Operating Instructions
Manual de instrucciones
Istruzioni per l'uso (faccita opposta)
Manual de instru0es (lado inverso)
ICF-SW12
Sony Corporation © 1997 Printed in Jsqsan
Page 2
Owner's Record
The model nuir^>er u located at the bottom and the
smal number is located in the battery compartment.
Record the serial number in the space provided
You are cautioned that any changes or
modifications rtot expressly approved in this
manual could void your authority to operate this
equipment.
Page 3

sdiËUââi
Before You Begin
Thank you for choosing the Sony receiver' h wiii
give you many hours of reliable service aiul listening
pleasure.
Before operating the receiver, please read these
inatructions ttuMoughly and retain them for future
refereiKe.
Features
FM/SW/MW World band receiver for travelers
• FM/SW 1-9/MW 11 band receiver with high
sensitivity and selectivity
< Band ^read system entbies you to easily tune in
SW slatiorw
• Built-in alarm
• Summer tune adjuatment
< Built-in earphone jack
• Snooze functlan
Power Sources
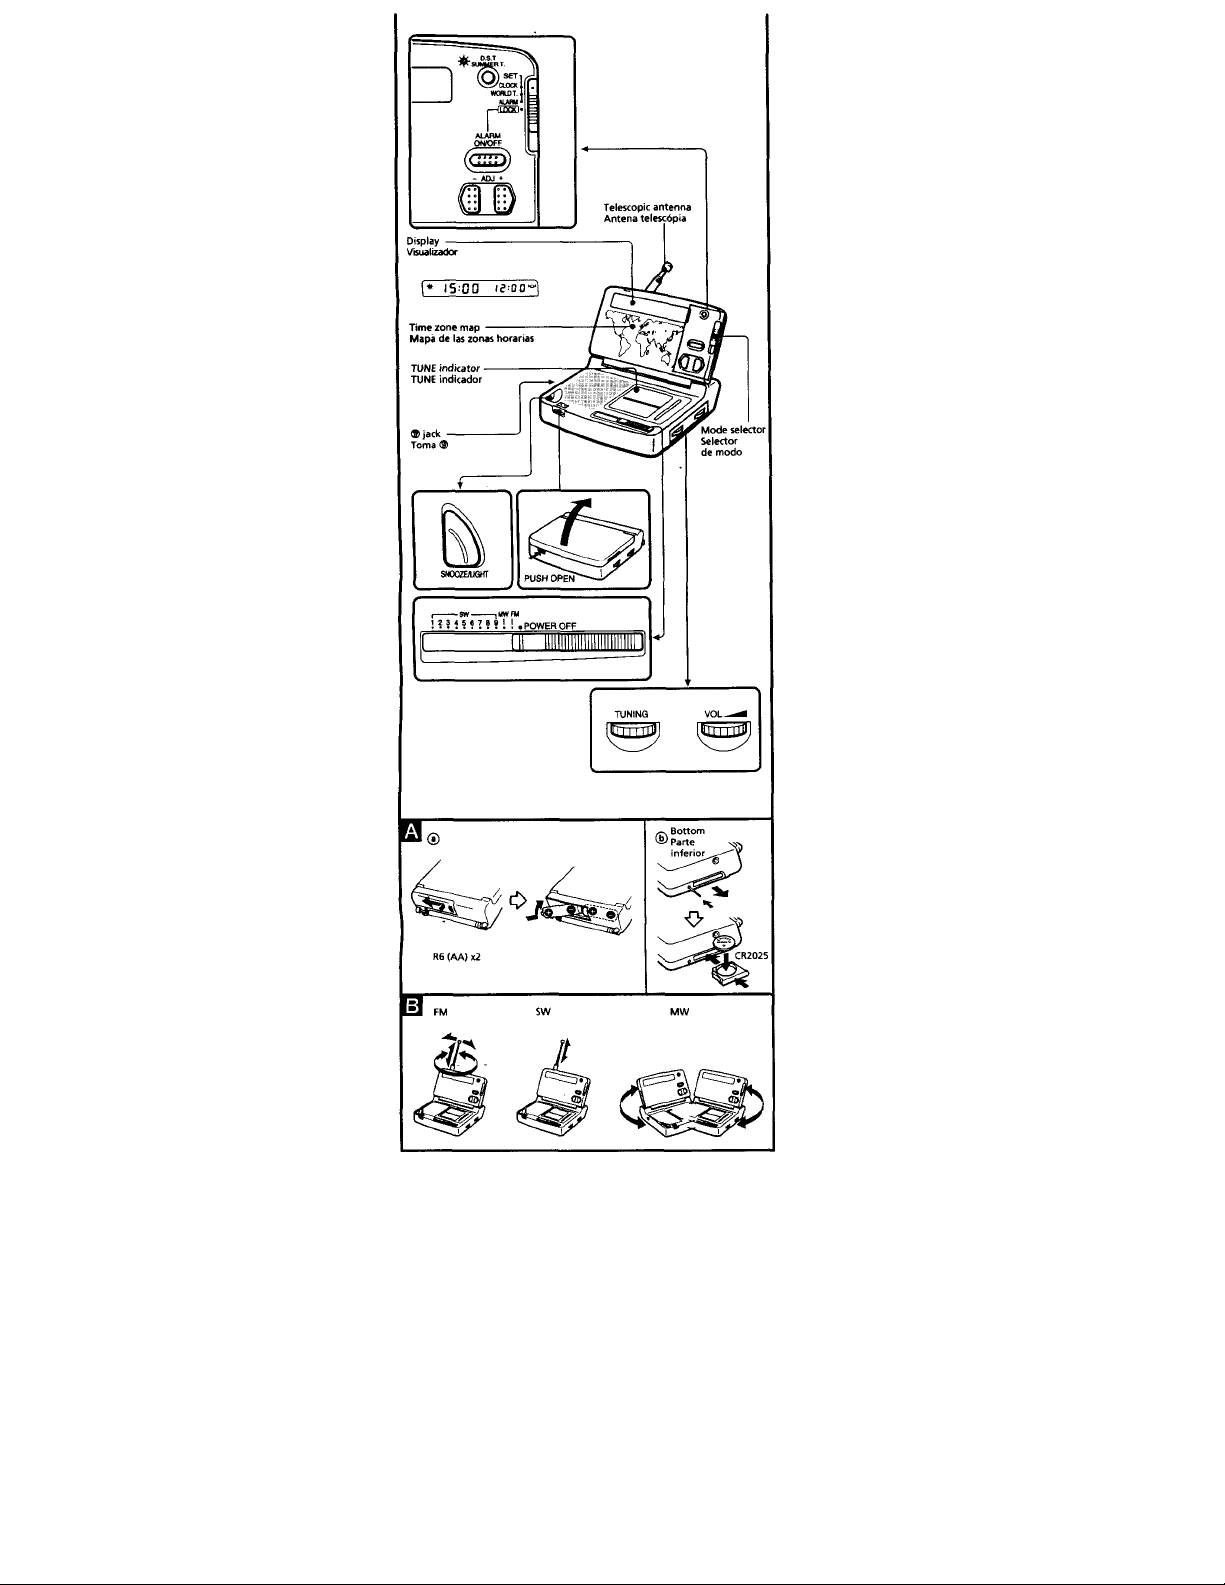
Installing Batteries (see
Fig. Q-€»
1 While pressing the lid. slide it in the
direction of the arrow.
2 Insert two R6 (size AA) batteries (not
supplied) with correct polarity.
Battsry Hf«
Approx. 35 houis, using Sony batteries R6 (AA)
Iteplacing batteriM
When the sound of the radio becomes distorted or
unstadsle and the alarm sound b geltii^ lower
replace both KS (size AA) batteries.
Note on dry battery
When die unit Is not be used for a long period
time remove dve batteries to avoid damage from
battery leakage and cono$hn.
Installing Lithium
Battery for Clock
Backup
2 Insert the battery with the flat (••-) side
Uthium batt«ry life
Approx, lyeacof clock operation, using Sony
CR 2025 lithium battery
Repfadng (fthfum b«tf*ry
Whm the display becomes dim. replace the CR2025
lidiium batte^.
Note
You cannot Ibten to the radio by only installing a
lithium battery. You should use two R6 (size AAj
batteries (not supplied).
Notes on bgttorios
• iesp the lithium battery out of reach of children.
• Wipediebattery vritha dry cloth to assuie good
• Be lure to Install the battery in the correct polarity
CAUTION
Danger of explosion if battery b incorrectly replaced.
Replace only widi the same or equivalent type
recoeunsnded by the equipmeiti rnanufactun.
Discard used batteries according to manufacture's
instnictiorts.
(See Fig. Q-®)
1 Positi<^ the bottom of the radio
upward and insert a tip of a ballpoint
pen or something equivalent into the
hole next to the lithium battery
compartment and push.
The battery holder comes out.
facing upwards, then insert the
compartment until it is locked in
position.
Should the battery be swallowed, immediately
cofistill a doctor.
contact.
poaition. •
• Do not hold d«e battery with metallic tweeaers, as
doing so may cause a short-circuit.
• Da ruX break up the battery or throw if into a fire,
vridch might cause it to explode.
Carefully dispose of the used battery.
To change the display to
the daylight saving time
(summertime)
indication
Press D.S.T.»SUMMER T.
The -ill- mark apptears in the display and
the time indication changes to summer
time.
To cancel the summer time indication,
press D.S.T.'SUMMER T. again.
Operating the Radio
1 Select a desired band (FM, SWf-9 or
MW).
2 Tune in a station using the TUNING.
TUNE (tuning indicator) lights up when
a staticMt is tuned in.
3 Adjust die volume using VOL (volume).
• To turn off the radio, tel to ROWER OFF.
To Improve radio reception (See Fig.
IB)
FM: Extend the teieacopk antenna for better
reception.
SW: Stand the telescopic anteruu vertically
MW: Rotate die unit horizontally for optimum
A ferrite bar antenna is built into the u
Setting the Alarm
1 Set the mode selector to ALARM.
FResewTTae alahmtime
iS.-OO
2 Press the ADJ + or - to set the alarm
time.
3 Set mode selector to LOCK.
PftESENTTlMt aiARMTlME
iS
4 Press ALARM ON/OFF.
PflSSeMT TIMË AlABM TIME
iS’OQ le-OD“
(When alarm is set, the alarm time
appears in the display, if you press
ALARM ON/OFF again, the alarm time
is disappeared and is canceled.)
• Th« alarm sound will com« on at the preset time
and will auiomabcaliy turn itself off after about 60
miitutts. uttless it is turned off manually.
* To stop the alam sound, press ALARM ON/OFF.
To wako to tho alarm sound at the
same time the next day.
Press ALARM ON/OFF agaiiv The time set yesterday
will show up in the display.
To dose for a few more minutes,
press SNOOZE/UGHT.
TTw alarm will shut off, but will come on again after
about 9 minutes. You can repeat dus process six
tunes at the mostj№ an hour.
ic
-00
Page 4

Setting the Clock
The display will show a 12KX) (noon) indication
when the CR2025 lithium battery is first installed.
1 Set the mode selector to WORLD T.
2 Press ADJ + or - to choose the area to
which you want to set the time.
ADJ +
{For example, if you want to set the
time to 8:15 AM in Tokyo, move the T
mark to the "+9" position.)
3 Set the mode selector to CLOCK and
press ADJ + or - to set the time.
When ADJ + or - is held do\\m, the
minute digits advance rapidly.
The hour digits advance one by one
when the minute digits advance to "00"
after "59".
4 Set the mode selector to ALARM or
LOCK. The " : " mark stops flashing and
the clock will now start.
Note
If you remove the lithium battery after setting the
clock, the memory will be canceled. Set the clock
again.
Note on LOCK function
Normally, set the mode selector to LOCK so that ADJ
+ and - do not ftmction. This enables you to avoid
misoperation.
To set the time to the second
In step 4, set the mode selector to ALARM or LOCK
simultaneously with the radio or telephone time
signal.
To Check the Local Time of the Desired Time Zone
The numbers above and below the hme zone map
indicate the time differences from the UTC
(Universal Time Coordmated) ¡wsition. For example,
the time difference in Tokyo is +9 hours.
The light grey areas indicate special time zones.
These areas maintain special time differences
(written beside them).
Example: To check the local time in New
York.
Set the mode selector to WORLD T. and
press ADJ + or - to move the ▼ mark to the
"-5" position.
If you want to know the local time and the difference
in time in 30 minute uiuts, add it to the present time
(or subtract it from the present time). (For example, if
the difference in time is five hours and 30 minutes,
move the ▼ mark to the "+5" position and add 30
minutes to the displayed time.
PRESENT TIME ALARM TIME
Present time
▼ mark
Notes
• The buzzer sound level carmot be adjusted.
• If the radio is on and earphone is cormected to the
® jack, the buzzer alarm is heard from both the
speaker and earphone.
• If the radio is off and the earphone is connected to
the ® jack, the buzzer alarm is heard only from the
speaker.
• The mark flashes in the display at the preset
alarm time.
Lighting the Display
-Light Function
Press SNOOZE/UGHT.
The display lights up for about 10 seconds.
Precautions
Before operating the unit, be sure to install the
CR2025 clock battery.
• Operate the unit on the following power sources;
Radio: 3V EXI, two R6 (size AA) batteries.
Clock; 3V DC, one CR2025 lithium battery.
• Do not leave the imit in a location near heat
sources, or in a place subject to direct sunlight,
excessive dust, or mechanical shock, or in a car
with its windows closed.
• ^\ould any sobd ot^ect or liquid fall into the unit,
remove the batteries and have it checked by
qualified personnel before operating it any further.
• When the casing becomes soiled, clean it with a
soft cloth dampened with a mild detergent
solution. Never use abrasive cleansers or chemical
solvents, as they may mar the casing.
• Since a strong magnet is used for the speaker, keep
persorxal credit cards with magnetic ceding or
spring- wound watches away from the unit to
prevent them from possible damage caused by the
magnet.
• In vehicles or in buildings, radio reception may be
difficult or noisy. Try listening near a window.
If you have any questior\s or problems concerning
your unit, please consult your nearest Sony dealer.
Specifications
Time display
24-hour system
Frequency range
FM: 87.5-108 MHz
SWl: 4.750 - 5.060 MHz (60 meter band)
SW2: 5.900 - 6.200 MHz (49 meter band)
SW3: 7.100 - 7.350 MHz (41 meter band)
SW4: 9.400 - 9.990 MHz (31 meter band)
SW5; 11.600 - 12.100 MHz (25 meter band)
SW6:13.570 - 13.870 MHz (22 meter band)
SW7; 15.100-15.800 MHz (19 meter band)
SW8:17.480 - 17.900 MHz (16 meter band)
SW9; 21.450 - 21.750 MHz (13 meter band)
MW: 530-1,605 kHz
Speaker
Approx. 4.5 cm (1 i3/i6 inches) dia.
Power output
100 mW (at 10% harmonic distortion)
Ou^ut
® jack (minijack)
Power requirements
Radio: 3V DC, two R6 (size AA) batteries
Clock: 3V DC, one CR 2025 lithium battery
Dimensions
Approx. Ill X 30.5 x 80.3 mm (w/h/d)
(4 3/g X 1 '/4 X 3 V< inches) incl. projecting parts
and controls (with the lid closed)
Mass
Approx. 233 g (8.2 oz.) incl. batteries
Accessory supplied
Sony CR 2025 lithium battery (1)
Short wave guide (1)
Design and specifications are subject to change
without notice.
 Loading...