

Page 1
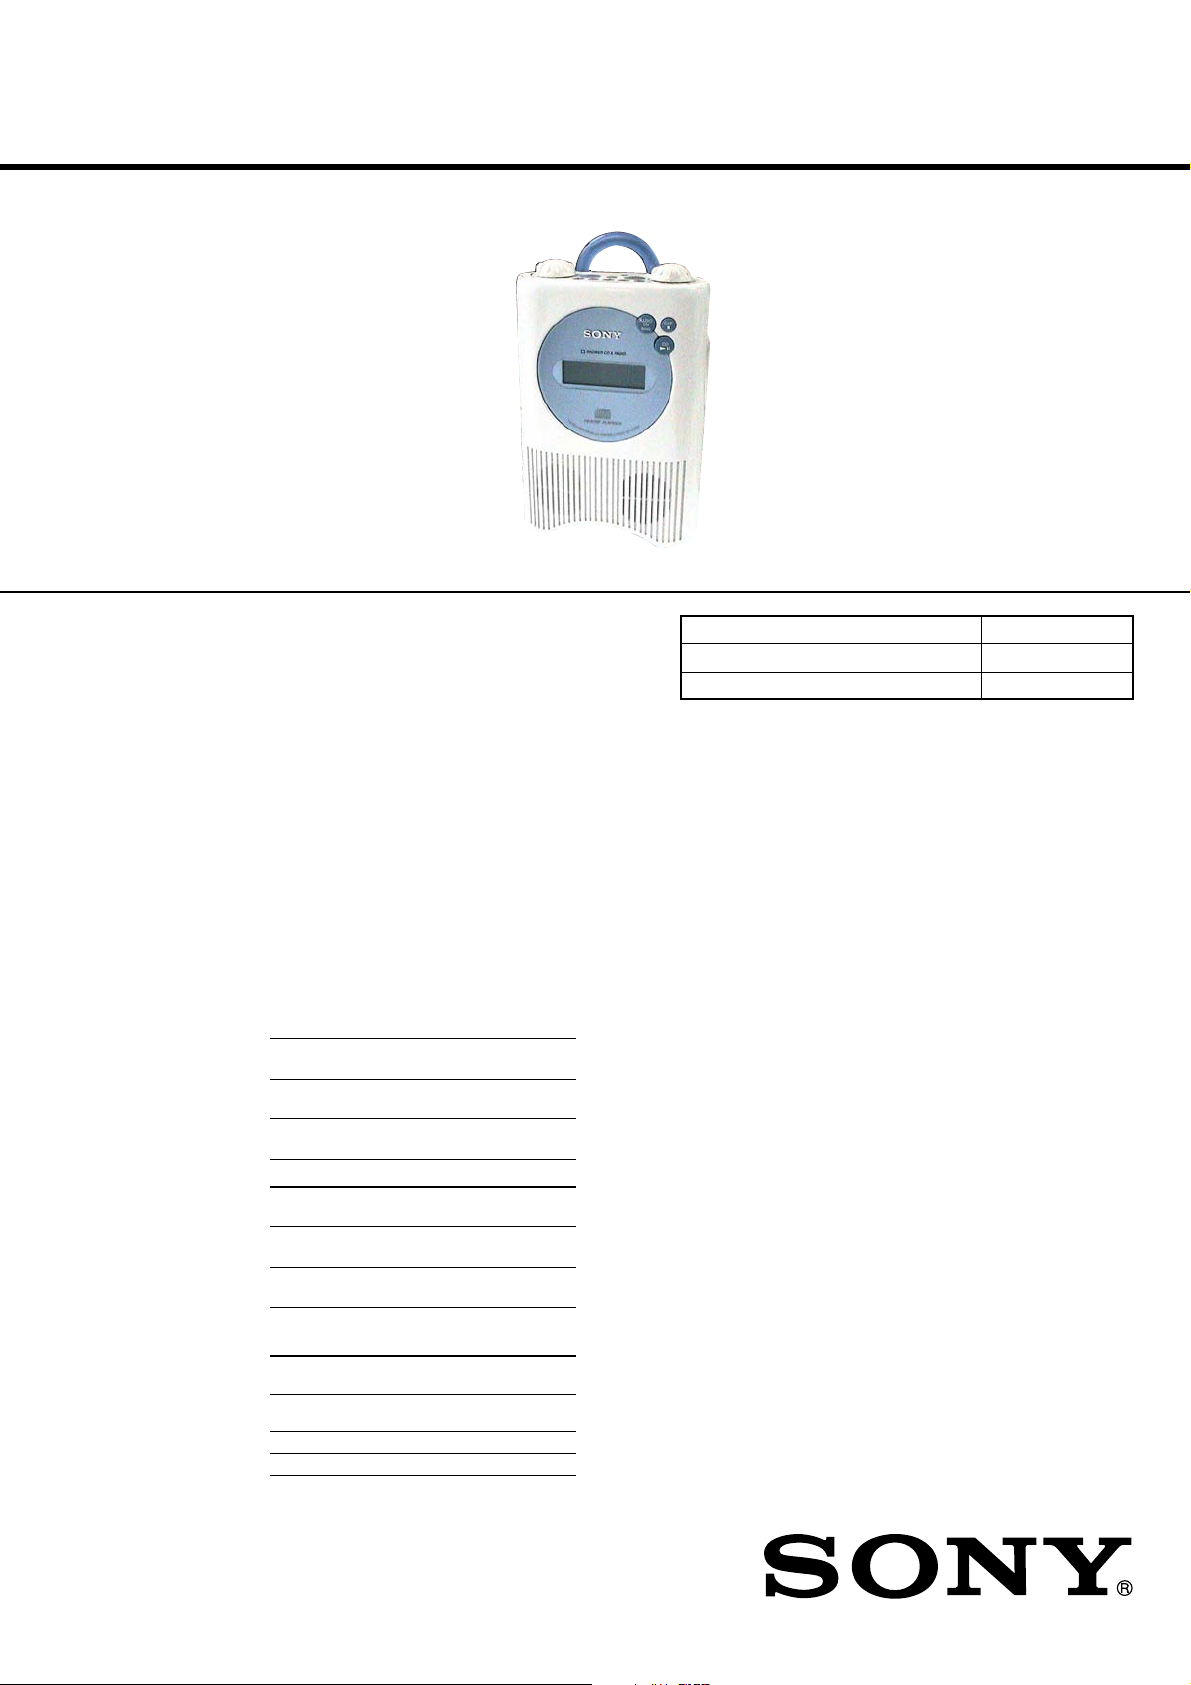
ICF-CD73/CD73V
SERVICE MANUAL
Ver. 1.1 2005.02
Photo: ICF-CD73V
SPECIFICATIONS
CD player section
System: Compact disc digital audio system
Laser diode properties: Material: GaAlAs
Wavelength: 780 nm
Emission duration: Continuous
Laser output: Less than 44.6 W
(This output is the value measured at a
distance of about 200 mm from the objective
lens surface on the optical pick-up block with
7 mm aperture.)
Frequency response: 20 — 20 000 Hz
Wow and flutter: Below measurable limit
Radio section
Frequency range: (ICF-CD73)
North America
Band Channel
FM 87.5 — 108 MHz 0.1 MHz
AM 530 — 1 710 kHz 10 kHz
FM 87.5 — 108 MHz 0.05 MHz
AM 531 — 1 710 kHz 9 kHz
Other countries/regions
Band Channel
FM 87.5 — 108 MHz 0.05 MHz
AM 531 — 1 611 kHz 9 kHz
FM 87.5 — 108 MHz 0.1 MHz
AM 530 — 1 610 kHz 10 kHz
Frequency range: (ICF-CD73V)
Band Range Channel
TV 2 — 13 ch 1 channel
WEATHER 1 — 7 ch 1 channel
FM 87.5 — 108 MHz 0.1 MHz
AM 530 — 1 710 kHz 10 kHz
+1
—1.5
step
step
step
dB
US Model
ICF-CD73V
Canadian Model
AEP Model
UK Model
E Model
ICF-CD73
Model Name Using Similar Mechanism ZS-X3CP
CD Mechanism Type KSM-900AAA
Optical Pick-up Name KSS-900A
General
Time display:
North America, UK: 12-hour system
Other countries/regions: 24-hour system
Speaker: 50 mm (2 inches) dia, 6 Ω
Power outputs:
400 mW + 400 mW (at 10% harmonic
distortion)
Power requirements:
6 V DC, 4 R14 (size C) batteries
External power source: DC IN 6 V
Dimensions:
Approx. 151.5 × 248 × 84 mm (w/h/d)
(Approx. 6 × 9
projecting parts and controls
Mass: Approx. 1 350 g (2 lb 16 oz) incl. batteries
Supplied accessories:
Suction cup (1), Strap (1)
AC power adaptor (1)*
* Supplied with European model only
Design and specifications are subject to change
without notice.
7
/8 × 3 3/8 inches) incl.
ICF-CD73
FM/AM CD PORTABLE RADIO
ICF-CD73V
TV/WEATHER/FM/AM
CD PORTABLE RADIO
9-877-131-02 Sony Corporation
2005B05-1 Personal Audio Group
© 2005.02 Published by Sony Engineering Corporation
Page 2
ICF-CD73/CD73V
Notes on chip component replacement
•Never reuse a disconnected chip component.
• Notice that the minus side of a tantalum capacitor may be damaged by heat.
Flexible Circuit Board Repairing
•Keep the temperature of the soldering iron around 270 ˚C during repairing.
• Do not touch the soldering iron on the same conductor of the
circuit board (within 3 times).
• Be careful not to apply force on the conductor when soldering
or unsoldering.
SAFETY CHECK-OUT
After correcting the original service problem, perform the following safety check before releasing the set to the customer:
Check the antenna terminals, metal trim, “metallized” knobs,
screws, and all other exposed metal parts for AC leakage.
Check leakage as described below.
LEAKAGE TEST
The AC leakage from any exposed metal part to earth ground and
from all exposed metal parts to any exposed metal part having a
return to chassis, must not exceed 0.5 mA (500 microamperes).
Leakage current can be measured by any one of three methods.
1. A commercial leakage tester, such as the Simpson 229 or RCA
WT -540A. Follo w the manufacturers’ instructions to use these
instruments.
2. A battery-operated AC milliammeter. The Data Precision 245
digital multimeter is suitable for this job.
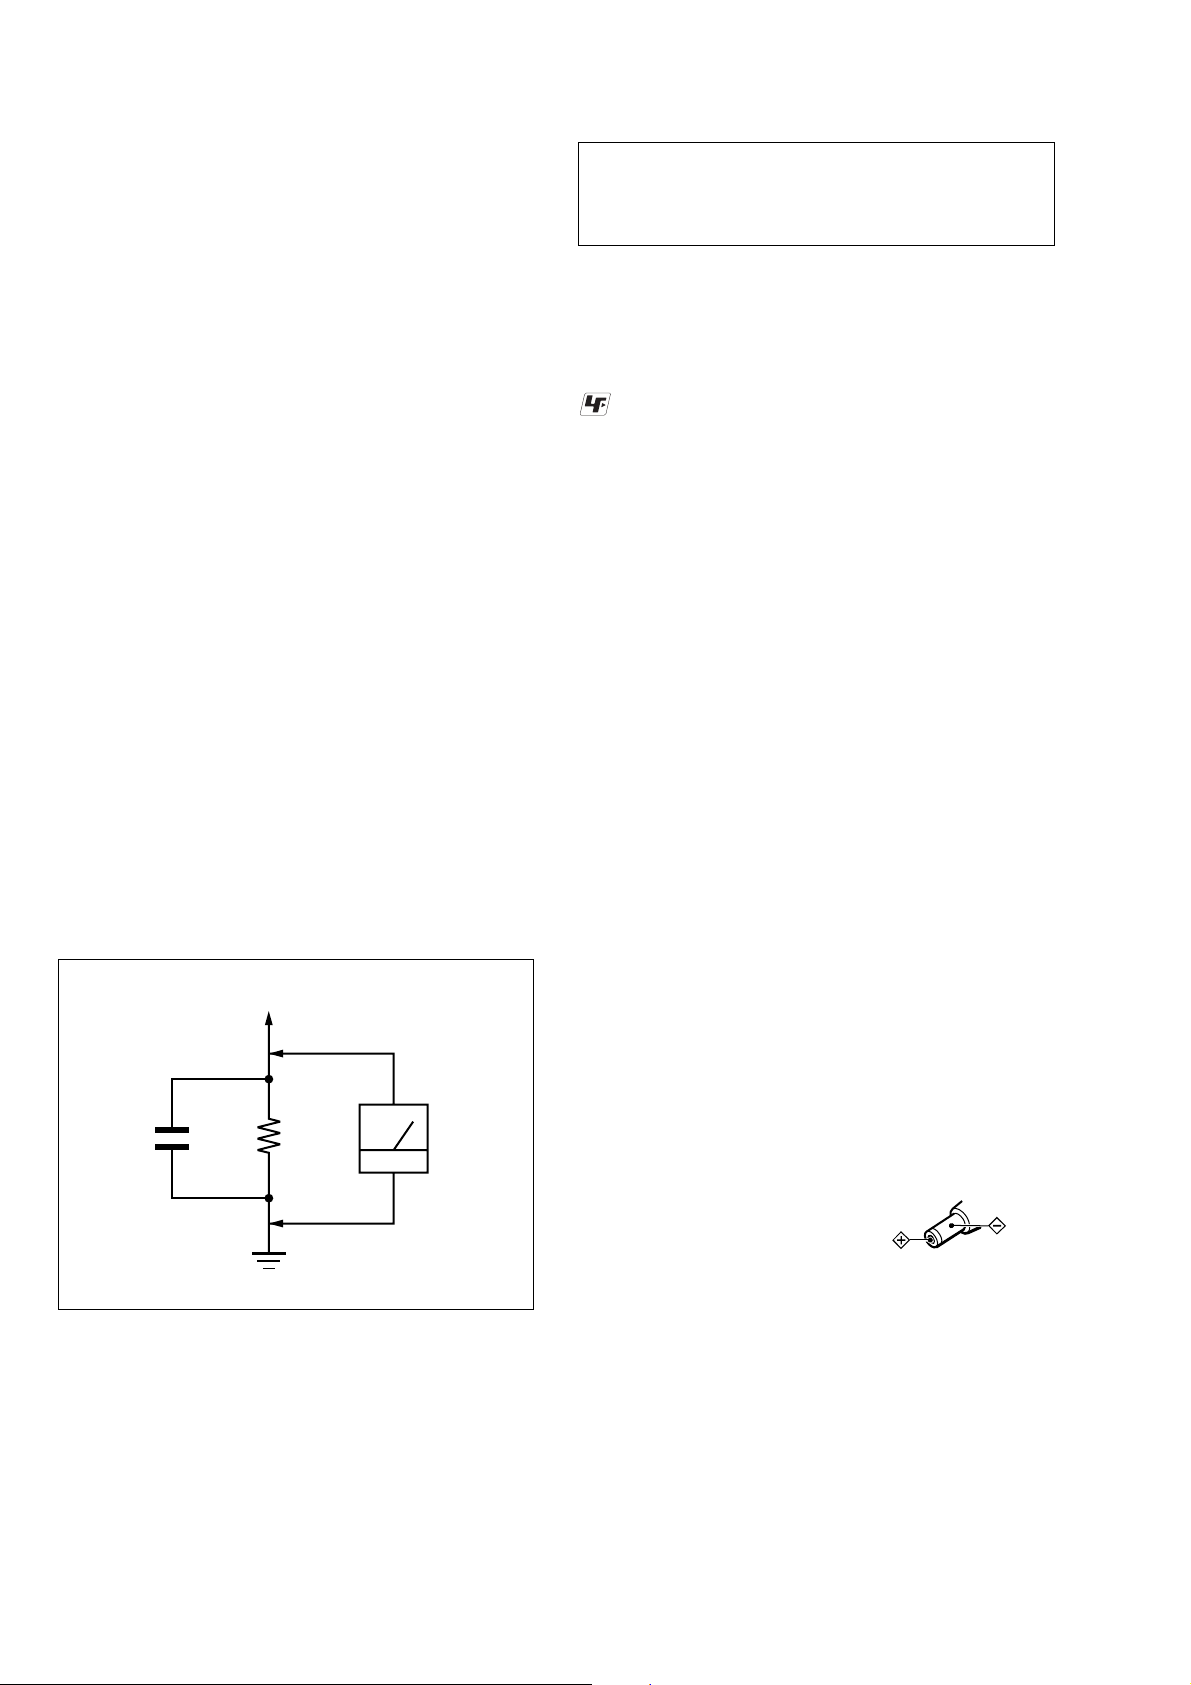
3. Measuring the voltage drop across a resistor by means of a
VOM or battery-operated AC voltmeter. The “limit” indication is 0.75 V, so analog meters must have an accurate lowvoltage scale. The Simpson 250 and Sanwa SH-63T rd are examples of a passive VOM that is suitable. Nearly all battery
operated digital multimeters that have a 2 V A C range are suitable. (See Fig. A)
To Exposed Metal
Parts on Set
AC
0.15 µF
1.5 k
Ω
voltmeter
(0.75 V)
CAUTION
Use of controls or adjustments or performance of procedures
other than those specified herein may result in hazardous radiation exposure.
UNLEADED SOLDER
Boards requiring use of unleaded solder are printed with the leadfree mark (LF) indicating the solder contains no lead.
(Caution: Some printed circuit boards may not come printed with
the lead free mark due to their particular size)
: LEAD FREE MARK
Unleaded solder has the following characteristics.
• Unleaded solder melts at a temperature about 40 ˚C higher than
ordinary solder.
Ordinary soldering irons can be used but the iron tip has to be
applied to the solder joint for a slightly longer time.
Soldering irons using a temperature regulator should be set to
about 350 ˚C.
Caution: The printed pattern (copper foil) may peel away if the
heated tip is applied for too long, so be careful!
• Strong viscosity
Unleaded solder is more viscou-s (sticky, less prone to flow)
than ordinary solder so use caution not to let solder bridges occur such as on IC pins, etc.
• Usable with ordinary solder
It is best to use only unleaded solder but unleaded solder may
also be added to ordinary solder.
Using the AC power adaptor
•When operating the unit with an external power source, do not remove the
batteries.
These batteries serve to backup the clock and memory settings. Since the
batteries discharge in this case as well, we recommend changing them about
once a year.
•To pre vent battery leakag e, we recommend removing the batteries when the
unit is connected to a wall outlet.
• Before connecting and disconnecting the external power source plug, be
sure to turn off the radio/CD. Otherwise, “E ” may be displayed. When this
occurs,turn on the radio/CD so that “E ” disappears..
•When the A C power adaptor is not to be used for a long period of time,unplug
it both from the DC IN 6 V jack and from the wall outlet.
•When the cover of the DC IN 6 V jack is open (to use the AC power adaptor), the jack area is not splash-resistant. When the AC power adaptor is not
connected to the DC IN 6 V jack, be sure to close the cover of the DC IN 6
V jack.
• Use the recommended Sony AC poweradaptor * only. The polarity of the
plugs of other manufacturers may be different. Failure to use the recommended AC power adaptor may cause the unit to malfunction.
* Supplied with European model only
If you have any questions or problems concerning your unit,please consult
your nearest Sony dealer.
Earth Ground
Fig. A. Using an AC voltmeter to check AC leakage.
SAFETY-RELATED COMPONENT WARNING!!
COMPONENTS IDENTIFIED BY MARK 0 OR DOTTED
LINE WITH MARK 0 ON THE SCHEMATIC DIAGRAMS
AND IN THE PARTS LIST ARE CRITICAL TO SAFE
OPERATION. REPLACE THESE COMPONENTS WITH
SONY PARTS WHOSE PART NUMBERS APPEAR AS
SHOWN IN THIS MANUAL OR IN SUPPLEMENTS PUBLISHED BY SONY.
2
Polarity of the plug
About CD-Rs/CD-RWs
This unit is compatible with CD-Rs/CD-RWs but playback capability may v ary
depending on the quality of the disc,the recording device and application software.
ATTENTION AU COMPOSANT AYANT RAPPORT
À LA SÉCURITÉ!
LES COMPOSANTS IDENTIFIÉS P AR UNE MARQUE 0
SUR LES DIAGRAMMES SCHÉMATIQUES ET LA LISTE
DES PIÈCES SONT CRITIQUES POUR LA SÉCURITÉ
DE FONCTIONNEMENT. NE REMPLACER CES COMPOSANTS QUE PAR DES PIÈCES SONY DONT LES
NUMÉROS SONT DONNÉS DANS CE MANUEL OU
DANS LES SUPPLÉMENTS PUBLIÉS PAR SONY.
Page 3

TABLE OF CONTENTS
1. SERVICING NOTES .............................................. 4
2. GENERAL .................................................................. 5
3. DISASSEMBLY
3-1. Disassembly Flow ........................................................... 6
3-2. Cabinet (Front) Section ................................................... 6
3-3. Cabinet (Upper) Section ................................................. 7
3-4. Chassis (Main) Section ................................................... 7
3-5. LCD Board ...................................................................... 8
3-6. Mechanism Deck (KSM-900AAA) ................................ 8
3-7. Optical Pick-up (KSS-900A) .......................................... 9
3-8. Speaker (SP101)/(SP201) ............................................... 9
4. TEST MODE .............................................................. 10
5. ELECTRICAL ADJUSTMENTS........................ 13
6. DIAGRAMS
6-1. Block Diagram – CD Section – .................................... 17
6-2. Block Diagram – TUNER Section (ICF-CD73) – ....... 18
6-3. Block Diagram – TUNER Section (ICF-CD73V) – .... 19
6-4. Block Diagram – MAIN Section – ............................... 20
6-5. Note for Printed Wiring Boards and
Schematic Diagrams ....................................................... 21
6-6. Printed Wiring Board – CD Section – ......................... 22
6-7. Schematic Diagram – CD Section – ............................. 23
6-8. Printed Wiring Board
– TUNER Section (ICF-CD73) – .................................. 24
6-9. Schematic Diagram
– TUNER Section (ICF-CD73) – .................................. 25
6-10. Printed Wiring Board
– TUNER Section (ICF-CD73V) – ............................... 26
6-11. Schematic Diagram
– TUNER Section (ICF-CD73V) – ............................... 27
6-12. Printed Wiring Boards – MAIN Section – ................... 28
6-13. Schematic Diagram – MAIN Section –........................ 29
6-14. Printed Wiring Boards – POWER Section – ................ 30
6-15. Schematic Diagram – POWER Section – .................... 31
6-16. IC Pin Function Description .......................................... 34
ICF-CD73/CD73V
7. EXPLODED VIEWS
7-1. Overall Section ................................................................ 36
7-2. Cabinet (Front) Section ................................................... 37
7-3. Cabinet (Main) Section ................................................... 38
7-4. Cabinet (Upper) Section ................................................. 39
7-5. Cabinet (Rear) Section-1 ................................................ 40
7-6. Cabinet (Rear) Section-2 ................................................ 41
7-7. Cabinet (Rear) Section-3 ................................................ 42
7-8. Optical Pick-up Section (KSM-900AAA) ..................... 43
8. ELECTRICAL PARTS LIST .............................. 44
3
Page 4
ICF-CD73/CD73V
Ver. 1.1
SECTION 1
SERVICING NOTES
NOTES ON HANDLING THE OPTICAL PICK-UP
BLOCK OR BASE UNIT
The laser diode in the optical pick-up block may suffer electrostatic break-down because of the potential difference generated
by the charged electrostatic load, etc. on clothing and the human
body.
During repair, pay attention to electrostatic break-down and also
use the procedure in the printed matter which is included in the
repair parts.
The flexible board is easily damaged and should be handled with
care.
NOTES ON LASER DIODE EMISSION CHECK
The laser beam on this model is concentrated so as to be focused
on the disc reflective surface by the objective lens in the optical
pick-up block. Therefore, when checking the laser diode emission, observe from more than 30 cm away from the objectiv e lens.
LASER DIODE AND FOCUS SEARCH OPERATION
CHECK
During normal operation of the equipment, emission of the laser
diode is prohibited unless the upper lid is closed while turning ON
the S701. (push switch type)
The following checking method for the laser diode is operable.
• Method
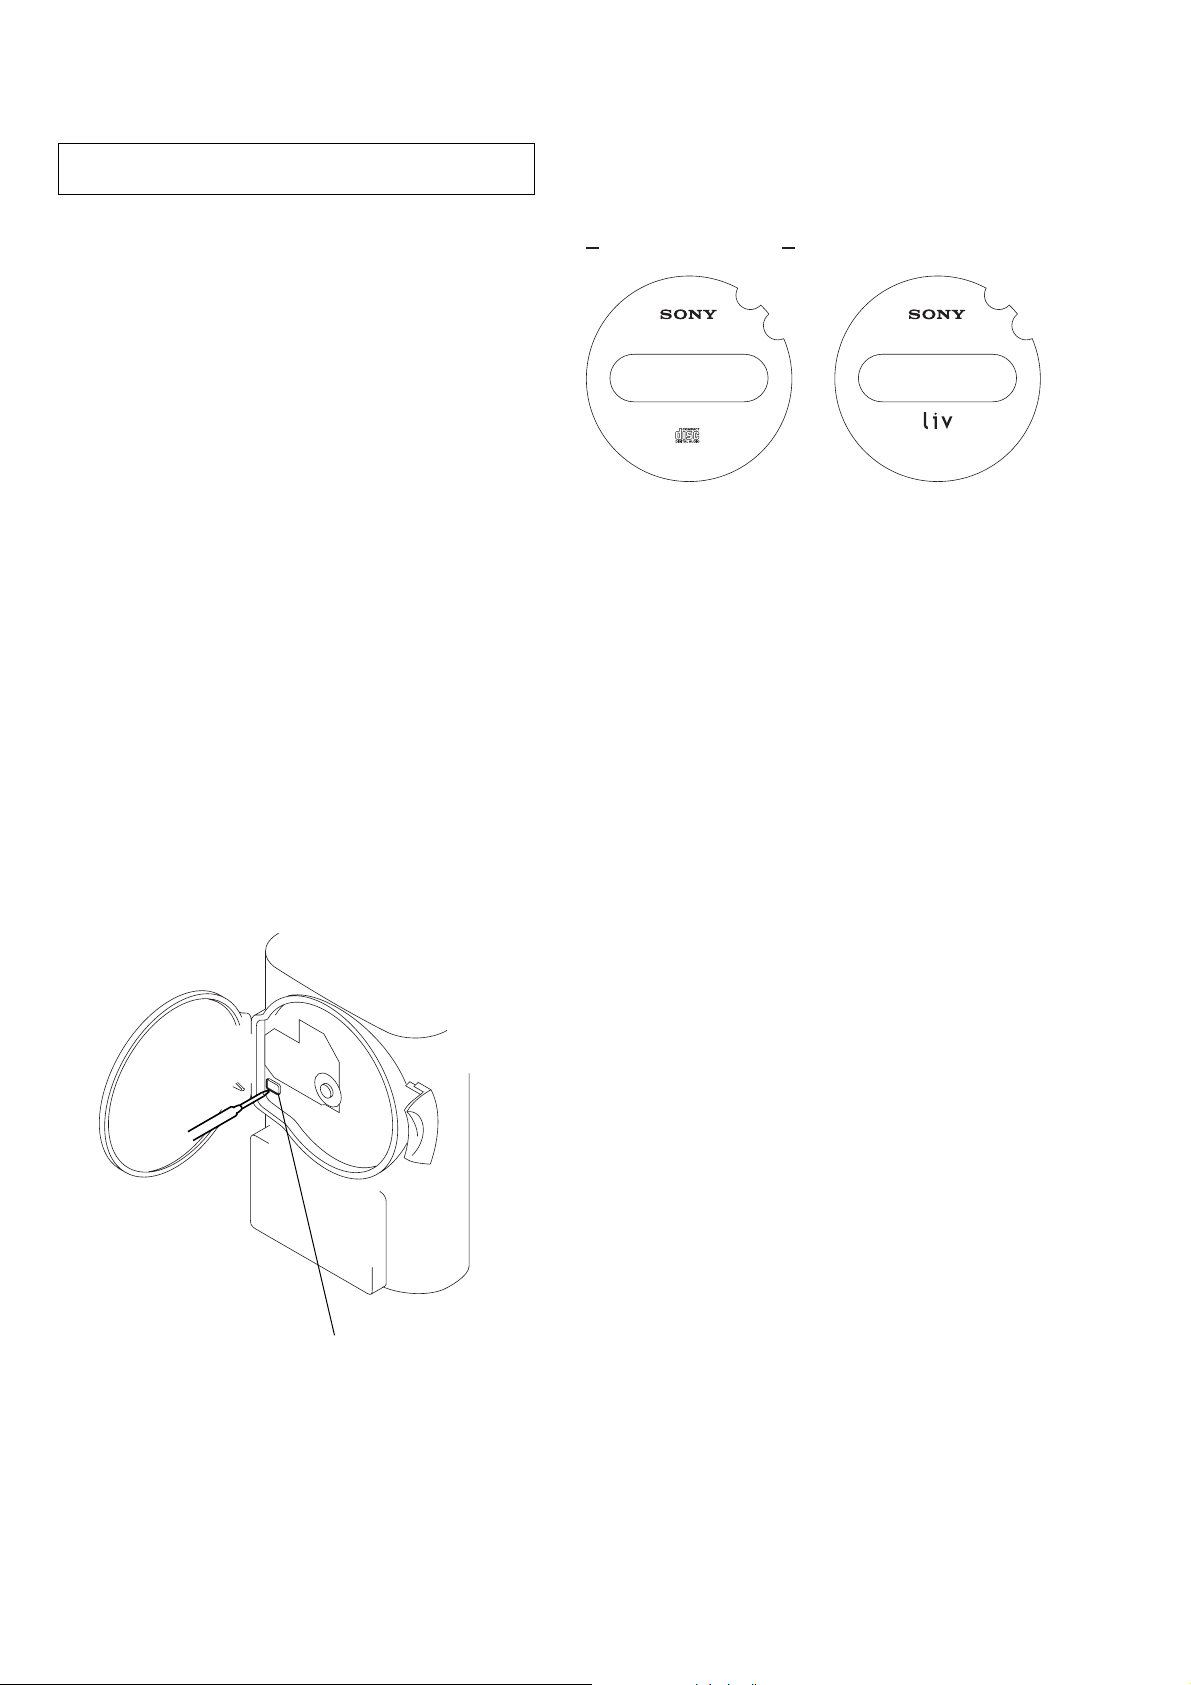
Emission of the laser diode is visually checked.
1. Open the lid.
2. Push the S551 as shown in Fig.1.
3. Press the [CD ] button.
4. Check the object lens for confirming normal emission of the
laser diode. If not emitting, there is a trouble in the automatic
power control circuit or the optical pick-up.
In this operation, the object lens will move up and down 2
times along with inward motion for the focus search.
NX
DISCRIMINATION OF ORIGINAL AND LIV MODEL
There are two types of ICF-CD73V.
Refer to following.
WINDOW Front View
ORIGINAL MODEL
LIV MODEL
S551
Fig.1 Method to push the S551
4
Page 5
SECTION 2
GENERAL
ICF-CD73 ICF-CD73V
ICF-CD73/CD73V
This section is extracted from
instruction manual.
CLOCK
MODE
AUTO
OFF
M
IN
VOLUME
X
A
M
1
PRESET TUNING/PRESET TIMER
SELECT/ PRESET
TIMER
SET
ON/OFF
5432
RADIO
ON
BAND
TUNE/TIME SET
TIMER SET
OFF
CD
AUTO
OFF
MIN
VOLUME
MAX
1
PRESET TUNING/PRESET TIMER
SELECT/ PRESET
FM wire antenna
AM
AUTO OFF
TIMER
RADIO CD
FM12PM
MHz
kHz
SHUFFLE
ALL
REP1
PRESET
TRACK
RADIO CD
WEATHER
TV
AM
FM12PM
CLOCK
MODE
TIMER
SET
ON/OFF
5432
RADIO
FM wire antenna
AUTO OFF
TIMER
MHz
kHz
ON
BAND
SHUFFLE
REP1
TUNE/TIME SET
TIMER SET
OFF
CD
ALL
PRESET
TRACK
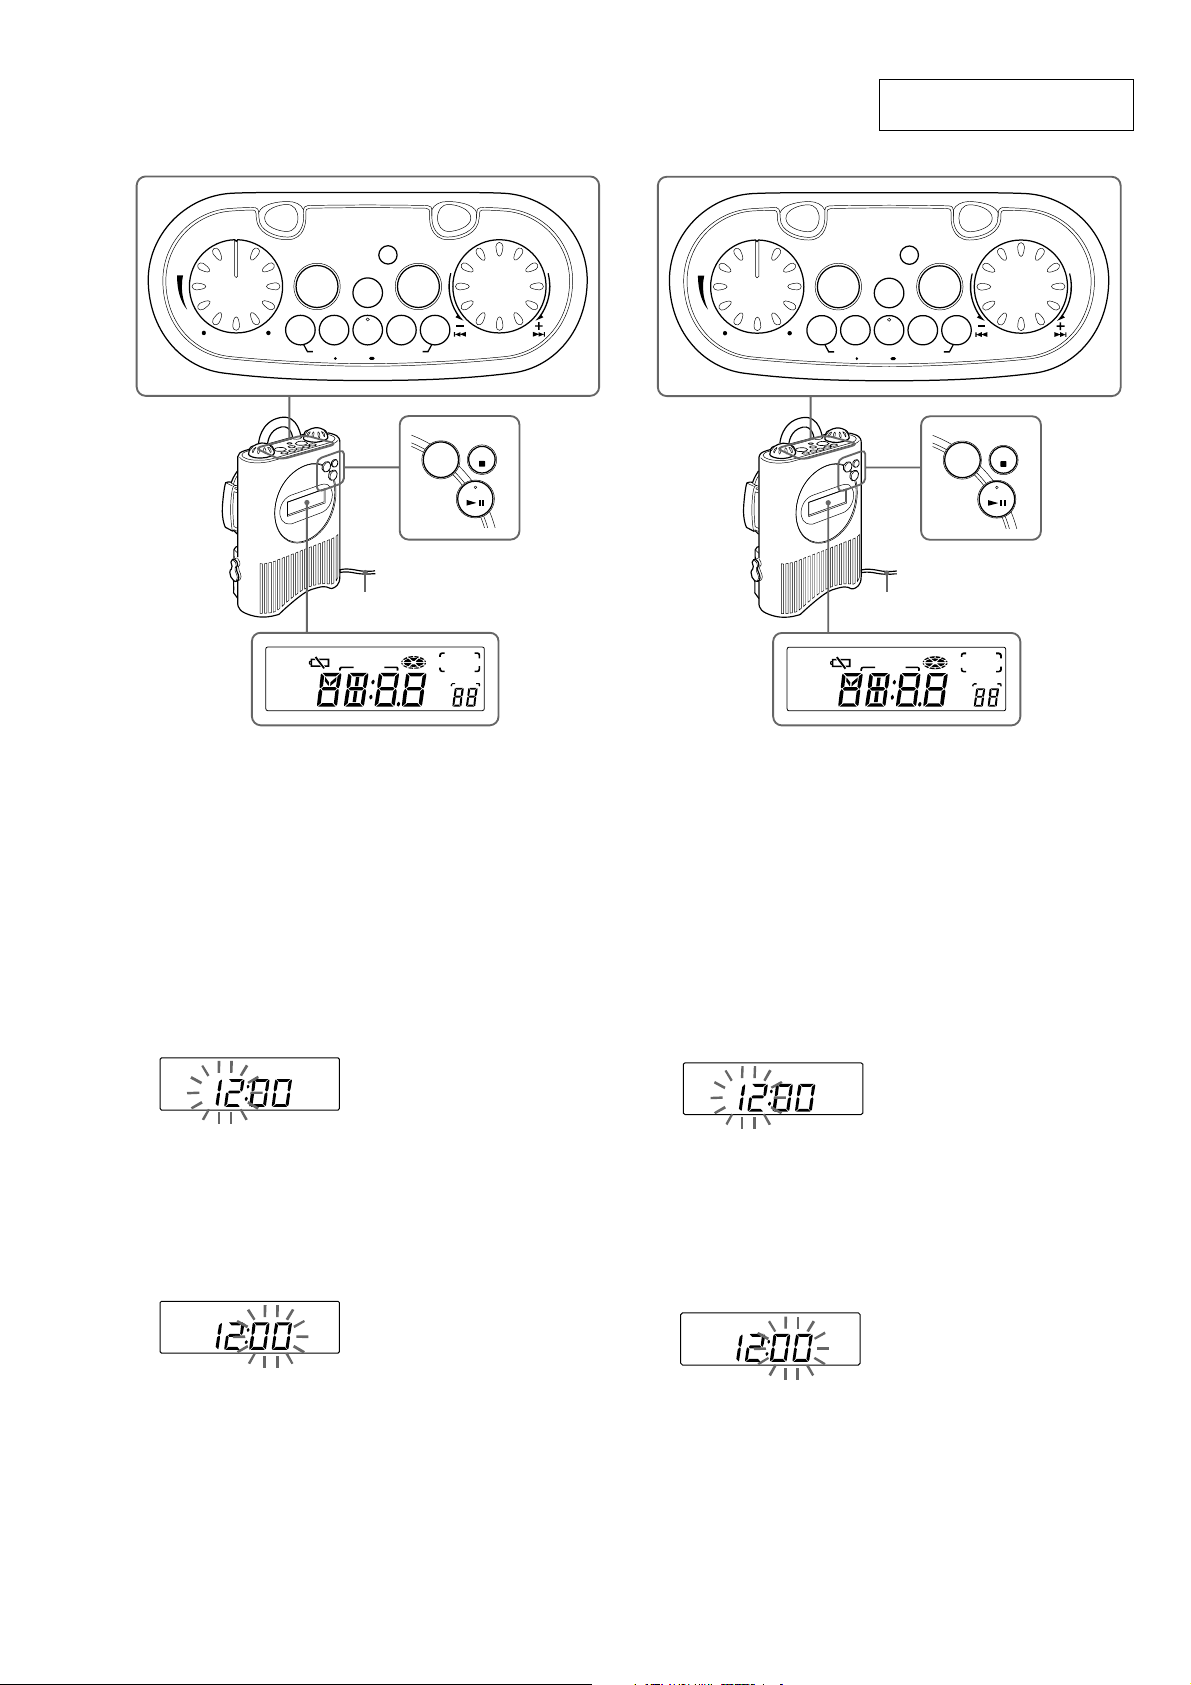
Setting the Clock
The display will flash “AM12:00” when the
batteries are installed or the AC power adaptor is
plugged in for the first time.
1 Press and hold down CLOCK for more
than 2 seconds.
The beep sounds and the hour flashes in the
display.
2 Rotate in either +/– direction the TUNE/
TIME SET/TIMER SET dial until
correct hour appears in the display.
AM
AUTO OFF
TIMER
RADIO CD
WEATHER
TV
FM12PM
Each rotation of the dial changes the digit(s)
by one.
When you hold the dial, the digit(s) change
rapidly.
kHz
MHz
SHUFFLE
REP1
ALL
PRESET
TRACK
3 Press CLOCK .
The beep sounds and the minute starts to
flash. Repeat step 2 to set the minute. After
setting the minute, press CLOCK again. The
two beeps sound and the clock starts from
0 seconds.
AM
AUTO OFF
TIMER
RADIO CD
WEATHER
TV
FM12PM
12-hour system: “AM 12:00” = midnight
24-hour system: “0:00” = midnight
Notes
•You can set the clock also during the radio
reception/CD playback mode.
•To set the current time quickly, rotate and hold
in either +/– direction the TUNE/TIME SET/
TIMER SET dial.
•To set the current time exactly, follow step 2
and press CLOCK again with the time signal of
a radio station.
MHz
kHz
SHUFFLE
ALL
REP1
PRESET
TRACK
the
Setting the Clock
The display will flash “AM12:00” when the
batteries are installed or the AC power adaptor
is plugged in for the first time.
1
Hold down CLOCK for more than
2 seconds.
The beep sounds and the hour flashes in the
display.
2
Rotate in either +/– direction the TUNE/
TIME SET/TIMER SET dial until the
correct hour appears in the display.
SHUFFLE
ALL
REP1
PRESET
TRACK
MHz
kHz
SHUFFLE
ALL
REP1
PRESET
TRACK
MHz
kHz
“PM 12:00” = noon
AM
AUT O O FF
TIMER
RADIO CD
WEATHER
TV
FM12PM
Each rotation of the dial changes the digit(s)
by one.
When you hold the dial, the digit(s) change
rapidly.
3
Press CLOCK .
The beep sounds and the minute starts to
flash. Repeat step 2 to set the minute. After
setting the minute, press CLOCK again. The
two beeps sound and the clock starts from
0 seconds.
AM
AUTO OFF
TIMER
RADIO CD
WEATHER
TV
FM12PM
12-hour system: “AM 12:00” = midnight
Notes
•You can set the clock also during the radio
reception/CD playback mode.
•To set the current time quickly, rotate and hold
in either +/– direction the TUNE/TIME SET/
TIMER SET dial.
•To set the current time exactly, follow step 2
and press CLOCK again with the time signal of
a radio station.
5
Page 6
ICF-CD73/CD73V
• This set can be disassembled in the order shown below.
3-1. DISASSEMBLY FLOW
SET
3-2. CABINET (FRONT) SECTION
(Page 6)
SECTION 3
DISASSEMBLY
3-3. CABINET (UPPER) SECTION
(Page 7)
3-4. CHASSIS (MAIN) SECTION
(Page 7)
3-5. LCD BOARD
(Page 8)
Note: Follow the disassembly procedure in the numerical order given.
3-6. MECHANISM DECK
(KSM-900AAA)
(Page 8)
3-7. OPTICAL PICK-UP
(KSS-900A)
(Page 9)
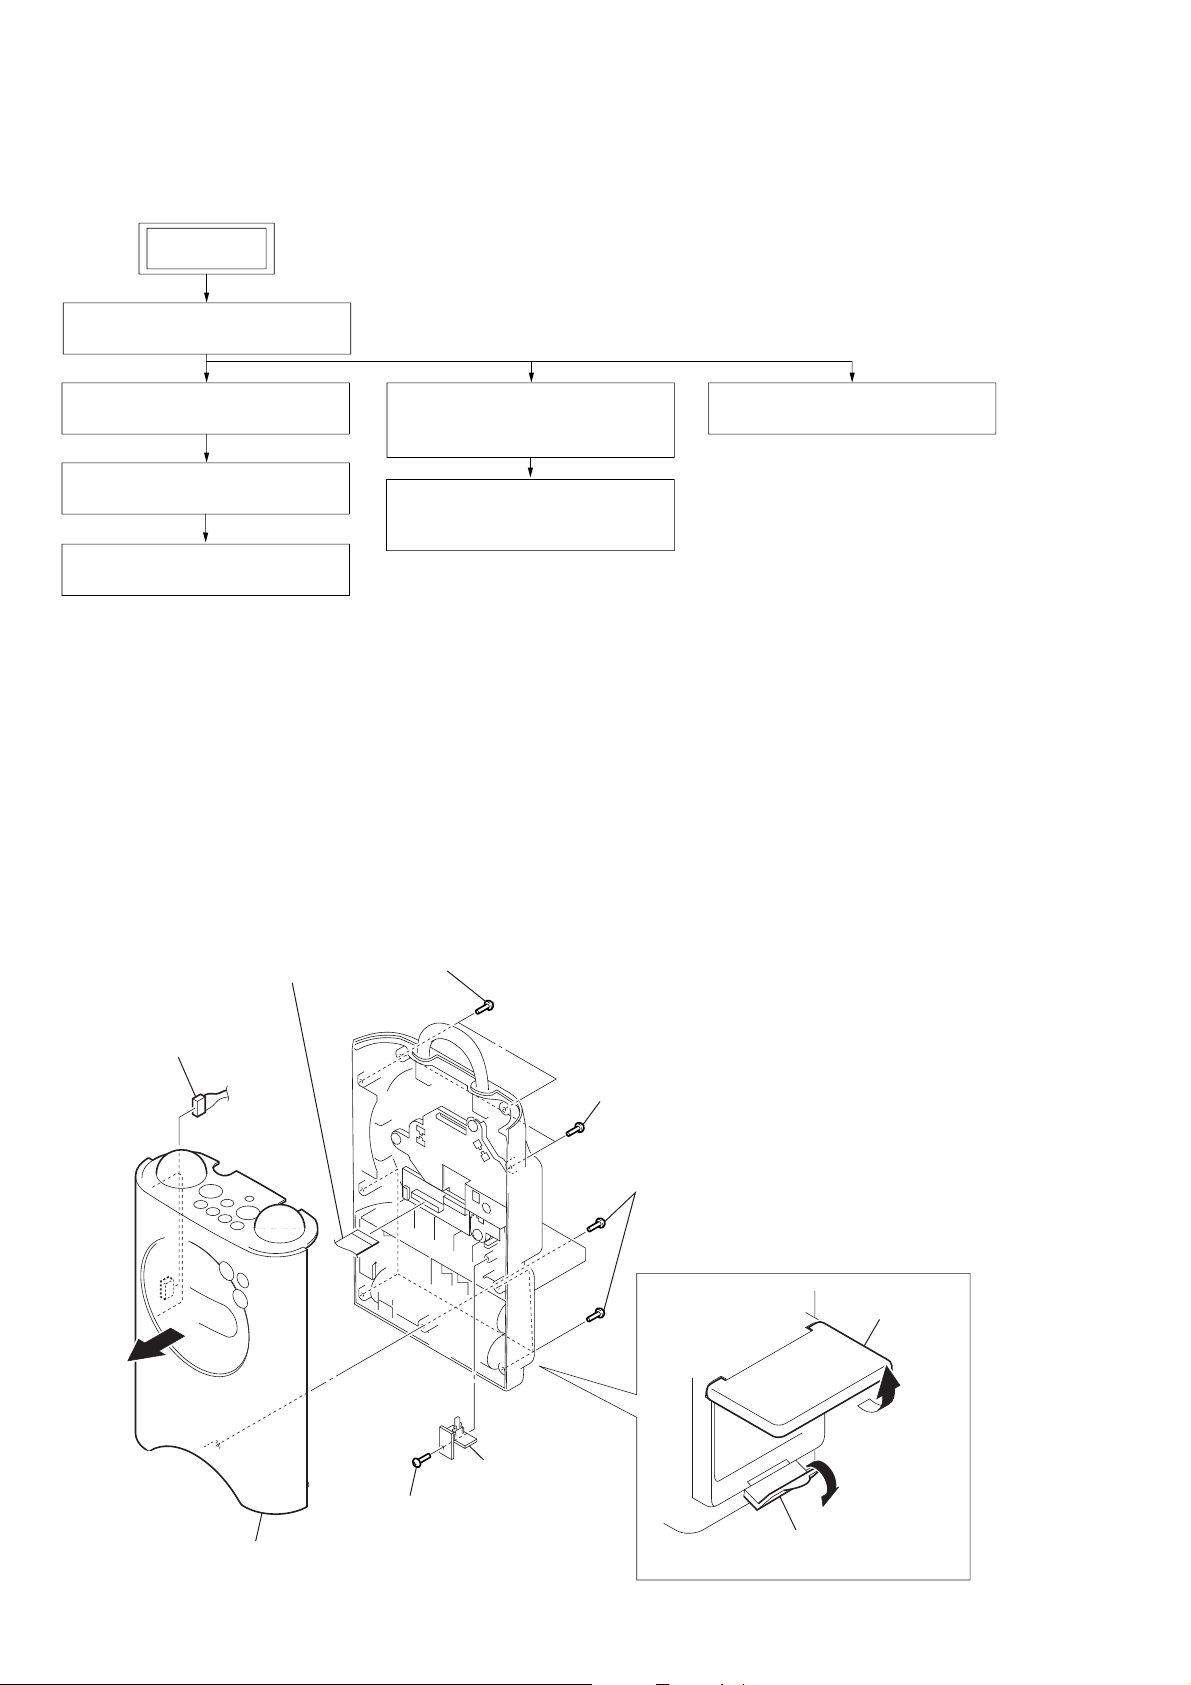
3-2. CABINET (FRONT) SECTION
5
two screws
(2.6
×
7
flat cable (CNP704)
10)
3-8. SPEAKER (SP101)/(SP201)
(Page 9)
8
connector
(CNP302)
6
qa
cabinet (front) section
9
screw (2.6 × 8)
0
SW board block
two screws
4
(2.6
3
×
10)
five screws
(2.6
×
10)
1
Open the buckle
(battery case lid).
2
Open the
battery case lid.
6
Page 7
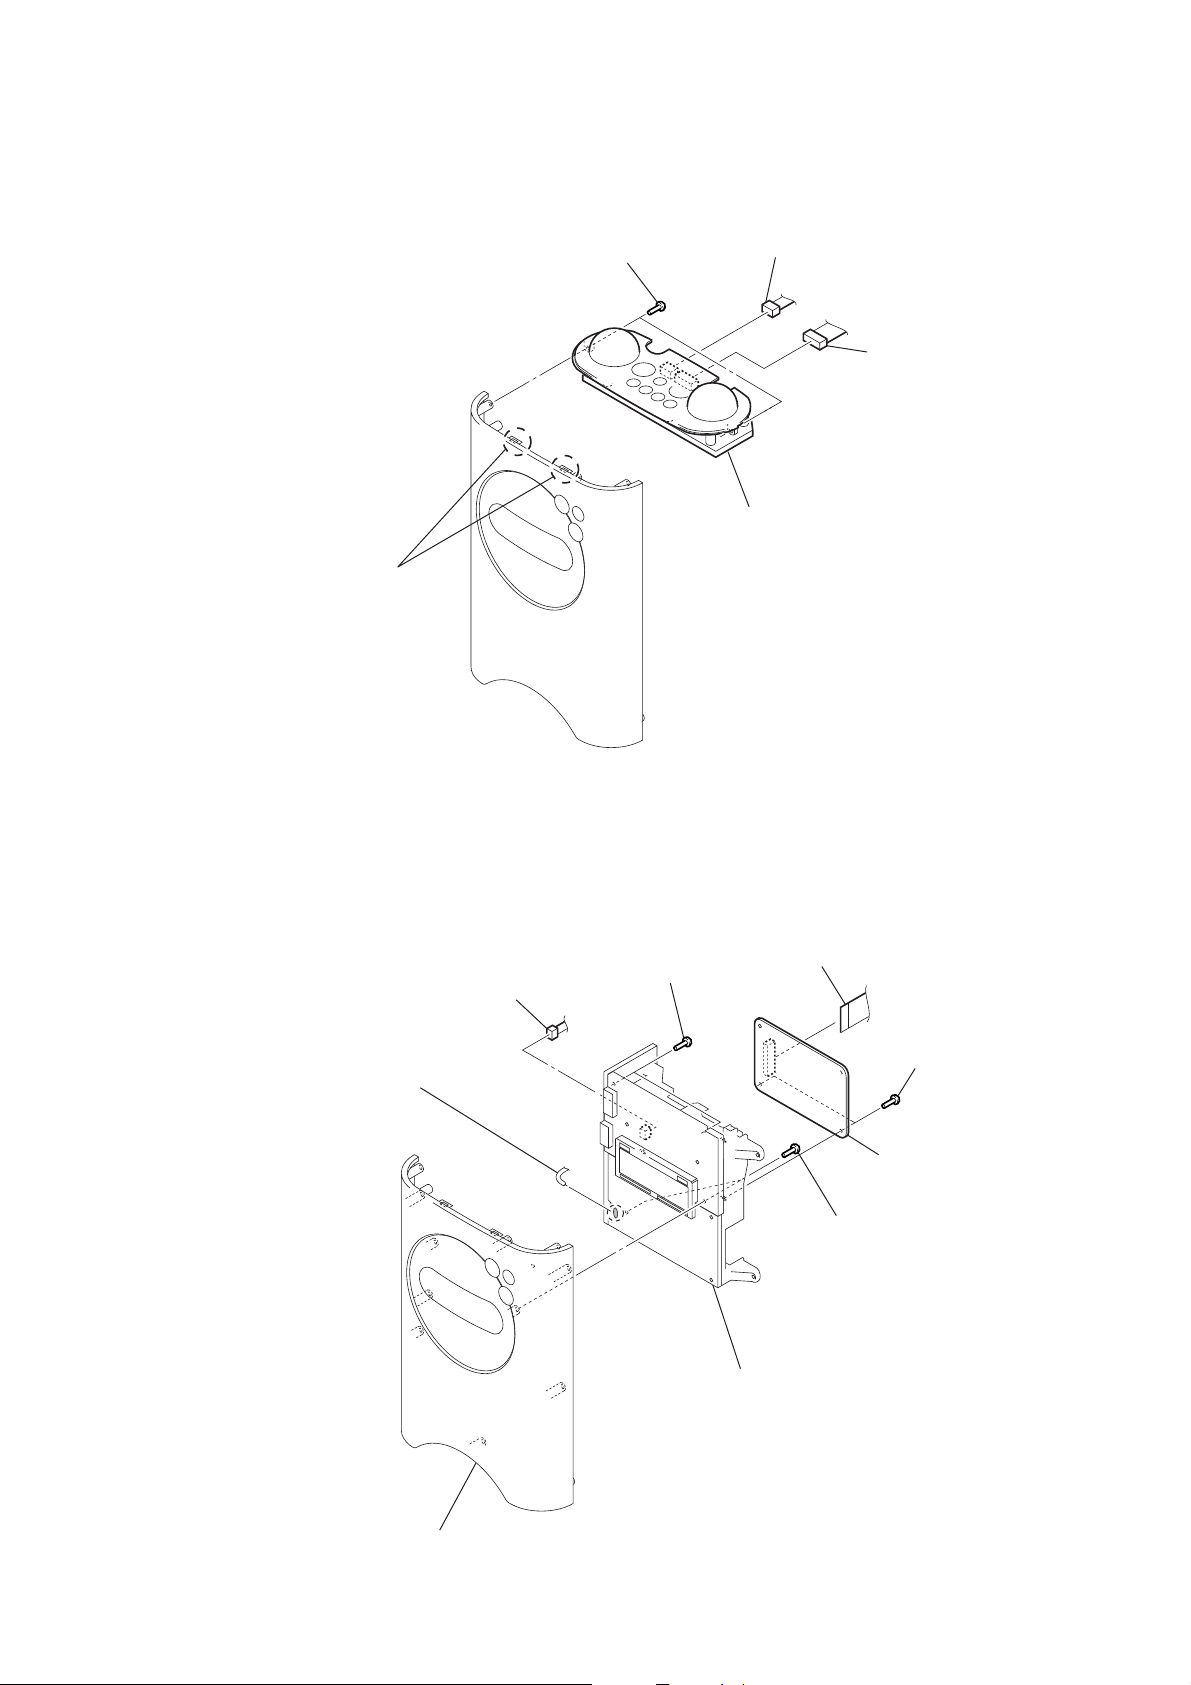
3-3. CABINET (UPPER) SECTION
)
4
two claws
3
two screws
(2.6
ICF-CD73/CD73V
2
connector
×
8)
(CNP602)
5
cabinet (upper) section
1
connector
(CNP601
3-4. CHASSIS (MAIN) SECTION
2
connector
(CNP303)
8
Remove the solder
of FM lead wire antenna
(ANT1).
5
two screws
(2.6
1
×
8)
9
chassis (main) section
flat cable
(CNP702)
6
two screws
(2.6
×
8)
3
two screws
(2.6
4
CD board
×
8)
7
cabinet (front) section
7
Page 8
ICF-CD73/CD73V
)
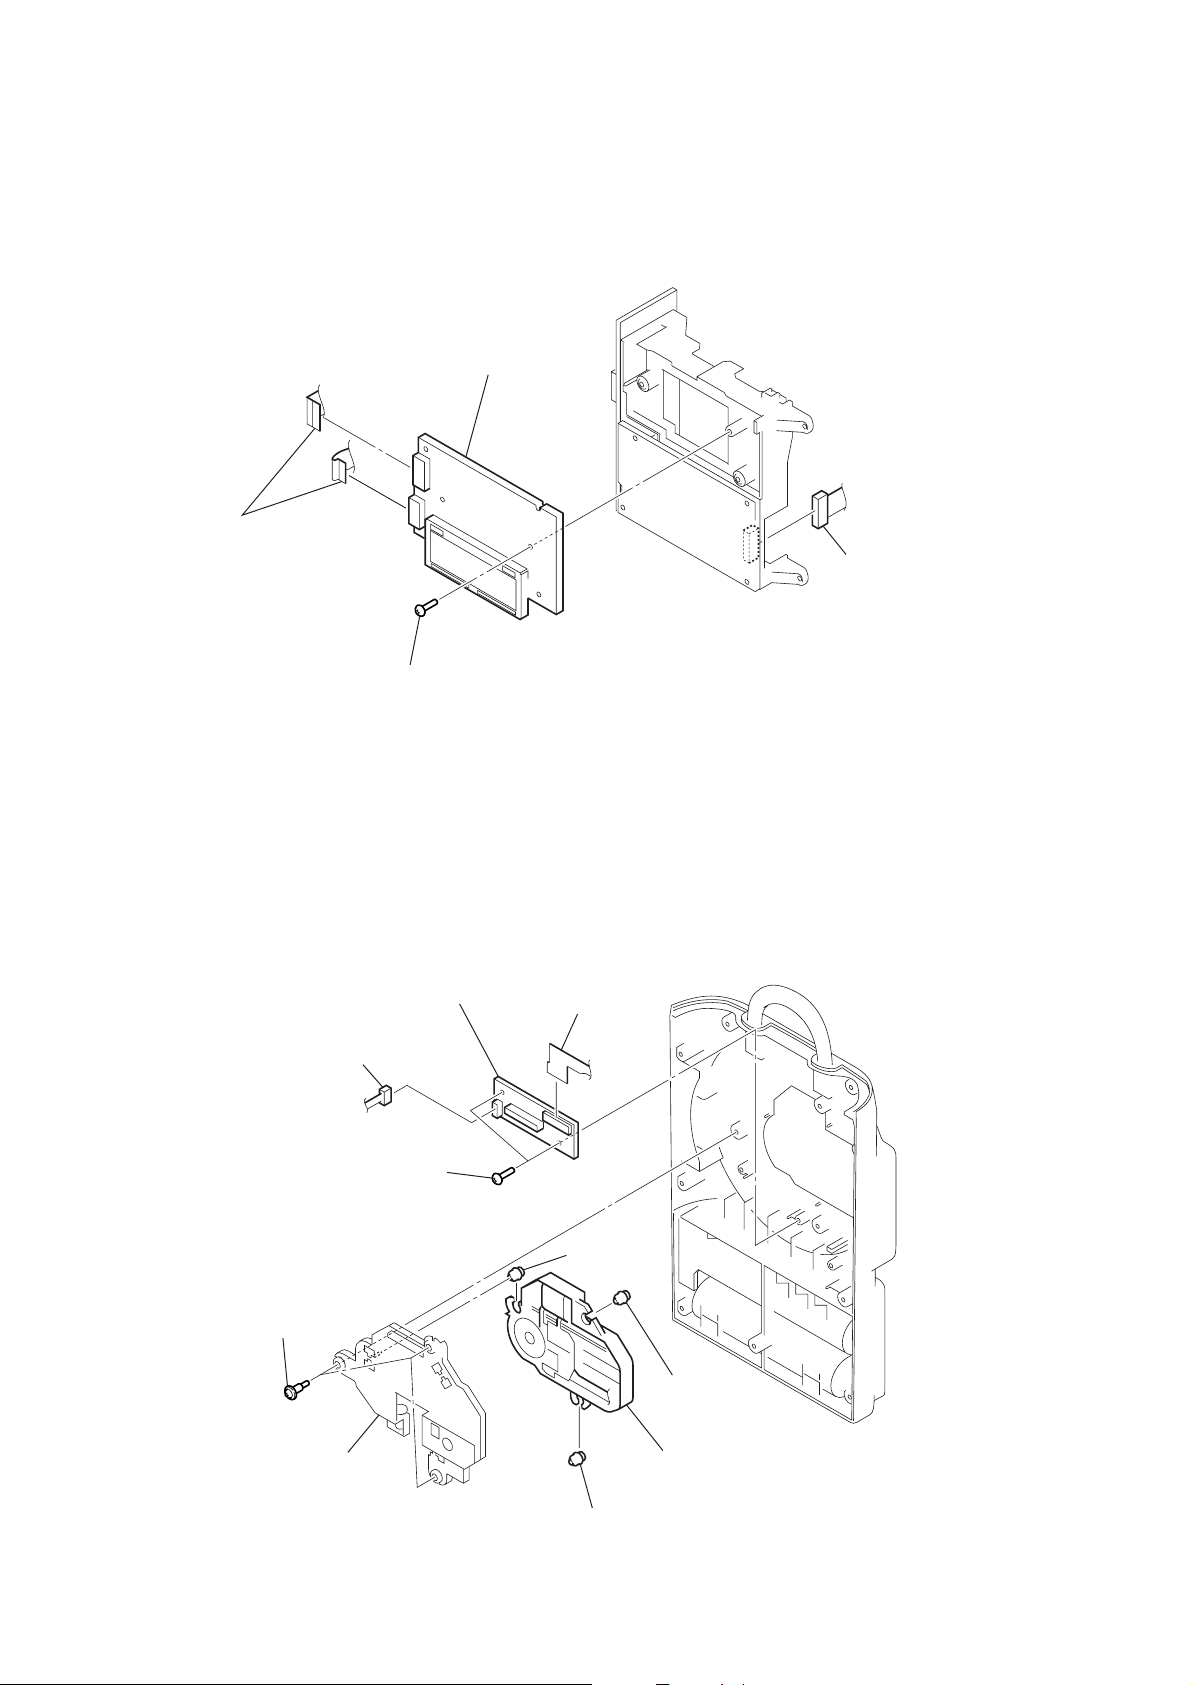
3-5. LCD BOARD
1
two flat cables
(CNP401, 402)
4
LCD board
2
connector
(CNP1: CD73)/
(CNP2: CD73V
3-6. MECHANISM DECK
(KSM-900AAA)
2
connector
(CNP706)
3
3
screw
(2.6 × 8)
4
relay board
two screws
(2.6
×
8)
1
flexible board
(CNP705)
7
rubber
(vibration)
5
three tapping
screws
8
rubber
(vibration)
0
6
chassis CD block
9
rubber (vibration)
mechanism deck
(KSM900AAA)
8
Page 9
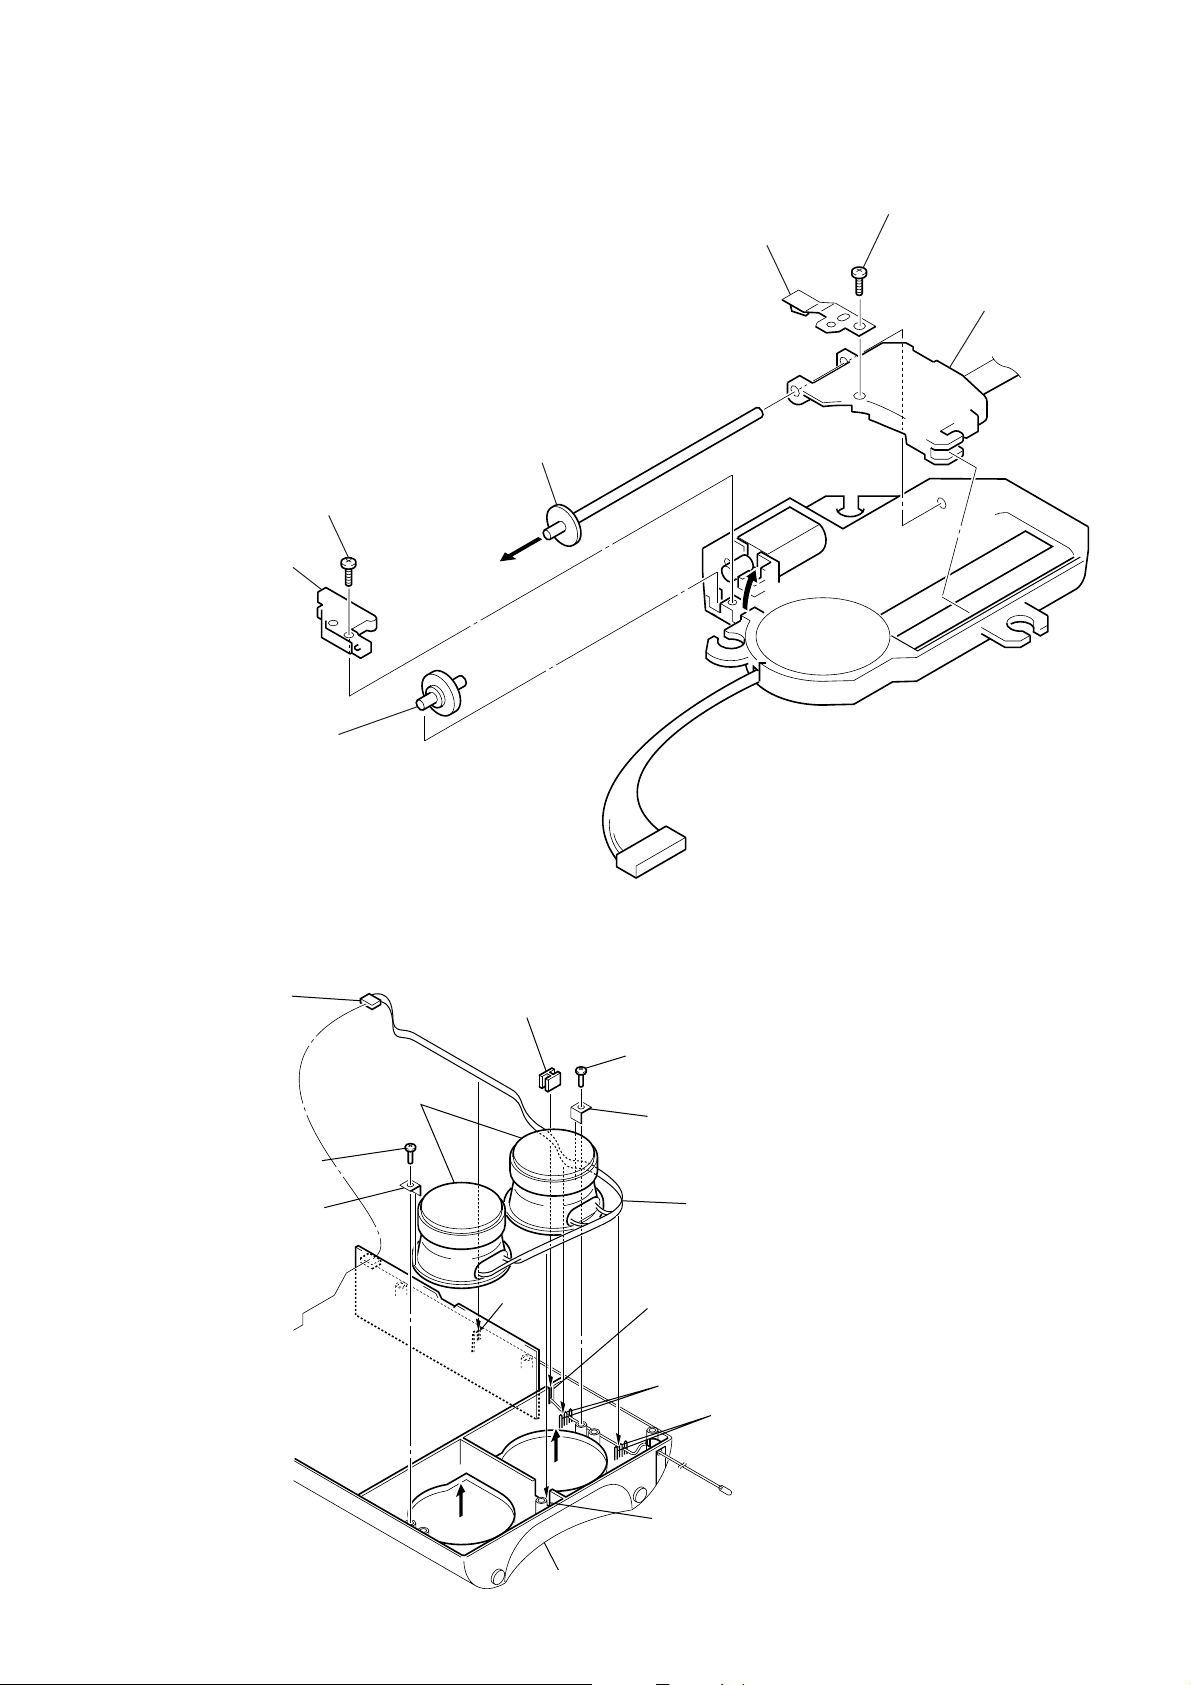
3-7. OPTICAL PICK-UP
p
s
(KSS-900A)
1
screw
×
8)
(2
2
holder (780C)
7
sled screw assy (780E)
5
rack spring (780C)
6
ICF-CD73/CD73V
4
screw
(B1.7
×
4)
8
optical pick-u
(KSS-900A)
3
gear (B) (780C)
3-8. SPEAKER (SP101)/(SP201)
1
connector
(CNP304)
5
two speakers
(SP101, SP201)
2
screw (2.6 × 8)
3
bracket (SP)
4
spacer (slit)
ditch
2
screw (2.6 × 8)
3
bracket (SP)
Note: When installing the speaker lead wire,
lead the speaker lead wire along ditche
and bosses of the cabinet (front).
ditch
cabinet (front)
boss
boss
ditch
9
Page 10
ICF-CD73/CD73V
SECTION 4
TEST MODE
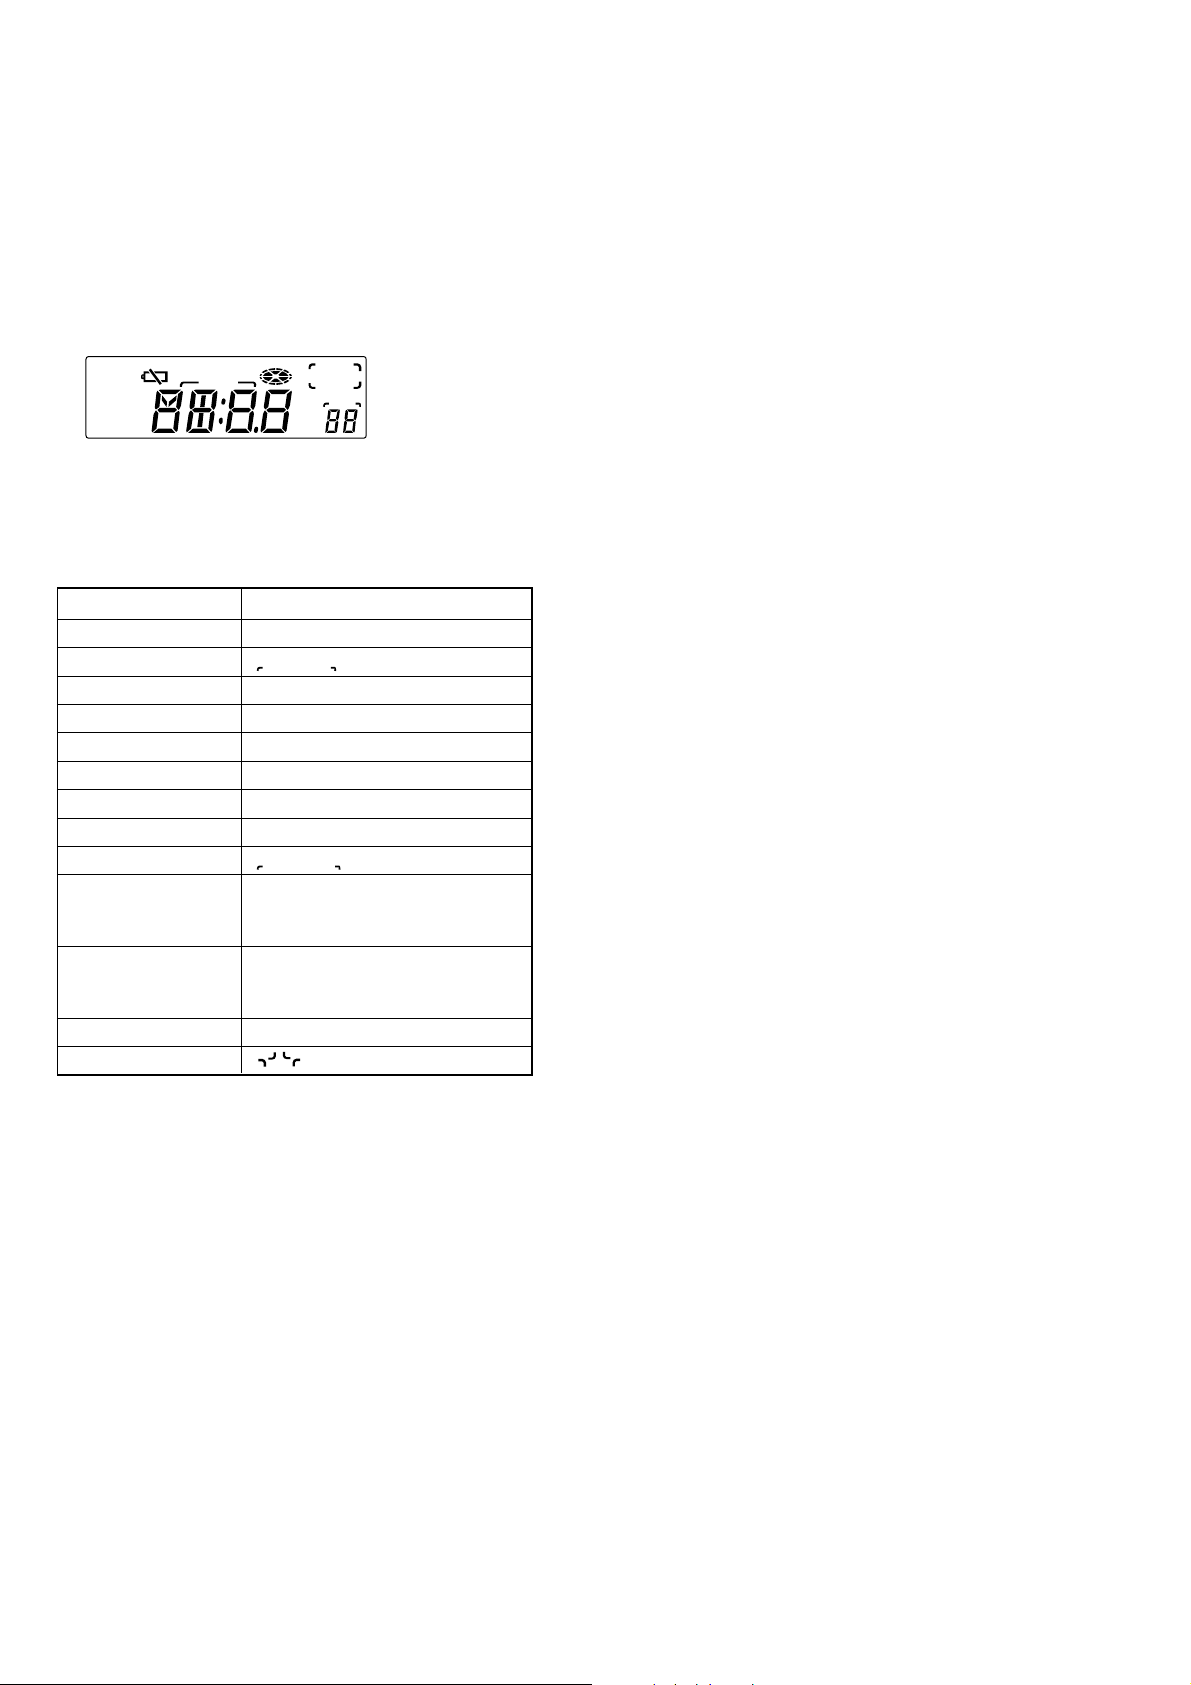
LCD AND KEY TEST MODE
Procedure:
1. Turn the power on while pressing simultaneously three buttons of [RADIO ON BAND], [CLOCK], and [1].
2. The microcomputer version will be displayed on the LCD.
3. Press the [AUTO OFF] button. (The LCD display will become
as follows)
LCD display
MHz
kHz
SHUFFLE
REP1
ALL
PRESET
TRACK
RADIO CD
WEATHER
TV
AM
FM12PM
AUTO OFF
TIMER
4. BEEP (A) will be output and the display corresponding to a
button is turned off, if a button on the set is pressed. Also,
BEEP (A) is output when the button is released.
Button Corresponding Table
Button Segment
CLOCK AM, PM, : (colon),
TIMER SET ON/OFF TIMER , AUTO OFF
1 1b, 1c
2 2a, 2b, 2d, 2e, 2g
3 3a, 3b, 3c, 3d, 3g
4 4b, 4c, 4f, 4g
5 5a, 5c, 5d, 5f, 5g
TUNE – . 6a, 6b, 6c, 6d, 6e, 6f, 6g
TUNE + > TRACK , PRESET
RADIO ON BAND RADIO, WEATHER, TV, FM,
1(FM), 2(FM), TV, .(point), MHz,
kHz
OFF x BatteryLow , 1a, 1d, 1e, 1f, 1g, 1h, 1i,
2c, 2f, 2h, 2i, 3e, 3f, 4a, 4d, 4e, 5b,
5e
CD NX CD, Pz1, Pz2, Pz3, Pz4
MODE , SHUFFLE, REP, 1, ALL
5. After all buttons on the set were pressed, press the [AUTO
OFF] button, and BEEP (B) will be output and the test mode
will be terminated.
6. If there is even one button that was not accepted, the set will
not be r eleased from test mode even though the [AUTO OFF]
button is pressed.
7. The set will return to normal state when the LCD AND KEY
TEST MODE is terminated.
10
Page 11
ICF-CD73/CD73V
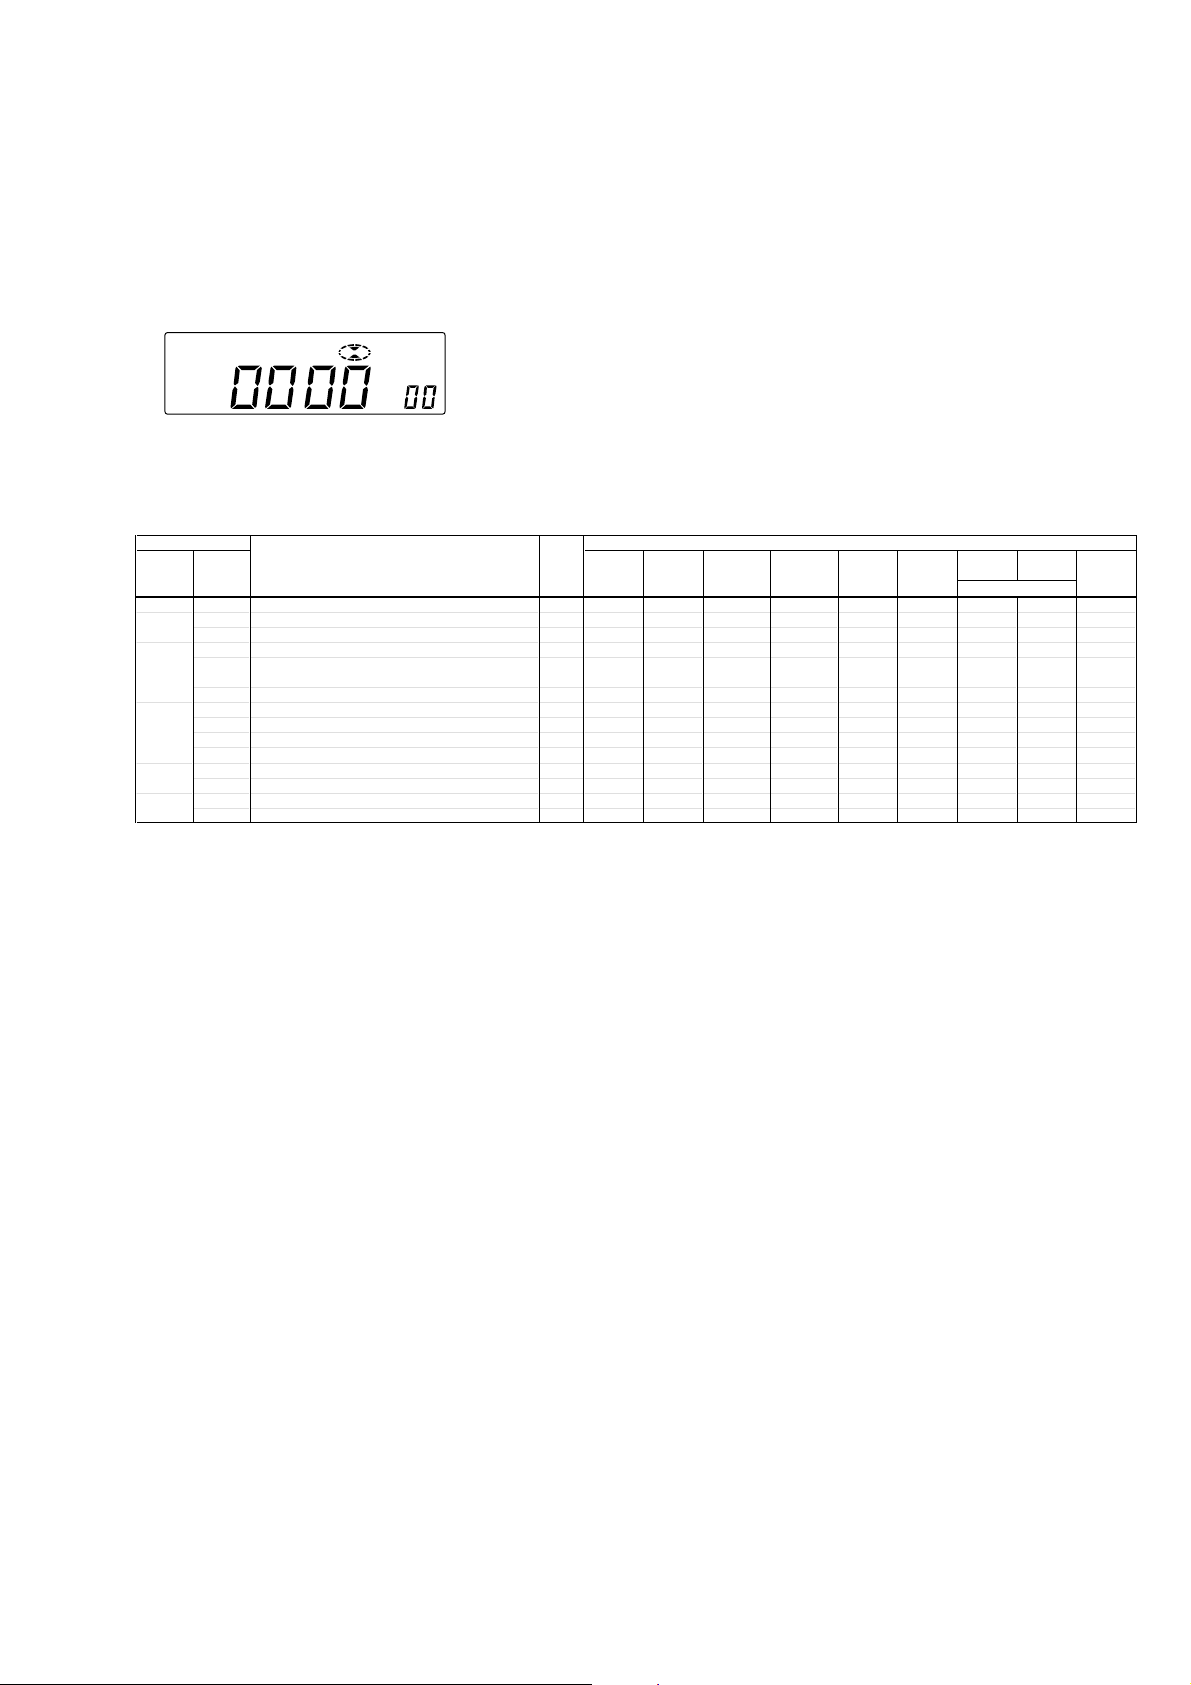
CD TEST MODE
Procedure:
1. Connect 47 kΩ and 100 kΩ resistors in parallel to the end of S501 on the LCD board, and short another end of resistors to the GND,
and the CD TEST MODE will be activated.
2. Insert a CD disc.
3. Turn the power on. Press the [CD ] button.
LCD display
4. The following shows the state transition table for each button operation in respective sub modes of CD TEST MODE.
State Transition T able
If each button is pressed in respective sub modes, the mode will transit to the sub modes listed in table.
MODE Explanation LCD Button
MAIN SUB
INT State when TEST MODE is activated.
STOP STOP0 State when a button is pressed once from initial state.
STOP0 Automatically adjusted value is held.
FOCUS FOCUS0 AUTO FOCUS transfer mode
FOCUS FOCUS SERVO ON state.(CLV-S, TRK/SLED, SERVO OFF)
It will be referred to as LPC ON if FOCUS carries out on.
F.LPC OFF LPC OFF in FOCUS state.
ALL ALSV State where all servo systems are turned on.
SERVO ALPC OFF State where all servo systems are turned on.(LPC:OFF)
TGUP State with TRK GAIN UP in all servo systems are turned on.(LPC:ON)
AUTO Mode in which automatic adjustment is made at once.
SLED SLDF SLED is fed outward in STOP state.
SLDR SLED is fed inward in STOP state.
F.SLED FCSF SLED is fed outward in FOCUS state.
FCSR SLED is fed inward in FOCUS state.
Mode transits to sub modes listed in table, if a button is pressed in respective sub modes.
CD
NX
OFF CD –+ RADIO ON AUTO OFF –+ Processing
NX
x
00 STOP0 FOCUS0
01 FOCUS0 STOP STOP EF Normal SLDF SLDR
02 STOP0 FOCUS0 Normal SLDF SLDR
03 STOP FOCUS
04 STOP F.LPC EF AUTO FCSF FCSR
05 STOP ALSV FOCUS FOCUS FOCUS0 FCSF FCSR
07 STOP ALPC OFF FOCUS FOCUS EF AUTO FCSF FCSR
08 STOP TGUP FOCUS FOCUS FCSF FCSR
09 STOP ALSV FOCUS FOCUS FCSF FCSR
b
cSTOPSTOPSTOPSTOP SLDF
dSTOPSTOPSTOPSTOP SLDR
E FOCUS FOCUS FOCUS FOCUS FCSF
F FOCUS FOCUS FOCUS FOCUS FCSR
OFF
>
.
BAND end
>
.
Long pressed
5. Turn the power off to release the CD TEST MODE.
11
Page 12
ICF-CD73/CD73V
CD-JUMP TEST MODE
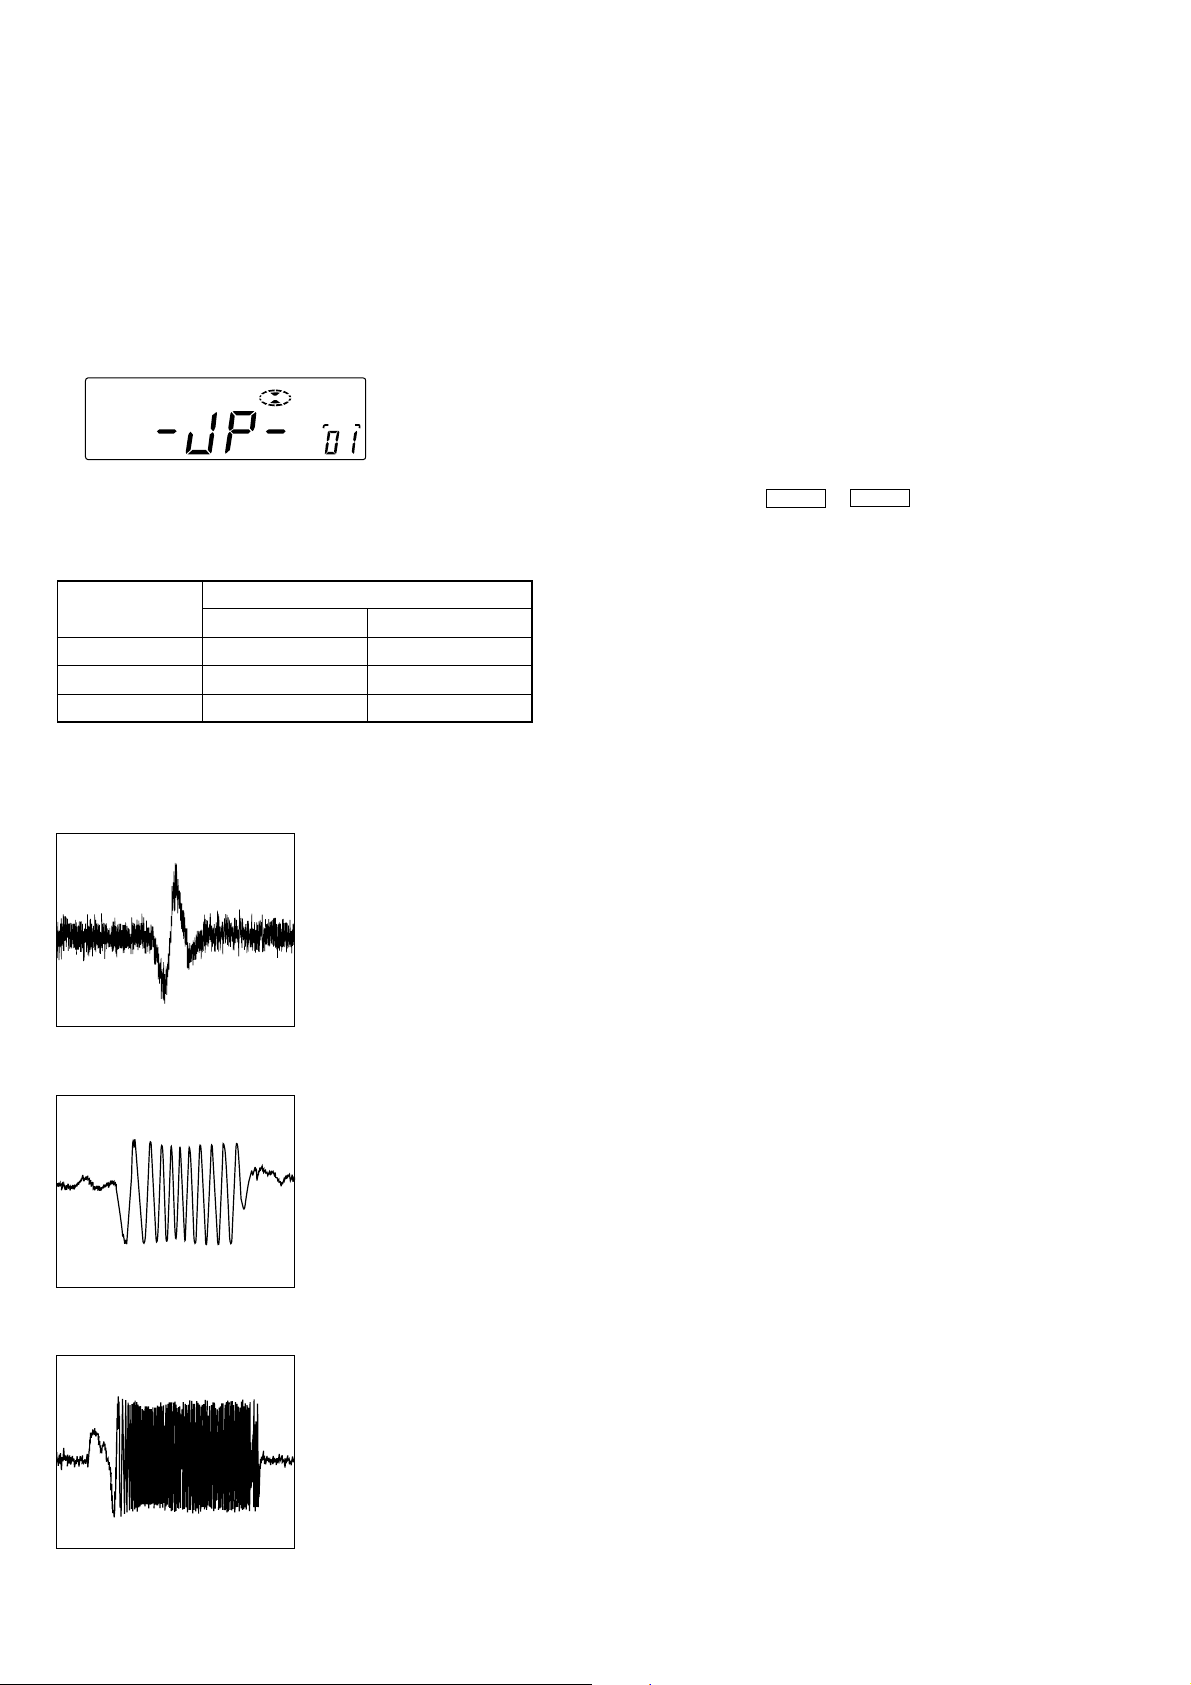
Procedure:
1. Connect the oscilloscope to TP (TE) and TP (VC) on the CD board.
Connecting Location: CD board (See page 16)
2. Connect 47 kΩ and 100 kΩ resistors in parallel to the end of S501 on the LCD board, and further connect 100 kΩ and 220 kΩ resistors
respectively and short them to the GND, and the CD-JUMP TEST MODE will be activated.
3. Insert a CD disc.
4. Turn the power on. Press the [CD ] button.
LCD display
5 . If the [MODE] button is pressed, you can jump in fast feed or fast reverse direction with the + > or – . button by the jump
amount set in Table 1.
Table 1
LCD
+ > – .
REP ALL TRACK + 1 TRACK - 1
SHUFFLE TRACK + 10 TRACK - 10
SHUFFLE, REP TRACK + 100 TRACK - 100
NX
CD
TRACK
Button
Waveform of TP (TE) and TP (VC) output in each mode is as follows.
REP ALL mode
500 µs/div
SHUFFLE mode
1 ms/div
SHUFFLE REP mode
10 ms/div
6. Turn the power off to release the CD-JUMP TEST MODE.
12
Page 13
r
SECTION 5
ELECTRICAL ADJUSTMENTS
ICF-CD73/CD73V
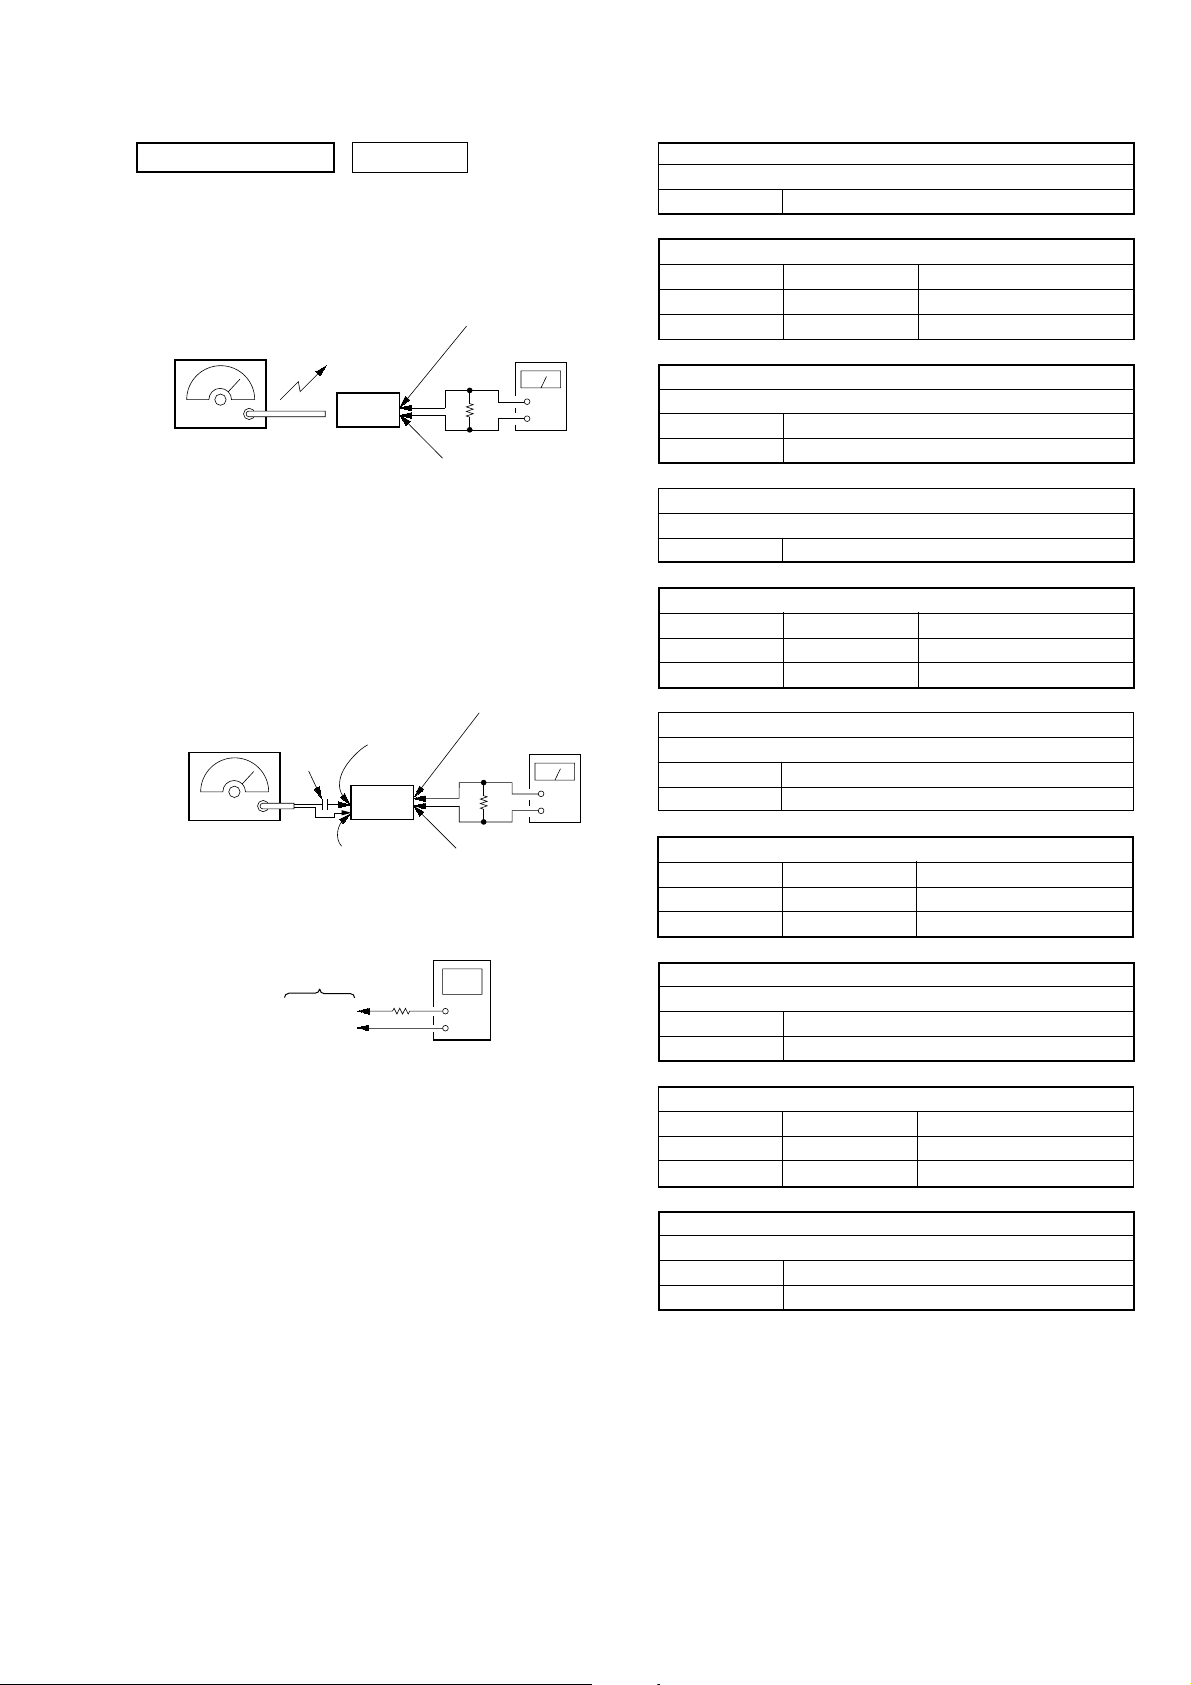
TUNER SECTION 0 dB=1 µV
[AM]
Setting:
Function: RADIO
Band: AM
AM RF signal
generator
30% amplitude
modulation by
400 Hz signal
Output level:
as low as possible
[FM/TV/WEATHER]
Setting:
Function: RADIO
Band: FM (ICF-CD73)
FM/TV/WEATHER (ICF-CD73V)
FM RF signal
generator
75 kHz frequency
deviation by 1 kHz
signal
Output level:
as low as possible
Put the lead-wire
antenna close to
the set.
0.01 µF
TUNER board
TP (GND)
TUNER board
TP (VT)
TP (GND)
set
TUNER board
TP (ANT)
set
digital voltmete
100 kΩ
JACK board
CNP304 pin 1
level meter
3.2 Ω
+
–
JACK board
CNP304 pin 2
JACK board
CNP304 pin 1
level meter
3.2 Ω
JACK board
CNP304 pin 2
AM IF ADJUSTMENT
Adjust for a maximum reading on level meter
T1 450 kHz
( ): ICF-CD73V
AM VCO VOLT A GE ADJUSTMENT
Adjustment Part Frequency Display Reading on Digital Voltmeter
L4 (L6) 530 kHz (531 kHz) 1.0 ± 0.05 V (1.0 ± 0.1 V)
Confirmation 1,710 kHz 5.3 ± 0.7 V
( ): ICF-CD73V
AM TRACKING ADJUSTMENT
Adjust for a maximum reading on level meter
L3 (L5) 620 kHz (580 kHz)
CT3 (CT5) 1,400 kHz (1,490 kHz)
FM IF ADJUSTMENT
Adjust for a minimum reading on level meter
T2 10.7 MHz
FM VCO VOLTAGE ADJUSTMENT (ICF-CD73)
Adjustment Part Frequency Display Reading on Digital Voltmeter
L2 108 MHz 3.0 ± 0.2 V
Confirmation 87.5 MHz 1.3 ± 0.3 V
FM TRACKING ADJUSTMENT (ICF-CD73)
Adjust for a maximum reading on level meter
+
–
L1 87.5 MHz
CT1 108 MHz
FM/TV (2 – 6 CH) VCO VOLTAGE ADJUSTMENT (ICF-CD73V)
Adjustment Part Frequency Display Reading on Digital Voltmeter
L4 TV 2 ch 1.0 ± 0.15 V
CT3 108 MHz 4.0 ± 0.15 V
FM/TV (2 – 6 CH) TRACKING ADJUSTMENT (ICF-CD73V)
Adjust for a maximum reading on level meter
L2 TV 2 ch
Confirmation 108 MHz
•Repeat the procedures in each adjustment several times, and the
tracking adjustments should be finally done by the trimmer capacitors.
• Remove FM/TV/WEATHER antenna in FM/TV/WEATHER
adjustment.
TV (7 – 13 CH)/WEATHER (1 – 7 CH) VCO VOLTAGE ADJUSTMENT (ICF-CD73V)
Adjustment Part Frequency Display Reading on Digital Voltmeter
L3 WEATHER 2 ch 1.0 ± 0.15 V
CT4 TV 13 ch 4.1 ± 0.15 V
TV (7 – 13 CH)/WEATHER (1 – 7 CH) TRACKING ADJUSTMENT (ICF-CD73V)
Adjust for a maximum reading on level meter
L1 WEATHER 2 ch
CT2 TV 13 ch
Adjustment and Connecting Location:TUNER board (ICF-
CD73)
(See page 14)
TUNER board (ICFCD73V)
(See page 15)
13
Page 14
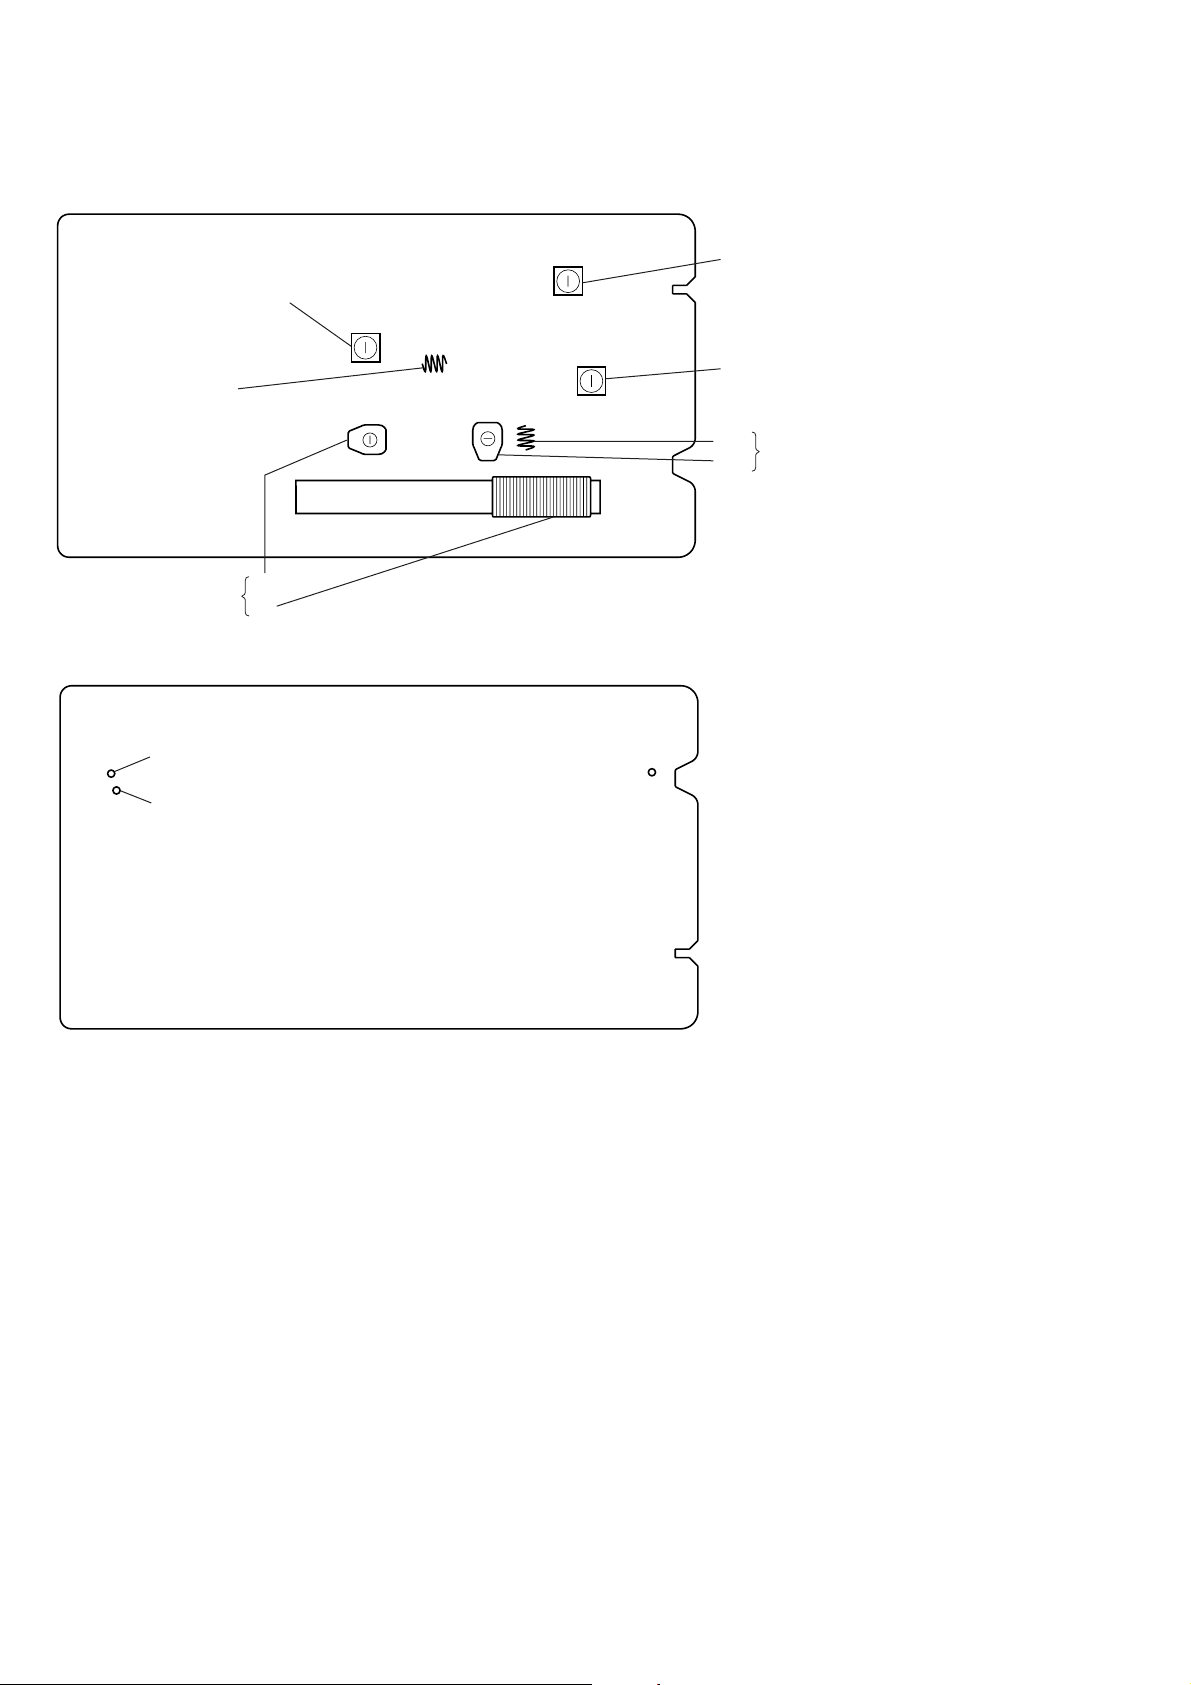
ICF-CD73/CD73V
Adjustment and Connecting Location:
– TUNER BOARD (Component Side) (ICF-CD73) –
AM VCO Voltage Adjustment
FM VCO Voltage Adjustment
AM T rac king Adjustment
L4
L2
CT3
L3
– TUNER BOARD (Conductor Side) (ICF-CD73) –
TP
(VT)
TP
(GND)
TP
(ANT)
T2 FM IF Adjustment
T1 AM IF Adjustment
L1
FM T rac king Adjustment
CT1
14
Page 15
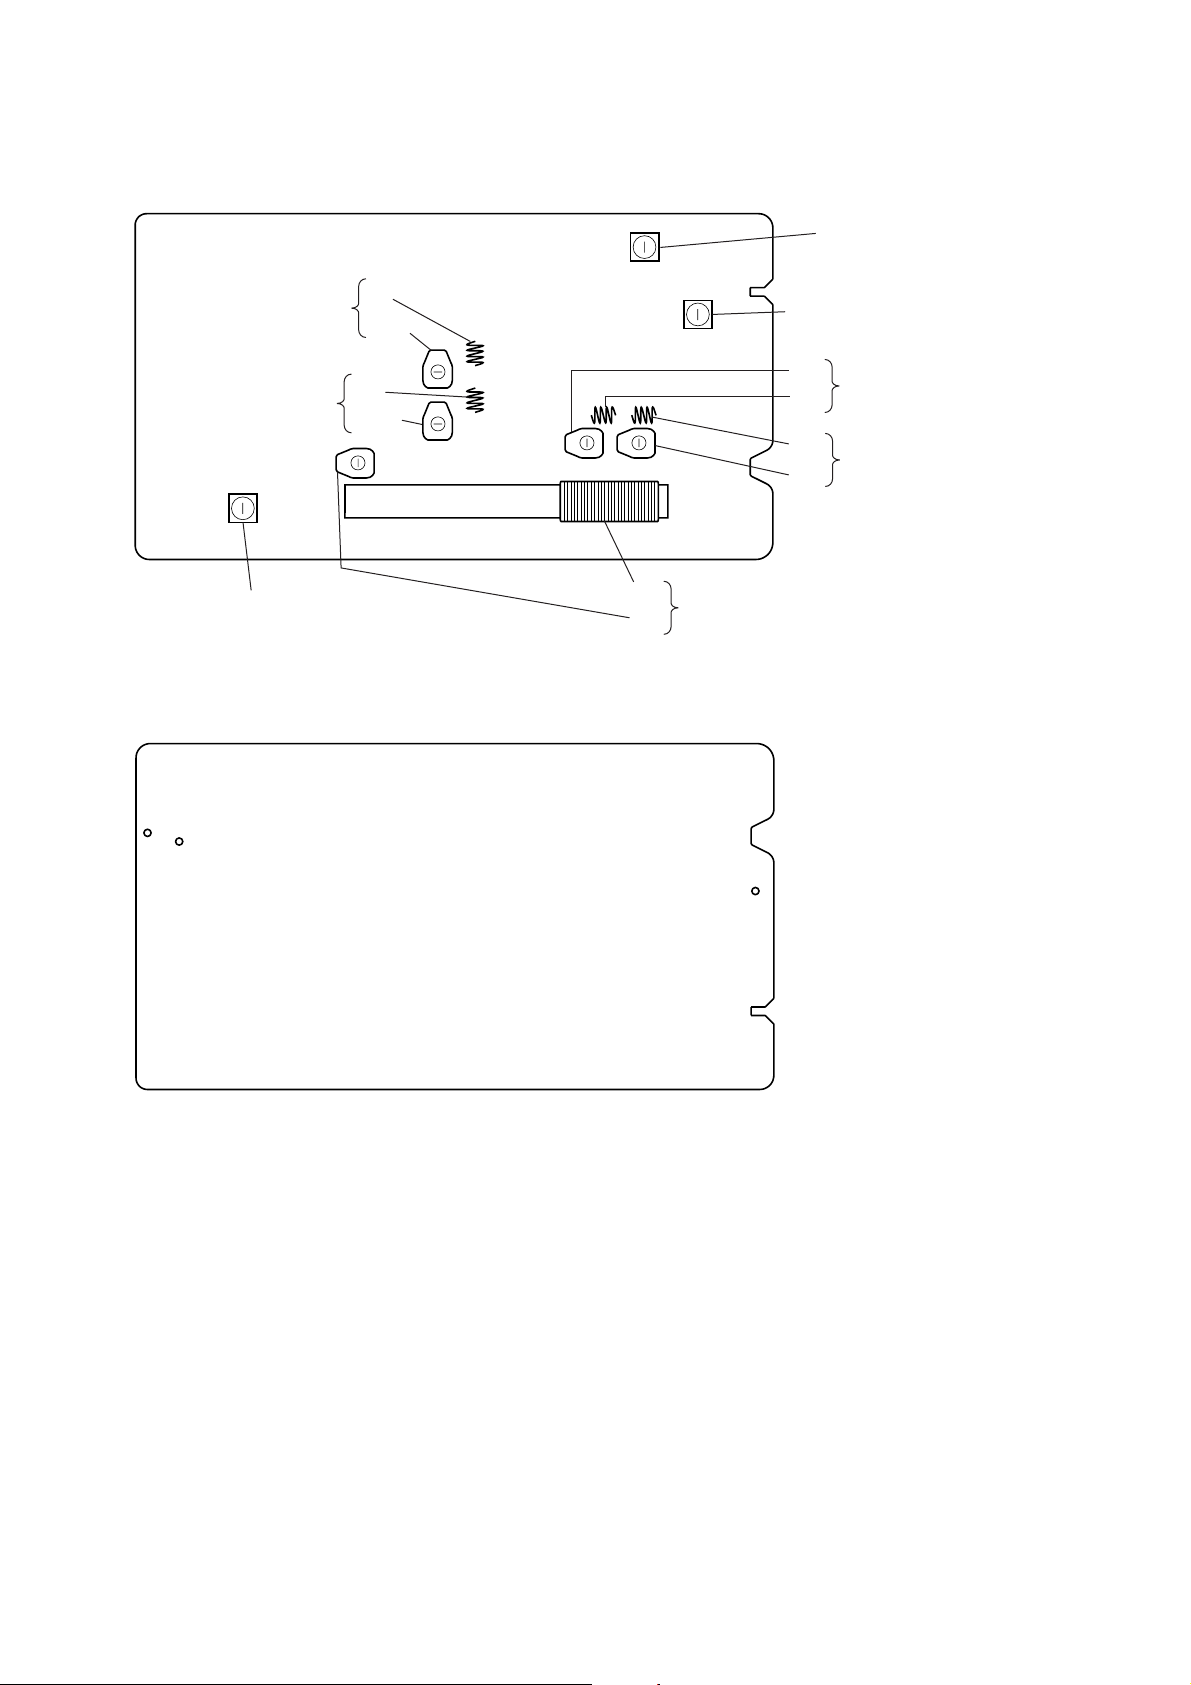
Adjustment and Connecting Location:
– TUNER BOARD (Component Side) (ICF-CD73V) –
TV (7 – 13 CH)/
WEATHER (1 – 7 CH)
VCO Voltage Adjustment
TV TV (2 – 6 CH)
VCO Voltage Adjustment
L3
CT4
L4
CT3
T2
IF Adjustment
T1
IF Adjustment
TV (7 – 13 CH)/
CT2
WEATHER (1 – 7 CH)
L1
Tracking Adjustment
L2
FM/TV (2 – 6 CH)
CT1
Tracking Adjustment
ICF-CD73/CD73V
AM VCO Voltage Adjustment
L6
– TUNER BOARD (Conductor Side) (ICF-CD73V) –
TP
)
(GND
TP
(VT)
L5
AM Tracking Adjustment
CT5
TP
(
ANT
)
15
Page 16
ICF-CD73/CD73V
CD SECTION
Perform all CD section check in the test mode.
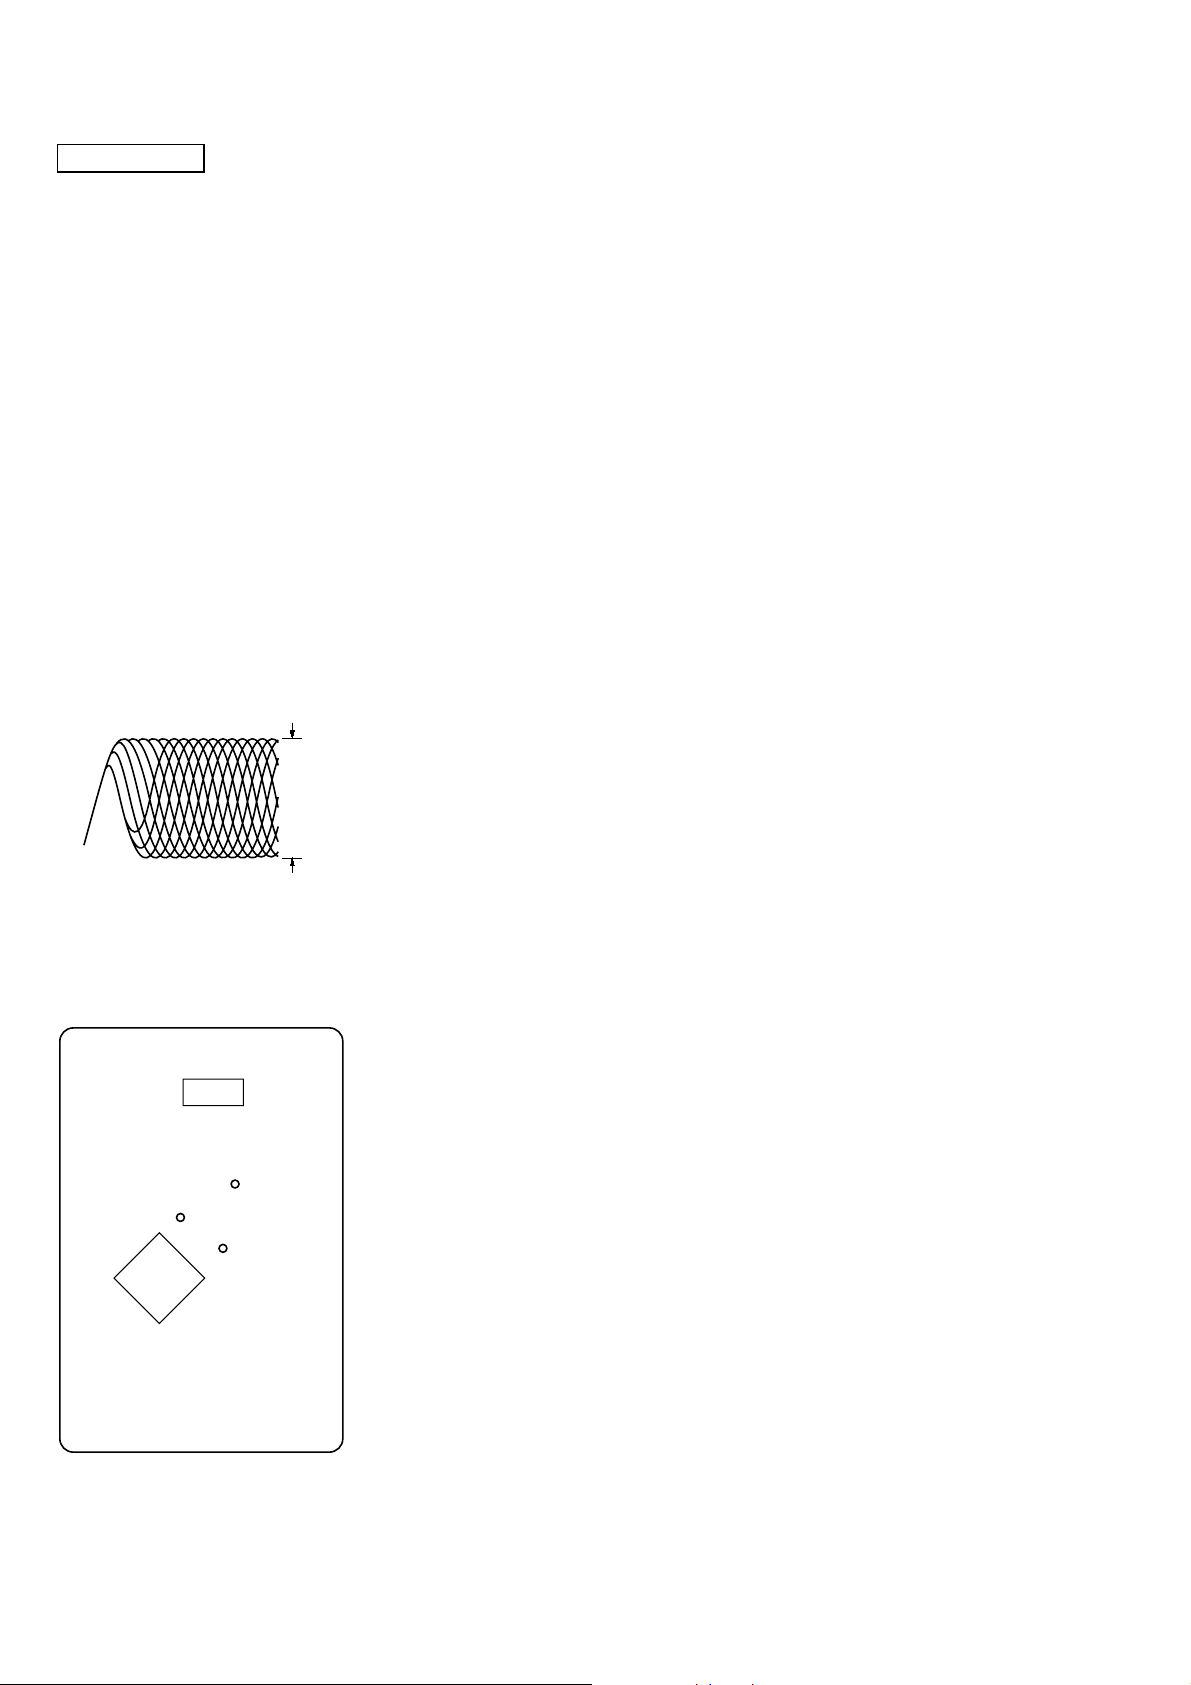
FOCUS BIAS CHECK
Procedure:
1. Connect the oscilloscope to TP (RF) and TP (VC) on the CD
board.
2. Set the CD test mode. (Refer to CD TEST MODE (See page
11))
3. Insert the test disc (YEDS-18). (Part No. 3-702-101-01) (CD)
4. Press the [CD ] button. (LPC ON)
5. Confirm that the oscilloscope waveform is as shown in the
figure below. (eye pattern)
A good eye pattern means that the diamond shape (◊) in the
center of the waveform can be clearly distinguished.
6. Press the [CD ] button. (LPC OFF)
7. Perform confirmation in the same manner as step 5.
8. Press the [OFF ] button.
9. Change the test disc (TCD-W082L). (Part No. J-2502-063-2)
(CD-RW)
10. Perform confirmation in the same manner as step 4 to 7.
NX
NX
x
• RF signal reference waveform (eye pattern)
VOLT/DIV: 0.2 V (with the 10: 1 probe in use.)
TIME/DIV: 500 ns
CD:
1.1 ± 0.2 Vp-p (LPC ON)
1.1 ± 0.3 Vp-p (LPC OFF)
CD-RW:
1.0 ± 0.2 Vp-p (LPC ON)
0.9 ± 0.3 Vp-p (LPC OFF)
When observing the eye pattern, set the oscilloscope
for AC range and raise vertical sensitivity.
Connecting Location:
– CD BOARD (Conductor Side) –
IC702
TP
(VC)
TP
(TE)
16
TP
(RF)
IC701
Page 17
SECTION 6
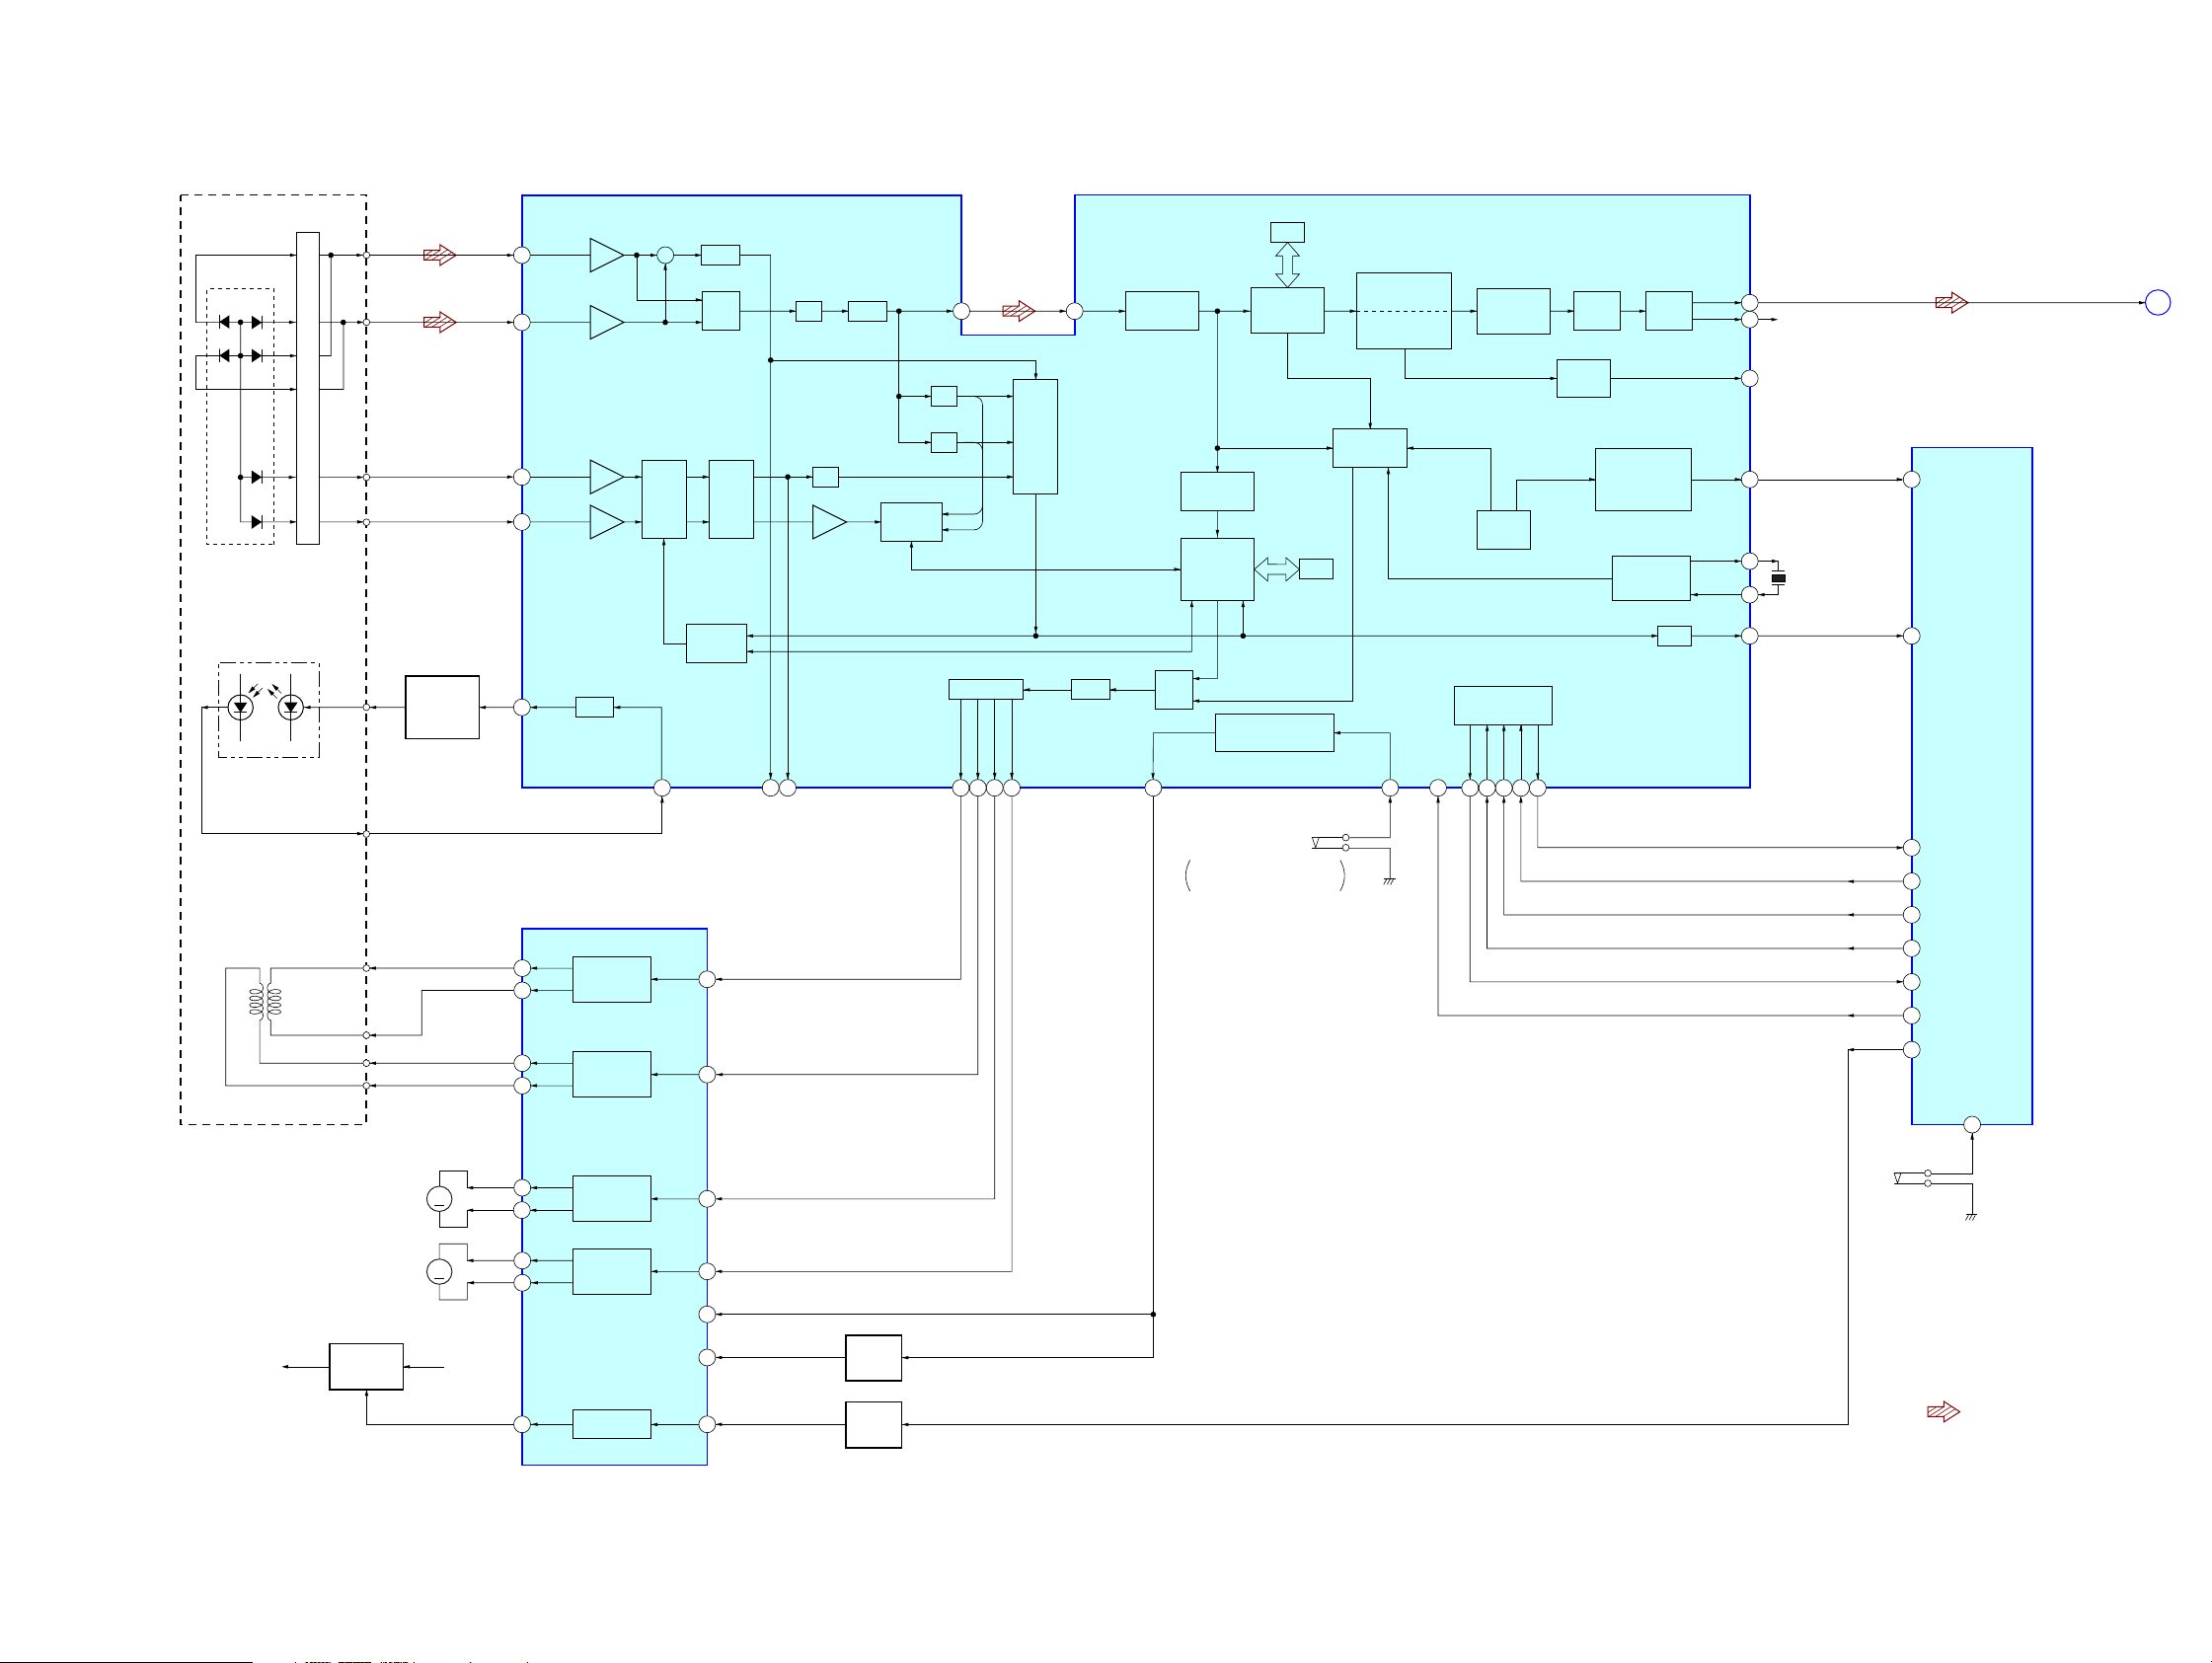
6-1. BLOCK DIAGRAM – CD Section –
FIN2 (PD1)
8
FIN1 (PD2)
7
DETECTOR
A
B
PD1
D
C
PD2
I-V AMP
DIAGRAMS
+
RF AMP, FOCUS/TRACKING SERVO,
DIGITAL SIGNAL PROCESSOR, CLV SERVO,
DIGITAL FILTER, D/A CONVERTER
LPF
MIX
IC701
EQ
AGC
ICF-CD73/CD73V
RAM
RF
4
PH
3
EFMIN
SLISE LEVEL
CONTROL
ERROR
CORRECTION
AUDIO CD
INTERPOLATION
MUTE
ATTENUATION
DEEMPHASIS
8FS
DIGITAL
FILTER
AUDIO
OUT
1 BIT
DAC
LPF
LCHO
RCHO
DOUT
42
R-CH
45
39
CD LCH
A
(Page 20)
F
E
OPTICAL PICK-UP
BLOCK
(KSM-900AAA)
LASER DIODE
LD
PD
2-AXIS
DEVICE
(FOCUS)
LO LD
LO PD
TRK +
TRK –
(TRACKING)
FCS +
FCS –
S/H
A/D
D/A
CONT4
25
PROCESSOR
SW
RUPTURE
DETECT
SERVO
ON :
GENERAL PURPOSE
PORTS
S701
(LIMIT)
When the optical pick-up
is inner position
BH
F
E
AUTOMATIC
POWER
CONTROL
Q701
TIN2 (F)
10
TIN1 (E)
9
LDD
80
19
20
17
18
APC
FOCUS/TRACKING COIL DRIVE,
SPINDLE/SLED MOTOR DRIVE,
POWER CONTROL
IC702
TRK+
TRACKING
TRK–
COIL DRIVE
FCS+
FOCUS
FCS–
COIL DRIVE
TBAL
LDS
79
TRK IN
FCS IN
AUDIO
ADJUST
9
10
LPF
13FE15
SW
TRACK
JUMP
TE
TDO21FDO23SLDO22SPDO
20
RAM
CLV, CAV
CONTROL
CONT166RES
72
PLL
VCEC
COMMAND
INTERFACE
WRQ61CE62CL63DI64DO
65
FRAME SYNC
DETECT,
PROTECT, INSERT,
EFM DECODE
CLOCK
GENERATOR
DRF
FSEQ
XOUT
DRF
XIN
31
48
49
67
X701
16.9344MHz
39 FSEQ
57 DRF
SYSTEM
CONTROLLER
IC401
(1/2)
53 CD DATA IN
54 CD DATA
55 CD CLK
56 CD CE
50 WRQ
58 XRST
59 CD ON
CD OPEN
61
M701
M
(SLED)
M702
(SPINDLE)
CD +3.3V PVCC
+3.3V
REGULATOR
Q705
M
SL+
22
SL–
23
SP+
25
SP–
24
SLED
MOTOR DRIVE
SPINDLE
MOTOR DRIVE
SL IN
SP IN
8
7
4MUTE34
5MUTE1
MUTING
SWITCH
Q702
S551
(CD LID OPEN/CLOSE)
• R-ch is omitted due to same as L-ch.
• SIGNAL PATH
REGB
31
REGULATOR
DC IN
30
CD ON
SWITCH
Q703, 704
: CD PLAY
1717
Page 18
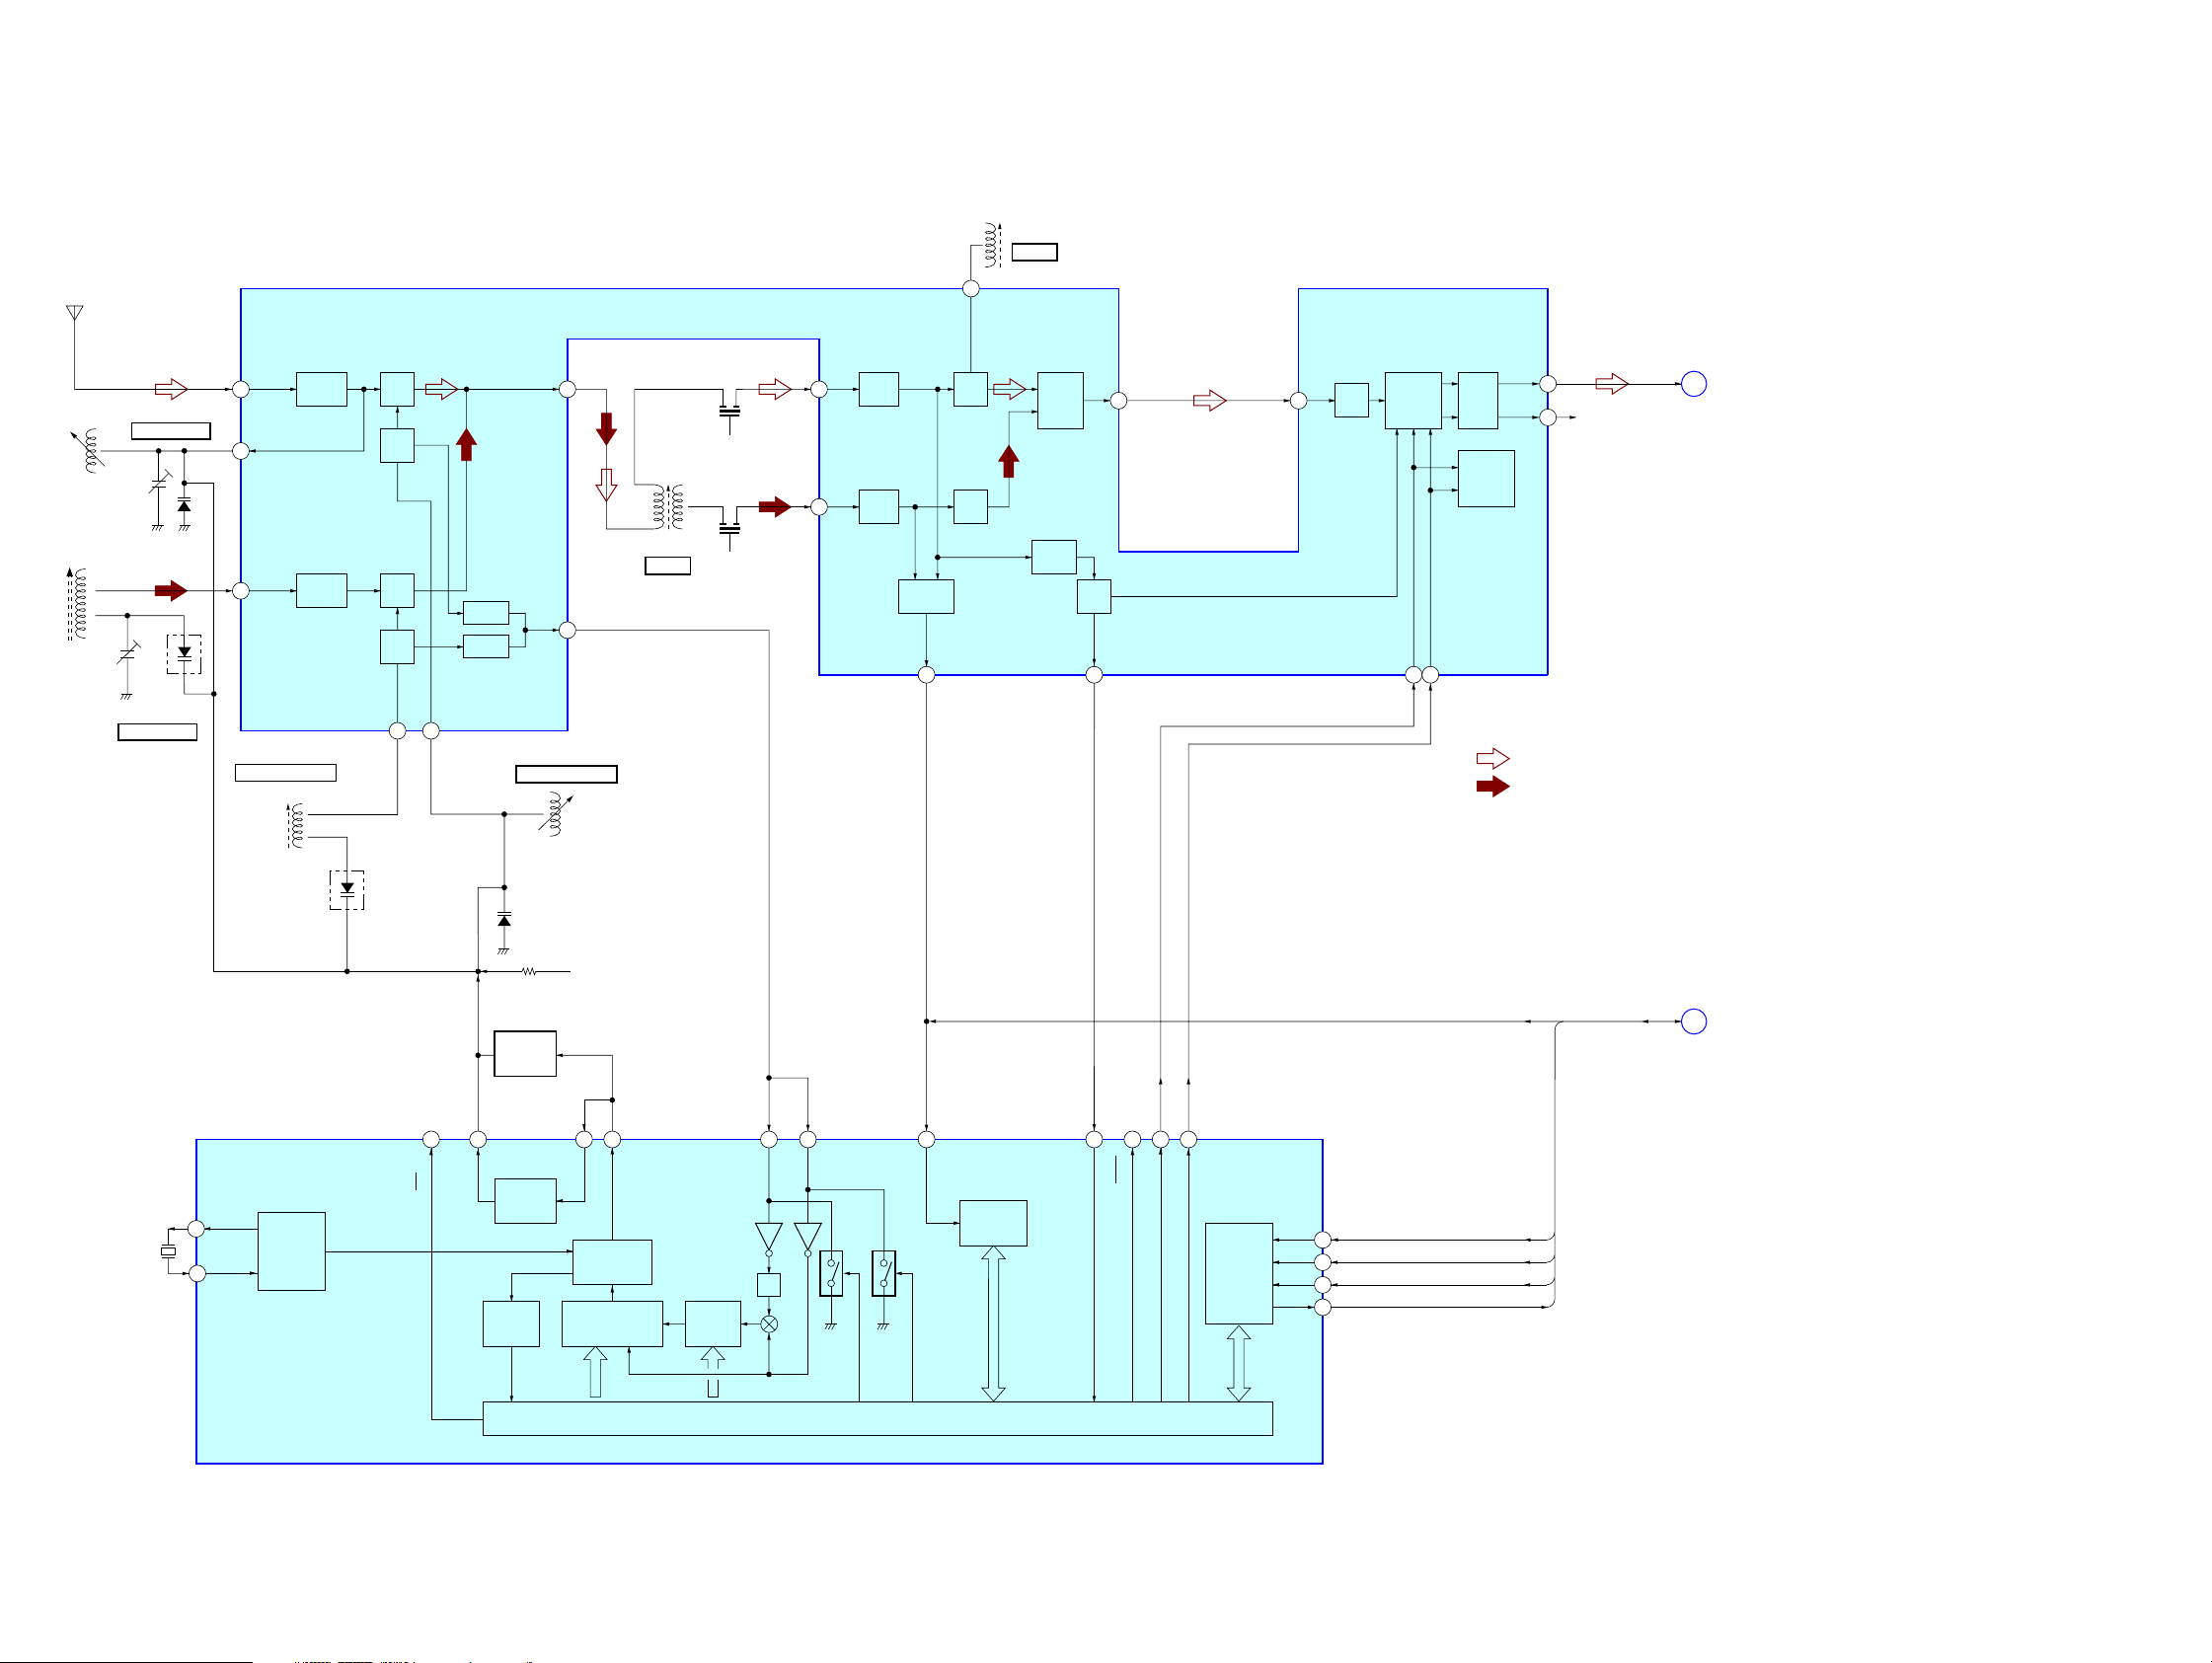
ICF-CD73/CD73V
6-2. BLOCK DIAGRAM – TUNER Section (ICF-CD73) –
ANT1
FM LEAD WIRE
ANTENNA
FM/AM RF AMP, MIX, OSC,
FM/AM IF AMP, DET, MPX
IC1
FM IFT
10
QUAD
T2
T2
FM IF
L1
FM RF
L3
AM FERRITE-ROD
ANTENNA
CT3
CT1, L1
FM TRACKING
CT1
D3
(1/2)
CT3, L3
AM TRACKING
D1
FM
RF IN
2
FM
RF OUT
24
AM
RF IN
22
L4
AM VCO VOLTAGE
L4
AM OSC
FM
RF AMP
AM
RF AMP
D3
(2/2)
FM
MIX
FM
OSC
AM
MIX
AM
OSC
AM OSC
20 21
FM OSC
BUFFER
BUFFER
MIX OUT
4 7
T1
AM IFT
T1
AM IF
OSC
OUT
19
L2
FM VCO VOLTAGE
L2
FM OSC
D2
CF2
CF4
FM
IF IN
FM IF
AMP
AM
IF IN
AM IF
6
AMP
FM
DET
AM
DET
IF
BUFFER
IF OUT
17 18
AF
BUFFER
LEVEL
DET
DET
OUT
ST
IND
ST IND
16
MPX
IN
AF
15
AMP
MPX
LPF1/BAND
LPF2/MO-ST
13
14
MUTE
STEREO/
MONO,
FM/AM
L-OUT
R-OUT
R-CH
TU LCH
B
(Page 20)
12
11
• R-ch is omitted due to same as L-ch.
• SIGNAL PATH
: FM
: AM
X1
75kHz
20
19
FM/AM PLL
IC2
XOUT
XIN
REFERENCE
DIVIDER
6
FM/AM
LP-OUT
UNLOCK
DETECT
LOW-PASS
FILTER
LOW-PASS
FILTER
VT B+
PD
LP-IN
PHASE
DETECTOR/
CHARGE PUMP
12 BIT
PROGRAMMABLE
DIVIDER
SWALLOW
COUNTER
111218
FMIN
AMIN
1/2
SHIFT REGISTER & LATCH
10 9
IF IN
UNIVERSAL
COUNTER
ST-IND
BAND
7
BAND
13817 16
MO/ST
CCB
INTERFACE
PLL DATA, PLL CLK,
MUTE
DI
2
CL
3
CE
1
DO
4
PLL DATA
PLL CLK
PLL CE
COUNT
PLL CE, COUNT, MUTE
C
(Page 20)
1818
Page 19
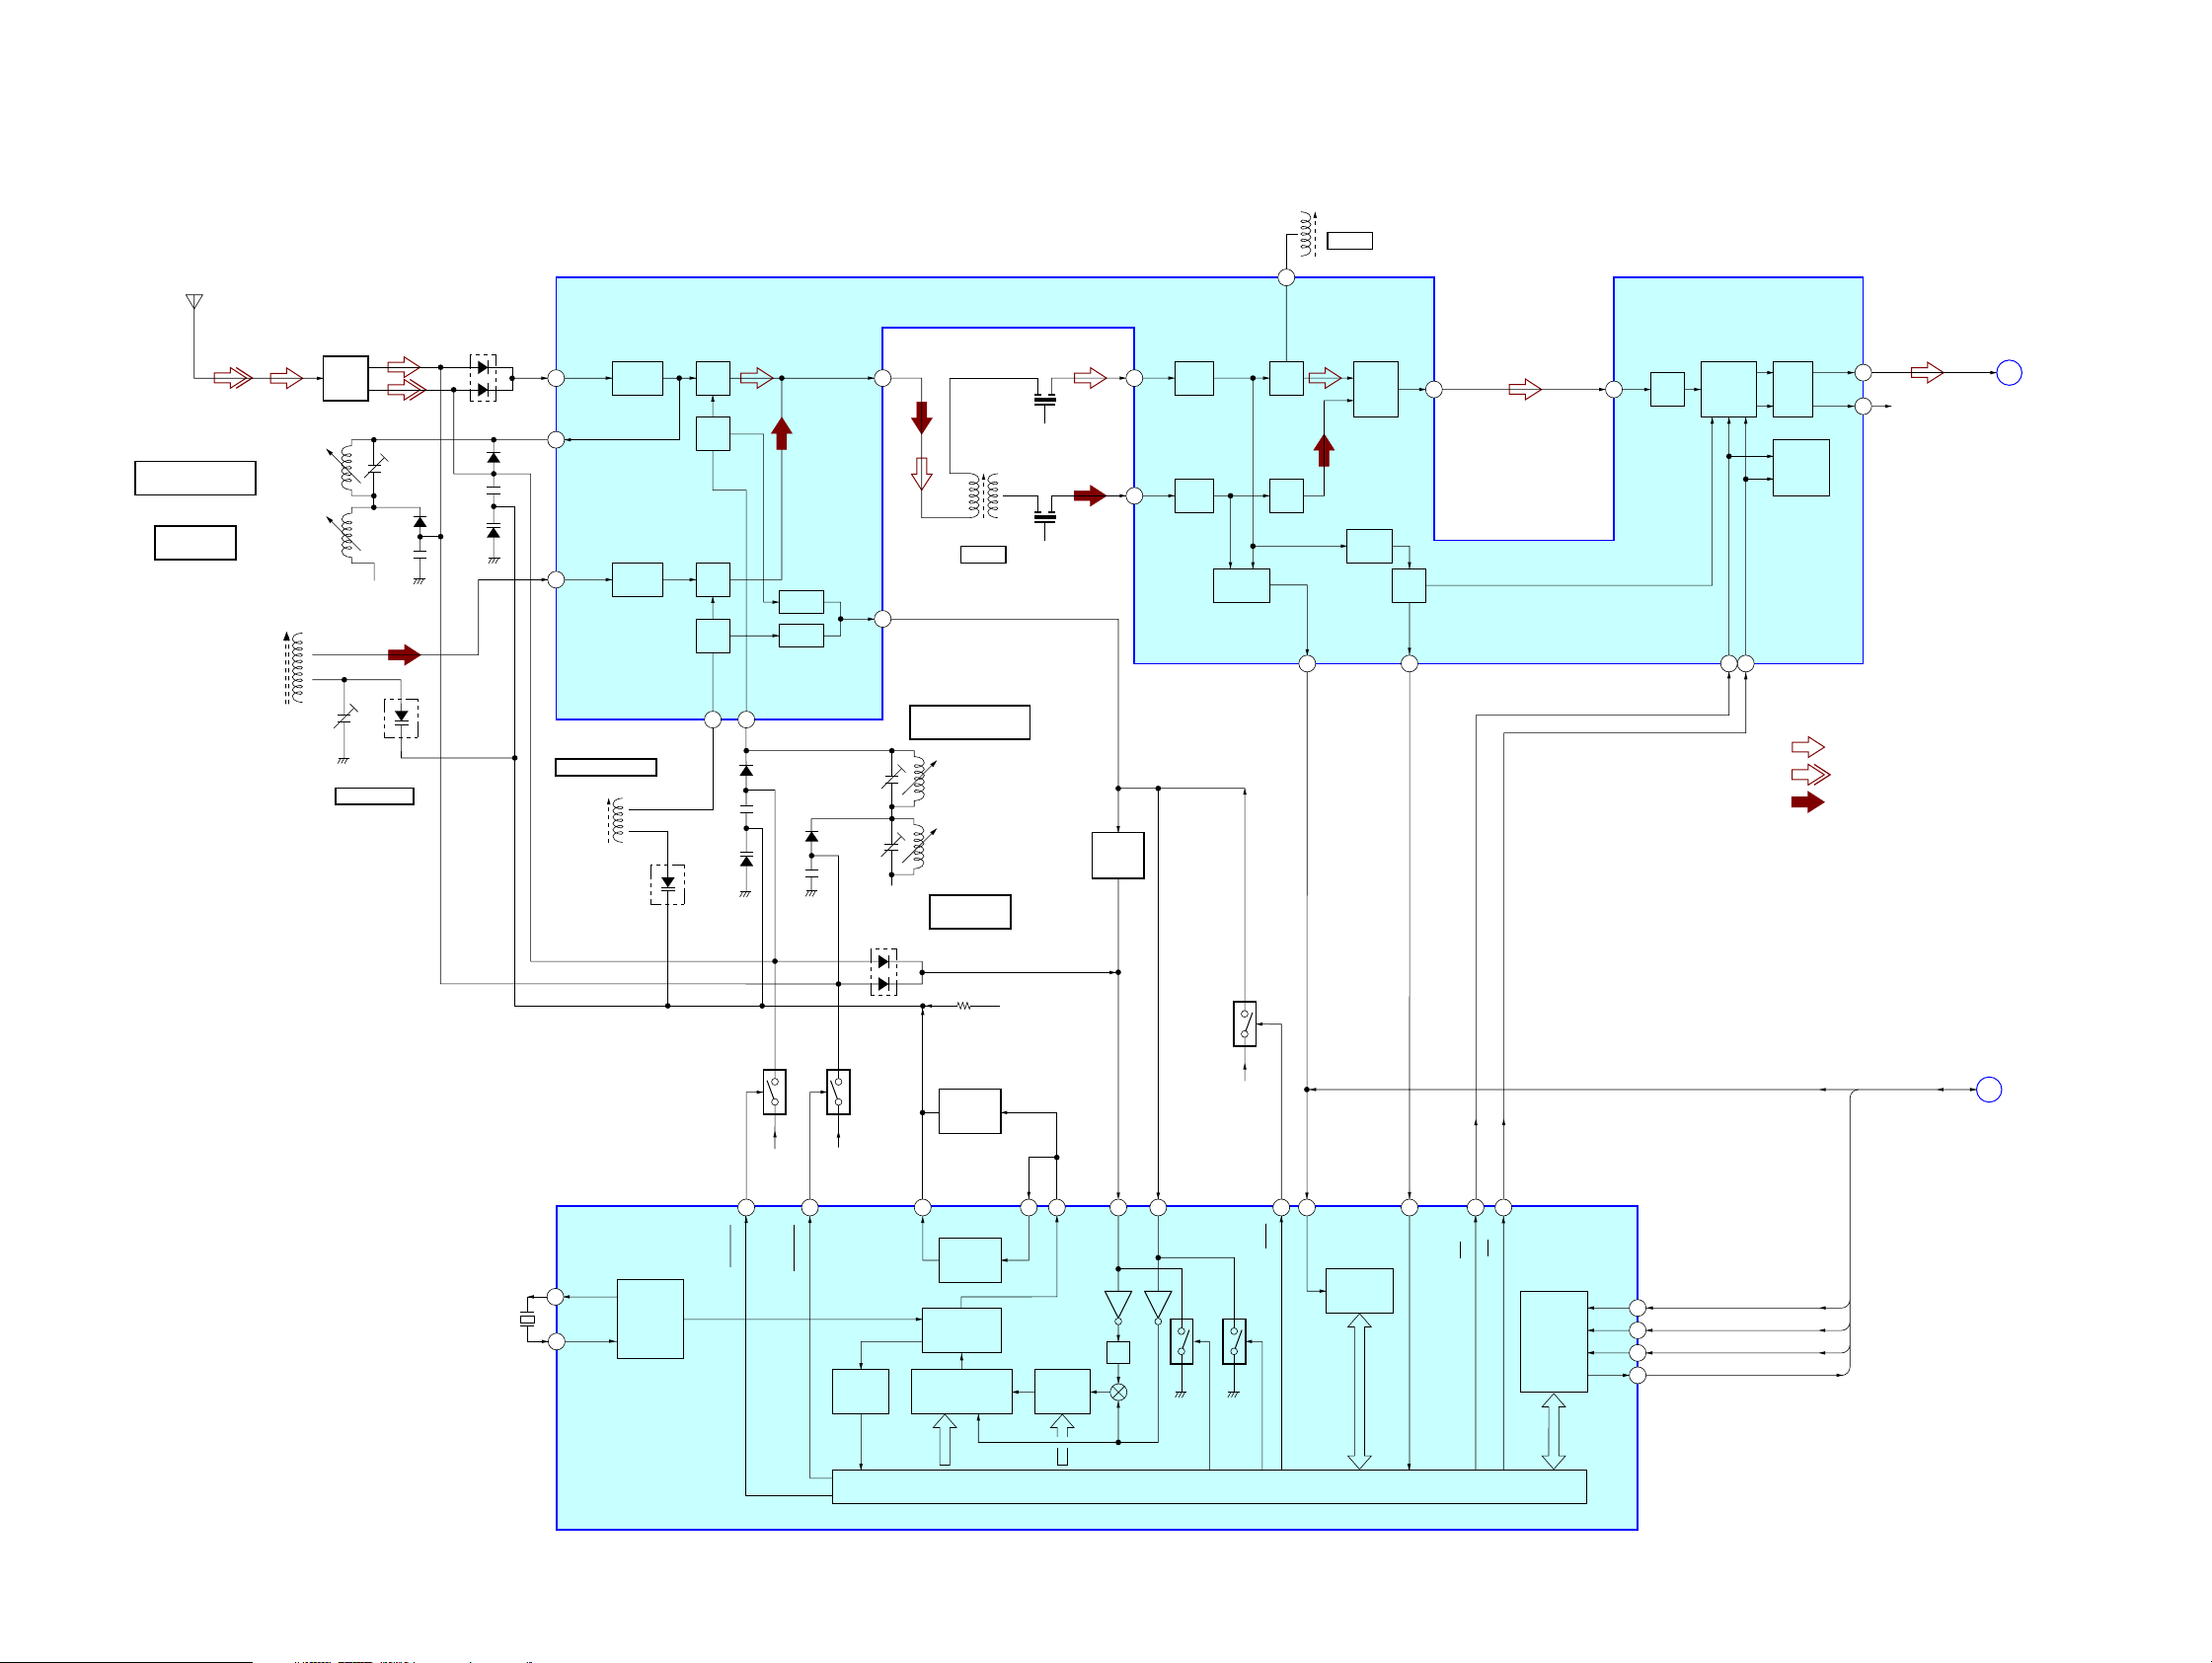
6-3. BLOCK DIAGRAM – TUNER Section (ICF-CD73V) –
ANT1
FM/TV/WEATHER
LEAD WIRE ANTENNA
CT2, L1
TV(7 – 13CH)/WEATHER
TRACKING
L2
FM/TV(2 – 6CH)
TRACKING
L5
AM FERRITE-ROD
ANTENNA
L1
TV/WEATHER
RF
L2
FM/TV
RF
B.P.F.
BPF1
CT5
AM TRACKING
RADIO 6V
D3
(1/2)
CT5, L5
CT2
D13
D15
D14
D1
FM/AM RF AMP, MIX, OSC,
FM/AM IF AMP, DET, MPX
IC1
FM
RF IN
FM
RF OUT
AM
RF IN
L6
FM
RF AMP
AM
RF AMP
D3
(2/2)
2
24
22
AM VCO VOLTAGE
L6
AM OSC
FM
MIX
FM
OSC
AM
MIX
AM
OSC
AM OSC
20 21
D17
D2
FM OSC
BUFFER
BUFFER
D24
MIX OUT
4 7
T1
AM IFT
T1
AM IF
OSC
OUT
19
CT4, L3
TV(7 – 13CH)/WEATHER
VCO VOLTAGE
L3
CT4
CT3
RADIO B+
D21
TV/WEATHER
OSC
L4
FM/TV
OSC
CT3, L4
FM/TV(2 – 6CH)
VCO VOLTAGE
CF2
CF4
OSC
BUFFER
Q14
ICF-CD73/CD73V
T2
FM IFT
T2
FM IF
10
QUAD
FM
IF IN
FM IF
AMP
AM
IF IN
AM IF
6
AMP
IF
BUFFER
FM
DET
AM
DET
IF OUT
17 18
AF
BUFFER
LEVEL
DET
DET
OUT
ST
IND
ST IND
16
MPX
IN
AF
15
AMP
MPX
LPF1/BAND
LPF2/MO-ST
13
14
MUTE
STEREO/
MONO,
FM/AM
L-OUT
R-OUT
12
11
R-CH
TU LCH
(Page 20)
• R-ch is omitted due to same as L-ch.
• SIGNAL PATH
: FM/TV (2
: TV (7
–
6CH)
–
13CH)/WEATHER
: AM
B
X1
75kHz
FM/AM PLL
20
XIN
19
IC2
XOUT
REFERENCE
DIVIDER
FM/TV (2-6CH)
ON SWITCH
Q12
RADIO B+
7
FM/TV-L
RADIO B+
TV-H/WB
TV (7-13CH)/
WEATHER
ON SWITCH
UNLOCK
DETECT
Q11
LOW-PASS
FILTER
LOW-PASS
LP-OUT
FILTER
PHASE
DETECTOR/
CHARGE PUMP
12 BIT
PROGRAMMABLE
DIVIDER
VT B+
LP-IN
SWALLOW
COUNTER
SWITCHING
Q13
PLL DATA, PLL CLK,
RADIO B+
1112186
PD
FMIN
AMIN
1/2
SHIFT REGISTER & LATCH
10 9
5 13817 16
IF IN
TV-H
UNIVERSAL
COUNTER
ST-IND
FM/AM
MO/ST
CCB
INTERFACE
DI
2
CL
3
CE
1
DO
4
MUTE
PLL DATA
PLL CLK
PLL CE
COUNT
PLL CE, COUNT, MUTE
C
(Page 20)
1919
Page 20
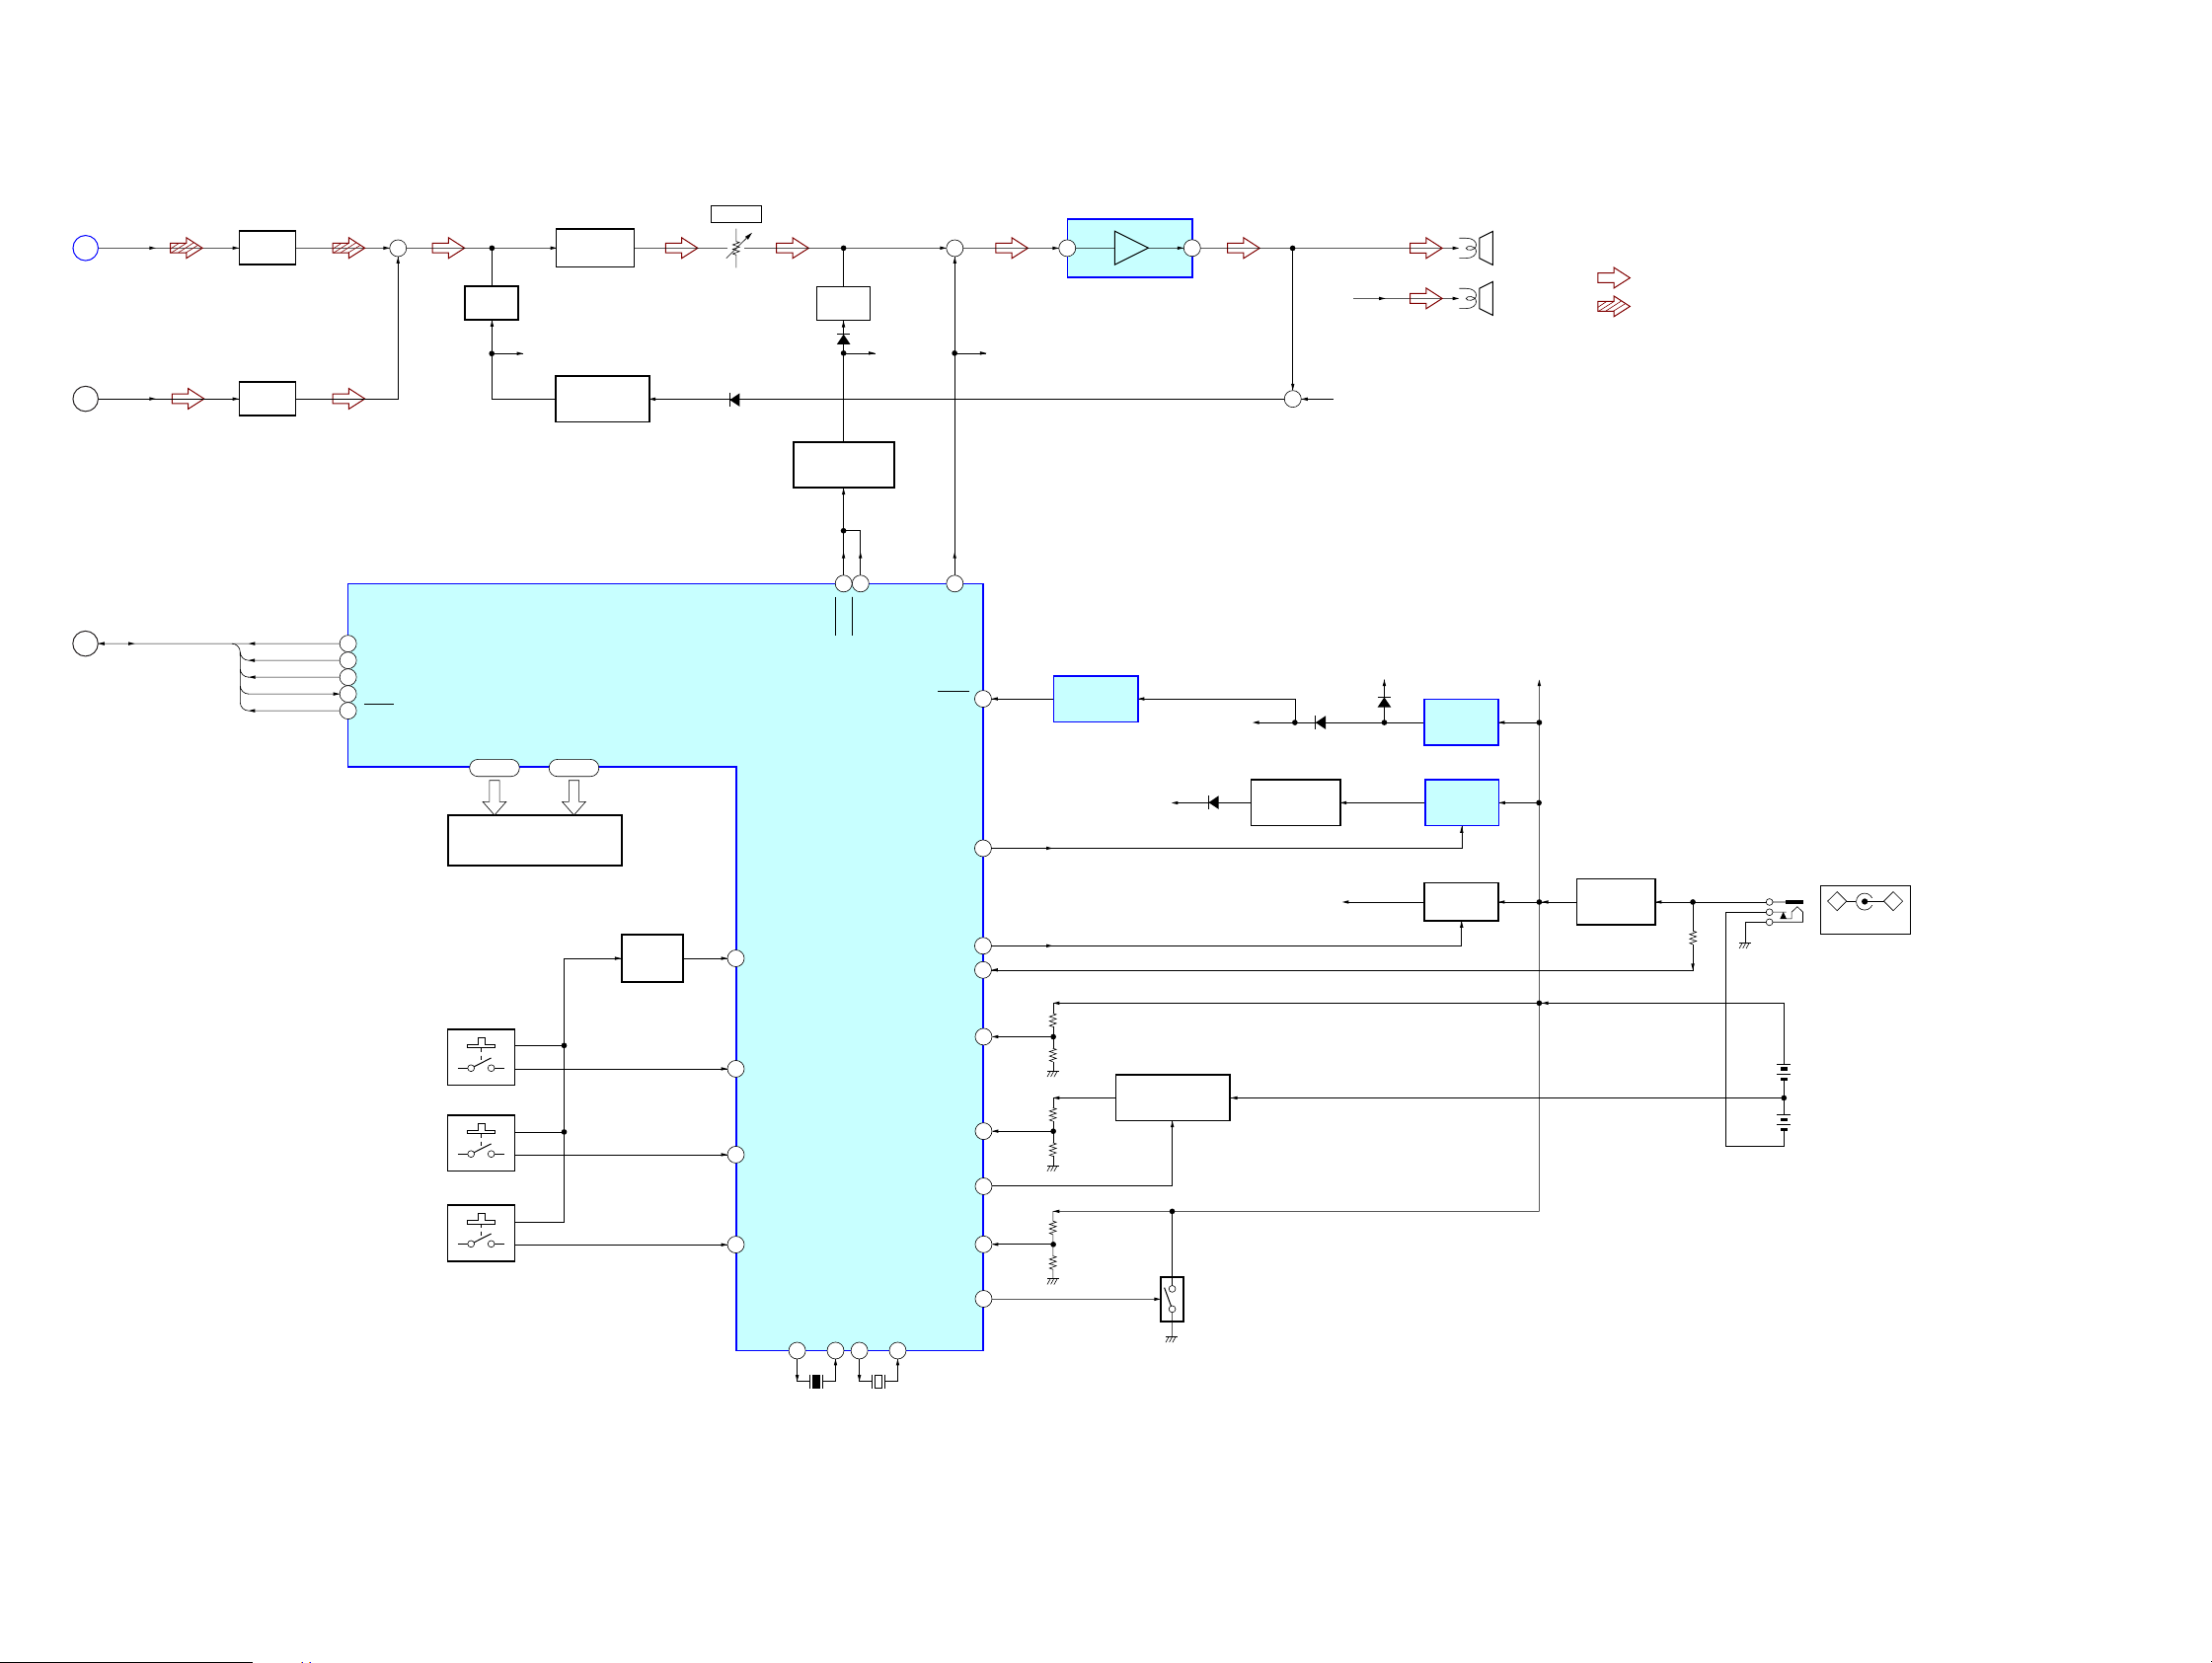
ICF-CD73/CD73V
6-4. BLOCK DIAGRAM – MAIN Section –
A
(Page 17)
ICF-CD73V
(Page 19)
B
ICF-CD73
(Page 18)
ICF-CD73V
(Page 19)
C
ICF-CD73
(Page 18)
CD LCH
TU LCH
PLL DATA, PLL CLK,
PLL CE, COUNT, MUTE
LINE AMP
Q153
LINE AMP
Q152
PLL DATA
PLL CLK
PLL CE
COUNT
MUTE
RV601
VOLUME
+ +
AGC
Q154
65
R DATA
R CLK
64
R CE
66
63
COUNT
MUTE
62
SEG0 – SEG17
10 – 27
LIQUID CRYSTAL DISPLAY
FILTER AMP
R-CH
AGC CONTROL
SYSTEM CONTROLLER
COM0 – COM3
6 – 9
LCD401
Q151
SWITCH
Q301
IC401 (2/2)
WAKE UP
SWITCH
Q401
D309
51
KEY CHK
MUTING
Q101
D101
MUTING
CONTROL SWITCH
Q403
78 79
A MUTE
B MUTE
R-CH
52
BUZZER
POWER AMP
IC303
• R-ch is omitted due to same as L-ch.
• SIGNAL PATH
: TUNER (FM/AM)
: CD PLAY
PVCC
+6V
REGULATOR
Q301, 306, 307
–
DC IN 6V
J901
+
VT B+
LOUT
1
UCOM B+
D308
+
D401
DC/DC
CONVERTER
Q304, 305, T301
POWER
AMP B+
R-CH
R-CH
D402
AUDIO
CIRCUIT
B+
+3.3V
REGULATOR
IC403
+3.3V
REGULATOR
IC301
B+ SWITCH
Q302, 303
SP101
(L-CH)
SP201
(R-CH)
LIN
7
R-CH
76RESET
32R ON
31POWER ON
41AC IN
RESET SIGNAL
GENERATOR
IC402
S501 – 503
S601 – 606
S607 – 611
43VH
KEY0
46
42VM
KEY 1
45
80BATT CHK M
LOAD
49DC CHK
77
KEY 2
44
XT1
XT2
X1
X2
X402
4.19MHz
7475
X401
32.768kHz
7071
DC MIDDLE VOLTAGE
CONTROL SWITCH
Q405
LOAD CONTROL
SWITCH
Q406
DRY BATTERY
SIZE “C”
(IEC DESIGNATION R14)
4PCS. 6V
2020
Page 21
ICF-CD73/CD73V
d
Ver. 1.1
6-5. NOTE FOR PRINTED WIRING BOARDS AND SCHEMATIC DIAGRAMS
Note on Printed Wiring Boards:
• X : parts extracted from the component side.
• Y : parts extracted from the conductor side.
• W : indicates side identified with part number.
z
•
•
• : Pattern from the side which enables seeing.
(The other layers' patterns are not indicated.)
Caution:
Pattern face side: Parts on the pattern face side seen from
(Conductor Side) the pattern face are indicated.
Parts face side: Parts on the par ts face side seen from
(Component Side) the parts face are indicated.
: Through hole.
f
: internal component.
Note on Schematic Diagram:
• All capacitors are in µF unless otherwise noted. pF: µµF
50 WV or less are not indicated except for electrolytics
and tantalums.
• All resistors are in Ω and 1/
specified.
f
•
• C : panel designation.
Note:
The components identified by mark 0 or dotted
line with mark 0 are critical for safety.
Replace only with part
number specified.
• A : B+ Line.
• H : adjustment for repair.
•Power voltage is dc 6 V and fed with regulated dc power
•Power voltage is dc 3 V and fed with regulated dc power
•Voltages are taken with a V OM (Input impedance 10 MΩ).
•Waveforms are taken with a oscilloscope.
• Circled numbers refer to waveforms.
• Signal path.
•Abbreviation
: internal component.
supply from pin 1 and 3 of CNP901 on the J ACK board.
supply from pin 2 and 3 of CNP901 on the J ACK board.
no mark : FM/TV (2 – 6 ch)
(): AM
[]: TV (7 – 13 ch)/WEATHER (1 – 7 ch)
〈〈 〉〉 : CD PLAY
Voltage variations may be noted due to normal production tolerances.
Voltage variations may be noted due to normal production tolerances.
F : FM/TV (2 – 6 ch)
L : TV (7 – 13 ch)/WEATHER (1 – 7 ch)
f : AM
J : CD PLAY
CND : Canadian model
IT : Italian model
MX : Mexican model
4
Note:
Les composants identifiés par
une marque 0 sont critiques
pour la sécurité.
Ne les remplacer que par une
pièce portant le numéro
spécifié.
W or less unless otherwise
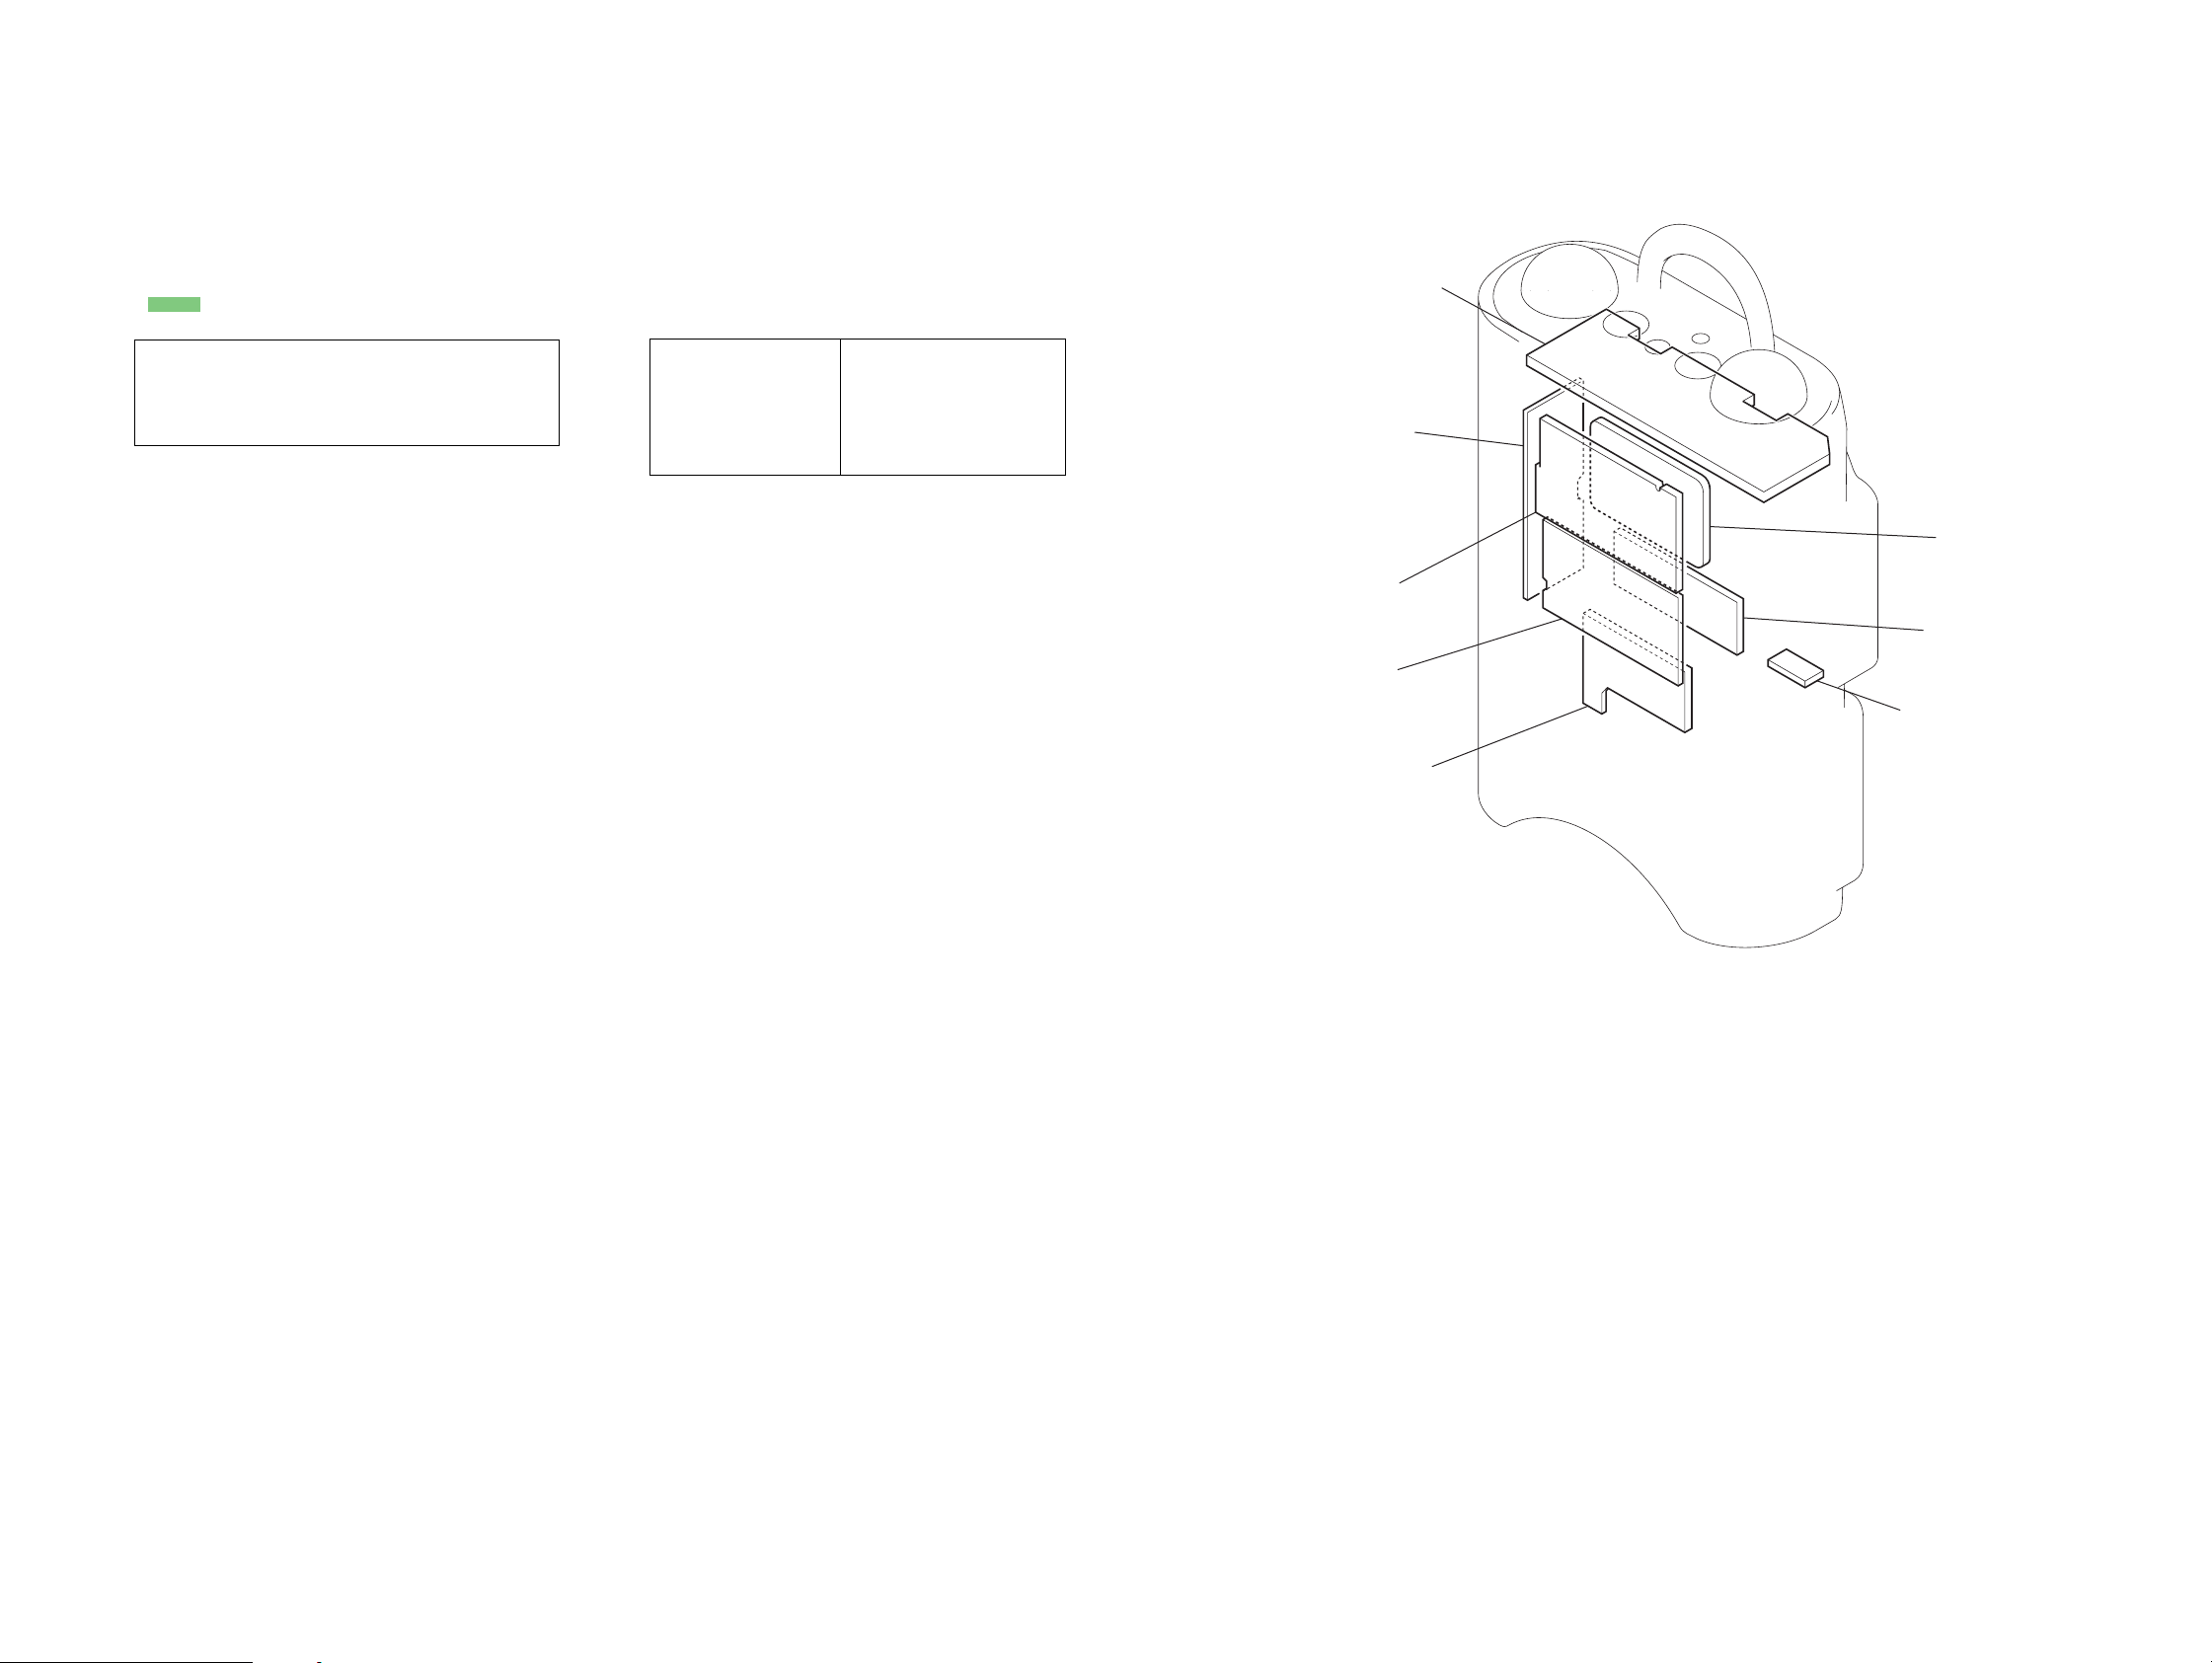
• Circuit Boards Location
key board
power board
CD boar
LCD board
relay board
tuner board
SW board
jack board
2121
Page 22
ICF-CD73/CD73V
• Semiconductor
Location
Ref. No. Location
D701 B-5
IC701 E-3
IC702 B-4
Q701 G-4
Q702 D-2
Q703 B-3
Q704 B-2
Q705 B-1
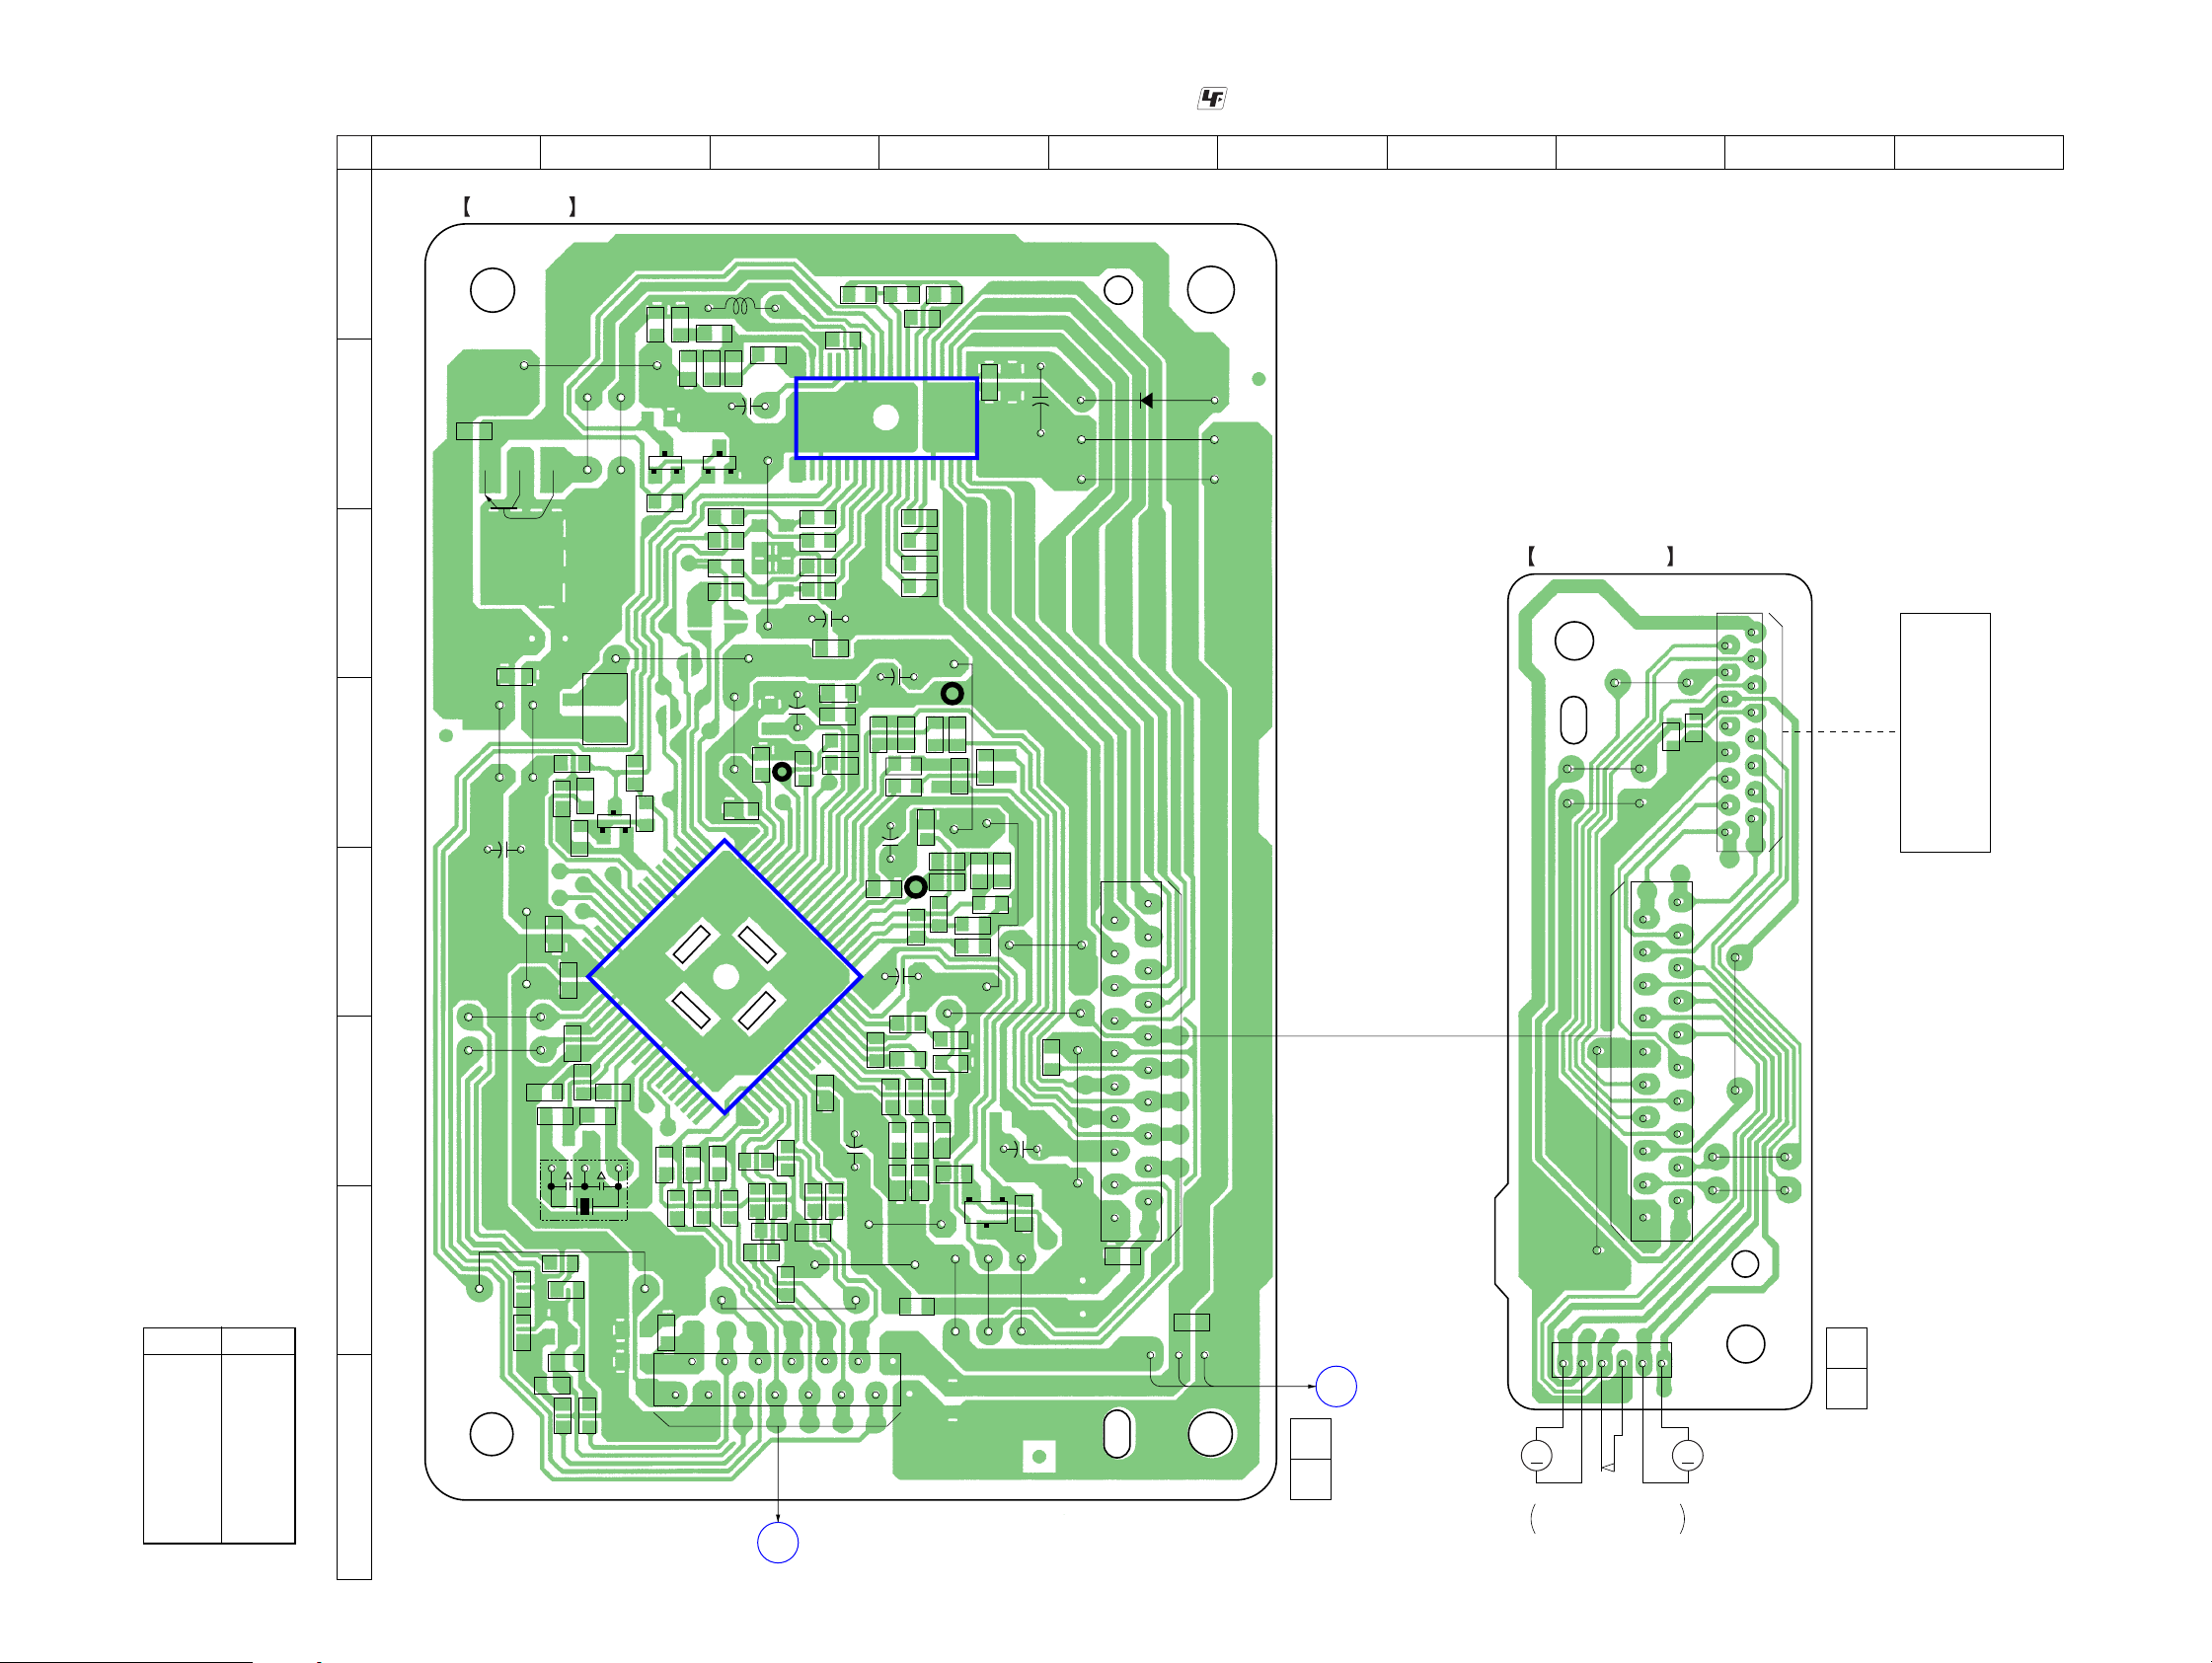
6-6. PRINTED WIRING BOARD – CD Section – • See page 21 for Circuit Boards Location. :Uses unleaded solder.
1 2 3 4 5 6 7 8 9 10
CD BOARD
A
B
C
D
E
F
G
H
C779
C766
JW711
C721
JW717
JW718
Q705
+
JW716
JW710
FB701
R720 R718
C725
R745
C718
JW725
R717
R719
C724
C717
C719
R722
JW703
JW705
R716
R747
40
41
C728
JC701
R724R723
X701
R721
L702
Q702
C729
JW704
ECB
Q704
C781
JC703
R746
C774
JW707
C734
1
R769
ECB
R727
L701
2
R770
R771
R773
Q703
ECB
R753
R756
R762
R759
21 20
IC701
60 61
C733
C732
R725
L750
R772
C767
JW709
C716
R726
R732
JC702
C768
+
TP
(TE)
C715
R728
C736
JW724
CNP702
D
JW706
C708
R729
40
R751
R754
R760
R757
C754
+
C711
C740
C735
R730
C738
C737
LCD BOARD
CNP402
(Page 28)
C714
C710
C712
C709
C763 C764 C761
C773
IC702
C757
C758
C756
C753
C745
1
80
12
+
C706
C744
C713
R712
R709
R706
C747
JW719
13
+
(RF)
R740
C743
R734
R735
C741
R743
C755
TP
+
C739
R731
JW720
C762
+
(VC)
R713
+
R736
TP
R701
R737
C742
R715
R703
C705
C704
R741
R733
R738
R702
R739
R742
21
201
R714
R710
C702
C701
E
JW723
JW708
R704
C703
Q701
C
JW722
C760
R707
R705
JW714
C749
B
+
C759
JW713
JW712
+
C746
JW721
R744
JW715
CNP701
19
1
C750
D701
JW701
JW702
20
2
1 3
C780
1-687-325-
11
(11)
E
POWER BOARD
CNP303
(Page 30)
M702
(SPINDLE)
RELAY BOARD
JW791
JW792
JW793
19
JW794
CNP706
M
S701
(LIMIT)
ON: When the optical pick-up
os inner position
1
CNP704
16
C777
20
2
CNP705
2
C778
16
JW796
JW797
1-687-324-
M701
M
(SLED)
1
OPTICAL
PICK-UP
BLOCK
(KSM-900AAA)
15
JW795
11
(11)
2222
Page 23
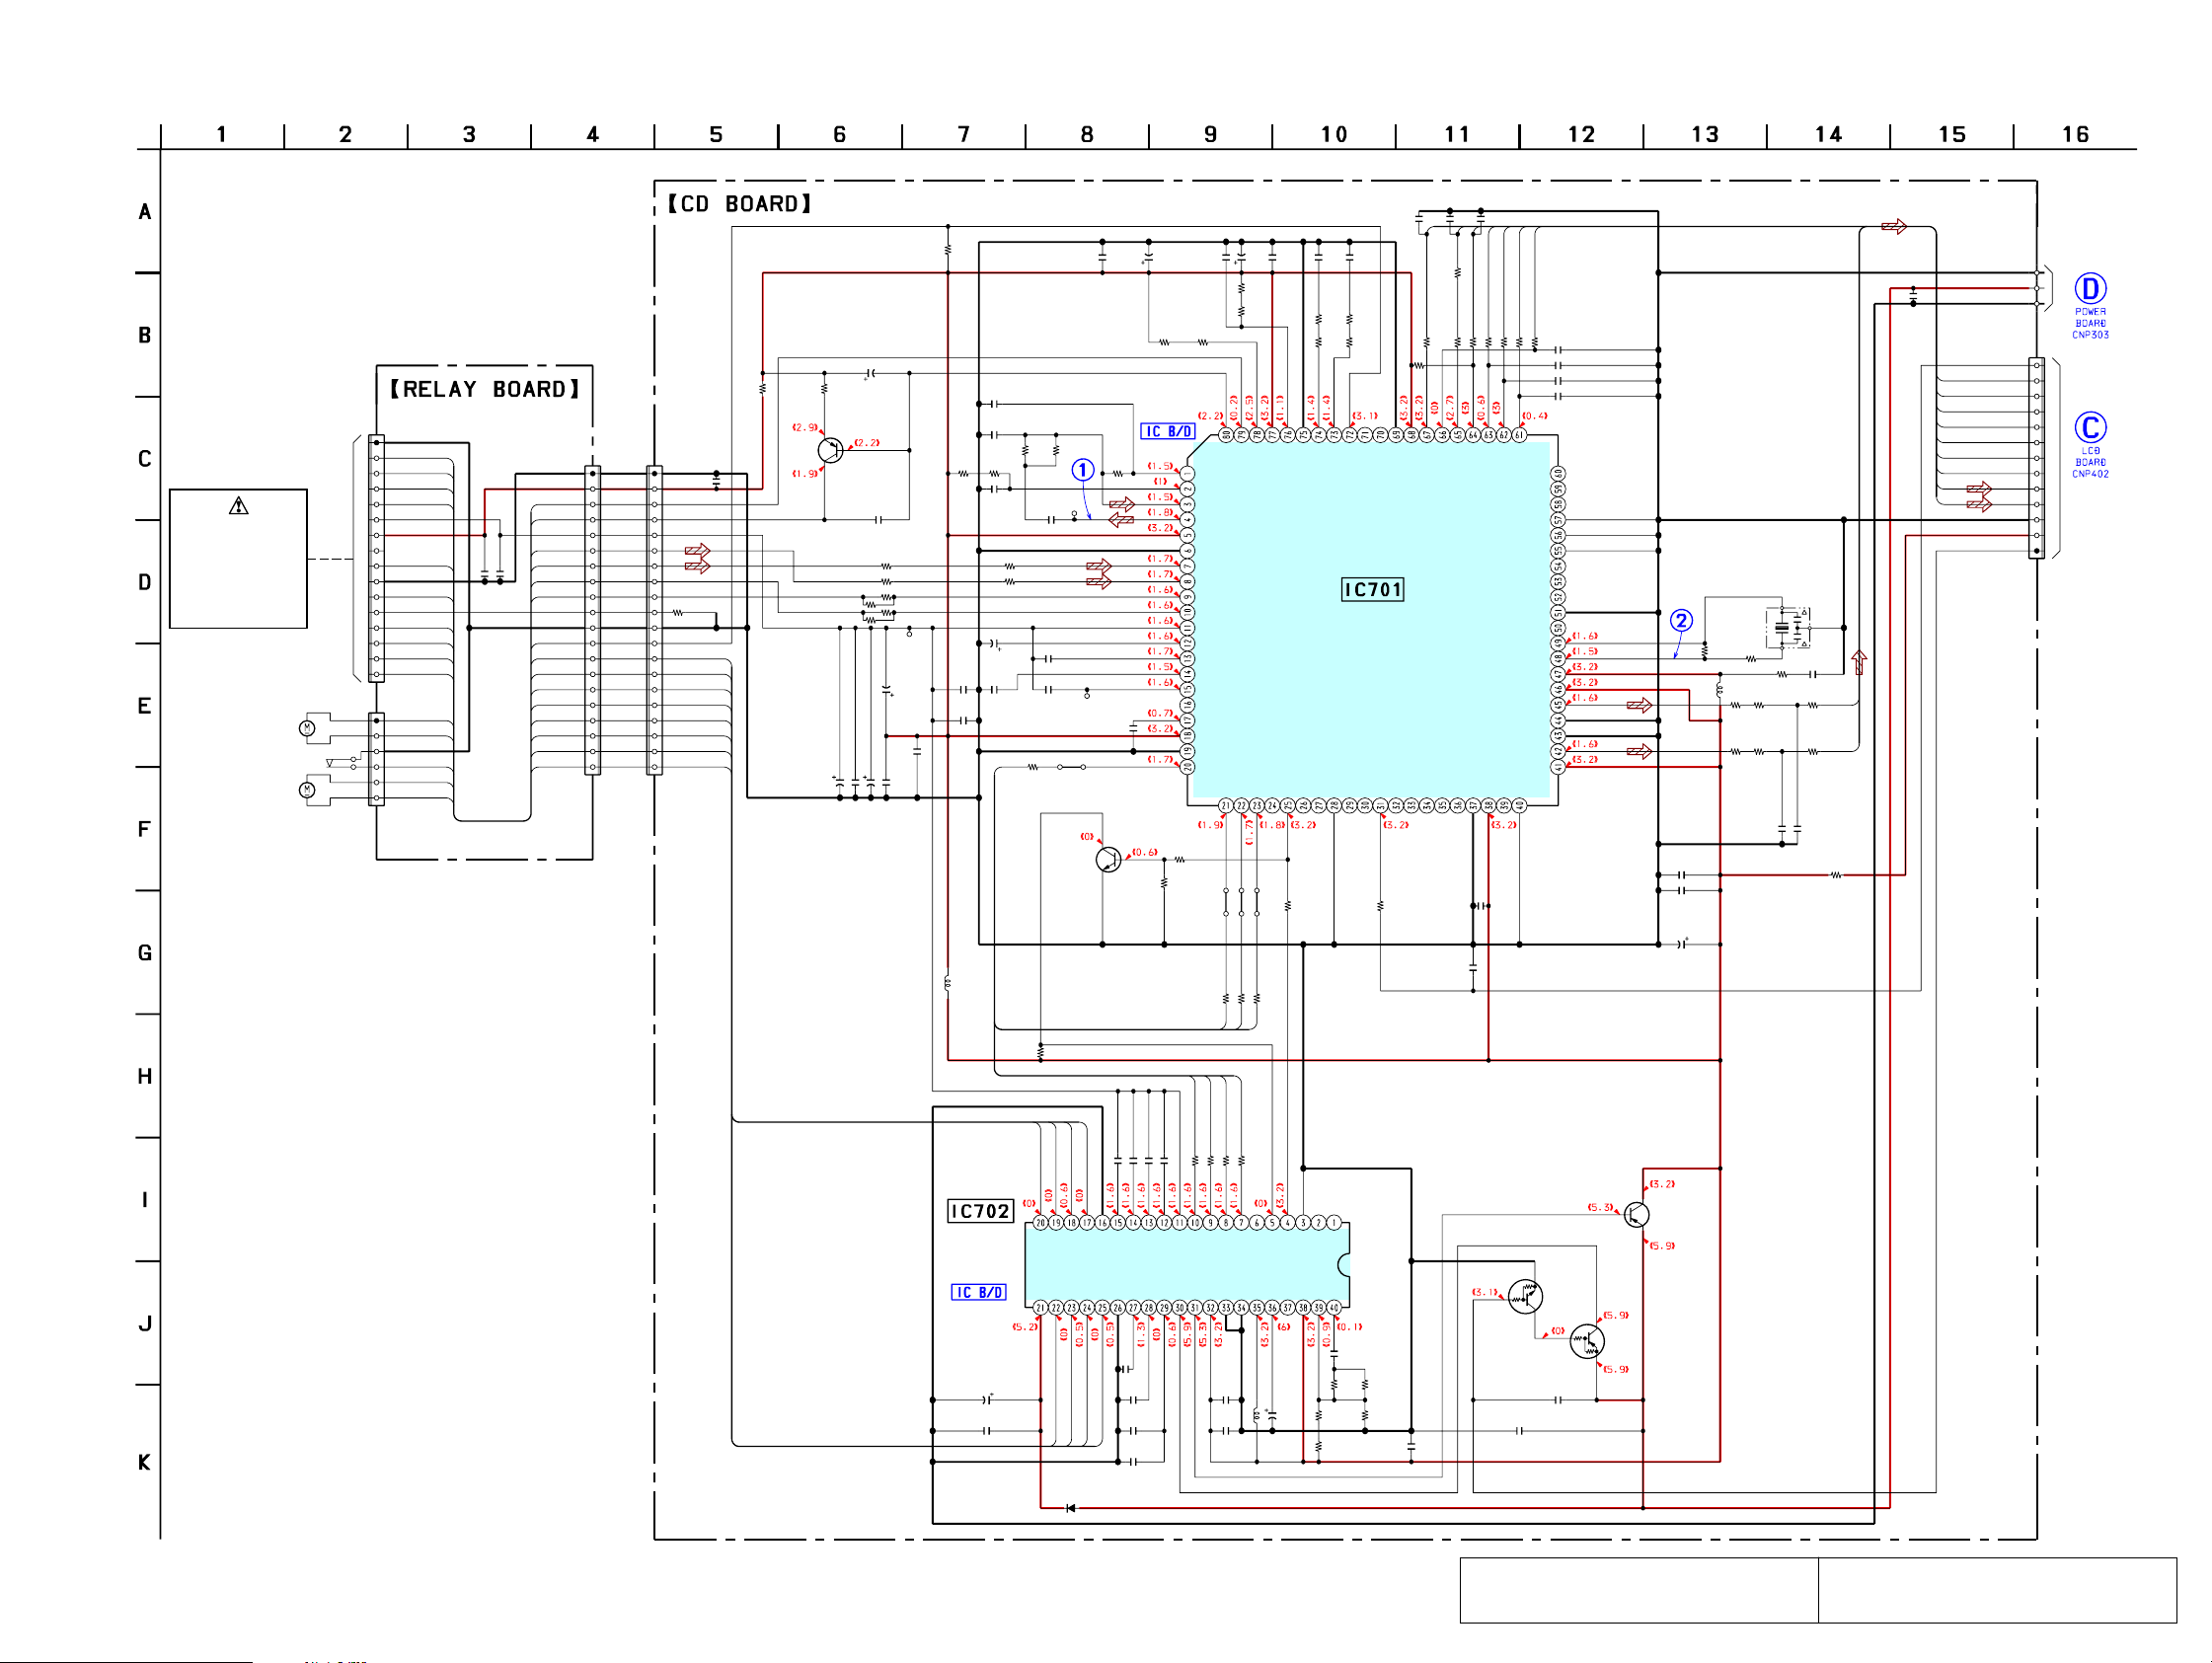
6-7. SCHEMATIC DIAGRAM – CD Section – • See page 33 for Waveforms. • See page 32 for IC Block Diagrams.
R733
OPTICAL
PICK-UP
BLOCK
(KSM-900AAA)
M701
(SLED)
(LIMIT)
M702
(SPINDLE)
47k
R743
0
CNP705
16P
GND
PD2
PD2
F
F
PD1
PD1
E
E
VC
VCC
NC
LD
LD LD
GND
PD
LD PD
VR
FCS+
FCS+
TRK+
TRK+
TRK-
TRK-
FCS-
FCS-
CNP706
6P
SL+
SL+
SL-
SL-
S701
GND
LIM
LIM
SP+
SP+
SP-
SP-
PD
LD
1
1
PD1
PD2
C778
C777
F
E
LIM
SP+
SP-
SL-
SL+
FCS+
TRK+
FCS-
TRK-
GND
VCC
LD PD
LD LD
VC
PD1
PD2
F
E
VR
GND
LIM
SP+
SP-
SL-
SL+
FCS+
TRK+
FCS-
TRK-
CNP701CNP704
C750
20P20P
0.1
R744
100
SP+
SP-
SL-
SL+
FCS+
TRK+
FCS-
TRK-
R713
R715
R742
10
Q701
KTN2907AS-RTK
AUTOMATIC
POWER CONTROL
470k
470k
4V
100
0.1
C749
C754
C702
C710
C714
L702
10µH
C701
0.047
C703
22p
R704 R705
R702R703
470 1k
4.7k22k
0.1
0.1
0.1
C705
4700p
R706
4.7k
R709
4.7k
C708
1
50V
C712
C711
4700p
1
TX TY
A1
R762
22k
R745
47k
C747
47
10V
C746
1000p
R707
10k
R710
10k
R712
220k
R714
220k
TP
(VC)
C713
100
4V
4V
100
C706
0.1
C753
C716
0.1
C744
0.1
R701
10k
TP
(RF)
4700p
C709
C715
TP
100p
(TE)
BP701
Q702
2SC4081
MUTING
SWITCH
ICF-CD73/CD73V
Ver. 1.1
C737 C736
1000p 22p
C738
1000p
C745
100
4V
R746
100k
R747
220k
R740R741
2201k
C743
0.1
SLCO
SLCIST
EFMIN
RF
RFVDD
RFVSS
FIN1
FIN2
TIN1
TIN2
VREF
REFI
FE
TEC
TE
RFMON
JITTC
ADAVDD
ADAVSS
TDO
FY
BP702
X
F
22k
R759
A2
C740
100
4V
R739
10k
R738
2.2k
R
S
D
F
D
D
L
L
O
O
D
O
D
L
P
D
F
S
S
Y
Y
L
P
S
S
BP704
BP703
X
X
L
P
S
S
22k
10k
R756
R753
A4
A3
C739
0.1
T
S
D
S
D
IS
V
V
K
V
V
C
P
5
4
C
T
T
A
N
N
D
P
O
O
G
C
C
JC703
0
C742
1
C741
0.047
R735R737
470470
R736 R734
220 220
1
2
1
2
O
D
P
RF AMP,FOCUS/TRACKING SERVO,
DIGITAL SIGNAL PROCESSOR,
CLV SERVO,D/A CONVERTER
6
T
N
O
/C
K
C
B
S
3
T
T
T
O
N
N
N
D
O
P
O
C
CO
C
IC701
LC78646E-US-E
G
T
/F
C
K
E
Q
F
C
E
E
B
/P
S
V
D
S
F
R716 C718
100 0.1
2.2k
R732
S
S
V
I1
N
O
M
B2
B3
B1
0
JC702
100
100
100
R728
R729
R731
F
5
S
Q
E
D
R
R
R
D
D
W
V
I5
I4
I3
I2
N
N
N
O
O
O
IN
M
M
M
M
C717
1000p
B7
B4
B5
B6
1k
1k
1k
1k
R730
R725
R726
R727
I
L
O
D
C
D
FSX/16MIN
S
S
)V
T
V
U
D
.3
O
D
(3
V
D
DATACK
ASDFIN
ASDACK
ASLRCK
16MOUNT
C735
0.01
C734
22p
C733
22p
C732
22p
E
C
DATA
LRSY
EFLG
C2F
XVSS
XIN
XOUT
XVDD
RVDD
RCHO
RVSS
LVSS
LCHO
LVDD
T
ES
T
R724
22k
C728
0.01
C719
0.01
C721
470
4V
X701
16.9344MHz
R723
470
FB701
JC701 C729
00.01
R720R718
10047
R719
R717 R721
100
47 0
C724 C725
0.01 0.01
B8
R722
0
B9
L701
0
C780
0.1
DGND 1
PVCC
PGND
3
CNP702
13P
(Page 31)
+3.3V
CD ON
FSEQ
DRF
DO
WRQ
CL
CE
DI
RES
RCH
(Page 29)
LCH
DGND
B1
B2
B3
B4
B5
B6
B7
B8
B9
FOCUS/TRACKING
COIL DRIVE,
SPINDLE/SLED
MOTOR DRIVE,
POWER CONTROL
IC702
BH6575FV
A4
A2
A3
A1
47k
47k
47k
0.022
0.022
0.022
+
K
R
T
1N4002
0.022
R754
R760
R757
C755
C756
C757
C758
FCS+
FCS-
+
4
1
S
S
D
C
C
FIL
N
F
F
G
P
-
+
+
-
L
L
P
P
S
S
S
S
P+
S
SP-
SL-
D701
F
2
1
E
IL
R
FIL
F
FIL3
V
2
D
T
N
G
P
C761
C762
0.1
C763
47p
C764
220p
IN
FT
R
T
D
O
P
C
C
S
S
1
R751
22k
Q705
2SB1184
+3.3V
T
E
IN
IN
IN
IN
S
L
P
S
K
E
S
S
R
FC
R
T
3
D
O
B
D
N
G
G
N
E
E
G
R
P
G
R
220µH
L750
C773
0.1
C774
0.1
F
4
1
E
T
U
M
G
L
T
F
3
LK
R
E
O
C
T
TA
U
S
M
S
Y
S
W
G
I
O
E
E
V
S
V
Q703
DTC115EUA
C768
0.022
R772 R773
10
10k 47k
R770 R771
4.7k 10k
R769
22k
C766
0.1
C767
10V
Q703,704
CD ON
SWITCH
C779 C781
0.1 1000p
Q704
DTA144EUA
The components identified by mark 0 or dotted
line with mark 0 are critical for safety.
2323
Replace only with part number specified.
REGULATOR
Les composants identifiés par une marque 0 sont
critiques pour la sécurité. Ne les remplacer que
par une pièce portant le numéro spécifié.
K-
TR
TRK+
K
R
T
C
C
V
P
C759
470
10V
C760
0.1
SL+
Page 24
ICF-CD73/CD73V
Ver. 1.1
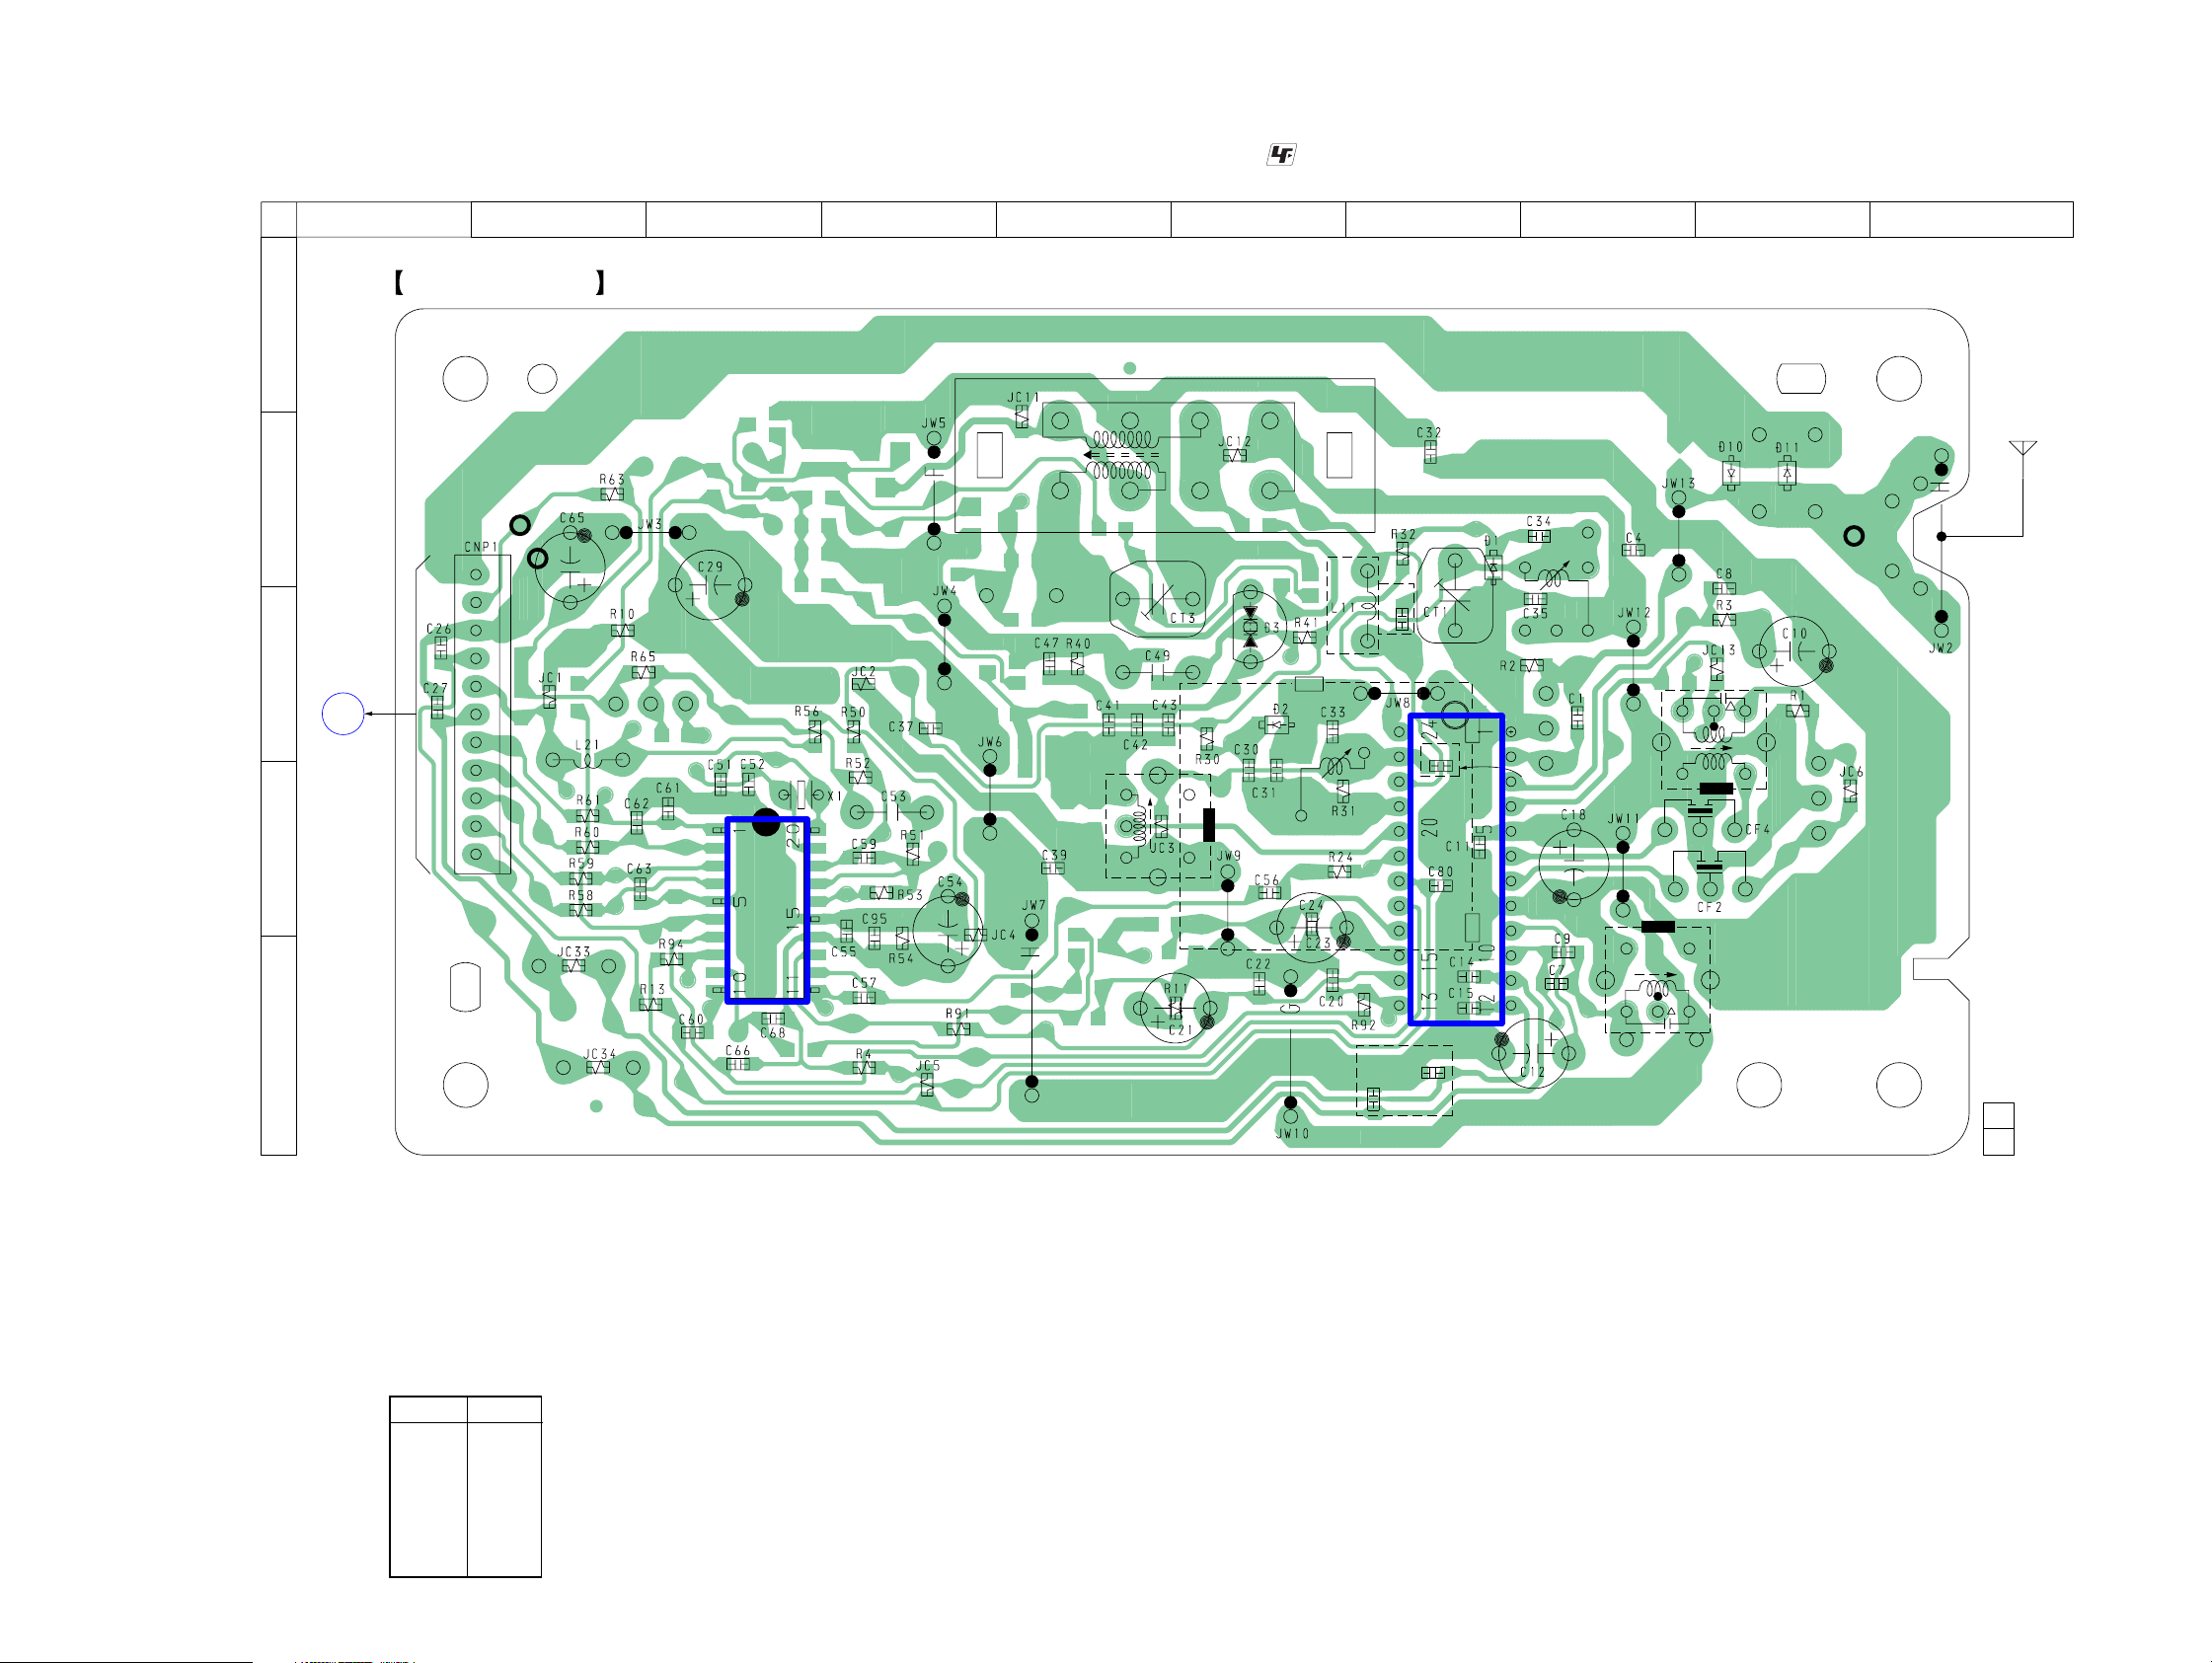
6-8. PRINTED WIRING BOARD – TUNER Section (ICF-CD73) – • See page 21 for Circuit Boards Location. :Uses unleaded solder.
1 2 3 4 5 6 7 8 9 10
TUNER BOARD
A
B
C
D
B
LCD
BOARD
(Page 28)
L3
AM FERRITE-ROD
ANTENNA
ANT1
FM LEAD WIRE
ANTENNA
TP
(VT)
(CND, MX)
1
TP
(GND)
L2
JC24
(UK, IT)
(SHIELD CASE)
C13
L1
T1
(CND, MX)
TP
(ANT)
IC1
11
IC2
L4
T2
E
C77
• Semiconductor
Location
Ref. No. Location
D1 C-7
D2 C-6
D3 C-6
D10 B-9
D11 B-9
IC1 D-7
IC2 D-3
(UK, IT)
C78
1-688-455-
11
(11)
2424
Page 25
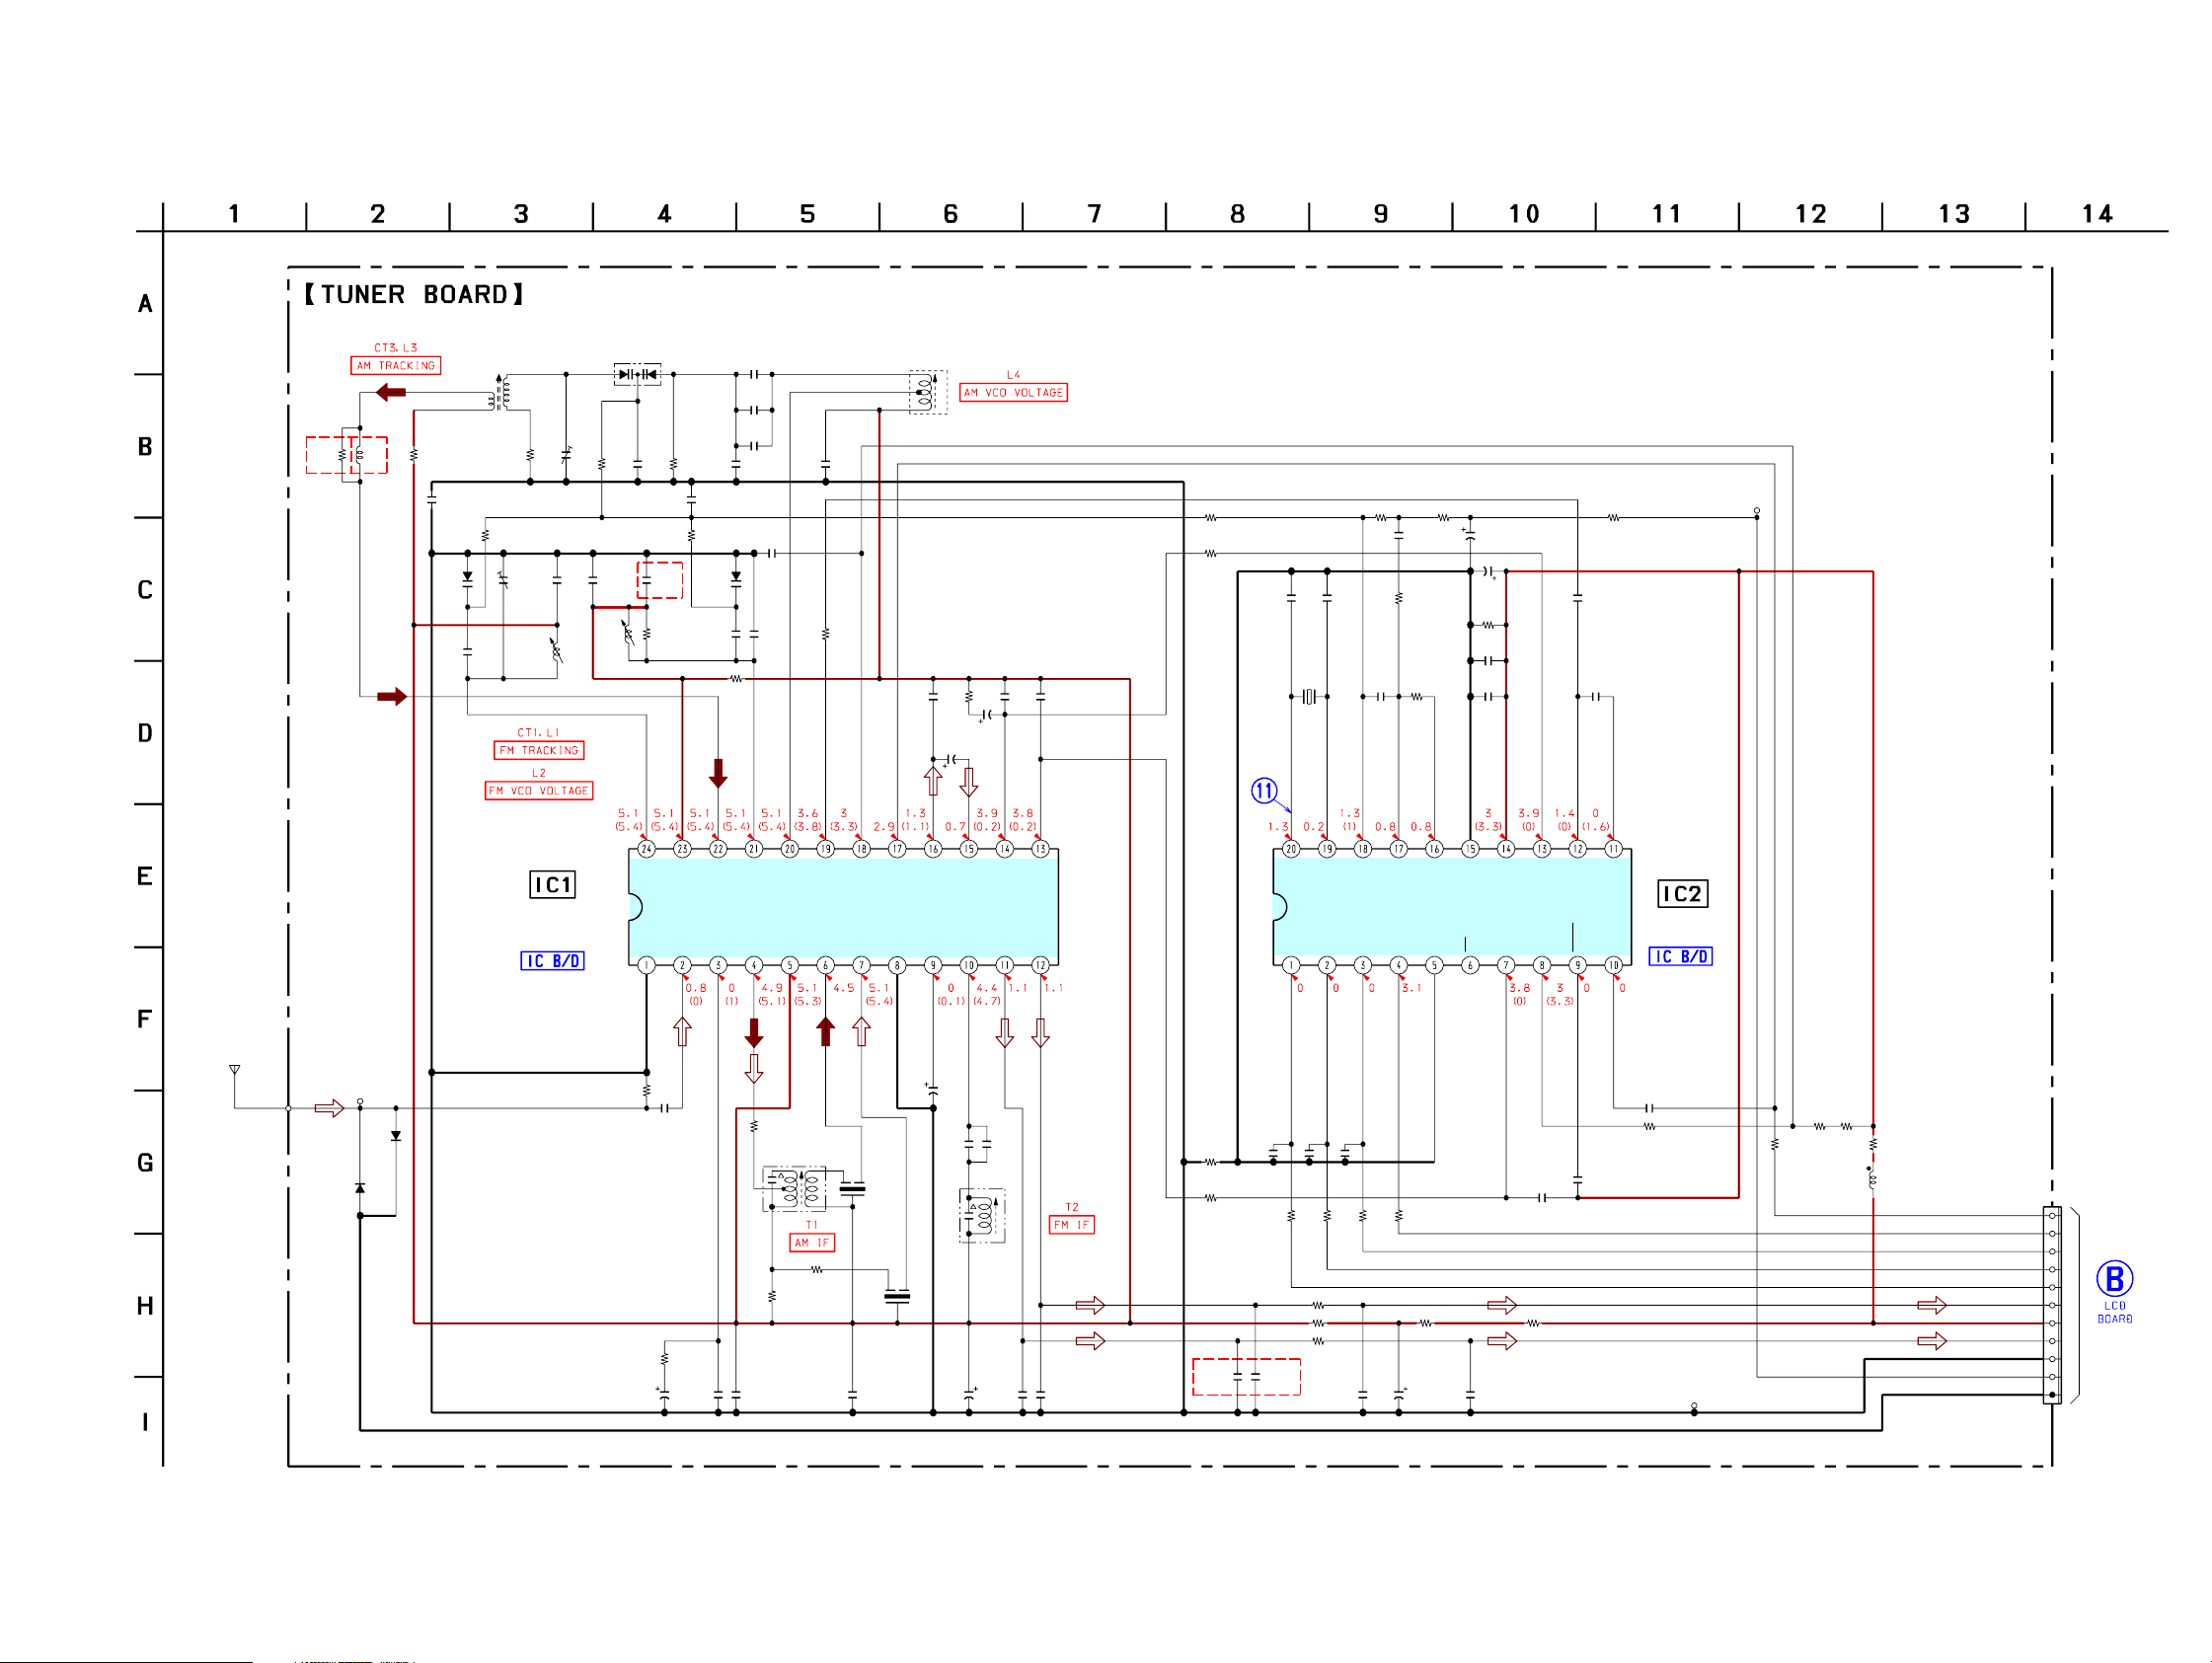
6-9. SCHEMATIC DIAGRAM – TUNER Section (ICF-CD73) – • See page 33 for Waveform. • See page 32 for IC Block Diagrams.
ICF-CD73/CD73V
Ver. 1.1
JC24
L3
AM FERRITE-ROD
ANTENNA
JC12 JC11L11
0
1µH
(CND, MX)(UK,IT)
00
C32
1000p
R32
100k
D1
KV1471E
C34
0.01
CT3
CT1
L1
FM
RF
FM/AM RF AMP,MIX,OSC,
FM/AM IF AMP,DET,MPX
IC1
TA2149BN
0.010.01
OSC
C33C35
L2
FM
KV1520NT
D3
C13
0.01
(CND, MX)
R31
3.3k
FM
RF OUT
GND1
FM
VCC1
0.01
RF IN
C41
220p
C42
100p
C43
22p
C47 C39R40R41 C49
10p 0.1220k10k 0.01
C37
R30
15k
W
LO
M
A
D2
AM
KV1471E
JC3
0
RF IN
T
U
C
C80
0.01
C31C30
22p0.01
FM OSC
OUT
MIX
AM OSC
R24
220
OSC
OUT
AMFMVCC2
IF IN
L4
AM OSC
C24 C22
220p 0.1
3.3k
IF OUT
ST IND
IF IN
GND2
DET OUT
AGC
TP
(VT)
R50
1k
R91
220
R11
C23
C21
1
1
50V
50V
MPX IN
QUAD
C20
0.1
LPF2
LPF1
/BAND
/MO-ST
R-OUT
L-OUT
C51 C52 R51
22p 10p 10k
X1
75KHz
T
U
O
X
E
C
R52 C53
00.22
C59 R53 C95
100p 15k 1000p
T
IN
U
X
-O
P
L
I
L
C
D
-IN
P
L
O
D
C65
R65 R63
4.7
10k 10k
50V
C54
220
10V
R54
470
C55
100p
S
D
P
E
T
U
M
D
S
D
V
V
D
N
M
FM/A
BA
C56
1000p
C57
1000p
T
IN
/S
O
FM
M
D
D
N
T-IN
BA
S
IN
M
A
IN
IF
FM/AM PLL
IC2
LC72137M-TLM
ANT1
FM LEAD WIRE
ANTENNA
(ANT)
TP
D11
1SS355
D10
1SS355
R2
470
C1
47p
R3
10k
C10
C8
1
50V
JC13
0
T1
AM IFT
CF4
JC6
R1
330
0
C11C4
0.11000p1000p
C12
4.7
50V
C61 C62 C63
C9
C7
5p
10p
T2
FM
IFT
CF2
∗
C14,15
C18
C14 C15
220
10V
∗∗
(CND, MX)0.022
0.01 (UK, IT)
JC4
R92
220
4700p 4700p
100p 100p 100p
0
(UK,IT)
C77 C78
R61 R60 R59 R58
2.2k 2.2k 2.2k 2.2k
JC33
0
0
JC2
0
JC34
C27 C26
100p 100p
C66 C68
100p 100p
R10
47
C29
100
10V
0
JC1
1000p
C60
R94
1k
TP
(GND)
JC5
R4
0
10k
R13
1k
R56
330
L21
10µH
MUTE
COUNT
R CLK
R DATA
S-GND
CNP1
11P
R CE
LCH
R +B
RCH
GND
VT
(Page 29)
2525
Page 26
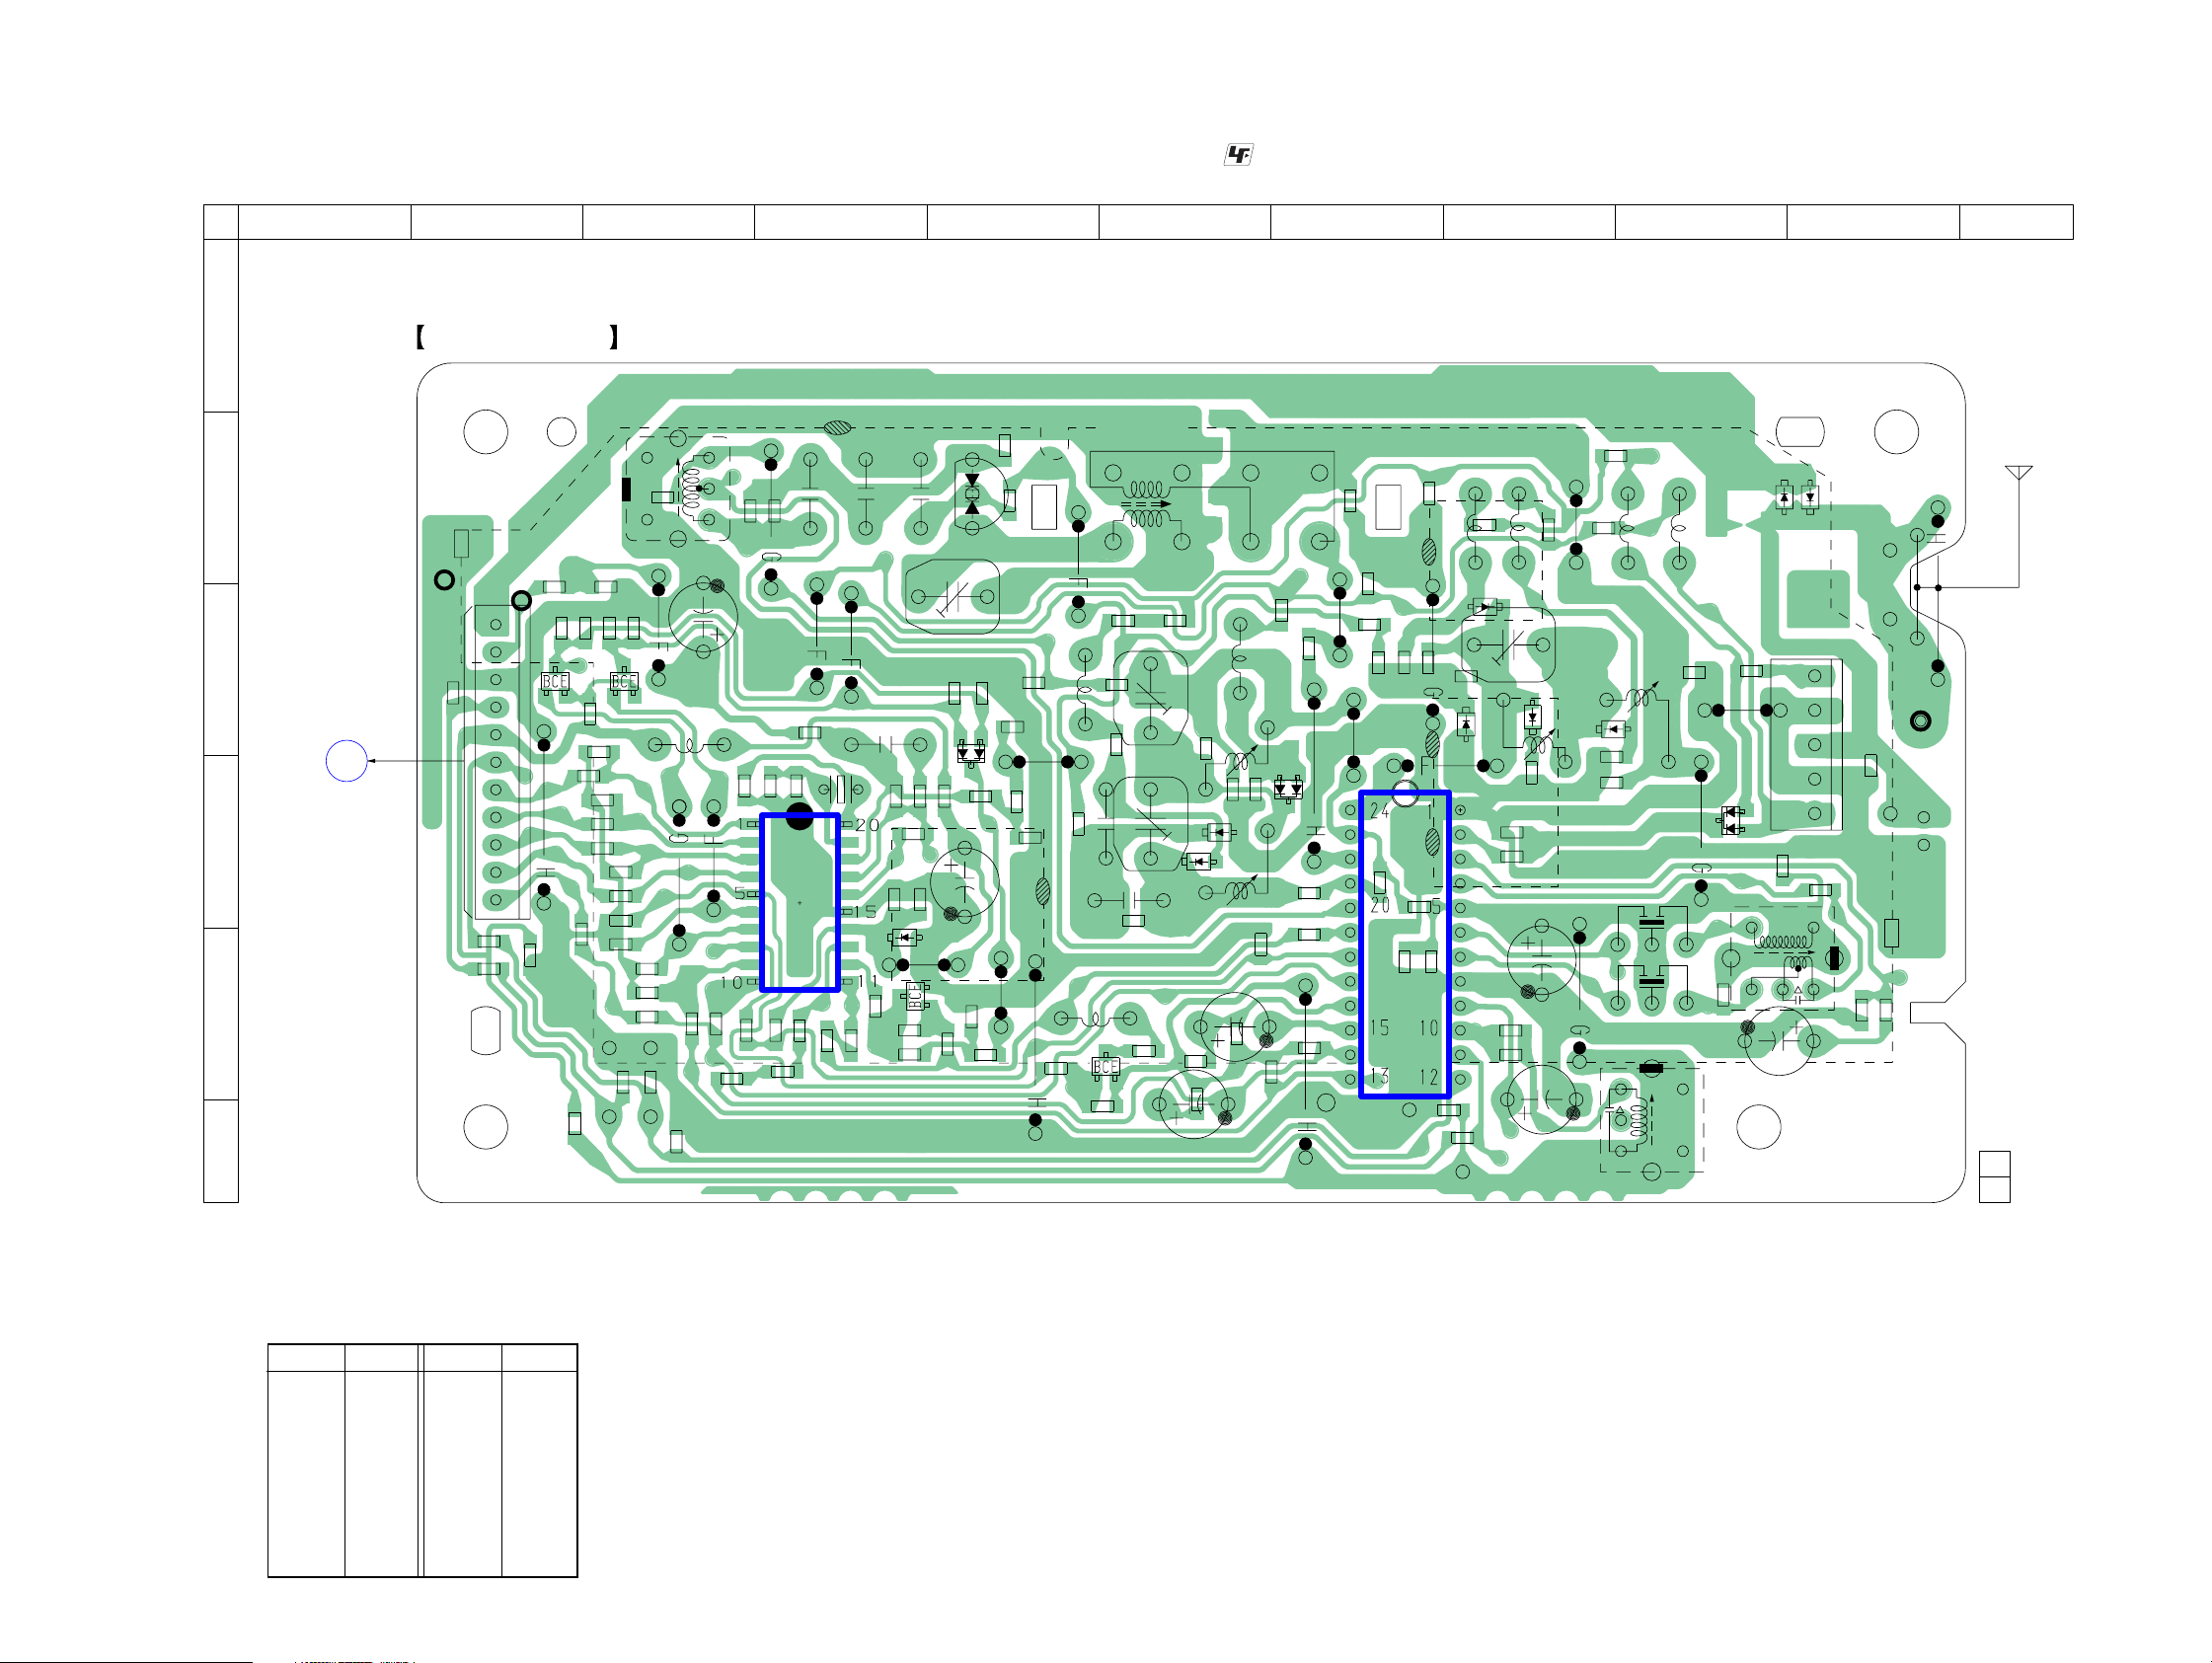
ICF-CD73/CD73V
Ver. 1.1
6-10. PRINTED WIRING BOARD – TUNER Section (ICF-CD73V) – • See page 21 for Circuit Boards Location. :Uses unleaded solder.
1 2 3 4 5 6 7 8 9 10 11
A
B
C
D
E
F
A
LCD BOARD
(Page 28)
TUNER BOARD
(SHIELD CASE)
TP
R62
(VT)
CNP2
TP
(GND)
C92
1
11
R81
R82
C52
Q12
JW21
JC12
C85
R6
R42
JC7
C64
C10
L6
C51
R51
C60
C61
R59
Q11
C55
C56
R52
R53
R41
C57
R54
C58
C59
C32
JW18
C9
C91
L31
R55
C72
JW20
C62
JC9
C26
C71
JW19
R58
C30
JW22
C70
IC2
R64
JC8
C69
R66
C31
R75
JW17
JC10
X61
JW16
C77
C63
C29
C68
C65
R73
C67
R68
D22
R72
C28
R69
R63
JW13
R61
Q14
C76
C43
D21
C75
D3
CT5
R74
C66
R71
C42
R33
C83
C54
R31
R84
C27
JW14
JW12
JW11
JW15
L16
R24
R70
L5
AM FERRITE-ROD
ANTENNA
FB4
FB5
JC6
CT3
R23
CT4
C21
C20
C22
L17
R37
Q13
R67
C35
R26
D17
C39
R19
D2
C18
C36
C37
L15
L4
L3
C19
C53
C41
R18
R79
D24
R22
R25
JW9
C40
JW23
JW8
C25
C23
R17
JC5
JW7
IC1
C16
R20
R5
C15
JC2
C24
C87
JW6
C90
JW25
C89
D1
JC4
L14
R16
D15
C6
C7
ANT1
FM/TV/WEATHER
LEAD WIRE
ANTENNA
11
(11)
R12
JW5
L13
R11
R15
CT2
D23
L1
C14
C86
R1
C1
C5
C13
C4
JW2
L12
L2
D14
CF4
CF2
T2
L11
C33
JW3
R2
D13
JC1
JW4
D11
BPF1
C34
C3
D10
1
5
JC3
C11
T1
C2
JW1
TP
(ANT)
R3
1-688-737-
• Semiconductor Location
Ref. No. Location
D1 C-8
D2 D-6
D3 B-5
D10 B-10
D11 B-10
D13 D-9
D14 C-9
D15 C-8
D17 D-6
D21 C-5
D22 E-4
Ref. No. Location
D23 C-8
D24 D-7
IC1 E-7
IC2 D-4
Q11 C-3
Q12 C-2
Q13 E-6
Q14 E-4
2626
Page 27
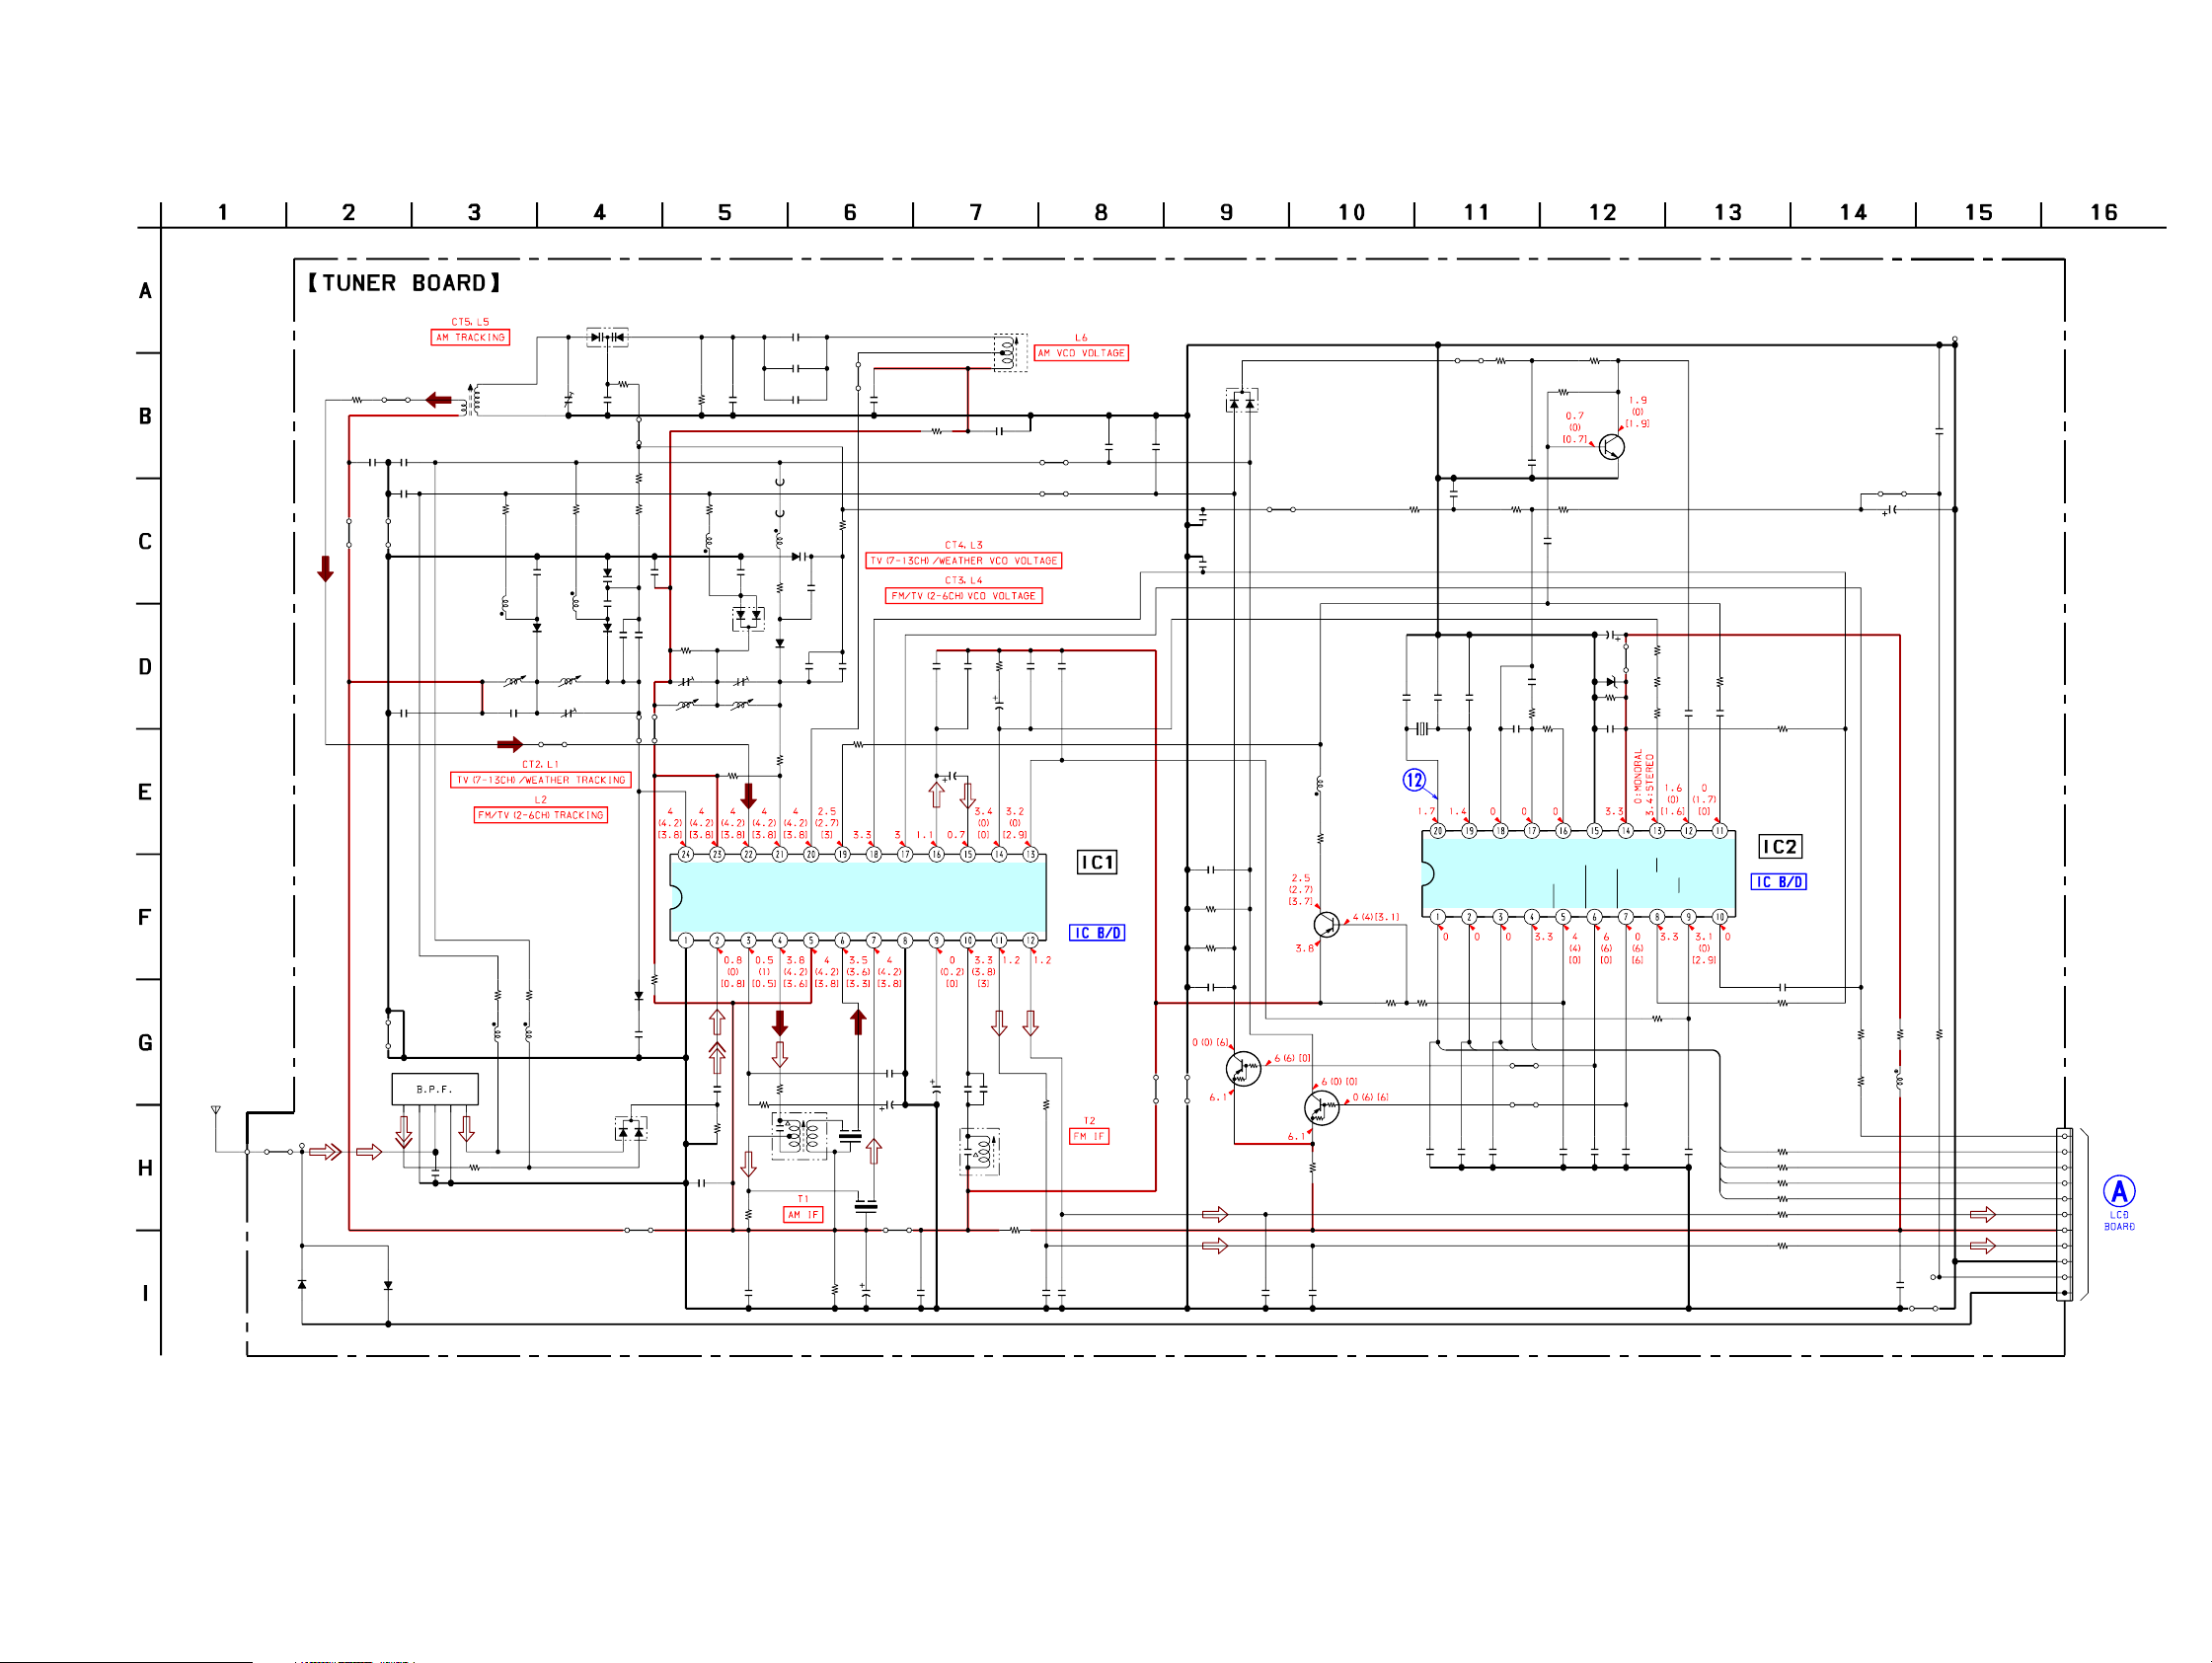
6-11. SCHEMATIC DIAGRAM – TUNER Section (ICF-CD73V) – • See page 33 for Waveform. • See page 32 for IC Block Diagrams.
ICF-CD73/CD73V
Ver. 1.1
ANT1
FM/TV/WEATHER
LEAD WIRE
ANTENNA
D3
KV1520NT
L5
AM FERRITE-ROD
R79
0
JW23
C25 C24
0.01 1000p
1000p
JW5
JW4
TP
(ANT)
JW1
1SS355TE
-17
ANTENNA
C23
R15
BPF1
C11
6P
680
10µH
KDS114-RTK KDS114-RTK
L11 L12
10µH
JC1
JW25
C33
0.1
15
-17
CT5
R16
C14
0.022
L14L13
10µH
D14 D15
L2 L1
FM/TV
TV/WEATHER
RF RF
C13
0.01
JW8
R12R11
1.5k1.5k
10µH
0
1k
CT2
KDS112-RTK
R31
47k
C28
0.01
JW15
R17
100k
JC5
C16
C89
22p
D23
1SS355TE
-17
C86
0.022
D13
0
0.022KV1471E
C15
22p
7
6
JW
JW
JW3
R33 C29
220k 10p
R18
680
L15C18D1
10µH
D24
KDS112
-RTK
R19
1k
FM/TV TV/WEATHER
OSC OSC
FM
RF OUT
GND1
FM
JC2
0
C1
1000p
R1
470
C34
0.1
VCC1
RF IN
2.2µH
0.022
CT4CT3
L3L4
AM
RF IN
M
A
C31
220p
C30
100p
C26
47p
FB4
FB5
L16 D2
KV1471E
C19
R23 C21
470 470p
KDS114
T
FM OSC
U
C
W
LO
MIX OUT
JC3
R3
10k
AM IFT
R2
330
C87
0.047
JW22
C32
0.047
JC6
0
R24
15k
D17
-RTK
C22
47p
C20
22p
1 50V0010k
IF OUT
OSC OUT
AM
CF4
ST IND
FM
IF IN
1000p
C4
220
10V
DET OUT
GND2
AGC
IF IN
C2
C5
4.7
10p 6p
50V
C3
1
50V
CF2
JW2
C90
220p
AM OSC
VCC2
0
T1
R5
470
L6
AM OSC
C27
0.01 0.01 1000p
C41C40R26C37C35
0.10.13.3k100p220p
C39
1
50V
C36R25R22R20
LPF2
LPF1
/BAND
/MO-ST
MPX IN
R-OUT
FM IFT
L-OUT
JC4
0
T2
R6
100
QUAD
C6 C7
JW17
JW16
C42 C43
FM/AM RF AMP,
MIX,OSC,
FM/AM IF AMP,
DET,MIX
IC1
TA2149BN
TP
(GND)
JW12
D21
KDS121
-RTK
C75
0.047
R84
4.7k
C70 C69C71
10p 6p10p
X61
75KHz
T
U
O
X
E
C
Q13
R67 R70
100k 22k
A4
Q12
Q11
KRA302-RTK
TV ON
SWITCH
JW14
100p 100p0.022 0.022
L17
10µH
R37
470
2N3906U
SWITCHING
KRA302-RTK
FM ON
SWITCH
JC7
0
C91 C92C10 C9
C83
0.001
C53
0.1
C52
0.01
R42
100k
R41
100k
C51
1000p
JW11JW9
R74C54
1k0.01
C68
0.47
R69
10k
C67
0.01
T
IN
U
X
-O
LP
I
L
C
D
A1
A2
A3
JW19
JW20
C57C56C55
R72R73R71
3.3k100k100
C64
1000p1SS355TE
L31
10µH
C85D11D10
0.01
JW18
C72
47
16V
R62
R61R59
1k
2202.2k
CNP2
11P
MUTE
COUNT
R CLK
R DATA
R CE
LCH
R +B
RCH
TP
(VT)
JW21
GND
S-GND
(Page 29)
VT
Q14
KTC4082
OSC
B
V-H/W
T
1000p
BUFFER
JW13
D
D
V
-L
/TV
M
F
R55
1k
JC9
0
JC8 JC10
00
R66
77
C
1k
1000p
T
IN
/S
O
FM
M
D
M
A
/
T-IN
S
IF IN
FM
C61C60C59C58
100p100p100p100p100p100p100p
IN
AM
A1
A2
A3
A4
FM/AM PLL
IC2
LC72137M-TLM
1000p
2.2k
R64C63
10k1000p
C62
R58
1k
JC12
0
R54
R53
2.2k
R52
2.2k
R51
2.2k
R81
100
R82
100
C66
220
10V
R63
680
C65
SS
V
R75
22k
C76
6p
D22
KDZ3.3V
R68
4.7k
D
P
P-IN
L
O
V-H
D
T
2727
Page 28
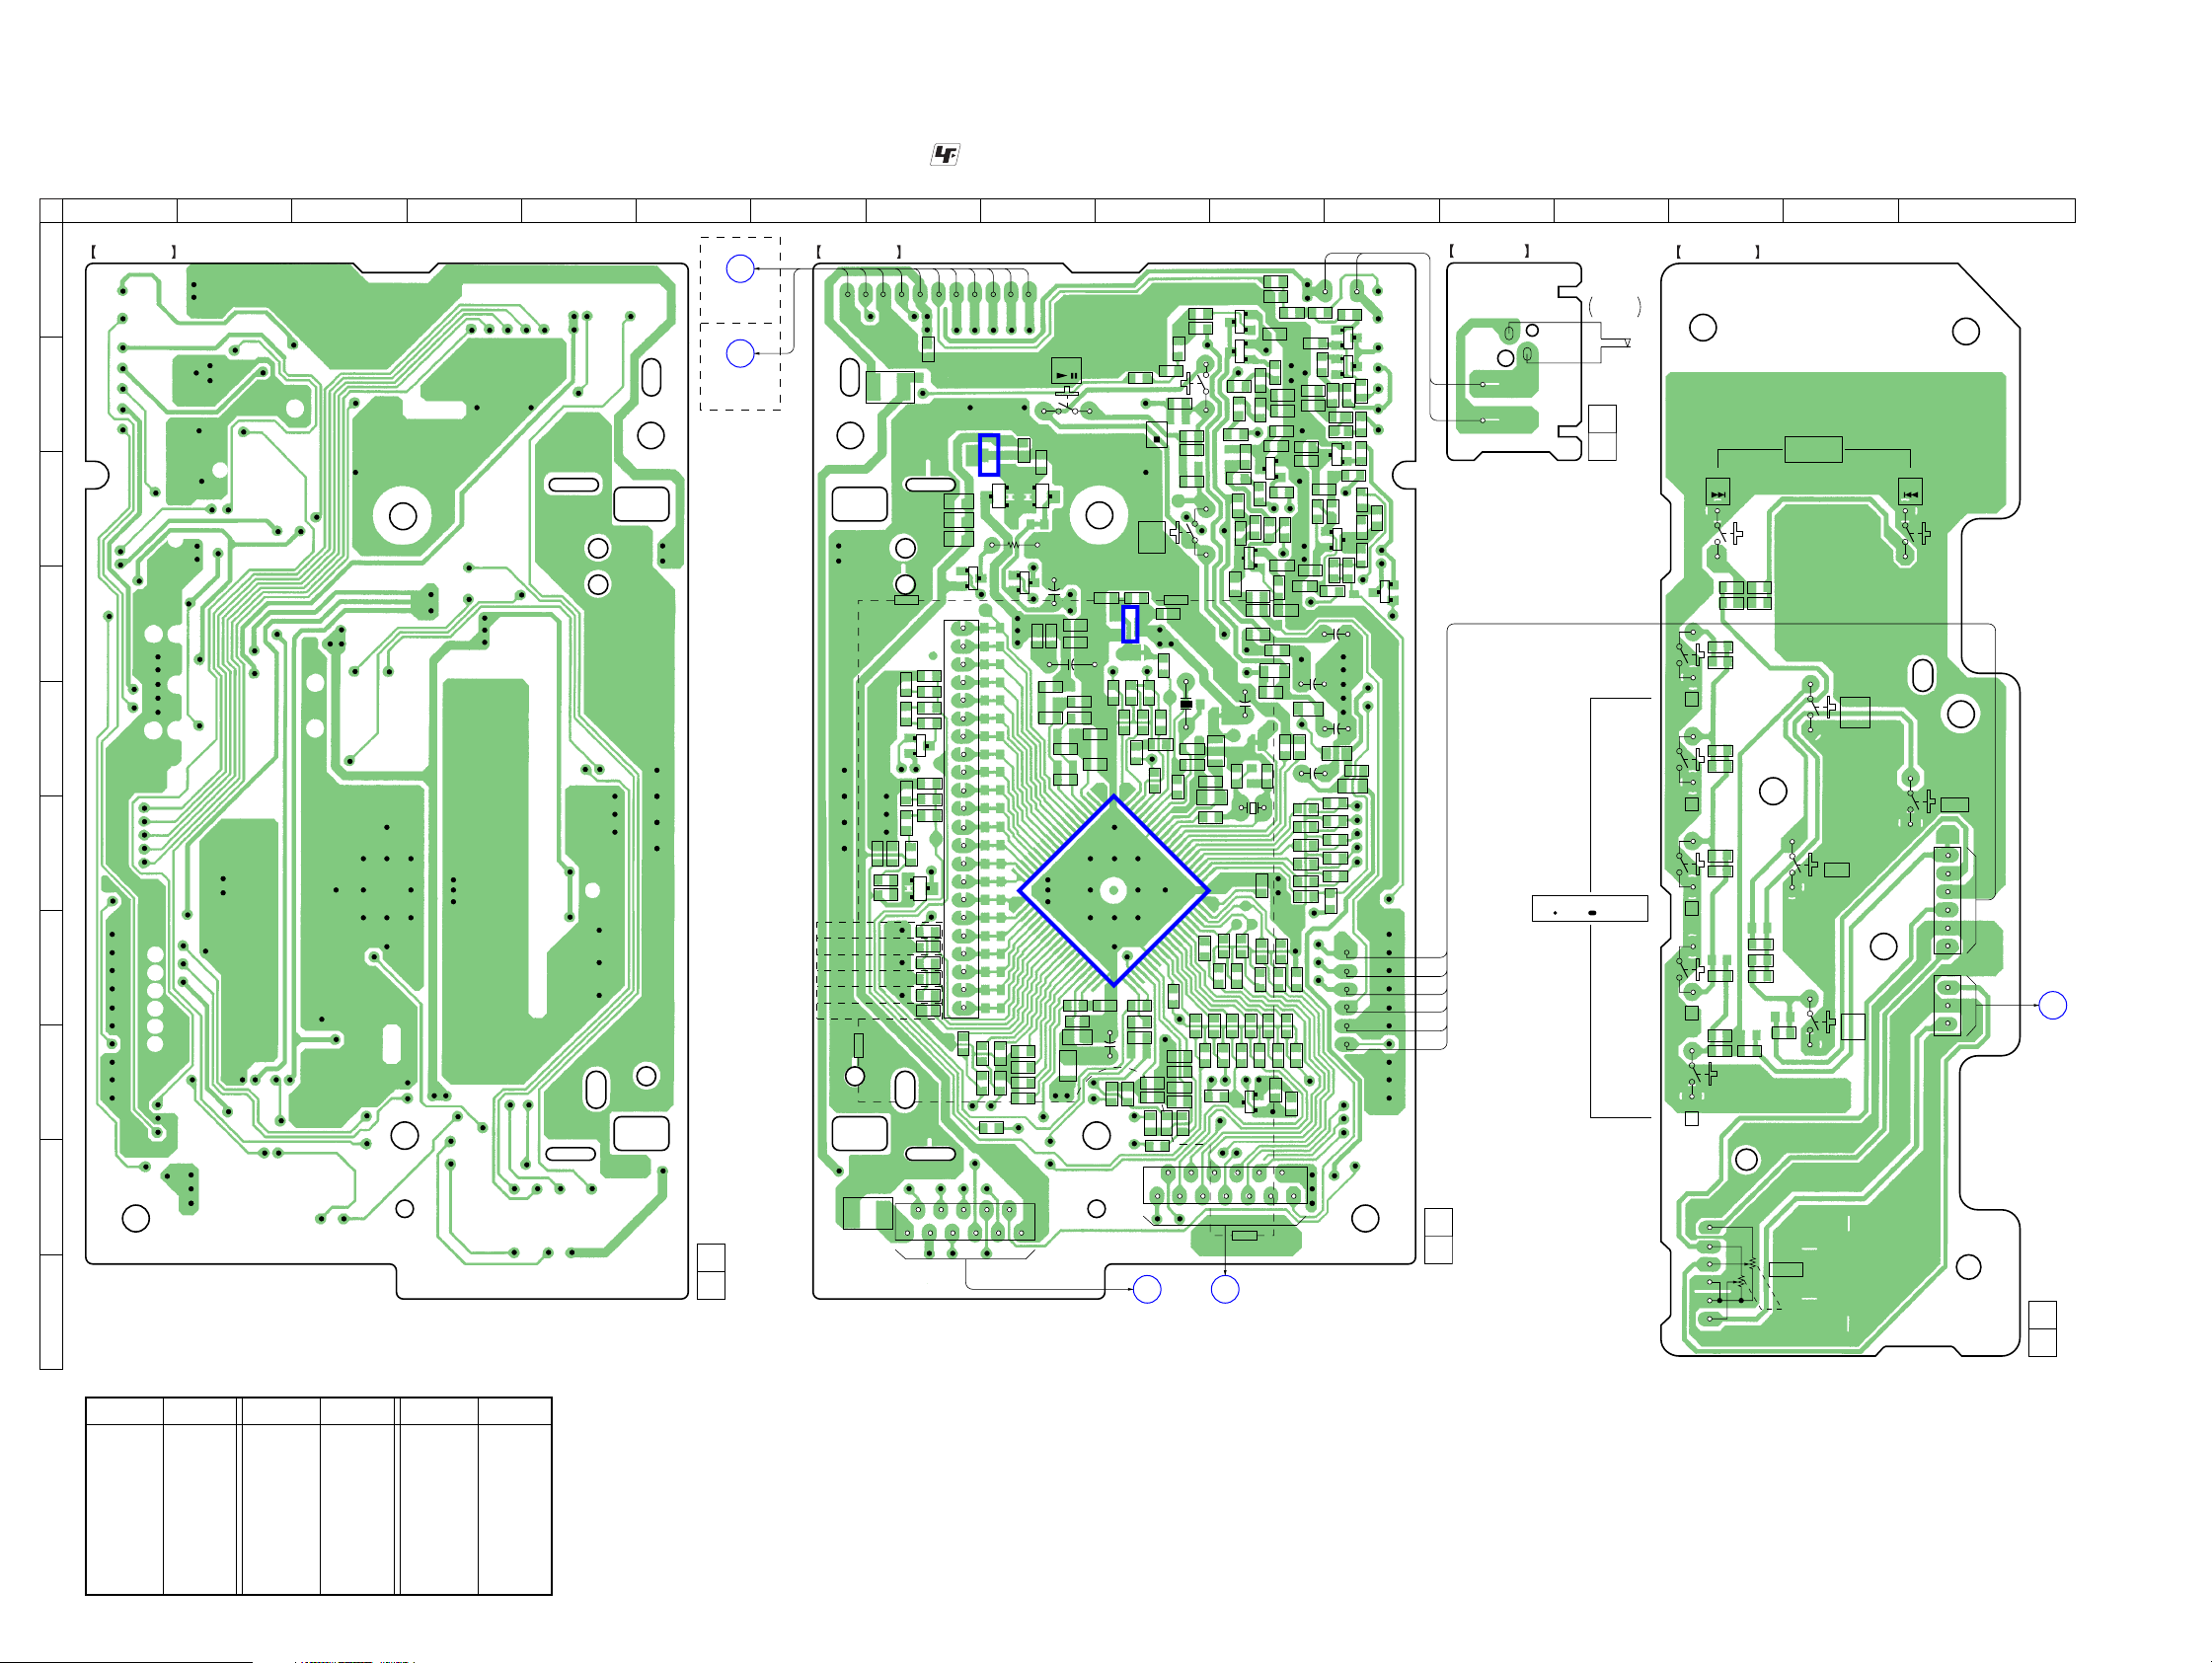
ICF-CD73/CD73V
Ver. 1.1
6-12. PRINTED WIRING BOARDS – MAIN Section – • See page 21 for Circuit Boards Location. :Uses unleaded solder.
1 2 3 4 5 6 7 8 9 10 11 12 13 14 15 16 17
(CD73V)
A
TUNER BOARD
CNP2
(Page 26)
(CD73)
B
TUNER BOARD
CNP1
(Page 24)
11
(11)
LCD BOARD
1 11
(CONDUCTOR SIDE)
C407
L405
IC403
C451
C456
C457
Q406
LCD401
LIQUID CRYSTAL DISPLAY
C455
R498
R507
R499 R508
R500
Q405
ECB
C453
R494
R509
R493 R510
C454
R496
R501
A
R495
K
R502
D403
A
(CD73: CND, UK, MX)
(CD73: IT, CD73V)
(CD73: UK)
(EXCEPT CD73: UK)
(CD73: IT)
(EXCEPT CD73: IT)
L404
R433
R432
R435
R434
R437
R436
10
CNP401
11
22
R438
S502
CD
3
2
C452
C450
1
A
A
Q403
C406 R440
R505
K
A
A
D402
C444
20
21
R441
R442
R443
R444
2
ECB
1
R504
R407
R409
C447
R506
R403
R405
C445 R489
+
C448
C449
+
C403
C402
C401
R401
180
IC401
40 41
C408
C409
C410
L401
K
D401
ECB
1
C405 R439
R448
1
2
IC402
C443
+
R449
POWER BOARD
R279
C442
R488
R497C411R445
R446
C412
C413
CNP301
S503
OFF
S501
RADIO
ON
BAND
(SHIELD CASE)
3
C441
R487
C440
C458
R485
R450
R451
R452
R455
12
13
C
C446
C263
S503
R486
R484
(Page 30)
A
B
C
D
E
F
G
H
J
I
LCD BOARD
(COMPONENT SIDE)
1-687-319-
R556
R456
R457
R453
R454
C414
R458
C255
R482
R553
R554
R552
C438
C439
C415
Q252
R259
R257
Q253
R262
C258
R256
Q251
X402
C437
L402
C435
C436
R480
61
60
R466
R465
C422
R459
R460
R461
C416
C417
R492
CNP402
D
CD BOARD
CNP702
(Page 22)
BCE
BCE
R267
R268
C252
C434
C423
Q401
R253
X401
R467
C418
R272
C251
R252
R352
SW BOARD
R179
2 1
C163
C155 R157
R159
R177
R178
C162
R477
R476
R475
R474
R473
R471
C421
1
C426
R154
+
R478
+
R164
R166
C352
R160
Q151
C354
R172
AK
C153
R176
R161
+
C353
D353
+
C432
C431
C430
C429
C428
R165
R167
C156
C161
R472
R152
1
6
Q152
ECB
Q153
ECB
C160
R162
R174 C158
BCE
Q154
R156
R175
ECB
C152 R153 R168
Q301
C151
BCE
C351
AK
D354
R353
AK
D352
2
1
1-687-323-
PRESET TUNING/PRESET TIMER
R260
R261
R264
R266
R265 C256
R278
C262
BCE
Q254
R274
C260
R275
C261
R276
BCE
R254
C253
R277
R354
D351
AK
R351
+
R479
C433
R468 R470
R469
C424
C425
R462
R463
R464
C419
C420
C460
BCE
R491
2
S551
CD LID
OPEN/CLOSE
11
(11)
SELECT/ PRESET
KEY BOARD
S608
+
R615
R616
R601
R602
S601
5
R603
R604
S602
4
R605
R606
S603
3
R608
S604
2
R609
R610
S605
1
R612
R613
R614
R618
R619
R620
TUNE/TIME SET
TIMER SET
R622
S609
MODE
S606
TIMER
SET
ON/OFF
S611
AUTO
OFF
S607
−
S610
CLOCK
CNP601
1
6
1
3
CNP602
F
POWER
BOARD
W302
(Page 30)
11
1-687-319-
(11)
-1
RV601
VOLUME
-2
11
1-687-322-
(11)
• Semiconductor Location
Ref. No. Location
D351 D-11
D352 E-12
D353 E-11
D354 E-12
D401 C-9
D402 C-9
D403 F-8
IC401 F-10
Ref. No. Location
IC402 D-10
IC403 C-9
Q151 C-12
Q152 B-12
Q153 B-12
Q154 C-12
Q251 C-11
Q252 A-11
Ref. No. Location
Q253 B-11
Q254 C-11
Q301 D-12
Q401 H-11
Q403 D-9
Q405 E-8
Q406 D-8
2828
Page 29
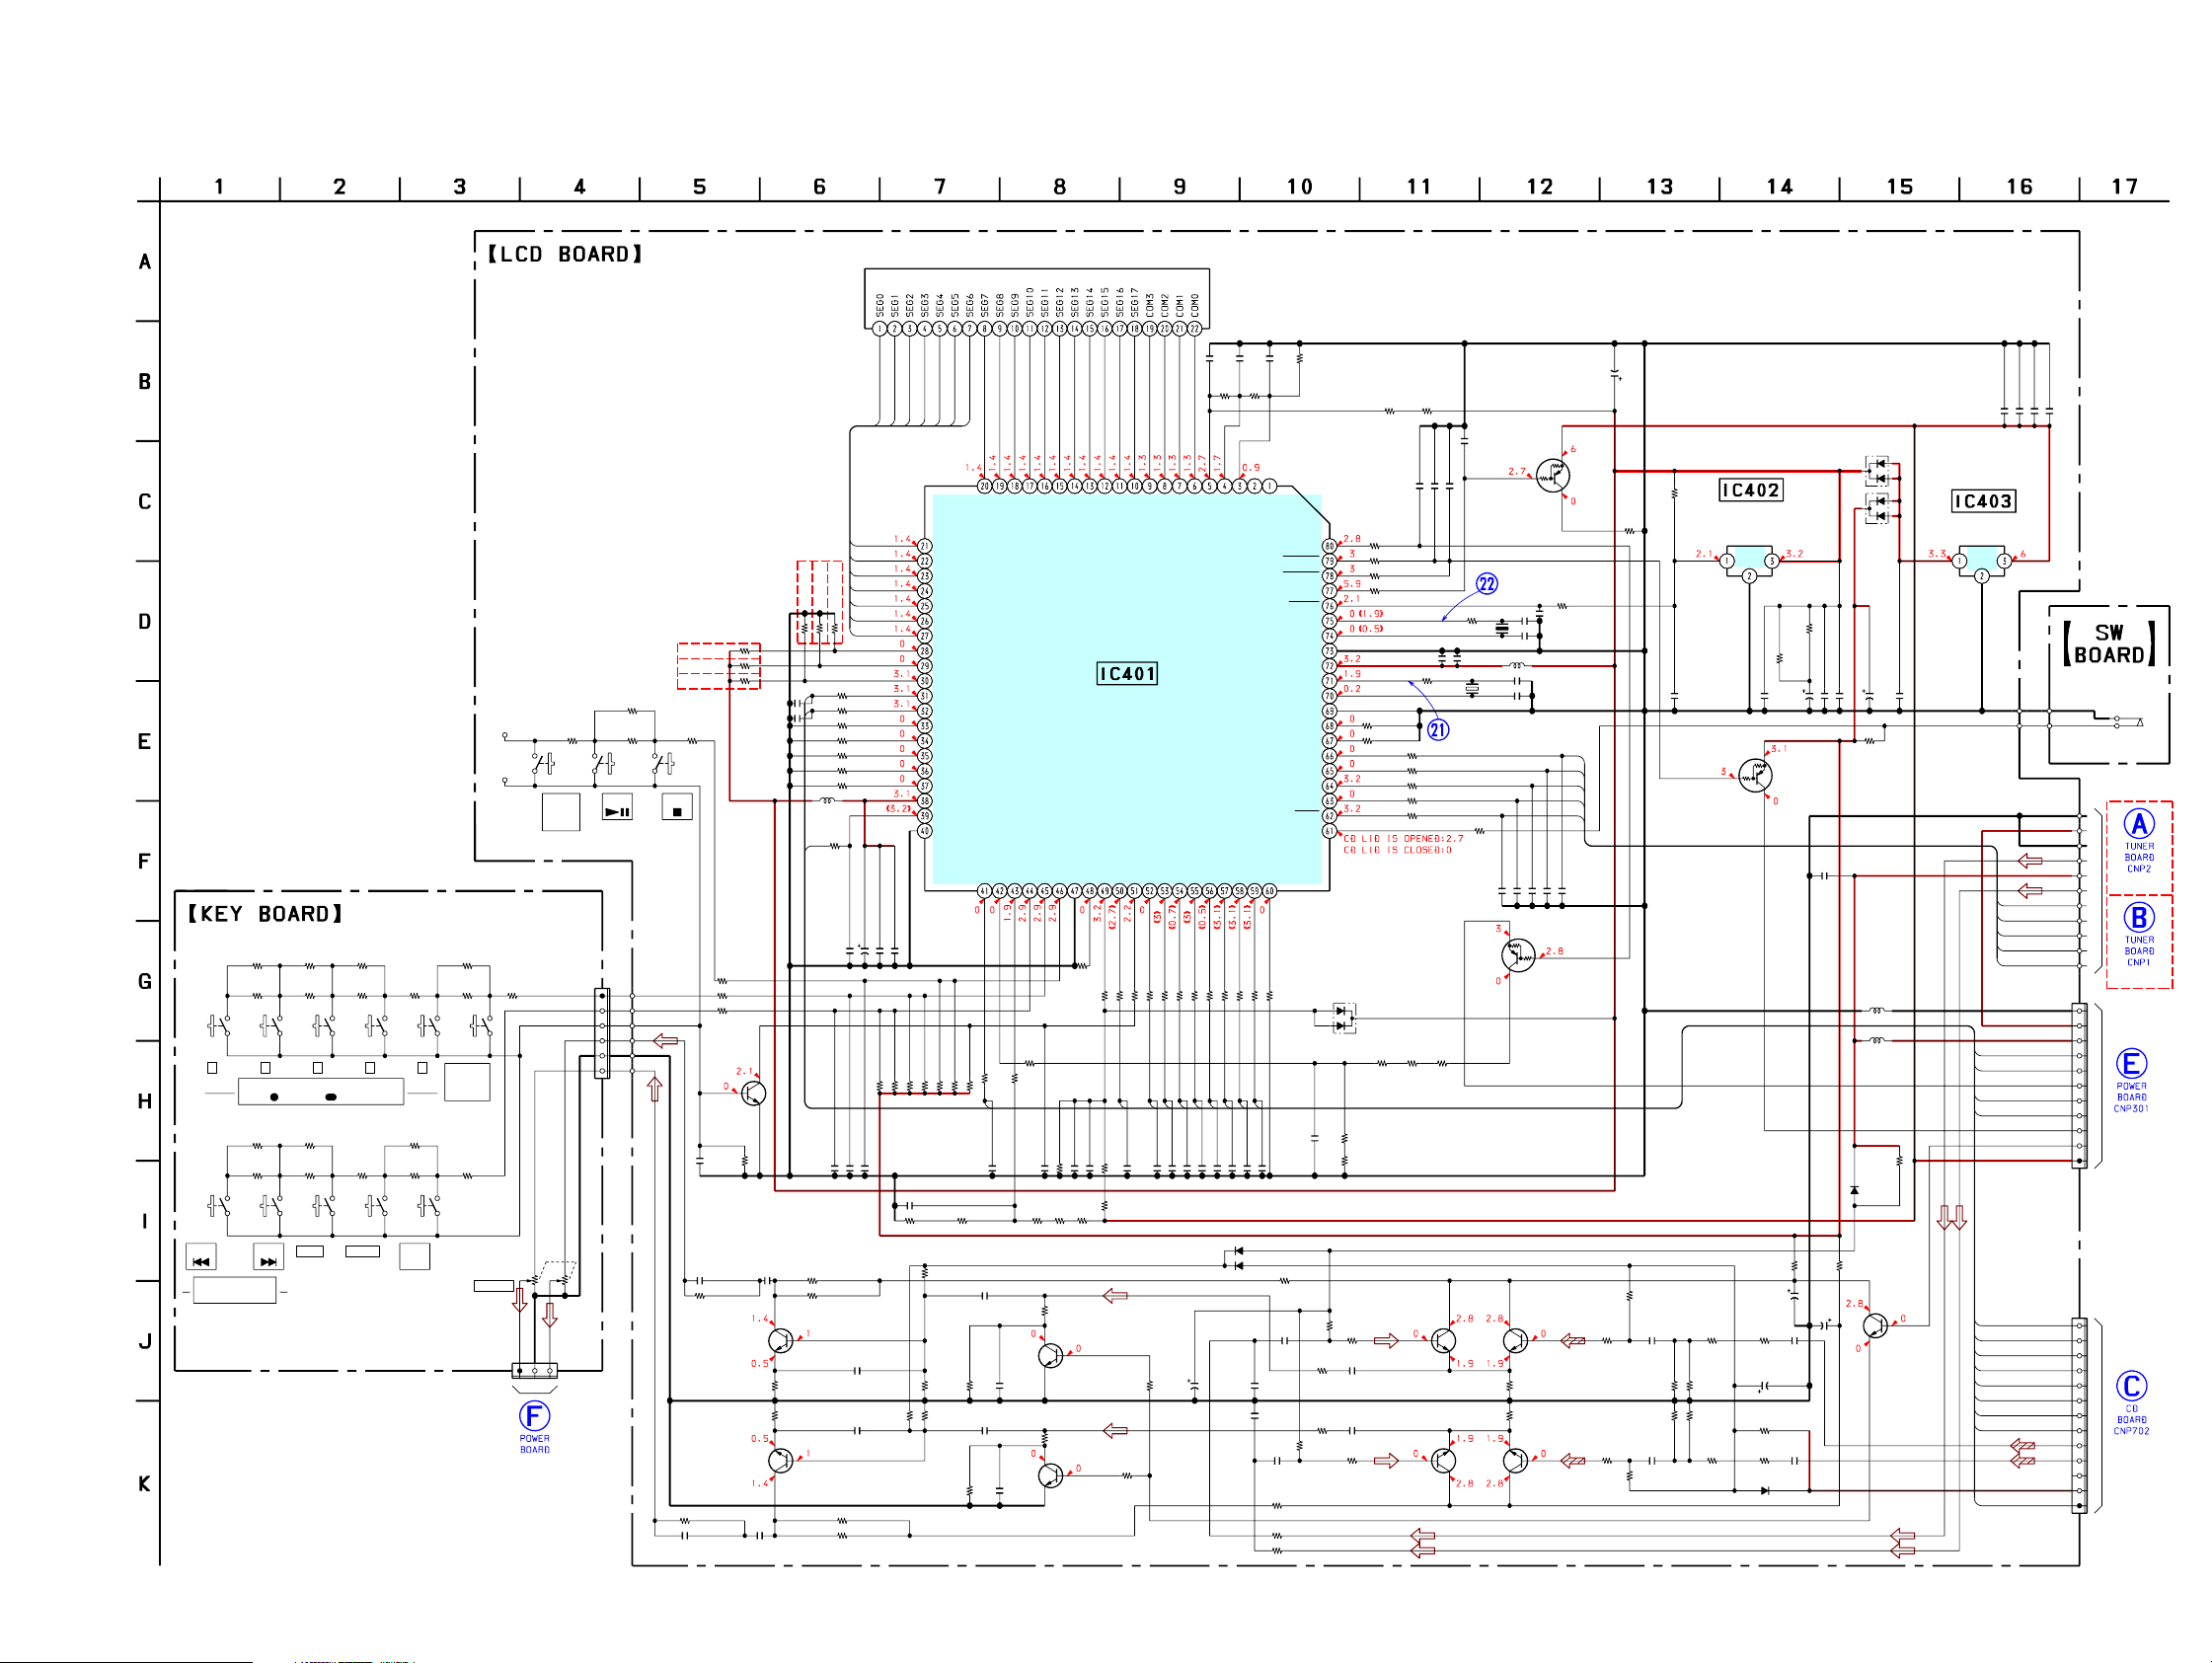
6-13. SCHEMATIC DIAGRAM – MAIN Section – • See pag e 33 for Waveforms.
)
V
)
3
)
7
D
:IT,C
3
7
D
EXCEPT CD73: UK
EXCEPT CD73: IT
(C
(
(
10k
10k
10k
R436
R434
R432
R601
R603
220k
R604
100k
R615
100k
MODE CLOCK
R605
100k
R606 R608
47k 22k
R618
22k
R619
47k
R620 R622
22k 10k
AUTO
OFF
220k
R602
470k
S601 S602 S603 S604 S605 S606
5 4 3 2 1
PRESET TUNING/PRESET TIMER
SELECT/ PRESET
R613
220k
R614 R616
100k 47k
S607 S608 S609 S610 S611
+-
TUNE/TIME SET
TIMER SET
R609
47k
R610 R612
22k 10k
TIMER
EST
ON/OFF
RV601
20k
VOLUME
TP501
TP502
-1 -2
D
N
G
E
H
R
C
L
P
(Page 31)
(CD73:CND,UK,MX)
(CD73:UK)
(CD73:IT)
R553
47k
R552
R554 R556
22k
ON
BAND
H
C
CNP602
R
3P
CNP601
6P
22k 10k
S502S501
CD OFFRADIO
1
6
10k
R433
10k
R435
10k
R437
S503
R455
100
R452
100
R449
100
Q401
2SC4081
WAKE UP
SWITCH
C460
1000p
R491
100k
C252
0.47
10k
R252
Q251
2SC4081
FILTER AMP
Q151
2SC4081
FILTER AMP
10k
R152
C151
4700p
C152
0.47
B3
C405
B1
0.01
C406
0.01
L401
100µH
C1
R445
1k
0.01
C413
R253C251
R275
R154
470
LCD401
LIQUID CRYSTAL DISPLAY
R401C401C402C403
R405 R403
3
0
1
G
E
EG
S
S
SEG6
SEG5
SEG4
SEG3
SEG2
SEG1
SEG0
1k
R438
1k
R439
10k
R440
10k
R441
10k
R442
10k
R443
10k
R444
4V
100
2.2
0.01
0.01
C410
C409
C411
C408
220k
100k
R450
R451
0.01
0.01
C414
C415
2.2k4700p
4.7k
C253
100p
R176 R353
220k 1k
2.2k
R153
4.7k
R175
5
2
4
G
G
G
G
E
E
E
E
S
S
S
S
SEG6
SEG5
SEG4
SEG3
SEG2
SEG1
SEG0
VERSION0
VERSION1
VERSION2
POWER ON
R ON
NC
NC
NC
NC
NC
AVDD
FSEQ
NC
220k
100k
220k
100k
R453
R454
R456
R457
C453
0.01
R276
220k
R277R254 R278 C262
220k470 100k 0.1
R177
220k
6
G
E
S
7
8
G
G
E
E
S
S
IN
C
M
V
A
470k
R446
R492
1k
2
B
0.01
C412
R494R510
220k220k
C261
0.047
C161C153
0.047100p
2
4
1
9
0
3
1
1
1
1
G
EG
G
EG
E
E
S
H
V
EG
S
S
S
S
0
S
1
2
S
Y
Y
E
EY
E
V
K
A
K
K
R458
10k
R497
1k
R448
1k
470k
0.01
0.01
R496
C454
C418
R272
4.7k
Q254
2SC4081
AGC
R172
4.7k
Q154C162R178
2SC40810.1100k
AGC
6
5
1
1
1
G
G
EG
E
E
S
S
S
SYSTEM CONTROLLER
IC401
µPD789477GC
-A33-8BT
K
H
Q
C
R
C
D
N
C
W
1k
1k
R459
R460
4
C
0.01
22k
1000p
C416
R502
C417
R495R501R493R509
100k220k220k220k
R274
R174
1k
7
3
1
M
G
O
E
C
S
K
R
H
E
Z
C
Z
Y
E
U
K
B
1k
1k
R461
R462
4
B
100p
C419
1k
100k 100k
0
2
2
M
O
C
IN
A
T
A
D
D
C
47
R463
3
C
100p
C420
C351
1
1
0
C
C
C
M
M
O
C
A
T
A
D
D
C
100
R464
7
C
220p
C421
47
4V
L
L
L
O
V
V
V
C
LK
T
F
CE
C
S
R
D
D
R
X
D
C
C
100
10k
1k
1k
R467
R465
R466
R468
8
5
6
2
C
C
C
C
100p
220p
100p
1000p
C422
C423
C424
C425
C263
1000p
C163
1000p
100k2.22.22.2
R407
R409
22k
10k
C458
0.01
0.01
0.01
0.01
C443
C442
C441
C
C
N
N
R488
BATT CHK M
B MUTE
A MUTE
LOAD
RESET
X2
X1
VSS0
VDD0
XT2
XT1
IC
NC
NC
R CE
R DATA
R CLK
COUNT
MUTE
CD OPEN
N
O
C
D
C
N
10k
1k
R470
R469
9
C
0.01
C426
D353
1SS355
D354
1SS355
R268
R168
0
D403
RB411D
0
R259C255
R257
100k
1k0.01
R157
R159C155
100k
1k0.01
4.7k
R279
4.7k
R179
1k
R487
1k
R486
1k
R485
1k
C435
0.1
R479
10k
R478
10k
R477
R476
R475
R474
R473
R498C455
220k0.01
R508
220k
Q252 Q253
2SC4081 2SC4081
Q152
2SC4081
R480
X401
1k
1k
1k
1k
1k
R500R499R507
220k220k220k
Q252,253
LINE AMP
Q152,153
LINE AMP
0
X402
C436
32.768KHz
R471
10k
Q406
DTA114EUA
LOAD
SWITCH
C440
0.01
R482
0
4.19MHz
L402
2.2
100p
47p
1000p
C430
C429
C428
MIDDLE VOLTAGE
CONTROL SWITCH
R260C260R256
1k110k
R160C160R156
1k110k
Q153
2SC4081
R484
C439
C438
100µH
C434
22p
C433
22p
220p
C431
Q405
DTS144EUA
DC
C437
100
4V
R505
220
10k
22p
22p
A1
A2
A3
A4
A5
220p
C432
R262
100k
C256R261
0.471k
R166 R164
100k 22k
C156R161
0.471k
R162
100k
ICF-CD73/CD73V
D401
RB411D
R489
470k
RESET SIGNAL
GENERATOR
IC402 IC403
XC61CN2002MR XC6201P332PR
VGRST
R506
22
R504
0.1
22
C446
1SS355
C447
0.047F
5.5V
R352
100
C353
47
4V
R267R265
022k
C258
0.47
C352
47
4V
C158
D352
0.47
C445
0.01
Q403
DTA124EUA
MUTING S GND
CONTROL
SWITCH
R264R266
22k100k
R165 R167
22k 0
1000p
D402
RB411D
6.3V
10
0.1
0.1
C444
C448
C449
R472
220k
C407
L404
L405
R351
1k
D351
1SS355
R354
100
C354
47
4V
2SC4081
CONTROL
0.1
C450
Q301
SWITCH
+3.3V REGULATORCONTROL
OI
G
B1
B2
B3
B4
C1
C2
AGC
C3
C4
C5
C6
C7
C8
C9
0.1
2.2
2.2
C452
C451
C456
22
1
A1
A2
PLL DATA
A3
A4
A5
µCDM-GND
POWER ON
BUZZER
+3.3V
CD ON
2.2
C457
1
(CD LID OPEN/CLOSE)
VT
GND
RCH
R +B
LCH
R CE
R CLK
COUNT
MUTE
CNP401
11P
VT
R +B
R ON
AC IN
VM
AMUT
AGC
+B
CNP402
13P
FSEQ
DRF
DO
WRQ
CL
CE
DI
RES
RCH
LCH
Ver. 1.1
S551
(ICF-CD73V)
1
(Page 27)
11
(Page 25)
(ICF-CD73)
(Page 31)
(Page 23)
2929
Page 30
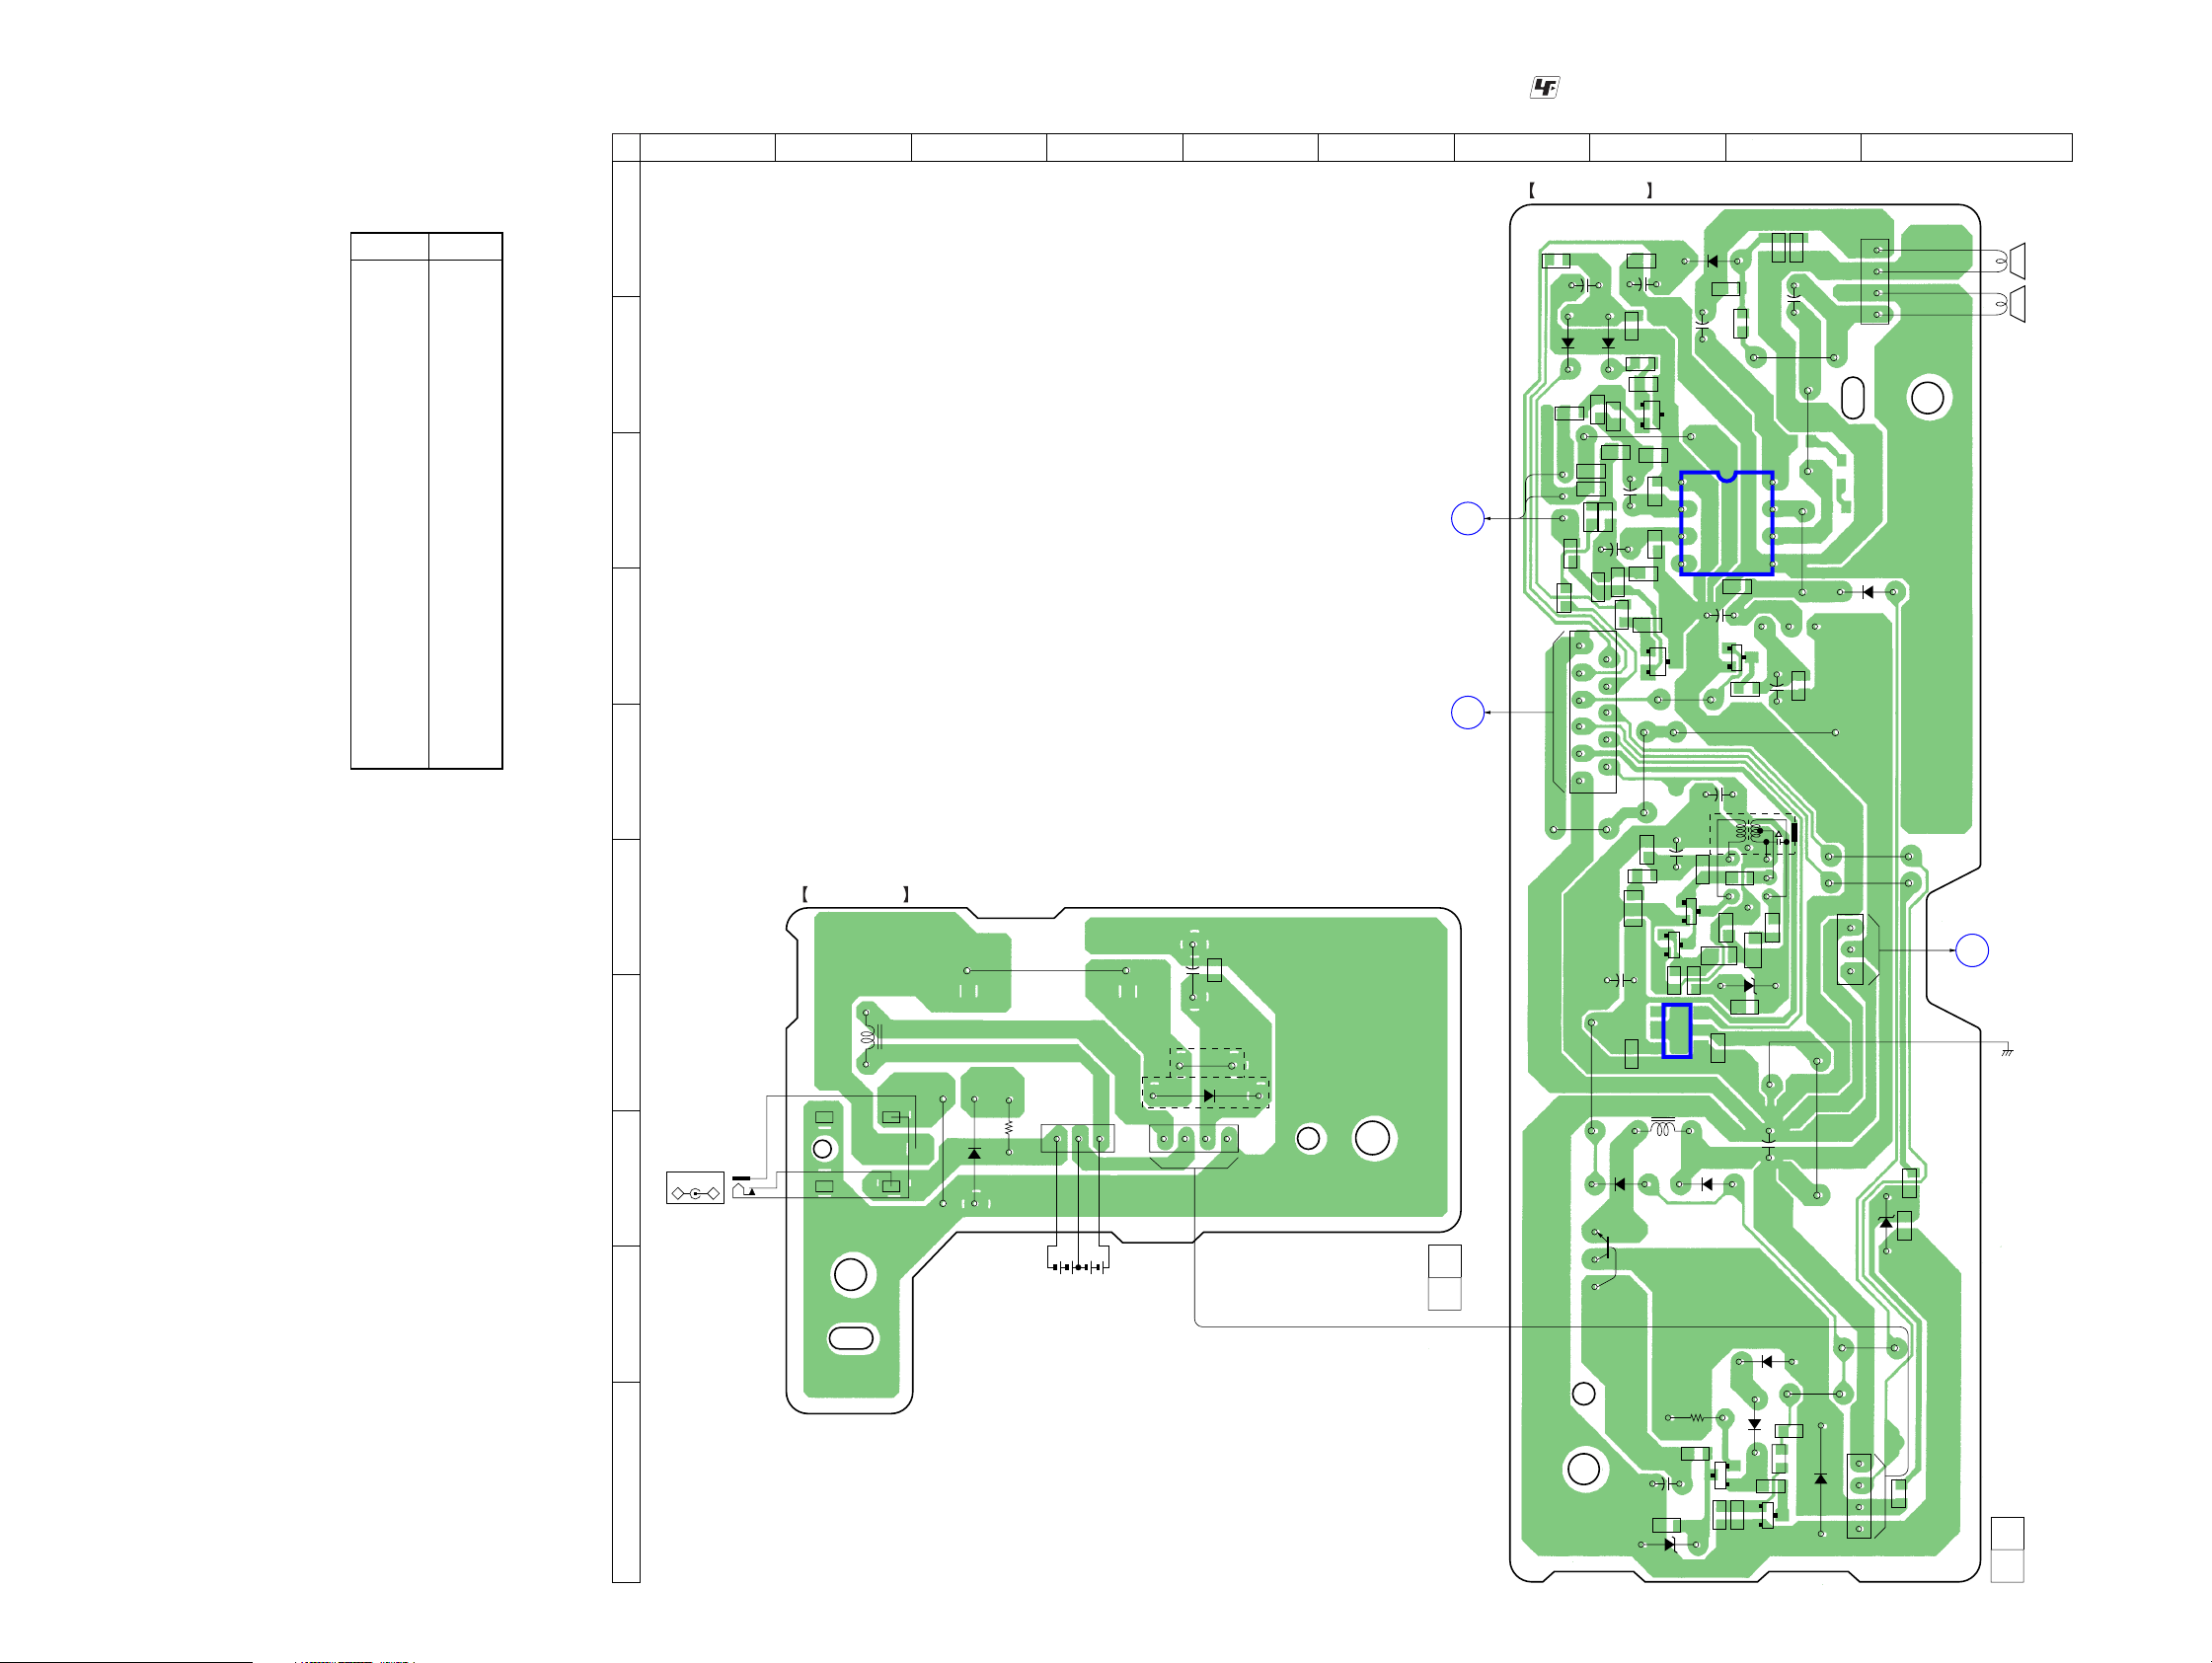
ICF-CD73/CD73V
6-14. PRINTED WIRING BOARDS – POWER Section – • See page 21 for Circuit Boards Location. :Uses unleaded solder.
1 2 3 4 5 6 7 8 9 10
• Semiconductor
Location
Ref. No. Location
D101 B-8
D201 B-7
D301 J-9
D302 H-10
D303 I-9
D304 J-9
D305 J-8
D307 G-9
D308 F-9
D309 A-8
D310 H-8
D311 D-10
D312 H-8
D901 H-3
D902 G-5
IC301 G-8
IC303 C-9
Q101 B-8
Q201 D-8
Q301 J-8
Q302 D-9
Q303 D-9
Q304 F-8
Q305 F-8
Q306 J-9
Q307 I-8
POWER BOARD
C201
+
R307
T301
JW309
JW310
CNP303
JW304
JW302
JW303
D302
JW312
CNP304
1
4
D311
1
3
C333
R303
E
CD BOARD
(Page 22)
(CHASSIS)
SP101
(L-CH)
SP201
(R-CH)
A
R334R319
+
R316
C325
D101
C326
C204
R109
R209
10
R102
R202
R104
C104
R204
R106
+
R206
C335
R318
C105
B
E
+
R203
C205
B
E
C327
B
C
F
KEY BOARD
CNP602
(Page 28)
D
D201
R105
3
1
R205
R317
11
C
LCD BOARD
CNP401
E
F
G
J901
DC IN 6V
H
+
–
JACK BOARD
L901
JW902
D901
R902
JW903
1
CNP901
C901
R901
+
(CD73: CND, CD73V)
JW901
D902
(CD73: UK, IT)
KH901
3
1
4
(Page 28)
JW308
1
CNP301
2
R309
L301
Q304
+
C308
C306
JW313
+
R103
C103C203
Q201
JW306
C309
Q305
4
5
IC301
L302
Q101
C
8
5
JW307
C310
C101
C
BCE
R311
+
D309
+
JW311
IC303
C323
C315
R312
BCE
C312
R310
3
1
D310D312
R108
C307
C324
+
C313
C314
+
C311
BCE
R308
JW305
R208
Q303
AK
D307
C305
D308
R333
JW0314
1
4
Q302
+
R313
C304
+
C334
1-687-321-
11
DRY BATTERY
SIZE "C"
I
(IEC DESIGNATION)
4PCS. 6V
(11)
Q307
D303
JW301
D304
R305
R306
Q301
ECB
J
C303
C302
D305
+
C320
R321
R304
Q306
D301
R320
R322
BCE
CNP302
1
4
R301
1-687-320-
11
(11)
3030
Page 31
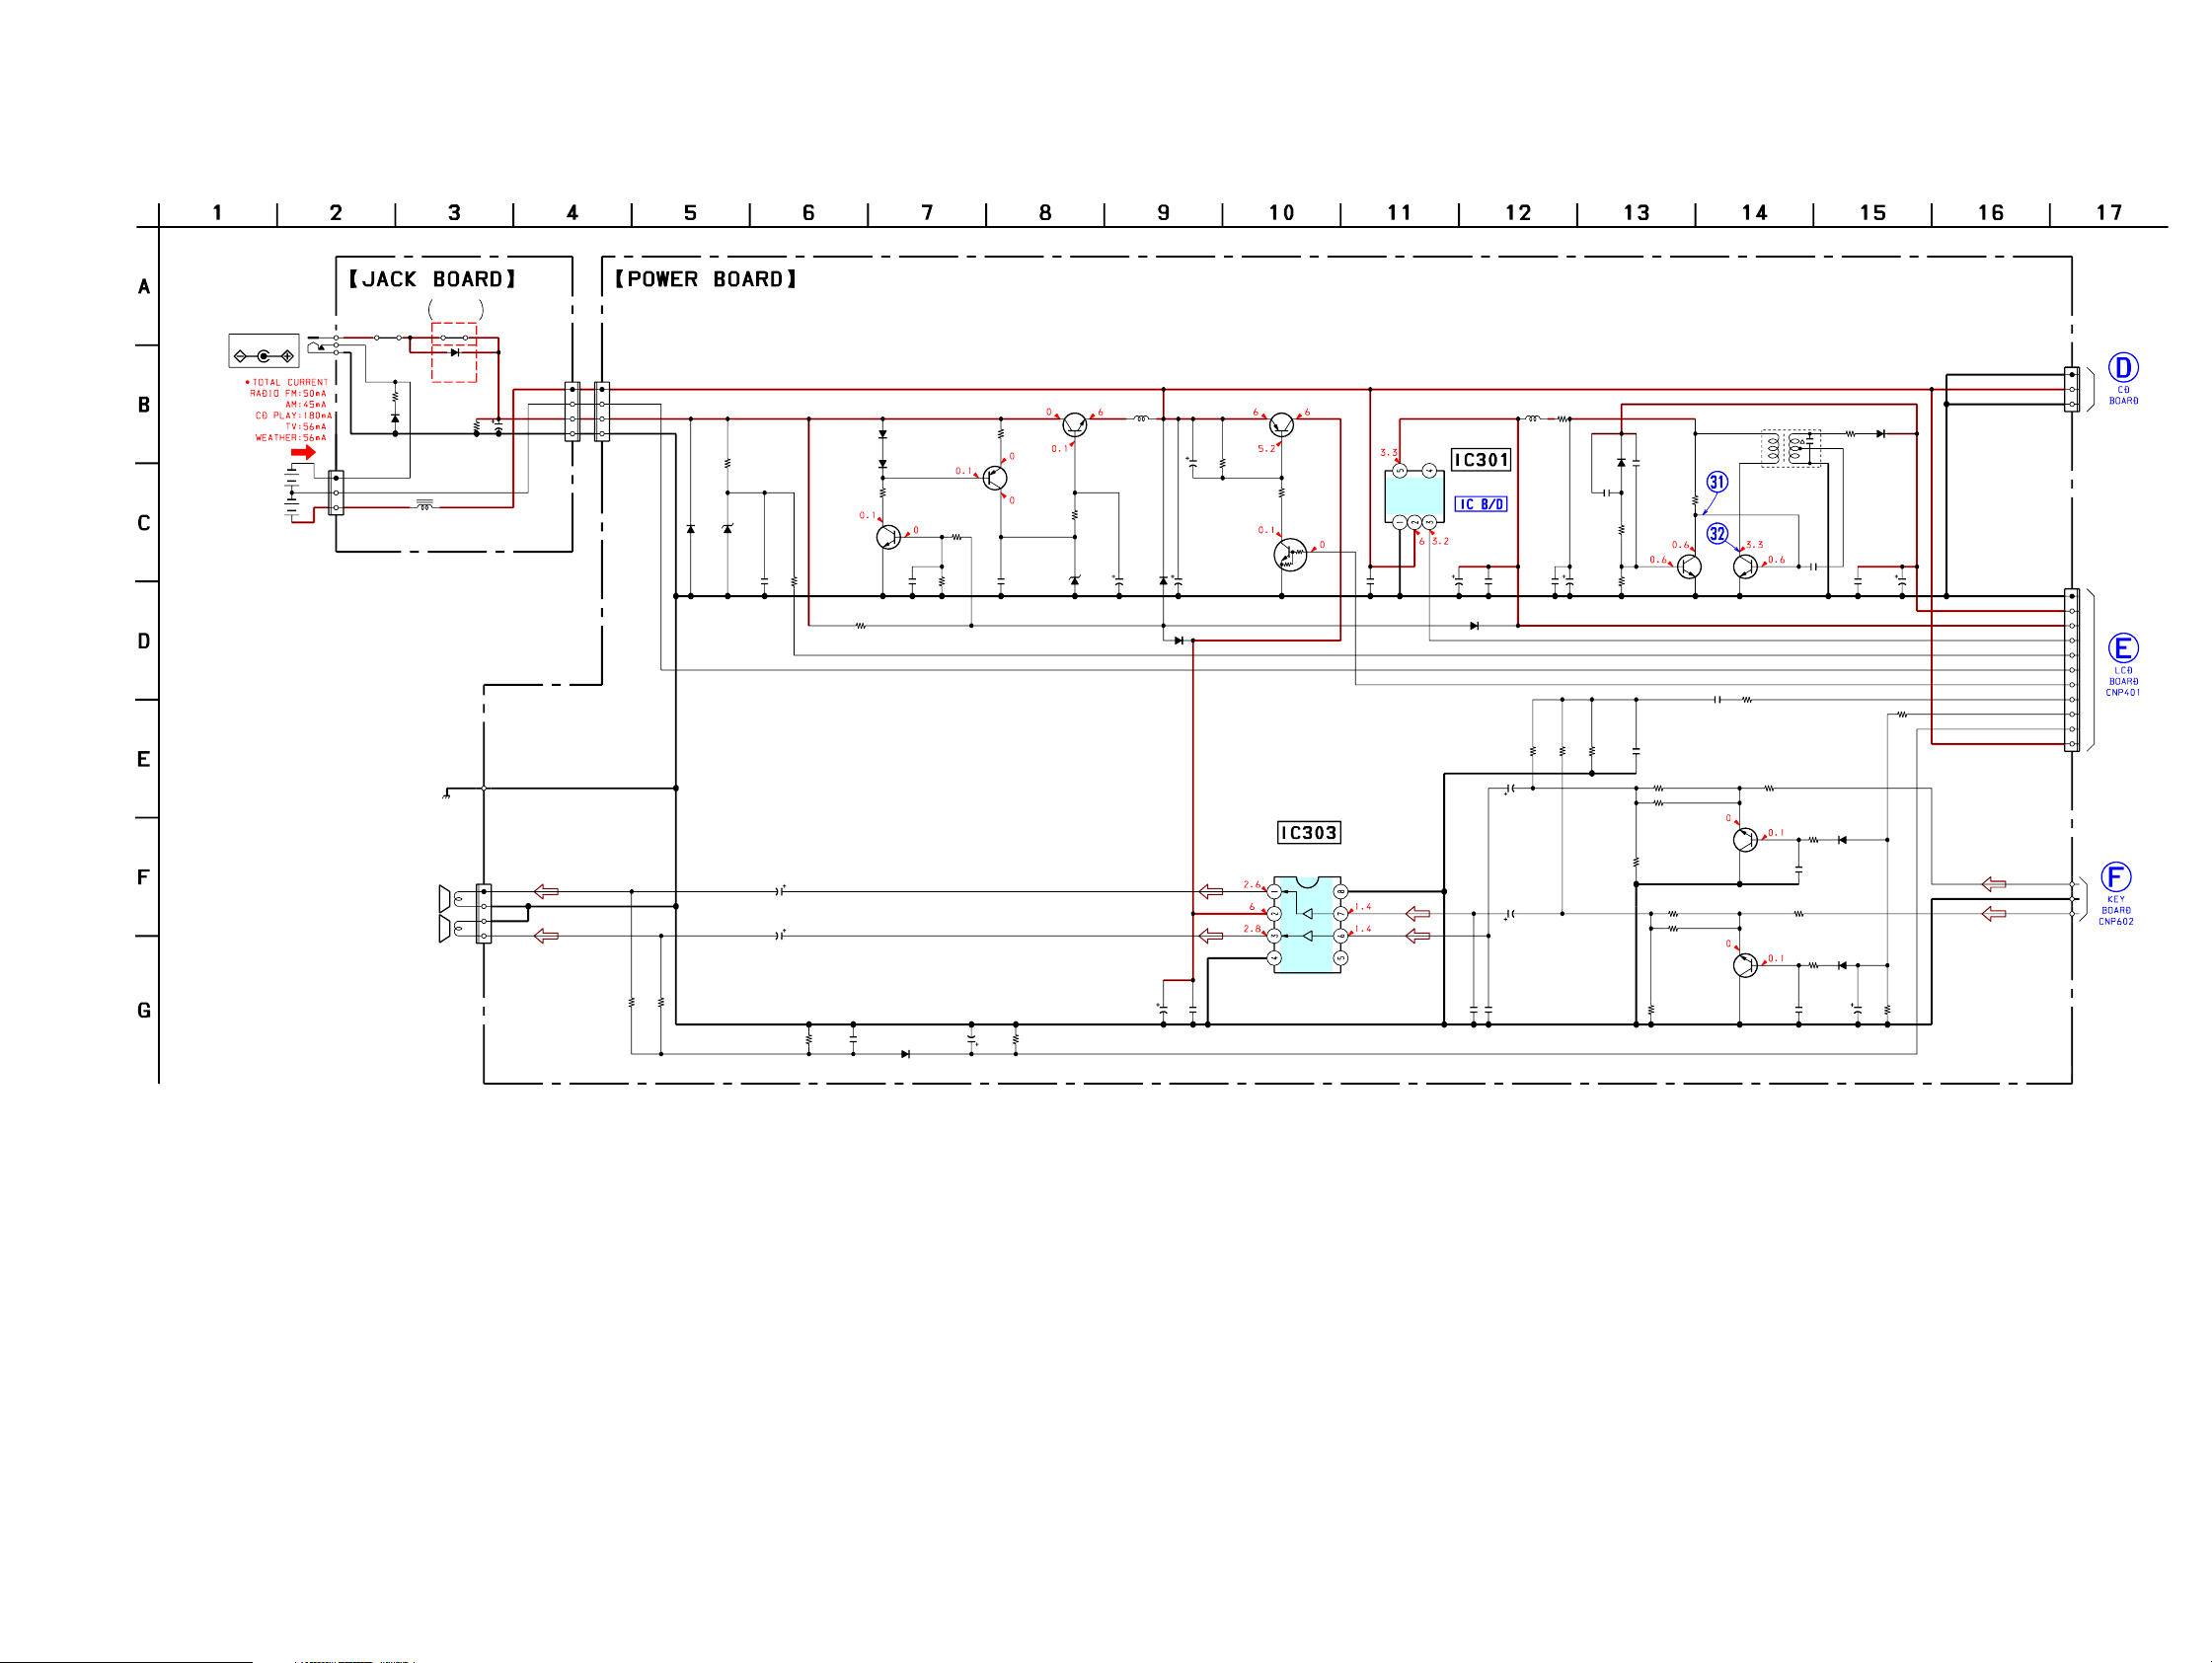
6-15. SCHEMATIC DIAGRAM – POWER Section –
CD73: CND
SP101
SP201
(L-CH)
(R-CH)
L901
47µH
(CHASSIS)
CD73V
D902
1N4002
(CD73:UK,IT)
KH901 CNP302
4P 4P
C901R901
1000
1k
16V
CNP304
4P
LCH
GND
GND
RCH
DRY BATTERY
SIZE"C"
(IEC DESIGNATION)
4PCS. 6V
DC IN 6V
J901
JW903 JW901
R902
100
D901
1N4002
CNP901
3P
ICF-CD73/CD73V
CNP303
3P
DGND
PVCC
µCDM GND
POWER ON
BUZZER
RCH 1
PRE GND
LCH
PGND
CNP301
AMUT
R ON
AC IN
11P
R +B
AGC
(Page 23)
VT
VM
(Page 29)
+B
3
(Page 29)
L301L302
R309
47µH
Q301R304
2SA157610k
1k
C302
0.0110MTZJ-6.8B
C335
4.7
16V
R305
47
D305
R334
1M
Q307
2SD2396K
R306
C303
D310
220
1SS119
10V
D311
1SS119
C323
C305
R307
470
47k
10V
Q302,303
B+ SWITCH
Q303
DTC114EUA
C304
100
10V
C324
470
0.1
10V
Q302
2SB1013
R308
1k
SPEAKER AMP
IC303
LA4525
VCC
GND
+3.3V
NCVOUT
REGULATOR
D
D
N
CE
VD
G
C307 C306
0.1 0.1
PRE
GND
NC
IC301
XC62HR3302PR
C308
100
4V
D312
1SS119
C103 C203
470p 470p
D303
Q301,306,307
1SS119
+6V REGULATOR
R301
1k
D301
D302
1N4002
RD3.0ES-T1B2
C333 R303
0.1 1 0k
C101
470
4V
C201
470
4V
R208R108
4.7k4.7k
1SS119
D304
R322
Q306
2SC4081
R321C320
4.7k0.01
R320
22k
D309R333 C334
1SS11947k 0.047
10µH
C309
0.01
R202
220k
C204
1
50V
C104
1
50V
10
D307
C311
0.01
R310
100k
C310
R311
10
47k
50V
R102 R316 C325
220k 4.7k 0.022
C312
1
MTZJ-6.8B
R312
47k
Q304 Q305
2SC4081 2SC4081
R204 R205
10k 10k
R209
22k
2SD1757K-T146
MUTING
R203
4.7k
R104 R105
10k 10k
R109
22k
2SD1757K-T146
MUTING
R103
4.7k
Q201
-RS
Q101
-RS
C326 R317
2200p 10k
Q304,305,T301
DC/DC
CONVERTER
T301
C313
22p
R206
1k
1SS119
C205
1000p
R106 D101
1k 1SS119
C105
1000p
R313 D308
1k 1SS355
C314
0.1
D201
C315
1
50V
R319
2.2k
C327
R318
4.7
100k
16V
3131
Page 32
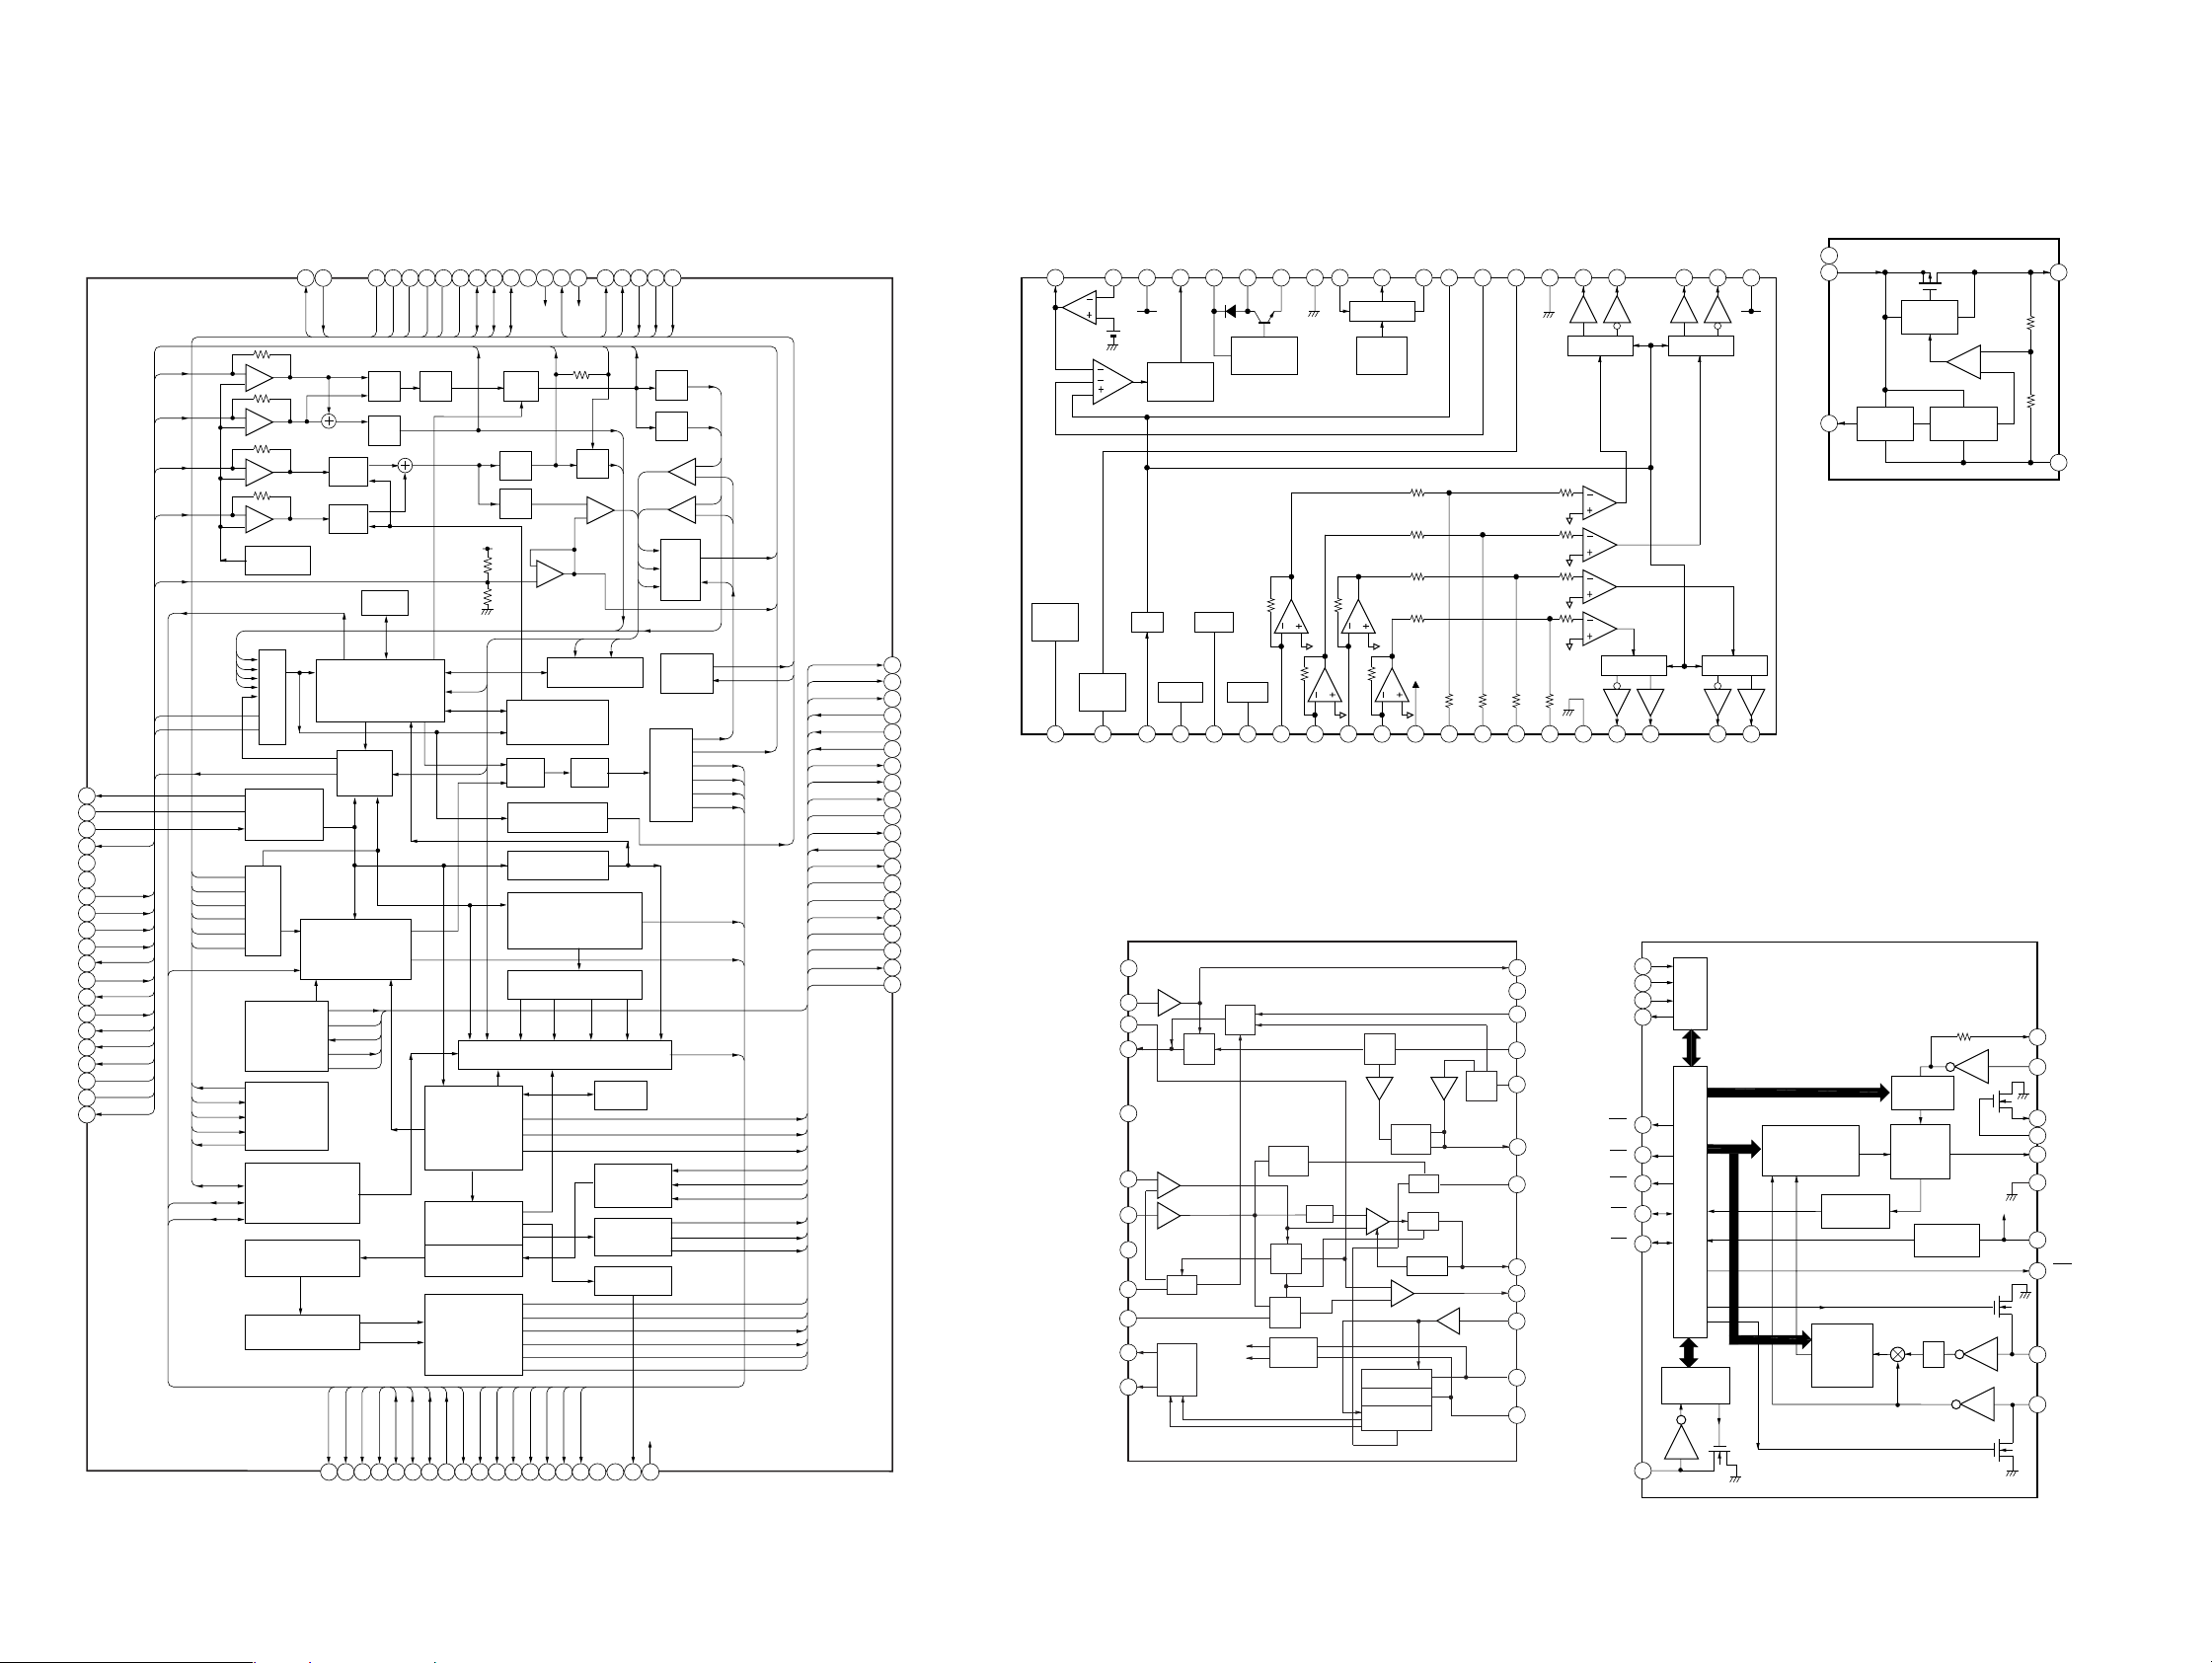
ICF-CD73/CD73V
Ver. 1.1
• IC Block Diagrams
– CD Board –
IC701 LC78646E-US-E
FIN1
FIN2
TIN1
TIN2
REFI
DEFECT
ADAVDD
ADAVSS
JITTC
SLCO
1
SLCO
SLCIST
EFMIN
RFVDD
RFVSS
VREF
RFMON
JITTC
ADAVDD
ADAVSS
FIN1
FIN2
TIN1
TIN2
REFI
TEC
TDO
SLCIST
2
EFMIN
3
RF
4
RF
5
6
FIN1
7
FIN2
8
TIN1
9
TIN2
10
VREF
11
REFI
12
FE
13
FE
TE
14
15
16
17
18
19
20
TEC
TE
RFMON
JITTC
ADAVDD
ADAVSS
TDO
PDO1
PDO2
FR
PCKIST
VVDD
VVSS
SBCK/FG
WRQ
CL
CE
DI
DO
CONT1-3
SBCK/CONT6
CONT4,5
LDS80LDD
79 78 77 76 75 74 73 72 71
LDS
LDD
+
–
+
–
+
–
+
–
LEVEL SET
A/D
SLICE LEVEL
CONTROL
PLL
VCEC
CLOCK
GENERATOR
COMMAND
INTERFACE
GENERAL PURPOSE
PORTS
8FS
DIGITAL FILTER
1BIT DAC
FDO
21 22 23 24 25 26 27 28 29 30 31 32 33 34 35 36 37 38
FR
VVDD
FR
VVDD
PCKIST
MIX
LPF
TBAL
TBAL
RAM
SERVO PROCESSOR
JITTER
DETECT
CLV,CAV
CONTROL
16MOUT
XVSS
XIN
XOUT
XVDD
SLDO
SPDO
CONT4
CONT5
GPDAC
FDO
SLDO
SPDO
CONT4
GPDAC
PCKIST
VVSS
PDO2
VVSS
PDO2
PDO1
EQ
ERROR
CORRECTION
AUDIO CD
INTERPOLATION
ATTENUATION
DEEMPHASIS
SBCK/FG
SBCK/CONT6
CONT5
SBCK/FG
SBCK/CONT6
VSS
PDO1
CONT1
CONT1
FE
MONITOR SIGNAL SELECTOR
MUTE
LPF
V/P
DEFECT
V/P
DEFECT
VDD5
CONT270CONT3
69 68 67 66 65 64 63 62 61
CONT2
FSEQ
DRF
CONT3
TE
AGC
LPF
LPF
–
+
AUTO ADJUST
SW
DRF
RUPTURE DEFECT
FRAME SYNC
DETECT,PROTECT,INSERT,
EFM DECODE
SUBCODE DECODE CRC
MONI1
MONI2
MONI3
FSEQ
MONI1
MONI2
MONI3
DRF
RES
WRQDODICLCE
TEC
SW
+
–
TRACK JUMP
D/A
AUDIO OUT
MONI4
MONI5
VSS
MONI4
MONI5
WRQDODICLCE
RF
PH
BH
MONI
CONT
S/H
RAM
EXTERNAL
AUDIO IN
SERIAL
OUT
39 40
TEST
DOUT
VDD(3.3V)
APC
+
–
+
–
FDO
SPDO
SLDO
GPDAC
FSEQ
MONI1-5
V/P
RFMON
VREF
LDD
LDS
TDO
FSX/16MIN
ASDFIN
ASDACK
ASLRCK
DATACK
DRF
EFLG
DATA
LRSY
LVDD
LVSS
LCHO
RCHO
RVDD
RVSS
C2F
DATA
DATACK
LRSY
ASDFIN
ASDACK
ASLRCK
16MOUT
EFLG
C2F
XVSS
FSX/16MIN
XIN
XOUT
XVDD
RVDD
RCHO
RVSS
LVSS
LCHO
LVDD
60
59
58
57
56
55
54
53
52
51
50
49
48
47
46
45
44
43
42
41
DATA
DATACK
LRSY
ASDFIN
ASDACK
ASLRCK
16MOUT
EFLG
C2F
XVSS
FSX/16MIN
XIN
XOUT
XVDD
RVDD
RCHO
RVSS
LVSS
LCHO
LVDD
IC702 BH6575FV-E2
−
EO
EI
OFF
VSYSSWVG
VSYS
DC/DC
CONVERTER
OSC
MUTE34
CLK
MUTE34
40 39 38 37 36 35 34 33 32 31 30 29 28 27 26 25 24 23 22 21
SYSTEM
ON
SYSTEM
OFF
1 2 3 4 5 6 7 8 9 10 11 12 13 14 15 16 17 18 19 20
START
MUTE1
CONVERTER
RESET
MUTE1
LG
VG
RESET
PGND3
IN1
GND
IN2
REGO
REGULATOR
VSYS
DETECT
IN3
REGB
IN4
DC INCTSOFT
FIL1
VREF
FIL2
SPRT
PGND2
OUT1+OUT1
PRE-DRIVER PRE-DRIVER
PRE-DRIVER PRE-DRIVER
FIL3
FIL4
PGND1
+
OUT4−OUT4
– TUNER Board –
IC1 TA2149BN
RF GND
1
2
FM RFIN
AM LOW CUT
MIX OUT
VCC
AM IF IN
FM IF IN
GND
AGC
QUAD
R-OUT
L-OUT
3
4
5
6
7
8
9
10
11
12
FM RF
MUTE
AM IF
FM IF
AGC
FM
MIX
AM
MIX
LEVEL
DET
AM
DET
FM
DET
ST/MO
FM/AM
24
FM RFOUT
23
RF VCC
AM RFIN
22
FM
OSC
OSC
AF BUFF
DIVIDE
DECODE
1/1 OR
VCO
BUFF
1/16
ST
SW
IF REQ
AF
BUFF
IF BUFF
1/8
AM
21
20
19
18
17
16
15
14
13
FM OSC
AM OSC
OSC OUT
ST LED
IF REQ
DET OUT
MPX IN
LPF1
LPF2
IC2 LC72137M-TLM
CE
1
DI
2
CL
3
DO
4
B01
5
6
B02
B03
7
8
I01
I02
9
UNIVERSAL
COUNTER
10
IFIN
OUT2+OUT2−PVCC
+
OUT3−OUT3
CCB
I/F
LATCH
DATA SHIFT REGISTER
– POWER Board –
IC301 XC62HR3302PR
NC
1
VIN
2 5
CURRENT
3
UNLOCK
DETECTOR
SWALLOW
COUNTER
1/16,1/17
4BITS
OUTPUT
CONTROL
REFERENCE
DIVIDER
PHASE
DETECTOR
CHARGE
PUMP
CE
12BITS
PROGRAMMABLE
DIVIDER
LIMIT
REFERENCE
VOLTAGE
POWER ON
RESET
1/2
VOUT
+
–
VSS
4
20
XOUT
XIN
19
18
AOUT
17
AIN
PD
16
VSS
15
14
VDD
B04
13
FMIN
12
AMIN
11
3232
Page 33
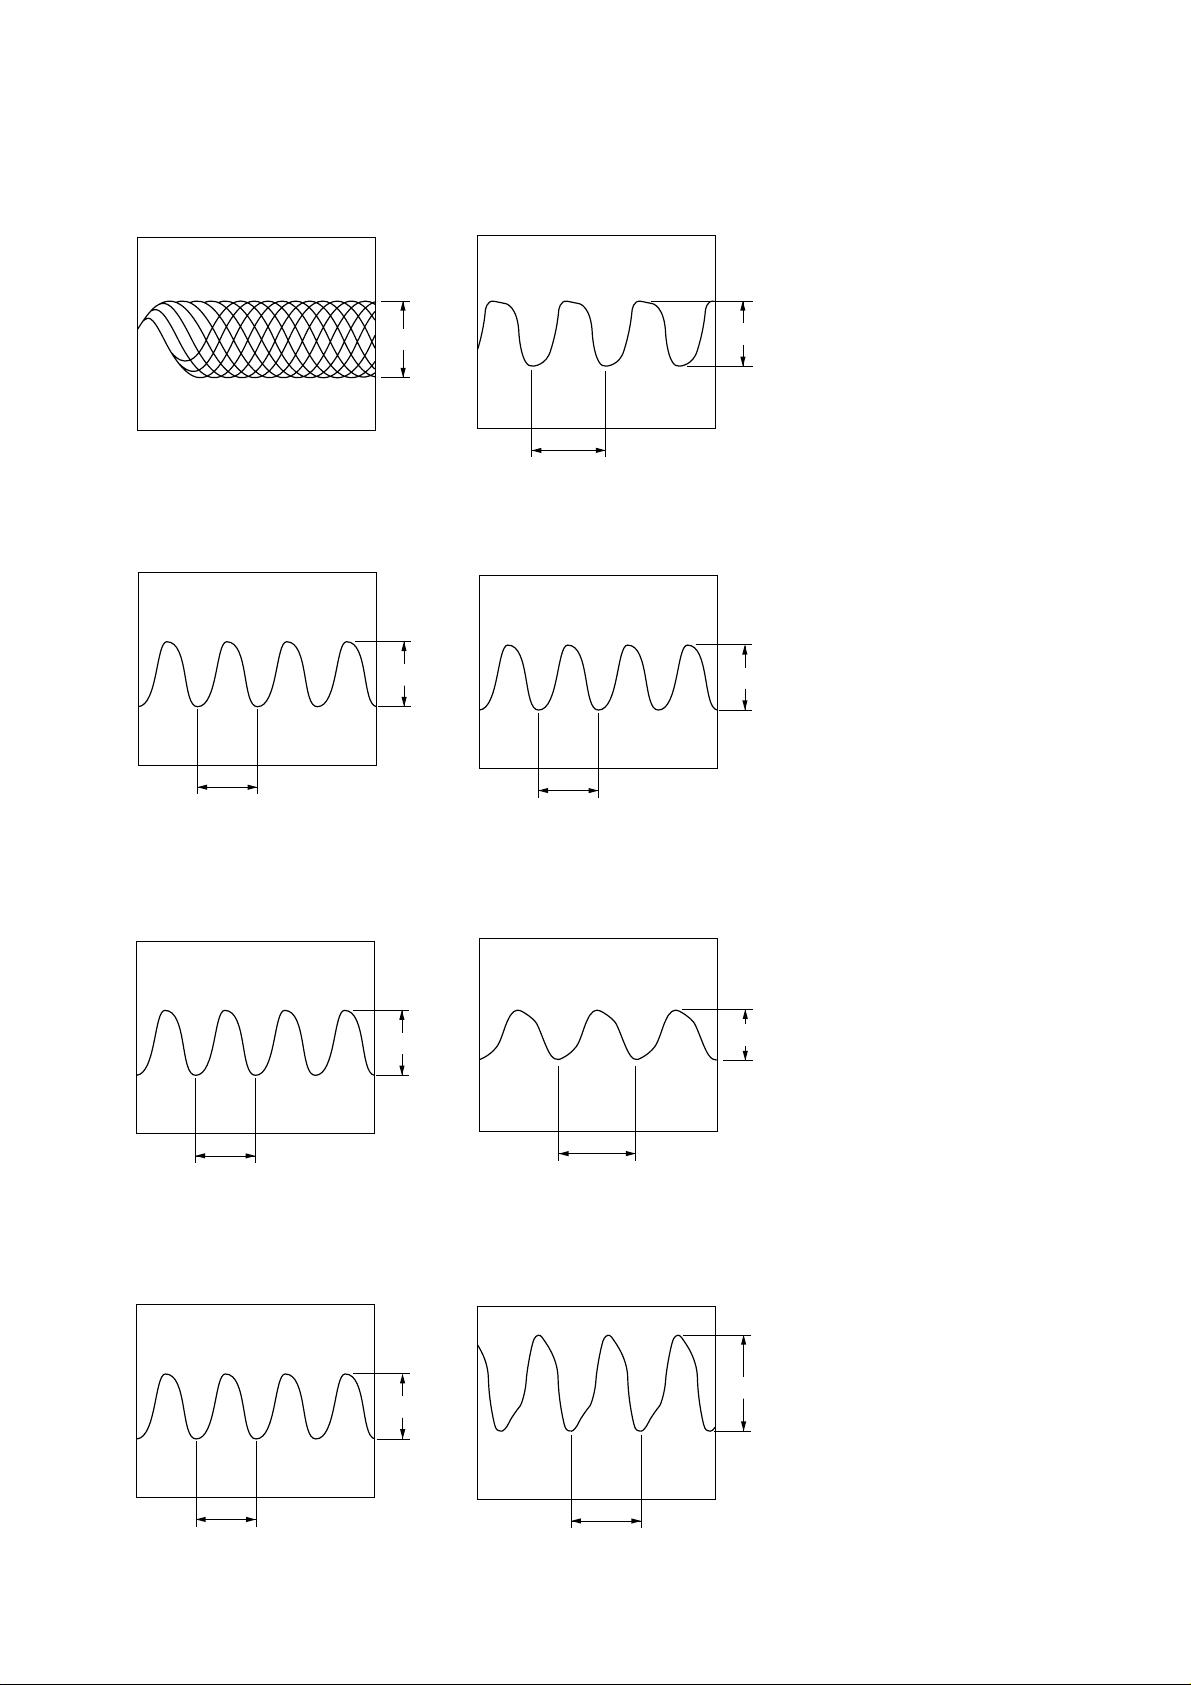
• Waveforms
– CD Board –
ICF-CD73/CD73V
– LCD Board –
1 IC701 4 (RF) (CD Play mode)
1.2 Vp-p
2 IC701 rk (XOUT) (CD Play mode)
2.0 Vp-p
wa IC401 ua (XT2)
3.2 Vp-p
30.5 µs
ws IC401 ug (X2) (CD Play mode)
3.1 Vp-p
59.1 ns
– TUNER Board –
qa IC2 w; (XOUT) (ICF-CD73)
13.3 µs
qs IC2 w; (XOUT) (ICF-CD73V)
1.0 Vp-p
238.6 ns
– POWER Board –
ea Q304 (Collector) (Tuner Mode)
460 mVp-p
32.3 µs
es Q305 (Collector) (Tuner Mode)
13.3 µs
1.7 Vp-p
3.8 Vp-p
32.3 µs
33
Page 34
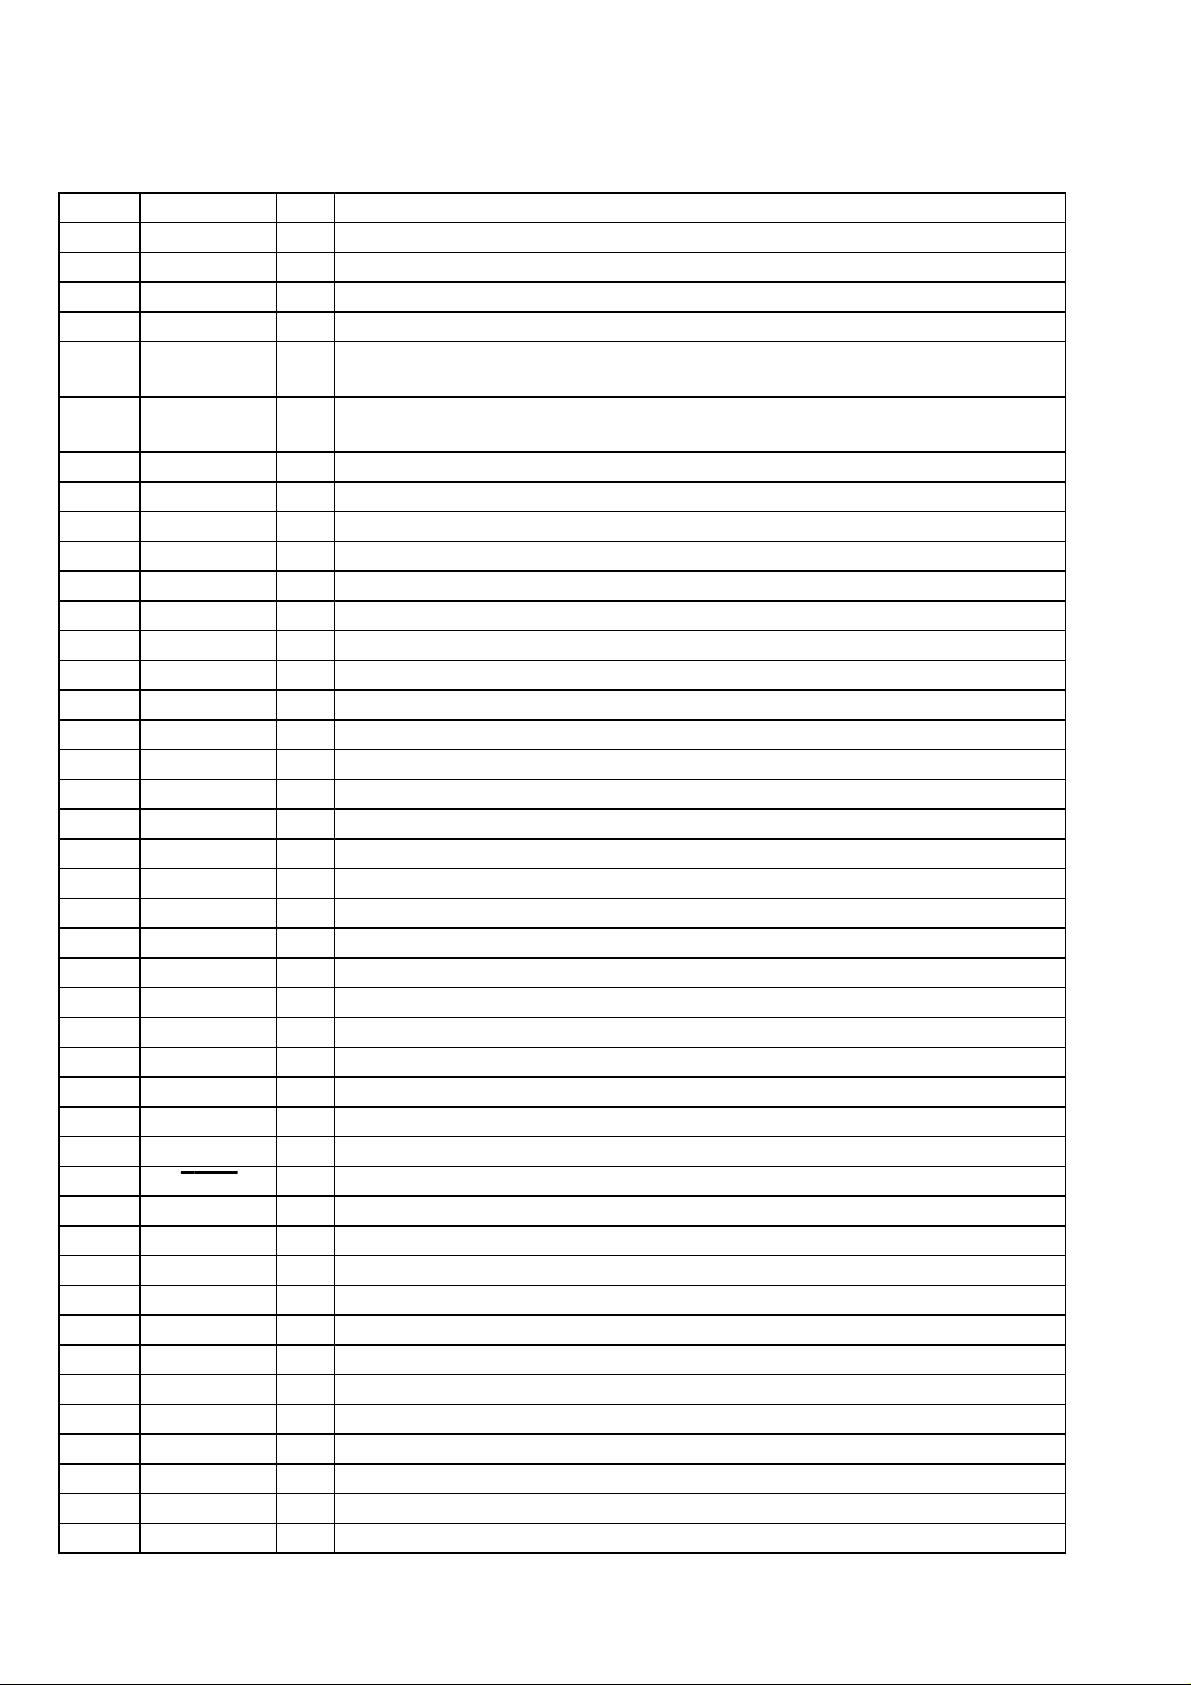
ICF-CD73/CD73V
Ver. 1.1
6-16. IC PIN FUNCTION DESCRIPTION
• LCD BOARD IC401 µPD789477GC-A33-8BT (SYSTEM CONTROLLER)
Pin No. Pin Name
1, 2 NC — Not used
3 to 5 VLC2 to VLC0 — Terminal for doubler circuit capacitor connection to develop liquid crystal display drive voltage
6 to 9 COM0 to COM3 O Common drive signal output to the liquid crystal display
10 to 27 SEG17 to SEG0 O Segment drive signal output to the liquid crystal display
28 to 30
31 POWER ON O
32 R ON O Power on/off control signal output for the tuner section “H”: tuner power on
33 to 37 NC I Not used
38 AVDD — Power supply terminal (+3.3V) (analog system)
39 FSEQ I CD synchronizing signal detection signal input from the digital signal processor
40 NC I Not used
41 AC IN I Power detection signal input terminal when connected AC power adapter (A/D input)
42 VM I Middle voltage (+3V) detection input for battery check
43 VH I High voltage (+6V) detection signal input for AC or battery check
44 to 46 KEY2 to KEY0 I Front and top panel key input terminal (A/D input)
47 AVSS — Ground terminal (for analog system)
48 NC I Not used
49 DC CHK I Power failure detection signal input terminal “L”: power failure, “H”: power on
50 WRQ I CD interruption signal input from the digital signal processor
51 KEY CHK I Key interruption detection signal input terminal
52 BUZZER O Beep sound signal output terminal
53 CD DATA IN I Serial data input from the digital signal processor
54 CD DATA O Serial data output to the digital signal processor
55 CD CLK O Serial data transfer clock signal output to the digital signal processor
56 CD CE O Chip enable signal output to the digital signal processor
57 DRF I CD focus on/off detection signal input from the digital signal processor
58 XRST O System reset signal output to the digital signal processor “L”: reset
59 CD ON O Power on/off control signal output for the CD section “H”: CD power on
60 NC I Not used
61 CD OPEN I CD lid open/close detect switch input terminal “L”: CD lid is closed, “H”: CD lid is opened
62 MUTE O Tuner muting on/off control signal output to the FM/AM PLL “L”: muting on
63 COUNT I PLL serial count data input terminal from the FM/AM PLL
64 R CLK O PLL serial data transfer clock signal output to the FM/AM PLL
65 R DATA O PLL serial data output to the FM/AM PLL
66 R CE O PLL chip enable signal output to the FM/AM PLL
67, 68 NC I Not used
69 IC — Ground terminal
70 XT1 I Sub system clock input terminal (32.768 kHz)
71 XT2 O Sub system clock output terminal (32.768 kHz)
72 VDD0 — Power supply terminal (+3.3V)
73 VSS0 — Ground terminal
74 X1 I Main system clock input terminal (4.19 MHz)
75 X2 O Main system clock output terminal (4.19 MHz)
VERSION0 to
VERSION2
I/O
I Setting input terminal for destination
Power on/off control signal output terminal for the power amplifier
“L”: standby mode, “H”: power amplifier on
Description
34
Page 35

ICF-CD73/CD73V
Pin No. Pin Name
76 RESET I
77 LOAD O Load control signal output terminal for battery reverse insert check
78 A MUTE O Audio muting on/off control signal output terminal “L”: muting on
79 B MUTE O Muting signal on/off control signal output terminal “L”: muting on (beep sound on)
80 BATT CHK M O Middle voltage (+3V) control signal output terminal for battery check
I/O
System reset signal input from the reset signal generator “L”: reset
For several hundreds msec. after the power supply rises, “L” is input, then it changes to “H”
Description
35
Page 36
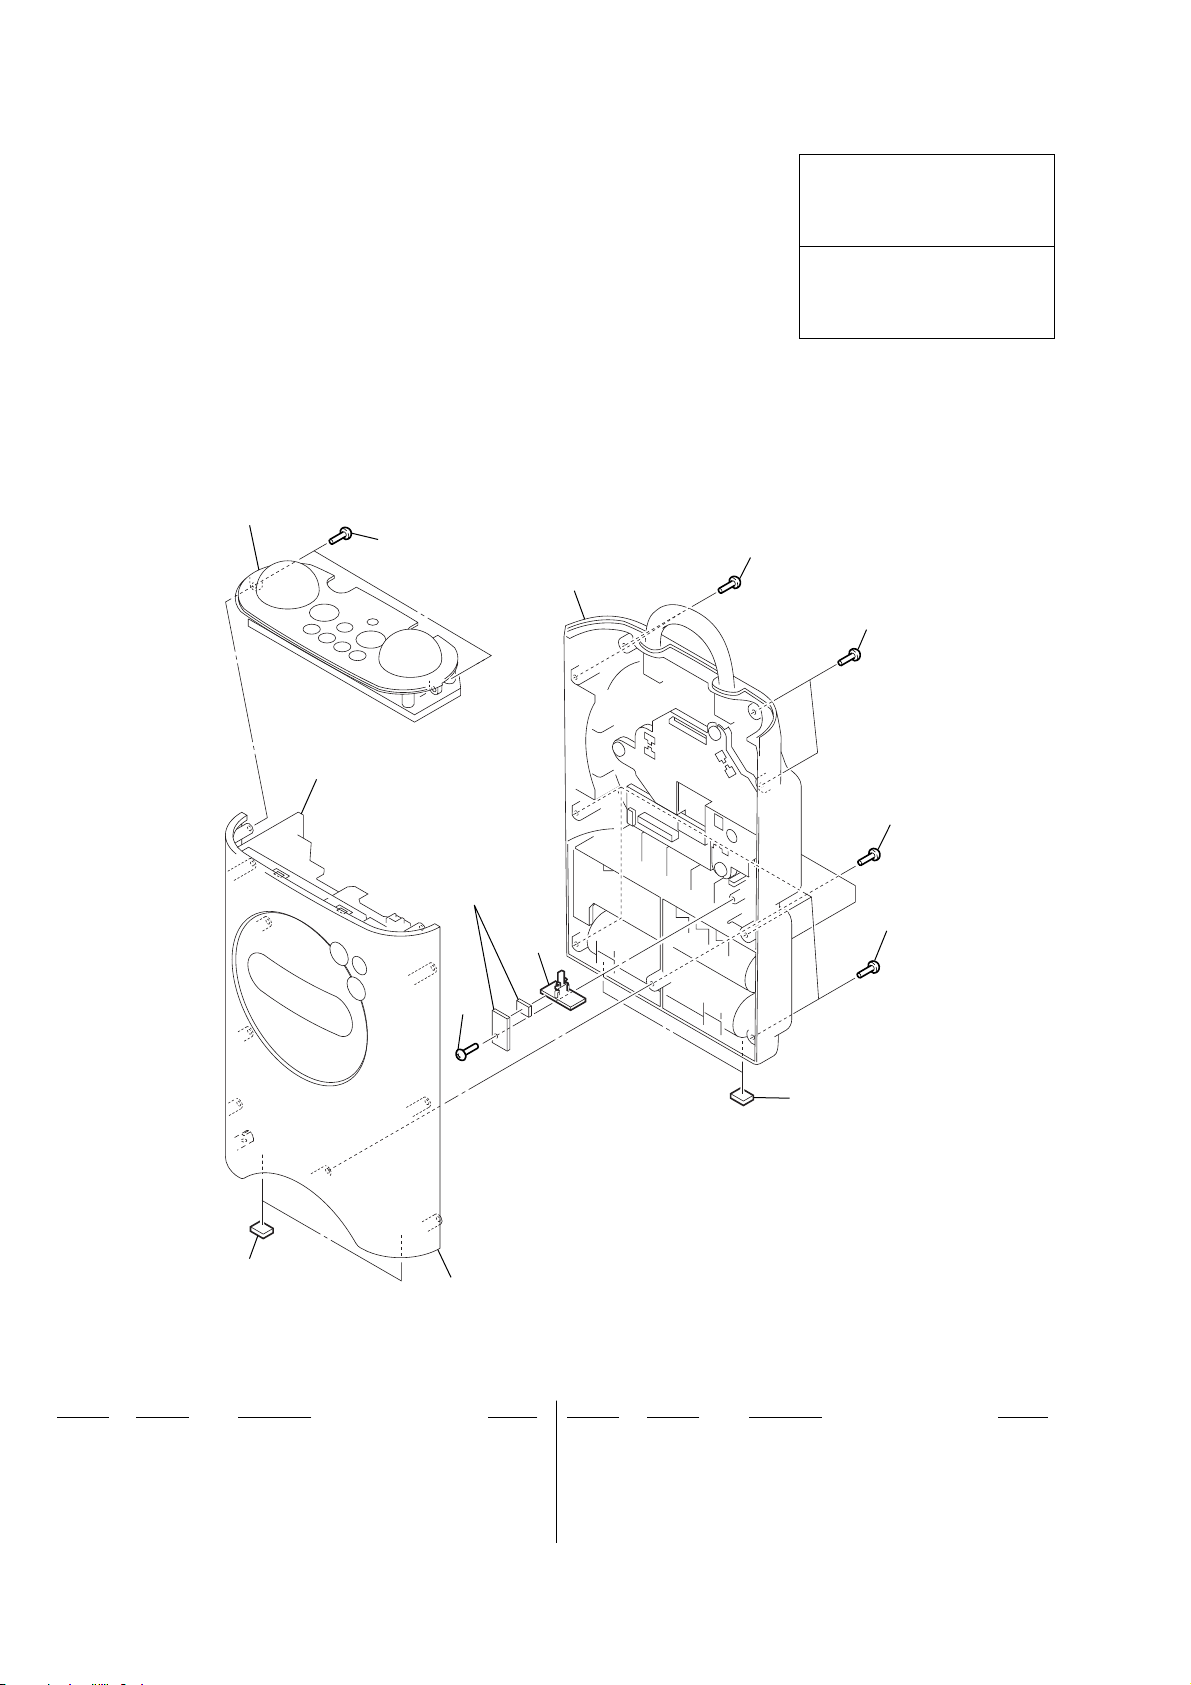
ICF-CD73/CD73V
Ver. 1.1
SECTION 7
EXPLODED VIEWS
NOTE:
• -XX and -X mean standardized parts, so they
may have some difference from the original
one.
• Color Indication of Appearance Parts
Example:
KNOB, BALANCE (WHITE) . . . (RED)
↑↑
Parts Color Cabinet's Color
• Refer to “DISCRIMINATION OF ORIGINAL
AND LIV MODEL” in the SERVICING
NOTES (page 4) about LIV model.
7-1. OVERALL SECTION
cabinet (upper)
section
• Items marked “*” are not stocked since they
are seldom required for routine service. Some
delay should be anticipated when ordering
these items.
• Accessories are given in the last of the electrical parts list.
•Abbreviation
CND: Canadian model
IT : Italian model
MX : Mexican model
3
cabinet (rear) section
The components identified by mark
0 or dotted line with mark 0 are
critical for safety.
Replace only with part number
specified.
Les composants identifiés par une
marque 0 sont critiquens pour la
sécurité.
Ne les remplacer que par une pièce
portant le numéro spécifié.
4
4
chassis (main) section
1
4
not supplied
4
2
3
1
cabinet (front)
section
Ref. No. Part No. Description Remark
1 3-368-852-01 FOOT
* 2 A-3683-356-A SW BOARD, COMPLETE
3 3-254-151-01 SCREW (B2.6), (+) P TAPPING
(CD73V: LIV (WHITE))
36
Ref. No. Part No. Description Remark
3 7-685-534-14 SCREW +BTP 2.6X8 TYPE2 N-S
(EXCEPT CD73V: LIV (WHITE))
4 3-252-827-01 SCREW (B2.6), (+) BV TAPPING
(CD73V: LIV (WHITE))
4 7-685-535-14 SCREW +BTP 2.6X10 TYPE2 N-S
(EXCEPT CD73V: LIV (WHITE))
Page 37
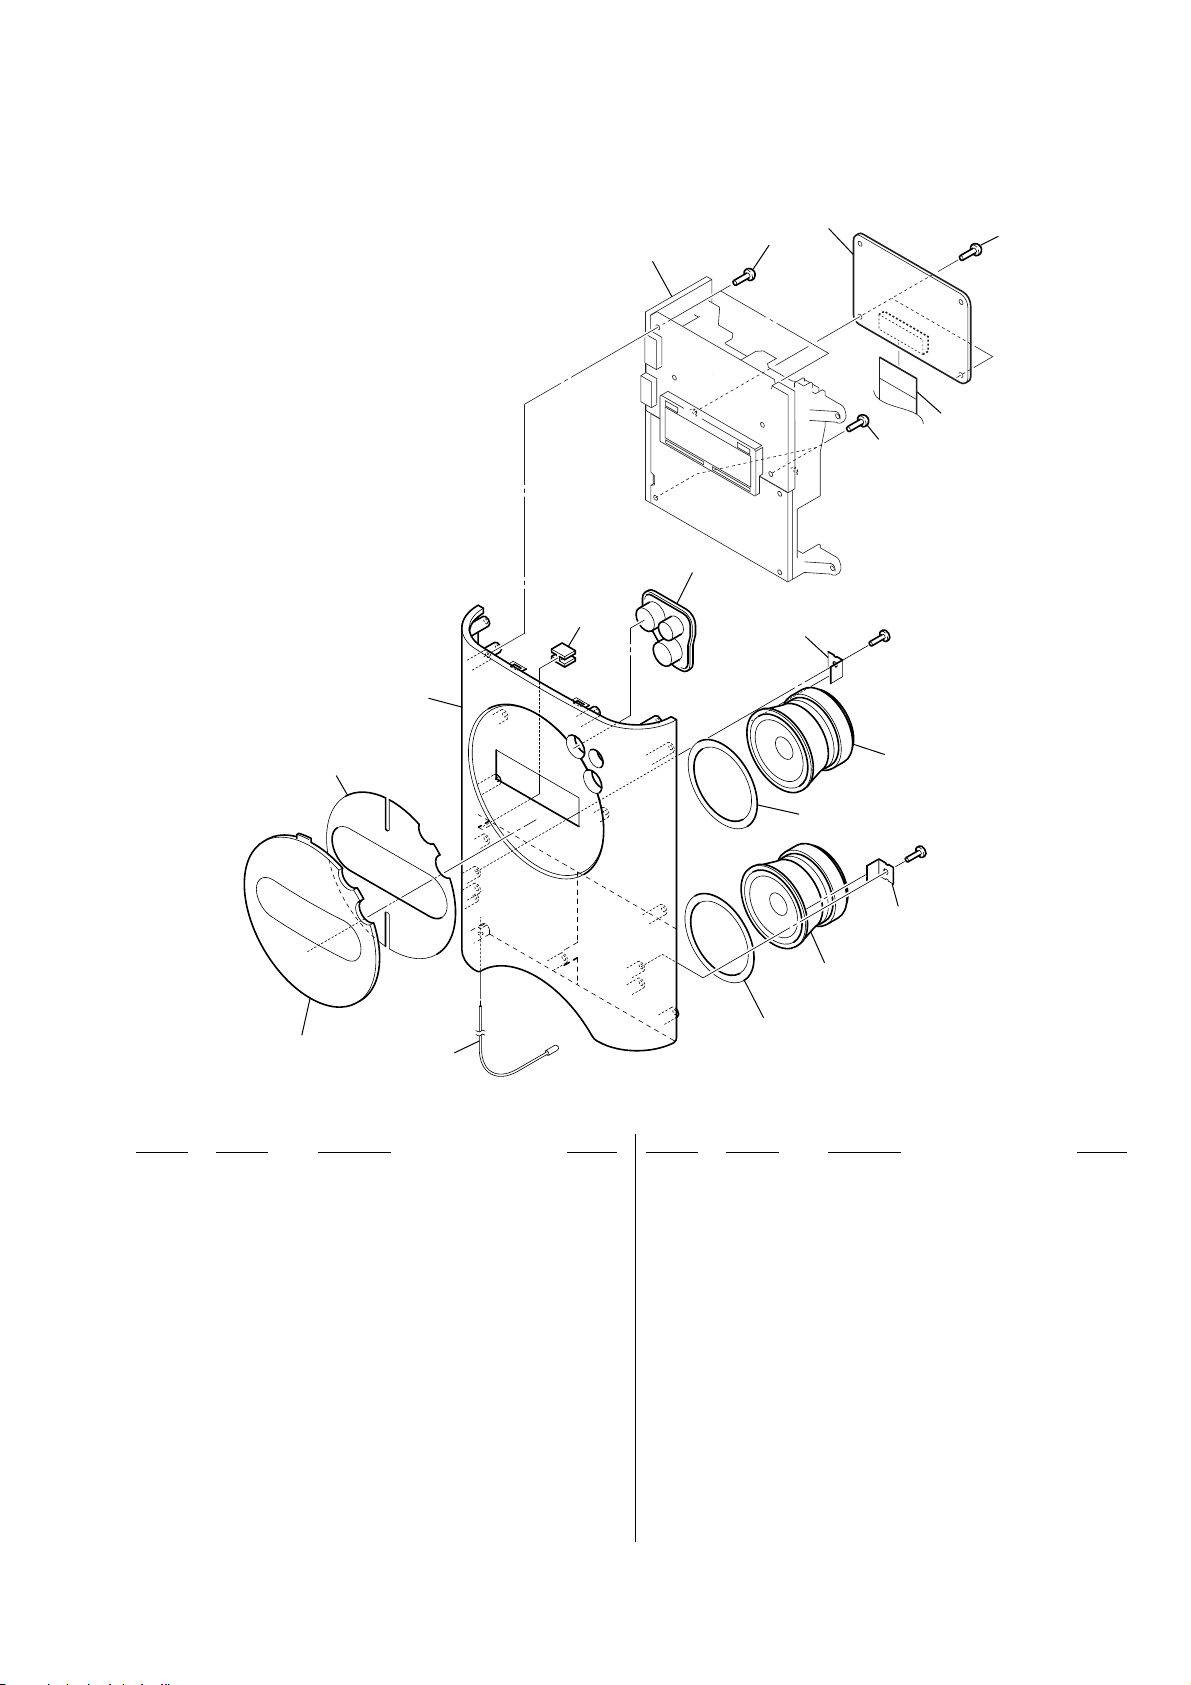
7-2. CABINET (FRONT) SECTION
d
chassis (main) section
55
59
ICF-CD73/CD73V
Ver. 1.1
58
59
not supplie
59
54
53
52
51
Ref. No. Part No. Description Remark
51 3-251-767-01 WINDOW (CLEAR BLUE)...(WHITE)
51 3-251-767-11 WINDOW (CLEAR YELLOW)...(BEIGE)
51 3-251-767-21 WINDOW (CLEAR YELLOW)...(BEIGE)
51 3-251-767-31 WINDOW (CLEAR BLUE)...(WHITE)
51 3-251-767-61 WINDOW (CLEAR BLUE)...(WHITE)
52 3-251-785-01 SHEET (WINDOW), ADHESIVE
53 3-251-762-01 CABINET (FRONT) (WHITE)
53 3-251-762-11 CABINET (FRONT) (BEIGE)
53 3-251-762-21 CABINET (FRONT) (WHITE) (CD73V: LIV)
54 3-254-693-01 SPACER (SLIT)
ANT1
(CD73V: ORIGINAL)
(CD73V: LIV)
(CD73: UK, IT)
(CD73: CND, MX)
(CD73V: LIV)
(CD73: CND, MX/CD73V: ORIGINAL)
(CD73: UK, IT/CD73V: LIV)
56
#1
SP101
57
#1
56
SP201
57
Ref. No. Part No. Description Remark
55 3-251-784-01 KEY (FUNCTION) (RADIO ON BAND, OFF x ,
(CD73: CND, MX/CD73V: ORIGENAL)
55 3-251-784-11 KEY (FUNCTION) (RADIO ON BAND, OFF x,
CD u) (for BEIGE, WHITE) (CD73V: LIV)
55 3-251-784-21 KEY (FUNCTION) (RADIO ON BAND, OFF x,
CD u) (for BEIGE) (CD73V: UK, IT)
56 3-252-742-01 BRACKET (SP)
57 3-255-641-01 SHEET (SP)
* 58 A-3683-347-A CD BOARD, COMPLETE
59 7-685-534-14 SCREW +BTP 2.6X8 TYPE2 N-S
(EXCEPT CD73V: LIV (WHITE))
59 3-254-151-01 SCREW (B2.6), (+) P TAPPING
ANT1 1-501-907-81 ANTENNA, FM WIRE
SP101 1-825-389-12 SPEAKER (5cm)
SP201 1-825-389-12 SPEAKER (5cm)
CD u) (for WHITE)
(CD73V: LIV (WHITE))
37
Page 38
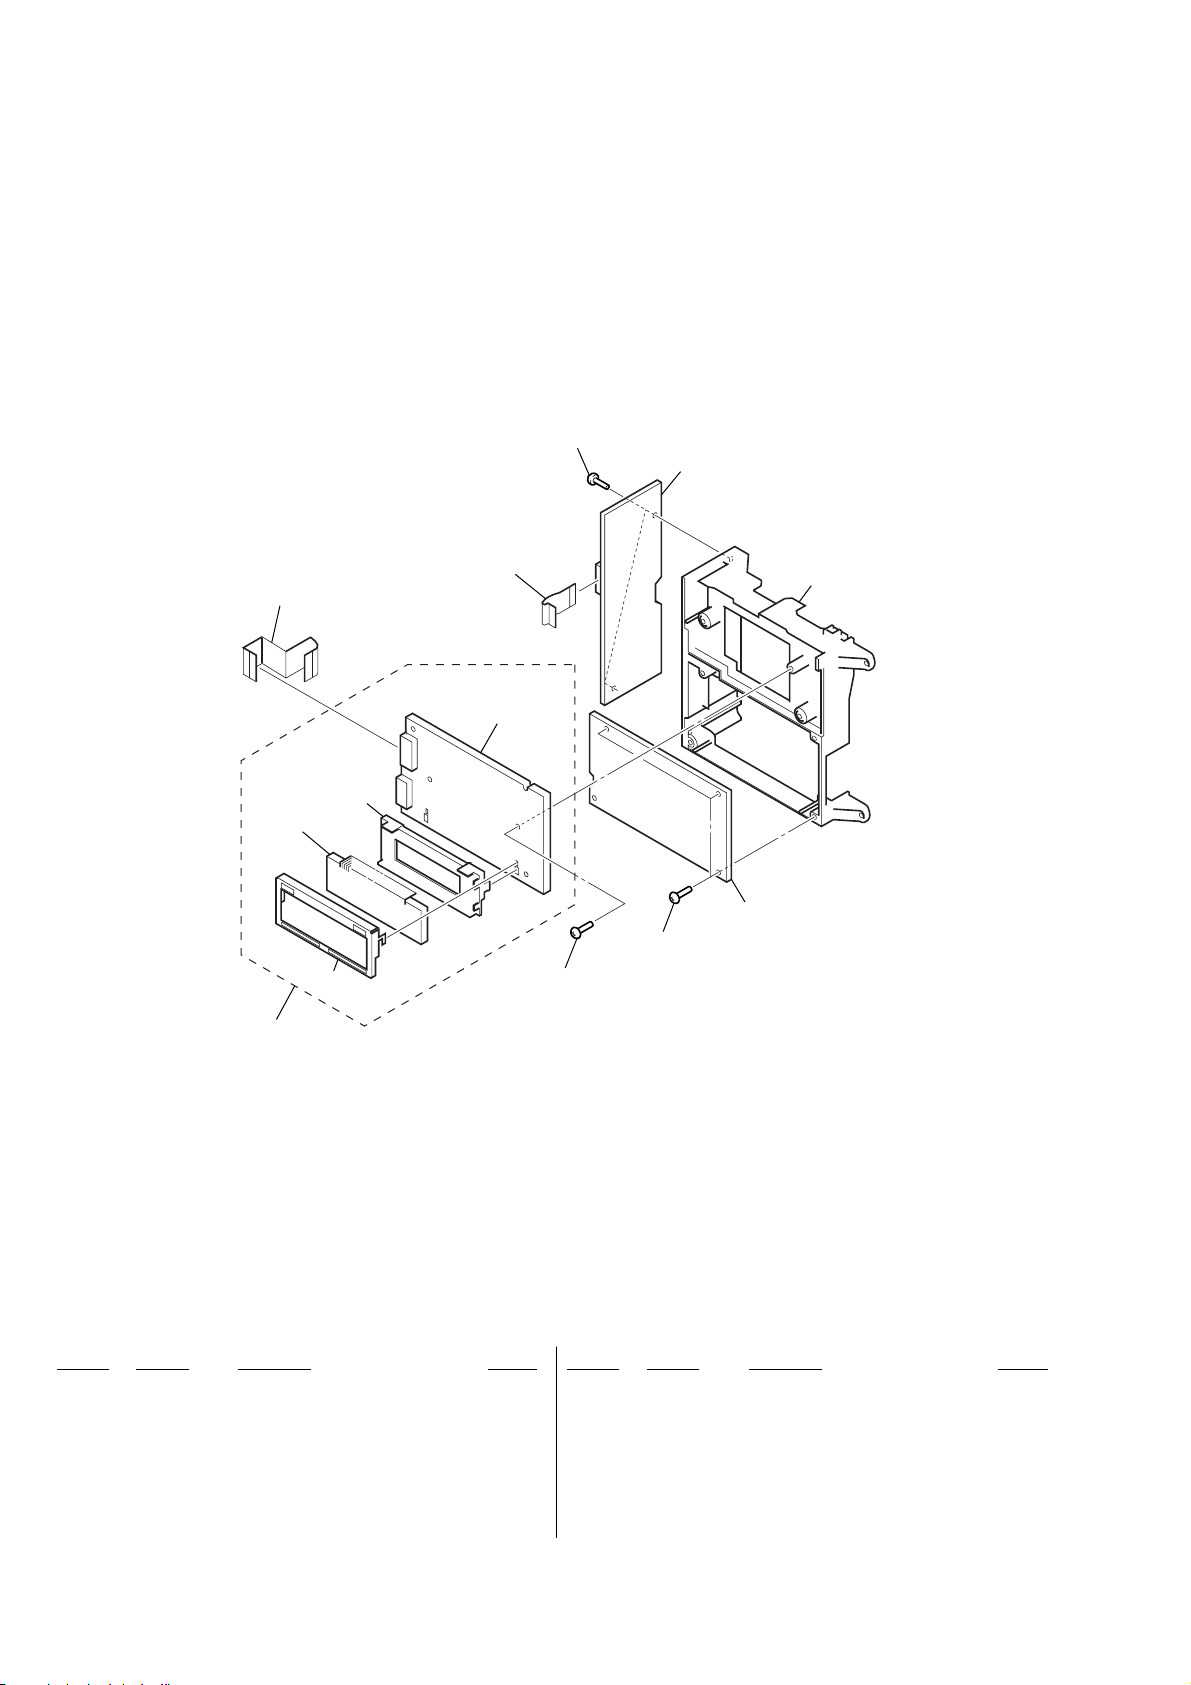
ICF-CD73/CD73V
Ver. 1.1
7-3. CHASSIS (MAIN) SECTION
107
105
not supplied
LCD401
103
102
104
not supplied
lcd board
106
101
107
107
Ref. No. Part No. Description Remark
* 101 A-3683-339-A TUNER BOARD, COMPLETE (CD73V)
* 101 A-3683-374-A TUNER BOARD, COMPLETE (CD73: CND, MX)
* 101 A-3683-375-A TUNER BOARD, COMPLETE (CD73: UK, IT)
* 102 A-3683-343-A LCD BOARD, COMPLETE (CD73V)
* 102 A-3683-378-A LCD BOARD, COMPLETE (CD73: CND, MX)
* 102 A-3683-381-A LCD BOARD, COMPLETE (CD73: IT)
* 102 A-3683-388-A LCD BOARD, COMPLETE (CD73: UK)
38
Ref. No. Part No. Description Remark
103 3-251-786-01 CASE (LCD), SHIELD
104 3-251-773-01 HOLDER (LCD)
* 105 A-3683-336-A POWER BOARD, COMPLETE
106 3-251-769-02 CHASSIS (MAIN)
107 7-685-534-14 SCREW +BTP 2.6X8 TYPE2 N-S
LCD401 1-805-196-11 DISPLAY PANEL, LIQUID CRYSTAL
Page 39
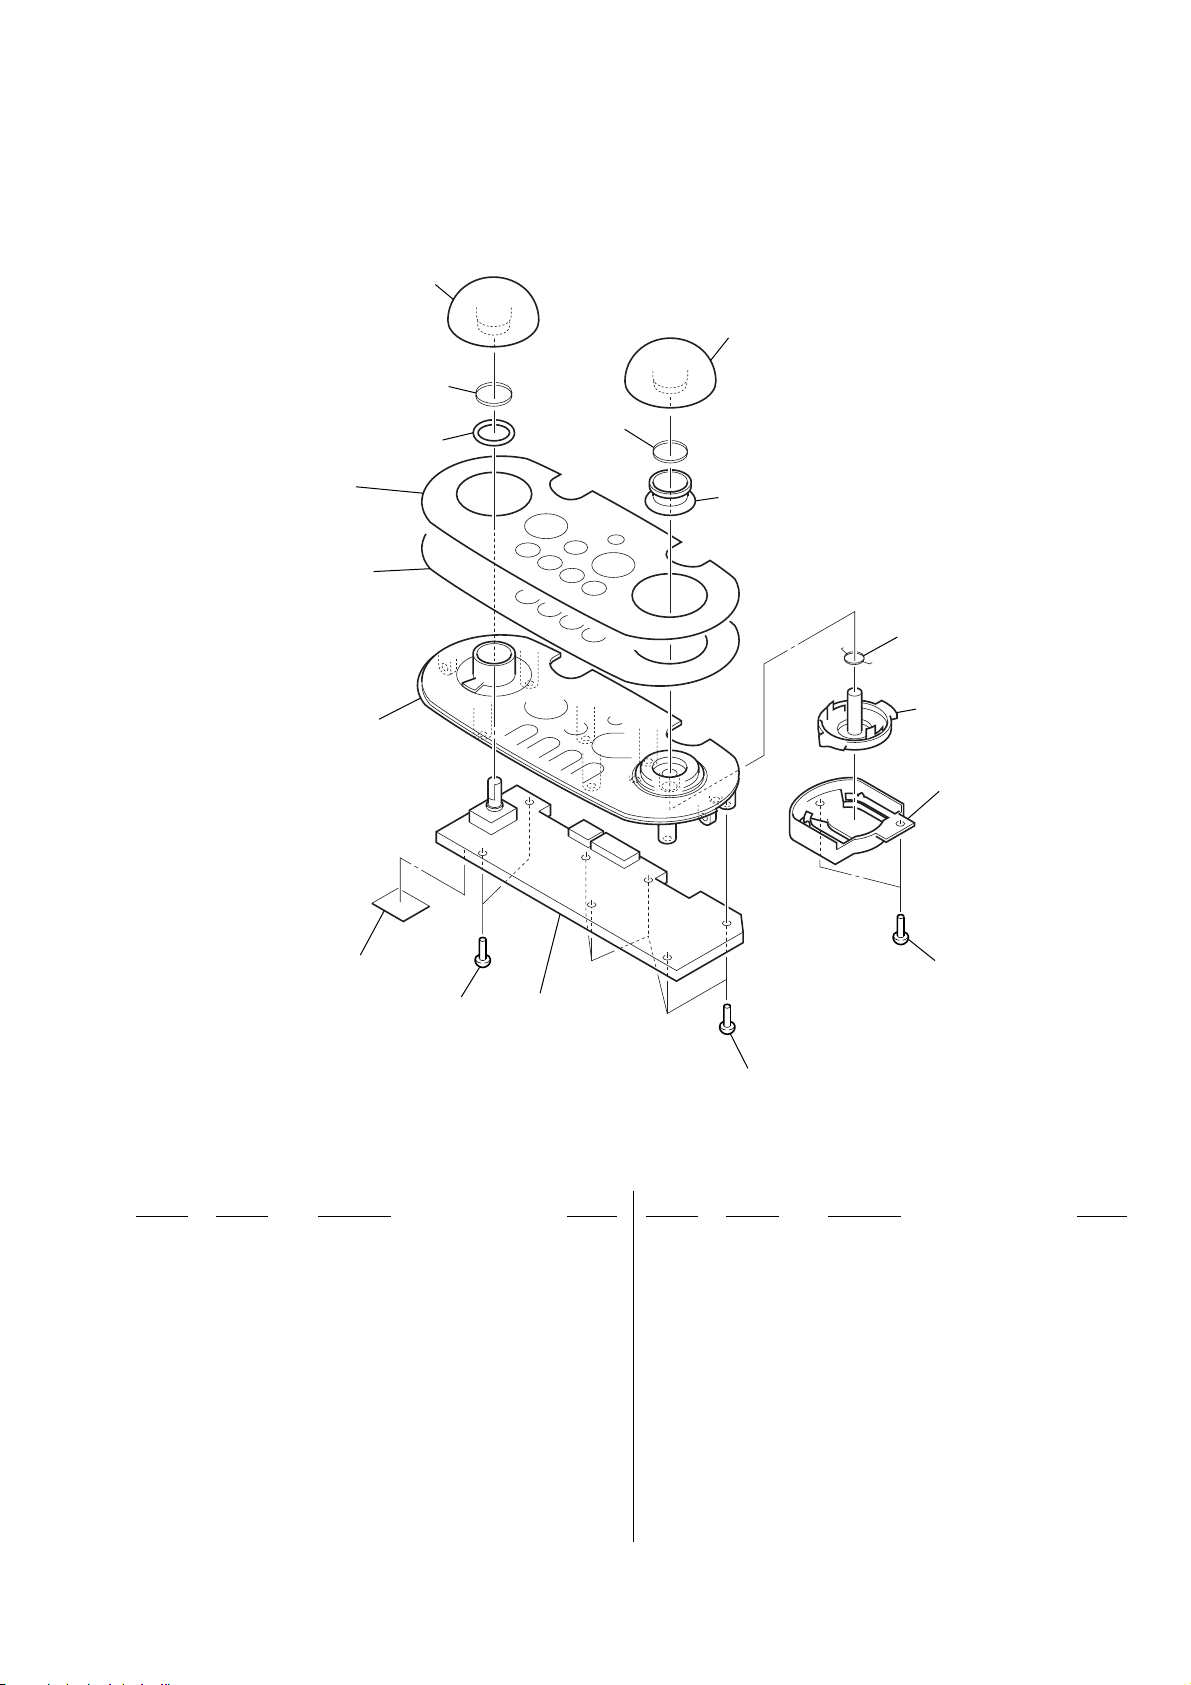
7-4. CABINET (UPPER) SECTION
157
156
ICF-CD73/CD73V
Ver. 1.1
158
152
153
154
not supplied
155
156
159
160
161
162
164
164
Ref. No. Part No. Description Remark
* 151 A-3683-352-A KEY BOARD, COMPLETE
152 3-251-778-01 KEY, SHEET (for WHITE)
(CD73: CND, MX/CD73V: ORIGENAL)
152 3-251-778-12 KEY, SHEET (for BEIGE) (CD73V: LIV)
152 3-251-778-21 KEY, SHEET (for BEIGE) (CD73: UK, IT)
152 3-251-778-51 KEY, SHEET (for WHITE) (CD73V: LIV)
153 3-255-643-01 SHEET (KEY), INSULATING
154 3-251-764-02 CABINET (UPPER) (WHITE)
(CD73: CND, MX/CD73V: ORIGENAL)
154 3-251-764-12 CABINET (UPPER) (BEIGE)
(CD73: UK, IT/CD73V: LIV)
154 3-251-764-21 CABINET (UPPER) (WHITE) (CD73V: LIV)
155 3-251-781-01 PACKING (VOL)
156 3-252-747-01 SPRING, RING
151
164
Ref. No. Part No. Description Remark
157 3-251-770-01 KNOB (VOL) (CD73: CND, MX/
CD73V: ORIGENAL)
157 3-251-770-11 KNOB (VOL) (CD73: UK, IT/CD73V: LIV)
158 3-251-771-02 KNOB (JOG) (CD73: CND, MX/
CD73V: ORIGENAL)
158 3-251-771-12 KNOB (JOG) (CD73: UK, IT/CD73V: LIV)
159 3-251-782-01 PACKING (JOG)
160 3-252-746-01 SPRING (JOG)
161 3-251-775-02 ARM (JOG)
162 3-251-774-01 FRAME (JOG)
164 3-254-151-01 SCREW (B2.6), (+) P TAPPING
(CD73V: LIV (WHITE))
164 7-685-534-14 SCREW +BTP 2.6X8 TYPE2 N-S
(EXCEPT CD73V: LIV (WHITE))
39
Page 40
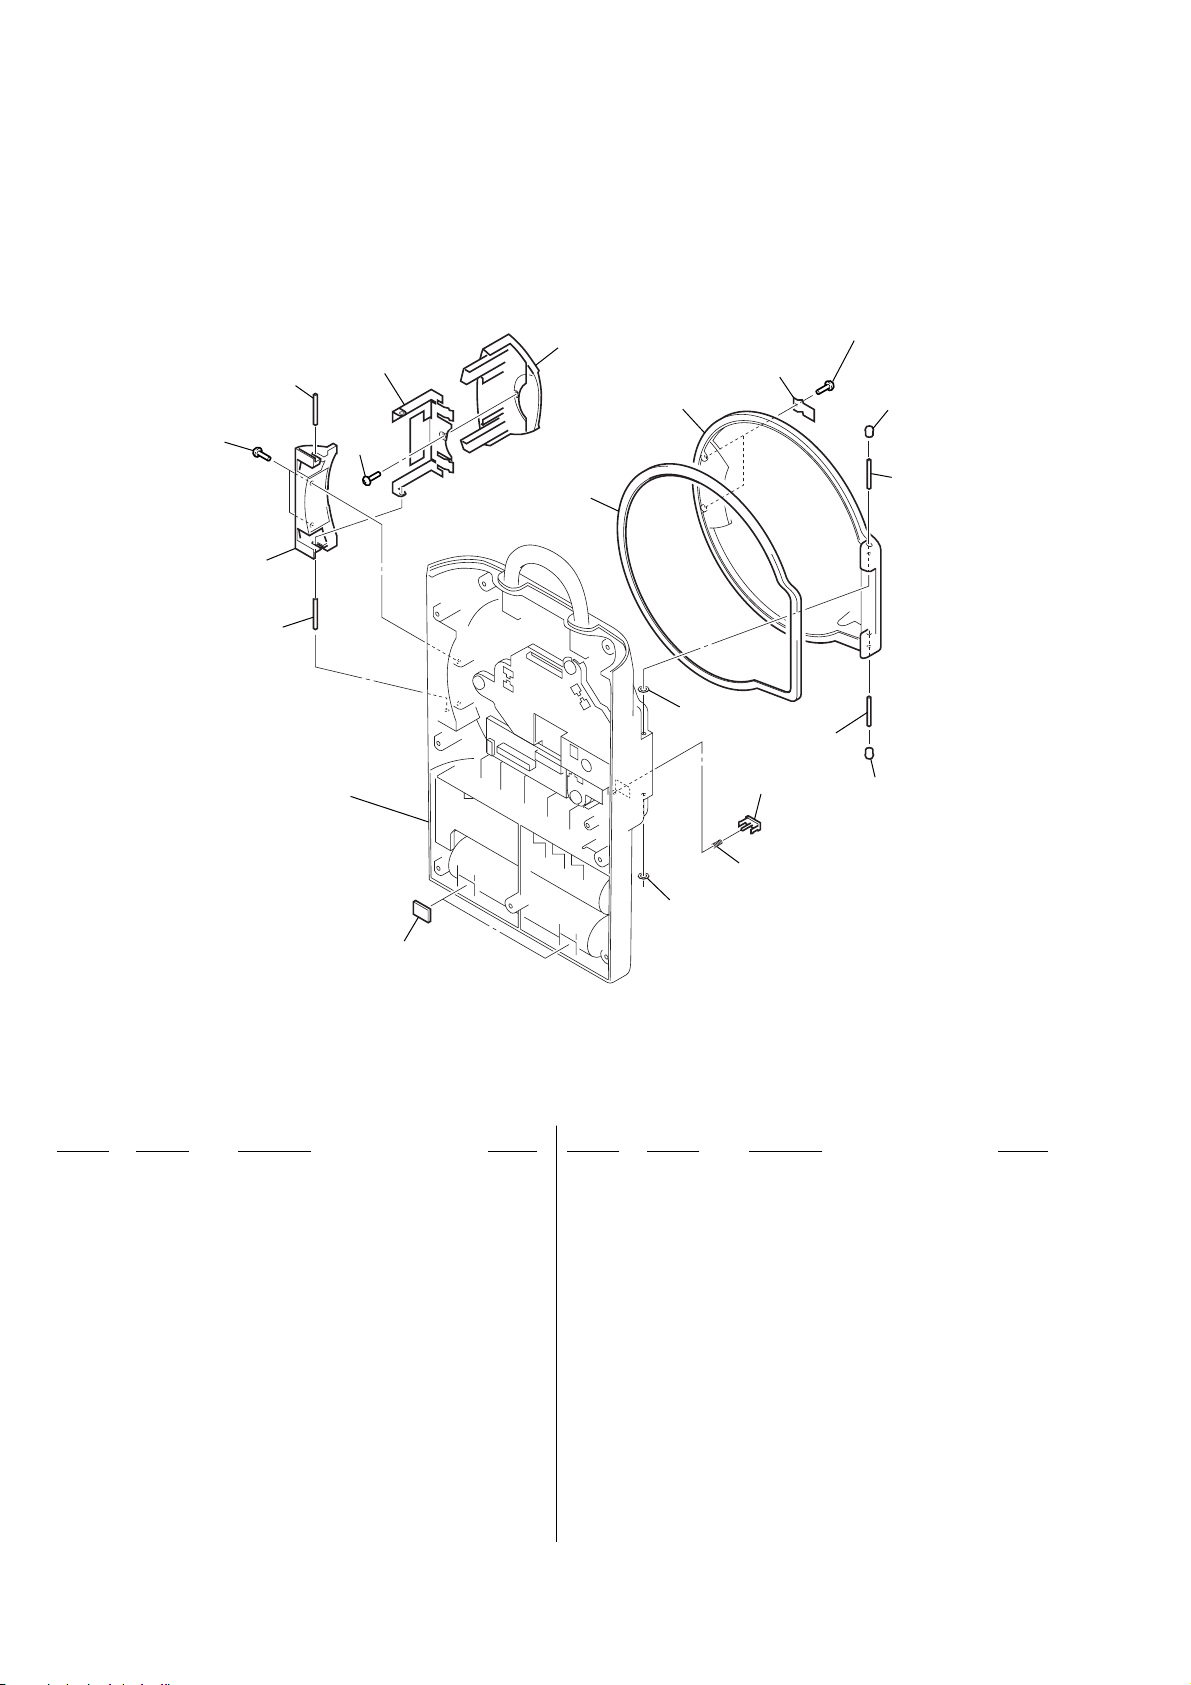
ICF-CD73/CD73V
Ver. 1.1
7-5. CABINET (REAR) SECTION-1
214
202
201
201
215
cabinet (rear)
section-2
203
204
205
209
208
208
206
210
211
215
213
207
207
213
212
Ref. No. Part No. Description Remark
201 3-703-358-06 PIN, PARALLEL (DIA. 2X14)
202 3-251-776-02 BUCKLE (CD LID) (WHITE)
(CD73: CND, MX/CD73V: ORIGINAL)
202 3-251-776-12 BUCKLE (CD LID) (BEIGE)
(CD73: UK, IT/CD73V: LIV)
202 3-251-776-21 BUCKLE (CD LID) (WHITE) (CD73V: LIV)
203 3-251-790-01 ARM, BRACKET
204 3-251-772-01 COVER (BUCKLE) (WHITE)
(CD73: CND, MX/CD73V: ORIGINAL)
204 3-251-772-11 COVER (BUCKLE) (BEIGE)
(CD73: UK, IT/CD73V: LIV)
204 3-251-772-21 COVER (BUCKLE) (WHITE) (CD73V: LIV)
205 3-251-779-01 PACKING (CD) (BLUE)...(WHITE)
(CD73: CND, MX/CD73V: ORIGINAL)
205 3-251-779-11 PACKING (CD) (YELLOW)...(BEIGE)
(CD73: UK, IT/CD73V: LIV)
205 3-251-779-31 PACKING (CD) (BLUE)...(WHITE) (CD73V: LIV)
Ref. No. Part No. Description Remark
206 3-251-791-01 CLAW (LOCK)
207 3-703-357-08 PIN (DIA 1.6 SERIES)
208 3-252-782-01 WASHER (CD LID)
209 3-251-765-01 LID, CD (WHITE)
(CD73: CND, MX/CD73V: ORIGINAL)
209 3-251-765-11 LID, CD (BEIGE) (CD73: UK, IT/CD73V: LIV)
209 3-251-765-41 LID, CD (WHITE) (CD73V: LIV)
210 3-254-926-01 SLIDER (CD)
211 3-254-927-01 SPRING (SWITCH)
212 3-252-748-01 SHEET (BUCKLE)
213 3-256-302-01 CAP (CD COVER)
214 3-254-082-01 SCREW (CD73V: LIV (WHITE))
214 7-685-534-14 SCREW +BTP 2.6X8 TYPE2 N-S
(EXCEPT CD73V: LIV (WHITE))
215 3-254-082-01 SCREW (CD73V: LIV(WHITE))
215 7-627-552-47 SCREW, PRECISION +P 1.7X4
(EXCEPT CD73V: LIV (WHITE))
40
Page 41
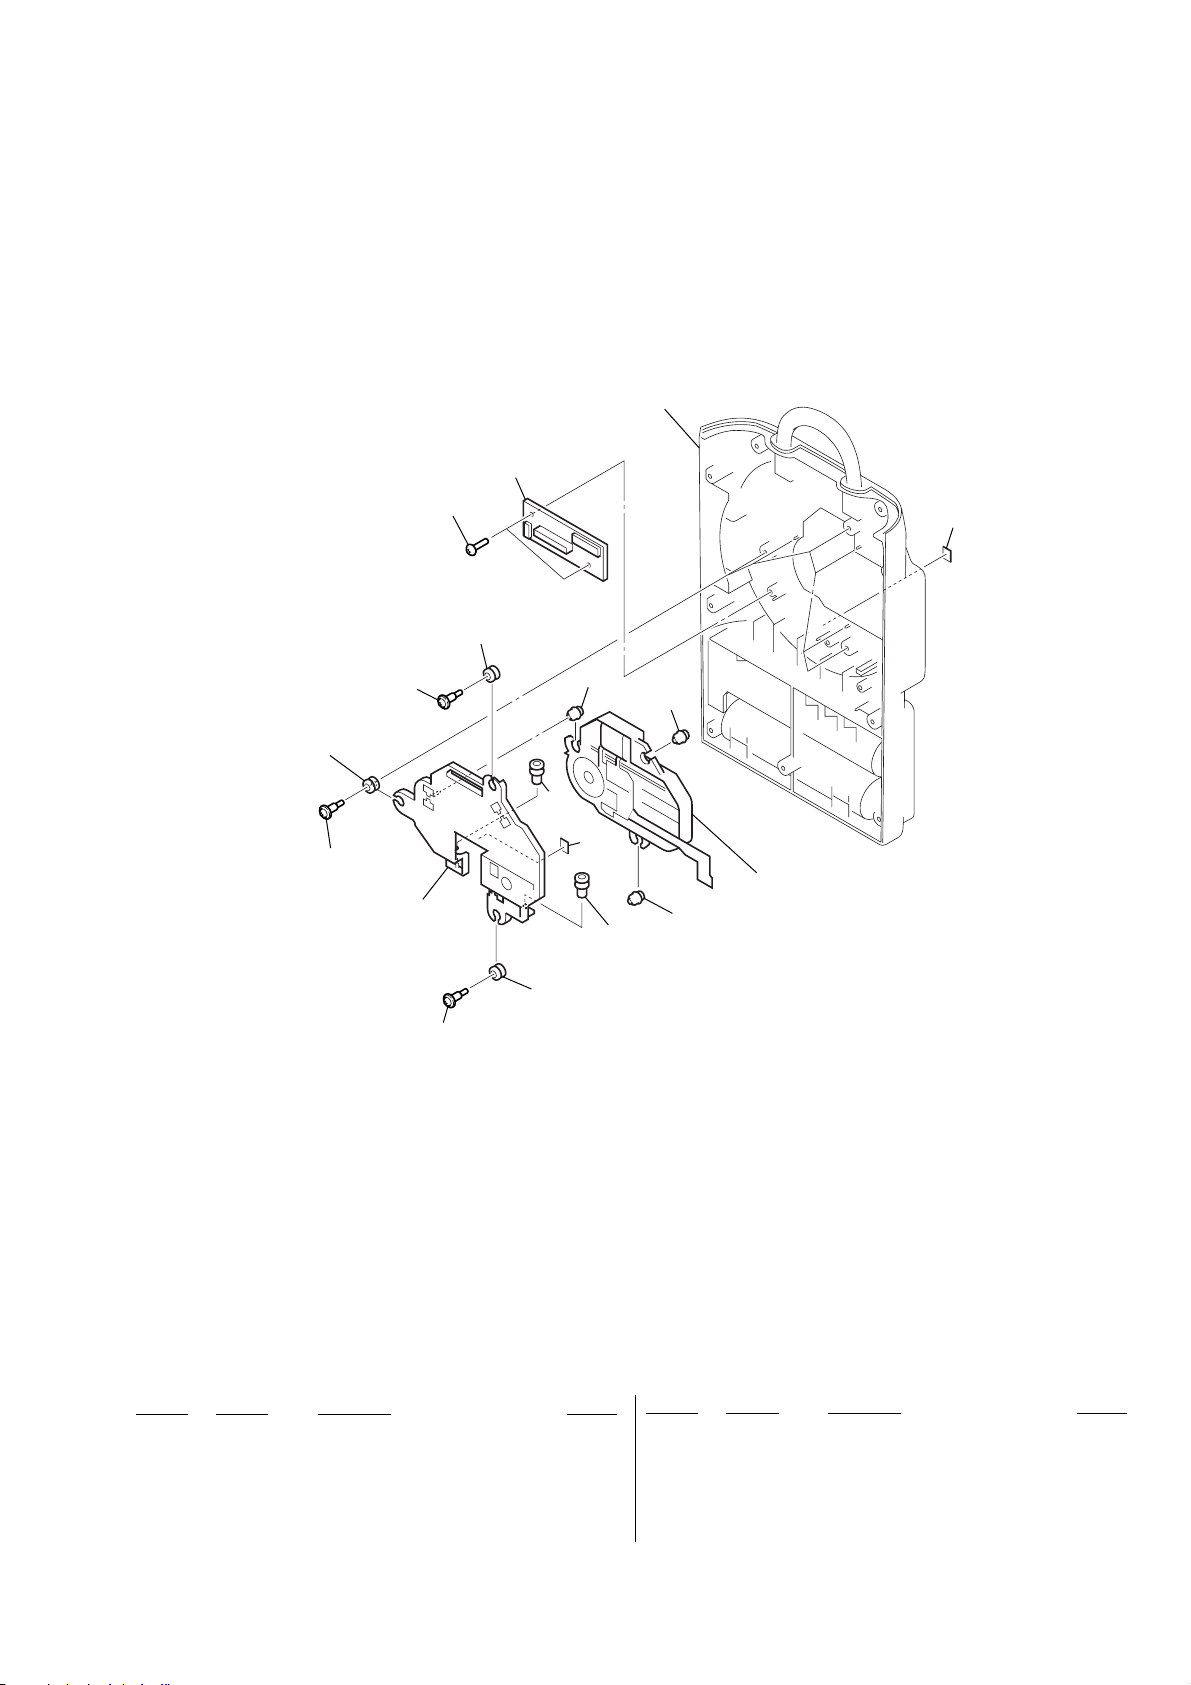
7-6. CABINET (REAR) SECTION-2
ICF-CD73/CD73V
Ver. 1.1
cabinet (rear) section-3
255
252
251
251
253
258
251
252
256
252
254
257
256
254
254
257
mechanism deck section
(KSM-900AAA)
Ref. No. Part No. Description Remark
251 3-044-315-01 SCREW, +PWH TAPPING
252 4-975-762-11 INSULATOR
253 3-251-768-02 CHASSIS (CD)
254 3-044-314-01 RUBBER (VIBRATION)
* 255 A-3683-360-A RELAY BOARD, COMPLETE
Ref. No. Part No. Description Remark
256 4-975-811-01 INSULATOR
257 3-254-690-01 LABEL (WATER CHECK)
258 3-254-151-01 SCREW (B2.6), (+) P TAPPING
(CD73V: LIV (WHITE))
258 7-685-534-14 SCREW +BTP 2.6X8 TYPE2 N-S
(EXCEPT CD73V: LIV (WHITE))
41
Page 42
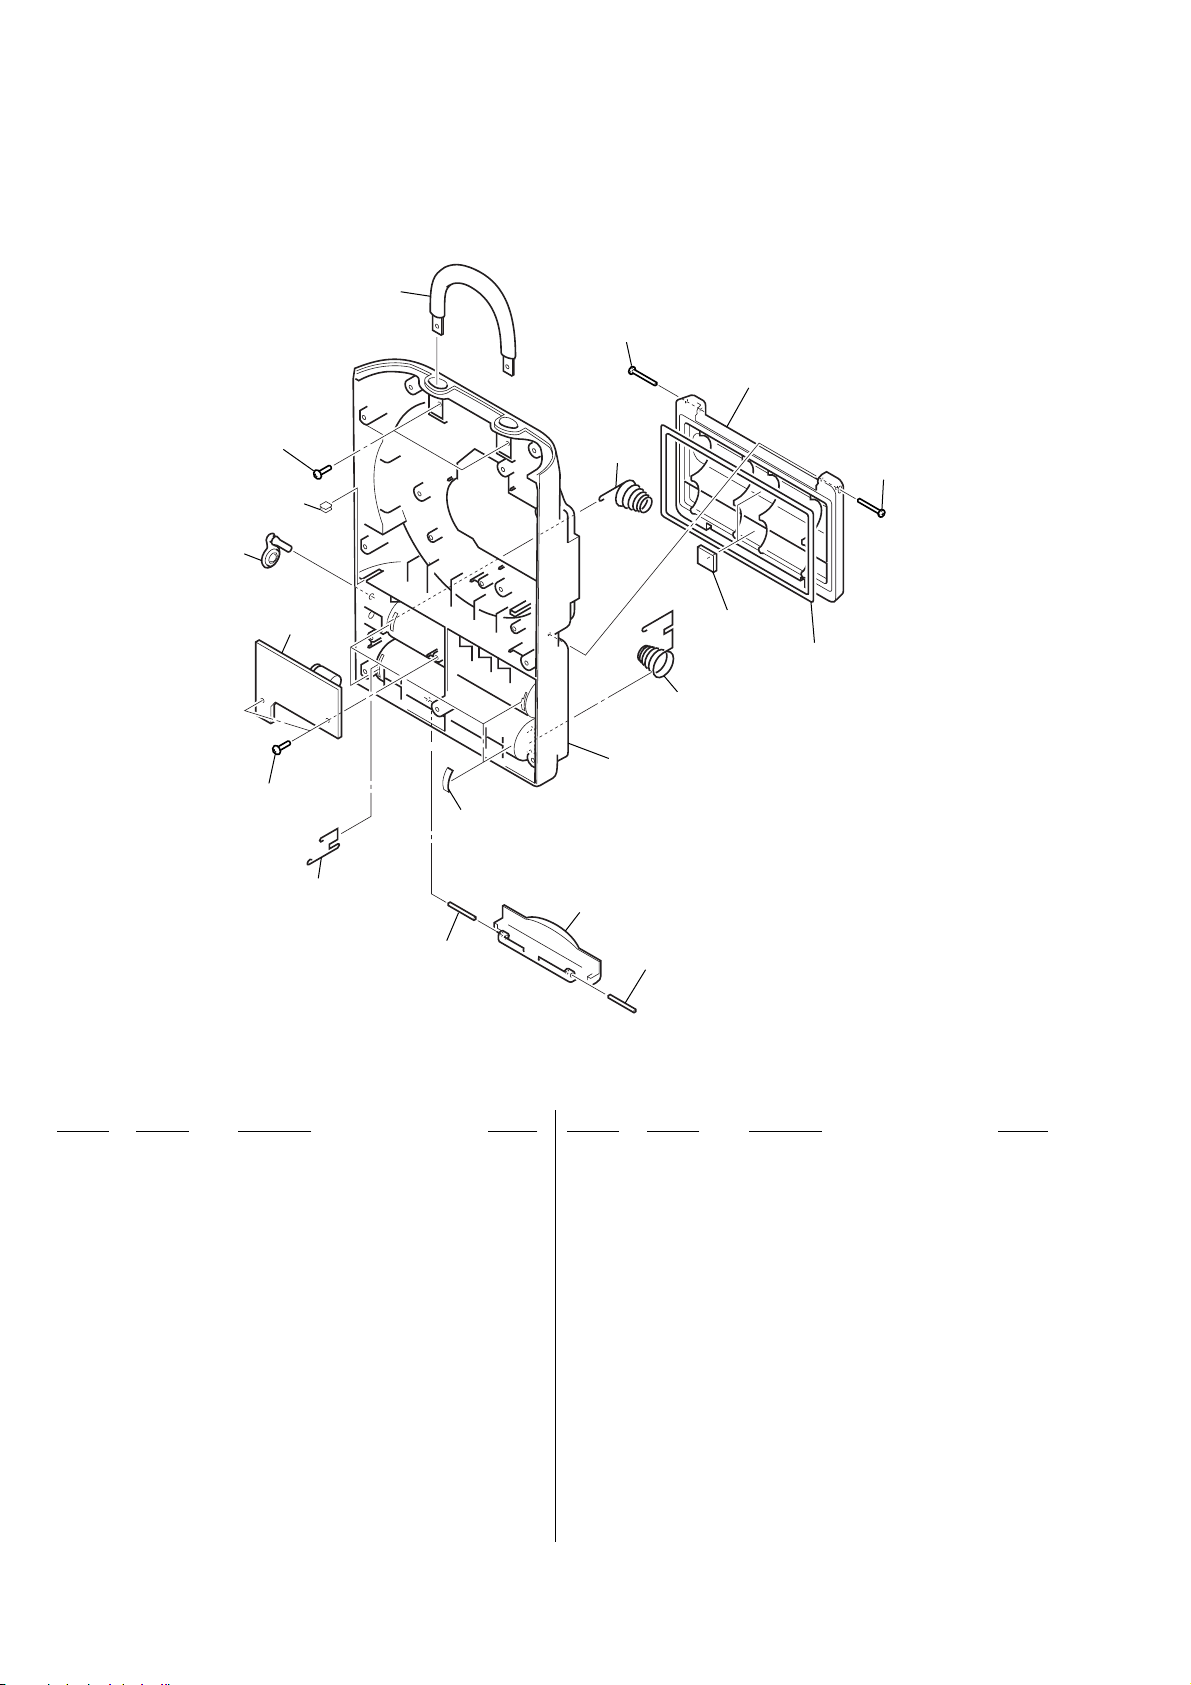
ICF-CD73/CD73V
Ver. 1.1
7-7. CABINET (REAR) SECTION-3
305
307
308
303
315
315
304
302
301
not supplied
312
313
306
311
not supplied
307
not supplied
309
310
Ref. No. Part No. Description Remark
301 3-251-792-01 TERMINAL (+), BATTERY
* 302 A-3683-364-A JACK BOARD, COMPLETE
(CD73: CND, MX/CD73V)
* 302 A-3683-385-A JACK BOARD, COMPLETE (CD73: UK, IT)
303 3-251-783-02 COVER (DC)
304 3-254-693-01 SPACER (SLIT)
305 3-251-795-01 HANDLE (BLUE)...(WHITE)
(CD73: CND, MX/CD73V: ORIGINAL)
305 3-251-795-11 HANDLE (YELLOW)...(BEIGE)
(CD73: UK, IT/CD73V: LIV)
305 3-251-795-31 HANDLE (BLUE)...(WHITE) (CD73V: LIV)
306 3-251-793-01 TERMINAL (–), BATTERY
307 3-238-521-01 SCREW (CASE)
308 3-251-766-02 LID, BATTERY CASE (WHITE)
(CD73: CND, MX/CD73V: ORIGINAL)
308 3-251-766-12 LID, BATTERY CASE (BEIGE)
(CD73: UK, IT/CD73V: LIV)
308 3-251-766-21 LID, BATTERY CASE (WHITE) (CD73V: LIV)
42
Ref. No. Part No. Description Remark
309 3-251-780-01 PACKING (BATTERY)
310 3-251-794-01 TERMINAL (+,–), BATTERY
311 3-251-763-02 CABINET (REAR) (WHITE)
(CD73: CND, MX/CD73V: ORIGINAL)
311 3-251-763-12 CABINET (REAR) (BEIGE) (CD73V: LIV)
311 3-251-763-22 CABINET (REAR) (BEIGE) (CD73: UK, IT)
311 3-251-763-41 CABINET (REAR) (WHITE) (CD73V: LIV)
312 3-251-789-01 SHEET (BATT)
313 3-251-777-02 BUCKLE (BATTERY CASE LID) (WHITE)
(CD73: CND, MX/CD73V: ORIGINAL)
313 3-251-777-12 BUCKLE (BATTERY CASE LID) (BEIGE)
(CD73: UK, IT/CD73V: LIV)
313 3-251-777-21 BUCKLE (BATTERY CASE LID) (WHITE)
(CD73V: LIV)
315 3-254-151-01 SCREW (B2.6), (+) P TAPPING
(CD73V: LIV (WHITE))
315 7-685-534-14 SCREW +BTP 2.6X8 TYPE2 N-S
(EXCEPT CD73V: LIV (WHITE))
Page 43
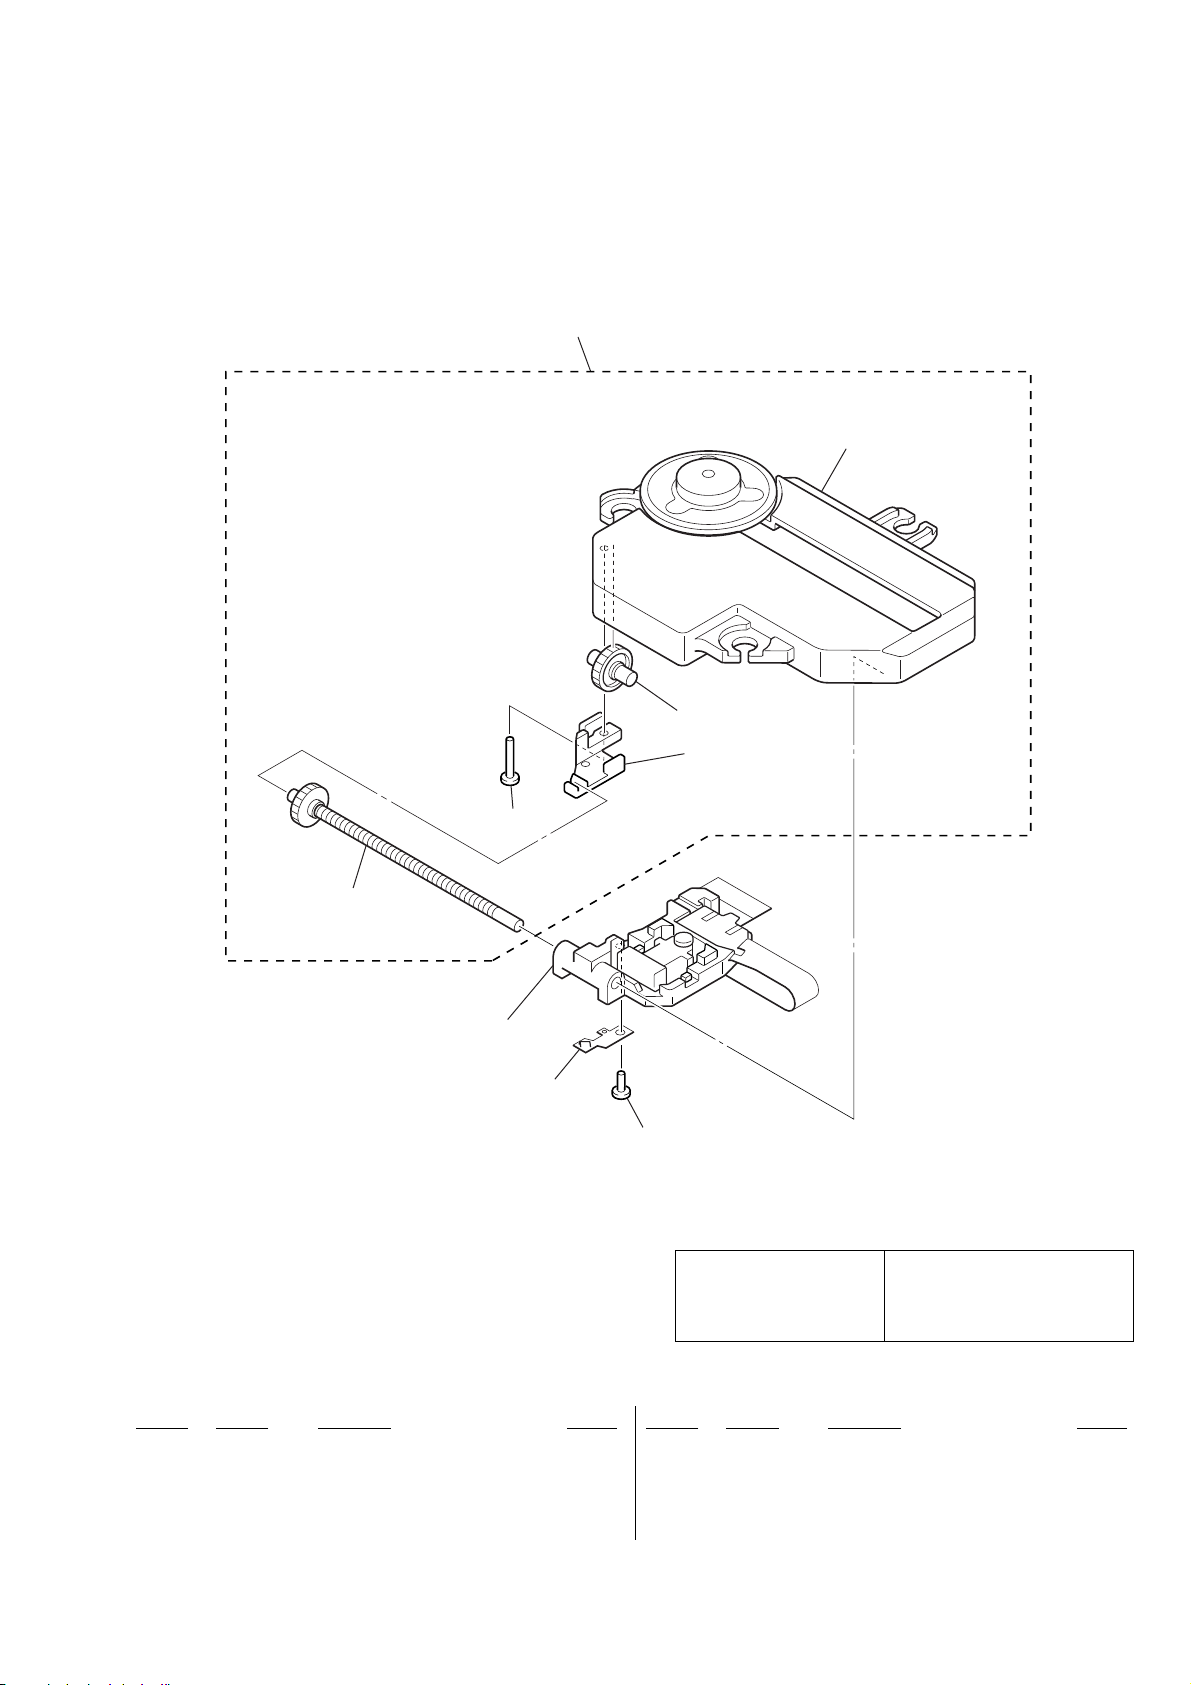
7-8. OPTICAL PICK-UP SECTION
(KSM-900AAA)
ICF-CD73/CD73V
401
(including M701, M702)
not supplied
405
406
404
407
402
403
408
The components identified by
mark 0 or dotted line with
mark 0 are critical for safety.
Replace only with part number specified.
Les composants identifiés par une
marque 0 sont critiques pour la
sécurité.
Ne les remplacer que par une pièce
portant le numéro spécifié.
Ref. No. Part No. Description Remark
* 401 A-4902-666-A MD ASSY (900AAA-RP)
(Including M701, M702)
402 2-165-627-01 GEAR B (780C)
403 2-165-626-01 HOLDER (780C)
404 2-646-352-01 SCREW (2X8)
Ref. No. Part No. Description Remark
405 X-2162-234-1 SCREW ASSY (780E), SLED
0406 8-820-137-02 OPTICAL PICK-UP KSS-900A/C2RP
407 2-165-630-02 SPRING (780C), RACK
408 2-646-358-11 SCREW (B1.7X4)
43
Page 44
ICF-CD73/CD73V
Ver. 1.1
CD
SECTION 8
ELECTRICAL PARTS LIST
NOTE:
• Due to standardization, replacements in the
parts list may be different from the parts specified in the diagrams or the components used
on the set.
• -XX and -X mean standardized parts, so they
may have some difference from the original
one.
• RESISTORS
All resistors are in ohms.
METAL: Metal-film resistor.
METAL OXIDE: Metal oxide-film resistor.
F: nonflammable
•Abbreviation
CND : Canadian model
IT : Italian model
Ref. No. Part No. Description Remark Ref. No. Part No. Description Remark
* A-3683-347-A CD BOARD, COMPLETE
C701 1-165-176-11 CERAMIC CHIP 0.047uF 10% 16V
C702 1-107-826-11 CERAMIC CHIP 0.1uF 10% 16V
C703 1-162-919-11 CERAMIC CHIP 22PF 5% 50V
C705 1-162-968-11 CERAMIC CHIP 0.0047uF 10% 50V
C706 1-164-156-11 CERAMIC CHIP 0.1uF 25V
C708 1-126-160-11 ELECT 1uF 20% 50V
C709 1-162-968-11 CERAMIC CHIP 0.0047uF 10% 50V
C710 1-164-156-11 CERAMIC CHIP 0.1uF 25V
C711 1-115-156-11 CERAMIC CHIP 1uF 10V
C712 1-162-968-11 CERAMIC CHIP 0.0047uF 10% 50V
C713 1-124-584-00 ELECT 100uF 20% 4V
C714 1-164-156-11 CERAMIC CHIP 0.1uF 25V
C715 1-162-927-11 CERAMIC CHIP 100PF 5% 50V
C716 1-164-156-11 CERAMIC CHIP 0.1uF 25V
C717 1-162-964-11 CERAMIC CHIP 0.001uF 10% 50V
C718 1-164-156-11 CERAMIC CHIP 0.1uF 25V
C719 1-162-970-11 CERAMIC CHIP 0.01uF 10% 25V
C721 1-126-518-11 ELECT 470uF 20% 4V
C724 1-162-970-11 CERAMIC CHIP 0.01uF 10% 25V
C725 1-162-970-11 CERAMIC CHIP 0.01uF 10% 25V
C728 1-162-970-11 CERAMIC CHIP 0.01uF 10% 25V
C729 1-162-970-11 CERAMIC CHIP 0.01uF 10% 25V
C732 1-162-919-11 CERAMIC CHIP 22PF 5% 50V
C733 1-162-919-11 CERAMIC CHIP 22PF 5% 50V
C734 1-162-919-11 CERAMIC CHIP 22PF 5% 50V
C735 1-162-970-11 CERAMIC CHIP 0.01uF 10% 25V
C736 1-162-919-11 CERAMIC CHIP 22PF 5% 50V
C737 1-162-964-11 CERAMIC CHIP 0.001uF 10% 50V
C738 1-162-964-11 CERAMIC CHIP 0.001uF 10% 50V
C739 1-164-156-11 CERAMIC CHIP 0.1uF 25V
C740 1-124-584-00 ELECT 100uF 20% 4V
C741 1-165-176-11 CERAMIC CHIP 0.047uF 10% 16V
C742 1-125-837-11 CERAMIC CHIP 1uF 10% 6.3V
C743 1-107-826-11 CERAMIC CHIP 0.1uF 10% 16V
C744 1-164-156-11 CERAMIC CHIP 0.1uF 25V
C745 1-124-584-00 ELECT 100uF 20% 4V
C746 1-162-964-11 CERAMIC CHIP 0.001uF 10% 50V
C747 1-124-589-11 ELECT 47uF 20% 16V
C749 1-124-584-00 ELECT 100uF 20% 4V
C750 1-164-156-11 CERAMIC CHIP 0.1uF 25V
MX : Mexican model
*******************
< CAPACITOR >
• Items marked “*” are not stocked since they
are seldom required for routine service.
Some delay should be anticipated when ordering these items.
• SEMICONDUCTORS
In each case, u: µ, for example:
uA. . : µA. . uPA. . : µPA. .
uPB. . : µPB. . uPC. . : µPC. .
uPD. . : µPD. .
• CAPACITORS
uF: µF
• COILS
uH: µH
C753 1-124-584-00 ELECT 100uF 20% 4V
C754 1-164-156-11 CERAMIC CHIP 0.1uF 25V
C755 1-164-227-11 CERAMIC CHIP 0.022uF 10% 25V
C756 1-164-227-11 CERAMIC CHIP 0.022uF 10% 25V
C757 1-164-227-11 CERAMIC CHIP 0.022uF 10% 25V
C758 1-164-227-11 CERAMIC CHIP 0.022uF 10% 25V
C759 1-126-935-11 ELECT 470uF 20% 16V
C760 1-164-156-11 CERAMIC CHIP 0.1uF 25V
C761 1-125-837-11 CERAMIC CHIP 1uF 10% 6.3V
C762 1-107-826-11 CERAMIC CHIP 0.1uF 10% 16V
C763 1-162-923-11 CERAMIC CHIP 47PF 5% 50V
C764 1-164-230-11 CERAMIC CHIP 220PF 5% 50V
C766 1-164-156-11 CERAMIC CHIP 0.1uF 25V
C767 1-124-261-00 ELECT 10uF 20% 10V
C768 1-164-227-11 CERAMIC CHIP 0.022uF 10% 25V
C773 1-164-156-11 CERAMIC CHIP 0.1uF 25V
C774 1-164-156-11 CERAMIC CHIP 0.1uF 25V
C779 1-164-156-11 CERAMIC CHIP 0.1uF 25V
C780 1-164-156-11 CERAMIC CHIP 0.1uF 25V
C781 1-162-964-11 CERAMIC CHIP 0.001uF 10% 50V
CNP701 1-784-742-11 CONNECTOR, FFC 20P
CNP702 1-784-774-11 CONNECTOR, FFC 13P
D701 8-719-052-88 DIODE 1N4002
FB701 1-469-701-21 FERRITE, EMI (SMD) (1608)
IC701 6-701-796-01 IC LC78646E-US-E
IC702 6-704-047-01 IC BH6575FV-E2
JC701 1-216-864-11 SHORT CHIP 0
JC702 1-216-864-11 SHORT CHIP 0
JC703 1-216-864-11 SHORT CHIP 0
L701 1-216-864-11 SHORT CHIP 0
The components identified by
mark 0 or dotted line with mark
0 are critical for safety.
Replace only with part number
specified.
Les composants identifiés par une
marque 0 sont critiquens pour la
sécurité.
Ne les remplacer que par une pièce
portant le numéro spécifié.
When indicating parts by reference
number, please include the board.
< CONNECTOR >
< DIODE >
< FERRITE BEAD >
< IC >
< SHORT >
< SHORT/COIL >
44
Page 45
ICF-CD73/CD73V
Ver. 1.1
CD JACK KEY
Ref. No. Part No. Description Remark
L702 1-414-398-11 INDUCTOR 10uH
L750 1-410-525-11 INDUCTOR 220uH
< TRANSISTOR >
Q701 8-729-054-57 TRANSISTOR KTN2907AS-RTK
Q702 8-729-905-35 TRANSISTOR 2SC4081-R
Q703 8-729-029-00 TRANSISTOR DTC115EUA-T106
Q704 8-729-028-91 TRANSISTOR DTA144EUA-T106
Q705 8-729-922-47 TRANSISTOR 2SB1184-TLR
< RESISTOR >
R701 1-216-833-11 METAL CHIP 10K 5% 1/10W
R702 1-216-829-11 METAL CHIP 4.7K 5% 1/10W
R703 1-216-837-11 METAL CHIP 22K 5% 1/10W
R704 1-216-817-11 METAL CHIP 470 5% 1/10W
R705 1-216-821-11 METAL CHIP 1K 5% 1/10W
R706 1-216-829-11 METAL CHIP 4.7K 5% 1/10W
R707 1-216-833-11 METAL CHIP 10K 5% 1/10W
R709 1-216-829-11 METAL CHIP 4.7K 5% 1/10W
R710 1-216-833-11 METAL CHIP 10K 5% 1/10W
R712 1-216-849-11 METAL CHIP 220K 5% 1/10W
R713 1-216-853-11 METAL CHIP 470K 5% 1/10W
R714 1-216-849-11 METAL CHIP 220K 5% 1/10W
R715 1-216-853-11 METAL CHIP 470K 5% 1/10W
R716 1-216-809-11 METAL CHIP 100 5% 1/10W
R717 1-216-805-11 METAL CHIP 47 5% 1/10W
R718 1-216-805-11 METAL CHIP 47 5% 1/10W
R719 1-216-809-11 METAL CHIP 100 5% 1/10W
R720 1-216-809-11 METAL CHIP 100 5% 1/10W
R721 1-216-864-11 SHORT CHIP 0
R722 1-216-864-11 SHORT CHIP 0
Ref. No. Part No. Description Remark
R754 1-216-841-11 METAL CHIP 47K 5% 1/10W
R756 1-216-837-11 METAL CHIP 22K 5% 1/10W
R757 1-216-841-11 METAL CHIP 47K 5% 1/10W
R759 1-216-837-11 METAL CHIP 22K 5% 1/10W
R760 1-216-841-11 METAL CHIP 47K 5% 1/10W
R762 1-216-837-11 METAL CHIP 22K 5% 1/10W
R769 1-216-837-11 METAL CHIP 22K 5% 1/10W
R770 1-216-829-11 METAL CHIP 4.7K 5% 1/10W
R771 1-216-833-11 METAL CHIP 10K 5% 1/10W
R772 1-216-833-11 METAL CHIP 10K 5% 1/10W
R773 1-216-841-11 METAL CHIP 47K 5% 1/10W
< VIBRATOR >
X701 1-781-801-21 VIBRATOR, CERAMIC (16.9344MHz)
**************************************************************
* A-3683-364-A JACK BOARD, COMPLETE
(CD73: CND, MX/CD73V)
* A-3683-385-A JACK BOARD, COMPLETE (CD73: UK, IT)
*********************
< CAPACITOR >
C901 1-126-767-11 ELECT 1000uF 20% 16V
< CONNECTOR >
* CNP901 1-785-669-11 PIN, CONNECTOR (PC BOARD) 3P
< DIODE >
D901 8-719-052-88 DIODE 1N4002
D902 8-719-052-88 DIODE 1N4002 (CD73: UK, IT)
R723 1-216-817-11 METAL CHIP 470 5% 1/10W
R724 1-216-837-11 METAL CHIP 22K 5% 1/10W
R725 1-216-821-11 METAL CHIP 1K 5% 1/10W
R726 1-216-821-11 METAL CHIP 1K 5% 1/10W
R727 1-216-821-11 METAL CHIP 1K 5% 1/10W
R728 1-216-809-11 METAL CHIP 100 5% 1/10W
R729 1-216-809-11 METAL CHIP 100 5% 1/10W
R730 1-216-821-11 METAL CHIP 1K 5% 1/10W
R731 1-216-809-11 METAL CHIP 100 5% 1/10W
R732 1-216-825-11 METAL CHIP 2.2K 5% 1/10W
R733 1-216-841-11 METAL CHIP 47K 5% 1/10W
R734 1-216-813-11 METAL CHIP 220 5% 1/10W
R735 1-216-817-11 METAL CHIP 470 5% 1/10W
R736 1-216-813-11 METAL CHIP 220 5% 1/10W
R737 1-216-817-11 METAL CHIP 470 5% 1/10W
R738 1-216-825-11 METAL CHIP 2.2K 5% 1/10W
R739 1-216-833-11 METAL CHIP 10K 5% 1/10W
R740 1-216-813-11 METAL CHIP 220 5% 1/10W
R741 1-216-821-11 METAL CHIP 1K 5% 1/10W
R742 1-216-797-11 METAL CHIP 10 5% 1/10W
R743 1-216-864-11 SHORT CHIP 0
R744 1-216-809-11 METAL CHIP 100 5% 1/10W
R745 1-216-841-11 METAL CHIP 47K 5% 1/10W
R746 1-216-845-11 METAL CHIP 100K 5% 1/10W
R747 1-216-849-11 METAL CHIP 220K 5% 1/10W
R751 1-216-837-11 METAL CHIP 22K 5% 1/10W
R753 1-216-833-11 METAL CHIP 10K 5% 1/10W
< JACK >
J901 1-580-681-21 JACK, DC (POLARITY UNIFIED TYPE)
(DC IN 6V)
< CABLE HOLDER >
* KH901 1-565-385-11 HOLDER, CABLE 4P
< COIL >
L901 1-456-379-11 COIL, CHOKE 47uH
< RESISTOR >
R901 1-216-821-11 METAL CHIP 1K 5% 1/10W
R902 1-247-807-31 CARBON 100 5% 1/4W
**************************************************************
* A-3683-352-A KEY BOARD, COMPLETE
********************
< CONNECTOR >
* CNP601 1-785-672-11 PIN, CONNECTOR (PC BOARD) 6P
* CNP602 1-785-669-21 PIN, CONNECTOR (PC BOARD) 3P
< RESISTOR >
R601 1-216-849-11 METAL CHIP 220K 5% 1/10W
R602 1-216-853-11 METAL CHIP 470K 5% 1/10W
R603 1-216-849-11 METAL CHIP 220K 5% 1/10W
45
Page 46
ICF-CD73/CD73V
Ver. 1.1
KEY LCD
Ref. No. Part No. Description Remark
R604 1-216-845-11 METAL CHIP 100K 5% 1/10W
R605 1-216-845-11 METAL CHIP 100K 5% 1/10W
R606 1-216-841-11 METAL CHIP 47K 5% 1/10W
R608 1-216-837-11 METAL CHIP 22K 5% 1/10W
R609 1-216-841-11 METAL CHIP 47K 5% 1/10W
R610 1-216-837-11 METAL CHIP 22K 5% 1/10W
R612 1-216-833-11 METAL CHIP 10K 5% 1/10W
R613 1-216-849-11 METAL CHIP 220K 5% 1/10W
R614 1-216-845-11 METAL CHIP 100K 5% 1/10W
R615 1-216-845-11 METAL CHIP 100K 5% 1/10W
R616 1-216-841-11 METAL CHIP 47K 5% 1/10W
R618 1-216-837-11 METAL CHIP 22K 5% 1/10W
R619 1-216-841-11 METAL CHIP 47K 5% 1/10W
R620 1-216-837-11 METAL CHIP 22K 5% 1/10W
R622 1-216-833-11 METAL CHIP 10K 5% 1/10W
< VARIABLE RESISTOR >
RV601 1-227-593-11 RES, VAR, CARBON 20K/20K (VOLUME)
< SWITCH >
S601 1-771-349-21 SWITCH, TACT (5)
S602 1-771-349-21 SWITCH, TACT (4)
S603 1-771-349-21 SWITCH, TACT (3)
S604 1-771-349-21 SWITCH, TACT (2)
S605 1-771-349-21 SWITCH, TACT (1)
S606 1-771-349-21 SWITCH, TACT (TIMER SET ON/OFF)
S607 1-771-349-21 SWITCH, TACT
(TUNE/TIME SET TIMER SET –, .)
S608 1-771-349-21 SWITCH, TACT
(TUNE/TIME SET TIMER SET +, >)
S609 1-771-349-21 SWITCH, TACT (MODE)
S610 1-771-349-21 SWITCH, TACT (CLOCK)
Ref. No. Part No. Description Remark
C255 1-162-970-11 CERAMIC CHIP 0.01uF 10% 25V
C256 1-117-863-11 CERAMIC CHIP 0.47uF 10% 6.3V
C258 1-117-863-11 CERAMIC CHIP 0.47uF 10% 6.3V
C260 1-125-837-11 CERAMIC CHIP 1uF 10% 6.3V
C261 1-165-176-11 CERAMIC CHIP 0.047uF 10% 16V
C262 1-107-826-11 CERAMIC CHIP 0.1uF 10% 16V
C263 1-162-964-11 CERAMIC CHIP 0.001uF 10% 50V
C351 1-124-589-11 ELECT 47uF 20% 16V
C352 1-124-589-11 ELECT 47uF 20% 16V
C353 1-124-589-11 ELECT 47uF 20% 16V
C354 1-124-589-11 ELECT 47uF 20% 16V
C401 1-135-834-11 CERAMIC CHIP 2.2uF 6.3V
C402 1-135-834-11 CERAMIC CHIP 2.2uF 6.3V
C403 1-135-834-11 CERAMIC CHIP 2.2uF 6.3V
C405 1-162-970-11 CERAMIC CHIP 0.01uF 10% 25V
C406 1-162-970-11 CERAMIC CHIP 0.01uF 10% 25V
C407 1-162-964-11 CERAMIC CHIP 0.001uF 10% 50V
C408 1-162-970-11 CERAMIC CHIP 0.01uF 10% 25V
C409 1-125-838-11 CERAMIC CHIP 2.2uF 10% 6.3V
C410 1-124-584-00 ELECT 100uF 20% 4V
C411 1-162-970-11 CERAMIC CHIP 0.01uF 10% 25V
C412 1-162-970-11 CERAMIC CHIP 0.01uF 10% 25V
C413 1-162-970-11 CERAMIC CHIP 0.01uF 10% 25V
C414 1-162-970-11 CERAMIC CHIP 0.01uF 10% 25V
C415 1-162-970-11 CERAMIC CHIP 0.01uF 10% 25V
C416 1-162-970-11 CERAMIC CHIP 0.01uF 10% 25V
C417 1-162-964-11 CERAMIC CHIP 0.001uF 10% 50V
C418 1-162-970-11 CERAMIC CHIP 0.01uF 10% 25V
C419 1-162-927-11 CERAMIC CHIP 100PF 5% 50V
C420 1-162-927-11 CERAMIC CHIP 100PF 5% 50V
C421 1-164-230-11 CERAMIC CHIP 220PF 5% 50V
C422 1-162-927-11 CERAMIC CHIP 100PF 5% 50V
S611 1-771-349-21 SWITCH, TACT (AUTO OFF)
**************************************************************
* A-3683-343-A LCD BOARD, COMPLETE (CD73V)
* A-3683-378-A LCD BOARD, COMPLETE (CD73: CND, MX)
* A-3683-381-A LCD BOARD, COMPLETE (CD73: IT)
* A-3683-388-A LCD BOARD, COMPLETE (CD73: UK)
********************
3-251-773-01 HOLDER (LCD)
3-251-786-01 CASE (LCD) , SHIELD
3-251-789-01 SHEET (BATT)
< CAPACITOR >
C151 1-162-968-11 CERAMIC CHIP 0.0047uF 10% 50V
C152 1-117-863-11 CERAMIC CHIP 0.47uF 10% 6.3V
C153 1-162-927-11 CERAMIC CHIP 100PF 5% 50V
C155 1-162-970-11 CERAMIC CHIP 0.01uF 10% 25V
C156 1-117-863-11 CERAMIC CHIP 0.47uF 10% 6.3V
C158 1-117-863-11 CERAMIC CHIP 0.47uF 10% 6.3V
C160 1-125-837-11 CERAMIC CHIP 1uF 10% 6.3V
C161 1-165-176-11 CERAMIC CHIP 0.047uF 10% 16V
C162 1-107-826-11 CERAMIC CHIP 0.1uF 10% 16V
C163 1-162-964-11 CERAMIC CHIP 0.001uF 10% 50V
C251 1-162-968-11 CERAMIC CHIP 0.0047uF 10% 50V
C252 1-117-863-11 CERAMIC CHIP 0.47uF 10% 6.3V
C253 1-162-927-11 CERAMIC CHIP 100PF 5% 50V
C423 1-164-230-11 CERAMIC CHIP 220PF 5% 50V
C424 1-162-927-11 CERAMIC CHIP 100PF 5% 50V
C425 1-162-964-11 CERAMIC CHIP 0.001uF 10% 50V
C426 1-162-970-11 CERAMIC CHIP 0.01uF 10% 25V
C428 1-162-964-11 CERAMIC CHIP 0.001uF 10% 50V
C429 1-162-923-11 CERAMIC CHIP 47PF 5% 50V
C430 1-162-927-11 CERAMIC CHIP 100PF 5% 50V
C431 1-164-230-11 CERAMIC CHIP 220PF 5% 50V
C432 1-164-230-11 CERAMIC CHIP 220PF 5% 50V
C433 1-162-919-11 CERAMIC CHIP 22PF 5% 50V
C434 1-162-919-11 CERAMIC CHIP 22PF 5% 50V
C435 1-107-826-11 CERAMIC CHIP 0.1uF 10% 16V
C436 1-125-838-11 CERAMIC CHIP 2.2uF 10% 6.3V
C437 1-124-584-00 ELECT 100uF 20% 4V
C438 1-162-919-11 CERAMIC CHIP 22PF 5% 50V
C439 1-162-919-11 CERAMIC CHIP 22PF 5% 50V
C440 1-162-970-11 CERAMIC CHIP 0.01uF 10% 25V
C441 1-162-970-11 CERAMIC CHIP 0.01uF 10% 25V
C442 1-162-970-11 CERAMIC CHIP 0.01uF 10% 25V
C443 1-162-970-11 CERAMIC CHIP 0.01uF 10% 25V
C444 1-126-157-11 ELECT 10uF 20% 16V
C445 1-162-970-11 CERAMIC CHIP 0.01uF 10% 25V
C446 1-107-826-11 CERAMIC CHIP 0.1uF 10% 16V
C447 1-125-701-11 DOUBLE LAYER 0.047F 5.5V
C448 1-107-826-11 CERAMIC CHIP 0.1uF 10% 16V
46
Page 47

ICF-CD73/CD73V
Ver. 1.1
LCD
Ref. No. Part No. Description Remark
C449 1-107-826-11 CERAMIC CHIP 0.1uF 10% 16V
C450 1-107-826-11 CERAMIC CHIP 0.1uF 10% 16V
C451 1-125-838-11 CERAMIC CHIP 2.2uF 10% 6.3V
C452 1-107-826-11 CERAMIC CHIP 0.1uF 10% 16V
C453 1-162-970-11 CERAMIC CHIP 0.01uF 10% 25V
C454 1-162-970-11 CERAMIC CHIP 0.01uF 10% 25V
C455 1-162-970-11 CERAMIC CHIP 0.01uF 10% 25V
C456 1-125-838-11 CERAMIC CHIP 2.2uF 10% 6.3V
C457 1-125-838-11 CERAMIC CHIP 2.2uF 10% 6.3V
C458 1-162-970-11 CERAMIC CHIP 0.01uF 10% 25V
C460 1-162-964-11 CERAMIC CHIP 0.001uF 10% 50V
< CONNECTOR >
CNP401 1-568-854-11 CONNECTOR, FFC 11P
CNP402 1-784-735-11 CONNECTOR, FFC 13P
< DIODE >
D351 8-719-988-61 DIODE 1SS355TE-17
D352 8-719-988-61 DIODE 1SS355TE-17
D353 8-719-988-61 DIODE 1SS355TE-17
D354 8-719-988-61 DIODE 1SS355TE-17
D401 8-719-975-40 DIODE RB411D
D402 8-719-975-40 DIODE RB411D
D403 8-719-975-40 DIODE RB411D
< IC >
IC401 6-802-907-01 IC uPD789477GC-A33-8BT
IC402 8-759-682-21 IC XC61CN2002MR
* IC403 6-703-576-01 IC XC6201P332PR
< COIL >
L401 1-412-963-11 INDUCTOR 100uH
L402 1-412-963-11 INDUCTOR 100uH
L404 1-469-450-21 INDUCTOR, FERRITE BEAD (3225)
L405 1-469-450-21 INDUCTOR, FERRITE BEAD (3225)
< LIQUID CRYSTAL DISPLAY >
LCD401 1-805-196-11 DISPLAY PANEL, LIQUID CRYSTAL
< TRANSISTOR >
Q151 8-729-905-35 TRANSISTOR 2SC4081-R
Q152 8-729-905-35 TRANSISTOR 2SC4081-R
Q153 8-729-905-35 TRANSISTOR 2SC4081-R
Q154 8-729-905-35 TRANSISTOR 2SC4081-R
Q251 8-729-905-35 TRANSISTOR 2SC4081-R
Q252 8-729-905-35 TRANSISTOR 2SC4081-R
Q253 8-729-905-35 TRANSISTOR 2SC4081-R
Q254 8-729-905-35 TRANSISTOR 2SC4081-R
Q301 8-729-905-35 TRANSISTOR 2SC4081-R
Q401 8-729-905-35 TRANSISTOR 2SC4081-R
Q403 8-729-028-83 TRANSISTOR DTA124EUA-T106
Q405 8-729-028-91 TRANSISTOR DTA144EUA-T106
Q406 8-729-028-73 TRANSISTOR DTA114EUA-T106
< RESISTOR >
R152 1-216-833-11 METAL CHIP 10K 5% 1/10W
R153 1-216-825-11 METAL CHIP 2.2K 5% 1/10W
Ref. No. Part No. Description Remark
R154 1-216-817-11 METAL CHIP 470 5% 1/10W
R156 1-216-833-11 METAL CHIP 10K 5% 1/10W
R157 1-216-845-11 METAL CHIP 100K 5% 1/10W
R159 1-216-821-11 METAL CHIP 1K 5% 1/10W
R160 1-216-821-11 METAL CHIP 1K 5% 1/10W
R161 1-216-821-11 METAL CHIP 1K 5% 1/10W
R162 1-216-845-11 METAL CHIP 100K 5% 1/10W
R164 1-216-837-11 METAL CHIP 22K 5% 1/10W
R165 1-216-837-11 METAL CHIP 22K 5% 1/10W
R166 1-216-845-11 METAL CHIP 100K 5% 1/10W
R167 1-216-864-11 SHORT CHIP 0
R168 1-216-864-11 SHORT CHIP 0
R172 1-216-829-11 METAL CHIP 4.7K 5% 1/10W
R174 1-216-821-11 METAL CHIP 1K 5% 1/10W
R175 1-216-829-11 METAL CHIP 4.7K 5% 1/10W
R176 1-216-849-11 METAL CHIP 220K 5% 1/10W
R177 1-216-849-11 METAL CHIP 220K 5% 1/10W
R178 1-216-845-11 METAL CHIP 100K 5% 1/10W
R179 1-216-829-11 METAL CHIP 4.7K 5% 1/10W
R252 1-216-833-11 METAL CHIP 10K 5% 1/10W
R253 1-216-825-11 METAL CHIP 2.2K 5% 1/10W
R254 1-216-817-11 METAL CHIP 470 5% 1/10W
R256 1-216-833-11 METAL CHIP 10K 5% 1/10W
R257 1-216-845-11 METAL CHIP 100K 5% 1/10W
R259 1-216-821-11 METAL CHIP 1K 5% 1/10W
R260 1-216-821-11 METAL CHIP 1K 5% 1/10W
R261 1-216-821-11 METAL CHIP 1K 5% 1/10W
R262 1-216-845-11 METAL CHIP 100K 5% 1/10W
R264 1-216-837-11 METAL CHIP 22K 5% 1/10W
R265 1-216-837-11 METAL CHIP 22K 5% 1/10W
R266 1-216-845-11 METAL CHIP 100K 5% 1/10W
R267 1-216-864-11 SHORT CHIP 0
R268 1-216-864-11 SHORT CHIP 0
R272 1-216-829-11 METAL CHIP 4.7K 5% 1/10W
R274 1-216-821-11 METAL CHIP 1K 5% 1/10W
R275 1-216-829-11 METAL CHIP 4.7K 5% 1/10W
R276 1-216-849-11 METAL CHIP 220K 5% 1/10W
R277 1-216-849-11 METAL CHIP 220K 5% 1/10W
R278 1-216-845-11 METAL CHIP 100K 5% 1/10W
R279 1-216-829-11 METAL CHIP 4.7K 5% 1/10W
R351 1-216-821-11 METAL CHIP 1K 5% 1/10W
R352 1-216-809-11 METAL CHIP 100 5% 1/10W
R353 1-216-821-11 METAL CHIP 1K 5% 1/10W
R354 1-216-809-11 METAL CHIP 100 5% 1/10W
R401 1-216-845-11 METAL CHIP 100K 5% 1/10W
R403 1-216-845-11 METAL CHIP 100K 5% 1/10W
R405 1-216-845-11 METAL CHIP 100K 5% 1/10W
R407 1-216-837-11 METAL CHIP 22K 5% 1/10W
R409 1-216-833-11 METAL CHIP 10K 5% 1/10W
R432 1-216-833-11 METAL CHIP 10K 5% 1/10W
(CD73: IT/CD73V)
R433 1-216-833-11 METAL CHIP 10K 5% 1/10W
(CD73: CND, UK, MX)
R434 1-216-833-11 METAL CHIP 10K 5% 1/10W
(EXCEPT CD73: UK)
R435 1-216-833-11 METAL CHIP 10K 5% 1/10W
(CD73: UK)
47
Page 48
ICF-CD73/CD73V
Ver. 1.1
LCD POWER
Ref. No. Part No. Description Remark
R436 1-216-833-11 METAL CHIP 10K 5% 1/10W
(EXCEPT CD73: IT)
R437 1-216-833-11 METAL CHIP 10K 5% 1/10W
(CD73: IT)
R438 1-216-821-11 METAL CHIP 1K 5% 1/10W
R439 1-216-821-11 METAL CHIP 1K 5% 1/10W
R440 1-216-833-11 METAL CHIP 10K 5% 1/10W
R441 1-216-833-11 METAL CHIP 10K 5% 1/10W
R442 1-216-833-11 METAL CHIP 10K 5% 1/10W
R443 1-216-833-11 METAL CHIP 10K 5% 1/10W
R444 1-216-833-11 METAL CHIP 10K 5% 1/10W
R445 1-216-821-11 METAL CHIP 1K 5% 1/10W
R446 1-216-821-11 METAL CHIP 1K 5% 1/10W
R448 1-216-821-11 METAL CHIP 1K 5% 1/10W
R449 1-216-809-11 METAL CHIP 100 5% 1/10W
R450 1-216-849-11 METAL CHIP 220K 5% 1/10W
R451 1-216-845-11 METAL CHIP 100K 5% 1/10W
R452 1-216-809-11 METAL CHIP 100 5% 1/10W
R453 1-216-849-11 METAL CHIP 220K 5% 1/10W
R454 1-216-845-11 METAL CHIP 100K 5% 1/10W
R455 1-216-809-11 METAL CHIP 100 5% 1/10W
R456 1-216-849-11 METAL CHIP 220K 5% 1/10W
R457 1-216-845-11 METAL CHIP 100K 5% 1/10W
R458 1-216-833-11 METAL CHIP 10K 5% 1/10W
R459 1-216-821-11 METAL CHIP 1K 5% 1/10W
R460 1-216-821-11 METAL CHIP 1K 5% 1/10W
R461 1-216-821-11 METAL CHIP 1K 5% 1/10W
R462 1-216-821-11 METAL CHIP 1K 5% 1/10W
R463 1-216-805-11 METAL CHIP 47 5% 1/10W
R464 1-216-809-11 METAL CHIP 100 5% 1/10W
R465 1-216-809-11 METAL CHIP 100 5% 1/10W
R466 1-216-821-11 METAL CHIP 1K 5% 1/10W
R467 1-216-833-11 METAL CHIP 10K 5% 1/10W
R468 1-216-821-11 METAL CHIP 1K 5% 1/10W
R469 1-216-821-11 METAL CHIP 1K 5% 1/10W
R470 1-216-833-11 METAL CHIP 10K 5% 1/10W
R471 1-216-833-11 METAL CHIP 10K 5% 1/10W
R472 1-216-849-11 METAL CHIP 220K 5% 1/10W
R473 1-216-821-11 METAL CHIP 1K 5% 1/10W
R474 1-216-821-11 METAL CHIP 1K 5% 1/10W
R475 1-216-821-11 METAL CHIP 1K 5% 1/10W
R476 1-216-821-11 METAL CHIP 1K 5% 1/10W
R477 1-216-821-11 METAL CHIP 1K 5% 1/10W
R478 1-216-833-11 METAL CHIP 10K 5% 1/10W
R479 1-216-833-11 METAL CHIP 10K 5% 1/10W
R480 1-216-864-11 SHORT CHIP 0
R482 1-216-864-11 SHORT CHIP 0
R484 1-216-833-11 METAL CHIP 10K 5% 1/10W
R485 1-216-821-11 METAL CHIP 1K 5% 1/10W
R486 1-216-821-11 METAL CHIP 1K 5% 1/10W
R487 1-216-821-11 METAL CHIP 1K 5% 1/10W
R488 1-216-821-11 METAL CHIP 1K 5% 1/10W
R489 1-216-853-11 METAL CHIP 470K 5% 1/10W
R491 1-216-845-11 METAL CHIP 100K 5% 1/10W
R492 1-216-853-11 METAL CHIP 470K 5% 1/10W
R493 1-218-748-11 METAL CHIP 220K 0.5% 1/10W
R494 1-218-748-11 METAL CHIP 220K 0.5% 1/10W
R495 1-216-845-11 METAL CHIP 100K 5% 1/10W
Ref. No. Part No. Description Remark
R496 1-216-853-11 METAL CHIP 470K 5% 1/10W
R497 1-216-821-11 METAL CHIP 1K 5% 1/10W
R498 1-218-748-11 METAL CHIP 220K 0.5% 1/10W
R499 1-218-748-11 METAL CHIP 220K 0.5% 1/10W
R500 1-218-748-11 METAL CHIP 220K 0.5% 1/10W
R501 1-218-748-11 METAL CHIP 220K 0.5% 1/10W
R502 1-216-837-11 METAL CHIP 22K 5% 1/10W
R504 1-216-801-11 METAL CHIP 22 5% 1/10W
R505 1-249-409-11 CARBON 220 5% 1/4W
R506 1-216-801-11 METAL CHIP 22 5% 1/10W
R507 1-218-748-11 METAL CHIP 220K 0.5% 1/10W
R508 1-218-748-11 METAL CHIP 220K 0.5% 1/10W
R509 1-218-748-11 METAL CHIP 220K 0.5% 1/10W
R510 1-218-748-11 METAL CHIP 220K 0.5% 1/10W
R552 1-216-837-11 METAL CHIP 22K 5% 1/10W
R553 1-216-841-11 METAL CHIP 47K 5% 1/10W
R554 1-216-837-11 METAL CHIP 22K 5% 1/10W
R556 1-216-833-11 METAL CHIP 10K 5% 1/10W
< SWITCH >
S501 1-771-349-21 SWITCH, TACT (RADIO ON, BAND)
S502 1-771-349-21 SWITCH, TACT (CD NX)
S503 1-771-349-21 SWITCH, TACT (OFF x)
< VIBRATOR >
X401 1-760-252-12 VIBRATOR, CRYSTAL (32.768kHz)
X402 1-813-715-11 VIBRATOR, CERAMIC (4.19MHz)
**************************************************************
* A-3683-336-A POWER BOARD, COMPLETE
***********************
< CAPACITOR >
C101 1-126-518-11 ELECT 470uF 20% 4V
C103 1-162-962-11 CERAMIC CHIP 470PF 10% 50V
C104 1-126-160-11 ELECT 1uF 20% 50V
C105 1-162-964-11 CERAMIC CHIP 0.001uF 10% 50V
C201 1-126-518-11 ELECT 470uF 20% 4V
C203 1-162-962-11 CERAMIC CHIP 470PF 10% 50V
C204 1-126-160-11 ELECT 1uF 20% 50V
C205 1-162-964-11 CERAMIC CHIP 0.001uF 10% 50V
C302 1-162-970-11 CERAMIC CHIP 0.01uF 10% 25V
C303 1-126-176-11 ELECT 220uF 20% 10V
C304 1-104-665-11 ELECT 100uF 20% 25V
C305 1-126-935-11 ELECT 470uF 20% 16V
C306 1-164-156-11 CERAMIC CHIP 0.1uF 25V
C307 1-164-156-11 CERAMIC CHIP 0.1uF 25V
C308 1-124-584-00 ELECT 100uF 20% 4V
C309 1-162-970-11 CERAMIC CHIP 0.01uF 10% 25V
C310 1-126-964-11 ELECT 10uF 20% 50V
C311 1-162-970-11 CERAMIC CHIP 0.01uF 10% 25V
C312 1-109-982-11 CERAMIC CHIP 1uF 10% 10V
C313 1-162-919-11 CERAMIC CHIP 22PF 5% 50V
C314 1-107-826-11 CERAMIC CHIP 0.1uF 10% 16V
C315 1-126-960-11 ELECT 1uF 20% 50V
C320 1-162-970-11 CERAMIC CHIP 0.01uF 10% 25V
C323 1-126-935-11 ELECT 470uF 20% 16V
C324 1-164-156-11 CERAMIC CHIP 0.1uF 25V
48
Page 49
ICF-CD73/CD73V
Ver. 1.1
POWER RELAY SW
Ref. No. Part No. Description Remark
C325 1-164-227-11 CERAMIC CHIP 0.022uF 10% 25V
C326 1-162-966-11 CERAMIC CHIP 0.0022uF 10% 50V
C327 1-124-231-61 ELECT 4.7uF 20% 16V
C333 1-107-826-11 CERAMIC CHIP 0.1uF 10% 16V
C334 1-165-176-11 CERAMIC CHIP 0.047uF 10% 16V
C335 1-124-231-61 ELECT 4.7uF 20% 16V
< CONNECTOR >
CNP301 1-568-854-11 CONNECTOR, FFC 11P
* CNP302 1-785-670-11 PIN, CONNECTOR (PC BOARD) 4P
* CNP303 1-785-669-11 PIN, CONNECTOR (PC BOARD) 3P
* CNP304 1-785-656-21 PIN, CONNECTOR (PC BOARD) 4P
< DIODE >
D101 8-719-911-19 DIODE 1SS119-25
D201 8-719-911-19 DIODE 1SS119-25
D301 8-719-052-88 DIODE 1N4002
D302 8-719-109-63 DIODE RD3.0ESB2
D303 8-719-911-19 DIODE 1SS119-25
D304 8-719-911-19 DIODE 1SS119-25
D305 8-719-109-97 DIODE RD6.8ESB2
D307 8-719-109-97 DIODE RD6.8ESB2
D308 8-719-988-61 DIODE 1SS355TE-17
D309 8-719-911-19 DIODE 1SS119-25
D310 8-719-911-19 DIODE 1SS119-25
D311 8-719-911-19 DIODE 1SS119-25
D312 8-719-911-19 DIODE 1SS119-25
< IC >
Ref. No. Part No. Description Remark
R205 1-216-833-11 METAL CHIP 10K 5% 1/10W
R206 1-216-821-11 METAL CHIP 1K 5% 1/10W
R208 1-216-829-11 METAL CHIP 4.7K 5% 1/10W
R209 1-216-837-11 METAL CHIP 22K 5% 1/10W
R301 1-216-821-11 METAL CHIP 1K 5% 1/10W
R303 1-216-833-11 METAL CHIP 10K 5% 1/10W
R304 1-216-833-11 METAL CHIP 10K 5% 1/10W
R305 1-249-401-11 CARBON 47 5% 1/4W
R306 1-216-797-11 METAL CHIP 10 5% 1/10W
R307 1-216-841-11 METAL CHIP 47K 5% 1/10W
R308 1-216-821-11 METAL CHIP 1K 5% 1/10W
R309 1-216-797-11 METAL CHIP 10 5% 1/10W
R310 1-216-845-11 METAL CHIP 100K 5% 1/10W
R311 1-216-841-11 METAL CHIP 47K 5% 1/10W
R312 1-216-841-11 METAL CHIP 47K 5% 1/10W
R313 1-216-821-11 METAL CHIP 1K 5% 1/10W
R316 1-216-829-11 METAL CHIP 4.7K 5% 1/10W
R317 1-216-833-11 METAL CHIP 10K 5% 1/10W
R318 1-216-845-11 METAL CHIP 100K 5% 1/10W
R319 1-216-825-11 METAL CHIP 2.2K 5% 1/10W
R320 1-216-837-11 METAL CHIP 22K 5% 1/10W
R321 1-216-829-11 METAL CHIP 4.7K 5% 1/10W
R322 1-216-821-11 METAL CHIP 1K 5% 1/10W
R333 1-216-841-11 METAL CHIP 47K 5% 1/10W
R334 1-216-857-11 METAL CHIP 1M 5% 1/10W
< TRANSFORMER >
T301 1-449-138-11 TRANSFORMER, DC-DC CONVERTER
**************************************************************
IC301 6-704-036-01 IC XC62HR3302PR
IC303 8-759-366-92 IC LA4525-E
< COIL >
L301 1-412-006-31 INDUCTOR 10uH
L302 1-456-379-11 INDUCTOR 47uH
< TRANSISTOR >
Q101 8-729-922-87 TRANSISTOR 2SD1757K-RS
Q201 8-729-922-87 TRANSISTOR 2SD1757K-RS
Q301 8-729-026-52 TRANSISTOR 2SA1576A-T106-R
Q302 8-729-801-84 TRANSISTOR 2SB1013-4
Q303 8-729-907-00 TRANSISTOR DTC114EU
Q304 8-729-905-35 TRANSISTOR 2SC4081-R
Q305 8-729-905-35 TRANSISTOR 2SC4081-R
Q306 8-729-905-35 TRANSISTOR 2SC4081-R
Q307 8-729-021-82 TRANSISTOR 2SD2396K
< RESISTOR >
R102 1-216-849-11 METAL CHIP 220K 5% 1/10W
R103 1-216-829-11 METAL CHIP 4.7K 5% 1/10W
R104 1-216-833-11 METAL CHIP 10K 5% 1/10W
R105 1-216-833-11 METAL CHIP 10K 5% 1/10W
R106 1-216-821-11 METAL CHIP 1K 5% 1/10W
* A-3683-360-A RELAY BOARD, COMPLETE
**********************
< CAPACITOR >
C777 1-125-837-11 CERAMIC CHIP 1uF 10% 6.3V
C778 1-125-837-11 CERAMIC CHIP 1uF 10% 6.3V
< CONNECTOR >
CNP704 1-784-781-11 CONNECTOR, FFC 20P
CNP705 1-779-553-21 CONNECTOR, FFC (LIF (NON-ZIF)) 16P
* CNP706 1-566-761-11 PIN, CONNECTOR (PC BOARD) 6P
**************************************************************
* A-3683-356-A SW BOARD, COMPLETE
*******************
< SWITCH >
S551 1-571-936-11 SWITCH, LEAF (CD LID OPEN/CLOSE)
**************************************************************
R108 1-216-829-11 METAL CHIP 4.7K 5% 1/10W
R109 1-216-837-11 METAL CHIP 22K 5% 1/10W
R202 1-216-849-11 METAL CHIP 220K 5% 1/10W
R203 1-216-829-11 METAL CHIP 4.7K 5% 1/10W
R204 1-216-833-11 METAL CHIP 10K 5% 1/10W
49
Page 50
ICF-CD73/CD73V
Ver. 1.1
TUNER
Ref. No. Part No. Description Remark
* A-3683-339-A TUNER BOARD, COMPLETE (CD73V)
* A-3683-374-A TUNER BOARD, COMPLETE (CD73: CND, MX)
* A-3683-375-A TUNER BOARD, COMPLETE (CD73: UK, IT)
**********************
< BAND PASS FILTER >
BPF1 1-781-765-11 FILTER, BAND PASS (CD73V)
< CAPACITOR >
C1 1-162-923-11 CERAMIC CHIP 47PF 5% 50V
(CD73)
C1 1-162-964-11 CERAMIC CHIP 0.001uF 10% 50V
(CD73V)
C2 1-162-964-11 CERAMIC CHIP 0.001uF 10% 50V
(CD73V)
C3 1-115-871-11 ELECT 1uF 20% 50V
(CD73V)
C4 1-126-176-11 ELECT 220uF 20% 10V
(CD73V)
C4 1-162-964-11 CERAMIC CHIP 0.001uF 10% 50V
(CD73)
C5 1-126-794-11 ELECT 4.7uF 20% 50V
(CD73V)
C6 1-162-915-11 CERAMIC CHIP 10PF 0.5PF 50V
(CD73V)
C7 1-162-910-11 CERAMIC CHIP 5PF 0.25PF 50V
(CD73)
C7 1-162-911-11 CERAMIC CHIP 6PF 0.5PF 50V
(CD73V)
C8 1-162-964-11 CERAMIC CHIP 0.001uF 10% 50V
(CD73)
C9 1-162-915-11 CERAMIC CHIP 10PF 0.5PF 50V
(CD73)
C9 1-164-227-11 CERAMIC CHIP 0.022uF 10% 25V
(CD73V)
C10 1-126-960-11 ELECT 1uF 20% 50V
(CD73)
C10 1-164-227-11 CERAMIC CHIP 0.022uF 10% 25V
(CD73V)
C11 1-107-826-11 CERAMIC CHIP 0.1uF 10% 16V
(CD73)
C11 1-162-911-11 CERAMIC CHIP 6uF 0.5PF 50V
(CD73V)
C12 1-126-963-11 ELECT 4.7uF 20% 50V
(CD73)
C13 1-162-970-11 CERAMIC CHIP 0.01uF 10% 25V
(CD73: CND, MX/CD73V)
C14 1-162-970-11 CERAMIC CHIP 0.01uF 10% 25V
(CD73: UK, IT)
C14 1-164-227-11 CERAMIC CHIP 0.022uF 10% 25V
(CD73: CND, MX/CD73V)
Ref. No. Part No. Description Remark
C18 1-164-227-11 CERAMIC CHIP 0.022uF 10% 25V
(CD73V)
C19 1-164-227-11 CERAMIC CHIP 0.022uF 10% 25V
(CD73V)
C20 1-107-826-11 CERAMIC CHIP 0.1uF 10% 16V
(CD73)
C20 1-128-801-21 CERAMIC 22PF 5% 50V
(CD73V)
C21 1-126-960-11 ELECT 1uF 20% 50V
(CD73)
C21 1-128-817-51 CERAMIC 470PF 5% 50V
(CD73V)
C22 1-107-826-11 CERAMIC CHIP 0.1uF 10% 16V
(CD73)
C22 1-162-923-11 CERAMIC CHIP 47PF 5% 50V
(CD73V)
C23 1-126-960-11 ELECT 1uF 20% 50V
(CD73)
C23 1-162-964-11 CERAMIC CHIP 0.001uF 10% 50V
(CD73V)
C24 1-162-960-11 CERAMIC CHIP 220PF 10% 50V
(CD73)
C24 1-162-964-11 CERAMIC CHIP 0.001uF 10% 50V
(CD73V)
C25 1-162-974-11 CERAMIC CHIP 0.01uF 50V
(CD73V)
C26 1-162-923-11 CERAMIC CHIP 47PF 5% 50V
(CD73V)
C26 1-162-927-11 CERAMIC CHIP 100PF 5% 50V
(CD73)
C27 1-162-927-11 CERAMIC CHIP 100PF 5% 50V
(CD73)
C27 1-162-974-11 CERAMIC CHIP 0.01uF 50V
(CD73V)
C28 1-161-051-00 CERAMIC 0.01uF 10% 25V
(CD73V)
C29 1-102-508-11 CERAMIC 10PF 0.5PF 50V
(CD73V)
C29 1-104-665-11 ELECT 100uF 20% 25V
(CD73)
C30 1-162-927-11 CERAMIC CHIP 100PF 5% 50V
(CD73V)
C30 1-162-970-11 CERAMIC CHIP 0.01uF 10% 25V
(CD73)
C31 1-102-978-00 CERAMIC 220PF 5% 50V
(CD73V)
C31 1-162-919-11 CERAMIC CHIP 22PF 5% 50V
(CD73)
C32 1-162-964-11 CERAMIC CHIP 0.001uF 10% 25V
(CD73)
C32 1-164-361-11 CERAMIC CHIP 0.047uF 16V
(CD73V)
C15 1-162-919-11 CERAMIC CHIP 22PF 5% 50V
C15 1-162-970-11 CERAMIC CHIP 0.01uF 10% 25V
(CD73: UK, IT)
C15 1-164-227-11 CERAMIC CHIP 0.022uF 10% 25V
(CD73: CND, MX)
C16 1-162-970-11 CERAMIC CHIP 0.01uF 10% 25V
C18 1-126-934-11 ELECT 220uF 20% 16V
50
(CD73V)
(CD73V)
(CD73)
C33 1-162-970-11 CERAMIC CHIP 0.01uF 10% 25V
(CD73)
C33 1-164-156-11 CERAMIC CHIP 0.1uF 25V
(CD73V)
C34 1-162-970-11 CERAMIC CHIP 0.01uF 10% 25V
(CD73)
C34 1-164-156-11 CERAMIC CHIP 0.1uF 25V
(CD73V)
C35 1-162-960-11 CERAMIC CHIP 220PF 10% 50V
(CD73V)
Page 51
ICF-CD73/CD73V
Ver. 1.1
TUNER
Ref. No. Part No. Description Remark
C35 1-162-970-11 CERAMIC CHIP 0.01uF 10% 25V
(CD73)
C36 1-115-871-11 ELECT 1uF 20% 50V
(CD73V)
C37 1-162-927-11 CERAMIC CHIP 100PF 5% 50V
(CD73V)
C37 1-162-970-11 CERAMIC CHIP 0.01uF 10% 25V
(CD73)
C39 1-107-826-11 CERAMIC CHIP 0.1uF 10% 16V
(CD73)
C39 1-115-871-11 ELECT 1uF 20% 50V
(CD73V)
C40 1-164-156-11 CERAMIC CHIP 0.1uF 25V
(CD73V)
C41 1-164-156-11 CERAMIC CHIP 0.1uF 25V
(CD73V)
C41 1-164-230-11 CERAMIC CHIP 220PF 5% 50V
(CD73)
C42 1-162-927-11 CERAMIC CHIP 100PF 5% 50V
(CD73)
C42 1-162-974-11 CERAMIC CHIP 0.01uF 50V
(CD73V)
C43 1-162-919-11 CERAMIC CHIP 22PF 5% 50V
(CD73)
C43 1-162-964-11 CERAMIC CHIP 0.001uF 10% 50V
(CD73V)
C47 1-162-915-11 CERAMIC CHIP 10PF 0.5PF 50V
(CD73)
C49 1-161-051-00 CERAMIC 0.01uF 10% 25V
(CD73)
C51 1-162-919-11 CERAMIC CHIP 22PF 5% 50V
(CD73)
C51 1-162-964-11 CERAMIC CHIP 0.001uF 10% 50V
(CD73V)
C52 1-162-915-11 CERAMIC CHIP 10PF 0.5PF 50V
(CD73)
C52 1-162-974-11 CERAMIC CHIP 0.01uF 50V
(CD73V)
C53 1-136-169-00 FILM 0.22uF 5% 50V
(CD73)
C53 1-164-156-11 CERAMIC CHIP 0.1uF 25V
(CD73V)
C54 1-126-934-11 ELECT 220uF 20% 16V
(CD73)
C54 1-162-974-11 CERAMIC CHIP 0.01uF 50V
(CD73V)
C55 1-162-927-11 CERAMIC CHIP 100PF 5% 50V
C56 1-162-927-11 CERAMIC CHIP 100PF 5% 50V
(CD73V)
C56 1-162-964-11 CERAMIC CHIP 0.001uF 10% 50V
(CD73)
C57 1-162-927-11 CERAMIC CHIP 100PF 5% 50V
(CD73V)
C57 1-162-964-11 CERAMIC CHIP 0.001uF 10% 50V
(CD73)
C58 1-162-927-11 CERAMIC CHIP 100PF 5% 50V
(CD73V)
C59 1-162-927-11 CERAMIC CHIP 100PF 5% 50V
C60 1-162-927-11 CERAMIC CHIP 100PF 5% 50V
(CD73V)
C60 1-162-964-11 CERAMIC CHIP 0.001uF 10% 50V
(CD73)
Ref. No. Part No. Description Remark
C61 1-162-927-11 CERAMIC CHIP 100PF 5% 50V
C62 1-162-927-11 CERAMIC CHIP 100PF 5% 50V
(CD73)
C62 1-162-964-11 CERAMIC CHIP 0.001uF 10% 50V
(CD73V)
C63 1-162-927-11 CERAMIC CHIP 100PF 5% 50V
(CD73)
C63 1-162-964-11 CERAMIC CHIP 0.001uF 10% 50V
(CD73V)
C64 1-162-974-11 CERAMIC CHIP 0.01uF 50V
(CD73V)
C65 1-126-963-11 ELECT 4.7uF 20% 50V
(CD73)
C65 1-162-964-11 CERAMIC CHIP 0.001uF 10% 50V
(CD73V)
C66 1-126-176-11 ELECT 220uF 20% 10V
(CD73V)
C66 1-162-927-11 CERAMIC CHIP 100PF 5% 50V
(CD73)
C67 1-162-970-11 CERAMIC CHIP 0.01uF 10% 25V
(CD73V)
C68 1-137-194-11 FILM 0.47uF 5% 50V
(CD73V)
C68 1-162-927-11 CERAMIC CHIP 100PF 5% 50V
(CD73)
C69 1-162-911-11 CERAMIC CHIP 6PF 0.5PF 50V
(CD73V)
C70 1-162-915-11 CERAMIC CHIP 10PF 0.5PF 50V
(CD73V)
C71 1-162-915-11 CERAMIC CHIP 10PF 0.5PF 50V
(CD73V)
C72 1-126-786-11 ELECT 47uF 20% 16V
(CD73V)
C75 1-164-361-11 CERAMIC CHIP 0.047uF 25V
(CD73V)
C76 1-162-911-11 CERAMIC CHIP 6PF 0.5PF 50V
(CD73V)
C77 1-162-964-11 CERAMIC CHIP 0.001uF 10% 50V
(CD73V)
C77 1-162-968-11 CERAMIC CHIP 0.0047uF 10% 50V
(CD73: UK, IT)
C78 1-162-968-11 CERAMIC CHIP 0.0047uF 10% 50V
(CD73: UK, IT)
C80 1-162-970-11 CERAMIC CHIP 0.01uF 10% 25V
(CD73)
C83 1-162-964-11 CERAMIC CHIP 0.001uF 10% 50V
(CD73V)
C85 1-162-964-11 CERAMIC CHIP 0.001uF 10% 50V
(CD73V)
C86 1-162-995-11 CERAMIC CHIP 0.022uF 50V
(CD73V)
C87 1-164-361-11 CERAMIC CHIP 0.047uF 25V
(CD73V)
C89 1-162-919-11 CERAMIC CHIP 22PF 5% 50V
(CD73V)
C90 1-162-960-11 CERAMIC CHIP 220PF 10% 50V
(CD73V)
C91 1-162-927-11 CERAMIC CHIP 100PF 5% 50V
(CD73V)
C92 1-162-927-11 CERAMIC CHIP 100PF 5% 50V
(CD73V)
51
Page 52
ICF-CD73/CD73V
Ver. 1.1
TUNER
Ref. No. Part No. Description Remark
C95 1-162-964-11 CERAMIC CHIP 0.001uF 10% 50V
(CD73)
< CERAMIC FILTER >
CF2 1-760-023-11 FILTER, CERAMIC (CD73)
CF2 1-795-215-21 FILTER, CERAMIC (CD73V)
CF4 1-781-962-21 FILTER, CERAMIC
< CONNECTOR >
* CNP1 1-785-663-11 PIN, CONNECTOR (PC BOARD) 11P (CD73)
* CNP2 1-785-663-11 PIN, CONNECTOR (PC BOARD) 11P (CD73V)
< TRIMMER >
CT1 1-141-601-21 CAP, ADJ (CD73: CND)
CT1 1-141-603-21 CAP, ADJ (CD73: UK, IT)
CT2 1-141-601-21 CAP, ADJ (CD73V)
CT3 1-141-601-21 CAP, ADJ (CD73: UK, IT/CD73V)
CT3 1-141-603-21 CAP, ADJ (CD73: CND)
CT4 1-141-601-21 CAP, ADJ (CD73V)
CT5 1-141-601-21 CAP, ADJ (CD73V)
< DIODE >
D1 8-719-078-48 DIODE KV1471ETR1-3
D2 8-719-078-48 DIODE KV1471ETR1-3
D3 8-719-050-69 DIODE KV1520N
D10 8-719-988-61 DIODE 1SS355TE-17
D11 8-719-988-61 DIODE 1SS355TE-17
D13 8-719-082-21 DIODE KDS112-RTK (CD73V)
D14 8-719-082-22 DIODE KDS114-RTK (CD73V)
D15 8-719-082-22 DIODE KDS114-RTK (CD73V)
D17 8-719-082-22 DIODE KDS114-RTK (CD73V)
D21 8-719-082-07 DIODE KDS121-RTK (CD73V)
D22 8-719-082-08 DIODE KDZ3.3V-RTK (CD73V)
D23 8-719-988-61 DIODE 1SS355TE-17 (CD73V)
D24 8-719-082-21 DIODE KDS112-RTK (CD73V)
Ref. No. Part No. Description Remark
JC11 1-216-864-11 SHORT CHIP 0 (CD73)
JC12 1-216-864-11 SHORT CHIP 0
JC13 1-216-864-11 SHORT CHIP 0 (CD73)
JC24 1-216-864-11 SHORT CHIP 0 (CD73: UK, IT)
JC33 1-216-864-11 SHORT CHIP 0 (CD73)
JC34 1-216-864-11 SHORT CHIP 0 (CD73)
< COIL >
L1 1-409-775-11 COIL, AIR-CORE (CD73)
L1 1-419-856-11 COIL, AIR-CORE (CD73V)
L2 1-416-509-11 COIL, AIR-CORE (CD73)
L2 1-419-857-11 COIL, AIR-CORE (CD73V)
L3 1-419-854-11 COIL, AIR-CORE (CD73V)
L3 1-754-117-12 ANTENNA, FERRITE-ROD (MW) (CD73)
L4 1-411-234-21 COIL, AM OSC (CD73)
L4 1-419-855-11 COIL, AIR-CORE (CD73V)
L5 1-754-117-12 ANTENNA, FERRITE-ROD (MW) (CD73V)
L6 1-411-234-21 COIL, AM OSC (CD73V)
L11 1-410-509-11 INDUCTOR 10uH (CD73V)
L11 1-414-142-11 INDUCTOR 1uH (CD73: CND, MX)
L12 1-410-509-11 INDUCTOR 10uH (CD73V)
L13 1-410-509-11 INDUCTOR 10uH (CD73V)
L14 1-410-509-11 INDUCTOR 10uH (CD73V)
L15 1-410-509-11 INDUCTOR 10uH (CD73V)
L16 1-410-501-11 INDUCTOR 2.2uH (CD73V)
L17 1-410-509-11 INDUCTOR 10uH (CD73V)
L21 1-410-509-11 INDUCTOR 10uH (CD73)
L31 1-410-509-11 INDUCTOR 10uH (CD73V)
< TRANSISTOR >
Q11 8-729-054-02 TRANSISTOR KRA302-RTK (CD73V)
Q12 8-729-054-02 TRANSISTOR KRA302-RTK (CD73V)
Q13 8-729-055-18 TRANSISTOR 2N3906U-RTK (CD73V)
Q14 8-729-055-16 TRANSISTOR KTC4082-RTK (CD73V)
< RESISTOR >
< FERRITE BEAD >
FB4 1-469-701-21 FERRITE, EMI (SMD) (1608) (CD73V)
FB5 1-469-701-21 FERRITE, EMI (SMD) (1608) (CD73V)
< IC >
IC1 6-700-512-01 IC TA2149BN (CD73)
IC1 6-700-512-01 IC TA2149BN (CD73V)
IC2 8-759-483-40 IC LC72137M-TLM-E (CD73)
IC2 8-759-483-40 IC LC72137M-TLM-E (CD73V)
< JUMPER RESISTOR>
JC1 1-216-864-11 SHORT CHIP 0
JC2 1-216-864-11 SHORT CHIP 0
JC3 1-216-864-11 SHORT CHIP 0
JC4 1-216-864-11 SHORT CHIP 0
JC5 1-216-864-11 SHORT CHIP 0
JC6 1-216-864-11 SHORT CHIP 0
JC7 1-216-864-11 SHORT CHIP 0 (CD73V)
JC8 1-216-864-11 SHORT CHIP 0 (CD73V)
JC9 1-216-864-11 SHORT CHIP 0 (CD73V)
JC10 1-216-864-11 SHORT CHIP 0 (CD73V)
R1 1-216-815-11 METAL CHIP 330 5% 1/10W
(CD73)
R1 1-216-817-11 METAL CHIP 470 5% 1/10W
(CD73V)
R2 1-216-815-11 METAL CHIP 330 5% 1/10W
(CD73V)
R2 1-216-817-11 METAL CHIP 470 5% 1/10W
(CD73)
R3 1-216-833-11 METAL CHIP 10K 5% 1/10W
R4 1-216-833-11 METAL CHIP 10K 5% 1/10W
(CD73)
R5 1-216-817-11 METAL CHIP 470 5% 1/10W
(CD73V)
R6 1-216-809-11 METAL CHIP 100 5% 1/10W
(CD73V)
R10 1-216-805-11 METAL CHIP 47 5% 1/10W
(CD73)
R11 1-216-823-11 METAL CHIP 1.5K 5% 1/10W
(CD73V)
R11 1-216-827-11 METAL CHIP 3.3K 5% 1/10W
(CD73)
R12 1-216-823-11 METAL CHIP 1.5K 5% 1/10W
(CD73V)
52
Page 53
ICF-CD73/CD73V
Ver. 1.1
TUNER
Ref. No. Part No. Description Remark
R13 1-216-821-11 METAL CHIP 1K 5% 1/10W
(CD73)
R15 1-216-819-11 METAL CHIP 680 5% 1/10W
(CD73V)
R16 1-216-821-11 METAL CHIP 1K 5% 1/10W
(CD73V)
R17 1-216-845-11 METAL CHIP 100K 5% 1/10W
(CD73V)
R18 1-216-819-11 METAL CHIP 680 5% 1/10W
(CD73V)
R19 1-216-821-11 METAL CHIP 1K 5% 1/10W
(CD73V)
R20 1-216-833-11 METAL CHIP 10K 5% 1/10W
(CD73V)
R22 1-216-864-11 SHORT CHIP 0 (CD73V)
R23 1-216-817-11 METAL CHIP 470 5% 1/10W
(CD73V)
R24 1-216-813-11 METAL CHIP 220 5% 1/10W
(CD73)
R24 1-216-835-11 METAL CHIP 15K 5% 1/10W
(CD73V)
R25 1-216-864-11 SHORT CHIP 0 (CD73V)
R26 1-216-827-11 METAL CHIP 3.3K 5% 1/10W
(CD73V)
R30 1-216-835-11 METAL CHIP 15K 5% 1/10W
(CD73)
R31 1-216-827-11 METAL CHIP 3.3K 5% 1/10W
(CD73)
R31 1-216-841-11 METAL CHIP 47K 5% 1/10W
(CD73V)
R32 1-216-845-11 METAL CHIP 100K 5% 1/10W
(CD73)
R33 1-216-849-11 METAL CHIP 220K 5% 1/10W
(CD73V)
R37 1-216-817-11 METAL CHIP 470 5% 1/10W
(CD73V)
R40 1-216-849-11 METAL CHIP 220K 5% 1/10W
(CD73)
R41 1-216-833-11 METAL CHIP 10K 5% 1/10W
(CD73)
R41 1-216-845-11 METAL CHIP 100K 5% 1/10W
(CD73V)
R42 1-216-845-11 METAL CHIP 100K 5% 1/10W
(CD73V)
R50 1-216-821-11 METAL CHIP 1K 5% 1/10W
(CD73)
R51 1-216-825-11 METAL CHIP 2.2K 5% 1/10W
(CD73V)
R51 1-216-833-11 METAL CHIP 10K 5% 1/10W
(CD73)
R52 1-216-825-11 METAL CHIP 2.2K 5% 1/10W
(CD73V)
R52 1-216-864-11 SHORT CHIP 0 (CD73)
R53 1-216-825-11 METAL CHIP 2.2K 5% 1/10W
(CD73V)
R53 1-216-835-11 METAL CHIP 15K 5% 1/10W
(CD73)
R54 1-216-817-11 METAL CHIP 470 5% 1/10W
(CD73)
R54 1-216-825-11 METAL CHIP 2.2K 5% 1/10W
(CD73V)
R55 1-216-821-11 METAL CHIP 1K 5% 1/10W
(CD73V)
Ref. No. Part No. Description Remark
R56 1-216-815-11 METAL CHIP 330 5% 1/10W
(CD73)
R58 1-216-821-11 METAL CHIP 1K 5% 1/10W
(CD73V)
R58 1-216-825-11 METAL CHIP 2.2K 5% 1/10W
(CD73)
R59 1-216-825-11 METAL CHIP 2.2K 5% 1/10W
R60 1-216-825-11 METAL CHIP 2.2K 5% 1/10W
(CD73)
R61 1-216-813-11 METAL CHIP 220 5% 1/10W
(CD73V)
R61 1-216-825-11 METAL CHIP 2.2K 5% 1/10W
(CD73)
R62 1-216-821-11 METAL CHIP 1K 5% 1/10W
(CD73V)
R63 1-216-819-11 METAL CHIP 680 5% 1/10W
(CD73V)
R63 1-216-833-11 METAL CHIP 10K 5% 1/10W
(CD73)
R64 1-216-833-11 METAL CHIP 10K 5% 1/10W
(CD73V)
R65 1-216-833-11 METAL CHIP 10K 5% 1/10W
(CD73)
R66 1-216-821-11 METAL CHIP 1K 5% 1/10W
(CD73V)
R67 1-216-845-11 METAL CHIP 100K 5% 1/10W
(CD73V)
R68 1-216-829-11 METAL CHIP 4.7K 5% 1/10W
(CD73V)
R69 1-216-833-11 METAL CHIP 10K 5% 1/10W
(CD73V)
R70 1-216-837-11 METAL CHIP 22K 5% 1/10W
(CD73V)
R71 1-216-809-11 METAL CHIP 100 5% 1/10W
(CD73V)
R72 1-216-827-11 METAL CHIP 3.3K 5% 1/10W
(CD73V)
R73 1-216-845-11 METAL CHIP 100K 5% 1/10W
(CD73V)
R74 1-216-821-11 METAL CHIP 1K 5% 1/10W
(CD73V)
R75 1-216-833-11 METAL CHIP 10K 5% 1/10W
(CD73V)
R79 1-216-864-11 SHORT CHIP 0 (CD73V)
R81 1-216-809-11 METAL CHIP 100 5% 1/10W
(CD73V)
R82 1-216-809-11 METAL CHIP 100 5% 1/10W
(CD73V)
R84 1-216-829-11 METAL CHIP 4.7K 5% 1/10W
(CD73V)
R91 1-216-813-11 METAL CHIP 220 5% 1/10W
(CD73)
R92 1-216-813-11 METAL CHIP 220 5% 1/10W
(CD73)
R94 1-216-821-11 METAL CHIP 1K 5% 1/10W
(CD73)
< TRANSFORMER >
T1 1-433-741-11 TRANSFORMER, IF
T2 1-419-465-11 COIL (DET)
53
Page 54

ICF-CD73/CD73V
Ver. 1.1
TUNER
Ref. No. Part No. Description Remark
< VIBRATOR >
X1 1-795-449-11 VIBRATOR, CRYSTAL (75kHz) (CD73)
**************************************************************
MISCELLANEOUS
**************
0406 8-820-137-02 OPTICAL PICK-UP KSS-900A/C2RP
ANT1 1-501-907-81 ANTENNA, FM WIRE
SP101 1-825-389-12 SPEAKER (5cm)
SP201 1-825-389-12 SPEAKER (5cm)
**************************************************************
ACCESSORIES
************
0 1-477-415-12 ADAPTOR, AC (AC-CSE10) (CD73: IT)
0 1-477-416-11 ADAPTOR, AC (AC-CSE10) (CD73: UK)
3-040-605-02 SUCKER
3-253-601-12 MANUAL, INSTRUCTION (ENGLISH, FRENCH)
(CD73)
3-253-601-22 MANUAL, INSTRUCTION (ENGLISH) (CD73V)
3-253-601-31 MANUAL, INSTRUCTION
(GERMAN, SPANISH, DUTCH) (CD73: IT, MX)
3-253-601-41 MANUAL, INSTRUCTION
(SWEDISH, ITALIAN, PORTUGUESE, FINNISH)
(CD73: IT)
3-254-933-01 STRAP
Ref. No. Part No. Description Remark
54
The components identified by
mark 0 or dotted line with
mark 0 are critical for safety .
Replace only with part number specified.
Les composants identifiés par une
marque 0 sont critiques pour la
sécurité.
Ne les remplacer que par une pièce
portant le numéro spécifié.
Page 55

MEMO
ICF-CD73/CD73V
55
Page 56
ICF-CD73/CD73V
REVISION HISTORY
Clicking the version allows you to jump to the revised page.
Also, clicking the version at the upper right on the revised page allows you to jump to the next revised
page.
Ver. Date Description of Revision
1.0 2003.03 New
1.1 2005.02 Addition of Mexican model (ICF-CD73) (ENG-04020)
Revision of electrical parts
Revision of mechanical parts
 Loading...