

Sony ICF-B08 Operating Instructions Manual
FM/AM Radio
Operating Instructions
ICF-B08
4-452-666-12(1)
© 2013 Sony Corporation
Printed in China
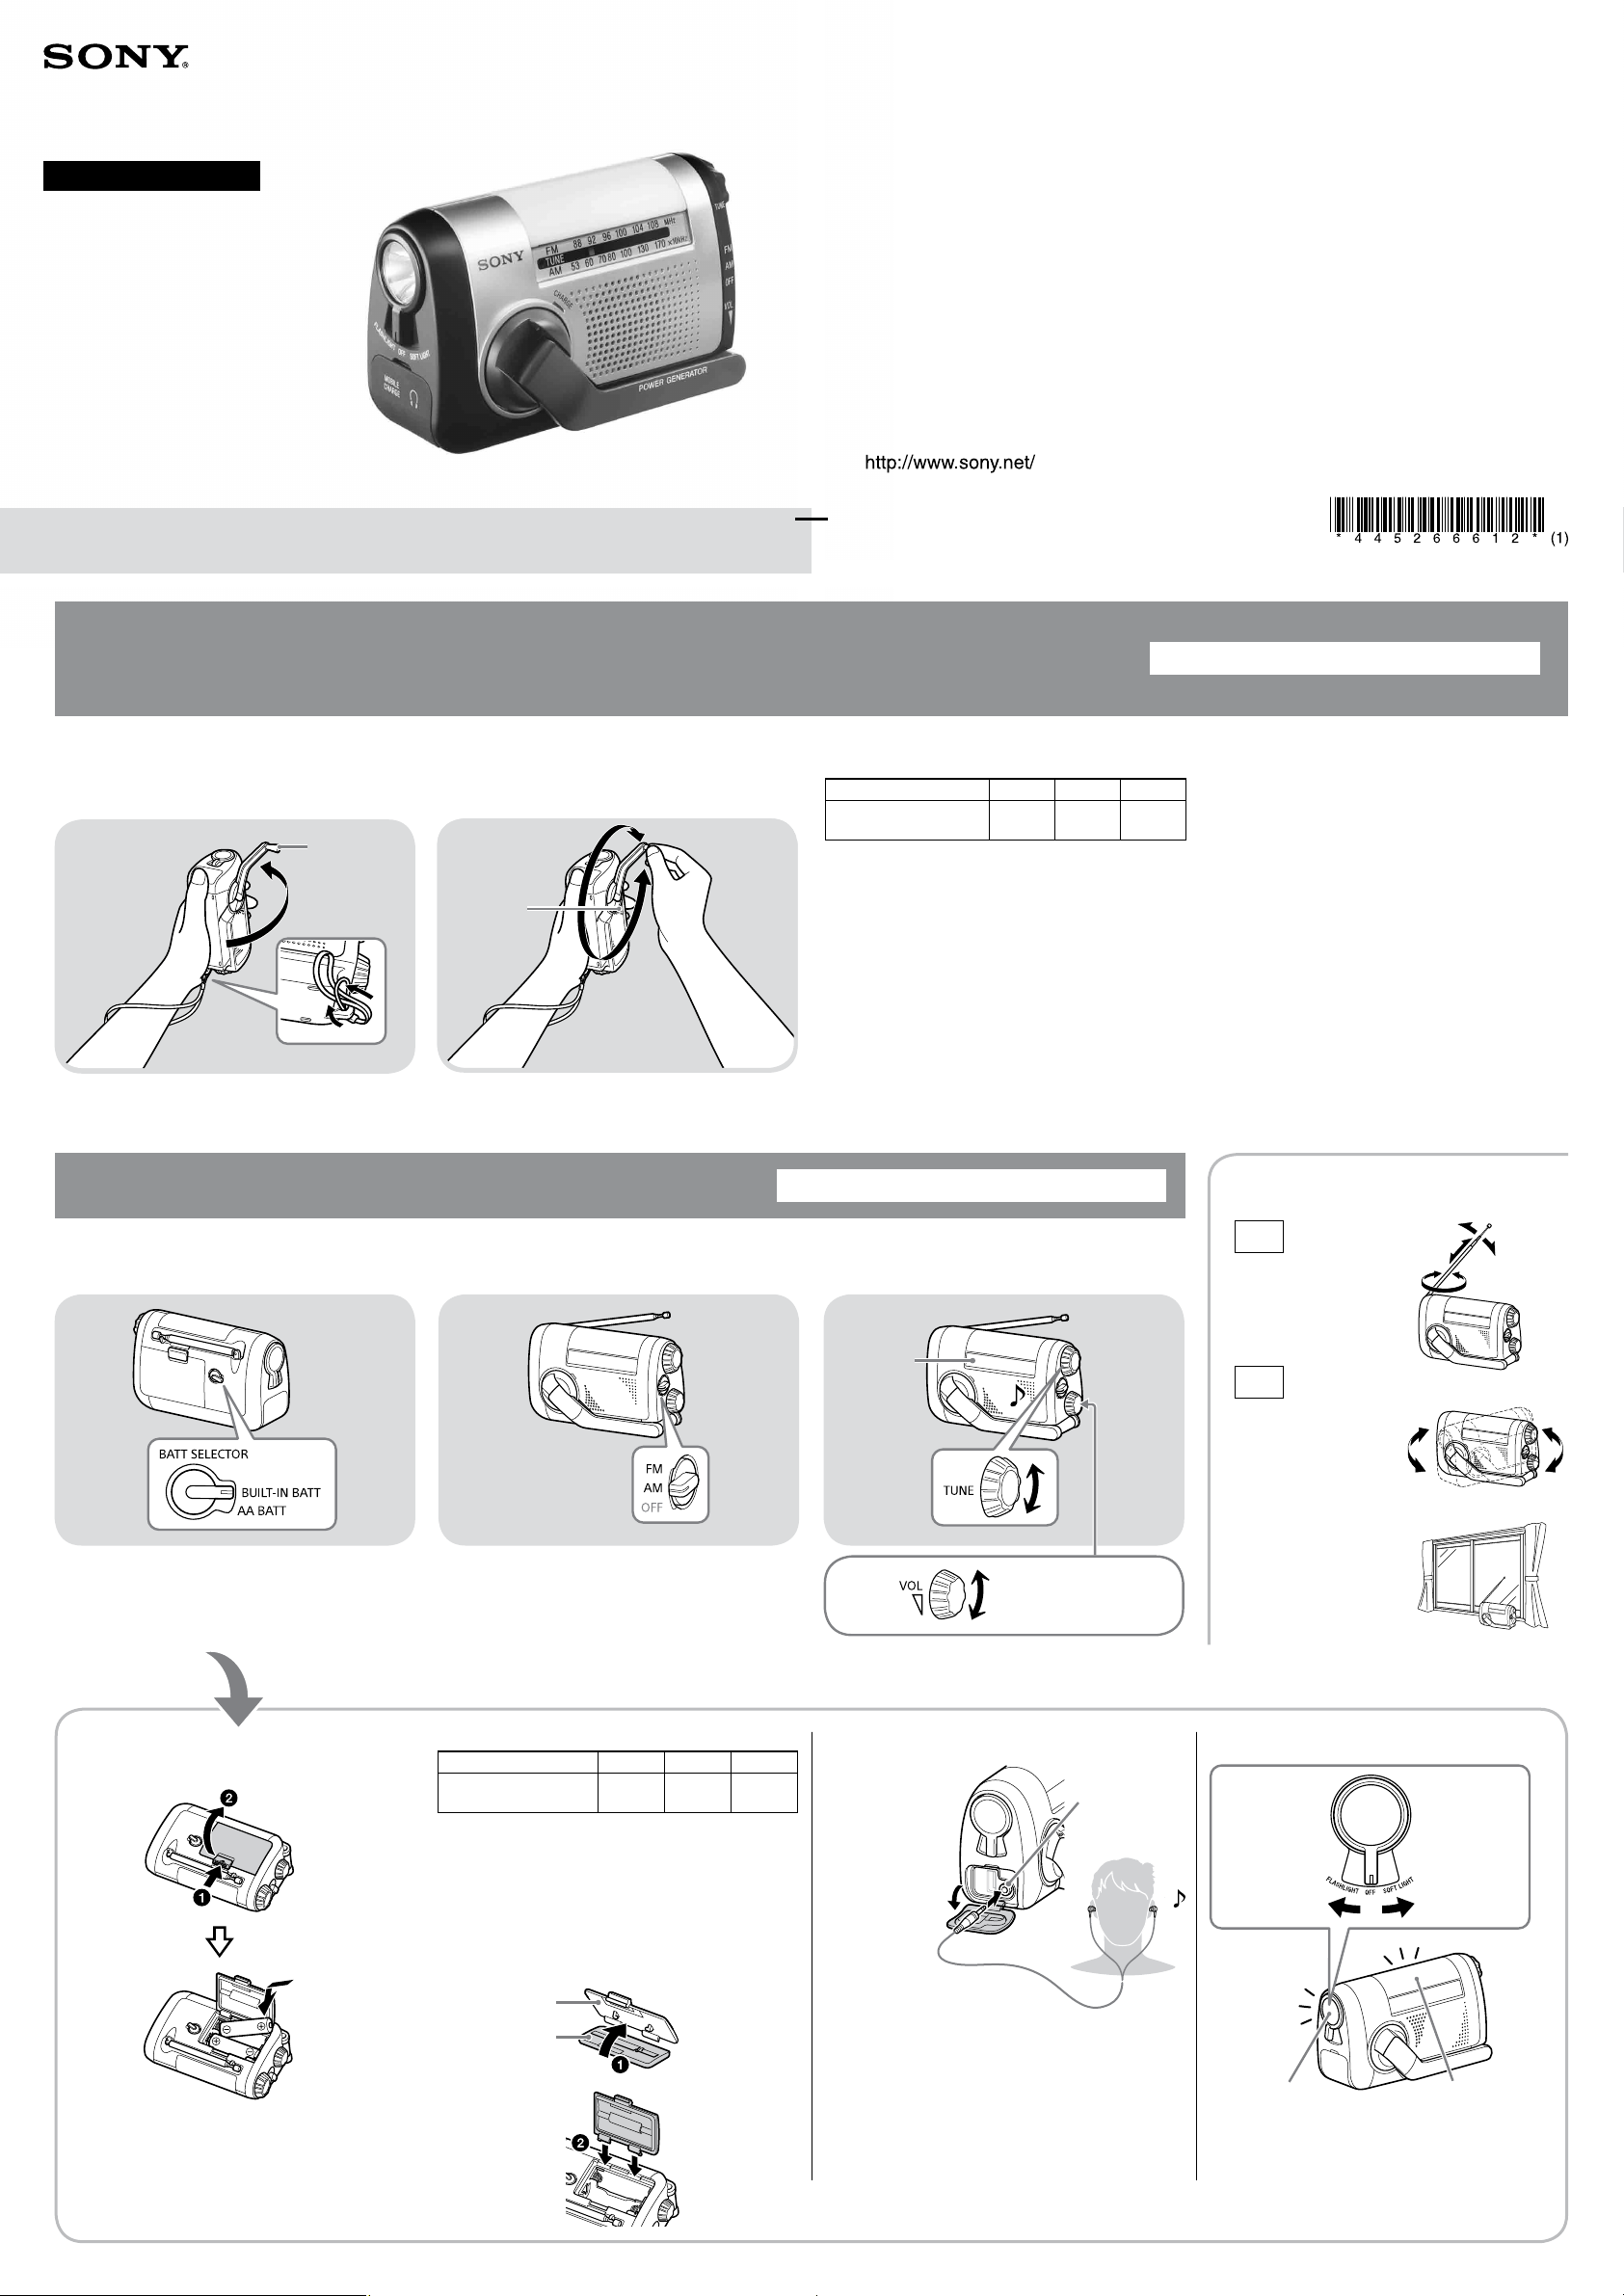
Charging the Built-in Rechargeable Battery
Using the Hand Cranking Method
Hold the unit firmly and
pull out the POWER
1
GENERATOR handle.
POWER
Fold in the
telescopic
antenna.
Put your hand through the hand strap to prevent
accidents and injuries from dropping the unit.
GENERATOR
handle
Listening to the Radio
Turn the handle to
charge.
2
The CHARGE
indicator
lights up while
charging.
To charge, turn
the handle in
either direction.
As a guideline, turn the handle at a speed of
approx. two turns or more per second.
You can charge the battery while listening to the radio.
You can charge the battery while listening to the radio.
Rechargeable battery operating time
(Approx. minutes)
FM AM Light
2
1 minute of charging by
turning the handle*
*1 When the handle is turned at a speed of approx.
twoturns per second
2
At power output of approx. 1 mW
*
3
The battery operating time when using FLASHLIGHT
*
is the same as when using SOFT LIGHT.
Notes
• Each time you turn the handle for two or three
minutes, pause approx. one minute and then start
turning the handle again.
• If you charge the battery while listening to the radio,
there may be noise interference in the radio.
50*
1
75*
2
15*
3
To improve radio reception
Choose the power source.
1
BUILT-IN BATT: When using the built-in
rechargeable battery, charged using the hand
cranking method, as the power source.
AA BATT: When using LR6 (size AA) batteries (not
supplied) as the power source.
Installing two LR6 (size AA)
batteries (not supplied)
Pull the tab up
toward you to
open the lid
of the battery
compartment.
Slide the tab.
Select “FM” or “AM.”
2
Battery operating time (Approx. hours)
FM AM Light
LR6 (size AA) dry
batteries*
*1 When two brand-new Sony alkaline LR6 (size AA)
2
JEITA (Japan Electronics and Information Technology
*
3
The battery operating time when using FLASHLIGHT
*
1
dry batteries are used until they are exhausted
Industries Association) standards. The actual battery
life may vary depending on the circumstances.
is the same as when using SOFT LIGHT.
80
(JEITA*2)
100
(JEITA*2)
50*
3
Tune to the desired
station.
3
When the
station is
tuned in,
the TUNE
indicator
lights up.
Adjust the volume
using VOL.
Using headphones (not supplied)
headphone
jack
Open the
terminal
cover.
FM
Extend the telescopic
antenna and/or
change the direction of
the antenna.
AM
The unit is equipped
with a telescopic
antenna. Rotate the
unit to get the best
reception.
If you are unable to
get clear reception,
change the location of
the unit (e.g. move the
unit close to a window
when it is being used
indoors).
Using the light
FLASHLIGHT
turns on
Hold the
bottom
of the
antenna.
SOFT LIGHT
turns on
Always insert
the side of the
battery first.
The built-in rechargeable battery cannot be
charged from LR6 (size AA) batteries.
If the battery compartment lid comes off
compartment lid
Battery
Waterproof
inner lid
Snap the
waterproof
inner lid into
the battery
compartment lid.
Insert the
claws into the
openings on
the battery
compartment.
Connect the monaural
headphones (3.5 mm
mini-plug)*.
* You can also use stereo headphones. Note, however,
that the unit will produce the exact same sound
from the left and right channels.
FLASHLIGHT
SOFT LIGHT
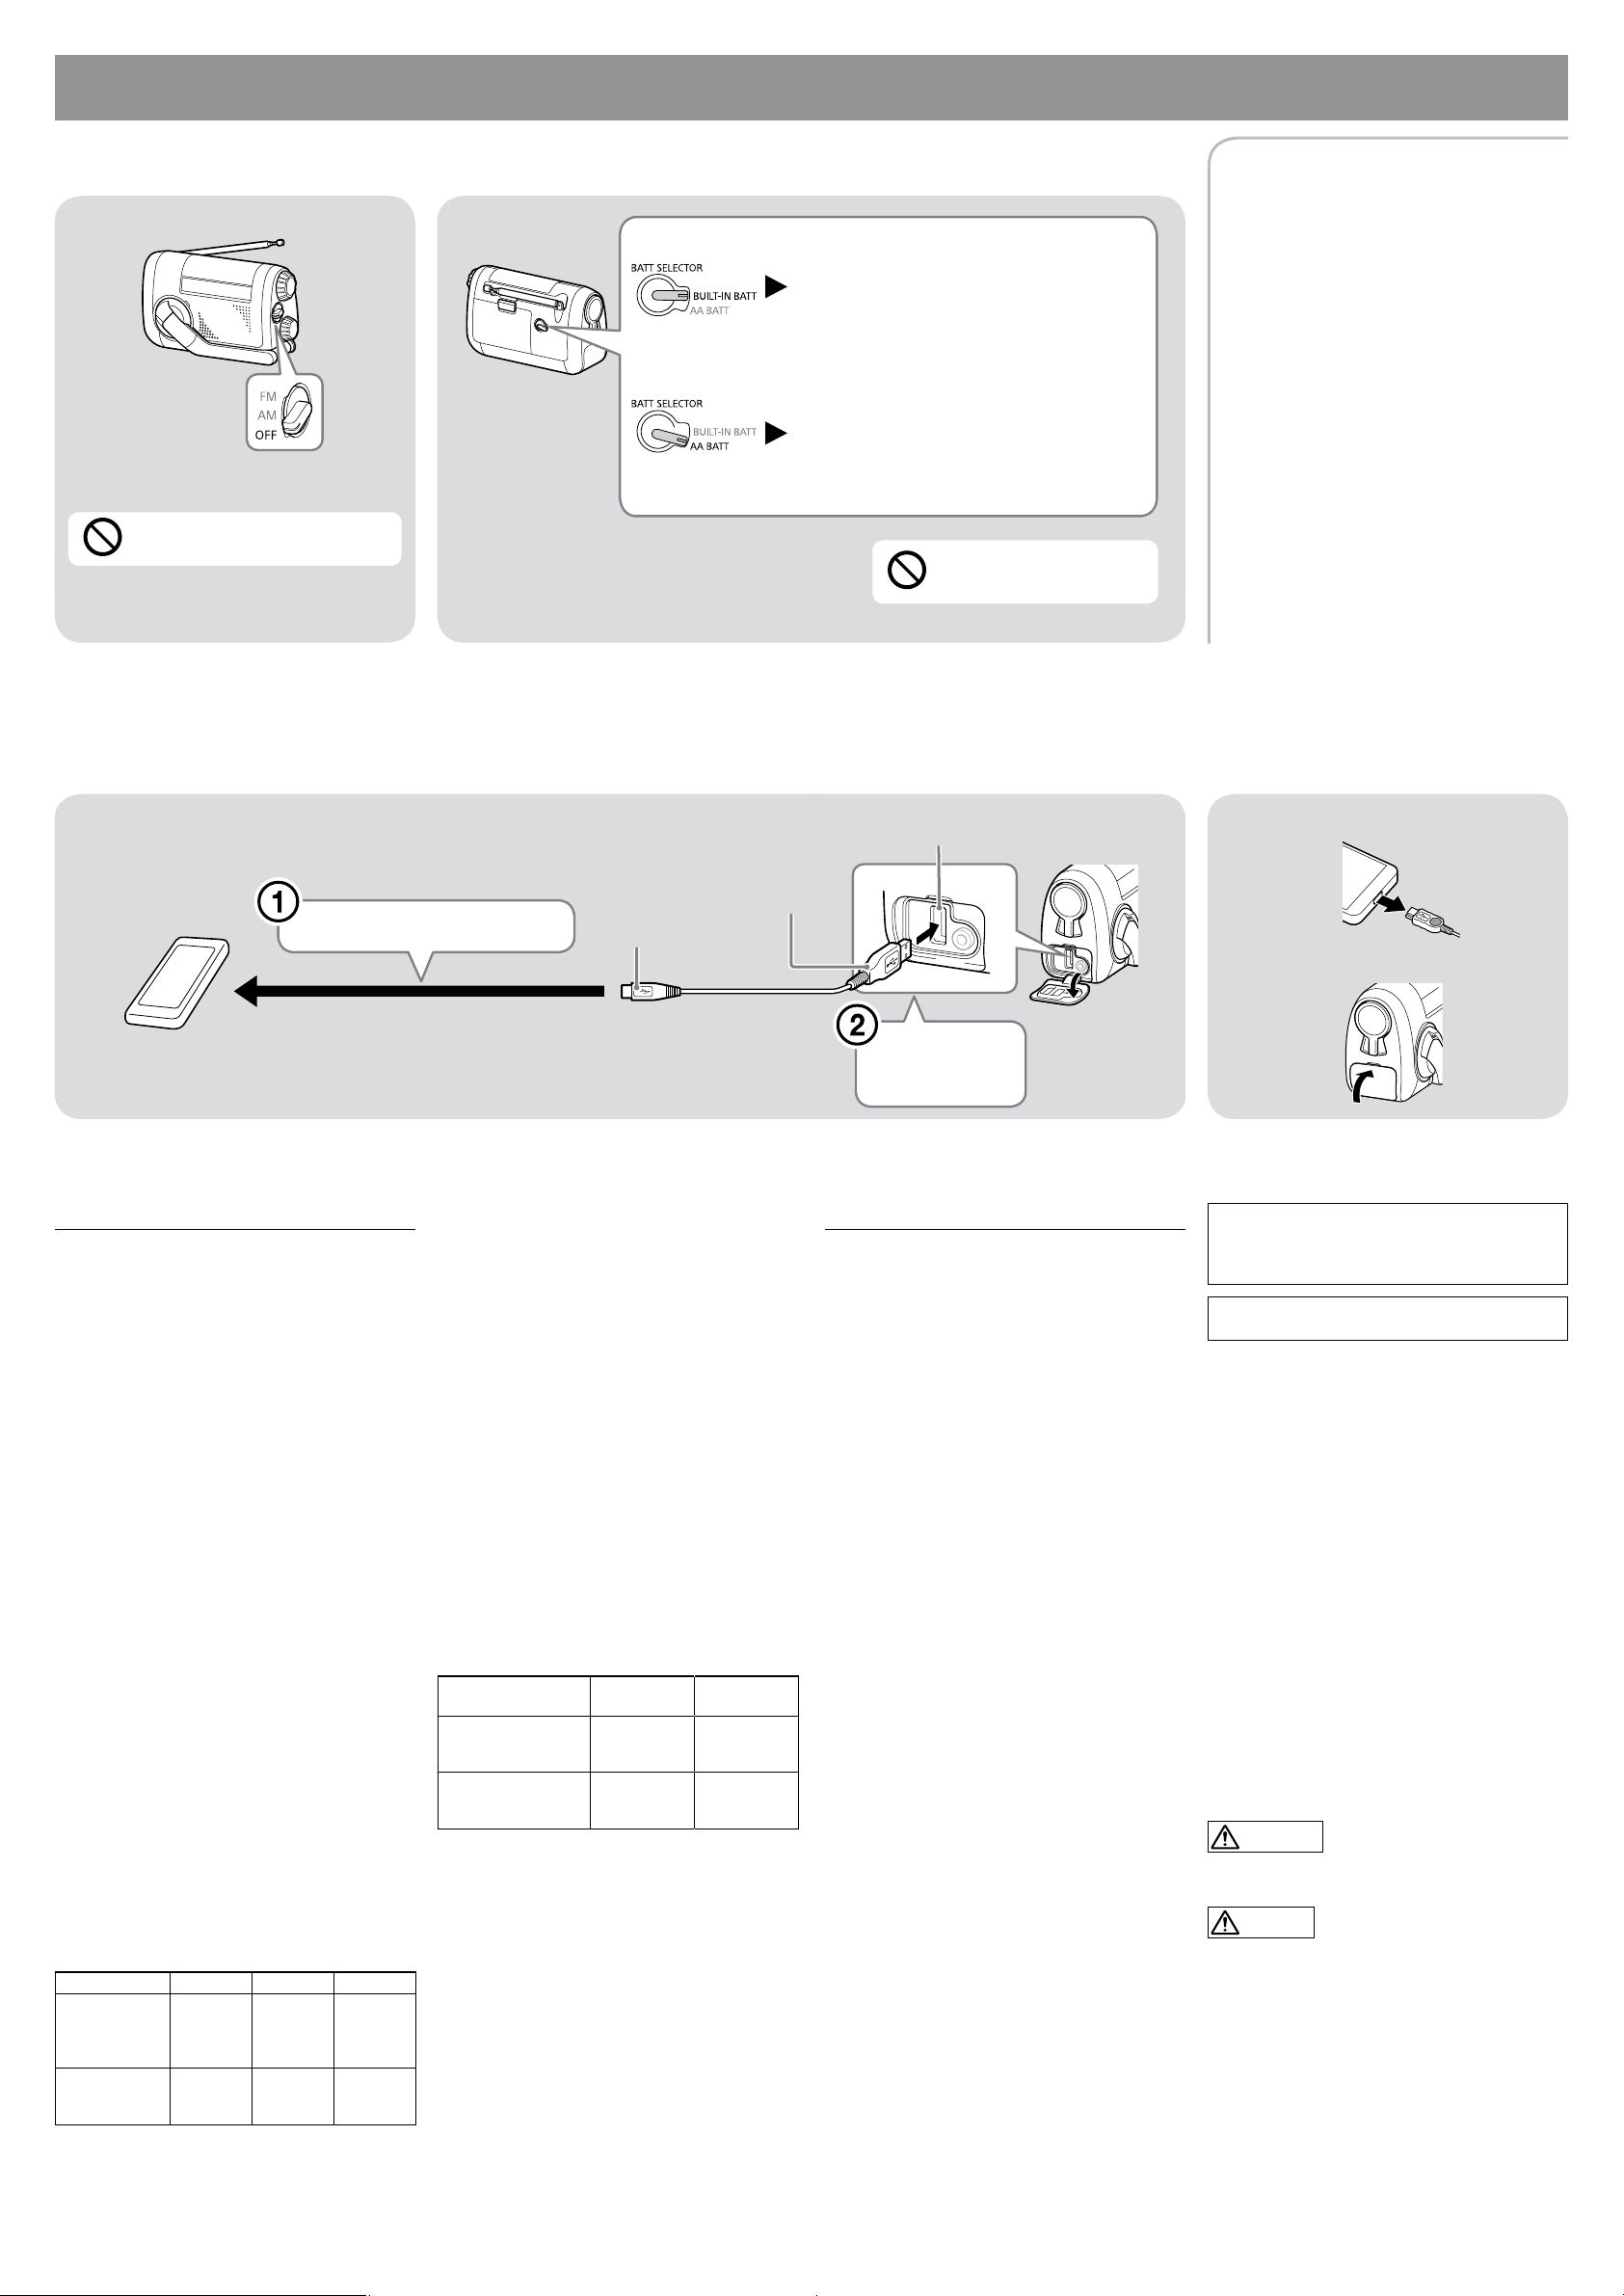
Charging a Smartphone
Set power to “OFF.”
1
You cannot charge a smartphone
while listening to the radio.
Choose the power source.
2
Even while the smartphone is being charged using LR6
(size AA) batteries, if you turn the handle, the charging
operation will be switched to the hand cranking
method. (The CHARGE indicator will not light up.)
Charging a smartphone using the hand
cranking method:
(Turn the handle at a speed of approx. two turns or
more per second. If you charge the smartphone for
one minute, you will be able to continuously talk on
the smartphone for approx. one minute. If you turn
the handle at slower than the specified speed, the
smartphone may not be charged.)
Charging a smartphone from LR6 (size AA)
batteries (not supplied):
(If you charge the smartphone using two brandnew Sony alkaline LR6 (size AA) dry batteries, you
will be able to continuously talk on the smartphone
for approx. 25 minutes.)
You cannot charge a
smartphone from the built-in
rechargeable battery.
Notes
• Charge a smartphone before the battery of the
smartphone is completely exhausted.
• You cannot charge a smartphone from the size
AA manganese dry batteries.
• When you charge a smartphone using alkaline
dry batteries, be sure to use brand-new
batteries.
• The battery sometimes becomes very hot after
charging, so be careful not to burn yourself
when you handle it.
• This unit does not guarantee that it can be used
for charging all products that can be charged
via USB.
Tips
• Check the charge status on the smartphone
screen.
• If a warning message is displayed on the
smartphone while you are turning the handle,
pause briefly and then start turning the handle
again.
• To charge a smartphone using LR6 (size AA)
batteries after charging the smartphone using
the hand cranking method, stop turning the
handle and then disconnect and reconnect the
USB cable.
Connect the unit to a smartphone to charge the smartphone.
3
Connect the smartphone.
Smartphone
Specifications
Frequency range
FM: 87.5MHz 108MHz
AM: 530kHz 1,710kHz
Speaker
Approx. 3.6 cm dia. round 8 Ω (1)
Output
headphone jack (ø 3.5 mm mini jack) (1)
MOBILE CHARGE (USB) jack (1)
Power output
60 mW (Using the built-in rechargeable battery)
90 mW (Using Sony alkaline LR6 (size AA) dry
batteries, not supplied)
Power requirements
Built-in Nickel Metal Hydride (2.4 V, 700 mAh,
Ni-MH) battery or 3 V DC, two LR6 (size AA) dry
batteries
Dimensions
Approx. 132 mm × 77 mm × 58 mm (W/H/D)
Mass
Main unit: Approx. 329 g
When dry batteries are used: Approx. 376 g (incl.
LR6 (size AA) batteries)
Supplied accessories
Carrying pouch (1), Micro USB cable (1), Emergency
whistle (1), Hand strap (1), Operating instructions
(1)
Design and specifications of this unit are subject
to change without notice for improvement of
performance.
The company names and product names indicated
in this instructions document are the trademarks or
registered trademarks of those companies.
Operating time
The actual battery operating time may vary
depending on the surrounding environment and
operating conditions. The battery operating time for
a smartphone is an approximate guide based on
measurements of typical models.
Battery operating time
FM AM Light
1 minute of
charging by
turning the
1
handle*
LR6 (size AA)
dry batteries*
Approx. 50
minutes*
Approx.
4
80 hours
(JEITA*5)
Approx. 75
2
minutes*
Approx.
100 hours
(JEITA*5)
Approx. 15
2
minutes*
Approx. 50
hours*
Notes
• If using this unit for the first time, if it had not been
used for a long time, or if the power has been left
on, the battery operating time may be short even
after charging it. In that case, charge (for more than
a minute) and discharge the battery (using the
radio or light) several times. The battery life will be
restored.
• When you do not use this unit for a long time,
remove the LR6 (size AA) batteries and set the
BATT SELECTOR switch to “AA BATT” to prevent
deterioration of the built-in rechargeable battery.
And charge the rechargeable battery by turning the
handle at least once a year at the recommended
speed (approx. two turns per second) for approx.
one minute or more.
• When the battery is exhausted, the sound will
become weak or distorted, or the TUNE indicator will
grow dark. In that case, turn the handle to charge
the built-in rechargeable battery or replace LR6 (size
AA) batteries with new ones.
• You cannot replace the built-in rechargeable battery.
• If the operating time of the radio is too short even
after charging the unit, please contact your nearest
Sony dealer.
Smartphone operating time
1 minute of charging
by turning the
1
handle*
Charged from
LR6 (size AA) dry
batteries*
1
*
When the handle is turned at a speed of approx.
2
At power output of approx. 1 mW
*
3
The battery operating time when using FLASHLIGHT
*
4
When two brand-new Sony alkaline LR6 (size AA)
*
5
JEITA (Japan Electronics and Information Technology
*
3
6
The operating time varies depending on the
*
7
When two brand-new Sony alkaline LR6 (size AA)
*
3
7
two turns per second.
is the same as when using SOFT LIGHT.
dry batteries are used until they are exhausted
Industries Association) standards. The actual battery
life may vary depending on the circumstances.
smartphone model and operating conditions.
dry batteries are used for charging a smartphone
until these batteries are exhausted
(The time required to finish charging varies
depending on the type of batteries and model of
smartphone.)
Micro USB plug
Micro USB cable (supplied)
(If the smartphone uses a cable
other than that with a micro USB
plug, use the USB cable supplied
with the smartphone.)
6
*
Continuous
standby state
Approx. 40
minutes
Approx. 16
hours
Continuous
talking
Approx. 1
minute
Approx. 25
minutes
USB plug
MOBILE CHARGE (USB) jack
Open the
Connect the
unit.
terminal
cover.
Precautions
On handling the unit
• Do not drop the unit or subject it to shock; doing so
may cause a malfunction.
• Do not leave the unit in the following locations.
In a place exposed to extremely high
temperatures (60°C or higher) or low
temperatures (0°C or lower)
Near heat sources
In a place exposed to high humidity
In the cabin of a car with closed windows
(particularly in summer)
In a place exposed to excessive dust
In a confined space such as a bookcase or built-in
cabinet
• Do not place lighted candles on the apparatus.
• Do not expose the batteries installed to excessive
heat such as sunshine, fire or the like for a long time.
• Do not let any solid object or liquid fall into the unit.
• When the cabinet becomes soiled, clean it with a
soft dry cloth. Never use chemical solvents such as
thinner or benzene, as they may mar the cabinet.
• Do not leave magnetic bank cards, magnetic
train passes, or other cards containing magnetic
information near the speaker. The information on
the card may be erased by the magnet inside the
speaker.
• Keep the volume at a moderate level so as not to
harm your ears.
On splash proof performance
Although this unit is splash proof to a degree against
exposure to a spray of rain, snow, and water, exercise
caution in the following situations.
• Do not splash a large amount of water on the unit.
• Do not immerse the unit in water.
• If water is splashed on the unit or it is dropped into
water, immediately remove the unit from the water
and wipe moisture from the unit with a soft dry
cloth.
• If water gets into the speaker, turn the speaker side
of the unit downward and pour the water out from
the speaker.
• When the headphone jack or USB port is not
used, be sure to close the terminal cover. If you do
not close the terminal cover, the unit’s splash proof
state will be compromised. When these terminals
are being used with the cover open, be careful not to
expose them to water.
• After the unit is exposed to water, take caution it
does not make nearby objects wet.
After charging is finished,
disconnect the cable and
4
close the terminal cover.
Disconnect the USB cable.
Hold the connector
Smartphone
Close the terminal cover.
On using this unit, Sony shall not be liable for any
damage caused by smartphone memory data loss or
inability to talk on the smartphone, loss in profit, or
any claim from a third party.
If the unit malfunctions, do not open the cabinet.
Contact your nearest Sony dealer.
Disposing of the unit
Remove the built-in rechargeable battery for
environmental protection. Before removing the built-in
rechargeable battery, set the BATT SELECTOR switch to
“AA BATT.”
1 Detach parts of the main unit in the following order.
Bottom cover: Remove two screws.
Panel with FLASHLIGHT: Remove the screw near
the headphone jack under the terminal cover.
Panel with VOL control : Pull out and remove the
three dials, and then remove the screw under the
VOL control.
SOFT LIGHT cover on top of the unit: Remove
two screws on the antenna rest at the rear of the
unit.
Side of unit with battery compartment: Remove
the screw near the tip of the telescopic antenna
on the antenna rest. Then remove two screws on
the right edge, two screws on the lower edge, and
the screw at the upper right corner in the battery
compartment.
2 Remove the screw on the board to detach it and
then remove the built-in rechargeable battery.
3 Hold the connector plug of the board and disconnect
the
built-in
rechargeable battery from the board.
WARNING
Do not open the cabinet except when disposing of the
unit.
CAUTION
• Be sure to disconnect the rechargeable battery
from the board. Electricity flows when the battery is
connected and it can be unsafe. When removing the
battery, be careful not to touch the interior of other
parts.
• Make sure that the built-in rechargeable battery
is completely exhausted and then remove the
rechargeable battery.
plug to disconnect
the cable.
 Loading...