

Page 1
SONY
3-860-406-11 (1)
1C Recorder
Operating Instructions
ICD-30
©1997 by Sony Corporation Printed in Japan |
Owner's Record
The model number is located at the bottom and the serial number is
located inside the battery compartment. Record the serial number
in the space provided below. Refer to them whenever you call upon
your Sony dealer regarding this product.
Model No. lCD-30
For the customers in the U.S.A.
INFORMATION
This equipment has been tested and found to comply with the
limits for a Class B digital device, pursuant to Part 15 of the FCC
Rules. These limits are designed to provide reasonable protection
against harmful interference in a residential installation. This
equipment generates, uses, and can radiate radio frequency energy
and, if not installed and used in accordance with the instructions,
may cause harmful interference to radio communications.
However, there is no guarantee that interference will not occur in a
particular installation. If this equipment does cause harmful
interference to radio or television reception, which can be
determined by turning the equipment off and on, the user is
encouraged to try to correct the interference by one or more of the
following measures;
V O I C E F I L E
Serial No._
Welcome!
Thank you for purchasing the Sony IC Recorder.
Some features are:
• 8 minutes (SP) /16 minutes (LP) recording time
• Up to 99 notes in each file
• Two note files — The ratio of the recording time for these files is
adjustable within the maximum recordable time of this unit.
• Note date stamp
• Alarm with message
• Informative LCD with backlight
• Flash memory to keep notes recorded even without a battery
► Getting Started
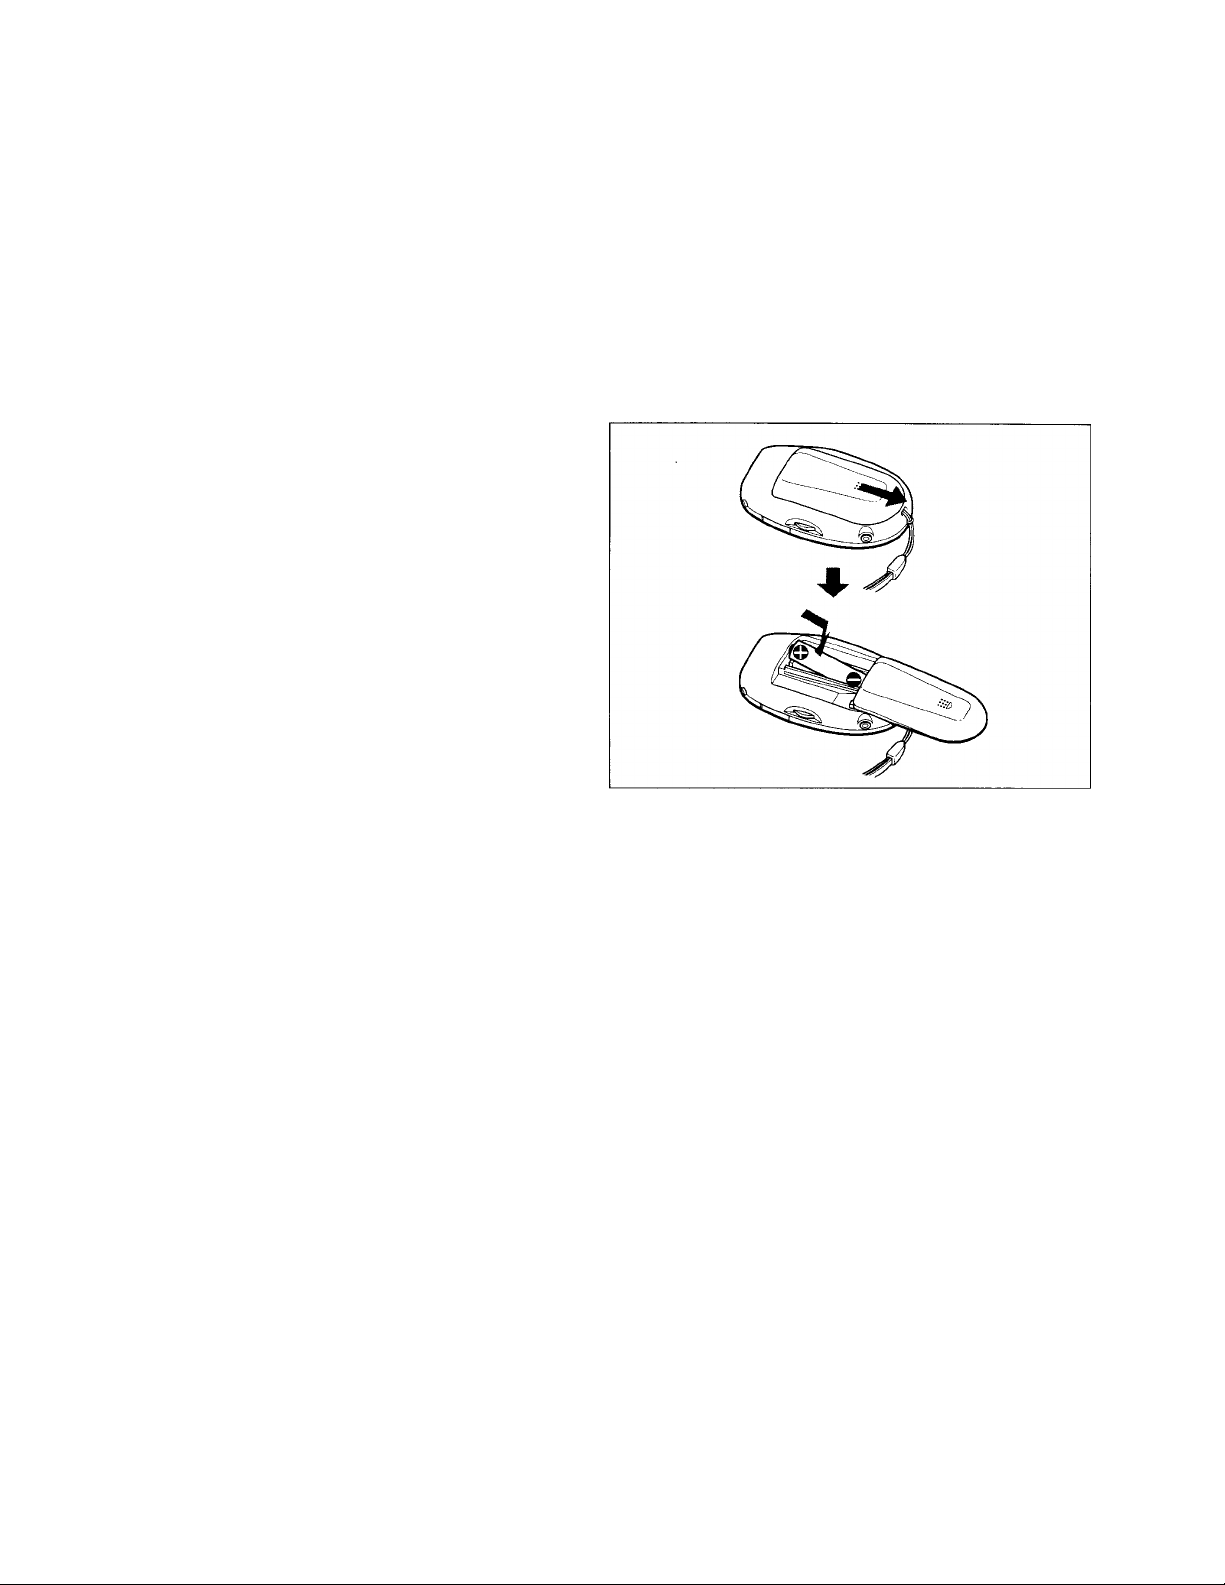
Installing the Battery
1 Slide open the battery compartment lid.
2 Insert a size AAA (LR03) alkaline battery with correct polarity,
and close the lid.
- Reorient or relocate the receiving antenna.
- Increase the separation between the equipment and receiver.
- Connect the equipment into an outlet on a circuit different from
that to which the receiver is connected.
- Consult the dealer or an experienced radio/TV technician for
help.
This device complies with Part 15 of the FCC Rules. Operation is
subject to the following two conditions: (1) This device may not
cause harmful interference, and (2) this device must accept any
interference received, including interference that may cause
undesired operation.
You are cautioned that any changes or modifications not expressly
approved in this manual could void your authority to operate this
equipment.
Clock setting display appears when you insert a battery for the first
time, and when you insert a battery after the unit has been without
a battery for a certain period of time. For more details, please refer
to Setting the Clock, from step 2.
Note
Make sure to close the lid completely. Otherwise the unit will not
operate.
Replacing the battery
"<Xi" appears on the display when the battery becomes weak and it
flashes when the battery is exhausted.
Replace the battery with a new one.
Battery life
Sony alkaline battery LR03 (SG)
• When recording for 2 minutes and playing back for 3 minutes every day
Notes
• When you replace the battery, insert a new battery within 3 minutes after
you removed the exhausted one, otherwise all the settings you have made
will be reset to the initial settings. The recorded notes, however, will
remain.
• Do not charge a dry battery.
• When you will not use the unit for a long time, remove the battery to avoid
any damage caused by battery leakage and subsequent corrosion.
approx. 2 months’
Page 2
► Basic Operations
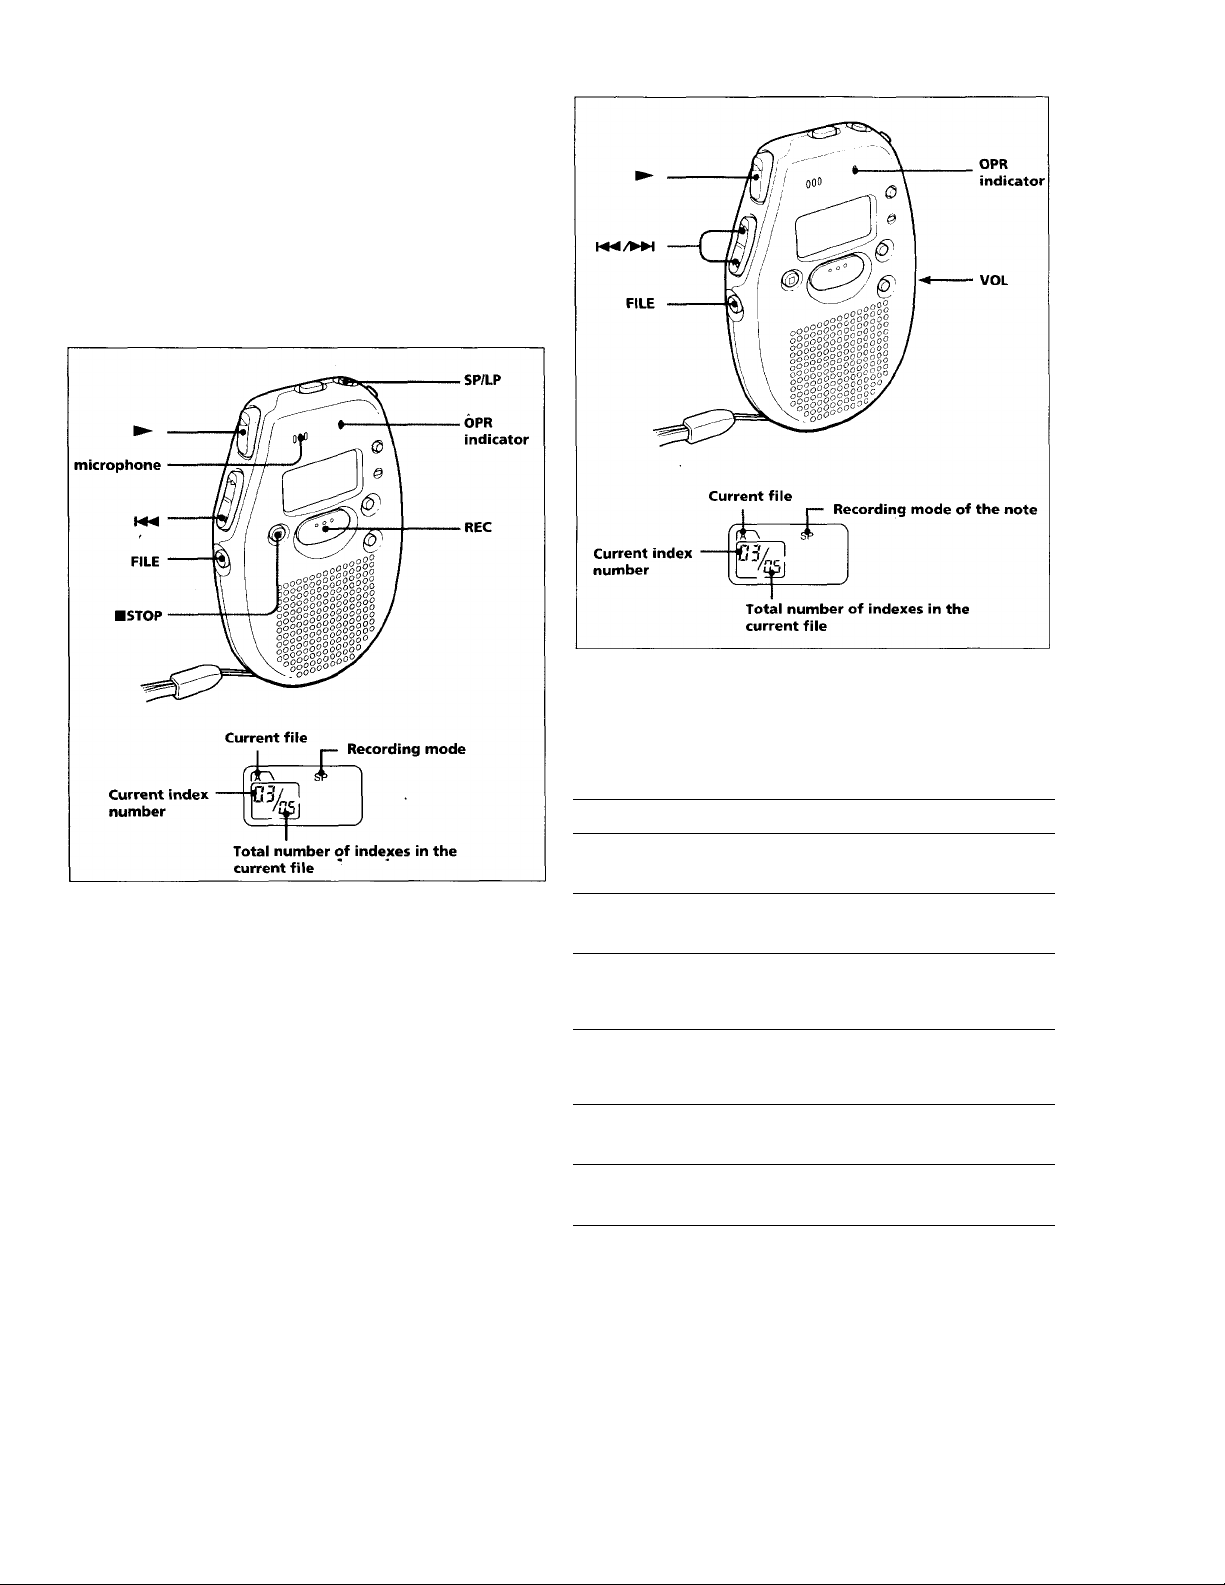
Recording Notes
This 1C recorder automatically records notes after the last recorded
note so that you can start recording quickly without searching for
the end of the last recording.
You can record up to 99 notes in each file, A and B. When you
record all notes in SP (standard play) mode, you can record for 8
minutes and in LP (long play) mode for 16 minutes . If you record
notes in a mixture of SP and LP modes, the recordable time varies
from 8 to 16 minutes.
Each recorded note has an index number, and a newly recorded
note will have the last index number.
Playing Back Notes
1 Press SP/LP to select SP or LP mode.
"SP" or "LP" is displayed.
2 Press FILE to select file A or B.
"A" or "B" is displayed.
3 Press REC and speak into the microphone.
The OPR indicator lights in red and recording starts.
4 Press ■ STOP to stop recording.
For the next time you record, if the displays of SP/LP mode and the
file are what you want, just follow steps 3 and 4.
When you have recorded up to 99 notes or the maximum recording
time, "FULL" appears in the display. If you wanf to record more
notes in the same file, first erase some old notes.
To listen to the last recording
Press ► right after recording.
To review the current recording instantly
Press during recording.
1 Press FILE to select a file, A or B.
2 Press or to select an index number you want to play.
3 Press ►.
The OPR indicator lights in green and playback starts.
4 Adjust the volume with the VOL control.
To Press
Skip to the next index
number
play-
Skip to the previous index
you find the number
number you want to play.
Search forward for an index
number
during stop
mode.
Search backward for an index
number
during stop
mode.
Search forward during playback
playback.
Search backward during
release it at the playback
you want during playback.
Press repeatedly until you find the
Keep pressing WN and release it at the
Keep pressing and release it at the
Keep pressing WH and release it at the
index number you want to
Press repeatedly until
index number you want
index number you want
point you want during
Keep pressing and
Playback Pause function
If you press HSTOP part way through your playback of a note,
when you press ►, the note will continue from where you
stopped.
index
point
For private listening
Connect an earphone (not supplied) to the ©jack.
The built-in speaker will be automatically disconnected.
Page 3
^ Advanced Operations
Erasing Notes
Setting the Clock
You need to set the clock to use the following features:
• alarm
•date stamp
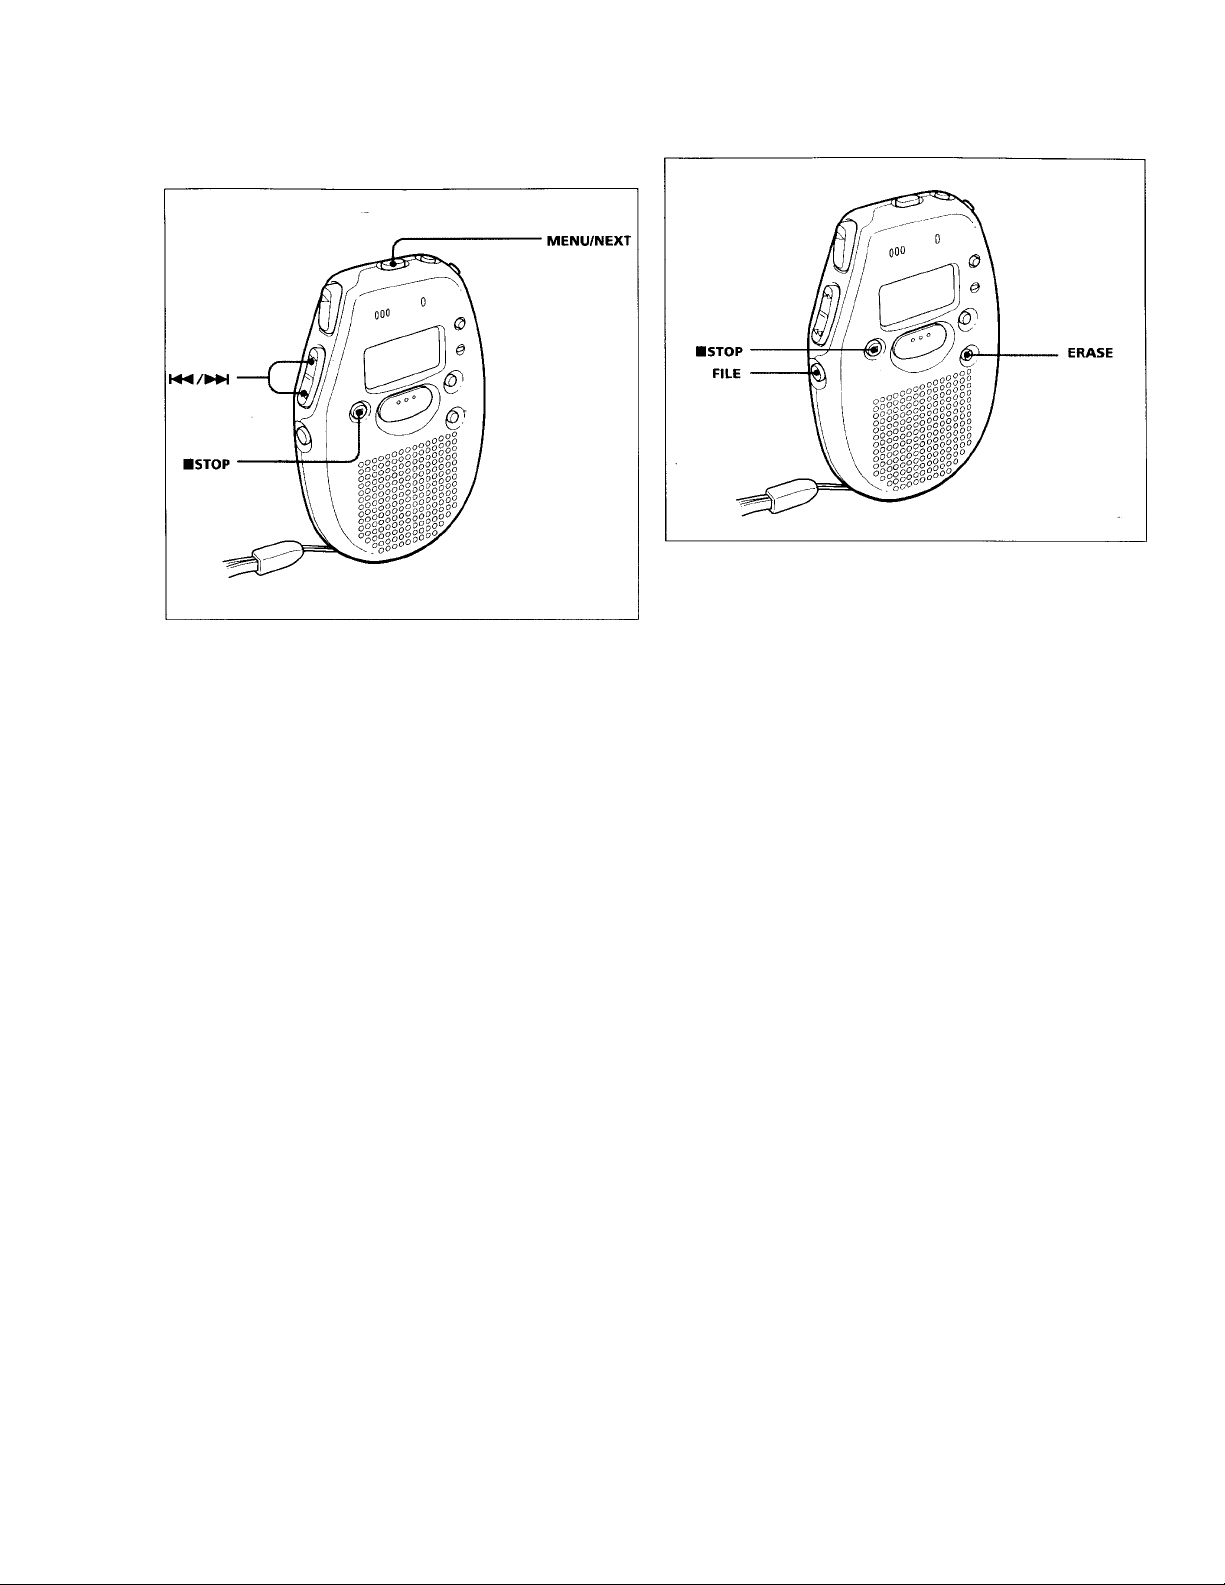
1 Press MENU/NEXT repeatedly until the date display appears.
2 Press or K4 to set the date.
Keep pressing the button, to change the date successively.
3 Press MENU/NEXT again.
The time display appears.
4 Press or to set the time.
Keep pressing the button to change the time successively.
5 Press HSTOP.
The unit returns to normal mode.
The clock starts from 0 second.
You can delete the recorded notes one by one or all notes in a file at
a time.
Note that once a recording has been erased, you cannot retrieve it.
Erasing a note
1 Press ERASE while playing back the note you want to erase.
The index number and "ErASE" flash, and the first and the last
5 seconds of the note are played back 10 times.
2 Press ERASE again while the note is played back.
The note is erased and the remaining tracks are renumbered.
To cancel erasing
Press HSTOP before step 2.
To erase other tracks
Repeat steps 1 and 2.
To erase a note partially
Before you do steps 1 and 2, divide the note into the part to erase
and the part not to erase by adding an index mark. (For details,
refer to Adding/Erasing Index Marks.)
Erasing all notes in a file
1 Press FILE to select the desired file, A or B.
2 Press BSTOP and ERASE at the same time for about a second
during stop mode.
"All ErASE" flashes.
3 Press ERASE to erase the notes.
All the notes in the file are erased.
To cancel erasing
Press HSTOP before step 3.
Page 4
Various Ways of Recording
Adding index numbers while recording
You can add index marks while recording a note at the point you
like so that you can quickly find and play from the marked
position.
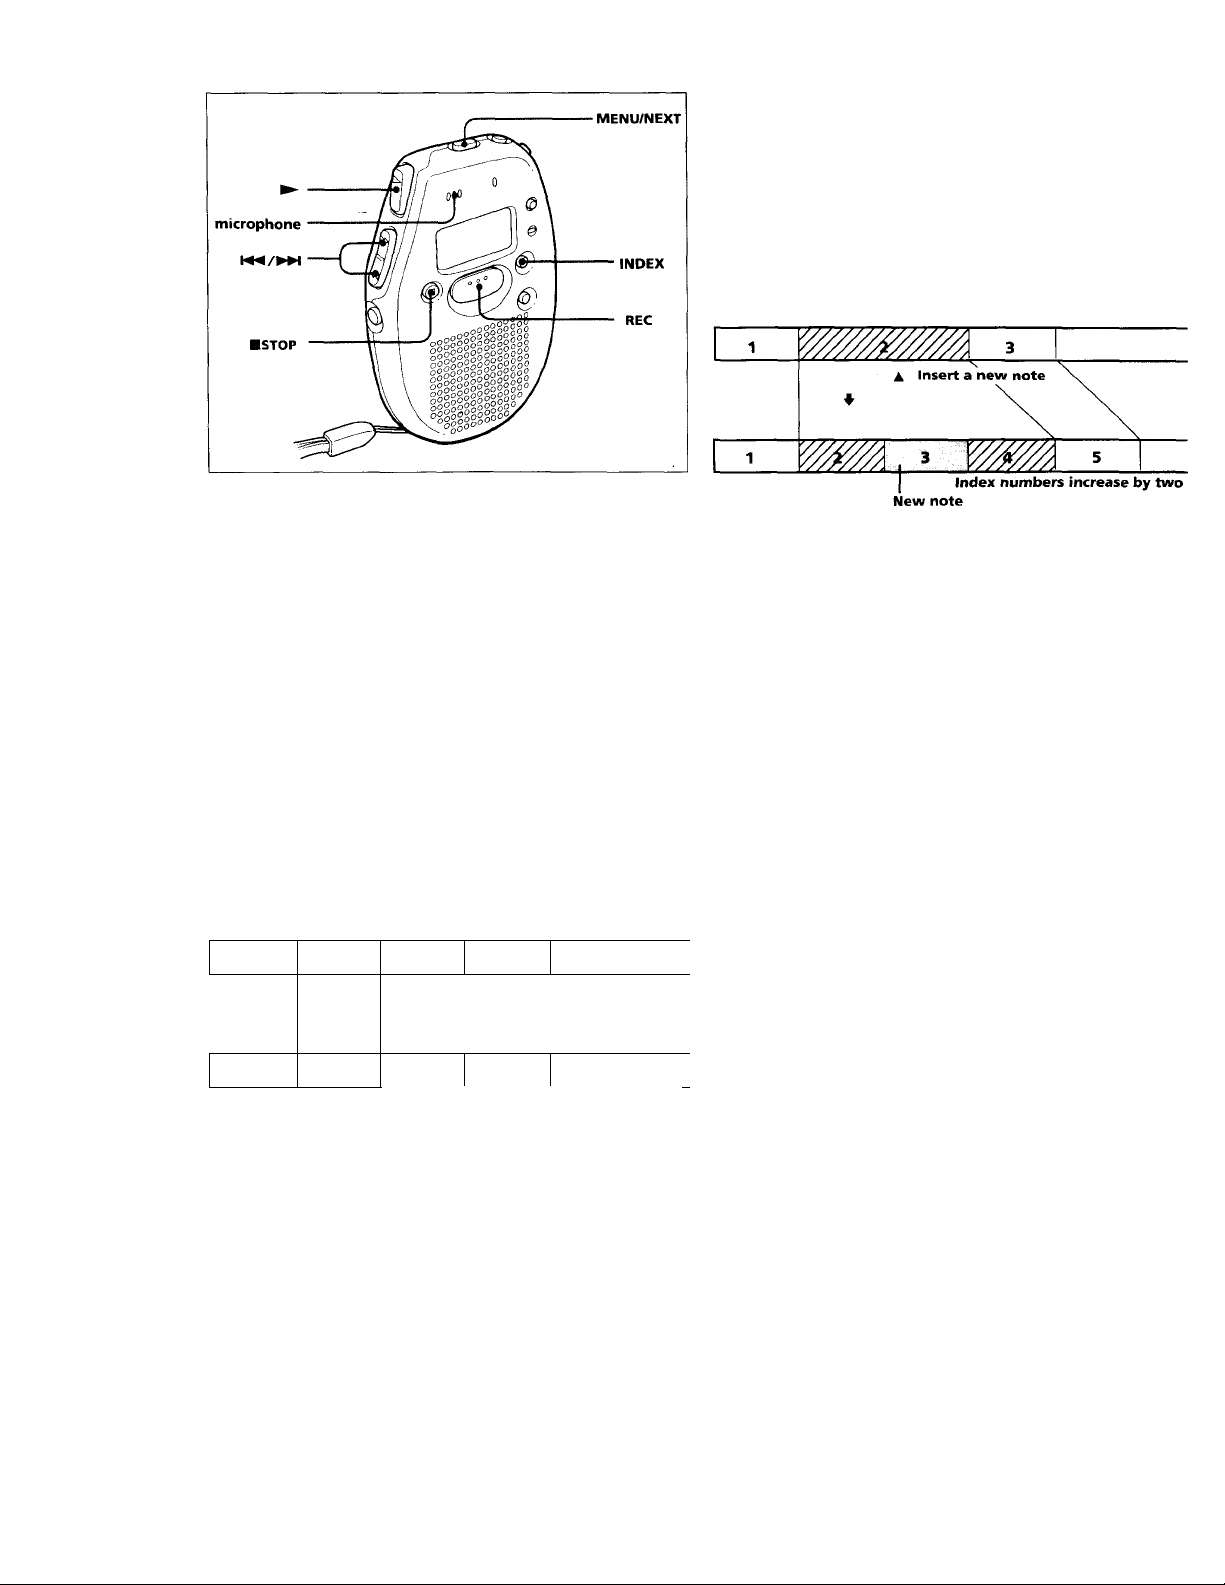
While the unit is recording a note, press INDEX, and the new index
number flashes.
An index mark is added and the following index numbers will
increase by one.
Inserting a new note in the middle of a previously recorded note
1 Press MENU/NEXT repeatedly until "InS" appears.
2 Press or to select "On”.
3 Press «STOP.
The display returns to the normal mode.
4 Press or to select the index number to which you
want to add a note.
5 Press ► to play the note and press HSTOP at the point you
want to add a new note.
6 Press and hold REC for more than a second until "InS" appears
and flashes, and then speak into the microphone.
The new note is added and the previous note is divided into
two index numbers. Remaining notes after that are
renumbered.
To stop recording
Press BSTOP.
To insert more notes
Repeat steps 4 to 6.
To record normally (not inserting)
Briefly press REC.
Inserting a new note between two notes
1 Press MENU/NEXT repeatedly until "InS" appears.
2 Press or to select "On".
3 Press HSTOP.
The display returns to the normal mode.
4 Press or to select the index number before which
you want to jnsert a new note.
5 Press and hold REC for more than a second until "InS” appears
and flashes, and then speak into the microphone.
The new note is added and the notes after that are renumbered
as follows.
1 2
1 2
Ik
Insert a neiN note
4
♦
3
3
4
4
5
I Index numbers increase by one
New note
To stop recording
Press BSTOP.
To insert more notes
Repeat steps 4 and 5.
To record normally (not inserting)
Briefly press REC.
To return to the normal mode
Select "OFF" in step 2.
Note
• When there are already 98 notes recorded in the file, you cannot insert a
new recording.
To return to the normal mode
Select "OFF" in step 2.
Page 5
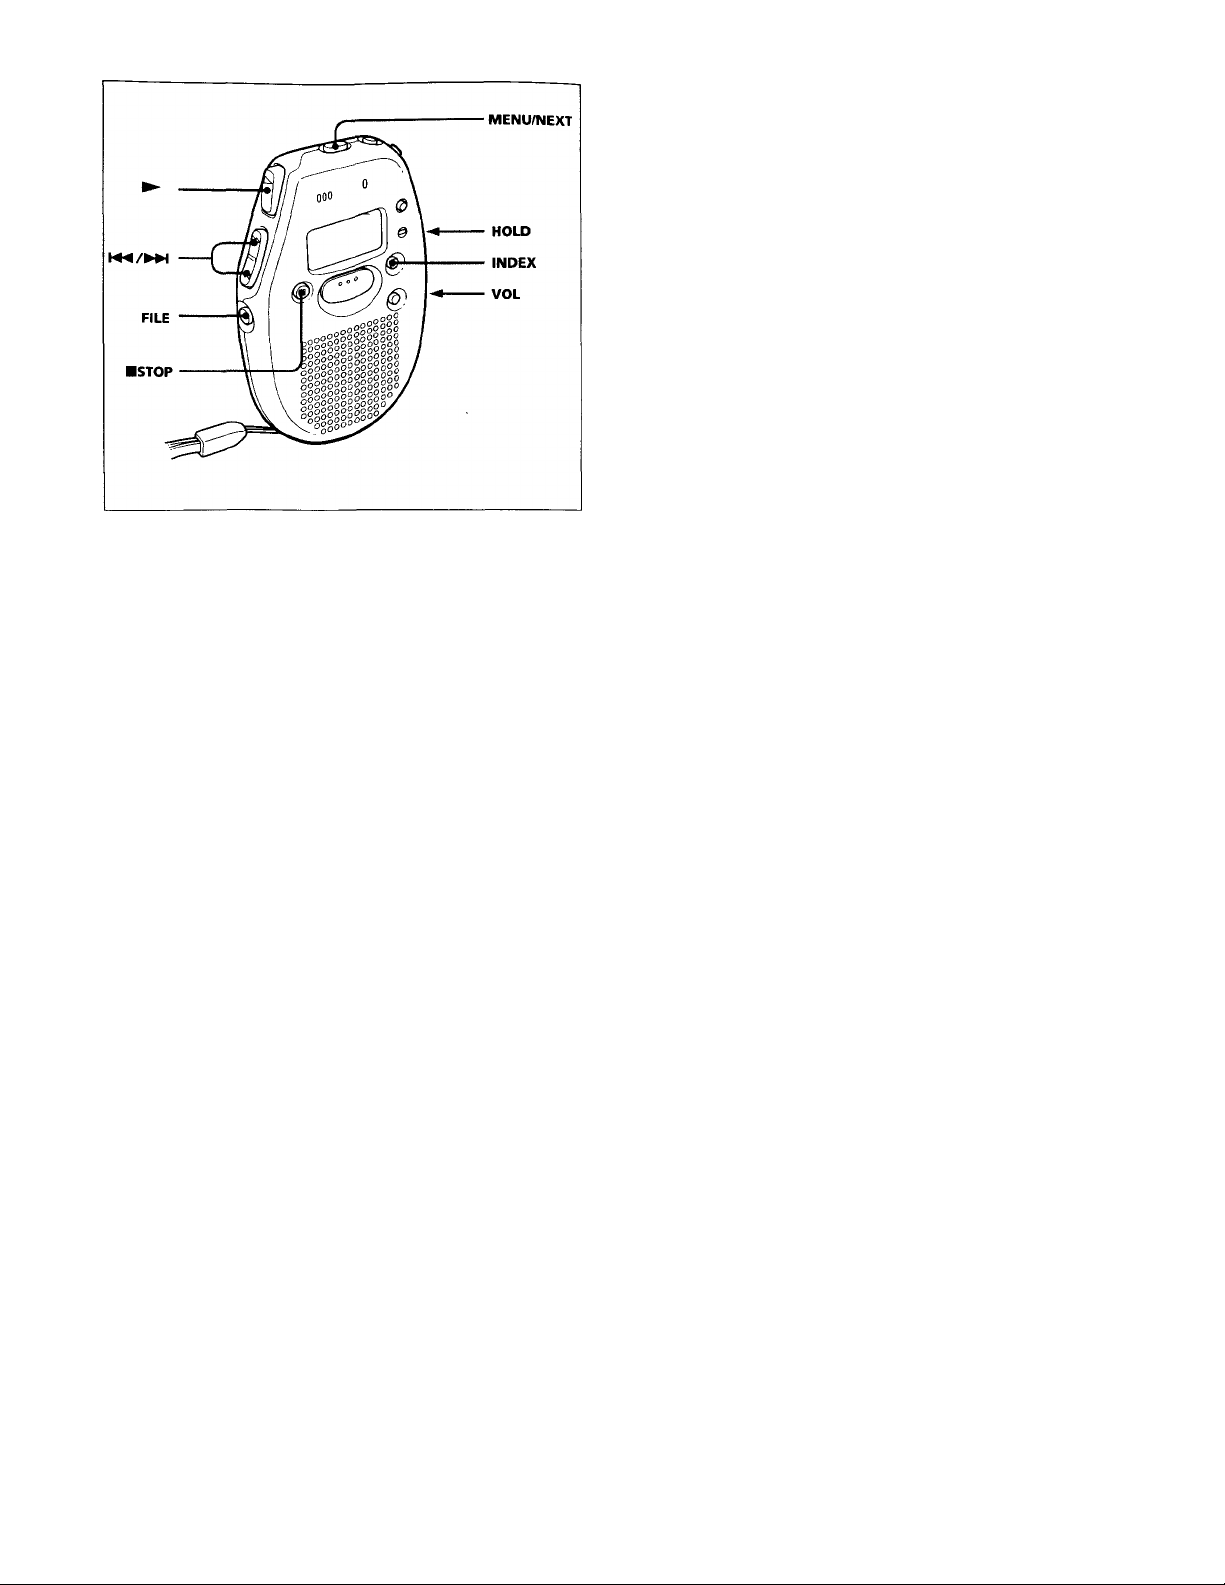
Various ways of playing
Playing a note repeatedly (Repeat play)
Press ► for more than a second until" " appears while the unit
is playing the desired note. The unit will play the note over and
over again.
Playing a note using timer
You can set the unit to play a note automatically on a chosen day
and time with the alarm.
You cannot set the alarm if you have not set the clock on the unit.
Also, you cannot use the alarm if you have not recorded any note.
1 Select the file and the index number you want to play with an
alarm by pressing FILE and /►►!.
2 Press MENU/NEXT repeatedly until "AL" appears.
3 Press or to select "On".
4 Press MENU/NEXT.
The day flashes.
5 Press or to select a day you want.
If you select:
•"mon" to "Sun", the note is played back only on that day
within a week.
•"ALL", the note is played back every day.
6 Press MENU/NEXT.
The time flashes.
7 Press or to select the desired time.
8 Press BSTOP to return to the normal mode.
(>•>) appears and the alarm is set.
When the set day and time come, the alarm rings for 10 seconds
and then the note is played.
To stop the note from playing
Press BSTOP while the alarm sounds, otherwise the note starts
playback.
Even if the HOLD switch is on, you can stop the note.
To play the note before alarm sound finishes
Press BSTOP and ►.
To stop Repeat play
Press BSTOP.
To return to the normal play
Briefly press ►.
Playing all notes in a file continuously
You can play back all notes in a file continuously without pressing
► for each note.
1 Press MENU/NEXT repeatedly until "cont" appears.
2 Press or to select "On".
3 Press BSTOP.
The display returns to the normal mode.
4 Press
To. play back the notes one by one
Select "OFF” on step 2.
Playing the beginning of each note
(Scanning Play)
When you press for more than a second while the unit is in the
stop mode, the unit plays the first five seconds of all notes. This
makes it easy to find the desired note.
If you press ► when you find the desired note, you can listen to
the complete note.
After playing the last note, the unit returns to the first note and
stops.
To select an other index number
1 Press MENU/NEXT repeatedly until "AL" appears.
2 Press or to select "OFF".
3 Press BSTOP.
4 Repeat steps 1 to 8 of "Playing a note using the timer".
Notes
• The note plays back at the set volume, so make sure to set the volume at a
comfortable level.
• If the set alarm time comes during recording, the alarm sounds and the
note plays right after the recording finishes. W, however, flashes at the set
time.
• The alarm does not sound during menu mode. It will sound when you
return to the normal mode.
• If you erase the note to be played by timer, the alarm and timer play will be
cancelled.
Preventing accidental operation
Slide the HOLD switch in the direction of the arrow, "o-n" is
displayed, indicating that all the functions of the buttons are
locked, except B STOP to stop an alarm.
When the unit is in the MENU mode, the HOLD function is ignored
even if you have set the HOLD switch to work.
To release the key protection, slide the HOLD switch in the
opposite direction.
To stop Scanning play
Press BSTOP.
Page 6
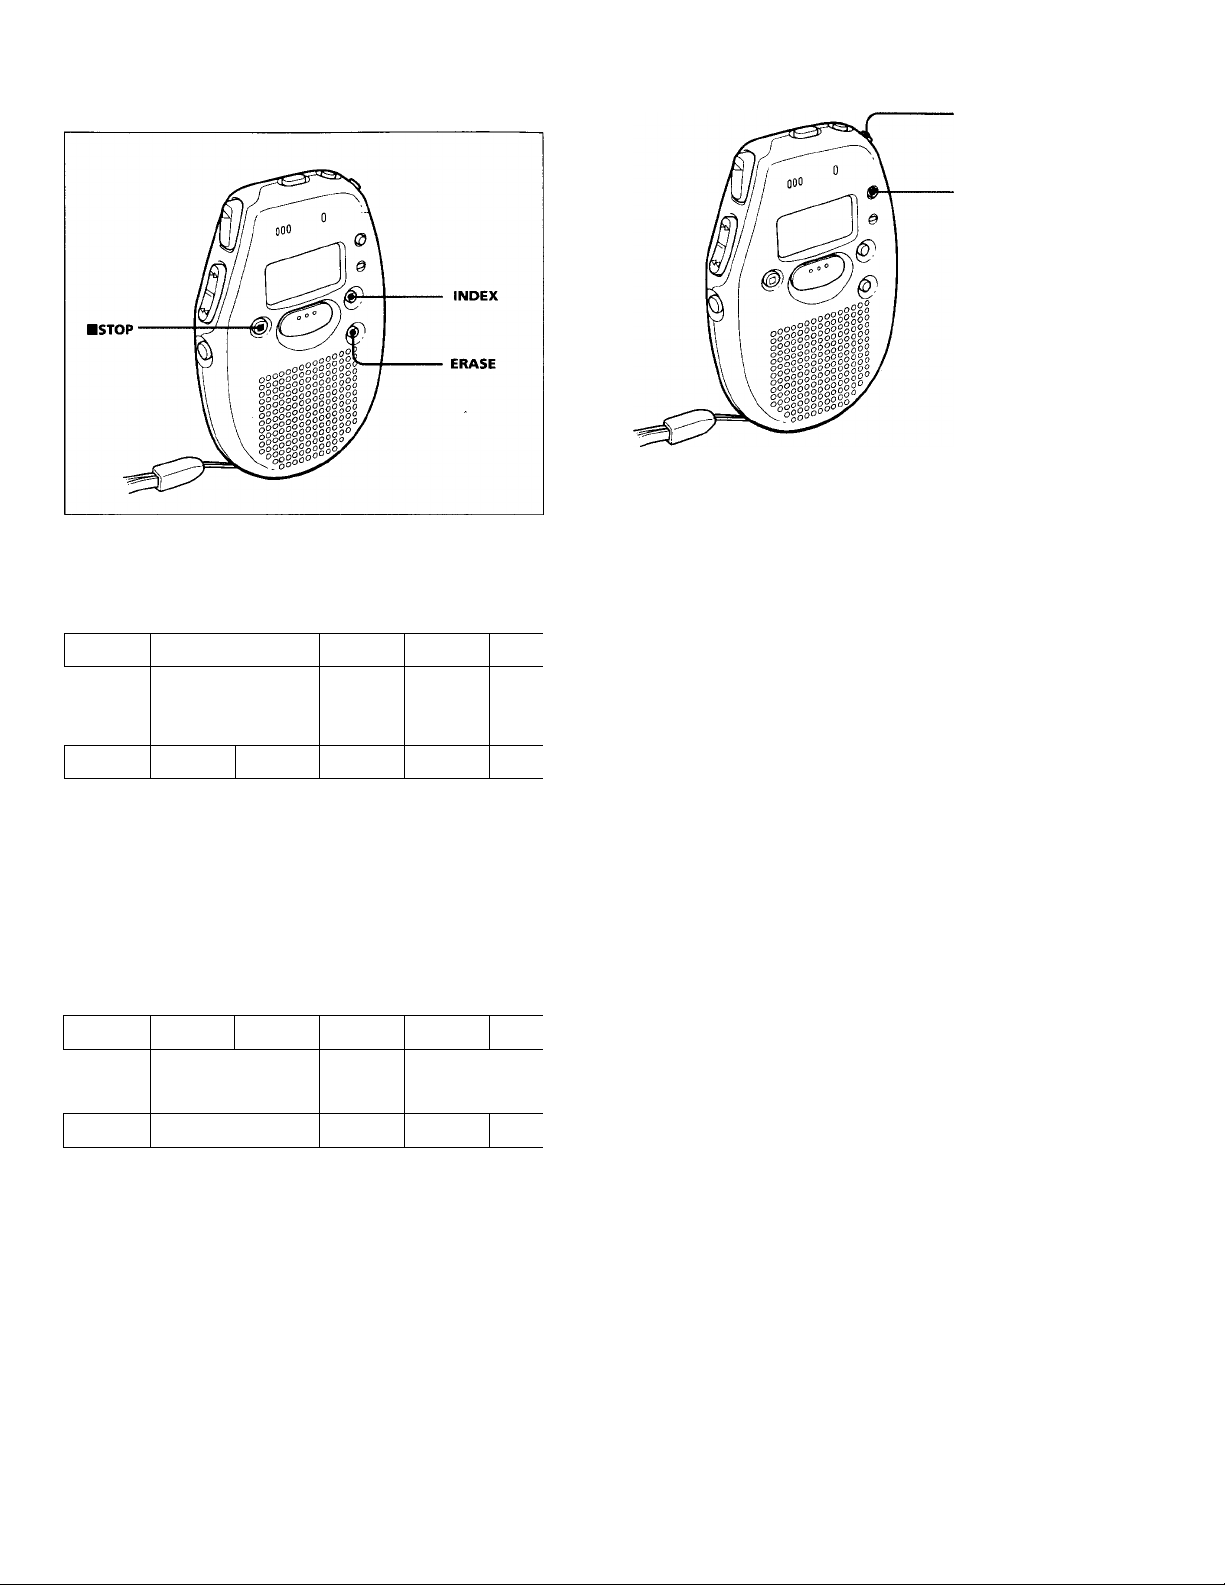
Adding/Erasing Index Marks
You can add or erase index marks after recording.
Dividing a note
You can divide a note by adding index marks.
The index numbers will increase as follows.
1 3 4
A Index ma♦rking
Changing the Display
LIGHT
DGPIAY
The display changes as follows every time you press DISPLAY.
After 10 seconds without pressing any button, the unit returns to
clock display.
Recorded date
'i'
Time counter
'i'
Recordable time
I
_______
1 2 3 4 5
Index numbers increase
While the unit is playing a note, press INDEX at the point you want
to mark. The index number flashes. .
An index mark is added and the following index numbers will
increase by one.
Combining notes
You can erase an index mark to combine the notes before and after
the index mark.
The index numbers will change as follows.
1 2 3
▲ Index ma♦rfc erasing
1
1 Find the index number you want to erase.
2 Press INDEX and ERASE at the same time for more than a
second.
The index number and "ErASE" flashes for 10 seconds.
3 While the display is flashing, press ERASE.
The notes are then combined and unit returns to the normal
mode.
2 3
Index numbers decrease
4
5
4
Notes
• Recordable time varies depending on if SP or LP is selected.
• "
---------
" is displayed instead of:
— the clock display when you have not set the clock.
— the recorded date of the note when you have not set the clock.
— the recorded date when you have not recorded any note.
To see the display in a dark place
Press LIGHT and the display is lit.
To turn off the light, press LIGHT again.
If you do not operate the unit for 10 seconds while the light is on,
the light turns off automatically.
To cancel Erasing
Press HSTOP before step 3.
Page 7
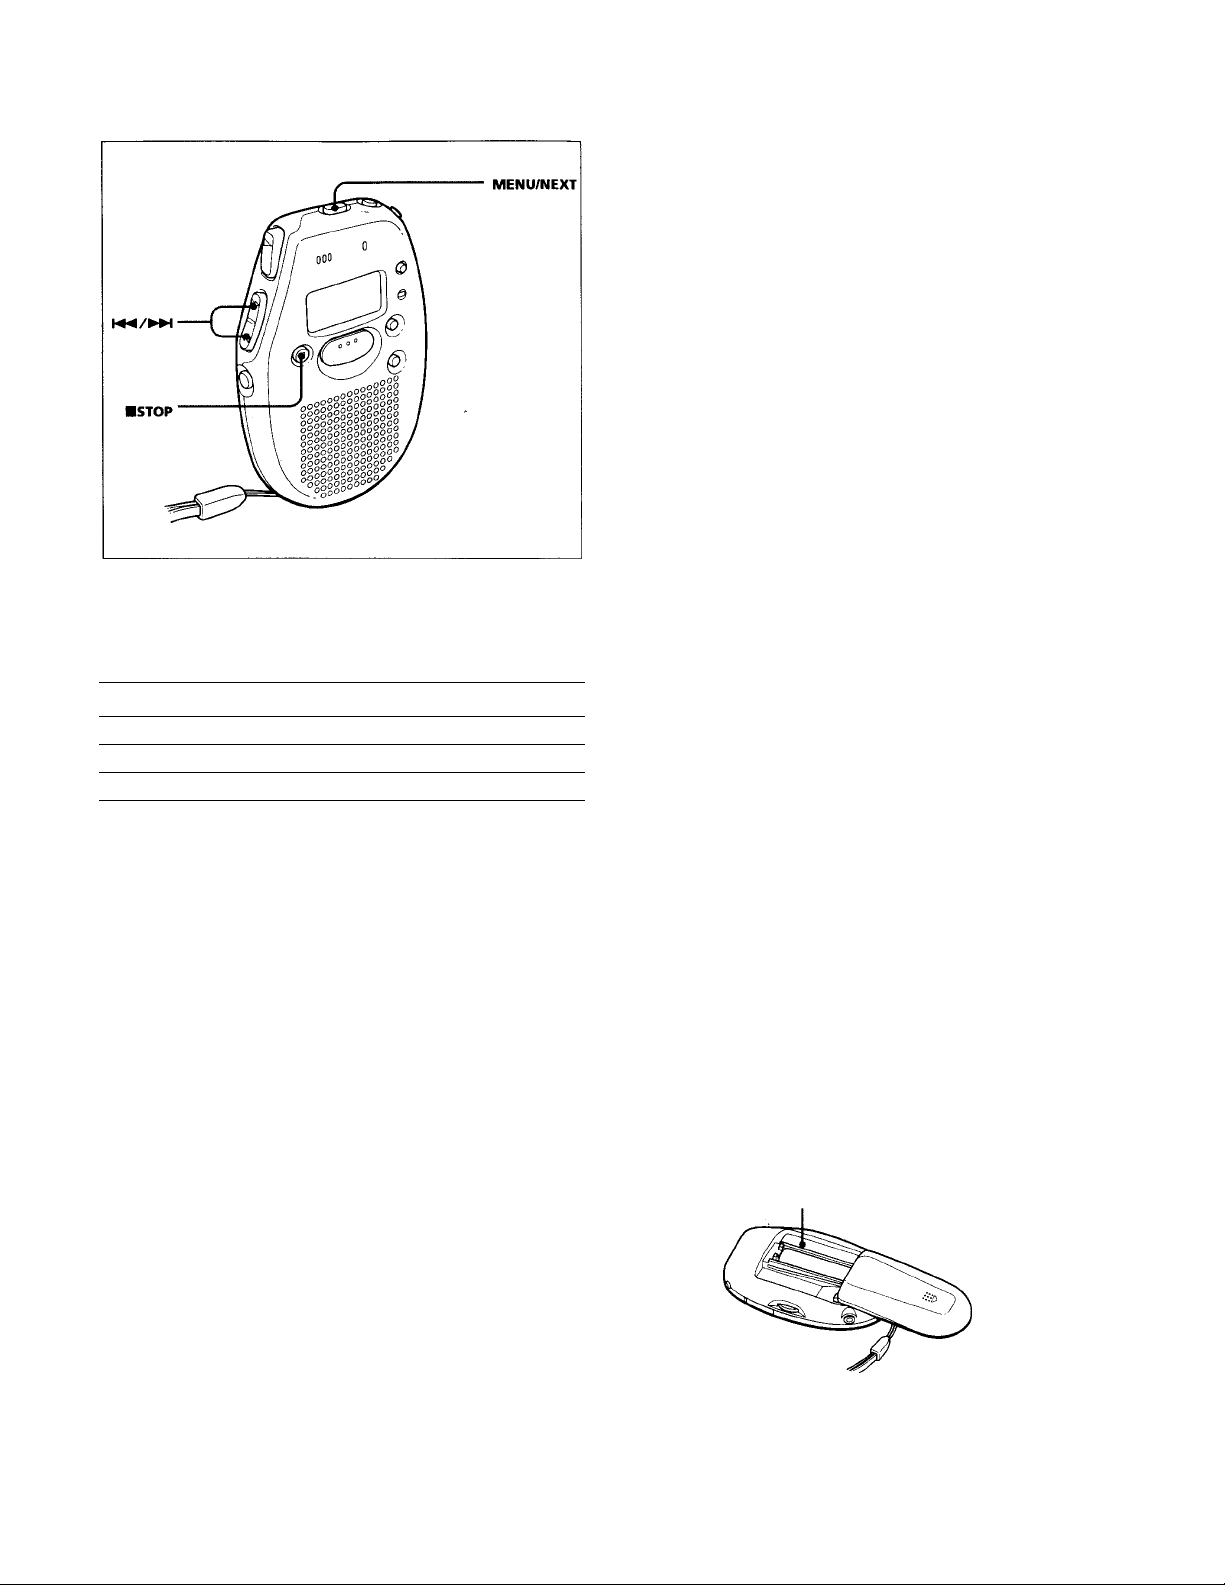
Cutting off the Beep Sound
Additional Information
You can cut off the beep sound by following the steps below.
The alarm still sounds even if you set the beep sound off.
1 Press MENU/NEXT repeatedly until "bEEP" appears.
2 Press or to select "OFF".
3 Press HSTOP to return to the normal display.
What beep sound means
Beep Patterns
“ (single tone) Usual mode
“ "" (double tone) Enter/exit special mode
----------
(triple tone)
* This pattern lets you know the procedure is wrong or informs you of some
messages, such as:
— you are trying to record a note w^hen you have already recorded up to
the maximum recordable time.
— the unit has stopped functioning due to lack of battery power.
To retrieve the beep sound
Select "On" on step 2.
Means
Notice*
Precautions
On power
Operate the unit only on 1.5 V DC. Use a size AAA (LR03) alkaline
battery.
On the unit
• Do not leave the unit in a location near heat sources, or in a place
subject to direct sunlight, excessive dust or mechanical shock.
• Should any solid object or liquid fall into the unit, remove the
batteries and have the unit checked by qualified personnel before
operating it any further.
Keep personal credit cards using magnetic coding or spring-wound
watches, etc., away from the unit to prevent possible damage from
the magnet used in the speaker.
If you have any questions or problems concerning your unit, please
consult your nearest Sony dealer.
Troubleshooting
Should any problem persist after you have made these checks,
consult your nearest Sony dealer.
The unit does not operate.
■> The battery has been inserted with incorrect polarity.
-> The battery is weak.
-> The battery compartment lid is not closed completely.
-> The buttons are locked with the HOLD switch.
No sound comes from the speaker.
The earphone is plugged in.
-> The volume is turned down completely.
"FULL" appears even before the unit has reached the
maximum recording time and you cannot record.
-> When you have recorded 99 notes in a file, "FULL"
appears regardless of the total recorded time. To
continue recording, erase unnecessary notes or index
marks.
"FULL" appears even before the unit records 99 notes in
a file and you cannot record.
-> When you have recorded for the maximum recording
time, "FULL" appears regardless of the total number
of recorded indexes. To continue recording, erase
unnecessary notes.
"
--------
"is dispiayed.
-> You have not set the clock.
-> The recorded date is not displayed if you recorded the
note when the clock was not set.
The unit does not operate correctly
-> Press the reset button with a pen point. The unit will
be reset to the initial setting. The recorded notes,
however, will not be erased.
The reset button
Page 8

Limitation of the System
Symptom
You cannot add an index mark
while recording/playing a
note.
You cannot do Insert recording.
Cause
• You cannot add an index mark or insert a
note in the first or the last 2.5 seconds of
a note.
•If you erase notes or add/erase index
marks frequently, the unit may become
unable to add index marks or insert
notes.
Maintenance
To clean the exterior
Use a soft cloth slightly moistened in water. Do not use alcohol,
benzine or thinner.
Specifications
Recording media
Built-in flash memory
Recording time
SP: 8 minutes
LP: 16 minutes
Frequency response
SP: 200 Hz - 3,400 Hz
LP: 200 Hz -1,700 Hz
Speaker
Approx. 3.6 cm (1 ^/i6 in.) dia.
Power output
70 mW
Output
Earphone jack (mini jack) for 8 - 300 ohms earphone
Power requirements
Size AAA (LR03) alkaline battery: 1.5 V EXI
Dimensions (w/h/d) (incl. projecting parts and controls)
Approx. Sh'X 85.9-x 22.5 mm
(2 '/4 X 3 '/2 X 2^/32in.)
Mass (not including battery)
Approx. 50 g (1.8 oz.)
Supplied accessories
Hand strap x 1
Size AAA (LR03) alkaline battery x 1
This warranty is valid only in the United States.
SONY,
LIMITED WARRANTY
Sony Electronics Inc. ('Sorry'l werrents №■$ Product (including any aecassortes) egainst detects in material or
workmanship as follows:
1. LABOR: For a period of 90 days from the date of purchase, If this Product is determirted to be defective.
Sony will repair or replace the Product at its option, at no charge, or pay the labor charges to any Sony euthoriied service feciUty. After the i^rrenty Period, you must pay for all labor charges.
2. PARTS: In addition, Sony wHl supply, at r>o charge, haw or retxjilt replacerrterws in exchange for defective
padsfor apariodof oneMlyear. After 90daysfrom thedateof purchase, labor for removal and installstfon is
availabla from Sony authorited service facilities or a Sony Service Center at your expense
To obtain wacranty service, you must take the Product, or delrver the Produa freight prepaid, in either ria original
packaging or packaging affordit>g an equal degree of prcftaction. to any authoriNd Sorty service fecility.
This warranty does not cover cosmetic damage or damage due to acts of God, acctdsnt misuse, abuea, negli
gence, commercial use, or modification of. or to any part of the Product, including the antenna. This warranty
does rtot cover damage due to improper operation or mairnananca, connection to improper voltage supply, or
attempted repair by anyorte other than a facilitv authorized by Sony to service the Product. This warranty does
not cover Products sold AS IS or WTTK ALL FAULTS, or consumables (such as fuses or baneriesl. This warranty
is valid only in the United States.
This warranty is invalid if the factory applied señal number has been altered or removed from the Product.
REPAIR OR REPLACEMENT AS PROVIDED UNDER THIS WARRANTY IS THE EXCLUSIVE REMEDY OF THE
CONSUMER. SONY SHAU NOT BE LIABLE FOR ANY INaOENTAL OR CONSEÜUENT1AL DAMAGES FOR
BREACH OF ANY EXPRESS OR IMPLIED WARRANTY ON THIS PRODUCT. EXCEPT TO THE EXTENT PROHIBfTEO BY APPUCABLE LAW. ANY IMPUED WARRANTY Of MERCHANTABILITY OR FTThlESS FOR A PARTICU-
PURPOSE ON THS PRODUCT IS LIMITED IN DURATION TO THE DURATION OF THIS WARRANTY.
Some states do rtot allow ths exclusion or limitation of incidemal or consequential damages, or allow limitatiorts
on how long an implied warranty lasts, so the above limitatioris or exclusions may notappiytoyou. In addition,
if you enter into a service contract with the Sony Partnership within 90 days of the date of sale, the limitation on
how long an impliad warranty lasts does not apply to yoa This warranty gives you specific legal rights. ar>d you
may have other rights which vary from state to state.
For your convenience. Sorty Electronics Ina has established telephorte numbers for frequently askedquestions:
To locate the servicer or dealer nearest you, or for service assistance or resolution of a service
product informatiorr or operation, call:
For an accessory or pert not available from your authorized dealer, call:
Soity Direct Reeponse Center
1-t800)-222-76e9
Of write to:
Sony Direct Response Center
12451 Gateway Blvd.
Fort Myers. FL 33913
1-<800M98-SONY (7869)
[Portable Audiol
Design and specifications are subject to change without notice.
 Loading...