

Page 1
2-687-522-01 (1)
フラッシュ
Flash
取扱説明書
Operating Instructions
Mode d’emploi
HVL-F36AM
電気製品は安全のための注意事項を守らないと、
火災や人身事故になることがあります。
この取扱説明書には、事故を防ぐための重要な注意事項と製品の
取り扱いかたを示しています。この取扱説明書をよくお読み
のうえ、製品を安全にお使いください。お読みになったあ
とは、いつでも見られるところに必ず保管してください。
© 2006 Sony Corporation Printed in Japan
Page 2
安全のために
(42〜44ページも合わせて
お読みください。)
ソニー製品は安全に充分配慮して設計
されています。しかし、まちがった使
いかたをすると、火災や感電などによ
り人身事故になることがあり危険で
す。事故を防ぐために次のことを必ず
お守りください。
安全のための注意事項を守る
•
故障したら使わずに、ソニーデジタ
•
ル一眼レフカメラ専用ヘルプデスク
に修理を依頼する
万一異常が起きたら
•
本機が熱くなり
変なにおい、煙が出た場合
b
1 本機の電源を切る。
2 電池をはずす。
3 ソニーデジタル一眼レフカメラ
専用ヘルプデスクに修理を依頼
する。
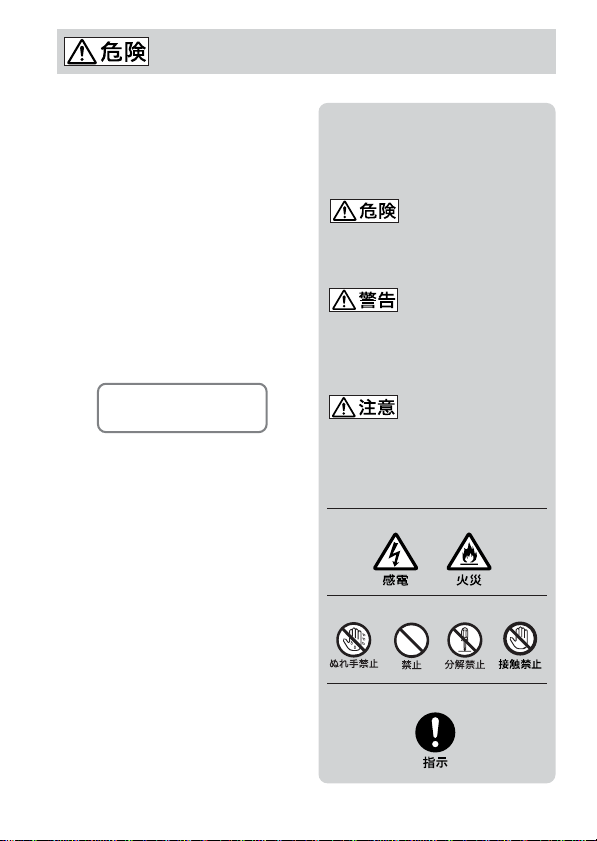
警告表示の意味
取扱説明書では、次のような表示を
しています。表示の内容をよく理解
してから本文をお読みください。
この表示の注意事項を守らないと、
火災・感電・破裂などにより死亡や
大けがなどの人身事故が生じます。
この表示の注意事項を守らないと、
火災・感電・事故などにより死亡や
大けがなど人身事故になることがあ
ります。
この表示の注意事項を守らないと、
感電やその他の事故によりけがをし
たり周辺の家財に損害を与えたりす
ることがあります。
注意を促す記号
行為を禁止する記号
行為を指示する記号
2
Page 3

目次
安全のために ........................................................................
主な特長 ....................................................................................................
各部の名前 ................................................................................................
操作部の名前 ............................................................................................
準備
電池の入れかた ...................................................................................
カメラへの取り付け、取りはずしかた ...............................................
ON/OFF
基本撮影
基本的な撮影(プログラムオート(P)フラッシュ撮影) ..............
各撮影モードでの撮影 .......................................................................
応用撮影
照射角の切り換え ..............................................................................
バウンス撮影 .....................................................................................
AF
ハイスピードシンクロ撮影(
ワイヤレスフラッシュ撮影(WL)...................................................
オートパワーオフの時間変更 ............................................................
その他
調光距離範囲 .....................................................................................
ご使用上の注意 .................................................................................
お手入れのしかた ..............................................................................
主な仕様 ............................................................................................
保証書とアフターサービス ...............................................................
安全のために..............................................................
切り換え .............................................................................
補助光 ...........................................................................................
).................................................
HSS
2
4
5
6
7
9
10
11
14
16
20
23
24
26
33
35
37
38
39
41
42
3
Page 4

お使いになる前に必ずお読みください
本取扱説明書とあわせて、お使いのカメラの取扱説明書もご確認くださ
い。
本機は防じん、防滴、防水仕様ではありません
置いてはいけない場所
使用中、保管中にかかわらず、次のような場所に置かないでください。故
障の原因になります。
異常に高温になる場所
•
炎天下や夏場の窓を閉め切った自動車内は特に高温になり、放置すると
変形したり、故障したりすることがあります。
直射日光の当たる場所、熱器具の近く
•
変形したり故障したりすることがあります。
激しい振動のある場所
•
強力な磁気のある場所
•
砂地、砂浜などの砂ぼこりの多い場所
•
海辺や砂地、あるいは砂ぼこりが起こる場所などでは、砂がかからない
ようにしてください。故障の原因になることがあります。
主な特長
ガイドナンバー36(
•
ラッシュです。
対応レンズとの組み合わせで、背景や被写体の反射率に左右されず良好
•
な調光が得られる
ワイヤレスでのハイスピードシンクロ撮影が可能です。
•
バウンス撮影など、多様な機能を備えています。
•
ADI
レンズ・
85mm
調光も可能です。
ISO 100・m
)のコンパクトなフ
4
Page 5

各部の名前
発光部
( )内は参照ページです。
ワイヤレス信号受光部
(
)
26
補助光発光部(23)
AF
バウンス角度表示
(
)
20
操作部(6)
フラッシュ取りはずし
ボタン(9)
オートロックフット
電池室ふた(7)
ワイドパネル(19)
ご使用前に本機前面部の保護シートをはがしてください。
5
Page 6

操作部の名前
(自動)
AUTO
ランプ(
発光ONランプ
(
10
発光
ンプ(
充電完了ランプ
(
12
発光
切り換えボタン
(
10
バウンスランプ
(
20
)
11
)
ラ
OFF
)
10
)
ON/OFF
)
)
ワイヤレスフラッシュ
ボタン(
26
)
電池警告表示
(
)
8
ワイヤレスフラッシュ
ランプ(
ズーム(照射角)切り
換えボタン(
ハイスピードシンクロ
ボタン(
)
26
マニュアルズーム
(手動切り換え)
ランプ(
ズーム(照射角)
ランプ(
ハイスピードシン
クロランプ(
24
)
18
18
)
18
)
)
)
24
6
Page 7
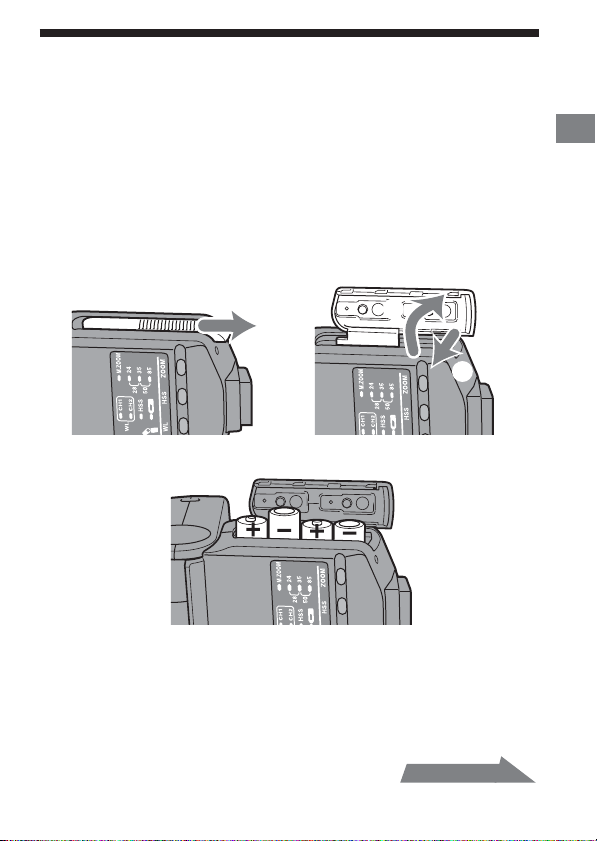
電池の入れかた
以下のいずれかの電池を使用します。
電池は同梱していません。
*
形アルカリ乾電池 4本
•単3
形リチウム電池 4本
•単3
形ニッケル水素電池(
•単3
ニッケル水素電池は、必ず指定の充電器で完全に充電してからお使いくださ
い。
電池室ふたを図の方向に押して開ける。
1
Ni-MH) 4
1
電池室内の表示にしたがって電池を入れる。
2
本
3
2
準
備
電池室ふたを閉める。
3
開けるときと反対の手順に沿ってください。
•
操作部のランプが点灯します。ランプが点灯しない場合は、発光
•
ON/OFF
切り換えボタンを押してください。
次ページにつづく
7
Page 8
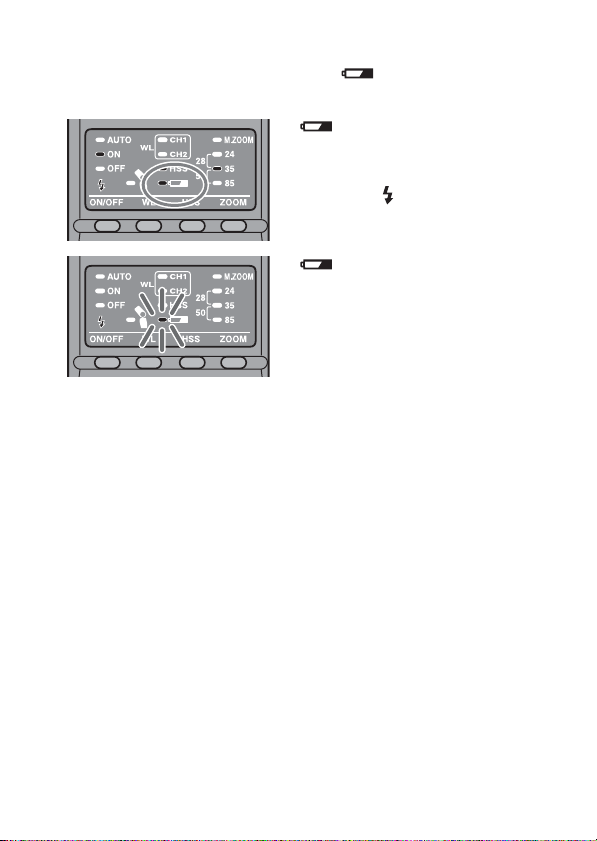
電池残量のチェック
電池の残量が少なくなると、液晶表示部の ランプが点灯または点滅し
ます。
ランプ点灯
電池の交換をおすすめします。
この状態でも、背面の充電完了
ランプ が点灯したら、本機は
発光可能です。
ランプのみ点滅
本機は発光しません。
新しい電池と交換してくださ
い。
本機の発光
•
いときは、電池の向きを確認してください。
ON/OFF
切り換えボタンを押してもランプが何も点灯しな
8
Page 9
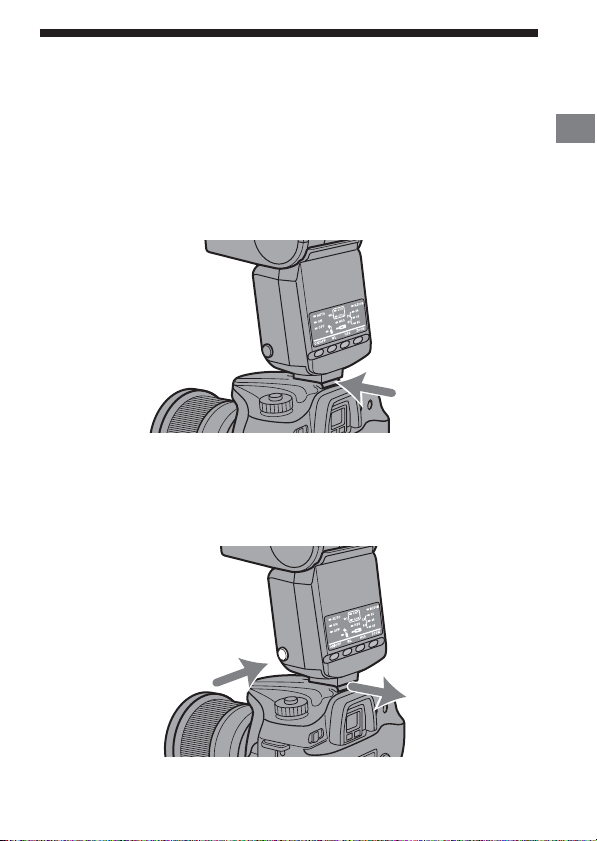
カメラへの取り付け、取りはずしかた
取り付けかた
オートロックフットを、矢印方向に止まるまでしっかり差し
込む。
自動的にロックされます。
•
カメラの内蔵フラッシュが上がっているときは、下げてから取り付けて
•
ください。
取りはずしかた
フラッシュ取りはずしボタンを押しながら1、本機を取りは
ずす2。
準
備
1
2
9
Page 10
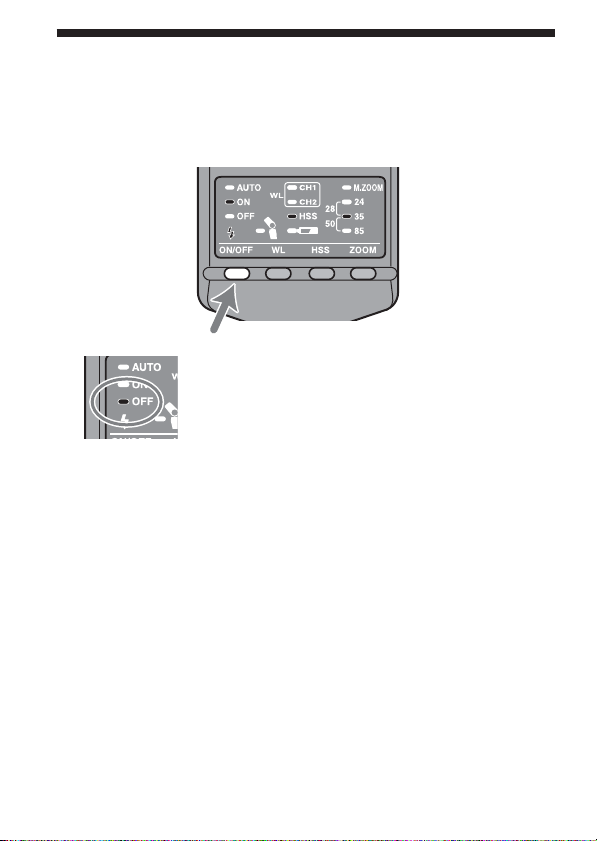
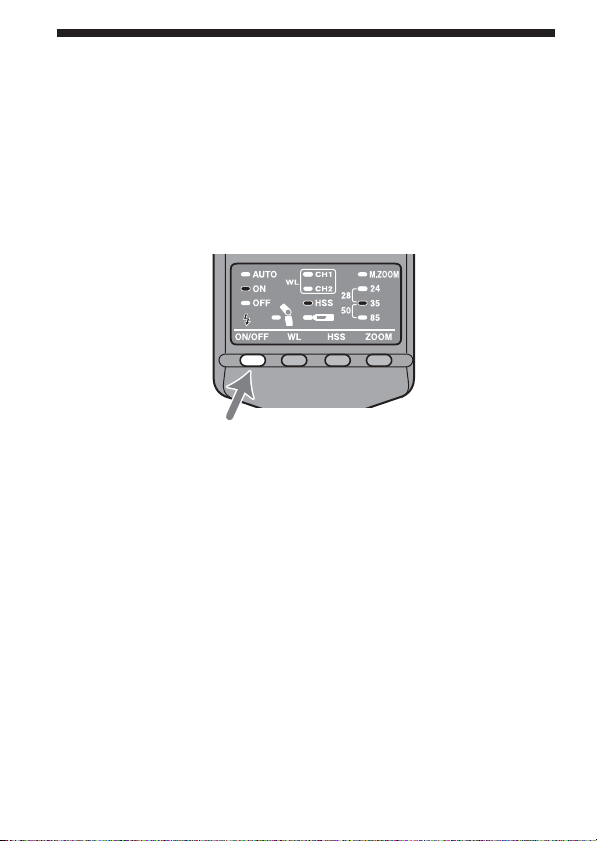
ON/OFF
切り換え
本機背面の発光
本機の電源が入ります。
電源が入ると操作部の発光ONランプが点灯します。
•
ON/OFF
電源が入った状態で発光
押すと、電源が切れ、発光
す。
•発光OFF
切り換えボタンを押す。
ON/OFF
ランプは8秒後に消えます。
切り換えボタンを
ランプが点灯しま
OFF
オートパワーオフ
カメラまたは本機を4分以上操作しないでいると、節電のため自動的に電
源が切れ、表示が消灯します。
ワイヤレスフラッシュ撮影時(26ページ)は60分で表示が消灯しま
•
す。
オートパワーオフまでの時間を変更する、またはオートパワーオフの作
•
動を禁止することもできます(33ページ)。
10
Page 11
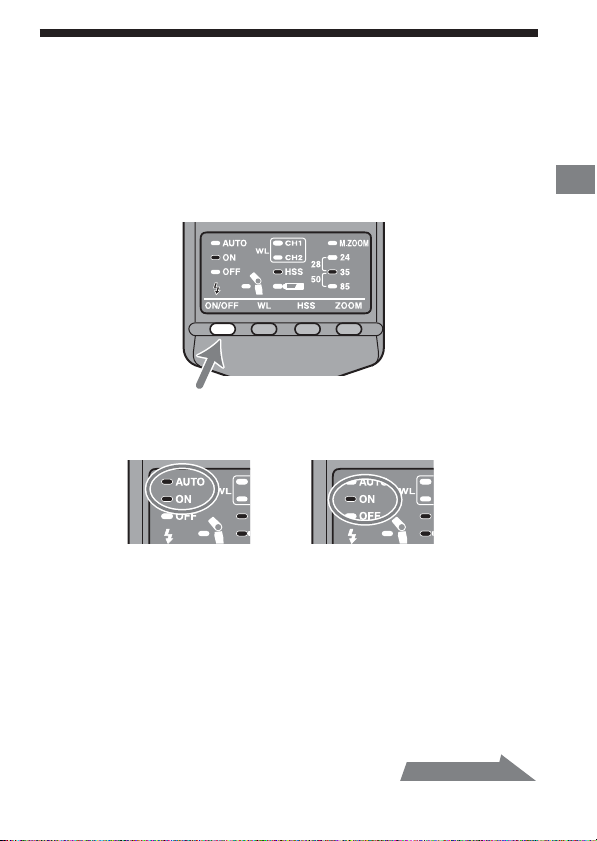
基本的な撮影(プログラムオート(P)
フラッシュ撮影)
カメラの撮影モードをPモードにする。
1
発光
2
ON/OFF
」または「ON」のランプを点灯させる。
「
ON
自動発光の場合、「
•
発光の場合は、「ON」のランプのみが点灯します。
切り換えボタンを押して、「
」と「ON」のランプが点灯します。強制
AUTO
AUTO
」と
基
本
撮
影
次ページにつづく
11
Page 12
本機の充電が完了したら、シャッターボタンを押し込んで
3
撮影する。
本機は操作部の充電完了ランプ が、カメラはファインダー内の
•
がそれぞれ点灯したら、充電完了です。
撮影後、適正露出が得られたときには、本機は操作部の充電完了ラン
プ が点滅します。
充電が完了する前に撮影すると、露出アンダーになることがあります。
•
セルフタイマーでフラッシュ撮影を行なうときは、充電完了を確認して
•
からシャッターボタンを押し込んでください。
自動発光になるか強制発光になるかは、カメラによって異なります。
•
詳しくはカメラの取扱説明書をご覧ください。
オートモードやシーンセレクションのあるカメラでは、それらのモード
•
はここではプログラムモードとして扱っています。
12
Page 13
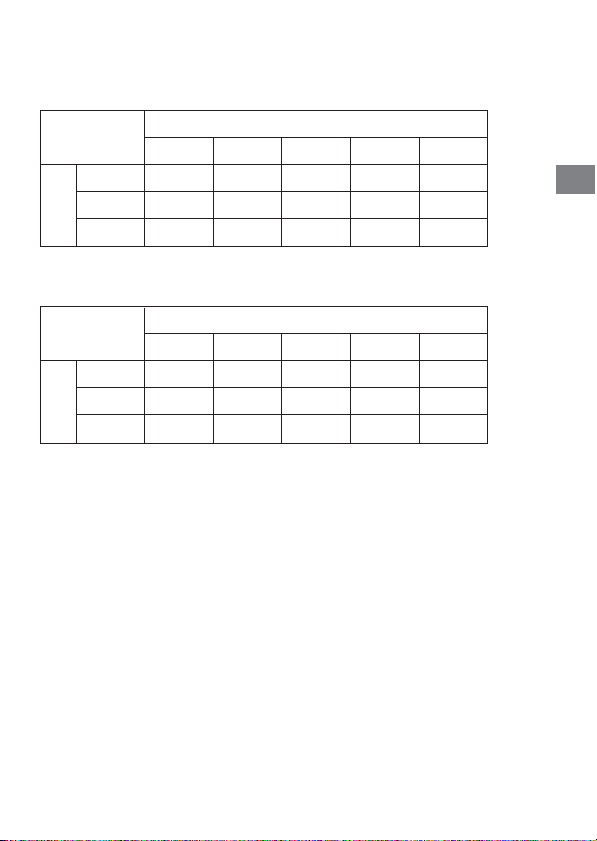
フラッシュ光の届く範囲(調光距離範囲)については以下のとおりで
•
す。
さらに詳しい情報については35ページをご覧ください。
絞
り
値
(F)
絞
り
値
(F)
ISO100
24 28 35 50 85
焦点距離(mm)
2.8 1-7 1-8 1-9 1-10 1-13
4 1-5 1-5.5 1-6 1-7 1-9
5.6 1-3.5 1-4 1-4.5 1-5 1-6.5
ISO400
24 28 35 50 85
焦点距離(mm)
2.8 1-14 1-16 1-18 1-20 1.2-26
4 1-10 1-11 1-12.5 1-15 1-18
5.6 1-7 1-8 1-9 1-10 1-13
(単位:m)
(単位:m)
基
本
撮
影
13
Page 14
各撮影モードでの撮影
絞り優先フラッシュ撮影(A)
カメラの撮影モードをAモードにする。
1
発光
2
3
4
ON/OFF
を点灯させる。
本機は強制発光となります。
•
絞り値を設定し、ピントを合わせる。
絞りを絞り込む(絞り値を大きくする)と調光距離は短く、開放側
•
にする(絞り値を小さくする)と長くなります。
シャッタースピードは自動的に設定されます。
•
充電が完了したら、シャッターボタンを押し込んで撮影す
る。
切り換えボタンを押して、「ON」のランプ
14
Page 15

シャッタースピード優先フラッシュ撮影(S)
カメラの撮影モードをSモードにする。
1
発光
2
3
4
ON/OFF
を点灯させる。
本機は強制発光となります。
•
シャッタースピードを設定し、ピントを合わせる。
充電が完了したら、シャッターボタンを押し込んで撮影す
る。
切り換えボタンを押して、「ON」のランプ
マニュアルモードフラッシュ撮影(M)
カメラの撮影モードをMモードにする。
1
発光
2
3
4
ON/OFF
を点灯させる。
本機は強制発光となります。
•
絞り値とシャッタースピードを設定し、ピントを合わせ
る。
絞りを絞り込む(絞り値を大きくする)と調光距離は短く、開放側
•
にする(絞り値を小さくする)と長くなります。
充電が完了したら、シャッターボタンを押し込んで撮影す
る。
切り換えボタンを押して、「ON」のランプ
基
本
撮
影
15
Page 16
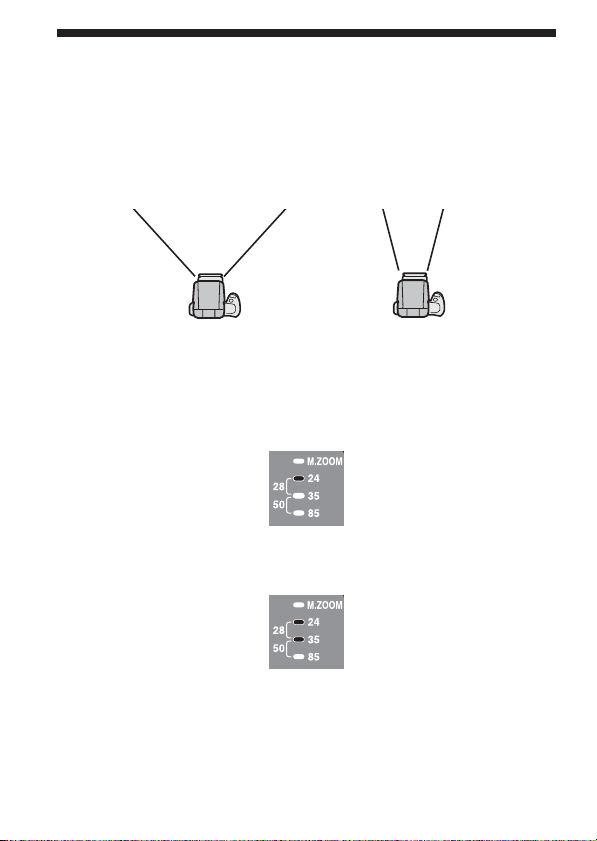
照射角の切り換え
照射角自動切り換え
本機では、
るように、自動的に照射角が切り換わります(オートズーム)。通常は手
動で照射角を切り換える必要はありません。
24mm〜85mm
の範囲で撮影中のレンズの焦点距離に対応す
の場合
24mm
シャッターボタンを半押しすると
•
24mm、35mm、85mm
します。
例:
24mm
28mm、50mm
の設定時は、ランプが2つ点灯します。
例:
28mm
設定時は、該当する数字の横のランプが点灯
設定時
設定時
16
焦点距離
85mm
の場合焦点距離
Page 17

オートズーム位置は使用レンズの焦点距離に応じて下のように設定され
•
ます。
使用レンズの焦点距離 オートズーム位置
24mm〜27mm 24mm
28mm〜34mm 28mm
35mm〜49mm 35mm
50mm〜84mm 50mm
〜
85mm
85mm
オートズームの状態で焦点距離
•
」のランプが点滅します。ワイドパネル(19ページ)の使用をおす
mm
すめします。そのまま撮影すると、画面周辺が暗くなることがありま
す。
未満のレンズを使用すると「
24mm
次ページにつづく
24
応
用
撮
影
17
Page 18
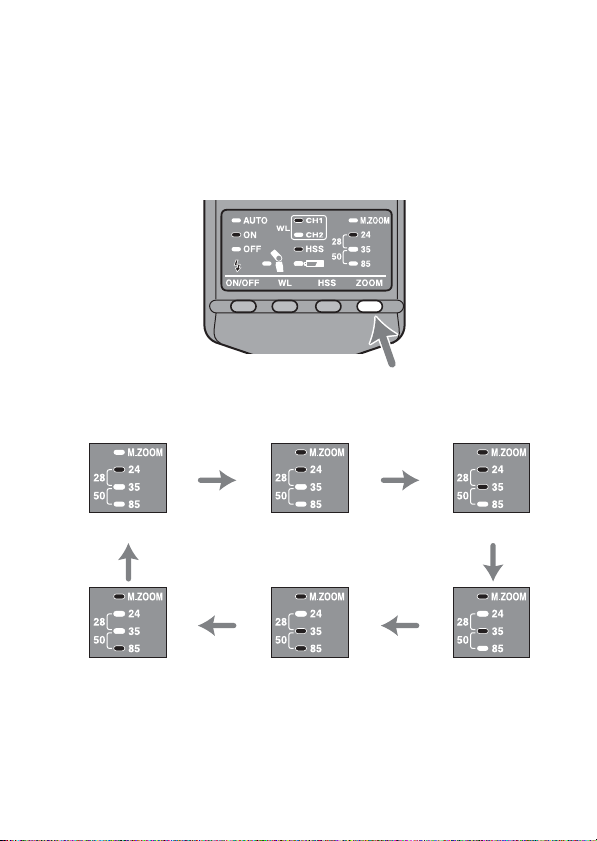
照射角手動切り換え
使用中のレンズの焦点距離にかかわらず、手動で照射角を設定することも
できます(マニュアルズーム)。
ズーム(照射角)切り換えボタン(
ZOOM
)を押して、希望の
照射角を表示させる。
以下の順に照射角が切り換わります。マニュアルズーム(手動切り換
•
え)ランプ「
オートズーム
使用中のレンズの焦点距離より狭い照射角(望遠側)を設定すると、画
•
面周辺が暗くなります。
M.ZOOM
85mm 50mm 35mm
」が点灯します。
24mm 28mm
18
Page 19
ワイドパネル(
ワイドパネルを取り付けると、
17mm
の焦点距離に対応)
までの焦点距離に対応します。
17mm
付属のワイドパネルを発光部に取り付ける。
カチッと音がするまで差し込んでください。
•
取りはずしが固い場合は、片側から順にはずしてください。
•
応
用
撮
影
ワイドパネル使用時は、照射角を
•
い。
焦点距離
•
部と周辺部で撮影距離が異なるため、画面周辺が若干暗くなることがあ
ります。
焦点距離が17mmより広角のレンズを使用すると、画面周辺が暗くな
•
ることがあります。
ワイドパネル使用時は、ハイスピードシンクロボタン(
•
て、ハイスピードシンクロランプが消えた状態でお使いください。
ワイドパネル使用時の調光距離については下の表をご覧ください。
•
付近で平面被写体を正面から撮影する場合、画面中央
17mm
以外に設定しないでくださ
24mm
HSS
)を押し
ISO100 ISO400
2.8 1 - 4 1 - 8
41 - 2.8 1 - 5.6
5.6 1 - 2 1 - 4
(単位:m)
19
Page 20
バウンス撮影
被写体のすぐ後ろに壁があるときに本機を発光させると、壁に強い影がで
きてしまいます。このような場合に発光部を天井などに向けて発光させ、
その反射光によって被写体を照明すると、強い影がなくなり、画面全体に
光の回ったやわらかい写真が撮れます。
20
バウンス撮影
通常のフラッシュ撮影
Page 21
発光部を上方向に回転させる。
フラッシュ発光部は45°、60°、75°、90°の角度で回転させること
•
ができます。
操作部のバウンスランプが点灯します。
•
バウンス撮影するとハイスピードシンクロ撮影(24ページ)は解除され
•
ます。
フラッシュ光を反射させる面(天井や壁)は、白に近いものをおすすめ
•
します。反射面が白以外のときは、反射したフラッシュ光が色の影響を
受けることがあります。高い天井や、ガラスなどはおすすめできませ
ん。
応
用
撮
影
次ページにつづく
21
Page 22
バウンス角度の調整
本機の直接光とバウンス光が同時に画面に入ると、照明ムラの原因となり
ます。反射させる面までの距離、撮影距離、使用レンズの焦点距離などを
考慮に入れて角度を決めてください。
良い例
悪い例
下の表を参考に角度を決めてください。
使用レンズの焦点距離 バウンス角度
以上
70mm
28〜70mm 60
以下
28mm
°
45
°
75°、90
°
22
Page 23

補助光
AF
被写体が暗いときやコントラスト(明暗差)が小さいときは、シャッター
ボタン半押し等オートフォーカスでピントを合わせると、本機前面の赤い
ランプが光ることがあります。これは、オートフォーカスでピントを合わ
せやすくするためのAF補助光です。
応
用
撮
影
補助光は、フラッシュ発光が
•AF
本機のAF補助光が発光するときは、カメラのAF補助光は発光しませ
•
ん。
フォーカスモードがコンティニュアスAFの状態になっているとき(動
•
いているものにピントを合わせ続けている場合)は、AF補助光は発光
しません。
レンズの焦点距離が
•
とがあります。本機をカメラから離しているときも発光しません。
300mm
の状態でも発光します。
OFF
以上のときは、AF補助光は発光しないこ
23
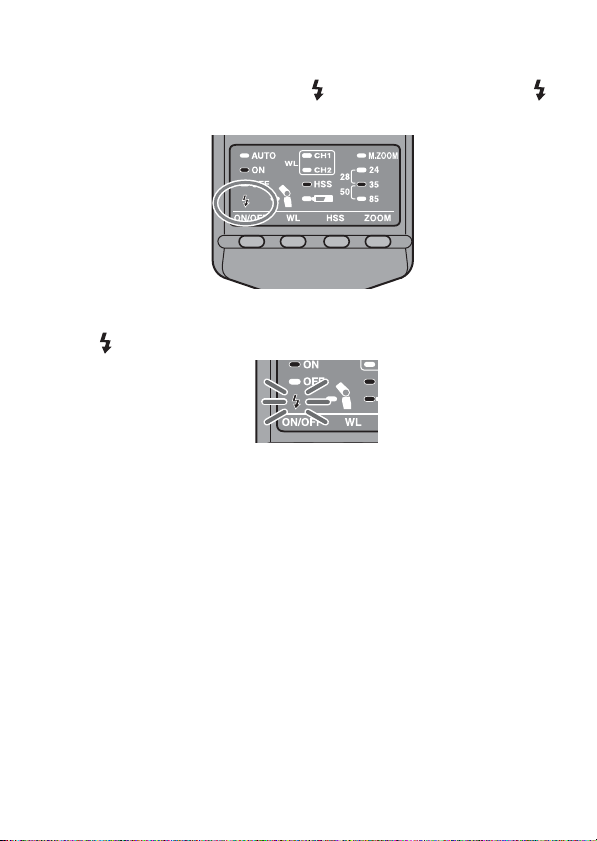
Page 24
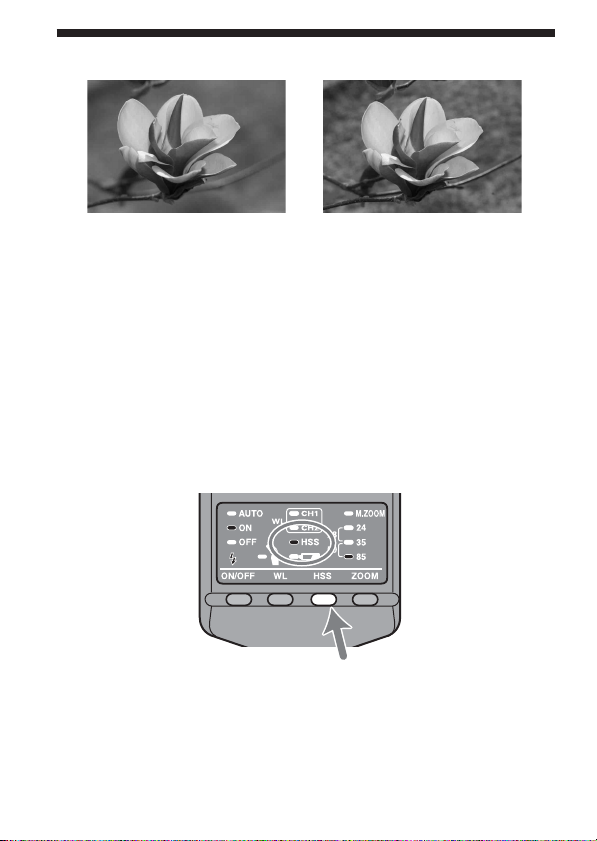
ハイスピードシンクロ撮影(
ハイスピードシンクロ撮影 通常のフラッシュ撮影
ハイスピードシンクロ撮影にすると、フラッシュ同調速度の制限がなくな
り、カメラの持つシャッタースピード全域でのフラッシュ撮影ができるよ
うになります。絞り値の選択幅が広がるので、本機を使った撮影でも絞り
を開けて背景をぼかして、前の被写体がより引き立つ写真を撮ることがで
きます。またAモードやMモードで開放側の絞り値でフラッシュ撮影をす
るとき、背景が非常に明るくて通常は露出オーバーとなるようなシーンで
も、高速シャッターを使って適正露出にすることができます。
HSS
)
ハイスピードシンクロボタン(
・「
」のランプが点灯します。
HSS
24
HSS
)を押す。
Page 25

もう一度ハイスピードシンクロボタン(
•
シンクロ撮影は解除されます。解除すると、同調速度より高速側の
シャッタースピードは設定されません。
明るい場所での撮影をおすすめします。
•
ハイスピードシンクロ撮影時は、通常のフラッシュ撮影よりも調光距離
•
範囲が短くなります。
ハイスピードシンクロ撮影時の正確な調光距離範囲は、39ページのハ
イスピードシンクロ発光時のガイドナンバー表より求めることができま
す。該当するガイドナンバーをレンズの絞り値で割った値が、調光距離
範囲の遠距離限界側(フラッシュ光の届く範囲)になります。
例:シャッタースピード
合、
ガイドナンバー8 ÷ 絞り値4 = 2、により、フラッシュ光は2mまで到
達します。
の場合は、この値の2倍になります。
ISO400
バウンス撮影でのハイスピードシンクロ撮影はできません。
•
フラッシュメーターやカラーメーターを使用する場合は、適正露出が得
•
られないためハイスピードシンクロ撮影はできません。
フラッシュ同調速度
一般的にフラッシュ撮影時には、これ以上の速度で撮影できないとい
う限界のシャッタースピード(フラッシュ同調速度)があります。ハイ
スピードシンクロ撮影(24ページ)の可能なカメラでは、この同調速
度の制限はなくなり、カメラの持つ最速のシャッタースピードでのフ
ラッシュ撮影が可能です。
1/500
秒、焦点距離
)を押すと、ハイスピード
HSS
、絞り値F4の場
28mm
応
用
撮
影
25
Page 26
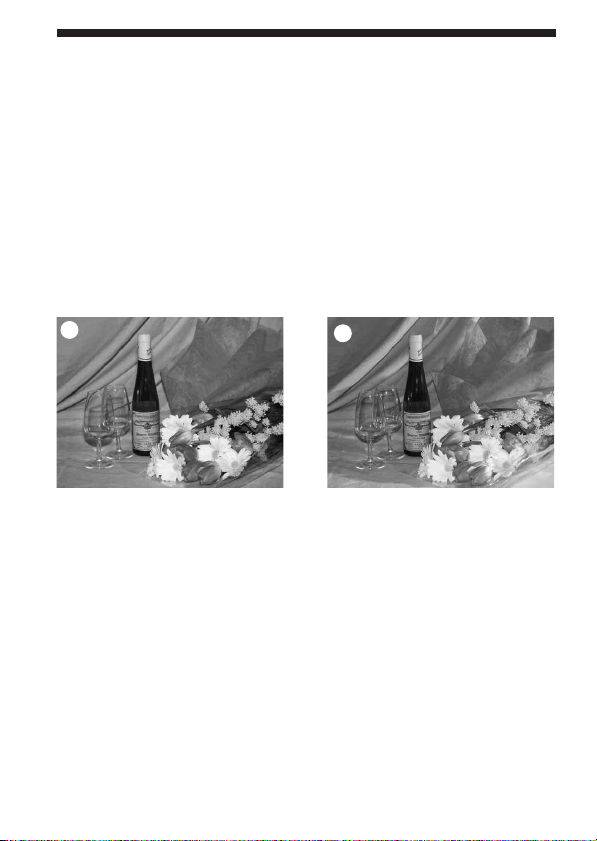
ワイヤレスフラッシュ撮影(
本機をカメラに取り付けて撮影すると、写真1のように平面的な写真にな
ることがあります。このようなとき、本機をカメラから取りはずして撮影
すると、本機の位置を工夫することで、陰影を付けて立体感を出すことが
できます(写真2)。
一眼レフカメラでこのような撮影をするときには、カメラとフラッシュを
コードで接続しなければならないことが多いのですが、本機では、カメラ
との信号の伝達をコードではなく、カメラの内蔵フラッシュの光を使用し
て行うため、コードがなくてもこのような撮影ができます。露出はカメラ
が自動で適正露出になるよう制御します。
WL
)
1
26
2
通常撮影 ワイヤレスフラッシュ撮影
Page 27
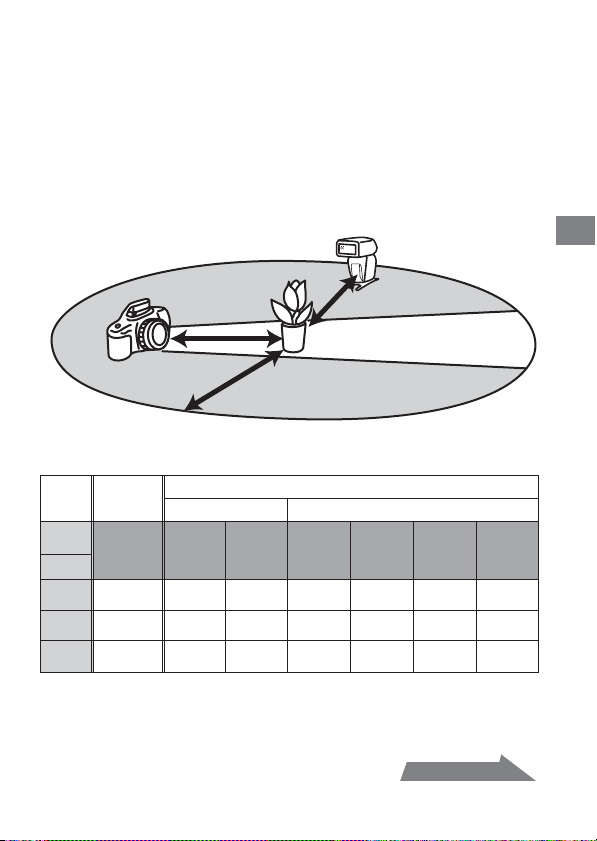
ワイヤレスフラッシュ撮影の距離範囲
ワイヤレスフラッシュは、内蔵フラッシュの発光を信号光として、カメラ
から離した本機を発光させます。信号光が正しく受け取れるよう、カメ
ラ・本機・被写体を設置してください。
室内など暗いところで撮影してください。
•
下図の灰色の部分にカメラから離した本機を設置してください。
•
カメラと被写体の
距離 表1参照
被写体を中心とした半径5mの円内にカメラ
と本機を設置してください
ワイヤレスフラッシュ撮影の距離表
カメラと被
シャッター
スピード
絞り値
写体の距離
(表1)
全シャッター
スピード
HSS
1/60
以下
2.8 1.4 - 5 1.4 - 5 1 - 5 1 - 4 1 - 3 1 - 2 1 - 1.5
41 - 51 - 3.5 1 - 5 1 - 3 1 - 2 1 - 1.5 –
5.6 1 - 5 1 - 2.5 1 - 3.5 1 - 2 1 - 1.5 – –
表の値は
•
ISO感度 ISO100
記の値の2倍になります。(上限は5mを目安としてください。)
でない撮影
1/60
秒
同調速度
の場合です。
HVL-F36AM
〜
1/250秒1/500秒1/1000秒1/2000
本機と被写体の
距離 表2参照
被写体の真後ろに本機を置かな
いでください
と被写体の距離(表2)
撮影
HSS
の場合は、遠い側が上
ISO400
秒
単位
応
用
撮
影
m
次ページにつづく
27
Page 28
ワイヤレスフラッシュ撮影時の注意
ワイヤレス撮影時は、撮影直前にカメラの内蔵フラッシュが一度発光す
•
るため、フラッシュメーター、カラーメーターでの測定はできません。
本機の照射角は、自動的に
•
ワイヤレスフラッシュ撮影時に、まれに周囲の静電気や電磁波ノイズに
•
よって誤発光する場合があります。
使用しないときは、発光
ださい。
ON/OFF
になります。
24mm
切り換えボタンで発光
OFF
にしてく
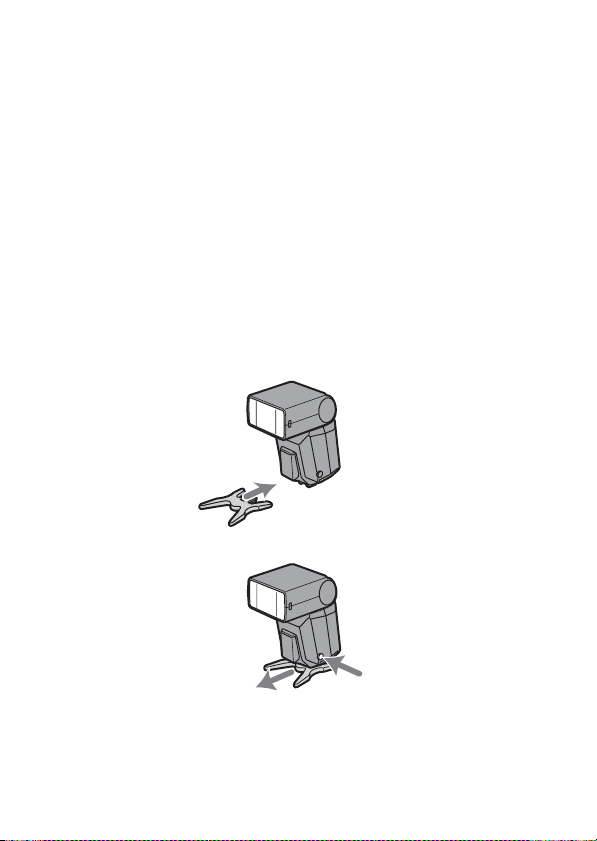
ミニスタンドの取り付け、取りはずしかた
本機をカメラから離したときは、付属のミニスタンドをご使用くださ
•
い。
ミニスタンドの三脚用ネジ穴で、三脚に取り付けることも可能です。
•
取り付けかた
取りはずしかた
28
Page 29
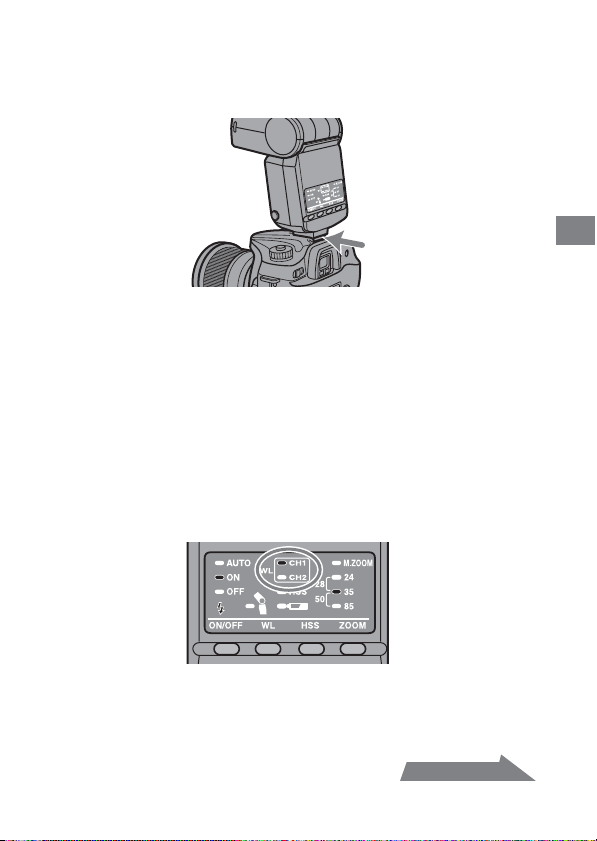
ワイヤレスフラッシュ撮影方法
本機をカメラに取り付け、本機とカメラの電源をONにす
1
る。
カメラをワイヤレスフラッシュに設定する。
2
設定方法はカメラによって異なります。カメラの使用説明書をご覧
•
ください。
カメラをワイヤレスに設定すると、本機も自動的にワイヤレス設定
•
になります。
背面部のワイヤレスフラッシュランプ(WL)のチャンネル
•
「
」が点灯します。チャンネル2を選択している場合には
CH1
「
」が点灯します。詳しい設定方法は31ページをご覧くださ
CH2
い。
応
用
撮
影
1
次ページにつづく
29
Page 30
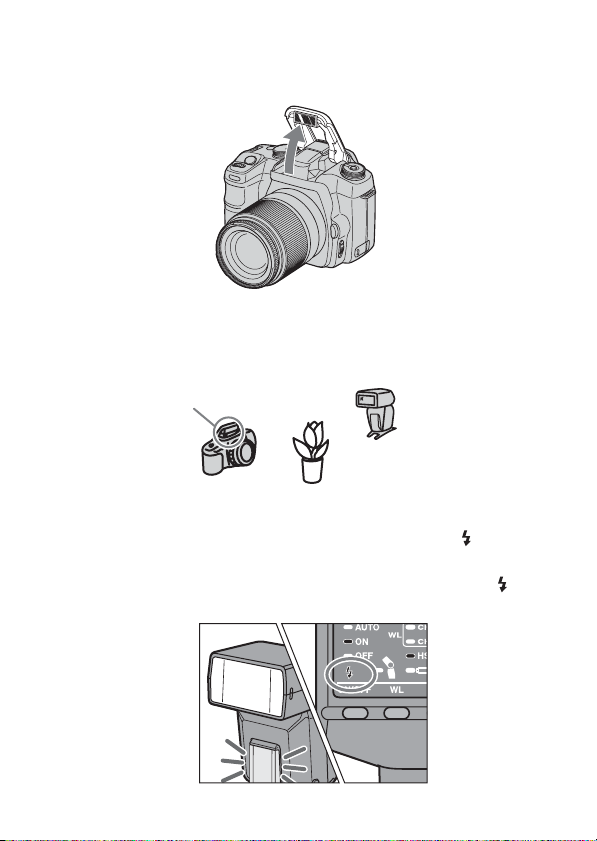
本機をカメラから取りはずし、カメラの内蔵フラッシュを
3
上げる。
カメラから取りはずすと、「
•
カメラと本機を設置する。
4
室内など暗いところに設置してください。
•
設置方法は27ページをご覧ください。
•
内蔵フラッシュ
内蔵フラッシュと本機の充電完了を確認する。
5
内蔵フラッシュは、充電完了時にはファインダー内の が点灯しま
•
す。
本機は、充電完了時には前面のAF補助光が点滅し、背面の が点灯
•
します。
」ランプが点灯します。
HSS
本機
30
Page 31

テスト発光を行ない、本機の発光を確認する。
6
テスト発光の方法は、カメラによって異なります。詳しくはカメラ
•
の取扱説明書をご覧ください。
発光しない場合は、カメラ・本機・被写体の配置場所を変えてくだ
•
さい。
もう一度内蔵フラッシュと本機の充電完了を確認し、シャ
7
ッターボタンを押し込んで撮影する。
チャンネル設定を変更するには
撮影会などで近くにワイヤレスフラッシュ撮影をしている人がいると、そ
の人の内蔵フラッシュ等の信号光により、お使いのフラッシュが発光して
しまうことがあります。このような場合は、以下の方法でチャンネル設定
を変えることができます。
ワイヤレスフラッシュランプの「
1
プが点灯していない状態にする。
点灯している場合には、ワイヤレスフラッシュボタンを押してくだ
•
さい。
ワイヤレスフラッシュボタンを3秒間押し続ける。
2
秒後にチャンネルが変更され、それに応じてランプの点灯が変わ
•3
ります。
フラッシュをカメラに取り付けて、シャッターボタンを半
3
押しする。
この操作により、カメラにフラッシュのチャンネル情報が転送され
•
ます。
CH1
」、「
CH2
次ページにつづく
」のラン
31
応
用
撮
影
Page 32

本機単独でワイヤレスに設定する場合
本機をカメラに取り付けてワイヤレス設定を行った際に、本機のチャンネ
ル情報はカメラに伝えられています。そのため本機のチャンネルを変えず
に同一カメラと本機を使い続ける場合は、次からはカメラと本機を別々に
ワイヤレスに設定することもできます。
カメラ側:
ワイヤレスに設定する。
操作方法はカメラの使用説明書をご覧ください。
本機側:
ワイヤレスフラッシュボタンを押し、「
を点灯させる。
CH1
」または「
CH2
」
32
Page 33

オートパワーオフの時間変更
本機のオートパワーオフまでの時間をお好みの状態に変更することができ
ます。
発光
1
2
ON/OFF
• AUTO
が可能な状態となります。
ワイヤレスフラッシュボタンで設定の対象を選択する。
チャンネル1「
•
通常のオートパワーオフ
チャンネル2「
•
ワイヤレスフラッシュ設定時のオートパワーオフ
切り換えボタンを3秒間押し続ける。
ランプ、ONランプ、
」
CH1
」
CH2
ランプが同時に点灯し、時間変更
OFF
応
用
撮
影
次ページにつづく
33
Page 34

ズーム(照射角)切り換えボタンでオートパワーオフまで
3
の時間を選択する。
チャンネル1「
•
選択項目
点灯ランプ
」 通常のオートパワーオフ
CH1
分後
4
分後
15
分後
60
[
M.ZOOM
チャンネル2「
4
•
パワーオフ
選択項目
点灯ランプ
発光
ON/OFF
CH2
分後
60
[
M.ZOOM
切り換えボタンを押して通常の状態に戻
す。
選択された設定は、フラッシュを
•
持されています。
]
[
]
[
24mm
」 ワイヤレスフラッシュの設定時のオート
なし
]
[
]
24mm
にしても電池を抜いても、保
OFF
35mm
]なし[
85mm
]
34
Page 35

調光距離範囲
下記は、本機をカメラに装着して撮影したときの調光距離範囲(適正露出
が得られる撮影距離範囲)です。
焦点距離
ISO25 ISO50 ISO100 ISO200 ISO400 ISO800
F32 - - - - - - 1.0 - 1.1
F22 - - - - - 1.0 - 1.4 1.0 - 1.6
F16 - - - - 1.0 - 1.4 1.0 - 1.9 1.0 - 2.2
F11 - - - 1.0 - 1.4 1.0 - 2.0 1.0 - 2.7 1.0 - 3.2
F8 - - 1.0 - 1.4 1.0 - 1.9 1.0 - 2.8 1.0 - 3.8 1.0 - 4.4
F5.6 - 1.0 - 1.4 1.0 - 2.0 1.0 - 2.8 1.0 - 3.9 1.0 - 5.4 1.0 - 6.3
F4 1.0 - 1.4 1.0 - 1.9 1.0 - 2.8 1.0 - 3.9 1.0 - 5.5 1.0 - 7.5 1.0 - 8.8
F2.8 1.0 - 2.0 1.0 - 2.8 1.0 - 3.9 1.0 - 5.5 1.0 - 7.9 1.0 - 11 1.0 - 13
F2 1.0 - 2.8 1.0 - 3.9 1.0 - 5.5 1.0 - 7.7 1.0 - 11 1.0 - 15 1.0 - 18
F1.4 1.0 - 3.9 1.0 - 5.5 1.0 - 7.6 1.0 - 11 1.0 - 16 1.0 - 21 1.1 - 25
の場合 (単位:m)
17mm
ISO1000
そ
の
他
焦点距離
ISO25 ISO50 ISO100 ISO200 ISO400 ISO800
F32 - - - - 1.0 - 1.3 1.0 - 1.7 1.0 - 2.0
F22 - - - 1.0 - 1.3 1.0 - 1.8 1.0 - 2.5 1.0 - 2.9
F16 - - 1.0 - 1.3 1.0 - 1.8 1.0 - 2.5 1.0 - 3.4 1.0 - 3.9
F11 - 1.0 - 1.3 1.0 - 1.8 1.0 - 2.5 1.0 - 3.6 1.0 - 5.0 1.0 - 5.7
F8 1.0 - 1.3 1.0 - 1.8 1.0 - 2.5 1.0 - 3.5 1.0 - 5.0 1.0 - 6.9 1.0 - 7.9
F5.6 1.0 - 1.8 1.0 - 2.5 1.0 - 3.6 1.0 - 5.0 1.0 - 7.1 1.0 - 9.8 1.0 - 11
F4 1.0 - 2.5 1.0 - 3.5 1.0 - 5.0 1.0 - 7.0 1.0 - 10 1.0 - 14 1.0 - 16
F2.8 1.0 - 3.6 1.0 - 5.0 1.0 - 7.1 1.0 - 10 1.0 - 14 1.0 - 20 1.0 - 23
F2 1.0 - 5.0 1.0 - 7.0 1.0 - 10 1.0 - 14 1.0 - 20 1.3 - 28 1.4 - 32
F1.4 1.0 - 7.1 1.0 - 10 1.0 - 14 1.0 - 20 1.3 - 28 1.8 - 40 2.0 - 45
焦点距離
•
を目安としてお考えください。焦点距離
80mm
の場合 (単位:m)
24mm
の場合は、
28mm
の中間が目安となります。
24mmと35mm
の遠距離側限界の値の中間
の場合は
50mm
35mm
次ページにつづく
ISO1000
と
35
Page 36

焦点距離
ISO25 ISO50 ISO100 ISO200 ISO400 ISO800
F32 - - - 1.0 - 1.1 1.0 - 1.6 1.0 - 2.2 1.0 - 2.5
F22 - - 1.0 - 1.1 1.0 - 1.6 1.0 - 2.3 1.0 - 3.1 1.0 - 3.6
F16 - 1.0 - 1.1 1.0 - 1.6 1.0 - 2.2 1.0 - 3.1 1.0 - 4.3 1.0 - 5.0
F11 1.0 - 1.1 1.0 - 1.6 1.0 - 2.3 1.0 - 3.2 1.0 - 4.5 1.0 - 6.3 1.0 - 7.2
F8 1.0 - 1.6 1.0 - 2.2 1.0 - 3.1 1.0 - 4.4 1.0 - 6.3 1.0 - 8.6 1.0 - 9.9
F5.6 1.0 - 2.2 1.0 - 3.1 1.0 - 4.5 1.0 - 6.3 1.0 - 8.9 1.0 - 12 1.0 - 14
F4 1.0 - 3.1 1.0 - 4.4 1.0 - 6.3 1.0 - 8.8 1.0 - 12 1.0 - 17 1.0 - 20
F2.8 1.0 - 4.5 1.0 - 6.2 1.0 - 8.9 1.0 - 13 1.0 - 18 1.1 - 25 1.3 - 28
F2 1.0 - 6.2 1.0 - 8.8 1.0 - 13 1.0 - 18 1.1 - 25 1.6 - 35 1.8 - 40
F1.4 1.0 - 8.9 1.0 - 13 1.0 - 18 1.1 - 25 1.6 - 36 2.2 - 50 2.5 - 56
の場合 (単位:m)
35mm
ISO1000
焦点距離
ISO25 ISO50 ISO100 ISO200 ISO400 ISO800
F32 - - 1.0 - 1.1 1.0 - 1.6 1.0 - 2.3 1.0 - 3.1 1.0 - 3.6
F22 - 1.0 - 1.1 1.0 - 1.6 1.0 - 2.3 1.0 - 3.3 1.0 - 4.5 1.0 - 5.2
F16 1.0 - 1.1 1.0 - 1.6 1.0 - 2.3 1.0 - 3.2 1.0 - 4.5 1.0 - 6.2 1.0 - 7.1
F11 1.0 - 1.6 1.0 - 2.3 1.0 - 3.3 1.0 - 4.6 1.0 - 6.5 1.0 - 9 1.0 - 10
F8 1.0 - 2.3 1.0 - 3.2 1.0 - 4.5 1.0 - 6.3 1.0 - 9.0 1.0 - 12 1.0 - 14
F5.6 1.0 - 3.2 1.0 - 4.5 1.0 - 6.4 1.0 - 9.0 1.0 - 13 1.0 - 18 1.0 - 20
F4 1.0 - 4.5 1.0 - 6.3 1.0 - 9 1.0 - 13 1.0 - 18 1.1 - 25 1.3 - 28
F2.8 1.0 - 6.4 1.0 - 9.0 1.0 - 13 1.0 - 18 1.1 - 26 1.6 - 35 1.8 - 40
F2 1.0 - 9.0 1.0 - 13 1.0 - 18 1.1 - 25 1.6 - 36 2.3 - 50 2.6 - 56
F1.4 1.0 - 13 1.0 - 18 1.1 - 26 1.6 - 36 2.3 - 51 3.2 - 71 3.6 - 80
以内での撮影は、フラッシュ光がレンズにさえぎられ写真の下部に
•1m
影ができることがありますので、ワイヤレスフラッシュ撮影を行ってく
ださい。
の場合 (単位:m)
85mm
ISO1000
36
Page 37

ご使用上の注意
撮影上の注意
本機は強い光が出ますので、人物の目の前で発光させないでください。
•
電池について
アルカリ乾電池は、温度や保管のしかたによっては、電池残量が実際の
•
残量よりも低く液晶表示部に表示されることがあります。このような場
合でも、本機をしばらく使用すると電池残量が回復します。
点滅して使用できない場合でも、発光
か押すと、電池残量が回復し使用可能になることがあります。それでも
回復しないときは、電池を交換してください。
リチウム電池をご使用の場合、高温下での発光時や連続発光により電池
•
が発熱すると、電池内部の安全回路が働き、
に本機が使用できなくなる場合があります。しばらく使用を止めて、電
池温度を下げてからお使いください。
ニッケル水素電池は、電池残量が残り少なくなると急激に性能が低下し
•
ます。撮影中に突然
り、
電池の製造後の経過期間により、新しい電池でも本機の発光間隔および
•
発光回数が性能表と異なることがあります。
が点滅し始めてすぐに使用不可能になることもあります。
のみが点滅して本機が使用できなくなった
ON/OFF
切り換えボタンを何度
が点滅して一時的
が
そ
の
他
次ページにつづく
37
Page 38

使用温度について
本機の使用温度範囲は0℃〜40℃です。
•
直射日光下の車内など極度の高温下や、湿度の高いところに本機を放置
•
しないでください。
急激な温度変化を与えると内部に水滴を生じる危険性があります。ス
•
キー場のような寒い屋外から温かい室内に持ち込む場合は、屋外でビ
ニール袋に入れ、袋の中の空気を絞り出して密閉します。その後室内に
持ち込み、周囲の温度になじませてから取り出してください。
電池の性能は低温になるほど低下します。低温下では、新しい電池を使
•
う、保温した予備の電池を用意して暖めながら交互に使う、などの点に
留意してご使用ください。また低温下では、電池の残量が残っていても
一時的に
性能が低下した電池でも、常温に戻せば性能は回復し再び使えるように
なります。
本機は防水性能は備えていません。海辺等で使用されるときは、水や砂
•
がかからないよう注意してください。水、砂、ホコリ、塩分等が残って
いると故障の原因になります。
ランプが点灯することがあります。なお低温のために
お手入れのしかた
本機をカメラから取りはずし、柔らかい布でから拭きしてください。砂が
ついたときは、こすると傷を付けますので、ブロアーで軽く吹き飛ばして
ください。汚れがひどいときは、中性洗剤溶液を少し含ませた布で拭いて
から、もう一度から拭きしてください。シンナー、ベンジン、アルコール
などは表面の仕上げを傷めますので使わないでください。
38
Page 39

主な仕様
ガイドナンバー
発光間隔/発光回数
通常(閃光)発光時(
レンズ焦点距離
(照射角)
ワイドパネル装着時の照射角です。
*
ワイヤレス発光時(
レンズ焦点距離
(照射角)
ワイドパネル装着時の照射角です。
*
ハイスピードシンクロ(フラット)発光時(
発光間隔(秒) 約
発光回数(回) 約
発光回数とは、新しい電池で電池消耗までに発光できる回数
•
を表します。
ISO 100
17* 24 28 35 50 85
mm
)
GN 11 20 22 25 29 36
ISO 100
17* 24 28 35 50 85
mm
)
GN 8.5 14 15 19 22 28
ISO 100
シャッター
スピード
レンズ焦点距離(照射角)
24 28 35 50 85
mm
1/250 10 11 13 15 18
1/500 7 8 9 11 13
1/1000 5 5.6 6.5 7.5 9
1/2000 3.5 4 4.6 5.3 6.4
1/4000 2.5 2.8 3.2 3.8 4.5
1/8000 1.7 2 2.3 2.6 3.2
1/12000 1.2 1.4 1.6 1.8 2.2
アルカリ リチウム
0.2〜6
約
0.2〜6
ニッケル水素電池
(
1550 mAh
約
0.2〜5
200〜4000約500〜10000約150〜3000
次ページにつづく
そ
の
他
)
)
39
Page 40

照射角
照射角レンズ焦点距離(照射角)
照射角
上下(°)
左右(°)
ワイドパネル装着時の照射角です。
*
17* 24 28 35 50 85
115 60 53 45 34 23
125 78 70 60 46 31
mm
連続発光
補助光 低コントラストかつ低輝度時自動発光
AF
調光方式 プリ発光による光量制御
外形寸法
質量
同梱物 フラッシュ(1)、ミニスタンド(1)、ケース(1)、
取扱説明書に記載の機能は当社試験条件によります。
本機の仕様および外観は、改良のため予告なく変更することがあります
が、ご了承ください。
コマ/秒で40回の連続撮影に追随可能
5
(閃光発光時、
動作範囲(α
中央エリア:
その他周辺エリア:
GN6、85mm
に焦点距離
100
0.5m〜6m
0.5m〜3m
68 ×122 × 89 mm(幅/高さ/
g(電池含まず)
260
ワイドパネル(1)、印刷物一式
、ニッケル水素電池使用時)
50mm
ダイレクト調光
TTL
奥行き)
レンズ装着時)
40
Page 41

保証書とアフターサービス
保証書は国内に限られています
付属している保証書は、国内仕様です。外国で万一、故障、不具合が生じ
た場合の現地でのアフターサービスおよびその費用については、ご容赦く
ださい。
保証書
この製品には保証書が添付されておりますので、お買い上げの際お買い
•
上げ店でお受け取りください。
所定事項の記入および記載内容をお確かめのうえ、大切に保存してくだ
•
さい。
保証期間は、お買い上げ日より1年間です。
•
アフターサービス
調子の悪いときはまずチェックを
この取扱説明書をもう一度ご覧になってお調べください。
それでも具合の悪いときは
ソニーデジタル一眼レフカメラ専用ヘルプデスクにご相談ください。
保証期間中の修理は
保証書の記載内容に基づいて修理させていただきます。
詳しくは保証書をご覧ください。
保証期間経過後の修理は
修理によって機能が維持できる場合は、ご要望により有料修理させていた
だきます。当社では本機の補修用性能部品(製品の機能を維持するために
必要な部品)を、製造打ち切り後最低8年間保有しています。この部品保
有期間を修理可能の期間とさせていただきます。保有期間が経過したあと
も、故障箇所によっては修理可能の場合がありますので、ソニーデジタル
一眼レフカメラ専用ヘルプデスクにご相談ください。
ご相談になるときは、次のことをお知らせください。
品名:
•
•
•
HVL-F36AM
故障の状態:できるだけ詳しく
購入年月日
41
そ
の
他
Page 42

(2ページも合わせてお読みください)
下記の注意事項を守らないと、火災・感電により
死亡や大けがの原因となります。
分解や改造をしない
火災や感電の原因となります。危険ですので、絶対に自分で分
解しないでください。
内部の点検や修理はソニーデジタル一眼レフカメラ専用ヘルプ
デスクにご依頼ください。
内部に水や異物を入れない
水や異物が入ると火災や感電の原因となります。この製品は防
水構造にはなっていませんので、水中や雨天での使用はできま
せん。万一、水や異物が入ったときは、すぐにカメラ本体のス
イッチを切り、本機からはずしてください。ソニーデジタル一
眼レフカメラ専用ヘルプデスクにご相談ください。
雷が鳴りだしたら、使用しない
遠くで雷が鳴りだしたときは、感電を避けるため、すぐにご使
用を中止してください。
本機を布団などでおおった状態で使わない
熱がこもって変形したり、火災の原因となることがあります。
発光部を人の目に近づけて発光させない
強力な光は目をいためる恐れがあります。
落下などで、外装ケースなどが破損したときは、絶
対に露出部分に触れない
感電の原因となることがあります。
自動車などの運転中にストロボを操作したり、運転
者に向けてストロボを発光させない
交通事故の原因となることがあります。
42
Page 43

万一、使用中に高熱、焦げ臭い、煙が出るなどの異
常を感じたら、すみやかに電池を抜き、使用を中止
してください。
放置すると火災や火傷の原因となります。
下記の注意事項を守らないと、けがをしたり周辺の家財に
損害を与えたりすることがあります。
湿気やほこり、油煙、湯気の多い場所では使わない
上記のような場所で使うと、火災や感電の原因となることがあり
ます。
ぬれた手で本機をさわらない
感電の原因となることがあります。
乳幼児の手の届かないところで使用/保管する
ケガ、感電、故障の原因になります。
安定した場所に置く
ぐらついた台の上や傾いたところなどに置いたり、不安定な状態
で設置すると、製品が落ちてけがの原因となることがあります。
発光部を皮膚や物で覆ったまま発光させない。
発光のとき、発光部が大変熱くなり、火傷の恐れがあります。
安
全
の
た
め
に
43
Page 44

電池についての安全上のご注意と
お願い
漏液、発熱、発火、破裂、誤飲による大けがややけど、火災などを避
けるため、下記の注意事項をお守りください。
火の中に入れない。電子レンジやオーブンで加熱しない。
•
ショートさせたり改造、分解しない。
•
コインやヘアピンなどの金属類と一緒に携帯、保管しない。
•
火のそばや炎天下、高温になった車の中などで放置したりしない。
•
水・海水・牛乳・清涼飲料水・石鹸水などの液体で濡らさない。
•
ハンマーなどでたたいたり、踏みつけたり落下させるなどの強い衝撃を
•
与えない。
幼児の手の届かない場所に置き、口に入れないよう注意する。万一、飲
•
み込んだ場合は、ただちに医師に相談してください。
指定された種類の電池を使用する。
•
乾電池は充電しない。
•
電池を使い切ったとき、長期間使用しないときは、取り出しておく。
•
と−の向きを正しく入れる。
•+
古い電池と新しい電池、種類、メーカーの異なる電池は一緒に使わな
•
い。
44
Page 45

お願い
ニッケル水素電池はリサイクルできます。不要になった電池
は、金属部にセロハンテープなどの絶縁テープを貼って充電
ニッケル
水素電池
充電式電池の回収・リサイクルおよびリサイクル協力店については
有限責任中間法人
式電池リサイクル協力店へお持ちください。
ホームページ
JBRC
http://www.jbrc.net/hp/contents/index.html
を参照してください。
商標について
はソニー株式会社の商標です。
45
Page 46

English
Before operating the product, please read this manual thoroughly and
retain it for future reference.
WARNING
To reduce fire or shock hazard, do not expose the unit to rain or moisture.
Tape over lithium battery contacts to avoid short-circuit when disposing of
batteries, and follow local regulations for battery disposal.
Keep batteries or things that could be swallowed away from young
children. Contact a doctor immediately if an object is swallowed.
Immediately remove the batteries and discontinue use if...
• the product is dropped or subjected to an impact in which the interior is
exposed.
• the product emits a strange smell, heat, or smoke.
Do not disassemble. Electric shock may occur if a high voltage circuit
inside the product is touched.
IMPORTANT SAFETY
INSTRUCTIONS
When using your photographic equipment, basic safety
precautions should always be followed, including the
following:
Read and understand all instructions before using.
Close supervision is necessary when any appliance is used
by or near children. Do not leave appliance unattended
while in use.
Care must be taken as burns can occur from touching hot
parts.
2
Page 47

Do not operate appliance with a damaged cord or if the
appliance has been dropped or damaged- until it has been
examined by a qualified serviceman.
Let appliance cool completely before putting away. Loop
cord loosely around appliance when storing.
To reduce the risk of electric shock, do not immerse this
appliance in water or other liquids.
To reduce the risk of electric shock, do not disassemble this
appliance, but take it to a qualified serviceman when
service or repair work is required. Incorrect reassembly can
cause electric shock when the appliance is used
subsequently.
The use of an accessory attachment not recommended by
the manufacturer may cause a risk of fire, electric shock, or
injury to persons.
Batteries may become hot or explode due to improper use.
Use only the batteries specified in this instruction manual.
Do not install the batteries with the polarity (+/-) reversed.
Do not subject batteries to fire or high temperatures.
Do not attempt to recharge (except for rechargeable
batteries), short or disassemble.
Do not mix, batteries of different types, brands or ages.
SAVE THESE
INSTRUCTIONS
CAUTION
Do not touch the flashtube during operation, it may become hot
when the flash fires.
3
Page 48

For customers in Europe
Disposal of Old Electrical & Electronic Equipment
(Applicable in the European Union and other European
countries with separate collection systems)
This symbol on the product or on its packaging indicates that
this product shall not be treated as household waste. Instead
it shall be handed over to the applicable collection point for
the recycling of electrical and electronic equipment. By
ensuring this product is disposed of correctly, you will help
prevent potential negative consequences for the environment
and human health, which could otherwise be caused by
inappropriate waste handling of this product. The recycling
of materials will help to conserve natural resources. For more
detailed information about recycling of this product, please
contact your local Civic Office, your household waste
disposal service or the shop where you purchased the
product.
For the customers in the U.S.A.
CAUTION
You are cautioned that any changes or modifications not expressly
approved in this manual could void your authority to operate this
equipment.
NOTE:
This equipment has been tested and found to comply with the limits for a
Class B digital device, pursuant to Part 15 of the FCC Rules.
These limits are designed to provide reasonable protection against harmful
interference in a residential installation.
This equipment generates, uses, and can radiate radio frequency energy
and, if not installed and used in accordance with the instructions, may
cause harmful interference to radio communications.
However, there is no guarantee that interference will not occur a particular
installation. If this equipment does cause harmful interference to radio or
television reception, which can be determined by turning the equipment
off and on, the user is encouraged to try to correct the interference by one
or more of following measures:
– Reorient or relocate the receiving antenna.
– Increase the separation between the equipment and receiver.
– Connect the equipment into an outlet on a circuit different from that to
which the receiver is connected.
– Consult the dealer or an experienced radio/TV technician for help.
4
Page 49

Table of contents
Features ................................................................................................. 6
Name of parts ....................................................................................... 7
Control panel ........................................................................................ 8
Preparations
Inserting batteries ................................................................................ 9
Attachment and removal of the flash ............................................. 11
Auto power ON/OFF ....................................................................... 12
Basics
Program auto flash (The basics) ...................................................... 13
Recording modes ............................................................................... 16
Apprications
Zoom flash coverage ......................................................................... 18
Bounce flash ....................................................................................... 22
AF illuminator .................................................................................... 25
High-speed sync (HSS) ..................................................................... 26
Wireless flash mode (WL)................................................................. 28
Time to auto power off...................................................................... 35
Additional Information
Flash range.......................................................................................... 37
Notes on use ....................................................................................... 39
Maintenance ....................................................................................... 40
Specifications ...................................................................................... 41
5
Page 50

Before use
For details, refer to the operating instructions supplied with your camera.
This flash is not dust-proof, splash-proof or waterproof.
Do not place this flash in the following locations
Regardless of whether this unit is in use or in storage, do not place it in any
of the following locations. Doing so may lead to a malfunction.
• Placing this flash in locations subject to direct sunlight such as on
dashboards or near a heater may cause this unit to deform or
malfunction.
• Locations with excessive vibration
• Locations with strong electromagnetism
• Locations with excessive sand
In locations such as the seashore and other sandy areas or where dust
clouds occur, protect the unit from sand and dust.
This may lead to a malfunction.
Features
•A compact flash that provides a flash output with a maximum guide
number 36 (85 mm position, ISO 100 · m).
• Can be used with compatible lenses to enable ADI (Advanced Distance
Integration) flash metering, which is not affected by the reflection rate of
the background or subject.
• Enables High-speed Sync.
• Provides many functions such as bounce flash, etc.
6
Page 51

Name of parts
Flashtube
Wireless control-
signal receiver
(28)
Mounting-footrelease button (11)
AF illuminator
Bounce indicator
(22)
Control panel
(8)
(25)
Mounting foot
Battery-chamber
door (9)
Wide panel (21)
Remove the protective sheet from the front
of the AF illuminator before use.
7
Page 52

Control panel
Auto lamp (13)
Flash-ON lamp
(12)
Flash-OFF lamp
(12)
Flash-ready
lamp (14)
Flash ON/OFF
button (12)
Bounce lamp (22)
Wireless flash
button (28)
Low-battery
lamp (10)
Wireless flash
lamps (28)
Manual-ZOOM
lamp (20)
ZOOM (flash
coverage)
lamps (20)
High-speedsync lamp
(26)
ZOOM (flash
coverage)
selection button
(20)
High-speed-sync
button (26)
8
Page 53

Inserting batteries
The HVL-F36AM may be powered by :
*Batteries are not supplied.
• Four AA-size alkaline batteries
• Four AA-size lithium batteries
• Four AA-size rechargeable nickel-metal hydride (Ni-MH) batteries
Always ensure that rechargeable nickel-metal hydride batteries are
charged in the specified charger unit.
1 Open the battery-chamber door as shown.
1
3
2
2 Insert the batteries in the battery chamber as in the
diagram.
Preparations
3 Close the battery-chamber door.
• Follow the reverse steps when opening the battery-chamber door.
• The lamp on the control panel comes on. If it does not come on,
press the flash ON/OFF button.
Continued on the next page
9
Page 54

Checking Batteries
The lamp on the control panel comes on or blinks when the batteries
are low.
lamp on
Changing the batteries is
recommended. The flash can still be
used in this state if (Flash-ready
lamp) on the rear of the unit is lit.
Only lamp blinking
Flash cannot be used.
Insert new batteries.
• If nothing comes on when the flash ON/OFF button is pressed, check
the orientation of the batteries.
10
Page 55

Attachment and removal of the
flash
Attaching the flash to the camera
Push the mounting foot firmly onto the camera until it
stops.
• The flash is locked in place automatically.
• If the built-in flash in the camera is protruding, lower it before attaching
the flash unit.
Removing the flash from the camera
While pressing the mounting-foot release button 1,
remove the flash 2.
1
2
Preparations
11
Page 56

Auto power ON/OFF
Press the flash ON/OFF button on the back side of the
flash.
Power of the flash turns it on.
• When the power of the flash is turned on, the flash-ON lamp on the
control panel comes on.
If you press the flash ON/OFF button while the flash is
turned on, the flash switches off and the flash-OFF lamp
on the control panel comes on.
• The flash-OFF lamp goes out after 8 seconds.
Auto power off
When the camera or flash is not used for four minutes, power switches off
and control panel indicators disappear automatically to save the batteries.
• In wireless flash photography (p. 28), control panel indicators disappear
after 60 minutes.
• You can change the time until auto power off, or disable auto power off.
(p. 35)
12
Page 57

Program auto flash (The basics)
1 Select the P mode on the camera.
2 Press the flash ON/OFF button to turn on the “AUTO”
and “ON” lamps or the “ON” lamp on the control panel.
• The “AUTO” and “ON” lamps come on with Autoflash. Only the
“ON” lamp comes on with Fill-flash.
Basics
Continued on the next page
13
Page 58

3 When the flash is charged, press the shutter button to
take a photo.
• The flash is charged when the flash-ready lamp on the control
panel of the unit and the indicator in the camera viewfinder are
both on.
When the correct exposure has been obtained for the photo just taken,
the flash-ready lamp on the control panel blinks.
• The photo will be under-exposed if taken before charging is complete.
• Press the shutter button after making sure that charging is complete
when using the flash with the self-timer.
• Either Autoflash or Fill-flash is selected, depending on your camera. For
details, refer to the operating instructions of your camera.
• If your camera has AUTO mode or Scene Selection mode, they are dealt
with here as program auto.
14
Page 59

• The following tables show the distance reached by the light from the
flash (i.e. the flash range).
See page 37 for further details.
ISO100
2.8 1-7 1-8 1-9 1-10 1-13
4 1-5 1-5.5 1-6 1-7 1-9
Aperture
5.6 1-3.5 1-4 1-4.5 1-5 1-6.5
ISO400
2.8 1-14 1-16 1-18 1-20 1.2-26
4 1-10 1-11 1-12.5 1-15 1-18
Aperture
5.6 1-7 1-8 1-9 1-10 1-13
Focal length (mm)
24 28 35 50 85
Focal length (mm)
24 28 35 50 85
Basics
(unit : m)
(unit : m)
15
Page 60

Recording modes
Aperture priority flash photography (A)
1 Select the A mode on the camera.
2 Press the flash ON/OFF button to turn on the flash-ON
lamp.
• Fill-flash is selected.
3 Set the aperture and focus the subject.
• Reduce the aperture (i.e. increase the f-stop) to reduce the flash
range, or open the aperture (i.e. reduce the f-stop) to increase the
flash range.
• The shutter speed is automatically set.
4 Press the shutter button when charging is complete.
16
Page 61

Shutter speed priority flash
photography (S)
1 Select the S mode on the camera.
2 Press the flash ON/OFF button to turn on the flash-ON
lamp.
• Fill-flash is selected.
3 Set the shutter speed, and focus the subject.
4 Press the shutter button when charging is complete.
Manual exposure mode flash
photography (M)
1 Select the M mode on the camera.
2 Press the flash ON/OFF button to turn on the flash-ON
lamp.
• Fill-flash is selected.
3 Set the aperture and shutter speed, and focus the
subject.
• Reduce the aperture (i.e. increase the f-stop) to reduce the flash
range, or open the aperture (i.e. reduce the f-stop) to increase the
flash range.
4 Press the shutter button when charging is complete.
Basics
17
Page 62

Zoom flash coverage
Auto zoom
This flash automatically switches zoom coverage to cover a range of focal
lengths from 24 mm to 85 mm when photographing (auto zoom).
Normally, you do not need to switch the zoom coverage manually.
24 mm focal length 85 mm focal length
• Press the shutter button partway down.
When the coverage is set to 24 mm, 35 mm or 85 mm, the corresponding
lamp comes on.
For example : 24 mm
When the coverage is set to 28 mm or 50 mm, two lamps come on.
For example : 28 mm
18
Page 63

• Auto zoom coverage is set as follows:
Focal length in use Coverage
24 mm - 27 mm 24 mm
28 mm - 34 mm 28 mm
35 mm - 49 mm 35 mm
50 mm - 84 mm 50 mm
85 mm or more 85 mm
• When a lens having a focal length of less than 24 mm is used with auto
zoom, “24 mm” lamp blinks. Use of the wide panel (p. 21) is
recommended in this case to prevent darkening at the periphery of the
image.
Continued on the next page
Applications
19
Page 64

Manual zoom
You can manually set the zoom coverage regardless of the focal length of
the lens in use.
Press the ZOOM button to display the desired zoom
coverage.
• Zoom coverage is changed in the following order.
The manual-ZOOM lamp “M.ZOOM” comes on.
Auto Zoom 24 mm 28 mm
85 mm 50 mm 35 mm
• If the zoom coverage is set to less than the focal length of the lens in use,
the periphery of the screen darkens.
20
Page 65

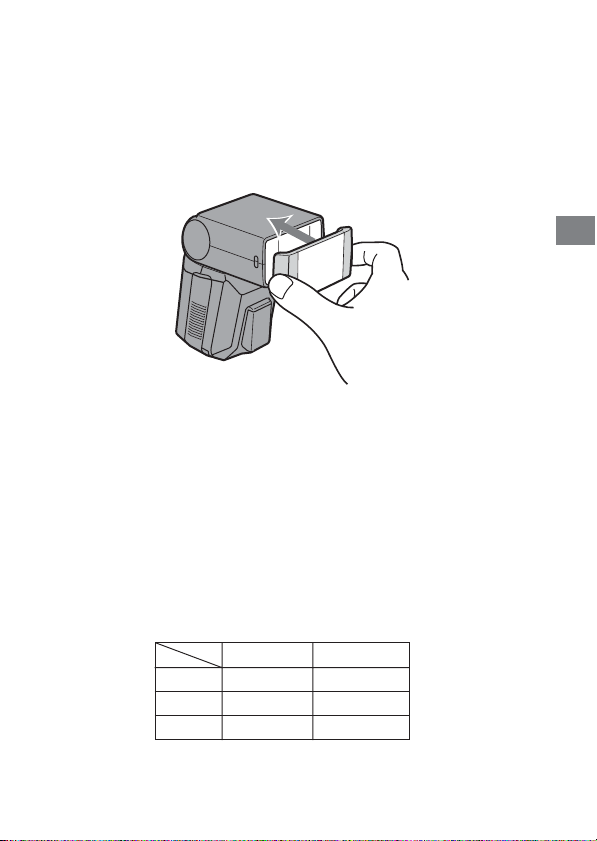
Wide panel (17 mm zoom angle)
Attaching the wide panel expands flash coverage to a focal length of 17
mm.
Attach the supplied wide panel to the flashtube.
• Push the wide panel onto the flashtube until it clicks into place.
• If removing the wide panel is difficult, pull one side off first.
• When using the wide panel, only set the zoom coverage to 24 mm.
• When photographing a flat subject from the front at a focal length of
about 17 mm, the periphery of the screen may darken slightly because
the focal distances at the center and periphery of the screen are different.
• When using a wide-angle lens with a focal length below 17 mm, the
periphery of the screen may darken.
• When using the wide panel, press the high-speed-sync button to keep
the high-speed-sync lamp off.
• See the following table for the flash range when using the wide panel.
ISO100 ISO400
2.8 1 - 4 1 - 8
41 - 2.8 1 - 5.6
5.6 1 - 2 1 - 4
(unit : m)
Applications
21
Page 66

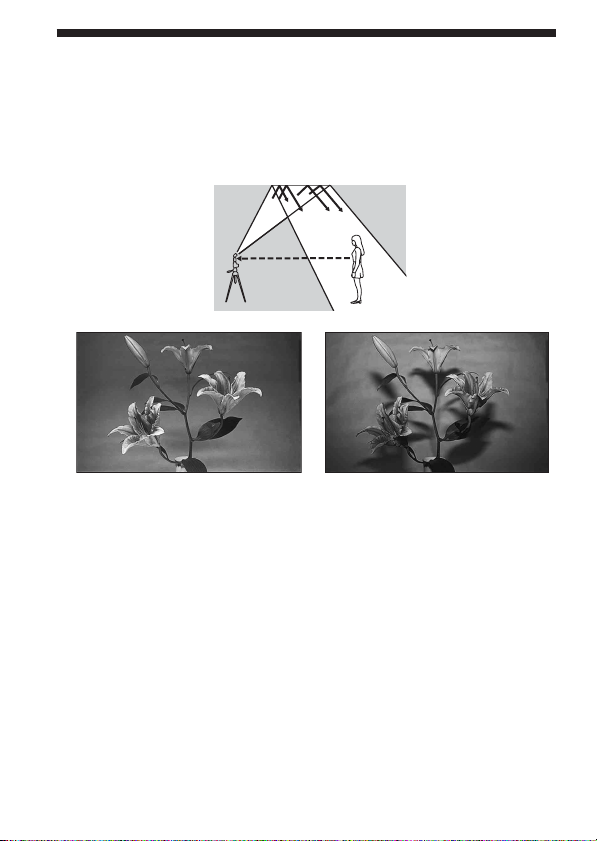
Bounce flash
Using the flash with a wall directly behind the subject produces strong
shadows on the wall. By directing the flash at the ceiling you can
illuminate the subject with reflected light, reducing the intensity of the
shadows and producing a softer light on the screen.
Bounce flash Normal flash
22
Page 67

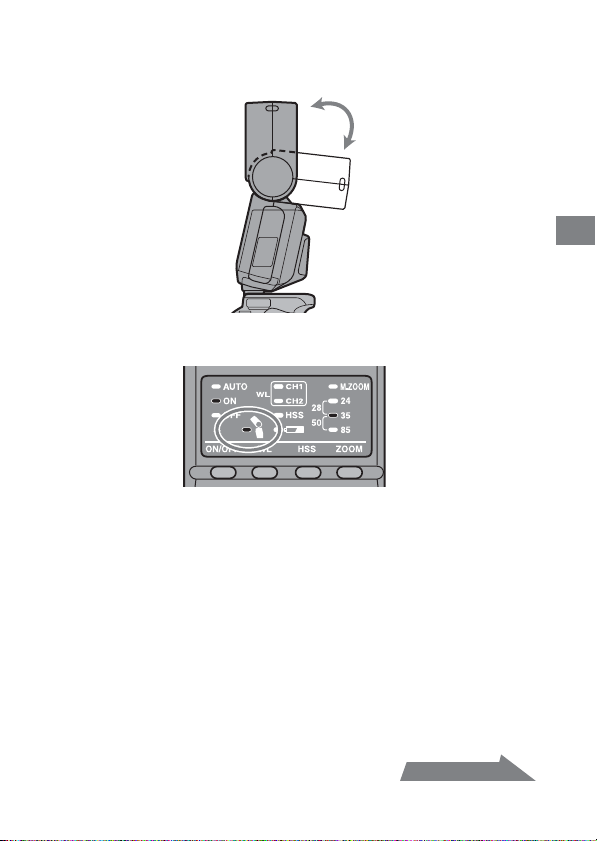
Rotate the flash upwards.
• The flash can be set to 45°, 60°, 75° or 90°.
• The bounce lamp on the control panel comes on.
• High-speed sync (p. 26) is cancelled when using bounce flash.
• Use a white ceiling or wall to reflect the flash. A colored surface may
color the light. High ceilings or glass are not recommended.
Applications
Continued on the next page
23
Page 68

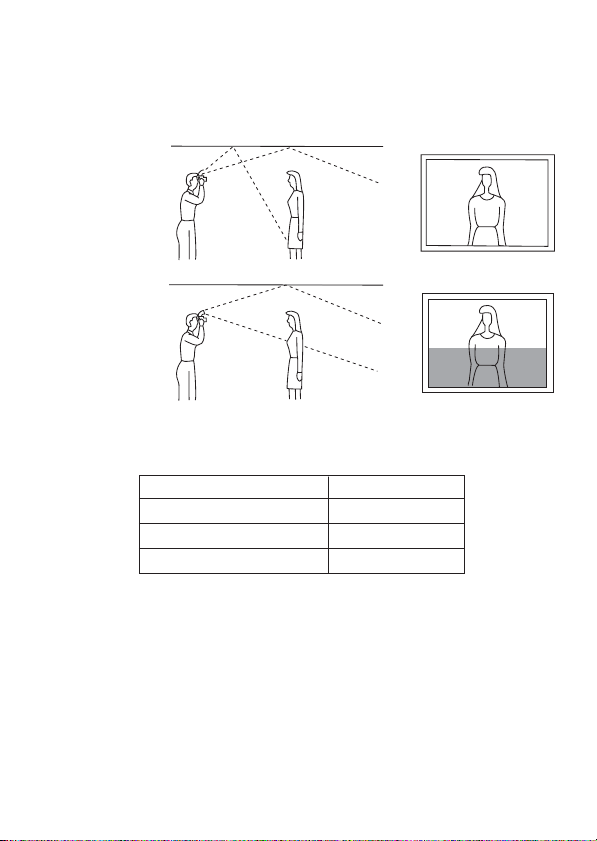
Adjusting bounce angle
Simultaneously using direct light and bounced light from the flash
produces uneven lighting. Determine the bounce angle with respect to the
distance to the reflective surface, the distance from the camera to the
subject, the focal length of the lens etc.
Correct
Incorrect
Determine the angle in relation to the following table.
Focal length of lens Bounce angle
70 mm minimum 45°
28 - 70 mm 60°
28 mm maximum 75°, 90°
24
Page 69

AF illuminator
In low-light or when subject contrast is low, when the shutter button is
pressed partway down for Auto Focus, the red lamp on the front of the
flash unit will light. This is the AF illuminator used as an aid in Auto
Focus.
• The AF illuminator operates even when the flash is off.
• The camera AF illuminator does not operate while the flash AF
illuminator is operating.
• The AF illuminator does not operate while Continuous AF is used in
focusing mode (when continually focusing on a moving subject).
• The AF illuminator may not operate if the focal length of the lens is
greater than 300 mm. The flash will not operate when removed from the
camera.
Applications
25
Page 70

High-speed sync (HSS)
High-speed sync Normal flash
High-speed sync eliminates the restrictions of flash sync speed and enables
the flash to be used through the entire shutter speed range of the camera.
The increased selectable aperture range allows flash photography with a
wide aperture, leaving the background out of focus and accentuating the
front subject. Even when photographing at a wide f-stop in the A mode or
M mode, when the background is very bright and the shot will normally
be over-exposed, you can adjust the exposure by using the high-speed
shutter.
Press the high-speed sync button (HSS).
• The high-speed-sync lamp comes on.
26
Page 71

• If you press the high-speed sync button (HSS) again, high-speed sync is
cancelled. When high-speed sync is cancelled, the shutter speed cannot
be set faster than the sync speed.
• Taking photos in bright locations is recommended.
• The flash range with high-speed sync is smaller than with normal flash
photography.
You can find the accurate flash range with high-speed sync by using the
HSS flat flash (ISO100) table on page 41. Divide the guide number by the
aperture to obtain the maximum distance of the flash range.
For example, with a 1/500 shutter speed and 28 mm focal length, the
guide number is 8 according to the table. Since 8 (the guide number)
divided by 4 (the aperture) equals 2, the flash range in this case would
be 2 m.
The number is doubled when using ISO400.
• High-speed sync cannot be used with bounce flash.
• When using a flash meter or color meter, high-speed sync cannot be
used because it interferes with the proper exposure.
Flash Sync Speed
Flash photography is generally associated with a maximum shutter
speed referred to as the flash sync speed. This restriction does not
apply to cameras designed for high-speed sync (HSS) photography
(p. 26), since they allow flash photography at the maximum shutter
speed of the camera.
Applications
27
Page 72

Wireless flash mode (WL)
Photographs taken with the flash attached to the camera are flat as shown
in photo 1. In such cases, remove the flash from the camera and position
it to obtain a more three-dimensional effect as shown in photo 2.
When taking this type of photograph with a single lens reflex camera, the
camera and the flash unit are most commonly connected by a cable. This
flash eliminates the need for a cable to transmit signals to the flash unit by
using the light of the built-in flash itself as a signal. The correct exposure is
determined automatically by the camera.
1
Normal flash Wireless flash
2
Wireless Flash Range
The wireless flash uses a light signal from the built-in flash as a trigger to
operate the off-camera flash unit. Follow the points below when
positioning the camera, flash, and subject.
• Photograph in dark locations indoors.
• Place the off-camera flash within the gray area in the following diagram.
28
Page 73

Distance between camera
and subject (see Table 1)
Place the camera and flash unit
within a 5 m radius of the
subject
Distance between flash and
subject (see Table 2)
Do not place the flash
directly behind the subject
Distance camera-HVL-F36AM-subject
Distance
camera- subject
(Table 1)
Shutter
speed
Aperture
All shutter
speeds
Maximum
1/60 sec
2.8 1.4 - 5 1.4 - 5 1 - 5 1 - 4 1 - 3 1 - 2 1 - 1.5
41 - 51 - 3.5 1 - 5 1 - 3 1 - 2 1 - 1.5 –
5.6 1 - 5 1 - 2.5 1 - 3.5 1 - 2 1 - 1.5 – –
• The distances in the above table assume the use of ISO 100. If ISO 400 is
used the distances must be multiplied by a factor of two (assume a limit
of 5 m).
Distance HVL-F36AM - subject (Table 2)
Other than HSS HSS
1/60 to
speed
sync
1/250
sec
1/500
sec
1/1000
sec
1/2000
sec
Unit : m
Applications
Continued on the next page
29
Page 74

Notes on wireless flash
• You cannot use a flash meter or color meter in wireless flash mode
because the camera’s built-in pre-flash goes off.
• The zoom position for the HVL-F36AM is automatically set to 24 mm.
• When photographing with the wireless flash, the flash may in rare cases
go off by mistake due to ambient static electricity or electromagnetic
noise.
When the flash is not in use, turn it off using the flash ON/OFF button.
Attaching and removing the mini-stand
• Use the supplied mini-stand when the flash unit is separate from the
camera.
• You can attach the flash unit to a tripod using the tripod socket holes in
the mini-stand.
Attachment
Removal
30
Page 75

Photography with wireless flash
1 Attach the flash to the camera and turn the power of
the flash and camera on.
2 Set the camera to wireless flash.
• The setting method differs depending on the camera used. For
details, see the operating instructions of your camera.
• When the camera is set to wireless the flash is also set to wireless
automatically, and WL is displayed on the control panel.
• The channel 1 “CH1” lamp for the wireless flash comes on. When
channel 2 is selected, the “CH2” lamp is lit. For details on changing
the channel settings, see page 33.
Applications
Continued on the next page
31
Page 76

3 Remove the flash from the camera and raise the built-
in flash.
• When the flash is removed from the camera, the high-speed-sync
lamp comes on.
4 Set up the camera and flash.
• Set up the camera and flash in a dark location, such as indoors.
• See page 28 for details.
5 Make sure that the built-in flash and flash are fully
charged.
• is lit in the viewfinder when the built-in flash is fully charged.
• The AF illuminator on the front blinks, and on the rear is lit, when
the flash is fully charged.
32
Page 77

6 Use test flash to check the flash.
• The test flash method differs depending on the camera used. For
details, see the operation instructions of your camera.
• If the test flash does not work, change the position of the camera,
flash or subject.
7 Check again that the built-in flash and the flash are
fully charged, and press the shutter button to take the
photo.
Changing the channel setting
If another wireless flash is being used nearby, such as at a photo session,
your flash may be set off by the light signal from the built-in flash of
another camera. To prevent this, you can change the channel as follows.
1 Make sure that the wireless flash lamps “CH1” and
“CH2“ are both off.
• If they are on, press the wireless flash button to turn them off.
2 Press the wireless flash button for three seconds.
• After three seconds the channel is changed, and the channel
indicator lamp changes accordingly.
3 Attach the flash to the camera and press the shutter
button partway down.
• This operation transmits the channel information from the flash to
the camera.
Continued on the next page
Applications
33
Page 78

Setting wireless flash by flash only
When the flash is attached to the camera and the wireless flash set up, the
channel information is transmitted to the camera. This means that if you
continue to use the same camera and flash combination without changing
the wireless channel then you can also set the flash and camera separately
to wireless.
Camera setting:
Set to the wireless flash mode.
For details, refer to the operating instructions supplied with your camera.
Flash setting:
Press the wireless flash button to turn on the “CH1” or
“CH2” lamp.
34
Page 79

Time to auto power off
You can change the time to auto power off.
1 Press the flash ON/OFF button for three seconds.
• The auto lamp, flash-ON lamp and flash-OFF lamp come on at the
same time.
2 Press the wireless flash button to select a channel.
• Channel 1“CH1”
Auto power off
• Channel 2 “CH2”
Auto power off when wireless flash is set
Applications
Continued on the next page
35
Page 80

3 Press the zoom selection button to select the desired
time until auto power off.
• Channel 1 “CH1” Auto power off
Options
Lamps
4
minutes
15
minutes
60
minutes
None
[M.ZOOM]
• Channel 2 “CH2” Auto power off in wireless flash mode
Options
Lamps
60
minutes
[M.ZOOM]
[24 mm] [35 mm] [85 mm]
None
[24 mm]
4 Press the flash ON/OFF button to return to normal
status.
• The selected settings are maintained even if the flash unit is
switched off or the battery is removed.
36
Page 81

Flash range
The following tables show the flash range when taking photos with the
flash attached to the camera (i.e. the appropriate range to provide a correct
exposure).
When the focal length is 17 mm (unit: m)
ISO25 ISO50 ISO100 ISO200 ISO400 ISO800 ISO1000
F32 - - - - - - 1.0 - 1.1
F22 - - - - - 1.0 - 1.4 1.0 - 1.6
F16 - - - - 1.0 - 1.4 1.0 - 1.9 1.0 - 2.2
F11 - - - 1.0 - 1.4 1.0 - 2.0 1.0 - 2.7 1.0 - 3.2
F8 - - 1.0 - 1.4 1.0 - 1.9 1.0 - 2.8 1.0 - 3.8 1.0 - 4.4
F5.6 - 1.0 - 1.4 1.0 - 2.0 1.0 - 2.8 1.0 - 3.9 1.0 - 5.4 1.0 - 6.3
F4 1.0 - 1.4 1.0 - 1.9 1.0 - 2.8 1.0 - 3.9 1.0 - 5.5 1.0 - 7.5 1.0 - 8.8
F2.8 1.0 - 2.0 1.0 - 2.8 1.0 - 3.9 1.0 - 5.5 1.0 - 7.9 1.0 - 11 1.0 - 13
F2 1.0 - 2.8 1.0 - 3.9 1.0 - 5.5 1.0 - 7.7 1.0 - 11 1.0 - 15 1.0 - 18
F1.4 1.0 - 3.9 1.0 - 5.5 1.0 - 7.6 1.0 - 11 1.0 - 16 1.0 - 21 1.1 - 25
When the focal length is 24 mm (unit: m)
ISO25 ISO50 ISO100 ISO200 ISO400 ISO800 ISO1000
F32 - - - - 1.0 - 1.3 1.0 - 1.7 1.0 - 2.0
F22 - - - 1.0 - 1.3 1.0 - 1.8 1.0 - 2.5 1.0 - 2.9
F16 - - 1.0 - 1.3 1.0 - 1.8 1.0 - 2.5 1.0 - 3.4 1.0 - 3.9
F11 - 1.0 - 1.3 1.0 - 1.8 1.0 - 2.5 1.0 - 3.6 1.0 - 5.0 1.0 - 5.7
F8 1.0 - 1.3 1.0 - 1.8 1.0 - 2.5 1.0 - 3.5 1.0 - 5.0 1.0 - 6.9 1.0 - 7.9
F5.6 1.0 - 1.8 1.0 - 2.5 1.0 - 3.6 1.0 - 5.0 1.0 - 7.1 1.0 - 9.8 1.0 - 11
F4 1.0 - 2.5 1.0 - 3.5 1.0 - 5.0 1.0 - 7.0 1.0 - 10 1.0 - 14 1.0 - 16
F2.8 1.0 - 3.6 1.0 - 5.0 1.0 - 7.1 1.0 - 10 1.0 - 14 1.0 - 20 1.0 - 23
F2 1.0 - 5.0 1.0 - 7.0 1.0 - 10 1.0 - 14 1.0 - 20 1.3 - 28 1.4 - 32
F1.4 1.0 - 7.1 1.0 - 10 1.0 - 14 1.0 - 20 1.3 - 28 1.8 - 40 2.0 - 45
• The flash range at a focal length of 28 mm is roughly between the long
range limit values at focal lengths of 24 mm and 35 mm. The flash range
at a focal length of 50 mm is roughly between the long range limit
values at focal lengths of 35 mm and 80 mm.
Continued on the next page
37
Addiional Information
Page 82

When the focal length is 35 mm (unit: m)
ISO25 ISO50 ISO100 ISO200 ISO400 ISO800 ISO1000
F32 - - - 1.0 - 1.1 1.0 - 1.6 1.0 - 2.2 1.0 - 2.5
F22 - - 1.0 - 1.1 1.0 - 1.6 1.0 - 2.3 1.0 - 3.1 1.0 - 3.6
F16 - 1.0 - 1.1 1.0 - 1.6 1.0 - 2.2 1.0 - 3.1 1.0 - 4.3 1.0 - 5.0
F11 1.0 - 1.1 1.0 - 1.6 1.0 - 2.3 1.0 - 3.2 1.0 - 4.5 1.0 - 6.3 1.0 - 7.2
F8 1.0 - 1.6 1.0 - 2.2 1.0 - 3.1 1.0 - 4.4 1.0 - 6.3 1.0 - 8.6 1.0 - 9.9
F5.6 1.0 - 2.2 1.0 - 3.1 1.0 - 4.5 1.0 - 6.3 1.0 - 8.9 1.0 - 12 1.0 - 14
F4 1.0 - 3.1 1.0 - 4.4 1.0 - 6.3 1.0 - 8.8 1.0 - 12 1.0 - 17 1.0 - 20
F2.8 1.0 - 4.5 1.0 - 6.2 1.0 - 8.9 1.0 - 13 1.0 - 18 1.1 - 25 1.3 - 28
F2 1.0 - 6.2 1.0 - 8.8 1.0 -13 1.0 - 18 1.1 - 25 1.6 - 35 1.8 - 40
F1.4 1.0 - 8.9 1.0 - 13 1.0 - 18 1.1 - 25 1.6 - 36 2.2 - 50 2.5 - 56
When the focal length is 85 mm (unit: m)
ISO25 ISO50 ISO100 ISO200 ISO400 ISO800 ISO1000
F32 - - 1.0 - 1.1 1.0 - 1.6 1.0 - 2.3 1.0 - 3.1 1.0 - 3.6
F22 - 1.0 - 1.1 1.0 - 1.6 1.0 - 2.3 1.0 - 3.3 1.0 - 4.5 1.0 - 5.2
F16 1.0 - 1.1 1.0 - 1.6 1.0 - 2.3 1.0 - 3.2 1.0 - 4.5 1.0 - 6.2 1.0 - 7.1
F11 1.0 - 1.6 1.0 - 2.3 1.0 - 3.3 1.0 - 4.6 1.0 - 6.5 1.0 - 9 1.0 - 10
F8 1.0 - 2.3 1.0 - 3.2 1.0 - 4.5 1.0 - 6.3 1.0 - 9.0 1.0 - 12 1.0 - 14
F5.6 1.0 - 3.2 1.0 - 4.5 1.0 - 6.4 1.0 - 9.0 1.0 - 13 1.0 - 18 1.0 - 20
F4 1.0 - 4.5 1.0 - 6.3 1.0 - 9 1.0 - 13 1.0 - 18 1.1 - 25 1.3 - 28
F2.8 1.0 - 6.4 1.0 - 9.0 1.0 - 13 1.0 - 18 1.1 - 26 1.6 - 35 1.8 - 40
F2 1.0 - 9.0 1.0 - 13 1.0 - 18 1.1 - 25 1.6 - 36 2.3 - 50 2.6 - 56
F1.4 1.0 - 13 1.0 - 18 1.1 - 26 1.6 - 36 2.3 - 51 3.2 - 71 3.6 - 80
• When photographing at a distance of less than 1 m, the lens may block
the light from the flash causing a shadow to appear at the bottom of the
photo. Photograph in wireless flash mode.
38
Page 83

Notes on use
While shooting
• This flash unit generates strong light, so it should not be used directly in
front of the eyes.
Batteries
• The battery level displayed on the control panel may be lower than the
actual battery capacity, temperature, and storage conditions. The
displayed battery level is restored to the correct value after the flash has
been used a few times. When blinks to indicate that the flash
cannot be used, pressing the flash ON/OFF button a number of times
may result in restoration of the correct battery level display. If the
battery level is still not restored, replace the battery.
• When using lithium batteries, if the batteries become hot due to high
temperature or continuous use, may blink and the flash may not
work for a while. Wait for the batteries to cool down before using the
flash again.
• Nickel-metal hydride batteries can lose power suddenly. If starts
blinking or the flash can no longer be used while taking pictures, change
or recharge the batteries.
• The flash frequency and number of flashes provided by new batteries
may vary from the values shown in the table, depending on the time
elapsed since manufacture of the batteries.
Additional Information
Continued on the next page
39
Page 84

Temperature
• The flash unit may be used over a temperature range of 0 °C to 40 °C.
• Do not expose the flash unit to extremely high temperatures (e.g. in
direct sunlight inside a vehicle) or high humidity.
• To prevent condensation forming on the flash, place it in a sealed plastic
bag when bringing it from a cold environment into a warm
environment. Allow it to reach room temperature before removing it
from the bag.
• Battery capacity decreases at colder temperatures. Keep your camera
and spare batteries in a warm inside pocket when shooting in cold
weather. may come on even when there is some power left in the
batteries in cold weather. Batteries will regain some of their capacity
when warmed to normal operating temperature.
• This flash unit is not waterproof. Be careful not to bring it into contact
with water or sand when using it at the seashore, for example. Contact
with water, sand, dust, or salt may result in a malfunction.
Maintenance
Remove this unit from the camera. Clean the flash with a dry soft cloth. If
the flash has been in contact with sand, wiping will damage the surface,
and it should therefore be cleaned gently using a blower. In the event of
stubborn stains, use a cloth lightly dampened with a mild detergent
solution, and then wipe the unit clean with a dry soft cloth. Never use
strong solvents, such as thinner or benzine, as these damage the surface
finish.
40
Page 85

Specifications
Guide number
Normal flash (ISO 100)
Flash Coverage
Setting (mm)
GN 11 20 22 25 29 36
* When the wide panel is attached
Wireless flash (ISO 100)
Flash Coverage
Setting (mm)
GN 8.5 14 15 19 22 28
* When the wide panel is attached
HSS flat flash (flash with HSS, ISO 100)
Shutter speed 24 28 35 50 85
1/250 10 11 13 15 18
1/500 7 8 9 11 13
1/1000 5 5.6 6.5 7.5 9
1/2000 3.5 4 4.6 5.3 6.4
1/4000 2.5 2.8 3.2 3.8 4.5
1/8000 1.7 2 2.3 2.6 3.2
1/12000 1.2 1.4 1.6 1.8 2.2
17* 24 28 35 50 85
17* 24 28 35 50 85
Additional Information
Flash Coverage Setting (mm)
Continued on the next page
41
Page 86

Frequency/Repetition
Alkaline Lithium
Frequency (sec)
Repetition (times)
• Repetition is the approximate number of times that are
possible before a new battery is completely dead.
Flash coverage
Flash coverage 17* 24 28 35 50 85
Top-bottom (° ) 115 60 53 45 34 23
Left-right (° ) 125 78 70 60 46 31
* When the wide panel is attached
Continuous 40 flashes at 5 flashes per second
flash performance (Normal flash, GN 6, 85 mm, nickel-metal
hydride battery)
AF illuminator Autoflash at low contrast and low brightness
Operating range (with a 50 mm lens attached to α100)
Central area: 0.5 m to 6 m
Pripheral areas : 0.5 m to 3 m
Flash control Flash control using pre-flash, TTL direct metering
Dimension W 68 × H 122 × D 89 mm
(Approx.) (2 3/4 × 4 7/8 × 3 5/8 inches)
Mass (Approx.) 260 g (9.2 oz)
Included items Flash (1), Mini-stand (1), Case (1), Wide panel (1),
Set of printed documentation
0.2 - 6 0.2 - 6 0.2 - 5
200 - 4000 500 - 10000 150 - 3000
Flash Coverage Setting (mm)
Nickel hydride
(1550 mAh)
Functions in these operating instructions depend on testing conditions at
our firm.
Design and specifications are subject to change without notice.
42
Page 87

Trademark
is a trademark of Sony Corporation.
Additional Information
43
Page 88

Français
Avant de faire fonctionner ce produit, lisez attentivement ce mode
d’emploi et conservez-le pour toute référence ultérieure.
AVERTISSEMENT
Afin de réduire les risques d’incendie ou de décharge électrique, n’exposez
pas cet appareil à la pluie ou à l’humidité.
Scotcher les contacts des piles lithium avant de les jeter. Suivre les
éventuelles consignes locales sur le rejet des piles.
Ne pas laisser les piles ou de petits accessoires à la portée de jeunes enfants
qui pourraient les avaler. En cas d’ingestion accidentelle, contacter
immédiatement un médecin.
Retirer immédiatement les piles du flash si :
• L’appareil est tombé ou a reçu un choc à la suite duquel il s’est brisé et
laisse apparaître ses composants internes.
• L’appareil chauffe anormalement ou émet une fumée ou une odeur
étrange.
Ne pas démonter le flash. Risque d’électrocution lié à la présence de
circuits haute tension.
CONSIGNES DE SECURITE
IMPORTANTES
Lors de l’utilisation de votre matériel photographique, il
convient d’observer des précautions de sécurité de base, à
savoir, entre autres :
Prendre connaissance de toutes les instructions à respecter
avant toute utilisation.
Lorsqu’un appareil est utilisé par un enfant ou à proximité
d’un enfant, une surveillance attentionnée est obligatoire.
2
Page 89

Ne pas laisser l’appareil sans surveillance pendant
l’utilisation.
Il convient d’être prudent car les parties chaudes peuvent
entraîner des brûlures.
Ne pas utiliser l’appareil lorsque le cordon est endommagé
ou si l’appareil est tombé ou a été endommagé, tant qu’il
n’a pas été examiné par un technicien qualifié.
Laisser l’appareil refroidir complètement avant de le
ranger. Enrouler le cordon autour de l’appareil sans le
serrer lors du rangement.
Pour réduire les risques d’électrocution, ne pas immerger
cet appareil dans l’eau ou d’autres liquides.
Pour réduire les risques d’électrocution, ne pas démonter
cet appareil et confier l’entretien ou les réparations
éventuelles à un technicien qualifié. Un montage incorrect
peut entraîner une électrocution lors de l’utilisation
suivante de l’appareil.
L’utilisation d’un dispositif de fixation pour accessoires non
recommandé par le fabricant peut constituer un risque
d’incendie, d’électrocution ou de blessure des personnes.
Les piles peuvent chauffer ou exploser suite à une
utilisation incorrecte.
Utiliser uniquement les piles indiquées dans ce mode
d’emploi.
Ne pas mettre les piles en place avec une polarité inversée
(+/-).
Ne pas soumettre les piles au feu ou à de fortes
températures.
Ne pas essayer de les recharger (sauf pour les piles
rechargeables), ne pas les mettre en court-circuit, ne pas les
démonter.
Ne pas mélanger différents types et différentes marques de
piles, ni des piles anciennes et nouvelles.
3
Page 90

CONSERVER CES
CONSIGNES
ATTENTION
Lors de l’émission de l’éclair, le tube à éclairs peut être très chaud. Ne pas
la toucher.
Pour les clients en Europe
Traitement des appareils électriques et électroniques en
fin de vie (Applicable dans les pays de l’Union
Européenne et aux autres pays européens disposant de
systèmes de collecte sélective)
Ce symbole, apposé sur le produit ou sur son emballage,
indique que ce produit ne doit pas être traité avec les déchets
ménagers. Il doit être remis à un point de collecte approprié
pour le recyclage des équipements électriques et
électroniques. En s’assurant que ce produit est bien mis au
rebut de manière appropriée, vous aiderez à prévenir les
conséquences négatives potentielles pour l’environnement et
la santé humaine. Le recyclage des matériaux aidera à
préserver les ressources naturelles. Pour toute information
supplémentaire au sujet du recyclage de ce produit, vous
pouvez contacter votre municipalité, votre déchetterie ou le
magasin où vous avez acheté le produit.
Marque commerciale
est une marque commerciale de Sony Corporation.
4
Page 91

Table des matières
Caractéristiques ................................................................................... 6
Nomenclature....................................................................................... 7
Panneau de commande....................................................................... 8
Préparations
Mise en place des piles........................................................................ 9
Montage et démontage du flash ...................................................... 11
Mise en marche/Arrêt automatique ............................................... 12
Principes de base
Flash en mode de programmation automatique
(principes de base) ............................................................................. 13
Modes d’enregistrement ................................................................... 16
Applications
Couverture de la tête-réflecteur Zoom ........................................... 18
Flash indirect ...................................................................................... 22
Illuminateur AF.................................................................................. 25
Synchro haute vitesse (HSS)............................................................. 26
Flash sans cordon (WL) .................................................................... 28
Durée de temporisation avant auto-extinction ............................. 35
Informations complémentaires
Portée du flash ...................................................................................... 37
Remarques sur l’utilisation .................................................................
Entretien .............................................................................................. 40
Caractéristiques ................................................................................. 41
39
5
Page 92

Avant la première utilisation
Pour plus d’informations, reportez-vous au mode d’emploi fourni avec
votre appareil photo.
Ce flash n’est pas étanche à la poussière, aux gouttes ni à
l’eau.
Ne pas le placer dans les endroits suivants :
Où que vous utilisiez ou stockiez cet appareil, ne le placez pas dans les
endroits suivants. Ceci pourrait entraîner un problème de fonctionnement.
• Placer ce flash dans des endroits soumis à la lumière directe du soleil
comme sur un tableau de bord ou à proximité d’un radiateur peut
entraîner sa déformation ou un dysfonctionnement.
• Endroits soumis à des vibrations excessives
• Endroits soumis à de fortes ondes magnétiques
• Endroits sablonneux
Prenez garde à ne pas exposer cet appareil au sable lorsque vous êtes
sur une plage ou dans des zones sablonneuses.
Ceci pourrait entraîner un problème de fonctionnement.
Caractéristiques
• Flash compact qui offre une sortie de flash avec un nombre guide
maximal de 36 (position 85 mm, ISO 100 · m).
• Ce flash peut être utilisé avec des objectifs compatibles pour permettre
une mesure au flash ADI (Advanced Distance Integration), qui n’est pas
affectée par le taux de réflexion de l’arrière-plan ou du sujet.
• Il permet une synchro haute vitesse.
• Il propose également de nombreuses fonctions telles que le flash
indirect, etc.
6
Page 93

Nomenclature
Tube à éclairs
Récepteur de
signaux sans
cordon (28)
Illuminateur AF (25)
Indicateur
d’orientation
verticale (22)
Panneau de
commande (8)
Bouton de
déverrouillage du
sabot (11)
Sabot
Volet-couvercle du
compartiment des
piles (9)
Adaptateur grand-angle (21)
Retirer la feuille de protection de l’avant de
l’illuminateur AF avant utilisation.
7
Page 94

Panneau de commande
Témoin Auto
(13)
Témoin ON du
flash (12)
Témoin OFF du
flash (12)
Témoin de
charge du flash
(14)
Touche ON/
OFF du flash
(12)
Témoin de flash
indirect (22)
Touche de
flash sans
cordon (28)
Témoin
d’usure des
piles (10)
Témoins de flash
sans cordon (28)
Témoin de zoom
manuel (20)
Témoins de
ZOOM
(couverture
du flash) (20)
Témoin de
synchro
haute vitesse
(26)
Touche de
sélection ZOOM
(couverture du
flash) (20)
Touche de synchro
haute vitesse (26)
8
Page 95

Mise en place des piles
Le HVL-F36AM peut être alimenté par :
*Les piles ne sont pas fournies.
•4 piles alcalines type AA
•4 piles lithium type AA
•4 piles Ni-MH (nickel-métal hydrure) rechargeables type AA
S’assurer que ces piles sont bien rechargées avec le chargeur adapté.
1 Ouvrir le compartiment des piles comme indiqué.
1
3
2
2 Mettre les piles en place en respectant les polarités
indiquées sur le schéma figurant dans le compartiment.
3 Refermer le compartiment.
• Exécuter les étapes dans le sens inverse lors de l’ouverture du
compartiment.
• Le témoin sur le panneau de commande s’allume. S’il ne s’allume
pas, appuyez sur la touche ON/OFF du flash.
Préparations
Suite à la page suivante
9
Page 96

Vérification de l’état des piles
Le témoin du panneau de commande s’allume ou clignote si les piles
sont faibles.
lTémoin allumé
Il est recommandé de changer les
piles. Le flash peut encore être utilisé
dans cet état si (témoin de charge
du flash), situé à l’arrière de
l’appareil, est allumé.
Seul le témoin clignote
Le flash ne peut plus fonctionner.
Remplacez les piles.
• Vérifiez la mise en place des piles si rien ne se passe après avoir appuyé
sur la touche ON/OFF.
10
Page 97

Montage et démontage du flash
Montage du flash sur l’appareil photo
Pousser fermement le sabot sur l’appareil photo jusqu’à ce
qu’il s’encliquette.
• Le flash est automatiquement verrouillé en place.
• Si le flash intégré de l’appareil photo est déployé, le rabattre avant de
monter le flash.
Retrait du flash de l’appareil photo
Tout en appuyant sur le bouton de déverrouillage 1 du
sabot, retirer le flash 2.
Préparations
1
2
11
Page 98

Mise en marche/Arrêt
automatique
Appuyez sur la touche ON/OFF situé à l’arrière du flash.
Lorsque le flash est alimenté, il se met sous tension.
• Lors de la mise sous tension du flash, le témoin ON du flash du
panneau de commande s’allume.
Si vous appuyez sur la touche ON/OFF du flash alors
que le flash est sous tension, le flash s’éteint et le témoin
OFF du flash du panneau de commande s’allume.
• Le témoin OFF du flash s’éteint après 8 secondes.
Arrêt automatique
Le flash est automatiquement mis hors tension et les indicateurs du
panneau de commande s’éteignent afin d’économiser les piles lorsque
l’appareil photo ou le flash n’a pas été utilisé pendant 4 minutes.
• Lors de prise de vues avec le flash détaché de l’appareil (p. 28), les
indicateurs du panneau de commande disparaissent au bout de 60
minutes.
• Vous pouvez modifier la durée de temporisation avant auto-extinction,
ou désactiver l’auto-extinction. (p. 35)
12
Page 99

Flash en mode de programmation
automatique (principes de base)
1 Sélectionner le mode P sur l’appareil photo.
2 Appuyez sur la touche ON/OFF du flash pour allumer
les témoins « AUTO » et « ON » ou le témoin « ON » du
panneau de commande.
• Les témoins « AUTO » et « ON » s’allument pour indiquer le mode
flash automatique. Le témoin « ON » s’allume seul pour le mode
Fill-flash.
Principes de base
Suite à la page suivante
13
Page 100

3 Lorsque le flash est chargé, appuyez sur le déclencheur
pour prendre une photo.
• Le flash est chargé lorsque le témoin de charge du flash situé sur
le panneau de commande du flash et l’indicateur dans le viseur
sont allumés.
Lorsque l’exposition de la photo qui vient d’être prise est bonne, le
témoin de charge du flash du panneau de commande clignote.
• La photo risque d’être sous-exposée si le déclenchement intervient après
la fin de la charge du flash.
• Lors de l’utilisation du retardateur, appuyez à fond sur le déclencheur
seulement lorsque la charge du flash est terminée.
• Le mode flash automatique ou Fill-flash est sélectionné, selon votre
appareil photo. Pour plus d’informations, reportez-vous au mode
d’emploi de votre appareil photo.
• Si votre appareil photo comporte le mode automatique ou de sélection
de scène, ces modes sont gérés ici comme des modes automatiques
programmés.
14
 Loading...