

Page 1

3-862-667-11 (1)
Video Flash
Operating Instructions
Mode d‘emploi
HVL-F10
1998 by Sony Corporation Printed in Japan
IMPORTANT
SAFETY
INSTRUCTION
When using your electronic flash, basic
safety precautions should always be
followed, including the following:
1 Read and understand all instructions
before using.
2 Care must be taken as burns can
occur from touching hot parts.
3 Do not operate appliance if it has
been dropped or damaged, until it
has been examined by a qualified
serviceman.
4 To reduce the risk of electric shock,
do not immerse this appliance in
water or other liquids.
5 To reduce the risk of electric shock,
do not disassemble this appliance,
but take it to a qualified serviceman
when service or repair work is
required. Incorrect reassembly can
cause electric shock when the
appliance is used subsequently.
6 The use of an accessory attachment
not recommended by the
manufacturer may cause a risk of
fire, electric shock, or injury to
persons.
SAVE THESE
INSTRUCTIONS
A
1
2
3
English Français
WARNING
To prevent fire or shock hazard, do not
expose the unit to rain or moisture.
To avoid electrical shock, do not open the
cabinet. Refer servicing to qualified
personnel only.
This equipment has been tested and found to comply
with the limits for a Class B digital device, pursuant to
Part 15 of the FCC Rules. These limits are designed to
provide reasonable protection against harmful
interference in a residential installation. This equipment
generates, uses, and can radiate radio frequency energy
and, if not installed and used in accordance with the
instructions, may cause harmful interference to radio
communications. However, there is no guarantee that
interference will not occur in a particular installation. If
this equipment does cause harmful interference to radio
or television reception, which can be determined by
turning the equipment off and on, the user is encouraged
to try to correct the interference by one or more of the
following measures:
– Reorient or relocate the receiving antenna.
– Increase the separation between the equipment and
receiver.
– Connect the equipment into an outlet on a circuit
different from that to which the receiver is connected.
– Consult the dealer or an experienced radio/TV
technician for help.
You are cautioned that any changes or modifications not
expressly approved in this manual could void your
authority to operate this equipment.
Features
You can enjoy shooting subjects with the camcorder
in photo mode under the following conditions:
• Insufficient light
• Too much brightness behind the subject (backlighting)
Cleaning
Remove the video flash from the camcorder. Clean
the video flash with a dry soft cloth.
In case of stubborn stains, use a cloth lightly
dampened with a mild detergent solution, then wipe
the unit clean with a dry soft cloth.
Never use strong solvents, such as thinner or benzine,
as these damage the surface finish.
Troubleshooting
Symptom
The battery charge
complete mark doesn’t
appear in the viewfinder
(or display window).
The video flash does not
work even though the
battery charge complete
mark appears in the
viewfinder.
Remedy
Replace the batteries
with one brand new
Sony lithium
manganese battery.
Fresh batteries provide
power for about 400
flashes.
You need to go to a
Sony dealer (Sony
service facility) to
replace the bulb. Do not
replace the bulb
yourself.
Specifications
Dimensions About 1 9/16 × 2 1/4 × 2 3/16 inches
Mass About 3
Supplied accessory One CR123A lithium manganese
Design and specifications are subject to change without
notice.
(About 40×57×55.5mm) (w/h/d)
(Projections are not included in the
dimensions)
1
/5 oz. (90g)
(including supplied battery)
battery.
One pouch.
This mark indicates that this product is
a genuine accessory for Sony video
products. When purchasing Sony video
products, Sony recommends that you
purchase accessories with this
“GENUINE VIDEO ACCESSORIES”
mark.
Installing the battery
(See Figure A)
1 Remove the battery cover.
2 Install the two supplied batteries.
3 Reattach the battery cover.
Notes
• When you replace the batteries, be sure to use one new
Sony CR123A lithium manganese battery. Use of
another battery may present a risk of fire or explosion.
• Set the positive (+) and negative (–) terminals of the
batteries correctly as illustrated.
• To avoid damage from possible battery leakage,
remove the batteries when you will not use the video
flash for a long time.
WARNING
The battery may explode if mistreated. Do not recharge,
disassemble, or dispose of in fire.
AVERTISSEMENT
Afin d’éviter tout risque d’incendie ou
d’électrocution, ne pas exposer l’appareil à la
pluie ou à l’humidité.
Pour éviter tout risque de décharge
électrique, n’ouvrez pas le boîtier. Ne confiez
l’entretien qu’à un personnel qualifié.
Caractéristiques
Votre caméscope autorise les prises de vue en mode
photo dans les cas suivants:
• Lumière insuffisante
• Excès de luminosité derrière le sujet (contre-jour)
Nettoyage
Retirez le flash vidéo du caméscope. Nettoyez le flash
vidéo à l’aide d’un chiffon sec et doux.
Si les taches persistent, utilisez un chiffon légèrement
humecté de savon liquide, puis essuyez à l’aide d’un
chiffon doux et sec.
N’utilisez jamais de solvants puissants tels que
diluant ou benzine, car ils peuvent endommager la
finition externe.
En cas de difficultés
Symptômes
Le témoin d’état de charge
des piles n’apparaît pas
dans le viseur (ou dans
l’afficheur).
Le flash vidéo ne
fonctionne pas alors que le
témoin de charge de la
batterie apparaît dans
le viseur.
Remèdes
Remplacez les piles par
une batterie au lithiummanganèse Sony neuve.
Des piles neuves
permettent d’effectuer
environ 400 flashs.
Consultez votre
distributeur Sony
(centre d’assistance
technique Sony) pour
remplacer l’ampoule.
Ne remplacez pas
l’ampoule vous-même.
Spécifications
Dimensions Environ 40×57×55,5 mm (1 9/16 ×
Poids Environ 90 g (3
Accessoires fournis Une batterie au lithium-manganèse
La conception et les spécifications sont modifiables sans
préavis.
1
/4 × 2 3/16 pouces) (l/h/p)
2
(Les saillies ne sont pas incluses
dans les dimensions)
(batterie fournie comprise)
CR123A
Une housse
Cette marque indique que ce
produit est un accessoire prévu pour
les produits vidéo Sony. Quand vous
achetez un produit vidéo Sony, nous
vous conseillons de vous procurer
des accessoires portant cette marque
“GENUINE VIDEO
ACCESSORIES”.
1
/5 on.)
Installation des piles
(Voir l’illustration A)
1 Retirez le couvercle des piles.
2 Installez les deux piles fournies.
3 Replacez le couvercle.
Remarques
• Lorsque vous remplacez les piles, veillez à utiliser une
batterie au lithium-manganèse CR123A Sony neuve.
• Placez les pôles positif (+) et négatif (–) des piles
correctement, comme indiqué sur l’illustration.
• Pour éviter tout dommage dû à une fuite d’électrolyte,
enlevez les piles quand vous ne comptez pas utiliser le
flash vidéo pendant un certain temps.
Page 2
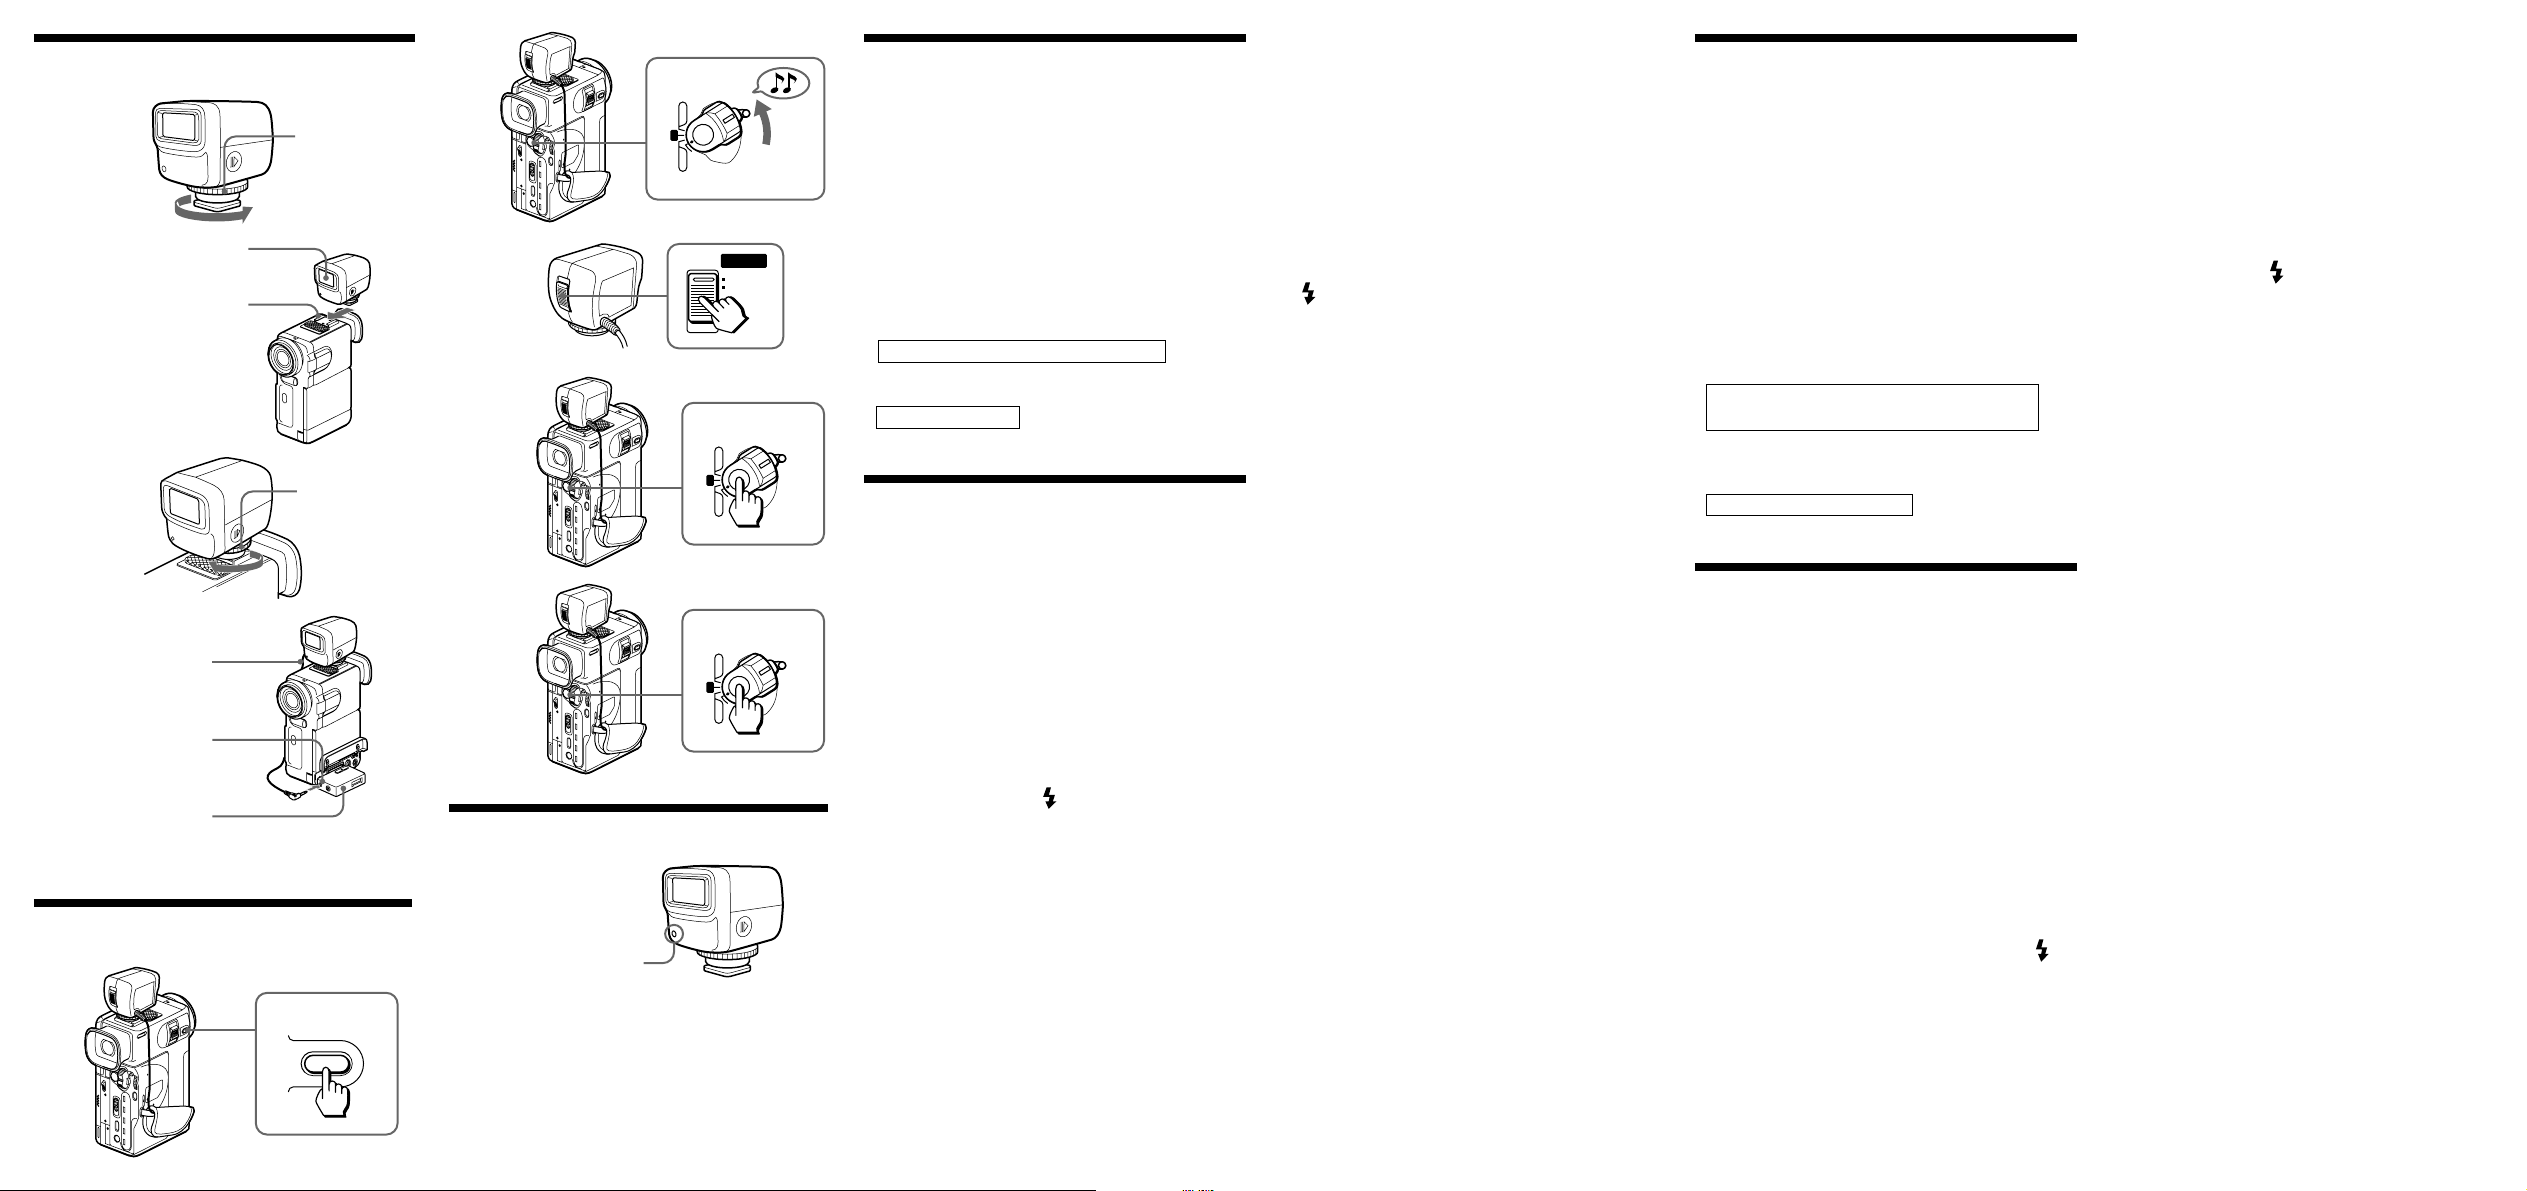
B
1
2
Flashing section
Fenêtre du flash
Accesory shoe
Griffe pour
accessoires
3
4
LANC control cable
Câble de contrôle LANC
lLANC control jack
Prise de contrôle lLANC
VMC-LM7 adaptor
(not supplied)
Adaptateur VMC-LM7
(non fourni)
C
1
Knob
Bouton
Knob
Bouton
FOCUS
2
3
5
6
D
Light exposure meter
Cellule
OFFPOWER
VTR CAMERA
PHOTO
VTR CAMERA
OFFPOWER
VTR CAMERA
OFFPOWER
POWER
ON
OFF
PHOTO
PHOTO
Attaching the video flash
to a camcorder
(See Figure B)
1 Turn the knob of the video flash
counterclockwise to loosen.
2 Attach the video flash to the camcorder by
sliding the video flash forward to set it
firmly in the camcorder accessory shoe. Be
sure to position the flashing section of the
unit facing the front.
3 Turn the knob clockwise to tighten.
4 Connect the LANC cable.
Using camcoder with a LANC jack
Connect the video flash LANC cable to the
camcoder lLANC control jack.
Using DCR-PC10
Connect as the illustration.
Using the video flash
(See Figure C)
The DCR-PC10/PC10E is used here for illustration
purpose. Please refer to the Operation Manual of
your camcorder for detailed camcorder operation
instructions.
1 Press the camcorder FOCUS button lightly.
2 While pressing the camcorder small green
button on the POWER switch, set it to
PHOTO. Two beeps sound.
3 Set the video flash POWER switch to ON.
The video flash starts charging. It takes more than 7
seconds for it to charge completely. The battery
charge complete mark appears in the camcorder
viewfinder and display window.
4 Point the camcorder to the subject and
adjust the focus.
5 Press the camcorder START/STOP button
lightly and hold it until a still picture
appears in the camcorder viewfinder. Keep
pressing the camcorder START/STOP button
lightly.
The video flash flashes. The still picture appears in
the viewfinder.
To change the still picture, release the camcorder
START/STOP button. The video flash starts
charging after you release the camcorder START/
STOP button.
Be sure you have the battery charge complete mark
in the viewfinder (or display window) before
you press the camcorder START/STOP button
lightly again.
Note
• The camcorder will adjust brightness after you
press the camcorder START/STOP button, so
that the picture may be darkened temporarily
before the video flash flashes.
6 Press the camcorder START/STOP button
down all the way and release it.
The still picture in the viewfinder is recorded for
about 7 seconds. The sound during those 7 seconds
is also recorded.
After the still picture is recorded, the video flash
starts recharging.
Notes
• The video flash is effective for distances from about
1~4m (Automatic light level adjustment).
• Set the video flash POWER switch to OFF after use.
• It takes longer for the video flash to charge as the
batteries become older.
• The video flash will need to recharge even if it is
completely charged after:
– you set the video flash POWER switch to OFF
– you detach the video flash LANC control cable
from the camcorder lLANC control jack
– you set the camcorder POWER switch to any
other position, i.e. LOCK or STANDBY.
• While using the video flash, be careful not to cover
the video flash light exposure meter (see Figure
D).
Fixation du flash vidéo au
caméscope
(Voir l’illustration B)
1 Dévissez le flash vidéo en tournant le
bouton dans le sens contraire des aiguilles
d’une montre.
2 Fixez le flash vidéo au caméscope en le
faisant glisser vers l’avant de sorte qu’il
soit fermement calé dans la griffe pour
accessoires. Assurez-vous que la fenêtre du
flash soit orientée vers l’avant.
3 Resserrez le bouton en le faisant tourner
dans le sens des aiguilles d’une montre.
4 Branchez le câble LANC.
Utilisation d’un caméscope doté d’une
prise LANC
Raccordez le câble LANC de la torche vidéo
à la prise de commande lLANC du
caméscope.
Utilisation du DCR-PC10
Raccordez-le comme illustré.
Utilisation du flash vidéo
(Voir l’illustration C)
Le modèle DCR-PC10/PC10E sert de base pour les
explications. Reportez-vous au manuel d’instructions
de votre caméscope pour le fonctionnement détaillé
de votre caméscope.
1 Appuyez légèrement sur la touche FOCUS
du caméscope.
2 Tout en appuyant sur le petit bouton vert
du commutateur POWER du caméscope,
amenez-le sur PHOTO. Deux bips
retentissent.
3 Mettez le commutateur POWER du flash
vidéo sur ON.
Le flash vidéo commence à se recharger. Il lui faut
plus de 7 secondes pour se recharger
complètement. Le témoin de charge des piles
apparaît dans le viseur et dans l’afficheur du
caméscope.
4 Dirigez le caméscope vers le sujet et
effectuez la mise au point.
5 Appuyez doucement sur la touche START/
STOP du caméscope jusqu’à ce qu’une
image fixe apparaisse dans le viseur.
Continuez à appuyer légèrement sur la
touche START/STOP.
Le flash vidéo se met à clignoter. L’image fixe
apparaît dans le viseur.
Pour changer d’image fixe, relâchez la touche
START/STOP. Le flash vidéo commence à se
recharger dès que vous relâchez la touche START/
STOP du caméscope. Assurez-vous que le témoin
de charge des piles apparaît dans le viseur (ou
dans l’afficheur) avant d’enfoncer à nouveau
légèrement la touche START/STOP de votre
caméscope.
Remarque
• Après que vous avez appuyé sur la touche
START/STOP, le caméscope règle la luminosité
pour assombrir momentanément l’image avant
que le flash vidéo ne se déclenche.
6 Appuyez à fond sur la touche START/STOP
de votre caméscope et relâchez-la.
L’image fixe affichée dans votre viseur est
enregistrée pendant environ 7 secondes. Pendant
ces 7 secondes, le son est également enregistré.
Dès que l’image fixe est enregistrée, le flash vidéo
commence à se recharger.
Remarques
• La torche vidéo est efficace à une distance
d’environ 1~4 m (réglage automatique du niveau
d’éclairement).
• Après utilisation, mettez le commutateur POWER
du flash vidéo en position OFF.
• Le flash vidéo met plus de temps à se recharger si
les piles commencent à être usées.
• Le flash vidéo doit se recharger même s’il est
complètement rechargé après que:
– vous avez mis le commutateur POWER du flash
vidéo sur OFF
– vous avez débranché le câble de contrôle LANC
du flash vidéo de la prise de contrôle lLANC du
caméscope
– vous avez mis le commutateur POWER du
caméscope sur d’autres positions, LOCK ou
STANDBY.
• Lorsque vous utilisez la torche vidéo, veillez à ne
pas recouvrir la cellule de la torche vidéo (voir
l’illustration D).
 Loading...