

Page 1
9-885-031-61
Stereo Video Cassette Recorder
HV-FX5950D
PAL
© 2003 Sony Corporation
Page 2

ENGLISH
WARNING
To prevent fire or shock hazard, do not expose the unit to
rain or moisture. To avoid electrical shock, do not open
the cabinet. Refer servicing to qualified personnel only.
Precautions
Safety
• This unit operates on 200-240 V AC, 50 Hz. Check that the
unit's operating voltage is identical with your local power
supply.
• If anything falls into the cabinet, unplug the unit and have it
checked by qualified personnel before operating it any further.
• The unit is not disconnected from the mains as long as it is
connected to the mains, even if the unit itself has been turned
off.
• Unplug the unit from the AC outlet if you do not intend to use it
for an extended period of time. To disconnect the cord, pull it
out by the plug, never by the cord.
• To prevent fire or shock hazard, do not place objects filled with
liquids, such as vases, on the apparatus.
Caution
Televison programs, films, video tapes and other materials
may be copyrighted.
Unauthorized recording of such material may be contrary to
the provisions of the copyright laws. Also, use of this
recorder with cable television transmission may require
authorization from the cable television transmitter and/or
program owner.
Installing
• Allow adequate air circulation to prevent internal heat buildup.
• Do not place the unit on surfaces (rugs, blankets, etc.) or near
materials (curtains, draperies) that may block the ventilation
slots.
• Do not install the unit near heat sources such as radiators or
air ducts, or in a place subject to direct sunlight, excessive
dust, mechanical vibration or shock.
• Do not install the unit in an inclined position. It is designed to
be operated in a horizontal position only.
• Keep the unit and cassettes away from equipment with strong
magnets, such as microwave ovens or large loudspeakers.
• Do not place heavy objects on the unit.
• If the unit is brought directly from a cold to a warm location,
moisture may condense inside the VCR and cause damage to
the video head and tape. When you first install the unit, or
when you move it from a cold to a warm location, wait for
about 3 hours before operating the unit.
2
ENGLISH
Page 3
Welcome
Thank you for purchasing this product.
To optimize the performance of this
unit, please read through this manual
carefully.
Main features
of this VCR
Favorite Program
The VCR memorizes the previously
recorded programs with the timer
recording. Just select the program you
want to record from the list, and the
VCR will set the timer recording
automatically.
ZWEITON broadcast
You can receive, record, and play
back stereo and bilingual TV
programs.
Auto Tuning
You can easily finish the VCR settings
of the TV channels at once.
Rec. End Search
You can fast-forward or rewind the
tape at the end of the recorded
program automatically.
Table of contents
Preparation
Connecting the VCR ........................................ 4
Preparing the remote control ........................... 6
Tuning your TV to the VCR..............................6
Setting the VCR channels – Auto Tuning ........ 7
Setting the VCR channels manually ................ 9
Changing the channel position assignment.....10
Setting the language...................................... 10
Setting the clock.............................................11
Playback
Playing back a tape........................................12
Various search functions................................ 15
Recording
Recording a TV program................................17
Recording ZWEITON stereo and bilingual
programs........................................................18
Recording with One-Touch Recording...........19
NTSC Playback on PAL-TV
Tapes recorded in the NTSC system
can be played back on this VCR.
High Speed Rewinding
A E-180 video tape can be rewound at
about 1 minute.
Setting the timer.............................................20
Setting the timer with Favorite Program
system............................................................22
Duplicating ..................................................... 23
Other functions
On-screen display..........................................24
Recording or playing back the wide aspect
ratio programs................................................25
Setting Child Lock mode................................25
Setting Power Save mode .............................26
Additional information
Care and maintenance...................................26
Head cleaning................................................ 26
Troubleshooting ............................................. 27
Specifications.................................................27
Parts and controls..........................................28
ENGLISH
3
Page 4
PREPARATION
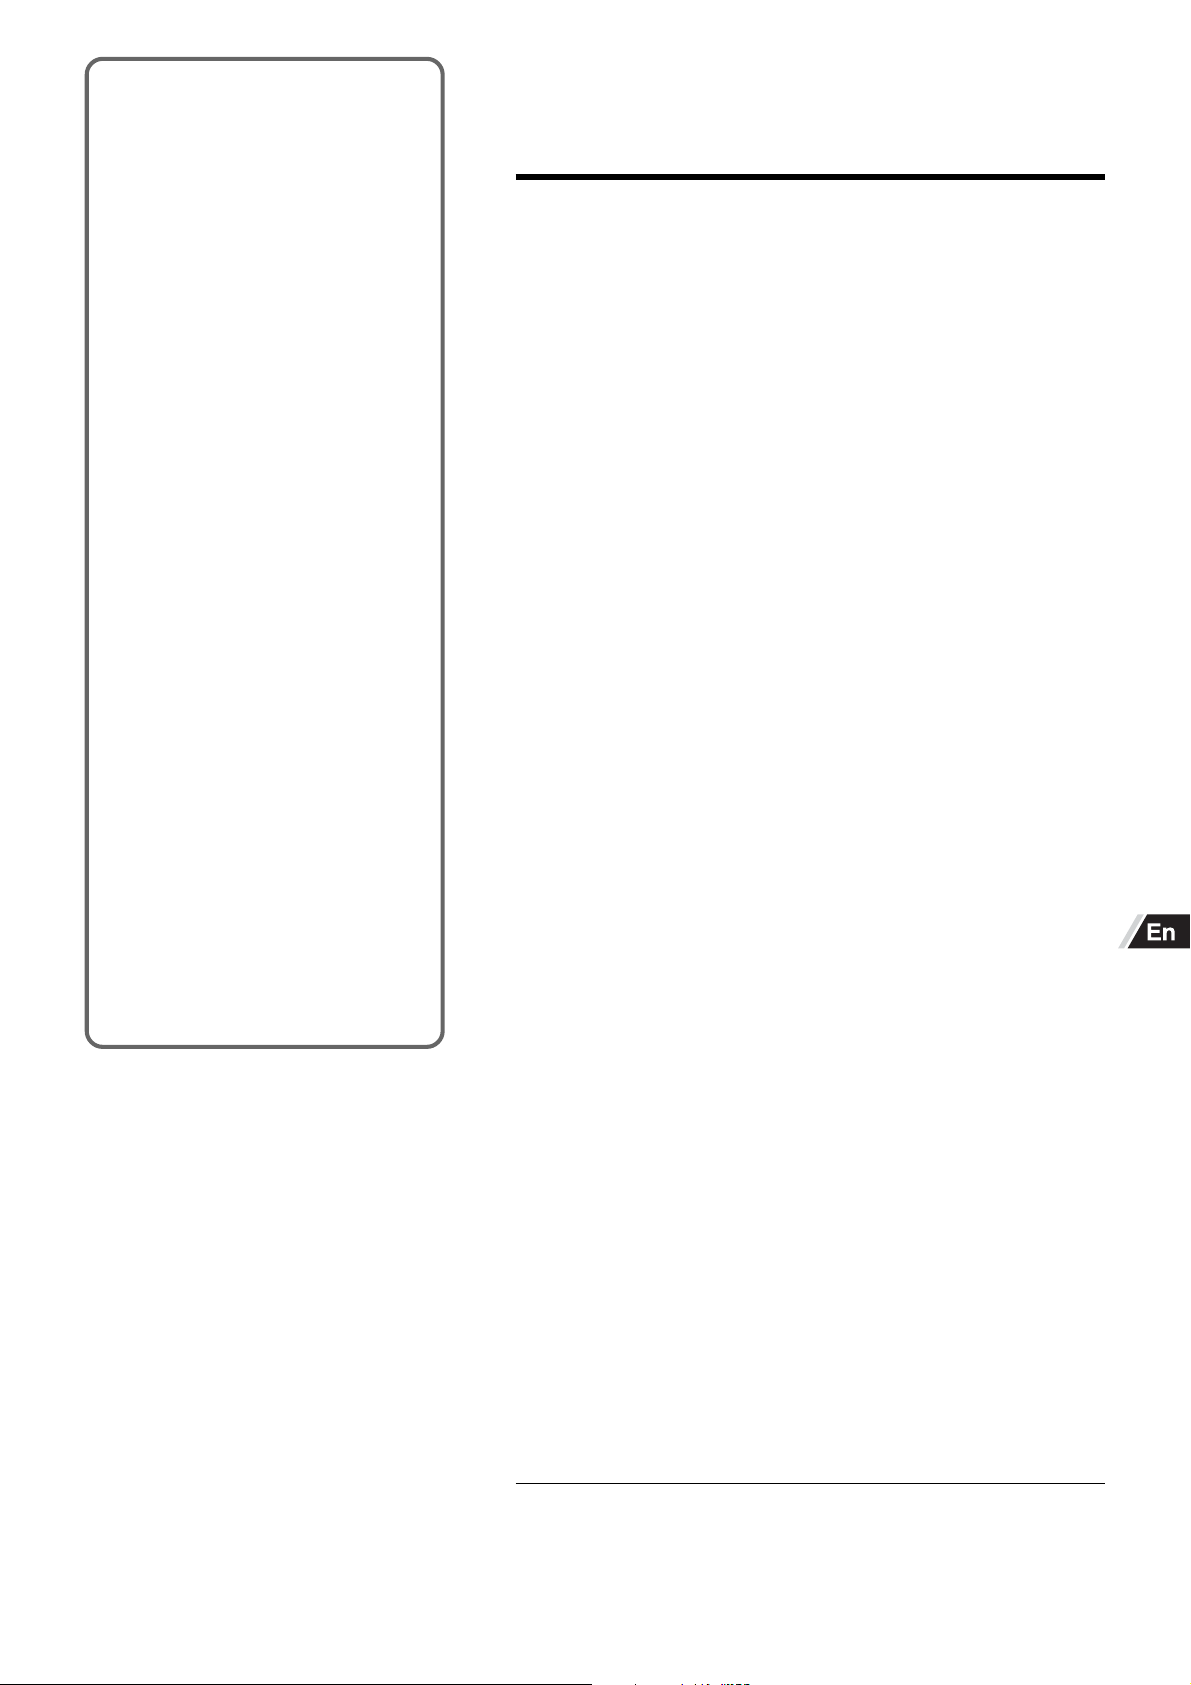
Connecting the VCR
Basic connections
EURO AV1
AUDIO/
VIDEO
4
To AC outlet
Disconnect the antenna cord from your TV and connect it to
1
the AERIAL jack on this VCR.
Connect the supplied antenna cord to the RF. OUT jack on the
2
VCR and the antenna jack on your TV.
Connect the optional 21-pin scart cord to the EURO AV1
3
AUDIO/VIDEO jack on the VCR and the 21-pin scart jack on
your TV.
This connection is recommended as an easier way to set-up the VCR, and
improves the picture and sound quality.
If you do not use this connection, go to the next step.
21-pin scart cord
3
(not supplied)
ENTREE
ANTENNE
AERIAL
SORTIE
ANTENNE
RF.OUT
2
Antenna cord
(supplied)
1
Antenna cord
(not supplied)
Cable box
or
or
Satellite receiver
TV
To antenna jack
4
Connect the power cord to the AC outlet.
To 21-pin scart
Notes
• All connections should be made with both the VCR and your TV unplugged from the AC outlet.
• If your TV has more than one 21-pin scart jack, please refer to the TV operation instructions.
• If you do not have a house hold antenna jack or you are uncertain of it, you should seek the advice of a local antenna dealer.
jack
Additional connections
To connect a stereo system
This connection improves the sound quality. If you connect a stereo system, you can listen to ZWEITON sound from the
speakers of the system.
Connect the AUDIO OUT L/R jacks of the VCR to the audio input jacks of the stereo system using the optional audio cord.
Stereo system
to audio input jacks
AUDIO
SORTIE OUT
GDL
R
ENTREE
ANTENNE
4
Audio cord (not supplied)
ENGLISH
Page 5
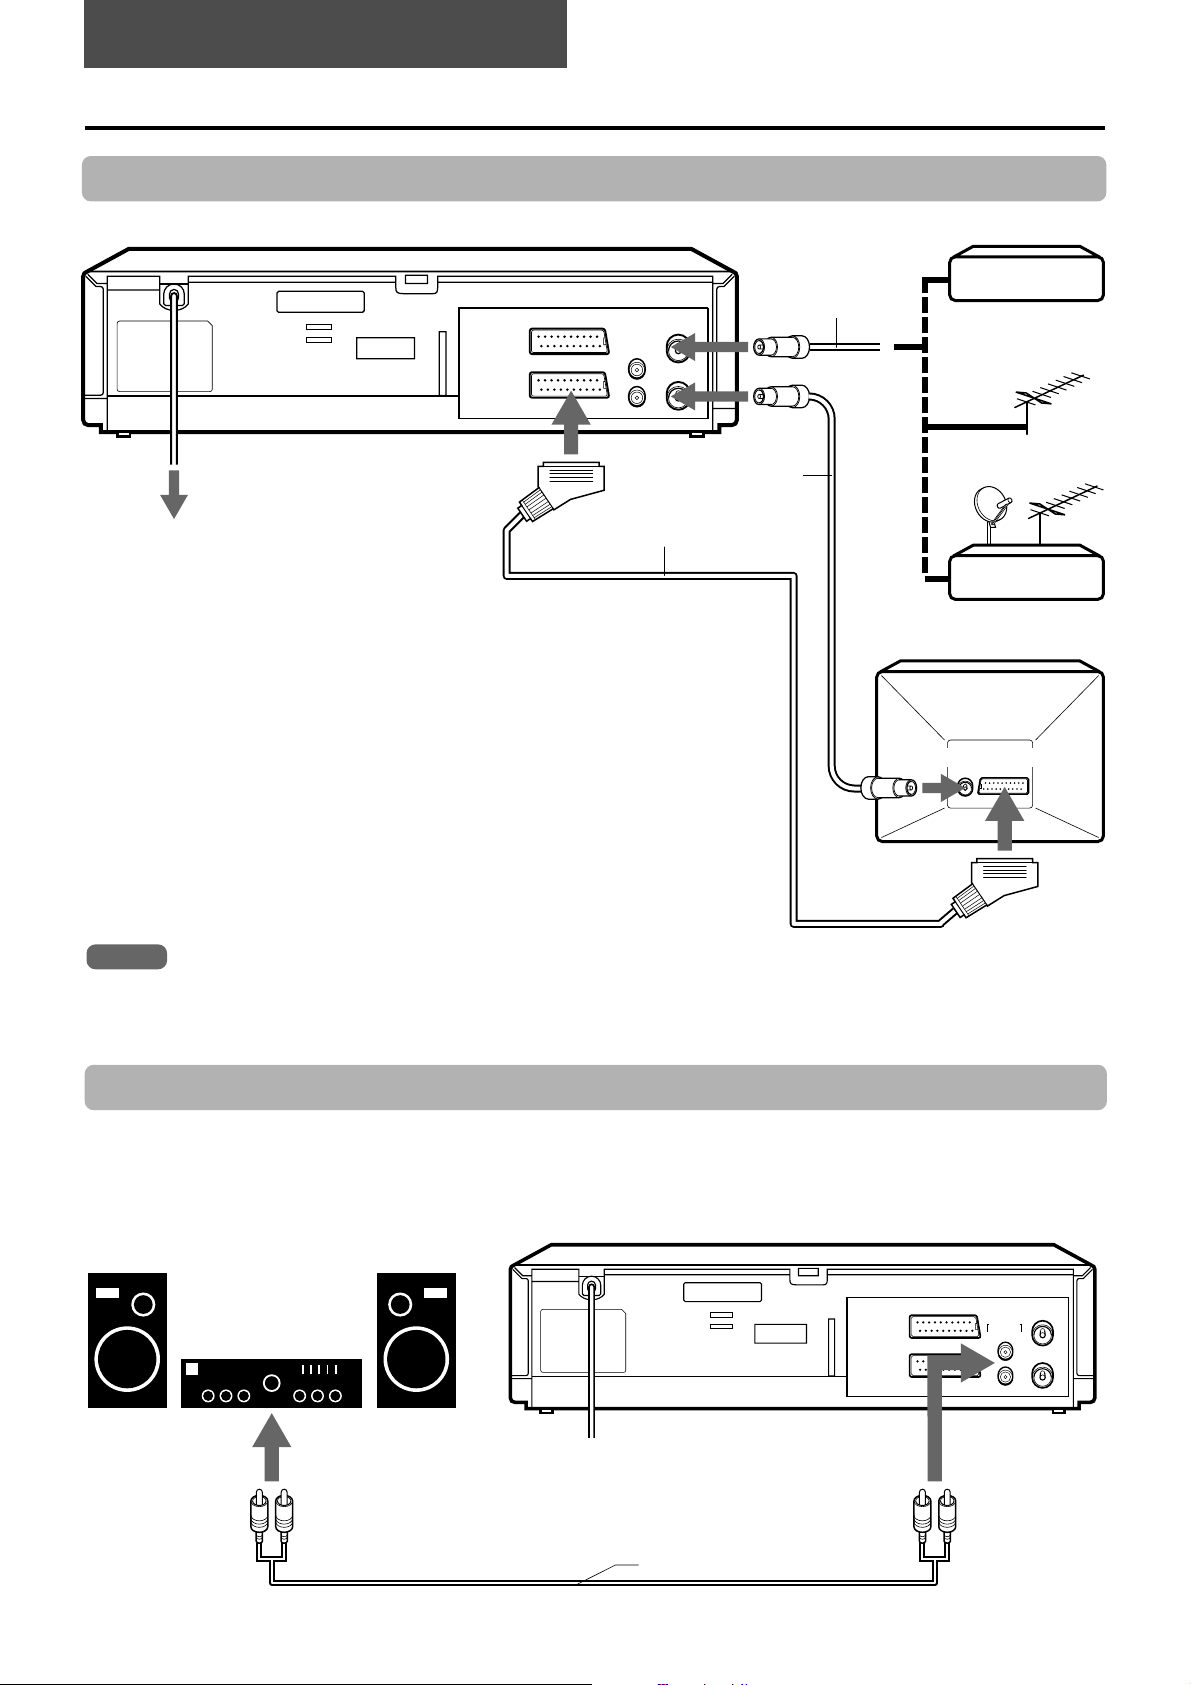
To connect to a satellite receiver, cable box or PAY-TV decoder with a 21-pin scart jack
Connect the VCR and the satellite receiver, cable box or PAY-TV decoder with an optional 21-pin scart cord.
PAY-TV decoder
DECODER
21-pin scart cord
(not supplied)
or
DECODER
EURO AV2
DECODER
EURO AV1
AUDIO/
VIDEO
Satellite receiver/cable box
TVVIDEO
Antenna cord
(not supplied)
ENTREE
ANTENNE
AERIAL
SORTIE
ANTENNE
RF.OUT
Antenna cord
(supplied)
21-pin scart cord (not supplied)
TV
To antenna jack
Notes
• If your satellite receiver or cable box has more than two scart jacks, use
the TV jack to connect to the VCR and not the VIDEO jack. Otherwise you
may not receive a proper picture.
• If you connect the VCR to a cable box or satellite receiver, please refer to
the operating instruction of those appliances.
To enjoy the sound and picture from the VCR (VCR mode)
Press TV/VIDEO on the remote control to display “VCR” on the display window. The VCR automatically switches to VCR mode
when the VCR is turned on.
To watch a program on the TV while recording another program on the VCR (TV mode)
Select the program to be watched using the TV’s tuner. The sound and picture of the channel selected for recording are
received by the VCR.
VCR TV
During power on VCR mode AV input selected
TV mode Input from TV’s tuner∗
During power off – Input from TV’s tuner
∗When the VCR is set to the TV mode and the PAY-TV channel is selected, the signals are scrambled even when PAY-TV is
selected by the TV’s tuner. In this case, either set the VCR to the VCR mode or switch the TV’s input signals to AV input.
ENGLISH
5
Page 6

Preparing the remote control
RF CHANNEL 36
Tuning your TV to the VCR
Inserting the batteries
Caution
To prevent damage from leakage or explosion, follow
the descriptions below.
•Insert two R03 (size AAA) batteries (supplied) with the
0 and 9 marks correctly as illustrated.
• Do not mix old batteries with new ones or different
types of batteries.
• Do not throw the batteries into a fire, apply heat to
them or take them apart.
• Do not carry the batteries with keys or other metallic
objects.
Note
Remove the batteries when they have no more power, or when
you do not use the remote control for a long period of time.
When using the VCR, the signals passes from the antenna
to the VCR and then out to the TV. Before you use your
VCR, a video output channel must be set on your TV.
If you have connected the VCR to the TV with a 21-pin
scart cord, this procedure is not necessary.
1
Press l /6 on the remote control to turn on the
VCR.
Make sure your TV is turned on.
2
Select a spare channel position on the TV and
tune the TV so that the blue screen appears
clearly on the TV screen.
Refer to the TV operating instructions for tuning.
Whenever you want to play back a tape, select this
channel position.
If there is interference on the
picture (wavyline, picture roll, etc.)
During power off, press and hold CHANNEL +
1
or - on the VCR for more than 4 seconds.
“RF 36” appears on the display window.
Using the remote control
Point the remote control toward the remote sensor.
30
30
Remote sensor
7m
Notes
• The remote control may not operate when there is any
obstruction between the remote control and the remote
sensor.
• Strong ambient light sources such as a fluorescent lamp or
direct sunlight may cause unreliable operation.
• Using a TV with the same type of infrared remote control
facing the same direction may cause incorrect operation.
• The maximum distance for effective control between the
remote control and the remote sensor is 7 meters.
• Although you can use the remote control within an angle of
up to 30 degrees in any direction from directly in front of the
remote sensor, we recommend a narrower angle for stable
operation.
• During Power Save mode, the remote control does not
operate.
Press CHANNEL + or - to select another
2
channel.
You can select any number between 22 and 68.
Tune the TV so that the RF CHANNEL screen
3
appears clearly on the TV screen.
Refer to the TV operating instructions for tuning the TV
picture.
Press l /6 to turn off the VCR.
4
The VCR is now tuned to your TV. Whenever you want
to use the VCR, select the VCR channel on your TV.
If there is still interference on the TV
screen
Connect the VCR to the TV with an optional 21-pin scart cord.
Whenever you want to play back a tape, simply select a
channel on your TV called AV or AUX.
You can set RF out to OFF in step 2.
Tip
If “RF 36” does not appear on the display window in step 1, the
VCR is in Power Save mode. In this case, press l /6 on the
VCR to turn on the VCR, and press l /6 on the remote control
to turn the VCR off. Then perform step 1 again.
ENGLISH
6
Page 7
Setting the VCR channels —
01
SE
C06 +1 5 PR-01
01 C06 +15 PR-0 1
02 C20 +47 PR-0 2
03 C23 +31 PR-0 3
04 C28 +47 PR-0 4
05 C40 +10 PR-0 5
06 C50 +31 PR-0 6
07 ––
08 ––––––
–––––
–––––
,
:
:
MOVE
DELETE
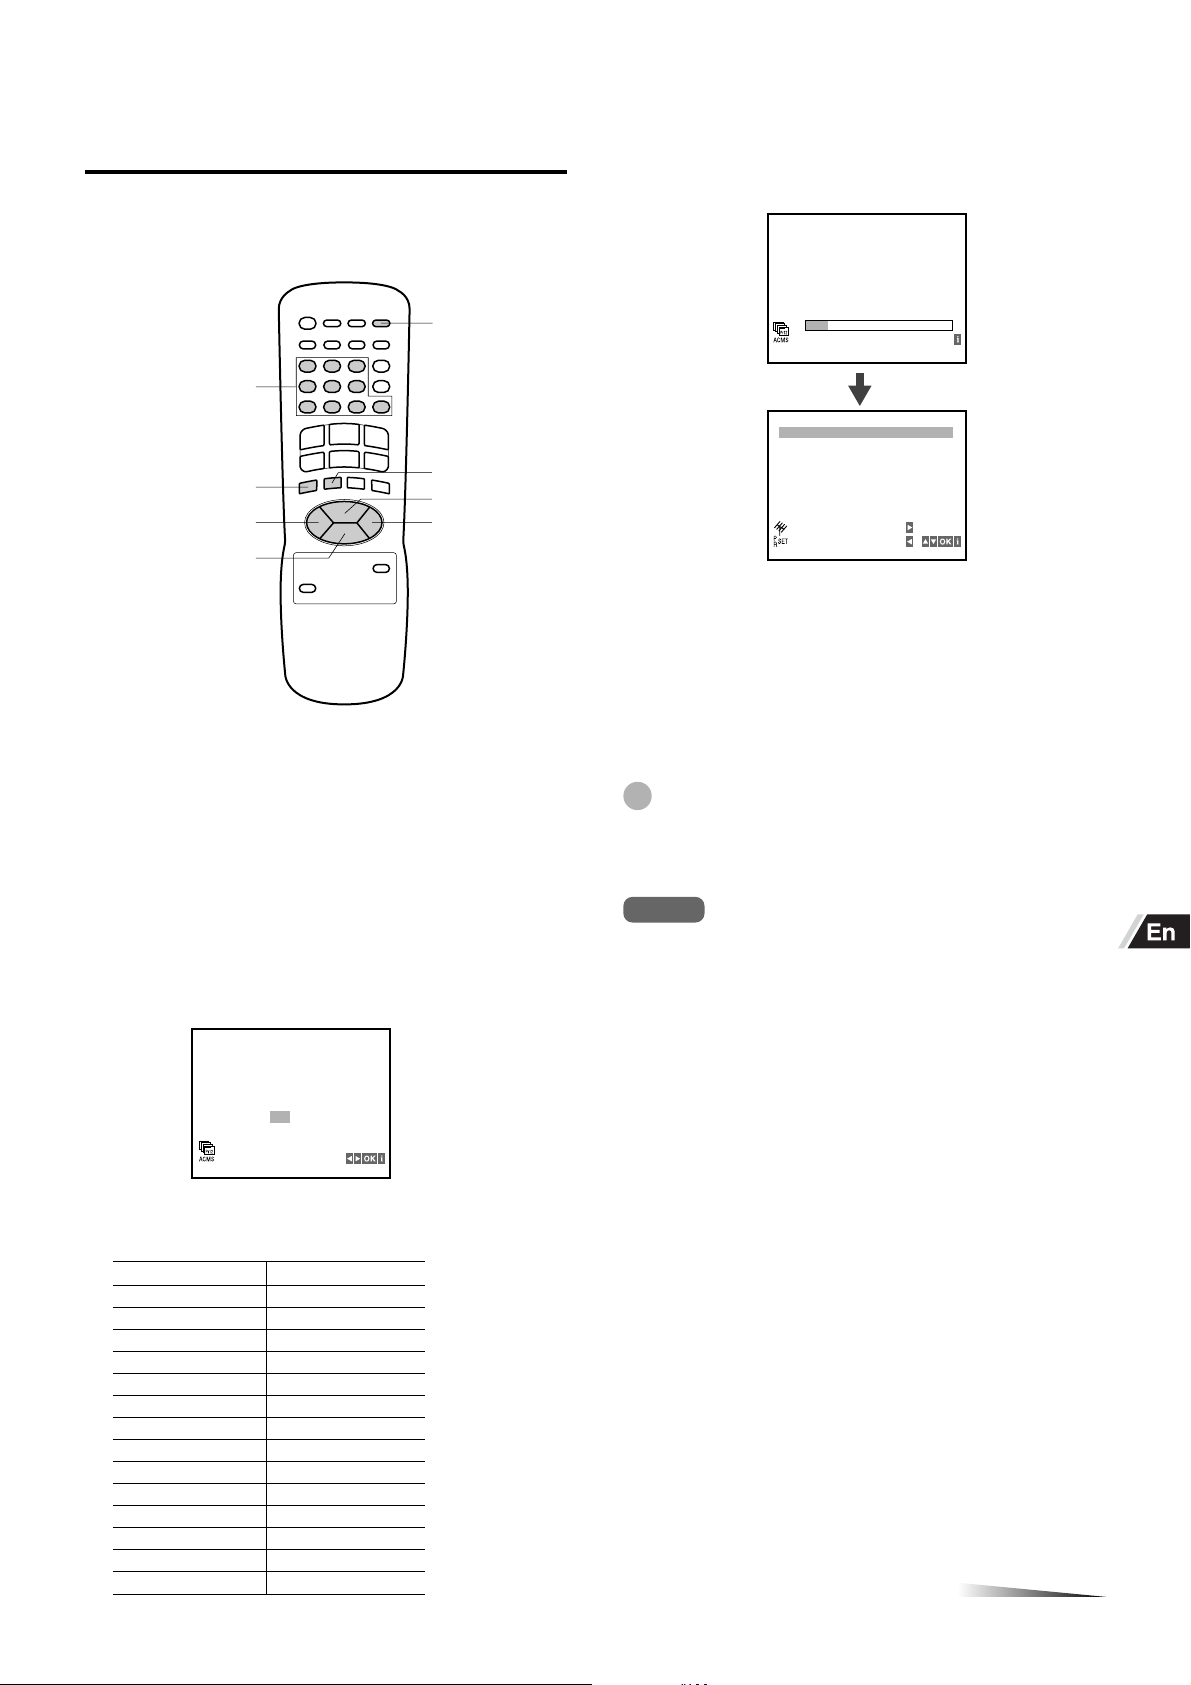
Auto Tuning
The Auto Tuning function can search and tune all available
TV stations and assign them in the VCR.
l /6
Number
buttons
Press OK to start Auto Tuning.
4
A scan bar appears on the TV screen.
In a few minutes, after the VCR has finished setting the
VCR channels, VCR channel table appears on the TV
screen.
i/MENU
j
k-
Turn on the TV and set the TV for VCR
1
OK
i+
l
reception.
•When the VCR and TV are connected with a 21-pin
scart cord, set the TV to the AV mode.
•When they are connected with only the antenna cord,
set the TV to the video output channel.
2
Press l /6 on the remote control to turn on the
VCR.
When you press l /6 for the first time after unpacking the
VCR, this screen appears on the TV screen.
5
Press i/MENU to return to the normal screen.
If the desired TV stations could not be
preset
Set the VCR channels manually. See page 9.
(Presetting the VCR channels is necessary for recording TV
programs.)
Tip
To re-start Auto Tuning, press i/MENU. And press j or l to
select ACMS, then press OK. Press j or l to select the letter
of your country, then press OK to start Auto Tuning.
Notes
• Even if the power supply is interrupted, the VCR will
automatically receive the preset channels when the power is
restored once you have completed Auto Tuning.
This function does not operate if the TV station is not
broadcasting when the power is restored.
• Once you conduct Auto Tuning, the previous settings will be
canceled.
A B CH D DK E F I
N NL P S SF OTHERS
Press j or l to select the country so that it
3
corresponds to the following chart:
Indicated letter Country
A Austria
B Belgium
CH Switzerland
D Germany
DK Denmark
E Spain
FFrance
I Italy
N Norway
NL Netherlands
P Portugal
S Sweden
SF Finland
OTHERS Others
CONTINUE
ENGLISH
7
Page 8
REC
TIME
DATE
SYS TEM
OSD
OPR
AUDIO
ON
OFF
f
OSD
Setting the VCR channels — Auto Tuning (continued)
REC
TIME
DATE
SYS-
TEM
OSD
OPR
AUDIO
ON
OFF
ON
OFF
f
OSD
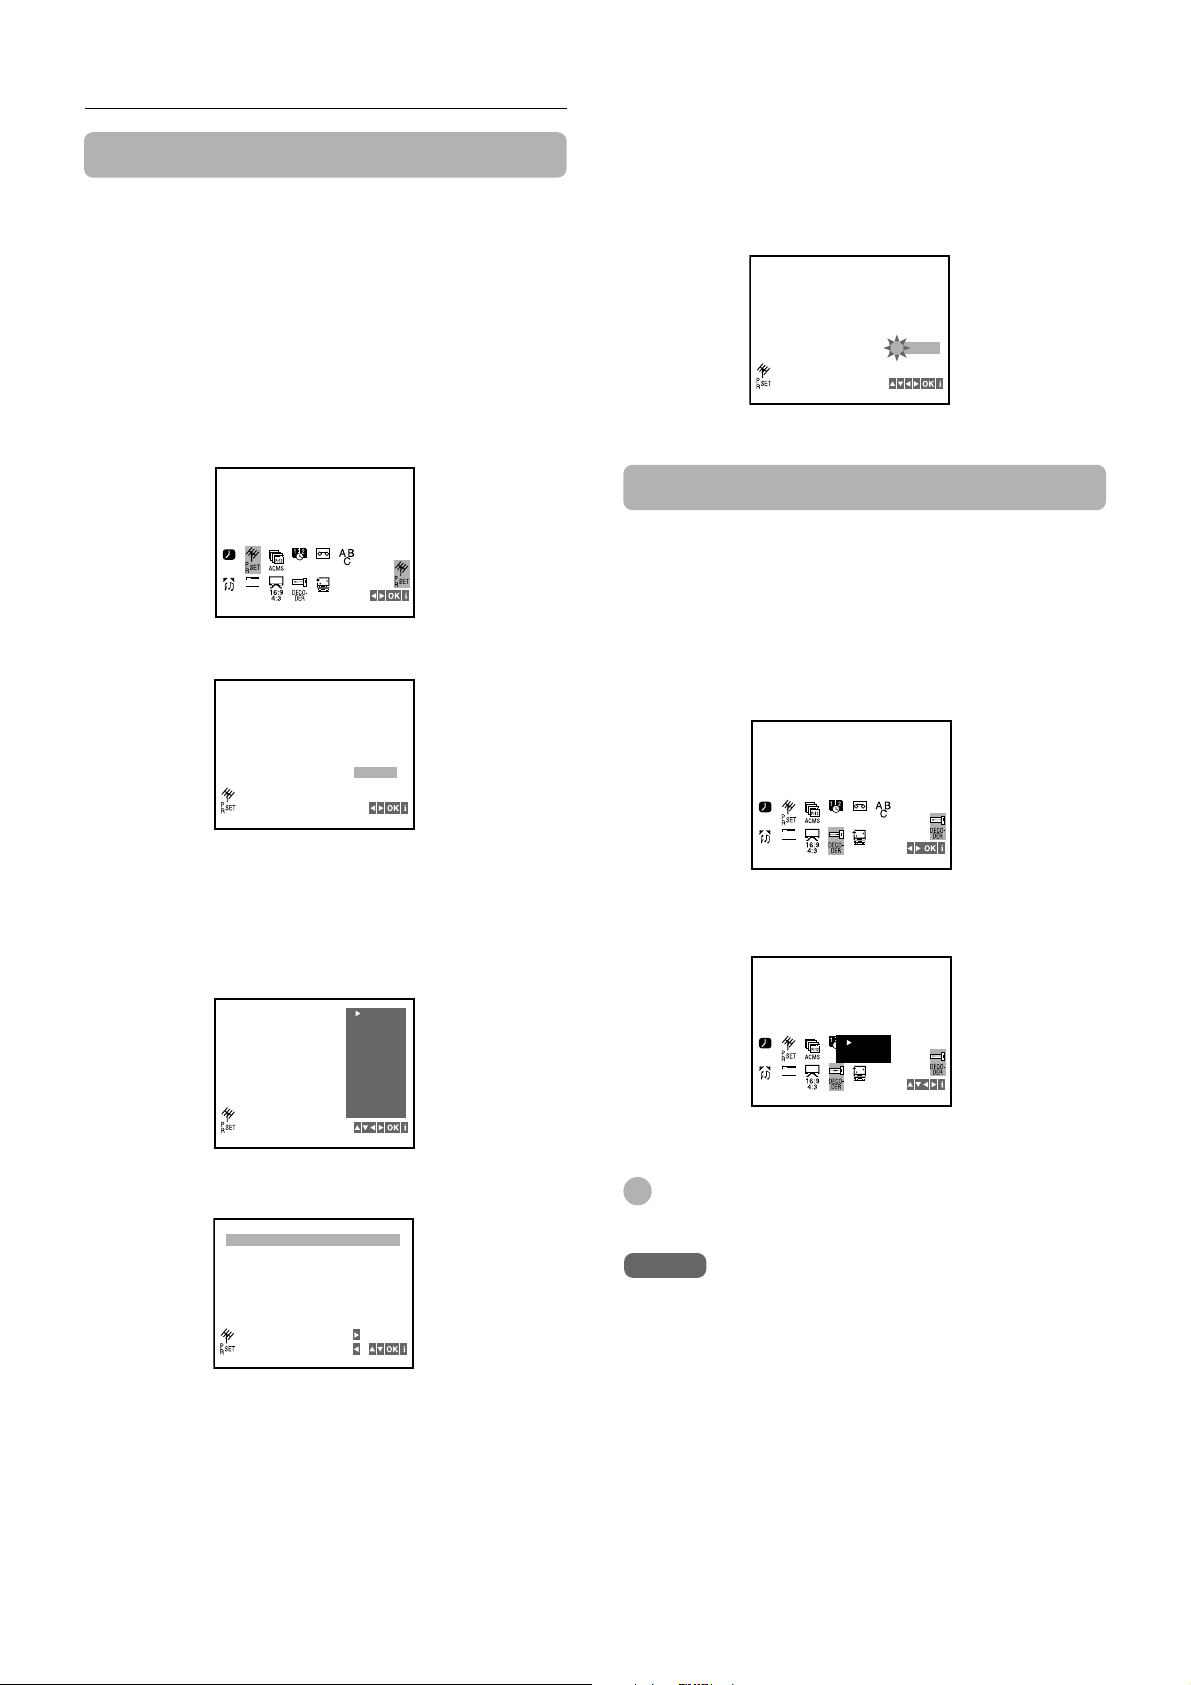
Registering the TV station’s name
You can enter the TV station’s name manually.
1
Press i+ or k- or the number buttons to
select the channel position you want to register
the name.
2
Press i/MENU.
The selected item appears on the right hand corner of
the menu.
3
Press j or l to select PR SET, then press
OK.
TIME
REC
f
OSD
ON
OFF
AUDIO
Press l twice, then press OK.
4
SYS-
DATE
TEM
OSD
OPR
To change a TV station’s name
In step 5, press l. The first letter of the station name
flashes. And press i+ or k- repeatedly to display the
desired letter, then press l. You can change up to 5 letters.
Press OK to enter the name, then press i/MENU to return to
the VCR channel table. Press i/MENU again to return to the
normal screen.
PR
CH MFT STATION
01 C06 ARD
+15
Using the PAY-TV decoder
When the PAY-TV decoder is connected to the EURO AV2
DECODER jack on the rear, set DECODER in the menu to
ON.
Press i/MENU.
1
2
Press j or l to select DECODER, then press
OK.
PR CH MFT STATION
01 C06 +15
The TV station’s name list appears.
Press i+ or k- to select the desired TV
5
station’s name, then press OK.
You can change the TV station’s name manually. See
“To change a TV station’s name” on this page.
ARD
ZDF
WDR 3
BR3
HR3
MOVE
DELETE
EMISORA
N 3
NDR3
SWF3
–––––
–––––
:
:
,
CH MFT
PR
C06 +15
01
Press i/MENU to display the VCR channel table.
6
01 C06 +15 ARD
02 C20 +47 PR-02
03 C23 +31 PR-03
04 C28 +47 PR-04
05 C40 +10 PR-05
06 C50 +31 PR-06
07 ––
08 ––––––
Press i+ or k- to select ON.
3
Press i/MENU to return to the normal screen.
4
Tip
You can return to the menu by pressing j or l in step 3.
Notes
• For using the PAY-TV decoder, connect to the EURO AV2
DECODER jack.
• When you change the setting in step 3, the picture on the
screen will disappear momentarily. This is not a malfunction.
To register the other TV station’s name, press
7
i+ or k- to select the channel position, then
press OK to display the screen in step 4. Repeat
steps 4 through 6 until all required stations are
set.
Press i/MENU to return to the normal screen.
8
ENGLISH
8
Page 9
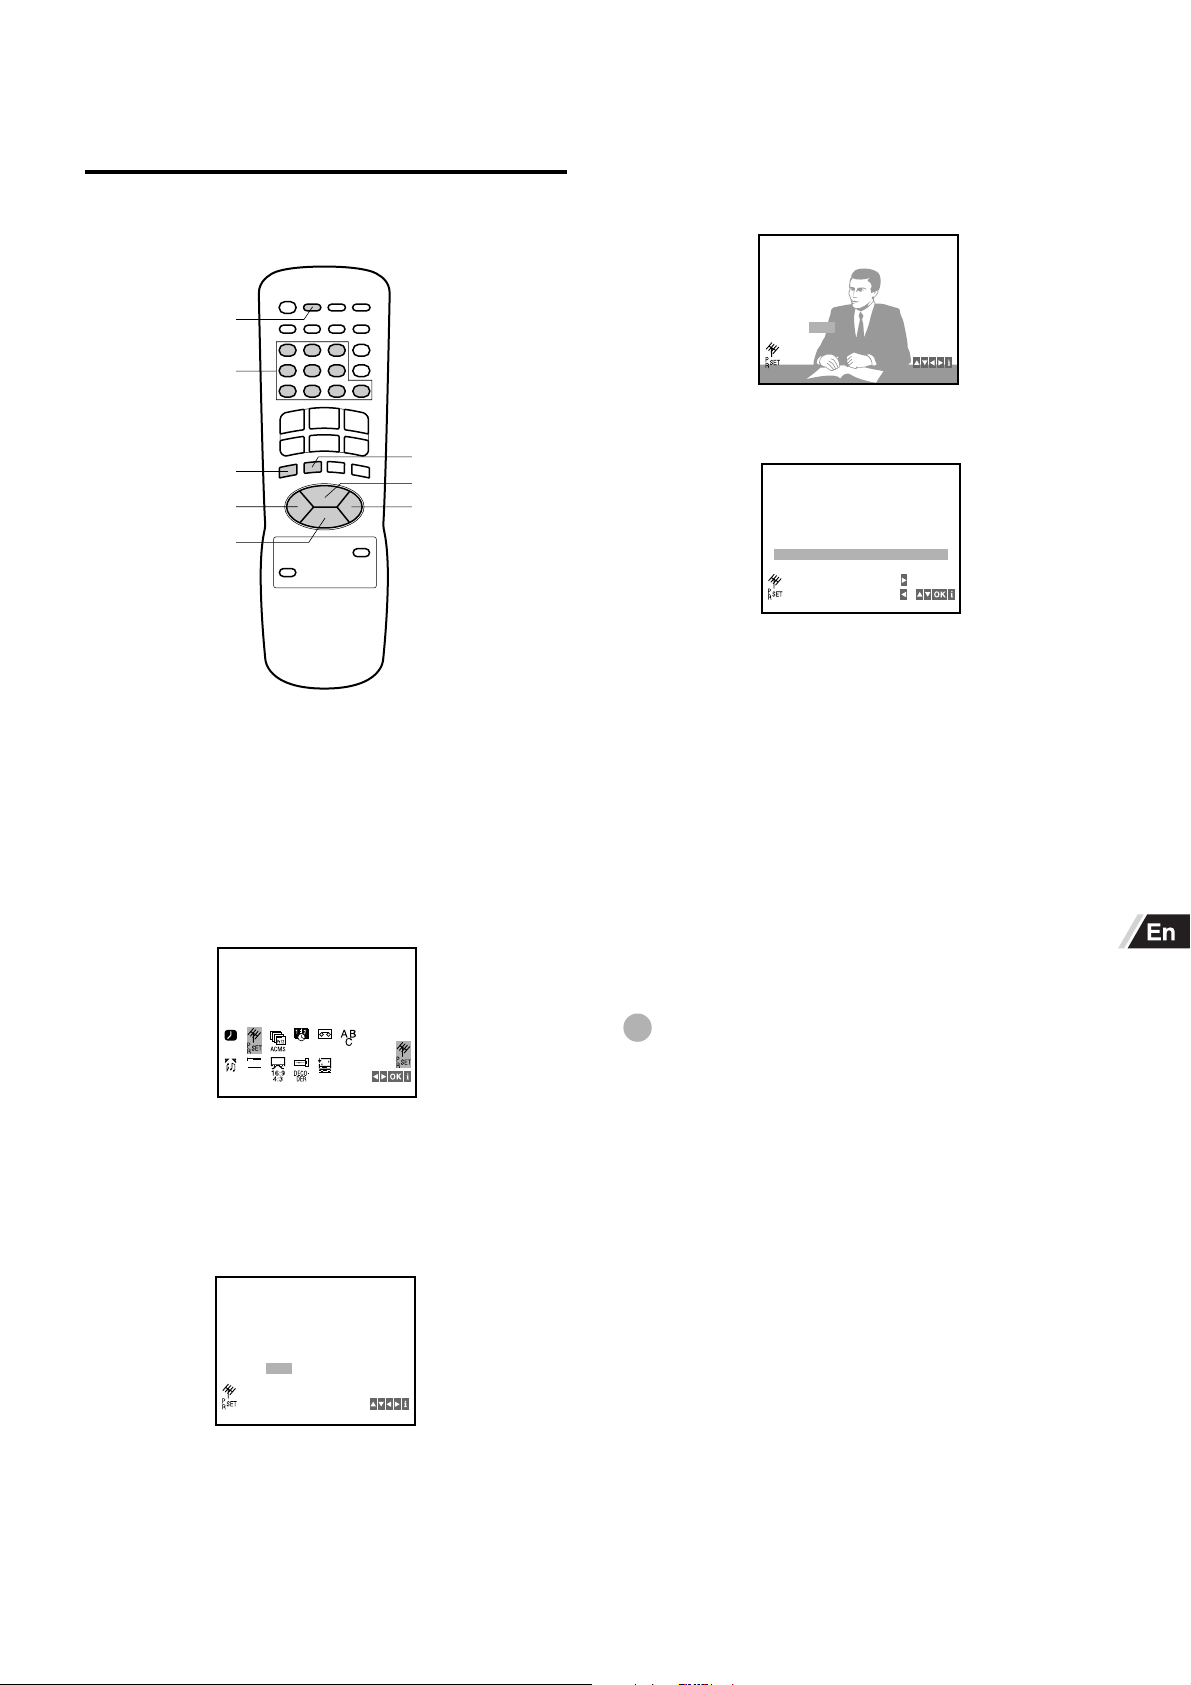
Setting the VCR channels
01 C06 + 1 5 P R- 01
02 C20 + 4 7 P R- 02
03 C23 + 3 1 P R- 03
04 C28 + 4 7 P R- 04
05 C40 + 1 0 P R- 05
06 C50 + 3 1 P R- 06
07 C27
08 ––
+16––PR-07
–––––
,
:
:
MOVE
DELETE
PR
07 C27 +16
CHANNEL / CABLE : AV
CH MFT STATION
manually
You must set the VCR channels manually for recording TV
programs, if Auto Tuning does not set them correctly.
INPUT SELECT
Number
buttons
i/MENU
j
k-
1
Select the channel position to be tuned using
the number buttons.
OK
i+
l
5
Enter the VCR channel number of TV station
you want to tune using the number buttons.
• You can also select the VCR channel number using
i+ or k-.
• If the TV station is received, the VCR displays the TV
program.
6
Press i/MENU to display the VCR channel table.
To set the other VCR channel, press i+ or k-
7
to select the channel position, then press OK to
return to the screen in step 4. Repeat steps 4
through 6 until all required VCR channels are
set.
8
Press i/MENU to return to the normal screen.
2
Press i/MENU.
Press j or l to select PR SET, then press
3
OK.
TIME
REC
f
OSD
ON
OFF
AUDIO
Press INPUT SELECT to select the normal TV
4
SYS-
DATE
TEM
OSD
OPR
station or cable TV.
If you receive the program from VHF/UHF antenna,
press INPUT SELECT to display “C02” below CH.
If you receive cable TV program, press INPUT SELECT
to display “S01” below CH.
PR
CH MFT STATION
07 C02 00
CHANNEL / CABLE : AV
If you cannot get a clear picture
In step 5, press l to highlight MFT, then press i+ or k-
repeatedly until the clear picture is obtained.
To erase the channel
After step 6, press i+ or k- to select the TV station you
want to erase, then press j to erase.
Tip
To search all the receivable channels, press and hold i+ or
k- for more than 4 seconds in step 5.
ENGLISH
9
Page 10

REC
TIME
DATE
SYS-
TEM
OSD
OPR
OSD
AUDIO
ESPAÑOL
ITALIANO
FRANCAIS
DEUTSCH
ENGLISH
DUTCH
ON
OFF
f
OSD
REC
TIME
DATE
SYS TEM
OSD
OPR
OSD
AUDIO
ON
OFF
f
OSD
Changing the channel position
Setting the language
assignment
You can change the channel position assignment as you like.
i/MENU
Press i/MENU.
1
j
k-
OK
i+
l
The on-screen menu can display one of following six
languages: English, German, French, Italian, Spanish and
Dutch.
i/MENU
1
Press i/MENU.
j
k-
OK
i+
l
2
Press j or l to select PR SET, and press
OK, then press i/MENU.
The VCR channel table appears.
Press i+ or k- to select the TV station you
3
want to move, then press l.
01 C06 +15 PR-01
02 C20 +47 PR-02
03 C23 +31 PR-03
04 C28 +47 PR-04
05 C40 +10 PR-05
06 C50 +31 PR-06
––
07
08 –– –– –––––
Press i+ or k- to select the channel
4
MOVE
DELETE
–––––––
:
:
,
position where you want to insert the selected
TV station.
• The selected TV station will be inserted into the new
position.
• If you assign a channel position which has already
been assigned to another TV station, the succeeding
programed TV stations shift up/down in order.
01 C06 +15 PR-01
02 C20 +47 PR-02
03 C23 +31 PR-03
04 C28 +47 PR-04
C50 +3 1 PR-06
05
06
C40 +1 0 PR-05
––
07
08 –– –– –––––
–––––––
Press j or l to select OSD, then press OK.
2
Press i+ or k- to select the desired
3
language.
Press i/MENU to return to the normal screen.
4
Tip
You can return to the menu by pressing j or l in step 3.
10
5
Press OK.
Press i/MENU to return to the normal screen.
6
ENGLISH
Page 11

Setting the clock
You must set the date and time for timer recordings.
5
Press i/MENU to start the clock.
The normal screen returns.
To correct the digits while setting
Before pressing i/MENU in step 5, press j or l to select
the item you want to correct. Reset the digits using the
number buttons, i+ or k-.
Number
buttons
i/MENU
j
OK
i+
l
k-
Press i/MENU.
1
Press j or l to select TIME DATE, then press
2
OK.
TIME
REC
AUDIO
f
OSD
ON
OFF
SYS-
DATE
TEM
OSD
TIME
OPR
DATE
Tip
When the power supply is interrupted for more than 3 seconds,
the clock setting is cleared. In this case, you have to set the
clock again.
Note
The date can be set from A.D. 2001 to A.D. 2100.
Set the hours using the number buttons.
3
•When selecting a number less than 10, press 0 to enter
the tens digit and then press the buttons 1 through 9 to
enter the ones digit.
• You can also select the hour using i+ or k-, then
press l.
HH
MM––DD––MM––YY
:..
––
TIME
DATE
4
Set the minutes, day, month and year in the
––
–––
same way as in step 3.
The day of the week automatically appears when you set
the year.
HH
MM20DD21MM04YY
:..
10
TIME
DATE
03
SUN
ENGLISH
11
Page 12

PLAYBACK
Playing back a tape
TV/VIDEO
AUTO
TRACKING
C PLAY
s STOP
CH/TRACKING
i+
CH/TRACKING
k-
Before starting
Turn on the TV and set the TV for VCR reception.
•When the VCR and TV are connected with a 21-pin scart
cord, set the TV to the AV mode.
•When they are connected with only the antenna cord, set
the TV to the video output channel.
If you cannot get a clear playback
picture
Although the VCR adjusts the tracking automatically, you
may need to adjust the tracking manually if the tape quality
is too poor.
While the VCR is adjusting the tracking automatically,
“A-tr” flashes on the display window. It goes off after the
adjustment is complete.
TIMER VCR REM BILSAP ST
REC
SP LP EP
If the picture and the sound have noise, try manual tracking.
M
To adjust the tracking manually
During playback, press CH/TRACKING i+ or k-
repeatedly until you get the best possible picture.
(Automatic Tracking is canceled.)
To return to the automatic tracking
Press AUTO TRACKING.
Note
“A-tr” does not appear while playing back unrecorded portions
of the tape.
Hi-Fi
Insert a cassette.
1
The power turns on automatically.
Playback starts immediately if the erasure prevention tab
has been removed from the cassette.
Press C PLAY to start playback.
2
To stop playback
Press s STOP.
Tip
When you can not see the playback picture on the screen,
press TV/VIDEO to display “VCR” on the display window.
Notes
• When the tape reaches the end during playback, fast-
forward, forward search, skip search or CM skip, the VCR
automatically rewinds the tape to the beginning, ejects the
cassette, and turns the power off. (Automatic rewind
function)
• The VCR selects the tape speed, SP, LP or EP (NTSC only)
automatically.
• Do not put your hands into the tape compartment. Injury may
result. Be especially careful that young children do not do so.
12
ENGLISH
Page 13

REC
TIME
DATE
SYS TEM
OSD
OPR
AUDIO
AUDIO
ON
OFF
f
OSD
REC
TIME
DATE
SYS TEM
OSD
OPR
AUDIO
AUDIO
LEFT
STEREO
ON
OFF
f
OSD
RIGHT
MONO
z
C PLAY
f REW/[
a PAUSE/FRAMEF
i/MENU
OK
j
CH/TRACKING
k-
Additional functions
To
Make a
picture still
Fast-forward
the tape
Rewind the
tape
Eject the
cassette
Search
forward
Search
reverse
Play frameby-frame
Press
a PAUSE/
FRAMEFduring
playback
g F FWD/]
during stop
f REW/[
during stop
z
g
F FWD
during playback
f
REW
/[
during playback
a PAUSE/
FRAMEF
repeatedly during still
/]
l /6
CM SKIP
g F FWD/]
s STOP
CH/TRACKING i+
l
To return to the
original mode
Press C PLAY.
Press s STOP.
Press s STOP.
—
Press C PLAY.
Press C PLAY.
Press C PLAY.
Tips
• You can eject the cassette by pressing z during power off.
(This does not work during Power Save mode.)
• You can adjust unstable pictures during still by pressing CH/
TRACKING i+ or k- repeatedly.
• Depending on the tape, noise lines may appear or color may
fade during still, forward and reverse searches.
You can move the noise lines during forward and reverse
searches by pressing CH/TRACKING i+ or k-
repeatedly.
Notes
• If a still picture lasts for more than 5 minutes, the VCR will
automatically enter stop mode to protect the tape.
• If forward and reverse searches last for more than 3 minutes,
the VCR will automatically enter playback mode to protect
the tape.
• The sound will be muted during forward and reverse
searches, and still.
Selecting stereo or bilingual sound
Press i/MENU.
1
2
Press j or l to select AUDIO and then press
OK.
Press i+ or k- to select the adjustment of
3
your choice.
To watch the picture of a tape during fastforward or rewind – Skip search
Hold down g F FWD/]
forward or rewind. The VCR switches forward or reverse
search.
Release the button to return to the fast-forward or rewind
mode.
or
f REW/[ during fast-
To skip an advertisement
Press CM SKIP during playback. The VCR searches
forward approximately 30 seconds of the recorded time.
Each press changes the recorded time of forward search in
30 seconds increments to a maximum of 3 minutes.
After forward search, VCR returns to the normal playback.
During CM skip, the counter does not register blank portions
with no recorded signal.
To turn off automatically after rewinding
Press l /6 during rewind. “REW” flashes on the TV screen.
The VCR turns the power off after rewinding the tape to the
beginning.
Adjustment
Stereo transmission Bilingual transmission
STEREO Stereo Mixed sound (main
and secondary)
LEFT Left channel Main sound
RIGHT Right channel Second sound
MONO Standard sound Standard sound (in
principle, the main
sound)
For listening
Press i/MENU to return to the normal screen.
4
Tip
You can return to the menu by pressing j or l in step 3.
Note
When you play back a cassette recorded in mono mode, the
sound is always played back in mono, regardless of the audio
setting.
CONTINUE
ENGLISH
13
Page 14

REC
TIME
DATE
SYS TEM
OSD
OPR
SYS TEM
AUDIO
ON
OFF
f
OSD
REC
TIME
DATE
SYS TEM
OSD
OPR
SYS TEM
AUDIO
PAL
AUTO
ON
OFF
f
OSD
MESECAM
Playing back a tape (continued)
Setting the color system manually
Normally the AUTO setting is sufficient. If the playback
picture color is abnormal, select the color system of the
cassette you are using.
1
Press MENU.
2
Press j or l to select SYSTEM, then press OK.
i/MENU
j
OK
i+
l
k-
Improving the quality of the picture
– OPR (Optimum Picture Response)
1
Press i/MENU during playback.
2
Press j or l to select OPR, then press
OK.
TIME
REC
AUDIO
f
OSD
ON
OFF
SYS-
DATE
TEM
OSD
OPR
OPR
3
Press i+ or k- to select the color system,
PAL or MESECAM.
Press i/MENU to return to the normal screen.
4
To return to the automatic selection mode
Select AUTO in step 3.
Tip
You can return to the menu by pressing j or l in step 3.
Note
The color system setting is automatically returned to AUTO if
the cassette is ejected.
3
Press i+ or k- to select SOFT or SHARP.
SOFT makes the picture softer.
SHARP makes the picture clearer.
OFF
TIME
SOFT
REC
f
SHARP
OSD
ON
OFF
AUDIO
Press i/MENU to return to the normal screen.
4
SYS-
DATE
TEM
OSD
OPR
OPR
To turn off OPR
Select OFF in step 3.
Tip
You can return to the menu by pressing j or l in step 3.
Notes
• You can select OPR in step 2 only during playback.
• OPR is automatically set to OFF when a cassette is ejected
or the power is turned off.
Playing back the NTSC tape
Tapes recorded in the NTSC color system can be played
back on this unit.
If you play back the NTSC tape on this unit, you can watch
the picture on a PAL color system TV.
• Depending on the tape, the playback picture shrinks
vertically to some degree.
• Depending on the tape, the playback picture may scroll
vertically on the screen. If your TV has a V-HOLD control,
adjust for a stable picture. If not, you cannot stop scrolling.
• Depending on the tape, noise lines may appear or color may
fade during still.
• Noise lines may appear or color may fade during forward
and reverse searches.
• Although NTSC tapes can be played back on a PAL system
TV, these tapes cannot be dubbed by a PAL system VCR.
• Depending on the tape, the quality of the playback picture
and sound are not clear and the auto tracking function may
not be performed properly.
14
ENGLISH
Page 15

Various search functions
ZERO RETURN
s STOP
OK/CLOCK/
COUNTER
j
CH/TRACKING
k-
Playing at various speeds
During playback
Press j or l repeatedly during playback. Each press
varies the playback speed gradually as follows:
CLEAR
CH/TRACKING i+
l
SLOW T
Rewinding or fast-forwarding to a
specific point – Zero Return
Before starting
Make sure the on-screen display is set to ON (page 24).
1
Press OK/CLOCK/COUNTER until the tape
counter appears on the TV screen. See page
24.
E
S
0:30:00
Press CLEAR at the point you want to locate
2
later.
The tape counter on the TV screen resets to “0:00:00”.
Press The VCR switches
l once forward playback at twice speed
l twice forward search
j once or forward slow motion playback
SLOW T
j twice still
j 3 times reverse playback
j 4 times reverse playback at 3 times speed
j 5 times reverse search
During still
Press j or l repeatedly during still. Each press varies the
playback speed gradually as follows:
Press The VCR switches
l once or forward slow motion playback
SLOW T
l twice forward playback
l 3 times forward playback at twice speed
l 4 times forward search
j once or reverse playback
j twice reverse playback at 3 times speed
j 3 times reverse search
Tips
• You can adjust unstable pictures during still by pressing CH/
TRACKING i+ or k- repeatedly.
• Depending on the tape, noise lines may appear or color may
fade during still, and forward and reverse searches.
You can move the noise lines during forward and reverse
searches by pressing CH/TRACKING i+ or k-
repeatedly.
• If noise lines appear on the still picture, press l to play back
at slow speed. Press CH/TRACKING i+ or k- to move
the noise lines, then j to return to the still picture.
E
S
0:00:00
After playback or recording, press s STOP,
3
then ZERO RETURN.
The tape automatically stops when the tape counter
returns to “0:00:00”.
Notes
• When you insert a cassette, the tape counter is reset to
“0:00:00”.
• The tape counter does not work while playing unrecorded
portions of a tape.
Notes
• If slow motion playback lasts for more than 30 seconds, the
VCR will automatically enter playback mode to protect the
tape.
• Reverse slow motion playback can not be made.
CONTINUE
ENGLISH
15
Page 16

recorded
blank
recorded
blank
Various search functions (continued)
REC. END
SEARCH
s STOP
Searching the end of the recorded
program – REC. End Search
You can fast-forward or rewind the tape at the end of the
recorded program automatically.
Press REC. END SEARCH during stop.
The unit starts searching.
To stop REC. End Search
Press s STOP.
Notes
• When the tape does not have blank space, searching stops
at the end of the tape.
• If a recorded portion left is less than 7 minutes in SP mode
or 14 minutes in LP mode when REC. END SEARCH is
pressed, this function does not work correctly.
• If a tape has been recorded over in a different mode, either
SP or LP mode, REC. End Search may not work completely.
FF
REC. END SEARCH
Searching stops automatically after fast-forwarding or
rewinding as below:
Fast-forward
recorded
recorded blank
Press REC. END SEARCH
Previous recorded
last recordedlast recorded
Fast-forward
Press REC. END SEARCH
Rewind
Fast-forward
Stop
blank
Stop
blankblank
16
recorded
recorded
Stop
ENGLISH
blank
blank
Rewind (after
fast -forwarding
for a few seconds)
Press REC. END SEARCH
Page 17

RECORDING
Recording a TV program
INPUT SELECTINPUT SELECT
SP/LP
Number
buttons
a PAUSE/
FRAMEF
s STOP
CH/TRACKING
k-
Before starting
Turn on the TV and set the TV for VCR reception.
•When the VCR and TV are connected with a 21-pin scart
cord, set the TV to the AV mode.
•When they are connected with only the antenna cord, set
the TV to the video output channel.
TV/VIDEO
w REC
CH/TRACKING
i+
To stop recording
Press s STOP.
To pause recording
Press a PAUSE/FRAME F. The REC indicator on the
display window flashes. To resume recording, press
a PAUSE/FRAME
F again.
To prevent an accidental recording
Break off the erasure prevention tab on the back edge of the
cassette.
To record over the tape again, cover the gap with adhesive
tape.
Adhesive tape
Erasure prevention tab
To watch another TV program while
recording
•When the VCR and the TV are connected with a 21-pin
scart cord, set the TV to TV mode, and select the channel
to watch. Some TVs cannot be switched to TV mode by
operating the TV. In this case, press TV/VIDEO to turn off
“VCR” on the display window.
•When they are connected with only the antenna cord,
press TV/VIDEO to turn off “VCR” on the display window,
and select the channel to watch.
1
Insert a cassette with its erasure prevention tab
in place.
Make sure the tape has enough blank space for
recording.
The power turns on automatically.
If “VCR” does not appear on the display window, press
TV/VIDEO so that “VCR” appears.
2
Press SP/LP to select the tape speed, SP or LP.
LP provides twice as much recording time as SP,
although SP produces better picture and audio sounds.
SP
Tips
• If you want to record a program through the line input, press
INPUT SELECT to display “AV1” (from the EURO AV1
AUDIO/ VIDEO jack on the rear) or “AV2” (from the EURO
AV2 DECODER jack on the rear) on the display window and
the TV screen.
• You can select the stereo or bilingual sound while recording
without affecting the recorded program. See page 13.
Notes
• If you try to record on a cassette without its erasure
prevention tab, the VCR will eject the cassette.
• If recording pause lasts for more than 5 minutes, the VCR
will automatically enter stop mode to protect the tape.
Press CH/TRACKING i+ or k- repeatedly or
3
the number buttons to select the channel
position to record.
Press w REC to start recording.
4
CONTINUE
ENGLISH
17
Page 18

Recording a TV program (continued)
Recording ZWEITON stereo
Playing back the portion you just
recorded – One-Touch Playback
OTPB
ONE-TOUCH
PLAYBACK
and bilingual programs
This VCR receives and records stereo and bilingual
programs in ZWEITON system automatically.
When the VCR receives stereo, “STEREO” appears on the
TV screen.
If the broadcast is bilingual, “BIL” appears on the TV screen.
When recording ZWEITON stereo and
bilingual programs
ZWEITON broadcasts are recorded according to the
following table:
Sound recorded
Track
Hi-Fi audio
Left channel
Hi-Fi audio
Right channel
Normal audio
(mono)
To select the sound when playing back a
ZWEITON - recorded tape
See “Selecting stereo or bilingual sound” on page 13.
Stereo
Left channel
Right channel
Standard (usually
the mixed sound
of the left and
right channels)
Bilingual
Main sound
Sub sound
Standard (usually
the main sound)
Using One-Touch Playback after timer recording (page 20)
is convenient. You can play back only the portion you just
recorded by pressing a single button later.
1
Stop recording (when recording without timer).
The ONE-TOUCH PLAYBACK button on the VCR lights.
If another operating button is pressed after you stop
recording, One-Touch Playback will be canceled.
2
Press ONE-TOUCH PLAYBACK on the VCR or
OTPB on the remote control.
The tape rewinds to the start of the recorded portion and
begins playback.
When you set the timer for more than two
timer programs
The VCR starts playing back from the earliest one when you
use One-Touch Playback.
Note
One -Touch Playback does not work for recordings of less than
1 minute.
18
ENGLISH
Page 19

Recording with One–Touch
Recording
To stop, pause, or turn off the power
while recording
Press s STOP, a PAUSE/FRAME F or l /6.
You can immediately start recording the current channel for
a specified time with One-Touch Recording.
l /6
a PAUSE/
FRAMEF
Before setting the Recording
• Turn on the TV and set the TV for VCR reception.
-When the VCR and TV are connected with a 21-pin scart
cord, set the TV to the AV mode.
-When they are connected with only the antenna cord, set
the TV to the video output channel.
•Insert a cassette with its erasure prevention tab in place.
Make sure the tape has sufficient recording time.
• Select the channel position to record and tape speed.
s STOP
w REC
To extend the recording duration while
recording
Press w REC until the new duration you want appears on
the display window.
Note
During One-Touch Recording, when the tape reaches the end,
VCR turns off and “TIMER” flashes on the display window.
Press w REC.
1
The VCR starts recording.
Press w REC repeatedly to set the recording
2
duration.
Each press changes the recording duration on the
display window and the TV screen in the following way:
M
REC
SP
0H30 l 1H00 l 1H30 l ... l 8H30
i
regular recording j 9H00 j
The recording time indicator on the display window
counts down to “0H00”.
The recording stops at “0H00” and the VCR turns off.
VCR REM BILSAP ST
LP EP
Hi-Fi
ENGLISH
19
Page 20

Setting the timer
PR DATE
–– –– ––:––~––:–– SP
–– –– ––:––~––:–– SP
–– –– ––:––~––:–– SP
–– –– ––:––~––:–– SP
–– –– ––:––~––:–– SP
–– –– ––:––~––:–– SP
–– –– ––:––~––:–– SP
T I M E
PR DATE
–– –– ––:––~––:–– SP
PR-01 –– ––:––~––:–– SP
–– –– ––:––~––:–– SP
–– –– ––:––~––:–– SP
–– –– ––:––~––:–– SP
–– –– ––:––~––:–– SP
–– –– ––:––~––:–– SP
T I M E
PR DATE
–– –– ––:––~––:–– SP
–– –– ––:––~––:–– SP
–– –– ––:––~––:–– SP
–– –– ––:––~––:–– SP
–– –– ––:––~––:–– SP
–– –– ––:––~––:–– SP
SP
PR-01 17 21:00~21:––
T I M E
You can set up to 7 programs within one month of the
current date.
INPUT SELECT
Number
buttons
l /6
4
Enter the channel position using the number
buttons.
•When selecting the numbers less than 10, press 0 to
enter the tens digit, then press the button 1 through 9
to enter the ones digit.
• You can also select the channel using i+ or k-,
then press l.
• If you registered the name manually, the TV station’s
name appears instead of the channel position number.
i/MENU
j
OK
i+
l
k-
Before setting the timer
• Turn on the TV and set the TV for VCR reception.
-When the VCR and TV are connected with a 21-pin scart
cord, set the TV to the AV mode.
-When they are connected with only the antenna cord, set
the TV to the video output channel.
• Check that the VCR clock is set correctly.
•Insert a cassette with its erasure prevention tab in place.
Make sure the tape has sufficient recording time.
• To set the timer for a satellite, cable TV or PAY-TV
channel, check that the satellite (or cable) receiver or
PAY-TV decoder is turned on and the channel you want to
record is selected.
Enter the date using the number buttons.
5
• If you want to set daily/weekly recordings, see “To set
the daily /weekly timer” on page 21.
• You can also select the date using i+ or k-, then
press l.
Set the start time (hours and minutes), and end
6
time (hours and minutes) using the number
buttons.
•When selecting the numbers less than 10, press 0 to
enter the tens digit, then press the button 1 through 9
to enter the ones digit.
• You can also select the start and end times using
i+ or k-, then press l.
Press i/MENU.
1
Press j or l to select REC, then press
2
OK.
Press OK to begin setting the timer recording
3
program.
20
ENGLISH
TIME
REC
f
OSD
ON
OFF
AUDIO
PR DATE
–– –– ––:––~––:–– SP
–– –– ––:––~––:–– SP
–– –– ––:––~––:–– SP
–– –– ––:––~––:–– SP
–– –– ––:––~––:–– SP
–– –– ––:––~––:–– SP
–– –– ––:––~––:–– SP
DATE
DELETE:
SYS TEM
OSD
OPR
T I M E
REC
,
Press i+ or k- to select the tape speed, SP,
7
IP or LP.
PR DATE
PR-01 17 21:00~21:45 LP
–– –– ––:––~––:–– SP
–– –– ––:––~––:–– SP
–– –– ––:––~––:–– SP
–– –– ––:––~––:–– SP
–– –– ––:––~––:–– SP
–– –– ––:––~––:–– SP
IP (Intelligent Play): This feature is convenient if you
want to record in SP mode first but you are not sure if
the remaining tape length is enough for the expected
recording time.
IP mode will automatically switch to LP mode from SP
mode if it detects the remaining tape length will not last
to the end of the program.
T I M E
17 21:00~21:45
Page 21

8
→
→
→
→
8:00
9:00
10:00 11:00
Press i/MENU.
The timer program list sorted by the start time appears.
9
If you want to set another program, repeat
steps 3 through 8.
If the program overlaps another
Do not overlap programs, since overlapping portions of the
conflicting programs will not be recorded. Earlier recording
times have priority over later recording times as shown in
the diagram.
10
Press i/MENU.
PROGRAM COMPLETED
PLEASE PUSH POWER FOR
TIMER RECORDING START
The normal screen returns after a few seconds.
11
Press l /6 to turn off the VCR.
• “TIMER” appears on the display window, and the VCR
stands by for the timer recording.
• The cassette is ejected and the guide message
appears if the cassette’s erasure prevention tab has
been removed. The cassette-in indicator flashes on the
display window.
• If a cassette is not inserted, the guide message
appears and the cassette-in indicator flashes.
To set the daily/weekly timer
In step 5, press OK before entering the date. Then press j
or l to select the recording type.
DLY: For daily recording from Monday to Friday
SU indication to SA indication: For a weekly recording
Program 1
Program 2
Program 3
Actual recorded
portions
Non-recorded portion
Prog. 1
Prog. 2
Prog. 3
Tips
• If the timer program list and “PROGRAM FULL” appear on
the TV screen in step 2, 7 programs are already set. Cancel
an unnecessary program.
• When the power supply is interrupted for more than 3
seconds, the preset program and the clock are cleared. In
this case, set the clock and the program again and turn the
VCR off so as to stand by for timer recording.
• If you want to record a program through the line input, press
i+, k- or INPUT SELECT to display “AV1” (from the
EURO AV1 AUDIO/VIDEO jack on the rear) or “AV2” (from
the EURO AV2 DECODER jack on the rear) in step 4
instead of the TV station.
• To confirm the setting, select REC in the menu to display the
timer program list. Press i/MENU to return to the normal
screen.
Notes
• If you make an irregular setting, “PLEASE CHECK” appears.
• During timer recording, when the tape reaches the end, VCR
turns off and “TIMER” flashes on the display window.
PR DATE
PR-01 17
–– –– ––:––~––:–– SP
–– –– ––:––~––:–– SP
–– –– ––:––~––:–– SP
–– –– ––:––~––:–– SP
–– –– ––:––~––:–– SP
–– –– ––:––~––:–– SP
DLY SU MO TU WE TH FR SA
T I M E
17
––:––~––:–– SP
Press OK.
To cancel the daily/weekly timer setting, press OK to turn off
the daily/weekly display. Press j to highlight the date, then
press i+ or k- to correct the date.
To correct the data while setting the timer
Before pressing i/MENU in step 8, press j or l until the
item you want to correct is highlighted, then set the correct
data using the number buttons, i+ or k-.
To cancel a program
Press i/MENU and select REC by pressing j or l, then
press OK. Press i+ or k- to select an unnecessary
program, then press j to cancel.
ENGLISH
21
Page 22

Setting the timer with
PROGRAM COMPLETED
PLEASE PUSH POWER FOR
TIMER RECORDING START
PR DATE
26
–– –– ––:––~––:–– SP
–– –– ––:––~––:–– SP
–– –– ––:––~––:–– SP
–– –– ––:––~––:–– SP
LP
20
PR-03 21:00~21:45
PR-01 19:00~19:30 SP
,
DELETE:
–– –– ––:––~––:–– SP
T I M E
Favorite Program system
You can easily set the timer recording for your favorite TV
program with the Favorite Program system. The VCR
memorizes the previously recorded programs with the timer
recording. Just select the program you want to record from
the list, and the VCR will set the timer recording
automatically.
l /6
Press OK.
3
The selected program is added to the timer program list
and listed in order by the start time. The date from a
week ahead is displayed instead of the day of a week.
4
If you want to set another program, repeat
steps 1 through 3.
5
Press i/MENU.
i/MENU
j
k-
FAVORITE
PROGRAM
OK
i+
l
Before setting the timer
• Turn on the TV and set the TV for VCR reception.
-When the VCR and TV are connected with a 21-pin scart
cord, set the TV to the AV mode.
-When they are connected with only the antenna cord, set
the TV to the video output channel.
• Check that the VCR clock is set correctly.
•Insert a cassette with its erasure prevention tab in place.
Make sure the tape has sufficient recording time.
• To set the timer for a satellite, cable TV or PAY-TV
channel, check that the satellite (or cable) receiver or
PAY-TV decoder is turned on and the channel you want to
record is selected.
Press FAVORITE PROGRAM.
1
The Favorite Program screen appears and shows the
previously recorded programs.
PR-02 FRI 9:00~10:00 LP
PR-01 SAT 1 9 : 0 0~19:30 SP
DELETE:
P1/2FAVORITE PROGRAM
,
The guide message appears when there is no program
on the list. In this case, press i/MENU twice to return to
the normal screen.
Press i+ or k- to select the program you
2
want to record.
The normal screen returns after a few seconds.
Press l /6 to turn off the VCR.
6
• “TIMER” appears on the display window, and the VCR
stands by for timer recording.
• The cassette is ejected and the guide message
appears if the cassette’s erasure prevention tab has
been removed. The cassette-in indicator flashes on the
display window.
• If a cassette is not inserted, the guide message appears
and the cassette-in indicator flashes.
To correct the data while setting the timer
1 After step 3, press i+ or k- to select the program you
want to correct, then press OK.
2 Press j or l until the item you want to correct is
highlighted.
3 Set the correct data using the number buttons, i+ or
k-.
To cancel a favorite program
In step 2, press i+ or k- to select an unnecessary
program, then press j to cancel.
Notes
• If 7 programs are already listed on a page, the old data will
be shifted to the list on the next page in order.
• If the 14 programs are already memorized, the data will be
deleted in order from the oldest one and the other programs
shift down in order.
• If the program with the same data is already on the list, the
old data will be deleted.
• Favorite Program data will not be cleared even if the power
supply is interrupted.
• For using the Favorite Program system, you must make a
recording for more than 10 minutes in SP mode or 20
minutes in LP mode.
22
ENGLISH
PR-02 FRI 9:00~10:00 LP
PR-01 SAT 1 9 : 0 0~19:30 SP
DELETE:
P1/2FAVORITE PROGRAM
,
Page 23

Duplicating
Connecting with another VCR
This VCR (Recorder)
EURO AV2
DECODER
EURO AV1
AUDIO/
VIDEO
ENTREE
ANTENNE
AERIAL
SORTIE
ANTENNE
RF.OUT
TV
EURO AV2
DECODER
(not supplied)
Tip
If the other VCR is a monaural type, use the 1
××
phono
× 2 phono type audio cord or you can not
××
record sound on the both L and R tracks.
Operation
To audio/video out jacks
or
To 21-pin scart jack
or
To audio/video out jacks
Another VCR (Player)
Video camera
(Player)
INPUT SELECT
SP/LP
a PAUSE/
FRAMEF
w REC
1
Insert a pre-recorded source cassette into
another (playback) VCR.
2
Insert a blank cassette with its erasure
prevention tab in place into this VCR (recorder).
Press INPUT SELECT repeatedly to display
3
“AV2” on the TV screen.
Press SP/LP to select SP or LP.
4
5
Press w REC and a PAUSE/FRAME F on the
recording VCR.
Set the other VCR to playback.
6
Press a PAUSE/FRAME F on the recording
7
VCR.
ENGLISH
23
Page 24

PR-01
STOP
15:1421.04.03 SUN
SP
15:14
REC
TIME
DATE
SYS TEM
OSD
OPR
AUDIO
ON
OFF
f
OSD
ON
OFF
f
OSD
REC
TIME
DATE
SYS TEM
OSD
OPR
AUDIO
OFF
ON
ON
OFF
f
OSD
ON
OFF
f
OSD
OTHER FUNCTIONS
On-screen display
OK/CLOCK/
i/MENU
j
k-
Identifying the on-screen display
items
Hi-Fi Audio indicator
Operating
mode
indicator
Tape speed
indicator
Day/Month/
Year/Day of
the week
STOP Hi-Fi
SP
PR-01
STEREO
S
0:30:0021.04.03 SUN
COUNTER
i+
l
Channel position/TV
station/AV indicator
STEREO/BIL (bilingual)/
MONO indicator
Remaining tape length
E
Tape counter/
Current time
Changing the on-screen display
Press OK/CLOCK/COUNTER. Each press changes the onscreen display as follows:
STOP
SP
After 3
seconds
All indicators are turned off.
PR-01
S
0:30:00
After 3
seconds
S
0:30:00
E
E
Notes
• The tape counter and the remaining tape length appear only
when a cassette is inserted.
• The remaining tape length indicator may not be displayed
correctly depending on the type or condition of the tape or
when you use a VHS-C tape. The remaining tape length
indicator is not displayed just after you insert a cassette, or
when playback or recording begins.
• The remaining tape length indicator is intended for rough
measurement only.
Turning the on-screen display off
1
Press i/MENU.
Press j or l to select OSD ON/OFF, then
2
press OK.
When you record a video signal output from your VCR onto
another VCR, turn off the on-screen display. (See the right.)
Otherwise, the mode indicators displayed on the TV screen
will be recorded on the tape.
Operating mode indicator
The current tape operation is indicated as follows:
PLAY: Play
REW: Rewind
FF: Fast-forward
ENGLISH
EJECT: Cassette eject
RECORD: Record
RECP: Recording pause
STOP: Stop
24
Press i+ or k- to select OFF.
3
The blue screen appears.
Press i/MENU to return to the normal screen.
4
To turn the on-screen display on
Press i+ or k- to select ON in step 3.
Tip
You can return to the menu by pressing j or l in step 3.
Page 25

Recording or playing back the
Setting Child Lock mode
wide aspect ratio programs
This VCR can record and playback the 16:9 wide aspect
ratio programs.
i/MENU
j
k-
Press i/MENU.
1
Press j or l to select 16:9/4:3, then press
2
OK.
OK
i+
l
During Child Lock mode, the buttons on the front panel of
the VCR are not operable.
CHILD LOCK
Press CHILD LOCK.
“SAFE” flashes on the display window for a few seconds.
The buttons except z EJECT and s STOP on the VCR are
not operable. You can control the VCR only by the remote
control.
M
VCR REM BILSAP ST
TIMER
REC
LP EP
SP
Hi-Fi
TIME
REC
f
OSD
ON
OFF
AUDIO
Press i+ or k- to select the desired setting.
3
SYS-
DATE
TEM
OSD
OPR
AUTO: To play back the wide screen programs as wide,
and to play back the normal programs as normal
4:3: To record or playback in normal format
16:9: To record or playback in wide-screen format
TIME
REC
f
OSD
ON
OFF
AUDIO
4
Press i/MENU to return to the normal screen.
SYS-
AUTO
DATE
TEM
OSD
4:3
16:9
OPR
Tip
You can return to the menu by pressing j or l in step 3.
Note
The programs can be watched in 16:9 only with the TV
corresponding to the wide-screen format.
To cancel the Child Lock mode
Press CHILD LOCK again.
“OFF” flashes on the display window for a few seconds.
ENGLISH
25
Page 26

ADDITIONAL INFORMATION
DUST ON THE HEADS!
Setting Power Save mode
You can reduce the power spending during the standby
mode.
l /6
Press l /6 on the VCR.
The VCR goes into Power Save mode and the display
window turns off.
The power consumption during the Power Save mode is
approximately 2.5 W.
During Power Save mode, the buttons on the remote control
(except l /6) are not operable and the cassette cannot be
ejected.
To cancel the Power Save mode
Press l /6 on the VCR or the remote control.
Notes
• When the VCR is set to make a timer recording, the VCR
does not go into Power Save mode even if you press
l /6 on the VCR.
• If you press l /6 on the remote control to turn off the VCR,
the VCR does not go into Power Save mode.
Care and maintenance
To clean the cabinet
Wipe with a soft dry cloth.
If the surfaces are extremely dirty, use a soft cloth lightly
moistened with mild detergent solution. Do not use strong
solvents, such as alcohol, benzine or thinner as these could
damage the finish of the unit.
Do not stick a seal or an adhesive label
Do not stick a seal or an adhesive label on the surface for a
long time. The finish of the unit may be damaged or come
off.
When noises are heard from the radio or another audio/
video equipment
Separate the equipment from this unit.
Head cleaning
The VCR cleans the video heads automatically every time a
cassette is inserted or ejected. This will prevent the dirt
accumulating on the heads. However, manual cleaning is
still necessary after a long period of use. If the unit detects
any dirt on the heads after playing back a tape for more than
30 seconds, “DUST ON THE HEADS!” is displayed on the
TV screen. In this case, clean the video heads with a
commercially available cleaning tape. If you continue to use
the VCR without cleaning, the picture may be clogged or
you will not be able to play back at all.
Before cleaning, please refer to the cleaning tape operating
instruction for details.
When the playback picture is noisy
When the noise becomes worse
Worn out video heads
If the playback picture has not improved with the cleaning,
the video heads may be worn out and needs to be changed.
In this case, please seek the advice of your local dealers.
26
ENGLISH
Page 27

Troubleshooting
Specifications
If the unit does not operate properly, read the instructions
again, then check the following guide.
The l /6 button does not operate.
Make sure the power cord is connected securely.
The playback picture is noisy.
• Adjust the tracking manually when the tape quality is poor.
•Although the unit cleans the video heads automatically, dirt
may be accumulated after a long period of use. Clean the
video heads with a commercially available video heads
cleaning tape.
• Make sure all the connections with the VCR are made
correctly and securely.
There is no playback picture.
• Set the TV to AV mode or video output channel.
• Press TV/VIDEO to display “VCR” on the display window.
TV reception is noisy or there is no TV reception.
• Connect the VCR to the antenna and TV correctly and
securely.
• Move the VCR away from the TV set.
Tape operation buttons do not work while the power is
on and the cassette is inserted.
Moisture condensation may have occurred. Wait for about
two hours until the moisture evaporates completely before
you operate the VCR.
Abnormal operation has occurred.
External interference may have affected the internal
microprocessor. Disconnect the power cord from the AC
outlet. Wait approximately 15 minutes, then connect it again.
The remote control does not operate.
Replace both batteries with new ones.
There is no sound.
Connect the VCR correctly and securely.
The timer does not operate.
Set the VCR clock correctly.
The VCR receives no or noisy ZWEITON transmissions.
Make sure that the antenna clearly picks up the ZWEITON
transmissions.
No clock display during power off.
The VCR is in Power Save mode.
Video recording system
Rotary 2 head helical scanning system
Video head Double azimuth 4 heads
Tuner system Frequency synthesized tuner
TV system B/G
Video signal system PAL/MESECAM color signal,
625 lines, 50 fields
Usable cassettes VHS video cassettes
Recording/playback time
PAL/MESECAM
SP:5 hours max. with E-300 tape
LP: 10 hours max. with E-300 tape
NTSC (Playback only)
SP:3 hours 30 minutes max.
with T-210 tape
LP: 7 hours max.
with T-210 tape
EP:10 hours 30 minutes max.
with T-210 tape
Tape speed PAL/MESECAM
SP:23.39 mm/sec.
LP: 11.69 mm/sec.
NTSC (Playback only)
SP:33.35 mm/sec.
LP: 16.67 mm/sec.
EP:11.12 mm/sec.
Rewind time Approx. 1 min. with E-180 tape
Channel coverage VHF: E02 – E12
UHF: E21 – E69
CATV: S01 – S41
Video input 0.5 – 2.0 Vp-p, 75 ohm, unbalanced
Video output 1.0 Vp-p, 75 ohm, unbalanced
Horizontal resolution 240 lines (SP mode)
Video S/N 43 dB (SP mode)
Audio track 3 tracks (Hi-Fi sound 2 tracks, Normal
sound 1 track)
Audio input –6 dBm, more than 10 Kohm
Audio output SCART: –6 dBm, less than 1 Kohm
RCA: –6 dBm, less than 1 Kohm
Hi-Fi frequency response
20 Hz – 20 KHz
Hi-Fi dynamic range More than 87 dB (SP mode)
Hi-Fi Wow and Flutter Less than 0.01% (SP mode)
Operating temperature 5°C – 35°C
Power requirements 200 – 240 V AC, 50 Hz
Power consumption 12 watts
TYP 2.5 watts (power save mode)
Dimensions 360 (W) × 270 (D) × 94.5 (H) mm
Weight Approx. 4.0 kg
Supplied accessories Antenna cord (1)
Remote control (1)
R03 (size AAA) batteries (2)
Design and specifications are subject to change without notice for
the purpose of performance improvement.
ENGLISH
27
Page 28

Parts and controls
Front panel
Cassette compartment
ONE-TOUCH PLAYBACK
button
l /6 button
CHANNEL +/-
buttons
Display window
Display window
Clock/tape operation
indication
f REW (Rewind)
button
C PLAY button
a PAUSE button
g F FWD
(Fast forward) button
w REC(Recording)
button
s STOP button
z EJECT button
Remote sensor
Cassette-in indicator
REC (Recording) indicator
VCR indicator
TIMER indicator
TIMER
REC
VCR
28
ENGLISH
Page 29

Rear panel
Power cord
Remote Control
EURO AV2 DECODER
jack
AERIAL jack
RF.OUT jack
AUDIO OUT L/R jacks
EURO AV1 AUDIO/VIDEO
jack
INPUT SELECT button
z (EJECT) button
ZERO RETURN button
SP/LP button
Number buttons
C PLAY button
f REW (Rewind)/[ button
a PAUSE/FRAME F button
s STOP button
i/MENU button
OK/CLOCK/COUNTER
button
TV/VIDEO button
l /6 (POWER) button
REC. END SEARCH button
AUTO TRACKING button
CM-SKIP button
CHILD LOCK button
g F FWD (Fast Forward)/ ] button
OTPB (One-Touch playback) button
w REC (Recording) button
CLEAR button
CH/TRACKING i+/k-, j/l,
buttons
SLOW T button
FAVORITE PROGRAM button
ENGLISH
29
Page 30

Sony Corporation Printed in Indonesia http://www.aiwa.com/
 Loading...