

Page 1
Home Theatre
System
4-264-479-11(1)
HT-SS380
©2011 Sony Corporation
Operating Instructions
Manual de instrucciones
US
ES
Page 2
WARNING
To reduce the risk of fire or electric
shock, do not expose this apparatus to
rain or moisture.
To reduce the risk of fire, do not cover the
ventilation opening of the apparatus with
newspapers, tablecloths, curtains, etc. Do not place
the naked flame sources such as lighted candles on
the apparatus.
Do not install the appliance in a confined space, such
as a bookcase or built-in cabinet.
To reduce the risk of fire or electric shock, do not
expose this apparatus to dripping or splashing, and
do not place objects filled with liquids, such as
vases, on the apparatus.
As the main plug is used to disconnect the unit from
the mains, connect the unit to an easily accessible
AC outlet. Should you notice an abnormality in the
unit, disconnect the main plug from the AC outlet
immediately.
Do not expose batteries or apparatus with batteryinstalled to excessive heat such as sunshine, fire or
the like.
The unit is not disconnected from the mains as long
as it is connected to the AC outlet, even if the unit
itself has been turned off.
To prevent injury, this apparatus must be securely
attached to the floor/wall in accordance with the
installation instructions.
For customers in the United
States
ENERGY STAR® is a U.S. registered
mark.
As an ENERGY STAR
Sony Corporation has determined that
this product meets the ENERGY
®
STAR
guidelines for energy
efficiency.
®
partner,
Owner’s Record
The model and serial numbers are located on the rear
of the unit. Record these numbers in the space
provided below. Refer to them whenever you call
upon your Sony dealer regarding this product.
Model No.
This symbol is intended to alert the
user to the presence of uninsulated
“dangerous voltage” within the
product’s enclosure that may be of
sufficient magnitude to constitute a
risk of electric shock to persons.
This symbol is intended to alert the
user to the presence of important
operating and maintenance
(servicing) instructions in the
literature accompanying the
appliance.
Serial No.
Important Safety Instructions
1) Read these instructions.
2) Keep these instructions.
3) Heed all warnings.
4) Follow all instructions.
5) Do not use this apparatus near water.
6) Clean only with dry cloth.
7) Do not block any ventilation openings. Install in
accordance with the manufacturer’s instructions.
8) Do not install near any heat sources such as
radiators, heat registers, stoves, or other
apparatus (including amplifiers) that produce
heat.
9) Do not defeat the safety purpose of the polarized
or grounding-type plug. A polarized plug has
two blades with one wider than the other. A
grounding type plug has two blades and a third
grounding prong. The wide blade or the third
prong are provided for your safety. If the
provided plug does not fit into your outlet,
consult an electrician for replacement of the
obsolete outlet.
10)Protect the power cord from being walked on or
pinched particularly at plugs, convenience
receptacles, and the point where they exit from
the apparatus.
11)Only use attachments/accessories specified by
the manufacturer.
US
2
Page 3

12)Use only with the cart, stand, tripod, bracket, or
table specified by the manufacturer, or sold with
the apparatus. When a cart is used, use caution
when moving the cart/apparatus combination to
avoid injury from tip-over.
13)Unplug this apparatus during lightning storms or
when unused for long periods of time.
14)Refer all servicing to qualified service personnel.
Servicing is required when the apparatus has
been damaged in any way, such as power-supply
cord or plug is damaged, liquid has been spilled
or objects have fallen into the apparatus, the
apparatus has been exposed to rain or moisture,
does not operate normally, or has been dropped.
The following FCC statement
applies only to the version of
this model manufactured for
sale in the U.S.A. Other
versions may not comply with
FCC technical regulations.
NOTE:
This equipment has been tested and found to comply
with the limits for a Class B digital device, pursuant
to Part 15 of the FCC Rules. These limits are
designed to provide reasonable protection against
harmful interference in a residential installation.
This equipment generates, uses and can radiate radio
frequency energy and, if not installed and used in
accordance with the instructions, may cause harmful
interference to radio communications. However,
there is no guarantee that interference will not occur
in a particular installation. If this equipment does
cause harmful interference to radio or television
reception, which can be determined by turning the
equipment off and on, the user is encouraged to try
to correct the interference by one or more of the
following measures:
– Reorient or relocate the receiving antenna.
– Increase the separation between the equipment
and receiver.
– Connect the equipment into an outlet on a circuit
different from that to which the receiver is
connected.
– Consult the dealer or an experienced radio/TV
technician for help.
CAUTION
You are cautioned that any changes or modifications
not expressly approved in this manual could void
your authority to operate this equipment.
For TDM-iP380 only
The nameplate and serial number is located on the
bottom exterior.
FCC RECOMMEND
The shielded interface cable recommended in this
manual must be used with this equipment in order to
comply with The limits for a digital device pursuant
to Subpart B of Part 15 of FCC Rules.
US
US
3
Page 4

About This Manual
• The instructions in this manual are for model
HT-SS380. The illustrations used in this manual
are of the USA model and they may be different
from your model. Any differences in operation are
marked in the manual as “USA model only”.
The HT-SS380 consists of:
• Receiver STR-KS380
• Speaker system*
– Front/Surround speaker SS-TSB105
– Center speaker SS-CTB102
– Subwoofer SS-WSB103
* Be sure to use only the supplied speakers.
• The instructions in this manual describe the
operation of the receiver with the supplied remote
control. You can also use the control buttons on
the receiver if they have the same or similar names
as those on the remote control.
On Copyrights
This receiver incorporates Dolby* Digital and Pro
Logic Surround and the DTS** Digital Surround
System.
* Manufactured under license from Dolby
Laboratories. Dolby, Pro Logic, and the doubleD symbol are trademarks of Dolby Laboratories.
** Manufactured under license under U.S. Patent
#’s: 5,451,942; 5,956,674; 5,974,380;
5,978,762; 6,226,616; 6,487,535; 7,212,872;
7,333,929; 7,392,195; 7,272,567 & other U.S.
and worldwide patents issued & pending. DTS,
DTS-HD and the Symbol are registered
trademarks, & DTS-HD Master Audio, and the
DTS logos are trademarks of DTS, Inc. Product
includes software. © DTS, Inc. All Rights
Reserved.
This receiver incorporates High-Definition
Multimedia Interface (HDMI
HDMI, the HDMI Logo, and High-Definition
Multimedia Interface are trademarks or registered
trademarks of HDMI Licensing LLC in the United
States and other countries.
“x.v.Color (x.v.Colour)” and “x.v.Color
(x.v.Colour)” logo are trademarks of Sony
Corporation.
TM
) technology.
“BRAVIA” is a trademark of Sony Corporation.
“PlayStation” is a registered trademark of Sony
Computer Entertainment Inc.
®
iPhone
, iPod®, iPod classic®, iPod nano®, and
iPod touch
in the U.S. and other countries.
All other trademarks and registered trademarks are
of their respective holders. In this manual, ™ and ®
marks are not specified.
“Made for iPod” and “Made for iPhone” mean that
an electronic accessory has been designed to
connect specifically to iPod or iPhone, respectively,
and has been certified by the developer to meet
Apple performance standards.
Apple is not responsible for the operation of this
device or its compliance with safety and regulatory
standards. Please note that the use of this accessory
with iPod or iPhone may affect wireless
performance.
US
4
®
are trademarks of Apple Inc., registered
Page 5

Table of Contents
Supplied accessories ..................................... 6
Supplied speakers.......................................... 6
Description and location of parts .................. 7
Getting started ............................................. 14
Connections
1: Installing the speakers............................. 15
2: Connecting the speakers ......................... 17
3: Connecting the TV.................................. 18
4: Connecting the video equipment ............ 19
5: Connecting the audio equipment ............ 22
6: Connecting the antennas ......................... 23
7: Connecting the AC power cord
(mains lead)............................................ 23
Preparing the receiver
Initializing the receiver ............................... 24
Using AUTO CALIBRATION.................... 24
Basic Operations
Playback ...................................................... 28
Viewing information on the display panel .. 29
Tuner Operations
Listening to FM radio ................................. 29
Presetting radio stations .............................. 31
“BRAVIA” Sync Features
What is “BRAVIA” Sync?........................... 34
Preparing for the “BRAVIA” Sync..............35
Playing back equipment with one-touch
operation (One-Touch Play)................... 36
Enjoying the TV sound from the speakers
connected to the receiver
(System Audio Control) .........................36
Turning off the receiver with the TV
(System Power-Off)................................37
Enjoying the TV sound via an HDMI cable
(Audio Return Channel) ......................... 37
Enjoying movies with the optimum sound
field (Theatre/Theater Mode Sync) ........ 38
Enjoying optimum sound field for the
selected scene (Scene Select) .................38
Advanced Settings
Reassigning the input button on the remote
control.....................................................38
Using the setting menu ................................39
Additional Information
Precautions .................................................. 44
Troubleshooting...........................................45
Specifications .............................................. 49
Index............................................................ 51
Enjoying Surround Sound
Selecting the sound field ............................. 32
US
5
Page 6
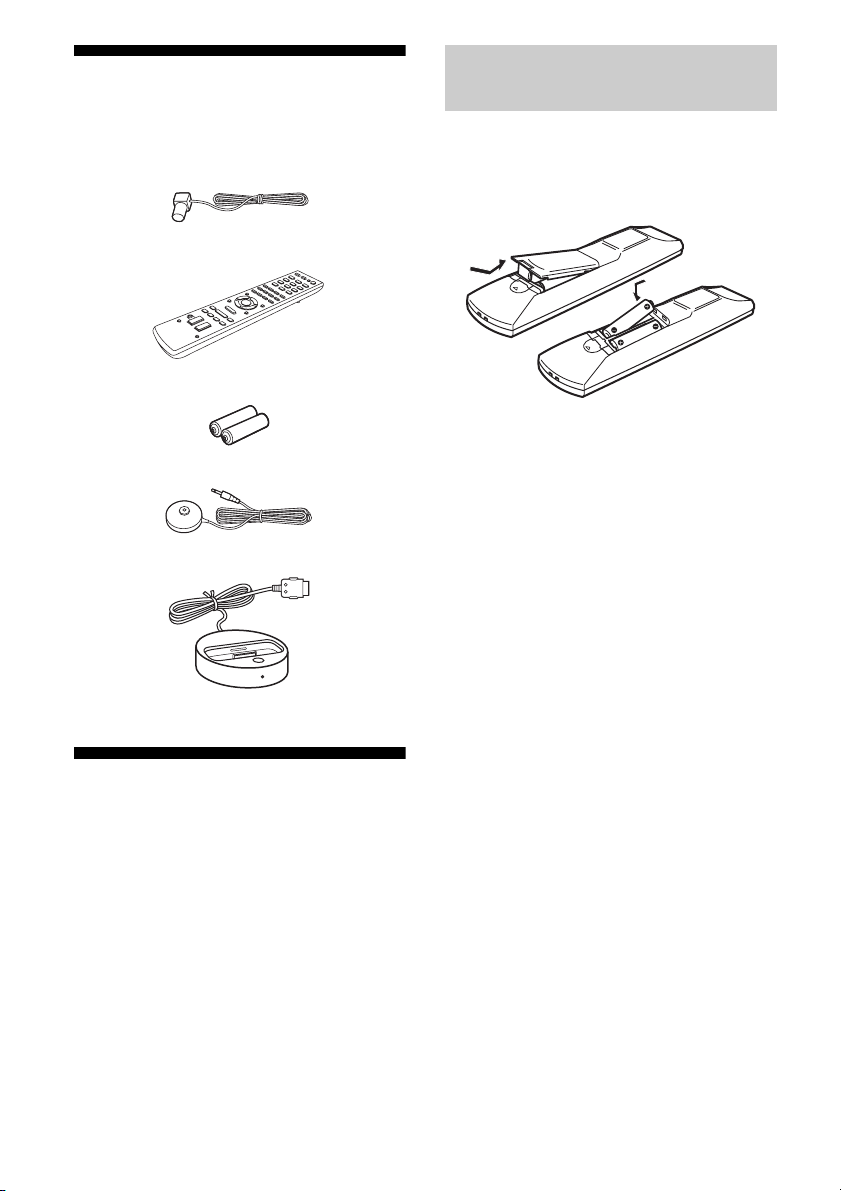
Supplied accessories
• Operating Instructions (this manual)
• Quick Setup Guide
• FM wire antenna (aerial) (1)
• Remote control (RM-AAU120) (1)
• R6 (size-AA) batteries (2)
• Optimizer microphone (ECM-AC2) (1)
• DOCK FOR iPod/iPhone (TDM-iP380) (1)
Supplied speakers
• Front speaker (2)
• Center speaker (1)
• Surround speaker (2)
• Subwoofer (1)
Inserting batteries into the
remote control
Insert two R6 (size AA) batteries (supplied) by
matching 3 and # on the batteries to the
diagram inside the battery compartment of the
remote control.
Notes
• Do not leave the remote control in an extremely
hot or humid place.
• Do not use a new battery with old ones.
• Do not mix manganese batteries and other kinds of
batteries.
• Do not expose the remote control sensor to direct
sunlight or lighting apparatuses. Doing so may
cause a malfunction.
• If you do not intend to use the remote control for
an extended period of time, remove the batteries to
avoid possible damage from battery leakage and
corrosion.
• When you replace or remove the batteries, the
remote control buttons may be reset to the default
settings. If this happens, reassign the buttons again
(page 38).
• When the receiver no longer responds to the
remote control, replace all the batteries with new
ones.
US
6
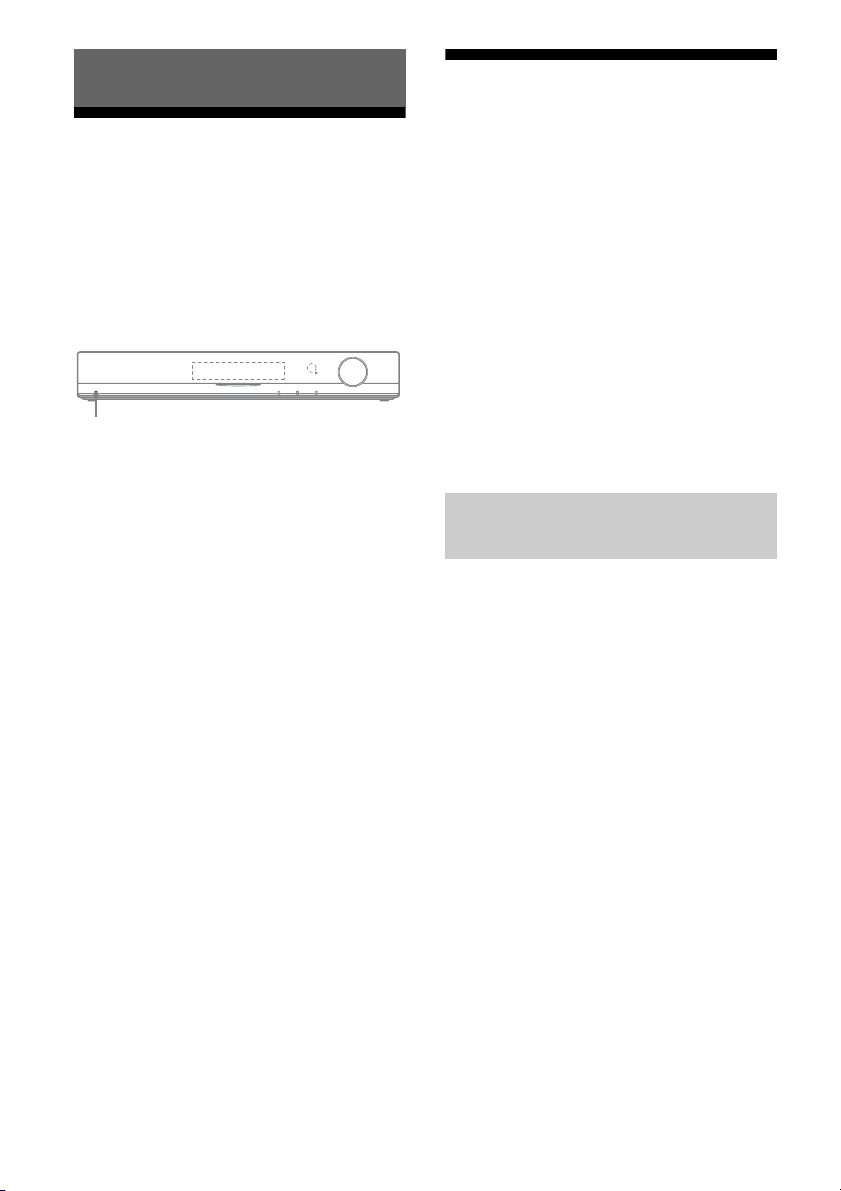
Page 7
Description and location of parts
4
5
6
q
q
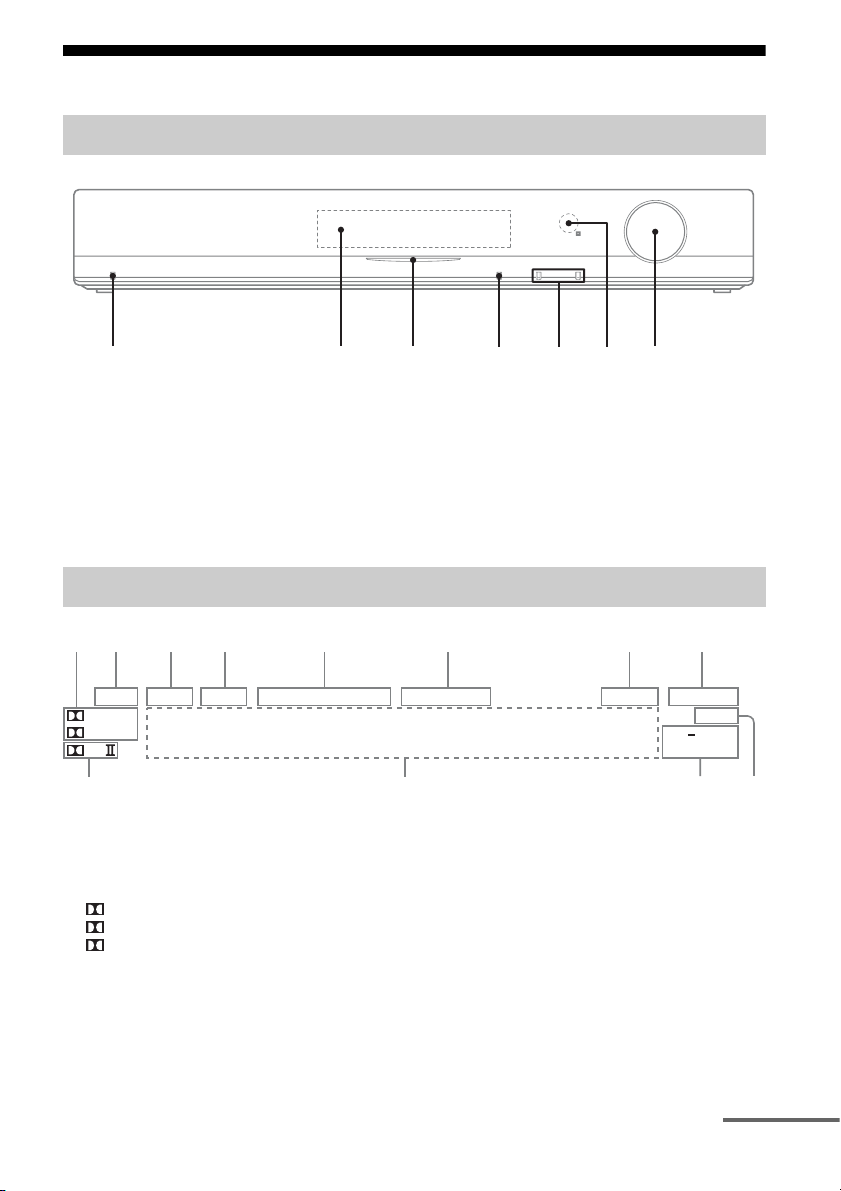
Front panel
1
A ?/1 (on/standby) (page 24, 28, 39)
B Display panel (page 7)
C White indicator
Lights up when the receiver is turned on.
Lights off when the DIMMER is set to DIM
MAX (page 43) or the receiver is turned off.
2
3
D SOUND FIELD (page 32)
E INPUT +/– (page 26)
F Remote control sensor
Receives signals from remote control.
G MASTER VOLUME (page 28, 46)
7
Indicators on the display panel
12 3 4 5 6 7 8
LPCM NIGHT SLEEP HDMI COAX OPT TUNED ST MUTING DTS 96/24
True HD
+
D
PL
s
A Dolby Digital Surround indicator
Lights up the respective indicator when the
receiver is decoding the corresponding Dolby
Digital format signals.
TrueHD Dolby TrueHD
D Dolby Digital
D+ Dolby Digital Plus
Note
When playing a Dolby Digital format disc, make
sure that you have completed the digital
connections.
a
B LPCM
Lights up when the receiver is decoding the
Linear PCM signals.
C NIGHT
Lights up when the Night Mode function is set to
on (page 42).
D SLEEP
Lights up when the Sleep Timer is activated
(page 43).
NEO:6
DTS HD LBR
MSTR HI RES
0
9
continued
US
7
Page 8

E Input indicator
Lights up to indicate the current input.
HDMI
– The INPUT MODE is set to “AUTO”, and
when the receiver recognizes the equipment
connected via an HDMI IN jack (page 19).
– The TV INPUT detected Audio Return
Channel (ARC) signals (page 37).
COAX
The VIDEO input is selected.
OPT
– The INPUT MODE is set to “AUTO” and the
source signal is a digital signal being input
through the OPT IN jack (page 18).
– The INPUT MODE is set to “OPT” (page 42).
F Tuning indicator
Lights up to indicate the current status of the
radio station (page 29).
TUNED
When receives a radio station.
ST
When broadcasts in stereo mode.
G MUTING
Lights up when the muting function is activated.
H DTS indicator
Lights up the respective indicator when the
receiver is decoding the corresponding DTS
format signals.
DTS DTS
DTS 96/24 DTS 96 kHz/24 bit
Note
When playing a DTS format disc, make sure that
you have completed the digital connections.
I NEO:6
Lights up when DTS Neo:6 Cinema/Music
decoder is activated (page 33).
L Dolby Pro Logic indicator
Lights up the respective indicator when the
receiver performs Dolby Pro Logic processing.
This matrix surround decoding technology can
enhance input signals.
PL Dolby Pro Logic
PLII Dolby Pro Logic II
J DTS-HD indicator
Lights up the respective indicator when the
receiver is decoding the corresponding DTS-HD
format signals.
DTS-HD LBR DTS-HD Low Bit Rate
Audio
DTS-HD MSTR DTS-HD Master Audio
DTS-HD HI RES DTS-HD High Resolution
Audio
K Message display area
Display the volume level, selected input source,
audio input signal, etc.
US
8
Page 9
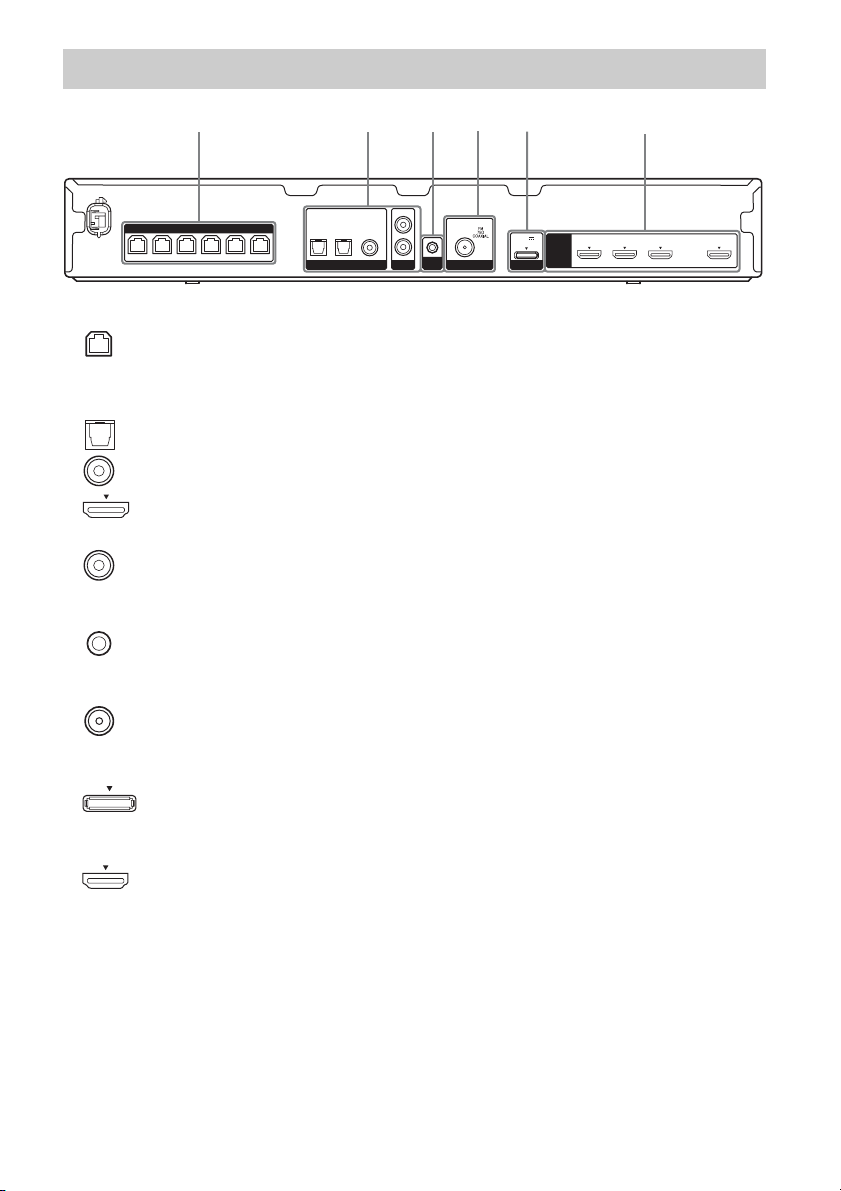
Rear panel
1
SPEAKERS
SUR R SUR L CENTER
FRONT LFRONT R
SUBWOOFER
2
OPT IN
OPT IN
SAT/CATV
TV
DIGITAL LINE IN ANTENNA
A SPEAKERS section (page 17)
B Audio signal section
DIGITAL INPUT/OUTPUT jacks (page 18, 21)
OPT IN
COAX IN
HDMI IN/OUT
ANALOG INPUT jack (page 22)
AUDIO IN
C AUTO CALIBRATION section (page 25)
AUTO CAL MIC jack
D ANTENNA section (page 23)
FM ANTENNA jack
COAX IN
VIDEO
AUDIO IN
4
3
L
R
AUTO
CAL MIC
5
DC5V
1 A MAX
DMPORT
HDMI
2,6
GAME IN BD/DVD IN SAT/CATV IN TV OUT
ARC
E DMPORT section (page 22)
DMPORT jack
F VIDEO signal section (page 21)
HDMI IN/OUT jacks
US
9
Page 10
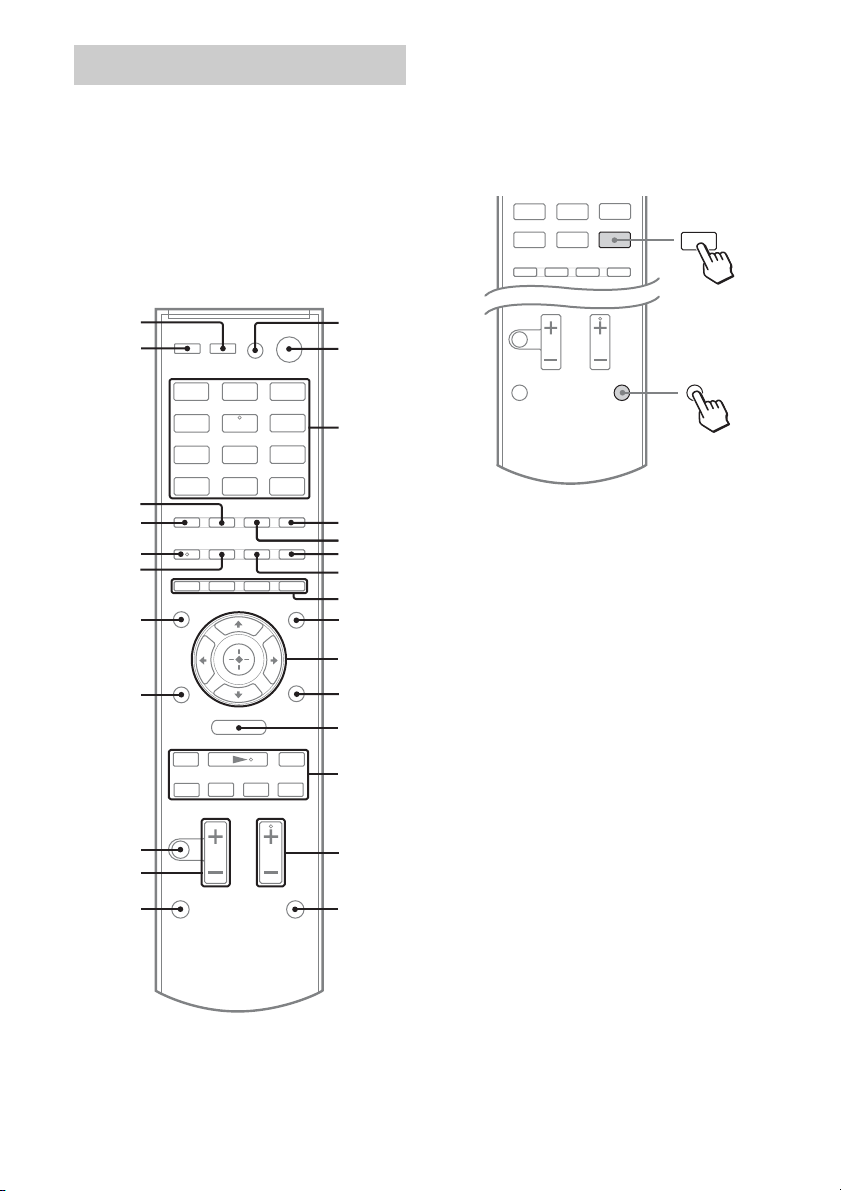
Remote control
Use the supplied remote control to operate this
receiver and other equipment. The remote
control is assigned to operate Sony audio/
video equipment. You can reassign the input
button to match the equipment connected to
your receiver (page 38).
RM-AAU120
To use the buttons printed in
pink
Hold down SHIFT (O), then press the button
printed in pink that you want to use.
Example: Hold down SHIFT (O), then press
ENTER (C).
TUNER
DMPORT
2 Press
ENTER
wh
wg
BD/DVD GAME
VIDEO
TV
TUNER
DMPORT
wf
wd
ws
wa
w;
O
ql
MENU
mM
x
X
.
qk
qj
qh
SAT/
CATV
LINE IN
>
1
2
3
4
5
6
7
8
9
0
qa
qs
qd
qf
qg
1 Hold down
SHIFT
To control the receiver
B ?/11) (on/standby)
Turns the receiver on or sets it to standby mode.
Saving the power in standby mode
When “CTRL HDMI” is set to “CTRL OFF”
(page 40).
C Input buttons
Selects the equipment you want to use. When
you press any of the input buttons, the receiver
turns on. The buttons are assigned to control
Sony equipment.
Numeric buttons
Hold down SHIFT (O), then press numeric
buttons to preset or tune to the preset stations
(page 31).
ENTER
Hold down SHIFT (O), then press ENTER to
– enters the selections.
– stores a station during tuner operation.
D D.TUNING
Enters direct tuning mode (page 30).
E MEMORY
Stores a station during tuner operation.
F DISPLAY
Press AMP MENU, then press DISPLAY to
view information on the display panel (page 29).
2)
2)
10
US
Page 11
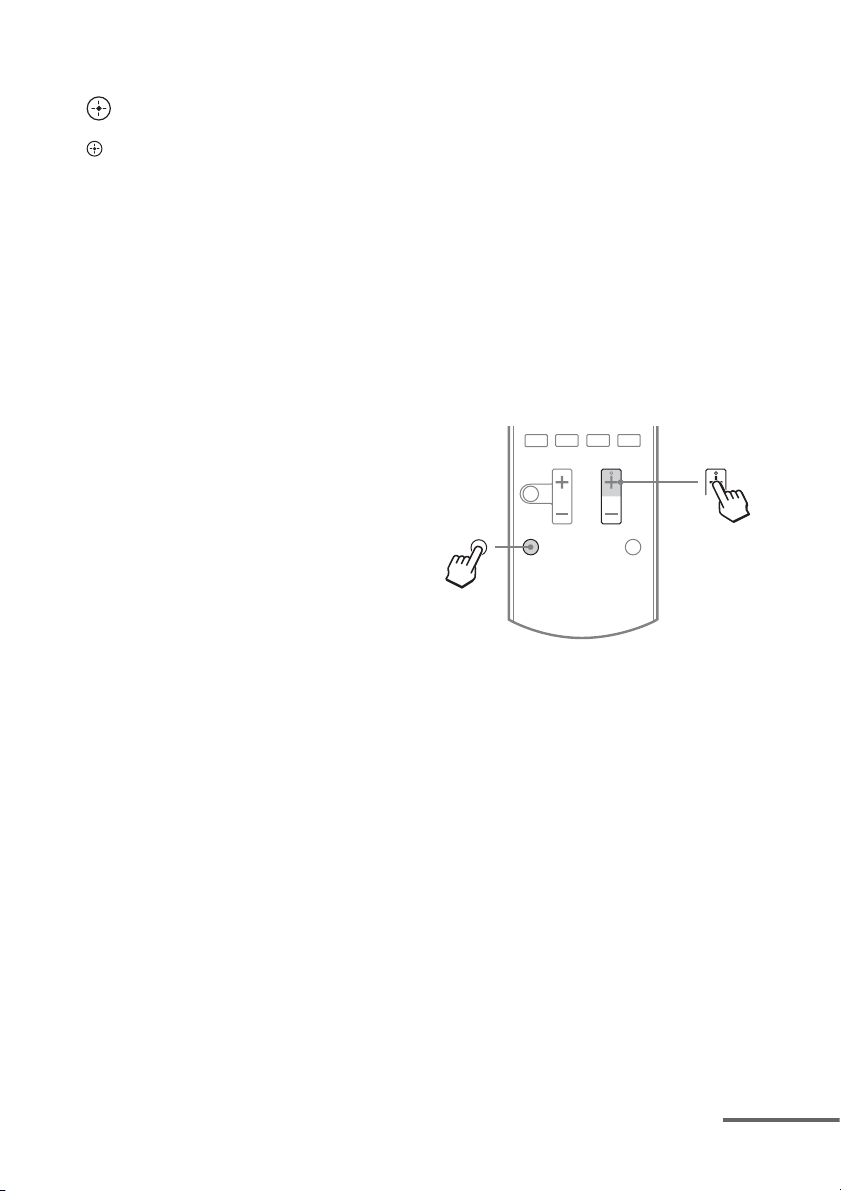
I AMP MENU
Displays the menu to operate the receiver.
J
V/v/B/b
,
Press V/v/B /b to select the settings, then press
to enter/confirm the selection.
M TUNING +/–
Scans a station (page 30).
PRESET +/–
Selects preset stations (page 31).
N SOUND FIELD +
2)
/–
Selects a sound field (page 32).
O SHIFT
Changes the remote control button function to
activate the buttons printed in pink (page 10).
Q MASTER VOL +/–
Adjust the volume level of all speakers at the
same time.
R MUTING
Turns off the sound temporarily.
Press the button again to restore the sound.
S RETURN/EXIT O
Returns to the previous menu.
Y AUTO VOL
Adjusts the volume automatically depending on
the input signal or content from the connected
equipment (ADVANCED AUTO VOLUME
function).
This function is useful, for example, when the
sound of a commercial is louder than the TV
programs.
Notes
• Be sure to reduce the volume level before you
turn off this function.
• As this function is available only when Dolby
Digital, DTS or Linear PCM signals are input,
the sound may suddenly increase when you
switch to other formats.
• This function does not work in the following
cases.
– Linear PCM signals with a sampling
frequency of more than 48 kHz are being
received.
– Dolby Digital Plus, Dolby TrueHD, DTS 96/
24, DTS-HD Master Audio, or DTS-HD
High Resolution Audio signals are being
received.
1)
If you press AV ?/1 (A) and ?/1 (B)
simultaneously, the receiver and connected
equipment will turn off (SYSTEM STANDBY).
The function of the AV ?/1 (A) changes
automatically each time you press the input
buttons (C).
2)
The 5/TV, AUDIO, N and TV CH +/SOUND
FIELD+ buttons have tactile dots.
Use the tactile dots as references when operating
the receiver.
To control a Sony TV
Hold down TV (P), then press the button
printed in yellow to select the function you
want.
Example: Hold down TV (P), then press TV
CH + (N).
x
X
.
1 Hold
down
TV
A TV ?/1 (on/standby)
Turns the TV on or off.
C Numeric buttons
Selects the TV channels.
ENTER
Enters the selections.
CLEAR
Use with the numeric buttons to select the
channel numbers of the Digital CATV terminal.
For example, to select 2.1, press 2, CLEAR,
and 1.
F DISPLAY
Displays information related to the current TV
program.
H Color buttons
Displays an operation guide on the TV screen
when the color buttons are available. Follow the
operation guide to perform a selected operation.
>
2 Press
TV CH +
2)
K TOOLS/OPTIONS
Displays the TV function options.
continued
11
US
Page 12

L MENU/HOME
Displays the TV menus.
N TV CH +
2)
/–
Scans for the preset TV channels.
Q TV VOL +/–
Adjust the TV volume.
R MUTING
Activates the TV’s muting function.
S RETURN/EXIT O
Returns to the previous TV menu.
T GUIDE
Display the on-screen program guide.
V AUDIO
2)
Changes the dual sound mode.
Z INPUT
Selects the input signal (TV or video).
1)
If you press AV ?/1 (A) and ?/1 (B)
simultaneously, the receiver and connected
equipment will turn off (SYSTEM STANDBY).
The function of the AV ?/1 (A) changes
automatically each time you press the input
buttons (C).
2)
The 5/TV, AUDIO, N and TV CH +/SOUND
FIELD+ buttons have tactile dots.
Use the tactile dots as references when operating
the receiver.
12
US
Page 13

To control other Sony equipment
Be sure to hold down SHIFT (O) to activate the buttons printed in pink (page 10).
Name
A AV ?/1
1)
C Numeric buttons
Blu-ray Disc,
DVD player
Power Power Power Power
2)
Track Channel Channel Track
ENTER Enter Enter Enter Enter
CLEAR Clear Clear – Track >10
F DISPLAY Display Display Display Display
G ANGLE Select angle – – –
H Color buttons Menu, guide Menu, guide – –
J EnterEnterEnter–
V/v/B/b Select Select Select –
K TOOLS/OPTIONS Options
menu
L MENU/HOME Menu Menu Menu –
M m/M
3)
Search forward,
backward
2)3)
N
./>
3)
X
3)
x
3)
Play – Play Play
Skip track – Search index Skip track
Pause – Pause Pause
Stop – Stop Stop
S RETURN/EXIT O Return Return, exit,
T GUIDE Program
schedule
U SUBTITLE Subtitle – – –
V AUDIO
2)
Audio–––
W TOP MENU On-screen guide – – –
X POP UP/MENU Menu–––
Z INPUT Select input – Select input –
1)
If you press AV ?/1 (A) and ?/1 (B)
simultaneously, the receiver and connected
equipment will turn off (SYSTEM STANDBY).
The function of the AV ?/1 (A) changes
automatically each time you press the input
buttons (C).
2)
The 5/TV, AUDIO, N and TV CH +/SOUND
FIELD+ buttons have tactile dots.
Use the tactile dots as references when operating
the receiver.
3)
This button is also available for DOCK FOR iPod/
iPhone operation. For details on the function of the
button, refer to the operating instructions supplied
with the DOCK FOR iPod/iPhone.
Satellite tuner,
Cable TV tuner
Options
VCR CD player
––
menu
– Fast forward,
rewind
––
Live TV
Guide menu – –
Notes
• The above explanation is intended to serve as
examples.
• Depending on the model of your connected
equipment, some functions explained in this
section may not work with the supplied remote
control.
Fast forward,
rewind
13
US
Page 14
Getting started
You can enjoy your audio/video equipment connected to the receiver by following the simple steps
below.
Installing and connecting the speakers (page 15, 17)
m
Connecting the TV (page 18)
m
Connecting the video equipment (page 19)
m
Connecting the audio equipment (page 22)
m
Setting the audio output settings on the connected equipment
To output multi channel digital audio, check the digital audio output setting on the connected
equipment.
For a Blu-ray Disc player, check that “Audio (HDMI)”, “Dolby Digital (Coaxial/Optical)”, and
“DTS (Coaxial/Optical)” are set to “Auto”, “Dolby Digital” and “DTS” respectively (as of
September 2010).
For a PlayStation 3, check that “BD/DVD Audio Output Format (HDMI)” is set to “Bitstream”
(with system software version 3.5).
For details, refer to the operating instructions supplied with the connected equipment.
m
Preparing the receiver
See “7: Connecting the AC power cord (mains lead)” (page 23) and “Initializing the receiver”
(page 24).
m
Performing Auto Calibration (page 25)
You can check the speaker connection using “Test Tone” (page 40). If the sound is not output
correctly, check the speaker connection and make the settings explained above again.
US
14
Page 15
Connections
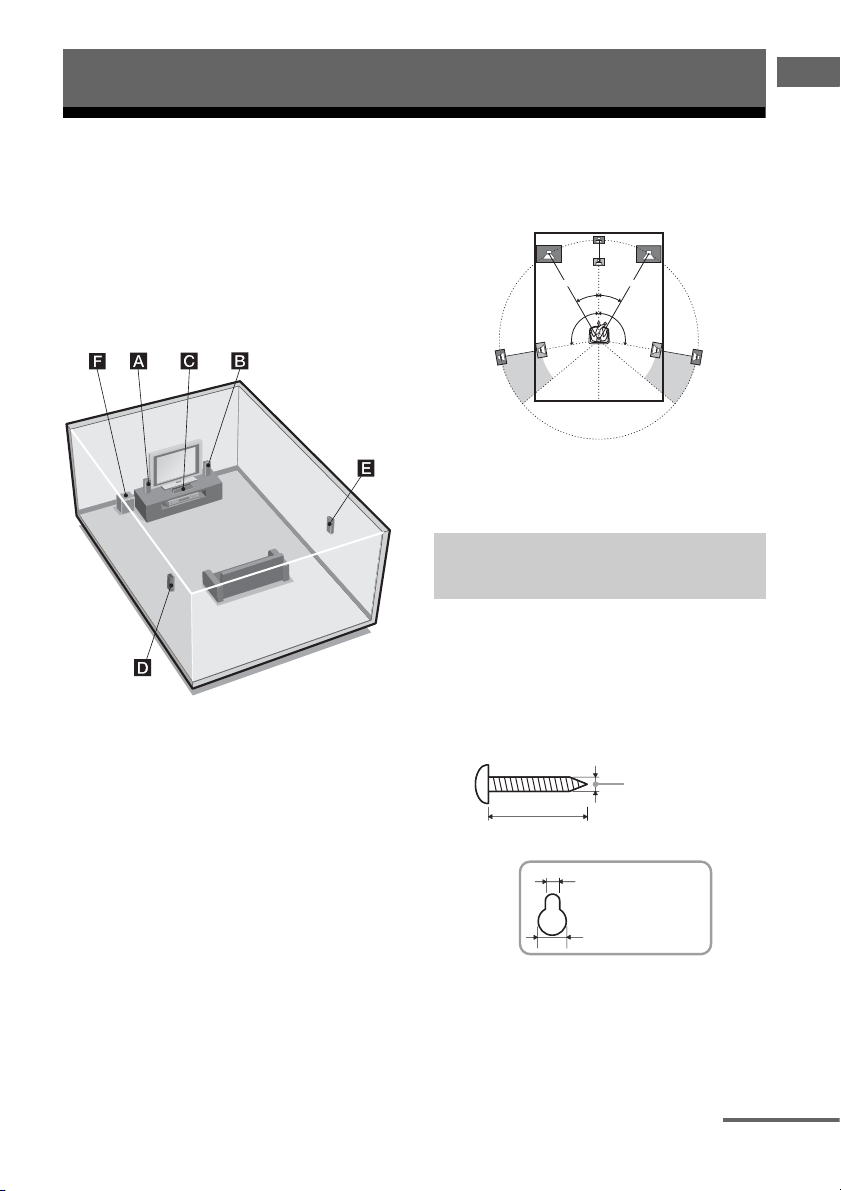
1: Installing the speakers
Connections
This receiver allows you to use a 5.1 channel
speaker system. To fully enjoy theater-like
multi channel surround sound, be sure to
connect all the supplied speakers (two front
speakers, a center speaker, and two surround
speakers) and a subwoofer (5.1 channel).
You can place your speakers as shown below.
AFront speaker (left)
BFront speaker (right)
CCenter speaker
DSurround speaker (left)
ESurround speaker (right)
FSubwoofer
Tips
• The angle A should be the same.
A A
30˚30˚
100˚-120˚100˚-120˚
• Since the subwoofer does not emit highly
directional signals, you can place it wherever you
want.
Installing the speakers on the
wall
You can install your speakers on the wall.
1 Prepare screws (not supplied)
that are suitable for the hook on
the back of each speaker. See
the illustrations below.
4 mm (3/16 in)
more than 25 mm (1 in)
5 mm (7/32 in)
10 mm (13/32 in)
Hook on the rear of the speaker
continued
15
US
Page 16
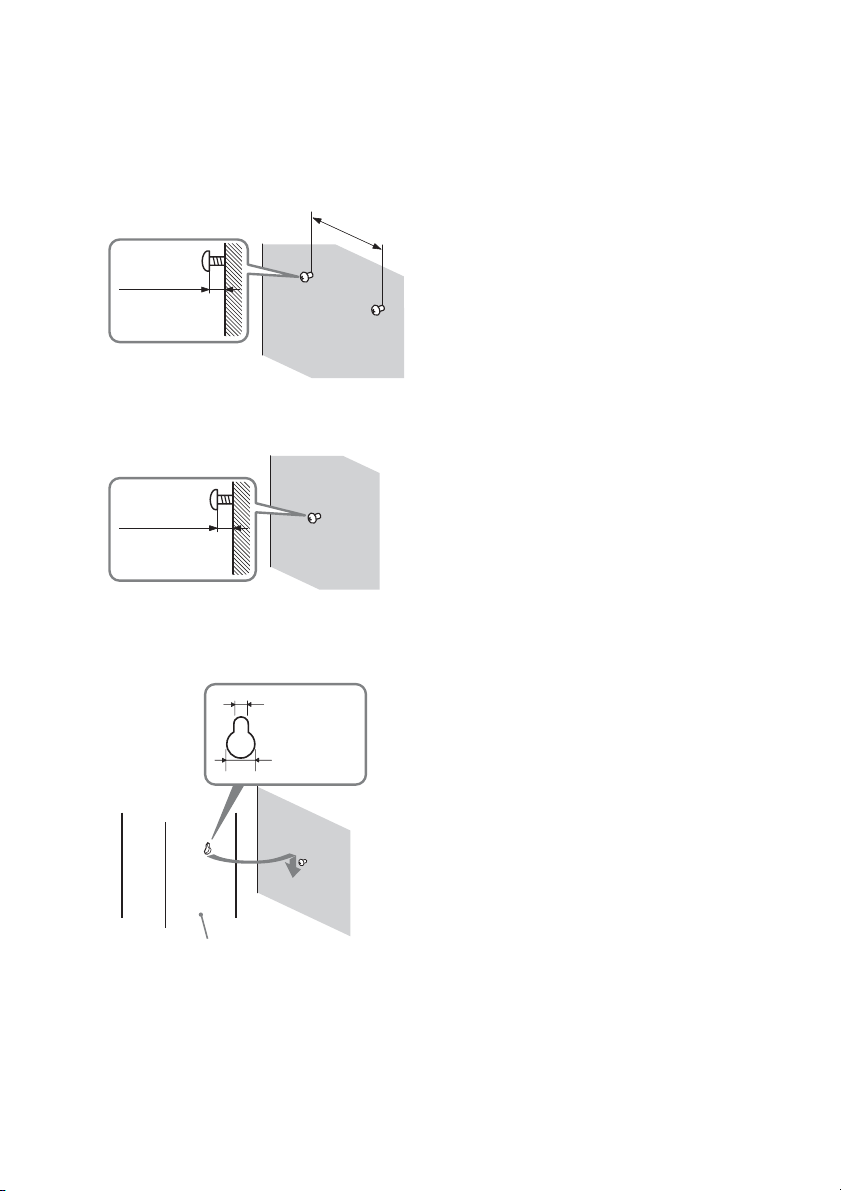
2 Fasten the screws to the wall.
The screws should protrude
8 mm to 10 mm (11/32 in to
13/32 in).
For the center speaker
210 mm
(8 3/8 in)
8 mm to 10 mm
(11/32 in to
13/32 in)
For the front speakers and
surround speakers
8 mm to 10 mm
(11/32 in to
13/32 in)
3 Hang the speakers on the
screws.
Notes
• Use screws that are suitable for the wall material
and strength. As a plaster board wall is especially
fragile, attach the screws securely to a beam and
fasten them to the wall. Install the speakers on a
vertical and flat wall where reinforcement is
applied.
• Contact a screw shop or installer regarding the
wall material or screws to be used.
• Sony is not responsible for accident or damage
caused by improper installation, insufficient wall
strength or improper screw installation, natural
calamity, etc.
16
5 mm (7/32 in)
10 mm
(13/32 in)
Rear of the speaker
US
Page 17
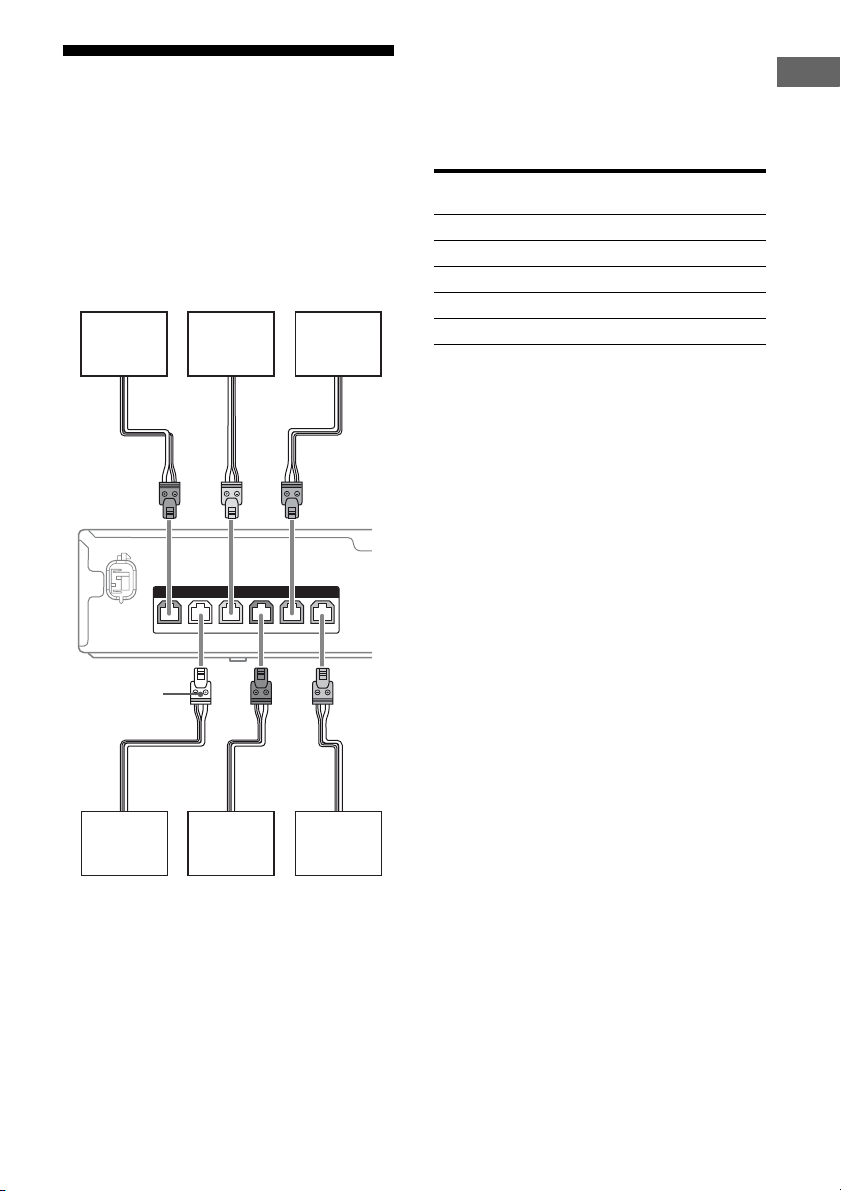
2: Connecting the
speakers
Before connecting cords, be sure to disconnect
the AC power cord (mains lead).
The connector of the speaker cords is colorcoded depending on the type of speaker.
Connect the speaker cords to match the color
of the SPEAKERS jacks of the receiver.
SUBWOOFER
F
CENTER
BE
SPEAKERS
SUR R
FRONT R
FRONT L
SUR L
Note
To connect the speaker correctly, you can check the
speaker type by referring to the speaker label at the
rear panel of the speakers. The subwoofer does not
have the speaker label. For details of the speaker
type, see page 4.
Character on
speaker label
FRONT L Front left
FRONT R Front right
CENTER Center
SUR L Surround left
SUR R Surround right
Speaker type
Connections
Connector
A
D
AFront speaker (left)
BFront speaker (right)
CCenter speaker
DSurround speaker (left)
ESurround speaker (right)
FSubwoofer
C
17
US
Page 18
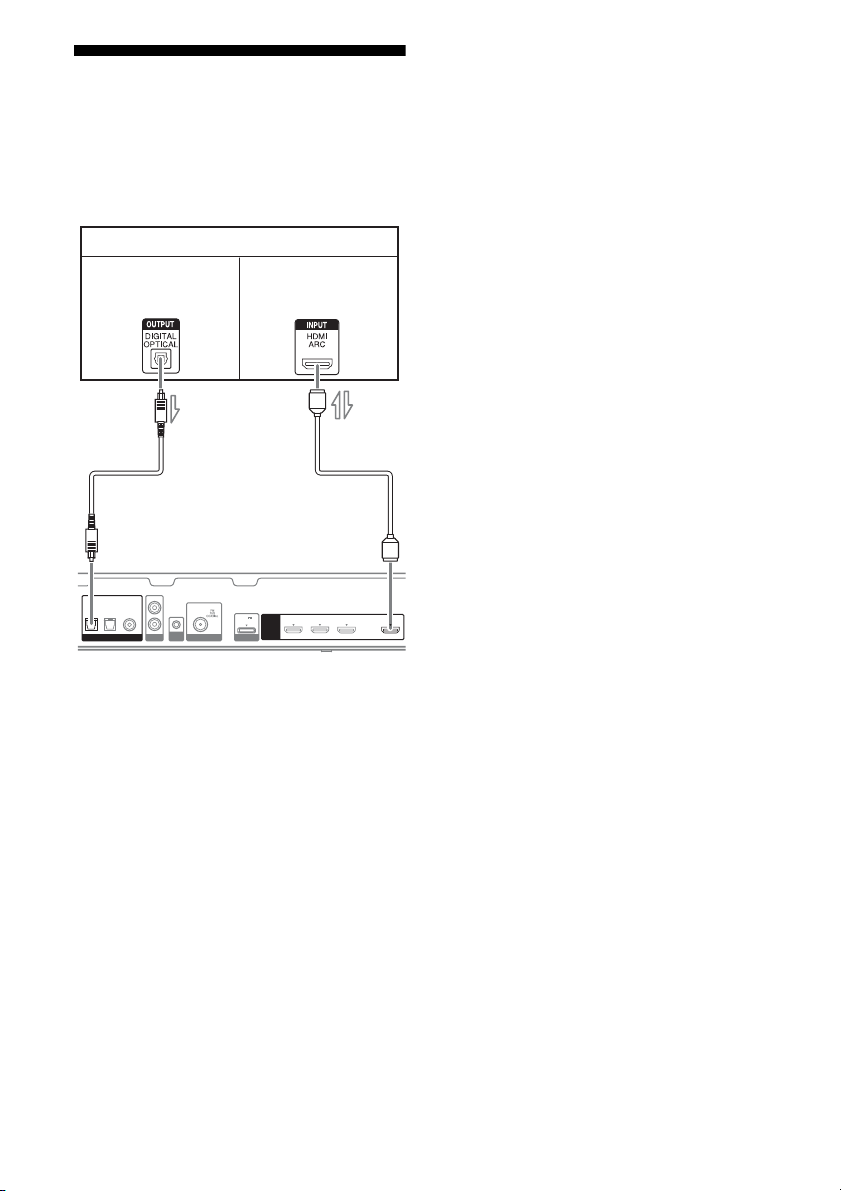
3: Connecting the TV
You can watch the selected input image when
you connect the HDMI TV OUT jack to a TV.
Before connecting cords, be sure to disconnect
the AC power cord (mains lead).
TV
Audio signals
AUDIO IN
COAX IN
OPT IN
OPT IN
VIDEO
SAT/CATV
TV
DIGITAL LINE IN ANTENNA
L
R
CAL MIC
AUTO
Audio/video
signals
B*A***
DC5V
1 A MAX
HDMI
GAME IN BD/DVD IN SAT/CATV IN TV OUT
DMPORT
Notes
• Be sure to turn the receiver on when the video and
audio signals of a playback equipment are being
output to a TV via the receiver. Unless the power is
turned on, neither video nor audio signals will be
transmitted.
• Depending on the status of the connection between
the TV and the antenna (aerial), the image on the
TV screen may be distorted. If this is the case,
place the antenna (aerial) farther away from the
receiver.
• When connecting optical digital cords, insert the
plugs straight until they click into place.
• Do not bend or tie optical digital cords.
Tips
• All the digital audio jacks are compatible with
32 kHz, 44.1 kHz, 48 kHz, and 96 kHz sampling
frequencies.
• When you connect the audio output jack of the TV
to the TV OPT IN jack of the receiver to output the
TV sound from the speakers connected to the
receiver, set the sound output jack of the TV to
“Fixed” if it can be switched between either
“Fixed” or “Variable”.
ARC
A Optical digital cord (not supplied)
B HDMI cable (not supplied)
Sony recommends that you use an HDMIauthorized cable or Sony HDMI cable.
* To enjoy the TV broadcast in multi channel
surround sound from the speakers connected to
the receiver, you can make either one of the
following connections:
– connect A.
– connect B if your TV is compatible with the
Audio Return Channel (ARC) function.
Be sure to turn off the TV’s volume or activate the
TV’s muting function.
**This receiver is compatible with the Audio Return
Channel (ARC) function. If you connect the
receiver to the ARC compatible TV, the TV
sound will output from the speakers connected to
the receiver via the HDMI TV OUT jack. Be sure
to set the “ARC” to “ARC ON” in HDMI menu
(page 37).
US
18
Page 19

4: Connecting the video
equipment
Using HDMI connection
High-Definition Multimedia Interface
(HDMI) is an interface which transmits video
and audio signals in digital format.
By connecting Sony “BRAVIA” Synccompatible equipment using HDMI cables,
operations can be simplified. See ““BRAVIA”
Sync Features” (page 34).
HDMI features
• A digital audio signals transmitted by HDMI
can be output from the speakers connected to
the receiver. This signal supports Dolby
Digital, DTS and Linear PCM.
• The receiver can receive Multi Channel
Linear PCM (up to 8 channels) with a
sampling frequency of 192 kHz or less with
an HDMI connection.
• This receiver supports High Bitrate Audio
(DTS-HD Master Audio, Dolby TrueHD),
Deep Color (Deep Colour), x.v.Color
(x.v.Colour) and 3D transmission.
Notes on HDMI connections
• An audio signal input to the HDMI IN jack
is output from the SPEAKERS jacks and
HDMI TV OUT jack. It is not output from
any other audio jacks.
• Video signals input to the HDMI IN jack can
only be output from the HDMI TV OUT
jack.
• DSD signals of Super Audio CD are not
input and output.
• Audio signals (sampling frequency, bit
length, etc.) transmitted from an HDMI jack
may be suppressed by the connected
equipment. Check the setup of the connected
equipment if the image is poor or the sound
does not come out of the equipment
connected via the HDMI cable.
• Sound may be interrupted when the
sampling frequency, the number of channels
or the audio format of the audio output
signals from the playback equipment is
switched.
• When the connected equipment is not
compatible with copyright protection
technology (HDCP), the image and/or the
sound from the HDMI TV OUT jack may be
distorted or may not be output.
If this is the case, check the specification of
the connected equipment.
• You can enjoy High Bitrate Audio (DTSHD Master Audio, Dolby TrueHD), Multi
Channel Linear PCM only with an HDMI
connection.
• Set the image resolution of the playback
equipment to more than 720p/1080i to enjoy
High Bitrate Audio (DTS-HD Master
Audio, Dolby TrueHD).
• You may need to make certain settings on
the image resolution of the playback
equipment before you can enjoy Multi
Channel Linear PCM. Refer to the operating
instructions of the playback equipment.
• To enjoy 3D images, connect 3Dcompatible TV and video equipment (Bluray Disc player, Blu-ray Disc recorder,
PlayStation 3, etc.) to the receiver using
High Speed HDMI cables, put on 3D
glasses, and then play back a 3D-compatible
content.
• Depending on the TV or the video
equipment, 3D images may not be
displayed.
• Not every HDMI equipment supports all
functions that are defined by the specified
HDMI version. For example, equipment that
support HDMI, version 1.4, may not support
Audio Return Channel (ARC).
• Refer to the operating instructions of each
equipment connected for details.
Connections
19
US
Page 20

When connecting cords
• Before connecting cords, be sure to
disconnect the AC power cord (mains lead).
• It is not necessary to connect all the cords.
Connect according to the availability of
jacks on the connected equipment.
• Use a High Speed HDMI cable. If you use a
Standard HDMI cable, 1080p, Deep Color
(Deep Colour) or 3D images may not be
displayed properly.
• We do not recommend using an HDMI-DVI
conversion cable. When you connect an
HDMI-DVI conversion cable to a DVI-D
equipment, the sound and/or the image may
be lost.
• When connecting optical digital cords, insert
the plugs straight until they click into place.
• Do not bend or tie optical digital cords.
Tip
All the digital audio jacks are compatible with
32 kHz, 44.1 kHz, 48 kHz, and 96 kHz sampling
frequencies.
20
US
Page 21

Connecting a VCR, PlayStation 3, Blu-ray Disc player, DVD player,
satellite tuner, cable TV tuner.
Connections
Audio signals
OPT IN
OPT IN
SAT/CATV
TV
DIGITAL
VCR
AUDIO IN
COAX IN
VIDEO
L
R
LINE IN ANTENNA
PlayStation 3
Audio/video
signals
Blu-ray Disc player,
DVD playe r
Audio/video
signals
AB
DC5V
1 A MAX
AUTO
CAL MIC
C
DMPORT
HDMI
GAME IN BD/DVD IN TV OUT
SAT/CATV IN
B
HDMI
HDMIHDMI
B
ARC
Audio signals Audio/video
A Coaxial digital cord (not supplied)
B HDMI cable (not supplied)
Sony recommends that you use an HDMI
authorized cable or Sony HDMI cable.
C Optical digital cord (not supplied)
signals
Satellite tuner, cable TV tuner
Notes
• Be sure to change the default setting of the BD/
DVD input button on the remote control so that
you can use the button to control your DVD
player. For details, see “Reassigning the input
button on the remote control” (page 38).
• You cannot do recording on the VCR via this
receiver. For details, refer to the operating
instructions supplied with the VCR.
21
US
Page 22
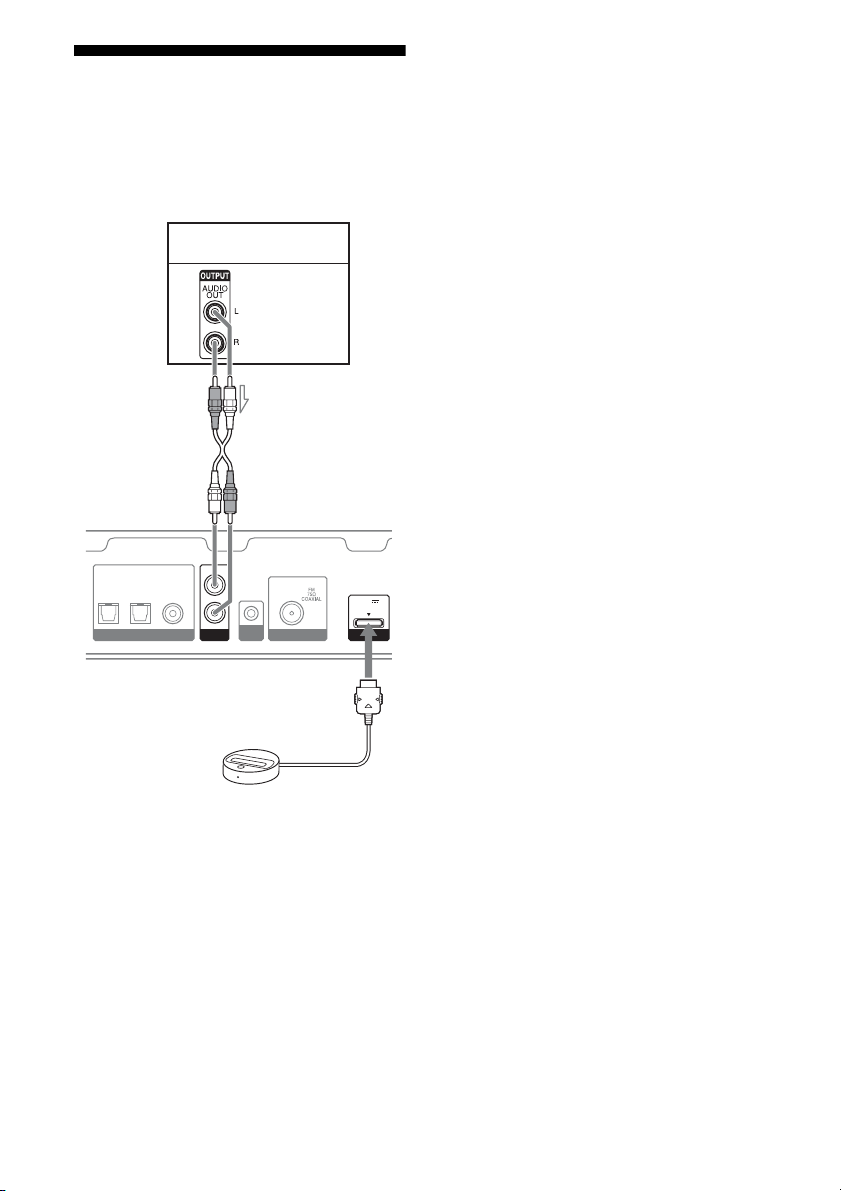
5: Connecting the audio
equipment
Before connecting cords, be sure to disconnect
the AC power cord (mains lead).
Super Audio CD player,
CD player
Audio signals
A
AUDIO IN
COAX IN
OPT IN
OPT IN
VIDEO
SAT/CATV
TV
DIGITAL LINE IN ANTENNA
L
R
AUTO
CAL MIC
DC5V
1 A MAX
DMPORT
• Do not connect or disconnect the DOCK
FOR iPod/iPhone while the receiver is
turned on.
• Be sure to connect the DOCK FOR iPod/
iPhone firmly, insert the connector straight
in.
• As the connector of the DOCK FOR iPod/
iPhone is fragile, be sure to handle with care
when placing or moving the receiver.
DOCK FOR iPod/iPhone
(supplied)
A Audio cord (not supplied)
Notes on connecting DOCK
FOR iPod/iPhone
• Be sure to use only the supplied DOCK FOR
iPod/iPhone.
• You can view the images on the TV screen
by connecting the video output of the
DOCK FOR iPod/iPhone to the video input
of the TV. For details, refer to the operating
instructions supplied with the DOCK FOR
iPod/iPhone.
US
22
Page 23
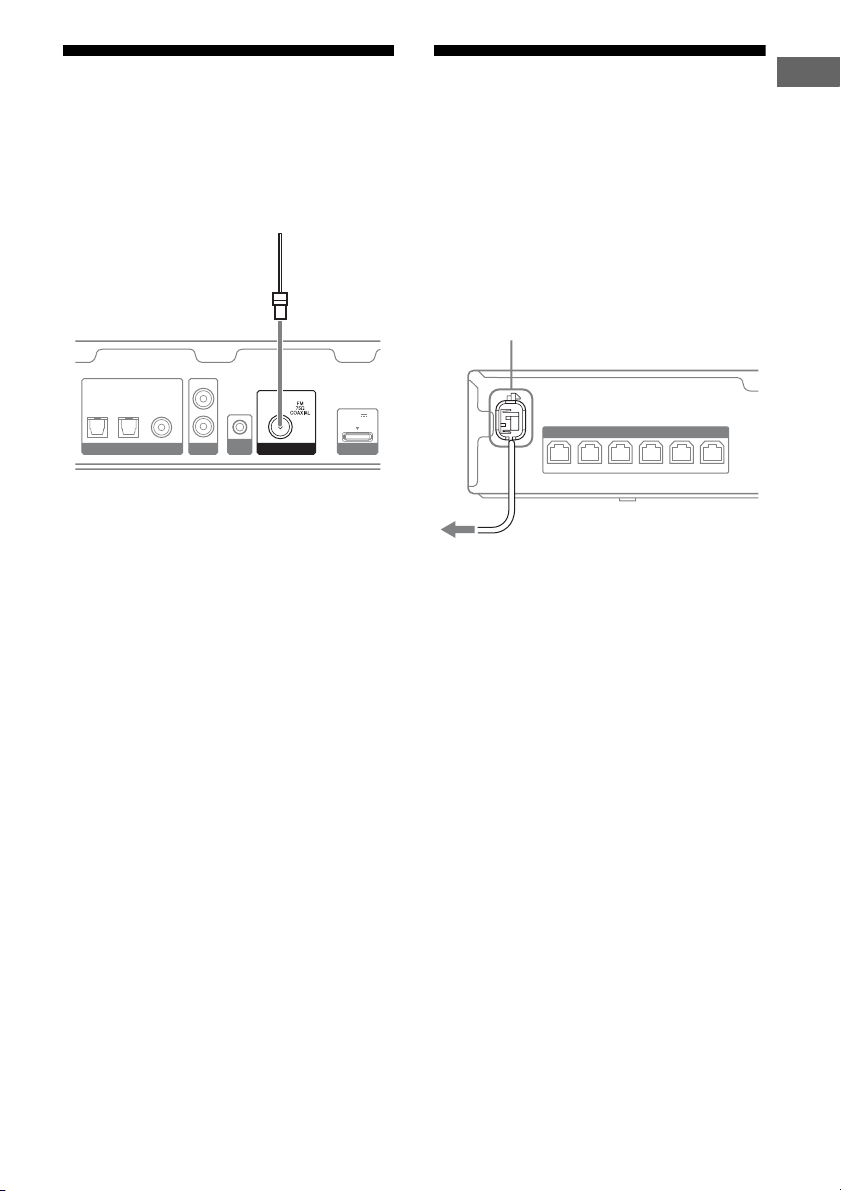
6: Connecting the
antennas
7: Connecting the AC
power cord (mains lead)
Connections
Before connecting the antennas, be sure to
disconnect the AC power cord (mains lead).
FM wire antenna (aerial) (supplied)
AUDIO I N
COAX IN
OPT IN
OPT IN
TV
VIDEO
SAT/CATV
DIGITAL LINE IN ANTENNA
L
R
AUTO
CAL MIC
DC5V
1 A MAX
DMPORT
Notes
• Be sure to fully extend the FM wire antenna
(aerial).
• After connecting the FM wire antenna (aerial),
keep it as horizontal as possible.
Connect the AC power cord (mains lead) to a
wall outlet.
Be sure to turn the receiver on when the video
and audio signals of a playback equipment are
being output to a TV via the receiver. Unless
the power is turned on, neither video nor audio
signals will be transmitted.
AC power cord (mains lead)
SPEAKERS
SUR R SUR L CENTER
FRONT LFRONT R
To the wall outlet
SUBWOOFER
23
US
Page 24
Preparing the receiver
Using AUTO CALIBRATION
Initializing the receiver
Before using the receiver for the first time,
initialize the receiver by performing the
following procedure. This procedure can also
be used to revert back to the factory default
settings.
Be sure to use the buttons on the receiver to
perform this operation.
?/1
1 Press ?/1 to turn off the
receiver.
2 Hold down ?/1 for 5 seconds.
After “CLEARING” appears on the
display panel for a while, “CLEARED”
appears.
All the settings you have changed or
adjusted are reset to the default settings.
This receiver is equipped with DCAC (Digital
Cinema Auto Calibration) Technology which
allows you to perform automatic calibration as
follows:
• Check the connection between each speaker
and the receiver.
• Adjust the speaker level.
• Measure the distance of each speaker from
your seating position.
• Measure the frequency characteristics.
The DCAC is designed to achieve proper
sound balance for your room. However, you
can adjust the speaker levels manually
according to your preference. For details, see
“To adjust the speaker levels” (page 41).
Before you perform Auto
Calibration
Before you perform Auto Calibration, check
the following items.
• Set up and connect the speakers (page 15,
17).
• Connect only the supplied optimizer
microphone to the AUTO CAL MIC jack.
Do not connect any other microphones to
this jack.
• Remove any obstacles in the path between
the optimizer microphone and the speakers
to avoid measurement errors.
• Get accurate measurement by making sure
the environment is free from noise and quiet.
Notes
• The speakers emit very loud sound during the
calibration and the volume cannot be adjusted.
Provide consideration to your neighborhood and to
the children in presence.
• If the muting function has been activated before
you perform Auto Calibration, the muting function
will be shut off automatically.
24
US
Page 25
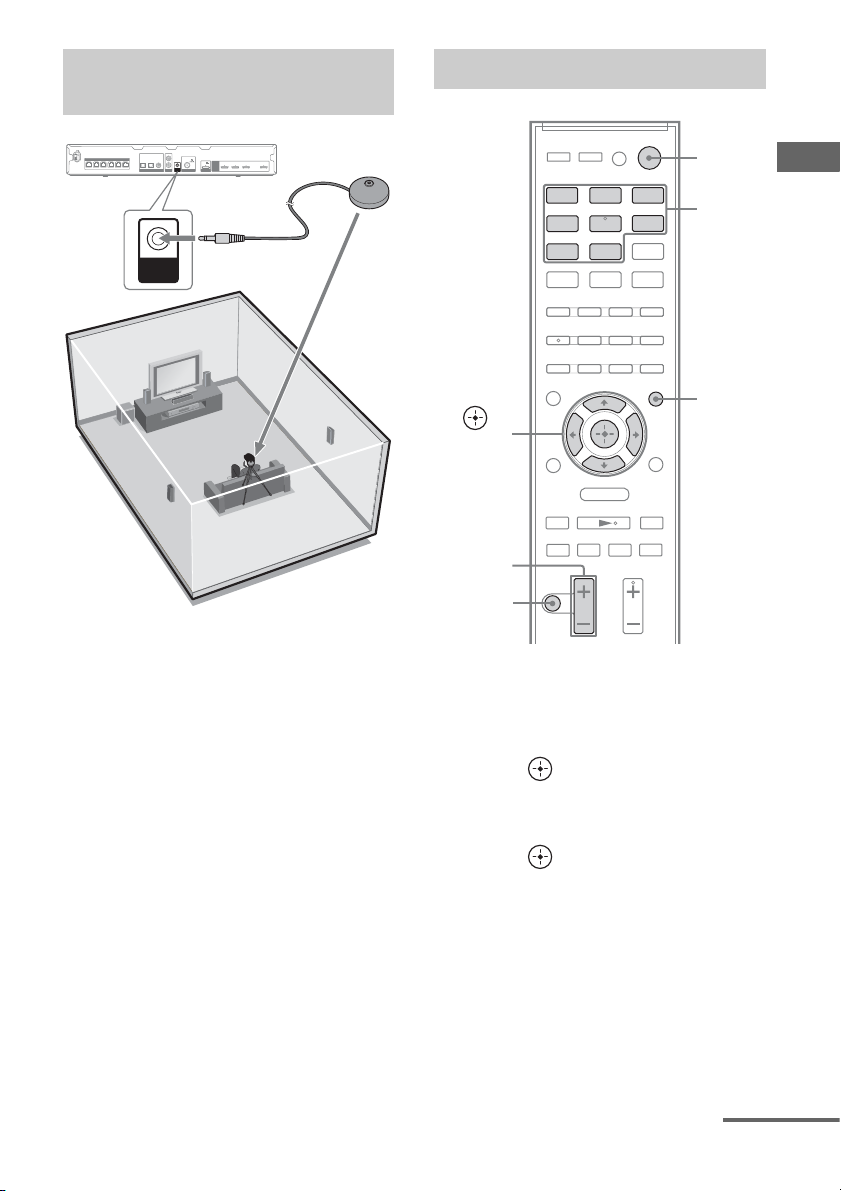
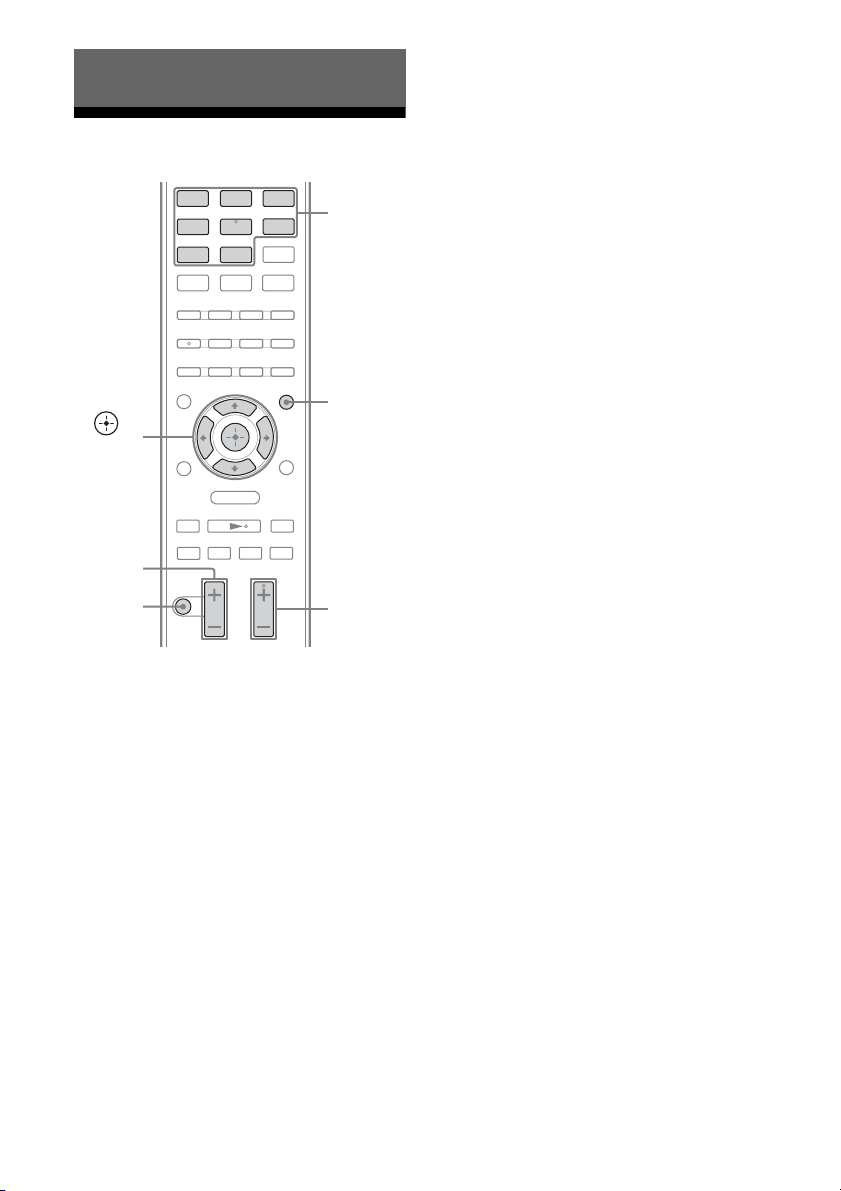
1: Setting up the Auto
Calibration
2: Performing Auto Calibration
AUDIO IN
COAX IN
OPT INTVOPT IN
VIDEO
SAT/CATV
DIGITAL LINE IN ANTENNA
AUTO
CAL MIC
L
DC5V
1 A MAX
R
HDMI
AUTO
GAME IN BD/DVD IN SAT/CATV IN TV OUT
DMPORT
CAL MIC
SPEAKERS
FRONT LFRONT R
SUR R SUR L CENTERSUBWOOFER
ARC
Optimizer
microphone
1 Connect the supplied optimizer
microphone to the AUTO CAL
MIC jack.
2 Set up the optimizer
microphone.
Place the optimizer microphone at your
seating position. You can also use a stool
or tripod so that the optimizer
microphone remains at the same height as
your ears.
Tip
When you face the speaker towards the optimizer
microphone, you will get a more accurate
measurement.
?/1
X
DMPORT
MENU
SAT/
CATV
LINE IN
TV
x
Input
buttons
AMP
MENU
>
,
V/v/B/b
MASTER
BD/DVD GAME
VIDEO
TUNER
O
mM
.
VOL +/–
MUTING
1 Press AMP MENU.
2 Press V/v repeatedly until
“AUTO CAL” appears, then
press or b.
3 Press V/v repeatedly until
“A.CAL START” appears, then
press .
Measurement starts in 5 seconds.
The measurement process will take
approximately 30 seconds to complete.
Preparing the receiver
continued
25
US
Page 26

The table below provides measurement
status shown on the display panel.
Measurement for Display
Speaker existance TONE
Speaker gain, distance,
frequency response
Subwoofer gain and
distance
T S P
WOOFER
To cancel Auto Calibration
The Auto Calibration function will be
canceled when you perform the following
during the measurement process:
– Press ?/1 or MUTING.
– Press input buttons on the remote control or
INPUT +/– on the receiver.
– Change the volume level.
3: Confirming/saving the
measurement results
1 Confirm the measurement
result.
When the measurement process is
completed, the result appears on the
display panel with a beep sound.
Measurement process
[Display]
Completes properly
[SAVE EXIT]
Fails
[E - xxx xx]
Do this
Proceed to step
2.
See “When error
codes appear”
(page 27).
2 View the measurement result.
Press V/v repeatedly to select the item,
then press .
•EXIT
Exits the setting process without saving
the measurement results.
• WARN CHECK
Displays warning related to the
measurement results. See “Checking the
warning message” (page 27).
• SAVE EXIT
Saves the measurement results and exits
the setting process.
•RETRY
Performs the Auto Calibration again.
26
3 Save the measurement result.
Select “SAVE EXIT” in step 2.
“COMPLETE” appears on the display
panel and the measurement results are
saved.
4 Disconnect the optimizer
microphone from the receiver.
Note
If you reposition your speaker, we recommend that
you perform Auto Calibration again to enjoy the
surround sound.
US
Page 27

When error codes appear
1
Check the problem of the error.
Display and explanation
E -
xxx* 32
None of the speakers were detected. Make sure
that the optimizer microphone is connected
properly and perform the Auto Calibration
again.
If the optimizer microphone is connected
properly but the error code still appears, the
optimizer microphone cable may be damaged.
E -
xxx* 33
• The optimizer microphone is not connected.
• None of the front speakers are connected or
only one front speaker is connected.
• Either the surround left or surround right
speaker is not connected.
• The subwoofer is not connected.
* xxx
represent a speaker channel
FFront
S Surround
SW Subwoofer
Depending on the error code, the speaker
channel may not appears.
2 Perform Auto Calibration again.
Press V/v to select “RETRY YES”, then
press .
3 Follow steps in “3: Confirming/saving
the measurement results” (page 26).
Checking the warning message
If a warning on the measurement result is
present, detailed information is displayed.
Display and explanation
xxx* 40
W -
The measurement process has completed with high
noise level detection.
You may be able to achieve better results if you try
in a quite environment again.
W -
xxx* 41
W -
xxx* 42
The input from the microphone is too big. The
distance between the speaker and the microphone
may be too close. Set them apart and perform the
measurement again.
W -
xxx* 43
The distance and position of a subwoofer cannot be
detected. This may be caused by noise. Try to
perform the measurement in a quiet environment.
NO WARN
There is no warning information.
* xxx
represent a speaker channel
FL Front left
FR Front right
CNT Center
SL Surround left
SR Surround right
SW Subwoofer
Depending on the measurement result, the speaker
channel may not appears.
Preparing the receiver
To return to step 2 of
“3: Confirming/saving the
measurement results”
Press .
Tip
Depending on the position of the subwoofer, the
measurement results may vary. However, there will
be no problems even if you continue to use the
receiver with that value.
27
US
Page 28
Basic Operations
Playback
BD/DVD GAME
VIDEO
TUNER
,
V/v/B/b
O
mM
MASTER
VOL +/–
MUTING
.
DMPORT
MENU
X
5 Press MASTER VOL +/– to
adjust the volume.
You can also use MASTER VOLUME on
the receiver.
SAT/
CATV
Input
LINE IN
TV
x
buttons
AMP
MENU
>
SOUND
FIELD +/–
6 Press SOUND FIELD +/– to
enjoy the surround sound.
You can also use SOUND FIELD on the
receiver.
To activate the muting function
Press MUTING. “MUTING” lights up on the
display panel.
The muting function will be canceled when
you do the following.
• Press the button again.
• Increase the volume.
• Turn off the receiver.
• Perform Auto Calibration.
To avoid damaging your
speakers
Before you turn off the receiver, be sure to turn
down the volume level.
Turn on the connected
1
equipment.
2 Turn on the receiver.
3 Press the input button which
corresponds to the equipment
you want.
You can also use INPUT +/– on the
receiver.
The selected input appears on the display
panel.
Note
When you press TUNER, “FM TUNER”
appears for a while, and then frequency
appears on the display panel.
4 Play back the source.
US
28
Page 29

Viewing information on
the display panel
The display panel provides various
information of the receiver status such as
sound field.
TV
DMPORT
SAT/
CATV
LINE IN
Input
buttons
DISPLAY
AMP
MENU
BD/DVD GAME
VIDEO
TUNER
O
1 Select the input for which you
want to check the information.
2 Press AMP MENU, then press
DISPLAY repeatedly.
Each time you press the button, the
display changes cyclically as follows:
Selected input t Sound field currently
applied t Volume level
Tuner Operations
Listening to FM radio
You can listen to FM broadcasts through the
built-in tuner. Before operation, be sure you
have connected the FM antenna (aerial) to the
receiver (page 23).
MENU
X
TV
DMPORT
SAT/
CATV
LINE IN
x
Numeric
buttons
ENTER
D.TUNING
AMP
MENU
>
SHIFT
TUNER
,
V/v/B/b
TUNING
+/–
BD/DVD GAME
VIDEO
TUNER
O
mM
.
Basic Operations/Tuner Operations
When listening to FM radio
Preset station name*) t Frequency t
Sound field currently applied t Volume
level
* Preset station name appears only if you have
entered a name for a preset station (page 32).
Note
Character or marks may not be displayed for
some languages.
29
US
Page 30

Tuning to a station
automatically (Automatic
Tuning)
1 Press TUNER.
2 Press TUNING + or TUNING –.
TUNING + scans from lower to higher
frequency stations and TUNING – for
scanning higher to lower.
The receiver stops scanning whenever a
frequency is received.
In case of poor FM stereo
reception
If the FM stereo reception is poor and “ST”
flashes on the display panel, select monaural
audio to lessen the sound distortion.
1 Press AMP MENU.
2 Press V/v repeatedly until “TUNER”
appears, then press or b.
3 Press V/v repeatedly until “FM MODE”
appears, then press or b.
4 Press V/v repeatedly until “MONO”
appears, then press .
To return to stereo mode, repeat steps 1 to 4
and select “STEREO” in step 4.
Tip
To improve reception, reorient the supplied FM wire
antenna (aerial).
Tuning to a station directly
(Direct Tuning)
You can enter the frequency of a station
directly by using the numeric buttons.
1 Press TUNER.
2 Press D.TUNING.
3 Hold down SHIFT, then press
the numeric buttons to enter
the frequency.
Example: FM 102.50 MHz
Select 1 b 0 b 2 b 5
4 Hold down SHIFT, then press
ENTER.
If a wrong frequency is entered
“FM ---.--” appears and then the display
returns to the current frequency.
If you cannot tune to a station
Make sure you have entered the right
frequency. Try repeating steps 2 to 4. If you
still cannot tune in a station, the frequency
may not be in use in your area.
30
US
Page 31

Presetting radio stations
You can store up to 30 FM stations as your
favorite stations.
X
TV
DMPORT
MENU
SAT/
CATV
LINE IN
x
Numeric
buttons
ENTER
MEMORY
DISPLAY
AMP
MENU
PRESET
>
+/–
SHIFT
TUNER
,
V/v/B/b
BD/DVD GAME
VIDEO
TUNER
O
mM
.
5 Hold down SHIFT, then press
ENTER.
The station is stored as the selected preset
number.
6 Repeat steps 2 to 5 to store
another station.
To change the preset number
Restart from step 3.
Tuning to preset stations
1 Press TUNER.
2 Press PRESET + or PRESET –
to select the station.
Each time you press the button, you can
select a preset station as follows:
1 2345 27...
30 29 28
You can also hold down SHIFT and then
press the numeric buttons to enter the
preset station. To tune to the selection,
hold down SHIFT then press ENTER.
Tuner Operations
1 Press TUNER.
2 Tune to the station that you
want to preset using Automatic
Tuning (page 30) or Direct
Tuning (page 30).
3 Press MEMORY.
A preset number appears on the display
panel.
4 Press PRESET + or PRESET –
repeatedly to select the preset
number you want.
You can also select the preset number
directly by holding down SHIFT and then
press the numeric buttons.
31
US
Page 32

Naming preset station
1 Press TUNER.
2 Tune to the preset station you
want to create an index name
for (page 31).
3 Press AMP MENU.
4 Press V/v repeatedly until
“TUNER” appears, then press
or b.
5 Press V/v repeatedly until
“NAME IN” appears, then press
or b.
The cursor flashes and you can select a
character.
6 Press V/v to select a character,
then press B/b to move the
input position backward and
forward.
You can enter up to 8 characters to name
the station.
Tips
• You can select the character type as follows
by pressing V/v.
Alphabet (upper case) t Numbers t
Symbols
• To enter a blank space, press b without
selecting a character.
If you enter a wrong character
Press B/b until the character to be
changed flashes, then press V/v to select
the desired character.
Enjoying Surround Sound
Selecting the sound field
This receiver can create multi channel
surround sound. You can select one of the
optimized sound fields from the receiver’s
pre-programmed sound fields.
x
X
.
Press SOUND FIELD +/– repeatedly
to select the sound field you want.
You can also use SOUND FIELD on the
receiver.
2 channel sound mode
You can switch the output sound to 2 channel
sound regardless of the recording formats of
the software you are using, the playback
equipment connected, or the sound field
settings of the receiver.
x 2CH ST. (2 Channel Stereo)
The receiver outputs the sound from the front
left/right speakers and the subwoofer only.
Standard 2 channel stereo sources completely
bypass the sound field processing and multi
channel surround formats are downmixed to 2
channel except LFE signals.
>
SOUND
FIELD +/–
7 Press .
The name you entered is registered.
US
32
Auto Format Direct (A.F.D.)
mode
The Auto Format Direct (A.F.D.) mode allows
you to listen to high fidelity sound and select
the decoding mode for listening to a 2 channel
stereo sound as multi channel sound.
Page 33

x A.F.D. STD (A.F.D. Standard)
Presets the sound as it was recorded/encoded
without adding any surround effects.
However, this receiver will generate a low
frequency signal for output to the subwoofer
when there is no LFE signals.
x A.F.D. MULTI (A.F.D. Multi)
Outputs 2 channel left/right signals from all
speakers.
Music mode
You can take advantage of surround sound
simply by selecting one of the receiver’s
pre-programmed sound fields. They bring the
exciting and powerful sound of concert halls
into your home.
x SPORTS (Sports)
Reproduces the feeling of sports broadcasting.
Movie mode
You can take advantage of surround sound
simply by selecting one of the receiver’s preprogrammed sound fields. They bring the
exciting and powerful sound of movie theaters
into your home.
x HD-D.C.S. (HD Digital Cinema
Sound)
This mode is Sony’s new innovative home
theater technology using the latest acoustic
and digital signal processing technologies. It is
based on precise response measurement data
of a mastering studio.
With this mode, you are able to enjoy Blu-ray
and DVD movies at home with not only the
high quality of sound, but also the best sound
ambience, just as the movie’s sound engineer
intended in the mastering process.
x PLII MV (Pro Logic II Movie)
Performs Dolby Pro Logic II Movie mode
decoding. This setting is ideal for movies
encoded in Dolby Surround. In addition, this
mode can reproduce sound in 5.1 channel for
watching videos of overdubbed or old movies.
x NEO6 CIN (Neo:6 Cinema)
Performs DTS Neo:6 Cinema mode decoding.
A source recorded in 2 channel format is
decoded into 5 channels.
x GAMING (Gaming)
Reproduces powerful and realistic sound,
suited for playing video games.
x NEWS (News)
Reproduces a clearer announcer’s voice.
x P. AUDIO (Portable Audio
Enhancer)
Reproduces a clear enhanced sound image
from your portable audio device. This mode is
ideal for MP3 and other compressed music.
x PLII MS (Pro Logic II Music)
Performs Dolby Pro Logic II Music mode
decoding. This setting is ideal for normal
stereo sources such as CDs.
x NEO6 MUS (Neo:6 Music)
Performs DTS Neo:6 Music mode decoding.
A source recorded in 2 channel format is
decoded into 5 channels. This setting is ideal
for normal stereo sources such as CDs.
Notes
• Source signals more than 5.1 channels are
downmixed to 5.1 channel.
• The movie and music mode do not work when
DTS-HD Master Audio, DTS-HD High
Resolution Audio or Dolby TrueHD with
sampling frequency of more than 48 kHz are being
received.
• The sound is not output from multiple speakers
depending on the source.
• Depending on the disc or source, the beginning of
the sound may be cut off as the optimum mode is
automatically selected. To avoid cutting the sound,
select “A.F.D. STD”.
Enjoying Surround Sound
continued
33
US
Page 34

• When the input signal is multi channel source,
Dolby Pro Logic II Movie/Music are canceled and
the multi channel source is output directly.
• When the bilingual broadcast sound is input,
Dolby Pro Logic II Movie/Music are not effective.
• Depending on the input stream, the decoding mode
may not be effective.
• When you select “HD-D.C.S.” depending on the
input stream, Dolby Pro Logic may be applied
automatically.
To turn off the surround effect
for movie/music
Press SOUND FIELD +/– repeatedly to select
“2CH ST.” or “A.F.D. STD”.
You can also use SOUND FIELD on the
receiver to select “2CH ST.” or “A.F.D. STD”.
“BRAVIA” Sync Features
What is “BRAVIA” Sync?
The “BRAVIA” Sync function allows
communication between Sony products such
as TV, Blu-ray Disc/DVD Player, AV
amplifier, etc. that supports the Control for
HDMI function.
By connecting Sony equipment that are
compatible with the “BRAVIA” Sync via an
HDMI cable (not supplied), operation is
simplified as follows:
• One-Touch Play (page 36)
• System Audio Control (page 36)
• System Power-Off (page 37)
• Audio Return Channel (page 37)
• Theatre/Theater Mode Sync (page 38)
• Scene Select (page 38)
Control for HDMI is a mutual control function
standard used by HDMI CEC (Consumer
Electronics Control) for HDMI (HighDefinition Multimedia Interface).
34
We recommend that you connect the receiver
to products featuring “BRAVIA” Sync.
Note
Depending on the connected equipment, the
Control for HDMI function may not work. Refer to
the operating instructions of the
US
equipment.
Page 35

Preparing for the
“BRAVIA” Sync
The receiver is compatible with the “Control
for HDMI-Easy Setting” function.
• If your TV is compatible with the “Control
for HDMI-Easy Setting” function, you can
set the Control for HDMI function of the
receiver and playback equipment
automatically by setting the Control for
HDMI function on your TV (page 35).
• If your TV is not compatible with the
“Control for HDMI-Easy Setting” function,
set the Control for HDMI function of the
receiver, playback equipment and TV
individually (page 35).
If your TV is not compatible with
the “Control for HDMI-Easy
Setting” function
AMP
MENU
,
V/v/B/b
Press AMP MENU.
1
O
MENU
2 Press V/v repeatedly until “HDMI”
appears, then press
or b.
3 Press V/v repeatedly until “CTRL
HDMI” appears, then press or b.
If your TV is compatible with the
“Control for HDMI-Easy Setting”
function
The Control for HDMI function of the receiver
can be turned on simultaneously by turning on
the Control for HDMI function of the TV.
1 Connect the receiver, TV and playback
equipment via HDMI connection (page
19).
(The respective equipment must be
compatible with the Control for HDMI
function.)
2 Turn on the receiver, TV and playback
equipment.
3 Turn on the Control for HDMI function
of the TV.
The Control for HDMI function of the
receiver and all the connected equipment
are turned on simultaneously. When the
setup is completed, “COMPLETE” will
appear on display panel.
For details on setting the TV, refer to the
operating instructions supplied with the TV.
4 Press V/v repeatedly until “CTRL ON”
appears, then press .
Control for HDMI function is turned on.
5 Set the Control for HDMI function for
the connected equipment to on.
If the Control for HDMI function is already
set to on, you do not need to change the
setting.
For details on setting the TV and connected
equipment, refer to the operating
instructions of the respective equipment.
Notes
• Before you perform the “Control for HDMI-Easy
Setting” on your TV, be sure to turn on the TV and
other connected equipment including the receiver
first.
• If the playback equipment cannot function after
you have made the settings for “Control for
HDMI-Easy Setting”, check the Control for
HDMI setting on your TV.
• If the connected equipment do not support the
“Control for HDMI-Easy Setting”, but still
supports the Control for HDMI then you need to
set the Control for HDMI function for the
connected equipment before you perform the
“Control for HDMI-Easy Setting” from the TV.
“BRAVIA” Sync Features
35
US
Page 36

Playing back equipment
Enjoying the TV sound
with one-touch operation
(One-Touch Play)
By a simple operation (one-touch), equipment
connected to the receiver with BRAVIA Sync
function start automatically. You can enjoy the
sound/images from the connected equipment.
When you start playback a connected
equipment, the receiver and TV operation are
simplified as follow:
Receiver and TV
Turns on (if in standby mode)
r
Switches to appropriate HDMI input
Notes
• Be sure that the System Audio Control function is
set to on using TV menu.
• Depending on the TV, the start of the content may
not appear.
Tip
You can also select a connected equipment, such as
DVD/Blu-ray Disc player using the TV menu. The
receiver and TV will automatically switch to the
appropriate HDMI input.
from the speakers
connected to the receiver
(System Audio Control)
You can enjoy the TV sound from the speakers
connected to the receiver by a simple
operation.
You can operate System Audio Control
function using the TV menu. For details, refer
to the operating instructions of the TV.
TV Receiver
Sets System Audio
Control to on
Minimizes TV
volume
You can also use the System Audio Control
function as follows.
• If you turn on the receiver while the TV is
turned on, the System Audio Control
function will automatically activate to
output TV sound through the speakers
connected to the receiver. However, if you
turn off the receiver, the sound will output
from the TV speakers.
• When you adjust the TV volume, the System
Audio Control function adjusts the
receiver’s volume simultaneously.
Notes
• If System Audio Control does not function
according to your TV setting, refer to the operating
instructions of the TV.
• Your TV must support the System Audio Control
function.
• If the TV is turned on before turning on the
receiver, the TV will momentarily loose the sound
output.
• Turns on (if in
standby mode)
• Switches to
appropriate
HDMI input
Outputs TV
sound
36
US
Page 37

Turning off the receiver
with the TV
(System Power-Off)
When you turn the TV off, using the POWER
button on the TV’s remote control, the receiver
and the connected equipment turn off
automatically.
You can also use the receiver’s remote control
to turn off the TV.
TV ?/1
BD/DVD GAME
VIDEO
TV
SAT/
CATV
LINE IN
TV
Enjoying the TV sound via
an HDMI cable
(Audio Return Channel)
The Audio Return Channel (ARC) function
enables the TV to output the audio signals to
the receiver via an HDMI cable connected to
the HDMI TV OUT jack.
You can enjoy the TV sound from the speakers
connected to the receiver without connecting
the TV OPT IN jack.
AMP
,
V/v/B/b
O
MENU
MENU
1 Press AMP MENU.
2 Press V/v repeatedly until
“HDMI” appears, then press
or b.
“BRAVIA” Sync Features
Hold down TV, then press TV ?/1.
The TV, receiver and the equipment connected
via HDMI are turned off.
Notes
• Set the TV power supply interlock function to
“ON” before using the System Power-Off function.
For details, refer to the operating instructions of the
TV.
• Depending on the connected equipment, it may not
be turned off. For details, refer to the operating
instructions of the connected equipment.
3 Press V/v repeatedly until
“ARC” appears, then press
or b.
4 Press V/v repeatedly until
“ARC ON” appears, then press
.
Note
This function is only available when your TV is
compatible with Audio Return Channel (ARC)
function.
37
US
Page 38

Enjoying movies with the
optimum sound field
(Theatre/Theater Mode Sync)
Press THEATER or THEATRE on
the remote control of the TV or the
Blu-ray Disc player, while pointing
the remote control toward the TV.
The sound field switches to “HD-D.C.S.”.
To return to the previous sound field, press
THEATER or THEATRE again.
Note
The sound field may not switch depending on the
TV.
Tip
The sound field may revert to the previous field
when you change the TV’s input.
Enjoying optimum sound
field for the selected
scene
Advanced Settings
Reassigning the input
button on the remote
control
You can change the default settings of the
input buttons (BD/DVD, GAME, SAT/
CATV, VIDEO and LINE IN) to suit the
equipment in your system.
For example, if you connect a Blu-ray Disc
player to the SAT/CATV jack on the receiver,
you can set the SAT/CATV button on this
remote control to control the Blu-ray Disc
player.
INPUT
Numeric
buttons
BD/DVD GAME
VIDEO
TUNER
DMPORT
CATV
LINE IN
TV
AV ?/1
?/1
SAT/
Input
buttons
(Scene Select)
The Scene Select function allows you to enjoy
the optimum picture quality and switches the
sound field according to the selected scene on
your TV. For details on the operation, refer to
the operating instructions of the TV.
Note
The sound field may not switch depending on the
TV.
US
38
MASTER
VOL –
1 While holding down the input
button of which you want to
change the assignment, hold
down AV ?/1.
Example: While holding down SAT/
CATV, hold down AV ?/1.
2 With the AV ?/1 button held,
release the input button.
Example: With the AV ?/1 button held,
release SAT/CATV.
Page 39

3 Referring to the following table,
press the corresponding
button for the category you
want, then release AV ?/1.
Example: Press 1, then release AV ?/1.
Now you can use the SAT/CATV button
to control the Blu-ray Disc player.
Categories Press
Blu-ray Disc player
(command mode BD1)
Blu-ray Disc recorder
(command mode BD3)
DVD player
(command mode DVD1)
DVD recorder
(command mode DVD3)
VCR (command mode VTR3)
CD player 6
e)
DSS
a)
The default setting of the BD/DVD button.
b)
For details on the BD1 or BD3 setting, refer to the
operating instructions supplied with the Blu-ray
Disc player or Blu-ray Disc recorder.
c)
Sony DVD recorders are operated with a DVD1 or
DVD3 setting. For details, refer to the operating
instructions supplied with the DVD recorders.
d)
The default setting of the VIDEO button.
e)
The default setting of the SAT/CATV button.
a)b)
b)
c)
Resetting the remote control
While holding down MASTER VOL –, press
?/1 and INPUT.
The remote control is reset to the default
settings.
1
2
3
4
d)
5
7
Using the setting menu
You can customize the receiver by making
various adjustments with settings menu.
Navigating through menus
AMP
,
V/v/B/b
RETURN/
EXIT O
O
MENU
MENU
1 Press AMP MENU.
2 Press V/v repeatedly until the
menu item you want appears,
then press or b.
3 Press V/v repeatedly until the
parameter you want to adjust
appears, then press or b.
4 Press V/v repeatedly until the
setting you want appears, then
press .
To return to the previous
display
Press B or RETURN/ EXIT O.
To exit the menu
Press AMP MENU.
Advanced Settings
continued
39
US
Page 40

Overview of the menus
You can set the following items using the
AMP MENU.
The default settings are underlined.
AMP MENU
AUTO CAL
LEVEL TEST TONE AUTO xxx
SPEAKER CENTER SP CENTER YES
a)
A.CAL START
FL LEVEL FL +6.0,…
FR LEVEL FR +6.0,…
CNT LEVEL
SL LEVEL
SR LEVEL
SW LEVEL SW +6.0,…
D. RANGE COMP. MAX
SUR SP SUR YES
FL DIST. FL 32' 9",…
FR DIST. FR 32' 9",…
CNT DIST.
SL DIST.
SR DIST.
SW DIST. SW 32' 9",…
c)
d)
d)
c)
d)
d)
OFF
FL 0
,...
FL -6.0
FR 0
,...
FR -6.0
CNT +6.0,...
CNT 0
,...
CNT -6.0
SL +6.0,…
,...
SL 0
SL -6.0
SR +6.0,…
SR 0
,...
SR -6.0
SW 0
,...
SW -6.0
COMP. STD
COMP. AUTO
COMP. OFF
CENTER NO
SUR NO
FL 9' 10
",…
FL 3' 3"
FR 9' 10
",…
FR 3' 3"
CNT 32' 9",…
CNT 9' 10
CNT 3' 3"
SL 32' 9",….
SL 9' 10
",…
SL 3' 3"
SR 32' 9",…
SR 9' 10
",…
SR 3' 3"
SW 9' 10
SW 3' 3"
",…
",…
EQ BASS BASS +6,...
TREBLE TREBLE +6,
e)
TUNER
b)
AUDIO A/V SYNC SYNC ON
HDMI CTRL HDMI CTRL ON
SYSTEM DIMMER DIM MAX
a)
For details, see “2: Performing Auto Calibration”
(page 25).
b)
xxx represent a speaker channel (FL, CNT, FR,
SR, SL, SW).
c)
This parameter is only available when “CENTER
SP” is set to “CENTER YES”.
d)
This parameter is only available when “SUR SP”
is set to “SUR YES”.
e)
This parameter is only available when TUNER
input is selected.
f)
This parameter is only available when SAT/CATV
input is selected.
g)
This parameter is only available when “CTRL
HDMI” is set to “CTRL ON”.
h)
For details, see “Enjoying the TV sound via an
FM MODE STEREO
NAME IN
DUAL MONO MAIN/SUB
NIGHT MODE NIGHT ON
INPUT MODEf)AUTO
PASS THRU
ARC
SLEEP 2-00-00
AUTO STBY STBY ON
g)
g)h)
,...
BASS 0
BASS -6
…TREBLE 0
…TREBLE -6
MONO
SYNC OFF
MAIN
SUB
NIGHT OFF
OPT
CTRL OFF
ON
AUTO
ARC ON
ARC OFF
DIM MID
DIM OFF
1-30-00
1-00-00
0-30-00
OFF
STBY OFF
,
HDMI cable (Audio Return Channel)” (page 37).
40
US
Page 41

LEVEL menu
You can adjust the level of each speaker to suit
your preference.
To output a test tone from each
speaker
You can output a test tone from the speakers in
sequence.
• AUTO FL, AUTO CNT, AUTO FR, AUTO
SR, AUTO SL, AUTO SW
•OFF
When a test tone is not output from
the speakers
• The speaker cords may not be connected
securely.
• The speaker cords may have the short-circuit
problem.
Note
The test tone signals are not output from the HDMI
TV OUT jack.
Tip
Audio dynamic range compression lets you
compress the dynamic range of the soundtrack based
on the dynamic range information included in the
Dolby Digital signal.
“COMP. STD” is the standard setting, but it only
enacts light compression. Therefore, we recommend
using the “COMP. MAX” setting. This greatly
compresses the dynamic range and lets you view
movies late at night at low volumes. Unlike analog
limiters, the levels are predetermined and provide a
very natural compression.
SPEAKER menu
You can adjust the distance of the speakers
connected to this receiver.
To set the speaker connection
• CENTER (SUR) YES: Selects when you
connect the speaker.
• CENTER (SUR) NO: Selects when you do
not connect the speaker.
To adjust the speaker levels
You can adjust each speaker level (FL
LEVEL, FR LEVEL, CNT LEVEL, SL
LEVEL, SR LEVEL, SW LEVEL) from –6.0
dB to +6.0 dB in 0.5 dB interval.
Enjoying Dolby Digital sound at
low volume (D. RANGE)
Narrows the dynamic range of the sound track.
Useful for enjoying movies at low volume.
D. RANGE only applies to Dolby Digital
sources.
• COMP. MAX: Compress dynamic range
fully.
• COMP. STD: Compress dynamic range as
intended by the recording engineer.
• COMP. AUTO: Compress dynamic range
automatically.
• COMP. OFF: Does not compress dynamic
range.
To set the speaker distance
You can adjust each speaker distance (FL
DIST, FR DIST, CNT DIST, SL DIST, SR
DIST, SW DIST) from 3' 3" to 32' 9" in 1 inch
interval.
EQ menu
You can adjust the equalizer (bass and treble
level) of the front speakers from -6 dB to
+6 dB in 1 dB interval.
xBASS
xTREBLE
41
Advanced Settings
US
Page 42

TUNER menu
You can set the FM station receiving mode and
name the preset stations.
x FM MODE
• STEREO: This receiver will decode the
signal as stereo signal when the radio station
is broadcast in stereo.
• MONO: This receiver will decode the signal
as mono signal regardless of the broadcast
signal.
x NAME IN
Lets you set the name of preset stations. For
details, see “Naming preset station” (page 32).
x DUAL MONO
Lets you select the language you want when
you listen to the dual audio of a digital
broadcast when available. This feature only
functions for Dolby Digital sources.
• MAIN / SUB: Outputs sound of the main
language through the front left speaker and
sound of the sub language through the front
right speaker simultaneously.
• MAIN: Outputs sound of the main language.
• SUB: Outputs sound of the sub language.
x NIGHT MODE
Lets you retain a theater-like environment at
low volume levels.
• NIGHT ON
• NIGHT OFF
AUDIO menu
You can adjust settings for the audio to suit
your preference.
x A/V SYNC
Lets you delay the output of audio to minimize
the time gap between audio output and visual
display.
• SYNC ON: The audio output is delayed so
that the time gap between the audio output
and visual display is minimized.
• SYNC OFF: The audio output is not
delayed.
Notes
• You may not be able to adjust the delay between
sound and image perfectly using this function.
• This parameter is useful when you use a large LCD
or plasma monitor or a projector.
• The delay time may vary depending on audio
format, sound field, and speaker distance settings.
Tip
While this function is on, the bass, treble, and effect
levels increase, and “D. RANGE” is automatically
set to “COMP. MAX”.
x INPUT MODE
Lets you select the audio input mode setting
when you connect satellite tuner or cable TV
tuner to both HDMI IN jack and optical digital
input jack on the receiver and SAT/CATV
input has been selected.
• AUTO: Gives priority to HDMI audio
signals if there are both digital (HDMI and
optical) connections.
• OPT: Specifies the digital audio signals
input to the SAT/CATV OPT IN jack.
42
US
Page 43

HDMI menu SYSTEM menu
You can make various adjustments for HDMI
settings.
x CTRL HDMI
Lets you turn the Control for HDMI function
on or off. For details, see ““BRAVIA” Sync
Features” (page 34).
x PASS THRU
Lets you output the HDMI signals to the TV
even when the receiver is in standby mode.
• ON: The receiver continuously outputs
HDMI signals from the receiver’s HDMI
TV OUT jack.
• AUTO: When the TV is turned on while the
receiver is in the standby mode, the receiver
outputs HDMI signals from the receiver’s
HDMI TV OUT jack. Sony recommends
this setting if you use a “BRAVIA” Sync
compatible Sony TV. This setting saves
power in the standby mode when compared
with the “ON” setting.
Notes
• The power saving function may not work for some
TVs compatible with the “BRAVIA” Sync. If this
is the case, set “PASS THRU” to “ON”.
• Depending on your equipment, it may take time
before image or sound is output.
You can customize the settings of the receiver.
x DIMMER
Lets you adjust the brightness of the display
panel in 3 levels.
•DIM MAX
•DIM MID
•DIM OFF
x SLEEP
Lets you set the receiver to turn off
automatically at a specified time.
• 2-00-00
• 1-30-00
• 1-00-00
• 0-30-00
•OFF
When Sleep Timer is being used, “SLEEP”
indicator lights up on the display panel.
Tip
To check the remaining time before the receiver
turns off, select “SLEEP” using the AMP MENU.
The remaining time appears on the display panel. To
cancel the Sleep Timer, select “OFF”.
x AUTO STBY
Lets you set the receiver switch to standby
mode automatically when you do not operate
the receiver or when there is no signals input to
the receiver.
• STBY ON: Switches to standby mode after
approximately 30 minutes.
• STBY OFF: Does not switch to standby
mode.
Notes
• This function does not work when TUNER input is
selected.
• If you use the Auto Standby mode and the Sleep
Timer at the same time, the Sleep Timer has
priority.
Advanced Settings
43
US
Page 44

Additional Information
Precautions
On safety
Should any solid object or liquid fall into the
cabinet, unplug the receiver and have it
checked by qualified personnel before
operating it any further.
On power sources
• Before operating the receiver, check that the
operating voltage is identical with your local
power supply.
The operating voltage is indicated on the
nameplate on the back of the receiver.
• The unit is not disconnected from the AC
power source (mains) as long as it is
connected to the wall outlet, even if the unit
itself has been turned off.
• If you are not going to use the receiver for a
long time, be sure to disconnect the receiver
from the wall outlet. To disconnect the AC
power cord (mains lead), grasp the plug
itself; never pull the cord.
• (USA model only)
One blade of the plug is wider than the other
for the purpose of safety and will fit into the
wall outlet only one way. If you are unable
to insert the plug fully into the outlet, contact
your dealer.
• The AC power cord (mains lead) must be
changed only at a qualified service shop.
On heat buildup
Although the receiver heats up during
operation, this is not a malfunction. If you
continuously use this receiver at a large
volume, the cabinet temperature of the top,
side and bottom rises considerably. To avoid
burning yourself, do not touch the cabinet.
On placement
• Place the receiver in a location with
adequate ventilation to prevent heat buildup
and prolong the life of the receiver.
• Do not place the receiver near heat sources,
or in a place subject to direct sunlight,
excessive dust, or mechanical shock.
• Do not place anything on top of the cabinet
that might block the ventilation holes and
cause malfunctions.
• Do not place the receiver near equipment
such as a TV, VCR, or tape deck. If the
receiver is being used in combination with a
TV, VCR, or tape deck, and is placed too
close to that equipment, noise may result,
and picture quality may suffer. This is
especially likely when using an indoor
antenna (aerial). Therefore, we recommend
using an outdoor antenna (aerial).
• Use caution when placing the receiver or
speakers on surfaces that have been
specially treated (with wax, oil, polish, etc.)
as staining or discoloration of the surface
may result.
On operation
Before connecting other equipment, be sure to
turn off and unplug the receiver.
If you encounter color
irregularity on a nearby TV
screen
The center speaker is magnetically shielded to
allow it to be installed near a TV set. However,
color irregularities may still be observed on
certain types of TV sets. As the front speakers,
surround speakers and subwoofer are not
magnetically shielded, we recommend that
you place them slightly further away from TV
set (page 15).
If color irregularity is
observed...
Turn off the TV set, then turn it on again after
15 to 30 minutes.
44
US
Page 45

If color irregularity is observed
again...
Place the speaker further away from the TV
set.
If howling occurs
Reposition the speakers or turn down the
volume on the receiver.
On cleaning
• Clean the cabinet, panel, and controls with a
soft dry cloth. Do not use any type of
abrasive pad, scouring powder, scrubbing
brush or sponge.
• If it is stained with oil or fingerprints, breath
on the surface and wipe it with soft dry cloth.
If you have any questions or problems
concerning your receiver, please consult your
nearest Sony dealer.
Troubleshooting
If you experience any of the following
difficulties while using the receiver, use this
troubleshooting guide to help you remedy the
problem. Should any problem persist, consult
your nearest Sony dealer. Note that if service
personnel changes some parts during repair,
these parts may be retained.
Power
The receiver is turned off
automatically.
• “AUTO STBY” is set to “STBY ON”
(page 43).
• The sleep timer function is working (page
43).
Sound
Dolby Digital or DTS multi channel
sound is not reproduced.
• Check that the DVD, etc. you are playing
is recorded in Dolby Digital or DTS
format.
• When connecting the DVD player, etc., to
the digital input jacks of this receiver,
check the audio output setting of the
connected equipment.
• Use the TV menu to set the Speaker
Setting to Audio System.
• Make sure “CTRL HDMI” is set to
“CTRL OFF” in HDMI menu.
The surround effect cannot be
obtained.
• Make sure you have selected the sound
field for movie or music mode (page 33).
• Sound fields do not function when DTSHD Master Audio, DTS-HD High
Resolution Audio or Dolby TrueHD with
sampling frequency of more than 48 kHz
are being received.
There is no sound, or only a very low
level sound is heard from the specified
speakers.
• Make sure you have connected to both the
L and R jacks of an analog equipment,
analog equipment requires both L and R
jack connections. Use an audio cord (not
supplied).
• Check that the speakers are connected
securely.
• Check that the subwoofer is connected
correctly and securely.
• Adjust the speaker level (page 41).
Additional Information
continued
45
US
Page 46

There is no sound from a specific
equipment.
• Check that the equipment is connected
correctly to the audio input jacks for that
equipment.
• Check that the cord(s) used for the
connection is (are) fully inserted into the
jacks on both the receiver and the
equipment.
• Check that the equipment is connected
correctly to the HDMI jack for that
equipment.
• Make sure “CTRL HDMI” is set to
“CTRL ON” in HDMI menu.
• You cannot listen to the Super Audio CD
by connecting HDMI.
• Depending on the playback equipment,
you may need to set up the HDMI setting
of the equipment. Refer to the operating
instructions supplied with each
equipment.
• Be sure to use a High Speed HDMI cable
when you view images or listen to sound,
especially for the 1080p, Deep Color
(Deep Colour) or 3D transmission.
There is no sound, no matter which
equipment is selected, or only a very
low-level sound is heard.
• Check that all connecting cords are
inserted to their input/output jacks for the
respective jacks of the receiver, speakers
and the equipment.
• Check that both the receiver and all
equipment are turned on.
• Check that MASTER VOLUME is not set
to “VOL MIN”.
• Press MUTING to cancel the muting
function.
• Check that you have selected the correct
equipment with the input buttons.
• The protective device on the receiver has
been activated. Turn off the receiver,
eliminate the short-circuit problem, and
turn on the power again.
• Check that the INPUT MODE setting is
correct for SAT/CATV input.
There is severe hum or noise.
• Check that the speakers and equipment are
connected securely.
• Check that the connecting cords are away
from a transformer or motor, and at least
3 meters (10 feet) away from a TV set or
fluorescent light.
• Move your audio equipment away from
the TV.
• The plugs and jacks are dirty. Wipe them
with a cloth slightly moistened with
alcohol.
There is no sound from digital sources
(from OPTICAL input jack).
• Check that the INPUT MODE is set to
“OPT” for SAT/CATV input (page 42).
• Set “ARC” to “ARC OFF” when no sound
is output from TV OPT IN jack during TV
input.
When the receiver is in standby mode,
there is no sound output from the TV.
• When the receiver enters into standby
mode, the sound is from the last HDMI
equipment selection before you turned off
the receiver. If you are enjoying other
equipment, play the equipment and
perform the One-Touch Play operation, or
turn on the receiver to select the HDMI
equipment you want to enjoy.
• Make sure “PASS THRU” is set to “ON”
in the HDMI menu if you connect
equipment not compatible with the
“BRAVIA” Sync to the receiver (page 43).
46
US
Page 47

No sound is output from the receiver
and TV speaker.
• Check that the equipment is connected
correctly to the HDMI jack for that
equipment.
• Make sure “CTRL HDMI” is set to
“CTRL ON” in HDMI menu.
• You cannot listen to the Super Audio CD
by connecting HDMI.
• Depending on the playback equipment,
you may need to set up the HDMI setting
of the equipment. Refer to the operating
instructions supplied with each
equipment.
• Be sure to use a High Speed HDMI cable
when you view images or listen to sound,
especially for the Deep Color (Deep
Colour) or 3D transmission.
• Make sure the TV is compatible with the
System Audio Control function.
• If you cannot listen to the sound of the
equipment connected to the receiver while
TV input is selected
– Be sure to change the input of the
receiver to HDMI when you want to
watch a program on the equipment
connected via HDMI connection to the
receiver.
– Change the TV channel when you want
to watch a TV broadcast.
– Be sure to select the correct equipment
or input you want when you watch a
program from the equipment connected
to the TV. Refer to the operating
instructions of the TV on this operation.
There is no sound from the equipment
connected to the DOCK FOR iPod/
iPhone.
• Adjust the volume of this receiver.
• The DOCK FOR iPod/iPhone and/or
equipment is not connected correctly.
Turn off the receiver, then reconnect the
DOCK FOR iPod/iPhone and/or
equipment.
Image
No image appears on the TV.
• Make sure you have connected the video
output of your video equipment to the TV.
• Move your audio equipment away from
the TV.
• Make sure you have connected the video
output of your DOCK FOR iPod/iPhone to
the TV.
• Check that the equipment is connected
correctly to the HDMI jack for that
equipment.
• Depending on the playback equipment,
you may need to set up the equipment.
Refer to the operating instructions
supplied with each equipment.
• Be sure to use a High Speed HDMI cable
when you view images or listen to sound,
especially for the 1080p, Deep Color
(Deep Colour) or 3D transmission.
When the receiver is in standby mode,
there is no image output from the TV.
• When the receiver enters into standby
mode, the image is from the last HDMI
equipment selection before you turned off
the receiver. If you are enjoying other
equipment, play the equipment and
perform the One-Touch Play operation, or
turn on the receiver to select the HDMI
equipment you want to enjoy.
• Make sure “PASS THRU” is set to “ON”
in the HDMI menu if you connect
equipment not compatible with the
“BRAVIA” Sync to the receiver (page 43).
No 3D image appears on the TV.
• Depending on the TV or the video
equipment, 3D images may not be
displayed.
Additional Information
47
US
Page 48

Tuner
Others
The FM reception is poor.
• Use a 75-ohm coaxial cable (not supplied)
to connect the receiver to an outdoor FM
antenna (aerial) as shown below.
Outdoor FM antenna (aerial)
Receiver
ANTENNA
Radio stations cannot be tuned in.
• Check that the antennas are connected
securely. Adjust the antennas and connect
an external antenna (aerial), if necessary.
• The signal strength of the stations is too
weak with automatic tuning. Change to
monaural reception (page 30).
• No stations have been preset or the preset
stations have been cleared (when tuning
by scanning preset stations is used). Preset
the stations (page 31).
Remote control
The remote control does not function.
• Point the remote control at the remote
control sensor on the receiver.
• Remove any obstacles in the path between
the remote control and the receiver.
• Replace all the batteries in the remote
control with new ones, if they are weak.
• Make sure you select the correct input on
the remote control.
The Control for HDMI function does not
work.
• Check the HDMI connection (page 19).
• Make sure “CTRL HDMI” is set to
“CTRL ON” in HDMI menu.
• Make sure the connected equipment is
compatible with the Control for HDMI
function.
• Check the Control for HDMI settings on
the connected equipment. Refer to the
operating instructions of the connected
equipment.
• The types and the number of equipment
which can be controlled by the
“BRAVIA” Sync are restricted in the
HDMI CEC standard as follows.
– Recording equipment (Blu-ray Disc
recorder, DVD recorder, etc.): up to 3
equipment
– Playback equipment (Blu-ray Disc
player, DVD player, etc.): up to 3
equipment
– Tuner-related equipment: up to 4
equipment
– AV receiver (audio system): up to 1
equipment
The TV’s remote control cannot be
used to control the connected
equipment when using the Control for
HDMI function.
• Depending on the connected equipment
and TV, you may need to set up the
equipment and TV. Refer to the operating
instructions supplied with each equipment
and TV.
• Change the input of the receiver to the
HDMI input connected to the equipment.
48
US
Page 49

Error messages
If there is a malfunction, a message appears on
the display panel. You can check the condition
of the system by the message. If any problem
persists, consult your nearest Sony dealer.
If an error message appears while you perform
Auto Calibration, see “When error codes
appear” (page 27) to solve the problem.
PROTECTOR
Irregular current is output to the speakers,
the volume level is too high, or the upper
panel of the receiver is covered and
ventilation holes are blocked. The receiver
will automatically turn off after a few
seconds. Check the speaker connection and
remove the object covering the ventilation
holes.
Turn on the power and increase the volume
level.
Clearing the memory
If you are unable to remedy the problem using
the troubleshooting guide, clearing the
receiver’s memory may remedy the problem.
However, note that all memorized settings will
be reset to the default settings and you will
have to readjust all settings on the receiver.
Reference sections
To clear See
All memorized settings page 24
Specifications
AUDIO POWER
SPECIFICATIONS
Amplifier section
POWER OUTPUT AND TOTAL
HARMONIC DISTORTION:
(FTC)
(USA model only)
FRONT L + FRONT R
With 3 ohm loads, both
channels driven, from 180
– 20,000 Hz; rated 84 watts
per channel minimum
RMS power, with no more
than 1% total harmonic
distortion from 250
milliwatts to rated output.
POWER OUTPUT (reference)
FRONT L/FRONT R/CENTER/SUR L/SUR R
167 W (per channel at
3 ohms, 1 kHz)
SUBWOOFER 165 W (at 3 ohms, 60 Hz)
Inputs
Analog Sensitivity: 1 V/50 kohms
Digital (Coaxial) Impedance: 75 ohms
FM tuner section
Tuning range 87.5 MHz – 108.0 MHz
(100 kHz step)
Antenna FM wire antenna (aerial)
Antenna terminals 75 ohms, unbalanced
General
Power requirements 120 V AC, 60 Hz
Power output (DMPORT)
DC OUT: 5 V, 1 A MAX
Power consumption 110 W
Power consumption (during standby mode)
0.3 W (When Control for
HDMI is set to off)
Additional Information
continued
49
US
Page 50

Dimensions (w/h/d) (Approx.)
430 mm × 65 mm ×
306 mm
(17 in × 2 5/8 in ×
12 1/8 in)
including projecting parts
and controls
Mass (Approx.) 3.0 kg (6 lb 10 oz)
Speaker section
• Front/Surround speaker (SS-TSB105)
• Center speaker (SS-CTB102)
Front/Surround speaker
Full range
Center speaker Full range, magnetically
shielded
Speaker unit
Front/Surround speaker
55 mm × 80 mm (2 1/4 in ×
3 1/4 in), cone type
Center speaker 30 mm × 60 mm (1 3/16 in
× 2 3/8 in), cone type
Enclosure type
Front/Surround speaker
Bass reflex
Center speaker Acoustic suspension
Rated impedance 3 ohms
Dimension (w/h/d) (Approx.)
Front/Surround speaker
85 mm × 220 mm × 95 mm
(3 3/8 in × 8 3/4 in ×
3 3/4 in) (with foot)
Center speaker 315 mm × 55 mm × 60 mm
(12 1/2 in × 2 1/4 in ×
2 3/8 in) (with foot)
Mass (Approx.)
Front speaker 0.46 kg (1 lb 1 oz)
(with foot)
Center speaker 0.31 kg (11 oz) (with foot)
Surround speaker 0.53 kg (1 lb 3 oz)
(with foot)
• Subwoofer (SS-WSB103)
Speaker unit 160 mm (6 3/8 in),
cone type
Enclosure type Bass reflex
Rated impedance 3 ohms
Dimensions (w/h/d) (Approx.)
260 mm × 265 mm ×
270 mm (10 1/4 in ×
10 1/2 in × 10 3/4 in)
(with foot)
Mass (Approx.) 3.6 kg (7 lb 15 oz)
(with foot)
Design and specifications are subject to
change without notice.
Halogenated flame retardants are not used in
the certain printed wiring boards.
50
US
Page 51

Index
Numerics
2 channel sound mode 32
5.1 channel 15
A
A.F.D. MODE 32
A/V SYNC 42
Audio Return Channel
(ARC) 37
Auto Calibration 24
AUTO STBY 4 3
B
Blu-ray Disc player
connecting 21
“BRAVIA” Sync
preparing 35
C
Cable TV tuner
connecting 21
CD player
connecting 22
Clear
memory 49
Control for HDMI 35
D
DIMMER 43
DOCK FOR iPod/iPhone
connecting 22
DVD player
connecting 21
I
Initial setup 24
INPUT MODE 42
M
Menu
AUDIO 40
AUTO C AL 40
EQ 40
HDMI 40
LEVEL 40
SPEAKER 40
SYSTEM 40
Movie mode 33
Music mode 33
Muting 28
N
Naming 32
NIGHT MODE 42
O
One-Touch Play 36
P
Playback 28
PlayStation 3
connecting 21
PROTECTOR 49
R
Remote control 10
S
Satellite tuner
connecting 21
Scene Select 38
SLEEP 43
Sound fields
selecting 32
Speakers
connecting 17
installing 15
Super Audio CD player
connecting 22
System Audio Control 36
System Power-Off 37
T
TEST TONE 40
Theatre/Theater Mode Sync
38
Tuner
connecting 23
Tuning
automatically 30
directly 30
to preset stations 31
TV
connecting 18
V
VCR
connecting 21
Additional Information
E
Error messages 49
F
FM Mode 42
H
HDMI
connecting 19
51
US
Page 52

ADVERTENCIA
Nombre del producto:
Sistema de cine para el hogar
Modelo: HT-SS380
POR FAVOR LEA DETALLADAMENTE ESTE
MANUAL DE INSTRUCCIONES ANTES DE
CONECTAR Y OPERAR ESTE EQUIPO.
RECUERDE QUE UN MAL USO DE SU
APARATO PODRÍA ANULAR LA GARANTÍA.
Para reducir el riesgo de incendios o
descargas eléctricas, no exponga la
unidad a la lluvia ni a la humedad.
Para reducir el riesgo de incendios, no cubra las
aberturas de ventilación del aparato con periódicos,
manteles, cortinas, etc. No coloque ninguna fuente
de llamas al descubierto, como velas encendidas,
sobre el aparato.
No instale el aparato en un espacio cerrado, como
una estantería para libros o un armario empotrado.
Para reducir el riesgo de incendios o descargas
eléctricas, no exponga el aparato a goteos o
salpicaduras, ni coloque recipientes con líquidos,
como jarrones, encima de éste.
Puesto que el enchufe principal se utiliza para
desconectar la unidad de la corriente, conecte la
unidad a una toma de corriente de ca de fácil acceso.
En caso observar un funcionamiento anómalo de la
unidad, desconecte inmediatamente el enchufe
principal de la toma de corriente de ca.
No exponga pilas o aparatos con pilas instaladas a
fuentes de calor excesivo, como la luz solar directa,
el fuego o similares.
Aunque haya apagado la unidad, esta continuará
recibiendo suministro eléctrico mientras esté
conectada a la toma de corriente de ca.
Para evitar posibles daños, este aparato se deberá
fijar firmemente al suelo o a la pared de acuerdo con
las instrucciones de instalación.
Para clientes de Estados
Unidos
ENERGY STAR® is a U.S. registered
mark.
As an ENERGY STAR
Corporation has determined that this
product meets the ENERGY STAR
guidelines for energy efficiency.
®
partner, Sony
®
Registro del propietario
Los números de serie y de modelo se indican en la
parte posterior de la unidad. Anote estos números en
el espacio proporcionado a continuación. Indíquelos
cuando se ponga en contacto con el distribuidor
Sony con relación a este producto.
N.º de modelo
Este símbolo tiene por objeto
advertir al usuario de la presencia de
“tensión peligrosa” no aislada en el
interior del producto que puede ser
de magnitud suficiente como para
presentar un riesgo de electrocución
para las personas.
Este símbolo tiene por objeto
advertir al usuario de la presencia de
instrucciones importantes de
funcionamiento y mantenimiento
(servicio) en la documentación que
acompaña a este dispositivo.
N.º de serie
Instrucciones importantes
sobre seguridad
1) Lea estas instrucciones.
2) Guarde estas instrucciones.
3) Tenga en cuenta todas las advertencias.
4) Siga todas las instrucciones.
5) No utilice este aparato cerca del agua.
6) Límpielo únicamente con un trapo seco.
7) No obstruya ningún orificio de ventilación.
Realice la instalación de acuerdo con las
instrucciones del fabricante.
8) No instale la unidad cerca de ninguna fuente
térmica como los radiadores, fuentes de calor,
estufas u otros aparatos (incluso amplificadores)
que produzcan calor.
ES
2
Page 53

9) No fuerce el dispositivo de seguridad de los
enchufes polarizados o con conexión a tierra. Un
enchufe polarizado presenta dos patas, una más
ancha que la otra. Un enchufe con conexión a
tierra presenta dos patas y un tercer contacto de
conexión a tierra. La pata ancha o tercer contacto
se suministra por motivos de seguridad. Si el
enchufe suministrado no encaja en la toma de
corriente, póngase en contacto con un electricista
para que sustituya la toma de corriente obsoleta.
10)Procure que nadie pise el cable de alimentación y
evite someterlo a presión, especialmente en la
parte de los enchufes, las tomas de corriente y el
punto de salida del aparato.
11)Utilice únicamente los accesorios que especifica
el fabricante.
12)Utilícelo únicamente con un carro, una mesilla,
un trípode, un soporte o una mesa que especifica
el fabricante, o que se vende con el aparato.
Cuando se utiliza un carro, tenga precaución al
mover la combinación del carro y el aparato para
evitar daños durante el recorrido.
13)Desconecte este aparato durante las tormentas
eléctricas o en caso de que no se utilice durante
períodos prolongados de tiempo.
14)Acuda a personal de asistencia técnica
cualificado para cualquier tipo de reparación. Es
necesario llevar a cabo una reparación cuando se
ha dañado el aparato de alguna manera, como en
caso de que se haya dañado un cable de
suministro de alimentación o enchufe, si se han
derramado líquidos o se han caído objetos sobre
el aparato, si se ha expuesto el aparato a la lluvia
o a la humedad, si no funciona normalmente o si
se ha caído.
La siguiente declaración de la
FCC es aplicable únicamente
a la versión de este modelo
fabricada para vender en
Estados Unidos. Es posible
que otras versiones no
cumplan con las normativas
técnicas de la FCC.
NOTA:
Este equipo ha sido probado y se ha comprobado que
cumple con los límites para un dispositivo digital de
Clase B de acuerdo con la sección 15 del reglamento
de la FCC. Dichos límites se han establecido para
proporcionar una protección razonable contra
interferencias dañinas en una instalación residencial.
Este equipo genera, utiliza y puede emitir energía de
radiofrecuencia y, si no se instala y utiliza según las
instrucciones, puede causar interferencias dañinas
en las radiocomunicaciones. No obstante, no se
garantiza que no se producirán interferencias en una
instalación en particular. Si este equipo causa una
interferencia dañina a la recepción de radio o
televisión, que se puede determinar al encender y
apagar el equipo, se recomienda al usuario tratar de
corregir la interferencia con una o más de las
siguientes medidas:
– Cambiar la orientación o la ubicación de la antena
receptora.
– Aumentar la distancia entre el equipo y el
receptor.
– Conectar el equipo a una toma de corriente de un
circuito distinto al que está enchufado el receptor.
– Ponerse en contacto con el distribuidor o solicitar
los servicios de un técnico experimentado en
reparaciones de radio y televisión.
PRECAUCIÓN
Se advierte que cualquier cambio o modificación
que no se apruebe de modo explícito en este manual
podría anular su autorización para utilizar este
equipo.
ES
Solo para TDM-iP380
La placa de características y el número de serie están
situados en el exterior, en la zona inferior.
RECOMENDACIÓN FCC
Debe utilizarse el cable de interfaz con protección
recomendado en este manual para cumplir con los
límites de un dispositivo digital especificados en el
subapartado B de la parte 15 de las normas de la
FCC.
3
ES
Page 54

Acerca de este manual
• Las instrucciones que se incluyen en este manual
son para el modelo HT-SS380. Las ilustraciones
utilizadas en este manual corresponden al modelo
de Estados Unidos y pueden no coincidir con su
modelo. Las diferencias en el funcionamiento se
marcan en el manual con el texto “Solo el modelo
de Estados Unidos”.
El HT-SS380 consta de:
• Receptor STR-KS380
• Sistema de altavoces*
– Altavoz frontal/altavoz de sonido envolvente
SS-TSB105
– Altavoz central SS-CTB102
– Altavoz de graves SS-WSB103
* Asegúrese de utilizar solo los altavoces
suministrados.
• En las instrucciones de este manual se describen
las operaciones del receptor con el mando a
distancia suministrado. También pueden utilizarse
los botones de control del receptor si tienen el
mismo nombre o un nombre similar a los del
mando a distancia.
Información sobre derechos de
autor
Este receptor incorpora Dolby* Digital y Pro Logic
Surround y el sistema DTS** Digital Surround.
* Fabricado bajo licencia de Dolby Laboratories.
Dolby, Pro Logic y el símbolo de la doble D son
marcas comerciales de Dolby Laboratories.
** Fabricado con licencia bajo las patentes
estadounidenses: 5 451 942; 5 956 674; 5 974
380; 5 978 762; 6 226 616; 6 487 535; 7 212 872;
7 333 929; 7 392 195; 7 272 567 y otras patentes
estadounidenses e internacionales emitidas y
pendientes. DTS, DTS-HD y el símbolo son
marcas comerciales registradas. DTS-HD
Master Audio y los logotipos de DTS son marcas
comerciales de DTS, Inc. El producto incluye el
software. © DTS, Inc. Todos los derechos
reservados.
Este receptor incorpora la tecnología HighDefinition Multimedia Interface (HDMI
HDMI, el logotipo de HDMI y High-Definition
Multimedia Interface son marcas comerciales o
marcas comerciales registradas de HDMI Licensing
LLC en los Estados Unidos y en otros países.
“x.v.Color (x.v.Colour)” y el logotipo de “x.v.Color
(x.v.Colour)” son marcas comerciales de Sony
Corporation.
“BRAVIA” es una marca comercial de Sony
Corporation.
“PlayStation” es una marca comercial registrada de
Sony Computer Entertainment Inc.
®
iPhone
, iPod®, iPod classic®, iPod nano® e iPod
®
touch
son marcas comerciales de Apple Inc.,
registradas en US y en otros países.
El resto de marcas comerciales y marcas
comerciales registradas son propiedad de sus
respectivos propietarios. En este manual, las marcas
™ y ® no se especifican.
“Made for iPod” y “Made for iPhone” indican que
un accesorio electrónico se ha diseñado para
funcionar específicamente con un iPod o un iPhone,
respectivamente, y que el desarrollador ha
certificado que satisface los niveles de rendimiento
exigidos por Apple.
Apple no se hace responsable del funcionamiento de
este dispositivo ni de su cumplimiento con las
exigencias de seguridad y normativas. Tenga en
cuenta que el uso de este accesorio con un iPod o un
iPhone puede alterar el funcionamiento de una
conexión inalámbrica.
TM
).
ES
4
Page 55

Índice
Accesorios suministrados.............................. 6
Altavoces suministrados................................ 6
Descripción y localización de las piezas....... 7
Procedimientos iniciales ............................. 15
Conexiones
1: Instalación de los altavoces..................... 16
2: Conexión de los altavoces....................... 18
3: Conexión del televisor ............................ 19
4: Conexión de un equipo de vídeo............. 20
5: Conexión de un equipo de audio............. 23
6: Conexión de las antenas.......................... 24
7: Conexión del cable de alimentación
de ca ....................................................... 24
Preparación del receptor
Inicialización del receptor........................... 25
Utilización de AUTO CALIBRATION
(calibración automática)......................... 25
Operaciones básicas
Reproducción .............................................. 29
Visualización de información en el visor.... 30
Operaciones del
sintonizador
Escuchar la radio FM .................................. 30
Presintonización de emisoras de radio........ 32
Disfrutar de sonido
envolvente
Selección del campo de sonido................... 34
Funciones de “BRAVIA”
Sync
¿Qué es “BRAVIA” Sync?..........................36
Preparación para “BRAVIA” Sync..............36
Reproducción de equipos con una
pulsación (Reproducción mediante una
pulsación) ...............................................37
Escuchar el sonido del televisor por los
altavoces conectados al receptor
(Control de audio del sistema)................38
Apagado del receptor con el televisor
(Apagado del sistema) ............................ 39
Escuchar el sonido del televisor a través
de un cable HDMI (Canal de Retorno
de Audio)................................................ 39
Disfrutar de películas con el campo de
sonido óptimo (Sincronización del
modo Theater/Theatre) ........................... 40
Disfrutar de un campo de sonido óptimo
para la escena seleccionada
(Selección de escena) .............................40
Configuración avanzada
Reasignación de botones de introducción
del mando a distancia .............................40
Uso del menú de ajustes ..............................41
Información adicional
Precauciones................................................46
Solución de problemas ................................ 48
Especificaciones .......................................... 52
Índice........................................................... 54
ES
5
Page 56

Accesorios
suministrados
• Manual de instrucciones (este manual)
• Guía de instalación rápida
• Antena monofilar de FM (1)
• Mando a distancia (RM-AAU120) (1)
• Pilas R6 (tamaño AA) (2)
• Micrófono optimizador (ECM-AC2) (1)
• DOCK FOR iPod/iPhone (TDM-iP380) (1)
Altavoces suministrados
• Altavoz frontal (2)
• Altavoz central (1)
• Altavoz de sonido envolvente (2)
• Altavoz de graves (1)
Inserción de las pilas en el
mando a distancia
Introduzca dos pilas R6 (tamaño AA)
(suministradas) fijándose en que los símbolos
3 y # de las pilas coincidan con el diagrama
que hay en el compartimento para pilas del
mando a distancia.
Notas
• No deje el mando a distancia en lugares con una
temperatura muy alta o mucha humedad.
• No utilice pilas nuevas junto con pilas usadas.
• No mezcle pilas de manganeso con otros tipos de
pilas.
• No exponga el sensor del mando a distancia a la
luz solar directa ni a equipos de iluminación, ya
que podría producirse un fallo de funcionamiento.
• Si no va a utilizar el mando a distancia durante un
período de tiempo prolongado, extraiga las pilas
para evitar que se produzcan daños derivados de
fugas y corrosión.
• Cuando cambie las pilas, es posible que se
restauren los ajustes predeterminados de los
botones del mando a distancia. Si esto ocurre,
vuelva a asignar la función que desee a los botones
(página 40).
• Cuando el receptor deje de responder a las órdenes
del mando a distancia, cambie todas las pilas por
pilas nuevas.
ES
6
Page 57

Descripción y localización de las piezas
4
5
6
q
q
Panel frontal
1
A ?/1 (encendido/en espera)
(página 25, 29 y 41)
B Visor (página 7)
C Indicador blanco
Se ilumina cuando el receptor está encendido.
Se apaga cuando el DIMMER está ajustado en
DIM MAX (página 46) o el receptor está
apagado.
2
3
D SOUND FIELD (campo sonido)
(página 34)
E INPUT +/– (entrada +/-) (página 27)
F Sensor del mando a distancia
Recibe las señales del mando a distancia.
G MASTER VOLUME (volumen maestro)
(página 29 y 49)
7
Indicadores del visor
12 3 4 5 6 7 8
LPCM NIGHT SLEEP HDMI COAX OPT TUNED ST MUTING DTS 96/24
True HD
+
D
PL
s
A Indicador Dolby Digital Surround
Se ilumina el indicador correspondiente cuando
el receptor decodifica alguno de los siguientes
formatos de señal Dolby Digital.
TrueHD Dolby TrueHD
D Dolby Digital
D+ Dolby Digital Plus
Nota
Durante la reproducción de discos con formato
Dolby Digital, asegúrese de que ha realizado las
conexiones digitales.
a
B LPCM
Se ilumina cuando el receptor decodifica señales
PCM lineales.
C NIGHT
Se ilumina cuando está activada la función Modo
nocturno (página 45).
D SLEEP
Se ilumina cuando el Temporizador para
desconexión está activado (página 46).
NEO:6
DTS HD LBR
MSTR HI RES
0
9
continúa
ES
7
Page 58

E Indicador de entrada
Se ilumina para indicar la entrada activada.
HDMI
– El INPUT MODE está ajustado en “AUTO” y
el receptor reconoce el equipo conectado a
través de una toma HDMI IN (página 20).
– La entrada TV INPUT detecta las señales de
Canal de Retorno de Audio (ARC) (página
39).
COAX
La entrada VIDEO está seleccionada.
OPT
– El INPUT MODE está fijado en “AUTO” y la
señal de origen es una señal digital recibida a
través de la toma OPT IN (entrada OPT)
(página 19).
– El INPUT MODE está fijado en “OPT”
(página 45).
F Indicador de sintonización
Se enciende para indicar el estado actual de la
emisora de radio (página 30).
TUNED
Cuando recibe una emisora de radio.
ST
Cuando una emisora emite en modo estéreo.
G MUTING
Se ilumina cuando está activada la función de
silenciamiento.
H Indicador DTS
Enciende el indicador correspondiente cuando el
receptor descodifica alguno de los siguientes
formatos de señal DTS.
DTS DTS
DTS 96/24 DTS 96 kHz/24 bits
Nota
Durante la reproducción de discos con formato
DTS, asegúrese de que ha realizado las
conexiones digitales.
I NEO:6
Se enciende cuando el decodificador DTS Neo:6
Cinema/Music está activado (página 35).
J Indicador DTS-HD
Enciende el indicador correspondiente cuando el
receptor descodifica alguno de los siguientes
formatos de señal DTS-HD.
DTS-HD LBR DTS-HD Audio de
velocidad de bits baja
DTS-HD MSTR DTS-HD Audio maestro
DTS-HD HI RES DTS-HD Audio de alta
resolución
K Área de visualización de mensajes
Muestra el nivel de volumen, la fuente de entrada
seleccionada, la señal de entrada de audio, etc.
L Indicador Dolby Pro Logic
Se ilumina el indicador respectivo cuando el
receptor aplica el procesamiento Dolby Pro
Logic. Esta tecnología de decodificación de
sonido envolvente de matriz mejora las señales
de entrada.
PL Dolby Pro Logic
PLII Dolby Pro Logic II
ES
8
Page 59

Panel posterior
1
SPEAKERS
SUR R SUR L CENTER
FRONT LFRONT R
SUBWOOFER
2
AUDIO IN
COAX IN
OPT IN
OPT IN
VIDEO
SAT/CATV
TV
DIGITAL LINE IN ANTENNA
4
3
L
R
AUTO
CAL MIC
5
DC5V
1 A MAX
DMPORT
HDMI
A Sección SPEAKERS (altavoces) (página 18)
B Sección de señal de audio
Tomas DIGITAL INPUT/OUTPUT (entrada/salida digital) (páginas 19 y 22)
OPT IN (entrada OPT)
COAX IN (entrada COAX)
HDMI IN/OUT (entrada/salida HDMI)
Toma ANALOG INPUT (página 23)
AUDIO IN (entrada audio)
C Sección AUTO CALIBRATION (Calibración automática) (página 26)
Toma AUTO CAL MIC (micrófono calibración automática)
D Sección ANTENNA (antena) (página 24)
Toma FM ANTENNA (antena FM)
2,6
GAME IN BD/DVD IN SAT/CATV IN TV OUT
ARC
E Sección DMPORT (página 23)
Toma DMPORT
F Sección de señal VIDEO (vídeo) (página 22)
Tomas HDMI IN/OUT (entrada/salida HDMI)
ES
9
Page 60

Mando a distancia
Con el mando a distancia suministrado podrá
utilizar este receptor y otros equipos. El mando
a distancia está asignado a la utilización de
equipos de audio o vídeo de Sony. Con el
botón de entrada puede modificar la
asignación en función de los equipos que tenga
conectados al receptor (página 40).
RM-AAU120
Para utilizar los botones con la
impresión rosa
Mantenga pulsado el botón SHIFT
(mayúsculas) (O) y, a continuación, pulse el
botón con la impresión rosa que desea utilizar.
Ejemplo: mantenga pulsado el botón SHIFT
(mayúsculas) (O), y, a continuación, pulse
ENTER (introducir) (C).
TUNER
DMPORT
2 Pulse
ENTER
wh
wg
BD/DVD GAME
VIDEO
TV
TUNER
DMPORT
wf
wd
ws
wa
w;
O
ql
MENU
mM
x
X
.
qk
qj
qh
SAT/
CATV
LINE IN
>
1
2
3
4
5
6
7
8
9
0
qa
qs
qd
qf
qg
1 Mantenga
pulsado
SHIFT
Para controlar el receptor
B ?/11) (encendido/en espera)
Enciende el receptor o lo sitúa en el modo de
espera.
Ahorro de energía en el modo de espera
Si “CTRL HDMI” está ajustado en “CTRL
OFF” (página 42).
C Botones de introducción
Seleccione el equipo que desea utilizar. Al pulsar
uno de los botones de introducción, el receptor se
enciende. Estos botones están asignados al
control de equipos Sony.
Botones numéricos
Mantenga pulsado el botón SHIFT (mayúsculas)
(O) y pulse los botones numéricos para
preajustar o sintonizar las emisoras
memorizadas (página 32).
ENTER
Mantenga pulsado el botón SHIFT (mayúsculas)
(O), y, a continuación, pulse ENTER
(introducir) para
– Introducir las selecciones.
– Guardar una emisora cuando funciona el
sintonizador.
2)
2)
10
ES
Page 61

D D.TUNING (sintonización D.)
Accede al modo de sintonización directa
(página 31).
E MEMORY (memoria)
Guarda una emisora cuando funciona el
sintonizador.
F DISPLAY (visor)
Pulse AMP MENU (menú amplificación) y, a
continuación, pulse DISPLAY (visor) para ver la
información en el visor (página 30).
I AMP MENU (menú amplificación)
Muestra el menú para utilizar el receptor.
J
V/v/B/b
,
Pulse V/v/B /b para seleccionar los ajustes y
pulse para introducir/confirmar la selección.
M TUNING +/– (sintonización +/–)
Busca una emisora (página 31).
PRESET +/– (presintonizar +/–)
Selecciona las emisoras memorizadas
(página 32).
N SOUND FIELD (campo sonido) +
2)
/–
Selecciona un campo de sonido (página 34).
O SHIFT (mayúsculas)
Cambia la función del botón del mando a
distancia para activar los botones con la
impresión rosa (página 10).
Q MASTER VOL +/– (volumen maestro +/–)
Ajusta el nivel de volumen de todos los altavoces
al mismo tiempo.
Y AUTO VOL (volumen auto.)
Ajusta el volumen automáticamente en función
de la señal de entrada o del contenido del equipo
conectado (función ADVANCED AUTO
VOLUME [volumen automático avanzado]).
Esta función resulta de utilidad, por ejemplo, si
el sonido de un anuncio es más alto que el de los
programas de televisión.
Notas
• Antes de desactivar esta función, asegúrese de
bajar el nivel de volumen.
• Esta función solo está disponible si se reciben
señales Dolby Digital, DTS o PCM Lineal, por
lo que es posible que el sonido aumente de
forma brusca al cambiar a otros formatos.
• Esta función no puede utilizarse en los
siguientes casos.
– Si se reciben señales PCM Lineal con una
frecuencia de muestreo superior a 48 kHz.
– Si se reciben señales Dolby Digital Plus,
Dolby TrueHD, DTS 96/24, audio maestro
DTS-HD o audio de alta resolución DTSHD.
1)
Si pulsa AV ?/1 (A) y ?/1 (B) al mismo
tiempo, el receptor y el equipo conectado se
apagarán (SYSTEM STANDBY [espera del
sistema]). La función de AV ?/1 (A) cambia
automáticamente cada vez que pulsa los botones
de entrada (C).
2)
Los botones 5/TV, AUDIO, N y TV CH +/
SOUND FIELD+ (canal TV/campo de sonido +)
cuentan con puntos táctiles.
Utilícelos como referencia cuando use el receptor.
R MUTING (silenciar)
Desactiva el sonido momentáneamente.
Pulse el botón de nuevo para restablecer el
sonido.
S RETURN/EXIT (volver/salir) O
Vuelve al menú anterior.
continúa
11
ES
Page 62

Para controlar un televisor Sony
Mantenga pulsado TV (P) y, a continuación,
pulse el botón con la impresión amarilla para
seleccionar la función que desee.
Ejemplo: mantenga pulsado el botón TV (P),
y, a continuación, pulse TV CH + (canal TV +)
(N).
x
X
.
1 Mantenga
pulsado
TV
A TV ?/1 (encendido/en espera)
Enciende o apaga el televisor.
C Botones numéricos
Selecciona los canales de TV.
ENTER (introducir)
Introduce las selecciones.
CLEAR (borrar)
Utilice los botones numéricos para seleccionar
los números de canal del terminal CATV digital.
Por ejemplo, para seleccionar 2.1, pulse 2,
CLEAR (borrar) y 1.
F DISPLAY (visor)
Muestra información relacionada con el
programa de televisión actual.
H Botones de colores
Muestran una guía de funcionamiento en la
pantalla del televisor cuando los botones de color
están disponibles. Siga la guía de
funcionamiento para realizar la operación
seleccionada.
K TOOLS/OPTIONS (herramientas/
opciones)
Muestra las opciones de la función de televisión.
L MENU/HOME (menú/inicio)
Muestra los menús de televisión.
N TV CH (canal TV) +
Busca los canales de televisión memorizados.
>
2 Pulse
TV CH +
2)
2)
/–
Q TV VOL +/– (volumen TV +/–)
Ajusta el volumen del televisor.
R MUTING (silenciar)
Activa la función de silenciamiento del televisor.
S RETURN (volver)/EXIT (salir) O
Vuelve al menú de televisión anterior.
T GUIDE (guía)
Muestra la guía de programas en pantalla.
V AUDIO
2)
Cambia el modo de sonido dual.
Z INPUT (entrada)
Selecciona la señal de entrada (televisor o
vídeo).
1)
Si pulsa AV ?/1 (A) y ?/1 (B) al mismo
tiempo, el receptor y el equipo conectado se
apagarán (SYSTEM STANDBY [espera del
sistema]). La función de AV ?/1 (A) cambia
automáticamente cada vez que pulsa los botones
de entrada (C).
2)
Los botones 5/TV, AUDIO, N y TV CH +/
SOUND FIELD+ (canal TV/campo de sonido +)
cuentan con puntos táctiles.
Utilícelos como referencia cuando use el receptor.
12
ES
Page 63

Para controlar otros equipos Sony
Mantenga pulsado el botón SHIFT (mayúsculas) (O) para activar los botones con la impresión
rosa (página 10).
Nombre
A AV ?/1
1)
Lector de discos
Blu-ray, DVD
Alimentación Alimentación Alimentación Alimentación
C Botones numéricos2)Pista Canal Canal Pista
ENTER (introducir) Introducción Introducción Introducción Introducción
CLEAR Borrar Borrar – Pista >10
F DISPLAY (visor) Visor Visor Visor Visor
G ANGLE Seleccionar ángulo – – –
H Botones de color Menú, guía Menú, guía – –
J Introducción Introducción Introducción –
V/v/B/b Seleccionar Seleccionar Seleccionar –
K TOOLS/OPTIONS
(herramientas/
Menú
de opciones
opciones)
L MENU/HOME (menú/
Menú Menú Menú –
inicio)
M m/M
3)
Buscar hacia
adelante, atrás
2)3)
N
./>
X
x
3)
3)
3)
S RETURN/EXIT (volver/
Reproducir – Reproducir Reproducir
Saltar pista – Buscar índice Saltar pista
Pausa – Pausa Pausa
Detener – Detener Detener
Volver Volver, salir,
salir) O
T GUIDE (guía) Programación Menú de guía – –
Sintonizador de
satélite,
decodificador de
televisión por
cable
Menú
Videograbadora Lector de CD
––
de opciones
– Avance rápido,
retroceso
––
TV en directo
Avance rápido,
retroceso
U SUBTITLE Subtítulos – – –
V AUDIO
W TOP MENU (menú
2)
Audio–––
Guía en pantalla – – –
superior)
X POP UP/MENU
Menú–––
(ventana emergente/
menú)
Z INPUT (entrada) Seleccionar entrada – Seleccionar entrada –
continúa
13
ES
Page 64

1)
Si pulsa AV ?/1 (A) y ?/1 (B) al mismo
tiempo, el receptor y el equipo conectado se
apagarán (SYSTEM STANDBY). La función de
AV ?/1 (A) cambia automáticamente cada vez
que pulsa los botones de entrada (C).
2)
Los botones 5/TV, AUDIO, N y TV CH +/
SOUND FIELD+ (canal TV/campo de sonido +)
cuentan con puntos táctiles.
Utilícelos como referencia cuando use el receptor.
3)
Este botón también permite utilizar la función
DOCK FOR iPod/iPhone. Para obtener más
información sobre este botón, consulte el manual
de instrucciones suministrado con el DOCK FOR
iPod/iPhone.
Notas
• La explicación anterior se ofrece únicamente a
modo de ejemplo.
• En función del modelo de equipo conectado, es
posible que algunas de las funciones que se
explican en esta sección no funcionen con el
mando a distancia suministrado.
14
ES
Page 65

Procedimientos iniciales
Siguiendo el procedimiento descrito a continuación podrá disfrutar de su equipo de audio o vídeo
conectado al receptor.
Instalación y conexión de los altavoces (página 16, 18)
m
Conexión del televisor (página 19)
m
Conexión de un equipo de vídeo (página 20)
m
Conexión de un equipo de audio (página 23)
m
Configuración de los ajustes de salida de audio en el equipo conectado
Para emitir audio digital multicanal, verifique la configuración de salida de audio digital del
equipo conectado.
En el caso de un reproductor Blu-ray Disc, compruebe que las opciones “Audio (HDMI)”,
“Dolby Digital (Coaxial/Optical)” y “DTS (Coaxial/Optical)” están ajustadas en “Auto”, “Dolby
Digital” y “DTS” respectivamente (información válida a septiembre de 2010).
En el caso de una PlayStation 3, compruebe que la opción “BD/DVD Audio Output Format
(HDMI)” esté ajustada en “Bitstream” (en la versión del software del sistema 3.5).
Para obtener más información, consulte el manual de instrucciones suministrado con el equipo
conectado.
m
Preparación del receptor
Consulte “7: Conexión del cable de alimentación de ca” (página 24) y “Inicialización del
receptor” (página 25).
m
Realización de la Calibración automática (página 26)
Puede comprobar la conexión de los altavoces utilizando “Test Tone” (página 42). Si el sonido
no se emite correctamente, compruebe la conexión del altavoz y repita los ajustes descritos.
15
ES
Page 66

Conexiones
1: Instalación de los altavoces
Este receptor le permite utilizar un sistema de
altavoces de 5.1 canales. Para disfrutar al
máximo de un sonido envolvente multicanal
similar al de las salas de cine, asegúrese de
conectar todos los altavoces suministrados
(dos altavoces frontales, un altavoz central y
dos altavoces de sonido envolvente) y un
altavoz de graves (5.1 canales).
Puede colocar los altavoces tal y como se
muestra a continuación.
AAltavoz frontal (izquierdo)
BAltavoz frontal (derecho)
CAltavoz central
DAltavoz de sonido envolvente (izquierdo)
EAltavoz de sonido envolvente (derecho)
FAltavoz de graves
Observaciones
•El ángulo A debe ser el mismo.
A A
30˚30˚
100˚-120˚100˚-120˚
• Como el altavoz de graves no emite señales
altamente direccionales, puede colocarlo en la
posición que más le convenga.
Instalación de los altavoces en
la pared
Puede instalar los altavoces en la pared.
1 Prepare los tornillos (no
suministrados) adecuados
para el gancho que se
encuentra en la parte trasera de
cada uno de los altavoces.
Consulte las ilustraciones que
aparecen a continuación.
4 mm (3/16 pulg.)
más de 25 mm (1 pulg.)
16
5 mm (7/32 pulg.)
10 mm (13/32 pulg.)
Gancho de la parte trasera del altavoz
ES
Page 67

2 Fije los tornillos a la pared.
Deben salir entre 8 mm y
10 mm (11/32 pulg. y 13/32
pulg.).
Altavoz central
210 mm
(8 3/8 pulg.)
8 mm y 10 mm
(11/32 pulg. y
13/32 pulg.)
Altavoces frontales y altavoces de
sonido envolvente
8 mm y 10 mm
(11/32 pulg. y
13/32 pulg.)
3 Cuelgue los altavoces de los
tornillos.
Notas
• Use tornillos adecuados para el material y la
resistencia de la pared. Como las paredes de placas
de yeso son especialmente frágiles, coloque los
tornillos en una viga y fíjelos a la pared. Instale los
altavoces en una pared vertical y plana, donde se
haya aplicado un refuerzo.
• Acuda a una ferretería o consulte a un instalador
para informarse del material de la pared o los
tornillos que debe utilizar.
• Sony no se hace responsable de accidentes o daños
provocados por instalaciones incorrectas, de la
falta de resistencia de la pared, de una instalación
inadecuada de los tornillos, desastres naturales,
etc.
Conexiones
5 mm
(7/32 pulg.)
10 mm
(13/32 pulg.)
Parte trasera del altavoz
17
ES
Page 68

2: Conexión de los
altavoces
Antes de conectar los cables, asegúrese de
desconectar el cable de alimentación de CA.
El conector de los cables de los altavoces tiene
un código de color que depende del tipo de
altavoz.
Conecte los cables de altavoz procurando que
coincidan con los colores de las tomas
SPEAKERS (altavoces) del receptor.
BE
F
Nota
Para conectar el altavoz correctamente, puede
comprobar de qué tipo de altavoz se trata
consultando la etiqueta situada en el panel trasero de
los altavoces. El altavoz de graves no tiene etiqueta.
Para obtener información sobre el tipo de altavoz,
consulte la página 4.
Texto en la
etiqueta del altavoz
FRONT L (frontal I) Frontal izquierdo
FRONT R (frontal D) Frontal derecho
CENTER (central) Central
SUR L (env. I) Sonido envolvente
SUR R (env. D) Sonido envolvente
Tipo de altavoz
izquierdo
derecho
SPEAKERS
SUBWOOFER
Conector
A
FRONT R
FRONT L
SUR R
D
SUR L
CENTER
C
AAltavoz frontal (izquierdo)
BAltavoz frontal (derecho)
CAltavoz central
DAltavoz de sonido envolvente (izquierdo)
EAltavoz de sonido envolvente (derecho)
FAltavoz de graves
ES
18
Page 69

3: Conexión del televisor
Al conectar la toma HDMI TV OUT (salida
HDMI TV) a un televisor, se ve la imagen de
la entrada seleccionada.
Antes de conectar los cables, asegúrese de
desconectar el cable de alimentación de CA.
Televisor
Señales de audio
AUDIO IN
COAX IN
OPT IN
OPT IN
VIDEO
SAT/CATV
TV
DIGITAL LINE IN ANTENNA
L
R
CAL MIC
AUTO
Señales de
audio/vídeo
B*A***
DC5V
1 A MAX
HDMI
GAME IN BD/DVD IN SAT/CATV IN TV OUT
DMPORT
Notas
• Asegúrese de encender el receptor cuando las
señales de vídeo y audio de un equipo de
reproducción se transmiten al televisor a través del
receptor. A menos que el equipo esté encendido, no
se transmitirán señales de vídeo ni de audio.
• En función del estado de la conexión entre el
televisor y la antena, es posible que la imagen
visualizada en la pantalla del televisor aparezca
distorsionada. Si tiene este problema, coloque la
antena más lejos del receptor.
• Si conecta cables digitales ópticos, inserte las
clavijas en línea recta hasta que encajen en su sitio.
• No doble ni ate los cables digitales ópticos.
Observaciones
• Todas las tomas de audio digital son compatibles
con las frecuencias de muestreo 32 kHz, 44,1 kHz,
48 kHz y 96 kHz.
• Al conectar la toma de salida de audio del televisor
a la toma TV OPT IN (entrada TV OPT) del
receptor para emitir el sonido del televisor a través
de los altavoces conectados al receptor, ajuste la
toma de salida de sonido del televisor en “Fijo” si
tiene las opciones “Fijo” y “Variable”.
ARC
Conexiones
A Cable digital óptico (no suministrado)
B Cable HDMI (no suministrado)
Sony recomienda utilizar un cable HDMI
certificado o un cable HDMI de Sony.
* Para disfrutar de un programa de televisión con
sonido envolvente multicanal procedente de los
altavoces conectados al receptor, puede realizar
una de las siguientes conexiones:
– Conecte A.
– Conecte B si su televisor es compatible con la
función Canal de Retorno de Audio (ARC).
Asegúrese de desactivar el volumen del televisor
o de activar la función de silenciamiento.
**Este receptor es compatible con la función Canal
de Retorno de Audio (ARC). Si conecta el
receptor a un televisor compatible con ARC, el
sonido se emitirá a través de los altavoces
conectados al receptor mediante la toma HDMI
TV OUT (salida HDMI TV). No olvide ajustar
“ARC” en “ARC ON” en el menú HDMI (página
39).
19
ES
Page 70

4: Conexión de un equipo
de vídeo
Uso de la conexión HDMI
La interfaz multimedia de alta definición
(HDMI) es una interfaz que transmite señales
de audio y vídeo en formato digital.
Mediante la conexión de equipos compatibles
con la tecnología Sony “BRAVIA” Sync
utilizando cables HDMI, pueden simplificarse
las operaciones. Consulte “Funciones de
“BRAVIA” Sync” (página 36).
Especificaciones de HDMI
• Las señales de audio digital que se
transmiten mediante HDMI pueden emitirse
a través de los altavoces conectados al
receptor. Esta señal es compatible con Dolby
Digital, DTS y PCM lineal.
• El receptor puede recibir PCM lineal
multicanal (hasta 8 canales) con una
frecuencia de muestreo de 192 kHz o
inferior a través de una conexión HDMI.
• Este receptor es compatible con High Bitrate
Audio (DTS-HD Master Audio, Dolby
TrueHD), Deep Color (Deep Colour),
x.v.Color (x.v.Colour) y transmisión en 3D.
Notas acerca de las conexiones
HDMI
• Las señales de audio que se transmiten a la
toma HDMI IN se emiten a través de las
tomas SPEAKERS y de la toma HDMI TV
OUT (salida HDMI TV). No se emiten a
través de ninguna otra toma de audio.
• Las señales de vídeo transmitidas a la toma
HDMI IN solo pueden emitirse desde la
toma HDMI TV OUT (salida HDMI TV).
• Este equipo no está preparado para la
entrada ni la salida de señales DSD de Super
Audio CD.
• Es posible que el equipo conectado suprima
las señales de audio (frecuencia de muestreo,
longitud de bits, etc.) transmitidas a través
de una toma HDMI. Compruebe la
configuración del equipo conectado si la
imagen es de baja calidad o si no se emite el
sonido de un equipo conectado mediante el
cable HDMI.
• Es posible que el sonido se interrumpa si se
modifica la frecuencia de muestreo, el
número de canales o el formato de audio de
las señales de salida de audio del equipo de
reproducción.
• Si el equipo conectado no es compatible con
la tecnología de protección de los derechos
de autor (HDCP), es posible que la imagen o
el sonido de la toma HDMI TV OUT (salida
HDMI TV) se emitan distorsionados o no se
emitan.
Si se encuentra con esta situación,
compruebe la especificación del equipo
conectado.
• Únicamente puede disfrutar de High Bitrate
Audio (DTS-HD Master Audio, Dolby
TrueHD) y PCM lineal multicanal con una
conexión HDMI.
• Suba la resolución de la imagen del equipo
de reproducción por encima de 720p/1080i
para disfrutar de High Bitrate Audio
(DTS-HD Master Audio, Dolby TrueHD).
20
ES
Page 71

• Antes de poder disfrutar de PCM lineal
multicanal, es posible que tenga que realizar
algunos ajustes en la resolución de la imagen
del equipo de reproducción. Consulte el
manual de instrucciones del equipo de
reproducción.
• Puede disfrutar de contenidos de vídeo en
3D con televisores y equipos de vídeo
compatibles con 3D (por ejemplo,
reproductor de discos Blu-ray, grabadora de
discos Blu-ray, PlayStation 3, etc.)
conectando al receptor cables HDMI de alta
velocidad y, con las gafas 3D
correspondientes, reproduciendo contenidos
compatibles con 3D.
• En función del televisor o el equipo de
vídeo, es posible que no pueda visualizar
imágenes en 3D.
• No todos los equipos HDMI son
compatibles con todas las funciones
definidas para la versión HDMI
especificada. Por ejemplo, aquellos equipos
compatibles con HDMI, versión 1.4, no
siempre cuentan con la función Canal de
Retorno de Audio (ARC).
• Consulte el manual de instrucciones de
todos los equipos conectados para obtener
más información.
Conexión de los cables
• Antes de conectar los cables, asegúrese de
desconectar el cable de alimentación de CA.
• No es necesario conectar todos los cables.
Realice las conexiones necesarias según las
tomas presentes en el equipo conectado.
• Use un cable HDMI de alta velocidad. Si usa
un cable HDMI estándar, es posible que no
se visualicen correctamente las imágenes de
1080p, Deep Color (Deep Colour) o 3D.
• No se recomienda utilizar un cable de
conversión HDMI-DVI. Si conecta un cable
de conversión HDMI-DVI a un equipo DVID, es posible que el sonido y/o la imagen se
pierdan.
• Si conecta cables digitales ópticos, inserte
las clavijas en línea recta hasta que encajen
en su sitio.
• No doble ni ate los cables digitales ópticos.
Observación
Todas las tomas de audio digital son compatibles
con las frecuencias de muestreo 32 kHz, 44,1 kHz,
48 kHz y 96 kHz.
Conexiones
21
ES
Page 72

Conexión de una videograbadora, PlayStation 3, reproductor de
discos Blu-ray, lector de DVD, sintonizador de satélite o decodificador
de televisión por cable
Videograbadora
Señales de audio
OPT IN
OPT IN
TV
SAT/CATV
DIGITAL
COAX IN
VIDEO
PlayStation 3
Señales de
audio/vídeo
Reproductor de discos
Blu-ray, lector de DVD
Señales de
audio/vídeo
AB
AUDIO IN
L
R
AUTO
LINE IN ANTENNA
CAL MIC
C
DC5V
1 A MAX
DMPORT
HDMI
GAME IN BD/DVD IN TV OUT
SAT/CATV IN
B
HDMI
HDMIHDMI
B
ARC
Señales de audio Señales de
Sintonizador de satélite, decodificador de
A Cable digital coaxial
(no suministrado)
B Cable HDMI (no suministrado)
Sony recomienda utilizar un cable HDMI
certificado o un cable HDMI de Sony.
C Cable digital óptico (no suministrado)
ES
22
audio/vídeo
televisión por cable
Notas
• No olvide modificar el ajuste predeterminado del
botón de introducción BD/DVD del mando a
distancia para que pueda utilizarlo para controlar
el lector de DVD. Para obtener más información,
consulte “Reasignación de botones de
introducción del mando a distancia” (página 40).
• No es posible realizar grabaciones en la
videograbadora a través de este receptor. Para
obtener más información, consulte el manual de
instrucciones suministrado con la videograbadora.
Page 73

5: Conexión de un equipo
de audio
Antes de conectar los cables, asegúrese de
desconectar el cable de alimentación de ca.
Reproductor de Super
Audio CD, lector de CD
Señales de audio
A
AUDIO IN
COAX IN
OPT IN
OPT IN
VIDEO
SAT/CATV
TV
DIGITAL LINE IN ANTENNA
L
R
AUTO
CAL MIC
DC5V
1 A MAX
DMPORT
• No conecte ni desconecte el DOCK FOR
iPod/iPhone mientras el receptor esté
encendido.
• Conecte el DOCK FOR iPod/iPhone con
firmeza, introduciendo el conector recto.
• El conector del DOCK FOR iPod/iPhone es
frágil: manipúlelo con cuidado cuando
instale o traslade el receptor.
Conexiones
DOCK FOR iPod/iPhone
(suministrado)
A Cable de audio (no suministrado)
Notas sobre la conexión del
DOCK FOR iPod/iPhone
• Utilice únicamente el DOCK FOR iPod/
iPhone suministrado.
• Puede ver las imágenes en la pantalla del
televisor conectando la salida de vídeo del
DOCK FOR iPod/iPhone a la entrada de
vídeo del televisor. Para obtener más
información, consulte el manual de
instrucciones suministrado con el DOCK
FOR iPod/iPhone.
23
ES
Page 74

6: Conexión de las
7: Conexión del cable de
antenas
Antes de conectar las antenas, asegúrese de
desconectar el cable de alimentación de ca.
Antena monofilar de FM (suministrada)
AUDIO I N
COAX IN
OPT IN
OPT IN
TV
Notas
• Extienda completamente la antena monofilar de
FM.
• Después de conectar la antena monofilar de FM,
manténgala lo más plana posible.
VIDEO
SAT/CATV
DIGITAL LINE IN ANTENNA
L
R
AUTO
CAL MIC
DC5V
1 A MAX
DMPORT
alimentación de ca
Conecte el cable de alimentación de ca a una
toma de corriente de pared.
Asegúrese de encender el receptor cuando las
señales de vídeo y audio de un equipo de
reproducción se transmiten al televisor a
través del receptor. A menos que el equipo esté
encendido, no se transmitirán señales de vídeo
ni de audio.
Cable de alimentación de ca
SPEAKERS
SUR R SUR L CENTER
FRONT LFRONT R
A la toma de corriente de pared
SUBWOOFER
24
ES
Page 75

Preparación del receptor
Inicialización del
receptor
Antes de utilizar el receptor por primera vez,
inicialícelo siguiendo los pasos que se indican
a continuación. Este procedimiento también
puede utilizarse para restaurar los ajustes
predeterminados de fábrica.
Utilice los botones del receptor para realizar
esta operación.
?/1
1 Pulse ?/1 para apagar el
receptor.
2 Mantenga pulsado ?/1 durante
5 segundos.
Primero aparecerá “CLEARING” en el
visor y, al cabo de unos instantes, se
mostrará “CLEARED”.
Todos los ajustes modificados o
configurados serán sustituidos por los
ajustes predeterminados.
Utilización de AUTO
CALIBRATION
(calibración automática)
Preparación del receptor
Este receptor está equipado con la tecnología
DCAC (Calibración automática de cine
digital), que permite realizar la calibración
automática de la forma siguiente:
• Compruebe la conexión entre cada altavoz y
el receptor.
• Ajuste el nivel de los altavoces.
• Mida la distancia entre cada altavoz y su
posición de escucha.
• Mida las características de la frecuencia.
La función DCAC está diseñada para
conseguir un equilibrio del sonido adecuado
dentro de la sala. No obstante, tiene la opción
de ajustar los niveles de los altavoces
manualmente para adaptarlos a sus
preferencias. Para obtener más información,
consulte “Para ajustar el nivel de los
altavoces” (página 43).
Antes de realizar la Calibración
automática
Antes de empezar con la Calibración
automática, realice las siguientes
comprobaciones.
• Coloque los altavoces y conéctelos
(página 16, 18).
• Conecte únicamente el micrófono
optimizador suministrado a la toma AUTO
CAL MIC (micrófono calibración auto.). No
conecte ningún otro micrófono a esta toma.
• Retire todos los obstáculos situados entre el
micrófono optimizador y los altavoces para
evitar errores de medición.
• Asegúrese de que no hay ruido para poder
obtener los resultados más precisos posibles.
continúa
25
ES
Page 76

Notas
• Los altavoces emiten un sonido muy alto durante
la calibración y el volumen no puede ajustarse.
Piense en los vecinos y en los niños que estén en la
sala.
• Si ha activado la función de silenciamiento antes
de realizar la Calibración automática, se apagará
automáticamente.
Observación
Si coloca el altavoz orientado hacia el micrófono
optimizador conseguirá una medición más precisa.
2: Realización de la Calibración
automática
1: Configuración de la
Calibración automática
AUDIO IN
COAX IN
OPT INTVOPT IN
VIDEO
SAT/CATV
DIGITAL LINE IN ANTENNA
AUTO
CAL MIC
L
DC5V
1 A MAX
R
HDMI
AUTO
GAME IN BD/DVD IN SAT/CATV IN TV OUT
DMPORT
CAL MIC
SPEAKERS
FRONT LFRONT R
SUR R SUR L CENTERSUBWOOFER
ARC
Micrófono
optimizador
1 Conecte el micrófono
optimizador suministrado a la
toma AUTO CAL MIC
(micrófono calibración auto.).
2 Configure el micrófono
optimizador.
Coloque el micrófono optimizador en la
posición de escucha. Puede utilizar un
taburete o un trípode para que el
micrófono optimizador quede a la altura
de sus orejas.
?/1
SAT/
BD/DVD GAME
VIDEO
TUNER
DMPORT
CATV
LINE IN
TV
Botones
de introducción
AMP
MENU
,
V/v/B/b
O
MENU
mM
x
X
MASTER
VOL +/–
.
>
MUTING
1 Pulse AMP MENU (menú
amplificación).
2 Pulse V/v varias veces hasta
que aparezca “AUTO CAL” y, a
continuación, pulse o b.
26
ES
Page 77

3 Pulse V/v varias veces hasta
que aparezca “A.CAL START”
y, a continuación, pulse .
La medición empezará al cabo de
5 segundos.
El proceso de medición dura 30 segundos
aproximadamente.
Esta tabla presenta los distintos estados
de medición que aparecen en el visor.
Objeto de la medición Visor
Existencia del altavoz TONE
Ganancia del altavoz,
distancia, respuesta de
frecuencia
Ganancia y distancia del
altavoz de graves
Para cancelar la Calibración
automática
La función Calibración automática se
cancelará si realiza las siguientes operaciones
durante el proceso de medición:
– Pulse ?/1 o MUTING (silenciar).
– Pulse los botones de introducción en el
mando a distancia o INPUT (entrada) +/– en
el receptor.
– Cambie el nivel de volumen.
T S P
WOOFER
3: Confirmación/
almacenamiento de los
resultados de la medición
1 Confirme el resultado de la
medición.
Al final del proceso de medición,
aparecerá el resultado en el visor y el
sistema le avisará con un pitido.
Proceso de medición
[Visor]
Resultado correcto
[SAVE EXIT]
Error
[E - xxx xx]
Acción
recomendada
Vaya al paso 2.
Consulte
“Cuando
aparecen
códigos de error”
(página 28).
2 Consulte el resultado de la
medición.
Pulse V/v varias veces para seleccionar el
elemento y, continuación, pulse .
•EXIT
Permite salir del proceso de
configuración sin guardar los resultados
de la medición.
•WARN CHECK
Muestra la advertencia relacionada con
los resultados de la medición. Consulte
“Información de los mensajes de
advertencia” (página 28).
• SAVE EXIT
Permite guardar los resultados de la
medición y salir del proceso de
configuración.
•RETRY
Vuelve a realizar la Calibración
automática.
Preparación del receptor
3 Guarde el resultado de la
medición.
Seleccione “SAVE EXIT” en el paso 2.
Aparece “COMPLETE” en la pantalla y
se guardarán los resultados de la
medición.
continúa
27
ES
Page 78

4 Desconecte el micrófono
optimizador del receptor.
Nota
Si cambia de sitio el altavoz, le recomendamos que
vuelva a realizar la Calibración automática para
disfrutar del mejor sonido envolvente.
Cuando aparecen códigos de
error
1
Consulte el problema asociado al error.
Mensaje y explicación
E -
xxx* 32
No se ha detectado ningún altavoz. Compruebe
que el micrófono optimizador está bien
conectado y vuelva a realizar la Calibración
automática.
Si el micrófono optimizador está bien conectado
pero sigue apareciendo el código de error, es
posible que el cable del micrófono optimizador
esté en mal estado.
E -
xxx* 33
• El micrófono optimizador no está conectado.
• Ninguno de los altavoces frontales está
conectado o solo hay un altavoz frontal
conectado.
• El altavoz de sonido envolvente izquierdo o el
altavoz de sonido envolvente derecho no está
conectado.
• El altavoz de graves no está conectado.
* xxx
2 Vuelva a realizar la Calibración
automática.
Pulse V/v para seleccionar “RETRY YES”
y, a continuación, pulse .
3 Siga los pasos del apartado
“3: Confirmación/almacenamiento de
los resultados de la medición” (página
27).
representa un canal de altavoz.
F Frontal
SEnvolvente
SW Altavoz de graves
En función del código de error, es posible que
el canal del altavoz no aparezca.
Información de los mensajes de
advertencia
Si se muestra una advertencia sobre el
resultado de la medición, aparecerá
información detallada.
Mensaje y explicación
xxx* 40
W -
En el proceso de medición se ha detectado un nivel
de ruido elevado.
Seguramente obtendrá mejores resultados si vuelve
a probarlo con un ambiente más tranquilo.
W -
xxx* 41
W -
xxx* 42
Las señales que recibe el micrófono son demasiado
potentes. La distancia entre el altavoz y el
micrófono es demasiado reducida. Sepárelos y
vuelva a realizar la medición.
W -
xxx* 43
No se puede detectar la distancia y la posición de un
altavoz de graves. Es posible que la causa sea el
ruido. Pruebe a realizar la medición en un entorno
silencioso.
NO WARN
No hay información de advertencia.
* xxx
Para volver al paso 2 de
“3: Confirmación/
almacenamiento de los
resultados de la medición”
Pulse .
Observación
En función de la posición del altavoz de graves, los
resultados de la medición pueden variar. Sin
embargo, no tendrá problemas aunque siga
utilizando el receptor con ese valor.
representa un canal de altavoz.
FL Frontal izquierdo
FR Frontal derecho
CNT Central
SL Sonido envolvente izquierdo
SR Sonido envolvente derecho
SW Altavoz de graves
En función del resultado de la medición, es posible
que el canal del altavoz no aparezca.
28
ES
Page 79

Operaciones básicas
Reproducción
BD/DVD GAME
VIDEO
TV
TUNER
DMPORT
,
V/v/B/b
O
MENU
mM
x
X
MASTER
VOL +/–
MUTING
.
SAT/
CATV
LINE IN
>
Botones de
introducción
AMP MENU
SOUND
FIELD +/–
5 Pulse MASTER VOL +/– para
ajustar el volumen.
También puede usar MASTER
VOLUME (volumen maestro) en el
receptor.
6 Pulse SOUND FIELD +/– para
disfrutar del sonido
envolvente.
También puede usar SOUND FIELD
(campo sonido) en el receptor.
Para activar la función de
silenciamiento
Pulse MUTING (silenciar). Se iluminará
“MUTING” en el visor.
La función de silenciamiento se cancelará si
realiza alguna de las acciones siguientes:
• Volver a pulsar el botón.
• Subir el volumen.
• Apagar el receptor.
• Realizar la Calibración automática.
Para evitar dañar los altavoces
Antes de apagar el receptor, asegúrese de bajar
el nivel de volumen.
Operaciones básicas
Encienda el equipo conectado.
1
2 Encienda el receptor.
3 Pulse el botón de introducción
del equipo que desea utilizar.
También puede pulsar INPUT +/–
(entrada +/-) en el receptor.
La entrada seleccionada aparecerá en el
visor.
Nota
Al pulsar TUNER (sintonizador), aparecerá
“FM TUNER” durante unos instantes y,
después, el visor mostrará la frecuencia.
4 Reproduzca la fuente.
29
ES
Page 80

Visualización de
información en el visor
El visor ofrece distintos datos sobre el estado
del receptor, como el campo de sonido.
TV
DMPORT
SAT/
CATV
LINE IN
Botones de
introducción
DISPLAY
AMP MENU
BD/DVD GAME
VIDEO
TUNER
O
1 Seleccione la entrada de la que
desea obtener información.
2 Pulse AMP MENU (menú
amplificación) y, después,
pulse DISPLAY (visor) varias
veces.
Cada vez que pulse el botón, la
información del visor cambiará siguiendo
este orden:
Entrada seleccionada t Campo de
sonido aplicado t Nivel de volumen
Operaciones del sintonizador
Escuchar la radio FM
Puede escuchar emisiones de FM mediante el
sintonizador incorporado. Antes de realizar
cualquier operación, asegúrese de que ha
conectado la antena de FM al receptor
(página 24).
X
TV
DMPORT
MENU
SAT/
CATV
>
Botones
numéricos
ENTER
D.TUNING
AMP MENU
SHIFT
LINE IN
x
TUNER
,
V/v/B/b
TUNING
+/–
BD/DVD GAME
VIDEO
TUNER
O
mM
.
Al escuchar radio FM
Nombre de la emisora presintonizada*)
t Frecuencia t Campo de sonido
aplicado t Nivel de volumen
* El nombre de la emisora presintonizada solo
aparece si ha introducido un nombre para
dicha emisora (página 33).
Nota
Es posible que algunos caracteres o símbolos
no aparezcan en determinados idiomas.
ES
30
Page 81

Sintonización de una emisora
automáticamente (Sintonización
automática)
1 Pulse TUNER (sintonizador).
2 Pulse TUNING + (sintonización
+) o TUNING – (sintonización –).
TUNING + (sintonización +) busca las
emisoras empezando por la frecuencia
más baja, mientras que TUNING –
(sintonización –) empieza por la
frecuencia más alta.
El receptor detiene la exploración cada
vez que recibe una frecuencia.
Si la recepción estéreo de FM es
deficiente
Si la recepción estéreo de FM es deficiente y
parpadea “ST” en el visor, seleccione audio
monoaural para reducir la distorsión del
sonido.
1 Pulse AMP MENU (menú amplificación).
2 Pulse V/v varias veces hasta que aparezca
“TUNER” y, a continuación, pulse o b.
3 Pulse V/v varias veces hasta que aparezca
“FM MODE” y, a continuación, pulse o
b.
4 Pulse V/v varias veces hasta que aparezca
“MONO” y, a continuación, pulse .
Para volver al modo estéreo, repita los pasos
del 1 al 4 y seleccione “STEREO” en el paso 4.
Observación
Para mejorar la recepción, reoriente la antena
monofilar de FM suministrada.
Sintonización de una emisora
directamente (Sintonización
directa)
Puede introducir la frecuencia de una emisora
directamente mediante los botones numéricos.
1 Pulse TUNER (sintonizador).
2 Pulse D.TUNING (sintonización
directa).
3 Mantenga pulsado SHIFT
(mayúsculas) y, a
continuación, pulse los
botones numéricos para
introducir la frecuencia.
Ejemplo: FM 102,50 MHz
Seleccione 1 b 0 b 2 b 5.
4 Mantenga pulsado SHIFT
(mayúsculas) y, a
continuación, pulse ENTER
(introducir).
Si introduce una frecuencia
incorrecta
Aparecerá “FM ---.--” y en el visor volverá a
aparecer la frecuencia que tenía sintonizada.
Si no logra sintonizar una
emisora
Asegúrese de que ha introducido la frecuencia
correcta. Repita los pasos del 2 al 4. Si aun así
no logra sintonizar una emisora, lo más
probable es que la frecuencia no se utilice en
su zona.
Operaciones del sintonizador
31
ES
Page 82

Presintonización de
emisoras de radio
Puede guardar un máximo de 30 emisoras de
FM como emisoras favoritas.
MENU
X
TV
DMPORT
SAT/
CATV
LINE IN
x
Botones
numéricos
ENTER
MEMORY
DISPLAY
AMP
MENU
PRESET
>
+/–
TUNER
V/v/B/b
BD/DVD GAME
VIDEO
TUNER
,
O
mM
.
4 Pulse PRESET + (presintonizar
+) o PRESET – (presintonizar –)
varias veces para seleccionar
la emisora presintonizada que
desee.
También puede seleccionar el número de
presintonía directamente pulsando
SHIFT (mayúsculas) y, a continuación,
los botones numéricos.
5 Mantenga pulsado SHIFT
(mayúsculas) y, a
continuación, pulse ENTER
(introducir).
La emisora se guardará con el número de
presintonía seleccionado.
6 Repita los pasos del 2 al 5 para
guardar otra emisora.
Para cambiar el número de
presintonía
Vuelva a empezar desde el paso 3.
SHIFT
1 Pulse TUNER (sintonizador).
2 Sintonice la emisora que desee
presintonizar con
Sintonización automática
(página 31) o Sintonización
directa (página 31).
3 Pulse MEMORY (memoria).
Aparecerá en el visor un número de
presintonía.
ES
32
Page 83

Sintonización de emisoras
presintonizadas
Asignación de nombre a una
emisora presintonizada
1 Pulse TUNER (sintonizador).
2 Pulse PRESET + (presintonizar
+) o PRESET – (presintonizar –)
para seleccionar la emisora.
Cada vez que pulsa el botón, puede
seleccionar una emisora presintonizada
en este orden:
1 2345 27...
30 29 28
Otra opción es mantener pulsado SHIFT
(mayúsculas) y, después, pulsar los
botones numéricos para introducir la
emisora presintonizada. Para sintonizar la
emisora elegida, mantenga pulsado
SHIFT (mayúsculas) y, después, pulse
ENTER (introducir).
1 Pulse TUNER (sintonizador).
2 Sintonice la emisora
presintonizada para la que
desea crear un nombre de
índice (página 33).
3 Pulse AMP MENU (menú
amplificación).
4 Pulse V/v varias veces hasta
que aparezca “TUNER” y, a
continuación, pulse o b.
5 Pulse V/v varias veces hasta
que aparezca “NAME IN” y, a
continuación, pulse o b.
El cursor parpadeará y podrá seleccionar
un carácter.
6 Pulse V/v para seleccionar un
carácter y, a continuación,
pulse B/b para desplazar el
punto de introducción hacia
atrás o hacia delante.
El nombre de la emisora puede estar
formado por un máximo de 8 caracteres.
Observaciones
• Puede seleccionar el tipo de carácter en el
orden siguiente pulsando V/v.
Alfabeto (mayúsculas) t Números t
Símbolos.
• Para introducir un espacio en blanco, pulse b
sin seleccionar ningún carácter.
Si introduce un carácter incorrecto
Pulse B/b hasta que parpadee el carácter
que desea cambiar y, a continuación,
pulse V/v para seleccionar el carácter que
desee.
Operaciones del sintonizador
7 Pulse .
Se registrará el nombre introducido.
33
ES
Page 84

Disfrutar de sonido envolvente
Modo Auto Format Direct
(A.F.D.)
Selección del campo de
sonido
Este receptor tiene la capacidad de crear
sonido envolvente multicanal. Es posible
seleccionar uno de los campos de sonido
optimizados entre los campos de sonido
preprogramados del receptor.
x
X
.
Pulse SOUND FIELD +/– (campo
sonido +/–) varias veces para
seleccionar el campo de sonido
que desee.
También puede usar SOUND FIELD (campo
sonido) en el receptor.
Modo de sonido de 2 canales
Puede seleccionar sonido en 2 canales como
sonido de salida independientemente de los
formatos de grabación del software que utilice,
del equipo de reproducción conectado o de los
ajustes de campo de sonido del receptor.
x 2CH ST. (estéreo de 2 canales)
El receptor solo emite el sonido por los
altavoces frontales izquierdo/derecho y por el
altavoz de graves.
Las fuentes estéreo de 2 canales estándar
omiten totalmente el procesamiento del campo
de sonido, y los formatos de sonido envolvente
multicanal se reducen a 2 canales, con la
excepción de las señales LFE.
>
SOUND FIELD +/–
El modo Auto Format Direct (A.F.D.) le
permite escuchar sonido en alta fidelidad y
seleccionar el modo de decodificación para
escuchar un sonido estéreo de 2 canales como
sonido multicanal.
x A.F.D. STD (A.F.D. Standard)
Presenta el sonido tal como se grabó o codificó
sin añadir efectos de sonido envolvente.
Sin embargo, este receptor generará una señal
de baja frecuencia para emitirla en el altavoz
de graves cuando no haya señales LFE.
x A.F.D. MULTI (A.F.D. Multi)
Emite las señales izquierda/derecha de
2 canales desde todos los altavoces.
Modo Película
Para disfrutar del sonido envolvente, basta con
seleccionar uno de los campos de sonido
preprogramados del receptor. Con ellos,
tendrá en su casa un sonido nítido y potente,
igual que si estuviera en el cine.
x HD-D.C.S. (HD Digital Cinema
Sound)
Este modo es la innovadora tecnología que
Sony ha diseñado para los sistemas de cine en
casa, con los últimos avances en el
procesamiento de señales acústicas y digitales.
Se basa en los datos de medición de la
respuesta de un estudio de masterización
procesados con la máxima precisión.
Con este modo, puede disfrutar de películas
Blu-ray y DVD en casa con la mejor calidad de
sonido, pero también con el mejor ambiente
sonoro, exactamente como lo diseñó el
ingeniero de sonido en el proceso de
masterización.
34
ES
Page 85

x PLII MV (Pro Logic II Movie)
Efectúa la decodificación en el modo Dolby
Pro Logic II Movie. Este ajuste es ideal para
películas codificadas en Dolby Surround.
Además, este modo puede reproducir sonido
de 5.1 canales para ver vídeos de películas
antiguas o sobregrabadas.
x NEO6 CIN (Neo:6 Cinema)
Efectúa la decodificación en el modo DTS
Neo:6 Cinema. Una fuente grabada en formato
de 2 canales se decodifica con el formato de
5 canales.
Modo Música
Para disfrutar del sonido envolvente, basta con
seleccionar uno de los campos de sonido
preprogramados del receptor. Con ellos,
tendrá en su casa un sonido nítido y potente,
igual que si estuviera en una sala de
conciertos.
x SPORTS (Deporte)
Transmite las sensaciones de una transmisión
deportiva.
x GAMING (Juegos)
Reproduce sonido potente y realista, ideal para
jugar a videojuegos.
x NEWS (Noticias)
Aumenta la claridad de la voz del presentador.
x P. AUDIO (Portable Audio
Enhancer)
Reproduce una imagen de sonido clara y
mejorada de un dispositivo de audio portátil.
Este modo es ideal para archivos MP3 y otros
formatos de música comprimida.
x PLII MS (Pro Logic II Music)
Efectúa la decodificación en el modo Dolby
Pro Logic II Music. Este ajuste es ideal para
fuentes estéreo estándar como, por ejemplo,
discos CD.
x NEO6 MUS (Neo:6 Music)
Efectúa la decodificación en el modo DTS
Neo:6 Music. Una fuente grabada en formato
de 2 canales se decodifica con el formato de
5 canales. Este ajuste es ideal para fuentes
estéreo estándar como, por ejemplo, discos
CD.
Notas
• Las señales que contienen más de 5.1 canales se
reproducen en 5.1 canales.
• Los modos Película y Música no funcionan al
recibir DTS-HD Master Audio, DTS-HD High
Resolution Audio o Dolby TrueHD con una
frecuencia de muestreo superior a 48 kHz.
• El sonido no se emite desde varios altavoces, en
función de la fuente.
• Según el disco o la fuente, es posible que se
suprima el principio del sonido, ya que se
selecciona automáticamente el modo más
adecuado. Para evitar la supresión del principio del
sonido, seleccione “A.F.D. STD”.
• Cuando la señal de entrada es una fuente
multicanal, las opciones Dolby Pro Logic II
Movie/Music se cancelan y se emite directamente
la fuente multicanal.
• Cuando se recibe sonido bilingüe, las opciones
Dolby Pro Logic II Movie/Music no pueden
activarse.
• En función del flujo de entrada, quizás no pueda
utilizarse el modo de decodificación.
• Al seleccionar “HD-D.C.S.”, a veces se aplica
Dolby Pro Logic de forma automática, en función
del flujo de entrada.
Para apagar el efecto
envolvente de la película/
música
Pulse SOUND FIELD +/– (campo sonido +/–)
varias veces para seleccionar “2CH ST.” o
“A.F.D. STD”.
También puede usar SOUND FIELD (campo
sonido) en el receptor para seleccionar “2CH
ST.” o “A.F.D. STD”.
Disfrutar de sonido envolvente
35
ES
Page 86

Funciones de “BRAVIA” Sync
¿Qué es “BRAVIA” Sync?
La función “BRAVIA” Sync permite la
comunicación entre los productos Sony, como
televisores, reproductores de discos Blu-ray,
lectores de DVD o amplificadores de AV,
entre otros, con la función Control por HDMI.
Al conectar equipos Sony compatibles con la
función “BRAVIA” Sync con un cable HDMI
(no suministrado), el funcionamiento se
simplifica en los aspectos indicados a
continuación:
• Reproducción mediante una pulsación
(página 37)
• Control de audio del sistema (página 38)
• Apagado del sistema (página 39)
• Canal de retorno de audio (página 39)
• Sincronización del modo Theater/Theatre
(página 40)
• Selección de escena (página 40)
Control por HDMI es una función de control
mutuo estándar que utiliza HDMI CEC
(Consumer Electronics Control) para HDMI
(High-Definition Multimedia Interface).
Se recomienda conectar el receptor a
productos que incorporen la tecnología
“BRAVIA” Sync.
Nota
En función del equipo conectado, es posible que la
función Control por HDMI no funcione. Consulte el
manual de instrucciones del
equipo.
Preparación para
“BRAVIA” Sync
El receptor es compatible con la función
“Control por HDMI (ajuste fácil)”.
• Si su televisor es compatible con la función
“Control por HDMI (ajuste fácil)”, puede
configurar la función Control por HDMI del
receptor y del equipo de reproducción
automáticamente ajustando la función
Control por HDMI en el televisor
(página 36).
• Si su televisor no es compatible con la
función “Control por HDMI (ajuste fácil)”,
deberá ajustar la función Control por HDMI
del receptor, equipo de reproducción y
televisor por separado (página 37).
Si el televisor es compatible con
la función “Control por HDMI
(ajuste fácil)”
La función Control por HDMI del receptor
puede activarse simultáneamente al activar la
función Control por HDMI del televisor.
1 Conecte el receptor, el televisor y el
equipo de reproducción con una
conexión HDMI (página 20).
(El equipo utilizado debe ser
compatible con la función Control por
HDMI.)
2 Encienda el receptor, el televisor y el
equipo de reproducción.
3 Active la función Control por HDMI del
televisor.
La función Control por HDMI del receptor
y de todos los equipos conectados se activa
simultáneamente. Cuando haya terminado
la configuración, aparecerá “COMPLETE”
en el visor.
36
Para obtener más información acerca de la
configuración del televisor, consulte el manual
de instrucciones suministrado con el televisor.
ES
Page 87

Si el televisor no es compatible
con la función “Control por
HDMI (ajuste fácil)”
AMP
MENU
,
V/v/B/b
Pulse AMP MENU (menú
1
amplificación).
O
MENU
2 Pulse V/v varias veces hasta que
aparezca “HDMI” y, a continuación,
pulse o b.
3 Pulse V/v varias veces hasta que
aparezca “CTRL HDMI” y, a
continuación, pulse o b.
4 Pulse V/v varias veces hasta que
aparezca “CTRL ON” y, a continuación,
pulse .
Se activará la función Control por HDMI.
5 Active la función Control por HDMI en
el equipo conectado.
Si la función Control por HDMI ya está
activada, no es necesario que modifique
este ajuste.
Para obtener más información acerca de la
configuración del televisor y del equipo
conectado, consulte el manual de
instrucciones del componente
correspondiente.
Notas
• Antes de ejecutar la función “Control por HDMI
(ajuste fácil)” del televisor, compruebe que el
televisor y los demás equipos conectados (incluido
el receptor) estén encendidos.
• Si el equipo de reproducción no funciona después
de haber configurado “Control por HDMI”,
compruebe el ajuste de Control por HDMI en el
televisor.
• Si el equipo conectado no admite la función
“Control por HDMI (ajuste fácil)”, pero es
compatible con el Control por HDMI, deberá
ajustar la función Control por HDMI en el equipo
conectado antes de utilizar la función “Control por
HDMI (ajuste fácil)” en el televisor.
Reproducción de equipos
con una pulsación
(Reproducción mediante una
pulsación)
Con una sencilla operación (con tan solo
pulsar un botón), comenzará la reproducción
automática del equipo conectado al receptor
con la función BRAVIA Sync. Podrá disfrutar
del sonido y las imágenes de los equipos
conectados.
Al iniciar la reproducción del equipo
conectado, el funcionamiento del receptor y
del televisor se simplifican del siguiente
modo:
Receptor y televisor
Se enciende
(si se encuentra en el modo en espera)
r
Se activa la entrada HDMI adecuada
Notas
• Por medio del menú del televisor, asegúrese de que
la función Control de audio del sistema esté
activada.
• En función del televisor, es posible que no
aparezca el principio del contenido.
Observación
También es posible seleccionar un equipo conectado
como, por ejemplo, un lector de DVD/reproductor
de discos Blu-ray mediante el menú del televisor. Se
activa automáticamente la entrada HDMI adecuada
del receptor y del televisor.
Funciones de “BRAVIA” Sync
37
ES
Page 88

Escuchar el sonido del
televisor por los
altavoces conectados al
receptor
(Control de audio del sistema)
Es posible escuchar el sonido del televisor a
través de los altavoces conectados al receptor
mediante una sencilla operación.
La función Control de audio del sistema puede
controlarse a través del menú del televisor.
Para obtener más información, consulte el
manual de instrucciones del televisor.
Televisor Receptor
Notas
• Si la función Control de audio del sistema no
funciona según el ajuste del televisor, consulte el
manual de instrucciones del televisor.
• El televisor debe ser compatible con la función
Control de audio del sistema.
• Si enciende el televisor antes que el receptor,
perderá la salida de sonido del televisor durante
unos instantes.
Activa el Control de
audio del sistema
Baja el volumen
del televisor lo
máximo posible
La función Control de audio del sistema puede
utilizarse también tal como se indica a
continuación.
• Si enciende el receptor mientras el televisor
está encendido, la función Control de audio
del sistema se activará automáticamente, y el
sonido del televisor se emitirá a través de los
altavoces conectados al receptor. En cambio,
si apaga el receptor, el sonido se emitirá a
través de los altavoces del televisor.
• Al ajustar el volumen del televisor, la
función Control de audio del sistema
ajustará simultáneamente el volumen del
receptor.
• Se enciende (si
se encuentra en
el modo en
espera)
• Se activa la
entrada HDMI
adecuada
Emite el sonido
del televisor
38
ES
Page 89

Apagado del receptor con
el televisor
(Apagado del sistema)
Si apaga el televisor mediante el botón
POWER (alimentación) del mando a distancia
del televisor, el receptor y el equipo conectado
se apagarán automáticamente.
También puede utilizar el mando a distancia
del receptor para apagar el televisor.
TV ?/1
BD/DVD GAME
VIDEO
TV
SAT/
CATV
LINE IN
TV
Escuchar el sonido del
televisor a través de un
cable HDMI
(Canal de Retorno de Audio)
La función Canal de Retorno de Audio (ARC)
permite al televisor transmitir las señales de
audio al receptor a través de un cable HDMI
conectado a la toma HDMI TV OUT (salida
HDMI TV).
Puede escuchar el sonido del televisor por los
altavoces conectados al receptor sin necesidad
de conectar la toma TV OPT IN (entrada TV
OPT).
AMP
MENU
,
V/v/B/b
O
MENU
1 Pulse AMP MENU (menú
amplificación).
Funciones de “BRAVIA” Sync
Mantenga pulsado TV (televisor) y,
a continuación, pulse TV ?/1.
El televisor, el receptor y el equipo conectado
a través de HDMI se apagarán.
Notas
• Ajuste la función de interrupción de la
alimentación del televisor en “ON” antes de
utilizar la función Apagado del sistema. Para
obtener más información, consulte el manual de
instrucciones del televisor.
• En función del equipo conectado, es posible que no
se apague. Para obtener más información, consulte
el manual de instrucciones del equipo conectado.
2 Pulse V/v varias veces hasta
que aparezca “HDMI” y, a
continuación, pulse o b.
3 Pulse V/v varias veces hasta
que aparezca “ARC” y, a
continuación, pulse o b.
4 Pulse V/v varias veces hasta
que aparezca “ARC ON” y, a
continuación, pulse .
Nota
Esta función solo está disponible si el televisor es
compatible con la función Canal de Retorno de
Audio (ARC).
39
ES
Page 90

Disfrutar de películas con
el campo de sonido
óptimo
(Sincronización del modo
Theater/Theatre)
Pulse THEATER (cine) o THEATRE
(cine) en el mando a distancia del
televisor o del reproductor de
discos Blu-ray con el mando a
distancia orientado hacia el
televisor.
El campo de sonido pasa a “HD-D.C.S.”.
Para volver al campo de sonido anterior, pulse
de nuevo THEATER (cine) o THEATRE
(cine).
Nota
En función del televisor, es posible que el campo de
sonido no cambie.
Observación
Es posible que vuelva a activarse el campo de sonido
anterior al cambiar la entrada del televisor.
Configuración avanzada
Reasignación de botones
de introducción del
mando a distancia
Es posible modificar los ajustes
predeterminados de los botones de
introducción (BD/DVD, GAME, SAT/CATV,
VIDEO y LINE IN) para adaptarlos al equipo
de su sistema.
Por ejemplo, si conecta un reproductor de
discos Blu-ray a la toma SAT/CATV del
receptor, podrá configurar el botón SAT/
CATV de este mando a distancia para que
controle el reproductor de discos Blu-ray.
INPUT
Botones
numéricos
BD/DVD GAME
VIDEO
TV
TUNER
DMPORT
CATV
LINE IN
AV ?/1
?/1
SAT/
Botones de
introducción
Disfrutar de un campo de
sonido óptimo para la
escena seleccionada
(Selección de escena)
La función Selección de escena le permite
disfrutar de una calidad de imagen óptima y
activa el campo de sonido más adecuado para
la escena seleccionada en el televisor. Para
obtener más información acerca de su
funcionamiento, consulte el manual de
instrucciones del televisor.
Nota
En función del televisor, es posible que el campo de
sonido no cambie.
ES
40
MASTER
VOL –
1 Mientras mantiene pulsado el
botón de introducción cuya
asignación desea modificar,
mantenga pulsado AV ?/1.
Ejemplo: Mientras mantiene pulsado
SAT/CATV, mantenga pulsado AV ?/1.
2 Con el botón AV ?/1 pulsado,
suelte el botón de introducción.
Ejemplo: Mientras mantiene pulsado el
botón AV ?/1, suelte SAT/CATV.
Page 91

3 Consultando la tabla siguiente,
pulse el botón asociado a la
categoría que desee y, a
continuación, suelte AV ?/1.
Ejemplo: Pulse 1 y, a continuación, suelte
AV ?/1.
A partir de ahora podrá utilizar el botón
SAT/CATV para controlar el reproductor
de discos Blu-ray.
Uso del menú de ajustes
Tiene la opción de personalizar el receptor
introduciendo cambios a través del menú de
ajustes.
Navegación por los menús
Categorías Pulse
Reproductor de discos Blu-ray
(modo de comando BD1)
Grabadora de discos Blu-ray
(modo de comando BD3)
Lector de DVD
(modo de comando DVD1)
Grabadora de DVD
(modo de comando DVD3)
Videograbadora (modo de
comando VTR3)
Lector de CD 6
e)
DSS
a)
El ajuste predeterminado del botón BD/DVD.
b)
Para obtener más información acerca del ajuste de
BD1 o BD3, consulte el manual de instrucciones
suministrado con el reproductor de discos Blu-ray
o la grabadora de discos Blu-ray.
c)
Las grabadoras DVD de Sony se controlan con un
ajuste DVD1 o DVD3. Para obtener más
información, consulte el manual de instrucciones
suministrado con las grabadoras de DVD.
d)
El ajuste predeterminado del botón VIDEO.
e)
El ajuste predeterminado del botón SAT/CATV.
d)
a)b)
b)
1
2
3
4
c)
5
7
Reinicio del mando a distancia
Mientras mantiene pulsado MASTER VOL –
(volumen maestro –), pulse ?/1 e INPUT
(entrada).
Se restaurarán los ajustes predeterminados del
mando a distancia.
AMP
,
V/v/B/b
RETURN/
EXIT O
O
MENU
MENU
1 Pulse AMP MENU (menú
amplificación).
2 Pulse V/v varias veces hasta
que aparezca la opción del
menú que desea y, a
continuación, pulse o b.
3 Pulse V/v varias veces hasta
que aparezca el parámetro que
desee ajustar y, a continuación,
pulse o b.
4 Pulse V/v varias veces hasta
que aparezca el ajuste que
desee y, a continuación, pulse
.
Para volver a la pantalla anterior
Pulse B o RETURN/ EXIT O (volver/salir).
Para salir del menú
Pulse AMP MENU (menú amplificación).
Configuración avanzada
continúa
41
ES
Page 92

Descripción general de los
menús
A través de AMP MENU (menú
amplificación) podrá ajustar las siguientes
opciones.
La configuración predeterminada aparece
subrayada.
AMP MENU
AUTO CAL
LEVEL TEST TONE AUTO xxx
SPEAKER CENTER SP CENTER YES
a)
A.CAL START
FL LEVEL FL +6.0,…
FR LEVEL FR +6.0,…
CNT LEVEL
SL LEVEL
SR LEVEL
SW LEVEL SW +6.0,…
D. RANGE COMP. MAX
SUR SP SUR YES
FL DIST. FL 32' 9",…
FR DIST. FR 32' 9",…
CNT DIST.
SL DIST.
SR DIST.
SW DIST. SW 32' 9",…
c)
d)
d)
c)
d)
d)
OFF
,...
FL 0
FL -6.0
,...
FR 0
FR -6.0
CNT +6.0,...
,...
CNT 0
CNT -6.0
SL +6.0,…
,...
SL 0
SL -6.0
SR +6.0,…
,...
SR 0
SR -6.0
SW 0
,...
SW -6.0
COMP. STD
COMP. AUTO
COMP. OFF
CENTER NO
SUR NO
",…
FL 9' 10
FL 3' 3"
",…
FR 9' 10
FR 3' 3"
CNT 32' 9",…
CNT 9' 10
CNT 3' 3"
SL 32' 9",….
",…
SL 9' 10
SL 3' 3"
SR 32' 9",…
",…
SR 9' 10
SR 3' 3"
SW 9' 10
",…
SW 3' 3"
",…
EQ BASS BASS +6,...
TREBLE TREBLE +6,
e)
TUNER
AUDIO A/V SYNC SYNC ON
b)
HDMI CTRL HDMI CTRL ON
SYSTEM DIMMER DIM MAX
a)
Para obtener más información, consulte
FM MODE STEREO
NAME IN
DUAL MONO MAIN/SUB
NIGHT MODE NIGHT ON
INPUT MODEf)AUTO
PASS THRU
ARC
SLEEP 2-00-00
AUTO STBY STBY ON
g)
g)h)
,...
BASS 0
BASS -6
…TREBLE 0
…TREBLE -6
MONO
SYNC OFF
MAIN
SUB
NIGHT OFF
OPT
CTRL OFF
ON
AUTO
ARC ON
ARC OFF
DIM MID
DIM OFF
1-30-00
1-00-00
0-30-00
OFF
STBY OFF
,
“2: Realización de la Calibración automática”
(página 26).
b)
xxx representa un canal de altavoz (FL, CNT,
FR, SR, SL, SW).
c)
Este parámetro únicamente está disponible cuando
“CENTER SP” está ajustado en “CENTER YES”.
d)
Este parámetro únicamente está disponible cuando
“SUR SP” está ajustado en “SUR YES”.
e)
Este parámetro únicamente está disponible cuando
la entrada TUNER (sintonizador) está
seleccionada.
f)
Este parámetro únicamente está disponible cuando
la entrada SAT/CATV está seleccionada.
g)
Este parámetro únicamente está disponible cuando
“CTRL HDMI” está ajustado en “CTRL ON”.
h)
Para obtener más información, consulte “Escuchar
el sonido del televisor a través de un cable HDMI
(Canal de Retorno de Audio)” (página 39).
42
ES
Page 93

Menú LEVEL
Es posible ajustar el nivel de cada altavoz para
adaptarlo a sus preferencias.
Para emitir un tono de prueba
desde cada altavoz
Puede emitir un tono de prueba desde los
altavoces siguiendo una secuencia.
• AUTO FL, AUTO CNT, AUTO FR, AUTO
SR, AUTO SL, AUTO SW
•OFF
Si no se emite un tono de prueba a
través de los altavoces
• Es posible que los cables de los altavoces no
estén conectados correctamente.
• Es posible que se haya producido un
cortocircuito en los cables de los altavoces.
Nota
Las señales del tono de prueba no se emiten a través
de la toma HDMI TV OUT (salida HDMI TV).
Para ajustar el nivel de los
altavoces
Puede ajustar el nivel de todos los altavoces
(FL LEVEL, FR LEVEL, CNT LEVEL, SL
LEVEL, SR LEVEL, SW LEVEL) en un
campo de entre –6,0 dB y +6,0 dB en pasos de
0,5 dB.
Disfrutar de sonido Dolby
Digital a un volumen bajo
(D. RANGE)
Reduce el rango dinámico de la pista de
sonido. Es útil para disfrutar de películas con
un volumen bajo.
D. RANGE se aplica únicamente a fuentes
Dolby Digital.
• COMP. MAX: comprime el rango dinámico
totalmente.
• COMP. STD: comprime el rango dinámico
de la forma concebida por el ingeniero de
grabación.
• COMP. AUTO: comprime el rango
dinámico automáticamente.
• COMP. OFF: no comprime el rango
dinámico.
Observación
La compresión del rango dinámico de audio le
permite comprimir el rango dinámico de la pista de
sonido en función de la información del rango
dinámico incluida en la señal Dolby Digital.
“COMP. STD” es el ajuste estándar, pero solo
representa una compresión ligera. Por ello,
recomendamos utilizar el ajuste “COMP. MAX”.
Este ajuste comprime considerablemente el rango
dinámico y permite ver películas a altas horas de la
noche con un volumen bajo. A diferencia de los
limitadores analógicos, los niveles están
predeterminados y ofrecen una compresión muy
natural.
Configuración avanzada
43
ES
Page 94

Menú SPEAKER
Menú TUNER
Es posible ajustar la distancia de los altavoces
conectados a este receptor.
Para ajustar la conexión de los
altavoces
• CENTER (SUR) YES: se selecciona cuando
conecta el altavoz.
• CENTER (SUR) NO: se selecciona cuando
no conecta el altavoz.
Para ajustar la distancia de los
altavoces
Puede ajustar la distancia de los distintos
altavoces (FL DIST, FR DIST, CNT DIST, SL
DIST, SR DIST, SW DIST) entre 3' 3" y 32' 9"
en intervalos de 1 pulg..
Menú EQ
Puede ajustar el ecualizador (nivel de graves y
agudos) de los altavoces frontales entre -6 dB
y +6 dB en intervalos de 1 dB.
xBASS
xTREBLE
Puede configurar el modo de recepción de las
emisoras de FM y el nombre de las emisoras
presintonizadas.
x FM MODE
•STEREO: este receptor descodificará la
señal como señal estéreo cuando la emisora
de radio retransmita en estéreo.
• MONO: este receptor descodificará la señal
como señal mono independientemente del
tipo de emisión.
x NAME IN
Le permite definir el nombre de las emisoras
presintonizadas. Para obtener más
información, consulte “Asignación de nombre
a una emisora presintonizada” (página 33).
Menú AUDIO
Puede configurar los ajustes de audio en
función de sus preferencias.
x A/V SYNC
Le permite retardar la salida de audio para
minimizar el desfase entre la salida de audio y
la aparición de la imagen.
• SYNC ON: se retarda la salida de audio para
minimizar el desfase entre la salida de audio
y la aparición de la imagen.
• SYNC OFF: no se retarda la salida de audio.
Notas
• Es posible que, usando esta función, no pueda
ajustar a la perfección el retardo existente entre el
sonido y la imagen.
• Este parámetro es útil al utilizar una pantalla LCD
grande, un monitor de plasma o un proyector.
• El tiempo de retardo puede variar en función del
formato de audio, el campo de sonido y la distancia
de los altavoces.
44
ES
Page 95

x DUAL MONO
Le permite elegir el idioma que prefiere al
escuchar audio dual en una emisión digital,
cuando esta opción está disponible. Esta
función solo puede utilizarse en las fuentes
Dolby Digital.
• MAIN / SUB: se emite, simultáneamente, el
sonido correspondiente al idioma principal a
través del altavoz frontal izquierdo y el
sonido del idioma secundario a través del
altavoz frontal derecho.
• MAIN: se emite el sonido correspondiente al
idioma principal.
• SUB: se emite el sonido correspondiente al
idioma secundario.
x NIGHT MODE
Le permite disfrutar de un ambiente propio del
cine con niveles de volumen bajos.
• NIGHT ON
• NIGHT OFF
Observación
Cuando esta función está activada, aumentan los
niveles de graves, agudos y efectos, y “D. RANGE”
se ajusta automáticamente en “COMP. MAX”.
x INPUT MODE
Le permite seleccionar el ajuste del modo de
entrada de audio al conectar un sintonizador de
satélite o un decodificador de televisión por
cable a la toma HDMI IN y a la toma de
entrada digital óptica del receptor con la
entrada SAT/CATV seleccionada.
• AUTO: da prioridad a las señales de audio
HDMI si se han realizado las dos conexiones
digitales (tanto HDMI como óptica).
• OPT: especifica las señales de audio digital
enviadas a la toma SAT/CATV OPT IN
(entrada SAT/CATV OPT).
Menú HDMI
Puede configurar varias opciones en los
ajustes HDMI.
x CTRL HDMI
Le permite activar o desactivar la función
Control por HDMI. Para obtener más
información, consulte “Funciones de
“BRAVIA” Sync” (página 36).
x PASS THRU
Le permite transmitir las señales HDMI al
televisor aunque el receptor se encuentre en el
modo en espera.
• ON: el receptor emite continuamente señales
HDMI desde la toma HDMI TV OUT
(salida HDMI TV) del receptor.
• AUTO: cuando se enciende el televisor
mientras que el receptor está en el modo de
espera, el receptor emite señales HDMI
desde la toma HDMI TV OUT (salida
HDMI TV) del receptor. Sony recomienda
este ajuste si utiliza un televisor Sony
compatible con “BRAVIA” Sync. Este
ajuste ahorra energía en el modo en espera,
en comparación con el ajuste “ON”.
Notas
• La función de ahorro de energía no funciona en
algunos televisores compatibles con “BRAVIA”
Sync. En este caso, ajuste “PASS THRU” en
“ON”.
• En función del equipo, deben pasar unos instantes
antes de que se emita imagen o sonido.
Configuración avanzada
45
ES
Page 96

Menú SYSTEM
Puede personalizar los ajustes del receptor.
Información adicional
x DIMMER
Le permite ajustar el brillo del visor en tres
niveles.
•DIM MAX
•DIM MID
•DIM OFF
x SLEEP
Le permite configurar el receptor para que se
apague automáticamente cuando haya
transcurrido el tiempo especificado.
• 2-00-00
• 1-30-00
• 1-00-00
• 0-30-00
•OFF
Al utilizar el Temporizador para desconexión,
se ilumina el indicador “SLEEP” en el visor.
Observación
Para consultar el tiempo que falta para que se apague
el receptor, seleccione “SLEEP” con AMP MENU.
El tiempo restante aparecerá en el visor. Para
cancelar el Temporizador para desconexión,
seleccione “OFF”.
x AUTO STBY
Le permite configurar el receptor para que
acceda al modo en espera automáticamente
cuando no accione el receptor o cuando no
reciba señales de entrada.
• STBY ON: activa el modo en espera cuando
han transcurrido unos 30 minutos.
• STBY OFF: no activa el modo en espera.
Notas
• Esta función no se activa cuando la entrada
TUNER (sintonizador) está seleccionada.
• Si utiliza el modo en espera automático y el
Temporizador para desconexión al mismo tiempo,
el Temporizador para desconexión tiene prioridad.
Precauciones
Seguridad
Si algún objeto sólido o líquido accede a la
carcasa, desenchufe el receptor y deje que
personal cualificado lo revise antes de seguir
utilizándolo.
Fuentes de alimentación
• Antes de utilizar el receptor, compruebe que
el voltaje de funcionamiento es idéntico al
del suministro eléctrico local.
El voltaje de funcionamiento está indicado
en la placa de características de la parte
posterior del receptor.
• Aunque haya apagado la unidad, ésta
continuará recibiendo suministro eléctrico
de CA mientras esté conectada a la toma de
corriente de CA.
• Si no va a utilizar el receptor durante un
periodo de tiempo prolongado, asegúrese de
desconectarlo de la toma de corriente de
pared. Para desconectar el cable de
alimentación de CA, tire del enchufe; nunca
tire del cable.
• (Solo el modelo de Estados Unidos)
Uno de los contactos del enchufe es más
ancho que el otro, por motivos de seguridad,
y solo podrá introducirse en la toma de
corriente de pared en un sentido. Si no puede
insertar el enchufe totalmente en la toma,
póngase en contacto con su distribuidor.
• El cable de alimentación de CA solo puede
sustituirse en un establecimiento de servicio
técnico cualificado.
46
ES
Page 97

Acumulación de calor
Que el receptor se caliente durante el
funcionamiento no indica un fallo de
funcionamiento. Si utiliza este receptor de
forma continua a niveles de volumen elevados,
la temperatura aumentará considerablemente
en las partes superior, laterales e inferior de la
carcasa. Para evitar quemarse, no toque la
carcasa.
Instalación
• Coloque el receptor en un lugar con
ventilación adecuada para evitar que se
acumule calor y prolongar su vida útil.
• No coloque el receptor cerca de fuentes de
calor, ni en lugares expuestos a la luz solar
directa, polvo excesivo o golpes mecánicos.
• No coloque ningún objeto sobre la carcasa
que pueda bloquear los orificios de
ventilación y ocasionar fallos de
funcionamiento.
• No coloque el receptor cerca de equipos
tales como un televisor, una videograbadora
o una platina de casete. Si está utilizando el
receptor junto con un televisor, una
videograbadora o una platina de casete y se
coloca muy cerca de dichos equipos, es
posible que se produzca ruido y que se
deteriore la calidad de la imagen. Esto es
especialmente probable cuando se utiliza
una antena interior. Por lo tanto, se
recomienda utilizar una antena exterior.
• Tenga precaución si coloca el receptor o los
altavoces sobre superficies con un
tratamiento especial (con cera, aceite,
pulimento, etc.), ya que podrían aparecer
manchas o producirse decoloración.
Si detecta irregularidades en
los colores que muestra una
pantalla de televisión cercana
El altavoz central está blindado
magnéticamente para permitir su instalación
cerca de un conjunto de televisión. Sin
embargo, en determinados tipos de aparatos de
televisión podrían aparecer ciertas
irregularidades de color. Dado que los
altavoces frontales, los altavoces de sonido
envolvente y el altavoz de graves no están
magnéticamente blindados, se recomienda
colocarlos en una posición más alejada del
aparato de televisión (página 16).
Si se perciben irregularidades
en los colores...
Apague el televisor y, transcurridos entre 15 y
30 minutos, enciéndalo de nuevo.
Si vuelven a aparecer
irregularidades en los colores...
Aleje el altavoz aún más del televisor.
Si se producen acoples
Cambie la posición de los altavoces o
desactive el volumen del receptor.
Limpieza
• Limpie la carcasa, el panel y los controles
con un paño suave humedecido. No utilice
ningún tipo de almohadilla abrasiva,
limpiador en polvo, estropajos ni esponjas.
• Si las manchas son de aceite o de huellas
digitales, exhale su aliento sobre la
superficie y pase un paño suave seco.
Información adicional
Funcionamiento
Antes de conectar otros equipos, asegúrese de
apagar y desenchufar el receptor.
Si tiene alguna pregunta o problema
relacionado con el receptor, consulte con el
distribuidor Sony más cercano.
47
ES
Page 98

Solución de problemas
Si experimenta alguna de las siguientes
dificultades cuando utilice el receptor, utilice
esta guía de solución de problemas para
solucionar el problema. Si el problema
persiste, consulte con el distribuidor Sony más
cercano. Tenga en cuenta que si el personal del
servicio técnico cambia algunas piezas durante
la reparación, es posible que dichas partes no
le sean devueltas.
Alimentación
El receptor se apaga automáticamente.
• La opción “AUTO STBY” está fijada en
“STBY ON” (página 46).
• La función de temporizador para
desconexión está activa (página 46).
Sonido
No se reproduce el sonido Dolby
Digital o DTS multicanal.
• Compruebe que el DVD, etc. que está
reproduciendo está grabado en formato
Dolby Digital o DTS.
• Si conecta un lector de DVD, etc. a las
tomas de entrada digital del receptor,
compruebe el ajuste de salida de audio del
componente conectado.
• Utilice el menú del televisor para
seleccionar Sistema de audio como
configuración de los altavoces.
• Asegúrese de que “CTRL HDMI” esté
ajustado en “CTRL OFF” en el menú
HDMI.
No se puede obtener el efecto de
sonido envolvente.
• Asegúrese de que ha seleccionado el
campo de sonido para el modo película o
música (página 34).
• Los campos de sonido no funcionan al
recibir DTS-HD Master Audio, DTS-HD
High Resolution Audio o Dolby TrueHD
con una frecuencia de muestreo superior a
48 kHz.
No hay sonido, o el sonido es muy bajo
en los altavoces especificados.
• Asegúrese de que ha conectado las tomas L
y R del equipo analógico. Los equipos
analógicos requieren la conexión de las
tomas L y R. Utilice un cable de audio (no
suministrado).
• Compruebe que los altavoces estén
conectados correctamente.
• Compruebe que el altavoz de graves está
conectado correcta y firmemente.
• Ajuste el nivel de los altavoces (página 43).
No se emite sonido de un equipo
específico.
• Compruebe que el equipo está conectado
correctamente a las tomas de entrada de
audio correspondientes a dicho equipo.
• Compruebe que los cables utilizados para
realizar la conexión están completamente
insertados en las tomas tanto del receptor
como del equipo.
• Compruebe que el equipo está conectado
correctamente a la toma HDMI
correspondiente a dicho equipo.
• Asegúrese de que “CTRL HDMI” esté
ajustado en “CTRL ON” en el menú
HDMI.
• No es posible escuchar un Super Audio
CD mediante una conexión HDMI.
• En función del equipo de reproducción, es
posible que deba configurar los ajustes
HDMI del equipo. Consulte el manual de
instrucciones suministrado con cada
equipo.
• Asegúrese de utilizar un cable HDMI de
alta velocidad al visualizar imágenes o
escuchar sonido, sobre todo durante la
transmisión 1080p, Deep Colour o 3D.
48
ES
Page 99

No se emite sonido,
independientemente del equipo
seleccionado, o solo se escucha un
sonido muy bajo.
• Compruebe que todos los cables de
conexión están insertados en las tomas de
entrada/salida de las tomas
correspondientes del receptor, los
altavoces y el equipo.
• Compruebe que el receptor y todos los
equipos están encendidos.
• Compruebe que el control MASTER
VOLUME (volumen maestro) no esté
ajustado en “VOL MIN”.
• Pulse MUTING (silenciar) para cancelar
la función de silenciamiento.
• Compruebe que ha seleccionado el equipo
correcto con los botones de entrada.
• El dispositivo protector del receptor se ha
activado. Apague el receptor, elimine el
problema de cortocircuito y vuelva a
encenderlo.
• Compruebe que el ajuste INPUT MODE
es correcto para la entrada SAT/CATV.
Se produce un zumbido o ruido
considerable.
• Compruebe que los altavoces y los
equipos están conectados correctamente.
• Compruebe que los cables de conexión
estén alejados de un transformador o
motor y alejados al menos 3 metros de un
televisor o luz fluorescente.
• Aleje los equipos de audio del televisor.
• Los enchufes y las tomas están sucios.
Límpielos con un paño ligeramente
humedecido con alcohol.
No se emite sonido de fuentes digitales
(a través de la toma de entrada
OPTICAL).
• Compruebe que el ajuste de INPUT
MODE esté establecido en “OPT” para la
entrada SAT/CATV (página 45).
• Ajuste “ARC” en “ARC OFF” si no se
emite sonido a través de la toma TV OPT
IN (entrada TV OPT) durante la recepción
de señales de televisor.
Cuando el receptor está en el modo de
espera, el televisor no emite sonido.
• Cuando el receptor entra en el modo de
espera, el sonido se emite desde el equipo
HDMI seleccionado la última vez que
apagó el receptor. Si está utilizando otro
equipo, inicie la reproducción del equipo y
efectúe la operación Reproducción
mediante una pulsación, o apague el
receptor para seleccionar el equipo HDMI
que desea utilizar.
• Asegúrese de que “PASS THRU” está
fijado en “ON” en el menú HDMI si
conecta un equipo no compatible con
“BRAVIA” Sync al receptor (página 45).
Información adicional
continúa
49
ES
Page 100

No se emite sonido del receptor ni del
altavoz del televisor.
• Compruebe que el equipo está conectado
correctamente a la toma HDMI
correspondiente a dicho equipo.
• Asegúrese de que “CTRL HDMI” esté
ajustado en “CTRL ON” en el menú HDMI.
• No es posible escuchar un Super Audio CD
mediante una conexión HDMI.
• En función del equipo de reproducción, es
posible que deba configurar los ajustes
HDMI del equipo. Consulte el manual de
instrucciones suministrado con cada equipo.
• Asegúrese de utilizar un cable HDMI de alta
velocidad al visualizar imágenes o escuchar
sonido, sobre todo durante la transmisión
Deep Colour o 3D.
• Asegúrese de que el televisor es compatible
con la función de Control de audio del
sistema.
• Si no puede escuchar el sonido de un equipo
conectado al receptor con la entrada de TV
seleccionada
– Asegúrese de cambiar la entrada del
receptor a HDMI si desea ver un programa
en el equipo conectado al receptor a través
de la conexión HDMI.
– Cambie el canal del televisor si desea ver
una emisión de televisión.
– Asegúrese de seleccionar el equipo o la
entrada que desee al ver un programa
desde el equipo conectado al televisor.
Consulte esta operación en el manual de
instrucciones del televisor.
No hay sonido del equipo conectado al
DOCK FOR iPod/iPhone.
• Ajuste el volumen del receptor.
• El DOCK FOR iPod/iPhone y/o el equipo
no están conectados correctamente.
Apague el receptor y vuelva a conectar el
DOCK FOR iPod/iPhone y/o el equipo.
Imagen
No hay imagen en el televisor.
• Asegúrese de que ha conectado la salida de
vídeo de su equipo de vídeo al televisor.
• Aleje los equipos de audio del televisor.
• Asegúrese de que ha conectado la salida de
vídeo de su DOCK FOR iPod/iPhone al
televisor.
• Compruebe que el equipo está conectado
correctamente a la toma HDMI
correspondiente a dicho equipo.
• En función del equipo de reproducción, es
posible que deba configurar el equipo.
Consulte el manual de instrucciones
suministrado con cada equipo.
• Asegúrese de utilizar un cable HDMI de
alta velocidad al visualizar imágenes o
escuchar sonido, sobre todo durante la
transmisión 1080p, Deep Colour o 3D.
Cuando el receptor está en el modo de
espera, el televisor no emite imagen.
• Cuando el receptor entra en el modo de
espera, la imagen se emite desde el equipo
HDMI seleccionado la última vez que
apagó el receptor. Si está utilizando otro
equipo, inicie la reproducción del equipo y
efectúe la operación Reproducción
mediante una pulsación, o apague el
receptor para seleccionar el equipo HDMI
que desea utilizar.
• Asegúrese de que “PASS THRU” está
fijado en “ON” en el menú HDMI si
conecta un equipo no compatible con
“BRAVIA” Sync al receptor (página 45).
No hay imagen 3D en el televisor.
• En función del televisor o el equipo de
vídeo, es posible que no pueda visualizar
imágenes en 3D.
50
ES
 Loading...