

Page 1
Home Theatre System
Operating Instructions
GB
http://www.sony.net/
使用說明書
CT
©2018 Sony Corporation Printed in China 4-735-136-31(1)
HT-S500RF/S700RF
Page 2

WARNING
Do not install the appliance in a
confined space, such as a bookcase or
built-in cabinet.
To reduce the risk of fire, do not cover
the ventilation opening of the appliance
with newspapers, tablecloths, curtains,
etc.
Do not expose the appliance to naked
flame sources (for example, lighted
candles).
To reduce the risk of fire or electric
shock, do not expose this appliance to
dripping or splashing, and do not place
objects filled with liquids, such as vases,
on the appliance.
The unit is not disconnected from the
mains as long as it is connected to the
AC outlet, even if the unit itself has been
turned off.
As the main plug is used to disconnect
the unit from the mains, connect the
unit to an easily accessible AC outlet.
Should you notice an abnormality in the
unit, disconnect the main plug from the
AC outlet immediately.
Do not expose batteries or appliances
with battery-installed to excessive heat,
such as sunshine and fire.
Indoor use only.
Recommended cables
Properly shielded and grounded cables
and connectors must be used for
connection to host computers and/or
peripherals.
For the Bar Speaker
The nameplate is located on the bottom
of the Bar Speaker.
GB
2
Page 3

Table of Contents
About These Operating
Instructions ..............................4
What’s in the Box ..........................5
What You Can Do with the
System .....................................6
Guide to Parts and Controls .......... 7
Connecting to a TV or Audio
Device
Connecting a TV
with an HDMI
Cable and/or
Optical Cable
Connecting an Audio Device with an
Analog Audio Cable ...............11
Preparing for Using the
System
Mounting the Bar Speaker and
Surround Speakers on a
Wall .........................................12
Operating the System Using the
Remote Control ..................... 15
When the TV Remote Control does
not Work ................................ 15
Listening to the Sound
Listening to a TV and Other
Devices .................................. 16
Listening to Music on a USB
Device .....................................17
Selecting the Sound Effect
Adjusting the Sound .................... 19
Adjusting the Volume of the
Subwoofer .............................20
Startup Guide
(separate
document)
Listening to Music/Sound
with the BLUETOOTH®
Function
Listening to Music from a Mobile
Device .................................... 21
Listening to Music on the Mobile
Device with Sony | Music
Center ....................................23
Using the Various Functions
Using the Setup Display ..............24
Using the Control for HDMI
Function .................................27
Notes on HDMI Connections .......28
Saving Power Consumption ........29
Troubleshooting
Troubleshooting ..........................30
Resetting the System ..................35
Additional Information
Specifications ...............................36
Playable Types of Files
(USB Input) .............................38
Supported Input Audio Formats
(HDMI OUT (TV (ARC)) or TV IN
(OPTICAL)) ..............................38
On BLUETOOTH
Communication .....................39
Precautions ..................................40
GB
GB
3
Page 4

About These Operating
Instructions
•The instructions in these Operating
Instructions describe the controls on
the remote control.
•Some illustrations are presented as
conceptual drawings, and may be
different from the actual products.
•The default settings are underlined on
each feature description.
•The text enclosed in double quotation
mark (“--”) appears in the front panel
display.
GB
4
Page 5
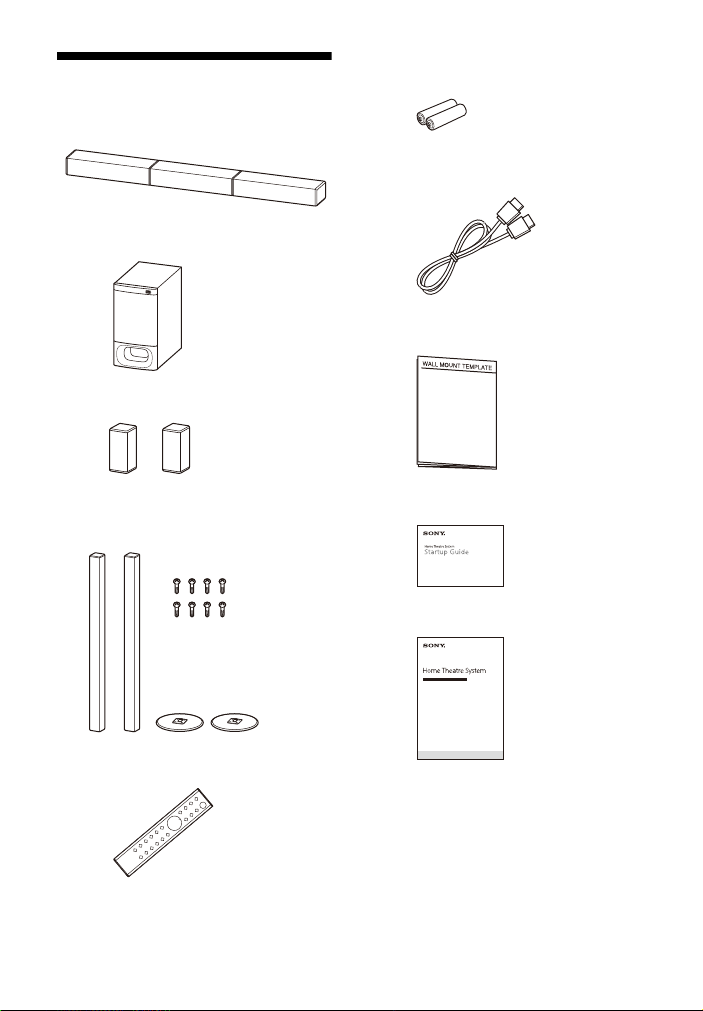
What’s in the Box
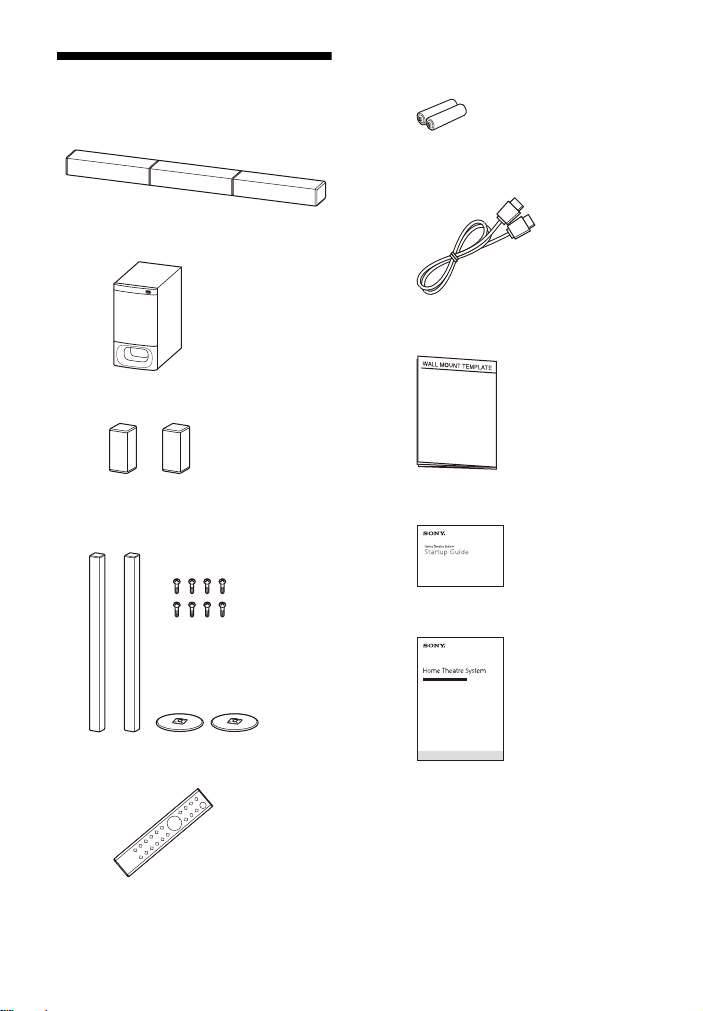
•Bar Speaker (1)
•Subwoofer (1)
• Surround speaker (HT-S500RF only) (2)
• R03 (size AAA) battery (2)
•HDMI cable (1)
• WALL MOUNT TEMPLATE (1)
• S urround speaker (2), speaker base (2),
and screw (8) (HT-S700RF only)
• Remote control (1)
•Startup Guide
• Operating Instructions
GB
5
Page 6
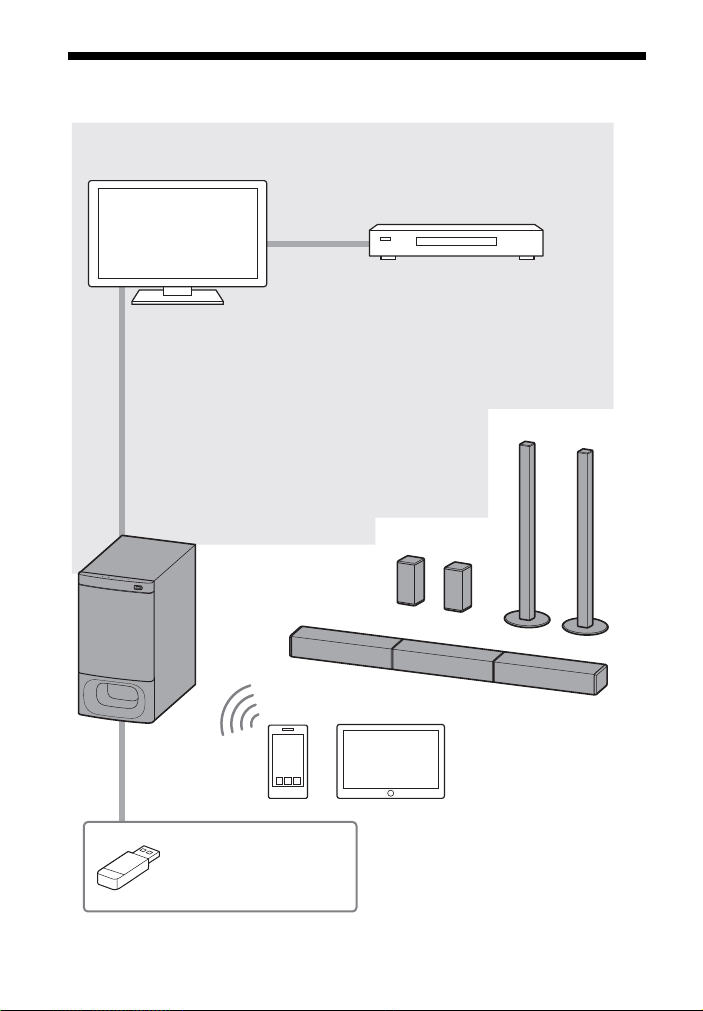
What You Can Do with the System
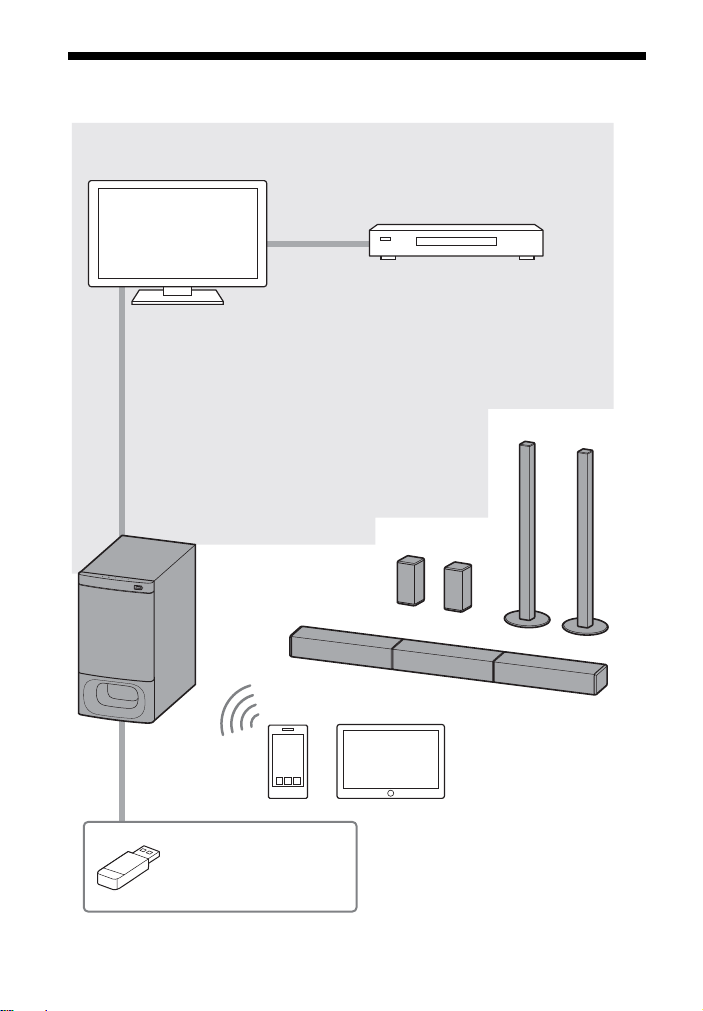
“Listening to a TV and Other Devices”
(page 16)
Blu-ray Disc™ player, cable
box, satellite box, etc.
Connecting the TV
(refer to “Startup Guide” (separate document) or
“Connecting an Audio Device with an Analog
Audio Cable” (page 11))
“Using the Control for HDMI Function”
(page 27)
“Listening to Music
on a USB Device”
(page 17)
“Listening to Music
from a Mobile Device”
(page 21)
“Listening to Music on
the Mobile Device
with Sony | Music
Center” (page 23)
HT-S500RF
HT-S700RF
GB
6
Page 7
Guide to Parts and Controls
Details are omitted from the illustrations.
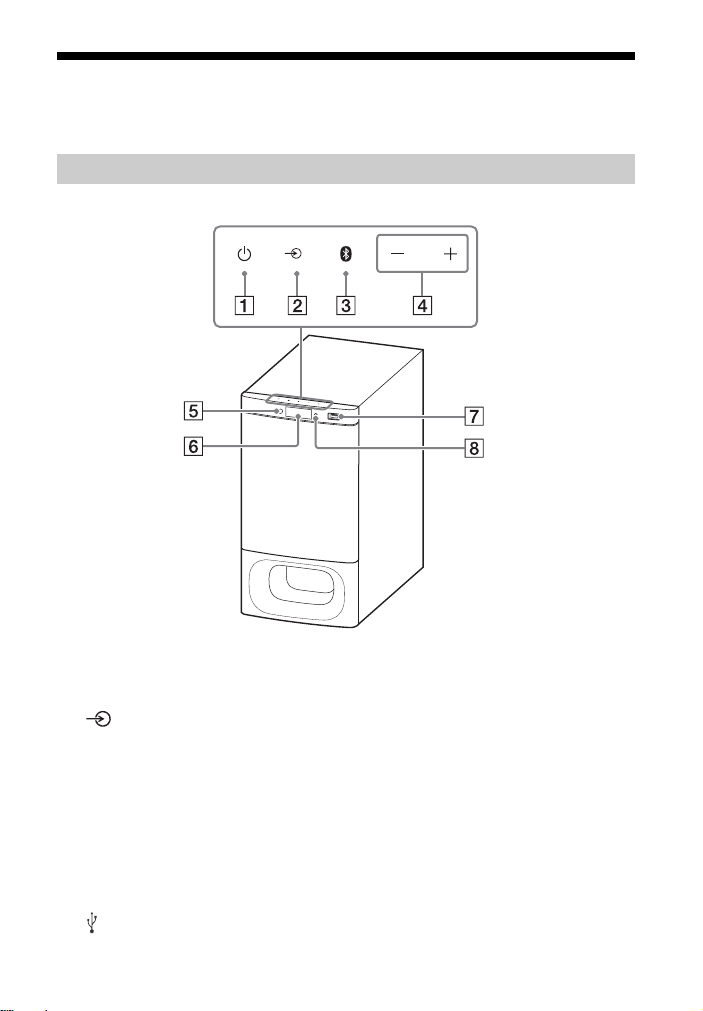
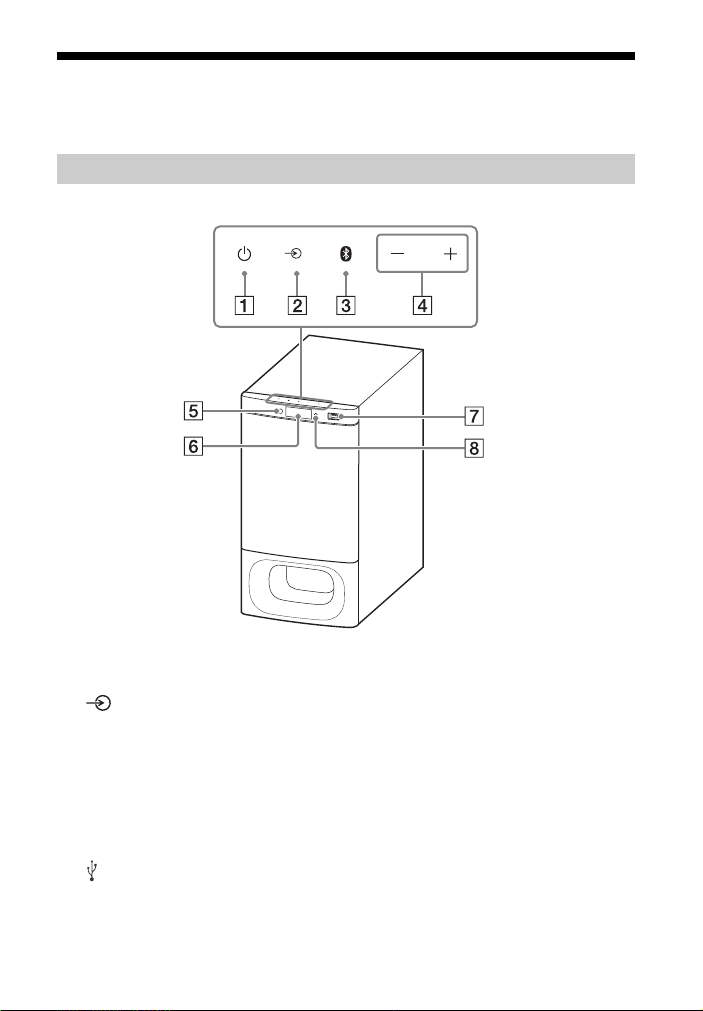
Subwoofer
Front
(power) button
Turns on the system or sets it to
standby mode.
(input select) button
(page 16)
BLUETOOTH button (page 21)
+/– (volume) buttons
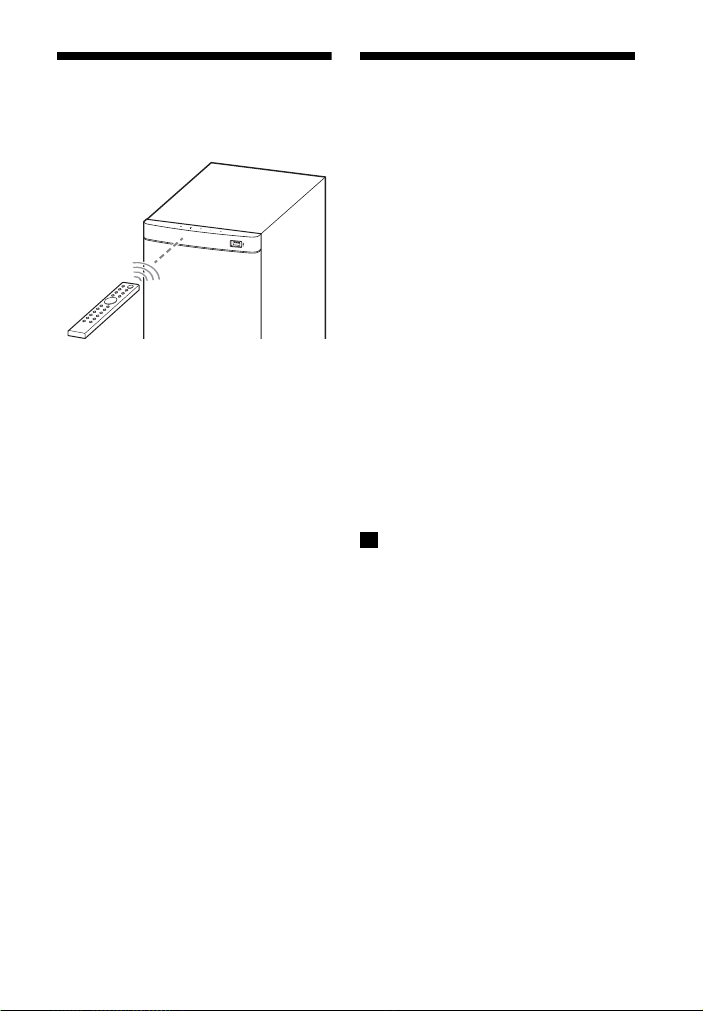
Remote control sensor (page 15)
Point the remote control at the
remote control sensor to operate
the system.
Front panel display
(USB) port (page 17)
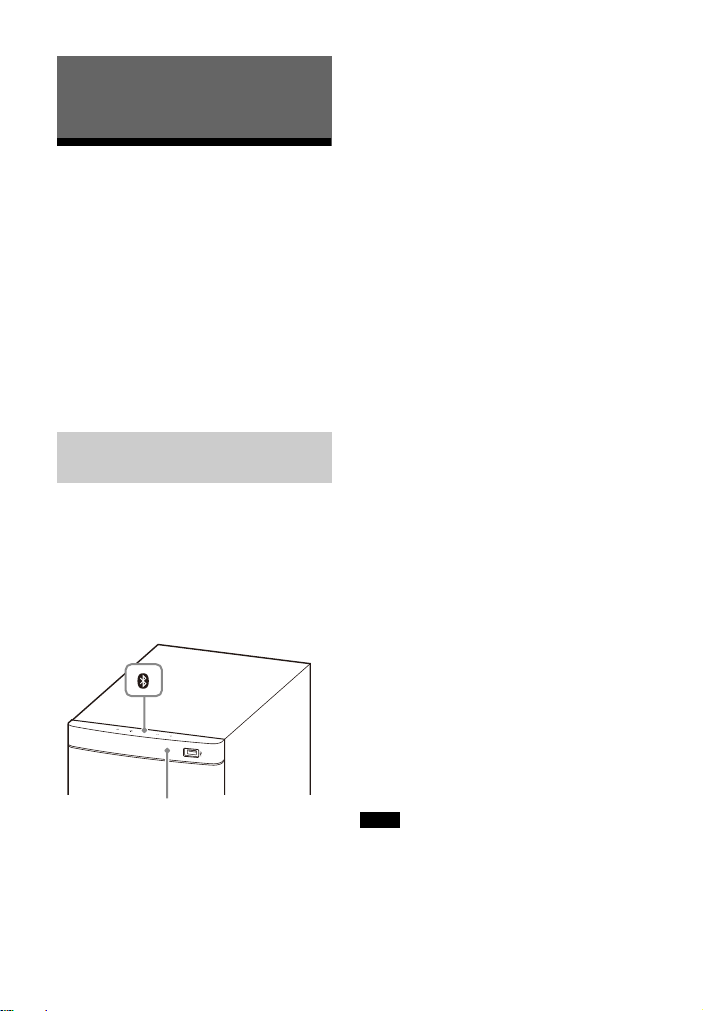
BLUETOOTH indicator
– Lights in blue: BLUETOOTH
connection is established (the
BLUETOOTH input is selected).
– Flashes quickly in blue: While
waiting for connection with a
device.
– Flashes in blue: While
reconnecting or performing
pairing.
GB
7
Page 8
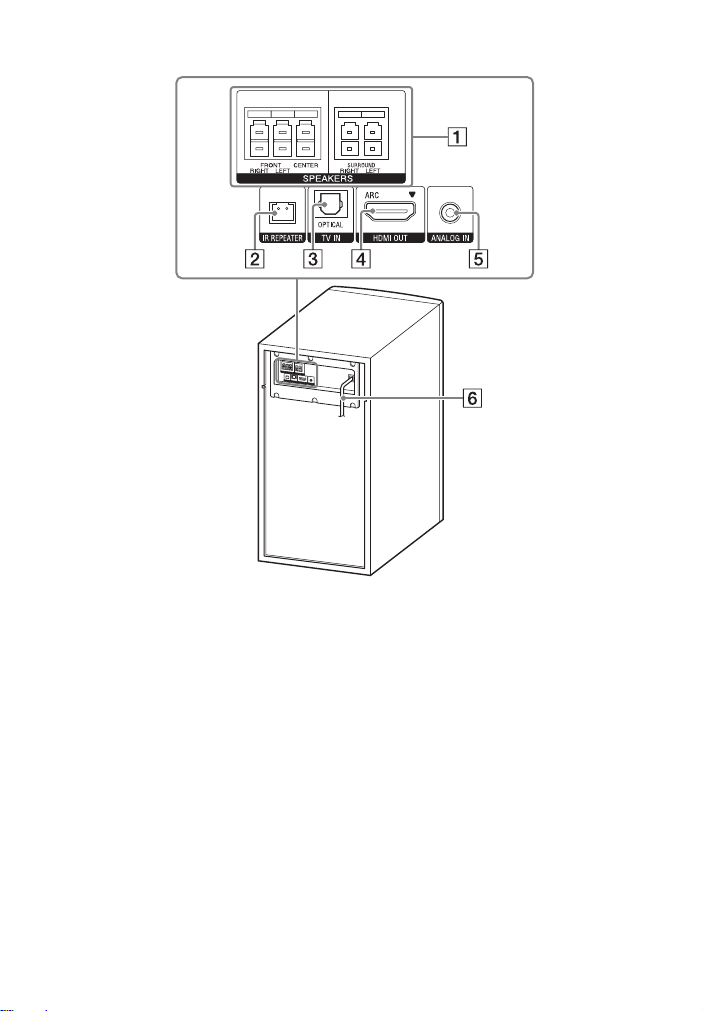
Rear
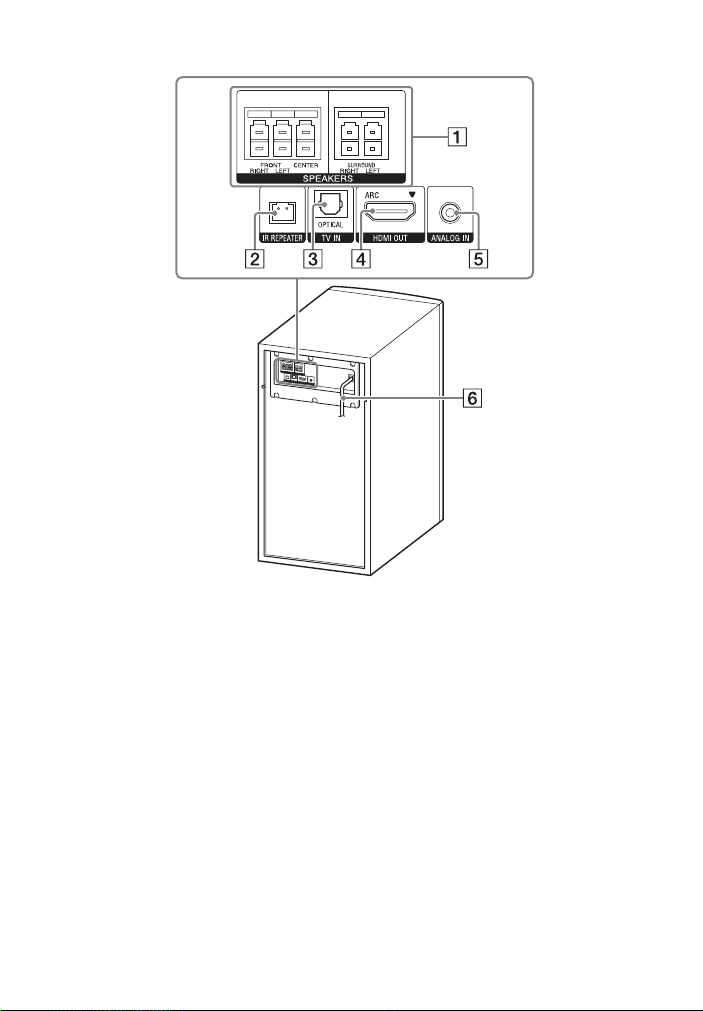
SPEAKERS jacks
IR REPEATER jack
TV IN (OPTICAL) jack
HDMI OUT (ARC) jack
Connect a TV that has an HDMI
input jack with an HDMI cable.
The system is compatible with
Audio Return Channel (ARC). ARC
is the function that sends TV
sou nd to an AV devi ce su ch as the
system from the TV’s HDMI jack.
GB
8
ANALOG IN jack (page 11)
AC power cord (mains lead)
Page 9
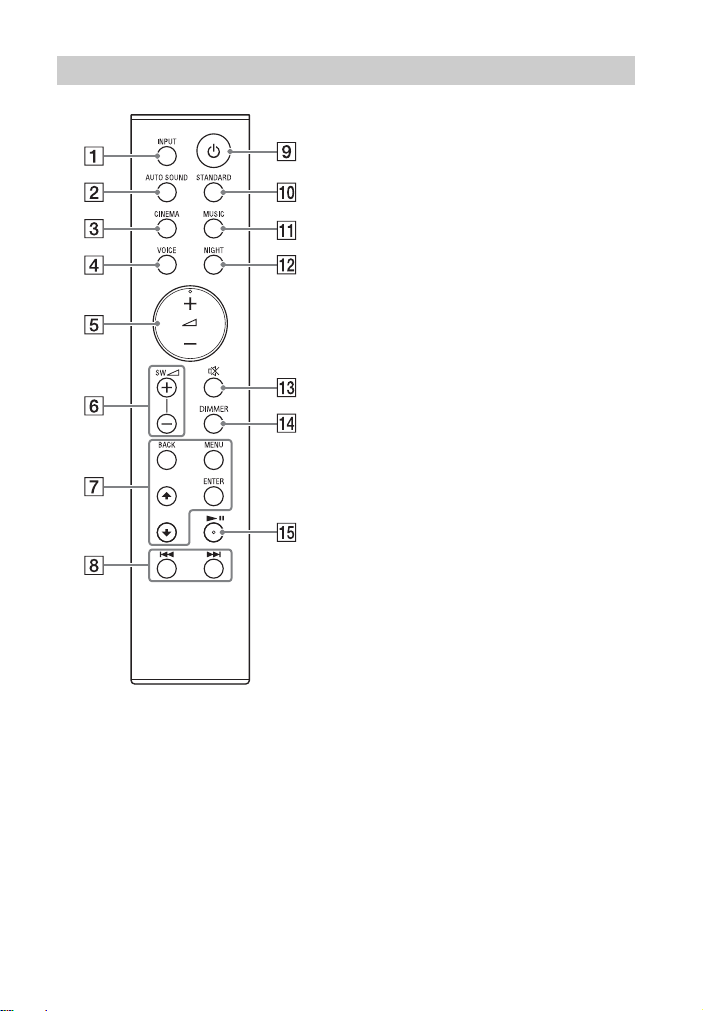
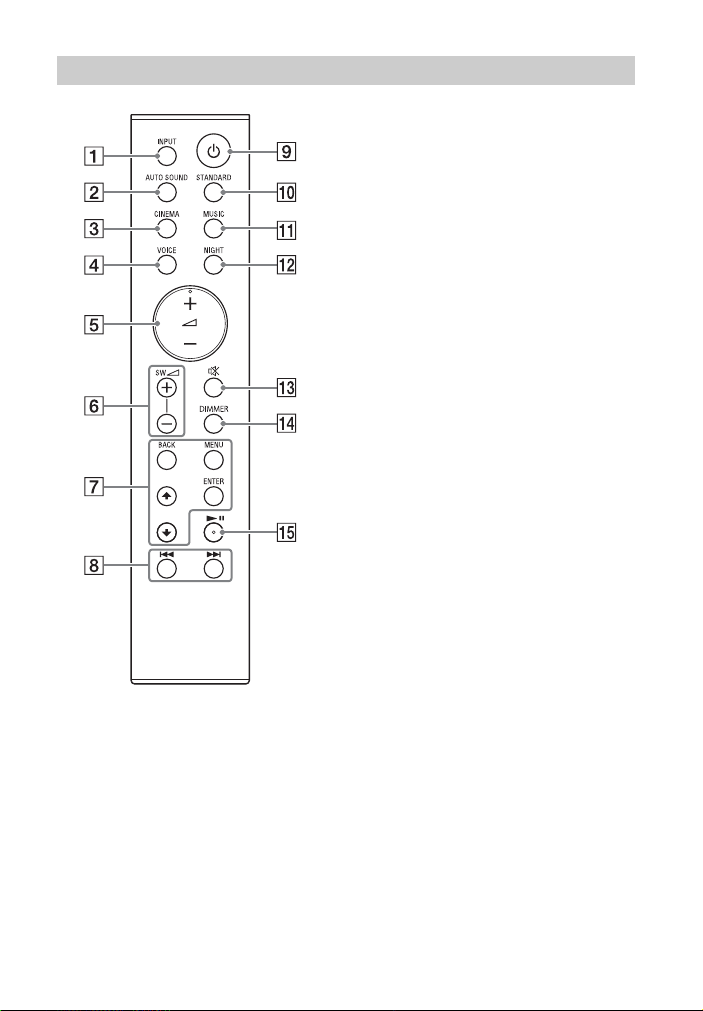
Remote Control
INPUT (page 16)
Selects the input source.
AUTO SOUND (page 19)
Selects AUTO SOUND for the sound
effect.
CINEMA (page 19)
Selects CINEMA for the sound
effect.
VOICE (page 19)
Turns on/off the voice mode.
(volume) +*/–
Adjusts the volume.
SW (subwoofer volume) +/–
Adjusts the subwoofer volume.
MENU (page 24)
Turns on/off the menu in the front
panel display.
/ (page 17, 24)
Selects the menu items.
Selects the content on the TV screen
for USB playback.
ENTER (page 17, 24)
Enters the selection.
Plays the content that is selected by
/ for USB playback.
BACK (page 17, 24)
Returns to the previous display.
Stops USB playback.
/ (previous/next)
(page 17, 21)
Press to select the previous/next
track or file.
Hold down to search backward or
forward.
(power)
Turns on the system or sets it to
standby mode.
STANDARD (page 19)
Selects STANDARD for the sound
effect.
MUSIC (page 19)
Selects MUSIC for the sound effect.
NIGHT (page 19)
Turns on/off the night mode.
GB
9
Page 10

(muting)
Mutes the sound temporarily.
Pressing the button while muting
cancels muting.
DIMMER
Adjusts the brightness of the front
panel display.
“BRGHT” “DARK” “OFF”
• The front panel display is turned
off when “OFF” is selected. It turns
on automatically when you
operate the system, then turns off
again if you do not operate the
system for several seconds.
However, in some cases, the front
panel display may not turn off. In
this case, the brightness of the
front panel display is same as
“DARK.”
(play/pause)* (page 17, 21)
Plays, pauses, or resumes playback.
*The + and buttons have a tactile
dot. Use it as a guide during operation.
About the replacement of
batteries for the remote control
When the system does not respond by
operating with the remote control,
replace two batteries with new
batteries.
Use R03 (size AAA) manganese
batteries for replacement.
10
GB
Page 11
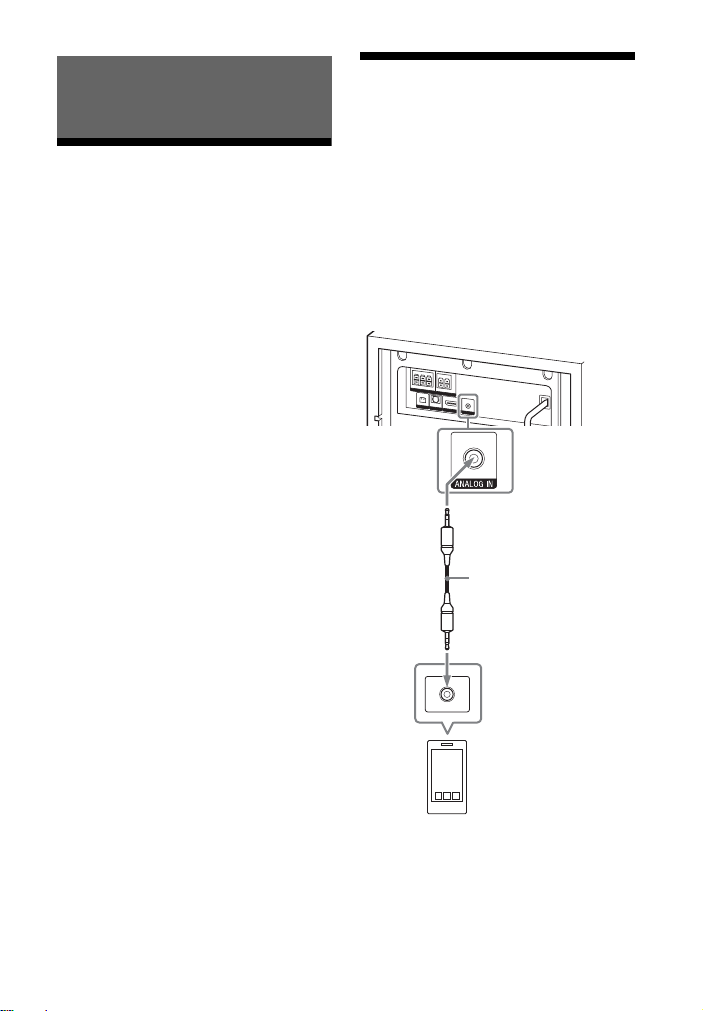
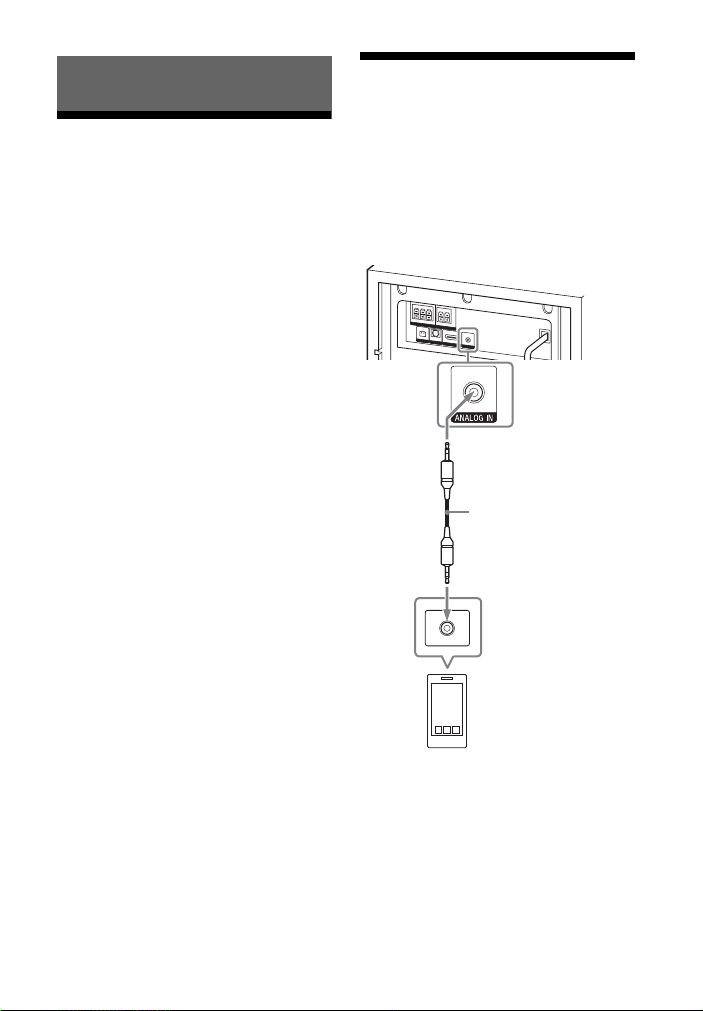
Connecting to a TV or Audio
Smartphone,
WALKMAN®, other
audio devices, etc.
Analog
audio out
Analog audio cable
(not supplied)
Device
Connecting a TV with an
HDMI Cable and/or
Optical Cable
Refer to Startup Guide (separate
document).
Connecting an Audio
Device with an Analog
Audio Cable
To connect portable audio devices such
as smartphones and WALKMAN® to the
system, connect them via the ANALOG
IN jack on the system.
For listening to the connected device,
see “Listening to a TV and Other
Devices” (page 16).
GB
11
Page 12
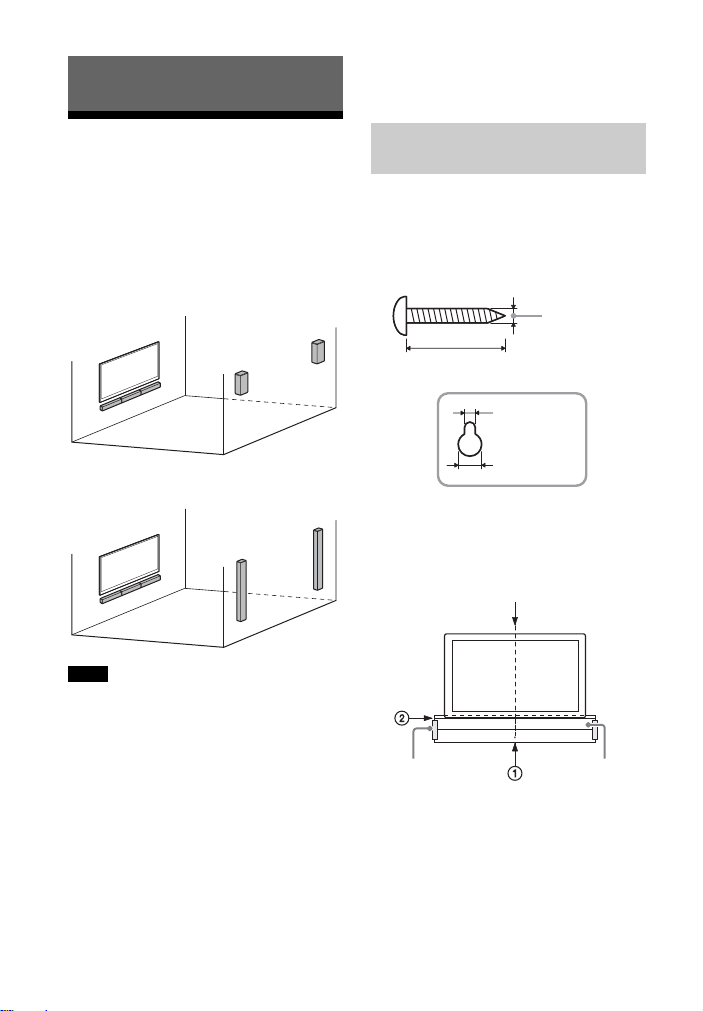
Preparing for Using the System
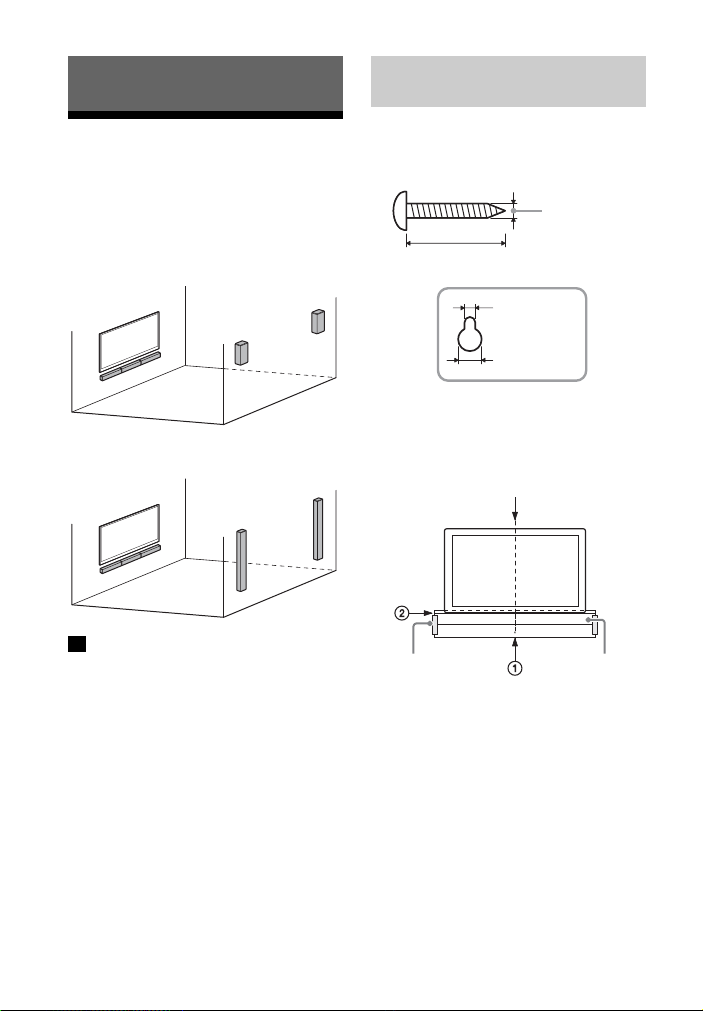
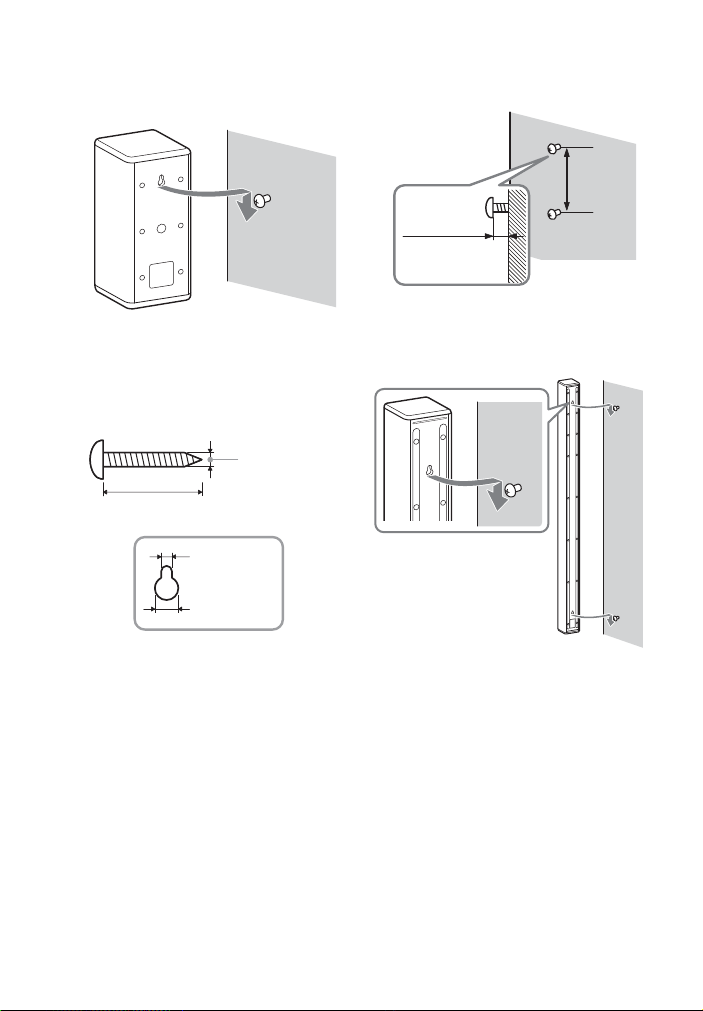
Hole on the rear of the Bar Speaker
4mm
More than 30 mm
5 mm
10 mm
Center of the TV
WALL MOUNT
TEMPLATE
Adhesive tape,
etc.
installation, insufficient wall strength,
improper screw installation or natural
disaster, etc.
Mounting the Bar
Speaker and Surround
Speakers on a Wall
You can mount the Bar Speaker and
surround speakers on a wall.
HT-S500RF
HT-S700RF
Notes
• Prepare screws (not supplied) that are
suitable for the wall material and
strength. As a plasterboard wall is
especially fragile, attach the screws
securely in the wall beam. Install the
speakers horizontally, hung by screws in
studs in a continuous flat section of the
wall.
• Have the installation done by a Sony
dealer or licensed contractor and pay
special attention to safety during the
installation.
• Sony shall not be held responsible for
accidents or damage caused by improper
Mounting the Bar Speaker
on a Wall
1 Prepare two screws (not supplied)
that are suitable for the wall
mount holes on the rear of the Bar
Speaker.
2 Stick WALL MOUNT TEMPLATE
(supplied) on a wall.
1 Align TV CENTER LINE () of
WALL MOUNT TEMPLATE with the
center line of your TV.
2 Align TV BOTTOM LINE () of
WALL MOUNT TEMPLATE with the
bottom of your TV, then stick
GB
12
Page 13
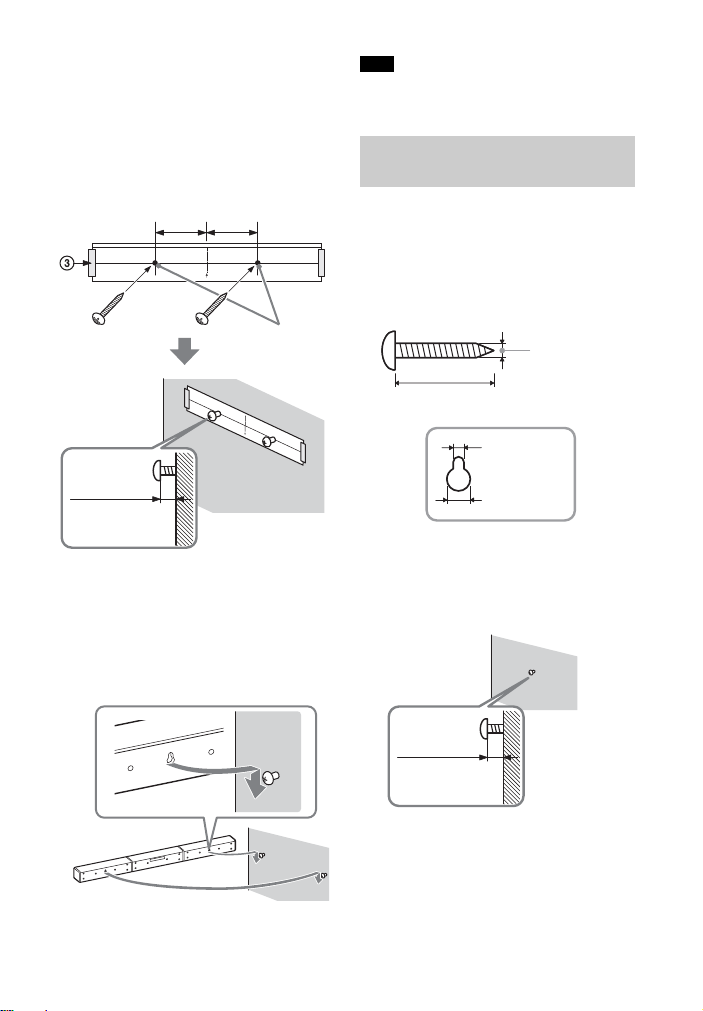
WALL MOUNT TEMPLATE on a
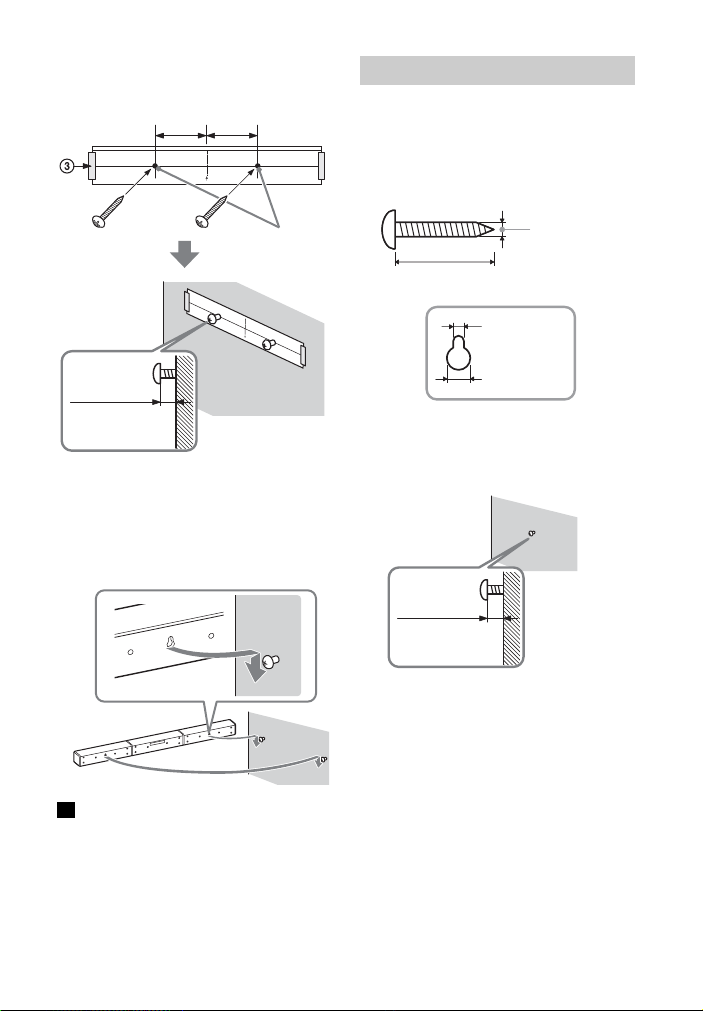
Screws
Marks
6 mm to
7mm
297.5 mm
297.5 mm
Hole on the rear of the surround speaker
4mm
More than 30 mm
5 mm
10 mm
8 mm to
9mm
wall by using a commercially
available adhesive tape, etc.
3 Fasten the screws into the marks
on SCREW LINE () of WALL
MOUNT TEMPLATE as the
illustration below.
Note
When sticking WALL MOUNT TEMPLATE,
smooth it out fully.
Mounting the Surround
Speakers on a Wall
For HT-S500RF
1 Prepare a screw (not supplied) for
each speaker that is suitable for
the wall mount hole on the rear of
the surround speaker.
4 Remove WALL MOUNT TEMPLATE.
5 Hang the Bar Speaker on the
screws.
Align the holes of the rear of the Bar
Speaker with the screws, then hang
the Bar Speaker on the two screws.
2 Fasten the screw in the wall.
The screw should protrude as
illustration.
13
GB
Page 14
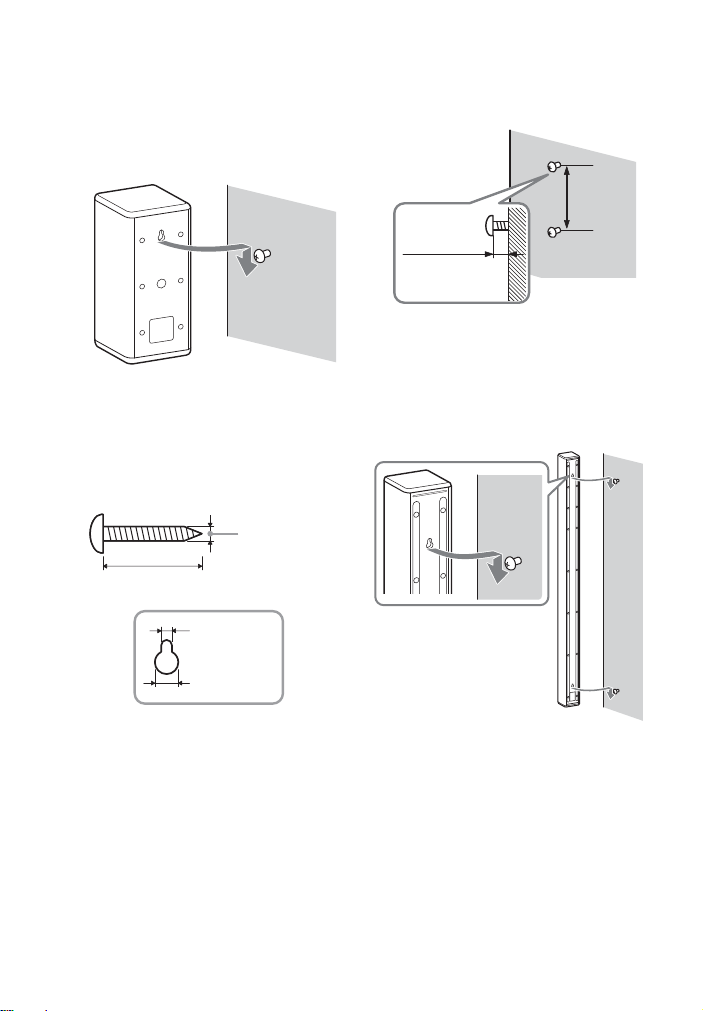
3 Hang the surround speaker on the
Hole on the rear of the surround speaker
4mm
More than 30 mm
5 mm
10 mm
1,000 mm
8 mm to
9mm
screw.
Align the hole of the rear of the
surround speaker with the screw,
then hang the surround speaker on
the screw.
For HT-S700RF
1 Prepare two screws (not supplied)
for each speaker that are suitable
for the wall mount holes on the
rear of the surround speaker.
2 Fasten the screws in the wall.
The screw should protrude as
illustration.
3 Hang the surround speaker on the
screws.
Align the holes of the rear of the
surround speaker with the screws,
then hang the surround speaker on
the screws.
14
GB
Page 15
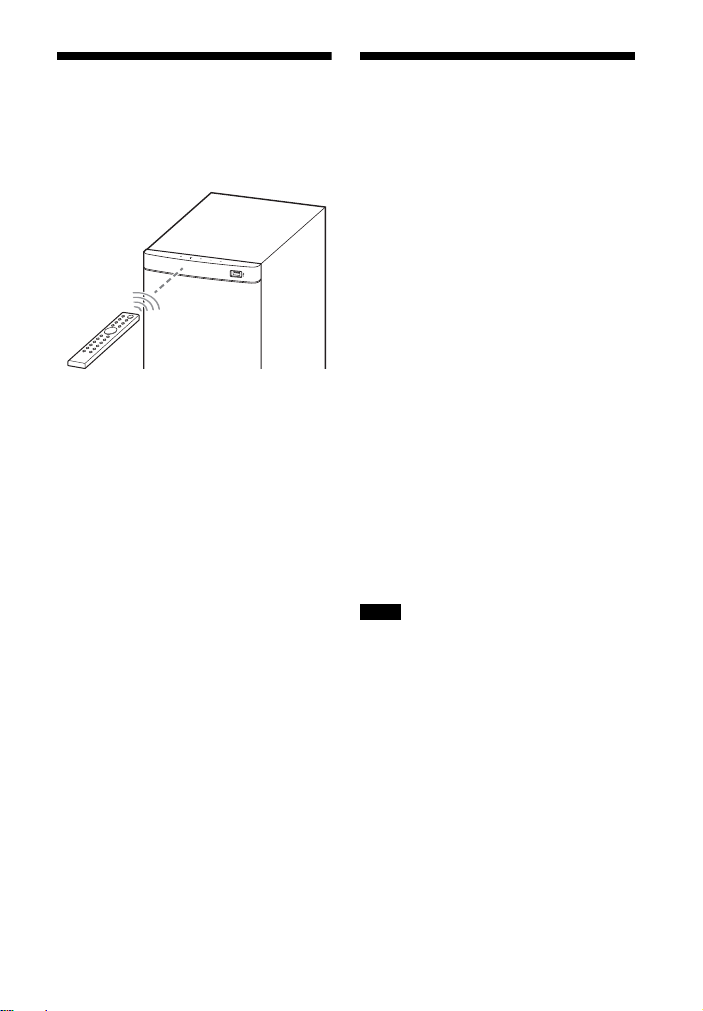
Operating the System
Using the Remote Control
When the TV Remote
Control does not Work
Point the remote control at the
subwoofer’s remote control sensor.
When the Bar Speaker obstructs the
remote control sensor of the TV, the TV
remote control may not work. In that
case, enable the IR repeater function of
the system.
You can control the TV with the TV
remote control by sending the remote
signal from the rear of the Bar Speaker.
1 Connect the IR repeater cord to
the subwoofer.
Refer to Startup Guide (separate
document).
2 Press MENU.
The menu item appears in the front
panel display.
3 Select “SYS >” – “IRRPT” by using
//ENTER.
4 Select “ON” by using //ENTER.
To turn off the IR repeater function,
select “OFF.”
5 Press MENU to turn off the menu.
Notes
• Be sure to check that the TV remote
control cannot control the TV, and then
set the IR repeater function to on. If it is
set to on when the remote control can
control the TV, appropriate operation
may not be obtained because of the
interference between the direct
command from the remote control and
the command via the Bar Speaker.
• On some TVs, this function may not work
correctly. In this case, place the Bar
Speaker slightly further away from the TV.
15
GB
Page 16
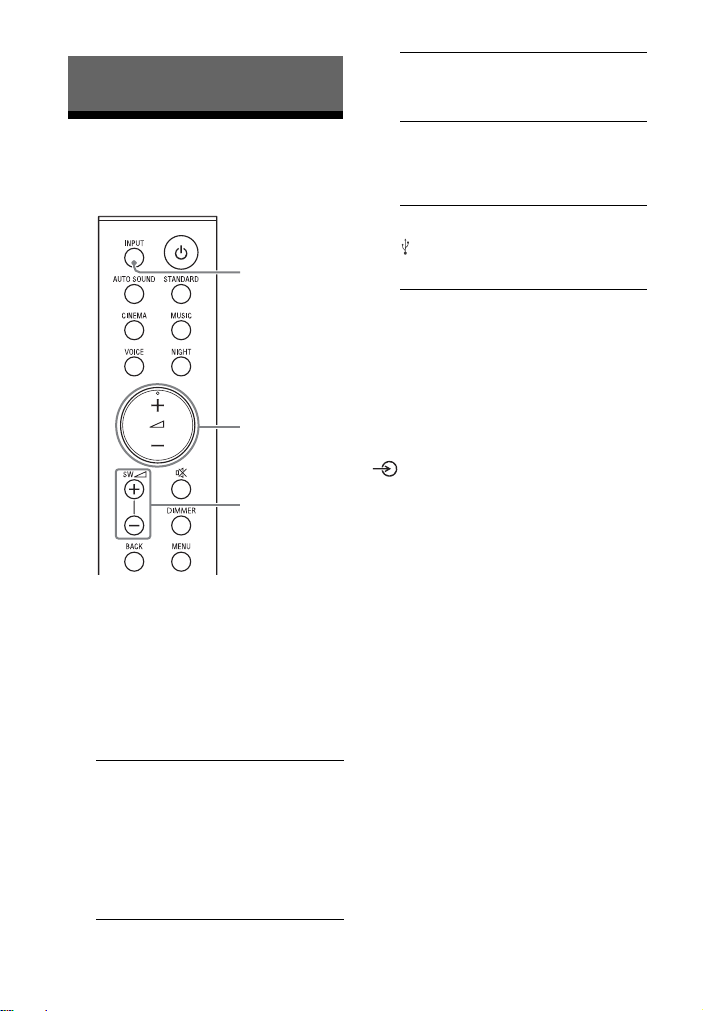
Listening to the Sound
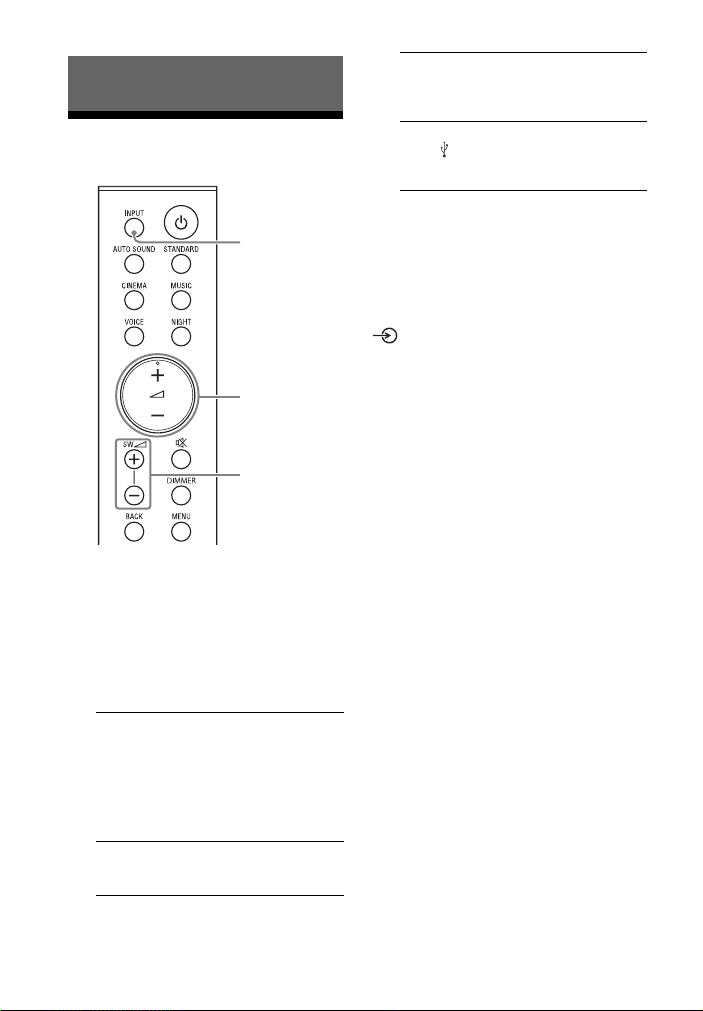
INPUT
+/–
SW +/–
Listening to a TV and
Other Devices
1 Press INPUT repeatedly.
When you press INPUT once, the
input source is changed and the
selected input source appears in the
front panel display.
Each time you press INPUT, the
input source changes cyclically as
follows.
“TV” “ANALG” “BT” “USB”
“TV”
• TV compatible with the Audio Return
Channel (ARC) function that is
connected to the HDMI OUT (ARC) jack
• TV that is connected to the TV IN
(OPTICAL) jack
When you connect the TV to both the
HDMI OUT (ARC) and TV IN (OPTICAL)
jacks, the input of the HDMI OUT (ARC)
jack has priority.
GB
16
“ANALG”
Audio device (smartphone, WALKMAN®,
etc.) that is connected to the ANALOG IN
jack
“BT”
BLUETOOTH device that supports A2DP
For details, see “Listening to Music/
Sound with the BLUETOOTH® Function”
(page 21).
“USB”
USB device that is connected to the
(USB) port
For details, see “Listening to Music on a
USB Device” (page 17).
2 Adjust the volume.
• Adjust the volume by pressing
+/– on the remote control.
• Adjust the subwoofer volume by
pressing SW +/– on the remote
control (page 20).
Tip
You can also select the input by pressing
on the subwoofer.
Page 17
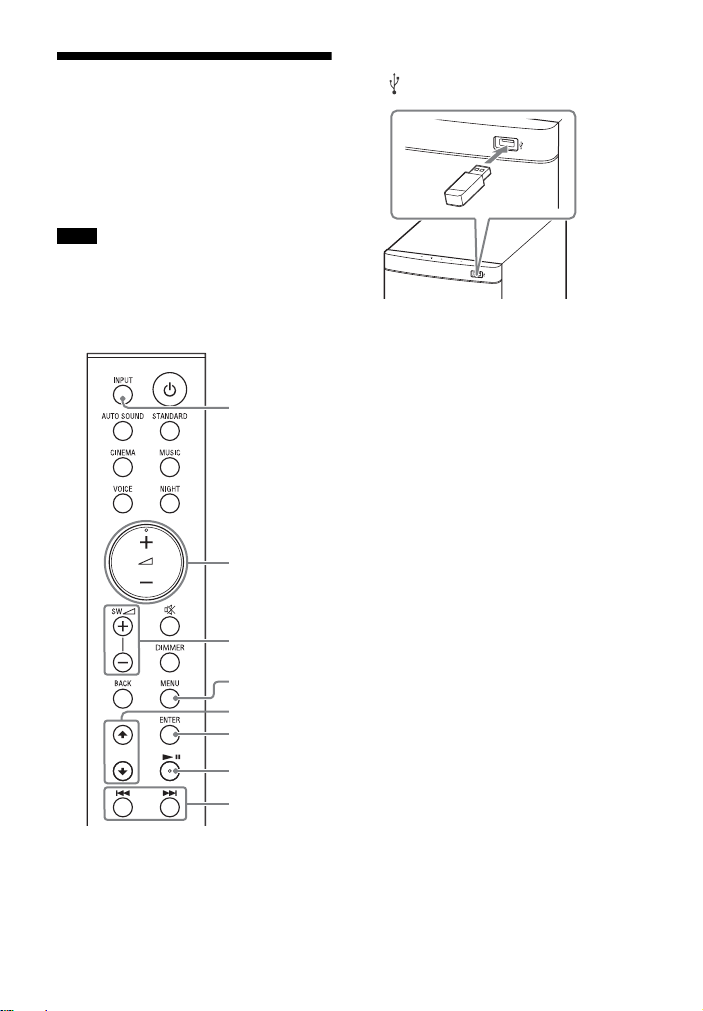
Listening to Music on a
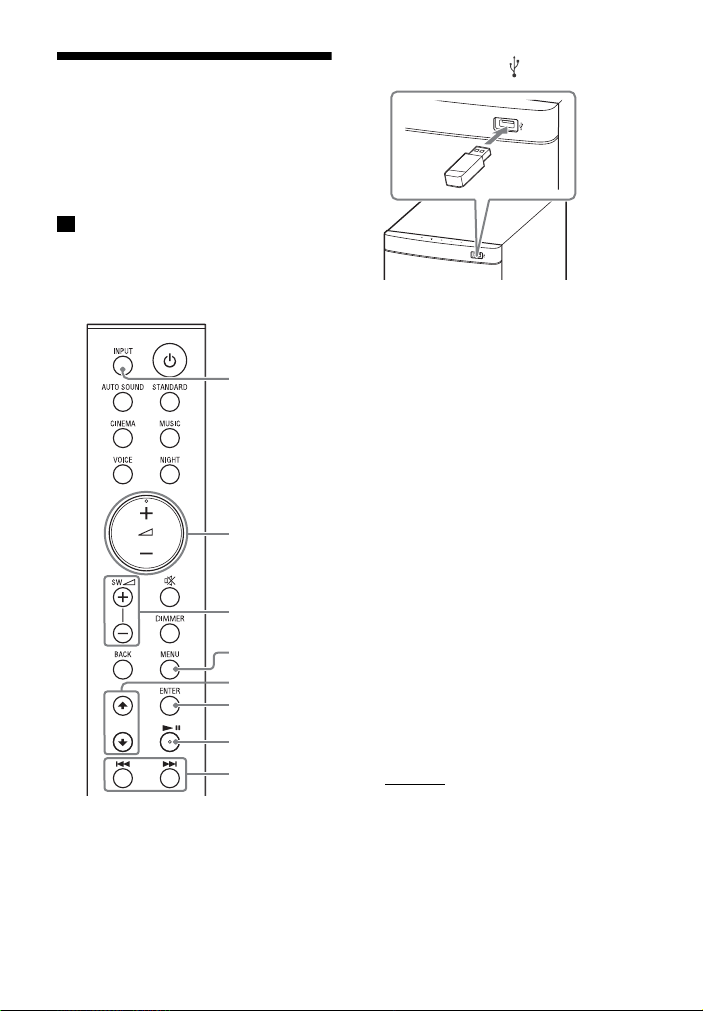
ENTER
+/–
/
INPUT
/
SW +/–
MENU
USB Device
You can play music files stored on a
connected USB device.
For playable types of files, see “Playable
Types of Files (USB Input)” (page 38).
Notes
• To view the USB content list on the TV
screen, make sure you connect the
system to the TV using an HDMI cable.
• Change the input of the TV to the input to
which the system is connected.
1 Connect the USB device to the
(USB) port.
2 Press INPUT repeatedly to select
“USB” in the front panel display.
“READ” appears in the front panel
display and the system starts
reading data of the USB device.
When the reading of data is
completed, the USB content list
appears on the TV screen.
3 Press / to select the content
you want, then press ENTER.
The selected content starts playing.
4 Adjust the volume.
• Adjust the volume by pressing
+/– on the remote control.
• Adjust the subwoofer volume by
pressing SW +/– on the remote
control (page 20).
To select the play mode
You can select the play mode for USB
playback, such as repeat play or random
play, from the menu.
1 Press MENU.
The menu item appears in the front
panel display.
2 Select “USB >” – “REPT” by using //
ENTER.
17
GB
Page 18
3 Select the play mode by using //
ENTER.
•“NONE”
: Plays back all tracks under
the current folder.
•“ONE”: Repeats one track.
•“FLDER”: Repeats all tracks in a
folder.
•“SHFFL”: Repeats all tracks in a
folder in random order.
4 Press MENU to turn off the menu.
Other operations
To Do this
Pause or resume
playback
Select the previous or
next track
Search backward or
forward (rewind/fast
forward)
Notes
• Do not remove the USB device during
operation. To avoid data corruption or
damage to the USB device, turn the
system off before connecting or
removing the USB device.
• “NOUSB” fl ashes in the fron t panel display
if you connect an unsupported or broken
USB device.
• Depending on the file format, rewind and
fast forward do not work.
Press .
Press /.
Press and hold
/.
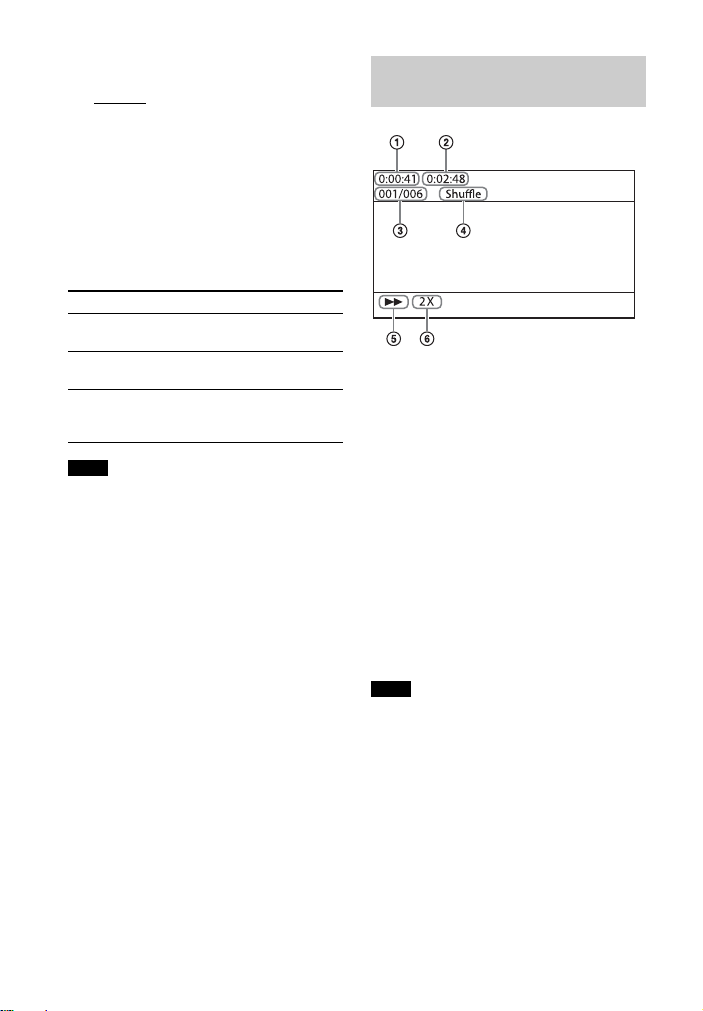
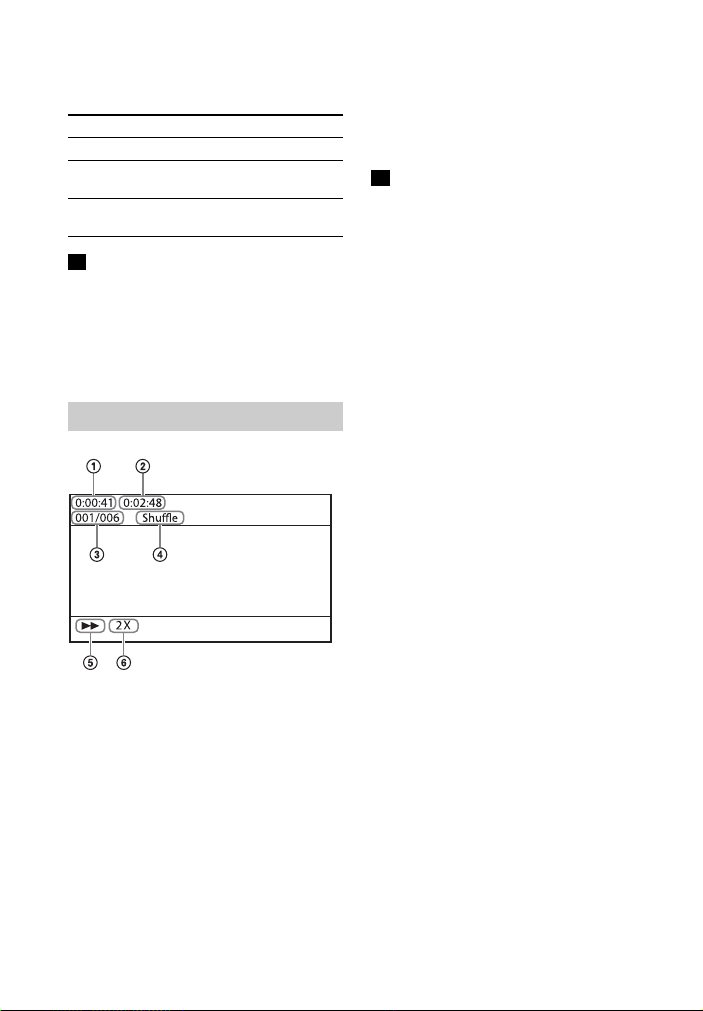
Information of USB Device
on the TV Screen
Playing time
Total playing time
Selected file index/Total files in the
folder
Play mode
Playback status
Rewind/fast forward speed
The following messages appear on the
TV screen depending on the status of
the USB device.
•[No USB]
No USB device is inserted.
• [Waiting]
The system is searching a USB device.
Notes
• Depending on the playback source, some
information may not be displayed.
• Depending on the play mode, the
information displayed may be different.
18
GB
Page 19
Selecting the Sound Effect
STANDARD
AUTO SOUND
MUSIC
CINEMA
“STANDARD”
Sound effects are optimized for the
individual source.
Adjusting the Sound
Enjoying the Sound Effect
that is Tailored to Sound
Sources (Sound Mode)
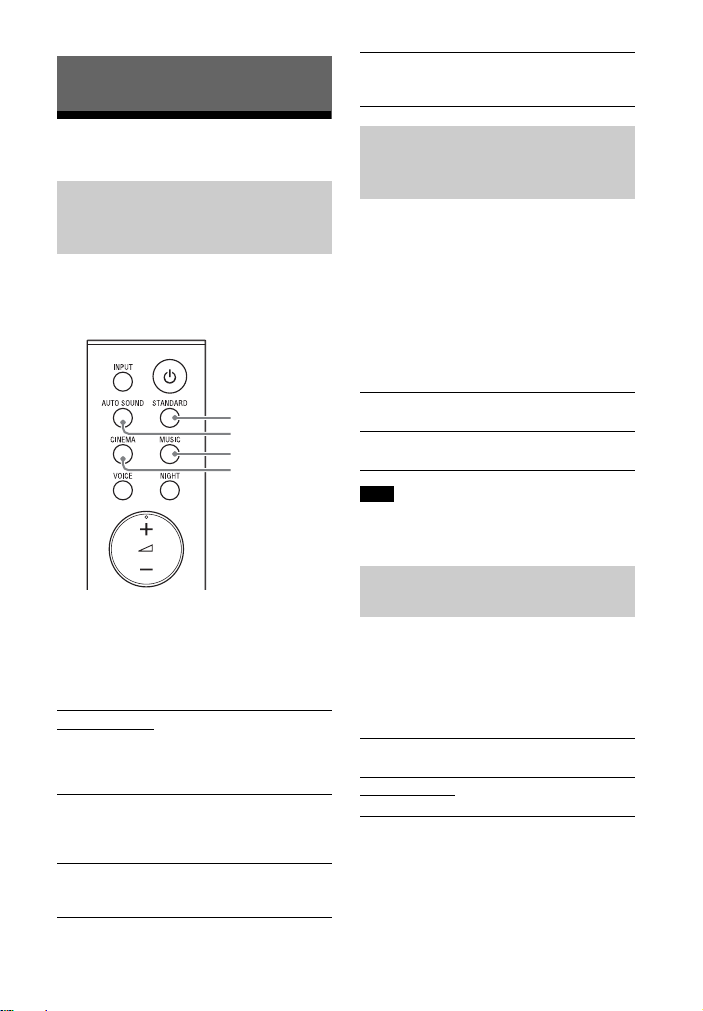
You can easily enjoy pre-programmed
sound effects that are tailored to
different kinds of sound sources.
Press AUTO SOUND, CINEMA, MUSIC,
or STANDARD to select the sound
mode.
The selected sound mode appears in the front
panel display.
“AUTO SOUND”
You can enjoy the sound with Sonyrecommended sound mode. The sound
mode is automatically optimized according
to playback content and function.
“CINEMA”
Sounds are played back with surround
effects, and they are realistic and powerful,
making them suitable for movies.
“MUSIC”
Sound effects are optimized for listening to
music.
Enjoying Clear Sound with
Low Volume at Midnight
(NIGHT)
You can compress sound in accordance
with the information contained in the
content by setting the night mode to on.
Sound is output at low volume with
minimum loss of fidelity and clarity of
dialog.
Press NIGHT to set the function to on
or off.
Night mode on
“N.ON” appears in the front panel display.
Night mode off
“N.OFF” appears in the front panel display.
Note
When you turn the system off, the night
mode is set to off automatically.
Making Dialogs Clearer
(VOICE)
You can make dialogs clearer by setting
the voice mode to on.
Press VOICE to set the function to on
or off.
Voice mode on
“V.ON” appears in the front panel display.
Voice mode off
“V.OFF” appears in the front panel display.
19
GB
Page 20
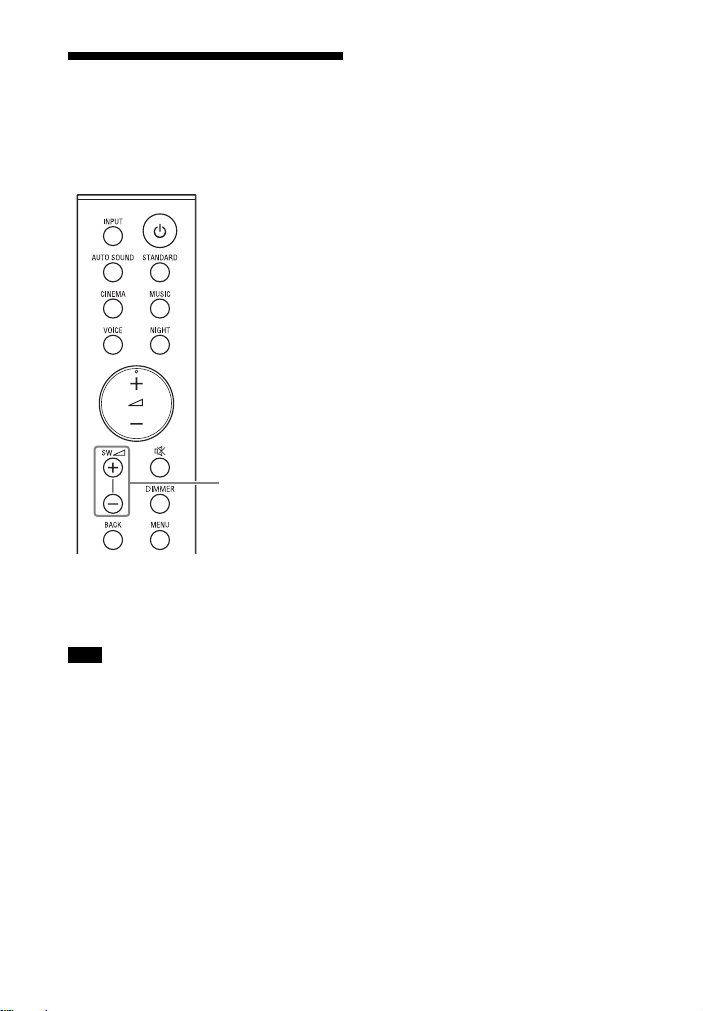
Adjusting the Volume of
SW +/–
the Subwoofer
The subwoofer is designed for playback
of bass or low frequency sound.
Press SW (subwoofer volume) +/–
to adjust the volume of the
subwoofer.
Note
When the input source does not contain
much bass sound, such as in TV programs,
the bass sound from the subwoofer may
be difficult to hear.
20
GB
Page 21
Listening to Music/Sound with the
BLUETOOTH indicator
BLUETOOTH
button
BLUETOOTH® Function
Listening to Music from
a Mobile Device
You can listen to music stored on a
mobile device such as a smartphone or
tablet via a wireless connection by
connecting the system and the mobile
device with the BLUETOOTH function.
When connecting to the mobile device
with the BLUETOOTH function, you can
operate by simply using the supplied
remote control without turning the TV
on.
Listening to Music by Pairing
with a Mobile Device
1 Press and hold the BLUETOOTH
button on the subwoofer for 2
seconds.
The system enters the pairing mode
and the BLUETOOTH indicator
flashes quickly.
2 On the mobile device, search for
the system by performing the
pairing operation.
The list of the BLUETOOTH devices
that are searched appears on the
screen of the mobile device.
For the operation method to pair
the BLUETOOTH device to the
mobile device, refer to the
operating instructions of the mobile
device.
3 Pair the system and mobile device
by selecting “HT-S500RF” or “HTS700RF” from the list on the
screen of the mobile device.
If a Passkey is requested, enter
“0000.”
4 Make sure that the BLUETOOTH
indicator on the subwoofer lights
in blue.
A connection between the system
and mobile device has been
established.
5 Start audio playback with the
music app on the connected
mobile device.
Sound is output from the system.
6 Adjust the volume.
• Adjust the volume by pressing
+/– on the remote control.
• Adjust the subwoofer volume by
pressing SW +/– on the remote
control (page 20).
• and / on the remote
control can be used for the
BLUETOOTH function. (Searching
backward or forward by holding
down / does not work.)
Notes
• You can pair up to 8 BLUETOOTH devices.
If a 9th BLUETOOTH device is paired, the
least recently connected device will be
replaced by the new one.
• Perform pairing for the second and
subsequent mobile devices.
GB
21
Page 22
Tips
INPUT
+/–
/
SW +/–
• You can check the connection status of
the BLUETOOTH function by checking the
BLUETOOTH indicator status (page 7).
• While the BLUETOOTH input is being
selected, the system enters the pairing
mode by pressing the BLUETOOTH button
on the subwoofer shortly.
Listening to Music from the
Paired Mobile Device
reconnects to the BLUETOOTH
device it was most recently
connected to.
3 Make sure that the BLUETOOTH
indicator lights in blue.
A connection between the system
and mobile device has been
established.
4 Start audio playback with the
music app on the connected
mobile device.
Sound is output from the system.
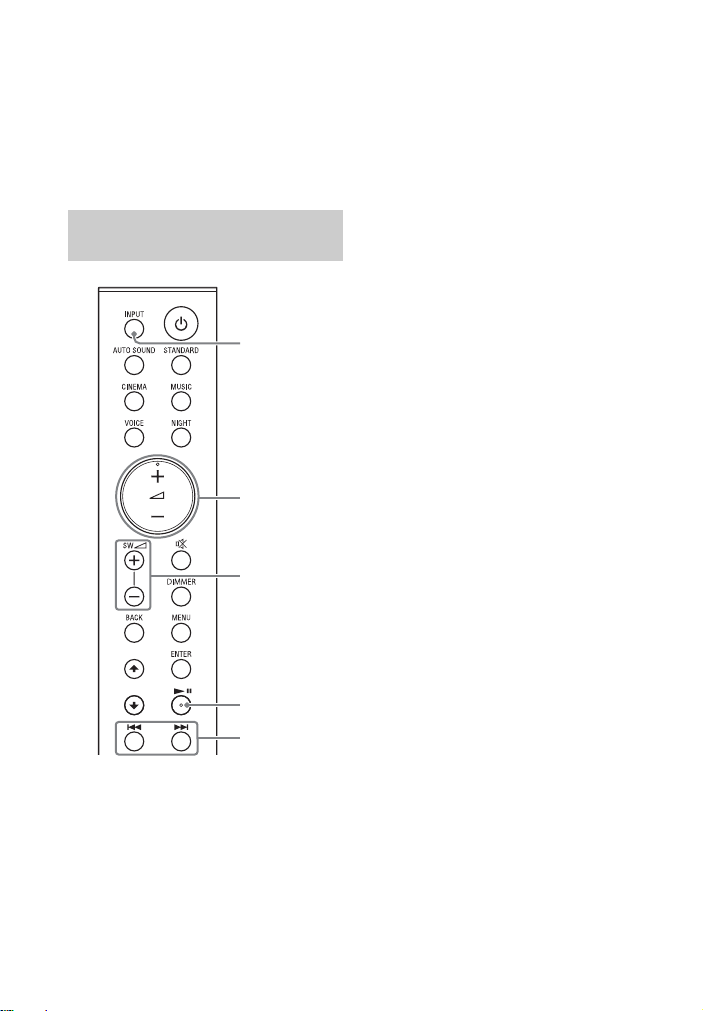
5 Adjust the volume.
• Adjust the volume by pressing
+/– on the remote control.
• Adjust the subwoofer volume by
pressing SW +/– on the remote
control (page 20).
• and / on the remote
control can be used for the
BLUETOOTH function. (Searching
backward or forward by holding
down / does not work.)
1 Turn the BLUETOOTH function of
the mobile device to on.
2 Press INPUT repeatedly to select
“BT” or press the BLUETOOTH
button on the subwoofer shortly.
The BLUETOOTH indicator flashes
and the system automatically
GB
22
Page 23

Listening to Music on the
Mobile Device with
Sony | Music Center
What You can Do with Sony |
Music Center
Sony | Music Center is an application for
controlling compatible Sony audio
devices using the mobile device such as
a smartphone or tablet.
For details about Sony | Music Center,
refer to the following URL.
http://www.sony.net/smcqa/
Sony | Music Center allows you to:
– enjoy music at home seamlessly.
– change commonly used settings,
select the input of the system, and
adjust the volume.
– enjoy music content stored on a
smartphone with the system.
– enjoy music visually with your
smartphone display.
Notes
• Before using Sony | Music Center with the
BLUETOOTH function, be sure to set “BT
>” – “BT PW” on the system to “ON”
(page 26).
• What you can control with Sony | Music
Center varies depending on the
connected device. The specification and
design of the application may change
without notice.
2 Connect the system and mobile
device with the BLUETOOTH
function (page 21).
3 Start Sony | Music Center.
4 Operate by following the Sony |
Music Center screen.
Notes
• Use Sony | Music Center of the latest
version. For details about Sony | Music
Center, refer to Google Play or the App
Store. If you cannot connect the system
and a BLUETOOTH device via the
BLUETOOTH function, uninstall Sony |
Music Center and try to connect via the
BLUETOOTH function again.
Using Sony | Music Center
1 Install the free Sony | Music
Center app to the mobile device.
Search for Sony | Music Center at
Google Play or the App Store and
install it onto your mobile device.
23
GB
Page 24
Using the Various Functions
Note
Using the Setup Display
You can set the following items with the menu.
Your settings are retained even if you disconnect the AC power cord (mains lead).
1 Press MENU to turn on the menu in the front panel display.
2 Press BACK///ENTER repeatedly to select the item and setting you want.
3 Press MENU to turn off the menu.
Note
You can also turn off the menu by performing an operation other than a menu operation
such as pressing +/–, SW +/–, , etc.
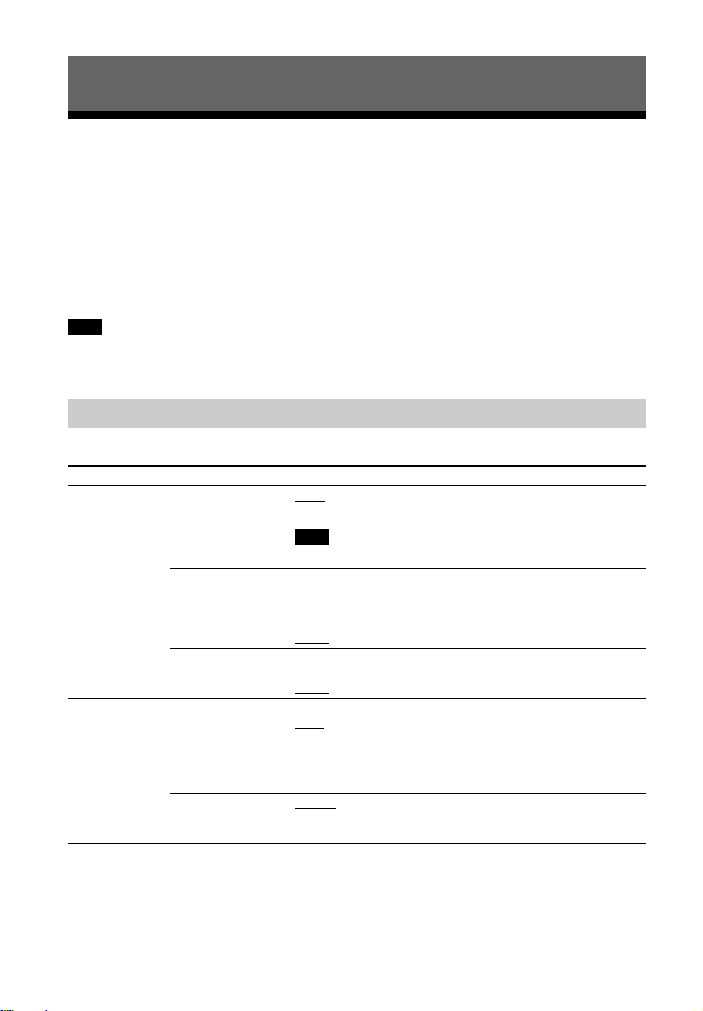
Menu List
The default settings are underlined. They may differ depending on the area.
Menu items Function
“LVL >”
(Level)
“SPK >”
(Speaker)
“SUR.L”/“SUR.R”
(Surround left/right
speaker level)
“DRC”
(Dynamic range
control)
“TTONE”
(Test tone)
“MULTI”
(Multi Speaker
Mode)
“SUR.L”/“SUR.R”
(Surround left/right
speaker distance)
“0.0”
: Adjusts the sound level of the surround speakers
from –6.0 dB to +6.0 dB (0.5 dB interval).
Be sure to set “TTONE” to “ON” for easy adjustment.
Useful for enjoying movies at low sound volume. DRC
applies to Dolby Digital sources.
“ON”: Compresses sound according to the information in
the content.
: Sound is not compressed.
“OFF”
“ON”: The test tone is output from each speaker in
sequence.
: Turns off the test tone.
“OFF”
You can set the output of the speakers of the system.
: The sound is output from all the speakers,
“ON”
regardless of the number of audio channels for the
playback source.
“OFF”: The sound is output from the speakers that
correspond to the audio channel for the playback source.
: Adjusts the distance from the seating position to
“3.0M”
the surround speakers from 1.0 meter to 6.0 meters (0.1
meter interval).
24
GB
Page 25

Menu items Function
Note
“AUD >”
(Audio)
“HDMI>” “CTRL”
“DUAL”
(Dual mono)
“STRM”
(Stream)
(Control for HDMI)
“TVSTB”
(Standby Linked to
TV)
You can enjoy multiplex broadcast sound when the
system receives a Dolby Digital multiplex broadcast
signal.
“MAIN”
“SUB”: Sound of the sub language will be output.
“M/S”: Mixed sound of both the main and sub languages
will be output.
To receive a Dolby Digital signal, you need to connect a TV
or other device to the HDMI OUT (ARC) jack with the HDMI
cable (supplied) or the T V IN (OPTICAL) jack with an optical
digital cable (not supplied).
Shows the current audio stream information.
For details of the supported audio formats, see
“Supported Input Audio Formats (HDMI OUT (TV (ARC)) or
TV IN (OPTICAL))” (page 38).
: The Control for HDMI function is enabled. Devices
“ON”
connected with an HDMI cable can control each other.
“OFF”: Off.
This function is available when you set “CTRL” to “ON.”
“AUTO”
off automatically when you turn off the TV.
“ON”: The system turns off automatically when you turn
off the TV, regardless of the input.
“OFF”: The system does not turn off when you turn off the
TV.
: Sound of the main language will be output.
: If the input of the system is “ TV”, the system turns
25
GB
Page 26

Menu items Function
Note
Note
Note
“BT >”
(BLUETOOTH)
“USB >” “REPT”
“SYS >”
(System)
“BT PW”
(BLUETOOT H
power)
“BTAAC”
(BLUETOOTH codec
- AAC)
“BTSTB”
(BLUETOOT H
standby)
“INFO”
(BLUETOOT H
device information)
(Play mode)
“ASTBY”
(Auto standby)
“IRRPT”
(IR repeater)
“VER”
(Version)
You can turn the BLUETOOTH function on or off.
“ON”
: Turns the BLUETOOTH function on.
“OFF”: Turns the BLUETOOTH function off.
When the BLUETOOTH function is set to off, the
BLUETOOTH input is skipped while selecting input by
pressing INPUT.
You can enjoy high-quality sound if AAC codec is enabled
and your device supports AAC codec.
“ON”: Enables AAC codec.
: Disables AAC codec.
“OFF”
If changing this setting, the changed setting is reflected
after the next BLUETOOTH connection.
When the system has pairing information, you can turn
the system on and listen to music from a BLUETOOTH
device, even when the system is in standby mode, by
setting the BLUETOOTH standby mode to on.
: BLUETOOTH standby mode is enabled.
“ON”
“OFF”: BLUETOOTH standby mode is disabled.
While the BLUETOOTH standby mode is on, standby
power consumption increases.
The detected BLUETOOTH device name and address
appear in the front panel display.
“NO DEVICE ” appears if the system is not connected to a
BLUETOOTH device.
• “NONE”
• “ONE”: Repeats one track.
• “FLDER”: Repeats all tracks in a folder.
• “SHFFL”: Repeats all tracks in a folder in random order.
“ON”: Turns on the auto standby function. When you do
not operate the system for about 20 minutes, the system
enters standby mode automatically.
: Off.
“OFF”
You can control the TV with the TV remote control via the
Bar Speaker. For details, see “When the TV Remote Control
does not Work” (page 15).
The current firmware version information appears in the
front panel display.
: Plays back all tracks under the current folder.
26
GB
Page 27

Using the Control for
HDMI Function
Connecting a device such as a TV or
Blu-ray Disc player compatible with the
Control for HDMI function* by an HDMI
cable (High Speed HDMI Cable,
supplied) enables you to easily operate
the device by a TV remote control.
The following functions can be used
with the Control for HDMI function.
• System Power Off function
• System Audio Control function
• Audio Return Channel (ARC)
• One-Touch Play function
* Control for HDMI is a standard used by
CEC (Consumer Electronics Control) for
allowing HDMI (High-Definition
Multimedia Interface) devices to control
each other.
Note
These functions may work with devices
other than those manufactured by Sony,
but operation is not guaranteed.
Preparing to Use the Control
for HDMI Function
Set “HDMI>” – “CTRL” on the system to
“ON” (page 25). The default setting is
“ON”.
Enable the Control for HDMI function
settings for the TV and other device
connected to the system.
Tip
If you enable the Control for HDMI function
when using a TV manufactured by Sony,
the Control for HDMI function of the system
is also enabled automatically. When
“HDMI>” – “CTRL” on the system is changed
to “ON,” “DONE” appears in the front panel
display.
System Power Off Function
When you turn off the TV, the system
will turn off automatically.
Set “HDMI>” – “TVSTB” on the system to
“ON” or “AUTO” (page 25). The default
setting is “AUTO”.
System Audio Control
Function
If you turn on the system while you are
watching the TV, the TV sound will be
output from the speakers of the system.
The volume of the system can be
adjusted using the TV remote control.
If the TV sound was output from the
speakers of the system the previous
time you watched the TV, the system
will be turned on automatically when
you turn on the TV again.
Operations can also be made by the
TV’s menu. For details, refer to the
operating instructions of your TV.
Notes
• Sound is only output from the TV if other
than “TV” input is selected when using
the Twin Picture function on the TV. When
you disable the Twin Picture function, the
sound is output from the system.
• The number for the sy stem’s volume level
is displayed on the TV screen depending
on the TV. The volume number displayed
on the TV may differ from the number on
the front panel display of the system.
• Depending on the settings of the TV, the
System Audio Control function may not
be available. For details, refer to the
operating instructions of your TV.
• Depending on the TV, if the TV sound was
output from the speakers of the TV the
previous time you watched the TV, the
system may not turn on by interlocking
with the TV power even if the TV is turned
on.
27
GB
Page 28

Audio Return Channel (ARC)
If the system is connected to a TV’s
HDMI IN jack compatible with Audio
Return Channel, you can listen to TV
sound from the speakers of the system
without connecting an optical digital
cable.
Note
If the TV is not compatible with Audio
Return Channel, an optical digital cable
needs to be connected (refer to the
supplied Startup Guide).
One-Touch Play Function
When you play content on a device
(Blu-ray Disc player, “PlayStation®4”,
etc.) connected to the TV, the system
and TV are turned on automatically, the
input of the system is switched to the
input for the TV, and sound is output
from the speakers of the system.
Notes
• If the TV sound was output from the
speakers of the TV the previous time you
watched the TV, the system may not turn
on and the sound and picture may be
output from the TV even if device content
is played.
• Depending on the TV, the beginning part
of content being played may not play
correctly.
Notes on HDMI
Connections
• Use an HDMI-authorized cable or the
supplied HDMI cable.
• Use a Sony High Speed HDMI cable
with the Cable Type Logo.
• We do not recommend using an
HDMI-DVI conversion cable.
• Check the setup of the connected
de vic e if a n im age i s po or or the soun d
does not come out of the device
connected via the HDMI cable.
• Audio signals (sampling frequency, bit
length, etc.) transmitted from an HDMI
jack may be suppressed by the
connected device.
28
GB
Page 29

Saving Power
Consumption
To use the system while saving power
consumption, change the following
settings.
Turn the System Off by
Detecting the Using State
When you set the auto standby function
to on, the system enters standby mode
automatically when you do not operate
the system for about 20 minutes and
the system is not receiving an input
signal.
Set “SYS >” – “ASTBY” on the system to
“ON” (page 26).
The default setting is “OFF.”
Saving Power in Standby
Mode
To save power consumption during the
standby mode, set “BTSTB”
(BLUETOOTH standby) (page 26) and
“CTRL” (Control for HDMI) (page 25) to
“OFF.”
The default settings for them are “ON.”
29
GB
Page 30

Troubleshooting
Troubleshooting
If you experience any of the following
difficulties while using the system, use
this troubleshooting guide to help
remedy the problem before requesting
repairs. Should any problem persist,
consult your nearest Sony dealer.
Power
The system does not power up.
Check that the AC power cord (mains
lead) is connected securely.
Disconnect the AC power cord (mains
lead) from the wall outlet (mains),
and then reconnect after several
minutes.
The system is turned off
automatically.
The auto standby function is working.
Set “SYS >” – “ASTBY” to “OFF”
(page 26).
The system does not turn on even
when the TV is turned on.
Set “HDMI>” – “CTRL” to “ON”
(page 25). The TV must support the
Control for HDMI function (page 27).
For details, refer to the operating
instructions of your TV.
Check the speaker settings of the TV.
The system power syncs with the
speaker settings of the TV. Fo r details,
refer to the operating instructions of
your TV.
Depending on the TV, if the sound
was output from the speakers of the
TV the previous time, the system may
not turn on by interlocking with the
TV even when the TV is turned on.
The system turns off when the TV is
turned off.
Check the setting of “HDMI>” –
“TVSTB” (page 25). When “TVSTB” is
set to “ON” or “AUTO,” the system
turns off automatically when you turn
off the TV.
The system does not turn off even
when the TV is turned off.
Check the setting of “HDMI>” –
“TVSTB” (page 25). To turn off the
system automatically regardless of
the input when you turn off the TV,
set “TVSTB” to “ON.” The TV must
support the Control for HDMI function
(page 27). For details, refer to the
operating instructions of your TV.
Picture
There is no picture or the picture is
not output correctly.
Select the appropriate input
(page 16).
When there is no picture while TV
input is selected, select the TV
channel that you want using the TV
remote control.
Disconnect the HDMI cable, then
connect it again. Make sure that the
cable is firmly inserted.
Sound
No TV sound is output from the
system.
Check the type and connection of the
HDMI cable or optical digital cable
that is connected to the system and
the TV (refer to the supplied Startup
Guide).
Disconnect the cables that are
connected between the TV and the
system, then connect them firmly
again. Disconnect the AC power cords
(mains leads) of the TV and the
30
GB
Page 31

system from the AC outlets (mains),
then connect them again.
When the system and TV are
connected with the HDMI cable,
check the following.
– The HDMI jack of the connected TV
is labeled with “ARC.”
– The Control for HDMI function of the
TV is set to on.
– On the system, the Control for HDMI
function is set to on (page 27).
If your TV is not compatible with
Audio Return Channel, connect the
optical digital cable (not supplied)
(refer to the supplied Startup Guide).
If the TV is not compatible with Audio
Return Channel, TV sound will not be
output from the system even if the
system is connected to the TV’s HDMI
IN jack.
If the sound of the device that is
connected to the optical input jack of
the TV is not output, try the following.
– Connect the cable box or satellite
box directly to the TV IN (OPTICAL)
jack of the system.
Press INPUT repeatedly to select the
TV input (page 16).
Increase the volume on the TV or
cancel muting.
Depending on the order in which you
connect the TV and the system, the
system may be muted. If this
happens, turn on the TV first, then the
system.
Set the speakers setting of the TV
(BRAVIA) to Audio System. Refer to
the operating instructions of your TV
regarding how to set the TV.
Check the sound output of the TV.
Refer to the operating instructions of
the TV for the TV settings.
The system supports the Dolby
Digital, DTS, and PCM audio formats
(page 38). When you play back
unsupported format, set the digital
audio out setting of the TV (BRAVIA)
to “PCM.” For details, refer to the
operating instructions of your TV.
The sound is output from both the
system and the TV.
Mute the sound of the system or the
TV.
No sound or only a very low-level
sound is heard from the subwoofer.
Make sure the AC power cord (mains
lead) of the subwoofer is connected
properly (refer to the su pplied Startup
Guide).
Press SW + to increase the
subwoofer volume (page 20).
A subwoofer is for reproducing bass
sound. If the input sources contain
very little bass sound components
(i.e., a TV broadcast), the sound from
the subwoofer may be difficult to
hear.
When you play content compatible
with copyright protection technology
(HDCP), it is not output from the
subwoofer.
No sound or only a very low-level
sound of the device connected to
the system is heard from the
system.
Press + and check the volume
level (page 9).
or + to cancel the muting
Press
function (page 9).
Make sure the input source is
selected correctly. You should try
other input sources by pressing
INPUT repeatedly (page 16).
Check that all the cables and cords of
the system and the connected device
are firmly inserted.
If the connected device supports the
up-sampling feature, you need to
turn it off.
No sound or only very low-level
sound is heard from the surround
speakers.
Make sure that the cables of the
surround speakers are connected
GB
31
Page 32

properly to the subwoofer (refer to
the supplied Startup Guide).
Check that “SPK >” – “MULTI” is set to
“ON” (page 24). If “SPK >” – “MULTI” is
set to “OFF,” the sound is not output
from the surround speakers when
playing the sound of 2-channel
source.
Multi-channel sound which has not
been recorded as surround sound is
not output from the surround
speakers.
The surround effect cannot be
obtained.
Depending on the input signal and the
sound mode setting, surround sound
processing may not work effectively.
The surround effect may be subtle,
depending on the program or disc.
To play multi channel audio, check
the digital audio output setting on
the device connected to the system.
For details, refer to the operating
instructions supplied with the
connected device.
USB Device Connection
The USB device is not recognized.
Try the following:
Turn the system off.
Remove and reconnect the USB
device.
Turn the system on.
Make sure that the USB device is
securely connected to the (USB)
port (page 17).
Check to see if the USB device or a
cable is damaged.
Make sure that the USB device is on.
If the USB device is connected via a
USB hub, disconnect it and connect
the USB device directly to the
subwoofer.
Mobile Device Connection
BLUETOOTH connection cannot be
completed.
Make sure that the BLUETOOTH
indicator on the subwoofer is lit
(page 7).
Make sure the BLUETOOTH device to
be connected is turned on and the
BLUETOOTH function is enabled.
Bring the BLUETOOTH device close to
the subwoofer.
Pair this system and the BLUETOOTH
device again. You may need to cancel
the pairing with this system using
your BLUETOOTH device first.
If “BT >” – “BT PW” is set to “OFF,” set
to “ON” (page 26).
Pairing cannot be achieved.
Bring the BLUETOOTH device close to
the subwoofer.
Ma ke sure this system is not receiving
interference from a wireless LAN
device, other 2.4 GHz wireless
devices, or a microwave oven. If a
device that generates
electromagnetic radiation is nearby,
move the device away from this
system.
Pairing may not be possible if other
BLUETOOTH devices are present
around the system. In this case, turn
off the other BLUETOOTH devices.
Sound of the connected
BLUETOOTH mobile device is not
output from the system.
Make sure that the BLUETOOTH
indicator on the subwoofer is lit
(page 7).
Bring the BLUETOOTH device close to
the subwoofer.
If a device that generates
electromagnetic radiation, such as a
wireless LAN device, other
BLUETOOTH devices, or a microwave
32
GB
Page 33

oven is nearby, move the device away
from this system.
Move the USB 3.0 device and its cable
away from this system.
Remove any obstacle between this
system and the BLU ETOOTH device or
move this system away from the
obstacle.
Reposition the connected
BLUETOOTH device.
Switch the wireless LAN frequency of
any nearby wireless LAN router or PC
to 5 GHz range.
Increase the volume on the
connected BLUETOOTH device.
The sound is not in sync with the
image.
When you are watching movies, you
may hear the sound with a slight
delay from the image.
Remote Control
The remote control of this system
does not function.
Point the remote control at the
remote control sensor on the
subwoofer (page 7).
Remove any obstacles in the path
between the remote control and the
subwoofer.
Replace both batteries in the remote
control with new ones, if they are
weak.
Make sure you are pressing the
correct button on the remote control
(page 9).
The TV remote control does not
work.
Install the Bar Speaker so that it does
not obstruct the remote control
sensor of the TV.
This problem might be solved by
enabling the IR repeater function
(page 15).
Others
The Control for HDMI function does
not work properly.
Check the connection with the
system (refer to the supplied Startup
Guide).
Enable the Control for HDMI function
on the TV. For details, refer to the
operating instructions of your TV.
Wait a while, and then try again. If
you unplug the system, it will take a
while before operations can be made.
Wait for 15 seconds or longer, and
then try again.
Make sure the devices connected to
the system support the Control for
HDMI function.
Enable the Control for HDMI function
of the devices connected to the
system. For details, refer to the
operating instructions of your device.
The type and number of devices that
can be controlled by the Control for
HDMI function is restricted by the
HDMI CEC standard as follows:
– Recording devices (Blu-ray Disc
recorder, DVD recorder, etc.): up to
3 devices
– Playback devices (Blu-ray Disc
player, DVD player, etc.): up to 3
devices
– Tuner-related devices: up to 4
devices
– Audio system (receiver/
headphone): up to 1 devi ce (used by
this system)
33
GB
Page 34
“PRTCT” appears in the front panel
display of the subwoofer, the sound
is muted, and buttons on the
remote control or subwoofer other
than (power) do not work.
The protection feature is activated.
Press (power) to turn the system
off and disconnect the AC power cord
(mains lead) and check the items
below.
– Make sure that the ventilations of
the subwoofer are not covered and
turn on the system after a while.
– When the system is using the USB
connection, remove the USB device
and turn on the system. If the
system operates properly, the
current of the connected USB device
is over the maximum output current
of the system 500 mA, or the USB
device may have an abnormality.
The front panel display of the
subwoofer is not lit.
P ress DIMMER to set the brightness to
“BRGHT” or “DARK” if set to “OFF”
(page 9).
Sensors of the TV do not work
properly.
The Bar Speaker may block some
sensors (such as the brightness
sensor), the remote control receiver
of your TV or the emitter for 3D
glasses (infrared transm ission) of a 3D
TV that supports the infrared 3D glass
system, or wireless communication.
Move the Bar Speaker away from the
TV within a range that allows those
parts to operate properly. For the
locations of the sensors and remote
control receiver, refer to the
operating instructions supplied with
the TV.
The system does not work properly
(“DEMO” appears in the front panel
display).
The system is in demo mode. To
cancel demo mode, reset the system.
Press and hold (power), +, and
on the subwoofer for more than 5
seconds (page 35).
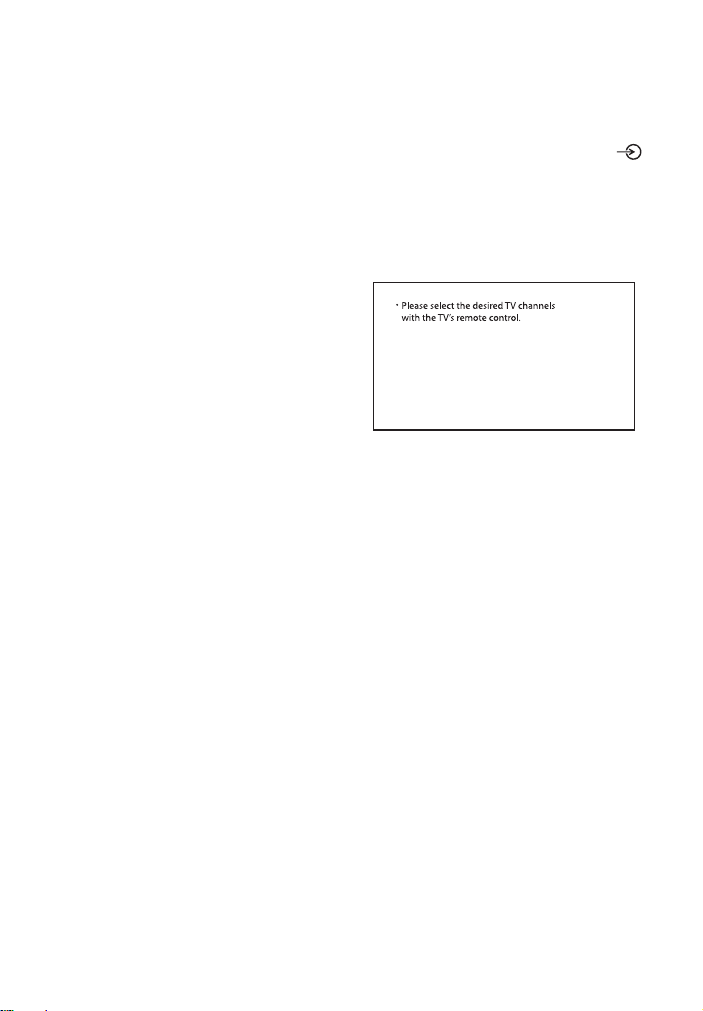
When you change to the TV input
from the USB input by pressing
INPUT, the message appears.
* This screen is an example for English.
Select the TV program by using the TV
remote control.
34
GB
Page 35

Resetting the System
If the system still does not operate
properly, reset the system as follows.
1 Press and hold , +, and on
the subwoofer for more than 5
seconds.
“INIT” appears in the front panel
display, and the settings of the
menu and sound mode, etc. return
to their initial status.
2 Disconnect the AC power cord
(mains lead).
3 Connect the AC power cord (mains
lead), then press to turn on the
system.
Tip
The default settings are underlined on
each feature description.
35
GB
Page 36

Additional Information
Specifications
Subwoofer
(SA-WS500RF/SA-WS700RF)
Amplifier section
POWER OUTPUT (rated)
Front L + Front R: 85 W + 85 W (at
5.5 ohms, 1 kHz, 1% THD)
POWER OUTPUT (reference)
Front L/Front R/Surround L/Surround
R/Center: 152 W (per channel at
5.5 ohms, 1 kHz)
Subwoofer: 240 W (at 3.3 ohms,
100 Hz)
Inputs
TV IN (OPTICAL)
USB
HDMI OUT (ARC)
ANALOG IN
Output
HDMI OUT (ARC)
HDMI section
Connector
Type A (19pin)
USB section
(USB) port:
Type A
BLUETOOTH section
Communication system
BLUETOOTH Specification version 4.2
Output
BLUETOOTH Specification Power
Class 2
Maximum communication range
Line of sight approx. 10 m
Frequency band
2.4 GHz band (2.4000 GHz -
2.4835 GHz)
Modulation method
FHSS (Freq Hopping Spread Spectrum)
1)
Compatible BLUETOOTH profiles
A2DP (Advanced Audio Distribution
Profile)
AVRCP (Audio Video Remote Control
Profile)
Supported Codec
SBC
Transmission range (A2DP)
20 Hz - 20,000 Hz (Sampling frequency
32 kHz, 44.1 kHz, 48 kHz)
1)
The actual range will vary depending on
factors such as obstacles between
devices, magnetic fields around a
microwave oven, static electricity,
cordless phone use, reception
sensitivity, the operating system,
software applications, etc.
2)
BLUETOOTH standard profiles indicate
the purpose of BLUETOOTH
communication between devices.
3)
Codec: Audio signal compression and
conversion format
4)
Abbreviation for Subband Codec
5)
Abbreviation for Advanced Audio
Coding
4)
, AAC
3)
5)
2)
Speaker section
Speaker system
Subwoofer system, Bass reflex
Speaker
HT-S500RF: 180 mm cone type
HT-S700RF: 200 mm cone type
General
Power requirements
220 V - 240 V AC, 50 Hz/60 Hz
Power consumption
On: 140 W
Standby: 0.5 W or less (Power Saving
mode)
(When “CTRL” in “HDMI>” and “BTSTB”
in “BT >” are set to “OFF”)
Dimensions* (approx.) (w/h/d)
HT-S500RF: 207 mm × 402 mm ×
330 mm
HT-S700RF: 231 mm × 438 mm ×
378 mm
* Including projection portion
Mass (approx.)
HT-S500RF: 9.0 kg
HT-S700RF: 10.2 kg
36
GB
Page 37

Compatible iPhone/iPod models
The compatible iPhone/iPod models are as
follows. Update your iPhone/iPod with the
latest software before using with the
system.
Made for:
iPhone X/iPhone 8/iPhone 8 Plus/iPhone
7/iPhone 7 Plus/iPhone SE/iPhone 6s/
iPhone 6s Plus/iPhone 6/iPhone 6 Plus/
iPhone 5s/iPhone 5c/iPhone 5
iPod touch (6th generation)
Bar Speaker
(SS-S500RF/SS-S700RF)
Front L/Front R speaker blocks
Speaker system
2-Way speaker system, Bass reflex
Speaker
Woofer: 48 mm × 90 mm cone type
Tweeter: 25 mm balanced dome type
Center speaker block
Speaker system
Full range speaker system, Bass reflex
Speaker
Woofer: 48 mm × 90 mm cone type
General
Dimensions (w/h/d) (approx.)
900 mm × 64 mm × 90 mm
Mass (approx.)
3.0 kg
Surround Speakers
(SS-SS700RF)
Speaker system
2-Way speaker system, Bass reflex
Speaker
Woofer: 48 mm × 90 mm cone type
Tweeter: 25 mm balanced dome type
Dimensions (w/h/d) (approx.)
78 mm × 1200 mm × 78 mm
Mass (approx.)
3.6 kg
Design and specifications are subject to
change without notice.
Surround Speakers
(SS-SS500RF)
Speaker system
Full range speaker system, Bass reflex
Speaker
48 mm x 90 mm cone type
Dimensions (w/h/d) (approx.)
91 mm × 216 mm × 91 mm
Mass (approx.)
1.0 kg
37
GB
Page 38

Playable Types of Files
(USB Input)
Codec Extension
MP3 (MPEG-1 Audio
Layer III)
WMA9 Standard .wma
LPCM (2ch) .wav
Notes
• Some files may not play or may play with
no sound depending on the file format,
the file encoding, or the recording
condition.
• Some files edited on a PC may not play.
• The system does not play coded files such
as DRM and Lossless.
• The system can recognize the following
files or folders in USB devices:
– up to 200 folders (including empty
folder and root folder)
– up to 150 tracks in one folder
– up to folders in the 8th layer (including
the root folder)
• Some USB devices may not work with this
system.
• The system can recognize Mass Storage
Class (MSC) devices.
.mp3
Supported Input Audio
Formats (HDMI OUT (TV
(ARC)) or TV IN (OPTICAL))
Audio formats supported by this system
are as follows.
•Dolby Digital
•DTS
•Linear PCM 2ch
38
GB
Page 39

On BLUETOOTH
Communication
• BLUETOOTH devices should be used
within approximately 10 meters
(33 feet) (unobstructed distance) of
each other. The effective
communication range may become
shorter under the following
conditions.
– When a person, metal object, wall or
other obstruction is between the
devices with a BLUETOOTH
connection
– Locations where a wireless LAN is
installed
– Around microwave ovens that are in
use
– Locations where other
electromagnetic waves occur
• BLUETOOTH devices and wireless LAN
(IEEE 802.11b/g/n) use the same
frequency band (2 .4 GHz). When using
your BLUETOOTH device near a device
with wireless LAN capability,
electromagnetic interference may
occur. This could result in lower data
transfer rates, noise, or inability to
connect. If this happens, try the
following remedies:
– Use this system at least 10 meters
(33 feet) away from the wireless LAN
device.
– Turn off the power to the wireless
LAN device when using your
BLUETOOTH device within 10 meters
(33 feet).
– Install this system and BLUETOOTH
device as closer to each other as
possible.
• The radio waves broadcast by this
system may interfere with the
operation of some medical devices.
Since this interference may result in
malfunc tion, always t urn off the po wer
o n th is sy st em an d B LU ET OO TH de vi ce
in the following locations:
– I n hospitals, on trains, in airplanes, at
gas stations, and any place where
flammable gasses may be present
– Near automatic doors or fire alarms
• This system supports security
functions that comply with the
BLUETOOTH specification to ensure
secure connection during
communication using BLUETOOTH
technology. However, this security
may be insufficient depending on the
setting contents and other factors, so
always be careful when performing
communication using BLUETOOTH
technology.
• Sony cannot be held liable in any way
for damages or other loss resulting
from information leaks during
communication using BLUETOOTH
technology.
• BLUETOOTH communication is not
necessarily guaranteed with all
BLUETOOTH devices that have the
same profile as this system.
• BLUETOOTH devices connected with
this system must comply with the
BLUETOOTH specification prescribed
by the Bluetooth SIG, Inc ., and must be
certified to comply. However, even
when a device complies with the
BLUETOOTH specification, there may
be cases where the characteristics or
specifications of the BLUETOOTH
device make it impossible to connect,
or may result in different control
methods, display or operation.
• Noise may occur or the audio may cut
off depending on the BLUETOOTH
device connected with this system,
the communications environment, or
surrounding conditions.
If you have any questions or problems
concerning your system, please consult
your nearest Sony dealer.
39
GB
Page 40

Precautions
On safety
• Should any solid object or liquid fall into
the system, unplug the system and have
it checked by qualified personnel before
operating it any further.
• Do not touch the AC power cord (mains
lead) with wet hands. Doing so may cause
an electric shock.
• Do not climb on the Bar Speaker,
subwoofer and surround speakers as you
may fall down and injure yourself, or
system damage may result.
On power sources
• Before operating the system, check that
the operating voltage is identical to your
local power supply. The operating voltage
is indicated on the nameplate at the rear
of the subwoofer.
• If you are not going to use the system for
a long time, be sure to disconnect the
system from the wall outlet (mains). To
disconnect the AC power cord (mains
lead), grasp the plug itself; never pull the
cord.
• AC power cord (mains lead) must be
changed only at a qualified service shop.
On heat buildup
Although the system heats up during
operation, this is not a malfunction.
If you continuously use this system at high
volume, the system temperature rises
considerably. To avoid burning yourself, do
not touch the system.
On placement
• Place the system in a location with
adequate ventilation to prevent heat
buildup and prolong the life of the
system.
• Do not place the system near heat
sources or in a place subject to direct
sunlight, excessive dust, or mechanical
shock.
• Do not place the Bar Speaker, subwoofer
and surround speakers on a soft surface
(rugs, blankets, etc.) or place anything at
the rear of the Bar Speaker, subwoofer
and surround speakers that might block
the ventilation holes and cause
malfunctions.
• If the system is being used in combination
with a TV, VCR, or tape deck, noise may
result and picture quality may be
affected. In this case, place the system
away from the TV, VCR, or tape deck.
• Use caution when placing the system on a
surface that has been specially treated
(with wax, oil, polish, etc.), as staining or
discoloration of the surface may result.
• Take care to avoid any possible injury
from the corners of the Bar Speaker,
subwoofer and surround speakers.
• Keep 3 cm or more space under the Bar
Speaker and surround speakers when you
hang it on a wall.
On operation
Before connecting other device, be sure to
turn off and unplug the system.
If you encounter color irregularity
on a nearby TV screen
Color irregularities may be observed on
certain types of TV.
• If color irregularity is observed...
Turn off the TV, then turn it on again after
15 to 30 minutes.
• If color irregularity is observed again...
Place the system further away from the
TV.
On cleaning
Clean the system with a soft, dry cloth. Do
not use any type of abrasive pad, scouring
powder, or solvent such as alcohol or
benzine.
If you have any question or problem
concerning your system, please consult
your nearest Sony dealer.
40
GB
Page 41

On handling the subwoofer
Do not place your hand into the slit of the
subwoofer when lifting it. The speaker
driver may be damaged. When lifting it,
hold the bottom of the subwoofer.
Copyrights and Trademarks
This system incorporates Dolby* Digital
and the DTS** Digital Surround System.
* Manufactured under license from Dolby
Laboratories.
Dolby, Dolby Audio and the double-D
symbol are trademarks of Dolby
Laboratories.
**For DTS patents, see http://
patents.dts.com. Manufactured under
license from DTS Licensing Limited. DTS,
the Symbol, & DTS and the Symbol
together are registered trademarks, and
DTS Digital Surround is a trademark of
DTS, Inc. © DTS, Inc. All Rights Reserved.
This system incorporates High-Definition
Multimedia Interface (HDMI™) technology.
The terms HDMI and HDMI High-Definition
Multimedia Interface, and the HDMI Logo
are trademarks or registered trademarks of
HDMI Licensing Administrator, Inc. in the
United States and other countries.
The BLUETOOTH
registered trademarks owned by Bluetooth
SIG, Inc. and an y use of such marks by Sony
Corporation is under license. Other
trademarks and trade names are those of
their respective owners.
Google Play is a trademark of Google LLC.
Apple, iPhone, iPod, and iPod touch are
trademarks of Apple Inc., registered in the
U.S. and other countries. App Store is a
service mark of Apple Inc., registered in the
U.S. and other countries.
Use of the Made for Apple badge means
that an accessory has been designed to
connect specifically to the Apple product(s)
identified in the badge, and has been
certified by the developer to meet Apple
performance standards. Apple is not
responsible for the operation of this device
or its compliance with safety and
regulatory standards.
®
word mark and logos are
41
GB
Page 42

“BRAVIA” logo is a trademark of Sony
Corporation.
“PlayStation” is a registered trademark or
trademark of Sony Interactive
Entertainment Inc.
MPEG Layer-3 audio coding technology
and patents licensed from Fraunhofer IIS
and Thomson.
Windows Media is either a registered
trademark or trademark of Microsoft
Corporation in the United States and/or
other countries.
This product is protected by certain
intellectual property rights of Microsoft
Corporation. Use or distribution of such
technology outside of this product is
prohibited without a license from Microsoft
or an authorized Microsoft subsidiary.
All other trademarks are trademarks of
their respective owners.
42
GB
Page 43

Page 44

警告
切勿將本設備安裝在狹窄的空間內,如書
櫃或壁櫥內。
為了降低發生火災的危險,請勿使用報
紙、桌布、窗簾等物品蓋住設備的通風
孔。
請勿將如點燃的蠟燭等明火源放置於設備
上。
為了降低發生火災或觸電的危險,請勿讓
本設備受到液體潑濺,也不要將如花瓶等
裝滿液體的物體放置於本設備上。
只要本機的電源線仍連接在電源插座上,
即使本機的電源已經關閉,但本機仍然未
與交流電源斷開連接。
由於電源插頭是用來斷開本機與電源插座
的連接,因此請將本機連接至便於插拔的
交流電源插座。一旦發現本機有異常情
況,請立即斷開電源插頭與交流電源插座
的連接。
請勿讓電池或安裝電池的設備暴露在過熱
的環境中,例如:陽光、火等。
限室內使用。
建議的電纜
必須使用妥善包覆及接地的電纜和連接器
來連接主機電腦和/或週邊設備。
對於主動式揚聲器系統
此標示牌位於主動式揚聲器系統的底部。
CT
2
Page 45

目錄
關於本使用說明書 .............. 4
盒中內容 ...................... 5
系統的功能 .................... 6
部件與控制器的指南 ............ 7
連接到電視機或音訊裝置
使用 HDMI 連接線
和 / 或光纖傳輸
線連接電視機
使用類比音訊連接線連接音訊
裝置 ..................... 11
準備使用系統
將主動式揚聲器系統和環繞揚聲器
安裝到牆上 ............... 12
使用遙控器操作系統 ........... 15
電視機遙控器不能操作時 ....... 15
聆聽聲音
聆聽電視和其他裝置 ........... 16
聆聽 USB 裝置上的音樂 ......... 17
選擇音效
調整聲音 ..................... 19
調整主動式重低音揚聲器的
音量 ..................... 20
透過 BLUETOOTH® 功能聆聽音樂 /
聲音
聆聽行動裝置中的音樂 ......... 21
使用 Sony | Music Center 聆聽行動
裝置中的音樂 ............. 23
使用各種功能
使用設定顯示 ................. 24
使用 HDMI 控制功能 ............ 27
HDMI 連接的注意事項 .......... 28
節省耗電量 ................... 28
故障排除
故障排除 ..................... 29
重設系統 ..................... 32
入門指南
(另外的文件)
其他資訊
規格 ......................... 33
可播放檔案的類型
(USB 輸入) ............... 35
支援的輸入音訊格式(HDMI OUT (TV
(ARC)) 或 TV IN
(OPTICAL)) ............... 35
關於 BLUETOOTH 通訊 ........... 36
預先注意事項 ................. 37
CT
CT
3
Page 46

關於本使用說明書
•本使用說明書中的說明描述遙控器上的
控制鍵。
•有些插圖作為概念圖,可能與實際產品
有差異。
•每個功能說明的預設設定會以底線標示。
•雙引號內的文字 (“--”)出現在前顯
示面板上。
CT
4
Page 47
盒中內容
• 主動式揚聲器系統 (1)
• 主動式重低音揚聲器 (1)
• 環繞揚聲器 (僅 HT-S500RF)(2)
• R03 (AAA 大小)電池 (2)
• HDMI 連接線 (1)
• 壁掛式安裝模板 (1)
• 環繞揚聲器 (2)、揚聲器底座 (2)和
螺絲 (8)(僅 HT-S700RF)
• 遙控器 (1)
• 入門指南
• 使用說明書
CT
5
Page 48
系統的功能
“ 聆聽電視和其他裝置 ”
(第 16 頁)
Blu-ray Disc™ 播放器、有線
電視盒、衛星電視盒等
連接電視機
(請參閱 “ 入門指南 ” (另外的文件)或 “ 使用類
比音訊連接線連接音訊裝置 ” (第 11 頁))
“使用HDMI控制功能”(第27頁)
“ 聆聽 USB 裝置上的音
樂 ” (第 17 頁)
“ 聆聽行動裝置中的音
樂 ” (第 21 頁)
“ 使用 Sony | Music
Center 聆聽行動裝置中
的音樂”(第23頁)
HT-S500RF
HT-S700RF
CT
6
Page 49
部件與控制器的指南
插圖省略細節。
主動式重低音揚聲器
正面
(電源)按鈕
開啟系統或設至待機模式。
(輸入選擇)按鈕 (第 16 頁)
BLUETOOTH 按鈕 (第 21 頁)
+/- (音量)按鈕
遙控器感應器 (第 15 頁)
將遙控器指向遙控器感應器以操作系
統。
前顯示面板
(USB)連接埠 (第 17 頁)
BLUETOOTH 指示燈
- 亮起藍燈:已建立 BLUETOOTH 連線
(選取 BLUETOOTH 輸入)。
- 快速閃爍藍燈:等待連接裝置時。
- 閃爍藍燈:重新連接或執行配對
時。
CT
7
Page 50
背面
SPEAKERS 插孔
IR REPEATER 插孔
TV IN (OPTICAL) 插孔
HDMI OUT (ARC) 插孔
用 HDMI 連接線連接具備 HDMI 輸入
插孔的電視機。
系統相容於 Audio Return Channel
(ARC)。ARC 是將電視機的聲音從
電視機的 HDMI 插孔傳送到系統等
AV 裝置的功能。
CT
8
ANALOG IN 插孔 (第 11 頁)
交流電源線
Page 51
遙控器
INPUT (第 16 頁)
選擇輸入來源。
AUTO SOUND (第 19 頁)
將音效選擇為 AUTO SOUND。
CINEMA (第 19 頁)
將音效選擇為 CINEMA。
VOICE (第 19 頁)
開啟 / 關閉語音模式。
(音量)+*/-
調節音量。
SW (主動式重低音揚聲器音
量)+/-
調節主動式重低音揚聲器音量。
MENU (第 24 頁)
開啟 / 關閉前顯示面板上的選單。
/ (第 17、24 頁)
選擇選單項目。
在電視機螢幕上選擇 USB 播放的內
容。
ENTER (第 17、24 頁)
輸入選擇。
播放透過
/ 選取的 USB 播放內容。
BACK (第 17、24 頁)
返回前一個顯示。
停止 USB 播放。
/ (上一個 / 下一個)
(第 17、21 頁)
按下可選擇上一個 / 下一個曲目或檔
案。
按住可向前或向後搜尋。
(電源)
開啟系統或設至待機模式。
STANDARD (第 19 頁)
將音效選擇為 STANDARD。
MUSIC (第 19 頁)
將音效選擇為 MUSIC。
NIGHT (第 19 頁)
開啟 / 關閉夜間模式。
CT
9
Page 52

(靜音)
暫時靜音。
靜音時按下按鈕可取消靜音。
DIMMER
調整前顯示面板的亮度。
“BRGHT”“DARK”“OFF”
• 選取 “OFF” 時,前顯示面板會關
閉。操作系統時會自動開啟,如果
在數秒鐘內沒有操作系統,則會再
次關閉。但是,在某些情況下,前
顯示面板可能不會關閉。在此情況
下,前顯示面板的亮度與 “DARK”
相同。
(播放 / 暫停) * (第 17、21
頁)
播放、暫停或繼續播放。
* + 和 按鈕有觸覺點。操作時,可將
其作為參考點。
關於更換遙控器的電池
使用遙控器操作時,如果系統沒有反應,
請更換兩顆新電池。
使用 R03 (AAA 大小)錳電池進行更換。
10
CT
Page 53
連接到電視機或音訊裝置
智慧型手機、
WALKMAN®、其他音訊
裝置等
類比音訊
輸出
類比音訊連接線
(無附帶)
使用 HDMI 連接線和 /
或光纖傳輸線連接電視
機
請參閱入門指南 (另外的文件)。
使用類比音訊連接線連
接音訊裝置
若要將智慧型手機和 WALKMAN® 等可攜式
音訊裝置連接到系統,請透過系統上的
ANALOG IN 插孔連接。
關於聆聽連接的裝置,請參閱 “ 聆聽電
視和其他裝置 ” (第 16 頁)。
CT
11
Page 54
準備使用系統
主動式揚聲器系統背面的孔
4mm
超過 30 mm
5 mm
10 mm
電視機中心
壁掛式安裝
模板
膠帶等
將主動式揚聲器系統安裝到牆
上
將主動式揚聲器系統和
環繞揚聲器安裝到牆上
您可以將主動式揚聲器系統和環繞揚聲器
安裝到牆上。
HT-S500RF
HT-S700RF
註
• 準備適合牆壁材料和強度的螺絲 (無附
帶)。由於石膏板牆壁易碎,請將螺絲牢固
釘入牆柱。水平安裝揚聲器,並將其懸掛在
連續平面牆柱上的螺絲上。
• 讓 Sony 經銷商或授權承包商完成安裝,並在
安裝期間特別注意安全事宜。
• 對因安裝錯誤、牆壁不夠堅固、螺絲安裝錯
誤或自然災害等引起的事故或損壞,Sony
概不負責。
1 準備適合主動式揚聲器系統背面壁掛
孔的兩個螺絲 (無附帶)。
2 將壁掛式安裝模板 (附帶)貼在牆
上。
1 將壁掛式安裝模板的電視機中心線
()對齊電視機的中心線。
2 將壁掛式安裝模板的電視機底部線
()對齊電視機的底部,然後使
用市售膠帶等將壁掛式安裝模板黏
貼到牆壁上。
CT
12
Page 55
3 如下圖所示,在壁掛式安裝模板的螺
螺絲
標示位置
6 mm 至 7 mm
297.5 mm
297.5 mm
環繞揚聲器背面的孔
4mm
超過 30 mm
5 mm
10 mm
8 mm 至 9 mm
絲線 ()上的標示位置鎖緊螺絲。
4 取下壁掛式安裝模板。
5 將主動式揚聲器系統掛在螺絲上。
將主動式揚聲器系統的背面孔對齊螺
絲,然後將主動式揚聲器系統掛在兩
個螺絲上。
將環繞揚聲器安裝到牆上
如果使用 HT-S500RF
1 準備適合環繞揚聲器背面壁掛孔的螺
絲,每個揚聲器各一顆螺絲 (無附
帶)。
2 將螺絲旋入牆壁。
螺絲應如圖所示突出。
註
黏貼壁掛式安裝模板時,將它完全撫平。
13
CT
Page 56
3 將環繞揚聲器掛在螺絲上。
環繞揚聲器背面的孔
4mm
超過 30 mm
5 mm
10 mm
1000 mm
8 mm 至 9 mm
將環繞揚聲器的背面孔對齊螺絲,然
後將環繞揚聲器掛在螺絲上。
如果使用 HT-S700RF
1 準備適合環繞揚聲器背面壁掛孔的螺
絲,每個揚聲器各兩顆螺絲 (無附
帶)。
2 將螺絲旋入牆壁。
螺絲應如圖所示突出。
3 將環繞揚聲器掛在螺絲上。
將環繞揚聲器的背面孔對齊螺絲,然
後將環繞揚聲器掛在螺絲上。
CT
14
Page 57
使用遙控器操作系統
將遙控器指向主動式重低音揚聲器的遙控器
感應器。
電視機遙控器不能操作
時
當主動式揚聲器系統擋到電視機的遙控器
感應器時,電視機遙控器可能會無法使
用。在此狀況下,請啟用系統上的 IR 中
繼器功能。
透過從主動式揚聲器系統背面傳送遠端訊
號,可以使用電視機遙控器控制電視機。
1 將 IR 中繼器電線連接到主動式重低音
揚聲器。
請參閱入門指南 (另外的文件)。
2 按 MENU。
選單項目出現在前顯示面板上。
3 使用 //ENTER 選擇 “SYS >”-
“IRRPT”。
4 使用 //ENTER 選擇 “ON”。
若要關閉 IR 中繼器功能,選擇
“OFF”。
5 按 MENU 關閉選單。
註
• 請務必確定電視機遙控器無法控制電視機,
再將 IR 中繼器功能設為開啟。如果該設定
在遙控器可控制電視機時設為開啟,則因為
遙控器的直接命令與透過主動式揚聲器系統
發出的命令之間有干擾,所以可能無法適當
操作。
• 在某些電視機上,此功能可能無法正確運
作。在此情況下,請將主動式揚聲器系統稍
微遠離電視機。
15
CT
Page 58
聆聽聲音
INPUT
+/-
SW +/-
聆聽電視和其他裝置
1 重複按下 INPUT。
按一下 INPUT 時,輸入來源會變更,
所選輸入來源會出現在前顯示面板
上。
每按一下 INPUT,輸入來源會如下循
環改變。
“TV”“ANALG”“BT”
“USB”
“TV”
• 連接至 HDMI OUT (ARC) 插孔的 Audio
Return Channel (ARC)功能相容的電視
機
• 連接至 TV IN (OPTICAL) 插孔的電視機
當您將電視機連接至 HDMI OUT (ARC) 和
TV IN (OPTICAL) 插孔時,HDMI OUT (ARC)
插孔的輸入擁有優先權。
“ANALG”
連接 ANALOG IN 插孔的音訊裝置 (智慧型
手機、WALKMAN® 等)
“BT”
支援 A2DP 的 BLUETOOTH 裝置
詳情請參閱 “ 透過 BLUETOOTH® 功能聆聽
音樂/聲音”(第21頁)。
“USB”
連接至 (USB)連接埠的 USB 裝置
詳情請參閱 “ 聆聽 USB 裝置上的音樂 ”
(第 17 頁)。
2 調節音量。
• 按下遙控器上的 +/- 調節音量。
• 按下遙控器上的SW +/-調節主動
式重低音揚聲器音量 (第 20 頁)。
提示
您也可以按下主動式重低音揚聲器上的
選擇輸入。
16
CT
Page 59
聆聽 USB 裝置上的音樂
ENTER
+/-
/
INPUT
/
SW +/-
MENU
您可播放在連接的 USB 裝置上儲存的音樂
檔案。
有關可播放檔案的類型,請參閱 “ 可播
放檔案的類型 (USB 輸入)” (第 35
頁)。
註
• 若要在電視機螢幕上檢視 USB 內容清單,確
認您使用 HDMI 連接線將系統連接至電視
機。
• 將電視機的輸入變更為系統連接的輸入。
1 將 USB 裝置連接至 (USB)連接埠。
2 重複按下 INPUT 選擇前顯示面板上的
“USB”。
“READ” 出現在前顯示面板上,系統
開始讀取 USB 裝置的資料。資料讀取
完成時,電視機螢幕上出現 USB 內容
清單。
3 按 / 選擇您想要的內容,然後按
ENTER。
開始播放所選擇的內容。
4 調節音量。
• 按下遙控器上的 +/- 調節音量。
• 按下遙控器上的SW +/-調節主動
式重低音揚聲器音量 (第 20 頁)。
選擇播放模式
您可以從選單中選擇 USB 播放的播放模
式,例如重複播放或隨機播放。
1 按 MENU。
選單項目出現在前顯示面板上。
2 使用 //ENTER 選擇 “USB >”–
“REPT”。
3 使用 //ENTER 選擇播放模式。
•“NONE”
曲目。
•“ONE”:重複播放一首曲目。
•“FLDER”:重複播放資料夾內的所有
曲目。
•“SHFFL”:隨機重複播放資料夾內的
所有曲目。
:播放目前資料夾內的所有
CT
17
Page 60
4 按 MENU 關閉選單。
其他操作
若要 動作
暫停或繼續播放 按 。
選擇上一首或下一首曲目按 /。
向後或向前搜尋
(倒轉 / 快轉)
註
• 操作時請勿拔下 USB 裝置。為了避免破壞數
據或損壞 USB 裝置,請在連接或拔下 USB 裝
置前關閉系統。
• 如果您連接不支援或損壞的 USB 裝置,前顯
示面板上會閃爍 “NOUSB”。
• 視檔案格式而定,倒轉和快轉可能無效。
按住 /。
電視機螢幕上的 USB 裝置資訊
電視機螢幕上出現的以下訊息視 USB 裝置
的狀態而定。
• [No USB]
未插入 USB 裝置。
• [Waiting]
系統正在搜尋 USB 裝置。
註
• 視播放來源而定,可能無法顯示某些資訊。
• 視播放模式而定,顯示的資訊可能不同。
播放時間
總播放時間
所選檔案索引 / 資料夾內的檔案總數
播放模式
播放狀態
倒轉 / 快轉速度
CT
18
Page 61
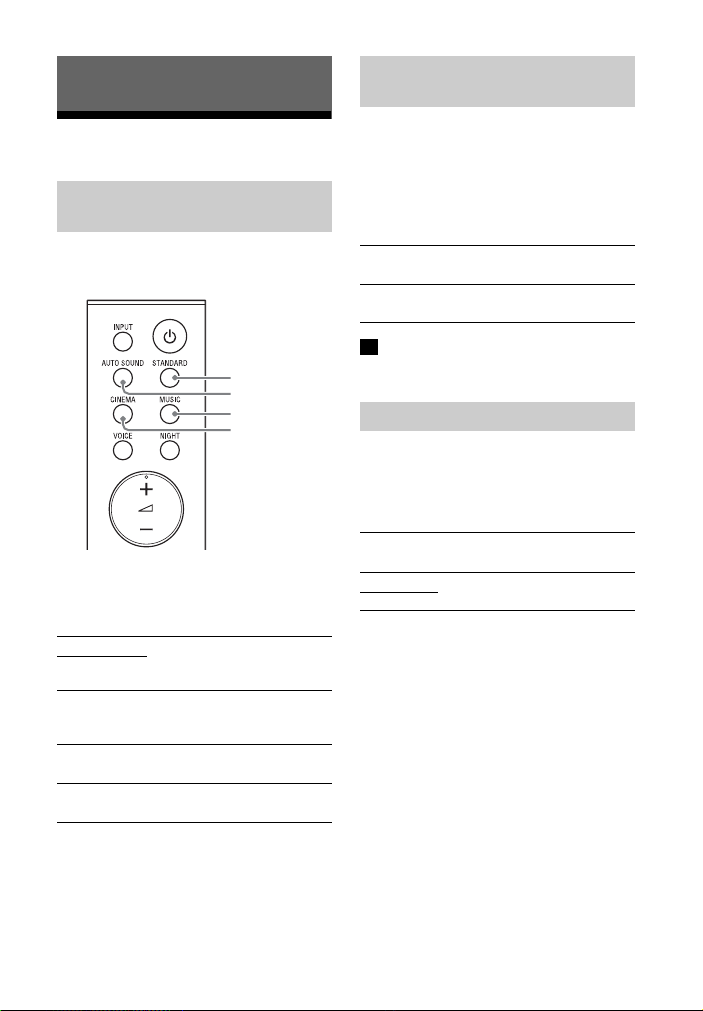
選擇音效
STANDARD
AUTO SOUND
MUSIC
CINEMA
調整聲音
欣賞針對音源的音效 (聲音模
式)
您可輕鬆欣賞針對不同的音源而預先編程
的音效。
按 AUTO SOUND、CINEMA、MUSIC 或
STANDARD 選擇聲音模式。
所選聲音模式出現在前顯示面板上。
“AUTO SOUND”
您可以使用 Sony 建議的聲音模式欣賞聲音。聲
音模式根據播放內容和功能自動最佳化。
“CINEMA”
以環繞效果播放聲音,真實呈現強而有力的聲
音,適合觀賞影片。
“MUSIC”
針對聆聽音樂最佳化的音效。
“STANDARD”
針對個別來源最佳化的音效。
深夜時以低音量欣賞清晰的聲
音 (NIGHT)
您可以透過將夜間模式設為開啟,根據內
容中包含的資訊來壓縮聲音。
在失真度最低且對話清晰的狀況下以低音
量輸出聲音。
按 NIGHT 可開啟或關閉功能。
夜間模式開啟
“N.ON” 出現在前顯示面板上。
夜間模式關閉
“N.OFF” 出現在前顯示面板上。
註
關閉系統時,夜間模式會自動設為關閉。
讓對話更清楚 (VOICE)
您可以透過將語音模式設為開啟使對話更
清楚。
按 VOICE 可開啟或關閉功能。
語音模式開啟
“V.ON” 出現在前顯示面板上。
語音模式關閉
“V.OFF” 出現在前顯示面板上。
19
CT
Page 62
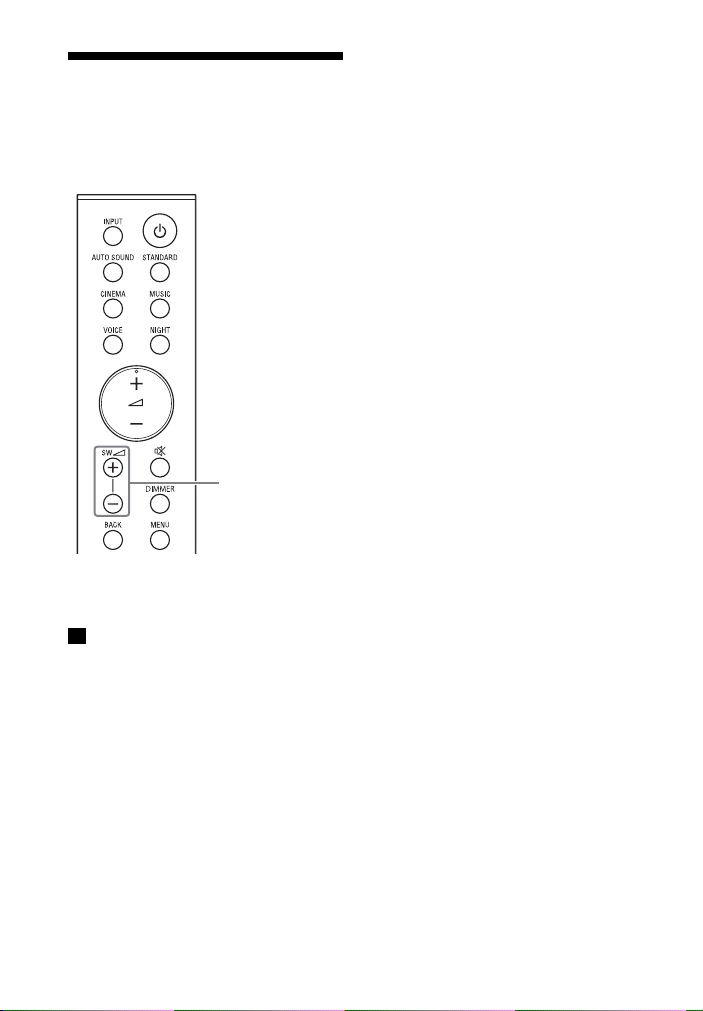
調整主動式重低音揚聲
SW +/-
器的音量
主動式重低音揚聲器設計用於播放低音或
低頻聲音。
按 SW (主動式重低音揚聲器音量)
+/- 調整主動式重低音揚聲器的音量。
註
如果輸入來源不含許多低音,例如在電視節
目中,主動式重低音揚聲器的低音可能很難
聽到。
20
CT
Page 63
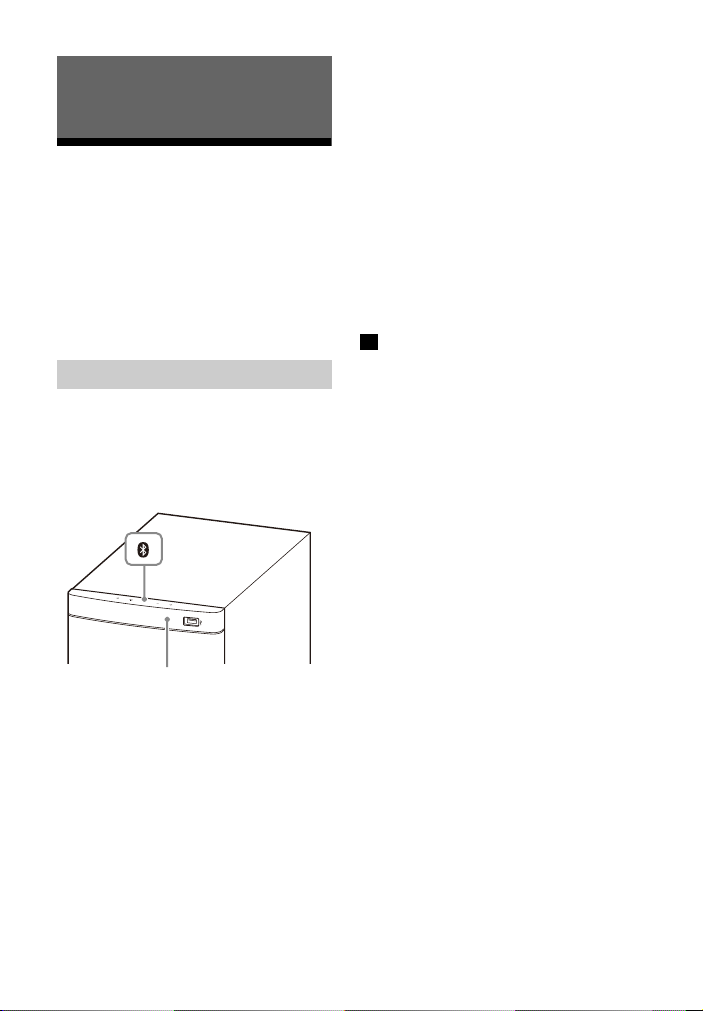
透過 BLUETOOTH® 功能聆聽音
BLUETOOTH 指示燈
BLUETOOTH
按鈕
樂/聲音
聆聽行動裝置中的音
樂
使用 BLUETOOTH 功能連接系統與行動裝
置,可以透過無線連接聆聽儲存在智慧型
手機或平板電腦等行動裝置上的音樂。
透過 BLUETOOTH 功能連接行動裝置時,只
要使用附帶的遙控器就能操作,不需開啟
電視。
透過與行動裝置配對聆聽音樂
1 按住主動式重低音揚聲器上的
BLUETOOTH 按鈕 2 秒。
系統進入配對模式,且 BLUETOOTH 指
示燈快速閃爍。
4 確定主動式重低音揚聲器上的
BLUETOOTH 指示燈亮起藍燈。
系統與行動裝置之間的連線已建立。
5 使用所連線行動裝置上的音樂應用程
式開始播放音訊。
聲音從系統輸出。
6 調節音量。
• 按下遙控器上的 +/- 調節音量。
• 按下遙控器上的SW +/-調節主動
式重低音揚聲器音量 (第 20 頁)。
• 遙控器上的 和 / 可用
於 BLUETOOTH 功能。(按住 /
向前或向後搜尋無效。)
註
• 您最多可以配對 8個BLUETOOTH裝置。如果配
對第 9 個 BLUETOOTH 裝置,新的裝置將替換
最早連接的裝置。
• 為第二個和之後的行動裝置執行配對。
提示
• 您可檢查 BLUETOOTH 指示燈狀態以確定
BLUETOOTH 功能的連線狀態 (第 7 頁)。
• 選取 BLUETOOTH 輸入時,短按主動式重低音
揚聲器上的 BLUETOOTH 按鈕可使系統進入配
對模式。
2 在行動裝置上,透過執行配對操作搜
尋系統。
搜尋到的 BLUETOOTH 裝置清單會出現
在行動裝置的螢幕上。
有關將 BLUETOOTH 裝置與行動裝置配
對的操作方法,請參閱行動裝置的使
用說明書。
3 從行動裝置螢幕上的清單中選擇
“HT-S500RF” 或 “HT-S700RF”,
將系統與行動裝置配對。
如需密碼,請輸入 “0000”。
CT
21
Page 64
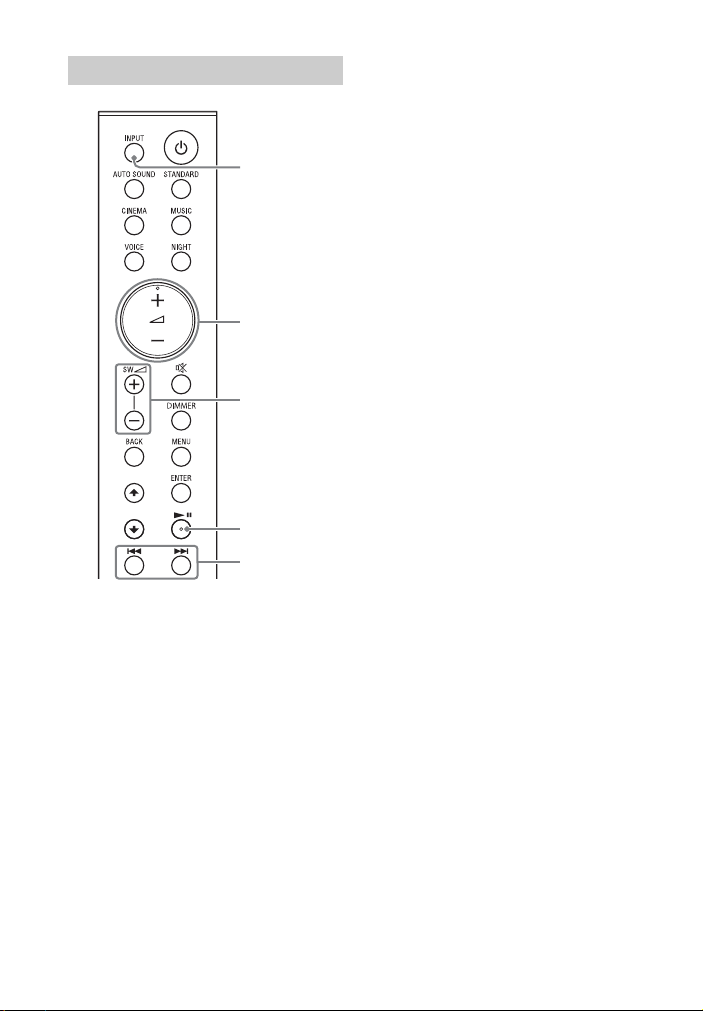
聆聽已配對行動裝置中的音樂
INPUT
+/-
/
SW +/-
• 按下遙控器上的SW +/- 調節主動
式重低音揚聲器音量 (第 20 頁)。
• 遙控器上的 和 / 可用
於 BLUETOOTH 功能。(按住 /
向前或向後搜尋無效。)
1 開啟行動裝置的 BLUETOOTH 功能。
2 重複按下 INPUT 選擇 “BT” 或短按主
動式重低音揚聲器上的 BLUETOOTH 按
鈕。
BLUETOOTH 指示燈閃爍,系統會自動
重新連接最近連線的 BLUETOOTH 裝
置。
3 確定 BLUETOOTH 指示燈亮起藍燈。
系統與行動裝置之間的連線已建立。
4 使用所連線行動裝置上的音樂應用程
式開始播放音訊。
聲音從系統輸出。
5 調節音量。
• 按下遙控器上的 +/- 調節音量。
22
CT
Page 65

使用 Sony | Music
Center 聆聽行動裝置
中的音樂
Sony | Music Center 的功能
Sony | Music Center 是使用智慧型手機
或平板電腦等行動裝置控制相容 Sony 音
訊裝置的應用程式。
有關 Sony | Music Center 的詳情,請參
閱以下 URL。
http://www.sony.net/smcqa/
Sony | Music Center 能讓您:
– 無縫在家欣賞音樂。
– 變更常用設定,選擇系統輸入及調整音
量。
– 使用系統欣賞智慧型手機中儲存的音樂
內容。
– 使用智慧型手機顯示幕體驗音樂的視覺
享受。
註
• 透過 BLUETOOTH 功能使用 Sony | Music
Center 前,務必將系統上的 “BT >”-“BT
PW”設定為“ON”(第25頁)。
• 您可以使用 Sony | Music Center 控制的操
作視連接的裝置而異。應用程式的規格及設
計如有變更,恕不另行通知。
4 按照 Sony | Music Center 畫面上的指
示操作。
註
• 使用最新版 Sony | Music Center。有關
Sony | Music Center 的詳情,請參閱
Google Play 或 App Store。如果您無法透
過 BLUETOOTH 功能連接系統和 BLUETOOTH 裝
置,請解除安裝 Sony | Music Center,然
後再次嘗試透過 BLUETOOTH 功能連接。
使用 Sony | Music Center
1 將免費 Sony | Music Center 應用程式
安裝到行動裝置。
在 Google Play 或 App Store 上搜尋
Sony | Music Center,然後安裝到行
動裝置。
2 將系統和行動裝置透過 BLUETOOTH 功
能連接(第21頁)。
3 啟動 Sony | Music Center。
23
CT
Page 66
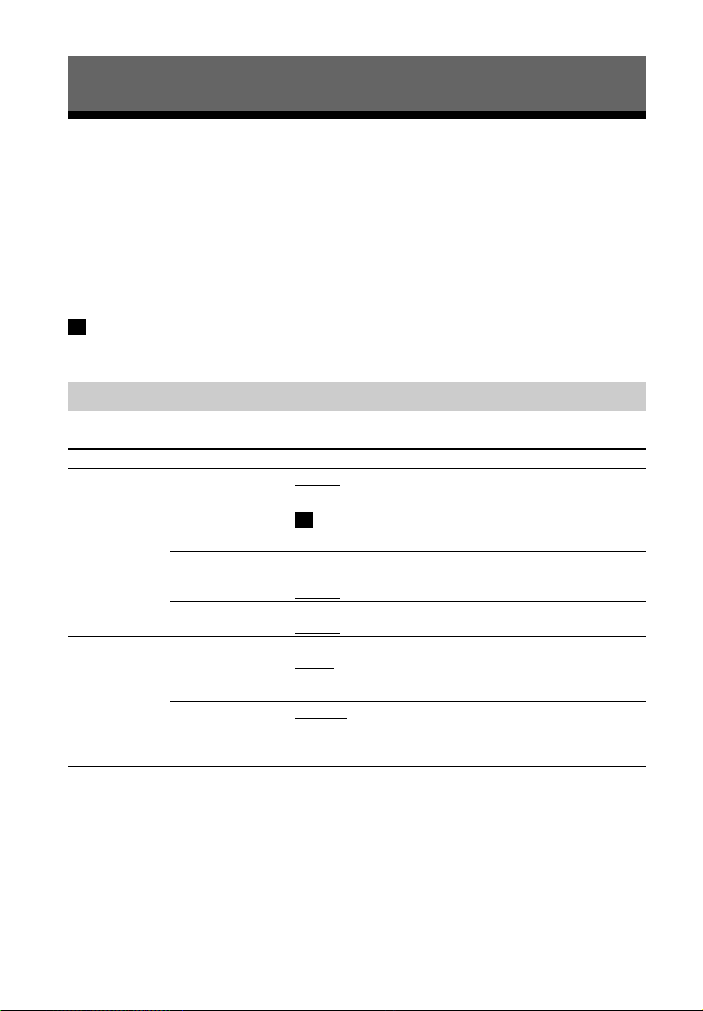
使用各種功能
註
使用設定顯示
您可以使用選單設定下列項目。
即使拔出交流電源線,仍會保留您的設定。
1 按 MENU 開啟前顯示面板上的選單。
2 重複按下 BACK///ENTER 選擇您想要的項目和設定。
3 按 MENU 關閉選單。
註
透過執行選單操作以外的操作,例如按 +/-、SW +/-、 等,也能關閉選單。
選單清單
預設設定會以底線標示。視區域而定,預設設定可能不同。
選單項目 功能
“LVL >”
(等級)
“SPK >”
(揚聲器)
“SUR.L”/
“SUR.R”
(左 / 右環繞揚聲器
音量)
“DRC”
(動態範圍控制)
“TTONE”
(測試音)
“MULTI”
(多重揚聲器模式)
“SUR.L”/
“SUR.R”
(左 / 右環繞揚聲器
距離)
“0.0”
:在 -6.0 dB 至 +6.0 dB 的範圍內調整環繞揚聲器的
音量 (調整間隔為 0.5 dB)。
務必將 “TTONE” 設定為 “ON” 以方便調整。
適合以低音量欣賞電影。DRC 適用於 Dolby Digital 來源。
“ON”:根據內容中的資訊壓縮聲音。
:不壓縮聲音。
“OFF”
“ON”:每個揚聲器依序輸出測試音。
:關閉測試音。
“OFF”
您可以設定系統揚聲器的輸出。
:不論播放來源有幾個聲道,都會從所有揚聲器輸出
“ON”
聲音。
“OFF”:從對應播放來源聲道的揚聲器輸出聲音。
:在 1.0 公尺至 6.0 公尺的範圍內調整聆聽位置到
“3.0M”
環繞揚聲器的距離 (調整間隔為 0.1 公尺)。
CT
24
Page 67

選單項目 功能
註
註註註
“AUD >”
(音訊)
“HDMI>” “CTRL”
“BT >”
(BLUETOOTH)
“DUAL”
(雙重單聲道)
“STRM”
(串流)
(HDMI 控制)
“TVSTB”
(待機連結至電視
機)
“BT PW”
(BLUETOOTH 電源)
“BTAAC”
(BLUETOOTH 轉碼
器 - AAC)
當系統接收 Dolby Digital 多路廣播訊號時,可以欣賞多路
廣播聲音。
“MAIN”
“SUB”:輸出副語言的聲音。
“M/S”:混合輸出主、副語言的聲音。
若要接收 Dolby Digital 訊號,您需使用 HDMI 連接線 (附
帶)將電視機或其他裝置連接至 HDMI OUT (ARC) 插孔或使用
光纖數位線 (無附帶)連接至 TV IN (OPTICAL) 插孔。
顯示目前音訊串流資訊。
有關支援音訊格式的詳情,請參閱 “ 支援的輸入音訊格式
(HDMI OUT (TV (ARC)) 或 TV IN (OPTICAL))” (第 35
頁)。
“ON”
可以互相控制。
“OFF”:關閉。
將 “CTRL” 設定為 “ON” 時,可以使用此功能。
“AUTO”
自動關閉系統。
“ON”:不論輸入為何,關閉電視機時,都會自動關閉系
統。
“OFF”:關閉電視機時,系統不會關閉。
您可以開啟或關閉 BLUETOOTH 功能。
“ON”
“OFF”:關閉 BLUETOOTH 功能。
若 BLUETOOTH 功能設為關閉,透過按 INPUT 選擇輸入時,會
略過 BLUETOOTH 輸入。
如果 AAC 轉碼器已啟用,而且裝置支援 AAC 轉碼器,您可以
欣賞高品質聲音。
“ON”:啟用 AAC 轉碼器。
“OFF”
:輸出主語言的聲音。
:HDMI 控制功能啟用。透過 HDMI 連接線連接的裝置
:如果系統的輸入為 “TV”,關閉電視機時,也會
:開啟 BLUETOOTH 功能。
:停用 AAC 轉碼器。
如果變更此設定,下次 BLUETOOTH 連接後會反映變更後的設
“BTSTB”
(BLUETOOTH 待機)
“INFO”
(BLUETOOTH 裝置資
訊)
定。
若系統具有配對資訊,透過將 BLUETOOTH 待機模式設為開
啟,即使系統處於待機模式,您仍可開啟系統並聆聽
BLUETOOTH 裝置中的音樂。
:BLUETOOTH 待機模式啟用。
“ON”
“OFF”:BLUETOOTH 待機模式停用。
BLUETOOTH 待機模式開啟時,待機耗電量增加。
偵測到的 BLUETOOTH 裝置名稱和位址出現在前顯示面板上。
如果系統未連接至 BLUETOOTH 裝置,會出現 “NO DEVICE”。
25
CT
Page 68

選單項目 功能
“USB >” “REPT”
“SYS >”
(系統)
(播放模式)
“ASTBY”
(自動待機)
“IRRPT”
(IR 中繼器)
“VER”
(版本)
• “NONE”:播放目前資料夾內的所有曲目。
• “ONE”:重複播放一首曲目。
• “FLDER”:重複播放資料夾內的所有曲目。
• “SHFFL”:隨機重複播放資料夾內的所有曲目。
“ON”:開啟自動待機功能。當您大約 20 分鐘沒有操作系
統,系統會自動進入待機模式。
“OFF”
透過主動式揚聲器系統,可以使用電視機遙控器控制電視
機。詳情請參閱 “ 電視機遙控器不能操作時 ” (第 15
頁)。
目前韌體版本資訊出現在前顯示面板上。
:關閉。
26
CT
Page 69

使用 HDMI 控制功能
透過 HDMI 連接線 (高速 HDMI 傳輸線,附
帶)連接與 HDMI 控制功能 * 相容的電視
機或 Blu-ray Disc 播放器等裝置,可讓
您使用電視機的遙控器輕鬆操作裝置。
以下功能可以與 HDMI 控制功能一起使用。
• 系統關閉功能
• 系統聲音控制功能
• Audio Return Channel (ARC)
• 觸控播放功能
* HDMI 控制是 CEC (Consumer Electronics
Control)用於讓 HDMI (高解析度多媒體
介面)裝置互相控制的標準。
註
這些功能可能適用於非 Sony 製造的裝置,但
不保證能正常運作。
若您在上次觀賞電視時,電視機的聲音是
從系統的揚聲器輸出,則重新開啟電視機
時,系統也會自動開啟。
也可以使用電視機選單進行操作。詳情請
參閱電視機的使用說明書。
註
• 使用電視機的雙重畫面功能時,如果不是選
取 “TV” 輸入,只會從電視機輸出聲音。
當您停用雙重畫面功能時,會從系統輸出聲
音。
• 視電視機而定,表示系統音量的數字會顯示
在電視機螢幕上。電視機上顯示的音量數字
可能與系統前顯示面板上的數字不同。
• 視電視機的設定而定,系統聲音控制功能可
能無效。詳情請參閱電視機的使用說明書。
• 視電視機而定,若您在上次觀賞電視時,電
視機的聲音是從電視機的揚聲器輸出,即使
電視機開啟,系統也可能不會透過與電視機
電源聯鎖而開啟。
準備使用 HDMI 控制功能
將系統上的 “HDMI>”–“CTRL” 設定為
“ON” (第 25 頁)。預設設定為
“ON”。
為電視機和連接至系統的其他裝置啟用
HDMI 控制功能設定。
提示
如果在使用 Sony 製造的電視機時啟用 HDMI
控制功能,系統的 HDMI 控制功能也會自動啟
用。系統上的 “HDMI>”-“CTRL” 變更為
“ON” 時,“DONE” 會出現在前顯示面板
上。
系統關閉功能
關閉電視機時,也會自動關閉系統。
將系統上的 “HDMI>”-“TVSTB” 設定為
“ON”或“AUTO”(第25頁)。預設設
定為 “AUTO”。
系統聲音控制功能
若您在觀賞電視時開啟系統,則電視機的
聲音會從系統的揚聲器輸出。可以使用電
視機遙控器調整系統音量。
Audio Return Channel (ARC)
如果系統連接至與 Audio Return Channel
相容的電視機 HDMI IN 插孔,您可以從系
統的揚聲器聆聽電視機的聲音,而不需連
接光纖數位線。
註
如果電視機與 Audio Return Channel 不相
容,需要連接光纖數位線 (請參閱附帶的入
門指南)。
觸控播放功能
當您在與電視機連接的裝置 (Blu-ray
Disc 播放器、“PlayStation®4” 等)上
播放內容時,本系統與電視機會自動開
啟,系統的輸入會切換到電視機的輸入,
聲音會從系統的揚聲器輸出。
註
• 如果您上次觀賞電視時電視機的聲音從電視
機的揚聲器輸出,則即使播放裝置內容,系
統也可能不會開啟,而且聲音和圖像可能會
從電視機輸出。
• 視電視機而定,可能無法正確播放所播放內
容的起始處。
27
CT
Page 70

HDMI 連接的注意事項
節省耗電量
• 使用 HDMI 授權的連接線或附帶的 HDMI 連
接線。
• 使用有連接線類型標誌的 Sony 高速 HDMI
連接線。
• 我們不建議使用 HDMI-DVI 轉換線。
• 如果透過 HDMI 連接線連接的裝置無法輸
出聲音或是畫質不良,請檢查連接裝置
的設定。
• 連接裝置可能會抑制經由 HDMI 插孔傳輸
的音訊訊號 (取樣頻率、位元長度
等)。
若要在節省耗電量的情況下使用系統,請
變更以下設定。
透過偵測使用狀態關閉系統
若將自動待機功能設為開啟,當您大約
20 分鐘沒有操作系統,而且系統沒有接收
到輸入訊號時,系統會自動進入待機模
式。
將系統上的 “SYS >”-“ASTBY” 設定為
“ON”(第26頁)。
預設設定為 “OFF”。
待機模式中省電
若要在待機模式期間節省功耗,請將
“BTSTB” (BLUETOOTH 待機)(第 25
頁)和 “CTRL” (HDMI 控制)(第 25
頁)設定為 “OFF”。
預設設定為 “ON”。
28
CT
Page 71

故障排除
故障排除
若您在使用系統時遇到任何以下問題 , 請
在尋求維修之前使用此故障檢修指南以幫
助您解決有關問題。若問題持續,請就近
與 Sony 經銷商聯絡。
圖像
沒有圖像或圖像輸出不正確。
選擇適當的輸入 (第 16 頁)。
選擇 TV 輸入時,如果沒有圖像,請使用
電視機遙控器選擇您要的電視頻道。
斷開 HDMI 連接線,然後再次連接。確定
連接線已插牢。
聲音
電源
系統電源未開啟。
檢查交流電源線已穩固地連接。
將交流電源線從牆壁插座中拔出,數分
鐘後再重新接上。
系統自動關閉。
自動待機功能運作。將 “SYS >”-
“ASTBY” 設定為 “OFF” (第 26
頁)。
雖然電視機開啟,但系統沒有開啟。
將 “HDMI>”-“CTRL” 設定為 “ON”
(第 25 頁)。電視機必須支援 HDMI 控
制功能 (第 27 頁)。詳情請參閱電視
機的使用說明書。
檢查電視機的揚聲器設定。系統電源與
電視機的揚聲器設定同步。詳情請參閱
電視機的使用說明書。
視電視機而定,若上次聲音是從電視機
的揚聲器輸出,即使電視機開啟,系統
也可能不會透過與電視機聯鎖而開啟。
當電視機關閉時,系統也關閉。
檢查 “HDMI>”-“TVSTB” 的設定
(第 25 頁)。若將 “TVSTB” 設定為
“ON” 或 “AUTO”,關閉電視機時,
也會自動關閉系統。
雖然電視機關閉,但系統沒有關閉。
檢查 “HDMI>”-“TVSTB” 的設定
(第 25 頁)。如果不論輸入為何都要在
關閉電視機時自動關閉系統,請將
“TVSTB” 設為 “ON”。電視機必須支
援 HDMI 控制功能 (第 27 頁)。詳情請
參閱電視機的使用說明書。
系統無法輸出電視機的聲音。
檢查連接系統與電視機的 HDMI 連接線或
光纖數位線的類型和連接 (請參閱附
帶的入門指南)。
請中斷連接電視機與系統的連接線,然
後再次穩固連接它們。請從交流電插座
拔出電視機與系統的交流電源線,然後
再次連接它們。
透過 HDMI 連接線連接本系統和電視機
時,檢查以下內容。
– 所連接電視機的 HDMI 插孔標示
“ARC”。
– 電視機的 HDMI 控制功能設為開啟。
– 在系統上,HDMI 控制功能設為開啟
(第 27 頁)。
如果電視機與 Audio Return Channel 不
相容,請連接光纖數位線 (無附帶)
(請參閱附帶的入門指南)。如果電視
機與 Audio Return Channel 不相容,
即使系統連接至電視機的 HDMI IN 插
孔,電視機的聲音也不會從系統輸出。
如果連接電視機光纖輸入插孔的裝置沒
有輸出聲音,請嘗試以下操作。
– 將有線電視盒或衛星電視盒直接連接
到系統的 TV IN (OPTICAL) 插孔。
重複按下 INPUT 選擇 TV 輸入 (第 16
頁)。
提高電視機音量或取消靜音。
視您連接電視機與系統的順序而定,系
統可能會靜音。如果發生此狀況,請先
打開電視機,再啟動系統。
將電視機 (BRAVIA)的揚聲器設定設
為音訊系統。請參閱電視機的使用說明
書中有關如何設定電視機的資訊。
29
CT
Page 72

檢查電視機的聲音輸出。請參閱電視機
的使用說明書中有關電視機設定的資
訊。
系統支援 Dolby Digital、DTS 和 PCM 音
訊格式 (第 35 頁)。播放不支援的格
式時,將電視機 (BRAVIA)的數位音
訊輸出設定設為 “PCM”。詳情請參閱
電視機的使用說明書。
系統與電視機會同時輸出聲音。
將系統或電視機的聲音靜音。
主動式重低音揚聲器未發出聲音,或聲
音很小。
確定主動式重低音揚聲器的交流電源線
正確連接 (請參閱附帶的入門指南)。
按SW + 提高主動式重低音揚聲器音
量(第20頁)。
主動式重低音揚聲器用於重現低音。如
果輸入來源不含許多低音 (例如電視
廣播),主動式重低音揚聲器的聲音可
能很難聽到。
播放與版權保護技術 (HDCP)相容的
內容時,不會從主動式重低音揚聲器輸
出。
連接至系統的裝置未從系統發出聲音,
或聲音很小。
按 +,並檢查音量 (第 9 頁)。
或 + 以取消靜音功能 (第 9
按
頁)。
確認已正確選擇輸入來源。您應該重複
按 INPUT 來嘗試其他輸入來源 (第 16
頁)。
檢查系統與連接裝置的所有連接線與導
線是否皆已插牢。
如果連接的裝置支援向上採樣功能,必
須將其關閉。
環繞揚聲器未發出聲音,或聲音很小。
確定環繞揚聲器的連接線正確連接到主
動式重低音揚聲器 (請參閱附帶的入
門指南)。
確定 “SPK >”–“MULTI” 設定為
“ON” (第 24 頁)。如果 “SPK >”–
“MULTI” 設定為 “OFF”,播放 2 聲
道音源聲音時,環繞揚聲器不會輸出聲
音。
未以環繞聲錄製的多聲道聲音不會從環
繞揚聲器輸出。
不能產生環繞效果。
視輸入訊號與聲音模式設定而定,環繞
聲處理可能無法有效運作。環繞音效可
能不明顯,視節目或光碟而定。
若要播放多聲道音訊,請檢查連接本系
統的裝置上,數位音訊輸出設定是否正
確。詳情請參閱連接裝置附帶的使用說
明書。
USB 裝置連接
USB 裝置不被識別。
嘗試以下操作 :
關閉系統。
移除 USB 裝置,然後再次連接。
開啟系統。
確保 USB 裝置穩固地連接至 (USB)連
接埠 (第 17 頁)。
檢查 USB 裝置或連接線是否損壞。
確保 USB 裝置已開啟。
如果透過 USB 集線器連接 USB裝置,切斷
連接,然後將 USB 裝置直接連接至主動
式重低音揚聲器。
行動裝置連接
無法完成 BLUETOOTH 連線。
確認主動式重低音揚聲器上的
BLUETOOTH 指示燈亮起 (第 7 頁)。
確認要連接的 BLUETOOTH 裝置已開啟,
並已啟用 BLUETOOTH 功能。
讓 BLUETOOTH 裝置靠近主動式重低音揚
聲器。
再次配對本系統和 BLUETOOTH 裝置。您
可能需要先使用 BLUETOOTH 裝置取消本
系統的配對。
如果 “BT >”-“BT PW” 設定為
“OFF”,請設定為 “ON” (第 25
頁)。
無法完成配對。
讓 BLUETOOTH 裝置靠近主動式重低音揚
聲器。
確認本系統未接收來自無線 LAN 裝置、
其他 2.4 GHz 無線裝置或微波爐的干
擾。如果附近有產生電磁幅射的裝置,
請將該裝置移離本系統。
30
CT
Page 73

如果系統附近有其他 BLUETOOTH 裝置,
可能無法配備。在此情況下,請關閉其
他 BLUETOOTH 裝置。
系統無法輸出所連接 BLUETOOTH 行動裝
置的聲音。
確認主動式重低音揚聲器上的
BLUETOOTH 指示燈亮起 (第 7 頁)。
讓 BLUETOOTH 裝置靠近主動式重低音揚
聲器。
如果附近有產生電磁輻射的裝置,如無
線 LAN 裝置、其他 BLUETOOTH 裝置或微
波爐,請將該裝置移離本系統。
將 USB 3.0裝置與其連接線移離本系統。
請將本系統與 BLUETOOTH 裝置之間的任
何障礙物移開,或將本系統遠離障礙
物。
重新擺放連接的 BLUETOOTH 裝置。
將任何附近的無線 LAN 路由器或 PC 的無
線 LAN 頻率切換到 5 GHz 的範圍。
調高連接的 BLUETOOTH 裝置的音量。
聲音與影像不同步。
觀賞影片時,您聽到的聲音可能會比影
像慢一些。
遙控器
本系統的遙控器不能操作。
將遙控器指向主動式重低音揚聲器上的
遙控器感應器 (第 7 頁)。
移除遙控器和主動式重低音揚聲器之間
的所有障礙物。
若遙控器的電池電量不足,請更換兩顆
新電池。
確認您在遙控器上按下正確按鈕 (第 9
頁)。
電視機遙控器不能操作。
安裝主動式揚聲器系統時,不要擋到電
視機的遙控器感應器。
啟用 IR 中繼器功能可能可解決此問題
(第 15 頁)。
其它
HDMI 控制功能不能正常操作。
檢查系統連線 (請參閱附帶的入門指
南)。
啟用電視機的 HDMI 控制功能。詳情請參
閱電視機的使用說明書。
請稍等片刻,然後再試一次。如果拔出
系統的插頭,要稍等一下才能進行操
作。等待 15 秒以上,然後再試一次。
確保連接系統的裝置支援 HDMI 控制功
能。
啟用連接系統的裝置的 HDMI 控制功能。
詳情請參閱您裝置的使用說明書。
HDMI 控制功能可控制的裝置類型與數目
受 HDMI CEC 標準的限制,如下所示:
– 錄製裝置 (Blu-ray Disc 錄影機、
DVD 錄影機等):最多 3 個裝置
– 播放裝置 (Blu-ray Disc 播放器、
DVD 播放器等):最多 3 個裝置
– 與調諧器相關的裝置:最多 4 個裝置
– 音訊系統(接收器 / 耳機):最多1個
裝置 (本系統使用)
“PRTCT” 出現在主動式重低音揚聲器
的前顯示面板上,靜音,遙控器或主動
式重低音揚聲器上 (電源)以外的按
鈕無效。
保護功能啟動。按 (電源)關閉系
統,拔出交流電源線,並檢查下列項
目。
– 確保主動式重低音揚聲器的通風未被
擋住,在一段時間後開啟系統。
– 當系統使用 USB 連接時,請移除 USB 裝
置,然後開啟系統。如果系統正常運
作,連接的 USB 裝置電流超過系統最
大輸出電流 500 mA,或 USB 裝置可能
異常。
主動式重低音揚聲器的前顯示面板未亮
起。
如果亮度設定為 “OFF”,按 DIMMER 設
定為 “BRGHT” 或 “DARK” (第 9
頁)。
CT
31
Page 74
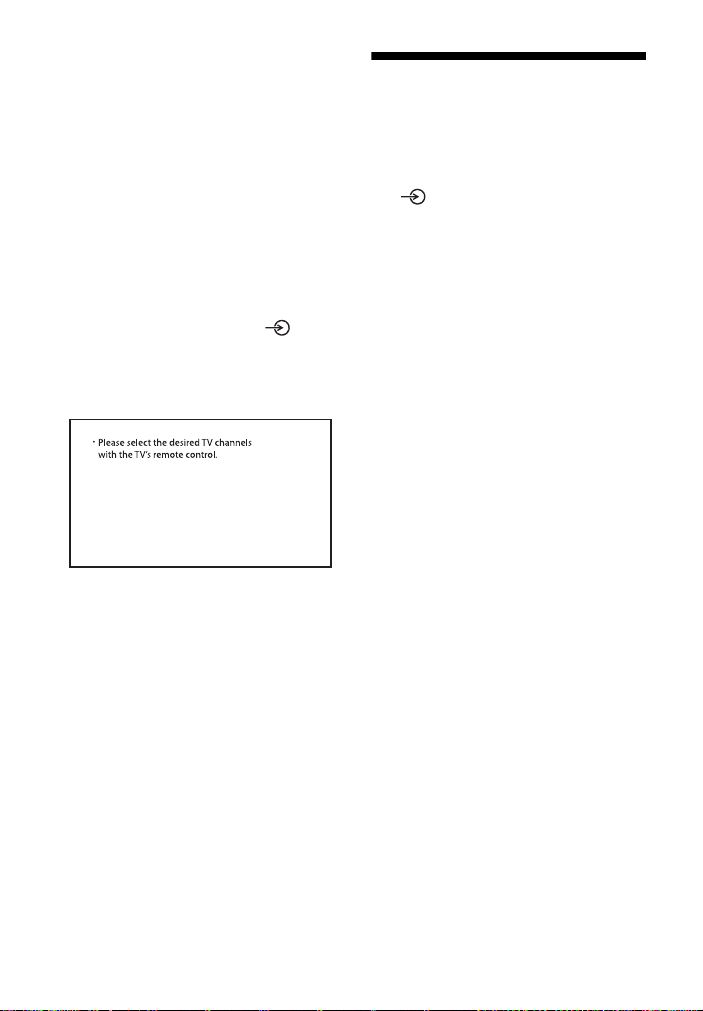
電視機感應器未正確運作。
主動式揚聲器系統可能阻礙某些感應器
(例如亮度感應器)、電視機的遙控器
接收器、支援紅外線 3D 眼鏡系統之 3D
電視機的 3D 眼鏡發射器 (紅外線傳
輸)或無線通訊。在允許部件正確運作
的範圍內,將主動式揚聲器系統從電視
機處移開。針對感應器和遙控器接收器
的位置,請參閱電視機附帶的使用說明
書。
系統沒有正常運作 (“DEMO” 出現在
前顯示面板上)。
系統處於示範模式。若要取消示範模
式,請重設系統。按住主動式重低音揚
聲器上的 (電源)、+ 和 超過
5秒(第32頁)。
當您按下 INPUT 從 USB 輸入變更為 TV
輸入時,出現訊息。
* 此畫面為英文的範例。
使用電視機遙控器選擇電視節目。
重設系統
若系統仍無法正確運作,請依以下方法
重設系統。
1 按住主動式重低音揚聲器上的 、+ 和
超過5秒。
“INIT” 出現在前顯示面板上,選單
設定和聲音模式等回到初始狀態。
2 拔出交流電源線。
3 連接交流電源線,然後按 開啟系
統。
提示
每個功能說明的預設設定會以底線標示。
32
CT
Page 75

其他資訊
規格
主動式重低音揚聲器
(SA-WS500RF/SA-WS700RF)
放大器部分
功率輸出 (額定)
左前置 + 右前置:85 W + 85 W (5.5 歐
姆,1 kHz,1% THD)
功率輸出 (參考)
左前置/右前置/左環繞/右環繞/中
置:152 W (每聲道 5.5 歐姆,1 kHz)
主動式重低音揚聲器:240 W (3.3 歐
姆,100 Hz)
輸入
TV IN (OPTICAL)
USB
HDMI OUT (ARC)
ANALOG IN
輸出
HDMI OUT (ARC)
HDMI 部分
接頭
A 型 (19 針)
USB 部分
(USB)連接埠:
A型
BLUETOOTH 部分
通訊系統
BLUETOOTH 規格 4.2 版
輸出
BLUETOOTH 規格電源等級 2
最遠通訊範圍
視線範圍約 10 m
頻率波段
2.4 GHz 波段 (2.4000 GHz -
2.4835 GHz)
調製方式
FHSS (Freq Hopping Spread Spectrum)
1)
相容的 BLUETOOTH 模式
A2DP (Advanced Audio Distribution
Profile)
AVRCP (Audio Video Remote Control
Profile)
支援的轉碼器
SBC4)、AAC
傳輸範圍 (A2DP)
20 Hz - 20000 Hz (取樣頻率 32 kHz、
44.1 kHz、48 kHz)
1)
實際範圍視裝置之間的障礙物、微波爐附
近的磁場、靜電、無線電話、接收靈敏
度、作業系統、軟體應用程式等因素而
異。
2)
BLUETOOTH 標準模式指出裝置之間的
BLUETOOTH 通訊目的。
3)
轉碼器:音訊訊號壓縮和轉換格式
4)
次頻帶轉碼器的縮寫
5)
進階音訊編碼的縮寫
2)
3)
5)
揚聲器部分
揚聲器系統
主動式重低音揚聲器系統、低音反射
揚聲器
HT-S500RF:180 mm 圓錐型
HT-S700RF:200 mm 圓錐型
一般常規
電源需求
220 V - 240 V AC,50 Hz/60 Hz
耗電量
開啟:140 W
待機:0.5 W 或以下 (省電模式)
(當 “HDMI>” 中的 “CTRL” 和
“BT >” 中的 “BTSTB” 設定為
“OFF” 時)
尺寸 * (約)(寬/高/深)
HT-S500RF:207 mm × 402 mm ×
330 mm
HT-S700RF:231 mm × 438 mm ×
378 mm
*包括突出部分
質量 (約)
HT-S500RF:9.0 kg
HT-S700RF:10.2 kg
相容的 iPhone/iPod 機型
相容的 iPhone/iPod 機型如下。與系統一起
使用 iPhone/iPod 之前,使用最新的軟體進
行更新。
33
CT
Page 76

適用於:
iPhone X/iPhone 8/iPhone 8 Plus/iPhone
7/iPhone 7 Plus/iPhone SE/iPhone 6s/
iPhone 6s Plus/iPhone 6/iPhone 6 Plus/
iPhone 5s/iPhone 5c/iPhone 5
iPod touch (第 6 代)
主動式揚聲器系統
(SS-S500RF/SS-S700RF)
左前置 / 右前置揚聲器區塊
揚聲器系統
雙向揚聲器系統、低音反射
揚聲器
低音揚聲器:48 mm × 90 mm 圓錐型
高音揚聲器:25 mm 平衡半球型
中置揚聲器區塊
揚聲器系統
全範圍揚聲器系統、低音反射
揚聲器
低音揚聲器:48 mm × 90 mm 圓錐型
一般常規
尺寸 (寬 / 高 / 深)(約)
900 mm × 64 mm × 90 mm
質量 (約)
3.0 kg
環繞揚聲器 (SS-SS500RF)
揚聲器系統
全範圍揚聲器系統、低音反射
揚聲器
48 mm × 90 mm 圓錐型
尺寸 (寬 / 高 / 深)(約)
91 mm × 216 mm × 91 mm
質量 (約)
1.0 kg
環繞揚聲器 (SS-SS700RF)
揚聲器系統
雙向揚聲器系統、低音反射
揚聲器
低音揚聲器:48 mm × 90 mm 圓錐型
高音揚聲器:25 mm 平衡半球型
尺寸 (寬 / 高 / 深)(約)
78 mm × 1200 mm × 78 mm
質量 (約)
3.6 kg
設計及規格如有變更,恕不另行通知。
34
CT
Page 77

可播放檔案的類型
(USB 輸入)
轉碼器 副檔名
MP3 (MPEG-1 Audio Layer
III)
WMA9 標準 .wma
LPCM (2ch) .wav
註
• 某些檔案視檔案格式、檔案編碼或錄製狀態
而可能無法播放或可能無法輸出聲音。
• 可能無法播放一些在 PC 編輯過的檔案。
• 本系統無法播放 DRM 和無損等編碼檔案。
• 本系統可識別在 USB 裝置中的以下檔案或資
料夾:
– 多達 200 個資料夾 (包括空資料夾和根資
料夾)
– 一個資料夾中多達 150 首曲目
– 多達第 8 層中的資料夾 (包括根資料夾)
• 某些 USB 裝置無法與本系統配合使用。
• 本系統可識別大容量存儲器級別 (MSC)裝
置。
.mp3
支援的輸入音訊格式
(HDMI OUT (TV (ARC))
或 TV IN (OPTICAL))
本系統支援的音訊格式如下。
• Dolby Digital
• DTS
• 線性 PCM 2ch
35
CT
Page 78

關於 BLUETOOTH 通訊
• BLUETOOTH裝置必須在距離彼此約10公尺
(無障礙)範圍內才能使用。在下列情
形,實際的通訊範圍可能縮短。
– 當透過 BLUETOOTH 連接的裝置之間有
人、金屬物體、牆壁或其它障礙
– 無線 LAN 安裝的位置
– 在使用中的微波爐周圍
– 其它電磁波發生的地方
• BLUETOOTH 裝置與無線 LAN
(IEEE 802.11b/g/n)使用相同的頻率
波段 (2.4 GHz)。在有無線 LAN 功能的
裝置附近使用 BLUETOOTH 裝置時,可能
會產生電磁干擾。這可能導致較低的數
據傳輸率、噪音或無法連接。如果發生
這種情況,請嘗試以下補救措施:
– 在距離無線LAN裝置至少10公尺遠的位
置使用本系統。
– 在 10 公尺範圍內使用 BLUETOOTH 裝置
時,請關閉無線 LAN 裝置的電源。
– 安裝本系統與 BLUETOOTH 裝置時儘可能
彼此靠近。
• 本系統的無線電波廣播可能干擾一些醫
療裝置的操作。因為此干擾可能導致故
障,在以下地點請總是關閉本系統和
BLUETOOTH 裝置的電源:
– 在醫院、火車上、飛機上、加油站以
及任何可能存在可燃氣體的地方
– 靠近自動門或火災報警器
• 本系統支援符合BLUETOOTH規格的安全功
能以確保使用 BLUETOOTH 技術通訊時的
安全連接。然而,此安全視設定內容和
其它因素而可能不足,因此使用
BLUETOOTH 技術進行通訊時總是要小心。
• Sony對於在使用BLUETOOTH技術通訊過程
中蒙受的損害或資訊洩露造成的其它損
失概不負責。
• 無法保證所有與本系統相同模式的
BLUETOOTH 裝置之間的 BLUETOOTH 通訊。
• 與本系統連接的BLUETOOTH裝置必須符合
Bluetooth SIG, Inc. 規定的 BLUETOOTH
規格,而且必須經過認證符合規格。然
而,即使裝置符合 BLUETOOTH 規格,還
是有 BLUETOOTH 裝置基於特性或規格使
裝置無法連接,或導致不同的控制方
式、顯示或操作。
• 視連接至本系統的 BLUETOOTH 裝置、通訊
環境或周圍情形,可能產生噪音或音訊
可能被切斷。
如果您對本系統有任何疑問或問題,請就
近與 Sony 經銷商聯絡。
36
CT
Page 79

預先注意事項
關於安全
• 如果有任何固體或液體進入系統,請拔出系
統的插頭,並在繼續操作前讓合格的技術人
員進行檢查。
• 請勿用潮濕的手觸摸交流電源線。否則可能
引起觸電。
• 請勿攀爬主動式揚聲器系統、主動式重低音
揚聲器和環繞揚聲器,否則可能跌落受傷,
或是損壞系統。
關於電源
• 操作系統之前,請先確定操作電壓與當地電
源供應相符。操作電壓如主動式重低音揚聲
器背部的標示牌所示。
• 若您將長時間不使用系統,請務必將系統插
頭從牆壁插座拔出。若要切斷交流電源線,
請握住插頭拔出,切勿拉扯電線。
• 交流電源線必須在合格服務商店更換。
關於變熱
本系統會在操作時變熱,這不是故障。
如果持續長時間以高音量使用本系統,系統
溫度會變得相當高。為了避免燙傷,請勿觸
碰系統。
關於放置
• 請將系統擺放在通風良好的位置以防止熱量
累積,並延長系統的壽命。
• 請勿將系統擺放於靠近熱源的地方,或者會
受到陽光直曬、灰塵過多或機械性撞擊的地
方。
• 請勿將主動式揚聲器系統、主動式重低音揚
聲器和環繞揚聲器放置在柔軟表面 (地毯、
毛毯等)上,也請勿擺放任何可能阻擋通風
孔並造成故障的東西於主動式揚聲器系統、
主動式重低音揚聲器和環繞揚聲器背面。
• 若本系統與電視機、錄影機或磁帶卡座搭配
使用,可能會產生雜訊,影響圖像品質。發
生此狀況時,請將系統放置在距離電視機、
錄影機或磁帶卡座較遠處。
• 將本系統置於經特別處理 (打蠟、塗油、
拋光等)的表面上時,請務必小心,否則可
能會造成表面著色或變色。
• 請小心不要撞到主動式揚聲器系統、主動式
重低音揚聲器和環繞揚聲器的邊角,以免受
傷。
• 將主動式揚聲器系統和環繞揚聲器掛在牆壁
上時,下方要保留 3 cm 或以上的距離。
關於操作
連接其他裝置前,請務必關閉系統並拔掉電
源插頭。
如果附近的電視機螢幕上出現色彩不
均勻
某些類型的電視機可能會出現色彩不均勻的
情況。
• 如果出現色彩不均勻 ...
請關閉電視機,在 15 至 30 分鐘後再次開
啟。
• 如果再次出現色彩不均勻 ...
將系統設置在距離電視機較遠處。
關於清理
使用柔軟的乾布清潔系統。請勿使用任何類
型的砂紙、拋光粉或溶液,如酒精或汽油。
如果您對本系統有任何疑問或問題,請就近
與 Sony 經銷商聯絡。
有關操作主動式重低音揚聲器
抬起主動式重低音揚聲器時,切勿將手放入
其狹縫內。揚聲器驅動器可能會損壞。抬起
主動式重低音揚聲器時,請扶住底部。
37
CT
Page 80

版權與商標
本系統結合 Dolby* Digital 與 DTS**
Digital Surround System。
* 本產品經過杜比實驗室的許可而製造。
Dolby、Dolby Audio 和雙 D 標誌是 Dolby
Laboratories 的商標。
**關於 DTS 專利,請參閱 http://
patents.dts.com
授權製造。DTS、符號及 DTS 連同符號為
DTS, Inc. 的註冊商標,DTS Digital
Surround 為 DTS, Inc. 的商標。 © DTS,
Inc. 保留所有權利。
本系統包含 High-Definition Multimedia
Interface (HDMI™)技術。
HDMI、HDMI 高畫質多媒體介面及 HDMI 標誌
為 HDMI Licensing Administrator, Inc. 在
美國及其他國家的商標或註冊商標。
BLUETOOTH
Bluetooth SIG, Inc. 所有,Sony
Corporation 對該商標的各項使用均已經授
權。其他商標和商號是相關擁有者之專利。
Google Play 為 Google LLC 的商標。
Apple、iPhone、iPod和iPod touch是Apple
Inc. (蘋果電腦公司)在美國以及其它國家
註冊的商標。App Store是Apple Inc.的服務
標記。
“Made for Apple”徽章的使用,是指某配
件可以與特定的標有該徽章的Apple產品連
接,並經開發者證明符合Apple性能標準。
Apple並不對該裝置的操作或其安全和規章標
準的遵行提供保證。
“BRAVIA”標誌為Sony Corporation的商標。
。DTS Licensing Limited
®
字型商標和圖形商標均為
Windows Media是Microsoft Corporation在
美國和/或其它國家的註冊商標或商標。
本產品由Microsoft Corporation的某些知識
產權所保護。在沒有獲得Microsoft或授權
Microsoft子公司許可的情況下,不允許於本
產品之外使用或配銷此技術。
所有其他商標為各自所有者的商標。
“PlayStation”是Sony Interactive
Entertainment Inc.的註冊商標或商標。
MPEG Layer-3音頻編碼技術和專利由
Fraunhofer IIS和Thomson授權。
CT
38
Page 81

Page 82

Page 83

 Loading...