

Page 1

Sound Bar
Operating Instructions US
Mode d’emploi FR
Instrucciones de
operación
ES
HT-NT3
Page 2
WARNING
To reduce the risk of fire or electric
shock, do not expose this apparatus
to rain or moisture.
Do not install the appliance in a
confined space, such as a bookcase or
built-in cabinet.
To reduce the risk of fire, do not cover
the ventilation opening of the appliance
with newspapers, tablecloths, curtains,
etc.
Do not expose the appliance to naked
flame sources (for example, lighted
candles).
To reduce the risk of fire or electric
shock, do not expose this appliance to
dripping or splashing, and do not place
objects filled with liquids, such as vases,
on the appliance.
Do not expose batteries or appliances
with battery-installed to excessive heat,
such as sunshine and fire.
To prevent injury, this apparatus must
be securely placed on the cabinet or
attached to the floor/wall in accordance
with the installation instructions.
Indoor use only.
On power sources
The unit is not disconnected from the
mains as long as it is connected to the
AC outlet, even if the unit itself has
been turned off.
As the main plug is used to disconnect
the unit from the mains, connect the
unit to an easily accessible AC outlet.
Should you notice an abnormality in
the unit, disconnect the main plug
from the AC outlet immediately.
For the customers in the USA
Owner’s Record
The model and serial numbers are
located on the rear exterior of the Bar
Speaker. Record these numbers in the
space provided below. Refer to them
whenever you call upon your Sony
dealer regarding this product.
Model No._____________________________
Serial No._____________________________
This symbol is intended to alert
the user to the presence of
uninsulated “dangerous
voltage” within the product’s enclosure
that may be of sufficient magnitude to
constitute a risk of electric shock to
persons.
This symbol is intended to alert
the user to the presence of
important operating and
maintenance (servicing) instructions in
the literature accompanying the
appliance.
Properly shielded and grounded cables
and connectors must be used for
connection to host computers and/or
peripherals in order to meet FCC
emission limits.
NOTE:
This equipment has been tested and
found to comply with the limits for a
Class B digital device, pursuant to Part
15 of the FCC Rules. These limits are
designed to provide reasonable
protection against harmful interference
in a residential installation. This
equipment generates, uses, and can
radiate radio frequency energy and, if
not installed and used in accordance
with the instructions, may cause
harmful interference to radio
communications. However, there is no
guarantee that interference will not
occur in a particular installation. If this
equipment does cause harmful
interference to radio or television
US
2
Page 3

reception, which can be determined by
turning the equipment off and on, the
user is encouraged to try to correct the
interference by one or more of the
following measures:
– Reorient or relocate the receiving
antenna (aerial).
– Increase the separation between the
equipment and receiver.
– Connect the equipment into an outlet
on a circuit different from that to
which the receiver is connected.
– Consult the dealer or an experienced
radio/TV technician for help.
CAUTION
You are cautioned that any changes or
modifications not expressly approved in
this manual could void your authority to
operate this equipment.
This equipment must not be co-located
or operated in conjunction with any
other antenna or transmitter.
This equipment complies with FCC
radiation exposure limits set forth for an
uncontrolled environment and meets
the FCC radio frequency (RF) Exposure
Guidelines. This equipment has very low
levels of RF energy that it deemed to
comply without maximum permissive
exposure evaluation (MPE). But it is
desirable that it should be installed and
operated keeping the radiator at least
20 cm or more away from person’s body
(excluding extremities: hands, wrists,
feet and ankles).
Compliance with FCC requirement
15.407(c)
Data transmission is always initiated by
software, which is the passed down
through the MAC, through the digital
and analog baseband, and finally to the
RF chip. Several special packets are
initiated by the MAC. These are the only
ways the digital baseband portion will
turn on the RF transmitter, which it then
turns off at the end of the packet.
Therefore, the transmitter will be on
only while one of the aforementioned
packets is being transmitted. In other
words, this device automatically
discontinue transmission in case of
either absence of information to
transmit or operational failure.
Frequency Tolerance: ±20 ppm
Important Safety Instructions
1) Read these instructions.
2) Keep these instructions.
3) Heed all warnings.
4) Follow all instructions.
5) Do not use this apparatus near
water.
6) Clean only with dry cloth.
7) Do not block any ventilation
openings. Install in accordance with
the manufacturer’s instructions.
8) Do not install near any heat sources
such as radiators, heat registers,
stoves, or other apparatus (including
amplifiers) that produce heat.
9) Do not defeat the safety purpose of
the polarized or grounding-type
plug. A polarized plug has two
blades with one wider than the
other. A grounding type plug has
two blades and a third grounding
prong. The wide blade or the third
prong are provided for your safety. If
the provided plug does not fit into
your outlet, consult an electrician for
replacement of the obsolete outlet.
10) Protect the power cord from being
walked on or pinched particularly at
plugs, convenience receptacles, and
the point where they exit from the
apparatus.
11) Only use attachments/accessories
specified by the manufacturer.
3
US
Page 4

12) Use only with the cart, stand, tripod,
bracket, or table specified by the
manufacturer, or sold with the
apparatus. When a cart is used, use
caution when moving the cart/
apparatus combination to avoid
injury from tip-over.
13) Unplug this apparatus during
lightning storms or when unused for
long periods of time.
14) Refer all servicing to qualified service
personnel. Servicing is required
when the apparatus has been
damaged in any way, such as powersupply cord or plug is damaged,
liquid has been spilled or objects
have fallen into the apparatus, the
apparatus has been exposed to rain
or moisture, does not operate
normally, or has been dropped.
For the customers in Canada
Properly shielded and grounded cables
and connectors must be used for
connection to host computers and/or
peripherals.
5,150 MHz – 5,250 MHz band is
restricted to indoor operations only.
High-power radars are allocated as
primary users (i.e. priority users) of the
bands 5,250 MHz – 5,350 MHz and
5,650 MHz – 5,850 MHz and that these
radars could cause interference and/or
damage to LE-LAN devices.
This device complies with Industry
Canada’s licence-exempt RSSs.
Operation is subject to the following
two conditions:
(1) This device may not cause
interference; and
(2) This device must accept any
interference, including interference that
may cause undesired operation of the
device.
This equipment complies with IC
radiation exposure limits set forth for an
uncontrolled environment and meets
RSS-102 of the IC radio frequency (RF)
Exposure rules. This e quipment has very
low levels of RF energy that it deemed
to comply without maximum permissive
exposure evaluation (MPE). But it is
desirable that it should be installed and
operated keeping the radiator at least
20 cm or more away from person’s body
(excluding extremities: hands, wrists,
feet and ankles).
Copyrights and Trademarks
This system incorporates Dolby*
Digital and the DTS** Digital Surround
System.
* Manufactured under license from
Dolby Laboratories. Dolby and the
double-D symbol are trademarks of
Dolby Laboratories.
** For DTS patents, see
http://patents.dts.com.
Manufactured under license from
DTS Licensing Limited. DTS, DTS-HD,
the Symbol, & DTS and the Symbol
together are registered trademarks
of DTS, Inc. © DTS, Inc. All Rights
Reserved.
This system incorporates High-
Definition Multimedia Interface
(HDMI™) technology.
The terms HDMI and HDMI HighDefinition Multimedia Interface, and
the HDMI Logo are trademarks or
registered trademarks of HDMI
Licensing LLC in the United States and
other countries.
“BRAVIA” is a trademark of Sony
Corporation.
“PlayStation” is a registered trademark
of Sony Computer Entertainment Inc.
US
4
Page 5

Wi-Fi®, Wi-Fi Protected Access®, Wi-Fi
Alliance® and Wi-Fi CERTIFIED
Miracast® are registered trademarks of
Wi-Fi Alliance®.
Wi-Fi CERTIFIED™, WPA™, WPA2™,
Wi-Fi Protected Setup™ and
Miracast™ are trademarks of Wi-Fi
Alliance®.
The N Mark is a tra demark or registered
trademark of NFC Forum, Inc. in the
United States and in other countries.
Android™ is a trademark of Google Inc.
Google Pl ay™ is a trademark of G oogle
Inc.
Google Ca st™ is a trademark of Goo gle
Inc.
Google Cast™ Ready and the Google
Cast Ready badge are trademarks of
Google Inc.
“Xperia” is a trademark of Sony Mobile
Communications AB.
The BLUETOOTH® word mark and
logos are registered trademarks
owned by Bluetooth SIG, Inc. and any
use of such marks by Sony Corporation
is under license. Other trademarks and
trade names are those of their
respective owners.
LDAC™ and LDAC logo are trademarks
of Sony Corporation.
“DSEE HX” is a trademark of Sony
Corporation.
MPEG Layer-3 audio coding
technology and patents licensed from
Fraunhofer IIS and Thomson.
Windows Media is either a registered
trademark or trademark of Microsoft
Corporation in the United States and/
or other countries.
This product is protected by certain
intellectu al property rights o f Microsoft
Corporation. Use or distribution of
such technology outside of this
product is prohibited without a license
from Microsoft or an authorized
Microsoft subsidiary.
Opera® Devices SDK from Opera
Software ASA. Copyright 1995-2013
Opera Software ASA. All rights
reserved.
“ClearAudio+” is a trademark of Sony
Corporation.
“x.v.Color” and “x.v.Color” logo are
trademarks of Sony Corporation.
Apple, the Apple logo, iPhone, iPod,
iPod touch, and Retina are trademarks
of Apple Inc., registered in the U.S. and
other countries. App Store is a service
mark of Apple Inc.
“Made for iPod,” and “Made for
iPhone” mean that an electronic
accessory has been designed to
connect specifically to iPod or iPhone,
respectively, and has been certified by
the developer to meet Apple
performance standards. Apple is not
responsible for the operation of this
device or its compliance with safety
and regulatory standards. Please note
that the use of this accessory with iPod
or iPhone may affect wireless
performance.
Compatible iPod/iPhone models
The compatible iPod/iPhone models
are as follows. Update your iPod/
iPhone with the latest software before
using with the system.
BLUETOOTH technology works with:
iPhone
iPhone 6 Plus/iPhone 6/iPhone 5s/
iPhone 5c/iPhone 5/iPhone 4s/
iPhone 4/iPhone 3GS
iPod touch
iPod touch (5th generation)/iPod
touch (4th generation)
All other trademarks are trademarks of
their respective owners.
US
5
Page 6

Other system and product names are
generally trademarks or registered
trademarks of the manufacturers. ™
and marks are not indicated in this
document.
Notice on GNU GPL/LGPL applied
software and other Open Source
Softwares
This product contains software that is
subject to the GNU General Public
License (“GPL”) or GNU Lesser General
Public License (“LGPL”). These establish
that customers have the right to
acquire, modify, and redistribute the
source code of said software in
accordance with the terms of the GPL or
the LGPL.
For details of the GPL, LGPL and other
software licenses, please refer to
[Software License Information] in
[System Settings] of the [Setup] menu
on the product.
The source code for the software used
in this product is subject to the GPL and
LGPL, and is available on the Web. To
download, please access the following:
URL:
http://oss.sony.net/Products/Linux
Please note that Sony cannot answer or
respond to any inquiries regarding the
content of this source code.
About These Operating
Instructions
The instructions in these Operating
Instructions describe the controls on
the remote control. You can also use
the controls on the Bar Speaker if they
have the same or similar names as
those on the remote control.
Some illustrations are presented as
conceptual drawings, and may be
different from the actual products.
The items displayed on the TV screen
may vary depending on the area.
The default setting is underlined.
The text enclosed in bracket ([--])
appears on the TV screen, and the text
enclosed in double quotation mark
(“--”) appears in the front panel
display.
US
6
Page 7

Table of Contents
Connecting Startup Guide (separate document)
About These Operating
Instructions .......................... 6
Listening/Viewing
Enjoying video/sound from the
connected devices .............. 9
Playing music/photo from a
USB device ........................... 9
Listening to music from a
BLUETOOTH device ............10
Playing music/photo from
other devices via the
network function ................10
Sound Adjustment
Enjoying sound effects .............10
Using the DSEE HX function
(Reproducing audio codec
files with natural sound
quality) .................................11
BLUETOOTH Function
Listening to music from a
BLUETOOTH device ............ 12
Listening to sound by
transmitting to a
BLUETOOTH-compatible
receiver ...............................14
Network Function
Connecting with a wired
network ...............................16
Connecting with a wireless
network ............................... 17
Playing files on a Home
Network ..............................18
Enjoying various online
services ...............................19
Using Screen mirroring .............19
Viewing Copyright-protected
4K Content
Connecting a 4K TV .................20
Connecting 4K devices ............. 21
Settings and Adjustments
Using the Setup Display ...........22
Using the Options menu ......... 29
US
7
Page 8

Other Functions
Controlling the system using a
smartphone or tablet
(SongPal) ............................ 31
Using Google Cast™ ................32
Using the Control for HDMI
Function for “BRAVIA”
Sync ....................................32
Enjoying multiplex broadcast
sound (Dual Mono) ............34
Deactivating the buttons on
the Bar Speaker
(Child Lock) .........................34
Changing the brightness .........35
Saving power in Standby
Mode ..................................35
Enabling the IR repeater
function (when you cannot
control the TV) ....................35
Further settings for the
wireless system ..................36
Modifying the angle of the Bar
Speaker ............................... 37
Mounting the Bar Speaker on
a wall ..................................38
Additional Information
Precautions ..............................39
Troubleshooting .......................40
Guide to Parts and Controls ....48
Playable types of files ..............52
Supported audio formats ........53
Specifications ...........................53
On BLUETOOTH
communication ..................56
Index .........................................57
END USER LICENSE
AGREEMENT .......................59
US
8
Page 9
Listening/Viewing
Listening/Viewing
Enjoying video/sound
from the connected
devices
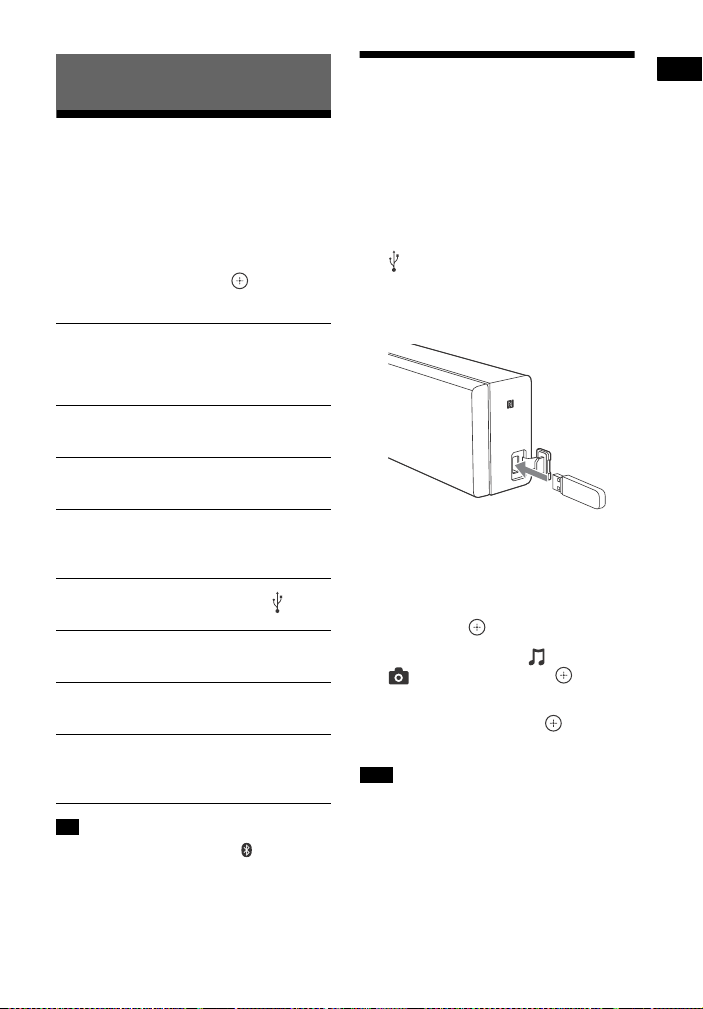
Playing music/photo
from a USB device
You can play music/photo files on a
connected USB device.
For playable types of files, see “Playable
types of files” (page 52).
Press INPUT +/–.
You can also press HOME, then press
/// repeatedly and to select
the input you want.
[TV]
Device (TV, etc.) that is connected to the TV
(DIGITAL IN) jack, or a TV compatible with the
Audio Return Channel function that is
connected to the HDMI OUT (ARC) jack
[HDMI1]/[HDMI2]/[HDMI3]
Device that is connected to the HDMI IN 1/2/3
jack
[Bluetooth Audio]
“BT”
BLUETOOTH device that supports A2DP
[Analog]
“ANALOG”
Device (Digital media player, etc.) that is
connected to the ANALOG IN jack
[USB]
USB device that is connected to the (USB)
port
[Screen mirroring]
“SCR M”
Screen mirroring-compatible device (page 19)
[Home Network]
“H.NET”
Contents stored on a server (page 18)
[Music Services]
“M.SERV”
Contents of music services offered on the
Internet (page 19)
Tip
You can also press PAIRING and
MIRRORING on the remote control to select
[Bluetooth Audio] and [Screen mirroring]
input respectively.
1 Connect the USB device to the
(USB) port.
Refer to the operating instructions
of the USB device before
connecting.
2 Press HOME.
The home screen appears on the TV
screen.
3 Press /// to select [USB],
then press .
4 Press / to select [Music] or
[Photo], then press .
5 Press / to select the content
you want, then press .
The selected content starts playing.
Note
Do not remove the USB device during
operation. To avoid data corruption or
damage to the USB device, turn the system
off before removing the USB device.
US
9
Page 10

Listening to music from a
BLUETOOTH device
See “BLUETOOTH Function” (page 12).
Playing music/photo
from other devices via
the network function
See “Network Function” (page 16).
Sound Adjustment
Enjoying sound effects
You can easily enjoy pre-programmed
sound effects that are tailored to
different kinds of sound sources. They
bring exciting and powerful sound into
your home.
Note
You cannot select the sound effects when
the system is connected to a BLUETOOTH
receiver in transmitter mode.
Selecting the sound field
Press SOUND FIELD repeatedly during
playback.
[ClearAudio+]
You can enjoy the sound with Sonyrecommended sound field. Sound field is
automatically optimized according to
playback content and function.
[Movie]
The system provides the optimized sound for
watching movies.
[Music]
The system provides the optimized sound for
listening to music.
[Sports]
This system reproduces the feel of sports
broadcasting. Commentary is clear, cheers
are heard as surround sound, and sounds are
realistic.
[Game Studio]
The system provides the optimized sound for
playing video games.
[Standard]
The system provides the sound that
corresponds to every source.
10
Tip
You can also press CLEARAUDIO+ to
select [ClearAudio+].
You can also select [Sound Field] from the
Options menu (page 29).
US
Page 11
Sound Adjustment
Using the Night mode
function
This function is useful when watching
movies late at night. You will be able to
hear the dialog clearly even at a low
volume level.
Press NIGHT.
Night mode function is activated. Press
again to cancel the function.
Tip
You can also select [Night] from the
Options menu (page 29).
Using the Clear Voice
function
This function helps make dialogues
clearer.
Press VOICE repeatedly.
[Voice : 1]: Standard
[Voice : 2]: Dialogue range is
enhanced.
[Voice : 3]: Dialogue range is
enhanced, and the parts of range
difficult to be discerned by the elderly
are boosted.
Tip
You can also select [Type 1], [Type 2] or
[Type 3] in [Voice] from the Options menu
(page 29).
Using the DSEE HX
function (Reproducing
audio codec files with
natural sound quality)
DSEE HX upscales existing sound
sources to near hi-resolution sound
quality, and it makes you feel as if you
are really there at the recording studio
or concert.
This function only works when [Music] is
selected as sound field.
1 Press HOME.
The home screen appears on the TV
screen.
2 Press to select [Setup] at the
upper right corner, then press .
3 Press / to select [Audio
Settings], then press .
4 Press / to select [DSEE HX], then
press .
5 Press / to select [On], then
press .
Note
Only the fine sound restoration feature of
the DSEE HX function will be applied to
PCM audio sources with lossless
compression. The DSEE HX function does
not work for DSD (DSDIFF, DSF) format
files. The file is expanded to a maximum
96 kHz/24 bit equivalent.
This fun ction works with 2- channel digital
input signals of 44.1 kHz or 48 kHz.
This function does not work when
[Analog] input is selected.
This function does not work when
[Bluetooth Mode] is set to [Transmitter]
(page 25).
US
11
Page 12

BLUETOOTH Function
Listening to music from a
BLUETOOTH device
Pairing this system with a
BLUETOOTH device
Pairing is an operation where
BLUETOOTH devices register with each
other beforehand. Once a pairing
operation is per formed, it does not need
to be performed again.
Before you pair the device with this
system, be sure to set the [Bluetooth
Mode] to [Receiver] (page 25).
1 Place the BLUETOOTH device
within 1 meter (3.3 feet) from the
Bar Speaker.
2 Press PAIRING .
The blue LED indicator flashes and
the BLUETOOTH pairing screen
appears on the TV screen.
Tip
You can also select [Bluetooth Audio]
from home screen.
3 Set the BLUETOOTH device in
pairing mode.
For details on setting the
BLUETOOTH device in pairing mode ,
refer to the operating instructions
supplied with the device.
4 Select “HT-NT3” on the device’s
display.
Perform this step within 5 minutes,
otherwise pairing mode will be
canceled.
When the BLUETOOTH connection
is established, device n ame appears
on the TV screen and the blue LED
indicator lights up.
Note
If passkey is required on the
BLUETOOTH device, enter “0000”.
Passkey may be called “Passcode”,
“PIN code”, “PIN number” or
“Password”.
Tip
You can change the system’s name
that appears on your device by using
[Device Name] in [System Settings]
(page 27).
5 Start playback on the BLUETOOTH
device.
6 Adjust the volume.
Adjust the volume of the
BLUETOOTH device first, if the
volume level is still too low, adjust
the volume level on the Bar
Speaker.
Note
You can pair up to 9 BLUETOOTH devices. If
the 10th BLUETOOTH device is paired, the
least recently connected device will be
replaced by the new one.
To cancel pairing operation
Press HOME or INPUT +/–.
Connecting to a BLUETOOTH
device from this system
You can connect to the paired
BLUETOOTH device from this system.
Check the following before playing
music:
The BLUETOOTH function of the
BLUETOOTH device is turned on.
The pairing has been completed
(page 12).
The [Bluetooth Mode] is set to
[Receiver] (page 25).
12
US
Page 13
BLUETOOTH Function
1 Press PAIRING .
Note
To connect to the most recent
connected BLUETOOTH device, press
. Then proceed to Step 5.
2 Press OPTIONS.
3 Select [Device List], then press .
A list of paired BLUETOOTH devices
appears.
4 Press / repeatedly to select the
device you want, then press .
5 Press to start playback.
6 Adjust the volume.
Adjust the volume of the
BLUETOOTH device first, if the
volume level is still too low, adjust
the volume level on the Bar
Speaker.
Note
Once the system and the BLUETOOTH
device are connected, you can control
playback by pressing , , , /
and /.
You can connect to the system from a
paired BLUETOOTH device even when the
system in standby mode, if you set the
[Bluetooth Standby] to [On] (page 25).
The audio playback on this system may
be delayed from that on the BLUETOOTH
device because of the characteristics of
the BLUETOOTH wireless technology.
Tip
You can enable or disable codec AAC or
LDAC from BLUETOOTH device (page 25).
To disconnect the BLUETOOTH
device
Perform any of the following items.
Press PAIRING again.
Disable the BLUETOOTH function on
the BLUETOOTH device.
When playback screen is displayed,
press OPTIONS, then select
[Disconnect].
Turn off the system or the BLUETOOTH
device.
To delete a paired BLUETOOTH
device from the device list
1 Follow Steps 1 to 3 above.
2 Press / repeatedly to select the
device, then press OPTIONS.
3 Press / repeatedly to select
[Remove], then press .
4 Press / repeatedly to select [OK],
then press .
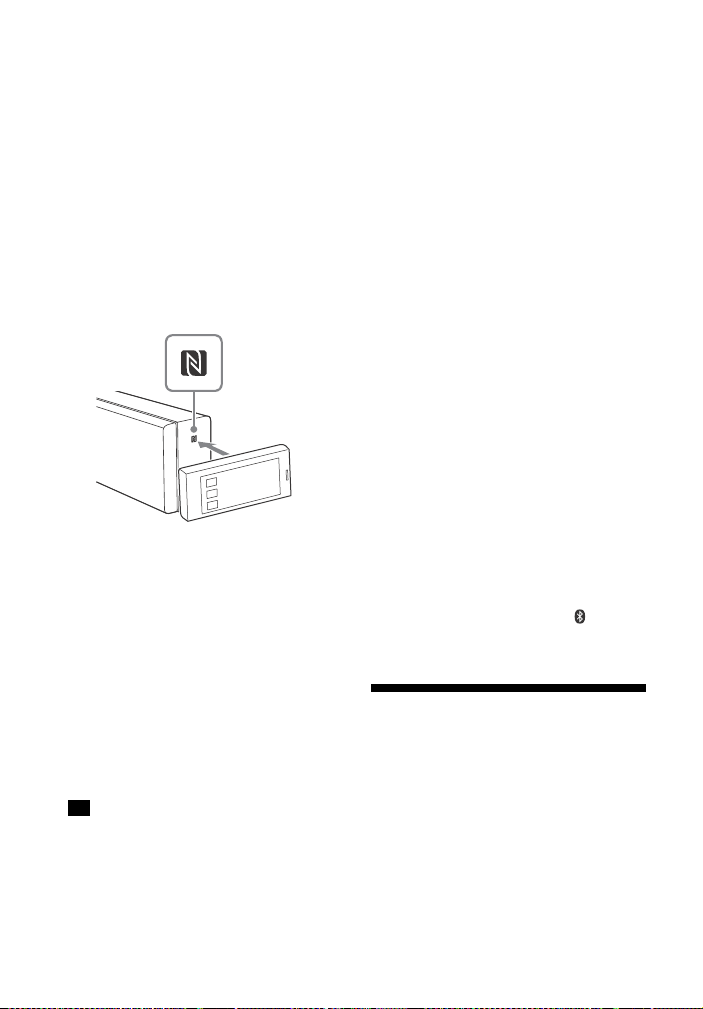
Connecting to a remote
device by One-touch
listening function (NFC)
NFC (Near Field Communication) is a
technology enabling short-range
wireless communication between
various devices.
By holding an NFC-compatible remote
device near to the N-Mark on the Bar
Speaker, the system and remote device
proceed to complete pairing and the
BLUETOOTH connection automatically.
Compatible remote devices
Remote devices with a built-in NFC
function
(OS: Android 2.3.3 or later, excluding
Android 3.x)
This feature does not work with NFCcompatible receiver (such as
headphones).
Note
The system only can recognize and
connect to one NFC-compatible device at
a time.
Depending on your remote device, you
may need to perform the following items
on your remote device in advance.
13
US
Page 14
Turn on the NFC function. For details,
refer to the operating instructions of the
remote device.
If your remote device is having an older
OS version than Android 4.1.x,
download and start the “NFC Easy
Connect” application. “NFC Easy
Connect” is a free application for
Android remote devices that can be
obtained from Google Play. (The
application may not be available in
some countries/regions.)
1 Hold the remote device near to
the N-Mark on the Bar Speaker
until the remote device vibrates.
Follow the on-screen instructions
displayed on the remote device,
and complete the procedure for
BLUETOOTH connection.
When the BLUETOOTH connection
is established, the blue LED
indicator on the front panel lights
up.
2 Start playback of audio source on
the remote device.
For details on playback operations,
refer to the operating instructions of
your remote device.
Tip
If pairing and the BLUETOOTH connection
fail, do the following.
Hold the remote device near to the
N-Mark on the Bar Speaker again.
Remove the case from the remote
device if using a commercially available
remote device case.
Relaunch “NFC Easy Connect”
application.
Set the [Quick Start/Network Standby]
to [On] if you want to connect a
BLUETOOTH device when the system is
in standby mode.
If the volume level is low, adjust the
volume of the remote device first. If the
volume level is still too low, adjust the
volume level on the Bar Speaker.
If you hold the remote device near to the
N-Mark when the system is in transmitter
mode, the [Bluetooth Mode] is changed
to [Receiver] automatically. This feature
does not work with NFC-compatible
receiver.
To stop playback
The playback will be stopped when you
perform any of the following items.
Hold the remote device near to the
N-Mark on the Bar Speaker again.
Stop the music player of the remote
device.
Turn off the system or the remote
device.
Change the input.
Disable the BLUETOOTH function on
the remote device.
Press , HOME or PAIRING on the
remote control.
Listening to sound by
transmitting to a
BLUETOOTH-compatible
receiver
You can listen to sound of the source
playing via this system using
BLUETOOTH-compatible receiver (such
as headphones).
14
US
Page 15

BLUETOOTH Function
1 Turn on BLUETOOTH function on
the BLUETOOTH receiver.
2 Set [Bluetooth Mode] to
[Transmitter] in [Bluetooth
Settings] (page 25).
3 Press / to select [OK].
4 Press / to select the
BLUETOOTH receiver’s name from
[Device List] in [Bluetooth
Settings] (page 25), then press .
When the BLUETOOTH connection
is established, the blue LED
indicator lights up.
Note
If you cannot find your BLUETOOTH
receiver’s name in the list, select
[Scan].
5 Start playback the source via this
system.
The sound is output from the
BLUETOOTH receiver.
6 Adjust the volume.
Adjust the volume of the
BLUETOOTH receiver.
When connected to a BLUETOOTH
receiver, volume level of the Bar
Speaker cannot be controlled.
Volume buttons on the Bar Speaker
and remote control only works for
the BLUETOOTH receiver.
Note
You can register up to 9 BLUETOOTH
receivers. If the 10th BLUETOOTH receiver
is registered, the least recently connected
BLUETOOTH receiver will be replaced by
the new one.
The system can display up to 15 detected
BLUETOOTH receivers in the [Device List].
You cannot change the sound effects or
settings in Options menu during sound
transmitting.
Some contents cannot be output due to
content protection.
The audio output from the BLUETOOTH
receiver may be delayed from that on the
system because of the characteristics of
the BLUETOOTH wireless technology.
No sound is output from system’s
speakers and HDMI OUT (ARC) jack when
BLUETOOTH receiver is successfully
connected to the system.
[Screen mirroring] input, [Bluetooth
Audio] input and Home Theatre Control
function are disabled when the system is
in transmitter mode.
Tip
Once the system and BLUETOOTH
receiver are connected, you can control
playback by using playback operation
buttons on the BLUETOOTH receiver.
You can connect this system to the most
recently connected BLUETOOTH receiver
by pressing RX/TX repeatedly to
select [Transmitter]. Then, start playback
the source on the system.
To disconnect the BLUETOOTH
receiver
Perform any of the following items.
Disable the BLUETOOTH function on
BLUETOOTH receiver.
Set [Bluetooth Mode] to [Receiver] or
[Off] (page 25).
Turn off the system or the BLUETOOTH
receiver.
Perform the One-touch function (NFC).
To delete a registered
BLUETOOTH receiver
1 Select [Device List] in [Bluetooth
Settings] (page 25).
A list of paired and detected
BLUETOOTH receivers appears.
2 Press / to select the device, then
press OPTIONS.
3 Press / to select [Remove], then
press .
4 Press / to select [OK], then press
.
15
US
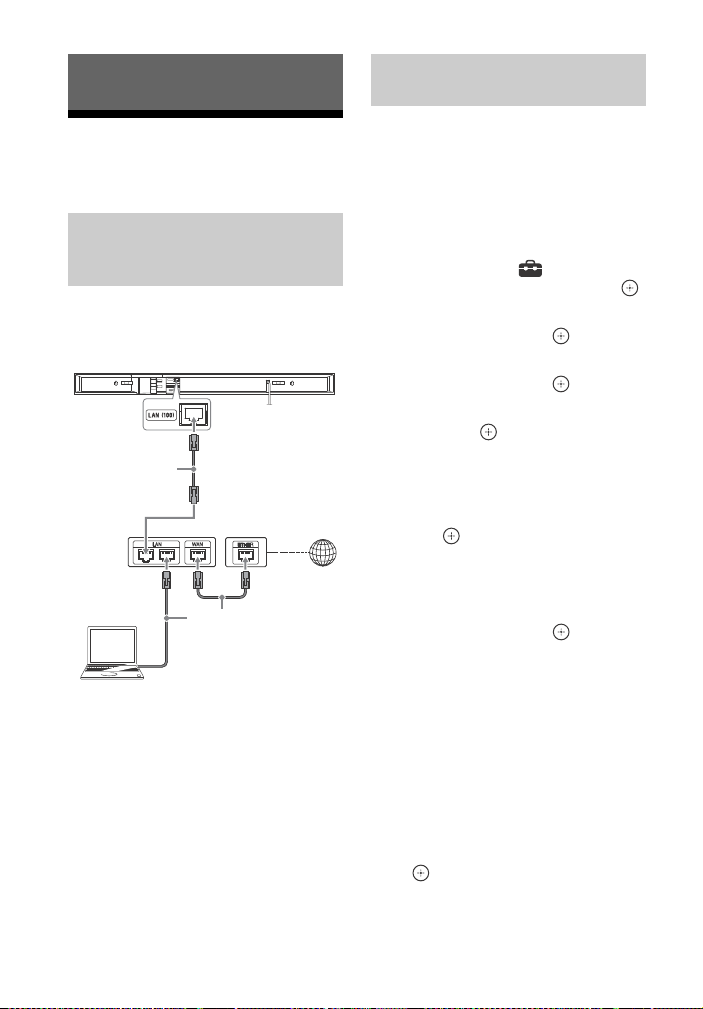
Page 16
Network Function
LAN cable
(not supplied)
Server
Broadband
router
ADSL modem/
Cable modem
LAN cable
(not supplied)
Internet
Setting up a wired LAN
connection
Connecting with a wired
network
Connecting the system to
the network using a LAN
cable
The following illustration is an example
configuration of a home network with
the system and a server.
You do not need to perform the
following set up if you have performed
the [Easy Network Settings].
1 Press HOME.
The home screen appears on the TV
screen.
2 Press to select [Setup] at the
upper right corner, then press .
3 Press / to select [Network
Settings], then press .
4 Press / to select [Internet
Settings], then press .
5 Press / to select [Wired Setup],
then press .
The screen for selecting the IP
address acquisition method
appears on the TV screen.
6 Press / to select [Auto], then
press .
7 Press / to browse information,
then press .
8 Press / to select [Save &
Connect], then press .
The system starts connecting to the
network. For details, refer to the
messages that appear on the TV
screen.
16
US
If using a fixed IP address
Select [Custom] in step 6, then follow
the on-screen instructions to select
[Specify IP address]. The IP address
input display appears on the TV screen.
Follow the on-screen instructions to
enter the value for [IP Address], then
press to confirm the values.
Page 17

Network Function
Enter the values for [Subnet Mask],
[Default Gateway], [Primary DNS] and
[Secondary DNS], then press .
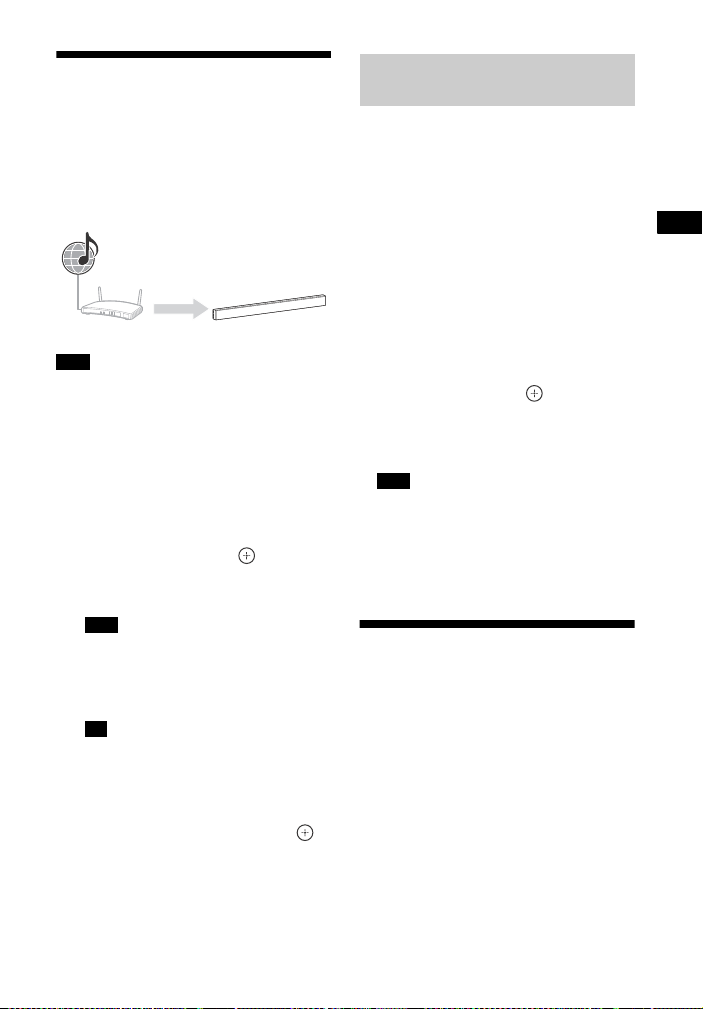
Connecting with a
wireless network
Setting up a wireless LAN
connection
Before performing network
settings
When your wireless LAN router (access
point) is Wi-Fi Protected Setup (WPS)compatible, you can easily set the
network settings with the WPS button.
If not, you will be required to select or
enter the following information. Check
the following information in advance.
The network name (SSID)* of the
wireless LAN router/access point
The security key (password)** for the
network
* SSID (Service Set Identifier) is a name
that identifies a particular access point.
** This information should be available
from a label on your wireless LAN
router/access point, from the operating
instructions, from the person who set up
your wireless network, or from the
information provided by your Internet
service provider.
3 Press / to select the network
name (SSID) you want, then press
.
The security setting display appears
on the TV screen.
4 Enter the security key (WEP key,
WPA/WPA2 key) using the
software keyboard. Use ///
and to select the characters/
numbers, then select [Enter] to
confirm the security key.
The system starts connecting to the
network. For details, refer to the
messages that appear on the TV
screen.
If using a fixed IP address
Select [New connection registration] in
step 3, select [M anual registration], then
follow the on-screen instructions to
select [Specify IP address]. The IP
address input display appears on the TV
screen.
Follow the on-screen instructions to
enter the value for [IP Address], then
press to confirm the values.
Enter the values for [Subnet Mask],
[Default Gateway], [Primary DNS] and
[Secondary DNS], then press .
Note
The security setting display in step 4 does
not appear if your network has not been
secured by encryption (using the security
key).
1 Follow Steps 1 to 4 of “Setting up a
wired LAN connection” (page 16).
2 Press / to select [Wireless
Setup(built-in)], then press .
A list of available SSIDs (access
points) appears on the TV screen.
US
17
Page 18

Playing files on a Home
Player
(This system)
Server
Controller
Renderer
(This system)
Server
Network
You can play music/photo files on other
Home Network-compatible device by
connecting them to your home network.
This system can be used as a player and
renderer.
Server: Stores and shares digital
media contents
Player: Finds and plays digital media
content from the server
Renderer: Receives and plays files
from the server, and can be operated
by another device (controller)
Controller: Operates the renderer
device
Prepare for using the Home Network
function.
Connect the system to a network
(page 16).
Prepare other Home Network-
compatible devic e. For details, refer to
the operating instructions of the
device.
To play files stored on a server via
the system (Player)
Select [Home Network] from the home
screen, then se lect the server. Select the
file you want to play from [Music] or
[Photo].
To play remote files by operating
the system (Renderer) via a Home
Network Controller
You can operate the system with a
Home Network Controller-compatible
device (a mobile phone, etc.), when
playing files stored on a server.
For details on operation, refer to the
operating instructions of the Home
Network Controller-compatible device.
Note
Do not operate the system with the
supplied remote control and a controller at
the same time.
Tip
The system is compatible with the “Play
To” function of Windows Media® Player 12
that comes standard with Windows 7.
18
US
Page 19
Network Function
Enjoying various online
Internet
Router This system
services
You can listen to music services offered
on the Internet with this system. To use
this function, the system must be
connected to the Internet.
Note
You may have to register your system
before using some music services. For
details on registration, visit the customer
support site of the service provider.
1 Press HOME.
The home screen appears on the TV
screen.
2 Press / to select [Music
Services], then press .
The service provider list appears on
the TV screen.
Note
Depending on the Internet content
connection status, the service provider
list may take some time to appear on
the TV screen.
Tip
You can update the service provider
list by pressing OPTIONS, then select
[Update List].
3 Press / to select the music
service you want, then press .
Press BACK to go to the previous
directory.
Registering a new music
service
You can enjoy listening to content from
a variety of music services offered on
the Internet.
Checking the registration code
You may be required to enter the
registration code of the system when
you enjoy a new music service.
1 Select [Music Services] from the home
screen.
The service provider list appears on
the TV screen.
2 Press / to select the music service
you want, then press .
The registration information
including the registration code
appears on the TV screen.
Note
You may see the registration
information on the TV screen when you
enter a music service. The timing this
information appears depend on the
music service.
Using Screen mirroring
“Screen mirroring” is a function to
display the screen of a mobile device on
the TV by Miracast technology.
The system can be connected directly
with a Screen mirroring-compatible
device (e.g. smartphone, tablet). You
can enjoy the display screen of the
device on your large TV screen. No
wireless router (or access point) is
required to use this feature.
19
US
Page 20
1 Press MIRRORING.
High Speed HDMI
cable (supplied)
HDCP 2.2compatible
HDMI jack
2 Follow the on-screen instructions.
Activate the Screen mirroring
function from your device.
For details on how to activate the
function, refer to the operating
instructions supplied with your
device.
To connect to an Xperia
smartphone using One-touch
mirroring function (NFC)
Press MIRRORING, then hold the Xperia
smartphone near to the N-Mark on the
Bar Speaker.
To exit mirroring
Press HOME or INPUT +/–.
Note
When using Screen mirroring, the quality
of picture and sound may sometimes be
deteriorated due to interference from
other network.
Some network functions may not be
available during Screen mirroring.
Make sure that the device is compatible
with Miracast. Connectivity with all
Miracast compatible devices is not
guaranteed.
Depending on the usage environment,
the quality of the picture and sound may
deteriorate.
Tip
You can select your preference sound
effect during mirroring. Press the sound
effect buttons (page 51).
If the quality of the picture and sound
often deteriorates, you may improve the
quality by setting the [Scr een mirroring RF
Setting] (page 28).
Viewing Copyright-protected 4K
Content
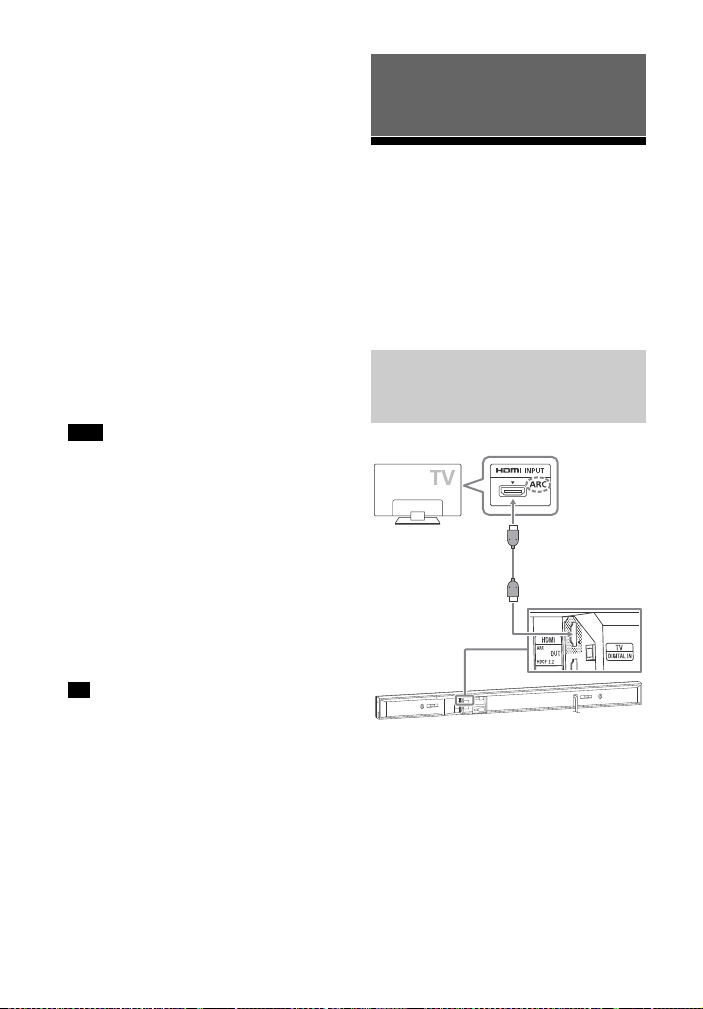
Connecting a 4K TV
To view copyright-protected 4K
content, connect the system and TV via
an HDCP 2.2-compatible HDMI jack. For
details on whether the TV is equipped
with HDCP 2.2-compatible HDMI jack,
refer to the operating instructions
supplied with the TV.
When the TV’s HDMI jack is
labeled with ARC* and
compatible with HDCP 2.2
* The ARC (Audio Return Channel)
function sends digital sound from a TV
to this system using just an HDMI cable.
20
US
Page 21
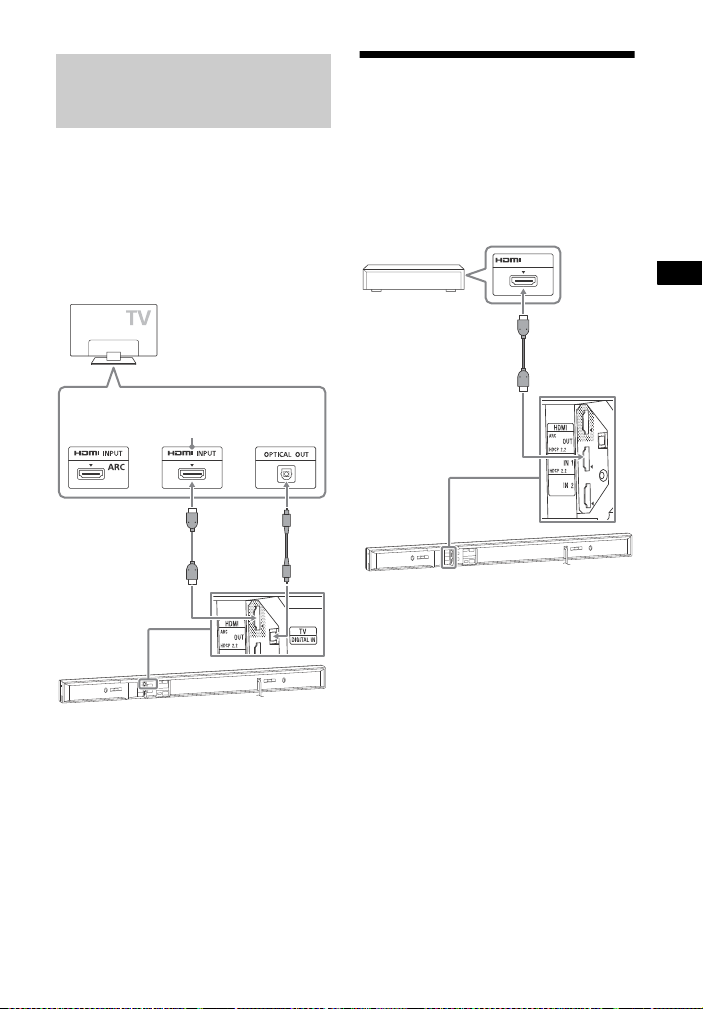
Viewing Copyright-protected 4K Content
When the TV’s HDMI jack is
High Speed
HDMI cable
(supplied)
Optical
digital
cable (not
supplied)
HDCP 2.2compatible
HDMI jack
OUTPUT
High Speed
HDMI cable
(not supplied)
Blu-ray Disc™
player, cable box or
satellite box, etc.
HDCP 2.2compatible
HDMI jack
labeled with ARC and not
compatible with HDCP 2.2
If your TV’s HDMI jack is labeled with
ARC and not compatible with HDCP 2.2,
connect the system to your TV’s HDMI
jack that is compatible with HDCP 2.2
using an HDMI cable. Then, connect an
optical digital cable to the optical
output jack of the TV to listen to digital
sound.
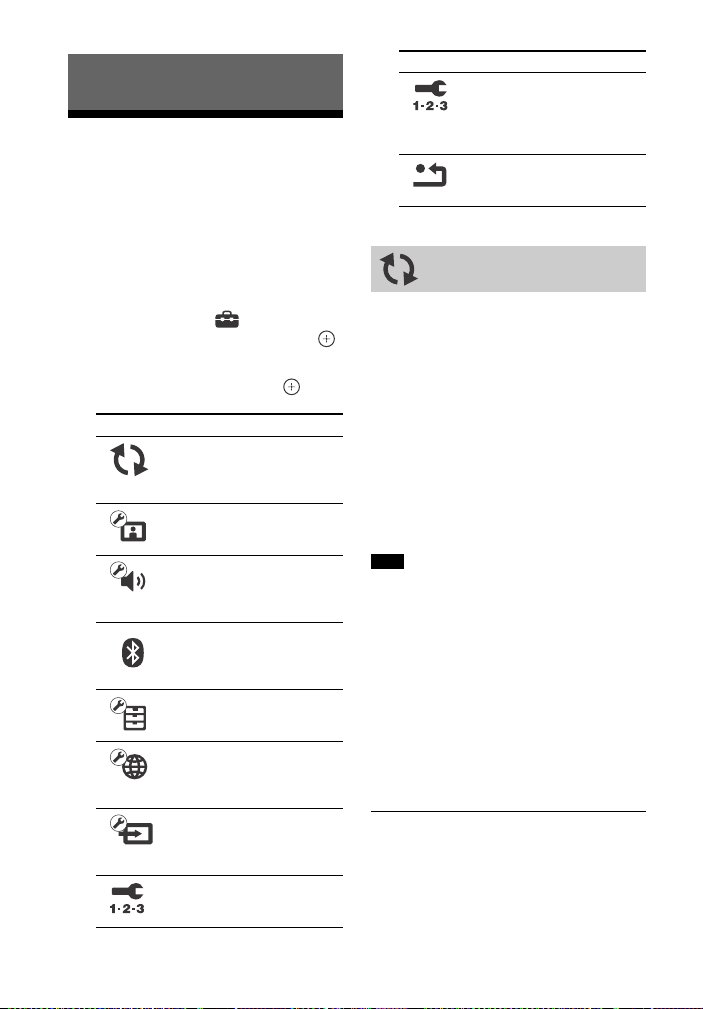
Connecting 4K devices
Connect a 4K device to the HDMI IN 1
jack of the system. For details on
whether the device is HDCP 2.2compatible, refer to the operating
instructions supplied with the device.
21
US
Page 22
Settings and Adjustments
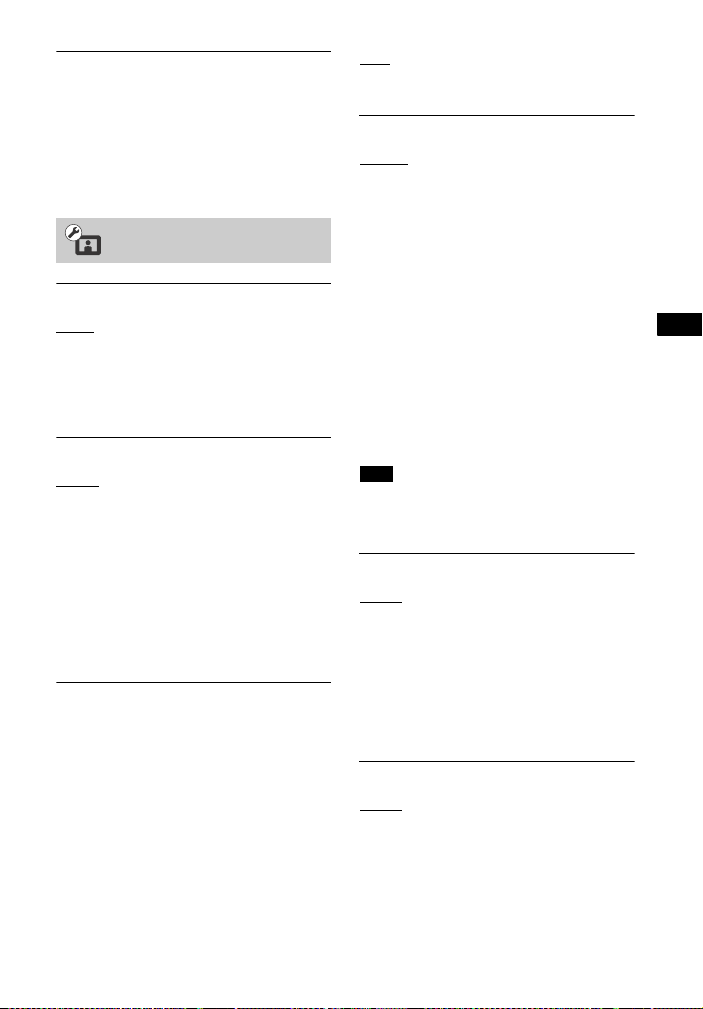
Using the Setup Display
You can make various adjustments to
items such as picture and sound.
The default settings are underlined.
Icon Explanation
[Easy Network Settings]
(page 29)
Runs [Easy Network Settings]
to make the basic network
settings.
[Resetting] (page 29)
Resets the system to the
factory settings.
1 Press HOME.
The home screen appears on the TV
screen.
2 Press to select [Setup] at the
upper right corner, then press .
3 Press / to select the setup
category icon, then press .
Icon Explanation
[Software Update]
(page 22)
Updates the software of the
system.
[Screen Settings] (page 23)
Makes the screen settings
according to the type of TV.
[Audio Settings] (page 24)
Makes the audio settings
according to the type of
connecting jacks.
[Bluetooth Settings]
(page 25)
Makes detailed settings for
the BLUETOOTH function.
[System Settings] (page 26)
Makes the system-related
settings.
[Network Settings]
(page 28)
Makes detailed settings for
Internet and network.
[Input Skip Setting]
(page 28)
Sets the input skip setting fo r
each input.
[Easy Setup] (page 29)
Re-runs the [Easy Setup] to
make the basic settings.
[Software Update]
By updating your software to the latest
version, you can take advantage of the
newest functions.
During a software update, “UPDT”
appears in the front panel display. After
the update completes, the system
automatically reboots.
While the updating operation is in
progress, do not turn on or off the
system, or operate the system or TV.
Wait for the software update to
complete.
Note
For information about update functions,
visit the following website:
http://www.sony.com/soundbarsupport
If your network condition is poor, visit the
website above to download the latest
software version and update via USB
memory.
Set [Auto Update] to [On] when you want
to perform software updates
automatically (page 27). Depending on
the contents of the updates, software
update may be performed even if you set
[Auto Update] to [Off].
[Update via Internet]
Updates the system’s software using
available network. Make sure network is
connected to the Internet. For details,
see “Network Function” (page 16).
22
US
Page 23
Settings and Adjustments
[Update via USB Memory]
Updates software using USB memory.
Make sure that the Software Update
Folder is correctly named as “UPDATE”.
The system can recognize up to 500
files/folders in a single layer including
the update files/folders.
[Screen Settings]
[TV Type]
[16:9]
: Select this when connecting to a
wide-screen TV or a TV with a
wide-mode function.
[4:3]: Select this when connecting to a
4:3 screen TV without a wide-mode
function.
[Output Video Resolution]
[Auto]
: Outputs video signal according
to the resolution of the TV or connected
device.
[480i/576i]*, [480p/576p]*, [720p],
[1080i], [1080p]: Outputs video signal
according to the selected resolution
setting.
* If the color system of the playback
content is NTSC, the video signals
resolution can be converted to [480i] and
[480p] only.
[24p Output]
[Network content 24p Output]
This function sets the signals output
from the HDMI OUT (ARC) jack on the
system when using the Screen mirroring
function.
[Auto]: Outputs 24p video signals only
when you connect a 1080/24pcompatible TV via an HDMI connection
and the [Output Video Resolution] is set
to [Auto] or [1080p].
: Select this when your TV is not
[Off]
compatible with 1080/24p video
signals.
[4K Output]
[Auto1]
: Outputs 2K (1920 × 1080) video
signals during video playback (Screen
mirroring) and 4K video signals during
photo play when connecting to a Sony
4K-compatible device.
Outputs 4K video signals during 24p
video contents playback or photo play
when connecting to a non-Sony
4K-compatible device.
[Auto2]: Automatically outputs 4K/24p
video signals when you connect a
4K/24p-compatible device and make
the appropriate setting for [Network
content 24p Output] in [24p Output],
and also outputs 4K/24p photo images
when you play 2D photo files.
[Off]: Turns off the function.
Note
If your Sony device is not detected when
[Auto1] is selected, the setting will have the
same effect as [Auto2] setting.
[YCbCr/RGB (HDMI)]
[Auto]
: Automatically detects the type
of external device, and switches to the
matching color setting.
[YCbCr (4:2:2)]: Outputs YCbCr 4:2:2
video signals.
[YCbCr (4:4:4)]: Outputs YCbCr 4:4:4
video signals.
[RGB]: Select this when connecting to a
device with an HDCP compliant DVI jack.
[HDMI Deep Color Output]
[Auto]
: Normally select this.
[12bit], [10bit]: Outputs 12bit/10bit video
signals when the connected TV is
compatible with Deep Color.
[Off]: Select this when the picture is
unstable or colors appear unnatural.
23
US
Page 24
[Video Direct]
You can disable the On-Screen Display
(OSD) of the system when [HDMI1],
[HDMI2] or [HDMI3] input is selected.
This function is useful when playing a
game, you can fully enjoy the game’s
screen.
[On]: Disables the OSD. Information will
not be displayed on the screen and the
OPTIONS and DISPLAY buttons are
disabled.
: Displays information on the sc reen
[Off]
when you change the settings such as
selecting the sound field.
[Off]: No compression of dynamic
range.
[Attenuation settings - Analog]
Distortion may occur when you listen to
a device connected to the ANALOG IN
jack. You can prevent distortion by
attenuating the input level on the
system.
: Attenuates the input level. The
[On]
output level will decrease at this setting.
[Off]: Normal input level. Select this
when connecting to a portable device
(such as digital media player).
[SBM] (Super Bit Mapping)
[On]
: Smooths the gradation of video
signals output from the HDMI OUT (ARC)
jack.
[Off]: Select this when outputting
distorted video signals or unnatural
color.
[Audio Settings]
[DSEE HX]
This function only works when [ Music] is
selected as sound field.
: Upscales the audio file to a High-
[On]
Resolution Audio file and reproduces
the clear high-range sound which is
often lost (page 11).
[Off]: Off.
[Audio DRC]
You can compress the dynamic range of
the sound track.
: Automatically compresses
[Auto]
sound encoded in Dolby TrueHD.
[On]: The system reproduces the sound
track with the kind of dynamic range
that the recording engineer intended.
[Audio Output]
You can select the output method
where the audio signal is output.
[Speaker]: Outputs sound from the
system’s speakers only.
[Speaker + HDMI]
: Outputs sound from
the system’s speakers and 2-channel
linear PCM signals from the HDMI OUT
(ARC) jack.
[HDMI]: Outputs sound from the HDMI
OUT (ARC) jack only. Sound format
depends on the connected device.
Note
When [Control for HDMI] is set to [On]
(page 26), [Audio Output] is set to
[Speaker + HDMI] automatically and this
setting cannot be changed.
24
US
Page 25

Settings and Adjustments
[Bluetooth Settings]
[Bluetooth Mode]
You can enjoy contents from remote
device by using this system or listen to
sound from this system by using other
device such as headphones.
[Receiver]
mode which enables it to receive and
output audio from the remote device.
[Transmitter]: This system is in
transmitter mode which enables it to
send audio to the BLUETOOTH receiver
(such as headphones).
[Off]: The BLUETOOTH power is turned
off and you cannot select the [Bluetooth
Audio] input.
Note
You can connect to a remote device by
using One-touch listening function even
though you have set [Bluetooth Mode] to
[Off].
[Device List]
Display a list of paired and detected
BLUETOOTH receivers when [Bluetooth
Mode] is set to [Transmitter] (page 25).
[Bluetooth Standby]
You can set the [Bluetooth Standby] so
that the system can be turned on by a
BLUETOOTH device even when the
system is in standby mode. This
function is only available when you set
[Bluetooth Mode] to [Receiver] or
[Transmitter].
[On]
when you establish a BLUETOOTH
connection from a paired BLUETOOTH
device.
[Off]: Off.
: This system is in receiver
: The system turns on automatically
Note
If you set [Quick Start/Network Standby] to
[Off] and [Bluetooth Standby] to [On], the
system can be turned on by a BLUETOOTH
device, but BLUETOOTH connection fails.
[Bluetooth Codec - AAC]
This function is only available when you
set [Bluetooth Mode] to [Receiver] or
[Transmitter].
: Enable AAC codec.
[On]
[Off]: Disable AAC codec.
Note
You can enjoy high quality sound if the
AAC is enabled. In case you cannot listen
to AAC sound from your device, select
[Off].
If you change the [Bluetooth Codec - AAC]
setting when a BLUETOOTH device is
connected, the codec setting is only
reflected after the next connection.
[Bluetooth Codec - LDAC]
This function is only available when you
set [Bluetooth Mode] to [Receiver] or
[Transmitter].
: Enable LDAC codec.
[On]
[Off]: Disable LDAC codec.
Note
If you change the [Bluetooth Codec - LDAC]
setting when a BLUETOOTH device is
connected, the codec setting is only
reflected after the next connection.
25
US
Page 26
Tip
LDAC is an audio coding technology
developed by Sony that enables the
transmission of High-Resolution (Hi-Res)
Audio content, even over a BLUETOOTH
connection. Unlike other BLUETOOTH
compatible coding technologies such as
SBC, it operates without any downconversion of the Hi-Res Audio content*,
and allows approximately three times
more data** than those other technologies
to be transmitted over a BLUETOOTH
wireless network with unprecedented
sound quality, by means of efficient coding
and optimized packetization.
*Excluding DSD format contents.
** In comparison with SBC (Subband
Coding) when the bitrate of 990 kbps
(96/48 kHz) or 909 kbps (88.2/44.1 kHz)
is selected.
[Wireless Playback Quality]
You can set transmission data rate of
LDAC playback. This function is only
available when you set [Bluetooth
Mode] to [Transmitter] and [Bluetooth
Codec - LDAC] to [On].
[Auto]: The data rate is automatically
changed depending on environment. If
audio playback is unstable in this
setting, use other three settings.
[Sound Quality]: The highest data rate is
used. Sound is sent in th e higher quality,
however audio playback sometimes
may become unstable when the link
quality is not good enough.
[Standard]
: The middle data rate is
used. It balances both sound quality
and playback stability.
[Connection]: Stability is prioritized.
Sound quality may be reasonable and
connection status will most likely be
stable. If the connection is unstable, this
setting is recommended.
[System Settings]
[OSD Language]
You can select the language you want
for the system on-screen display.
[Wireless Sound Connection]
You can make further settings for the
wireless system. For details, see
“Further settings for the wireless
system” (page 36).
[IR-Repeater]
[On]: Enables the system to relay the
signal from a remote control to the TV
(page 35).
: Off.
[Off]
[HDMI Settings]
[Control for HDMI]
: Turns on the [Control for HDMI]
[On]
function. You can operate mutually
between device that are co nnected with
an HDMI cable.
[Off]: Off.
[Audio Return Channel]
This function is available when you
connect the system to a TV’s HDMI IN
jack that is compatible with the Audio
Return Channel function and [Control
for HDMI] is set to [On].
: The system can receive the
[Auto]
digital audio signal of the TV
automatically via an HDMI cable.
[Off]: Off.
[Standby Through]
You can output HDMI signals to the TV
even when the system is in standby
mode. This function is available when
you set [Control for HDMI] to [On].
26
US
Page 27

Settings and Adjustments
[Auto]: Outputs signals from the HDMI
OUT (ARC) jack when the TV is turned on
while the system is in the standby
mode. This setting saves power in the
standby mode compared to the [On]
setting.
[On]: Always output signals from the
HDMI OUT (ARC) ja ck when the system is
in standby mode. If you connect a TV
other than “BRAVIA”, we recommend
you to select this setting.
[Off]: No signals are output when
system is in standby mode. This setting
saves power in the standby mode
compared to the [On] setting.
[Quick Start/Network Standby]
[On]: Shortens the startup time from
standby mode. You can operate the
system quickly after turning it on.
[Off]
: The default setting.
[Auto Standby]
[On]
: Turns on the [Auto Standby]
function. When you do not operate the
system for about 20 minutes, the
system enters standby mode
automatically.
[Off]: Off.
[Auto Display]
[On]
: Automatically displays
information on the screen when
changing the audio signals, picture
mode, etc.
[Off]: Displays information only when
you press DISPLAY.
[Software Update Notification]
[On]
: Sets the system to inform you of
latest software version information
(page 22).
[Off]: Off.
[Auto Update Settings]
[Auto Update]
[On]: Software update is automatically
executed between 2 a.m. and 5 a.m.
local time in the selected [Time Zone]
while this system is not in use. If you set
[Quick Start/Network Standby] to [Off],
software update is performed after you
turned off the system.
: Off.
[Off]
[Time Zone]
Select your country/region.
Note
Depending on the contents of the updates,
software update may be performed even if
you set [Auto Update] to [Off].
[Device Name]
You can change the name of this system
according to your preference so that it is
more recognizable during BLUETOOTH
or Screen mirroring function. The name
is also used in other ne twork usage such
as Home Network. Follow on-screen
instructions and use software keyboard
to enter the name.
[System Information]
You can display the system’s software
version information and the MAC
address.
[Software License Information]
You can display the Software License
Information.
27
US
Page 28
[Network Settings]
[Internet Settings]
Connect the system to the network
beforehand. For details, see “Network
Function” (page 16).
[Wired Setup]: Select this when you
connect to a broadband router using a
LAN cable. When you select this setting,
the built-in wireless LAN is disabled
automatically.
[Wireless Setup(built-in)]
when you use the built-in wireless LAN
of the system for wireless network
connection.
Tip
For further details, visit the following
website and check the FAQ:
http://www.sony.com/soundbarsupport
: Select this
[Connection Server Settings]
Sets whether or not to display the
connected Home Network server.
[Auto Renderer Access Permission]
[On]
: Allows automatic access from a
newly detected Home Network
controller.
[Off]: Off.
[Renderer Access Control]
Displays a list of Home Network
controller-compatible products and sets
whether or not to accept commands
from the controllers in the list.
[External Control]
[On]
: Allows the home automation
controller to operate this system.
[Off]: Off.
[Network Connection Status]
Displays the current network
connection status.
[Network Connection Diagnostics]
You can run the network diagnostic to
check if the network connection has
been made properly.
[Screen mirroring RF Setting]
If you use multiple wireless systems,
such as a wireless LAN (Local Area
Network), the wireless signals may be
unstable. In this case, playback stability
may be improved by setting the priority
radio frequency channel for Screen
mirroring.
: Normally select this. The system
[Auto]
automatically selects the better channel
for Screen mirroring.
[CH 1]/[CH 6]/[CH 11]: The selected
channel is prioritized for Screen
mirroring connection.
US
28
[Remote Start]
[On]: Allows turn on the system by a
device linked via network when the
system is in standby mode.
: The system cannot be turned on
[Off]
by a device linked via network.
[Input Skip Setting]
The skip setting is a convenient feature
that allows you to skip unused inputs
when selecting a input by pressing
INPUT +/–.
[Do not skip]
the selected input.
[Skip]: The system skips the selected
input.
Note
If you press INPUT +/– when the home
screen is displayed, input icon appears
dimmed if it has been set to [Skip].
: The system does not skip
Page 29
Settings and Adjustments
[Easy Setup]
Using the Options menu
Runs [Easy Setup] to make the basic
initial settings and basic network
settings for the system. Follow the onscreen instructions.
[Easy Network
Settings]
Runs [Easy Network Settings] to make
the basic network settings. Follow the
on-screen instructions.
[Resetting]
[Reset to Factory Default Settings]
You can reset the system settings to the
factory default by selecting the group of
settings. All the settings within the
group will be reset.
[Initialize Personal Information]
You can erase your personal
information stored in the system.
Note
If you dispose, transfer or resell this
system, please delete all Personal
Information for security purposes. Please
take the appropriate measures such as
logging out after using a network service.
Various settings and playback
operations are available by pressing
OPTIONS. The available items differ
depending on the situation.
Common options
[A/V SYNC]
Adjusts the time gap between picture and
sound (page 30).
[Sound Field]
Changes the sound field setting (page 10).
[Night]
Turns on or off the Night mode function
(page 11).
[Voice]
Enhances the dialogue range to enjoy clear
voice sounds (page 11).
[Repeat Setting]
Sets repeat playback.
[Play/Stop]
Starts or stops playback.
[Play from beginning]
Plays the item from the beginning.
[Change Category]
Switches between the [Music] and
[Photo] category in [USB] or [Home
Network] input. This item only available when
the display list is available for the category.
[Music] only
[Shuffle Setting]
Sets shuffle playback.
[Add Slideshow BGM]
Registers music files in the USB memory as
slideshow background music (BGM).
29
US
Page 30
[Photo] only
[Slideshow]
Starts a slideshow.
[Slideshow Speed]
Changes the slideshow speed.
[Slideshow Effect]
Sets the effect when playing a slideshow.
[Slideshow BGM]
[Off]: Turns off the function.
[My Music from USB]: Sets the music files
registered in [Add Slideshow BGM].
[Change Display]
Switches between [Grid View] and [List View].
[Rotate Left]
Rotates the photo counterclockwise by
90 degrees.
[Rotate Right]
Rotates the photo clockwise by 90 degrees.
[View Image]
Displays the selected picture.
Adjusting the delay between
the picture and sound
[A/V SYNC]
When the sound does not match the
pictures on the TV screen, you can
adjust the delay between the picture
and sound for the following inputs.
The setting method differs depending
on the input.
When the [TV] input is selected
1 Press OPTIONS.
“SYNC” appears in the front panel
display.
2 Press or .
3 Press / to adjust the delay, then
press .
You can adjust from 0 ms to 300 ms
in 25 ms increments.
4 Press OPTIONS.
“SYNC” disappears from the front
panel display.
When the [HDMI1], [HDMI2], or
[HDMI3] input is selected
1 Press OPTIONS.
The Options menu appears on the
TV screen.
2 Press / to select [A/V SYNC],
then press .
3 Press / to adjust the delay, then
press .
You can adjust from 0 ms to 300 ms
in 25 ms increments.
US
30
Page 31

Other Functions
Other Functions
Controlling the
system using a
smartphone or
tablet (SongPal)
SongPal is a dedicated app for
operating SongPal-compatible audio
devices manufactured by Sony using a
smartphone or tablet. Search for
SongPal on Google Play™ or App Store
and download it using your smartphone
or tablet.
SongPal allows you to:
change commonly used settings,
selecting the input of the system and
adjusting the volume.
enjoy music content stored on a home
network server or smartphone with
the system.
enjoy music visually with your
smartphone display.
configure Wi-Fi connection settings
easily using SongPal if your Wi-Fi
router does not have a WPS function.
use the SongPal Link function
(page 31).
Note
Before you start to perform the
operations below, be sure to set the
[Bluetooth Mode] to [Receiver] (page 25).
This system is compatible with SongPal
version 3.0 or later.
SongPal uses the network function
(page 16) and/or BLUETOOTH function
(page 12) of the system.
Specifications and display design of
SongPal are subject to change without
notice.
When using an Android device
1 Search, download and launch
SongPal application on Android
device.
2 Connect the system and Android
device by BLUETOOTH connection
(page 12) or network connection
(page 16).
Tip
If you connect the system and Android
device by network connection, connect
the device by Wi-Fi to the same network
as that of the system.
3 Follow the instructions on SongPal.
When using an iPhone/iPod
1 Search, download and launch
SongPal application on iPhone/iPod.
2 Connect the system and iPhone/iPod
by BLUETOOTH connection (page 12)
or network connection (page 16).
Tip
If you connect the system and iPhone/
iPod by network connection, connect
the iPhone/iPod by Wi-Fi to the same
network as that of the system.
3 Follow the instructions on SongPal.
Listening to the same music
on multiple devices/
listening to different music
in a different location
(SongPal Link)
You can enjoy music stored on your
computer or smartphone or from music
services in multiple rooms at the same
time.
For details on SongPal Link, please visit
the following URL:
http://www.sony.net/nasite
31
US
Page 32

Using Google Cast™
Google Cast allows you to select music
content from the Google Cast™ Ready
app and play back on the system.
Google Cast requires the initial setup
using SongPal.
1 Download SongPal to the device.
2 Start SongPal, and then connect
the device by Wi-Fi to the same
network as that of the system.
3 Perform the initial setup on the
device following the instructions
from SongPal.
4 Start the Google Cast Ready app
on the device, and then select this
system to play back content.
Note
You cannot use Google Cast while
“GOOGLE CAST UPDATING” appears in the
front panel display. Wait until the update is
complete, and then try again.
Using the Control for
HDMI Function for
“BRAVIA” Sync
This function is available on TVs with the
“BRAVIA” Sync function.
By connecting Sony products that are
compatible with the Control for HDMI
function via an HDMI cable, operation is
simplified with the features below.
You can enable the Control for HDMI
function by setting [Control for HDMI] to
[On] (page 26).
Note
To use the “BRAVIA” Sync function, be
sure to turn on the system and all
connected device after completed the
HDMI connection.
Depending on the settings of the
connected device, the Control for HDMI
function may not work correctly. Refer to
the operating instructions of the device.
Control for HDMI - Easy Setting
You can set the system’s [Control for
HDMI] function automatically by
enabling the corresponding setting on
the TV.
“DONE” appears in the front panel
display when the Easy Setting is
completed.
Note
You can set [Control for HDMI] function
manually if the above setting is not
working. For details, see “[HDMI Settings]”
(page 26).
System Power Off
When you turn off the TV, the system
and the connected device will turn off
automatically.
Note
The system does not turn off automatically
while playing music on this system.
One-Touch Play
When you play content on a device
(Blu-ray Disc™ player, “PlayStation®4”,
etc.) connected to the system with an
HDMI cable, the system and TV are
turned on automatically and the input of
the system is switched to the
appropriate HDMI input.
Note
The feature above may not operate with
certain devices.
32
US
Page 33

Other Functions
If you set [Standby Through] to [Auto] or
[On] (page 26), then play back the
contents on a connected device when the
system is in standby mode, sound and
image can only be output from the TV
while the system remains in standby
mode.
System Audio Control
If you turn on the system while you are
watching the TV, the TV sound will be
output from the speakers of the system
automatically.
The volume of the system will be
adjusted when you adjust the volume
using the TV’s remote control.
If the TV sound was output from the
speakers of the system the last time you
watched the TV, the system will be
turned on automatically when you turn
on the TV again.
You can also enjoy this feature when
using Twin Picture function (Picture and
Picture (P&P)) on your TV.
If the [TV], [HDMI1], [HDMI2] or [HDMI3]
input is selected, the sound can be
output from the system.
If other than [TV], [HDMI1], [HDMI2] or
[HDMI3] input is selected, the sound is
output only from the TV when using
the Twin Picture function. When you
turn off the Twin Picture function, the
sound is output from the system.
Audio Return Channel
You can enjoy TV sound via the system
by using just one HDMI cable. For details
of the setting, see “[Audio Return
Channel]” (page 26).
Echo Canceling Sync
You can reduce the echo when you use
the Social Viewing function while
watching TV programs. Conversation
becomes clearer.
If the current selected input is [TV],
[HDMI1], [HDMI2] or [HDMI3], the input
is automatically changed to [TV] input.
Sound of the Social Viewing and TV
program is output from the system.
If the current selected input is other
than [TV], [HDMI1], [HD MI2] or [HDMI3],
the sound of the Social Viewing and
the playback content is output from
TV.
Note
This feature only works for TV that
supports Social Viewing function. For
details, refer to the operating instructions
of your TV.
Be sure to set the audio output setting on
your TV so that the sound can be output
through this system.
The Echo Canceling Sync function is a
Sony proprietary function. This function
cannot operate with non-Sony devices.
Home Theatre Control
If a Home Theatre Control-compatible
TV is connected to the system, an icon
for Internet based applications appears
on the connected TV.
You can change the settings of the
system (such as change an input or
sound field) by using the remote control
of your TV.
Note
Your TV must be connected to Int ernet t o
use the Home Theatre Control function.
The Home Theatre Control function is a
Sony proprietary function. This function
cannot operate with non-Sony devices.
Language Follow
When you change the language for the
on-screen display of the TV, the
system’s on-screen display language is
also changed.
33
US
Page 34

Notes on HDMI connections
Use a High Speed HDMI cable. If you
use a Standard HDMI cable, 1080p,
Deep Color, 3D, and 4K content may
not be displayed properly.
Use an HDMI-authorized cable. Use a
Sony High Speed HDMI cable with the
Cable Type Logo.
We do not recommend using an
HDMI-DVI conversion cable.
Audio signals (sampling frequency, bit
length, etc.) transmitte d from an HDMI
jack may be suppressed by the
connected device.
Sound may be interrupted when the
sampling frequency or the number of
channels of audio output signals from
the playback device is switched.
When [TV] input is selected, video
signals via one of the HDMI IN 1/2/3
jacks selected last time are output
from the HDMI OUT (ARC) jack.
This system supports Deep Color,
“x.v.Color”, 3D, and 4K transmission.
To enjoy 3D content, connect a
3D-compatible TV and video device
(Blu-ray Disc™ player, “PlayStation®4”,
etc.) to the system using High Speed
HDMI cables, put on 3D glasses, and
then play back a 3D-compatible
Blu-ray Disc™, etc.
To enjoy 4K content, the TV and
players that are connected to the
system must be compatible with 4K
content.
Enjoying multiplex
broadcast sound (Dual
Mono)
You can enjoy multiplex broadcast
sound when the system receives a
Dolby Digital multiplex broadcast signal.
Note
To receive a Dolby Digital signal, you need
to connect a TV or other devices to the TV
(DIGITAL IN) jack with a optical digital
cable.
If your TV’s HDMI IN jac k is c ompa tibl e with
the Audio Return Channel function
(page 26), you can receive a Dolby Digital
signal via an HDMI cable.
Press AUDIO repeatedly until the
signal you want appears in the front
panel display.
“MAIN”: Sound of the main language
will be output.
“SUB”: Sound of the sub language will
be output.
“MN/SB”: Mixed sound of both the
main and sub languages will be
output.
Deactivating the buttons
on the Bar Speaker (Child
Lock)
34
You can deactivate the buttons on the
Bar Speaker (except for ) for
preventing misoperation, such as child
mischief.
Be sure to use the buttons on the Bar
Speaker to perform this operation.
US
Page 35

Other Functions
While holding INPUT, press VOL –,
VOL + and VOL – in sequence.
“LOCK” appears in the front panel
display.
You can only operate the system by
using the remote control.
To cancel, while holding INPUT, press
VOL –, VOL + and VOL – in sequence.
“UNLCK” appears in the front panel
display.
Changing the brightness
You can change the brightness of the
front panel display and blue LED
indicator.
Press DIMMER repeatedly.
You can select “OFF”, “DIM1” or “DIM2”.*
* The brightness for “DIM1” and “DIM2”
settings are the same.
Note
The front panel display is turned off when
“DIM2” is selected. It turns on
automatically when you press any buttons,
then turns off again if you do not operate
the system for about 10 seconds. However,
in some cases, the front panel display may
not turn off.
Saving power in Standby
Mode
Check that you have made the following
settings:
[Bluetooth Standby] is set to [Off]
(page 25).
[Control for HDMI] in [HDMI Settings] is
set to [Off] (page 26).
[Quick Start/Network Standby] is set
to [Off] (page 27).
[Remote Start] is set to [Off] (page 28).
Enabling the IR repeater
function (when you
cannot control the TV)
When the Bar Speaker obstructs the
remote control sensor of the TV, the TV
remote control may not work. In that
case, enable the IR repeater function of
the system.
You can control the TV with the remote
control of the TV by sending the remote
signal from the rear of the Bar Speaker.
Note
Be sure to check that the remote control
of the TV cannot control the TV, then set
[IR-Repeater] to [On]. If it is set to [On]
when the remote control can control the
TV, appropriate operation may not be
obtained, because of the interference
between the direct command from the
remote control and the command via the
Bar Speaker.
On some TVs, this function may not work
correctly. In this case, place the Bar
Speaker slightly further away from the TV.
1 Press HOME on the remote control
of the system.
The home screen appears on the TV
screen.
35
US
Page 36

2 Press to select [Setup] at the
upper right corner, then press .
3 Press / to select [System
Settings], then press .
4 Press / to select [IR-Repeater],
then press .
5 Press / to select [On], then
press .
Activating wireless
transmission between
specific units
[Secure Link]
You can specify the wireless connection
to link the Bar Speaker to the subwoofer
using the Secure Link function.
This function can help prevent
interference if you use multiple wireless
products or your neighbors use wireless
products.
Further settings for the
wireless system
You can make further settings for the
wireless system by using the [Wireless
Sound Connection] settings.
1 Press HOME.
The home screen appears on the TV
screen.
2 Press to select [Setup] at the
upper right corner, then press .
3 Press / to select [System
Settings], then press .
4 Press / to select [Wireless
Sound Connection], then press .
The [Wireless Sound Connection]
display appears.
[Secure Link] (page 36)
[RF Band] (page 37)
1 Select [Wireless Sound
Connection] in [System Settings]
(page 36).
2 Press / to select [Secure Link],
then press .
3 Press / to select [On], then
press .
4 Press SECURE LINK on the rear of
the subwoofer.
Proceed to the next Step within a
few minutes.
5 Press / to select [Start], then
press .
To return to the previous display,
select [Cancel].
6 After the message [Secure Link
setting is complete.] appears,
press .
The subwoofer is linked to the Bar
Speaker and the on/standby
indicator on the subwoofer turns
orange.
If the message [Cannot set Secure
Link.] appears, follow the on-screen
messages.
36
US
Page 37

Other Functions
To cancel the Secure Link function
For the Bar Speaker
Select [Off] on Step 3 above.
For the subwoofer
Hold down SECURE LINK on the rear of
the subwoofer until the on/standby
indicator turns green or flashes green.
Selecting the frequency
band
[RF Band]
You can select the frequency band
which RF channel belongs to.
1 Select [Wireless Sound
Connection] in [System Settings]
(page 36).
2 Press / to select [RF Band], then
press .
3 Press / to select the setting you
want, then press .
[Auto]: Normally select this. The
system automatically selects the
strongest frequency band for
transmission.
[5.2GHz], [5.8GHz]: The system
transmits sound according to the
selected frequency band.
Tip
We recommend you to set [RF Band] to
[Auto].
Modifying the angle of
the Bar Speaker
You can modify the angle of the Bar
Speaker by attaching the supplied
stands to the bottom of the Bar Speaker.
Tip
When you place the Bar Speaker in a flat
position above eye level, detaching the
stands will ensure proper sound
orientation.
1 Turn the Bar Speaker upside
down.
2 Remove the protection sheet from
the double-sided tape on the
stand (supplied).
37
US
Page 38

3 Attach the stand to the Bar
Stand
5.2 mm
(7/32 in)
10 mm
(13/32 in)
More than 30 mm (1 3/16 in)
4 mm
(3/16 in)
8 mm to 9 mm
(11/32 in to
3/8 in)
726 mm
(28 5/8 in)
Speaker by matching the “” on
the stand to the “” on the Bar
Speaker.
4 Repeat step 2 and 3 to attach the
stand for the other side.
Mounting the Bar
Speaker on a wall
You can mount the Bar Speaker on a
wall.
Note
Prepare screws (not supplied) that are
suitable for the wall material and
strength. As a plasterboard wall is
especially fragile, attach the screws
securely to two studs in the wall beam.
Install the Bar Speaker horizontally, hung
by screws in studs in a continuous flat
section of the wall.
Be sure to subcontract the installation to
Sony dealers or licensed contractors and
pay special attention to safety during the
installation.
Sony shall not be held responsible for
accidents or damage caused by improper
installation, insufficient wall strength,
improper screw installation or natural
calamity, etc.
When you use the HDMI IN 3 jack of the
wall-mounted Bar Speaker, connect the
swivel-type High Speed HDMI cable.
US
38
1 Prepare screws (not supplied) that
are suitable for the holes on the
rear of the Bar Speaker.
2 Fasten the screws to two studs in
the wall.
The screws should protrude by
8 mm to 9 mm (11/32 in to 3/8 in).
3 Hang the Bar Speaker on the
screws.
Align the holes at the rear of the Bar
Speaker with the screws, then hang
the Bar Speaker on the two screws.
Page 39

Additional Information
Additional Information
Precautions
On safety
Should any solid object or liquid fall
into the cabinet, unplug the system
and have it checked by qualified
personnel before operating it any
further.
Do not touch the AC power cord
(mains lead) with wet hands. Doing so
may cause an electric shock.
Do not climb on the Bar Speaker and
subwoofer, as you may fall down and
injure yourself, or system damage may
result.
On power sources
Before operating the system, check
that the operating voltage is identical
to your local power supply. The
operating voltage is indicated on the
nameplate at the rear of the Bar
Speaker and subwoofer.
If you are not going to use the system
for a long time, be sure to disconnect
the system from the wall outlet. To
disconnect the AC power cord (mains
lead), grasp the plug itself; never pull
the cord.
AC power cord (mains lead) must be
changed only at a qualified service
shop.
On heat buildup
Although the system heats up during
operation, this is not a malfunction. If
you continuously use this system at a
large volume, the cabinet temperature
of the top, side and bottom rises
considerably. To avoid burning yourself,
do not touch the cabinet.
On placement
Leave the front of the system open.
Do not place the system on top of a
device that radiates heat.
Place the system in a location with
adequate ventilation to prevent heat
build-up in the system.
Do not place the Bar Speaker and
subwoofer on a soft surface (rugs,
blankets, etc.) or place anything at the
rear of the Bar Speaker and subwoofer
that might block the ventilation holes
and cause malfunctions.
Do not install the system near heat
sources such as radiators, air ducts, or
in a place subject to direct sunlight,
excessive dust, mechanical vibration,
or shock.
Do not install the system in an inclined
position. It is designed to be operated
in a horizontal position only.
Do not place metal objects in front of
the front panel. It may limit reception
of radio waves.
Do not place the system in a place
where medical equipment is in use. It
may cause a malfunction of medical
equipment.
If you use a pacemaker or other
medical device, consult your physician
or the manufacturer of your medical
device before using the wireless LAN
function.
Use caution when placing the Bar
Speaker and subwoofer on a surface
that has been specially treated (with
wax, oil, polish, etc.), as staining or
discoloration of the surface may
result.
Take care to avoid any possible injury
from the corners of the Bar Speaker
and subwoofer.
If the system is being used in
combination with a TV, VCR, or tape
deck, noise may result and picture
quality may suffer. In such a case,
place the system away from the TV,
VCR, or tape deck.
39
US
Page 40

The speakers of this system are not
magnetically shielded.
Do not place magnetic cards or a CRTtype TV set near the system.
On operation
Before connecting other devices, be
sure to turn off and unplug the system.
On adjusting volume
Do not turn up the volume while
listening to a section with very low level
inputs or no audio signals. If you do, the
speakers may be damaged when a peak
level section is suddenly played.
On cleaning
Clean the cabinet, panel, and controls
with a soft cloth slightly moistened with
a mild detergent solution. Do not use
any type of abrasive pad, scouring
powder or solvent such as alcohol or
benzine.
On replacement of parts
In the events that this system is
repaired, repaired parts may be retained
for reuse or recycling purposes.
On your TV’s color
If the system cause the color irregularity
on your TV screen, turn off the TV then
turn it on after 15 to 30 minutes. If color
irregularity persist, place the system
further away from the TV set.
IMPORTANT NOTICE
Caution: This system is capable of
holding a still video image or
on-screen display image on your TV
screen indefinitely. If you leave the
still video image or on-screen display
image displayed on your TV for an
extended period of time, you risk
permanent damage to your TV
screen. Plasma display panel
televisions and projection televisions
are susceptible to this.
Notes on updating
This system allows you to update the
software automatically when connected
to the Internet via a wired or wireless
network.
You can add new features and use the
system with more convenience and
safety by updating the system.
If you do not want to update
automatically, you can disable the
function by using SongPal installed on
your smartphone or tablet. However,
the system may update the software
automatically for reasons such as
safety, even if this function is disabled.
You can also update the software using
the settings menu when this function is
disabled. See “Using the Setup Display”
(page 22) for details.
You may not use the system while the
software is being updated.
Disclaimer regarding services
offered by third parties
Services offered by third parties may be
changed, suspended, or terminated
without prior notice. Sony shall not be
held responsible in these situations.
If you have any questions or problems
concerning your system, please consult
your nearest Sony dealer.
Troubleshooting
If you experience any of the following
difficulties while using the system, use
this troubleshooting guide to help
remedy the problem before requesting
repairs. Should any problem persist,
consult your nearest Sony dealer.
In the event of a problem with the
wireless sound function, have a Sony
dealer check the entire system (Bar
Speaker and subwoofer).
40
US
Page 41

Additional Information
General Messages
The power does not turn on.
Check that the AC power cord
(mains lead) is connected securely.
The remote control does not function.
The distance between the remote
control and the Bar Speaker is too
far.
The batteries in the remote control
are weak.
The system is turned off automatically.
The [Auto Standby] is working. Set
[Auto Standby] to [Off] (page 27).
The system does not work normally.
Disconnect the AC power cord
(mains lead) from the wall outlet
(mains), then reconnect after
several minutes.
TV remote control does not work.
This problem might be solved by
enabling the IR repeater function
(page 35).
Sensors of the TV do not work properly.
The Bar Speaker may block some
sensors (such as the brightness
sensor) and the remote control
receiver of your TV, or the “emitter
for 3D glasses (infrared
transmission)” of a 3D TV that
supports the infrared 3D glass
system. Move the Bar Speaker away
from the TV within a range that
allow those parts to operate
properly. For the locations of the
sensors and remote control
receiver, refer to the operating
instructions supplied with the TV.
[A new software version is available.
Please go to the “Setup” section of the
menu and select “Software Update” to
perform the update.] appears on the
TV screen.
See [Software Update] (page 22) to
update the system to a latest
software version.
“PRTCT”, “PUSH” and “POWER” appear
alternately in the front panel display.
Press to turn off the system.
After “STBY” disappears, disconnect
the AC power cord (mains lead)
from the wall outlet (mains). Then,
check that nothing is blocking the
ventilation holes of the Bar Speaker.
Reconnect the AC power cord
(mains lead) and turn on the
system. If the problem persists,
consult your nearest Sony dealer.
“LOCK” flashes in the front panel
display when you press any button on
the Bar Speaker.
Set the child lock function to off
(page 34).
appears without any messages on
the entire TV screen.
Contact your nearest Sony dealer or
local authorized Sony service
facility.
“NOT USE” appears in the front panel
display when you press any of the
sound effect buttons (page 51).
The sound effects setting cannot be
changed when the system is
connected to a BLUETOOTH receiver
in transmitter mode.
41
US
Page 42

Picture
There is no picture or the picture is not
output correctly.
Select the appropriate input
(page 9).
While holding INPUT, press VOL +,
VOL – and VOL + in sequence to
reset the video output resolution to
the lowest resolution.
There is no picture when you make an
HDMI cable connection.
If you connect a device supporting
HDCP2.2, be sure to connect the
device to the HDMI IN 1 jack and the
TV to the HDMI OUT (ARC) jack of
the system.
The system is connected to an input
device that is not HDCP (Highbandwidth Digital Content
Protection) compliant. In this case,
check the specifications of the
connected device.
3D content from the HDMI IN 1/2/3 jack
do not appear on the TV screen.
Depending on the TV or video
device, 3D content may not appear.
Check the supported HDMI video
format (page 55).
4K content from the HDMI IN 1/2/3 jack
do not appear on the TV screen.
Depending on the TV or the video
device, 4K content may not appear.
Check the video capability and
settings of your TV and video
device.
Use a High Speed HDMI cable.
No image is output from the TV when
the system is in standby mode.
When the system enters standby
mode, the image from the last
selected HDMI device before you
turned off the system i s displayed. If
you are enjoying content from
another device, play the content on
the device and perform the OneTouch Play operation, or turn on the
system to select the HDMI device
from which you want to enjoy
content.
Set [Standby Through] to [On] in
[HDMI Settings] (page 26).
An image is not displayed on the entire
TV screen.
Check the setting of [TV Type] in
[Screen Settings] (page 23).
The aspect ratio on the media is
fixed.
Color irregularity occurs on the TV
screen.
If the color irregularity persists, turn
off the TV set once, then turn it on
after 15 to 30 minutes.
Make sure that no magnetic object
(magnetic latch on a TV stand,
health care device, toy, etc.) is
placed near the system.
Images from the H DMI jack is distor ted.
Video from the device connected to
the HDMI jack may be distorted. If
this happens, set [Video Direct] to
[On] (page 24).
Sound
42
No sound or only a very low-level
sound of the device connected to the
system is heard.
Press
Press or
US
+ and check the volume
level (page 51).
+ to cancel the
muting function (page 51).
Page 43

Additional Information
Make sure the input source is
selected correctly. You should try
other input sources by pressing the
INPUT +/– repeatedly (page 9).
Check that all the cables and cords
of the system and the connected
device are firmly inserted.
No TV sound is output from the system.
Press INPUT +/– repeatedly to select
[TV] input.
Check the connection of the HDMI
cable or optical digital cable that is
connected to the system and the TV
(refer to Step 1 in the supplied
Startup Guide).
Turn on the TV, then turn on the
system.
Set the speaker setting of the TV to
Audio System. Refer to the
operating instructions of the TV for
the TV settings.
Increase the volume on the TV or
cancel muting.
When a TV compatible with the
Audio Return Channel (ARC)
function is connected with an HDMI
cable, make sure the cable is
connected to the HDMI input (ARC)
terminal of the TV (refer to Step 1 in
the supplied Startup Guide).
If the TV is not compatible with the
Audio Return Channel (ARC)
function, connect the optical digital
cable in addition to the HDMI cable
in order to output sound (refer to
Step 1 in the supplied Startup
Guide).
The sound is output from both the
system and the TV.
Turn off the sound of the system or
the TV.
There is no sound from the TV via the
HDMI OUT (ARC) jack when using the
Audio Return Channel function.
Set [Control for HDMI] in [HDMI
Settings] of [System Settings] to
[On] (page 26). Also, set [Audio
Return Channel] in [HDMI Settings]
of [System Settings] to [Auto]
(page 26).
Make sure that your TV is
compatible with the Audio Return
Channel function.
Make sure that an HDMI cable is
connected to a jack on your TV that
is compatible with the Audio Return
Channel function.
The system does not output sound of
TV programs correctly whe n connected
to a set-top box.
Set [Audio Retu rn Channel] in [HDMI
Settings] of [System Settings] to
[Off] (page 26).
Check the connections (refer to the
supplied Startup Guide).
Severe hum or noise is heard.
Check that the devices are
connected securely.
Move your audio device away from
the TV.
The plugs and jacks are dirty. Wipe
them with a cloth slightly
moistened with alcohol.
No sound or only a very low-level
sound is heard from the subwoofer.
Press SW
subwoofer volume (page 51).
Make sure that the on/standby
indicator of the subwoofer is lit in
green. If not, see “No sound is heard
from the subwoofer.” in “Wireless
sound” (page 44).
+ to increase the
43
US
Page 44

A subwoofer is for reproduc ing bass
sound. In the case of input sources
that contain very little bass sound
components (for example, a TV
broadcast), the sound from the
subwoofer may be difficult to hear.
When you play content compatible
with copyright protection
technology (HDCP), it is not output
from the subwoofer.
Dolby Digital or DTS multi-channel
sound is not reproduced.
Check that the DVD, etc. you are
playing is recorded in Dolby Digital
or DTS format.
You can only enjoy High Bitrate
Audio (DTS-HD Master Audio, Dolby
TrueHD), DSD and Multi Channel
Linear PCM with an HDMI
connection.
Distortion occurs in the sound of a
connected device.
Reduce the input level for the
connected device by setting
[Attenuation settings - Analog]
(page 24).
Wireless sound
No sound is heard from the subwoofer.
The on/standby indicator of the
subwoofer does not light up.
Check that the AC power cord
(mains lead) of the subwoofer is
connected prop erly. (Refer to Step
4 in the supplied Startup Guide)
Press the (on/standby) on the
subwoofer to turn on the power.
The on/standby indicator of the
subwoofer flashes slowly in green
or lights up in red.
Move the subwoofer to a location
near the Bar Speaker so that the
on/standby indicator of the
subwoofer lights up in green.
Follow the steps in “Activating
wireless transmission between
specific units” (page 36).
The on/standby indicator of the
subwoofer flashes quickly in green.
Consult your nearest Sony dealer.
The on/standby indicator of the
subwoofer flashes in red.
Press the (on/standby) on the
subwoofer to turn off the power
and check whether the ventilation
opening of the subwoofer is
blocked or not.
The subwoofer is designed for
playback of bass sound. When the
input source does not contain much
of bass sound, as is the case with
most TV programs, the bass sound
may not be audible.
Press the SW
+ to increase the
volume of the subwoofer (page 51).
Sound skips or has noise.
If there is a device nearby that
generates electromagnetic waves
like a wireless LAN or an electronic
oven in use, locate the system apart
from it.
If there is an obstacle between the
Bar Speaker and the subwoofer,
move or remove it.
Locate the Bar Speaker and the
subwoofer as close as possible.
Switch the wireless LAN frequency
of any nearby Wi-Fi router or
personal computer to 2.4 GHz
range.
Switch the LAN c onnection of the TV
or Blu-ray Disc™ player from
wireless to wired.
Playback
File names are not displayed correctly.
The system can only display ISO
8859-1 compliant character
formats. Other character formats
may be displayed differently.
44
US
Page 45

Additional Information
Depending on the writing software
used, the input characters may be
displayed differently.
A file does not start playing from the
beginning.
Resume play has been selected.
Press OPTIONS and select [Play
from beginning], then press .
Playback does not start from the
resume point where you last stopped
playing.
The resume point may be cleared
from memory depending on the file
when
you disconnect the USB device.
you play other content.
you turn off the system.
Unstable playback when using Screen
mirroring.
Depending on the usage
environment, devices emitting
radio waves such as other wireless
LAN devices or microwave ovens
may interfere with the Screen
mirroring. Move the system and the
Screen mirroring-compatible device
away from such devices, or turn off
such devices.
Depending on the usage
environment, communication
speed may be affected by the
distance or obstacle between
devices, types of device, device
configuration, or radio waves.
Communication may be lost due to
line congestion.
USB device
The USB device is not recognized.
Try the following:
Turn the system off.
Remove and reconnect the USB
device.
Turn the system on.
Make sure that the USB device is
securely connected to the (USB)
port.
Check if the USB device or a cable is
damaged.
Check if the USB device is on.
If the USB device is connected via a
USB hub, disconnect it and connect
the USB device directly to the Bar
Speaker.
“BRAVIA” Sync ([Control for
HDMI])
The [Control for HDMI] function does
not work (“BRAVIA” Sync).
Check the HDMI connection (refer
to Step 1 in the supplied Startup
Guide).
Check that [Control for HDMI] is set
to [On] (page 26).
If you change the HDMI connection,
turn the system off and on again.
If power failure occurs, set [Control
for HDMI] to [Off], then set [Control
for HDMI] to [On] (page 26).
Check the following and refer to the
operating instructions supplied with
the device.
The connected device is
compatible with the [Control for
HDMI] function.
The connected device’s setting
for the [Control for HDMI] function
is correct.
If you connect/disconnect the AC
power cord (mains lead), wait more
than 15 seconds before operating
the system.
If you connect the audio output of
video device with the system, using
a cable other than an HDMI cable,
no sound may be output because
of “BRAVIA” Sync. In such a case,
set [Control for HDMI] to [Off]
(page 26) or connect the cable from
the audio output jack of the video
device directly to the TV.
45
US
Page 46

The types and number of devices
that can be controlled by the
“BRAVIA” Sync feature are
restricted by the HDMI CEC
standard as follows:
Recording devices (Blu-ray Disc™
recorders, DVD recorders, etc.): up
to 3 devices
Playback devices (Blu-ray Disc™
players, DVD players, etc.): up to
3 devices (including this system)
Tuner-related devices: up to
4 devices
Audio system (receiver/
headphones): up to 1 device
(including this system)
Network connection
The system cannot connect to the
network.
Check the network connection
(page 16) and the network settings
(page 28).
Wireless LAN connection
You cannot connect your PC to the
Internet after [Wi-Fi Protected Setup
(WPS)] is performed.
The wireless settings of the router
may change automatically if you
use the Wi-Fi Protected Setup
function before adjusting the
settings of the router. In this case,
change the wireless s ettings of your
PC accordingly.
The system cannot connect to the
network or the network connection is
unstable.
Check if the wireless LAN router is
on.
Check the network connection
(page 16) and the network settings
(page 28).
Depending on the usage
environment, including the wall
material, radio wave reception
conditions, or obstacles between
the system and the wireless LAN
router, the possible communication
distance may be shortened. Move
the system and the wireless LAN
router closer to each other.
Devices that use a 2.4 GHz
frequency band, such as a
microwave, BLUETOOTH, or digital
cordless device, may interrupt
communication. Move the system
away from such devices, or turn off
such devices.
The wireless LAN connection may
be unstable depending on the
usage environment, especially
while using the BLUETOOTH
function of the system. In this case,
adjust the usage environment.
The wireless router you want is not
shown in the wireless network list.
Press BACK to return to the previous
screen, and try [Wireless
Setup(built-in)] again. If the wireless
router you want is still not detected,
select [New connection registration]
from the network list, then select
[Manual registration] to input a
network name (SSID) manually.
BLUETOOTH device
BLUETOOTH connection cannot be
completed.
Make sure that the blue LED
indicator is lit (page 48).
Make sure the BLUETOOTH device
to be connected is turned on and
the BLUETOOTH function is
enabled.
Move the BLUETOOTH device closer
to the Bar Speaker.
46
US
Page 47

Additional Information
Pair this system and the
BLUETOOTH device again. You may
need to cancel the pairing with this
system using your BLUETOOTH
device first.
Set [Bluetooth Mode] to [Receiver]
or [Transmitter] (page 25).
Pairing cannot be done.
Move the BLUETOOTH device closer
to the Bar Speaker.
Pairing may not be possible if other
BLUETOOTH devices are present
around the Bar Speaker. In this case,
turn off the other BLUETOOTH
devices.
Delete the system from your
BLUETOOTH device and perform
pairing again (page 12).
NFC function does not work.
NFC function does not work with
BLUETOOTH-compatible receivers
(such as headphones). To listen to
sound using a BLUETOOTHcompatible receiver, see “Listening
to sound by transmitting to a
BLUETOOTH-compatible receiver”
(page 14).
Connecting cannot be done.
The pairing registration information
has been erased. Perform the
pairing operation again (page 12).
There is no sound.
Make sure this Bar Speaker is not
too far from the BLUETOOTH device,
or this system is not receiving
interference from a Wi-Fi network,
other 2.4 GHz wireless device, or
microwave oven.
Check that the BLUETOOTH
connection is made properly
between this system and the
BLUETOOTH device.
Pair this system and the
BLUETOOTH device again.
Keep the Bar Speaker away from
metal objects or surfaces.
Make sure [Bluetooth Audio] input
is selected.
Adjust the volume of the
BLUETOOTH device first, if the
volume level is still too low, adjust
the volume level on the Bar
Speaker.
The sound skips or fluctuates, or the
connection is lost.
The Bar Speaker and the
BLUETOOTH device are too far
apart.
If there are obstacles between the
Bar Speaker and your BLUETOOTH
device, remove or avoid the
obstacles.
If there is device that generates
electromagnetic radiation, such as a
wireless LAN, other BLUETOOTH
device, or a microwave oven
nearby, move them away.
47
US
Page 48

Guide to Parts and Controls
Slot
For more information, refer to the pages indicated in parentheses.
Bar Speaker
Front/Side
(on/standby)
Turns on the system, or sets it to
standby mode.
INPUT
Selects the device you want to use.
PAIRING
VOL (volume) +*/–
* VOL + button has a tactile dot. Use
the tactile dot as a reference when
operating the Bar Speaker.
(N-Mark) (page 14)
Position the NFC-compatible device
near this indication to activate the
NFC function.
US
48
(USB) port (page 9)
Place your fingernail in the slot to
open the cover.
Remote control sensor
Blue LED indicator
Shows the BLUETOOTH status as
follows.
During BLUETOOTH
pairing
The system is
attempting to connect
with a BLUETOOTH
device
Flashes quickly
Flashes
Page 49

Additional Information
The system has
established connec tion
with a BLUETOOTH
device
Front panel display
Rear panel
Lights up
Removing the grille frame
Remove or attach the grille frame in
parallel with the front panel.
HDMI OUT* (ARC) jack
TV (DIGITAL IN) jack
HDMI IN 1*/2 jacks
ANALOG IN jack
LAN (100) terminal
HDMI IN 3 jack
AC power cord (mains lead)
* HDMI IN 1 and HDMI OUT jacks support
HDCP 2.2 protocol. HDCP 2.2 is newly
enhanced copyright protection
technology that is used to protect
content such as 4K movies.
49
US
Page 50

Subwoofer
On/standby indicator
Lights off: Power is off.
Red: Not connected to Bar
Speaker (standby mode).
Green: Connected to Bar Speaker
(SECURE LINK connection is not
established).
Orange: SECURE LINK connection
is established.
(on/standby)
SECURE LINK (page 36)
AC power cord (mains lead)
US
50
About the standby mode
The subwoofer enters standby mode
automatically and the on/standby
indicator turns red when the Bar
Speaker is in standby mode or wireless
transmission is deactivated. The
subwoofer turns on automatically when
the Bar Speaker is turned on and
wireless transmission is activated.
Page 51

Additional Information
Remote control
AUDIO, , and + buttons have a
tactile dot. Use the tactile dot as a
reference when operating the remote
control.
(on/standby)
Turns on the system or sets it to
standby mode.
INPUT +/– (page 9)
Selects the device you want to use.
Sound effect buttons
See “Enjoying sound effects”
(page 10).
CLEARAUDIO+, SOUND FIELD,
VOICE, NIGHT
DISPLAY
Displays playback information on
the TV screen.
DIMMER (page 35)
Adjusts the brightness of the front
panel display and blue LED
indicator.
Color buttons
Shortcut keys for selecting items on
some menus.
MIRRORING (page 20)
Selects the [Screen mirroring] input.
PAIRING (page 12)
Sets the system to pairing mode.
This button only works when
[Bluetooth Mode] is set to [Receiver]
(page 25).
BACK
Returns to the previous display.
OPTIONS (pages 13, 15, 29, 30)
Displays the Options menu on the
TV screen or in the front panel
display. (The location differs
depending on the selected
function.)
HOME (pages 9, 11, 16, 19, 22)
Enters or exits the system’s home
screen.
///
Moves the highlight to a displayed
item.
(enter)
Enters the selected item.
(subwoofer volume) +/–
SW
Adjust the volume of the bass
sound.
(muting)
Turns off the sound temporarily.
(volume) +/–
Adjusts the volume.
Playback operation buttons
See “Listening/Viewing” (page 9).
/ (rewind/fast forward)
Searches backward or forward.
51
US
Page 52

/ (previous/next)
Selects the previous/next track or
file.
(play)
Starts or re-starts playback (resume
play).
(pause)
Pauses or re-starts playback.
(stop)
Stops playback.
AUDIO (page 34)
Selects the audio format.
RX/TX
Switches the [Bluetooth Mode] to
[Receiver] or [Transmitter]
(page 25).
Playable types of files
Music
Codec Extension
MP3 (MPEG-1 Audio
*4
Layer III)
AAC/HE-AAC
WMA9 Standard
WMA 10 Pro
LPCM
FLAC
Dolby Digital
DSF
DSDIFF
AIFF
ALAC
Vorbis
Monkey’s Audio
*1*4
*2
*4
*1
*2*4
*1
*1*5
*1
*1
*2
*2
*1
.mp3
.m4a, .aac
.wma
.wma
.wav
.flac, .fla
.ac3
.dsf
.dff
.aiff, .aif
.m4a
.ogg
.ape
*2
Photo
Format Extension
JPEG .jpeg, .jpg, .jpe
PNG .png
GIF .gif
*1
The system may not play this file format
on a Home Network server.
*2
The system does not play this file
format on a Home Network server.
*3
The system does not play animated
PNG or animated GIF files.
*4
The system can play “.mka” files. This
file cannot be played on a Home
Network server.
*5
The system does not play DST encoded
files.
Note
Some files may not play depending on
the file format, the file encoding, the
recording condition, or Home Network
server condition.
Some files edited on a PC may not play.
Some files may not be able to perform
fast forward or fast reverse function.
The system does not play 3D photo files.
The system does not play coded files such
as DRM and Lossless.
The system can recognize the following
files or folders in USB devices:
up to folders in the 9th layer (including
the root folder)
up to 500 files/folders in a single layer
The system can recognize the following
files or folders stored in the Home
Network server:
up to folders in the 19th layer
up to 999 files/folders in a single layer
Some USB devices may not work with this
system.
The system can recognize Mass Storage
Class (MSC) devices (such as flash
memory or an HDD), Still Image Capture
Devices (SICDs), and 101-key keyboards.
*3
*3
52
US
Page 53

Additional Information
Supported audio formats
Audio formats supported by this system
are as follows.
Format
LPCM 2ch
LPCM 5.1ch
LPCM 7.1ch
Dolby Digital
Dolby TrueHD,
Dolby Digital Plus
DTS
DTS-ES Discrete 6.1,
DTS-ES Matrix 6.1
DTS96/24
DTS-HD High
Resolution Audio
DTS-HD Master
Audio
DTS-HD Low Bit
Rate
DSD
: Supported format.
: Unsupported format.
* Decoded as DTS core.
[HDMI1]
[HDMI2]
[HDMI3]
* *
* *
Input
[TV]
(DIGITAL IN)
Specifications
Bar Speaker (SA-NT3)
Amplifier section
USA models only:
POWER OUTPUT AND TOTAL HARMONIC
DISTORTION:
(FTC)
Front L + Front R:
With 4 ohms loads, both channels
driven, from 300 Hz – 20,000 Hz; rated
50 watts per channel minimum RMS
power, with no more than 1% total
harmonic distortion from
250 milliwatts to rated output.
POWER OUTPUT (reference)
Front L/Front R:
133 W (per channel at 4 ohms, 1 kHz)
Other models:
POWER OUTPUT (rated)
Front L + Front R:
60 W + 60 W (at 4 ohms, 1 kHz, 1% THD)
POWER OUTPUT (reference)
Front L/Front R:
133 W (per channel at 4 ohms, 1 kHz)
Inputs
HDMI IN 1*/2/3
TV (DIGITAL IN)
ANALOG IN
Output
HDMI OUT* (ARC)
* HDMI IN 1 and HDMI OUT jacks support
HDCP 2.2 protocol. HDCP 2.2 is newly
enhanced copyright protection
technology that is used to protect
content such as 4K movies.
HDMI section
Connector
Type A (19pin)
USB section
(USB) port:
Type A (For connecting USB memory,
memory card reader, and digital still
camera)
53
US
Page 54

LAN section
LAN (100) terminal
100BASE-TX Terminal
Wireless LAN section
Standards Compliance
IEEE 802.11 a/b/g/n
Frequency band
2.4 GHz, 5 GHz
BLUETOOTH section
Communication system
BLUETOOTH Specification version 3.0
Output
BLUETOOTH Specification Power
Class 1
Maximum communication range
Line of sight approx. 30 m (98.4 ft)
Frequency band
2.4 GHz
Modulation method
FHSS (Freq Hopping Spread Spectrum)
Compatible BLUETOOTH profiles
A2DP 1.2 (Advanced Audio Distribution
Profile)
AVRCP 1.5 (Audio Video Remote
Control Profile)
Supported Codecs
SBC4), AAC, LDAC
Transmission range (A2DP)
20 Hz – 20,000 Hz (Sampling
frequency 44.1 kHz, 48 kHz, 88.2 kHz,
96 kHz)
1)
The actual range will vary depending on
factors such as obstacles between
devices, magnetic fields around a
microwave oven, static electricity,
cordless phone, reception sensitivity,
antenna’s performance, operating
system, software application, etc.
2)
BLUETOOTH standard profiles indicate
the purpose of BLUETOOTH
communication between devices.
3)
Codec: Audio signal compression and
conversion format
4)
Subband Codec
3)
2)
Front L/Front R speaker section
Speaker system
2-way speaker system, Acoustic
suspension
Speaker
Woofer: 65 mm (2 5/8 in) cone type,
magnetic fluid speaker ×2
Tweeter: 18 mm (23/32 in) dome type
×2
General
Power requirements
120 V AC, 60 Hz
Power consumption
On: 55 W
Standby:
0.3 W (For details on the setting,
see page 35.)
Dimensions (w/h/d) (approx.)
1,070 mm × 86 mm × 65 mm
1)
(42 1/4 in × 3 1/2 in × 2 5/8 in) incl.
projecting parts
Mass (approx.)
3.1 kg (6 lb 14 oz)
Subwoofer (SA-WNT3)
POWER OUTPUT (reference)
134 W (per channel at 4 ohms, 80 Hz)
Speaker system
Subwoofer system
Bass reflex
Speaker
160 mm (6 3/8 in) cone type
Power requirements
120 V AC, 60 Hz
Power consumption
On: 20 W
Standby: 0.5 W or less
Dimensions (w/h/d) (approx.)
190 mm × 382 mm × 385 mm
(7 1/2 in × 15 1/8 in × 15 1/4 in)
Mass (approx.)
8 kg (17 lb 11 oz)
Wireless transmitter/
receiver section
Communication system
Wireless Sound Specification version
3.0
Frequency band
5.2 GHz, 5.8 GHz
Modulation method
DSSS
54
US
Page 55

Additional Information
Video formats supported by the system
Input/Output (HDMI Repeater block)
Format 2D
4096 × 2160p @ 59.94/60 Hz
4096 × 2160p @ 50 Hz
4096 × 2160p @ 23.98/24 Hz
3840 × 2160p @ 59.94/60 Hz
3840 × 2160p @ 50 Hz
3840 × 2160p @ 29.97/30 Hz
3840 × 2160p @ 25 Hz
3840 × 2160p @ 23.98/24 Hz
1920 × 1080p @ 59.94/60 Hz
1920 × 1080p @ 50 Hz
1920 × 1080p @ 29.97/30 Hz
1920 × 1080p @ 25 Hz
1920 × 1080p @ 23.98/24 Hz
1920 × 1080i @ 59.94/60 Hz
1920 × 1080i @ 50 Hz
1280 × 720p @ 59.94/60 Hz
1280 × 720p @ 50 Hz
1280 × 720p @ 29.97/30 Hz
1280 × 720p @ 23.98/24 Hz
720 × 480p @ 59.94/60 Hz
720 × 576p @ 50 Hz
640 × 480p @ 59.94/60 Hz
*1
YCbCr 4:2:0/Supported 8-bit only
*2
Supported 8-bit only
Design and specifications are subject to
change without notice.
*1
*1
*2
*1
*1
*2
*2
*2
3D
Frame
packing
Side-by-Side
(Half)
Over-Under
(Top-and-
Bottom)
55
US
Page 56

On BLUETOOTH
communication
Supported BLUETOOTH version
and profiles
Profile refers to a standard set of
functions for various BLUETOOTH
product features. See “BLUETOOTH
section” in “Specifications ” (page 54 ) for
the BLUETOOTH version and profiles
supported by this system.
Effective communication range
BLUETOOTH devices should be used
within approximately 10 meters (33 feet)
(unobstructed distance) of each other.
The effective communication range may
become shorter under the following
conditions.
When a person, metal object, wall or
other obstruction is between the
devices with a BLUETOOTH connection
Locations where a wireless LAN is
installed
Around microwave ovens that are in
use
Locations where other
electromagnetic waves are generated
Effects of other devices
BLUETOOTH devices and wireless LAN
(IEEE 802.11b/g/n) device use the same
frequency band (2.4 GHz). When using
your BLUETOOTH device near a device
with wireless LAN capability,
electromagnetic interference may
occur. This could result in lower data
transfer rates, noise, or inability to
connect. If this happens, try the
following remedies:
Use this system at least 10 meters
(33 feet) away from the wireless LAN
device.
Turn off the power to the wireless LAN
device when using your BLUETOOTH
device within 10 meters (33 feet).
Install this system and BLUETOOTH
device as closer to each other as
possible.
Effects on other devices
The radio waves broadcast by this
system may interfere with the operation
of some medical devices. Since this
interference may result in malfunction,
always turn off the power on this system
and BLUETOOTH device in the following
locations:
In hospitals, on trains, in airplanes, at
gas stations, and any place where
flammable gasses may be present
Near automatic doors or fire alarms
Note
This system supports security functions
that comply with the BLUETOOTH
specification to ensure secure connection
during communication using BLUETOOTH
technology. However, this security may
be insufficient depending on the setting
contents and other factors, so always be
careful when performing communication
using BLUETOOTH technology.
Sony shall not be held liable in any way for
damages or other loss resulting from
information leaks during communication
using BLUETOOTH technology.
BLUETOOTH communication is not
necessarily guaranteed with all
BLUETOOTH devices that have the same
profile as this system.
BLUETOOTH devices connected with this
system must comply with the
BLUETOOTH specification prescribed by
the Bluetooth SIG, Inc., and must be
certified to comply. However, even when
a device complies with the BLUETOOTH
specification, there may be cases where
the characteristics or specifications of the
BLUETOOTH device make it impossible to
connect, or may result in different control
methods, display or operation.
Noise may occur or the audio may cut off
depending on the BLUETOOTH device
connected with this system, the
communications environment, or
surrounding conditions.
56
US
Page 57

Additional Information
Index
Numerics
24p Output 23
4K Output 23
A
A/V SYNC 30
Attenuation settings - Analog 24
Audio DRC 24
Audio Output 24
Audio Return Channel 26
Audio Settings 24
Auto Display 27
Auto Renderer Access Permission 28
Auto Standby 27
Auto Update 27
Auto Update Settings 27
B
BLUETOOTH 12
Bluetooth Codec - AAC 25
Bluetooth Codec - LDAC 25
Bluetooth Mode 25
Bluetooth Settings 25
Bluetooth Standby 25
BRAVIA Sync 32
C
Child Lock 34
Clear Voice 11
Connection Server Settings 28
Control for HDMI 26, 32
D
Device List 25
Device Name 27
Dimmer 35
DSEE HX 11, 24
E
Easy Network Settings 29
Easy Setup 29
External Control 28
F
Front panel 48
H
HDMI
YCbCr/RGB (HDMI) 23
HDMI Deep Color Output 23
Home Network 18, 28
I
Initialize Personal Information 29
Input Skip Setting 28
Internet Settings 28
IR-Repeater 26, 35
M
Multiplex broadcast sound 34
N
Network Connection Diagnostics 28
Network Settings 28
NFC 13, 20
Night mode 11
O
OSD Language 26
Output Video Resolution 23
Q
Quick Start/Network Standby 27
57
US
Page 58

R
Rear panel 49
Remote control 51
Remote Start 28
Renderer Access Control 28
Reset to Factory Default Settings 29
Resetting 29
RF Band 37
S
SBM 24
Screen mirroring 19
Screen mirroring RF Setting 28
Screen Settings 23
Secure Link 36
Slideshow 30
Software License Information 27
Software Update 22
SongPal 31
Standby Through 26
System Information 27
System Settings 26
T
Time Zone 27
TV Type 23
U
USB 9
V
Video Direct 24
W
Wireless Playback Quality 26
Wireless Sound Connection 26, 36
US
58
Page 59

Additional Information
END USER LICENSE AGREEMENT
IMPORTANT:
BEFORE USING THE SOFTWARE, PLEASE READ THIS END USER LICENSE AGREEMENT
(“EULA”) CAREFULLY. BY USING THE SOFTWARE YOU ARE ACCEPTING THE TERMS OF THIS
EULA. IF YOU DO NOT ACCEPT THE TERMS OF THIS EULA, YOU MAY NOT USE THE
SOFTWARE.
This EULA is a legal agreement between you and Sony Corporation (“SONY”). This EULA
governs your rights and obligations regarding the SONY software of SONY and/or its third
party licensors (including SONY’s affiliates) and their respective affiliates (collectively, the
“THIRD-PARTY SUPPLIERS”), together with any updates/upgrades provided by SONY, any
printed, on-line or other electronic documentation for such software, and any data files
created by operation of such software (collectively, the “SOFTWARE”).
Notwithstanding the foregoing, any software in the SOFTWARE having a separate end
user license agreement (including, but not limited to, GNU General Public license and
Lesser/Library General Public License) shall be covered by such applicable separate end
user license agreement in lieu of the terms of this EULA to the extent required by such
separate end user license agreement (“EXCLUDED SOFTWARE”).
SOFTWARE LICENSE
The SOFTWARE is licensed, not sold. The SOFTWARE is protected by copyright and other
intellectual property laws and international treaties.
COPYRIGHT
All right and title in and to the SOFTWARE (including, but not limited to, any images,
photographs, animation, video, audio, music, text and “applets” incorporated into the
SOFTWARE) is owned by SONY or one or more of the THIRD-PARTY SUPPLIERS.
GRANT OF LICENSE
SONY grants you a limited license to use the SOFTWARE solely in connection with your
compatible device (“DEVICE”) and only for your individual, non-commercial use. SONY and
the THIRD-PARTY SUPPLIERS expressly reserve all rights, title and interest (including, but
not limited to, all intellectual property rights) in and to the SOFTWARE that this EULA does
not specifically grant to you.
REQUIREMENTS AND LIMITATIONS
You may not copy, publish, adapt, redistribute, attempt to derive source code, modify,
reverse engineer, decompile, or disassemble any of the SOFTWARE, whether in whole or
in part, or create any derivative works from or of the SOFTWARE unless such derivative
works are intentionally facilitated by the SOFTWARE. You may not modify or tamper with
any digital rights management functionality of the SOFTWARE. You may not bypass,
modify, defeat or circumvent any of the functions or protections of the SOFTWARE or any
mechanisms operatively linked to the SOFTWARE. You may not separate any individual
component of the SOFTWARE for use on more than one DEVICE unless expressly
authorized to do so by SONY. You may not remove, alter, cover or deface any trademarks
or notices on the SOFTWARE. You may not share, distribute, rent, lease, sublicense,
assign, transfer or sell the SOFTWARE. The software, network services or other products
other than SOFTWARE upon which the SOFTWARE’S performance depends might be
interrupted or discontinued at the discretion of the suppliers (software suppliers, service
suppliers, or SONY). SONY and such suppliers do not warrant that the SOFTWARE, network
services, contents or other products will continue to be available, or will operate without
interruption or modification.
59
US
Page 60

USE OF SOFTWARE WITH COPYRIGHTED MATERIALS
The SOFTWARE may be capable of being used by you to view, store, process and/or use
content created by you and/or third parties. Such content may be protected by copyright,
other intellectual property laws, and/or agreements. You agree to use the SOFTWARE
only in compliance with all such laws and agreements that apply to such content. You
acknowledge and agree that SONY may take appropriate measures to protect the
copyright of content stored, processed or used by the SOFTWARE. Such measures include,
but are not limited to, counting the frequency of your backup and restoration through
certain SOFTWARE features, refusal to accept your request to enable restoration of data,
and termination of this EULA in the event of your illegitimate use of the SOFTWARE.
CONTENT SERVICE
PLEASE ALSO NOTE THAT THE SOFTWARE MAY BE DESIGNED TO BE USED WITH CONTENT
AVAILABLE THROUGH ONE OR MORE CONTENT SERVICES (“CONTENT SERVICE”). USE OF
THE SERVICE AND THAT CONTENT IS SUBJECT TO THE TERMS OF SERVICE OF THAT
CONTENT SERVICE. IF YOU DECLINE TO ACCEPT THOSE TERMS, YOUR USE OF THE
SOFTWARE WILL BE LIMITED. You acknowledge and agree that certain content and
services available through the SOFTWARE may be provided by third parties over which
SONY has no control. USE OF THE CONTENT SERVICE REQUIRES AN INTERNET
CONNECTION. THE CONTENT SERVICE MAY BE DISCONTINUED AT ANY TIME.
INTERNET CONNECTIVITY AND THIRD PARTY SERVICES
You acknowledge and agree that access to certain SOFTWARE features may require an
Internet connection for which you are solely responsible. Further, you are solely
responsible for payment of any third party fees associated with your Internet connection,
including but not limited to Internet service provider or airtime charges. Operation of the
SOFTWARE may be limited or restricted depending on the capabilities, bandwidth or
technical limitations of your Internet connection and service. The provision, quality and
security of such Internet connectivity are the sole responsibility of the third party
providing such service.
EXPORT AND OTHER REGULATIONS
You agree to comply with all applicable export and re-export restrictions and regulations
of the area or country in which you reside, and not to transfer, or authorize the transfer, of
the SOFTWARE to a prohibited country or otherwise in violation of any such restrictions or
regulations.
HIGH RISK ACTIVITIES
The SOFTWARE is not fault-tolerant and is not designed, manufactured or intended for
use or resale as on-line control equipment in hazardous environments requiring fail-safe
performance, such as in the operation of nuclear facilities, aircraft navigation or
communication systems, air traffic control, direct life support machines, or weapons
systems, in which the failure of the SOFTWARE could lead to death, personal injury, or
severe physical or environmental damage (“HIGH RISK ACTIVITIES”). SONY, each of the
THIRD-PARTY SUPPLIERS, and each of their respective affiliates specifically disclaim any
express or implied warranty, duty or condition of fitness for HIGH RISK ACTIVITIES.
EXCLUSION OF WARRANTY ON SOFTWARE
You acknowledge and agree that use of the SOFTWARE is at your sole risk and that you
are responsible for use of the SOFTWARE. The SOFTWARE is provided “AS IS,” without
warranty, duty or condition of any kind.
60
US
Page 61

Additional Information
SONY AND EACH OF THE THIRD-PARTY SUPPLIERS (for purposes of this Section, SONY and
each of the THIRD-PARTY SUPPLIERS shall be collectively referred to as “SONY”)
EXPRESSLY DISCLAIM ALL WARRANTIES, DUTIES OR CONDITIONS, EXPRESS OR IMPLIED,
INCLUDING, BUT NOT LIMITED TO, THE IMPLIED WARRANTIES OF MERCHANTABILITY,
NONINFRINGEMENT AND FITNESS FOR A PARTICULAR PURPOSE. SONY DOES NOT
WARRANT OR MAKE ANY CONDITIONS OR REPRESENTATIONS (A) THAT THE FUNCTIONS
CONTAINED IN ANY OF THE SOFTWARE WILL MEET YOUR REQUIREMENTS OR THAT THEY
WILL BE UPDATED, (B) THAT THE OPERATION OF ANY OF THE SOFTWARE WILL BE CORRECT
OR ERROR-FREE OR THAT ANY DEFECTS WILL BE CORRECTED, (C) THAT THE SOFTWARE
WILL NOT DAMAGE ANY OTHER SOFTWARE, HARDWARE OR DATA, (D) THAT ANY
SOFTWARE, NETWORK SERVICES (INCLUDING THE INTERNET) OR PRODUCTS (OTHER THAN
THE SOFTWARE) UPON WHICH THE SOFTWARE’S PERFORMANCE DEPENDS WILL CONTINUE
TO BE AVAILABLE, UNINTERRUPTED OR UNMODIFIED, AND (E) REGARDING THE USE OR
THE RESULTS OF THE USE OF THE SOFTWARE IN TERMS OF ITS CORRECTNESS, ACCURACY,
RELIABILITY, OR OTHERWISE.
NO ORAL OR WRITTEN INFORMATION OR ADVICE GIVEN BY SONY OR AN AUTHORIZED
REPRESENTATIVE OF SONY SHALL CREATE A WARRANTY, DUTY OR CONDITION OR IN ANY
WAY INCREASE THE SCOPE OF THIS WARRANTY. SHOULD THE SOFTWARE PROVE
DEFECTIVE YOU ASSUME THE ENTIRE COST OF ALL NECESSARY SERVICING, REPAIR OR
CORRECTION. SOME JURISDICTIONS DO NOT ALLOW THE EXCLUSION OF IMPLIED
WARRANTIES, SO THESE EXCLUSIONS MAY NOT APPLY TO YOU.
LIMITATION OF LIABILITY
SONY AND EACH OF THE THIRD-PARTY SUPPLIERS (for purposes of this Section, SONY and
each of the THIRD-PARTY SUPPLIERS shall be collectively referred to as “SONY”) SHALL
NOT BE LIABLE FOR ANY INCIDENTAL OR CONSEQUENTIAL DAMAGES FOR BREACH OF ANY
EXPRESS OR IMPLIED WARRANTY, BREACH OF CONTRACT, NEGLIGENCE, STRICT LIABILITY
OR UNDER ANY OTHER LEGAL THEORY RELATED TO THE SOFTWARE, INCLUDING, BUT NOT
LIMITED TO, ANY DAMAGES ARISING OUT OF LOSS OF PROFITS, LOSS OF REVENUE, LOSS
OF DATA, LOSS OF USE OF THE SOFTWARE OR ANY ASSOCIATED HARDWARE, DOWN TIME
AND USER’S TIME, EVEN IF ANY OF THEM HAVE BEEN ADVISED OF THE POSSIBILITY OF
SUCH DAMAGES. IN ANY CASE, EACH AND ALL OF THEIR AGGREGATE LIABILITY UNDER
ANY PROVISION OF THIS EULA SHALL BE LIMITED TO THE AMOUNT ACTUALLY PAID FOR
THE PRODUCT. SOME JURISDICTIONS DO NOT ALLOW THE EXCLUSION OR LIMITATION OF
INCIDENTAL OR CONSEQUENTIAL DAMAGES, SO THE ABOVE EXCLUSION OR LIMITATION
MAY NOT APPLY TO YOU.
AUTOMATIC UPDATE FEATURE
From time to time, SONY or the THIRD-PARTY SUPPLIERS may automatically update or
otherwise modify the SOFTWARE, including, but not limited to, for purposes of
enhancement of security functions, error correction and improvement of functions, at
such time as you interact with SONY’s or third parties’ servers, or otherwise. Such updates
or modifications may delete or change the nature of features or other aspects of the
SOFTWARE, including, but not limited to, functions you may rely upon. You acknowledge
and agree that such activities may occur at SONY’s sole discretion and that SONY may
condition continued use of the SOFTWARE upon your complete installation or acceptance
of such update or modifications. Any updates/modifications shall be deemed to be, and
shall constitute part of, the SOFTWARE for purposes of this EULA. By acceptance of this
EULA, you consent to such update/modification.
61
US
Page 62

ENTIRE AGREEMENT, WAIVER, SEVERABILITY
This EULA and SONY’s privacy policy, each as amended and modified from time to time,
together constitute the entire agreement between you and SONY with respect to the
SOFTWARE. The failure of SONY to exercise or enforce any right or provision of this EULA
shall not constitute a waiver of such right or provision. If any part of this EULA is held
invalid, illegal, or unenforceable, that provision shall be enforced to the maximum extent
permissible so as to maintain the intent of this EULA, and the other parts will remain in full
force and effect.
GOVERNING LAW AND JURISDICTION
The United Nations Convention on Contracts for the International Sale of Goods shall not
apply to this EULA. This EULA shall be governed by the laws of Japan, without regards to
conflict of laws provisions. Any dispute arising out of this EULA shall be subject to the
exclusive venue of the Tokyo District Court in Japan, and the parties hereby consent to the
venue and jurisdiction of such courts.
EQUITABLE REMEDIES
Notwithstanding anything contained in this EULA to the contrary, you acknowledge and
agree that any violation of or non-compliance with this EULA by you will cause irreparable
harm to SONY, for which monetary damages would be inadequate, and you consent to
SONY obtaining any injunctive or equitable relief that SONY deems necessary or
appropriate in such circumstances. SONY may also take any legal and technical remedies
to prevent violation of and/or to enforce this EULA, including, but not limited to,
immediate termination of your use of the SOFTWARE, if SONY believes in its sole
discretion that you are violating or intend to violate this EULA. These remedies are in
addition to any other remedies SONY may have at law, in equity or under contract.
TERMINATION
Without prejudice to any of its other rights, SONY may terminate this EULA if you fail to
comply with any of its terms. In case of such termination, you must cease all use, and
destroy any copies, of the SOFTWARE.
AMENDMENT
SONY RESERVES THE RIGHT TO AMEND ANY OF THE TERMS OF THIS EULA AT ITS SOLE
DISCRETION BY POSTING NOTICE ON A SONY DESIGNATED WEB SITE, BY EMAIL
NOTIFICATION TO AN EMAIL ADDRESS PROVIDED BY YOU, BY PROVIDING NOTICE AS PART
OF THE PROCESS IN WHICH YOU OBTAIN UPGRADES/UPDATES OR BY ANY OTHER
LEGALLY RECOGNIZABLE FORM OF NOTICE. If you do not agree to the amendment, you
should promptly contact SONY for instructions. Your continued use of the SOFTWARE after
the effective date of any such notice shall be deemed your agreement to be bound by
such amendment.
THIRD-PARTY BENEFICIARIES
Each THIRD-PARTY SUPPLIER is an express intended third-party beneficiary of, and shall
have the right to enforce, each provision of this EULA with respect to the SOFTWARE of
such party.
Should you have any questions concerning this EULA, you may contact SONY by writing to
SONY at applicable contact address of each area or country.
Copyright © 2014 Sony Corporation.
62
US
Page 63

Page 64

AVERTISSEMENT
Pour réduire le risque d’incendie ou
d’électrocution, n’exposez pas cet
appareil à la pluie ou à l’humidité.
N’installez pas l’appareil dans un
espace confiné, comme dans une
bibliothèque ou un meuble encastré.
Pour réduire le risque d’incendie,
n’obstruez pas l’orifice de ventilation de
l’appareil avec un journal, une nappe,
une tenture, etc.
N’exposez pas l’appareil à une source
de flamme nue (notamment une bougie
allumée).
Pour réduire le risque d’incendie ou
d’électrocution, n’exposez pas cet
appareil à un écoulement d’eau ou à
des éclaboussures, et ne placez pas
d’objets remplis de liquides,
notamment des vases, sur l’appareil.
N’exposez pas les piles ou un appareil
contenant des piles à une chaleur
excessive, notamment aux rayons du
soleil ou au feu.
Pour éviter de vous blesser, cet appareil
doit être convenablement placé sur le
boîtier ou fixé au sol/mur selon les
instructions d’installation.
Pour utilisation en intérieur
uniquement.
Sources d’alimentation
L’unité n’est pas déconnectée du
secteur tant qu’elle reste branchée à la
prise de courant, même si l’unité
proprement dite a été mise hors
tension.
Comme la prise secteur sert à
déconnecter l’unité du secteur,
connectez l’unité à une prise de
courant facilement accessible. Si vous
constatez une anomalie sur l’unité,
débranchez immédiatement la prise
secteur de la prise de courant.
FR
2
Pour les clients aux États-Unis
Enregistrement du propriétaire
Les numéros de modèle et de série sont
situés derrière la barre de haut-parleurs,
à l’extérieur. Reportez ces numéros
dans l’espace fourni ci-dessous.
Reportez-vous à ces numéros lorsque
vous appelez votre fournisseur Sony
pour ce produit.
N° de modèle _________________________
N° de série ____________________________
Ce symbole avertit l’utilisateur
de la présence d’une « tension
dangereuse » non isolée dans le
boîtier du produit qui peut être
suffisamment importante pour
constituer un risque d’électrocution des
personnes.
Ce symbole avertit l’utilisateur
de la présence d’instructions
d’utilisation et de maintenance
(entretien) importants dans les
documents fournis avec l’appareil.
Des câbles et connec teurs correctement
isolés et mis à la terre doivent être
utilisés pour la connexion d’ordinateurs
hôtes et/ou de périphérique, en
conformité avec les limites d’émission
FCC.
REMARQUE :
Cet équipement a été testé et déclaré
conforme aux limitations d’un appareil
numérique de Classe B, selon la
partie 15 de la Réglementation FCC. Ces
limitations sont conçues pour offrir une
protection raisonnable contre des
interférences nuisibles dans une
installation résidentielle. Cet
équipement génère, utilise et peut
émettre une énergie de fréquence radio
et, s’il n’est pas installé et utilisé
conformément aux instructions, il peut
causer des interférences nuisibles aux
communications radio. Cependant, il
n’y a aucune garantie que ces
interférences ne se produisent pas dans
une installation particulière. Si cet
Page 65

équipement cause des interférences
nuisibles avec la réception radio ou de
télévision, ce qui peut être constaté en
allumant et éteignant l’équipement,
l’utilisateur est encouragé à corriger ces
interférences en effectuant l’une ou
plusieurs des mesures suivantes :
– Réorientez ou replacez l’antenne de
réception.
– Augmentez la distance séparant
l’équipement du récepteur.
– Connectez l’équipement sur une prise
d’un circuit différent de celui où lequel
le récepteur est connecté.
– Consultez le fournisseur ou un
technicien qualifié radio/TV pour
obtenir de l’aide.
ATTENTION
Vous êtes informé que tout
changement ou modification non
expressément approuvé dans ce
manuel peut annuler votre droit
d’utilisation de cet équipement.
Cet équipement ne doit pas être situé à
proximité ou utilisé avec une autre
antenne ou un autre transmetteur.
Cet équipement est conforme aux
limites d’exposition aux radiations FCC
mises en places pour un environnement
non contrôlé et res pectent les Directives
d’exposition aux fréquences radio (RF)
de la FCC. Cet équipement émet une
énergie RF très faible qui est considérée
conforme sans évaluation de
l’exposition maximale permise (EMP).
Cependant, cet équipement doit être
installé et utilisé en gardant une
distance de 20 cm ou plus entre le
dispositif rayonnant et le corps (à
l’exception des extrémités : mains,
poignets, pieds et chevilles).
Conforme aux prescriptions FCC
15.407(c)
La transmission de données est toujours
initiée par un logiciel, qui est passé par
MAC, à travers la bande de base
numérique et analogique et finalement
à la puce RF. Plusieurs paquets spéciaux
sont initiés par le MAC. Ce sont les
seules manières à travers lesquelles la
portion de la bande numérique de base
mettra en marche le transmetteur RF,
qui sera postérieurement éteint à la fin
du paquet. Par conséquent, le
transmetteur ne sera en marche que
lorsqu’un des paquets cités ci-dessus
est en cours de transmission. En
d’autres mots, le dispositif interrompt
automatiquement la transmission en
cas de manque d’information à
transmettre ou en cas de défaillance de
fonctionnement.
Tolérance de fréquence : ±20 ppm
Instructions de sécurité
importantes
1) Veuillez lire ces instructions.
2) Conservez ces instructions.
3) Tenez compte de tous les
avertissements.
4) Suivez toutes les instructions.
5) N’utilisez pas cet appareil près de
l’eau.
6) Nettoyez l’appareil uniquement avec
un chiffon sec.
7) Ne bloquez pas les orifices de
ventilation. Installez l’appareil en
respectant les instructions du
fabricant.
8) N’installez pas l’appareil près de
sources de chaleur, notamment un
radiateur, un appareil de chauffage,
un réchaud ou autre appareil (y
compris amplificateurs) produisant
de la chaleur.
9) N’empêchez pas les fins de sécurité
de la prise polarisée ou avec mise à
la terre. Une prise polarisée dispose
de deux fiches, l’une plus grande
que l’autre. Une prise avec mise à la
terre dispose de deux fiches et une
troisièm broche de mise à la terre. La
fiche longue ou la troisième broche
de mise à la terre sont présentes
pour votre sécurité. Si la prise fournie
de rentre pas dans votre prise de
courant, consultez un technicien
pour qu’il remplace la prise de
courant obsolète.
3
FR
Page 66

10) Protégez le cordon d’alimentation
pour ne pas marcher dessus ni le
pincer, en particulier au niveau de la
prise, des multi-prises et au point de
sortie de l’appareil.
11) N’utilisez que les pièces/accessoires
spécifiés par le fabricant.
12) N’utilisez l’appareil qu’avec la
charrette, le stand, le trépied, le
socle ou la table spécifiés par le
fabricant, ou vendus avec l’appareil.
Lors de l’utilisation d’une charrette,
faites attention lors du déplacement
de l’ensemble charrette/appareil
pour éviter toute blessure par
renversement.
13) Débranchez l’appareil pendant les
orages ou lorsqu’il est inutilisé
pendant une longue période.
14) Consulter des techniciens
d’entretien qualifiés pour tout
entretien de l’appareil. L’entretien
est nécessaire lorsque l’appareil a
été endommagé, notamment si le
cordon d’alimentation ou la prise est
endommagée, si du liquide s’est
renversé ou si des objets sont
tombés sur l’appareil, s’il a été
exposé à la pluie ou à l’humidité, s’il
ne fonctionne pas normalement ou
s’il est tombé.
Pour les clients au Canada
Des câbles et connecteurs correctement
isolés et mis à la terre doivent être
utilisés pour la connexion d’ordinateurs
hôtes et/ou de périphérique.
La bande 5 150 MHz – 5 250 MHz est
restreints à une utilisation à l’interieur.
Les utilisateurs devraient aussi être
avisés que les radars de haute
puissance sont désignés comme
utilisateurs principaux (ils ont la priorité)
pour les bandes 5 250 MHz – 5 350 MHz
et 5 650 MHz – 5 850 MHz, et que ces
radars peuvent provoquer du brouillage
et/ou des dommages aux dispositifs
LAN-EL.
Le présent appareil est conforme aux
CNR d’Industrie Canada applicables aux
appareils radio exempts de licence.
L’exploitation est autorisée aux deux
conditions suivantes :
(1) l’appareil ne doit pas produire de
brouillage;
(2) l’utilisateur de l’appareil doit
accepter tout brouillage radioélectrique
subi, même si le brouillage est
susceptible d’en compromettre le
fonctionnement.
Cet équipement est conforme aux
limites d’exposition aux rayonnements
énoncées pour un environnement
noncontrôlé et respecte les règles
d’exposition aux fréquences
radioélectriques (RF) CNR-102 de l’IC.
Cet équipement émet une énergie RF
très faible qui est considérée conforme
sans évaluation de l’exposition
maximale autorisée. Cependant, cet
équipement doit être installé et utilisé
en gardant une distance de 20 cm ou
plus entre le dispositif rayonnant et le
corps (à l’exception des extrémités :
mains, poignets, pieds et chevilles).
Droits d’auteur et marques
commerciales
Ce système intègre Dolby* Digital et
DTS** Digital Surround System.
* Fabriqué sous licence de Dolby
Laboratories. Dolby et le symbole
double-D sont des marques
déposées de Dolby Laboratories.
** Pour les brevets DTS, voir
http://patents.dts.com. Fabriqué
sous licence de DTS Licensing
Limited. DTS, DTS-HD, le symbole,
ainsi que DTS et le symbole utilisés
ensemble sont des marques
déposées de DTS, Inc. © DTS, Inc.
Tous droits réservés.
FR
4
Page 67

Le système intègre la technologie
High-Definition Multimedia Interface
(HDMI™).
Les termes HDMI et HDMI HighDefinition Multimedia Interface et le
logo HDMI sont des marques
commerciales ou des marques
déposées de HDMI Licensing LLC aux
États-Unis et dans d’autres pays.
« BRAVIA » est une marque
commerciale de Sony Corporation.
« PlayStation » est une marque
déposée de Sony Computer
Entertainment Inc.
Wi-Fi®, Wi-Fi Protected Access®, Wi-Fi
Alliance® et Wi-Fi CERTIFIED Miracast®
sont des marques déposées de Wi-Fi
Alliance®.
Wi-Fi CERTIFIED™, WPA™, WPA2™,
Wi-Fi Protected Setup™ et Miracast™
sont des marques commerciales de
Wi-Fi Alliance®.
Le N Mark est une marque
commerciale ou une marque déposée
de NFC Forum, Inc. aux États-Unis et
dans d’autres pays.
Android™ est une marque de
commerce de Google Inc.
Google Play™ est une marque de
commerce de Google Inc.
Google Cast™ est une marque de
commerce de Google Inc.
Compatible avec Google Cast™ et
l’insigne Compatible avec Google Cast
sont des marques de commerce de
Google Inc.
« Xperia » est une marque
commerciale de Sony Mobile
Communications AB.
Le mot et les logos BLUETOOTH® sont
des marques déposées de Bluetooth
SIG, Inc. et toute utilisation de ces
marques par Sony Corporation est
sous licence. Les autres marques
commerciales et noms de marques
appartiennent à leurs propriétaires
respectifs.
LDAC™ et le logo LDAC sont des
marques commerciales de Sony
Corporation.
« DSEE HX » est une marque
commerciale de Sony Corporation.
Technologie de codage audio et
brevets MPEG Layer-3 sous licence
Fraunhofer IIS et Thomson.
Windows Media est une marque
déposée ou une marque commerciale
de Microsoft Corporation aux ÉtatsUnis et/ou dans d’autres pays.
Ce produit est protégé par des droits
de propriété inte llectuelle de Microsoft
Corporation. Il est interdit d’utiliser ou
de distribuer cette technologie hors de
ce produit sans disposer d’une licence
appropriée de Microsoft ou d’une
filiale de Microsoft autorisée.
Opera® Devices SDK d’Opera Software
ASA. Copyright 1995-2013 Opera
Software ASA. Tous droits réservés.
« ClearAudio+ » est une marque
commerciale de Sony Corporation.
« x.v.Color » et le logo de « x.v.Color »
sont des marques commerciales de
Sony Corporation.
Apple, le logo Apple, iPhone, iPod,
iPod touch et Retina sont des marques
commerciales de Apple Inc., déposées
aux États-Unis et dans d’autres pays.
App Store est une marque de service
d’Apple Inc.
« Made for iPod » et « Made for
iPhone » signifient qu’un accessoire
électronique a été conçu pour être
connecté spécifiquement à un iPod ou
un iPhone, et qu’ il a été certifié par le
développeur comme étant conforme
aux normes de performances Apple.
Apple n’est pas responsable du bon
fonctionnement de cet appareil ni de
sa conformité aux normes
réglementaires et de sécurité. Veuillez
noter que l’utilisation de cet acces soire
avec un iPod ou un iPhone peut
affecter les performances des
transmissions sans fil.
FR
5
Page 68

Modèles iPod/iPhone
compatibles
Les modèles iPod/iPhone compatibles
sont les suivants. Mettez à jour votre
iPod/iPhone avec le logiciel le plus
récent avant de l’utiliser avec le
système.
La technologie BL UETOOTH fonctionne
avec :
iPhone
iPhone 6 Plus/iPhone 6/iPhone 5s/
iPhone 5c/iPhone 5/iPhone 4s/
iPhone 4/iPhone 3GS
iPod touch
iPod touch (5ème génération)/iPod
touch (4ème génération)
Toutes les autres marques
commerciales sont la propriété de
leurs détenteurs respectifs.
Les autres noms de systèmes et de
produits sont généralement des
marques commerciales ou des
marques déposées des fabricants. Les
marques ™ et ne sont pas indiquées
dans ce document.
Remarque à propos du logiciel
appliqué GNU GPL/LGPL et
d’autres logiciels libres
Ce produit contient un logiciel qui est
assujetti à la Licence Publique Générale
GNU (« GPL ») ou à la Licence Publique
Générale Limitée GNU (« LGPL »). Elles
déterminent que les clients ont le droit
d’acquérir, de modifier et de
redistribuer le code source dudit logiciel
conformément aux conditions figurant
dans la GPL ou LGPL.
Pour obtenir plus de détails sur les
licences GPL, LGPL et d’autres licences
de logiciels, veuillez vous reporter à
[Information de licence logicielle] dans
[Réglages système] du menu [Config.]
sur le produit.
Le code source pour le logiciel utilisé
dans ce produit est assujetti aux
licences GPL et LGPL et il disponible sur
le Web. Pour le télécharger, veuillez
accéder à l’adresse suivante :
URL :
http://oss.sony.net/Products/Linux
Veuillez remarquer que Sony ne peut
répondre à des requêtes concernant le
contenu de ce code source.
À propos de ce mode
d’emploi
Les instructions contenues dans le
présent mode d’emploi décrivent les
commandes de la télécommande.
Vous pouvez également utiliser les
commandes de la barre de hautparleurs, si elles portent le même nom
ou un nom analogue à celles de la
télécommande.
Certaines illustrations sont des dessins
conceptuels qui peuvent être
différents des produits effectivement
commercialisés.
Les éléments affichés sur l’écran du
téléviseur peuvent varier suivant la
région.
Le réglage par défaut est souligné.
Le texte entre crochets ([--]) apparaît à
l’écran du téléviseur et le texte entre
guillemets (« -- ») apparaît sur
l’affichage de la façade.
FR
6
Page 69

Table des matières
Connexion Guide de démarrage (document séparé)
À propos de ce mode
d’emploi ............................... 6
Écoute/Visualisation
Pour utiliser la vidéo/le son des
appareils connectés ............ 9
Pour reproduire des fichiers de
musique/photos à partir
d’un périphérique USB ........ 9
Pour écouter de la musique à
partir d’un périphérique
BLUETOOTH ........................10
Pour reproduire des fichiers de
musique/photos via la
fonction du réseau .............10
Réglage du son
Pour utiliser des effets
sonores ...............................10
Pour utiliser la fonction DSEE
HX (pour reproduire des
fichiers codec audio avec
une qualité de son
naturelle) .............................11
Fonction BLUETOOTH
Pour écouter de la musique à
partir d’un périphérique
BLUETOOTH ........................12
Pour écouter un son en
transmettant à un
récepteur compatible avec
BLUETOOTH ........................15
Fonction du réseau
Pour se connecter à un réseau
câblé ................................... 17
Pour se connecter à un réseau
sans fil .................................18
Lecture de fichiers sur un
réseau domestique ............19
Utilisation de divers services
en ligne .............................. 20
Utilisation de fonction Mise en
miroir de l’écran .................21
Visualiser que des contenus
4K dont le copyright est
protégé
Connexion d’un téléviseur
4K ........................................22
Connexion d’appareils 4K ........23
Réglages et ajustements
Utilisation de l’écran de
configuration ..................... 24
Utilisation du menu Options ....32
FR
7
Page 70

Autres fonctions
Contrôler le système à l’aide
d’un smartphone ou d’une
tablette (SongPal) ..............33
Utilisation de Google Cast™ ....34
Utilisation de la fonction
Contrôle pour HDMI pour
« BRAVIA » Sync .................35
Reproduction d’un son diffusé
en multiplex (Dual
Mono) ................................. 37
Désactivation des touches de
la barre de haut-parleurs
(Verrouillage enfant) .......... 37
Réglage de la luminosité .........38
Économie d’énergie en mode
veille ...................................38
Activation de la fonction
répéteur IR (lorsque vous
ne pouvez pas commander
le téléviseur) .......................38
Autres réglages du système
sans fil ................................39
Modification de l’angle de la
barre de haut-parleurs .......40
Fixation de la barre de haut-
parleurs au mur .................. 41
Informations
complémentaires
Précautions ..............................42
Dépannage ...............................44
Index des composants et des
commandes .......................53
Types de fichiers
compatibles ........................57
Formats audio pris en
charge .................................58
Spécifications ...........................58
Connexion BLUETOOTH ........... 61
Index .........................................63
CONTRAT DE LICENCE
D’UTILISATEUR FINAL .........65
FR
8
Page 71

Écoute/Visualisation
Écoute/Visualisation
Pour utiliser la vidéo/le
son des appareils
connectés
Astuce
Vous pouvez également appuyer sur
PAIRING et MIRRORING sur la
télécommande pour sélectionner l’entrée
[Bluetooth Audio] et [Mise en miroir de
l’écran], respectivement.
Appuyez sur INPUT +/–.
Vous pouvez également appuyer sur
HOME et ensuite sur /// plusieurs
fois et pour sélectionner l’entrée de
votre choix.
[TV]
Appareil (téléviseur, etc.) connecté à la prise
TV (DIGITAL IN), ou t éléviseur compatible avec
la fonction Audio Return Channel connecté à
la prise HDMI OUT (ARC)
[HDMI1]/[HDMI2]/[HDMI3]
Appareil connecté à la prise HDMI IN 1/2/3
[Bluetooth Audio]
«BT»
Appareil BLUETOOTH prenant en charge le
format A2DP
[Analog]
«ANALOG»
Appareil (lecteurs de médias numérique s, etc.)
connecté à la prise ANALOG IN
[USB]
Périphérique USB connecté au port (USB)
[Mise en miroir de l’écran]
«SCR M»
Appareil compatible avec la Mise en miroir de
l’écran (page 21)
[Home Network]
«H.NET»
Contenus stockés sur un serveur (page 19)
[Music Services]
«M.SERV»
Contenus de services de musique offerts sur
Internet (page 20)
Pour reproduire des
fichiers de musique/
photos à partir d’un
périphérique USB
Vous pouvez lire des fichiers musique/
photo à partir d’un périphérique USB
connecté.
Pour connaître les différents types de
fichiers compatibles, reportez-vous à
la section « Types de fichiers
compatibles » (page 57).
1 Connectez le périphérique USB au
port (USB).
Reportez-vous au mode d’emploi
du périphérique USB avant de le
connecter.
2 Appuyez sur HOME.
L’écran d’accueil s’affiche à l’écran
du téléviseur.
3 Appuyez sur /// pour
sélectionner [USB], puis appuyez
sur .
FR
9
Page 72

4 Appuyez sur / pour
sélectionner [Musique] ou
[Photo], puis appuyez sur .
5 Appuyez sur / pour
sélectionner le contenu de votre
choix et appuyez ensuite sur .
Le contenu sélectionné commence
la lecture.
Remarque
N’ôtez pas le périphérique USB lors de son
utilisation. Pour éviter toute corruption ou
endommagement des données sur le
périphérique USB, éteignez le système
avant d’enlever un périphérique USB.
Pour écouter de la
musique à partir d’un
périphérique
BLUETOOTH
Consultez « Fonction BLUETOOTH »
(page 12).
Pour reproduire des
fichiers de musique/
photos via la fonction du
réseau
Consultez « Fonction du réseau »
(page 17).
Réglage du son
Pour utiliser des effets
sonores
Vous pouvez facilement utiliser des
effets sonores préalablement
programmés qui sont faits sur mesure
en fonction des différentes sources de
sons. Ils vous permettent de profiter
chez vous d’une aco ustique exaltante et
puissante.
Remarque
Vous ne pouvez pas sélectionner les effets
sonores lorsque le système est connecté à
un récepteur BLUETOOTH en mode
transmetteur.
Sélection du champ
acoustique
Appuyez plusieurs fois sur SOUND
FIELD pendant la lecture.
[ClearAudio+]
Vous pouvez apprécier le son avec le champ
sonore recommandé par Sony. Le champ
acoustique est automatiquement optimisé en
fonction du contenu lu et de la fonction.
[Movie]
Le système délivre un son optimisé pour le
visionnage de films.
[Music]
Le système délivre un son optimisé pour
écouter de la musique.
[Sports]
Ce système reproduit la sensation des
événements sportifs télévisés. Les
commentaires sont clairs, les acclamations
sont perçues comme un son d’ambiance et
les sons sont ressemblants.
[Game Studio]
Le système délivre un son optimisé adapté
aux jeux vidéo.
10
FR
Page 73

Réglage du son
[Standard]
Le système fournit le son qui correspond à
chaque source.
Astuce
Vous pouvez aussi appuyer sur
CLEARAUDIO+ pour sélectionner
[ClearAudio+].
Vous pouvez également sélectionner
[Sound Field] à partir du menu Options
(page 32).
Pour utiliser la fonction
Mode nocturne
Cette fonction est utile pour regarder
des films lorsqu’il est tard la nuit. Vous
pourrez écouter clairement les
dialogues même lorsque le volume est
faible.
Appuyez sur NIGHT.
La fonction Mode nocturne est activée.
Appuyez de nouveau pour annuler la
fonction.
Astuce
Vous pouvez également sélectionner
[Night] à partir du menu Options (page 32).
Pour utiliser la fonction Voix
claire
Cette fonction rend les dialogues plus
clairs.
Appuyez plusieurs fois sur VOICE.
[Voice : 1] : Standard
[Voice : 2] : La gamme des dialogues
est améliorée.
[Voice : 3] : La gamme des dialogues
est améliorée et les sections de la
gamme qui sont difficiles à discerner
par les personnes âgées sont
améliorées.
Astuce
Vous pouvez également sélectionner
[Type 1], [Type 2] ou [Type 3] dans [Voice]
dans le menu Options (page 32).
Pour utiliser la fonction
DSEE HX (pour reproduire
des fichiers codec audio
avec une qualité de son
naturelle)
Le DSEE HX convertit les sources audio
existantes en qualité audio proche de la
haute résolution, pour que vous ayez
l’impression d’être dans un studio
d’enregistrement ou à un concert.
Cette fonction n’est active que lorsque
[Music] est sélectionnée comme champ
acoustique.
1 Appuyez sur HOME.
L’écran d’accueil s’affiche à l’écran
du téléviseur.
2 Appuyez sur pour sélectionner
[Config.] sur le coin supérieur
droit, puis appuyez sur .
3 Appuyez sur / pour
sélectionner [Réglages audio],
puis appuyez sur .
4 Appuyez sur / pour
sélectionner [DSEE HX], puis
appuyez sur .
5 Appuyez sur / pour
sélectionner [Marche], puis
appuyez sur .
FR
11
Page 74

Remarque
Seule la fonction de restauration du son
de la foncti on DSEE HX sera appliquée aux
sources audio PCM avec compression
sans perte. La fonction DSEE HX ne
fonctionne pas pour les fichiers au format
DSD (DSDIFF, DSF). Le fichier est étendu à
un équivalent maximum de 96 kHz/
24 bits.
Cette fonctionnalité fonctionne avec des
signaux d’entrée numérique 2 canaux de
44,1 kHz ou 48 kHz.
Cette fonctionnalité ne fonctionne pas
lorsque l’entrée [Analog] est
sélectionnée.
Cette fonctionnalité ne fonctionne pas
lorsque [Mode Bluetooth] est réglé sur
[Émetteur] (page 27).
Fonction BLUETOOTH
Pour écouter de la
musique à partir d’un
périphérique
BLUETOOTH
Appairage de ce système
avec un appareil
BLUETOOTH
L’appairage est une opération où les
appareils BLUETOOTH s’enregistrent
entre-eux à l’avance. Une fois
l’opération d’appairage effectuée, elle
ne doit plus l’être.
Avant d’appairer l’appareil avec ce
système, assurez-vous de définir le
[Mode Bluetooth] sur [Récepteur]
(page 27).
1 Placez l’appareil BLUETOOTH à
1 mètre (3,3 pieds) de la barre de
haut-parleurs.
2 Appuyez sur PAIRING .
Le voyant DEL bleu clignote et
l’écran d’appairage BLUETOOTH
s’affiche à l’écran du téléviseur.
Astuce
Vous pouvez également sélectionner
[Bluetooth Audio] à partir de l’écran
d’accueil.
3 Réglez l’appareil BLUETOOTH en
mode d’appairage.
Pour obtenir plus de détails sur le
réglage de l’appareil BLUETOOTH
en mode d’appairage, reportezvous au mode d’emploi fourni avec
l’appareil.
12
FR
Page 75

Fonction BLUETOOTH
4 Sélectionnez « HT-NT3 » sur
l’écran de l’appareil.
Effectuez cette étape dans les
5 minutes, autrement le mode
d’appairage sera annulé.
Lorsque la connexion BLUETOOTH
est établie, le nom du dispositif
s’affiche à l’écran du téléviseur et le
voyant DEL bleu s’allume.
Remarque
Si une clé est requise pour l’appareil
BLUETOOTH, saisissez « 0000 ». La clé
peut être appelée « Clé », « Code
NIP », « Numéro NIP » ou « Mot de
passe ».
Astuce
Vous pouvez modifier le nom du
système qui apparaît sur votre
appareil à l’aide de [Nom d’appareil]
dans [Réglages système] (page 30).
5 Commencez la lecture sur
l’appareil BLUETOOTH.
6 Réglez le volume.
Réglez tout d’abord le volume de
l’appareil BLUETOOTH. Si le volume
est toujours trop faible, réglez le
volume de la barre de hautparleurs.
Remarque
Vous pouvez appairer jusqu’à 9 appareils
BLUETOOTH. Si un dixième appareil
BLUETOOTH est appairé, le dernier appareil
connecté sera alors remplacé par le
nouveau.
Pour annuler une opération
d’appairage
Appuyez sur HOME ou INPUT +/–.
Connexion à un appareil
BLUETOOTH à partir de ce
système
Vous pouvez vous connecter au
périphérique BLUETOOTH apparié à
partir de ce système.
Vérifiez les réglages suivants avant de
lire de la musique :
La fonction BLUETOOTH de l’appareil
BLUETOOTH est allumée.
L’appairage a été effectué (page 12).
Le [Mode Bluetooth] est réglé sur
[Récepteur] (page 27).
1 Appuyez sur PAIRING .
Remarque
Pour connecter le dernier appareil
BLUETOOTH connecté, appuyez sur
. Puis passez à l’étape 5.
2 Appuyez sur OPTIONS.
3 Sélectionnez [Liste des appareils],
puis appuyez sur .
Une liste des appareils BLUETOOTH
appairés s’affiche.
4 Appuyez plusieurs fois sur /
pour sélectionner l’appareil
souhaité, puis appuyez sur .
5 Appuyez sur pour commencer
la lecture.
6 Réglez le volume.
Réglez tout d’abord le volume de
l’appareil BLUETOOTH. Si le volume
est toujours trop faible, réglez le
volume de la barre de hautparleurs.
Remarque
Une fois que le système et le périphérique
BLUETOOTH sont connectés, vous pouvez
contrôler la lecture en appuyant sur ,
, , / et /.
13
FR
Page 76

Vous pouvez vous connecter au système
à partir d’un périphérique BLUETOOTH
apparié même lorsque le système est en
mode veille, si vous mettez [Attente
Bluetooth] sur [Marche] (page 27).
La lecture audio sur ce système peut être
différée de celle sur l’appareil
BLUETOOTH de par les caractéristiques de
la technologie sans fil BLUETOOTH.
Astuce
Vous pouvez activer ou désactiver le codec
AAC ou LDAC à partir du périphérique
BLUETOOTH (page 27).
Pour déconnecter l’appareil
BLUETOOTH
Réalisez une des actions suivantes.
Appuyez de nouveau sur PAIRING .
Dé sac ti vez la f onct ion BLU ET OOT H su r
le périphérique BLUETOOTH.
Lorsque l’écran de lecture s’affiche,
appuyez sur OPTIONS et sélectionnez
ensuite [Déconnecter].
Éteignez le systè me ou le périphérique
BLUETOOTH.
Pour supprimer un appareil
BLUETOOTH appairé depuis la
liste d’appareils
1 Suivez les étapes 1 à 3 ci-dessus.
2 Appuyez plusieurs fois sur / pour
sélectionner l’appareil, puis appuyez
sur OPTIONS.
3 Appuyez plusieurs fois sur / pour
sélectionner [Retirer], puis appuyez
sur .
4 Appuyez plusieurs fois sur / pour
sélectionner [OK], puis appuyez sur
.
Connexion d’un appareil à
distance à l’aide de la
fonction Écoute One-touch
(NFC)
La technologie NFC (Near Field
Communication) permet une
communication sans fil à faible portée
entre différents appareils.
Lorsque vous placez un appareil à
distance compatible NFC à côté du
signe N de la barre de haut-parleurs, le
système et l’appareil à distance
effectuent l’appairage et la connexion
BLUETOOTH automatiquement.
Appareils à distance compatibles
Appareils à distance intégrant une
fonction NFC
(OS : Android 2.3.3 ou ultérieur, sauf
Android 3.x)
Cette fonctionnalité ne fonctionne pas
avec un récepteur compatible avec
NFC (tel qu’un casque à écouteurs, par
exemple).
Remarque
Le système ne peut reconnaître et
connecter qu’un appareil compatible NFC
à la fois.
En fonction de votre appareil à distance,
vous devrez réaliser à l’avance les actions
suivantes sur votre appareil à distance.
Activez la fonction NFC. Pour obtenir
plus de détails, reportez-vous au mode
d’emploi de l’appareil à distance.
Si la version de votre SE est antérieure à
la version Android 4.1.x, téléchargez et
lancez l’application « NFC Easy
Connect ». « NFC Easy Connect » est
une application gratuite pour les
appareils à distance Android
téléchargeable sur Google Play. (Il est
possible que l’application ne soit pas
disponible dans certains pays/régions.)
14
FR
Page 77

Fonction BLUETOOTH
1 Placez l’appareil à distance près
du signe N situé sur la barre de
haut-parleurs jusqu’à ce que
l’appareil à distance vibre.
Suivez les instructions affichées sur
l’écran de l’appareil à distance, puis
terminez la proc édure de connexion
BLUETOOTH.
Lorsque la connexion BLUETOOTH
est établie, le voyant DEL bleu sur la
façade s’allume.
2 Démarrez la lecture d’une source
audio sur l’appareil à distance.
Pour obtenir plus de détails sur les
opérations de lecture, reportezvous au mode d’emploi de votre
appareil à distance.
Astuce
Si l’appairage et la connexion
BLUETOOTH échouent, effectuez la
procédure suivante.
Placez de nouveau l’appareil à distance
près du signe N sur la barre de hautparleurs.
Enlevez l’étui de l’appareil à distance si
vous en utilisez un.
Relancez l’application « NFC Easy
Connect ».
Réglez le [Démarrage Rapide/Attente
Réseau] sur [Marche] si vous souhaitez
connecter un périphérique BLUE TOOTH
lorsque le système est en mode veille.
Si le volume est trop bas, réglez tout
d’abord le volume de l’appareil à
distance. Si le volume est toujours trop
bas, réglez ensuite le volume de la barre
de haut-parleurs.
Si vous placez l’appareil à distance près
du signe N lorsque le système est en
mode transmetteur, le [Mode Bluetooth]
passe automatiquement à [Récepteur].
Cette fonctionnalité ne fonctionne pas
avec un récepteur compatible avec NFC.
Pour arrêter la lecture
Il est possible d’arrêter la lecture en
effectuant l’une des actions suivantes.
Placez de nouveau l’appareil à
distance près du signe N sur la barre
de haut-parleurs.
Arrêtez le lecteur de musique de
l’appareil à distance.
Éteignez le système ou l’appareil à
distance.
Changez l’entrée.
Désactivez la fonction BLUETOOTH sur
l’appareil à distance.
Appuyez sur , HOME ou
PAIRING sur la télécommande.
Pour écouter un son en
transmettant à un
récepteur compatible
avec BLUETOOTH
Vous pouvez écouter le son de la source
en cours de lecture via ce système à
l’aide d’un récepteur compatible avec
BLUETOOTH (tel qu’un casque à
écouteurs, par exemple).
1 Activez la fonction BLUETOOTH
sur le récepteur BLUETOOTH.
15
FR
Page 78

2 Réglez [Mode Bluetooth] sur
[Émetteur] dans [Réglages
Bluetooth] (page 27).
3 Appuyez sur / pour
sélectionner [OK].
4 Appuyez sur / pour
sélectionner le nom du récepteur
BLUETOOTH à partir de la [Liste
des appareils] dans [Réglages
Bluetooth] (page 27), puis
appuyez sur .
Lorsque la connexion BLUETOOTH
est établie, le voyant DEL bleu
s’allume.
Remarque
Si vous ne trouvez pas le nom du
récepteur BLUETOOTH dans la liste,
sélectionnez [Balayer].
5 Lancez la lecture de la source via
ce système.
Le son est reproduit à partir du
récepteur BLUETOOTH.
6 Réglez le volume.
Règle le volume du récepteur
BLUETOOTH.
Lorsque l’unité est connectée à un
récepteur BLUETOOTH, le volume
de la barre de haut-parleurs ne peut
pas être contrôlé. Les touches de
volume de la barre de haut-parleurs
et de la télécommande ne
fonctionnent que pour le récepteur
BLUETOOTH.
Remarque
Vous pouvez enregistrer jusqu’à
9 récepteurs BLUETOOTH. Si un dixième
récepteur BLUETOOTH est enregistré, le
dernier récepteur BLUETOOTH connecté
sera alors remplacé par le nouveau.
Le système peut afficher jusqu’à 15
récepteurs BLUETOOTH détectés dans la
[Liste des appareils].
Vous ne pouvez pas changer les effets
sonores ou les réglages dans le menu
Options pendant la transmission du son.
Certains contenus ne peuvent être
reproduits car ils sont protégés.
L’audio reproduit à partir du récepteur
BLUETOOTH peut être différé de celui sur
le système en raison des caractéristiques
de la technologie sans fil BLUETOOTH.
Aucun son n’est émis par les haut-
parleurs et la prise HDMI OUT (ARC)
lorsque le récepteur BLUETOOTH est
correctement connecté au système.
L’entrée [Mise en miroir de l’écran],
l’entrée [Bluetooth Audio] et la fonction
de commande du Home Theatre sont
désactivées lorsque le système est en
mode transmetteur.
Astuce
Une fois que le système et le récepteur
BLUETOOTH sont connectés, vous pouvez
contrôler la lecture en utilisant les
touches des opérations de lecture sur le
récepteur BLUETOOTH.
Vous pouvez connecter ce système au
dernier récepteur BLUETOOTH connecté
en appuyant plusieurs fois sur RX/TX
pour sélectionner [Émetteur]. Ensuite,
démarrez la lecture de la source sur le
système.
Pour déconnecter le récepteur
BLUETOOTH
Réalisez une des actions suivantes.
Désactivez la fonction BLUETOOTH sur
le récepteur BLUETOOTH.
Réglez [Mode Bluetooth] sur
[Récepteur] ou [Non] (page 27).
Éteignez le système ou le récepteur
BLUETOOTH.
Exécutez la fonction One-touch (NFC).
16
FR
Page 79

Fonction du réseau
Pour supprimer un récepteur
Câble LAN
(non fourni)
Serveur
Router à
large bande
Modem ADSL/
modem par câble
Câble LAN
(non fourni)
Internet
BLUETOOTH enregistré
1 Sélectionnez [Liste des appareils]
dans [Réglages Bluetooth] (page 27).
Une liste de récepteurs BLUETOOTH
appariés et détectés s’affiche.
2 Appuyez sur / pour sélectionner
l’appareil, puis appuyez sur OPTIONS.
3 Appuyez sur / pour sélectionner
[Retirer], puis appuyez sur .
4 Appuyez sur / pour sélectionner
[OK], puis appuyez sur .
Fonction du réseau
Pour se connecter à un
réseau câblé
Pour connecter le système
au réseau à l’aide d’un câble
LAN
L’illustration suivante est une
configuration d’un réseau domestique
avec le système et un serveur fournie à
titre d’exemple.
FR
17
Page 80

Configuration d’une
connexion câblée LAN
Il n’est pas nécessaire de réaliser la
configuration suivante si vous avez
exécuté les [Réglages réseau faciles].
1 Appuyez sur HOME.
L’écran d’accueil s’affiche à l’écran
du téléviseur.
2 Appuyez sur pour sélectionner
[Config.] sur le coin supérieur
droit, puis appuyez sur .
3 Appuyez sur / pour
sélectionner [Réglages réseau],
puis appuyez sur .
4 Appuyez sur / pour
sélectionner [Réglages Internet],
puis appuyez sur .
5 Appuyez sur / pour
sélectionner [Configuration
câblée], puis appuyez sur .
L’écran pour sélectionner la
méthode d’acquisition de l’adresse
IP apparaît à l’écran du téléviseur.
6 Appuyez sur / pour
sélectionner [Autom.], puis
appuyez sur .
7 Appuyez sur / pour parcourir
l’information, puis appuyez sur .
8 Appuyez sur / pour
sélectionner [Sauvegarder et
connecter], puis appuyez sur .
Le système commence à se
connecter au réseau. Pour plus de
détails, veuillez vous reporter aux
messages qui s’affichent à l’écran
du téléviseur.
Si une adresse IP fixe est utilisée
Sélectionnez [Personnalisé] dans
l’étape 6 et suivez les instructions
affichées à l’écran pour sélectionner
[Spécifier l’adresse IP]. L’écran de saisie
de l’adresse IP s’affiche à l’écran du
téléviseur.
Suivez les instructions à l’écran pour
saisie les valeurs de l’[Adresse IP], puis
appuyez sur pour confirmer les
valeurs.
Saisissez les valeurs pour [Masque de
sous-réseau], [Passerelle par défaut],
[DNS primaire] et [DNS secondaire], puis
appuyez sur .
Pour se connecter à un
réseau sans fil
Configuration d’une
connexion sans fil LAN
Avant de procéder aux réglages
réseau
Lorsque votre routeur LAN sans fil (point
d’accès) est compatible WPS (Wi-Fi
Protected Setup), vous pouvez
facilement configurer les réglages
réseau avec la touche WPS.
Si vous ne souhaitez pas la configurer, le
système vous demandera de
sélectionner ou de saisir une des
informations suivantes. Veuillez vérifier
l’information suivante à l’avance.
Le nom du réseau (SSID)* du routeur/
point d’accès LAN sans fil
Le mot de passe** de sécurité du
réseau
* Le nom SSID (Service Set Identifier)
identifie un point d’accès spécifique.
18
FR
Page 81

Fonction du réseau
** Pour obtenir ces informations, consultez
l’étiquette apposée sur votre routeur/
point d’accès LAN sans fil, le mode
d’emploi, la personne qui a configuré
votre réseau sans fil ou bien encore les
informations fournies par votre
fournisseur d’accès à Internet.
1 Suivez les étapes 1 à 4 de
« Configuration d’une connexion
câblée LAN » (page 18).
2 Appuyez sur / pour
sélectionner [Configuration sans
fil (intégré)], puis appuyez sur .
Une liste des SSID (points d’accès)
disponibles s’affiche à l’écran du
téléviseur.
3 Appuyez sur / pour
sélectionner le nom du réseau
(SSID) de votre choix et puis sur
.
L’écran des réglages de sécurité
s’affiche à l’écran du téléviseur.
4 Saisissez le mot de passe de
sécurité (mot de passe WEP, mot
de passe WPA/WPA2) à l’aide du
clavier du logiciel. Utilisez
/// et pour sélectionner
les caractères/numéros et
sélectionnez [Enter] pour
confirmer le mot de passe de
sécurité.
Le système commence à se
connecter au réseau. Pour plus de
détails, veuillez vous reporter aux
messages qui s’affichent à l’écran
du téléviseur.
Si une adresse IP fixe est utilisée
Sélectionnez [Nouvelle inscription de
connexion] dans l’étape 3, puis
[Enregist. manuel], et suivez les
instructions affichées à l’écran pour
sélectionner [Spécifier l’adresse IP].
L’écran de saisie de l’adresse IP s’affiche
à l’écran du téléviseur.
Suivez les instructions à l’écran pour
saisie les valeurs de l’[Adresse IP], puis
appuyez sur pour confirmer les
valeurs.
Saisissez les valeurs pour [Masque de
sous-réseau], [Passerelle par défaut],
[DNS primaire] et [DNS secondaire], puis
appuyez sur .
Remarque
L’écran des paramètres de sécurité de
l’étape 4 ne s’affiche pas si votre réseau n’a
pas été sécurisé par cryptage (à l’aide du
mot de passe de sécurité).
Lecture de fichiers sur un
réseau domestique
Vous pouvez lire des fichiers musique/
photo sur d’autres appareils
compatibles avec votre réseau
domestique en les connectant à votre
réseau domestique.
Ce système peut être utilisé comme
lecteur ou comme Renderer.
Serveur : Archive et partage des
contenus média numériques
Lecteur : Trouve et lit des contenus
médias numériques provenant du
serveur
Renderer : Reçoit et lit des fichiers
provenant du serveur, et peut être
utilisé par un autre appareil
(contrôleur)
Contrôleur : Commande le renderer
Préparez l’utilisation de la fonction
Réseau domestique.
Connectez le système à un réseau
(page 17).
Préparez un autre appareil compatible
avec le Réseau domestique. Pour
obtenir plus de détails, reportez-vous
au mode d’emploi de l’appareil.
19
FR
Page 82

Pour lire des fichiers archivés sur
Lecteur
(Ce système)
Serveur
Contrôleur
Renderer
(Ce système)
Serveur
Internet
Routeur Ce système
un serveur via le système
(lecteur)
Sélectionnez [Home Network] sur
l’écran d’accueil et ensuite le serveur.
Sélectionnez le fichier que vous
souhaitez lire depuis [Musique] ou
[Photo].
Pour lire des fichiers à distance en
utilisant le système (Renderer)
via un contrôleur de Réseau
domestique
Vous pouvez commander le système à
l’aide d’un appareil compatible avec un
contrôleur de Réseau domestique (un
portable, etc.), lors de la lecture de
fichiers archivés sur un serveur.
Pour obtenir plus de détails sur le
fonctionnement, reportez-vous au
mode d’emploi de l’appa reil compatible
avec le contrôleur du Réseau
domestique.
Remarque
Ne commandez pas le système avec la
télécommande fournie et le contrôleur en
même temps.
FR
20
Astuce
Le système est compatible avec la fonction
« Play To » du Windows Media® Player 12
fourni avec Windows 7.
Utilisation de divers
services en ligne
Vous pouvez écouter de la musique
disponible sur Internet à l’aide de ce
système. Pour utiliser cette fonction, le
système doit être connecté à Internet.
Remarque
Il est possible que vous deviez enregistrer
votre système avant d’utiliser certains
services qui offrent de la musique. Pour
obtenir plus de détails concernant
l’enregistrement, rendez-vous sur le site
d’assistance du client du fournisseur du
service.
1 Appuyez sur HOME.
L’écran d’accueil s’affiche à l’écran
du téléviseur.
2 Appuyez sur / pour
sélectionner [Music Services], puis
appuyez sur .
La liste de fournisseurs de services
s’affiche à l’écran du téléviseur.
Remarque
Selon l’état de la connexion du
contenu Internet, la liste du
fournisseur de services peut prendre
quelques instants avant d’apparaître à
l’écran du téléviseur.
Page 83

Fonction du réseau
Astuce
Vous pouvez mettre à jour la liste de
fournisseurs de services en appuyant
sur OPTIONS et en sélectionnant
ensuite [Mettre la liste à jour].
3 Appuyez sur / pour
sélectionner le service de musique
de votre choix et appuyez ensuite
sur .
Appuyez sur BACK pour revenir au
répertoire précédent.
Pour enregistrer un nouveau
service de musique
Vous pouvez écouter les contenus
d’une variété de services de musique
disponibles sur Internet.
Pour vérifier le code d’inscription
Il est possible que le service vous
demande de saisir le code d’inscription
lorsque vous utilisez un nouve au service
de musique.
1 Sélectionnez [Music Services] sur
l’écran d’accueil.
La liste de fournisseurs de services
s’affiche à l’écran du téléviseur.
2 Appuyez sur / pour sélectionner le
service de musique de votre choix et
appuyez ensuite sur .
Les renseignements de l’inscription, y
compris le code d’inscription,
s’affichent à l’écran du téléviseur.
Remarque
Vous pouvez consulter les informations
de l’inscription à l’écran du téléviseur au
moment de saisir un service de
musique. La synchronisation de cette
information s’affiche en fonction du
service de musique sélectionné.
Utilisation de fonction
Mise en miroir de l’écran
La « Mise en miroir de l’écran » est une
fonction permettant d’afficher l’écran
d’un appareil mobile sur le téléviseur
par la technologie Miracast.
Le système peut être connecté
directement à un appareil compatible
avec la fonction Mise en miroir de
l’écran (un smartphone ou une tablette,
par exemple). Vous pouvez afficher
l’écran de votre appareil sur l’écran de
votre téléviseur. Un routeur sans fil (ni
un point d’accès) n’est nécessaire pour
utiliser cette fonction.
1 Appuyez sur MIRRORING.
2 Suivez les instructions à l’écran.
Activez la fonction de Mise en miroir
de l’écran sur votre appareil.
Pour obtenir plus de détails sur
l’activation de cette fonction,
reportez-vous au mode d’emploi
fourni avec votre appareil.
Pour connecter un smartphone
Xperia à l’aide de la fonction
Duplication One-Touch (NFC)
Appuyez sur MIRRORING, et placez
votre smartphone Xperia près du signe
N sur la barre de haut-parleurs.
Terminer la duplication
Appuyez sur HOME ou INPUT +/–.
Remarque
Lors de l’utilisation de la Mise en miroir de
l’écran, la qualité des images et du son
peut parfois être détériorée à cause des
interférences provenant d’un autre
réseau.
Il est possible que certaines fonctions
réseau ne soient pas disponibles avec la
fonction Mise en miroir de l’écran.
FR
21
Page 84

Assurez-vous que l’appareil soit
Câble HDMI haute
vitesse (fourni)
Prise HDMI
compatible
HDCP 2.2
compatible avec Miracast. La connectivité
avec tous les appareils compatibles avec
Miracast n’est pas garantie.
Selon l’environnement d’utilisation, la
qualité des images et du son peut être
détériorée.
Astuce
Vous pouvez sélectionner votre effet
sonore préféré pendant la duplication.
Appuyez sur les touches des effets
sonores (page 56).
Si la qualité de l’image et du son se
détériorent souvent, vous pouvez
améliorer la qualité en configurant [Régl.
RF Mise en miroir de l’écran] (page 30).
Visualiser que des contenus 4K
dont le copyright est protégé
Connexion d’un
téléviseur 4K
Pour visualiser des contenus 4K dont le
copyright est protégé, connectez le
système et le téléviseur via une prise
HDMI compatible HDCP 2.2. Pour
obtenir plus de détails pour savoir si le
téléviseur est équipé d’une prise HDMI
compatible avec HDCP 2.2, reportezvous au mode d’emploi fourni avec le
téléviseur.
Lorsque la prise HDMI du
téléviseur a une étiquette
ARC* et qu’elle est
compatible avec HDCP 2.2
22
FR
* La fonction ARC (Audio Return Channel)
envoie un son numérique d’un
téléviseur à ce système en n’utilisant
qu’un câble HDMI.
Page 85

Visualiser que des contenus 4K dont le copyright est protégé
Lorsque la prise HDMI du
Câble HDMI
haute vitesse
(fourni)
Câble
optique
numérique
(non fourni)
Prise HDMI
compatible
HDCP 2.2
OUTPUT
Câble HDMI
haute vitesse
(non fourni)
Lecteur Blu-ray
Disc™, décodeur
ou décodeur
satellite, etc.
Prise HDMI
compatible
HDCP 2.2
téléviseur a une étiquette
ARC et qu’elle n’est pas
compatible avec HDCP 2.2
Si la prise HDMI de votre téléviseur a une
étiquette ARC et si elle n’est pas
compatible avec HDCP 2.2, connectez le
système à la prise HDMI de votre
téléviseur compatible avec HDCP 2.2 à
l’aide d’un câble HDMI. Connectez
ensuite un câble o ptique numérique à la
prise de sortie optique du téléviseur
pour écouter le son numérique.
Connexion d’appareils
4K
Pour connecter un appareil 4K à la prise
HDMI IN 1 d u système. Po ur ob tenir p lus
de détails pour savoir si l’appareil est
compatible avec HDCP 2.2, reportezvous au mode d’emploi fourni avec
l’appareil.
23
FR
Page 86

Réglages et ajustements
Utilisation de l’écran de
configuration
Vous pouvez effectuer divers réglages
comme l’image et le son.
Les réglages par défaut sont soulignés.
1 Appuyez sur HOME.
L’écran d’accueil s’affiche à l’écran
du téléviseur.
2 Appuyez sur pour sélectionner
[Config.] sur le coin supérieur
droit, puis appuyez sur .
3 Appuyez sur / pour
sélectionner l’icône de la
catégorie de configuration, puis
appuyez sur .
Icône Explication
[Mise à jour logicielle]
(page 24)
Mettre à jour le logiciel du
système.
[Réglages d’écran]
(page 25)
Définir les réglages d’écran
en fonction du type de
téléviseur.
[Réglages audio] (page 26)
Définir les réglages audio en
fonction du type de prises de
connexion.
[Réglages Bluetooth]
(page 27)
Définissez les réglages
détaillés pour la fonction
BLUETOOTH.
[Réglages système]
(page 28)
Définir les réglages liés au
système.
Icône Explication
[Réglages réseau] (page 30)
Définir les réglages détaillés
pour Internet et le réseau.
[Rég. Ent. Ignor.] (page 31)
Règle le réglage de saut
d’entrée pour chaque
entrée.
[Régl. facile] (page 31)
Exécutez de nouveau le
[Régl. facile] pour définir les
réglages de base.
[Réglages réseau faciles]
(page 31)
Exécuter les [Réglages
réseau faciles] pour définir
les réglages réseau de base.
[Réinitialisation] (page 31)
Réinitialiser le système à ses
réglages d’usine.
[Mise à jour logicielle]
Lorsque vous mettez votre l ogiciel à jour
à la dernière version, vous bénéficiez
des fonctions les plus récentes.
Pendant une mise à jour logicielle,
« UPDT » s’affiche sur l’affichage de la
façade. Une fois la mise à jour terminée,
le système se réinitialise
automatiquement.
Pendant la progression de la mise à
jour, ne mettez pas le système sous ou
hors tension, et n’uti lisez pas le système
ou le téléviseur. Attendez que la mise à
jour logicielle soit terminée.
Remarque
Pour plus d’informations sur les fonctions
de mise à jour, reportez-vous au site Web
suivant :
http://www.sony.com/soundbarsupport
Si votre connexion au réseau est
mauvaise, rendez-vous sur le site Web
ci-dessus pour télécharger la version la
plus récente du logiciel et réaliser la mise
à jour via une clé de stockage USB.
24
FR
Page 87

Réglages et ajustements
Réglez [Mise à jour automatique] sur
[Marche] lorsque vous souhaitez
effectuer des mises à jour automatiques
du logiciel (page 30). En fonction du
contenu des mises à jour, la mise à jour
du logiciel peut être effectuée même si
vous réglez [Mise à jour automatique] sur
[Non].
[Mise à jour via Internet]
Met à jour le logiciel du système en
utilisant un réseau disponible. Assurezvous que le réseau est connecté à
Internet. Pour plus de détails, reportezvous à « Fonction du réseau » (page 17).
[Mise-à-jour via une mémoire USB]
Met à jour le logiciel à l’aide d’une clé
USB. Assurez-vous que le Dossier Mise à
jour logicielle est correctement nommé
«UPDATE».
Le système peut reconnaître jusqu’à
500 fichiers/dossiers dans une seule
couche y compris les fichiers/dossiers
de mise à jour.
[Réglages d’écran]
[Type de téléviseur]
[16:9]
: Sélectionnez ce réglage lorsque
vous connectez un téléviseur à écran
large ou un téléviseur possédant une
fonction de mode large.
[4:3] : Sélectionnez ce réglage lorsque
vous connectez un téléviseur à écran
4:3 sans fonction de mode large.
[Résolution de la sortie vidéo]
[Auto]
: Reproduit un signal vidéo en
fonction de la résolution du téléviseur
ou de l’appareil connecté.
[480i/576i]*, [480p/576p]*, [720p],
[1080i], [1080p] : Reproduit un signal
vidéo en fonction du réglage de
résolution sélectionné.
* Si le système de couleur du contenu lu
est NTSC, la résolution des signaux vidéo
peut être convertie en [480i] et [480p]
uniquement.
[Sortie 24p]
[Contenu réseau sortie 24p]
Cette fonction règle la sortie du signal
de la prise HDMI OUT (ARC) vers le
système, lorsque vous utilisez la
fonction de Mise en miroir de l’écran.
[Auto] : Reproduit des signaux vidéo
24p uniquement lorsque vous
connectez un téléviseur compatible
1080/24p via une connexion HDMI et
que la [Résolution de la sortie vidéo] est
réglée sur [Auto] ou sur [1080p].
: Sélectionnez ce réglage lorsque
[Non]
votre téléviseur n’est pas compatible
avec des signaux vidéo 1080/24p.
[Sortie 4K]
[Auto1]
: Reproduit des signaux vidéo 2K
(1920 × 1080) pendant la reproduction
vidéo (Mise en miroir de l’écran) et des
signaux vidéo 4K pendant la lecture de
photos lorsque connecté à un appareil
compatible 4K Sony.
Reproduit des signaux vidéo 4K
pendant la reproduction de contenus
vidéo 24p ou la lecture de photos
lorsque connecté à un appareil
compatible 4K autre que Sony.
[Auto2] : Reproduit automatiquement
des signaux vidéo 4K/24p lorsque vous
connectez un appareil compatible avec
4K/24p et que vous effectuez les
réglages nécessaires pour [Contenu
réseau sortie 24p] dans [Sortie 24p], et
reproduit également des images photo
4K/24p lorsque vous lisez des fichiers
photo 2D.
[Non] : Désactiver la fonction.
Remarque
Si votre appareil Sony n’est pas détecté
lorsque [Auto1] est sélectionné, ce réglage
aura le même effet que le réglage [Auto2].
25
FR
Page 88

[YCbCr/RGB (HDMI)]
[Auto]
: Détecte automatiquement le
type d’appareil externe et bascule vers
le réglage de couleurs correspondant.
[YCbCr (4:2:2)] : Reproduit des signaux
vidéo YCbCr (4:2:2).
[YCbCr (4:4:4)] : Reproduit des signaux
vidéo YCbCr (4:4:4).
[RGB] : Sélectionnez ce réglage lorsque
vous connectez un appareil doté d’une
prise DVI compatible HDCP.
[Sortie HDMI Deep Color]
[Auto]
: En principe, sélectionnez ce
réglage.
[12 bits], [10 bits] : Reproduit dessignaux
vidéo 12 bits/10 bits lorsq ue le téléviseur
connecté estcompatible avec Deep
Color.
[Non] : Sélectionnez ce réglage lorsque
l’image est instable ou les couleurs ne
semblent pas naturelles.
[Vidéo Directe]
Vous pouvez désactiver l’affichage à
l’écran (OSD) du système lorsque
l’entrée [HDMI1], [HDMI2] ou [HDMI3] est
sélectionnée. Cette fonction est utile
lorsque vous jouez à un jeu car elle vous
permet d’utiliser tout l’écran du jeu.
[Marche] : Désactive l’OSD. Aucune
information ne sera affichée à l’écran et
les touches OPTIONS et DISPLAY sont
désactivées.
: Affiche des informations à
[Non]
l’écran lorsque vous changer les
réglages, comme par exemple la
sélection du champ sonore.
[SBM] (Super Bit Mapping)
[Marche]
reproduction des signaux vidéo de la
prise HDMI OUT (ARC).
: Adoucit la gradation de la
[Non] : Sélectionnez ce réglage lors de la
reproduction de signaux vidéo
déformés ou si les couleurs ne semblent
pas naturelles.
[Réglages audio]
[DSEE HX]
Cette fonction n’est active que lorsque
[Music] est sélectionnée comme champ
acoustique.
[Marche]
un fichier audio de haute résolution et
reproduit le clair son élevé qui se perd
souvent (page 11).
[Non] : Désactivé.
[Drc Audio]
Pour compresser la gamme dynamique
de la plage audio.
[Auto]
son encodé en Dolby TrueHD.
[Marche] : Le système reproduit la plage
audio avec le type de gamme
dynamique prévu par l’ingénieur du son
au moment de l’enregistrement.
[Non] : Aucune compression de la
gamme dynamique.
[Réglages atténuation - Analog]
Une distorsion peut se produire lors de
l’écoute d’un appareil connecté à la
prise ANALOG IN. Vous pouvez éviter la
distorsion en atténuant le niveau
d’entrée du système.
[Marche]
Le niveau d’entrée diminue lorsque ce
réglage est défini.
[Non] : Niveau d’entrée normal.
Sélectionnez cette option lorsque vous
vous connectez à un appareil portable
(tel qu’un lecteur de médias
numériques).
: Transforme le fichier audio en
: Comprime automatiquement le
: Atténue le niveau d’entrée.
26
FR
Page 89

Réglages et ajustements
[Sortie audio]
Vous pouvez sélectionner la méthode
de sortie à utiliser pour la reproduction
du signal audio.
[Enceinte] : Reproduit le son provenant
des haut-parleurs du système
uniquement.
[Enceinte+HDMI]
: Reproduit le son
provenant des haut-parleurs du
système et les signaux PCM linéaires à
2 canaux provenant de la prise HDMI
OUT (ARC).
[HDMI] : Reproduit le son provenant de
la prise HDMI OUT (ARC) uniquement. Le
format du son dépend de l’appareil
connecté.
Remarque
Lorsque [Contrôle pour HDMI] est réglé sur
[Marche] (page 29), [Sortie audio] est réglé
sur [Enceinte+HDMI] automatiquement et
ce réglage ne peut pas être modifié.
[Réglages Bluetooth]
[Mode Bluetooth]
Vous pouvez utiliser les contenus d’un
appareil à distance en utilisant ce
système ou écouter des sons de ce
système en utilisant d’autres appareils
tels qu’un casque à écouteurs.
[Récepteur]
récepteur, ce qui lui permet de recevoir
et de reproduire de l’audio à partir de
l’appareil à distance.
[Émetteur] : Ce système est en mode
transmetteur, ce qui lui permet
d’envoyer un son audio au récepteur
BLUETOOTH (tel qu’un casque à
écouteurs, par exemple).
[Non] : BLUETOOTH est désactivé et
vous ne pouvez pas sélectionner
l’entrée [Bluetooth Audio].
: Ce système est en mode
Remarque
Vous pouvez vous connecter à un appareil
à distance à l’aide de la fonction d’écoute,
même si vous avez mis le [Mode Bluetooth ]
sur [Non].
[Liste des appareils]
Affiche une liste de récepteurs
BLUETOOTH appariés et détectés
lorsque le [Mode Bluetooth] est réglé
sur [Émetteur] (page 27).
[Attente Bluetooth]
Vous pouvez régler le [Attente
Bluetooth] pour que le système puisse
être mis en marche par un appareil
BLUETOOTH, même si le système est en
mode veille. Cette fonction n’est
disponible que si [Mode Bluetooth] est
réglé sur [Récepteur] ou [Émetteur].
[Marche]
: Le système se met
automatiquement en marche lorsque
vous établissez une connexion
BLUETOOTH à partir d’un appareil
BLUETOOTH apparié.
[Non] : Désactivé.
Remarque
Si vous réglez [Démarrage Rapide/Attente
Réseau] sur [Non] et [Attente Bluetooth]
sur [Marche], le système peut être mis en
marche par un appareil BLUETOOTH, mais
la connexion BLUETOOTH échoue.
[Bluetooth Codec - AAC]
Cette fonction n’est disponible que si
[Mode Bluetooth] est réglé sur
[Récepteur] ou [Émetteur].
[Marche]
: Activer codec AAC.
[Non] : Désactiver codec AAC.
Remarque
Profitez d’un son de haute qualité si l’AAC
est activé. Si vous ne pouvez pas écouter
le son AAC sur votre appareil,
sélectionnez [Non].
27
FR
Page 90

Si vous modifiez le réglage [Bluetooth
Codec - AAC] lorsqu’un appareil
BLUETOOTH est connecté, le réglage du
codec ne s’applique qu’à la prochaine
connexion.
[Bluetooth Codec - LDAC]
Cette fonction n’est disponible que si
[Mode Bluetooth] est réglé sur
[Récepteur] ou [Émetteur].
[Marche]
: Activer codec LDAC.
[Non] : Désactiver codec LDAC.
Remarque
Si vous modifiez le réglage [Bluetooth
Codec - LDAC] lorsqu’un appareil
BLUETOOTH est connecté, le réglage du
codec ne s’applique qu’à la prochaine
connexion.
Astuce
LDAC est une technologie de cryptage
audio conçue par Sony, qui permet de
transmettre du contenu audio haute
résolution, même par connexion
BLUETOOTH. Contrairement aux autres
technologies de cryptage compatibles
BLUETOOTH telles que SBC, il fonctionne
sans réduction de la résolution du contenu
audio haute résolution*, et permet de
transmettre environ trois fois plus de
données** sur le réseau BLUETOOTH en
comparaison à d’autres t echnologies, avec
une qualité sonore inégalée, grâce à un
cryptage efficace et une mise en paquets
optimisée.
* À l’exclusion des contenus au format
DSD.
** En comparaison avec SBC (codage par
sous-bandes) lorsqu’un débit binaire de
990 kbps (96/48 kHz) ou de 909 kbps
(88,2/44,1 kHz) est sélectionné.
[Qualité de la lecture sans fil]
Vous pouvez régler le débit de
transmission de la lecture LDAC. Cette
fonction n’est disponible que si [Mode
Bluetooth] est réglé sur [Émetteur] et
[Bluetooth Codec - LDAC] sur [Marche].
[Auto] : Le débit de transmission c hange
automatiquement en fonction de
l’environnement. Si la lecture audio est
instable avec ce réglage, utilisez trois
autres réglages.
[Qualité Sonore] : Le débit de
transmission le plus élevé est utilisé. Le
son est envoyé avec la qualité
optimale ; cependant, la lecture audio
peut parfois devenir instable lorsque la
qualité du lien n’est pas suffisamment
bonne.
[Normal]
: Le débit de transmission
intermédiaire est utilisé. Cette fonction
équilibre la qualité du son et la stabilité
de la lecture.
[Connexion] : La stabilité est prioritaire.
La qualité du son peut être raisonnable
et il est probable que l’état de la
connexion soit stable. Ce réglage est
recommandé si la connexion est
instable.
[Réglages système]
[Langue OSD]
Vous pouvez choisir la langue
d’affichage du système.
[Connexion du son sans fil]
Vous pouvez effectuer plus de réglages
pour le système sans fil. Pour plus de
détails, reportez-vous à « Autres
réglages du système sans fil » (page 39).
28
FR
Page 91

Réglages et ajustements
[IR-Repeater]
[Marche] : Permet a u système de relayer
le signa l depuis une t élécommande v ers
le téléviseur (page 38).
: Désactivé.
[Non]
[Réglages HDMI]
[Contrôle pour HDMI]
[Marche]
pour HDMI]. Vous pouvez commander
mutuellement les appareils connectés à
l’aide d’un câble HDMI.
[Non] : Désactivé.
[Audio Return Channel]
Cette fonction est disponible lorsque
vous connectez le système à une prise
HDMI IN de votre téléviseur, compatible
avec la fonction Audio Return Channel
et que [Contrôle pour HDMI] est réglé
sur [Marche].
[Auto]
signal audio numérique du téléviseur
automatiquement via un câble HDMI.
[Non] : Désactivé.
[Standby Through]
Vous pouvez reproduire des signaux
HDMI sur le téléviseur même lorsque le
système est en mode veille. Cette
fonction est disponible lorsque vous
réglez [Contrôle pour HDMI] sur
[Marche].
[Auto]
HDMI OUT (ARC) lorsque l e téléviseur est
allumé et que le système est en mode
veille. Ce réglage permet d’économiser
de l’énergie en mode veille en
comparaison au réglage [Marche].
[Marche] : Reproduisez toujours des
signaux de la prise HDMI OUT (ARC)
lorsque le système est en mode veille. Si
vous connectez un téléviseur autre que
« BRAVIA », nous vous recommandons
de sélectionner ce réglage.
: Active la fonction [Contrôle
: Le système peut recevoir le
: Reproduit les signaux de la prise
[Non] : Aucun signal n’est reproduit
lorsque le système est en mode veille.
Ce réglage permet d’économiser de
l’énergie en mode veille en
comparaison au réglage [Marche].
[Démarrage Rapide/Attente
Réseau]
[Marche] : Réduit le temps de
démarrage à partir du mode veille. Vous
pouvez utiliser rapidement le système
après sa mise sous tension.
[Non]
: Paramètre par défaut.
[Attente automatique]
[Marche]
automatique]. Si vous ne commandez
pas le système pendant environ
20 minutes, le système se met
automatiquement en mode veille.
[Non] : Désactivé.
[Affichage automatique]
[Marche]
informations à l’écran lors du
changement des signaux audio, du
mode d’image, etc.
[Non] : Affiche les informations
uniquement lorsque vous appuyez sur
DISPLAY.
[Avis de m-à-j du logiciel]
[Marche]
vous informe des informations de
dernière version logicielle (page 24).
[Non] : Désactivé.
: Active la fonction [Attente
: Affiche automatiquement les
: Règle le système pour qu’il
29
FR
Page 92

[Réglages Mise à jour automatique]
[Mise à jour automatique]
[Marche] : La mise à jour du logiciel est
automatiquement exécutée entre 2 h et
5 h du matin heure locale pour le
[Fuseau horaire] choisi lorsque ce
système n’est pas utilisé. Si vous réglez
[Démarrage Rapide/Attente Réseau] sur
[Non], la mise à jour du logiciel est
effectuée lorsque vous éteignez le
système.
: Désactivé.
[Non]
[Fuseau horaire]
Choisissez votre pays ou région.
Remarque
En fonction du contenu des mises à jour, la
mise à jour du logiciel peut être effectuée
même si vous réglez [Mise à jour
automatique] sur [Non].
[Nom d’appareil]
Vous pouvez modifier à votre gré le nom
de ce système pour le reconnaître plus
facilement dans le cadre de la fonction
BLUETOOTH ou Mise en miroir de
l’écran. Le nom est également utilisé
pour un usage dans d’autres réseaux
tels que le Réseau domestique. Suivez
les instructions à l’écran et utilisez le
clavier virtuel pour saisir le nom.
[Informations système]
Vous pouvez afficher les informations
de la version logicielle du système et
son adresse MAC.
[Information de licence logicielle]
Vous pouvez afficher l’information de
licence logicielle.
[Réglages réseau]
[Réglages Internet]
Connectez tout d’abord le système à un
réseau. Pour plus de détails, reportezvous à « Fonction du réseau » (page 17).
[Configuration câblée] : Sélectionnez
cette option lors d’une connexion à un
routeur à large b ande à l’aide d’un câble
LAN. Lorsque vous sélectionnez ce
réglage, le LAN sans fil intégré est
automatiquement désactivé.
[Configuration sans fil (intégré)]
Sélectionnez cette option lors de
l’utilisation du LAN sans fil intégré du
système pour la connexion réseau sans
fil.
Astuce
Pour obtenir plus de détails, consultez la
FAQ du site Web suivant :
http://www.sony.com/soundbarsupport
[État de la connexion réseau]
Affiche l’état de connexion du réseau
actuel.
[Diagnostic de connexion réseau]
Vous pouvez lancer le diagnostic réseau
pour vérifier si la connexion réseau a été
correctement effectuée.
[Régl. RF Mise en miroir de l’écran]
Si vous utilisez plusieurs systèmes sans
fil, comme un LAN (Local Area Network)
sans fil, les signaux sans fil pourraient
être instables. Dans ce cas, il est
possible d’améliorer la stabilité de la
lecture en réglant le canal de
radiofréquence prioritaire pour la Mise
en miroir de l’écran.
:
30
FR
Page 93

Réglages et ajustements
[Auto] : En principe, sélectionnez ce
réglage. Le système sélectionne
automatiquement un meilleur canal
pour la Mise en miroir de l’écran.
[CH 1]/[CH 6]/[CH 11] : Le canal
sélectionné a la priorité pour la
connexion par Mise en miroir de l’écran.
[Réglages du serveur de connexion]
Définit l’affichage ou non du serveur du
Réseau domestique connecté.
[Perm. accéd. auto-rend.]
[Marche]
à partir d’un contrôleur Réseau
domestique récemment détecté.
[Non] : Désactivé.
[Commande d’accès du Renderer]
Affiche une liste de produits
compatibles avec le contrôleur du
Réseau domestique et définit s’il est
nécessaire d’accepter des commandes
des contrôleurs dans la liste.
[Contrôle externe]
[Marche]
d’automatisation domestique de
commander le système.
[Non] : Désactivé.
: Autorise l’accès automatique
: Permet au contrôleur
[Rég. Ent. Ignor.]
Le réglage du saut est une
fonctionnalité pratique qui permet de
sauter les entrées non utilisées lors de la
sélection d’une entrée en appuyant sur
INPUT +/–.
[Ne pas ignorer]
pas l’entrée sélectionnée.
[Ignorer] : Le système saute l’entrée
sélectionnée.
Remarque
Si vous appuyez sur INPUT +/– lorsque
l’écran d’accueil est affiché, l’icône
d’entrée apparaît atténuée si elle est
réglée sur [Ignorer].
: Le système ne saute
[Régl. facile]
Exécute [Régl. facile] pour réaliser les
réglages initiaux de base et les réglages
de base du réseau pour le système.
Suivez les instructions à l’écran.
[Réglages réseau
faciles]
[Démarrage à distance]
[Marche] : Permet de mettre le système
sous tension à distance par un appareil
lié via le réseau lorsque le système est
en mode veille.
: Le système ne peut pas être mis
[Non]
sous tension par un appareil lié via le
réseau.
Exécuter les [Réglages réseau faciles]
pour définir les réglages ré seau de base.
Suivez les instructions à l’écran.
[Réinitialisation]
[Rétablir les réglages d’usine]
Vous pouvez rétablir les réglages
d’usine du système en sélectionnant le
groupe de réglages. Tous les réglages
du groupe seront réinitialisés.
31
FR
Page 94

[Initialiser les Infos personnelles]
Vous pouvez effacer vos informations
personnelles stockées dans le système.
Remarque
Si vous mettez au rebut, transférez ou
revendez ce système, veuillez supprimer
tous les renseignements personnels pour
des raisons de sécurité. Veuillez adopter
les mesures pertinentes, telles que fermer
la session après l’utilisation d’un service
réseau.
[Changer de catégorie]
Permet d’alterner entre les catégories
[Musique] et [Photo] dans l’entrée
[USB] ou [Home Network]. Cet élément est
uniquement disponible lorsque la liste
affichée est disponible pour la catégorie.
[Musique] uniquement
[Régl. lect. aléatoire]
Configure la lecture dans un ordre aléatoire.
[Ajouter mus. de fond]
Enregistrer des fichiers de musique dans la
mémoire USB comme musique
d’accompagnement des diaporamas (BGM).
Utilisation du menu
Options
Différents réglages et opérations de
lecture sont disponibles en appuyant
sur OPTIONS. Les éléments disponibles
varient selon la situation.
Options communes
[SYNC A/V]
Régler le décalage entre l’image et le son
(page 33).
[Sound Field]
Modifie le réglage du champ acoustique
(page 10).
[Night]
Désactive et active la fonction du mode
Nocturne (page 11).
[Voice]
Améliore la gamme du dialogue pour que les
sons vocaux soient nets (page 11).
[Répéter réglage]
Configurer la lecture répétée.
[Lecture/Arrêt]
Démarrer ou arrêter la lecture.
[Lire du début]
Lire l’élément à partir du début.
[Photo] uniquement
[Diaporama]
Démarrer un diaporama.
[Vitesse diapo.]
Modifier la vitesse du diaporama.
[Effet diaporama]
Configurer l’effet lors de la lecture d’un
diaporama.
[Mus. de fond diapo]
[Non] : Désactiver la fonction.
[Ma musique USB] : Con figurer les fichiers de
musique enregistrés dans [Ajouter mus. de
fond].
[Changer l’affichage]
Basculer entre [Affichage de grille] et
[Affichage de liste].
[Rotation à gauche]
Faire pivoter la photo de 90 degrés dans le
sens contraire des aiguilles d’une montre.
[Rotation à droite]
Faire pivoter la photo de 90 degrés dans le
sens des aiguilles d’une montre.
[Visualis. image]
Afficher l’image sélectionnée.
32
FR
Page 95

Autres fonctions
Réglage du décalage entre
l’image et le son
Autres fonctions
[SYNC A/V]
Lorsque le son ne correspond pas aux
images affichées sur l’écran du
téléviseur, vous pouvez régler le
décalage entre l’image et le son dans le
cadre des entrées suivantes.
La méthode de réglage varie selon
l’entrée.
Lorsque l’entrée [HDMI1],
[HDMI2], ou [HDMI3] est
sélectionnée
1 Appuyez sur OPTIONS.
Le menu Options s’affiche sur
l’écran du téléviseur.
2 Appuyez sur / pour
sélectionner [SYNC A/V], puis
appuyez sur .
3 Appuyez sur / our régler le
décalage, puis appuyez sur .
Vous pouvez sélectionner une
valeur comprise entre 0 ms et
300 ms par incréments de 25 ms.
Lorsque l’entrée [TV] est
sélectionnée
1 Appuyez sur OPTIONS.
« SYNC » apparaît sur l’affichage de
la façade.
2 Appuyez sur ou .
3 Appuyez sur / our régler le
décalage, puis appuyez sur .
Vous pouvez sélectionner une
valeur comprise entre 0 ms et
300 ms par incréments de 25 ms.
4 Appuyez sur OPTIONS.
« SYNC » disparaît de l’affichage de
la façade.
Contrôler le
système à l’aide
d’un smartphone
ou d’une tablette
(SongPal)
SongPal est une application dédiée
permettant d’utiliser des appareils
audio compatibles SongPal fabriqués
par Sony, avec un smartphone ou d’une
tablette. Recherchez SongPal sur
Google Play™ ou sur l’App Store et
téléchargez-le sur votre smartphone ou
votre tablette.
SongPal vous permet :
de modifier les réglages courants, en
choisissant l’entrée du système et en
réglant le volume.
d’écouter avec le système de la
musique stockée sur un serveur
réseau domestique ou un
smartphone.
de profiter de la m usique visuellement
avec l’écran de votre smartphone.
de configurer facilement les
paramètres de connexion Wi-Fi avec
SongPal si votre routeur Wi-Fi n’a pas
de fonction WPS.
d’utiliser la fonction SongPal Link
(page 34).
Remarque
Avant de commencer à réaliser les
opérations ci-dessous, assurez-vous de
mettre le [Mode Bluetooth] sur
[Récepteur] (page 27).
Ce système est compatible avec SongPal,
version 3.0 ou ultérieure.
SongPal utilise la fonction réseau
(page 17) et/ou la fonction BLUETOOTH
(page 12) du système.
33
FR
Page 96

Les caractéristiques techniques et
l’affichage de SongPal sont susceptibles
d’être modifiés sans avis préalable.
Si vous utilisez un appareil
Android
1 Cherchez, téléchargez et lancez
l’application SongPal sur un appareil
Android.
2 Connectez le système et l’appareil
Android par connexion BLUETOOTH
(page 12) ou par connexion réseau
(page 17).
Astuce
Si vous connectez le système et un
appareil Android par connexion réseau,
connectez l’appareil par Wi-Fi sur le
réseau auquel le système est connecté.
3 Suivez les instructions de SongPal.
Si vous utilisez un iPhone/iPod
1 Cherchez, téléchargez et lancez
l’application SongPal sur un iPhone/
iPod.
2 Connectez le système et l’iPhone/
iPod par connexion BLUETOOTH
(page 12) ou par connexion réseau
(page 17).
Astuce
Si vous connectez le système et un
iPhone/iPod par connexion réseau,
connectez l’iPhone/iPod par Wi-Fi sur le
même réseau que celui auquel le
système est connecté.
3 Suivez les instructions de SongPal.
Écouter la même musique
sur plusieurs appareils/
écouter de la musique
différente à des endroits
différents (SongPal Link)
Vous pouvez profiter de la musique
stockée sur votre ordinateur, votre
smartphone ou proposée par des
services musicaux dans plusieurs pièces
au même moment.
Pour obtenir plus de détails sur SongPal
Link, veuillez consulter l’URL suivante :
http://www.sony.net/nasite
Utilisation de Google
Cast™
Google Cast vous permet de choisir du
contenu musical depuis l’application
Compatible avec Google Cast™ et de
lire la musique sur le système. Google
Cast requiert un paramétrage initial
avec SongPal.
1 Téléchargez SongPal sur
l’appareil.
2 Lancez SongPal, puis connectez
l’appareil par Wi-Fi au réseau
auquel le système est connecté.
3 Eff ectuez le paramét rage initial de
l’appareil en suivant les
instructions de SongPal.
4 Lancez l’application Compatible
avec Google Cast sur l’appareil,
puis choisissez ce système pour
lire du contenu.
Remarque
Vous ne pouvez pas utiliser Google Cast
lorsque l’affichage de la façade « GOOGLE
CAST UPDATING ». Attendez que la mise à
jour soit terminée, puis réessayez.
34
FR
Page 97

Autres fonctions
Utilisation de la fonction
Contrôle pour HDMI pour
« BRAVIA » Sync
Cette fonction est disponible sur les
téléviseurs prenant en charge la
fonction « BRAVIA » Sync.
En connectant les produits Sony
compatibles avec la fonction Contrôle
pour HDMI via un câble HDMI,
l’opération est simplifiée avec les
fonctionnalités ci-dessous.
Vous pouvez activer la fonction Contrô le
pour HDMI en mettant [Contrôle pour
HDMI] sur [Marche] (page 29).
Remarque
Pour utiliser la fonction « BRAVIA » Sync,
assurez-vous d’activer le système et tous
les appareils connectés une fois la
connexion HDMI effectuée.
En fonction des réglages de l’appareil
connecté, il est possible que la fonction
Contrôle pour HDMI ne fonctionne pas
correctement. Reportez-vous au mode
d’emploi de l’appareil.
Contrôle pour HDMI - Réglage
facile
Vous pouvez définir automatiquement
la fonction [Contrôle pour HDMI] du
système en activant le réglage
correspondant sur le téléviseur.
« DONE » apparaît à l’affichage de la
façade lorsque - Réglage facile est
terminé.
Remarque
Vous pouvez régler la fonction [Contrôle
pour HDMI] manuellement si les réglages
ci-dessus ne fonctionnent pas. Pour plus
de détails, reportez-vous à « [Réglages
HDMI] » (page 29).
Mise hors tension du système
Lorsque vous éteignez le téléviseur, le
système et l’appareil connecté
s’éteindront automatiquement.
Remarque
Le système ne s’éteint pas
automatiquement lorsqu’il lit de la
musique sur le système.
Lecture une touche
Lorsque vous reproduisez des contenus
sur un appareil (lecteur Blu-ray Disc™,
« PlayStation®4 », etc.) connecté au
système avec un câble HDMI, le système
et le téléviseur s’allument
automatiquement et l’entrée du
système passe à l’entrée HDMI
pertinente.
Remarque
Il est possible que cette fonction ne
s’applique pas à certains appareils.
Si vous réglez [Standby Through] sur
[Auto] ou [Marche] (page 29) et que vous
reproduisez ensuite les contenus sur un
appareil connecté lorsque le système est
en mode veille, le son et l’image ne
peuvent être reproduits que par le
téléviseur tandis que le système reste en
mode veille.
Contrôle audio du système
Si vous allumez le système lorsque vous
regardez la télévision, le son du
téléviseur sera émis par les hautparleurs du système automatiquement.
Le volume du système sera réglé
lo rs qu e v ou s r ég le z l e v ol um e à l ’a id e d e
la télécommande du téléviseur.
Si le son du téléviseur a été émis par les
haut-parleurs du système la dernière
fois que vous avec regardé la télévision,
le système sera mis en marche
automatiquement lorsque vo us allumez
de nouveau le téléviseur.
35
FR
Page 98

Vous pouvez aussi utiliser cette
fonctionnalité à l’aide de la fonction
Double image (Picture and Picture, PAP)
sur votre téléviseur.
Si l’entrée [TV], [HDMI1], [HDMI2] ou
[HDMI3] est sélectionnée, le son peut
être émis à partir du système.
Si une entrée autre que [TV], [HDMI1],
[HDMI2] ou [HDMI3] est sélectionnée,
le son n’est émis qu’a partir du
téléviseur lorsque la fonction Double
image est utilisée. Si vous désactivez
la fonction Double image, le son est
émis par le système.
Audio Return Channel
Vous pouvez profiter du son du
téléviseur via le système en utilisant un
simple câble HDMI. Pour obtenir plus de
détails sur le réglage, consultez la
section « [Audio Return Channel] »
(page 29).
Synchronisation de l’annulation
de l’écho
Vous pouvez réduire l’écho lorsque
vous utilisez la fonction Social Viewing
tout en regardant des programmes de
télévision. La conversation devient plus
claire.
Si l’entrée actuellement sélectionnée
est [TV], [HDMI1], [HDMI2] ou [HDMI3],
l’entrée passe automatiquement à
l’entrée [TV]. Le son de Social Viewing
et du programme de télévision est
émis par le système.
Si l’entrée sélectionnée est différente
de [TV], [HDMI1], [HDMI2] ou [HDMI3],
le son de Social Viewing et du contenu
de lecture sort du téléviseur.
Remarque
Cette fonctionnalité ne fonctionne
qu’avec les téléviseurs compatibles avec
la fonction Social Viewing. Pour obtenir
plus de détails, reportez-vous au mode
d’emploi de votre téléviseur.
Assurez-vous de régler les paramètres de
sortie audio sur votre téléviseur pour que
le son puisse être reproduit à travers le
système.
La fonction Synchronisation de
l
’annulation de l’écho réalise une
fonction qui est la propriété de Sony.
Cette fonction ne fonctionne pas avec des
appareils d’autres marques.
Commande du Home Theatre
Si un téléviseur compatible avec
commande du Home Theatre est
connecté au système, une icône pour
les applications basées sur Internet
apparaît sur le téléviseur connecté.
Vous pouvez modifier les paramètres du
système (vous pouvez par exemple
changer une entrée ou un champ
sonore) à l’aide de la télécommande de
votre téléviseur.
Remarque
Votre téléviseur doit être connecté à
Internet pour utiliser la fonction de
commande du Home Theatre.
La fonction de commande du Home
Theatre réalise une fonction qui est la
propriété de Sony. Cette fonction ne
fonctionne pas avec des appareils
d’autres marques.
Suivi langue
Lorsque vous modifiez la langue
d’affichage du téléviseur, la langue
d’affichage du système est également
modifiée.
36
FR
Page 99

Autres fonctions
Remarques à propos des
connexions HDMI
Utilisez un Câble HDMI haute vitesse.
Si vous utilisez un câble HDMI
standard, il est possible que les
contenus de 1080p, Deep Color, 3D et
4K ne s’affichent pas correctement.
Utilisez un câble HDMI certifié. Utilisez
un Câble HDMI haute vitesse Sony
avec le logo du type de câble.
Nous ne vous recommandons pas
d’utiliser un câble de conversion
HDMI-DVI.
Les signaux audio (fréquence
d’échantillonnage, longueur binaire,
etc.) transmis par une prise HDMI
peuvent être supprimés par l’appareil
connecté.
Le son peut être interrompu lorsque la
fréquence d’échantillonnage ou le
nombre de canaux des signaux de
sortie audio de l’appareil de lecture
sont commutés.
Lorsque l’entrée [TV] est sélectionnée,
les signaux vidéo via une des prises
HDMI IN 1/2/3 sélectionnés la dernière
fois sont reproduits à partir de la prise
HDMI OUT (ARC).
Ce système est compatible avec la
transmission Deep Color, « x.v.Color »,
3D et 4K.
Pour lire des contenus 3D, connectez
un téléviseur compatible avec la
technologie 3D et un lecteur vidéo
(lecteur Blu-ray Disc™,
« PlayStation®4 », etc.) au système à
l’aide de Câbles HDMI haute vitesse,
utilisez des lunettes 3D et reproduisez
un Blu-ray Disc™ compatible avec la
technologie 3D, etc.
Pour afficher des contenus 4K, le
téléviseur et les lecteurs qui sont
connectés au système doivent être
compatibles avec les contenus 4K.
Reproduction d’un son
diffusé en multiplex
(Dual Mono)
Vous pouvez écouter un son diffusé en
multiplex lorsque le système reçoit un
signal diffusé en multiplex Dolby Digital.
Remarque
Pour recevoir un son Dolby Digital, vous
devez connecter un téléviseur ou un autre
appareil sur la pr ise TV (DIGITAL IN) avec un
câble optique numérique.
Si la prise HDMI IN de votre téléviseur est
compatible avec la fonction Audio Return
Channel (page 29), vous pouvez recevoir
un signal Dolby Digital via un câble HDMI.
Appuyez plusieurs fois sur la touche
AUDIO jusqu’à ce que le signal
souhaité apparaisse sur l’affichage de
la façade.
«MAIN» : Le son de la langue
principale est reproduit.
«SUB»: Le son de la langue
secondaire est reproduit.
«MN/SB»: Un mixage des langues
principale et secondaire est reproduit.
Désactivation des
touches de la barre de
haut-parleurs
(Verrouillage enfant)
Vous pouvez désactiver les touches de
la barre de haut-parleurs (sauf )
pour éviter toute manipulation
accidentelle, par exemple par un enfant.
Assurez-vous d’utiliser les touches sur la
barre de haut-parleurs pour réaliser
cette opération.
37
FR
Page 100

En maintenant appuyé INPUT,
appuyez sur VOL –, VOL + et VOL –
dans cet ordre.
« LOCK » apparaît sur l’affichage de la
façade.
Vous ne pouvez utiliser le système qu’à
l’aide de la télécommande.
Pour annuler, tout en maintenant
appuyé INPUT, appuyez sur VOL –,
VOL + et VOL – dans cet ordre.
« UNLCK » apparaît sur l’affichage de la
façade.
Réglage de la luminosité
Vous pouvez changer la luminosité de
l’affichage de la façade, et du voyant
DEL bleu.
Appuyez plusieurs fois sur DIMMER.
Vous pouvez choisir « OFF », « DIM1 » ou
« DIM2 ».*
* La luminosité pour les réglages « DIM1 »
et « DIM2 » est identique.
Remarque
L’affichage de la façade s’éteint lorsque
« DIM2 » est sélectionné. Il s’allume
automatiquement lorsque vous appuyez
sur une touche et s’éteint de nouveau si
vous ne commandez pas le système
pendant environ 10 secondes. Cependant,
dans certains cas, l’affichage de la façade
peut s’éteindre.
[Contrôle pour HDMI] dans les
[Réglages HDMI] est réglé sur [Non]
(page 29).
[Démarrage Rapide/Attente Réseau]
est réglé sur [Non] (page 29).
[Démarrage à distance] est réglé sur
[Non] (page 31).
Activation de la fonction
répéteur IR (lorsque vous
ne pouvez pas
commander le
téléviseur)
Lorsque la barre de haut-parleurs
bloque le capteur de la télécommande
du téléviseur, cette de rnière peut ne pas
fonctionner. Dans ce cas, activez la
fonction répéteur IR du système.
Vous pouvez contrôler le téléviseur avec
la télécommande du téléviseur, en
envoyant le signal distant depuis
l’arrière de la barre de haut-parleurs.
Économie d’énergie en
mode veille
Vérifiez que vous avez effectué les
réglages suivants :
[Attente Bluetooth] est réglé sur [Non]
(page 27).
FR
38
 Loading...