

Page 1

Sound Bar
Operating Instructions
HT-MT300/MT301
Page 2

WARNING
Do not install the appliance in a
confined space, such as a bookcase or
built-in cabinet.
To reduce the risk of fire, do not cover
the ventilation opening of the appliance
with newspapers, tablecloths, curtains,
etc.
Do not expose the appliance to naked
flame sources (for example, lighted
candles).
To reduce the risk of fire or electric
shock, do not expose this appliance to
dripping or splashing, and do not place
objects filled with liquids, such as vases,
on the appliance.
The unit is not disconnected from the
mains as long as it is connected to the
AC outlet, even if the unit itself has been
turned off.
As the main plug is used to disconnect
the unit from the mains, connect the
unit to an easily accessible AC outlet.
Should you notice an abnormality in the
unit, disconnect the main plug from the
AC outlet immediately.
connection to host computers and/or
peripherals.
For the Bar Speaker
The nameplate is located on the bottom
of the Bar Speaker.
For the AC adapter
Labels for AC adapter Model No. and
Serial No. are located at the bottom of
AC adapter.
For the customers in Europe
Notice for customers: the
following information is only
applicable to equipment sold in
countries applying EU directives.
This product has been manufactured by
or on behalf of Sony Corporation, 1-7-1
Konan Minato-ku Tokyo, 108-0075
Japan. Inquiries related to product
compliance based on European Union
legislation shall be addressed to the
authorized representative, Sony
Belgium, bijkantoor van Sony Europe
Limited, Da Vincilaan 7-D1, 1935
Zaventem, Belgium. For any service or
guarantee matters, please refer to the
addresses provided in the separate
service or guarantee documents.
As the mai n plug o f AC p ower adapte r is
used to disconnect the AC power
adapter from the mains, connect it to an
easily accessible AC outlet. Should you
notice an abnormality in it, disconnect it
from the AC outlet immediately.
Do not expose batteries or appliances
with battery-installed to excessive heat,
such as sunshine and fire.
Indoor use only.
Recommended cables
Properly shielded and grounded cables
and connectors must be used for
GB
2
Hereby, Sony Corp., declares that this
equipment is in compliance with the
essential requirements and other
relevant provisions of Directive 1999/5/
EC.
For details, please access the following
URL:
http://www.compliance.sony.de/
This equipment has been tested and
found to comply with the limits set out
in the EMC regulation using a
connection cable shorter than 3 meters.
Page 3

Disposal of Old
Electrical &
Electronic
Equipment
(Applicable in the
European Union
and other
European
countries with
separate collection systems)
This symbol on the product or on its
packaging indicates that this product
shall not be treated as household waste.
Instead it shall be handed over to the
applicable collection point for the
recycling of electrical and electronic
equipment. By ensuring this product is
disposed of correctly, you will help
prevent potential negative
consequences for the environment and
human health, which could otherwise
be caused by inappropriate waste
handling of this product. The recycling
of materials will help to conserve natural
resources. For more detailed
information about recycling of this
product, please contact your local Civic
Office, your household waste disposal
service or the shop where you
purchased the product.
Disposal of waste
batteries (applicable
in the European Union
and other European
countries with
separate collection
systems)
This symbol on the battery or on the
packaging indicates that the battery
provided with this product shall not be
treated as household waste.
On certain batteries this symbol might
be used in combination with a chemical
symbol. The chemical symbols for
mercury (Hg) or lead (Pb) are added if
the battery contains more than 0.0005%
mercury or 0.004% lead.
By ensuring these batteries are
disposed of correctly, you will help
prevent potentially negative
consequences for the environment and
human health which could otherwise be
caused by inappropria te waste handling
of the battery. The recycling of the
materials will help to conserve natural
resources.
In case of products that for safety,
performance or data integrity reasons
require a permanent connection with an
incorporated battery, this battery
should be replaced by qualified service
staff only.
To ensure that the battery will be
treated properly, hand over the product
at end-of-life to the applicable
collection point for the recycling of
electrical and electronic equipment.
For all other batteries, please view the
section on how to remove the battery
from the product safely. Hand the
battery over to the applicable collection
point for the recycling of waste
batteries.
For more detailed information about
recycling of this product or battery,
please contact your local Civic Office,
your household waste disposal service
or the shop where you purchased the
product.
For the customers in Australia or
New Zealand
It should be installed and operated with
at least 20 cm and more between the
radiator and person’s body (excluding
extremities: hands, wrists, feet and
ankles).
GB
3
Page 4

Table of Contents
Basic Setup
About these operating
instructions ............................. 4
What’s in the Box .......................... 5
Guide to Parts and Controls ......... 6
Listening to the Sound
Listening to a TV and Other
Devices ...................................13
Listening to Music on a USB
Device ....................................14
Selecting the Sound Effect
Setting the Sound Effect that is
Tailored to Sound Sources ....16
Enjoying Clear Sound with Low
Volume at Midnight
(NIGHT) ...................................16
Making Dialogues Clearer
(VOICE) ................................... 17
Making Sound with Low Volume
Easy to Hear by Compressing
Dynamic Range ...................... 17
Adjusting the Volume of the
Subwoofer .............................18
Listening to Music/Sound
with the BLUETOOTH Function
Listening to Music from a Mobile
Device ....................................19
Listening to Music on the Mobile
Device with SongPal .............. 21
Turning the System On by
Operating the BLUETOOTH
Device ....................................22
Startup Guide
(separate
document)
Using the Various Functions
Activating Wireless Transmission
Between Specific Units
(SECURE LINK) ........................23
Enjoying Multiplex Broadcast Sound
(AUDIO) ................................. 24
Saving Power Consumption ....... 24
Optimizing the Subwoofer Sound
When Installing under a
Sofa ....................................... 25
Setting the Attenuation Function for
the ANALOG IN and TV IN
(OPTICAL) Jacks ..................... 26
Troubleshooting
Troubleshooting ...........................27
Resetting the System .................. 30
Additional Information
Specifications ...............................31
Playable Types of Files .................33
Supported Input Audio
Formats ..................................33
On BLUETOOTH
Communication .................... 34
Precautions ................................. 35
About these operating instructions
•The instructions in these Operating
Instructions describe the controls on
the remote control.
•Some illustrations are presented as
conceptual drawings, and may be
different from the actual products.
•The default settings are underlined on
each feature description.
GB
4
Page 5

What’s in the Box
•Bar Speaker (1)
•Subwoofer (1)
• AC adapter (1)
• AC power cord (mains lead) (1)
–U.K./Ireland models
– Australia/New Zealand models
• Remote control (1)
• R03 (size AAA) battery (2)
• Optical digital cable (1)
• Speaker pad for the subwoofer (4)
•Startup Guide
• Operating Instructions
GB
5
Page 6

Guide to Parts and Controls
Details are omitted from the illustrations.
Bar Speaker (Main Unit)
Front
Remote control sensor
Point the remote control at the
remote control sensor to operate
the system.
N-Mark (page 20)
When using the NFC function, touch
your NFC-compatible device to the
mark.
(input select) button
(page 13)
BLUETOOTH PAIRING button
(page 19)
+/– (volume) buttons
GB
6
(power) button
Turns on the system or sets it to
standby mode.
Indicators
For details, see “About the
indicators on the main unit”
(page 7).
Page 7
About the indicators on the main unit
Lighting and flashing of the indicator(s) on the main unit indicate the input or status
of the input device.
Indicators Status
• Lights: TV input is selected.
• Flashes once: While changing the volume/subwoofer volume.
• Lights in blue: BLUETOOTH connection is established (BLUETOOTH input is
selected).
• Flashes once: While changing the volume/subwoofer volume.
• Flashes quickly in blue: During pairing standby status.
• Flashes in blue: BLUETOOTH connection is being attempted.
• Lights: USB input is selected.
• Flashes once: While changing the volume/subwoofer volume.
• Flashes quickly: While reading data of the connected USB device.
• Flashes twice repeatedly: When connecting an unsupported device.
• Lights: Analog input is selected.
• Flashes once: While changing the volume/subwoofer volume.
• Light(s): Sound effect is selected. (page 16)
The indicators flash when tu rning on/off the function setting or operating the remote
control.
Indicators Status
• Flash twice: One of the following functions is set to on.
–Dolby DRC (page17)
– BLUETOOTH standby (page 22)
– Auto standby (page 24)
– Sofa mode (page 25)
– Attenuation (page 26)
• Flashes twice: One of the following functions is set to off.
–Dolby DRC (page17)
– BLUETOOTH standby (page 22)
– Auto standby (page 24)
– Sofa mode (page 25)
– Attenuation (page 26)
• Flash twice: The audio channel is set to Main (page 24) or one of the following
functions is set to on.
–Night mode (page16)
–Voice mode (page17)
• Light for 2 seconds and turn off: The sound effect is set to CLEAR AUDIO+.
• Flash alternately: The subwoofer is attemptin g to connect to the system with the
Secure Link function (page 23).
• Flashes twice: The audio channel is set to Sub (page 24) or one of the following
functions is set to off.
–Night mode (page16)
–Voice mode (page17)
GB
7
Page 8

Indicators Status
• Flashes twice: The audio channel is set to Main/S ub (page 24).
• Flash three times: The volume/subwoofer volume level is set to
maximum/minimum.
• Flash repeatedly: The sound is muted.
• Flash for 10 seconds and the system is turned off: The
protection feature is activated (page 30).
• Flash slowly: The system enters standby mode by the
auto standby function.
GB
8
Page 9
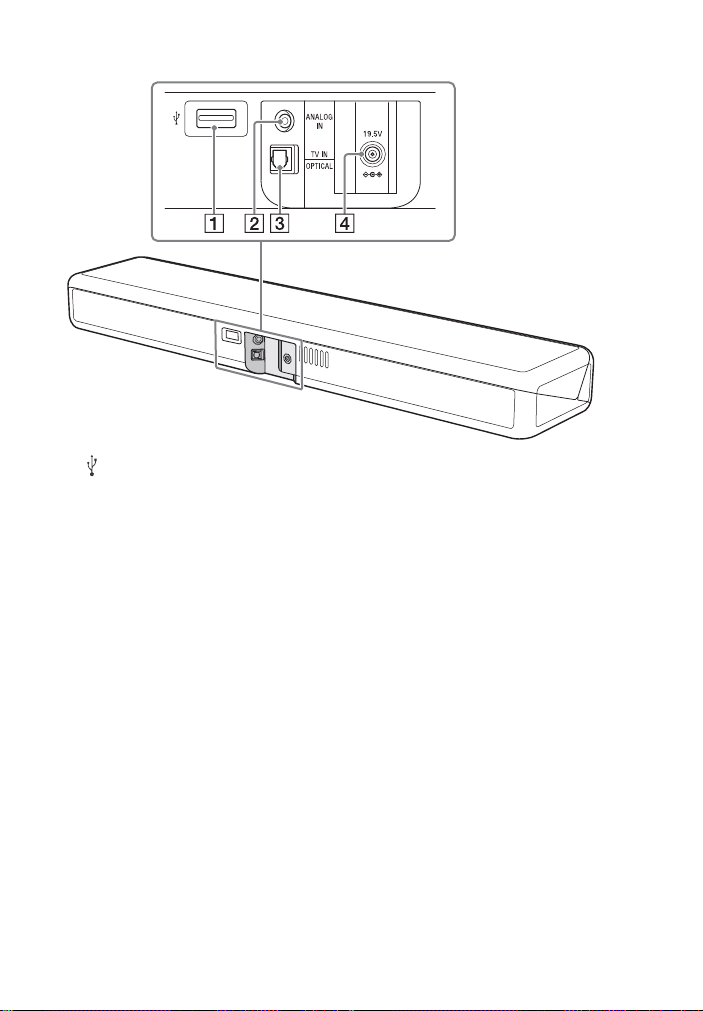
Rear
(USB) port (page 14)
ANALOG IN jack
TV IN (OPTICAL) jack
DC IN jack
GB
9
Page 10

Subwoofer
(power) button
Turns on the subwoofer or sets it
to standby mode.
Power indicator
– Lights in red: The subwoofer is in
standby mode
– Lights in green: The subwoofer is
connected to the system
– Lights in orange: The subwoo fer is
connected to the system with the
Secure Link function
– Flashes in green: The subwoofer is
attempting to connect to the
system
– Flashes in orange: The subwoofer
is attempting to connect to the
system with the Secure Link
function
– Flashes in red: The protection
feature of the subwoofer is
activated (page 28).
SECURE LINK button (page 23)
Ventilation holes
For safety, do not block the
ventilation holes.
10
GB
Page 11

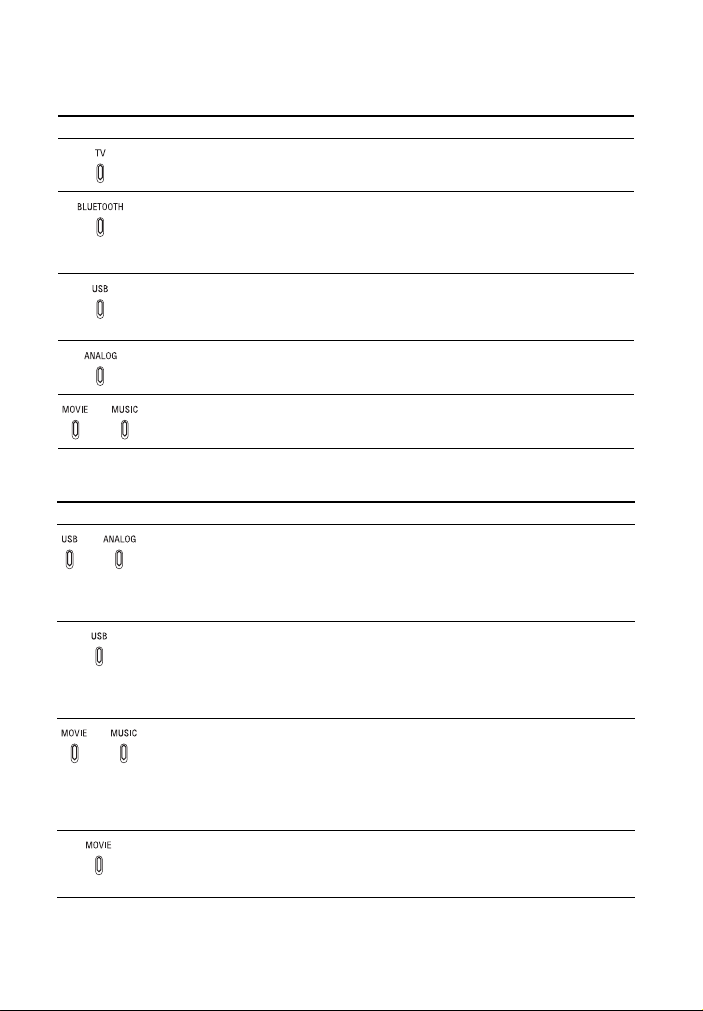
Remote Control
Some buttons function differently
depending on how long the button is
pressed. The icons below indicate how
long to press the button.
• : Press the button.
• : Press and hold the button for
five seconds.
TV (page 13)
Selects the TV connected to the
TV IN (OPTICAL) jack for output
sound.
BLUETOOTH (page 20)
Activates the BLUETOOTH
function on the system.
USB (page 14)
Selects the USB connected to the
(USB) port for output sound.
ANALOG
: Selects the TV connected to
the ANALOG IN jack for output
sound. (page 13)
: Turns on/off the audio
attenuation function. (page 26)
(volume) +*/–
Adjusts the volume.
SW (subwoofer volume) +/–
(page 18)
Adjusts the volume of the
subwoofer.
/ (previous/next)
(page 14, 19)
Go to the beginning of the
previous or next file.
– + (select) (page 14)
Switches between previous and
next folder to be played for USB
playback.
CLEAR AUDIO+
: Selects CLEAR AUDIO+ for the
sound effect. (page 16)
: Activates the secure link
mode. (page 23)
(power)
Turns on the system or sets it to
standby mode.
GB
11
Page 12

AUDIO*
: Selects the audio channel for
Dolby Digital multiplex broadcast.
(page 24)
: Turns on/off the Dolby DRC
function. (page 17)
VOICE
: Turns on/off the voice mode.
(page 17)
: Turns on/off the sofa mode.
(page 25)
NIGHT
: Turns on/off the night mode.
(page 16)
: Turns on/off the
BLUETOOTH standby mode.
(page 22)
(muting)
Turns off the sound temporarily.
(play/pause)* (page 14, 19)
Pauses or resumes playback.
MOVIE/MUSIC
: Selects MOVIE or MUSIC for
the sound effect. (page 16)
: Turns on/off the auto
standby function. (page 24)
*The AUDIO, , and + buttons have
a tactile dot. Use it as a guide during
operation.
12
GB
Page 13

Listening to the Sound
Listening to the Sound
TV
BLUETOOTH
USB
ANALOG
SW +/–
+/–
Listening to a TV and Other Devices
1 Press TV, ANALOG, BLUETOOTH,
or USB to select the input that the
desired device is connected.
The indicator of the selected input
on the main unit lights up.
TV
TV that is connected to the TV IN
(OPTICAL) jack
ANALOG
TV that is connected to the ANALOG IN
jack
BLUETOOTH
BLUETOOTH device that supports A2DP
For details, see “Listening to Music/
Sound with the BLUETOOTH Function”
(page 19).
USB
USB device that is connected to the
(USB) port
For details, see “Listening to Music on a
USB Device” (page 14).
2 Adjust the volume.
• Adjust the volume by pressing
+/– on the remote control.
• Adjust the subwoofer volume by
pressing SW +/– on the remote
control (page 18).
Tip
If you press on the main unit, the
device changes cyclically as follows.
TV BLUETOOTH USB ANALOG
13
GB
Page 14

Listening to Music on a
USB
— +
SW +/–
+/–
/
First
hierarchy
Second
hierarchy
: Folder
: Music file
USB Device
You can play music files stored on a
connected USB device.
For playable types of files, see “Playable
Types of Files” (page 33).
1 Connect the USB device to the
(USB) port.
4 Press – + to switch between
previous and next folder to be
played.
You can go to the beginning of the
previous or next file by using /
on the remote control.
5 Adjust the volume.
• Adjust the volume by pressing
+/– on the remote control.
• Adjust the subwoofer volume by
pressing SW +/– on the remote
control (page 18).
Note
Do not remove the USB device during
operation. To avoid data corruption or
damage to the USB device, turn the system
off before connecting or removing the USB
device.
Playback Order of Music
If there is a folder on the USB device,
music files are played in order from the
music files on the first hierarchy.
The playback order of music files differs
depending on the file system of the USB
device.
2 Press USB.
3 Press (play/pause).
GB
14
Page 15

Listening to the Sound
File system Playback order of the folder
FAT32 Recorded date and time
NTFS Folder or file name order
Tip
You can select the playback method by
using SongPal (page 21).
and music file
order (old to new)
15
GB
Page 16

Selecting the Sound Effect
MOVIE/MUSIC
CLEAR AUDIO+
NIGHT
Setting the Sound Effect that is Tailored to Sound Sources
You can easily enjoy pre-programmed
sound effects that are tailored to
different kinds of sound sources.
Press CLEAR AUDIO+ or MOVIE/MUSIC
to select the sound effects.
When selecting MOVIE or MUSIC, press
MOVIE/MUSIC repeatedly.
CLEAR AUDIO+
You can enjoy the sound with Sonyrecommended sound field. Sound field is
automatically optimized according to
playback content and function.
The MOVIE and MUSIC indicators light up for
2 seconds and turn off.
MOVIE
Sounds are played back with surround
effects, and they are realistic and powerful,
making them suitable for movies.
The MOVIE indicator lights up.
MUSIC
Sound effects are optimized for listening to
music.
The MUSIC indicator lights up.
GB
16
Enjoying Clear Sound with Low Volume at Midnight (NIGHT)
You can compresses sound in
accordance with the information
contained in the content by setting the
night mode to on.
Sound is output at low volume with
minimum loss of fidelity and clarity of
dialogue.
Press NIGHT to set the function to on
or off.
Night mode on
The MOVIE and MUSIC indicators flash twice.
Night mode off
The MOVIE indicator flashes twice.
Note
When you turn the system off, the night
mode is set to off automatically.
Page 17

Selecting the Sound Effect
Making Dialogues
VOICE
AUDIO
Clearer (VOICE)
You can make dialogs clearer by setting
the voice mode to on.
Press VOICE to set the function to on
or off.
Voice mode on
The MOVIE and MUSIC indicators flash twice.
Voice mode off
The MOVIE indicator flashes twice.
Making Sound with Low Volume Easy to Hear by Compressing Dynamic Range
This function works only when playing
the Dolby Digital signal of the device
that is connected to the TV IN (OPTICAL)
jack. When you set Dolby DRC (Dynamic
Range Control) to on, dynamic range of
the audio signal (range between the
maximum and minimum volume) is
compressed and sound with low
volume is easy to hear.
Hold down AUDIO for 5 seconds to set
the function to on or off.
Dolby DRC on
The USB and ANALOG indicators flash twice.
Dolby DRC off
The USB indicator flashes twice.
17
GB
Page 18

Adjusting the Volume of
SW +/–
the Subwoofer
The subwoofer is designed for playback
of bass or low frequency sound.
Press SW (subwoofer volume) +/–
to adjust the volume of the
subwoofer.
Note
When the input source does not contain
much bass sound, such as in TV programs,
the bass sound from the subwoofer may
be difficult to hear.
18
GB
Page 19

Listening to Music/Sound with the BLUETOOTH Function
Listening to Music/Sound with the
BLUETOOTH
BLUETOOTH
indicator
BLUETOOTH
PAIRING
BLUETOOTH Function
Listening to Music from a Mobile Device
You can listen to music stored on a
mobile device such as a smartphone or
tablet via a wireless connection by
connecting the system and the mobile
device with the BLUETOOTH function.
When connecting to the mobile device
with the BLUETOOTH function, you can
operate by simply using the supplied
remote control without turning the TV
on.
Listening to Music by Pairing
with a Mobile Device
1 Press BLUETOOTH PAIRING on the
main unit.
The system enters the pairing mode
and the BLUETOOTH indicator
flashes quickly.
3 Make sure that the BLUETOOTH
indicator on the main unit lights in
blue.
A connection between the system
and mobile device has been
established.
4 Start audio playback with the
music app on the connected
mobile device.
Sound is output from the main unit.
5 Adjust the volume.
• Adjust the volume by pressing
+/– on the remote control.
• Adjust the subwoofer volume by
pressing SW +/– on the remote
control (page 18).
• and / on the remote
control can be used for the
BLUETOOTH function.
Notes
• You can pair up to 10 BLUETOOTH
devices. If the 11th BLUETOOTH device is
paired, the least recently connected
device will be replaced by the new one.
• Perform pairing for the second and
subsequent mobile devices.
Tip
You can check the connection status of the
BLUETOOTH function by checking the
BLUETOOTH indicator status (page 7).
2 Turn on the BLUETOOTH function,
and then select “HT-MT300/301”
after searching fo r it on the mobile
device.
If a Passkey is requested, enter
“0000.”
19
GB
Page 20

Listening to Music from the
BLUETOOTH
SW +/–
+/–
BLUETOOTH
indicator
Paired Mobile Device
1 Turn the BLUETOOTH function of
the mobile device to on.
2 Press BLUETOOTH.
The system automatically
reconnects to the BLUETOOTH
device it was most recently
connected to.
3 Make sure that the BLUETOOTH
indicator lights in blue.
A connection between the system
and mobile device has been
established.
4 Start audio playback with the
music app on the connected
mobile device.
Sound is output from the main unit.
5 Adjust the volume.
• Adjust the volume by pressing
+/– on the remote control.
• Adjust the subwoofer volume by
pressing SW +/– on the remote
control (page 18).
Connecting to a Mobile
Device by One-Touch
Function (NFC)
By holding an NFC-compatible mobile
device such as a smartphone or tablet
near the N mark on the main unit, the
system is turned on automatically, then
pairing and BLUETOOTH connection are
performed automatically.
Compatible devices
Smartphones, tablets, and music players
with the NFC function built-in
(OS: Android™ 2.3.3 or later, excluding
Android 3.x)
1 Turn on the NFC function of the
mobile device.
2 Touch the N mark on the main unit
with the mobile device.
Keep touching until the mobile
device vibrates and message
appears on the mobile device.
Follow the on-screen instructions to
complete pairing of the main unit
and mobile device.
20
GB
Page 21

Listening to Music/Sound with the BLUETOOTH Function
3 Make sure that the BLUETOOTH
indicator lights in blue.
A connection between the system
and mobile device has been
established.
4 Start audio playback with the
music app on the connected
mobile device.
Sound is output from the system.
5 Adjust the volume.
• Adjust the volume by pressing
+/– on the remote control.
• Adjust the subwoofer volume by
pressing SW +/– on the remote
control (page 18).
To stop playback by One-touch
function
Touch the N mark on the main unit with
the mobile device again.
BLUETOOTH will be disconnected.
Notes
• Depending on your device, you may need
to perform the following items on your
mobile device in advance.
– Turn on the NFC function.
– Install the “NFC Easy Connect”
application from Google Play™ and
start the application. (The application
may not be available in some countries/
regions.) For details, refer to the
operating instructions of your device.
• If your mobile device is a type that goes
into standby mode in response to
magnetic force, it may not be able to be
connected by NFC. When the One-touch
function does not work, connect it by
using the BLUETOOTH function (page 19).
Listening to Music on the Mobile Device with SongPal
What You can Do with
SongPal
SongPal is an application for controlling
compatible Sony audio devices using
the mobile device such as a smartphone
or tablet.
For details about SongPal, refer to the
following URL.
http://info.songpal.sony.net/help/
Installing SongPal onto your mobile
device provides the following.
Sound settings of the system
You can easily customize your sound, or
use the CLEAR AUDIO+ setting
recommended by Sony.
Enjoying music on the USB device
You can play music on a device
connected to the (USB) port on the
main unit.
You can perform and change the shuffle
and repeat playback settings from
SongPal only.
Note
What you can control with SongPal varies
depending on the connected device. The
specification and design of the application
may change without notice.
GB
21
Page 22

Using SongPal
NIGHT
1 Install the free SongPal app to the
mobile device.
Search for So ngPal at Google Play or
the App Store and install it onto
your mobile device.
2 Connect the system and mobile
device with the BLUETOOTH
function (page 19) or NFC function
(page 20).
3 Start SongPal.
4 Operate by following the SongPal
screen.
Note
Use SongPal of the latest version.
Turning the System On by Operating the BLUETOOTH Device
When the system has pairing
information, you can turn the system on
and listen to music from a BLUETOOTH
device even when the system is in
standby mode by setting the
BLUETOOTH standby mode to on.
Hold down NIGHT for 5 seconds to set
the function to on or off.
BLUETOOTH standby mode on
The USB and ANALOG indicators flash twice.
BLUETOOTH standby mode off
The USB indicator flashes twice.
22
Note
While the BLUETOOTH standby mode is on,
standby power consumption increases.
GB
Page 23

Using the Various Functions
Using the Various Functions
SECURE LINK
CLEAR AUDIO+
Activating Wireless Transmission Between Specific Units (SECURE LINK)
You can specify the wireless connection
to link the main unit to the subwoofer
using the Secure Link function. This
function can help prevent interference if
you use multiple wireless products or
your neighbors use wireless products.
1 Press SECURE LINK on the rear of
the subwoofer.
The power indicator on the
subwoofer flashes in orange.
2 Hold down CLEAR AUDIO+ for 5
seconds.
The USB and ANALOG indicators
flash twice, then the MOVIE and
MUSIC indicators flash alternately.
When the main unit is linked to the
subwoofer, the indicators stop
flashing.
If it failed, the MOVIE and MUSIC
indicators light up for 5 seconds. Try
the above operation again.
23
GB
Page 24

Enjoying Multiplex
AUDIO
MOVIE/MUSIC
Broadcast Sound (AUDIO)
Saving Power Consumption
You can enjoy multiplex broadcast
sound when the system receives a
Dolby Digital multiplex broadcast signa l.
Press AUDIO repeatedly.
The channel changes cyclically as
follows.
Sub Main/Sub
Main
Main
Outputs only the main channel.
The MOVIE and MUSIC indicators flash twice.
Sub
Outputs only the sub channel.
The MOVIE indicator flashes twice.
Main/Sub
Main sound is output from the left speaker
and sub sound is output from the right
speaker.
The MUSIC indicator flashes twice.
Note
To receive a Dolby Digital signal, you need
to connect a TV or other devices to the TV
IN (OPTICAL) jack with the optical digital
cable (supplied).
To use the system while saving power
consumption, change the following
settings.
Turn the System Off by
Detecting the Using State
When you set the auto standby function
to on, the system enters standby mode
automatically when you do not operate
the system for about 20 minutes and
the system is not receiving an input
signal.
Hold down MOVIE/MUSIC for 5
seconds to set the function to on or
off.
Auto standby on
The USB and ANALOG indicators flash twice.
The default setting for U.K./Ireland models is
on.
Auto standby off
The USB indicator flashes twice.
The default setting for Australia/New
Zealand models is off.
24
GB
Page 25

Using the Various Functions
Saving Power in Standby
VOICE
Mode
To save power consumption during the
standby mode, set the BLUETOOTH
standby mode to off (page 22).
The default setting is on.
Optimizing the Subwoofer Sound When Installing under a Sofa
You can optimize the sound of the
subwoofer that is installed under a sofa
by setting the sofa mode to on.
Hold down VOICE for 5 seconds to set
the function to on or off.
Sofa mode on
The USB and ANALOG indicators flash twice.
Sofa mode off
The USB indicator flashes twice.
25
GB
Page 26

Setting the Attenuation
ANALOG
Function for the ANALOG
IN and TV IN (OPTICAL)
Jacks
Distortion may occur when you listen to
a device connected to the ANALOG IN
and TV IN (OPTICAL) jacks. You can
prevent distortion by attenuating the
input level on the system.
Hold down ANALOG for 5 seconds to
set the function to on or off.
Attenuation on
The USB and ANALOG indicators flash twice.
Attenuation off
The USB indicator flashes twice.
26
GB
Page 27

Troubleshooting
Troubleshooting
Troubleshooting
If you experience any of the following
difficulties while using the system, use
this troubleshooting guide to help
remedy the problem before requesting
repairs. Should any problem persist,
consult your nearest Sony dealer.
Be sure to bring both your main unit and
subwoofer, even if it seems as though
only one has a problem, when you
request to repair.
Power
The system does not power up.
Check that the AC power cord (mains
lead) is connected securely.
Disconnect the AC power cord (mains
lead) from the wall outlet (mains),
and then reconnect after several
minutes.
The system is turned off
automatically.
The auto standby function is working.
Set the auto standby function to off
(page 24).
Sound
No TV sound is output from the
system.
If no sound is output from an optical
digital output jack, try the following.
– Connect the cable box or satellite
box directly to the TV IN (OPTICAL)
jack of the system.
– Connect the system and TV with an
analog audio cable (not supplied)
and switch the input of the system
to “ANALOG.”
Press the input button of the jack to
which you connected the TV
(page 13).
Increase the volume on the TV or
cancel muting.
Check the sound output of the TV.
Refer to the operating instructions of
the TV for the TV settings.
The system supports th e Dolby Digital
and PCM audio formats (page 33).
When you playback unsupported
format, set the digital audio out
setting of the TV (BRAVIA) to “PCM.”
For details, refer to the operating
instructions of your TV.
The sound is output from both the
system and the TV.
Mute the sound of the system or the
TV.
No sound or only a very low-level
sound of the device connected to
the system is heard from the
system.
Press + and check the volume
level (page 11).
or + to cancel the muting
Press
function (page 11).
Make sure the input source is
selected correctly. You should try
other input sources by pressing a
different input button on the remote
control (page 13).
Check that all the cables and cords of
the system and the connected device
are firmly inserted.
If the connected device supports up-
sampling feature, you need to turn it
off.
The surround effect cannot be
obtained.
Depending on the input signal and
the sound field setting, surround
sound processing may not work
effectively. The surround effect may
be subtle, depending on the program
or disc.
27
GB
Page 28

To play multi channel audio, check
the digital audio output setting on
the device connected to the system.
For details, refer to the operating
instructions supplied with the
connected device.
Subwoofer
No sound or only a very low-level
sound is heard from the subwoofer.
Press SW + to increase the
subwoofer volume (page 18).
Make sure that the power indicator
on the subwoofer is lit in green.
If the power indicator on the
subwoofer does not light, try the
following.
– Check that the AC power cord
(mains lead) of the subwoofer is
connected properly.
–Press (power) on the subwoofer
to turn on the power.
If the power indicator on the
subwoofer flashes slowly in green or
lights in red, try the following.
– Move the subwoofer to a location
near the main unit so that the power
indicator lights in green.
– Follow the steps in “Activating
Wireless Transmission Between
Specific Units (SECURE LINK)”
(page 23).
If the power indicator on the
subwoofer flashes in red, the
protection feature of the subwoofer is
activated. Press (power) on the
subwoofer to turn off the power and
check whether the ventilation holes
of the subwoofer are blocked or not.
A subwoofer is for reproducing bass
sound. In the case of input sources
that contain very little bass sound
components (i.e., a T V broadcast), the
sound from the subwoofer may be
difficult to hear.
The subwoofer is designed for
playback of bass sound. When the
input source does not contain much
of bass sound, as is the case with
most TV programs, the bass sound
may not be audible.
Set the night mode to off. For details,
see “Enjoying Clear Sound with Low
Volume at Midnight (NIGHT)”
(page 16).
Sound skips or has noise.
If there is a device nearby that
generates electromagnetic waves,
such as a wireless LAN or a
microwave oven in use, locate the
system apart from it.
If there is an obstacle between the
main unit and the subwoofer, move
or remove it.
Locate the main unit and the
subwoofer as close as possible.
Switch the wireless LAN frequency of
any nearby wireless LAN router or
personal computer to 5 GHz band.
Switch the TV, Blu-ra y Disc player, etc.
from wireless LAN to wired LAN.
USB Device Connection
The USB device is not recognized.
Try the following:
Turn the system off.
Remove and reconnect the USB
device.
Turn the system on.
Make sure that the USB device is
securely connected to the (USB)
port (page 14).
Check to see if the USB device or a
cable is damaged.
Make sure that the USB device is on.
If the USB device is connected via a
USB hub, disconnect it and connect
the USB device directly to the system.
Connect the USB device to the
ANALOG IN jack of the system using
an analog audio cable (not supplied).
28
GB
Page 29

Troubleshooting
Mobile Device Connection
BLUETOOTH connection cannot be
completed.
Make sure that the BLUETOOTH
indicator on the main unit is lit
(page 6).
Make sure the BLUETOOTH device to
be connected is turned on and the
BLUETOOTH function is enabled.
Bring this system and the
BLUETOOTH device closer together.
Pair this system and the BLUETOOTH
device again. You may need to cancel
the pairing with this system using
your BLUETOOTH device first.
Pairing cannot be achieved.
Bring this system and the
BLUETOOTH device closer together.
Make sure this system is not receiving
interference from a wireless LAN
device, other 2.4GHz wireless
devices, or a microwave oven. If a
device that generates
electromagnetic radiation is nearby,
move the device away from this
system.
Pairing may not be possible if other
BLUETOOTH devices are present
around the system. In this case, turn
off the other BLUETOOTH devices.
Sound of the connected
BLUETOOTH mobile device is not
output from the system.
Make sure that the BLUETOOTH
indicator on the main unit is lit
(page 6).
Bring this system and the
BLUETOOTH device closer together.
If a device that generates
electromagnetic radiation, such as a
wireless LAN device, other
BLUETOOTH devices, or a microwave
oven is nearby, move the device away
from this system.
Remove any obstacle between this
system and the BLUETO OTH device or
move this system away from the
obstacle.
Reposition the connected
BLUETOOTH device.
Switch the wireless LAN frequency of
any nearby wireless LAN router or PC
to 5 GHz range.
Increase the volume on the
connected BLUETOOTH device.
The sound is not in sync with the
image.
When you are watching movies, you
may hear the sound with a slight
delay from the image.
Remote Control
The remote control of this system
does not function.
Point the remote control at the
remote control sensor on the main
unit (page 6).
Remove any obstacles in the path
between the remote control and the
system.
Replace both batteries in the remote
control with new ones, if they are
weak.
Make sure you are pressing the
correct button on the remote control
(page 11).
The TV remote control does not
work.
Install the main unit so that it does
not obstruct the remote control
sensor of the TV.
29
GB
Page 30

Others
All indicators on the main unit flash
for 10 seconds and the system is
turned off.
The protection feature is activated.
Disconnect the AC power cord (mains
lead) and check the items below.
– Make sure that the ventilations of
the main unit are not covered and
turn on the system after a while.
– When the system is using the USB
connection, remove the USB device
and turn on the system. If the
system operates properly, the
current of the connected USB device
is over the maximum output current
of the system 500 mA, or the USB
device may have an abnormality.
Sensors of the TV do not work
properly.
The main unit may block some
sensors (such as the brightness
sensor), the remote control receiver
of your TV or the emitter for 3D
glasses (infrared transm ission) of a 3D
TV that supports the infrared 3D glass
system, or wireless communication.
Move the main unit away from the TV
within a range that allow those parts
to operate properly. For the locations
of the sensors and remote control
receiver, refer to the operating
instructions supplied with the TV.
The system does not work properly.
The system may be in demo mode. To
cancel demo mode, reset the system.
Press and hold (power) and – on
the main unit for more than 5 seconds
(page 30).
Resetting the System
If the system still does not operate
properly, reset the system as follows.
1 Press and hold and – on the
main unit for more than 5
seconds.
All indicators on the main unit flash
3 times, and the settings return to
their initial status.
2 Disconnect the AC power cord
(mains lead).
3 Connect the AC power cord (mains
lead), then press to turn on the
system.
4 Link the system to the subwoofer
(page 23).
Tip
The default settings are underlined on
each feature description.
30
GB
Page 31

Additional Information
Additional Information
Specifications
Bar Speaker (SA-MT300,
SA-MT301)
Amplifier section
POWER OUTPUT (rated)
Front L + Front R: 20 W + 20 W
(at 4 ohms, 1 kHz, 1% THD)
POWER OUTPUT (reference)
Front L/Front R speaker blocks: 25 W
(per channel at 4 ohms, 1 kHz)
Inputs
USB
ANALOG IN
TV IN (OPTICAL)
USB section
(USB) port:
Type A (For connecting USB memory)
BLUETOOTH section
Communication system
BLUETOOTH Specification version 4.2
Output
BLUETOOTH Specification Power
Class 1
Maximum communication range
Line of sight approx. 25 m
Frequency band
2.4 GHz band (2.4000 GHz -
2.4835 GHz)
Modulation method
FHSS (Freq Hopping Spread Spectrum)
Compatible BLUETOOTH profiles
A2DP 1.2 (Adv anced Audio Distribut ion
Profile)
AVRCP 1.6 (Audio Video Remote
Control Profile)
Supported Codecs
4)
SBC
Transmission range (A2DP)
20 Hz - 20,000 Hz (Sampling frequency
32 kHz, 44.1 kHz, 48 kHz)
1)
The actual range will vary depending on
factors such as obstacles between
devices, magnetic fields around a
microwave oven, static electricity,
cordless phone use, reception
sensitivity, the operating system,
software applications, etc.
2)
BLUETOOTH standard profiles indicate
the purpose of BLUETOOTH
communication between devices.
3)
Codec: Audio signal compression and
conversion format
4)
Abbreviation for Subband Codec
Front L/Front R speaker block section
Speaker system
Full range speaker system, Acoustic
suspension
Speaker
40 mm × 100 mm cone type
General
Power requirements
DC 19.5 V (using the supplied AC
adapter connected to AC 100 V - 24 0 V,
50 Hz/60Hz power supply)
Power consumption
On: 25 W
Standby mode: 0.5 W or less
BLUETOOTH Standby mode is set to
on: 1.8 W or less*
BLUETOOTH Standby mode is set to
off: 0.5 W or less
* The system will automatically enter
Power saving mode when there is no
BLUETOOTH pairing history, even if
the BLUETOOTH stand by mode is set
to on.
1)
2)
3)
Dimensions* (approx.) (w/h/d)
500 mm × 54 mm × 103 mm
* Not including projection portion
Mass (approx.)
1.4 kg
Compatible iPod/iPhone models
The compatible iPod/iPhone models are as
follows. Update your iPod/iPhone with the
latest software before using with the
system.
BLUETOOTH technology works with:
iPhone 7 Plus/iPhone 7/iPhone SE/iPhone
6s Plus/iPhone 6s/iPhone 6 Plus/
iPhone 6/iPhone 5s/iPhone 5c/iPhone 5
iPod touch (6th generation)/iPod touch
(5th generation)
GB
31
Page 32

Subwoofer (SA-WMT300,
SA-WMT301)
POWER OUTPUT (reference)
50 W (at 4 ohms, 100 Hz)
Speaker system
Subwoofer speaker system, Bass
reflex
Speaker
120 mm cone type
Power requirements
220 V - 240 V AC, 50 Hz/60 Hz
Power consumption
On: 20 W
Standby mode: 0.5 W or less
Dimensions* (approx.) (w/h/d)
95 mm × 383 mm × 365 mm
* Not including projection portion
Mass (approx.)
4.9 kg
Wireless transmitter/
receiver section
Frequency band
2.4 GHz (2.4000 GHz - 2.4835 GHz)
Modulation method
FHSS (Freq Hopping Spread Spectrum)
Design and specifications are subject to
change without notice.
32
GB
Page 33

Additional Information
Playable Types of Files
Codec Extension
MP3 (MPEG-1 Audio
Layer III)
WMA9 Standard .wma
LPCM .wav
Notes
• Some files may not play depending on
the file format, the file encoding, or the
recording condition.
• Some files edited on a PC may not play.
• The system does not play coded files such
as DRM and Lossless.
• The system can recognize the following
files or folders in USB devices:
– folder paths up to 128 characters long
– up to 200 folders (including root folder)
– up to 200 audio files/folders in each
folder
• Some USB devices may not work with this
system.
• The system can recognize Mass Storage
Class (MSC) devices.
.mp3
Supported Input Audio Formats
Audio formats supported by this system
are as follows.
•Dolby Digital
•Linear PCM 2ch
33
GB
Page 34

On BLUETOOTH Communication
• BLUETOOTH devices should be used
within approximately 10 meters
(33 feet) (unobstructed distance) of
each other. The effective
communication range may become
shorter under the following
conditions.
– When a person, metal object, wall or
other obstruction is between the
devices with a BLUETOOTH
connection
– Locations where a wireless LAN is
installed
– Around microwave ovens that are in
use
– Locations where other
electromagnetic waves occur
• BLUETOOTH devices and wireless LAN
(IEEE 802.11b/g/n) use the same
frequency band (2.4 GHz). When us ing
your BLUETOOTH device near a device
with wireless LAN capability,
electromagnetic interference may
occur. This could result in lower data
transfer rates, noise, or inability to
connect. If this happens, try the
following remedies:
– Use this system at least 10 meters
(33 feet) away from the wireless LAN
device.
– Turn off the power to the wireless
LAN device when using your
BLUETOOTH device within 10 meters
(33 feet).
– Install this system and BLUETOOTH
device as closer to each other as
possible.
• The radio waves broadcast by this
system may interfere with the
operation of some medical devices.
Since this interference may result in
malfunction, always turn off the po wer
on this system and BLUET OOTH device
in the following locations:
– In hos pitals, on trains, in airplanes , at
gas stations, and any place where
flammable gasses may be present
– Near automatic doors or fire alarms
• This system supports security
functions that comply with the
BLUETOOTH specification to ensure
secure connection during
communication using BLUETOOTH
technology. However, this security
may be insufficient depending on the
setting contents and other factors, so
always be careful when performing
communication using BLUETOOTH
technology.
• Sony cannot be held liable in any way
for damages or other loss resulting
from information leaks during
communication using BLUETOOTH
technology.
• BLUETOOTH communication is not
necessarily guaranteed with all
BLUETOOTH devices that have the
same profile as this system.
• BLUETOOTH devices connected with
this system must comply with the
BLUETOOTH specification prescribed
by the Bluetooth SI G, Inc., and must be
certified to comply. However, even
when a device complies with the
BLUETOOTH specification, there may
be cases where the characteristics or
specifications of the BLUETOOTH
device make it impossible to connect,
or may result in different control
methods, display or operation.
• Noise may occur or the audio may cut
off depending on the BLUETOOTH
device connected with this system,
the communications environment, or
surrounding conditions.
If you have any questions or problems
concerning your system, please consult
your nearest Sony dealer.
34
GB
Page 35

Additional Information
Precautions
On safety
• Should any solid object or liquid fall into
the system, unplug the system and have
it checked by qualified personnel before
operating it any further.
• Do not climb on the main unit and
subwoofer, as you may fall down and
injure yourself, or system damage may
result.
On power sources
• Before operating the system, check that
the operating voltage is identical to your
local power supply. The operating voltage
is indicated on the nameplate on the
bottom of the main unit.
• If you are not going to use the system for
a long time, be sure to disconnect the
system from the wall outlet (mains). To
disconnect the AC power cord (mains
lead), grasp the plug itself; never pull the
cord.
• One blade of the plug is wider than the
other for the purpose of safety and will fit
into the wall outlet (mains) only one way.
If you are unable to insert the plug fully
into the outlet, contact your dealer.
• AC power cord (mains lead) must be
changed only at a qualified service shop.
On heat buildup
Although the system heats up during
operation, this is not a malfunction.
If you continuously use this system at high
volume, the system temperature at the
rear and bottom rises considerably. To
avoid burning yourself, do not touch the
system.
On placement
• Place the system in a location with
adequate ventilation to prevent heat
buildup and prolong the life of the
system.
• Do not place the system near heat
sources or in a place subject to direct
sunlight, excessive dust, or mechanical
shock.
• Do not place anything on the top of the
main unit.
• If the system is being used in combination
with a TV, VCR, or tape deck, noise may
result and picture quality may suffer. In
such a case, place the system away from
the TV, VCR, or tape deck.
• Use caution when placing the system on a
surface that has been specially treated
(with wax, oil, polish, etc.), as staining or
discoloration of the surface may result.
• Take care to avoid any possible injury
from the corners of the main unit and
subwoofer.
• When installing the subwoofer under a
sofa, you may feel sick due to vibration of
the subwoofer. In this case, adjust the
subwoofer volume or install the
subwoofer in a location other than under
a sofa.
On operation
Before connecting other equipment, be
sure to turn off and unplug the system.
If you encounter color irregularity
on a nearby TV screen
Color irregularities may be observed on
certain types of TV.
• If color irregularity is observed...
Turn off the TV, then turn it on again after
15 to 30 minutes.
• If color irregularity is observed again...
Place the system further away from the
TV.
On cleaning
Clean the system with a soft, dry cloth. Do
not use any type of abrasive pad, scouring
powder, or solvent such as alcohol or
benzine.
If you have any question or problem
concerning your system, please consult
your nearest Sony dealer.
35
GB
Page 36

Copyrights and Trademarks
This system incorporates Dolby* Digital.
* Manufactured under license from Dolby
Laboratories.
Dolby, Dolby Audio and the double-D
symbol are trademarks of Dolby
Laboratories.
The BLUETOOTH
registered trademarks owned by Bluetooth
SIG, Inc. and any use of such marks by Sony
Corporation is under license. Other
trademarks and trade names are those of
their respective owners.
The N Mark is a trademark or registered
trademark of NFC Forum, Inc. in the United
States and in other countries.
Android and Google Play are trademarks of
Google Inc.
Apple, the Apple logo, iPhone, iPod, iPod
touch, and Retina are trademarks of Apple
Inc., registered in the U.S. and other
countries. App Store is a service mark of
Apple Inc.
“Made for iPod,” and “Made for iPhone”
mean that an electronic accessory has
been designed to connect specifically to
iPod or iPhone, respectively, and has been
certified by the developer to meet Apple
performance standards. Apple is not
responsible for the operation of this device
or its compliance with safety and
regulatory standards. Please note that the
use of this accessory with iPod or iPhone
may affect wireless performance.
“BRAVIA” logo is a trademark of Sony
Corporation.
®
word mark and logos are
Windows Media is either a registered
trademark or trademark of Microsoft
Corporation in the United States and/or
other countries.
This product is protected by certain
intellectual property rights of Microsoft
Corporation. Use or distribution of such
technology outside of this product is
prohibited without a license from Microsoft
or an authorized Microsoft subsidiary.
All other trademarks are trademarks of
their respective owners.
“ClearAudio+” is a trademark of Sony
Corporation.
MPEG Layer-3 audio coding technology
and patents licensed from Fraunhofer IIS
and Thomson.
GB
36
Page 37

Page 38

Page 39

Page 40

http://www.sony.net/
©2017 Sony Corporation Printed in Malaysia 4-688-010-22(1)
 Loading...