

Sony HT-FS30 Operating Instructions Manual

Home Theatre System
Operating Instructions
4-414-237-11 (1)
HT-FS30
WARNING
Do not install the appliance in a confined space, such as
a bookcase or built-in cabinet.
To reduce the risk of fire, do not cover the ventilation
opening of the apparatus with newspapers, tablecloths,
curtains, etc.
Do not place the naked flame sources such as lighted
candles on the apparatus.
To reduce the risk of fire or electric shock, do not
expose this apparatus to dripping or splashing, and do
not place objects filled with liquids, such as vases, on
the apparatus.
The unit is not disconnected from the mains as long as
it is connected to the AC outlet, even if the unit itself
has been turned off.
As the main plug is used to disconnect the unit from the
mains, connect the unit to an easily accessible AC
outlet. Should you notice an abnormality in the unit,
disconnect the main plug from the AC outlet
immediately.
Do not expose batteries or apparatus with batteryinstalled to excessive heat such as sunshine, fire or the
like.
In door use only.
Notice for customers: the following
information is only applicable to
equipment sold in countries applying EU
directives.
The manufacturer of this product is Sony Corporation,
1-7-1 Konan Minato-ku Tokyo, 108-0075 Japan. The
Authorized Representative for EMC and product safety
is Sony Deutschland GmbH, Hedelfinger Strasse 61,
70327 Stuttgart, Germany. For a ny service or guarantee
matters, please refer to the addresses given in separate
service or guarantee documents.
Disposal of Old Electrical
& Electronic Equipment
(Applicable in the
European Union and
other European
countries with separate
collection systems)
This symbol on the product or on
its packaging indicates that this
product shall not be treated as household waste. Instead
it shall be handed over t o the applicable collection point
for the re cycling of electri cal and electronic e quipment.
By ensuring this product is disposed of correctly, you
will help prevent potential negative consequences for
the environment and human health, which could
otherwise be caused by i nappropriate waste handling of
this product. The recycling of materials will help to
conserve natural resources. For more detailed
information about recycling of this product, please
contact your local Civic Office, your household waste
disposal service or the shop where you purchased the
product.
Disposal of waste
batteries (applicable in
the European Union and
other European
countries with separate
collection systems)
This symbol on the battery or on the packaging
indicates that the battery provided with this product
shall not be treated as household waste.
On certain batteries this symbol might be used in
combination with a chemical symbol. The chemical
symbols for mercury (Hg) or lead (Pb) are added if the
battery contains more than 0.0005% mercury or
0.004% lead.
By ensuring these batteries are disposed of correctly,
you will help prevent potentially negative
consequences for the environment and human health
which could otherwise be caused by inappropriate
waste handling of the battery. The recycling of the
materials will help to conserve natural resources. In
case of products that for safety, performance or data
integrity reasons require a permanent connection with
an incorporated battery, this battery should be replaced
by qualified service staff only. To ensure that the
battery will be treated properly, hand over the product
at end-of-life to the applicable collection point for the
recycling of electrical and electronic equipment. For all
other batteries, please view the section on how to
remove the battery from the product safely. Hand the
GB
2

battery over to the applicable collection point for the
recycling of waste batteries. For more detailed
information about recycling of this product or battery,
please contact your local Civic Office, your household
waste disposal service or th e shop where you purchas ed
the product.
Precautions
On safety
• Should any solid object or liquid fall into the system,
unplug the system and have it checked by qualified
personnel before operating it any further.
• Do not climb on the subwoofer, as you may fall down
and injure yourself, or system damage may result.
On power sources
• Before operating the system, check that the operating
voltage is identical to your local power supply. The
operating voltage is indicated on the nameplate at the
rear of the subwoofer.
• If you are not going to use the system for a long time,
be sure to disconnect the system from the wall outlet
(mains). To disconnect the AC power cord (mains
lead), grasp the plug itself; never pull the cord.
• AC power cord (mains lead) must be changed only at
the qualified service shop.
On heat buildup
Although the system heats up during operation, this is
not a malfunction. If you continuously use this system
at a large volume, the system temperature of the back
and bottom rises considerably. To avoid burning
yourself, do not touch the system.
On placement
• Place the system in a location with adequate
ventilation to prevent heat buildup and prolong the
life of the system.
• Do not place the system near heat sources, or in a
place subject to direct sunlight, excessive dust, or
mechanical shock.
• Do not place anything at the rear of the subwoofer that
might block the ventilation holes and cause
malfunctions.
• Do not cover the grill of the subwoofer.
• Do not place the system near equipment such as a TV,
VCR, or tape deck. (If the system is being used in
combination with a TV, VCR, or tape deck, and is
placed too close to that equipment, noise may result,
and picture quality may suffer. This is especially
likely when using an indoor antenna. Therefore, we
recommend using an outdoor antenna.)
• Use caution when placing the system on surfaces that
have been specially treated (wi th wax, oil, polish, etc.)
as staining or discoloration of the surface may result.
On operation
Before connecting other compon ents, be sure to turn off
and unplug the system.
If you encounter color irregularity on
a nearby TV screen
Color irregularitie s may be observed on certain types of
TV sets.
If color irregularity is observed...
Turn off the TV set, then turn it on again after 15 to 30
minutes.
If color irregularity is observed
again...
Place the subwoofer or the speakers further away from
the TV set.
On cleaning
Clean the system with a soft dry cloth. Do not use any
type of abrasive pad, scouring powder or solvent such
as alcohol or benzine.
If you have any question or problem concerning your
system, please consult your nearest Sony dealer.
Copyrights
This system incorporates Dolby* Digital and the
DTS** Digital Surround System.
* Manufactured under license from Dolby
Laboratories.
Dolby, and the double-D symbol are trademarks of
Dolby Laboratories.
** Manufactured under license under U.S. Patent Nos:
5,956,674; 5,974,380; 6,226,616; 6,487,535;
7,212,872; 7,333,929; 7,392,195; 7,272,567 & other
U.S. and worldwide patents issued & pending. DTSHD, the Symbol, & DTS-HD and the Symbol
together are registered trademarks of DTS, Inc.
Product includes software. © DTS, Inc. All Rights
Reserved.
This system incorporates High-Definition Multimedia
Interface (HDMI
™
) technology.
continued
GB
3

HDMI, the HDMI Logo, and High-Definition
Multimedia Interface are trademarks or registered
trademarks of HDMI Licensing LLC in the United
States and other countries.
“BRAVIA” logo is a trademark of Sony Corporation.
“x.v.Colour” and “x.v.Colour” logo are trademarks of
Sony Corporation.
“PlayStation
Computer Entertainment Inc.
” is a registered trademark of Sony
®
GB
4

Table of contents
Precautions...............................................3
Getting Started
Unpacking................................................6
Index to parts and controls.......................8
Positioning the system ...........................11
Connecting the speaker ..........................14
Connecting the TV and player, etc. .......15
Connecting other equipment..................17
Connecting the FM wire antenna (aerial)
.........................................................18
Connecting the AC power cord (mains
lead) .................................................19
Preparing for “BRAVIA” Sync .............19
Setting up the sound output of the
connected equipment.......................20
Playback Options
What is “BRAVIA” Sync?.....................21
Using “BRAVIA” Sync features ...........21
Operating the system using the supplied
remote control..................................23
Tuner Functions
Listening to the radio .............................25
Programming radio stations ...................26
Listening to the preset radio stations .....26
Naming preset stations...........................27
Viewing the station name or frequency on
the front panel display .....................28
Using the Radio Data System (RDS).....29
Surround Function
Enjoying the surround effect..................30
Advanced Settings
Controlling connected Sony equipment
with the remote control....................31
Changing the input button assignments of
the remote control............................34
Settings and adjustments using the
amplifier menu.................................36
Additional Information
Troubleshooting .................................... 39
Specifications........................................ 42
Index...................................................... 44
GB
5
Getting Started
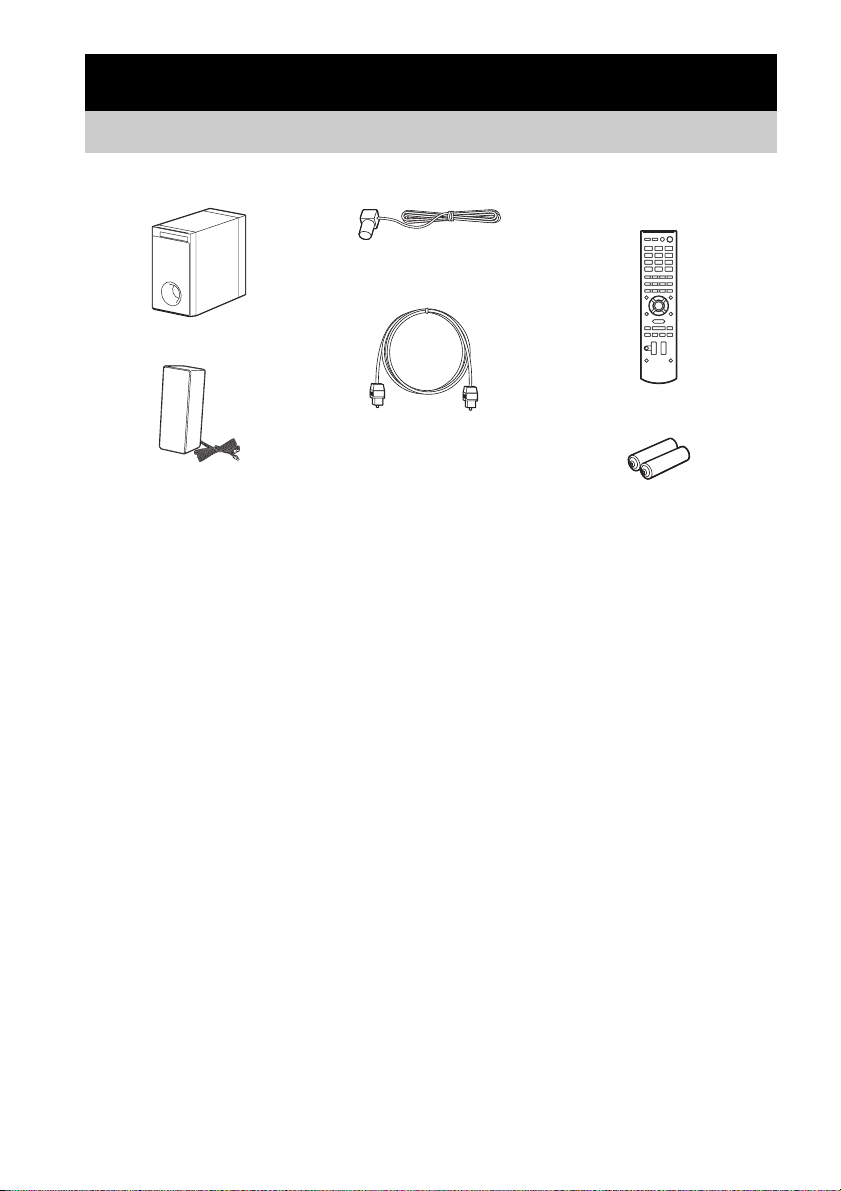
Unpacking
• Subwoofer (SA-WFS30) (1)
• Speaker (SS-TSB105) (2)
• FM wire antenna (aerial) (1)
• Digital optical cord for a TV
(2.5 m) (1)
• Remote control (RM-AAU114)
(1)
• Size AA (R6) batteries (2)
• Operating Instructions (1)
• Warranty (1)
GB
6
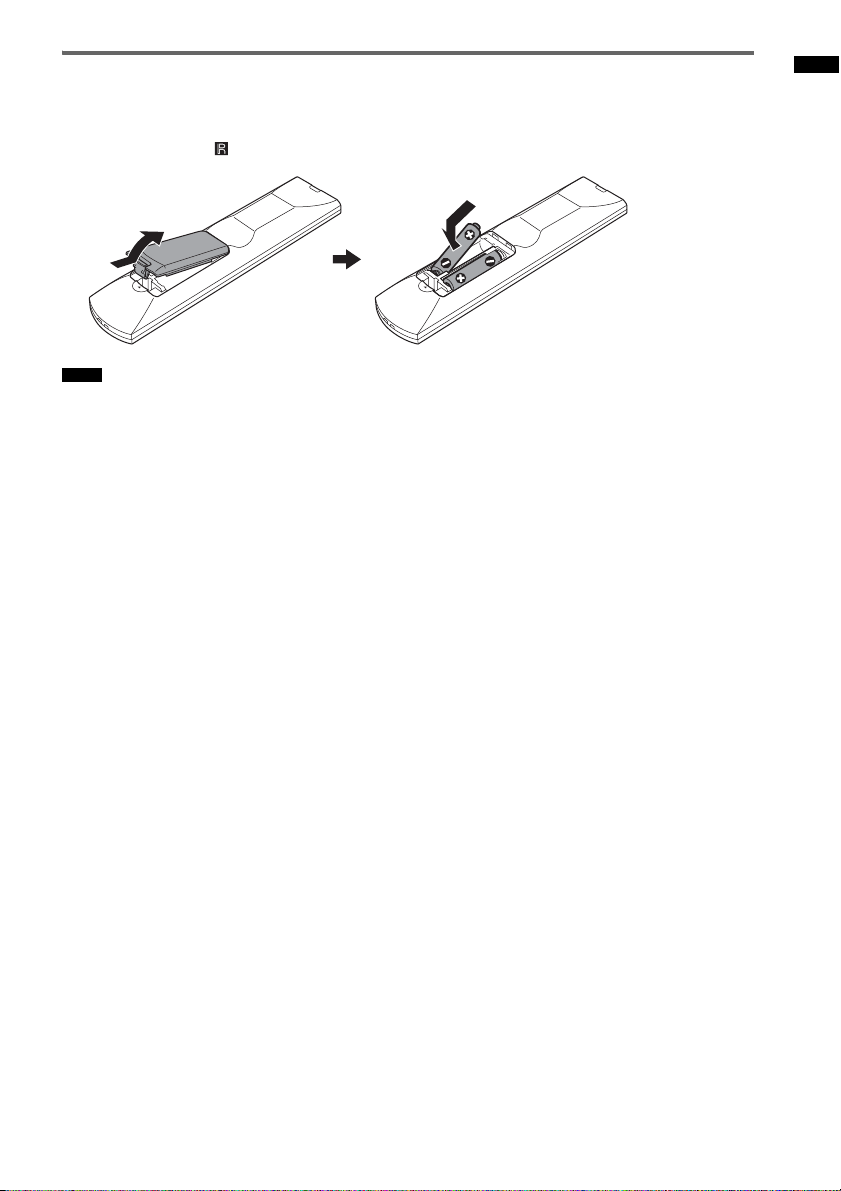
Inserting batteries into the remote control
Insert two size AA (R6) batteries (supplied) by matching the 3 and # ends on the batteries to the
diagram inside the battery compartment of the remote control. To use the remote control, point it at the
remote control sensor on the front panel display of the subwoofer.
Notes
• Do not leave the remote control in an extremely hot or humid place.
• Do not use a new battery with an old one.
• Do not drop any foreign object into the remote control casing, particularly when replacing the batteries.
• Do not expose the remote control sensor to direct sunlight or lighting apparatus. Doing so may cause a malfunction.
• If you do not intend to use the remote control for an extended period of time, remove the batteries to avoid possible
damage from battery leakage and corrosion.
Getting Started
GB
7
Index to parts and controls
For more information, see the pages indicated in parentheses.
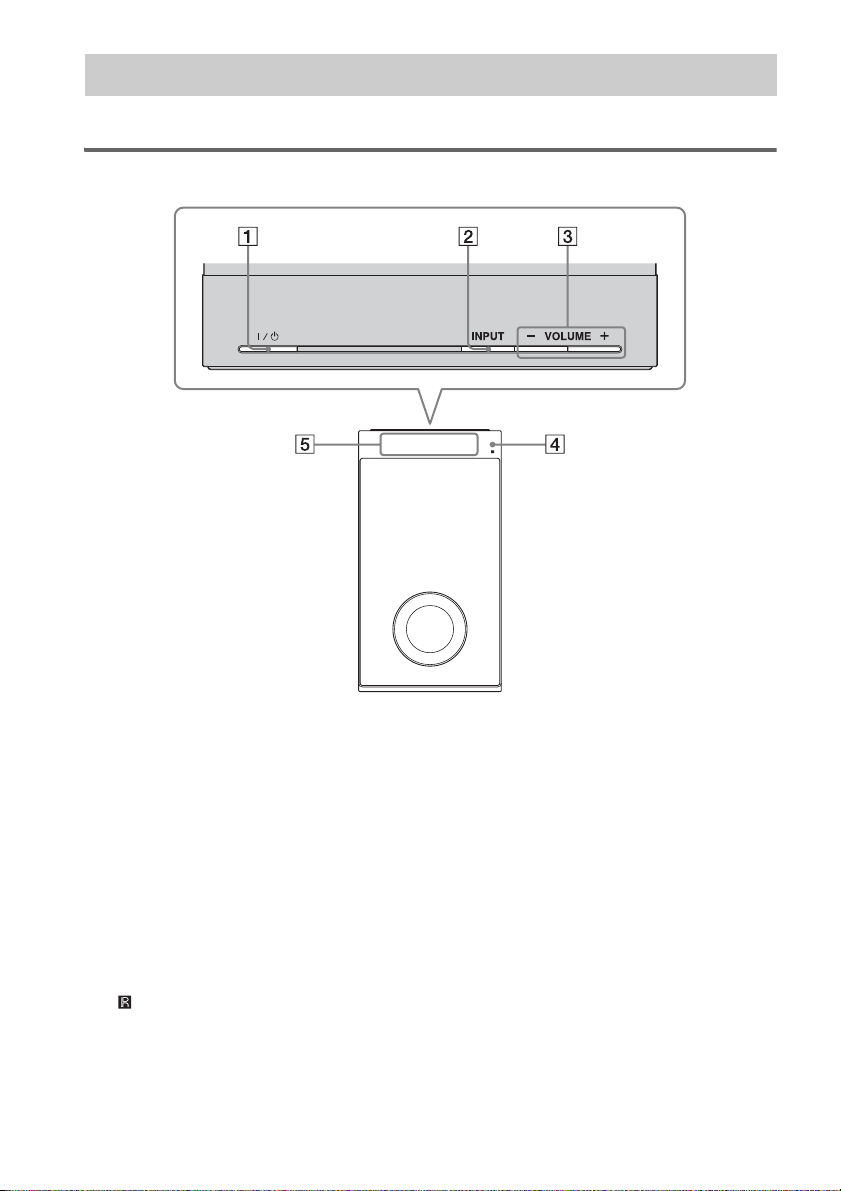
Top panel (subwoofer)
A ?/1 (power button)
Press to turn the system on or off.
B INPUT
Press to select the input source. Each time
you press the button, the input source
changes cyclically as follows:
TV t BD/DVD t GAME t
SAT/CATV t VIDEO t LINE IN t
TUNER FM t TV…
C VOLUME +/–
Press to adjust the volume level of the
system.
D (remote control sensor)
Point the remote here.
GB
8
E Front panel display
Allows you to check the system status.
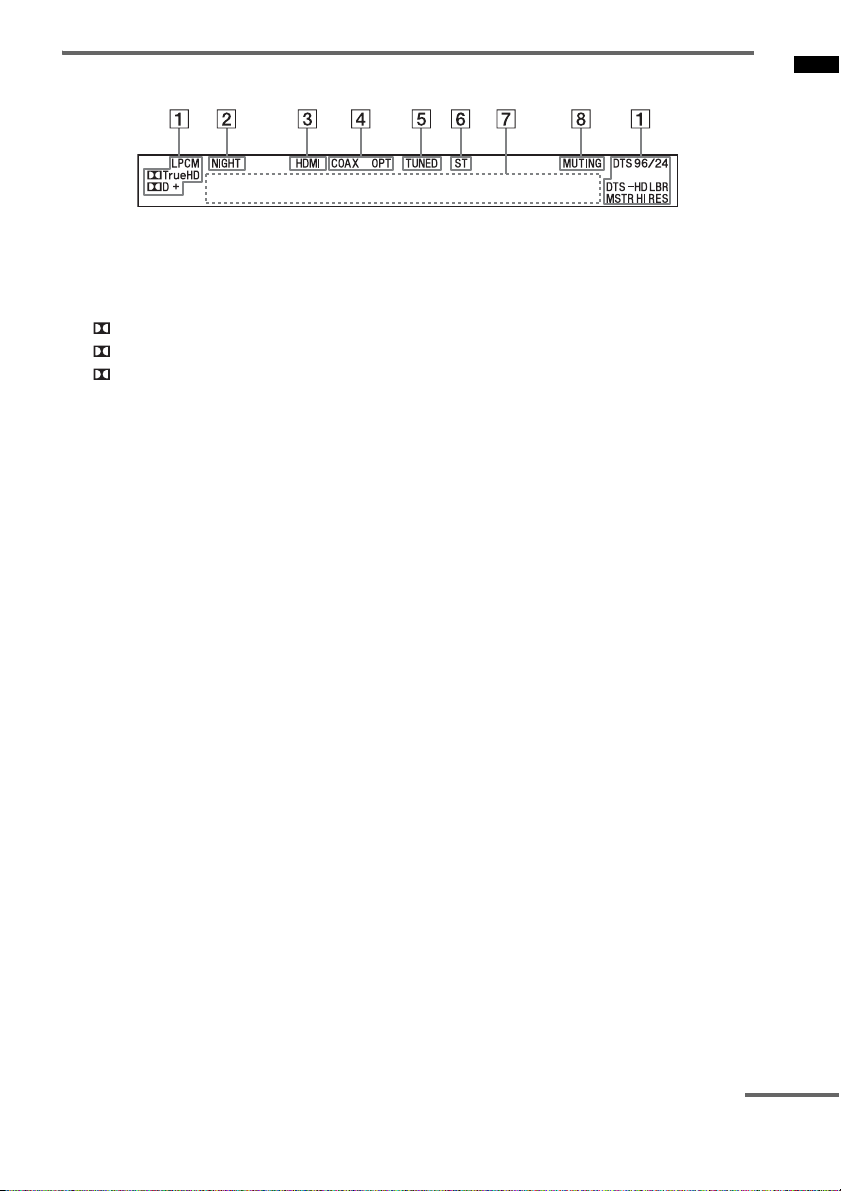
Front panel display (subwoofer)
Getting Started
A Audio format indicators
Light up according to the audio format that
is being input to the system.
LPCM: Linear PCM
TrueHD: Dolby TrueHD
D: Dolby Digital
D+: Dolby Digital Plus
DTS
DTS 96/24*
DTS-HD LBR: DTS-HD Low Bit Rate
DTS-HD MSTR: DTS-HD Master Audio
DTS-HD HI-RES: DTS-HD High
Resolution Audio
* Lights up only when a DTS 96/24 signal is
input while “2CH STEREO” is selected for the
sound field. If you select a sound field other
than “2CH STEREO,” it does not light up.
B NIGHT (page 37)
Lights up in NIGHT MODE.
C HDMI (page 15)
Lights up when an HDMI signal is input or
when an Audio Return Channel (ARC)
signal is being input to the system while
“TV” is selected as the input source.
D COAX/OPT
Lights up when a digital input jack (COAX
or OPT) is being used.
E TUNED (page 26)
Lights up when tuned in to an FM radio
station.
F ST (page 26)
Lights up when an FM stereo program is
received.
G Message display area
Displays volume, selected input source, etc.
H MUTING
Lights up when the sound is turned off.
continued
GB
9
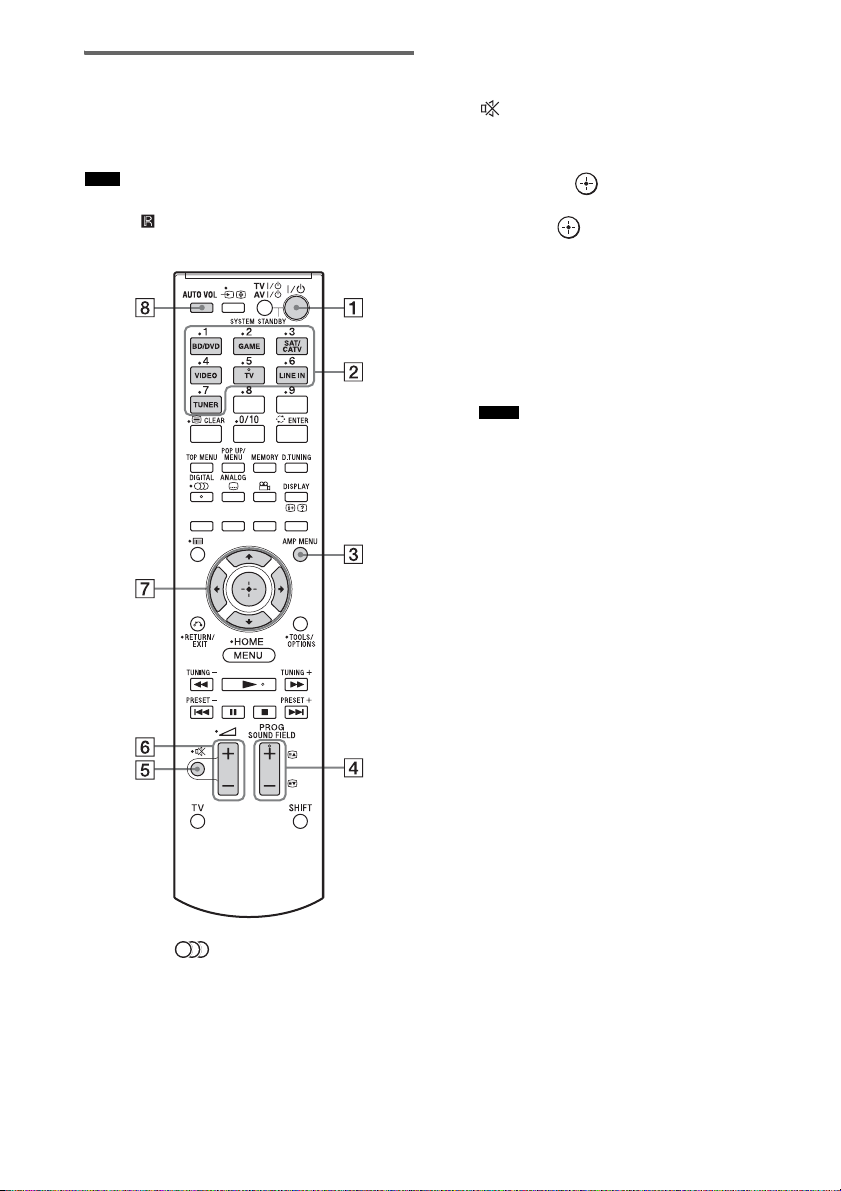
Remote control
This section describes subwoofer and speaker
button operation. See page 31 for details on the
button operation of connected equipment.
Note
• Point the remote control towards the remote control
sensor ( ) on the front panel display of the
subwoofer.
C AMP MENU (page 36)
D SOUND FIELD +/– (page 30)
E (muting)
F 2 +/–
Press to adjust the volume.
G C, X, x, c or
Press C, X, x or c to select the menu items.
Then press to enter the selection.
H AUTO VOL (volume)
Press to reduce fluctuations in the volume
while playing back audio sources or
programs (ADVANCED AUTO VOLUME
function). This function is useful, for
example, when the sound of a commercial is
louder than that of the TV programs.
Notes
• The AUTO VOL (volume) function is not
appropriate for listening to CDs.
• The AUTO VOL (volume) function is activated
only when Dolby Digital, DTS and Linear PCM
are being input to the system. If you change to
another input source, the sound may be louder
than it was before.
* The 5, N, and SOUND FIELD + buttons
have a tactile dot. Use it as a guide during operation.
A ?/1 (on/standby)
B Input buttons
Press one of the buttons to select the
equipment you want to use.
GB
10
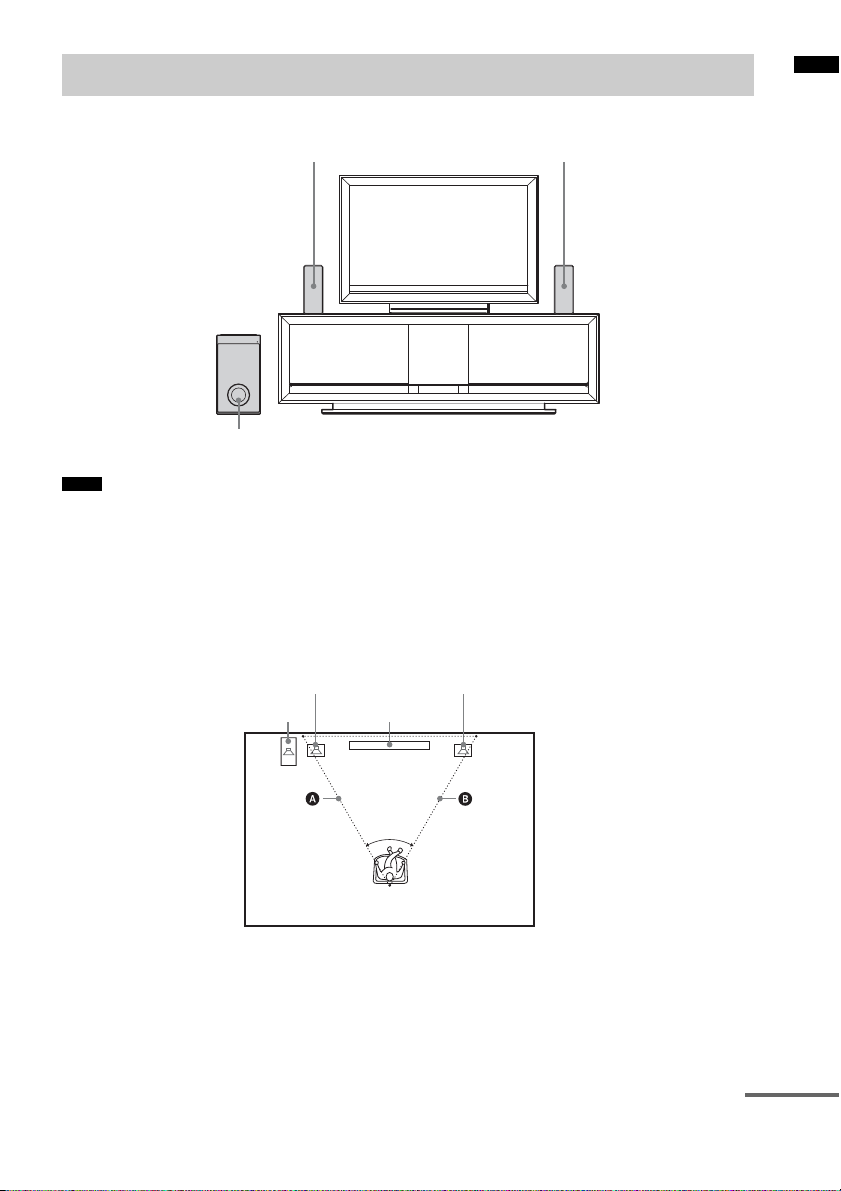
Positioning the system
The illustrations below are examples of how to install the speaker.
Speaker (L) Speaker (R)
Subwoofer
Notes
• Do not block the heat ventilation on the rear panel of the subwoofer.
• Do not cover the grill of the subwoofer.
• It is recommended to place the subwoofer on the front edge of a table or rack, etc., to accept the remote signal
correctly.
Installing the speakers on a flat surface
To make the most efficient use of the speakers, install the left and right speakers at the same distance
(up to 7 m (A and B)) from the listening position.
Speaker (L)
Subwoofer
Speaker (R)
TV
Getting Started
• Place both speakers the same distance apart as they are from the listening position (to form an isosceles triangle).
• The speakers should be placed at least 0.6 m apart.
• Place the speakers forward of the TV. Make sure there are no reflecting obstacles in the way of the speakers.
continued
11
GB
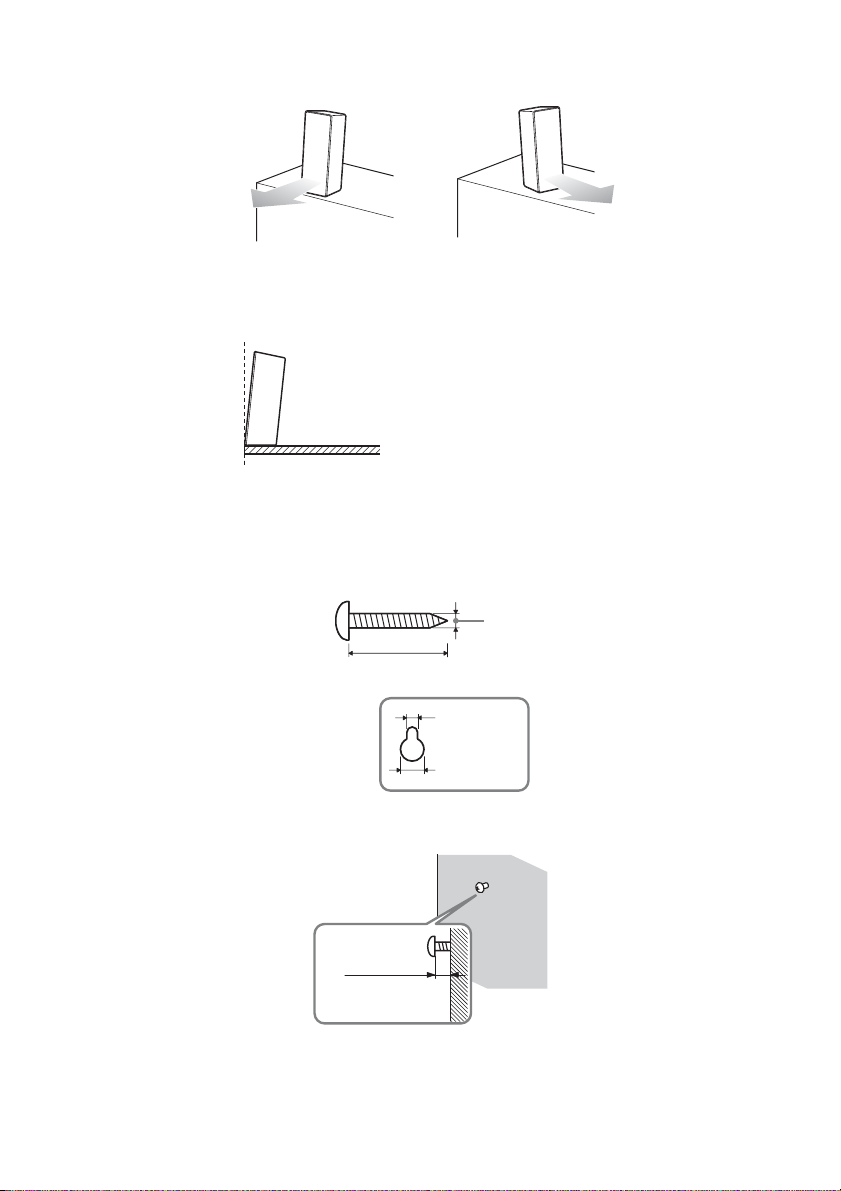
• Both speakers should be pointed straight forward. Do not place the speakers at an angle.
Correct
• It is recommended to place the speakers on the edge of a table or rack, etc., to prevent sound reflection.
Side view
Recommended
Incorrect
To install the speakers on a wall
You can install your speakers on the wall.
1 Prepare screws (not supplied) that are suitable for the hole on the back of each speaker.
See the illustrations below.
4mm
More than 25 mm
4.6 mm
Hole on the rear of
the speaker
10 mm
2 Fasten the screws to the wall. The screws should protrude 5 to 7 mm.
5 to 7 mm
GB
12
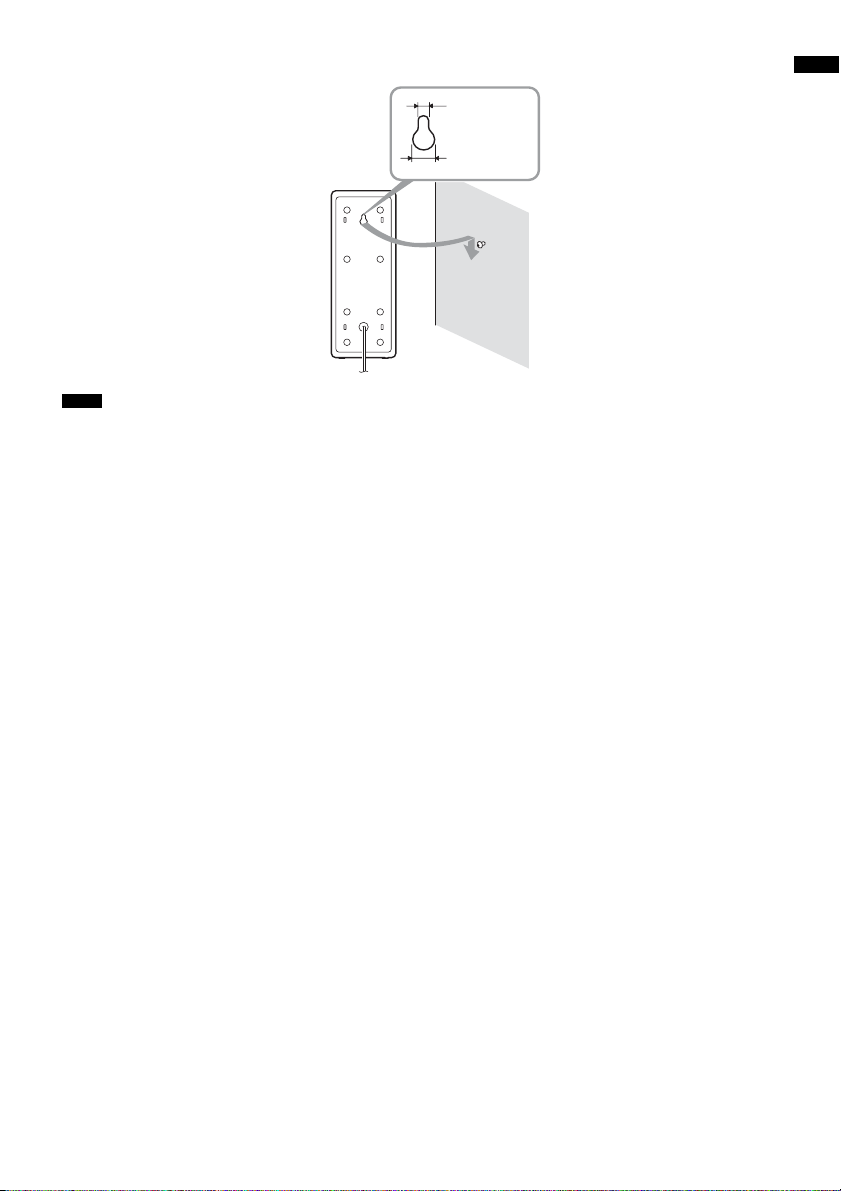
3 Hang the speakers on the screws.
4.6 mm
10 mm
Rear of the speaker
Notes
• Use screws that are suitable for the wall material and strength. As a plaster board wall is especially fragile, attach
the screws securely to a beam and fasten them to the wall. Install the speakers on a vertical and flat wall where
reinforcement is applied.
• Contact a screw shop or installer regarding the wall material or screws to be used.
• Sony is not responsible for accident or damage caused by improper installation, insufficient wall strength or
improper screw installation, natural calamity, etc.
Getting Started
13
GB
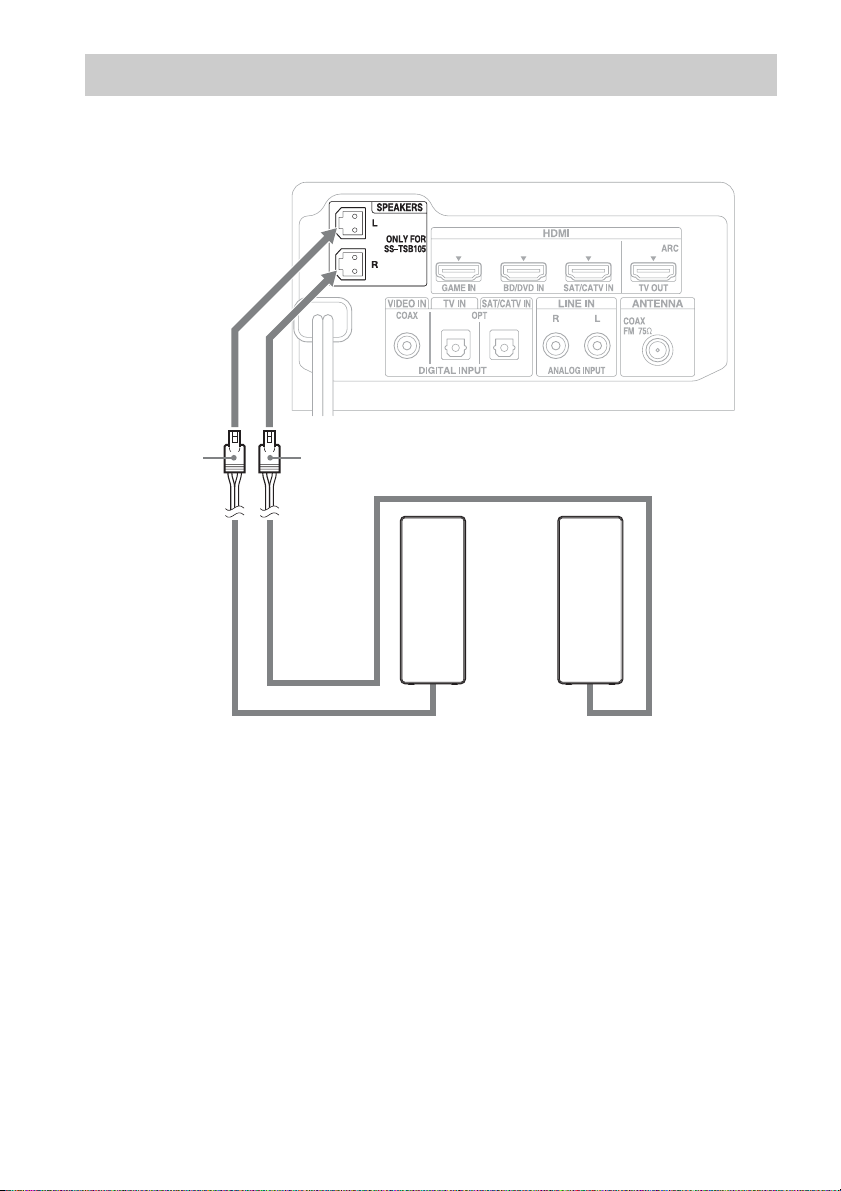
Connecting the speaker
The connectors of the speaker cord are color-coded depending on the type of speaker. Connect the
connectors of the speaker cord to match the color of the SPEAKERS jacks.
Rear of the subwoofer
White (speaker
(L))
Red (speaker (R))
Speaker (L)
Speaker cord
Speaker (R)
14
GB
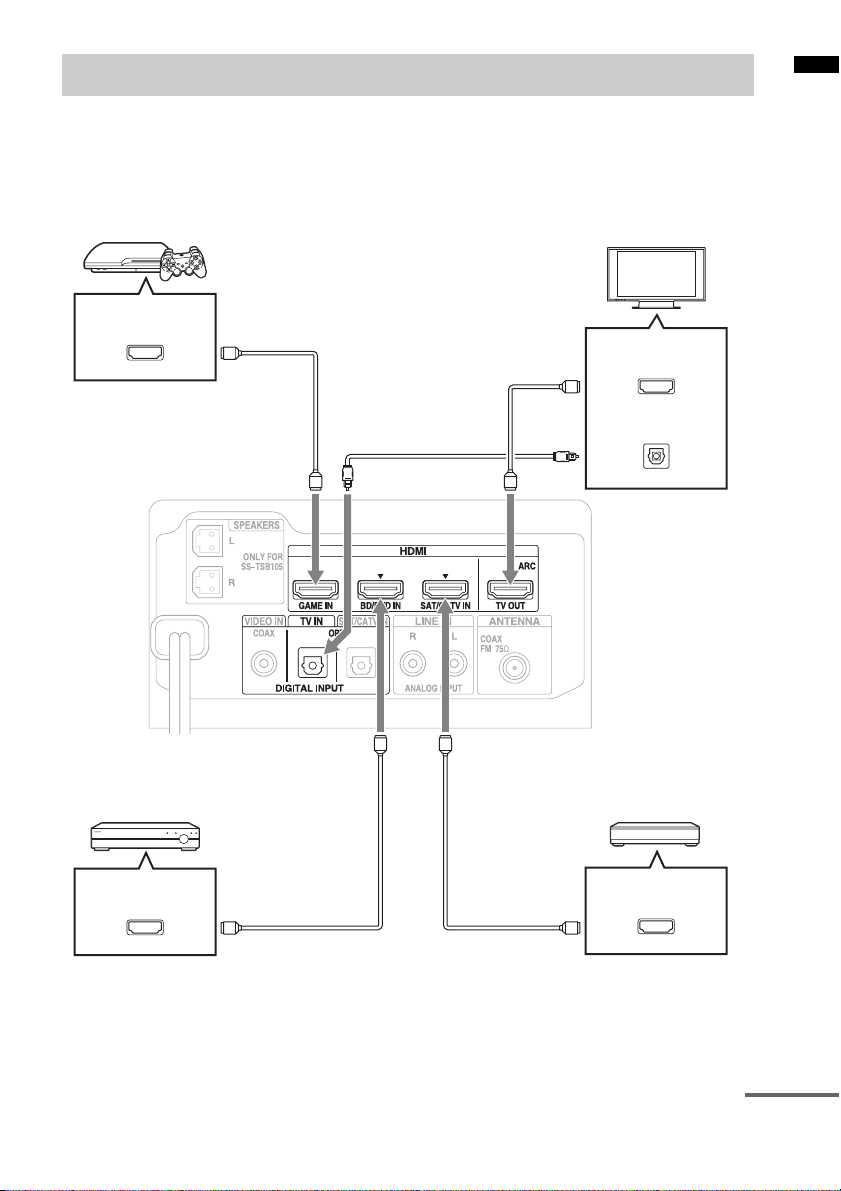
Connecting the TV and player, etc.
Connect the TV and/or player, etc., with HDMI jacks to the system using an HDMI cable.
By connecting Sony “BRAVIA” Sync-compatible equipment using HDMI cables and by setting the
Control for HDMI function via the TV for each connected equipment, operation can be simplified. See
“What is “BRAVIA” Sync?” (page 21).
We recommend that you connect products featuring “BRAVIA” Sync to the system.
“PlayStation
HDMI OUT
3” etc.
®
HDMI cable
(not supplied)
HDMI cable
(not supplied)
TV
HDMI IN (ARC)
Getting Started
Digital optical cord for a
TV (supplied)
Rear of the subwoofer
Blu-ray Disc player, DVD
player, etc.
HDMI OUT HDMI OUT
HDMI cable
(not supplied)
(not supplied)
Satellite tuner or cable television
tuner, etc., with an HDMI jack
HDMI cable
Digital Audio OUT
(optical)
continued
15
GB
 Loading...