

d
R6(AA) × 2
DC 3 V
AC-E30HG
OPE/BATT
c
b
a
STOP
S-BASS
PAUSE
REW/REV
FF/CUE
2
3
4
1
8Z-HJA-904-11
021004BKK-SA-AL
ENGLISH
Highlighted letters in the text of this manual correspond to the illustrations.
HS-JS189
STEREO RADIO CASSETTE RECORDER
OPERATING INSTRUCTIONS
Sony Corporation
http://www.aiwa.com/
A
1 2
3
B
PRECAUTIONS
To maintain good performance
Do not use the unit in places which are extremely hot, cold, dusty or humid.
In particular, do not keep the unit:
• in a high humidity area such as a bathroom
• near a heater
• in an area exposed to direct sunlight (e.g., inside a parked car, where it
can become extremely hot)
Note on listening with the headphones
• Listen at a moderate volume to avoid hearing damage.
• Do not wear the headphones while driving or cycling. It may create a
traffic hazard.
• You should use extreme caution or temporarily discontinue use in
potentially hazardous situations, such as walking, jogging, etc.
• Wear them properly; L is left, R is right.
• The in-ear type headphones should be worn with the longer cord behind
your neck.
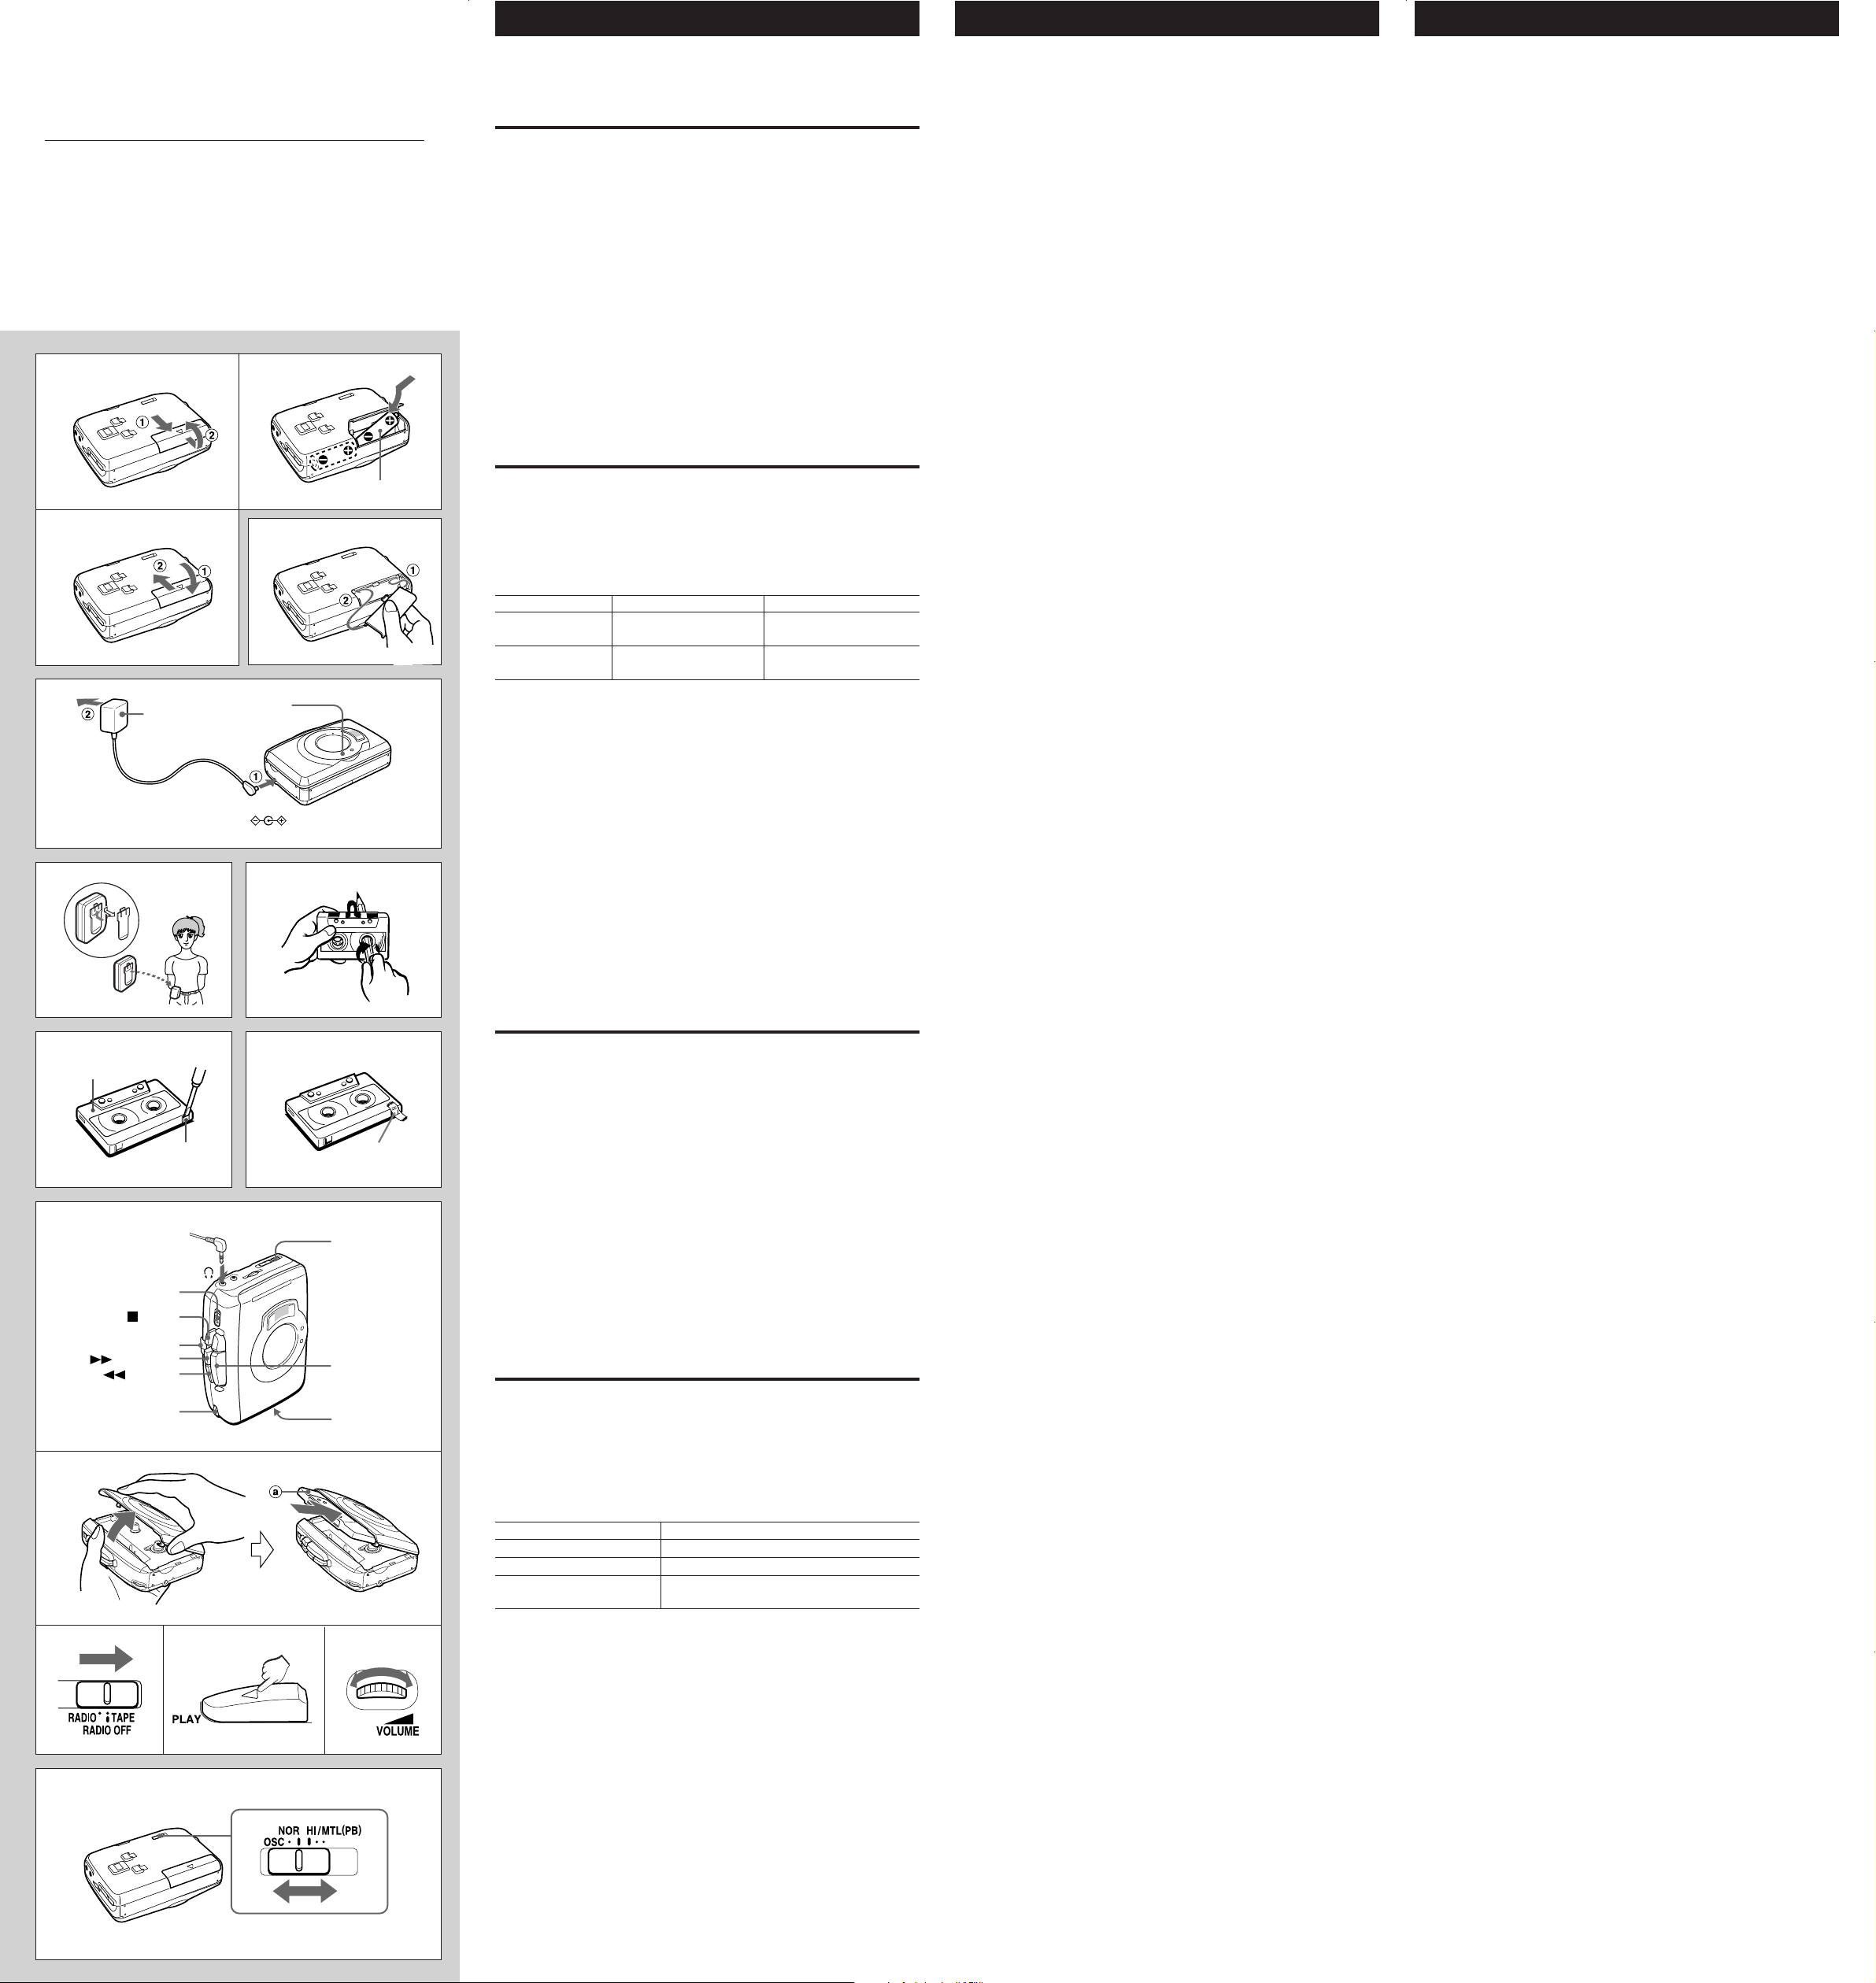
TO INSERT DRY CELL BATTERIES A
Insert two R6 (size AA) batteries with the 4 and 5 marks properly aligned.
Battery replacement
Replace the batteries when the OPE/BATT indicator goes out during
playback.
C
DE
Battery life
JEITA 1 mW playback
With manganese
batteries (R6P)
With alkaline
batteries (LR6)
If the cover of the battery compartment comes off B
Note on dry cell batteries
• Make sure that the 4 and 5 marks are correctly aligned.
• Do not mix different types of batteries, or an old battery with a new one.
• Never recharge the batteries, apply heat to them or take them apart.
• When not using the batteries, remove them to prevent needless wear.
• If liquid leaks from the batteries, wipe thoroughly to remove.
Approx. 6 hours
Approx. 20 hours
JEITA recording
Approx. 4 hours
Approx. 18 hours
Using on AC house current C
Connect the AC power adaptor to the DC 3V jack and to a wall outlet.
Use the AC-E30HG AC power adaptor (not supplied). Do not use any other
AC power adaptor.
Note
Specifications for AC-E30HG vary for each area. Check your local voltage
and the shape of the plug before purchasing.
PREPARATION
FG
H
1
Using the belt clip D
Cassette tapes E
• Check and tighten slack tape before use with a pencil or a similar tool.
Slack tape may break or jam in the mechanism.
• C-100 or longer tapes are extremely thin and easily deformed or
damaged. They are not recommended for use in this unit.
To prevent accidental erasure F
Break off the plastic tabs on the cassette tape after recording with a
screwdriver or other similar tool.
a Side A
b Tab for side A
To record on the cassette without the tab G
Cover the tab openings with cellophane tape.
c Cellophane tape
PLAYBACK H
Connect the supplied headphones to the ! jack of the main unit.
1 Open the cassette holder and insert a cassette.
a The side to be played back
2 Set the RADIO/TAPE switch to TAPE.
3 Press |PLAY to start playback.
4 Adjust the volume.
23 4
I
Basic operation
To fast forward Press cFF/CUE in stop mode.
To rewind Press dREW/REV in stop mode.
To stop Press aSTOP.
To pause Set the PAUSE switch to ON.
To resume, set it to OFF.
• cFF/CUE and dREW/REV are not released at the end of the tape.
Press aSTOP to release the buttons.
• Before pressing | PLAY, press a STOP when cFF/CUE or
dREW/REV is pressed.
• The PAUSE switch is released automatically when the aSTOP button is
pressed.
Super bass
Set the S-BASS switch to ON to emphasize the low frequencies.
To search while monitoring the sound
Keep cFF/CUE or dREW/REV pressed during playback. You can
search for the point you wish to listen to by monitoring the sound. When the
point is reached, release it to resume playback.
To select the tape type I
Set the tape selector switch to the correct position.
NOR: Type I (Normal) tape
HI/MTL: Type II (high/CrO
2) or Type IV (metal) tape

ENGLISH
S-BASS
1
2
3
4
MIC
4
PAUSE
2
REC
FLAT MIC
1
STOP
FLAT MIC
J
12
34
K
FM AM
L
RADIO RECEPTION J
1 Set the RADIO/TAPE switch to RADIO.
2 Select AM or FM ST (stereo).
3 Turn the TUNING control to tune in to a station.
4 Adjust the volume.
After listening, set the RADIO/TAPE switch to TAPE to turn off the power.
Super bass
Set the S-BASS switch to ON to emphasize the low frequencies.
If the FM stereo signal is weak
Select FM in step 2.
The sound will be heard in monaural, but distortion will be reduced.
For better reception K
FM: The headphone cord functions as the FM antenna. Keep it extended.
AM: Turn the unit to find the position which gives the best reception.
RECORDING FROM THE RADIO L
• Use Type I (normal) tape for recording.
• Recording is done on the side facing the cassette holder.
1 Insert a cassette.
a The side to be recorded on
2 Tune in to a station.
3 Press iREC to start recording.
The |PLAY button is depressed simultaneously, and the REC indicator
flashes in red.
After recording, set the RADIO/TAPE switch to TAPE to turn off the power.
Basic operation
To stop Press aSTOP.
To pause Set the PAUSE switch to ON.
The REC indicator lights in green.
To resume, set it to OFF.
• When the end of the tape is reached, recording stops and iREC and
|PLAY are released.
• The PAUSE switch is released automatically when the aSTOP button is
pressed.
If a high-pitched sound is heard during recording from AM
Set the OSC switch b to the position that less noise is heard.
123
M
12
RECORDING FROM THE MICROPHONE
• Use Type I (normal) tape for recording.
• Recording is done on the side facing the cassette holder.
• You can record from the FLAT MIC (built-in microphone) or optional
external microphone.
M
Recording with the FLAT MIC
The recorded sound will be monaural.
1 Insert a cassette.
a The side to be recorded on
2 Set the RADIO/TAPE switch to TAPE.
3 Place the unit on a desk, etc. with the FLAT MIC facing upward and
oriented to the sound source.
4 Press iREC to start recording.
The |PLAY button is depressed simultaneously, and the REC indicator
flashes in red.
Basic operation
To stop Press aSTOP.
To pause Set the PAUSE switch to ON.
The REC indicator lights in green.
To resume, set it to OFF.
• When the end of the tape is reached, recording stops and iREC and
|PLAY are released.
• The PAUSE switch is released automatically when the aSTOP button is
pressed.
Note
When you record with the FLAT MIC, make sure that no other microphone
is connected to the MIC jack.
To start recording immediately during playback
Press iREC during playback. Recording starts immediately.
If a high-pitched howling sound is heard
Move the headphones and the microphone farther apart, or reduce the
volume. Adjusting the output volume does not affect the sound to be
recorded.
Recording with the optional external microphone
Connect an optional external microphone to the MIC jack before recording.
In this case, the recorded sound will be stereo. Connecting a microphone
to the MIC jack deactivates the FLAT MIC.
34
N
MAINTENANCE N
To clean the head and the tape path
After every 10 hours of use, clean the head and the tape path with a head
cleaning cassette or cotton swab moistened with cleaning fluid or denatured
alcohol. (These cleaning kits are commercially available.)
When cleaning with a cotton swab a, wipe b, c, d and e.
To clean the cabinet
Use a soft cloth lightly moistened with a mild detergent solution.
Do not use strong solvents such as alcohol, benzine or thinner.
SPECIFICATIONS
Frequency range: FM 87.5 – 108 MHz; AM 530 – 1,605 kHz
Maximum output: 6 mW + 6 mW (JEITA 32 ohms)
Power sources: DC 3 V using two R6 (size AA) dry cell batteries, AC
house current using the optional AC power adaptor
Sony AC-E30HG.
Maximum dimensions:
120.7 (W) × 91 (H) × 39.4 (D) mm
7
(4
/8 × 3 5/8 × 1 9/16 in.)
Weight: Approx. 166 g (5.8 oz) excluding the batteries
Accessories: Stereo headphones (1)
• The specifications and external appearance of this unit are subject to
change without notice.
COPYRIGHT
Please check the laws on copyright relating to recording from discs, radio or
external tape for the country in which the unit is being used.
Belt clip (1)
 Loading...