

Page 1
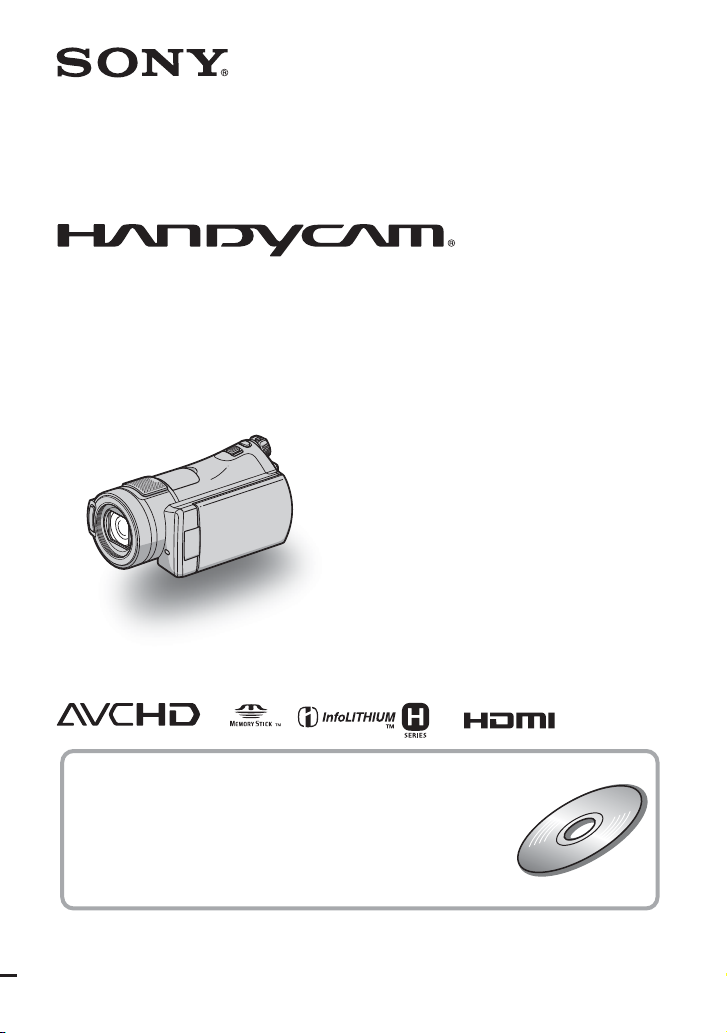
Digital HD Video Camera Recorder
Operating Guide
HDR-CX7/CX7K
3-214-660-11(1)
For details on the advanced operations, please refer to
“Handycam Handbook” (PDF).
© 2007 Sony Corporation
Page 2
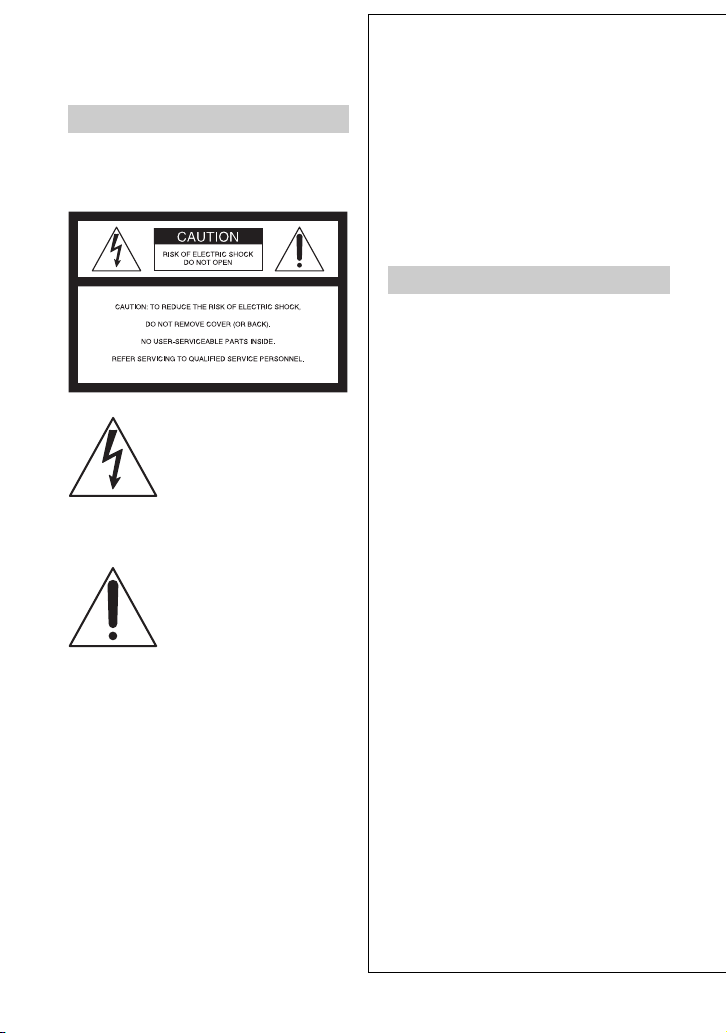
WARNING
To reduce fire or shock hazard, do
not expose the unit to rain or
moisture.
This symbol is intended to alert
the user to the presence of
uninsulated “dangerous
voltage” within the product’s
enclosure that may be of
sufficient magnitude to
constitute a risk of electric
shock to persons.
This symbol is intended to alert
the user to the presence of
important operating and
maintenance (servicing)
instructions in the literature
accompanying the appliance.
IMPORTANT SAFEGUARDS
For your protection, please read these safety
instructions completely before operating
the appliance, and keep this manual for
future reference.
Carefully observe all warnings, precautions
and instructions on the appliance, or the one
described in the operating instructions and
adhere to them.
Use
Power Sources
This set should be operated only from the type of
power source indicated on the marking label. If
you are not sure of the type of electrical power
supplied to your home, consult your dealer or
local power company. For those sets designed to
operate from battery power, or other sources, refer
to the operating instructions.
Polarization
This set may be equipped with a polarized ac
power cord plug (a plug having one blade wider
than the other).
This plug will fit into the power outlet only one
way. This is a safety feature. If you are unable to
insert the plug fully into the outlet, try reversing
the plug. If the plug should still fail to fit, contact
your electrician to have a suitable outlet installed.
Do not defeat the safety purpose of the polarized
plug by forcing it in.
Overloading
Do not overload wall outlets, extension cords or
convenience receptacles beyond their capacity,
since this can result in fire or electric shock.
Object and Liquid Entry
Never push objects of any kind into the set
through openings as they may touch dangerous
voltage points or short out parts that could result
in a fire or electric shock. Never spill liquid of any
kind on the set.
Attachments
Do not use attachments not recommended by the
manufacturer, as they may cause hazards.
2
Page 3

Cleaning
Unplug the set from the wall outlet before
cleaning or polishing it. Do not use liquid cleaners
or aerosol cleaners. Use a cloth lightly dampened
with water for cleaning the exterior of the set.
Installation
Water and Moisture
Do not use power-line operated sets near water –
for example, near a bathtub, washbowl, kitchen
sink, or laundry tub, in a wet basement, or near a
swimming pool, etc.
Power-Cord Protection
Route the power cord so that it is not likely to be
walked on or pinched by items placed upon or
against them, paying particular attention to the
plugs, receptacles, and the point where the cord
exits from the appliance.
Accessories
Do not place the set on an unstable cart, stand,
tripod, bracket, or table. The set may fall, causing
serious injury to a child or an adult, and serious
damage to the set. Use only a cart, stand, tripod,
bracket, or table recommended by the
manufacturer.
Ventilation
The slots and openings in the cabinet are provided
for necessary ventilation. To ensure reliable
operation of the set, and to protect it from
overheating, these slots and openings must never
be blocked or covered.
– Never cover the slots and openings with a cloth
or other materials.
– Never block the slots and openings by placing
the set on a bed, sofa, rug, or other similar
surface.
– Never place the set in a confined space, such as
a bookcase, or built-in cabinet, unless proper
ventilation is provided.
– Do not place the set near or over a radiator or
heat register, or where it is exposed to direct
sunlight.
Lightning
For added protection for this set during a lightning
storm, or when it is left unattended and unused for
long periods of time, unplug it from the wall
outlet and disconnect the antenna or cable system.
This will prevent damage to the set due to
lightning and power-line surges.
Service
Damage Requiring Service
Unplug the set from the wall outlet and refer
servicing to qualified service personnel under the
following conditions:
– When the power cord or plug is damaged or
frayed.
– If liquid has been spilled or objects have fallen
into the set.
– If the set has been exposed to rain or water.
– If the set has been subject to excessive shock by
being dropped, or the cabinet has been
damaged.
– If the set does not operate normally when
following the operating instructions. Adjust
only those controls that are specified in the
operating instructions. Improper adjustment of
other controls may result in damage and will
often require extensive work by a qualified
technician to restore the set to normal operation.
– When the set exhibits a distinct change in
performance – this indicates a need for service.
Servicing
Do not attempt to service the set yourself as
opening or removing covers may expose you to
dangerous voltage or other hazards.
Refer all servicing to qualified service personnel.
Replacement parts
When replacement parts are required, be sure the
service technician has used replacement parts
specified by the manufacturer that have the same
characteristics as the original parts.
Unauthorized substitutions may result in fire,
electric shock, or other hazards.
Safety Check
Upon completion of any service or repairs to the
set, ask the service technician to perform routine
safety checks (as specified by the manufacturer)
to determine that the set is in safe operating
condition.
3
Page 4
Read this first
Before operating the unit, please read this
manual thoroughly, and retain it for future
reference.
CAUTION
Replace the battery with the
specified type only. Otherwise, fire
or injury may result.
For customers in the U.S.A. and
CANADA
RECYCLING LITHIUM-ION BATTERIES
Lithium-Ion batteries are recyclable.
You can help preserve our
environment by returning your
used rechargeable batteries to the
collection and recycling location
nearest you.
For more information regarding
recycling of rechargeable batteries, call toll free 1800-822- 8837, or visit http://www.rbrc.org/
Caution: Do not handle damaged or leaking
Lithium-Ion batteries.
Owner’s Record
The model and serial numbers are located on the
bottom. Record the serial number in the space
provided below. Refer to these numbers whenever
you call your Sony dealer regarding this product.
Model No. HDR-
Serial No.
Model No. AC-
Serial No.
For customers in the U.S.A.
If you have any questions about this
product, you may call:
Sony Customer Information Center 1-800-
222-SONY (7669).
The number below is for the FCC related
matters only.
Regulatory Information
Declaration of Conformity
Trade Name: SONY
Model No.: HDR-CX7
Responsible Party: Sony Electronics Inc.
Address: 16530 Via Esprillo, San Diego, CA
92127 U.S.A
Telephone number: 858-942-2230
This device complies with Part 15 of the FCC
Rules.
Operation is subject to the following two
conditions:
(1) This device may not cause harmful
interference, and (2) this device must accept any
interference received, including interference
that may cause undesired operation.
Notes
HDR-CX7 is to be used with the Handycam
Station Model DCRA-C191 and AC Adaptor
Model AC-L200/L200B.
CAUTION
You are cautioned that any changes or
modifications not expressly approved in this
manual could void your authority to operate this
equipment.
Note
This equipment has been tested and found to
comply with the limits for a Class B digital
device, pursuant to Part 15 of the FCC Rules.
These limits are designed to provide reasonable
protection against harmful interference in a
residential installation. This equipment generates,
uses, and can radiate radio frequency energy and,
if not installed and used in accordance with the
instructions, may cause harmful interference to
radio communications.
4
Page 5

However, there is no guarantee that interference
will not occur in a particular installation. If this
equipment does cause harmful interference to
radio or television reception, which can be
determined by turning the equipment off and on,
the user is encouraged to try to correct the
interference by one or more of the following
measures:
– Reorient or relocate the receiving antenna.
– Increase the separation between the equipment
and receiver.
– Connect the equipment into an outlet on a
circuit different from that to which the receiver
is connected.
– Consult the dealer or an experienced radio/TV
technician for help.
The supplied interface cable must be used with t he
equipment in order to comply with the limits for a
digital device pursuant to Subpart B of Part 15 of
FCC Rules.
For the State of California, USA only
Perchlorate Material - special handling may
apply, See
www.dtsc.ca.gov/hazardouswaste/perchlorate
Perchlorate Material: Lithium battery contains
perchlorate.
Notes on use
Types of “Memory Stick” you can use
with your camcorder
• For recording movies, it is recommended that
you use a “Memory Stick PRO Duo” of 512 MB
or larger marked with:
– (“Memory Stick
PRO Duo”)
– (“Memory Stick
PRO-HG Duo”)
• A “Memory Stick PRO Duo” of up to 8 GB has
been confirmed to operate correctly with this
camcorder.
• See page 15 for the recordable time of a
“Memory Stick PRO Duo.”
• “Memory Stick PRO Duo” and “Memory Stick
PRO-HG Duo” are both called as “Memory
Stick PRO Duo” in this manual.
Using the camcorder
• The camcorder is not dustproofed, dripproofed
or waterproofed. See “Precautions” (p. 35).
• To prevent the “Memory Stick PRO Duo” from
being broken or recorded images from being
lost, do not do the following when either of the
respective lamps of the POWER switch (p. 12)
or the access lamp (p. 13) is on:
– to remove the battery pack or AC Adaptor
from the camcorder.
– to apply mechanical shock or vibration to the
camcorder.
• When inserting or ejecting the “Memory Stick
PRO Duo,” be careful so that the “Memory
Stick PRO Duo” does not pop out and drop
(p. 13).
• When connecting your camcorder to another
device with a cable, be sure to insert the
connector plug in the correct way. Pushing the
plug forcibly into the terminal will damage the
terminal and may result in a malfunction of your
camcorder.
On recording
• Before starting to record, test the recording
function to make sure the image and sound are
recorded without any problems.
• Compensation for the contents of recordings
cannot be provided, even if recording or
playback is not possible due to a malfunction of
the camcorder, recording media, etc.
• TV color systems differ depending on the
country/region. To view your recordings on a
TV, you need an NTSC system-based TV.
• Television programs, films, video tapes, and
other materials may be copyrighted.
Unauthorized recording of such materials may
be contrary to the copyright laws.
On playing back recorded images on
other devices
• To view the HD (high definition) images
recorded on the “Memory Stick PRO Duo” on
other devices, the device must comply with the
AVCHD format. Otherwise, you cannot view
the images.
5
Page 6

Save all your recorded image data
• To prevent your image data from being lost,
save all your recorded images on other media. It
is recommended that you save the image data on
a disc such as DVD-R using your computer.
Also, you can save your image data using a
VCR, or a DVD/HDD recorder (p. 26).
• It is recommended that you save your image
data periodically, after recording.
When the camcorder is connected to a
computer
• Do not try to format the “Memory Stick PRO
Duo” in the camcorder using a computer. If you
do so, your camcorder may not operate
correctly.
About language setting
• The on-screen displays in each local language are
used for illustrating the operating procedures.
Change the screen language before using your
camcorder if necessary (p. 12).
About this manual
• The images of the LCD screen used in this
manual for illustration purposes are captured
using a digital still camera, and therefore may
appear different from the actual images of the
LCD screen.
• Design and specifications of recording media
and other accessories are subject to change
without notice.
• The screenshots are from Windows XP. The
scenes may vary depending on the operating
system of the computer.
6
Page 7

Table of Contents
Read this first ...........................................................................................4
Notes on use .................................................................................................. 5
Getting Started
Step 1: Checking supplied items ..............................................................8
Step 2: Charging the battery pack ............................................................9
Step 3: Turning the power on, and setting the date and time .................12
Changing the language setting .................................................................... 12
Step 4: Inserting a “Memory Stick PRO Duo” .........................................13
Recording/Playback
Recording ...............................................................................................14
Playback .................................................................................................16
Playing the image on a TV ........................................................................... 17
Names and functions of parts and controls ............................................18
Indicators displayed during recording/playback .....................................21
Performing various functions - “ HOME” and “ OPTION” .............23
Saving images ........................................................................................26
Deleting images ......................................................................................26
Enjoying with a computer
Viewing “Handycam Handbook” (PDF) ..................................................27
What you can do with a Windows computer ..........................................28
Troubleshooting
Troubleshooting ......................................................................................32
Additional Information
Precautions ............................................................................................35
Specifications .........................................................................................37
7
Page 8
Getting Started
Step 1: Checking supplied items
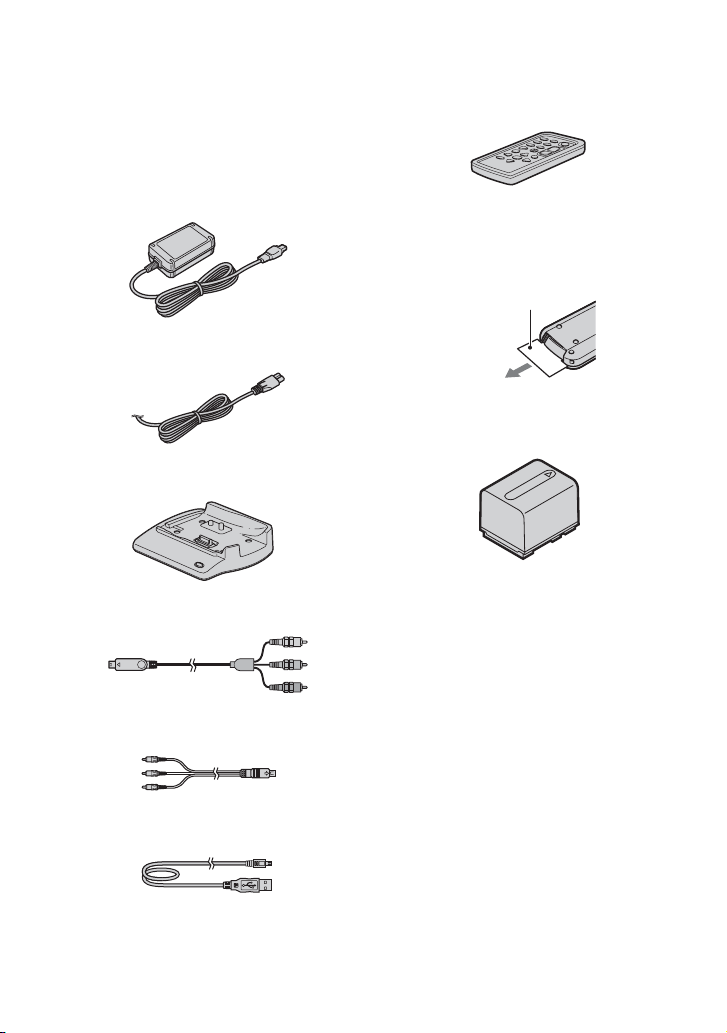
Make sure that you have the following
items supplied with your camcorder.
The number in the parentheses indicates the
number of that item supplied.
AC Adaptor (1) (p. 9)
Power cord (1) (p. 9)
Handycam Station (1) (p. 9)
Component video cable (1) (p. 17)
Wireless Remote Commander (1)
A button-type lithium battery is already installed.
Remove the insulation sheet before using
the Remote Commander.
Insulation sheet
Rechargeable battery pack (1) (p. 9)
NP-FH60
CD-ROM “Handycam Application
Software” (1) (p. 27)
– Picture Motion Browser (Software)
– Picture Motion Browser Guide
– Handycam Handbook (PDF)
A/V connecting cable (1) (p. 17)
USB cable (1) (p. 29)
8
“Operating Guide” (This manual) (1)
HDR-CX7K
“Memory Stick PRO Duo” 4 GB (1) (p. 13)
Page 9
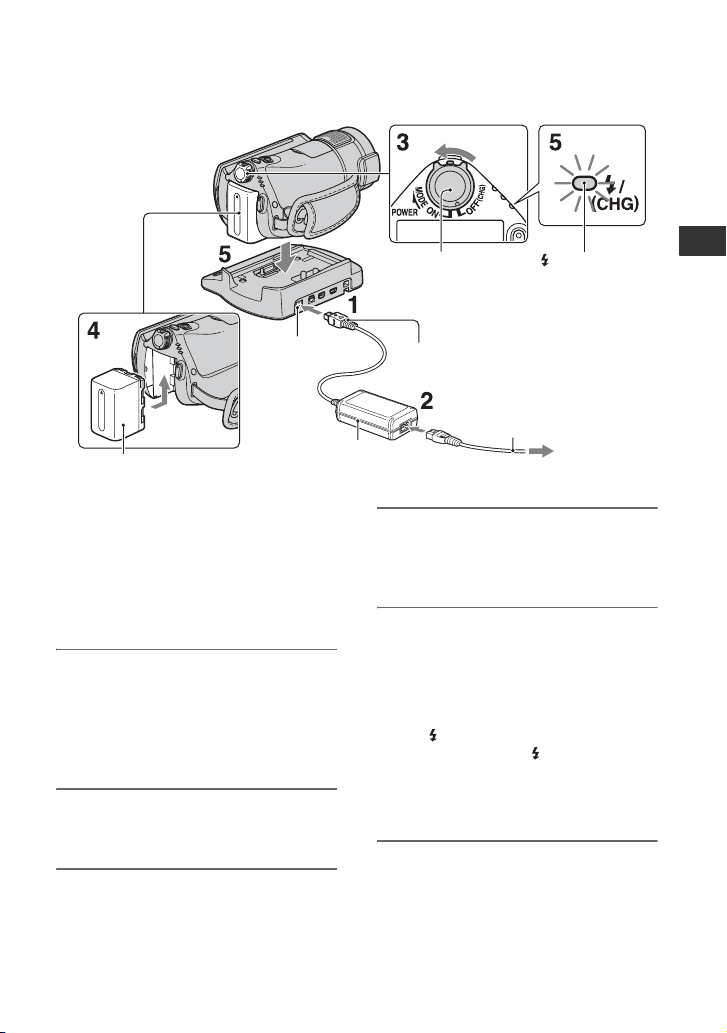
Step 2: Charging the battery pack
DC IN jack
Battery pack
You can charge the “InfoLITHIUM”
battery pack (H series) after
attaching it to your camcorder.
b Notes
• Your camcorder operates only with an
“InfoLITHIUM” battery pack (H series).
AC Adaptor
1 Connect the AC Adaptor to the
DC IN jack on the Handycam
Station.
Be sure that the v mark on the DC plug
is facing up.
2 Connect the power cord to the AC
Adaptor and the wall outlet.
POWER
switch
DC plug
Power cord
To the wall outlet
/CHG lamp
4 Attach the battery pack by sliding
it in the direction of the arrow
until it clicks.
5 Place the camcorder on the
Handycam Station as shown
above, and insert it into the
Handycam Station securely, all
the way to the bottom.
The /CHG (charge) lamp lights up and
charging starts. The /CHG (charge)
lamp turns off when the battery pack is
fully charged. Remove the camcorder
from the Handycam Station.
Getting Started
3 Slide the POWER switch in the
direction of the arrow to OFF
(CHG) (the default setting).
9
Page 10
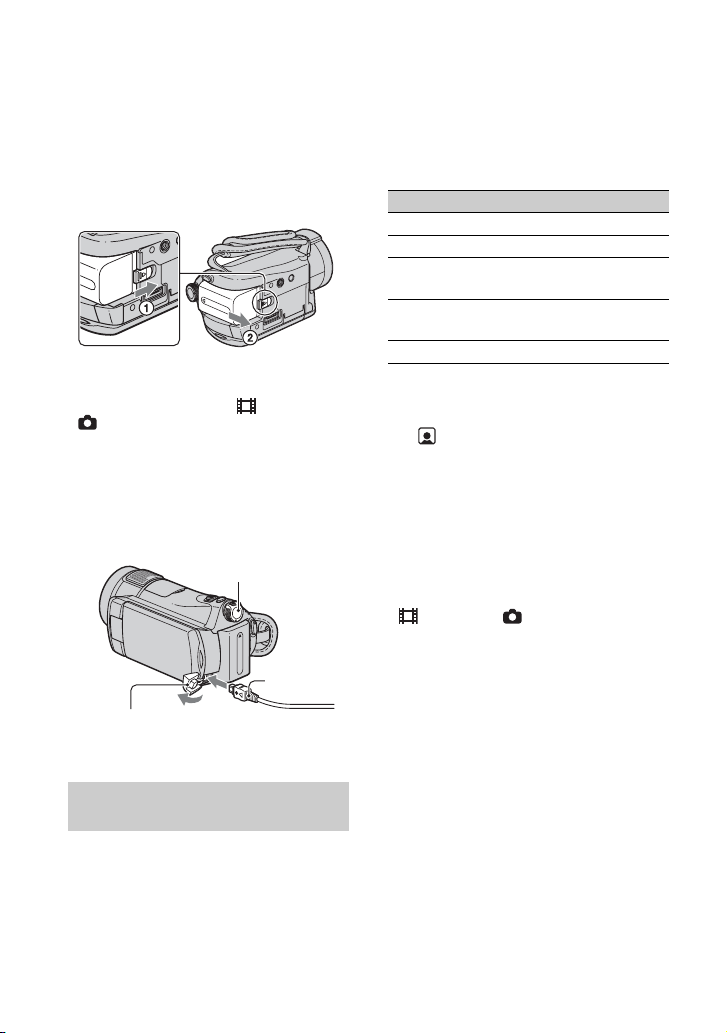
To remove the battery pack
Slide the POWER switch to OFF (CHG).
Slide the BATT (battery release) lever and
remove the battery pack.
BATT (battery
release) lever
b Notes
• When you remove the battery pack or the AC
Adaptor, make sure that the (Movie) lamp/
(Still) lamp (p. 12) is turned off.
To charge the battery pack using only
the AC Adaptor
Slide the POWER switch to OFF (CHG),
then connect the AC Adaptor directly to the
DC IN jack on the camcorder.
POWER switch
DC IN jack
Open the jack cover.
With the v mark on
the left
Available running time for the
supplied battery pack
Charging time:
Approximate time (min.) required when
you fully charge a completely exhausted
battery pack.
Recording/Playback time:
Approximate time (min.) available when
you use a fully charged battery pack.
10
DC plug
“HD” stands for high definition image
quality, and “SD” stands for standard image
quality.
(Unit:min.)
HD SD
Charging time 135
Recording time*
Continuous recording
time
Typical recording
time*
Playback time*
*1All times are measured under following
conditions.
– Recording mode: SP
– [ INDEX]: [OFF]
– LCD backlight: [ON] (top), [OFF] (bottom)
2
*
Typical recording time shows the time when
you repeat recording start/stop, turning the
power on/off and zooming.
3
When the LCD backlight is on.
*
On the battery pack
• Before changing the battery pack, slide the
POWER switch to OFF (CHG) and turn off the
(Movie) lamp/ (Still) lamp (p. 12).
• The power will not be supplied from the battery
as long as the AC Adaptor is connected to the
DC IN jack of your camcorder or the Handycam
Station, even when the power cord is
disconnected from the wall outlet.
On the charging/recording/playback time
• Times measured when using the camcorder at
25°C (77°F) (10°C to 30°C (50°F to 86°F) is
recommended).
• The available recording and playback time will
be shorter when you use your camcorder in low
temperatures.
• The available recording and playback time will
be shorter depending on the conditions under
which you use your camcorder.
On the AC Adaptor
• Use the nearby wall outlet when using the AC
Adaptor. Disconnect the AC Adaptor from the
1
95
110
95
115
45
2
3
160 190
55
45
55
Page 11

wall outlet immediately if any malfunction
occurs while using your camcorder.
• Do not use the AC Adaptor placed in a narrow
space, such as between a wall and furniture.
• Do not short-circuit the DC plug of the AC
Adaptor or battery terminal with any metallic
objects. This may cause a malfunction.
• Even if your camcorder is turned off, AC power
(house current) is still supplied to it while
connected to the wall outlet via the AC Adaptor.
Getting Started
11
Page 12
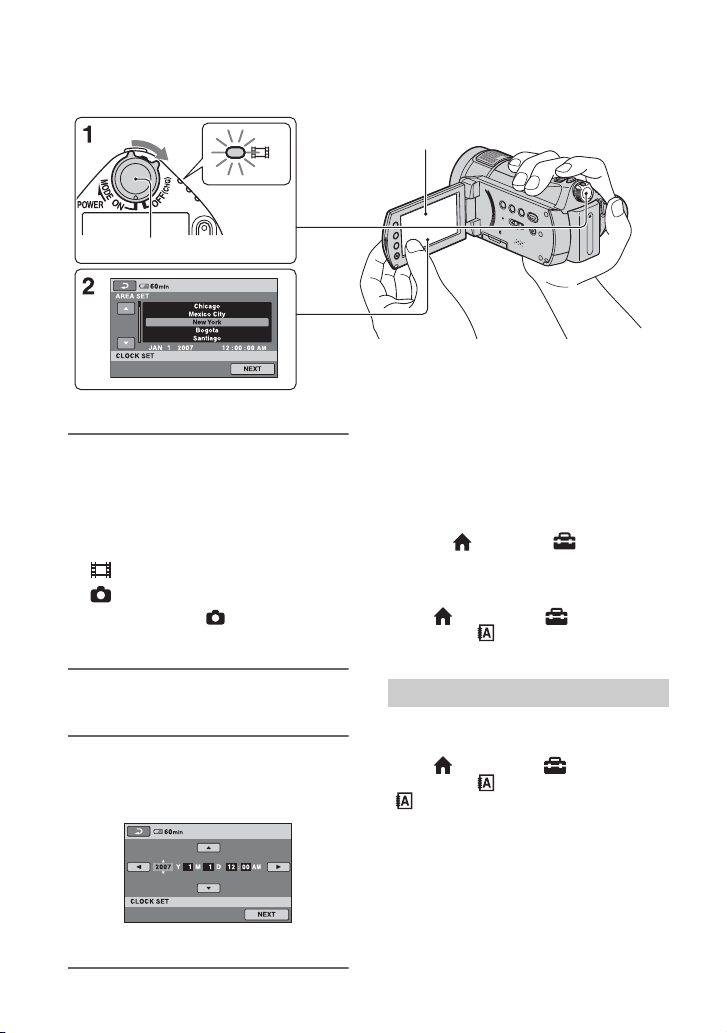
Step 3: Turning the power on, and setting the date and time
Touch the button on the LCD screen.
POWER switch
When using the camcorder for the first time, the
[CLOCK SET] screen appears on the LCD screen.
z Tips
1 While pressing the green button,
slide the POWER switch
repeatedly in the direction of the
arrow until the respective lamp
lights up.
(Movie): To record movies
(Still): To record still images
• When you turn on (Still) lamp, the
screen aspect ratio is changed to 4:3
automatically.
• The date and time do not appear during
recording, but they are automatically recorded
on the “Memory Stick PRO Duo,” and can be
displayed during playback.
• You can turn off the operation beeps by
touching (HOME) t (SETTINGS)
t [SOUND/DISP SET] t [BEEP] t [OFF].
To reset the date and time
Touch (HOME) t (SETTINGS)
t [CLOCK/ LANG] t [CLOCK
SET], and set the date and time.
2 Select the desired geographical
area with v/V, then touch [NEXT].
3 Set [DST SET] or [SUMMERTIME],
[Y] (year), [M] (month), [D] (day),
hour and minute.
The clock starts.
12
Changing the language setting
You can change the on-screen displays to
show messages in a specified language.
Touch (HOME) t (SETTINGS)
t [CLOCK/ LANG] t
[ LANGUAGE SET], then select the
desired language.
Page 13
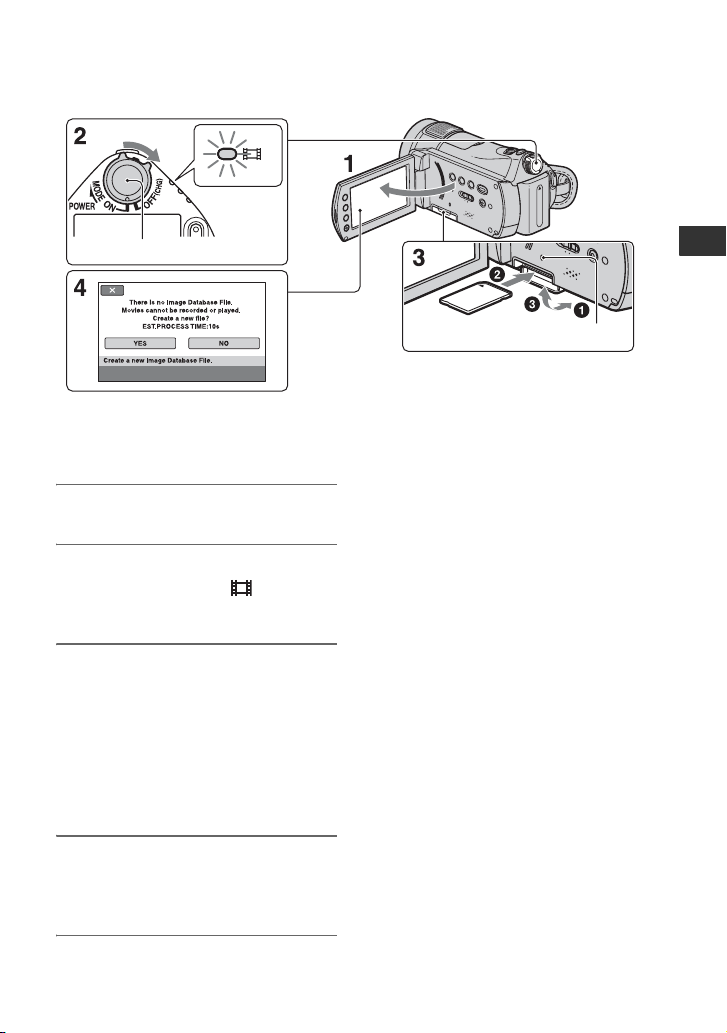
Step 4: Inserting a “Memory Stick PRO Duo”
POWER switch
If you insert a new “Memory Stick PRO Duo,” the
[Create a new Image Database File.] screen appears.
See page 5 on the “Memory Stick” you can
use with your camcorder.
1 Open the LCD panel.
2 Slide the POWER switch
repeatedly until the (Movie)
lamp lights up.
3 Insert the “Memory Stick PRO
Duo.”
1 Open the Memory Stick Duo cover in
the direction of the arrow.
2 Insert the “Memory Stick PRO Duo”
into the Memory Stick Duo slot in the
right direction until it clicks.
3 Close the Memory Stick Duo cover.
4 On the [Create a new Image
Database File.] screen, touch
[YES].
Access lamp
To eject a “Memory Stick PRO Duo”
Open the LCD panel and Memory Stick
Duo cover, lightly push the “Memory Stick
PRO Duo” in once.
b Notes
• When the access lamp is lit or flashing, your
camcorder is reading/writing data. To prevent
image data from being damaged, do not:
– eject the “Memory Stick PRO Duo”
– remove the battery pack or AC Adaptor
– shake or knock your camcorder
• Do not open the Memory Stick Duo cover
during recording.
• If you force the “Memory Stick PRO Duo” into
the slot in the wrong direction, the “Memory
Stick PRO Duo,” the Memory Stick Duo slot, or
image data may be damaged.
• If [Failed to create a new Image Database File.
It may be possible that there is not enough free
space.] is displayed on step 4, format the
“Memory Stick PRO Duo” (p. 26). Note that
formatting will delete all data recorded on the
“Memory Stick PRO Duo.”
Getting Started
13
Page 14
Recording/Playback
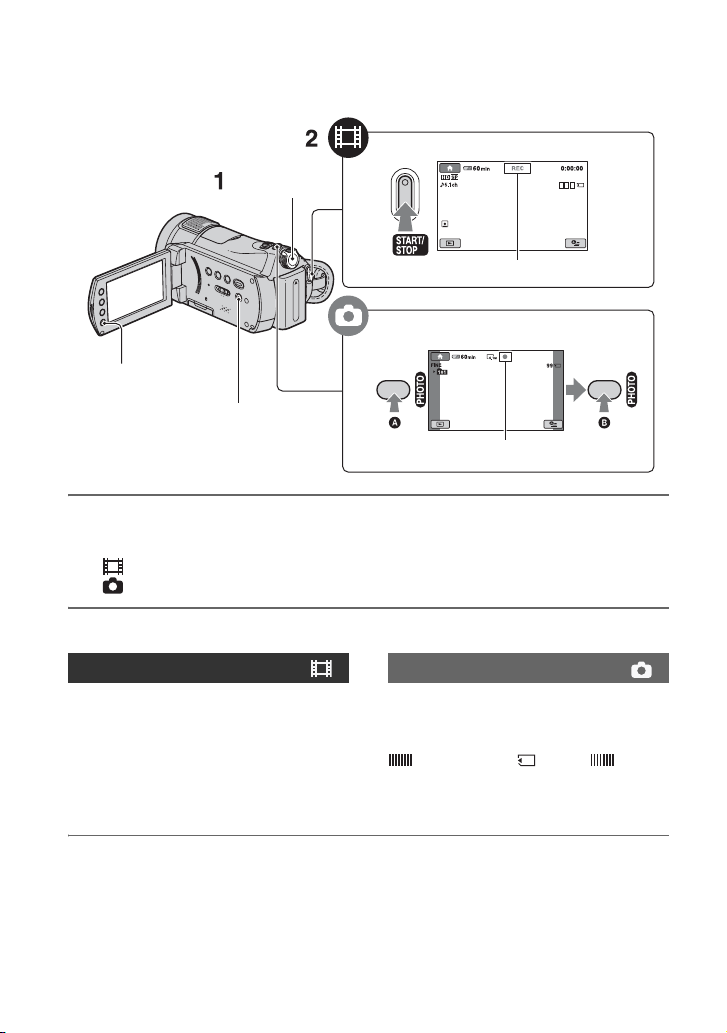
Recording
START/STOP D
POWER switch
A
[STBY] t [REC]
PHOTO E
START/STOP B
EASY C
Flashing t Lights up
1 Slide the POWER switch A until the respective lamp lights up.
Press the green button only when the POWER switch is in the OFF (CHG) position.
• (Movie): To record movies
• (Still): To record still images
2 Start recording.
Movies Still Images
Press START/STOP D (or B).
To stop recording, press START/STOP
again.
• See “Handycam Handbook” (PDF) to display
the image of SD (standard definition) image
quality.
14
Press PHOTO E lightly to adjust the
focus A (a beep sounds), then press
it fully B (a shutter click sounds).
disappears, the image has been recorded.
appears beside . When
Page 15
z Tips
• You can check the free “Memory Stick PRO
Duo” space by touching (HOME) t
(MANAGE MEMORY STICK) t [
INFO].
• You can capture up to 3 still images by pressing
PHOTO during movie recording.
• The maximum recordable time of Sony
“Memory Stick PRO Duo” is as follows with
recording mode [HD SP] (the default setting);
512 MB: approx. 8 minutes
1 GB: approx. 15 minutes
2 GB: approx. 35 minutes
4 GB: approx. 65 minutes
8 GB: approx. 140 minutes
• When measuring “Memory Stick PRO Duo”
capacity, 1 GB equals 1 billion bytes, a portion
of which is used for data management.
• See “Handycam Handbook” (PDF) for the
number of recordable still images.
• You can copy scenes of recorded movies as still
images on the hard disk of a computer, using the
supplied “Picture Motion Browser.” For details,
see “Picture Motion Browser Guide” on the
supplied CD-ROM.
To record/play back easily
By pressing EASY, nearly all settings on
the camcorder will be set to automatic
adjustment so that you can perform
recording or playback operation without
detailed settings. During Easy Handycam
operation, appears on the LCD screen.
To cancel Easy Handycam operation, press
EASY again.
b Notes
• You cannot use some buttons/functions during
Easy Handycam operation.
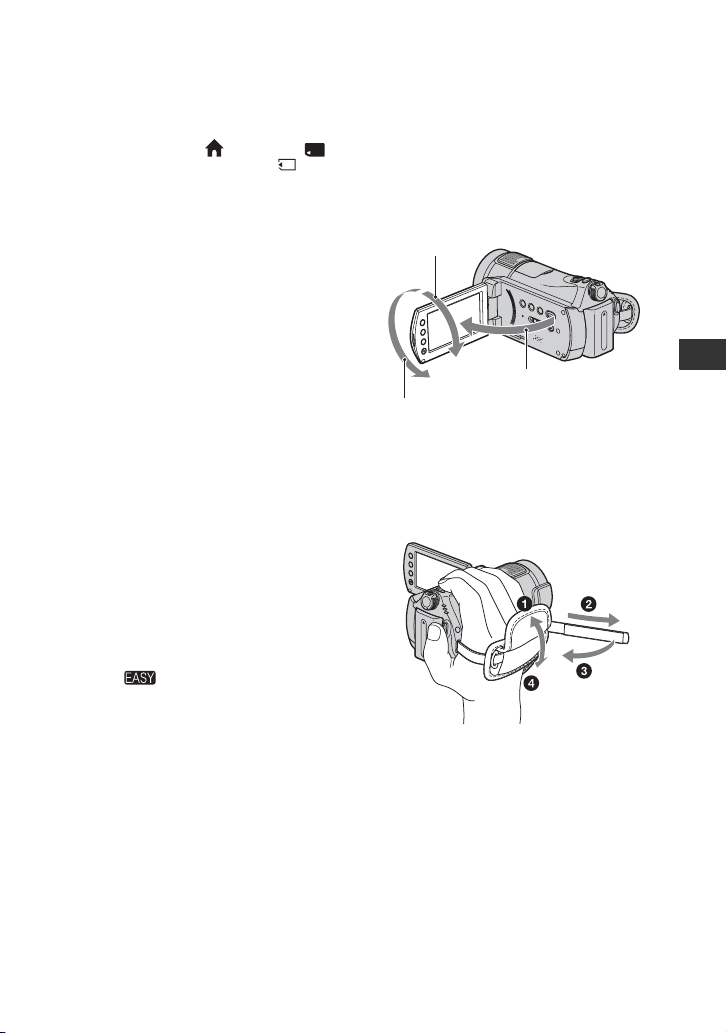
Adjusting the LCD panel
Open the LCD panel 90 degrees to the
camcorder (1), then rotate it to the best
angle to record or play (2).
290 degrees
(max.)
190 degrees to the
2180 degrees
(max.)
camcorder
Fastening the grip belt
Fasten the grip belt and hold your
camcorder correctly.
Recording/Playback
15
Page 16
Playback
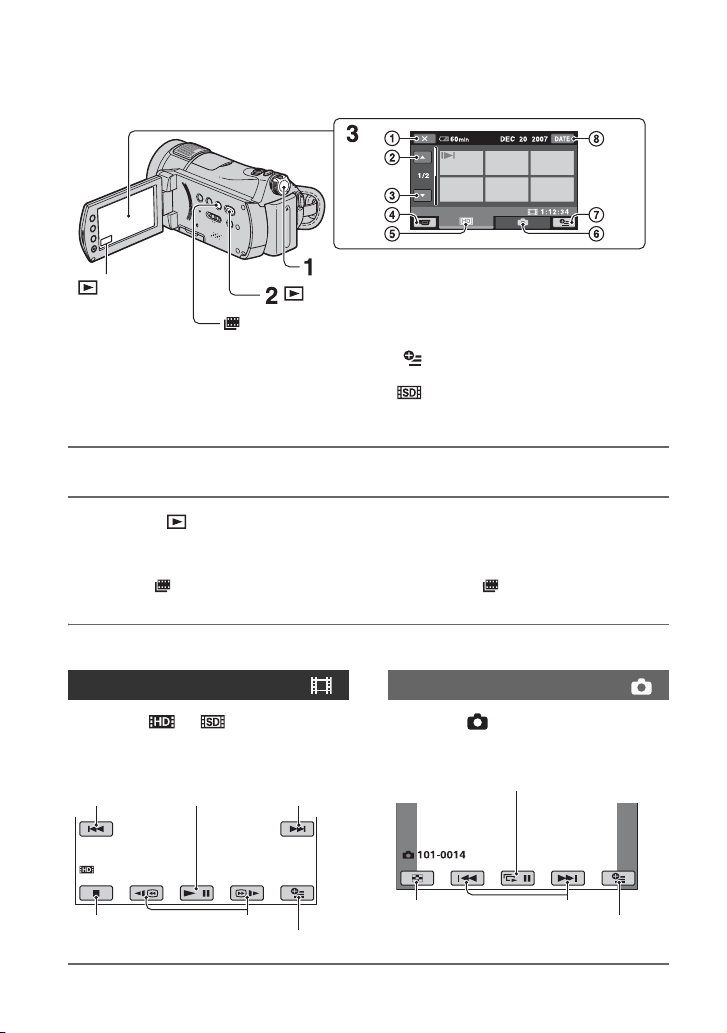
POWER switch A
(VIEW
IMAGES) D
1 Returns to the recording screen
2 Previous 6 images
3 Next 6 images
4 Returns to the recording screen
5 HD (high definition) image quality movie tab*
(Film Roll Index) C
1 Slide the POWER switch A to turn on your camcorder.
2 Press the (VIEW IMAGES) B (or D) button.
The VISUAL INDEX screen appears on the LCD screen (It may take some time to display
the thumbnails).
• Press the (Film Roll Index) button C to play back images from INDEX. See “Handycam
Handbook” (PDF) for details.
(VIEW IMAGES) B
6 Still image tab
7 (OPTION)
8 Searches for images by date
* appears for movies with SD (standard
definition) image quality.
3 Start playback.
Movies
Touch the or tab, and the
movie to be played back.
Beginning of the
scene/previous
scene
Stop (go to the
INDEX screen)
16
Toggles Play
or Pause as
you touch
Reverse/Forward
Next scene
OPTION
Still Images
Touch the tab, and the still image
to be played back.
Slide show
Go to the VISUAL
INDEX screen
Previous/Next
OPTION
Page 17
To adjust the sound volume of movies
When playing back a movie, touch
(OPTION) t tab t [VOLUME],
then adjust the volume with / .
z Tips
• When playback from the selected movie reaches
the last movie, the screen returns to the INDEX
screen.
• i appears with the image on the tab that was
most recently played back/recorded (B for the
still image). When you touch a movie marked
with i, you can play it back from the point it
was previously stopped.
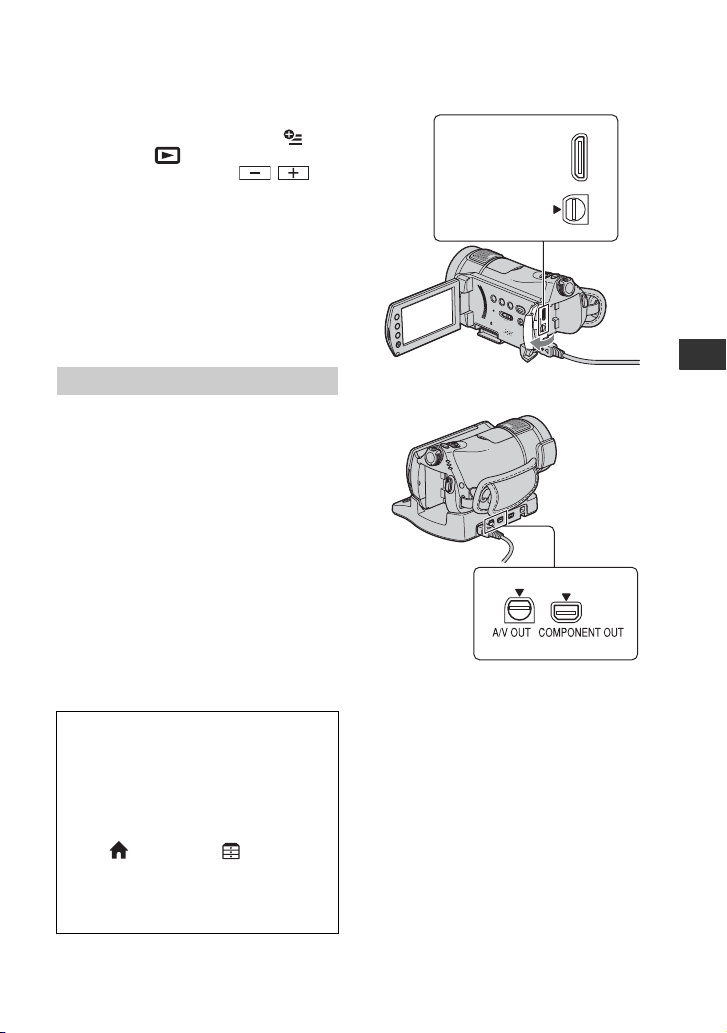
Playing the image on a TV
Connection methods and quality of the
image viewed on the TV screen differ
depending on what type of TV is connected,
and the connectors used.
b Notes
• When recording, set [X.V.COLOR] to [ON] to
play back on an x.v.Color-compliant TV. Some
settings may need to be adjusted on the TV
when playing back. Refer to the instruction
manual of your TV for details.
• Use the supplied AC Adaptor as the power
source (p. 9). Refer also to the instruction
manuals supplied with the device to be
connected.
Open the jack cover.
Handycam
Station
HDMI OUT
A/V OUT
Recording/Playback
Operation flow
Switch the input on the TV to the
connected jack.
Refer to the instruction manuals of the
TV.
r
Connect your camcorder and TV
referring to [TV CONNECT Guide].
Touch (HOME) t (OTHERS)
t [TV CONNECT Guide].
r
Make the required output settings
on your camcorder.
b Notes
• Only the Handycam Station is equipped with the
COMPONENT OUT jack.
• When the A/V connecting cable is used to
output images, images are output with SD
(standard definition) image quality.
• The Handycam Station and your camcorder are
both equipped with A/V OUT jacks. Connect
the A/V connecting cable either to the
Handycam Station or to your camcorder,
depending on your setup. Do not connect A/V
connecting cables to both the Handycam Station
and your camcorder at the same time, as image
disturbance may occur.
• For details on connecting and dubbing recorded
images to VCR or DVD/HDD recorders, see
“Handycam Handbook” (PDF).
17
Page 18
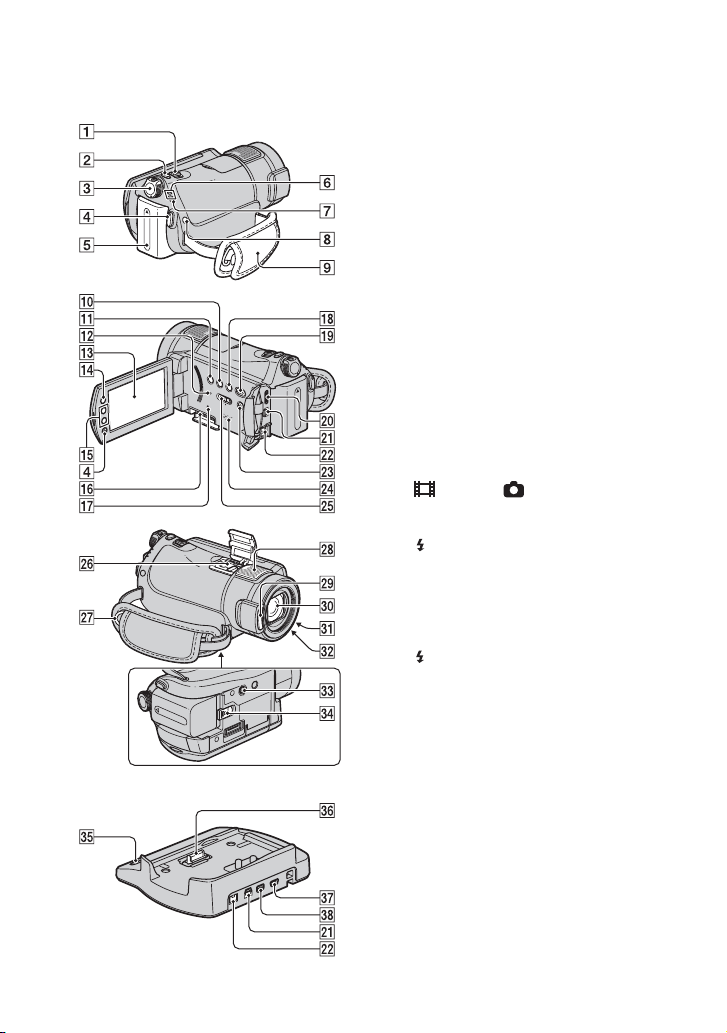
Names and functions of parts and controls
1 Power zoom lever
To use the zoom, move the power zoom
lever. Move the power zoom lever slightly
for a slower zoom. Move it further for a
faster zoom.
During playback, you can magnify still
images from about 1.1 to 5 times the
original size (Playback zoom).
• When you touch the screen during playback
zoom, the point you touched will be displayed in
the center of the displayed frame.
2 PHOTO button (p. 14)
3 POWER switch (p. 12, 14)
4 START/STOP button (p. 14)
5 Battery pack (p. 9)
6 (Movie)/ (Still) mode lamps
(p. 14)
7 /CHG (charge) lamp
Lights up while charging your camcorder,
or flickers while charging the flash, and
remains lit when the flash charging is
complete.
Handycam Station
18
8 (flash) button
You can select the settings for the flash.
9 Grip belt (p. 15)
0 DISP/BATT INFO button
You can switch the screen display when
you press while the power is set to on.
When you press while the power is set to
OFF (CHG), you can check the remaining
battery.
qa BACK LIGHT button
To adjust the exposure for backlit subjects,
press BACK LIGHT to display .. To
cancel the backlight function, press BACK
LIGHT again.
Page 19
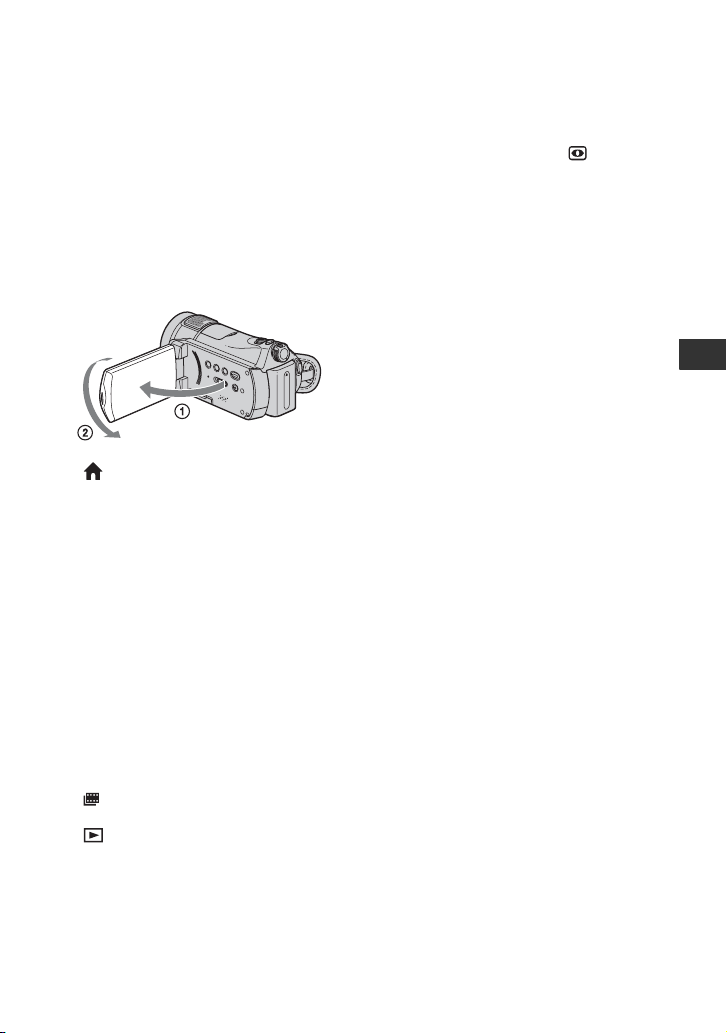
qs RESET button
To initialize the settings (Reset), press
RESET to initialize all the settings,
including settings for date and time.
qd LCD screen/touch panel
To record in mirror mode, open the LCD
screen 90 degrees to the camcorder (1),
then rotate it 180 degrees to the lens side
(2).
wg NIGHTSHOT switch
To record in dark places, set the
NIGHTSHOT switch to ON ( appears).
wj Hook for a shoulder belt
Attach the shoulder belt (optional).
wk Internal microphone
Records sound on movies.
Sound picked up by the internal
microphone is converted to 5.1ch surround
sound and recorded.
qf (HOME) button (p. 23)
qg Zoom buttons
Press for zooming in/out.
During playback, you can magnify still
images from about 1.1 to 5 times the
original size (Playback zoom).
• When you touch the screen during playback
zoom, the point you touched will be displayed in
the center of the displayed frame.
qh Memory Stick Duo slot (p. 13)
qj Access lamp
When the access lamp is lit or flashing,
your camcorder is writing or reading data
on the “Memory Stick PRO Duo.”
qk (Film Roll Index) button (p. 16)
ql (VIEW IMAGES) button (p. 16)
wd EASY button (p. 15)
wf Speaker
Sound comes out from the speaker while
playing back.
wl Flash
Flashes when using the flash.
e; Lens (Carl Zeiss Lens)
ea Camera recording lamp
Lights up in red during recording. Flashes
when remaining “Memory Stick PRO Duo”
space or battery power is low.
es Remote sensor/Infrared port
Receive the signal from the Remote
Commander.
ed Tripod receptacle (Bottom surface)
Attach the tripod (optional: the length of the
screw must be less than 5.5 mm (7/32 in.))
to the tripod receptacle using a tripod
screw.
ef BATT (battery release) lever
(p. 10)
Recording/Playback
19
Page 20

Connecting to other devices
w; HDMI OUT (mini) jack
Connect an HDMI cable (optional).
wa A/V OUT jack
Connect the A/V connecting cable.
ws DC IN jack
wh Active Interface Shoe
The Active Interface Shoe supplies power
to optional accessories such as a video light,
a flash, or a microphone. The accessory can
be turned on or off as you operate the
POWER switch on your camcorder.
eg DISC BURN button
Create a disc by connecting the camcorder
to a computer. For details, see “Picture
Motion Browser Guide.”
eh Interface connector
ej (USB) jack
Connect the USB cable.
ek COMPONENT OUT jack
Connect the component video cable.
20
Page 21
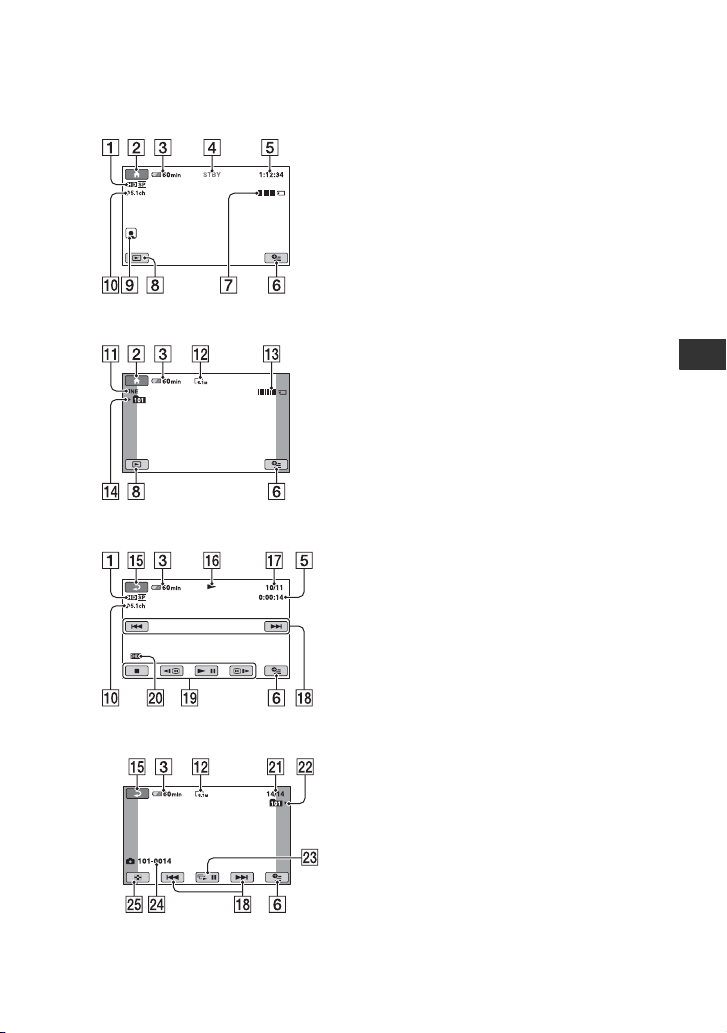
Indicators displayed during recording/playback
Recording movies
Recording still images
Viewing movies
Viewing still images
A Recording quality (HD/SD) and
Recording mode (XP/HQ/SP/LP)
B HOME button
C Remaining battery (approx.)
D Recording status ([STBY] (standby) or
[REC] (recording))
E Counter (hour/minute/second)
F OPTION button
G Dual Rec
H VIEW IMAGES button
I Face Index Set
J 5.1ch surround recording
K Quality ([FINE]/[STD])
L Image size
M This appears while a still image is being
saved.
N Recording folder
O Return button
P Playback mode
Q Currently playing movie number/
Number of total recorded movies
R Previous/Next button
S Video operation buttons
T Playing back image quality
U Current still image number/Number of
total recorded still images
V Playback folder
W Slide show button
X Data file name
Y VISUAL INDEX button
z Tips
• As the number of still images recorded on a
“Memory Stick PRO Duo” increases, new
folders are automatically created to store still
images.
Recording/Playback
21
Page 22
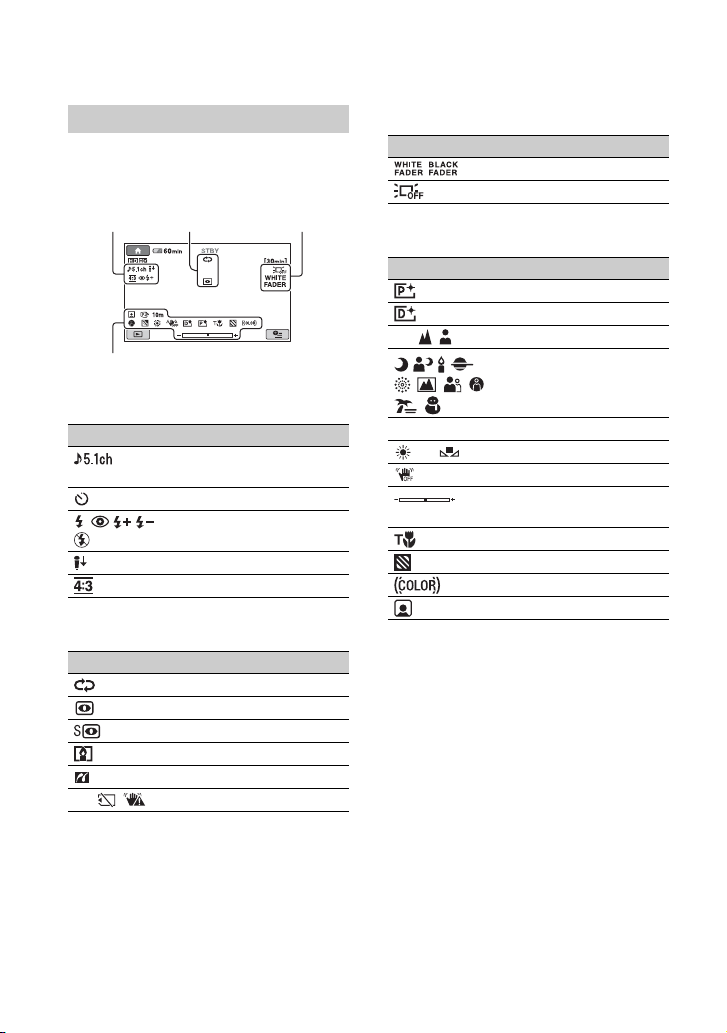
Indicators on the LCD screens
Following indicators appear during
recording/playback to indicate the settings
of your camcorder.
Upper left Upper right
Bottom
Upper left
Indicator Meaning
Flash, REDEYE
Center
Indicator Meaning
E Warning
Center
5.1ch surround
recording/playback
Self-timer recording
REDUC
MICREF LEVEL low
WIDE SELECT
Continuous slide show
NightShot
Super NightShot
Color Slow Shutter
PictBridge connecting
Upper right
Indicator Meaning
FADER
LCD backlight off
Bottom
Indicator Meaning
Picture effect
Digital effect
9 Manual focus
. Backlight
n White balance
b Notes
• The recording date and time are recorded
automatically on the “Memor y Stick PRO Duo.”
They are not displayed while recording.
However, you can check them as [
CODE] during playback.
SCENE SELECTION
SteadyShot off
EXPOSURE/
SPOT METER
TELE MACRO
ZEBRA
X.V.COLOR
Face Index set
DATA
22
Page 23
Performing various functions - “ HOME” and “ OPTION”
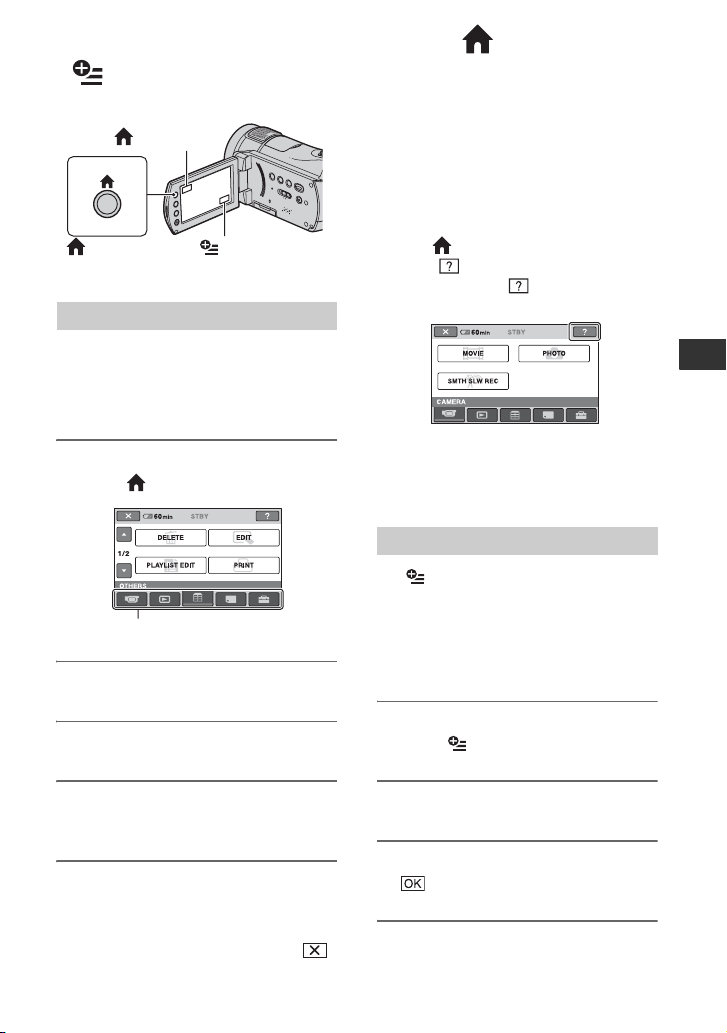
• You cannot simultaneously select or activate the
(HOME) B
(HOME) A (OPTION)
Using the HOME MENU
You can change the recording functions and
the operating settings for your convenience.
For details, see “Handycam Handbook”
(PDF).
1 Turn on your camcorder, then
press (HOME) A (or B).
Category
2 Touch the desired category.
grayed items in the current recording/playback
situation.
To see the explanation of the function
of each item on the HOME MENU
(HELP)
1 Press (HOME) A (or B).
2 Touch (HELP).
The bottom of the (HELP) turns
orange.
3 Touch the item you want to learn about.
When you touch an item, its explanation
appears on the screen.
To apply the option, touch [YES].
Using the OPTION MENU
The OPTION MENU appears just like
the pop-up window that appears when you
right-click the mouse on a computer.
Various functions are displayed in the
context of the operation. For details, see
“Handycam Handbook” (PDF).
Recording/Playback
3 Touch the desired setup item.
4 Follow the guide on the screen for
further operation.
z Tips
• If the item is not on the screen, touch v/V to
change the page.
• To hide the HOME MENU screen, touch .
1 While using your camcorder,
touch (OPTION) on the screen.
2 Touch the desired item.
3 Change the setting, then touch
.
23
Page 24
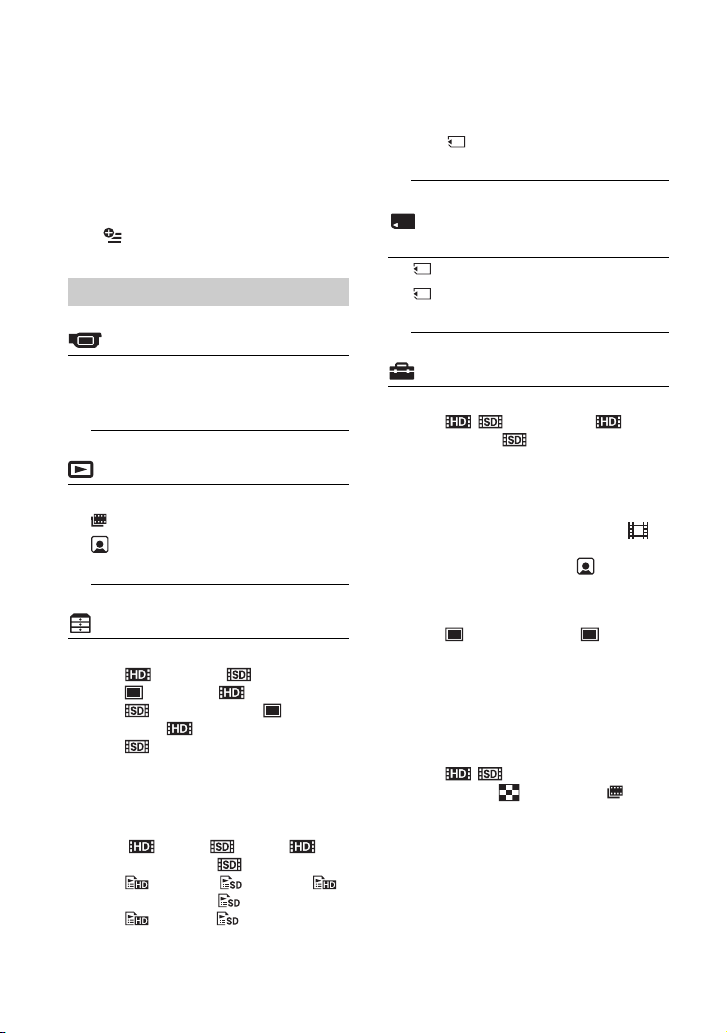
b Notes
• When the item you want is not on the screen,
touch another tab.
• The tabs and items that appear on the screen
depend on the recording/playback status of your
camcorder at the time.
• Some items appear without a tab.
• The OPTION MENU cannot be used during
Easy Handycam operation (p. 15).
Items of the HOME MENU
(CAMERA) category
1
MOVIE*
1
PHOTO*
SMTH SLW REC
(VIEW IMAGES) category
VISUAL INDEX*
INDEX*
INDEX*
PLAYLIST
1
1
1
(OTHERS) category
DELETE*
EDIT
PLAYLIST EDIT
PRINT
1
[ DELETE], [ DELETE],
[ DELETE], [ DELETE ALL],
DELETE ALL], [ DELETE
[
ALL], [ DELETE by date],
[ DELETE by date]
[DELETE], [DIVIDE]
[ ADD], [ ADD], [
ADD by date], [ ADD by date],
[ ERASE], [ ERASE], [
ERASE ALL], [ ERASE ALL],
[ MOVE], [ MOVE]
COMPUTER
[ COMPUTER], [DISC BURN]
TV CONNECT Guide*
(MANAGE MEMORY
STICK) category
FORMAT*
INFO
REPAIRIMG.DB F.
1
(SETTINGS) category
MOVIE SETTINGS
[ / REC SET]*
MODE], [ REC MODE],
[NIGHTSHOT LIGHT], [WIDE
SELECT], [DIGITAL ZOOM],
[STEADYSHOT], [AUTO SLW
SHUTTR], [X.V.COLOR],
[GUIDEFRAME], [ZEBRA], [
REMAINING], [FLASH LEVEL],
[REDEYE REDUC], [ INDEX
1
SET]*
PHOTO SETTINGS
[ IMAGE SIZE]*
QUALITY], [FILE NO.],
[NIGHTSHOT LIGHT],
[STEADYSHOT], [GUIDEFRAME],
[ZEBRA], [FLASH LEVEL],
[REDEYE REDUC]
VIEW IMAGES SET
[ / INDEX SET]*
CODE], [ DISPLAY], [
INTERVAL SET]*
SOUND/DISP SET*
[VOLUME]*1, [BEEP]*1, [LCD
BRIGHT], [LCD BL LEVEL], [LCD
COLOR]
OUTPUT SETTINGS
[TV TYPE], [DISP OUTPUT],
[COMPONENT]
2
1
1
, [ REC
1
, [
1
1
, [DATA
24
Page 25
CLOCK/ LANG
[CLOCK SET]*
SET]/[SUMMERTIME], [
LANGUAGE SET]*
GENERAL SET
[DEMO MODE], [REC LAMP],
[CALIBRATION], [A.SHUT OFF],
[REMOTE CTRL]
*1You can set these items also during Easy
Handycam operation (p. 15).
2
*
The menu name is changed to [SOUND
SETTINGS] during Easy Handycam operation
(p. 15).
1
, [AREA SET], [DST
1
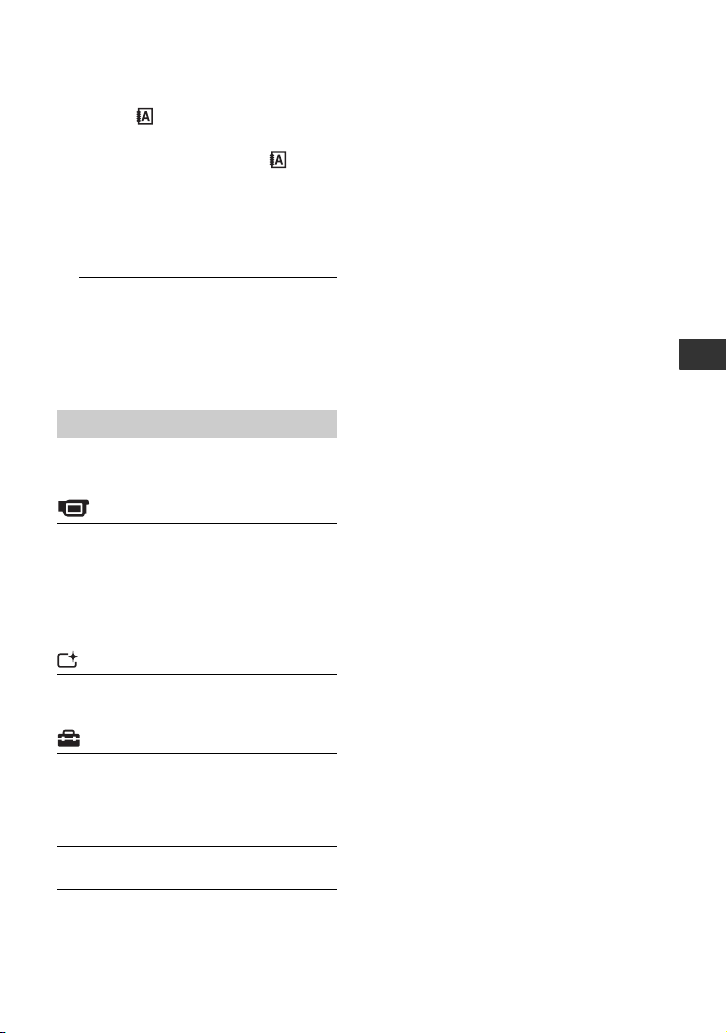
Items of the OPTION MENU
Items you can set only on the OPTION
MENU will be described below.
tab
[FOCUS], [SPOT FOCUS], [TELE
MACRO], [EXPOSURE], [SPOT
METER], [SCENE SELECTION],
[WHITE BAL.], [COLOR SLOW SHTR],
[SUPER NIGHTSHOT]
tab
[FADER], [D.EFFECT], [PICT.EFFECT]
Recording/Playback
tab
[MICREF LEVEL], [SELF-TIMER],
[TIMING], [RECORD SOUND]
– (The tab depends on the situation/No tab)
[SLIDE SHOW], [SLIDE SHOW SET],
[COPIES], [DATE/TIME], [SIZE]
25
Page 26
Saving images
Due to the limited capacity of the “Memory
Stick PRO Duo,” make sure that you save
the image data to some type of media such
as a DVD-R or the hard disk of a computer.
You can save the images recorded on the
camcorder as described below.
Saving images using a
computer
By using the “Picture Motion Browser” on
the supplied CD-ROM, you can save
images on a disc or the hard disk of a
computer. For details, see “Picture Motion
Browser Guide.”
Creating a disc with One Touch
(One Touch Disc Burn)
You can save images recorded on the
camcorder directly to a disc with ease.
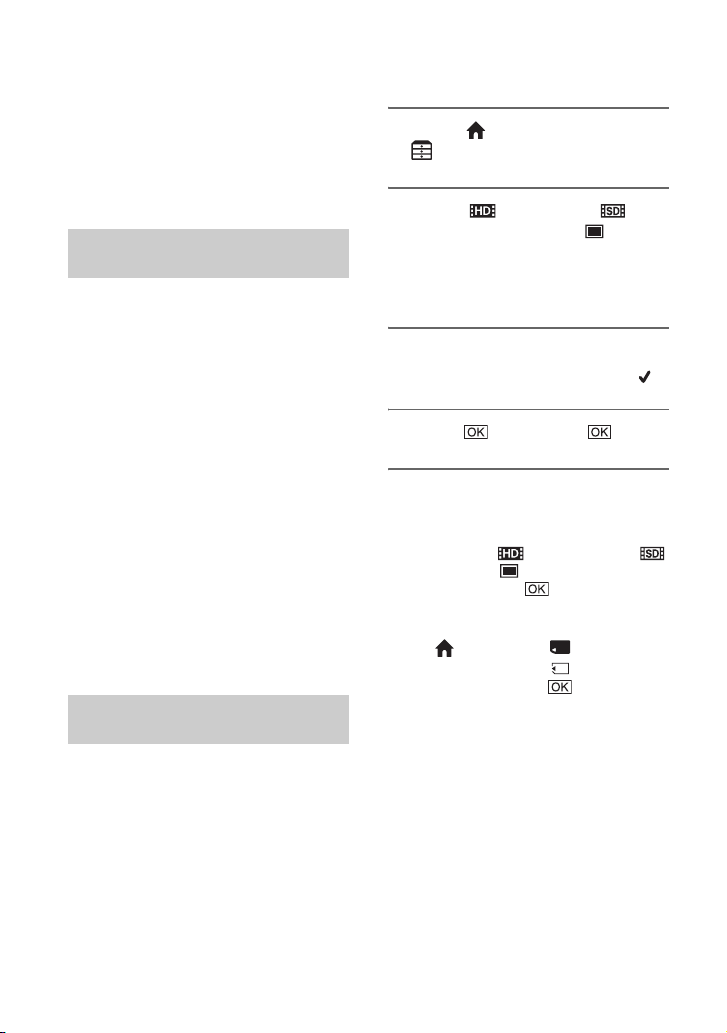
Deleting images
1 On the (HOME MENU), touch
(OTHERS) t [DELETE].
2 Touch [ DELETE] or [
DELETE] (movies), or [
DELETE] (still images), according
to the type of image you want to
delete.
3 Touch the image to be deleted.
The selected image is marked with .
4 Touch t [YES] t .
Saving images on a computer (Easy
PC Back-up)
You can save images recorded on the
camcorder on the hard disk of a computer.
Creating a disc with selected images
You can save images imported to your
computer on a disc. You can also edit those
images.
Saving images by connecting
your camcorder to other devices
You can dub images to VCR or DVD/HDD
devices. For details, see “Handycam
Handbook” (PDF).
26
To delete all movies or still images at
one time
In step 2, touch [ DELETE ALL]/[
DELETE ALL]/[ DELETE ALL] t
[YES] t [YES] t .
To delete all images (Format)
Touch (HOME) t (MANAGE
MEMORY STICK) t [FORMAT]
t [YES] t [YES] t .
b Notes
• Note that formatting will delete all data
recorded on the “Memory Stick PRO Duo.”
Page 27
Enjoying with a computer
Viewing “Handycam Handbook” (PDF)
For advanced use of your camcorder, see
“Handycam Handbook” (PDF).
To view “Handycam Handbook” (PDF),
you need to install Adobe Reader on your
computer.
For Windows users
1 Turn on the computer.
2 Place the CD-ROM (supplied) in
the disc drive of your computer.
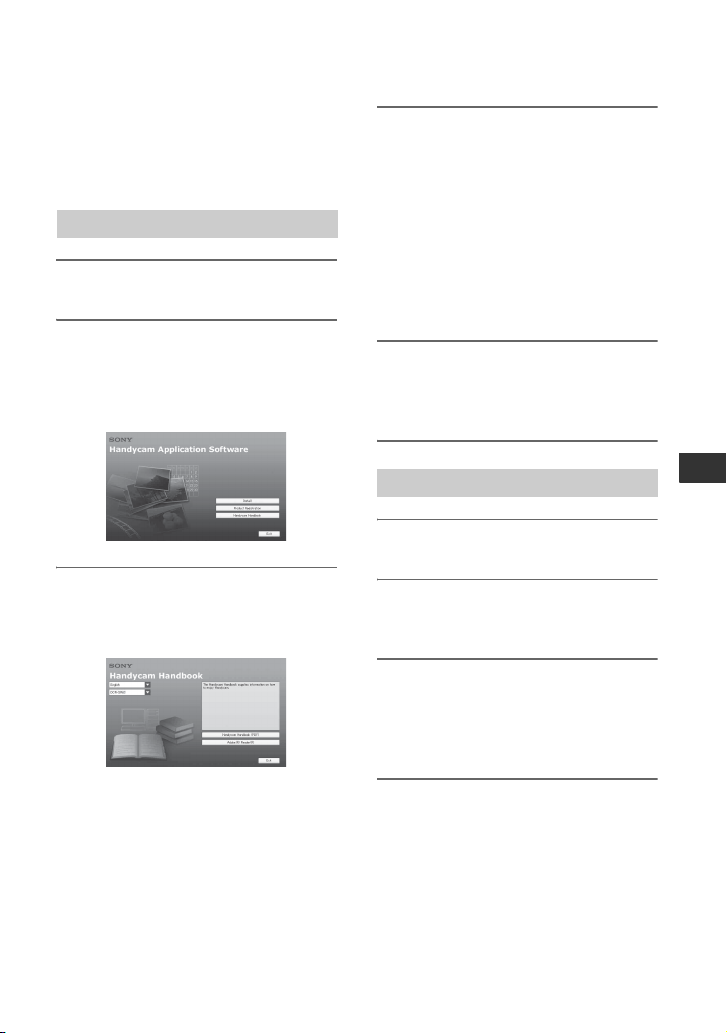
The select screen for installation
appears.
4 Select the desired language and
the model name of your
Handycam, then click [Handycam
Handbook (PDF)].
Installation starts. When the installation
is completed, the short-cut icon of
“Handycam Handbook” appears on the
desktop of your computer.
• The model name of your Handycam is
printed on its bottom surface.
5 Click [Exit] t [Exit], then remove
the CD-ROM from the disc drive
of your computer.
3 Click [Handycam Handbook].
The installation screen for “Handycam
Handbook” (PDF) appears.
For Macintosh users
1 Turn on the computer.
2 Place the CD-ROM (supplied) in
the disc drive of your computer.
3 Open the [Handbook] folder in the
CD-ROM, double-click the [US]
folder and then drag-and-drop the
“Handbook.pdf” on the computer.
Double-click “Handbook.pdf” to view the
handbook.
Enjoying with a computer
27
Page 28

What you can do with a Windows computer
When you install the “Picture Motion
Browser” on a Windows computer from the
supplied CD-ROM, you can enjoy the
following operations.
x Creating a disc with images taken with
your camcorder by one simple
operation
By pressing DISC BURN (p. 20) on the
Handycam Station, you can save images
recorded on your camcorder to a disc on
your computer.
x Importing images taken with your
camcorder to a computer
x Viewing imported images on a
computer
x Creating a disc with edited images
For details on the functions of “Picture
Motion Browser,” see “Picture Motion
Browser Guide” (p. 30).
b Notes
• This camcorder captures high definition footage
in the AVCHD format. Using the enclosed PC
software, high definition footage can be copied
onto DVD media. However, DVD media
containing AVCHD footage should not be used
with DVD based players or recorders, as the
DVD player/recorder may fail to eject the media
and may erase its contents without warning.
DVD media containing AVCHD footage may
be played on a compatible Blu-ray Disc™
player/recorder or other compatible device.
x Using a Macintosh computer
The supplied software “Picture Motion
Browser” does not support a Macintosh
computer.
On the advanced use of images on your
camcorder connected to your computer,
see the following URL;
http://guide.d-imaging.sony.co.jp/mac/
ms/us/
28
Installing the software
x Environment for using “Picture Motion
Browser”
OS: Microsoft Windows 2000 Professional
SP4/Windows XP SP2*/Windows
Vista*
* 64-bit editions and Starter (Edition) are not
supported.
• Standard installation is required.
• Operation is not assured if the above OS has
been upgraded or in a multi-boot environment.
CPU: Intel Pentium 4 2.8 GHz or faster
(Intel Pentium 4 3.6 GHz or faster, Intel
Pentium D 2.8 GHz or faster, Intel Core
Duo 1.66 GHz or faster, Intel Core 2
Duo 1.66 GHz or faster is
recommended.)
• The following operations are possible with Intel
Pentium III 1 GHz or faster.
– Importing the contents to the computer
– One Touch Disc Burn
– Creating an AVCHD format disc/DVD video
– Copying a disc
– Processing only the contents in SD (standard
definition) image quality
Memory:
Windows 2000, Windows XP: 512 MB
or more (1 GB or more is
recommended.)
For processing SD (standard definition)
image quality content only, 256 MB of
memory or more is necessary.
Windows Vista: 1 GB or more
Hard disk: Disk volume required for
installation: Approximately 800 MB
(10 GB or more may be necessary when
creating AVCHD format discs.)
Display: DirectX 7 or later-compatible
video card, Minimum 1,024 × 768 dots,
High Color (16 bit color)
Others: USB port (this must be
provided as standard), Hi-Speed USB
(USB 2.0 compatible) is recommended),
DVD burner (CD-ROM drive is
necessary for installation)
Page 29

b Notes
• The above operating environment is for playing
movies with [HD SP] image quality (7 Mbps)
on a computer.
• Even in a computer environment where the
operations are guaranteed, frames may be
dropped from movies with HD (high definition)
image quality, resulting in uneven playback.
However, imported images and images on discs
created subsequently will not be affected.
• Operations are not guaranteed, even on
computers fulfilling the above system
requirements. For example, other open or
background applications currently running may
limit product performance.
• “Picture Motion Browser” does not support
5.1ch surround sound reproduction. The sound
is reproduced in 2ch sound.
• If you use a Notebook PC, connect it to the AC
Adaptor as the power source when you view or
edit movies recorded in HD (high definition)
format. Otherwise, the software will not wo rk
properly due to the power saving function of the
PC.
• When you perform the One Touch Disc Burn
operation, a long scene may be separated into
plural discs or scenes, depending on the scene
length.
• You can read images recorded on a “Memory
Stick PRO Duo” in a Memory Stick slot of a
computer. However, in the following cases, do
not use the Memory Stick slot of the computer,
but connect your camcorder to the computer
with the USB cable:
– The computer is not compatible with a
“Memory Stick PRO Duo.”
– A Memory Stick Duo adaptor is required.
– A “Memory Stick PRO Duo” cannot be read
in the Memory Stick slot.
– Reading data from the Memory Stick slot is
slow.
x Installation procedure
You need to install the software to your
Windows computer before connecting
your camcorder to the computer. The
installation is required only for the first
time.
Contents to be installed and procedures
may differ depending on your OS.
1 Confirm that your camcorder is not
connected to the computer.
2 Turn on the computer.
b Notes
• Log on as an Administrator for installation.
• Close all applications running on the
computer before installing the software.
3 Place the supplied CD-ROM in the disc
drive of your computer.
The installation screen appears.
If the screen does not appear
1 Click [Start], then click [My Computer].
(For Windows 2000, double-click [My
Computer].)
2 Double-click [SONYPICTUTIL (E:)]
(CD-ROM) (disc drive).*
* Drive names (such as (E:)) may vary
depending on the computer.
4 Click [Install].
5 Select the language for the application to
be installed, then click [Next].
6 Check your area and country/region, then
click [Next].
7 Read [License Agreement], select [I accept
the terms of the license agreement] if you
agree, then click [Next].
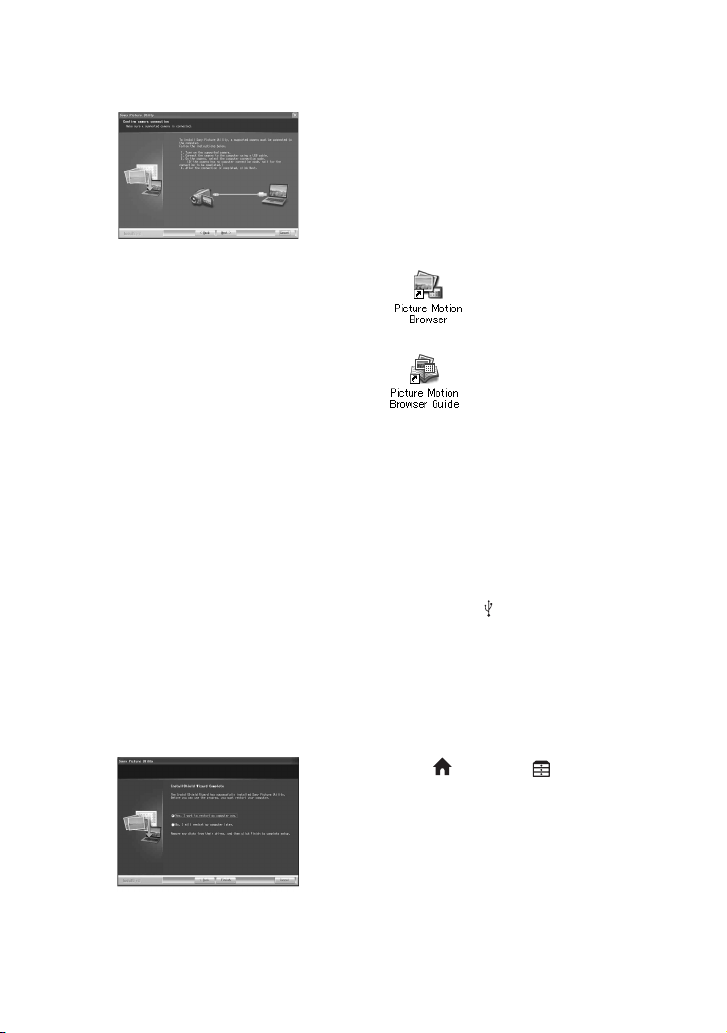
8 Connect your camcorder to the computer
following the steps below.
1 Connect the AC Adaptor to the Handycam
Station and a wall outlet.
2 Set the camcorder onto the Handycam
Station, then slide the POWER switch to
turn on.
3 Connect the (USB) jack (p. 20) of the
Handycam Station to the computer using
the supplied USB cable.
9 When [Connecting...] appears on the screen
of the camcorder, click [Next] on the
connection confirmation screen of the
computer.
Enjoying with a computer
29
Page 30
b Notes
• Even if a screen prompting you to restart
your computer appears, you do not need to
restart it at this time. Restart your computer
after completing the installation.
• It may take some time for the
authentication.
0 Follow the on-screen instructions to install
the software.
One of the following installation screens
appears, depending on the computer
environment. Check the screen and follow
the instructions displayed to install the
required software.
– Sonic UDF Reader*
Software required to recognize an AVCHD
format disc
– Windows Media Format 9 Series Runtime
(Windows 2000 only)
Software required to create a DVD
– Microsoft .NET Framework 1.1*
Software required to create an AVCHD
format disc
– Microsoft DirectX 9.0c*
Software required to handle movies
* Windows 2000, Windows XP only
qa Restart the computer if required to
complete the installation.
x Operating the Picture Motion Browser
After you install the software, shortcut
icons for “Picture Motion Browser” and
“Picture Motion Browser Guide” are
created on the desktop.
For the basic operation of “Picture Motion
Browser,” see “Picture Motion Browser
Guide.”
Double-click to start “Picture
Motion Browser.”
Double-click to start “Picture
Motion Browser Guide.”
x Connecting your camcorder to a
computer
To connect your camcorder to a computer,
follow the steps below.
1 Connect the AC Adaptor to the Handycam
Station and a wall outlet.
2 Set the camcorder onto the Handycam
Station, then slide the POWER switch to
turn on your camcorder.
3 Connect the (USB) jack (p. 20) of the
Handycam Station to a computer using the
supplied USB cable.
The [USB SELECT] screen appears on
your camcorder. Touch the item you want
to operate on the screen.
z Tips
• If the [USB SELECT] screen does not appear,
touch (HOME) t (OTHERS) t
[COMPUTER].
qs Remove the CD-ROM from the disc drive
of your computer.
30
Page 31
Recommended USB cable connection
To assure the proper functioning of your
camcorder, connect your camcorder to a
computer as below.
• Connect the USB ports of the Handycam Station
and a computer using the USB cable. Do not
connect anything to other USB ports of a
computer.
• When connecting to a computer with a USB
keyboard and USB mouse connected as standard
equipment, connect the Handycam Station to
another USB port using the USB cable.
b Notes
• Operations are not guaranteed when multiple
USB devices are connected to a computer.
• Be sure to connect the USB cable to a USB port.
If the USB cable is connected to a computer via
a USB keyboard or USB hub, operations are not
guaranteed.
b Notes
• Do not disconnect the USB cable while the
access lamp is lit.
• Before turning off your camcorder, disconnect
the USB cable following the proper procedures
described above.
• Disconnect the USB cable using the proper
procedures described above. Otherwise, files
stored on the “Memory Stick PRO Duo” may
not be updated correctly. Also, disconnecting
the USB cable improperly may cause a
malfunction of the “Memory Stick PRO Duo.”
To disconnect the USB cable
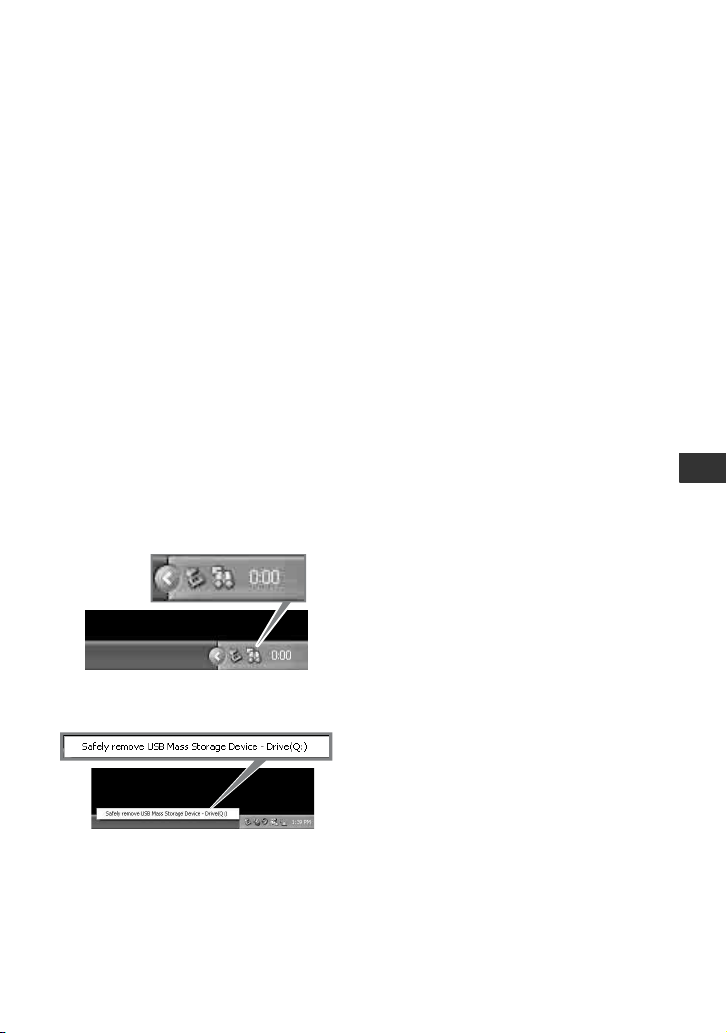
1 Click the [Unplug or eject hardware] icon
on the task tray on the bottom right of the
desk top.
2 Click [Safely remove USB Mass Storage
Device].
3 Click [OK] (Windows 2000 only).
4 Touch [END] on the screen of your
camcorder.
5 Touch [YES] on the screen of your
camcorder.
6 Disconnect the USB cable from the
Handycam Station and the computer.
Enjoying with a computer
31
Page 32

Troubleshooting
Troubleshooting
If you run into any problems using your
camcorder, use the following table to
troubleshoot the problem. If the problem
persists, disconnect the power source and
contact your Sony dealer.
Menu items are grayed out.
• There are some functions you cannot
activate simultaneously. For details, see
“Handycam Handbook” (PDF).
The power does not turn on.
• Attach a charged battery pack to the
camcorder (p. 9).
• Connect the plug of the AC Adaptor to
the wall outlet (p. 9).
• Set the camcorder onto the Handycam
Station securely (p. 9).
The camcorder does not operate
even when the power is set to on.
• It takes a few seconds for your
camcorder to be ready to shoot after the
power is turned on. This is not a
malfunction.
• Disconnect the AC Adaptor from the
wall outlet or remove the battery pack,
then reconnect it after about 1 minute.
If the functions still do not work, press
the RESET button (p. 19) using a
pointed object. (If you press the RESET
button, all settings, including the clock
setting, are reset.)
Buttons do not work.
• During Easy Handycam operation,
available buttons/functions are limited.
Cancel Easy Handycam operation. For
details on Easy Handycam operation,
refer to “Handycam Handbook” (PDF).
Your camcorder gets warm.
• This is because the power has been
turned on for a long time. This is not a
malfunction.
The power abruptly turns off.
• When approximately 5 minutes have
elapsed while you do not operate your
camcorder, the camcorder is
32
automatically turned off (A.SHUT
OFF). Change the setting of [A.SHUT
OFF], or turn on the power again, or
use the AC Adaptor.
• Charge the battery pack (p. 9).
Pressing START/STOP or PHOTO
does not record images.
• The playback screen is displayed. Set
the POWER switch to (Movie) or
(Still) (p. 14).
• Your camcorder is recording the image
you have just shot on the “Memory
Stick PRO Duo.” You cannot make
new recording during this period.
• The “Memory Stick PRO Duo” is full.
Use a new “Memory Stick PRO Duo”
or format the “Memory Stick PRO
Duo.” Or delete the unnecessary
images (p. 26).
• Total number of movie scenes or still
images exceeds the recordable capacity
of your camcorder. Delete the
unnecessary images (p. 26).
You cannot install “Picture Motion
Browser.”
• Check the computer environment
required to install “Picture Motion
Browser.”
• Install “Picture Motion Browser” in an
orderly manner (p. 29).
“Picture Motion Browser” does not
work correctly.
• Finish “Picture Motion Browser” and
restart your computer.
Your camcorder is not recognized by
the computer.
• Install “Picture Motion Browser”
(p. 29).
• Disconnect devices from the USB jack
of the computer other than the
keyboard, mouse, and your camcorder.
• Disconnect the USB cable from the
computer and the Handycam Station,
and restart the computer, then connect
the computer and your camcorder again
in an orderly manner (p. 30).
Page 33
• Make sure the media check tool of the
computer activates. For details on the
media check tool, see “Picture Motion
Browser Guide.”
Self-diagnosis display/Warning
indicators
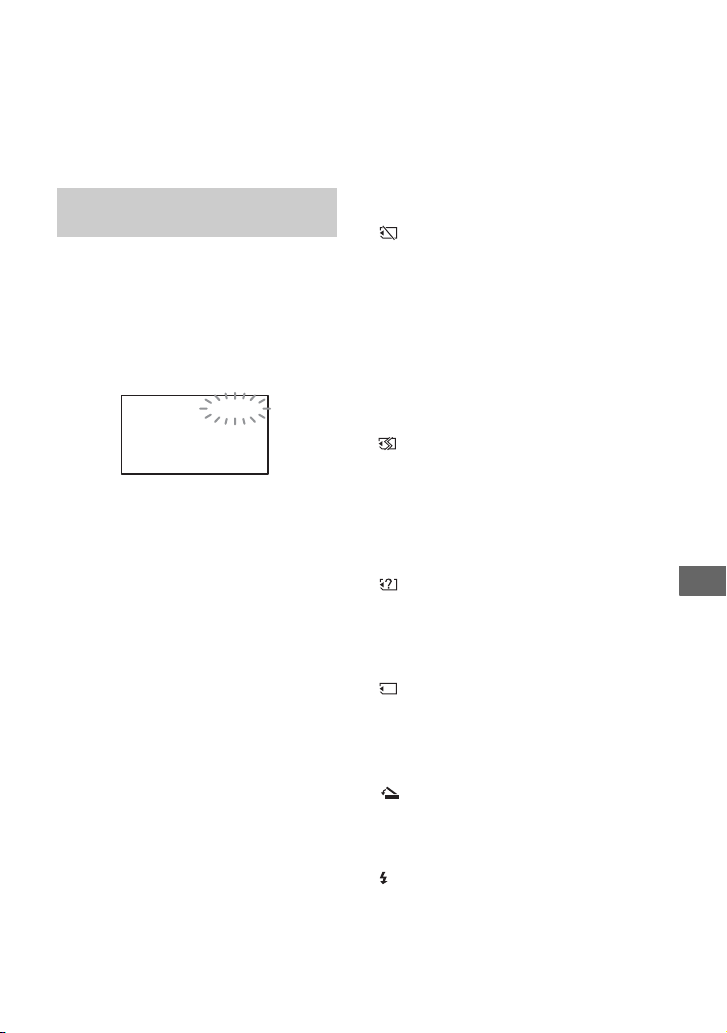
If indicators appear on the LCD screen,
check the following.
You can fix some symptoms by yourself. If
the problem persists even after you have
tried a couple of times, contact your Sony
dealer or local authorized Sony service
facility.
C:04:00
C:(or E:) ss:ss (Self-diagnosis
display)
C:04:ss
• The battery pack is not an
“InfoLITHIUM” battery pack (H
series). Use an “InfoLITHIUM” battery
pack (H series) (p. 9).
• Connect the DC plug of the AC
Adaptor to the DC IN jack of the
Handycam Station or your camcorder
securely (p. 9).
C:13:ss / C:32:ss
• Remove the power source. Reconnect it
and operate your camcorder again.
E:20:ss / E:31:ss / E:61:ss /
E:62:ss / E:91:ss / E:94:ss
• A malfunction that you cannot service
has occurred. Contact your Sony dealer
or local authorized Sony service
facility. Inform them of the 5-digit
code, which starts from “E.”
101-0001 (Warning indicator
pertaining to files)
• The file is damaged.*
• The file is unreadable.*
1
1
E (Battery level warning)
• The battery pack is nearly used up.*
• Depending on the operating
environment or battery conditions, E
may flash, even if there are
approximately 20 minutes remaining.*
(Warning indicator pertaining to
“Memory Stick PRO Duo”)
• Free space for recording images are
running out.
• There are not enough free spaces for
recording images. Insert a new
“Memory Stick PRO Duo,” delete
unnecessary images, or format the
“Memory Stick PRO Duo” (p. 26).*
• No “Memory Stick PRO Duo” is
inserted (p. 13).*
1
(Warning indicators pertaining to
“Memory Stick PRO Duo”
formatting)*
3
• The “Memory Stick PRO Duo” is
damaged.
• The “Memory Stick PRO Duo” is not
formatted correctly.
(Warning indicator pertaining to
incompatible “Memory Stick PRO
3
Duo”)*
• An incompatible “Memory Stick PRO
Duo” is inserted.
- (Warning indicator pertaining
to the write-protect of the “Memory
Stick PRO Duo”)*
3
• Access to the “Memory Stick PRO
Duo” was restricted on another device.
(Warning indicator pertaining to
the Memory Stick Duo cover)
• The Memory Stick Duo cover is open
(p. 13).*
1
(Warning indicator pertaining to
the flash)
• There is something wrong with the
2*3
flash.*
1
1
2
Troubleshooting
33
Page 34

(Warning indicator pertaining to
camera-shake warning)
• The amount of light is not sufficient, so
camera-shake easily occurs. Use the
flash.
• The camcorder is unsteady, so camerashake easily occurs. Hold the
camcorder steady with both hands and
record the image. However, note that
the camera-shake warning indicator
does not disappear.
*1Slow flashing
2
*
Fast flashing
3
*
You hear a melody when the warning indicators
appear on the screen.
34
Page 35

Additional Information
Precautions
On use and care
• Do not use or store the camcorder and
accessories in the following locations:
– Anywhere extremely hot, cold or humid.
Never leave them exposed to temperatures
above 60°C (140°F), such as under direct
sunlight, near heaters or in a car parked in the
sun. They may malfunction or become
deformed.
– Near strong magnetic fields or mechanical
vibration. The camcorder may malfunction.
– Near strong radio waves or radiation. The
camcorder may not be able to record properly.
– Near AM receivers and video equipment.
Noise may occur.
– On a sandy beach or anywhere dusty. If sand
or dust gets in your camcorder, it may
malfunction. Sometimes this malfunction
cannot be repaired.
– Near windows or outdoors, where the LCD
screen, or the lens may be exposed to direct
sunlight. This damages the LCD screen.
• Operate your camcorder on DC 6.8 V/7.2 V
(battery pack) or DC 8.4 V (AC Adaptor).
• For DC or AC operation, use the accessories
recommended in these operating instructions.
• Do not let your camcorder get wet, for example,
from rain or sea water. If your camcorder gets
wet, it may malfunction. Sometimes this
malfunction cannot be repaired.
• If any solid object or liquid gets inside the
casing, unplug your camcorder and have it
checked by a Sony dealer before operating it
any further.
• Avoid rough handling, disassembling,
modifying, physical shock, or impact such as
hammering, dropping or stepping on the
product. Be particularly careful of the lens.
• Keep the POWER switch setting to OFF (CHG)
when you are not using your camcorder.
• Do not wrap your camcorder with a towel, for
example, and operate it. Doing so might cause
heat to build up inside.
• When disconnecting the power cord, pull it by
the plug and not the cord.
• Do not damage the power cord such as by
placing anything heavy on it.
• Keep metal contacts clean.
• Keep the Remote Commander and button-type
battery out of children’s reach. If the battery is
accidentally swallowed, consult a doctor
immediately.
• If the battery electrolytic liquid has leaked:
– consult your local authorized Sony service
facility.
– wash off any liquid that may have contacted
your skin.
– if any liquid gets in your eyes, wash with
plenty of water and consult a doctor.
x When not using your camcorder for a
long time
• Periodically turn on your camcorder and let it
run such as by playing back or recording images
for about 3 minutes.
• Use up the battery pack completely before
storing it.
LCD screen
• Do not exert excessive pressure on the LCD
screen, as it may cause damage.
• If your camcorder is used in a cold place, a
residual image may appear on the LCD screen.
This is not a malfunction.
• While using your camcorder, the back of the
LCD screen may heat up. This is not a
malfunction.
x To clean the LCD screen
If fingerprints or dust make the LCD screen dirty,
it is recommended you use a soft cloth to clean it.
When you use the LCD Cleaning Kit (optional),
do not apply the cleaning liquid directly to the
LCD screen. Use cleaning paper moistened with
the liquid.
On handling the casing
• If the casing is soiled, clean the camcorder body
with a soft cloth lightly moistened with water,
and then wipe the casing with a dry soft cloth.
• Avoid the following to avoid damage to the
finish:
– Using chemicals such as thinner, benzine,
alcohol, chemical cloths, repellent, insecticide
and sunscreen.
– Handling the camcorder with above
substances on your hands.
– Leaving the casing in contact with rubber or
vinyl objects for a long period of time.
Additional Information
35
Page 36
About care and storage of the lens
• Wipe the surface of the lens clean with a soft
cloth in the following instances:
– When there are fingerprints on the lens
surface.
– In hot or humid locations
– When the lens is exposed to salty air such as
at the seaside.
• Store in a well-ventilated location subject to
little dirt or dust.
• To prevent mold, periodically clean the lens as
described above. It is recommended that you
operate your camcorder about once a month to
keep it in optimum state for a long time.
On charging the pre-installed
rechargeable battery
Your camcorder has a pre-installed rechargeable
battery to retain the date, time, and other settings
even when the POWER switch is set to OFF
(CHG). The pre-installed rechargeable battery is
always charged while your camcorder is
connected to the wall outlet via the AC Adaptor or
while the battery pack is attached. The
rechargeable battery will be fully discharged in
about 3 months if you do not use your
camcorder at all. Use your camcorder after
charging the pre-installed rechargeable battery.
However, even if the pre-installed rechargeable
battery is not charged, the camcorder operation
will not be affected as long as you are not
recording the date.
x Procedures
Connect your camcorder to a wall outlet using the
supplied AC Adaptor, and leave it with the
POWER switch set to OFF (CHG) for more than
24 hours.
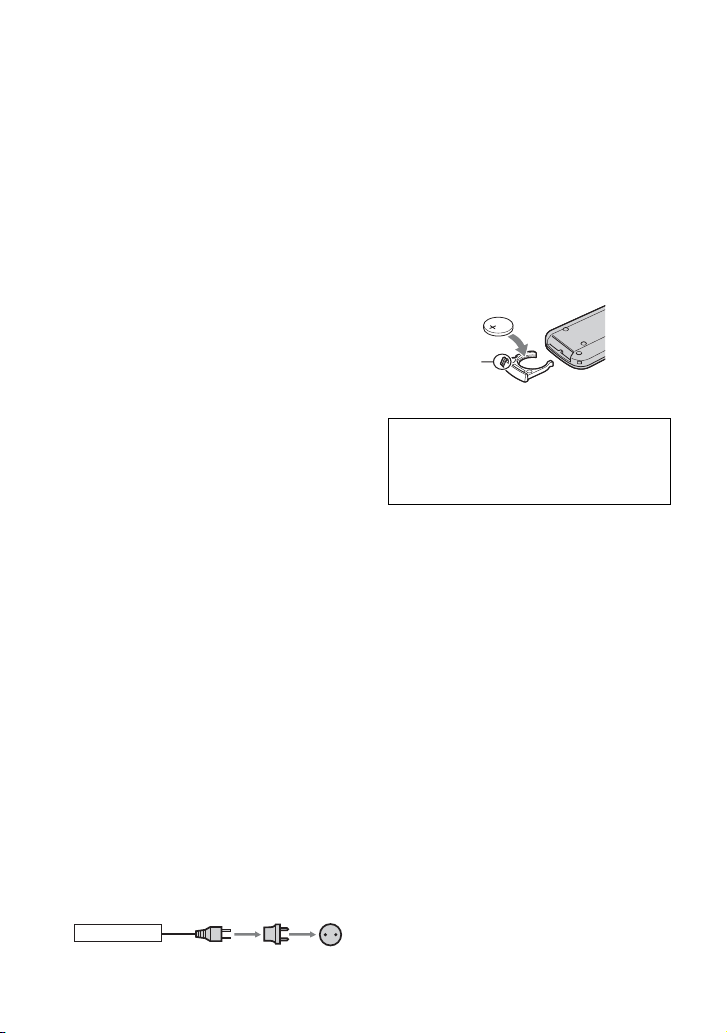
To change the battery of the Remote
Commander
1 While pressing on the tab, inset your
fingernail into the slit to pull out the
battery case.
2 Place a new battery with the + side
facing up.
3 Insert the battery case back into the
Remote Commander until it clicks.
Tab
WARNING
Battery may explode if mistreated. Do not
recharge, disassemble or dispose of in
fire.
• When the lithium battery becomes weak, the
operating distance of the Remote Commander
may shorten, or the Remote Commander may
not function properly. In this case, replace the
battery with a Sony CR2025 lithium battery.
Use of another battery may present a risk of fire
or explosion.
Power supply
You can use your camcorder in any countries/
regions using the AC Adaptor supplied with your
camcorder within the AC 100 V to 240 V, 50/60 Hz
range.
Use a commercially available AC plug adaptor [a],
if necessary, depending on the design of the wall
outlet [b].
AC-L200/L200B [a] [b]
36
Page 37

Specifications
System
Video compression format
AVCHD (HD)/MPEG2 (SD)/JPEG (Still
images)
Audio compression format
Dolby Digital 2/5.1ch
Dolby Digital 5.1 Creator
Video signal
NTSC color, EIA standards
1080/60i specification
Recording format
Movie (HD): AVCHD 1080/60i
Movie (SD): MPEG2-PS
Still image: Exif Ver.2.2*
Image device
6.3 mm (1/2.9 type) CMOS sensor
Recording pixels (still image, 4:3):
Max. 6.1 mega (2 848 × 2 136) pixels*
Gross: Approx. 3 200 000 pixels
Effective (movie, 16:9):
2 280 000 pixels
Effective (movie, 4:3):
1 710 000 pixels
Effective (still image, 16:9):
2 280 000 pixels
Effective (still image, 4:3):
3 040 000 pixels
Lens
Carl Zeiss Vario-Sonnar T
10 × (Optical), 20 × (Digital)
Focal length
F1.8 ~ 2.9
Filter diameter: 37 mm (1 1/2 in.)
f=5.4 ~ 54 mm (7/32 ~ 2 1/4 in.) When
converted to a 35 mm still camera
For movies: 40 ~ 400 mm (1 5/8 ~ 15 3/4 in.)
(16:9), 49 ~ 490 mm (1 15/16 ~ 19 3/8 in.)
(4:3)
For still images: 40 ~ 400 mm (1 5/8 ~ 15 3/4
in.) (16:9), 37 ~ 370 mm (1 1/2 ~ 14 5/8 in.)
(4:3)
Color temperature
[AUTO], [ONE PUSH],
[INDOOR] (3 200 K),
[OUTDOOR] (5 800 K)
Minimum illumination
2 lx (lux) ([AUTO SLW SHUTTR] [ON],
Shutter speed 1/30 sec)
0 lx (lux) (during NightShot function)
1
*1“Exif” is a file format for still images,
established by the JEITA (Japan
Electronics and Information Technology
Industries Association). Files in this
format can have additional information
such as your camcorder’s setting
information at the time of recording.
2
The unique pixel array of Sony’s ClearVid
*
CMOS sensor and image processing
system (new Enhanced Imaging
Processor) allows still image resolution
equivalent to the sizes described.
Input/Output connectors
Audio/Video output
10-pin connector
2
Video signal: 1 Vp-p, 75 Ω (ohms)
Luminance signal: 1 Vp-p, 75 Ω (ohms)
Chrominance signal: 0.286 Vp-p, 75 Ω
(ohms)
Audio signal: 327 mV (at load impedance 47
kΩ (kilohms)), Output impedance with less
than 2.2 kΩ (kilohms)
HDMI OUT jack
HDMI Type C mini connector
LCD screen
Image
6.7 cm (2.7 type, aspect ratio 16:9)
Total dot number
211 200 (960 × 220)
General
Power requirements
DC 6.8 V/7.2 V (battery pack)
DC 8.4 V (AC Adaptor)
Average power consumption
During camera recording using the LCD with
normal brightness:
HD: 4.4 W
SD: 3.8 W
Operating temperature
0 °C to + 40 °C (32 °F to 104 °F)
Storage temperature
-20 °C to + 60 °C (-4 °F to + 140 °F)
Dimensions (approx.)
69 × 67 × 129 mm
(2 3/4 × 2 3/4 × 5 1/8 in.) (w/h/d)
including the projecting parts
69 × 67 × 131 mm
(2 3/4 × 2 3/4 × 5 1/4 in.) (w/h/d)
Additional Information
37
Page 38

including the projecting parts, and the NPFH60 rechargeable battery pack attached
Mass (approx.)
370 g (13 oz) main unit only
450 g (15 oz) including the NP-FH60
rechargeable battery pack, and a “Memory
Stick PRO Duo”
Handycam Station DCRA-C191
Input/Output connectors
Audio/Video output
10 pin connector
Video signal: 1 Vp-p, 75 Ω (ohms)
Luminance signal: 1 Vp-p, 75 Ω (ohms)
Chrominance signal: 0.286 Vp-p, 75 Ω
(ohms)
Audio signal: 327 mV (at load impedance 47
kΩ (kilohms)), Output impedance with less
than 2.2 kΩ (kilohms)
COMPONENT OUT jack
Y: 1 Vp-p, 75 Ω (ohms)
PB/PR, CB/CR: +/- 350 mV, 75 Ω (ohms)
USB jack
mini-B
AC Adaptor AC-L200/L200B
Power requirements
AC 100 V - 240 V, 50/60 Hz
Current consumption
0.35 - 0.18 A
Power consumption
18 W
Output voltage
DC 8.4 V*
Operating temp erature
0 °C to + 40 °C (32 °F to 104 °F)
Storage temperature
-20 °C to + 60 °C (-4 °F to + 140 °F)
Dimensions (approx.)
48 × 29 × 81 mm
(1 15/16 × 1 3/16 × 3 1/4 in.) (w/h/d)
excluding the projecting parts
Mass (approx.)
170 g (6.0 oz) excluding the power cord
* See the label on the AC Adaptor for other
specifications.
Rechargeable battery pack NP-FH60
Maximum output voltage
DC 8.4 V
Output voltage
DC 7.2 V
Capacity
7.2 Wh (1 000 mAh)
Dimensions (approx.)
31.8 × 33.3 × 45.0 mm
(1 5/16 × 1 5/16 × 1 13/16 in.) (w/h/d)
Mass (approx.)
80 g (2.9 oz)
Operating temperature
0 °C to + 40 °C (32 °F to 104 °F)
Type
Lithium ion
Design and specifications are subject to change
without notice.
• Your camcorder is produced under the license of
Dolby Laboratories.
38
Page 39
On trademarks
• “Handycam” and
are registered trademarks of Sony Corporation.
• “AVCHD” and “AVCHD” logotype are
trademarks of Matsushita Electric Industrial
Co., Ltd. and Sony Corporation.
• “Memory Stick,” “ ,” “Memory Stick
Duo,” “ ,” “Memory Stick
PRO Duo,” “ ,”
“Memory Stick PRO-HG Duo,”
“ ,” “Memory Stick
Micro,” “MagicGate,” “ ,”
“MagicGate Memory Stick” and “MagicGate
Memory Stick Duo” are trademarks or
registered trademarks of Sony Corporation.
• “x.v.Color” is a trademark of Sony Corporation.
• “InfoLITHIUM” is a trademark of Sony
Corporation.
• Dolby and the double-D symbol are trademarks
of Dolby Laboratories.
• Dolby Digital 5.1 Creator is a trademark of
Dolby Laboratories.
• HDMI, the HDMI logo and High-Definition
Multimedia Interface are trademarks or
registered trademarks of HDMI Licensing LLC.
• Microsoft, Windows, Windows Media,
Windows Vista, and DirectX are either
registered trademarks or trademarks of
Microsoft Corporation in the United States and/
or other countries.
• Macintosh and Mac OS are registered
trademarks of Apple Inc. in the U.S. and other
countries.
• Intel, Intel Core, and Pentium are trademarks or
registered trademarks of Intel Corporation or its
subsidiaries in the United States and other
countries.
• Adobe, the Adobe logo, and Adobe Acrobat are
either registered trademarks or trademarks of
Adobe Systems Incorporated in the United
States and/or other countries.
All other product names mentioned herein may be
the trademarks or registered trademarks of their
respective companies. Furthermore, ™ and “
are not mentioned in each case in this manual.
®
”
Additional Information
39
Page 40
Additional information on this product and
answers to frequently asked questions can
be found at our Customer Support Website.
Printed on 70% or more recycled paper
using VOC (Volatile Organic Compound)free vegetable oil based ink.
Printed in Japan
US
 Loading...