

Page 1
Digital HD Video Camera Recorder
HDR-CX450/CX455/CX485/CX625/CX675/PJ675/CX680/PJ680
How to Use
Before use
Model Information
Model Information [1]
Parts and controls
Parts and controls (front/top) HDR-CX450/CX455/CX485 [2]
Parts and controls (front/top) (HDR-CX625/CX675/PJ675/CX680/PJ680) [3]
Parts and controls (LCD monitor) (HDR-CX450/CX455/CX485) [4]
Parts and controls (LCD monitor) (HDR-CX625/CX675/PJ675/CX680/PJ680)
[5]
Parts and controls (side) (HDR-CX450/CX455/CX485) [6]
Parts and controls (side) (HDR-CX625/CX675/PJ675/CX680/PJ680) [7]
Parts and controls (back/bottom) (HDR-CX450/CX455/CX485) [8]
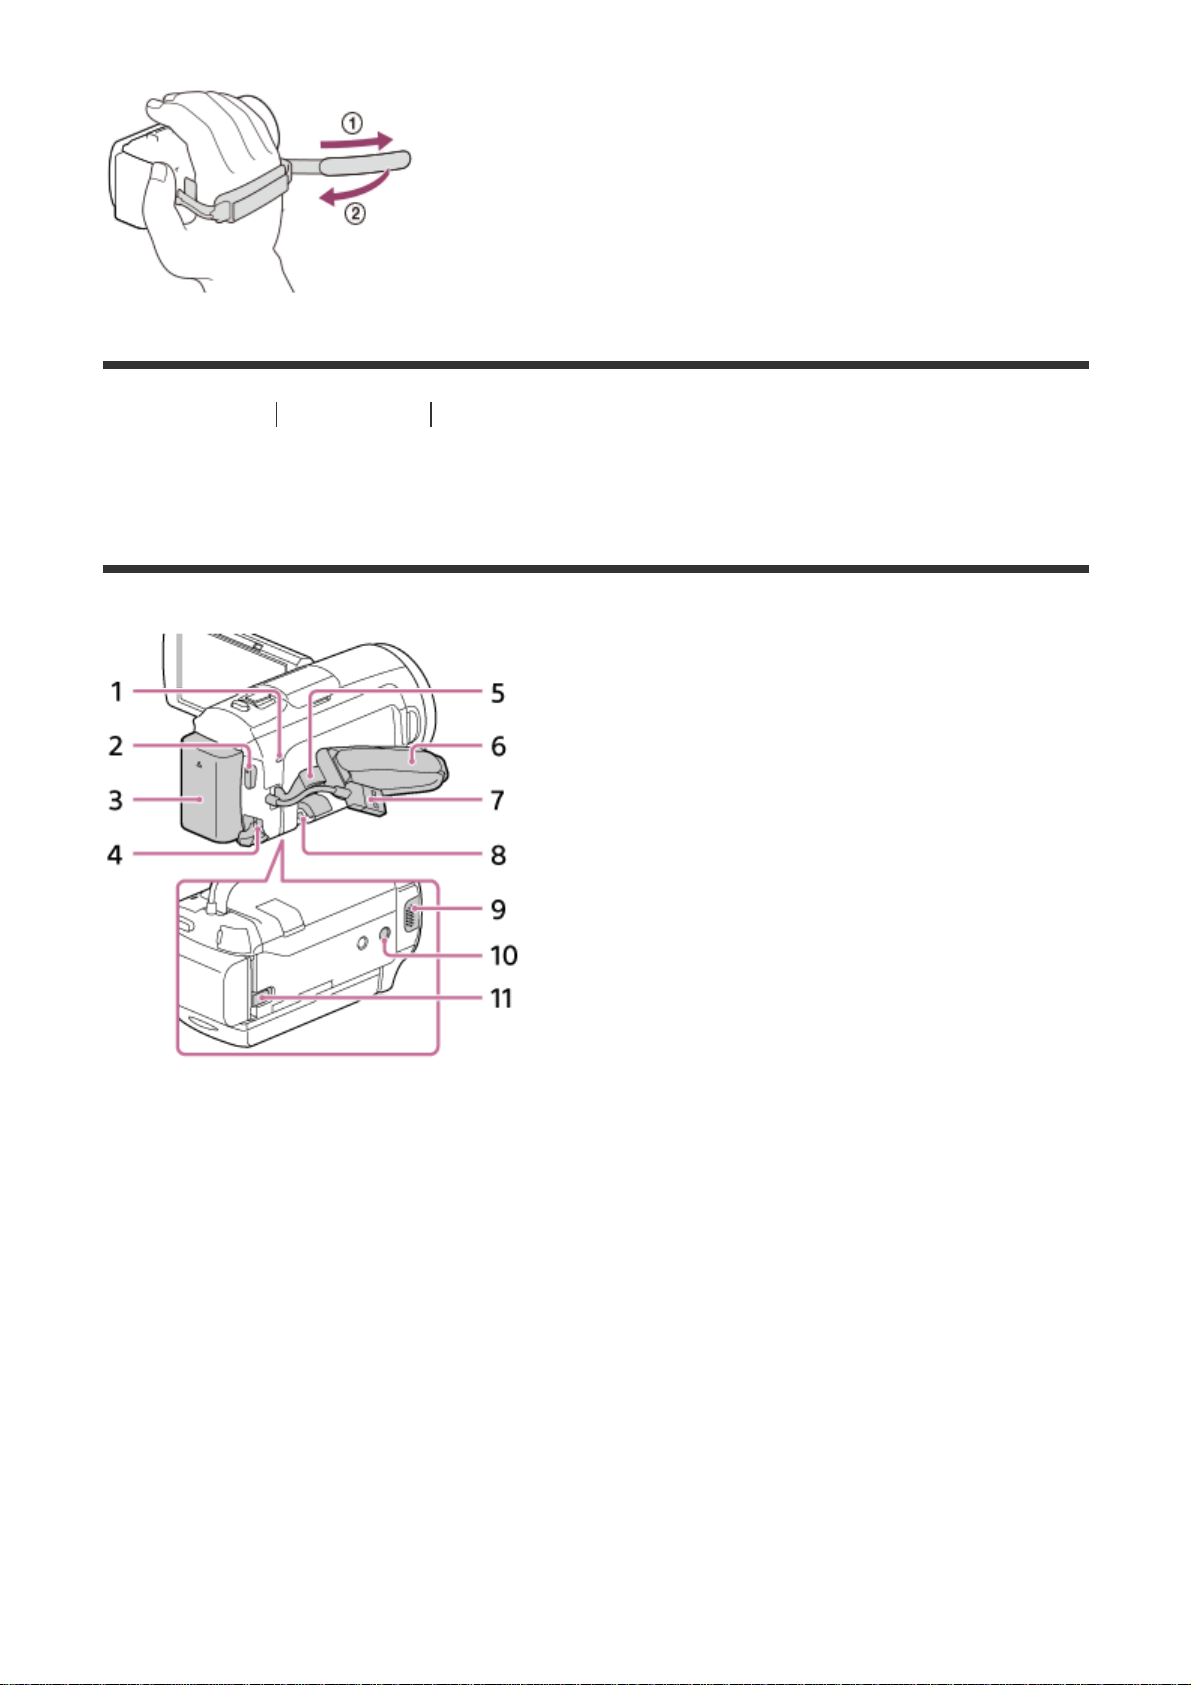
Parts and controls (back/bottom) (HDR-CX625/CX675/PJ675/CX680/PJ680) [9]
Screen indicators
Screen indicators [10]
Getting started
1
Page 2

Checking the supplied items
Supplied items [11]
Power source preparations
Attaching the battery pack [12]
Charging the battery pack using the AC Adaptor [13]
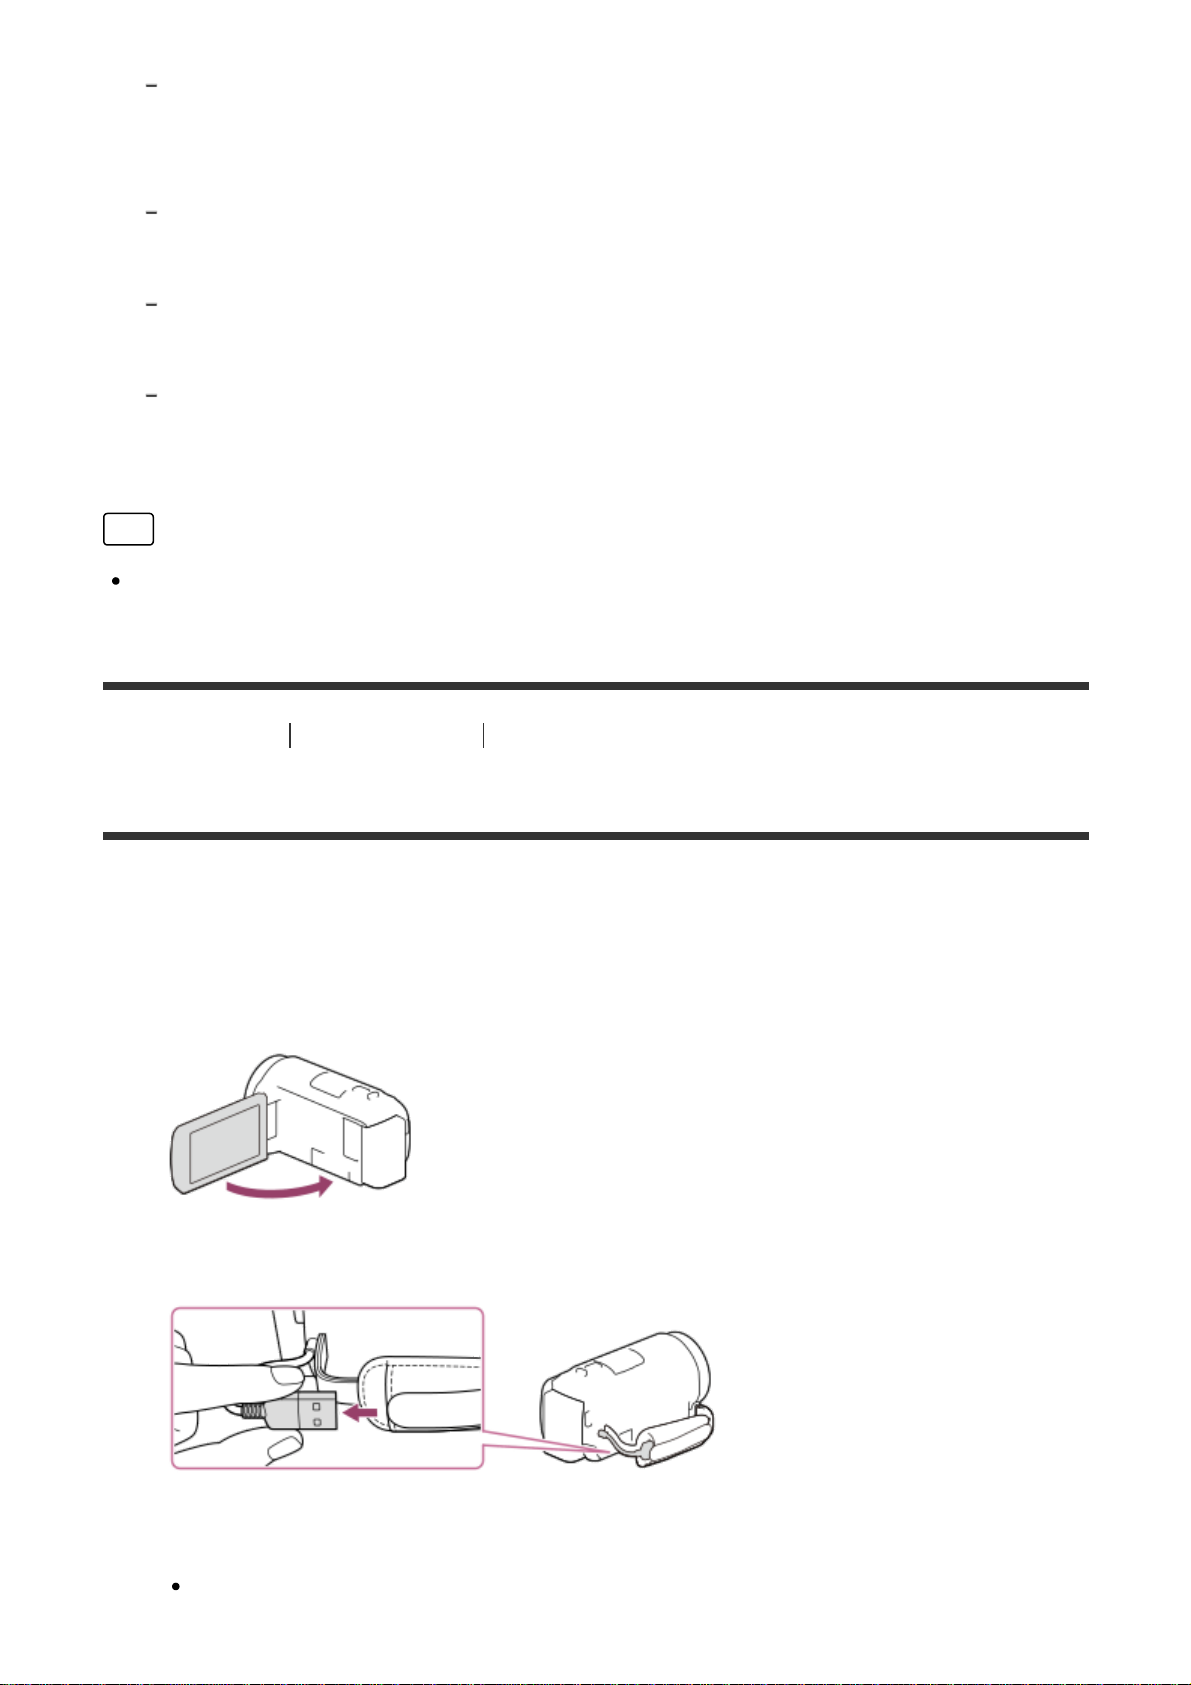
Charging the battery pack using your computer [14]
Turning the power on [15]
Using this product supplying power from a wall outlet (wall socket) [16]
Initial setup
Initial setting [17]
Preparing a memory card
Inserting a memory card [18]
Types of memory card you can use with this product [19]
Recording
Recording movies/photos
Recording movies [20]
Shooting photos [21]
Useful functions for recording
Zooming [22]
Capturing photos during movie recording (Dual Capture) [23]
Recording in mirror mode [24]
Intelligent Auto [25]
2
Page 3

Decreasing the voice volume of the person recording the movie (My Voice
Canceling) [26]
Recording the selected subject clearly (Lock-on AF) [27]
Using the Time-lapse Capture function [28]
Playback
Playing images using Event View
Playing movies and photos from the Event View screen [29]
Screen display on the Event View screen [30]
Creating a highlight movie
About Highlight Movie Maker [31]
Creating a highlight movie (MP4 format) with Highlight Movie Maker [32]
Adding a highlight point during recording [33]
Playing highlight movies [34]
Playing MP4 movies (HD movie) (switching the movie format)
Playing MP4 movies (HD movie) (switching the movie format) [35]
Editing images from the playback screen
Notes on editing [36]
Deleting the selected images [37]
Deleting by date [38]
Dividing a movie [39]
Capturing a photo from a movie (models with the internal memory or models
with the USB IN/OUT jacks) [40]
Viewing trajectory of a moving object (Motion Shot Video) [41]
Using the built-in projector
3
Page 4

Notes on using the projector (models with the projector) [42]
Using the built-in projector (models with the projector) [43]
Using the projector for your computer or other devices(models with the
projector) [44]
Playing images on a high definition TV
Connecting this product to a high definition TV [45]
Enjoying 5.1ch surround sound [46]
Using BRAVIA Sync [47]
On Photo TV HD [48]
On the HDMI cable [49]
Playing images on a non-high-definition TV
Connecting this product to a non-high-definition TV [50]
Saving images
Using the PlayMemories Home software
Import and utilize images on your computer (PlayMemories Home) [51]
Checking the computer system [52]
Installing the PlayMemories Home software in your computer [53]
Disconnecting this product from the computer [54]
About the dedicated software for this product [55]
Creating a Blu-ray disc [56]
Saving images on an external media device
Notes on use of the USB external hard disk [57]
Saving images on an USB external hard disk device [58]
Saving the desired images in this product to the external media device [59]
4
Page 5

Playing back images in the USB external hard disk device on this product [60]
Deleting images in the USB external hard disk device [61]
Creating a disc with a recorder
Creating a disc with a recorder [62]
Using the Wi-Fi function
What you can do with the Wi-Fi function
What you can do with the Wi-Fi function [63]
Installing PlayMemories Mobile
About the PlayMemories Mobile software [64]
Connecting a smartphone
Connecting to your NFC-enabled smartphone or tablet [65]
Connecting to your smartphone or tablet using the QR Code [66]
Connecting to your Android smartphone or tablet (by entering an SSID and
password) [67]
Connecting to your iPhone or iPad (by entering an SSID and password) [68]
Controlling via a smartphone
Using your smartphone or tablet as a wireless remote commander [69]
Using your smartphone or tablet as a wireless remote commander using the
NFC function (NFC one-touch remote) [70]
Transferring images to a smartphone
Transferring movies (MP4) and photos to your smartphone or tablet [71]
Transferring movies (MP4) and photos to your smartphone or tablet using the
NFC function (NFC one-touch sharing) [72]
5
Page 6

Transferring images to a computer
Send to Computer [73]
Transferring images to a TV
Playing images on a TV (View on TV) [74]
Live Streaming
About Live Streaming [75]
Preparing Live Streaming [76]
Performing Live Streaming [77]
Restrictions for Live Streaming [78]
Controlling other cameras through this product
Shooting with this product and other cameras with Multi Camera Control [79]
Connecting this product to one camera with Multi Camera Control (Single
Connection) [80]
Connecting this product to more than one camera with Multi Camera Control
(Multi Connection) [81]
Editing images recorded with several cameras [82]
Menu operations
Using menu items
Setting up menu items [83]
How to use the keyboard [84]
Shooting Mode
Movie [85]
Photo [86]
Time-lapse Capture [87]
6
Page 7

Camera/Mic
White Balance
[88]
Spot Meter/Fcs [89]
Spot Meter [90]
Spot Focus [91]
Exposure [92]
Focus [93]
IRIS [94]
Shutter Speed [95]
AE Shift (HDR-CX625/CX675/PJ675) [96]
White Balance Shift (HDR-CX625/CX675/PJ675) [97]
Low Lux [98]
Scene Selection [99]
Picture Effect [100]
Cinematone (HDR-CX625/CX675/PJ675) [101]
Fader [102]
Self-Timer [103]
SteadyShot (Movie) [104]
SteadyShot (Photo) [105]
Digital Zoom [106]
Conversion Lens (HDR-CX450/CX455/CX485) [107]
Auto Back Light [108]
Face Detection [109]
Smile Shutter [110]
Smile Sensitivity [111]
Flash (Only when connecting an external flash) (HDR-CX625/CX675/PJ675)
[112]
7
Page 8

Flash Level
(Only when connecting an external flash) (HDR-
CX625/CX675/PJ675) [113]
Red Eye Reduction (Only when connecting an external flash) (HDR-
CX625/CX675/PJ675) [114]
My Voice Canceling [115]
Blt-in Zoom Mic [116]
Auto Wind NR [117]
Audio Mode [118]
Audio Rec Level [119]
My Button [120]
Grid Line [121]
Display Setting [122]
Audio Level Display [123]
Image Quality/Size
REC Mode [124]
Frame Rate [125]
Dual Video REC [126]
File Format [127]
Image Size [128]
Wireless
Ctrl with Smartphone [129]
Multi Camera Control [130]
Live Streaming [131]
Send to Smartphone [132]
Send to Computer [133]
View on TV [134]
Airplane Mode [135]
Multi Camera Ctrl Set [136]
8
Page 9

Vid REC during strm. [137]
WPS Push [138]
Access point settings [139]
Edit Device Name [140]
Disp MAC Address [141]
SSID/PW Reset [142]
Network Info Reset [143]
Playback Function
Event View [144]
Edit/Copy
Delete [145]
Protect [146]
Copy (models with the internal memory) [147]
Direct Copy [148]
Setup
Media Select (Models with the internal memory) [149]
Media Info [150]
Format [151]
Empty (Models with the internal memory) [152]
Repair Img. DB F. [153]
File Number [154]
Data Code [155]
Volume [156]
Motion Interval ADJ [157]
Download Music (Models with the USB IN/OUT jacks) [158]
Empty Music (Models with the USB IN/OUT jacks) [159]
9
Page 10

TV Type [160]
HDMI Resolution [161]
CTRL FOR HDMI [162]
USB Connect [163]
USB Connect Setting [164]
USB Power Supply [165]
USB LUN Setting [166]
Beep [167]
Monitor Brightness [168]
Power ON w/monitor [169]
Language Setting [170]
Calibration [171]
Battery Info [172]
Power Save [173]
Initialize [174]
Demo Mode [175]
Version [176]
Date & Time Setting [177]
Area Setting [178]
Charging time/recording time of movies/number of recordable
photos
Check the charging time
Charging time [179]
Expected recording and playback times for individual batteries
Expected recording time with each battery pack [180]
Expected playback time with each battery pack [181]
10
Page 11

Expected movie recording time and number of recordable photos for the
internal memory
Notes on recording movies [182]
Expected recording time of movies (models with the internal memory) [183]
Expected number of recordable photos (models with the internal memory) [184]
Expected movie recording time and number of recordable photos for
memory cards
Notes on recording movies [185]
Expected recording time of movies [186]
Expected number of recordable photos [187]
Bit-rate for each recording mode
Bit-rate and recording pixels [188]
Pixels recorded at each image size of photos
Recording pixels and aspect ratio [189]
Additional information
Precautions
About the AVCHD format [190]
About the memory card [191]
About the InfoLITHIUM battery pack [192]
Services and software provided by other companies [193]
Handling of this product
On use and care [194]
On connecting to a computer or accessory etc. [195]
Notes on optional accessories [196]
11
Page 12

On moisture condensation [197]
Notes on disposal/transfer the ownership of this product (models equipped with
the internal memory) [198]
Note on disposal/transfer of the memory card [199]
Maintenance
On handling the LCD monitor [200]
To clean the casing and the projector lens surface (models with the projector)
[201]
About care and storage of the lens [202]
Using this product abroad
Using this product abroad [203]
Trademarks
On trademarks [204]
License
Notes on the License [205]
Zoom magnifications
Zoom magnifications [206]
Using this product after a long time
Using this product after a long time [207]
Troubleshooting
12
Page 13

Troubleshooting
If you have problems
If you have problems [208]
Overall operations
The power does not turn on. [209]
This product does not operate even when the power is set to on. [210]
The menu settings have been changed automatically. [211]
This product gets warm. [212]
A rattling noise is heard when this product is shaken. [213]
Intelligent Auto is canceled. [214]
Batteries/power sources
The power abruptly turns off. [215]
The POWER/CHG (charge) lamp does not light while the battery pack is being
charged. [216]
The POWER/CHG (charge) lamp flashes while the battery pack is being
charged. [217]
The remaining battery power is not displayed correctly. [218]
The battery pack is quickly discharged. [219]
Monitor
Menu items are grayed out. [220]
The buttons do not appear on the LCD monitor. [221]
The buttons on the touch panel do not work correctly or do not work at all. [222]
The buttons on the LCD monitor quickly disappear. [223]
There are dots in the shape of a grid on the monitor. [224]
13
Page 14

The backlight of the LCD monitor turns off if you do not attempt to operate this
product for a while. [225]
The image in the LCD monitor is not clear. [226]
Memory card
Operations using the memory card cannot be performed. [227]
Images stored on the memory card cannot be deleted. [228]
The data file name is not indicated correctly or flashes. [229]
Images cannot be played back or the memory card is not recognized. [230]
The data file cannot be copied from internal memory (models with the internal
memory). [231]
Recording
Pressing START/STOP or PHOTO does not record images. [232]
Photos cannot be recorded. [233]
The access lamp remains lit or flashing even if recording has stopped. [234]
The imaging field looks different. [235]
The actual recording time for movies is less than the expected recording time of
the recording media. [236]
This product stops recording. [237]
There is a slight time lag between the moment when START/STOP is pressed
and the actual movie recording starts or stops. [238]
The auto focus does not function. [239]
SteadyShot does not function. [240]
Images cannot be recorded or played back correctly. [241]
The subjects passing across this product very fast appear crooked. [242]
Horizontal stripes appear on the images. [243]
[Monitor Brightness] cannot be set. [244]
Sound is not recorded correctly. [245]
Photos are recorded automatically. [246]
14
Page 15

Playback
Images cannot be played back. [247]
Photos cannot be played back. [248]
The movie freezes. [249]
An icon appears on a thumbnail. [250]
No sound or only a quiet sound is heard during playback. [251]
Left and right sound is heard unbalanced when playing back movies on
computers or other devices. [252]
Wi-Fi
The wireless access point you want to connect to does not appear. [253]
[WPS Push] does not work. [254]
[Ctrl with Smartphone], [Send to Smartphone], [Send to Computer] or [View on
TV] terminates prematurely. [255]
Cannot transfer movies to your smartphone. [256]
The shooting screen does not display smoothly. The connection is cut off. [257]
The shooting screen during Multi Camera Control does not display smoothly.
The connection is cut off. [258]
The NFC connection does not work. [259]
Editing movies/photos on this product
A movie cannot be divided. [260]
The demonstration movies cannot be deleted. (models with the internal
memory) [261]
Playback on a TV
Neither image nor sound is played on the connected TV. [262]
The top, bottom, right, and left edges of images are trimmed slightly on a
connected TV. [263]
The image appears distorted on the 4:3 TV. [264]
15
Page 16

Black bands appear at the top and bottom of the LCD monitor of the 4:3 TV.
[265]
Copying/Connecting to other devices
Images are not copied correctly. [266]
Connecting to a computer
PlayMemories Home cannot be installed. [267]
PlayMemories Home does not work correctly. [268]
This product is not recognized by the computer. [269]
Self-diagnosis display/Warning indicators
Self-diagnosis display/Warning indicators
Self-diagnosis display [270]
Error messages during Live Streaming
Error messages during Live Streaming [271]
Warning messages
Warning messages
Warning Indicators [272]
[1] How to Use
Before use Model Information
Model Information
In this Help Guide, the differences in the specifications for each model are
described together.
16
Page 17
If you find the description like “Models with ... ” as below, confirm in this chapter
whether the description applies to this product.
(models with the internal memory)
(1080 60i-compatible device)
(1080 50i-compatible device)
To confirm the model name of this product
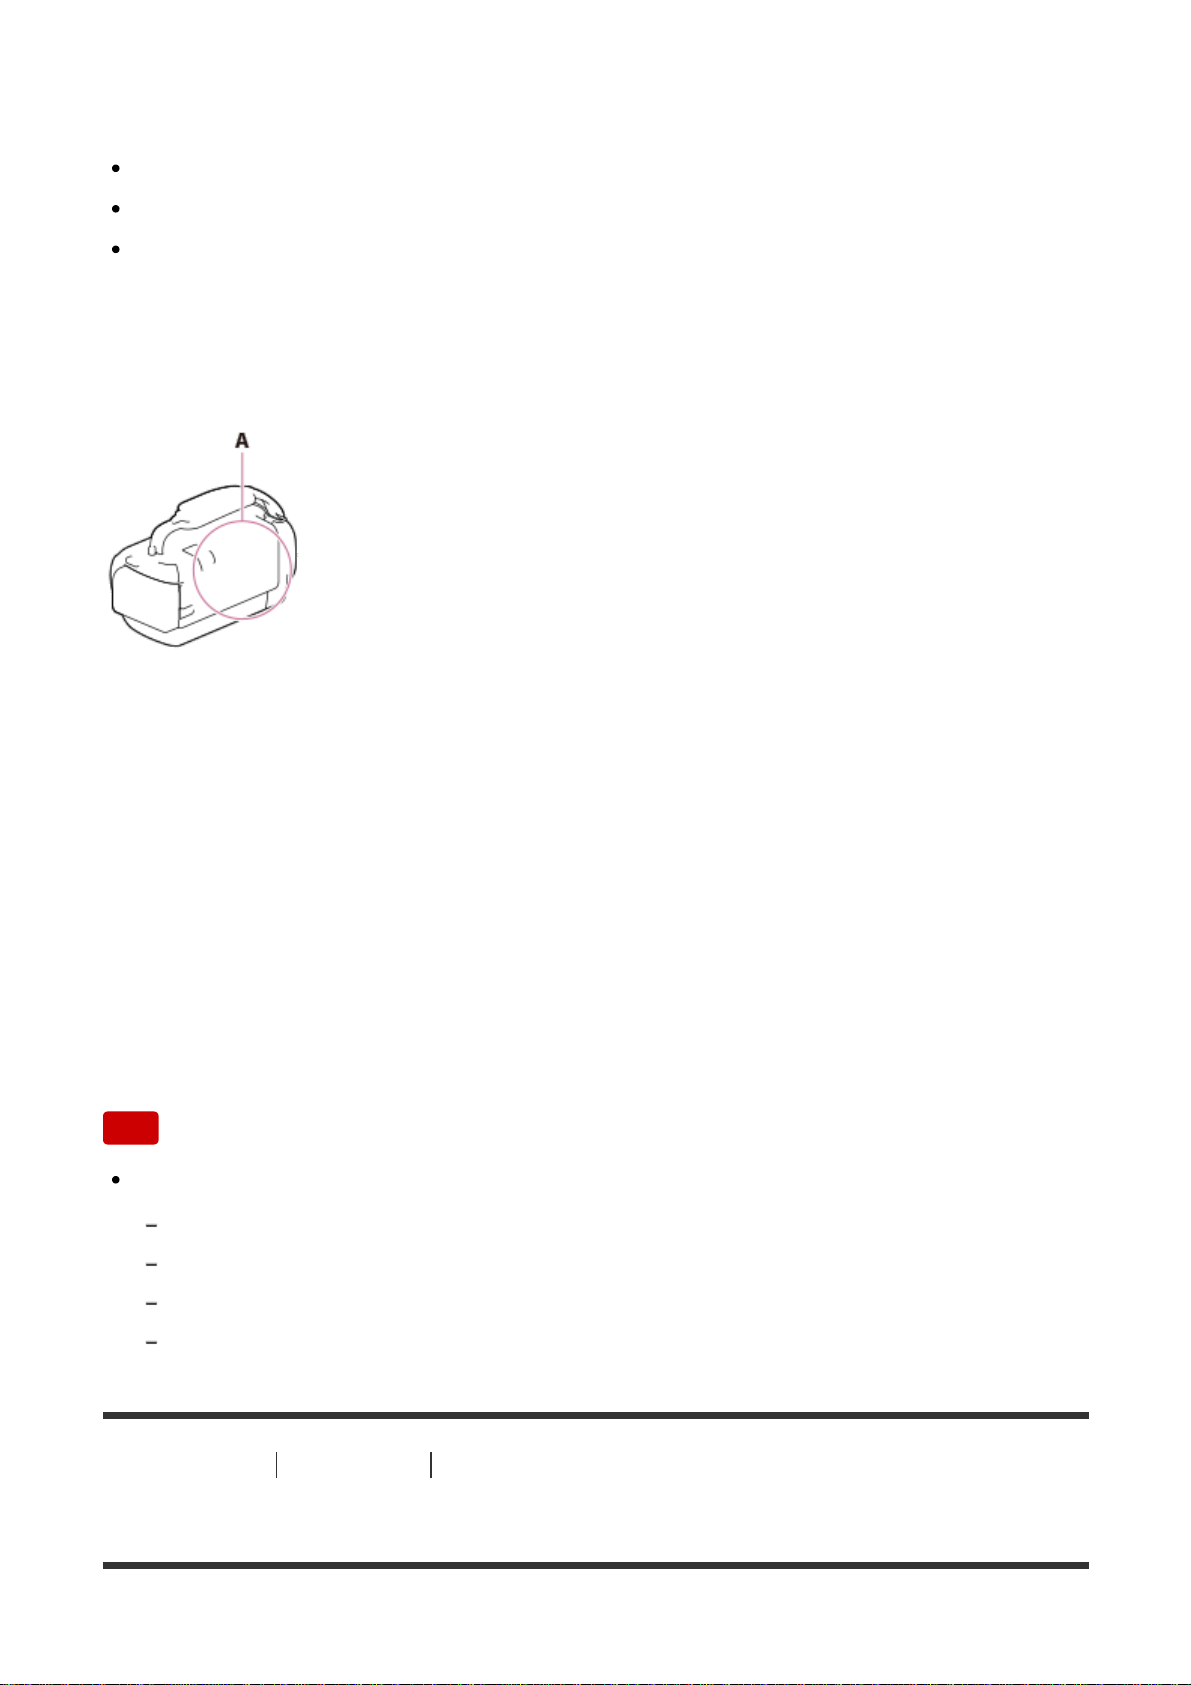
See the bottom of this product.
A: Model name (HDR-CX450/CX455/CX485/CX625/CX675/PJ675/CX680/PJ680)
Differences in functions
Models with the internal memory: HDR-
CX455/CX485/CX675/PJ675/CX680/PJ680
Models with the projector: HDR-PJ675/PJ680
1080 60i-compatible device: See the bottom of this product.
1080 50i-compatible device: See the bottom of this product.
Models with the USB IN/OUT jacks: Except models for Europe.
Models with the USB Output only jack: Models for Europe only.
Note
For the following items, the descriptions are explained with the model name.
Parts and controls
Menu items
Expected recording time of movies
Expected number of recordable photos
[2] How to Use
Before use Parts and controls
Parts and controls (front/top) HDR-CX450/CX455/CX485
17
Page 18
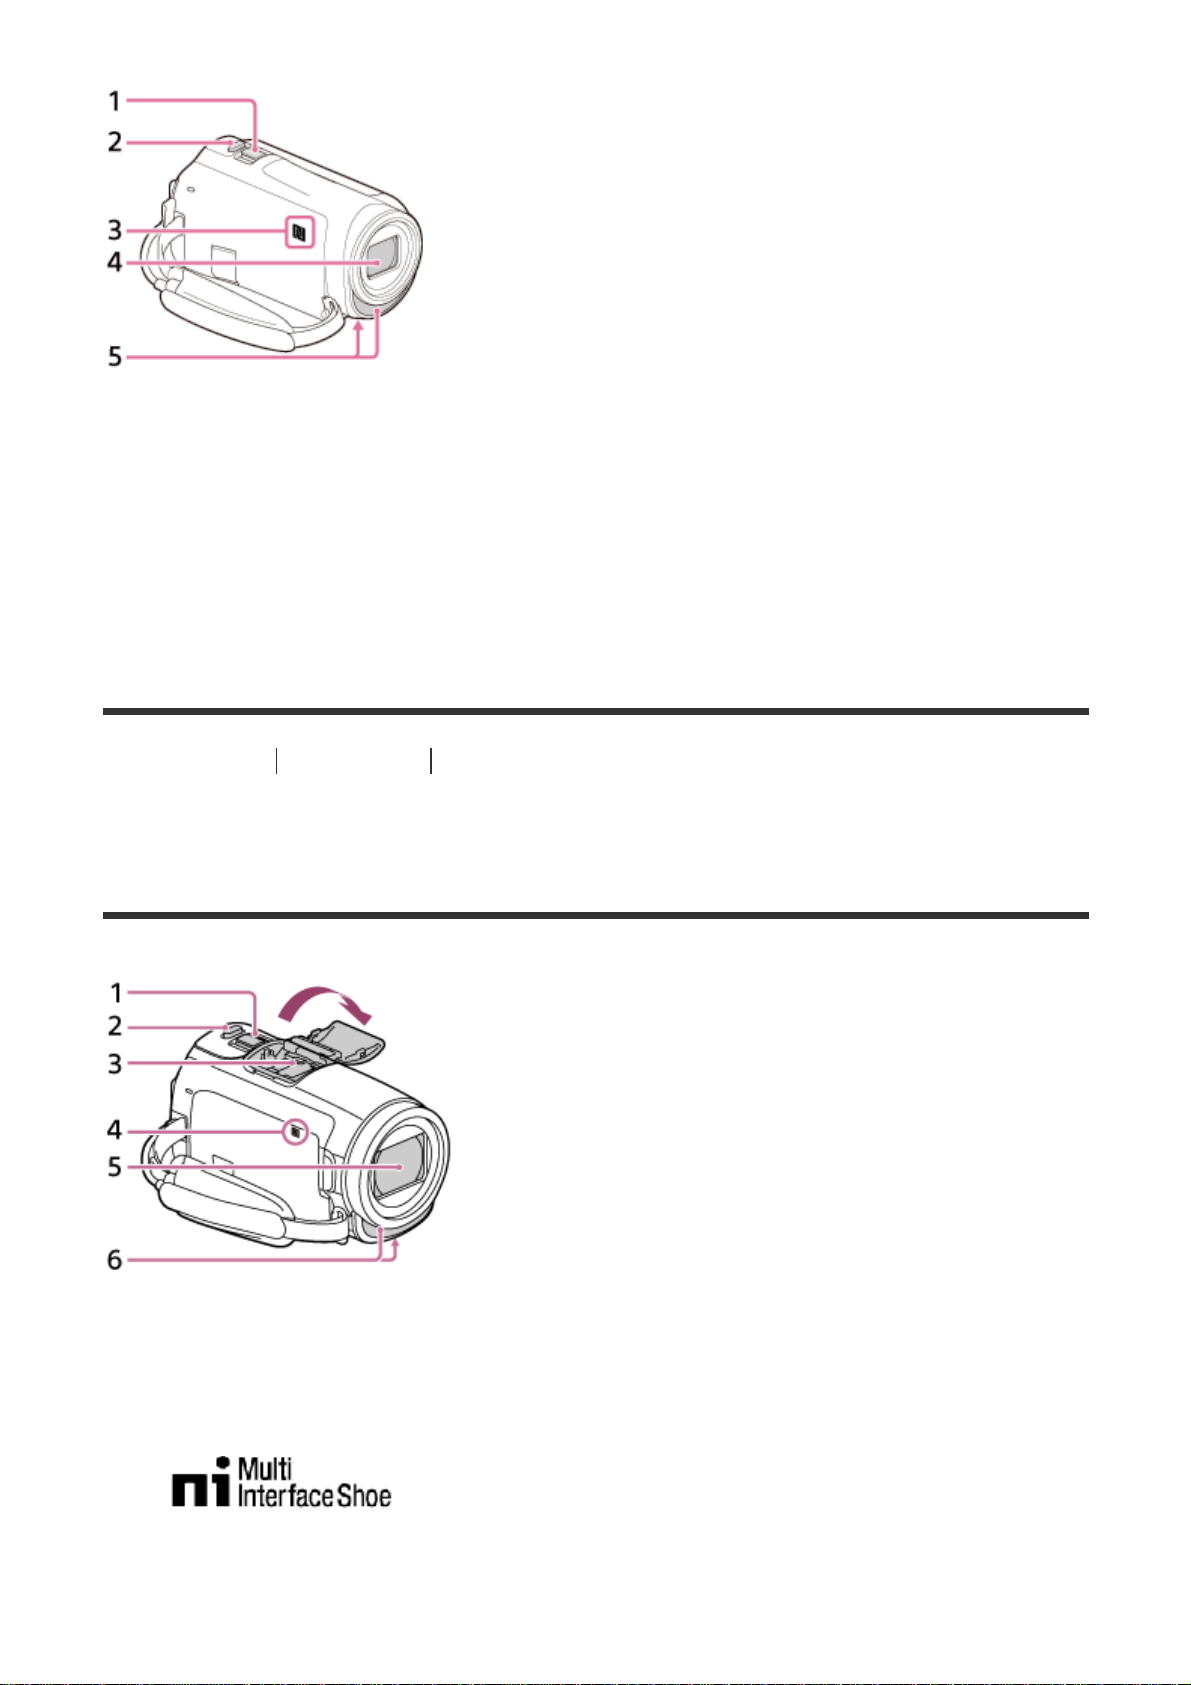
1. Power zoom lever
2. PHOTO button
3. N mark
NFC: Near Field Communication
4. Lens (ZEISS lens)
5. Built-in microphone
[3] How to Use
Before use Parts and controls
Parts and controls (front/top) (HDRCX625/CX675/PJ675/CX680/PJ680)
1. Power zoom lever
2. PHOTO button
3. Multi interface shoe
For details on compatible accessories of the Multi interface shoe, visit the
Sony website in your area, or consult your Sony dealer or local authorized
18
Page 19
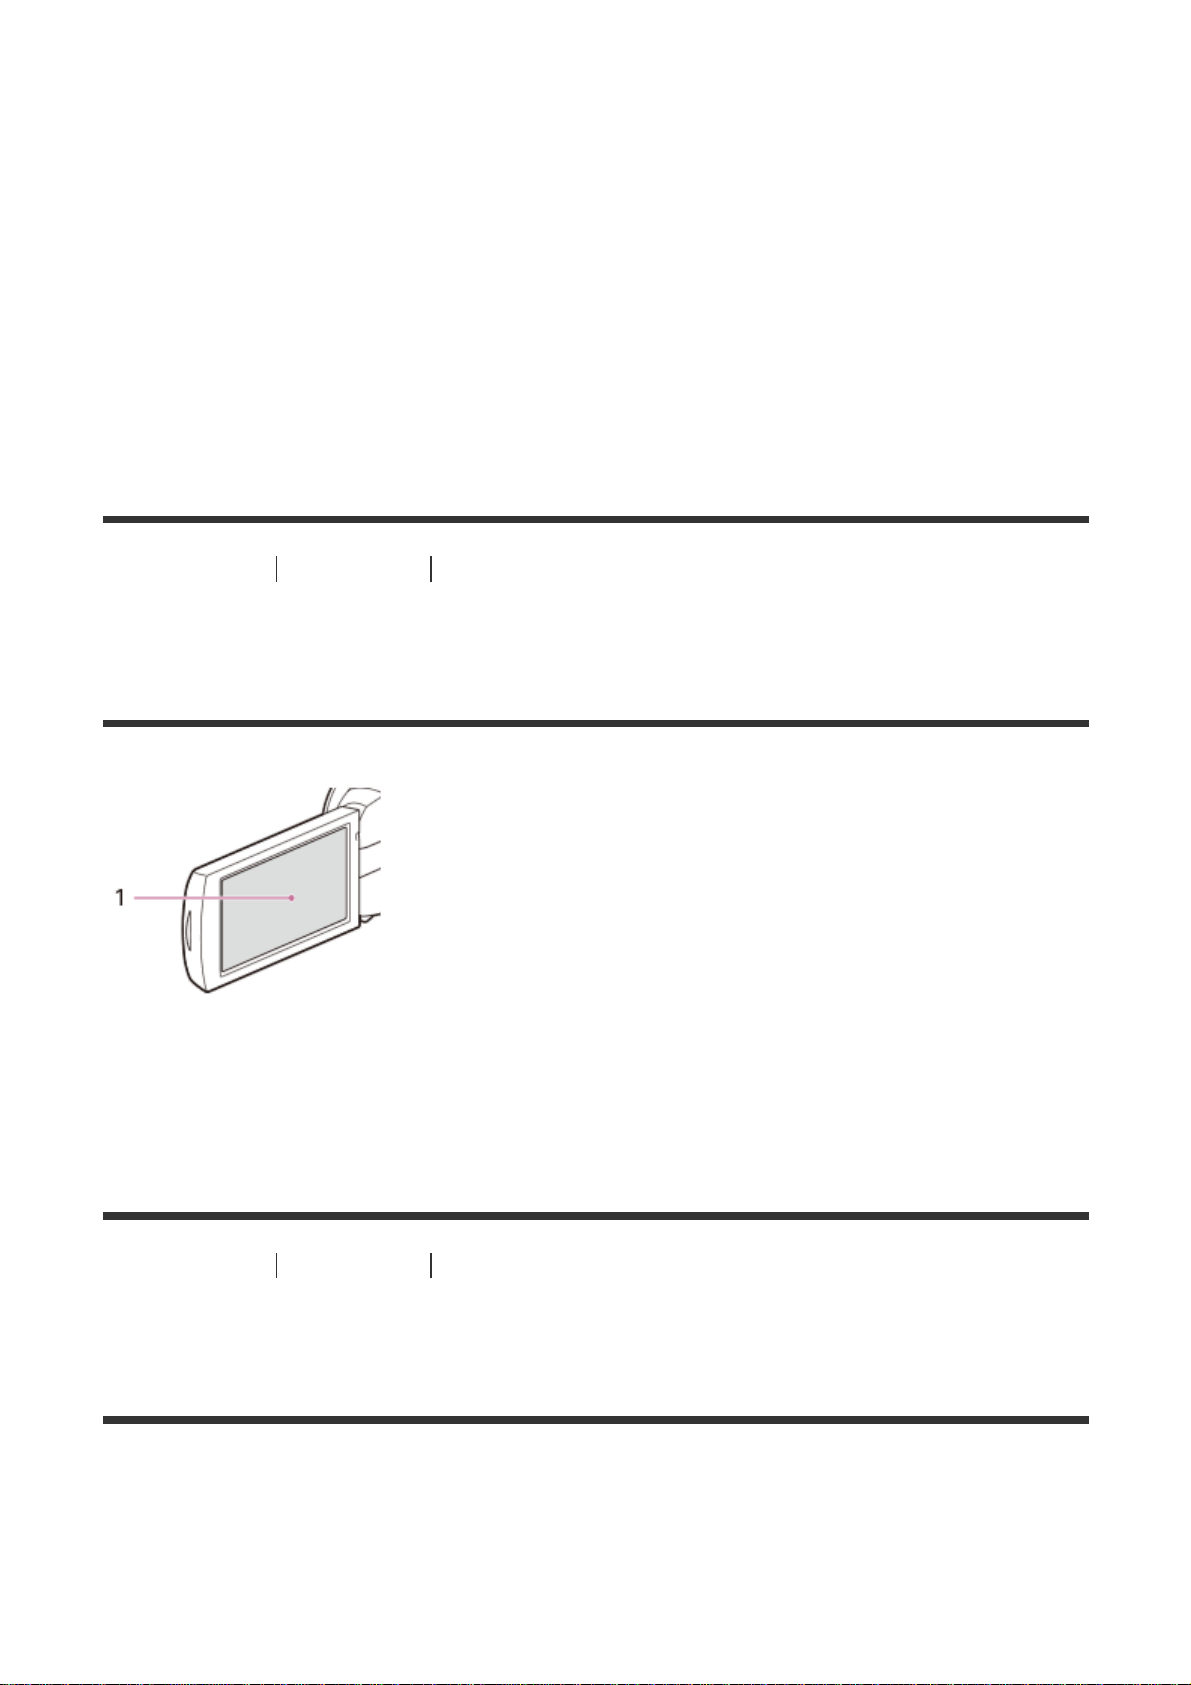
Sony service facility.
Operations with other manufacture’s accessories are not guaranteed.
If you use a shoe adaptor (sold separately), you can also use accessories
compatible with an Active Interface Shoe.
To prevent failure, do not use a commercially available flash with high-voltage
synchro terminals or with reverse polarity.
4. N mark
NFC: Near Field Communication
5. Lens (G lens)
6. Built-in microphone
[4] How to Use
Before use Parts and controls
Parts and controls (LCD monitor) (HDRCX450/CX455/CX485)
1. LCD monitor/Touch panel
If you rotate the LCD panel 180 degrees, you can close the LCD monitor with
the screen facing out. This is convenient during playback operations.
[5] How to Use
Before use Parts and controls
Parts and controls (LCD monitor) (HDRCX625/CX675/PJ675/CX680/PJ680)
19
Page 20
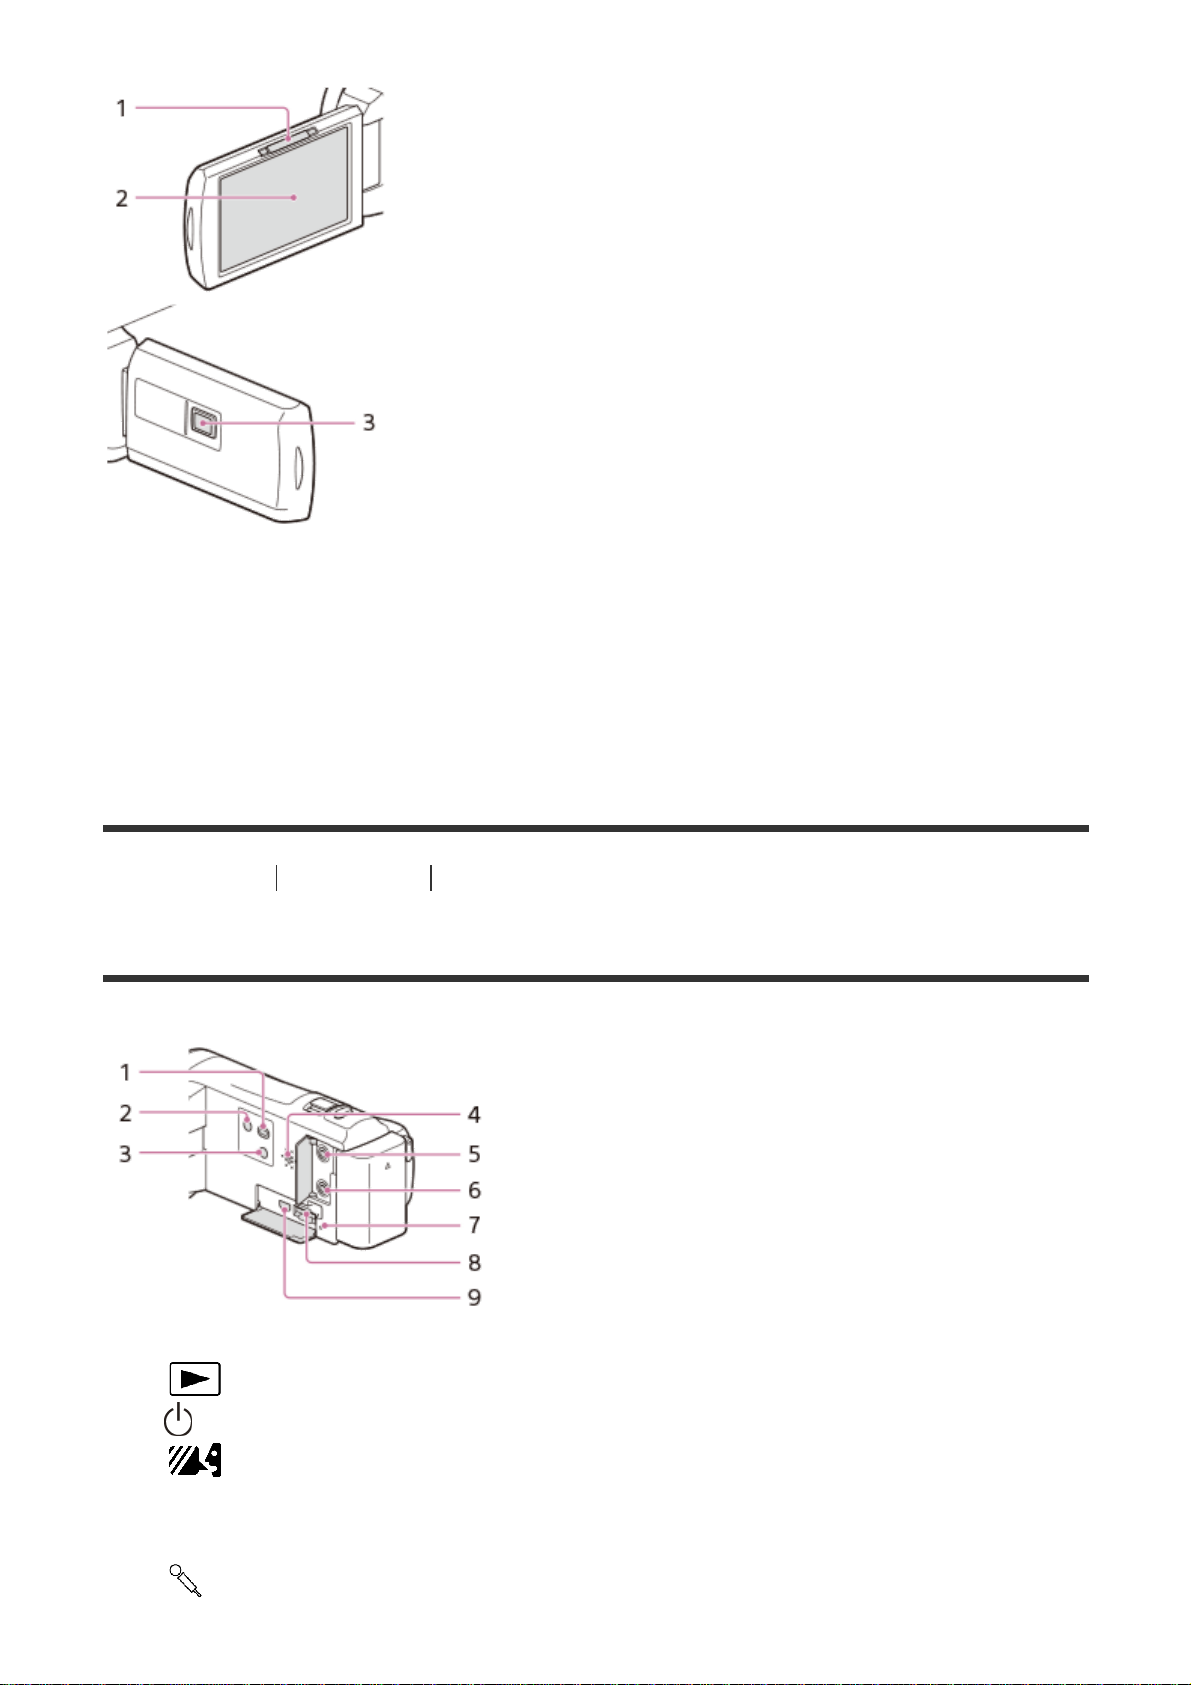
1. PROJECTOR FOCUS lever (models with the projector)
2. LCD monitor/Touch panel
If you rotate the LCD panel 180 degrees, you can close the LCD monitor with
the screen facing out. This is convenient during playback operations.
3. Projector lens (models with the projector)
[6] How to Use
Before use Parts and controls
Parts and controls (side) (HDR-CX450/CX455/CX485)
1. (View Images) button
2.
(ON/STANDBY) button
3.
(My Voice Canceling) button
Suppresses the voice of the person recording the movie.
4. Speaker
5.
(microphone) jack (PLUG IN POWER)
20
Page 21
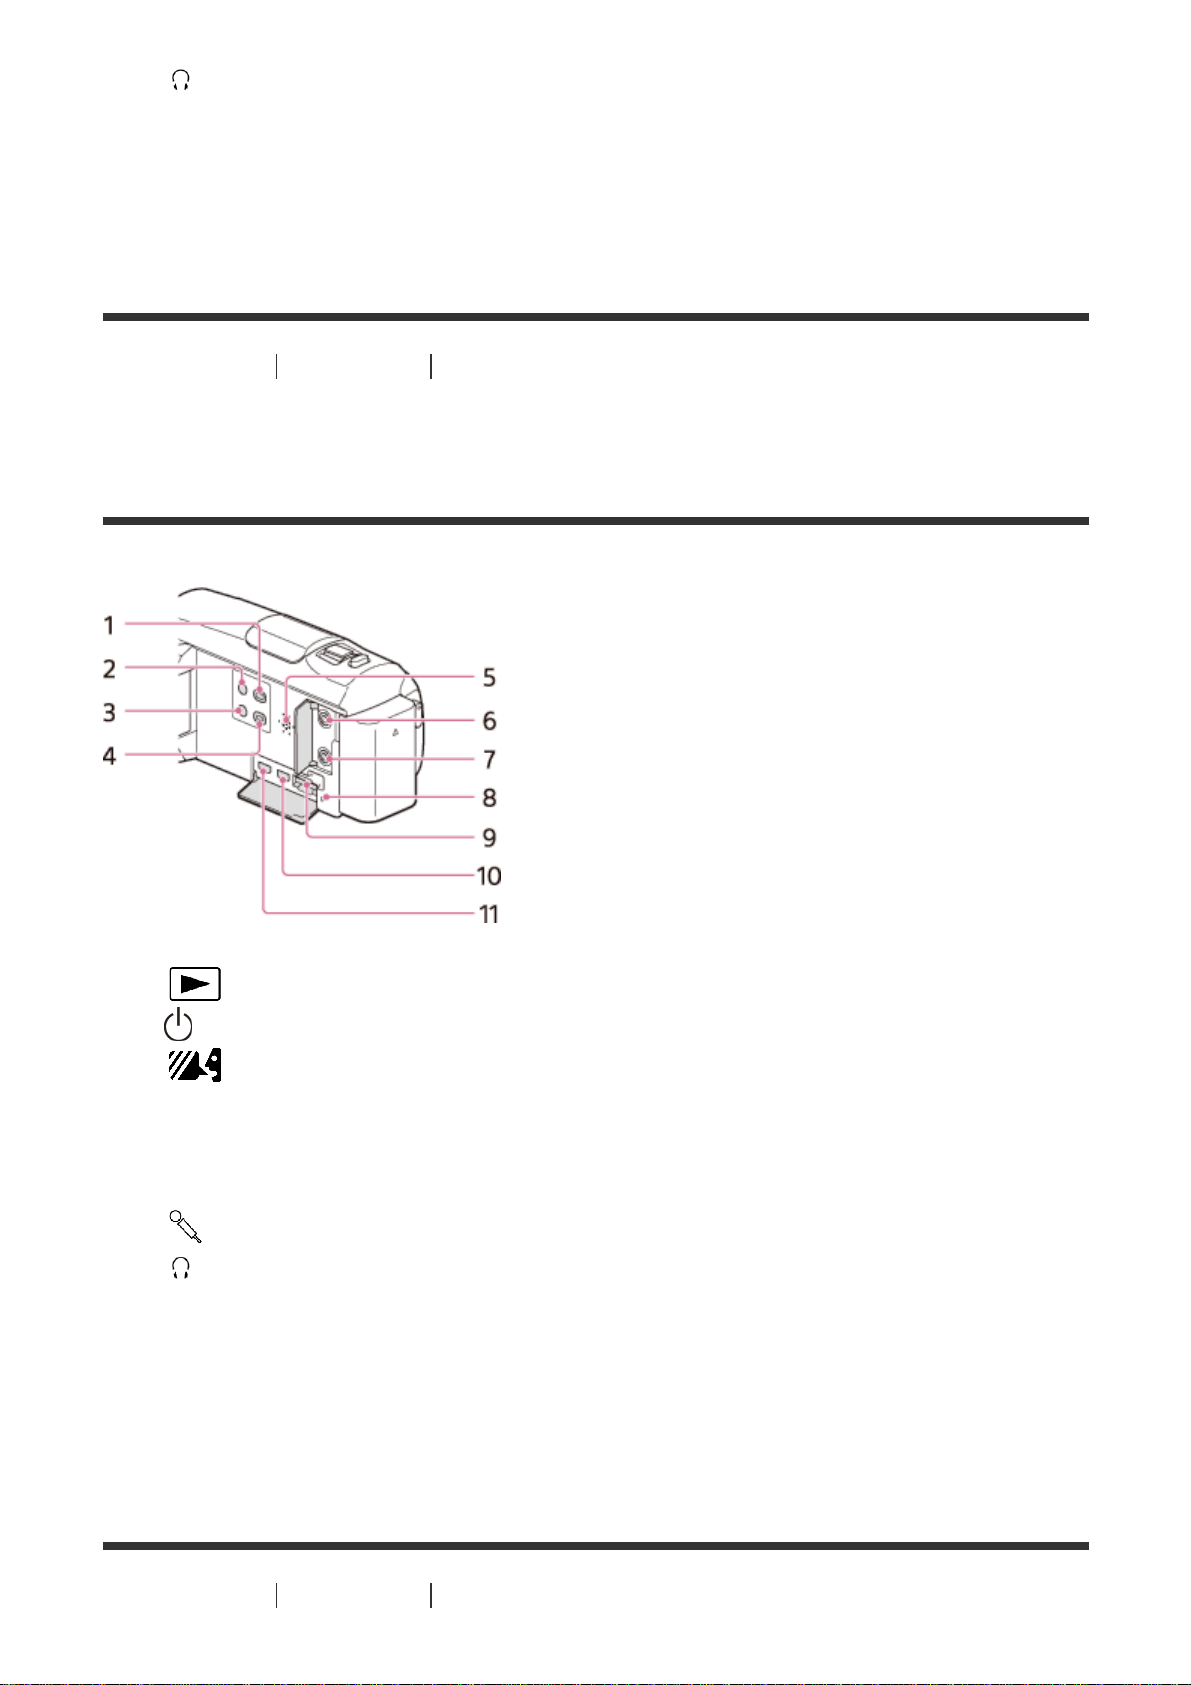
6. (headphones) jack
7. Memory card access lamp
While the lamp is lit or flashing, this product is reading or writing data.
8. Memory card slot
9. HDMI OUT jack
[7] How to Use
Before use Parts and controls
Parts and controls (side) (HDRCX625/CX675/PJ675/CX680/PJ680)
1. (View Images) button
2.
(ON/STANDBY) button
3.
(My Voice Canceling) button
Suppresses the voice of the person recording the movie.
4. PROJECTOR button (models with the projector)
5. Speaker
6.
(microphone) jack (PLUG IN POWER)
7.
(headphones) jack
8. Memory card access lamp
While the lamp is lit or flashing, this product is reading or writing data.
9. Memory card slot
10. HDMI OUT jack
11. PROJECTOR IN jack (models with the projector)
[8] How to Use
Before use Parts and controls
21
Page 22
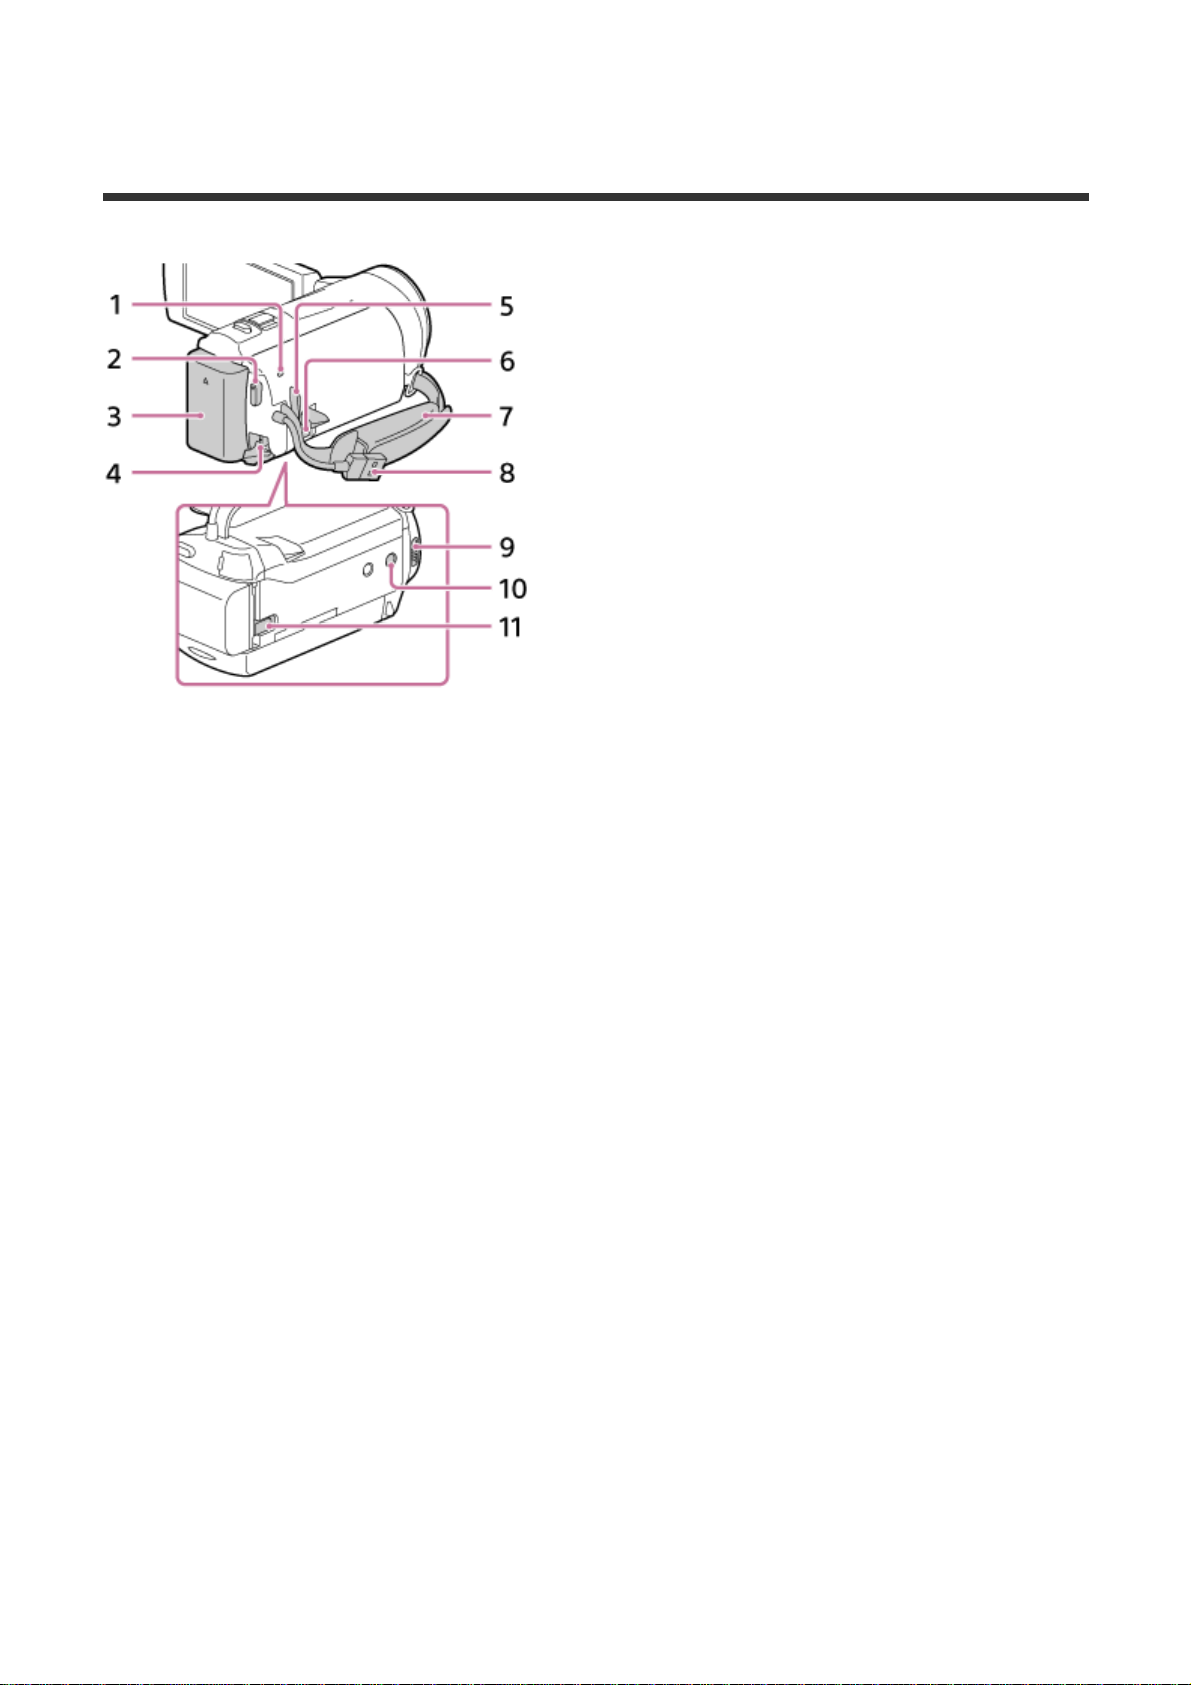
Parts and controls (back/bottom) (HDRCX450/CX455/CX485)
1. POWER/CHG (charge) lamp
2. START/STOP button
3. Battery pack
4. DC IN jack
5. Loop for a shoulder belt
6. Multi/Micro USB Terminal
Supports Micro USB compatible devices.
This terminal does not support VMC-AVM1 Adaptor Cable (sold separately).
You cannot use accessories via an A/V Remote Connector.
7. Grip belt
8. Built-in USB Cable
9. Tripod receptacle
Attach a tripod (sold separately: the length of the screw must be less than 5.5
mm (7/32 in.)). Depending on the specifications of the tripod, this product
may not attach in the proper direction.
10. Battery release lever
To fasten the grip belt
22
Page 23
[9] How to Use Before use Parts and controls
Parts and controls (back/bottom) (HDRCX625/CX675/PJ675/CX680/PJ680)
1. POWER/CHG (charge) lamp
2. START/STOP button
3. Battery pack
4. DC IN jack
5. Loop for a shoulder belt
6. Grip belt
7. Built-in USB Cable
8. Multi/Micro USB Terminal
Supports Micro USB compatible devices.
This terminal does not support VMC-AVM1 Adaptor Cable (sold separately).
You cannot use accessories via an A/V Remote Connector.
9. Tripod receptacle
23
Page 24
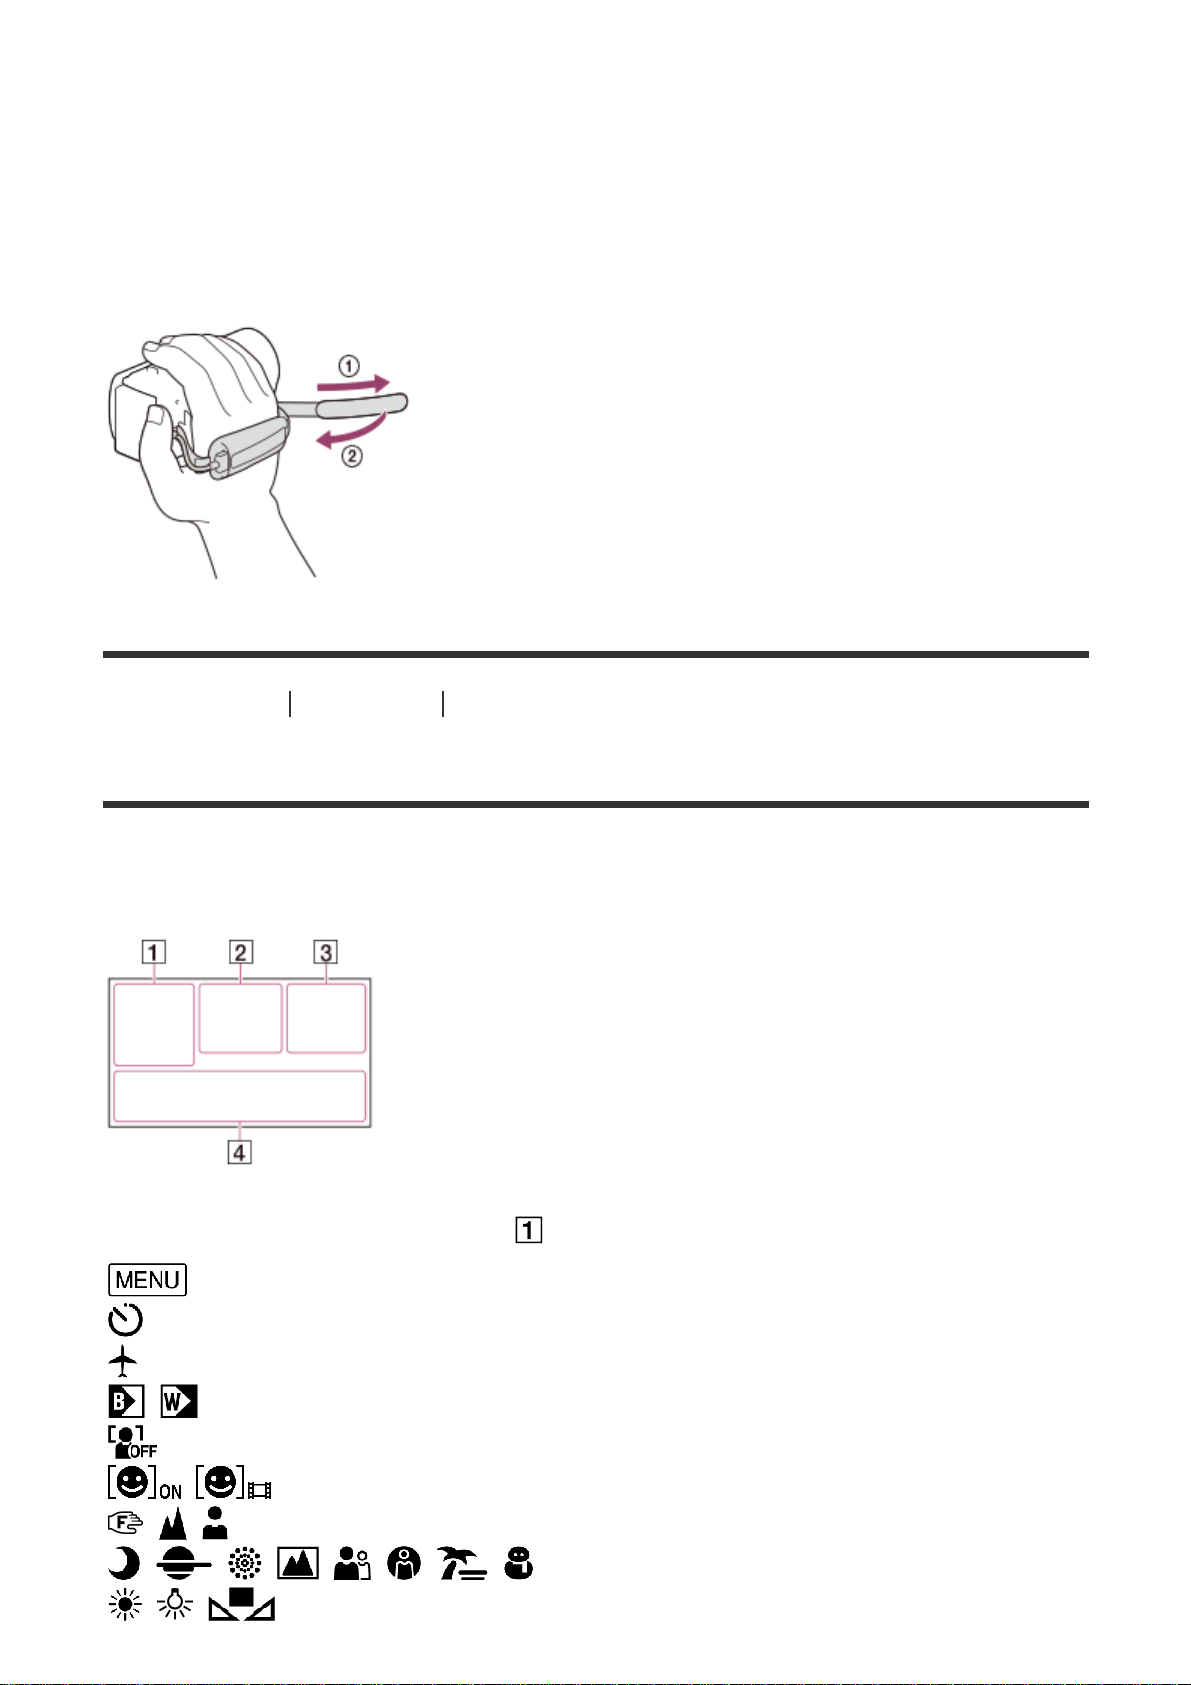
Attach a tripod (sold separately: the length of the screw must be less than 5.5
mm (7/32 in.)). Depending on the specifications of the tripod, this product
may not attach in the proper direction.
10. BATT (battery) release lever
To fasten the grip belt
[10] How to Use Before use Screen indicators
Screen indicators
The following indicators appear when you change the settings.
On the left side of the screen ( )
MENU button
Self-timer recording
[Airplane Mode] set to [On]
Fader
[Face Detection] set to [Off]
[Smile Shutter]
Manual focus
Scene Selection
White Balance
24
Page 25
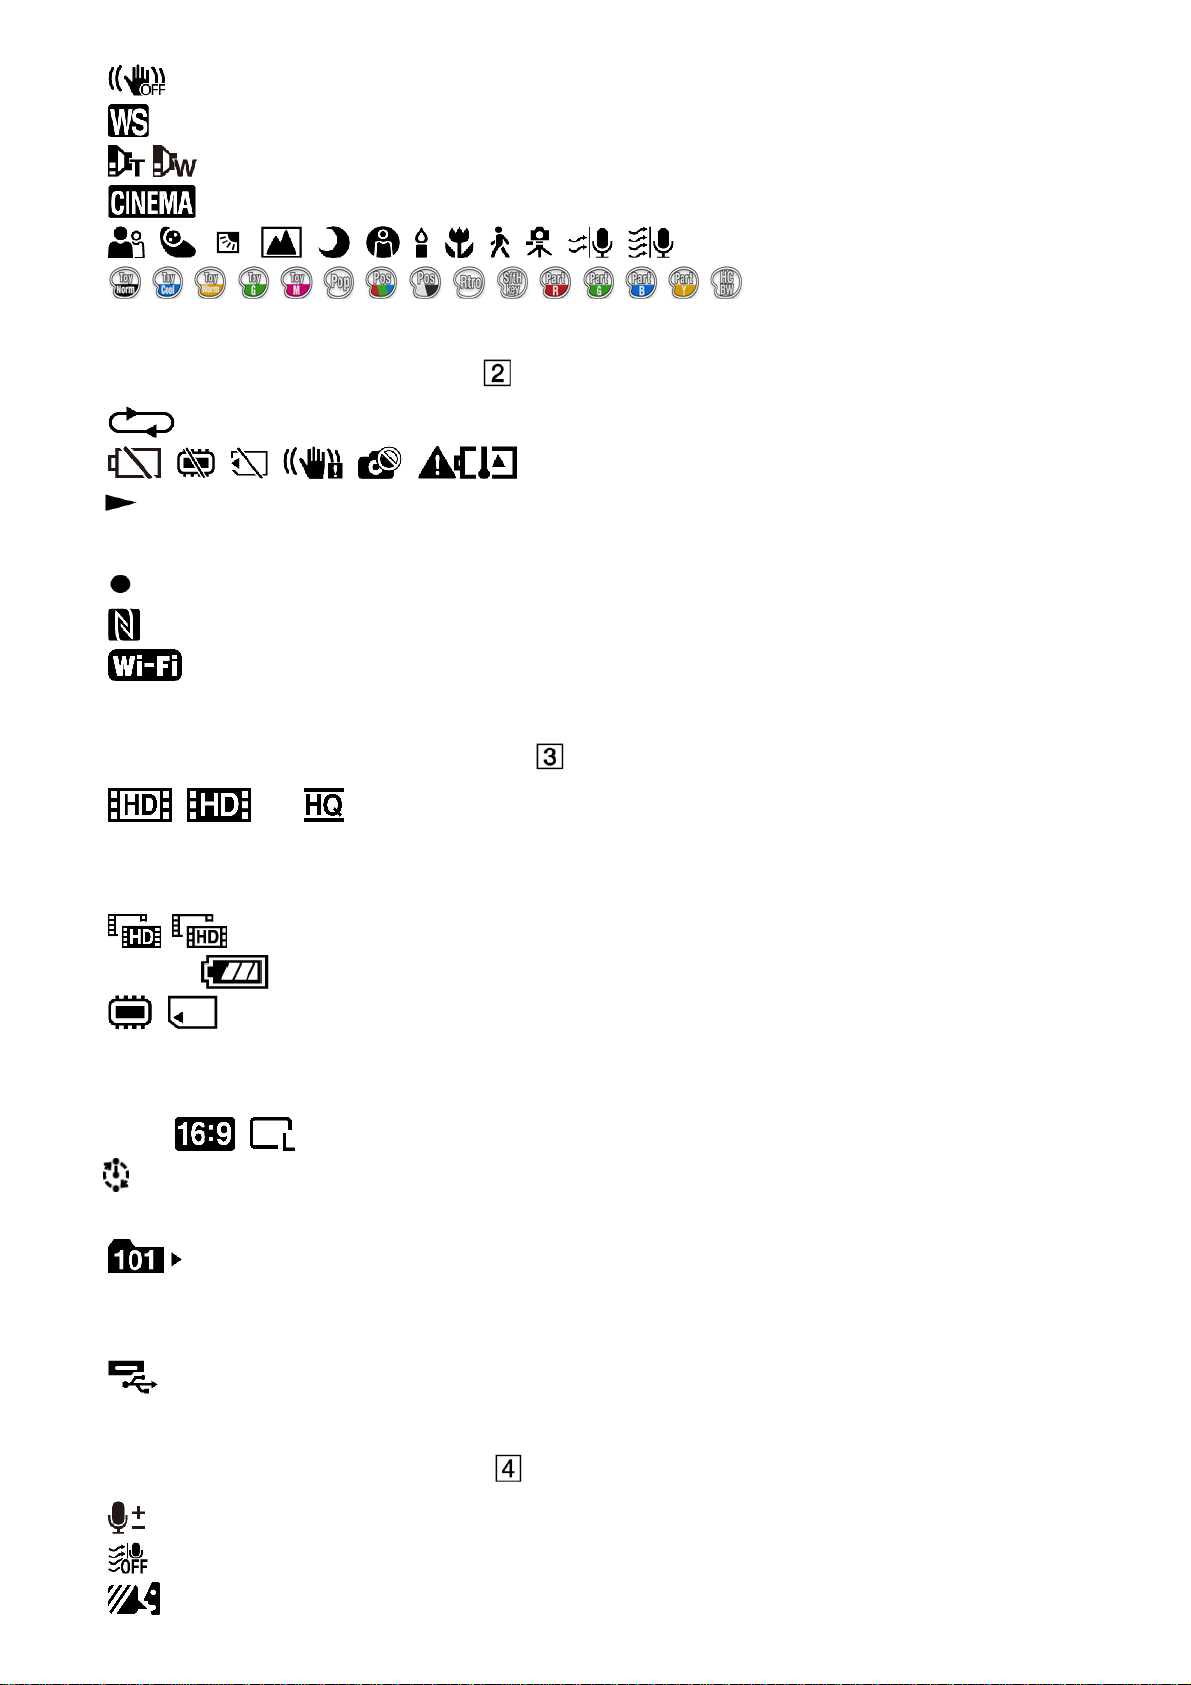
SteadyShot off
White Balance Shift (HDR-CX625/CX675/PJ675)
Conversion Lens (HDR-CX450/CX455/CX485)
Cinematone (HDR-CX625/CX675/PJ675)
Intelligent Auto
Picture Effect
At the center of the screen (
)
Slideshow Set
Warning
Playback mode
REC /STBY Recording mode
AE/AF lock
NFC
Wi-Fi
On the right side of the screen (
)
60i Frame rate (30p/60p/50p/60i/50i/24p*/25p), recording mode
(PS/FX/FH/HQ/LP) and movie size
*
(HDR-CX625/CX675/PJ675)
Dual Video REC
60 min
Remaining battery
Recording/playback/editing media
0:00:00 Counter (hour:minute:second)
00min Estimated recording time
9999
9.2M Approximate number of recordable photos and photo size
60 sec (Time-lapse Capture shooting interval value)
999/999 (Time-lapse Capture shot number/total shots settings value)
Folder of the memory card
100/112 Current playing movie or photo/Number of total recorded movies or
photos
Connection to the external media device
At the bottom of the screen (
)
Audio Rec Level
[Auto Wind NR] set to [Off]
[My Voice Canceling] set to [On]
25
Page 26
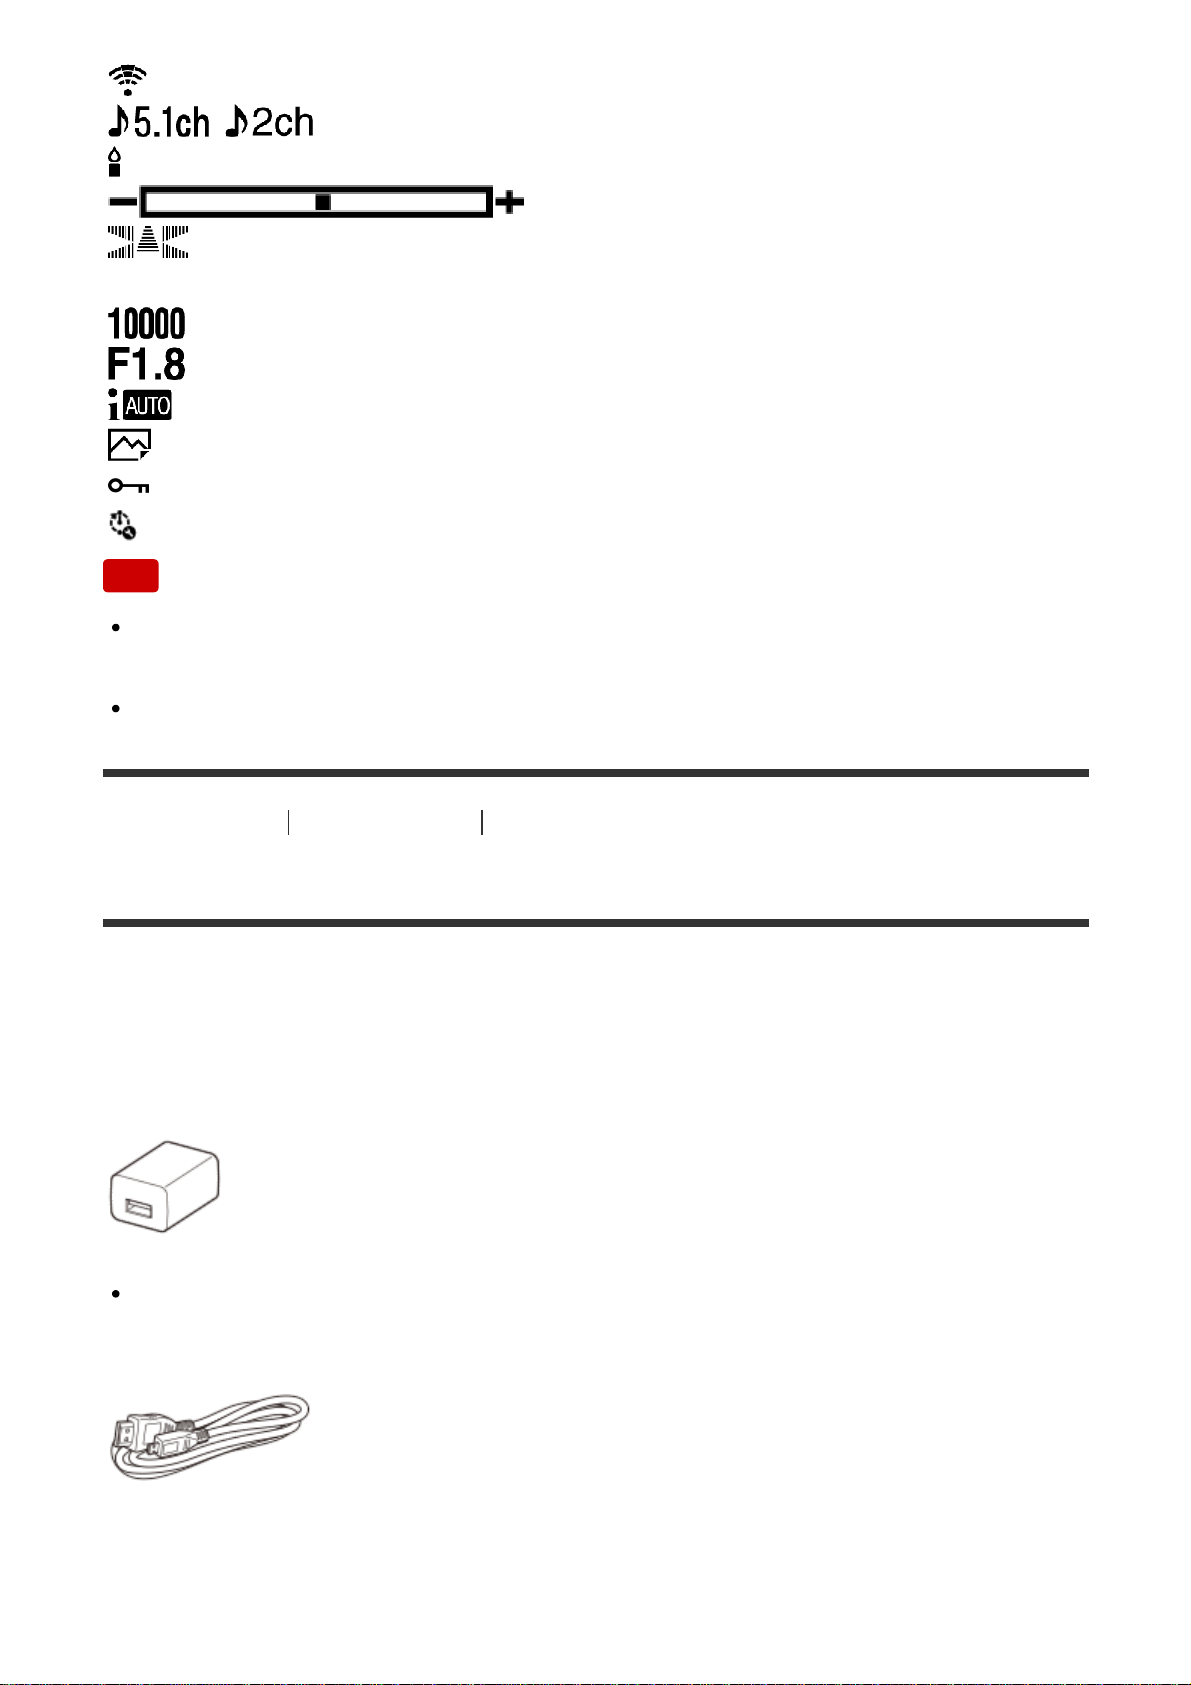
Blt-in Zoom Mic
Audio Mode
Low Lux
Spot Meter/Fcs/Spot Meter/Exposure
Audio Level Display
EV AE Shift (HDR-CX625/CX675/PJ675)
Shutter Speed
IRIS
Intelligent Auto
Data file name
Protect
Time-lapse settings
Note
Indicators and their positions are approximate and may differ from what you
actually see.
Some indicators may not appear, depending on the model.
[11] How to Use
Getting started Checking the supplied items
Supplied items
The numbers in ( ) indicate the supplied quantity.
Camcorder (1)
AC Adaptor (1)
The shape of the AC Adaptor varies depending on the countries/regions.
HDMI cable (1)
USB connection support cable (1)
26
Page 27
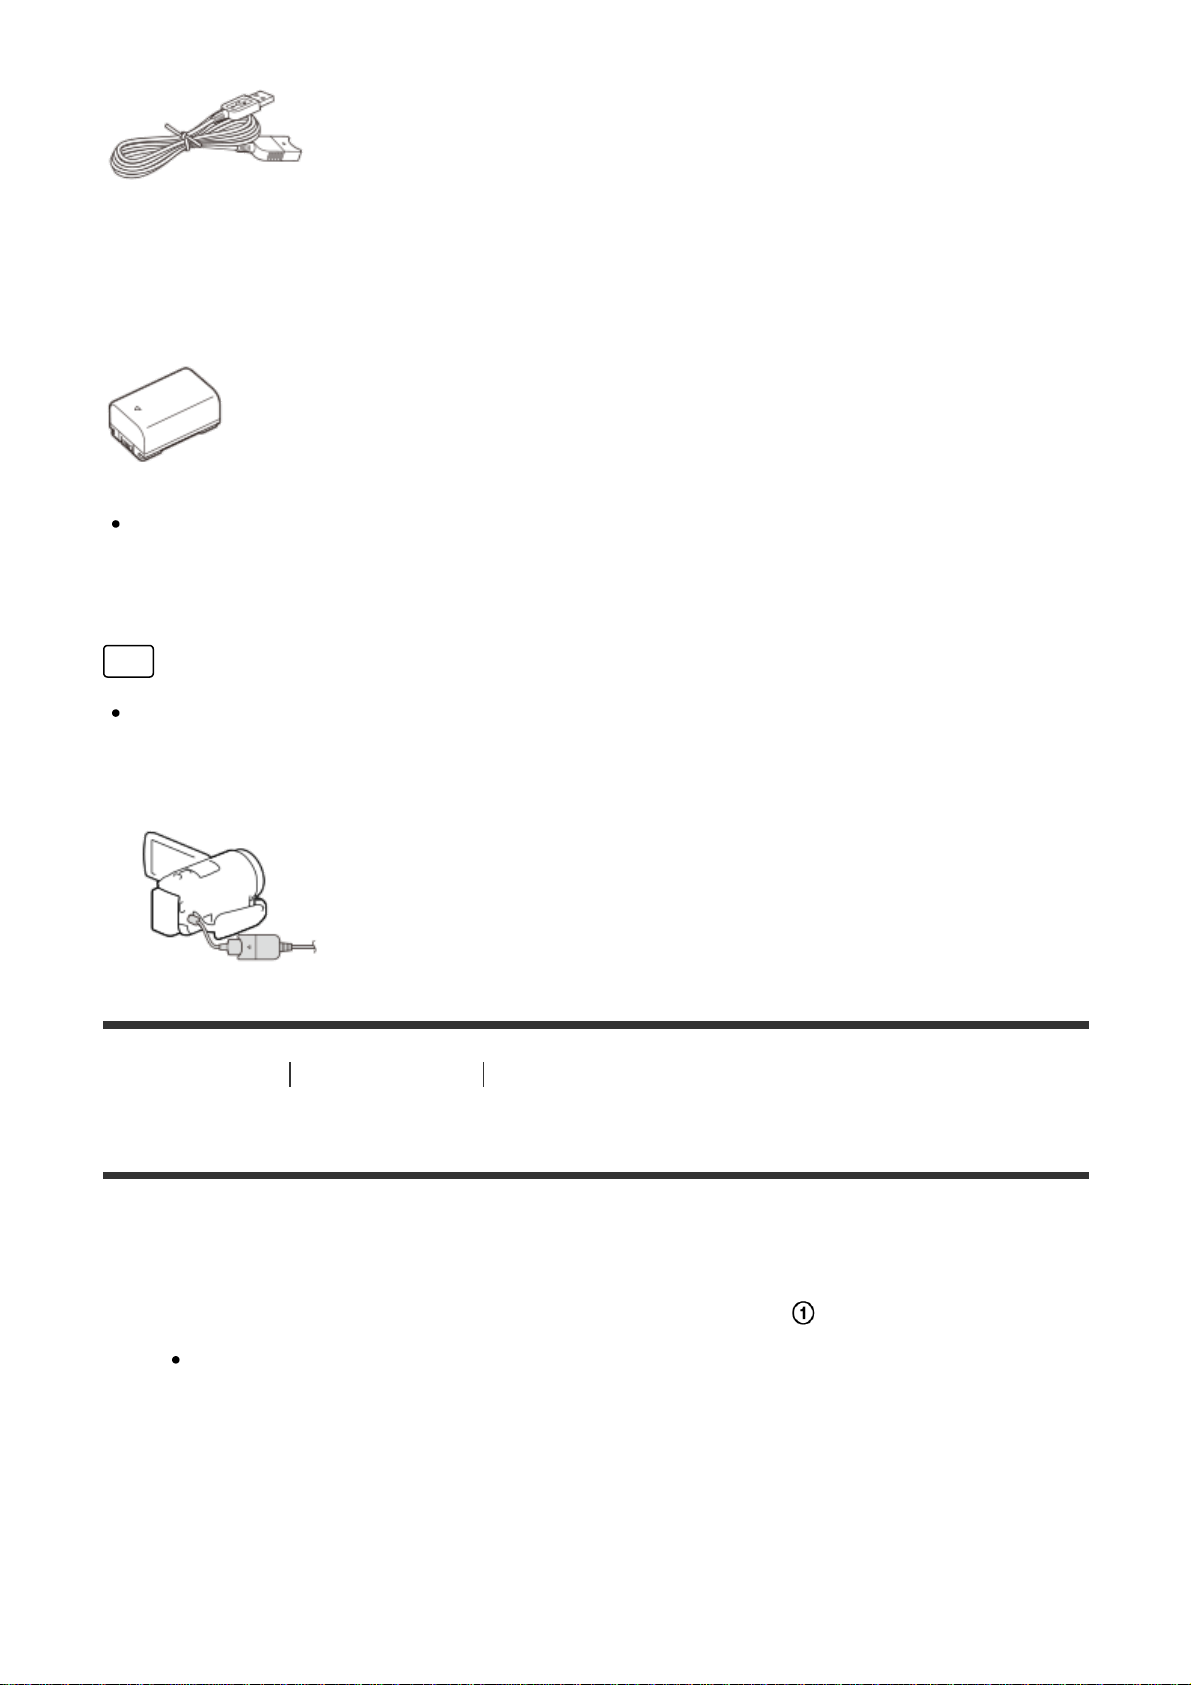
Rechargeable battery pack
NP-FV50 (HDR-CX450/CX455/CX485/CX625/CX675/PJ675) (1)
NP-FV50A (HDR-CX680/PJ680) (1)
When using this product while connected to a wall outlet (wall socket), such as
while charging, make sure to attach the battery pack to this product.
“Operating Guide” (1)
Hint
The USB connection support cable is designed for use with this product only.
Use this cable when the Built-in USB Cable of this product is too short for
connection.
[12] How to Use Getting started Power source preparations
Attaching the battery pack
Attach the battery pack to this product.
1. Close the LCD monitor and attach the battery pack (
).
Align the indentation on this product and projection on the battery pack,
then slide the battery pack upwards.
27
Page 28
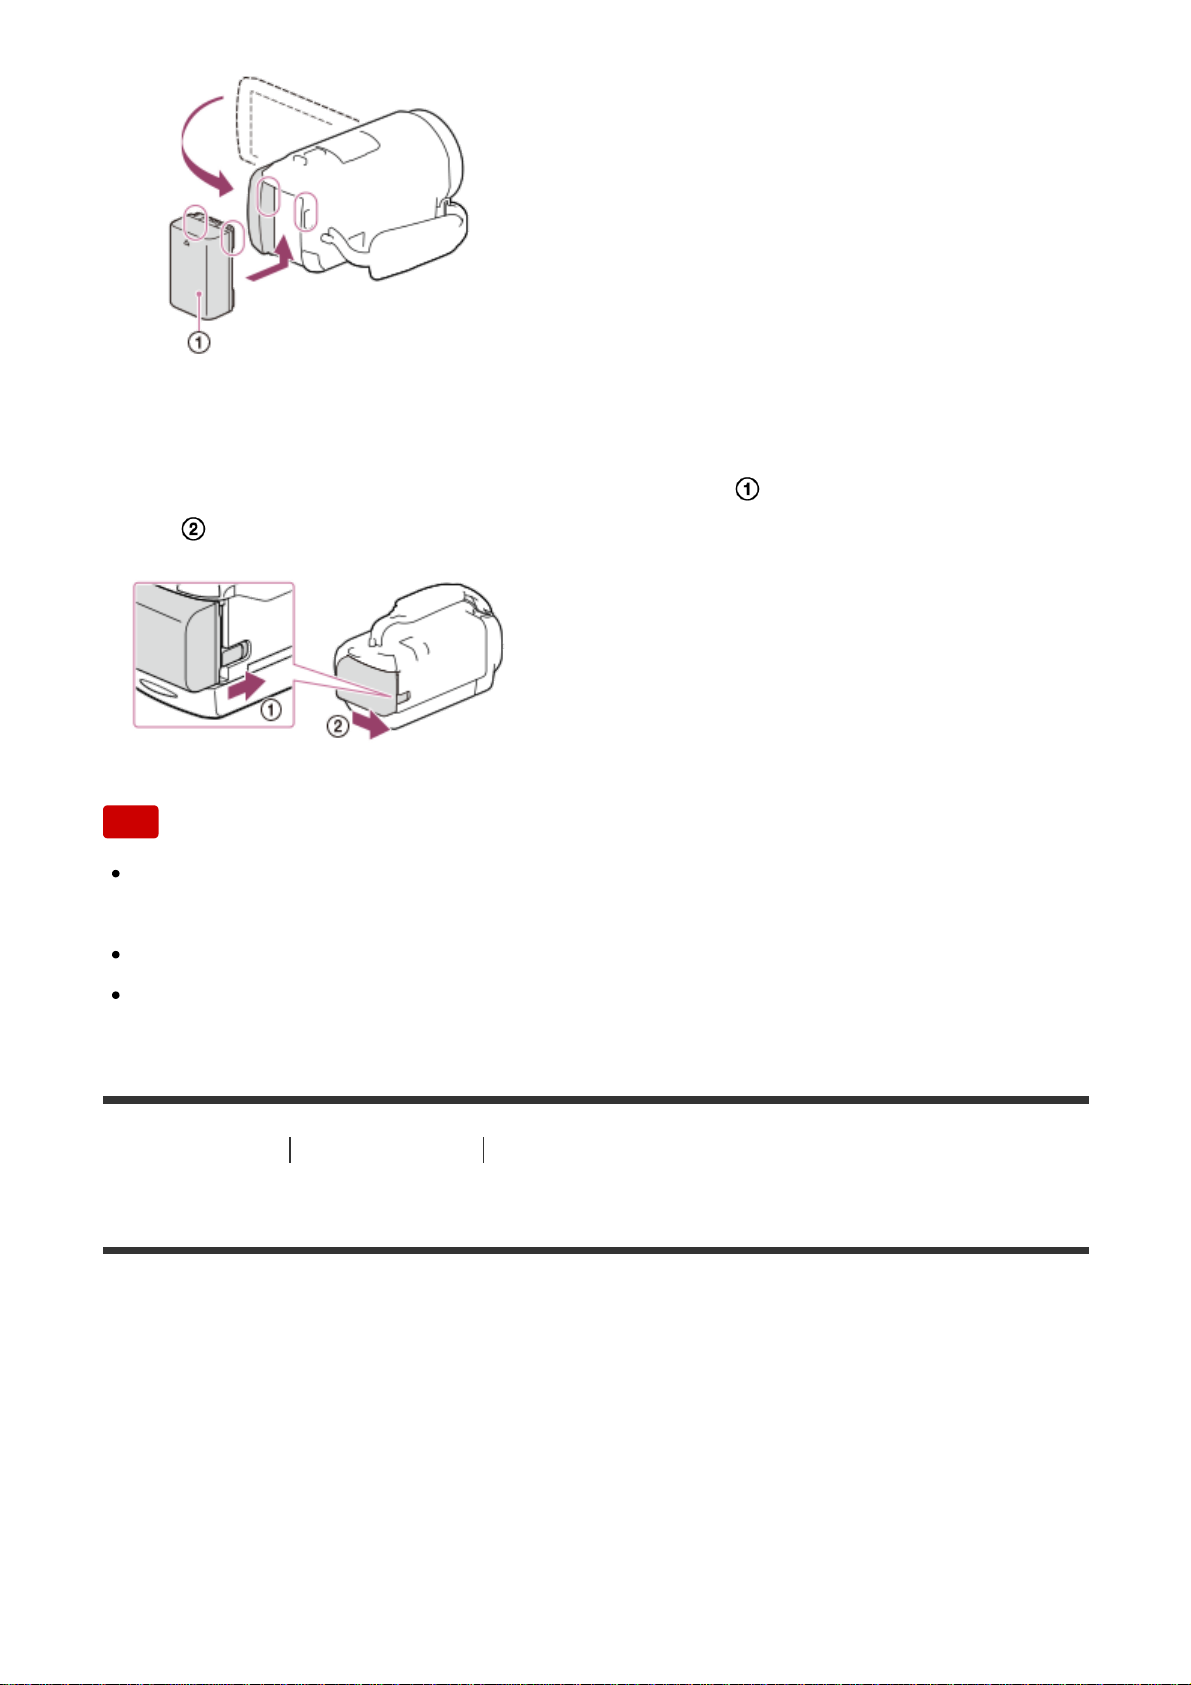
To remove the battery pack
Turn off this product. Slide the battery release lever (
) and remove the battery
pack (
).
Note
You cannot use any InfoLITHIUM battery pack other than the V series to this
product.
You cannot use the NP-FV30 InfoLITHIUM battery pack with this product.
In the default setting, the power turns off automatically if you leave this product
without any operation for about 2 minutes, to save battery power (Power Save).
[13] How to Use
Getting started Power source preparations
Charging the battery pack using the AC Adaptor
Charge the battery pack using the supplied AC Adaptor. Attach the battery pack in
advance.
1. Close the LCD monitor.
28
Page 29
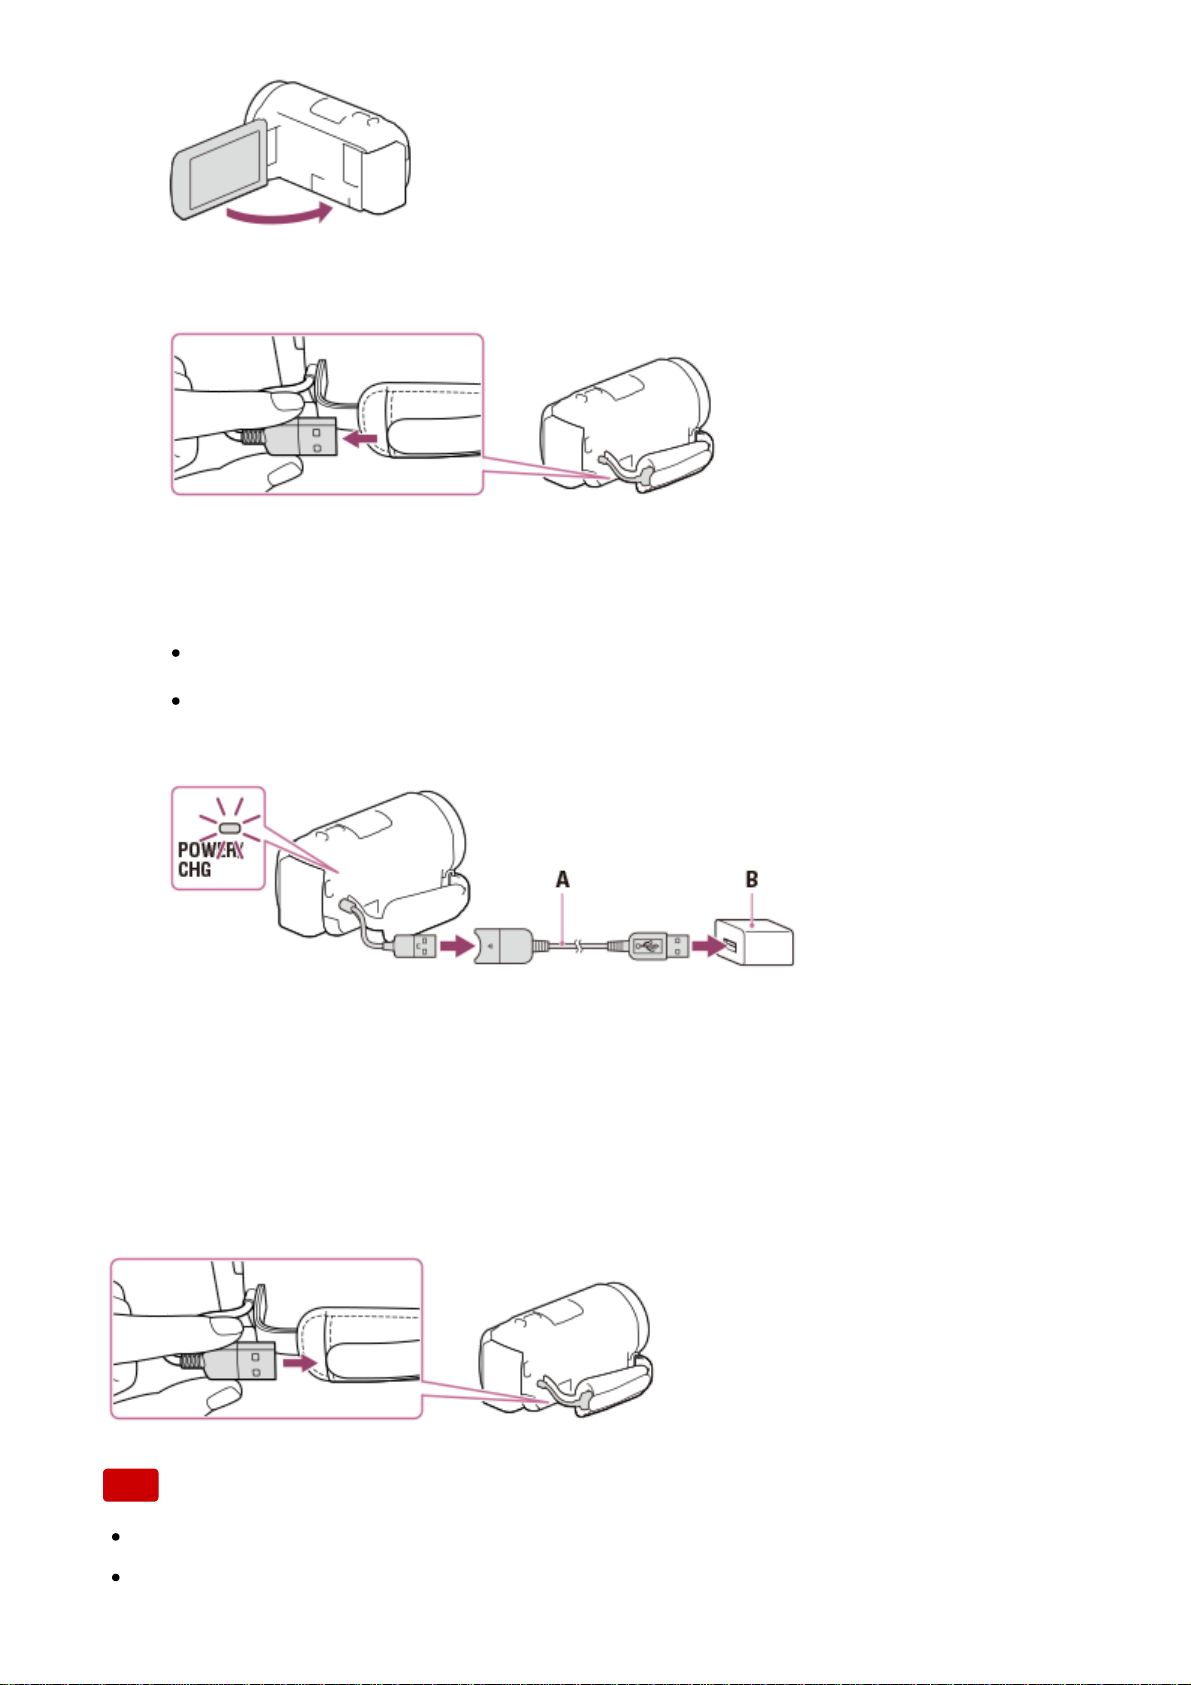
2. Pull out the USB Cable from this product.
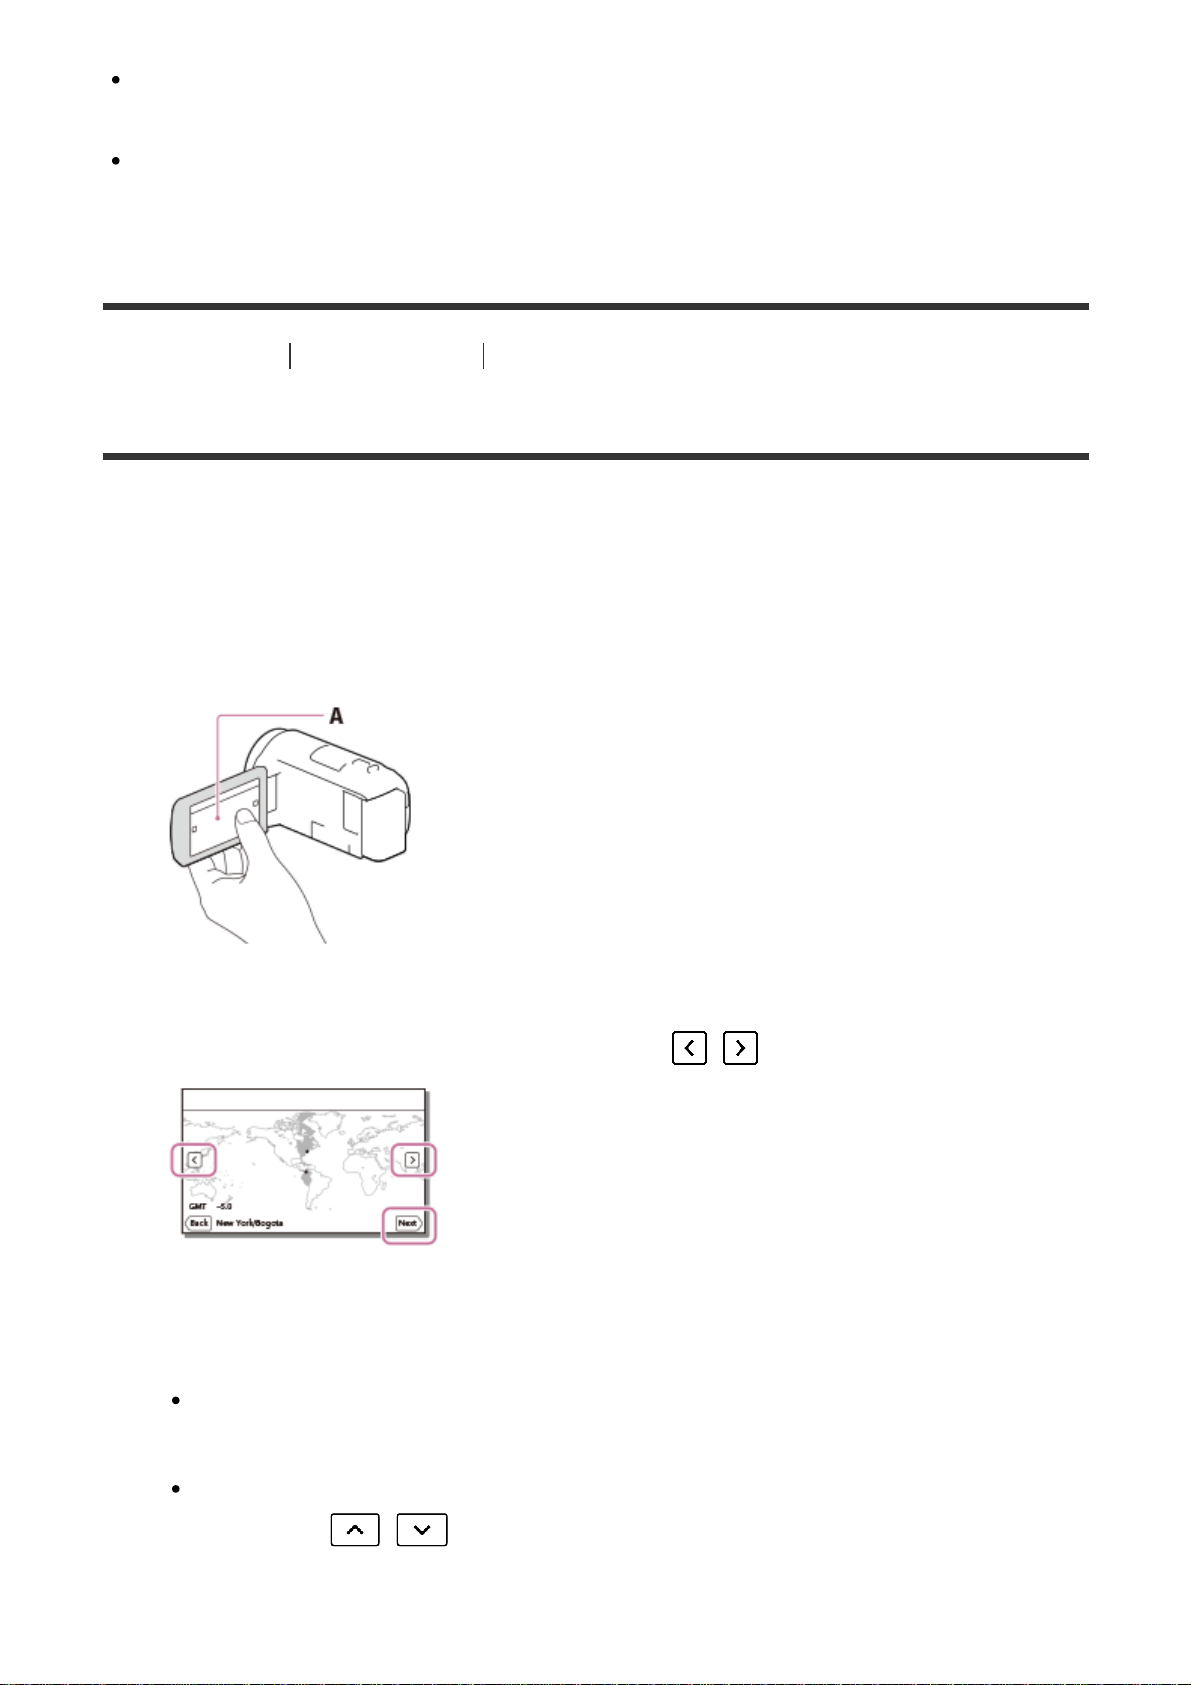
3. Connect this product to a wall outlet (wall socket) using the USB connection
support cable and the AC Adaptor.
The POWER/CHG (charge) lamp lights orange.
The POWER/CHG (charge) lamp turns off when the battery pack is fully
charged. Disconnect the USB connection support cable from this product.
A: USB connection support cable
B: AC Adaptor
To store the USB Cable
Put the USB Cable back in the pocket on the grip belt after use.
Note
The shape of the AC Adaptor varies depending on the countries/regions.
Be aware of the following notes on using the AC Adaptor.
29
Page 30
Use a nearby wall outlet (wall socket) when using the AC Adaptor. Disconnect the AC
Adaptor from the wall outlet (wall socket) immediately if any malfunction occurs while
using this product.
Do not use the AC Adaptor placed in a narrow space, such as between a wall and
furniture.
Do not short-circuit the USB jack of the AC Adaptor or battery terminal with any
metallic objects. This may cause a malfunction.
To disconnect the AC Adaptor from this product, first disconnect the USB connection
support cable from the AC Adaptor, and then disconnect this product from the USB
connection support cable holding the connectors.
Hint
It is recommended that you charge the battery in a temperature range of 10 °C
to 30 °C (50 °F to 86 °F).
[14] How to Use
Getting started Power source preparations
Charging the battery pack using your computer
Charge the battery pack by connecting this product and your computer with the
USB Cable. Attach the battery pack in advance.
1. Close the LCD monitor.
2. Pull out the USB Cable from this product.
3. Connect this product to a running computer using the USB Cable.
The POWER/CHG (charge) lamp turns orange.
30
Page 31
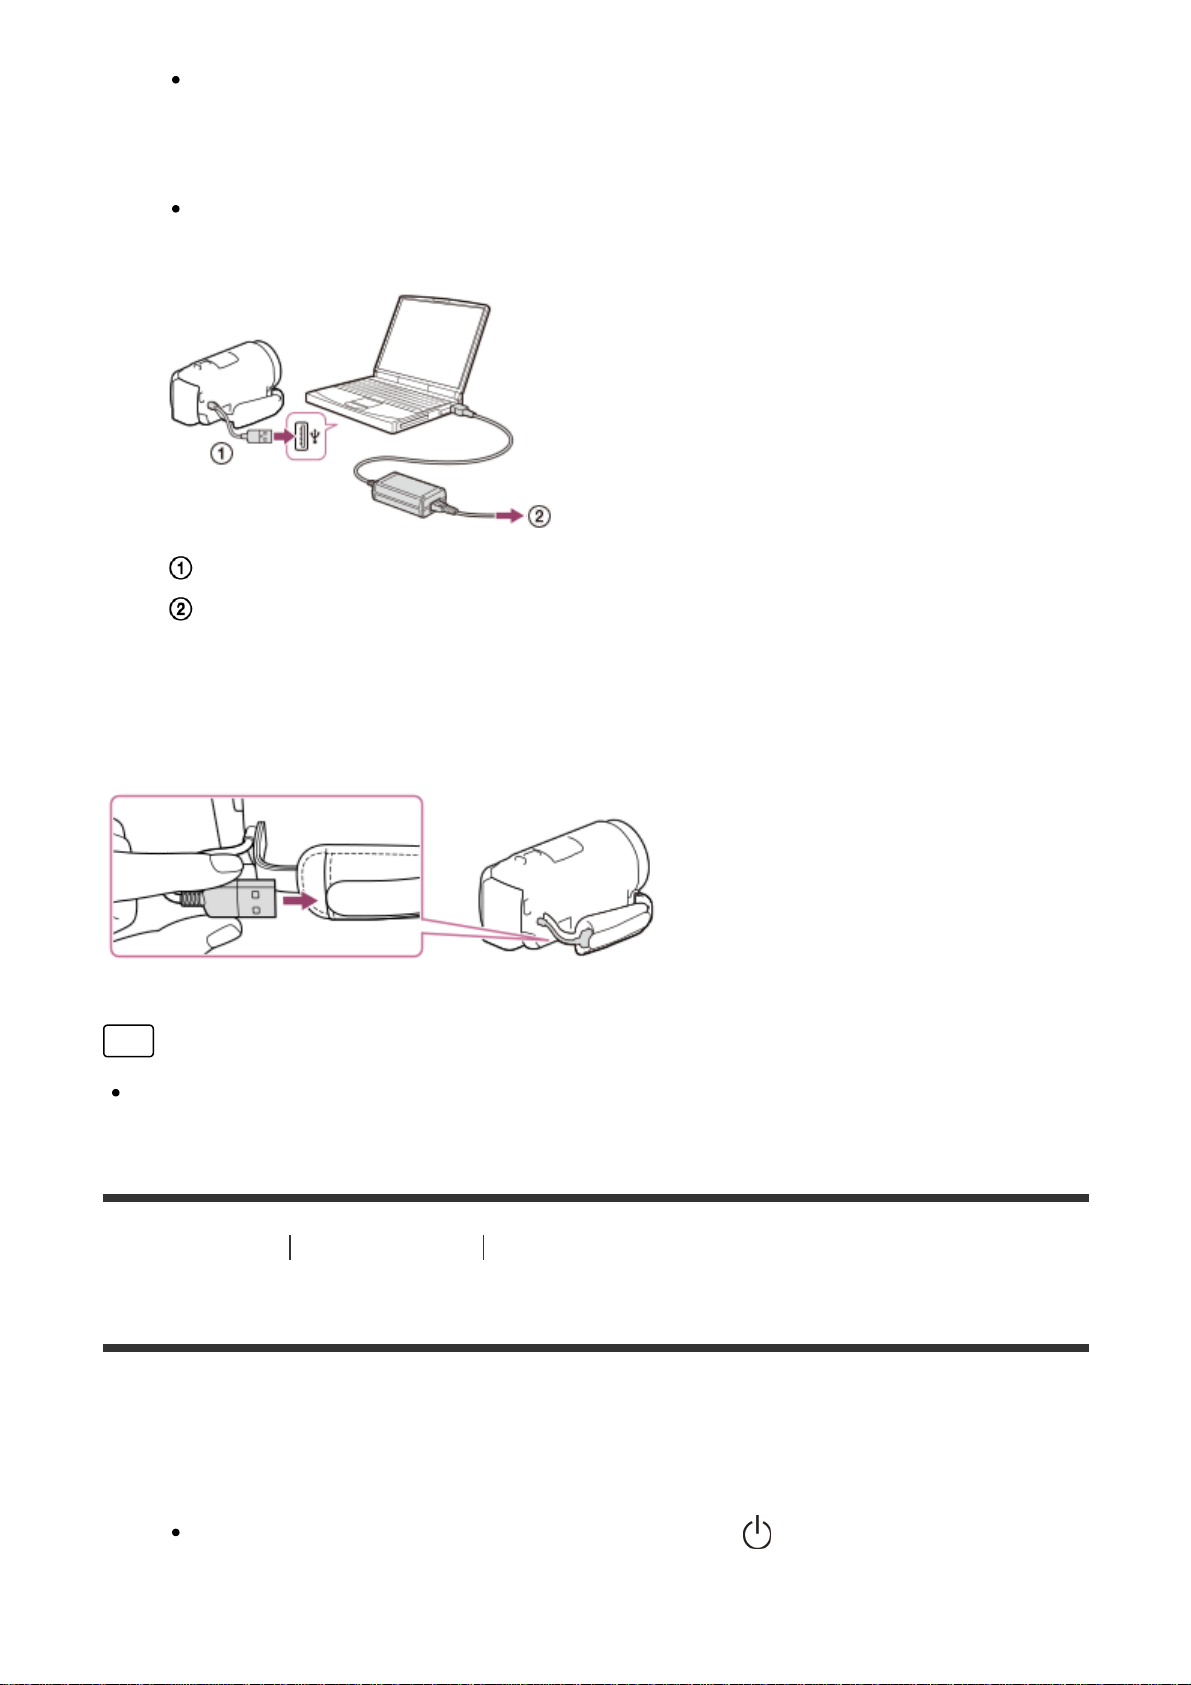
The POWER/CHG (charge) lamp turns off when the battery pack is fully
charged. Remove the USB Cable from the computer, and then store it in
the pocket on the grip belt.
If the USB Cable is not long enough for the connection, use the USB
connection support cable.
: USB Cable
: To a wall outlet (wall socket)
To put the USB Cable away
Put the USB Cable back in the pocket on the grip belt after use.
Hint
It is recommended that you charge the battery in a temperature range of 10 °C
to 30 °C (50 °F to 86 °F).
[15] How to Use
Getting started Power source preparations
Turning the power on
Turn on this product.
1. Open the LCD monitor of this product and turn the power on.
You can also turn on this product by pressing (ON/STANDBY) button.
31
Page 32
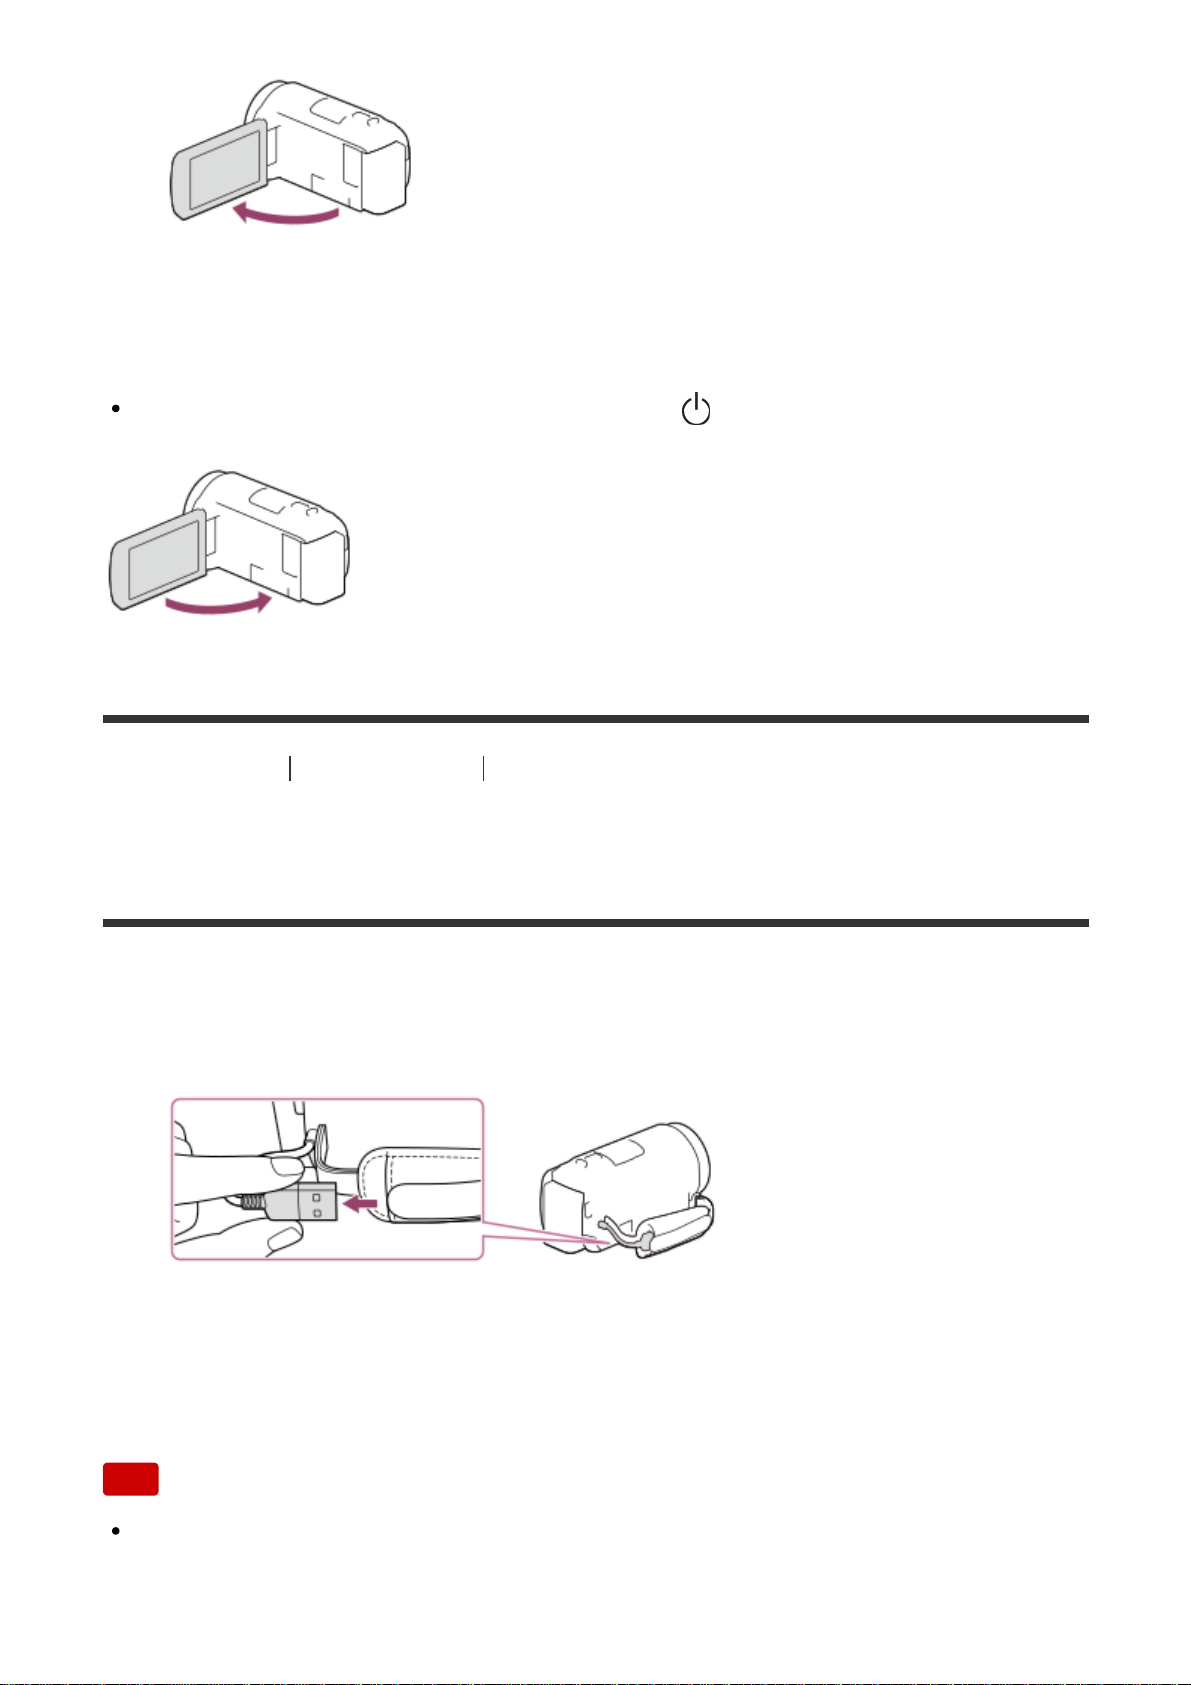
To turn off the power
Close the LCD monitor.
You can also turn off this product by pressing (ON/STANDBY) button.
[16] How to Use Getting started Power source preparations
Using this product supplying power from a wall outlet
(wall socket)
Supply power to this product using the AC Adaptor.
1. Attach the battery pack, and then pull out the USB Cable.
2. Connect this product to a wall outlet (wall socket) using the USB connection
support cable and the AC Adaptor.
Note
The battery pack is not charged, even when the AC Adaptor is connected to
this product, as long as the power is on.
32
Page 33
The battery pack must be attached to this product. Otherwise power will not be
supplied.
Even when connecting the AC Adaptor to this product, this product may
subsidiarily use power from the battery pack depending on the environment in
which you use this product.
[17] How to Use
Getting started Initial setup
Initial setting
Set the language, date and time when using this product for the first time.
1. Open the LCD monitor of this product and turn the power on.
2. Select the desired language, then select [Next].
A: Touch the LCD monitor
3. Select the desired geographical area with
/ , then select [Next].
4. Set [Daylight Savings] or [Summer Time], select the date format and the date
and time.
If you set [Daylight Savings] or [Summer Time] to [On], the clock advances
1 hour.
When you select the date and time, select one of the items and adjust the
value with
/ .
33
Page 34
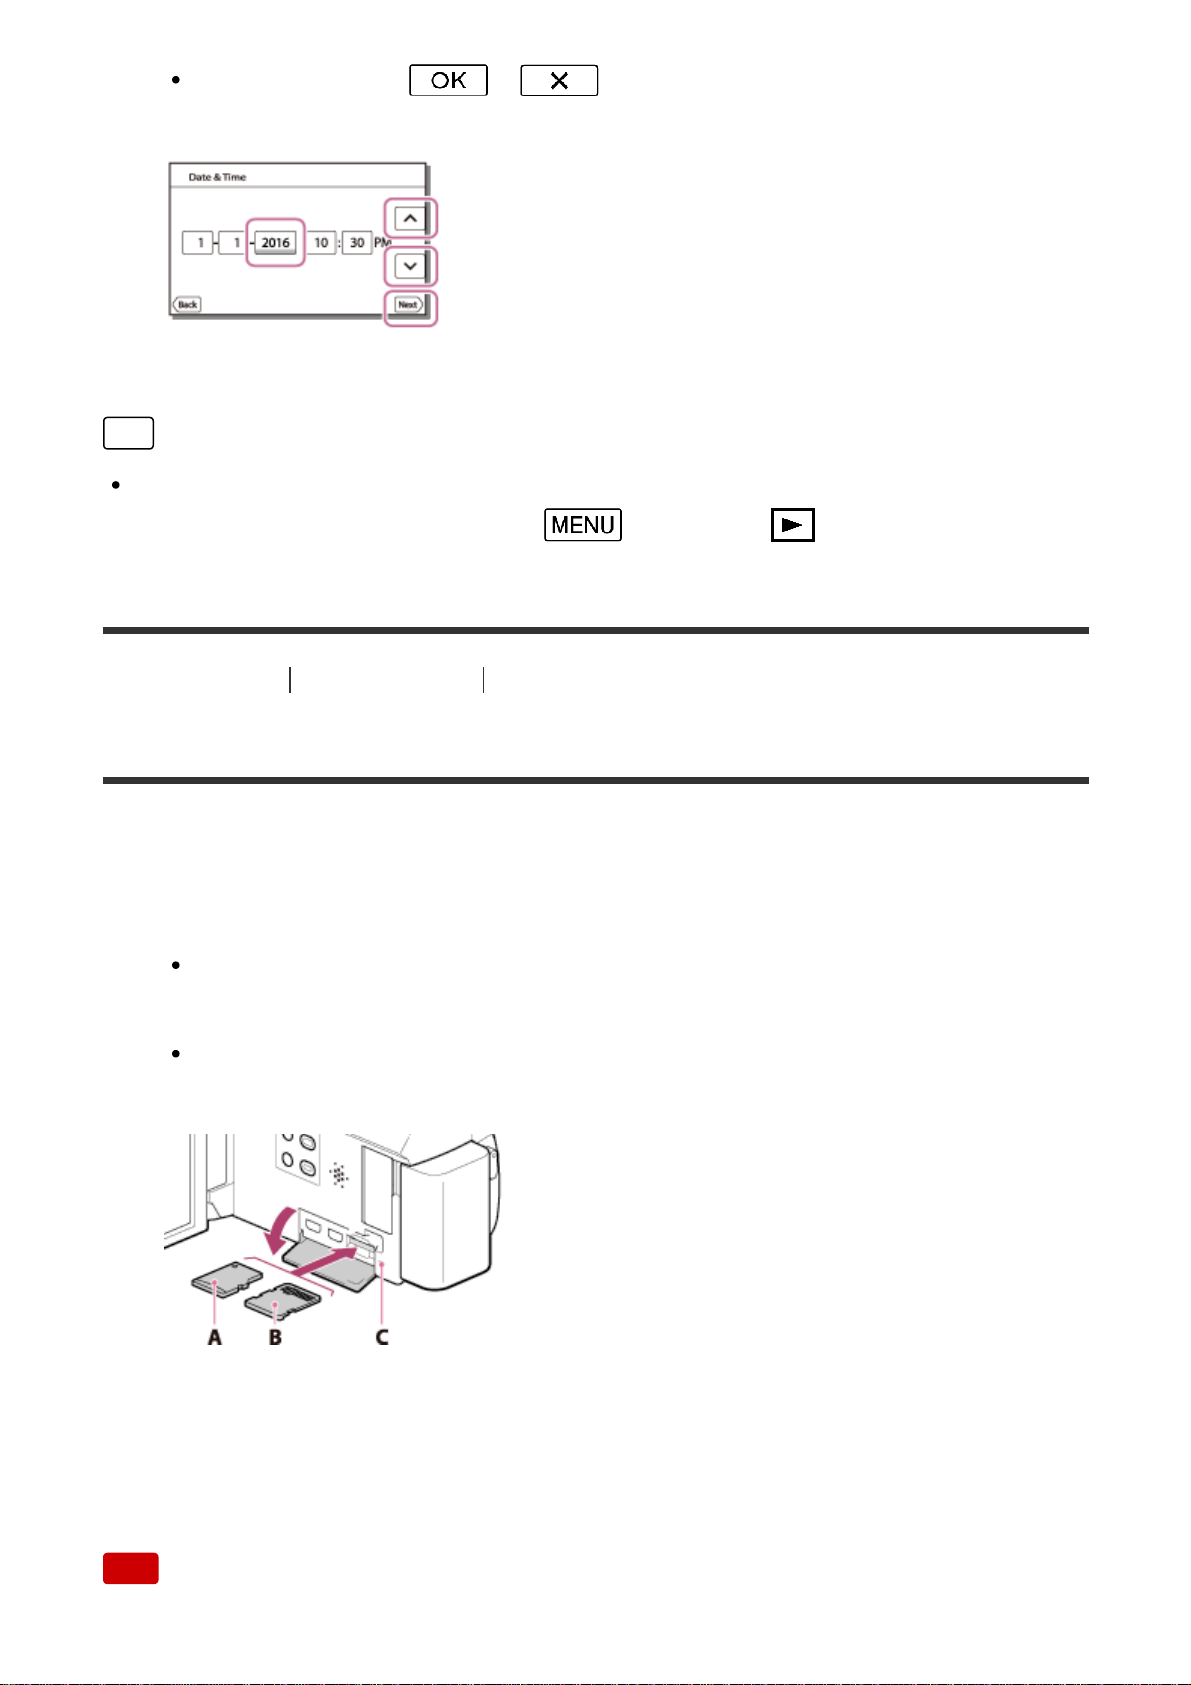
When you select - , the date and time setting operation is
complete.
Hint
The date and time are recorded automatically and can be displayed only during
playback. To display them, select
- [Setup] - [ Playback Settings] -
[Data Code] - [Date/Time].
[18] How to Use
Getting started Preparing a memory card
Inserting a memory card
Insert a memory card into this product.
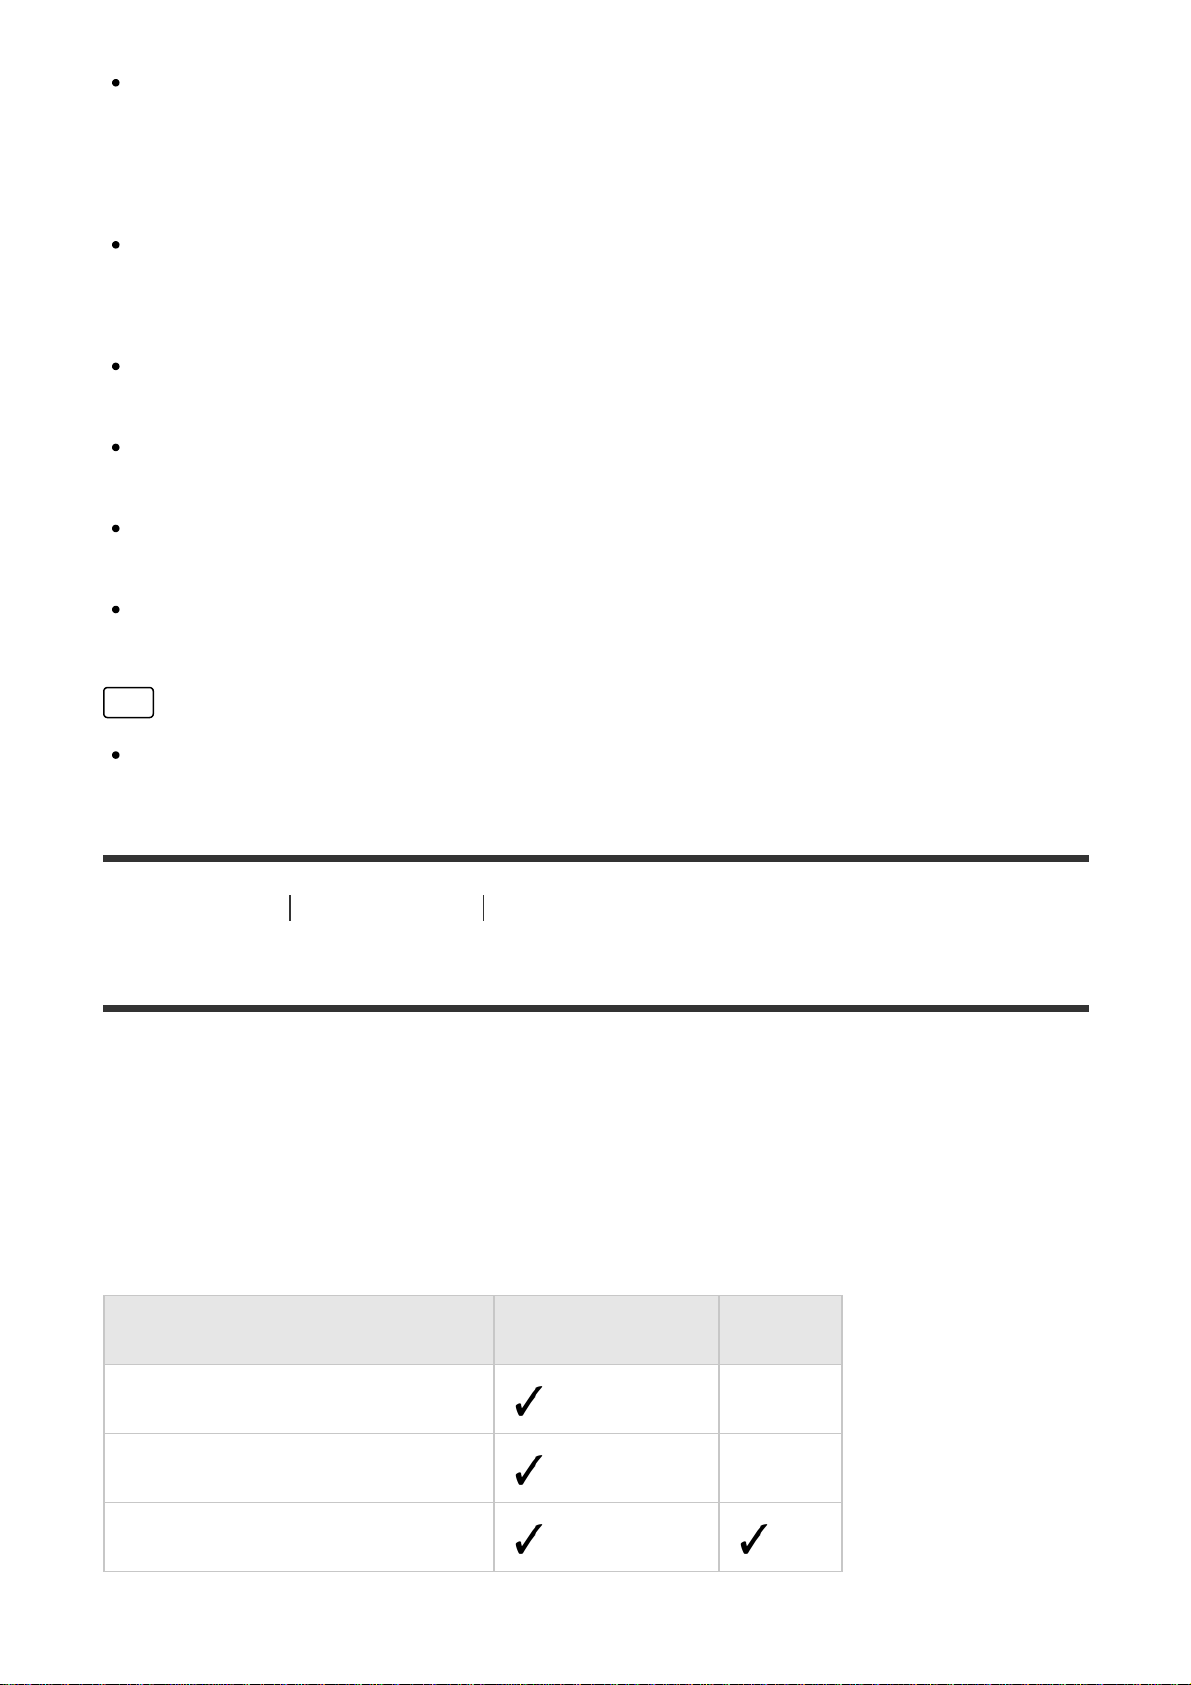
1. Open the cover and insert the memory card until it clicks.
microSD memory card: Insert the memory card straight in the direction
shown in figure A until it clicks.
Memory Stick Micro (M2) media: Insert the memory card straight in the
direction shown in figure B until it clicks.
A: Label side
B: Terminal side
C: Access lamp
Note
34
Page 35
To ensure stable operation of the memory card, it is recommended to format
the memory card with this product before the first use. Formatting the memory
card will erase all the data stored on it and the data will be irrecoverable. Save
your important data on your PC, etc.
Confirm the direction of the memory card. If you forcibly insert the memory card
in the wrong direction, the memory card, memory card slot, or image data may
be damaged.
Do not insert any memory card other than those that fit into the memory card
slot. Doing so may cause a malfunction.
When inserting or ejecting the memory card, be careful so that the memory
card does not pop out and drop.
Memory card will not be recognized by this product unless it is inserted straight
in the correct direction.
If [Preparing image database file. Please wait.] is displayed, wait until the
message disappears.
Hint
To eject the memory card, open the cover and lightly push the memory card in
once.
[19] How to Use
Getting started Preparing a memory card
Types of memory card you can use with this product
The following types of memory cards can be used with this product.
Select the type of memory card to use with the camcorder referring to
the following table.
In this Help Guide, the types of memory cards you can use with this product are
called Memory Stick PRO Duo media or SD card.
Memory card AVCHD XAVC S
Memory Stick Micro (M2) media
(Mark 2 only) –
microSD memory card
*1 –
microSDHC memory card
*1 *2
35
Page 36
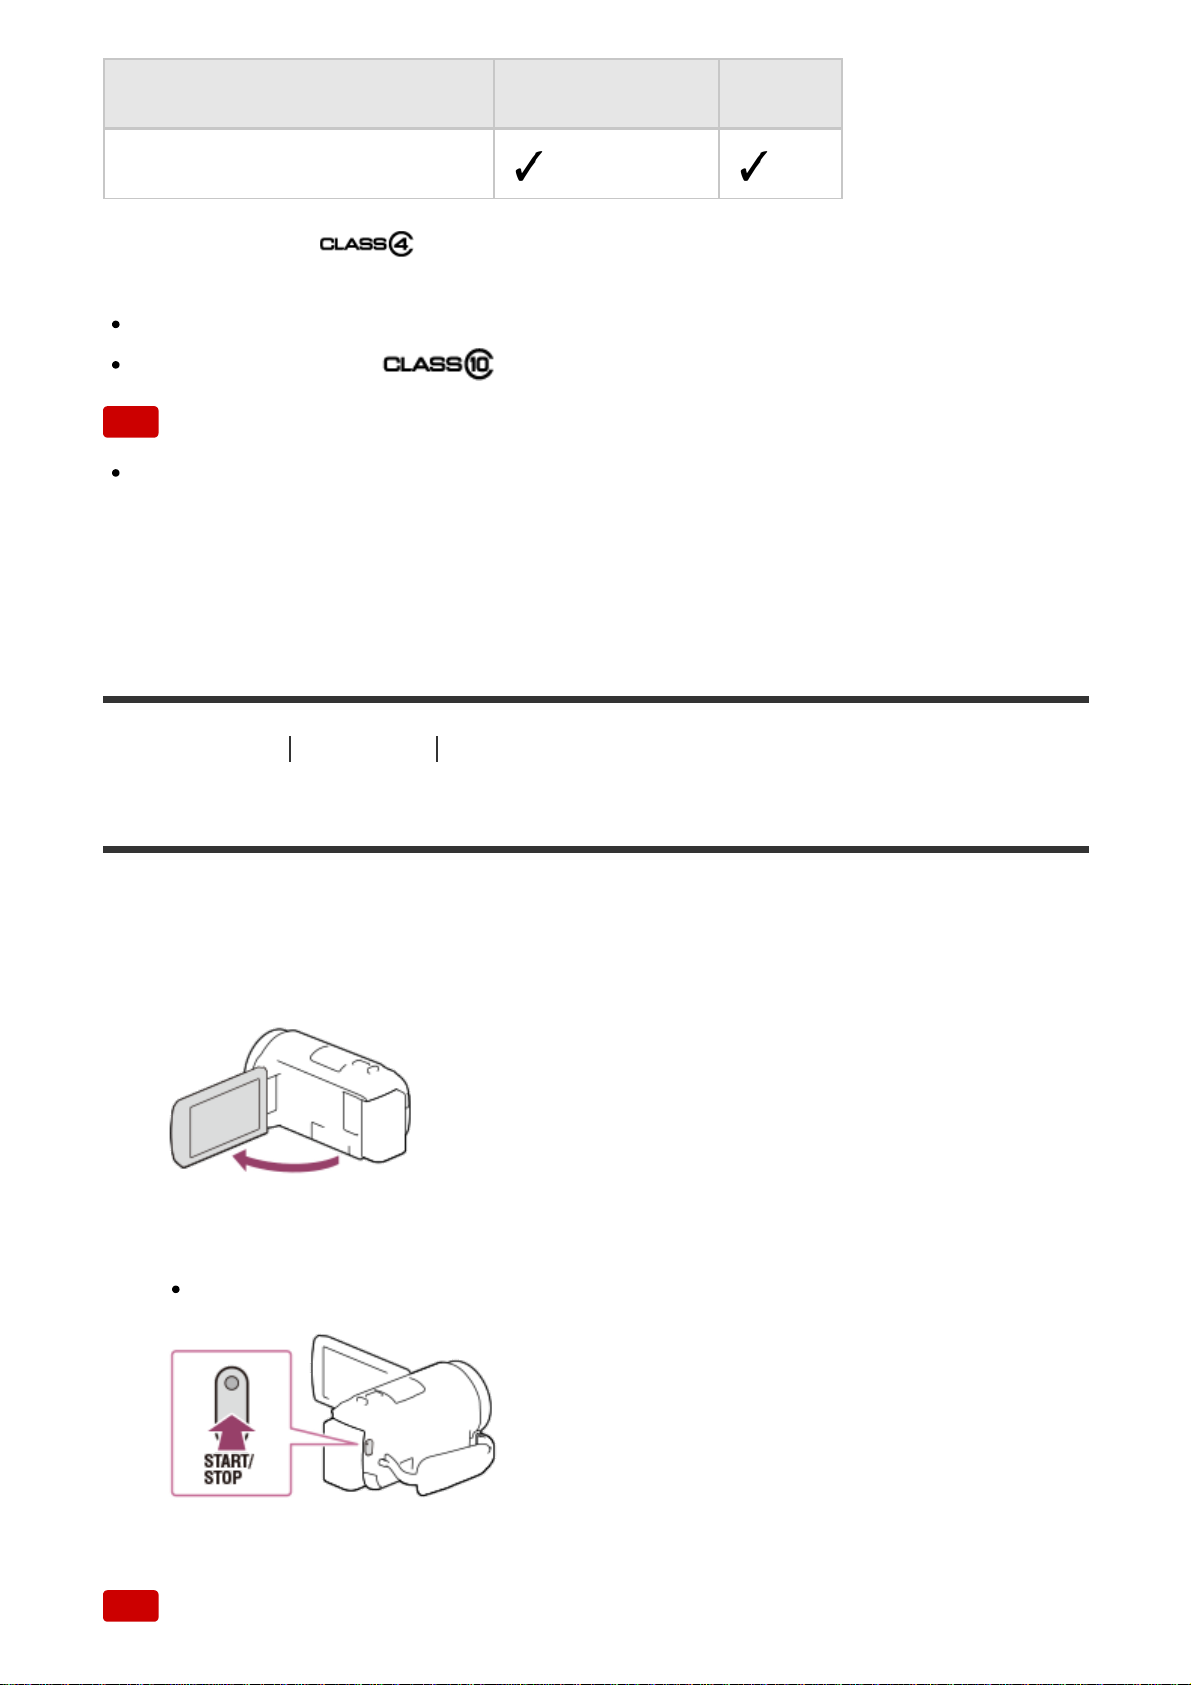
Memory card AVCHD XAVC S
microSDXC memory card
*1 *2
*1
SD speed class 4:
or faster
*2
Memory cards that meet the following conditions
Capacity of 4 GB or more
SD speed class 10:
Note
The movies recorded will be divided into files of 4GB when a SDHC memory
card is used to record XAVC S movies over extended periods of time. The
divided files will be played back continuously when played back on the
camcorder. The divided files can be integrated into the single file by using
PlayMemories Home.
[20] How to Use
Recording Recording movies/photos
Recording movies
Record movies.
1. Open the LCD monitor of this product and turn the power on.
2. Press START/STOP to start recording.
To stop recording, press START/STOP again.
Note
36
Page 37

If you close the LCD monitor while recording movies, this product stops
recording.
The maximum continuous recordable time of a movie is about 13 hours.
When an AVCHD movie file exceeds 2 GB, the next movie file is created
automatically.
When an MP4 movie file exceeds 4 GB, the next movie file is created
automatically.
The following states will be indicated if data is still being written onto the
recording media after recording has finished. During this time, do not apply
shock or vibration to this product, or remove the battery pack or AC Adaptor.
Access lamp is lit or flashing
The media icon in the upper right of the LCD monitor is flashing
The LCD monitor of this product can display recording images across the entire
monitor (full pixel display). However, this may cause slight trimming of the top,
bottom, right, and left edges of images when played back on a TV which is not
compatible with full pixel display. It is recommended you record images with
[Grid Line] set to [On] using the outer frame of [Grid Line] as a guide.
Check the subject on the LCD monitor, and then start recording.
If the lens cover does not fully open, only a black screen and sound may be
recorded.
If you record, covering the microphone on the bottom of this product, such as
by attaching a tripod, you may not obtain the best audio performance.
Hint
In the default setting, this product records an AVCHD movie and MP4 movie
simultaneously in the movie recording mode. When you do not want to record
an MP4 movie, set [Dual Video REC] to [Off].
In the default setting, [Dual Video REC] is set to [On].
[21] How to Use
Recording Recording movies/photos
Shooting photos
Shoot photos.
1. Open the LCD monitor of this product and turn the power on.
37
Page 38
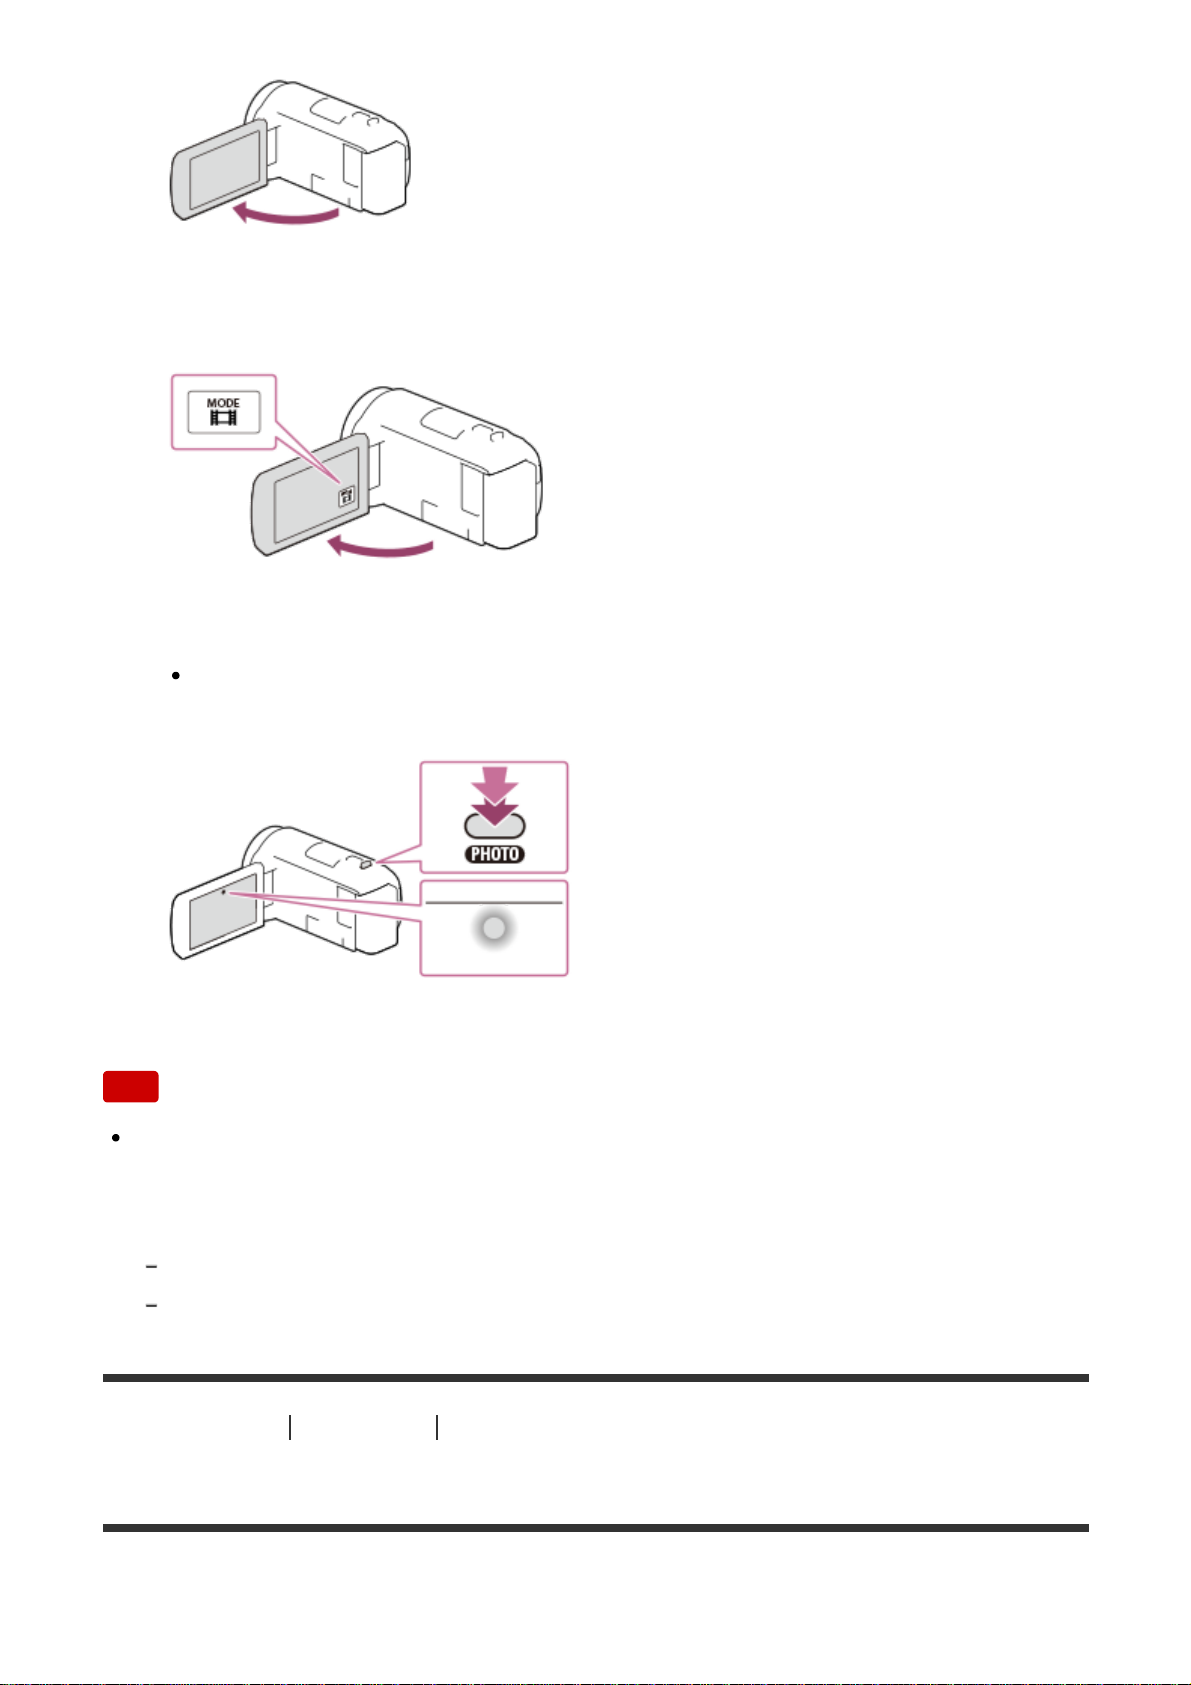
2. Select [MODE] on the LCD monitor, and then select the photo recording
mode.
3. Press PHOTO lightly to adjust the focus, then press it fully.
When the focus is adjusted properly, the AE/AF lock indicator appears on
the LCD monitor.
Note
The following states will be indicated if data is still being written onto the
recording media after recording has finished. During this time, do not apply
shock or vibration to this product, or remove the battery pack or AC Adaptor.
Access lamp is lit or flashing
The media icon in the upper right of the LCD monitor is flashing
[22] How to Use
Recording Useful functions for recording
Zooming
You can record an image with the subject magnified.
38
Page 39
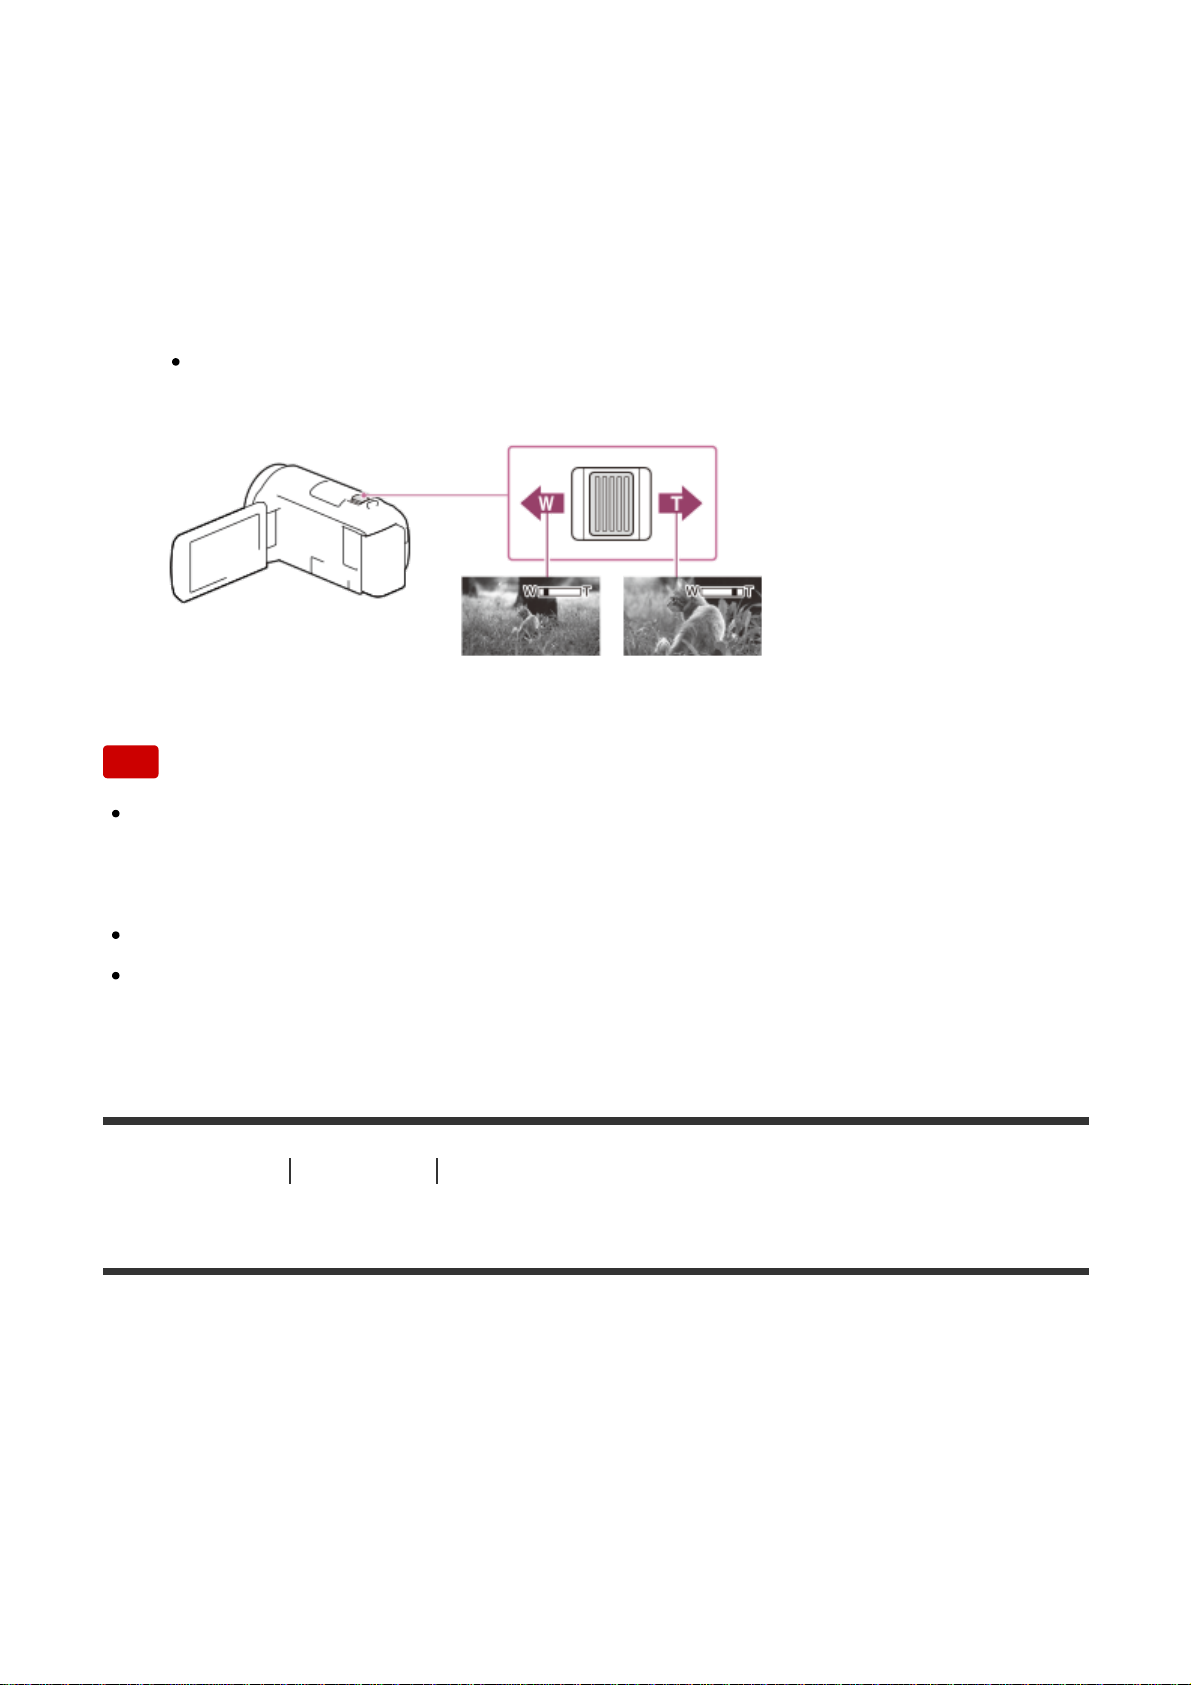
1. Move the power zoom lever to magnify or reduce the size of the image.
W:
Wider range of view (Wide angle)
T:
Close view (Telephoto)
Move the power zoom lever slightly for a slower zoom. Move it further for
a faster zoom.
Note
Be sure to keep your finger on the power zoom lever. If you move your finger
off the power zoom lever, the operation sound of the power zoom lever may
also be recorded.
You cannot change the zoom speed with the W/T button on the LCD monitor.
The minimum possible distance between this product and subject while
maintaining sharp focus is about 1 cm (about 13/32 in.) for wide angle and
about 80 cm (about 31 1/2 in.) for telephoto.
[23] How to Use
Recording Useful functions for recording
Capturing photos during movie recording (Dual Capture)
You can shoot photos during movie recording.
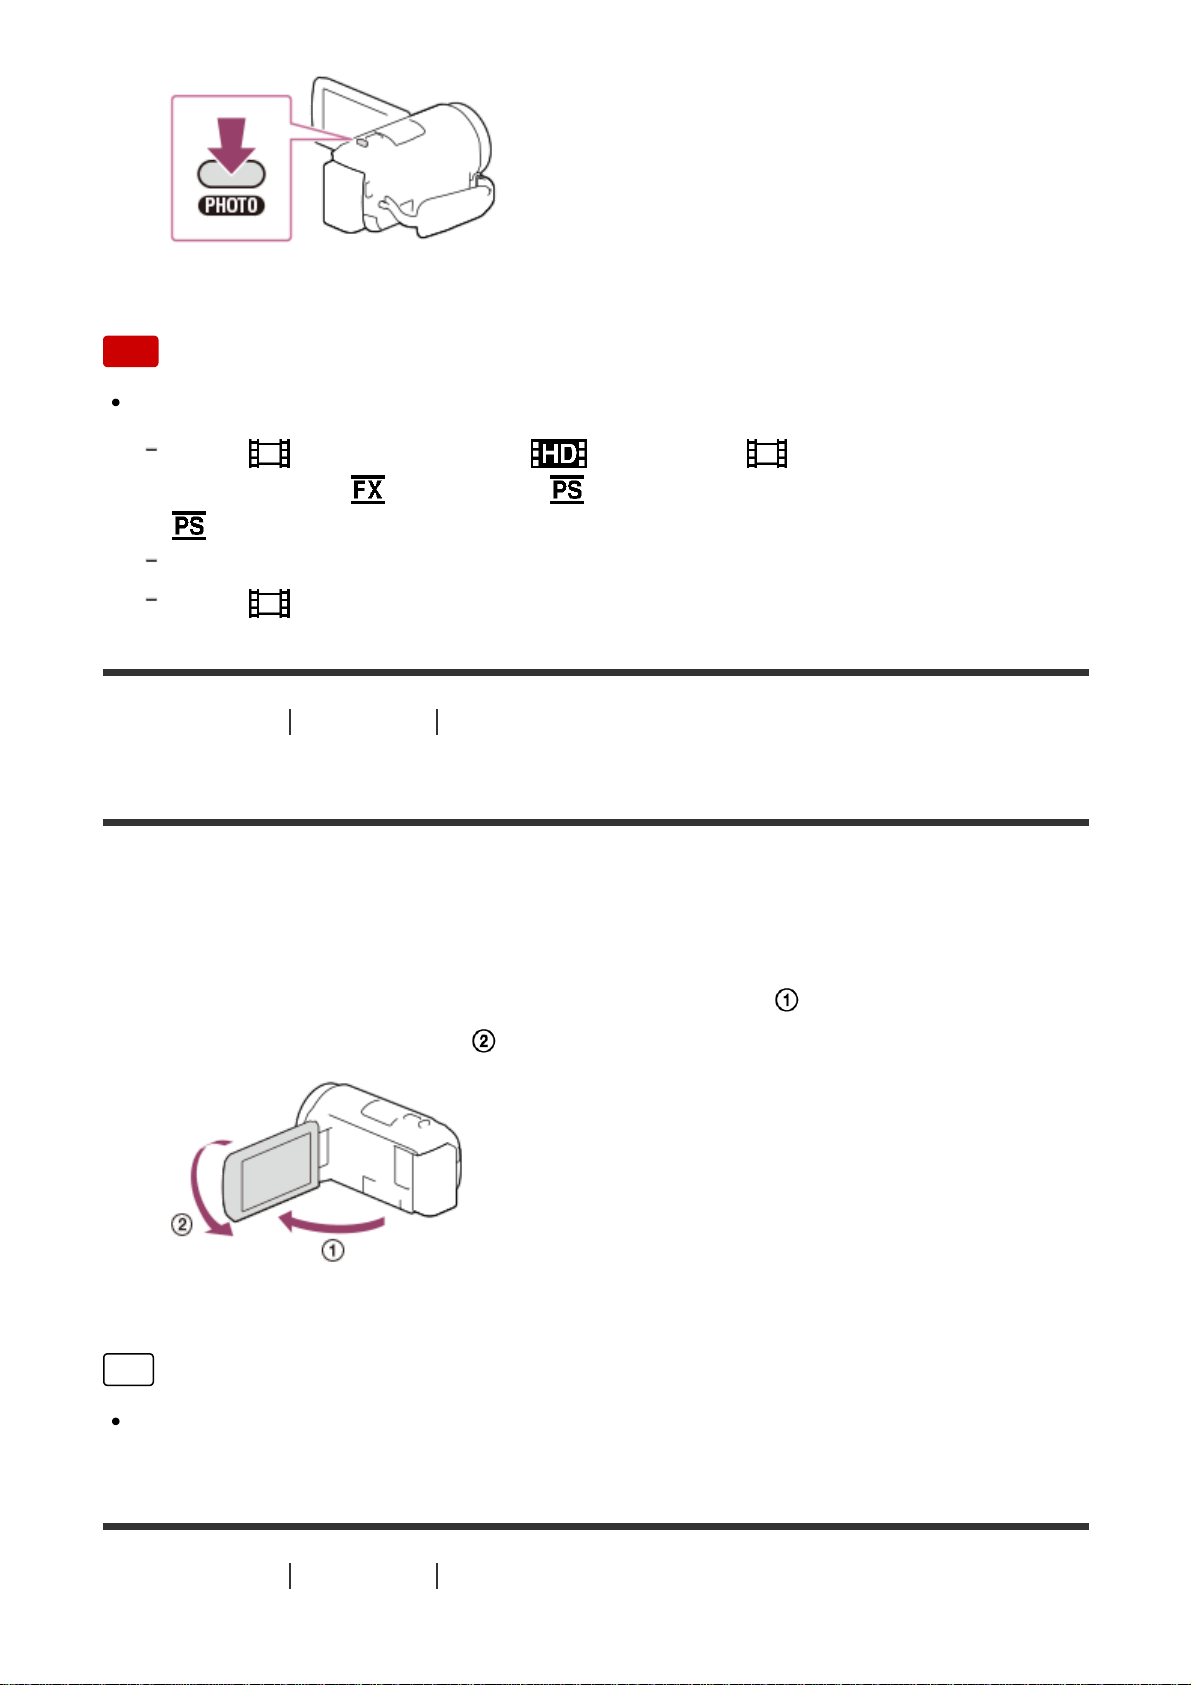
1. Press PHOTO during movie recording to capture photos.
39
Page 40
Note
You cannot capture photos during movie recording in the following situation(s):
When [
File Format] is set to [ AVCHD] and [ REC Mode] is set to
[Highest Quality
], [60p Quality ] (1080 60i-compatible device)/[50p Quality
] (1080 50i-compatible device).
When an item of [Picture Effect] is selected.
When [
SteadyShot] is set to [Intelligent Active].
[24] How to Use
Recording Useful functions for recording
Recording in mirror mode
You can rotate the LCD monitor 180 degrees so the LCD monitor faces toward
you to record yourself.
1. Open the LCD monitor 90 degrees to this product (
), then rotate it 180
degrees to the lens side (
), and then start recording.
Hint
A mirror-image of the subject appears on the LCD monitor, but the image will
be normal when recorded.
[25] How to Use
Recording Useful functions for recording
40
Page 41
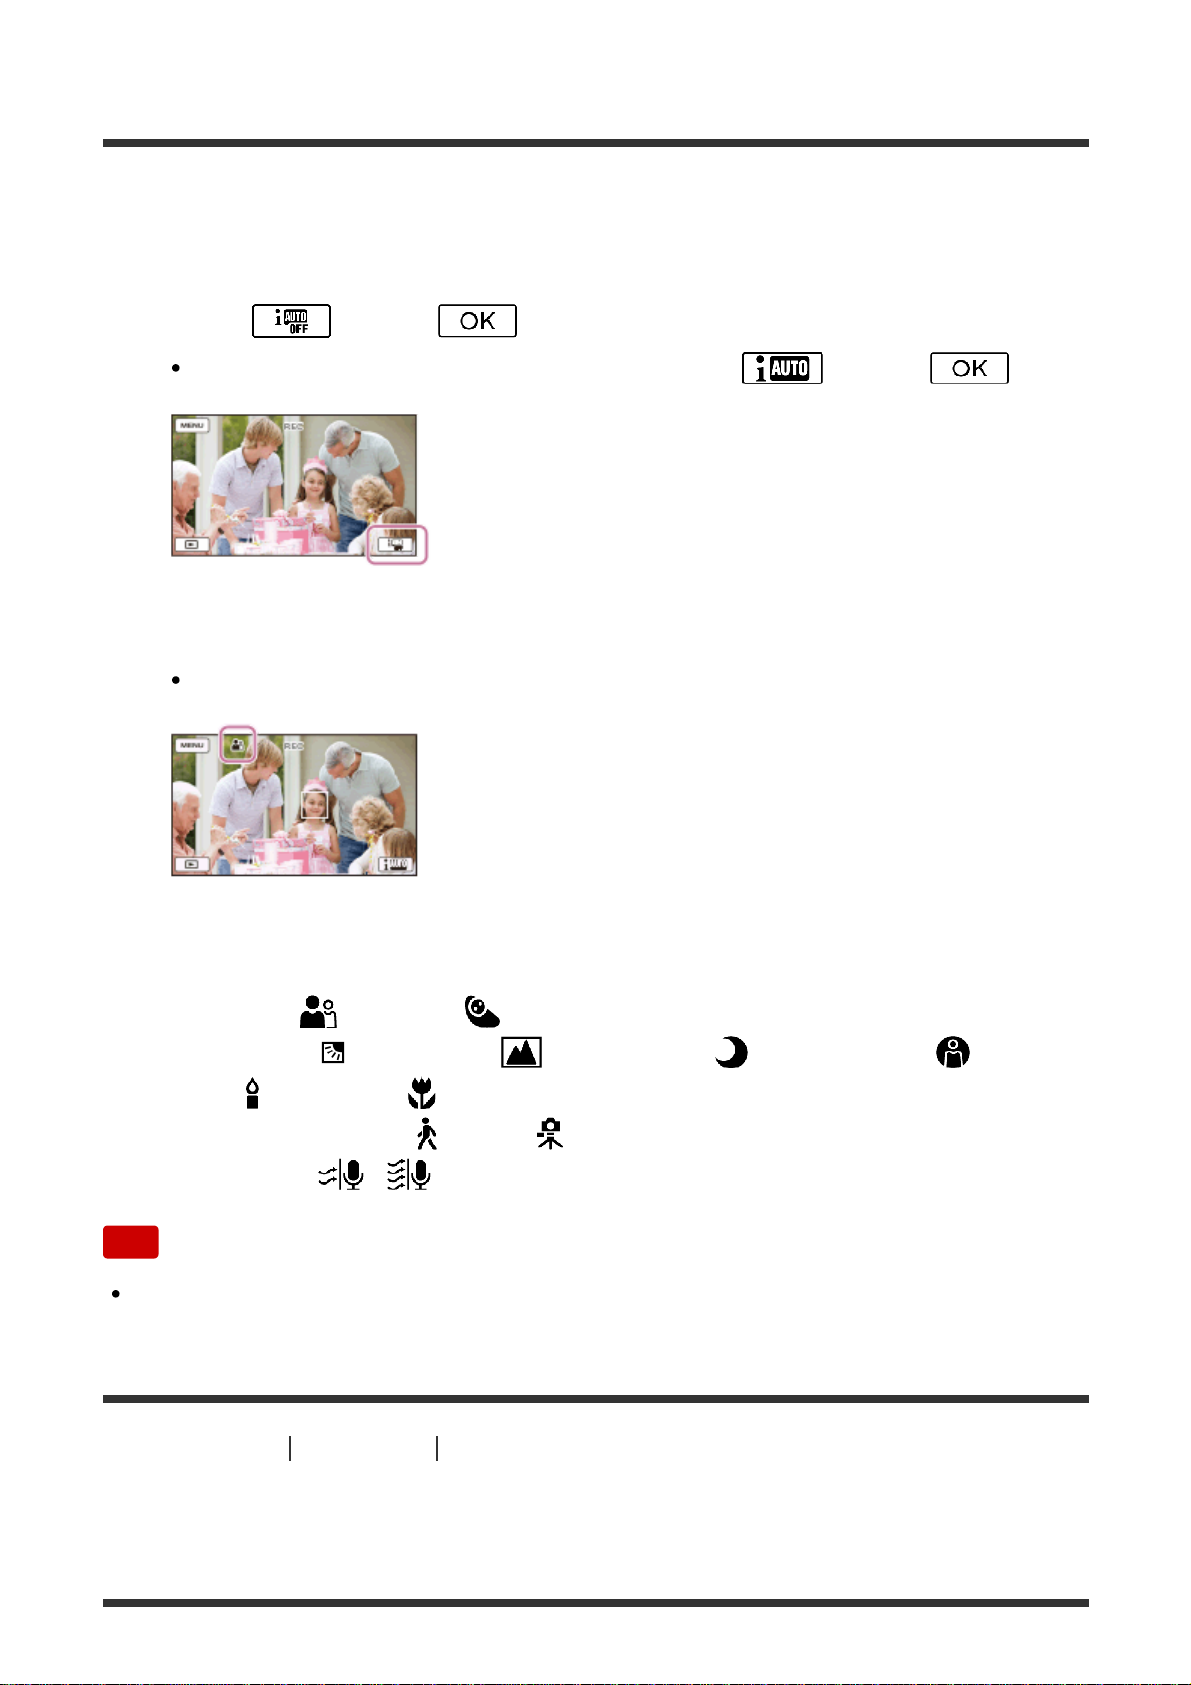
Intelligent Auto
This product records images after selecting the most suitable setting for the
subjects or the situation automatically.
1. Select
- [On] - on the recording screen of movies or photos.
To cancel the Intelligent Auto function, select - [Off] - .
2. Point this product toward the subject and start recording.
The icons that correspond to the conditions detected are displayed.
About the detectable scenes
Face detection:
(Portrait), (Baby)
Scene detection:
(Backlight), (Landscape), (Night Scene),
(Spotlight), (Low light), (Macro)
Camera-shake detection:
(Walk), (Tripod)
Sound detection:
, (Auto Wind NR)
Note
This product may not detect the expected scene or subject, depending on the
recording conditions.
[26] How to Use
Recording Useful functions for recording
Decreasing the voice volume of the person recording the
movie (My Voice Canceling)
41
Page 42
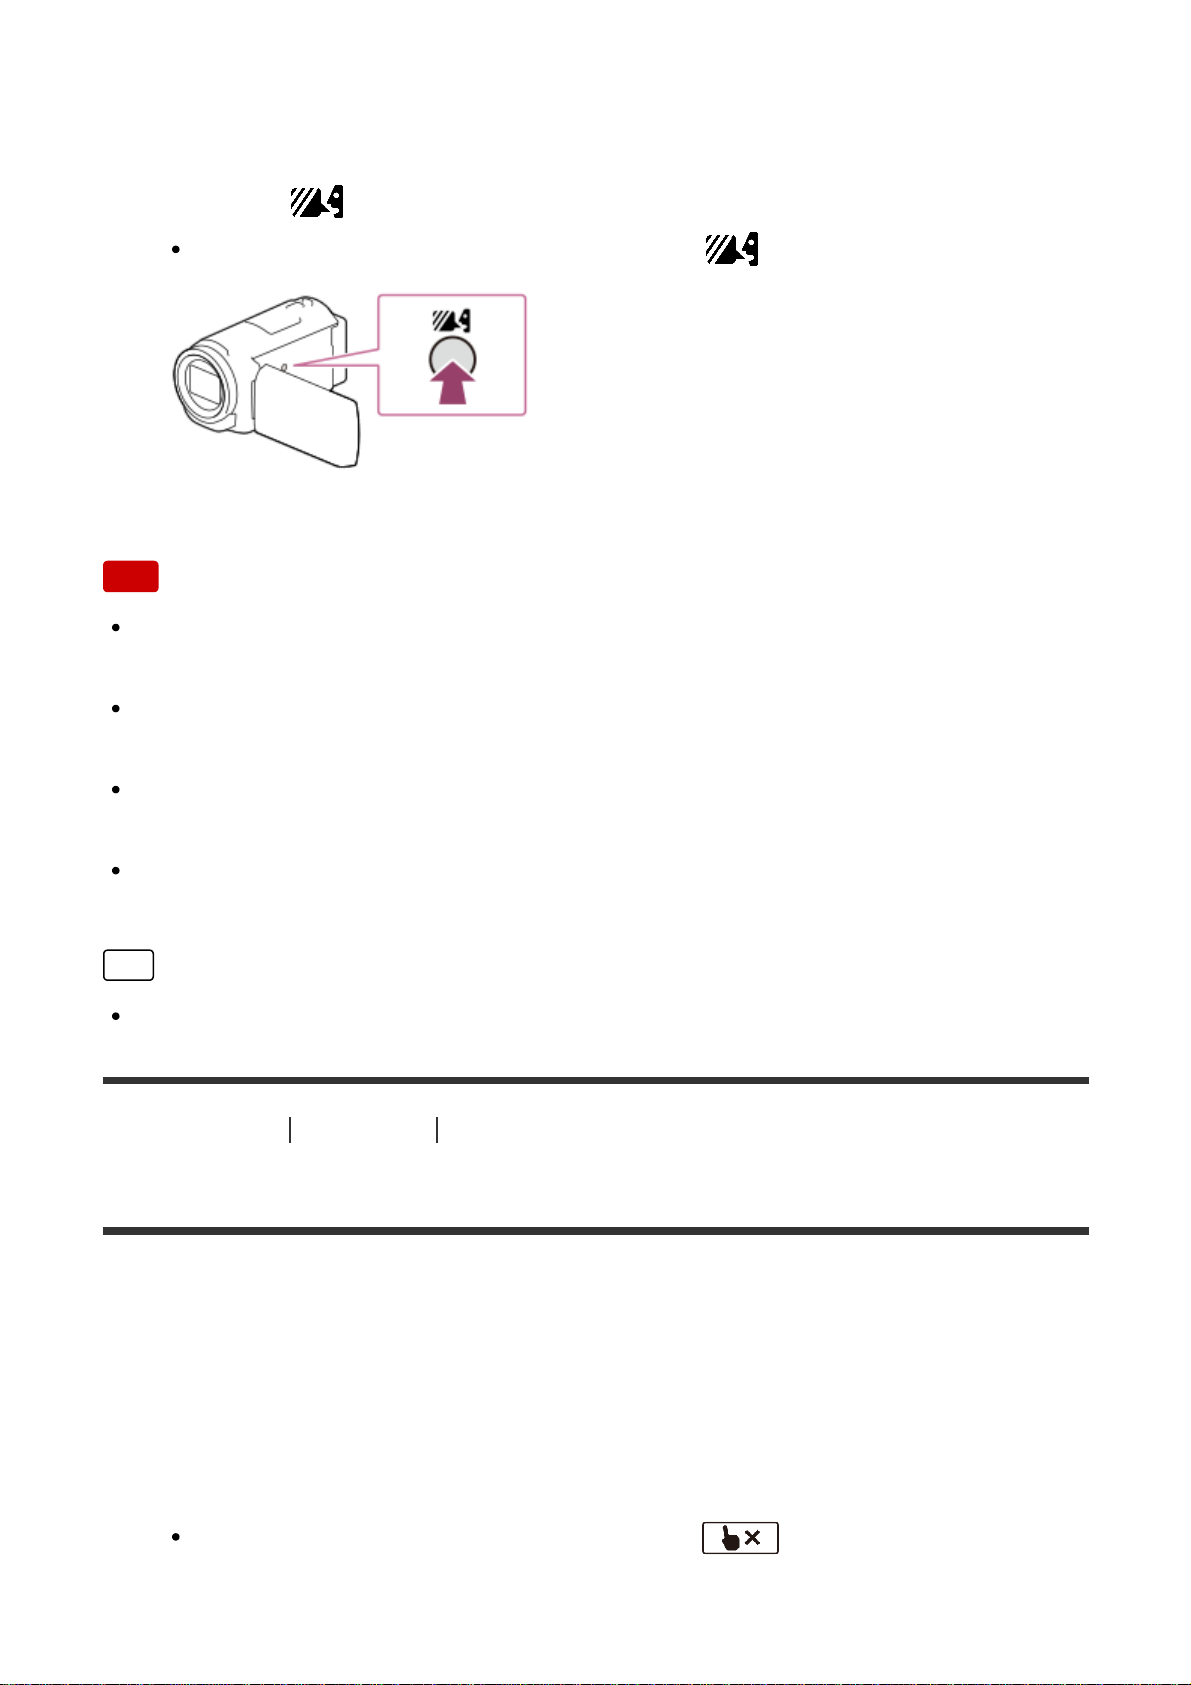
You can record movies decreasing the voice volume of the person recording the
movie.
1. Press the
button.
When [My Voice Canceling] is set to [On], is displayed.
Note
Set [My Voice Canceling] to [Off] if you want to record a movie without
decreasing the voice volume of the person recording the movie.
You cannot decrease the voice volume of the person recording the movie as
expected.
The [My Voice Canceling] function does not activate while an external
microphone is connected to this product.
If you record while covering the microphone on the bottom of this product such
as by attaching a tripod, [My Voice Canceling] may not work effectively.
Hint
You can also set [My Voice Canceling] from the menu.
[27] How to Use
Recording Useful functions for recording
Recording the selected subject clearly (Lock-on AF)
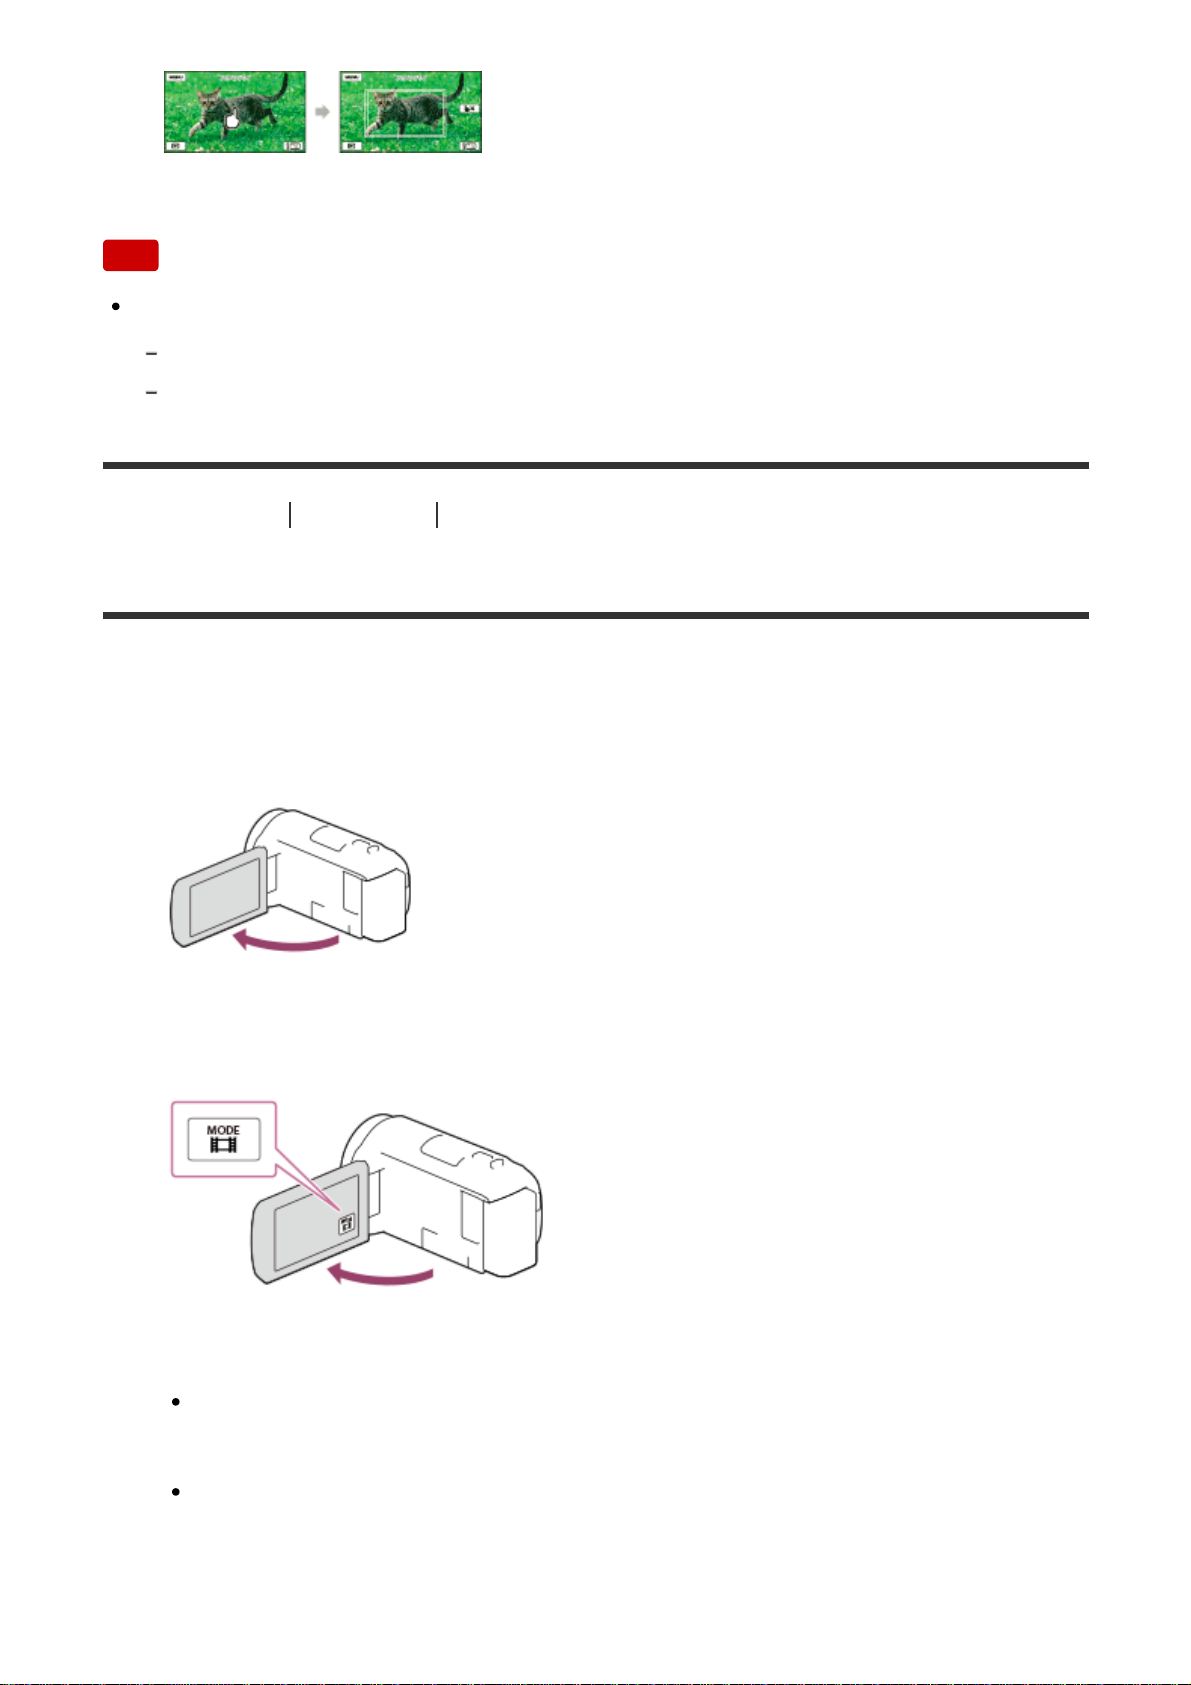
This product can track a subject you select and adjust the focus automatically.
The function is available in the movie or photo shooting mode when all the
following menu items are set to [Auto]:
[Scene Selection]/[White Balance]/[Focus]/[Exposure]/[IRIS]
1. Touch the subject you want to track while recording.
To cancel the Lock-on AF function, select .
42
Page 43
Note
While using the following functions, you cannot use [Lock-on AF].
[Digital Zoom]
[Live Streaming]
[28] How to Use
Recording Useful functions for recording
Using the Time-lapse Capture function
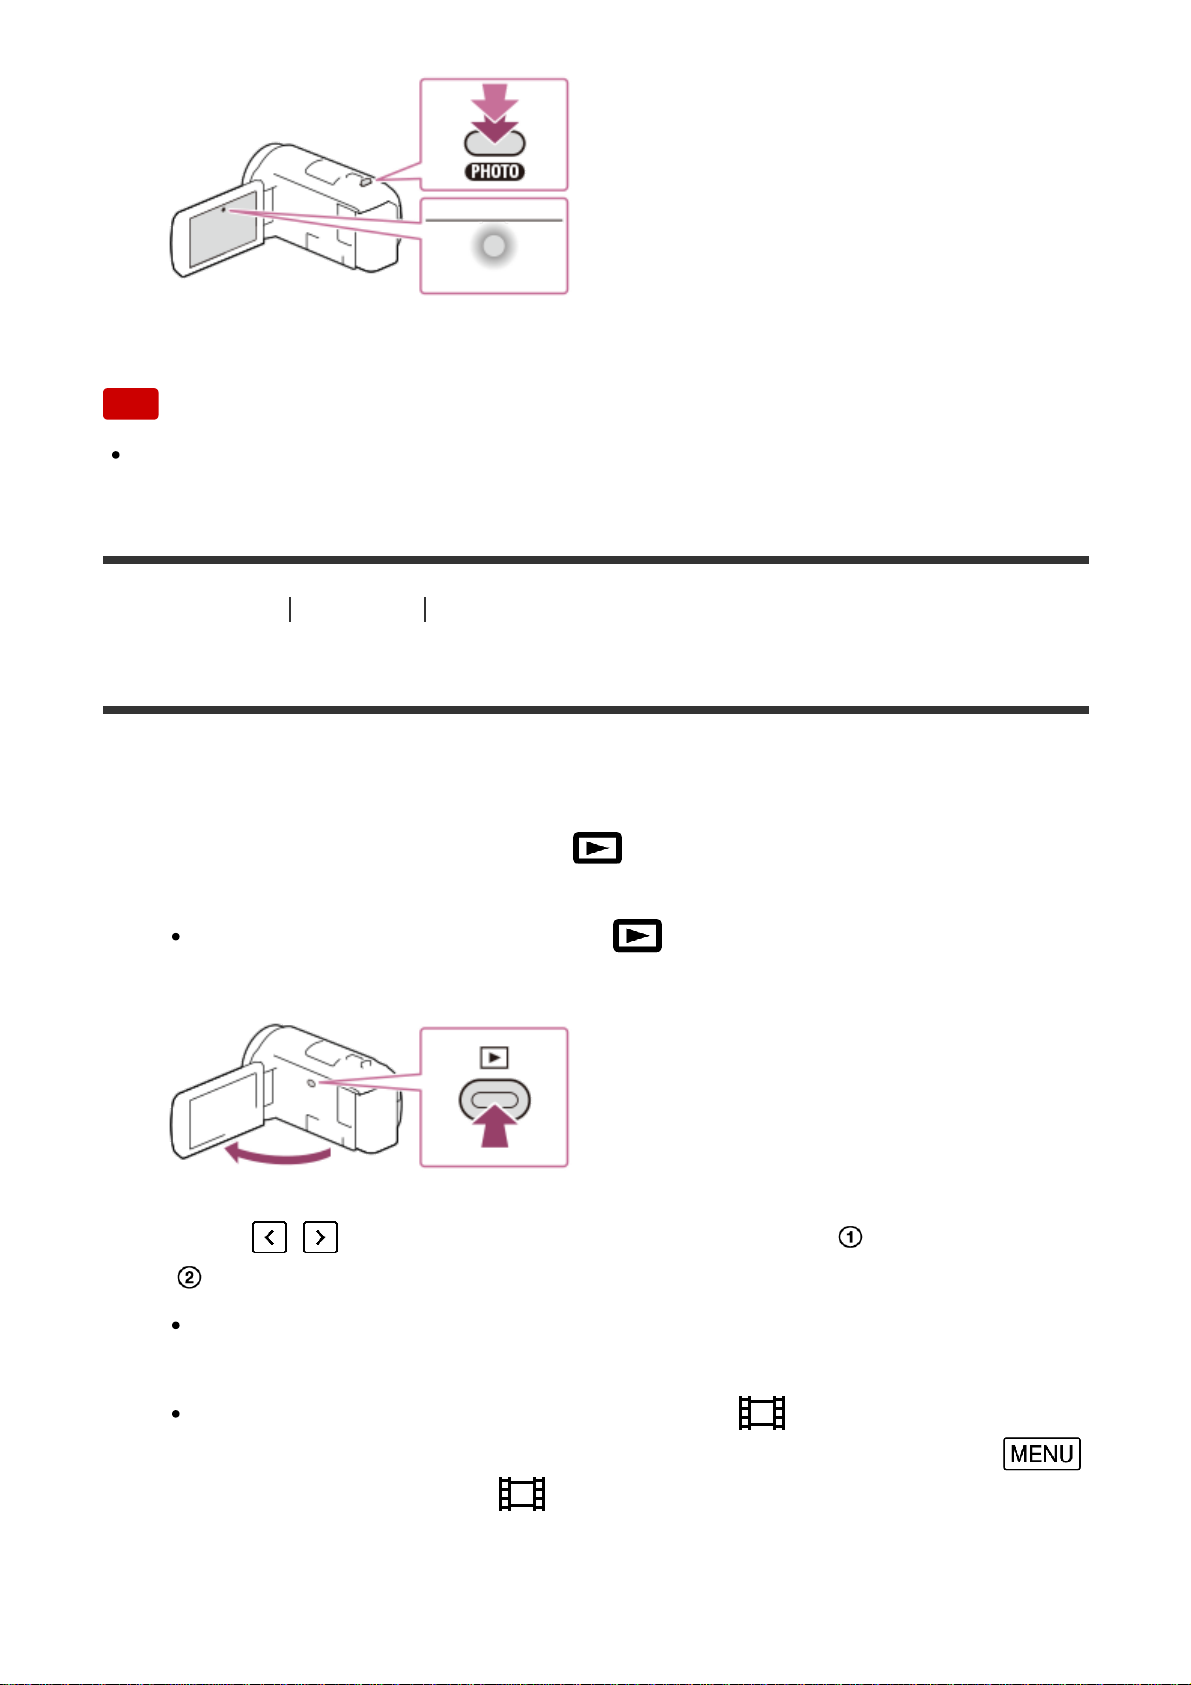
In the time-lapse capture mode, photos are taken sequentially at regular intervals.
1. Open the LCD monitor of this product and turn the power on.
2. Select [MODE] on the LCD monitor, and then select the time-lapse capture
mode.
3. Press PHOTO lightly to adjust the focus, then press it fully.
When the focus is adjusted properly, the AE/AF lock indicator appears on
the LCD monitor.
The time-lapse capture will be stopped if you press the PHOTO button
during time-lapse capture.
43
Page 44
Note
To save battery power, it is recommended to power the camcorder using the
USB cable or AC adaptor when using the time-lapse capture mode.
[29] How to Use
Playback Playing images using Event View
Playing movies and photos from the Event View screen
You can search for recorded images by date and time of recording (Event View).
1. Open the LCD monitor and press
(View Images) to enter the playback
mode.
You can also operate by selecting (View Images) on the LCD
monitor.
2. Select / to move the desired event to the center ( ) and then select it
(
).
This product displays recorded images as an event automatically, based
on the date and time.
Only movies saved in the format selected in [ File Format] will appear.
You can change the displayed movies by selecting the format from
- [Image Quality/ Size] - [ File Format].
44
Page 45
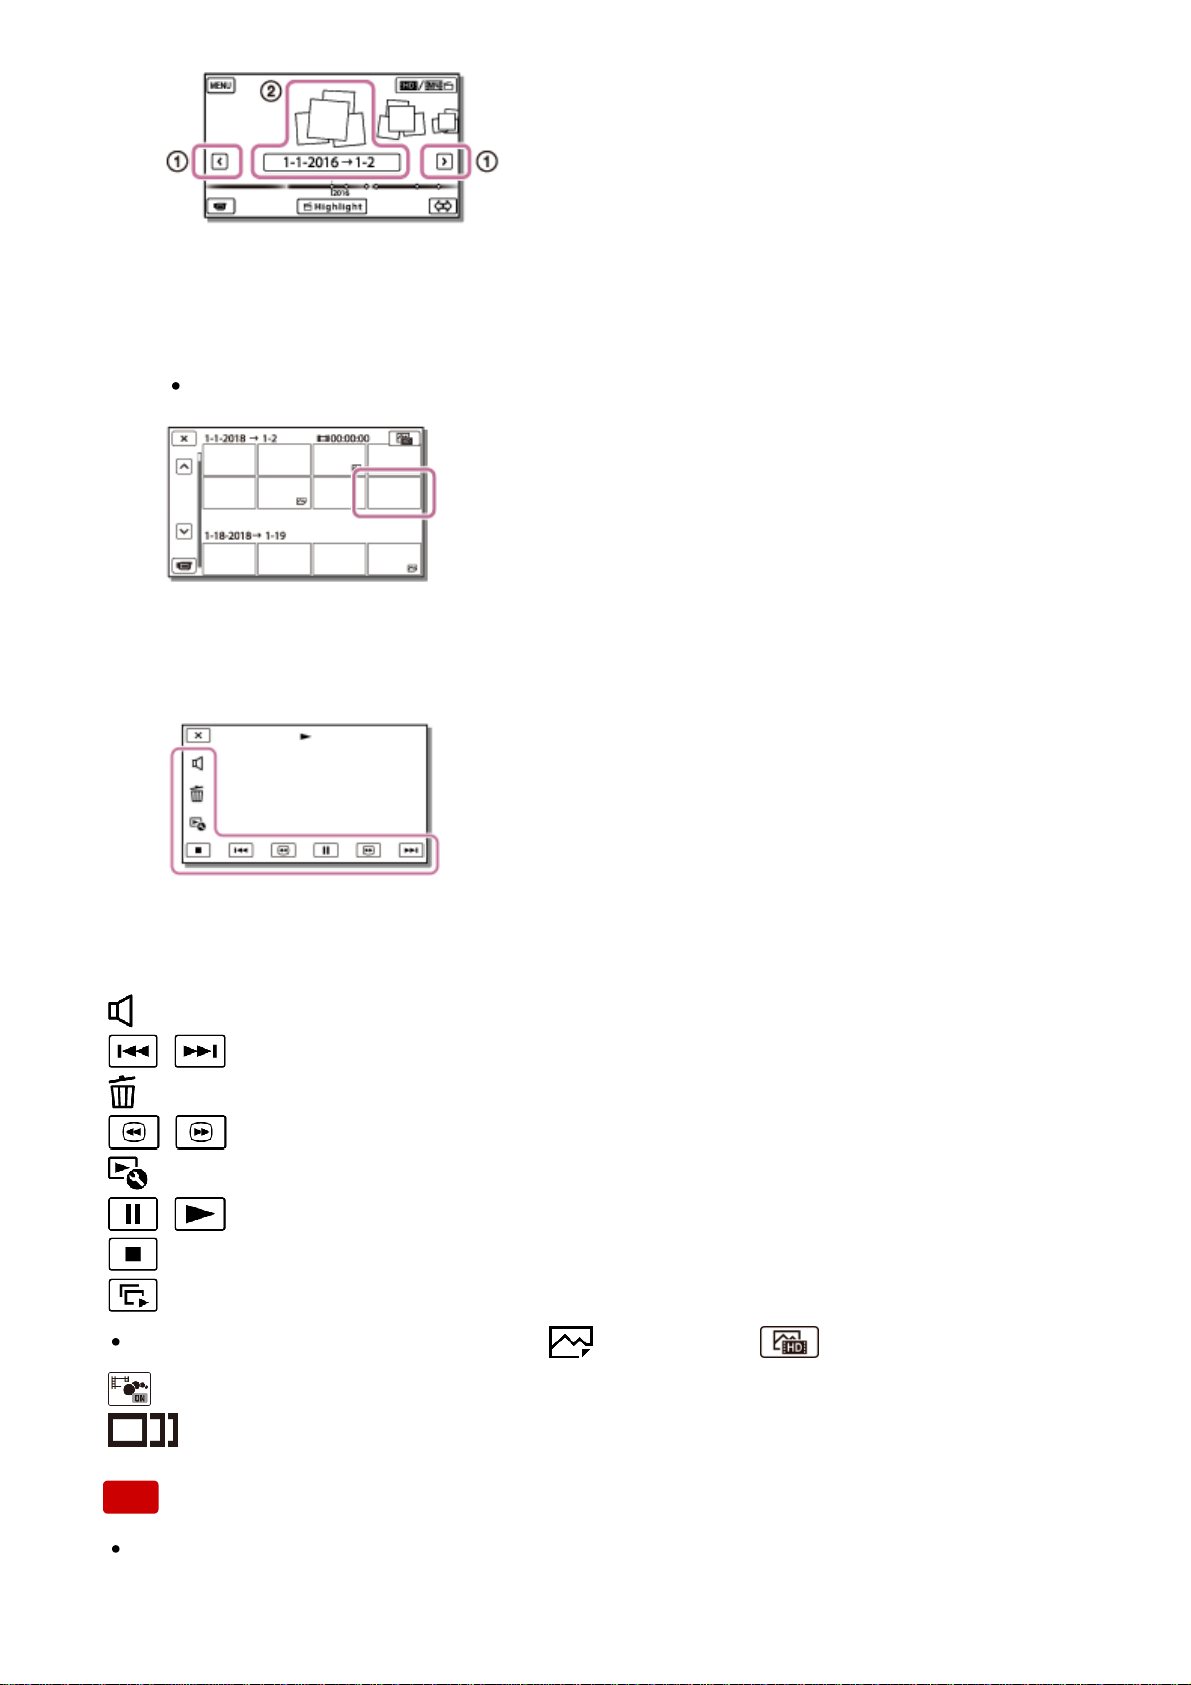
3. Select the image.
This product plays from the selected image to the last image in the event.
4. Select the appropriate buttons on the LCD monitor for various playback
operations.
Buttons for playback operations
: Volume
/ : Previous/Next
: Delete
/ : Fast-reverse/fast-forward
: Context
/ : Pause/Play
: Stop
: Play/stop slide show
To start playing slide show, select PHOTO from in step 3.
: Motion shot video
: Motion Interval ADJ
Note
To prevent your image data from being lost, save all your recorded images on
external media periodically.
45
Page 46
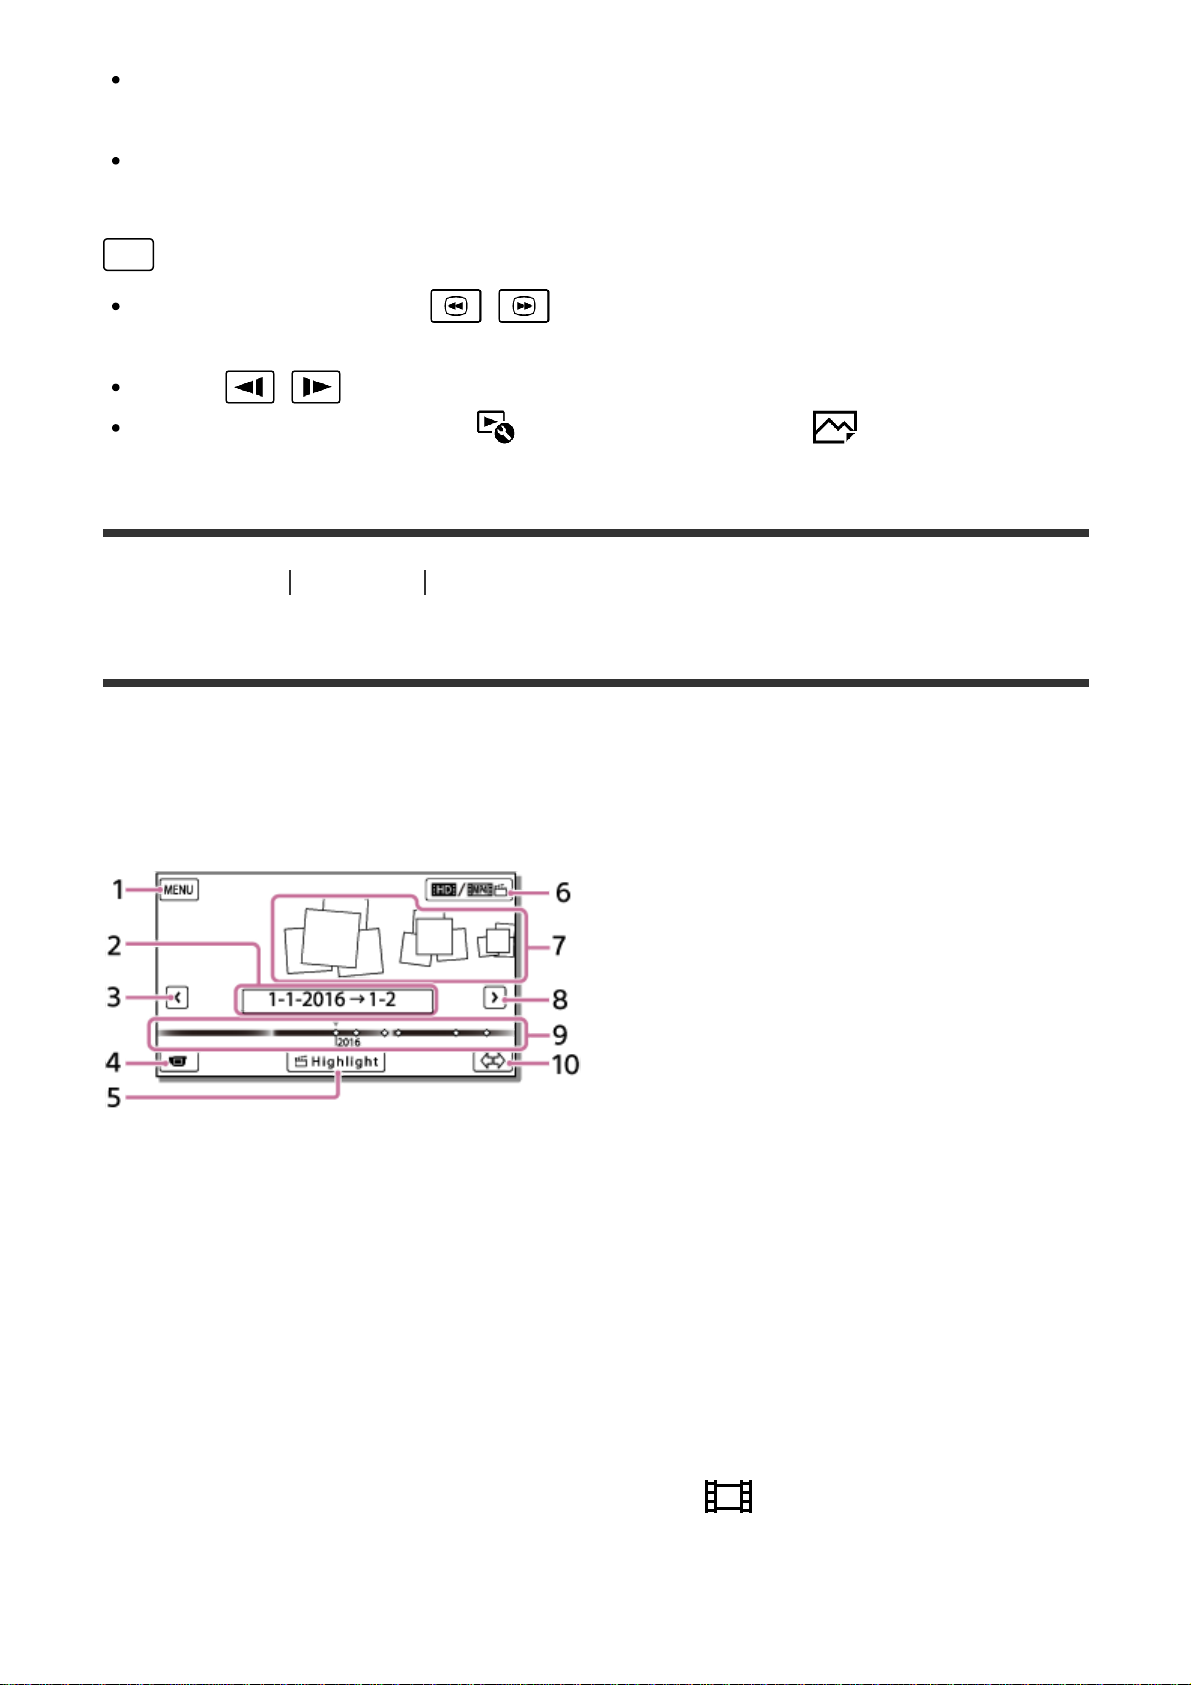
Some buttons described above may not appear, depending on the image being
played back.
In the default setting, a protected demonstration movie is pre-recorded
(Demonstration movies may not be installed depending on the model).
Hint
As you repeat selecting / during playback, movies are played as fast
as about 5 times - about 10 times - about 30 times - about 60 times.
Select / during pause to play movies slowly.
To repeat Slideshow, select - [Slideshow Set] when is selected with
the Switch Image Type button.
[30] How to Use
Playback Playing images using Event View
Screen display on the Event View screen
Explains items displayed on the Event View screen.
Event View screen
1. To the MENU screen
2. Event name
3. To the previous event
4. To the movie/photo recording mode
5. Highlight Movie Maker (*)
*
Highlight Movie Maker will be displayed when Movie format is set to AVCHD. It will not be
displayed when an external media device is connected to this product.
6. To switch movie format (HD/MP4)
The displayed icon differs depending on the [
File Format] setting.
7. Events
8. To the next event
46
Page 47
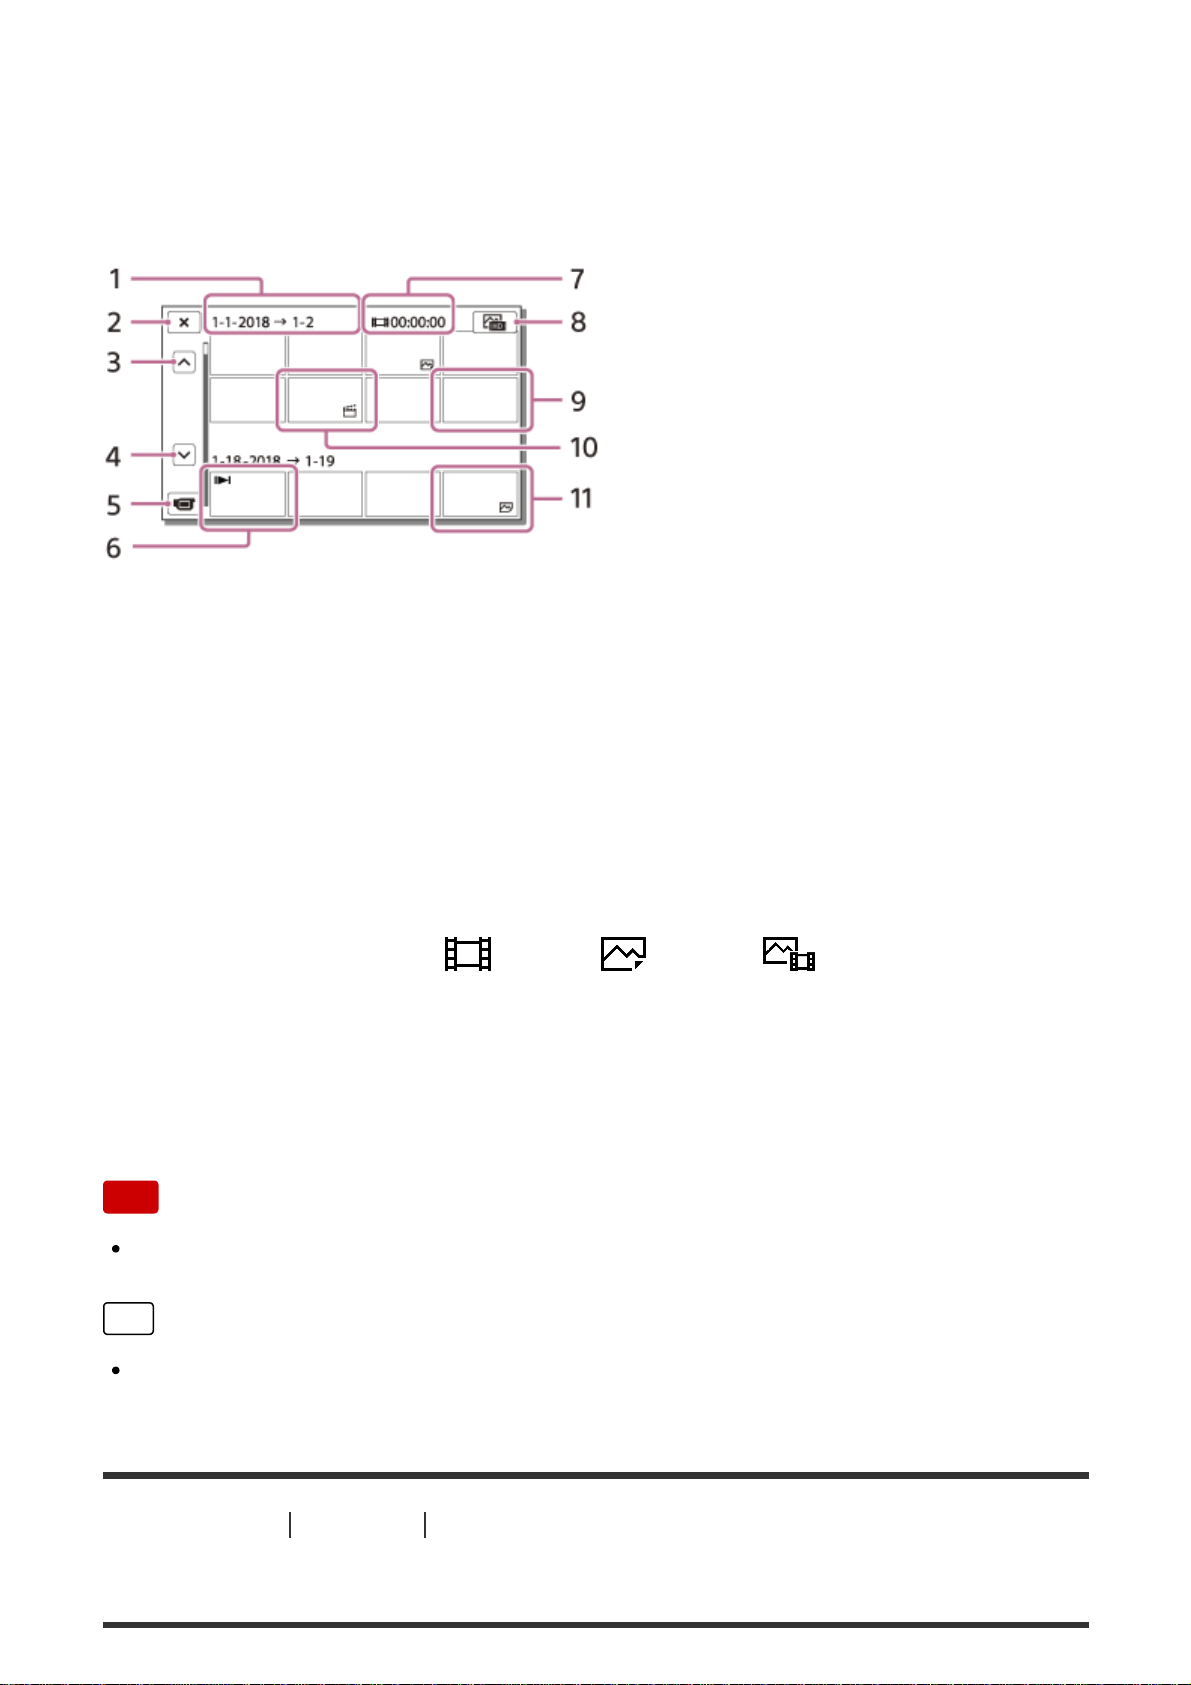
9. Time-line bar
10. To change Event Scale (approx. 3 months/1.5 years)
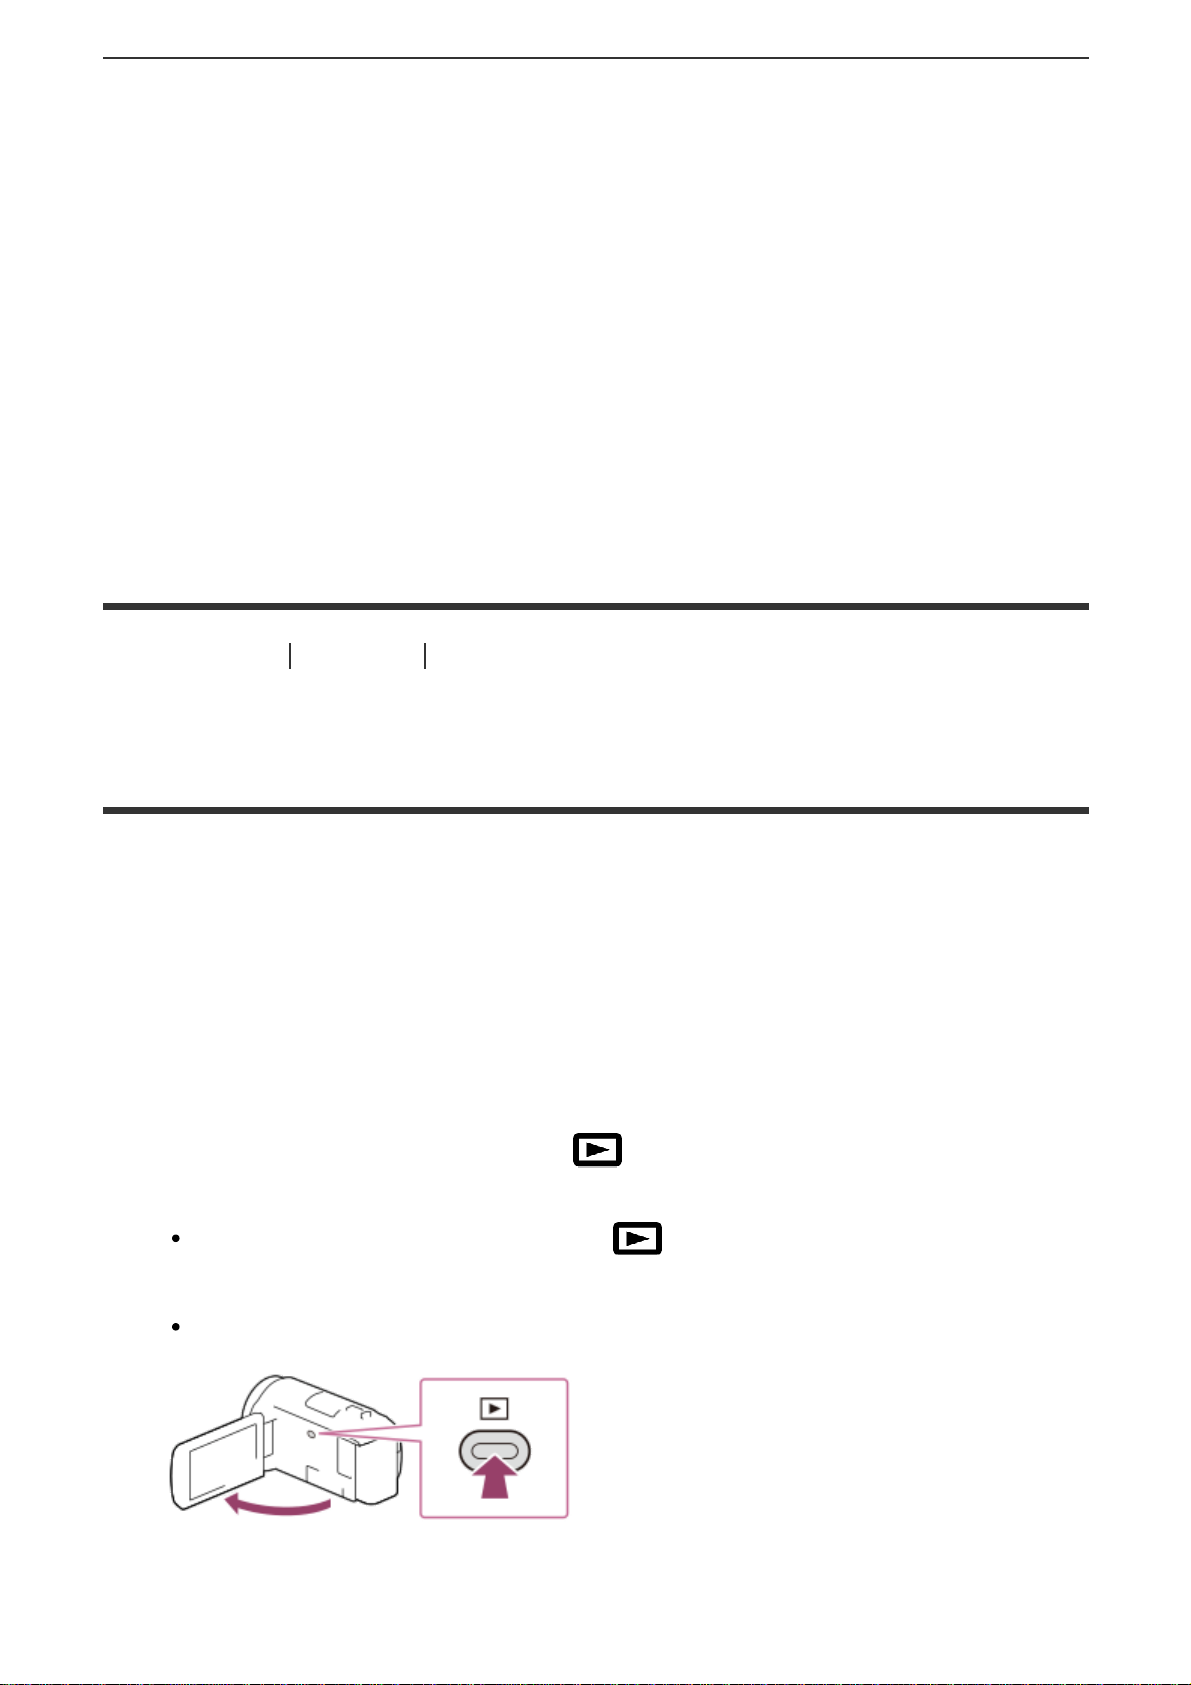
Index screen
1. Event name
2. To close the index screen
3. To the previous event
4. To the next event
5. To the movie/photo recording mode
6. Last played image
7. Recorded time/number of photos
8. To switch between the movie/photo playback screen (VISUAL INDEX)
Select the image type (
MOVIE, PHOTO, MOVIE/PHOTO) you
want to play.
9. Movie
10. Highlight Movie
11. Photo
Note
Displayed icons may differ, depending on the model.
Hint
Reduced-size images which enable you to view many images at the same time
on an index screen are called “thumbnails.”
[31] How to Use
Playback Creating a highlight movie
About Highlight Movie Maker
47
Page 48
Highlight Movie Maker on this product creates highlight movies (MP4 format) from
a number of movies (AVCHD format) you have recorded, freeing you from
complicated editing work.
Highlight movies created with Highlight Movie Maker are edited to match the
background music you select allowing you to share moving scenes by viewing
together with your friends and family or uploading to a video sharing site.
You can create a highlight movie that suits your preference more by setting
scenes to be used with Highlight Movie Maker, setting highlight points during
recording, or changing the background music.
Highlight movies are saved with the date they were created on and can be played
back in the same way as recorded movies.
[32] How to Use
Playback Creating a highlight movie
Creating a highlight movie (MP4 format) with Highlight
Movie Maker
Highlight Movie Maker can create highlight movies from a movies (AVCHD
format).
You can customize the editing range of Highlight Movie Maker and the background
music for highlight movies according to your preference.
It is recommended that you use the AC Adaptor when creating highlight movies
with Highlight Movie Maker.
1. Open the LCD monitor and press
(View Images) to enter the playback
mode.
You can also operate by selecting (View Images) on the LCD
monitor.
The Event View screen is displayed.
48
Page 49
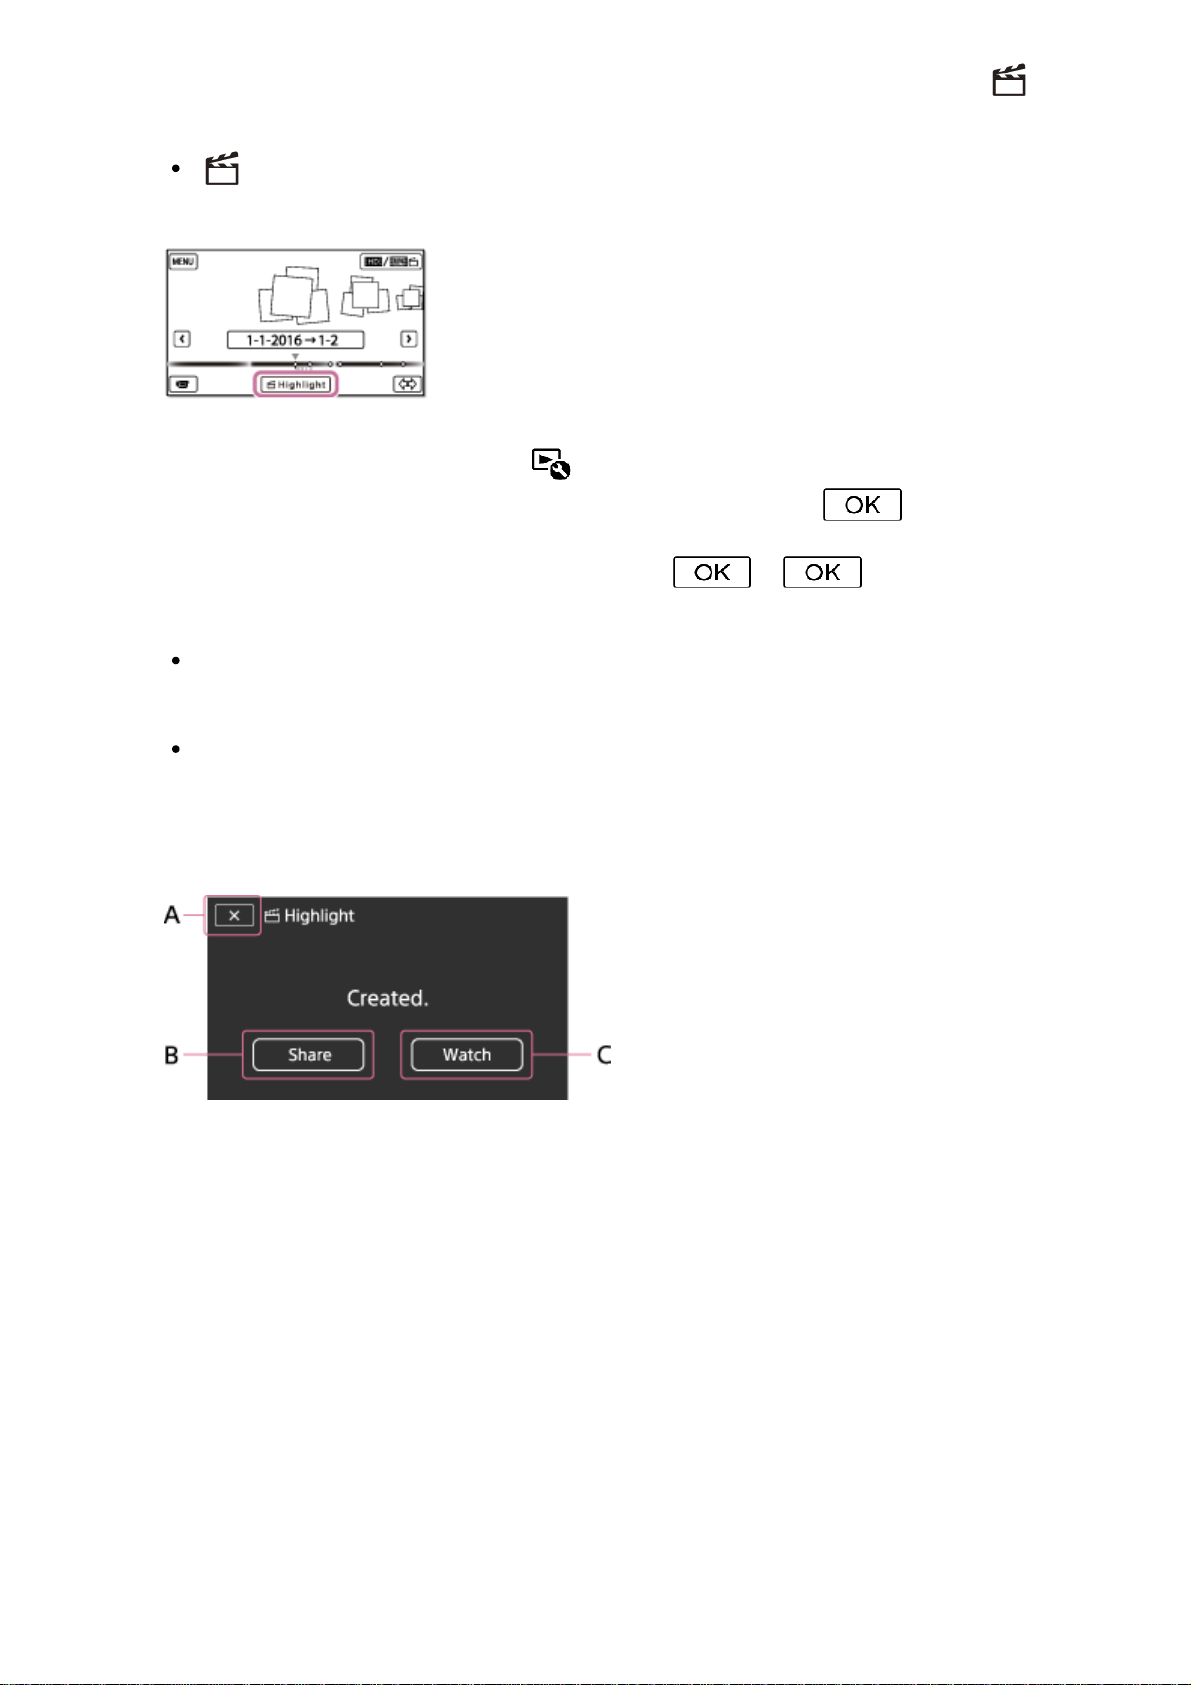
2. Display the desired event at the center of the Event View, and select [
Highlight].
[ Highlight] will not be displayed when only movies recorded in the
AVCHD format are selected.
3. To change the settings, select , change the settings according to your
preference on the displayed setting screen then select
.
4. On the setting confirmation screen, select
- . The highlight
movie is created.
The time required to create a highlight movie is about twice the total
duration of the movie being created.
The created highlight movie is saved in MP4 format.
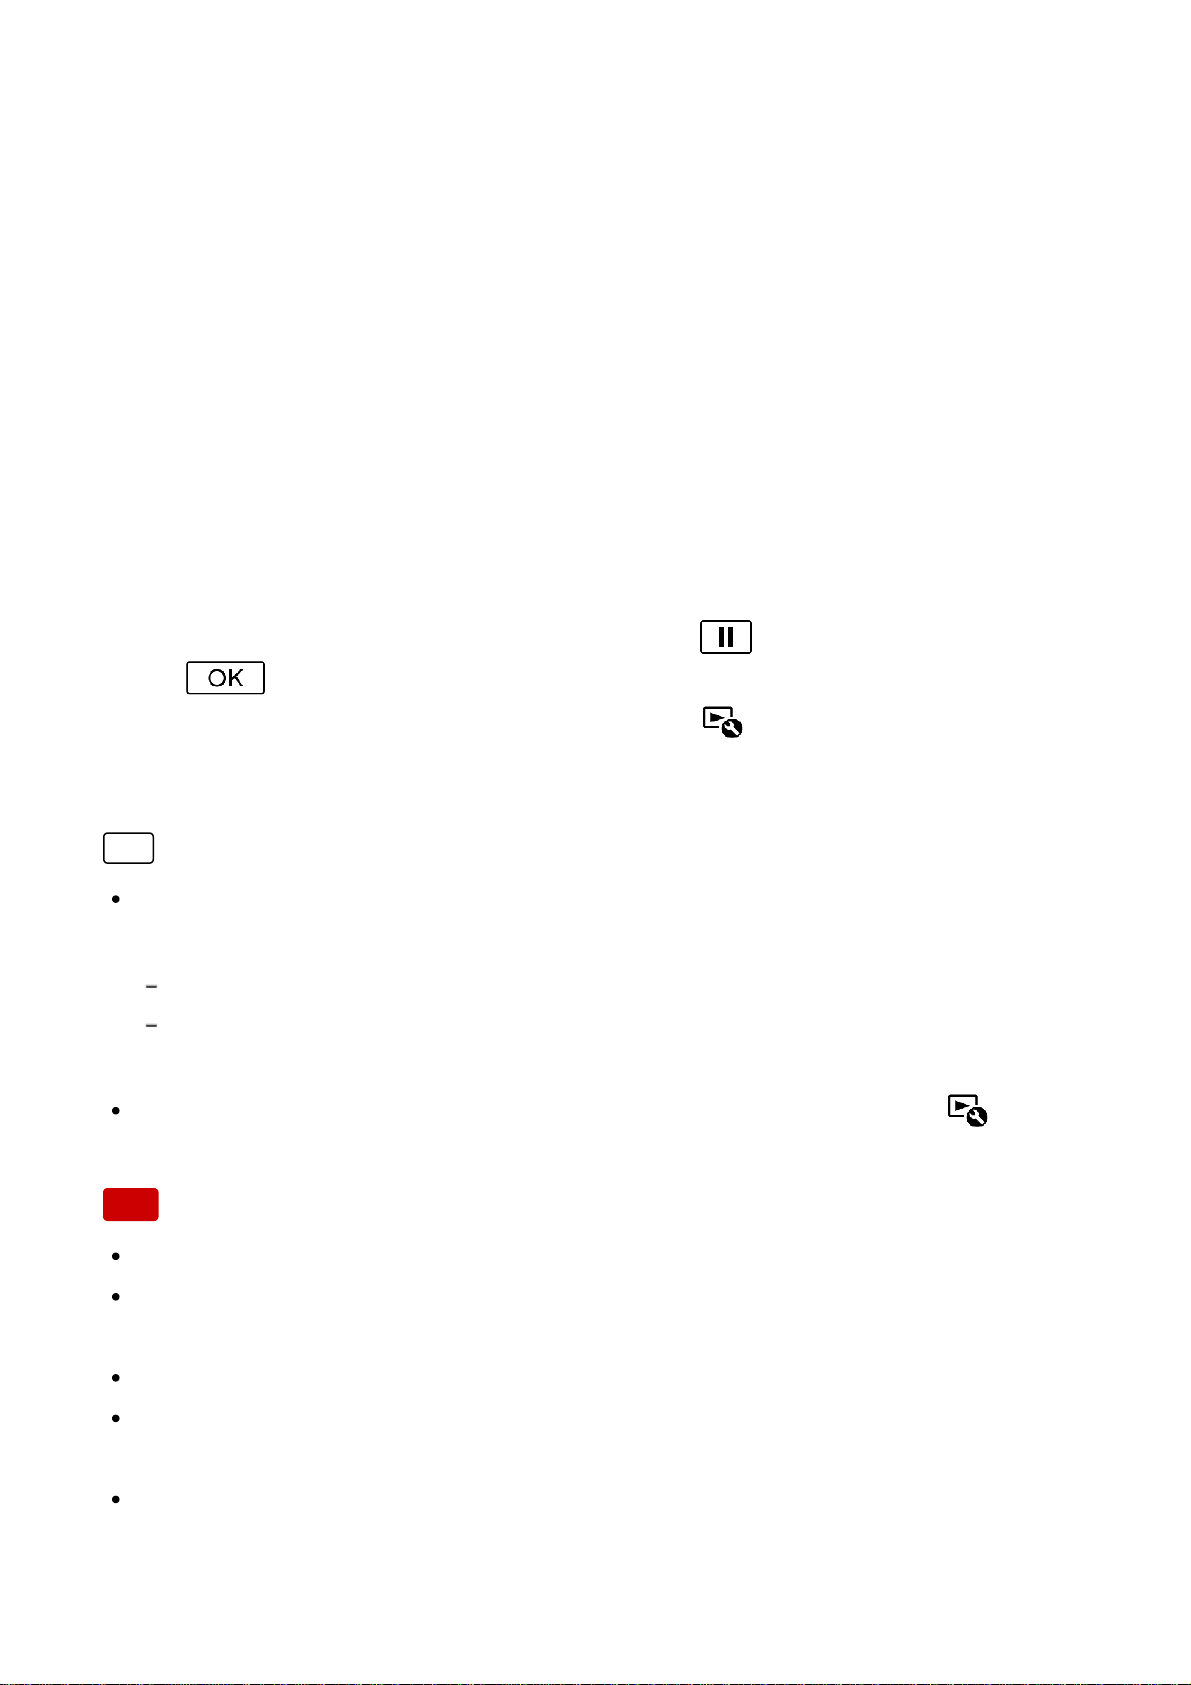
5. Select the desired operation when creation of the highlight movie is
completed.
A: To exit.
B: A screen where you can choose to share the created highlight movie on a
smartphone or computer is displayed. You will need a Wi-Fi connection or
USB connection to share the highlight movie.
C: To play back the created highlight movie to check the content.
Menu items that you can set
[Selection Range]
You can change the date range (starting date/ending date) of the highlight movie
to be created.
[Movie Length]
49
Page 50
You can set the length of the highlight movie.
[Transition Effect]
You can set the effect of the transition between scenes in the highlight movie.
[Transition Speed]
You can set the speed of the transition between scenes in the highlight movie.
[Music]
You can select your preferred background music for the highlight movie.
[Audio mix]
The balance of recorded sound and background music is adjusted.
[Highlight Point]
You can select scenes to be included in the highlight movie.
To add highlight points, play back a movie, select
to suspend playback, then
select
.
To clear the set highlight points of a movie, select
- [Clear All Points].
Hint
You can replace background music files on this product using Music Transfer of
“PlayMemories Home.”
Connect the product with your computer using a USB cable.
Start “PlayMemories Home” installed on your computer, then select Music Transfer
from the menu bar.
To transfer a highlight movie to a smartphone or a computer, select
displayed on the playback screen of the highlight movie.
Note
Select an AVCHD movie whose recording time is 5 seconds or longer.
If the duration of the selected movie is shorter than the time selected in [Movie
Length] or that of the background music, a highlight movie cannot be created.
The bit-rate of highlight movies created with [Highlight Movie Maker] is 12Mbps.
The created highlight movie cannot be saved if its file size exceeds the free
space of the memory.
Up to 10 highlight points can be set for a movie. If the number of set highlight
points has reached 10 points, no more highlight points can be set. To set a new
highlight point, clear all set highlight points and set them again.
50
Page 51

When no highlight points are set, the highlight movie is edited with the points
this product selects.
There is a possibility that some of the highlight points you have set will not be
used in the highlight movie.
If the highlight movie cannot be played back due to corrupted background
music file, select
- [Setup] - [ Playback Settings] - [Empty Music],
then transfer the background music file to this product. Background music files
pre-installed to this product can be recovered with Music Transfer of
“PlayMemories Home.”
The sound of the highlight movie is converted to 2ch stereo audio.
Only AVCHD movies (except 24p movies) can be used for a highlight movie.
Background music preinstalled on this product have officially been contracted
between Sony and licensors. Movies containing the said background music are
allowed for private use, duplication, distribution, or public transmission only
when the said movies are intended for nonprofit purposes and without receiving
any kind of consideration from the person to whom the said movies are
presented to.
[33] How to Use
Playback Creating a highlight movie
Adding a highlight point during recording
You can specify highlight points (scenes to be included in a highlight movie) during
recording.
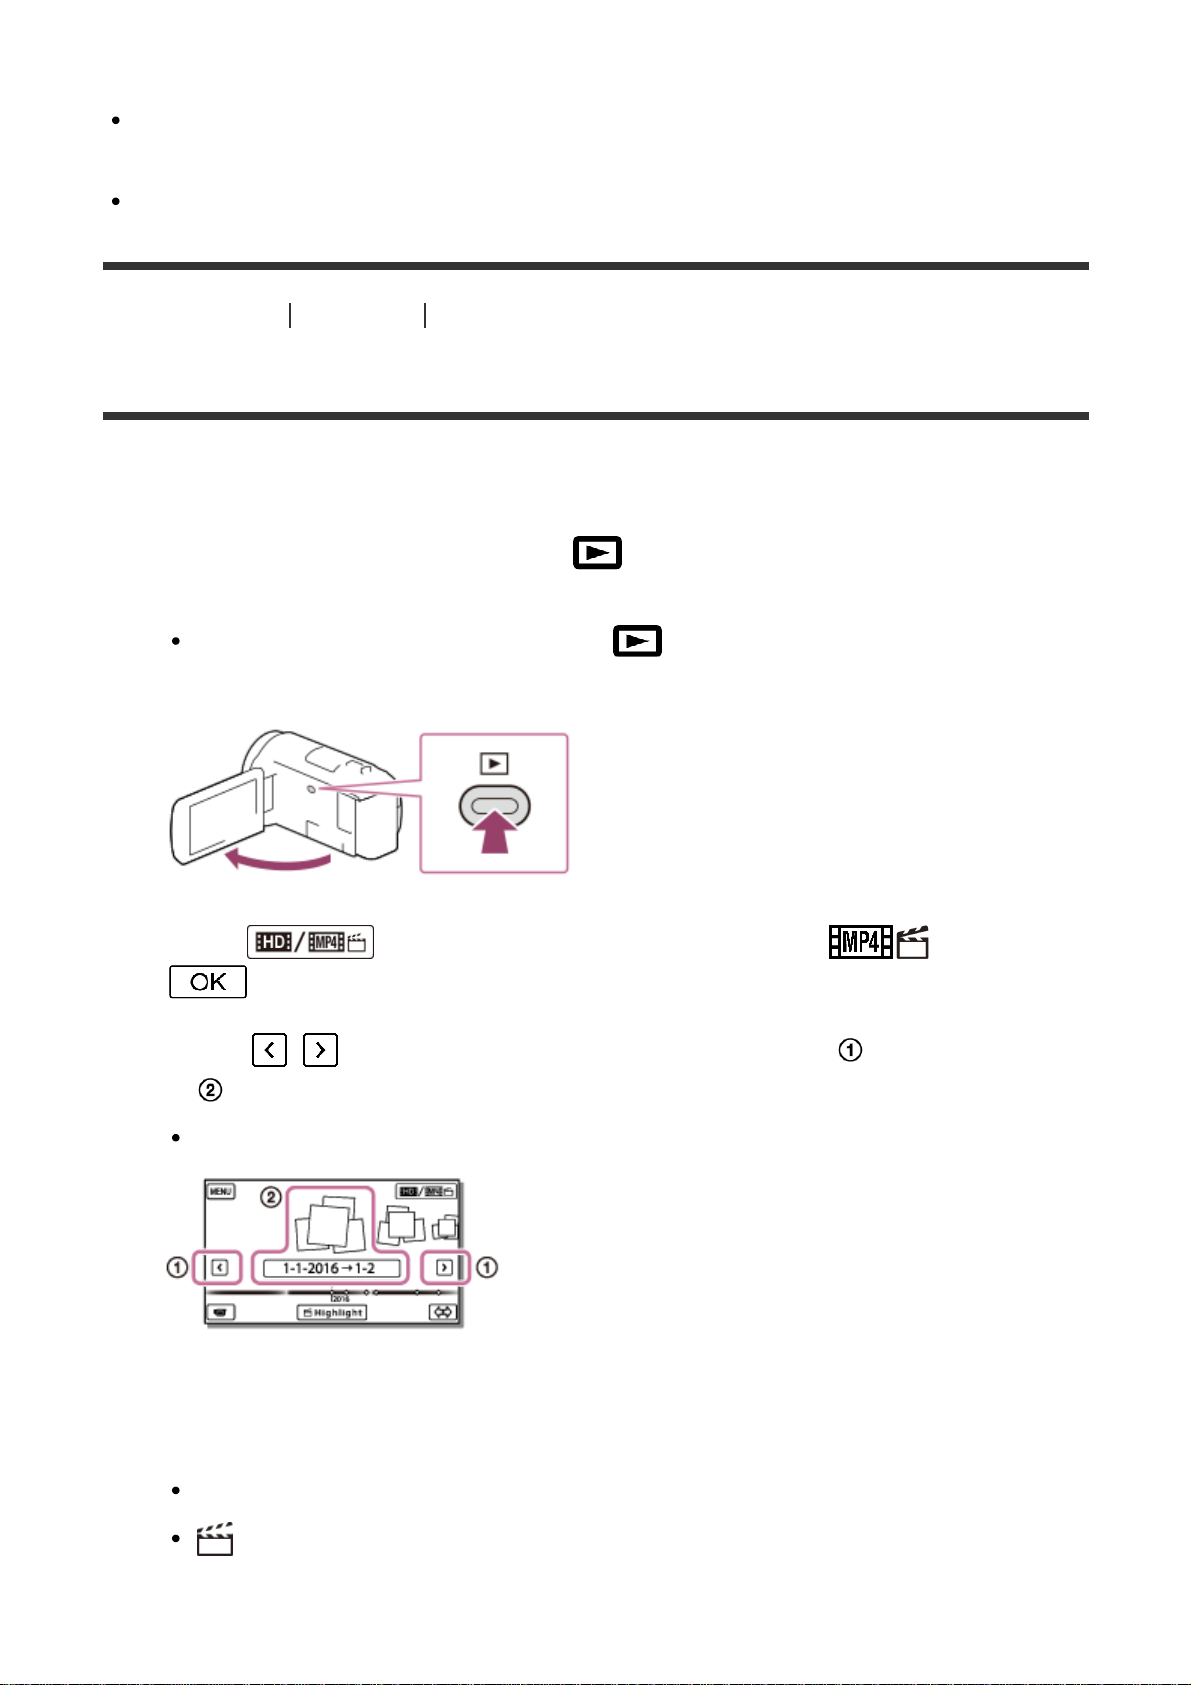
1. On the movie recording screen, select
at the bottom right corner when a
scene you want to include in the highlight movie appears.
Note
Up to 10 highlight points can be set. If the number of set highlight points has
reached 10 points, no more highlight points can be set. To set a new highlight
51
Page 52
point, set it when creating the highlight movie.
Highlight points can be set only on AVCHD movies (except 24p movies) during
recording.
Highlight points you set are not always used for the highlight movie.
[34] How to Use
Playback Creating a highlight movie
Playing highlight movies
You can play movies created in the Highlight Movie Maker.
1. Open the LCD monitor and press
(View Images) to enter the playback
mode.
You can also operate by selecting (View Images) on the LCD
monitor.
2. Select at the top right corner of the screen - MP4 -
.
3. Select
/ to move the desired event to the center ( ) and then select
it (
).
Highlight movies are saved with the date it was created on.
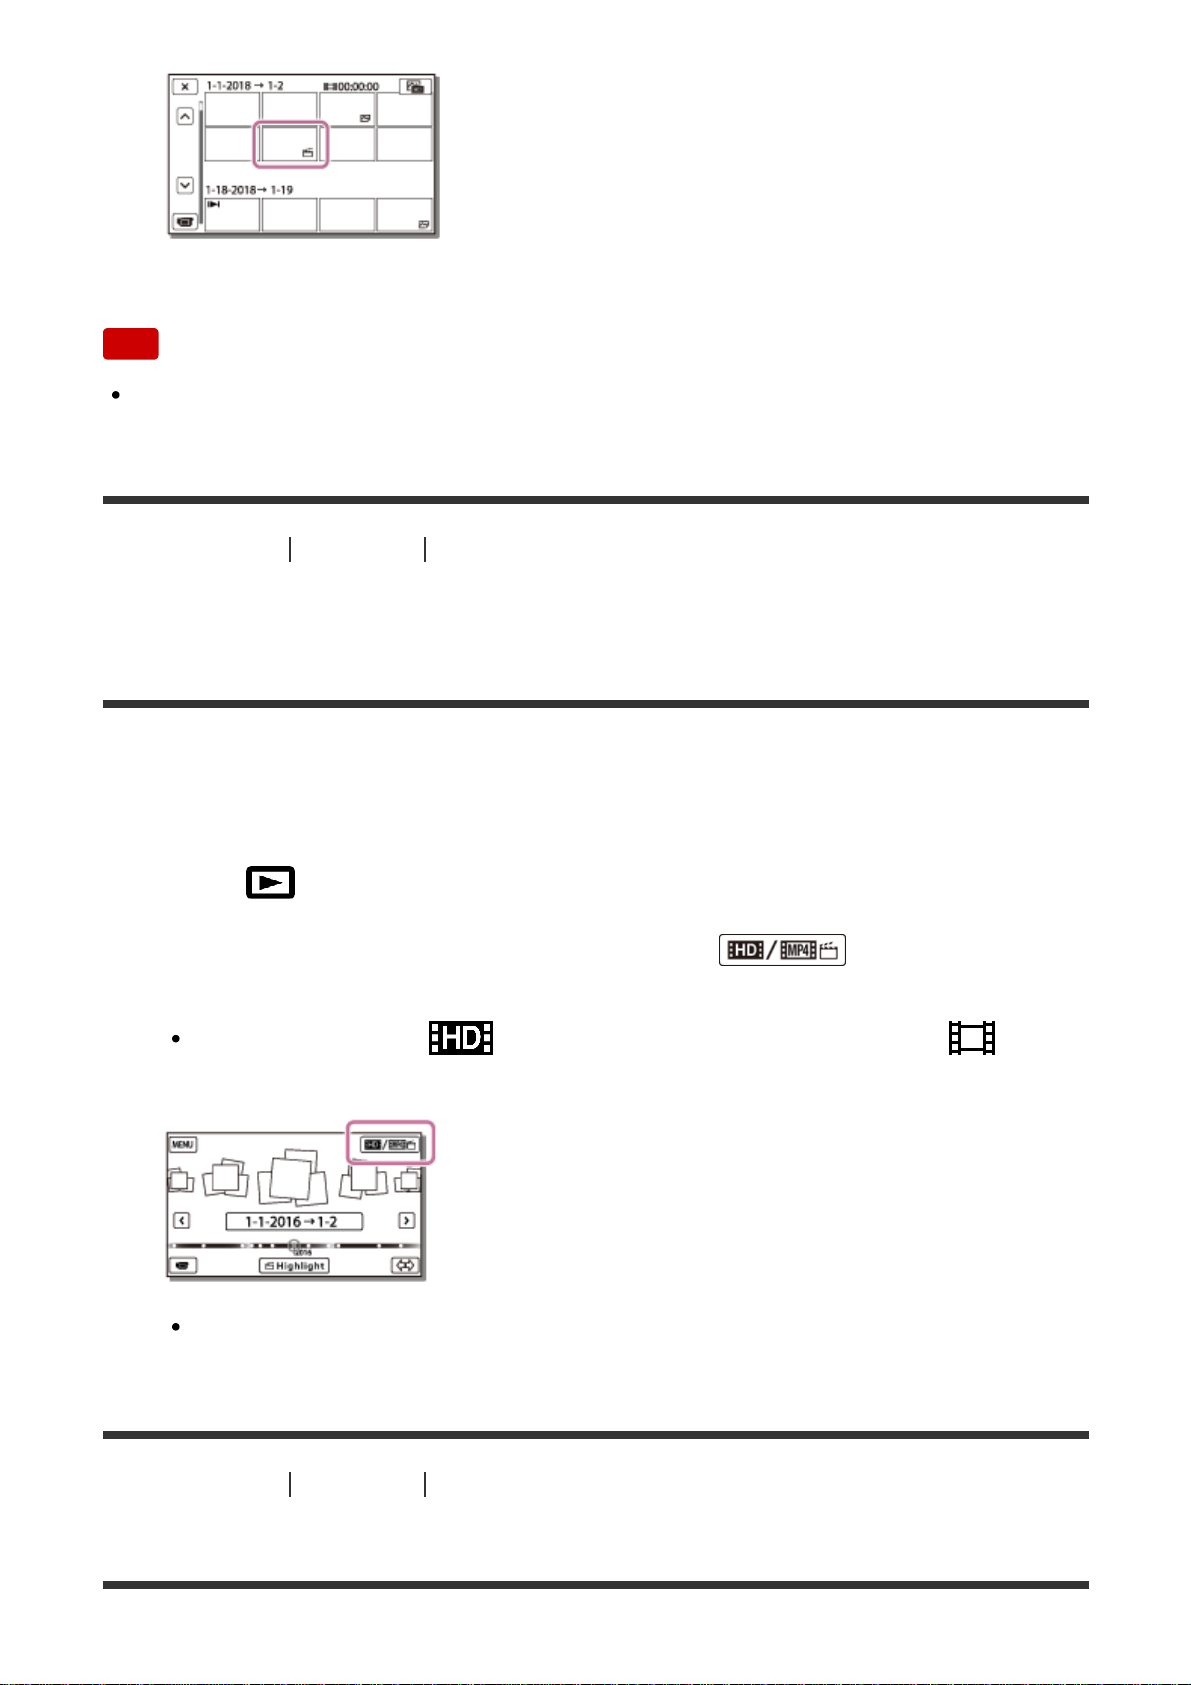
4. Select the image.
This product plays from the selected image to the last image in the event.
is displayed in the lower right corner of the highlight movie thumbnail.
52
Page 53
Note
To prevent your image data from being lost, save all your highlight movies on
external media periodically.
[35] How to Use
Playback Playing MP4 movies (HD movie) (switching the movie format)
Playing MP4 movies (HD movie) (switching the movie
format)
The format of a movie to be played or edited can be changed on the Event View
screen.
1. Press
(View Images) to enter the playback mode.
2. Select the movie format you want to play from
at the top right
corner of the LCD monitor.
An icon other than may be displayed depending on the [ File
Format] setting and playback movie format setting.
The format of a movie to be played or edited will be switched.
[36] How to Use
Playback Editing images from the playback screen
Notes on editing
53
Page 54
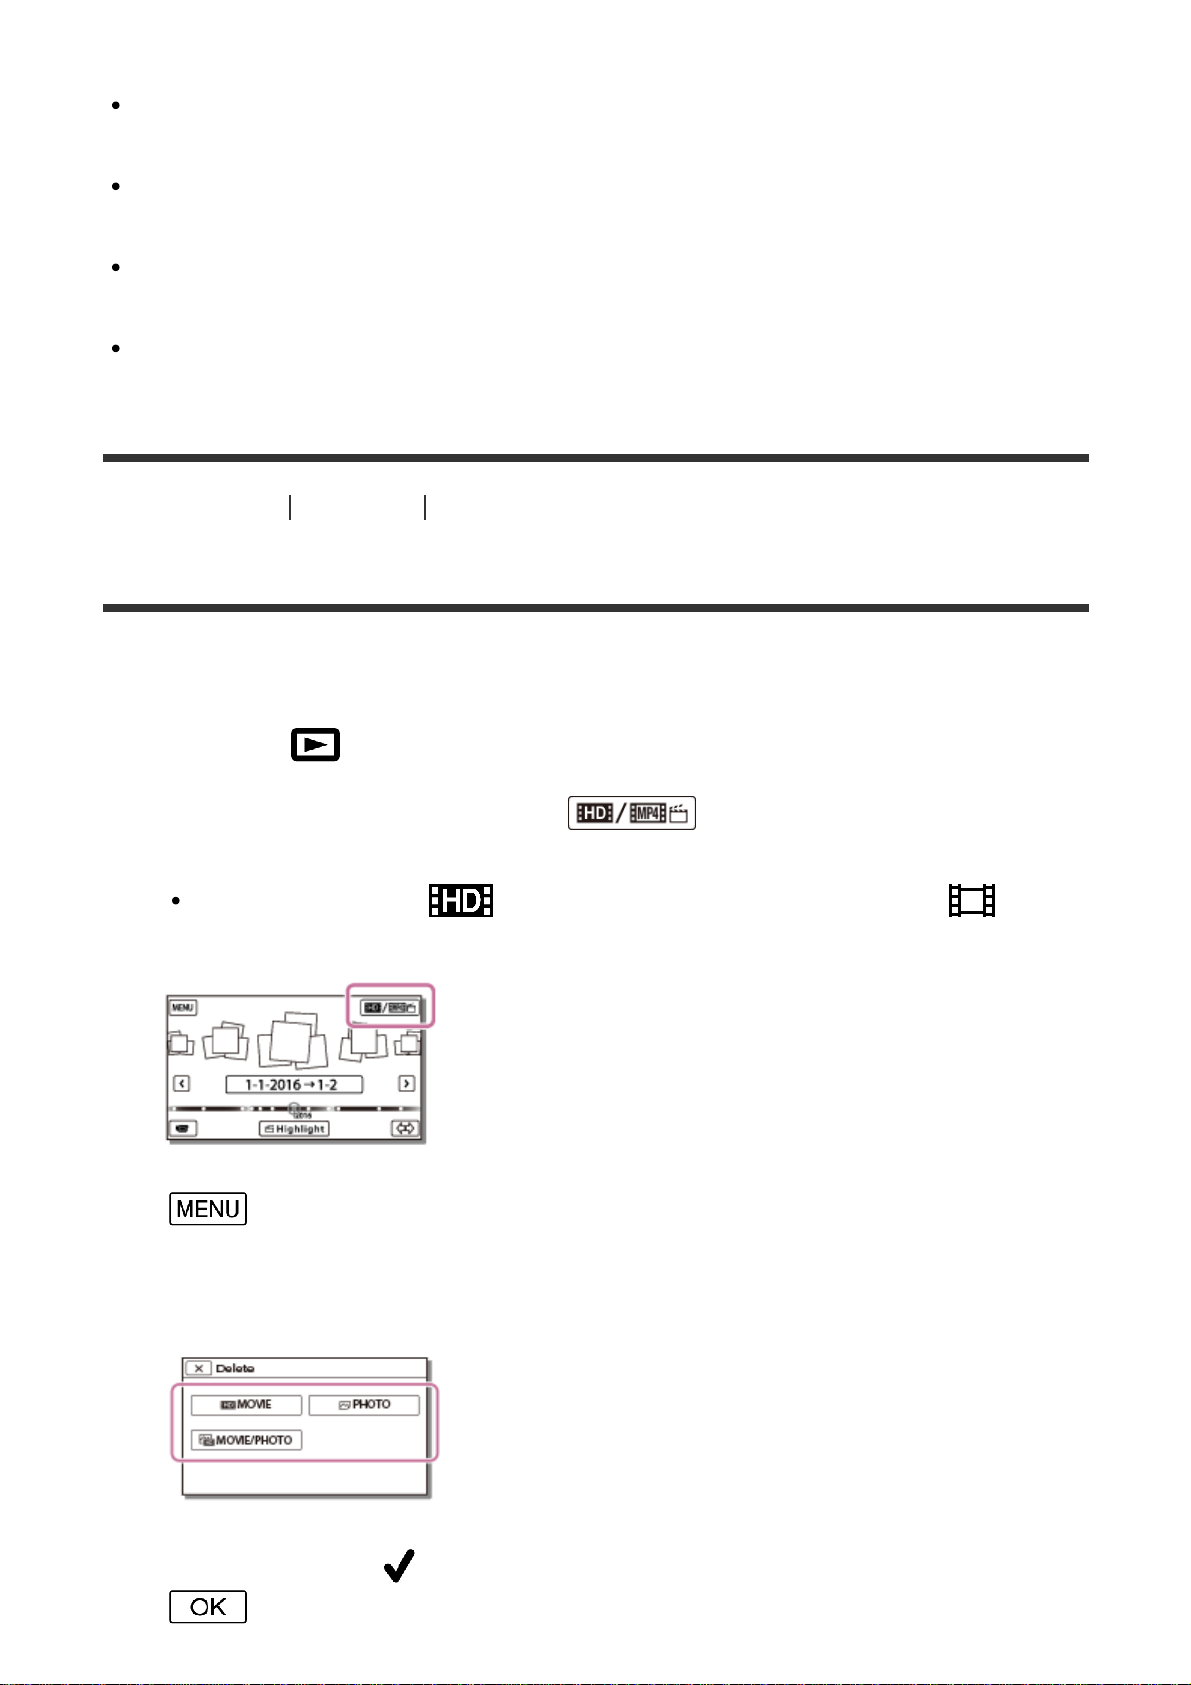
Some basic editing operations can be done on this product. If you want to do
advanced editing operations, install and use the PlayMemories Home software.
You cannot restore images once they are deleted. Save important movies and
photos before deleting.
Do not remove the battery pack or the AC Adaptor from this product while
deleting or dividing the images. Doing so may damage the recording media.
Do not eject the memory card while deleting or dividing images saved on the
memory card.
[37] How to Use
Playback Editing images from the playback screen
Deleting the selected images
Select and delete unnecessary images.
1. Press the
button on this product to enter the playback mode.
2. On the Event View screen, select
, and then select the movie
format you want to delete.
An icon other than may be displayed depending on the [ File
Format] setting and playback movie format setting.
3. - [Edit/Copy] - [Delete].
4. Select [Multiple Images], and then select the type of image you want to
delete.
5. Add check marks to the movies or photos to be deleted and select
.
54
Page 55
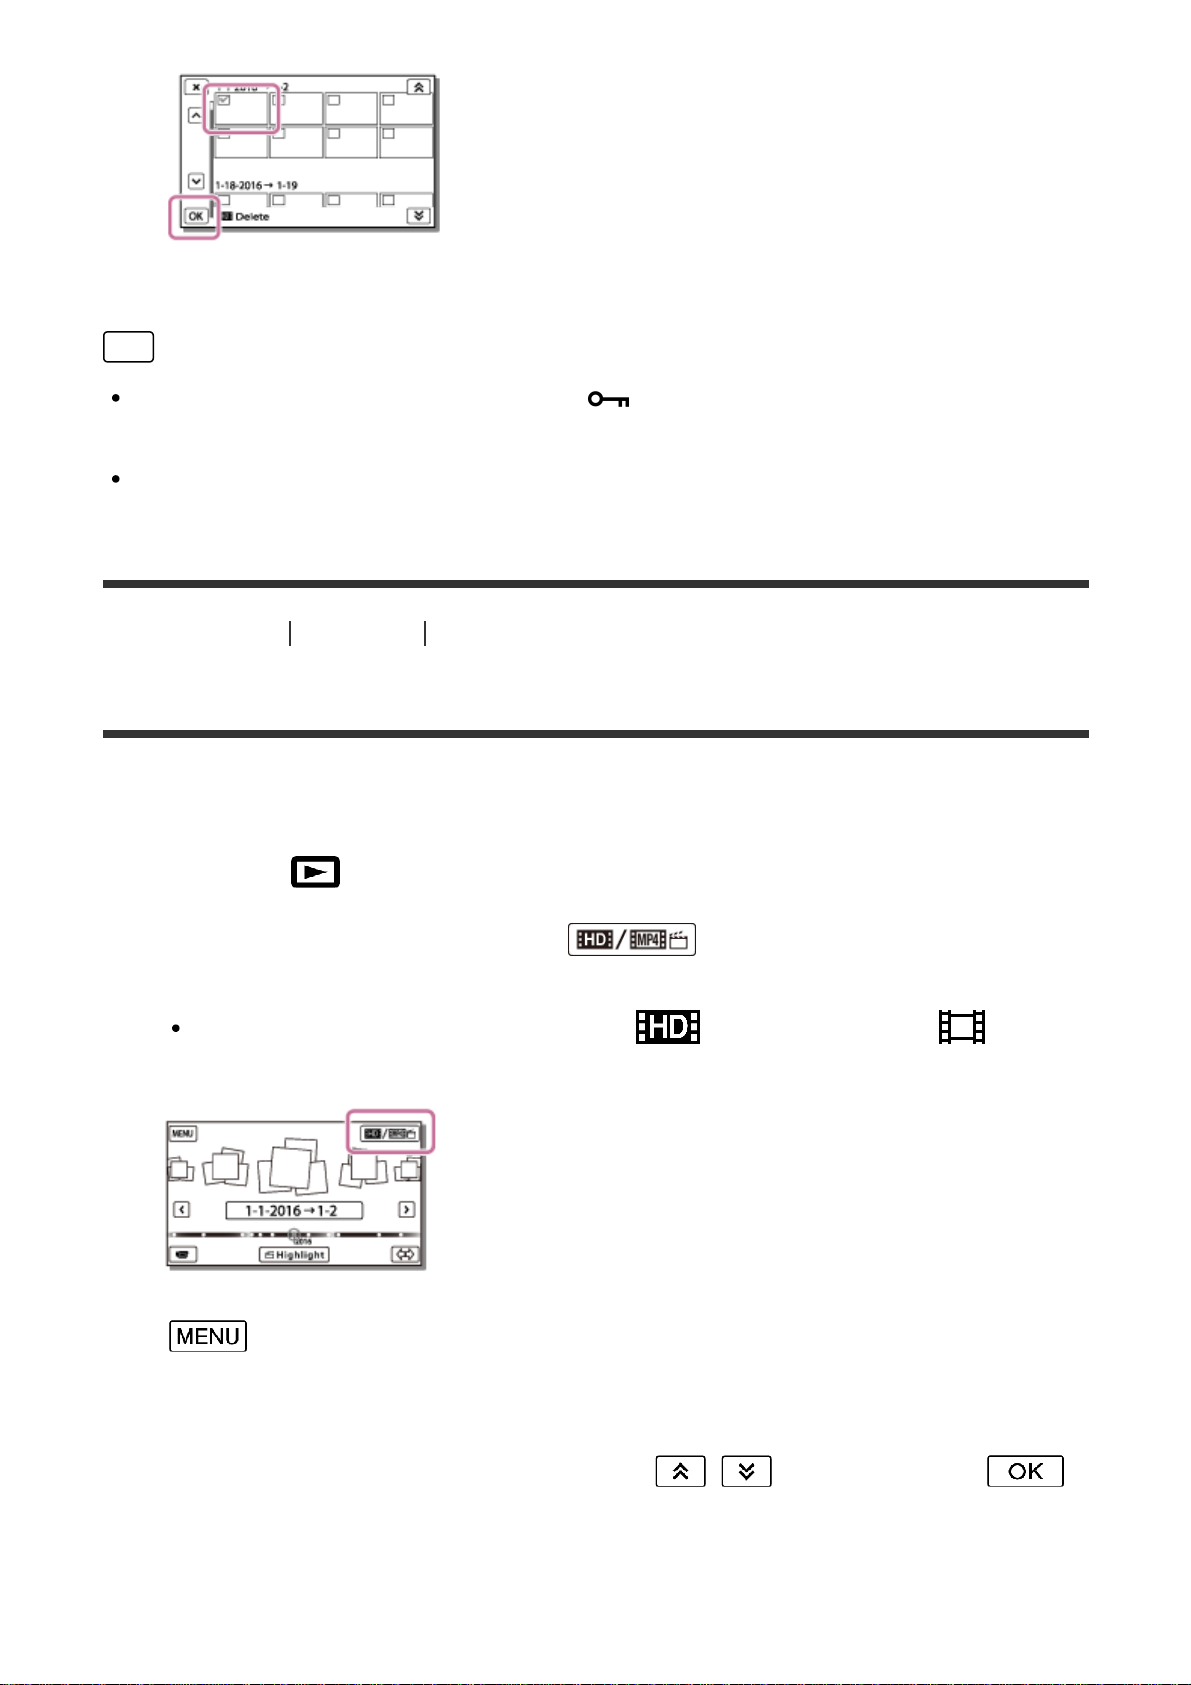
Hint
You cannot delete protected images ( ). Release the protection of the data
before deleting.
To delete the unwanted part of a movie, divide the movie and then delete that
part.
[38] How to Use
Playback Editing images from the playback screen
Deleting by date
Select unnecessary images by date of recording and delete them.
1. Press the
button on this product to enter the playback mode.
2. On the Event View screen, select
, and then select the movie
format you want to delete.
Another icon may appear instead of depending on the [ File
Format] setting and the movie playback format.
3. - [Edit/Copy] - [Delete].
4. Select [All In Event].
5. Select the date you want to delete using
/ , and then select .
55
Page 56
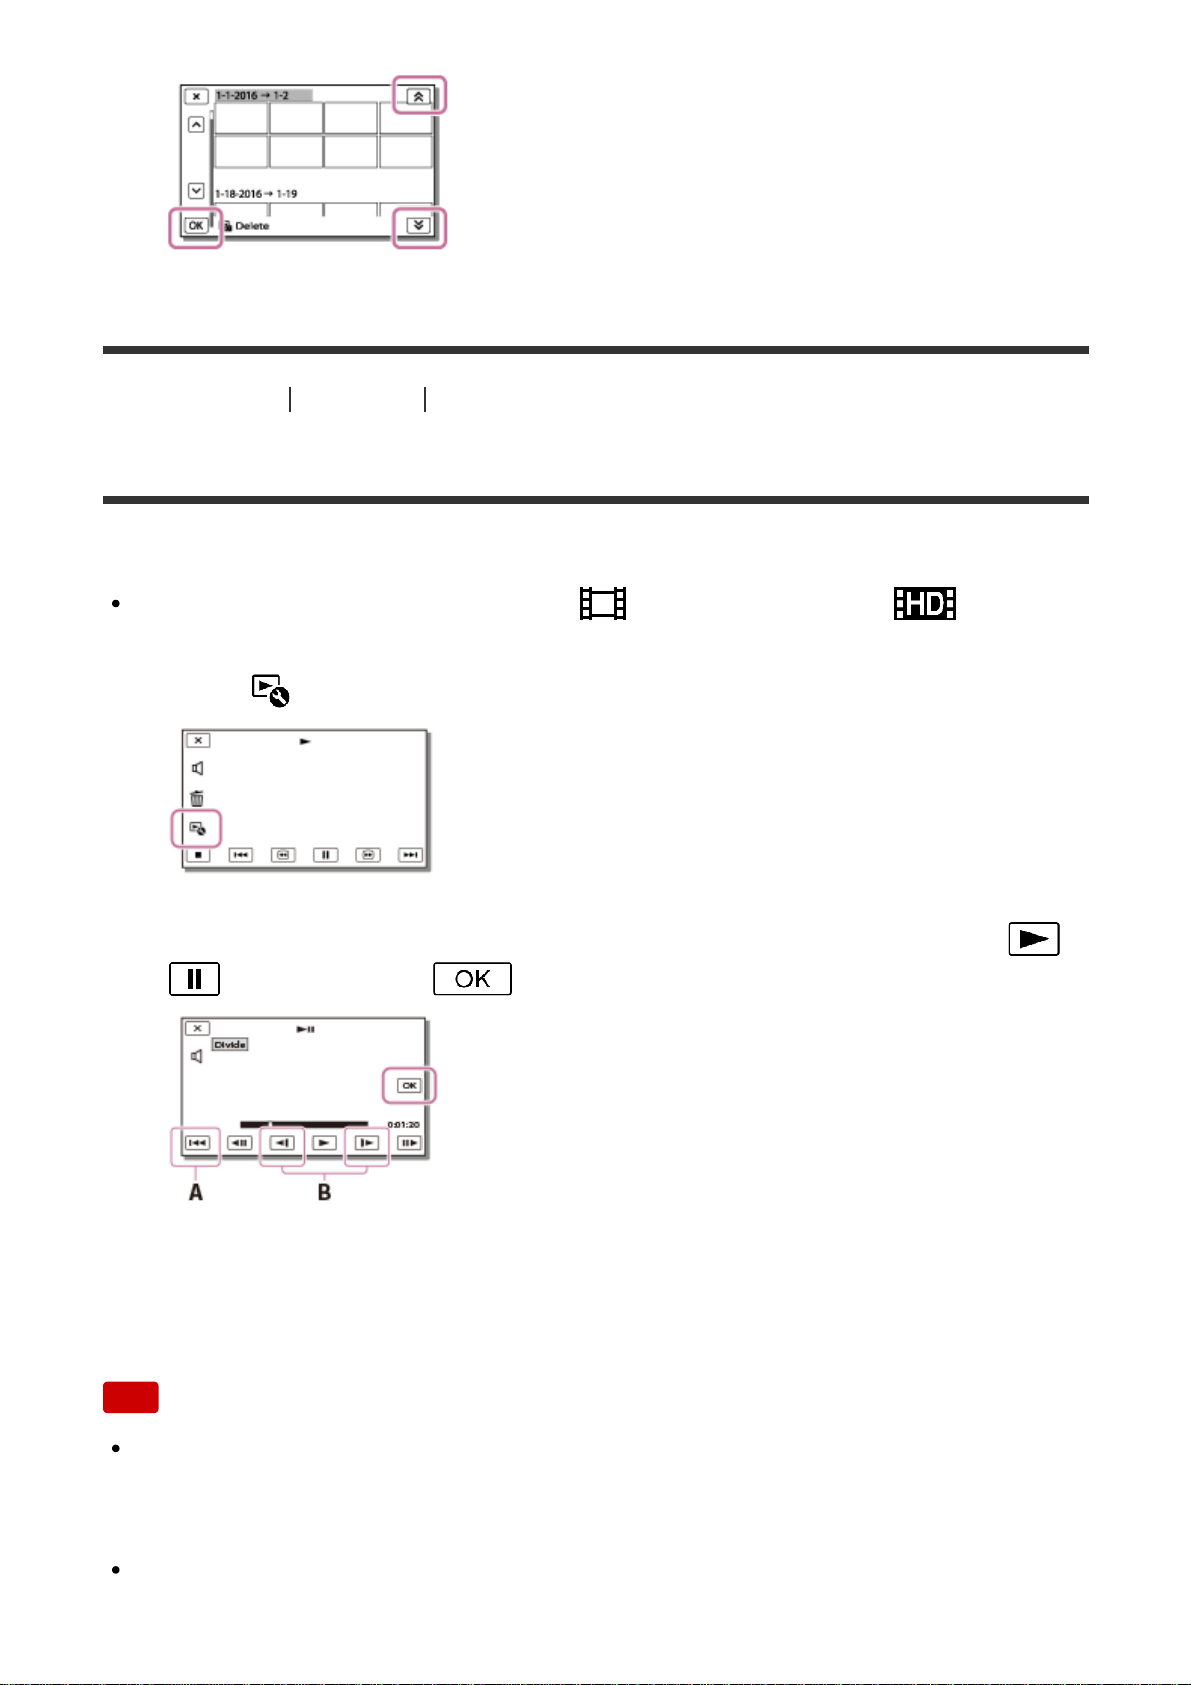
[39] How to Use Playback Editing images from the playback screen
Dividing a movie
Split a recorded movie at your desired point.
This function is available only when [ File Format] is set to [ AVCHD].
1. Select
- [Divide] on the movie playback screen.
2. Select the point where you want to divide the movie into scenes using /
, and then select .
A: Returns to the beginning of the selected movie
B: Adjusts the dividing point with more precision
Note
A slight difference may occur from the point where you select and the actual
dividing point, as this product selects the dividing point based on about half-
second increments.
An XAVC S movie or an MP4 movie cannot be divided.
56
Page 57
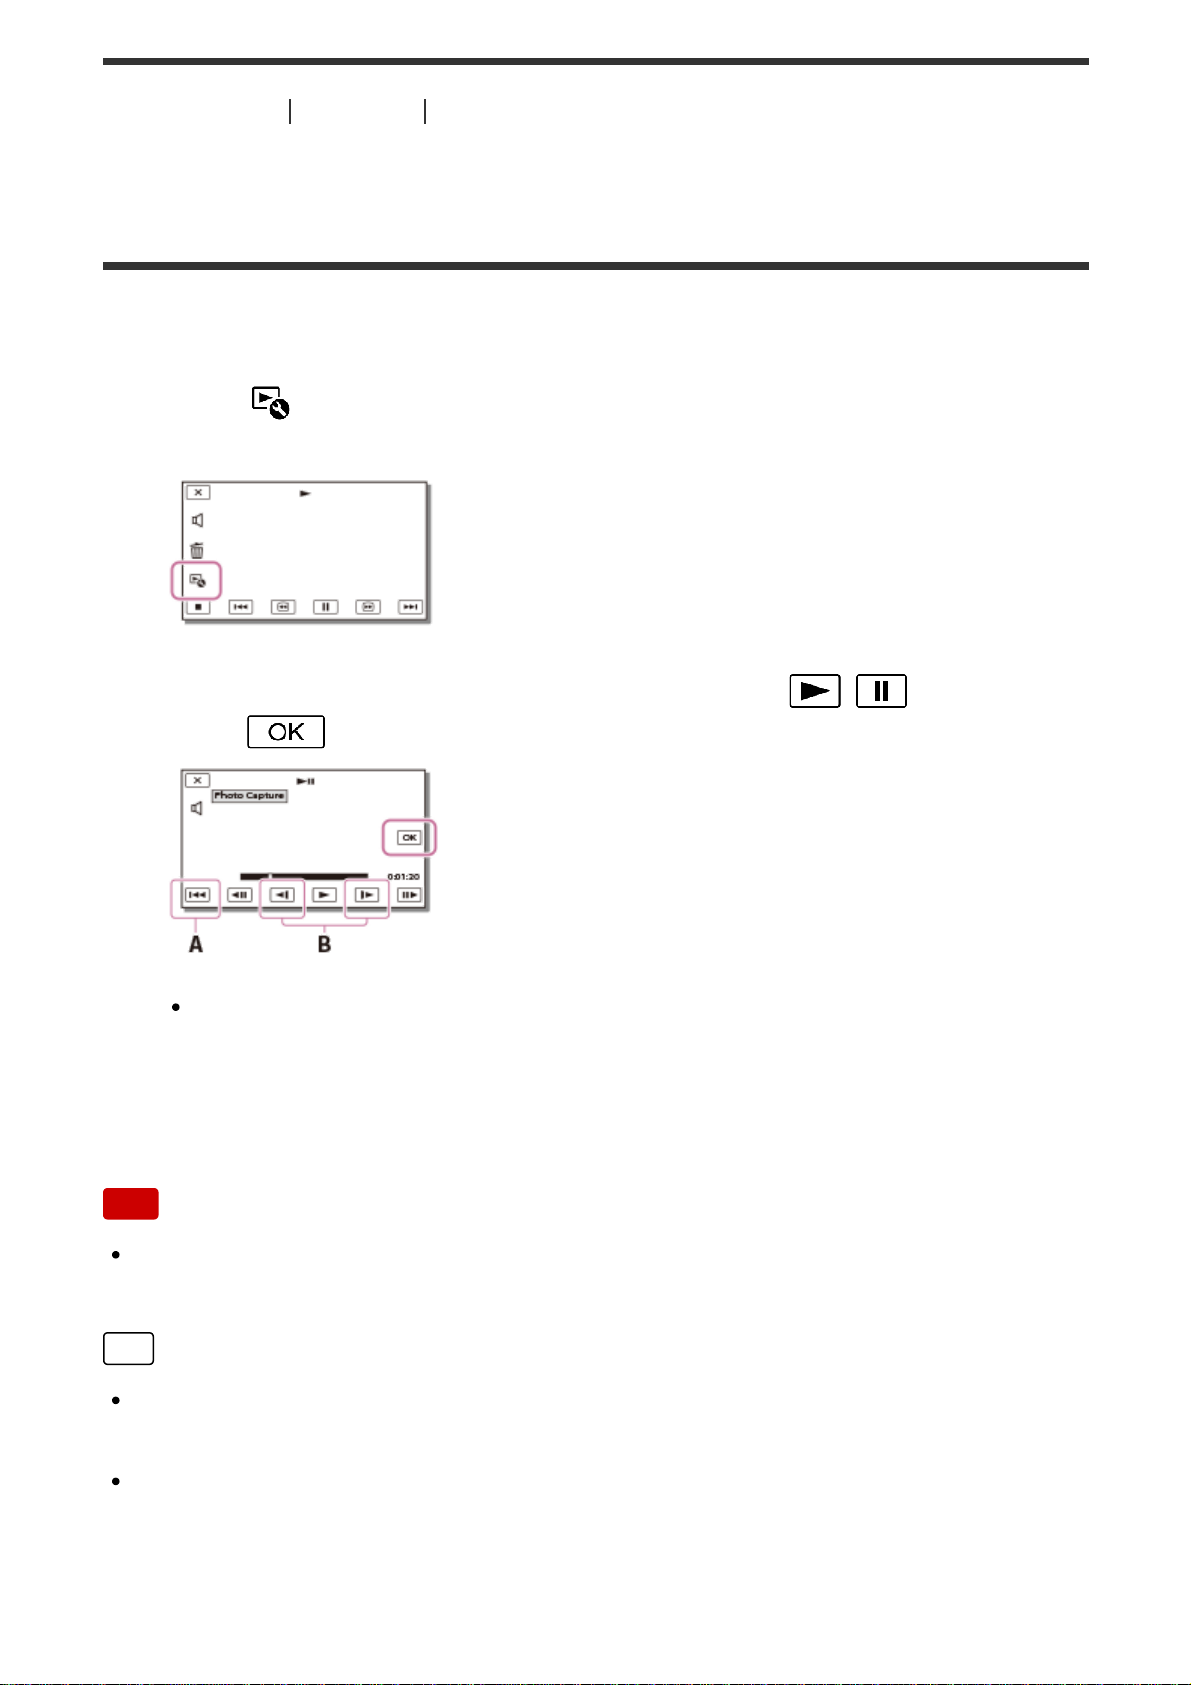
[40] How to Use Playback Editing images from the playback screen
Capturing a photo from a movie (models with the internal
memory or models with the USB IN/OUT jacks)
You can capture images from movies recorded with this product.
1. Select
- [Photo Capture] that appears on the playback screen of a
movie.
2. Select the scene you want to capture a photo using / , and then
select
.
The image size of the photo will be [2.1 M].
A: Returns to the beginning of the selected movie
B: Adjusts the capturing point with more precision
Note
You cannot capture photos from a movie saved on a memory card. (models
with the USB output only jack)
Hint
The recording date and time of captured photos are the same as the recording
date and time of the movies.
If the movie you are capturing from has no data code, the recording date and
time of the photo will be the date and time you captured from the movie.
57
Page 58
[41] How to Use Playback Editing images from the playback screen
Viewing trajectory of a moving object (Motion Shot
Video)
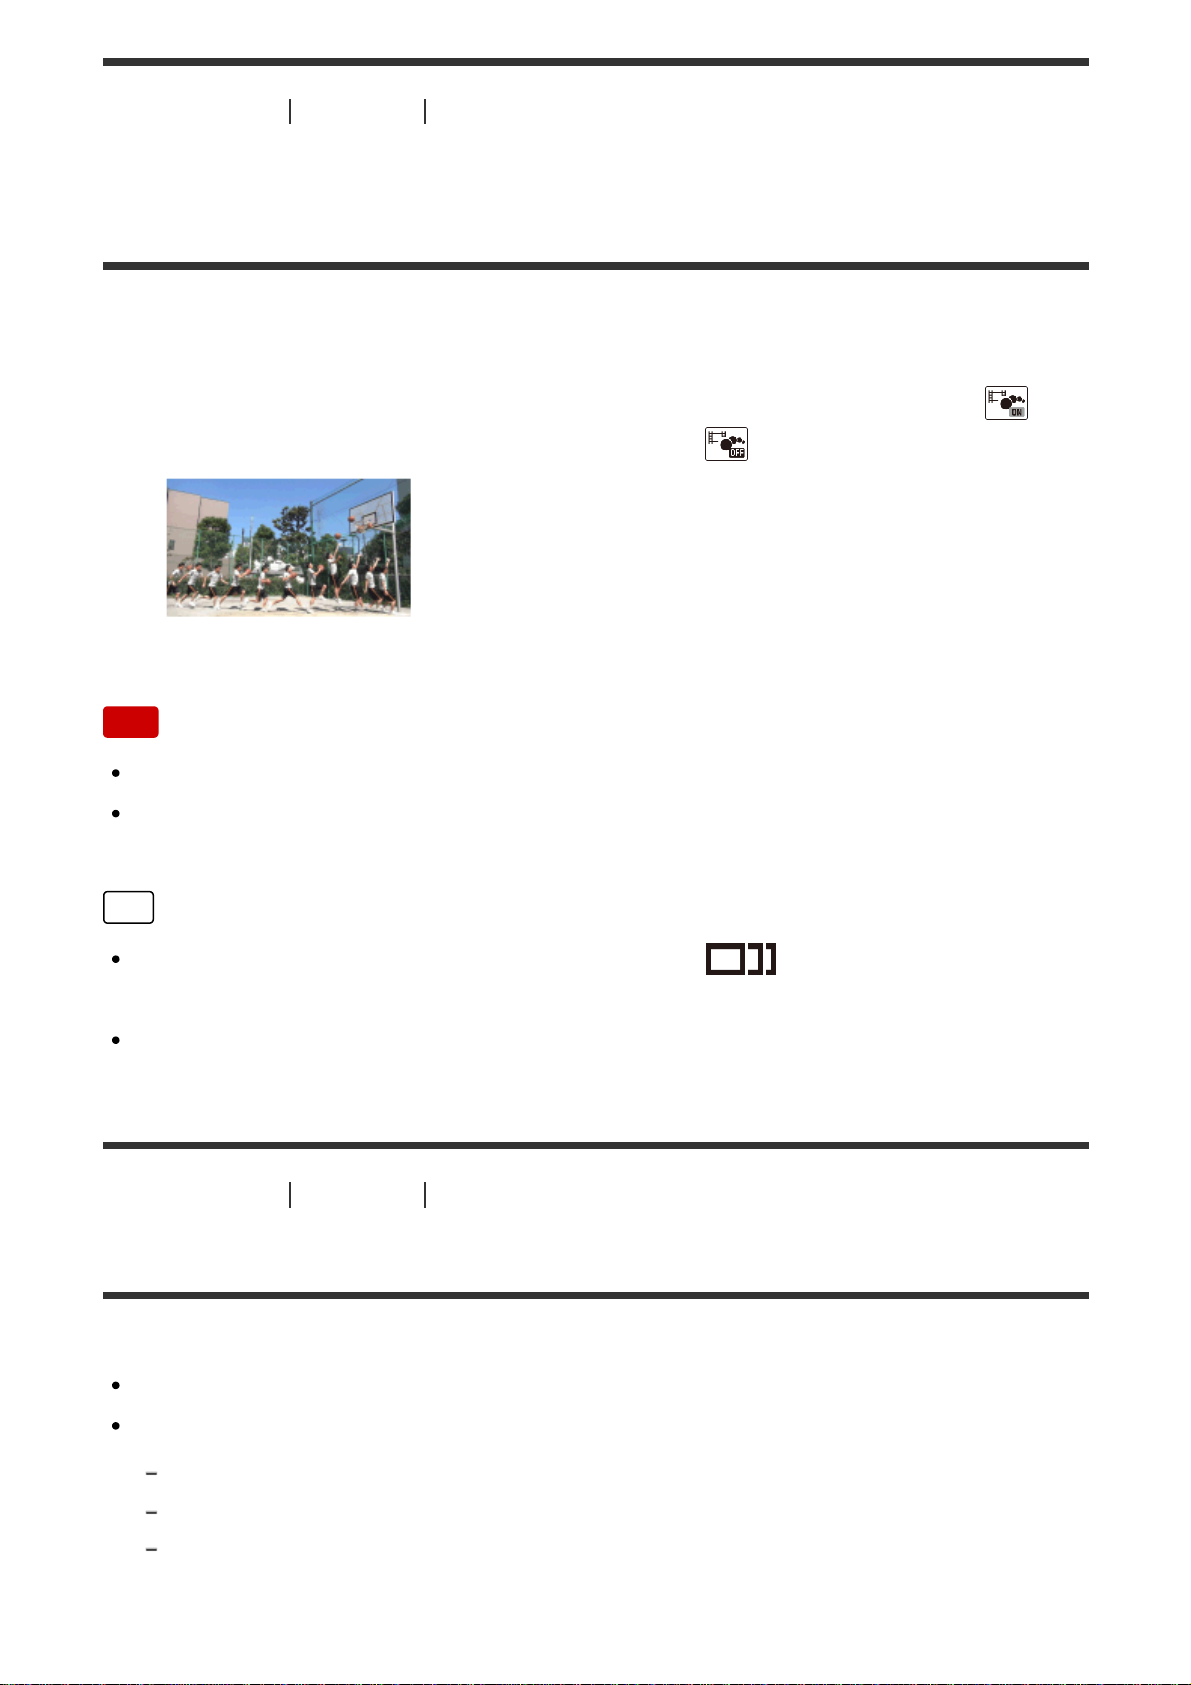
You can view the trajectory of a fast-moving object.
1. On the Event View screen, play your desired movie, and then select
.
To stop [Motion Shot Video] playback, select
.
Note
[Motion Shot Video] cannot be saved as movies.
Trajectories of a moving object may not be created properly if the object is
moving slowly or almost not at all.
Hint
If this function does not work well, you can use to change the interval of
trajectories to be created.
You can capture photos from your favorite scene of a [Motion Shot Video]
([Photo Capture]).
[42] How to Use
Playback Using the built-in projector
Notes on using the projector (models with the projector)
The LCD monitor turns off while an image is being projected.
Be careful of the following operations or situations while using the projector.
Make sure not to project images towards the eyes.
Make sure not to touch the projector lens.
The LCD monitor and the projector lens become hot while in use.
58
Page 59
Using the projector shortens battery life (using the supplied AC Adaptor is
recommended).
The following operations are unavailable while you are using the projector.
Operation of this product with the LCD monitor closed
Several other functions
When the projected images contain a lot of black, faint color unevenness may
appear. This is caused by light reflection in the projector lens and is not a
malfunction.
[43] How to Use
Playback Using the built-in projector
Using the built-in projector (models with the projector)
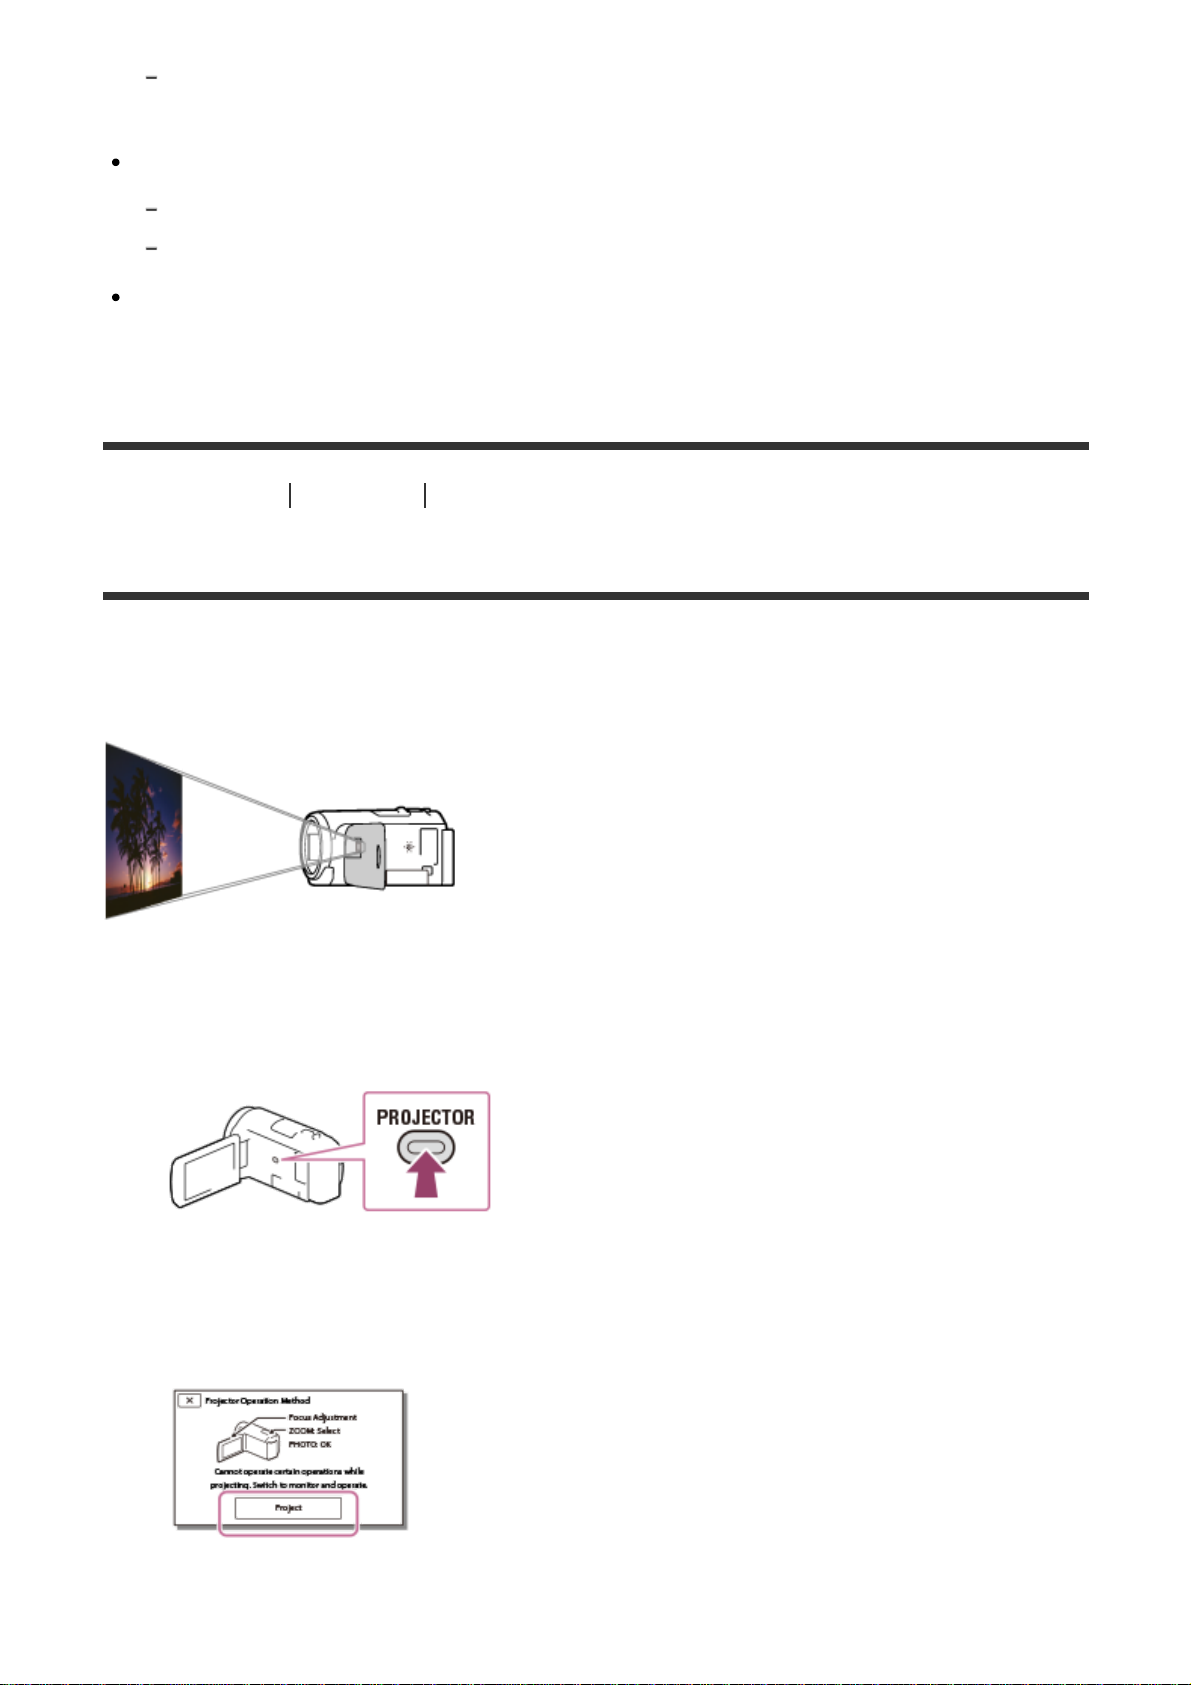
You can use a flat surface such as a wall as a screen to view recorded images
using the built-in projector.
1. Face the projector lens towards a surface, such as a wall, and then press
PROJECTOR.
2. Select [Image Shot on This Device] on the LCD monitor.
3. Select [Project] on the LCD monitor.
59
Page 60
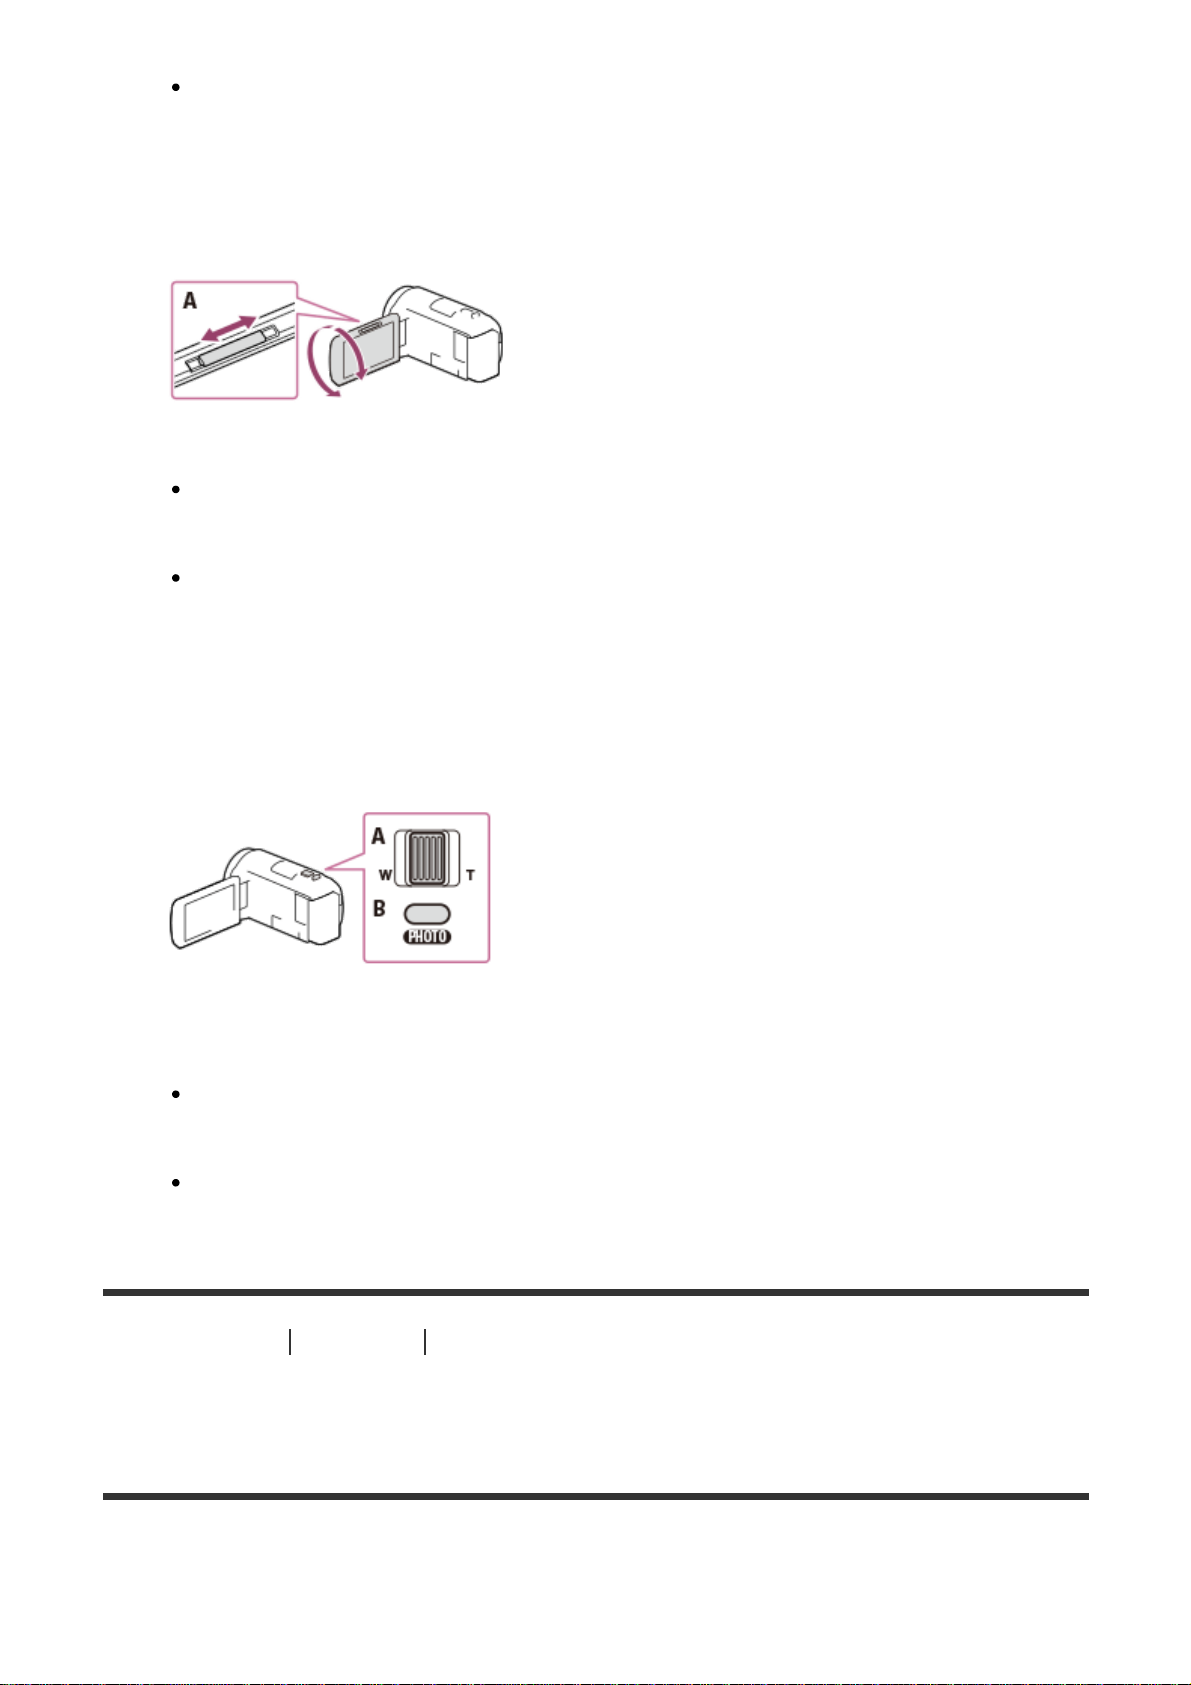
This screen appears the first time you use the built-in projector after this
product is turned on.
4. Adjust the focus of the projected image using the PROJECTOR FOCUS
lever.
A: PROJECTOR FOCUS lever
The projected image is larger when the distance between this product and
the reflecting surface increase.
It is recommended that you place this product further than 0.5 m (1.6 feet)
away (approximate distance) from the surface that the images are to be
projected onto.
5. Use the power zoom lever to move the selection frame that appears on the
projection screen, and then press the PHOTO button.
A: Power zoom lever
B: PHOTO button
For details on playback, see “Playing movies and photos from the Event
View screen.”
Press PROJECTOR to turn off the projector.
[44] How to Use
Playback Using the built-in projector
Using the projector for your computer or other
devices(models with the projector)
You can project images from a computer or other devices using the built-in
projector.
60
Page 61
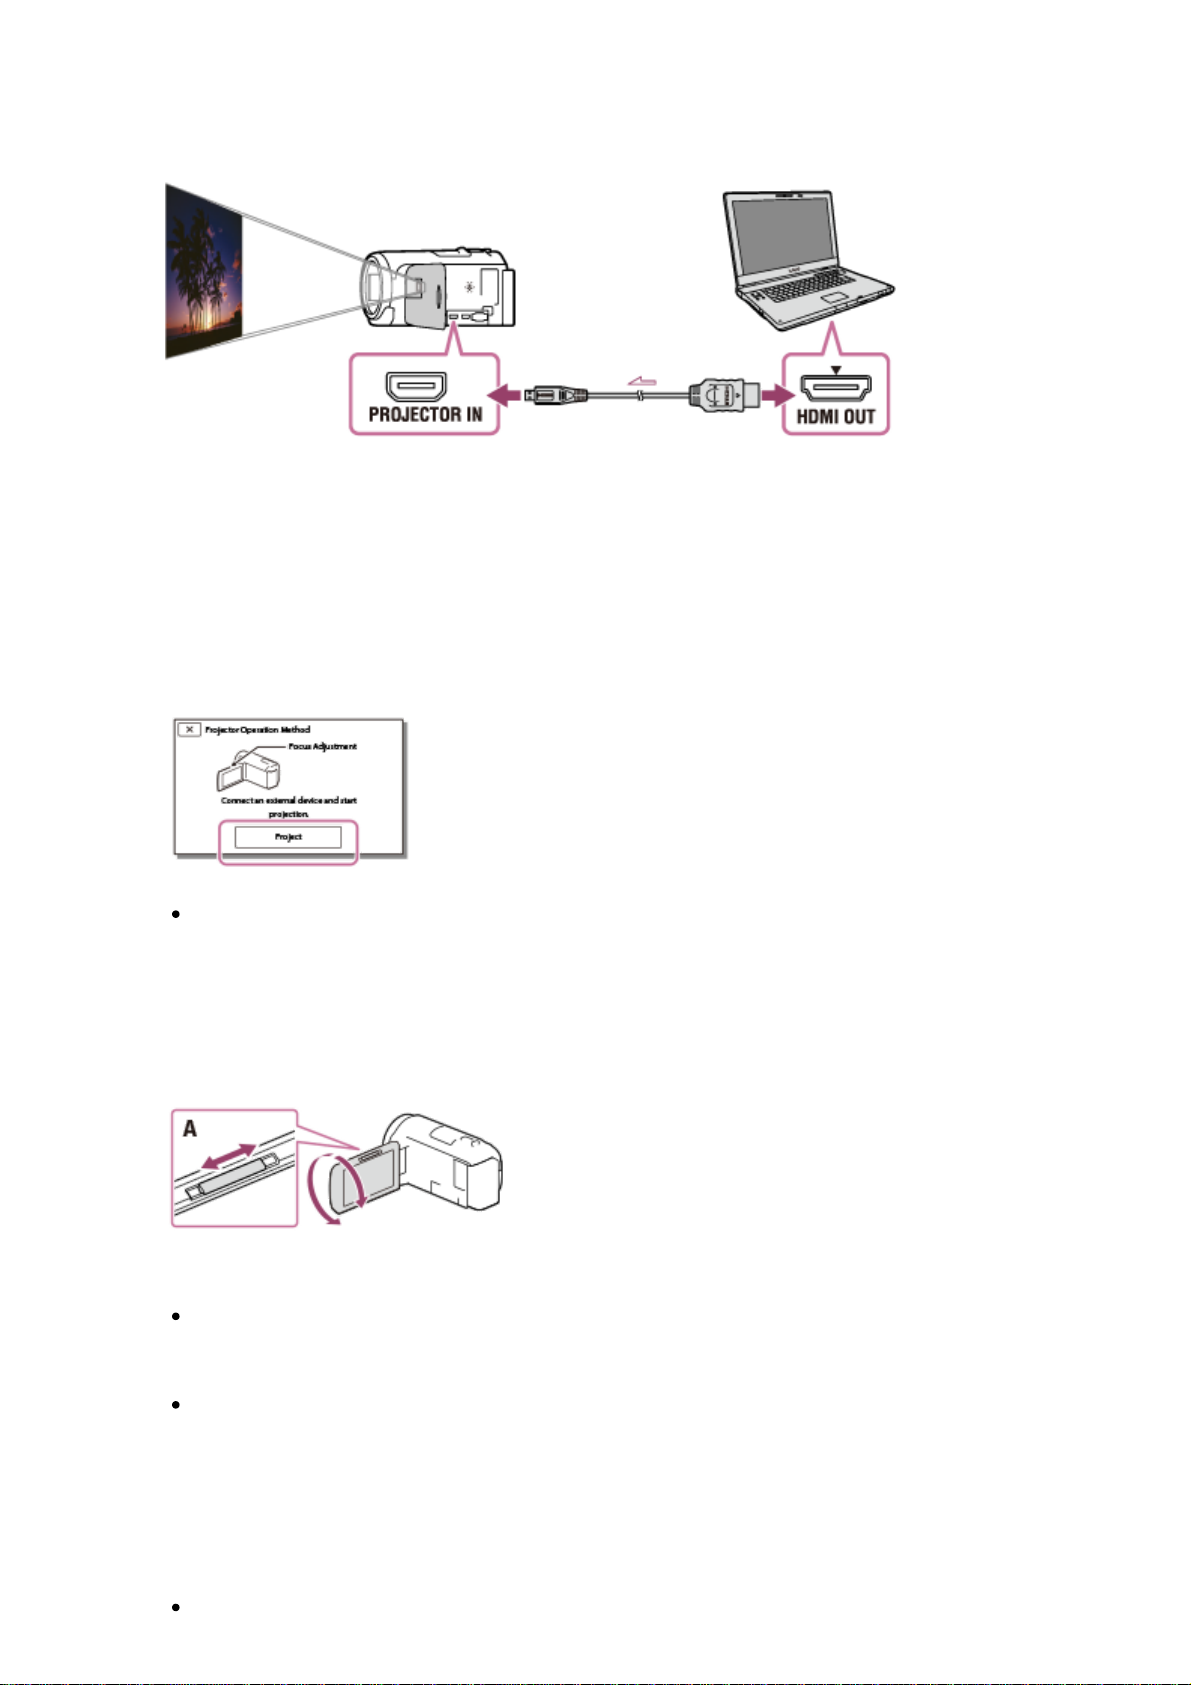
1. Connect the PROJECTOR IN jack of this product to an HDMI output jack of
the other device using the HDMI cable (supplied).
2. Face the projector lens towards a surface, such as a wall, and then press
PROJECTOR.
3. Select [Image from External Device] on the LCD monitor.
4. Select [Project] on the LCD monitor.
This screen appears the first time you use the built-in projector after this
product is turned on.
5. Adjust the focus of the projected image using the PROJECTOR FOCUS
lever.
A: PROJECTOR FOCUS lever
The further you position this product from the wall, the larger the screen
will be.
It is recommended that you place this product further than 0.5 m (1.6 feet)
away (approximate distance) from the surface that the images are to be
projected onto.
6. Select the image you want to view using your computer or other devices.
To turn off the projector, press PROJECTOR.
61
Page 62
Note
You can only operate the PROJECTOR FOCUS lever while projecting images.
Hint
If the terminal of the device connected is not compatible with the HDMI cable
(supplied), use an HDMI plug adaptor (sold separately). For details, refer to the
instruction manual supplied with the external media device.
[45] How to Use
Playback Playing images on a high definition TV
Connecting this product to a high definition TV
You can play images recorded in XAVC S or AVCHD movie format, in high
definition image quality by connecting this product to a TV with an HDMI jack.
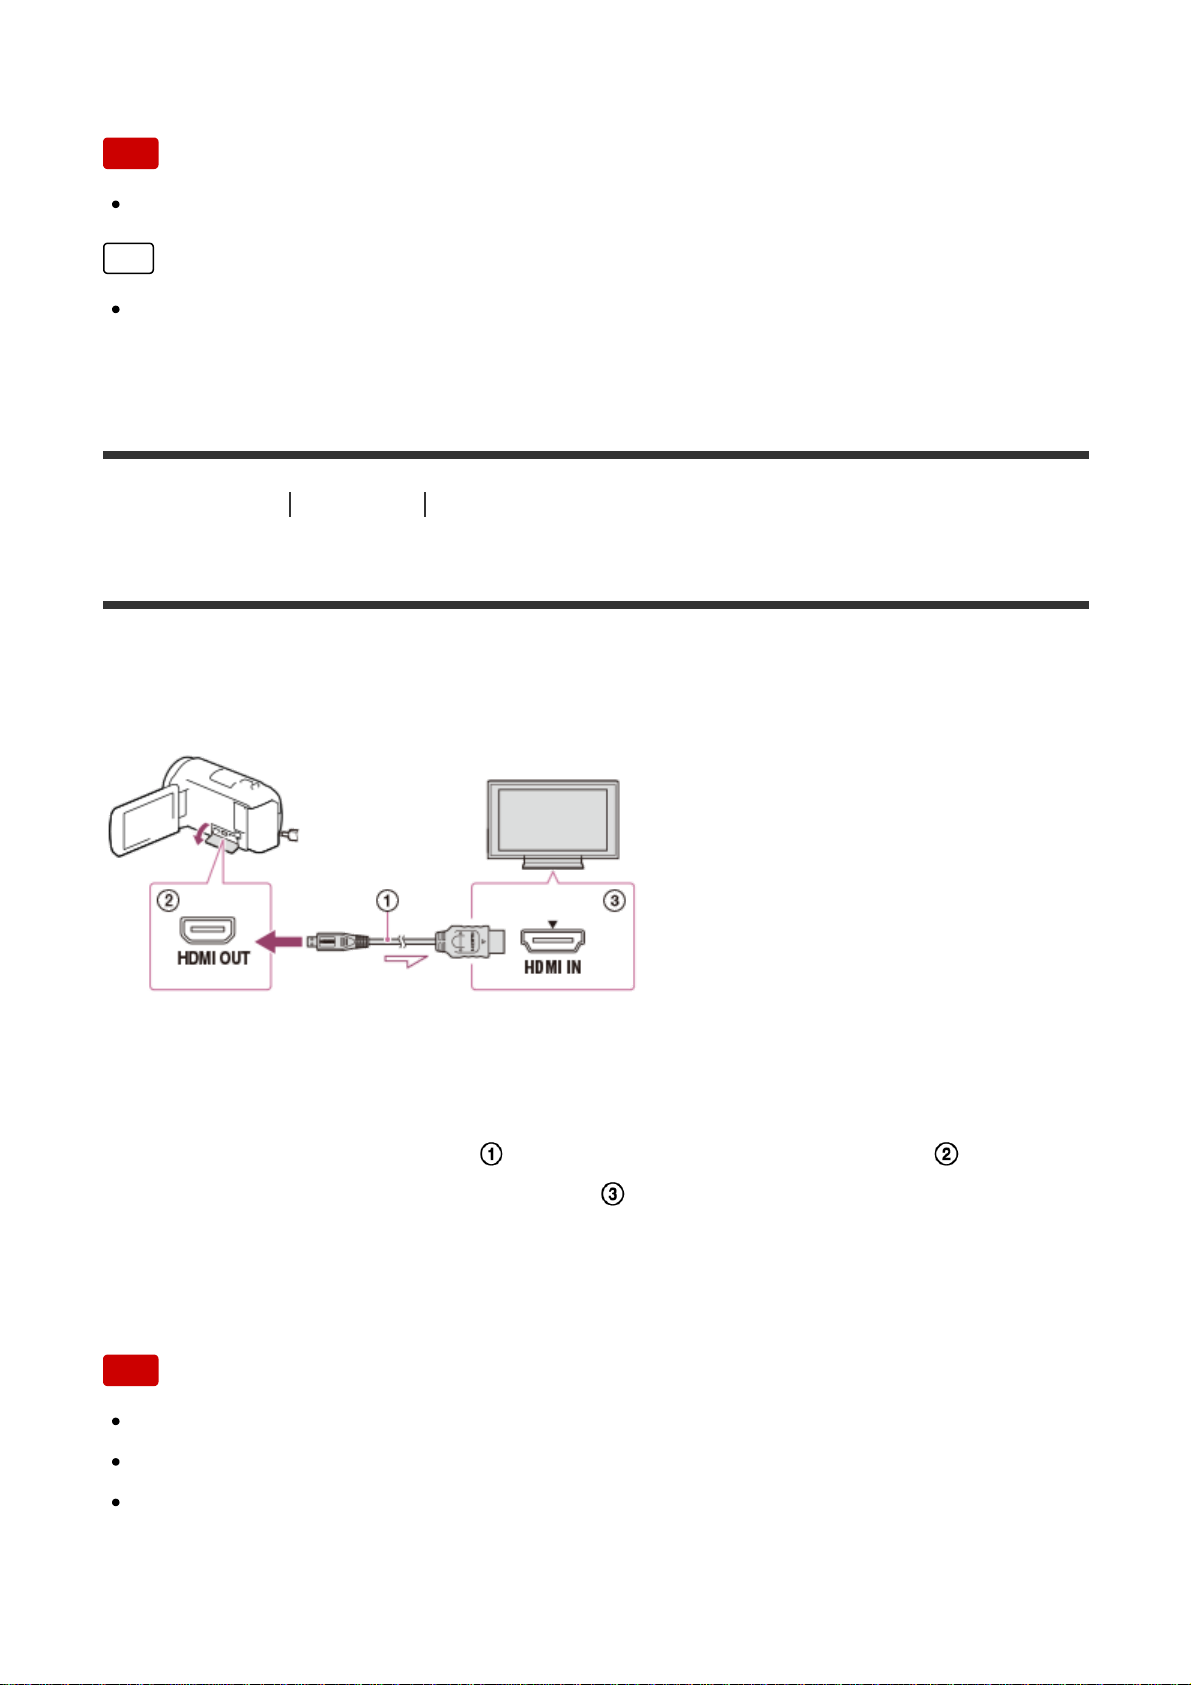
1. Switch the input on the TV to the connected jack.
2. Connect the HDMI cable (
) (supplied) to the HDMI OUT jack ( ) on this
product and to the HDMI input jack (
) on the TV.
3. Play a movie or a photo on this product.
Note
Refer to the instruction manuals of the TV as well.
Use the supplied AC Adaptor as the power source.
If the TV does not have an HDMI input jack, use an AV cable (sold separately).
Images are output in standard definition.
62
Page 63
If you connect this product to the TV using more than one type of cable to
output images, HDMI input takes priority on the TV.
If you do not want to display icons on the screen of the TV connected via HDMI,
select
- [Setup] - [ Connection], then set [CTRL FOR HDMI] to [Off].
[46] How to Use
Playback Playing images on a high definition TV
Enjoying 5.1ch surround sound
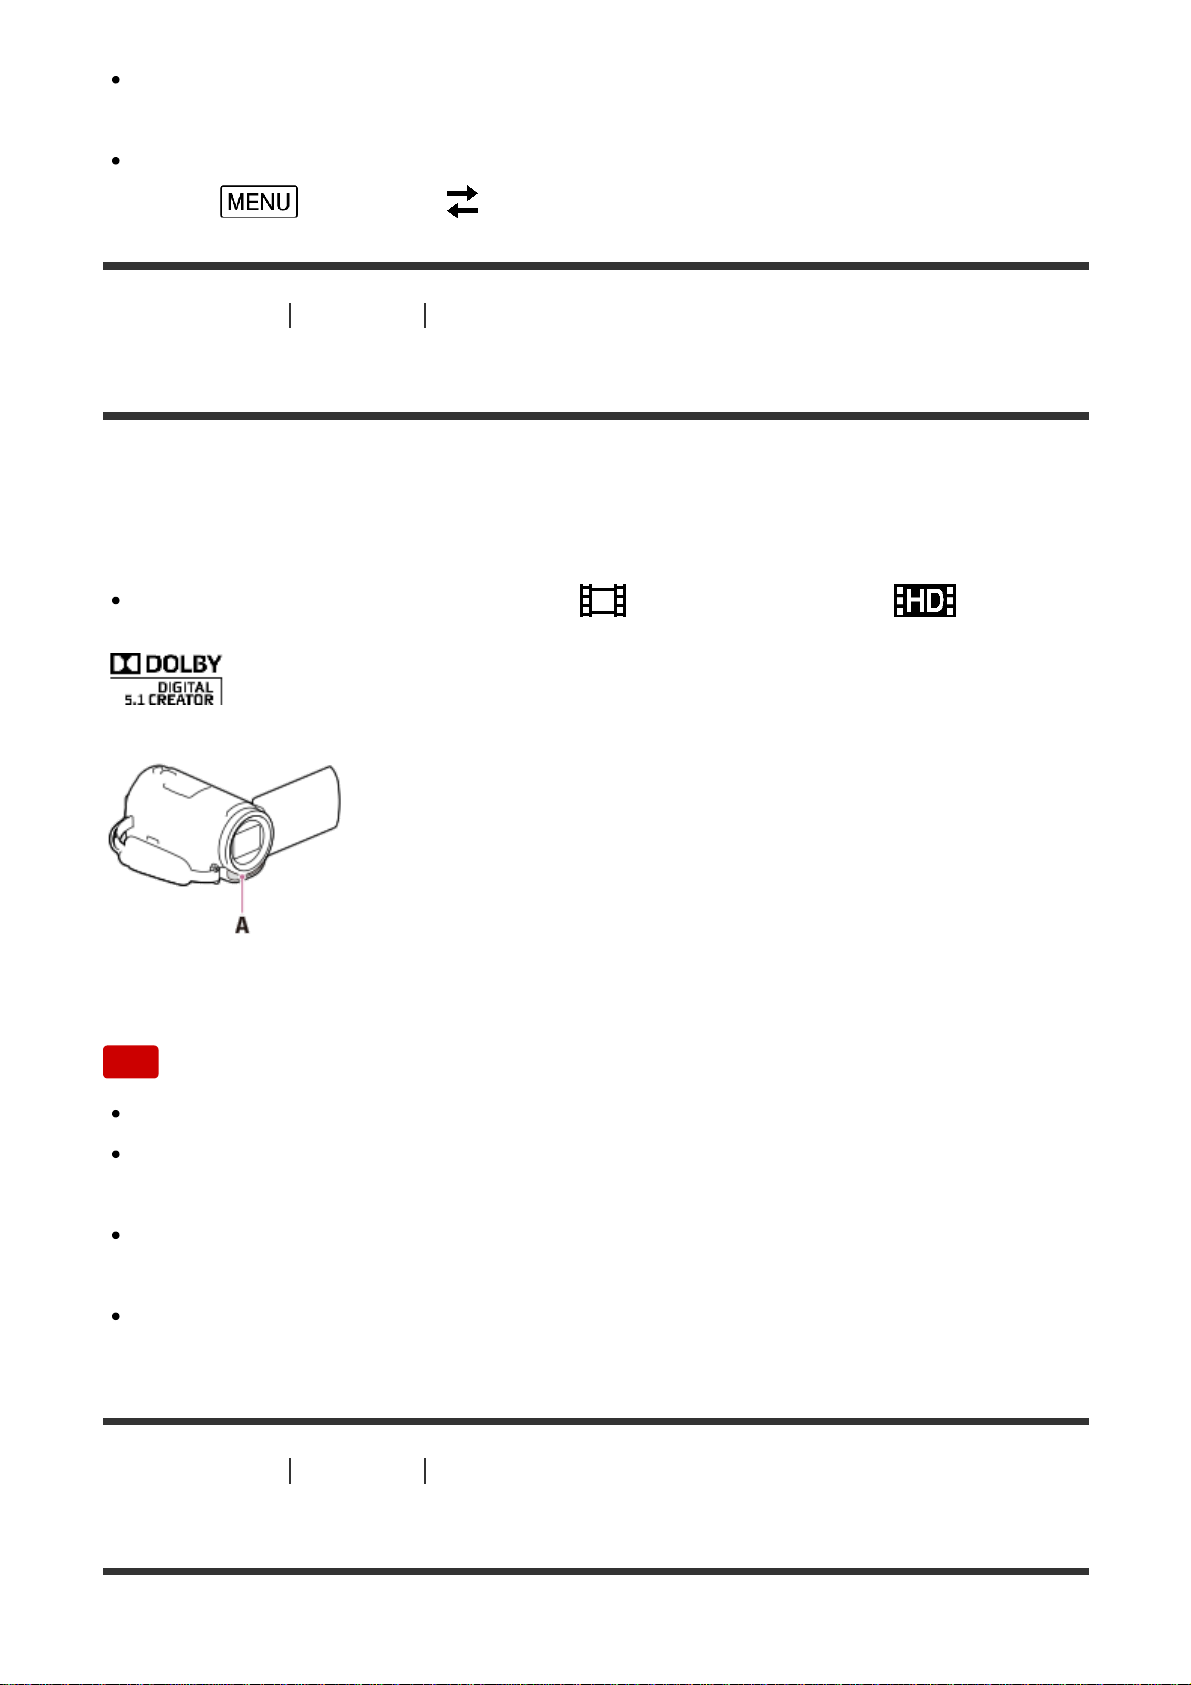
You can record Dolby Digital 5.1ch surround sound with the built-in microphone
(default setting). Realistic sound can be enjoyed when playing a movie on devices
that support 5.1ch surround sound input.
This function is available only when [ File Format] is set to [ AVCHD].
A: Built-in microphone
Note
The sound of XAVC S and MP4 movies are recorded in 2ch sound.
The built-in speaker does not output 5.1ch surround sound even if you play
back a movie recorded with 5.1ch surround sound on this product.
To enjoy the 5.1ch surround sound of the movies recorded in 5.1ch sound, you
need a device compatible with 5.1ch surround.
When you connect this product with the supplied HDMI cable, the sound of
movies recorded in 5.1ch sound is automatically output in 5.1ch sound.
[47] How to Use
Playback Playing images on a high definition TV
Using BRAVIA Sync
63
Page 64

You can operate this product with the remote commander of your TV by
connecting this product to a BRAVIA Sync compatible TV launched in 2008 or
later with the HDMI cable.
You can operate the menu of this product by pressing the SYNC MENU button of
the remote commander of your TV. You can display the LCD monitor of this
product such as Event View, play selected movies or display selected photos by
pressing up/down/left/right/enter buttons of the remote commander of your TV.
Note
There may be some operations you cannot do with the remote commander.
Set [CTRL FOR HDMI] to [On].
Also set your TV accordingly. Refer to the instruction manual of the TV for
details.
The operation of BRAVIA Sync differs according to each model of BRAVIA.
Refer to the instruction manual of your TV for details.
If you turn off the TV, this product is turned off simultaneously.
[48] How to Use
Playback Playing images on a high definition TV
On Photo TV HD
This product is compatible with the Photo TV HD standard. Photo TV HD allows
for highly-detailed, photo-like depiction of subtle textures and colors. By
connecting Sony’s Photo TV HD-compatible devices using the HDMI cable(*), a
whole new world of photos can be enjoyed in breathtaking HD quality.
*
The TV will automatically switch to the appropriate mode when playing back movies or displaying
photos.
[49] How to Use
Playback Playing images on a high definition TV
On the HDMI cable
Use the supplied HDMI cable or an HDMI cable with the HDMI logo.
Use an HDMI cable with an HDMI micro connector on one end (this product)
and a plug suitable for connecting to a TV on the other end.
64
Page 65
Copyright-protected images are not output from the HDMI OUT jack of this
product.
Some TVs may not function correctly (e.g., no sound or image) with this
connection.
Do not connect the HDMI OUT jack of this product to an external device HDMI
OUT jack, as malfunction may result.
HDMI (High-Definition Multimedia Interface) is an interface to send both
video/audio signals. The HDMI OUT jack outputs high quality images and
digital audio.
[50] How to Use
Playback Playing images on a non-high-definition TV
Connecting this product to a non-high-definition TV
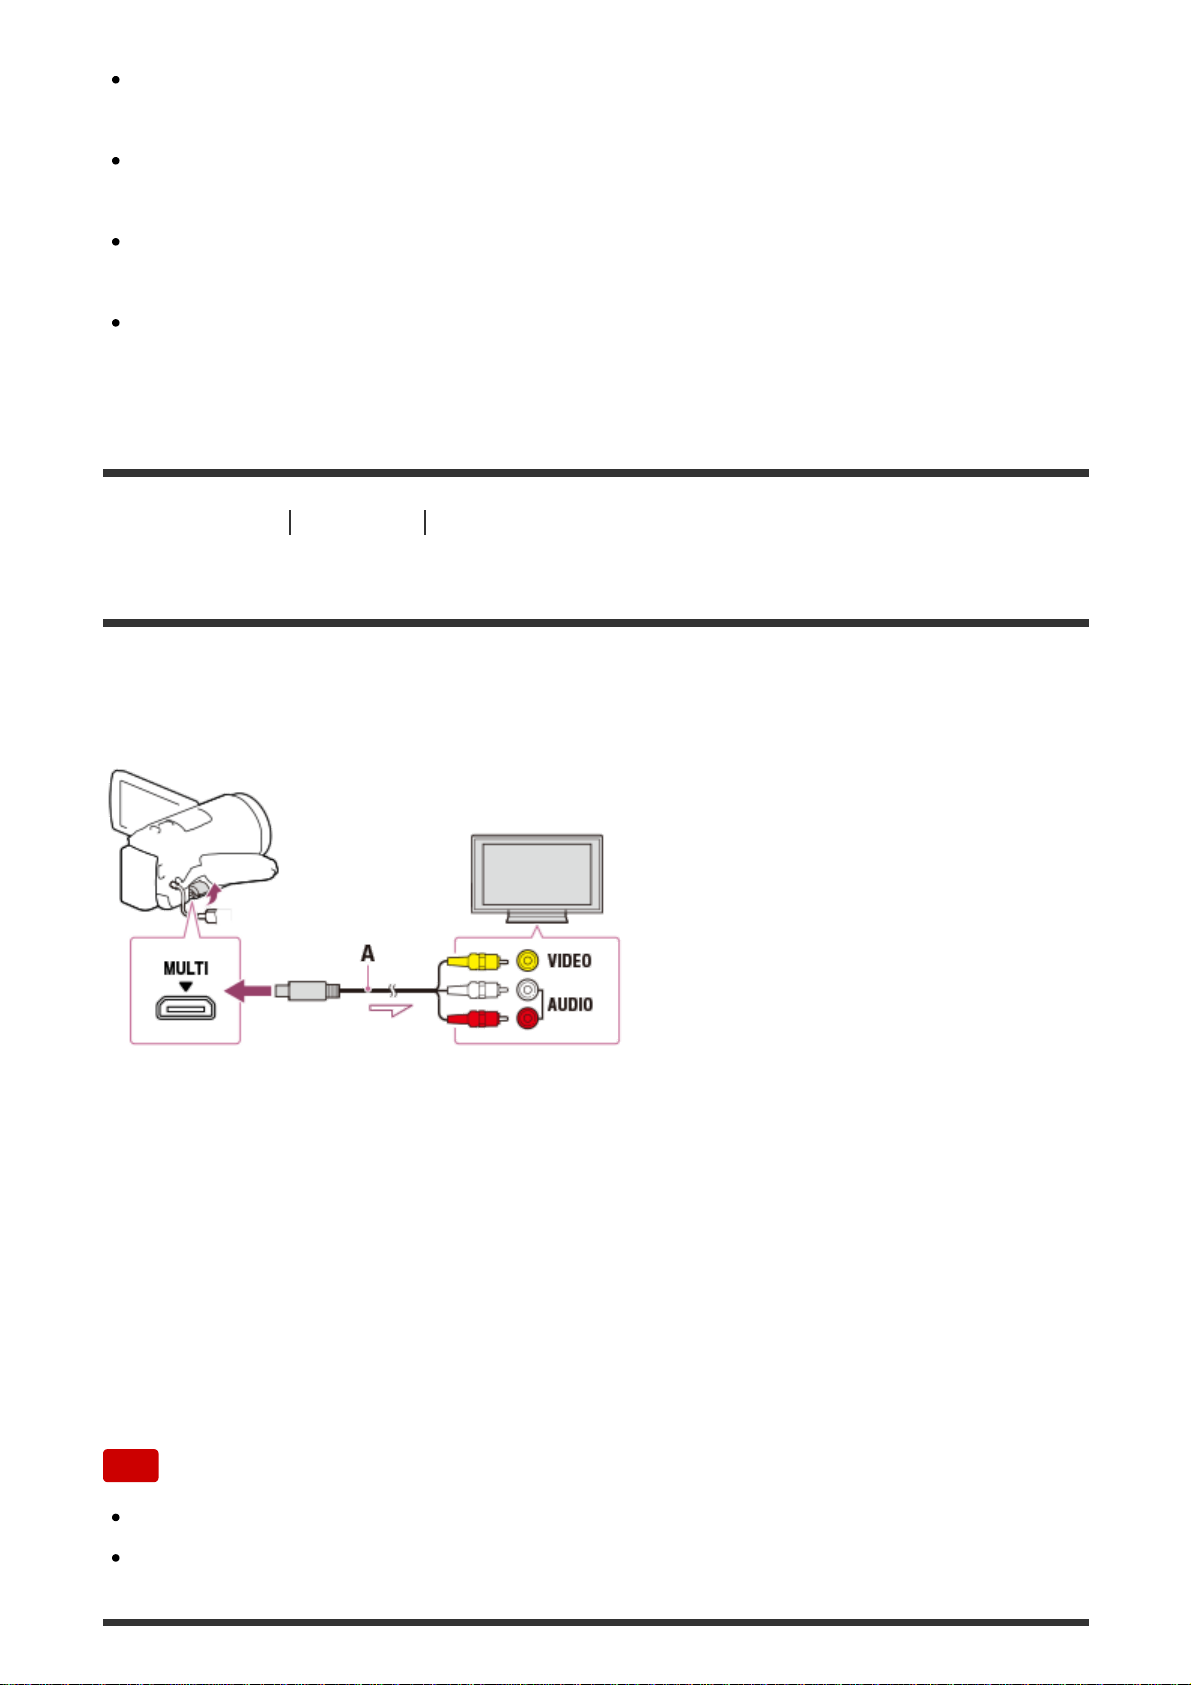
Play back images with this product connected to a TV by an AV cable (sold
separately).
A: AV cable (sold separately)
1. Switch the input on the TV to the connected jack.
2. Connect the Multi/Micro USB terminal of this product and the VIDEO/AUDIO
jack of your TV using an AV cable (sold separately).
3. Play a movie or a photo on this product.
Note
Refer to the instruction manuals of the TV as well.
Use the supplied AC Adaptor as the power source.
65
Page 66
[51] How to Use Saving images Using the PlayMemories Home software
Import and utilize images on your computer
(PlayMemories Home)
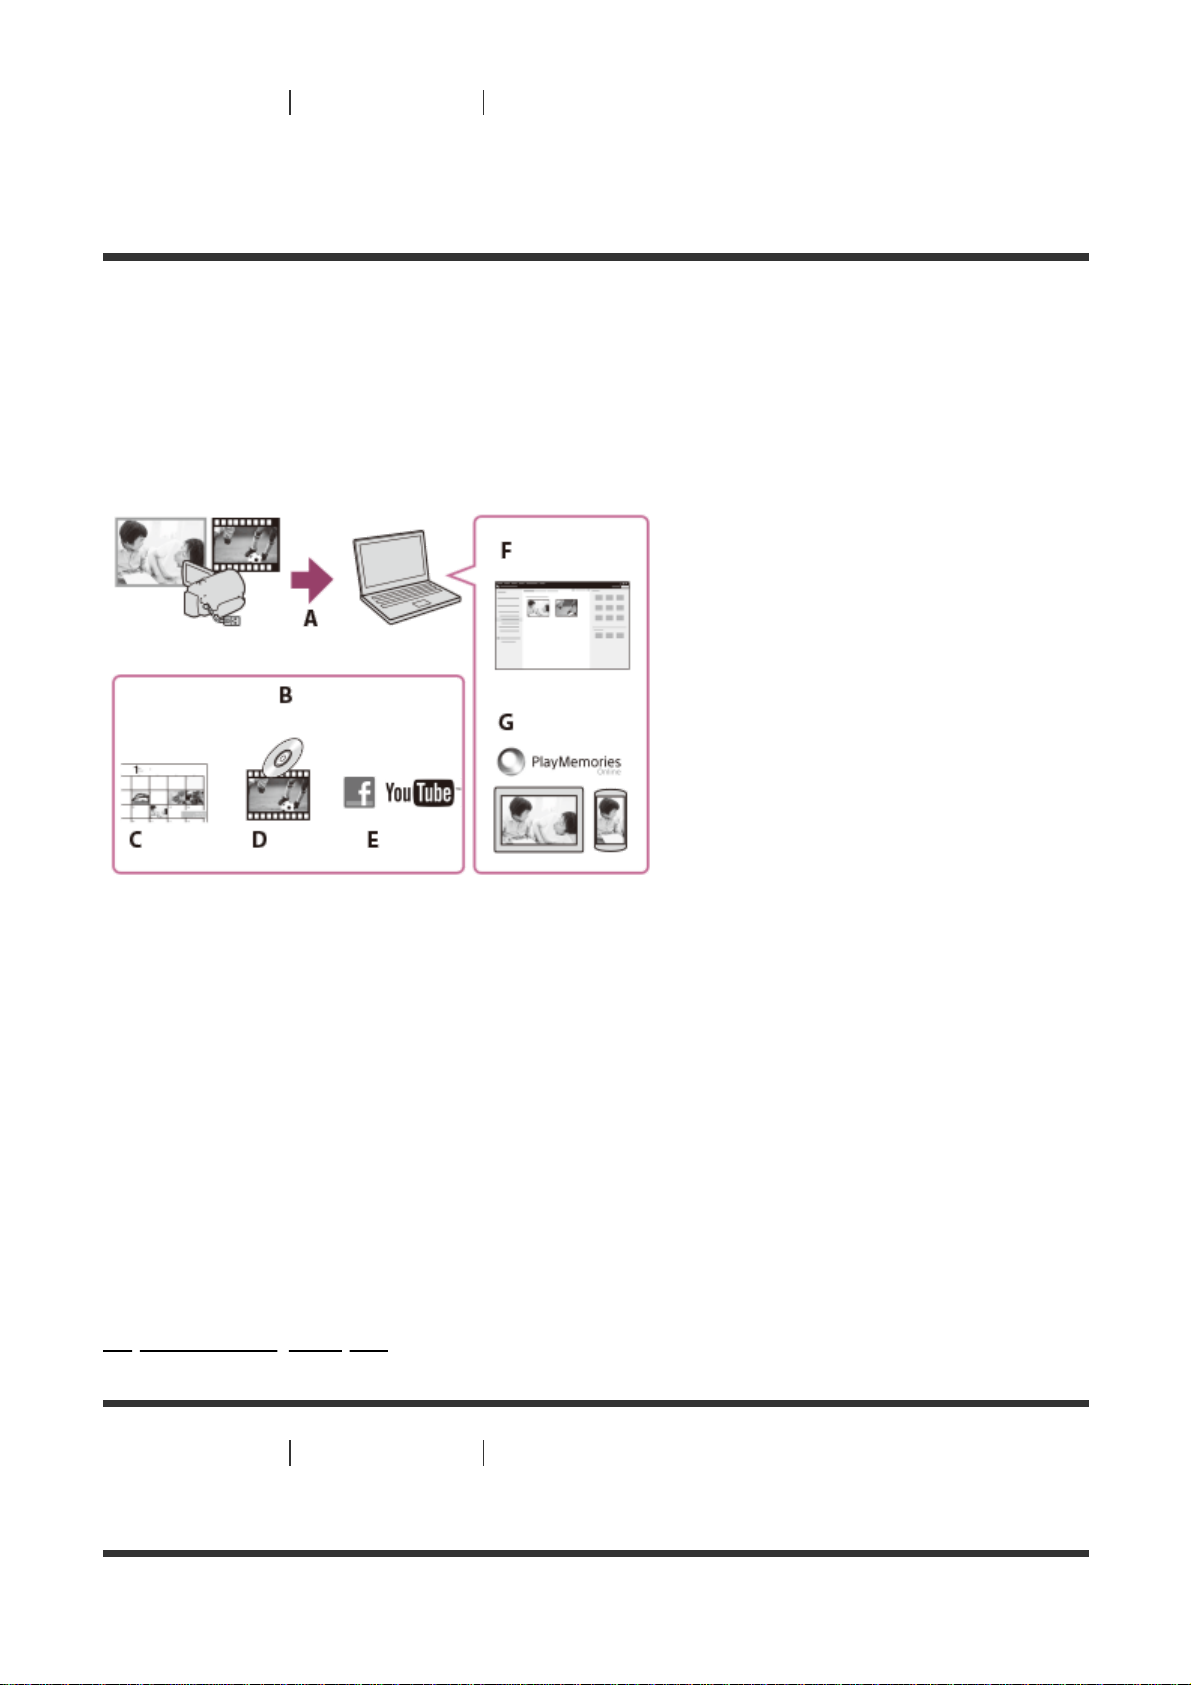
You can import movies and still images to your computer to use them in a variety
of ways.
PlayMemories Home is necessary to import XAVC S or AVCHD movies to your
computer.
A: Import images from this product
B: The functions below are also available on a Windows PC
C: View images in a calendar
D: Create a movie disc
E: Upload images to online services
F: Play the imported images
G: Share images on PlayMemories Online
Installing the PlayMemories Home software in your computer
PlayMemories Home can be downloaded from the following URL.
http://www.sony.net/pm/
[52] How to Use
Saving images Using the PlayMemories Home software
Checking the computer system
66
Page 67
You can check the system requirements for software at the following URL.
http://www.sony.net/pcenv/
[53] How to Use
Saving images Using the PlayMemories Home software
Installing the PlayMemories Home software in your
computer
Installing the PlayMemories Home software on your computer enables you to
make use of your recorded images.
1. Access the following download page using an Internet browser on your
computer to download the PlayMemories Home software.
http://www.sony.net/pm/
Install the software according to the on-screen instructions.
When the installation has completed, PlayMemories Home starts.
If the PMB (Picture Motion Browser) software is installed on your
computer, it will be overwritten by the PlayMemories Home software. Use
PlayMemories Home, the successor software of PMB.
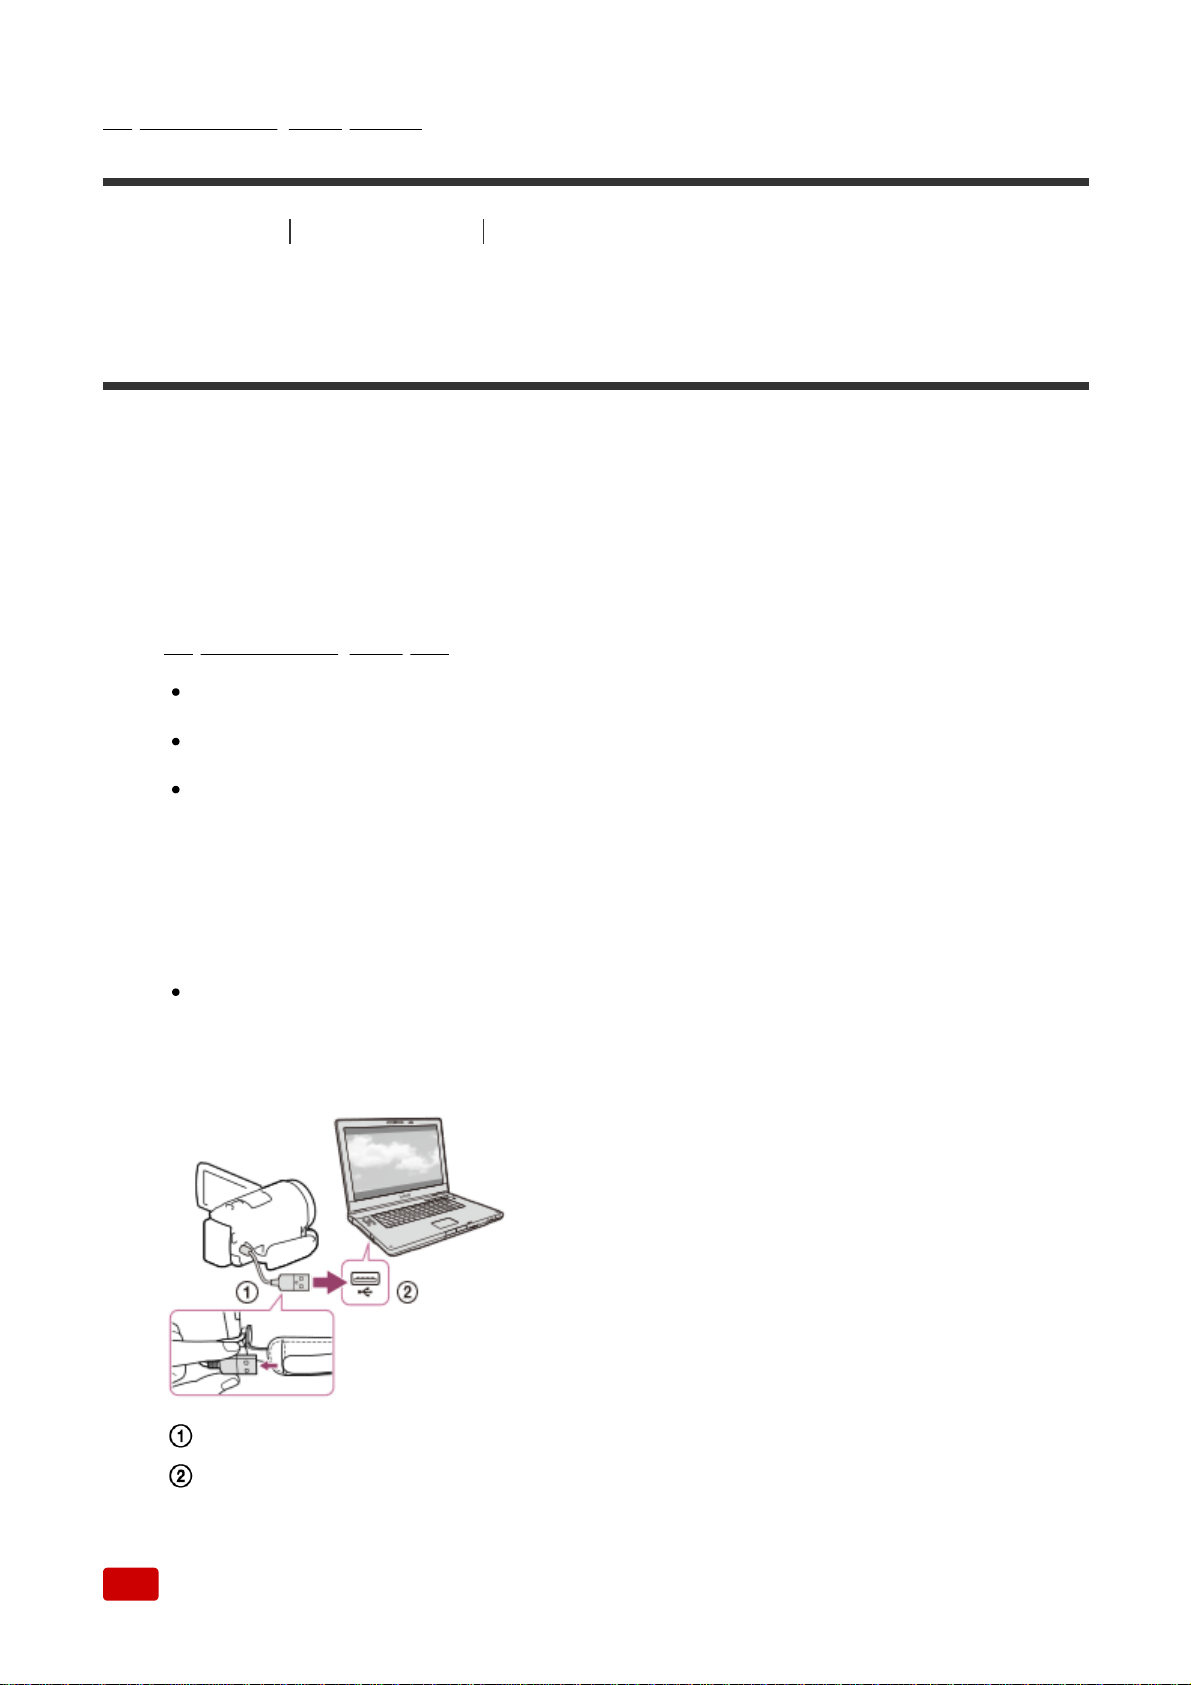
2. Connect this product and your computer with the USB Cable.
If the PlayMemories Home software is already installed on your computer,
connect this product to your computer. Functions that can be used with
this product will then be available.
The USB Cable
To the USB jack of your computer
Note
67
Page 68
Log on to your computer as an administrator.
You may need to restart your computer. When prompted to restart, follow the
on-screen instructions.
Depending on the usage environment, DirectX can then be installed.
Hint
For details on PlayMemories Home, refer to the help of PlayMemories Home.
[54] How to Use
Saving images Using the PlayMemories Home software
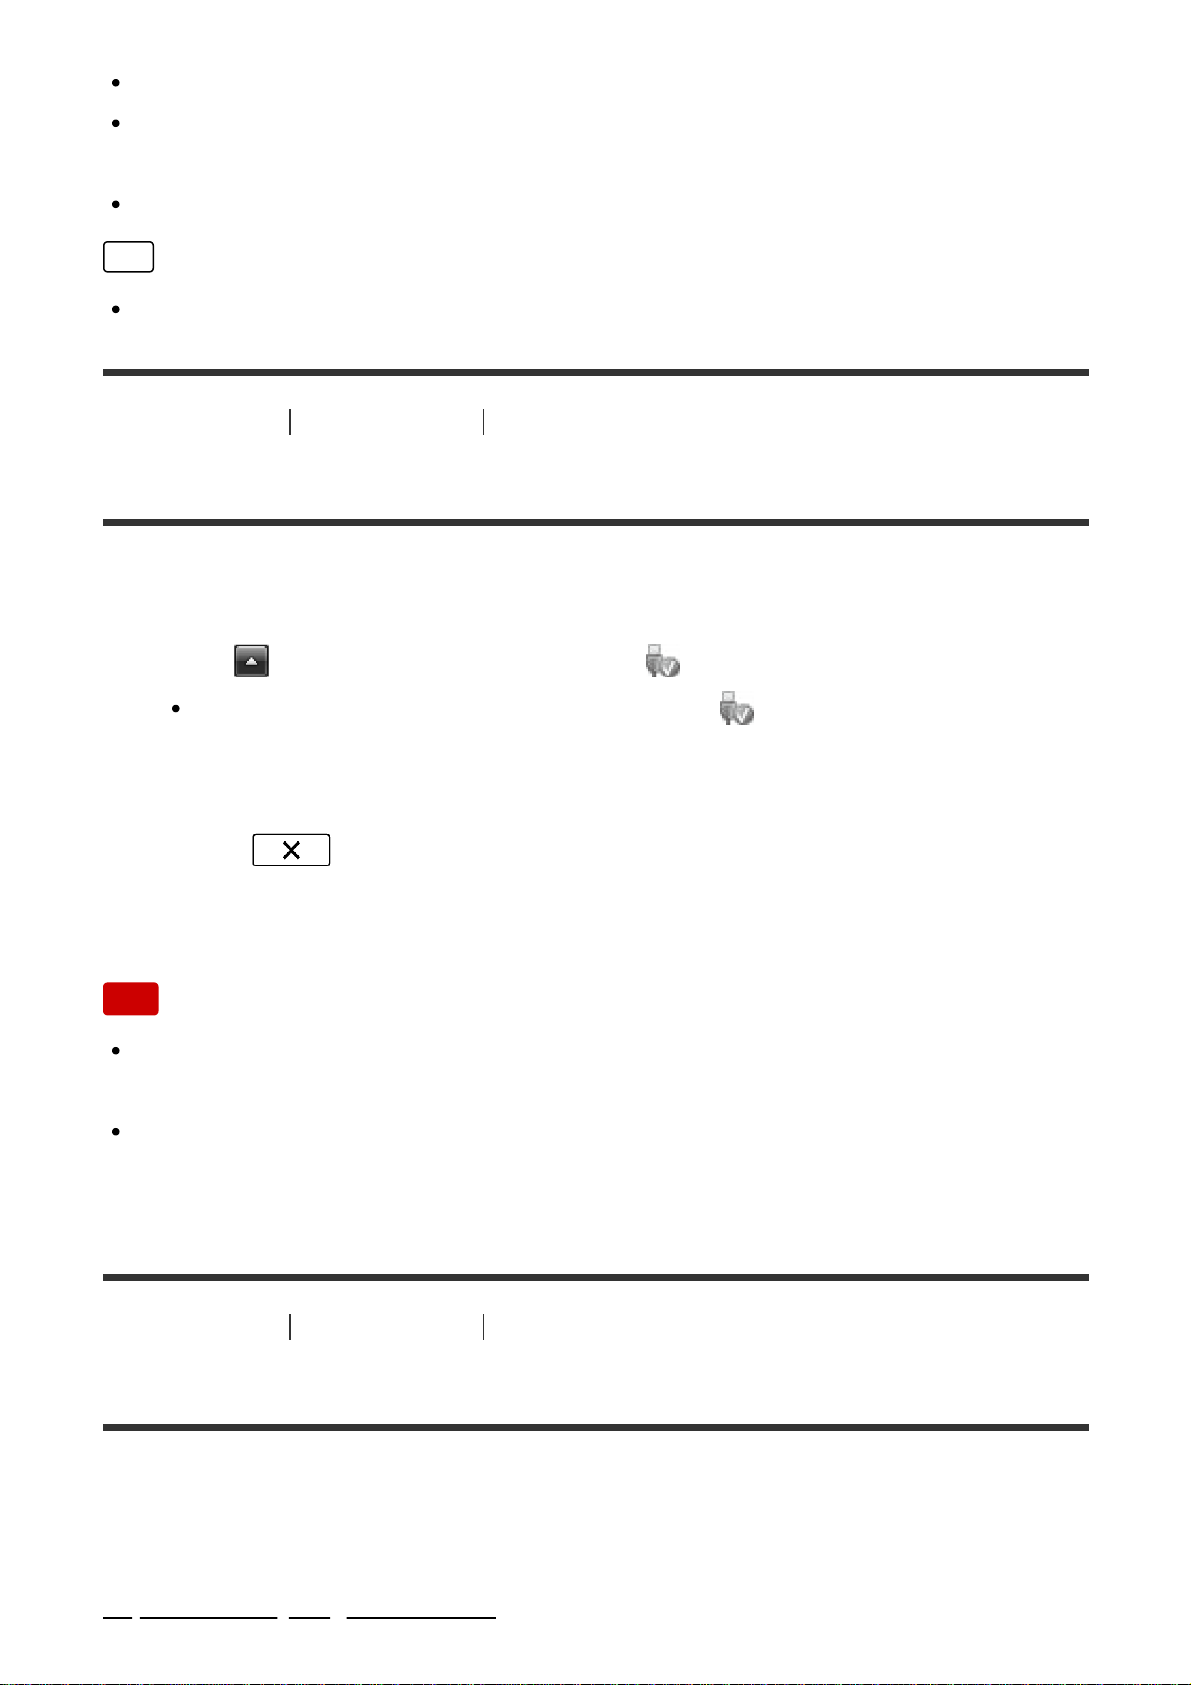
Disconnecting this product from the computer
Disconnect this product from the computer connected with the USB Cable.
1. Click
in the task tray, and then click .
If you use a Windows Vista computer, click in the task tray.
2. Click the message displayed on the computer screen.
3. Select
- [Yes] on the LCD monitor, and then disconnect the USB
Cable.
Note
If you use a Mac computer, drag and drop the memory card or the drive icon to
the Trash before disconnecting. The connection with the computer is released.
If you use a Windows 7 or Windows 8 computer, a disconnection icon may not
be displayed. In this case, you can release the connection without performing
the above operations.
[55] How to Use
Saving images Using the PlayMemories Home software
About the dedicated software for this product
You can download the dedicated software from the Sony website.
Windows:
http://www.sony.co.jp/imsoft/Win/
68
Page 69
Mac:
http://www.sony.co.jp/imsoft/Mac/
Note
The software that can be used with this product will differ, depending on the
countries/regions.
[56] How to Use
Saving images Using the PlayMemories Home software
Creating a Blu-ray disc
You can create a Blu-ray disc with an AVCHD movie previously imported to a
computer.
To create a Blu-ray disc, the “BD Add-on Software” must be installed.
http://support.d-imaging.sony.co.jp/BDUW/
Your computer must support the creation of Blu-ray discs.
BD-R (unrewritable) and BD-RE (rewritable) media are available for creating
Blu-ray discs. You cannot add contents to either type of disc after creating the
disc.
To play back a Blu-ray disc that has been created with a movie that was
recorded in [
AVCHD]/[60p Quality ] (1080 60i-compatible device) /
[50p Quality
] (1080 50i-compatible device) image quality, you need a
device that complies with the AVCHD Ver. 2.0 format.
You cannot save MP4 or XAVC S images onto a Blu-ray disc.
[57] How to Use
Saving images Saving images on an external media device
Notes on use of the USB external hard disk
Read the precautions when using the USB external hard disk.
Note
For this operation, you need the USB Adaptor Cable VMC-UAM2 (sold
separately).
69
Page 70

After attaching the battery pack to this product, connect the AC Adaptor to the
USB Cable and a wall outlet (wall socket).
Refer to the instruction manual supplied with the external media device.
You may not be able to use external media devices with a code function.
The file systems this product recognizes are FAT32/exFAT/NTFS. To use an
external media device formatted with a file system that this product cannot
recognize, format it on your computer, etc. in advance. Before formatting, make
sure that you have no important data saved on the external media device as
formatting will delete the data.
Operation is not guaranteed with all devices satisfying the operating
requirements.
The number of scenes you can save on the external media device is as follows.
However, even if the external media device has free space, you cannot save
scenes exceeding the following number.
XAVC S movies: Max. 9,999
AVCHD movies: Max. 3,999
The total of photos and MP4 movies: Max. 40,000
The number of scenes may be smaller depending on the type of images
recorded.
If this product does not recognize the external media device, try the following
operations.
Reconnect the USB Adaptor Cable to this product.
If the external media device has the AC power cord (mains lead), connect it to a wall
outlet (wall socket).
You cannot copy images from an external media device to this product.
Devices that cannot be used as an external media device
The following devices cannot be used as an external media device:
ordinary disc drive such as CD or DVD drive
media devices connected via a USB hub
media devices with a built-in USB hub
card reader
[58] How to Use
Saving images Saving images on an external media device
Saving images on an USB external hard disk device
70
Page 71
Easily save movies and photos to external media devices such as a USB external
hard disk drive.
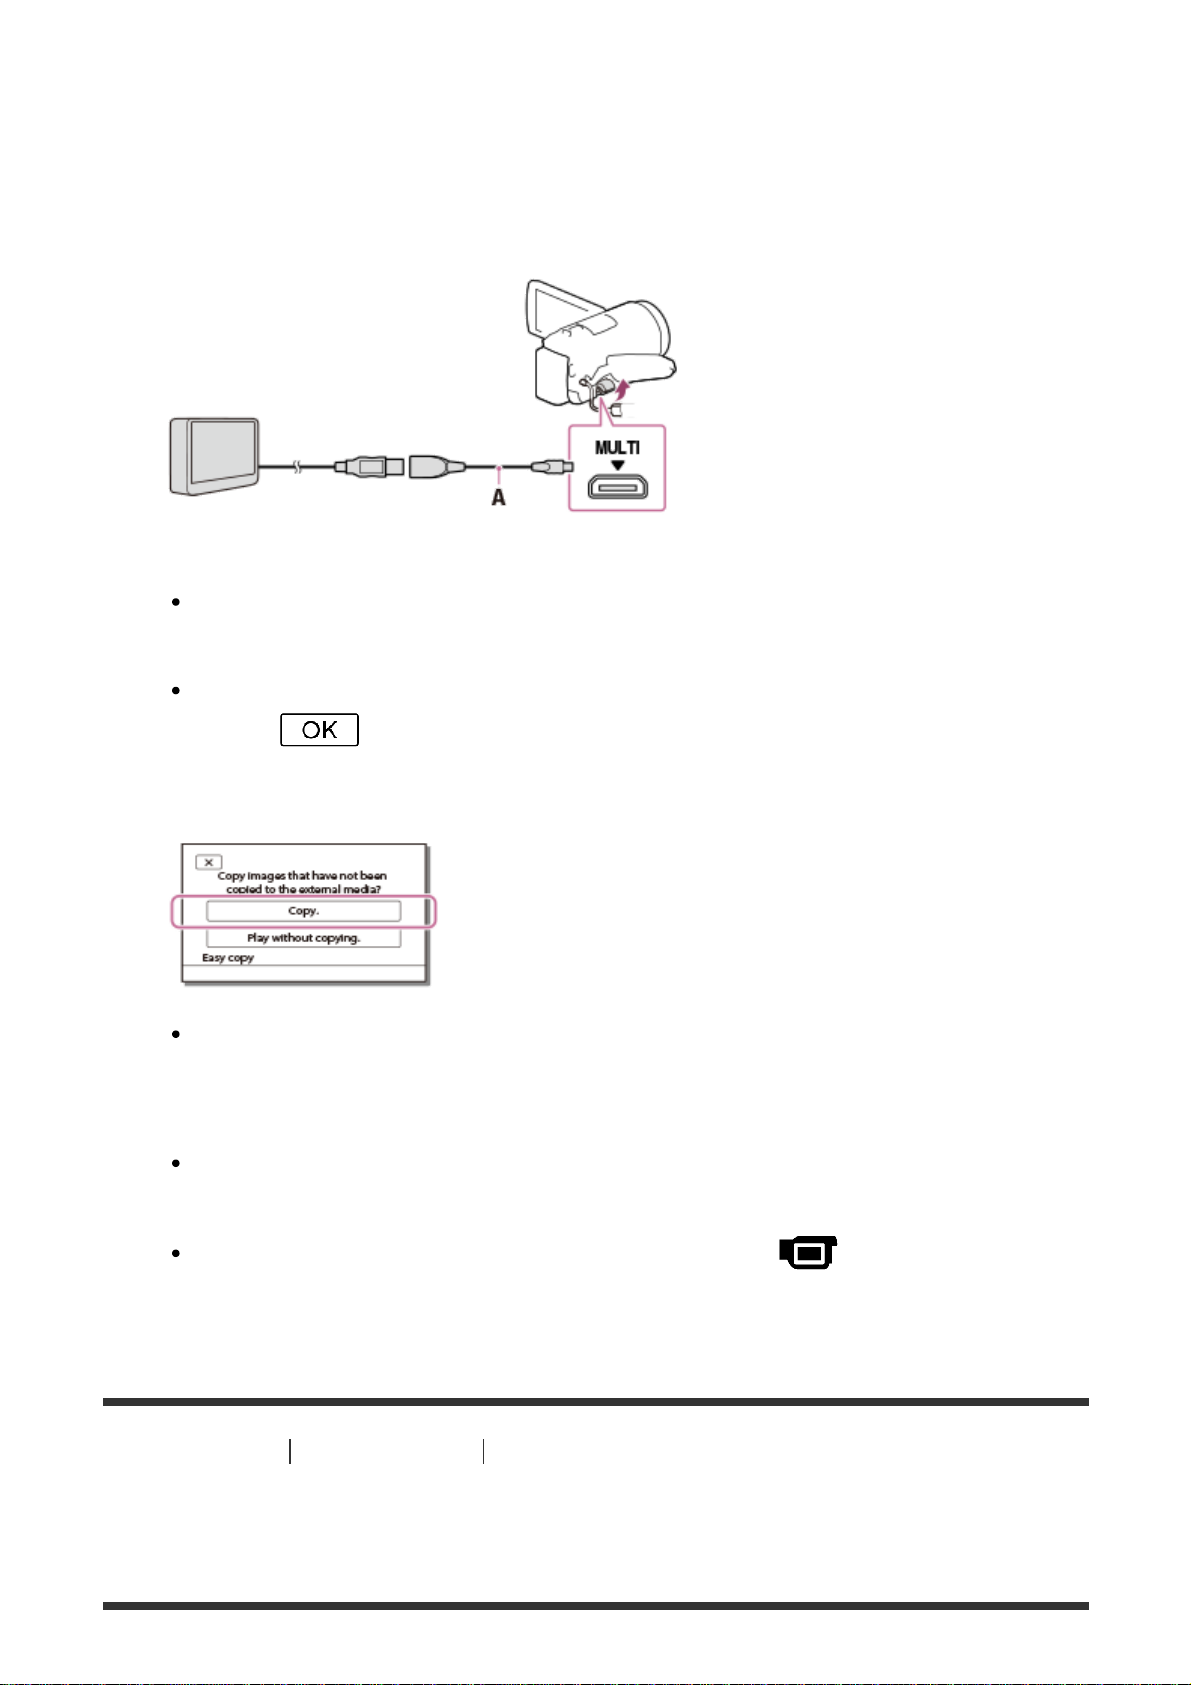
1. Connect this product to the external media device using a USB Adaptor
Cable (sold separately).
A: USB Adaptor Cable (sold separately)
Make sure not to disconnect the USB Cable while [Preparing image
database file. Please wait.] is displayed on the LCD monitor.
If [Repair Img. DB F.] is displayed on the LCD monitor of this product,
select
.
2. Select [Copy.] on the LCD monitor of this product.
Movies and photos that are stored on the recording media, and that have
not yet been saved on to an external media device can be saved on the
connected media device at this time.
This operation is available only when there are newly recorded images in
this product.
To disconnect the external media device, select while either Event
View or Event Index is displayed.
[59] How to Use
Saving images Saving images on an external media device
Saving the desired images in this product to the external
media device
71
Page 72
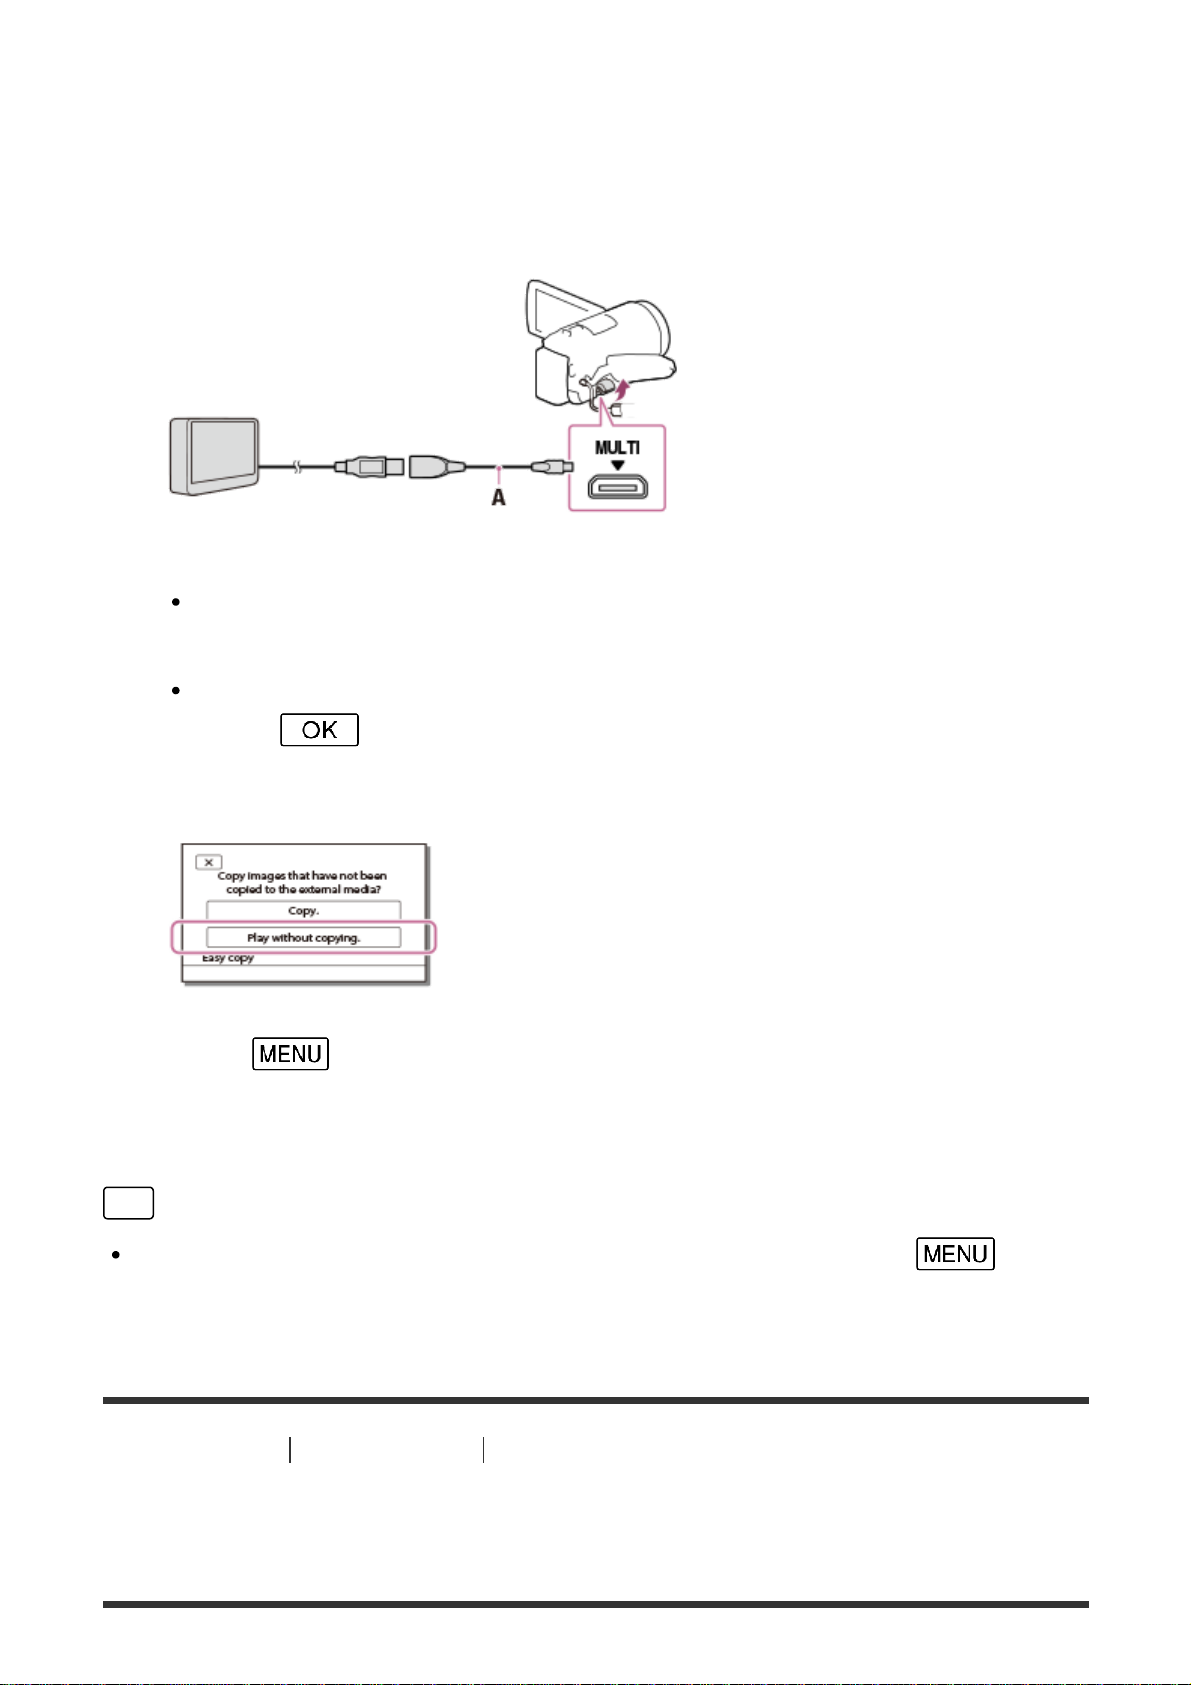
Save selected movies and photos on an external media device such as a USB
external hard disk drive.
1. Connect this product to the external media device using a USB Adaptor
Cable (sold separately).
A: USB Adaptor Cable (sold separately)
Make sure not to disconnect the USB Cable while [Preparing image
database file. Please wait.] is displayed on the LCD monitor.
If [Repair Img. DB F.] is displayed on the LCD monitor of this product,
select
.
2. Select [Play without copying.].
3. Select - [Edit/Copy] - [Copy], and then follow the on-screen
instructions to save images.
Hint
If you want to copy images that have not yet been copied, select -
[Edit/Copy] - [Direct Copy] while this product is connected to the external media
device.
[60] How to Use
Saving images Saving images on an external media device
Playing back images in the USB external hard disk
device on this product
72
Page 73
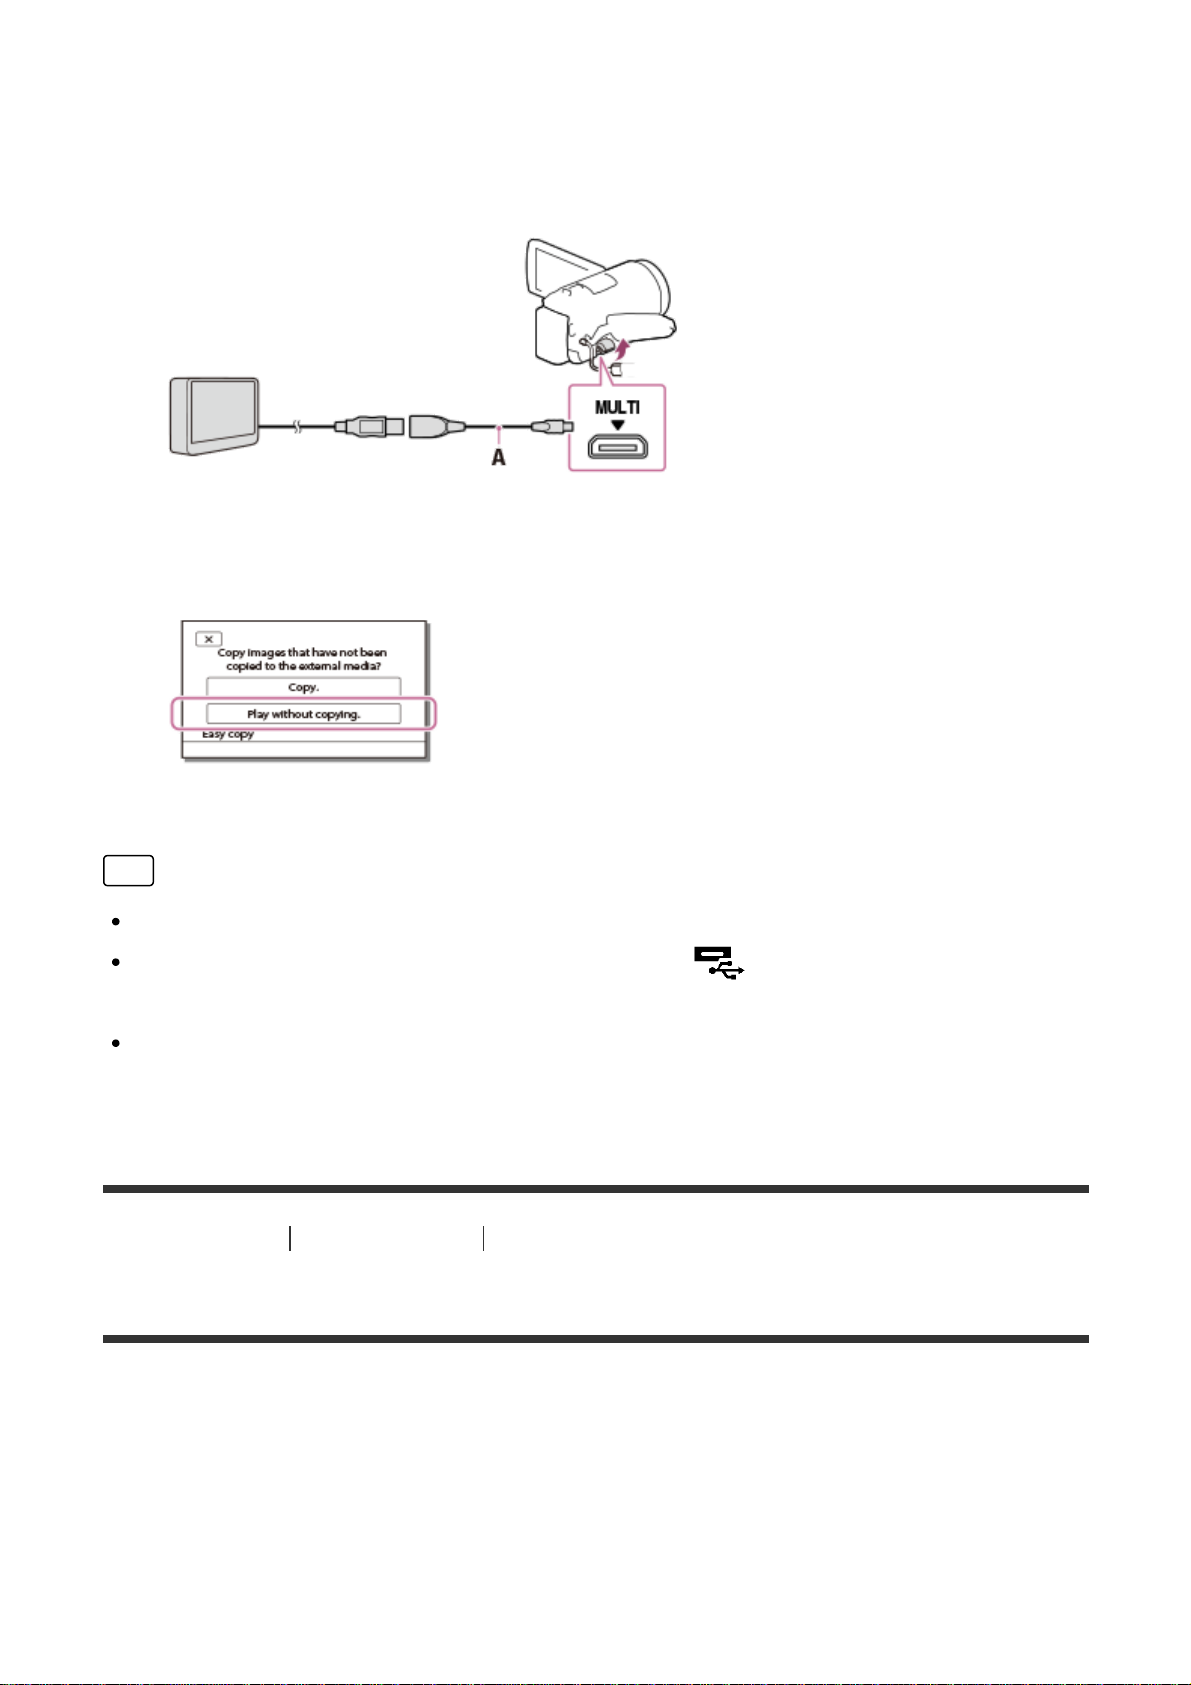
Play back images saved on a USB external hard disk device on this product.
1. Connect this product to the external media device using a USB Adaptor
Cable (sold separately).
A: USB Adaptor Cable (sold separately)
2. Select [Play without copying.], and then select the image you want to view.
Hint
You can also view images on a TV connected to this product.
When an external media device is connected, will appear on the Event
View screen.
To play back the images saved on an external media device using your
computer, select the drive that represents the external media device on the
PlayMemories Home software, and then play movies.
[61] How to Use
Saving images Saving images on an external media device
Deleting images in the USB external hard disk device
Delete images saved on a USB external hard disk device.
1. Connect this product to the external media device using a USB Adaptor
Cable (sold separately).
73
Page 74
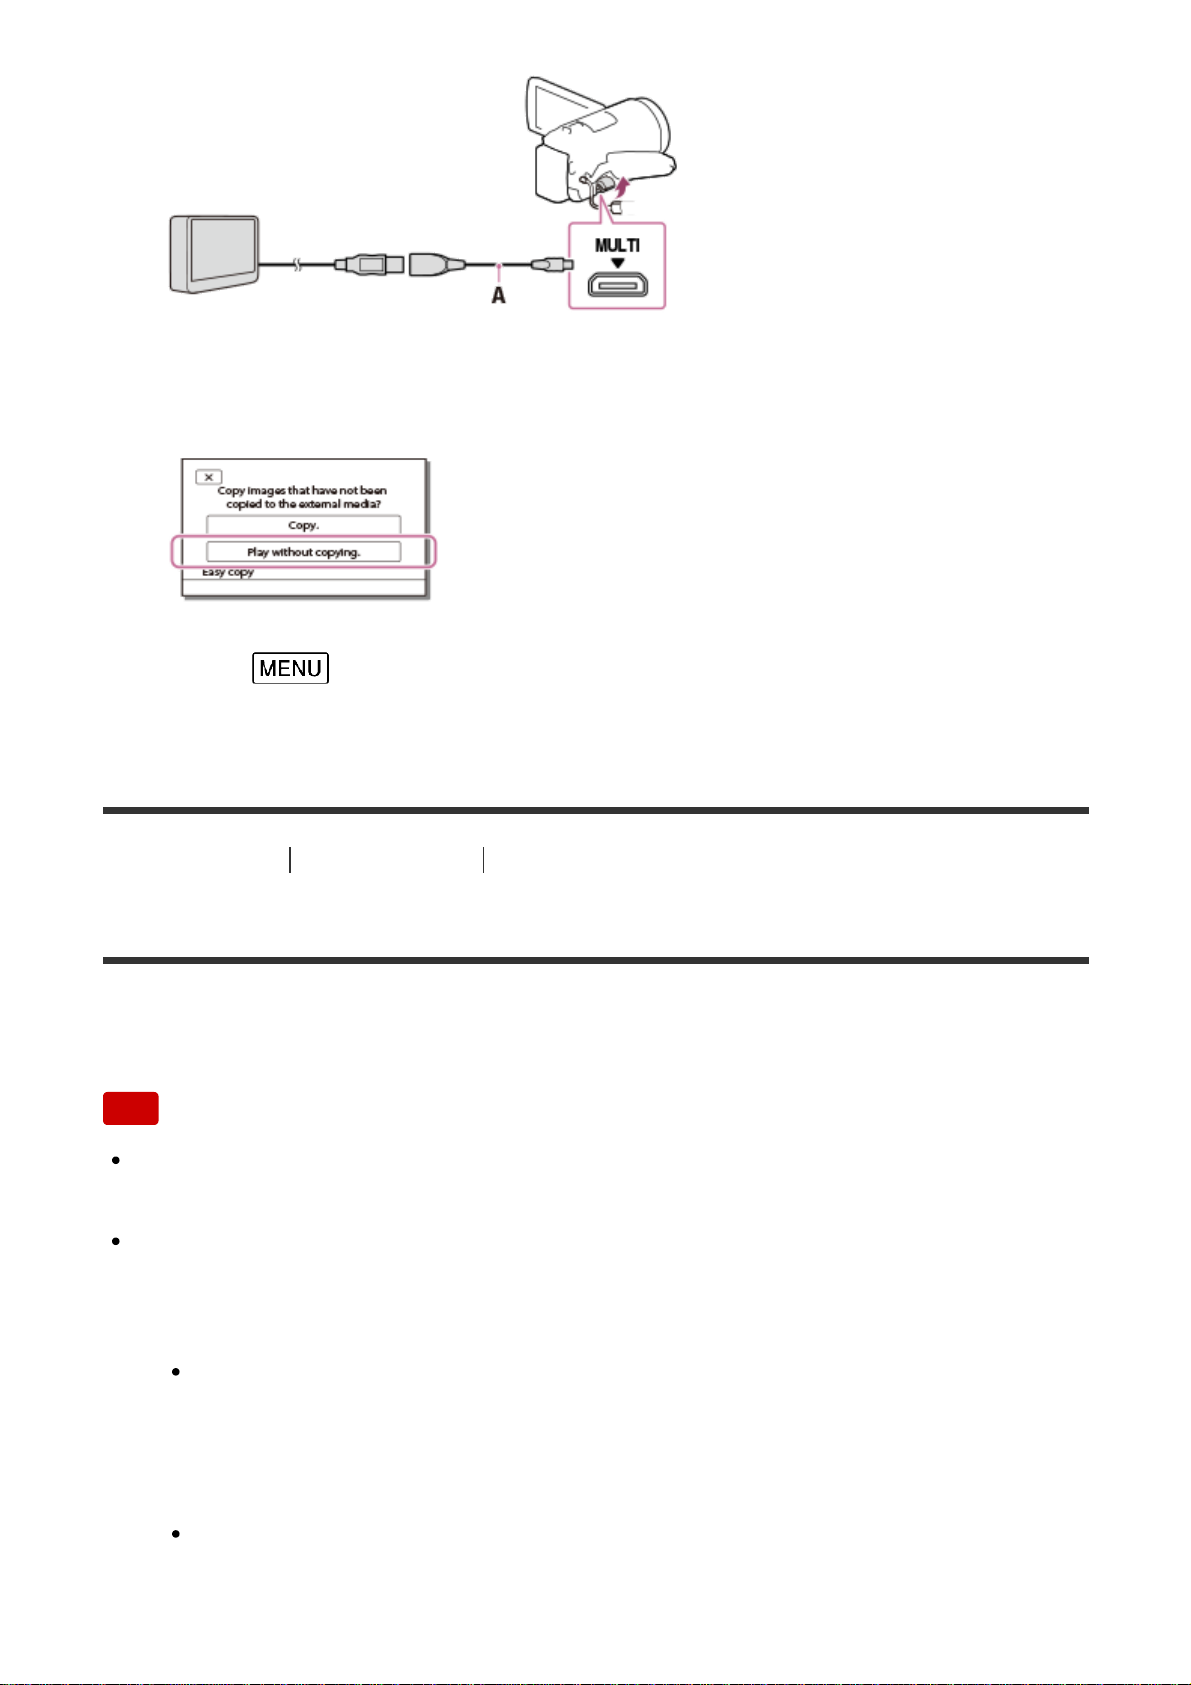
A: USB Adaptor Cable (sold separately)
2. Select [Play without copying.].
3. Select - [Edit/Copy] - [Delete], and then follow on-screen instructions
to delete images.
[62] How to Use
Saving images Creating a disc with a recorder
Creating a disc with a recorder
You can copy images on this product onto a disc or video casette. Connect this
product to a disc recorder with an AV cable (sold separately).
Note
After attaching the battery pack to this product, connect this product to a wall
outlet (wall socket) using the supplied AC Adaptor for this operation.
Refer to the instruction manual supplied with the device connected.
1. Insert the recording medium in the recording device (a disc recorder, etc.).
If your recording device has an input selector, set it to the input mode.
2. Connect this product to the recording device with an AV cable (sold
separately).
Connect this product to the input jacks of the recording device.
74
Page 75
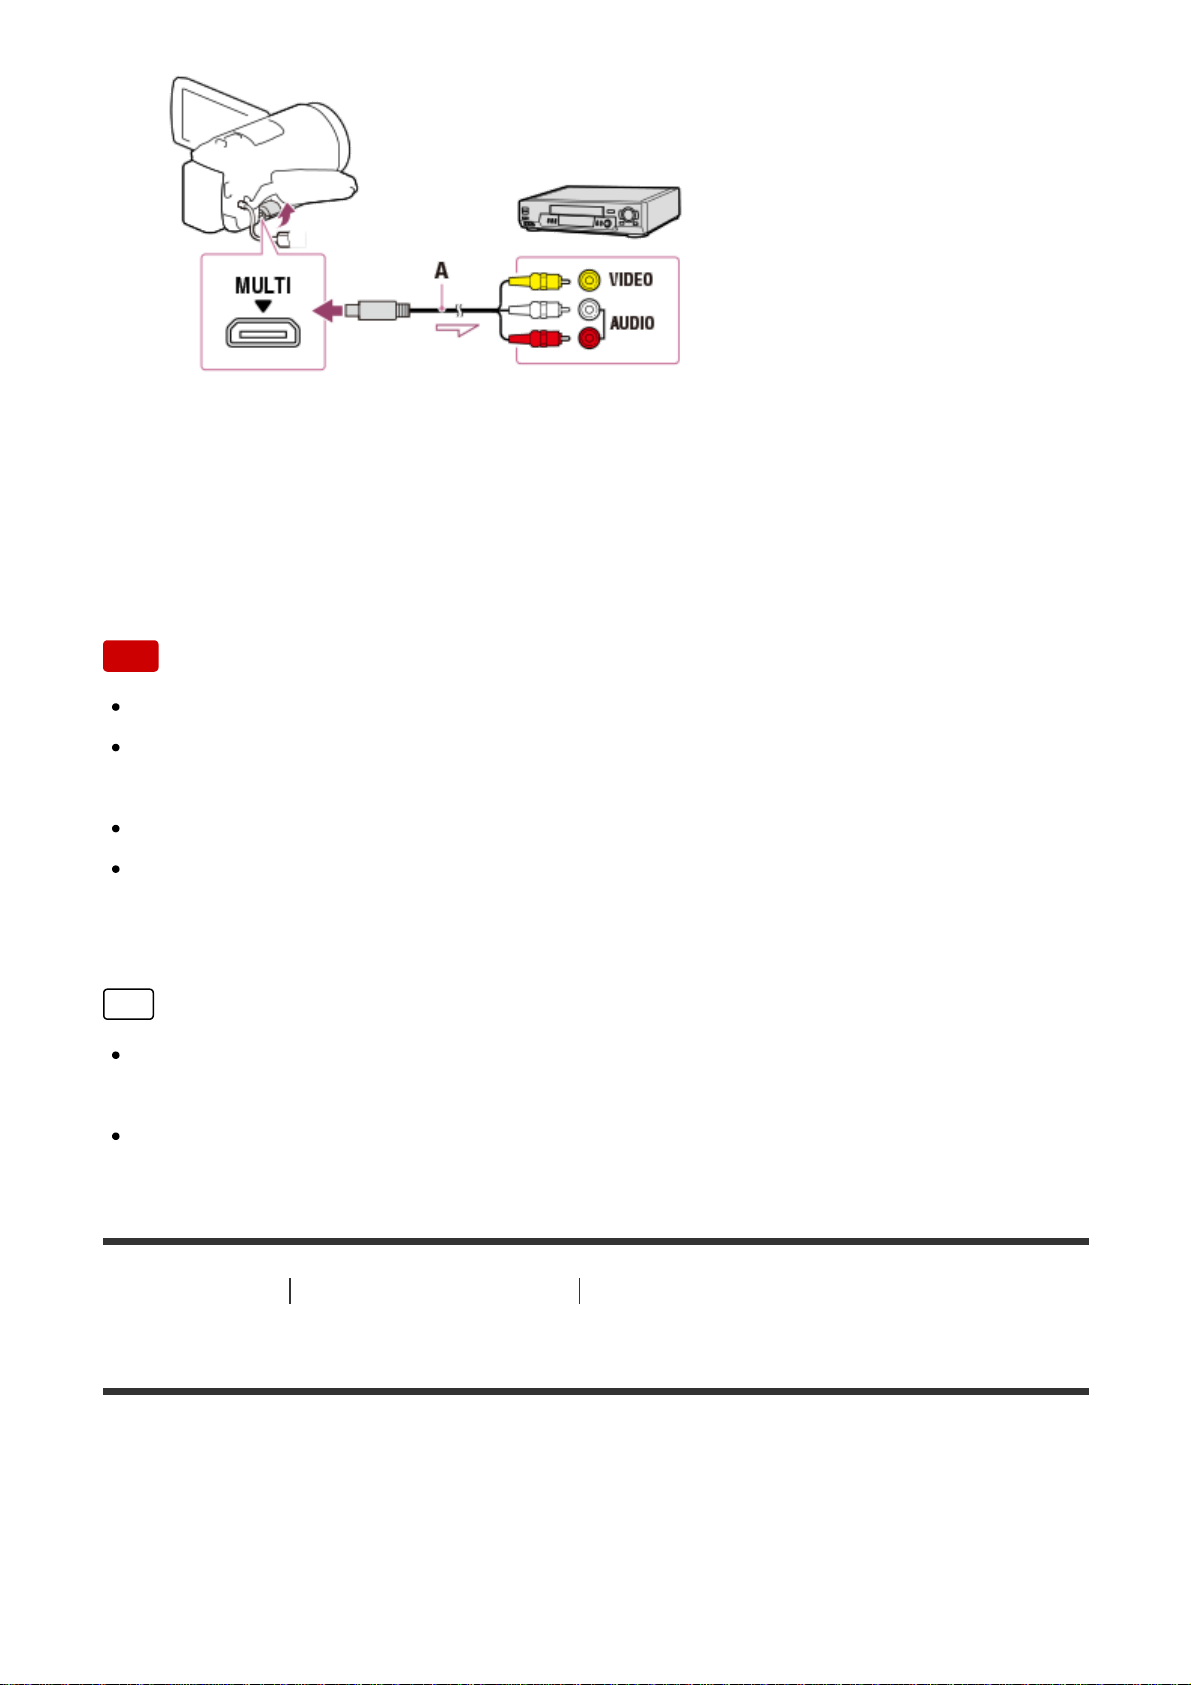
A: AV cable (sold separately)
3. Start playback on this product, and record it on the recording device.
4. When dubbing is finished, stop the recording device, and then this product.
Note
You cannot copy images to recorders connected with the HDMI cable.
Since copying is performed via analog data transfer, the image quality may
deteriorate.
Images will be copied with standard definition image quality.
When you connect a monaural device, connect the yellow plug of an AV cable
(sold separately) to the video input jack, and the white (left channel) or the red
(right channel) plug to the audio input jack on the device.
Hint
Change the [Data Code] setting if you want to copy the date and time and the
camera setting data information.
Set [TV Type] to [4:3] if the screen size of your display device such as TV is
4:3.
[63] How to Use
Using the Wi-Fi function What you can do with the Wi-Fi function
What you can do with the Wi-Fi function
Explains what you can do using the Wi-Fi function of this product.
Saving movies and photos to your computer
75
Page 76
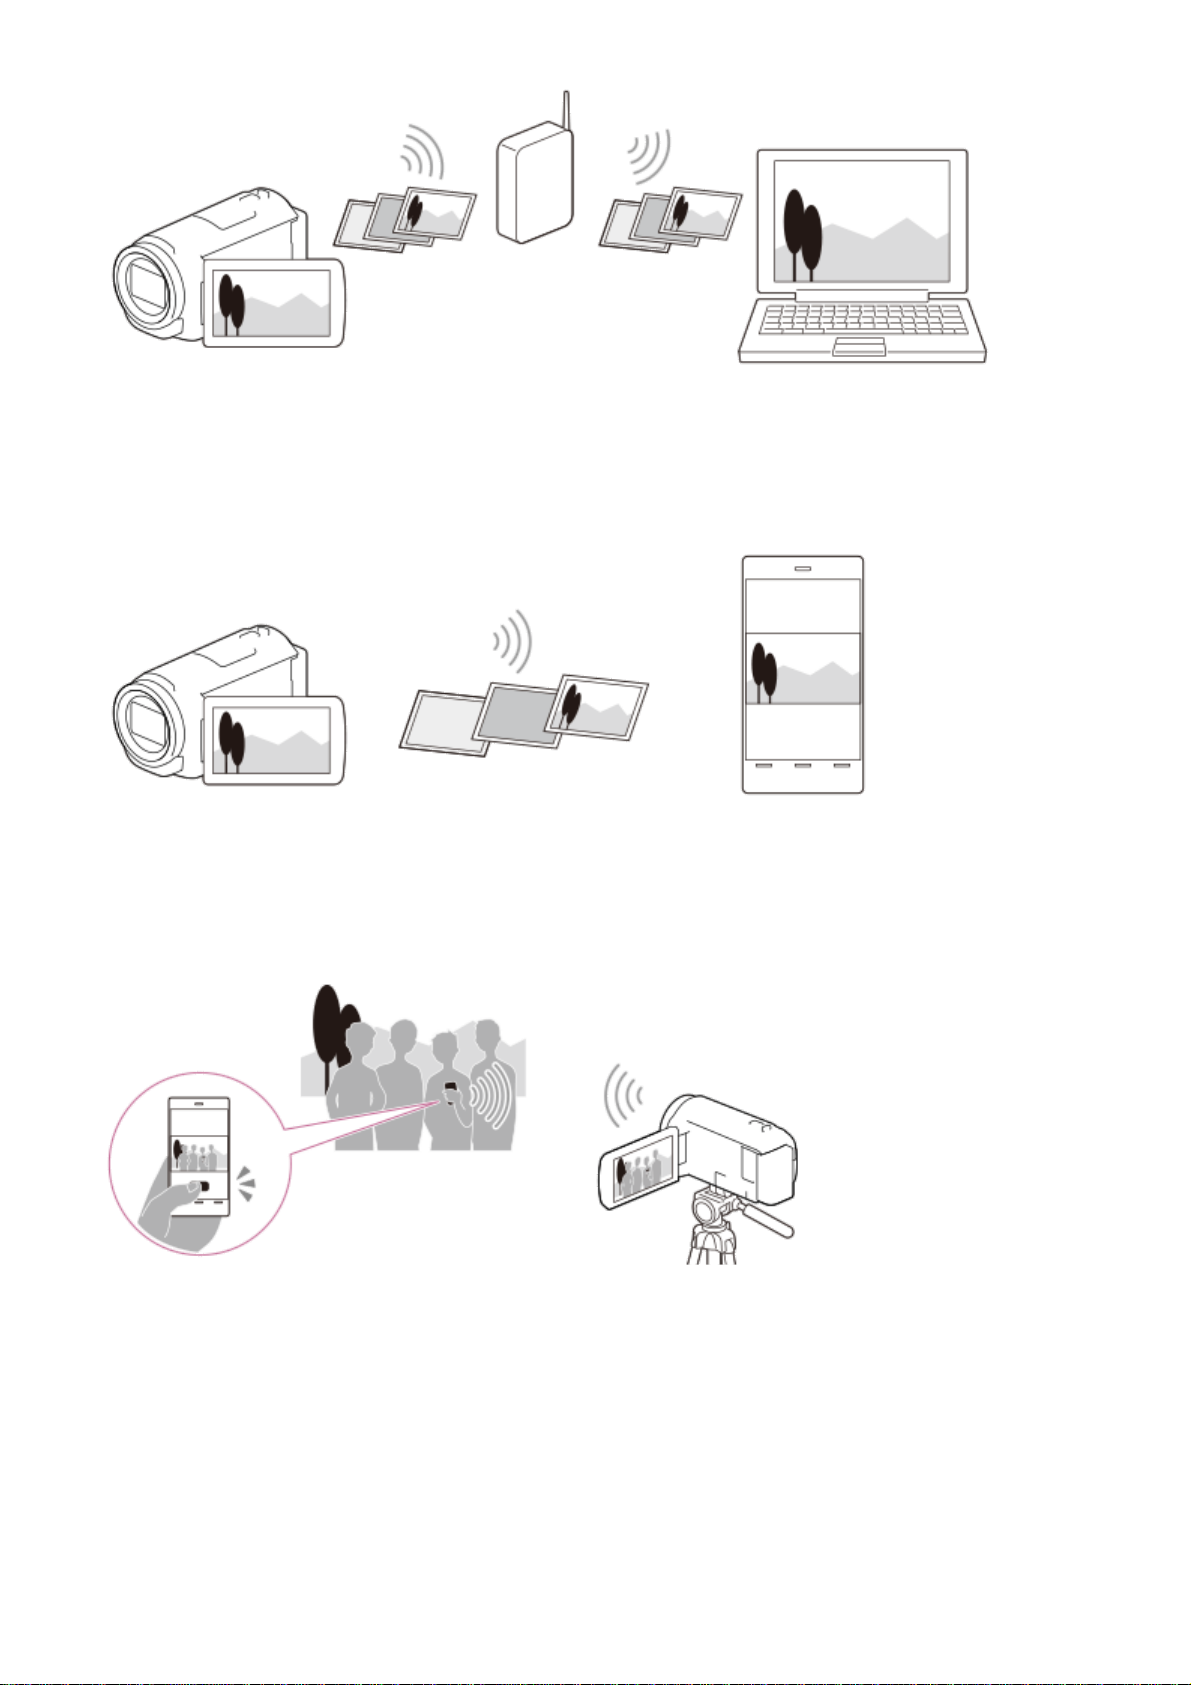
Transferring movies (MP4) and photos to your smartphone or
tablet
Using your smartphone or tablet as a wireless remote
commander
Playing images on a TV
76
Page 77
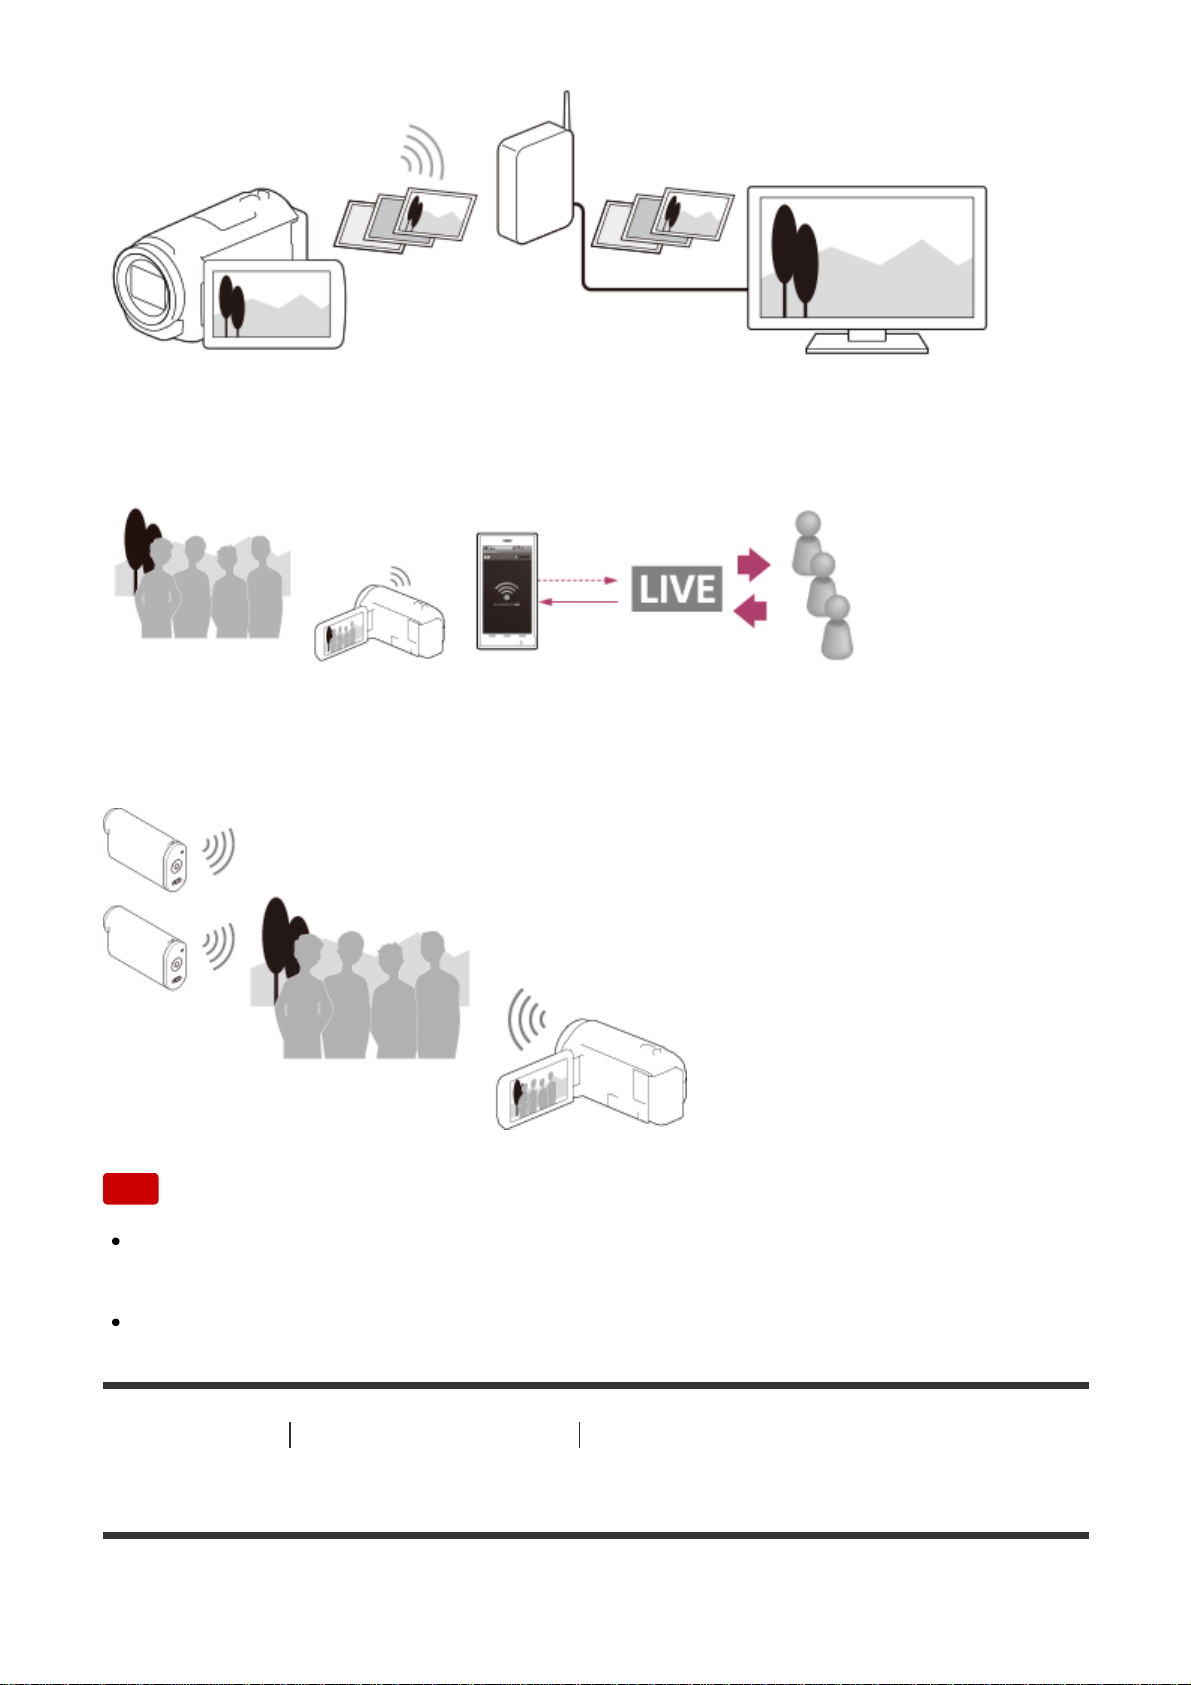
Live Streaming
Multi Camera Control
Note
The Wi-Fi function of this product cannot be used by connecting to a public
wireless network.
PlayMemories Mobile is not guaranteed to work on all smartphones and tablets.
[64] How to Use
Using the Wi-Fi function Installing PlayMemories Mobile
About the PlayMemories Mobile software
77
Page 78
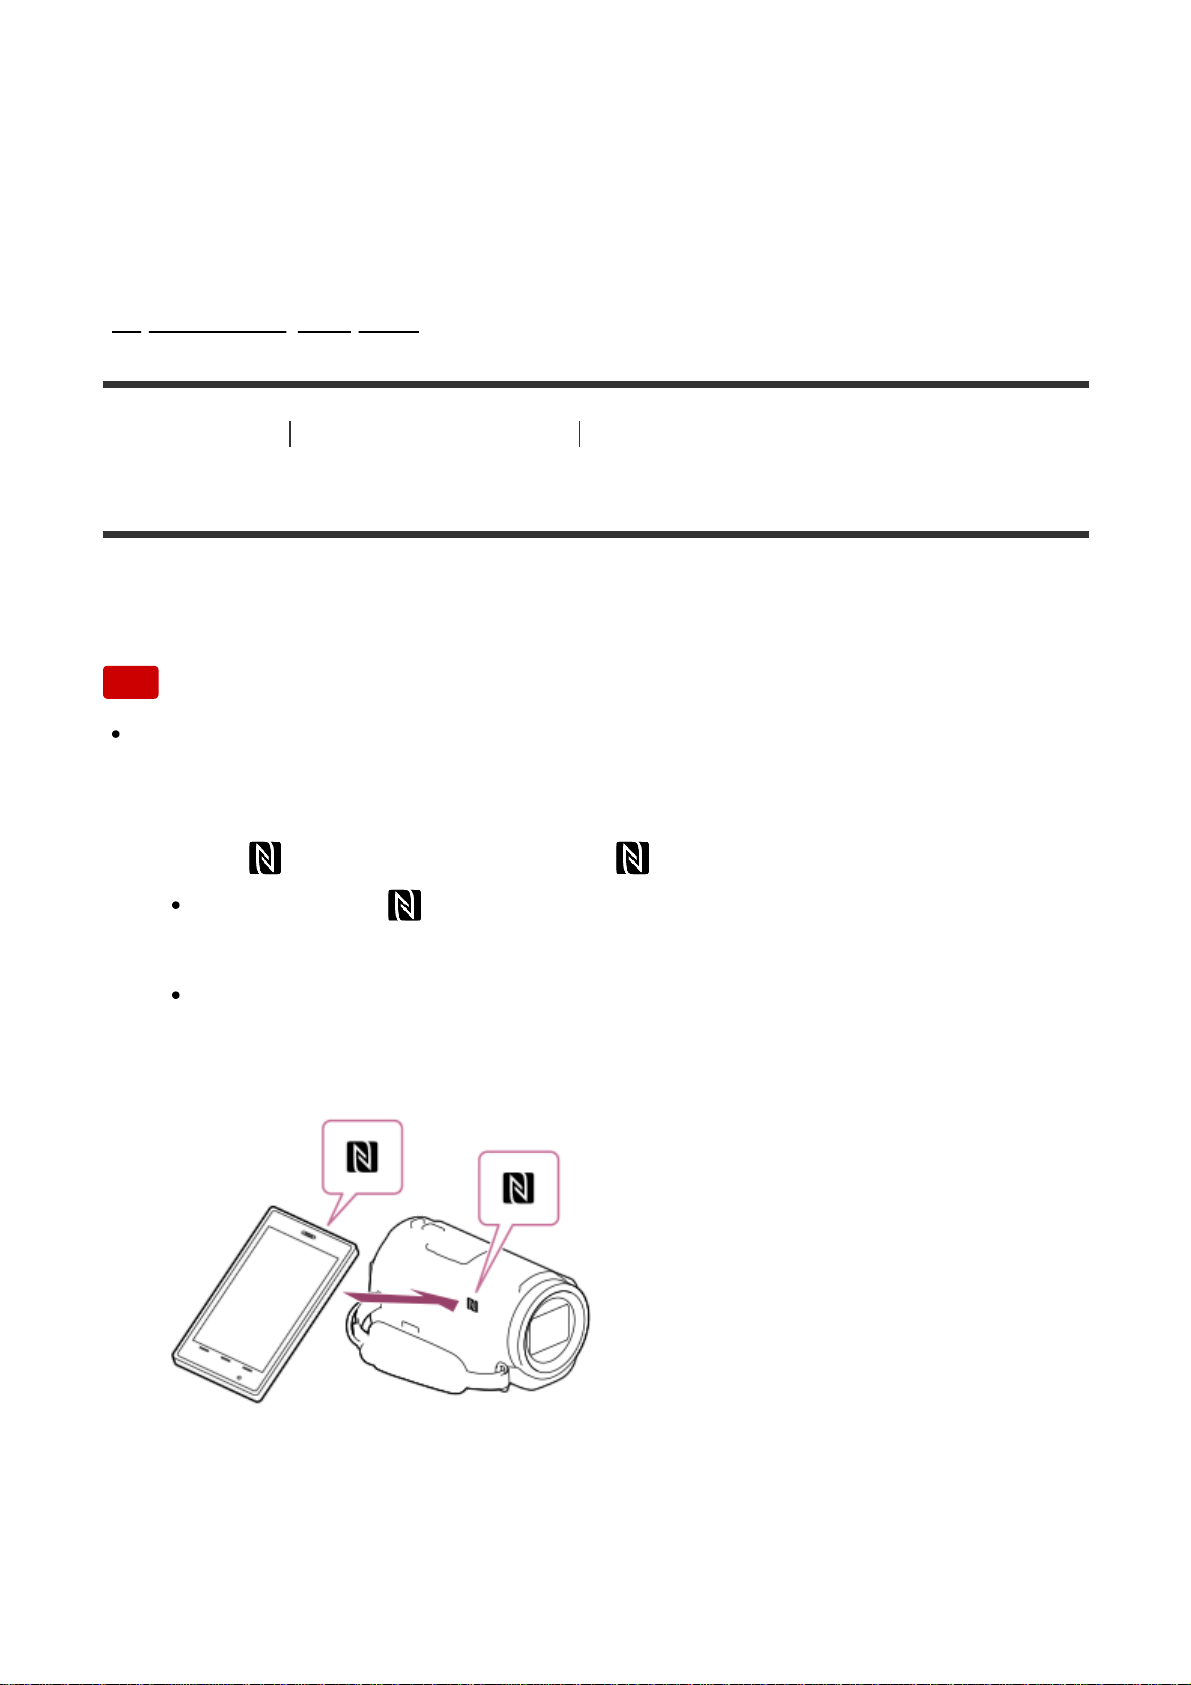
To perform operations such as [Ctrl with Smartphone] and [Send to Smartphone],
the PlayMemories Mobile application for smartphone is required. Install the
application from the applications store for your smartphone.
If PlayMemories Mobile is already installed in your smartphone, update the
application to the latest version.
For details on PlayMemories Mobile, visit the PlayMemories Mobile support page
(
http://www.sony.net/pmm/).
[65] How to Use
Using the Wi-Fi function Connecting a smartphone
Connecting to your NFC-enabled smartphone or tablet
You can easily connect this product to your NFC-enabled Android smartphone or
tablet.
Note
Make sure that your smartphone is not in sleep mode and the screen is
unlocked in advance.
1. Touch
(N mark) of this product to (N mark) of your smartphone.
Make sure that (N mark) is displayed on the LCD monitor of this
product.
Hold this product and your smartphone together and keep them still for
about 1-2 seconds until PlayMemories Mobile starts up on your
smartphone.
What you can do with the NFC connection
Operations available when you touch this product to an NFC-enabled smartphone
differs depending on the status of this product.
78
Page 79

When this product is in movie/photo recording mode
[Ctrl with Smartphone] starts up.
When images are being played back on this product
[Send to Smartphone] starts up and images being played back are transferred.
Note
To use the one-touch functions of this product, an NFC-enabled smartphone or
tablet is required.
NFC (Near Field Communication) is an international standard for short-range
wireless communication technology.
If the connection is not made successfully, try the procedures shown in
“Connecting to an Android smartphone or tablet.”
[66] How to Use
Using the Wi-Fi function Connecting a smartphone
Connecting to your smartphone or tablet using the QR
Code
You can easily connect this product to your smartphone or tablet by reading the
QR Code.
1. Install PlayMemories Mobile on your smartphone.
If PlayMemories Mobile is already installed on your smartphone, update
the software to the latest version.
2. Select
- [Wireless] - [ Function] - [Ctrl with Smartphone].
The QR Code, SSID, password and device name are displayed.
3. Start up PlayMemories Mobile, and select [Scan QR Code of the Camera]
from the screen of PlayMemories Mobile.
79
Page 80
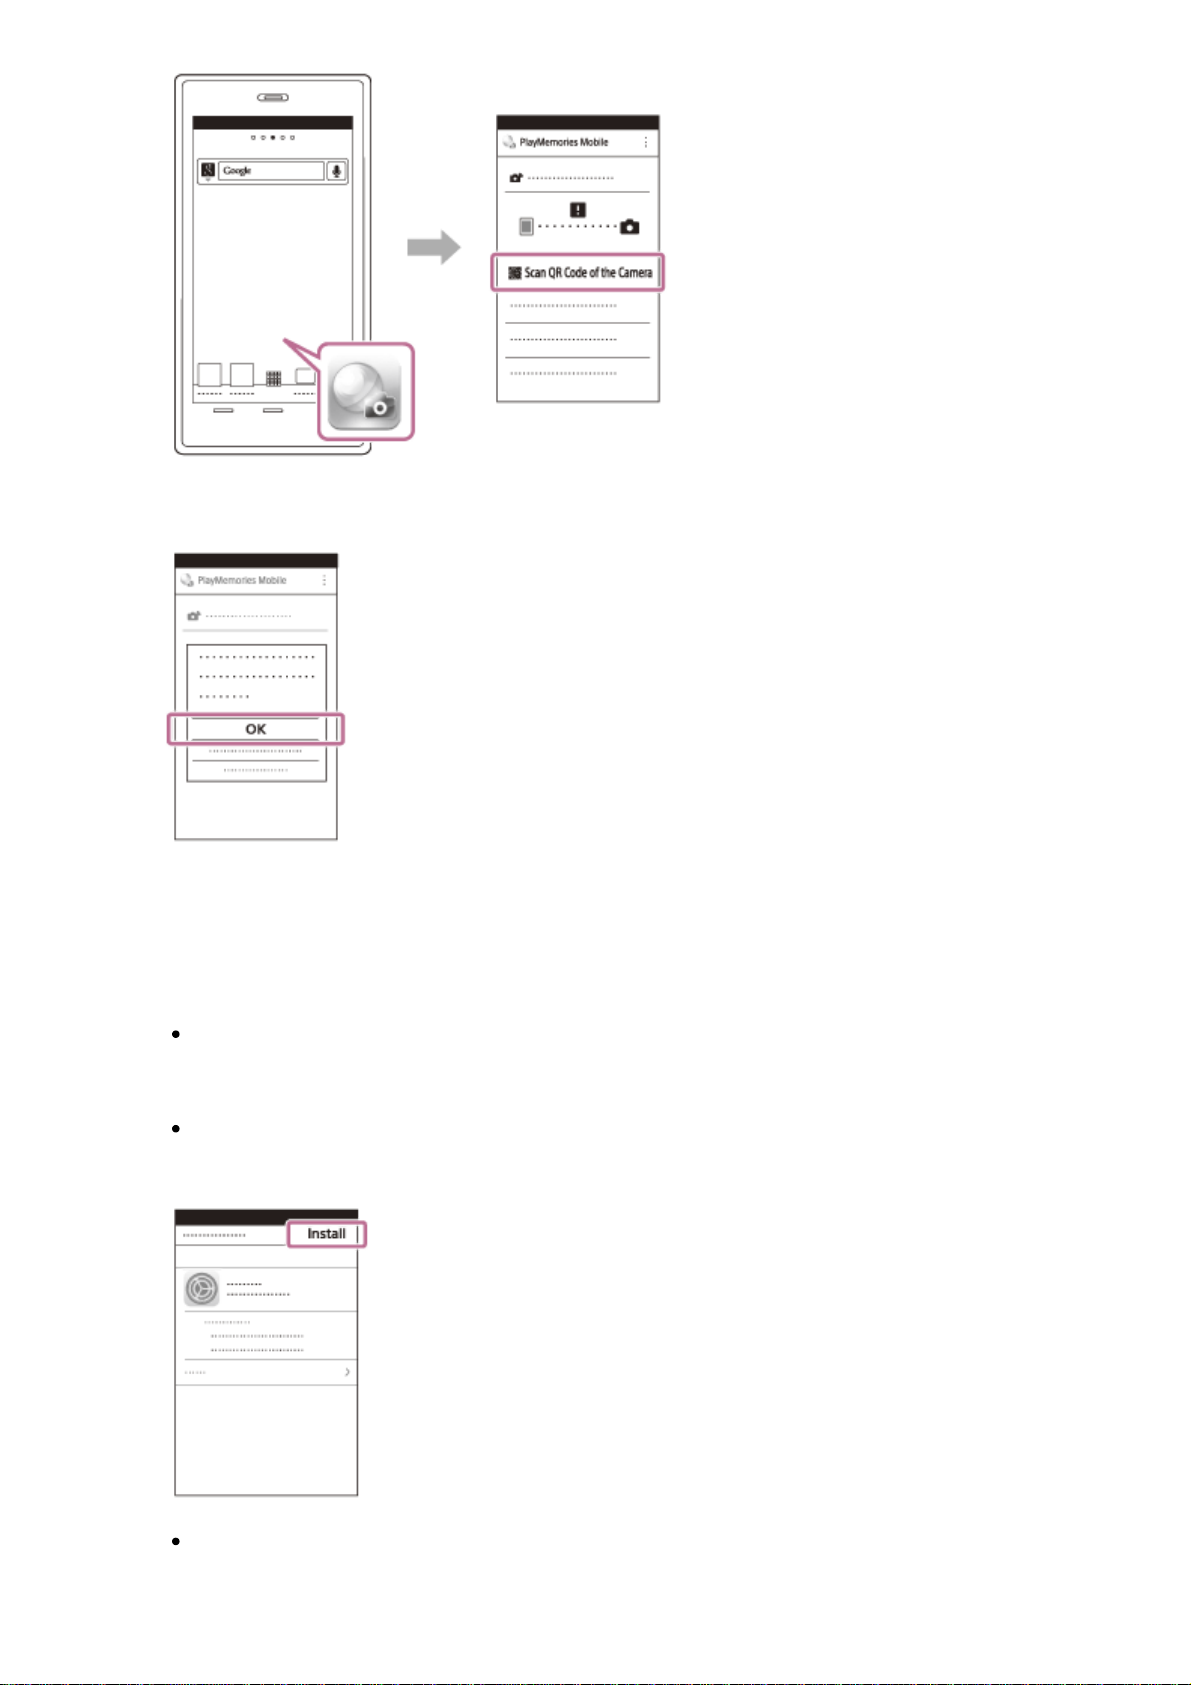
4. Select [OK]. (If a message appears, select [OK] again.)
5. With your smartphone, read the QR Code displayed on the LCD monitor of
the camcorder.
Android
When [Connect with the camera?] is displayed, select [Connect].
iPhone/iPad
Follow the on-screen instructions and install the profile (setting
information).
On Home, select [Settings] - [Wi-Fi].
80
Page 81
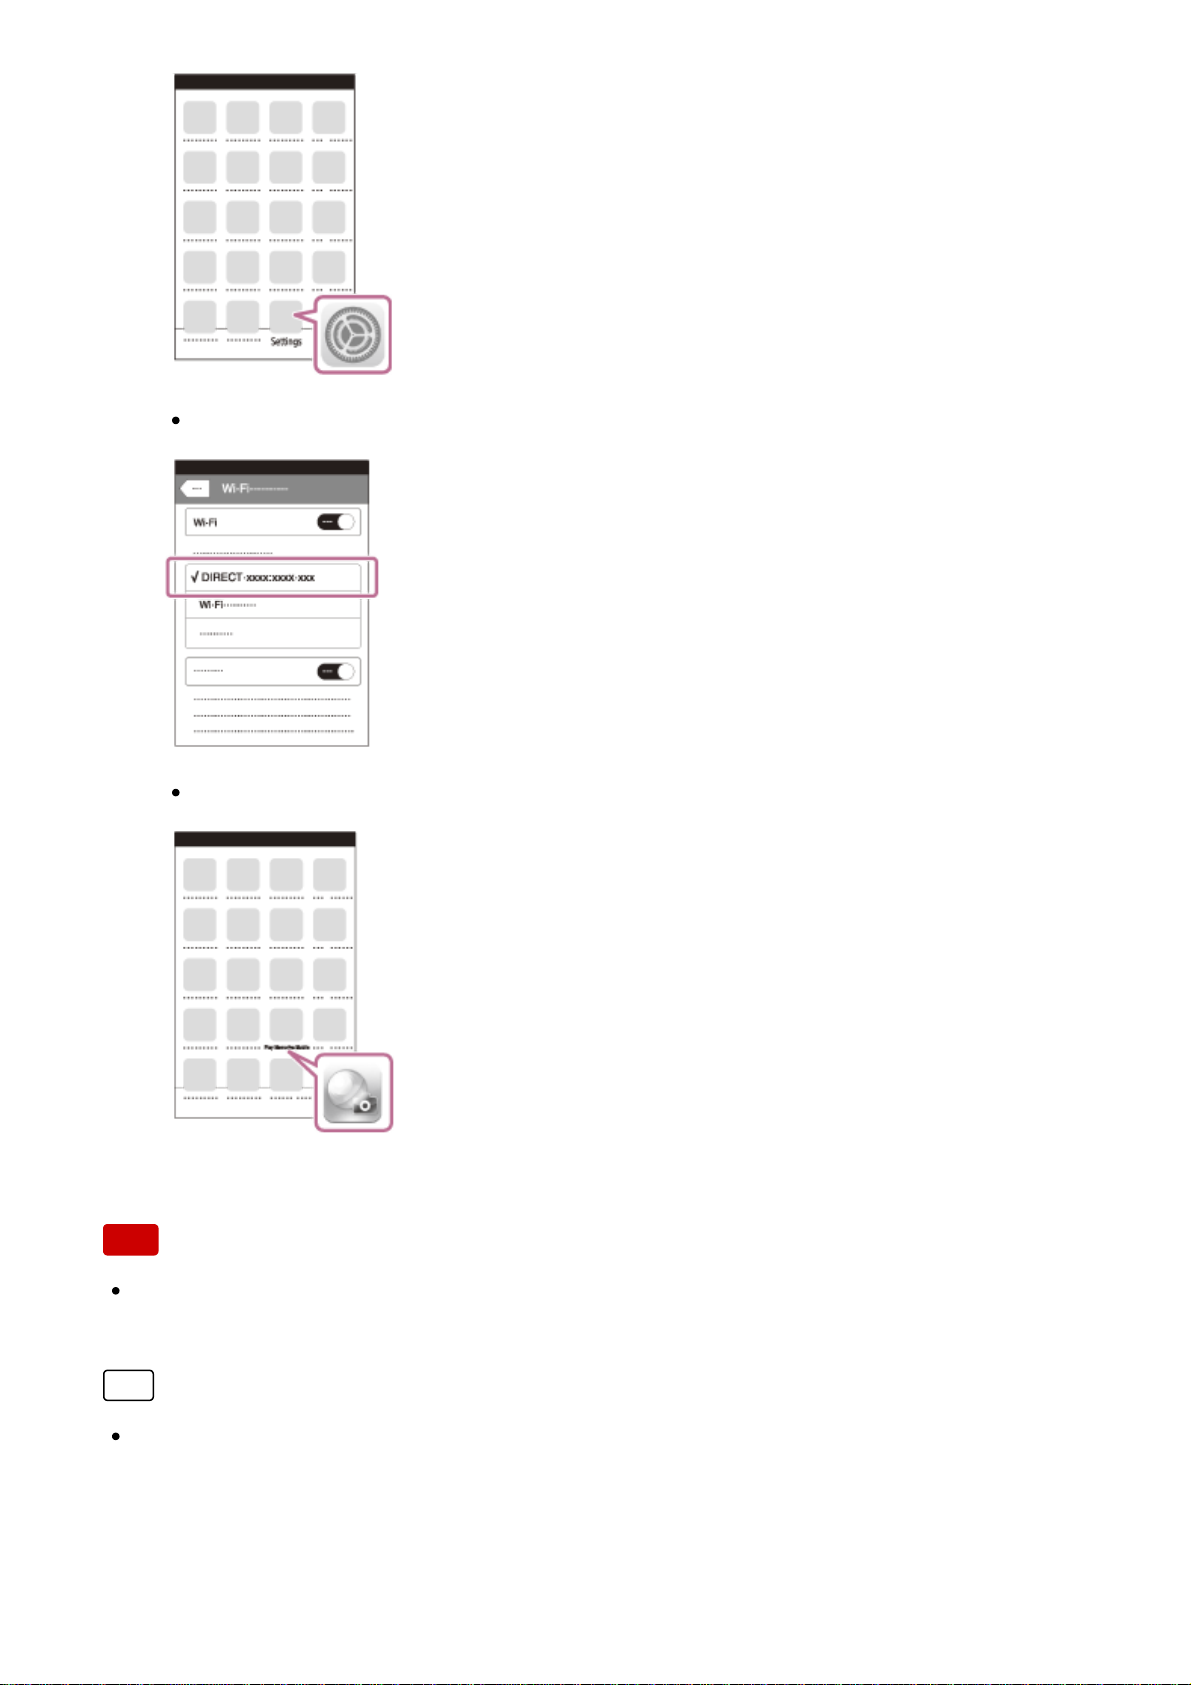
Select the SSID of the camcorder.
Go back to the Home screen and start up PlayMemories Mobile.
Note
If the camcorder cannot be connected with the smartphone by NFC or by
reading the QR Code, connect by using the SSID and the password.
Hint
Once the QR Code is read and the connection has been successfully
established, the SSID (DIRECT-xxxx) and the password of the camcorder will
be registered onto your smartphone. Subsequent Wi-Fi connections between
the camcorder and your smartphone will only require selecting the SSID of the
camcorder registered on your smartphone.
81
Page 82
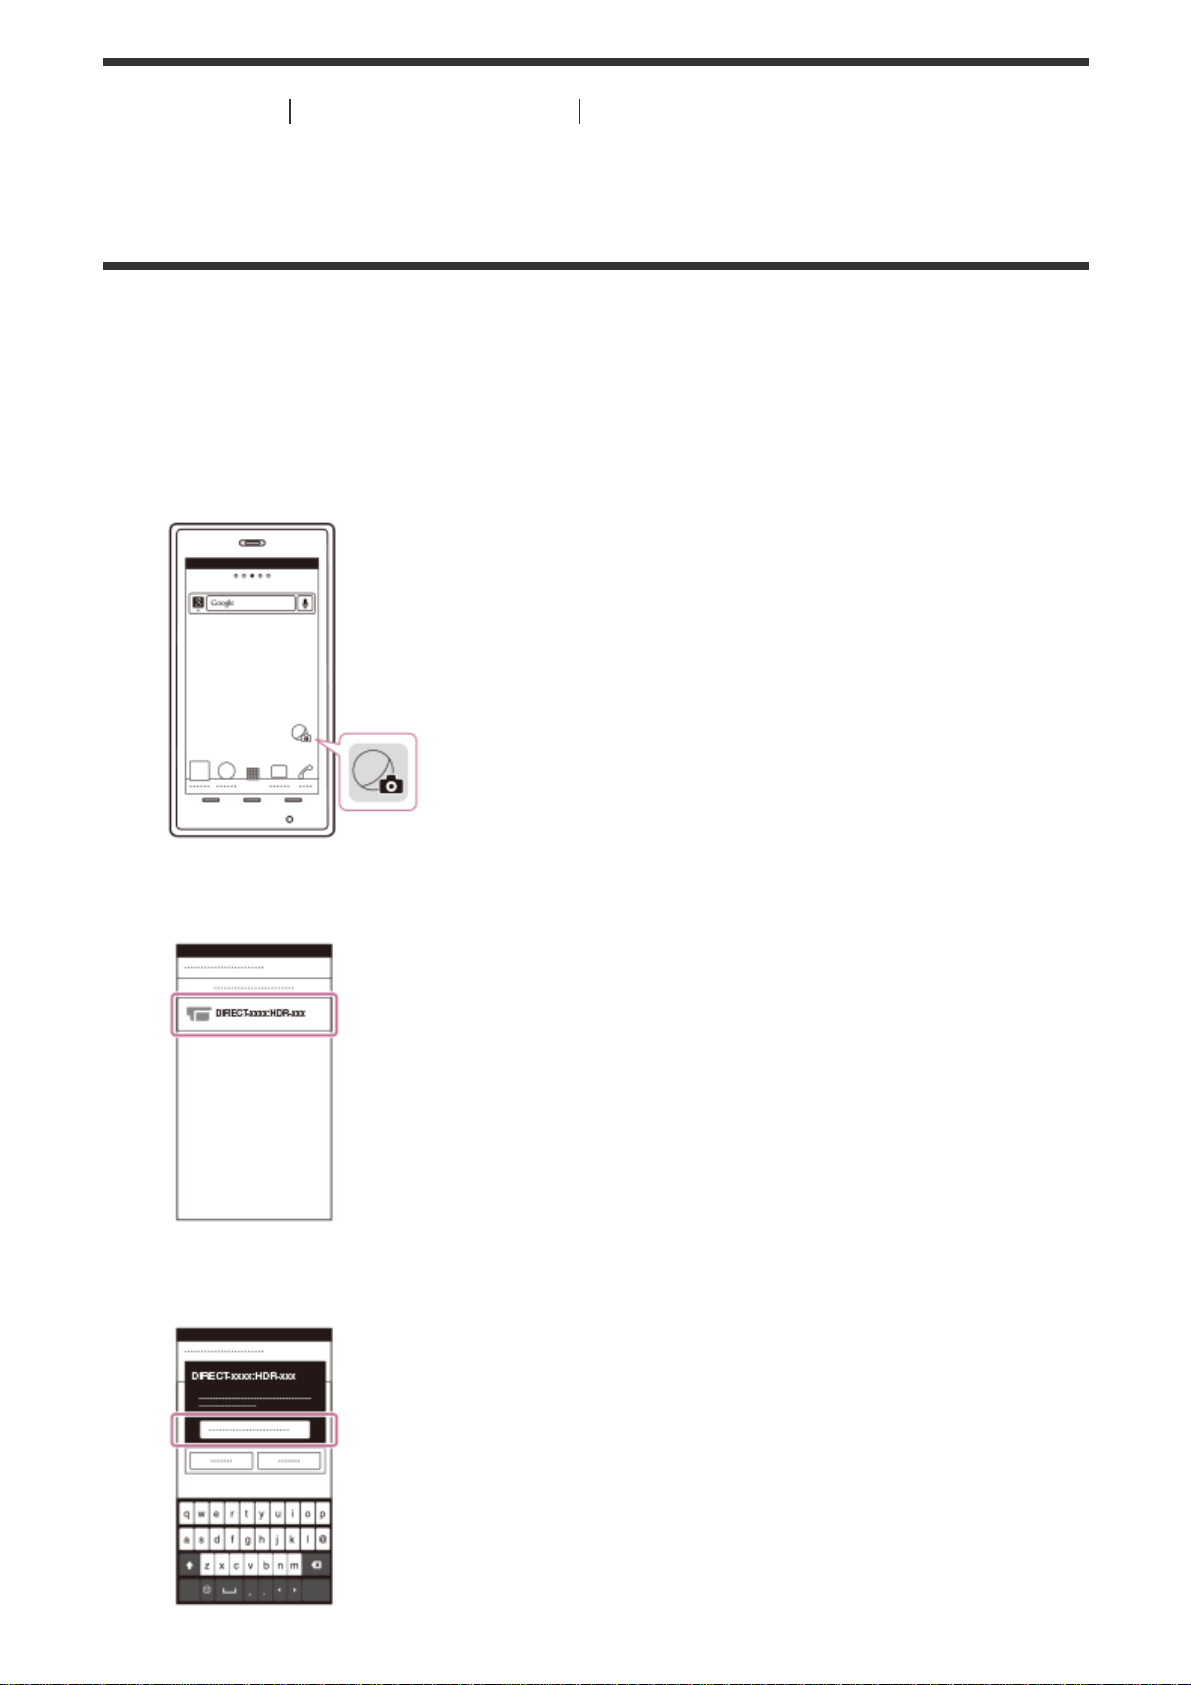
[67] How to Use Using the Wi-Fi function Connecting a smartphone
Connecting to your Android smartphone or tablet (by
entering an SSID and password)
Shows how to connect this product to your Android smartphone or tablet. Display
the SSID and password in advance by selecting [Send to Smartphone] or [Ctrl
with Smartphone] on this product.
1. Start up PlayMemories Mobile on the smartphone.
2. Select the SSID displayed on this product.
3. Enter the password displayed on this product.
82
Page 83
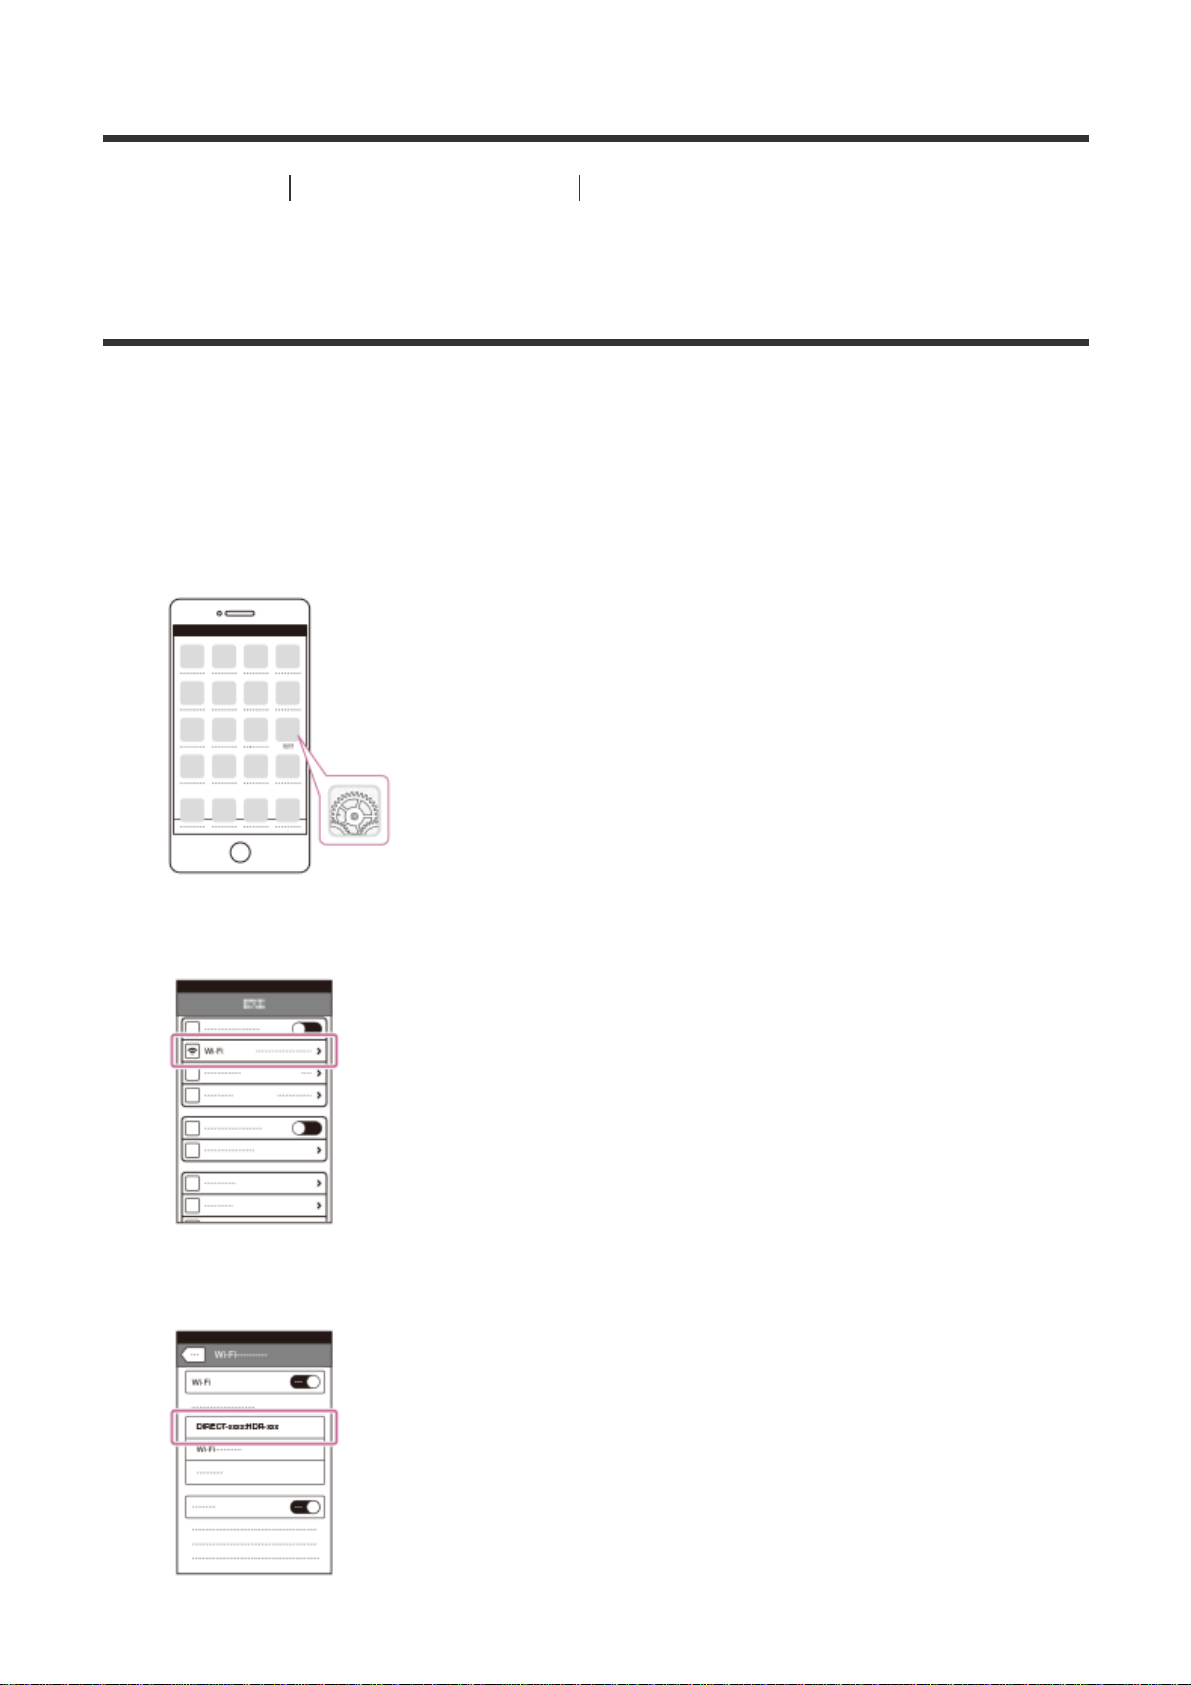
[68] How to Use Using the Wi-Fi function Connecting a smartphone
Connecting to your iPhone or iPad (by entering an SSID
and password)
Shows how to connect this product to your iPhone or iPad. Display the SSID and
password in advance by selecting [Send to Smartphone] or [Ctrl with Smartphone]
on this product.
1. Open the settings menu.
2. Select Wi-Fi.
3. Select the SSID displayed on this product.
83
Page 84
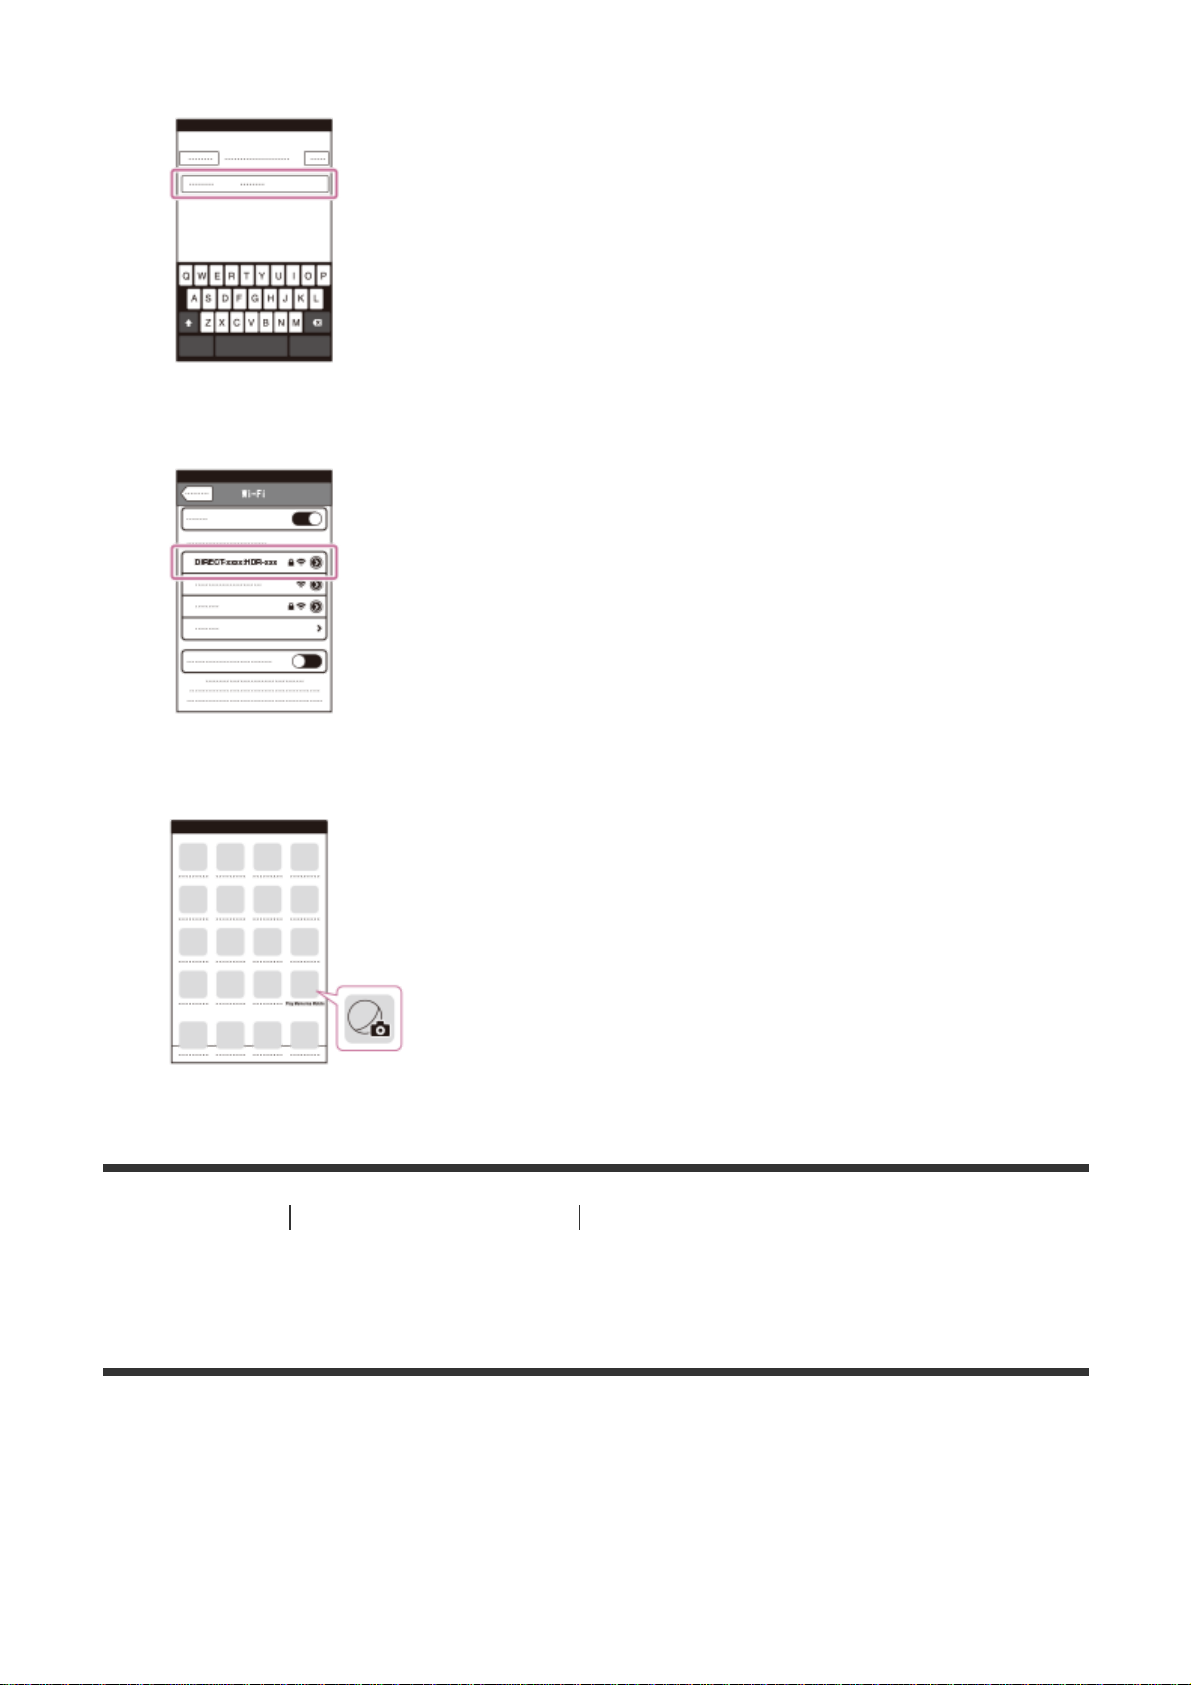
4. Enter the password displayed on this product.
5. Confirm that the SSID displayed on this product is selected.
6. Go back to Home and start up PlayMemories Mobile.
[69] How to Use Using the Wi-Fi function Controlling via a smartphone
Using your smartphone or tablet as a wireless remote
commander
You can operate this product using your smartphone or tablet as a wireless remote
commander.
1. Install PlayMemories Mobile on your smartphone.
84
Page 85
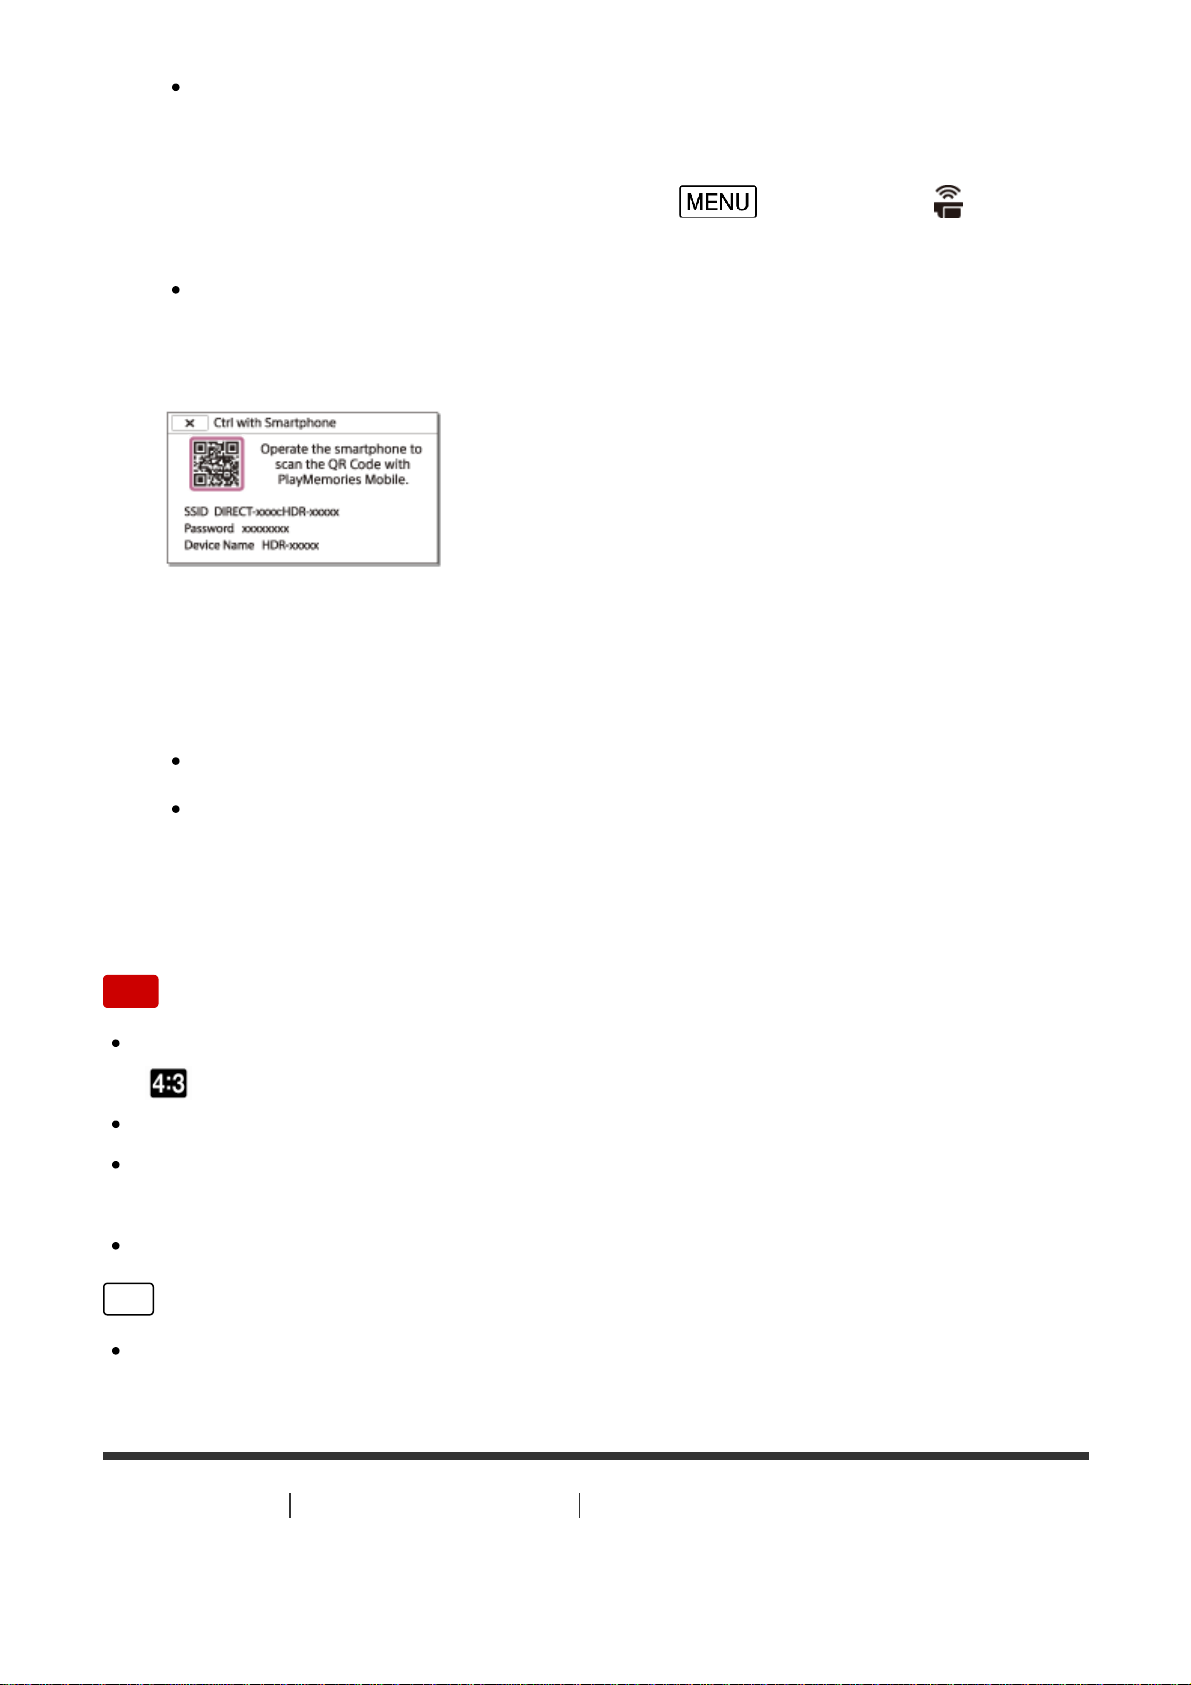
If PlayMemories Mobile is already installed in your smartphone, update
the software to the latest version.
2. On the LCD monitor of this product, select
- [Wireless] - [ Function]
- [Ctrl with Smartphone].
The QR Code, SSID, password and device name are displayed on the
LCD monitor of this product. This product is now ready to be operated
using your smartphone.
3. Start PlayMemories Mobile, select [Scan QR Code of the Camera] - [OK] -
[OK], then scan the QR Code displayed on the LCD monitor of this product
with your smartphone or tablet.
Connect to this product using your smartphone.
For details on connecting your smartphone, see “Related Topic.”
4. Operate this product using your smartphone.
Note
The photo size stored on the smartphone is [2M] except when the image size is
[
S (VGA)].
Movies are recorded on this product and are not stored on the smartphone.
The operation methods and display screens for the application are subject to
change without notice by future upgrades.
This application is not guaranteed to work on all smartphones and tablets.
Hint
For the latest supported OS, refer to the download page of PlayMemories
Mobile.
[70] How to Use
Using the Wi-Fi function Controlling via a smartphone
85
Page 86
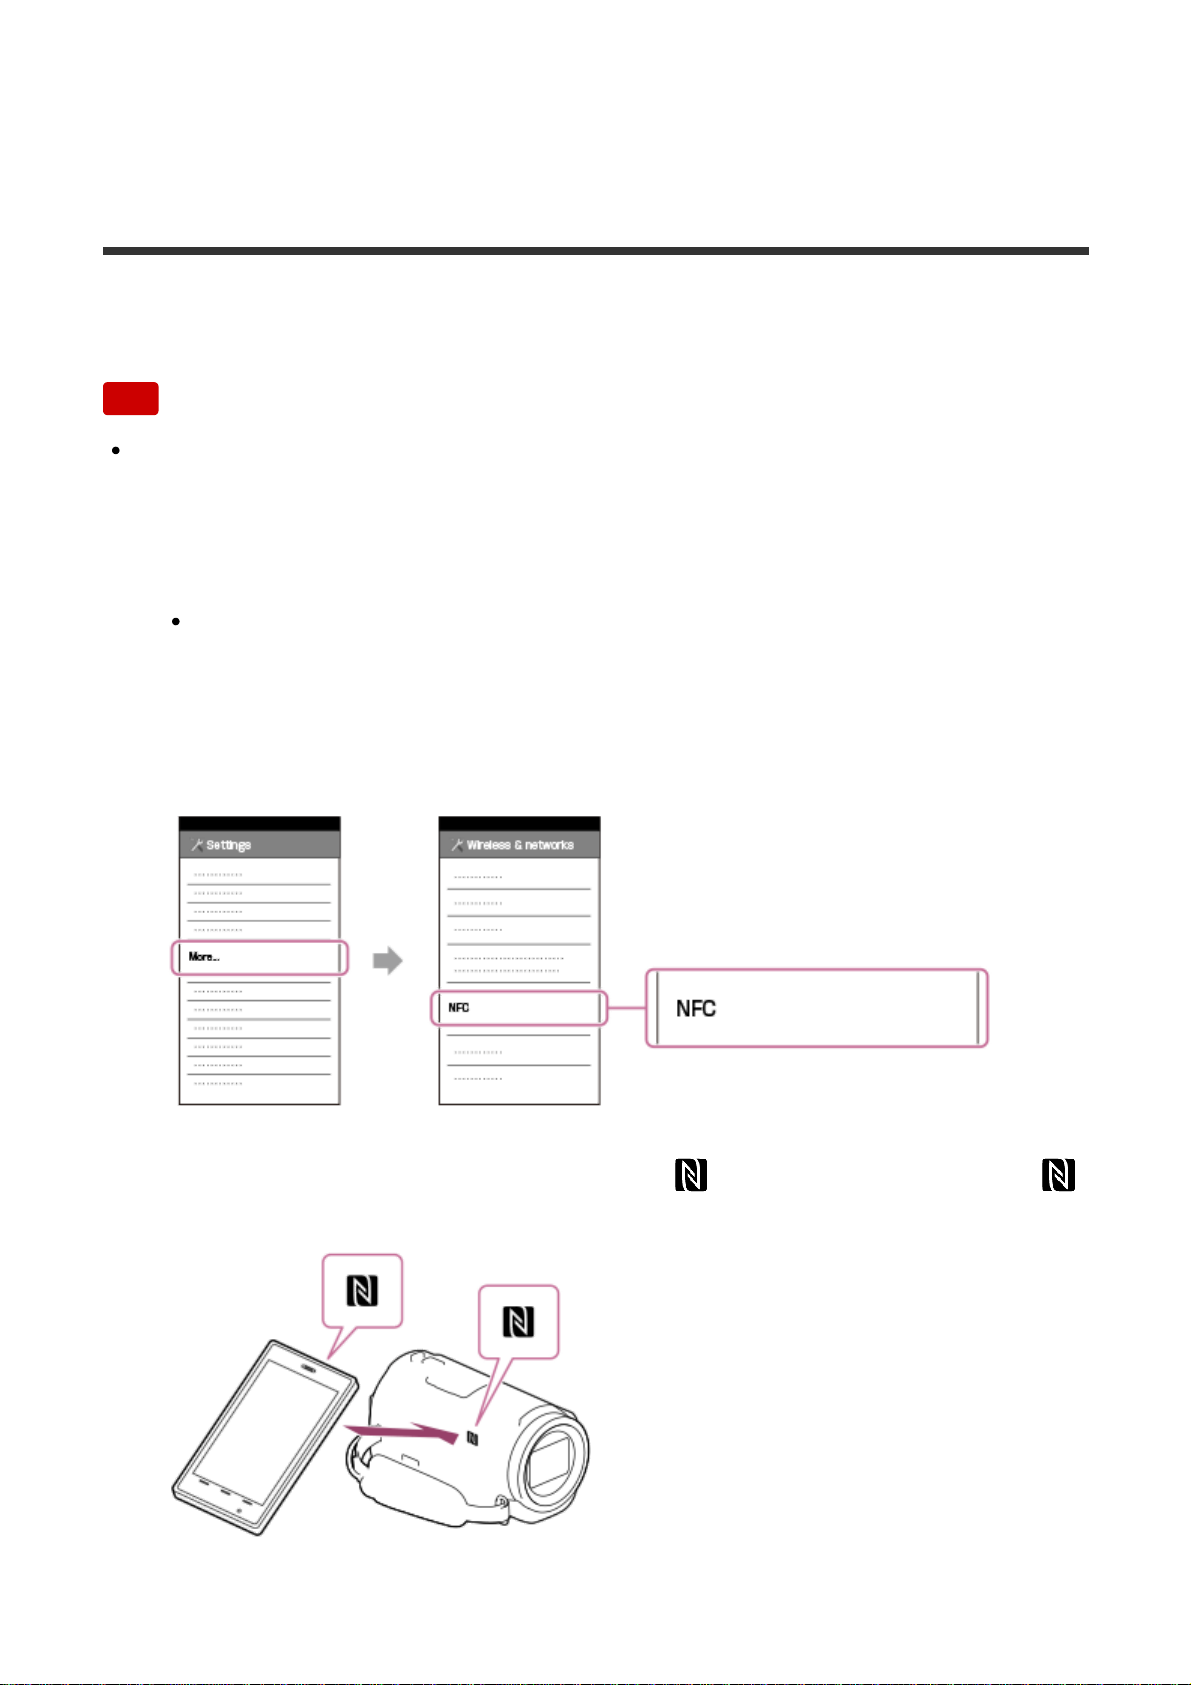
Using your smartphone or tablet as a wireless remote
commander using the NFC function (NFC one-touch
remote)
You can operate this product using your NFC-enabled smartphone or tablet as a
wireless remote commander.
Note
Make sure that your smartphone is not in sleep mode and the screen is
unlocked in advance.
1. Install PlayMemories Mobile on your smartphone.
If PlayMemories Mobile is already installed in your smartphone, update
the software to the latest version.
2. Select [Settings] on the smartphone, then select [More…] and place a
checkmark next to [NFC].
3. Enter the recording mode, and then touch (N mark) of this product to
(N mark) of your smartphone.
86
Page 87
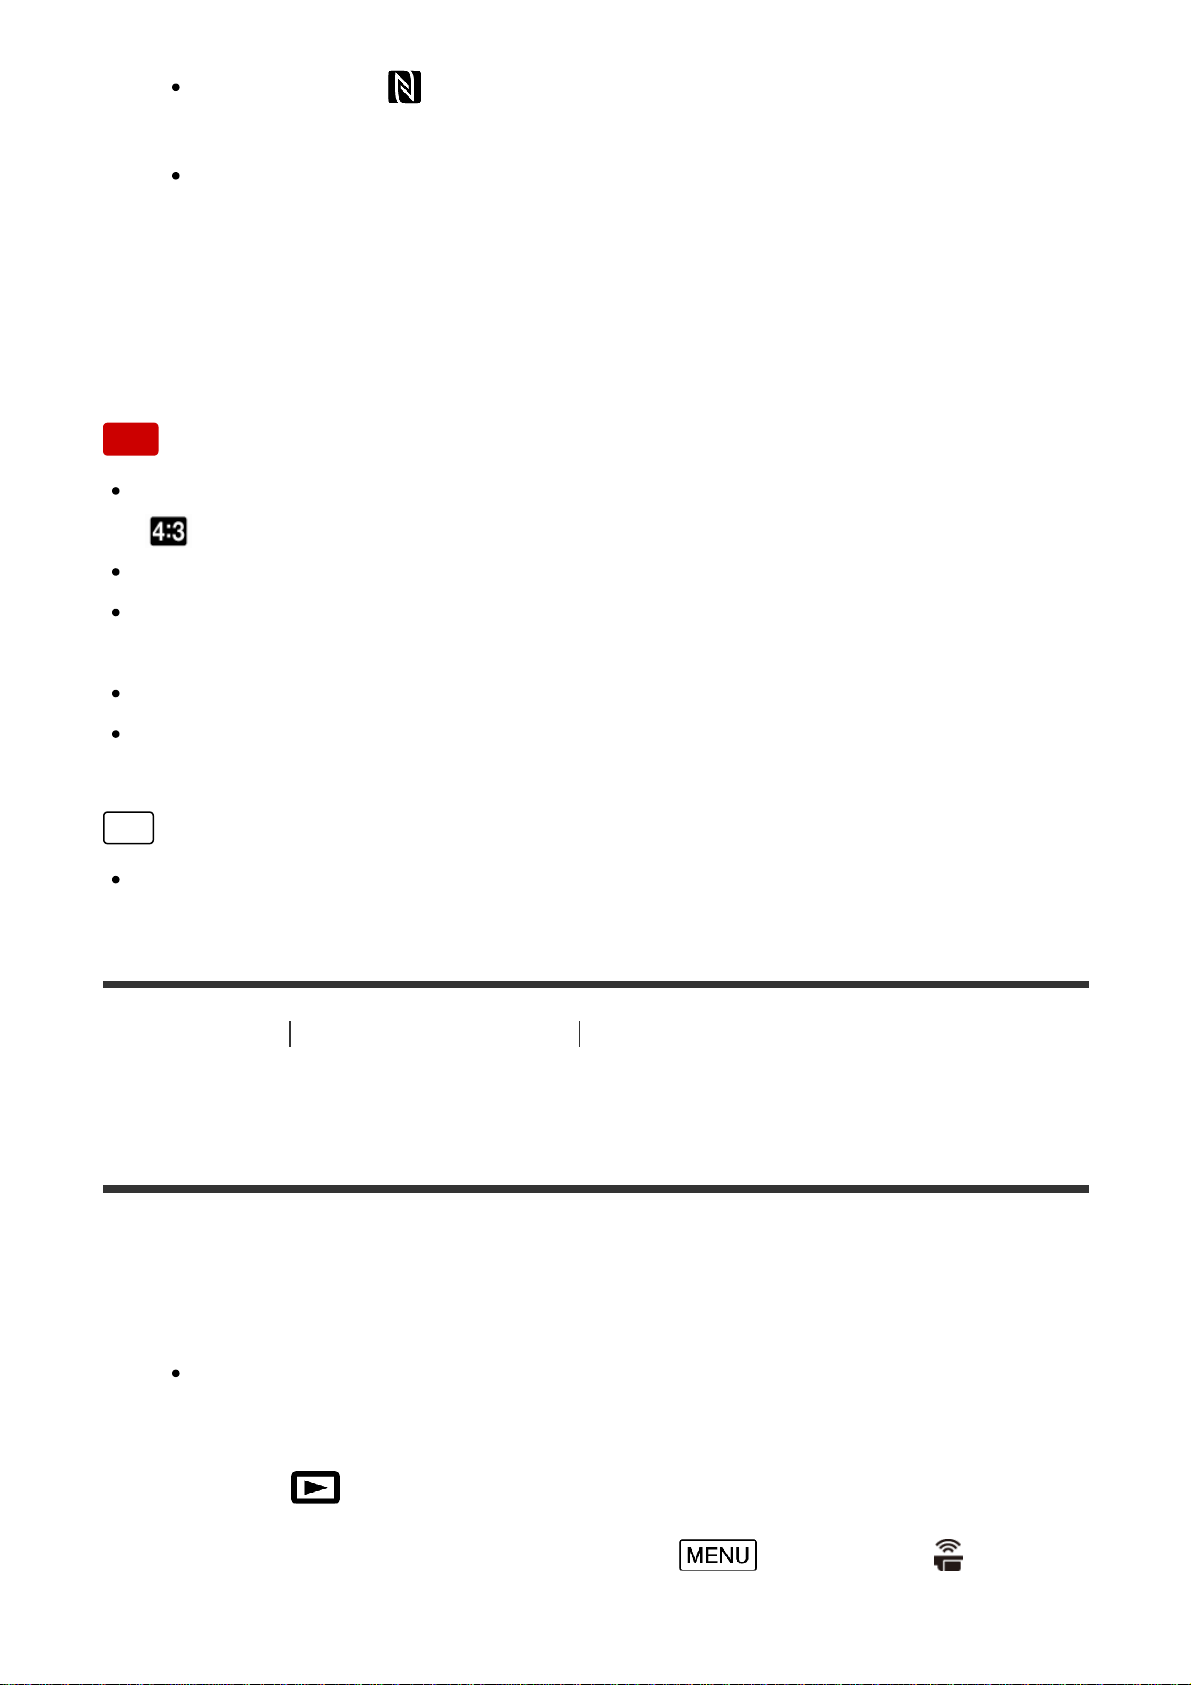
Make sure that (N mark) is displayed on the LCD monitor of this
product.
Hold this product and your smartphone together and keep them still for
about 1-2 seconds until PlayMemories Mobile starts up on your
smartphone.
4. Operate this product using your smartphone.
Note
The photo size stored on the smartphone is [2M] except when the image size is
[
S (VGA)].
Movies are recorded on this product and are not stored on the smartphone.
The operation methods and display screens for the application are subject to
change without notice by future upgrades.
This application is not guaranteed to work on all smartphones and tablets.
If the connections is not made successfully, try the procedures shown in
“Connecting to an Android smartphone or tablet.”
Hint
For the latest supported OS, refer to the download page of PlayMemories
Mobile.
[71] How to Use
Using the Wi-Fi function Transferring images to a smartphone
Transferring movies (MP4) and photos to your
smartphone or tablet
Transfer images to your smartphone or tablet.
1. Install PlayMemories Mobile on your smartphone.
If PlayMemories Mobile is already installed in your smartphone, update
the software to the latest version.
2. Press the
button on this product to enter the playback mode.
3. On the LCD monitor of this product, select
- [Wireless] - [ Function]
- [Send to Smartphone] - [Select on This Device].
87
Page 88
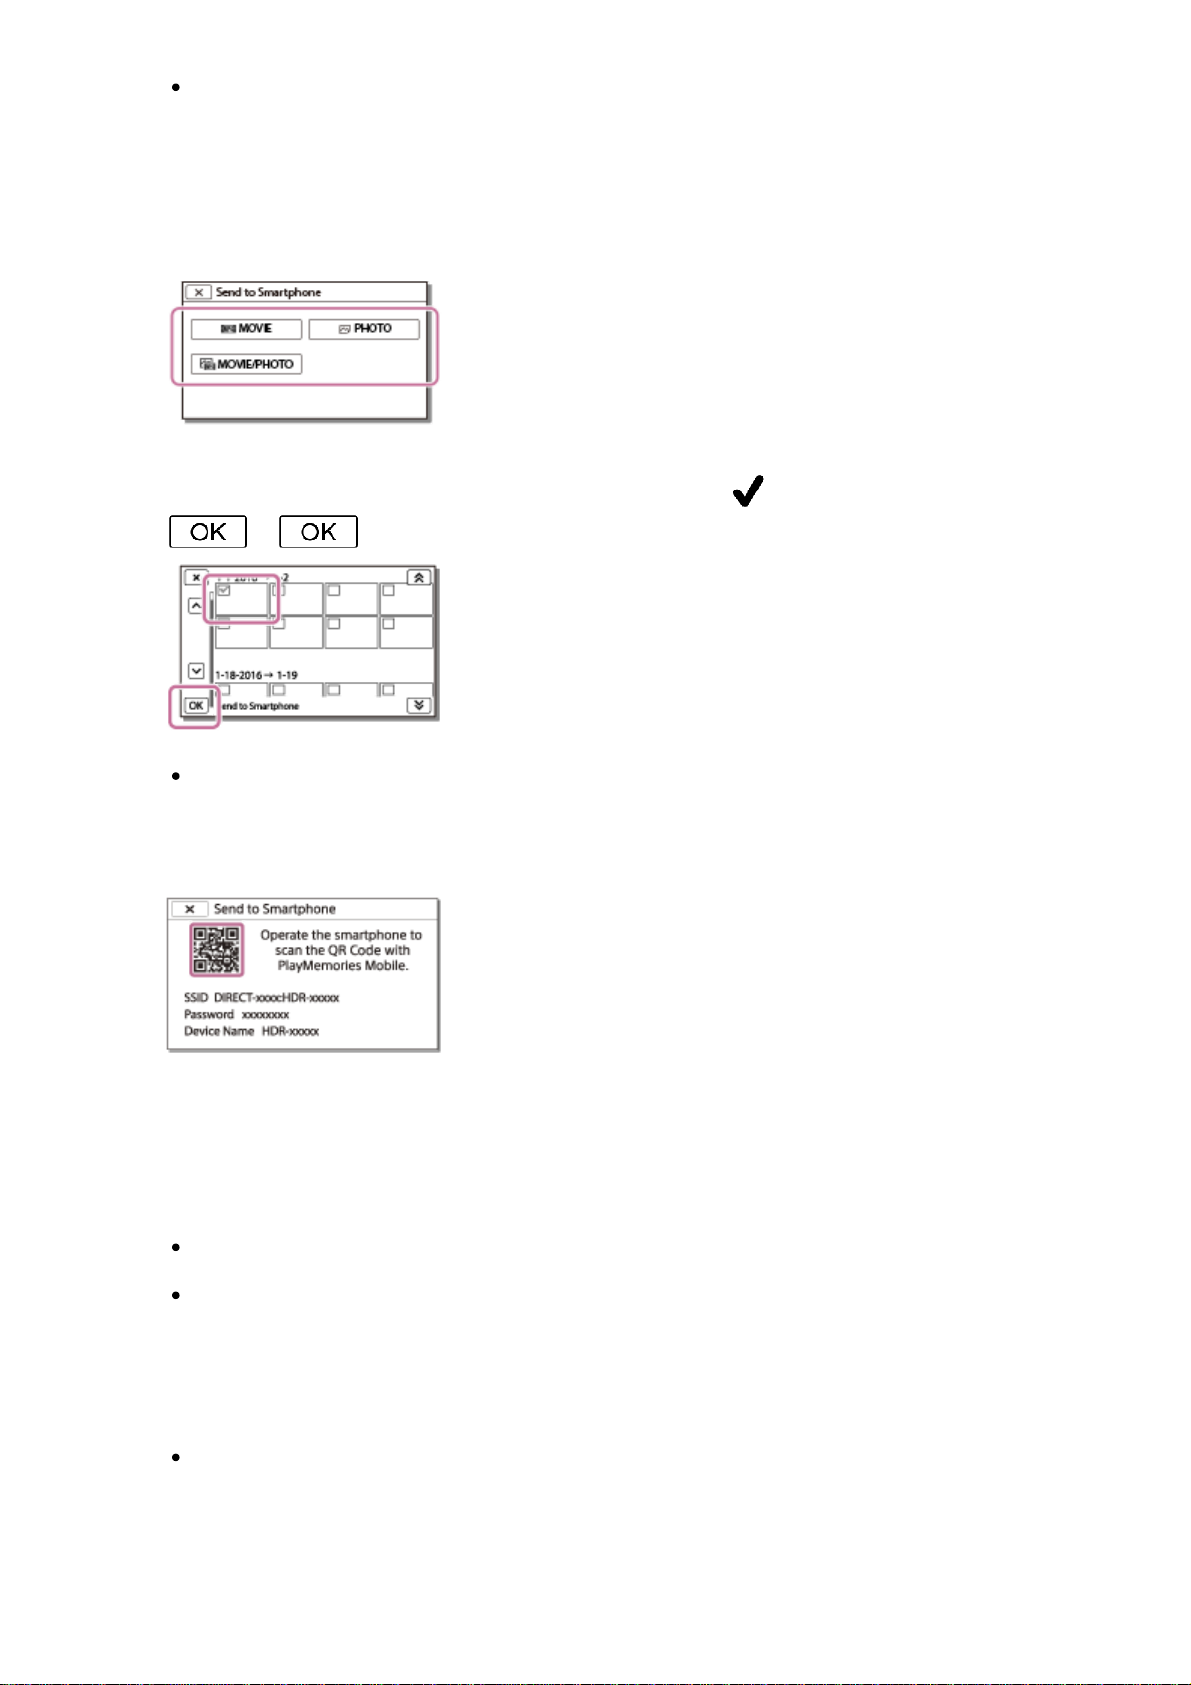
If you select [Select on Smartphone], all images stored in the internal
memory of this product (models with the internal memory) or on the
memory card are displayed on the smartphone screen.
4. Select the type of image you want to transfer.
5. Select the image you want to transfer, and add mark, and then select
- .
The QR Code, SSID, password and device name and a password are
displayed on the LCD monitor of this product. This product is now ready to
be connected from your smartphone.
6. Start PlayMemories Mobile, select [Scan QR Code of the Camera] - [OK] -
[OK], then read the QR Code displayed on the LCD monitor of this product
with your smartphone or tablet.
Connect to this product using your smartphone.
For details on the connection method of your smartphone, see “Related
Topic.”
7. The images are transferred from this product to the smartphone.
Transferred images will be stored in Gallery/Album on an Android
smartphone/tablet or Album on an iPhone/iPad.
88
Page 89
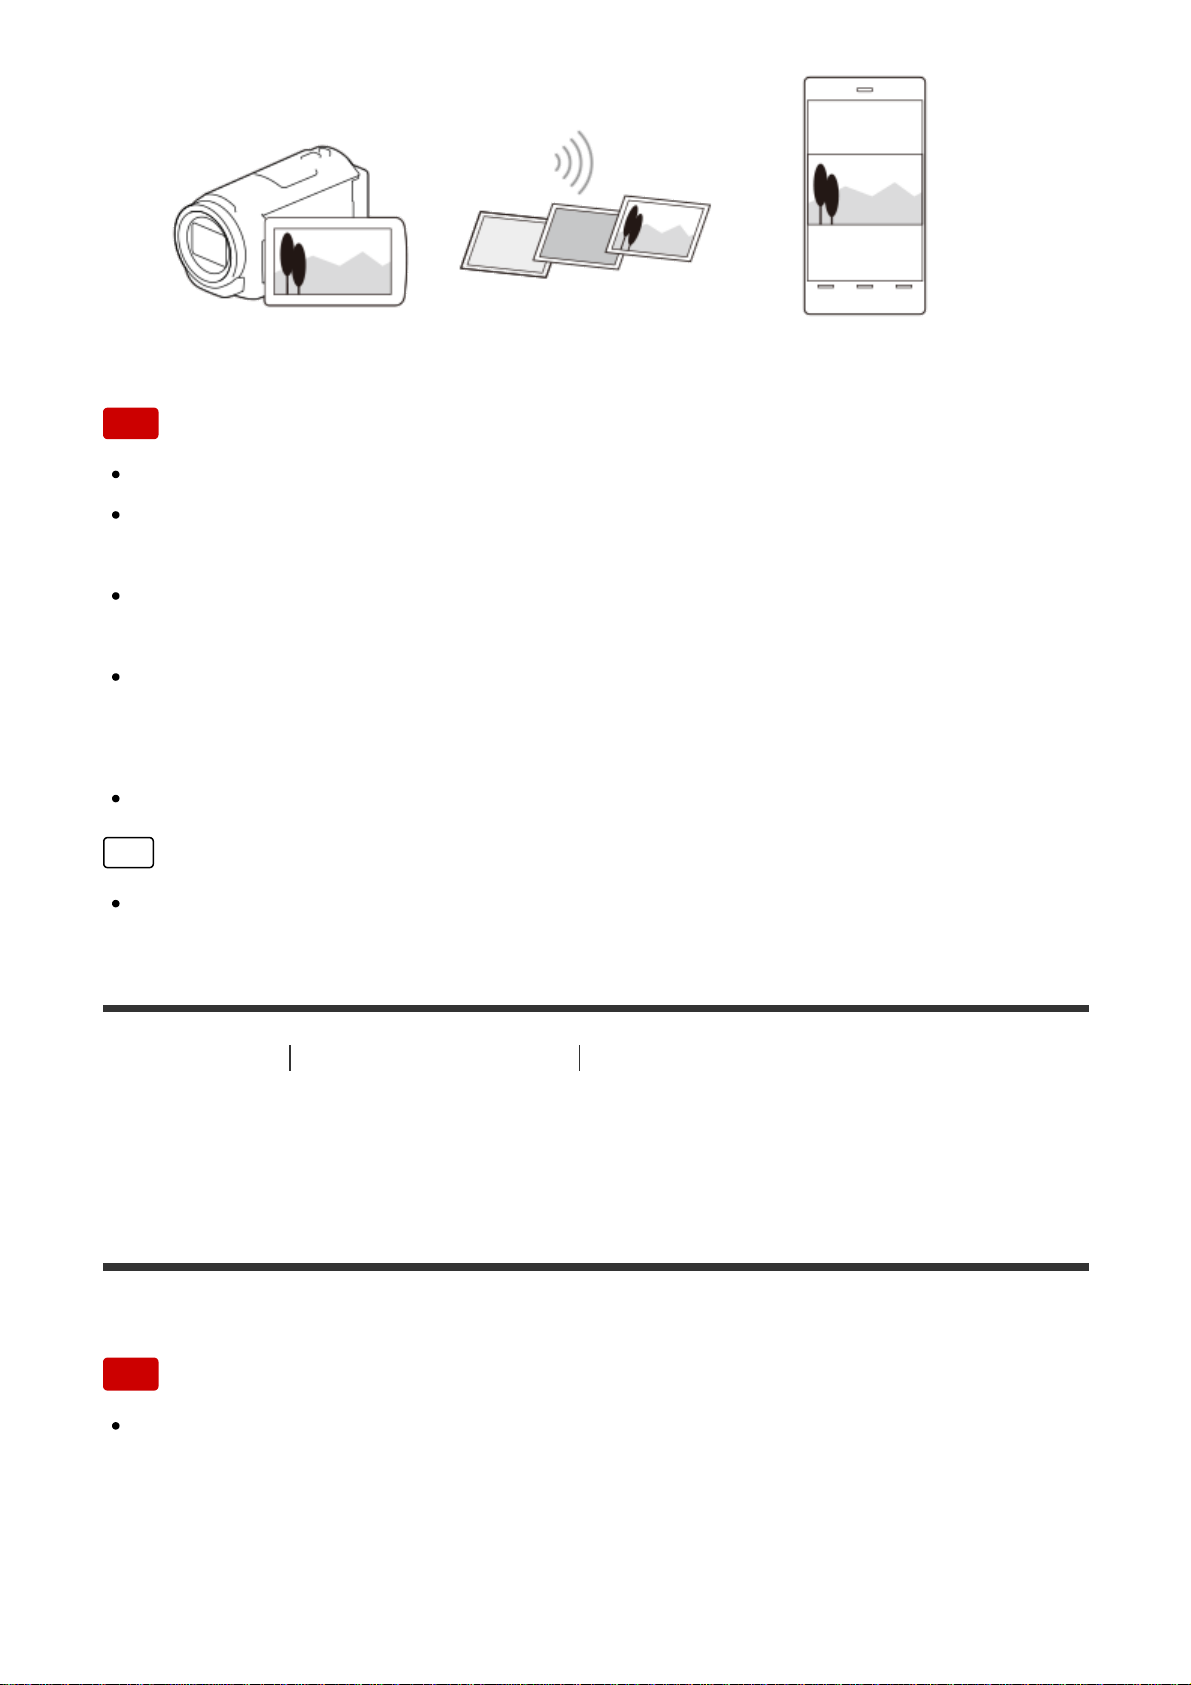
Note
You cannot transfer XAVC S movies or AVCHD movies.
[Send to Smartphone] is not available when MP4 movies or still images have
not been saved on this product.
To select MP4 movies when playing back a movie, see “Playing MP4 movies
(HD movie) (switching the movie format)” and switch the movie format.
If you want to import images recorded on a memory card, insert the memory
card to this product, and then select the memory card in [Media Select] (models
with the internal memory).
This application is not guaranteed to work on all smartphones and tablets.
Hint
For the latest supported OS, refer to the download page of PlayMemories
Mobile.
[72] How to Use
Using the Wi-Fi function Transferring images to a smartphone
Transferring movies (MP4) and photos to your
smartphone or tablet using the NFC function (NFC onetouch sharing)
Transfer images to your NFC-enabled Android smartphone or tablet.
Note
Make sure that your smartphone is not in sleep mode and the screen is
unlocked in advance.
1. Install PlayMemories Mobile on your smartphone.
89
Page 90
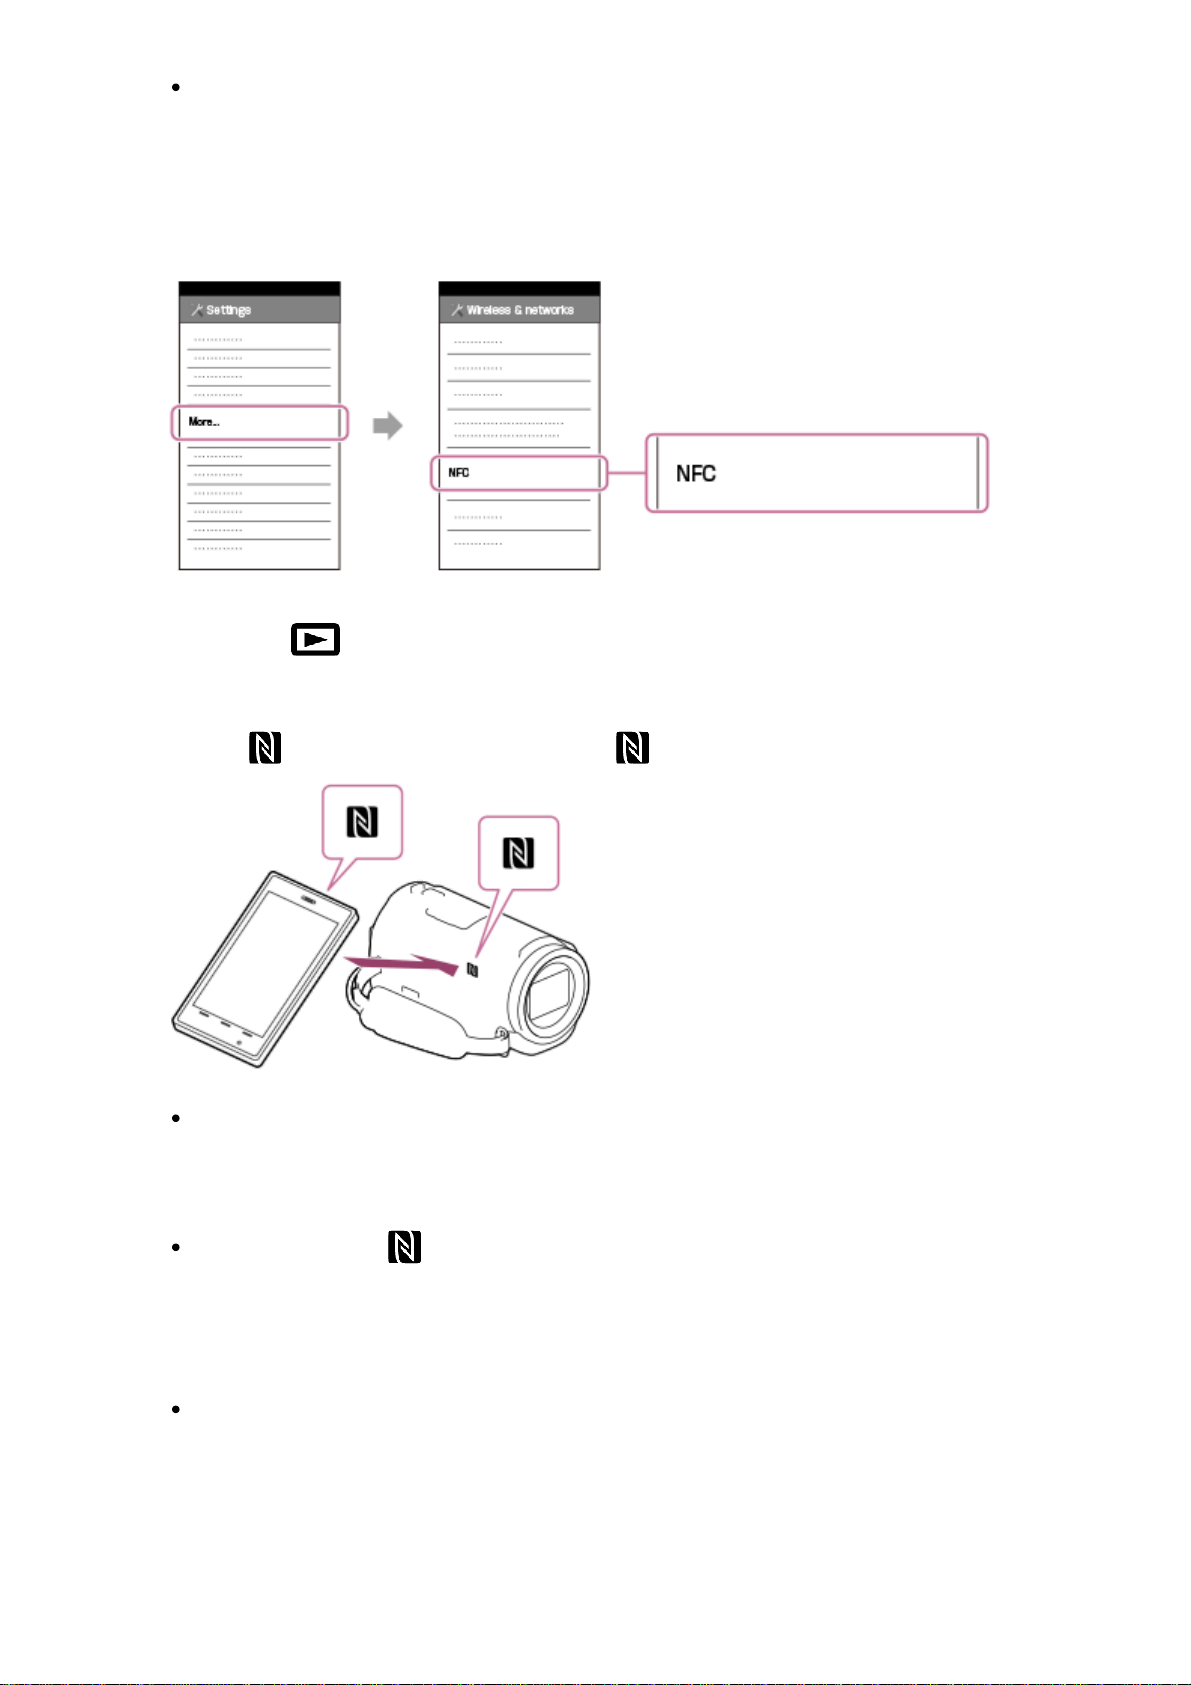
If PlayMemories Mobile is already installed in your smartphone, update
the software to the latest version.
2. Select [Settings] on the smartphone, then select [More…] and place a
checkmark next to [NFC].
3. Press the button on this product to enter the playback mode, and then
display the image you want to transfer on the LCD monitor of this product.
4. Touch
(N mark) of this product to (N mark) of your smartphone.
Hold this product and your smartphone together and keep them still for
about 1-2 seconds until PlayMemories Mobile starts up on your
smartphone.
Make sure that (N mark) is displayed on the LCD monitor of this
product.
5. The images are transferred from this product to the smartphone.
Transferred images will be stored in Gallery/Album on an Android
smartphone/tablet or Album on an iPhone/iPad.
90
Page 91
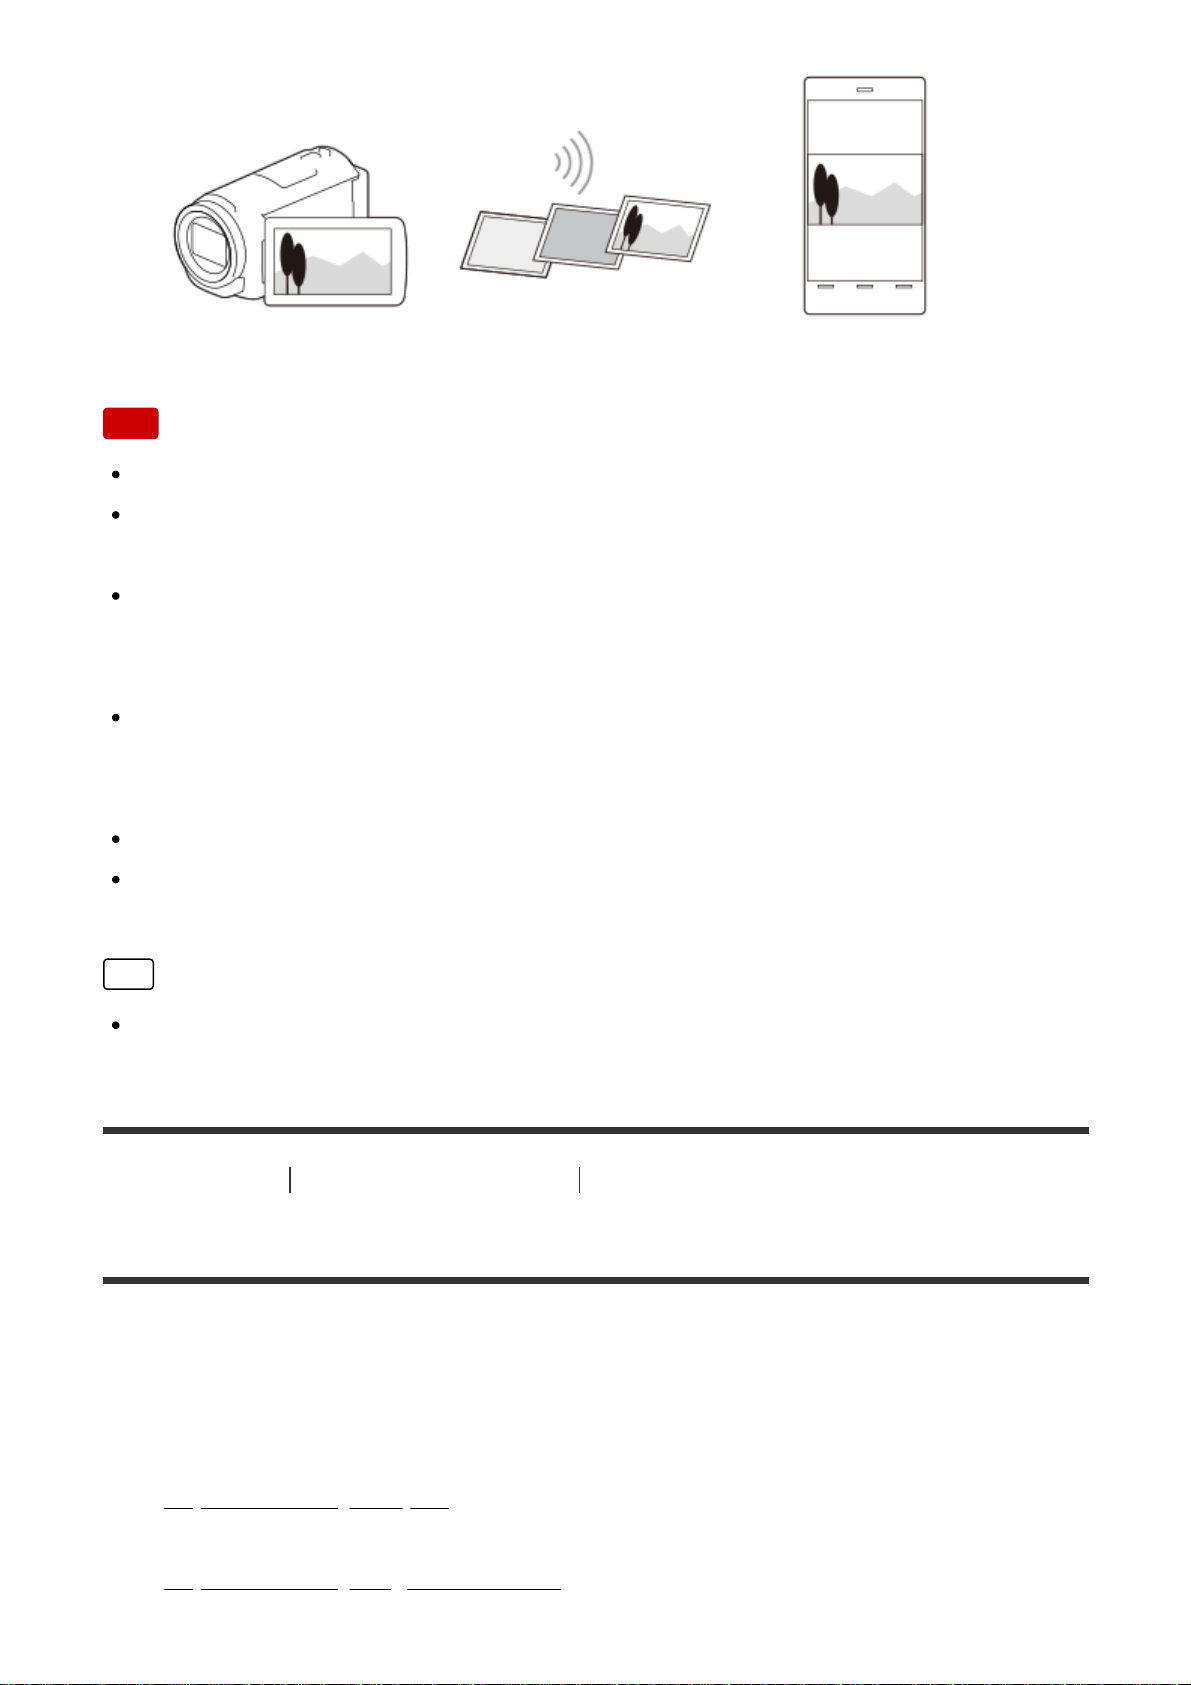
Note
You cannot transfer XAVC S movies or AVCHD movies.
[Send to Smartphone] is not available when MP4 movies or still images have
not been saved on this product.
Select “Switch Movie Format button” in “Playing MP4 movies (HD movie)
(switching the movie format)”, to select MP4 movies when you play back
movies.
If you want to import images recorded on a memory card, insert the memory
card to this product, and then select the memory card in [Media Select] (models
with the internal memory).
This application is not guaranteed to work on all smartphones and tablets.
If the connections is not made successfully, try the procedures shown in
“Connecting to an Android smartphone or tablet.”
Hint
For the latest supported OS, refer to the download page of PlayMemories
Mobile.
[73] How to Use
Using the Wi-Fi function Transferring images to a computer
Send to Computer
You can transfer and save movies and photos to your computer.
1. Install the software on your computer.
For Windows: PlayMemories Home
http://www.sony.net/pm/
For Mac: Wireless Auto Import
http://www.sony.co.jp/imsoft/Mac/
91
Page 92
If connecting this product to your computer for the first time after installing
the software, set [USB Connect Setting] to [Mass Storage] on this product,
and then connect this product to your computer with the USB Cable.
If the software is already installed in your computer, update the software to
the latest version.
2. Connect this product to the wireless network access point.
If your access point does not support the WPS push button, refer to
“Access point settings”.
If your access point supports the WPS push button, refer to “WPS Push”.
Settings for steps 1 and 2 are required only the first time.
3. Press the
button on this product to enter the playback mode.
4. On the LCD monitor of this product, select
- [Wireless] - [ Function]
- [Send to Computer].
Images are automatically transferred to and saved on the computer.
Only newly recorded images are transferred.
Note
Do not close the LCD monitor while transferring files. Transferring will be
interrupted.
You must turn on the computer to execute [Send to Computer].
Depending on the settings of the application on the computer, this product may
turn off automatically after saving images.
If you want to import images recorded on a memory card, insert the memory
card to this product in advance (models with the internal memory).
Importing movies and multiple still images may take time.
[74] How to Use
Using the Wi-Fi function Transferring images to a TV
Playing images on a TV (View on TV)
You can view images on your TV connected to the network by transferring images
from this product without connecting this product and TV with a cable.
92
Page 93
Operations may be required on your TV before playing depending on the TV you
use. Refer to the instruction manuals of the TV as well.
1. Connect this product to a wireless network access point.
If your access point does not support the WPS push button, refer to
“Access point settings”.
If your access point supports the WPS push button, refer to “WPS Push”.
Step 1 can be skipped from the second time.
2. Press the
button on this product to enter the playback mode.
3. Select
- [Wireless] - [ Function] - [View on TV] - the type of image
you want to transfer.
4. Play a movie or a photo on the TV.
Note
This function is not available for [ XAVC S HD] movies.
This function is available with the DLNA player compatible TVs.
You can view images only on TVs that are compatible with the network function
(including wired network).
It may take time until the images are played on the TV.
This function is not available when using an access point without a security
setting (WEP/WPA/WPA2) to protect from prying eyes.
Select the access point you registered with this product when connecting your
TV.
To enjoy viewing movies comfortably, use a wired network connection for your
TV. Depending on the wireless network environment, movies may not be
played smoothly.
Depending on the settings of the recorded movie, it may not play smoothly.
[75] How to Use
Using the Wi-Fi function Live Streaming
About Live Streaming
Live Streaming is a function to stream real-time video to a video sharing site such
as Ustream (currently IBM Cloud Video), and can be accomplished by using this
93
Page 94
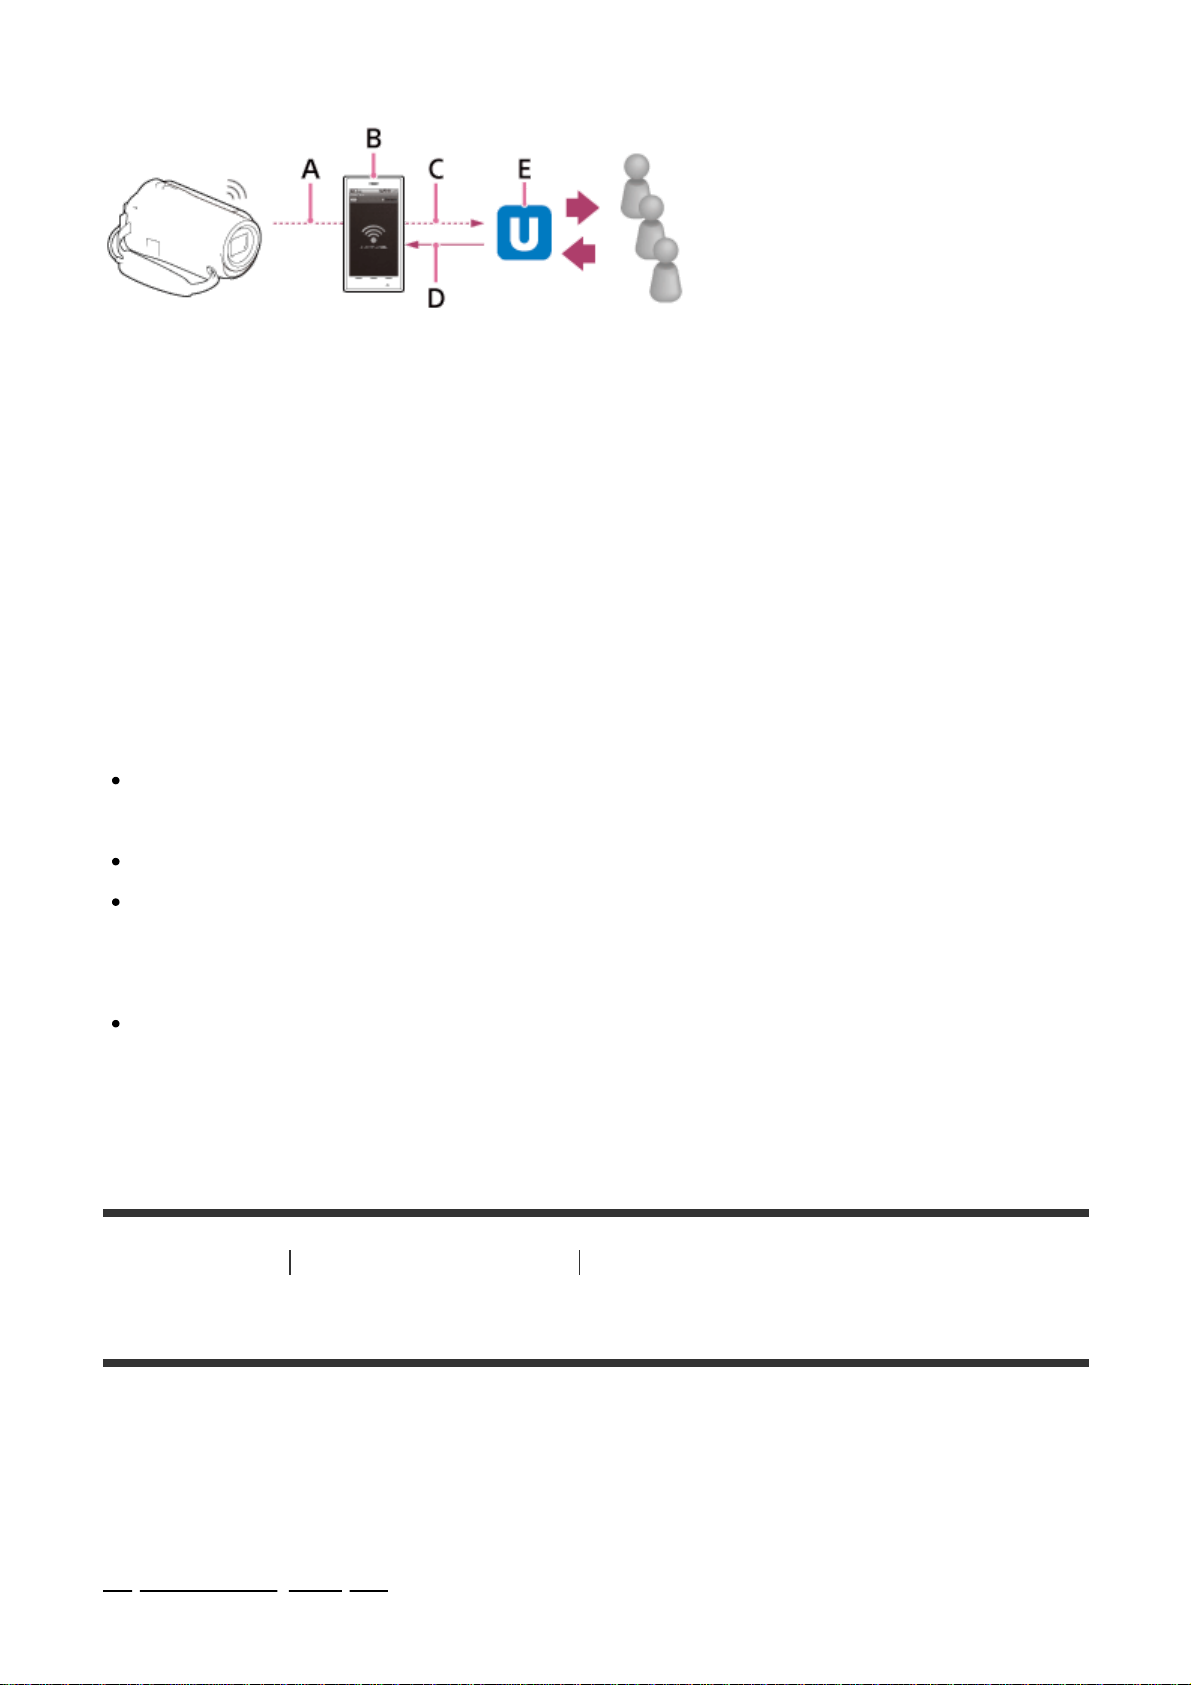
product with a Wi-Fi router or smartphone capable of tethering.
A: Wi-Fi
B: Tethering mode
C: 3G/LTE
D: Comments from viewers
E: Video sharing site such as Ustream (currently IBM Cloud Video)
To perform Live Streaming, the following preparations are
required.
Set the following settings for streaming in the Live Streaming settings of this
product.
User registration to video sharing site (such as Ustream (currently IBM Cloud
Video))
A smartphone (capable of tethering) or a Wi-Fi network environment
Live Streaming feature is dependent upon the Third Party Internet Provider's
service and terms in your region. The feature may not be available due to your
region's broadband and internet service restriction.
For the tethering settings of your smartphone or the Wi-Fi network settings of
your router, refer to the instructions manual of your smartphone or your Wi-Fi
router. For more details about the Wi-Fi network settings, consult the network
service provider.
[76] How to Use
Using the Wi-Fi function Live Streaming
Preparing Live Streaming
Configure the network settings on this product and register the video sharing site
account and SNS settings using the dedicated application “PlayMemories Home”
installed on your computer, in advance.
You can download “PlayMemories Home” from the following support site.
http://www.sony.net/pm/
94
Page 95
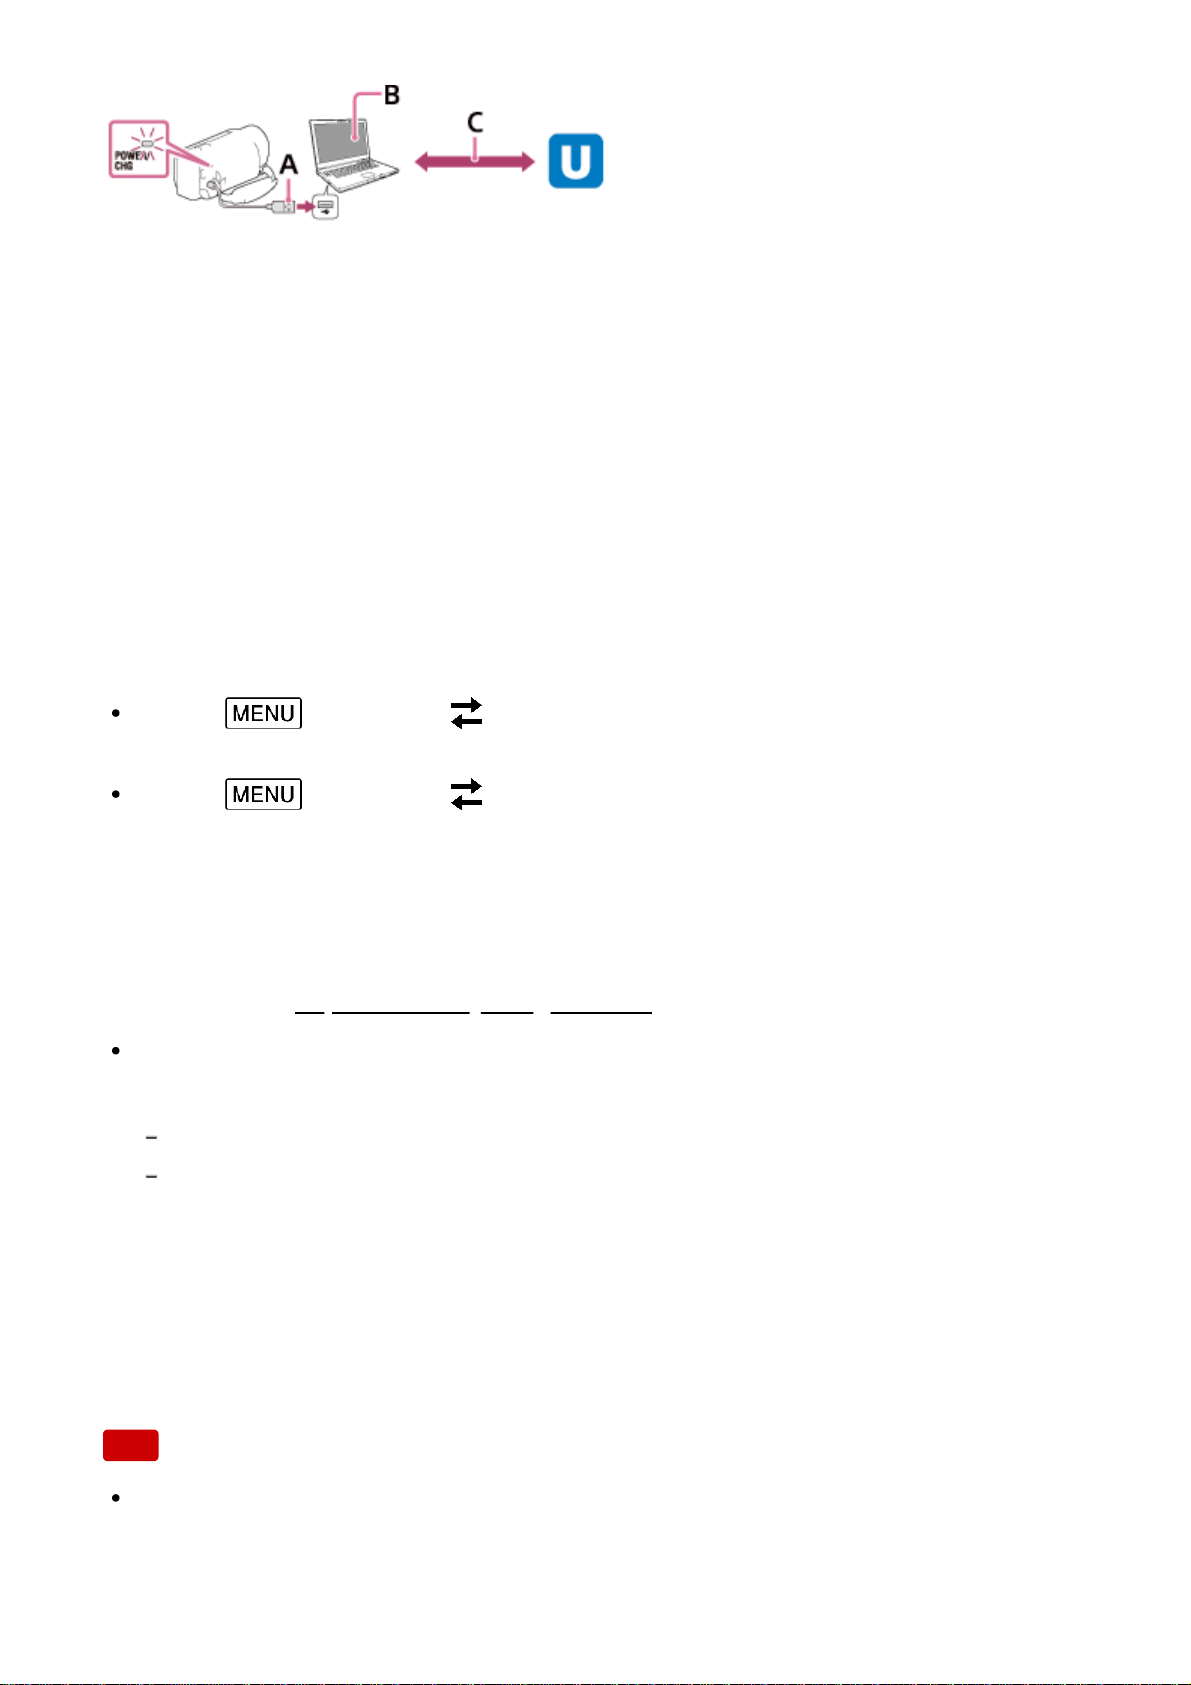
A: USB
Connect to your computer with Mass Storage.
B: “PlayMemories Home”
Start “PlayMemories Home.”
C: Obtaining OAuth authenticated channel ID
Log in to Ustream (currently IBM Cloud Video) and perform authentication using
“PlayMemories Home.”
Network settings on the computer
Check the following settings before connecting this product to your computer.
Select - [Setup] - [ Connection] - [USB Connect Setting], and [Mass
Storage] is selected.
Select - [Setup] - [ Connection] - [USB LUN Setting] and confirm that
[Multi] is selected.
You can set the following with the live streaming settings of “PlayMemories
Home.”
Select “PlayMemories Home” - [Tools] - [Network Settings Tool].
For details, see
http://www.sony.net/guide/nst/.
Streaming settings: You can set the streaming method and information of
videos.
Streaming site, channel, image quality, and saving settings of the streaming site
Title and description of streaming video
Live streaming settings of this product
Connect this product to the access point. For details, see “Access point settings”
or “WPS Push”.
Note
Your personal information (information required when logging in to Ustream
(currently IBM Cloud Video)) is set in this product. Be sure to reset the settings
of this product when you transfer or dispose of it.
95
Page 96
Hint
Ustream (currently IBM Cloud Video) is a video sharing site through which you
can stream and view videos with the Live Streaming function of this product.
For details of Ustream (currently IBM Cloud Video), see the following site.
(
https://video.ibm.com/).
[77] How to Use
Using the Wi-Fi function Live Streaming
Performing Live Streaming
You can start Live Streaming after the preparation is complete.
When Live Streaming for the first time, it is recommended that you rehearse
streaming in a prepared environment after setting up with a “PlayMemories Home”
on your computer in advance.
Set your smartphone to tethering mode or turn on your Wi-Fi router before
performing Live Streaming.
1. On the movie/photo recording screen, select
- [Wireless] - [
Function] - [Live Streaming].
2. Press the START/STOP button to start streaming.
[Connecting...] and the registered SSID are displayed during streaming
preparation then
is displayed when Live Streaming starts.
3. Press the START/STOP button again to stop streaming.
is flashing until Live Streaming finished.
Note
For some languages, the onscreen-displays might change to English while
using the Live Streaming function.
The frame rate of the movie that is Live Streaming is fixed as follows:
1080 60i-compatible device: 30p or 60i.
1080 50i-compatible device: 25p or 50i.
There may be time lag of 10 - 30 seconds between the start of Live Streaming
on this product and video streaming on the video sharing site.
The following are not available during Live Streaming:
96
Page 97

(My Voice Canceling)
Fader
Dual Video REC
Smile Shutter
[Intelligent Active] of [
SteadyShot]
Hint
You can record a movie that is Live Streaming into the memory of this product.
The movie is recorded either in the internal memory (internal memory equipped
model only) or the memory card based on the setting.
If the internal memory (internal memory equipped model only) or the memory
card becomes full, recording stops automatically without stopping streaming.
When you want to perform only Live Streaming without recording a movie into
the internal memory (models with the internal memory) or a memory card,
select [Wireless] - [
Setting] - [Vid REC during strm.] - [Off].
[78] How to Use
Using the Wi-Fi function Live Streaming
Restrictions for Live Streaming
There are restrictions when performing Live Streaming.
Restrictions for Ustream (currently IBM Cloud Video)
There are some restrictions for video streaming on Ustream (currently IBM
Cloud Video). For details, see the Ustream (currently IBM Cloud Video) site.
Network connection
Use a smartphone capable of tethering or Wi-Fi router for Live Streaming.
However, proper operation with all smartphones or Wi-Fi routers is not
guaranteed. Public wireless LANs cannot be used as connections for Live
Streaming.
Simultaneous Live Streaming with multiple cameras
You cannot live stream videos simultaneously using the same account on more
than 1 camera. You need to connect using another account.
Effects due to wireless communication conditions
97
Page 98

When connected using the tethering function of a smartphone or via a Wi-Fi
router, images and sounds may be interrupted, or the communication may be
cut off due to wireless communication conditions.
Connection for Live Streaming
The communication time you can use for Live Streaming is limited according to
the contract of your smartphone or Wi-Fi router. Confirm it in advance.
Continuous streaming time
Continuous Live Streaming using this product is limited to about 13 hours.
Restrictions of network connections
In some countries, you cannot connect to Live Streaming sites. Use this
function in accordance with the laws of that country.
The Wi-Fi function of this product cannot be used by connecting to a public
wireless network.
[79] How to Use
Using the Wi-Fi function Controlling other cameras through this product
Shooting with this product and other cameras with Multi
Camera Control
This function enables you to record images using this product and several
cameras simultaneously by connecting them to Wi-Fi. You can also perform some
basic operations of the connected cameras, such as configuring the settings, from
this product.
Recorded images can be edited with PlayMemories Home, including editing such
as creating a PinP (Picture in Picture; an image with an inset window of another
image) clip.
1. Connect this product and other cameras via Wi-Fi.
For details on the connection method, see “
Connecting this product to one
camera with Multi Camera Control (Single Connection) ” and “Connecting
this product to more than one camera with Multi Camera Control (Multi
Connection) .”
98
Page 99
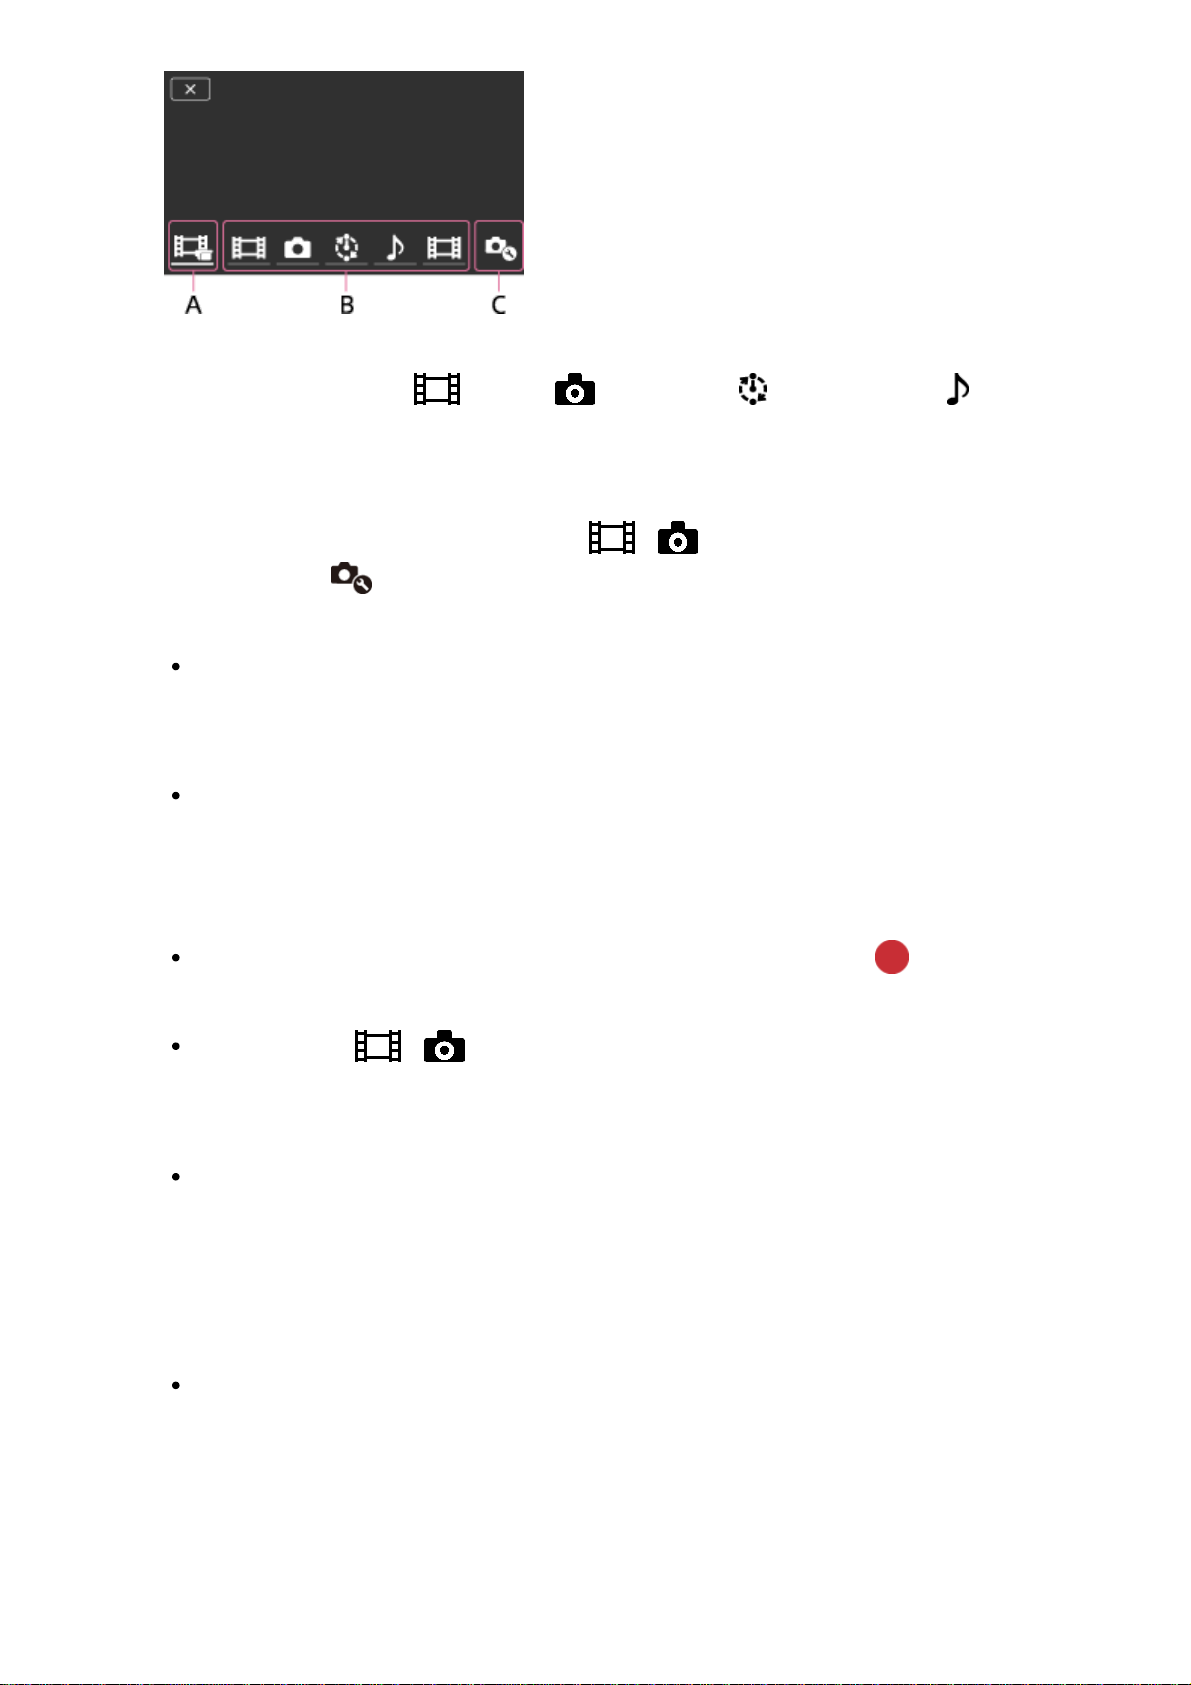
A: This product
B: Shooting modes (
Movie, Still Image, Interval Shoot, Audio) of
connected cameras
C: Various settings of connected cameras
2. Select the displayed icons such as
, or those in B in the figure
above, select
, then configure the desired settings for each connected
camera.
Among the menu items described in “Menu items that you can set” below,
only the items that can be configured on the connected camera will be
displayed.
The status of the selected camera can be checked on the LCD monitor of
this product.
3. Press the START/STOP button of this product.
All devices connected to this product will start recording. is displayed
on the icons of this product and the cameras that are recording movies. (*)
By selecting , or icons displayed in B in the figure above during
shooting, you can check the image being recorded with the connected
camera on the LCD monitor of this product.
The PHOTO button or the zoom lever of this product can be used even
during shooting with Multi Camera Control.
*
Some indicators may not appear depending on the model.
4. Press the START/STOP button of this product.
Recording ends.
Menu items that you can set
[Connect Device Swt] (displayed when one camera is connected)
Disconnects the currently connected camera and selects another device.
99
Page 100
[Connect Device Reg] (displayed when several cameras are connected)
Registers cameras that have not been registered before.
[Shooting Mode]
Selects the shooting mode of the connected camera (for one camera when only
one camera is connected and for all cameras when several cameras are
connected).
[
Movie]: Records movies.
[
Still Image]: Records photos.
[
Interval Shoot]: Continues to record photos at regular intervals.
[
Audio]: Records sound only.
[Shooting Settings]
Movie shooting settings (displayed when one camera is connected and the
Shooting Mode is set to [
Movie])
You can configure settings for movie shooting of the connected camera.
[Recording Mode]: Sets the movie image quality.
[
SteadyShot]: Sets to activate the camera-shake reduction.
[
Shooting Angle]: Sets the shooting angle.
[Flip]: Sets whether to record images upside down.
[
File Format]: Sets the file format for recording movies.
Still image shooting settings (displayed when one camera is connected and
the Shooting Mode is set to [
Still Image])
You can configure settings for photo shooting of the connected camera.
[Flip]: Sets whether to record images upside down.
[
Drive Mode]: Sets the continuous shooting method.
[
Shooting Interval]: Sets the interval of continuous shooting.
[
Self-Timer]: Sets self-timer.
Interval shooting settings (displayed when one camera is connected and the
Shooting Mode is set to [
Interval Shoot])
You can set the interval period for consecutive recordings of the interval photo
recording.
[Flip]: Sets whether to record images upside down.
[
Shooting Interval]: Sets the interval period for in how many seconds a photo is
recorded.
100
 Loading...