

Page 1
HCD-ZX66i/ZX99i
SERVICE MANUAL
Ver. 1.0 2009.02
• HCD-ZX66i/ZX99i are the tuner, iPod,
CD and amplifi er section in LBT-ZX66i/ZX99i.
AUDIO POWER SPECIFICATIONS
POWER OUTPUT AND TOTAL HARMONIC DISTORTION:
HCD-ZX99i:
With 6-ohm loads, both channels driven, from 120 Hz – 10 kHz; rates 200
watts per channel minimum RMS power, with no more than 0.7 % total
harmonic distortion from 250 miliwatts to rated output.
HCD-ZX66i US model:
With 6-ohm loads, per channel driven, from 120 Hz – 10 kHz; rates 220
watts per channel minimum RMS power, with no more than 0.7 % total
harmonic distortion from 250 miliwatts to rated output.
Amplifi er section
HCD-ZX99i:
The following are measured at
AC 120 V, 60 Hz
Front/Surround speaker
Power output (rated):
270 W + 270 W (at 6 Ω, 1 kHz, 10 % THD)
RMS output power (reference):
180 W × 2 + 180 W × 2 (6 Ω at 1 kHz, 10 % THD)
HCD-ZX66i
The following are measured at
AC 120 V, 60 Hz
Front speaker
Power output (rated):
280 W (at 6 Ω, 1 kHz, 10 % THD)
RMS output power (reference):
210 W × 2 (6 Ω at 1 kHz, 10 % THD)
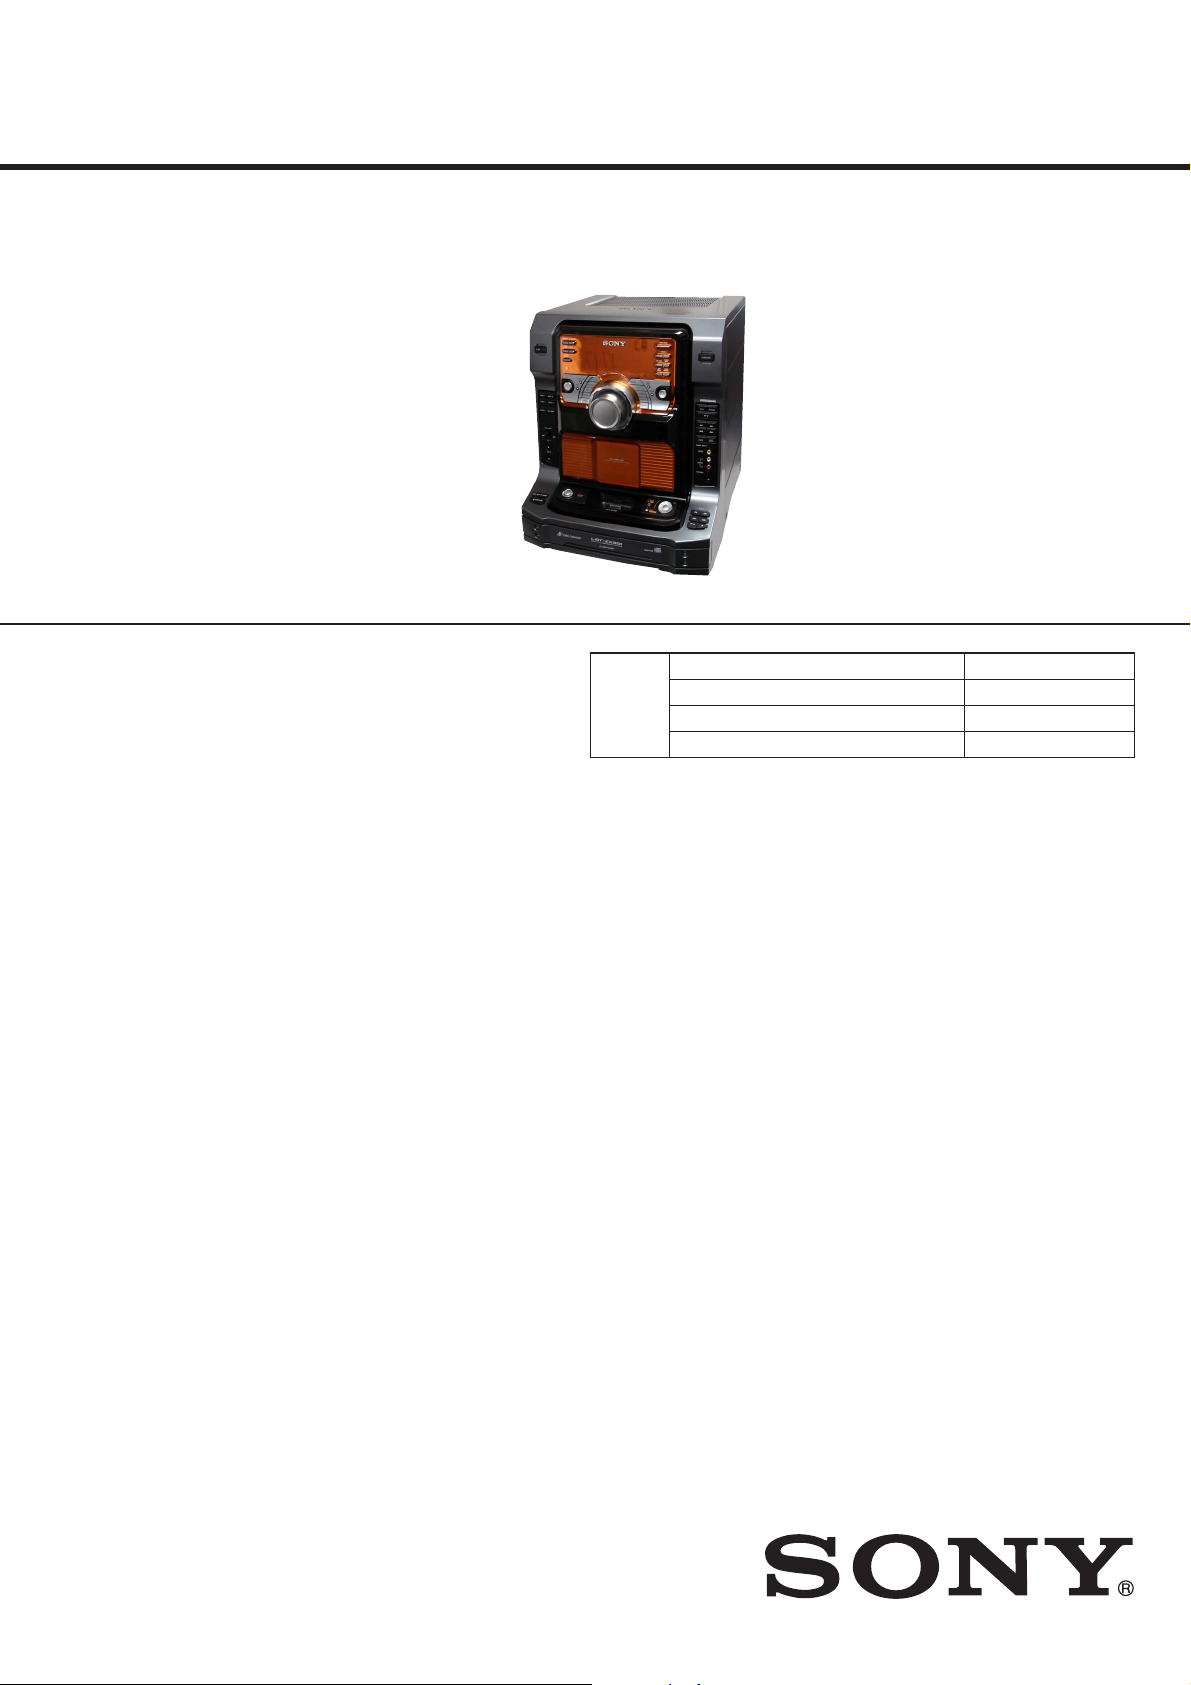
Photo: HCD-ZX99i
CD
Section
SPECIFICATIONS
US Model
HCD-ZX66i/ZX99i
Canadian Model
HCD-ZX66i
Model Name Using Similar Mechanism HCD-ZX9
CD Mechanism Type CDM79B-F1BD81
Base Unit Name BU-F1BD81A
Optical Pick-up Name KSM-215DCP/C2NP
Inputs
PHONO IN L/R:
Sensitivity 3 mV, impedance 47 kilohms
MIC 1/MIC 2:
Sensitivity 1 mV, impedance 10 kilohms
GAME INPUT AUDIO L/R:
Sensitivity 250 mV, impedance 47 kilohms
GAME INPUT VIDEO:
1 Vp-p, 75 Ω
PC IN L/R:
Sensitivity 250 mV, impedance 47 kilohms
Outputs
PHONES:
accepts headphones of 8 Ω or more
VIDEO OUT:
max. output level 1 Vp-p, load impedance 75 ohms
– Continued on next page –
9-889-432-01
2009B04-1
2009.02
©
COMPONENT Hi-Fi STEREO SYSTEM
Sony Corporation
Audio&Video Business Group
Published by Sony Techno Create Corporation
Page 2

HCD-ZX66i/ZX99i
Disc player section
System
Compact disc and digital audio system
Laser
Semiconductor laser
(λ = 780 nm)
Emission duration: continuous
Laser Output
Max. 44.6 μW*
* This output is the value measured at a distance of 200 mm
from the objective lens surface on the Optical Pick-up Block
with 7 mm aperture.
Frequency response
2 Hz - 20 kHz (±1.0 dB)
Wave length
780 - 790 nm
Signal-to-noise ratio
More than 90 dB
Dynamic range
More than 90 dB
CD DIGITAL OUT OPTICAL:
Wave length 660 nm, output level
–18 dBm
Tuner section
FM stereo, FM/AM superheterodyne tuner
FM tuner section
Tuning range
87.5 - 108.0 MHz (100 kHz step)
Antenna
FM lead antenna
Antenna terminals
75 ohms unbalanced
Intermediate frequency
10.7 MHz
AM tuner section
Tuning range
530 - 1,710 kHz (with the interval set at 10 kHz)
531 - 1,710 kHz (with the interval set at 9 kHz)
Antenna
AM loop antenna
Antenna terminals
External antenna terminal
Intermediate frequency
450 kHz
General
Power requirements
120 V AC, 60 Hz
Power consumption
HCD-ZX99i (US model):
400 W
HCD-ZX66i (US model):
230 W
HCD-ZX66i (Canadian model):
240 VA
Dimensions (w/h/d) (Approx.)
HCD-ZX99i/HCD-ZX66i:
361.4 × 435.5 × 454.6 mm
(14
Mass (Approx.)
HCD-ZX99i: 19.0 kg (41 lb 15 oz)
HCD-ZX66i: 14.6 kg (32 lb 4 oz)
Supplied accessories
Remote Commander (1)
R6 (size AA) batteries (2)
AM loop antenna (1)
FM lead antenna (1)
Speaker pads:
•HCD-ZX99i only (16)
•HCD-ZX66i only (8)
Speaker cords:
•HCD-ZX99i only
–grey (10 m) (39 3/8 ft) (2)
–white (3 m) (11 7/8 ft) (2)
•HCD-ZX66i only
–3 m (11
Design and specifi cations are subject to change without notice.
• Standby power consumption: 0.5 W
• Halogenated fl ame retardants are not used in the certain printed wiring
boards.
1
/4 × 17 1/4 × 18 inches)
7
/8 ft) (2)
iPod section
DC 5 V 500 mA MAX
2
SAFETY-RELATED COMPONET WARNING!
COMPONENTS IDENTIFIED BY MARK 0 OR DOTTED LINE
WITH MARK 0 ON THE SCHEMATIC DIAGRAMS AND IN
THE PARTS LIST ARE CRITICAL TO SAFE OPERATION.
REPLACE THESE COMPONENTS WITH SONY PARTS
WHOSE PART NUMBERS APPEAR AS SHOWN IN THIS
MANUAL OR IN SUPPLEMENTS PUBLISHED BY SONY.
ATTENTION AU COMPOSANT AYANT RAPPORT
À LA SÉCURITÉ!
LES COMPOSANTS IDENTIFIÉS PAR UNE MARQUE 0 SUR
LES DIAGRAMMES SCHÉMATIQUES ET LA LISTE DES
PIÈCES SONT CRITIQUES POUR LA SÉCURITÉ DE FONCTIONNEMENT. NE REMPLACER CES COMPOSANTS QUE
PAR DES PIÈCES SONY DONT LES NUMÉROS SONT DONNÉS DANS CE MANUEL OU DANS LES SUPPLÉMENTS
PUBLIÉS PAR SONY.
Page 3
HCD-ZX66i/ZX99i
NOTES ON CHIP COMPONENT REPLACEMENT
• Never reuse a disconnected chip component.
• Notice that the minus side of a tantalum capacitor may be damaged by heat.
FLEXIBLE CIRCUIT BOARD REPAIRING
• Keep the temperature of soldering iron around 270 °C during
repairing.
• Do not touch the soldering iron on the same conductor of the
circuit board (within 3 times).
• Be careful not to apply force on the conductor when soldering
or unsoldering.
UNLEADED SOLDER
Boards requiring use of unleaded solder are printed with the leadfree mark (LF) indicating the solder contains no lead.
(Caution: Some printed circuit boards may not come printed with
the lead free mark due to their particular size)
: LEAD FREE MARK
Unleaded solder has the following characteristics.
• Unleaded solder melts at a temperature about 40 °C higher
than ordinary solder.
Ordinary soldering irons can be used but the iron tip has to be
applied to the solder joint for a slightly longer time.
Soldering irons using a temperature regulator should be set to
about 350 °C.
Caution: The printed pattern (copper foil) may peel away if
the heated tip is applied for too long, so be careful!
• Strong viscosity
Unleaded solder is more viscous (sticky, less prone to fl ow)
than ordinary solder so use caution not to let solder bridges
occur such as on IC pins, etc.
• Usable with ordinary solder
It is best to use only unleaded solder but unleaded solder may
also be added to ordinary solder.
NOTES ON LASER DIODE EMISSION CHECK
The laser beam on this model is concentrated so as to be focused
on the disc refl ective surface by the objective lens in the optical
pickup block. Therefore, when checking the laser diode emission,
observe from more than 30 cm away from the objective lens.
SAFETY CHECK-OUT (US MODEL)
After correcting the original service problem, perform the following safety check before releasing the set to the customer:
Check the antenna terminals, metal trim, “metallized” knobs,
screws, and all other exposed metal parts for AC leakage.
Check leakage as described below.
LEAKAGE TEST
The AC leakage from any exposed metal part to earth ground and
from all exposed metal parts to any exposed metal part having a
return to chassis, must not exceed 0.5 mA (500 microamperes.).
Leakage current can be measured by any one of three methods.
1. A commercial leakage tester, such as the Simpson 229 or RCA
WT-540A. Follow the manufacturers’ instructions to use these
instruments.
2. A battery-operated AC milliammeter. The Data Precision 245
digital multimeter is suitable for this job.
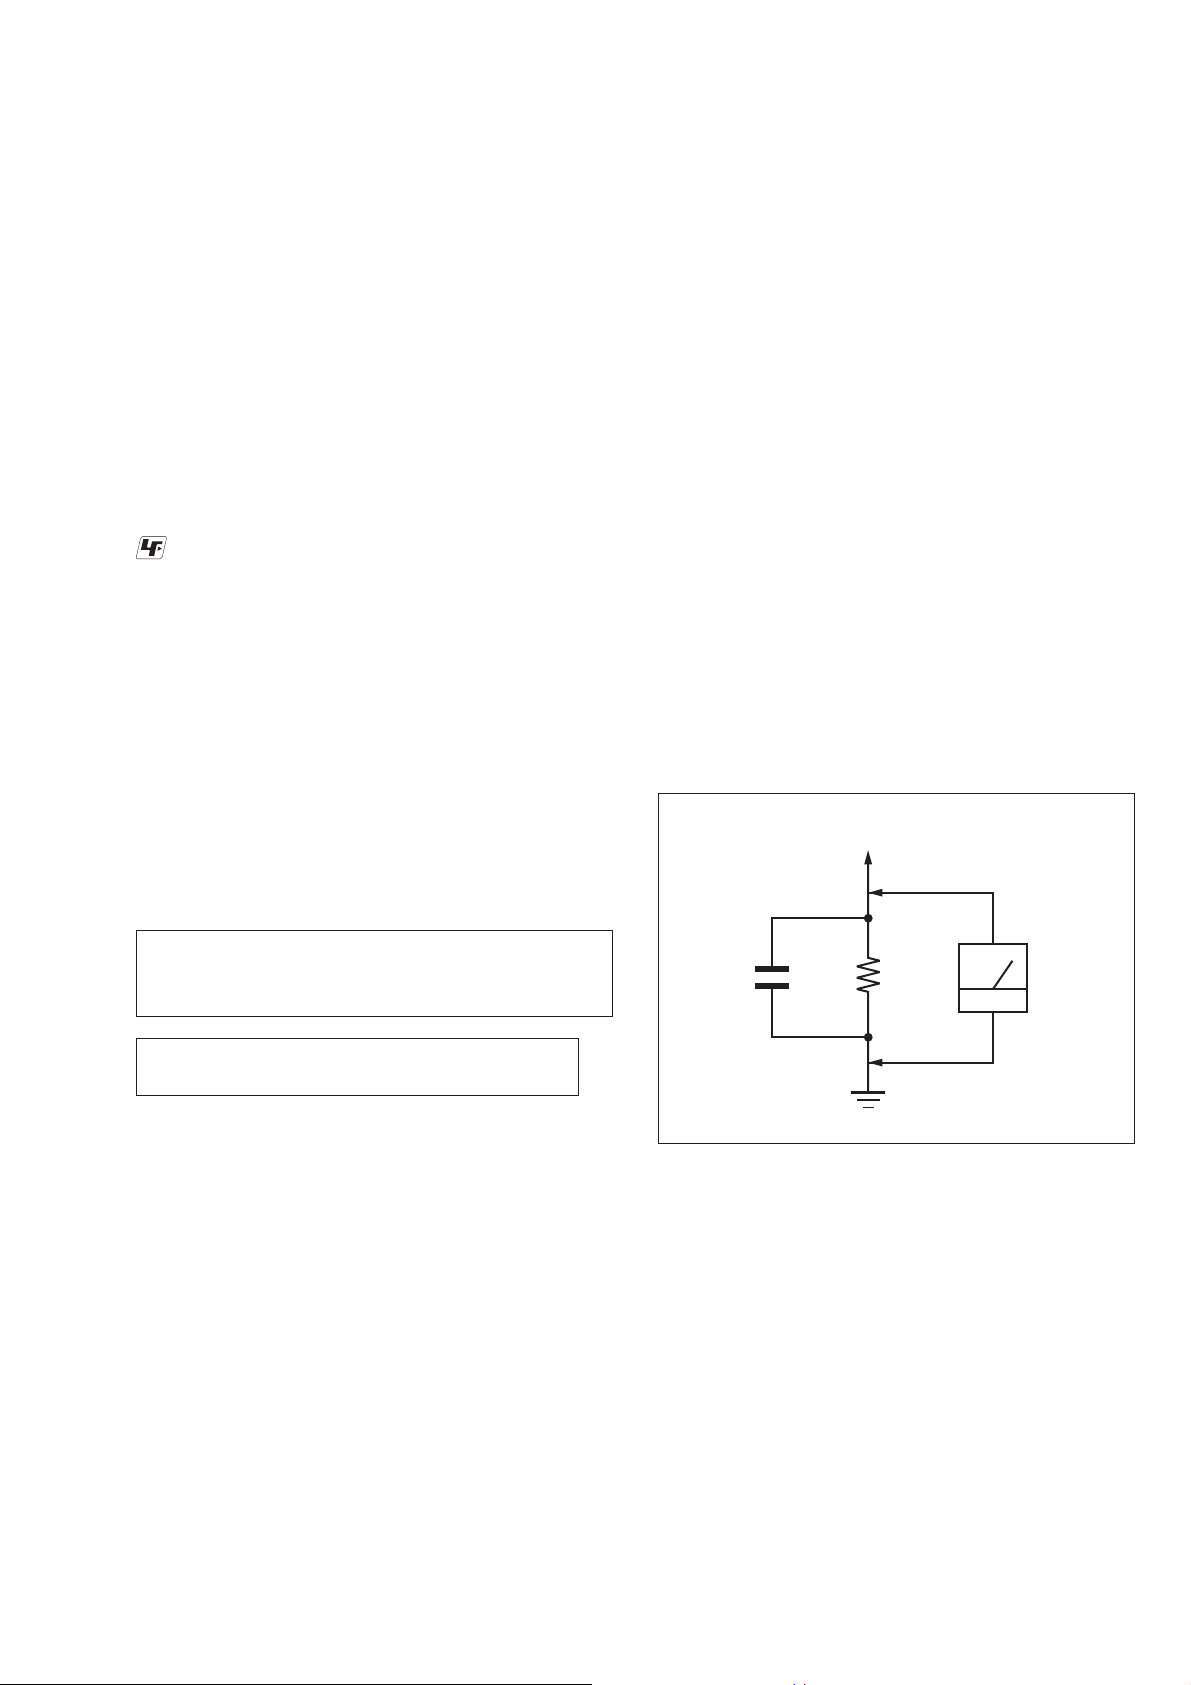
3. Measuring the voltage drop across a resistor by means of a
VOM or battery-operated AC voltmeter . The “limit” indication
is 0.75 V, so analog meters must have an accurate low-voltage
scale. The Simpson 250 and Sanwa SH-63Trd are examples
of a passive VOM that is suitable. Nearly all battery operated
digital multimeters that have a 2 V AC range are suitable. (See
Fig. A)
To Exposed Metal
Parts on Set
CAUTION
Use of controls or adjustments or performance of procedures
other than those specifi ed herein may result in hazardous radia-
tion exposure.
NOTES ON HANDLING THE OPTICAL PICK-UP
BLOCK OR BASE UNIT
The laser diode in the optical pick-up block may suffer electrostatic break-down because of the potential difference generated by the
charged electrostatic load, etc. on clothing and the human body.
During repair, pay attention to electrostatic break-down and also
use the procedure in the printed matter which is included in the
repair parts.
The fl exible board is easily damaged and should be handled with
care.
AC
1.5 kΩ0.15 μF
Earth Ground
voltmeter
(0.75 V)
Fig. A. Using an AC voltmeter to check AC leakage.
3
Page 4

HCD-ZX66i/ZX99i
Note on DualDiscs
A DualDisc is a two sided disc product which mates DVD recorded material on one side with digital audio material on the other
side. However, since the audio material side does not conform to
the Compact Disc (CD) standard, playback on this product is not
guaranteed.
Music discs encoded with copyright protection
technologies
This product is designed to play back discs that conform to the
Compact Disc (CD) standard. Recently, various music discs
encoded with copyright protection technologies are marketed by
some record companies. Please be aware that among those discs,
there are some that do not conform to the CD standard and may
not be playable by this product.
Note on Multi Session disc
When you play back Multi Session discs with different formats
for each session, the format of the fi rst session is recognized as
the disc type. Tracks in the second and subsequent sessions are
played back if they are the same formats as the fi rst session.
MPEG Layer-3 audio coding technology and patents licensed
from Fraunhofer IIS and Thomson.
iPod is a trademark of Apple Inc., registered in the U.S. and other
countries.
MODEL IDENTIFICATION
-Back Panel-
Model Part No.
HCD-ZX99i: US
HCD-ZX66i: US
HCD-ZX66i: Canadian
Part No.
2-649-004-4[]
2-649-004-5[]
2-649-004-6[]
4
Page 5

TABLE OF CONTENTS
HCD-ZX66i/ZX99i
1. SERVICE NOTE
1-1. Service Position of CD BU Block ......................... 6
1-2. Service Position of PANEL COM Board ............... 7
1-3. Service Position of POWER AMP Board .............. 8
1-4. Service Position of CD Changer ............................ 8
2. GENERAL
Guide to parts and controls .................................... 9
3. DISASSEMBLY
3-1. Case ........................................................................ 18
3-2. Loading Panel ........................................................ 18
3-3. Front Panel Section ................................................ 19
3-4. GAME HP Board, MIC Board ............................... 19
3-5. Back Panel Section ................................................ 20
3-6. Boards Section ....................................................... 20
3-7. CD Mechanism Section ......................................... 21
3-8. MAIN Board .......................................................... 21
3-9. Table Assy .............................................................. 22
3-10. SE-130 Board ......................................................... 22
3-11. TD Belt .................................................................. 23
3-12. DC Motor (M901) .................................................. 23
3-13. Optical Pick-up ...................................................... 24
3-14. BD81A Board ........................................................ 24
6-8. Printed Wiring Board –Main Section– ................... 38
6-9. Schematic Diagram –Main Section (1/3)– ............. 39
6-10. Schematic Diagram –Main Section (2/3)– ............. 40
6-11. Schematic Diagram –Main Section (3/3)– ............. 41
6-12. Printed Wiring Boards –Panel Section– ................. 42
6-13. Schematic Diagram –Panel Section– ..................... 43
6-14. Printed Wiring Board –IPOD Section– .................. 44
6-15. Schematic Diagram –IPOD Section– .................... 45
6-16. Printed Wiring Boards –Jack Section– .................. 46
6-17. Schematic Diagram –Jack Section– ....................... 47
6-18. Printed Wiring Boards –Volume Section– ............. 48
6-19. Schematic Diagram –Volume Section– ................. 49
6-20. Printed Wiring Boards –Left Button Section– ....... 50
6-21. Schematic Diagram –Left Button Section– ........... 51
6-22. Printed Wiring Boards –Right Button Section– ..... 52
6-23. Schematic Diagram –Right Button Section– ......... 53
6-24. Printed Wiring Board –Surround Section
(HCD-ZX99i)– ....................................................... 54
6-25. Schematic Diagram –Surround Section
(HCD-ZX99i)– ....................................................... 55
6-26. Printed Wiring Board –Power Amp Section– ........ 56
6-27. Schematic Diagram –Power Amp Section– ........... 57
6-28. Printed Wiring Boards –Transformer Section– ...... 58
6-29. Schematic Diagram –Transformer Section– .......... 59
4. TEST MODE ....................................................... 25
5. ELECTRICAL ADJUSTMENTS ...................... 28
6. DIAGRAMS
6-1. Block Diagram –CD Servo Section– ..................... 31
6-2. Block Diagram –Main Section– ............................ 32
6-3. Block Diagram –Display/Power Section– ............. 33
6-4. Printed Wiring Board –BD Section– ..................... 34
6-5. Schematic Diagram –BD Section– ........................ 35
6-6. Printed Wiring Boards –Loading Section– ............ 36
6-7. Schematic Diagram –Loading Section– ................ 37
7. EXPLODED VIEWS
7-1. Back Panel Section ............................................... 71
7-2. Front Panel Section (1) .......................................... 72
7-3. Front Panel Section (2) .......................................... 73
7-4. Chassis Section ...................................................... 74
7-5. CD Mechanism Section (1)
(CDM79B-F1BD81) .............................................. 75
7-6. CD Mechanism Section (2)
(CDM79B-F1BD81) .............................................. 76
8. ELECTRICAL PARTS LIST ............................. 77
5
Page 6

HCD-ZX66i/ZX99i
SECTION 1
SERVICE NOTE
1-1. SERVICE POSITION OF CD BU BLOCK
chassis
CD block
6
Page 7
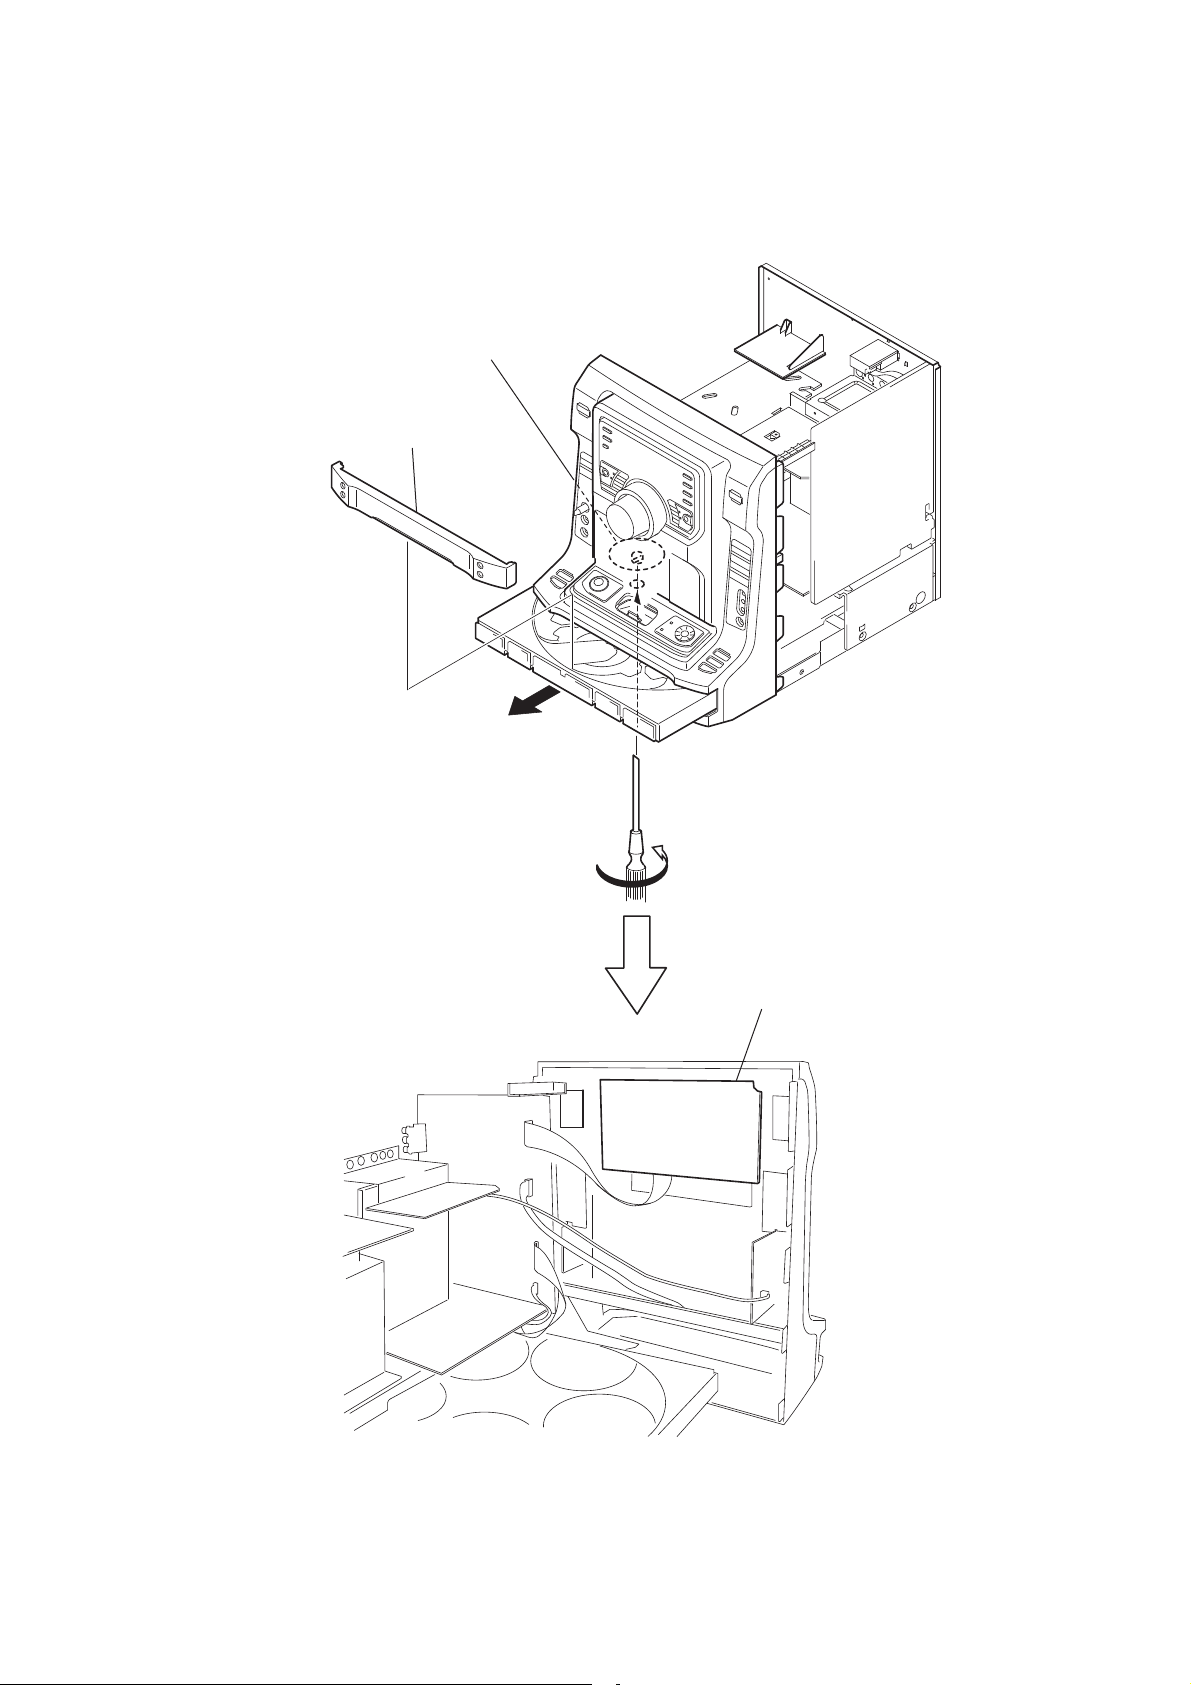
1-2. SERVICE POSITION OF PANEL COM BOARD
gear (shaft)
loading panel
HCD-ZX66i/ZX99i
Turn the gear (shaft) in the
direction of the arrow.
PANEL COM board
7
Page 8

HCD-ZX66i/ZX99i
1-3. SERVICE POSITION OF POWER AMP BOARD
front panel assy CD mechanism block
POWER AMP board
1-4. SERVICE POSITION OF CD CHANGER
CD mechanism block
8
Page 9

SECTION 2
GENERAL
Guide to parts and controls
This manual mainly explains operations using the buttons on the unit, but the same
operations can also be performed using the buttons on the remote having the same or
similar names.
Unit
– Front view
RRB RT
HCD-ZX66i/ZX99i
This section is extracted
from instruction manual.
FI
FH
FG
FE
FT
FB
F
XM
XL
– Top view
SH
XHXIXK
SFMFLFK
SBSTSE
PLAY
MODE
)4 T
RE
RG
RH
RK
RM
X
XB
XT
XE
XG
RI
RL
SG
US
6
9
Page 10

HCD-ZX66i/ZX99i
Remote RM-AMU008
U
SM
RG
RK
FK
XH
" (on/standby) (pages 13, 14,
16, 20, 34, 37)
Press to turn the system on or off.
# TIMER MENU (pages 16, 32)
Press to set the clock and the timers.
$ DISPLAY (pages 16, 21, 27, 28)
Press to change the information in
the display.
% ILLUMINATION (page 26)
Press to select the power illuminator.
& SLEEP (page 32)
Press to set the Sleep Timer.
' Display (pages 10, 26, 28, 37)
( Preset Effect buttons (SALSA/
REGGAE/POP/SAMBA/TANGO/
ROCK/JAZZ/DANCE/MOVIE/
GAME) (page 22)
Press to select preset effect.
) AMP MENU (pages 23, 27, 31)
Press to display the menu to operate
the system.
SI
RI
RH
SL
RT
SK
* FM MODE (pages 20, 37)
Press to select the FM monaural or
stereo reception.
+ TUNER/BAND (page 19)
Press to select AM or FM band.
, TUNING +/– (pages 19, 30)
Press to tune in a radio station.
- Unit: FUNCTION (pages 14, 17,
22, 29)
Remote: FUNCTION +/–
(pages 17, 19, 22, 29)
Press to select a function.
. TUNING MODE (pages 19, 31,
37)
Press to select the tuning mode.
/ TUNER MEMORY (page 30)
Press to preset a radio station.
0 TOOL MENU (page 21)
Press to return to previous menu of
the iPod.
7/W/#/C (pages 16, 21, 23, 27,
1
31, 32)
Push to select the menu items of the
system and iPod.
Unit: ENTER (pages 16, 21, 23,
27, 29, 30, 31, 32)
Remote: (pages 16, 21, 29,
30, 32)
Press to enter the settings.
2 Unit: RETURN (page 21)
Remote: 0 RETURN (page 21)
Press to return to previous menu of
the iPod.
3 iPod (page 20)
Press to select iPod function.
4 PHONO (page 22)
Press to select PHONO function.
Continued
M
Guide to parts and controls
US
7
10
Page 11

HCD-ZX66i/ZX99i
5 Operation buttons for iPod
function:
#9 (play/pause) (pages 20, 21)
Press to start or pause playback.
N/. (rewind/fast foward)
(page 21)
Press to find a point in a track.
/ (go backward/go
forward) (page 21)
Press to select a track.
6 GAME MIXING (page 26)
Press to select the level of the GAME
input.
7 GAME (pages 22, 25)
Press to select the GAME function.
8 GAME INPUT VIDEO jack
(pages 13, 22)
GAME INPUT AUDIO L/R jacks
(pages 13, 22)
Connect to an optional video game
player.
9 PHONES jack (pages 34, 39)
Connect the headphones.
: Unit: VOLUME +/– (pages 17, 19,
20, 22, 32, 34)
Turn to adjust the volume.
Remote: VOLUME +*/–
(pages 17, 19, 20, 22, 32, 34)
Press to adjust the volume.
; Power illuminator (page 26)
XK Disc tray (pages 10, 14, 17, 35,
37)
XL MIC 1/MIC 2 jack (pages 32, 34,
39)
Connect an optional microphone.
XM MIC LEVEL (pages 32, 34)
Turn to adjust the microphone
volume.
F PLAY MODE (pages 18, 36, 37)
Press to select the play mode of CD
function.
FB DISC 1 ~ 5 (pages 17, 29)
Press to select a disc.
Press to switch to CD function from
other function.
FT USER EQ (page 31)
Press to select the preset user
equalizer.
FE X-GROOVE (page 22)
Press to reinforce the bass.
FG SURROUND (page 22)
Press to select the surround effect.
FH IR Receptor (page 35)
FI EFFECT ON/OFF (page 22)
Press to activate or deactivate the
preset effect.
FK DISC SKIP (pages 14, 17, 29)
Press to select next disc.
FL EX-CHANGE (page 17)
Press to exchange other discs during
playback.
FM (LBT-ZX99i only)
SOUND FLASH (page 24)
Press and hold to select “SOUND
FLASH” effect.
S iPod connector (pages 13, 20)
Place an optional iPod on the
connector to listen to audio contents
stored in the iPod.
US
8
11
Page 12
HCD-ZX66i/ZX99i
SB (LBT-ZX99i only)
MODE (page 23)
When X-ROUND is set to on, press
to select X-ROUND mode.
(LBT-ZX99i only)
SPEAKERS (page 25)
When X-ROUND is set to off, press
to select speaker setting.
ST (LBT-ZX99i only)
X-ROUND ON/OFF (pages 23,
25)
Press to activate or deactivate
X-ROUND mode.
SE (LBT-ZX99i only)
JOG (page 24)
Turn to select X-ROUND setting.
Turn to select SOUND FLASH
speed.
SG Operation buttons for CD
function:
+/– (pages 17, 29)
Press to select a folder of MP3 files.
N.(rewind/fast forward)
(page 17)
Press to fast forward or rewind.
/ (go backward/go
forward) (page 17)
Press to select a track.
/9 (play/pause) (pages 17, 27,
29, 35)
Press to start or pause playback.
Y (stop) (pages 17, 19)
Press to stop playback.
SH ; OPEN/CLOSE (pages 14, 17,
35)
Press to open or close the disc tray.
SI EQ (pages 22, 31)
Press to select a preset sound effect.
SK CLEAR (page 30)
Press to delete the last step from the
program list.
SL Operation buttons on remote:
+/– (tuning) (pages 19, 30)
Press to tune in a radio station.
+/– (pages 17, 29)
Press to select a folder of MP3 files.
/ (go backward/go
forward) (pages 17, 21)
Press to select a track.
N.(rewind/fast forward)
(pages 17, 21)
Press to fast forward or rewind.
* (play) (pages 17, 20, 29, 35)
Press to start playback.
9 (pause) (pages 17, 21)
Press to pause playback.
Y (stop) (pages 17, 19)
Press to stop playback.
SM REPEAT/FM MODE (pages 17,
37)
Press to change the Repeat Play
setting of CD function.
Press to select the FM monaural or
stereo reception.
U PLAY MODE/TUNING MODE
(pages 18, 19, 29, 31, 36, 37)
Press to select the play mode of CD
function.
Press to select the tuning mode.
*The VOLUME + and / buttons have tactile
dots. Use the tactile dots as references when
operating the system.
Continued
M
Guide to parts and controls
US
9
12
Page 13

– Display
HCD-ZX66i/ZX99i
TRK MP3 CD TEXT
12345
EFFECT
X-GROOVE
ID3
SURR
RERT BR
" Lights up when the MP3 file contains
ID3 tag information.
# “TRK” lights up when a file name is
displayed. “ ” lights up when a
folder name is displayed.
$ Indicates the type of disc or file that
the system recognized.
% Displays the current status and
information (page 28).
& Indicators for the TUNER function
(pages 19, 30).
' Indicators for the level of the Game
Mixing (page 26).
( Lights up when the timer is set
(page 32).
) (LBT-ZX99i only)
Lights up according to the speaker
system setting.
* Indicates the selected play mode for
CD function (pages 18, 28).
ALL 1 DISC S
SHUF PGM REP 1
ST MONO TUNED
AUTO PRESET
SLEEP PLAY
GAME
MIXING
R
+ Indicators for the disc tray (page 17).
“ ” lights up when the disc is
selected. “ ” lights up when there is
a disc on the disc tray. “1”, “2”, “3”,
“4” and “5” light up when the system
is turned on.
, Lights up when the surround effect is
activated (page 22).
- Lights up when the X-GROOVE
effect is activated (page 22).
. Lights up when the sound effect is
activated (page 22).
MANUAL
10
US
13
Page 14
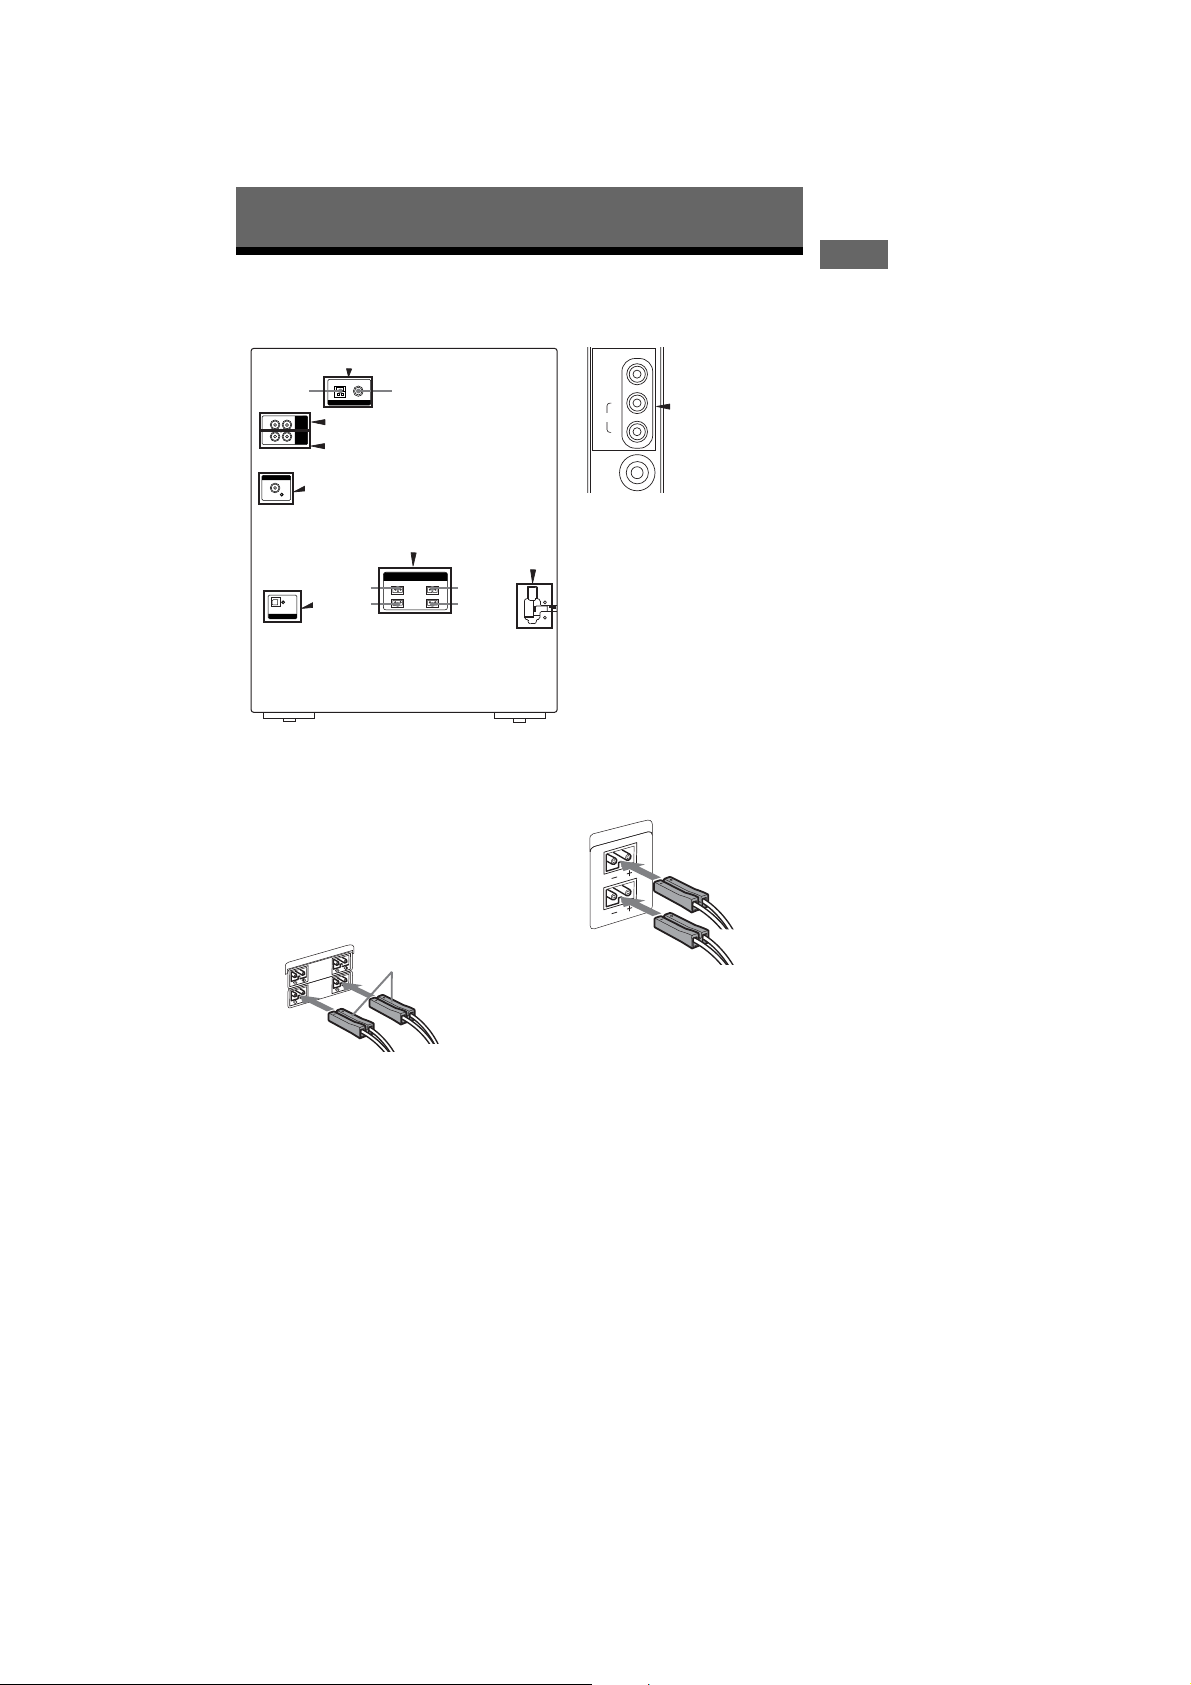
HCD-ZX66i/ZX99i
Getting Started
Hooking up the system
#
'
&
%
$
" Speakers
The speaker connectors are color-coded
with their respective speaker terminals on
the unit.
Front speakers
(LBT-ZX99i only)
Connect the speaker cords to the
SPEAKER FRONT (SPEAKER A)
terminals.
SPEAKER
L
)
SURROUND
AKER B
PE
R
(S
L
R
T
N
FRO
(SPEAKER A)
"
White
**
– Front panel– Rear panel
GAME INPUT
VIDEO
L
AUDIO
PHONES
To AM loop antenna
To FM lead antenna
)
To front speaker (right)
To front speaker (left)
To surround speaker (right)
To surround speaker (left)
* LBT-ZX99i only.
(LBT-ZX66i only)
Connect the speaker cords to the
SPEAKER terminals.
SPEAKER
(
R
L
R
Getting Started
Continued
M
11
US
14
Page 15

HCD-ZX66i/ZX99i
Tip
Connect the speaker cords to the terminals on
the front speakers.
Black ()
Black ()
Red ()
Red ()
Surround speakers
(LBT-ZX99i only)
Connect the speaker cords to the
SPEAKER SURROUND (SPEAKER B)
terminals and to the terminals on the
speakers as shown in the tip above.
SPEAKER
SUR
R
(SPEAKER B)
R
FRONT
(SPEAKER A)
ND
U
L
RO
L
Grey
Notes
• Be sure to use only the supplied speakers.
• Be sure to connect the speakers securely and
correctly. When connecting speaker cords,
insert the connector straight into the
terminals.
# Antennas
Find a location and an orientation that
provide good reception, and then set up
the antennas.
AM loop antenna
AM
FM75
COAXIAL
Extend the FM lead
antenna horizontally
Note
Keep the antennas away from the speaker cords
and the power cord to avoid picking up noise.
$ CD DIGITAL OUT jack
Use a digital optical cable (square, not
supplied) to connect the digital input of
the optional MD deck to this jack. You
can then record digital audio from this
system.
Note
There is no digital audio output from this jack
during playback of MP3 files.
12
% VIDEO OUT jack
Use a video cable (not supplied) to
connect the video input of TV to this jack.
& PHONO IN L/R jacks
Use an audio cord (not supplied) to
connect the audio output of the turntable
to these jacks. You can then output audio
through this system.
US
15
Page 16
HCD-ZX66i/ZX99i
' PC IN L/R jacks
Use an audio cord (not supplied) to
connect the audio output of the computer
to these jacks. You can then output audio
through this system.
( GAME INPUT jacks
GAME INPUT VIDEO jack
Use a video cable (not supplied) to
connect the video output of the optional
video game player to this jack. You can
then output video through this system.
Note
The video game player image may appear on the
TV screen even if the system is turned off.
GAME INPUT AUDIO L/R jacks
Use an audio cord (not supplied) to
connect the audio output of the optional
video game player to these jacks. You can
then output audio through this system.
) Power
Connect the power cord to a wall outlet.
The demonstration appears in the display.
When you press , the system turns on
and the demonstration automatically
ends.
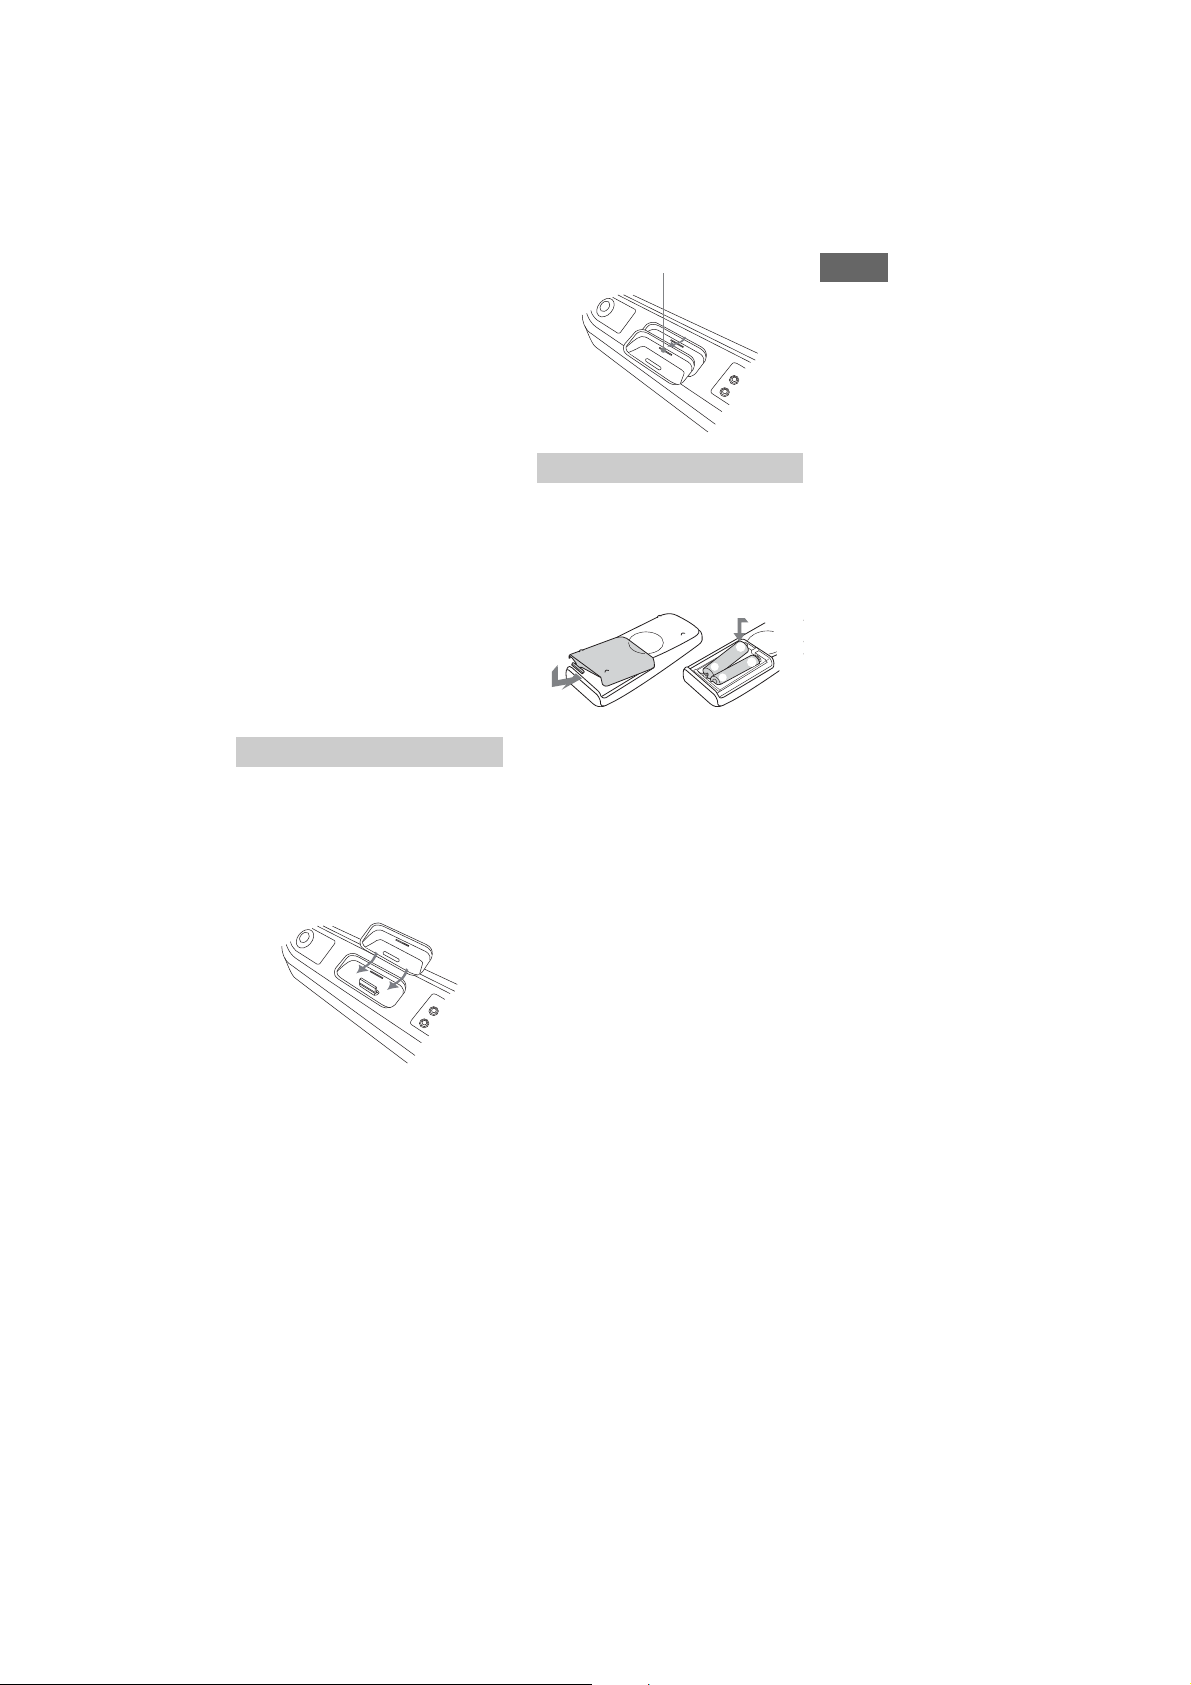
Using the iPod
Insert the iPod Dock Adapter (not
supplied) into the iPod connector before
use.
Use a Dock Adapter supplied with your
iPod. Otherwise, a compatible Dock
Adapter will need to be purchased
separately from Apple Inc.
To remove the iPod Dock Adapter, pull it
up with your fingernail or a flat object
using the slot inside the adapter.
Slot
Using the remote
Slide and remove the battery
compartment lid, and insert the two
supplied R6 (size AA) batteries, & side
first, matching the polarities shown
below.
F
&
&
F
Notes
• If you do not use the remote for a long period
of time, remove the batteries to avoid possible
damage from battery leakage and corrosion.
• With normal use, the batteries should last for
about six months. When the remote no longer
operates the system, replace both batteries
with new ones.
• Batteries installed devices shall not be
exposed to excessive heat such as sunshine,
fire or the like.
Getting Started
16
13
US
Page 17

DISASSEMBLY
• This set can be disassembled in the order shown below.
SET
HCD-ZX66i/ZX99i
SECTION 3
3-1. CASE
(Page 18)
3-2. LOADING PANEL
(Page 18)
3-3. FRONT PANEL SECTION
(Page 19)
3-5. BACK PANEL SECTION
(Page 20)
3-6. BOARDS SECTION
(Page 20)
3-13. OPTICAL PICK-UP
(Page 24)
3-14. BD81A BOARD
(Page 24)
3-4. GAME HP BOARD,
MIC BOARD
(Page 19)
3-8. MAIN BOARD
(Page 21)
3-7. CD MECHANISM SECTION
(Page 21)
3-9. TABLE ASSY
(Page 22)
3-10. SE-130 BOARD
(Page 22)
3-11. TD BELT
(Page 23)
3-12. DC MOTOR (M901)
(Page 23)
17
Page 18

HCD-ZX66i/ZX99i
Note: Follow the disassembly procedure in the numerical order shown below.
3-1. CASE
cover (top)
case
three screws
case 3 TP2
(
)
three claws
three screws
(+BVTP 3 × 8)
three claws
four screws
(+BVTP 3 × 8)
three screws
case 3 TP2
(
)
3-2. LOADING PANEL
loading panel
gear (shaft)
18
Turn the gear (shaft) in the
direction of the arrow.
Page 19

3-3. FRONT PANEL SECTION
wire (flat type)(17 core)
(CN507)
HCD-ZX66i/ZX99i
screw
(+BVTP 3 × 8)
RT front panel section
three screws
(+BVTP 3 × 8)
CN920 (3P)
two screws
(+BVTP 3 × 8)
wire
MAIN board
CN501 (1 1P)
CN801 (4P)
CN803 (3P)
CN802 (3P)
RB three screws
(+BVTP 3 × 8)
3-4. GAME HP BOARD, MIC BOARD
RT two clips
RH bracket (MIC)
RB
knob (MIC)
four screws
(+BVTP 3 × 8)
MIC board
RG
RE screw
(+BVTP 2.6 × 8)
two screws
(+BVTP 2.6 × 8)
GAME HP board
four screws
(+BVTP 3 × 8)
clip
bracket (game)
two screws
(+BVTP 3 × 8)
bracket (center)
19
Page 20
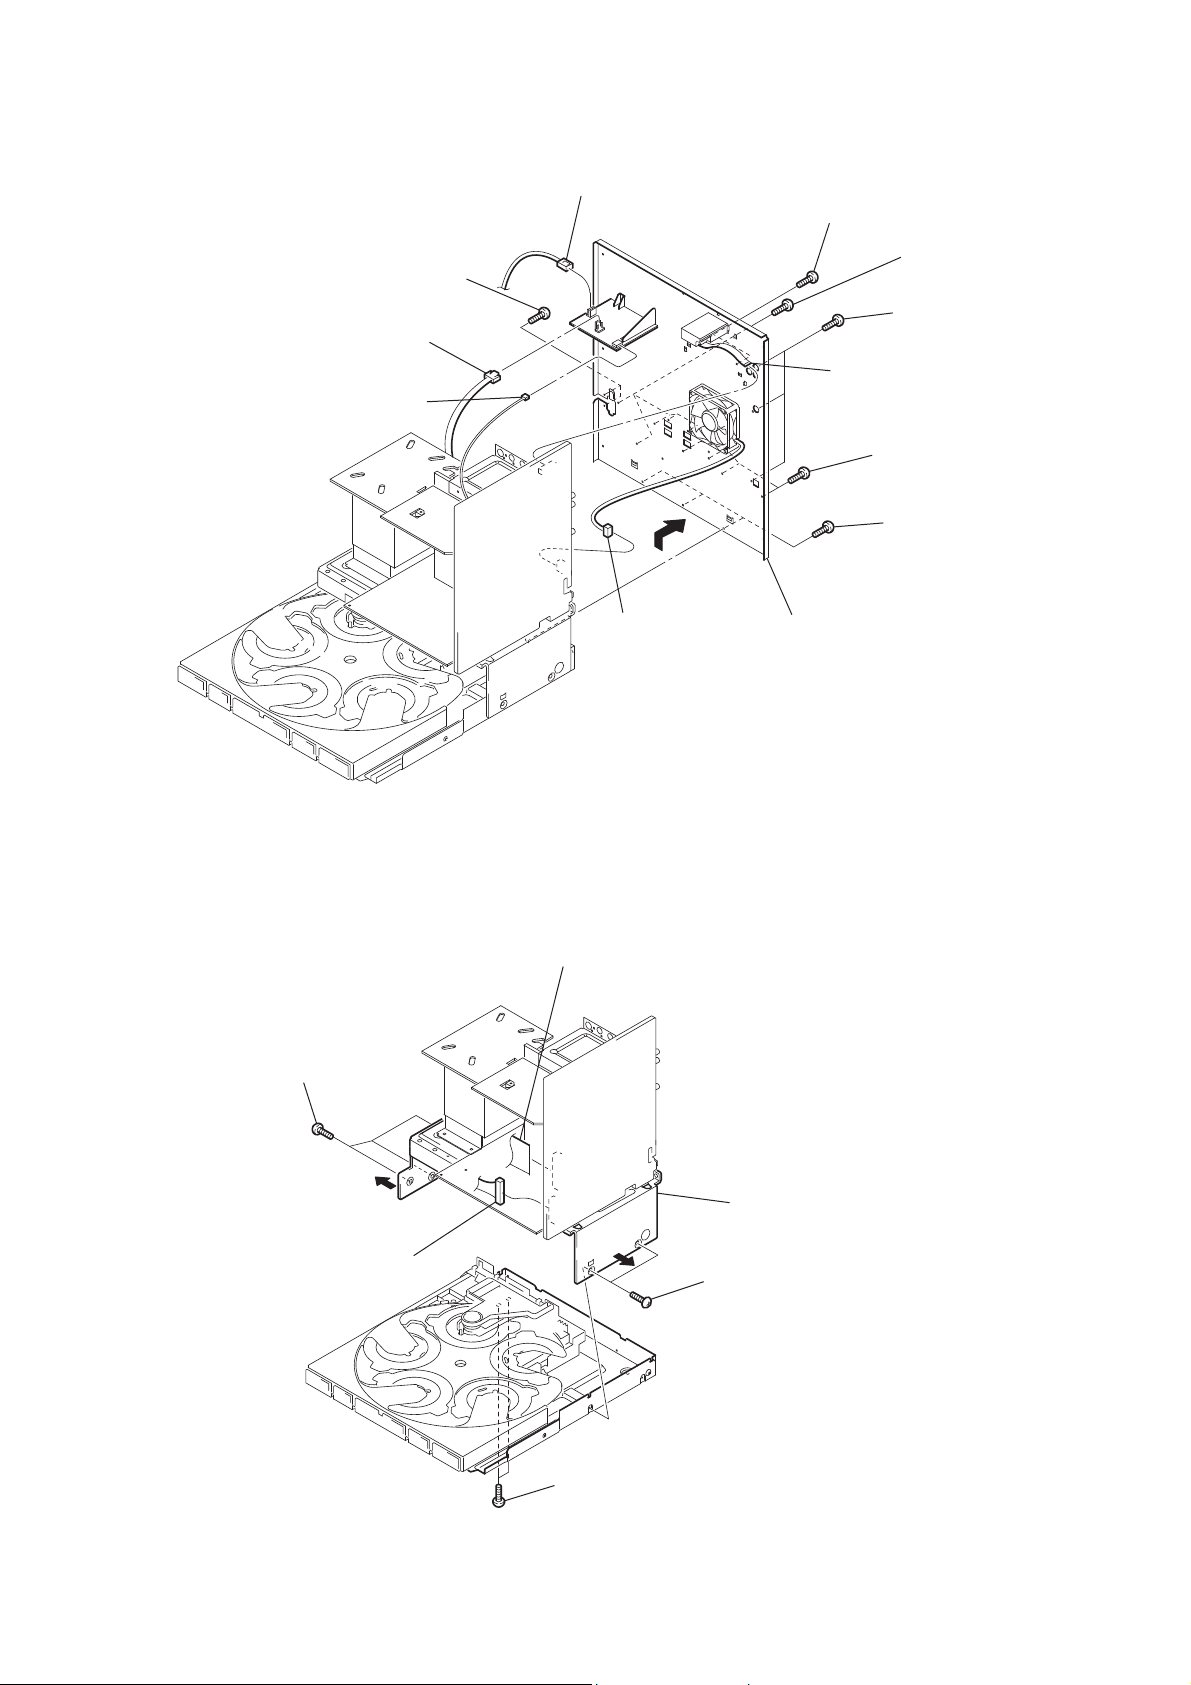
HCD-ZX66i/ZX99i
3-5. BACK PANEL SECTION
two screws
(+BVTP 3 × 8)
CN1115 (2P)
CN1100 (3P)
CN1116 (2P)
RB
RTCN513 (3P)
two screws
(+BVTP 3 × 8)
five screws
(+BVTP 3 × 8)
three screws
(+BVTP 3 × 8)
flexible flat cable (11 core)
(CN504)
four screws
(+BVTP 3 × 8)
three screws
(+BVTP 3 × 8)
REback panel section
3-6. BOARDS SECTION
three screws
(+BVTP 3 × 8)
CN509 (11P)
flexible flat cable (27 core)
(CN502)
boards section
two screws
(+BVTP 3 × 8)
20
two screws
(+BVTP 3 × 8)
Page 21

3-7. CD MECHANISM SECTION
two
screws
(+BV 3 (3-CR))
two
screws
(+BV 3 (3-CR))
HCD-ZX66i/ZX99i
CD mechanism section
3-8. MAIN BOARD
two screws
(+BVTP 3 × 8)
CN503 (4P)
CN601
MAIN board
CN505
CN602
CN509 (11P)
two screws
(+BVTP 3 × 8)
CN506
flexible flat cable (27 core)
(CN502)
21
Page 22

HCD-ZX66i/ZX99i
3-9. TABLE ASSY
two screws
(+BTP 2.6 × 8)
bracket
RTtable assy
plate (guide)
floating
+PTPWH M2.6
(
screw
(+BTP 2.6 × 8)
RB
claw
screw
)
tray
flexible flat cable (6 core)
(CN002) (FMS-18)
screw
(+BTP 2.6 × 8)
3-10. SE-130 BOARD
SE-130 board
CN102 (2P)
two screws
(+BTP 2.6 × 8)
flexible flat cable (6 core)
(CN101) (FMS-18)
claw
claw
22
Page 23

3-11. TD BELT
TD belt
two screws
(+P 3 × 3)
HCD-ZX66i/ZX99i
two screws
(+BTP 2.6 × 8)
TD unit assy
TD motor assy
table assy
3-12. DC MOTOR (M901)
CN004 (2P)
DC motor (M901)
belt (loading)
gear (loading A)
MD-94 board
two screws
(+P 2.6 × 4)
screw
(+
PTPWH M2.6
)
23
Page 24

HCD-ZX66i/ZX99i
3-13. OPTICAL PICK-UP
holder (BU) assy
chassis plate
two coil springs (insulating)
3-14. BD81A BOARD
two
stopper (BU)
two
screws
(+BVTP 2.6 (3CR))
optical pick-up
two coil springs (insulating)
two floating
(+
flexible flat cable (27 core)
(CN201)
optical pick-up
two screws
(+BVTP 3 × 8)
screws
PTPWH M2.6
)
24
BD81A board
Remove the four solders.
optical pick-up (16 core)
(CN101)
gap tube
screw
(+BVTP 2.6 (3CR))
Page 25

SECTION 4
TEST MODE
HCD-ZX66i/ZX99i
[GC TEST MODE]
• This mode is used to check the fl uorescent indicator tube,
LEDs, keys, JOG, VOLUME jog, model, destination and software version.
Procedure:
1. Press [M] (iPod) button, [TUNING MODE] button and
[DISC 2] button simultaneously.
2. All segments in fl uorescent indicator tube and the LEDs are
lighted up.
3. When you want to enter to the model version and destination
display mode, press [DISC 1] button. The model information
appears on the fl uorescent indicator tube.
4. Each time [DISC 1] button is pressed, the display changes
to display software version of the software creation. The sequence is MC, GC, SYS, CD, CDDM, CDMA, CDMB, BDA,
BDB, ST, TA, TM, and iPod in this order, and returns to the
MC version display.
5. When [DISC 3] button is pressed while the software version is
being displayed, the date of the software creation appears.
When [DISC 3] button is pressed again, the display returns to
the software version display. When [DISC 1] button is pressed
while the date of the software creation is being displayed, the
date of the software creation is displayed in the same order of
software version display.
6. Press [DISC 2] button, the key check mode is activated.
7. In the key check mode, the fl uorescent indicator tube displays
“K 0 J0 V0”.
Turn the [JOG] clockwise; “J” value increases by one. Turn
the [JOG] counterclockwise; “J” value decreases by one. Each
time a button is pressed, “K” value increases. Press their keys
on main unit to check whether the key is detected. However,
once a button has been pressed, it is no longer taken into account.
“V” value increases in the manner of 0, 1, 2, 3 ... if [VOLUME]
knob is turned clockwise, or it decreases in the manner of 0, 9,
8, 7 ... if [VOLUME] knob is turned counterclockwise.
8. When [EX-CHANGE] button is pressed after all segments
in fl uorescent indicator tube and the LEDs light up, alternate
segments in fl uorescent indicator tube would light up. If you
press [EX-CHANGE] button again, another half of alternate
segments in fl uorescent indicator tube would light up. Press
[EX-CHANGE] button again would cause all segments lights
up.
9. To release from this mode, press three buttons in the same
manner as step 1, or disconnect the power cord.
[MC TEST MODE]
• This mode is used to check operations of the respective sections of Amplifi er and Tuner.
Procedure:
• To enter MC Test Mode
1. Press [M] (iPod) button, [TUNING MODE] button and
[DISC 3] button simultaneously.
2. The CD ring indicators and speaker indicators fl ash on the fl u-
orescent indicator tube. The function is changed to PHONO.
• Check of Amplifi er
1. Press [v] button and a message “GEQ MAX” appears on the
fl uorescent indicator tube. GEQ increases to its maximum.
2. Press [V] button and a message “GEQ MIN” appears on the
fl uorescent indicator tube. GEQ decreases to its minimum.
3. Press either [b] button or [B] button and a message “GEQ
FLAT” appears on the fl uorescent indicator tube. GEQ is set to
fl at.
4. When the [VOLUME] knob is turned clockwise even slightly,
the sound volume increases to its maximum and a message
“VOLUME MAX” appears on the fl uorescent indicator tube.
5. When the [VOLUME] knob is turned counterclockwise even
slightly, the sound volume decreases to its minimum and a
message “VOLUME MIN” appears on the fl uorescent indica-
tor tube.
• To release from MC Test mode
1. To release from this mode, press [? / 1] button.
2. The cold reset is enforced at the same time.
[COLD RESET]
• The cold reset clears all data including preset data stored in the
RAM to initial conditions. Execute this mode when returning
the set to the customer.
Procedure:
1. Press
[? / 1] button simultaneously.
2. The fl uorescent indicator tube becomes blank for a while, and
[VACS ON/OFF]
• This mode is used to switch ON and OFF the VACS (Variable
Procedure:
1. Press [? / 1] button to turn the set ON.
2. Press [AMP MENU] button and [? / 1] button simultaneous-
[TUNER STEP CHANGE]
• The step interval of AM channels can be toggled between 9
Procedure:
1. Press [? / 1] button to turn the set ON.
2. Press [TUNER/BAND] button to select the “AM”.
3. Press [? / 1] button to turn the set OFF.
4. Press [TUNING MODE] button and [? / 1] button simultane-
[CD SERVICE MODE]
• This mode let you move the CD sled motor freely. Use this
Procedure:
1. Press [? / 1] button to turn the set ON.
2. Select CD function.
3. Press [M] (iPod) button, [TUNING MODE] button, and
4. The CD service mode is activated. The message “SERVICE
5. With the CD in stop status, press [M] (CD) to move the opti-
6. To turn on or off the laser, press [PLAY MODE] button. The
7. To release from this mode, press [? / 1] button.
M] (iPod) button, [TUNING MODE] button, and
[
the set is reset.
Attenuation Control System).
ly. The message “VACS OFF” or “VACS ON” appears on the
fl uorescent indicator tube.
kHz and 10 kHz.
ously. The system will turn ON automatically. The message
“AM 9k STEP” or “AM 10k STEP” appears on the fl uorescent
indicator tube and thus the channel step is changed.
mode when you want to clean the optical pick-up.
[DISC 5] button simultaneously.
MODE” appears on the fl uorescent indicator tube.
cal pick-up to outside track, or turn [m] (CD) to move to inside track. The message “SLED OUT” or “SLED IN” appears
on the fl uorescent indicator tube.
message “LD ON” or “LD OFF” appears on the fl uorescent
indicator tube.
25
Page 26

HCD-ZX66i/ZX99i
[CD AGING MODE]
• This mode can be used for operation check of CD section.
If an error occurs, the aging operation would stops and the sta-
tus is displayed.
If there were no error occurs, the aging operation would con-
tinue repeatedly.
Procedure:
1. Press [? / 1] button to turn the set ON.
2. Select CD function.
3. Load 5 discs on the disc tray.
4. Press [PLAY MODE] button repeatedly to select the “ALL
DISCS” mode, and press the [REPEAT] button on the remote
repeatedly to select repeat mode off.
5. Press [M] (iPod) button, [TUNING MODE] button and
[DISC 4] button simultaneously.
6. Aging operation is started.
7. To release from this mode, press [? / 1] button or disconnect
the power cord to turn the power OFF.
Aging mode sequence:
START
(from Disc 1)
Disc Chucking
[CD ERROR CODE MODE]
1. Display the CD error code when an error occurred
Procedure:
1. Press [M] (iPod) button, [TUNING MODE] button and
[DISC SKIP] button simultaneously to enter the error code
display mode.
2. The fl uorescent indicator tube displays the number of total er-
ror.
3. Each time CD buttons is pressed, display change as below.
Display of
Total Error
FF button
AMS (–)
button
AMS (–)
button
Display of
Mechanical
Errors
Display of
No Disc
Errors
FR button
AMS (+)
button
FR buttonFF button
AMS (+)
button
TOC Reading
Play first track for 2
seconds
Play last track for 2
seconds
EX-CHANGE open/
close
Open the disc tray
Disc skip
Close the disc tray
Change the next disc
4. To clear the error record, operate the cold reset. (Refer to the
“MC COLD RESET”)
5. To release from this mode, press the [? / 1] button or discon-
nect the power plug to turn the power OFF.
2. Display of total error
Em**Ed**
Em**: The number of times for CDM (mechanical) errors.
Ed**: The number of times for BD error (after chucking the
disc).
• Display of CDM (mechanical) errors. It is show with “M” and
11 digit number.
M*$$%%&&##00
M*: The number of history error for mechanical (“0” is latest
one)
(Press [>] (CD) button to display next error)
$$: Not used
%%: Loading related error (Second fi gure is not used)
D: Stop by the problem other than mechanical problem
while closing.
E: Stop by the problem other than mechanical problem
while opening.
C: Stop by the problem other than mechanical problem
while chucking up.
F: Stop by the problem other than mechanical problem
while chucking down.
26
Page 27

HCD-ZX66i/ZX99i
&&: Emerging error
01: Stop while chucking up.
02: Stop while chucking up.
03: Time-out of EX-CHANGE open.
05: Time-out of EX-CHANGE close.
##: Not used (value is fi xed to 00)
00: Not used (value is fi xed to 00)
• Display of BD errors. It is shown with “D” and 11 digits number.
D*$$%%&&##00
D*: The number of error history (“0” is latest one)
(Press [>] (CD) button to display next error)
$$: The detail of trouble
01: Focus error
02: GFS error
03: Setup error
%%: Not Used
&&: Processing operation when trouble occurs
00: No disc judgment without chucking retry.
01: No disc judgment after chucking retry.
tube and the CD ship mode is set.
5. Then AC power OFF.
[CD SHIP MODE (WITHOUT MEMORY CLEAR)]
• This mode moves the optical pick-up to the position durable
to vibration. Use this mode when returning the set to the customer after repair.
Procedure:
1. Press [? / 1] button to turn the set ON.
2. Select CD function.
3. Press [DISC SKIP] button and [? / 1] button simultaneously.
The set will power off automatically.
4. After the “STANDBY” blinking display fi nishes, a message
“MECHA LOCK” is displayed on the fl uorescent indicator
tube and the CD ship mode is set.
5. The AC power OFF.
[CD POWER MANAGE]
• This mode let you switch on or off power supply to the BU
during TUNER function.
• When CD POWER is set to OFF , the power supply to the BU is
cut off during TUNER function. It will increase the time taken
to access CD when function change from TUNER to CD but it
will improve tuner reception.
##: The state when judged as no disc
01: Stop
02: Setup
03: TOC reading
04: Access
05: Playback
06: Pause
07: Manual search (Play)
08: Manual search (Pause)
00: Not used (value is fi xed to 00)
[CD REPEAT 5 LIMIT OFF MODE]
• The number of repeat for CD playback is 5 times when the repeat mode is “REPEA T ALL”. This mode enables CD to repeat
playback for limitless times.
Procedure:
1. Press [? / 1] button to turn the set ON.
2. Select CD function.
3. Press [M] (iPod) button, [TUNING MODE] button and
[EX-CHANGE] button simultaneously to enter the CD repeat
5 limit off mode and the fl uorescent indicator tube displays
“LIMIT OFF”.
4. To release from this mode, operate the cold reset. (Refer to the
“MC COLD RESET”)
[CD SHIP MODE (WITH MEMORY CLEAR)]
• This mode moves the optical pick-up to the position durable to
vibration and clears all data including preset data stored in the
RAM to initial conditions. Use this mode when returning the
set to the customer after repair.
Procedure:
1. Press [? / 1] button to turn the set ON.
2. Select CD function.
3. Press [EX-CHANGE] button and [? / 1] button simultaneously. The set will power off automatically.
4. After the “STANDBY” blinking display fi nishes, a message
“MECHA LOCK” is displayed on the fl uorescent indicator
• When CD POWER is set to ON, the power supply to the BU
is not cut off during TUNER function. It will reduce the time
taken to access CD when function change from TUNER to CD
but it will decrease tuner reception performance.
Procedure:
1. Press [? / 1] button to turn the set ON.
2. Select CD function.
3. Press [? / 1] button to turn the set OFF.
4. When demonstration appear, press [x] (CD) button and
[? / 1] button simultaneously. The set will power on automati-
cally.
5. The message “CD POWER ON” or “CD POWER OFF” will
be displayed on the fl uorescent indicator tube.
[CD TRAY LOCK MODE]
• This mode let you lock the disc tray. When this mode is activated, the disc tray will not open when [OPEN/CLOSE] button or
[EX-CHANGE] button is pressed. The message “LOCKED”
will be displayed on the fl uorescent indicator tube.
Procedure:
1. Press [? / 1] button to turn the set ON.
2. Select CD function.
3. Press and hold [x] (CD) button and [Z OPEN/CLOSE] button simultaneously until “LOCKED” or “UNLOCKED” displayed on the fl uorescent indicator tube (around 5 seconds).
[VACS DISPLAY]
This mode is used to check the VACS level.
•
Procedure:
1. Press [? / 1] button to turn on the system.
2. Press [M] (iPod) button, [TUNER MEMORY] button and
[DISC 3] button simultaneously.
3. During the VACS Level Display Mode, the fl uorescent indi-
cator tube displays “VACSx APy”. “x” represent VACS level
which is triggered by signal level, and “y” represent APVACS
(Abuse Protection VACS) level which is triggered.
27
Page 28

HCD-ZX66i/ZX99i
SECTION 5
ELECTRICAL ADJUSTMENTS
CD SECTION
Note:
1. CD Block is basically designed to operate without adjustment.
Therefore, check each item in order given.
2. Use YEDS-18 (3-702-101-01) unless otherwise indicated.
3. Use an oscilloscope with more than 10MΩ impedance.
4. Clean the object lens by an applicator with neutral detergent
when the signal level is low than specifi ed value with the fol-
lowing checks.
S-Curve Check
oscilloscope
BD81A board
JPO102 (FEI)
TP177 (VC)
Procedure:
1. Connect oscilloscope to JPO102 (FEI) and TP177 (VC).
2. Press the [\ / 1] button to turn the power ON.
3. Load a disc (YEDS-18) and actuate the focus search. (In consequence of open and close the disc tray, actuate the focus
search)
4. Confi rm that the oscilloscope waveform (S-curve) is symmet-
rical between A and B. And confi rm peak to peak level within
3 ±0.5 Vp-p.
S-curve waveform
symmetry
Note: Clear RF signal waveform means that the shape “◊” can be
clearly distinguished at the center of the waveform.
VOLT/DIV: 200 mV
TIME/DIV: 500 ns
level: 1.3 ± 0.3 Vp-p
Checking Location:
TP177
(VC)
JPO102
(FEI)
IC101
A
within 3 ± 0.5 Vp-p
B
Note: • Try to measure several times to make sure than the ratio
of A : B or B : A is more than 10 : 7.
• Take sweep time as long as possible and light up the
brightness to obtain best waveform.
RF Level Check
oscilloscope
BD81A board
TP124 (RFACO)
TP177 (VC)
Procedure:
1. Connect oscilloscope to TP124 (RFACO) and TP177 (VC).
2. Press the [\ / 1] button to turn the power ON.
3. Load a disc (YEDS-18) and playback.
4. Confi rm that oscilloscope waveform is clear and check RFAC
signal level is correct or not.
TP124
(RFACO)
28
Page 29
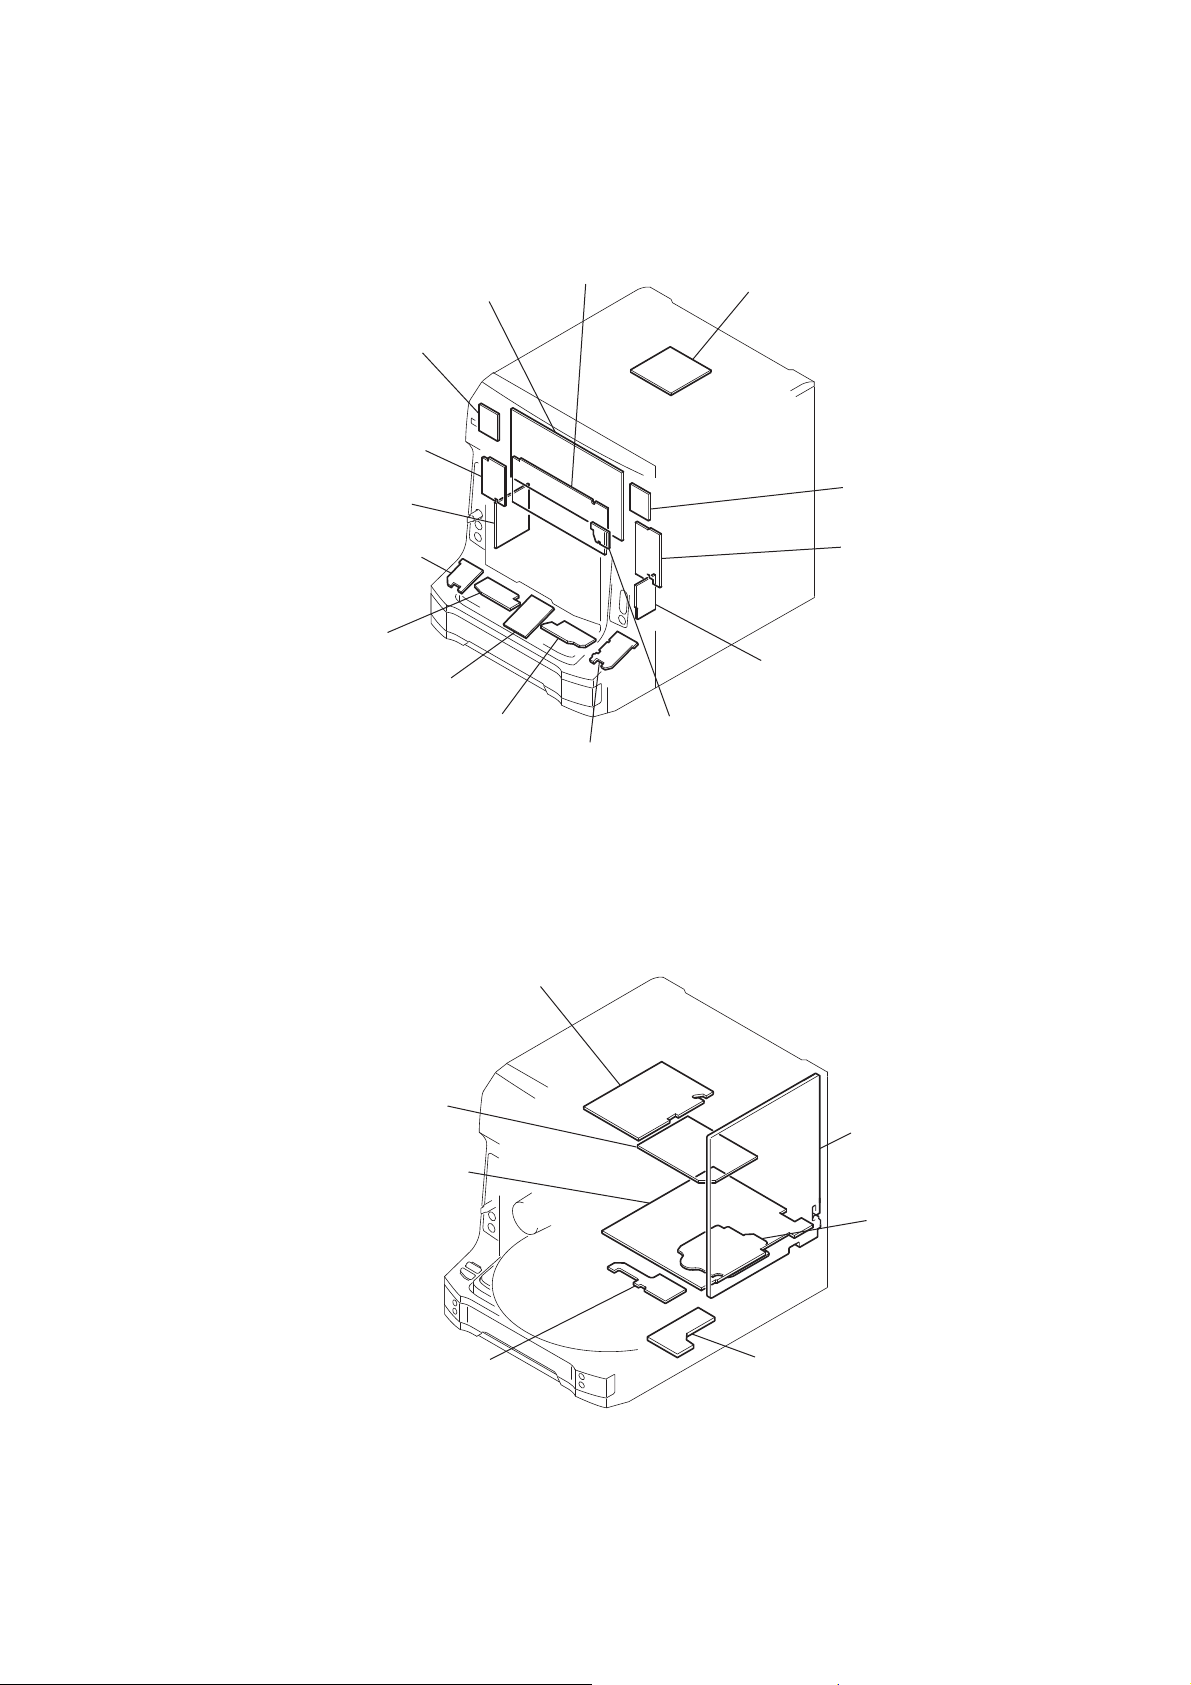
• Circuit Boards Location
HCD-ZX66i/ZX99i
SECTION 6
DIAGRAMS
POWER SW board
LEFT-BTTN board
MIC board
CD-L board
JOG-A board
(HCD-ZX99i)
IPOD board
PANEL COM board
JOG-B board
(HCD-ZX99i)
VOL board
CD-R board
SUBTRANS board
FUNCTION SW board
RIGHT-BTTN board
GAME HP board
CURSOR MT board
SURROUND board
(HCD-ZX99i)
POWER AMP board
SE-130 board
TRANS board
MAIN board
BD81A board
MD-94 board
29
Page 30
HCD-ZX66i/ZX99i
THIS NOTE IS COMMON FOR PRINTED WIRING BOARDS AND SCHEMATIC DIAGRAMS.
(In addition to this, the necessary note is printed in each block.)
For Printed Wiring Boards.
Note:
• X : parts extracted from the component side.
• Y : parts extracted from the conductor side.
• a : Through hole.
•
(The other layers' patterns are not indicated.)
: Pattern from the side which enables seeing.
Caution:
Pattern face side:
(SIDE B)
Parts face side:
(SIDE A)
Parts on the pattern face side seen from
the pattern face are indicated.
Parts on the parts face side seen from
the parts face are indicated.
For Schematic Diagrams.
Note:
• All capacitors are in μF unless otherwise noted. (p: pF) 50
WV or less are not indicated except for electrolytics and
tantalums.
• All resistors are in Ω and 1/4 W or less unless otherwise
specifi ed.
• % : indicates tolerance.
• f : internal component.
• 2 : nonfl ammable resistor.
• 5 : fusible resistor.
• C : panel designation.
Note:
The components identifi ed by mark 0 or dotted
line with mark 0 are critical for safety.
Replace only with part
number specifi ed.
• A : B+ Line.
• B : B– Line.
• Voltages and waveforms are dc with respect to ground
under no-signal (detuned) conditions.
no mark : FM
< > : CD PLAY
: Impossible to measure
*
• Voltages are taken with VOM (Input impedance 10 MΩ).
Voltage variations may be noted due to normal production
tolerances.
• Waveforms are taken with a oscilloscope.
Voltage variations may be noted due to normal production
tolerances.
• Circled numbers refer to waveforms.
• Signal path.
F : TUNER (FM/AM)
L : VIDEO
J : CD (ANALOG OUT)
c : CD (DIGTAL OUT)
N : MIC
Note:
Les composants identifi és
par une marque 0 sont
critiques pour la sécurité.
Ne les remplacer que par
une piéce portant le numéro spécifi é.
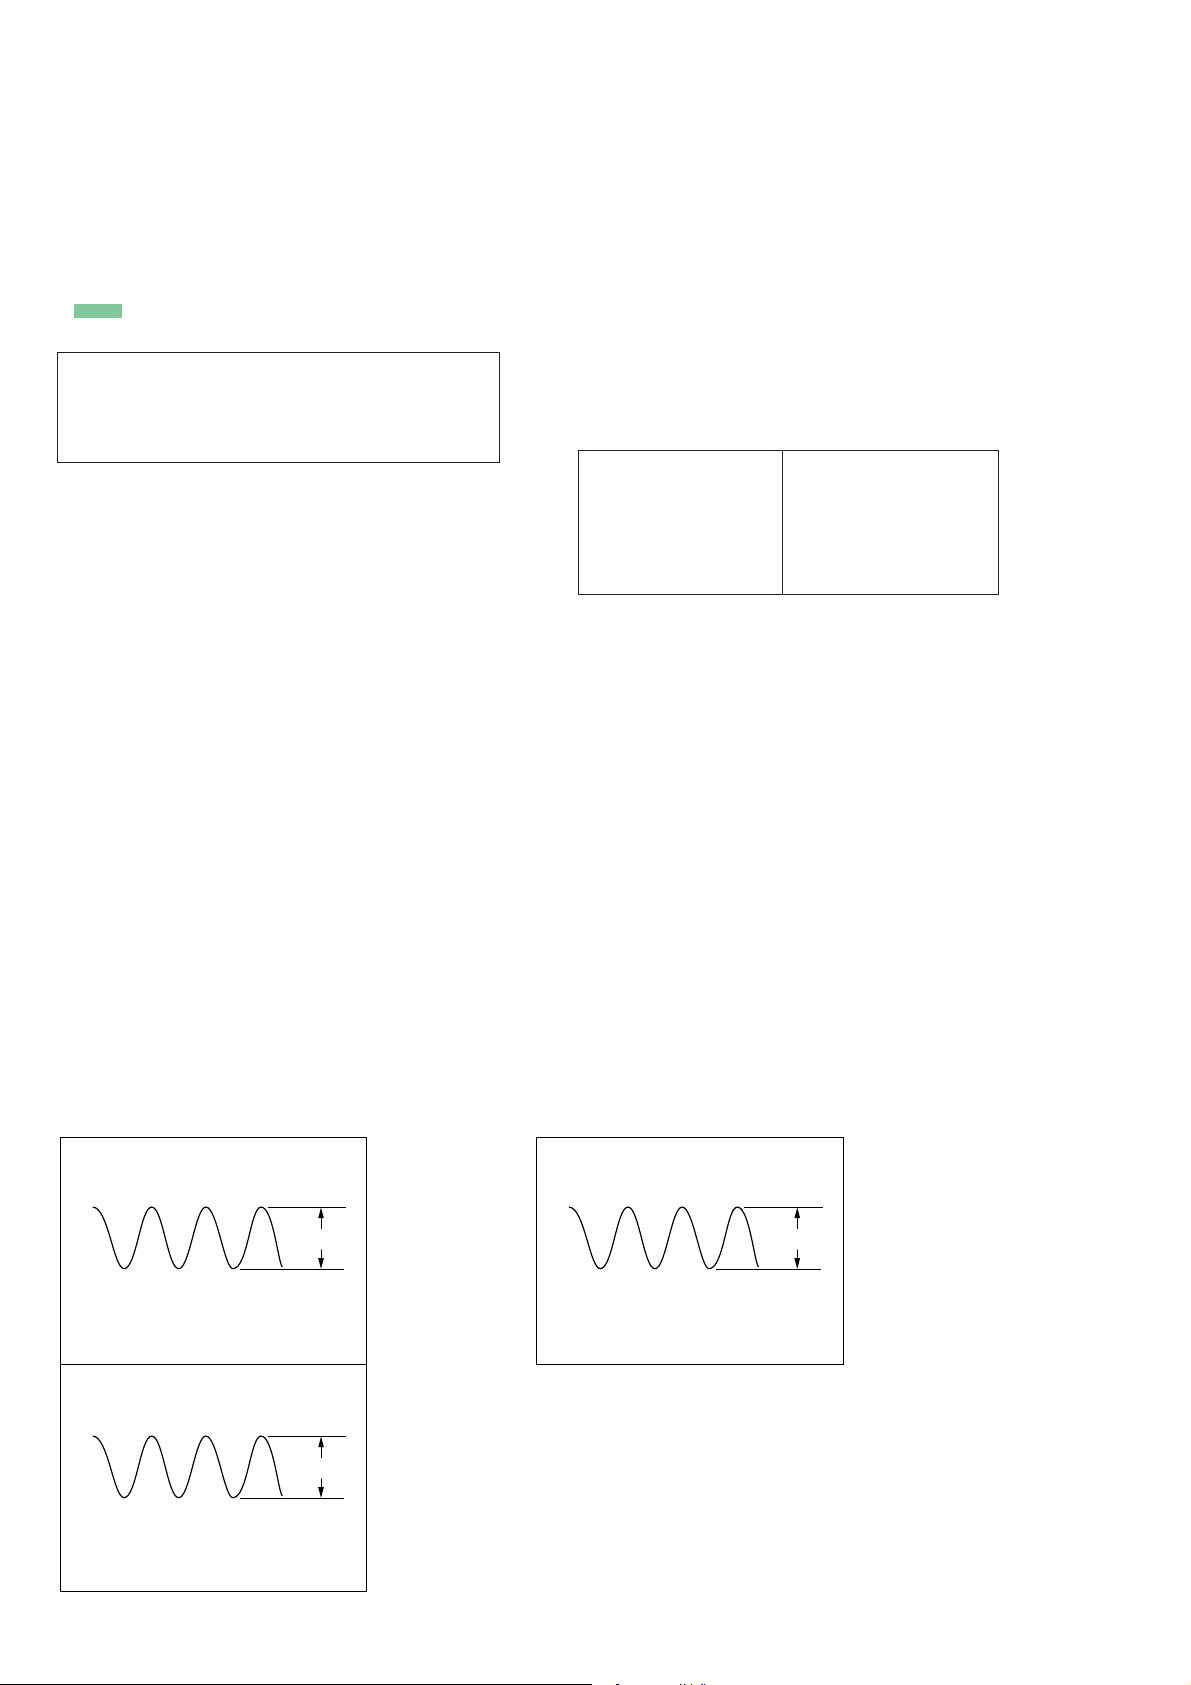
• Waveforms
– MAIN Board –
IC401 RB (XC-OUT)
32.768 kHz
1 V/DIV, 10 μsec/DIV
IC401 RE (X-OUT)
16 MHz
0.5 V/DIV, 50 nsec/DIV
30
2.1 Vp-p
1.6 Vp-p
– PANEL COM Board –
IC901 JT (X OUT)
3.5 Vp-p
4 MHz
1 V/DIV, 50 nsec/DIV
Page 31
HCD-ZX66i/ZX99i
HCD-ZX66i/ZX99i
3131
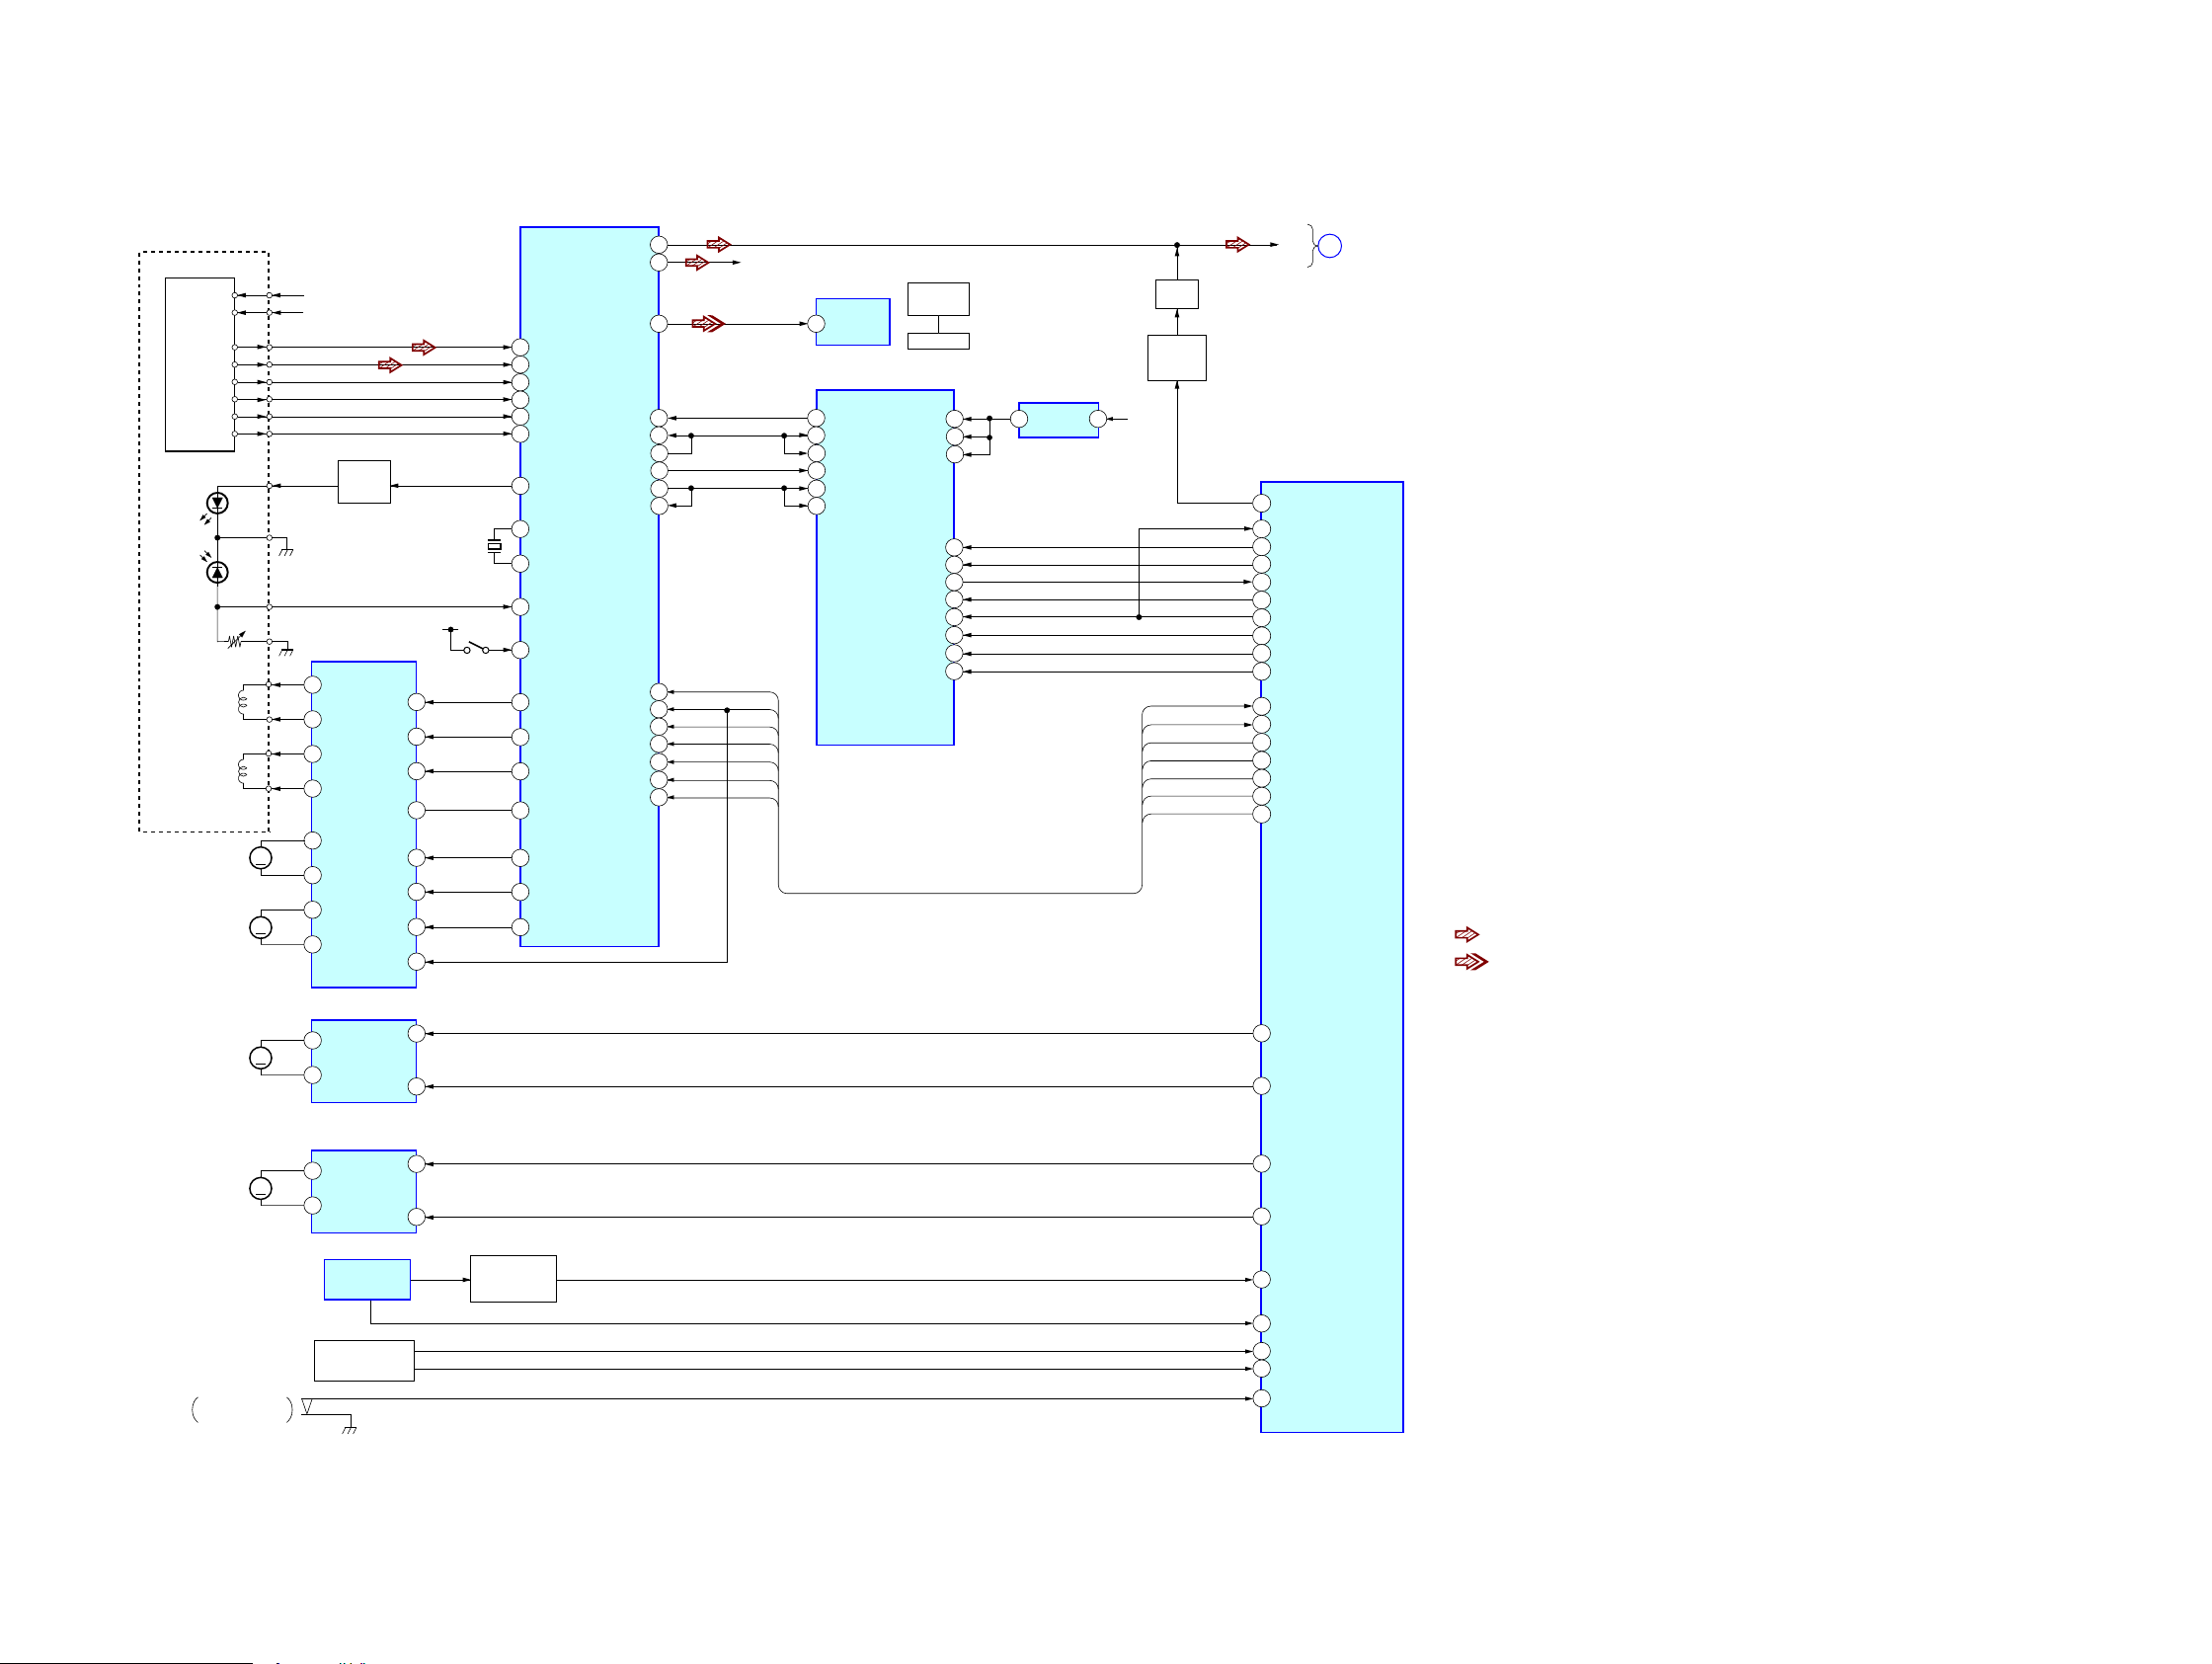
6-1. BLOCK DIAGRAM – CD SERVO Section –
OPTICAL PICK-UP
BLOCK
(KSM-215DCP)
LD
DRIVER
Q10
+1.7V
+3.3V
LD
GND
FOCUS
COIL
F+
F–
T+
T–
TRACKING
COIL
X171
16.9344MHz
SLED/SPINDLE
MOTOR DRIVER
IC251
RF AMP,DIGITAL
SIGNAL PROCESSOR
IC101
OPTICAL OUTPUT
IC503
16
7
15
17
18
VR
+3.3V
S101
(LIMIT)
PD
19
20
21
22
5
30
3
24
MUTE
CH2OUT-F
CH1FIN
CH1RIN
CH2FIN
SFDR
OPIN+
CH2OUT-R
CH1OUT-R
CH1OUT-F
CH4OUT-R
CH4OUT-F
CH3OUT-F
CH3OUT-R
M
M
M
M
M101
(SPINDLE)
M102
(SLED)
VC
VCC
A
B
C
D
E
F
DETECTOR
A
R-CH
B
E
19
F
20
LD
36
PD
37
TFDR
11
FFDR
13
CH3FIN
9
MPD
6
95
XTACN
100
XRST
102
DATA
104
XLAT
105
CLOCK
61
PCMDI
62
LRCKI
63
LRCK
65
PCMD
MP3 DECODER
IC301
SYSTEM CONTROL
IC401 (1/3)
21
40
SDO0
11
71
DOUT
86
AOUT2
81
AOUT1
DOUT
2
LRCKIA
16
SFSY/LRCKIB
19
SDIO
14
77
XTAO
78
XTAI
55
VDD
VDD
VDDM
26
27
C
28
D
29
107
SENS
XTACN
XRST
DATA
XLAT
CLOCK
SENS
TRDR
12
29
SRDR
CH3RIN
10
CH2RIN
FRDR
14
4
2
9
7
FIN
RIN
OUT1
OUT2
M901
(LOADING)
LOADING MOTOR DRIVER
IC515
66
BCK
60
BCKI
BCKIA
15
SBSY/BCKIB
18
6
+3.3V
CD L
8
5 1
3
100
1
7
5
2
3
18
STANBY
36
PO11/BUCK/AD14
8
MIACK
7
MICK
6
MIDIO
4
MICS
5
MILP
2
RESET
115
SCOR
SCOR
+1.5V REG
IC303
MP3 REQ
31
MP3 STB
6
MP3 DATA IN
41
CD A MUTE
MP3 CLK
MP3 ACK
MP3 DATA OUT
MP3 LP
MP3 CS
MP3 RST
SCOR
SENS
CLOCK
XLT
DATA
XRST
49
CKMN
50
CKMP
4
2
9
7
FIN
RIN
OUT1
OUT2
M902
(TURN TABLE)
TABLE MOTOR DRIVER
IC514
47
TRMP
PD
7
43
DSENS
42
TSENS
44
S2
45
S1
46
S0
48
TRMN
XTACN
TABLE SENSOR
PH101,102
ROTARY ENCODER
RE901
S901
TRAY POSITION
DETECT
TBL ADDRESS
SENS SWITCH
Q870
MUTE
Q150
MUTE
CONTROL
Q290
CD DIGITAL
OUT
OPTICAL
19
21
22
SCOR
SENS
CD CLK
XLAT
CD DATA
XRST
XTCN
23
24
25
26
A
MAIN
SECTION
• R-ch is omitted due to same as L-ch.
• Signal path
: CD (ANALOG OUT)
:
CD (DIGITAL OUT)
(Page 32)
Page 32
HCD-ZX66i/ZX99i
HCD-ZX66i/ZX99i
3232
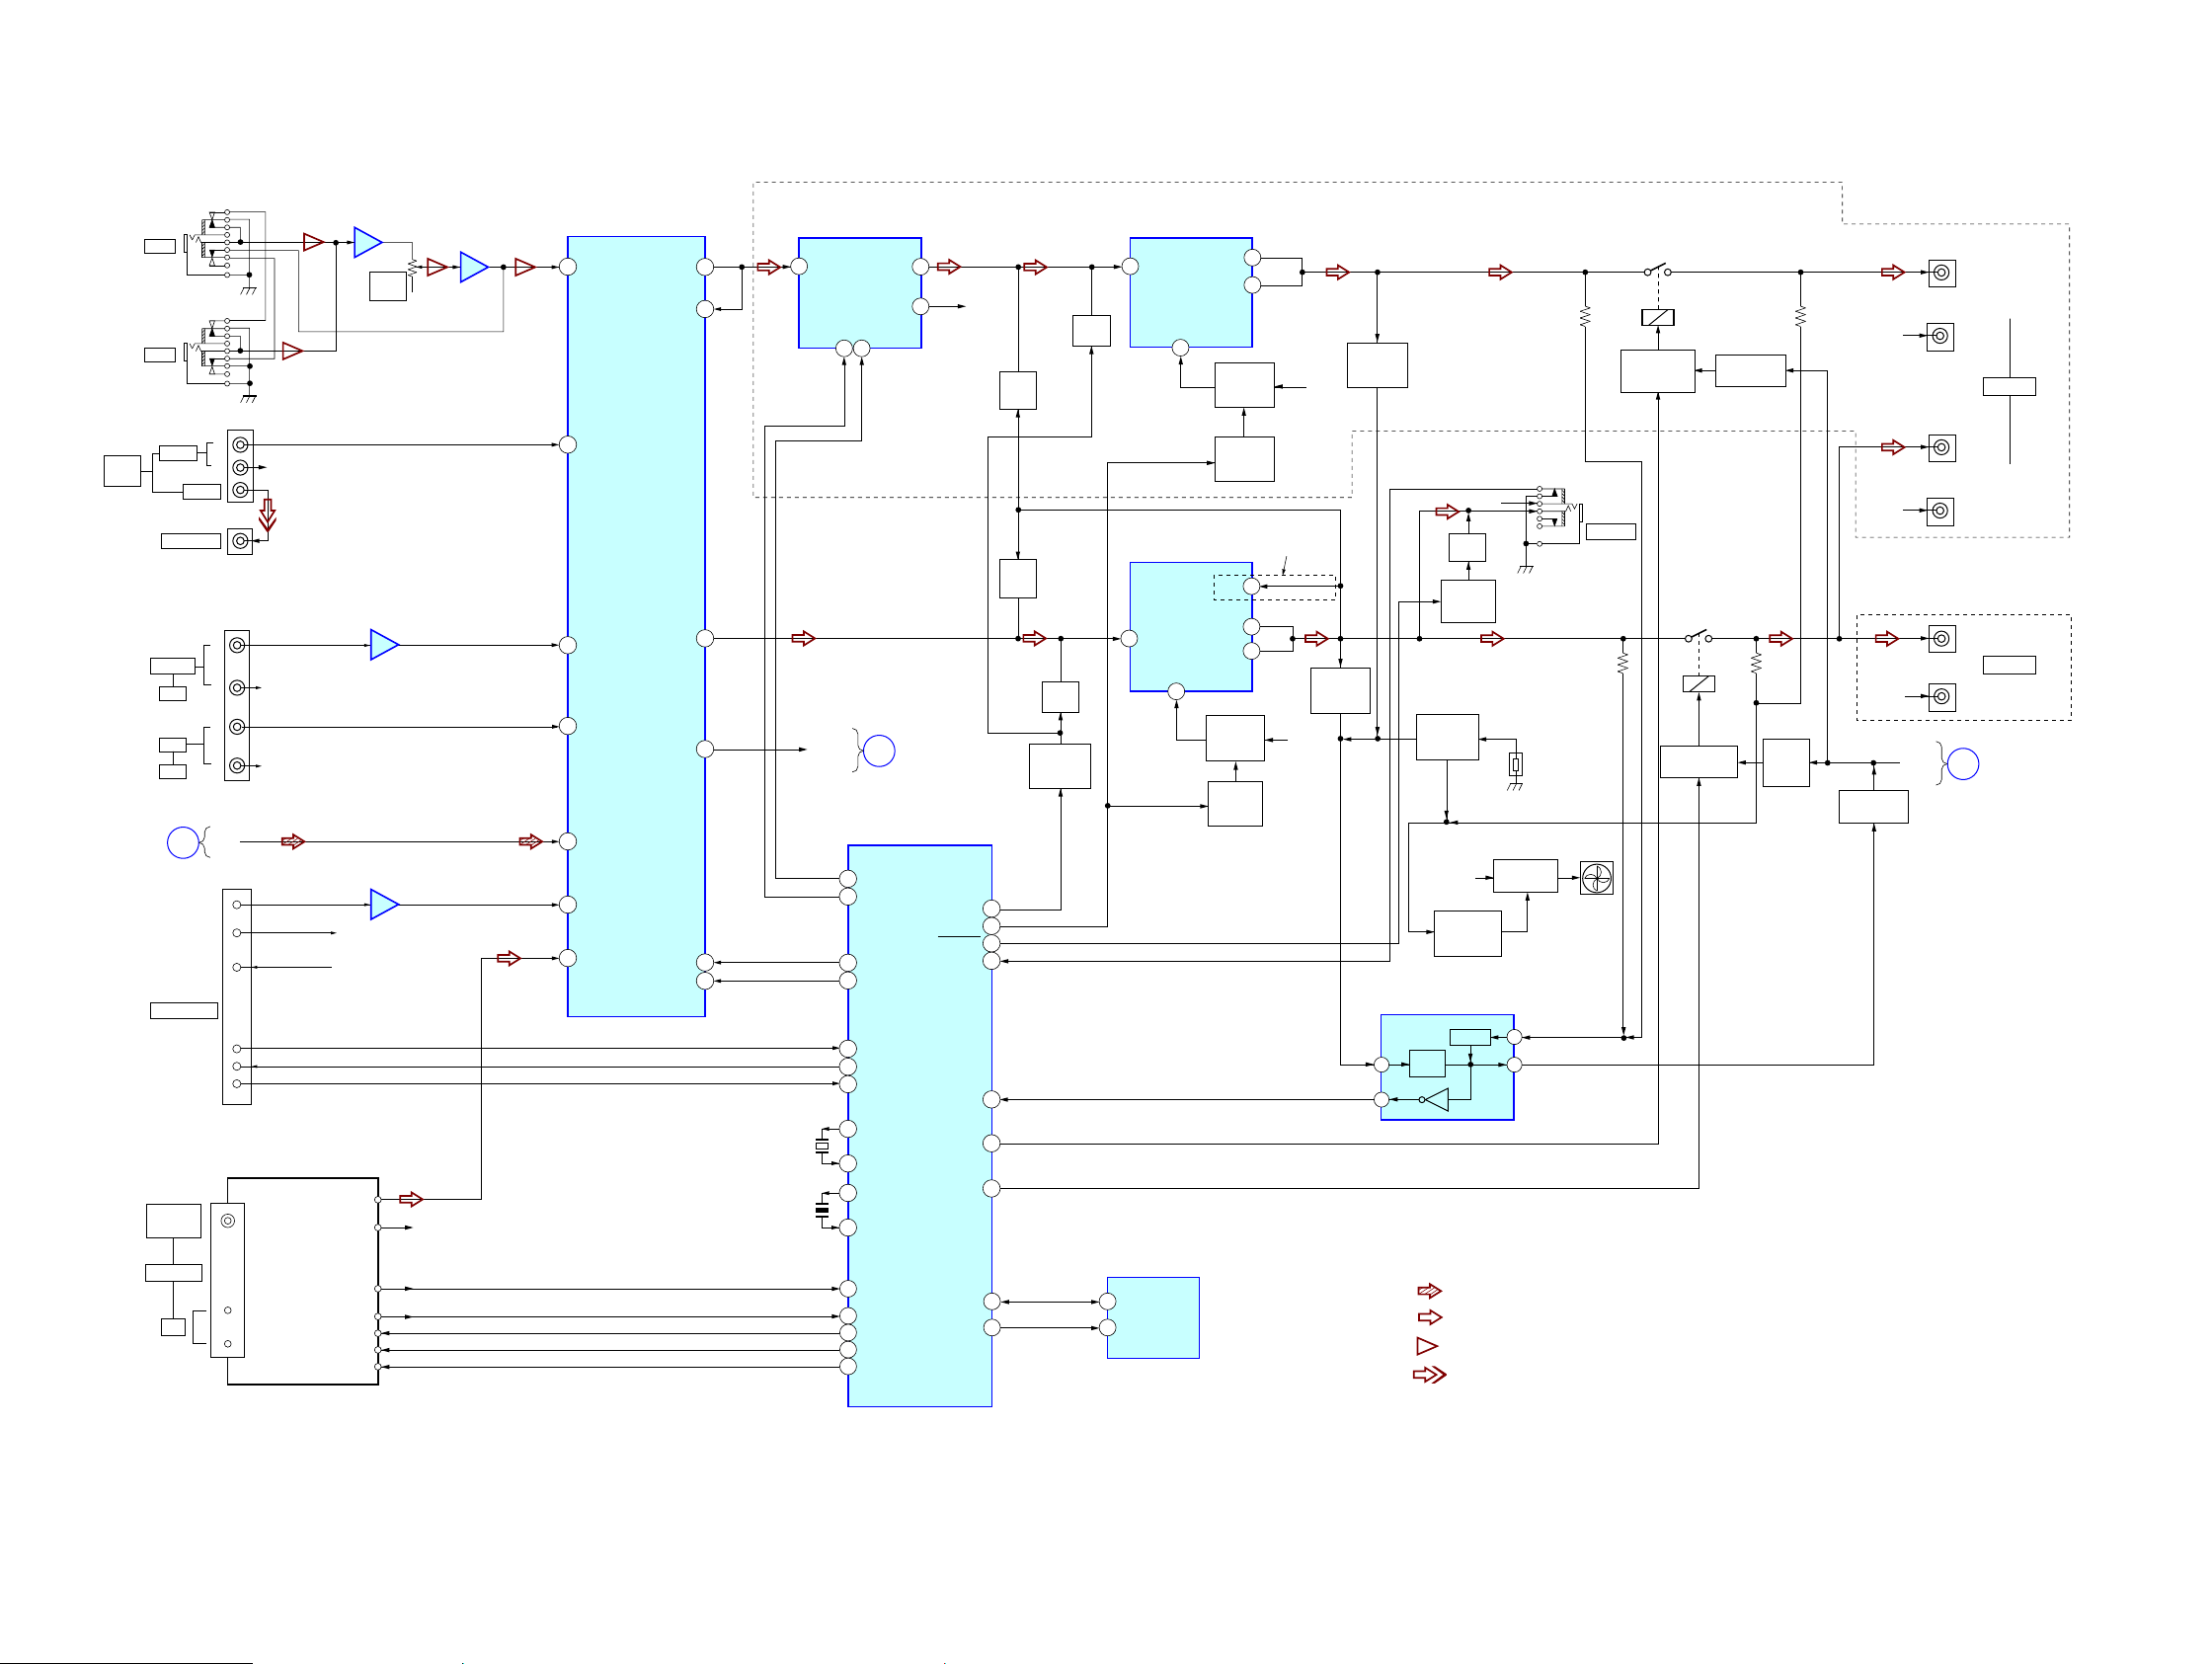
6-2. BLOCK DIAGRAM – MAIN Section –
J580
J716
CD L
A
CD SERVO
SECTION
C
DISPLAY/POWER
SECTION
AUDIO1 DATA
AUDIO1 CLK
IPOD DETECT
MIC IN
R-CH
-VH
GAMEL
IPOD TXD
XC-OUT
XC-IN
FR RELAY
EEPROM DATA
EEPROM CLK
SURR RELAY
PROTECT
OUT1
OUT2
CLOCK
DATA
HP DET
TONEOUTL
VOLINL
PHONO-L
MD_IN-L
CD-L
IPOD-L
ST-L
OUTL
SA2
DATA
CLK
HP MUTE
STK MUTE
LINE MUTE
SYSTEM CONTROL
IC401 (2/3)
GAME
INPUT
J801
RV801
MIC1
J851
PHONES
MIC
LEVEL
MIC AMP
IC850 (1/2)
MIC AMP
IC850 (2/2)
AUDIO
L
-2
-3
-3
-4
-1
-2
-1
R
VIDEO
R-CH
R-CH
R-CH
13
7
31
67
5
IPOD AMP
IC100
PHONO AMP
IC519
LINE-OUT-L
LINE-OUT-R
VBUS
DGND
CN1550
Dock for iPod
RXD
TXD
27
28
8
30
VBUS
J701
L
R
L
R
R-CH
J802
MIC2
B
DISPLAY/POWER
SECTION
POWER AMP
IC600 (ZX66i)
ZX66i
IC601 (ZX99i)
SPEANA
18
22
11
10
12
14
TM609
(2/2)
RY760
R-CH
ZX99i
ZX66i
MUTE
CONTROL
Q604,606
MUTE
CONTROL
Q600,601
OVERLOAD
DETECT
Q610
OVERLOAD
DETECT
Q668
SURROUND
RELAY DRIVE
Q762
PROTECTER
Q765
MUTE
CONTROL
Q505
MUTE
Q500
20 18
5
12
11
17
15 16
FRONT
(SPEAKER A)
L
R
STK MUTE
CONTROL
Q720,721
OVERLOAD
DETECT
Q722
SURROUND
POWER AMP
IC701
OVERLOAD
DETECT
Q780
DBFB
Q52
DBFB
Q154
MUTE
Q103
SOUND CONTROL
IC102
INPUT SELECTOR,
ELECTRONIC VOLUME
IC101
MUTE
Q641
R-CH
THERMAL
DETECT
Q628-630
RELAY DRIVER
Q644
AC DETECT
Q765
RY646
AC DET
AC CUT
DETECT
Q647
FAN DRIVER
CONTROL
Q555,557
OVER
LOAD
DC DET
TH629
FAN901
PROTECTOR
IC627
UNREG
FAN DRIVER
Q502,503
2
41
3
VIDEO OUT
IN
PC
SURROUND
(SPEAKER B)
L
R
SPEAKER
SPEAKER
TM607
PHONO
X401
32.768kHz
11
10
35
75
IPOD RXD
36
44
40
43
42
41
39
46
29
26
9
21
22
30
66
65
AUDIO2 DATA
VOLIN1
+RE2
-RE2
-PRE
IN2
LIN2
+RE2
-RE2
-PRE
IN2
-VH
AUDIO2 CLK
68
67
81
79
80
34
77
72
78
X-OUT
X-IN
X402
16MHz
13
15
R-CH
TM607
(2/2)
TM609
(1/2)
R-CH
L
R
TM607
(1/2)
R-CH
ST-L
TU901
FM/AM TUNER PACK
ANTENNA
ST-LOUT
FM ANT
AM ANT
AM ANT
ST-ROUT
TUNED
ST-DOUT
ST-DIN
ST-CLK
ST-CE
TUNED
ST-DOUT
ST-DIN
ST-CLK
ST-CE
FM75
COAXIAL
AM
TUNED
ST-DIN
ST-DOUT
ST-CLK
SDA
EEPROM
IC675
SCL
ST-CE
86
82
85
83
84
10
6
60
61
18
19
IN
• R-ch is omitted due to same as L-ch.
• Signal path
: CD (ANALOG OUT)
:
TUNER (FM/AM)
:
MIC
: VIDEO
(Page 33)
(Page 31)
(Page 33)
Page 33
HCD-ZX66i/ZX99i
HCD-ZX66i/ZX99i
3333
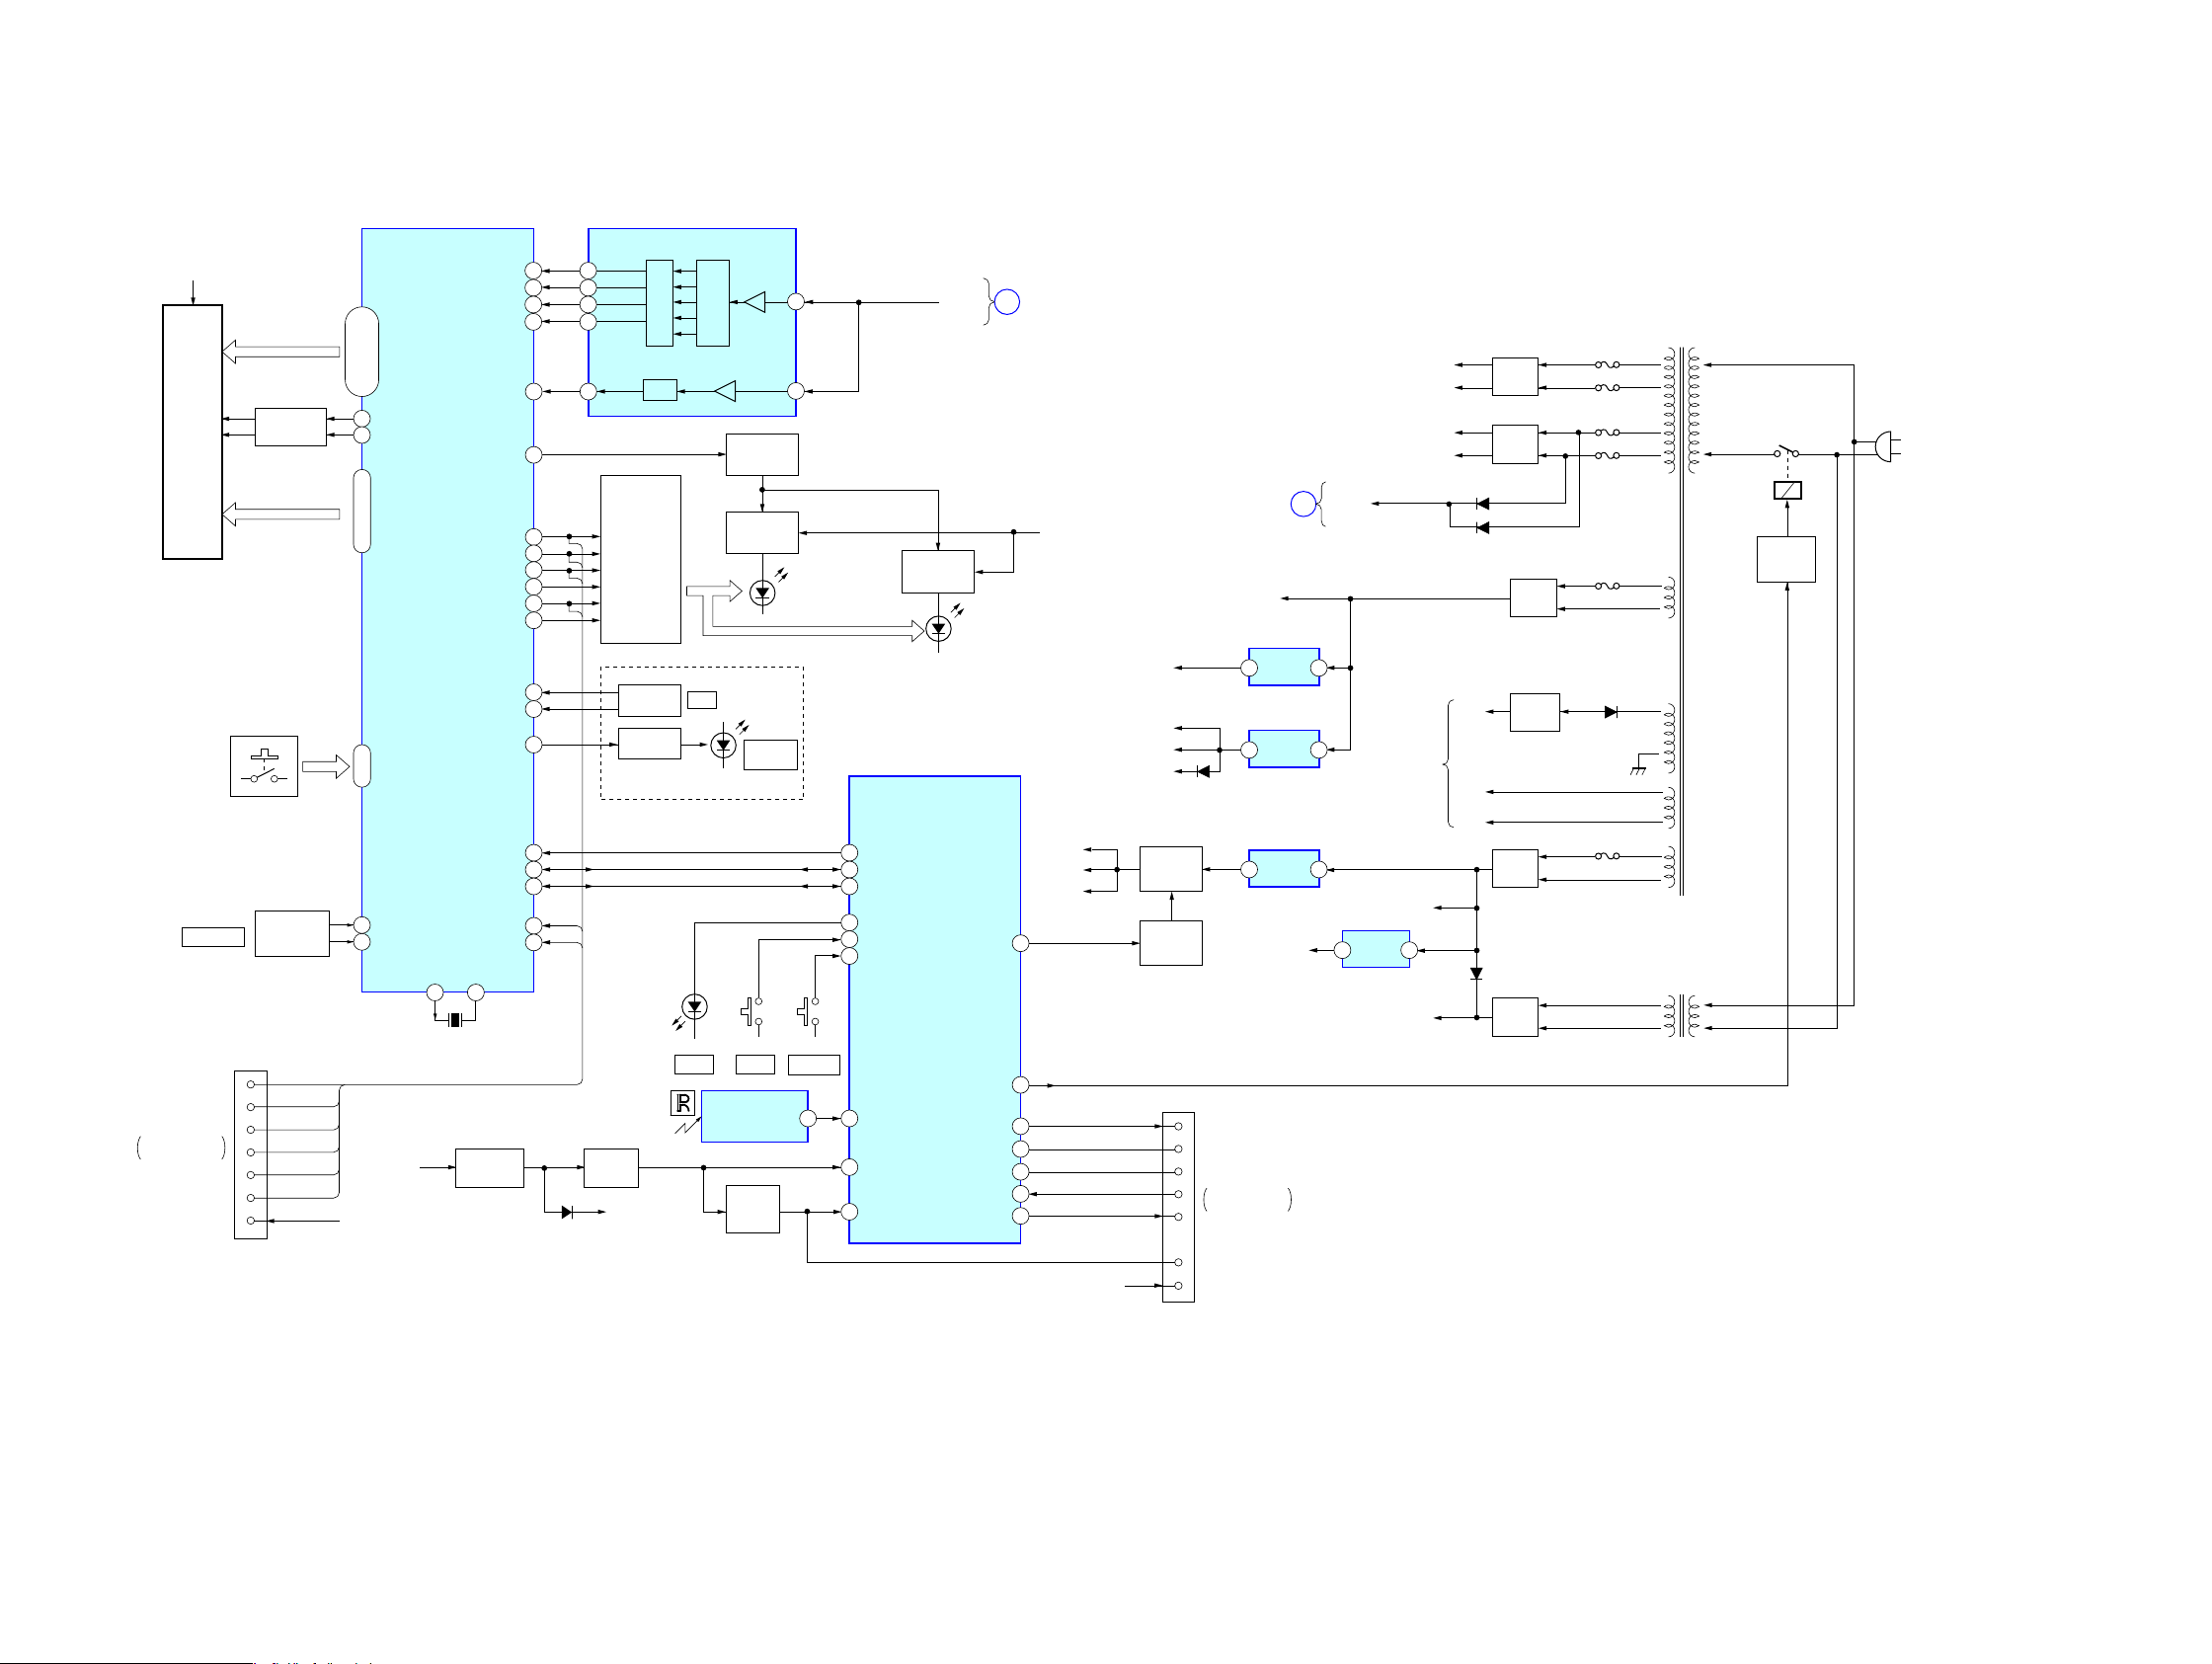
6-3. BLOCK DIAGRAM – DISPLAY/POWER Section –
VACUUM
FLUORESCENT
DISPLAY
FL901
5 – 10, 12 – 22,
24 – 41, 43
SEG-1 – SEG-36
KEY0-KEY5
64 – 69
91
70
BPF1-F01
71
BPF1-F02
72
BPF2-F03
BPF3-F04
73
BPF4OUT
IN1
IN2
BPF3OUT
BPF2OUT
BPF1OUT
SPEANA
G14
80 VOL A
XOUT
XIN
79
82 83
VOL B
MD0
MD2
INT0
INT1
SI0
SO0
VCC
1
2
3
4
5
6
7
CNS928
FLASH
PROGRAMMING
ROTARY
ENCODER
MAIN
SECTION
C
AC DET
–VL
+VL
–VH
+VH
X602
4MHz
VACUUM FLUORESCENT DISPLAY DRIVER,
KEY CONTROL
IC901
VF
BAND-PASS FILTER
IC903
D907,909,911,
913,915,917
D908,910,912,
914,916
D920
77
I2C DATA
74ALL BAND
59LED SELECTOR
52VOL1,2
VOL3,4
VOL5,6
VOL7,8
VOL9,10
53
54
55
56
57VOL11 LED
75JOG A
76JOG B
45SPK MODE LED
60
I2C-CLK
61
MD0 49
RESET
71 GC-RESET
D926
30 IIC-DATA
IIC-CLK
29
S929
S928
DISPLAY
! !
74 POWER-KEY
73 DISPLAY-KEY
MD0
MD2
INT0
INT1
SI0
SO0
76 STBY-LED
20 AC-CUT
40CD POWER
SYSTEM CONTROL
IC401 (3/3)
28STBY-RELAY
31MP3-STB
RECT
D501
LED+9V
A+3.3V
D+3.3V
MP3+3.3V
M+7V
D660
D661
D504,506
M+9V
LED+9V
VBUS
A+9V
+4V REG
Q209-211
RESET
Q208
–VG
UNREG(+15V)
D1192
RY1000
AC IN ~
PT1100
POWER
TRANSFORMER
(MAIN)
PT1101
POWER
TRANSFORMER
(SUB)
4 SIRCS
12 RESET
REMOTE CONTROL
SIGNAL RECEIVER
IC902
VACUUM
FLUORESCENT
DISPLAY
(FL901)
VF
VF
+11V
EVER+10V
88
G17
G1–G19
GRID DRIVER
Q901,902
F1181
F1191
F1161
F1141
F1151
F1171
1
EVER+10V
EVER+3.3V
–VG REG
Q664
RECT
D656
RECT
D502
RECT
D1002
RECT
D658
RELAY
DRIVER
Q1000
+9V REG
IC511
POWER
CONTROL
Q554
POWER
CONTROL
Q552
D506
RECOUT
17
1
2
DET
LED DRIVER
Q911–916
S957
JOG
SWITCH
JOG
ZX99i
X-ROUND
ON/OFF
LED POWER
CONTROL
Q904
LED POWER
CONTROL
Q903
LED DRIVE
Q917
DET B.P.F.
S900–911,
S913–919,
S921–927,
S930–938,
S940–945,947–949,
S950–955,
S970
S965–967 (ZX99i)
S980
VOLUME +/–
16
15
14
13
B
MAIN
SECTION
RESET
SWITCH
Q207
D209
+3.3V
MD2 51
3 1
3 1
+9V REG
IC510
3 1
4 2
+3.3V REG
IC513
+5V REG
IC501
34LINE MUTE
33FOR PROG
32NO USE
9CNVSS
4– 1, 100 – 86
TXD1
RTS1
CLK1
RXD1
CNVSS
VCC
+3.3V
RESET
2
3
5
6
7
8
4
CN040
FLASH
PROGRAMMING
LED POWER
CONTROL
Q905,906
(Page 32)
(Page 32)
Page 34
HCD-ZX66i/ZX99i
HCD-ZX66i/ZX99i
3434
1
A
B
C
D
E
F
G
H
234567891011121314
13
(13)
1-860-502-
1
28
36
27
19
1
9
10
18
1
3
4
5
M
M
13
(13)
1-860-502-
16
17
32
49
48
64
1
33
27
MAIN
BOARD
CN502
C115
M101
(SPINDLE)
C196
FB301
R205
R201
C201
C203
C209
C151
C134
C123
R121
C125
C15
C195
C171
R171
X171
C182
C183
C184
C318
C210
R165
R162
R191
R173
C174
C172
R172
C308
C312
R353
R354
C314
R302
R352
R351
R405
C316
C315
R313
C305
C303
C302
C255
C257
C258
C259
R253
C260
C116
C11
C10
C14
C18
R12
R11
C17
R10
R13
BCE
Q10
C16
C252
IC251
R252
R251
C251
R114
R113
C114
C113
C112
R112
R111
C111
CN101
R131
C131
C122
C124
R132
C133
C132
R141
R133
C142
C141
R142
C143
R151
R203
C161
C162
IC101
C181
R412
C194
R408
R163
C211
C213
R411
C309
C307
R307
C320
R401
R409
C212
C310
R303
R407
C163
IC301
R306
C311
R301
S101
(LIMIT)
IC303
R404
R419
R403
C313
M102
(SLED)
R402
R305
C317
R410
R406
R182
C186
CN201
C185
R204
R181
R161
C306
R143
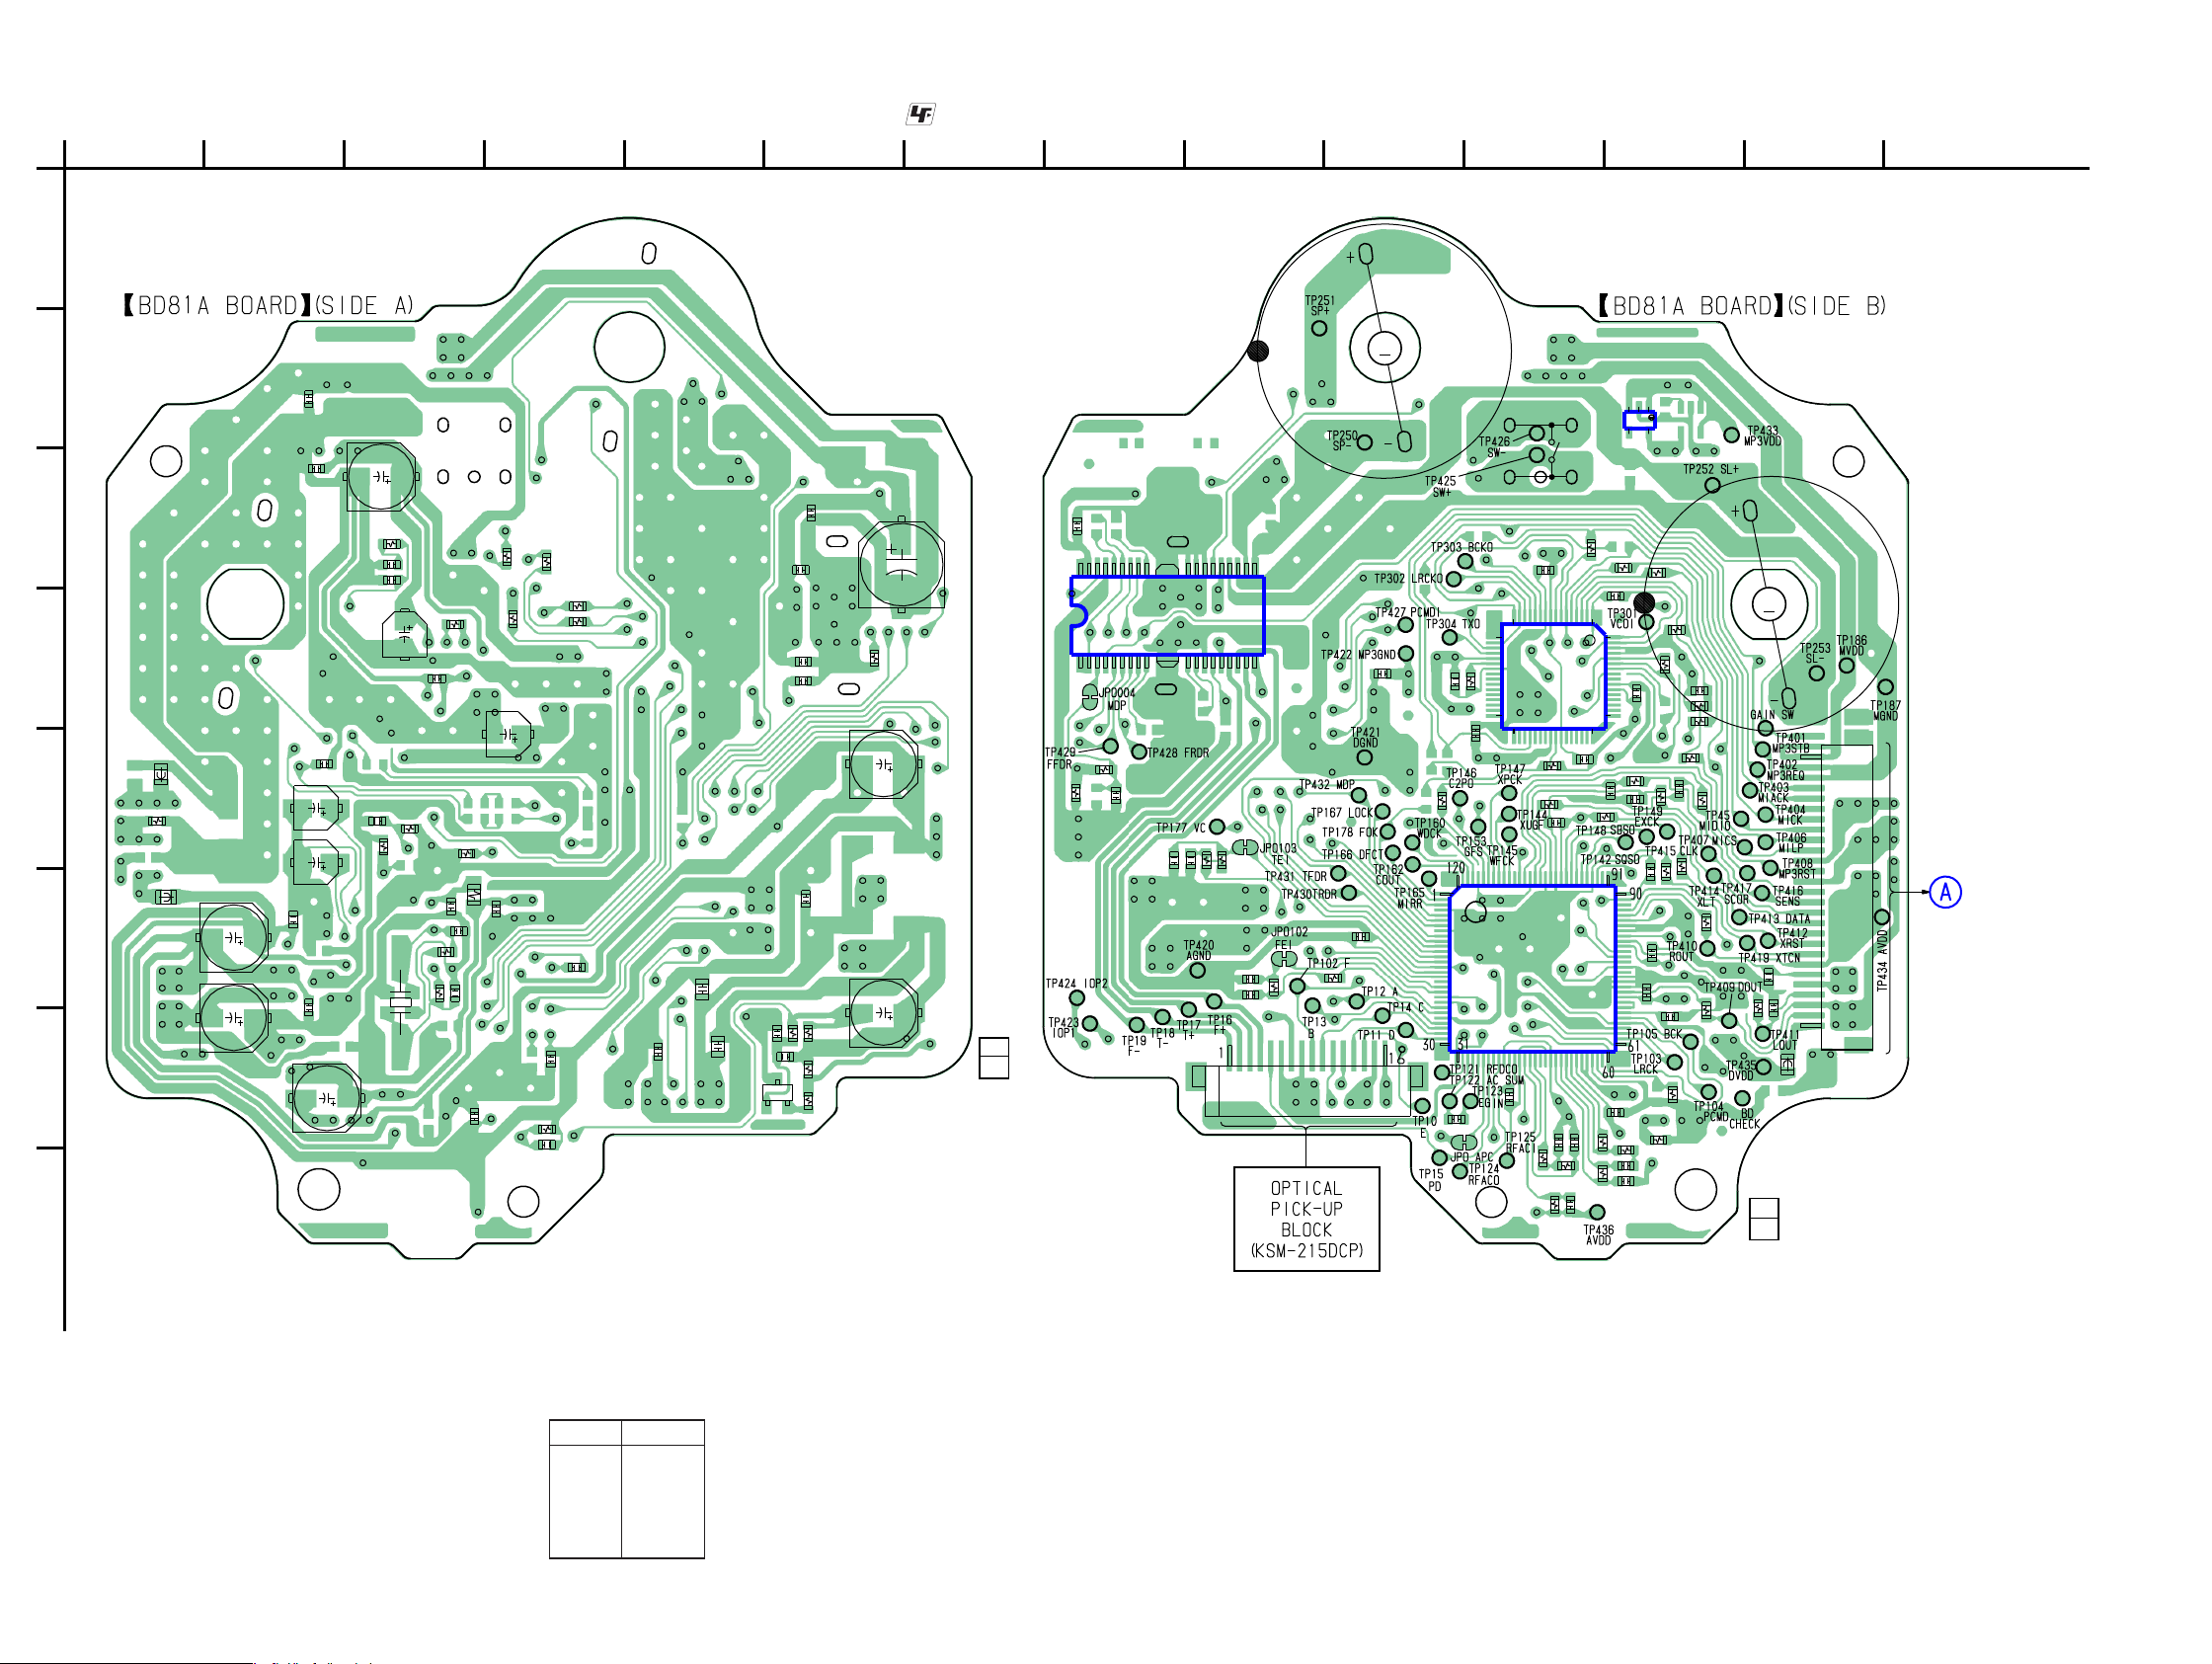
6-4. PRINTED WIRING BOARD – BD Section – • See page 29 for Circuit Boards Location. • : Uses unleaded solder.
Ref. No. Location
• Semiconductor
Location
(IC101) F-11
(IC251) D-8
(IC301) D-11
(IC303) B-12
Q10 G-6
( ): SIDE B
(Page 38)
Page 35
HCD-ZX66i/ZX99i
HCD-ZX66i/ZX99i
3535
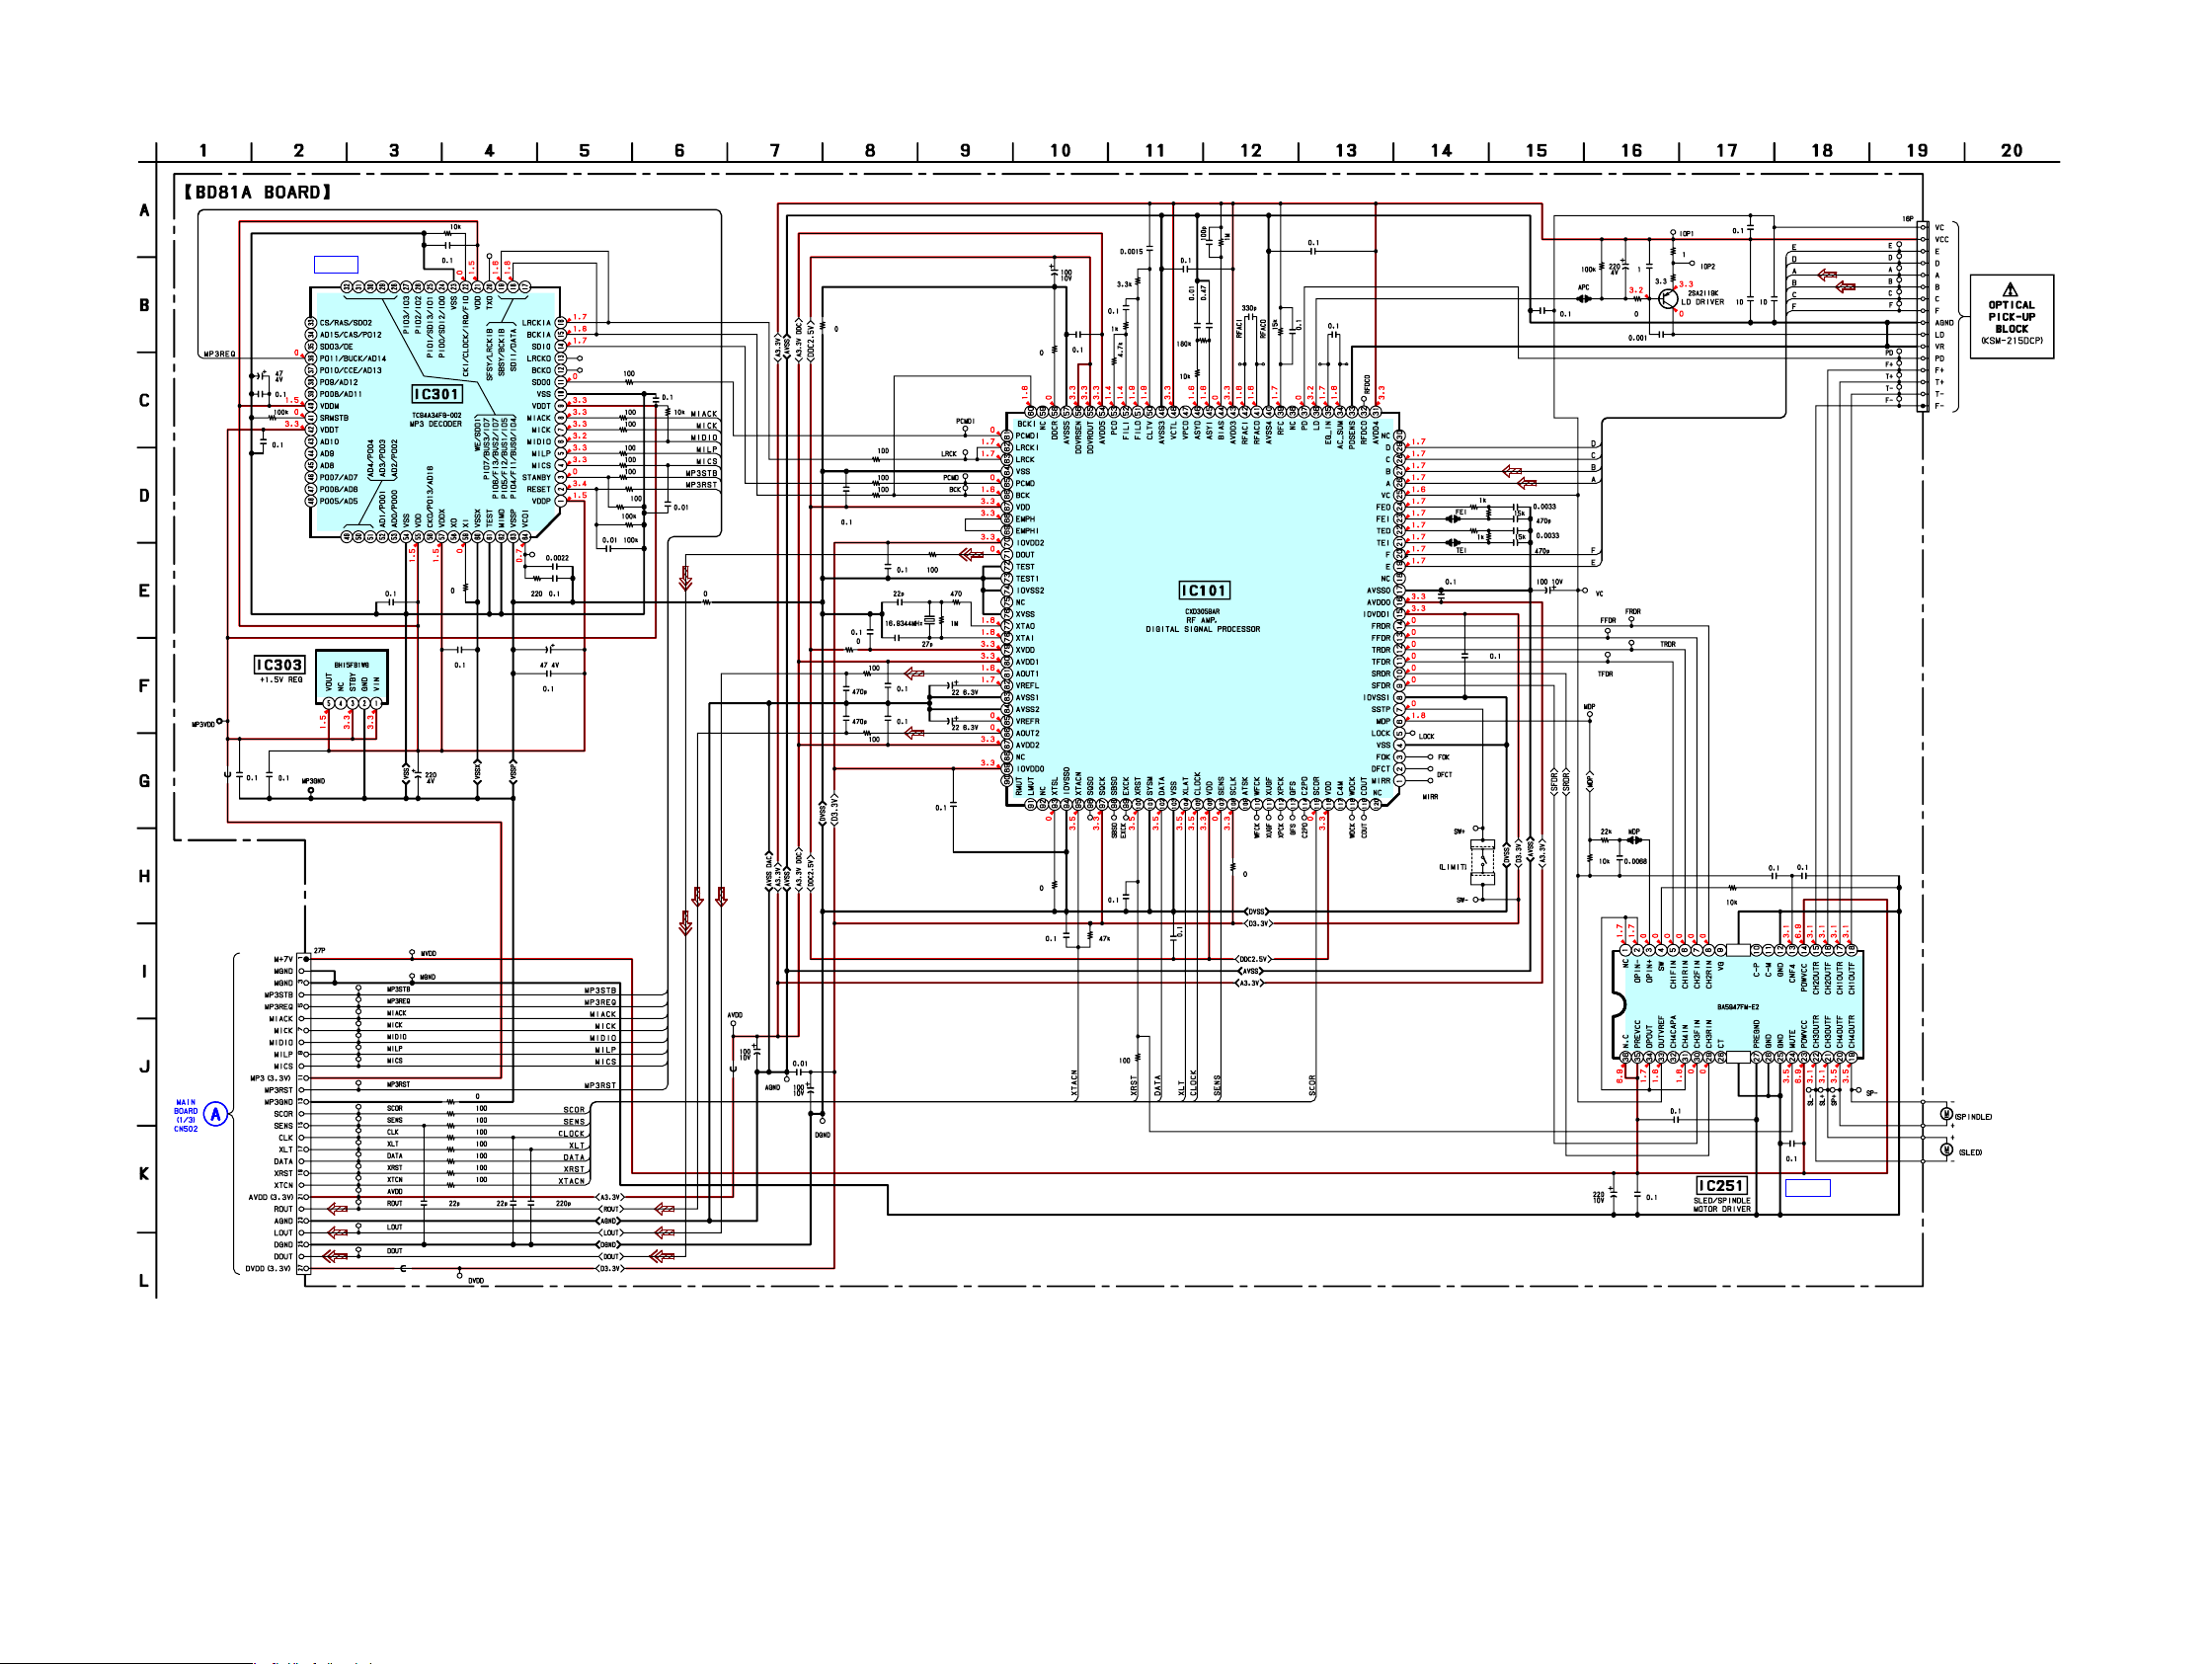
6-5. SCHEMATIC DIAGRAM – BD Section – • See page 60 for IC Block Diagrams. • See page 65 for IC Pin Function Descriptions.
IC B/D
IC B/D
TP165
TP166
TP178
TP186
TP187
TP167
TP177
TP121
TP122
TP123
C305
JPO004
JPO10
TP250
TP301
TP302
TP303
TP304
TP103
R163
R352
R353
R354
R401
R402
R403
R404
R405
R406
R407
R408
R409
R411
R412
R419
R11
R132
R251
R253
R12
R10
JPO102
JPO103
M101
C17
C151
C201
C203
C308
CN101
R121
C183
C184
TP420
TP421
TP422
TP423
TP424
R252TP425
TP426
TP427
TP428
TP429
TP431
TP432
R13
R313
TP433
TP436
TP401
TP407
TP406
TP405
TP404
TP403
TP402
TP408
TP410
TP434
TP417
TP416
TP415
TP414
TP413
TP412
TP419
TP411
TP409
TP19
TP18
TP16
TP15
TP102
TP14
TP13
TP12
TP11
TP10
R131
R301
R303
R173
R203
R302
R162
R205
R410
C320
C163
C196
M102
TP253
TP252
TP251
R112
R114
R111
R113
R305
IC301
R141
R307
TP125
TP124
TP142
TP149
C307
C309
C310
C311
C316
C315
C317
C312
C302
FB301
CN201
C212
C213
TP435
C211
C314
R306
C313
C318
C306
R351
C161
C174
C162 R161
TP104
TP105
C181
R181
R182
C182
IC101
C194
C143
C134
C133
C131
C124
C123
C122
C125
C132
C209
C210
TP148
TP145
TP144
TP147
TP153
TP146
TP160
TP162
S101
C195
C115
C114
C112
C16
C15
C10C11
TP430
C251
C252
C255
C257
C260
IC303
R204
R201
R165
R151
R143
C171 R171
R172
C172
C186
C185
C14
TP17
C258
C259
IC251
C303
R191
R133
C141
R142
C142
X171
C111
C113
C116
C18
Q10
(Page 39)
Page 36
HCD-ZX66i/ZX99i
HCD-ZX66i/ZX99i
3636
SE-130 BOARD
MD-94 BOARD
(13)
13
(13)
13
MAIN BOARD
CN509
B
M
M902
(TURN TABLE)
CN102
PH102
CN101
S001
CN002
CN001
CN003CN004
PH101
(LOADING)
ROTARY
ENCODER
1
A
B
C
D
E
F
23456
M901
+
–
RE901
1
2
5
6
(TRAY POSITION DETECT)
M
GRY
GRY
GRY
GRY
GRY
BLK
GRY
GRY
GRY
GRY
BLK
+
–
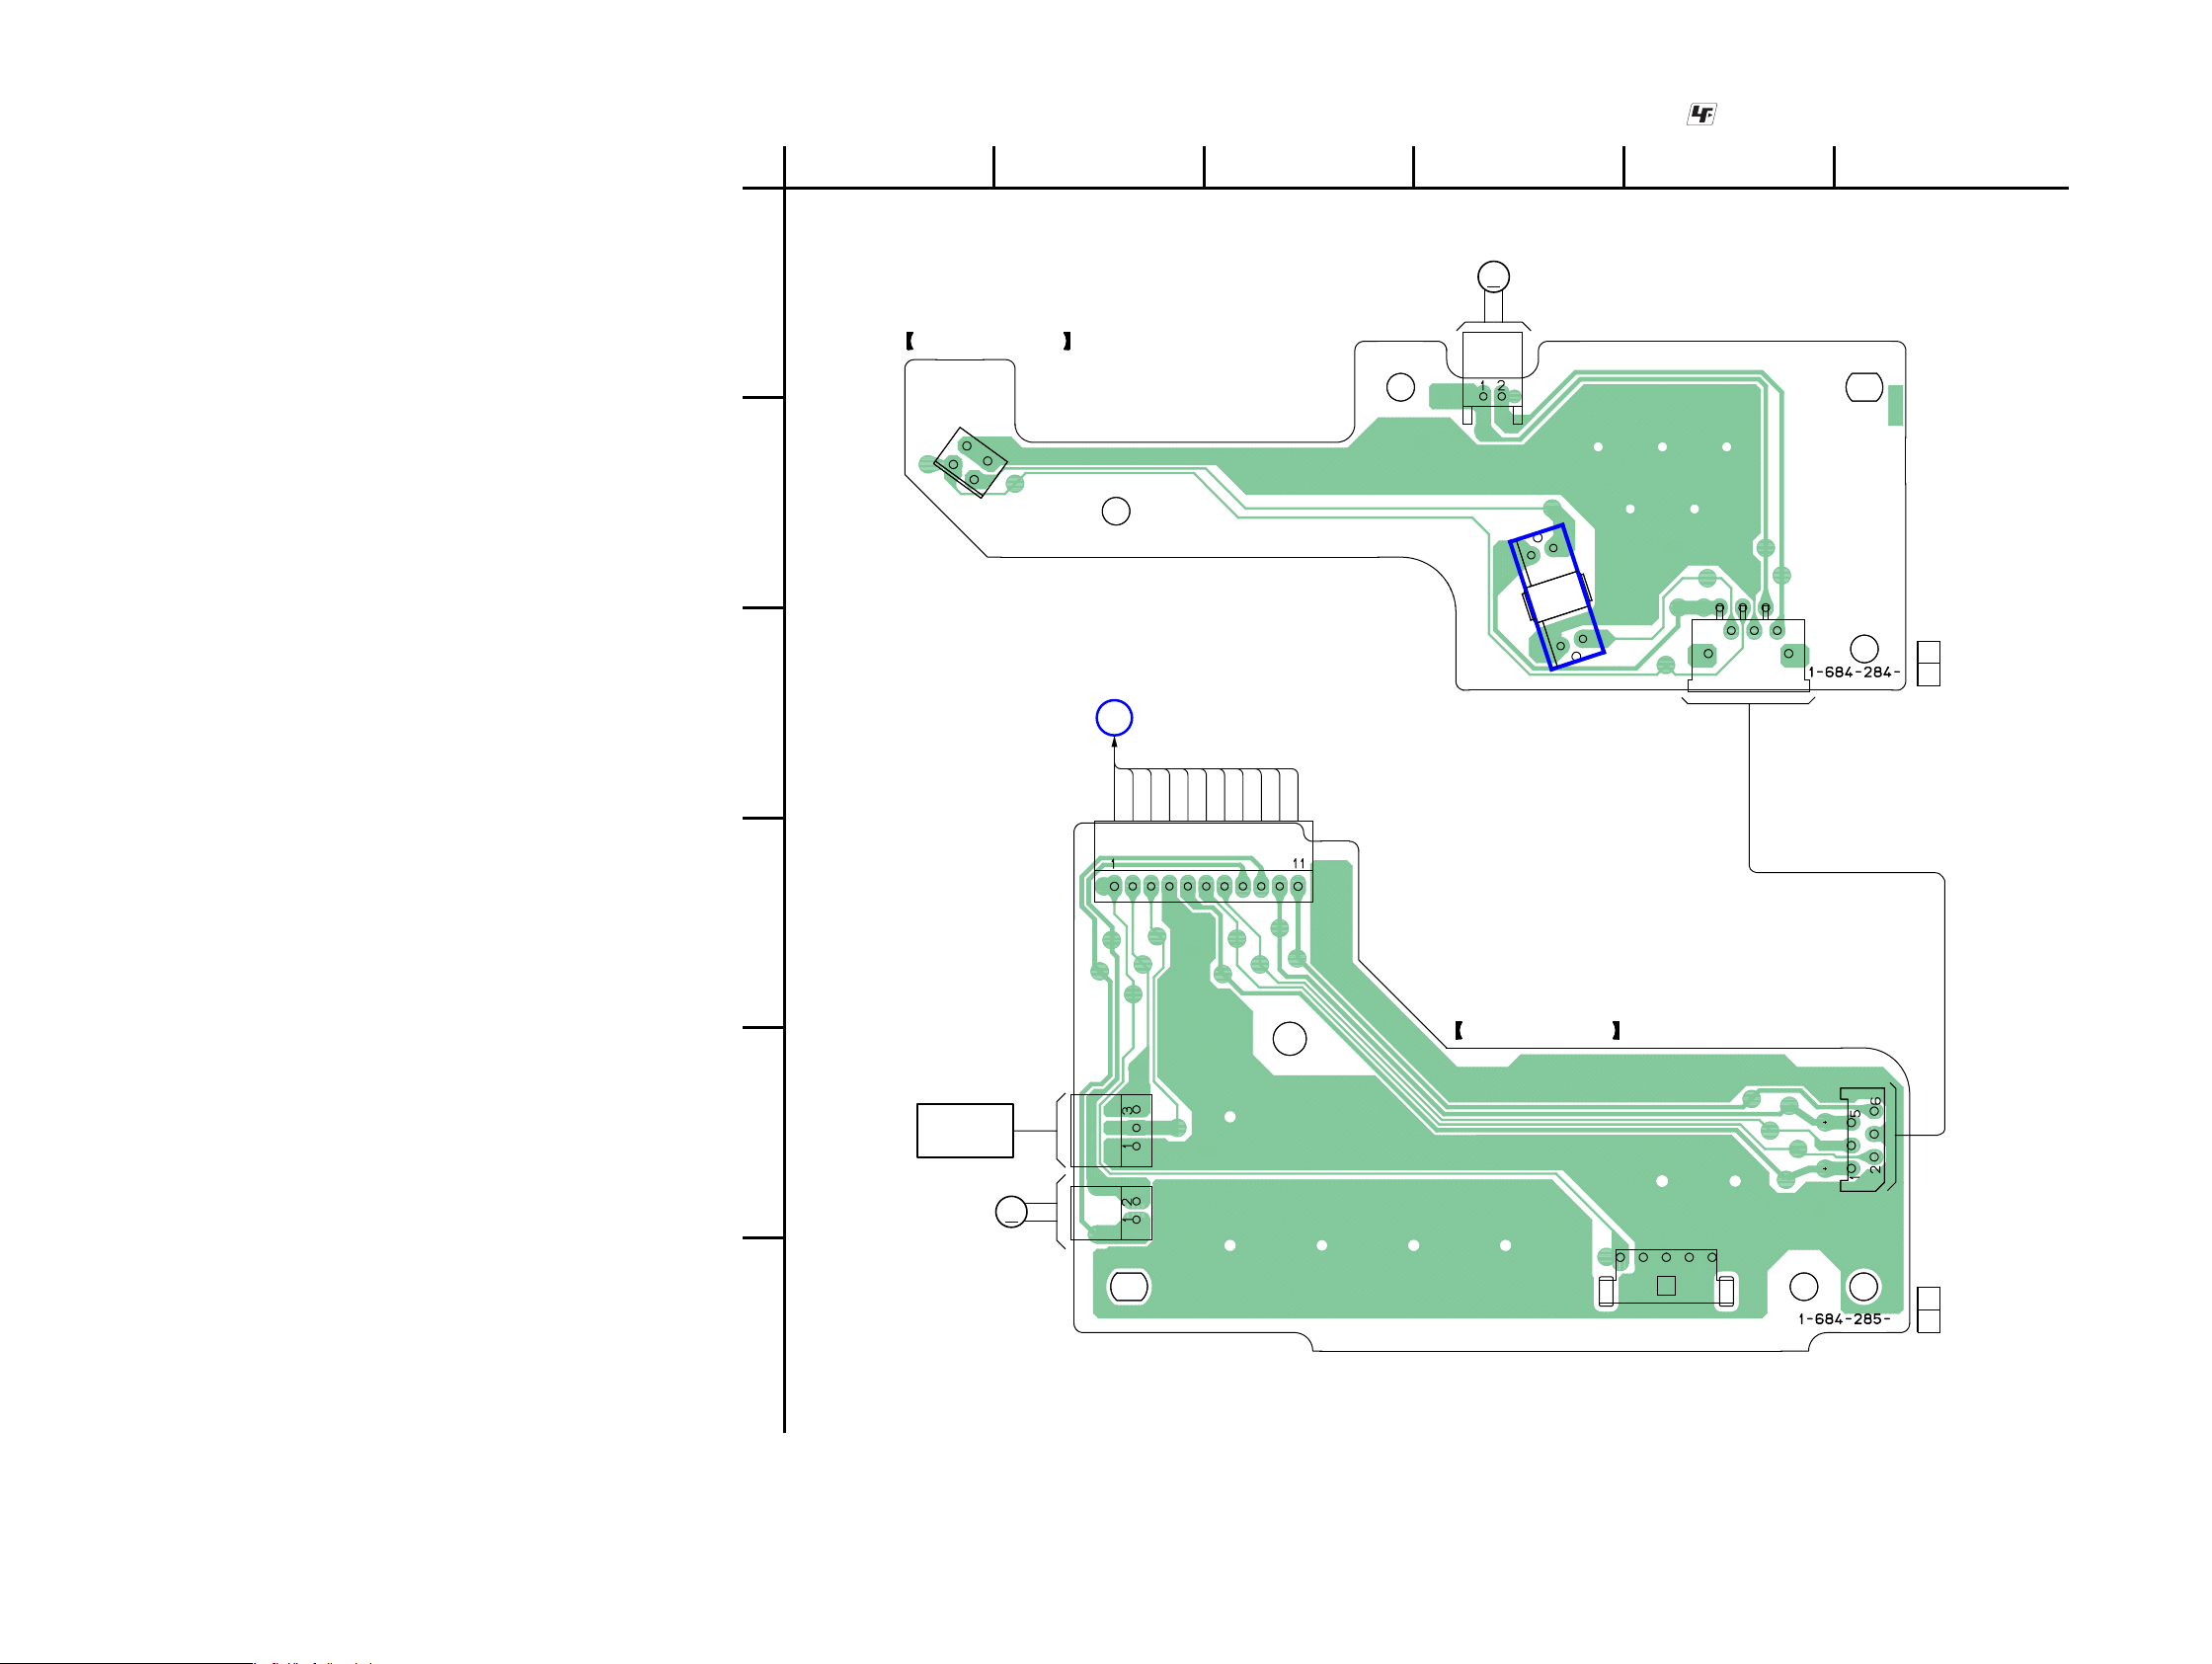
6-6. PRINTED WIRING BOARDS – LOADING Section – • See page 29 for Circuit Boards Location. • : Uses unleaded solder.
(Page 38)
Page 37
HCD-ZX66i/ZX99i
HCD-ZX66i/ZX99i
3737
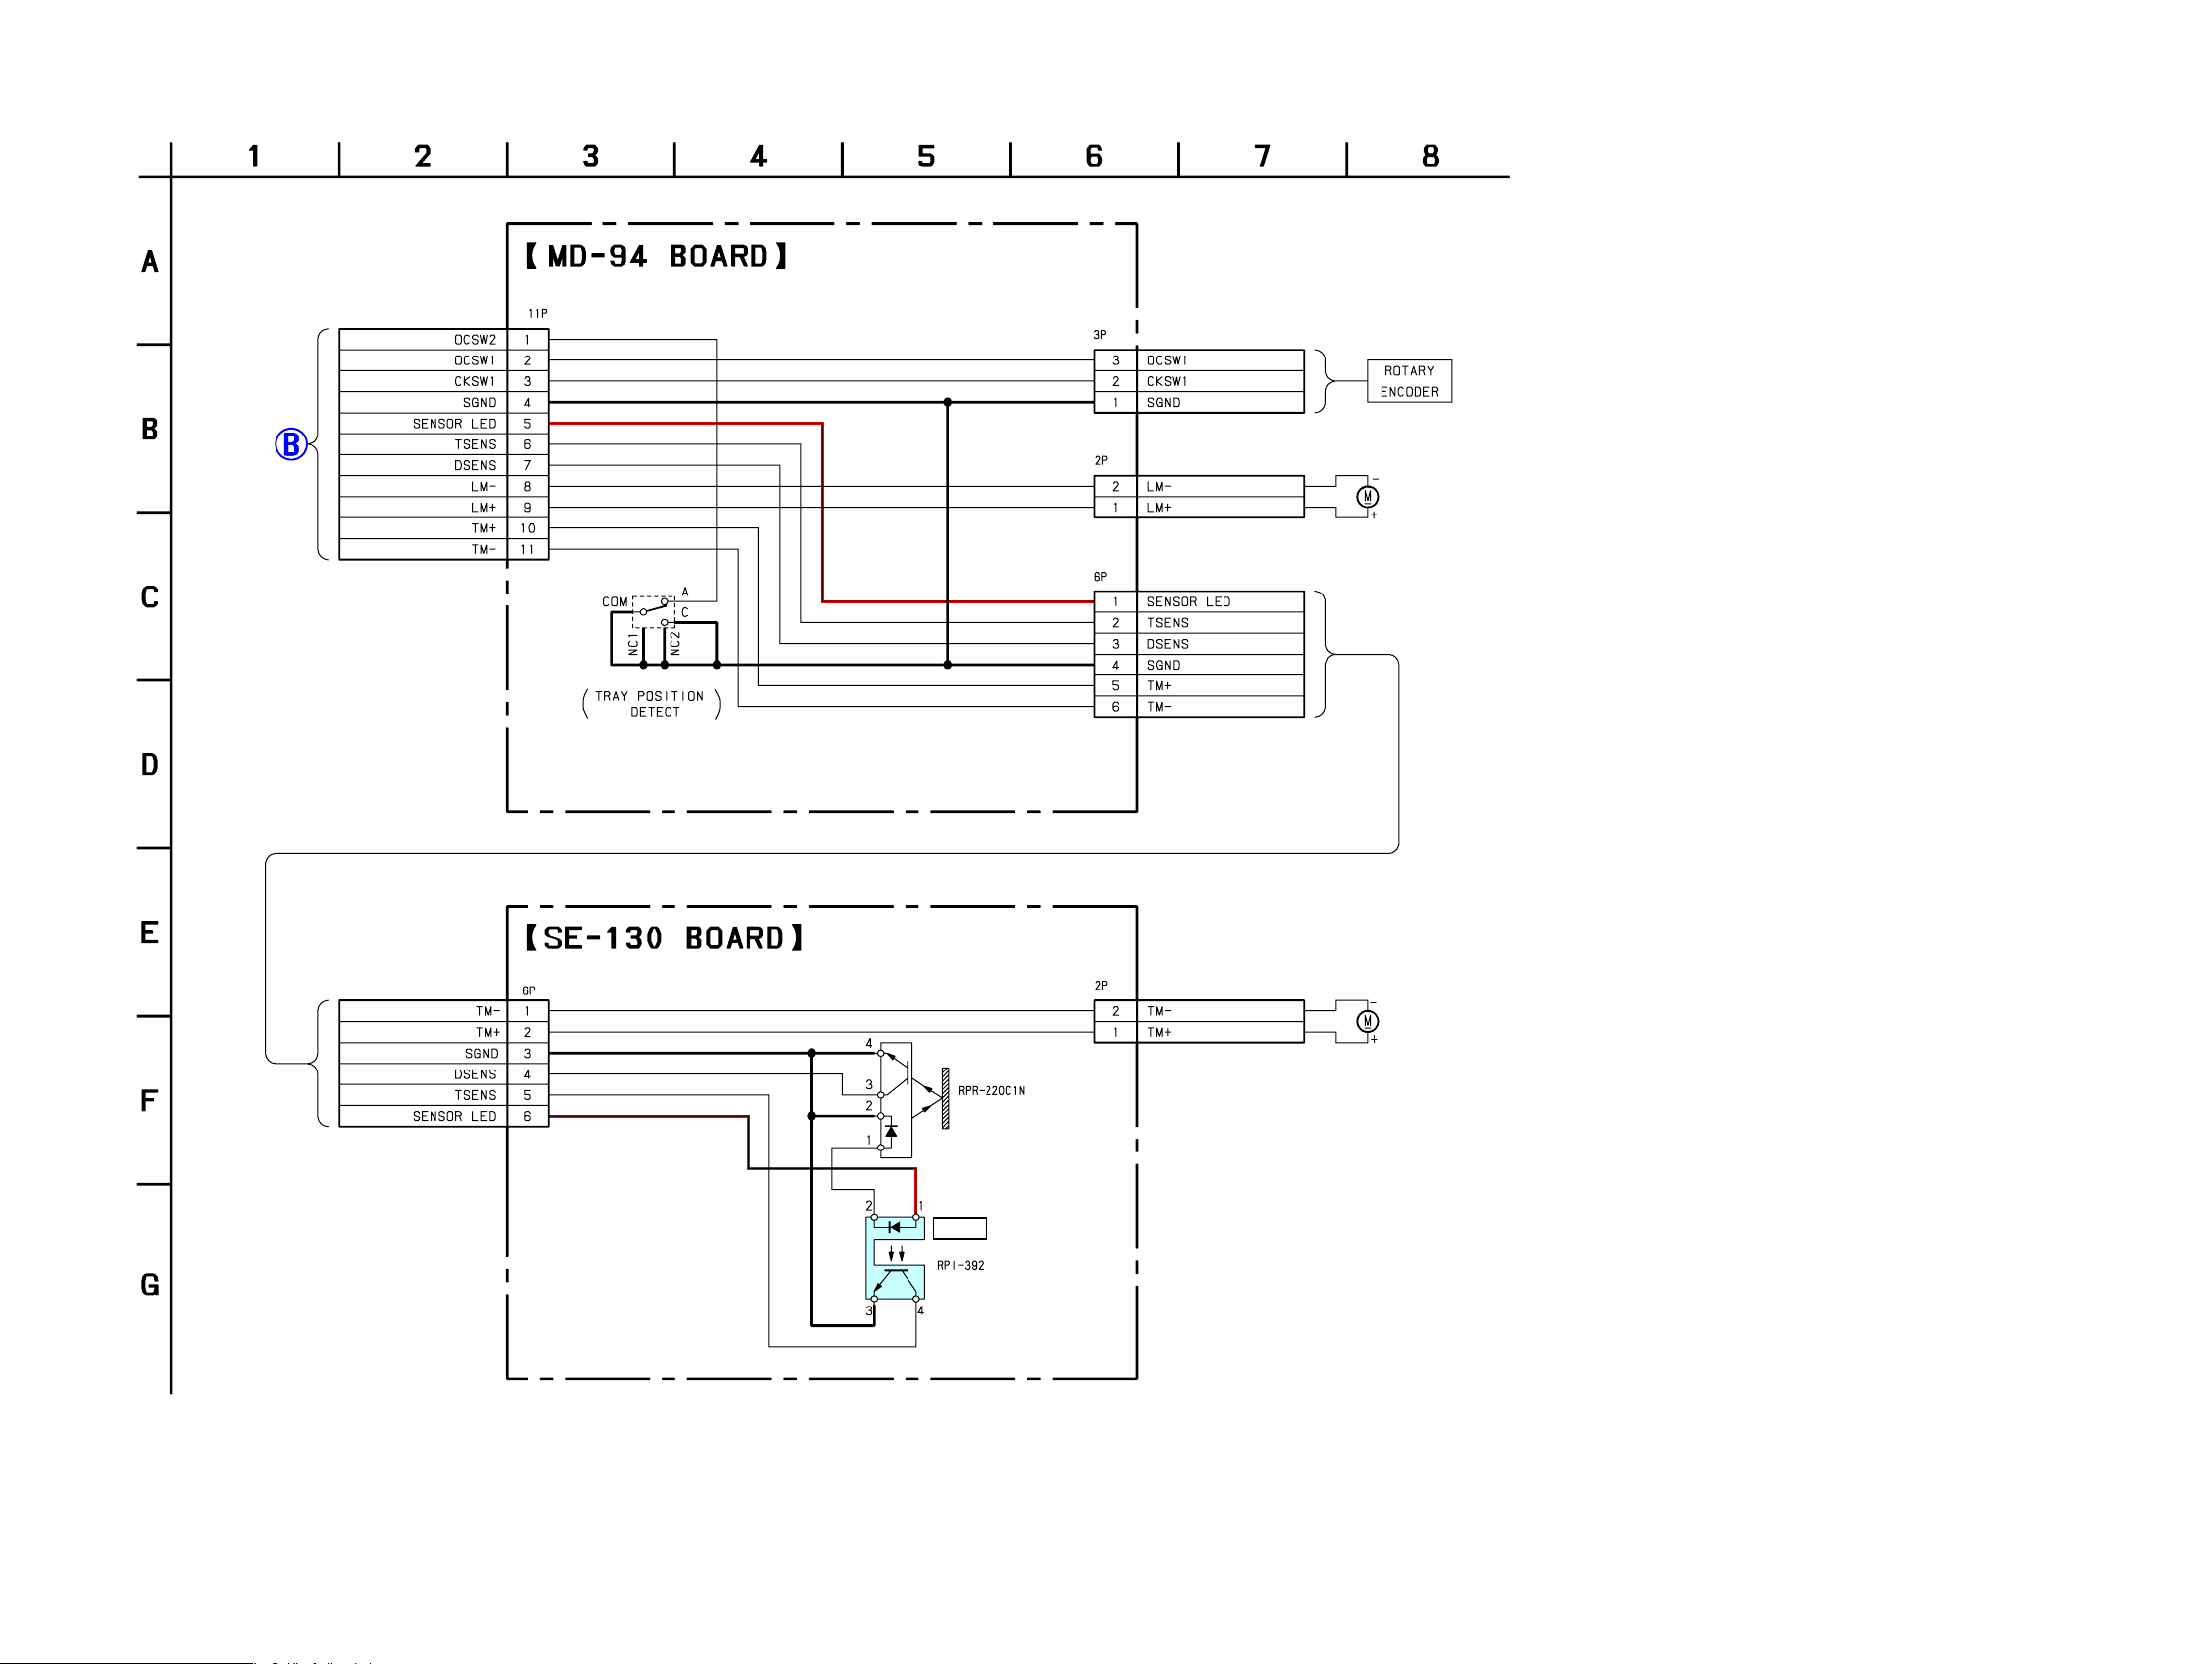
6-7. SCHEMATIC DIAGRAM – LOADING Section –
MAIN
BOARD
(1/3)
CN509
(LOADING)
(TURN TABLE)
TABLE
SENSOR
TABLE
SENSOR
CN001
S001
CN003
CN004
CN002
CN101
CN102
PH101
PH102
M901
M902
RE901
PH102
(Page 39)
Page 38
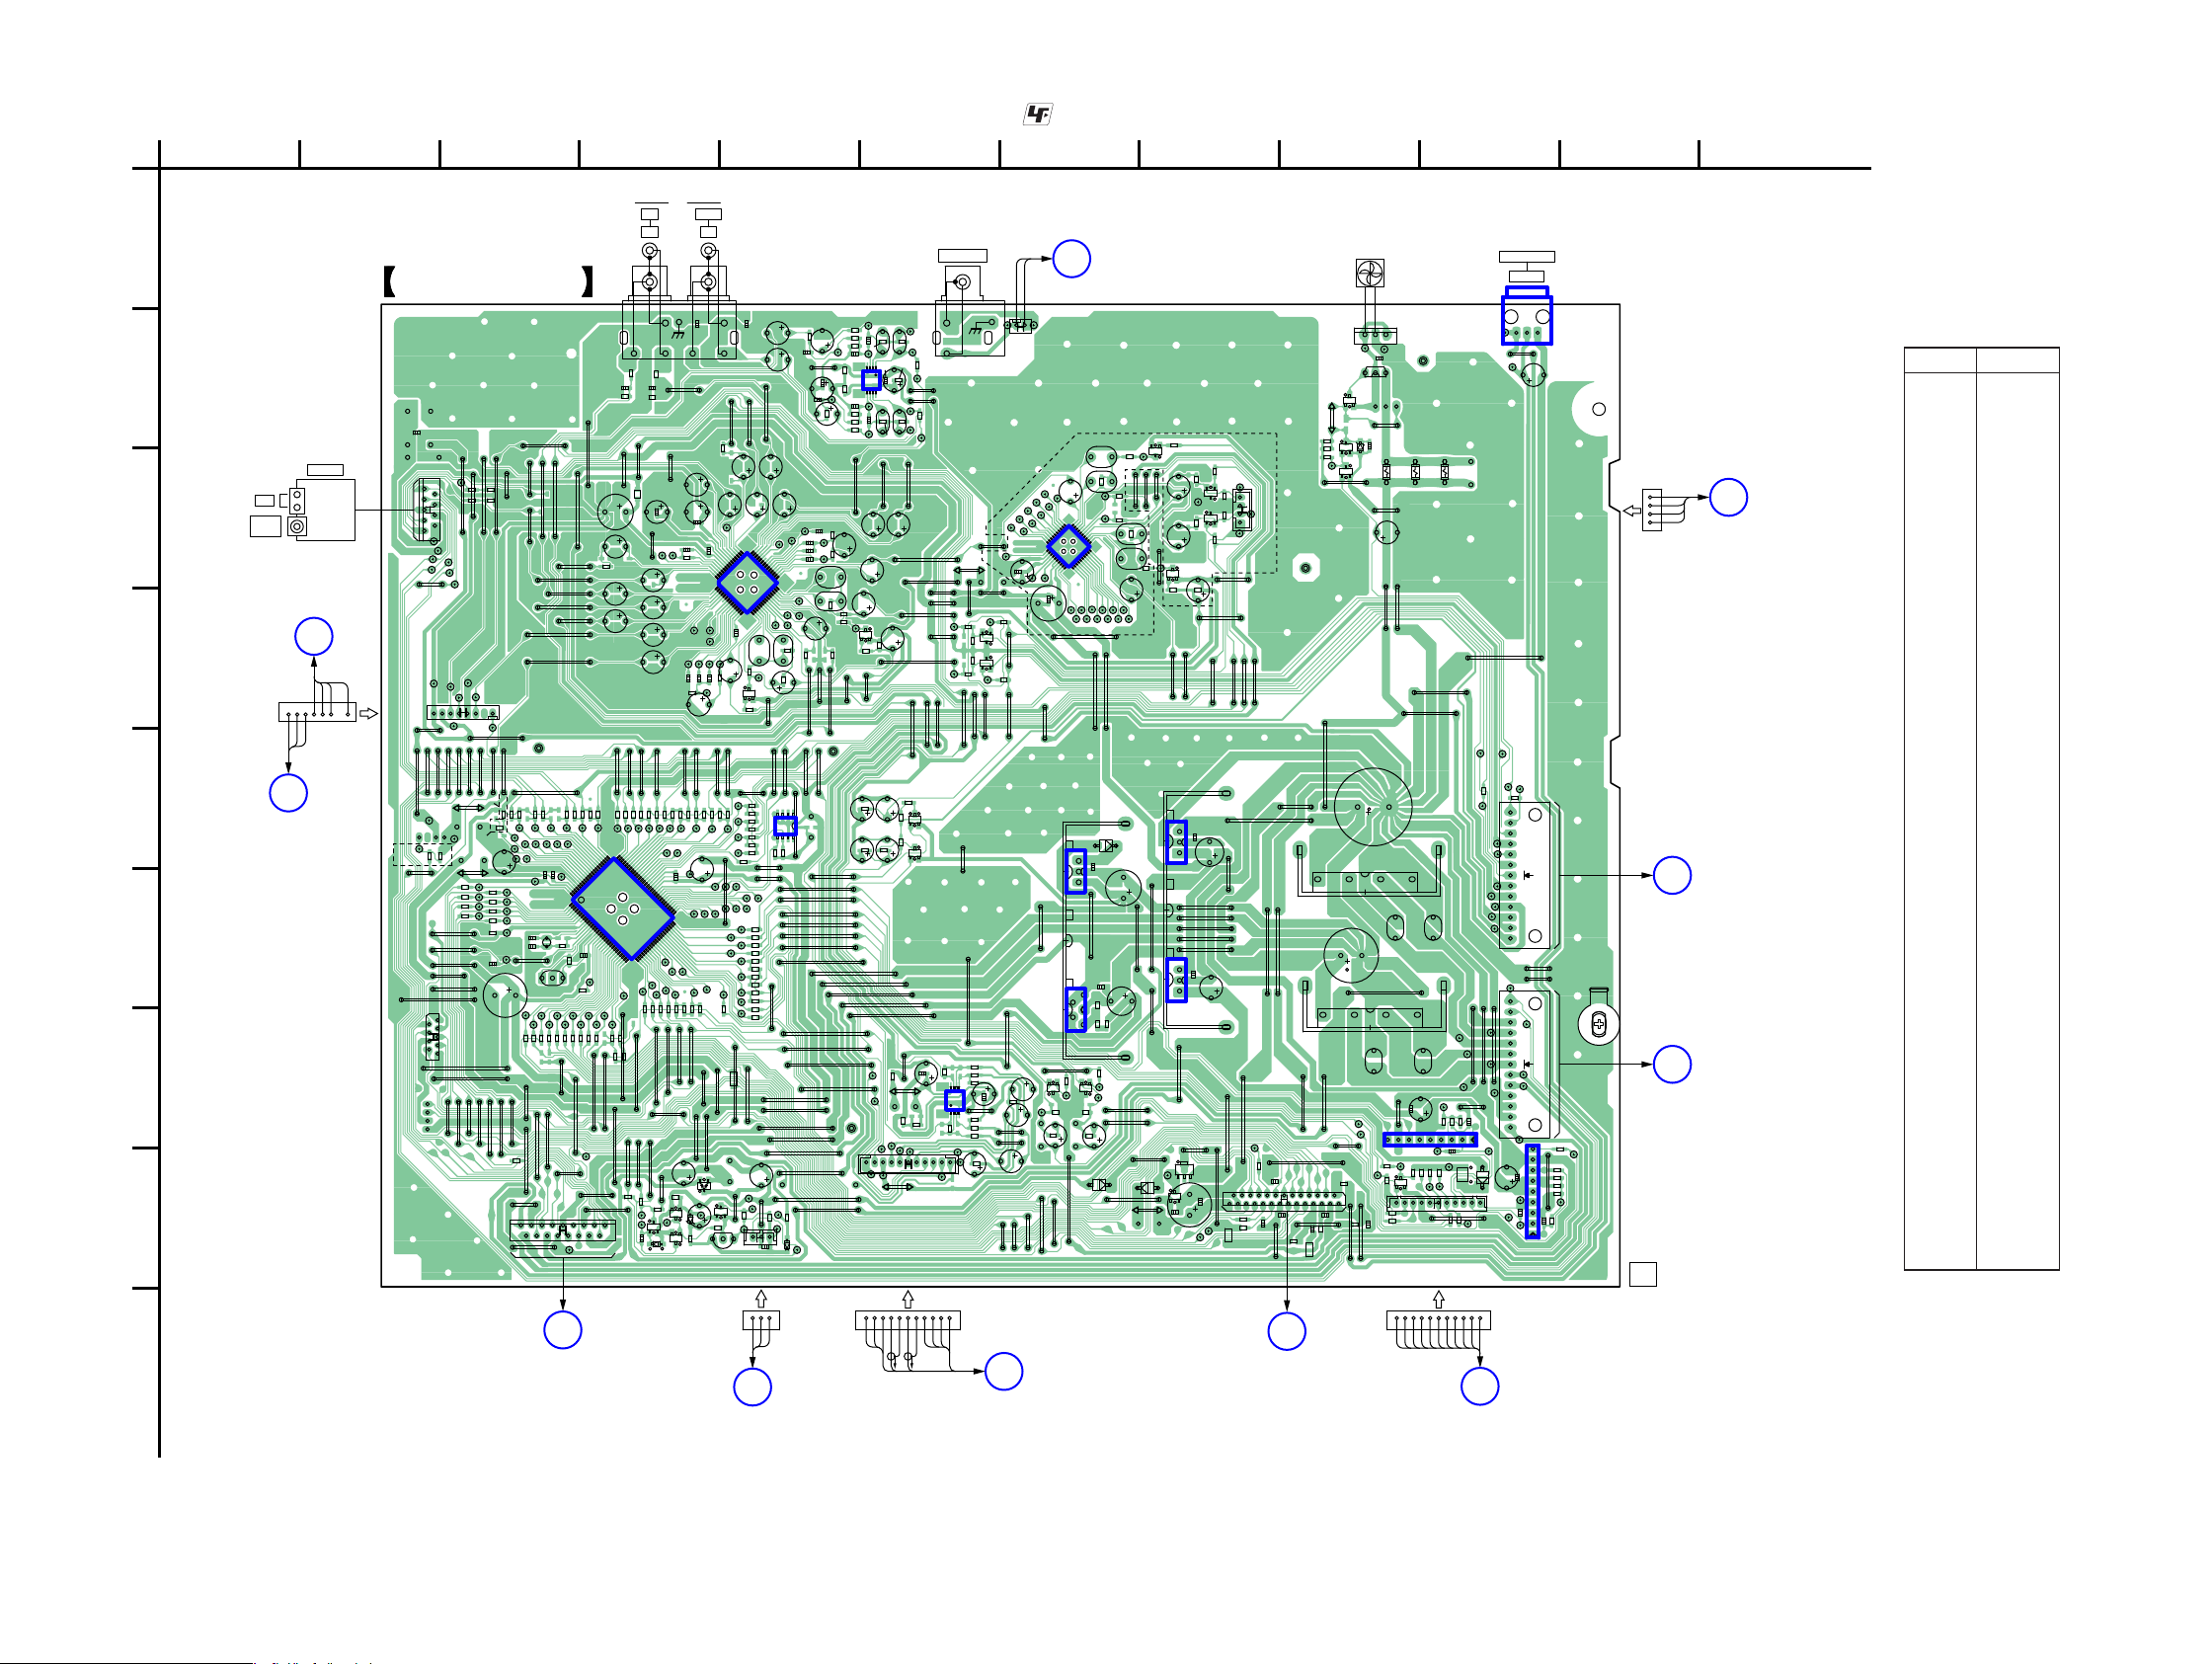
HCD-ZX66i/ZX99i
HCD-ZX66i/ZX99i
3838
1
A
B
C
D
E
F
G
H
I
23456789101112
1-878-465-
11
MAIN BOARD
H
SURROUND
BOARD
NO702
(ZX99i)
E
GAME HP
BOARD
CN802
K
SUBTRANS
BOARD
CN1000
D
IPOD
BOARD
CN1551
F
GAME HP BOARD
CN801
G
MIC BOARD
CN920
I
POWER AMP
BOARD
CN601
J
POWER AMP
BOARD
CN602
A
B
C
PANEL COM BOARD
CN914
BD81A BOARD
CN201
MD-94
BOARD
CN001
( )
1
28
9
2
1
8
9
B C E
13
1
11131
11
1
226
27
14
1
CN503
RED
GRY
GRY
GRY
4
NO500
BLK
GRY
GRY
CN501
GRY
GRY
GRY
WHT
BLK
BLK
WHT
GRY
GRY
GRY
BLK
BLK
BLK
GRY
GRY
GRY
GRY
GRY
GRY
GRY
GRY
GRY
81
CN040
FLASH
PROGRAMMING
2
1
16
17
1 11
1
11
+
–
91
12
113 113
~~
+
–
~~
18
4
5
2
1
13
13
13
13
1
3
1
14
15
29
28
42
43
56
14
58
1
100
80
81
50
51
30
31
B C E
14
58
58
14
BCE
BCE
ECB
BCE
BCE
BCE
BCE
BCE
BCE
BCE
BCE
JW564
R400
JW565
R401
D559
JW566
R402
JW567
R403
C23
JW568
R404
JW569
R405
C25
R406
C26
R407
C27
C28
R409
C29
JW570
JW571
JW572
JW573
JW574
C30
CN200
JW575
R411
C31
JW576
R413
JW577
C33
JW578
JW579
R222
R417
R418
C38
R419
C39
R227
JW580
R228
JW581
R229
JW582
JW583
JW584
R420
JW585
R421
C41
JW586
R422
JW587
R423
JW588
R424
R230
Q290
JW589
R425
R231
C45
R426
C46
C47
R428
Q870
C48
R429
C49
JW590
JW591
JW592
JW593
JW594
R430
C50
JW595
R431
JW596
R432
C202
JW597
R433
JW598
R434
JW599
R435
R436
R438
R442
R443
C214
CN040
R444
R445
C215
R446
C216
C217
R447
R448
C600
R449
C410
C411
X401
C412
X402
R450
C414
C416
C75
C76
C227
C77
C78
JL401
C79
JL402
JL403
JL404
JL405
JL406
JL407
C80
JL409
C81
C83
JL600
R465
JL601
R466
JL602
R467
JL603
JL604
R468
C88
JL605
C89
JL606
JL412
R276
JL607
JL608
JL609
JL417
JL418
R471
JL419
C91
R472
R473
JL610
R474
JL611
R475
JL612
R476
C96
R477
JL613
C97
JL614
R478
JL420
C98
JL421
R479
JL615
JL422
JL616
JL423
JL617
JL618
JL424
JL619
JL425
JL426
JL427
R480
JL428
C8
R481
JL429
R482
R483
R484
JL620
JW201
R485
JL621
JW202
R486
JL622
Q52
JL623
JW203
JL624
JW204
JL430
Q100
JL625
JL431
R295
JL626
JW206
Q102
JL432
R296
JW207
Q103
JL627
JL433
JW208
JL434
JL628
Q104
JW209
JL629
JL435
JL436
JL437
JL438
JW401
JL439
JW402
R492
JW403
JW210
JW404
JL630
JW211
JW405
JL631
JW212
JW406
JL632
JW213
JW407
JL633
JW408
D208
JL440
JL634
JW215
JW409
JL441
D209
JL635
JL442
JL636
JW217
JL637
JL443
JW600
JW218
JL638
JL444
JL639
JW601
JL445
JW602
C462
JL446
JW603
JL447
JW604
JW410
D210
C464
JL448
Q500
JW605
JW411
JL449
JW606
Q502
JL256
JW607
JW413
Q503
JL257
JL640
JR400
JW220
JW414
JL258
JL641
JW221
JW415
Q505
JL259
JL642
JW416
JW223
JW417
C277
JW224
JW418
L300
JL450
JW419
JL451
JL452
JW227
JL453
JW228
JL454
JL260
JW229
JL455
JL261
JL456
JL457
JW420
JL458
JW421
JL459
JW422
JW423
JW230
JW424
JW231
JW425
JW232
JW426
JW233
JW427
JW234
JW428
JL460
JW235
JW429
JL461
JW236
JW237
JL463
JW238
JW239
JL465
IC401
JL466
JL467
JW430
JL468
JW431
JL469
JW432
JW433
JW434
JW241
JW435
JW242
JW436
JW243
JW437
JW244
JL470
JW245
JW439
JL471
JW246
JL472
JW247
JL473
JW248
JL474
JW249
JL475
JL476
JL477
JW440
JL478
JW441
JL479
JL1
JW442
C496
JL2
JW443
JL3
JW250
JW444
C498
JW251
JW445
C499
JW252
JW446
JW253
JW254
JW448
JL480
Q150
ECB ECB
JW255
JW449
JL481
JW256
JL482
JW257
JL483
Q153
Q154
ECB
ECB
BCE
BCE
JL484
JL485
JL486
JL487
JW450
JL488
JL489
JW452
JW453
JW454
FB300
JW455
FB301
JW456
FB302
JW457
FB303
JW458
FB304
JL490
R100
JW459
FB305
JL491
R101
FB306
JL492
ZX66i
ZX99i
ZX99i
JL493
JL495
R106
JL497
R107
JW460
JL498
JW461
JL499
R109
JW462
Q552
JW463
JW464
R300
Q554
JW465
Q555
R301
JW466
R302
R303
Q557
JW468
R304
R110
JW469
R305
R111
R306
R112
R307
R113
R308
R309
R115
R116
R117
JW470
R118
JW471
R119
R501
JW472
R502
JW473
R504
R310
JW475
R311
R505
JW476
R506
R312
JW477
R507
R313
JW478
R120
R314
JW479
GRY
GRY
GRY
RED
GRY
GRY
RED
R121
R315
R509
R122
R316
R317
R123
R318
R125
R126
R127
JW480
R510
R511
R512
NO500
R518
R133
R134
R329
CN501
LP1
R135
CN502
LP2
CN503
R137
LP3
LP4
R138
LP5
R139
CN505CN506
CN507
NO510
NO510
R330
C100
R331
CN509
CN509
R332
NO512
C103
C104
JW499
R141
R335
C105
R336
C106
C108
C109
CN513
C300
19
C301
C302
C303
C304
C110
C305
R535
C111
R536
C306
C112
C307
C113
R538
R344
C114
R150
R345
R151
C116
R346
C118
C500
IC675
C501
R156
C502
R157
JL100
R159
JL101
C505
JL102
C506
JL103
C508
C509
R11
R12
R160
R161
C126
R162
R16
C127
R163
R17
C510
C128
C511
R165
R19
C512
R166
R167
C513
R168
C320
C514
C515
C321
R169
JL111
JL112
C322
C323
JL113
C324
JL114
C130
C131
JL115
C325
R21
JL116
C132
R22
JL117
C133
JL500
C328
R170
JL118
JL119
C329
JL501
R171
R365
A001
JL502
R366
R172
Q2
JL503
R173
R367
JL504
R368
R28
JL505
R175
R29
R176
JL506
R177
JL507
JL508
JL120
JL509
R30
C528
R371
C529
JL126
R373
JL127
R33
JL128
R374
JL510
JL511
R375
JL129
JL512
JL513
R377
R183
JL514
R184
R185
R187
C535
R188
JL130
R8
C534
C341
JL131
R189
JL132
1
10
11
20
20
30
31
40
C342
C537
JL133
JL134
C538
R381
JL135
R382
C153
JL520
C154
JL521
JW101
JL139
R191
C155
JL522
JW102
R386
C156
JL523
JW103
JL524
JW104
C158
JL525
JW105
C159
JL526
JW106
JL527
BLK
GRY
BLK
RED
+
–
JW107
JL528
JW108
JL140
JL529
JW109
JL142
JL143
C547
JW300
JL144
C160
JW301
R391
R585
JL145
JW302
R586
C162
JL146
R587
C163
JL147
JW304
JL530
JW110
C164
R588
JL148
JL531
JW111
R395
JL149
JL532
JW112
C166
JW113
R397
JW114
C168
R58
JW115
JW116
JW117
Q207
C554
JW500
JW118
Q208
JL150
JW119
JW501
Q209
C555
JL151
R591
JW502
JL152
JW503
R593
JL153
R594
JW504
JL154
R595
JW505
JL155
R596
JW506
JL156
R597
JL157
JL540
JR300
JW120
JW508
Q210
JL158
JL541
JR301
JW509
Q211
JL542
JR303
JL543
R67
JL544
JL545
D501
R69
D502
JW510
D504
JL160
JW511
D505
JL161
JW512
D506
JL162
JW513
JL163
JW514
IC100
JL164
JW515
C181
R71
IC101
JL165
JW516
IC102
C182
ZX99i
R72
JL166
JW517
JL167
JL550
JW518
JL168
JL551
JW519
JL169
JL552
C188
R78
JL555
JL556
JL557
JR123
JL558
JW520
JL170
JL559
JW521
JL171
JW522
JW523
JW524
JW525
JW526
JW527
R83
JL560
JW528
JL561
JW529
JL562
JL563
JL564
HS500
JL565
IC501
HS501
JL566
JL567
HS503
JL568
HS504
JW530
JL569
JW531
C586
JW532
JW533
C587
JW535
JW536
JW537
JL570
JL571
JL51
JL572
JL52
JL573
JL53
JL574
IC510
JL575
C591
IC511
C593
IC513
JW540
IC514
C594
IC515
JW542
C597
JW544
C598
JW545
C599
IC519
JW546
JW547
JW548
JW549
JW550
JW552
JW553
JW554
JW555
JW556
C12
JW557
C13
JW558
C14
JW559
C15
C16
C19
JW560
R208
BCE
BCE
ECB
ECB
ECB
D554
JW561
R209
D555
JW562
JW563
JW214
JW222
-2
R
IN
-1
L
-4
R
-3
L
PC
ANTENNA
TU901
AM
FM 75
COAXIAL
FM/AM
TUNER
PACK
J701
IN
PHONO
VIDEO OUT
J716
CD DIGITAL OUT
FAN901
DC FAN
OPTICAL
IC503
JW205
6-8. PRINTED WIRING BOARD – MAIN Section – • See page 29 for Circuit Boards Location. • : Uses unleaded solder.
Ref. No. Location
• Semiconductor
Location
D208 H-4
D209 H-4
D210 H-4
D501 F-9
D502 G-9
D504 H-8
D505 H-7
D506 H-5
D554 B-9
D555 H-10
D559 E-7
IC100 G-6
IC101 C-5
(IC102) C-7
IC401 F-4
IC501 F-7
IC503 B-10
IC510 F-8
IC511 E-8
IC513 F-7
IC514 H-10
IC515 G-10
IC519 B-6
IC675 E-5
Q2 D-5
Q52 D-6
Q100 G-7
Q102 D-6
(Q103) C-8
(Q104) C-8
Q150 G-7
(Q153) C-8
(Q154) C-8
Q207 H-4
Q208 H-4
Q209 H-5
Q210 H-5
Q211 H-4
Q290 E-6
Q500 E-6
Q502 B-9
Q503 B-9
Q505 E-6
Q552 H-8
Q554 H-8
Q555 B-9
Q557 C-9
Q870 H-9
( ): HCD-ZX99i only
(Page 46)
(Page 46)
(Page 46)
(Page 56)
(Page 54)
(Page 34)
(Page 36)
(Page 56)
(Page 58)
(Page 44)
(Page 42)
Page 39
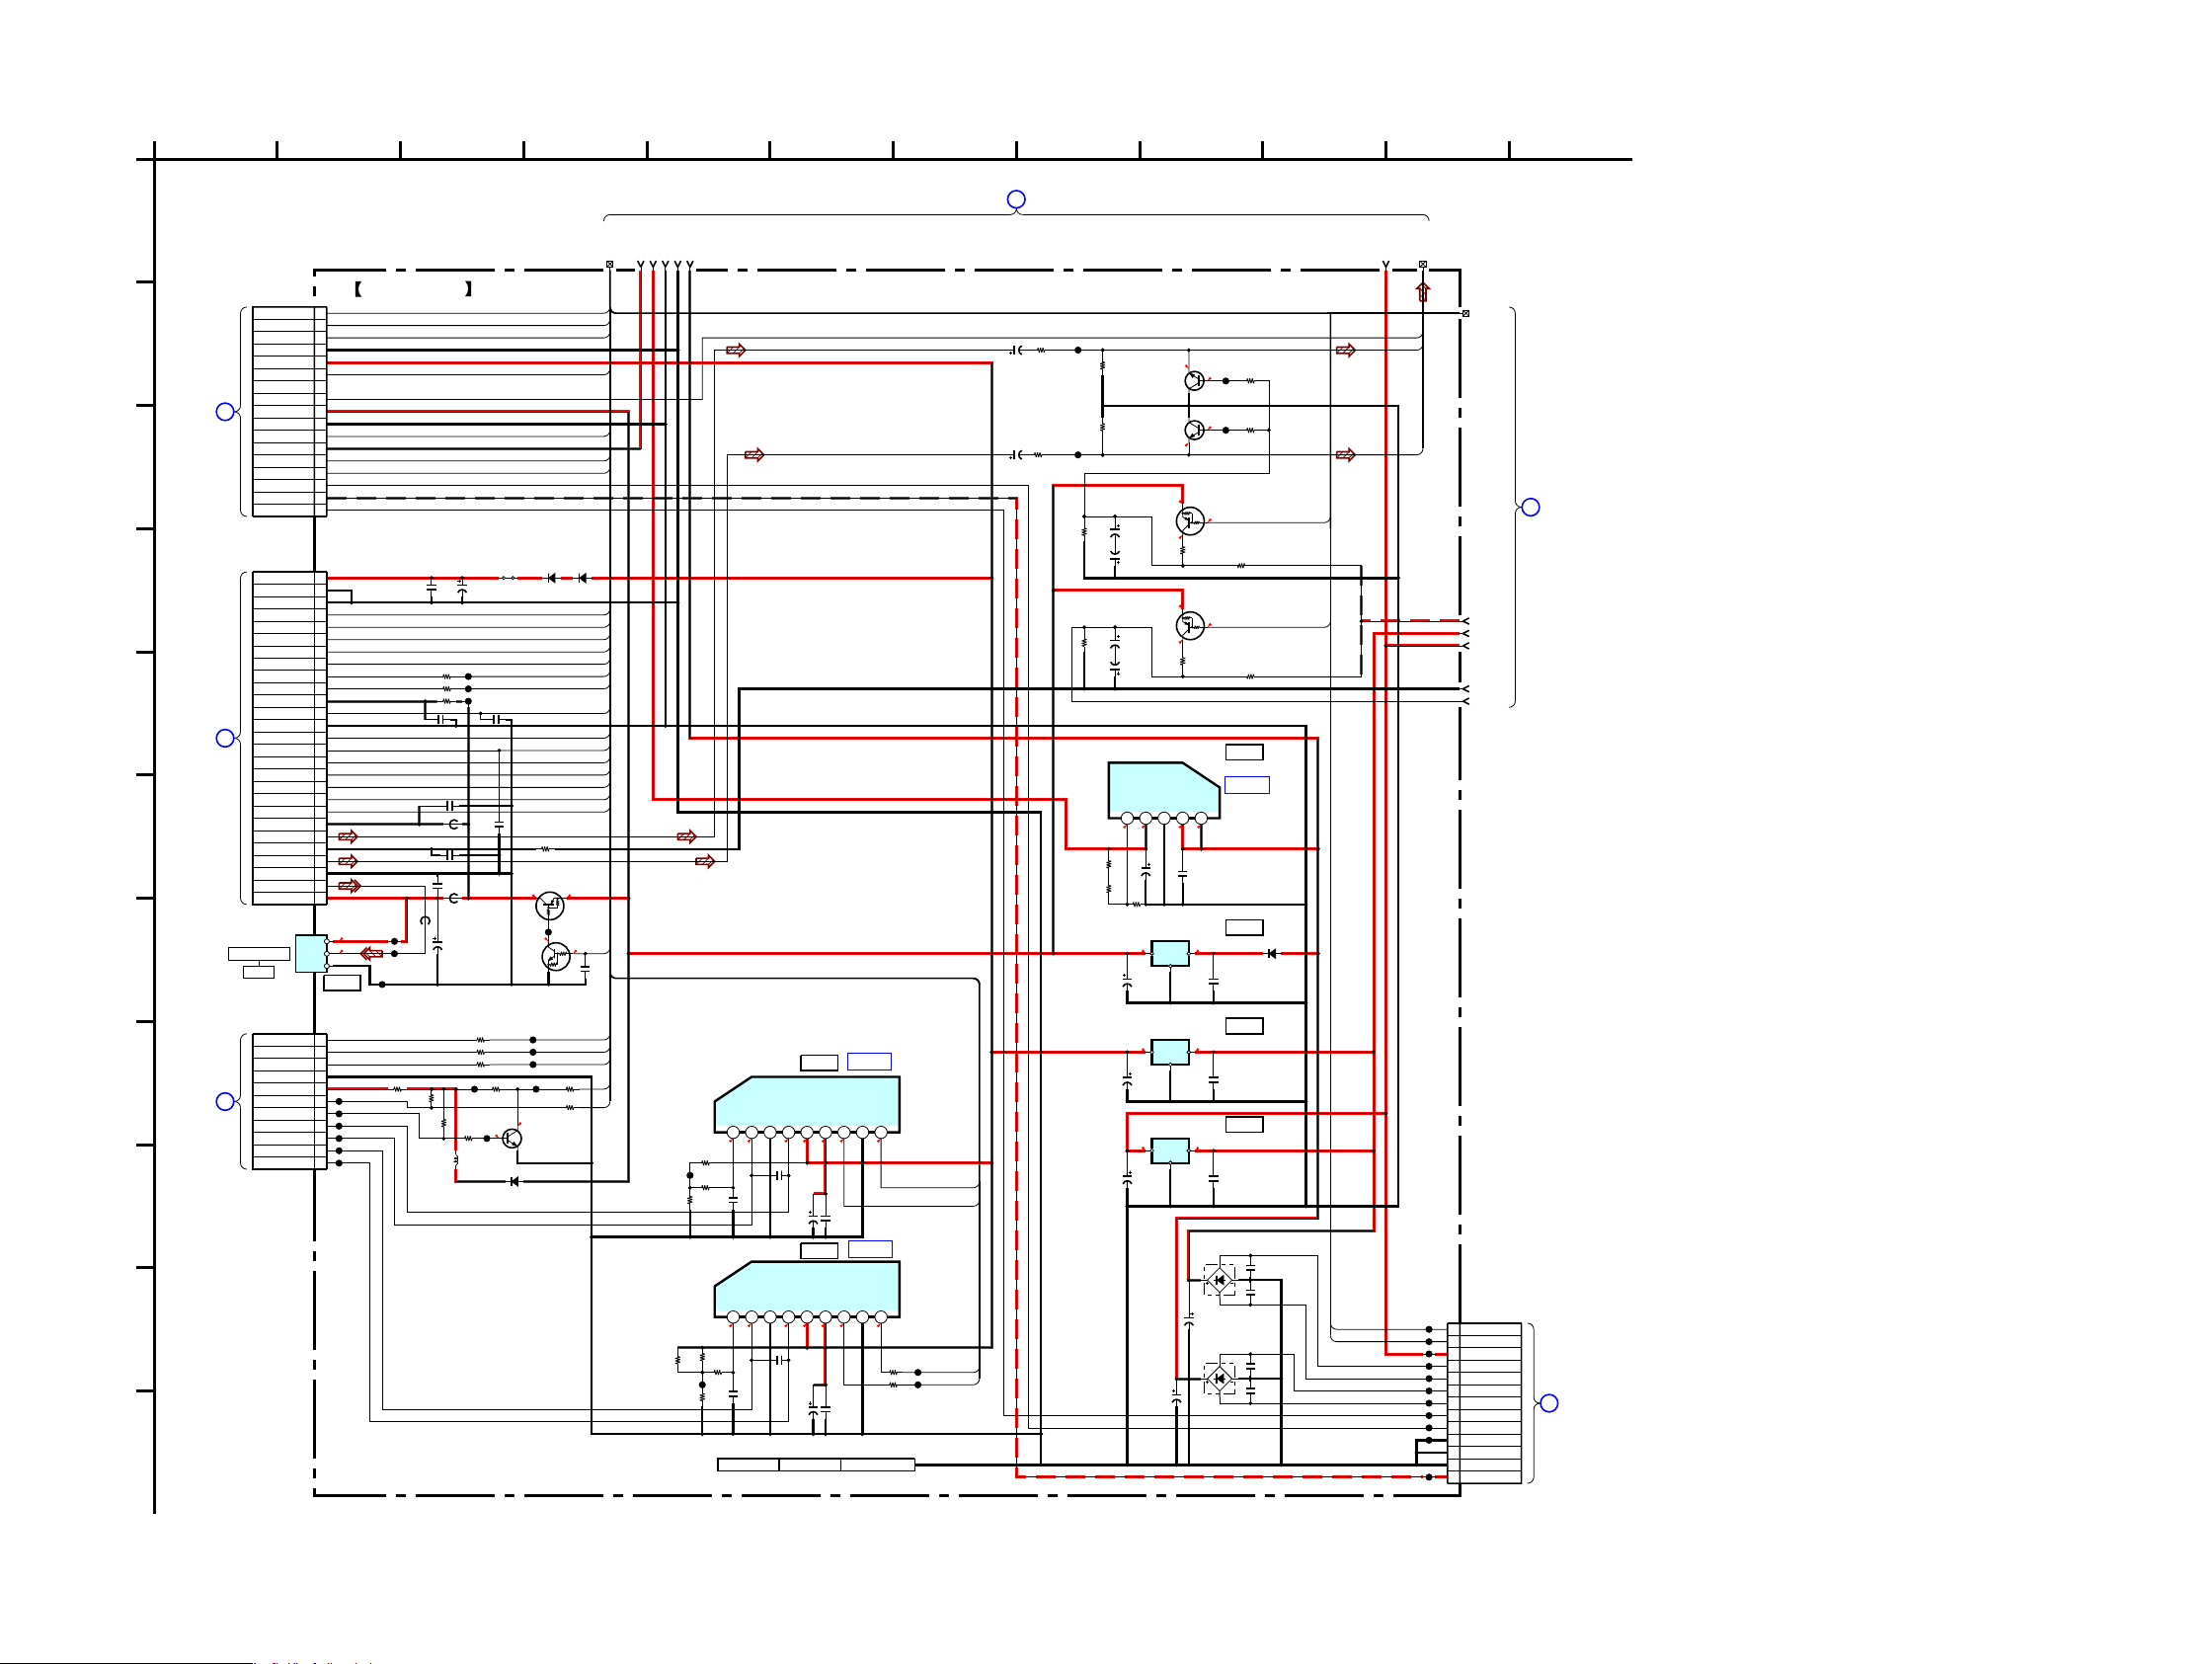
HCD-ZX66i/ZX99i
HCD-ZX66i/ZX99i
3939
3
D
4
C
1297
G
E
H
8
J
2
I
B
105 11
K
1
F
6
A
BOARD
CN914
PANEL COM
C
CN201
BOARD
A
BD81A
MD-94
BOARD
CN001
B
MAIN BOARD (2/3)
1
(3/3)
BOARD
MAIN
2
CN602
BOARD
POWER AMP
J
IC B/D
IC B/D
IC B/D
3.3
3.3
3.33.3
3.3
0
0.6
0
6.1
0
0
9.1
9.1
0
0
0
0
4.3
0
9.109.1
0
0.6
0.6
0
3.3
0
3.3
3.3
3.3
-2.9
1.2
5
11.1
11.1
3.3 10.2
9.1 15.1
915.1
C329
0.01
C597
0.01
C598
12 9876543
BA6956AN
IC514
TABLE MOTOR DRIVER
VREF
OUT2
RNF
OUT1
VIN
VCC
FIN
GND
RIN
25V
4700
C529
0.1
C593
0.1
C594
10V
100
C599
10V
470
C591
12 9876543
BA6956AN
IC515
LOADING MOTOR DRIVER
VREF
OUT2
RNF
OUT1
VIN
VCC
FIN
GND
RIN
100k
R300
100k
R303
47k
R301
10
R314
10
R315
15k
R307
1k
R317
33k
R308
0.01
C300
0.1
C301
0.1
C303
0.1
C305
0.1
C307
0.01
C304
25V
47
C302
25V
47
C306
1k
R302
0.1
C341
1
2
3
4
5
6
7
8
9
10
11
11P
CN509
OCSW2
OCSW1
CKSW1
SGND
SENSOR LED
TSENS
DSENS
LMLM+
TM+
TM-
10uH
L300
100R311
100R312
100R313
75R304
47k
R305
56k
R306
47k
R310
1k
R309
2SC3052EF-T1-LEF
Q870
TABLE ADDRESS
VCC
IN
GND
IC503
OPTICAL OUTPUT
TOTX147L(B)
0.1
C320
0.1C321
0.1C324
0.1
C325
47p
220p
C328
10V
1000
C322
10V
100
C555
RT1P137P-TP-1
Q552
POWER CONTROL
RT1N141C-TP-1
Q554
POWER CONTROL
10k
R125
10k
R175
33k
R123
33k
R173
1k
R172
1k
R122
50V
10
C156
50V
10
C116
Mount Mecha487053931 A001
10V470C510
0.1
C511
6.3V
1000
C342
10EDB40-TB3
D504
10EDB40-TB3
D505
10EDB40-TB3
D555
JW532
0R318
0R316
IO
G
IC513
+3.3V REG
uPC3533AHF
10EDB40-TB3
D559
2SC3052EF-T1-LEF
Q100
MUTE
2SC3052EF-T1-LEF
Q150
MUTE
JL609
JL610
JL611
JL612
JL613
JL614
JL615
JL616
JL617
JL618
JL619
JL620
JL621
JL622
JL627
JL628
JL629
JL630
1
2
3
4
5
6
7
8
9
10
11
12
13
14
15
16
17
17P
CN507
VF(2)
-VG
VF(1)
I2C CLK
I2C DATA
EVER+3.3V
SIRCS
DGND
D+3.3V
SPEANA
AGND
GC RESET
LED+9V
LED GND
DISPLAY
KEY POWER
LED STBY
50V
C277
2.2
Q290
RT1P141C-TP-1
MUTE CONTROL
50V
C227
2.2
Q505
RT1P141C-TP-1
MUTE CONTROL
0.01
C514
~
~
~
~
0.01
C512
16V
3300
C500
0
FB306
0FB305
0FB304
0FB302
1
2
3
4
5
6
7
8
9
10
11
12
13
14
15
16
17
18
19
20
21
22
23
24
25
26
27
27P
CN502
M+7V
MGND
MGND
MP3STB
MP3REQ
MIACK
MICK
MIDIO
MILP
MICS
MP3(3.3V)
MP3RST
MP3GND
SCOR
SENS
CLK
XLT
DATA
XRST
XTCN
AVDD(3.3V)
ROUT
AGND
LOUT
DGND
DOUT
DVDD(3.3V)
12345
IC501
+5V REG
BA00BC0WCP-V5E2
VC
VN
GND
VO
VFB
120k
R594
22k
R595
47k
R596
15k
R597
R507
68k
0.1
C554
IO
G
KIA7809API-U/PF
IC510
+9V REG
IO
G
KIA7809API-U/PF
IC511
+9V REG
FB300
FB301
FB303
D3SBA20-4100
D502
RECT
D3SBA20-4100
D501
RECT
0.1C323
50V
C509
2.2
50V
C513
2.2
R295
680k
R512
680k
15k
R296
JL607
JL623
JL624
JL625
JL626
JL639
JL640
JL641
JL642
JL555
JL556
JL557
JL558
JL532
JL559
JL560
JL561
JL562
JL563
JL564
1
2
3
4
5
6
7
8
9
10
11
12
13
13P
CN506
STK MUTE
FRONT RELAY
A+9V
AC3
AC3
AC4
AC4
VF(1)
VF(2)
DGND
DGND
DGND
-VG
R276
68k
BUS1
EVER+3.3V
VBUS
DGND
DGND
+11V
A+9V
BUS2
BUS4
-B
UNREG
A+9V
DGND
SIGN4182
46
45
44
43
47
49
50
34
42
41
31
100
1
7
18
19
21
22
23
24
25
26
40
76
74
73
71
30
4
29
SPEANA
2
5
3
CD-L
78
80
48
CD-R
M+9v
A+9v
iPod+5V
D+3.3V
(1/3)MAIN BOARD
CD DIGITAL OUT
OPTICAL
IC503
2
3
1
SENS SWITCH
IC515
IC514
IC501
IC513
2
31
13
2
13
2
IC510
IC511
6-9. SCHEMATIC DIAGRAM – MAIN Section (1/3) – • See page 60 for IC Block Diagrams.
(Page 35)
(Page 43)
(Page 37)
(Page 40)
(Page 41)
(Page 57)
Page 40
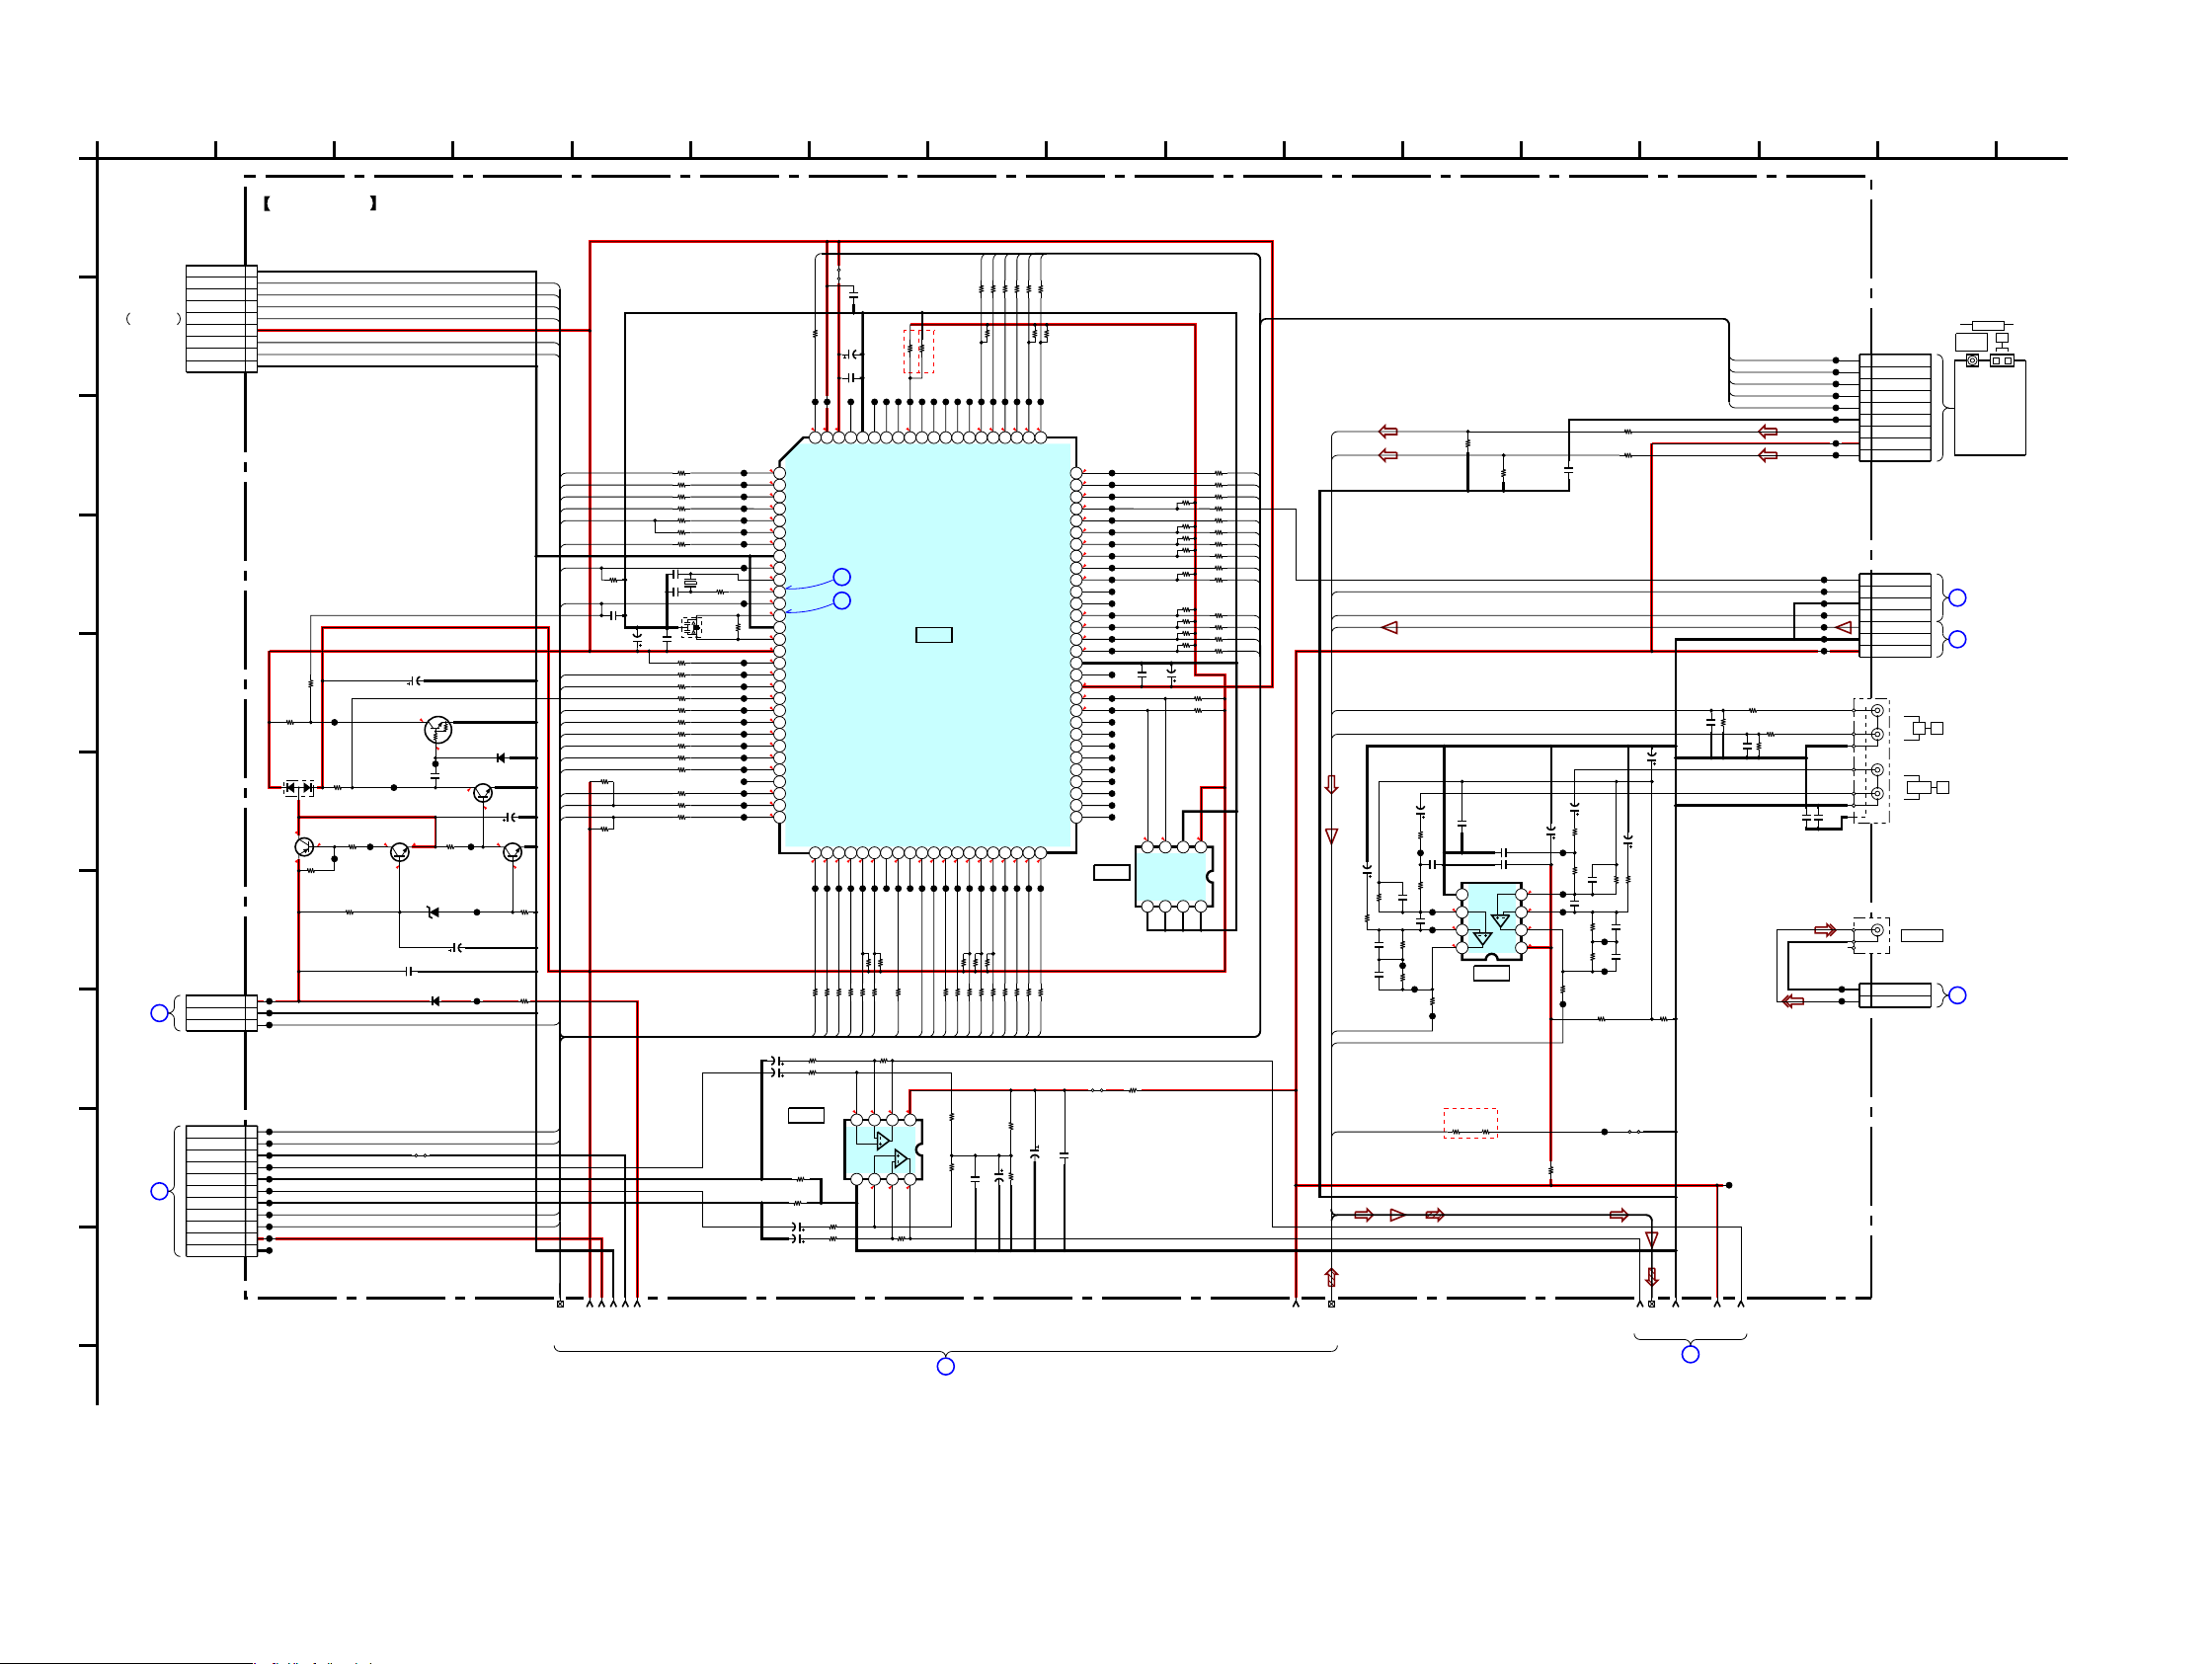
HCD-ZX66i/ZX99i
HCD-ZX66i/ZX99i
4040
156
I
3
D
162 10
A
139
H
G
78
E
J
C
B
4 125 141
F
11
F
CN801
GAME HP
BOARD
BOARD
MIC
CN920
G
E
BOARD
GAME HP
CN802
1
MAIN BOARD (1/3)
3
MAIN BOARD (3/3)
SUBTRANS
BOARD
CN1000
K
D
BOARD
IPOD
CN1551
1
2
3.3
0
0
3.3
4.1
9.9
9.3
8.2 4.1
4.6
0
0.7
0
3.3
3.3
3.3
3.300.403.3
0
3.3
3.3
3.3
3.3
3.3
3.3
0
0
0.1
1.3
3.3
2.5
0.8
3.3
0
3.3
0
3.3
0
3.3
3.3
3.3
0
3.3
3.3
3.3
3.3
0
3.303.3
3.4
3.403.3
000
0
3.3
3.3
000
0
3.2
0
3.2
0
0
3.3
3.3
3.3
3.2
3.3
0
0
0
0
3.3
3.4
3.4
3.4
3.4
3.3
4.2
4.3
4.3
8.64.3
4.3
4.2
2.7
4.1
4.1
2.7
4.1
4.1
8.2
ZX99i
ZX99i ZX66i
CN501
R404 100
10k
R409
330k
R411
10kR417
100R419
100R429
100R430
0.1
C414
0.1
C499
10V
100
C462
10k
R330
10kR329
100R431
100R432
100R433
100R434
100R435
100R436
100R438
100R445
100R446
100R474
10kR366
100R46710kR367
10kR346
10kR345
100R465
100R466
R365 10k
100R450
R381 15k
0.047
C412
220R468
R481 1k
R403 100
R402 100
100R418
100R421
JL439
100R442
100R443
100R444 10kR344
100R447
100R448
100R449
JL451
JL452
JL453
JL454
JL455
JL456
JL457
JL458
JL459
JL460
JL461
JL463
0.1
C464
10kR368
JL469
100R47110kR371
10kR374
10kR373
10kR375
10kR377
R382 10k
10kR386
100R472
100R473
100R477
100R478
100R479
100R482
100R485
100R486
100R400
JL470
JL487
JL488
JL489
JL490
JL491
JL492
JL493
JL495
JL497
0.1
C496
50V
10
C498
100R405
100R406
100R407
22p
C411
MAZ8043GMLS0
D210
2SC3052EF-T1-LEF
Q211
+4V REG
2SC3052EF-T1-LEF
Q210
+4V REG
C202
10
50V
2SC3052EF-T1-LEF
Q208
RESET
R229
100k
MA2J1110GLS0
D208
D209
MC2836-T112-1
R230
2.2k
R208
10k
R209
100
C216
10 50V
Q207
RT1N441C-TP-1
RESET SWITCH
C214
0.33
R228
100k
KTA1271Y-AT
Q209
+4V REG
C217
0.1
C215
10 50V
R222
10k
R231
680
R227
10k
R401 100
100R476
100R475
JL260
JL151
0.1
JR123
JL258
JL101
JL256
6.8k
R100
2.2k
R151
JL261
6.8k
R150
JL257
2.2k
R101
JL259
J716
1P
1k
R116
1kR160
C108
100p
47k
R113
47k
R163
100k
R106
100k
R156
560k
R112
1k
R109
1k
R501
560k
R162
330p
C154
100V
220p
C103
0.01
C501
1k
R161
1k
R159
0.01C505
100p
C166
16V
47
C502
1k
R157
50V
10
C155
1k
R166
1k
R502
1k
R107
100p
C106
100V
220p
C153
50V
10
C105
100
R518
0.1
C547
1k
R111
16V
100
C506
1kR110
C158
100p
330p
C104
0.1
C535
R167
100k
R536
4.7k
0.5%22k
R119
0.5%
22k
R121
0.5%
22k
R171
C114
50V1
22k
R168
0.5%
JW530
0.5%22kR170
0.5%22k
R169
22k
R118
0.5%
C113
50V1
R117
100k
R535
4.7k
R538
100
50V1
C164
50V1
C163
0.5%22k
R120
C537
0.1
MA2J1110GLS0
D506
22
R593
1
2
3
4
5
6
7
8
9
9P
CN200
ST-L
ST+9V
ST-R
GND
TUNED
ST-CE
ST-DIN
ST-CLK
ST-DOUT
JL510
8765
4321
NJM4558V-TE2
IC519
PHONO AMP
JL499
JL500
JL401
JL402
JL403
JL404
JL405
JL406
JL407
JL409
JL412
JL417
JL418
JL419
JL420
JL421
JL422
JL423
JL424
JL425
JL426
JL427
JL428
JL429
JL430
JL431
JL432
JL433
JL434
JL435
JL436
JL437
JL438
JL440
JL441
JL442
JL443
JL444
JL445
JL446
JL447
JL448
JL449
JL450
JL465
JL466
JL468
JL471
JL472
JL473
JL474
JL475
JL476
JL477
JL478
JL479
JL480
100R484
JL481
JL482
JL483
JL484
JL485
JL486
JL600
JL601
JL602
JL603
JL604
JL605
JL606
JL608
JL160
JL161
JL162
JL163
JL164
JL165
JL166
JL167
JL168
JL169
JL170
JL171
100R483
10kR335
10kR336
1
2
3
4
5
6
7
8
9
9P
CN040
DGND
TXD1
RTS1
MCU VCC
CLK1
RXD1
CN VSS
RESET
DGND
C538
10V
47
10V
100
C534
50V
2.2
C112
50V
2.2
C162
0.1
C528
R3311kR332
1.2k
JW544
100R428
100R422
100R423
100R424
100R425
100R426
100R480
JW545
1
2
3
3P
NO500
STBY RLY
DGND
EVER+10V
10kR395
10kR397
JW499
10kR391
R492 10k
G
J701
4P
1
2
2P
NO512
(V) SIGNAL
VGND
16MHz
X402
1
8
3
4
5
6
7
NO510
7P
HP DETECT
A+9V
GAME-R
AGND
GAME-L
MIC-OUT
MIC-GND
22kR420
1
2
3
4
5
6
7
8
9
10
11
11P
DGND
VBUS
TXD
RXD
L-
L+
R-
R+
SHIELD
IPOD MUTE
IPOD DET
1M
R413
47kR165
47kR115
JL501
JL503
JL504
JL505
JL508
JL509
JL511
JL512
JL513
JL514
JL502
JL520
JL521
JL522
JL523
JL524
JL525
JL526
JL530
JL531
JL527
JL528
JL550
JL551
JL552
4700p
C109
4700p
C159
32.768kHz
X401
12345678
9 101112131415161718192021222324 25 26 27 28 29 30
313233
34
353637383940414243444546474849
50
515253545556575859606162636465666768697071727374757677787980
81828384858687888990919293949596979899
100
R5F3640MDFAR
IC401
SYSTEM CONTROL
MP3-ACK
MP3-LP
MP3-CS
SIRCS
MP3-DATA-OUT
MP3-DATA-IN
MP3-CLK
BYTE
CNVSS
XC-IN
XC-OUT
RESET
X-OUT
VSS
X-IN
VCC
NMI
MP3-RST
SCOR
AC-CUT
SENS
CD-CLK
XLAT
CD-DATA
XRST
XCTN
NO USE
STBY-RELAY
IIC-CLK
IIC-DATA
MP3-STB
NO USE
FOR PROG
LINE MUTE
IPOD TXD
IPOD RXD
IPOD POWER
IPOD MUTE
NO USE
CD POWER
CD A-MUTE
TSENS
DSENSS2S1S0TRMP
TRMN
CKMN
CKMP
NO USE
NO USE
NO USE
NO USE
NO USE
NO USE
NO USE
NO USE
NO USE
EEPROM DATA
EEPROM CLK
VCC
NO USE
VSS
AUDIO1 DATA
AUDIO1 CLK
AUDIO2 DATA
AUDIO2 CLK
SOFT TEST
NO USE
GC RESET
SURR RELAY
DISPLAY KEY
POWER KEY
IPOD DETECT
STBY LED
HP DET
FR RELAY
HP MUTE
STK MUTE
PROTECT
ST CLK
ST DIN
ST DOUT
ST CE
TUNED
NO USE
NO USE
NO USE
NO USE
NO USE
MODEL-IN
DEST-IN
I-HOLD
NO USE
AVSS
NO USE
VREF
AVCC
MP3-REQ
22p
C410
C160
1500p
2200p
C110
C416
6.3V
2200
8765
4321
NJM4558V-TE2
IC100
IPOD AMP
8765
4321
IC675
S-24CS16A0I-J8T1G
A0
A1
A2
GND
SDA
SCL
WP
VCC
JL467
BUS1
EVER+3.3V
VBUS
DGND
DGND
+11V
A+9V
BUS2
IPOD-L
BUS3
DGND
A+9V
IPOD-R
80
7
72
78
79
5
82
83
848586
100
18
26
25
24
22
4
3
2
1
84
82
86
85
83
75
36
35
38
65
66
67
68
73
75
76
28
23
9
30
21
19
29
12
28
3132333536
3840414243
47
34
4445464849
50
74
12
9
32
33
34
31
81
MD-IN-L
MD-IN-R
GAME-R
GAME-L
MIC-IN
SPEANA
PHONO-L
PHONO-R
ST-L
ST-R
IN
PHONO
PC
(2/3)
MAIN BOARD
FLASH
PROGRAMMING
IC401
IC675
EEPROM
IC100
VCC
VSS
VCC
VSS
IC519
TUNER
AM
FM/AM
TU901
ANTENNA
PACK
COAXIAL
FM75
IN
R
L
-1
-2
-3
L
R
-4
VIDEO OUT
6-10. SCHEMATIC DIAGRAM – MAIN Section (2/3) – • See page 30 for Waveforms • See page 68 for IC Pin Function Descriptions.
(Page 41)
(Page 47)
(Page 47)
(Page 47)
(Page 45)
(Page 59)
(Page 39)
Page 41
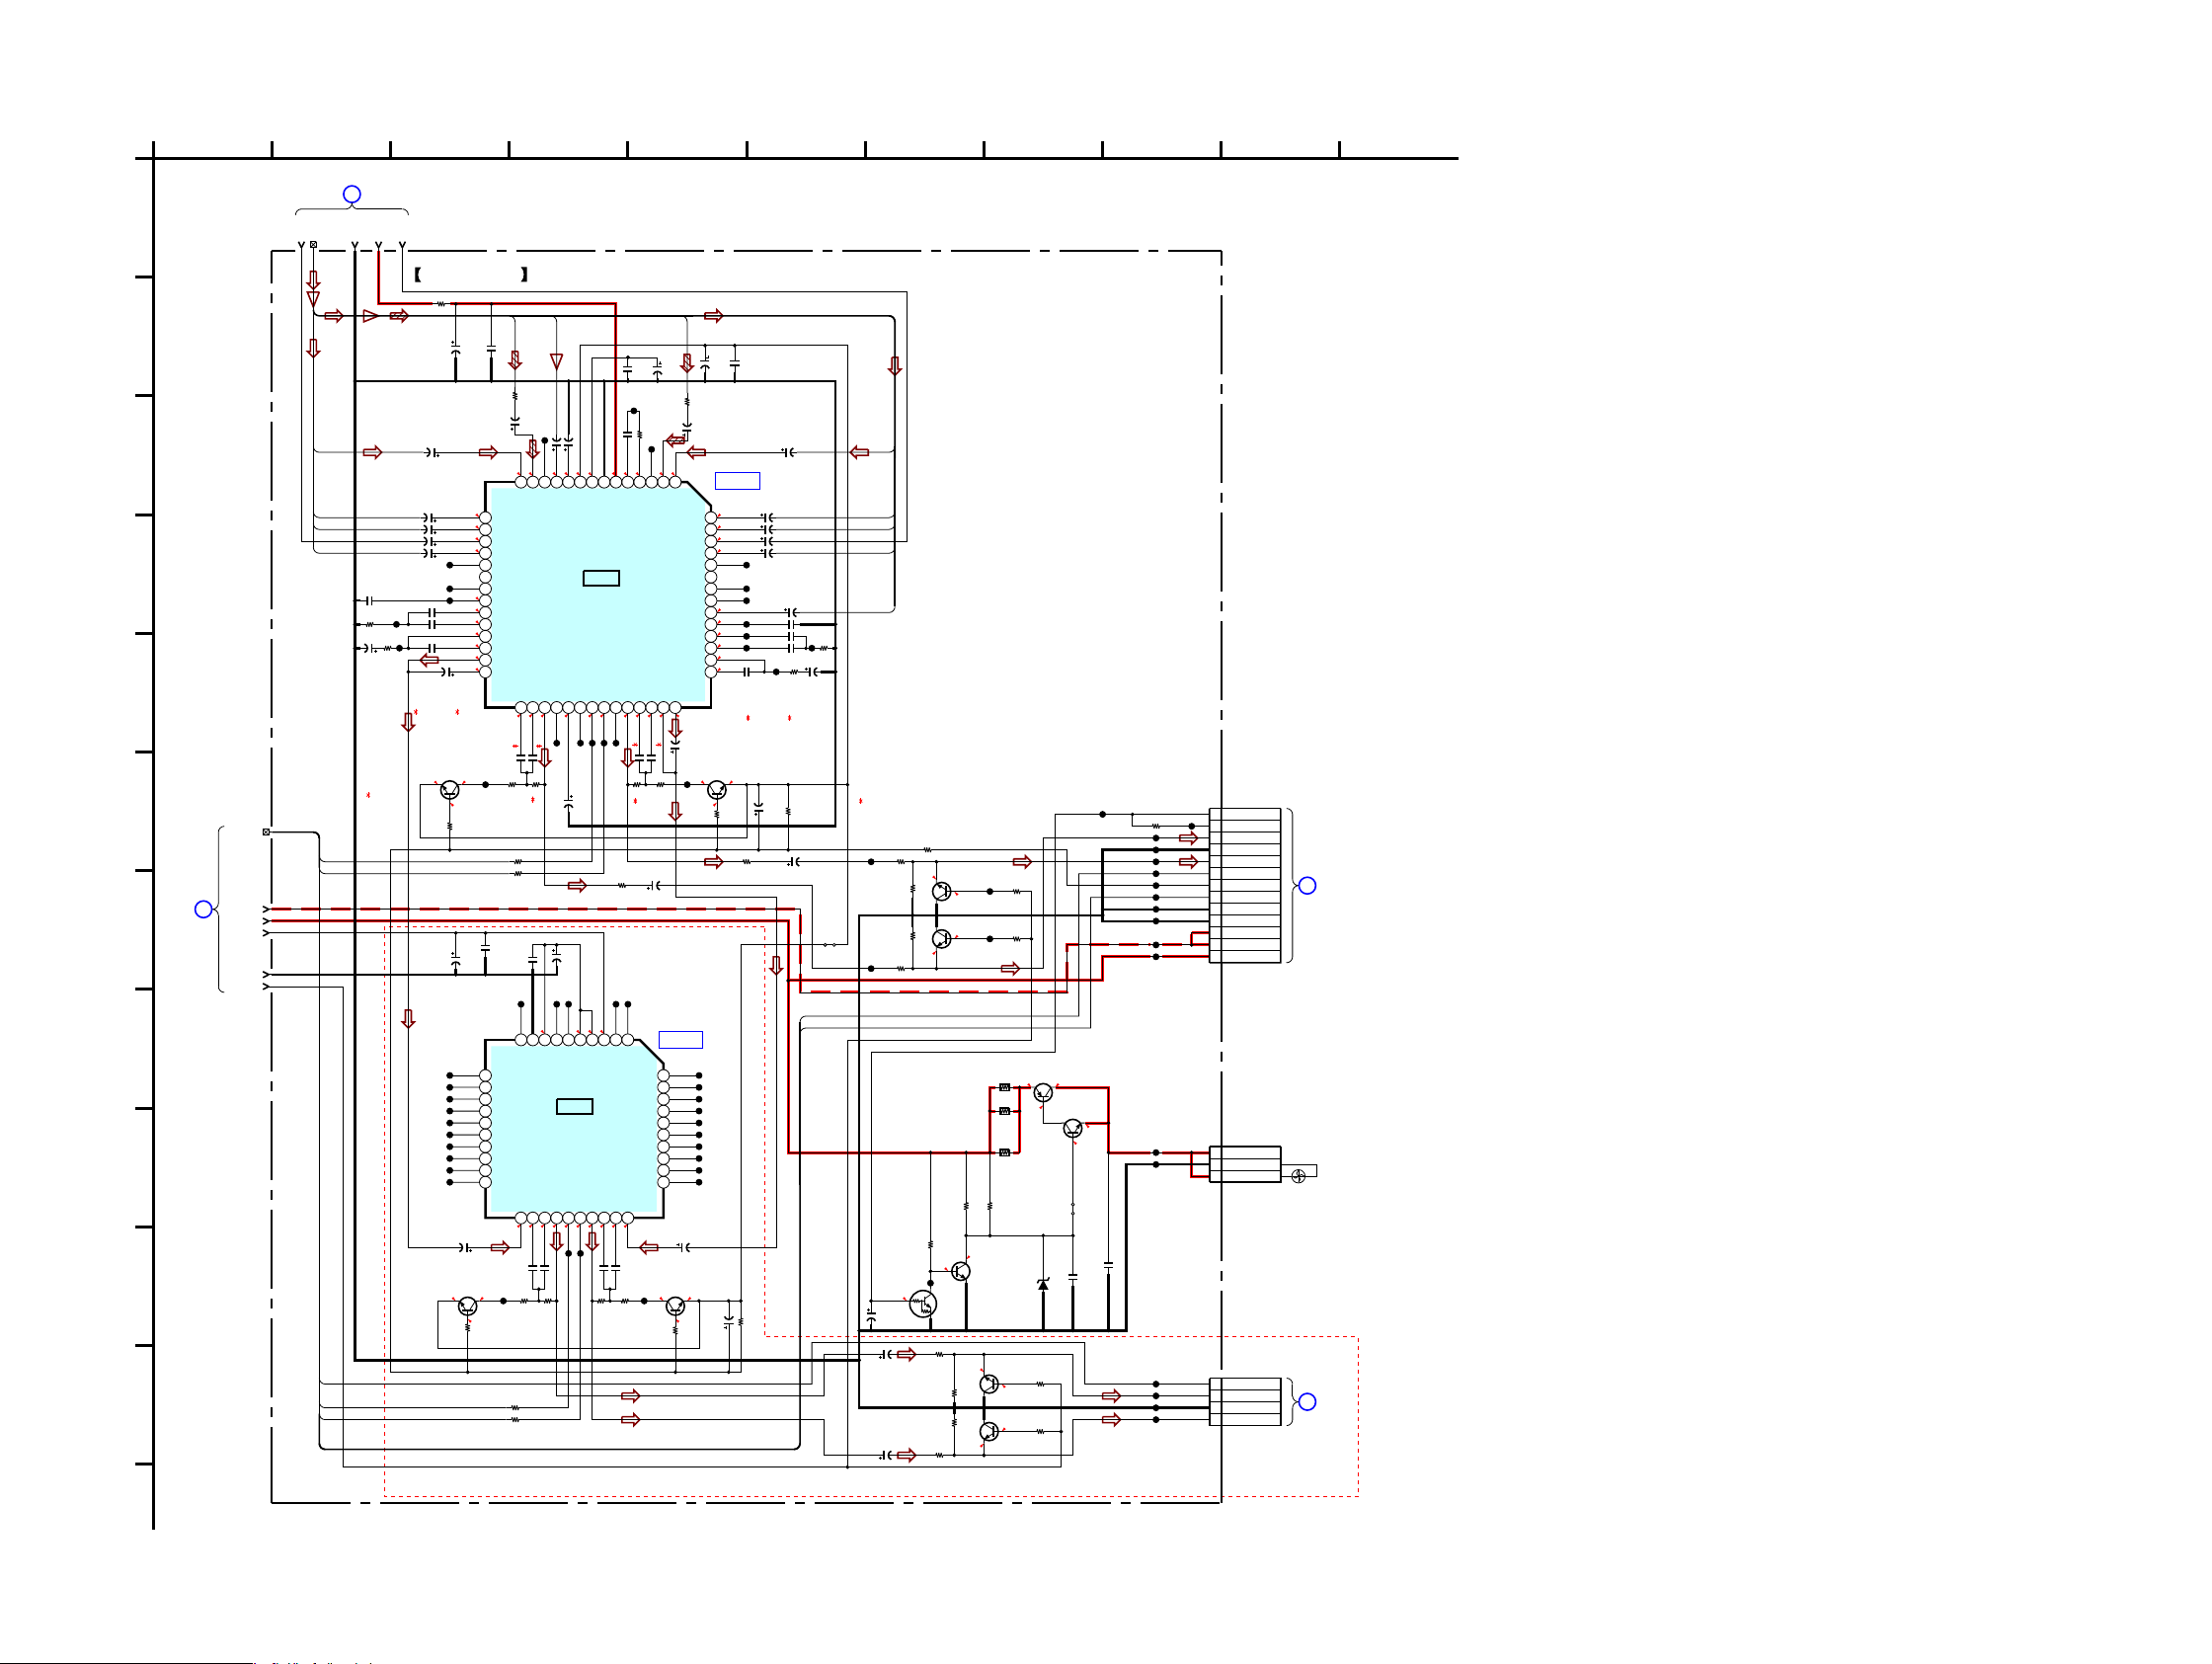
HCD-ZX66i/ZX99i
HCD-ZX66i/ZX99i
4141
6-11. SCHEMATIC DIAGRAM – MAIN Section (3/3) – • See page 61 for IC Block Diagrams.
3
D
4
C
97
G
E
H
8
J
2
I
B
105 11
K
1
F
6
A
IC B/D
IC B/D
MAIN BOARD (2/3)
3
BOARD
(1/3)
MAIN
2
CN601
BOARD
POWER AMP
I
H
NO702
BOARD
SURROUND
4.3
4.3
4.3
4.5
4.5
4.594.5
4.5
4.3
4.3
4.3
4.3
4.3
4.3
4.5
4.5
4.5
4.4
4.5
4.3
4.5
3.8
4.5
4.5
0
0
4.5
3.8
4.5
4.4
4.5
4.3
4.3
4.3
4.3
4.5
4.5
4.4
4.2
4.5
4.4
4.5
4.5
4.5
4.5
9
4.4
4.6
3.904.604.6
3.9
4.6
4.4
4.5 4.5
3.3
3.3
4.5
4.5
0
0
-2.9
-2.9
13.1 12.3
12.4
12.3
13
13
0.1
1.3
0
0
-2.8
-2.8
(ZX99i)
(ZX99i)
3.5
4.5 4.5
4.5
3.5
4.5
(ZX66i)
(ZX99i)1(ZX99i)
(ZX66i)
2
(ZX66i)
(ZX99i)(ZX99i)
(ZX66i)
34
(ZX66i)
(ZX99i)
(ZX99i)
(ZX66i)
6
5
1
2
5
6
4
3
ZX99i
(3/3)
1
2
3
4
5
6
7
8
9
10
11
12
13
13P
CN505
FAN ON
FAN DET
L-IN
PREGND
R-IN
PROTECT
DBFB F/B
HP MUTE
POWER GND
RELAY GND
-B
-B
UNREG
MAZ8130GMLS0
D554
2SC3052EF-T1-LEF
Q555
FAN DRIVER CONTROL
0.1
C586
0.1
C587
4.7k
R585
4.7k
R586
100k
R587
10k
R184
10k
R134
47k
R133
47k
R183
10k
R139
47k
R188
10k
R189
47k
R138
1
2
3
4
4P
CN503
REAR-R
PREGND
REAR-L
REAR-RY
0.01
C16
50V
2.2
C79
50V
10
C30
100kR30
0R591
50V0.47C12
10V
100
C14
50V
2.2
C29
10kR12
10k
R19
0.1
C19
50V10C89
10kR11
C46 4700p
50V10C26
50V
10
C45
50V
0.47
C49
0.01
C13
50V
1
C111
2SC3052EF-T1-LEF
Q2
DBFB
50V
10
C88
50V10C39
10kR16
2SC3052EF-T1-LEF
Q52
DBFB
C96
4700p
50V1C41
50V
10
C38
50V
10
C50
0.047C23
1M
R29
50V
10
C100
50V10C8
50V
10
C80
10k
R69
50V10C76
50V10C2850V10C78
4.7kR588
JL498
JL1
JL2
JL100
JL51
JL52
JL506
JL507
JL53
JL3
KTA1273-Y-AT
Q502
FAN DRIVER
2SC3052EF-T1-LEF
Q503
FAN DRIVER
JW531
47
R510
47
R511
47
R509
0.1
C130
0.01
C126
10V
100
C127
2SC3052EF-T1-LEF
Q104
DBFB
50V
0.47
C508
10k
R127
50V2.2
C133
2SC3052EF-T1-LEF
Q154
DBFB
10k
R177
50V2.2
C188
47k
R191
R141
47k
JL102
JL103
JL111
JL112
JL113
JL114
JL115
JL116
JL117
JL118
JL119
JL120
JL126
JL127
JL128
JL129
JL130
JL131
JL132
JL133
JL134
JL135
JL139
JL140
JL142
JL631
JL632
JL633
JL634
JL635
JL636
JL637
JL638
JL143
JL144
JL145
JL146
JL147
JL148
JL149
JL150
JL152
JL153
JL154
JL155
JL156
JL157
JL158
50V10C91
10kR504
10kR505
1M
R506
12345678 9 10 11 12 13 14
15161718192021222324252627
28
29303132333435
36373839404142
434445464748495051
52
535455
56
R2A15216FP
IC101
INPUT SELECTOR,
MD_IN-R
PHONO-R
IPOD-R
GAMER
INGAINOUTR
MD_OUT-R
RECBR
SA1
SA2
TRER
MID1R
MID2R
BASS1R
BASS2R
TONEOUTR
VOLINR
BB1R
BB2R
OUTR
AGCOUTR
DATA
CLK
SWOUT
AGCC
AGCOUTL
OUTL
BB2L
BB1L
VOLINL
TONEOUTL
BASS2L
BASS1L
MID2L
MID1L
TREL
RECBL
MD_OUT-L
INGAINOUTL
GAMEL
IPOD-L
PHONO-L
MD_IN-L
ST-L
CD-L
VIDEO-L
MIC IN
VC
REFOUT
REFIN
GND
VCC
DPLL/SURL
DPLR/SURR
VIDEO-R
CD-R
ST-R
12345678910
111213141516171819
20
212223242526
27282930
313233343536373839
40
R2S15207FP
IC102
SOUND CONTROL
INC2
IND2
REC2
SAOUT
BASS12
BASS22
TRE2
MID12
MID22
TONEOUT2
VOLIN2
BB12
BB22
OUT2
CLOCK
DATA
OUT1
BB21
BB11
VOLIN1
TONEOUT1
MID21
MID11
TRE1
BASS21
BASS11
REC1
IND1
INC1
INB1
INA1
GND
REFIN
SUR1
SUR2
MIX1
MIX2
VCC
INA2
INB2
16V
470
C600
16V
470
C128
RT1N441C-TP-1
Q557
FAN DRIVER CONTROL
10k
R71
10k
R21
0
R58
0
R8
0.022C98
10k
R78
10k
R28
0.022
C48
47k
R22
47k
R72
50V
22
C515
C77
C27
C75
C25
R67
R17
680
R126
680
R176
10V
100
C15
50V4.7
C31
50V4.7
C81
50V
4.7
C118
50V
4.7
C168
1k
R135
1k
R185
1k
R137
1k
R187
2SC3052EF-T1-LEF
Q103
MUTE
2SC3052EF-T1-LEF
Q153
MUTE
2SC3052EF-T1-LEF
Q102
MUTE
2SC3052EF-T1-LEF
Q500
MUTE
JL540
JL541
JL542
JL543
JL544
JL545
JL565
JL566
JL567
JL568
JL569
JL570
JL571
JL572
JL573
JL574
JL575
0.047C83
0.047
C33
0.01C47
0.01C97
4.7k
R83
4.7k
R33
0.27C132
0.27C182
0.22C181
0.22C131
1
2
3
3P
CN513
FAN
GND
FAN
IPOD-L
BUS3
DGND
A+9V
IPOD-R
BUS4
-B
UNREG
A+9V
DGND
SIGN4182
JW542
MD-IN-R
PHONO-R
GAME-R
SPEANA
ST-RST-L
MD-IN-L
PHONO-L
GAME-L
81
79
72
68
67
66
65
CD-L
MIC-IN
CD-R
MAIN BOARD
ELECTRONIC VOLUME
IC101
IC102
–+
FAN901
DC FAN
C25
0.22
0.18
C27
0.27
0.22
C75
0.27 0.22
C77
0.22 0.18
R67
1.2k
1.2k
R17
680
680
(Page 55)
(Page 57)
(Page 39)
(Page 40)
Page 42
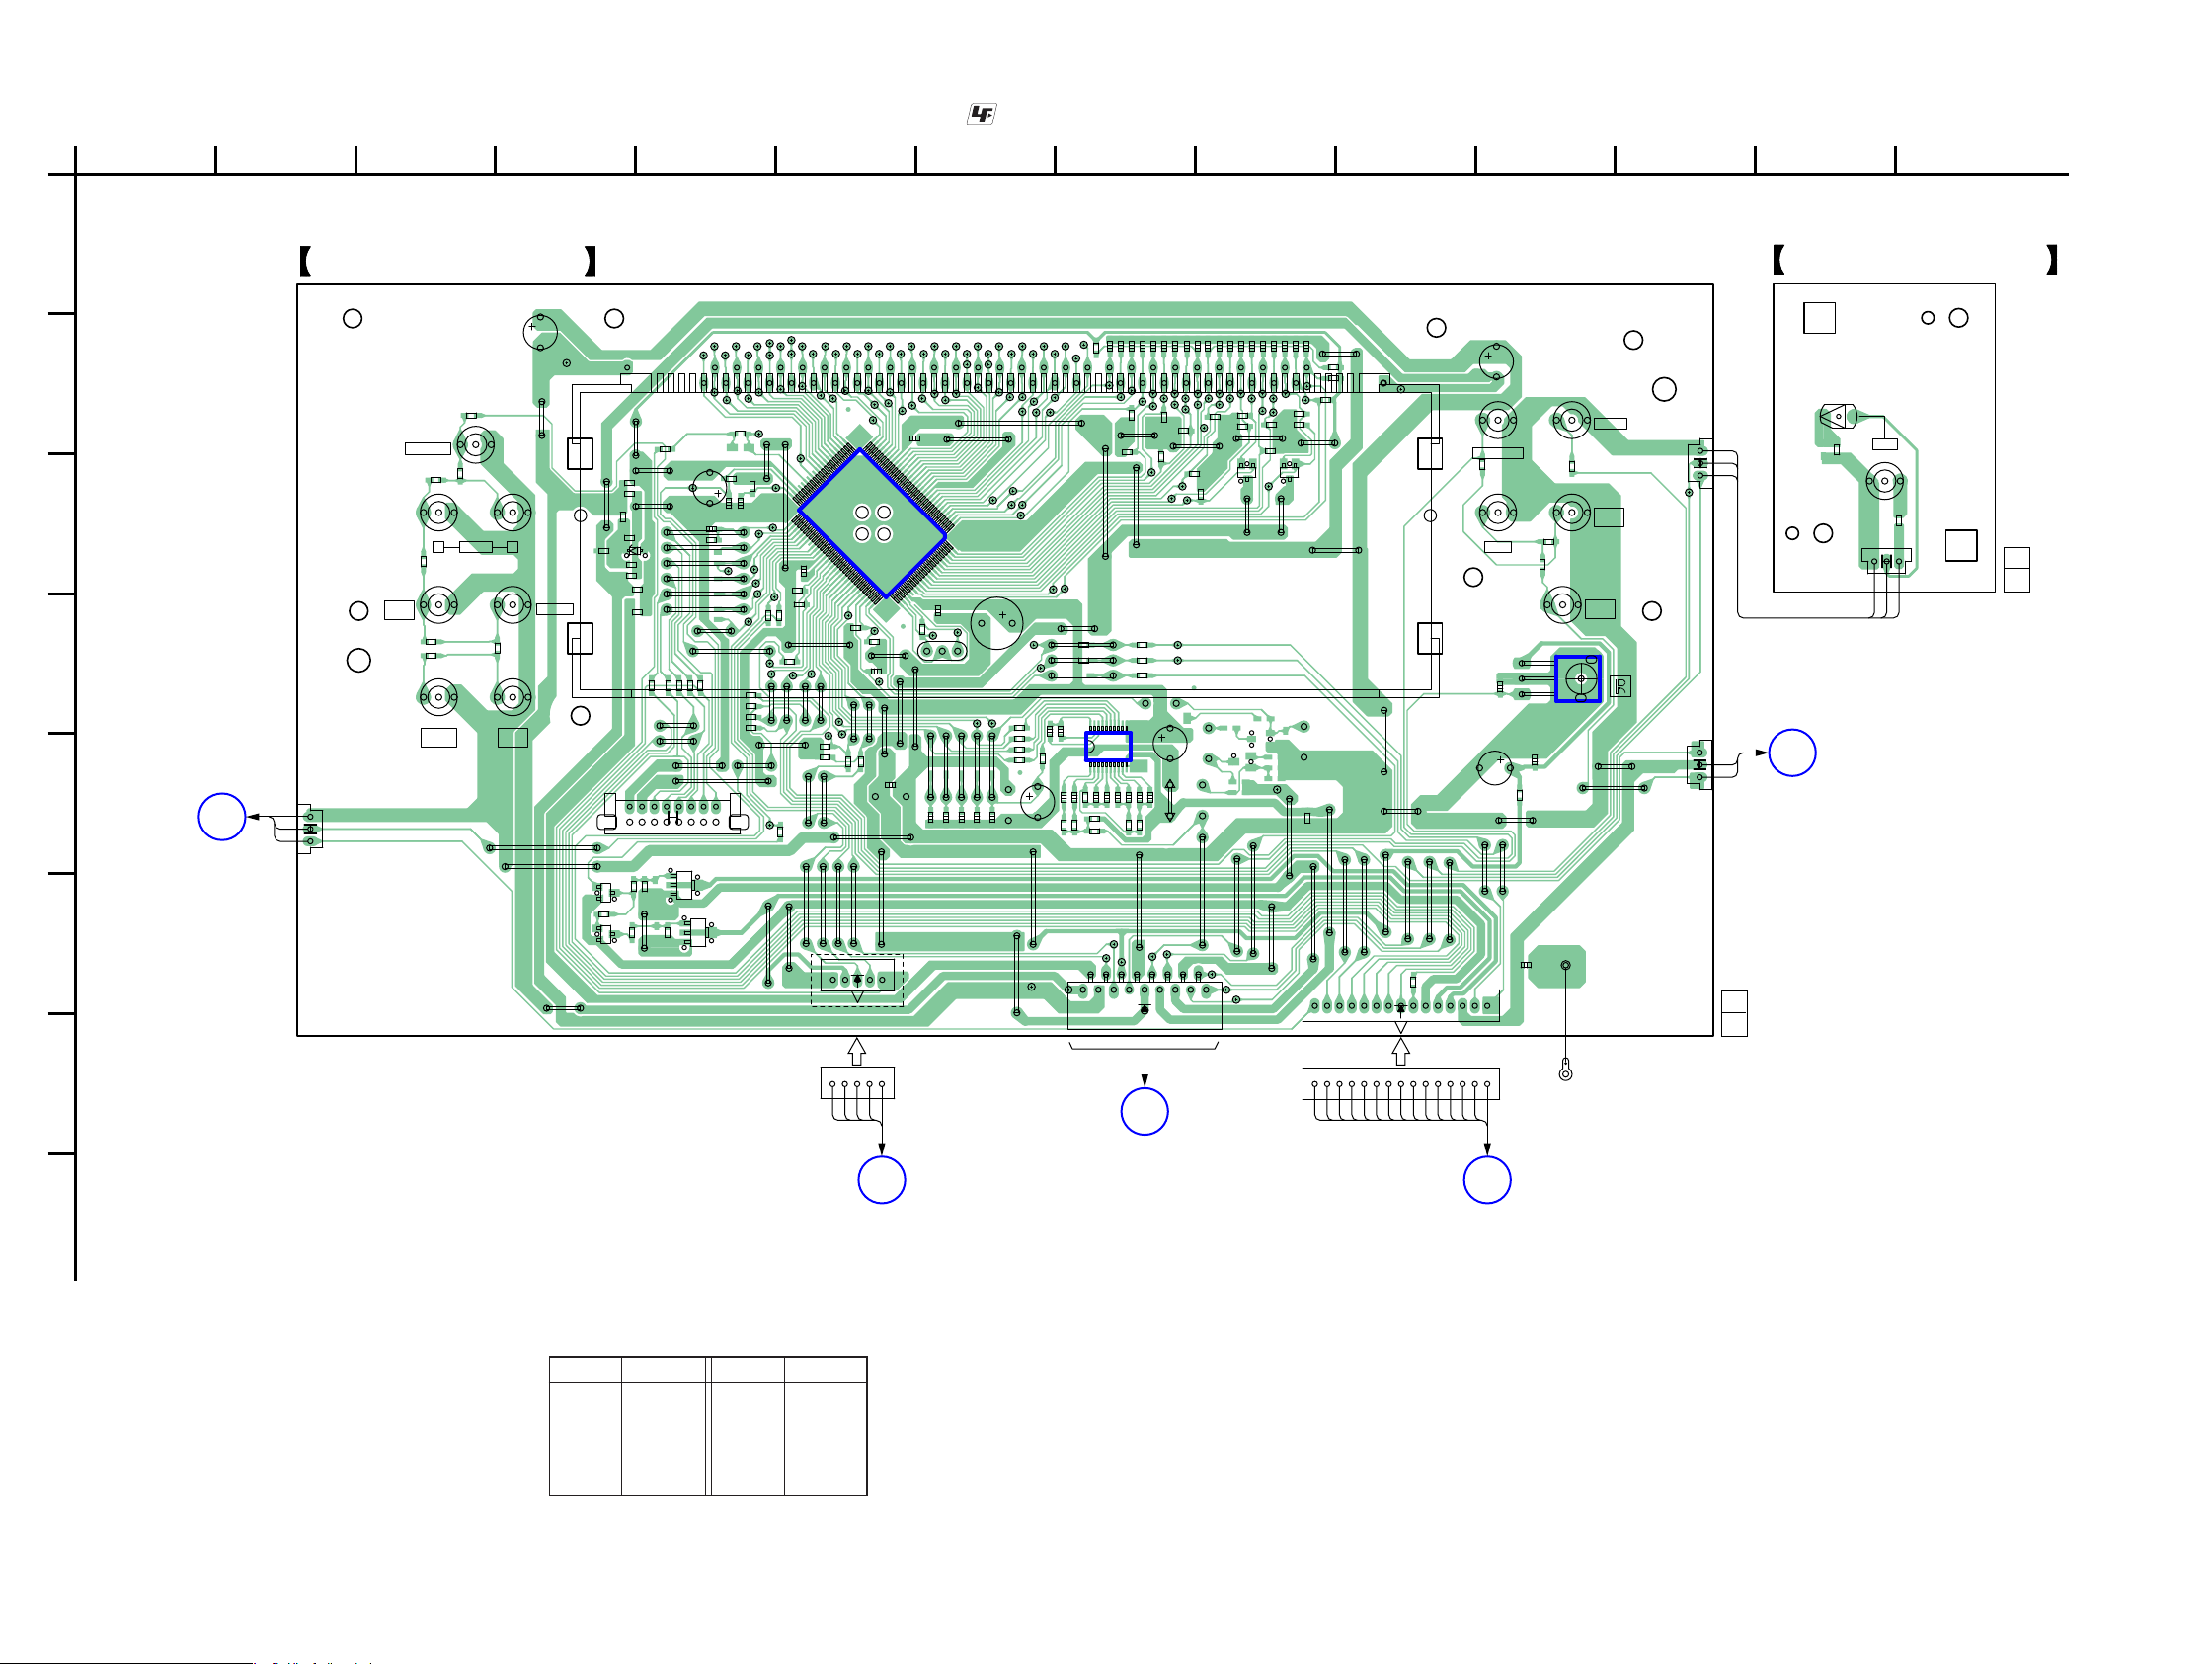
HCD-ZX66i/ZX99i
HCD-ZX66i/ZX99i
4242
1
A
B
C
D
E
F
G
H
234567891011121314
1-878-495-
11
(11)
1-878-471-
11
(11)
PANEL COM BOARD
POWER SW BOARD
C
L
VOL BOARD
NO924
MAIN BOARD
CN507
O
RIGHT-BTTN
BOARD
NO916
M
LEFT-BTTN
BOARD
NO915
N
JOG-A BOARD
CN922
(ZX99i)
(CHASSIS)
BLK
13
R1338
R1341
BLK
GRY
GRY
NO912
S929
D920
13
13
1
216
17
115
115
18
1 70
15
13
GRY
GRY
BLK
BLK
GRY
GRY
BLK
GRY
GRY
BLK
GRY
GRY
GRY
GRY
BLK
GRY
GRY
GRY
GRY
BLK
GRY
GRY
GRY
GRY
1
3
1
100
30
31
81
80
50
51
1120
1 10
W800
R1301
R1308
R1315
R1322
JW1000
JW1001
JW1002
JW1003
JW1004
JW1005
R1329
JW1006
JW1007
JW1009
JW1008
JL200
JL201
JL202
JL203
JL204
JW1010
JL205
JW1011
JL206
JW1012
JL207
JW1013
JL208
JW1014
JL209
JW1017
JW1018
JW1015
JW1016
JW1019
X602
JL210
JL211
JL212
JL213
JW1020
JL214
JL215
JW1021
FLASH
PROGRAMMING
JL216
JW1022
JL217
JW1023
JL218
JW1024
JL219
JW1025
JW1026
JW1027
JW1028
R851
JW1029
JL220
R1350
JL221
R1351
JL222
R1352
JL223
JL224
JW1030
R1354
JL225
JW1031
JL226
JW1032
JL227
JW1033
JL228
JW1034
JL229
JW1035
JW1036
JW1037
JW1038
JW1039
JL230
JL231
JL232
JL233
JL234
JW1040
JL235
JW1041
JL236
JW1042
JL237
JW1043
JL238
JW1044
JL239
JW1045
JW1046
JW1047
JW1048
JW1049
JL240
JL241
JL242
JL243
JL244
JW1050
JL245
JW1051
JL246
JW1052
JL247
JW1053
R1377
JL248
JW1054
R1378
JL249
JW1055
JW1056
JW1057
JW1058
JW1059
JL250
JL251
JL252
JL253
R1383
JL254
JW1060
R1384
JL255
JW1061
R1385
JL256
JW1062
R1386
JL257
JW1063
R1387
JL258
R1388
JW1064
R1389
JL259
JW1065
JW1066
JW1067
JW1068
JW1069
R1390
JL260
R1391
R1392
JL262
R1393
E C B E C B
JL263
JW1070
R1394
JL264
JW1071
R1395
JL265
R1396
JL266
R1397
JL267
JW1073
R1398
JL268
JW1074
R1399
JL269
JW1079
Q901
Q902
Q903
JL270
Q904
Q906
JL271
Q905
JL272
JL273
JW1080
JW1081
JW1082
JW1083
JW1084
JW1085
JW1086
JW1087
JW1088
JW1089
JW1090
JW1091
JW1092
JW1094
JW1095
FL901
VACUUM FLUORESCENT DISPLAY
R900
R901
R902
R903
R1400
R904
R1401
R905
R1402
R906
R1403
R907
R1404
R908
R909
R910
R911
R912
R913
R914
R915
R916
R917
R918
R919
NO908
NO908
ZX99i
NO909
R922
CNS928
NO910
NO913
NO913
15
BLK
GRY
GRY
GRY
GRY
JL101
JL102
NO917
JL103
JL104
JL105
JL106
JL107
JL108
CN914
JL109
JL110
R938
R939
JL112
JL113
JL114
C900
JL115
JL116
JL117
C903
JL118
R940
C904
JL119
R941
C905
R942
R944
R945
R946
R947
JL120
R948
JL121
R949
JL122
JL124
C910
JL125
JL126
JL127
JL128
R950
JL129
R951
R952
C916
R953
C917
C918
R954
R955
C919
R956
R957
JL130
R958
JL131
R959
JL132
JL133
JL134
C920
JL135
C921
JL136
C922
JL137
C923
JL138
C924
S900
JL139
C925
S901
C926
S902
C927
S903
C928
C929
JL140
JL141
JL143
C930
JL145
C931
C932
C933
C934
JL149
C935
C936
C937
C938
C939
JL150
JL151
JL152
JL153
JL154
C940
JL155
C941
JL156
C942
JL157
C944
JL159
C945
S921
TUNER/BAND
TUNING
FM MODE
TUNING
MODE
TUNER
MEMORY
AMP
MENU
DISPLAY
SLEEP
ILLUMINATION
TIMER
MENU
EFFECT
ON/OFF
+
–
C946
S922
R983
C947
S923
R984
C948
S924
R985
C949
S925
R986
S926
R987
S927
JL160
R988
S928
R989
C950
JL165
C951
JL166
C952
JL167
C953
JL168
R990
C954
C955
C956
R993
C957
R994
C958
C959
JW905
R997
JL170
R998
E C B E C B
E C B
E C B
JL171
R999
JL173JL174
C960
JL175
C961
JL176
JL177
JL178
JL179
D905
C966
JL180
JL182
JL183
JL186
JL187
JL188
JL189
JR914
JL190
JL191
JL192
JL193
JL194
JL195
IC901
JL196
IC902
JL197
IC903
JL198
C984
JL199
( )
6-12. PRINTED WIRING BOARDS – PANEL Section – • See page 29 for Circuit Boards Location. • : Uses unleaded solder.
Ref. No. Location
• Semiconductor Location
Ref. No. Location
D905 C-5
D920 B-13
IC901 C-6
IC902 D-11
IC903 E-8
Q901 C-9
Q902 C-9
Q903 F-4
Q904 F-5
Q905 F-4
Q906 F-5
(Page 52)
(Page 48)
(Page 38)
(Page 50)
(Page 50)
Page 43
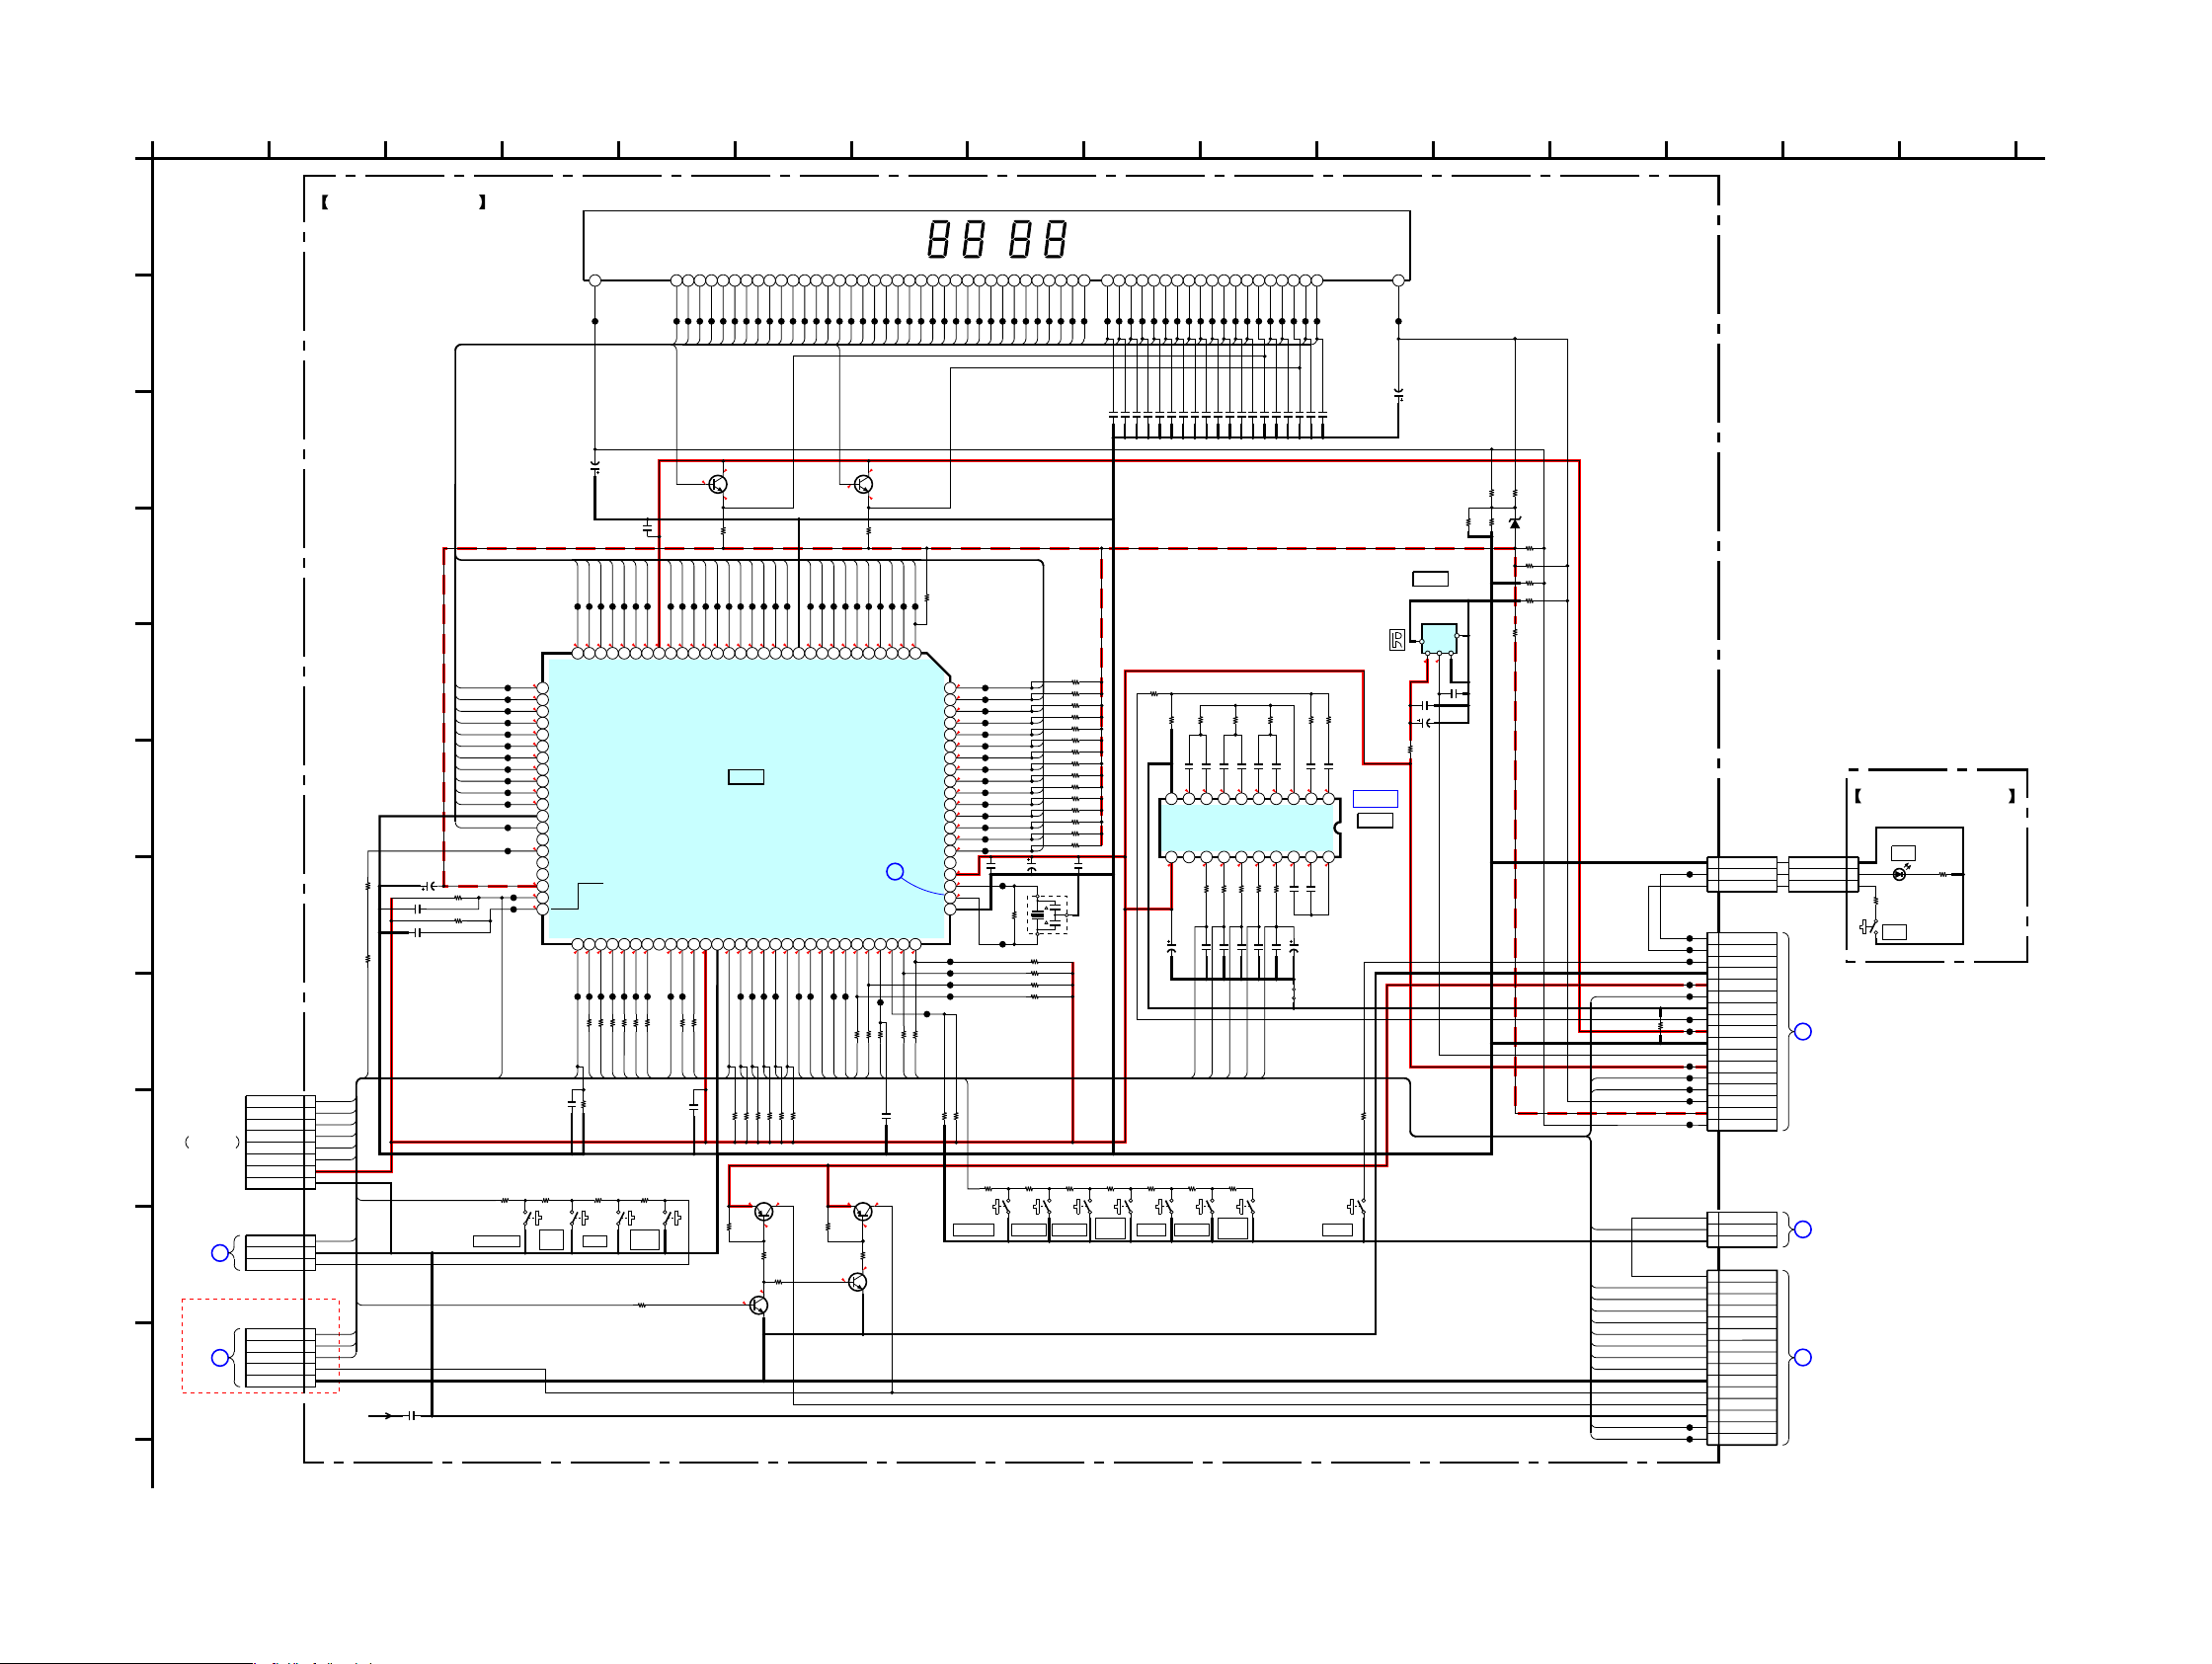
HCD-ZX66i/ZX99i
HCD-ZX66i/ZX99i
4343
H
6
E
71
J
11
B
10 12
I
5
K
4
F
9
A
2 14
D
C
133 8 15
G
16
1
LEFT-BTTN
M
BOARD
NO915
BOARD
CN922
JOG-A
N
IC B/D
MAIN
C
(1/3)
BOARD
CN507
RIGHT-BTTN
O
NO916
BOARD
L
BOARD
VOL
NO924
-31.1
3.3
-28.4
-31.2
-28.3
3.3
-28.6
-28.4
-21.7
-20.9
-21.9
-20.5
-22
3.3
-23.6
-20.4
-28.6
-26.9
-28.6
-18.7
-20.4
-26.9
-25.5
-26.9
-18.8
-25.4
-13.6
-20.4
-18.3
-25
-23.5
-27.4
-27.2
-27.5
-31.1
-31
-31
-31
-31
-31
-31
-31.1
-31.1
-31.1
-31.1
-31.1
-31.1
-31.2
-31.1
-31.1
3.3
1.4
1.2
0
1.9
0.1
000
0
1.7
3.4
3.4
3.3
3.3
3.3
3.3
3.3
3.3
3.3
0.2
0.2
0.100.2
3.3
3.3
3.3
0.6
0.3
0.3
-25.6
-20.4
-21.9
-28.6
-26.9
-23.6
-22.1
-23.8
-19.1
-22.4
-22.3
-9.1
-32.5
3.3
3.3
9.1 9
8.3
0.4
2.2
9.1
8.7
4.6
0.4
4.8
1.6
1.5
1.6
1.5
1.6
1.5
1.5
1.5
1.51.5
1.6
1.5
0.2
0.2
0.2
0.1
0.1
3.3
3.3
3.3
(ZX99i)
(ZX99i)
ZX99i
FLASH
PROGRAMMING
0.1
C916
15k
R905
15k
R906
15k
R907
15k
R908
15k
R909
15k
R910
10kR912
10kR914
100R915
R1351 1k
0.01
C910
100R904
100R903
10k
R902
0.1
C905
0.1C903
0.1C904
470
R959
1.5k
R956
680
R9581kR957
1k
R998
1k
R994
2SB1132-T100-QR
Q904
LED POWER CONTROL
470
R997
470
R993
2SB1132-T100-QR
Q906
LED POWER CONTROL
20 19 18 17 16
15 14 13 12 11
10987654321
NJM2760V-TE2
IC903
BAND-PASS FILTER
IN1
IN2
BUF1OUT
BPF2IN1
BPF2IN2
BPF3IN1
BPF3IN2
BPF4IN1
BPF4IN2
GND
VCCNCBPF1OUT
BPF2OUT
BPF3OUT
BPF4OUT
RECOUT
BPF1IN2
BPF1IN1
BUF2OUT
1M
R922
0.01
C917
1.5k
R987
680
R9841kR985
3.3k
R989
1.5k
R986
2.2k
R988
470
R983
470
R990
22k
R1350
100
R941
100
R942
MM3Z5V1ST1
D905
22k
R940
JW905
1000p
C921
10V
47
C920
0.01
C923
100k
R939
100k
R938
4MHz
X602
56k
R945
100k
R946
1k
R947
6.8k
R948
1k
R9491kR950
5.6k
R951
1k
R9521kR953
10k
R954
0
R999
10k
R955
1
C945
470p
C946
1
C947
470p
C948
1C949
4700p
C950
1C951
4700p
C952
1C953
0.022
C954
1C955
0.022
C956
1C957
0.047
C958
0.047
C959
50V
1
C960
50V
4.7
C961
10kR919
1kR918
10kR917
1kR916
0.1
C966
100
R1354
R1352 4.7k
100R913
100R911
2SC3052EF-T1-LEF
Q903
LED POWER CONTROL
2SC3052EF-T1-LEF
Q905
LED POWER CONTROL
2SC3052EF-T1-LEF
Q901
GRID DRIVER
2SC3052EF-T1-LEF
Q902
GRID DRIVER
S922 S926S925S923S921 S927S924 S928
S901S902S903 S900
0.01
C919
100V
C984
470p
22k
R1386
22k
R1387
1
2
3
3P
NO909
KEY5
DGND
KEY0
1
2
3
3P
NO910
DGND
LED STBY
KEY POWER
1
2
3
4
5
6
7
8
9
10
11
12
13
14
15
16
17
17P
CN914
LED STBY
KEY POWER
DISPLAY
LED GND
LED+9V
GC RESET
AGND
SPEANA
D+3.3V
DGND
SIRCS
EVER+3.3V
I2C DATA
I2C CLK
VF(1)
-VG
VF(2)
0
R1383
1
2
3
4
5
6
7
8
8P
CNS928
MD0
MD2
INT0
INT1
SI0
SO0
VCC-CPU
GC DGND
50V
4.7
C900
W800
100
R944
1kR1308
1kR1329
1k
R1377
1k
R1378
1kR1322
1kR1315
1kR1301
4.7k
R1384
4.7k
R1385
1kR1388
JL101
JL102
JL103
JL104
JL105
JL106
JL107
JL108
JL109
JL110
JL112
JL113
JL114
JL115
JL116
JL117
JL118
JL119
JL120
JL121
JL122
JL124
JL125
JL126
JL127
JL128
JL129
JL130
JL132
JL134
JL136
JL138
JL140
JL143
JL145
JL149
JL150
JL151
JL152
JL153
JL154
JL155
JL156
JL157
JL159
JL160
JL165
JL166
JL167
JL168
JL170
JL171
JL173
JL174
JL175
JL176
JL177
JL178
JL179
JL180
JL182
JL183
JL186
JL187
JL188
JL189
JL190
JL191
JL192
JL193
JL194
JL195
JL196
JL197
JL198
JL199
JL200JL131
JL133
JL135
JL139
JL141
JL137
JL201
JL202
JL203
JL204
JL205
JL206
JL207
JL208
JL209
JL210
JL211
JL212
JL213
JL214
JL215
JL216
JL217
JL218
JL219
JL220
JL221
JL222
JL223
JL224
JL225
JL226
JL227
JL228
JL229
JL230
JL231
JL232
JL233
JL234
JL235
JL236
JL237
JL238
JL239
JL240
JL241
JL242
JL243
JL244
JL245
JL246
JL247
JL248
JL249
JL250
JL251
JL252
JL253
JL254
JL255
JL256
JL257
JL258
JL259
JL260
JL262
JL263
JL264
JL265
JL266
JL267
JL268
JL269
JL270
JL271
JL272
JL273
R1389 10k
R1390 10k
R1391 10k
R1392 10k
R1393 10k
R1394 10k
R1395 10k
R1396 10k
R1397 10k
R1398 10k
R1399 10k
R1400 10k
R1401 10k
R1402 10k
R1403 10k
R1404
10k
1k
R851
10kR900
10kR901
FL901
VACUUM FLUORESCENT DISPLAY
1
2
3
3P
NO917
KEY RIGHT_BTTN
KEY4
DGND
1
2
3
4
5
6
7
8
9
10
11
12
13
14
15
15P
NO913
VOL B
VOL A
GC DGND
LED A
LED B
LED GND
VOL 11 LED
VOL 9, 10 LED
VOL 7, 8 LED
VOL 5, 6 LED
VOL 3, 4 LED
VOL 1, 2 LED
KEY2
KEY3
KEY RIGHT_BTTN
1
2
3
4
5
5P
NO908
SPK MODE LED
JOG A
JOG B
LED B
LED GND
50V
10
C944
50V
10
C922
4V470
C918
100V100pC924
100V100pC939
100V100pC931
100V100pC929
100V100pC928
100V100pC934
100V100pC936
100V100pC937
100V100pC940
100V100pC938
100V100pC925
100V100pC927
100V100pC935
100V100pC926
100V100pC930
100V100pC933
100V100pC942
100V100pC932
100V100pC941
0JR914
123456789 10111213141516171819202122
23 24 25 26 27 28 29 30
31
32
33
34
35
36
37
38
39
40
41
42
43
44
45
46
47
48
49
50
5152535455565758
59606162636465666768697071727374757677787980
81
82
83
84
85
86
87
88
89
90
91
92
93
94
95
96
97
98
99
100
IC901
VACUUM FLUORESCENT DISPLAY DRIVER,KEY CONTROL
MB90M407PF-G-146E1
G4G3G2
G1
SEG-1
SEG-2
SEG-3
SEG-4
SEG-5
SEG-6
VSS-IO
SEG-7
SEG-8
SEG-9
SEG-10
SEG-11
SEG-12
SEG-13
SEG-14
SEG-15
SEG-16
SEG-17
VDD-FIP
SEG-18
SEG-19
SEG-20
SEG-21
SEG-22
SEG-23
SEG-24
SEG-25
SEG-26
SEG-27
SEG-28
SEG-29
SEG-30
SEG-31
SEG-32
SEG-33
SEG-34
SEG-35
VSS-IO
SEG-36
NC
SPK MODE LED
CD LED
GAME LED
VKK
MD0
MD1/VDD-VFT
MD2
VOL 1, 2
VOL 3, 4
VOL 5, 6
VOL 7, 8
VOL 9, 10
VOL 11 LEDNCLED SELECTOR
I2C DATA
I2C CLOCK
AVCC
AVSS
KEY0
KEY1
KEY2
KEY3
KEY4
KEY5
BPF1-F01
BPF1-F02
BPF2-F03
BPF3-F04
ALL BAND
JOG A
JOG B
RESET
SOFT TEST
VOL B
VOL A
VSS-CPU
X OUT
X IN
VCC-CPU
NO USE
G19
G18
G17
G16
G15
G14
G13
G12
G11
G10
G9
G8
G7
G6
G5
VCC
OUT
GND
IC902
REMOTE CONTROL SIGNAL RECEIVER
NJL24H400A
S929
SLR-325VCT31
D920
100
R1341
330
R1338
1
2
3
3P
NO912
DGND
LED STBY
KEY POWER
2345678
9
10
1213141516171819202122
24252627282930
41
43
40
39
38
37
36
35
34
33
32
70
7173747576
77
60
61
59
65
43414039383736353433323130
29282726252422212019181716151413121098765
79
80
52
53
54
55
91
88
57
31
86
87
88
89
90
91
92
93
94
95
96
97
98
99
100
1
45
72
56
74
70
71
72
73
432
1
100
99
98
979695949392908987
86
51
64
6566676869
75
45
69
59
64
56
54
53
52
51
49
76
67
66
52
53
54
55
56
57
80
79
60
61
68
77
49
IC901
IC903
IC902
PANEL COM BOARD
1 8 9 10111213141516171819202122232425262728293031323334353637383940414243 5445 5046 5247 5148 6353 6157 6249 595855 6056 70
ILLUMINATION
TIMER
MENU
SLEEP
ON/OFF
EFFECT
TUNER/BAND TUNING – TUNING +
MODE
TUNING
FM MODE AMP MENU
MEMORY
TUNER
DISPLAY
312
POWER SW BOARD
6-13. SCHEMATIC DIAGRAM – PANEL Section – • See page 30 for Waveforms. • See page 62 for IC Block Diagrams. • See page 70 for IC Pin Function Descriptions.
(Page 49)
(Page 53)
(Page 39)
(Page 51)
(Page
51)
Page 44
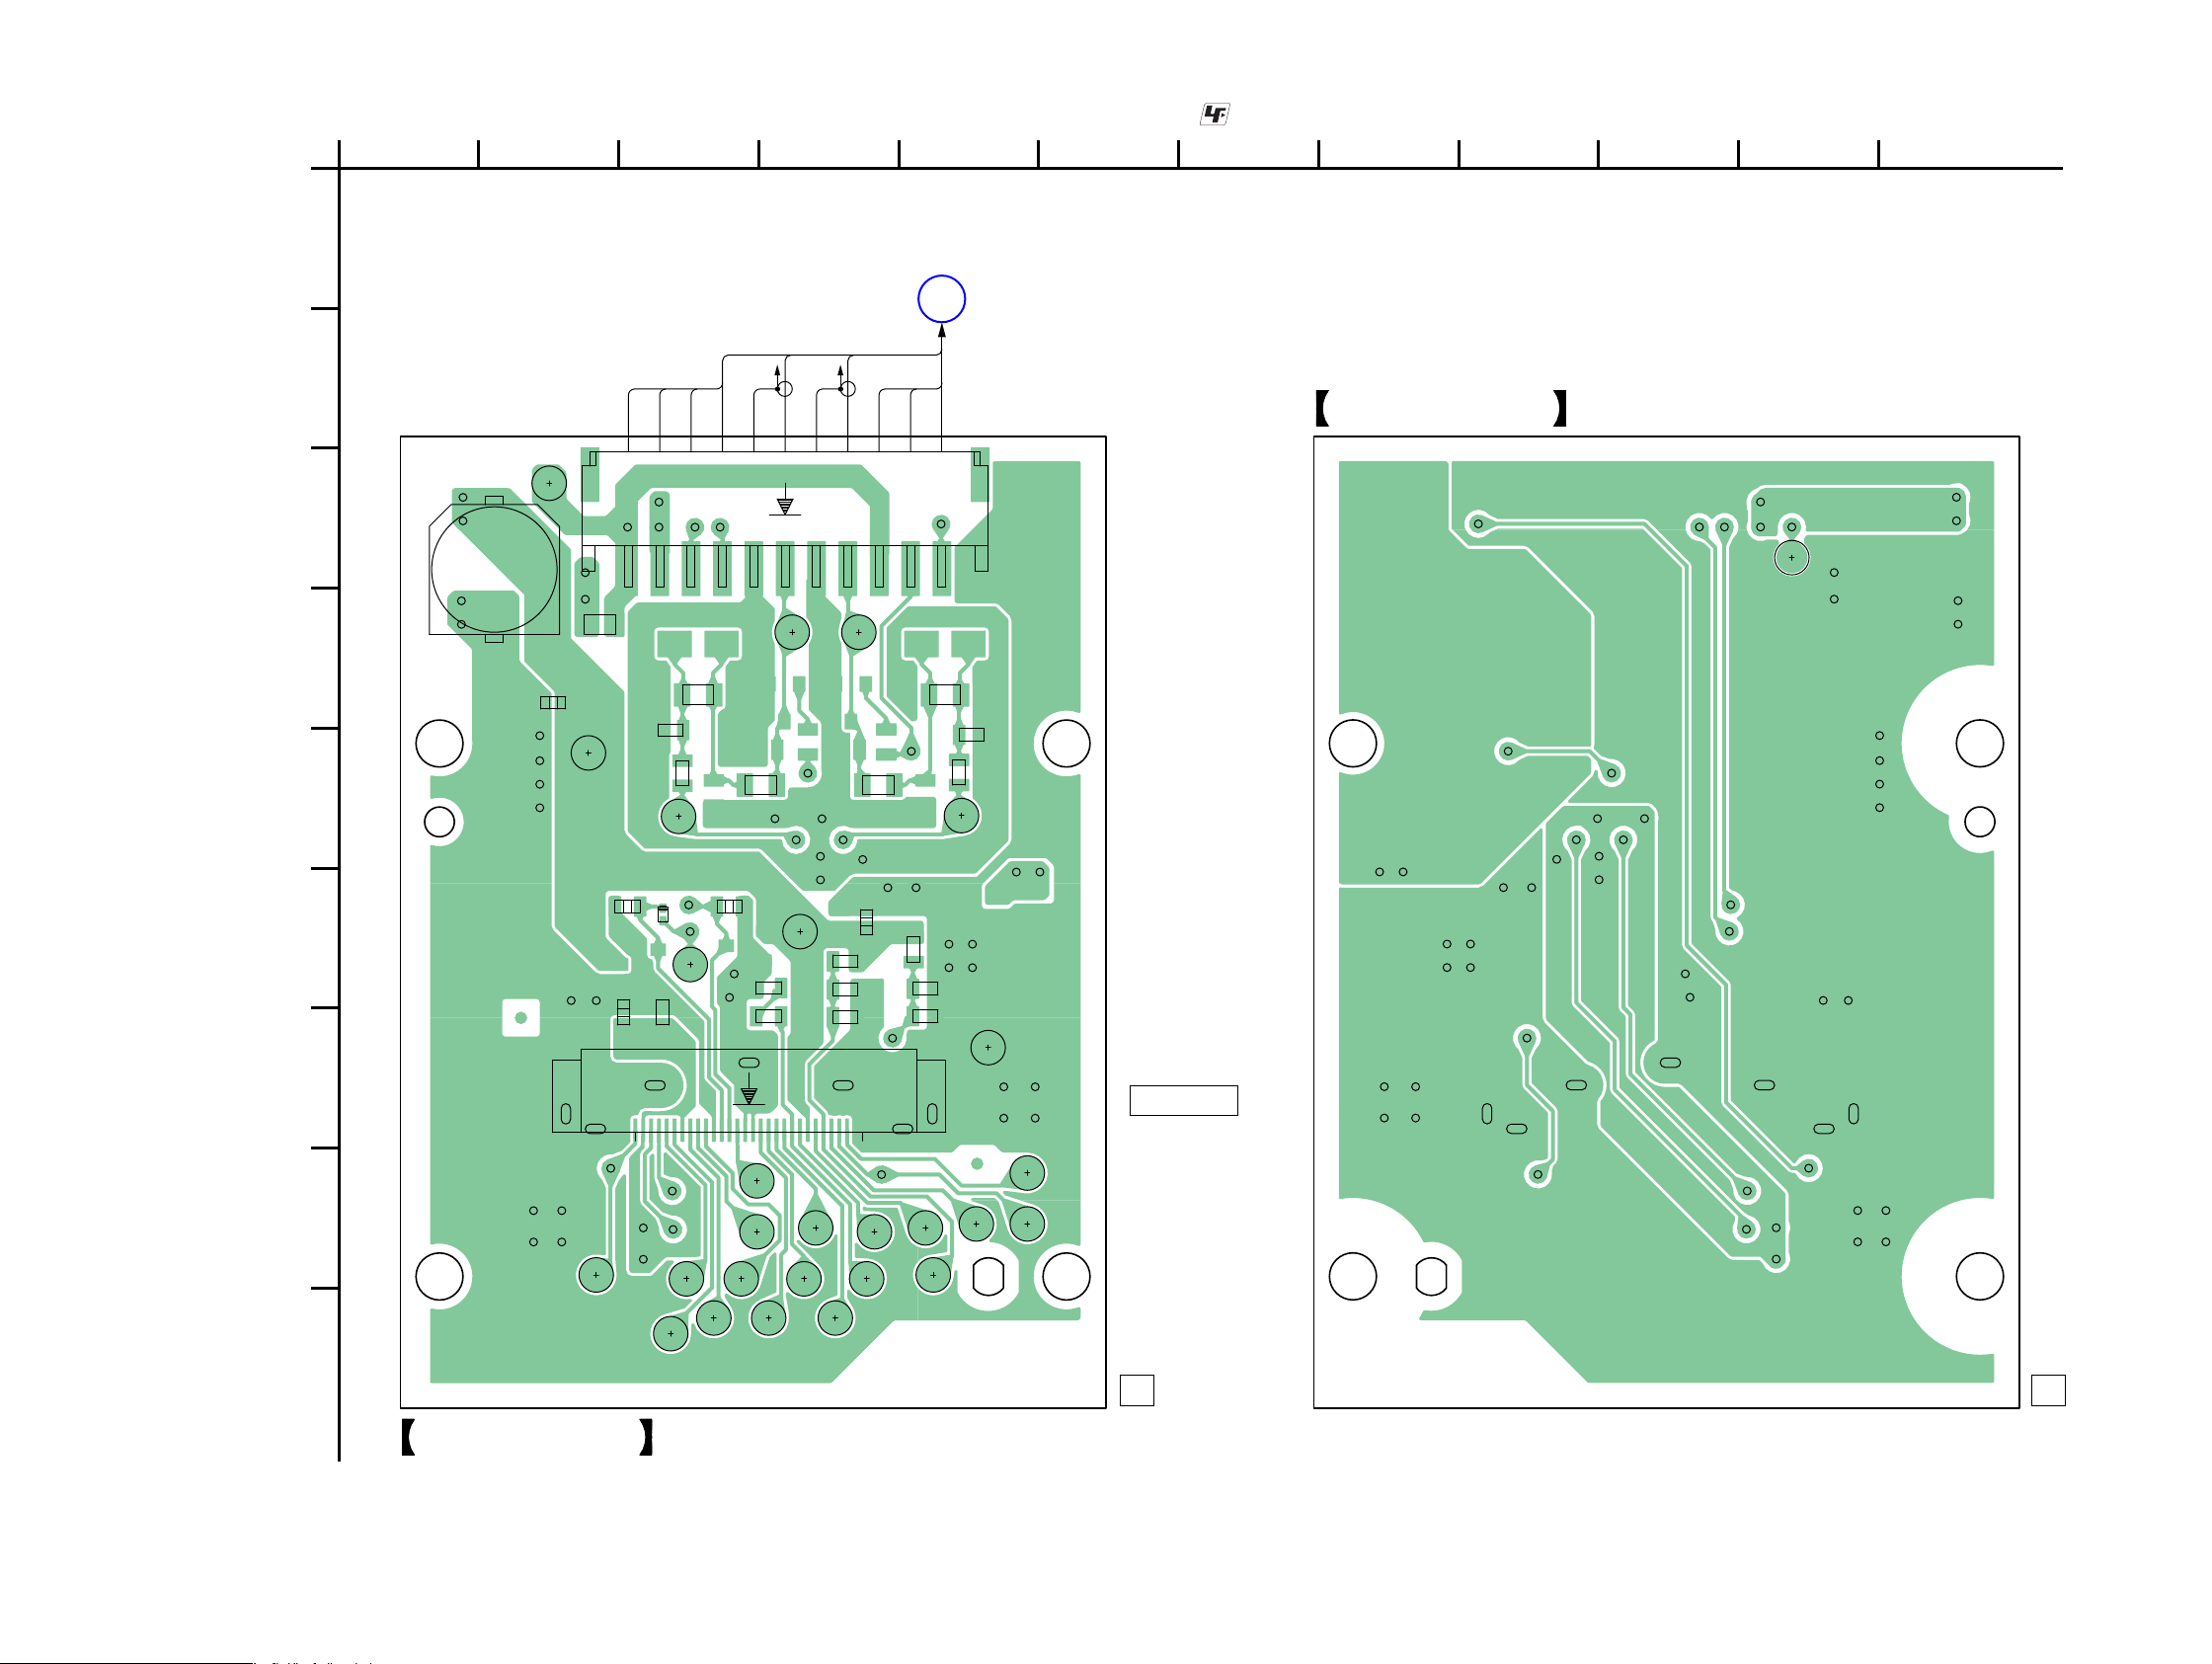
HCD-ZX66i/ZX99i
HCD-ZX66i/ZX99i
4444
1
A
B
C
D
E
F
G
H
I
23456789101112
1-878-548-
11
1-878-548-
11
D
MAIN BOARD
CN501
1
11 1
30
R1500
R1503
Dock for iPod
R1505
R1506
CN1550
CN1550
CN1551
C1551
C1553
C1554 C1555
C1556
C1557
D1553
R1550
R1553
BLK
GRY
BLK
WHT
BLK
WHT
GRY
GRY
GRY
GRY
GRY
R1555
R1556
R1557
R1558
R1563
R1571
R1590
R1591
R1592
R1593
R1594
R1595
TP1501
TP1550
TP1552
TP1553
TP1554
TP1555
TP1556
TP1557
TP1558
TP1559
TP1560
TP1561
TP1562
TP1563
TP1564
TP1565
TP1566
TP1567
TP1568
TP1569 TP1570
TP1571
TP1572
TP1573TP1574
TP1575
TP1576
TP1577
IPOD BOARD (SIDE A)
IPOD BOARD (SIDE B)
6-14. PRINTED WIRING BOARD – IPOD Section – • See page 29 for Circuit Boards Location. • : Uses unleaded solder.
(Page 38)
Page 45
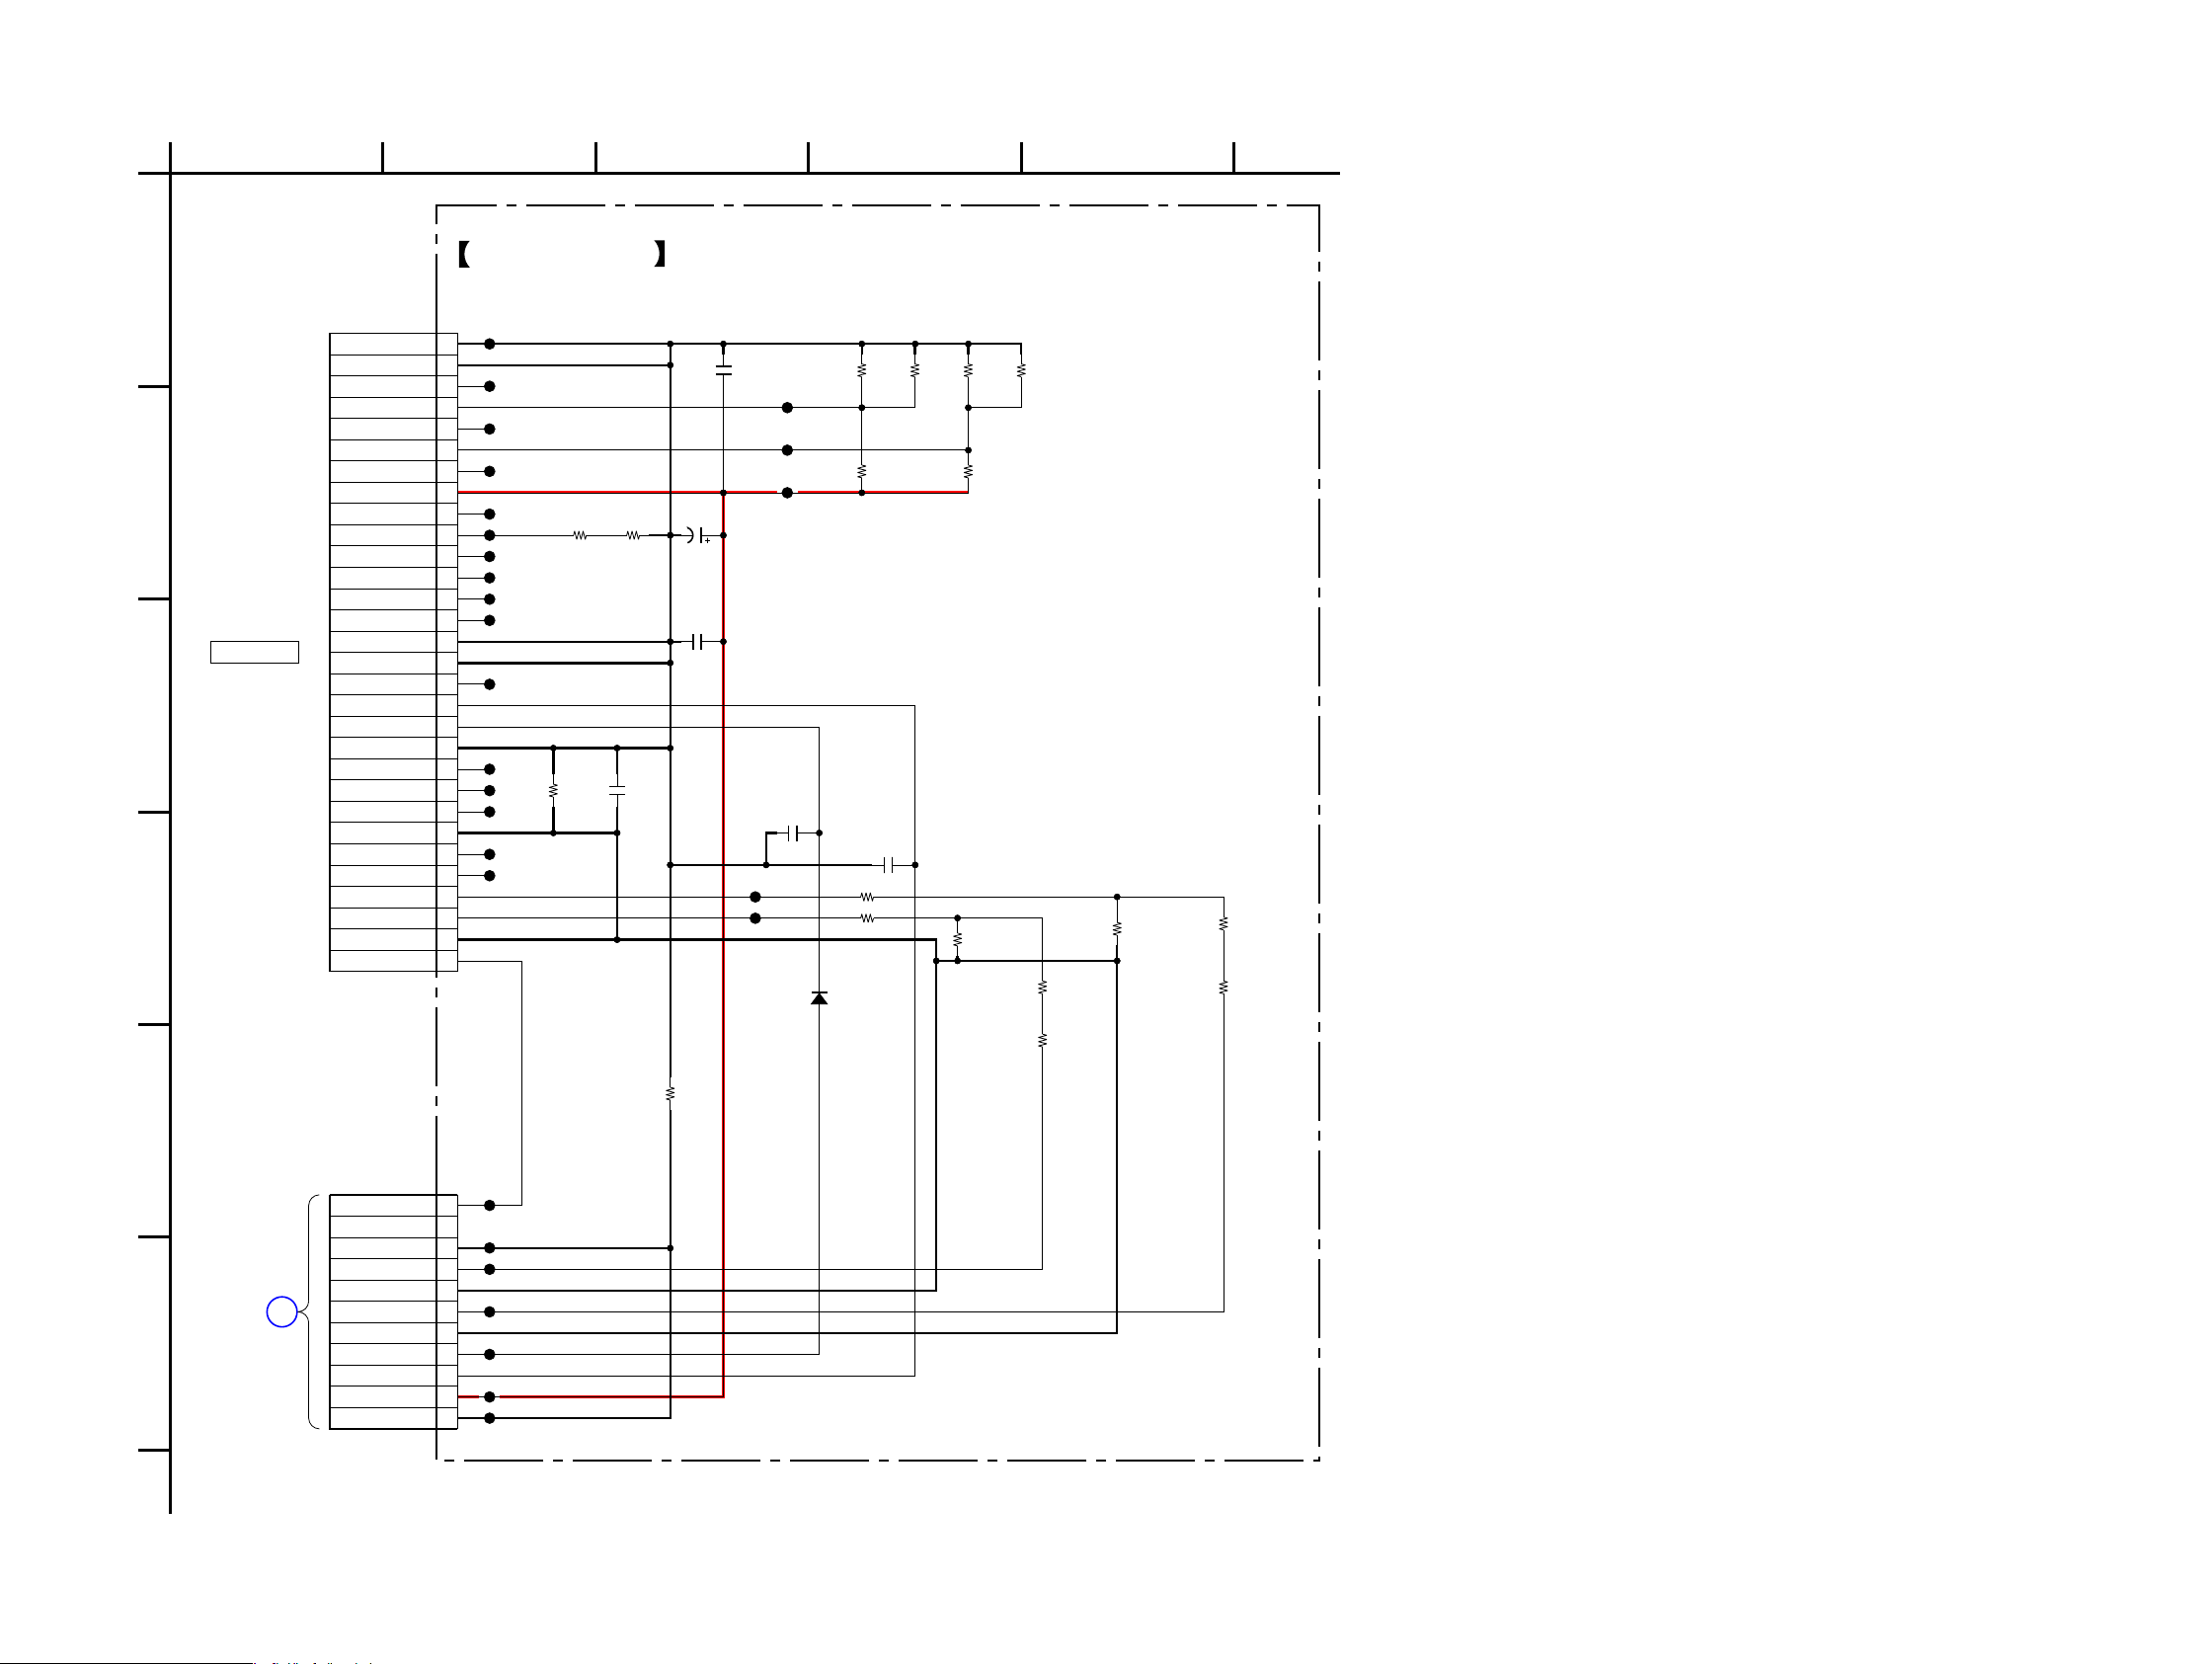
HCD-ZX66i/ZX99i
HCD-ZX66i/ZX99i
4545
3
D
2
A
E
C
B
451
F
D
BOARD
(2/3)
CN501
MAIN
TP1550
0.5%75k
R1594
TP1563
0.5%
100k
R1593
1
2
3
4
5
6
7
8
9
10
11
12
13
14
15
16
17
18
19
20
21
22
23
24
25
26
27
28
29
30
30P
CN1550
DGND
DGND
TPA+
USB D+
TPA-
USB D-
TPB+
VBUS
TPB-
ACC ID
PWR+
PWR+
ACC PWR
RESERVED
DGND
DGND
RESERVED
RXD
TXD
ACC DET
S-VIDEO-Y
S-VIDEO-C
VIDEO-OUT
REMOTE SENSE
LINE-IN-L
LINE-IN-R
LINE-OUT-L
LINE-OUT-R
A-GND
DGND
TP1577
TP1560
TP1574
0.1
C1557
0.5%
220k
R1556
TP1555
TP1501
R1571
0
TP1565
TP1552
RB521CS-30T2R
D1553
100R1500
TP1570
0.5%
75k
R1595
TP1558
TP1561
0
R1555
TP1567
100
R1558
0
R1506
TP1554
0
R1563
0.5%
100k
R1590
0
R1505
TP1573
TP1559
C1554
22p
0.5%
330k
R1557
TP1572
TP1562
0.1
C1553
C1551
0.1
1
2
3
4
5
6
7
8
9
10
11
11
P
CN1551
IPOD DET
IPOD MUTE
SHIELD
R+
R-
L+
L-
RXD
TXD
VBUS
DGND
TP1575
TP1553
0.5%
100k
R1591
TP1569
TP1576
TP1566
C1555
22p
100k
R1503
100k
R1553
TP1556
TP1564
TP1571
0.5%
100k
R1592
TP1557
TP1568
100R1550
6.3V
470
C1556
IPOD BOARD
Dock for iPod
6-15. SCHEMATIC DIAGRAM – IPOD Section –
(Page 40)
Page 46
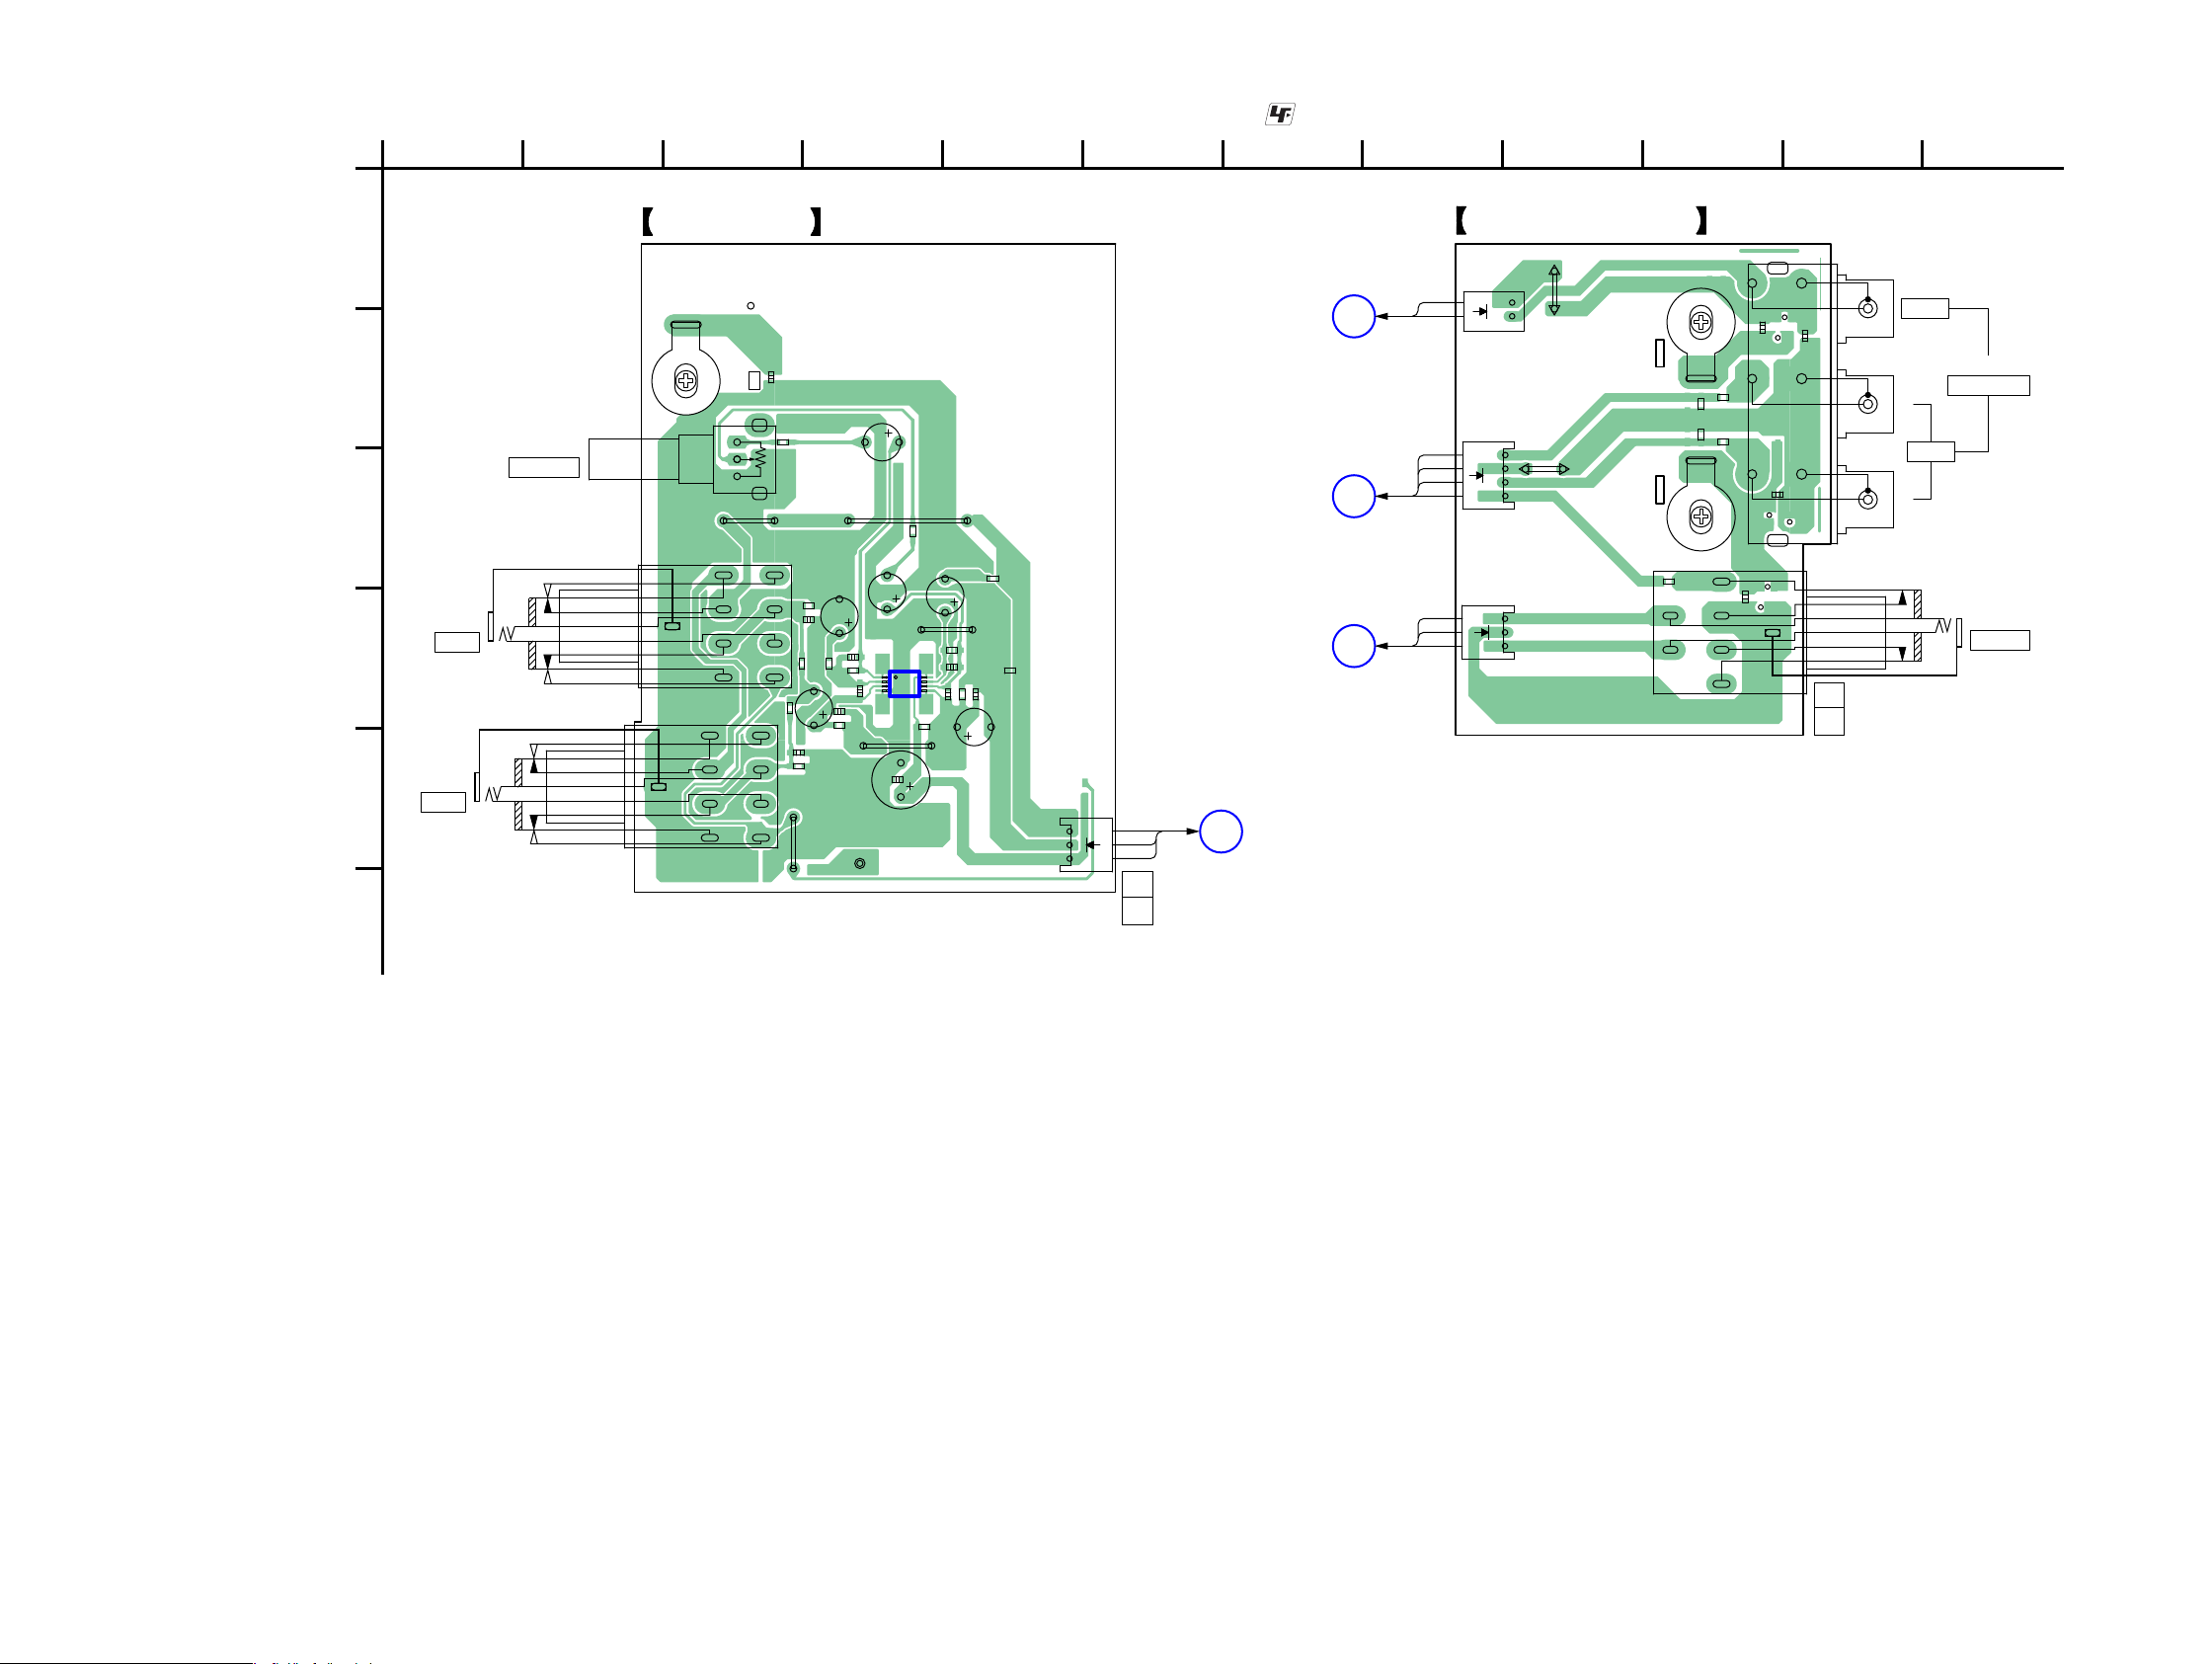
HCD-ZX66i/ZX99i
HCD-ZX66i/ZX99i
4646
1
A
B
C
D
E
F
23456789101112
1-878-467-
11
(11)
1-878-479-
11
(11)
E
MAIN
BOARD
NO512
F
MAIN
BOARD
NO510
P
POWER AMP
BOARD
NO609
G
MAIN
BOARD
NO510
MIC BOARD
GAME HP BOARD
13
14
5
8
W802
R801
R802
R803
R804
R805
R806
R807
R808
R809
R810
R811
R812
R813
R814
C800
C801
C802
C804
C808
C806
C807
C805
C809
C810
C811
C812
C813
C814
C815
C817
C818
JW820
ET801
RV801
MIC LEVEL
J580
GAME INPUT
-1
VIDEO
-2
L
AUDIO
-3
R
J851
PHONES
J802
MIC 2
J801
MIC 1
JW821
JW822
JW823
JW828
IC850
CN920
RV801
14
21
13
CN801
GRY
GRY
GRY
RED
GRY
GRY
RED
GRY
GRY
RED
GRY
BLK
CN802
CN803
R826
R827R828
R829
R830
C841
C842
C843
C844
JW810
JW811
ET803ET804
6-16. PRINTED WIRING BOARDS – JACK Section – • See page 29 for Circuit Boards Location. • : Uses unleaded solder.
(Page 56)
(Page 38)
(Page 38)
(Page 38)
Page 47
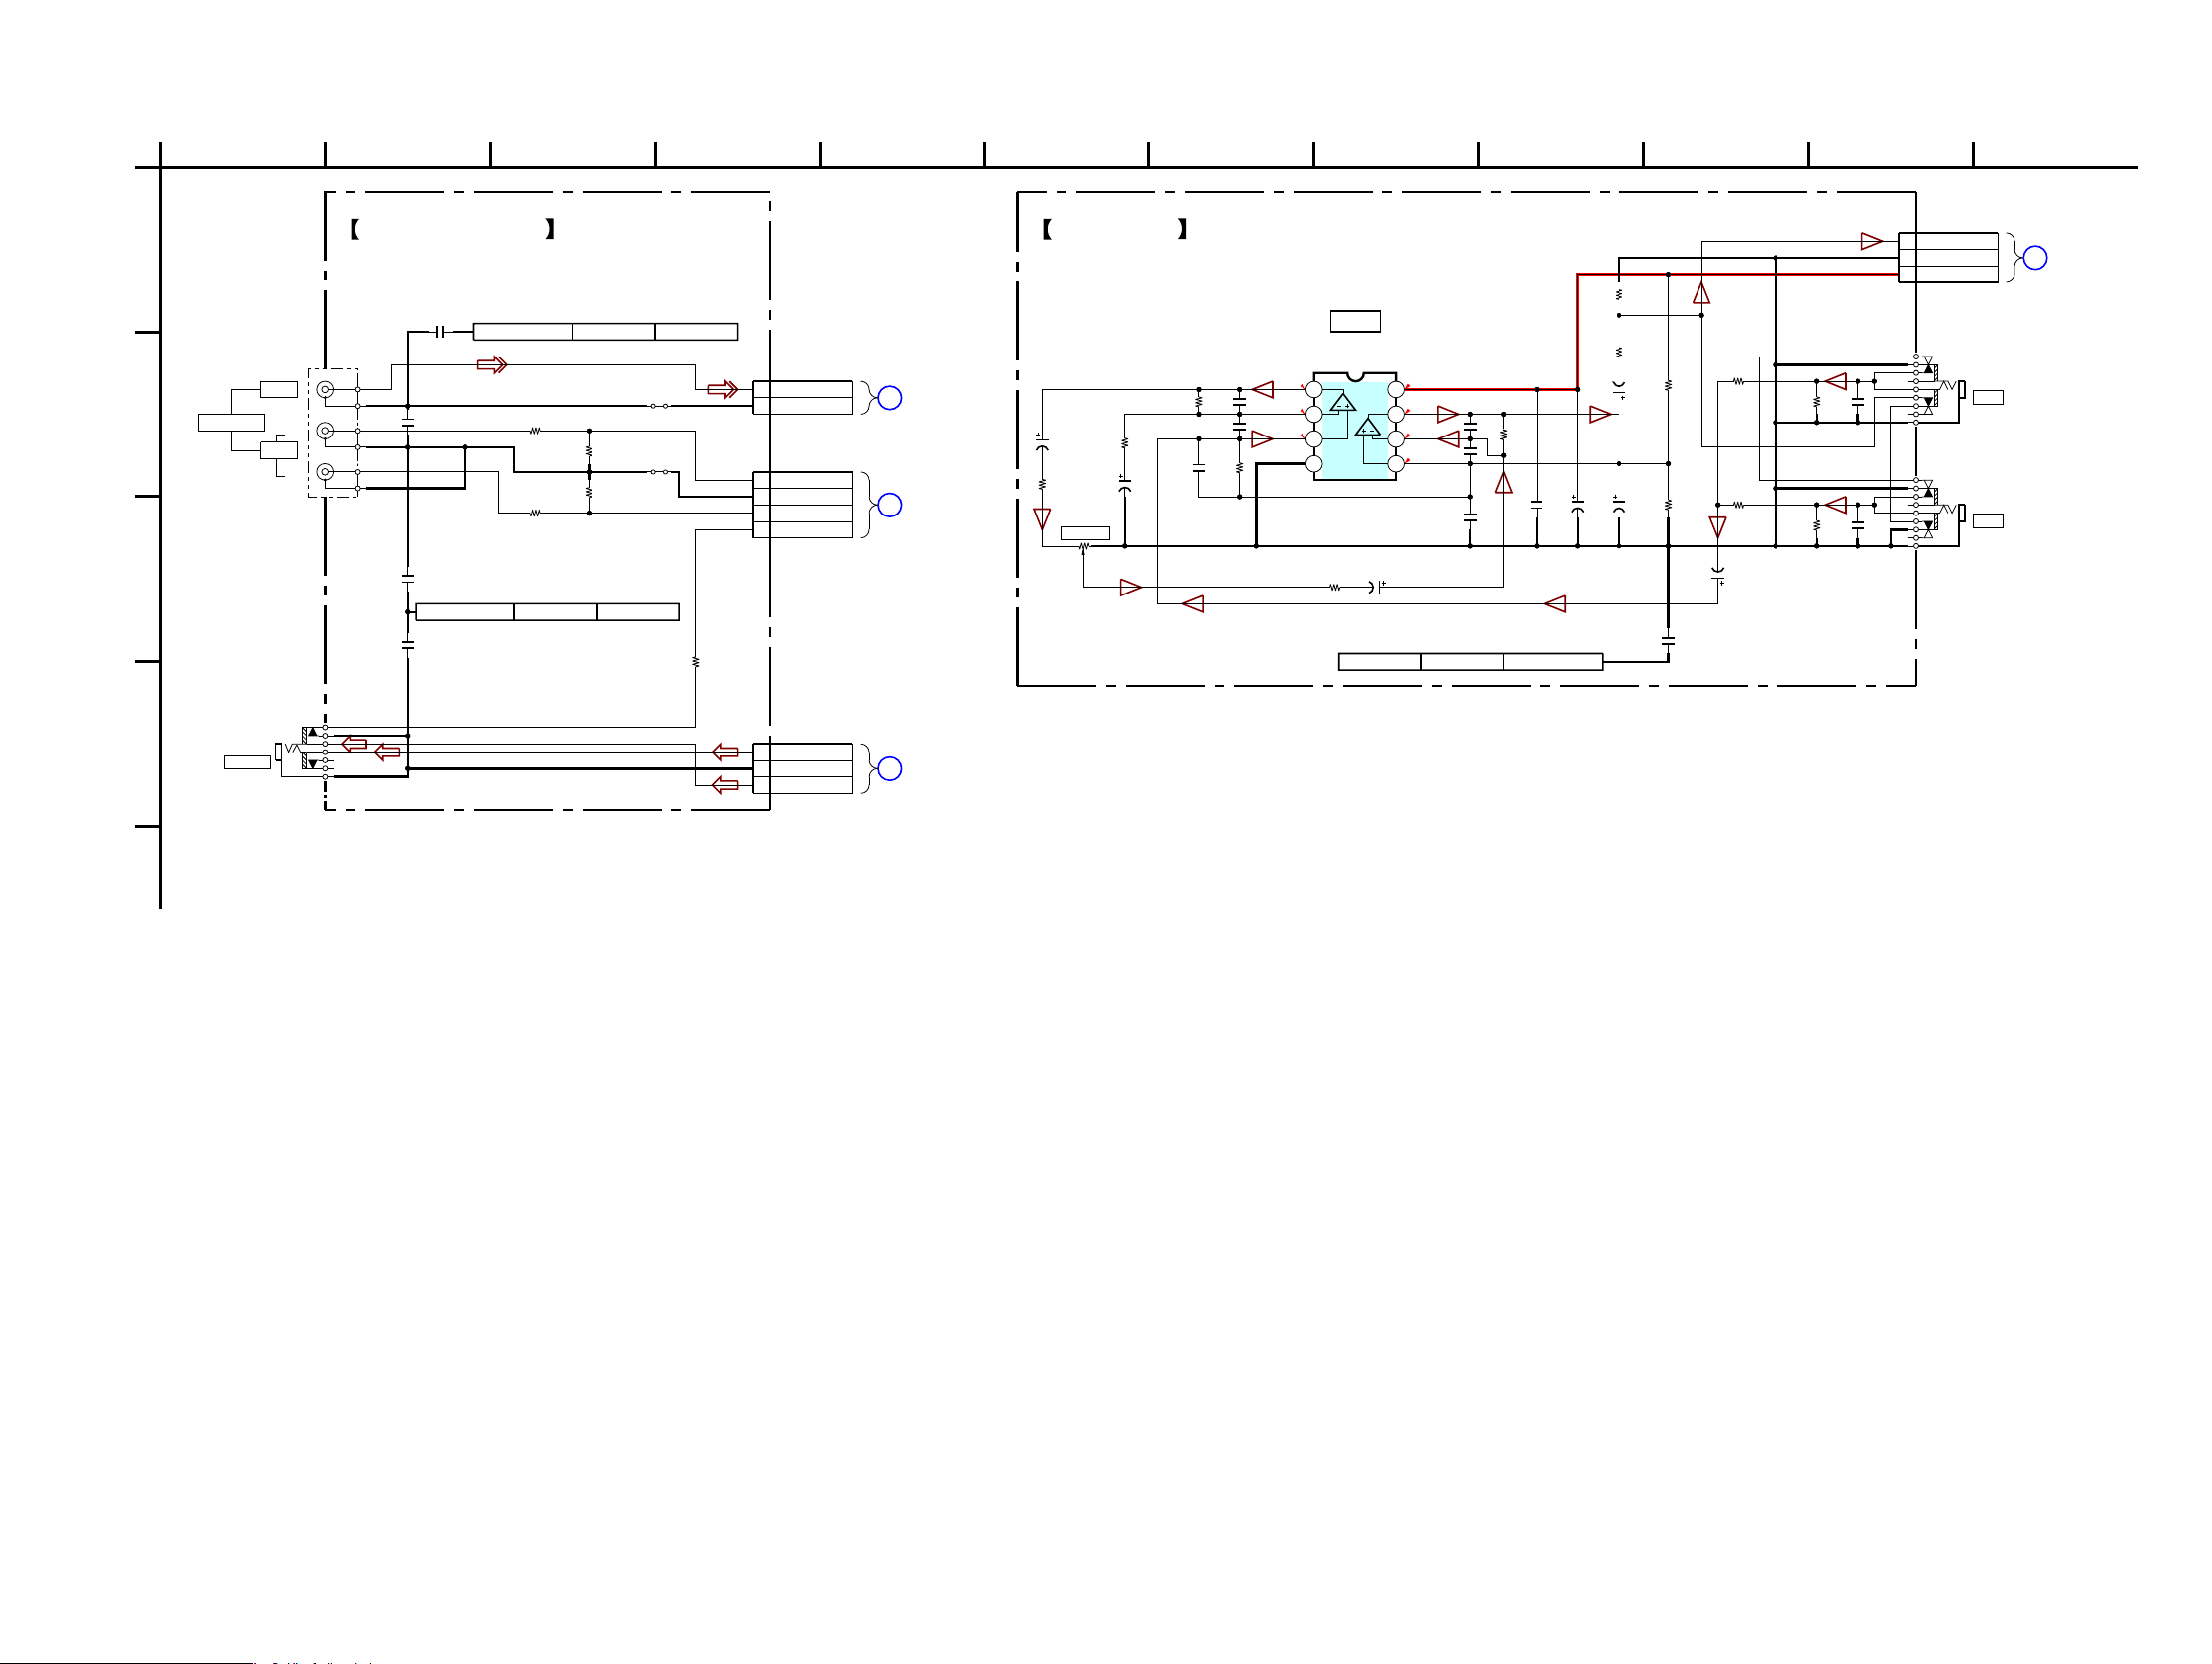
HCD-ZX66i/ZX99i
HCD-ZX66i/ZX99i
4747
114 935 1221
B
A
C
710
D
86
MAIN
(2/3)
G
BOARD
NO510
NO512
E
BOARD
(2/3)
MAIN
F
MAIN
NO510
BOARD
(2/3)
NO609
P
BOARD
POWER AMP
9
4.5
4.5
4.5
4.5
4.5
4.5
10k
R814
J801
J802
1k
R813
50V
2.2
C814
1000p
C813
10k
R811
1k
R812
100k
R810
47p
C811
50k
RV801
47k
R808
1k
R809
50V
1
C812
47p
C806
50V
2.2
C802
150p
C804
50V
2.2
C807
50V
2.2
C809
470p
C810
C818
0.1
0.1
C808
680
R807
10k
R806
100
R804
100k
R801
10k
R802
C800
0.1
10k
R803
8765
4321
NJM4558V-TE2
IC850
MIC AMP
25V
220
C805
150k
R805
1000p
C817
1000p
C815
50V
10
C801
Mount Mecha487053931 ET801
J851
J580
3P
C841
0.1
1
2
3
4
4P
CN801
HP DETECT
GAME-R
AGND
GAME-L
JW811
220k
R827
220k
R828
C843
0.1
C842
0.1
1
2
2P
CN802
(V) SIGNAL
VGND
1k
R829
1k
R830
0.1
C844
100
R826
JW810
1
2
3
3P
CN803
HP-L
GND
HP-R
1
2
3
3P
CN920
MIC-OUT
MIC-GND
A+9V
Mount Mecha 487053931ET803
Mount Mecha 487053931ET804
IC850
MIC BOARD
GAME HP BOARD
MIC 1
MIC 2
VCC
VSS
MIC LEVEL
R
L
AUDIO
GAME INPUT
VIDEO
-1
-2
-3
PHONES
6-17. SCHEMATIC DIAGRAM – JACK Section –
(Page 57)
(Page 40)
(Page 40)
(Page 40)
Page 48
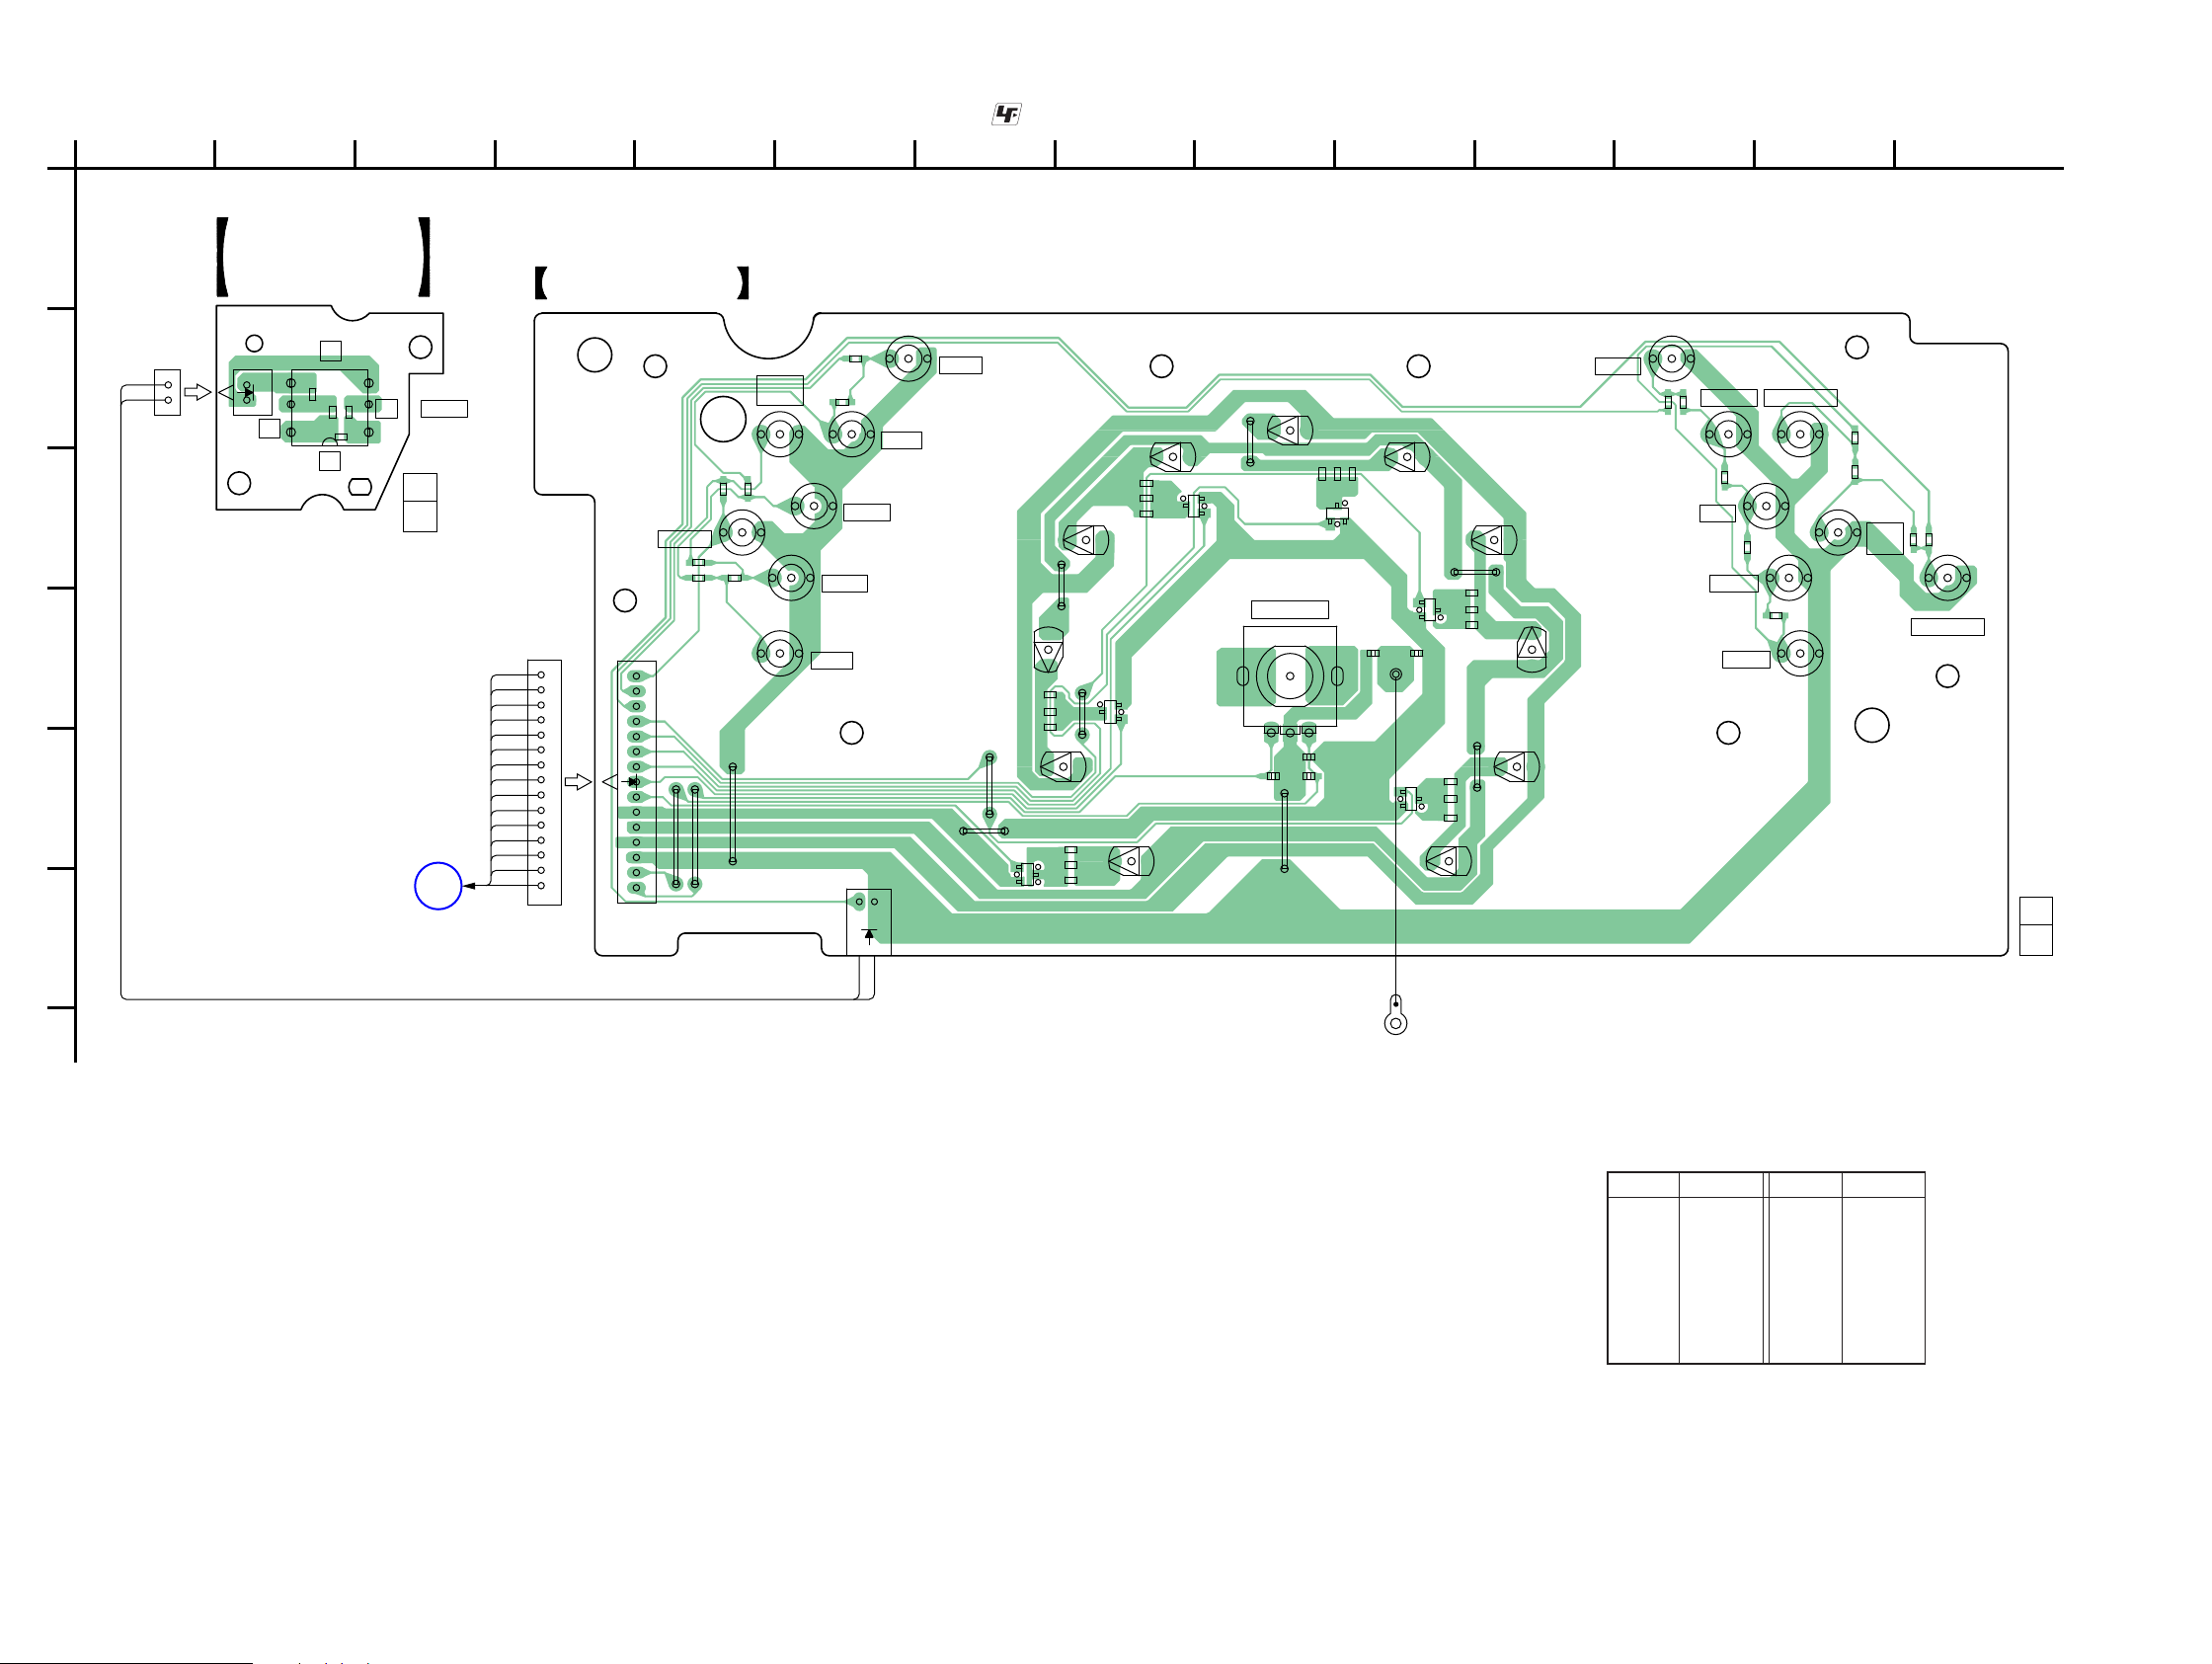
HCD-ZX66i/ZX99i
HCD-ZX66i/ZX99i
4848
1
A
B
C
D
E
F
234567891011121314
1-878-470-
11
(11)
1-878-477-
11
(11)
VOL BOARD
CURSOR MT
BOARD
L
PANEL COM
BOARD
NO913
15
1
NO924
GRY
GRY
GRY
BLK
GRY
GRY
GRY
GRY
BLK
GRY
GRY
GRY
GRY
BLK
GRY
12
NO929
NO929
R979
R980
R981
R982
S970
S970
ENTER
RETURN
ROCK
SALSA
REGGAE
POP
USER
EQ
SAMBA
TANGO
SURROUND
X-GROOVE
JAZZ
DANCE
MOVIE
GAME
TOOL
MENU
(CURSOR)
PUSH
ENTER
( )
115
21
BCE
ECB
ECB
BCE
BCE
S980
W801
R1300
R1302
R1303
R1306
R1309
R1310
R1313
R1316
R1317
R1320
R1323
R1324
R1327
R1330
R1331
R1335
R1336
R1337
Q911
(CHASSIS)
Q912
Q913
Q914
Q915
Q916
NO924
CN928
R960
R961
R962 R963
R964
S904
R965
S905
R966
S906
R967
S907
R968
S908
R969
S909
R970
S910
R971
S911
R972
R973
S913
VOLUME +/–
R974
S914
R975
S915
S916
S917
S918
S919
JW700
ECB
JW701
JW702
BLK
JW703
JW704
JW705
JW706
JW707
JW708
JW709
JW710
GRY
BLK
GRY
2
1
BLK
C967
C968
D908
C969
D909
D910
C971
D911
C972
D912
D907–917
(VOLUME ILLUMINATION)
D913
(2)
312
(3)
(4)
(5)
(6)
(7)
(8)
(9)
(10)
D914
D915
D916
(11)
D917
(1)
D907
C
#
W
7
6-18. PRINTED WIRING BOARDS – VOLUME Section – • See page 29 for Circuit Boards Location. • : Uses unleaded solder.
Ref. No. Location
• Semiconductor Location
Ref. No. Location
D907 E-10
D908 E-11
D909 D-11
D910 C-11
D911 C-10
D912 B-9
D913 C-8
D914 C-8
D915 D-7
D916 E-8
D917 E-8
Q911 E-10
Q912 D-10
Q913 C-10
Q914 C-8
Q915 D-8
Q916 F-7
(Page 42)
Page 49
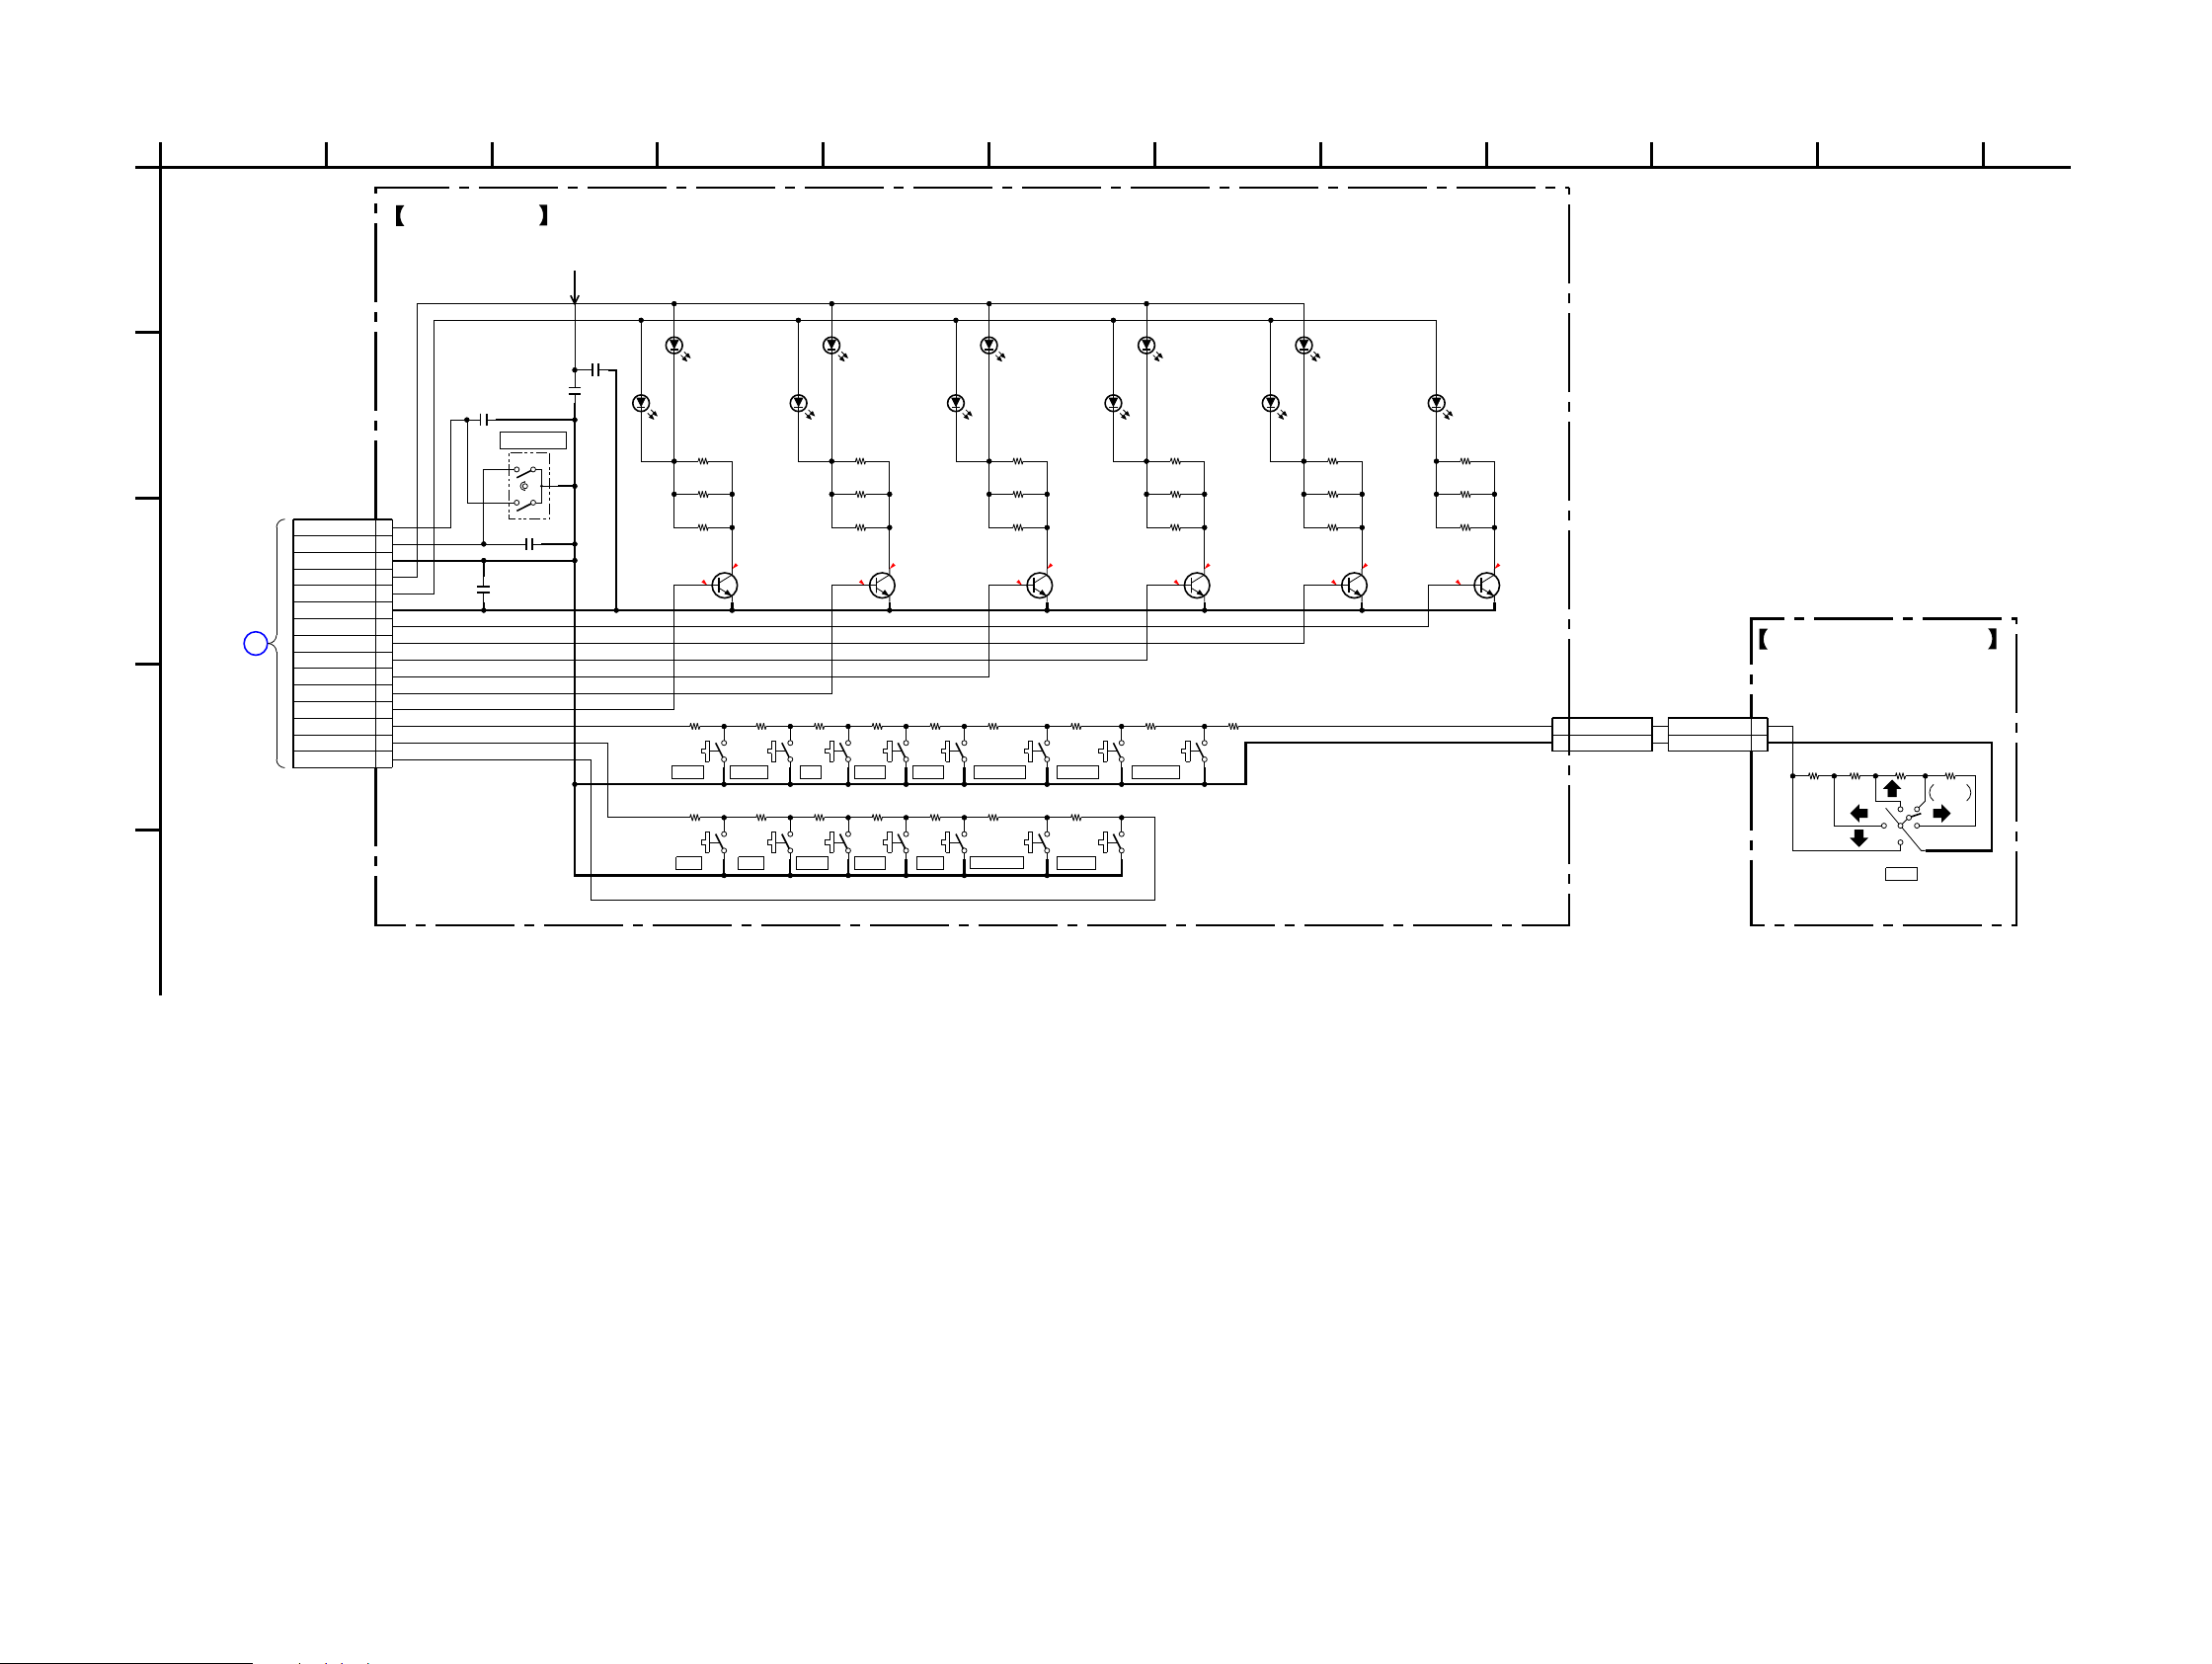
HCD-ZX66i/ZX99i
HCD-ZX66i/ZX99i
4949
6-19. SCHEMATIC DIAGRAM – VOLUME Section –
63
D
2 10
A
978
E
C
B
451 11
L
PANEL COM
NO913
BOARD
3.5
0.5
7.3
00
7.5
0
7.5
0
7.5
0
3.8
0.1
C967
0.1C968
0.1
C969
0.1
C971
4.7k
R961
3.3k
R962
2.2k
R963
1.5k
R964
1.5k
R965
1k
R966
680
R967
470
R968
470
R969
680
R9701kR971
1.5k
R972
1.5k
R973
2.2k
R974
3.3k
R975
1k
R1300
1k
R1302
1k
R1303
1k
R1306
1k
R1309
1k
R1310
1k
R1313
1k
R1316
1k
R1317
1k
R1320
1k
R1323
1k
R1324
1k
R1327
1k
R1330
1k
R1331
1k
R1335
1k
R1336
1k
R1337
C972
0.1
S904 S911S908 S910S907 S909S906S905
S918S914 S917S913 S916S915 S919
1
2
3
4
5
6
7
8
9
10
11
12
13
14
15
15P
NO924
VOL B
VOL A
GC GND
LED A
LED B
LED GND
VOL
1
1 LED
VOL 9, 10 LED
VOL 7, 8 LED
VOL 5, 6 LED
VOL 3, 4 LED
VOL 1, 2 LED
KEY2
KEY3
KEY RIGHT_BTTN
6.8k
R960
W801
2SC3052EF-T1-LEF
Q916
LED DRIVER
2SC3052EF-T1-LEF
Q912
LED DRIVER
2SC3052EF-T1-LEF
Q913
LED DRIVER
2SC3052EF-T1-LEF
Q914
LED DRIVER
2SC3052EF-T1-LEF
Q915
LED DRIVER
2SC3052EF-T1-LEF
Q911
LED DRIVER
SLI-325DCT31W
D912
SLI-325DCT31W
D908
SLI-325DCT31W
D909
SLI-325DCT31W
D914
SLI-325DCT31W
D915
SLI-325DCT31W
D907
SLI-325DCT31W
D910
SLI-325DCT31W
D916
SLI-325DCT31W
D911
SLI-325DCT31W
D913
SLI-325DCT31W
D917
S980
1
23
1
2
2P
CN928
DGND
CURSOR KEY
1
2
2P
NO929
DGND
CURSOR KEY
22k
R981
S970
52
1436
33k
R982
15k
R980
10k
R979
VOL BOARD
VOLUME +/–
(VOLUME ILLUMINATION 2) (VOLUME ILLUMINATION 4) (VOLUME ILLUMINATION 6) (VOLUME ILLUMINATION 8) (VOLUME ILLUMINATION 10)
(VOLUME ILLUMINATION 11)
(VOLUME ILLUMINATION 5)(VOLUME ILLUMINATION 1) (VOLUME ILLUMINATION 3) (VOLUME ILLUMINATION 7) (VOLUME ILLUMINATION 9)
SALSA REGGAE POP SAMBA TANGO SURROUND X-GROOVE
ROCK JAZZ DANCE MOVIE
TOOL MENU
RETURNGAME
USER EQ
CURSOR MT BOARD
PUSH
ENTER
ENTER
(CURSOR)
(Page 43)
Page 50

HCD-ZX66i/ZX99i
HCD-ZX66i/ZX99i
5050
1
A
B
C
D
E
F
G
H
I
23456789101112
1-878-473-
11
(11)
1-878-469-
11
(11)
1-878-468-
11
(11)
1-878-967-
11
(11)
N
PANEL COM BOARD
NO908
(ZX99i)
LEFT-BTTN BOARD
CD-L BOARD
JOG-A BOARD (HCD-ZX99i)
JOG-B BOARD (HCD-ZX99i)
M
PANEL COM
BOARD
NO909
13 13
R837
R840
R843
R844
R845
R846
NO915
3
1
NO915
GRY
GRY
BLK
GRY
BLK
GRY
GRY
GRY
GRY
BLK
3
1
GRY
GRY
BLK
GRY
GRY
BLK
NO918NO918
GRY
BLK
NO911
ZX99i
JW900
JW901
S931
S934
S935S936
S933
S932
DISC 1DISC 2
DISC 3
X-ROUND
ON/OFF
SOUND
FLASH
DISC 4
DISC 5
EX-CHANGE DISC SKIP
;OPEN/CLOSE
PLAY MODE
13
12
R834
R866
R896
NO900
13
NO900
S937S938
S939
12
17
ECB
JW960
JW961
R882
R883
R890
R892
Q917
CN922
NO950
D926
S965
S966
1 2
R884
BLK
GRY
BLK
GRY
NO951
S967
MODE
SPEAKERS
JOG
312
S957
6-20. PRINTED WIRING BOARDS – LEFT BUTTON Section – • See page 29 for Circuit Boards Location. • : Uses unleaded solder.
(Page 42)
(Page 42)
Page 51
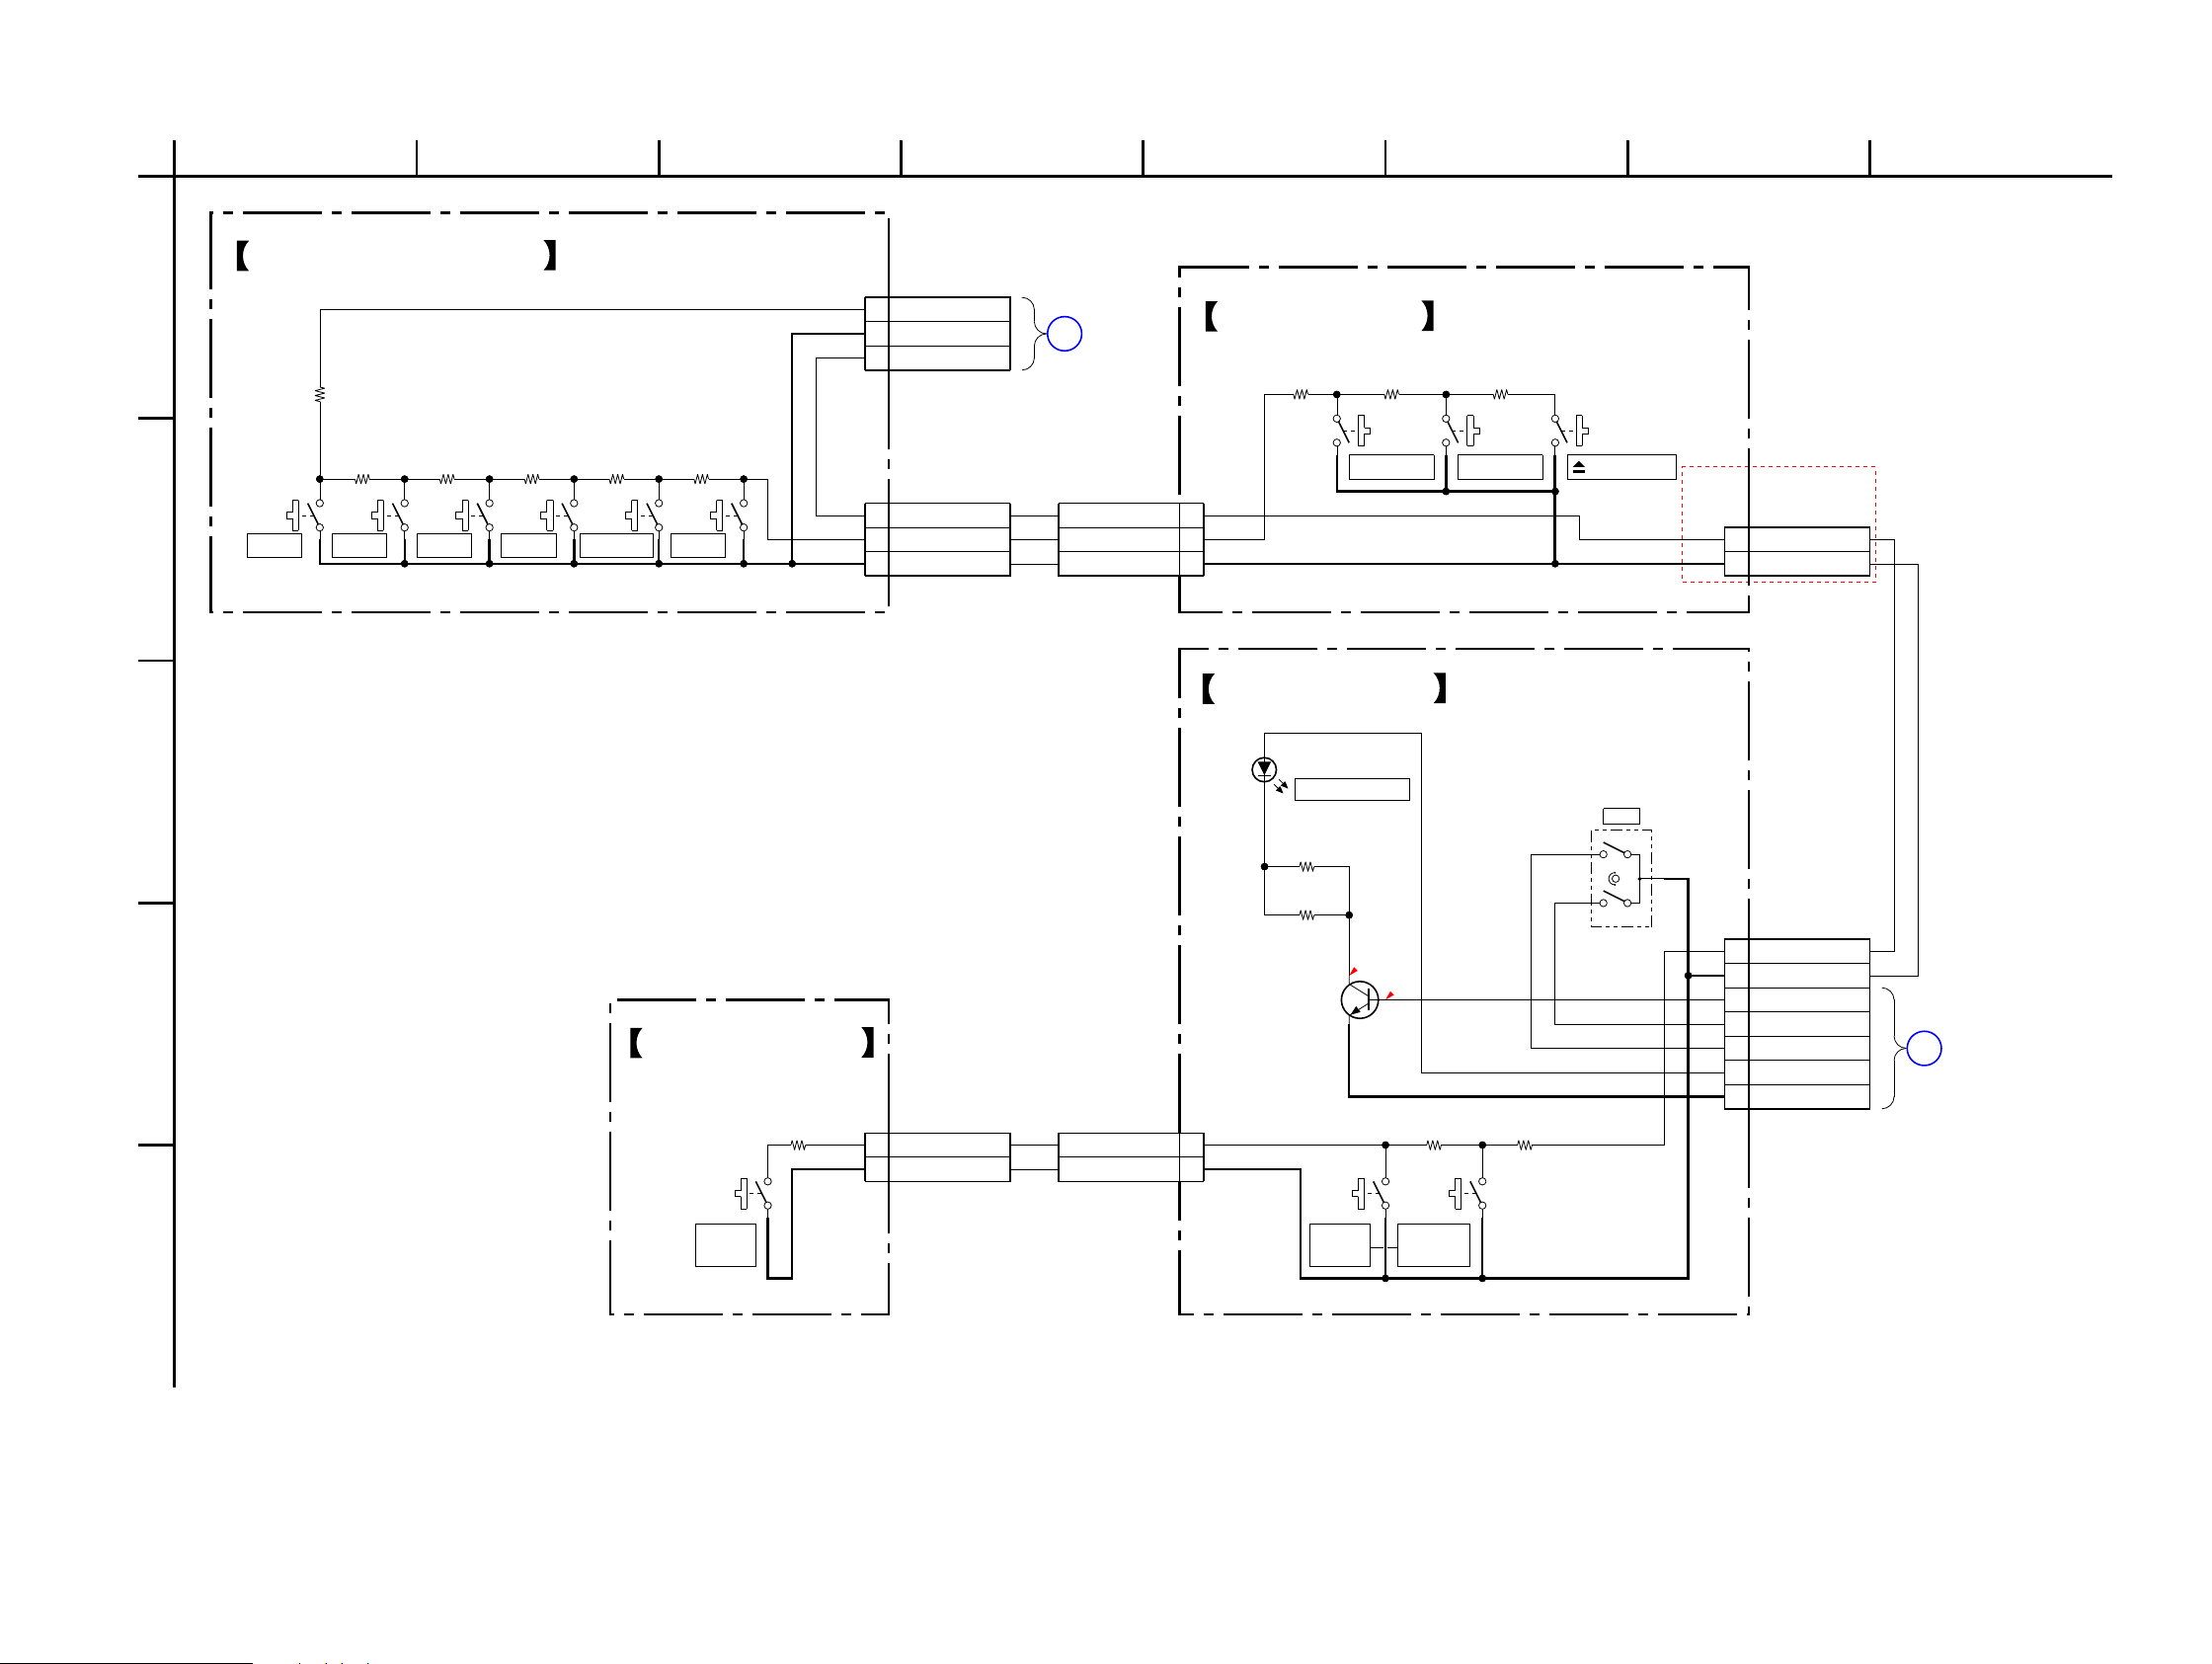
HCD-ZX66i/ZX99i
HCD-ZX66i/ZX99i
5151
63
D
2
A
78
E
C
B
451
M
BOARD
NO909
PANEL COM
N
PANEL COM
BOARD
NO908
4.2
0
(HCD-ZX99i)
(HCD-ZX99i)
(ZX99i)
ZX99i
(ZX99i)
S931S932S933S934S935S936
10k
R837
6.8k
R840
4.7k
R843
3.3k
R844
2.2k
R845
1.5k
R846
1
2
3
3P
NO918
KEY5
KEY0
DGND
1
2
3
3P
NO915
KEY5
DGND
KEY0
S938
1
2
3
3P
NO900
KEY5
KEY0
DGND
S937 S939
1
2
2P
NO911
KEY5
DGND
22k
R896
15k
R834
33k
R866
1k
R884
S967
1
2
2P
NO951
KEY5
DGND
470
R883
S965
SLR-325MCT31
D926
R892
680
2SC3052EF-T1-LEF
Q917
LED DRIVER
S966
S957
1
23
1
2
2P
NO950
KEY5
DGND
1
2
3
4
5
6
7
7P
CN922
KEY5
DGND
SPK MODE LED
JOG A
JOG B
LED B
LED GND
680
R882
R890
680
LEFT-BTTN BOARD
DISC 2 DISC 1 DISC 4DISC 3 DISC 5PLAY MODE
DISC SKIP EX-CHANGE OPEN/CLOSE
CD-L BOARD
X-ROUND ON/OFF
JOG
JOG-A BOARD
X-ROUND
ON/OFF
MODE
SPEAKERS
SOUND
FLASH
JOG-B BOARD
6-21. SCHEMATIC DIAGRAM – LEFT BUTTON Section –
(Page 43)
(Page 43)
Page 52
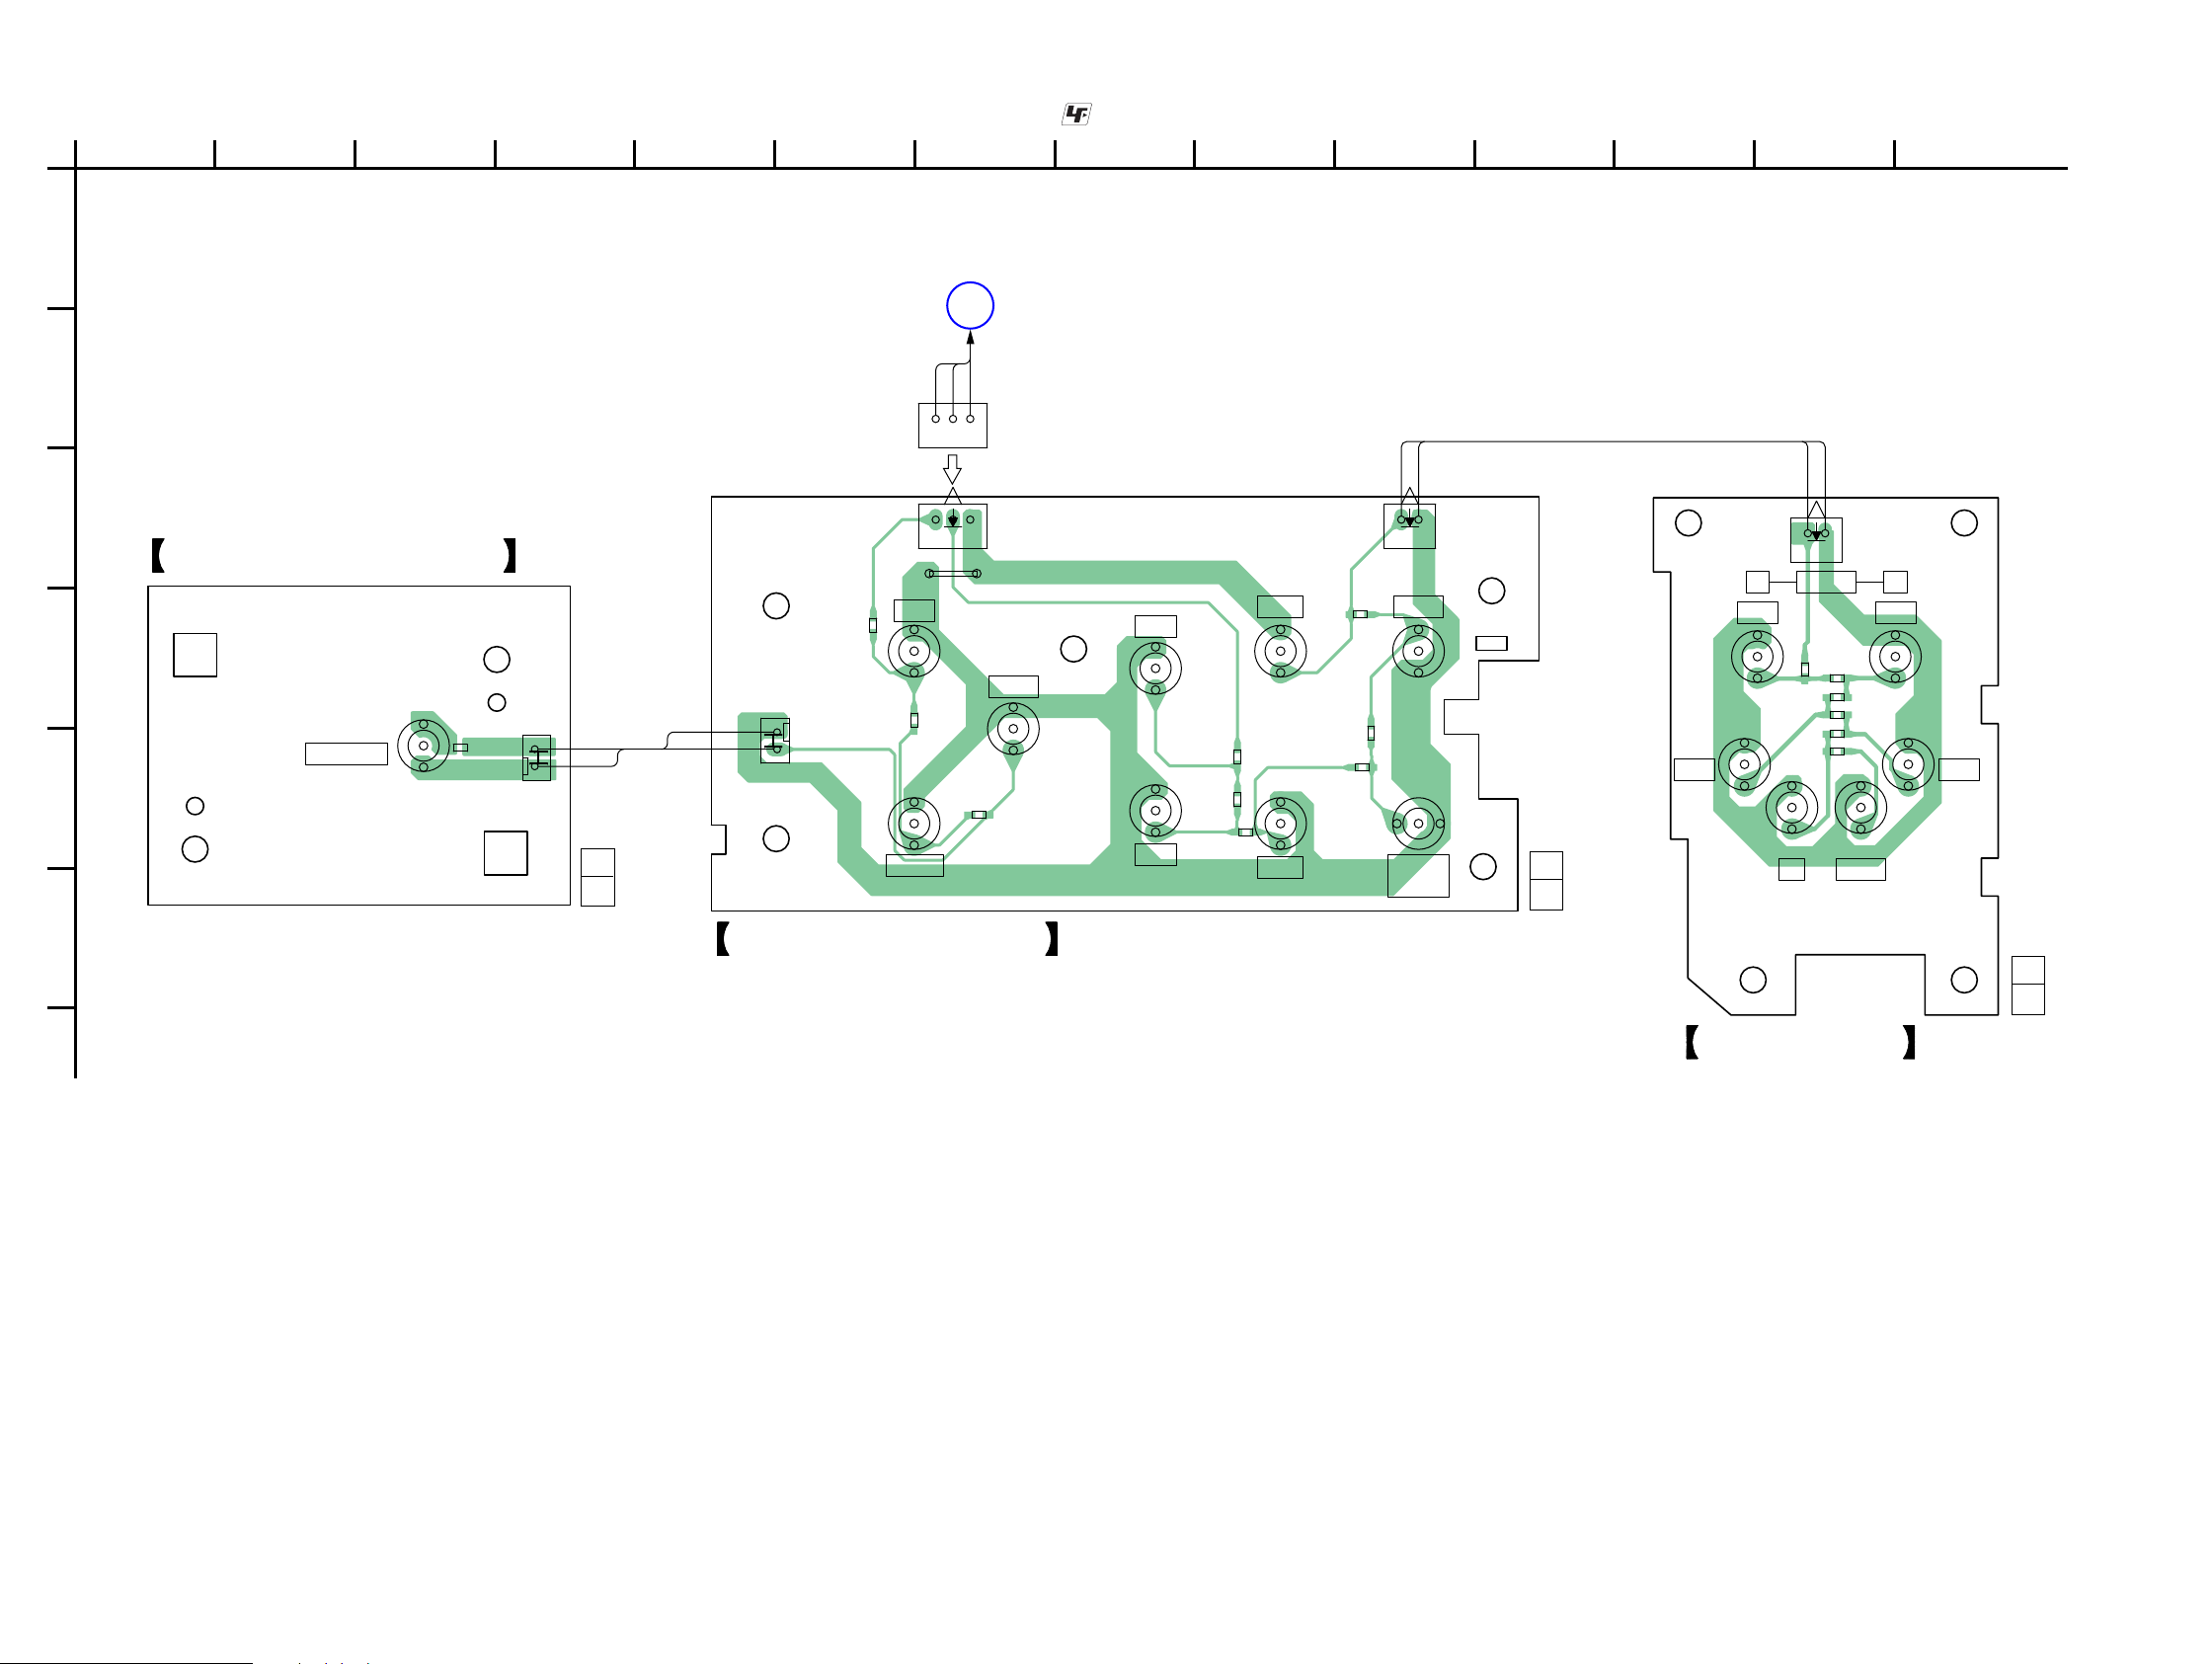
HCD-ZX66i/ZX99i
HCD-ZX66i/ZX99i
5252
1
A
B
C
D
E
F
234567891011121314
1-878-466-
11
(11)
1-878-472-
11
(11)
1-878-496-
11
(11)
O
PANEL COM BOARD
NO917
FUNCTION SW BOARD
RIGHT-BTTN BOARD
CD-R BOARD
1
ALBUM
+
–
2
R872
R873
R874
R875
R876
R877
NO925
S950 S951
S952 S953
S954 S955
1 2
GRY
BLK
GRY
GRY
BLK
GRY
BLK
13
13
R848
R852
R855
R858
R861 R864
R868
R869
R870
JW800
NO905
NO916
NO916
NO919
S940 S941
S942S943
S944
S945
S947
S948
S949
1
2
1
2
R832
NO901
BLK
GRY
GRY
BLK
S930
FUNCTION
PHONO
GAME
N
N
.
.
/9
/9Y
GAME
MIXING
iPod
6-22. PRINTED WIRING BOARDS – RIGHT BUTTON Section – • See page 29 for Circuit Boards Location. • : Uses unleaded solder.
(Page 42)
Page 53
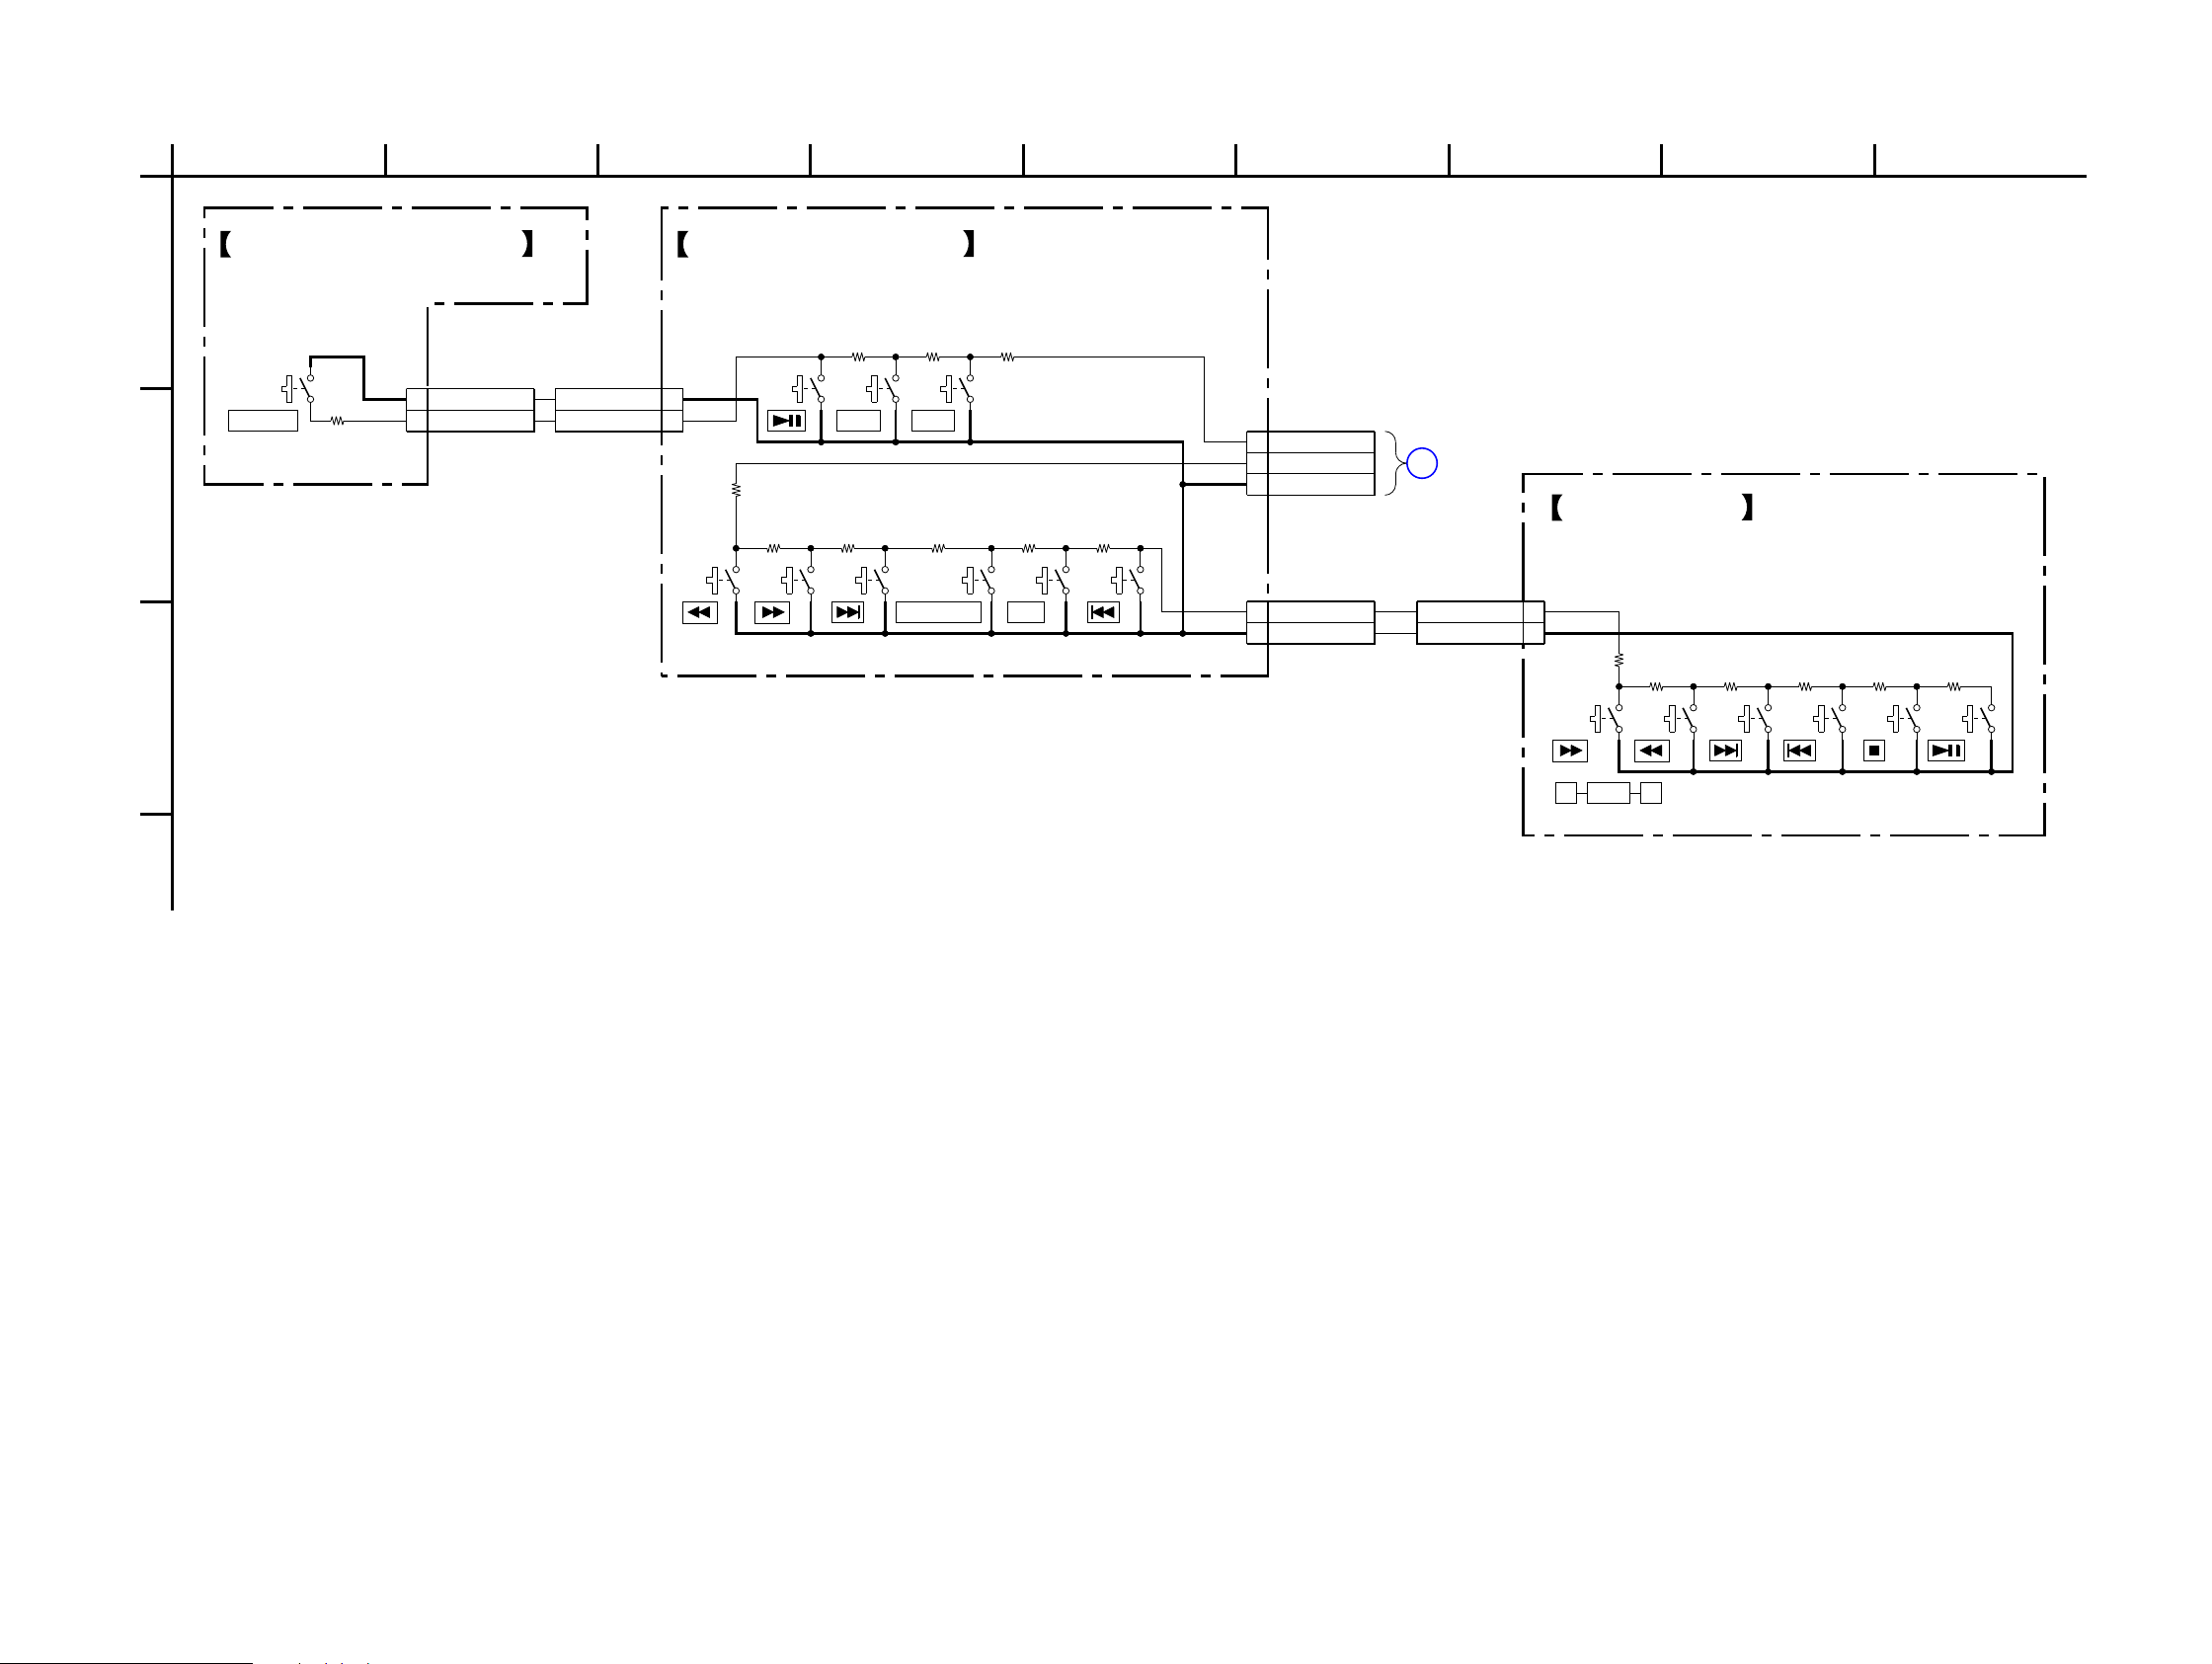
HCD-ZX66i/ZX99i
HCD-ZX66i/ZX99i
5353
671
B
54 9
A
2
C
3 8
PANEL COM
NO917
BOARD
O
S930
1
2
2P
NO901
GND
KEY3
15k
R832
680
R861
4.7k
R870
470
R864
1k
R858
S942
1
2
2P
NO905
KEY4
DGND
1
2
2P
NO919
DGND
KEY3
S940
S949
1.5k
R852
S948
S941
6.8k
R869
S943
2.2k
R848
10k
R868
1
2
3
3P
NO916
KEY RIGHT_BTTN
KEY4
DGND
1.5k
R855
S947
S944S945
S952
1
2
2P
NO925
KEY4
DGND
S954
6.8k
R874
S953
4.7k
R873
3.3k
R872
22k
R877
S950
S951
15k
R876
S955
10k
R875
FUNCTION SW BOARD
FUNCTION
PHONO iPod
RIGHT-BTTN BOARD
GAME MIXING GAME
CD-R BOARD
ALBUM
+
–
6-23. SCHEMATIC DIAGRAM – RIGHT BUTTON Section –
(Page 43)
Page 54
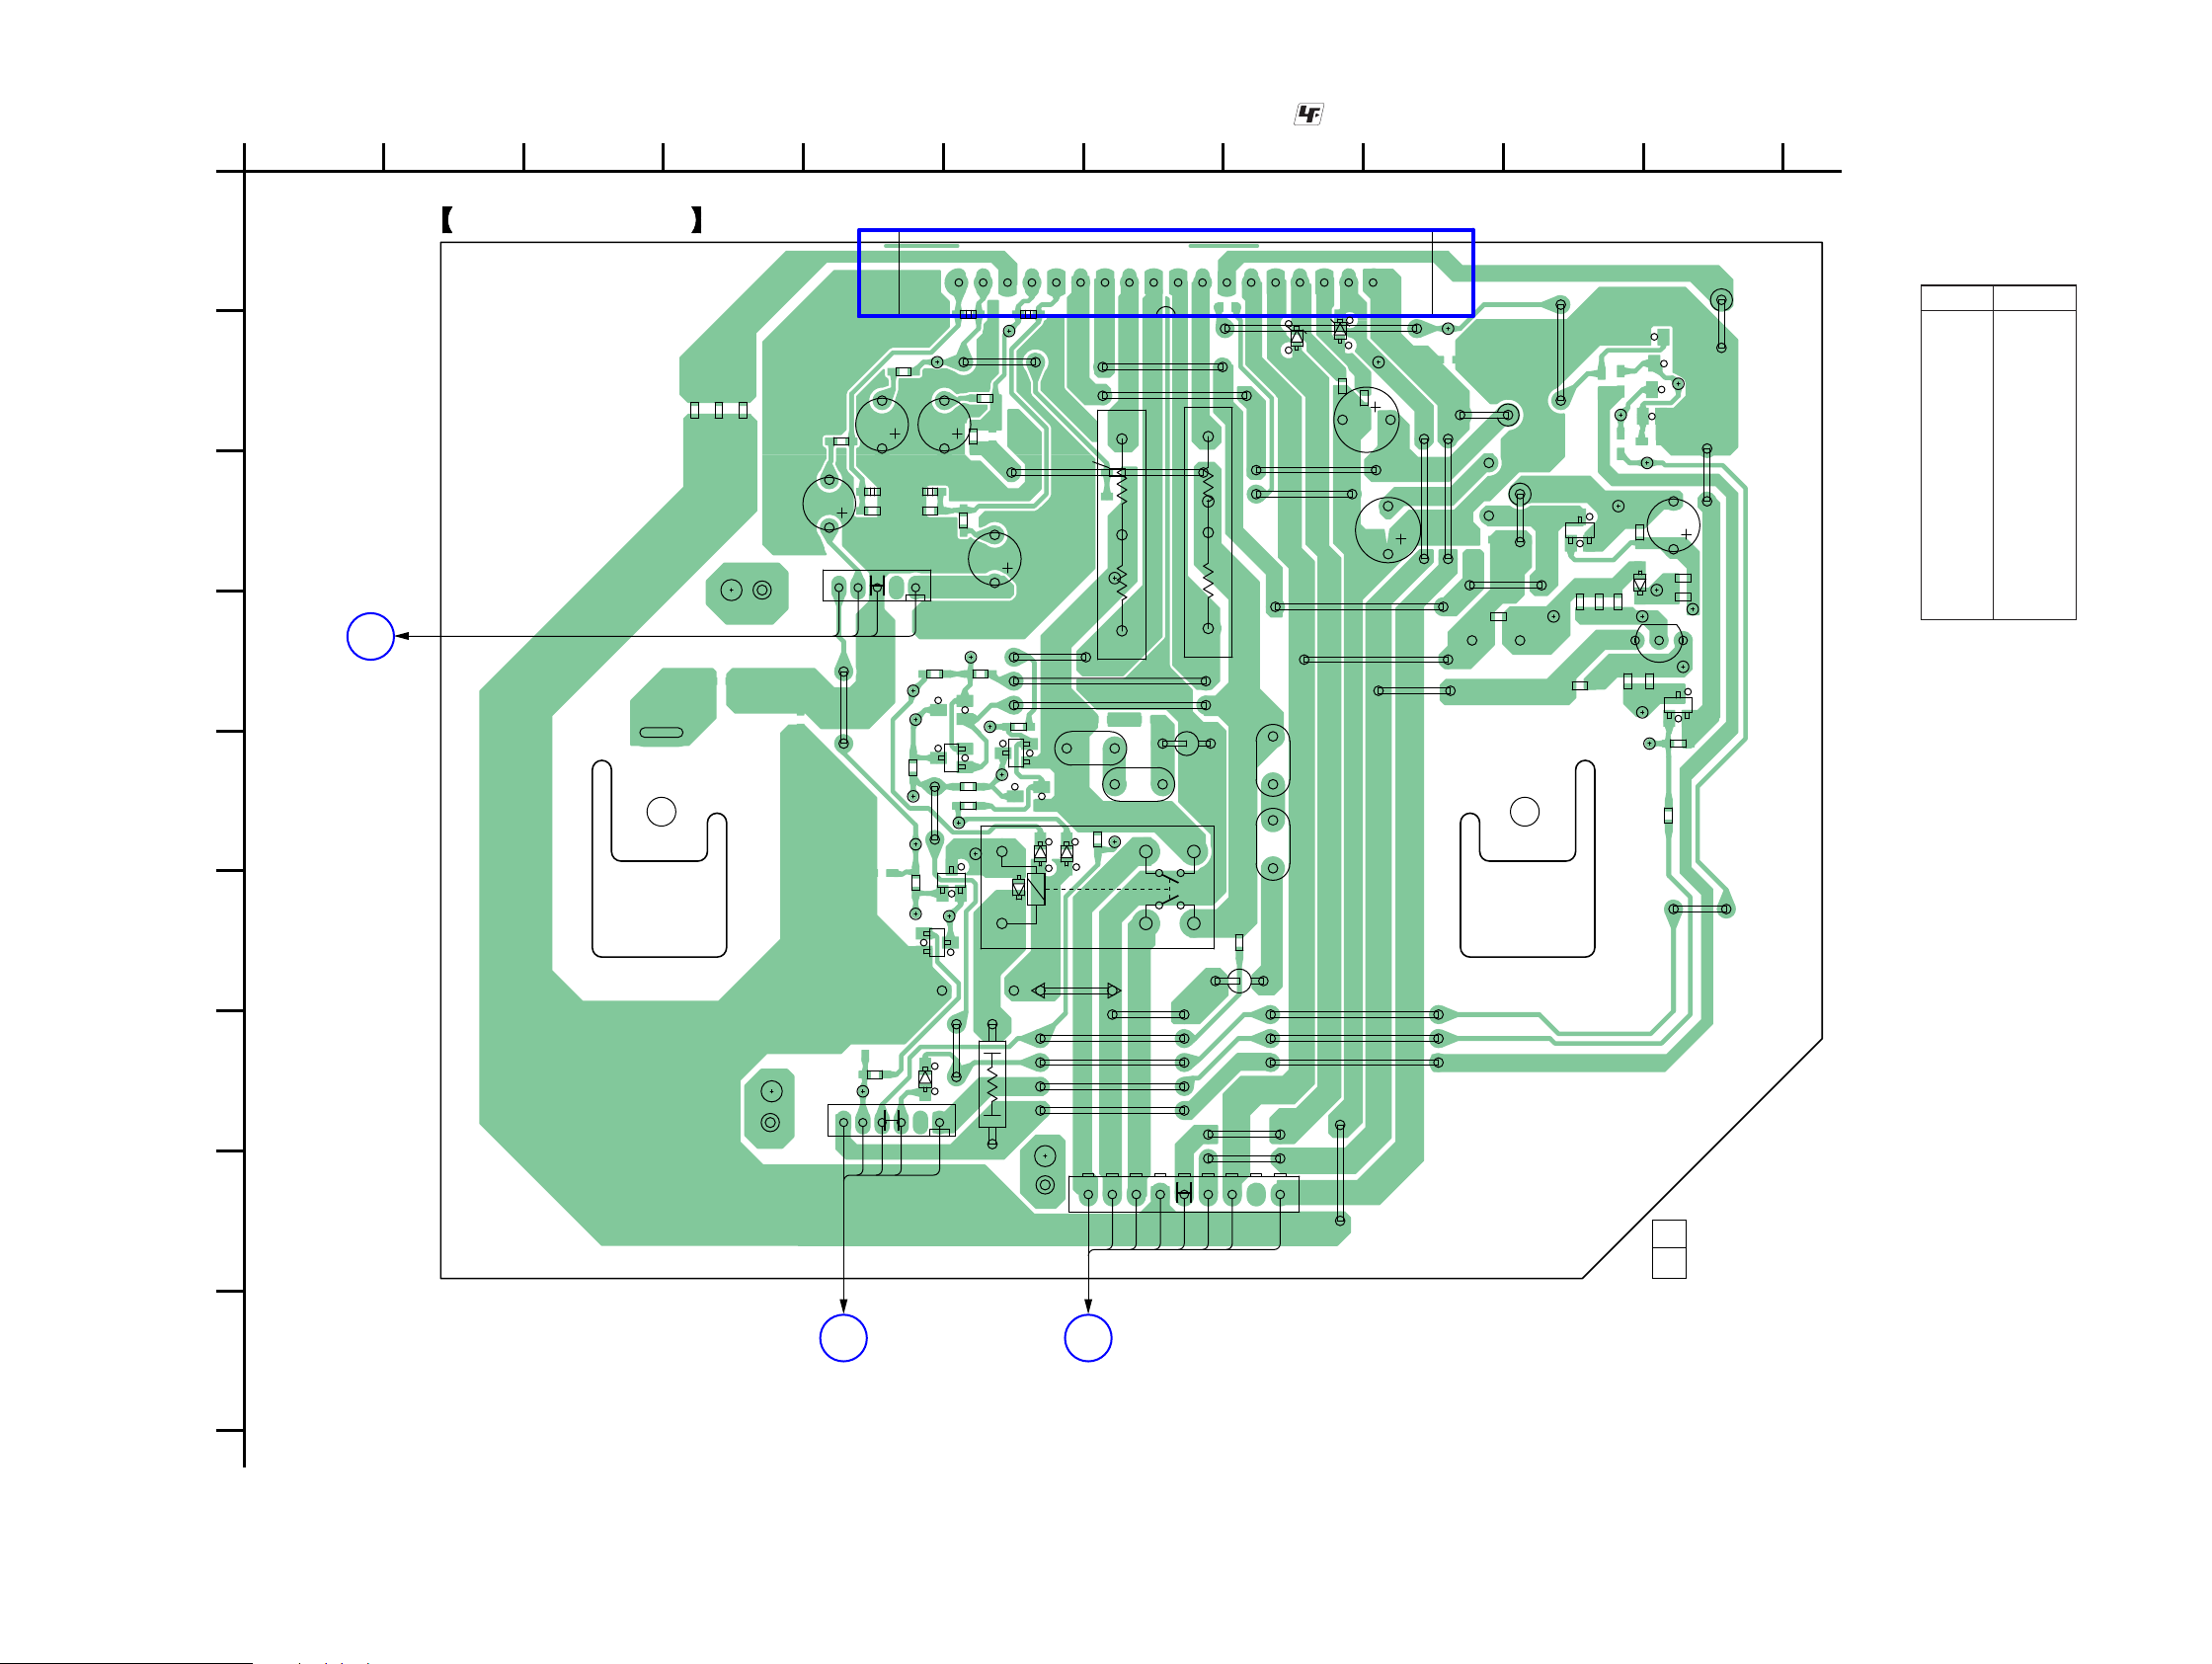
HCD-ZX66i/ZX99i
HCD-ZX66i/ZX99i
5454
1
A
B
C
D
E
F
G
H
I
234567891011
1-878-478-
11
(11)
SURROUND BOARD (HCD-ZX99i)
H
MAIN
BOARD
CN503
(ZX99i)
Q
POWER AMP BOARD
CN600
(ZX99i)
R
POWER AMP BOARD
CN606
(ZX99i)
19
18 1
16
15
BCE
BCE
BCE
BCE
ECB
BCE
JW758
D760
D761
D780
JW791
D790
D791
Q720
Q721
E C B
Q722
Q730
R700
R701
R702
Q762
R703
Q765
R710
R711
NO700
NO701
NO702
R720
Q780
R721
R722
R723
R724
R725
R726
R727
R728
R729
LP701
LP702
LP703
R730
R731
R732
R733
R734
R735
R736
R737
C700
C701
C702
C703
R750
R751
R752
JL700
JL701
JL702
JL703
JL704
JL705
C721
JL706
JL707
JL708
JL709
R766
JL710
JL711
JL712
JL713
JL714
C730
JL715
C731
JL716
JL717
JL718
JL719
JL720
JL721
JL722
JL723
JL724
JL725
JL726
JL727
JL728
R780
JL729
R781
R782
R783
R784
R785
JL730
R788
JL731
GRY
GRY
GRY
GRY
RED
JL732
C750
C751
C752
C753
JW700
R792
JW702
R793
R794
JW704
R795
JW705
R796
JW706
R797
JW707
R798
JW708
R799
JW709
JW710
JW714
JW716
JW717
JW718
JW719
JW721
JW722
JW724
JW725
JW727
RED
GRY
GRY
GRY
JW728
D720
C780
IC701
C781
JW731
JW732
JW733
JW734
JW735
JW736
JW737
D730
C795
C796
JW742
JW743
JW744
JW745
RY760
JW756
6-24. PRINTED WIRING BOARD – SURROUND Section (HCD-ZX99i) – • See page 29 for Circuit Boards Location. • : Uses unleaded solder.
Ref. No. Location
• Semiconductor
Location
D720 C-10
D730 E-6
D760 G-5
D761 F-6
D780 E-6
D790 B-8
D791 B-8
IC701 A-7
Q720 D-11
Q721 D-11
Q722 C-10
Q730 E-6
Q762 F-6
Q765 F-5
Q780 E-6
(Page 56)
(Page 56)
(Page 38)
Page 55
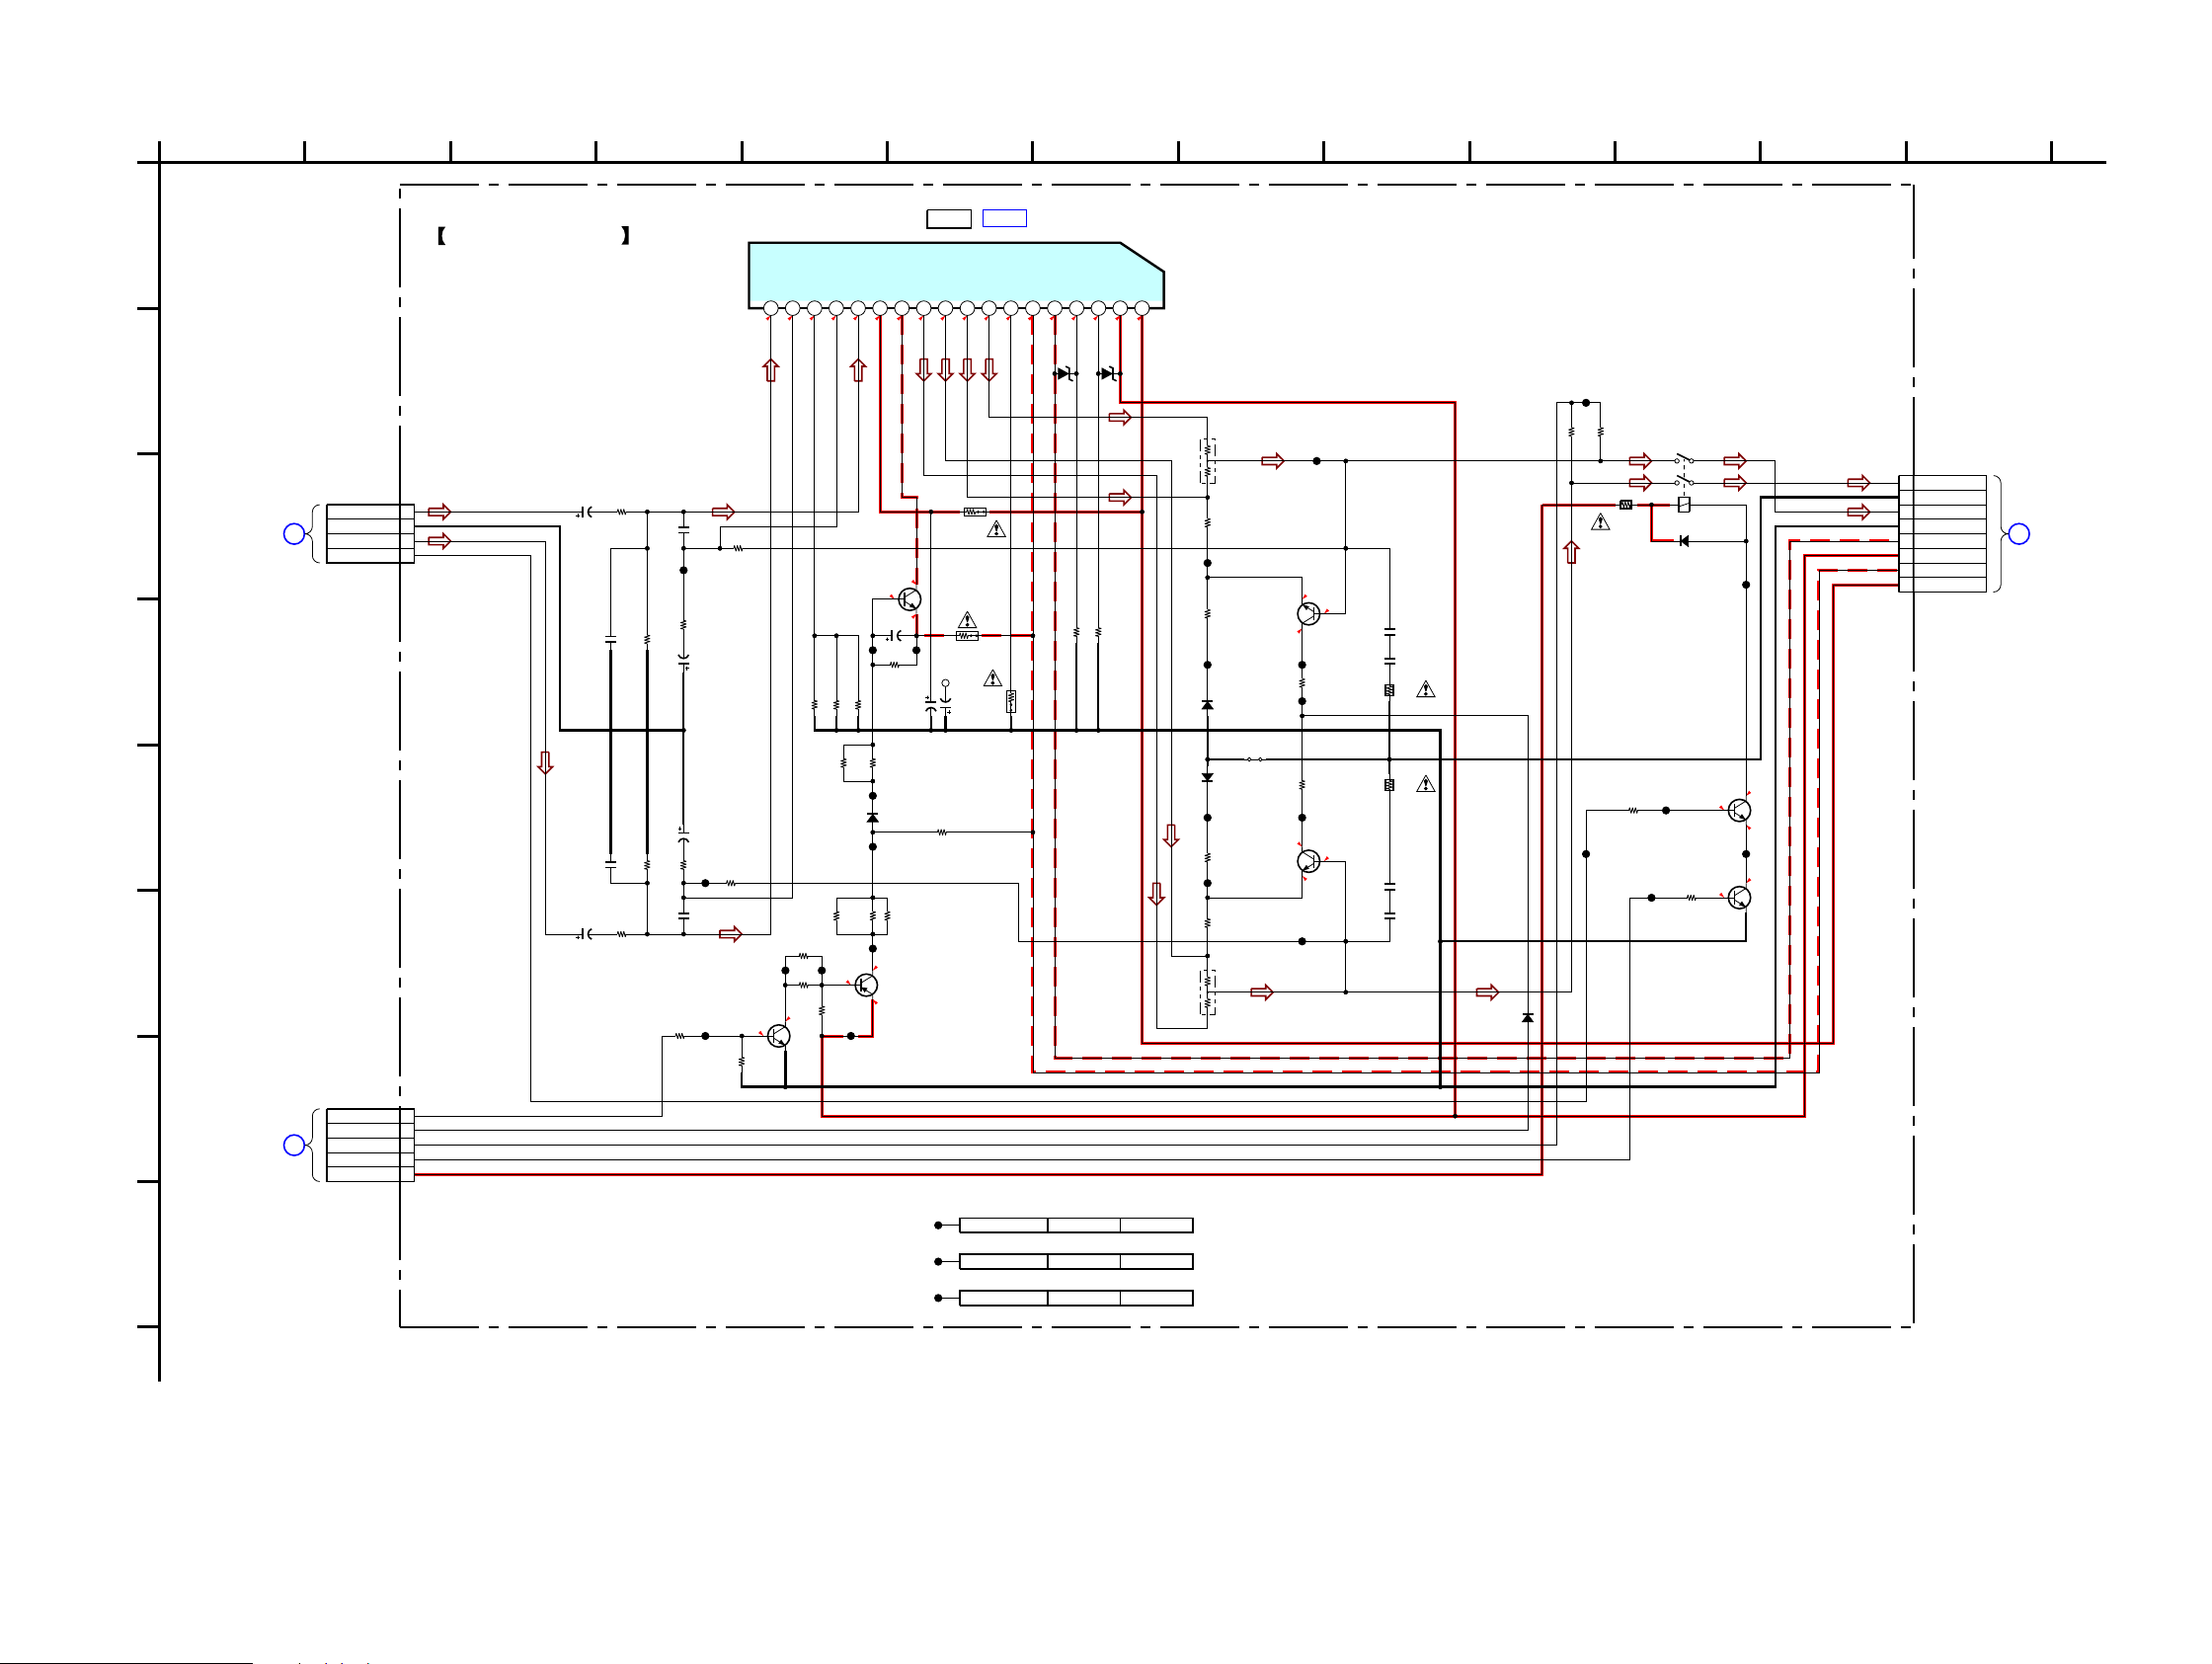
HCD-ZX66i/ZX99i
HCD-ZX66i/ZX99i
5555
63
D
2 10
A
139
H
G
78
E
C
B
4 1251
F
11
H
BOARD
(3/3)
CN503
MAIN
Q
POWER AMP
CN600
BOARD
R
CN606
BOARD
POWER AMP
IC B/D
(HCD-ZX99i)
(ZX99i)
(ZX99i)
0
0
33.6
32.9
33.7
0
0
-61.2
63.1
0
0
-62.7
0
0
000
-64.5
-32.8
-13.6
14.7
33.7
64.2
-62.7
0
-64
0
0
12.5
12.5
0
0
0
0
0
0.8
0.8
(ZX99i)
165432712 11 10 9 81318 17 16 15 14
STK412-240M-E
IC701
SURROUND POWER AMP
+VH
+VL
+REF
-REF
-VL
-VH
SUB-GND
+RE1
-RE1
-RE2
+RE2
-PRE
+PRE
IN1
NF1
BIAS
NF2
IN2
50V
4.7
C700
1k
R700
330
R702
47k
R701
2200p
C701
100p
C703
47k
R710
10V
100
C702
2200p
C751
47k
R751
10V
100
C752
330
R752
100p
C753
1k
R750
50V
4.7
C750
47k
R711
100kR799
100kR798
100kR792
33k
R727
68k
R736
68k
R726
68k
R725
50V22
C721
100V
22
C796
100V
22
C795
2SC3906K-T146E
Q722
OVERLOAD DETECT
MA2J1110GLS0
D720
100
R794
100
R795
100k
R737
100k
R724
100k
R729
2SA1207-AA
Q721
STK MUTE CONTROL
47k
R728
47k
R722
2.2k
R723
10k
R720
10k
R721
MAZ8180GMLS0
D790
MAZ8180GMLS0
D791
1kR796
1kR797
R780
0.22x2
R730
0.22x2
0.068
C730
0.068
C731
0.068
C780
0.068
C781
2SC3906K-T146E
Q730
OVERLOAD DETECT
MA2J1110GLS0
D730
MA2J1110GLS0
D780
1k
R731
1k
R781
22k
R782
22k
R732
150k
R733
150k
R783
2SC3906K-T146E
Q780
OVERLOAD DETECT
MA2J1110GLS0
D760
MA2J1110GLS0
D761
2.2k
R766
1.5k
R788
56k
R734
68k
R784
2SC3052EF-T1-LEF
Q762
SURROUND RELAY DRIVER
2SC3052EF-T1-LEF
Q765
PROTECTOR
2SC3052EF-T1-LEF
Q720
STK MUTE CONTROL
JL700
JL701
JL702
JL703
JL704
JL705
JL706
JL707
JL708
JL709
JL710
JL711
JL712
JL717
JL718
JL719
JL720
JL721
JL722
JL723
JL724
JL725
JL726
JL727
JL728
JL729
1
3
4
5
6
7
8
9
NO700
8P
+VH
-VH
+VL
-VL
SURR GND
REAR R-CH
REAR GND
REAR L-CH
RY760
1
2
3
4
5
6
JW791
JL730
JL731
JL732
Mount Mecha 153799332LP701 XX
Mount Mecha 153799332LP702 XX
Mount Mecha 153799332LP703 XX
1
3
4
5
NO702
4P
REAR-R
PREGND
REAR-L
REAR-RY
1
3
4
5
6
NO701
5P
STK MUTE
OVERLOAD DETECT
DC DETECT
AC CUT DETECT
UNREG
1W
100
R703
1
R793
1/2W
10
R735
1/2W
10
R785
IC701
SURROUND BOARD
5W
5W
6-25. SCHEMATIC DIAGRAM – SURROUND Section (HCD-ZX99i) – • See page 63 for IC Block Diagrams.
(Page 41)
(Page 57)
(Page 57)
Page 56
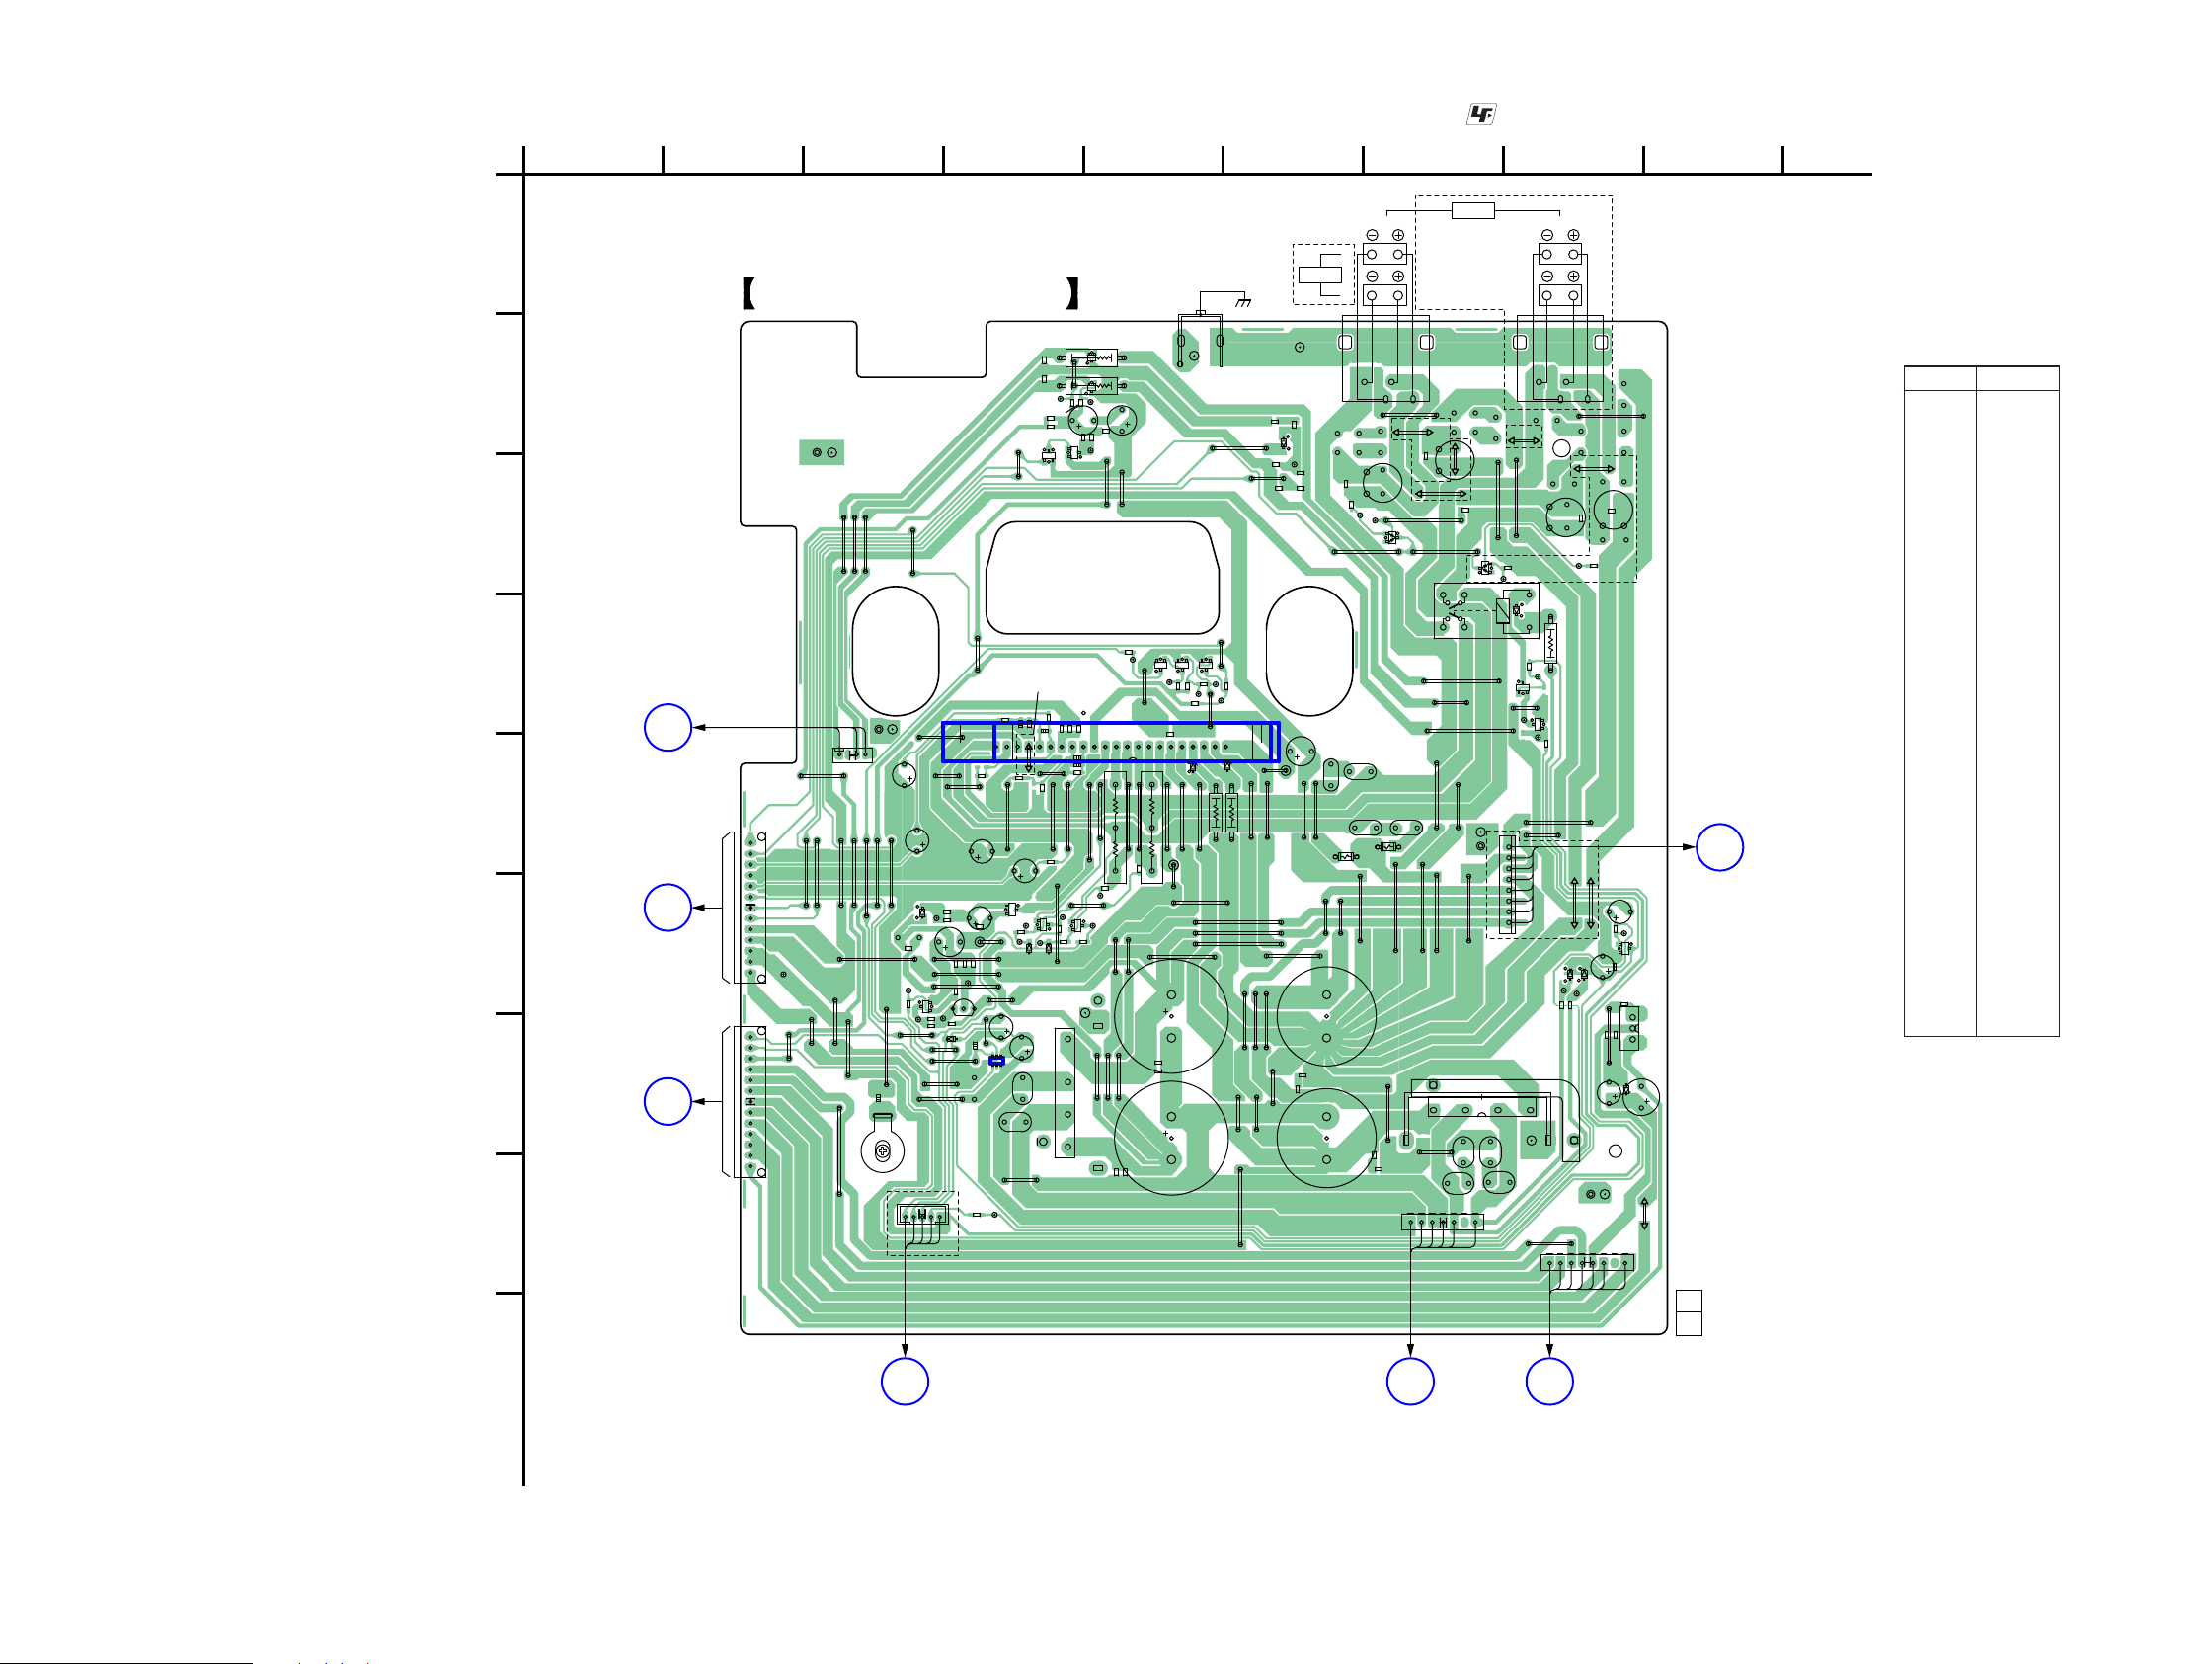
HCD-ZX66i/ZX99i
HCD-ZX66i/ZX99i
5656
1
A
B
C
D
E
F
G
H
I
23456789
1-878-474-
11
(11)
POWER AMP BOARD
J
MAIN
BOARD
CN506
T
TRANS BOARD
CN1113
R
SURROUND
BOARD
NO700
(ZX99i)
Q
SURROUND BOARD
NO701
(ZX99i)
P
GAME HP
BOARD
CN803
S
TRANS BOARD
CN1112
I
MAIN
BOARD
CN505
13
46
18
17
15
14
1313 1 1
18
18
1
+
–
1
22
E C B
ECB
ECB
ECB
ECB
BCE
BCE
ECB ECB ECB
ECB
ECB
BCE
BCE
BCE
ECB
R600
CL899
(CHASSIS)
R601
R602
R603
R604
Q664
R605
R606
R607
R608
D760
Q668
R609
R610
R611
R612
R613
R614
R615
R616
NO603
R617
R618
R619
CN600
NO608
CN601
NO609
CN602
R620
R621
CN606
R622
R623
R624
R625
R628
R629
LP600
ZX99i
LP601
LP602
LP603
RED
GRY
RED
GRY
GRY
GRY
GRY
GRY
R630
R631
R632
SPEAKER
SPEAKER
ZX99i
ZX66i
SURROUND
(SPEAKER B)
FRONT
(SPEAKER A)
TM607
R
R
L
R
L
L
TM609
R633
R634
L680
R635
R636
L682
R637
R638
R639
L686
C600
L688
C601
C602
C604
R640
C605
R641
R642 R643
C608
R644
C609
R646
R647
R649
C610
R650
ZX99i
R651
C616
R652
C617
R653
R654
R655
JL600
R658
JL601
R659
JL602
JL603
JL604
JL605
JL606
JL607
JL608
R660
JL609
R661
R662
C627
R663
C628
R664
C629
R665
R666
JL610
R668
JL611
TH629
R669
JL612
JL613
JL614
JL615
22P (ZX66i)18P (ZX99i)
JL616
JL617
C634
R670
JL619
C635
R671
R672
R673
R674
JL620
R678
JL621
R679
JL622
JL623
JL624
JL625
JL626
JL627
JL628
JL629
R682
C648
C649
R686
JL630
R688
JL631
JL632
JL633
JL634
C650
JL635
C651
JL636
C652
C654
R690
R691
JW601
C656
R692
JW602
C657
R693
JW603
C658
R694
JW604
C659
R695
JW605
R696
JW606
R697
JW607
R698
JW608
R699
JW609
C662
C663
JW610
JW611
C666
JW612
C667
JW613
JW614
JW615
JW616
JW617
JW618
JW619
D611
D612
JW620
JW621
C676
JW622
C677
JW623
C678
JW624
C679
JW625
JW626
JW627
JW629
IC600
D620
IC601
JW630
JW631
RY646
JW632
D627
JW634
JW636
JW637
HS801 (ZX99i)
JW640
C696
JW642
C697
JW643
JW644
JW645
JW646
JW648
JW649
JW651
D646
IC627
JW653
JW654
JW655
JW656
JW657
JW658
JW659
JR647
D654
JW660
JW661
D656
JW662
D658
JW664
JW665
JW666
JW667
JW668
JW669
D660
D661
R700
D664
JW670
R701
JW671
R702
JW672
JW673
JW674
Q765
JW675
JW676
JW677
JW678
JW679
D670
JW681
HS656 (ZX66i)
JW683
JW685
JW687
JW688
JW689
JW690
ZX66i
JW691
ZX66i
ZX99i
ZX99i
JW696
JW699
EPT605
ZX99i
CL801
CL802
CL803
R780
EPT650
JW700
JW701
JW702
JW703
Q600
JW704
Q601
JW705
JW706
JW707
Q604
JW708
JW709
Q606
D700
JW710
JW711
JW712
JW713
Q610
JW714
JW715
JW716
JW717
JW718
JW719
Q618
JW720
JW721
JW722
JW724
JW725
JW726
JW728
JW729
D720
Q628 Q629
JW730
JW733
Q630
JW734
JW735
JW736
JW737
Q640
Q641
Q644
Q647
~ ~
+
–
~~
6-26. PRINTED WIRING BOARD – POWER AMP Section – • See page 29 for Circuit Boards Location. • : Uses unleaded solder.
Ref. No. Location
• Semiconductor
Location
D611 E-6
D612 E-5
D620 F-4
D627 G-4
D646 D-8
D654 C-7
D656 G-7
D658 G-4
D660 F-8
D661 F-8
D664 G-8
D670 F-4
(D700) C-7
D720 F-3
D760 B-6
<IC600> D-5
(IC601) D-5
IC627 G-4
Q600 B-4
Q601 C-4
Q604 F-3
Q606 F-4
Q610 F-4
Q618 F-4
Q628 D-5
Q629 D-5
Q630 D-5
Q640 B-5
Q641 B-5
Q644 D-8
Q647 D-8
Q664 G-8
Q668 F-4
Q765 F-8
( ): HCD-ZX99i only
< >: HCD-ZX66i only
(Page 54)
(Page 58)(Page 58)
(Page 38)
(Page 54)
(Page 38)
(Page 46)
Page 57
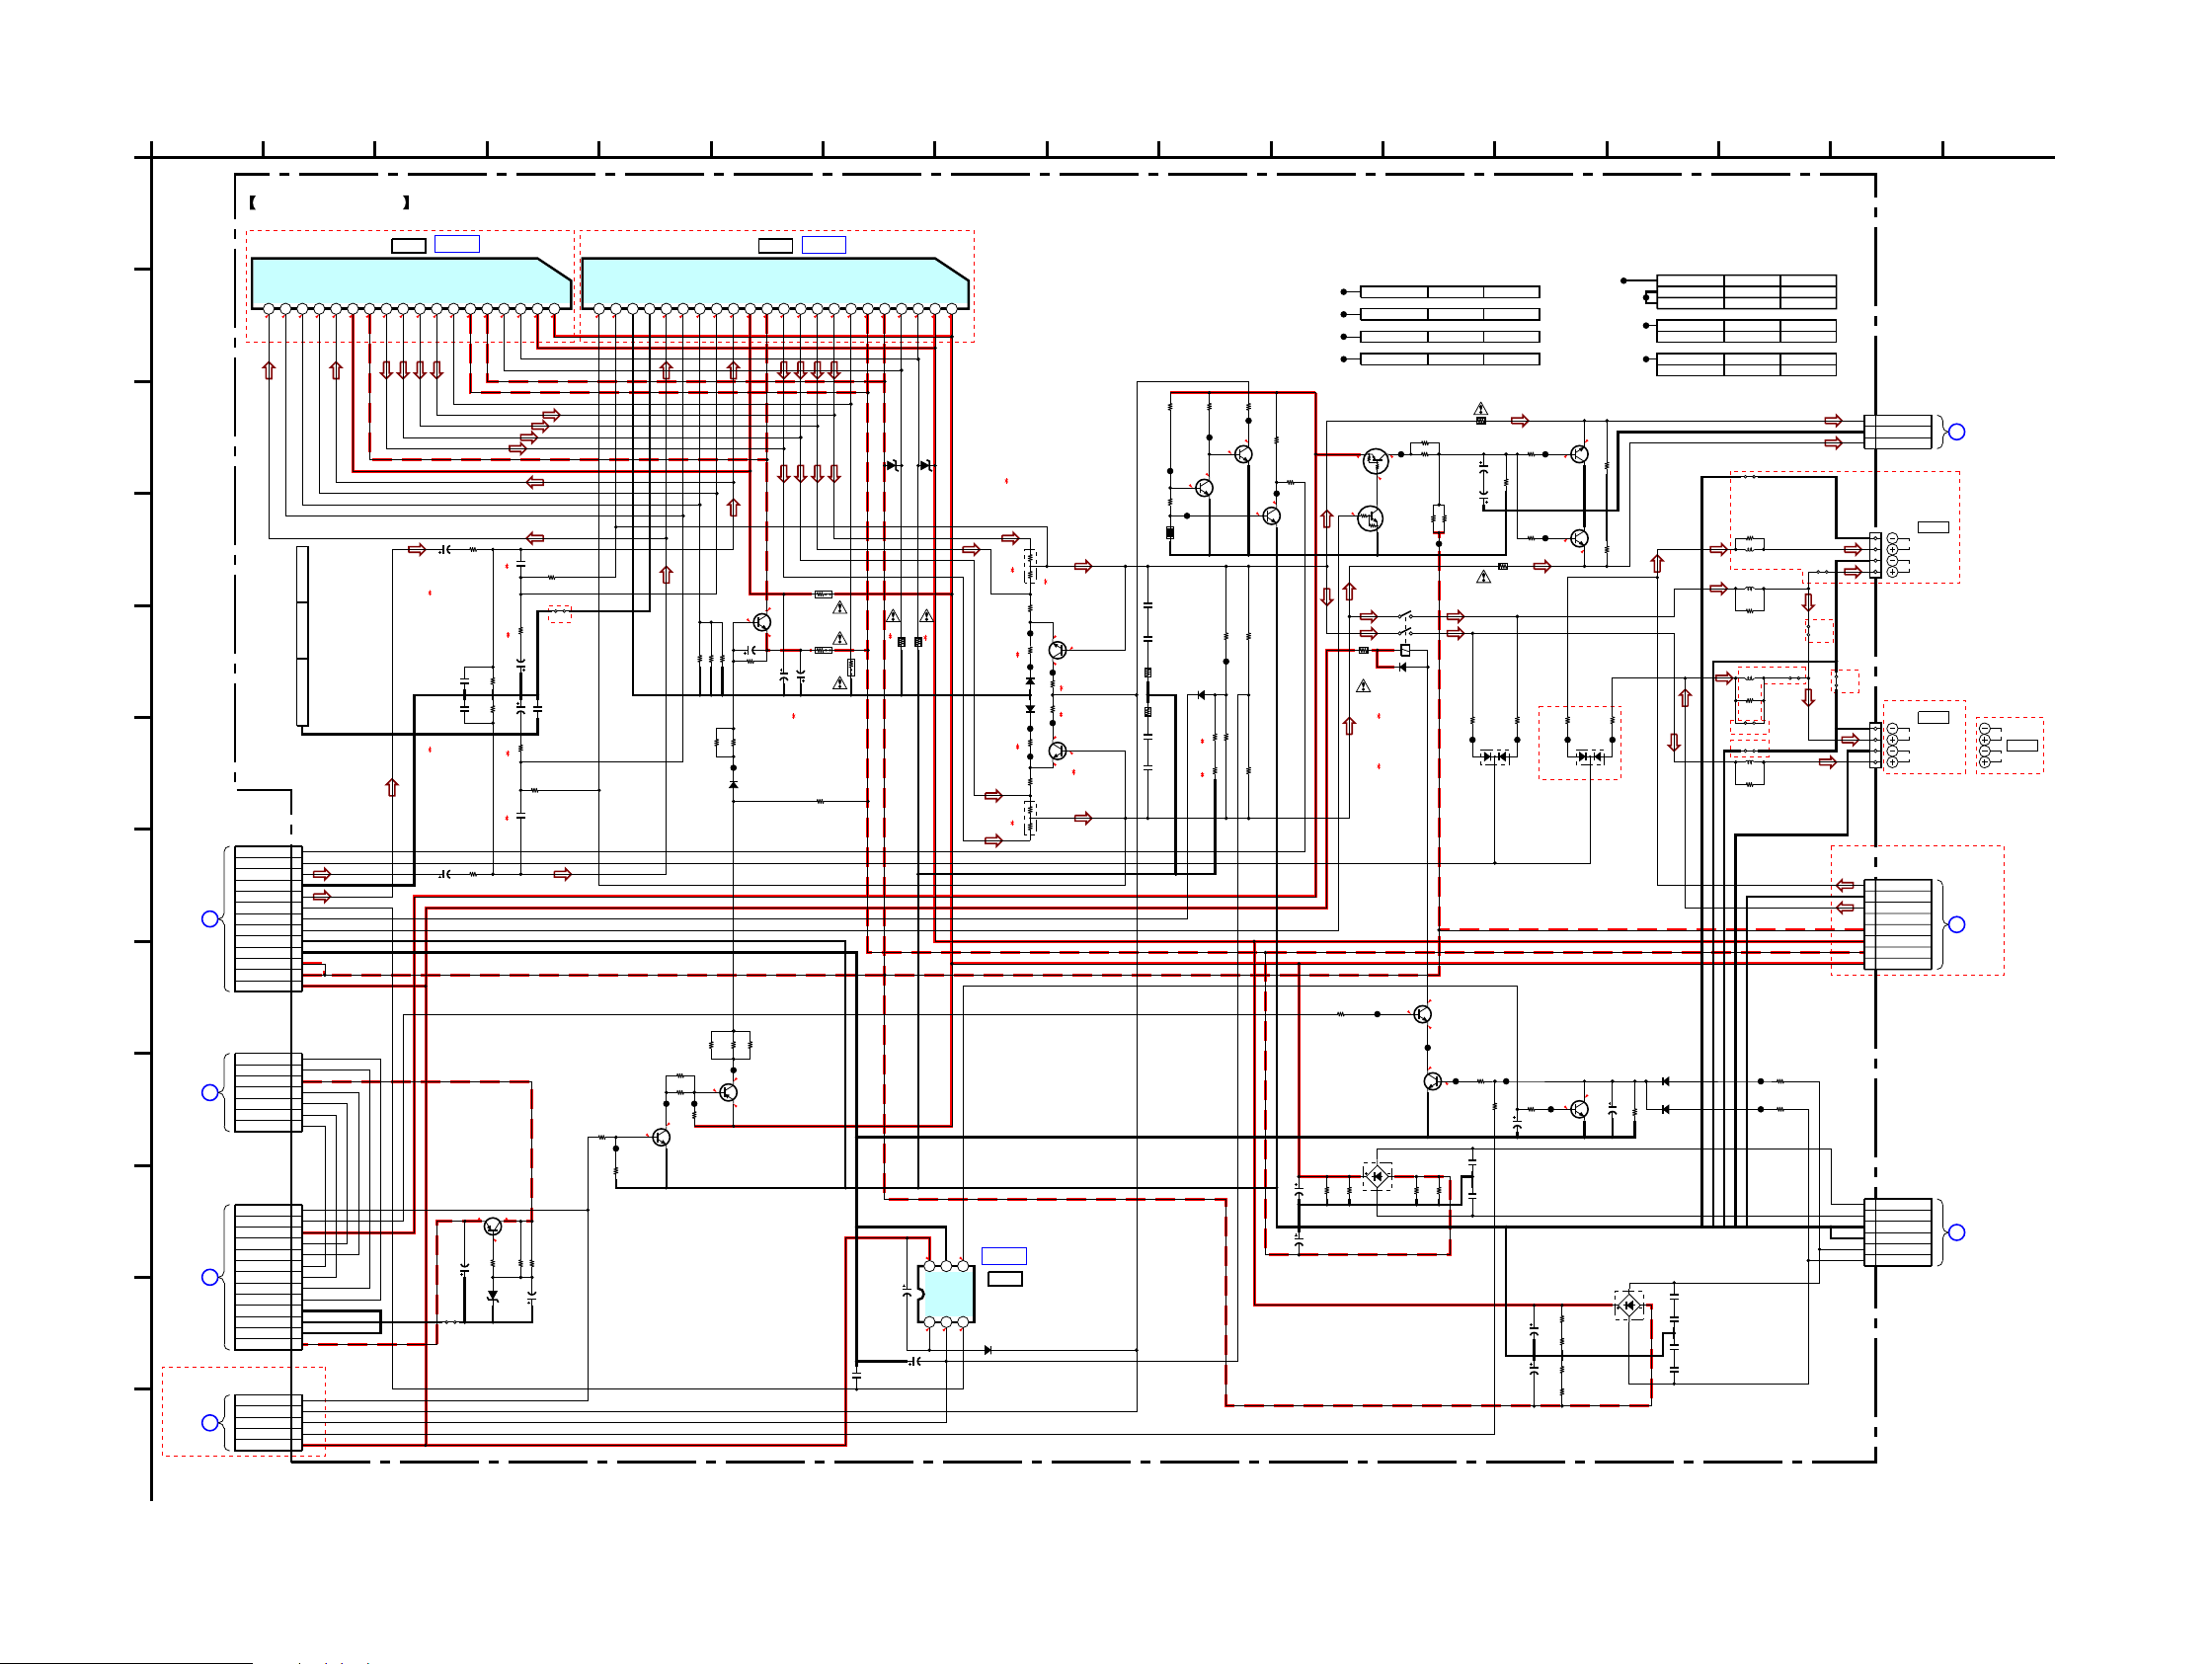
HCD-ZX66i/ZX99i
HCD-ZX66i/ZX99i
5757
114 169
G
35
L
F
12
I
1721 14
E
B
A
C
710
D
K
158 136
H
J
CN505
MAIN
I
BOARD
(3/3)
BOARD
T
TRANS
CN1113
BOARD
J
MAIN
(1/3)
CN506
SURROUND
BOARD
NO701
Q
BOARD
GAME HP
P
CN803
NO700
R
SURROUND
BOARD
BOARD
TRANS
CN1112
S
IC B/D
IC B/D
IC B/D
0
0
-62.3
0
63.8
0
-63.8
0
000
0
-65.3
-33.1
-14.2
13.8
33.1
65.5
0
0
0
0
0
0
-62.3
0
-63.8
63.8
000
0
-14.2
33.1
-65.3
-33.1
65.5
13.8
(ZX99i)
(ZX99i)
-32.5 -45.8
-33.1
64.7
65.2
65.5
0
0.7
0
15.7
0
15.3
3.4
-63.1
-63.8
-64
0
0
13.1
13.1
0
0
0
0.6
0
13.6
0
0.6
9
8.8
-5.5
0
0
-5.5
0
0
15.7
0
0
0.7
0
1.3
(ZX99i)
ZX99i
ZX66i
ZX99i
ZX99i
ZX66i
(ZX99i)
(ZX99i)
ZX66iZX99i
4
6
(ZX66i)
(ZX99i)
3
(ZX66i)
(ZX99i)
(ZX66i)
(ZX99i)
(ZX66i)
(ZX99i)
1
(ZX99i)
(ZX66i)
2
(ZX66i)
(ZX99i)
5
8
(ZX99i)
(ZX66i)
7
(ZX66i)
(ZX99i)
ZX99i
ZX99i
ZX66i
ZX66i
ZX99i
-5.5
1
1
2
2
ZX99i
3
3
4
4
5
5
6
6
7
8
ZX99i
220k
R679
1k
R600
100V
22
C610
47k
R690
2SC3052EF-T1-LEF
Q629
THERMAL DETECT
1k
R669
2.2k
R634
MAZ8180GMLS0
D611
47k
R700
MA2J1110GLS0
D670
47k
R633
56k
R623
10k
R640
R629
560
47k
R603
100k
R691
50V
10
C649
50V
2.2
C627
68k
R694
22k
R661
0.1
C679
MA2J1110GLS0
D720
2.2k
R607
0.01
C605
MA2J1110GLS0
D760
50V4.7
C650
10k
R605
2200p
C601
0.1
C629
1
2
3
4
5
6
7
8
9
10
11
12
13
13P
CN601
FAN ON
FAN DET
L-IN
PREGND
R-IN
PROTECT
DBFB F/B
HP MUTE
POWER GND
RELAY GND
-B
-B
UNREG
2SC3661-TB-E
Q640
MUTE
22kR674
10k
R641
50V
10
C662
0.068
C617
2SA1207-AA
Q606
MUTE CONTROL
50V
4.7
C600
0.068
C666
47k
R606
100k
R638
10V
100
C602
1.5k
R647
JW688
100
R612
~
~
D25XB60
D658
RECT
2SC3052EF-T1-LEF
Q630
THERMAL DETECT
R628
47k
2SC3906K-T146E
Q618
OVERLOAD DETECT
220k
R678
MA2J1110GLS0
D620
MA2J1110GLS0
D661
2SC2412K-T-146-R
Q765
AC DETECT
2SC2412K-T-146-R
Q604
MUTE CONTROL
33k
R611
2200p
C651
1W
100
R646
16V100
C628
1k
R619
56
R642
100
R615
25V
100
C634
100kR692
0.1
C659
50V22
C608
47k
R601
1
2
3
4
5
6
7
8
9
10
11
12
13
13P
CN602
STK MUTE
FRONT RELAY
A+9V
AC3
AC3
AC4
AC4
VF(1)
VF(2)
DGND
DGND
DGND
-VG
2SC3052EF-T1-LEF
Q628
THERMAL DETECT
22k
R660
1
3
4
5
6
7
NO608
6P
AC-VL
AC-VL
GND
GND
AC-VH
AC-VH
47k
R654
100k
R698
100
R666
2SC3906K-T146E
Q668
OVERLOAD DETECT
56
R643
2SC3661-TB-E
Q641
MUTE
2SC3906K-T146E
Q610
MUTE
50V
100
C663
25V
100
C635
22k
R624
JW662
10k
R604
MA2J1110GLS0
D646
68k
R610
8.2k
R662
47k
R649
2SC2412K-T-146-R
Q644
RELAY DRIVER
0.068
C616
100k
R639
1k
R650
MAZ8180GMLS0
D612
10V
100
C652
2.2k
R693
MA2J1110GLS0
D660
MA2J1110GLS0
D627
47k
R655
100kR617
100kR699
2SC2412K-T-146-R
Q647
AC CUT DETECT
220k
R659
47k
R701
1
2
3
4
5
5P
CN600
STK MUTE
OVERLOAD DETECT
DC DETECT
AC CUT DETECT
UNREG
0.068
C667
0
JR647
47k
R653
68k
R673
100k
R630
47k
R651
1
2
3
4
5
6
7
8
8P
CN606
+VH
-VH
+VL
-VL
SURR GND
REAR R-CH
REAR GND
REAR L-CH
1k
R664
100V
22
C609
220k
R658
68k
R609
100k
R631
100k
R608
10V
100
C648
10k
R635
560k
R632
123
456
RT8H015C-T112-1
IC627
PROTECTOR
OVL
DC DET
PROTECT O
GND
VCC
8.2k
R663
2.2k
R644
Q600
RT1P141C-TP-1
MUTE CONTROL
JL600
JL601
JL602
JL603
JL604
JL605
JL606
JL607
JL608
JL609
JL610
JL611
JL612
JL613
JL614
JL615
JL616
JL617
JL619
JL620
JL621
JL622JL623JL624JL625
JL626
JL627
JL628
JL629JL630
JL631
JL632
TM607
4P
1
2
3
4
TM609
4P
1
2
3
4
1
3
4
JW690
1
8
3
4
5
6
7
NO603
7P
VF
AC4
VF
-VFL
AC3
AC3
AC4
NO609
3P
HP-L
GND
HP-R
~
~
D10XB20
D656
RECT
Mount Mecha 424441551HS656 XX
CL801
Mount Mecha 424441551HS658
CL802
47k
R695
47k
R696
47k
R697
47k
R702
165432712 11 10 9 81318 17 16 15 14
STK412-240M-E
IC601
POWER AMP
0.22
C657
0.22
C678
0.22
C696
0.22
C697
100V
3300
C658
100V
3300
C677
50V
3300
C656
50V
3300
C676
RY646
1
2
3
4
5
6
MC2838-T112-1
D654
MC2838-T112-1
D700
JW699
JW689
JW726
JW691
JW720
Mount Mecha 492490681EPT650
1
2
3
TH629
JL633
JL634
Mount Mecha 153799332LP600
Mount Mecha 153799332LP601
CL803
CL899
UDZW-TE17-33B
D664
1
R616
RT1N141C-TP-1
Q601
MUTE CONTROL
2SB1565E
Q664
-VG REG
10
R622
10
R672
2W
R637
820
2W
R636
820
R613R614
C654
C604
R620
R670
R671
R621
R780
10
R688
10
10
R686
12345678910111213141516171819202122
STK412-150C
IC600
POWER AMP
+VH
+VL
+REF
-REF
-VL
-VH
SUB-GND
+RE1
-RE1
-RE2
+RE2
-PRE
+PRE
IN1
NF1
BIAS
NF2
IN2
NC
GND
LIM1
LIM2
L680
1.7uH
L686
1.7uH
L688
1.7uH
L682
1.7uH
R618
R668
R682
10
R602
R652
R625
R665
Mount Mecha 153799332LP602
Mount Mecha 153799332LP603
JL635
JL636
JW737
Mount Mecha 487053931EPT605
IC601
IC600
IC627
POWER AMP BOARD
IN2
+VH
NF2
BIAS
NF1
IN1
-PRE
+RE2
-RE2
-RE1
+RE1
SUB-GND
-VH
-VL
-REF
+REF
+VL
L
L
SURROUND
(SPEAKER B)
(SPEAKER A)
FRONT
(SPEAKER A)
R
(SPEAKER B)
FRONT
SURROUND
R
R
L
SPEAKER
TM607
+PRE
1k 1W
R613,614
3.3k 1W
100k
0.22x2 5W
R621,671
150k
0.1x2 5W
R618,668
C604,654
100p
220p
R602,652
330
560
15k
R620,670
33k
0
R665
1.5k
680
R625
3.3k
TM609
SPEAKER
TM607
SPEAKER
6-27. SCHEMATIC DIAGRAM – POWER AMP Section – • See page 63 for IC Block Diagrams.
(Page 47)
(Page 55)
(Page 59)
(Page 59)
(Page 39)
(Page 55)
(Page 41)
Page 58
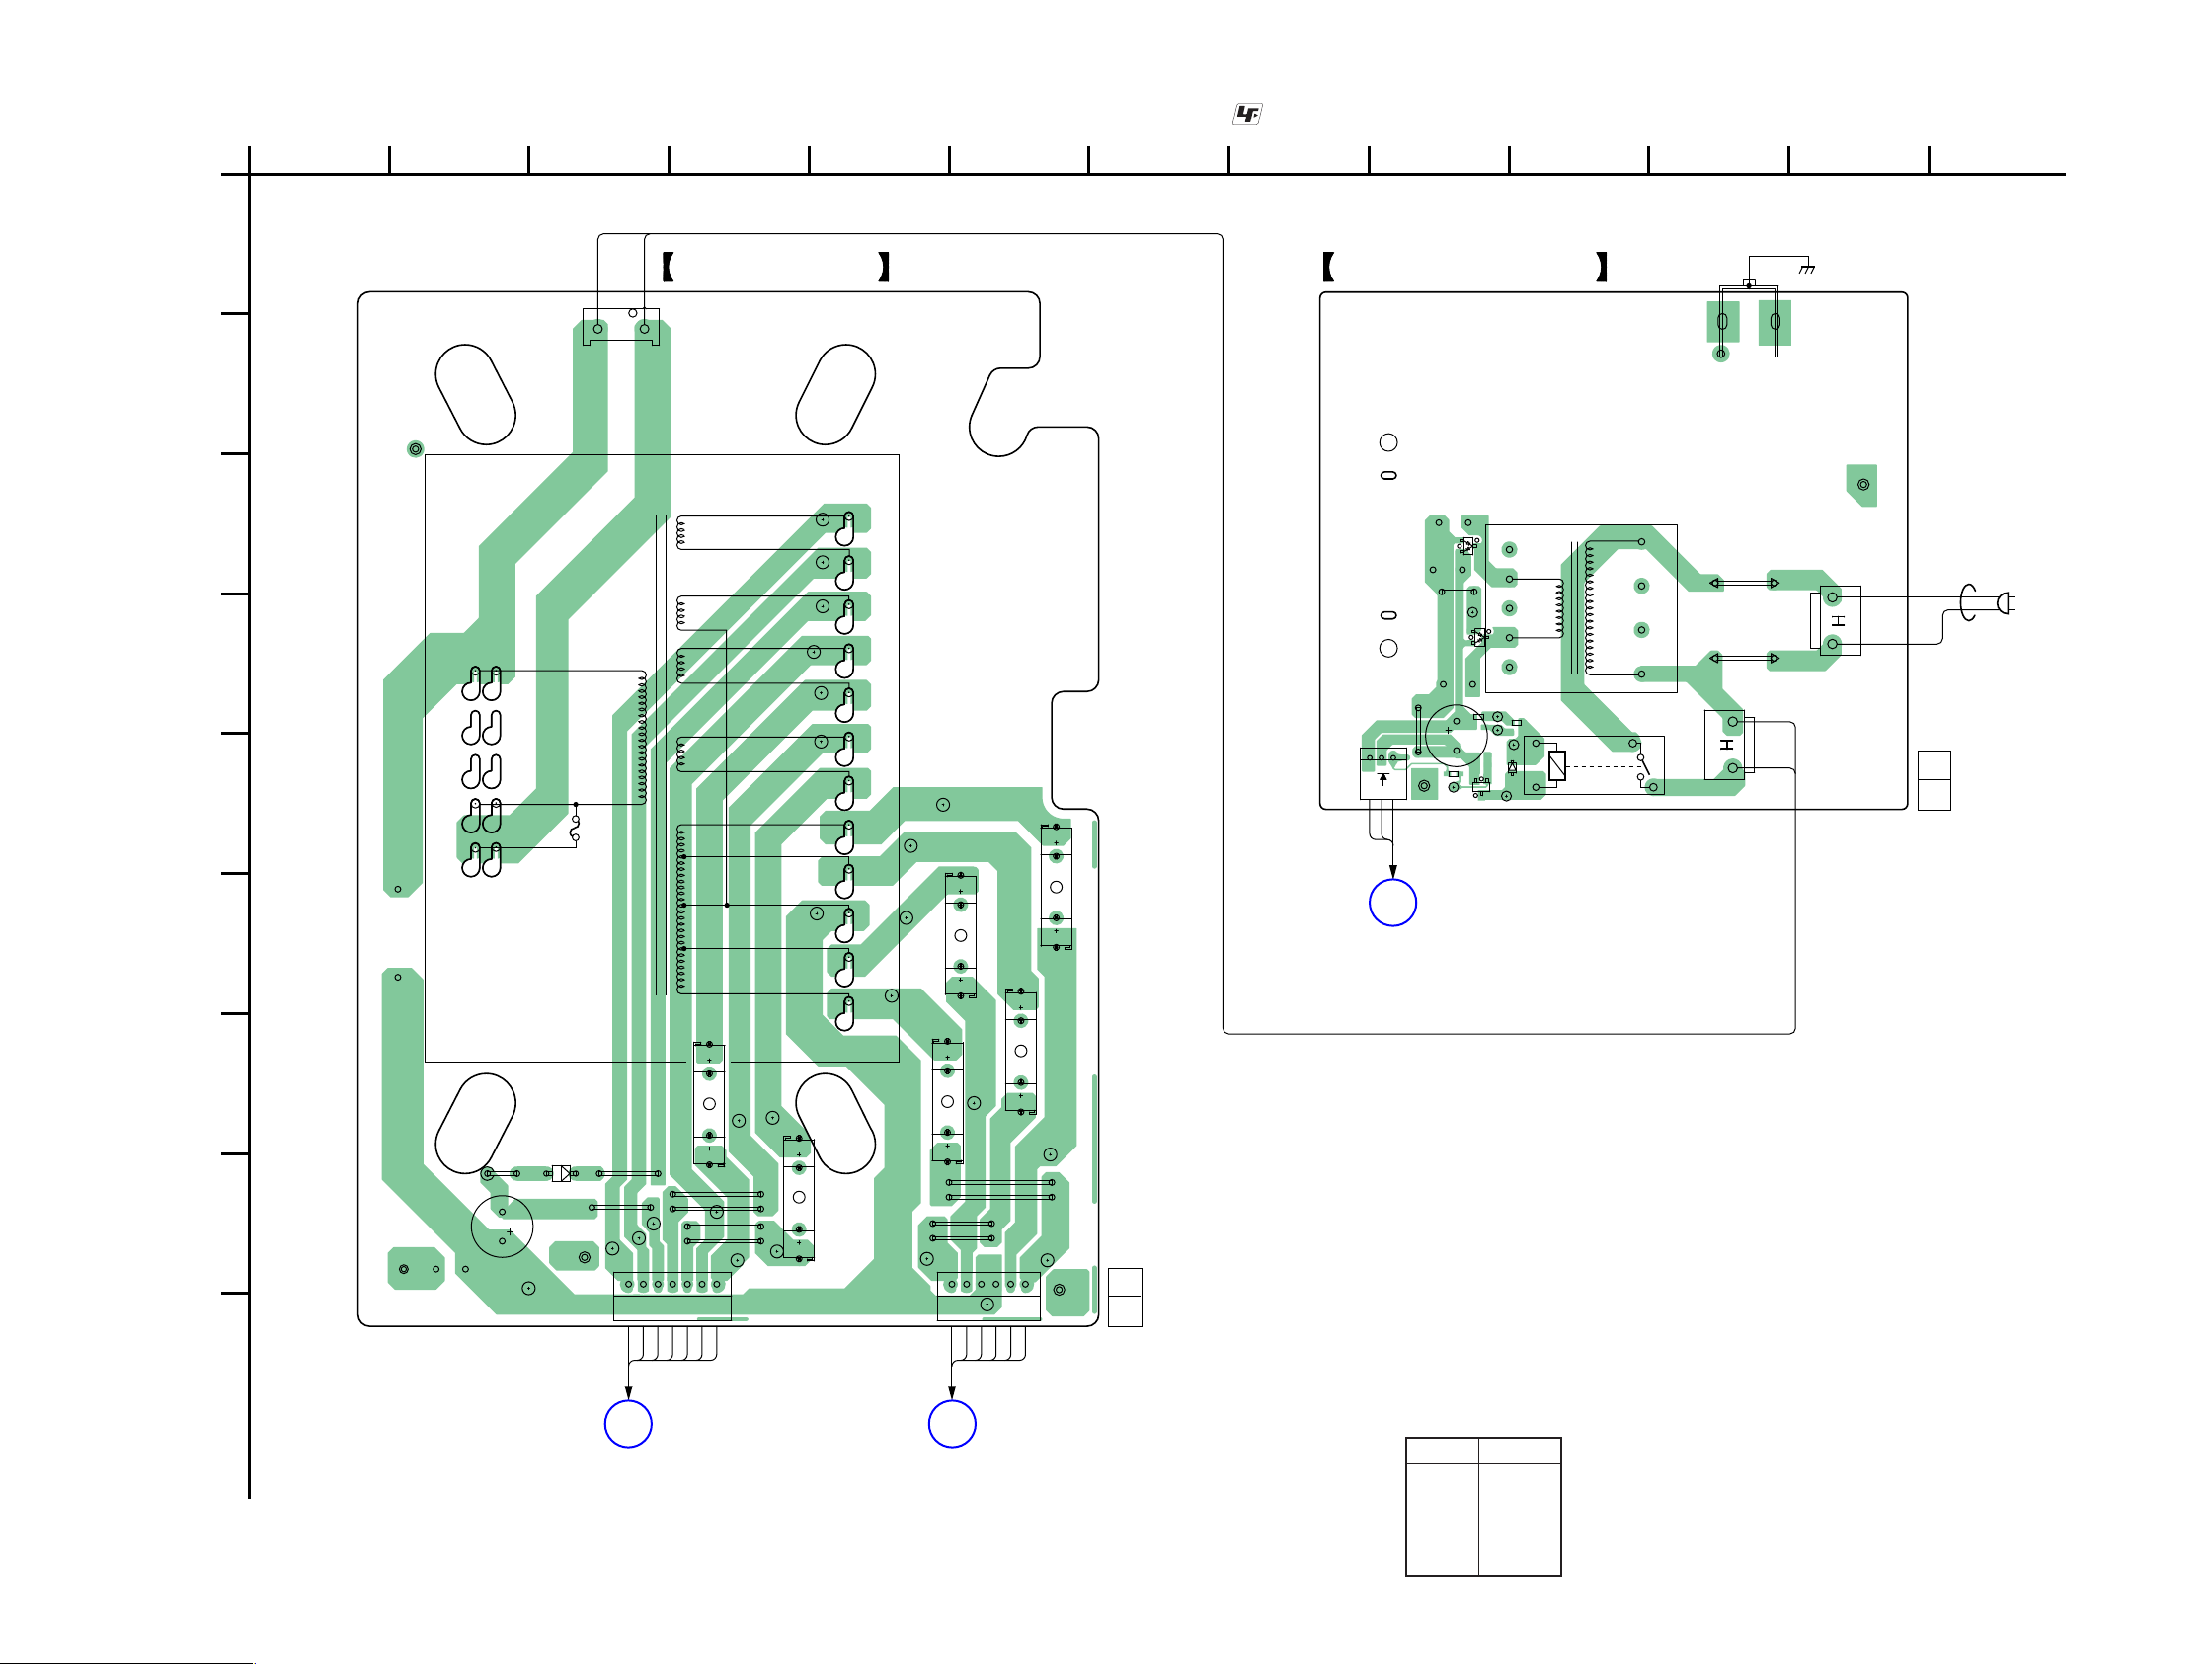
HCD-ZX66i/ZX99i
HCD-ZX66i/ZX99i
5858
1
A
B
C
D
E
F
G
H
I
2345678910111213
1-878-476-
11
(11)
1-878-475-
11
(11)
TRANS BOARD
SUBTRANS BOARD
K
MAIN BOARD
NO500
T
POWER AMP
BOARD
NO603
S
POWER AMP
BOARD
NO608
1617
13
W10
W11
W12
W13
W14
W15
W16
W17
W18
W19
C1192
D1192
F1151
F1161
F1171
F1141
JL1
JL2
JL3
JL4
JL5
F1181
JL6
JL7
JL8
JL9
LP1100
LP1101
F1191
W901
R1201
LP1180
NO1114
JW1141
JW1142
JL10
JL11
JL12
JL13
JL14
JL15
JL16
JL17
JL18
JL19
JL20
JL21
JL22
JL23
JL24
JL25
JW1171
JW1172
W2
: NOT REPLACEABLE:
BUILT IN TRANSFORMER.
W6
W3
W8
JW1181
W9
JW1182
JW1183
JW1184
JW1185
JW1186
CN1112CN1113
13
13
13
JW1050
JW1051
JL1000
JL1001
PT1101
POWER TRANSFORMER
(SUB)
PT1100
POWER TRANSFORMER
(MAIN)
JL1002
JL1003
JL1004
JL1005
B1000
(CHASSIS)
CN1000
Q1000
ECB
RY1000
D1000
D1001
D1002
R1000
C1052
R1050
JW1114
R1051
BRN
BLK
FC901
AC IN ~
WHT
BLU
JW1115
LP1000
LP1001
GRY
GRY
BRN
BLU
BLK
CN1115
CN1116
6-28. PRINTED WIRING BOARDS – TRANSFORMER Section – • See page 29 for Circuit Boards Location. • : Uses unleaded solder.
Ref. No. Location
• Semiconductor
Location
D1000 E-10
D1001 C-9
D1002 D-9
D1192 H-3
Q1000 E-9
(Page 56)
(Page 56)
(Page 38)
Page 59
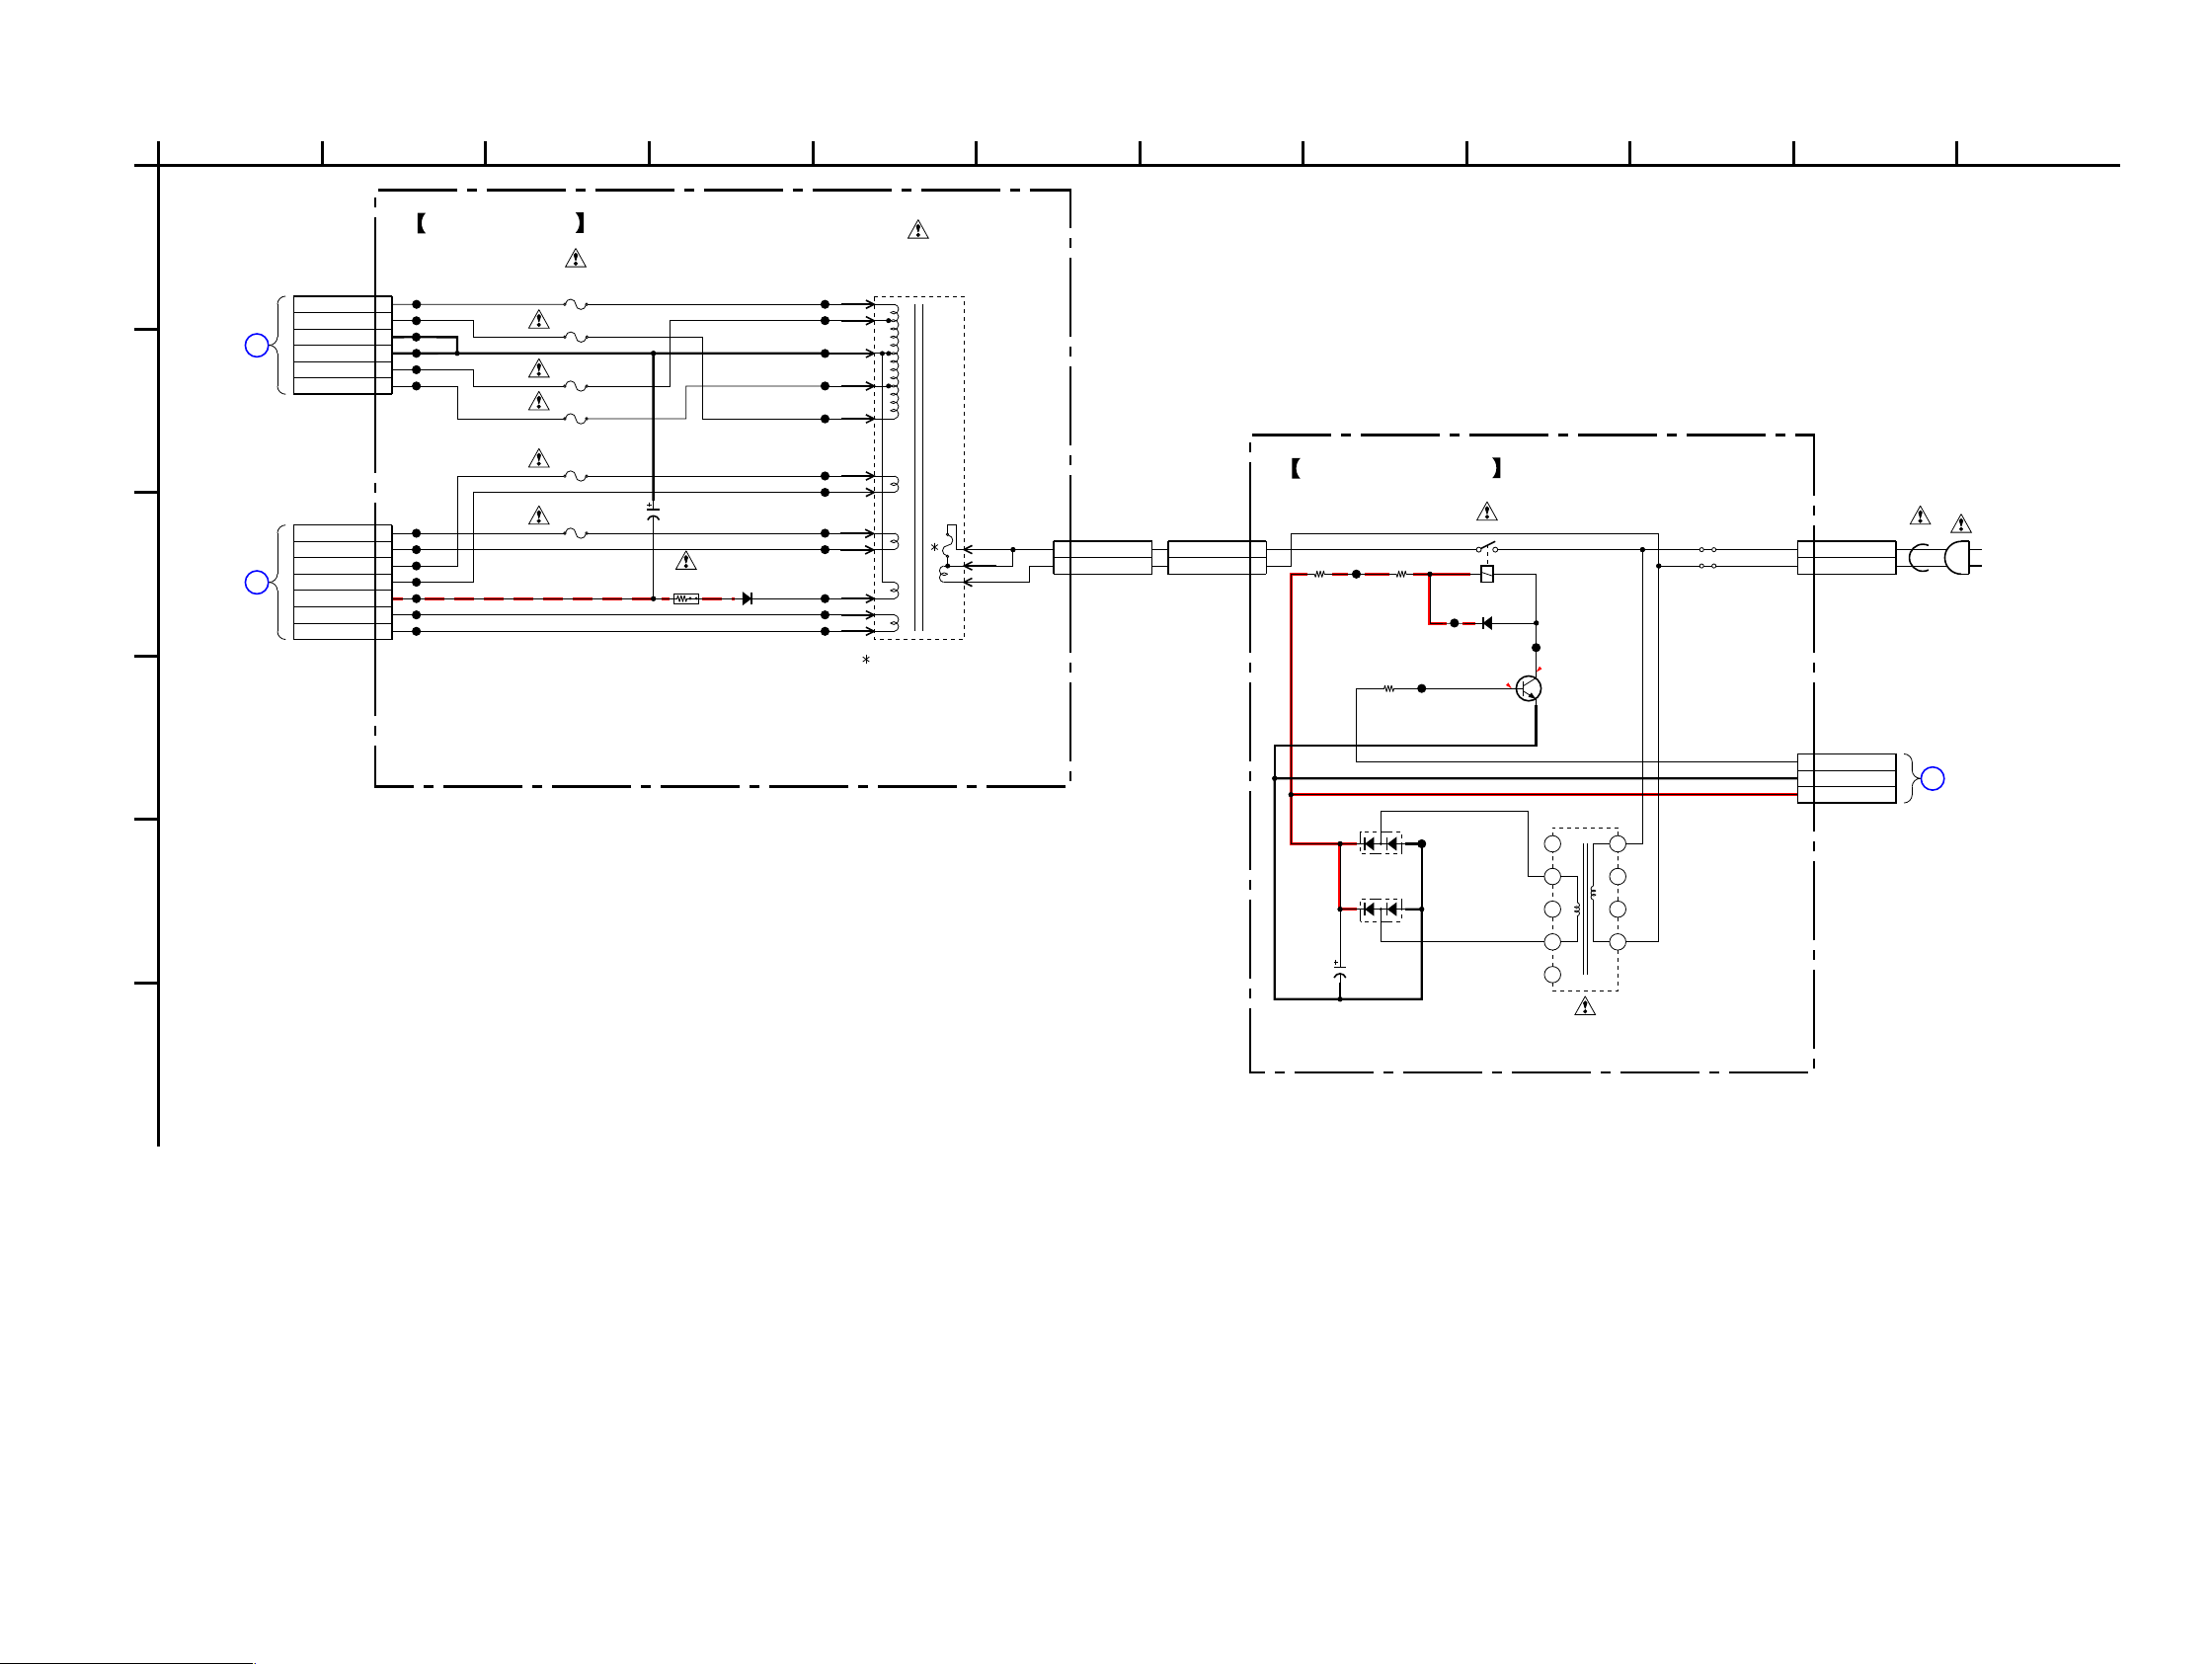
HCD-ZX66i/ZX99i
HCD-ZX66i/ZX99i
5959
114 935
F
21
E
B
A
C
710
D
86 12
NO608
S
POWER AMP
BOARD
BOARD
NO603
T
POWER AMP
BOARD
MAIN
K
(2/3)
NO500
0.8
0.1
JL20
JL5
W18
JL16
JL23
JL2
JL9
W10
JL19
JL11
JL15
JL1
JL24
JL25
JL3
W8
W14
JL17
W15
1
3
NO1114
2P
120V
N
JL12
1
2
3
4
5
6
1
2
3
4
5
6
7
6P
CN1112
AC-VL
AC-VL
GND
GND
AC-VH
AC-VH
JL10
W2
JL4
W19
W9
W16
JL6
JL14
JL13
W13
63V
100
C1192
JL18
W12
JL21
W11
JL22
7P
CN1113
VF
VF
-VFL
AC3
AC3
AC4
AC4
JL7
JL8
10EDB40-TB3
D1192
F1141
T8AL 250V
F1171
T8AL 250V
F1151
T8AL 250V
F1161
T8AL 250V
F1181
T4AL 250V
W3
F1191
T4AL 250V
JW1115
RY1000
JL1003
JL1000
JL1001
25V
1000
C1052
JW1114
1
3
CN1116
2P
L
N
MC2840-T1
12-1
D1001
RECT
JL1005
0
R1051
MC2840-T1
12-1
D1002
RECT
22
R1050
1
3
4
5
6
7
8
9
2
PT1101
POWER TRANSFORMER
(SUB)
MA2J1110GLS0
D1000
JL1004
2SC3052EF-T1-LEF
Q1000
RELAY DRIVER
4.7k
R1000
1
2
3
3P
CN1000
STBY RLY
DGND
EVER+10V
1
3
CN1115
2P
120V
N
W17
0.68
R1201
W6
TRANS BOARD
PT1100
POWER
TRANSFORMER
(MAIN)
FC901
AC IN ~
SUBTRANS BOARD
NOT REPLACEABLE:
BUILT IN TRANSFORMER.
6-29. SCHEMATIC DIAGRAM – TRANSFORMER Section –
(Page 57)
(Page 57)
(Page 40)
Page 60
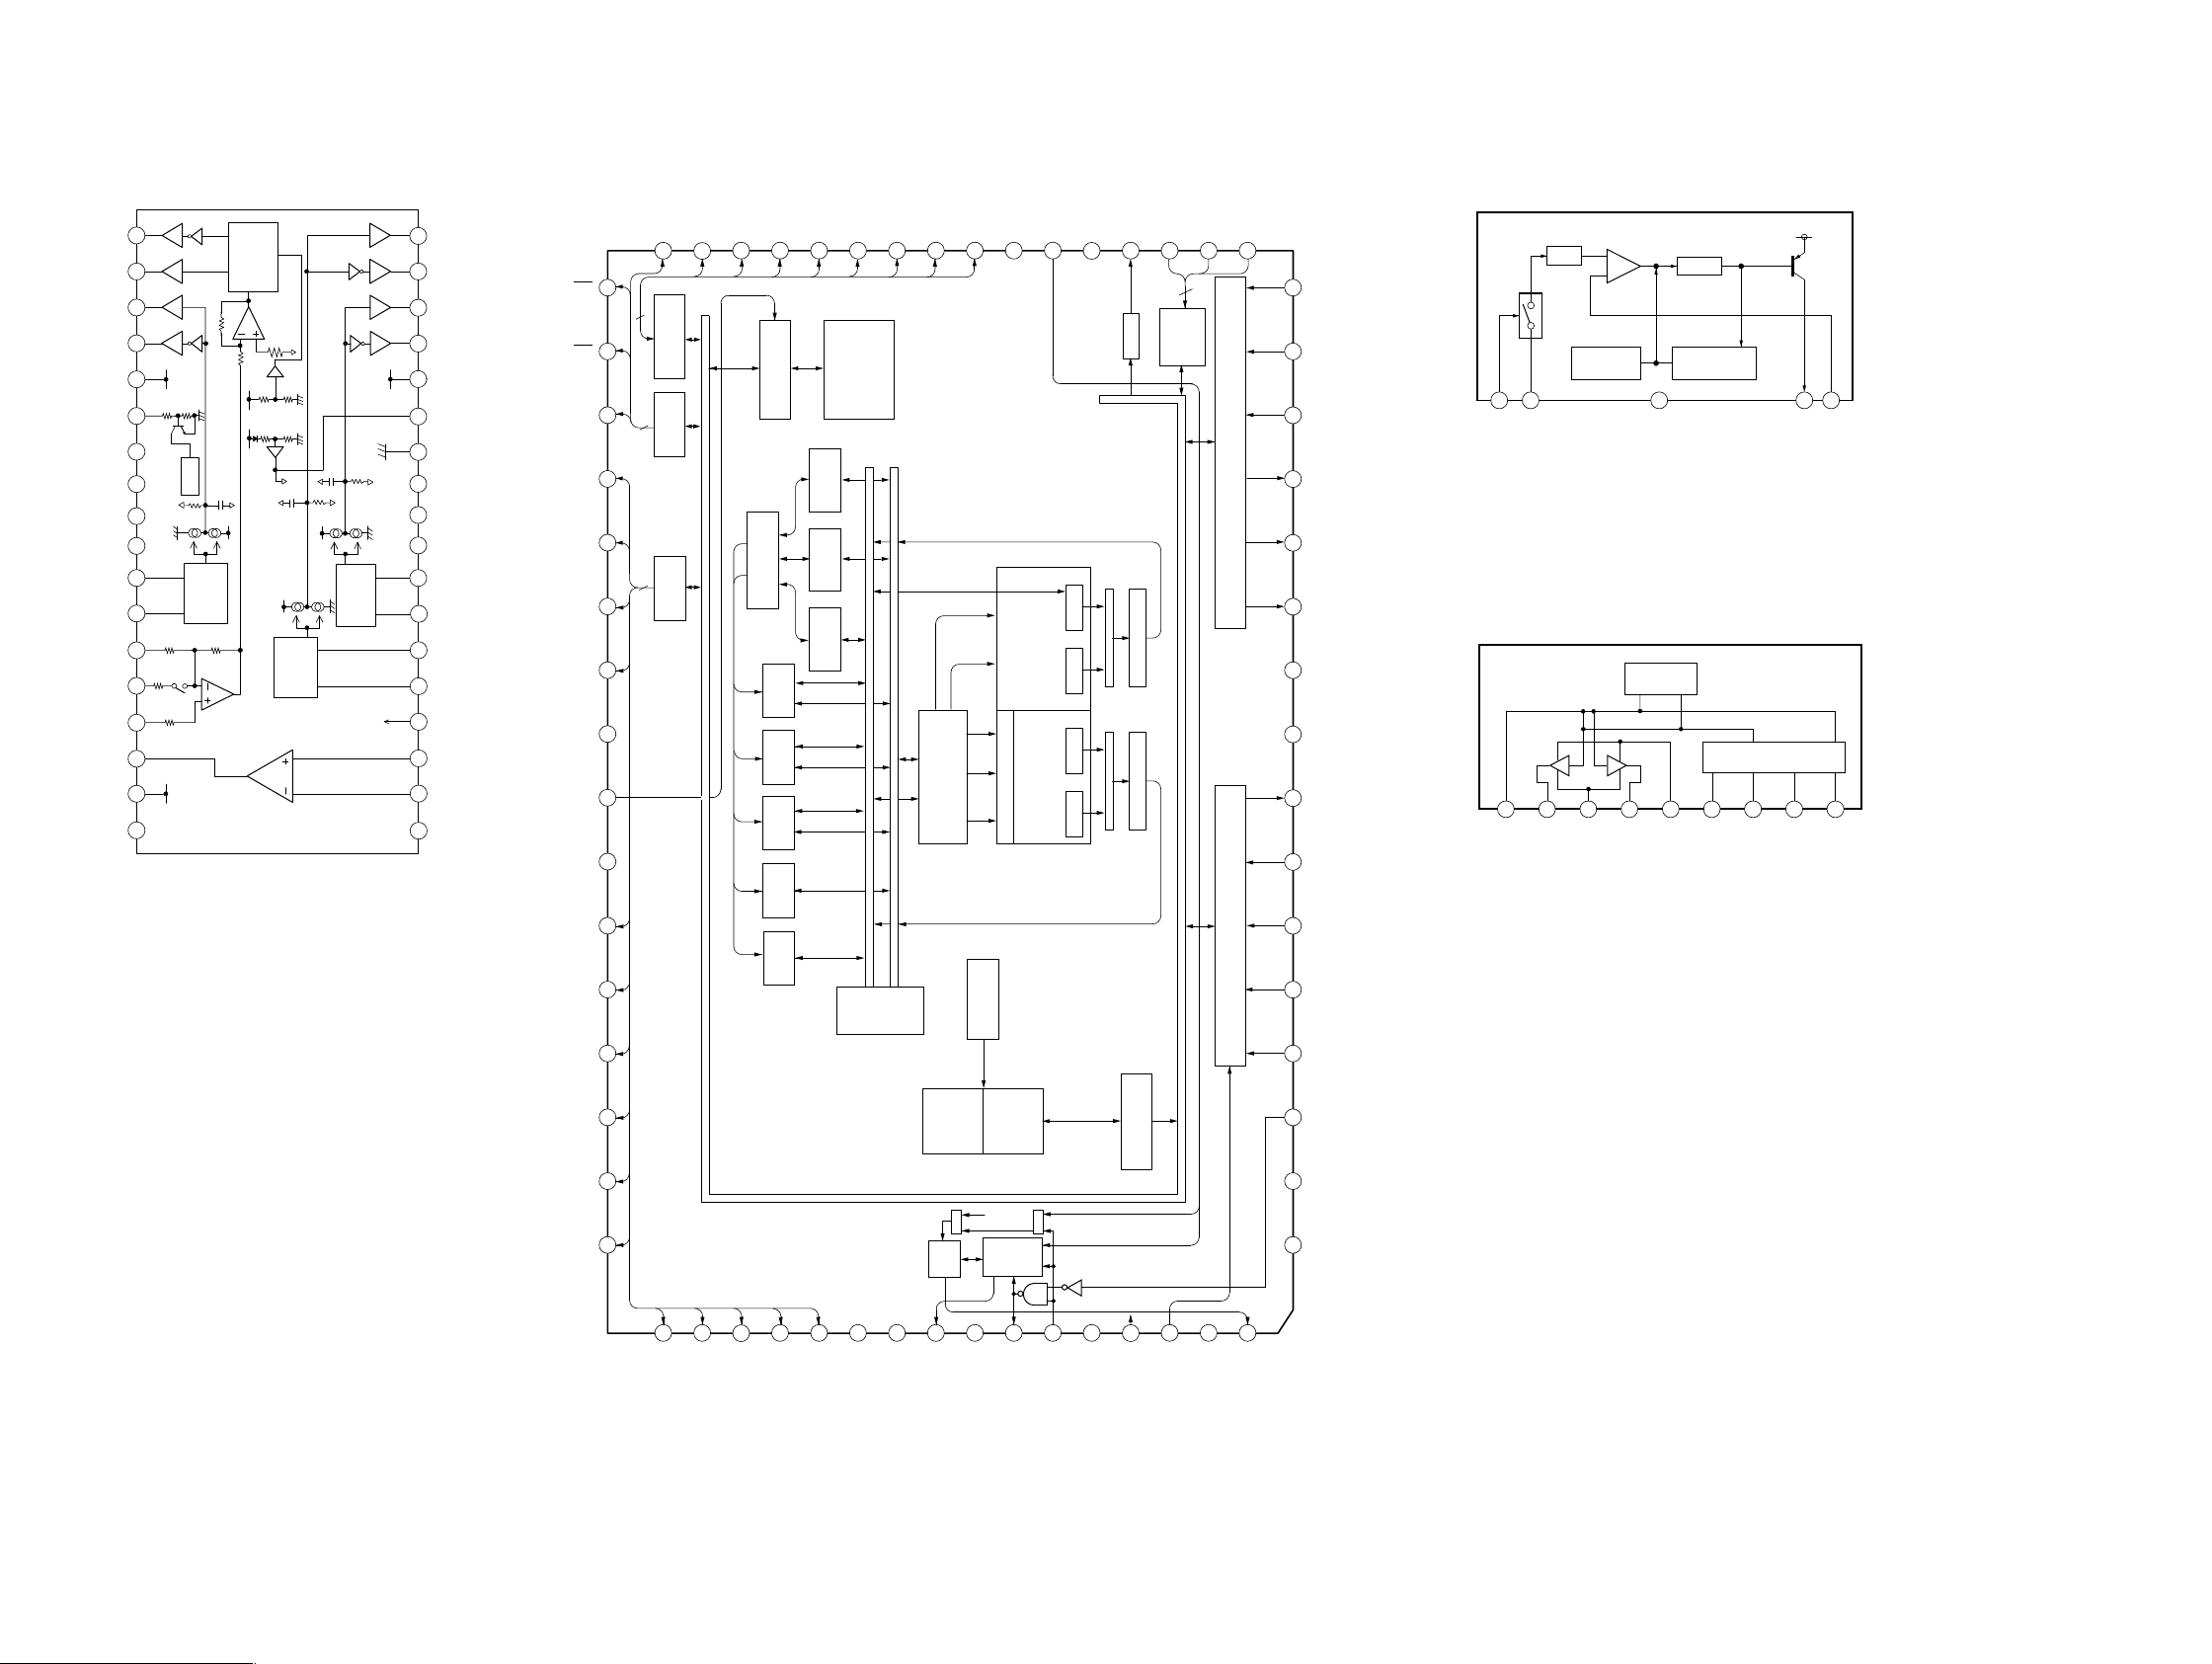
HCD-ZX66i/ZX99i
HCD-ZX66i/ZX99i
6060
• IC Block Diagrams
IC251 BA5947FM-E2 (BD81A Board) IC301 TC94A34FG-002 (BD81A Board) IC501 BA00BC0WCP-V5E2 (MAIN Board (1/3))
IC514 BA6956AN (MAIN Board (1/3))
IC515 BA6956AN (MAIN Board (1/3))
RAS
CAS
OE
WE
PIO7
PIO6
PIO5
PIO4
Bus
Switch
BUCK
CCE
AD12
AD11
General
In/Output Port
Address Calc.
2sets
Y-Pointer
register
C-Pointer
register
X-Pointer
register
VDDM
SRMSTB
VDDT
AD10
AD9
ERAM
2k word
CRAM
4k word
CROM
4k word
YRAM
4k word
XRAM
4k word
SRAM/
DRAM I/F
SRAM I/F
1Mbit
SRAM
X-Bus
Y-Bus
AD7
AD6
AD5
49 50 51 52 53 54 55 56 57 58 59 60 61 62 63 64
1
2
3
4
5
6
7
8
9
10
11
12
13
14
15
16
1718192021
222324252627282931 3032
33
34
35
36
37
38
39
40
41
42
43
44
45
46
47
48
AD8
VCO
Timing
Generator
PRAM
Instruction
Decoder
Program
Control
MCU. I/F
register
XO • X1 • X2
Y0 • Y1 • Y2
MX MY MZ
MAC
A0 A1
AX AY
ALU
A2 A3
DIT
round & limit round & limit
Audio I/F
LRCKIA
BCKIA
SDI0
LRCKO
BCKO
SDO0
VSS
VDDT
MIACK
MICK
MIDIO
MILP
MICS
STANBY
RESET
VDDP
AD4
AD3
AD2
AD1
AD0
VSS
VDD
CKO
VDDX
XO
TEST
VCOI
VSSX
XI
MIMD
VSSP
PIO3
PIO2
PIO1
PIO0
VSS
CKI
VDD
TXO
SFSY
SBSY
DATA
POM
Sub code
I/F
CDP Cont
I/F
CH4OUTR
D
20
CH4OUTF
D
21
CH3OUTF
D
22
CH3OUTR
POW
VCC
23
POWVCC
MUTE
GND
GND
PREGND
CT
CH3RIN
CH3FIN
CH4IN
CH4CAPA
OUTVREF
DPOUT
TREVCC
NC
24
25
26
27
28
29
30
31
32
33
34
35
36
10k
(ch3, 4)
50k 50k
100k
PIN3
50k
Pre
Vcc
R
F
R
MUTE
INTER-
FACE
19k
10k
F
LEVEL
SHIFT
POW
VCC
Vref
50k
50k 50k
PIN26
6.5k
50k
Vref
F
INTER-
FACE
D
19
F
R
F
INTER-
FACE
POW
VCC
(ch1, 2)
R
SW
D
CH1PUTF
18
D
CH1OUTR
17
D
CH2OUTF
16
D
CH2OUTR
15
POWVCC
14
CNF4
13
12
GND
C-M
11
10
9
8
7
6
5
4
3
2
1
C-P
VG
CH2RIN
CH2FIN
CH1RIN
CH1FIN
SW
OPIN+
OPIN-
NC
R
F
VREF
2
1
VN
VC
1 2 3 4 5 6 7 8 9
VREF
OUT2
–
+
THERMAL
SHUT DOWN
RNF
TSD
OUT1
DRIVER
OVER CURRENT
PROTECT
3
GND
VIN
CONTROL LOGIC
VCC
VDD
5VO4
VFB
FIN
GND
RIN
Page 61
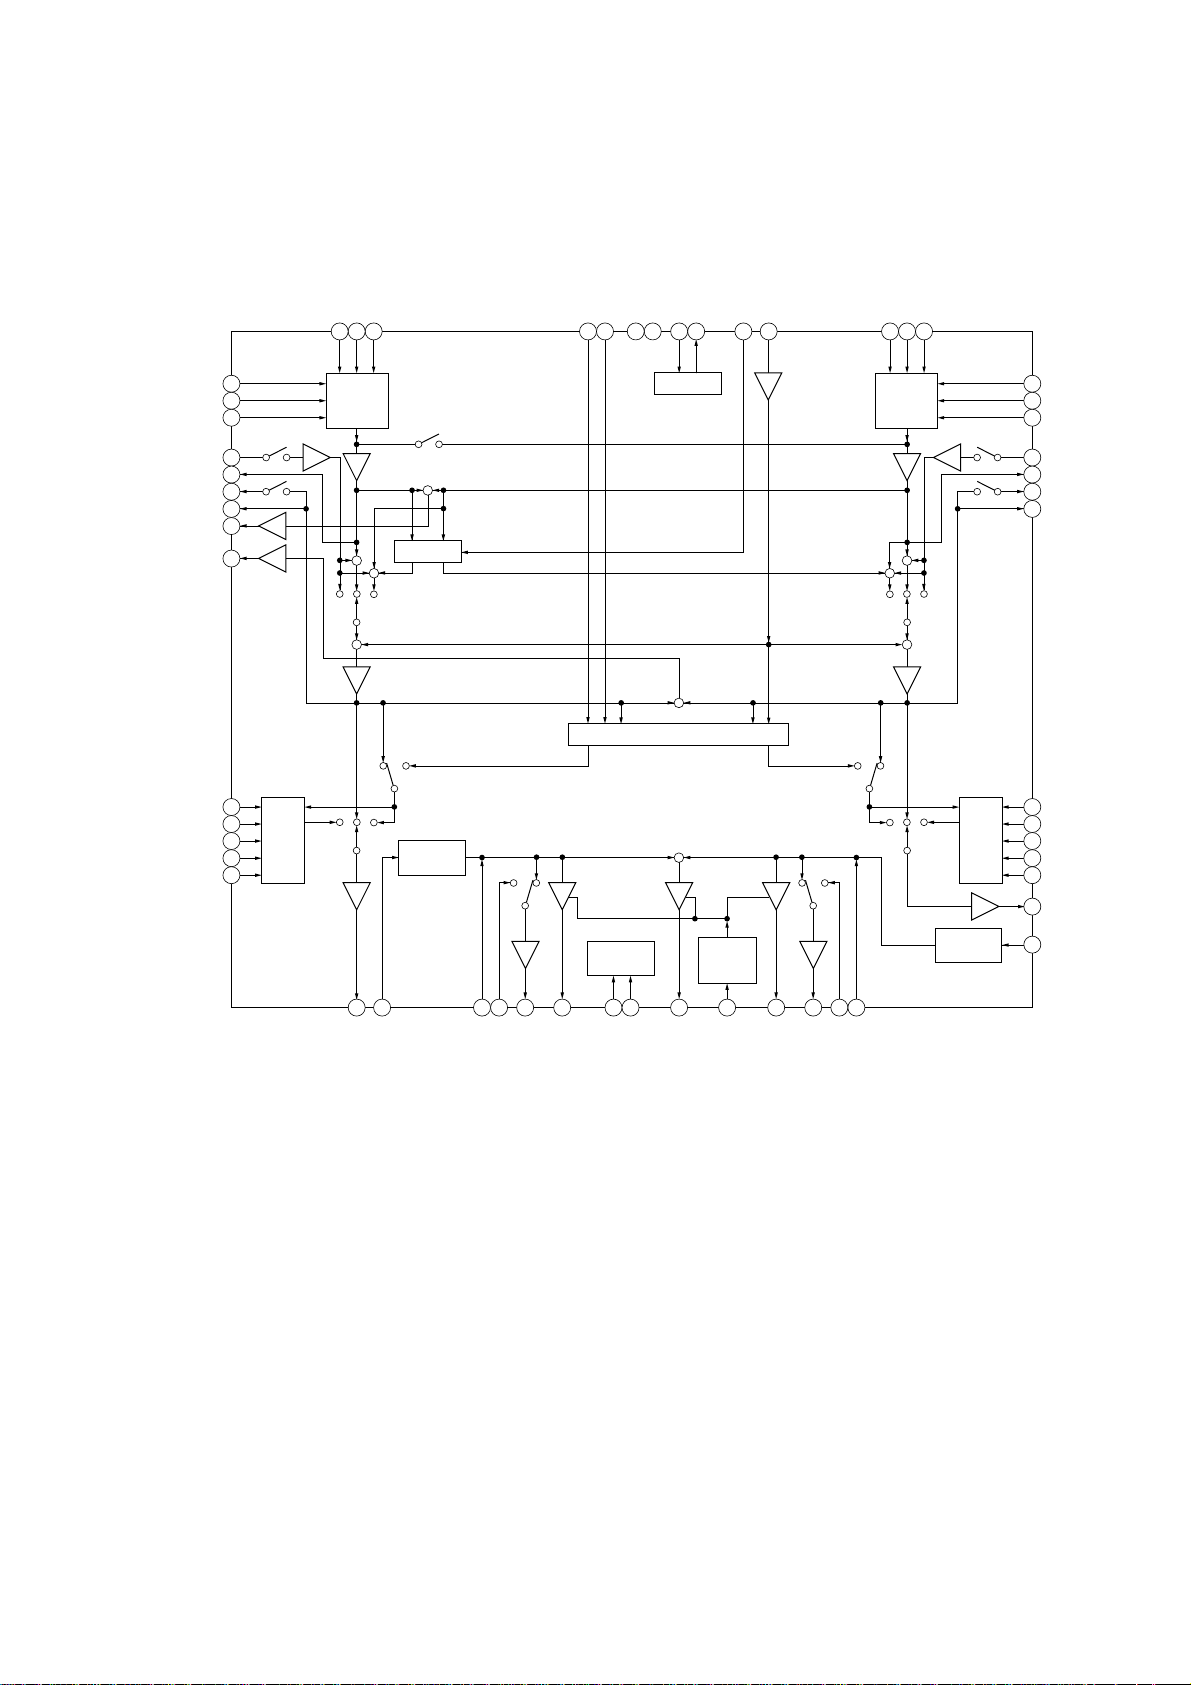
IC101 R2A15216FP (MAIN Board (3/3))
ST-R
CD-R
VIDEO-R
5455 525356 434445464748495051
DPLR/SURR
DPLL/SURL
VCC
GND
REFIN
REFOUT
HCD-ZX66i/ZX99i
VIDEO-L
CD-L
MIC IN
VC
ST-L
MD_IN-R
PHONO-R
IPOD-R
GAMER
INGAINOUTR
MD_OUT-R
RECBR
SA1
SA2
TRER
MID1R
MID2R
BASS1R
BASS2R
1
2
3
4
5
6
7
8
9
10
TONE
11
(TRE,
12
MID,
13
BASS)
14
6 INPUT
SELECTOR
(R-CH)
+
VOCAL CUT
+
+
+
R
ELECTRICAL
VOLUME
INTERFACE
IC102 SI8008TM-TL (KP POWER Board)
15 17 21 22 2419 20 231816 282625 27
BB1R
BB2R
VOLINR
TONEOUTR
OUTR
AGCOUTR
REFERENCE
+
SURROUND OR DPL IN
+
MCU
CLK
DATA
SWOUT
AUTO
GAIN
CONTROL
AGCC
AGCOUTL
OUTL
BB2L
SELECTOR
BB1L
6 INPUT
(L-CH)
+
+
+
TONE
L
(TRE,
MID,
BASS)
ELECTRICAL
VOLUME
42
MD_IN-L
41
PHONO-L
40
IPOD-L
39
GAMEL
38
INGAINOUTL
37
MD_OUT-L
36
RECBL
35
TREL
34
MID1L
33
MID2L
32
BASS1L
31
BASS2L
TONEOUTL
30
VOLINL
29
61
Page 62
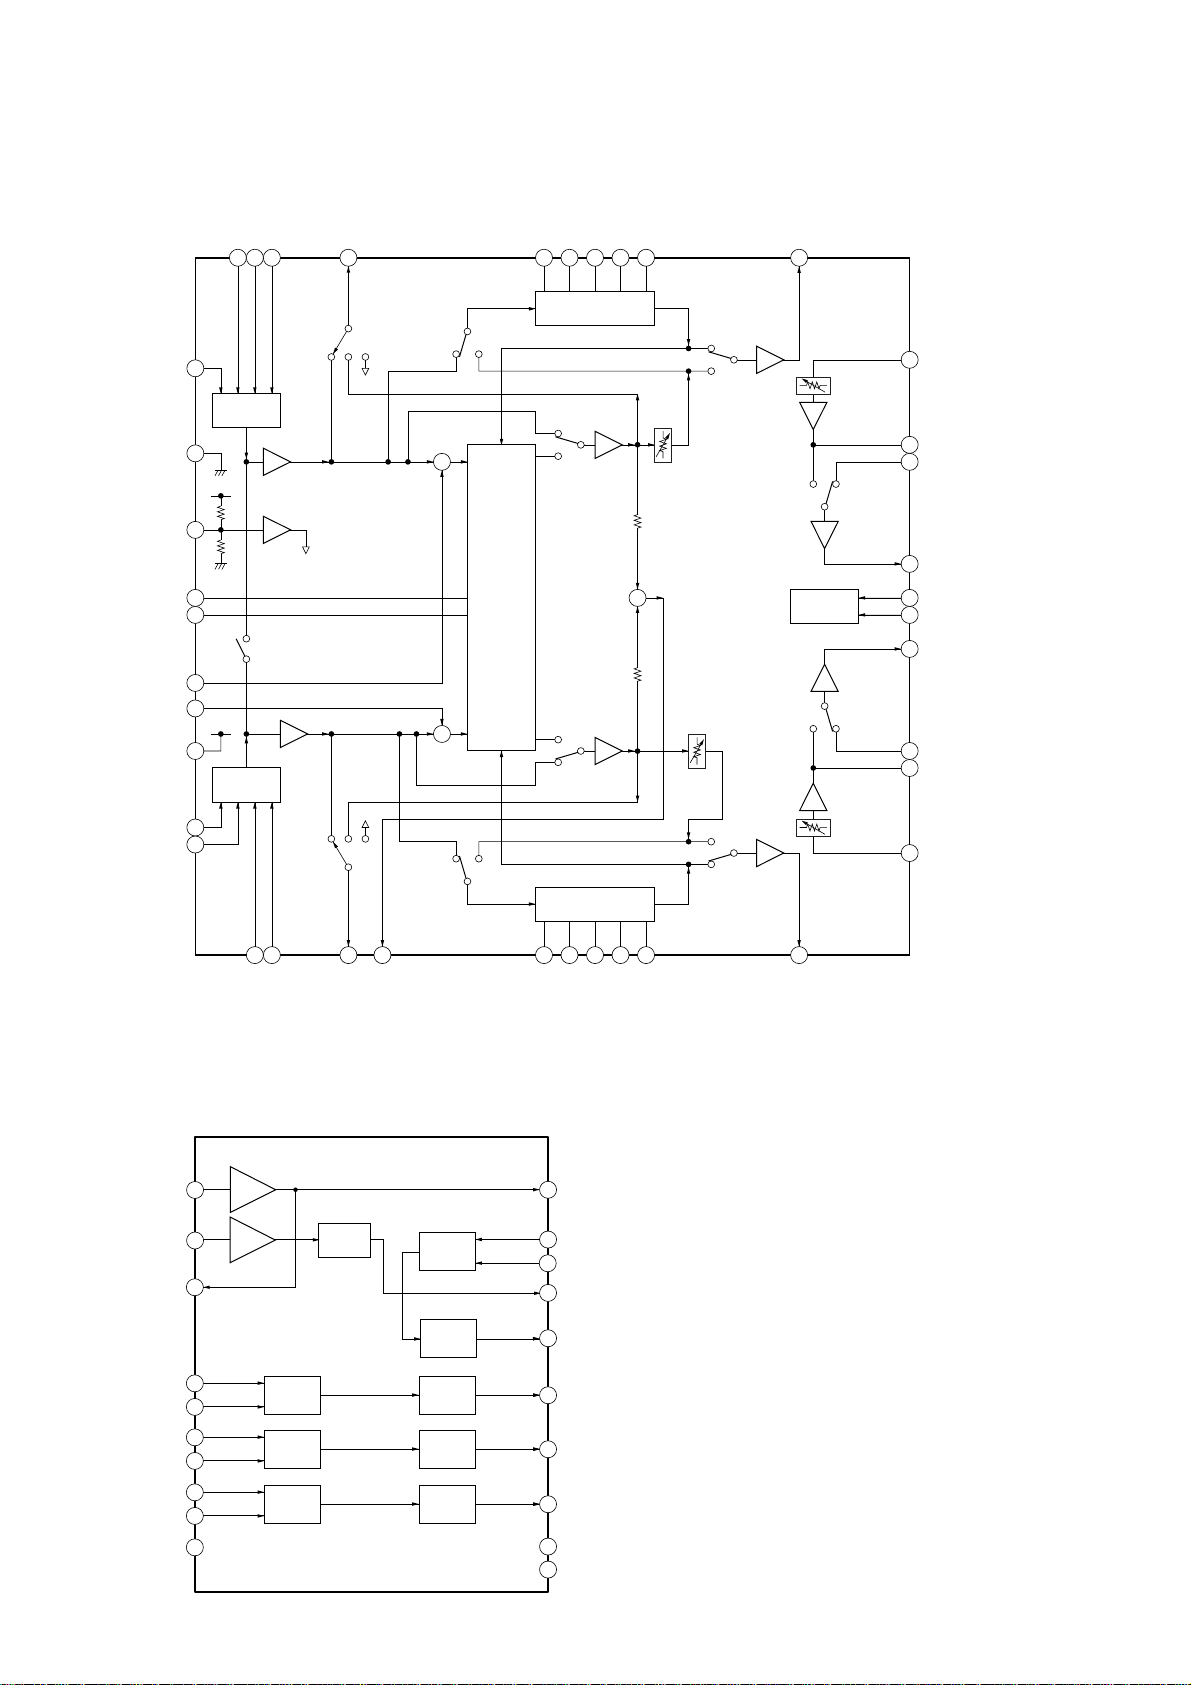
HCD-ZX66i/ZX99i
IC102 R2S15207FP (MAIN Board (3/3))
INC1
INB1
29 28
30
INA1
31
INPUT
SELECTOR
GND
32
REFIN
33
IND1
REC OUT
27
REC1
VOCAL CUT
ON/OFF
+
BASS1125BASS2124TRE123MID1122MID21
26
TONE CONTROL
(BASS, TREBLE, MID)
TONE ATT
TONE
ON/OFF
TONEOUT1
21
VOLIN1
20
VOLUME
BB11
19
BB21
18
BASS BOOST
ON/OFF
REF
SUR1
34
SUR2
35
MONO/STEREO
MIX1
36
37
MIX2
VOCAL CUT
ON/OFF
4
SAOUT
+
VCC
INA2
INB2
38
39
40
INPUT
SELECTOR
1 2
INC2
IND2
REC OUT
3
REC2
IC903 NJM2760V-TE2 (PANEL COM Board)
SURROUND
VOCAL CUT
TONE CONTROL
(BASS, TREBLE, MID)
5
7
8
TRE2
BASS126BASS22
+
MID129MID22
TONE ATT
ON/OFF
TONE
MCU
INTERFACE
10
TONEOUT2
BASS BOOST
ON/OFF
VOLUME
16
15
14
13
12
11
OUT117
DATA
CLOCK
OUT2
BB22
BB12
VOLIN2
62
BUF1OUT
BPF2IN1
BPF2IN2
BPF3IN1
BPF3IN2
BPF4IN1
BPF4IN2
GND
IN1
1
IN2
2
3
4
5
6
7
8
9
10
DET
BPF DET
BPF DET
BPF DET
BPF
DET
20
19
18
17
16
15
14
13
12
11
BPF2OUT
BPF1IN1
BPF1IN2
RECOUT
BPF4OUT
BPF3OUT
BPF2OUT
BPF1OUT
NC
VCC
Page 63
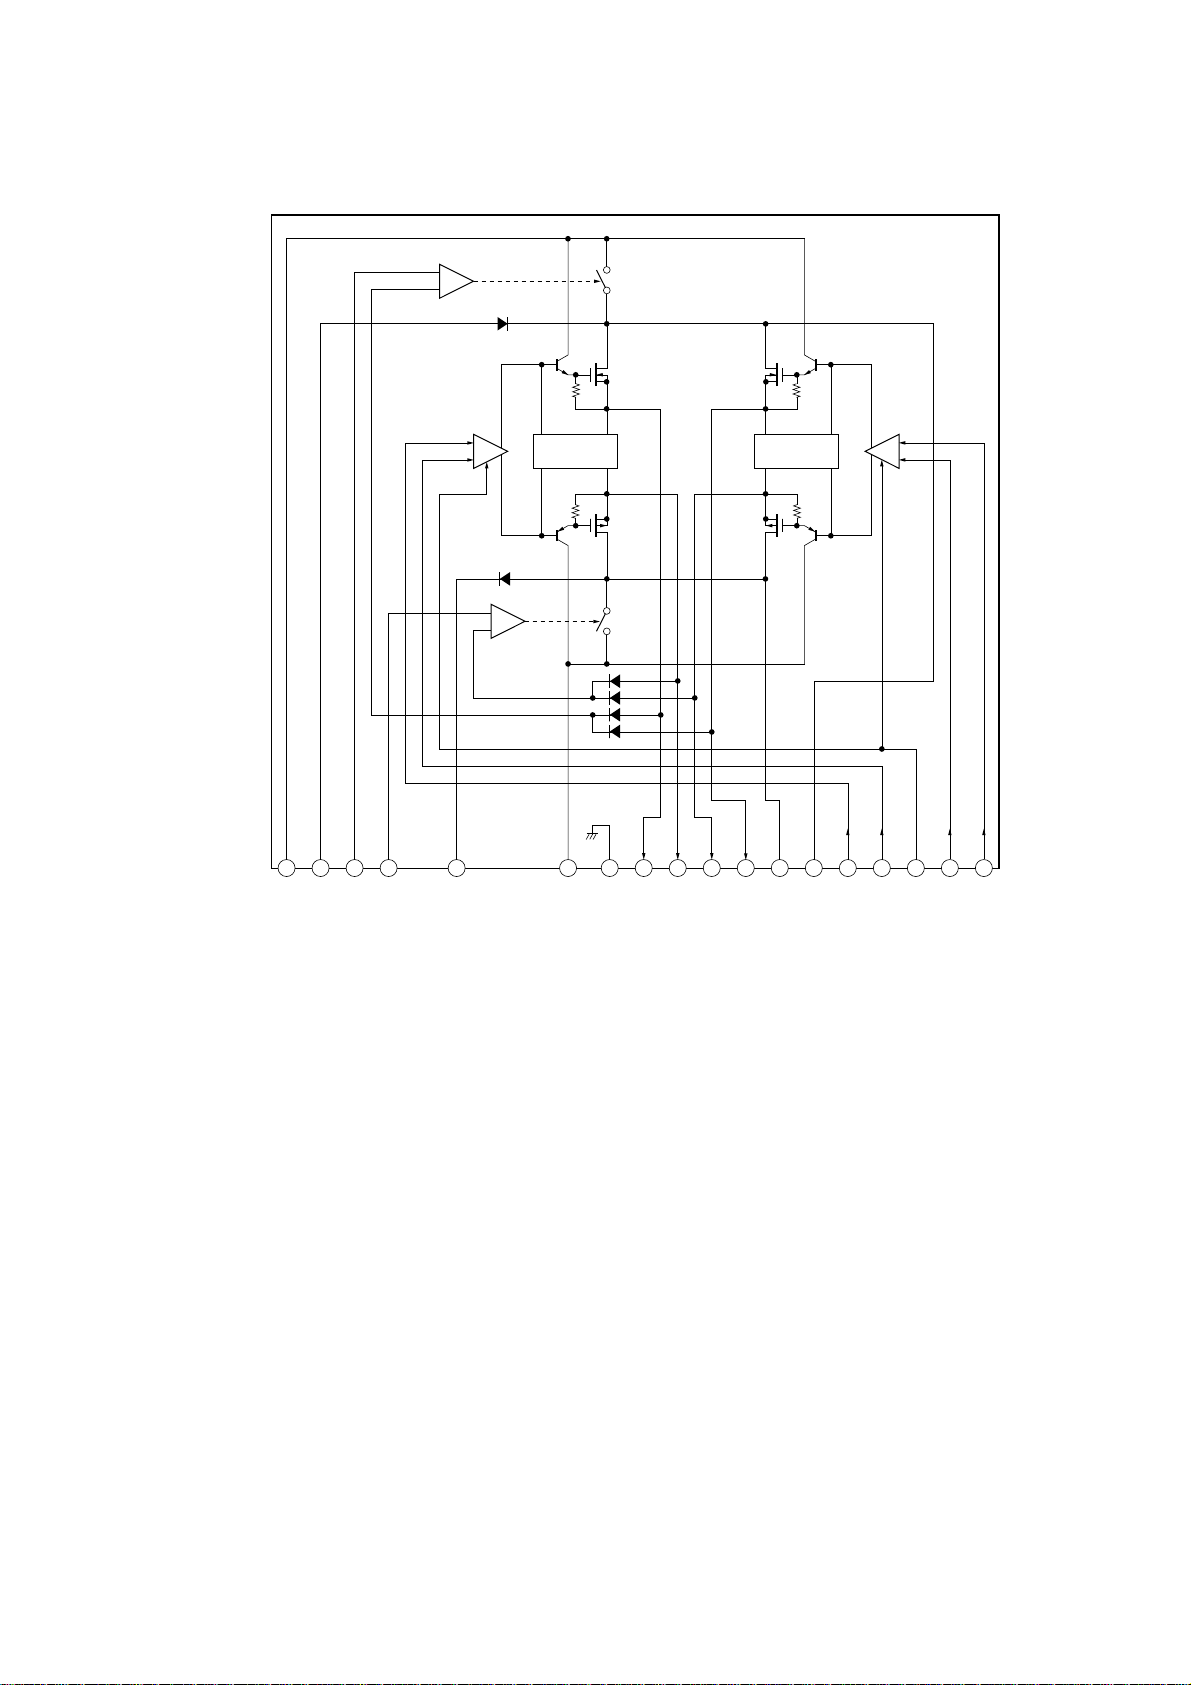
IC701 STK412-240M-E (SURROUND Board) (HCD-ZX99i only)
IC601 STK412-240M-E (POWER AMP Board) (HCD-ZX99i only)
COM1
HCD-ZX66i/ZX99i
PRE
DRIVER
1
2
3
+VH
+VL
+REF
4
–REF
5
–VL
COM2
CURRENT
LIMITER
6
–VH
7
SUB-GND
8
+RE1
10
–RE19–RE2
CURRENT
LIMITER
11
12
13
+RE2
–PRE
+PRE
PRE
DRIVER
14
15
16
17
18
IN1
NF1
BIAS
NF2
IN2
63
Page 64
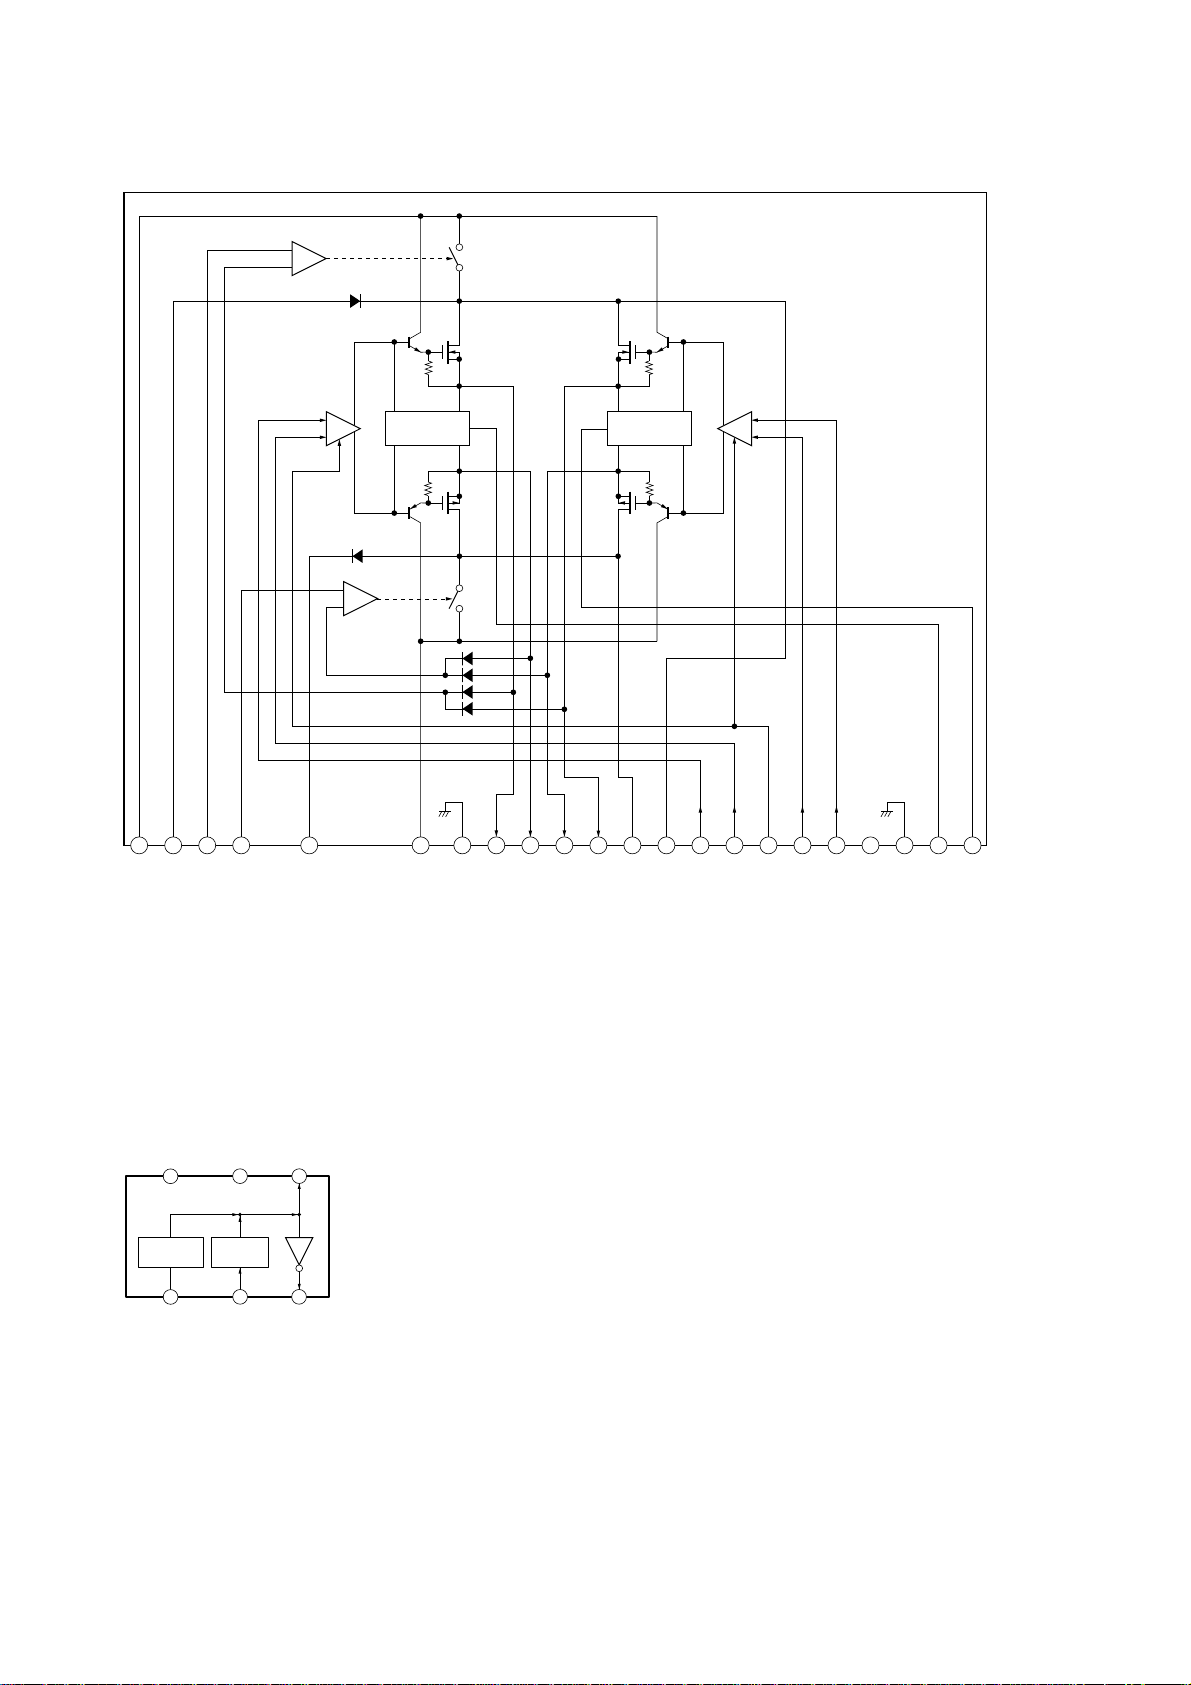
HCD-ZX66i/ZX99i
IC600 STK412-150C (POWER AMP Board) (HCD-ZX66i only)
COM1
PRE
DRIVER
1
2
3
+VH
+VL
4
+REF
–REF
5
–VL
COM2
CURRENT
LIMITER
6
–VH
7
SUB-GND
8
+RE1
10
–RE19–RE2
CURRENT
LIMITER
11
12
13
+RE2
–PRE
+PRE
PRE
DRIVER
14
15
16
17
18NC19
IN1
NF1
BIAS
NF2
20
IN2
GND
22
LIM121LIM2
64
IC627 RT8H015C-T112-1 (POWER AMP Board)
CT
VCC
6
OVER LOAD
DETECTDCDETECT
1
OCP
GND
5
2 3
VP
4
OUT
Page 65
• IC Pin Function Descriptions
BD81A BOARD IC101 CXD3059AR (RF AMP, DIGITAL SIGNAL PROCESSOR)
Pin No. Pin Name I/O Description
1 MIRR I/O Mirror signal input/output (Not used in this set)
2 DFCT I/O Defect signal input/output (Not used in this set)
3 FOK I/O Focus OK signal input/output (Not used in this set)
4 VSS — Ground
5 LOCK I/O Lock signal input/output (Not used in this set)
6 MDP O Spindle motor servo control signal output
7 SSTP I Disc most inner detection signal input
8 IOVSS1 — Digital ground
9 SFDR O Sled drive signal output (FWD direction)
10 SRDR O Sled drive signal output (REV direction)
11 TFDR O Tracking drive signal output (FWD direction)
12 TRDR O Tracking drive signal output (REV direction)
13 FFDR O Focus drive signal output (FWD direction)
14 FRDR O Focus drive signal output (REV direction)
15 IOVDD1 — Digital power supply pin (+3.3 V)
16 AVDD0 — Analog power supply pin (+3.3 V)
17 AVSS0 — Analog ground
18 NC — Not used. (Open)
19 E I E signal input
20 F I F signal input
21 TEI I Tracking error signal input
22 TEO O Tracking error signal output
23 FEI I Focus error signal input
24 FEO O Focus error signal output
25 VC I/O VC voltage output/Center voltage input
26 A I A signal input
27 B I B signal input
28 C I C signal input
29 D I D signal input
30 NC — Not used. (Open)
31 AVDD4 — Analog power supply pin (+3.3 V)
32 RFDCO I/O RFDC signal input/output (Not used in this set)
33 PDSENS I Reference voltage input (Fixed at L in this set)
34 AC_SUM O RFAC summing amplifi er signal output
35 EQ_IN I Equalizer circuit signal input
36 LD O APC amplifi er signal output
37 PD I APC amplifi er signal input
38 NC — Not used. (Open)
39 RFC I EQ cut off frequency adjustment input
40 AVSS4 — Analog ground
41 RFACO O RFAC signal output
42 RFACI I RFAC signal input
43 AVDD3 — Analog power supply pin (+3.3 V)
44 BIAS I Asymmetry circuit constant current input
45 ASYI I Asymmetry comparate voltage input
46 ASYO O EFM full swing signal output
47 VPCO O Charge pump output (Not used in this set)
48 VCTL I VCO2 control voltage input
49 AVSS3 — Analog ground
50 CLTV I VCO1 control voltage input
51 FILO O Filter signal output
52 FILI I Filter signal input
53 PCO O Charge pump output
54 AVDD5 — Analog power supply pin (+3.3 V)
HCD-ZX66i/ZX99i
65
Page 66
HCD-ZX66i/ZX99i
Pin No. Pin Name I/O Description
55 DDVROUT O DC/DC converter output
56 DDVRSEN I DC/DC converter output voltage monitor signal input
57 AVSS5 — Analog ground
58 DDCR I Reset signal input
59 NC — Not used. (Open)
60 BCKI I D/A interface bit clock signal input
61 PCMDI I D/A interface serial data signal input
62 LRCKI I D/A interface LR clock signal input
63 LRCK O D/A interface LR clock signal output
64 VSS — Ground
65 PCMD O D/A interface serial data signal output
66 BCK O D/A interface bit clock signal output
67 VDD — Power supply pin (+3.3 V)
68 EMPH O Not used. (Connect to EMPHI)
69 EMPHI I Not used. (Connect to EMPH)
70 IOVDD2 — Digital power supply pin (+3.3 V)
71 DOUT — Digital out signal output
72, 73 TEST I Test pin (Normally, fi xed at L)
74 IOVSS2 — Digital ground
75 NC — Not used. (Open)
76 XVSS — Ground
77 XTAO O Master clock signal output (16.9344 MHz)
78 XTAI I Master clock signal input (16.9344 MHz)
79 XVDD — Power supply pin (+3.3 V)
80 AVDD1 — Analog power supply pin (+3.3 V)
81 AOUT1 O L channel analog signal output
82 VREFL O L channel reference voltage output
83, 84 AVSS1,AVSS2 — Analog ground
85 VREFR O R channel reference voltage output
86 AOUT2 O R channel analog signal output
87 AVDD2 — Analog power supply pin (+3.3 V)
88 NC — Not used. (Open)
89 IOVDD0 — Digital power supply pin (+3.3 V)
90 RMUT O R channel “0” detection fl ug output (Not used in this set)
91 LMUT O L channel “0” detection fl ug output (Not used in this set)
92 NC — Not used. (Open)
93 XTSL I Sub clock signal input (Fixed at L in this set)
94 IOVSS0 — Digital ground
95 XTACN I Oscillation circuit control signal input
96 SQSO O Sub 80 bit, PCM peak and level data signal output (Not used in this set)
97 SQCK I Clock signal input
98 SBSO O Sub P-W serial data signal output (Not used in this set)
99 EXCK I Clock signal input (Not used in this set)
100 XRST I System reset signal input
101 SYSM I Mute signal input (Fixed at L in this set)
102 DATA I Serial data signal input
103 VSS — Ground
104 XLAT I Latch signal input
105 CLOK I Serial data transfer clock signal input
106 VDD — Power supply pin (+3.3 V)
107 SENS O SENS signal output
108 SCLK I Clock signal input (Fixed at H in this set)
109 ATSK I/O Input/output for anti-shock (Not used in this set)
110 WFCK O WFCK signal output (Not used in this set)
111 XUGF O XUGF signal output (Not used in this set)
112 XPCK O XPCK signal output (Not used in this set)
66
Page 67

Pin No. Pin Name I/O Description
113 GFS O GFS signal output (Not used in this set)
114 C2PO O C2PO signal output (Not used in this set)
115 SCOR O Sub code sync signal output
116 VDD — Power supply pin (+3.3 V)
117 C4M O 4.2366 MHz signal output (Not used in this set)
118 WDCK O Word clock signal output (Not used in this set)
119 COUT I/O Track count signal input/output (Not used in this set)
120 NC — Not used. (Open)
HCD-ZX66i/ZX99i
67
Page 68
HCD-ZX66i/ZX99i
MAIN BOARD (2/3) IC401 R5F3640MDFAR (SYSTEM CONTROL)
Pin No. Pin Name I/O Description
1 MP3-ACK I Acknowledgement input signal from MP3 decoder IC (L: acknowledged)
2 MP3-LP O Latch output signal to MP3 decoder IC (L: enable)
3 MP3-CS O Chip select output signal to MP3 decoder IC (L: enable)
4 SIRCS I Remote control signal input
5 MP3-DATA-OUT O Serial data output signal to MP3 decoder IC
6 MP3-DATA-IN I Serial data input signal from MP3 decoder IC
7 MP3-CLK O Serial data transfer clock signal to MP3 decoder IC
8 BYTE — Ground
9 CNVSS — Ground
10 XC-IN I Sub system clock input terminal (32.768 kHz)
11 XC-OUT O Sub system clock output terminal (32.768 kHz)
12 RESET I
13 X-OUT O Main system clock output terminal (16 MHz)
14 VSS — Ground
15 X-IN I Main system clock input terminal (16 MHz)
16 VCC — Power supply terminal (+3.3 V)
17 NMI I Non-maskable interrupt input terminal
18 MP3-RST O Reset signal output to MP3 decoder IC
19 SCOR I Subcode sync (S0+S1) detection signal input from the digital signal processor
20 AC-CUT I AC off detection signal input from the reset signal IC (L: AC cut detected)
21 SENS I Internal status detection monitor input from the digital signal processor
22 CD-CLK O Serial data transfer clock signal output to the digital signal processor
23 XLAT O Serial data latch pulse output to the digital signal processor
24 CD-DATA O Serial data output to the digital signal processor
25 XRST O Reset signal output to the digital signal processor and the motor/coil driver (L: reset)
26 XCTN O BD DSP Oscillation on/off control signal output (H: on)
27 NO USE I Not Used. (Open)
28 STBY-RELAY O Main power on/off control signal output (H: power on)
29 IIC-CLK I/O
30 IIC-DATA I/O
31 MP3-STB O Standby mode signal output MP3 decoder IC (L: standby mode)
32 NO USE I Not Used. (Open)
33 FOR PROG I Not Used. (Open)
34 LINE MUTE O Line muting on/off control signal (H: muting on)
35 IPOD TXD O Serial data output to the iPod
36 IPOD RXD I Serial data receive from the iPod
37 IPOD POWER O iPod power control (L: OFF, H: ON) (Not used in this set)
38 IPOD MUTE O iPod muting control (L: MUTE)
39 NO USE I Not Used. (Open)
40 CD POWER O Power on/off control signal output to BU section (H: power on)
41 CD A-MUTE O CD analog signal muting on/off control signal output (H: power on)
42 TSENS I Disc tray position detection signal input from CDM
43 DSENS I Disc existence detection signal input from CDM
44 S2 I Disc tray status detection signal input from CDM
45 S1 I Disc tray status detection signal input from CDM
46 S0 I Disc tray status detection signal input from CDM
47 TRMP O CDM turning motor control signal output
48 TRMN O CDM turning motor control signal output
49 CKMN O CDM loading motor control signal output
50 CKMP O CDM loading motor control signal output
51 to 59 NO USE I Not Used. (Open)
60 EEPROM DATA I/O EEPROM data signal input/output
System reset signal input from the reset signal IC (L: reset). After the power supply rises,L is
input for several hundreds msec and then change to H.
Clock signal for IIC communcation between master control controller and display Control
controller
Data signal for IIC communcation between master control controller and display Control
controller
68
Page 69
HCD-ZX66i/ZX99i
Pin No. Pin Name I/O Description
61 EEPROM CLK I/O EEPROM clock signal input/output
62 VCC — Power supply terminal (+3.3 V)
63 NO USE I Not Used. (Open)
64 VSS — Ground terminal
65 AUDIO1 DATA O Serial data output to audio signal processor
66 AUDIO1 CLK O Serial data transfer clock signal output to audio signal processor
67 AUDIO2 DATA O Serial data output to 4-ch volume IC
68 AUDIO2 CLK O Serial data transfer clock signal output to 4-ch volume IC
69 SOFT TEST O Soft test signal output
70 NO USE I Not Used. (Open)
71 GC RESET O Reset signal output to Display Control IC (L: reset)
72 SURR RELAY O Relay drive signal output for the surround speakers (H: relay on)
73 DISPLAY KEY I Display key press detection signal (Interrupt input)
74 POWER KEY I Power key press detection signal (Interrupt input)
75 IPOD DETECT I iPod plug in detection (L: connected, H: disconnected)
76 STBY LED O LED drive signal output of POWER indicator (H: LED on)
77 HP DET I Headphone connection detection signal input (H: headphone connected)
78 FR RELAY O Relay drive signal output for the front speakers (H: relay on)
79 HP MUTE O Headphone muting on/off control signal (L: muting on)
80 STK MUTE O Power amplifi er and sub woofer amplifi er on/off control signal output (H: amplifi er on)
81 PROTECT I Speaker protect detection signal input from speaker protect circuit (L: protector on)
82 ST CLK O PLL serial data transfer clock signal output to the tuner unit
83 ST DIN I PLL serial data input from the tuner unit
84 ST DOUT O PLL serial data output to the tuner unit
85 ST CE O PLL chip enable signal output to the tuner unit
86 TUNED I Tuning detection signal input from the tuner unit (L: tuned)
87 to 91 NO USE I Not Used. (Open)
92 MODEL-IN I Model setting terminal (L: HCD-ZX66i, H: HCD-ZX99i)
93 DEST-IN I Not Used. (Open)
94 I-HOLD I Not Used. (Open)
95 NO USE I Not Used. (Open)
96 AVSS — Ground terminal (for A/D conversion)
97 NO USE I Not Used. (Open)
98 VREF I A/D Converter reference voltage input terminal (+3.3 V)
99 AVCC — Power supply terminal (+3.3 V) (for A/D conversion)
100 MP3-REQ I Request signal from MP3 decoder IC
69
Page 70
HCD-ZX66i/ZX99i
PANEL COM BOARD IC901 MB90M407PF-G-146E1 (VACUUM FLUORESCENT DISPLAY DRIVER, KEY CONTROL)
Pin No. Pin Name I/O Description
1 to 4 G4 to G1 O Grid drive signal output for the vacuum fl uorescent display
5 to 10 SEG-1 to SEG-6 O Segment drive signal output for the vacuum fl uorescent display
11 VSS-IO — Ground (for I/O port)
12 to 22 SEG-7 to SEG-17 O Segment drive signal output for the vacuum fl uorescent display
23 VDD-FIP — Power supply pin (+3.3 V) (for the vacuum fl uorescent display)
24 to 41 SEG-18 to SEG-35 O Segment drive signal output for the vacuum fl uorescent display
42 VSS-IO — Ground (for I/O port)
43 SEG-36 O Segment drive signal output for the vacuum fl uorescent display
44 NC O Not used. (Open)
45 SPK MODE LED O Dynamic LED drive signal output of the X-ROUND indicator (H: LED on)
46 CD LED O Not used. (Open)
47 GAME LED O Not used. (Open)
48 VKK — Power supply pin (-33 V) (for the vacuum fl uorescent display)
49 MD0 I Setting pin for the CPU operational mode
50 MD1/VDD-VFT I Setting pin for the CPU operational mode
51 MD2 I Setting pin for the CPU operational mode
52 VOL 1, 2 O Dynamic LED drive signal output of the ILLUMINATION 1, 2 indicators (H: LED on)
53 VOL 3, 4 O Dynamic LED drive signal output of the ILLUMINATION 3, 4 indicators (H: LED on)
54 VOL 5, 6 O Dynamic LED drive signal output of the ILLUMINATION 5, 6 indicators (H: LED on)
55 VOL 7, 8 O Dynamic LED drive signal output of the ILLUMINATION 7, 8 indicators (H: LED on)
56 VOL 9, 10 O Dynamic LED drive signal output of the ILLUMINATION 9, 10 indicators (H: LED on)
57 VOL 11 LED O Dynamic LED drive signal output of the ILLUMINATION 11 indicator (H: LED on)
58 NC O Not used. (Open)
59 LED SELECTOR O Dynamic LED drive select signal output
60 I2C DATA I/O
61 I2C CLOCK I/O
62 AVCC — Power supply pin (+3.3 V) (for A/D conversion)
63 AVSS — Ground (for A/D conversion)
64 to 69 KEY0 to KEY5 I Key signal input (A/D input)
70 BPF1-F01 I
71 BPF1-F02 I
72 BPF1-F03 I
73 BPF1-F04 I
74 ALL BAND I
75 JOG A I
76 JOG B I
77 RESET I System reset signal input from the system control IC (L: reset)
78 SOFT TEST O Output for the software test point
79 VOL B I JOG dial pulse signal input from VOLUME rotary encoder (B phase input)
80 VOL A I JOG dial pulse signal input from VOLUME rotary encoder (A phase input)
81 VSS-CPU — Ground (for CPU)
82 X OUT O System clock signal output (4 MHz)
83 X IN I System clock signal input (4 MHz)
84 VCC-CPU — Power supply pin (+3.3 V) (for CPU)
85 NO USE O Not used. (Open)
86 to 100 G19 to G5 O Grid drive signal output for the vacuum fl uorescent display
Data input/output with I2C communication between the system control IC and display control
IC
Clock signal input/output with I2C communication between the system control IC and display
control IC
Spectrum analyzer drive signal input from the spectrum analyzer band-pass fi lter IC (A/D
input)
Spectrum analyzer drive signal input from the spectrum analyzer band-pass fi lter IC (A/D
input)
Spectrum analyzer drive signal input from the spectrum analyzer band-pass fi lter IC (A/D
input)
Spectrum analyzer drive signal input from the spectrum analyzer band-pass fi lter IC (A/D
input)
Spectrum analyzer drive signal input from the spectrum analyzer band-pass fi lter IC (A/D
input)
JOG dial pulse signal input from X-ROUND JOG rotary encoder (A phase input) (HCDZX99i)
JOG dial pulse signal input from X-ROUND JOG rotary encoder (B phase input) (HCDZX99i)
70
Page 71
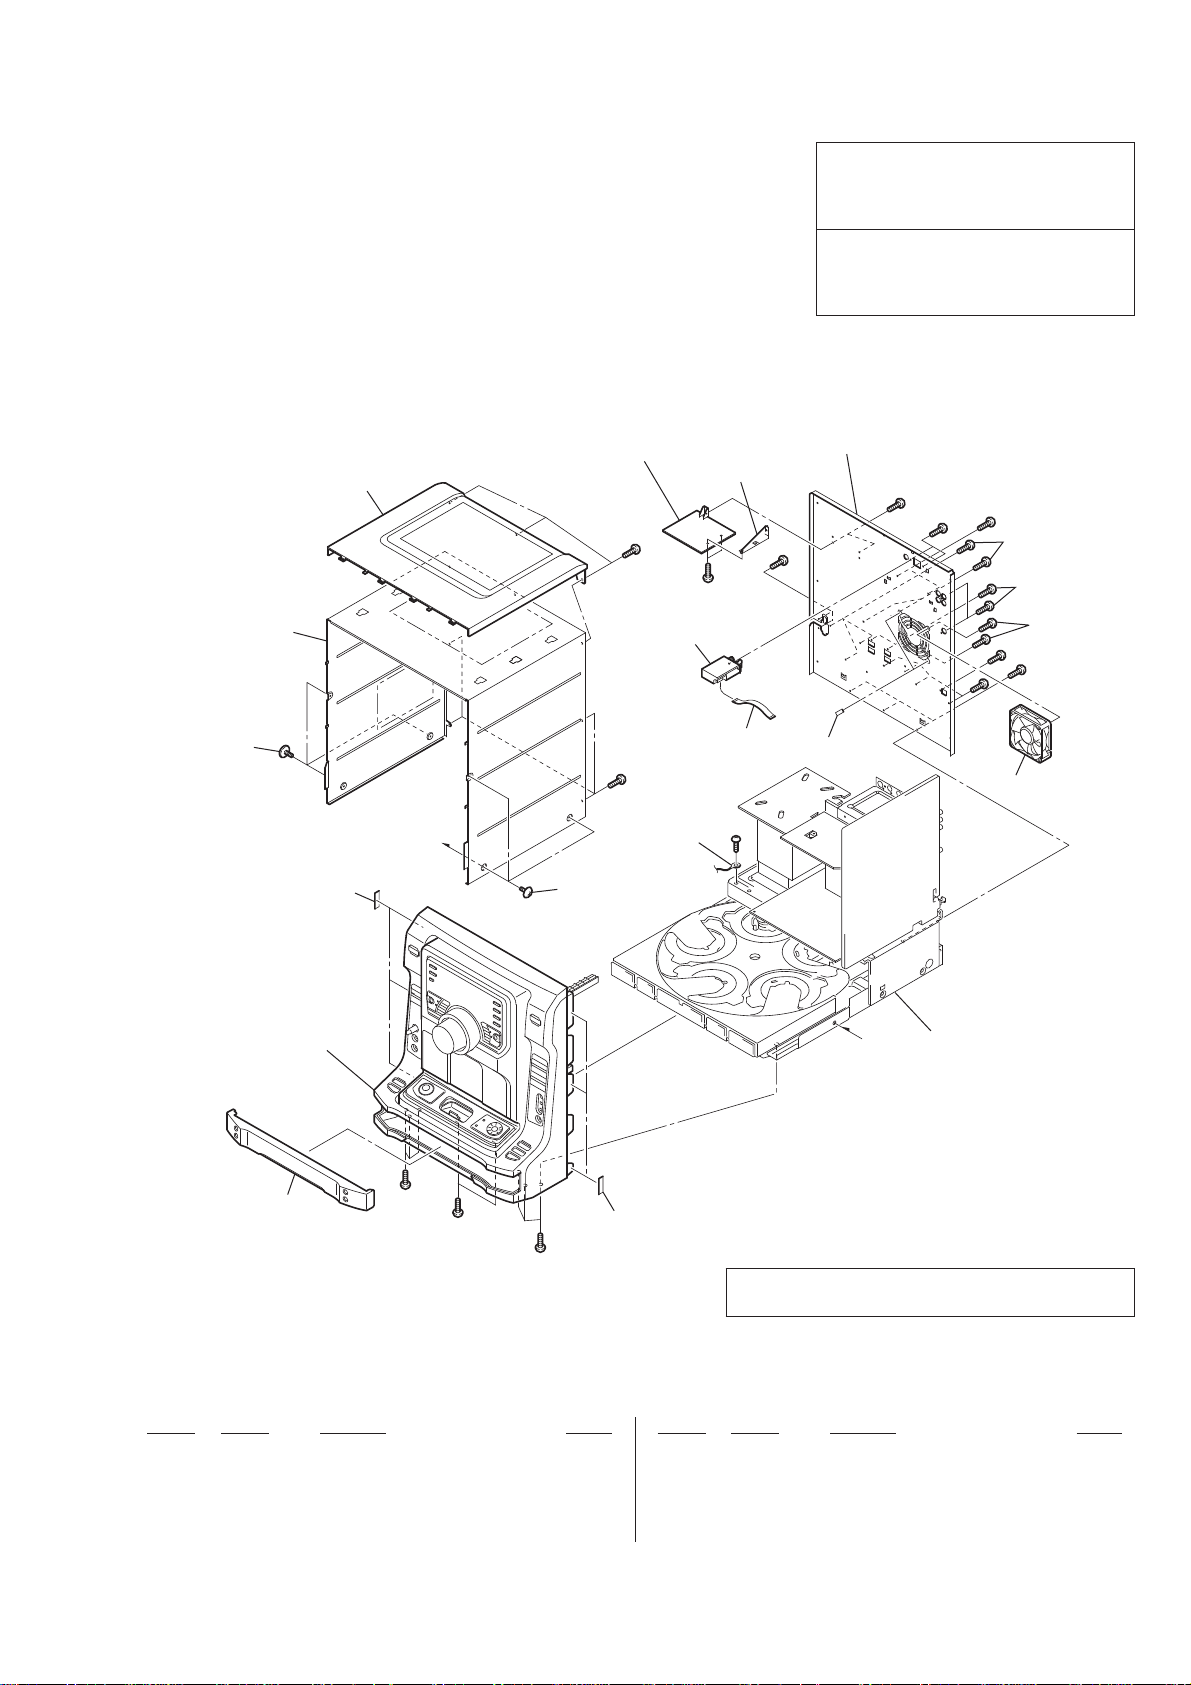
SECTION 7
EXPLODED VIEWS
HCD-ZX66i/ZX99i
Note:
• The mechanical parts with no reference
number in the exploded views are not supplied.
• Items marked “*” are not stocked since
they are seldom required for routine service. Some delay should be anticipated
when ordering these items.
7-1. BACK PANEL SECTION
4
3
• -XX and -X mean standardized parts, so
they may have some difference from the
original one.
not supplied
(SUBTRANS board)
not supplied
#1
#1
TU901
#1
The components identifi ed by mark 0
or dotted line with mark 0 are critical for
safety.
Replace only with part number specifi ed.
Les composants identifi és par une marque
0 sont critiques pour la sécurité.
Ne les remplacer que par une pièce portant
le numéro spécifi é.
not supplied
#1
#1
#1
#1
#1
#1
#1
#1
#1
2
not supplied
front panel section
1
#1
"
#1
2
#1
#1
not supplied
not supplied
5
not supplied
FAN901
#1
chassis section
"
Note: If the wire (fl at type) was replaced, fold it some as
the wire (fl at type) before replacement.
Ref. No. Part No. Description Remark Ref. No. Part No. Description Remark
1 4-252-686-31 PANEL, LOADING (ZX99i)
1 4-252-686-41 PANEL, LOADING (ZX66i)
2 3-363-099-02 SCREW (CASE 3 TP2)
3 4-237-661-51 CASE
4 4-252-685-01 COVER (TOP)
5 1-828-964-11 WIRE (FLAT TYPE) (11 CORE)
FAN901 1-763-372-11 FAN, DC
TU901 1-693-762-21 TUNER (FM/AM) (ANTENNA)
#1 7-685-646-79 SCREW +BVTP 3X8 TYPE2 IT-3
71
Page 72
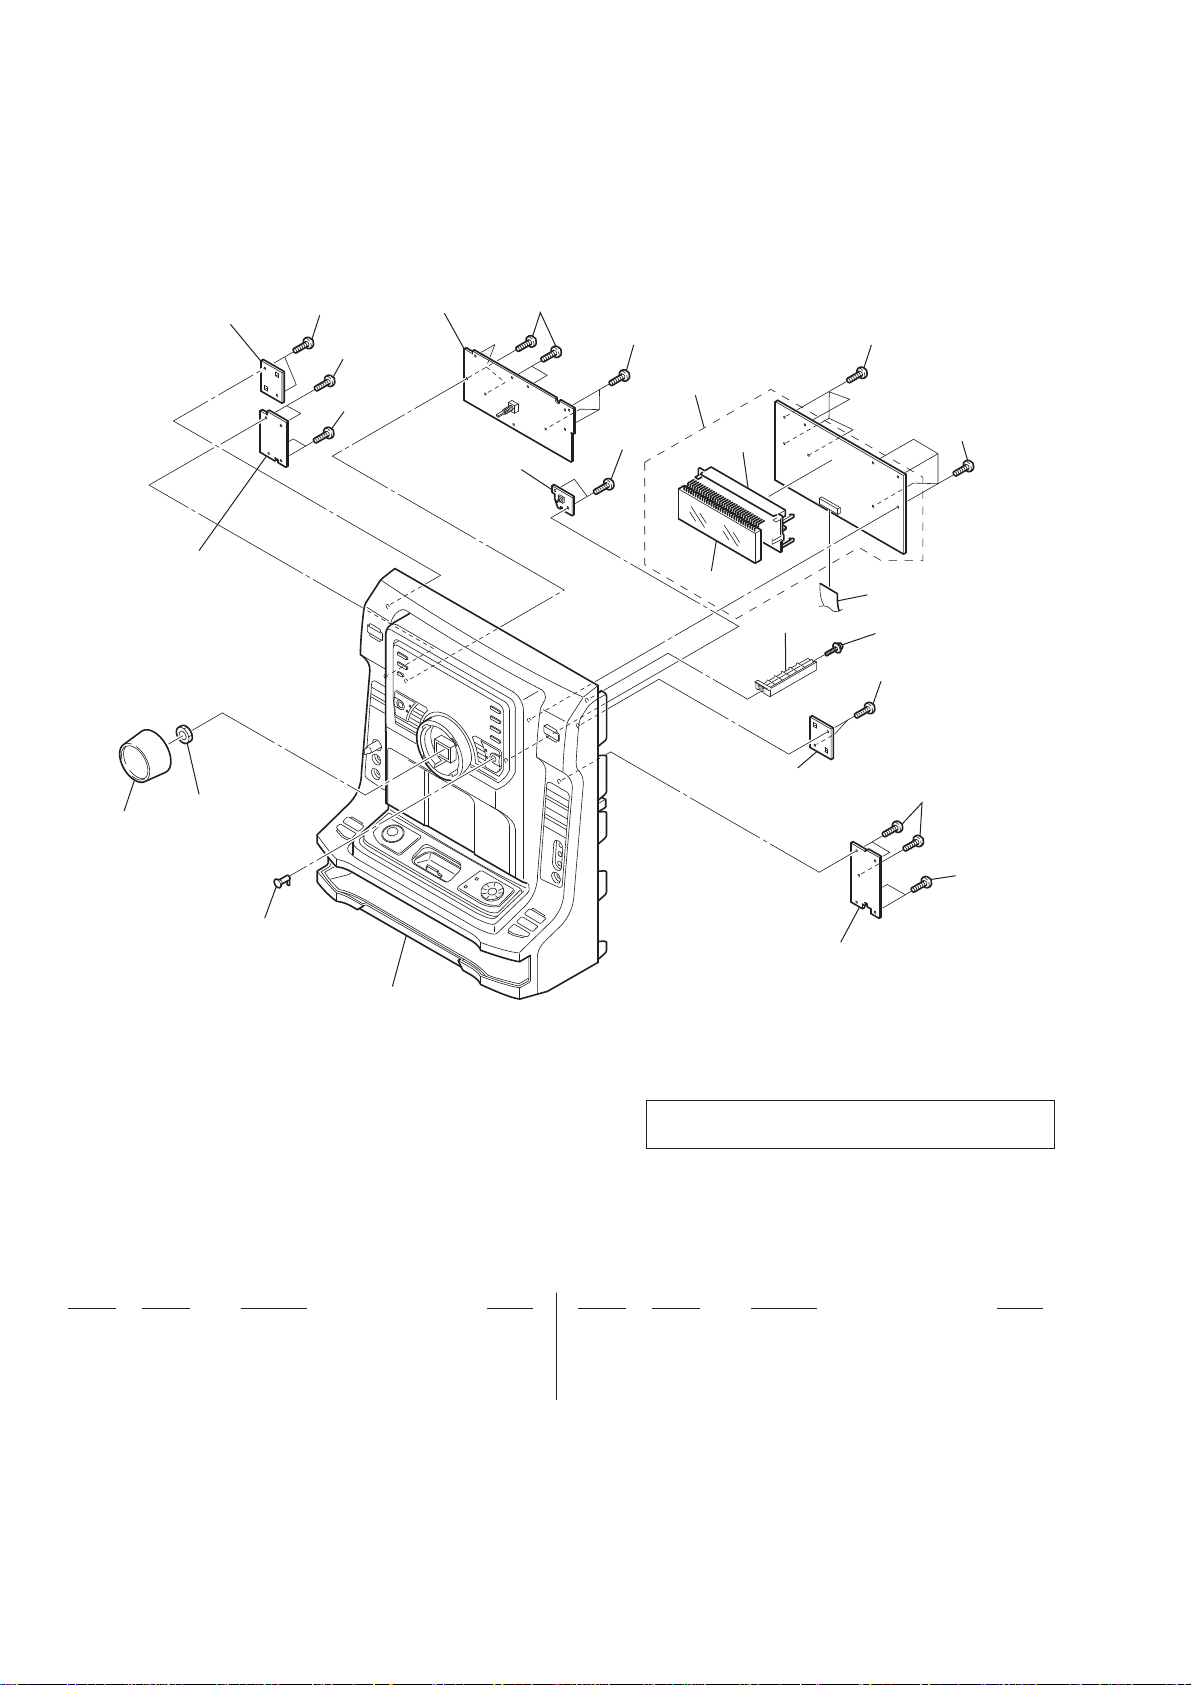
HCD-ZX66i/ZX99i
7-2. FRONT PANEL SECTION (1)
not supplied
(POWER SW board)
not supplied
(LEFT-BTTN board)
supplied with S975
52
53
53
53
not supplied
(CURSOR MT board)
not supplied
(VOL board)
53
53
53
54
55
FL901
not supplied
not supplied
(FUNCTION SW board)
53
53
56
57
53
53
53
51
not supplied
(RIGHT-BTTN board)
front panel section (2)
Note: If the wire (fl at type) was replaced, fold it some as
the wire (fl at type) before replacement.
Ref. No. Part No. Description Remark Ref. No. Part No. Description Remark
51 4-252-682-01 KNOB (ENTER)
52 4-252-684-01 KNOB (VOLUME)
53 3-087-053-01 +BVTP 2.6 (3CR)
54 A-1616-806-A PANEL COM BOARD, COMPLETE
55 4-253-178-01 HOLDER, FL
56 1-828-996-51 WIRE (FLAT TYPE) (17 CORE)
57 4-933-134-51 SCREW (+PTPWH 2.6X8)
FL901 1-483-081-11 VACUUM FLUORESCENT DISPLAY
72
Page 73
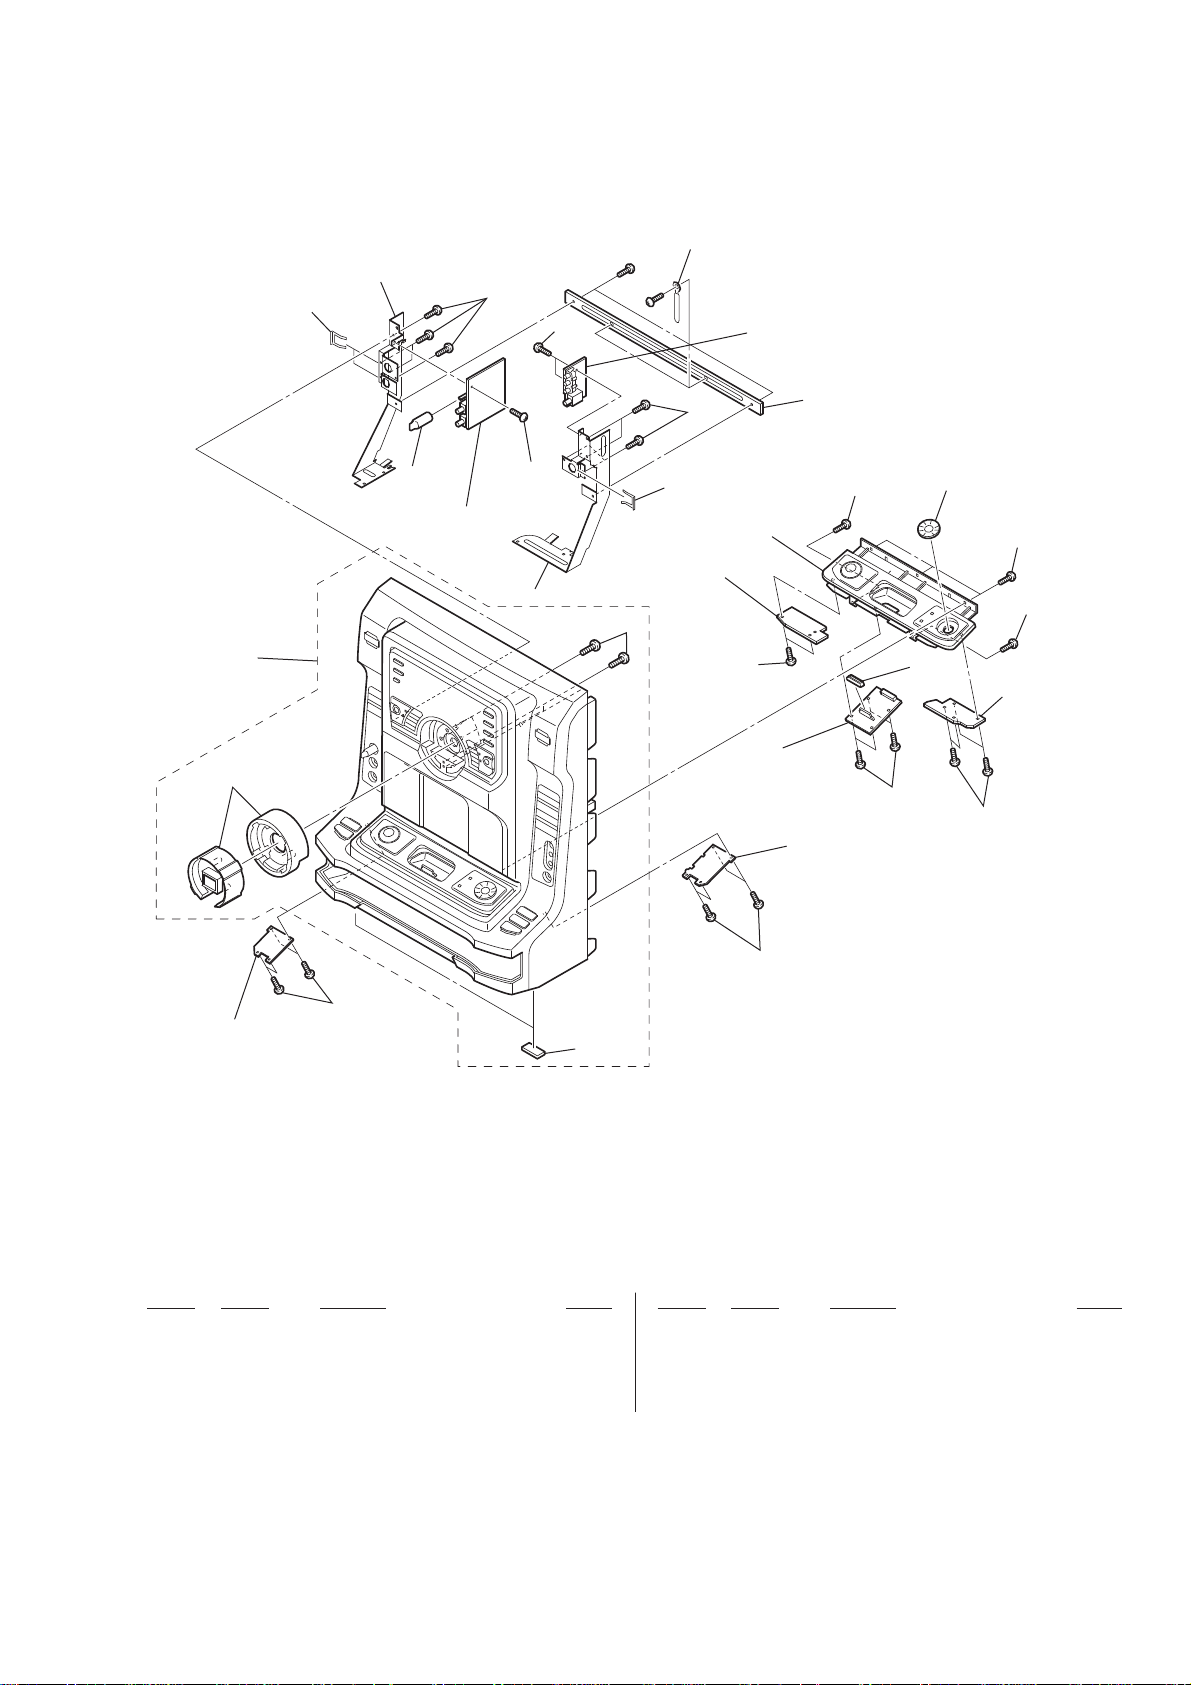
7-3. FRONT PANEL SECTION (2)
not supplied
supplied with jack
103
103
#1
#1
HCD-ZX66i/ZX99i
not supplied
not supplied
(GAME HP board)
101
not supplied
104
not supplied
(MIC board)
103
not supplied
supplied with jack
not supplied
(JOG-A board)
(HCD-ZX99i)
103
103
106
103
not supplied
(IPOD board)
103
not supplied
103
not supplied
(CD-R board)
103
107
105
103
103
not supplied
(JOG-B board)
(HCD-ZX99i)
103
not supplied
(CD-L board)
Ref. No. Part No. Description Remark Ref. No. Part No. Description Remark
101 X-2342-757-1 FRONT PANEL ASSY (ZX99I) (ZX99i)
101 X-2345-118-1 FRONT PANEL ASSY (ZX66I) (ZX66i)
102 4-225-252-21 CUSHION (FOOT)
103 3-087-053-01 +BVTP 2.6 (3CR)
104 4-237-635-11 KNOB (MIC)
103
102
105 4-252-683-01 KNOB (JOG) (ZX99i)
106 X-2342-758-1 BRACKET CD ASSY (ZX99I) (ZX99i)
106 X-2342-774-1 BRACKET CD ASSY (ZX66I) (ZX66i)
107 3-277-576-01 ESCUTCHEON
#1 7-685-646-79 SCREW +BVTP 3X8 TYPE2 IT-3
73
Page 74
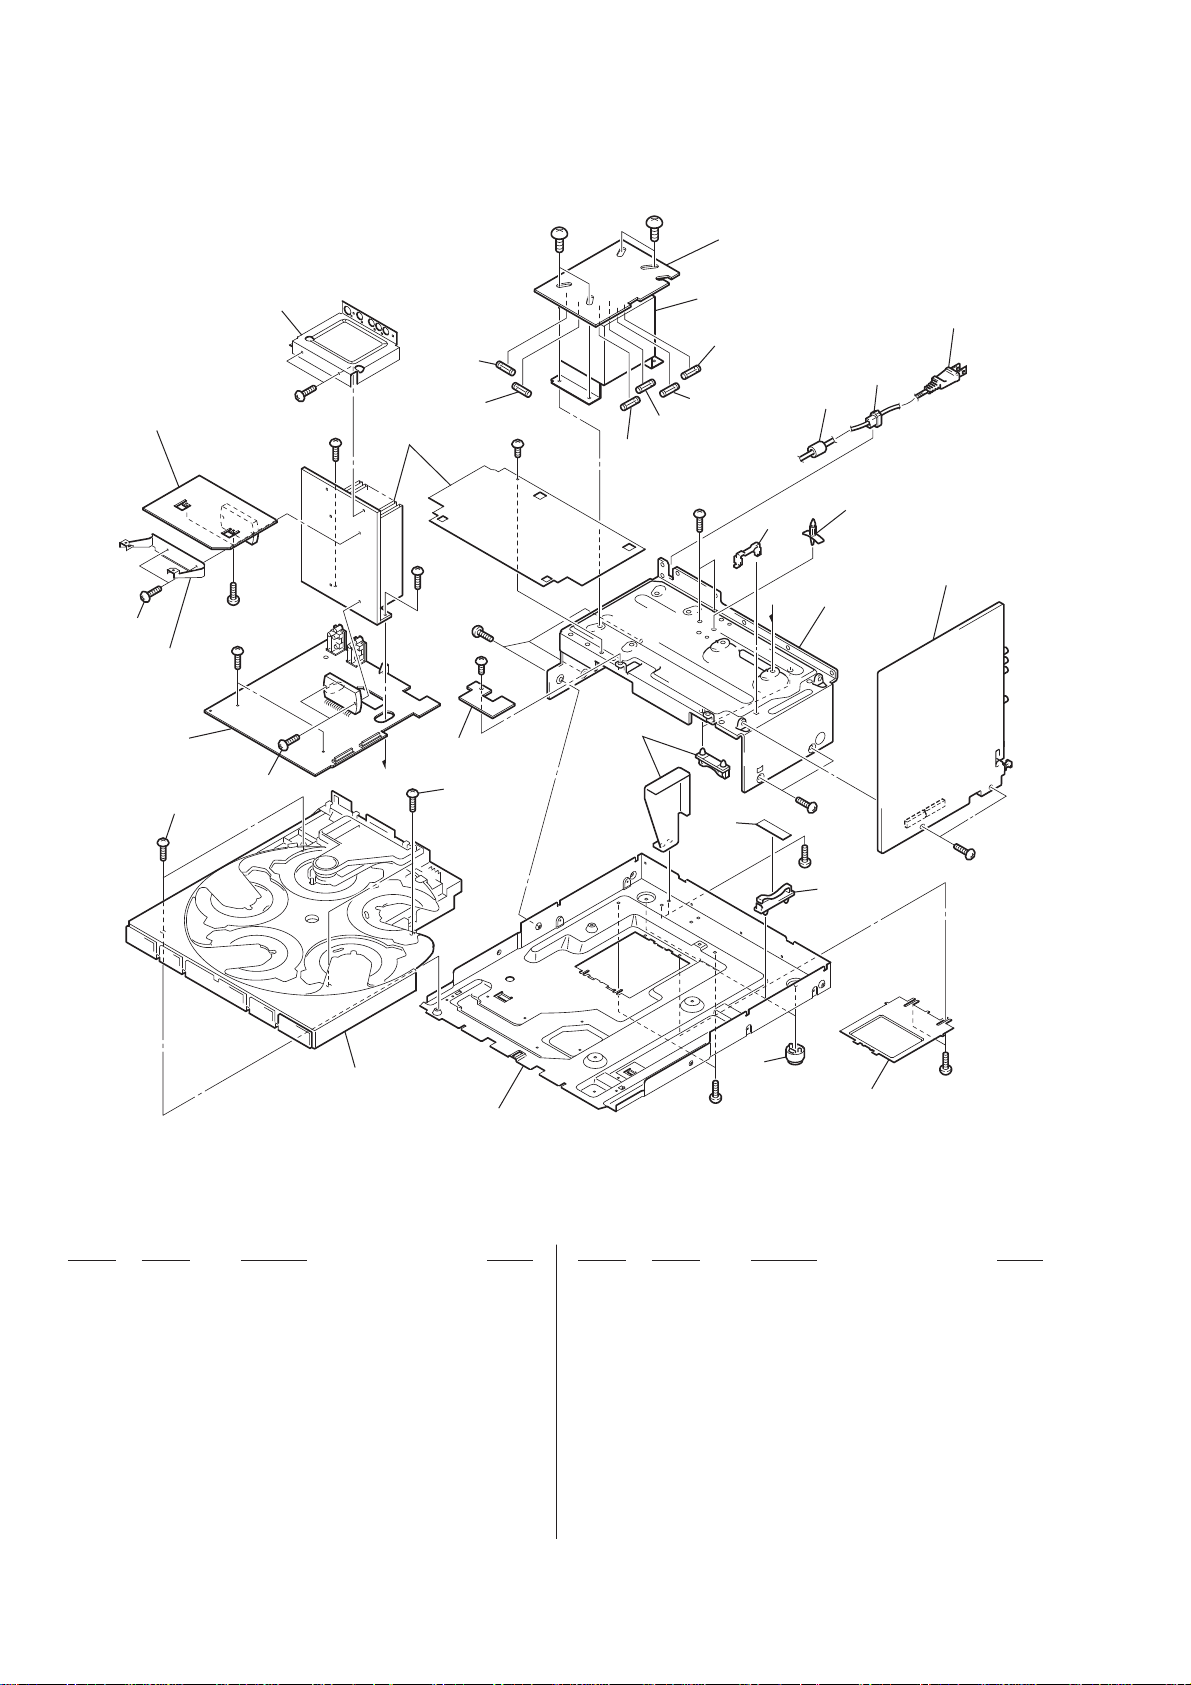
HCD-ZX66i/ZX99i
7-4. CHASSIS SECTION
#2
#2
not supplied
(TRANS board)
not supplied
not supplied
(SURROUND board)
(HCD-ZX99i)
152
not supplied
#1
#1
153
154
152
#1
#3
F1191
F1181
not supplied
#3
not supplied
#
#1
154
#1
#1
F1161
F1141
not supplied
PT1100
F1151
F1171
#1
160
157
#
156
FC901
158
not supplied
#1
#1
not supplied
155
159
#1
#1
151
not supplied
#1
CDM79B-F1BD81
not supplied
Ref. No. Part No. Description Remark Ref. No. Part No. Description Remark
151 4-965-822-01 FOOT
152 3-905-609-41 SCREW (TRANSISTOR)
153 A-1616-816-A POWER AMP BOARD, COMPLETE (ZX99i)
153 A-1616-833-A POWER AMP BOARD, COMPLETE (ZX66i)
154 3-077-331-01 +BV3 (3-CR)
0 155 1-783-820-11 CORD, POWER
156 3-703-244-00 BUSHING (2104), CORD
* 157 4-988-533-01 HOLDER, PWB
* 158 4-954-051-41 HOLDER, PC BOARD
159 A-1616-802-A MAIN BOARD, COMPLETE (ZX99i)
159 A-1616-827-A MAIN BOARD, COMPLETE (ZX66i)
* 160 3-378-433-01 CUSHION, SARANET
0 F1141 1-533-949-33 FUSE, CYLINDRICAL (TIME LAG) (T8AL/250V)
0 F1151 1-533-949-33 FUSE, CYLINDRICAL (TIME LAG) (T8AL/250V)
0 F1161 1-533-949-33 FUSE, CYLINDRICAL (TIME LAG) (T8AL/250V)
0 F1171 1-533-949-33 FUSE, CYLINDRICAL (TIME LAG) (T8AL/250V)
0 F1181 1-532-504-33 FUSE (T4AL/250V)
0 F1191 1-532-504-33 FUSE (T4AL/250V)
0 FC901 1-500-497-11 FILTER, CLAMP (FERRITE CORE)
0 PT1100 1-445-589-11 TRANSFORMER, POWER (MAIN) (ZX66i)
0 PT1100 1-445-590-11 TRANSFORMER, POWER (MAIN) (ZX99i)
#1 7-685-646-79 SCREW +BVTP 3X8 TYPE2 IT-3
#2 7-685-881-09 SCREW +BVTT 4X8 (S)
#3 7-685-647-79 SCREW +BVTP 3X10 TYPE2 IT-3
74
Page 75
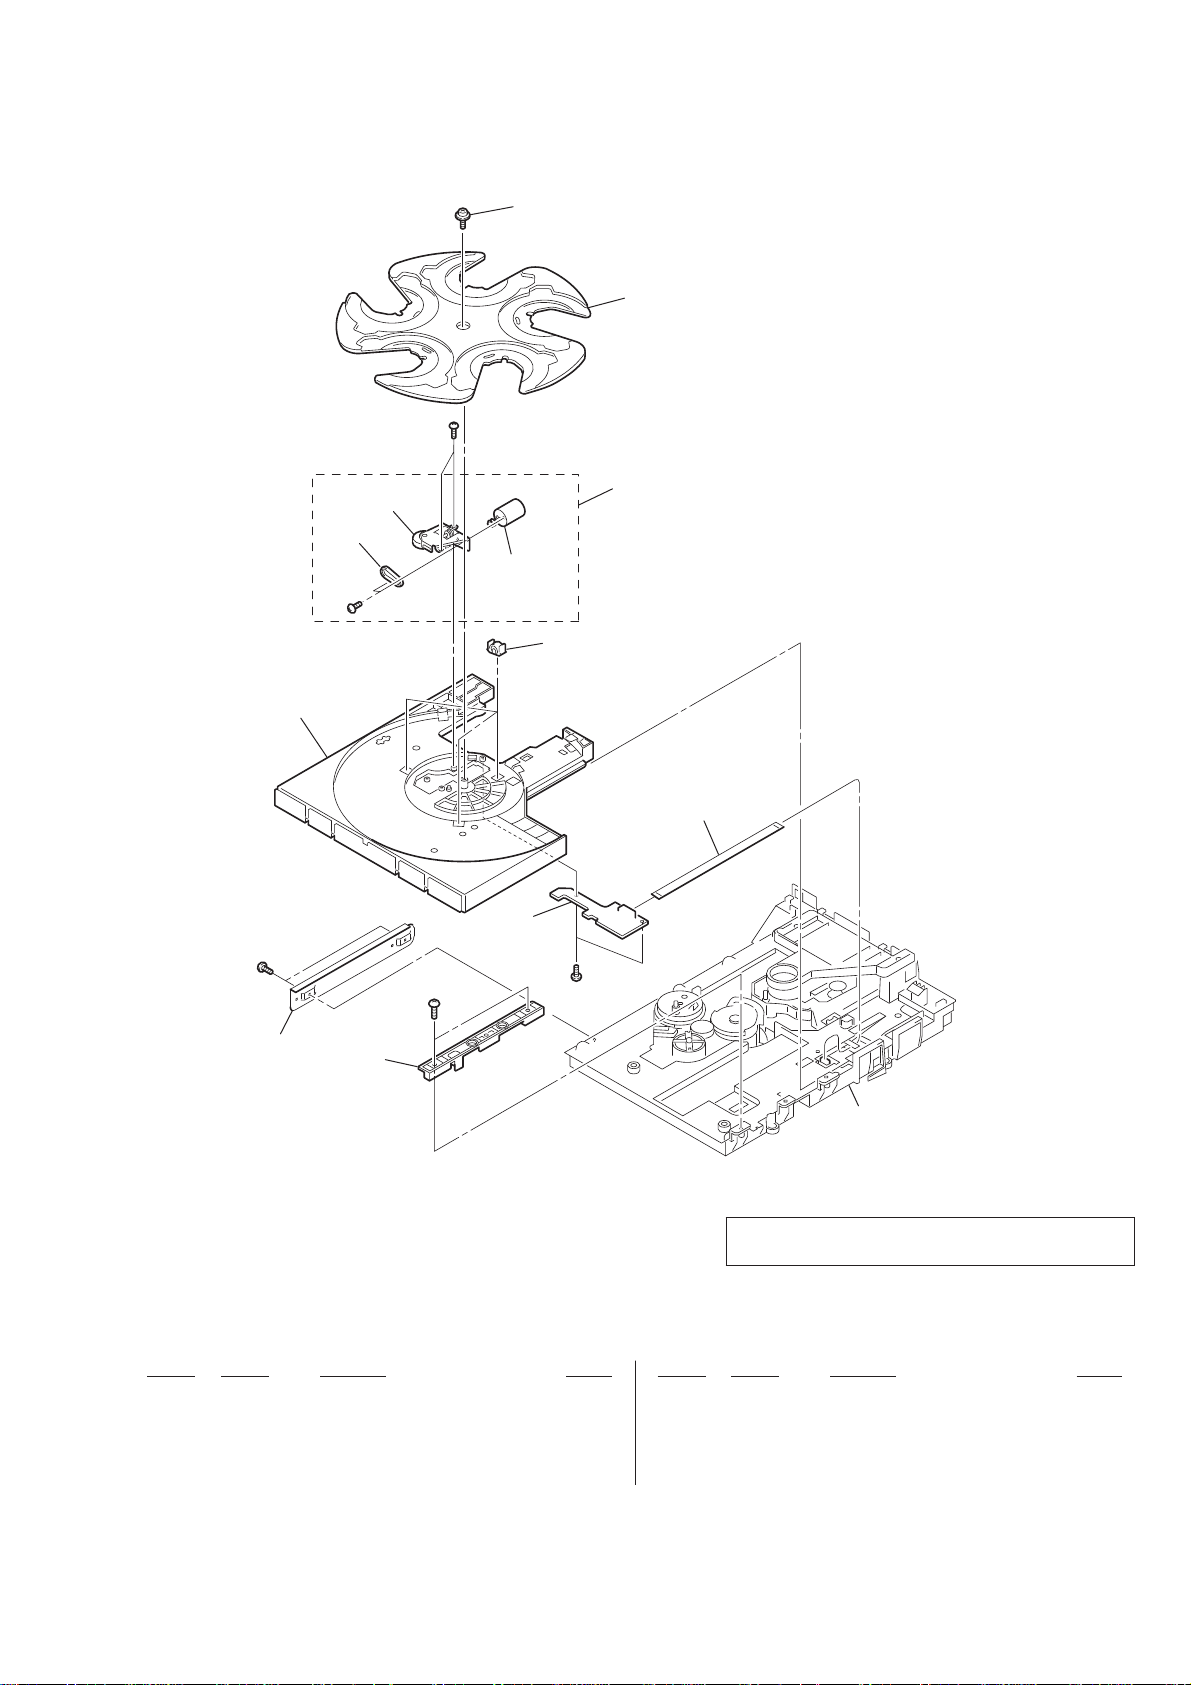
7-5. CD MECHANISM SECTION (1) (CDM79B-F1BD81)
#4
HCD-ZX66i/ZX99i
206
205
not supplied
#4
not supplied
204
#5
not
supplied
201
#4
not
supplied
202
203
not supplied
207
#4
CD mechanism section (2)
Note: If the wire (fl at type) was replaced, fold it some as
the wire (fl at type) before replacement.
Ref. No. Part No. Description Remark Ref. No. Part No. Description Remark
201 3-074-737-01 PLATE (GUIDE)
202 A-6060-642-A SE-130 BOARD, COMPLETE
203 A-6060-640-A UNIT ASSY, TD
204 3-074-725-01 BELT, TD
205 3-074-717-21 TRAY
206 4-218-252-52 SCREW (+PTPWH M2.6), FLOATING
207 1-823-921-11 FMS-18
#4 7-685-534-19 SCREW +BTP 2.6X8 TYPE2 N-S
#5 7-682-544-04 SCREW +P 3X3
75
Page 76
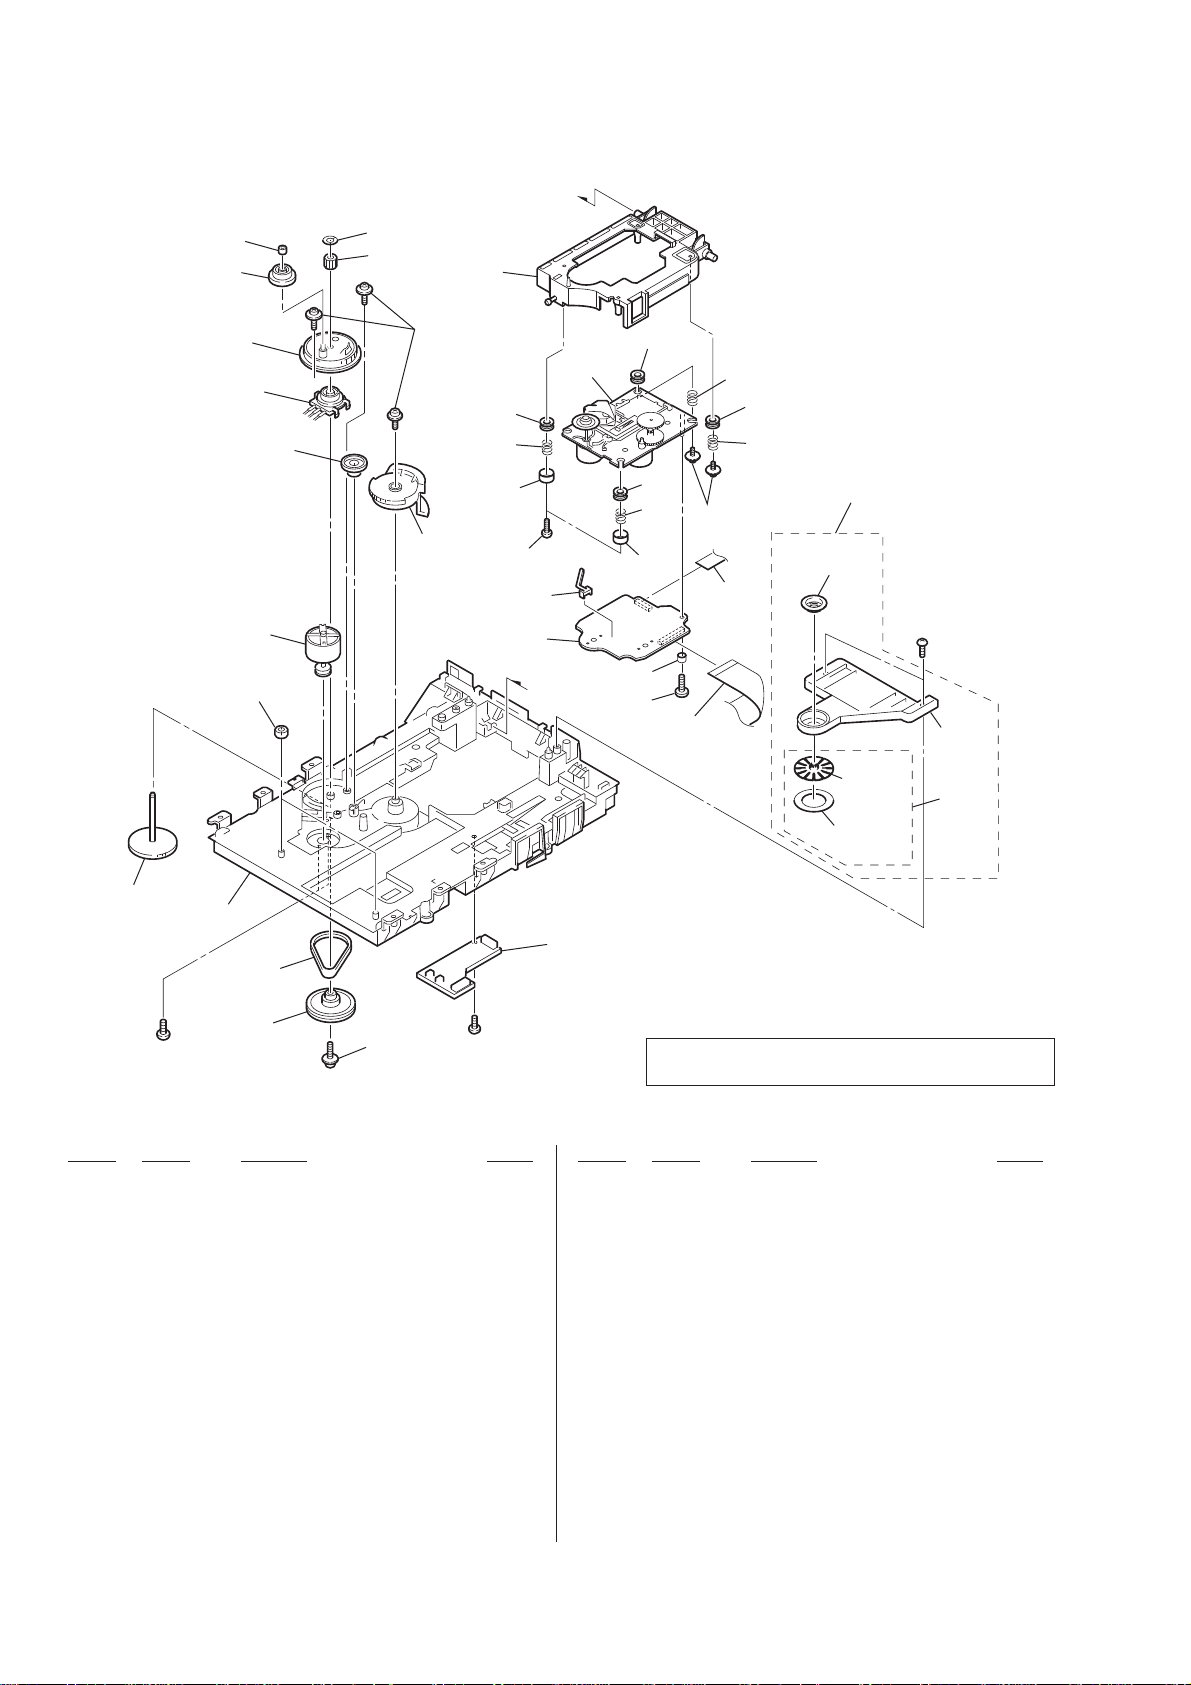
HCD-ZX66i/ZX99i
7-6. CD MECHANISM SECTION (2) (CDM79B-F1BD81)
$
260
259
258
RE901
M901
255
256
261
262
251
257
263
264
266
268
270
S101
269
not supplied
$
265
268
270
264
264
266
276
267
272
266
264
266
273
271
not
supplied
#1
not
supplied
275
274
254
not supplied
not supplied
253
(MD-94 board)
252
#6
Ref. No. Part No. Description Remark Ref. No. Part No. Description Remark
251 4-218-252-52 SCREW (+PTPWH M2.6), FLOATING
252 3-074-744-01 GEAR (LOADING A)
253 3-074-745-01 BELT (LOADING)
254 3-074-742-01 GEAR (SHAFT)
255 4-951-619-11 CUSHION (A)
256 3-074-735-01 GEAR (IDLER)
257 3-074-736-01 GEAR (CHUCK)
258 3-074-741-01 GEAR (LOADING B)
259 3-074-738-01 GEAR (SWING)
260 3-074-739-01 COLLAR (SWING)
261 3-016-533-11 WASHER (FR), STOPPER
262 3-074-740-01 GEAR (LOADING C)
263 X-4956-104-A HOLDER (BU) ASSY
264 4-227-549-11 INSULATOR
0 265 8-820-244-02 OPTICAL PICK-UP (KSM-215DCP/C2NP)
251
#4
Note: If the wire (fl at type) was replaced, fold it some as
the wire (fl at type) before replacement.
267 4-985-672-01 SCREW (+PTPWH M2.6), FLOATING
268 4-231-151-01 STOPPER (BU)
269 A-4751-045-A BD81A BOARD, COMPLETE
270 3-087-053-01 +BVTP 2.6 (3CR)
271 A-4713-281-A CHUCK ASSY
272 1-832-404-21 CABLE, FLEXIBLE FLAT (16 CORE)
273 1-452-925-21 MAGNET ASSY
274 4-231-777-02 SHEET (KH2)
275 X-4953-195-3 PULLEY (AT) ASSY
276 1-828-664-11 WIRE (FLAT TYPE) (27 CORE)
M901 X-3952-411-1 MOTOR ASSY, LOADING (LOADING)
RE901 1-418-746-11 ENCODER, ROTARY
S101 1-771-853-11 SWITCH, DETECTION (LIMIT)
#1 7-685-646-79 SCREW +BVTP 3X8 TYPE2 IT-3
#4 7-685-534-19 SCREW +BTP 2.6X8 TYPE2 N-S
266 4-227-045-11 SPRING (INSULATOR), COIL
76
#6 7-621-259-25 SCREW +P 2.6X4
Page 77
HCD-ZX66i/ZX99i
SECTION 8
ELECTRICAL PARTS LIST
Note:
• Due to standardization, replacements in
the parts list may be different from the
parts specifi ed in the diagrams or the com-
ponents used on the set.
• -XX and -X mean standardized parts, so
they may have some difference from the
original one.
• RESISTORS
All resistors are in ohms.
METAL: Metal-fi lm resistor.
METAL OXIDE: Metal oxide-fi lm resistor.
F: nonfl ammable
Ref. No. Part No. Description Remark Ref. No. Part No. Description Remark
A-4751-045-A BD81A BOARD, COMPLETE
**********************
< CAPACITOR >
C10 1-165-989-11 CERAMIC CHIP 10uF 10% 6.3V
C11 1-165-989-11 CERAMIC CHIP 10uF 10% 6.3V
C14 1-164-360-11 CERAMIC CHIP 0.1uF 16V
C15 1-164-360-11 CERAMIC CHIP 0.1uF 16V
C16 1-115-156-11 CERAMIC CHIP 1uF 10V
C17 1-126-210-21 ELECT CHIP 220uF 20% 4V
C18 1-162-964-11 CERAMIC CHIP 0.001uF 10% 50V
C111 1-162-967-11 CERAMIC CHIP 0.0033uF 10% 50V
C112 1-164-315-11 CERAMIC CHIP 470PF 5% 50V
C113 1-162-967-11 CERAMIC CHIP 0.0033uF 10% 50V
C114 1-164-315-11 CERAMIC CHIP 470PF 5% 50V
C115 1-164-360-11 CERAMIC CHIP 0.1uF 16V
C116 1-128-995-21 ELECT CHIP 100uF 20% 10V
C122 1-107-826-11 CERAMIC CHIP 0.1uF 10% 16V
C123 1-107-826-11 CERAMIC CHIP 0.1uF 10% 16V
C124 1-162-959-11 CERAMIC CHIP 330PF 5% 50V
C125 1-164-360-11 CERAMIC CHIP 0.1uF 16V
C131 1-162-927-11 CERAMIC CHIP 100PF 5% 50V
C132 1-117-863-11 CERAMIC CHIP 0.47uF 10% 6.3V
C133 1-162-970-11 CERAMIC CHIP 0.01uF 10% 25V
C134 1-164-360-11 CERAMIC CHIP 0.1uF 16V
C141 1-107-826-11 CERAMIC CHIP 0.1uF 10% 16V
C142 1-162-965-11 CERAMIC CHIP 0.0015uF 10% 50V
C143 1-164-360-11 CERAMIC CHIP 0.1uF 16V
C151 1-128-995-21 ELECT CHIP 100uF 20% 10V
C161 1-164-360-11 CERAMIC CHIP 0.1uF 16V
C162 1-164-360-11 CERAMIC CHIP 0.1uF 16V
C163 1-164-360-11 CERAMIC CHIP 0.1uF 16V
C171 1-162-919-11 CERAMIC CHIP 22PF 5% 50V
C172 1-162-920-11 CERAMIC CHIP 27PF 5% 50V
• Items marked “*” are not stocked since
they are seldom required for routine service. Some delay should be anticipated
when ordering these items.
• SEMICONDUCTORS
In each case, u: μ, for example:
uA. . : μA. . , uPA. . , μPA. . ,
uPB. . : μPB. . , uPC. . , μPC. . ,
uPD. . : μPD. .
• CAPACITORS
uF: μF
• COILS
uH: μH
C203 1-128-995-21 ELECT CHIP 100uF 20% 10V
C209 1-162-970-11 CERAMIC CHIP 0.01uF 10% 25V
C210 1-107-826-11 CERAMIC CHIP 0.1uF 10% 16V
C211 1-164-230-11 CERAMIC CHIP 220PF 5% 50V
C212 1-162-919-11 CERAMIC CHIP 22PF 5% 50V
C213 1-162-919-11 CERAMIC CHIP 22PF 5% 50V
C251 1-162-969-11 CERAMIC CHIP 0.0068uF 10% 25V
C252 1-164-360-11 CERAMIC CHIP 0.1uF 16V
C255 1-164-360-11 CERAMIC CHIP 0.1uF 16V
C257 1-164-360-11 CERAMIC CHIP 0.1uF 16V
C258 1-164-360-11 CERAMIC CHIP 0.1uF 16V
C259 1-164-360-11 CERAMIC CHIP 0.1uF 16V
C260 1-128-394-11 ELECT CHIP 220uF 20% 10V
C302 1-164-360-11 CERAMIC CHIP 0.1uF 16V
C303 1-164-360-11 CERAMIC CHIP 0.1uF 16V
C305 1-126-210-21 ELECT CHIP 220uF 20% 4V
C306 1-164-360-11 CERAMIC CHIP 0.1uF 16V
C307 1-164-360-11 CERAMIC CHIP 0.1uF 16V
C308 1-126-208-21 ELECT CHIP 47uF 20% 4V
C309 1-164-360-11 CERAMIC CHIP 0.1uF 16V
C310 1-164-360-11 CERAMIC CHIP 0.1uF 16V
C311 1-164-360-11 CERAMIC CHIP 0.1uF 16V
C312 1-164-360-11 CERAMIC CHIP 0.1uF 16V
C313 1-164-360-11 CERAMIC CHIP 0.1uF 16V
C314 1-126-208-21 ELECT CHIP 47uF 20% 4V
C315 1-107-826-11 CERAMIC CHIP 0.1uF 10% 16V
C316 1-162-966-11 CERAMIC CHIP 0.0022uF 10% 50V
C317 1-162-970-11 CERAMIC CHIP 0.01uF 10% 25V
C318 1-162-970-11 CERAMIC CHIP 0.01uF 10% 25V
C320 1-216-864-11 SHORT CHIP 0
< CONNECTOR >
CN101 1-770-425-51 CONNECTOR, FFC/FPC 16P
CN201 1-784-835-51 CONNECTOR, FFC (LIF(NON-ZIF)) 27P
The components identifi ed by mark 0
or dotted line with mark 0 are critical for
safety.
Replace only with part number specifi ed.
Les composants identifi és par une marque
0 sont critiques pour la sécurité.
Ne les remplacer que par une pièce portant
le numéro spécifi é.
When indicating parts by reference number, please include the board.
BD81A
C174 1-164-360-11 CERAMIC CHIP 0.1uF 16V
C181 1-164-360-11 CERAMIC CHIP 0.1uF 16V
C182 1-164-360-11 CERAMIC CHIP 0.1uF 16V
C183 1-124-778-00 ELECT CHIP 22uF 20% 6.3V
C184 1-124-778-00 ELECT CHIP 22uF 20% 6.3V
C185 1-164-315-11 CERAMIC CHIP 470PF 5% 50V
C186 1-164-315-11 CERAMIC CHIP 470PF 5% 50V
C194 1-164-360-11 CERAMIC CHIP 0.1uF 16V
C195 1-164-360-11 CERAMIC CHIP 0.1uF 16V
C196 1-164-360-11 CERAMIC CHIP 0.1uF 16V
C201 1-128-995-21 ELECT CHIP 100uF 20% 10V
< FERRITE BEAD >
FB301 1-500-445-21 FERRITE, EMI (SMD) (2012)
< IC >
IC101 8-752-425-12 IC CXD3059AR
IC251 6-705-808-01 IC BA5947FM-E2
IC301 6-705-365-01 IC TC94A34FG-002
IC303 6-705-807-01 IC BH15FB1WG
77
Page 78
HCD-ZX66i/ZX99i
BD81A CD-L CD-R CURSOR MT
Ref. No. Part No. Description Remark Ref. No. Part No. Description Remark
< TRANSISTOR >
Q10 6-551-120-01 TRANSISTOR 2SA2119K
< RESISTOR >
R10 1-216-791-11 METAL CHIP 3.3 5% 1/10W
R11 1-216-864-11 SHORT CHIP 0
R12 1-216-845-11 METAL CHIP 100K 5% 1/10W
R13 1-218-446-11 METAL CHIP 1 5% 1/10W
R111 1-216-821-11 METAL CHIP 1K 5% 1/10W
R112 1-216-835-11 METAL CHIP 15K 5% 1/10W
R113 1-216-821-11 METAL CHIP 1K 5% 1/10W
R114 1-216-835-11 METAL CHIP 15K 5% 1/10W
R121 1-216-835-11 METAL CHIP 15K 5% 1/10W
R131 1-216-857-11 METAL CHIP 1M 5% 1/10W
R132 1-216-833-11 METAL CHIP 10K 5% 1/10W
R133 1-216-848-11 METAL CHIP 180K 5% 1/10W
R141 1-216-829-11 METAL CHIP 4.7K 5% 1/10W
R142 1-216-821-11 METAL CHIP 1K 5% 1/10W
R143 1-216-827-11 METAL CHIP 3.3K 5% 1/10W
R412 1-216-809-11 METAL CHIP 100 5% 1/10W
R419 1-216-809-11 METAL CHIP 100 5% 1/10W
< VIBRATOR >
X171 1-767-408-21 VIBRATOR, CRYSTAL (16.9344MHz)
*************************************************************
CD-L BOARD
**********
< RESISTOR >
R834 1-216-835-11 METAL CHIP 15K 5% 1/10W
R866 1-216-839-11 METAL CHIP 33K 5% 1/10W
R896 1-216-837-11 METAL CHIP 22K 5% 1/10W
< SWITCH >
S937 1-762-875-21 SWITCH, KEYBOARD (DISC SKIP)
S938 1-762-875-21 SWITCH, KEYBOARD (EX-CHANGE)
S939 1-762-875-21 SWITCH, KEYBOARD (Z OPEN/CLOSE)
*************************************************************
R151 1-216-864-11 SHORT CHIP 0
R161 1-216-809-11 METAL CHIP 100 5% 1/10W
R162 1-216-841-11 METAL CHIP 47K 5% 1/10W
R163 1-216-809-11 METAL CHIP 100 5% 1/10W
R165 1-216-864-11 SHORT CHIP 0
R171 1-216-817-11 METAL CHIP 470 5% 1/10W
R172 1-216-857-11 METAL CHIP 1M 5% 1/10W
R173 1-216-295-11 SHORT CHIP 0
R181 1-216-809-11 METAL CHIP 100 5% 1/10W
R182 1-216-809-11 METAL CHIP 100 5% 1/10W
R191 1-216-864-11 SHORT CHIP 0
R201 1-500-445-21 FERRITE, EMI (SMD) (2012)
R203 1-216-864-11 SHORT CHIP 0
R204 1-500-445-21 FERRITE, EMI (SMD) (2012)
R205 1-216-864-11 SHORT CHIP 0
R251 1-216-833-11 METAL CHIP 10K 5% 1/10W
R252 1-216-837-11 METAL CHIP 22K 5% 1/10W
R253 1-216-833-11 METAL CHIP 10K 5% 1/10W
R301 1-216-845-11 METAL CHIP 100K 5% 1/10W
R302 1-216-833-11 METAL CHIP 10K 5% 1/10W
R303 1-216-845-11 METAL CHIP 100K 5% 1/10W
R305 1-216-845-11 METAL CHIP 100K 5% 1/10W
R306 1-216-864-11 SHORT CHIP 0
R307 1-216-833-11 METAL CHIP 10K 5% 1/10W
R313 1-216-813-11 METAL CHIP 220 5% 1/10W
R351 1-216-809-11 METAL CHIP 100 5% 1/10W
R352 1-216-809-11 METAL CHIP 100 5% 1/10W
R353 1-216-809-11 METAL CHIP 100 5% 1/10W
R354 1-216-809-11 METAL CHIP 100 5% 1/10W
R401 1-216-809-11 METAL CHIP 100 5% 1/10W
CD-R BOARD
***********
< RESISTOR >
R872 1-216-827-11 METAL CHIP 3.3K 5% 1/10W
R873 1-216-829-11 METAL CHIP 4.7K 5% 1/10W
R874 1-218-867-11 METAL CHIP 6.8K 0.5% 1/10W
R875 1-216-833-11 METAL CHIP 10K 5% 1/10W
R876 1-216-835-11 METAL CHIP 15K 5% 1/10W
R877 1-216-837-11 METAL CHIP 22K 5% 1/10W
< SWITCH >
S950 1-762-875-21 SWITCH, KEYBOARD (ALBUM +/ M)
S951 1-762-875-21 SWITCH, KEYBOARD (ALBUM –/ m)
S952 1-762-875-21 SWITCH, KEYBOARD (>)
S953 1-762-875-21 SWITCH, KEYBOARD (.)
S954 1-762-875-21 SWITCH, KEYBOARD (x)
S955 1-762-875-21 SWITCH, KEYBOARD (N X)
*************************************************************
CURSOR MT BOARD
****************
< RESISTOR >
R979 1-216-833-11 METAL CHIP 10K 5% 1/10W
R980 1-216-835-11 METAL CHIP 15K 5% 1/10W
R981 1-216-837-11 METAL CHIP 22K 5% 1/10W
R982 1-216-839-11 METAL CHIP 33K 5% 1/10W
< SWITCH >
R402 1-216-809-11 METAL CHIP 100 5% 1/10W
R403 1-216-809-11 METAL CHIP 100 5% 1/10W
R404 1-216-809-11 METAL CHIP 100 5% 1/10W
R405 1-216-809-11 METAL CHIP 100 5% 1/10W
R406 1-216-809-11 METAL CHIP 100 5% 1/10W
R407 1-216-809-11 METAL CHIP 100 5% 1/10W
R408 1-216-809-11 METAL CHIP 100 5% 1/10W
R409 1-216-809-11 METAL CHIP 100 5% 1/10W
R410 1-216-809-11 METAL CHIP 100 5% 1/10W
R411 1-216-809-11 METAL CHIP 100 5% 1/10W
78
S970 1-771-879-11 SWITCH, TACTILE (ENTER (CURSOR))
*************************************************************
Page 79
HCD-ZX66i/ZX99i
GAME HPFUNCTION SW IPOD JOG-A JOG-B LEFT-BTTN
Ref. No. Part No. Description Remark Ref. No. Part No. Description Remark
FUNCTION SW BOARD
******************
< RESISTOR >
R832 1-216-835-11 METAL CHIP 15K 5% 1/10W
< SWITCH >
S930 1-762-875-21 SWITCH, KEYBOARD (FUNCTION)
*************************************************************
R1553 1-216-845-11 METAL CHIP 100K 5% 1/10W
R1555 1-216-295-11 SHORT CHIP 0
R1556 1-218-903-11 METAL CHIP 220K 0.5% 1/10W
R1557 1-218-907-11 METAL CHIP 330K 0.5% 1/10W
R1558 1-216-809-11 METAL CHIP 100 5% 1/10W
R1563 1-216-295-11 SHORT CHIP 0
R1571 1-216-295-11 SHORT CHIP 0
R1590 1-218-895-11 METAL CHIP 100K 0.5% 1/10W
R1591 1-218-895-11 METAL CHIP 100K 0.5% 1/10W
R1592 1-218-895-11 METAL CHIP 100K 0.5% 1/10W
GAME HP BOARD
**************
< CAPACITOR >
C841 1-107-826-11 CERAMIC CHIP 0.1uF 10% 16V
C842 1-107-826-11 CERAMIC CHIP 0.1uF 10% 16V
C843 1-107-826-11 CERAMIC CHIP 0.1uF 10% 16V
C844 1-107-826-11 CERAMIC CHIP 0.1uF 10% 16V
< CONNECTOR >
CN801 1-564-720-11 PIN, CONNECTOR (SMALL TYPE) 4P
CN802 1-785-328-11 PIN, CONNECTOR (LIGHT ANGLE) 2P
CN803 1-564-719-11 PIN, CONNECTOR (SMALL TYPE) 3P
< JACK >
J580 1-764-592-11 JACK, PIN 3P (GAME INPUT VIDEO,AUDIO)
J851 1-770-226-11 JACK (LARGE TYPE) (PHONES)
< RESISTOR >
R826 1-216-809-11 METAL CHIP 100 5% 1/10W
R827 1-216-849-11 METAL CHIP 220K 5% 1/10W
R828 1-216-849-11 METAL CHIP 220K 5% 1/10W
R829 1-216-821-11 METAL CHIP 1K 5% 1/10W
R830 1-216-821-11 METAL CHIP 1K 5% 1/10W
*************************************************************
IPOD BOARD
***********
< CAPACITOR >
C1551 1-107-826-11 CERAMIC CHIP 0.1uF 10% 16V
C1553 1-107-826-11 CERAMIC CHIP 0.1uF 10% 16V
C1554 1-162-919-11 CERAMIC CHIP 22PF 5% 50V
C1555 1-162-919-11 CERAMIC CHIP 22PF 5% 50V
C1556 1-128-392-11 ELECT CHIP 470uF 20% 6.3V
R1593 1-218-895-11 METAL CHIP 100K 0.5% 1/10W
R1594 1-218-892-11 METAL CHIP 75K 0.5% 1/10W
R1595 1-218-892-11 METAL CHIP 75K 0.5% 1/10W
*************************************************************
JOG-A BOARD (ZX99i)
************
< CONNECTOR >
CN922 1-785-333-11 PIN, CONNECTOR (LIGHT ANGLE) 7P
< DIODE >
D926 8-719-060-27 LED SLR-325MCT31 (X-ROUND ON/OFF)
< TRANSISTOR >
Q917 8-729-620-07 TRANSISTOR 2SC3052EF-T1-LEF
< RESISTOR >
R882 1-216-819-11 METAL CHIP 680 5% 1/10W
R883 1-216-817-11 METAL CHIP 470 5% 1/10W
R890 1-216-819-11 METAL CHIP 680 5% 1/10W
R892 1-216-819-11 METAL CHIP 680 5% 1/10W
< SWITCH >
S957 1-478-133-11 ENCODER, ROTARY (JOG)
S965 1-762-875-21 SWITCH, KEYBOARD (MODE SPEAKERS)
S966 1-762-875-21 SWITCH, KEYBOARD (X-ROUND ON/OFF)
*************************************************************
JOG-B BOARD (ZX99i)
************
< RESISTOR >
R884 1-216-821-11 METAL CHIP 1K 5% 1/10W
C1557 1-107-826-11 CERAMIC CHIP 0.1uF 10% 16V
< CONNECTOR >
CN1550 1-820-701-11 PIN, CONNECTOR 30P (Dock for iPod)
CN1551 1-821-589-21 PIN, CONNECTOR (PC BOARD) 11P
< DIODE >
D1553 6-501-568-01 DIODE RB521CS-30T2R
< RESISTOR >
R1500 1-216-809-11 METAL CHIP 100 5% 1/10W
R1503 1-216-845-11 METAL CHIP 100K 5% 1/10W
R1505 1-216-295-11 SHORT CHIP 0
R1506 1-216-295-11 SHORT CHIP 0
R1550 1-216-809-11 METAL CHIP 100 5% 1/10W
< SWITCH >
S967 1-762-875-21 SWITCH, KEYBOARD (SOUND FLASH)
*************************************************************
LEFT-BTTN BOARD
***************
< RESISTOR >
R837 1-216-833-11 METAL CHIP 10K 5% 1/10W
R840 1-218-867-11 METAL CHIP 6.8K 0.5% 1/10W
R843 1-216-829-11 METAL CHIP 4.7K 5% 1/10W
R844 1-216-827-11 METAL CHIP 3.3K 5% 1/10W
R845 1-216-825-11 METAL CHIP 2.2K 5% 1/10W
R846 1-216-823-11 METAL CHIP 1.5K 5% 1/10W
7979
Page 80
HCD-ZX66i/ZX99i
MAINLEFT-BTTN
Ref. No. Part No. Description Remark Ref. No. Part No. Description Remark
< SWITCH >
S931 1-762-875-21 SWITCH, KEYBOARD (DISC 5)
S932 1-762-875-21 SWITCH, KEYBOARD (PLAY MODE)
S933 1-762-875-21 SWITCH, KEYBOARD (DISC 4)
S934 1-762-875-21 SWITCH, KEYBOARD (DISC 3)
S935 1-762-875-21 SWITCH, KEYBOARD (DISC 1)
S936 1-762-875-21 SWITCH, KEYBOARD (DISC 2)
*************************************************************
A-1616-802-A MAIN BOARD, COMPLETE (ZX99i)
A-1616-827-A MAIN BOARD, COMPLETE (ZX66i)
*********************
7-685-646-79 SCREW +BVTP 3X8 TYPE2 IT-3
< CAPACITOR >
C8 1-126-964-11 ELECT 10uF 20% 50V
C12 1-126-959-11 ELECT 0.47uF 20% 50V
C13 1-162-970-11 CERAMIC CHIP 0.01uF 10% 25V
C14 1-104-658-11 ELECT 100uF 20% 10V
C15 1-104-658-11 ELECT 100uF 20% 10V
C16 1-162-970-11 CERAMIC CHIP 0.01uF 10% 25V
C19 1-100-597-11 CERAMIC CHIP 0.1uF 10% 25V
C23 1-100-756-11 CERAMIC CHIP 0.047uF 10% 50V
C25 1-137-189-11 FILM 0.18uF 5% 50V
(ZX66i)
C25 1-137-190-11 FILM 0.22uF 5% 50V
(ZX99i)
C26 1-126-964-11 ELECT 10uF 20% 50V
C27 1-137-190-11 FILM 0.22uF 5% 50V
(ZX66i)
C27 1-136-170-00 FILM 0.27uF 5% 50V
(ZX99i)
C28 1-126-964-11 ELECT 10uF 20% 50V
C29 1-126-961-11 ELECT 2.2uF 20% 50V
C30 1-126-964-11 ELECT 10uF 20% 50V
C31 1-126-963-11 ELECT 4.7uF 20% 50V
C33 1-164-361-11 CERAMIC CHIP 0.047uF 25V
C38 1-126-964-11 ELECT 10uF 20% 50V
C39 1-126-964-11 ELECT 10uF 20% 50V
C41 1-126-960-11 ELECT 1uF 20% 50V
C45 1-126-964-11 ELECT 10uF 20% 50V
C46 1-114-573-11 CERAMIC CHIP 0.0047uF 5% 50V
C47 1-107-726-11 CERAMIC CHIP 0.01uF 10% 16V
C48 1-164-227-11 CERAMIC CHIP 0.022uF 10% 25V
C49 1-126-959-11 ELECT 0.47uF 20% 50V
C50 1-126-964-11 ELECT 10uF 20% 50V
C75 1-137-189-11 FILM 0.18uF 5% 50V
(ZX66i)
C75 1-137-190-11 FILM 0.22uF 5% 50V
(ZX99i)
C76 1-126-964-11 ELECT 10uF 20% 50V
C77 1-137-190-11 FILM 0.22uF 5% 50V
(ZX66i)
C77 1-136-170-00 FILM 0.27uF 5% 50V
(ZX99i)
C78 1-126-964-11 ELECT 10uF 20% 50V
C79 1-126-961-11 ELECT 2.2uF 20% 50V
C80 1-126-964-11 ELECT 10uF 20% 50V
C81 1-126-963-11 ELECT 4.7uF 20% 50V
C83 1-164-361-11 CERAMIC CHIP 0.047uF 25V
C88 1-126-964-11 ELECT 10uF 20% 50V
C89 1-126-964-11 ELECT 10uF 20% 50V
C91 1-126-964-11 ELECT 10uF 20% 50V
C96 1-114-573-11 CERAMIC CHIP 0.0047uF 5% 50V
C97 1-107-726-11 CERAMIC CHIP 0.01uF 10% 16V
C98 1-164-227-11 CERAMIC CHIP 0.022uF 10% 25V
C100 1-126-964-11 ELECT 10uF 20% 50V
C103 1-100-153-11 CERAMIC CHIP 220PF 5% 100V
C104 1-162-961-11 CERAMIC CHIP 330PF 10% 50V
C105 1-126-964-11 ELECT 10uF 20% 50V
C106 1-162-927-11 CERAMIC CHIP 100PF 5% 50V
C108 1-162-927-11 CERAMIC CHIP 100PF 5% 50V
C109 1-130-479-00 MYLAR 0.0047uF 5% 50V
C110 1-130-473-00 MYLAR 0.0015uF 5% 50V
C111 1-126-960-11 ELECT 1uF 20% 50V
C112 1-126-961-11 ELECT 2.2uF 20% 50V
C113 1-126-960-11 ELECT 1uF 20% 50V
C114 1-126-960-11 ELECT 1uF 20% 50V
C116 1-126-964-11 ELECT 10uF 20% 50V
C118 1-126-963-11 ELECT 4.7uF 20% 50V
(ZX99i)
C126 1-162-970-11 CERAMIC CHIP 0.01uF 10% 25V
(ZX99i)
C127 1-104-658-11 ELECT 100uF 20% 10V
(ZX99i)
C128 1-126-935-11 ELECT 470uF 20% 16V
(ZX99i)
C130 1-100-597-11 CERAMIC CHIP 0.1uF 10% 25V
(ZX99i)
C131 1-137-190-11 FILM 0.22uF 5% 50V
(ZX99i)
C132 1-136-170-00 FILM 0.27uF 5% 50V
(ZX99i)
C133 1-126-961-11 ELECT 2.2uF 20% 50V
(ZX99i)
C153 1-100-153-11 CERAMIC CHIP 220PF 5% 100V
C154 1-162-961-11 CERAMIC CHIP 330PF 10% 50V
C155 1-126-964-11 ELECT 10uF 20% 50V
C156 1-126-964-11 ELECT 10uF 20% 50V
C158 1-162-927-11 CERAMIC CHIP 100PF 5% 50V
C159 1-130-479-00 MYLAR 0.0047uF 5% 50V
C160 1-130-473-00 MYLAR 0.0015uF 5% 50V
C162 1-126-961-11 ELECT 2.2uF 20% 50V
C163 1-126-960-11 ELECT 1uF 20% 50V
C164 1-126-960-11 ELECT 1uF 20% 50V
C166 1-162-927-11 CERAMIC CHIP 100PF 5% 50V
C168 1-126-963-11 ELECT 4.7uF 20% 50V
(ZX99i)
C181 1-137-190-11 FILM 0.22uF 5% 50V
(ZX99i)
C182 1-136-170-00 FILM 0.27uF 5% 50V
(ZX99i)
C188 1-126-961-11 ELECT 2.2uF 20% 50V
(ZX99i)
C202 1-126-964-11 ELECT 10uF 20% 50V
C214 1-128-934-11 CERAMIC CHIP 0.33uF 20% 10V
C215 1-126-964-11 ELECT 10uF 20% 50V
C216 1-126-964-11 ELECT 10uF 20% 50V
C217 1-164-156-11 CERAMIC CHIP 0.1uF 25V
C227 1-126-961-11 ELECT 2.2uF 20% 50V
C277 1-126-961-11 ELECT 2.2uF 20% 50V
C300 1-107-726-11 CERAMIC CHIP 0.01uF 10% 16V
C301 1-107-826-11 CERAMIC CHIP 0.1uF 10% 16V
80
Page 81

HCD-ZX66i/ZX99i
MAIN
Ref. No. Part No. Description Remark Ref. No. Part No. Description Remark
C302 1-126-947-11 ELECT 47uF 20% 35V
C303 1-107-826-11 CERAMIC CHIP 0.1uF 10% 16V
C304 1-107-726-11 CERAMIC CHIP 0.01uF 10% 16V
C305 1-107-826-11 CERAMIC CHIP 0.1uF 10% 16V
C306 1-126-947-11 ELECT 47uF 20% 35V
C307 1-107-826-11 CERAMIC CHIP 0.1uF 10% 16V
C320 1-107-826-11 CERAMIC CHIP 0.1uF 10% 16V
C321 1-107-826-11 CERAMIC CHIP 0.1uF 10% 16V
C322 1-126-926-11 ELECT 1000uF 20% 10V
C323 1-107-826-11 CERAMIC CHIP 0.1uF 10% 16V
C324 1-107-826-11 CERAMIC CHIP 0.1uF 10% 16V
C325 1-107-826-11 CERAMIC CHIP 0.1uF 10% 16V
C328 1-162-957-11 CERAMIC CHIP 220PF 5% 50V
C329 1-162-949-11 CERAMIC CHIP 47PF 5% 50V
C341 1-100-566-11 CERAMIC CHIP 0.1uF 10% 25V
C342 1-126-916-11 ELECT 1000uF 20% 6.3V
C410 1-162-919-11 CERAMIC CHIP 22PF 5% 50V
C411 1-162-919-11 CERAMIC CHIP 22PF 5% 50V
C412 1-100-756-11 CERAMIC CHIP 0.047uF 10% 50V
C414 1-100-597-11 CERAMIC CHIP 0.1uF 10% 25V
C416 1-104-656-11 ELECT 2200uF 20% 6.3V
C462 1-104-658-11 ELECT 100uF 20% 10V
C464 1-100-597-11 CERAMIC CHIP 0.1uF 10% 25V
C496 1-100-597-11 CERAMIC CHIP 0.1uF 10% 25V
C498 1-126-964-11 ELECT 10uF 20% 50V
< CONNECTOR >
CN040 1-779-277-11 CONNECTOR, FFC (LIF(NON-ZIF)) 9P
CN200 1-784-770-11 CONNECTOR, FFC 9P
* CN501 1-564-713-11 PIN, CONNECTOR (SMALL TYPE) 11P
CN502 1-779-295-11 CONNECTOR, FFC (LIF(NON-ZIF)) 27P
CN503 1-564-706-11 PIN, CONNECTOR (SMALL TYPE) 4P (ZX99i)
CN505 1-778-982-11 CONNECTOR, BOARD TO BOARD 13P
CN506 1-778-982-11 CONNECTOR, BOARD TO BOARD 13P
CN507 1-784-778-11 CONNECTOR, FFC 17P
CN509 1-785-323-11 PIN, CONNECTOR (STRAIGHT) 11P
* CN513 1-564-506-11 PLUG, CONNECTOR 3P
< DIODE >
D208 6-501-817-01 DIODE MA2J1110GLS0
D209 6-500-334-01 DIODE MC2836-T112-1
D210 6-501-722-01 DIODE MAZ8043GMLS0
D501 6-500-385-01 DIODE D3SBA20-4100
D502 6-500-385-01 DIODE D3SBA20-4100
D504 6-500-522-21 DIODE 10EDB40-TB3
D505 6-500-522-21 DIODE 10EDB40-TB3
D506 6-501-817-01 DIODE MA2J1110GLS0
D554 6-501-772-01 DIODE MAZ8130GMLS0
D555 6-500-522-21 DIODE 10EDB40-TB3
D559 6-500-522-21 DIODE 10EDB40-TB3
C499 1-100-597-11 CERAMIC CHIP 0.1uF 10% 25V
C500 1-126-936-11 ELECT 3300uF 20% 16V
C501 1-162-970-11 CERAMIC CHIP 0.01uF 10% 25V
C502 1-126-947-11 ELECT 47uF 20% 35V
C505 1-162-970-11 CERAMIC CHIP 0.01uF 10% 25V
C506 1-126-933-11 ELECT 100uF 20% 16V
C508 1-126-959-11 ELECT 0.47uF 20% 50V
(ZX99i)
C509 1-126-961-11 ELECT 2.2uF 20% 50V
C510 1-126-925-11 ELECT 470uF 20% 10V
C511 1-100-597-11 CERAMIC CHIP 0.1uF 10% 25V
C512 1-130-483-00 MYLAR 0.01uF 5% 50V
C513 1-126-961-11 ELECT 2.2uF 20% 50V
C514 1-130-483-00 MYLAR 0.01uF 5% 50V
C515 1-126-965-11 ELECT 22uF 20% 50V
C528 1-164-156-11 CERAMIC CHIP 0.1uF 25V
C529 1-128-548-11 ELECT 4700uF 20% 25V
C534 1-104-658-11 ELECT 100uF 20% 10V
C535 1-107-826-11 CERAMIC CHIP 0.1uF 10% 16V
C537 1-107-826-11 CERAMIC CHIP 0.1uF 10% 16V
C538 1-126-947-11 ELECT 47uF 20% 35V
C547 1-164-156-11 CERAMIC CHIP 0.1uF 25V
C554 1-164-156-11 CERAMIC CHIP 0.1uF 25V
C555 1-104-658-11 ELECT 100uF 20% 10V
C586 1-107-826-11 CERAMIC CHIP 0.1uF 10% 16V
C587 1-107-826-11 CERAMIC CHIP 0.1uF 10% 16V
< FERRITE BEAD >
FB300 1-500-283-11 INDUCTOR, FERRITE BEAD
FB301 1-414-229-11 INDUCTOR, FERRITE BEAD
FB302 1-216-864-11 SHORT CHIP 0
FB303 1-500-283-11 INDUCTOR, FERRITE BEAD
FB304 1-216-864-11 SHORT CHIP 0
FB305 1-216-864-11 SHORT CHIP 0
FB306 1-216-864-11 SHORT CHIP 0
< IC >
IC100 8-759-278-58 IC NJM4558V-TE2
IC101 6-712-027-01 IC R2A15216FP
IC102
IC401 (Not supplied) IC R5F3640MDFAR
IC501 6-710-643-01 IC BA00BC0WCP-V5E2
IC503 6-600-461-01 IC TOTX147L(B) (CD DIGITAL OUT OPTICAL)
IC510 6-713-032-01 IC KIA7809API-U/PF
IC511 6-713-032-01 IC KIA7809API-U/PF
IC513 6-701-761-01 IC uPC3533AHF
IC514 8-759-598-69 IC BA6956AN
IC515 8-759-598-69 IC BA6956AN
IC519 8-759-278-58 IC NJM4558V-TE2
IC675 6-709-450-01 IC S-24CS16A0I-J8T1G
< JACK >
6-709-331-01 IC R2S15207FP (ZX99i)
C591 1-126-925-11 ELECT 470uF 20% 10V
C593 1-100-566-11 CERAMIC CHIP 0.1uF 10% 25V
C594 1-100-566-11 CERAMIC CHIP 0.1uF 10% 25V
C597 1-130-483-00 MYLAR 0.01uF 5% 50V
C598 1-130-483-00 MYLAR 0.01uF 5% 50V
C599 1-104-658-11 ELECT 100uF 20% 10V
C600 1-126-935-11 ELECT 470uF 20% 16V
J701 1-794-981-11 JACK, PIN 4P
J716 1-794-970-11 JACK, PIN 1P (VIDEO OUT)
< JUMPER RESISTOR >
JR123 1-100-597-11 CERAMIC CHIP 0.1uF 10% 25V
JR300 1-216-296-11 SHORT CHIP 0
JR301 1-216-296-11 SHORT CHIP 0
JR303 1-216-864-11 SHORT CHIP 0
JR400 1-216-296-11 SHORT CHIP 0
(PC IN,PHONO IN)
8181
Page 82

HCD-ZX66i/ZX99i
MAIN
Ref. No. Part No. Description Remark Ref. No. Part No. Description Remark
< COIL >
L300 1-412-058-11 INDUCTOR 10uH
< TRANSISTOR >
R110 1-216-821-11 METAL CHIP 1K 5% 1/10W
R111 1-216-821-11 METAL CHIP 1K 5% 1/10W
R112 1-216-854-11 METAL CHIP 560K 5% 1/10W
R113 1-216-841-11 METAL CHIP 47K 5% 1/10W
R115 1-216-841-11 METAL CHIP 47K 5% 1/10W
Q2 8-729-620-07 TRANSISTOR 2SC3052EF-T1-LEF
Q52 8-729-620-07 TRANSISTOR 2SC3052EF-T1-LEF
Q100 8-729-620-07 TRANSISTOR 2SC3052EF-T1-LEF
Q102 8-729-620-07 TRANSISTOR 2SC3052EF-T1-LEF
Q103 8-729-620-07 TRANSISTOR 2SC3052EF-T1-LEF (ZX99i)
Q104 8-729-620-07 TRANSISTOR 2SC3052EF-T1-LEF (ZX99i)
Q150 8-729-620-07 TRANSISTOR 2SC3052EF-T1-LEF
Q153 8-729-620-07 TRANSISTOR 2SC3052EF-T1-LEF (ZX99i)
Q154 8-729-620-07 TRANSISTOR 2SC3052EF-T1-LEF (ZX99i)
Q207 8-729-038-28 TRANSISTOR RT1N441C-TP-1
Q208 8-729-620-07 TRANSISTOR 2SC3052EF-T1-LEF
Q209 8-729-037-13 TRANSISTOR KTA1271Y
Q210 8-729-620-07 TRANSISTOR 2SC3052EF-T1-LEF
Q211 8-729-620-07 TRANSISTOR 2SC3052EF-T1-LEF
Q290 8-729-027-23 TRANSISTOR DTA114EKA-T146
Q500 8-729-620-07 TRANSISTOR 2SC3052EF-T1-LEF
Q502 8-729-040-76 TRANSISTOR KTA1273-Y-AT
Q503 8-729-620-07 TRANSISTOR 2SC3052EF-T1-LEF
Q505 8-729-027-23 TRANSISTOR DTA114EKA-T146
Q552 6-550-185-01 TRANSISTOR RT1P137P-TP-1
Q554 8-729-027-43 TRANSISTOR DTC114EKA-T146
Q555 8-729-620-07 TRANSISTOR 2SC3052EF-T1-LEF
Q557 8-729-038-28 TRANSISTOR RT1N441C-TP-1
Q870 8-729-620-07 TRANSISTOR 2SC3052EF-T1-LEF
< RESISTOR >
R8 1-216-864-11 SHORT CHIP 0
R11 1-216-833-11 METAL CHIP 10K 5% 1/10W
R12 1-216-833-11 METAL CHIP 10K 5% 1/10W
R16 1-216-833-11 METAL CHIP 10K 5% 1/10W
R17 1-216-819-11 METAL CHIP 680 5% 1/10W
(ZX99i)
R17 1-216-822-11 METAL CHIP 1.2K 5% 1/10W
(ZX66i)
R19 1-216-833-11 METAL CHIP 10K 5% 1/10W
R21 1-216-833-11 METAL CHIP 10K 5% 1/10W
R22 1-216-841-11 METAL CHIP 47K 5% 1/10W
R28 1-216-833-11 METAL CHIP 10K 5% 1/10W
R29 1-216-857-11 METAL CHIP 1M 5% 1/10W
R30 1-216-845-11 METAL CHIP 100K 5% 1/10W
R33 1-216-829-11 METAL CHIP 4.7K 5% 1/10W
R58 1-216-864-11 SHORT CHIP 0
R67 1-216-819-11 METAL CHIP 680 5% 1/10W
(ZX99i)
R67 1-216-822-11 METAL CHIP 1.2K 5% 1/10W
(ZX66i)
R69 1-216-833-11 METAL CHIP 10K 5% 1/10W
R71 1-216-833-11 METAL CHIP 10K 5% 1/10W
R72 1-216-841-11 METAL CHIP 47K 5% 1/10W
R78 1-216-833-11 METAL CHIP 10K 5% 1/10W
R83 1-216-829-11 METAL CHIP 4.7K 5% 1/10W
R100 1-218-867-11 METAL CHIP 6.8K 0.5% 1/10W
R101 1-216-825-11 METAL CHIP 2.2K 5% 1/10W
R106 1-216-845-11 METAL CHIP 100K 5% 1/10W
R107 1-216-821-11 METAL CHIP 1K 5% 1/10W
R116 1-216-821-11 METAL CHIP 1K 5% 1/10W
R117 1-216-845-11 METAL CHIP 100K 5% 1/10W
R118 1-218-879-11 METAL CHIP 22K 0.5% 1/10W
R119 1-218-879-11 METAL CHIP 22K 0.5% 1/10W
R120 1-218-879-11 METAL CHIP 22K 0.5% 1/10W
R121 1-218-879-11 METAL CHIP 22K 0.5% 1/10W
R122 1-216-821-11 METAL CHIP 1K 5% 1/10W
R123 1-216-839-11 METAL CHIP 33K 5% 1/10W
R125 1-216-833-11 METAL CHIP 10K 5% 1/10W
R126 1-216-819-11 METAL CHIP 680 5% 1/10W
(ZX99i)
R127 1-216-833-11 METAL CHIP 10K 5% 1/10W
(ZX99i)
R133 1-216-841-11 METAL CHIP 47K 5% 1/10W
R134 1-216-833-11 METAL CHIP 10K 5% 1/10W
R135 1-216-821-11 METAL CHIP 1K 5% 1/10W
R137 1-216-821-11 METAL CHIP 1K 5% 1/10W
(ZX99i)
R138 1-216-841-11 METAL CHIP 47K 5% 1/10W
(ZX99i)
R139 1-216-833-11 METAL CHIP 10K 5% 1/10W
(ZX99i)
R141 1-216-841-11 METAL CHIP 47K 5% 1/10W
(ZX99i)
R150 1-218-867-11 METAL CHIP 6.8K 0.5% 1/10W
R151 1-216-825-11 METAL CHIP 2.2K 5% 1/10W
R156 1-216-845-11 METAL CHIP 100K 5% 1/10W
R157 1-216-821-11 METAL CHIP 1K 5% 1/10W
R159 1-216-821-11 METAL CHIP 1K 5% 1/10W
R160 1-216-821-11 METAL CHIP 1K 5% 1/10W
R161 1-216-821-11 METAL CHIP 1K 5% 1/10W
R162 1-216-854-11 METAL CHIP 560K 5% 1/10W
R163 1-216-841-11 METAL CHIP 47K 5% 1/10W
R165 1-216-841-11 METAL CHIP 47K 5% 1/10W
R166 1-216-821-11 METAL CHIP 1K 5% 1/10W
R167 1-216-845-11 METAL CHIP 100K 5% 1/10W
R168 1-218-879-11 METAL CHIP 22K 0.5% 1/10W
R169 1-218-879-11 METAL CHIP 22K 0.5% 1/10W
R170 1-218-879-11 METAL CHIP 22K 0.5% 1/10W
R171 1-218-879-11 METAL CHIP 22K 0.5% 1/10W
R172 1-216-821-11 METAL CHIP 1K 5% 1/10W
R173 1-216-839-11 METAL CHIP 33K 5% 1/10W
R175 1-216-833-11 METAL CHIP 10K 5% 1/10W
R176 1-216-819-11 METAL CHIP 680 5% 1/10W
(ZX99i)
R177 1-216-833-11 METAL CHIP 10K 5% 1/10W
(ZX99i)
R183 1-216-841-11 METAL CHIP 47K 5% 1/10W
R184 1-216-833-11 METAL CHIP 10K 5% 1/10W
R185 1-216-821-11 METAL CHIP 1K 5% 1/10W
R187 1-216-821-11 METAL CHIP 1K 5% 1/10W
(ZX99i)
R188 1-216-841-11 METAL CHIP 47K 5% 1/10W
(ZX99i)
R189 1-216-833-11 METAL CHIP 10K 5% 1/10W
(ZX99i)
R109 1-216-821-11 METAL CHIP 1K 5% 1/10W
82
Page 83

HCD-ZX66i/ZX99i
MAIN
Ref. No. Part No. Description Remark Ref. No. Part No. Description Remark
R191 1-216-841-11 METAL CHIP 47K 5% 1/10W
(ZX99i)
R208 1-216-833-11 METAL CHIP 10K 5% 1/10W
R209 1-216-809-11 METAL CHIP 100 5% 1/10W
R222 1-216-833-11 METAL CHIP 10K 5% 1/10W
R227 1-216-833-11 METAL CHIP 10K 5% 1/10W
R228 1-216-845-11 METAL CHIP 100K 5% 1/10W
R229 1-216-845-11 METAL CHIP 100K 5% 1/10W
R230 1-216-825-11 METAL CHIP 2.2K 5% 1/10W
R231 1-216-819-11 METAL CHIP 680 5% 1/10W
R276 1-216-843-11 METAL CHIP 68K 5% 1/10W
R295 1-216-855-11 METAL CHIP 680K 5% 1/10W
R296 1-216-835-11 METAL CHIP 15K 5% 1/10W
R300 1-216-845-11 METAL CHIP 100K 5% 1/10W
R301 1-216-841-11 METAL CHIP 47K 5% 1/10W
R302 1-216-821-11 METAL CHIP 1K 5% 1/10W
R303 1-216-845-11 METAL CHIP 100K 5% 1/10W
R304 1-218-285-11 METAL CHIP 75 5% 1/10W
R305 1-216-841-11 METAL CHIP 47K 5% 1/10W
R306 1-216-842-11 METAL CHIP 56K 5% 1/10W
R307 1-216-835-11 METAL CHIP 15K 5% 1/10W
R308 1-216-839-11 METAL CHIP 33K 5% 1/10W
R309 1-216-821-11 METAL CHIP 1K 5% 1/10W
R310 1-216-841-11 METAL CHIP 47K 5% 1/10W
R311 1-216-809-11 METAL CHIP 100 5% 1/10W
R312 1-216-809-11 METAL CHIP 100 5% 1/10W
R313 1-216-809-11 METAL CHIP 100 5% 1/10W
R314 1-216-797-11 METAL CHIP 10 5% 1/10W
R315 1-216-797-11 METAL CHIP 10 5% 1/10W
R316 1-216-864-11 SHORT CHIP 0
R317 1-216-821-11 METAL CHIP 1K 5% 1/10W
R318 1-216-864-11 SHORT CHIP 0
R329 1-216-833-11 METAL CHIP 10K 5% 1/10W
R330 1-216-833-11 METAL CHIP 10K 5% 1/10W
R331 1-216-821-11 METAL CHIP 1K 5% 1/10W
(ZX99i)
R332 1-216-822-11 METAL CHIP 1.2K 5% 1/10W
(ZX99i)
R335 1-216-833-11 METAL CHIP 10K 5% 1/10W
R336 1-216-833-11 METAL CHIP 10K 5% 1/10W
R344 1-216-833-11 METAL CHIP 10K 5% 1/10W
R345 1-216-833-11 METAL CHIP 10K 5% 1/10W
R346 1-216-833-11 METAL CHIP 10K 5% 1/10W
R365 1-216-833-11 METAL CHIP 10K 5% 1/10W
R366 1-216-833-11 METAL CHIP 10K 5% 1/10W
R367 1-216-833-11 METAL CHIP 10K 5% 1/10W
R368 1-216-833-11 METAL CHIP 10K 5% 1/10W
R371 1-216-833-11 METAL CHIP 10K 5% 1/10W
R373 1-216-833-11 METAL CHIP 10K 5% 1/10W
R374 1-216-833-11 METAL CHIP 10K 5% 1/10W
R375 1-216-833-11 METAL CHIP 10K 5% 1/10W
R377 1-216-833-11 METAL CHIP 10K 5% 1/10W
R381 1-216-835-11 METAL CHIP 15K 5% 1/10W
R382 1-216-833-11 METAL CHIP 10K 5% 1/10W
R386 1-216-833-11 METAL CHIP 10K 5% 1/10W
R391 1-216-833-11 METAL CHIP 10K 5% 1/10W
(ZX66i)
R395 1-216-833-11 METAL CHIP 10K 5% 1/10W
R397 1-216-833-11 METAL CHIP 10K 5% 1/10W
R400 1-216-809-11 METAL CHIP 100 5% 1/10W
R401 1-216-809-11 METAL CHIP 100 5% 1/10W
R402 1-216-809-11 METAL CHIP 100 5% 1/10W
R403 1-216-809-11 METAL CHIP 100 5% 1/10W
R404 1-216-809-11 METAL CHIP 100 5% 1/10W
R405 1-216-809-11 METAL CHIP 100 5% 1/10W
R406 1-216-809-11 METAL CHIP 100 5% 1/10W
R407 1-216-809-11 METAL CHIP 100 5% 1/10W
R409 1-216-833-11 METAL CHIP 10K 5% 1/10W
R411 1-216-851-11 METAL CHIP 330K 5% 1/10W
R413 1-216-857-11 METAL CHIP 1M 5% 1/10W
R417 1-216-833-11 METAL CHIP 10K 5% 1/10W
R418 1-216-809-11 METAL CHIP 100 5% 1/10W
R419 1-216-809-11 METAL CHIP 100 5% 1/10W
R420 1-216-837-11 METAL CHIP 22K 5% 1/10W
R421 1-216-809-11 METAL CHIP 100 5% 1/10W
R422 1-216-809-11 METAL CHIP 100 5% 1/10W
R423 1-216-809-11 METAL CHIP 100 5% 1/10W
R424 1-216-809-11 METAL CHIP 100 5% 1/10W
R425 1-216-809-11 METAL CHIP 100 5% 1/10W
R426 1-216-809-11 METAL CHIP 100 5% 1/10W
R428 1-216-809-11 METAL CHIP 100 5% 1/10W
R429 1-216-809-11 METAL CHIP 100 5% 1/10W
R430 1-216-809-11 METAL CHIP 100 5% 1/10W
R431 1-216-809-11 METAL CHIP 100 5% 1/10W
R432 1-216-809-11 METAL CHIP 100 5% 1/10W
R433 1-216-809-11 METAL CHIP 100 5% 1/10W
R434 1-216-809-11 METAL CHIP 100 5% 1/10W
R435 1-216-809-11 METAL CHIP 100 5% 1/10W
R436 1-216-809-11 METAL CHIP 100 5% 1/10W
R438 1-216-809-11 METAL CHIP 100 5% 1/10W
R442 1-216-809-11 METAL CHIP 100 5% 1/10W
R443 1-216-809-11 METAL CHIP 100 5% 1/10W
R444 1-216-809-11 METAL CHIP 100 5% 1/10W
R445 1-216-809-11 METAL CHIP 100 5% 1/10W
R446 1-216-809-11 METAL CHIP 100 5% 1/10W
R447 1-216-809-11 METAL CHIP 100 5% 1/10W
R448 1-216-809-11 METAL CHIP 100 5% 1/10W
R449 1-216-809-11 METAL CHIP 100 5% 1/10W
R450 1-216-809-11 METAL CHIP 100 5% 1/10W
R465 1-216-809-11 METAL CHIP 100 5% 1/10W
R466 1-216-809-11 METAL CHIP 100 5% 1/10W
R467 1-216-809-11 METAL CHIP 100 5% 1/10W
R468 1-216-813-11 METAL CHIP 220 5% 1/10W
R471 1-216-809-11 METAL CHIP 100 5% 1/10W
R472 1-216-809-11 METAL CHIP 100 5% 1/10W
R473 1-216-809-11 METAL CHIP 100 5% 1/10W
R474 1-216-809-11 METAL CHIP 100 5% 1/10W
R475 1-216-809-11 METAL CHIP 100 5% 1/10W
R476 1-216-809-11 METAL CHIP 100 5% 1/10W
R477 1-216-809-11 METAL CHIP 100 5% 1/10W
R478 1-216-809-11 METAL CHIP 100 5% 1/10W
R479 1-216-809-11 METAL CHIP 100 5% 1/10W
R480 1-216-809-11 METAL CHIP 100 5% 1/10W
R481 1-216-821-11 METAL CHIP 1K 5% 1/10W
R482 1-216-809-11 METAL CHIP 100 5% 1/10W
R483 1-216-809-11 METAL CHIP 100 5% 1/10W
R484 1-216-809-11 METAL CHIP 100 5% 1/10W
R485 1-216-809-11 METAL CHIP 100 5% 1/10W
R486 1-216-809-11 METAL CHIP 100 5% 1/10W
R492 1-216-833-11 METAL CHIP 10K 5% 1/10W
(ZX99i)
R501 1-216-821-11 METAL CHIP 1K 5% 1/10W
8383
Page 84
HCD-ZX66i/ZX99i
PANEL COMMAIN MD-94 MIC
Ref. No. Part No. Description Remark Ref. No. Part No. Description Remark
R502 1-216-821-11 METAL CHIP 1K 5% 1/10W
R504 1-216-833-11 METAL CHIP 10K 5% 1/10W
(ZX99i)
R505 1-216-833-11 METAL CHIP 10K 5% 1/10W
(ZX99i)
R506 1-216-857-11 METAL CHIP 1M 5% 1/10W
(ZX99i)
R507 1-216-843-11 METAL CHIP 68K 5% 1/10W
R509 1-249-401-11 CARBON 47 5% 1/4W F
R510 1-249-401-11 CARBON 47 5% 1/4W F
R511 1-249-401-11 CARBON 47 5% 1/4W F
R512 1-216-855-11 METAL CHIP 680K 5% 1/10W
R518 1-216-809-11 METAL CHIP 100 5% 1/10W
R535 1-216-829-11 METAL CHIP 4.7K 5% 1/10W
R536 1-216-829-11 METAL CHIP 4.7K 5% 1/10W
R538 1-216-809-11 METAL CHIP 100 5% 1/10W
R585 1-216-829-11 METAL CHIP 4.7K 5% 1/10W
R586 1-216-829-11 METAL CHIP 4.7K 5% 1/10W
C813 1-115-416-11 CERAMIC CHIP 0.001uF 5% 25V
C814 1-126-961-11 ELECT 2.2uF 20% 50V
C815 1-162-964-11 CERAMIC CHIP 0.001uF 10% 50V
C817 1-162-964-11 CERAMIC CHIP 0.001uF 10% 50V
C818 1-107-826-11 CERAMIC CHIP 0.1uF 10% 16V
< CONNECTOR >
CN920 1-564-719-11 PIN, CONNECTOR (SMALL TYPE) 3P
< IC >
IC850 8-759-278-58 IC NJM4558V-TE2
< JACK >
J801 1-770-226-11 JACK (LARGE
J802 1-770-226-11 JACK (LARGE TYPE) (MIC 2)
< RESISTOR >
TYPE) (MIC 1)
R587 1-216-845-11 METAL CHIP 100K 5% 1/10W
R588 1-216-829-11 METAL CHIP 4.7K 5% 1/10W
R591 1-216-295-11 SHORT CHIP 0
R593 1-216-801-11 METAL CHIP 22 5% 1/10W
R594 1-216-846-11 METAL CHIP 120K 5% 1/10W
R595 1-216-837-11 METAL CHIP 22K 5% 1/10W
R596 1-216-841-11 METAL CHIP 47K 5% 1/10W
R597 1-216-835-11 METAL CHIP 15K 5% 1/10W
< VIBRATOR >
X401 1-814-067-11 OSCILLATOR, CRYSTAL (32.768kHz)
X402 1-795-482-11 VIBRATOR, CERAMIC (16MHz)
*************************************************************
MD-94 BOARD
***********
< CONNECTOR >
CN001 1-506-490-21 PIN, CONNECTOR 11P
CN002 1-784-767-11 CONNECTOR, FFC 6P
* CN003 1-564-013-11 PIN, CONNECTOR 3P
CN004 1-506-481-11 PIN, CONNECTOR 2P
< SWITCH >
S001 1-786-514-21 SWITCH, LEVER (SLIDE)
(TRAY POSITION DETECT)
*************************************************************
MIC BOARD
**********
R801 1-216-845-11 METAL CHIP 100K 5% 1/10W
R802 1-216-833-11 METAL CHIP 10K 5% 1/10W
R803 1-216-833-11 METAL CHIP 10K 5% 1/10W
R804 1-216-809-11 METAL CHIP 100 5% 1/10W
R805 1-216-847-11 METAL CHIP 150K 5% 1/10W
R806 1-216-833-11 METAL CHIP 10K 5% 1/10W
R807 1-216-819-11 METAL CHIP 680 5% 1/10W
R808 1-216-841-11 METAL CHIP 47K 5% 1/10W
R809 1-216-821-11 METAL CHIP 1K 5% 1/10W
R810 1-216-845-11 METAL CHIP 100K 5% 1/10W
R811 1-216-833-11 METAL CHIP 10K 5% 1/10W
R812 1-216-821-11 METAL CHIP 1K 5% 1/10W
R813 1-216-821-11 METAL CHIP 1K 5% 1/10W
R814 1-216-833-11 METAL CHIP 10K 5% 1/10W
< VARIABLE RESISTOR >
RV801 1-227-452-11 RES, VAR, CARBON 50K (MIC LEVEL)
*************************************************************
A-1616-806-A PANEL COM BOARD, COMPLETE
**************************
4-253-178-01 HOLDER, FL
< CAPACITOR >
C900 1-126-163-11 ELECT 4.7uF 20% 50V
C903 1-107-826-11 CERAMIC CHIP 0.1uF 10% 16V
C904 1-107-826-11 CERAMIC CHIP 0.1uF 10% 16V
C905 1-107-826-11 CERAMIC CHIP 0.1uF 10% 16V
C910 1-162-970-11 CERAMIC CHIP 0.01uF 10% 25V
< CAPACITOR >
C800 1-107-826-11 CERAMIC CHIP 0.1uF 10% 16V
C801 1-126-964-11 ELECT 10uF 20% 50V
C802 1-126-961-11 ELECT 2.2uF 20% 50V
C804 1-164-217-11 CERAMIC CHIP 150PF 5% 50V
C805 1-104-666-11 ELECT 220uF 20% 25V
C806 1-162-923-11 CERAMIC CHIP 47PF 5% 50V
C807 1-126-961-11 ELECT 2.2uF 20% 50V
C808 1-107-826-11 CERAMIC CHIP 0.1uF 10% 16V
C809 1-126-961-11 ELECT 2.2uF 20% 50V
C810 1-164-315-11 CERAMIC CHIP 470PF 5% 50V
C811 1-162-923-11 CERAMIC CHIP 47PF 5% 50V
C812 1-126-960-11 ELECT 1uF 20% 50V
84
C916 1-107-826-11 CERAMIC CHIP 0.1uF 10% 16V
C917 1-162-970-11 CERAMIC CHIP 0.01uF 10% 25V
C918 1-126-518-11 ELECT 470uF 20% 4V
C919 1-162-970-11 CERAMIC CHIP 0.01uF 10% 25V
C920 1-126-947-11 ELECT 47uF 20% 35V
C921 1-115-416-11 CERAMIC CHIP 0.001uF 5% 25V
C922 1-126-964-11 ELECT 10uF 20% 50V
C923 1-162-970-11 CERAMIC CHIP 0.01uF 10% 25V
C924 1-100-152-11 CERAMIC CHIP 100PF 5% 100V
C925 1-100-152-11 CERAMIC CHIP 100PF 5% 100V
C926 1-100-152-11 CERAMIC CHIP 100PF 5% 100V
C927 1-100-152-11 CERAMIC CHIP 100PF 5% 100V
C928 1-100-152-11 CERAMIC CHIP 100PF 5% 100V
C929 1-100-152-11 CERAMIC CHIP 100PF 5% 100V
Page 85
HCD-ZX66i/ZX99i
PANEL COM
Ref. No. Part No. Description Remark Ref. No. Part No. Description Remark
C930 1-100-152-11 CERAMIC CHIP 100PF 5% 100V
C931 1-100-152-11 CERAMIC CHIP 100PF 5% 100V
C932 1-100-152-11 CERAMIC CHIP 100PF 5% 100V
C933 1-100-152-11 CERAMIC CHIP 100PF 5% 100V
C934 1-100-152-11 CERAMIC CHIP 100PF 5% 100V
C935 1-100-152-11 CERAMIC CHIP 100PF 5% 100V
C936 1-100-152-11 CERAMIC CHIP 100PF 5% 100V
C937 1-100-152-11 CERAMIC CHIP 100PF 5% 100V
C938 1-100-152-11 CERAMIC CHIP 100PF 5% 100V
C939 1-100-152-11 CERAMIC CHIP 100PF 5% 100V
C940 1-100-152-11 CERAMIC CHIP 100PF 5% 100V
C941 1-100-152-11 CERAMIC CHIP 100PF 5% 100V
C942 1-100-152-11 CERAMIC CHIP 100PF 5% 100V
C944 1-126-964-11 ELECT 10uF 20% 50V
C945 1-125-837-11 CERAMIC CHIP 1uF 10% 6.3V
C946 1-164-315-11 CERAMIC CHIP 470PF 5% 50V
C947 1-125-837-11 CERAMIC CHIP 1uF 10% 6.3V
C948 1-164-315-11 CERAMIC CHIP 470PF 5% 50V
C949 1-125-837-11 CERAMIC CHIP 1uF 10% 6.3V
C950 1-162-968-11 CERAMIC CHIP 0.0047uF 10% 50V
C951 1-125-837-11 CERAMIC CHIP 1uF 10% 6.3V
C952 1-162-968-11 CERAMIC CHIP 0.0047uF 10% 50V
C953 1-125-837-11 CERAMIC CHIP 1uF 10% 6.3V
C954 1-164-227-11 CERAMIC CHIP 0.022uF 10% 25V
C955 1-125-837-11 CERAMIC CHIP 1uF 10% 6.3V
C956 1-164-227-11 CERAMIC CHIP 0.022uF 10% 25V
C957 1-125-837-11 CERAMIC CHIP 1uF 10% 6.3V
C958 1-165-176-11 CERAMIC CHIP 0.047uF 10% 16V
C959 1-165-176-11 CERAMIC CHIP 0.047uF 10% 16V
C960 1-126-960-11 ELECT 1uF 20% 50V
C961 1-126-963-11 ELECT 4.7uF 20% 50V
C966 1-100-566-11 CERAMIC CHIP 0.1uF 10% 25V
C984 1-100-155-11 CERAMIC CHIP 470PF 5% 100V
< CONNECTOR >
CN914 1-784-739-11 CONNECTOR, FFC 17P
CNS928 1-770-401-11 HOUSING, CONNECTOR (PC BOARD) 8P
< DIODE >
D905 8-719-976-99 DIODE DTZ5.1B
< VACUUM FLUORESCENT DISPLAY >
FL901 1-483-081-11 VACUUM FLUORESCENT DISPLAY
< IC >
IC901 6-808-586-01 IC MB90M407PF-G-146E1
IC902 6-600-349-31 IC NJL24H400A (IR)
IC903 6-705-678-01 IC NJM2760V-TE2
< JUMPER RESISTOR >
JR914 1-216-864-11 SHORT
< TRANSISTOR >
Q901 8-729-620-07 TRANSISTOR 2SC3052EF-T1-LEF
Q902 8-729-620-07 TRANSISTOR 2SC3052EF-T1-LEF
Q903 8-729-620-07 TRANSISTOR 2SC3052EF-T1-LEF
Q904 8-729-920-79 TRANSISTOR 2SB1132-T100-QR
Q905 8-729-620-07 TRANSISTOR 2SC3052EF-T1-LEF
Q906 8-729-920-79 TRANSISTOR 2SB1132-T100-QR
CHIP 0
< RESISTOR >
R851 1-216-821-11 METAL CHIP 1K 5% 1/10W
R900 1-216-833-11 METAL CHIP 10K 5% 1/10W
R901 1-216-833-11 METAL CHIP 10K 5% 1/10W
R902 1-216-833-11 METAL CHIP 10K 5% 1/10W
R903 1-216-809-11 METAL CHIP 100 5% 1/10W
R904 1-216-809-11 METAL CHIP 100 5% 1/10W
R905 1-216-835-11 METAL CHIP 15K 5% 1/10W
R906 1-216-835-11 METAL CHIP 15K 5% 1/10W
R907 1-216-835-11 METAL CHIP 15K 5% 1/10W
R908 1-216-835-11 METAL CHIP 15K 5% 1/10W
R909 1-216-835-11 METAL CHIP 15K 5% 1/10W
R910 1-216-835-11 METAL CHIP 15K 5% 1/10W
R911 1-216-809-11 METAL CHIP 100 5% 1/10W
R912 1-216-833-11 METAL CHIP 10K 5% 1/10W
R913 1-216-809-11 METAL CHIP 100 5% 1/10W
R914 1-216-833-11 METAL CHIP 10K 5% 1/10W
R915 1-216-809-11 METAL CHIP 100 5% 1/10W
R916 1-216-821-11 METAL CHIP 1K 5% 1/10W
R917 1-216-833-11 METAL CHIP 10K 5% 1/10W
R918 1-216-821-11 METAL CHIP 1K 5% 1/10W
R919 1-216-833-11 METAL CHIP 10K 5% 1/10W
R922 1-216-857-11 METAL CHIP 1M 5% 1/10W
R938 1-216-845-11 METAL CHIP 100K 5% 1/10W
R939 1-216-845-11 METAL CHIP 100K 5% 1/10W
R940 1-216-837-11 METAL CHIP 22K 5% 1/10W
R941 1-216-809-11 METAL CHIP 100 5% 1/10W
R942 1-216-809-11 METAL CHIP 100 5% 1/10W
R944 1-216-809-11 METAL CHIP 100 5% 1/10W
R945 1-216-842-11 METAL CHIP 56K 5% 1/10W
R946 1-216-845-11 METAL CHIP 100K 5% 1/10W
R947 1-216-821-11 METAL CHIP 1K 5% 1/10W
R948 1-218-867-11 METAL CHIP 6.8K 0.5% 1/10W
R949 1-216-821-11 METAL CHIP 1K 5% 1/10W
R950 1-216-821-11 METAL CHIP 1K 5% 1/10W
R951 1-216-830-11 METAL CHIP 5.6K 5% 1/10W
R952 1-216-821-11 METAL CHIP 1K 5% 1/10W
R953 1-216-821-11 METAL CHIP 1K 5% 1/10W
R954 1-216-833-11 METAL CHIP 10K 5% 1/10W
R955 1-216-833-11 METAL CHIP 10K 5% 1/10W
R956 1-216-823-11 METAL CHIP 1.5K 5% 1/10W
R957 1-216-821-11 METAL CHIP 1K 5% 1/10W
R958 1-216-819-11 METAL CHIP 680 5% 1/10W
R959 1-216-817-11 METAL CHIP 470 5% 1/10W
R983 1-216-817-11 METAL CHIP 470 5% 1/10W
R984 1-216-819-11 METAL CHIP 680 5% 1/10W
R985 1-216-821-11 METAL CHIP 1K 5% 1/10W
R986 1-216-823-11 METAL CHIP 1.5K 5% 1/10W
R987 1-216-823-11 METAL CHIP 1.5K 5% 1/10W
R988 1-216-825-11 METAL CHIP 2.2K 5% 1/10W
R989 1-216-827-11 METAL CHIP 3.3K 5% 1/10W
R990 1-216-817-11 METAL CHIP 470 5% 1/10W
R993 1-216-817-11 METAL CHIP 470 5% 1/10W
R994 1-216-821-11 METAL CHIP 1K 5% 1/10W
R997 1-216-817-11 METAL CHIP 470 5% 1/10W
R998 1-216-821-11 METAL CHIP 1K 5% 1/10W
R999 1-216-864-11 SHORT CHIP 0
R1301 1-216-821-11 METAL CHIP 1K 5% 1/10W
R1308 1-216-821-11 METAL CHIP 1K 5% 1/10W
R1315 1-216-821-11 METAL CHIP 1K 5% 1/10W
8585
Page 86
HCD-ZX66i/ZX99i
PANEL COM POWER AMP
Ref. No. Part No. Description Remark Ref. No. Part No. Description Remark
R1322 1-216-821-11 METAL CHIP 1K 5% 1/10W
R1329 1-216-821-11 METAL CHIP 1K 5% 1/10W
R1350 1-216-837-11 METAL CHIP 22K 5% 1/10W
R1351 1-216-821-11 METAL CHIP 1K 5% 1/10W
R1352 1-216-829-11 METAL CHIP 4.7K 5% 1/10W
R1354 1-216-809-11 METAL CHIP 100 5% 1/10W
R1377 1-216-821-11 METAL CHIP 1K 5% 1/10W
R1378 1-216-821-11 METAL CHIP 1K 5% 1/10W
R1383 1-216-864-11 SHORT CHIP 0
R1384 1-216-829-11 METAL CHIP 4.7K 5% 1/10W
R1385 1-216-829-11 METAL CHIP 4.7K 5% 1/10W
R1386 1-216-837-11 METAL CHIP 22K 5% 1/10W
R1387 1-216-837-11 METAL CHIP 22K 5% 1/10W
R1388 1-216-821-11 METAL CHIP 1K 5% 1/10W
R1389 1-216-833-11 METAL CHIP 10K 5% 1/10W
R1390 1-216-833-11 METAL CHIP 10K 5% 1/10W
R1391 1-216-833-11 METAL CHIP 10K 5% 1/10W
R1392 1-216-833-11 METAL CHIP 10K 5% 1/10W
R1393 1-216-833-11 METAL CHIP 10K 5% 1/10W
R1394 1-216-833-11 METAL CHIP 10K 5% 1/10W
R1395 1-216-833-11 METAL CHIP 10K 5% 1/10W
R1396 1-216-833-11 METAL CHIP 10K 5% 1/10W
R1397 1-216-833-11 METAL CHIP 10K 5% 1/10W
R1398 1-216-833-11 METAL CHIP 10K 5% 1/10W
R1399 1-216-833-11 METAL CHIP 10K 5% 1/10W
R1400 1-216-833-11 METAL CHIP 10K 5% 1/10W
R1401 1-216-833-11 METAL CHIP 10K 5% 1/10W
R1402 1-216-833-11 METAL CHIP 10K 5% 1/10W
R1403 1-216-833-11 METAL CHIP 10K 5% 1/10W
R1404 1-216-833-11 METAL CHIP 10K 5% 1/10W
< SWITCH >
S900 1-762-875-21 SWITCH, KEYBOARD (EFFECT ON/OFF)
S901 1-762-875-21 SWITCH, KEYBOARD (SLEEP)
S902 1-762-875-21 SWITCH, KEYBOARD (TIMER MENU)
S903 1-762-875-21 SWITCH, KEYBOARD (ILLUMINATION)
S921 1-762-875-21 SWITCH, KEYBOARD (TUNER/BAND)
S922 1-762-875-21 SWITCH, KEYBOARD (TUNING –)
S923 1-762-875-21 SWITCH, KEYBOARD (TUNING +)
S924 1-762-875-21 SWITCH, KEYBOARD (TUNING MODE)
S925 1-762-875-21 SWITCH, KEYBOARD (FM MODE)
S926 1-762-875-21 SWITCH, KEYBOARD (AMP MENU)
C604 1-162-957-11 CERAMIC CHIP 220PF 5% 50V
(ZX66i)
C605 1-162-970-11 CERAMIC CHIP 0.01uF 10% 25V
C608 1-126-965-11 ELECT 22uF 20% 50V
C609 1-128-560-11 ELECT 22uF 20% 100V
C610 1-128-560-11 ELECT 22uF 20% 100V
C616 1-136-495-11 FILM 0.068uF 5% 50V
C617 1-136-495-11 FILM 0.068uF 5% 50V
C627 1-126-961-11 ELECT 2.2uF 20% 50V
C628 1-126-933-11 ELECT 100uF 20% 16V
C629 1-164-156-11 CERAMIC CHIP 0.1uF 25V
C634 1-104-665-11 ELECT 100uF 20% 25V
C635 1-104-665-11 ELECT 100uF 20% 25V
C648 1-104-658-11 ELECT 100uF 20% 10V
C649 1-126-964-11 ELECT 10uF 20% 50V
C650 1-126-963-11 ELECT 4.7uF 20% 50V
C651 1-162-966-11 CERAMIC CHIP 0.0022uF 10% 50V
C652 1-104-658-11 ELECT 100uF 20% 10V
C654 1-162-953-11 CERAMIC CHIP 100PF 5% 50V
(ZX99i)
C654 1-162-957-11 CERAMIC CHIP 220PF 5% 50V
(ZX66i)
C656 1-127-811-11 ELECT(BLOCK) 3300uF 20% 50V
C657 1-137-190-11 FILM 0.22uF 5% 50V
C658 1-127-815-11 ELECT(BLOCK) 3300uF 20% 100V
C659 1-136-497-81 FILM 0.1uF 5% 50V
C662 1-126-964-11 ELECT 10uF 20% 50V
C663 1-126-968-11 ELECT 100uF 20% 50V
C666 1-136-495-11 FILM 0.068uF 5% 50V
C667 1-136-495-11 FILM 0.068uF 5% 50V
C676 1-127-811-11 ELECT(BLOCK) 3300uF 20% 50V
C677 1-127-815-11 ELECT(BLOCK) 3300uF 20% 100V
C678 1-137-190-11 FILM 0.22uF 5% 50V
C679 1-136-497-81 FILM 0.1uF 5% 50V
C696 1-137-190-11 FILM 0.22uF 5% 50V
C697 1-137-190-11 FILM 0.22uF 5% 50V
< CONNECTOR >
CN600 1-564-707-11 PIN, CONNECTOR (SMALL TYPE) 5P (ZX99i)
CN601 1-778-981-21 CONNECTOR, BOARD TO BOARD 13P
CN602 1-778-981-21 CONNECTOR, BOARD TO BOARD 13P
* CN606 1-564-511-11 PLUG, CONNECTOR 8P (ZX99i)
S927 1-762-875-21 SWITCH, KEYBOARD (TUNER MEMORY)
S928 1-762-875-21 SWITCH, KEYBOARD (DISPLAY)
< VIBRATOR >
X602 1-781-282-51 VIBRATOR, CERAMIC (4MHz)
*************************************************************
A-1616-816-A POWER AMP BOARD, COMPLETE (ZX99i)
A-1616-833-A POWER AMP BOARD, COMPLETE (ZX66i)
***************************
7-685-646-79 SCREW +BVTP 3X8 TYPE2 IT-3
7-685-647-79 SCREW +BVTP 3X10 TYPE2 IT-3 (ZX99i)
< CAPACITOR >
C600 1-126-963-11 ELECT 4.7uF 20% 50V
C601 1-162-966-11 CERAMIC CHIP 0.0022uF 10% 50V
C602 1-104-658-11 ELECT 100uF 20% 10V
C604 1-162-953-11 CERAMIC CHIP 100PF 5% 50V
(ZX99i)
86
< DIODE >
D611 6-501-782-01 DIODE MAZ8180GMLS0
D612 6-501-782-01 DIODE MAZ8180GMLS0
D620 6-501-817-01 DIODE MA2J1110GLS0
D627 6-501-817-01 DIODE MA2J1110GLS0
D646 6-501-817-01 DIODE MA2J1110GLS0
D654 6-500-335-01 DIODE MC2838-T112-1
D656 6-500-360-01 DIODE D10XB20
D658 8-719-073-32 DIODE D25XB60
D660 6-501-817-01 DIODE MA2J1110GLS0
D661 6-501-817-01 DIODE MA2J1110GLS0
D664 6-501-186-01 DIODE UDZW-TE17-33B
D670 6-501-817-01 DIODE MA2J1110GLS0
D700 6-500-335-01 DIODE MC2838-T112-1 (ZX99i)
D720 6-501-817-01 DIODE MA2J1110GLS0
D760 6-501-817-01 DIODE MA2J1110GLS0
Page 87
HCD-ZX66i/ZX99i
POWER AMP
Ref. No. Part No. Description Remark Ref. No. Part No. Description Remark
< IC >
IC600 6-600-642-01 IC STK412-150C (ZX66i)
IC601 6-600-169-01 IC STK412-240M-E (ZX99i)
IC627
< JUMPER RESISTOR >
JR647 1-216-864-11 SHORT CHIP 0
< COIL >
L680 1-420-872-52 COIL, AIR-CORE
L682 1-420-872-52 COIL, AIR-CORE (ZX99i)
L686 1-420-872-52 COIL, AIR-CORE
L688 1-420-872-52 COIL, AIR-CORE (ZX99i)
6-703-610-01 IC RT8H015C-T112-1
R618 1-234-499-21 ENCAPSULATED COMPONENT 0.22X2 5W
(ZX99i)
R618 1-234-798-11 ENCAPSULATED COMPONENT 0.1X2 5W (ZX66i)
R619 1-216-821-11 METAL CHIP 1K 5% 1/10W
R620 1-216-835-11 METAL CHIP 15K 5% 1/10W
(ZX99i)
R620 1-216-839-11 METAL CHIP 33K 5% 1/10W
(ZX66i)
R621 1-216-845-11 METAL CHIP 100K 5% 1/10W
(ZX66i)
R621 1-216-847-11 METAL CHIP 150K 5% 1/10W
(ZX99i)
R622 1-249-393-11 CARBON 10 5% 1/4W F
R623 1-216-842-11 METAL CHIP 56K 5% 1/10W
R624 1-216-837-11 METAL CHIP 22K 5% 1/10W
< TRANSISTOR >
Q600 8-729-027-23 TRANSISTOR DTA114EKA-T146
Q601 8-729-027-43 TRANSISTOR DTC114EKA-T146
Q604 8-729-901-81 TRANSISTOR 2SC2412K-T-146-R
Q606 8-729-821-00 TRANSISTOR 2SA1207
Q610 8-729-924-99 TRANSISTOR 2SC3722K-E
Q618 8-729-924-99 TRANSISTOR 2SC3722K-E
Q628 8-729-620-07 TRANSISTOR 2SC3052EF-T1-LEF
Q629 8-729-620-07 TRANSISTOR 2SC3052EF-T1-LEF
Q630 8-729-620-07 TRANSISTOR 2SC3052EF-T1-LEF
Q640 8-729-802-80 TRANSISTOR 2SC3661
Q641 8-729-802-80 TRANSISTOR 2SC3661
Q644 8-729-901-81 TRANSISTOR 2SC2412K-T-146-R
Q647 8-729-901-81 TRANSISTOR 2SC2412K-T-146-R
Q664 8-729-024-93 TRANSISTOR 2SB1565E
Q668 8-729-924-99 TRANSISTOR 2SC3722K-E
Q765 8-729-901-81 TRANSISTOR 2SC2412K-T-146-R
< RESISTOR >
R600 1-216-821-11 METAL CHIP 1K 5% 1/10W
R601 1-216-841-11 METAL CHIP 47K 5% 1/10W
R602 1-216-815-11 METAL CHIP 330 5% 1/10W
(ZX99i)
R602 1-216-818-11 METAL CHIP 560 5% 1/10W
(ZX66i)
R603 1-216-841-11 METAL CHIP 47K 5% 1/10W
R604 1-216-833-11 METAL CHIP 10K 5% 1/10W
R605 1-216-833-11 METAL CHIP 10K 5% 1/10W
R606 1-216-841-11 METAL CHIP 47K 5% 1/10W
R607 1-216-825-11 METAL CHIP 2.2K 5% 1/10W
R608 1-216-845-11 METAL CHIP 100K 5% 1/10W
R609 1-216-843-11 METAL CHIP 68K 5% 1/10W
R610 1-216-843-11 METAL CHIP 68K 5% 1/10W
R611 1-216-839-11 METAL CHIP 33K 5% 1/10W
0 R612 1-245-605-51 FUSIBLE 100 5% 1/4W F
0 R613 1-215-869-11 METAL OXIDE 1K 5% 1W F
(ZX99i)
0 R613 1-215-872-11 METAL OXIDE 3.3K 5% 1W F
(ZX66i)
0 R614 1-215-869-11 METAL OXIDE 1K 5% 1W F
(ZX99i)
0 R614 1-215-872-11 METAL OXIDE 3.3K 5% 1W F
(ZX66i)
0 R615 1-245-605-51 FUSIBLE 100 5% 1/4W F
0 R616 1-217-637-00 FUSIBLE 1 5% 1/4W F
R625 1-216-819-11 METAL CHIP 680 5% 1/10W
(ZX66i)
R625 1-216-823-11 METAL CHIP 1.5K 5% 1/10W
(ZX99i)
R628 1-216-841-11 METAL CHIP 47K 5% 1/10W
R629 1-216-818-11 METAL CHIP 560 5% 1/10W
R630 1-216-845-11 METAL CHIP 100K 5% 1/10W
R631 1-216-845-11 METAL CHIP 100K 5% 1/10W
R632 1-216-854-11 METAL CHIP 560K 5% 1/10W
R633 1-216-841-11 METAL CHIP 47K 5% 1/10W
R634 1-216-825-11 METAL CHIP 2.2K 5% 1/10W
R635 1-216-833-11 METAL CHIP 10K 5% 1/10W
0 R636 1-216-456-00 METAL OXIDE 820 5% 2W F
0 R637 1-216-456-00 METAL OXIDE 820 5% 2W F
R638 1-216-845-11 METAL CHIP 100K 5% 1/10W
R639 1-216-845-11 METAL CHIP 100K 5% 1/10W
R640 1-216-833-11 METAL CHIP 10K 5% 1/10W
R641 1-216-833-11 METAL CHIP 10K 5% 1/10W
R642 1-216-806-11 METAL CHIP 56 5% 1/10W
R643 1-216-806-11 METAL CHIP 56 5% 1/10W
R644 1-216-825-11 METAL CHIP 2.2K 5% 1/10W
0 R646 1-215-863-11 METAL OXIDE 100 5% 1W F
R647 1-216-823-11 METAL CHIP 1.5K 5% 1/10W
R649 1-216-841-11 METAL CHIP 47K 5% 1/10W
R650 1-216-821-11 METAL CHIP 1K 5% 1/10W
R651 1-216-841-11 METAL CHIP 47K 5% 1/10W
R652 1-216-815-11 METAL CHIP 330 5% 1/10W
(ZX99i)
R652 1-216-818-11 METAL CHIP 560 5% 1/10W
(ZX66i)
R653 1-216-841-11 METAL CHIP 47K 5% 1/10W
R654 1-216-841-11 METAL CHIP 47K 5% 1/10W
R655 1-216-841-11 METAL CHIP 47K 5% 1/10W
R658 1-216-849-11 METAL CHIP 220K 5% 1/10W
R659 1-216-849-11 METAL CHIP 220K 5% 1/10W
R660 1-216-837-11 METAL CHIP 22K 5% 1/10W
R661 1-216-837-11 METAL CHIP 22K 5% 1/10W
R662 1-216-832-11 METAL CHIP 8.2K 5% 1/10W
R663 1-216-832-11 METAL CHIP 8.2K 5% 1/10W
R664 1-216-821-11 METAL CHIP 1K 5% 1/10W
R665 1-216-827-11 METAL CHIP 3.3K 5% 1/10W
(ZX99i)
R665 1-216-864-11 SHORT CHIP 0 (ZX66i)
R666 1-216-809-11 METAL CHIP 100 5% 1/10W
R668 1-234-499-21 ENCAPSULATED COMPONENT 0.22X2 5W
(ZX99i)
R617 1-216-845-11 METAL CHIP 100K 5% 1/10W
R668 1-234-798-11 ENCAPSULATED COMPONENT 0.1X2 5W (ZX66i)
R669 1-216-821-11 METAL CHIP 1K 5% 1/10W
8787
Page 88
HCD-ZX66i/ZX99i
POWER AMP SE-130RIGHT-BTTNPOWER SW
Ref. No. Part No. Description Remark Ref. No. Part No. Description Remark
R670 1-216-835-11 METAL CHIP 15K 5% 1/10W
(ZX99i)
R670 1-216-839-11 METAL CHIP 33K 5% 1/10W
(ZX66i)
R671 1-216-845-11 METAL CHIP 100K 5% 1/10W
(ZX66i)
R671 1-216-847-11 METAL CHIP 150K 5% 1/10W
(ZX99i)
R672 1-249-393-11 CARBON 10 5% 1/4W F
R673 1-216-843-11 METAL CHIP 68K 5% 1/10W
R674 1-216-837-11 METAL CHIP 22K 5% 1/10W
R678 1-216-849-11 METAL CHIP 220K 5% 1/10W
R679 1-216-849-11 METAL CHIP 220K 5% 1/10W
R682 1-216-797-11 METAL CHIP 10 5% 1/10W
(ZX99i)
POWER SW BOARD
****************
< DIODE >
D920 8-719-053-43 LED SLR-325VCT31 (\ / 1)
< RESISTOR >
R1338 1-216-815-11 METAL CHIP 330 5% 1/10W
R1341 1-216-809-11 METAL CHIP 100 5% 1/10W
< SWITCH >
S929 1-762-875-21 SWITCH, KEYBOARD (\ / 1)
*************************************************************
R686 1-216-797-11 METAL CHIP 10 5% 1/10W
R688 1-216-797-11 METAL CHIP 10 5% 1/10W
(ZX99i)
R690 1-216-841-11 METAL CHIP 47K 5% 1/10W
R691 1-216-845-11 METAL CHIP 100K 5% 1/10W
R692 1-216-845-11 METAL CHIP 100K 5% 1/10W
R693 1-216-825-11 METAL CHIP 2.2K 5% 1/10W
R694 1-216-843-11 METAL CHIP 68K 5% 1/10W
R695 1-216-841-11 METAL CHIP 47K 5% 1/10W
R696 1-216-841-11 METAL CHIP 47K 5% 1/10W
R697 1-216-841-11 METAL CHIP 47K 5% 1/10W
R698 1-216-845-11 METAL CHIP 100K 5% 1/10W
R699 1-216-845-11 METAL CHIP 100K 5% 1/10W
R700 1-216-841-11 METAL CHIP 47K 5% 1/10W
(ZX99i)
R701 1-216-841-11 METAL CHIP 47K 5% 1/10W
(ZX99i)
R702 1-216-841-11 METAL CHIP 47K 5% 1/10W
R780 1-216-797-11 METAL CHIP 10 5% 1/10W
< RELAY >
RY646 1-755-308-21 RELAY
< THERMISTOR >
TH629 1-804-045-11 THERMISTOR
< TERMINAL BOARD >
RIGHT-BTTN BOARD
****************
< RESISTOR >
R848 1-216-825-11 METAL CHIP 2.2K 5% 1/10W
R852 1-216-823-11 METAL CHIP 1.5K 5% 1/10W
R855 1-216-823-11 METAL CHIP 1.5K 5% 1/10W
R858 1-216-821-11 METAL CHIP 1K 5% 1/10W
R861 1-216-819-11 METAL CHIP 680 5% 1/10W
R864 1-216-817-11 METAL CHIP 470 5% 1/10W
R868 1-216-833-11 METAL CHIP 10K 5% 1/10W
R869 1-218-867-11 METAL CHIP 6.8K 0.5% 1/10W
R870 1-216-829-11 METAL CHIP 4.7K 5% 1/10W
< SWITCH >
S940 1-762-875-21 SWITCH, KEYBOARD (.)
S941 1-762-875-21 SWITCH, KEYBOARD (GAME)
S942 1-762-875-21 SWITCH, KEYBOARD (GAME MIXING)
S943 1-762-875-21 SWITCH, KEYBOARD (>)
S944 1-762-875-21 SWITCH, KEYBOARD (M)
S945 1-762-875-21 SWITCH, KEYBOARD (m)
S947 1-762-875-21 SWITCH, KEYBOARD (N X)
S948 1-762-875-21 SWITCH, KEYBOARD (iPod)
S949 1-762-875-21 SWITCH, KEYBOARD (PHONO)
*************************************************************
A-6060-642-A SE-130 BOARD, COMPLETE
**********************
TM607 1-816-048-11 TERMINAL BOARD (4P) (SPEAKER) (ZX66i)
TM607 1-816-048-11 TERMINAL BOARD (4P) (SPEAKER
SURROUND (SPEAKER B) R,
FRONT (SPEAKER A) R) (ZX99i)
TM609 1-816-048-11 TERMINAL BOARD (4P) (SPEAKER
SURROUND (SPEAKER B) L,
FRONT (SPEAKER A) L) (ZX99i)
*************************************************************
88
< CONNECTOR >
CN101 1-750-243-11 SOCKET, CONNECTOR 6P
CN102 1-573-383-11 PIN, CONNECTOR (PC BOARD) 2P
< PHOTO SENSOR >
PH101 8-749-017-45 PHOTO SENSOR RPR-220C1N
< IC >
PH102 6-600-072-01 IC RPI-392
*************************************************************
Page 89
HCD-ZX66i/ZX99i
SUBTRANS SURROUND
Ref. No. Part No. Description Remark Ref. No. Part No. Description Remark
SUBTRANS BOARD
***************
< CAPACITOR >
C1052 1-126-942-61 ELECT 1000uF 20% 25V
< CONNECTOR >
CN1000 1-785-329-11 PIN, CONNECTOR (LIGHT ANGLE) 3P
CN1115 1-564-321-00 PIN, CONNECTOR (3.96mm PITCH) 2P
CN1116 1-564-321-00 PIN, CONNECTOR (3.96mm PITCH) 2P
< DIODE >
< IC >
IC701 6-600-169-01 IC STK412-240M-E
< TRANSISTOR >
Q720 8-729-620-07 TRANSISTOR 2SC3052EF-T1-LEF
Q721 8-729-821-00 TRANSISTOR 2SA1207
Q722 8-729-924-99 TRANSISTOR 2SC3722K-E
Q730 8-729-924-99 TRANSISTOR 2SC3722K-E
Q762 8-729-620-07 TRANSISTOR 2SC3052EF-T1-LEF
Q765 8-729-620-07 TRANSISTOR 2SC3052EF-T1-LEF
Q780 8-729-924-99 TRANSISTOR 2SC3722K-E
D1000 6-501-817-01 DIODE MA2J1110GLS0
D1001 6-500-848-01 DIODE MC2840-T112-1
D1002 6-500-848-01 DIODE MC2840-T112-1
< TRANSFORMER >
0 PT1101 1-445-514-11 TRANSFORMER, POWER (SUB)
< TRANSISTOR >
Q1000 8-729-620-07 TRANSISTOR 2SC3052EF-T1-LEF
< RESISTOR >
R1000 1-216-829-11 METAL CHIP 4.7K 5% 1/10W
R1050 1-216-801-11 METAL CHIP 22 5% 1/10W
R1051 1-216-864-11 SHORT CHIP 0
< RELAY >
0 RY1000 1-755-334-11 RELAY, AC POWER
*************************************************************
SURROUND BOARD (ZX99i)
****************
< CAPACITOR >
C700 1-126-963-11 ELECT 4.7uF 20% 50V
C701 1-162-966-11 CERAMIC CHIP 0.0022uF 10% 50V
C702 1-104-658-11 ELECT 100uF 20% 10V
C703 1-162-953-11 CERAMIC CHIP 100PF 5% 50V
C721 1-126-965-11 ELECT 22uF 20% 50V
C730 1-136-495-11 FILM 0.068uF 5% 50V
C731 1-136-495-11 FILM 0.068uF 5% 50V
C750 1-126-963-11 ELECT 4.7uF 20% 50V
C751 1-162-966-11 CERAMIC CHIP 0.0022uF 10% 50V
C752 1-104-658-11 ELECT 100uF 20% 10V
C753 1-162-953-11 CERAMIC CHIP 100PF 5% 50V
C780 1-136-495-11 FILM 0.068uF 5% 50V
C781 1-136-495-11 FILM 0.068uF 5% 50V
C795 1-128-560-11 ELECT 22uF 20% 100V
C796 1-128-560-11 ELECT 22uF 20% 100V
< DIODE >
D720 6-501-817-01 DIODE MA2J1110GLS0
D730 6-501-817-01 DIODE MA2J1110GLS0
D760 6-501-817-01 DIODE MA2J1110GLS0
D761 6-501-817-01 DIODE MA2J1110GLS0
D780 6-501-817-01 DIODE MA2J1110GLS0
< RESISTOR >
R700 1-216-821-11 METAL CHIP 1K 5% 1/10W
R701 1-216-841-11 METAL CHIP 47K 5% 1/10W
R702 1-216-815-11 METAL CHIP 330 5% 1/10W
0 R703 1-215-863-11 METAL OXIDE 100 5% 1W F
R710 1-216-841-11 METAL CHIP 47K 5% 1/10W
R711 1-216-841-11 METAL CHIP 47K 5% 1/10W
R720 1-216-833-11 METAL CHIP 10K 5% 1/10W
R721 1-216-833-11 METAL CHIP 10K 5% 1/10W
R722 1-216-841-11 METAL CHIP 47K 5% 1/10W
R723 1-216-825-11 METAL CHIP 2.2K 5% 1/10W
R724 1-216-845-11 METAL CHIP 100K 5% 1/10W
R725 1-216-843-11 METAL CHIP 68K 5% 1/10W
R726 1-216-843-11 METAL CHIP 68K 5% 1/10W
R727 1-216-839-11 METAL CHIP 33K 5% 1/10W
R728 1-216-841-11 METAL CHIP 47K 5% 1/10W
R729 1-216-845-11 METAL CHIP 100K 5% 1/10W
R730 1-234-499-21 ENCAPSULATED COMPONENT 0.22X2 5W
R731 1-216-821-11 METAL CHIP 1K 5% 1/10W
R732 1-216-837-11 METAL CHIP 22K 5% 1/10W
R733 1-216-847-11 METAL CHIP 150K 5% 1/10W
R734 1-216-842-11 METAL CHIP 56K 5% 1/10W
0 R735 1-245-711-31 CARBON 10 5% 1/2W F
R736 1-216-843-11 METAL CHIP 68K 5% 1/10W
R737 1-216-845-11 METAL CHIP 100K 5% 1/10W
R750 1-216-821-11 METAL CHIP 1K 5% 1/10W
R751 1-216-841-11 METAL CHIP 47K 5% 1/10W
R752 1-216-815-11 METAL CHIP 330 5% 1/10W
R766 1-216-825-11 METAL CHIP 2.2K 5% 1/10W
R780 1-234-499-21 ENCAPSULATED COMPONENT 0.22X2 5W
R781 1-216-821-11 METAL CHIP 1K 5% 1/10W
R782 1-216-837-11 METAL CHIP 22K 5% 1/10W
R783 1-216-847-11 METAL CHIP 150K 5% 1/10W
R784 1-216-843-11 METAL CHIP 68K 5% 1/10W
0 R785 1-245-711-31 CARBON 10 5% 1/2W F
R788 1-216-823-11 METAL CHIP 1.5K 5% 1/10W
R792 1-216-845-11 METAL CHIP 100K 5% 1/10W
0 R793 1-217-637-00 FUSIBLE 1 5% 1/4W F
0 R794 1-245-605-51 FUSIBLE 100 5% 1/4W F
0 R795 1-245-605-51 FUSIBLE 100 5% 1/4W F
R796 1-216-821-11 METAL CHIP 1K 5% 1/10W
R797 1-216-821-11 METAL CHIP 1K 5% 1/10W
R798 1-216-845-11 METAL CHIP 100K 5% 1/10W
R799 1-216-845-11 METAL CHIP 100K 5% 1/10W
D790 6-501-782-01 DIODE MAZ8180GMLS0
D791 6-501-782-01 DIODE MAZ8180GMLS0
8989
Page 90
HCD-ZX66i/ZX99i
SURROUND VOLTRANS
Ref. No. Part No. Description Remark Ref. No. Part No. Description Remark
< RELAY >
< TRANSISTOR >
RY760 1-755-308-21 RELAY
*************************************************************
TRANS BOARD
************
1-533-217-41 HOLDER, FUSE
< CAPACITOR >
C1192 1-128-576-11 ELECT 100uF 20% 63V
< CONNECTOR >
* CN1112 1-564-521-11 PLUG, CONNECTOR 6P
* CN1113 1-564-522-11 PLUG, CONNECTOR 7P
< DIODE >
D1192 6-500-522-21 DIODE 10EDB40-TB3
< RESISTOR >
0 R1201 1-219-124-11 FUSIBLE 0.68 5% 1/4W F
*************************************************************
VOL BOARD
**********
< CAPACITOR >
C967 1-107-826-11 CERAMIC CHIP 0.1uF 10% 16V
C968 1-107-826-11 CERAMIC CHIP 0.1uF 10% 16V
C969 1-107-826-11 CERAMIC CHIP 0.1uF 10% 16V
C971 1-107-826-11 CERAMIC CHIP 0.1uF 10% 16V
C972 1-107-826-11 CERAMIC CHIP 0.1uF 10% 16V
< CONNECTOR >
CN928 1-785-328-11 PIN, CONNECTOR (LIGHT ANGLE) 2P
< DIODE >
D907 6-500-424-01 LED SLI-325DCT31W
(VOLUME ILLUMINATION 1)
D908 6-500-424-01 LED SLI-325DCT31W
(VOLUME ILLUMINATION 2)
D909 6-500-424-01 LED SLI-325DCT31W
(VOLUME ILLUMINATION 3)
D910 6-500-424-01 LED SLI-325DCT31W
(VOLUME ILLUMINATION 4)
D911 6-500-424-01 LED SLI-325DCT31W
(VOLUME ILLUMINATION 5)
D912 6-500-424-01 LED SLI-325DCT31W
(VOLUME ILLUMINATION 6)
D913 6-500-424-01 LED SLI-325DCT31W
(VOLUME ILLUMINATION 7)
D914 6-500-424-01 LED SLI-325DCT31W
(VOLUME ILLUMINATION 8)
D915 6-500-424-01 LED SLI-325DCT31W
(VOLUME ILLUMINATION 9)
D916 6-500-424-01 LED SLI-325DCT31W
(VOLUME ILLUMINATION 10)
Q911 8-729-620-07 TRANSISTOR 2SC3052EF-T1-LEF
Q912 8-729-620-07 TRANSISTOR 2SC3052EF-T1-LEF
Q913 8-729-620-07 TRANSISTOR 2SC3052EF-T1-LEF
Q914 8-729-620-07 TRANSISTOR 2SC3052EF-T1-LEF
Q915 8-729-620-07 TRANSISTOR 2SC3052EF-T1-LEF
Q916 8-729-620-07 TRANSISTOR 2SC3052EF-T1-LEF
< RESISTOR >
R960 1-218-867-11 METAL CHIP 6.8K 0.5% 1/10W
R961 1-216-829-11 METAL CHIP 4.7K 5% 1/10W
R962 1-216-827-11 METAL CHIP 3.3K 5% 1/10W
R963 1-216-825-11 METAL CHIP 2.2K 5% 1/10W
R964 1-216-823-11 METAL CHIP 1.5K 5% 1/10W
R965 1-216-823-11 METAL CHIP 1.5K 5% 1/10W
R966 1-216-821-11 METAL CHIP 1K 5% 1/10W
R967 1-216-819-11 METAL CHIP 680 5% 1/10W
R968 1-216-817-11 METAL CHIP 470 5% 1/10W
R969 1-216-817-11 METAL CHIP 470 5% 1/10W
R970 1-216-819-11 METAL CHIP 680 5% 1/10W
R971 1-216-821-11 METAL CHIP 1K 5% 1/10W
R972 1-216-823-11 METAL CHIP 1.5K 5% 1/10W
R973 1-216-823-11 METAL CHIP 1.5K 5% 1/10W
R974 1-216-825-11 METAL CHIP 2.2K 5% 1/10W
R975 1-216-827-11 METAL CHIP 3.3K 5% 1/10W
R1300 1-216-821-11 METAL CHIP 1K 5% 1/10W
R1302 1-216-821-11 METAL CHIP 1K 5% 1/10W
R1303 1-216-821-11 METAL CHIP 1K 5% 1/10W
R1306 1-216-821-11 METAL CHIP 1K 5% 1/10W
R1309 1-216-821-11 METAL CHIP 1K 5% 1/10W
R1310 1-216-821-11 METAL CHIP 1K 5% 1/10W
R1313 1-216-821-11 METAL CHIP 1K 5% 1/10W
R1316 1-216-821-11 METAL CHIP 1K 5% 1/10W
R1317 1-216-821-11 METAL CHIP 1K 5% 1/10W
R1320 1-216-821-11 METAL CHIP 1K 5% 1/10W
R1323 1-216-821-11 METAL CHIP 1K 5% 1/10W
R1324 1-216-821-11 METAL CHIP 1K 5% 1/10W
R1327 1-216-821-11 METAL CHIP 1K 5% 1/10W
R1330 1-216-821-11 METAL CHIP 1K 5% 1/10W
R1331 1-216-821-11 METAL CHIP 1K 5% 1/10W
R1335 1-216-821-11 METAL CHIP 1K 5% 1/10W
R1336 1-216-821-11 METAL CHIP 1K 5% 1/10W
R1337 1-216-821-11 METAL CHIP 1K 5% 1/10W
< SWITCH >
S904 1-762-875-21 SWITCH, KEYBOARD (SALSA)
S905 1-762-875-21 SWITCH, KEYBOARD (REGGAE)
S906 1-762-875-21 SWITCH, KEYBOARD (POP)
S907 1-762-875-21 SWITCH, KEYBOARD (SAMBA)
S908 1-762-875-21 SWITCH, KEYBOARD (TANGO)
S909 1-762-875-21 SWITCH, KEYBOARD (SURROUND)
S910 1-762-875-21 SWITCH, KEYBOARD (USER EQ)
S911 1-762-875-21 SWITCH, KEYBOARD (X-GROOVE)
S913 1-762-875-21 SWITCH, KEYBOARD (ROCK)
S914 1-762-875-21 SWITCH, KEYBOARD (JAZZ)
D917 6-500-424-01 LED SLI-325DCT31W
(VOLUME ILLUMINATION 11)
90
S915 1-762-875-21 SWITCH, KEYBOARD (DANCE)
S916 1-762-875-21 SWITCH, KEYBOARD (MOVIE)
S917 1-762-875-21 SWITCH, KEYBOARD (GAME)
S918 1-762-875-21 SWITCH, KEYBOARD (TOOL MENU)
S919 1-762-875-21 SWITCH, KEYBOARD (RETURN)
Page 91

Ref. No. Part No. Description Remark
S980 1-487-171-11 ENCODER, ROTARY (VOLUME +/–)
*************************************************************
MISCELLANEOUS
**************
5 1-828-964-11 WIRE (FLAT TYPE) (11 CORE)
56 1-828-996-51 WIRE (FLAT TYPE) (17 CORE)
0 155 1-783-820-11 CORD, POWER
207 1-823-921-11 FMS-18
0 265 8-820-244-02 OPTICAL PICK-UP (KSM-215DCP/C2NP)
272 1-832-404-21 CABLE, FLEXIBLE FLAT (16 CORE)
273 1-452-925-21 MAGNET ASSY
276 1-828-664-11 WIRE (FLAT TYPE) (27 CORE)
0 F1141 1-533-949-33 FUSE, CYLINDRICAL (TIME LAG) (T8AL/250V)
0 F1151 1-533-949-33 FUSE, CYLINDRICAL (TIME LAG) (T8AL/250V)
0 F1161 1-533-949-33 FUSE, CYLINDRICAL (TIME LAG) (T8AL/250V)
0 F1171 1-533-949-33 FUSE, CYLINDRICAL (TIME LAG) (T8AL/250V)
0 F1181 1-532-504-33 FUSE (T4AL/250V)
0 F1191 1-532-504-33 FUSE (T4AL/250V)
FAN901 1-763-372-11 FAN, DC
HCD-ZX66i/ZX99i
VOL
0 FC901 1-500-497-11 FILTER, CLAMP (FERRITE CORE)
M901 X-3952-411-1 MOTOR ASSY, LOADING (LOADING)
0 PT1100 1-445-589-11 TRANSFORMER, POWER (MAIN) (ZX66i)
0 PT1100 1-445-590-11 TRANSFORMER, POWER (MAIN) (ZX99i)
RE901 1-418-746-11 ENCODER, ROTARY
S101 1-771-853-11 SWITCH, DETECTION (LIMIT)
TU901 1-693-762-21 TUNER (FM/AM) (ANTENNA)
9191
Page 92
HCD-ZX66i/ZX99i
REVISION HISTORY
Checking the version allows you to jump to the revised page.
Also, clicking the version at the top of the revised page allows you to jump to the next revised page.
Ver. Date Description of Revision
1.0 2009.02 New
 Loading...