

Page 1

http://servis-manual.com/
Page 2
http://servis-manual.com/
Page 3
SECTION 4
TEST MODE
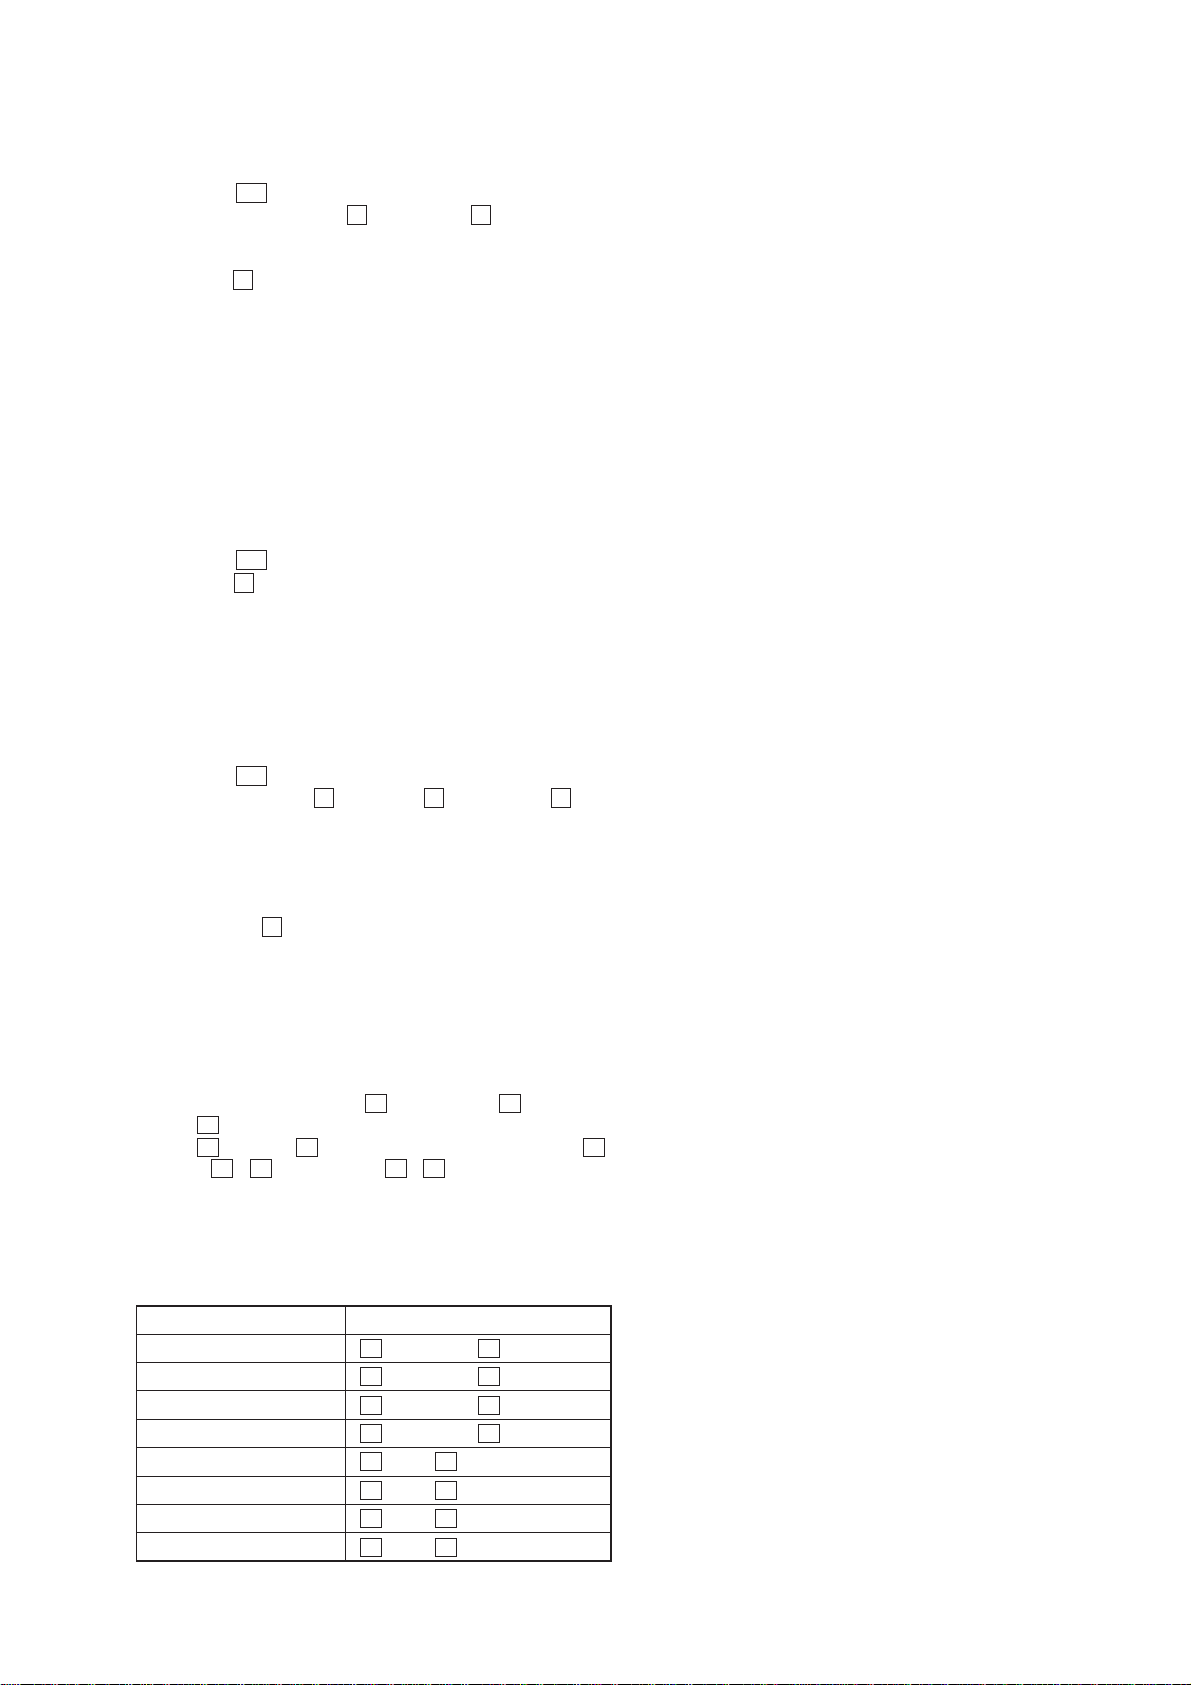
[LED All Lit, Key Check Mode]
Procedure:
1. Press the ?/1 button to turn the power ON.
2. Press three buttons of s (DECK B), A (DISC 1), and
[DISC 5] simultaneously.
3. LEDs are all turned on.
Press the G (CD) button, and the key check mode is acti vated.
LEDs are all OFF.
4. When a button is pressed, the LED near the pressed button
blinks or lights up.
Also, if all buttons are pressed, all LEDs light up (not blink).
5. To release from this mode, press three buttons in the same
manner as step 2, or remove the power cord.
[CD Delivery Mode]
• This mode moves the optical pick-up to the position durable to
vibration. Use this mode when returning the set to the customer
after repair.
Procedure:
1. Press the ?/1 button to turn the power ON.
2. Press the s (DECK B) and [DISC 1] buttons simultaneously .
3. A message “LOCK” is displayed on the liquid crystal display
of the STR-NX1/NX3, and the CD delivery mode is set.
[Tape Deck Test Mode]
(In case of connected to the STR-NX1/NX3)
• If connected to the STR-NX1/NX3, the mode also acts as the
STR-NX1/NX3 amplifer test mode.
Procedure:
1. Press the ?/1 button to turn the power ON.
2. Press three buttons of s (DECK B), A (DISC 1), and S (CD)
simultaneously.
3. On liquid crystal display of the STR-NX1/NX3, the disc calendar blinks, and “ALC OFF” is displayed, then the function
which was set before the test mode became active is displayed.
4. The automatic level control of the tape deck is in OFF status,
but while the
pressed during recording, automatic level control goes in ON
status.
[Tape Deck Test Mode]
(In case of connected to the power feed jig)
Procedure:
1. Turn on the Power switch on the power feed jig.
2. Press three buttons of s (DECK B), A (DISC 1),
and s (CD) simultaneously.
3. The G (CD) and S (CD) LEDs blink, and then pressing G
(CD), G / g (DECK A), or G / g (DECK B) button can
make each play possible.
4. Also, the other functions are enabled by pressing two buttons
simultaneously.
A combination of respective functions and buttons is as follows.
s (CD) and [REC PAUSE/START] buttons are
function button
CD AMS – s (DECK A), S (CD)
AMS + s (DECK A), s (CD)
FR s (DECK B), S (CD)
FF s (DECK B), s (CD)
Deck-A REW/AMS – s (CD), g (DECK A)
FF/AMS + s (CD), G (DECK A)
Deck-B REW/AMS – s (CD), g (DECK B)
FF/AMS + s (CD), G (DECK B)
Note: Check that CD/TC signal change switch of relay connector jig is
set to the TC position.
13
Page 4
SECTION 5
k
MECHANICAL ADJUSTMENTS
SECTION 6
ELECTRICAL ADJUSTMENTS
Precaution
1. Clean the following parts with a denatured alcohol-moistened
swab:
record/playback heads pinch rollers
erase head rubber belts
capstan idlers
2. Demagnetize the record/playback head with a head demagnetizer.
3. Do not use a magnetized screwdriver for the adjustments.
4. After the adjustments, apply suitable locking compound to the
parts adjusted.
5. The adjustments should be performed with the rated power supply voltage unless otherwise noted.
Torque Measurement
Mode
FWD
FWD
back tension
REV
REV
back tension
FF/REW
FWD tension
REV tension
Torque meter
CQ-102C
CQ-102C
CQ-102RC
CQ-102RC
CQ-201B
CQ-403A
CQ-403R
Meter reading
31 to 71 g • cm
(0.43 – 0.98 oz • inch)
2 to 6 g • cm
(0.03 – 0.08 oz • inch)
31 to 71 g • cm
(0.43 – 0.98 oz • inch)
2 to 6 g • cm
(0.03 – 0.08 oz • inch)
71 to 143 g • cm
(0.99 – 1.99 oz • inch)
100 g or more
(3.53 oz or more)
100 g or more
(3.53 oz or more)
TAPE DECK SECTION
0 dB=0.775 V
1. Demagnetize the record/playback head with a head demagnetizer.
2. Do not use a magnetized screwdriver for the adjustments.
3. After the adjustments, apply suitable locking compound to the
parts adjust.
4. The adjustments should be performed with the rated power
supply voltage unless otherwise noted.
5. The adjustments should be performed in the order given in
this service manual. (As a general rule, playback circuit adjustment should be completed before performing recording
circuit adjustment.)
6. The adjustments should be performed for both L-CH and RCH.
7. Switches and controls should be set as follows unless otherwise specified.
8. Set to the DOLBY NR OFF.
9. Set to the test mode. (See page 13)
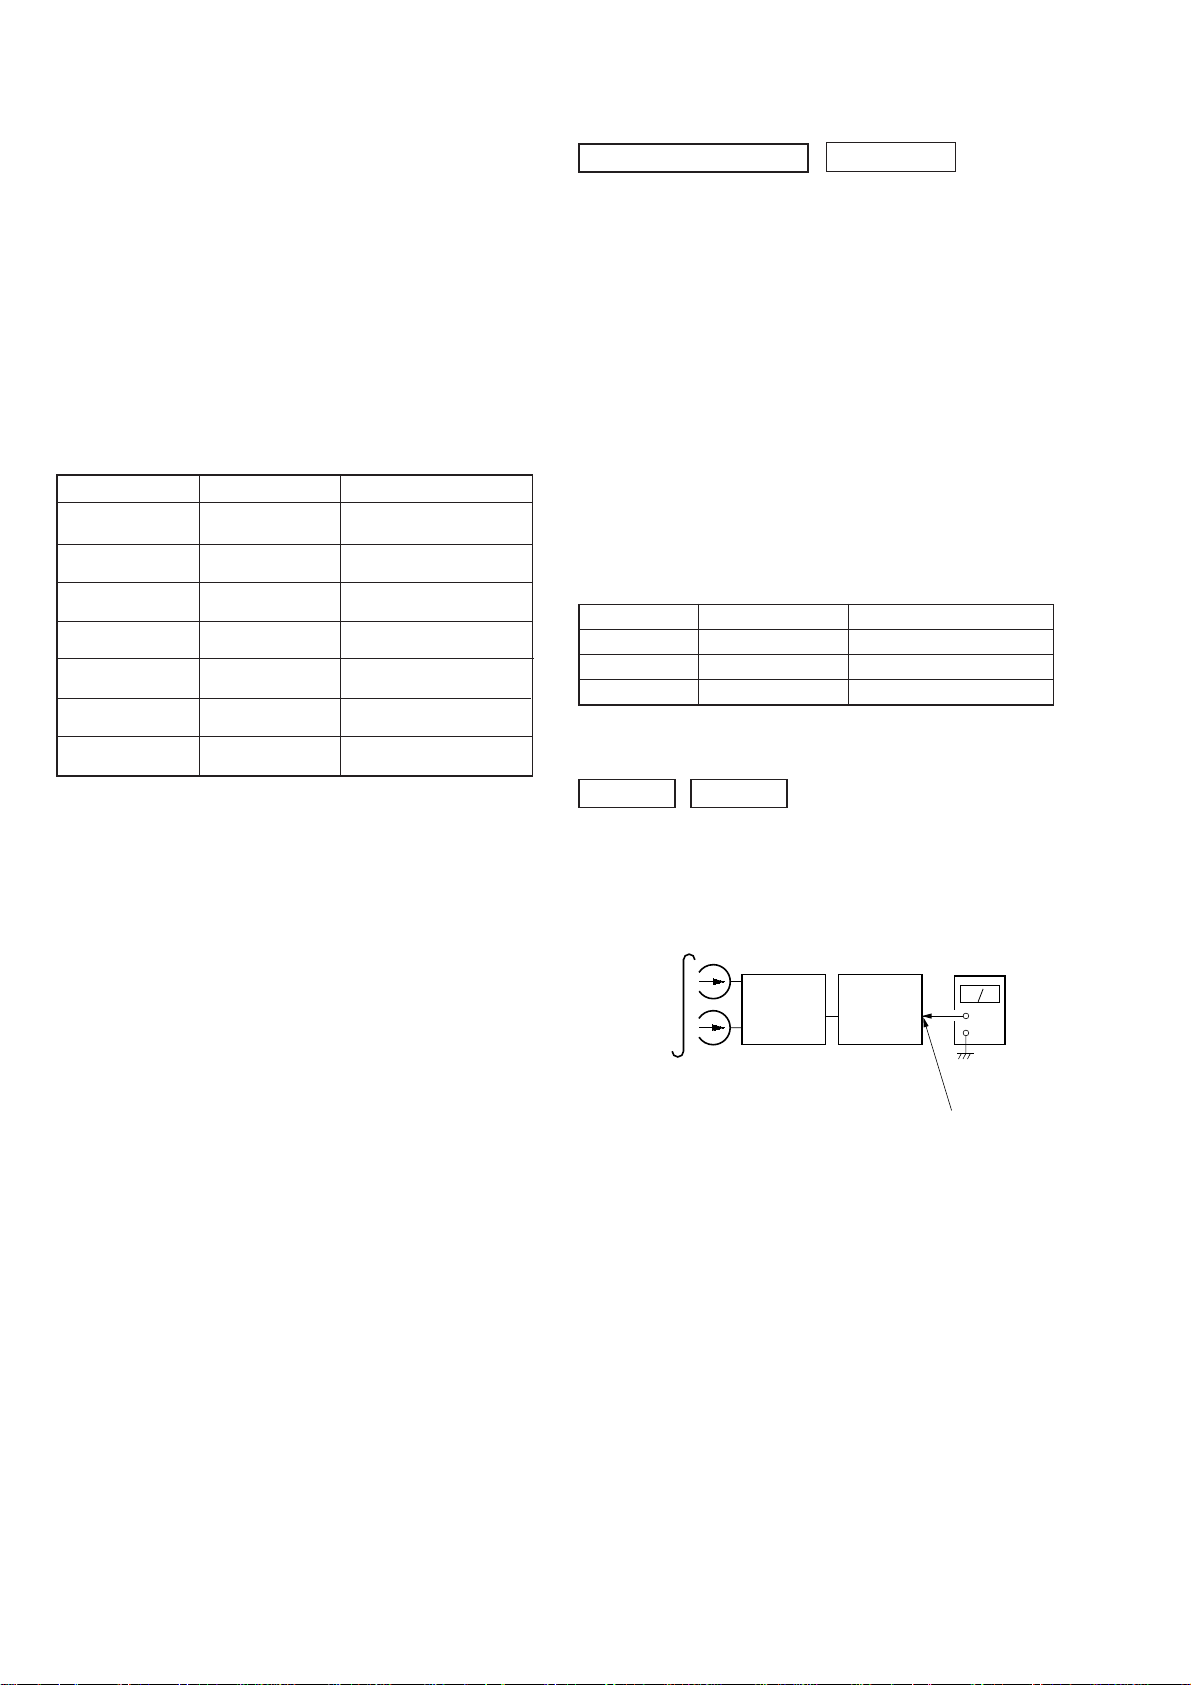
• Test Tape
Tape Signal Used for
P-4-A100 10 kHz, –10 dB Azimuth Adjustment
WS-48B 3 kHz, 0 dB Tape Speed Adjustment
P-4-L300 315 Hz, 0 dB Level Adjustment
Record/Playback Head Azimuth Adjustment
DECK A DECK B
Note: Perform this adjustments for both decks
Procedure:
1. Mode: Playback
test tape
P-4-A100
(10 kHz, –10 dB)
set
PFJ-1
or
STR-NX1/
NX3
level meter
+
–
AUDIO OUT jac
14
Page 5
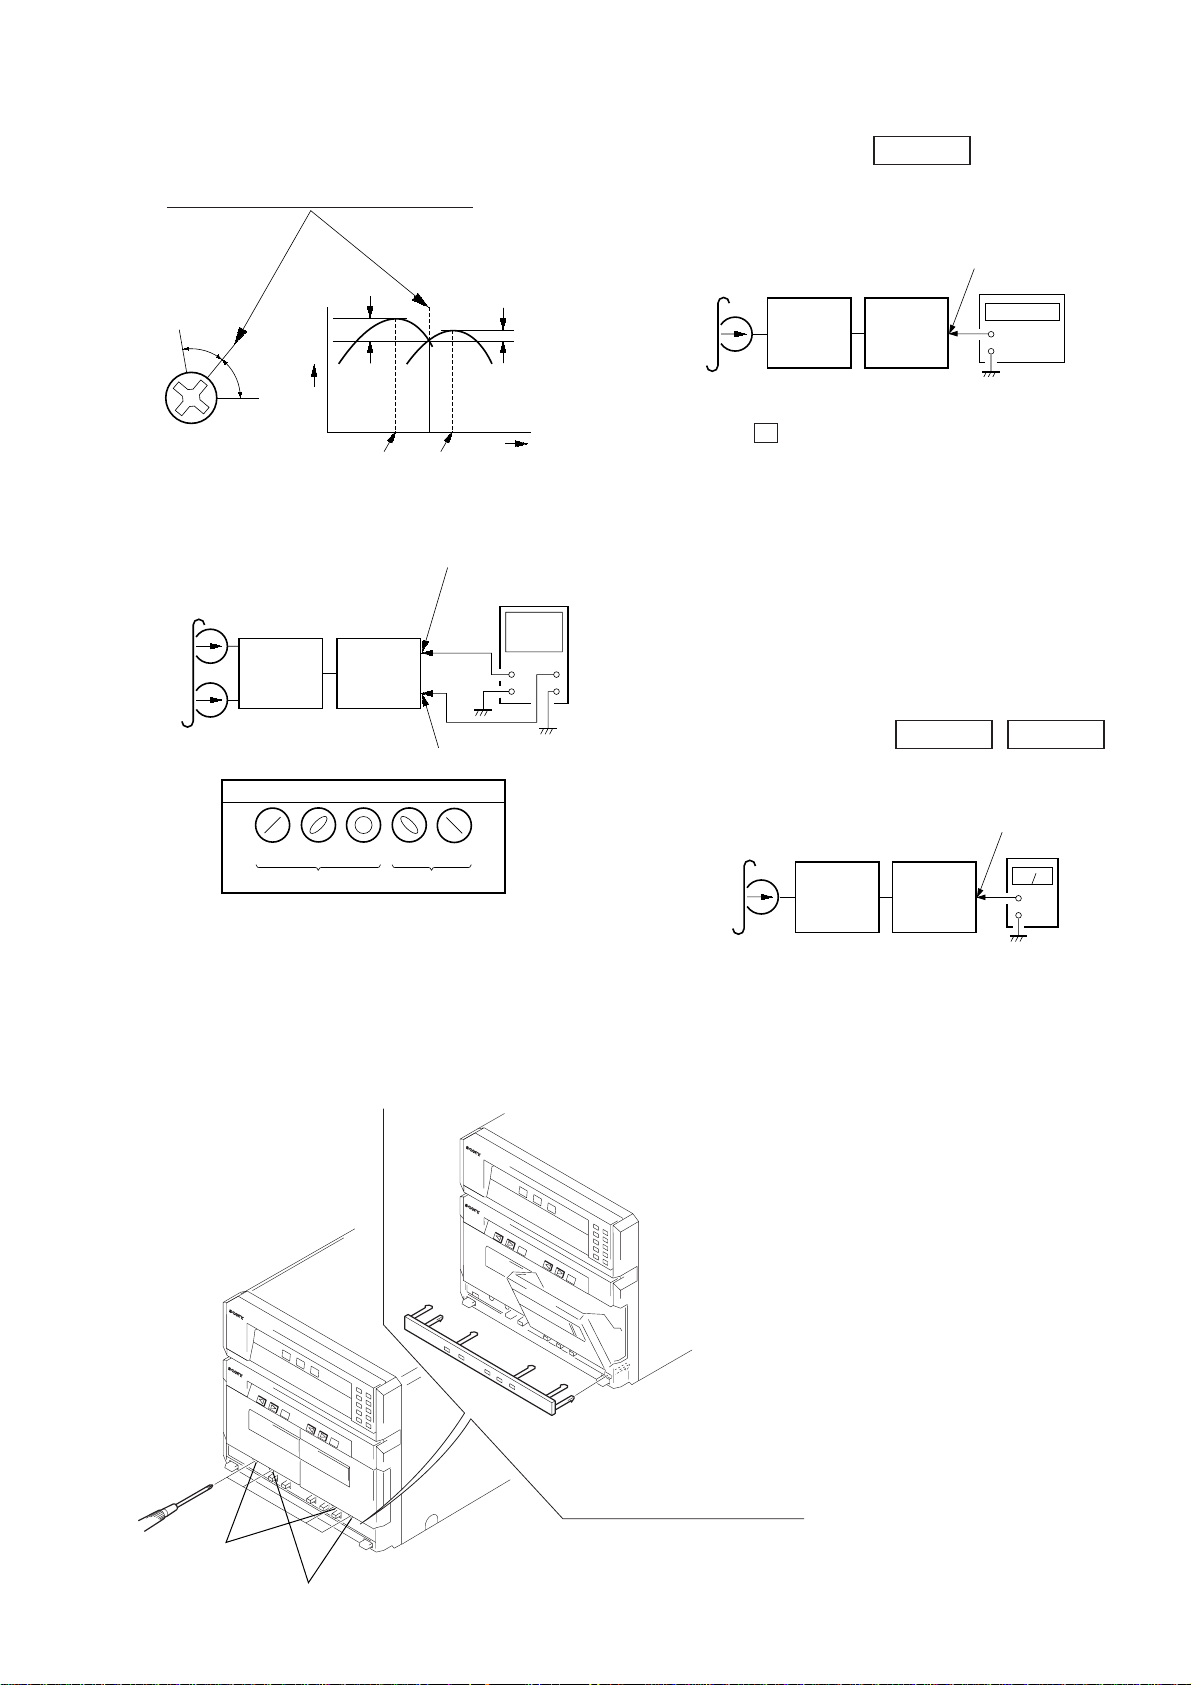
2. Turn the adjustment screw and check output peaks. If the peaks
+
–
AUDIO OUT jack
test tape
WS-48B
(3 kHz, 0 dB)
frequency counter
set
STR-NX1/
NX3
+
–
test tape
P-4-L300
(315 Hz, 0 dB)
level meter
AUDIO OUT jack
PFJ-1
or
STR-NX1/
NX3
set
do not match for L-CH and R-CH, turn the adjustment screw
so that outputs match within 1dB of peak.
Tape Speed Adjustment DECK B
• Execute only if connected to the STR-NX1/NX3
Mode: Playback
L-CH
peak
R-CH
Screw
position
peak
3. Mode: Playback
test tape
P-4-A100
(10 kHz, –10 dB)
L-CH
R-CH
in phase 45°90°135°180
within
1dB
Output
level
L-CH
peak
set
waveform of oscilloscope
STR-NX1/
good
R-CH
peak
AUDIO OUT (L) jack
PFJ-1
or
NX3
AUDIO OUT (R) jack
wrong
L-CH
R-CH
°
within
1dB
Screw
position
oscilloscope
H
V
1. Insert the WS-48B into the deck B.
2. Press the G (DECK B) button.
3. Press the [HI-DUB] button in playback mode.
Then at HIGH speed mode.
4. Adjust RV1001 on the LEAF SW board do that frequency
counter reads 6,000 ± 180 Hz.
5. Press the [HI-DUB] button.
Then back to NORMAL speed mode.
6. Adjust RV1002 on the LEAF SW board so that frequency
counter reads 3,000 ± 90 Hz.
Adjustment Location: LEAF SW board
Sample value of Wow and Flutter: 0.3% or less W.RMS (JIS)
(WS-48B)
Playback level Adjustment
DECK A DECK B
Procedure:
Mode: Playback
4. Repeat step 1 to 3 in playback (REV) mode.
5. After the adjustments, apply suitable locking compound to the
pats adjusted.
Adjustment Location:Playback Head (Deck A).
Record/Playback/Earth Head (Deck B).
Open the cassette holder
and unhock six claws of
the sub panel (TC2)
with tweezers or something,
then remove the sub panel (TC2).
Deck A is RV311 (L-CH) and RV411 (R-CH), Deck B is RV301
(L-CH) and RV401 (R-CH) so that adjustment within specified
value as follows.
Specified Value:
AUDIO OUT jack PB level: 301.5 to 338.3 mV (–8.2 to –7.2
dB) level
difference between the channels: within ± 0.5 dB
Adjustment Location: AUDIO board
forward
reverse
15
Page 6

REC Bias Adjustment DECK B
Procedure:
1. Mode: Record
Specified value:
AUDIO OUT jack PB level: 47.2 to 53.0 mV (–24.3 to –23.3 dB)
Adjustment Location: MAIN board
AUDIO IN jack
50 mV (–23.8 dB)
600
Ω
PFJ-1
or
STR-NX1/
NX3
blank tape
CN-123
set
AF OSC
1) 315 Hz
2) 10 kHz
attenuator
2. Mode: Playback
recorded
portion
set
PFJ-1
or
STR-NX1/
NX3
level meter
+
–
AUDIO OUT jack
3. Confirm playback the signal recorded in step 1 become specified value as follows.
If these values are out of specified value, adjust the RV341 (LCH) and RV441 (R-CH) on the AUDIO board to repeat steps
1and 2.
Specified value: Playback output of 315 Hz to playback
output of 10 kHz: ± 0.5 dB
Adjustment Location: AUDIO board
REC Level Adjustment DECK B
Procedure:
1. Mode: Record
AUDIO IN jack
315 Hz, 50 mV (–23.8 dB)
AF OSC
attenuator
600
Ω
PFJ-1
or
STR-NX1/
NX3
set
blank tape
CN-123
– MAIN BOARD (Conductor Side) –
REC
LEVEL
– AUDIO BOARD (Component Side) –
RV441
RV401
RV301
LR
PB LEVEL
– DECK B –
– LEAF SW BOARD (Component Side) –
TAPE SPEED
(NORMAL) (HIGH)
RV1002
REC BIAS
RV1001
IC602
RL
CN601
RV341
CN1001
RV351
(R-CH)
RV311
LR
PB LEVEL
– DECK A –
IC301
RV301
(L-CH)
CN301
RV411
1
3
2. Mode: Playback
recorded
portion
set
PFJ-1
or
STR-NX1/
NX3
level meter
+
–
AUDIO OUT jack
3. Confirm playback the signal recorded in step 1 become specified value as follows.
If these values are out of specified value, adjust the RV301 (LCH) and RV351 (R-CH) on the MAIN boar d to repeat ste ps 1
and 2.
16
Page 7
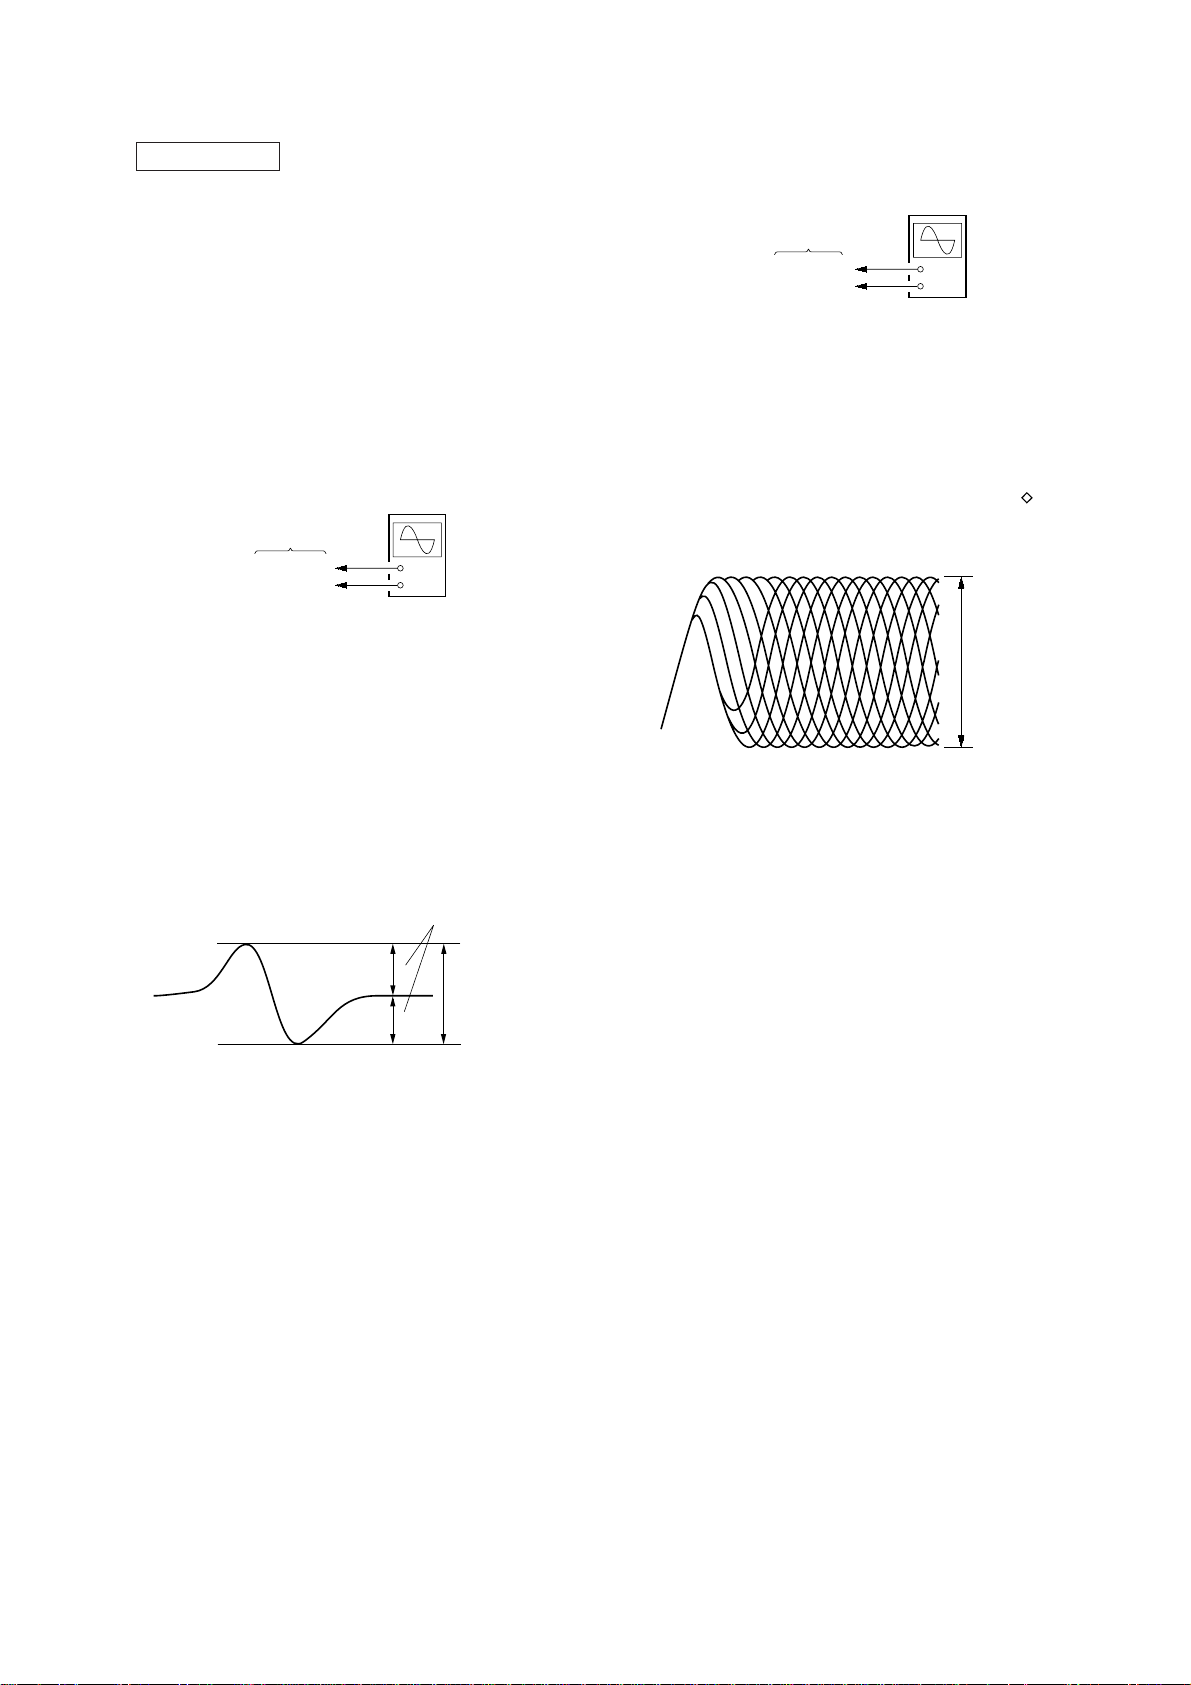
CD SECTION
+
–
BD board
TP (RF)
TP (VC)
oscilloscope
V
Note:
1. CD Block is basically designed to operate without adjustment. Therefore, check each item in order given.
2. Use YEDS-18 disc (3-702-101-01) unless otherwise indicated.
3. Use an oscilloscope with more than 10 MΩ impedance.
4. Clean the object lens by an applicator with neutral detergent when the
signal level is low than specified value with the following checks.
5. Use the following extension cables and relay connector.
• Extension cable (19P) (Part No. J-2501-011-B)
Relay connector (Part No. J-2501-167-A)
(BD board CN101 to MAIN board CN111)
• Extension cable (17P) (with connector) (Part No. J-2501-167-A)
(CONNECTOR board CN701 to MAIN board CN301)
1. S-CURVE CHECK
oscilloscope
BD board
TP (FEO)
TP (VC)
Procedure:
1. Connect oscilloscope to TP (FEO).
2. Connect between TP (FEO) and TP (VC) by lead wire.
3. Connect between TP (AGCCON) and TP (GND) by lead wire.
4. Turn the power ON.
5. Load a disc (YEDS-18) and turn the power ON again and actuate the focus search. (Actuate the focus search when disc
tray is moving in and out)
6. Check the oscilloscope waveform (S-curve) is symmetrical
between A and B. And confirm peak to peak level within
2.4±0.7 Vp-p.
+
–
2. RF LEVEL CHECK
Procedure:
1. Connect oscilloscope to TP (RF).
As TP (RF) and TP (VC) are located at the edge of board, clip
them together with the board using alligator clips.
2. Turn the power ON.
3. Load a disc (YEDS-18) and playback.
4. Confirm that oscilloscope wavefor m is clear and check RF signal level is correct or not.
Note: Clear RF signal waveform means that the shape “ ” can be clearly
distinguished at the center of the waveform.
RF signal waveform
VOLT/DIV: 200 m
TIME/DIV: 500 ns
level:
±
0.2 Vp-p
1.2
S-curve waveform
symmetry
A
B
within 2.4
±
0.7 Vp-p
7. After check, remove the lead wire connected in step 2.
Note: • Try to measure several times to make sure than the ratio of A : B
or B : A is more than 10 : 7.
• Take sweep time as long as possible and light up the brightness
to obtain best waveform.
17
Page 8

7-3. SCHEMATIC DIAGRAM – BD Board – • See page 32 for Waveforms. • See page 32 for IC Block Diagrams.
HTC-NX1
(Page 29)
• Voltages and waveforms are dc with respect to ground
under no-signal conditions.
no mark : CD PLAY
The components identified by mark 0 or dotted
line with mark 0 are critical for safety.
Replace only with part number specified.
Les composants identifiés par une marque 0 sont
critiques pour la sécurité. Ne les remplacer que
par une pièce portant le numéro spécifié.
2121
Page 9
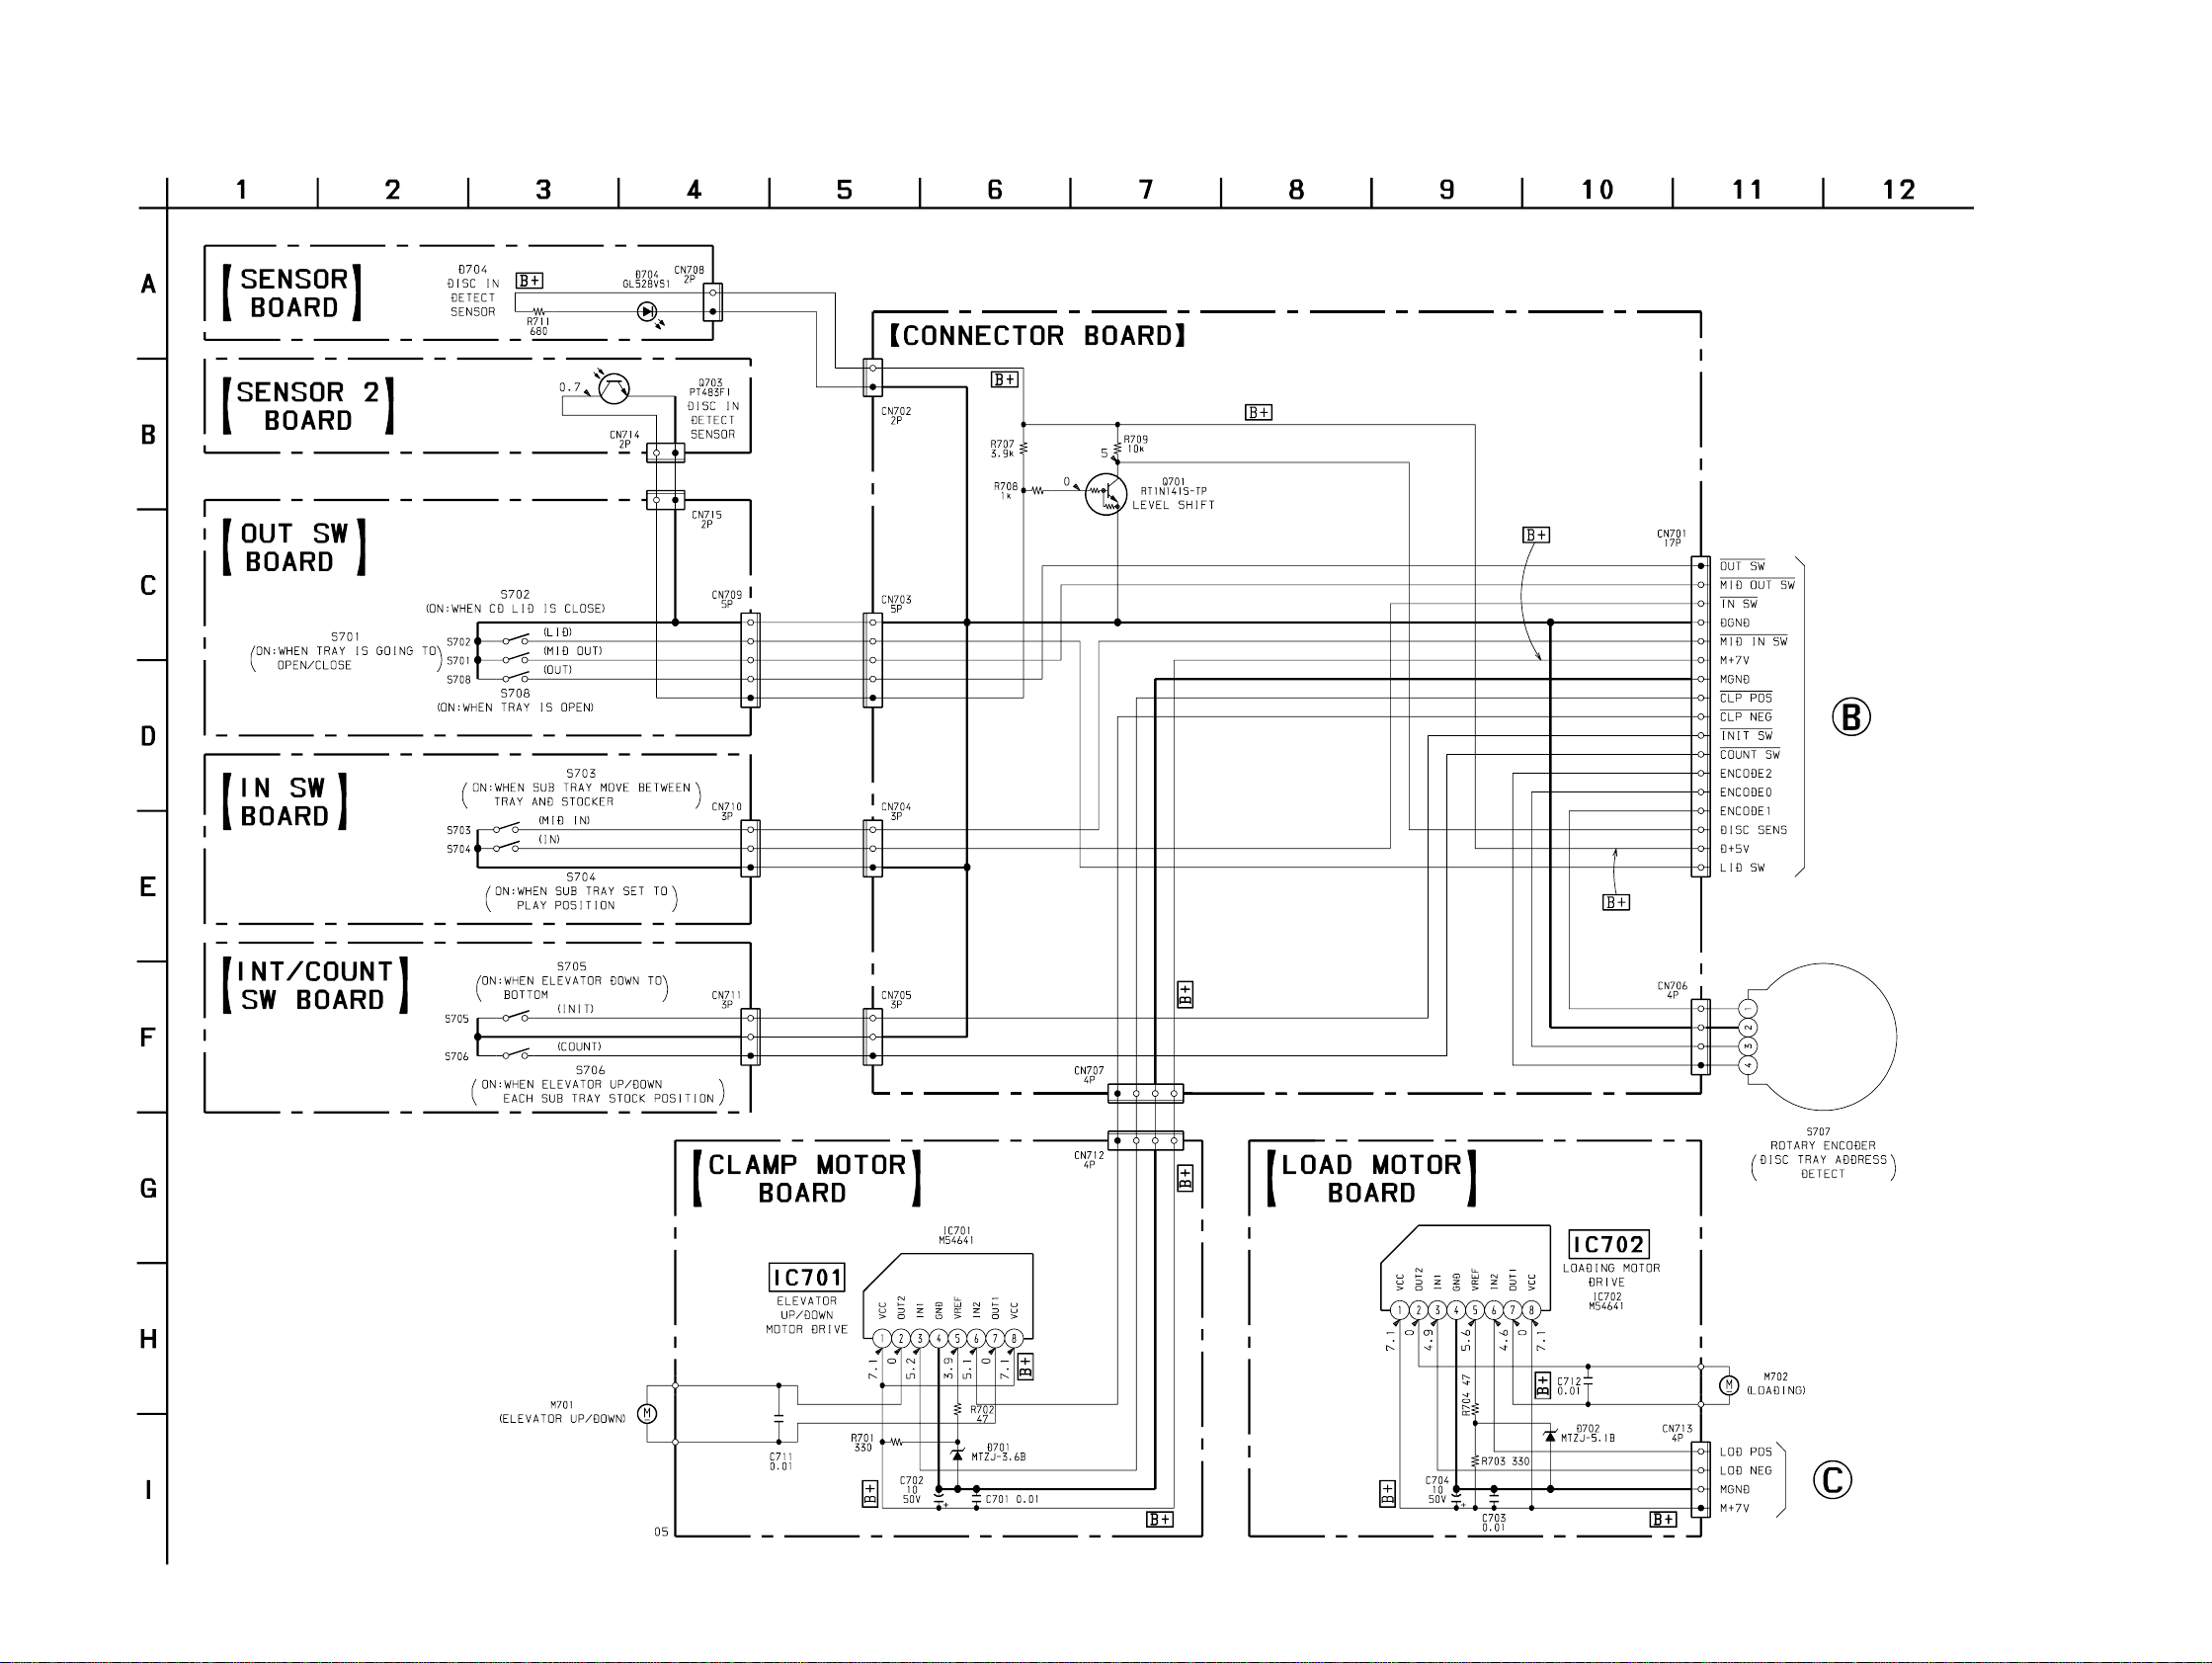
7-5. SCHEMATIC DIAGRAM – CD MOTOR/SENSOR Section – • See page 33 for IC Block Diagram.
HTC-NX1
• Voltages are dc with respect to ground under no-signal
conditions.
no mark : CD PLAY
(Page 29)
(Page 29)
2323
Page 10

7-7. SCHEMATIC DIAGRAM – AUDIO Board – • See page 33 for IC Block Diagram.
HTC-NX1
(PLAYBACK)
PB EQ AMP
(DECK A)
PB EQ AMP
(DECK B)
SWITCHING
PB LEVEL (L)
(DECK A)
PB LEVEL (R)
(DECK A)
PB LEVEL (L)
(DECK B)
PB LEVEL (R)
(DECK B)
NC
A +7.5V
APB–LCH
APB–RCH
AGND
BPB–LCH
BPB–RCH
A –7.5V
–VBIAS (–7.5V)
+VBIAS (+7.5V)
B–REC–RCH
B–REC–LCH
TC–HEAD–GND
D
(Page 28)
REC BIAS (R)
(DECK B)
BIAS OSC
REC BIAS (L)
(DECK B)
-6.8
REC BIAS
• Voltages are dc with respect to ground under no-signal
conditions.
no mark : TAPE PLAYBACK
( ) : RECORD
The components identified by mark 0 or dotted
line with mark 0 are critical for safety.
Replace only with part number specified.
Les composants identifiés par une marque 0 sont
critiques pour la sécurité. Ne les remplacer que
par une pièce portant le numéro spécifié.
2525
Page 11
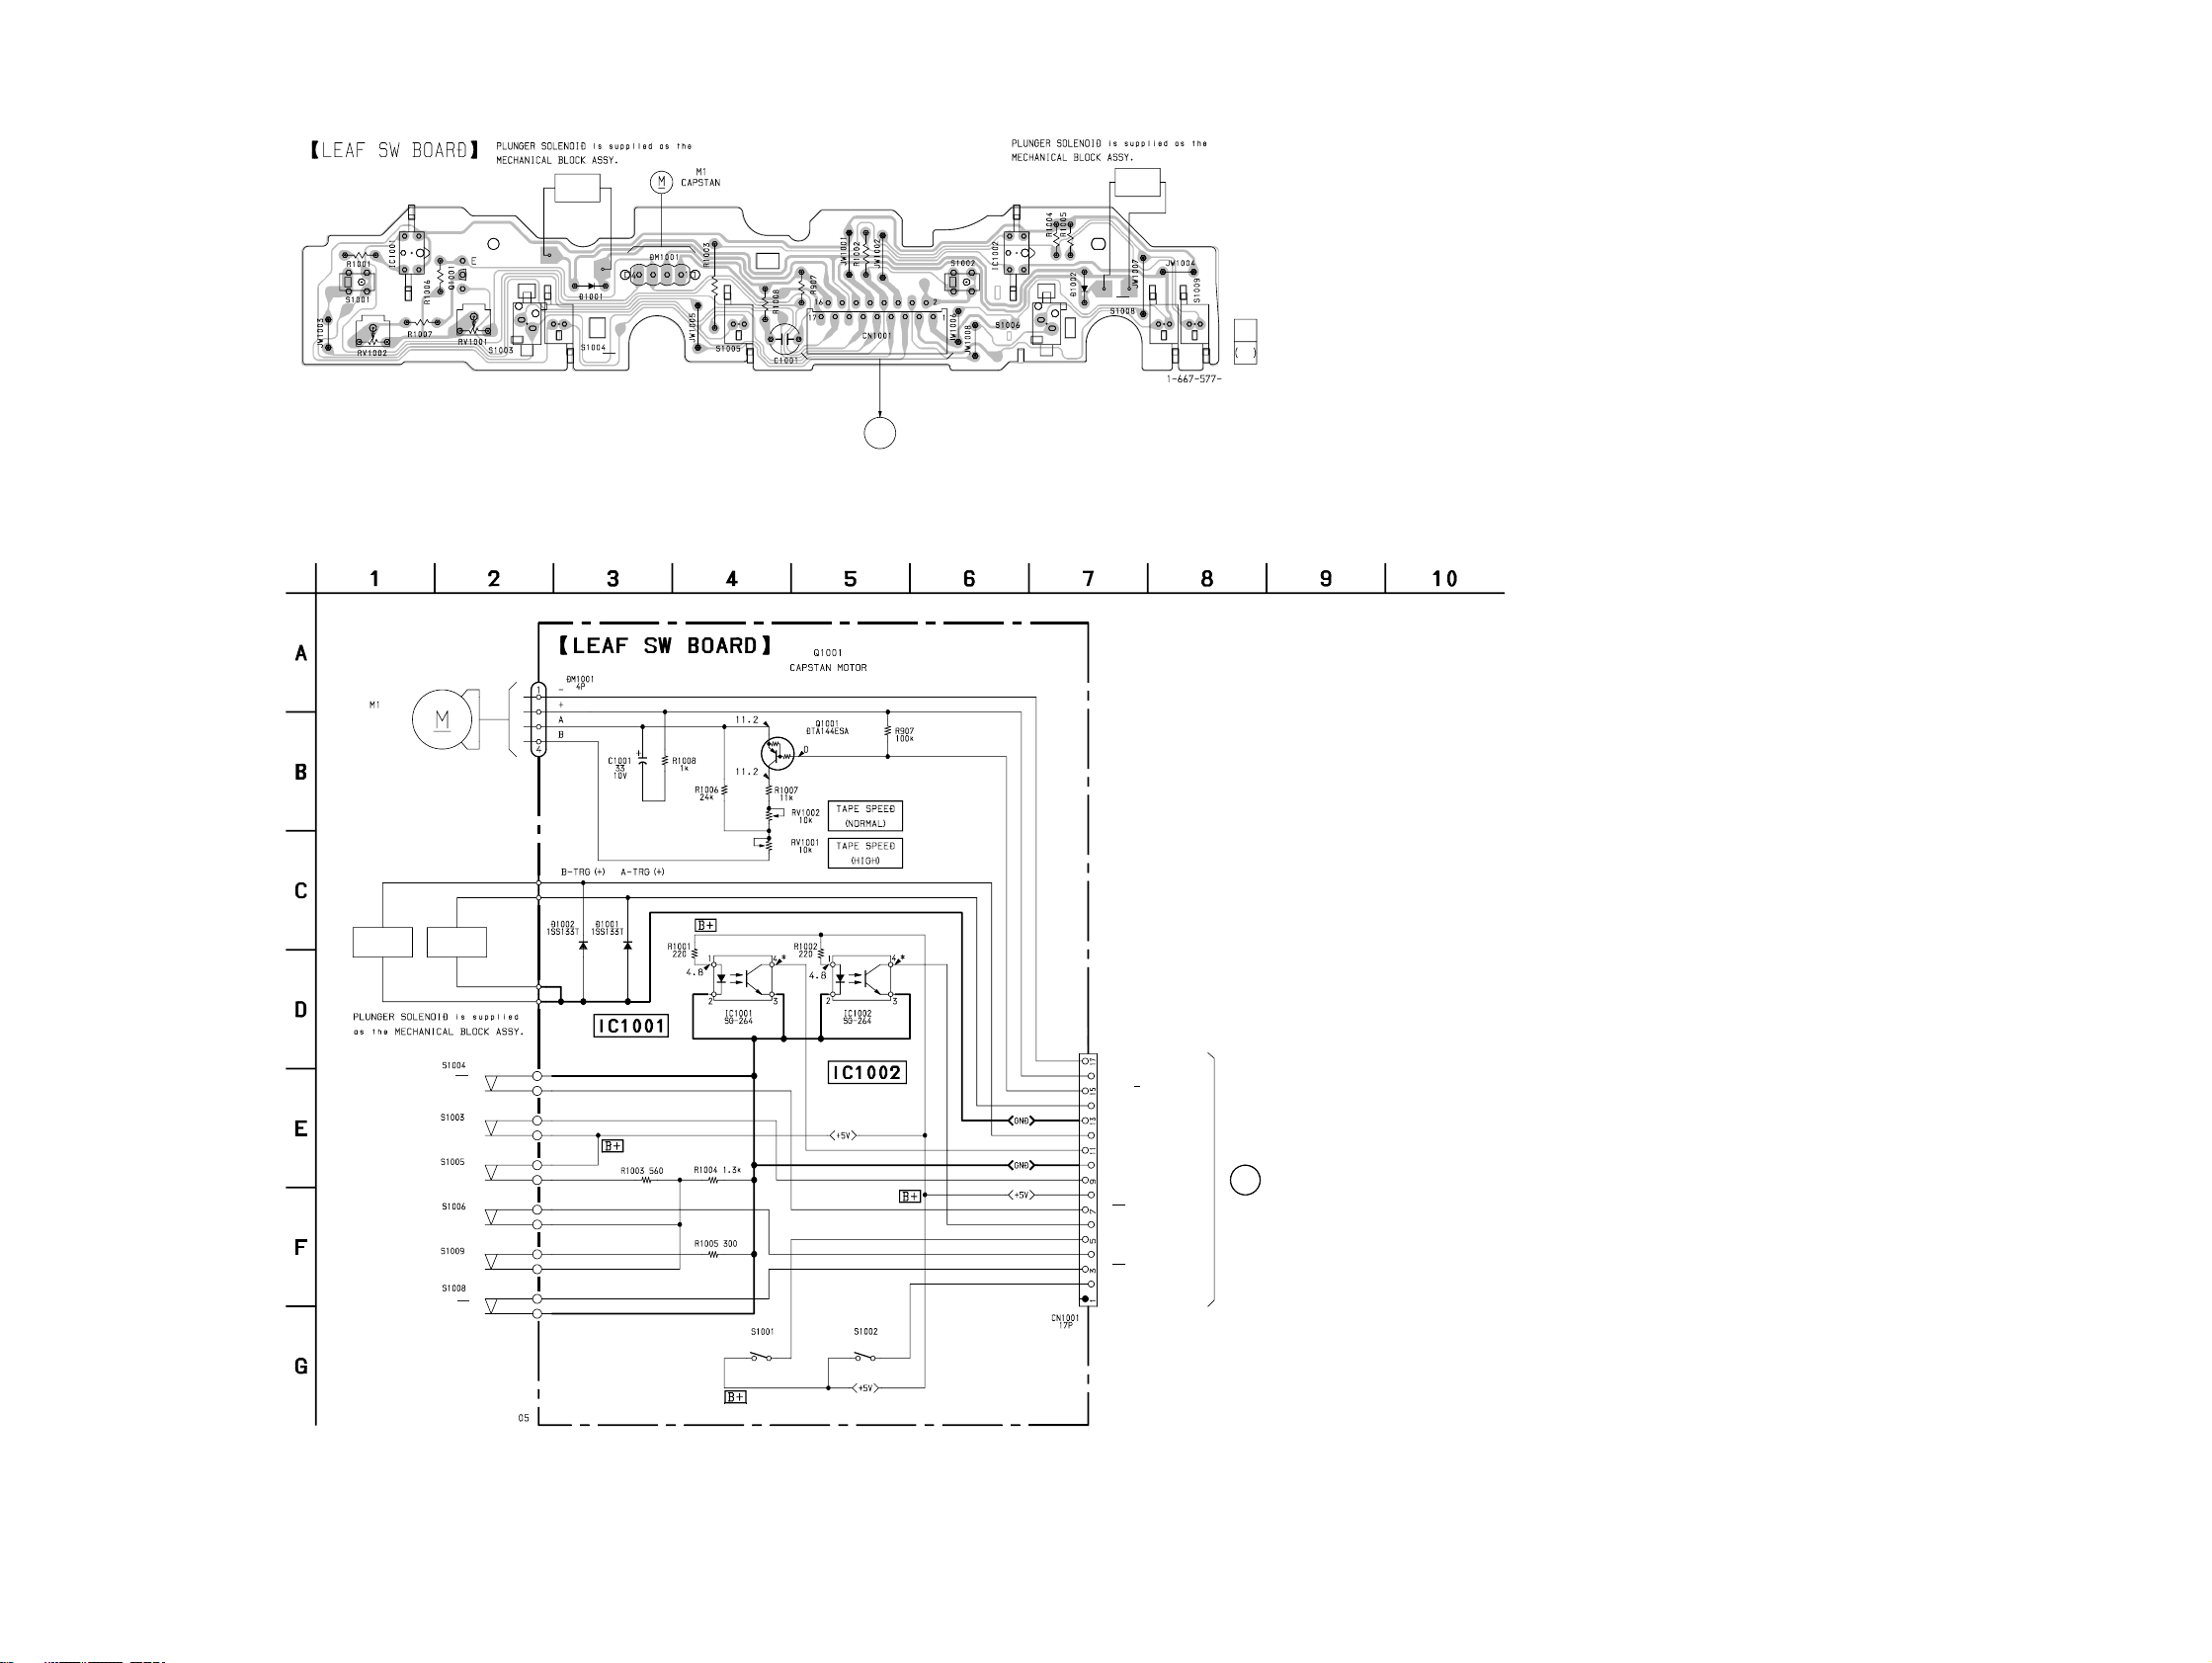
HTC-NX1
7-8. PRINTED WIRING BOARD – LEAF SW Board – • See page 19 for Circuit Boards Location.
DECK A
PLUNGER
4
3
1
2
(DECK A PLAY)
05
(DECK A HALF)
(DECK A 120/70)
(
)
(DECK A REC)
7-9. SCHEMATIC DIAGRAM – LEAF SW Board –
(CAPSTAN)
CONTROL SWITCH
L
(DECK B PLAY)
(Page 27)
4
1
(DECK B HALF)
DECK B
PLUNGER
3
2
(DECK B 120/70)
(DECK B REC)
21
21
DECK B
PLUNGER
DECK A
PLUNGER
(DECK A 120/70)
(DECK A HALF)
(DECK A REC)
(DECK B HALF)
(DECK B REC)
(DECK B 120/70)
ROTATION DETECT SENSOR
(DECK A)
• Voltages are dc with respect to ground under no-signal
conditions.
no mark : TAPE PLAYBACK
( ) : RECORD
: Impossible to measure
∗
(DECK A PLAY)
ROTATION DETECT
SENSOR (DECK B)
(DECK B PLAY)
CAPM–
CAPM+
CAPM–H/L
A–TRGM
TRGM–GND
B–TRGM
A–SHUT
DGND
A–HALF
+5V
A–120/70
B–SHUT
A PLAY
B–HALF / REC–A / REC–B
B–120/70
B PALY
NC
E
(Page 28)
2626
Page 12
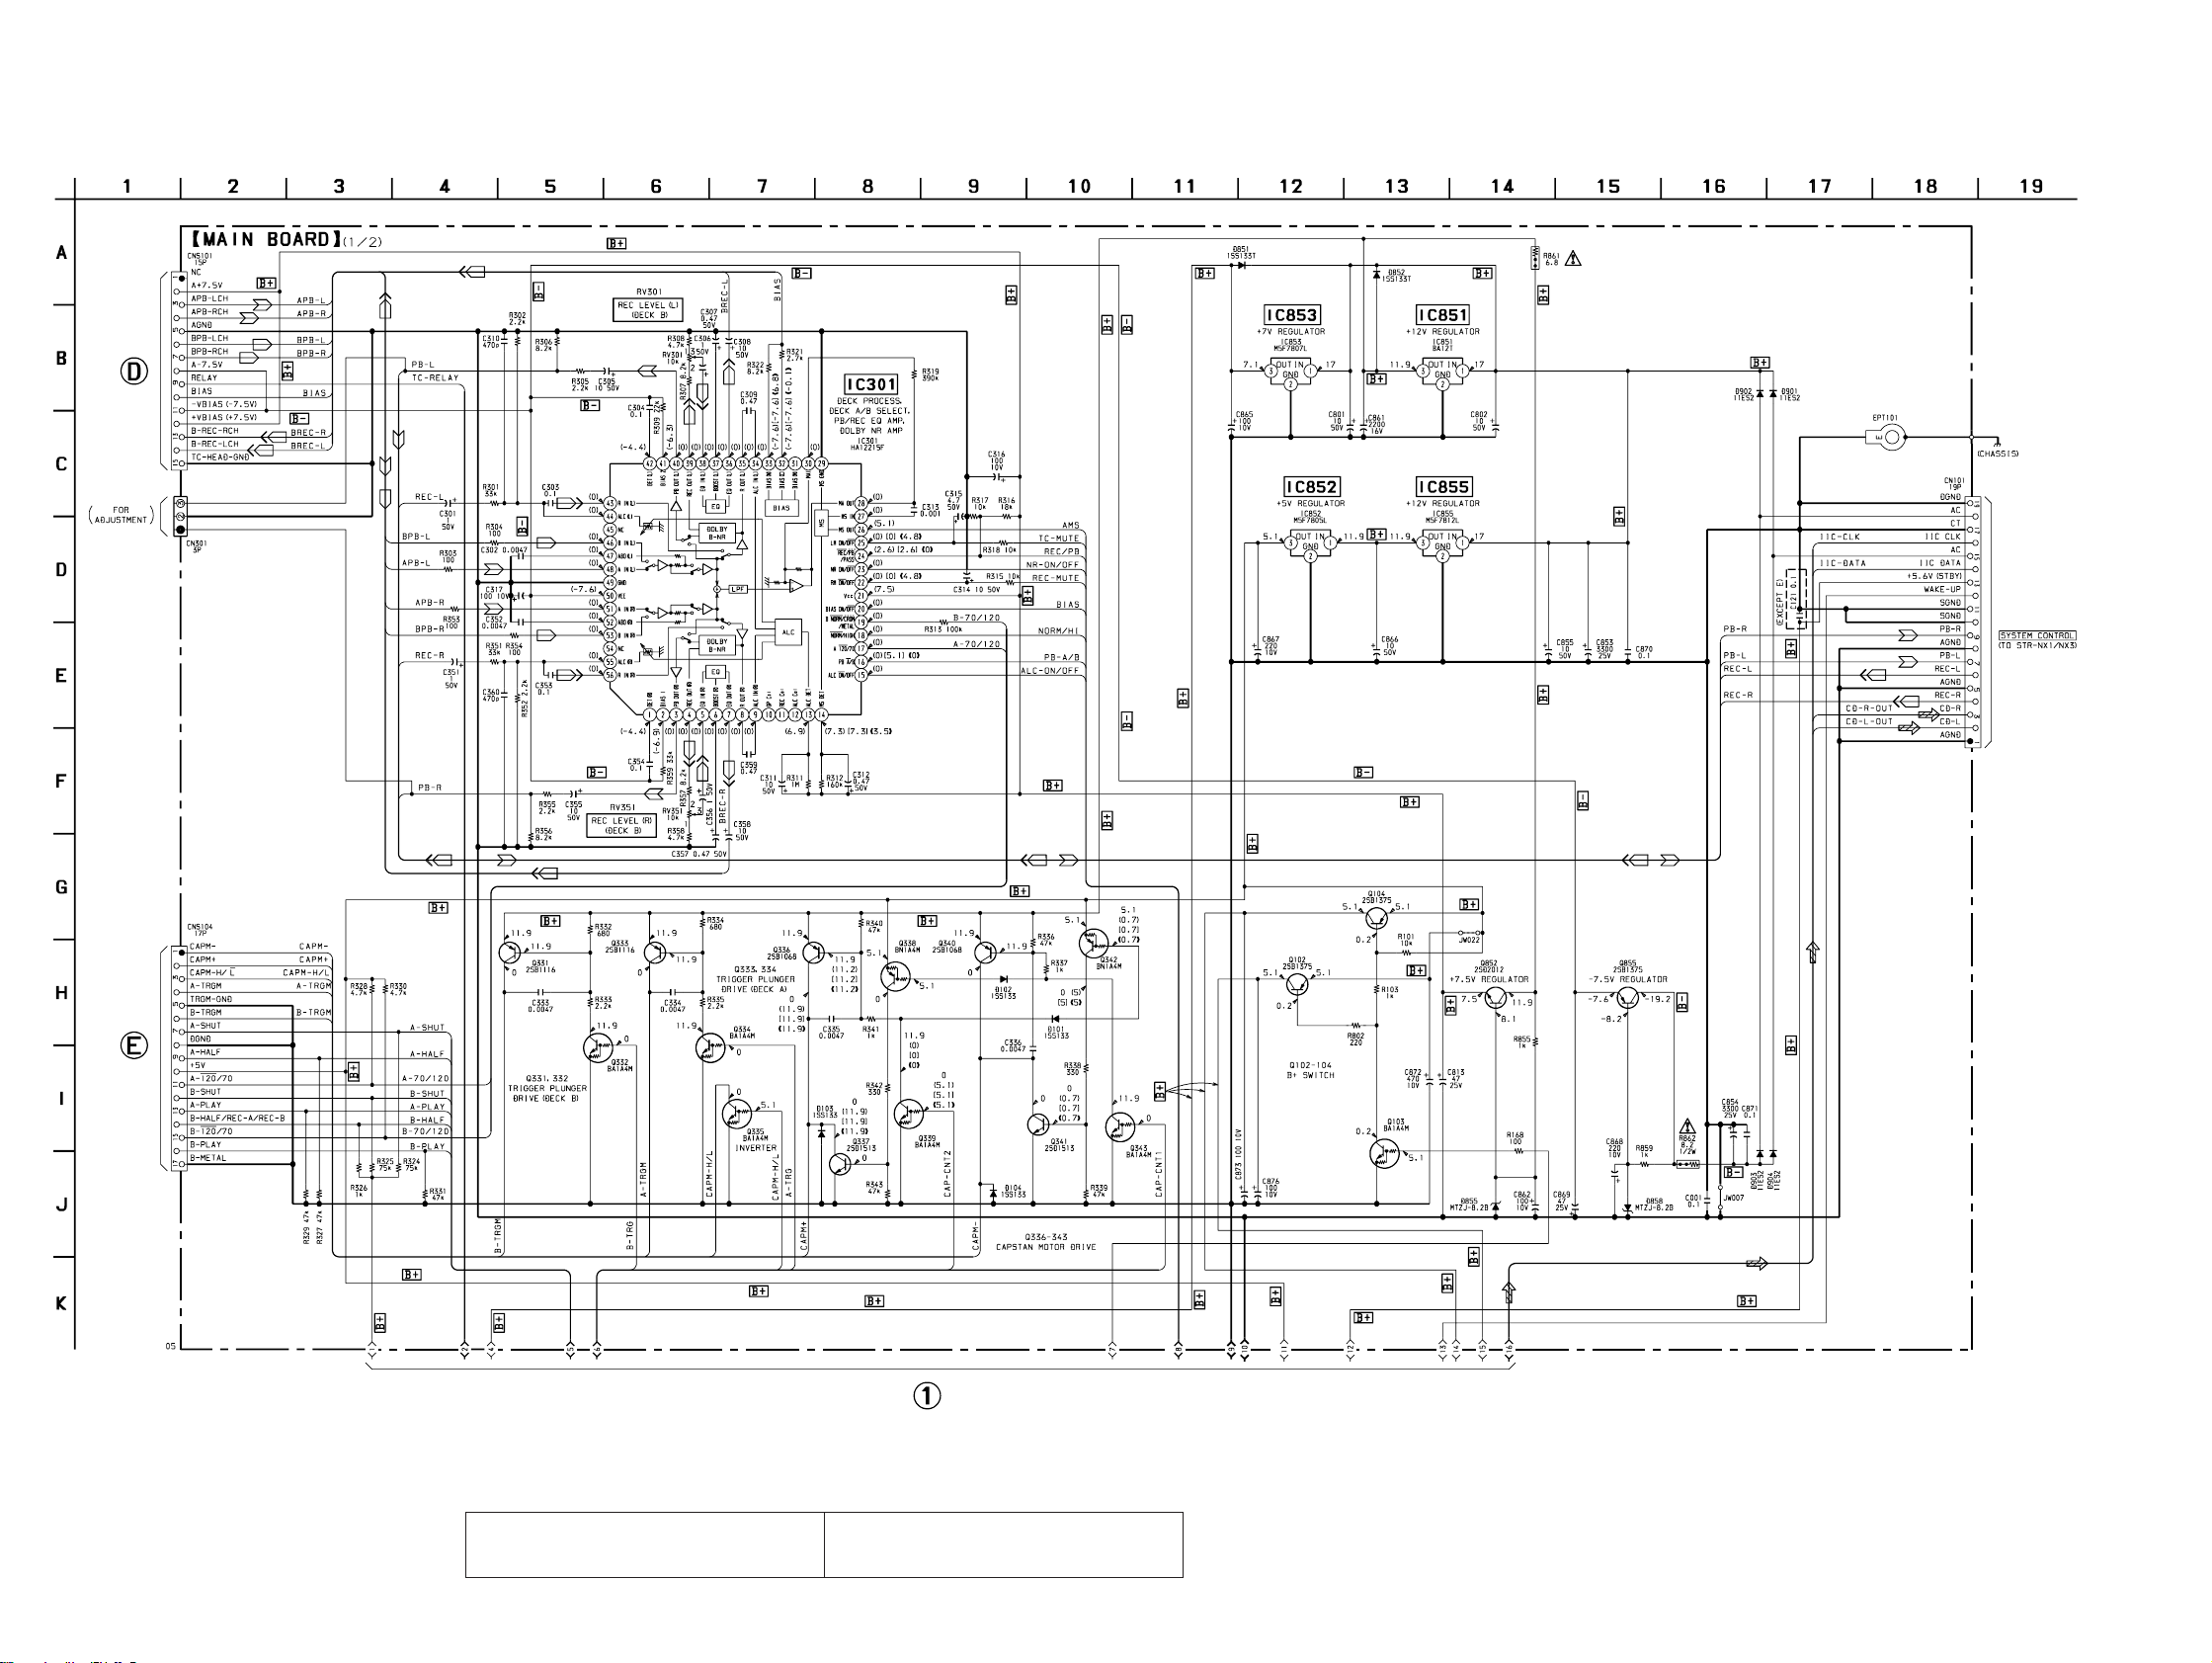
HTC-NX1
7-11. SCHEMATIC DIAGRAM – MAIN Board (1/2) –
(Page 25)
(Page 26)
• Voltages are dc with respect to ground under no-signal
conditions.
no mark : CD PLAY
( ) : TAPE PLAYBACK (DECK A)
[ ] : TAPE PLAYBACK (DECK B)
〈〈 〉〉 : RECORD
The components identified by mark 0 or dotted
line with mark 0 are critical for safety.
Replace only with part number specified.
(Page 29)
Les composants identifiés par une marque 0 sont
critiques pour la sécurité. Ne les remplacer que
par une pièce portant le numéro spécifié.
2828
Page 13

7-12. SCHEMATIC DIAGRAM – MAIN Board (2/2) – • See page 32 for Waveform.
HTC-NX1
(Page 28)
(Page 23)
(Page 23)
(Page 31)
(Page 31)
(Page 31)
(Page 21)
• Voltages and waveforms are dc with respect to ground
under no-signal conditions.
no mark : CD PLAY
( ) : TAPE PLAYBACK (DECK A)
[ ] : TAPE PLAYBACK (DECK B)
〈〈 〉〉 : RECORD
: Impossible to measure
∗
2929
Page 14

7-14. SCHEMATIC DIAGRAM – PANEL Section –
(Page 29)
HTC-NX1
(Page 29)
(Page 29)
• Voltages are dc with respect to ground under no-signal
conditions.
no mark : CD PLAY
3131
Page 15
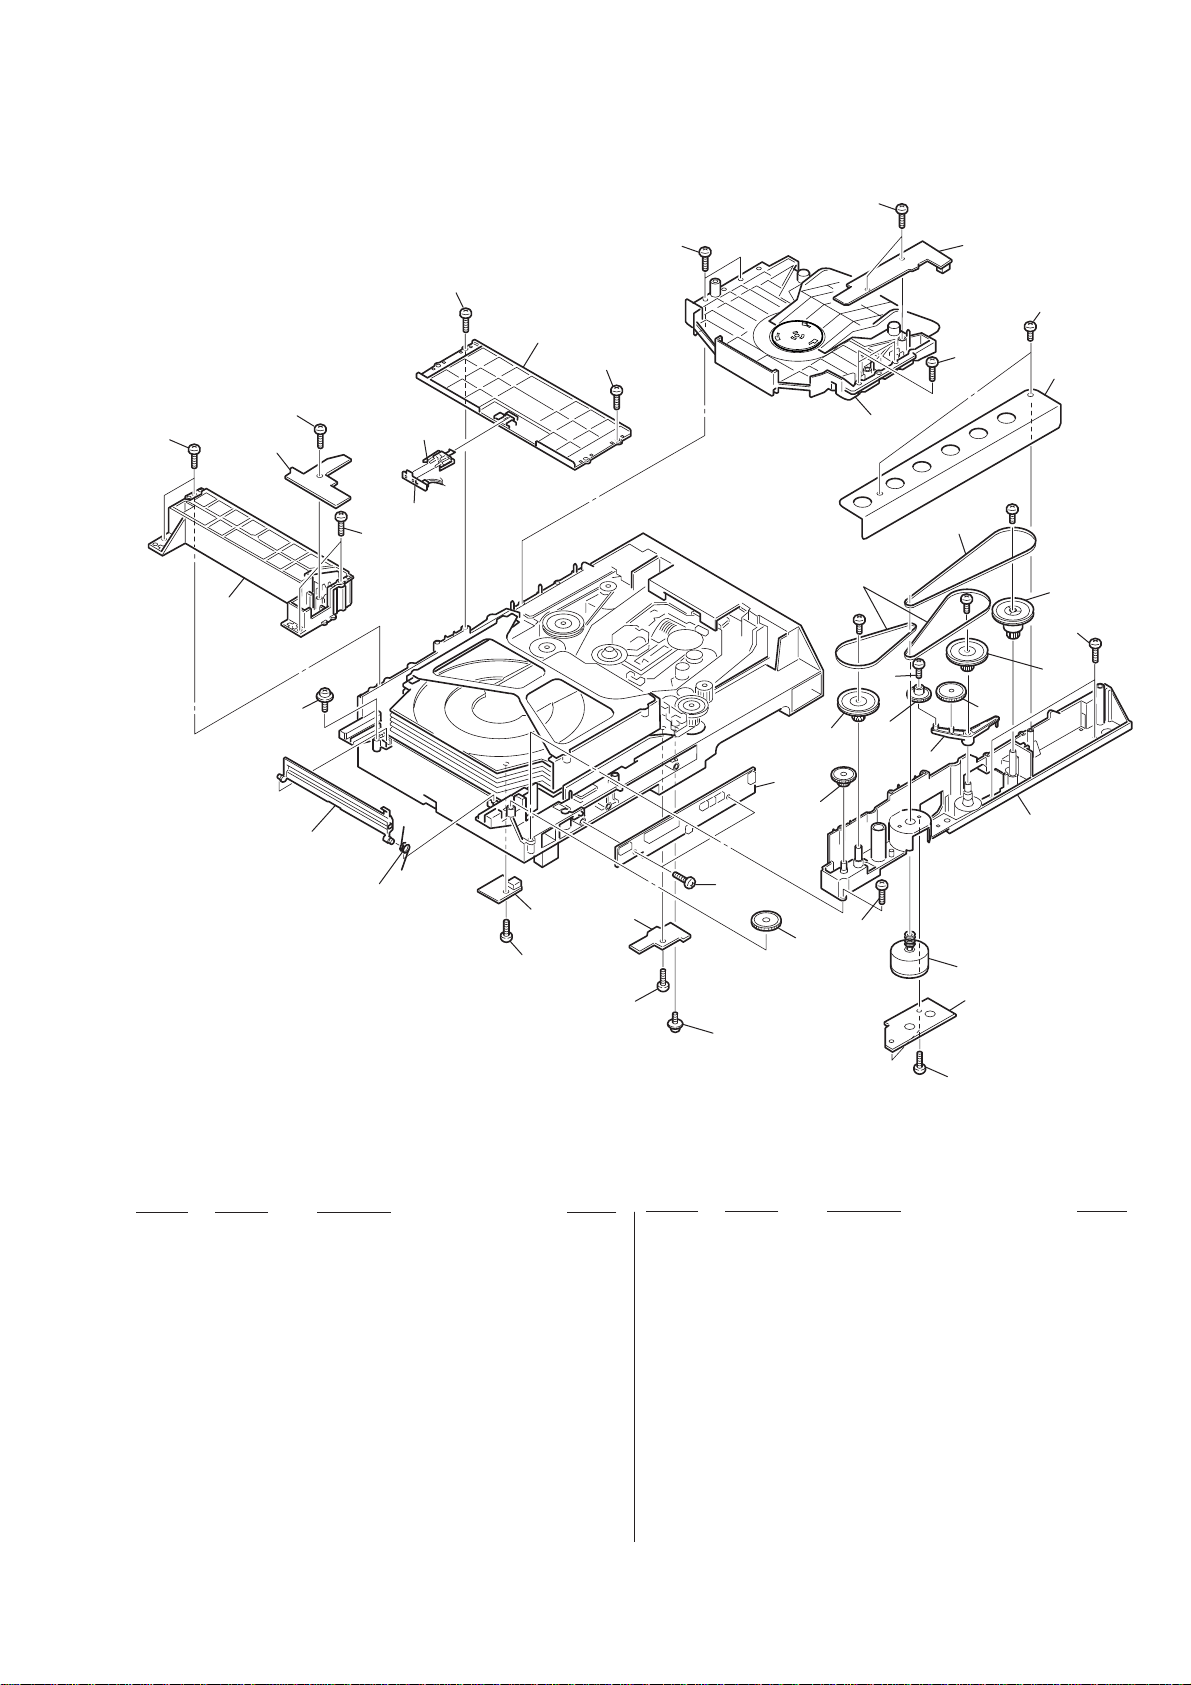
(3) CD MECHANISM DECK SECTION-1
(CDM53D-K1BD33)
151
151
159
151
160
158
157
151
162
161
151
177
151
151
174
170
171
168
#3
165
151
173
172
167
#3
164
151
151
166
#3
169
151
170
171
176
156
155
151
Ref. No. Part No. Description Remark
151 4-218-253-01 SCREW (M2.6), +BVTP
* 152 1-671-508-21 LOAD MOTOR BOARD
153 4-220-261-01 GEAR (EJECT)
* 154 1-671-502-21 INT/COUNT SW BOARD
* 155 1-671-504-21 SENSOR BOARD
156 4-212-676-03 SPRING (LID), TORSION
157 4-220-285-01 LID (DISC)
158 4-985-672-01 SCREW (+PTPWH M2.6), FLOATING
159 A-4672-622-F BASE (GUIDE) ASSY, FITTING
* 160 1-671-503-21 OUT SW BOARD
151
154
153
151
M702
152
151
175
151
Ref. No. Part No. Description Remark
166 4-214-129-01 COVER
167 4-211-235-01 BELT (COMMUNICATION)
168 4-211-236-01 BELT (LOADING)
169 4-220-278-01 PULLEY (MODE)
170 4-220-276-01 PULLEY (LD)
171 4-220-267-01 GEAR (LD DECELERATION)
172 4-220-272-01 LEVER (GOOSENECK)
173 4-220-271-01 GEAR (TRAY)
* 174 1-671-506-21 CONNECTOR BOARD
175 3-341-549-21 SCREW (2.6X12) (DIA. 7.5), +PTP WH
* 161 1-671-789-21 SENSOR 2 BOARD
162 4-220-274-01 HOLDER (SENSOR)
* 164 1-671-505-21 IN SW BOARD
165 A-4680-437-A MAGNET ASSY
176 4-213-488-04 CHASSIS (MOLD B)
177 4-213-579-01 BRACKET (CHASSIS)
M702 X-4950-342-1 MOTOR (LOADING) ASSY
39
Page 16
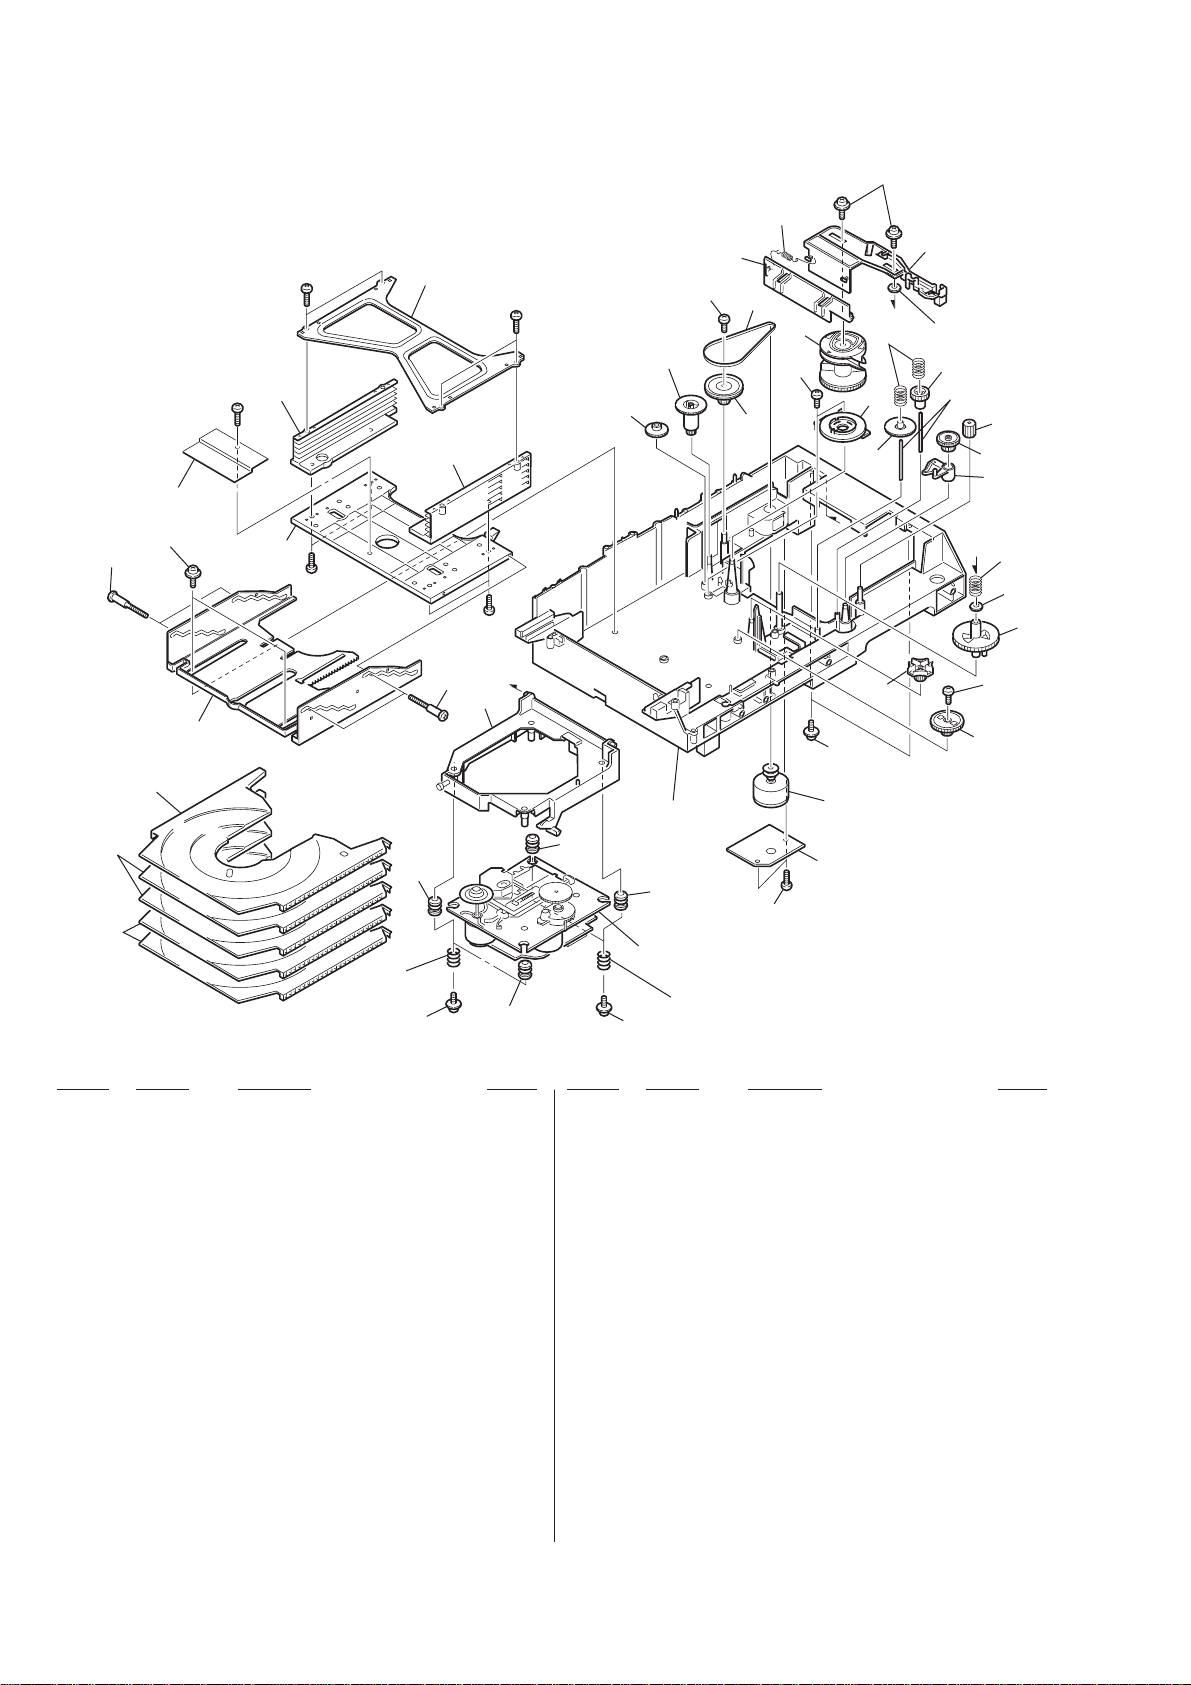
(4) CD MECHANISM DECK SECTION-2
(CDM53D-K1BD33)
not supplied
not supplied
210
212
#3
#3
215
213
#3
214
210
#3
209
A
#3
216
217
219
221
220
218
222
224
219
A
201
B
225
S707
228
237
223
not supplied
227
229
B
230
231
232
233
234
235
219
211
204
204
202
204
not
supplied
201
Ref. No. Part No. Description Remark
201 4-985-672-01 SCREW (+PTPWH M2.6), FLOATING
202 4-220-933-01 INSULATOR
204 4-213-487-53 TRAY (SUB)
205 4-213-482-02 CHASSIS (MOLD A)
209 X-4950-322-3 HOLDER (BU) ASSY
210 4-211-244-01 SCREW, STEP
211 4-211-223-04 SLIDER (U/D)
212 4-933-134-01 SCREW (M2.6), +PTPWH
213 4-211-224-03 BASE (STOCKER), FITTING
214 4-211-211-02 STOCKER (R)
202
236
205
201
M701
202
226
202
219
BU-K1BD33
not
supplied
201
Ref. No. Part No. Description Remark
224 4-220-275-01 GEAR (CHUCKING)
225 4-211-245-01 SPRING, COMPRESSION
* 226 1-671-507-21 CLAMP MOTOR BOARD
227 4-220-265-01 GEAR (LD MOVABLE)
228 4-220-269-01 GEAR (SELECTION)
229 4-211-242-01 SHAFT (SELECTION GEAR)
230 4-220-268-01 GEAR (LD DECELERATION B)
231 4-220-262-01 GEAR (RELAY)
232 4-220-273-01 LEVER (SELECTION)
233 4-216-879-01 SPRING (GEAR), COIL
215 4-211-210-03 STOCKER (L)
216 4-220-261-01 GEAR (EJECT)
217 4-220-266-01 GEAR (MODE DECELERATION)
218 4-220-276-01 PULLEY (LD)
219 4-218-253-01 SCREW (M2.6), +BVTP
220 4-211-237-01 BELT (MODE)
221 4-220-283-01 SLIDER (SHUTTER)
222 4-212-678-01 SPRING (SHUTTER), TENSION
223 4-220-284-01 SLIDER (SELECTION)
40
234 3-701-446-21 WASHER
235 4-220-270-01 GEAR (GEAR A)
236 4-220-264-01 GEAR (U/D SLIDER)
237 4-220-263-01 GEAR (GEAR B)
M701 X-4950-341-1 MOTOR (CLAMP) ASSY
(ELEVATOR UP/DOWN)
S707 1-418-045-01 ENCODER, ROTARY
(DISC TRAY ADDRESS DETECT)
Page 17
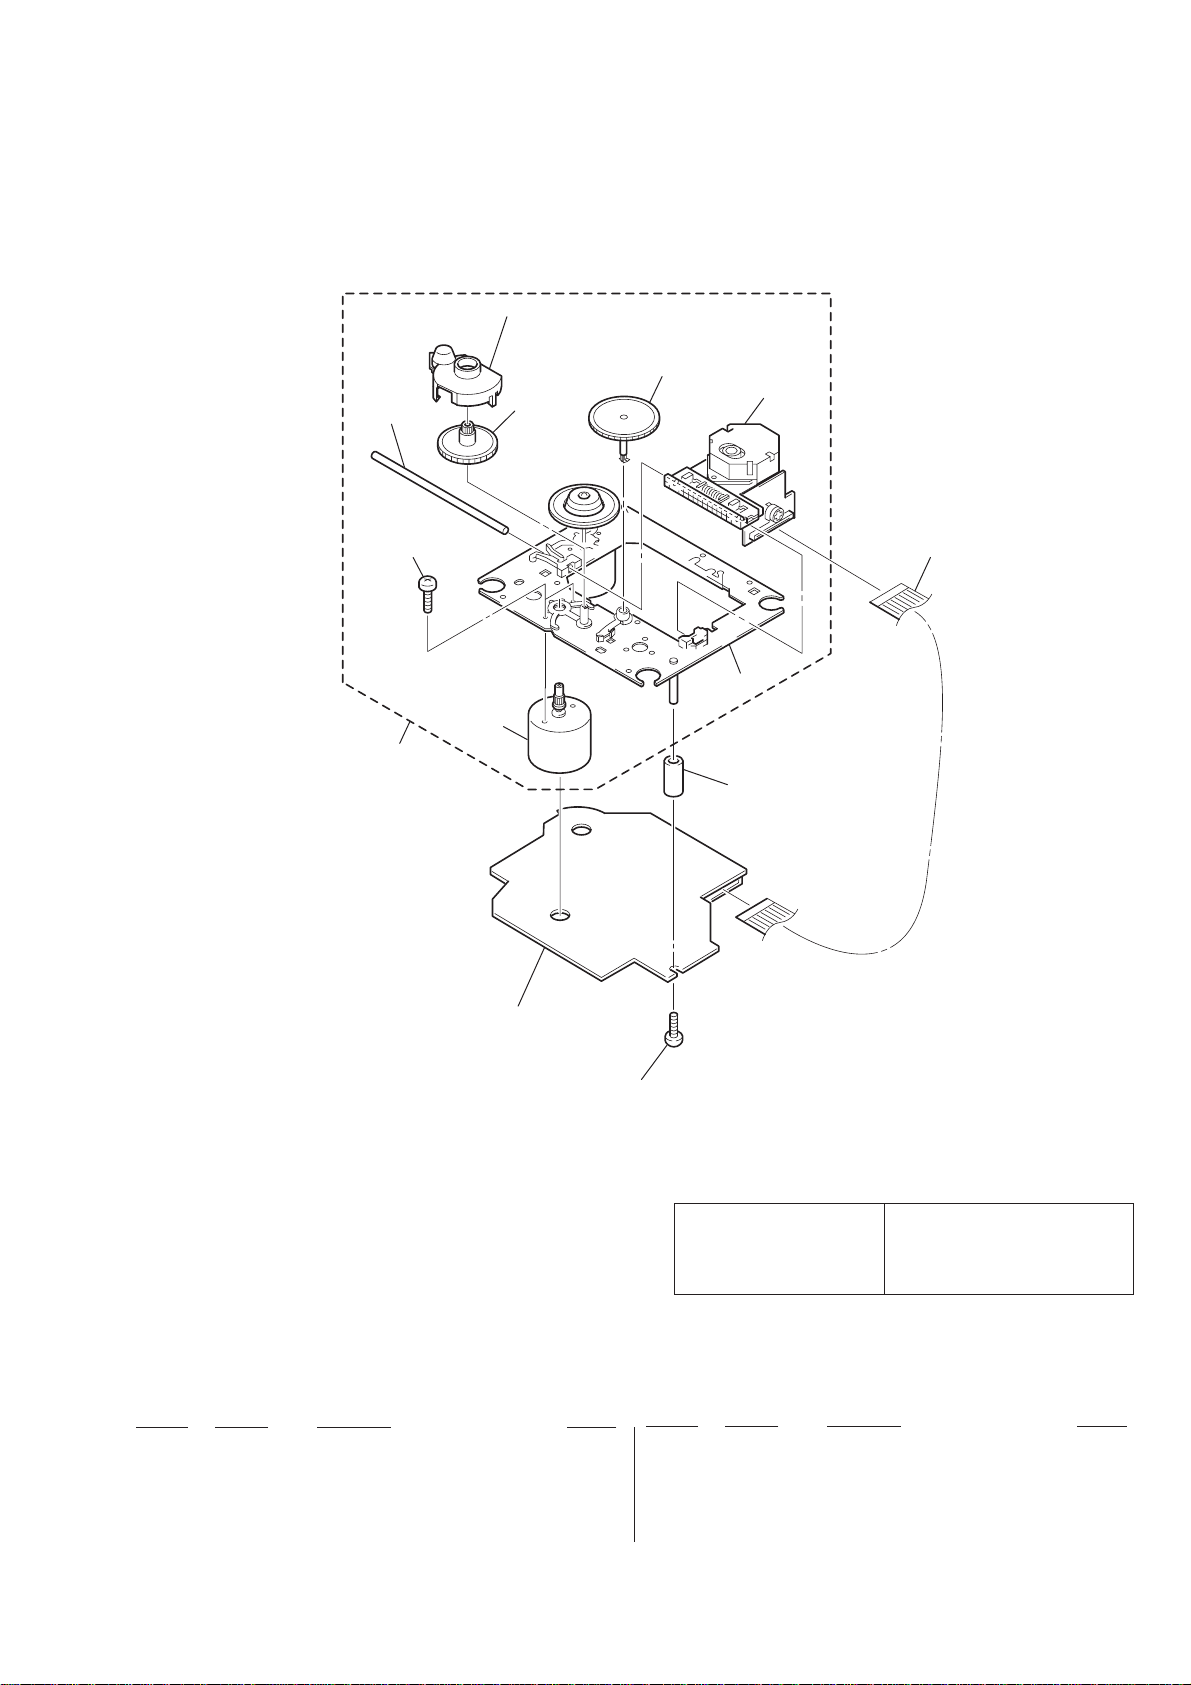
(5) CD BASE UNIT SECTION
(BU-K1BD33)
255
not supplied
256
not supplied
not supplied
254
253
257
M101
M102
258
252
251
Ref. No. Part No. Description Remark
251 4-996-243-01 SCREW (M2), +PSW
252 A-4724-330-A BD BOARD, COPLETE
0253 8-820-026-03 OPTICAL PICK-UP KSM-213BFN/C2NP
254 3-713-786-51 SCREW +P 2X3
255 2-626-908-01 SHAFT, SLED
The components identified by
mark 0 or dotted line with
mark 0 are critical for safety.
Replace only with part number specified.
Ref. No. Part No. Description Remark
256 2-627-003-02 GEAR (B) (RP)
257 1-769-069-11 WIRE (FLAT TYPE) (16 CORE)
258 4-216-878-11 COLLAR
M101 X-2646-110-3 MOTOR ASSY, SPINDLE
M102 X-2625-769-1 MOTOR ASSY, SLED
Les composants identifiés par une
marque 0 sont critiques pour la
sécurité.
Ne les remplacer que par une pièce
portant le numéro spécifié.
41
Page 18
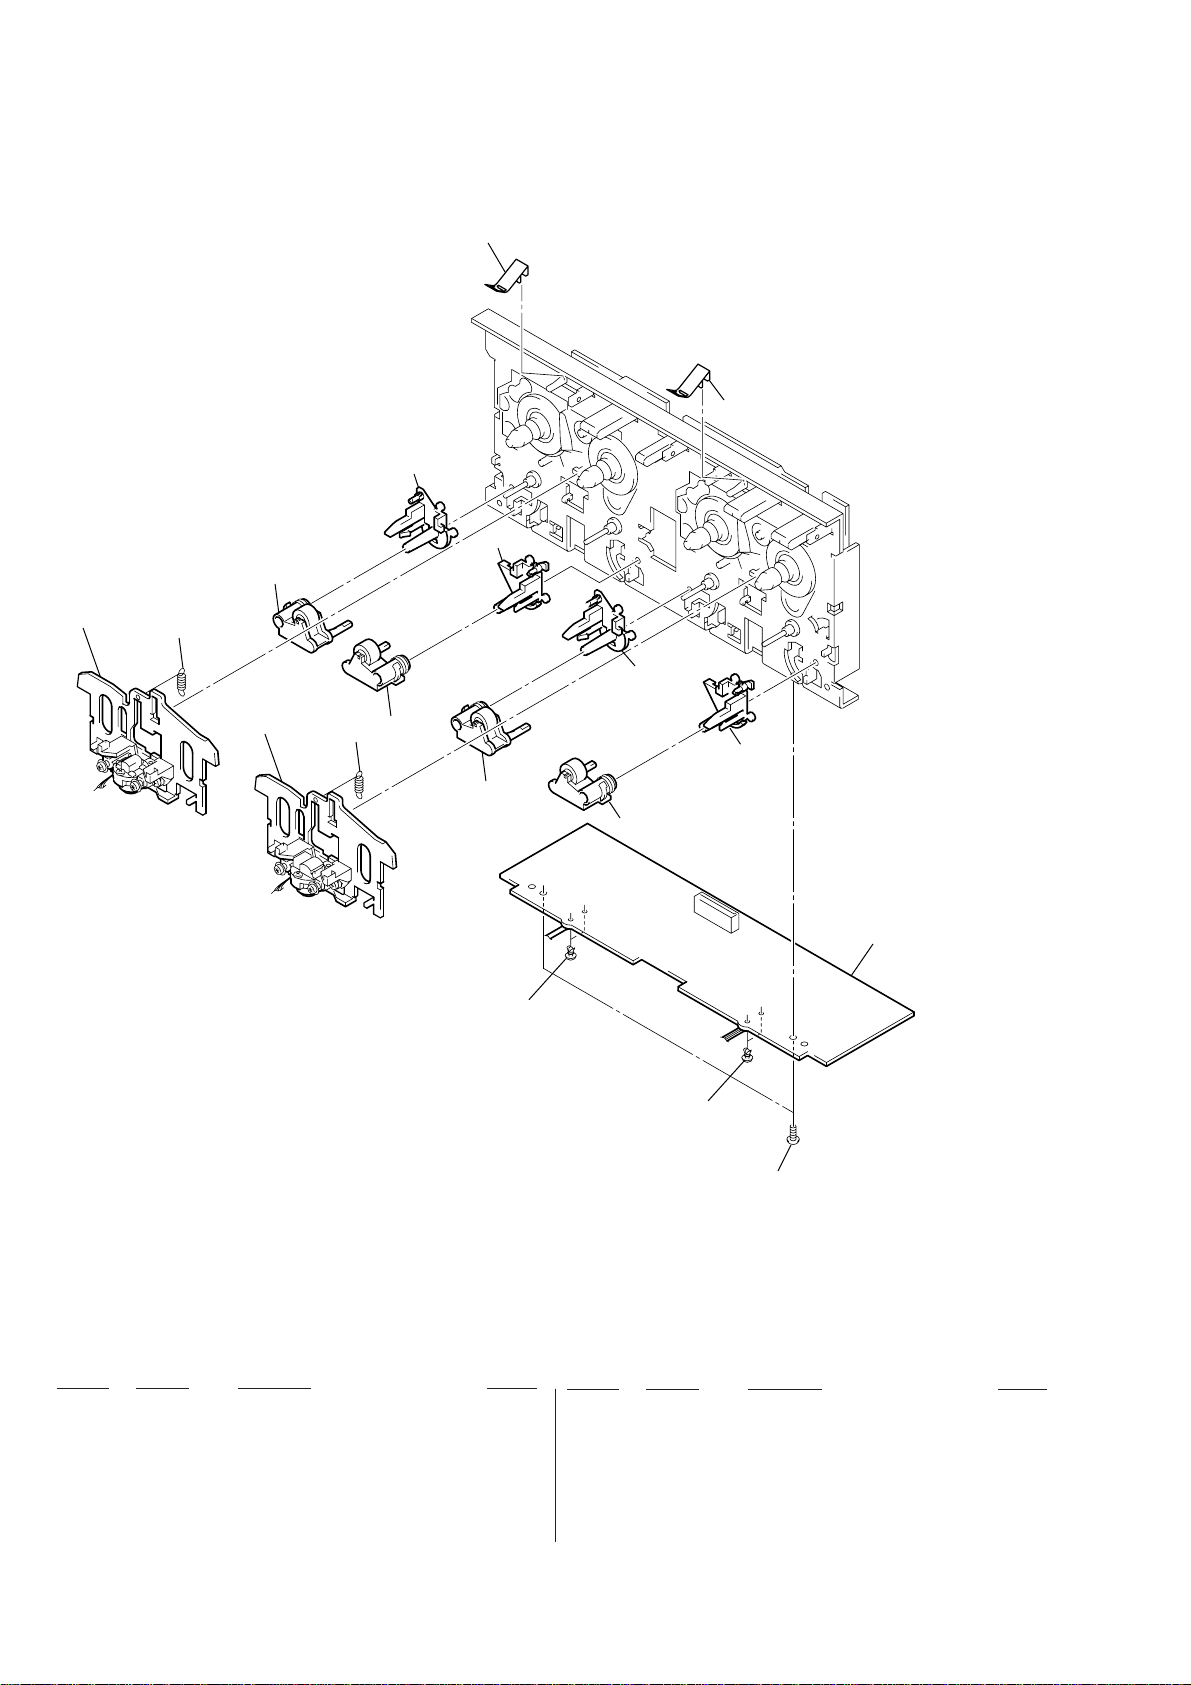
(6) TAPE MECHANISM DECK SECTION-1
(TCM-230AWR2)
407
404
408
408
406
HP101
403
HRPE101
403
407
405
406
404
405
409
402
402
401
Ref. No. Part No. Description Remark
401 3-376-464-11 SCREW (+PTT 2.6X6), GROUND POINT
402 3-036-914-01 RIVET
403 3-016-574-11 SPRING (HEAD), TENSION
404 X-3374-156-4 PINCH LEVER (REV) ASSY
405 X-3374-155-4 PINCH LEVER (FWD) ASSY
406 3-016-564-01 BASE (PINCH LEVER FWD)
42
Ref. No. Part No. Description Remark
407 3-016-565-01 BASE (PINCH LEVER REV)
408 3-026-892-01 SPRING (CASSETTE), LEAF
* 409 A-2007-731-A AUDIO BOARD, COMPLETE
HP101 A-2056-681-A DECK (A) ASSY, HEAD (PLAYBACK)
HRPE101A-2056-682-A DECK (B) ASSY, HEAD (REC/PB/ERASE)
Page 19
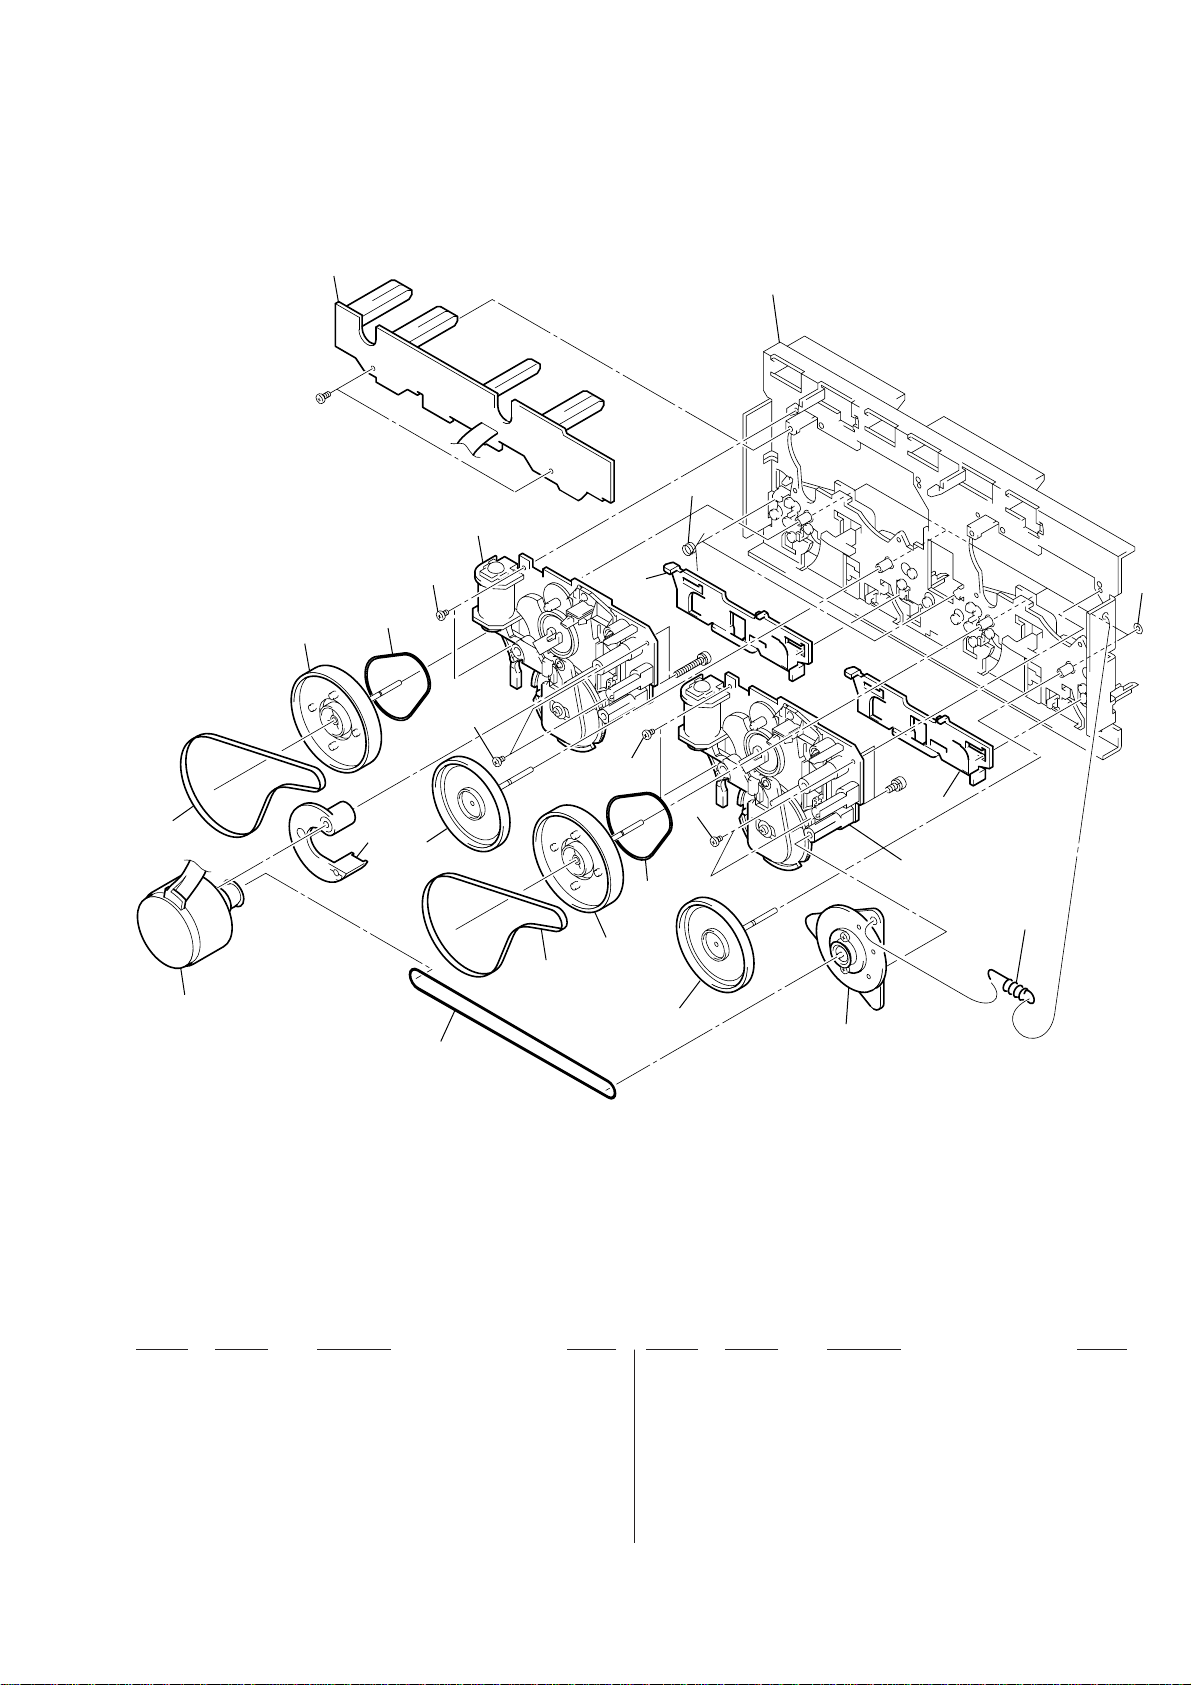
(7) TAPE MECHANISM DECK SECTION-2
(TCM-230AWR2)
452
455
#4
461
458
454
456
464
459
464
452
460
464
455
458
462
#5
464
451
463
#6
460
459
465
M1
456
457
453
Ref. No. Part No. Description Remark Ref. No. Part No. Description Remark
* 451 X-3374-214-4 CHASSIS ASSY, MAIN
452 3-016-570-01 BELT (CAPSTAN)
453 3-016-569-01 BELT (TENSION)
454 3-017-360-01 BRACKET (MOTOR)
455 X-3376-497-3 FLYWHEEL (FWD) ASSY
456 X-3374-235-1 FLYWHEEL (REV) ASSY
457 X-3374-238-1 PULLEY ASSY, TENSION
458 3-024-405-01 BELT (FR2)
459 A-2004-629-A MECHANICAL BLOCK ASSY
460 3-016-566-01 SLIDER, REVERSE
* 461 A-2007-732-A LEAF SW BOARD, COMPLETE
462 3-016-575-11 SPRING, TORSION
463 3-019-208-01 WASHER, STOPPER
464 3-030-823-01 SCREW (+BVTT) (2X3.5)
465 3-027-453-01 SPRING (GROUND), TENSION
M1 A-2004-628-A MOTOR ASSY, CAPSTAN
43
Page 20
AUDIO
SECTION 9
ELECTRICAL PARTS LIST
NOTE:
• Due to standardization, replacements in the
parts list may be different from the parts specified in the diagrams or the components used
on the set.
• -XX and -X mean standardized parts, so they
may have some difference from the original
one.
• RESISTORS
All resistors are in ohms.
METAL: Metal-film resistor.
METAL OXIDE: Metal oxide-film resistor.
F: nonflammable
• Abbreviation
AUS : Australian model
CND: Canadian model
JE : Tourist model
Ref. No. Part No. Description Remark Ref. No. Part No. Description Remark
* A-2007-731-A AUDIO BOARD, COMPLETE
C301 1-162-289-31 CERAMIC 390PF 10% 50V
C302 1-126-968-11 ELECT 100uF 20% 6.3V
C303 1-162-282-31 CERAMIC 100PF 10% 50V
C304 1-130-483-00 MYLAR 0.01uF 5% 50V
C305 1-107-715-11 ELECT 22uF 20% 16V
C311 1-162-289-31 CERAMIC 390PF 10% 50V
C313 1-162-282-31 CERAMIC 100PF 10% 50V
C314 1-130-487-00 MYLAR 0.022uF 5% 50V
C315 1-126-233-11 ELECT 22uF 20% 50V
C331 1-137-427-11 FILM 120PF 5% 50V
C332 1-162-288-31 CERAMIC 330PF 10% 50V
C333 1-162-209-31 CERAMIC 27PF 5% 50V
C401 1-162-289-31 CERAMIC 390PF 10% 50V
C402 1-126-968-11 ELECT 100uF 20% 6.3V
C403 1-162-282-31 CERAMIC 100PF 10% 50V
C404 1-130-483-00 MYLAR 0.01uF 5% 50V
C405 1-107-715-11 ELECT 22uF 20% 16V
C411 1-162-289-31 CERAMIC 390PF 10% 50V
C413 1-162-282-31 CERAMIC 100PF 10% 50V
C414 1-130-487-00 MYLAR 0.022uF 5% 50V
C415 1-126-233-11 ELECT 22uF 20% 50V
C431 1-137-427-11 FILM 120PF 5% 50V
C432 1-162-288-31 CERAMIC 330PF 10% 50V
C433 1-162-209-31 CERAMIC 27PF 5% 50V
C601 1-104-396-11 ELECT 10uF 20% 16V
C602 1-104-396-11 ELECT 10uF 20% 16V
C611 1-104-396-11 ELECT 10uF 20% 16V
C612 1-104-396-11 ELECT 10uF 20% 16V
C621 1-137-150-11 FILM 0.01uF 5% 100V
C622 1-126-961-11 ELECT 2.2uF 20% 50V
C623 1-136-155-00 FILM 0.015uF 5% 50V
C624 1-130-481-00 MYLAR 0.0068uF 5% 50V
C625 1-130-481-00 MYLAR 0.0068uF 5% 50V
C627 1-124-903-11 ELECT 1uF 20% 50V
C628 1-136-153-00 FILM 0.01uF 5% 50V
C642 1-104-664-11 ELECT 47uF 20% 16V
CN601 1-563-834-21 SOCKET, CONNECTOR 15P
KR : Korean model
MY : Malaysia model
SP : Singapore model
TH : Thai model
**********************
< CAPACITOR >
< CONNECTOR >
• Items marked “*” are not stocked since they
are seldom required for routine service.
Some delay should be anticipated when ordering these items.
• SEMICONDUCTORS
In each case, u: µ, for example:
uA. . : µA. . uPA. . : µPA. .
uPB. . : µPB. . uPC. . : µPC. .
uPD. . : µPD. .
• CAPACITORS
uF: µF
• COILS
uH: µH
IC601 8-759-111-44 IC uPC4570C-1
IC602 8-759-143-54 IC uPC1330HA
IC611 8-759-111-44 IC uPC4570C-1
L331 1-410-780-11 INDUCTOR 27mH
L431 1-410-780-11 INDUCTOR 27mH
L601 1-414-193-41 INDUCTOR 220uH
L602 1-414-193-41 INDUCTOR 220uH
Q621 8-729-142-46 TRANSISTOR 2SC2001TP-LK
Q622 8-729-142-46 TRANSISTOR 2SC2001TP-LK
Q623 8-729-801-93 TRANSISTOR 2SD1387-34-TP
R301 1-247-881-00 CARBON 120K 5% 1/4W
R302 1-249-409-11 CARBON 220 5% 1/4W
R303 1-249-433-11 CARBON 22K 5% 1/4W
R304 1-247-889-00 CARBON 270K 5% 1/4W
R305 1-247-858-11 CARBON 13K 5% 1/4W
R311 1-247-881-00 CARBON 120K 5% 1/4W
R312 1-247-807-31 CARBON 100 5% 1/4W
R314 1-247-882-11 CARBON 130K 5% 1/4W
R315 1-247-850-11 CARBON 6.2K 5% 1/4W
R331 1-249-430-11 CARBON 12K 5% 1/4W
R401 1-247-881-00 CARBON 120K 5% 1/4W
R402 1-249-409-11 CARBON 220 5% 1/4W
R403 1-249-433-11 CARBON 22K 5% 1/4W
R404 1-247-889-00 CARBON 270K 5% 1/4W
R405 1-247-858-11 CARBON 13K 5% 1/4W
R411 1-247-881-00 CARBON 120K 5% 1/4W
R412 1-247-807-31 CARBON 100 5% 1/4W
R414 1-247-882-11 CARBON 130K 5% 1/4W
R415 1-247-850-11 CARBON 6.2K 5% 1/4W
R431 1-249-430-11 CARBON 12K 5% 1/4W
R601 1-249-409-11 CARBON 220 5% 1/4W
R602 1-249-409-11 CARBON 220 5% 1/4W
R608 1-249-409-11 CARBON 220 5% 1/4W
R609 1-249-433-11 CARBON 22K 5% 1/4W
R611 1-249-409-11 CARBON 220 5% 1/4W
The components identified by
mark 0 or dotted line with mark
0 are critical for safety.
Replace only with part number
specified.
Les composants identifiés par une
marque 0 sont critiquens pour la
sécurité.
Ne les remplacer que par une pièce
portant le numéro spécifié.
When indicating parts by reference
number, please include the board.
< IC >
< COIL >
< TRANSISTOR >
< RESISTOR >
44
Page 21
AUDIO BD
Ref. No. Part No. Description Remark
R612 1-249-409-11 CARBON 220 5% 1/4W
0R621 1-212-851-00 FUSIBLE 5.6 5% 1/4W F
0R622 1-212-851-00 FUSIBLE 5.6 5% 1/4W F
R623 1-249-432-11 CARBON 18K 5% 1/4W
R624 1-249-432-11 CARBON 18K 5% 1/4W
R625 1-249-429-11 CARBON 10K 5% 1/4W
< VARIABLE RESISTOR >
RV301 1-238-598-11 RES, ADJ, CARBON 2.2K
RV311 1-238-598-11 RES, ADJ, CARBON 2.2K
RV341 1-241-768-11 RES, ADJ, CARBON 220K
RV401 1-238-598-11 RES, ADJ, CARBON 2.2K
RV411 1-238-598-11 RES, ADJ, CARBON 2.2K
RV441 1-241-768-11 RES, ADJ, CARBON 220K
< TRANSFORMER >
T621 1-423-980-11 TRANSFORMER, BIAS OSCILLATION
**************************************************************
A-4724-330-A BD BOARD, COMPLETE
*******************
< CAPACITOR >
Ref. No. Part No. Description Remark
C157 1-163-009-11 CERAMIC CHIP 0.001uF 10% 50V
C159 1-163-019-00 CERAMIC CHIP 0.0068uF 10% 50V
C161 1-126-206-11 ELECT CHIP 100uF 20% 6.3V
C162 1-126-205-11 ELECT CHIP 47uF 20% 6.3V
C163 1-126-206-11 ELECT CHIP 100uF 20% 6.3V
C165 1-163-038-00 CERAMIC CHIP 0.1uF 25V
C167 1-163-235-11 CERAMIC CHIP 22PF 5% 50V
C168 1-163-235-11 CERAMIC CHIP 22PF 5% 50V
C171 1-163-009-11 CERAMIC CHIP 0.001uF 10% 50V
C172 1-163-123-00 CERAMIC CHIP 180PF 5% 50V
C181 1-163-009-11 CERAMIC CHIP 0.001uF 10% 50V
C182 1-163-123-00 CERAMIC CHIP 180PF 5% 50V
< CONNECTOR >
CN101 1-778-874-11 CONNECTOR, FFC (LIF (NON-ZIF)) 19P
CN102 1-777-937-11 CONNECTOR, FFC/FPC 16P
< FERRITE BEAD/SHORT >
FB101 1-500-445-21 FERRITE 0uH
FB102 1-216-295-00 SHORT 0
FB103 1-500-445-21 FERRITE 0uH
FB104 1-216-295-00 SHORT 0
C101 1-163-005-11 CERAMIC CHIP 470PF 10% 50V
C102 1-164-004-11 CERAMIC CHIP 0.1uF 10% 25V
C103 1-163-005-11 CERAMIC CHIP 470PF 10% 50V
C104 1-163-031-11 CERAMIC CHIP 0.01uF 50V
C108 1-164-004-11 CERAMIC CHIP 0.1uF 10% 25V
C109 1-163-011-11 CERAMIC CHIP 0.0015uF 10% 50V
C110 1-164-182-11 CERAMIC CHIP 0.0033uF 10% 50V
C111 1-163-251-11 CERAMIC CHIP 100PF 5% 50V
C112 1-163-038-00 CERAMIC CHIP 0.1uF 25V
C113 1-163-038-00 CERAMIC CHIP 0.1uF 25V
C114 1-163-038-00 CERAMIC CHIP 0.1uF 25V
C115 1-126-607-11 ELECT CHIP 47uF 20% 4V
C116 1-126-607-11 ELECT CHIP 47uF 20% 4V
C117 1-126-209-11 ELECT CHIP 100uF 20% 4V
C118 1-163-009-11 CERAMIC CHIP 0.001uF 10% 50V
C119 1-163-235-11 CERAMIC CHIP 22PF 5% 50V
C121 1-163-038-00 CERAMIC CHIP 0.1uF 25V
C122 1-126-206-11 ELECT CHIP 100uF 20% 6.3V
C123 1-163-021-11 CERAMIC CHIP 0.01uF 10% 50V
C124 1-107-823-11 CERAMIC CHIP 0.47uF 10% 16V
C125 1-163-038-00 CERAMIC CHIP 0.1uF 25V
C126 1-163-038-00 CERAMIC CHIP 0.1uF 25V
C127 1-128-065-11 ELECT CHIP 68uF 20% 10V
C128 1-163-038-00 CERAMIC CHIP 0.1uF 25V
C129 1-163-031-11 CERAMIC CHIP 0.01uF 50V
< IC >
IC101 8-752-386-85 IC CXD2587Q
IC102 8-759-549-28 IC BA5974FP-E2
IC103 8-752-085-51 IC CXA2568M-T6
< TRANSISTOR >
Q101 8-729-010-08 TRANSISTOR MSB710-RT1
< RESISTOR >
R101 1-216-077-91 RES, CHIP 15K 5% 1/10W
R102 1-216-097-00 RES, CHIP 100K 5% 1/10W
R103 1-216-077-91 RES, CHIP 15K 5% 1/10W
R104 1-216-085-00 METAL CHIP 33K 5% 1/10W
R105 1-216-073-00 METAL CHIP 10K 5% 1/10W
R106 1-216-049-11 RES, CHIP 1K 5% 1/10W
R107 1-216-073-00 METAL CHIP 10K 5% 1/10W
R108 1-216-061-00 METAL CHIP 3.3K 5% 1/10W
R109 1-216-121-00 RES, CHIP 1M 5% 1/10W
R110 1-216-025-00 RES, CHIP 100 5% 1/10W
R111 1-216-121-00 RES, CHIP 1M 5% 1/10W
R113 1-216-121-00 RES, CHIP 1M 5% 1/10W
R114 1-216-073-00 METAL CHIP 10K 5% 1/10W
R116 1-216-001-00 METAL CHIP 10 5% 1/10W
R117 1-216-049-11 RES, CHIP 1K 5% 1/10W
C130 1-164-004-11 CERAMIC CHIP 0.1uF 10% 25V
C131 1-124-779-00 ELECT CHIP 10uF 20% 16V
C133 1-164-346-11 CERAMIC CHIP 1uF 16V
C140 1-164-346-11 CERAMIC CHIP 1uF 16V
C141 1-164-346-11 CERAMIC CHIP 1uF 16V
C143 1-163-038-00 CERAMIC CHIP 0.1uF 25V
C151 1-163-235-11 CERAMIC CHIP 22PF 5% 50V
C153 1-163-038-00 CERAMIC CHIP 0.1uF 25V
C154 1-110-501-11 CERAMIC CHIP 0.33uF 10% 16V
C156 1-163-235-11 CERAMIC CHIP 22PF 5% 50V
The components identified by
mark 0 or dotted line with
mark 0 are critical for safety.
Replace only with part number specified.
Les composants identifiés par une
marque 0 sont critiques pour la
sécurité.
Ne les remplacer que par une pièce
portant le numéro spécifié.
R119 1-216-041-00 METAL CHIP 470 5% 1/10W
R123 1-216-073-00 METAL CHIP 10K 5% 1/10W
R124 1-216-097-00 RES, CHIP 100K 5% 1/10W
R131 1-216-037-00 METAL CHIP 330 5% 1/10W
R135 1-216-295-00 SHORT 0
R136 1-216-295-00 SHORT 0
R137 1-216-295-00 SHORT 0
R138 1-216-295-00 SHORT 0
R143 1-216-103-00 METAL CHIP 180K 5% 1/10W
R144 1-216-103-00 METAL CHIP 180K 5% 1/10W
45
Page 22

BD CLAMP MOTOR CONNECTOR IN SW INT/COUNT SW LEAF SW
Ref. No. Part No. Description Remark
R147 1-216-069-00 METAL CHIP 6.8K 5% 1/10W
R148 1-216-001-00 METAL CHIP 10 5% 1/10W
R149 1-216-001-00 METAL CHIP 10 5% 1/10W
R158 1-216-111-00 METAL CHIP 390K 5% 1/10W
R159 1-216-101-00 METAL CHIP 150K 5% 1/10W
R161 1-216-308-00 METAL CHIP 4.7 5% 1/10W
R162 1-216-101-00 METAL CHIP 150K 5% 1/10W
R171 1-216-078-00 RES, CHIP 16K 5% 1/10W
R172 1-216-073-00 METAL CHIP 10K 5% 1/10W
R173 1-216-077-91 RES, CHIP 15K 5% 1/10W
R181 1-216-078-00 RES, CHIP 16K 5% 1/10W
R182 1-216-073-00 METAL CHIP 10K 5% 1/10W
R183 1-216-077-91 RES, CHIP 15K 5% 1/10W
< NETWORK RESISTOR >
RN101 1-233-412-11 RES, CHIP NETWORK 1.0K (3216)
RN102 1-233-576-11 RES, CHIP NETWORK 100
< SWITCH >
S101 1-572-085-11 SWITCH, LEAF (LIMIT)
< VIBRATOR >
X101 1-767-408-21 VIBRATOR, CRYSTAL (16.9344MHz)
**************************************************************
* 1-671-507-21 CLAMP MOTOR BOARD
*******************
Ref. No. Part No. Description Remark
< RESISTOR >
R707 1-249-424-11 CARBON 3.9K 5% 1/4W
R708 1-249-417-11 CARBON 1K 5% 1/4W
R709 1-249-429-11 CARBON 10K 5% 1/4W
**************************************************************
* 1-671-505-21 IN SW BOARD
************
< CONNECTOR >
* CN710 1-568-941-11 PIN, CONNECTOR 3P
< SWITCH >
S703 1-771-218-11 SWITCH, MICRO (MID IN)
S704 1-771-218-11 SWITCH, MICRO (IN)
**************************************************************
* 1-671-502-21 INT/COUNT SW BOARD
*******************
< SWITCH >
S705 1-771-264-11 SWITCH, PUSH (DETECTION) (1KEY) (INIT)
S706 1-771-264-11 SWITCH, PUSH (DETECTION) (1KEY) (COUNT)
**************************************************************
* A-2007-732-A LEAF SW BOARD, COMPLETE
************************
< CAPACITOR >
< CAPACITOR >
C701 1-162-306-11 CERAMIC 0.01uF 30% 16V
C702 1-126-964-11 ELECT 10uF 20% 50V
C711 1-162-306-11 CERAMIC 0.01uF 30% 16V
< CONNECTOR >
CN712 1-506-469-11 PIN, CONNECTOR 4P
< DIODE >
D701 8-719-109-69 DIODE MTZJ-T-77-3.6B
< IC >
IC701 8-759-633-65 IC M54641L
< RESISTOR >
R701 1-249-411-11 CARBON 330 5% 1/4W
R702 1-249-401-11 CARBON 47 5% 1/4W
**************************************************************
* 1-671-506-21 CONNECTOR BOARD
*****************
< CONNECTOR >
CN701 1-568-860-11 SOCKET, CONNECTOR 17P
< TRANSISTOR >
Q701 8-729-029-66 TRANSISTOR RT1N141S-TP
C1001 1-107-716-11 ELECT 33uF 20% 10V
< CONNECTOR >
CN1001 1-568-860-21 SOCKET, CONNECTOR 17P
< DIODE >
D1001 8-719-911-19 DIODE 1SS133T-72
D1002 8-719-911-19 DIODE 1SS133T-72
< CABLE HOLDER >
* DM1001 1-784-581-11 HOLDER, CABLE (2.5MM PITCH) 4P
< PHOTO INTERRUPTER >
IC1001 8-749-014-38 PHOTO INTERRUPTER SG-264
IC1002 8-749-014-38 PHOTO INTERRUPTER SG-264
< TRANSISTOR >
Q1001 8-729-029-56 TRANSISTOR DTA144ESA-TP
< RESISTOR >
R907 1-247-879-11 CARBON 100K 5% 1/4W
R1001 1-249-409-11 CARBON 220 5% 1/4W
R1002 1-249-409-11 CARBON 220 5% 1/4W
R1003 1-249-414-11 CARBON 560 5% 1/4W
R1004 1-247-834-11 CARBON 1.3K 5% 1/4W
R1005 1-247-818-11 CARBON 300 5% 1/4W
R1006 1-247-864-11 CARBON 24K 5% 1/4W
R1007 1-247-856-00 CARBON 11K 5% 1/4W
46
Page 23

LEAF SW LOAD MOTOR MAIN
Ref. No. Part No. Description Remark
R1008 1-249-417-11 CARBON 1K 5% 1/4W
< VARIABLE RESISTOR >
RV1001 1-241-785-11 RES, ADJ, CARBON 10K
RV1002 1-241-785-11 RES, ADJ, CARBON 10K
< SWITCH >
S1001 1-570-953-11 SWITCH, PUSH (1KEY) (DECK A PLAY)
S1002 1-570-953-11 SWITCH, PUSH (1KEY) (DECK B PLAY)
S1003 1-771-333-11 SWITCH, LEAF (DECK A HALF)
S1004 1-771-205-11 SWITCH, LEAF (DECK A 120/70)
S1005 1-771-205-11 SWITCH, LEAF (DECK A REC)
S1006 1-771-333-11 SWITCH, LEAF (DECK B HALF)
S1008 1-771-205-11 SWITCH, LEAF (DECK B 120/70)
S1009 1-771-205-11 SWITCH, LEAF (DECK B REC)
**************************************************************
* 1-671-508-21 LOAD MOTOR BOARD
******************
< CAPACITOR >
C703 1-162-306-11 CERAMIC 0.01uF 30% 16V
C704 1-126-964-11 ELECT 10uF 20% 50V
C712 1-162-306-11 CERAMIC 0.01uF 30% 16V
< CONNECTOR >
CN713 1-506-469-11 PIN, CONNECTOR 4P
< DIODE >
D702 8-719-109-85 DIODE MTZJ-T-77-5.1B
< IC >
IC702 8-759-633-65 IC M54641L
< RESISTOR >
R703 1-249-411-11 CARBON 330 5% 1/4W
R704 1-249-401-11 CARBON 47 5% 1/4W
**************************************************************
A-4426-608-A MAIN BOARD, COMPLETE (US, CND, AEP, UK)
A-4426-609-A MAIN BOARD, COMPLETE
(MY, SP, KR, AUS, JE)
A-4426-945-A MAIN BOARD, COMPLETE (TH)
*************************
7-685-646-79 SCREW +BVTP 3X8 TYPE2 SLIT
< CAPACITOR >
C001 1-164-159-11 CERAMIC 0.1uF 50V
C101 1-104-665-11 ELECT 100uF 20% 10V
C102 1-164-159-11 CERAMIC 0.1uF 50V
C103 1-164-159-11 CERAMIC 0.1uF 50V
C104 1-126-964-11 ELECT 10uF 20% 50V
C105 1-164-159-11 CERAMIC 0.1uF 50V
C108 1-104-665-11 ELECT 100uF 20% 10V
C109 1-164-159-11 CERAMIC 0.1uF 50V
C110 1-104-665-11 ELECT 100uF 20% 10V
C111 1-126-925-11 ELECT 470uF 20% 10V
Ref. No. Part No. Description Remark
C112 1-126-925-11 ELECT 470uF 20% 10V
C118 1-216-916-11 ELECT 1000uF 20% 6.3V
C119 1-161-494-00 CERAMIC 0.022uF 25V
C120 1-164-159-11 CERAMIC 0.1uF 50V
C121 1-164-159-11 CERAMIC 0.1uF 50V
(US, CND, AEP, UK)
C123 1-162-282-31 CERAMIC 100PF 10% 50V
C124 1-162-282-31 CERAMIC 100PF 10% 50V
C128 1-162-306-11 CERAMIC 0.01uF 30% 16V
C129 1-104-665-11 ELECT 100uF 20% 10V
C301 1-126-960-11 ELECT 1uF 20% 50V
C302 1-137-368-11 FILM 0.0047uF 5% 50V
C303 1-136-165-00 FILM 0.1uF 5% 50V
C304 1-136-165-00 FILM 0.1uF 5% 50V
C305 1-126-964-11 ELECT 10uF 20% 50V
C306 1-126-960-11 ELECT 1uF 20% 50V
C307 1-126-959-11 ELECT 0.47uF 20% 50V
C308 1-126-964-11 ELECT 10uF 20% 50V
C309 1-137-194-81 FILM 0.47uF 5% 50V
C310 1-162-290-31 CERAMIC 470PF 10% 50V
C311 1-126-964-11 ELECT 10uF 20% 50V
C312 1-126-959-11 ELECT 0.47uF 20% 50V
C313 1-162-294-31 CERAMIC 0.001uF 10% 50V
C314 1-126-964-11 ELECT 10uF 20% 50V
C315 1-126-963-11 ELECT 4.7uF 20% 50V
C316 1-104-665-11 ELECT 100uF 20% 10V
C317 1-104-665-11 ELECT 100uF 20% 10V
C333 1-162-600-11 CERAMIC 0.0047uF 30% 16V
C334 1-162-600-11 CERAMIC 0.0047uF 30% 16V
C335 1-162-600-11 CERAMIC 0.0047uF 30% 16V
C336 1-162-600-11 CERAMIC 0.0047uF 30% 16V
C351 1-126-960-11 ELECT 1uF 20% 50V
C352 1-137-368-11 FILM 0.0047uF 5% 50V
C353 1-136-165-00 FILM 0.1uF 5% 50V
C354 1-136-165-00 FILM 0.1uF 5% 50V
C355 1-126-964-11 ELECT 10uF 20% 50V
C356 1-126-960-11 ELECT 1uF 20% 50V
C357 1-126-959-11 ELECT 0.47uF 20% 50V
C358 1-126-964-11 ELECT 10uF 20% 50V
C359 1-137-194-81 FILM 0.47uF 5% 50V
C360 1-162-290-31 CERAMIC 470PF 10% 50V
C701 1-126-961-11 ELECT 2.2uF 20% 50V
C751 1-126-961-11 ELECT 2.2uF 20% 50V
C801 1-126-964-11 ELECT 10uF 20% 50V
C802 1-126-964-11 ELECT 10uF 20% 50V
C813 1-104-664-11 ELECT 47uF 20% 25V
C853 1-126-944-11 ELECT 3300uF 20% 25V
C854 1-126-944-11 ELECT 3300uF 20% 25V
C855 1-126-964-11 ELECT 10uF 20% 50V
C861 1-126-768-11 ELECT 2200uF 20% 16V
C862 1-104-665-11 ELECT 100uF 20% 10V
C865 1-104-665-11 ELECT 100uF 20% 10V
C866 1-126-964-11 ELECT 10uF 20% 50V
C867 1-126-934-11 ELECT 220uF 20% 10V
C868 1-126-934-11 ELECT 220uF 20% 10V
C869 1-104-664-11 ELECT 47uF 20% 25V
C870 1-164-159-11 CERAMIC 0.1uF 50V
47
Page 24

MAIN
Ref. No. Part No. Description Remark
C871 1-164-159-11 CERAMIC 0.1uF 50V
C872 1-126-925-11 ELECT 470uF 20% 10V
C873 1-104-665-11 ELECT 100uF 20% 10V
C876 1-104-665-11 ELECT 100uF 20% 10V
< CONNECTOR >
CN101 1-793-351-41 SOCKET, CONNECTOR 19P
(SYSTEM CONTROL)
CN102 1-784-782-11 CONNECTOR, FFC 21P
CN105 1-785-316-11 PIN, CONNECTOR (STRAIGHT) 4P
CN106 1-785-315-11 PIN, CONNECTOR (STRAIGHT) 3P
CN111 1-784-780-11 CONNECTOR, FFC 19P
CN112 1-784-778-11 CONNECTOR, FFC 17P
* CN301 1-560-666-00 PIN, CONNECTOR 3P
CNS101 1-784-776-11 CONNECTOR, FFC 15P
CNS104 1-784-778-11 CONNECTOR, FFC 17P
< DIODE >
D101 8-719-911-19 DIODE 1SS133T-72
D102 8-719-911-19 DIODE 1SS133T-72
D103 8-719-911-19 DIODE 1SS133T-72
D104 8-719-911-19 DIODE 1SS133T-72
D105 8-719-911-19 DIODE 1SS133T-72
D106 8-719-024-99 DIODE 11ES2-NTA2B (US, CND, AEP, UK)
D851 8-719-991-33 DIODE 1SS133T-77
D852 8-719-991-33 DIODE 1SS133T-77
D855 8-719-110-08 DIODE MTZJ-T-72-8.2B
D858 8-719-110-08 DIODE MTZJ-T-72-8.2B
Ref. No. Part No. Description Remark
Q331 8-729-118-00 TRANSISTOR 2SB1116-TP-LK
Q332 8-729-900-80 TRANSISTOR BA1A4M-TP
Q333 8-729-118-00 TRANSISTOR 2SB1116-TP-LK
Q334 8-729-900-80 TRANSISTOR BA1A4M-TP
Q335 8-729-900-80 TRANSISTOR BA1A4M-TP
Q336 8-729-116-59 TRANSISTOR 2SB1068TP
Q337 8-729-045-21 TRANSISTOR 2SD1513TP-LK
Q338 8-729-422-57 TRANSISTOR BN1A4M-TP
Q339 8-729-900-80 TRANSISTOR BA1A4M-TP
Q340 8-729-116-59 TRANSISTOR 2SB1068TP
Q341 8-729-045-21 TRANSISTOR 2SD1513TP-LK
Q342 8-729-422-57 TRANSISTOR BN1A4M-TP
Q343 8-729-900-80 TRANSISTOR BA1A4M-TP
Q852 8-729-209-15 TRANSISTOR 2SD2012
Q855 8-729-141-83 TRANSISTOR 2SB1375
< RESISTOR >
R101 1-249-429-11 CARBON 10K 5% 1/4W
R102 1-249-409-11 CARBON 220 5% 1/4W
R103 1-249-417-11 CARBON 1K 5% 1/4W
R104 1-249-409-11 CARBON 220 5% 1/4W
R105 1-247-807-31 CARBON 100 5% 1/4W
R106 1-247-807-31 CARBON 100 5% 1/4W
R107 1-247-807-31 CARBON 100 5% 1/4W
R108 1-247-807-31 CARBON 100 5% 1/4W
R109 1-247-807-31 CARBON 100 5% 1/4W
R110 1-247-807-31 CARBON 100 5% 1/4W
D901 8-719-024-99 DIODE 11ES2-NTA2B
D902 8-719-024-99 DIODE 11ES2-NTA2B
D903 8-719-024-99 DIODE 11ES2-NTA2B
D904 8-719-024-99 DIODE 11ES2-NTA2B
< COIL >
FB101 1-412-473-21 INDUCTOR 0uH
< IC >
IC101 8-759-597-55 IC M30622MA-A13FP
IC102 8-759-165-82 IC PST600E-T
IC107 8-749-923-04 IC TOTX178A (CD DIGITAL OUT OPTICAL)
IC301 8-759-495-26 IC HA12215F
IC851 8-759-394-35 IC BA12T
IC852 8-759-231-53 IC M5F7805L
IC853 8-759-604-86 IC M5F7807L
IC855 8-759-231-58 IC M5F7812L
< COIL >
L101 1-410-521-11 INDUCTOR 100uH
L103 1-410-521-11 INDUCTOR 100uH
< TRANSISTOR >
Q101 8-729-900-80 TRANSISTOR BA1A4M-TP
Q102 8-729-141-83 TRANSISTOR 2SB1375
Q103 8-729-900-80 TRANSISTOR BA1A4M-TP
Q104 8-729-141-83 TRANSISTOR 2SB1375
Q105 8-729-040-20 TRANSISTOR RT1P137L-TP
Q106 8-729-900-80 TRANSISTOR BA1A4M-TP
Q107 8-729-900-80 TRANSISTOR BA1A4M-TP
R111 1-247-807-31 CARBON 100 5% 1/4W
R112 1-247-807-31 CARBON 100 5% 1/4W
R113 1-247-807-31 CARBON 100 5% 1/4W
R114 1-247-807-31 CARBON 100 5% 1/4W
R115 1-247-807-31 CARBON 100 5% 1/4W
R116 1-247-807-31 CARBON 100 5% 1/4W
R117 1-247-807-31 CARBON 100 5% 1/4W
R118 1-247-807-31 CARBON 100 5% 1/4W
R119 1-247-807-31 CARBON 100 5% 1/4W
R120 1-249-429-11 CARBON 10K 5% 1/4W
R121 1-249-429-11 CARBON 10K 5% 1/4W
R122 1-249-429-11 CARBON 10K 5% 1/4W
R123 1-249-429-11 CARBON 10K 5% 1/4W
R124 1-247-807-31 CARBON 100 5% 1/4W
R125 1-247-807-31 CARBON 100 5% 1/4W
R126 1-247-807-31 CARBON 100 5% 1/4W
R127 1-247-807-31 CARBON 100 5% 1/4W
R128 1-247-807-31 CARBON 100 5% 1/4W
R129 1-249-429-11 CARBON 10K 5% 1/4W
R130 1-247-807-31 CARBON 100 5% 1/4W
R131 1-247-807-31 CARBON 100 5% 1/4W
R132 1-247-807-31 CARBON 100 5% 1/4W
R133 1-247-807-31 CARBON 100 5% 1/4W
R134 1-247-807-31 CARBON 100 5% 1/4W
R135 1-249-429-11 CARBON 10K 5% 1/4W
R136 1-249-413-11 CARBON 470 5% 1/4W
R138 1-249-429-11 CARBON 10K 5% 1/4W
R139 1-249-429-11 CARBON 10K 5% 1/4W
R140 1-249-417-11 CARBON 1K 5% 1/4W
R141 1-249-425-11 CARBON 4.7K 5% 1/4W
48
Page 25
MAIN OUT SW PANEL
Ref. No. Part No. Description Remark
R142 1-249-429-11 CARBON 10K 5% 1/4W
R143 1-249-429-11 CARBON 10K 5% 1/4W
R144 1-249-411-11 CARBON 330 5% 1/4W
R145 1-249-429-11 CARBON 10K 5% 1/4W
R146 1-247-807-31 CARBON 100 5% 1/4W
R147 1-249-417-11 CARBON 1K 5% 1/4W
R148 1-249-417-11 CARBON 1K 5% 1/4W
R149 1-249-425-11 CARBON 4.7K 5% 1/4W
R150 1-249-425-11 CARBON 4.7K 5% 1/4W
R151 1-249-429-11 CARBON 10K 5% 1/4W
R152 1-249-429-11 CARBON 10K 5% 1/4W
R153 1-249-429-11 CARBON 10K 5% 1/4W
R154 1-247-807-31 CARBON 100 5% 1/4W
R155 1-249-429-11 CARBON 10K 5% 1/4W
R156 1-249-429-11 CARBON 10K 5% 1/4W
R157 1-249-429-11 CARBON 10K 5% 1/4W
R158 1-249-429-11 CARBON 10K 5% 1/4W
R159 1-249-429-11 CARBON 10K 5% 1/4W
R160 1-249-429-11 CARBON 10K 5% 1/4W
R161 1-247-807-31 CARBON 100 5% 1/4W
R162 1-249-429-11 CARBON 10K 5% 1/4W
R163 1-249-429-11 CARBON 10K 5% 1/4W
R164 1-247-807-31 CARBON 100 5% 1/4W
R165 1-247-807-31 CARBON 100 5% 1/4W
R166 1-247-807-31 CARBON 100 5% 1/4W
R167 1-249-429-11 CARBON 10K 5% 1/4W
R168 1-247-807-31 CARBON 100 5% 1/4W
R169 1-249-429-11 CARBON 10K 5% 1/4W
R171 1-249-437-11 CARBON 47K 5% 1/4W
R301 1-249-435-11 CARBON 33K 5% 1/4W
R302 1-249-421-11 CARBON 2.2K 5% 1/4W
R303 1-247-807-31 CARBON 100 5% 1/4W
R304 1-247-807-31 CARBON 100 5% 1/4W
R305 1-249-421-11 CARBON 2.2K 5% 1/4W
R306 1-249-428-11 CARBON 8.2K 5% 1/4W
Ref. No. Part No. Description Remark
R334 1-249-415-11 CARBON 680 5% 1/4W
R335 1-249-421-11 CARBON 2.2K 5% 1/4W
R336 1-249-437-11 CARBON 47K 5% 1/4W
R337 1-249-417-11 CARBON 1K 5% 1/4W
R338 1-249-411-11 CARBON 330 5% 1/4W
R339 1-249-437-11 CARBON 47K 5% 1/4W
R340 1-249-437-11 CARBON 47K 5% 1/4W
R341 1-249-417-11 CARBON 1K 5% 1/4W
R342 1-249-411-11 CARBON 330 5% 1/4W
R343 1-249-437-11 CARBON 47K 5% 1/4W
R351 1-249-435-11 CARBON 33K 5% 1/4W
R352 1-249-421-11 CARBON 2.2K 5% 1/4W
R353 1-247-807-31 CARBON 100 5% 1/4W
R354 1-247-807-31 CARBON 100 5% 1/4W
R355 1-249-421-11 CARBON 2.2K 5% 1/4W
R356 1-249-428-11 CARBON 8.2K 5% 1/4W
R357 1-249-428-11 CARBON 8.2K 5% 1/4W
R358 1-249-425-11 CARBON 4.7K 5% 1/4W
R359 1-249-435-11 CARBON 33K 5% 1/4W
R701 1-247-807-31 CARBON 100 5% 1/4W
R702 1-249-435-11 CARBON 33K 5% 1/4W
R751 1-247-807-31 CARBON 100 5% 1/4W
R752 1-249-435-11 CARBON 33K 5% 1/4W
R802 1-247-815-91 CARBON 220 5% 1/4W
R855 1-249-417-11 CARBON 1K 5% 1/4W
R859 1-249-417-11 CARBON 1K 5% 1/4W
0R861 1-212-853-00 FUSIBLE 6.8 5% 1/4W F
0R862 1-212-956-00 FUSIBLE 8.2 5% 1/2W F
< VARIABLE RESISTOR >
RV301 1-238-600-11 RES, ADJ, CARBON 10K
RV351 1-238-600-11 RES, ADJ, CARBON 10K
< VIBRATOR >
R307 1-249-428-11 CARBON 8.2K 5% 1/4W
R308 1-249-425-11 CARBON 4.7K 5% 1/4W
R309 1-249-433-11 CARBON 22K 5% 1/4W
R311 1-247-903-00 CARBON 1M 5% 1/4W
R312 1-247-884-11 CARBON 160K 5% 1/4W
R313 1-249-441-11 CARBON 100K 5% 1/4W
R315 1-249-429-11 CARBON 10K 5% 1/4W
R316 1-249-432-11 CARBON 18K 5% 1/4W
R317 1-249-429-11 CARBON 10K 5% 1/4W
R318 1-249-429-11 CARBON 10K 5% 1/4W
R319 1-247-893-11 CARBON 390K 5% 1/4W
R321 1-249-422-11 CARBON 2.7K 5% 1/4W
R322 1-249-428-11 CARBON 8.2K 5% 1/4W
R324 1-247-876-11 CARBON 75K 5% 1/4W
R325 1-247-876-11 CARBON 75K 5% 1/4W
R326 1-249-417-11 CARBON 1K 5% 1/4W
R327 1-249-437-11 CARBON 47K 5% 1/4W
R328 1-249-425-11 CARBON 4.7K 5% 1/4W
R329 1-249-437-11 CARBON 47K 5% 1/4W
R330 1-249-425-11 CARBON 4.7K 5% 1/4W
R331 1-249-437-11 CARBON 47K 5% 1/4W
R332 1-249-415-11 CARBON 680 5% 1/4W
R333 1-249-421-11 CARBON 2.2K 5% 1/4W
The components identified by
mark 0 or dotted line with
mark 0 are critical for safety.
Replace only with part number specified.
Les composants identifiés par une
marque 0 sont critiques pour la
sécurité.
Ne les remplacer que par une pièce
portant le neméro spécifié.
X101 1-781-107-21 VIBRATOR, SERAMIC (16MHz)
**************************************************************
* 1-671-503-21 OUT SW BOARD
*************
< CONNECTOR >
* CN709 1-568-943-11 PIN, CONNECTOR 5P
CN715 1-506-481-11 PIN, CONNECTOR 2P
< SWITCH >
S701 1-771-218-11 SWITCH, MICRO (MID OUT)
S702 1-771-218-11 SWITCH, MICRO (LID)
S708 1-771-218-11 SWITCH, MICRO (OUT)
**************************************************************
A-4426-223-A PANEL BOARD, COMPLETE (EXCEPT TH)
A-4426-942-A PANEL BOARD, COMPLETE (TH)
**************************
< CONNECTOR >
CN204 1-784-782-11 CONNECTOR, FFC 21P
49
Page 26

PANEL
Ref. No. Part No. Description Remark
< LED >
D201 8-719-076-15 LED SELS6B14C-TP6 (KEY ILLUMINATION)
D202 8-719-076-15 LED SELS6B14C-TP6 (KEY ILLUMINATION)
D203 8-719-076-15 LED SELS6B14C-TP6 (KEY ILLUMINATION)
D204 8-719-076-15 LED SELS6B14C-TP6 (KEY ILLUMINATION)
D205 8-719-071-42 LED SEL5723C-TP15 (g(DECK B))
D206 8-719-071-42 LED SEL5723C-TP15 (g(DECK A))
D207 8-719-071-42 LED SEL5723C-TP15 (G(DECK B))
D208 8-719-071-42 LED SEL5723C-TP15 (G(DECK A))
D209 8-719-057-29 LED SML78423C-TP15 (DISC 1)
D210 8-719-057-29 LED SML78423C-TP15 (DISC 4)
D211 8-719-071-42 LED SEL5723C-TP15 (G(CD))
D212 8-719-071-41 LED SELS5923C-TP15 (S(CD))
D213 8-719-057-29 LED SML78423C-TP15 (DISC 2)
D214 8-719-057-29 LED SML78423C-TP15 (DISC 5)
D215 8-719-057-29 LED SML78423C-TP15 (DISC 3)
D218 8-719-076-15 LED SELS6B14C-TP6 (KEY ILLUMINATION)
D219 8-719-076-15 LED SELS6B14C-TP6 (KEY ILLUMINATION)
D220 8-719-076-15 LED SELS6B14C-TP6 (KEY ILLUMINATION)
D221 8-719-076-15 LED SELS6B14C-TP6 (KEY ILLUMINATION)
D222 8-719-076-15 LED SELS6B14C-TP6 (KEY ILLUMINATION)
D223 8-719-076-15 LED SELS6B14C-TP6 (KEY ILLUMINATION)
D224 8-719-076-15 LED SELS6B14C-TP6 (KEY ILLUMINATION)
D225 8-719-076-15 LED SELS6B14C-TP6 (KEY ILLUMINATION)
< TRANSISTOR >
Q201 8-729-900-80 TRANSISTOR BA1A4M-TP
Q202 8-729-900-80 TRANSISTOR BA1A4M-TP
Q203 8-729-900-80 TRANSISTOR BA1A4M-TP
Q204 8-729-900-80 TRANSISTOR BA1A4M-TP
Q205 8-729-900-80 TRANSISTOR BA1A4M-TP
Ref. No. Part No. Description Remark
R213 1-249-407-11 CARBON 150 5% 1/4W
R214 1-249-407-11 CARBON 150 5% 1/4W
R215 1-249-407-11 CARBON 150 5% 1/4W
R216 1-249-410-11 CARBON 270 5% 1/4W
R217 1-249-411-11 CARBON 330 5% 1/4W
R218 1-249-413-11 CARBON 470 5% 1/4W
R219 1-249-414-11 CARBON 560 5% 1/4W
R220 1-249-415-11 CARBON 680 5% 1/4W
R221 1-249-417-11 CARBON 1K 5% 1/4W
R222 1-249-418-11 CARBON 1.2K 5% 1/4W
R223 1-249-420-11 CARBON 1.8K 5% 1/4W
R224 1-249-422-11 CARBON 2.7K 5% 1/4W
R225 1-247-843-11 CARBON 3.3K 5% 1/4W
R226 1-249-425-11 CARBON 4.7K 5% 1/4W
R227 1-249-427-11 CARBON 6.8K 5% 1/4W
R228 1-249-429-11 CARBON 10K 5% 1/4W
R229 1-247-807-31 CARBON 100 5% 1/4W
R230 1-247-807-31 CARBON 100 5% 1/4W
R231 1-249-407-11 CARBON 150 5% 1/4W
R232 1-249-407-11 CARBON 150 5% 1/4W
R233 1-249-407-11 CARBON 150 5% 1/4W
R234 1-249-407-11 CARBON 150 5% 1/4W
R235 1-247-807-31 CARBON 100 5% 1/4W
R236 1-247-807-31 CARBON 100 5% 1/4W
R237 1-249-407-11 CARBON 150 5% 1/4W
R238 1-249-407-11 CARBON 150 5% 1/4W
R239 1-247-807-31 CARBON 100 5% 1/4W
R240 1-249-407-11 CARBON 150 5% 1/4W
R248 1-249-403-11 CARBON 68 5% 1/4W
R249 1-249-403-11 CARBON 68 5% 1/4W
R250 1-249-403-11 CARBON 68 5% 1/4W
R251 1-249-403-11 CARBON 68 5% 1/4W
Q206 8-729-900-80 TRANSISTOR BA1A4M-TP
Q207 8-729-900-80 TRANSISTOR BA1A4M-TP
Q208 8-729-900-80 TRANSISTOR BA1A4M-TP
Q209 8-729-900-80 TRANSISTOR BA1A4M-TP
Q210 8-729-900-80 TRANSISTOR BA1A4M-TP
Q211 8-729-900-80 TRANSISTOR BA1A4M-TP
Q212 8-729-900-80 TRANSISTOR BA1A4M-TP
Q213 8-729-900-80 TRANSISTOR BA1A4M-TP
Q214 8-729-900-80 TRANSISTOR BA1A4M-TP
Q215 8-729-900-80 TRANSISTOR BA1A4M-TP
Q216 8-729-900-80 TRANSISTOR BA1A4M-TP
< RESISTOR >
R201 1-249-410-11 CARBON 270 5% 1/4W
R202 1-249-411-11 CARBON 330 5% 1/4W
R203 1-249-413-11 CARBON 470 5% 1/4W
R204 1-249-414-11 CARBON 560 5% 1/4W
R205 1-249-415-11 CARBON 680 5% 1/4W
R206 1-249-417-11 CARBON 1K 5% 1/4W
R207 1-249-418-11 CARBON 1.2K 5% 1/4W
R208 1-249-420-11 CARBON 1.8K 5% 1/4W
R209 1-249-422-11 CARBON 2.7K 5% 1/4W
R210 1-249-403-11 CARBON 68 5% 1/4W
R211 1-249-403-11 CARBON 68 5% 1/4W
R212 1-249-407-11 CARBON 150 5% 1/4W
< SWITCH >
S201 1-762-875-21 SWITCH, KEYBOARD (s(DECK B))
S202 1-762-875-21 SWITCH, KEYBOARD (G(DECK B))
S203 1-762-875-21 SWITCH, KEYBOARD (g(DECK B))
S204 1-762-875-21 SWITCH, KEYBOARD (s(DECK A))
S205 1-762-875-21 SWITCH, KEYBOARD (G(DECK A))
S206 1-762-875-21 SWITCH, KEYBOARD (g(DECK A))
S211 1-762-875-21 SWITCH, KEYBOARD (G(CD))
S212 1-762-875-21 SWITCH, KEYBOARD (S(CD))
S213 1-762-875-21 SWITCH, KEYBOARD (s(CD))
S214 1-692-221-11 SWITCH, KEY BOARD (DISC 1)
S215 1-692-221-11 SWITCH, KEY BOARD (DISC 2)
S216 1-692-221-11 SWITCH, KEY BOARD (DISC 3)
S217 1-692-221-11 SWITCH, KEY BOARD (DISC 4)
S218 1-692-221-11 SWITCH, KEY BOARD (DISC 5)
S219 1-692-221-11 SWITCH, KEY BOARD (A(DISC 5))
S220 1-692-221-11 SWITCH, KEY BOARD (A(DISC 4))
S221 1-692-221-11 SWITCH, KEY BOARD (A(DISC 3))
S222 1-692-221-11 SWITCH, KEY BOARD (A(DISC 2))
S223 1-692-221-11 SWITCH, KEY BOARD (A(DISC 1))
**************************************************************
50
Page 27
PANEL TC-A PANEL TC-B SENSOR SENSOR 2
Ref. No. Part No. Description Remark
1-674-773-11 PANEL TC-A BOARD
****************
< RESISTOR >
R246 1-247-843-11 CARBON 3.3K 5% 1/4W
R247 1-249-425-11 CARBON 4.7K 5% 1/4W
< SWITCH >
S227 1-762-875-21 SWITCH, KEYBOARD (DIRECTION)
S228 1-762-875-21 SWITCH, KEYBOARD (DOLBY NR)
**************************************************************
1-674-772-11 PANEL TC-B BOARD
****************
< LED >
D216 8-719-071-41 LED SELS5923C-TP15 (CD SYNC)
D217 8-719-071-44 LED SELS5223C-TP15 (REC PAUSE/START)
< RESISTOR >
R241 1-249-407-11 CARBON 150 5% 1/4W
R242 1-249-409-11 CARBON 220 5% 1/4W
R243 1-249-427-11 CARBON 6.8K 5% 1/4W
R244 1-249-429-11 CARBON 10K 5% 1/4W
R245 1-249-431-11 CARBON 15K 5% 1/4W
Ref. No. Part No. Description Remark
61 1-773-170-11 WIRE (FLAT TYPE) (21 CORE)
67 1-773-004-11 WIRE (FLAT TYPE) (15 CORE)
68 1-773-044-11 WIRE (FLAT TYPE) (17 CORE) (16cm)
0253 8-820-026-03 OPTICAL PICK-UP KSM-213BFN/C2NP
257 1-769-069-11 WIRE (FLAT TYPE) (16 CORE)
HP101 A-2056-681-A DECK (A) ASSY, HEAD (PLAYBACK)
HRPE101A-2056-682-A DECK (B) ASSY, HEAD (REC/PB/ERASE)
M1 A-2004-628-A MOTOR ASSY, CAPSTAN
M101 X-2646-110-3 MOTOR ASSY, SPINDLE
M102 X-2625-769-1 MOTOR ASSY, SLED
M701 X-4950-341-1 MOTOR (CLAMP) ASSY
(ELEVATOR UP/DOWN)
M702 X-4950-342-1 MOTOR (LOADING) ASSY
S707 1-418-045-01 ENCODER, ROTARY
(DISC TRAY ADDRESS DETECT)
************************************************************
**************
HARDWARE LIST
**************
#1 7-685-647-79 SCREW +BVTP 3X10 TYPE2 N-S
#2 7-685-853-04 SCREW +BVTT 2X6 (S)
#3 7-685-533-19 SCREW +BTP 2.6X6 TYPE2 N-S
#4 7-685-851-04 SCREW +BVTT 2X4 (S)
#5 7-628-254-50 SCREW +PS 2.6X16
< SWITCH >
S224 1-762-875-21 SWITCH, KEYBOARD (HI DUB)
S225 1-762-875-21 SWITCH, KEYBOARD (CD SYNC)
S226 1-762-875-21 SWITCH, KEYBOARD (REC PAUSE/START)
**************************************************************
* 1-671-504-21 SENSOR BOARD
*************
< CONNECTOR >
CN708 1-506-481-11 PIN, CONNECTOR 2P
< LED >
D704 8-719-055-84 LED GL528VS1 (DISC IN DETECT SENSOR)
< RESISTOR >
R711 1-249-415-11 CARBON 680 5% 1/4W
**************************************************************
* 1-671-789-21 SENSOR 2 BOARD
***************
4-220-274-01 HOLDER (SENSOR) (//C)
< PHOTO TRANSISTOR >
#6 7-628-254-15 SCREW +PS 2.6X6
#7 7-685-646-79 SCREW +BVTP 3X8 TYPE2 N-S
#8 7-685-870-01 SCREW +BVTT 3X5 (S)
#9 7-685-862-11 SCREW +BVTT 2.6X6 (S)
Q703 8-729-926-31 PHOTO TRANSISTOR PT483F1
**************************************************************
MISCELLANEOUS
**************
1 1-773-040-11 WIRE (FLAT TYPE) (17 CORE) (12cm)
2 1-791-433-11 WIRE (FLAT TYPE) (19 CORE)
5 1-791-075-11 CORD, CONNECTION
The components identified by
mark 0 or dotted line with
mark 0 are critical for safety.
Replace only with part number specified.
Les composants identifiés par une
marque 0 sont critiques pour la
sécurité.
Ne les remplacer que par une pièce
portant le numéro spécifié.
51
Page 28
http://servis-manual.com/
Page 29

SECTION 4
TEST MODE
[CD Delivery Mode]
• Execute only if connected to the HTC-NX1.
• This mode moves the optical pick-up to the position durable to
vibration. Use this mode when returning the set to the customer
after repair.
Procedure:
1. Press the ?/1 button to turn the power ON.
2. Press the [ENTER] and ?/1 buttons simultaneously.
3. A message “LOCK” is displayed on the liquid crystal display ,
and the CD delivery mode is set.
[Change-over the MW Tuning Interval]
(EXCEPT AEP and UK models)
• The MW tuning interval can be changed over 9 kHz or 10 kHz.
Procedure:
1. Press the ?/1 button to turn the power ON.
2. Press the [TUNER] button to select the function “TUNER”,
and press the [TUNER BAND] button to select the BAND “MW”.
3. Press the ?/1 button to turn the power OFF.
4. Press the [TUNER MEMORY] and ?/1 buttons simultaneously,
and the display on the liquid crystal display changes to “MW
9 k STEP” or “MW 10 k STEP”, and thus the tuning interval
is changed over.
[MC Cold Reset]
• The cold reset clears all data including preset data stored in the
RAM to initial conditions. Execute this mode when returning
the set to the customer.
Procedure:
1. Turn the power ON or set to the DEMO mode.
2. Press the [GROOVE] and ?/1 buttons simultaneously.
3. The set is reset, and displays “COLD RESET”, then becomes
DEMO mode.
[Amplifier Test Mode]
Procedure:
1. Press the
2. Press three buttons of [ENTER] , [DISPLAY] , and
?/1 button to turn the power ON.
[TUNER BAND] simultaneously.
3. “ALC OFF” is displayed, then the function which was set be-
fore the test mode became active is displayed.
[LED and Liquid Crystal Display All Lit, Software Version Display, Key Check, VACS Level Display Mode]
Procedure:
1. Press the ?/1 button to turn the power ON.
2. Press three buttons of [ENTER] , [DISPLAY] , and
[STEREO/MONO] simultaneously.
3. LEDs and liquid crystal display are all turned on.
Rotating the JOG dial changes over the check patterns of liquid crystal display.
4. Successively, the following three modes can be activated.
(1) Press the [VIDEO/DVD] button, and the software version is
displayed on the liquid crystal display.
(2) Press the [MD] button, and the key check mode is activated.
In the key check mode, the liquid crystal display displays “K
0 J0 V0”. Each time a button is pressed, “K” value increases.
However, once a button is pressed, it is no longer taken into
account.
“J” value increases like 1, 2, 3 ... if turn the JOG dial clockwise, or it decreases like 0, 9, 8 ... if turn the JOG dial counterclockwise.
“V” value increases like 1, 2, 3 ... if turn the [VOLUME] dial
clockwise, or it decreases like 0, 9, 8 ... if turn the JOG dial
counterclockwise.
(3) Press the [TAPE] button, and the VACS level is displayed on
the liquid crystal display.
5. To release from these mode, press three buttons in the same
manner as step 2, or remove the power cord.
[MC Hot Reset]
• This mode resets the set with the preset data kept stored in the
memory. The hot reset mode functions same as if the power
cord is plugged in and out.
Procedure:
1. Turn the power ON or set to the DEMO mode.
2. Press three buttons of
[ENTER] , [DISPLAY] , and
[TUNER MEMORY] simultaneously.
3. The set is reset, and becomes standby state.
[Change-over of VACS ON/OFF]
Procedure:
1. Press the ?/1 button to turn the power ON.
2. Press three buttons of [ENTER] , [DISPLAY] , and [GROOVE]
simultaneously, and the display on the liquid crystal display
changes to “VACS ON” or “VACS OFF”, and thus the VACS
ON/OFF is changed over.
[VIDEO input, Record and CD play in CD function]
• Execute only if connected to the HTC-NX1.
Procedure:
1. Press the ?/1 button to turn the power ON.
2. Press three buttons of [ENTER] , [DISPLAY] , and
- m simultaneously.
3. “DVD 5.1CH” is displayed on liquid crystal display, and at
the same time, CD is played and the deck B is placed in the
record status.
[CD Service Mode]
• Execute only if connected to the HTC-NX1.
• This mode can run the CD sled motor optionally . Use this mode,
for instance, when cleaning the optical pick-up.
Procedure:
1. Press the
2. Press the [CD] button to select the function “CD”.
3. Press three buttons of [ENTER] , [POWER SAVE/DEMO] ,
and [STEREO/MONO] simultaneously.
4. Set to the Sled Servo mode.
5. With the CD in stop status, turn the JOG dial clockwise to
move the optical pick-up to outside track, or turn it counterclockwise to inside track.
6. To release from this mode, perform as follows.
1) Move the optical pick-up to the most inside track.
2) Remove the power cord.
Notes: • Always move the optical pick-up to most inside track when
?/1 button to turn the power ON.
releasing from this mode. Otherwise, a disc will not be unloaded.
• Do not run the sled motor excessively, otherwise the gear can
be chipped.
8
Page 30
[Aging Mode]
• Execute only if connected to the HTC-NX1.
This mode can be used for operation check of CD section and tape
deck section.
CD section and tape deck section work in parallel.
• If an error occurred:
The aging operation stops only an error occurred sections and
display then status.
• If no error occurs:
The aging operation continues repeatedly.
• Display at an error occurred
1) Display of the error count
(1) Press three buttons of [ENTER] , [POWER SAVE/DEMO] ,
and [GROOVE] simultaneously.
(2) Display of the error count following as below.
Display
EMC**EDC
**
Procedure:
1. Set disc in DISC5 tray.
2. Load the tapes into the decks A and B respectively.
3. Press the [PLAY MODE] button to set the “ ALL DISCS” mode,
and press the [REPEAT] button to “REPEAT” off.
4. Press the [CD] button to select the function “CD”.
5. Press three buttons of [ENTER] , [POWER SAVE/DEMO] ,
and [TUNER BAND] simultaneously.
6. The aging mode is activated, if the indicator of disc tray num-
ber on the liquid crystal display is blinking.
7. To release from the aging mode, press the ?/1 button to turn
the power OFF and operate the cold reset. (Refer to the “MC
Cold Reset”)
1. Display at the Aging Mode
• Display operating state of CD section and tape deck section alternately.
• If an error occurred, stop display which that section.
2. CD Section
• Display at the aging mode is the same as the normal operation.
• The sequence during the aging mode is following as below.
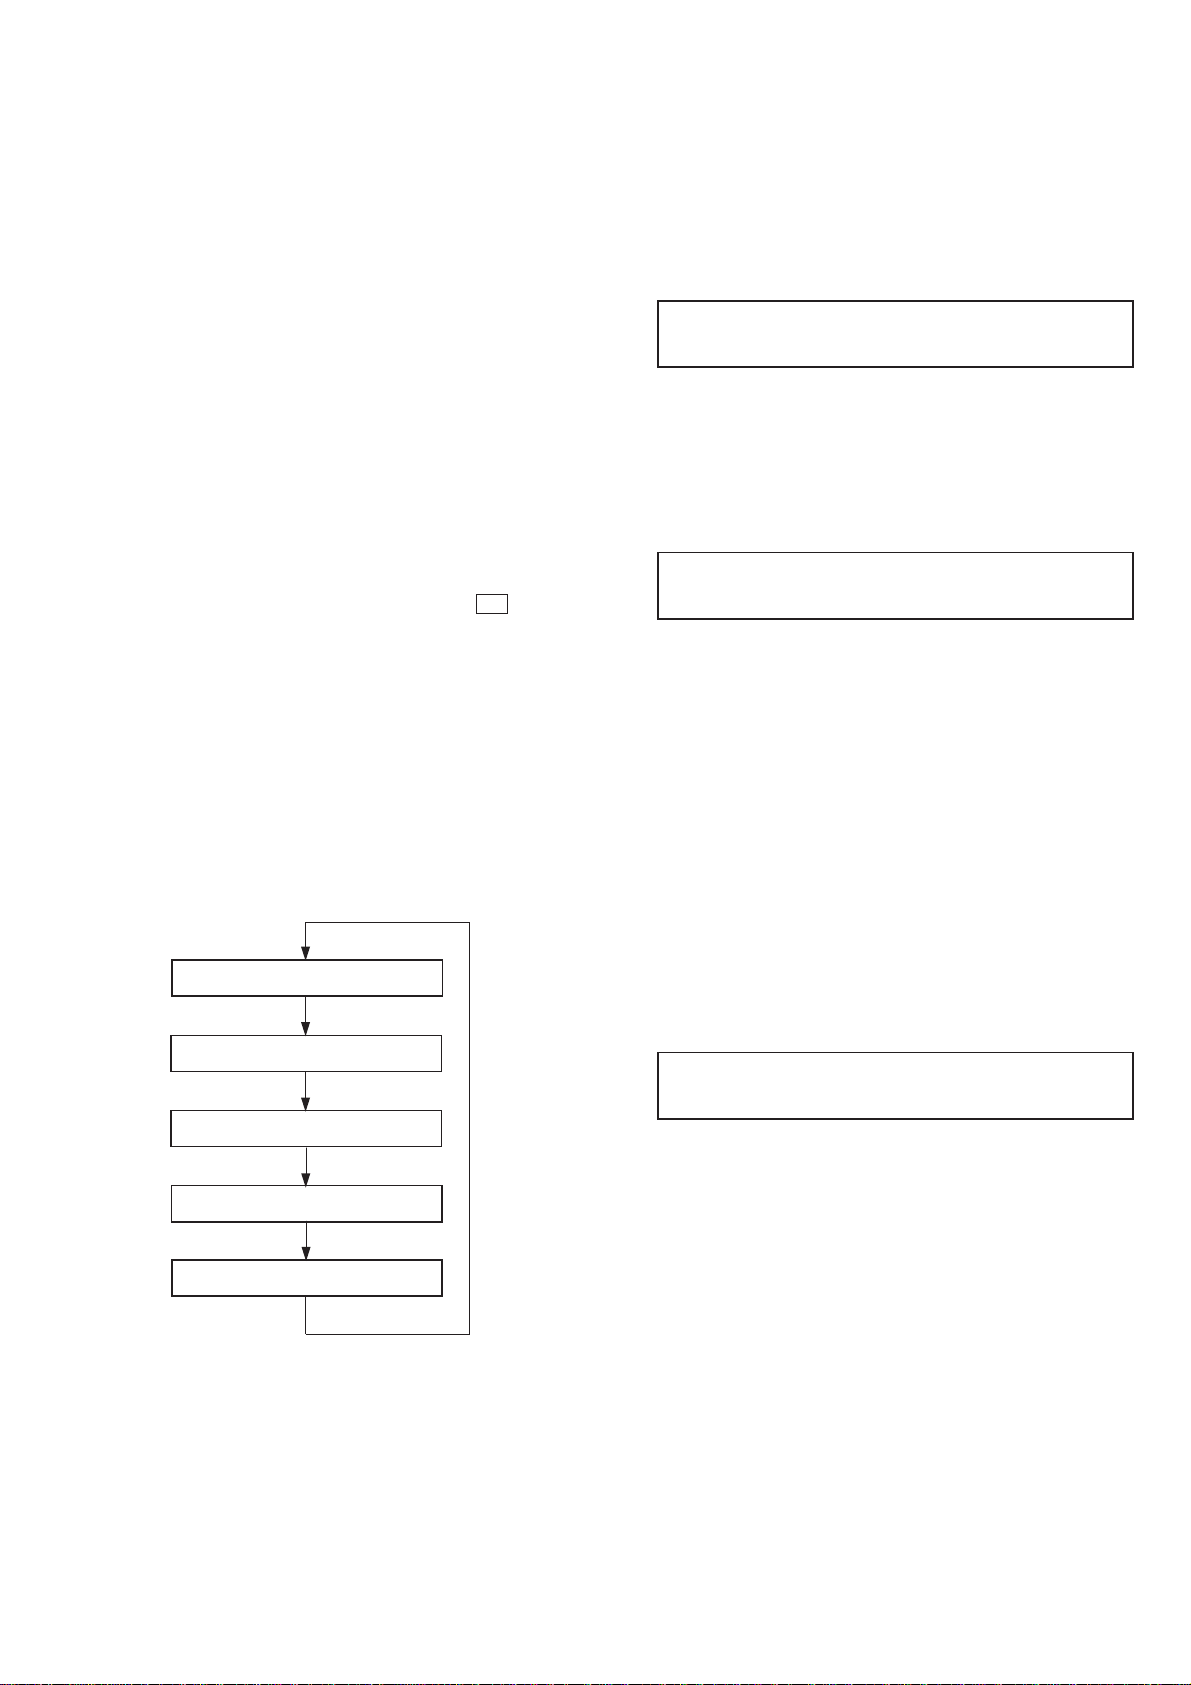
Aging mode sequence (CD section) :
Open the disc1 tray
Notes:
EMC**: The number of mechanical error.
EDC**: The number of no disc error after chucking the disc.
2) Display of mechanical error
Display
E**M##$$&&
Notes:
: The number of mechanical error.(“00” is latest one)
**
(Press the [PLAY MODE] button to changes next error display)
## : Not used.
$$ : Loading error. (Second figure is not used)
D: The error in the midst of close at the except mechanical trouble.
E : The error in the midst of open at the except mechanical trouble.
C : The error in the midst of chuck up at the except mechanical
trouble.
F : The error in the midst of EX-open at the except mechanical
trouble.
&&: Loading error. (Second figure in not used)
1: The error in the midst of chuck up.
2: The error in the midst of chuck down.
3: Time up of EX-open
4: Time up of EX-close.
3) Display of no disc error
Disc5 chucking
Disc5 TOC read
Disc5 play track1 for 2 seconds
Disc5 play last track for 2 seconds
Display
E**D##$$&&
Notes:
: The number of mechanical error.(“00” is latest one)
**
(Press the [REPEAT] button to changes next error display)
##:
01:Focus error
02:GFS error
03:Set up error
$$:
00:No disc error when does not chucking retry.
02:No disc error when chucking retry to completion.
&&: The state when judged no disc error. (Second figure is not used)
1: Stop
2: Set up
3: TOC read
4: Access
5: Play
6: Pause
7: Manual search (Play)
8: Manual search (Pause)3. Tape Deck Section
9
Page 31
3. Tape Deck Section
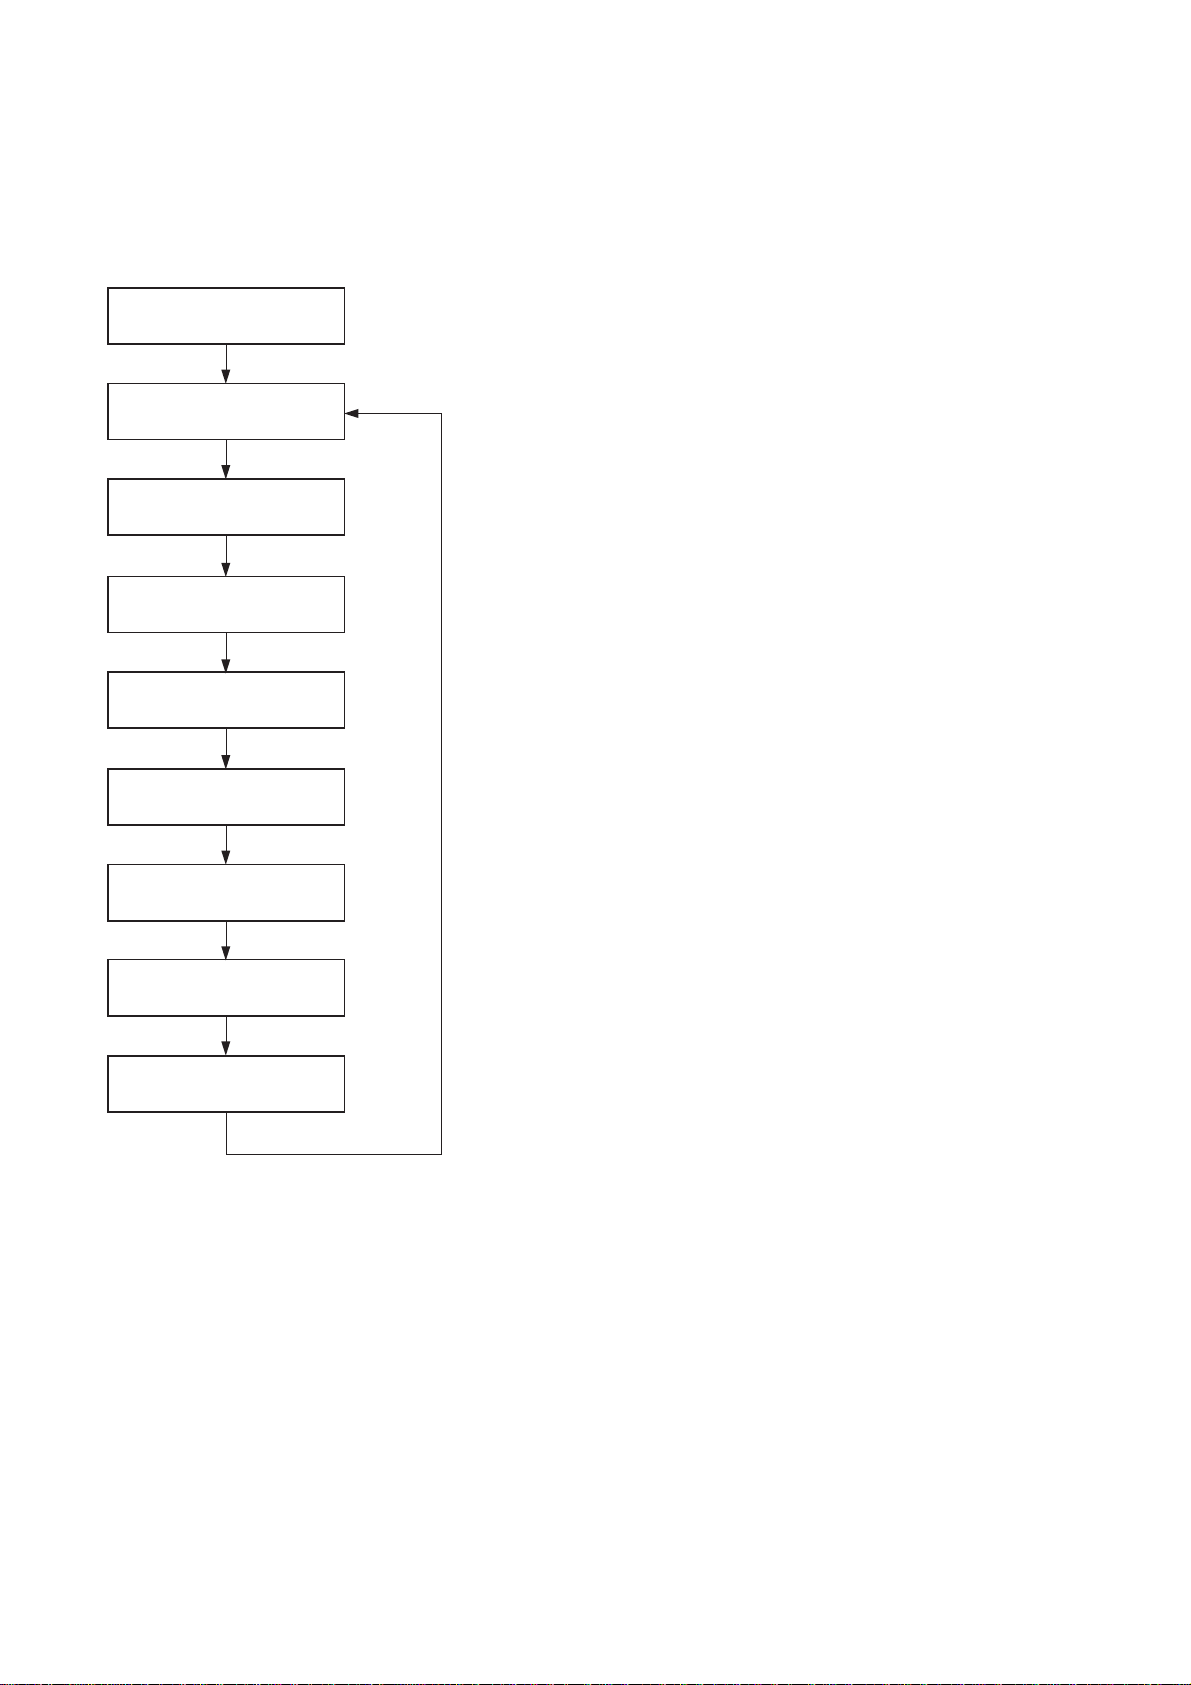
• The sequence during the aging mode is following as below.
• If an error occurred, stop display that step.
Aging mode sequence (Tape deck section) :
Rewind the tape A and B
“TAPE A AG-1”
Shut off
FWD play the tape A
“TAPE A AG-2”
2 minutes
Fast forward the tape A
“TAPE A AG-3”
Shut off or 20 seconds
REV play the tape A
“TAPE A AG-4”
2 minutes
Rewind the tape A
“TAPE A AG-5”
Shut off
FWD play the tape B
“TAPE B AG-2”
2 minutes
Fast forward the tape B
“TAPE B AG-3”
Shut off or 20 seconds
REV play the tape B
“TAPE A AG-4”
2 minutes
Rewind the tape B
“TAPE B AG-5”
Shut off
Note: “TAPE * AG-*” is display of each step.
10
Page 32
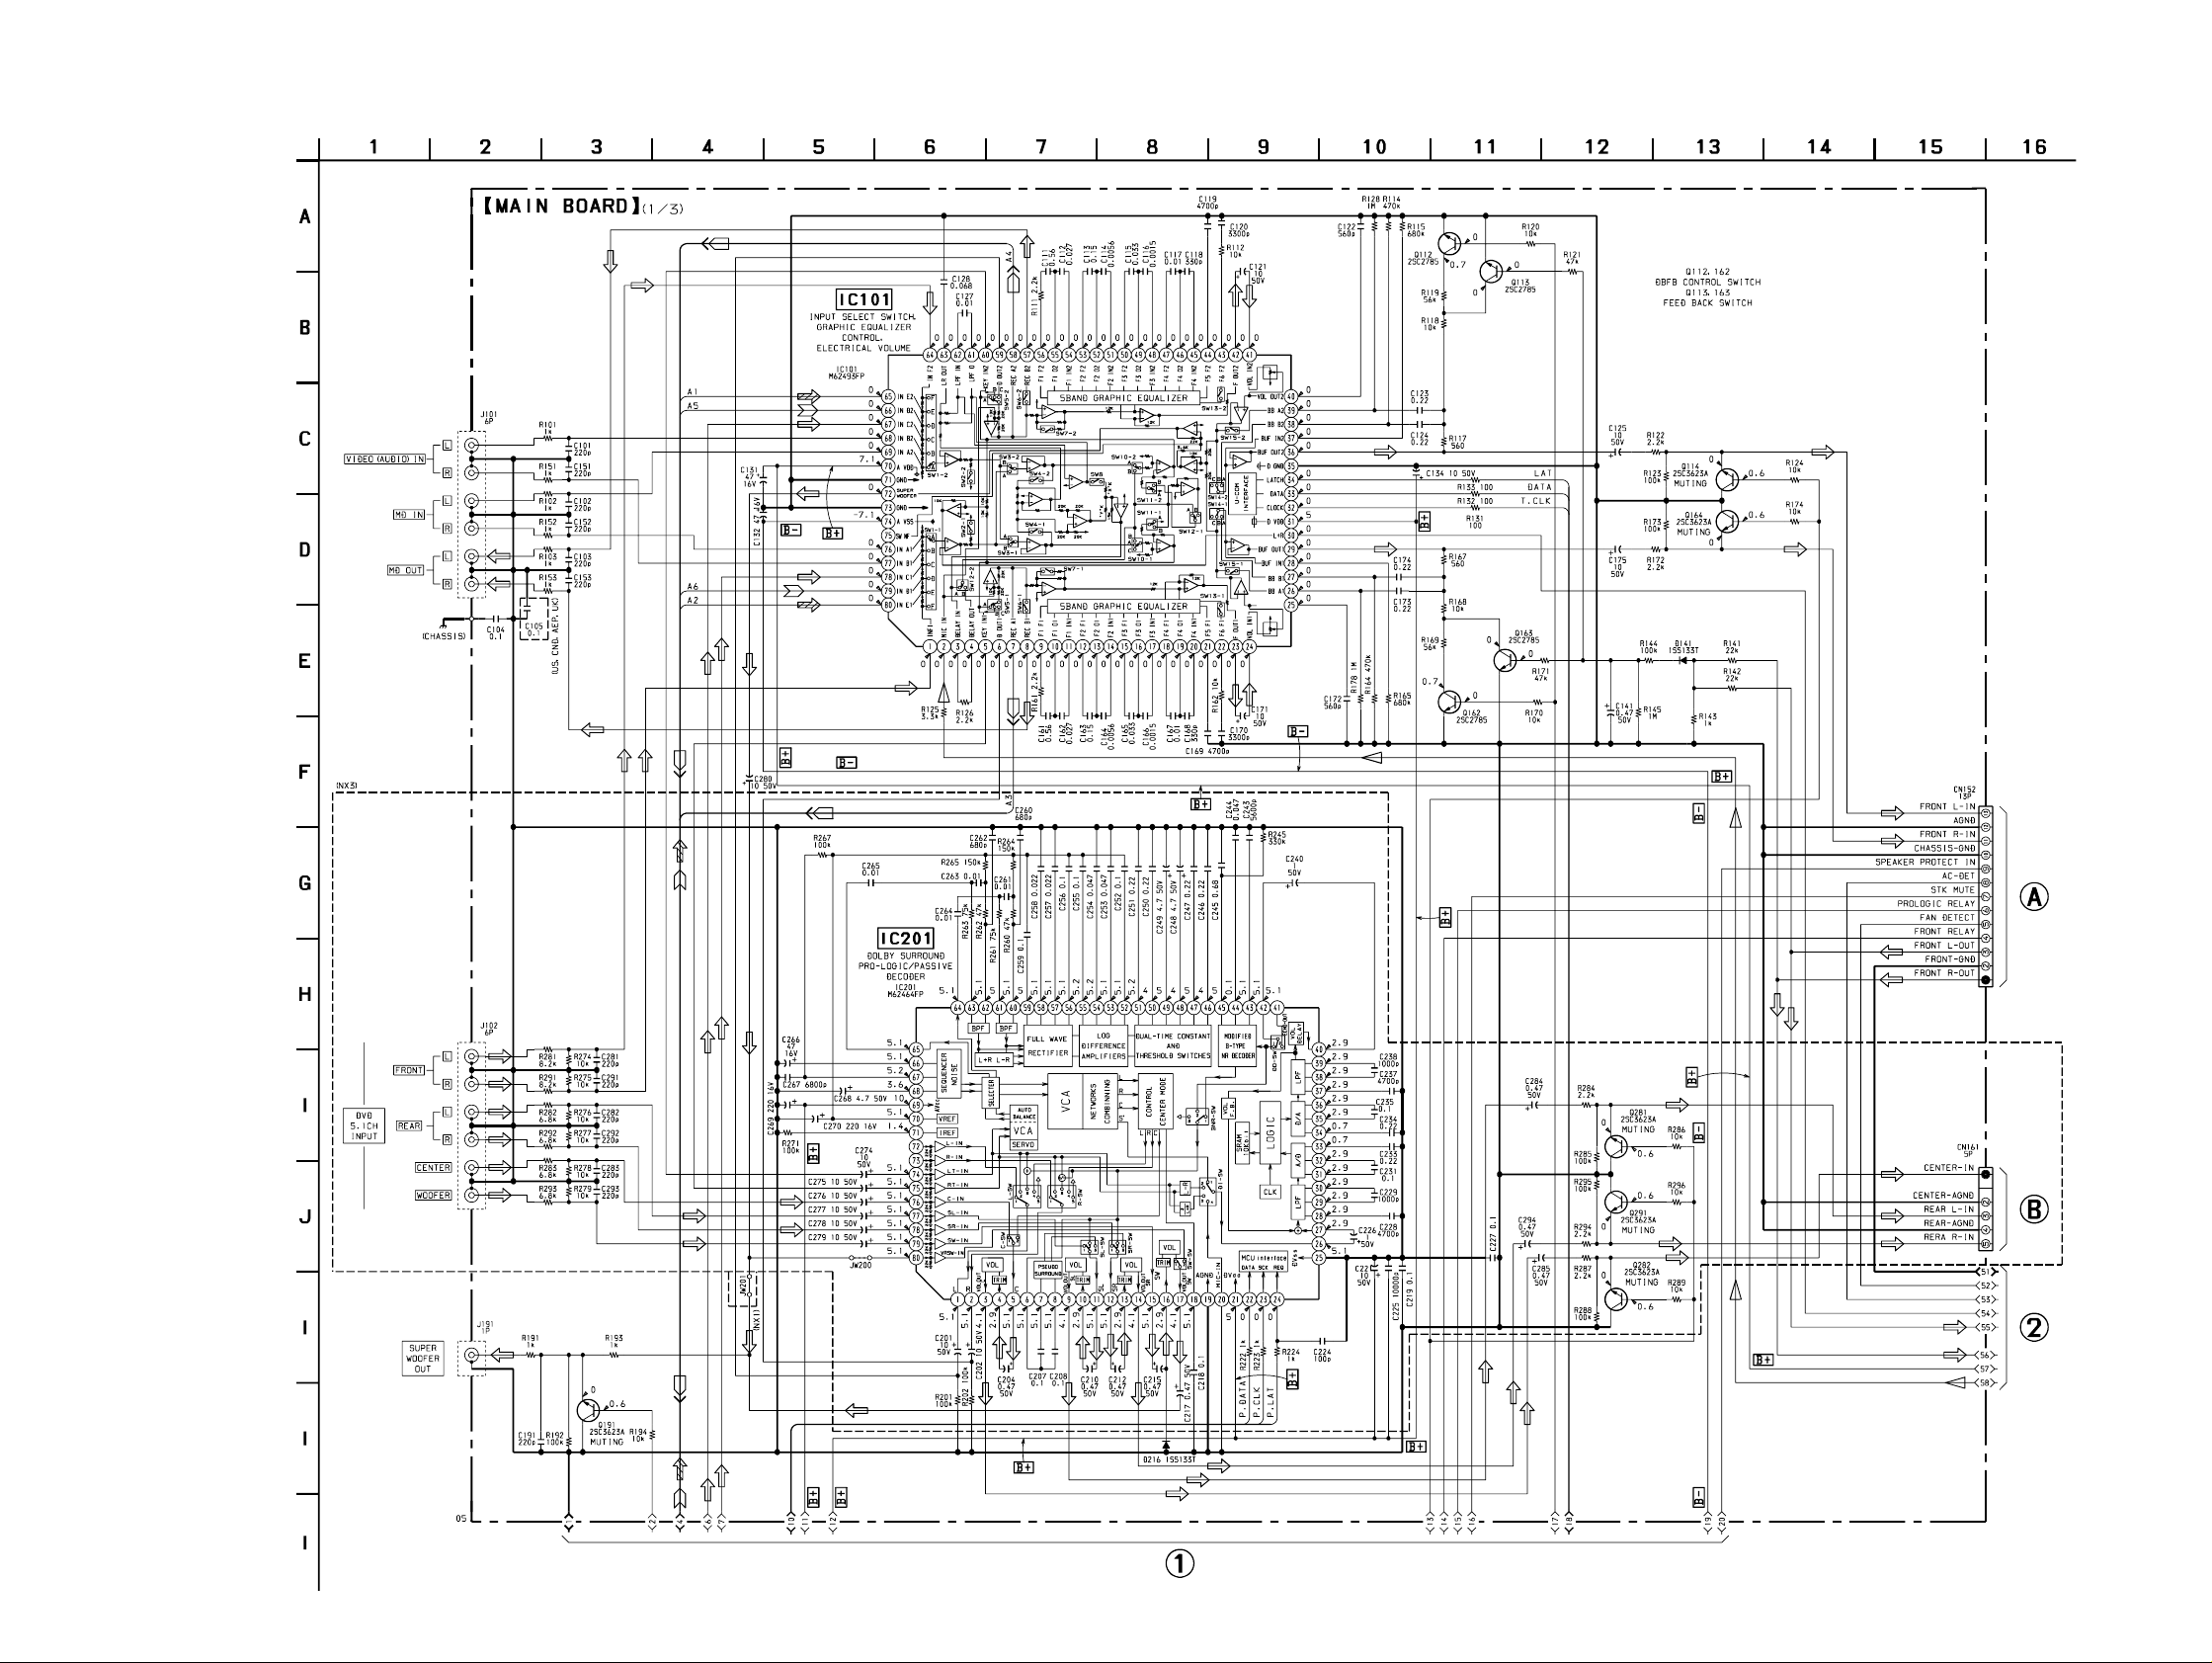
STR-NX1/NX3
5-2. SCHEMATIC DIAGRAM – MAIN Board (1/3) –
(Page
19)
(Page
17)
(Page
14)
(Page 13)
1212
Page 33
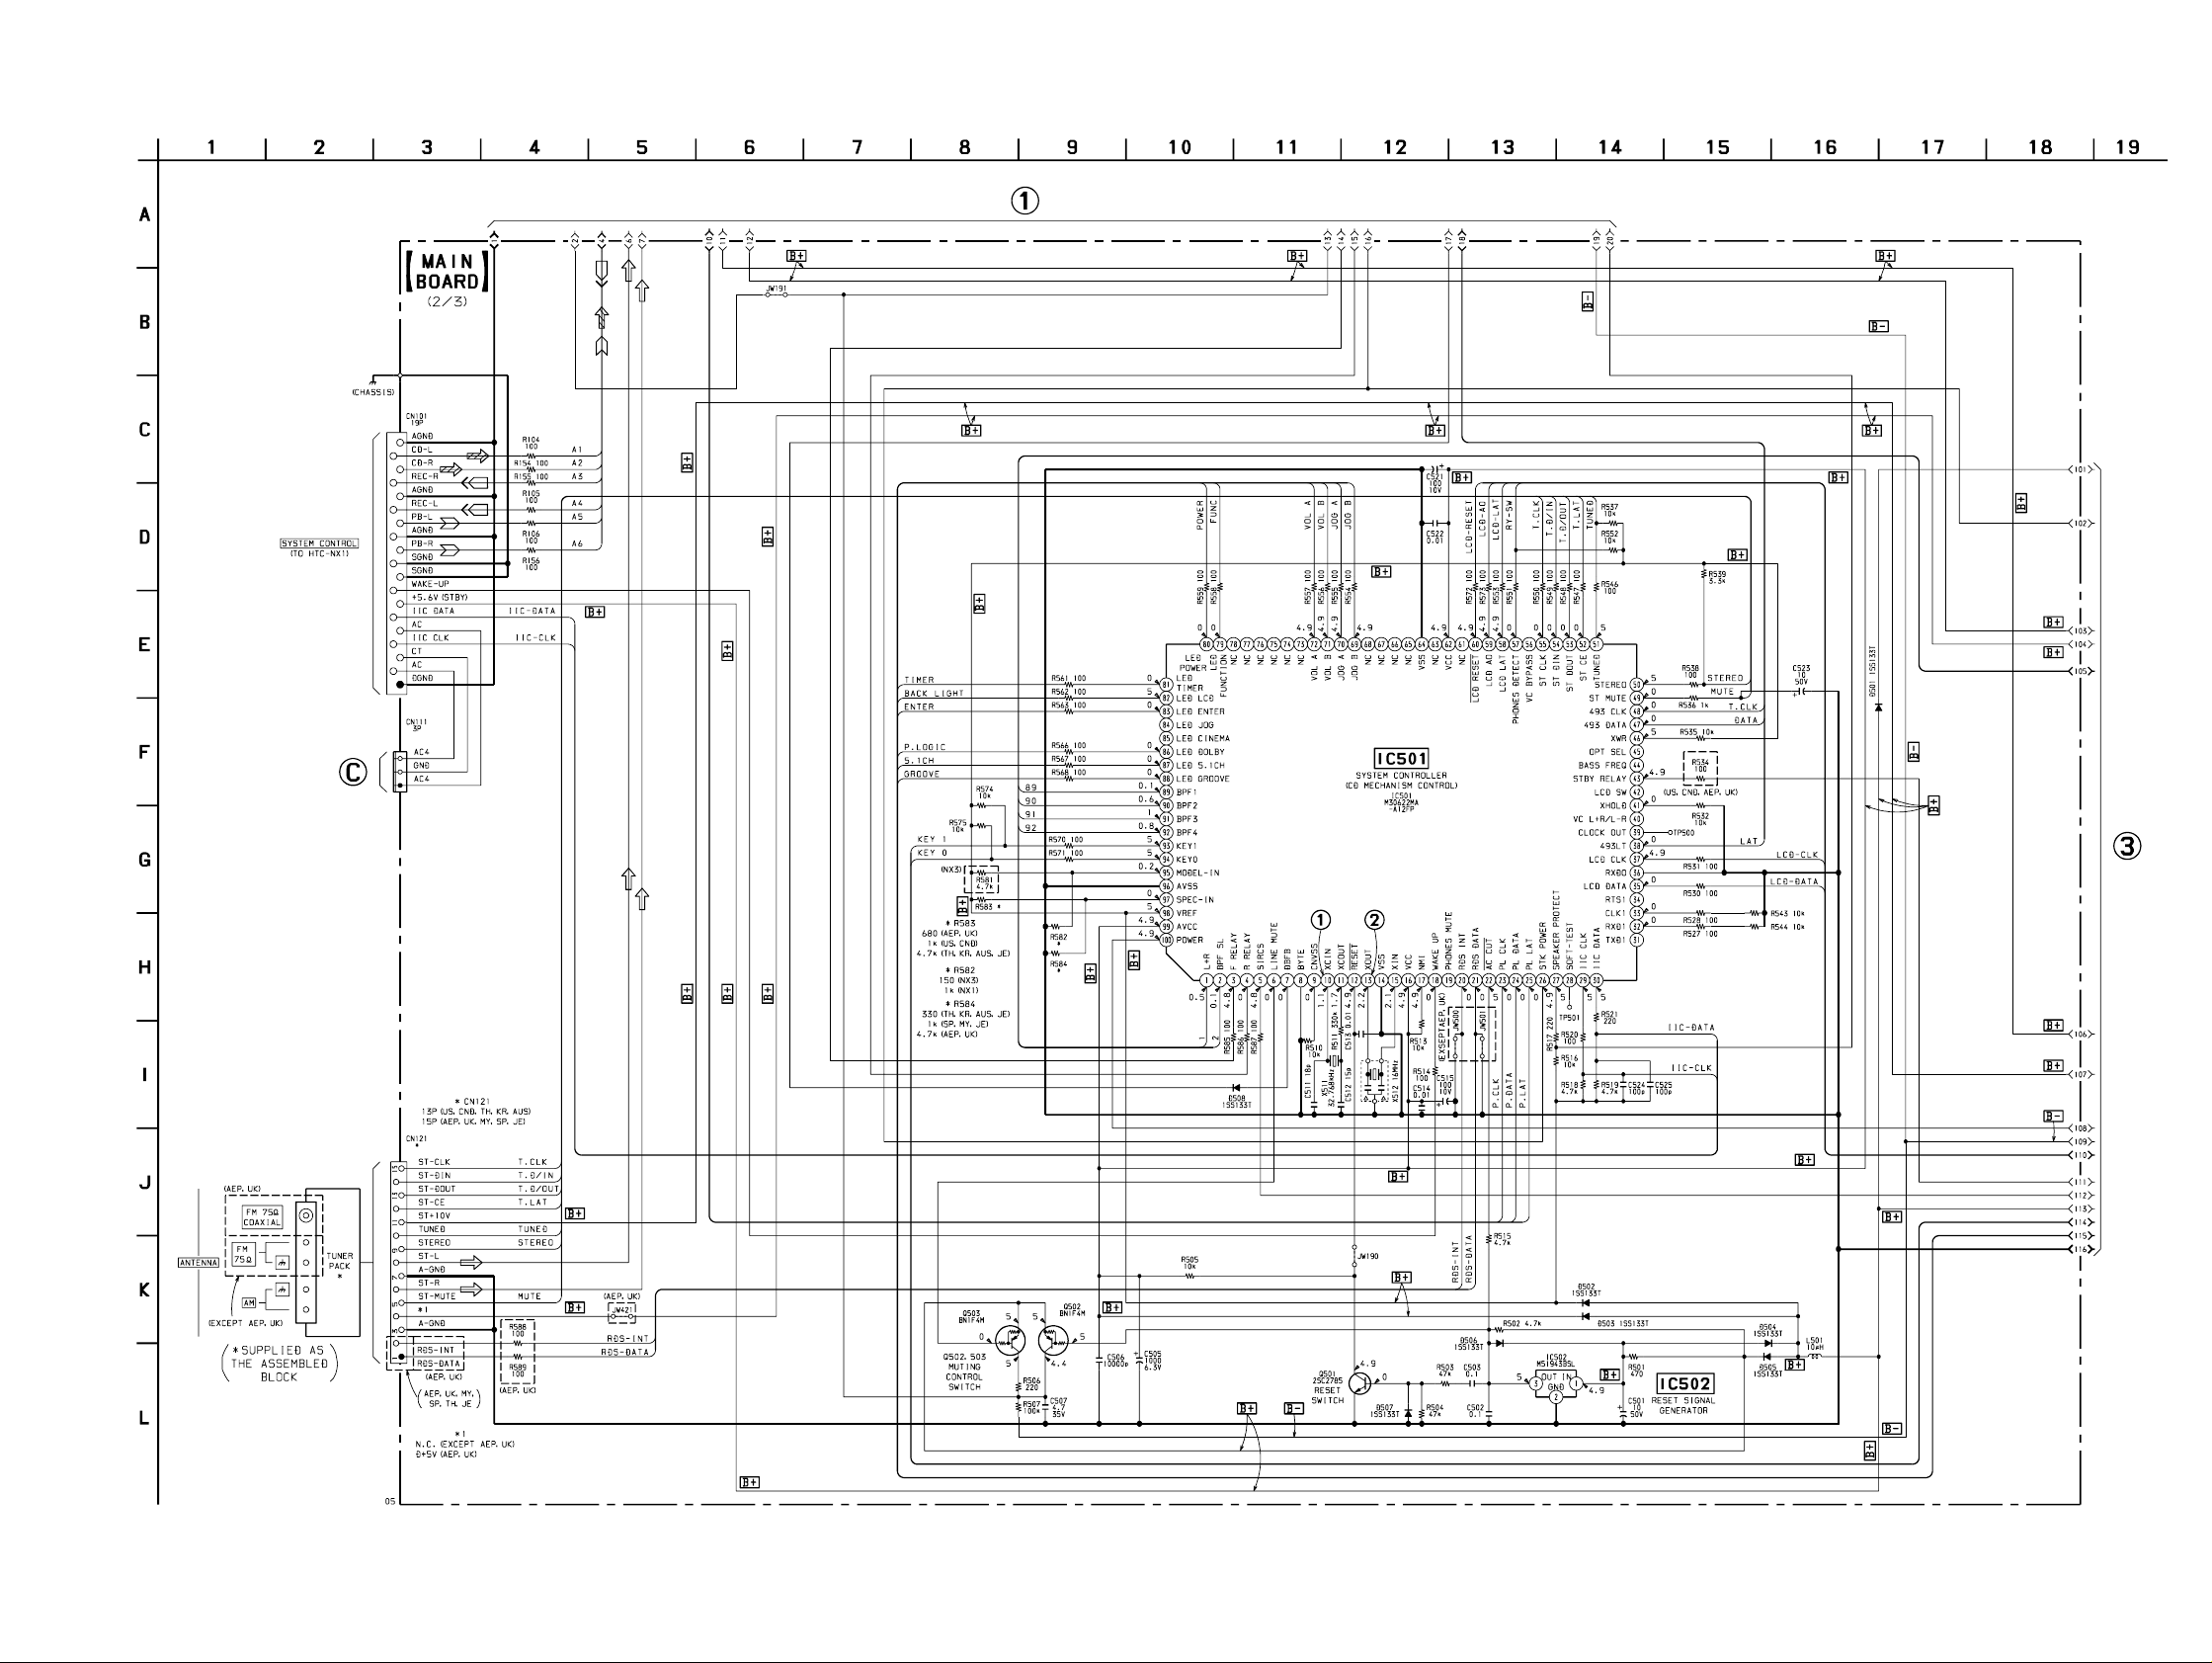
5-3. SCHEMATIC DIAGRAM – MAIN Board (2/3) – • See page 11 for Waveforms.
STR-NX1/NX3
(Page 12)
(Page 23)
(Page 14)
1313
Page 34
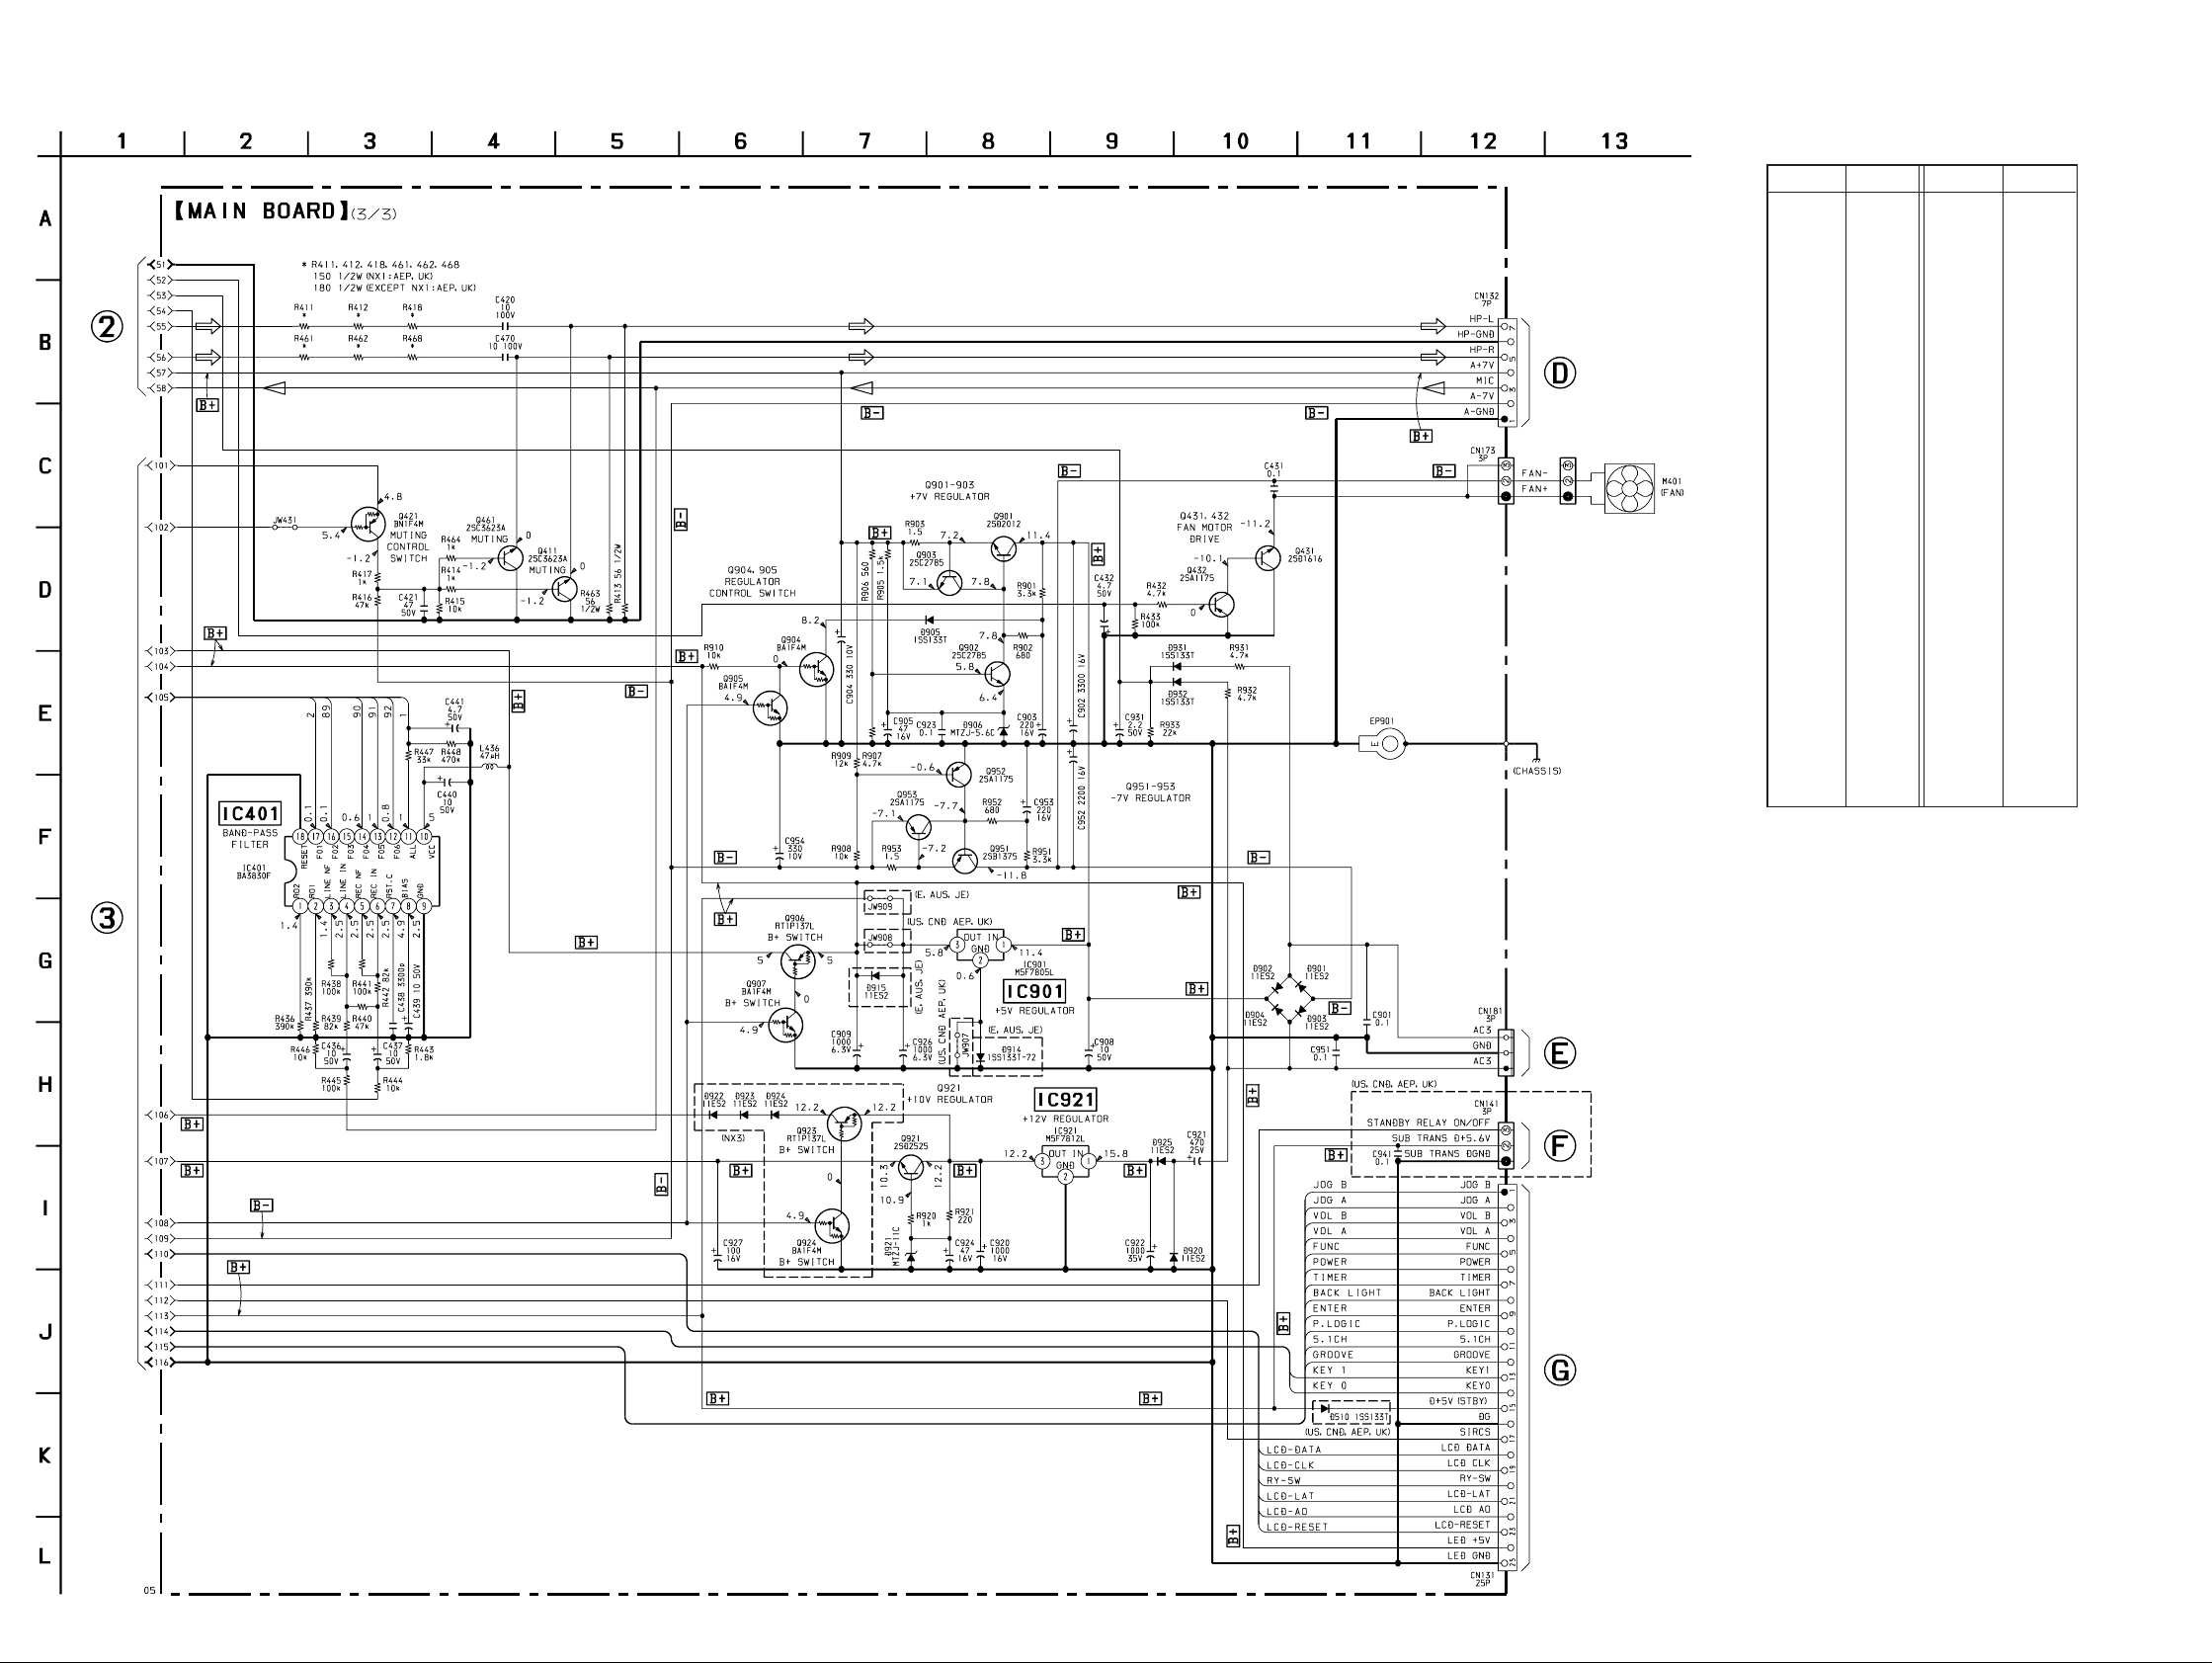
STR-NX1/NX3
5-4. SCHEMATIC DIAGRAM – MAIN Board (3/3) – • See page 11 for IC Block Diagram.
(Page 12)
(Page 21)
• Semiconductor Location
Ref. No. LocationRef. No. Location
D141 A-8
D216 E-9
D501 B-2
D502 D-1
D503 D-1
D504 E-1
D505 E-1
D506 E-1
D507 F-1
D508 E-2
D510 C-1
D901 B-5
D902 A-5
D903 B-5
D904 A-4
D905 A-6
D906 A-6
D914 A-3
D915 B-3
D920 B-4
D921 B-3
D922 E-7
D923 E-7
D924 D-6
D925 B-4
D931 A-4
D932 A-4
IC101 B-9
IC201 E-9
IC401 E-5
IC501 E-3
IC502 E-1
IC901 A-2
IC921 C-2
Q112 A-8
Q113 A-8
Q114 G-6
Q162 A-9
Q163 A-9
Q164 G-6
Q191 G-11
Q281 D-8
Q282 D-7
Q291 D-8
Q411 D-5
Q421 C-3
Q431 E-6
Q432 D-6
Q461 D-5
Q501 F-1
Q502 F-1
Q503 F-1
Q901 A-6
Q902 A-6
Q903 A-6
Q904 A-3
Q905 A-3
Q906 B-3
Q907 B-4
Q921 B-3
Q923 C-3
Q924 B-3
Q951 B-6
Q952 B-6
Q953 B-6
(Page 13)
(Page 23)
(Page 23)
(Page 21)
1414
Page 35
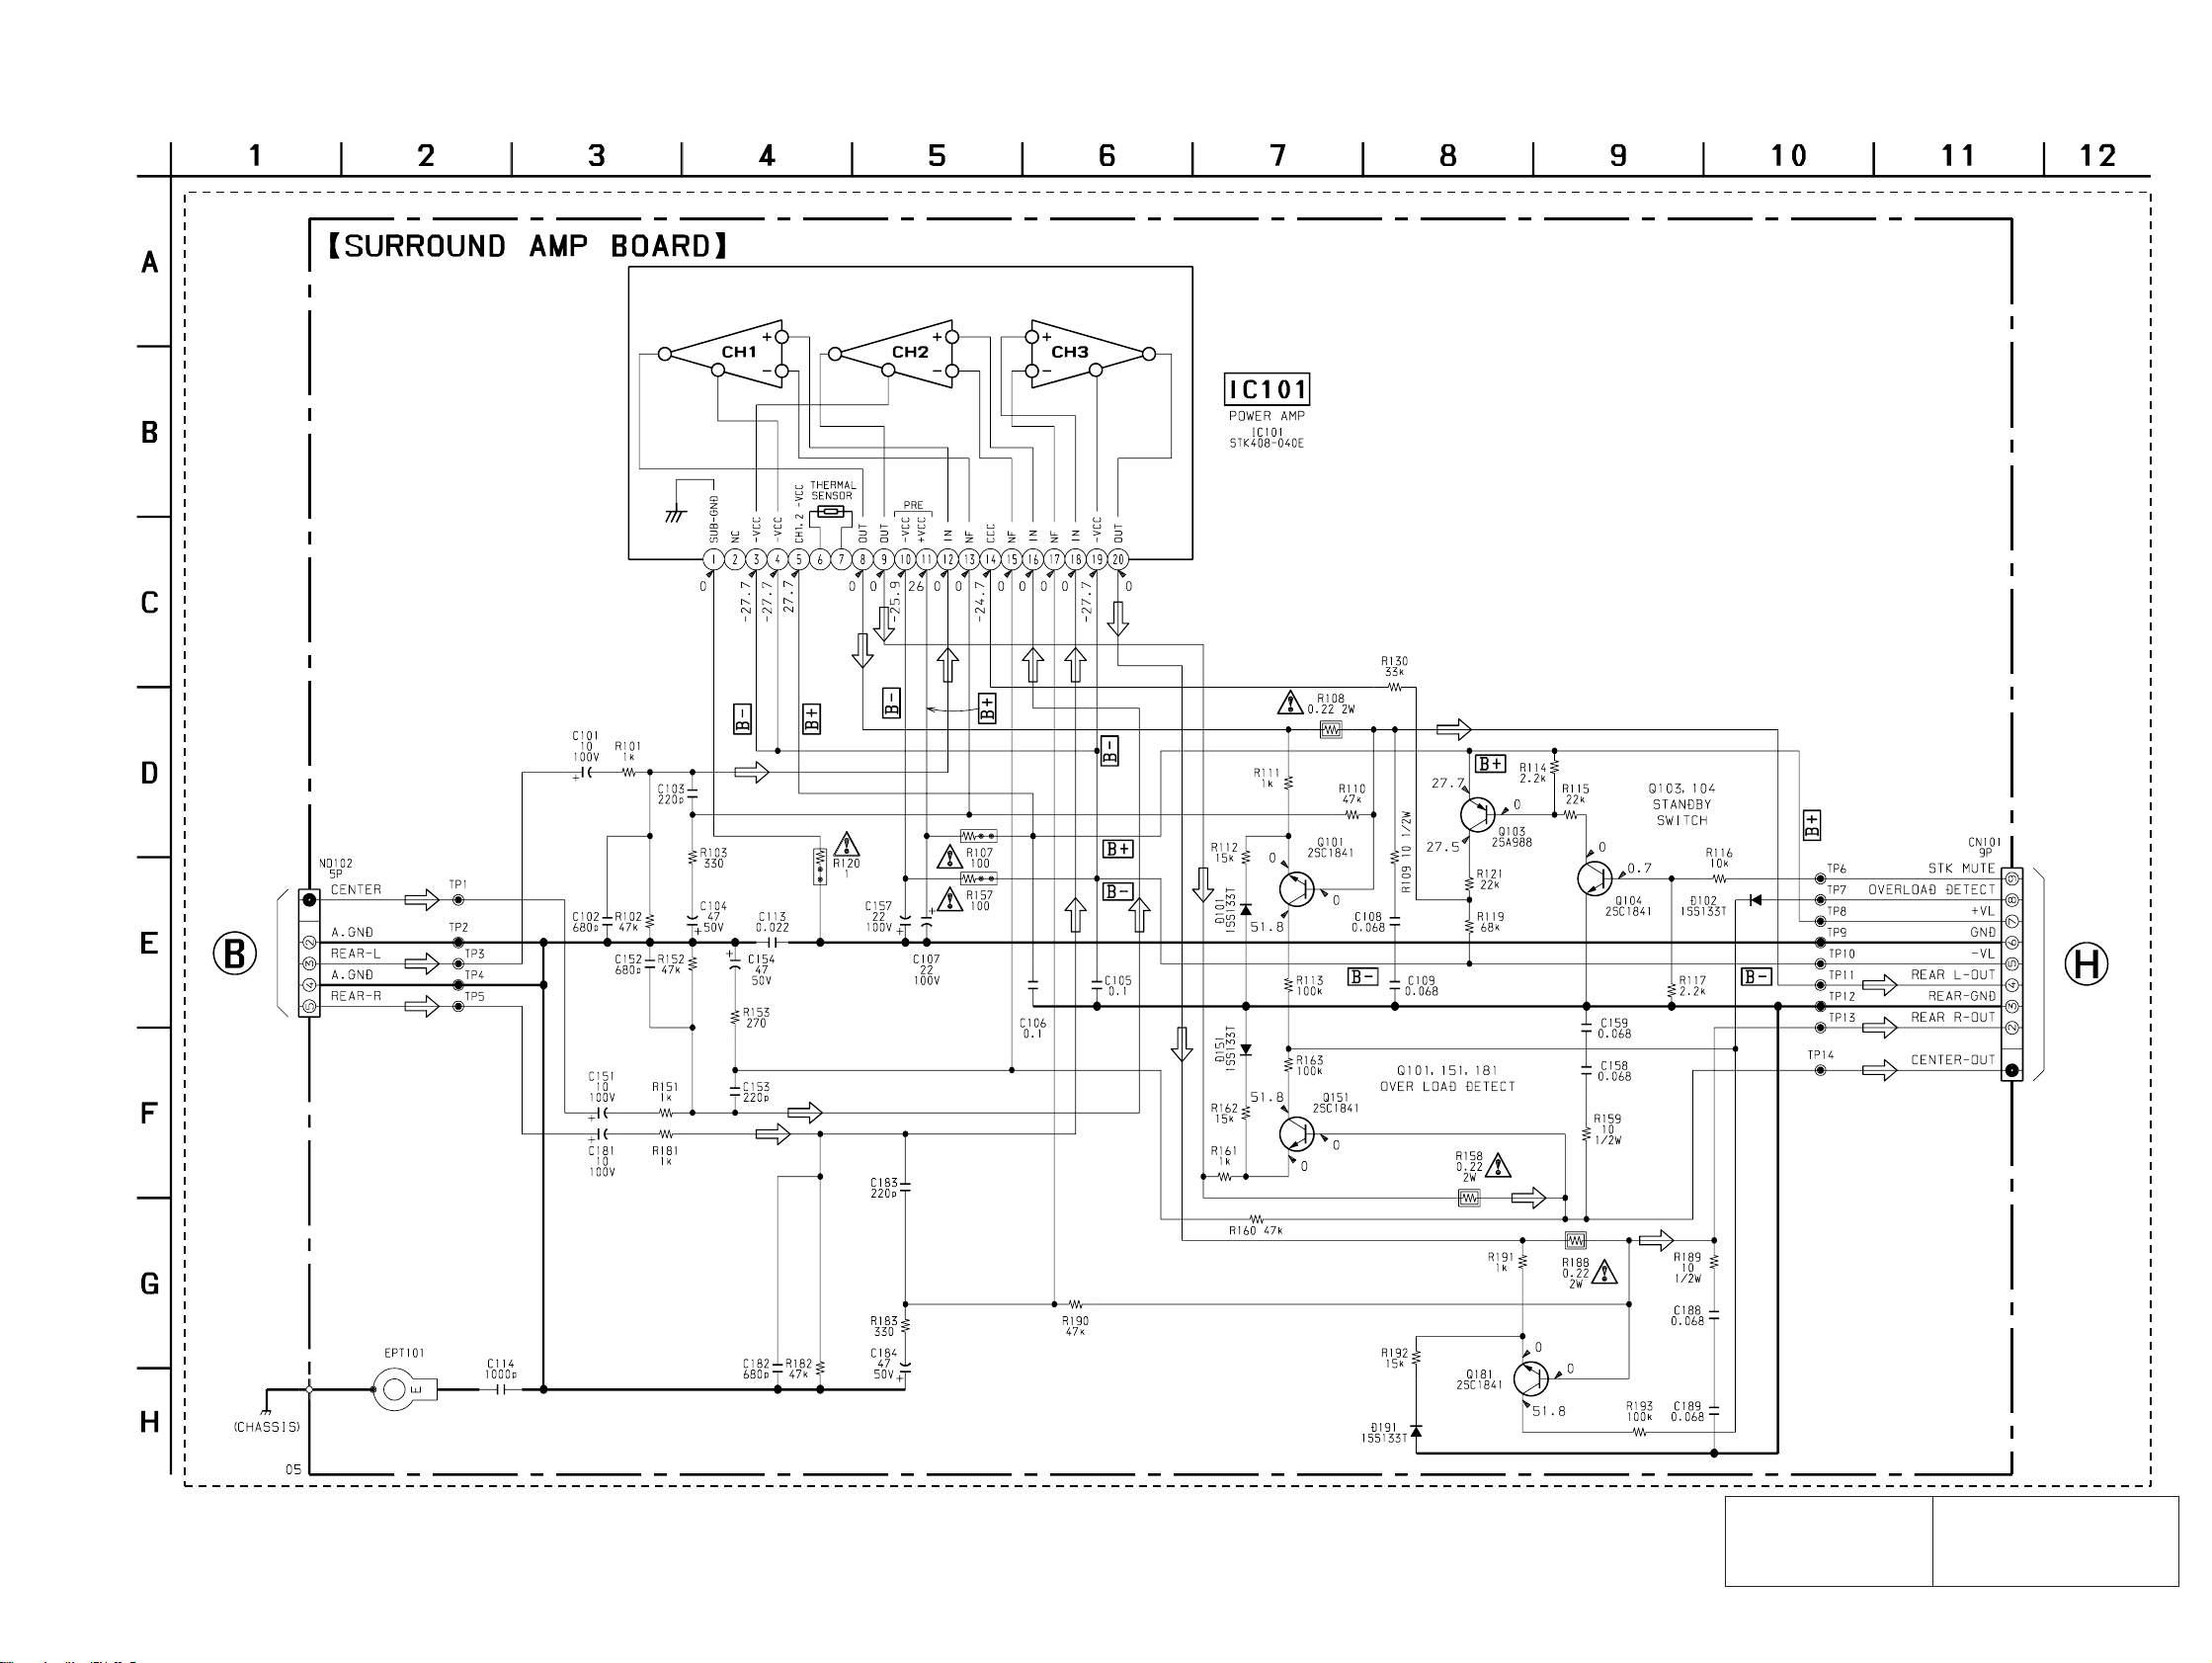
5-7. SCHEMATIC DIAGRAM – SURROUND AMP Board –
(NX3)
STR-NX1/NX3
(Page 12)
The components identified by
mark 0 or dotted line with
mark 0 are critical for safety.
Replace only with part number specified.
(Page 19)
Les composants identifiés par une
marque 0 sont critiques pour la
sécurité.
Ne les remplacer que par une pièce
portant le numéro spécifié.
1717
Page 36
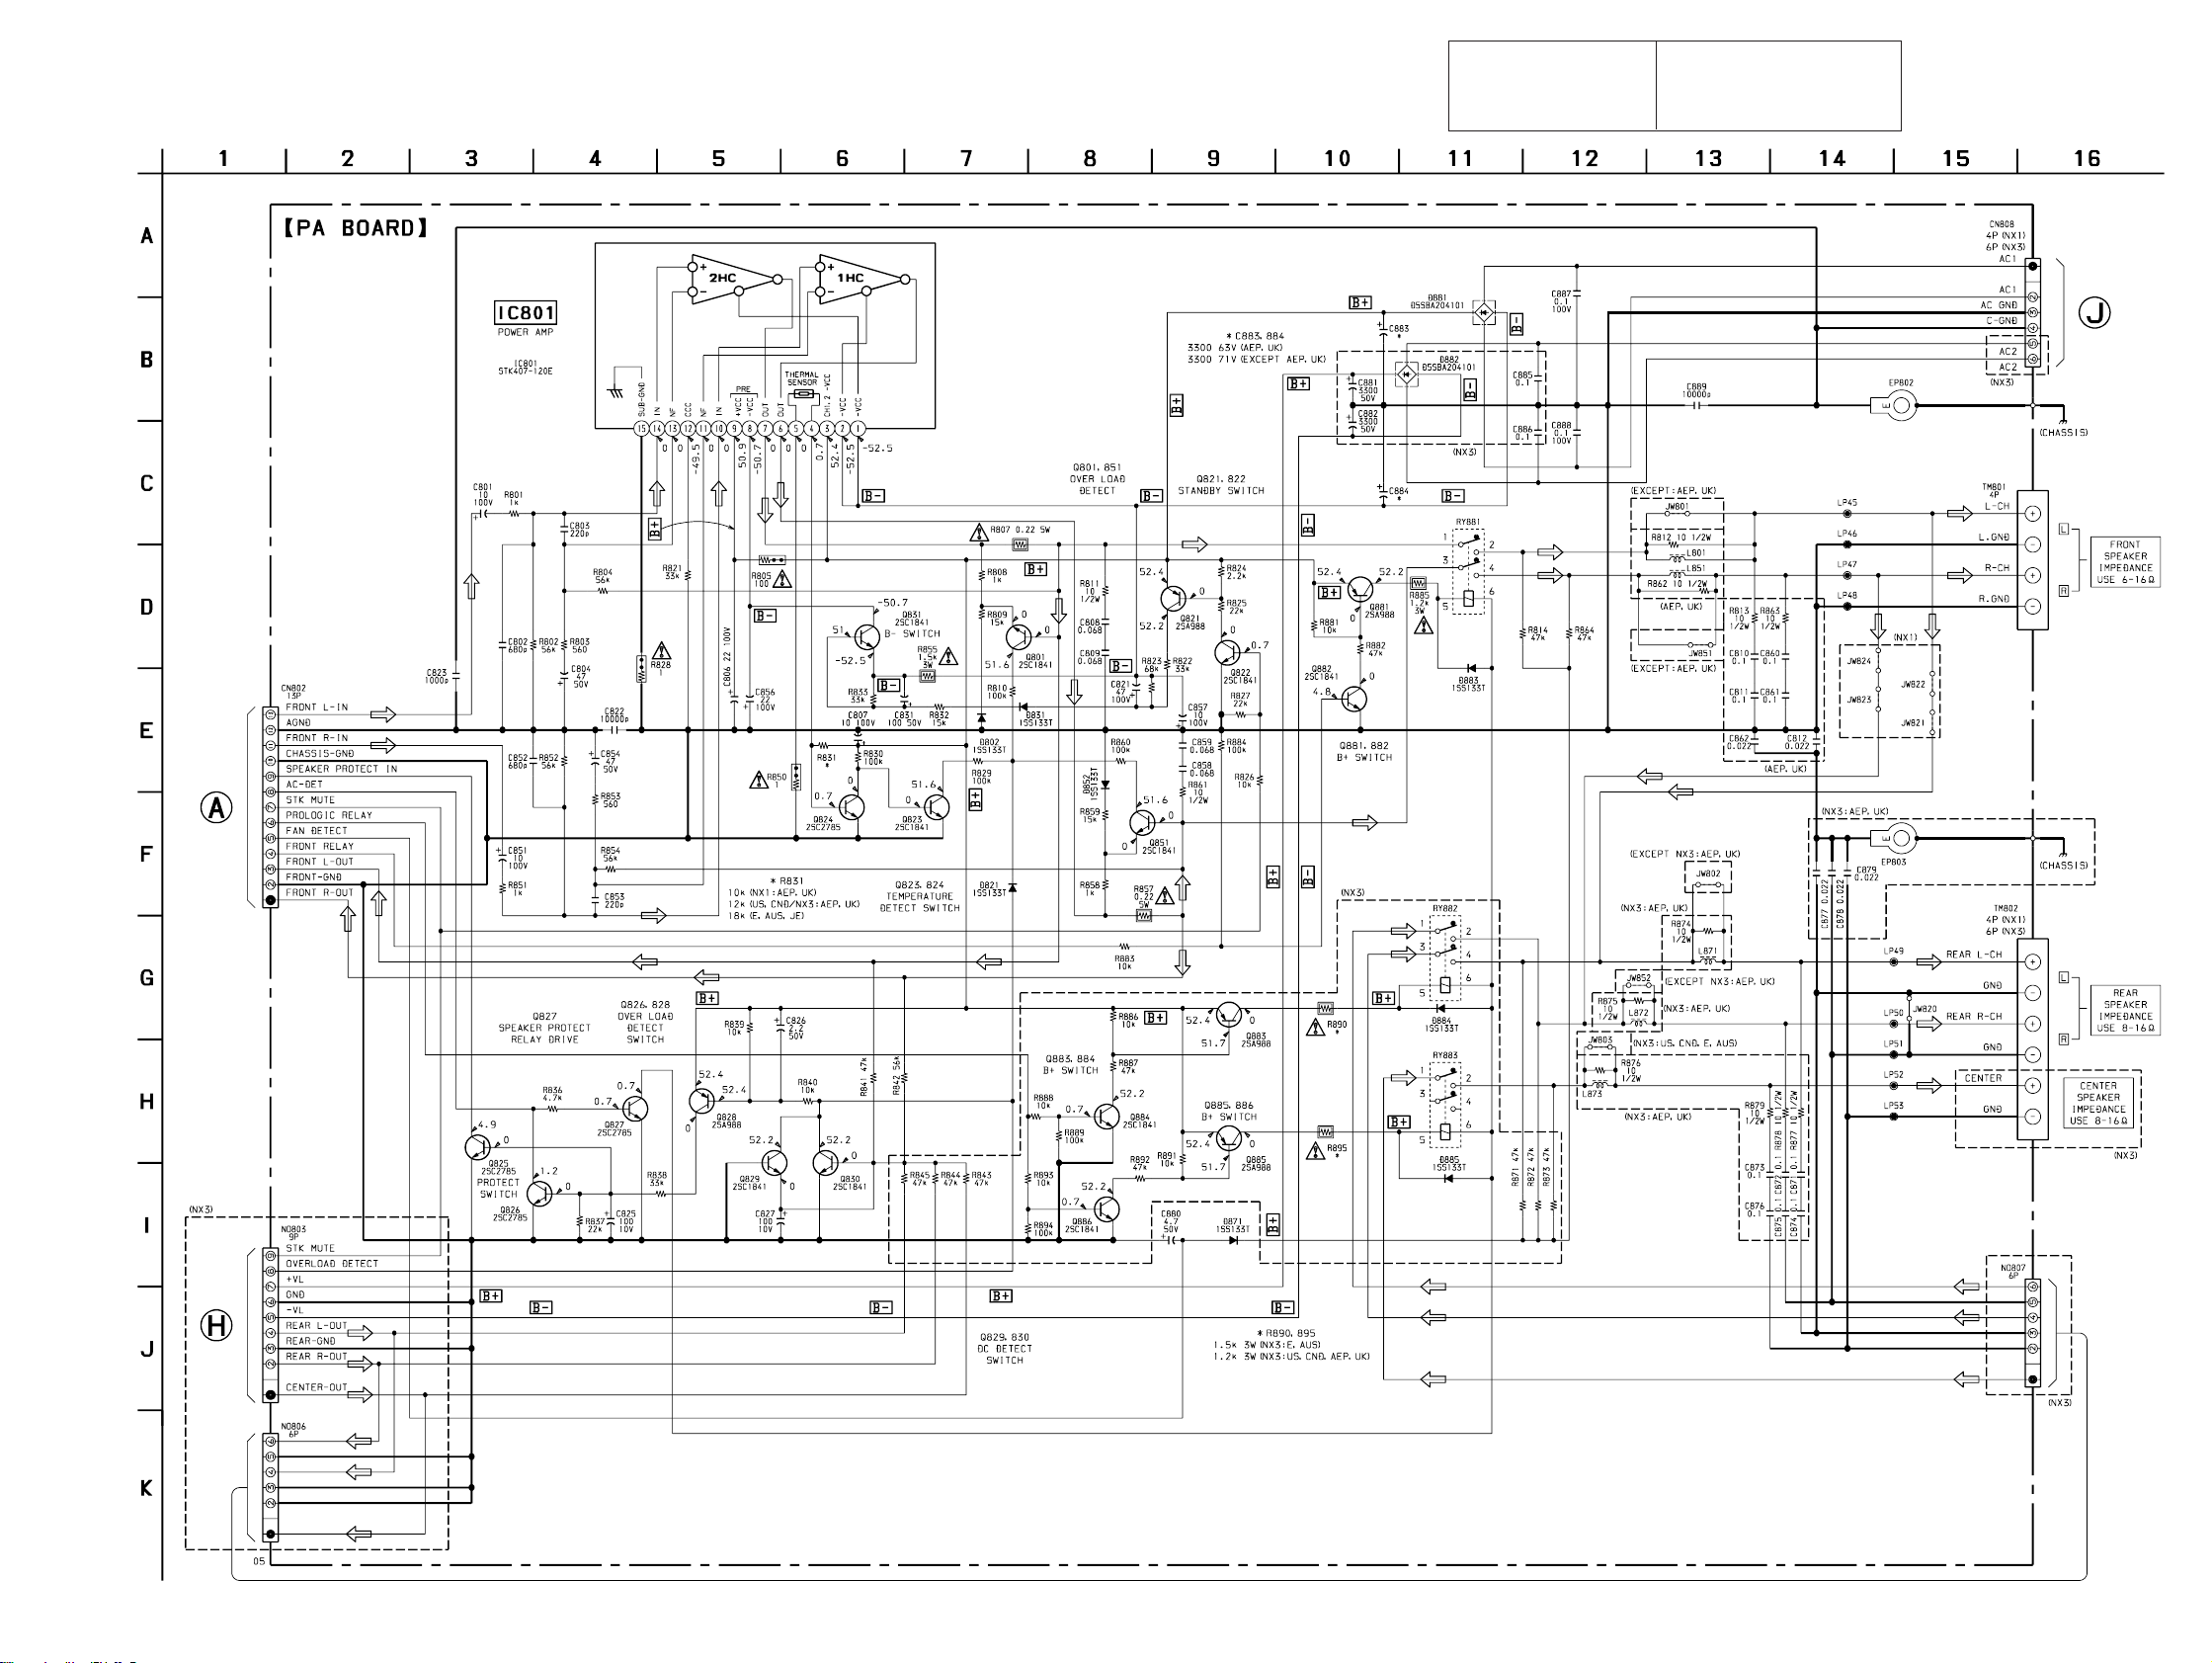
5-9. SCHEMATIC DIAGRAM – PA Board –
The components identified by
mark 0 or dotted line with
mark 0 are critical for safety.
Replace only with part number specified.
Les composants identifiés par une
marque 0 sont critiques pour la
sécurité.
Ne les remplacer que par une pièce
portant le numéro spécifié.
STR-NX1/NX3
(Page 23)
(Page 12)
(Page
17)
1919
Page 37
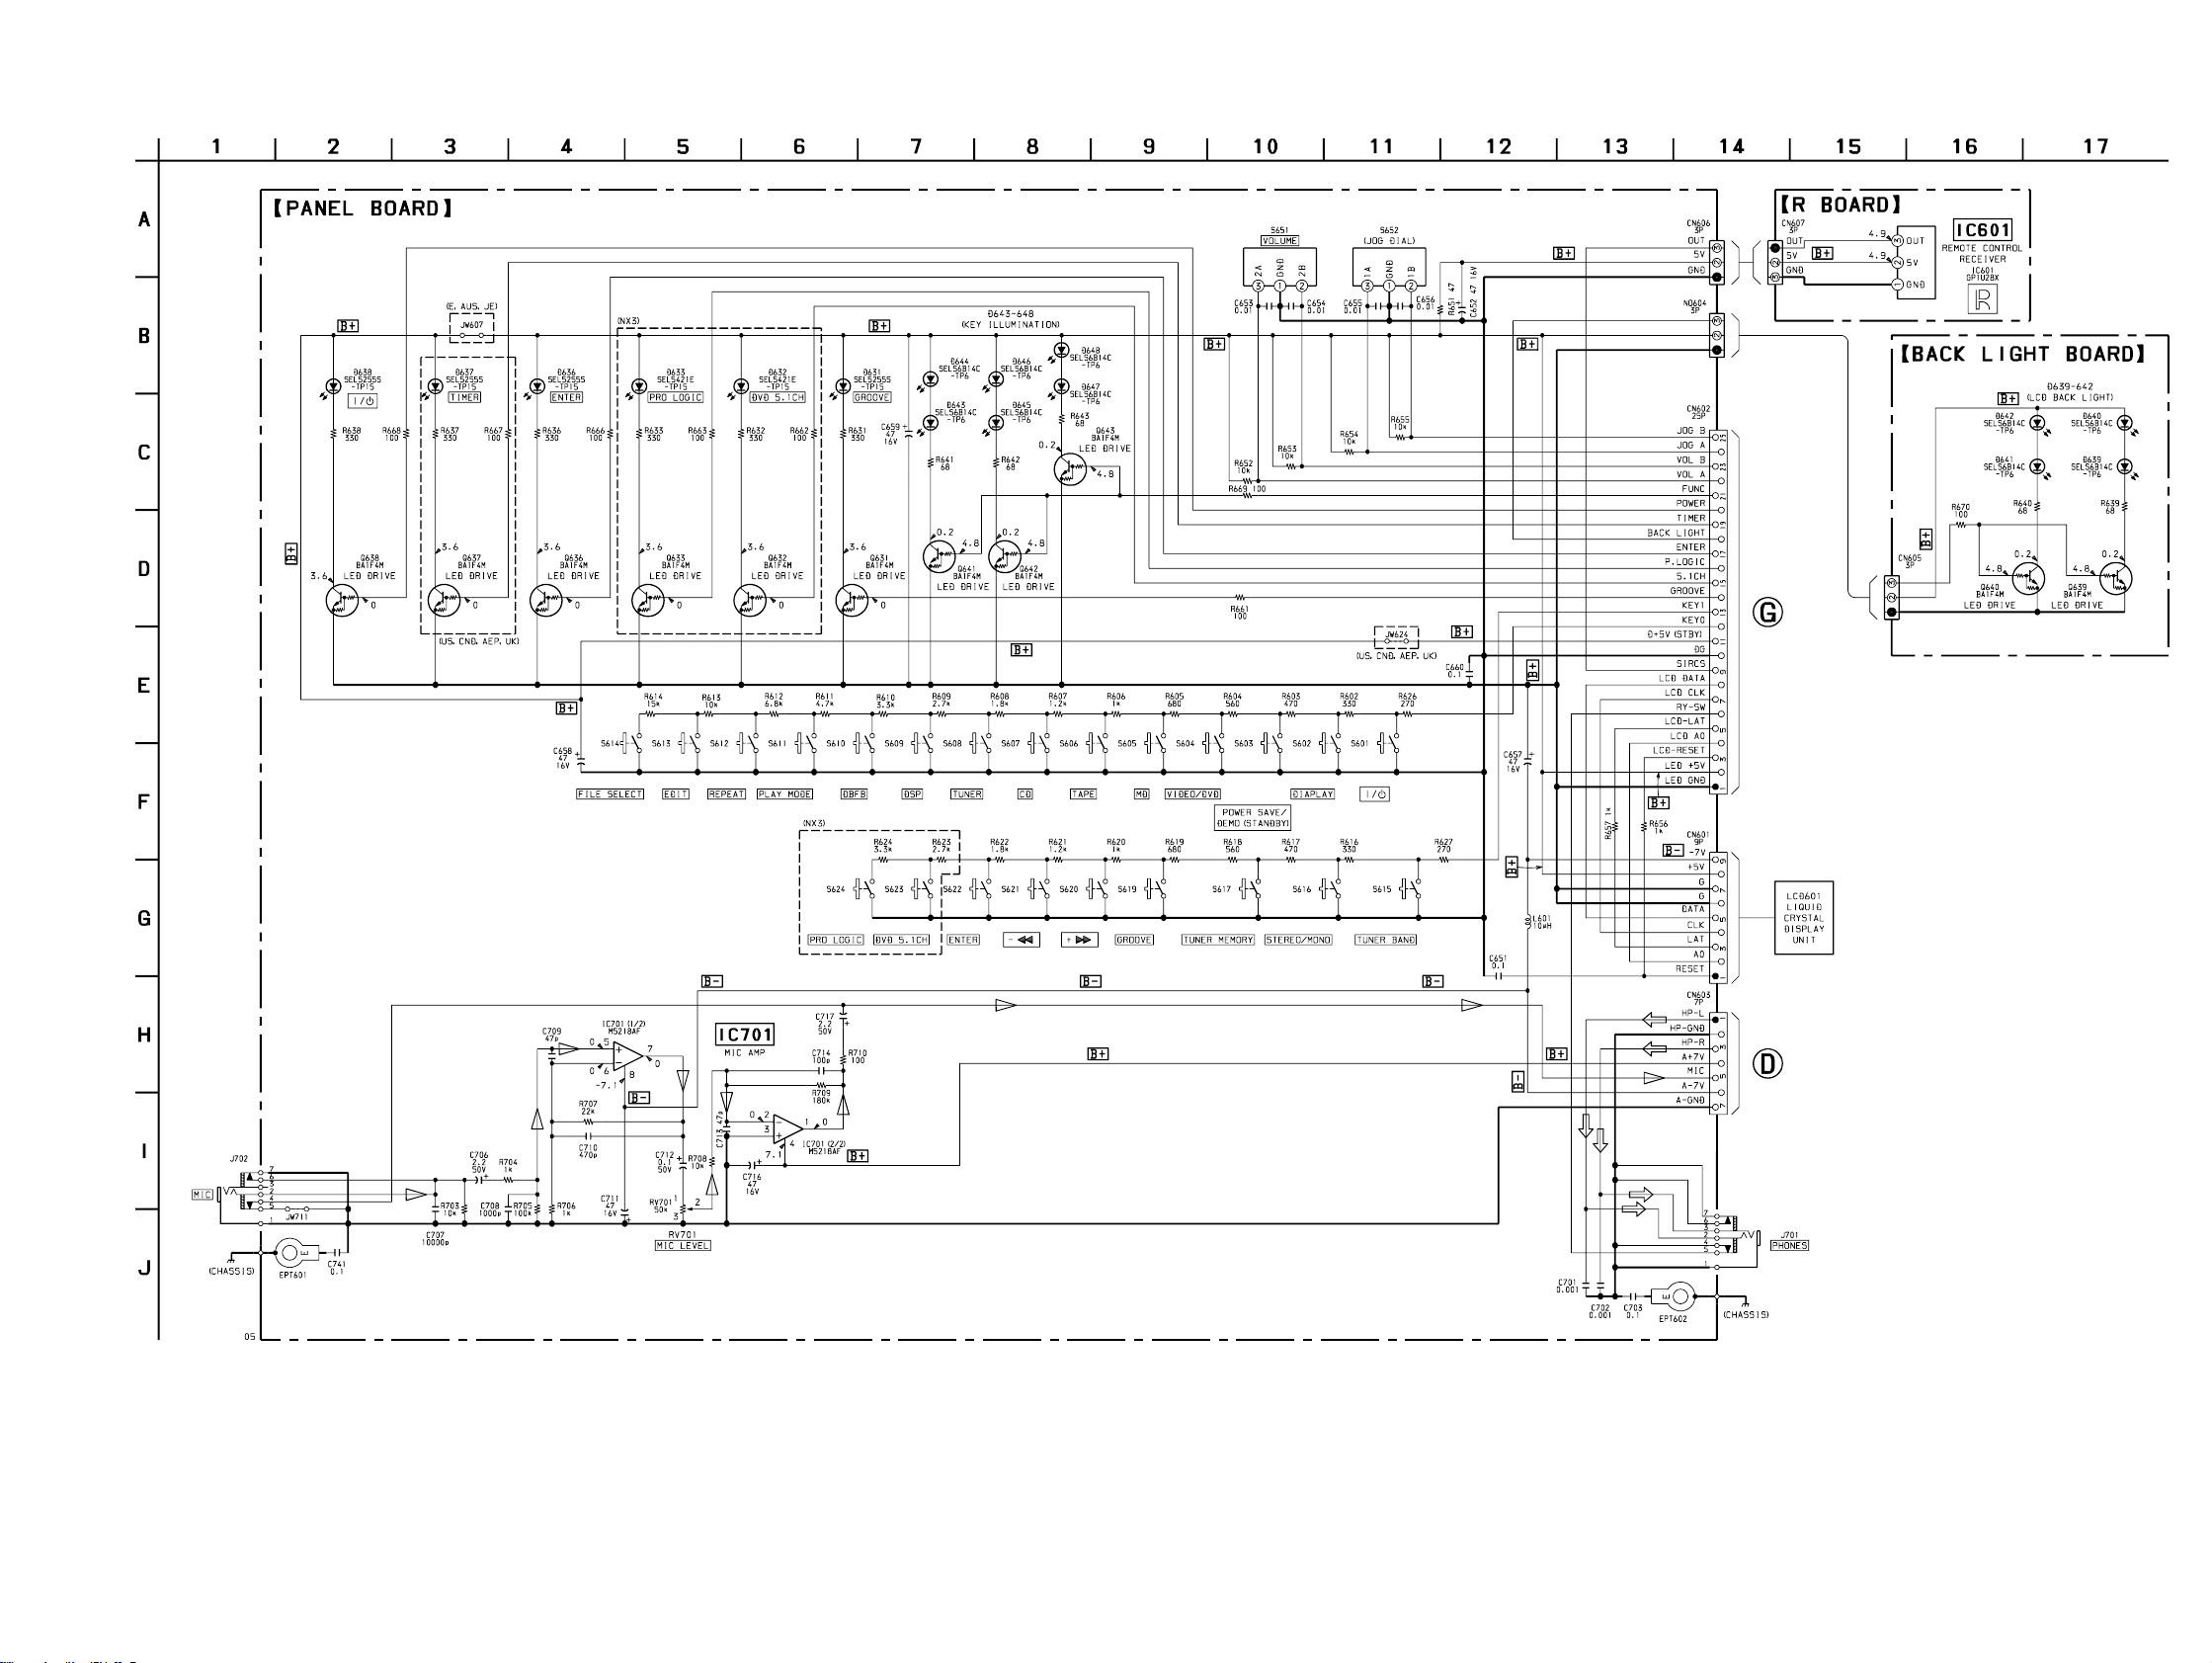
5-11. SCHEMATIC DIAGRAM – PANEL Section –
STR-NX1/NX3
(Page 14)
(Page 14)
2121
Page 38
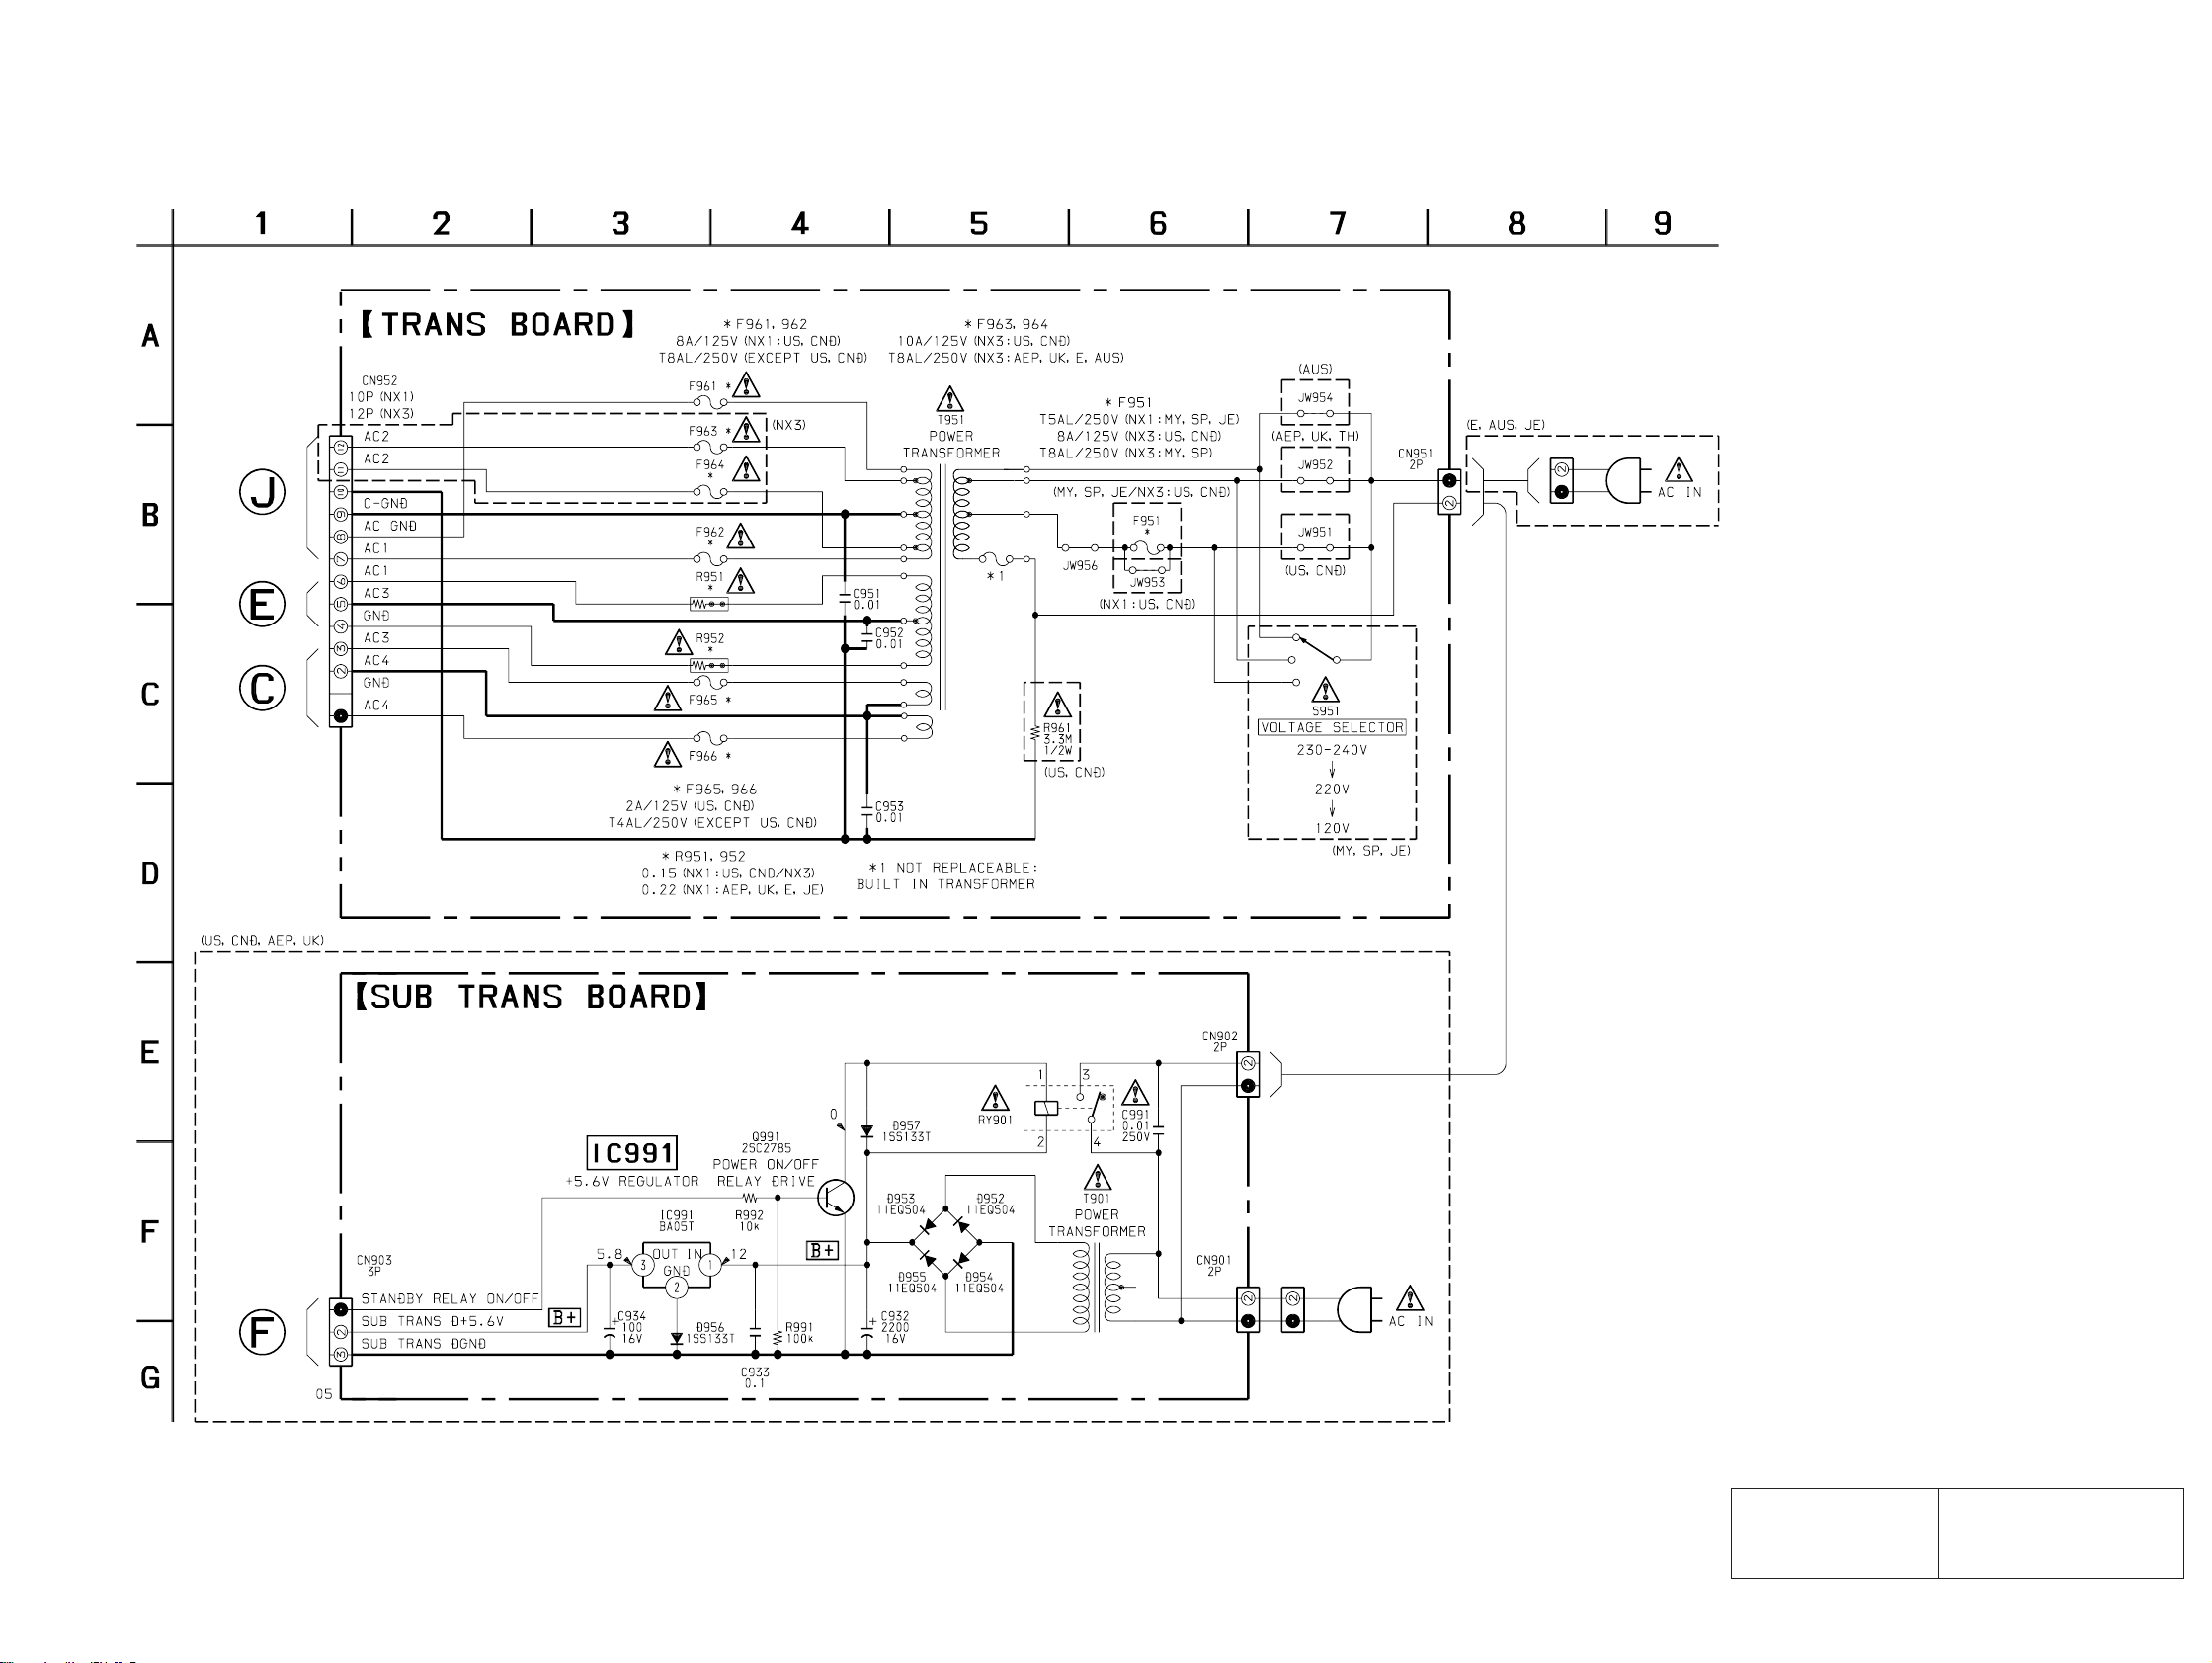
5-13. SCHEMATIC DIAGRAM – TRANSFORMER Section –
(Page 19)
STR-NX1/NX3
(Page 14)
(Page 13)
(Page 14)
The components identified by
mark 0 or dotted line with
mark 0 are critical for safety.
Replace only with part number specified.
Les composants identifiés par une
marque 0 sont critiques pour la
sécurité.
Ne les remplacer que par une pièce
portant le numéro spécifié.
2323
Page 39
BACK LIGHT MAIN
SECTION 7
ELECTRICAL PARTS LIST
NOTE:
• Due to standardization, replacements in the
parts list may be different from the parts specified in the diagrams or the components used
on the set.
• -XX and -X mean standardized parts, so they
may have some difference from the original
one.
• RESISTORS
All resistors are in ohms.
METAL: Metal-film resistor.
METAL OXIDE: Metal oxide-film resistor.
F: nonflammable
• Abbreviation
AUS : Australian model
CND: Canadian model
JE : Tourist model
Ref. No. Part No. Description Remark Ref. No. Part No. Description Remark
1-674-798-11 BACK LIGHT BOARD
CN605 1-785-329-11 PIN, CONNECTOR (LIGHT ANGLE) 3P
D639 8-719-076-15 LED SELS6B14C-TP6 (LCD BACK LIGHT)
D640 8-719-076-15 LED SELS6B14C-TP6 (LCD BACK LIGHT)
D641 8-719-076-15 LED SELS6B14C-TP6 (LCD BACK LIGHT)
D642 8-719-076-15 LED SELS6B14C-TP6 (LCD BACK LIGHT)
Q639 8-729-900-36 TRANSISTOR BA1F4M-TP
Q640 8-729-900-36 TRANSISTOR BA1F4M-TP
KR : Korean model
MY : Malaysia model
SP : Singapore model
TH : Thai model
****************
< CONNECTOR >
< LED >
< TRANSISTOR >
< RESISTOR >
• Items marked “*” are not stocked since they
are seldom required for routine service.
Some delay should be anticipated when ordering these items.
• SEMICONDUCTORS
In each case, u: µ, for example:
uA. . : µA. . uPA. . : µPA. .
uPB. . : µPB. . uPC. . : µPC. .
uPD. . : µPD. .
• CAPACITORS
uF: µF
• COILS
uH: µH
C114 1-137-437-11 FILM 0.0056uF 5% 50V
C115 1-136-159-00 FILM 0.033uF 5% 50V
C116 1-137-365-11 FILM 0.0015uF 5% 50V
C117 1-136-153-00 FILM 0.01uF 5% 50V
C118 1-162-288-31 CERAMIC 330PF 10% 50V
C119 1-137-368-11 FILM 0.0047uF 5% 50V
C120 1-137-367-11 FILM 0.0033uF 5% 50V
C121 1-126-964-11 ELECT 10uF 20% 50V
C122 1-162-291-31 CERAMIC 560PF 10% 50V
C123 1-136-169-00 FILM 0.22uF 5% 50V
C124 1-136-169-00 FILM 0.22uF 5% 50V
C125 1-126-964-11 ELECT 10uF 20% 50V
C127 1-162-306-11 CERAMIC 0.01uF 30% 16V
C128 1-136-495-11 FILM 0.068uF 5% 50V
C131 1-104-664-11 ELECT 47uF 20% 16V
C132 1-104-664-11 ELECT 47uF 20% 16V
C134 1-126-964-11 ELECT 10uF 20% 50V
The components identified by
mark 0 or dotted line with mark
0 are critical for safety.
Replace only with part number
specified.
Les composants identifiés par une
marque 0 sont critiquens pour la
sécurité.
Ne les remplacer que par une pièce
portant le numéro spécifié.
When indicating parts by reference
number, please include the board.
R639 1-249-403-11 CARBON 68 5% 1/4W
R640 1-249-403-11 CARBON 68 5% 1/4W
R670 1-247-807-31 CARBON 100 5% 1/4W
**************************************************************
A-4426-230-A MAIN BOARD, COMPLETE (NX1: AEP, UK)
A-4426-242-A MAIN BOARD, COMPLETE (NX1: US, CND)
A-4426-251-A MAIN BOARD, COMPLETE (NX1: MY, SP)
A-4426-261-A MAIN BOARD, COMPLETE (NX3: AEP, UK)
A-4426-269-A MAIN BOARD, COMPLETE (NX3: US, CND)
A-4426-277-A MAIN BOARD, COMPLETE (NX3: MY, SP)
A-4426-527-A MAIN BOARD, COMPLETE (NX3: KR, AUS)
A-4426-556-A MAIN BOARD, COMPLETE (NX1: JE)
A-4426-559-A MAIN BOARD, COMPLETE (NX1: KR)
A-4426-931-A MAIN BOARD, COMPLETE (NX1: TH)
*********************
7-685-646-79 SCREW +BVTP 3X8 TYPE2 N-S
< CAPACITOR >
C101 1-162-286-31 CERAMIC 220PF 10% 50V
C102 1-162-286-31 CERAMIC 220PF 10% 50V
C103 1-162-286-31 CERAMIC 220PF 10% 50V
C104 1-164-159-11 CERAMIC 0.1uF 50V
C105 1-164-159-11 CERAMIC 0.1uF 50V
(US, CND, AEP, UK)
C111 1-137-195-11 FILM 0.56uF 5% 50V
C112 1-136-158-00 FILM 0.027uF 5% 50V
C113 1-136-167-00 FILM 0.15uF 5% 50V
C141 1-126-959-11 ELECT 0.47uF 20% 50V
C151 1-162-286-31 CERAMIC 220PF 10% 50V
C152 1-162-286-31 CERAMIC 220PF 10% 50V
C153 1-162-286-31 CERAMIC 220PF 10% 50V
C161 1-137-195-11 FILM 0.56uF 5% 50V
C162 1-136-158-00 FILM 0.027uF 5% 50V
C163 1-136-167-00 FILM 0.15uF 5% 50V
C164 1-137-437-11 FILM 0.0056uF 5% 50V
C165 1-136-159-00 FILM 0.033uF 5% 50V
C166 1-137-365-11 FILM 0.0015uF 5% 50V
C167 1-136-153-00 FILM 0.01uF 5% 50V
C168 1-162-288-31 CERAMIC 330PF 10% 50V
C169 1-137-368-11 FILM 0.0047uF 5% 50V
C170 1-137-367-11 FILM 0.0033uF 5% 50V
C171 1-126-964-11 ELECT 10uF 20% 50V
C172 1-162-291-31 CERAMIC 560PF 10% 50V
C173 1-136-169-00 FILM 0.22uF 5% 50V
C174 1-136-169-00 FILM 0.22uF 5% 50V
C175 1-126-964-11 ELECT 10uF 20% 50V
C191 1-162-286-31 CERAMIC 220PF 10% 50V
C201 1-126-964-11 ELECT 10uF 20% 50V
(NX3)
C202 1-126-964-11 ELECT 10uF 20% 50V
(NX3)
C204 1-124-465-00 ELECT 0.47uF 20% 50V
(NX3)
30
Page 40

MAIN
Ref. No. Part No. Description Remark
C291 1-162-286-31 CERAMIC 220PF 10% 50V
(NX3)
C292 1-162-286-31 CERAMIC 220PF 10% 50V
(NX3)
C293 1-162-286-31 CERAMIC 220PF 10% 50V
(NX3)
C294 1-124-465-00 ELECT 0.47uF 20% 50V
(NX3)
C420 1-110-518-91 ELECT 10uF 20% 100V
C421 1-107-717-11 ELECT 47uF 20% 50V
C431 1-164-159-11 CERAMIC 0.1uF 50V
C432 1-126-963-11 ELECT 4.7uF 20% 50V
C436 1-126-964-11 ELECT 10uF 20% 50V
C437 1-126-964-11 ELECT 10uF 20% 50V
C438 1-162-303-11 CERAMIC 0.0033uF 30% 16V
C439 1-126-964-11 ELECT 10uF 20% 50V
C440 1-126-964-11 ELECT 10uF 20% 50V
C441 1-126-963-11 ELECT 4.7uF 20% 50V
C470 1-110-518-91 ELECT 10uF 20% 100V
C501 1-126-964-11 ELECT 10uF 20% 50V
C502 1-164-159-11 CERAMIC 0.1uF 50V
C503 1-136-165-00 FILM 0.1uF 5% 50V
C505 1-126-916-11 ELECT 1000uF 20% 6.3V
C506 1-162-306-11 CERAMIC 0.01uF 30% 16V
Ref. No. Part No. Description Remark
* CN111 1-564-506-11 PLUG, CONNECTOR 3P
CN121 1-784-774-11 CONNECTOR, FFC 13P
(US, CND, TH, KR, AUS)
CN121 1-784-776-11 CONNECTOR, FFC 15P (AEP, UK, MY, SP, JE)
CN131 1-784-786-11 CONNECTOR, FFC 25P
CN132 1-568-826-11 CONNECTOR, FFC 7P
CN141 1-506-468-11 PIN, CONNECTOR 3P (US, CND, AEP, UK)
CN152 1-778-982-11 CONNECTOR, BOARD TO BOARD 13P
CN161 1-691-767-11 PLUG (MICRO CONNECTOR) 5P (NX3)
* CN173 1-564-506-11 PLUG, CONNECTOR 3P
* CN181 1-564-506-11 PLUG, CONNECTOR 3P
< DIODE >
D141 8-719-911-19 DIODE 1SS133T-72
D216 8-719-911-19 DIODE 1SS133T-72 (NX3)
D501 8-719-911-19 DIODE 1SS133T-72
D502 8-719-911-19 DIODE 1SS133T-72
D503 8-719-911-19 DIODE 1SS133T-72
D504 8-719-911-19 DIODE 1SS133T-72
D505 8-719-911-19 DIODE 1SS133T-72
D506 8-719-911-19 DIODE 1SS133T-72
D507 8-719-911-19 DIODE 1SS133T-72
D508 8-719-911-19 DIODE 1SS133T-72
C507 1-107-713-11 ELECT 4.7uF 20% 35V
C511 1-162-205-31 CERAMIC 18PF 5% 50V
C512 1-162-203-31 CERAMIC 15PF 5% 50V
C513 1-162-306-11 CERAMIC 0.01uF 30% 16V
C514 1-162-306-11 CERAMIC 0.01uF 30% 16V
C515 1-104-665-11 ELECT 100uF 20% 25V
C521 1-104-665-11 ELECT 100uF 20% 10V
C522 1-162-306-11 CERAMIC 0.01uF 30% 16V
C523 1-126-964-11 ELECT 10uF 20% 50V
C524 1-162-282-31 CERAMIC 100PF 10% 50V
C525 1-162-282-31 CERAMIC 100PF 10% 50V
C901 1-136-165-00 FILM 0.1uF 5% 50V
C902 1-126-936-11 ELECT 3300uF 20% 16V
C903 1-126-934-11 ELECT 220uF 20% 16V
C904 1-126-924-11 ELECT 330uF 20% 10V
C905 1-104-664-11 ELECT 47uF 20% 16V
C908 1-126-964-11 ELECT 10uF 20% 50V
C909 1-126-916-11 ELECT 1000uF 20% 6.3V
C920 1-126-767-11 ELECT 1000uF 20% 16V
C921 1-126-941-11 ELECT 470uF 20% 25V
C922 1-126-952-11 ELECT 1000uF 20% 35V
C923 1-164-159-11 CERAMIC 0.1uF 50V
C924 1-104-664-11 ELECT 47uF 20% 16V
C926 1-126-916-11 ELECT 1000uF 20% 6.3V
C927 1-126-933-11 ELECT 100uF 20% 16V
C931 1-126-961-11 ELECT 2.2uF 20% 50V
C941 1-164-159-11 CERAMIC 0.1uF 50V
(US, CND, AEP, UK)
C951 1-136-165-00 FILM 0.1uF 5% 50V
C952 1-126-768-11 ELECT 2200uF 20% 16V
C953 1-126-934-11 ELECT 220uF 20% 16V
C954 1-126-924-11 ELECT 330uF 20% 10V
D510 8-719-911-19 DIODE 1SS133T-72 (US, CND, AEP, UK)
D901 8-719-024-99 DIODE 11ES2-NTA2B
D902 8-719-024-99 DIODE 11ES2-NTA2B
D903 8-719-024-99 DIODE 11ES2-NTA2B
D904 8-719-024-99 DIODE 11ES2-NTA2B
D905 8-719-911-19 DIODE 1SS133T-72
D906 8-719-921-48 DIODE MTZJ-T-72-5.6C
D914 8-719-911-19 DIODE 1SS133T-72 (E, AUS, JE)
D915 8-719-024-99 DIODE 11ES2-NTA2B (E, AUS, JE)
D920 8-719-024-99 DIODE 11ES2-NTA2B
D921 8-719-110-23 DIODE MTZJ-T-72-11C
D922 8-719-024-99 DIODE 11ES2-NTA2B (NX3)
D923 8-719-024-99 DIODE 11ES2-NTA2B (NX3)
D924 8-719-024-99 DIODE 11ES2-NTA2B (NX3)
D925 8-719-024-99 DIODE 11ES2-NTA2B
D931 8-719-911-19 DIODE 1SS133T-72
D932 8-719-911-19 DIODE 1SS133T-72
< GROUND TERMINAL >
EP901 1-537-770-21 TERMINAL BOARD, GROUND
< IC >
IC101 8-759-571-54 IC M62493FP
IC201 8-759-571-51 IC M62464FP (NX3)
IC401 8-759-083-77 IC BA3830F
IC501 8-759-597-56 IC M30622MA-A12FP
IC502 8-759-635-63 IC M51943BSL-TP
IC901 8-759-231-53 IC M5F7805L
IC921 8-759-231-58 IC M5F7812L
< JACK >
< CONNECTOR >
CN101 1-793-351-11 SOCKET, CONNECTOR 19P
32
J101 1-784-275-11 JACK, PIN 6P (VIDEO (AUDIO) IN, MD IN, MD
OUT)
Page 41

MAIN
Ref. No. Part No. Description Remark
J102 1-785-009-11 JACK, PIN 6P (DVD 5.1CH INPUT: FRONT,
REAR, CENTER, WOOFER) (NX3)
J191 1-774-785-11 JACK, PIN 1P (SUPER WOOFER OUT)
< COIL >
L436 1-410-517-11 INDUCTOR 47uH
L501 1-410-509-11 INDUCTOR 10uH
< TRANSISTOR >
Q112 8-729-119-78 TRANSISTOR 2SC2785TP-HFE
Q113 8-729-119-78 TRANSISTOR 2SC2785TP-HFE
Q114 8-729-141-30 TRANSISTOR 2SC3623ATP-LK
Q162 8-729-119-78 TRANSISTOR 2SC2785TP-HFE
Q163 8-729-119-78 TRANSISTOR 2SC2785TP-HFE
Q164 8-729-141-30 TRANSISTOR 2SC3623ATP-LK
Q191 8-729-141-30 TRANSISTOR 2SC3623ATP-LK
Q281 8-729-141-30 TRANSISTOR 2SC3623ATP-LK (NX3)
Q282 8-729-141-30 TRANSISTOR 2SC3623ATP-LK (NX3)
Q291 8-729-141-30 TRANSISTOR 2SC3623ATP-LK (NX3)
Q411 8-729-141-30 TRANSISTOR 2SC3623ATP-LK
Q421 8-729-900-63 TRANSISTOR BN1F4M-TP
Q431 8-729-111-29 TRANSISTOR 2SD1616-TP-LK
Q432 8-729-119-76 TRANSISTOR 2SA1175TP-HFE
Q461 8-729-141-30 TRANSISTOR 2SC3623ATP-LK
Q501 8-729-119-78 TRANSISTOR 2SC2785TP-HFE
Q502 8-729-900-63 TRANSISTOR BN1F4M-TP
Q503 8-729-900-63 TRANSISTOR BN1F4M-TP
Q901 8-729-209-15 TRANSISTOR 2SD2012
Q902 8-729-119-78 TRANSISTOR 2SC2785TP-HFE
Q903 8-729-119-78 TRANSISTOR 2SC2785TP-HFE
Q904 8-729-900-36 TRANSISTOR BA1F4M-TP
Q905 8-729-900-36 TRANSISTOR BA1F4M-TP
Q906 8-729-040-20 TRANSISTOR RT1P137L-TP
Q907 8-729-900-36 TRANSISTOR BA1F4M-TP
Q921 8-729-026-68 TRANSISTOR 2SD2525 (TP)
Q923 8-729-040-20 TRANSISTOR RT1P137L-TP (NX3)
Q924 8-729-900-36 TRANSISTOR BA1F4M-TP (NX3)
Q951 8-729-141-83 TRANSISTOR 2SB1375
Q952 8-729-119-76 TRANSISTOR 2SA1175TP-HFE
Q953 8-729-119-76 TRANSISTOR 2SA1175TP-HFE
< RESISTOR >
Ref. No. Part No. Description Remark
R122 1-249-421-11 CARBON 2.2K 5% 1/4W
R123 1-249-441-11 CARBON 100K 5% 1/4W
R124 1-249-429-11 CARBON 10K 5% 1/4W
R125 1-247-843-11 CARBON 3.3K 5% 1/4W
R126 1-249-421-11 CARBON 2.2K 5% 1/4W
R128 1-247-903-00 CARBON 1M 5% 1/4W
R131 1-247-807-31 CARBON 100 5% 1/4W
R132 1-247-807-31 CARBON 100 5% 1/4W
R133 1-247-807-31 CARBON 100 5% 1/4W
R141 1-249-433-11 CARBON 22K 5% 1/4W
R142 1-249-433-11 CARBON 22K 5% 1/4W
R143 1-249-417-11 CARBON 1K 5% 1/4W
R144 1-249-441-11 CARBON 100K 5% 1/4W
R145 1-247-903-00 CARBON 1M 5% 1/4W
R151 1-249-417-11 CARBON 1K 5% 1/4W
R152 1-249-417-11 CARBON 1K 5% 1/4W
R153 1-249-417-11 CARBON 1K 5% 1/4W
R154 1-247-807-31 CARBON 100 5% 1/4W
R155 1-247-807-31 CARBON 100 5% 1/4W
R156 1-247-807-31 CARBON 100 5% 1/4W
R161 1-249-421-11 CARBON 2.2K 5% 1/4W
R162 1-249-429-11 CARBON 10K 5% 1/4W
R164 1-247-895-00 CARBON 470K 5% 1/4W
R165 1-247-899-11 CARBON 680K 5% 1/4W
R167 1-249-414-11 CARBON 560 5% 1/4W
R168 1-249-429-11 CARBON 10K 5% 1/4W
R169 1-249-438-11 CARBON 56K 5% 1/4W
R170 1-249-429-11 CARBON 10K 5% 1/4W
R171 1-249-437-11 CARBON 47K 5% 1/4W
R172 1-249-421-11 CARBON 2.2K 5% 1/4W
R173 1-249-441-11 CARBON 100K 5% 1/4W
R174 1-249-429-11 CARBON 10K 5% 1/4W
R178 1-247-903-00 CARBON 1M 5% 1/4W
R191 1-249-417-11 CARBON 1K 5% 1/4W
R192 1-249-441-11 CARBON 100K 5% 1/4W
R193 1-249-417-11 CARBON 1K 5% 1/4W
R194 1-249-429-11 CARBON 10K 5% 1/4W
R201 1-249-441-11 CARBON 100K 5% 1/4W
(NX3)
R202 1-249-441-11 CARBON 100K 5% 1/4W
(NX3)
R222 1-249-417-11 CARBON 1K 5% 1/4W
(NX3)
R101 1-249-417-11 CARBON 1K 5% 1/4W
R102 1-249-417-11 CARBON 1K 5% 1/4W
R103 1-249-417-11 CARBON 1K 5% 1/4W
R104 1-247-807-31 CARBON 100 5% 1/4W
R105 1-247-807-31 CARBON 100 5% 1/4W
R106 1-247-807-31 CARBON 100 5% 1/4W
R111 1-249-421-11 CARBON 2.2K 5% 1/4W
R112 1-249-429-11 CARBON 10K 5% 1/4W
R114 1-247-895-00 CARBON 470K 5% 1/4W
R115 1-247-899-11 CARBON 680K 5% 1/4W
R117 1-249-414-11 CARBON 560 5% 1/4W
R118 1-249-429-11 CARBON 10K 5% 1/4W
R119 1-249-438-11 CARBON 56K 5% 1/4W
R120 1-249-429-11 CARBON 10K 5% 1/4W
R121 1-249-437-11 CARBON 47K 5% 1/4W
R223 1-249-417-11 CARBON 1K 5% 1/4W
(NX3)
R224 1-249-417-11 CARBON 1K 5% 1/4W
(NX3)
R245 1-247-891-00 CARBON 330K 5% 1/4W
(NX3)
R260 1-249-437-11 CARBON 47K 5% 1/4W
(NX3)
R261 1-247-876-11 CARBON 75K 5% 1/4W
(NX3)
R262 1-249-437-11 CARBON 47K 5% 1/4W
(NX3)
R263 1-247-876-11 CARBON 75K 5% 1/4W
(NX3)
R264 1-247-883-00 CARBON 150K 5% 1/4W
(NX3)
33
Page 42

MAIN
Ref. No. Part No. Description Remark
R265 1-247-883-00 CARBON 150K 5% 1/4W
(NX3)
R267 1-249-441-11 CARBON 100K 5% 1/4W
(NX3)
R271 1-249-441-11 CARBON 100K 5% 1/4W
(NX3)
R274 1-249-429-11 CARBON 10K 5% 1/4W
(NX3)
R275 1-249-429-11 CARBON 10K 5% 1/4W
(NX3)
R276 1-249-429-11 CARBON 10K 5% 1/4W
(NX3)
R277 1-249-429-11 CARBON 10K 5% 1/4W
(NX3)
R278 1-249-429-11 CARBON 10K 5% 1/4W
(NX3)
R279 1-249-429-11 CARBON 10K 5% 1/4W
(NX3)
R281 1-249-428-11 CARBON 8.2K 5% 1/4W
(NX3)
R282 1-249-427-11 CARBON 6.8K 5% 1/4W
(NX3)
R283 1-249-427-11 CARBON 6.8K 5% 1/4W
(NX3)
R284 1-249-421-11 CARBON 2.2K 5% 1/4W
(NX3)
R285 1-249-441-11 CARBON 100K 5% 1/4W
(NX3)
R286 1-249-429-11 CARBON 10K 5% 1/4W
(NX3)
R287 1-249-421-11 CARBON 2.2K 5% 1/4W
(NX3)
R288 1-249-441-11 CARBON 100K 5% 1/4W
(NX3)
R289 1-249-429-11 CARBON 10K 5% 1/4W
(NX3)
R291 1-249-428-11 CARBON 8.2K 5% 1/4W
(NX3)
R292 1-249-427-11 CARBON 6.8K 5% 1/4W
(NX3)
R293 1-249-427-11 CARBON 6.8K 5% 1/4W
(NX3)
R294 1-249-421-11 CARBON 2.2K 5% 1/4W
(NX3)
R295 1-249-441-11 CARBON 100K 5% 1/4W
(NX3)
R296 1-249-429-11 CARBON 10K 5% 1/4W
(NX3)
R411 1-260-089-11 CARBON 150 5% 1/2W
(NX1: AEP, UK)
R411 1-260-090-11 CARBON 180 5% 1/2W
(EXCEPT NX1: AEP, UK)
R412 1-260-089-11 CARBON 150 5% 1/2W
(NX1: AEP, UK)
Ref. No. Part No. Description Remark
R418 1-260-089-11 CARBON 150 5% 1/2W
(NX1: AEP, UK)
R418 1-260-090-11 CARBON 180 5% 1/2W
(EXCEPT NX1: AEP, UK)
R431 1-249-421-11 CARBON 2.2K 5% 1/4W
R432 1-249-425-11 CARBON 4.7K 5% 1/4W
R433 1-249-441-11 CARBON 100K 5% 1/4W
R436 1-247-893-11 CARBON 390K 5% 1/4W
R437 1-247-893-11 CARBON 390K 5% 1/4W
R438 1-249-441-11 CARBON 100K 5% 1/4W
R439 1-249-440-11 CARBON 82K 5% 1/4W
R440 1-249-437-11 CARBON 47K 5% 1/4W
R441 1-249-441-11 CARBON 100K 5% 1/4W
R442 1-249-440-11 CARBON 82K 5% 1/4W
R443 1-249-420-11 CARBON 1.8K 5% 1/4W
R444 1-249-429-11 CARBON 10K 5% 1/4W
R445 1-249-441-11 CARBON 100K 5% 1/4W
R446 1-249-429-11 CARBON 10K 5% 1/4W
R447 1-249-435-11 CARBON 33K 5% 1/4W
R448 1-247-895-00 CARBON 470K 5% 1/4W
R461 1-260-089-11 CARBON 150 5% 1/2W
(NX1: AEP, UK)
R461 1-260-090-11 CARBON 180 5% 1/2W
(EXCEPT NX1: AEP, UK)
R462 1-260-089-11 CARBON 150 5% 1/2W
(NX1: AEP, UK)
R462 1-260-090-11 CARBON 180 5% 1/2W
(EXCEPT NX1: AEP, UK)
R463 1-260-084-11 CARBON 56 5% 1/2W
R464 1-249-417-11 CARBON 1K 5% 1/4W
R468 1-260-089-11 CARBON 150 5% 1/2W
(NX1: AEP, UK)
R468 1-260-090-11 CARBON 180 5% 1/2W
(EXCEPT NX1: AEP, UK)
R501 1-249-413-11 CARBON 470 5% 1/4W
R502 1-249-425-11 CARBON 4.7K 5% 1/4W
R503 1-249-437-11 CARBON 47K 5% 1/4W
R504 1-249-437-11 CARBON 47K 5% 1/4W
R505 1-249-429-11 CARBON 10K 5% 1/4W
R506 1-249-409-11 CARBON 220 5% 1/4W
R507 1-249-441-11 CARBON 100K 5% 1/4W
R510 1-249-429-11 CARBON 10K 5% 1/4W
R511 1-247-891-00 CARBON 330K 5% 1/4W
R513 1-249-429-11 CARBON 10K 5% 1/4W
R514 1-247-807-31 CARBON 100 5% 1/4W
R515 1-249-425-11 CARBON 4.7K 5% 1/4W
R516 1-249-429-11 CARBON 10K 5% 1/4W
R517 1-247-807-31 CARBON 100 5% 1/4W
R518 1-249-425-11 CARBON 4.7K 5% 1/4W
R519 1-249-425-11 CARBON 4.7K 5% 1/4W
R520 1-249-409-11 CARBON 220 5% 1/4W
R521 1-249-409-11 CARBON 220 5% 1/4W
R412 1-260-090-11 CARBON 180 5% 1/2W
(EXCEPT NX1: AEP, UK)
R413 1-260-084-11 CARBON 56 5% 1/2W
R414 1-249-417-11 CARBON 1K 5% 1/4W
R415 1-249-429-11 CARBON 10K 5% 1/4W
R416 1-249-437-11 CARBON 47K 5% 1/4W
R417 1-249-417-11 CARBON 1K 5% 1/4W
34
R526 1-247-807-31 CARBON 100 5% 1/4W
R527 1-247-807-31 CARBON 100 5% 1/4W
R528 1-247-807-31 CARBON 100 5% 1/4W
R529 1-247-807-31 CARBON 100 5% 1/4W
R530 1-247-807-31 CARBON 100 5% 1/4W
R531 1-247-807-31 CARBON 100 5% 1/4W
R532 1-249-429-11 CARBON 10K 5% 1/4W
Page 43

MAIN PA
Ref. No. Part No. Description Remark
R534 1-247-807-31 CARBON 100 5% 1/4W
(US, CND, AEP, UK)
R535 1-249-429-11 CARBON 10K 5% 1/4W
R536 1-249-417-11 CARBON 1K 5% 1/4W
R537 1-249-429-11 CARBON 10K 5% 1/4W
R538 1-247-807-31 CARBON 100 5% 1/4W
R539 1-247-843-11 CARBON 3.3K 5% 1/4W
R543 1-249-429-11 CARBON 10K 5% 1/4W
R544 1-249-429-11 CARBON 10K 5% 1/4W
R546 1-247-807-31 CARBON 100 5% 1/4W
R547 1-247-807-31 CARBON 100 5% 1/4W
R548 1-247-807-31 CARBON 100 5% 1/4W
R549 1-247-807-31 CARBON 100 5% 1/4W
R550 1-247-807-31 CARBON 100 5% 1/4W
R551 1-247-807-31 CARBON 100 5% 1/4W
R552 1-249-429-11 CARBON 10K 5% 1/4W
R553 1-247-807-31 CARBON 100 5% 1/4W
R554 1-247-807-31 CARBON 100 5% 1/4W
R555 1-247-807-31 CARBON 100 5% 1/4W
R556 1-247-807-31 CARBON 100 5% 1/4W
R557 1-247-807-31 CARBON 100 5% 1/4W
R558 1-247-807-31 CARBON 100 5% 1/4W
R559 1-247-807-31 CARBON 100 5% 1/4W
R561 1-247-807-31 CARBON 100 5% 1/4W
R562 1-247-807-31 CARBON 100 5% 1/4W
R563 1-247-807-31 CARBON 100 5% 1/4W
R566 1-247-807-31 CARBON 100 5% 1/4W
R567 1-247-807-31 CARBON 100 5% 1/4W
R568 1-247-807-31 CARBON 100 5% 1/4W
R570 1-247-807-31 CARBON 100 5% 1/4W
R571 1-247-807-31 CARBON 100 5% 1/4W
R572 1-247-807-31 CARBON 100 5% 1/4W
R573 1-247-807-31 CARBON 100 5% 1/4W
R574 1-249-429-11 CARBON 10K 5% 1/4W
R575 1-249-429-11 CARBON 10K 5% 1/4W
R581 1-249-425-11 CARBON 4.7K 5% 1/4W
(NX3)
R582 1-249-407-11 CARBON 150 5% 1/4W
(NX3)
R582 1-249-417-11 CARBON 1K 5% 1/4W
(NX1)
R583 1-249-415-11 CARBON 680 5% 1/4W
(AEP, UK)
R583 1-249-417-11 CARBON 1K 5% 1/4W
(US, CND)
R583 1-249-425-11 CARBON 4.7K 5% 1/4W
(TH, KR, AUS, JE)
R584 1-249-411-11 CARBON 330 5% 1/4W
(TH, KR, AUS)
R584 1-249-417-11 CARBON 1K 5% 1/4W
(MY, SP, JE)
R584 1-249-425-11 CARBON 4.7K 5% 1/4W
(AEP, UK)
R585 1-247-807-31 CARBON 100 5% 1/4W
R586 1-247-807-31 CARBON 100 5% 1/4W
R587 1-247-807-31 CARBON 100 5% 1/4W
R588 1-247-807-31 CARBON 100 5% 1/4W
(AEP, UK)
R589 1-247-807-31 CARBON 100 5% 1/4W
(AEP, UK)
Ref. No. Part No. Description Remark
R901 1-247-843-11 CARBON 3.3K 5% 1/4W
R902 1-249-415-11 CARBON 680 5% 1/4W
R903 1-249-383-11 CARBON 1.5 5% 1/6W
R905 1-249-419-11 CARBON 1.5K 5% 1/4W
R906 1-249-414-11 CARBON 560 5% 1/4W
R907 1-249-425-11 CARBON 4.7K 5% 1/4W
R908 1-249-429-11 CARBON 10K 5% 1/4W
R909 1-249-430-11 CARBON 12K 5% 1/4W
R910 1-249-429-11 CARBON 10K 5% 1/4W
R920 1-249-417-11 CARBON 1K 5% 1/4W
R921 1-249-409-11 CARBON 220 5% 1/4W
R931 1-249-425-11 CARBON 4.7K 5% 1/4W
R932 1-249-425-11 CARBON 4.7K 5% 1/4W
R933 1-249-433-11 CARBON 22K 5% 1/4W
R951 1-247-843-11 CARBON 3.3K 5% 1/4W
R952 1-249-415-11 CARBON 680 5% 1/4W
R953 1-249-383-11 CARBON 1.5 5% 1/6W
< VIBRATOR >
X511 1-567-098-41 VIBRATOR, CRYSTAL (32.768kHz)
X512 1-781-107-21 VIBRATOR, SERAMIC (16MHz)
**************************************************************
A-4426-238-A PA BOARD, COMPLETE (NX1: AEP, UK)
A-4426-246-A PA BOARD, COMPLETE (NX1: US, CND)
A-4426-255-A PA BOARD, COMPLETE (NX1: MY, SP, KR, JE)
A-4426-266-A PA BOARD, COMPLETE (NX3: AEP, UK)
A-4426-272-A PA BOARD, COMPLETE (NX3: US, CND)
A-4426-281-A PA BOARD, COMPLETE (NX3: E, AUS)
A-4426-938-A PA BOARD, COMPLETE (NX1: TH)
*******************
< CAPACITOR >
C801 1-128-582-11 ELECT 10uF 20% 100V
C802 1-162-292-31 CERAMIC 680PF 10% 50V
C803 1-162-286-31 CERAMIC 220PF 10% 50V
C804 1-126-967-11 ELECT 47uF 20% 50V
C806 1-128-560-11 ELECT 22uF 20% 100V
C807 1-128-582-11 ELECT 10uF 20% 100V
C808 1-136-495-11 FILM 0.068uF 5% 50V
C809 1-136-495-11 FILM 0.068uF 5% 50V
C810 1-136-165-00 FILM 0.1uF 5% 50V
(AEP, UK)
C811 1-136-165-00 FILM 0.1uF 5% 50V
(AEP, UK)
C812 1-161-494-00 CERAMIC 0.022uF 25V
(AEP, UK)
C821 1-128-562-11 ELECT 47uF 20% 100V
C822 1-162-306-11 CERAMIC 0.01uF 30% 16V
C823 1-162-294-31 CERAMIC 0.001uF 10% 50V
C825 1-104-665-11 ELECT 100uF 20% 10V
C826 1-126-961-11 ELECT 2.2uF 20% 50V
C827 1-104-665-11 ELECT 100uF 20% 10V
C831 1-126-968-11 ELECT 100uF 20% 50V
C851 1-128-582-11 ELECT 10uF 20% 100V
C852 1-162-292-31 CERAMIC 680PF 10% 50V
C853 1-162-286-31 CERAMIC 220PF 10% 50V
C854 1-126-967-11 ELECT 47uF 20% 50V
35
Page 44
PA
Ref. No. Part No. Description Remark
C856 1-128-560-11 ELECT 22uF 20% 100V
C857 1-128-582-11 ELECT 10uF 20% 100V
C858 1-136-495-11 FILM 0.068uF 5% 50V
C859 1-136-495-11 FILM 0.068uF 5% 50V
C860 1-136-165-00 FILM 0.1uF 5% 50V
(AEP, UK)
C861 1-136-165-00 FILM 0.1uF 5% 50V
(AEP, UK)
C862 1-161-494-00 CERAMIC 0.022uF 25V
(AEP, UK)
C871 1-136-165-00 FILM 0.1uF 5% 50V
(NX3: AEP, UK)
C872 1-136-165-00 FILM 0.1uF 5% 50V
(NX3: AEP, UK)
C873 1-136-165-00 FILM 0.1uF 5% 50V
(NX3: AEP, UK)
C874 1-136-165-00 FILM 0.1uF 5% 50V
(NX3: AEP, UK)
C875 1-136-165-00 FILM 0.1uF 5% 50V
(NX3: AEP, UK)
C876 1-136-165-00 FILM 0.1uF 5% 50V
(NX3: AEP, UK)
C877 1-161-494-00 CERAMIC 0.022uF 25V
(NX3: AEP, UK)
C878 1-161-494-00 CERAMIC 0.022uF 25V
(NX3: AEP, UK)
C879 1-161-494-00 CERAMIC 0.022uF 25V
(NX3: AEP, UK)
C880 1-126-163-11 ELECT 4.7uF 20% 50V
C881 1-127-751-11 ELECT 3300uF 20% 50V
(NX3: US, CND, AEP, UK)
C881 1-127-811-11 ELECT 3300uF 20% 50V
(NX3: MY, SP, KR, AUS)
C882 1-127-751-11 ELECT 3300uF 20% 50V
(NX3: US, CND, AEP, UK)
C882 1-127-811-11 ELECT 3300uF 20% 50V
(NX3: MY, SP, KR, AUS)
C883 1-127-752-11 ELECT 3300uF 20% 63V
(AEP, UK)
C883 1-127-753-11 ELECT 3300uF 20% 71V
(US, CND)
C883 1-127-813-11 ELECT 3300uF 20% 71V
(E, AUS, JE)
C884 1-127-752-11 ELECT 3300uF 20% 63V
(AEP, UK)
C884 1-127-753-11 ELECT 3300uF 20% 71V
(US, CND)
C884 1-127-813-11 ELECT 3300uF 20% 71V
(E, AUS, JE)
C885 1-136-165-00 FILM 0.1uF 5% 50V
(NX3)
Ref. No. Part No. Description Remark
< DIODE >
D802 8-719-911-19 DIODE 1SS133T-72
D821 8-719-911-19 DIODE 1SS133T-72
D831 8-719-911-19 DIODE 1SS133T-72
D852 8-719-911-19 DIODE 1SS133T-72
D871 8-719-911-19 DIODE 1SS133T-72
D881 8-719-510-68 DIODE D5SBA204101
D882 8-719-510-68 DIODE D5SBA204101 (NX3)
D883 8-719-911-19 DIODE 1SS133T-72
D884 8-719-911-19 DIODE 1SS133T-72 (NX3)
D885 8-719-911-19 DIODE 1SS133T-72 (NX3)
< GROUND TERMINAL >
EP802 1-537-770-21 TERMINAL BOARD, GROUND
< IC >
IC801 8-749-015-39 IC STK407-120E
< COIL >
L801 1-420-872-00 COIL, AIR-CORE (AEP, UK)
L851 1-420-872-00 COIL, AIR-CORE (AEP, UK)
L871 1-420-872-00 COIL, AIR-CORE (NX3: AEP, UK)
L872 1-420-872-00 COIL, AIR-CORE (NX3: AEP, UK)
L873 1-420-872-00 COIL, AIR-CORE (NX3: AEP, UK)
< TRANSISTOR >
Q801 8-729-140-84 TRANSISTOR 2SC1841TP-PAFAEA
Q821 8-729-140-82 TRANSISTOR 2SA988TP-PAFAEA
Q822 8-729-140-84 TRANSISTOR 2SC1841TP-PAFAEA
Q823 8-729-140-84 TRANSISTOR 2SC1841TP-PAFAEA
Q824 8-729-119-78 TRANSISTOR 2SC2785TP-HFE
Q825 8-729-119-78 TRANSISTOR 2SC2785TP-HFE
Q826 8-729-119-78 TRANSISTOR 2SC2785TP-HFE
Q827 8-729-119-78 TRANSISTOR 2SC2785TP-HFE
Q828 8-729-140-82 TRANSISTOR 2SA988TP-PAFAEA
Q829 8-729-140-84 TRANSISTOR 2SC1841TP-PAFAEA
Q830 8-729-140-84 TRANSISTOR 2SC1841TP-PAFAEA
Q831 8-729-140-84 TRANSISTOR 2SC1841TP-PAFAEA
Q851 8-729-140-84 TRANSISTOR 2SC1841TP-PAFAEA
Q881 8-729-140-82 TRANSISTOR 2SA988TP-PAFAEA
Q882 8-729-140-84 TRANSISTOR 2SC1841TP-PAFAEA
Q883 8-729-140-82 TRANSISTOR 2SA988TP-PAFAEA (NX3)
Q884 8-729-140-84 TRANSISTOR 2SC1841TP-PAFAEA (NX3)
Q885 8-729-140-82 TRANSISTOR 2SA988TP-PAFAEA (NX3)
Q886 8-729-140-84 TRANSISTOR 2SC1841TP-PAFAEA (NX3)
< RESISTOR >
C886 1-136-165-00 FILM 0.1uF 5% 50V
C887 1-130-777-00 FILM 0.1uF 10% 100V
C888 1-130-777-00 FILM 0.1uF 10% 100V
C889 1-162-306-11 CERAMIC 0.01uF 30% 16V
< CONNECTOR >
CN802 1-778-981-11 CONNECTOR, BOARD TO BOARD 13P
CN808 1-691-766-11 PLUG (MICRO CONNECTOR) 4P (NX1)
CN808 1-691-768-11 PLUG (MICRO CONNECTOR) 6P (NX3)
36
(NX3)
R801 1-249-417-11 CARBON 1K 5% 1/4W
R802 1-249-438-11 CARBON 56K 5% 1/4W
R803 1-249-414-11 CARBON 560 5% 1/4W
R804 1-249-438-11 CARBON 56K 5% 1/4W
0R805 1-212-881-11 FUSIBLE 100 5% 1/4W F
0R807 1-217-156-00 METAL 0.22 10% 5W F
R808 1-249-417-11 CARBON 1K 5% 1/4W
R809 1-249-431-11 CARBON 15K 5% 1/4W
R810 1-249-441-11 CARBON 100K 5% 1/4W
R811 1-260-076-11 CARBON 10 5% 1/2W
The components identified by
mark 0 or dotted line with
mark 0 are critical for safety.
Replace only with part number specified.
Les composants identifiés par une
marque 0 sont critiques pour la
sécurité.
Ne les remplacer que par une pièce
portant le numéro spécifié.
Page 45
PA
Ref. No. Part No. Description Remark
R812 1-260-076-11 CARBON 10 5% 1/2W
(AEP, UK)
R813 1-260-076-11 CARBON 10 5% 1/2W
(AEP, UK)
R814 1-249-437-11 CARBON 47K 5% 1/4W
R821 1-249-435-11 CARBON 33K 5% 1/4W
R822 1-249-435-11 CARBON 33K 5% 1/4W
R823 1-249-439-11 CARBON 68K 5% 1/4W
R824 1-249-421-11 CARBON 2.2K 5% 1/4W
R825 1-249-433-11 CARBON 22K 5% 1/4W
R826 1-249-429-11 CARBON 10K 5% 1/4W
R827 1-249-433-11 CARBON 22K 5% 1/4W
0R828 1-202-972-61 FUSIBLE 1 5% 1/4W F
R829 1-249-441-11 CARBON 100K 5% 1/4W
R830 1-249-441-11 CARBON 100K 5% 1/4W
R831 1-249-429-11 CARBON 10K 5% 1/4W
(NX1: AEP, UK)
R831 1-249-43‹-11 CARBON 12K 5% 1/4W
(US, CND/NX3: AEP, UK)
R831 1-249-432-11 CARBON 18K 5% 1/4W
(E, AUS, JE)
R832 1-249-431-11 CARBON 15K 5% 1/4W
R833 1-249-435-11 CARBON 33K 5% 1/4W
R836 1-249-425-11 CARBON 4.7K 5% 1/4W
R837 1-249-433-11 CARBON 22K 5% 1/4W
R838 1-249-435-11 CARBON 33K 5% 1/4W
R839 1-249-429-11 CARBON 10K 5% 1/4W
R840 1-249-429-11 CARBON 10K 5% 1/4W
R841 1-249-437-11 CARBON 47K 5% 1/4W
R842 1-249-438-11 CARBON 56K 5% 1/4W
R843 1-249-437-11 CARBON 47K 5% 1/4W
(NX3)
R844 1-249-437-11 CARBON 47K 5% 1/4W
(NX3)
R845 1-249-437-11 CARBON 47K 5% 1/4W
(NX3)
0R850 1-202-972-61 FUSIBLE 1 5% 1/4W F
R851 1-249-417-11 CARBON 1K 5% 1/4W
R852 1-249-438-11 CARBON 56K 5% 1/4W
R853 1-249-414-11 CARBON 560 5% 1/4W
R854 1-249-438-11 CARBON 56K 5% 1/4W
0R855 1-215-918-41 METAL OXIDE 1.5K 5% 3W F
0R857 1-217-156-00 METAL 0.22 10% 5W F
R858 1-249-417-11 CARBON 1K 5% 1/4W
R859 1-249-431-11 CARBON 15K 5% 1/4W
R860 1-249-441-11 CARBON 100K 5% 1/4W
R861 1-260-076-11 CARBON 10 5% 1/2W
R862 1-260-076-11 CARBON 10 5% 1/2W
(AEP, UK)
R863 1-260-076-11 CARBON 10 5% 1/2W
(AEP, UK)
R864 1-249-437-11 CARBON 47K 5% 1/4W
R871 1-249-437-11 CARBON 47K 5% 1/4W
(NX3)
R872 1-249-437-11 CARBON 47K 5% 1/4W
(NX3)
R873 1-249-437-11 CARBON 47K 5% 1/4W
(NX3)
Ref. No. Part No. Description Remark
R874 1-260-076-11 CARBON 10 5% 1/2W
(NX3: AEP, UK)
R875 1-260-076-11 CARBON 10 5% 1/2W
(NX3: AEP, UK)
R876 1-260-076-11 CARBON 10 5% 1/2W
(NX3: AEP, UK)
R877 1-260-076-11 CARBON 10 5% 1/2W
(NX3: AEP, UK)
R878 1-260-076-11 CARBON 10 5% 1/2W
(NX3: AEP, UK)
R879 1-260-076-11 CARBON 10 5% 1/2W
(NX3: AEP, UK)
R881 1-249-429-11 CARBON 10K 5% 1/4W
R882 1-249-437-11 CARBON 47K 5% 1/4W
R883 1-249-429-11 CARBON 10K 5% 1/4W
R884 1-249-441-11 CARBON 100K 5% 1/4W
0R885 1-216-481-41 METAL OXIDE 1.2K 5% 3W F
R886 1-249-429-11 CARBON 10K 5% 1/4W
(NX3)
R887 1-249-437-11 CARBON 47K 5% 1/4W
(NX3)
R888 1-249-429-11 CARBON 10K 5% 1/4W
(NX3)
R889 1-249-441-11 CARBON 100K 5% 1/4W
(NX3)
0R890 1-215-918-41 METAL OXIDE 1.5K 5% 3W F
(NX3: E, AUS)
0R890 1-216-481-41 METAL OXIDE 1.2K 5% 3W F
(NX3: US, CND, AEP, UK)
R891 1-249-429-11 CARBON 10K 5% 1/4W
(NX3)
R892 1-249-437-11 CARBON 47K 5% 1/4W
(NX3)
R893 1-249-429-11 CARBON 10K 5% 1/4W
(NX3)
R894 1-249-441-11 CARBON 100K 5% 1/4W
(NX3)
0R895 1-215-918-41 METAL OXIDE 1.5K 5% 3W F
(NX3: E, AUS)
0R895 1-216-481-41 METAL OXIDE 1.2K 5% 3W F
(NX3: US, CND, AEP, UK)
< RELAY >
RY881 1-755-168-11 RELAY
RY882 1-515-920-11 RELAY (24V) (NX3)
RY883 1-515-920-11 RELAY (24V) (NX3)
< TERMINAL >
TM801 1-537-240-11 TERMINAL BOARD (CHECKER PIN)
(FRONT SPEAKER)
TM802 1-537-240-11 TERMINAL BOARD (CHECKER PIN)
(REAR SPEAKER) (NX1)
TM802 1-537-510-11 TERMINAL BOARD (SPEAKER) (6P)
(REAR SPEAKER, CENTER SPEAKER) (NX3)
**************************************************************
The components identified by
mark 0 or dotted line with
mark 0 are critical for safety.
Replace only with part number specified.
Les composants identifiés par une
marque 0 sont critiques pour la
sécurité.
Ne les remplacer que par une pièce
portant le numéro spécifié.
37
Page 46

PANEL
Ref. No. Part No. Description Remark
A-4426-226-A PANEL BOARD, COMPLETE
(NX1: US, CND, AEP, UK)
A-4426-249-A PANEL BOARD, COMPLETE (NX1: MY, SP, KR,
A-4426-258-A PANEL BOARD, COMPLETE
(NX3: US, CND, AEP, UK)
A-4426-275-A PANEL BOARD, COMPLETE (NX3: E, AUS)
A-4426-927-A PANEL BOARD, COMPLETE (NX1: TH)
**********************
< CAPACITOR >
C651 1-164-159-11 CERAMIC 0.1uF 50V
C652 1-104-664-11 ELECT 47uF 20% 16V
C653 1-162-306-11 CERAMIC 0.01uF 30% 16V
C654 1-162-306-11 CERAMIC 0.01uF 30% 16V
C655 1-162-306-11 CERAMIC 0.01uF 30% 16V
C656 1-162-306-11 CERAMIC 0.01uF 30% 16V
C657 1-104-664-11 ELECT 47uF 20% 16V
C658 1-104-664-11 ELECT 47uF 20% 16V
C659 1-104-664-11 ELECT 47uF 20% 16V
C660 1-164-159-11 CERAMIC 0.1uF 50V
C701 1-162-294-31 CERAMIC 0.001uF 10% 50V
C702 1-162-294-31 CERAMIC 0.001uF 10% 50V
C703 1-164-159-11 CERAMIC 0.1uF 50V
C706 1-126-961-11 ELECT 2.2uF 20% 50V
C707 1-162-306-11 CERAMIC 0.01uF 30% 16V
C708 1-162-294-31 CERAMIC 0.001uF 10% 50V
C709 1-162-215-31 CERAMIC 47PF 5% 50V
C710 1-162-290-31 CERAMIC 470PF 10% 50V
C711 1-104-664-11 ELECT 47uF 20% 16V
C712 1-126-956-91 ELECT 0.1uF 20% 50V
C713 1-162-215-31 CERAMIC 47PF 5% 50V
C714 1-162-282-31 CERAMIC 100PF 10% 50V
C716 1-104-664-11 ELECT 47uF 20% 16V
C717 1-126-961-11 ELECT 2.2uF 20% 50V
C741 1-164-159-11 CERAMIC 0.1uF 50V
< CONNECTOR >
CN601 1-784-731-11 CONNECTOR, FFC 9P
CN602 1-784-747-11 CONNECTOR, FFC 25P
CN603 1-568-850-11 CONNECTOR, FFC 7P
* CN606 1-560-666-00 PIN, CONNECTOR 3P
< LED >
D631 8-719-076-21 LED SEL5255S-TP15 (GROOVE)
D632 8-719-046-43 LED SEL5421E-TP15 (DVD 5.1CH) (NX3)
D633 8-719-046-43 LED SEL5421E-TP15 (PRO LOGIC) (NX3)
D636 8-719-076-21 LED SEL5255S-TP15 (ENTER)
D637 8-719-076-21 LED SEL5255S-TP15 (TIMER)
(US, CND, AEP, UK)
Ref. No. Part No. Description Remark
< GROUND TERMINAL >
JE)
EPT601 1-537-770-21 TERMINAL BOARD, GROUND
EPT602 1-537-770-21 TERMINAL BOARD, GROUND
< IC >
IC701 8-759-634-51 IC M5218AP
< JACK >
J701 1-785-569-11 JACK (SMALL TYPE) (PHONES)
J702 1-785-569-11 JACK (SMALL TYPE) (MIC)
< COIL >
L601 1-410-509-11 INDUCTOR 10uH
< TRANSISTOR >
Q631 8-729-900-36 TRANSISTOR BA1F4M-TP
Q632 8-729-900-36 TRANSISTOR BA1F4M-TP (NX3)
Q633 8-729-900-36 TRANSISTOR BA1F4M-TP (NX3)
Q636 8-729-900-36 TRANSISTOR BA1F4M-TP
Q637 8-729-900-36 TRANSISTOR BA1F4M-TP (US, CND, AEP,
Q638 8-729-900-36 TRANSISTOR BA1F4M-TP
Q641 8-729-900-36 TRANSISTOR BA1F4M-TP
Q642 8-729-900-36 TRANSISTOR BA1F4M-TP
Q643 8-729-900-36 TRANSISTOR BA1F4M-TP
< RESISTOR >
R602 1-249-411-11 CARBON 330 5% 1/4W
R603 1-249-413-11 CARBON 470 5% 1/4W
R604 1-249-414-11 CARBON 560 5% 1/4W
R605 1-249-415-11 CARBON 680 5% 1/4W
R606 1-249-417-11 CARBON 1K 5% 1/4W
R607 1-249-418-11 CARBON 1.2K 5% 1/4W
R608 1-249-420-11 CARBON 1.8K 5% 1/4W
R609 1-249-422-11 CARBON 2.7K 5% 1/4W
R610 1-247-843-11 CARBON 3.3K 5% 1/4W
R611 1-249-425-11 CARBON 4.7K 5% 1/4W
R612 1-249-427-11 CARBON 6.8K 5% 1/4W
R613 1-249-429-11 CARBON 10K 5% 1/4W
R614 1-249-431-11 CARBON 15K 5% 1/4W
R616 1-249-411-11 CARBON 330 5% 1/4W
R617 1-249-413-11 CARBON 470 5% 1/4W
R618 1-249-414-11 CARBON 560 5% 1/4W
R619 1-249-415-11 CARBON 680 5% 1/4W
R620 1-249-417-11 CARBON 1K 5% 1/4W
R621 1-249-418-11 CARBON 1.2K 5% 1/4W
R622 1-249-420-11 CARBON 1.8K 5% 1/4W
UK)
D638 8-719-076-21 LED SEL5255S-TP15 (?/1)
D643 8-719-076-15 LED SELS6B14C-TP6 (KEY ILLUMINATION)
D644 8-719-076-15 LED SELS6B14C-TP6 (KEY ILLUMINATION)
D645 8-719-076-15 LED SELS6B14C-TP6 (KEY ILLUMINATION)
D646 8-719-076-15 LED SELS6B14C-TP6 (KEY ILLUMINATION)
D647 8-719-076-15 LED SELS6B14C-TP6 (KEY ILLUMINATION)
D648 8-719-076-15 LED SELS6B14C-TP6 (KEY ILLUMINATION)
38
R623 1-249-422-11 CARBON 2.7K 5% 1/4W
(NX3)
R624 1-247-843-11 CARBON 3.3K 5% 1/4W
(NX3)
R626 1-249-410-11 CARBON 270 5% 1/4W
R627 1-249-410-11 CARBON 270 5% 1/4W
R631 1-249-411-11 CARBON 330 5% 1/4W
R632 1-249-411-11 CARBON 330 5% 1/4W
(NX3)
Page 47
PANEL R SUB TRANS
Ref. No. Part No. Description Remark
R633 1-249-411-11 CARBON 330 5% 1/4W
(NX3)
R636 1-249-411-11 CARBON 330 5% 1/4W
R637 1-249-411-11 CARBON 330 5% 1/4W
(US, CND, AEP, UK)
R638 1-249-411-11 CARBON 330 5% 1/4W
R641 1-249-403-11 CARBON 68 5% 1/4W
R642 1-249-403-11 CARBON 68 5% 1/4W
R643 1-249-403-11 CARBON 68 5% 1/4W
R651 1-249-401-11 CARBON 47 5% 1/4W
R652 1-249-429-11 CARBON 10K 5% 1/4W
R653 1-249-429-11 CARBON 10K 5% 1/4W
R654 1-249-429-11 CARBON 10K 5% 1/4W
R655 1-249-429-11 CARBON 10K 5% 1/4W
R656 1-249-417-11 CARBON 1K 5% 1/4W
R657 1-249-417-11 CARBON 1K 5% 1/4W
R661 1-247-807-31 CARBON 100 5% 1/4W
R662 1-247-807-31 CARBON 100 5% 1/4W
(NX3)
R663 1-247-807-31 CARBON 100 5% 1/4W
(NX3)
R666 1-247-807-31 CARBON 100 5% 1/4W
R667 1-247-807-31 CARBON 100 5% 1/4W
(US, CND, AEP, UK)
R668 1-247-807-31 CARBON 100 5% 1/4W
R669 1-247-807-31 CARBON 100 5% 1/4W
R703 1-249-429-11 CARBON 10K 5% 1/4W
R704 1-249-417-11 CARBON 1K 5% 1/4W
Ref. No. Part No. Description Remark
S620 1-762-875-21 SWITCH, TACTILE (+ M)
S621 1-762-875-21 SWITCH, TACTILE (– m)
S622 1-762-875-21 SWITCH, TACTILE (ENTER)
S623 1-762-875-21 SWITCH, TACTILE (DVD 5.1CH) (NX3)
S624 1-762-875-21 SWITCH, TACTILE (PRO LOGIC) (NX3)
S651 1-473-392-11 ENCODER, ROTARY (VOLUME)
S652 1-473-534-11 ENCODER, ROTARY (JOG DIAL)
**************************************************************
* 1-675-197-11 R BOARD
*******
< CONNECTOR >
* CN607 1-565-835-11 SOCKET, CONNECTOR 3P
< IC >
IC601 8-749-011-05 IC GP1U28X (REMOTE CONTROL RECEIVER)
**************************************************************
1-674-801-11 SUB TRANS BOARD (US, CND, AEP, UK)
****************
< CAPACITOR >
C932 1-126-768-11 ELECT 2200uF 20% 16V
C933 1-164-159-11 CERAMIC 0.1uF 50V
C934 1-126-933-11 ELECT 100uF 20% 16V
0C991 1-113-925-11 CERAMIC 0.01uF 20% 250V
R705 1-249-441-11 CARBON 100K 5% 1/4W
R706 1-249-417-11 CARBON 1K 5% 1/4W
R707 1-249-433-11 CARBON 22K 5% 1/4W
R708 1-249-429-11 CARBON 10K 5% 1/4W
R709 1-247-885-00 CARBON 180K 5% 1/4W
R710 1-247-807-31 CARBON 100 5% 1/4W
< VARIABLE RESISTOR >
RV701 1-225-739-11 RES, VAR CARBON 50K (MIC LEVEL)
< SWITCH/ROTARY ENCODER >
S601 1-762-875-21 SWITCH, TACTILE (?/1)
S602 1-762-875-21 SWITCH, TACTILE (DISPLAY)
S603 1-762-875-21 SWITCH, TACTILE (POWER SAVE/DEMO
S604 1-762-875-21 SWITCH, TACTILE (VIDEO/DVD)
S605 1-762-875-21 SWITCH, TACTILE (MD)
S606 1-762-875-21 SWITCH, TACTILE (TAPE)
S607 1-762-875-21 SWITCH, TACTILE (CD)
S608 1-762-875-21 SWITCH, TACTILE (TUNER)
S609 1-762-875-21 SWITCH, TACTILE (DSP)
S610 1-762-875-21 SWITCH, TACTILE (DBFB)
S611 1-762-875-21 SWITCH, TACTILE (PLAY MODE)
S612 1-762-875-21 SWITCH, TACTILE (REPEAT)
S613 1-762-875-21 SWITCH, TACTILE (EDIT)
S614 1-762-875-21 SWITCH, TACTILE (FILE SELECT)
S615 1-762-875-21 SWITCH, TACTILE (TUNER BAND)
S616 1-762-875-21 SWITCH, TACTILE (STEREO/MONO)
S617 1-762-875-21 SWITCH, TACTILE (TUNER MEMORY)
S619 1-762-875-21 SWITCH, TACTILE (GROOVE)
The components identified by
mark 0 or dotted line with
mark 0 are critical for safety.
Replace only with part number specified.
Les composants identifiés par une
marque 0 sont critiques pour la
sécurité.
Ne les remplacer que par une pièce
portant le numéro spécifié.
(STANDBY))
< CONNECTOR >
* CN901 1-580-230-11 PIN, CONNECTOR (PC BOARD) 2P
CN902 1-564-321-00 PIN, CONNECTOR 2P
< DIODE >
D952 8-719-024-99 DIODE 11EQS04-NTA2B
D953 8-719-024-99 DIODE 11EQS04-NTA2B
D954 8-719-024-99 DIODE 11EQS04-NTA2B
D955 8-719-024-99 DIODE 11EQS04-NTA2B
D956 8-719-911-19 DIODE 1SS133T-72
D957 8-719-911-19 DIODE 1SS133T-72
< IC >
IC991 8-759-450-47 IC BA05T
< TRANSISTOR >
Q991 8-729-119-78 TRANSISTOR 2SC2785TP-HFE
< RESISTOR >
R991 1-249-441-11 CARBON 100K 5% 1/4W
R992 1-249-429-11 CARBON 10K 5% 1/4W
< RELAY >
0RY901 1-755-276-11 RELAY, POWER
< TRANSFORMER >
0T901 1-433-999-11 TRANSFORMER, POWER (AEP, UK)
0T901 1-435-059-11 TRANSFORMER, POWER (US, CND)
**************************************************************
39
Page 48
SURROUND AMP TRANS
Ref. No. Part No. Description Remark
A-4426-260-A SURROUND AMP BOARD, COMPLETE (NX3)
******************************
< CAPACITOR >
C101 1-128-582-11 ELECT 10uF 20% 100V
C102 1-162-292-31 CERAMIC 680PF 10% 50V
C103 1-162-286-31 CERAMIC 220PF 10% 50V
C104 1-126-967-11 ELECT 47uF 20% 50V
C105 1-136-165-00 FILM 0.1uF 5% 50V
C106 1-136-165-00 FILM 0.1uF 5% 50V
C107 1-128-560-11 ELECT 22uF 20% 100V
C108 1-136-495-11 FILM 0.068uF 5% 50V
C109 1-136-495-11 FILM 0.068uF 5% 50V
C113 1-161-494-00 CERAMIC 0.022uF 25V
C114 1-162-294-31 CERAMIC 0.001uF 10% 50V
C151 1-128-582-11 ELECT 10uF 20% 100V
C152 1-162-292-31 CERAMIC 680PF 10% 50V
C153 1-162-286-31 CERAMIC 220PF 10% 50V
C154 1-126-967-11 ELECT 47uF 20% 50V
C157 1-128-560-11 ELECT 22uF 20% 100V
C158 1-136-495-11 FILM 0.068uF 5% 50V
C159 1-136-495-11 FILM 0.068uF 5% 50V
C181 1-128-582-11 ELECT 10uF 20% 100V
C182 1-162-292-31 CERAMIC 680PF 10% 50V
C183 1-162-286-31 CERAMIC 220PF 10% 50V
C184 1-126-967-11 ELECT 47uF 20% 50V
C188 1-136-495-11 FILM 0.068uF 5% 50V
C189 1-136-495-11 FILM 0.068uF 5% 50V
Ref. No. Part No. Description Remark
R103 1-249-411-11 CARBON 330 5% 1/4W
0R107 1-212-881-11 FUSIBLE 100 5% 1/4W F
0R108 1-220-755-11 METAL 0.22 10% 2W F
R109 1-260-076-11 CARBON 10 5% 1/2W
R110 1-249-437-11 CARBON 47K 5% 1/4W
R111 1-249-417-11 CARBON 1K 5% 1/4W
R112 1-249-431-11 CARBON 15K 5% 1/4W
R113 1-249-441-11 CARBON 100K 5% 1/4W
R114 1-249-421-11 CARBON 2.2K 5% 1/4W
R115 1-249-433-11 CARBON 22K 5% 1/4W
R116 1-249-429-11 CARBON 10K 5% 1/4W
R117 1-249-421-11 CARBON 2.2K 5% 1/4W
R119 1-249-439-11 CARBON 68K 5% 1/4W
0R120 1-217-637-00 FUSIBLE 1 5% 1/4W F
R121 1-249-433-11 CARBON 22K 5% 1/4W
R130 1-249-435-11 CARBON 33K 5% 1/4W
R151 1-249-417-11 CARBON 1K 5% 1/4W
R152 1-249-437-11 CARBON 47K 5% 1/4W
R153 1-249-410-11 CARBON 270 5% 1/4W
0R157 1-212-881-11 FUSIBLE 100 5% 1/4W F
0R158 1-220-755-11 METAL 0.22 10% 2W F
R159 1-260-076-11 CARBON 10 5% 1/2W
R160 1-249-437-11 CARBON 47K 5% 1/4W
R161 1-249-417-11 CARBON 1K 5% 1/4W
R162 1-249-431-11 CARBON 15K 5% 1/4W
R163 1-249-441-11 CARBON 100K 5% 1/4W
R181 1-249-417-11 CARBON 1K 5% 1/4W
R182 1-249-437-11 CARBON 47K 5% 1/4W
< CONNECTOR >
* CN101 1-564-524-11 PLUG, CONNECTOR 9P
< DIODE >
D101 8-719-911-19 DIODE 1SS133T-72
D102 8-719-911-19 DIODE 1SS133T-72
D151 8-719-911-19 DIODE 1SS133T-72
D191 8-719-911-19 DIODE 1SS133T-72
< GROUND TERMINAL >
EPT101 1-537-770-21 TERMINAL BOARD, GROUND
< IC >
IC101 8-749-015-54 IC STK408-040E
< CONNECTOR >
NO102 1-691-767-11 PLUG (MICRO CONNECTOR) 5P
< TRANSISTOR >
Q101 8-729-140-84 TRANSISTOR 2SC1841TP-PAFAEA
Q103 8-729-140-82 TRANSISTOR 2SA988TP-PAFAEA
Q104 8-729-140-84 TRANSISTOR 2SC1841TP-PAFAEA
Q151 8-729-140-84 TRANSISTOR 2SC1841TP-PAFAEA
Q181 8-729-140-84 TRANSISTOR 2SC1841TP-PAFAEA
< RESISTOR >
R101 1-249-417-11 CARBON 1K 5% 1/4W
R102 1-249-437-11 CARBON 47K 5% 1/4W
R183 1-249-411-11 CARBON 330 5% 1/4W
0R188 1-220-755-11 METAL 0.22 10% 2W F
R189 1-260-076-11 CARBON 10 5% 1/2W
R190 1-249-437-11 CARBON 47K 5% 1/4W
R191 1-249-417-11 CARBON 1K 5% 1/4W
R192 1-249-431-11 CARBON 15K 5% 1/4W
R193 1-249-441-11 CARBON 100K 5% 1/4W
**************************************************************
1-674-803-11 TRANS BOARD
************
1-533-217-31 HOLDER, FUSE
< CAPACITOR >
C951 1-162-306-11 CERAMIC 0.01uF 30% 16V
C952 1-162-306-11 CERAMIC 0.01uF 30% 16V
C953 1-162-306-11 CERAMIC 0.01uF 30% 16V
< CONNECTOR >
CN951 1-564-321-00 PIN, CONNECTOR 2P (E, AUS, JE)
< FUSE >
0F951 1-532-505-31 FUSE T5AL/250V (NX1: MY, SP, JE)
0F951 1-533-311-11 FUSE, GLASS CYLINDRICAL 8A/250V
(NX3: US, CND)
0F951 1-533-949-31 FUSE T8AL/250V (NX3: MY, SP)
0F961 1-533-311-11 FUSE, GLASS CYLINDRICAL 8A/125V
(NX1: US, CND)
0F961 1-533-949-31 FUSE, CYLINDRICAL T8AL/250V
(EXCEPT US, CND)
40
The components identified by
mark 0 or dotted line with
mark 0 are critical for safety.
Replace only with part number specified.
Les composants identifiés par une
marque 0 sont critiques pour la
sécurité.
Ne les remplacer que par une pièce
portant le numéro spécifié.
Page 49
TRANS
Ref. No. Part No. Description Remark
0F962 1-533-311-11 FUSE, GLASS CYLINDRICAL 8A/125V
(NX1: US, CND)
0F962 1-533-949-31 FUSE, CYLINDRICAL T8AL/250V
(EXCEPT US, CND)
0F963 1-533-312-11 FUSE, GLASS CYLINDRICAL 10A/125V
(NX3: US, CND)
0F963 1-533-949-31 FUSE, CYLINDRICAL T8AL/250V
(NX3: AEP, UK, E, AUS)
0F964 1-533-312-11 FUSE, GLASS CYLINDRICAL 10A/125V
(NX3: US, CND)
0F964 1-533-949-31 FUSE, CYLINDRICAL T8AL/250V
(NX3: AEP, UK, E, AUS)
0F965 1-532-504-31 FUSE T4AL/250V (EXCEPT US, CND)
0F965 1-533-296-11 FUSE, GLASS CYLINDERICAL (DIA.5) 2A/125V
(US, CND)
0F966 1-532-504-31 FUSE T4AL/250V (EXCEPT US, CND)
0F966 1-533-296-11 FUSE, GLASS CYLINDERICAL (DIA.5) 2A/125V
(US, CND)
< RESISTOR >
0R951 1-219-120-11 FUSIBLE 0.15 5% 1/4W F
(NX1: US, CND/NX3)
0R951 1-219-121-11 FUSIBLE 0.22 5% 1/4W F
(NX1: AEP, UK, E, JE)
0R952 1-219-120-11 FUSIBLE 0.15 5% 1/4W F
(NX1: US, CND/NX3)
0R952 1-219-121-11 FUSIBLE 0.22 5% 1/4W F
(NX1: AEP, UK, E, JE)
0R961 1-202-725-00 SOLID 3.3M 10% 1/2W
(US, CND)
Ref. No. Part No. Description Remark
69 1-784-731-11 CONNECTOR, FFC 9P
0104 1-575-651-11 CORD, POWER (NX3: MY, SP)
0104 1-575-651-21 CORD, POWER (NX1: AEP, UK, MY, SP/NX3:
AEP, UK)
0104 1-575-653-11 CORD, POWER (NX1: TH)
0104 1-690-608-11 CORD, POWER (NX3: AUS)
0104 1-690-609-21 CORD, POWER (CND, JE)
0104 1-769-079-21 CORD, POWER (KR)
0104 1-783-531-31 CORD, POWER (US)
0107 1-569-007-11 ADAPTOR, CONVERSION 2P (JE)
0107 1-569-008-21 ADAPTOR, CONVERSION 2P (MY, SP)
0107 1-770-019-11 ADAPTOR, CONVERSION PLUG 3P (UK)
LCD601 1-803-738-11 LIQUID CRYSTAL DISPLAY UNIT
M401 1-763-117-11 FAN, DC
0T951 1-433-993-11 TRANSFORMER, POWER (NX1: E, JE)
0T951 1-433-994-11 TRANSFORMER, POWER (NX1: AEP, UK)
0T951 1-433-995-11 TRANSFORMER, POWER (NX1: US, CND)
0T951 1-433-996-11 TRANSFORMER, POWER (NX3: E, AUS)
0T951 1-433-997-11 TRANSFORMER, POWER (NX3: AEP, UK)
0T951 1-433-998-11 TRANSFORMER, POWER (NX3: US, CND)
**************************************************************
**************
HARDWARE LIST
**************
#1 7-685-647-01 SCREW +BVTP 3X10 TYPE1
#2 7-685-650-79 SCREW +BVTP 3X16 TYPE2 IT-3
#3 7-685-880-09 SCREW +BVTT 4X6 (S)
#4 7-685-871-01 SCREW +BVTT 3X6 (S)
#5 7-685-646-79 SCREW +BVTP 3X8 (S)TYPE2 N-S
< SWITCH >
0S951 1-771-291-11 SWITCH, POWER (VOLTAGE SELECTOR)
(MY, SP, JE)
< TRANSFORMER >
0T951 1-433-993-11 TRANSFORMER, POWER (NX1: E, JE)
0T951 1-433-994-11 TRANSFORMER, POWER (NX1: AEP, UK)
0T951 1-433-995-11 TRANSFORMER, POWER (NX1: US, CND)
0T951 1-433-996-11 TRANSFORMER, POWER (NX3: E, AUS)
0T951 1-433-997-11 TRANSFORMER, POWER (NX3: AEP, UK)
0T951 1-433-998-11 TRANSFORMER, POWER (NX3: US, CND)
**************************************************************
MISCELLANEOUS
**************
4 1-751-688-11 WIRE (FLAT TYPE) (13 CORE)
(NX1: US, CND, TH, KR/NX3: US, CND, KR, AUS)
4 1-773-011-11 WIRE (FLAT TYPE) (15 CORE)
(AEP, UK, MY, SP, JE)
6 1-233-545-11 TUNER PACK (FM/AM) (NX1: TH, KR/NX3: KR,
AUS)
6 1-233-546-11 TUNER PACK (FM/MW/SW) (MY, SP)
6 1-693-443-11 TUNER PACK (FM/AM) (AEP, UK)
6 1-693-445-11 TUNER PACK (FM/AM) (US, CND)
6 1-693-465-11 TUNER PACK (FM/MW/SW) (NX1: JE)
62 1-769-908-11 WIRE (FLAT TYPE) (9 CORE)
64 1-773-213-11 WIRE (FLAT TYPE) (25 CORE)
67 1-769-886-11 WIRE (FLAT TYPE) (7 CORE)
#6 7-685-872-09 SCREW +BVTT 3X8 (S)
The components identified by
mark 0 or dotted line with
mark 0 are critical for safety.
Replace only with part number specified.
Les composants identifiés par une
marque 0 sont critiques pour la
sécurité.
Ne les remplacer que par une pièce
portant le numéro spécifié.
41
Page 50

MAIN
Ref. No. Part No. Description Remark
C207 1-136-165-00 FILM 0.1uF 5% 50V
(NX3)
C208 1-136-165-00 FILM 0.1uF 5% 50V
(NX3)
C210 1-124-465-00 ELECT 0.47uF 20% 50V
(NX3)
C212 1-124-465-00 ELECT 0.47uF 20% 50V
(NX3)
C215 1-124-465-00 ELECT 0.47uF 20% 50V
(NX3)
C217 1-124-465-00 ELECT 0.47uF 20% 50V
(NX3)
C218 1-136-165-00 FILM 0.1uF 5% 50V
(NX3)
C219 1-164-159-11 CERAMIC 0.1uF 50V
(NX3)
C221 1-126-964-11 ELECT 10uF 20% 50V
(NX3)
C224 1-162-282-31 CERAMIC 100PF 10% 50V
(NX3)
C225 1-162-306-11 CERAMIC 0.01uF 30% 16V
(NX3)
C226 1-126-160-11 ELECT 1uF 20% 50V
(NX3)
C227 1-164-159-11 CERAMIC 0.1uF 50V
(NX3)
C228 1-137-368-11 FILM 0.0047uF 5% 50V
(NX3)
C229 1-130-471-00 MYLAR 0.001uF 5% 50V
(NX3)
C231 1-136-165-00 FILM 0.1uF 5% 50V
(NX3)
C233 1-136-169-00 FILM 0.22uF 5% 50V
(NX3)
C234 1-136-169-00 FILM 0.22uF 5% 50V
(NX3)
C235 1-136-165-00 FILM 0.1uF 5% 50V
(NX3)
C237 1-137-368-11 FILM 0.0047uF 5% 50V
(NX3)
C238 1-130-471-00 MYLAR 0.001uF 5% 50V
(NX3)
C240 1-126-160-11 ELECT 1uF 20% 50V
(NX3)
C243 1-137-437-11 FILM 0.0056uF 5% 50V
(NX3)
C244 1-136-161-00 FILM 0.047uF 5% 50V
(NX3)
C245 1-136-175-00 FILM 0.68uF 5% 50V
(NX3)
C246 1-136-169-00 FILM 0.22uF 5% 50V
(NX3)
C247 1-136-169-00 FILM 0.22uF 5% 50V
(NX3)
C248 1-126-963-11 ELECT 4.7uF 20% 50V
(NX3)
C249 1-126-963-11 ELECT 4.7uF 20% 50V
(NX3)
C250 1-136-169-00 FILM 0.22uF 5% 50V
(NX3)
C251 1-136-169-00 FILM 0.22uF 5% 50V
(NX3)
Ref. No. Part No. Description Remark
C252 1-136-165-00 FILM 0.1uF 5% 50V
(NX3)
C253 1-136-161-00 FILM 0.047uF 5% 50V
(NX3)
C254 1-136-161-00 FILM 0.047uF 5% 50V
(NX3)
C255 1-136-165-00 FILM 0.1uF 5% 50V
(NX3)
C256 1-136-165-00 FILM 0.1uF 5% 50V
(NX3)
C257 1-136-157-00 FILM 0.022uF 5% 50V
(NX3)
C258 1-136-157-00 FILM 0.022uF 5% 50V
(NX3)
C259 1-136-165-00 FILM 0.1uF 5% 50V
(NX3)
C260 1-136-357-11 FILM 680PF 5% 50V
(NX3)
C261 1-136-153-00 FILM 0.01uF 5% 50V
(NX3)
C262 1-136-357-11 FILM 680PF 5% 50V
(NX3)
C263 1-136-153-00 FILM 0.01uF 5% 50V
(NX3)
C264 1-136-153-00 FILM 0.01uF 5% 50V
(NX3)
C265 1-136-153-00 FILM 0.01uF 5% 50V
(NX3)
C266 1-104-664-11 ELECT 47uF 20% 16V
(NX3)
C267 1-130-481-00 MYLAR 0.0068uF 5% 50V
(NX3)
C268 1-126-963-11 ELECT 4.7uF 20% 50V
(NX3)
C269 1-126-934-11 ELECT 220uF 20% 16V
(NX3)
C270 1-126-934-11 ELECT 220uF 20% 16V
(NX3)
C274 1-126-964-11 ELECT 10uF 20% 50V
(NX3)
C275 1-126-964-11 ELECT 10uF 20% 50V
(NX3)
C276 1-126-964-11 ELECT 10uF 20% 50V
(NX3)
C277 1-126-964-11 ELECT 10uF 20% 50V
(NX3)
C278 1-126-964-11 ELECT 10uF 20% 50V
(NX3)
C279 1-126-964-11 ELECT 10uF 20% 50V
(NX3)
C280 1-126-964-11 ELECT 10uF 20% 50V
C281 1-162-286-31 CERAMIC 220PF 10% 50V
(NX3)
C282 1-162-286-31 CERAMIC 220PF 10% 50V
(NX3)
C283 1-162-286-31 CERAMIC 220PF 10% 50V
(NX3)
C284 1-124-465-00 ELECT 0.47uF 20% 50V
(NX3)
C285 1-124-465-00 ELECT 0.47uF 20% 50V
(NX3)
31
 Loading...