

Page 1
HCD-CPX22/NXM3
SERVICE MANUAL
Ver 1.0 2004. 04
• HCD-CPX22 is the Amplifier, CD player,
tape deck and tuner section in CMT-CPX22.
• HCD-NXM3 is the Amplifier, CD player,
tape deck and tuner section in MHC-NXM3.
Photo : HCD-CPX22
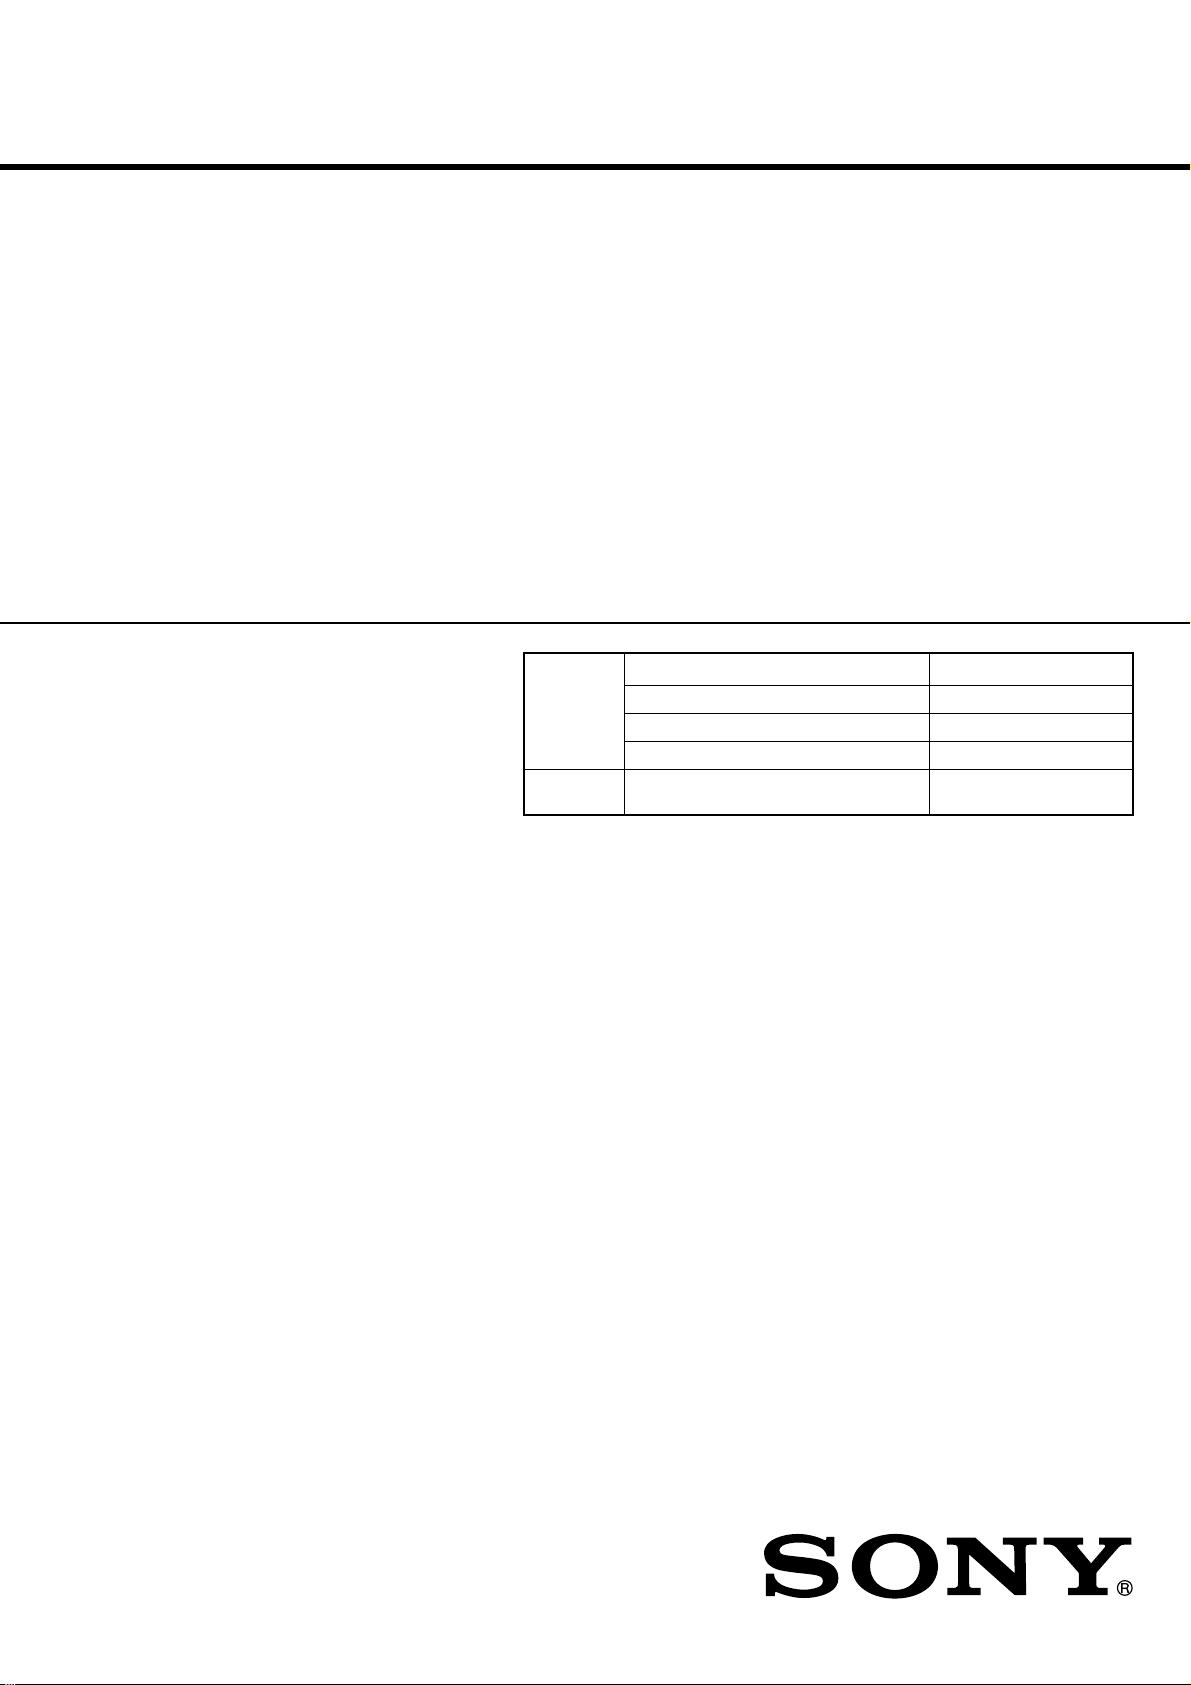
Model Name Using Similar Mechanism NEW
CD CD Mechanism Type CDM81B-F1BD81A
Section Base Unit Name BU-F1BD81A
Optical Pick-up Name KSM-215DCP/C2NP
TAPE
Section
Model Name Using Similar Mechanism NEW
US Model
HCD-CPX22
AEP Model
HCD-CPX22/NXM3
UK Model
E Model
HCD-CPX22
SPECIFICATIONS
Amplifier section
For the U.S.A. model
AUDIO POWER SPECIFICATIONS
HCD-CPX22
POWER OUTPUT AND TOTAL HARMONIC DISTORTION:
With 4-ohm loads, both channels driven, from 120 – 10,000 Hz;
rated 100 watts per channel minimum RMS power, with no more
than 10% total harmonic distortion from 250 milliwatts to rated
output.
Other models:
The following measured at AC 120 – 127/220 – 240 V, 50/60 Hz
(Saudi Arabian model only)
The following measured at AC 230 V, 50/60 Hz (European and
Russian models only)
The following measured at AC 120/220 – 240 V, 50/60 Hz (except
for European, Russian and Saudi Arabian models)
DIN power output (rated): 75 + 75 watts (4 ohms at 1 kHz, DIN)
Continuous RMS power output (reference):
100 + 100 watts
(4 ohms at 1 kHz, 10% THD)
Inputs
VIDEO/MD IN (phono jacks):
Outputs
DIGITAL (OPTICAL) OUT: Optical Wavelength: 660 nm
PHONES (mini jack): accepts headphones with an
Sensitivity 250/450 mV, impedance
47 kilohms
impedance of 8 ohms or more
SPEAKER: Use only the supplied speakers
SS-CPX22
(HCD-CPX22)
SS-NXM3
(HCD-NXM3)
CD player section
System
Laser Semiconductor laser
Frequency response 2 Hz – 20 kHz (±0.5 dB)
Tape deck section
Recording system 4-track 2-channel stereo
Frequency response 50 – 13,000 Hz (±3 dB), using Sony
Compact disc and digital audio system
(λ=770 – 810 nm)
Emission duration: continuous
TYPE I cassettes
– Continued on next page –
HCD-CPX22
MICRO Hi-Fi COMPONENT SYSTEM
HCD-NXM3
MiNi Hi-Fi COMPONENT SYSTEM
9-877-828-01
2004D02-1
© 2004.04
Sony Corporation
Home Audio Company
Published by Sony Engineering Corporation
Page 2
HCD-CPX22/NXM3
Tuner section
FM stereo, FM/AM superheterodyne tuner
FM tuner section
Tuning range
U.S.A. model: 87.5 – 108.0 MHz (100-kHz step)
Russian model: 65.0 – 74.0 MHz (10-kHz step)
(There is no stereo effect)
87.5 – 108.0 MHz (50-kHz step)
Other models: 87.5 – 108.0 MHz (50-kHz step)
Antenna FM lead antenna
Antenna terminals 75 ohms unbalanced
Intermediate frequency 10.7 MHz
AM tuner section
Tuning range
Pan-American model: 530 – 1,710 kHz
(with the tuning interval set at 10 kHz)
531 – 1,710 kHz
(with the tuning interval set at 9 kHz)
European, Russian and Saudi Arabian models:
531 – 1,602 kHz
(with the tuning interval set at 9 kHz)
Other models: 531 – 1,602 kHz
(with the tuning interval set at 9 kHz)
530 – 1,710 kHz
(with the tuning interval set at 10 kHz)
Antenna AM loop antenna
Antenna terminals External antenna terminal
Intermediate frequency 450 kHz
SAFETY CHECK-OUT
After correcting the original service problem, perform the following
safety checks before releasing the set to the customer:
Check the antenna terminals, metal trim, “metallized” knobs, screws,
and all other exposed metal parts for AC leakage. Check leakage as
described below.
LEAKAGE
The AC leakage from any exposed metal part to earth ground and
from all exposed metal parts to any exposed metal part having a
return to chassis, must not exceed 0.5 mA (500 microamperes).
Leakage current can be measured by any one of three methods.
1. A commercial leakage tester , such as the Simpson 229 or RCA
WT -540A. Follow the manufacturers’ instructions to use these
instruments.
2. A battery-operated AC milliammeter. The Data Precision 245
digital multimeter is suitable for this job.
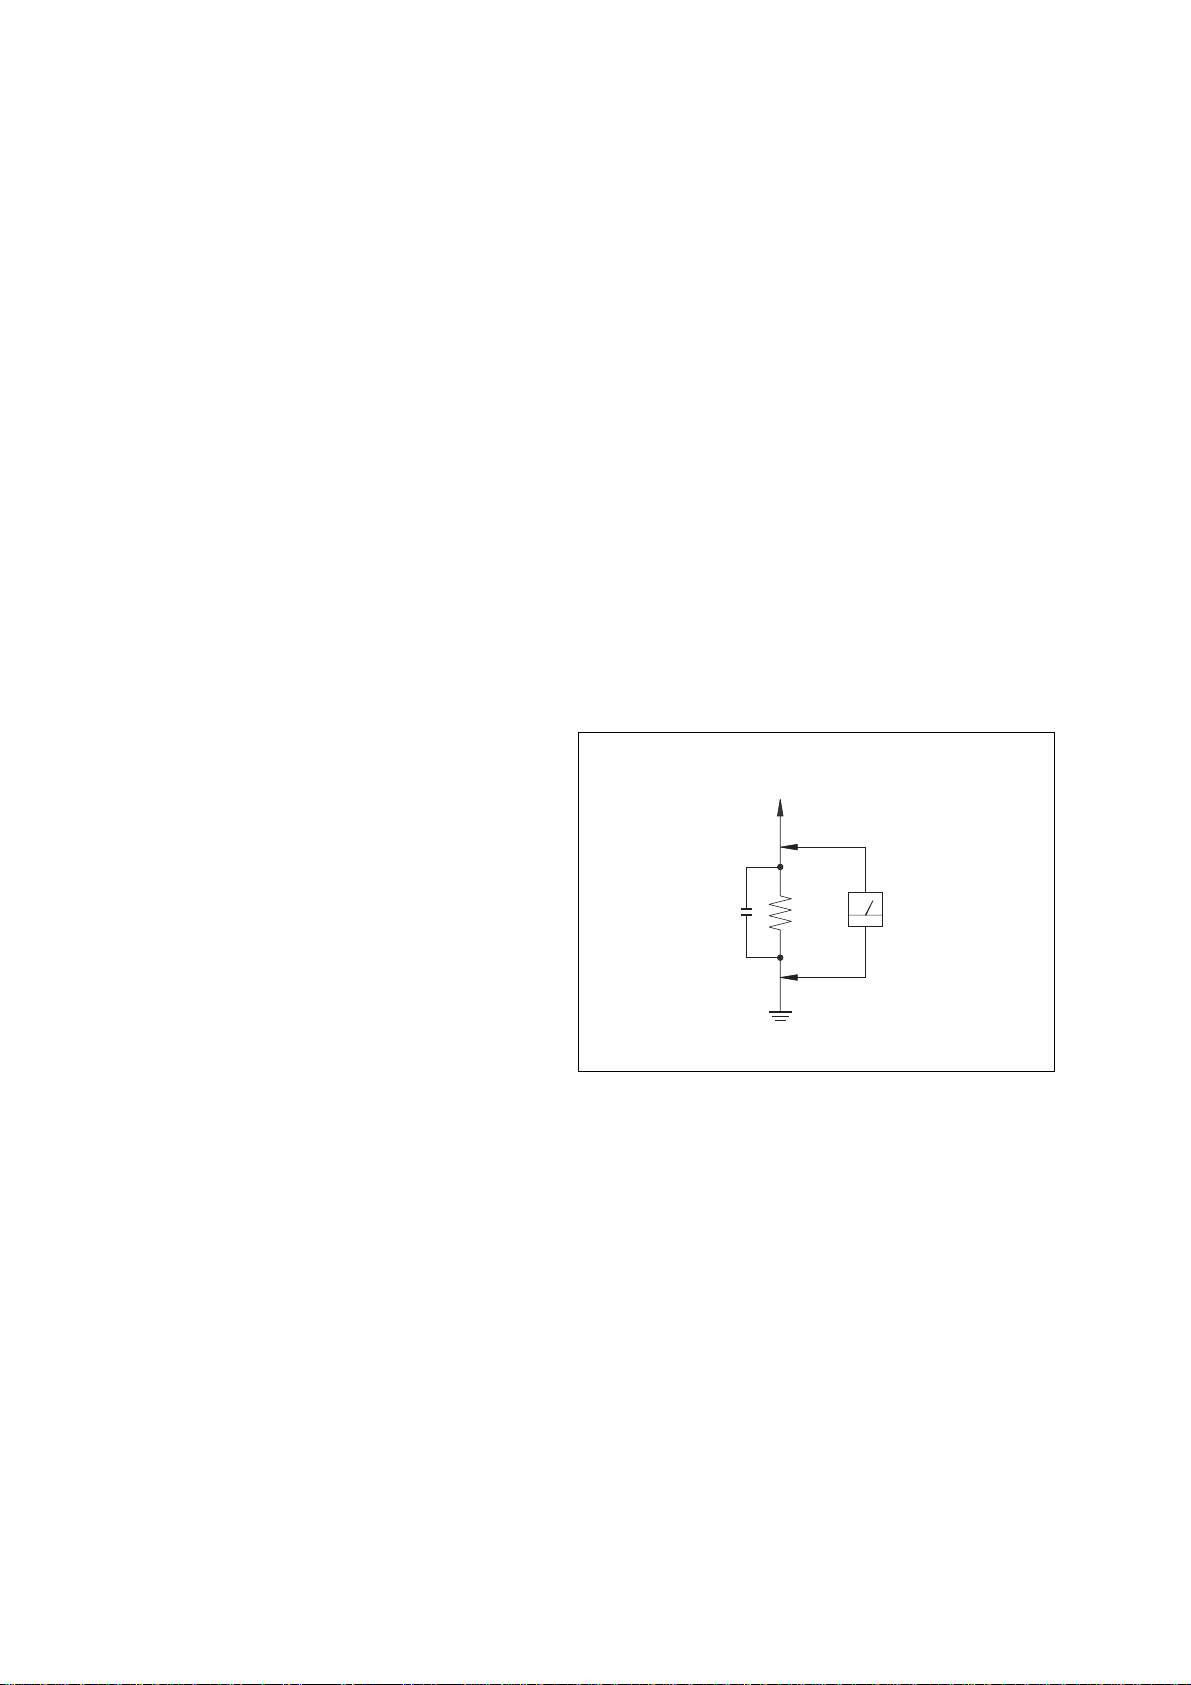
3. Measuring the voltage drop across a resistor by means of a
VOM or battery-operated AC voltmeter . The “limit” indication
is 0.75 V, so analog meters must have an accurate low-voltage
scale. The Simpson 250 and Sanwa SH-63Trd are examples
of a passive VOM that is suitable. Nearly all battery operated
digital multimeters that have a 2V AC range are suitable. (See
Fig. A)
General
Power requirements
U.S.A. model: 120 V AC, 60 Hz
European and Russian models:
230 V AC, 50/60 Hz
Saudi Arabian model: 120 – 127 V or 220 – 240 V AC,
50/60 Hz
Adjustable with voltage selector
Other models: 120 V, 220 – 240 V AC, 50/60 Hz
Adjustable with voltage selector
Power consumption
U.S.A. model: 65 watts
European and Russian models:
65 watts
0.3 watts (in Power Saving mode)
Other models: 65 watts
Dimensions (w/h/d) incl. projecting parts and controls
Amplifier/Tuner/Tape/CD section:
Approx. 230 x 292 x 355 mm
Mass
Amplifier/Tuner/Tape/CD section:
Approx. 6.1 kg
Supplied accessories Remote Commander (1)
Size AA (R6) batteries (2)
AM loop antenna (1)
FM lead antenna (1)
Speaker pads (8)
Speaker cords
To Exposed Metal
Parts on Set
AC
0.15 µF
Fig. A. Using an A C v oltmeter to check A C leakage.
1.5 k Ω
Earth Ground
Voltmeter
(0.75 V)
Design and specifications are subject to change without notice.
2
Page 3
TABLE OF CONTENTS
HCD-CPX22/NXM3
1. SERVICING NOTES ................................................ 4
2. GENERAL
Location of Controls........................................................ 5
3. DISASSEMBLY
3-1. Disassembly Flow ........................................................... 7
3-2. Case ................................................................................. 8
3-3. Main Board, Front Panel Section .................................... 8
3-4. Tape Mechanism Deck .................................................... 9
3-5. Panel Board ..................................................................... 9
3-6. Back Panel ....................................................................... 10
3-7. CD Mechanism Deck (CDM81B-F1BD81A) ................. 10
3-8. S-Master Board................................................................ 11
3-9. Tray.................................................................................. 11
3-10. M761 (LD/ST Motor), M762 (BU U/D Motor) .............. 12
3-11. Base Unit (BU-F1BD81A).............................................. 12
3-12. BD Board......................................................................... 13
4. TEST MODE.............................................................. 14
5. MECHANICAL ADJUSTMENTS ....................... 17
6. ELECTRICAL ADJUSTMENTS
Deck section .................................................................... 17
CD Section ...................................................................... 18
7. DIAGRAMS
7-1. Circuit Board Location .................................................... 21
7-2. Block Diagram – CD Servo Section –............................ 22
7-3. Block Diagram – Tuner/Tape Deck Section – ................ 23
7-4. Block Diagram – Main Section – ................................... 24
7-5. Block Diagram – S-Master Section –............................. 25
7-6. Printed Wiring Board – BD Board – .............................. 26
7-7. Schematic Diagram – BD Board – ................................. 27
7-8. Printed Wiring Board – CD Mechanism Board –........... 28
7-9. Schematic Diagram – CD Mechanism Board – ............. 29
7-10. Printed Wiring Boards – Main Board – .......................... 30
7-11. Schematic Diagram – Main Board (1/3) – ..................... 31
7-12. Schematic Diagram – Main Board (2/3) – ..................... 32
7-13. Schematic Diagram – Main Board (3/3) – ..................... 33
7-14. Printed Wiring Boards – Panel Board – ......................... 34
7-15. Schematic Diagram – Panel Board –............................... 35
7-16. Printed Wiring Board – Disc SW, Vol, HP Board – ....... 36
7-17. Schematic Diagram – Disc SW, Vol, HP Board – .......... 37
7-18. Printed Wiring Board – S-Master Board – ..................... 38
7-19. Schematic Diagram – S-Master Board – ........................ 39
7-20. IC Block Diagram ........................................................... 40
7-21. IC Pin Function Description............................................ 41
8. EXPLODED VIEWS
8-1. Main Section.................................................................... 47
8-2. Front Panel Section ......................................................... 48
8-3. Chassis Section................................................................ 49
8-4. CD Mechanism Deck Section-1
(CDM81B-F1BD81A) .................................................... 50
8-5. CD Mechanism Deck Section-2
(CDM81B-F1BD81A) .................................................... 51
8-6. CD Mechanism Deck Section-3
(CDM81B-F1BD81A) .................................................... 52
9. ELECTRICAL PARTS LIST................................ 53
Notes on chip component replacement
• Never reuse a disconnected chip component.
• Notice that the minus side of a tantalum capacitor may be
damaged by heat.
Flexible Circuit Board Repairing
• Keep the temperature of soldering iron around 270˚C
during repairing.
• Do not touch the soldering iron on the same conductor of the
circuit board (within 3 times).
• Be careful not to apply force on the conductor when soldering
or unsoldering.
CAUTION
Use of controls or adjustments or performance of procedures
other than those specified herein may result in hazardous
radiation exposure.
This appliance is classified as
a CLASS 1 LASER product.
This label is located on the rear
exterior.
SAFETY-RELATED COMPONENT WARNING!!
COMPONENTS IDENTIFIED BY MARK 0 OR DOTTED LINE WITH
MARK 0 ON THE SCHEMATIC DIAGRAMS AND IN THE PARTS
LIST ARE CRITICAL TO SAFE OPERATION. REPLACE THESE
COMPONENTS WITH SONY PARTS WHOSE PART NUMBERS
APPEAR AS SHOWN IN THIS MANUAL OR IN SUPPLEMENTS
PUBLISHED BY SONY .
3
Page 4
HCD-CPX22/NXM3
SECTION 1
SERVICING NOTES
NOTES ON HANDLING THE OPTICAL PICK-UP BLOCK
OR BASE UNIT
The laser diode in the optical pick-up block may suffer electrostatic
break-down because of the potential difference generated by the
charged electrostatic load, etc. on clothing and the human body.
During repair, pay attention to electrostatic break-down and also
use the procedure in the printed matter which is included in the
repair parts.
The flexible board is easily damaged and should be handled with
care.
NOTES ON LASER DIODE EMISSION CHECK
The laser beam on this model is concentrated so as to be focused on
the disc reflective surface by the objective lens in the optical pickup block. Therefore, when checking the laser diode emission, observe
from more than 30 cm away from the objective lens.
LASER DIODE AND FOCUS SEARCH OPERA TION CHECK
Carry out the “S curve check” in “CD section adjustment” and check
that the S curve waveform is output several times.
•Abbreviation
E3 : 240 V AC Area in E model
E51 : Chilean and Peruvian model
EA : Saudi Arabia model
RU : Russian model
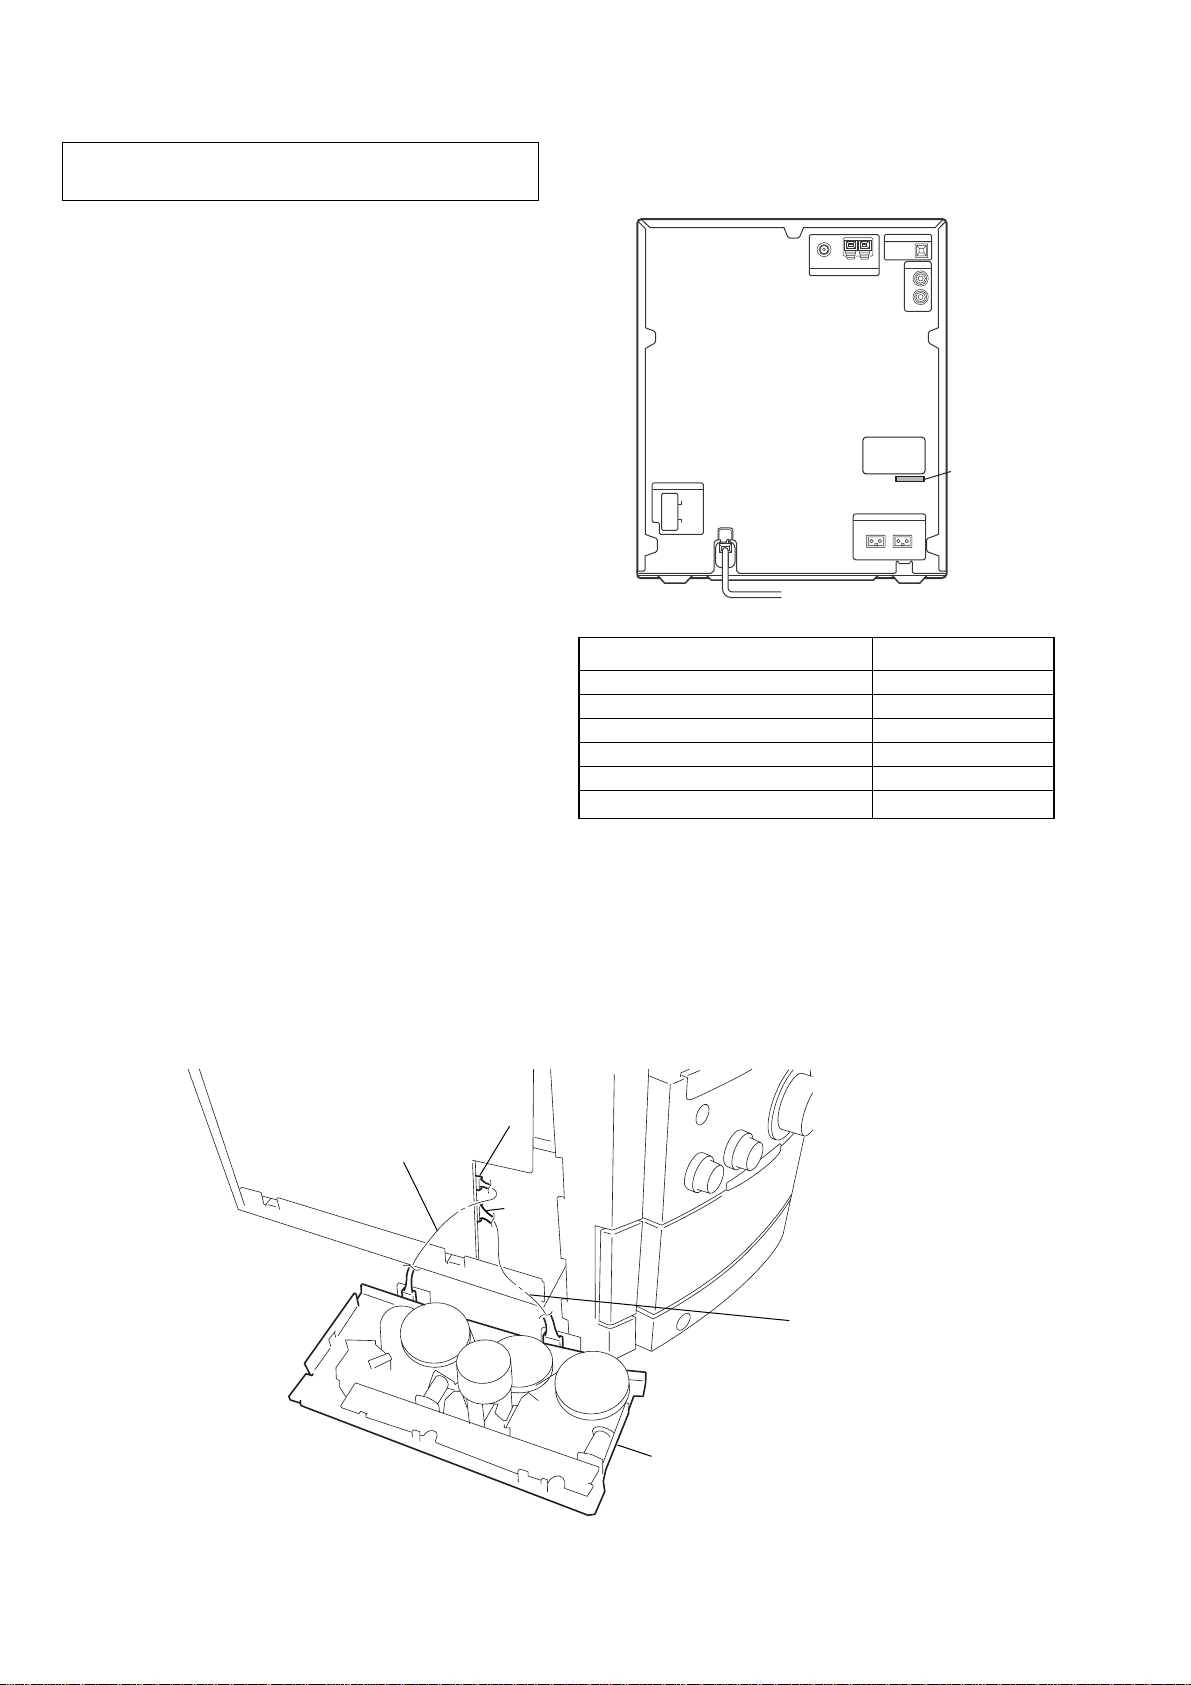
• MODEL IDENTIFICATION
– Back Panel –
PART No.
MODEL PART No.
AEP, UK models 4-253-358-0[]
RU model 4-253-358-1[]
E3 model 4-253-358-2[]
E51 model 4-253-358-3[]
US model 4-253-358-4[]
EA model 4-253-358-5[]
• SERVICE POSITION FOR TAPE MECHANISM DECK
CN301
Jig (J-2501-270-A)
CN302
Jig (J-2501-271-A)
tape mechanism deck
4
Page 5
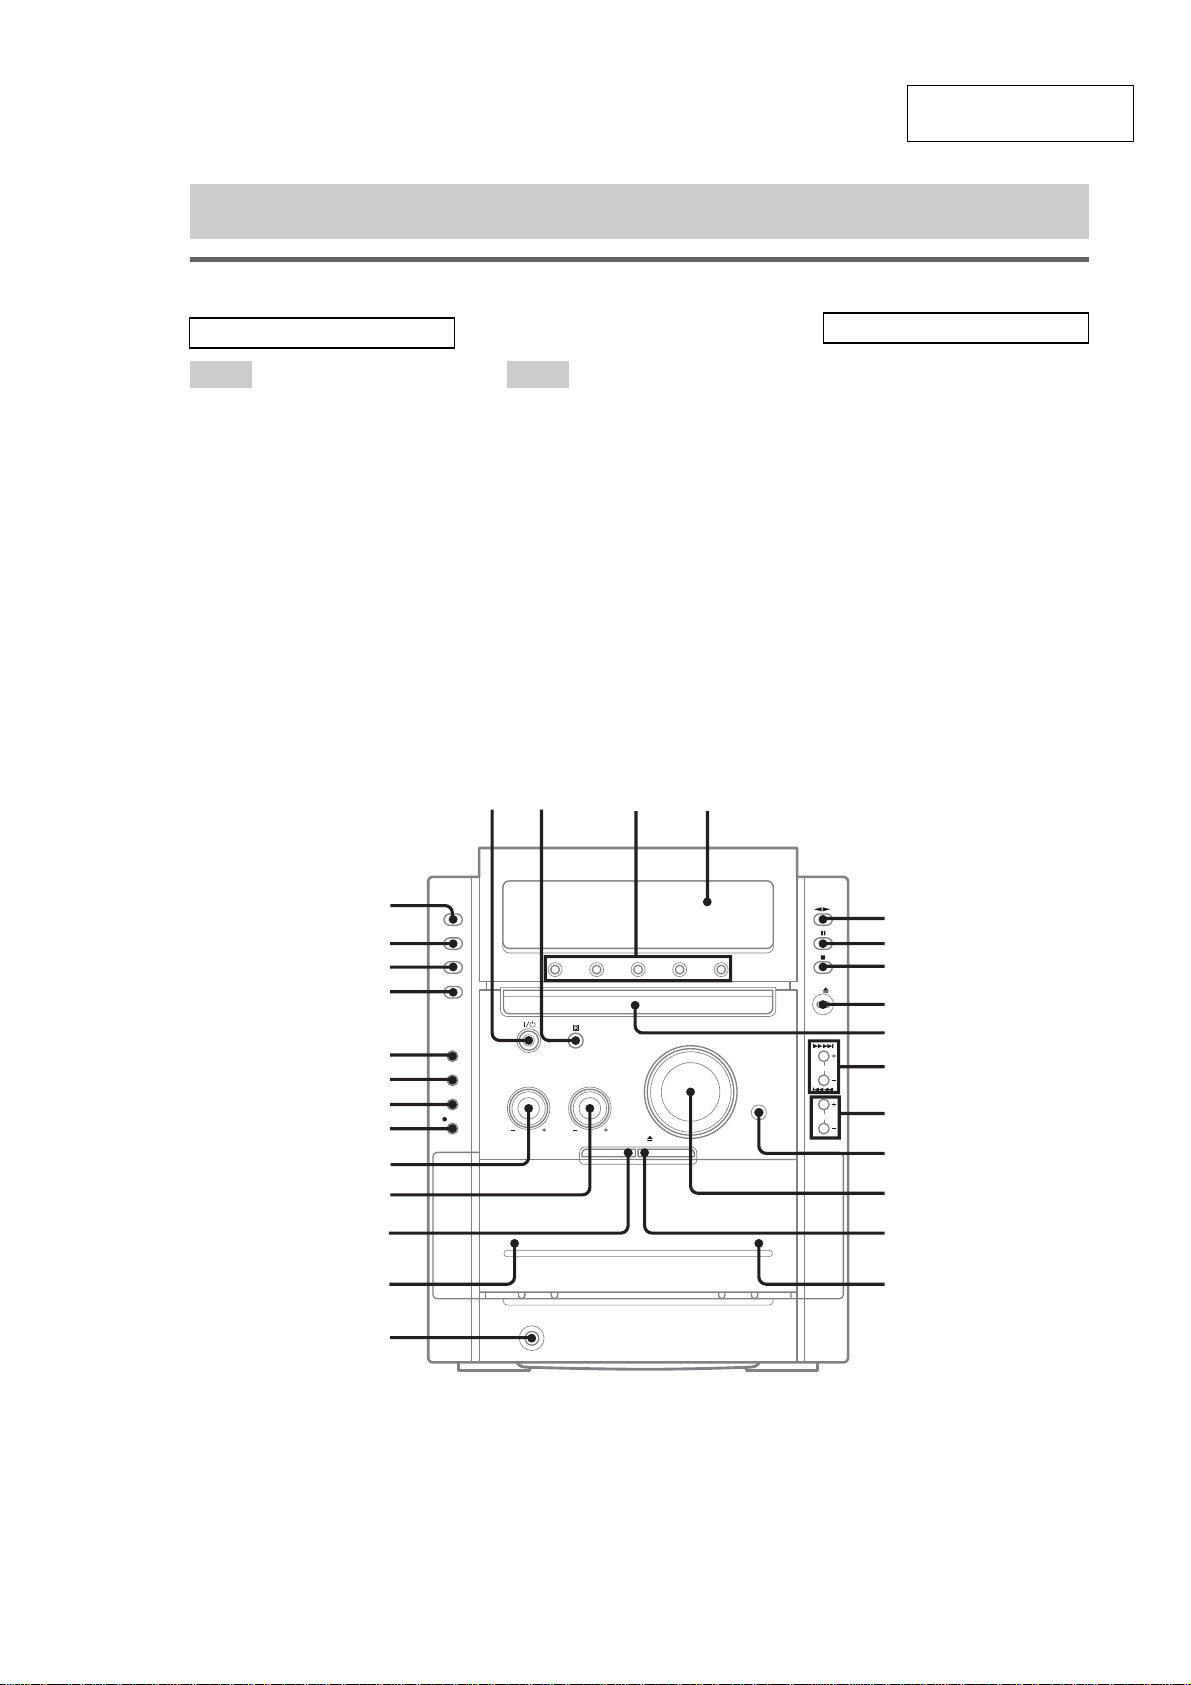
LOCA TING THE CONTROLS
12 3 4
List of button locations and reference pages
Main unit
SECTION 2
GENERAL
HCD-CPX22/NXM3
This section is extracted
from instruction manual.
ALPHABETICAL ORDER
A – O P – Z
ALBUM +/– qa
BASS control w;
CD wk
CD SYNC ws
Deck A qj
Deck B qg
DIMMER wd
DISC 1 – 5 3
Disc tray 9
DISPLAY wf
Display window 4
DSGX qs
PHONES jack qh
Remote sensor 2
TAPE A/B wh
TREBLE control ql
TUNER/BAND wj
TUNING +/– 0
VIDEO/MD wg
VOLUME control qd
BUTTON DESCRIPTIONS
?/1 (power) 1
nN (play) 5
X (pause) 6
x (stop) 7
CD Z (eject) 8
.m/M> (rewind/fast
forward, go back/go forward)
0
TAPE Z B(eject) qf
A TAPE Z (eject) qk
z START wa
wk
wj
wh
wg
wf
wd
ws
wa
w;
ql
qk
qj
qh
5
6
7
8
9
0
qa
qs
qd
qf
qg
5
Page 6
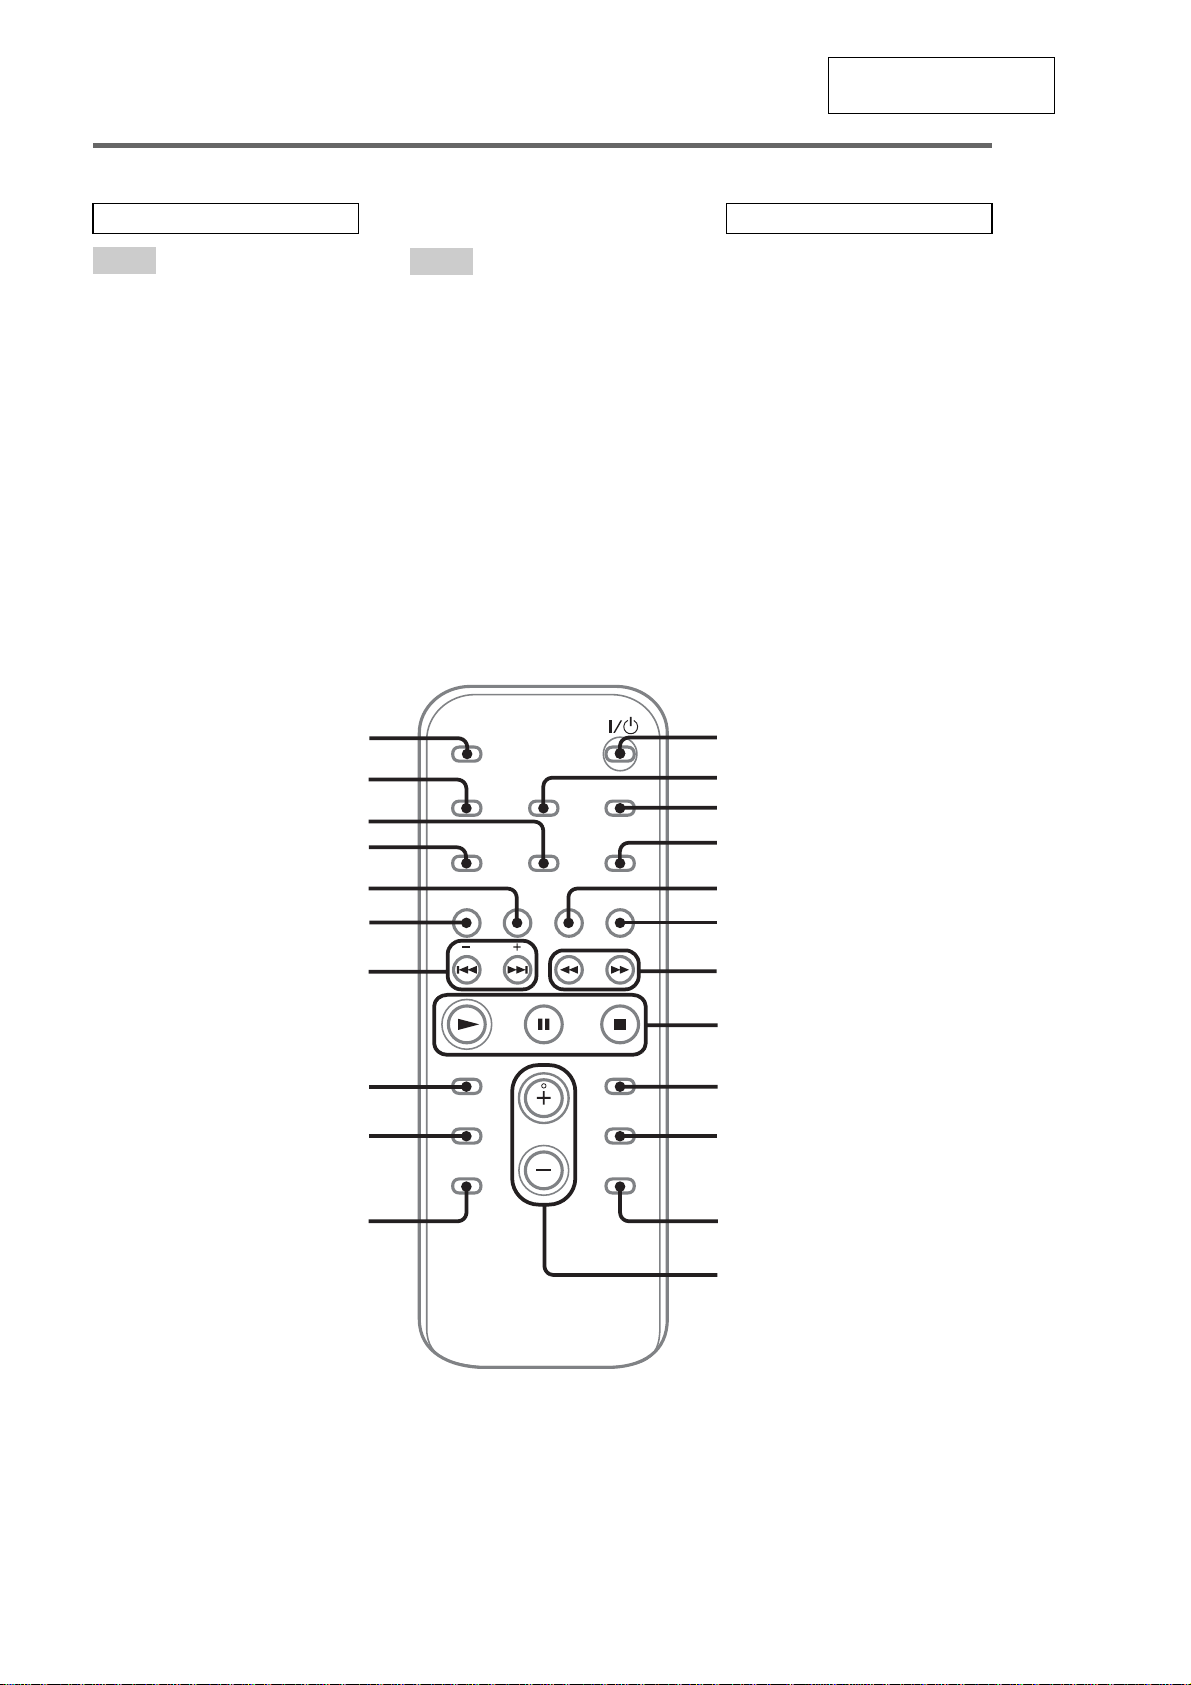
HCD-CPX22/NXM3
Remote con trol
This section is extracted
from instruction manual.
ALPHABETICAL ORDER
A – E
ALBUM – qd
ALBUM + qa
CD qk
CLEAR qg
CLOCK/TIMER SELECT 2
CLOCK/TIMER SET 3
DISC SKIP 0
DISPLAY wa
ENTER 9
EQ qf
ws
wa
F – Z
FM MODE 4
FUNCTION 6
PLAY MODE w;
REPEAT 4
SLEEP ws
TAPE qj
TUNER BAND 5
TUNER MEMORY ql
TUNING MODE w;
VOLUME +/– qs
BUTTON DESCRIPTIONS
?/1 (power) 1
m/M (rewind/fast forward)
N (play) 8
X (pause) 8
x (stop) 8
./> (go back/go forward)
–/+ (tuning) qh
1
2
7
qh
w;
ql
qk
qj
qh
qg
qf
qd
3
4
5
6
7
8
9
q;
qa
qs
6
Page 7
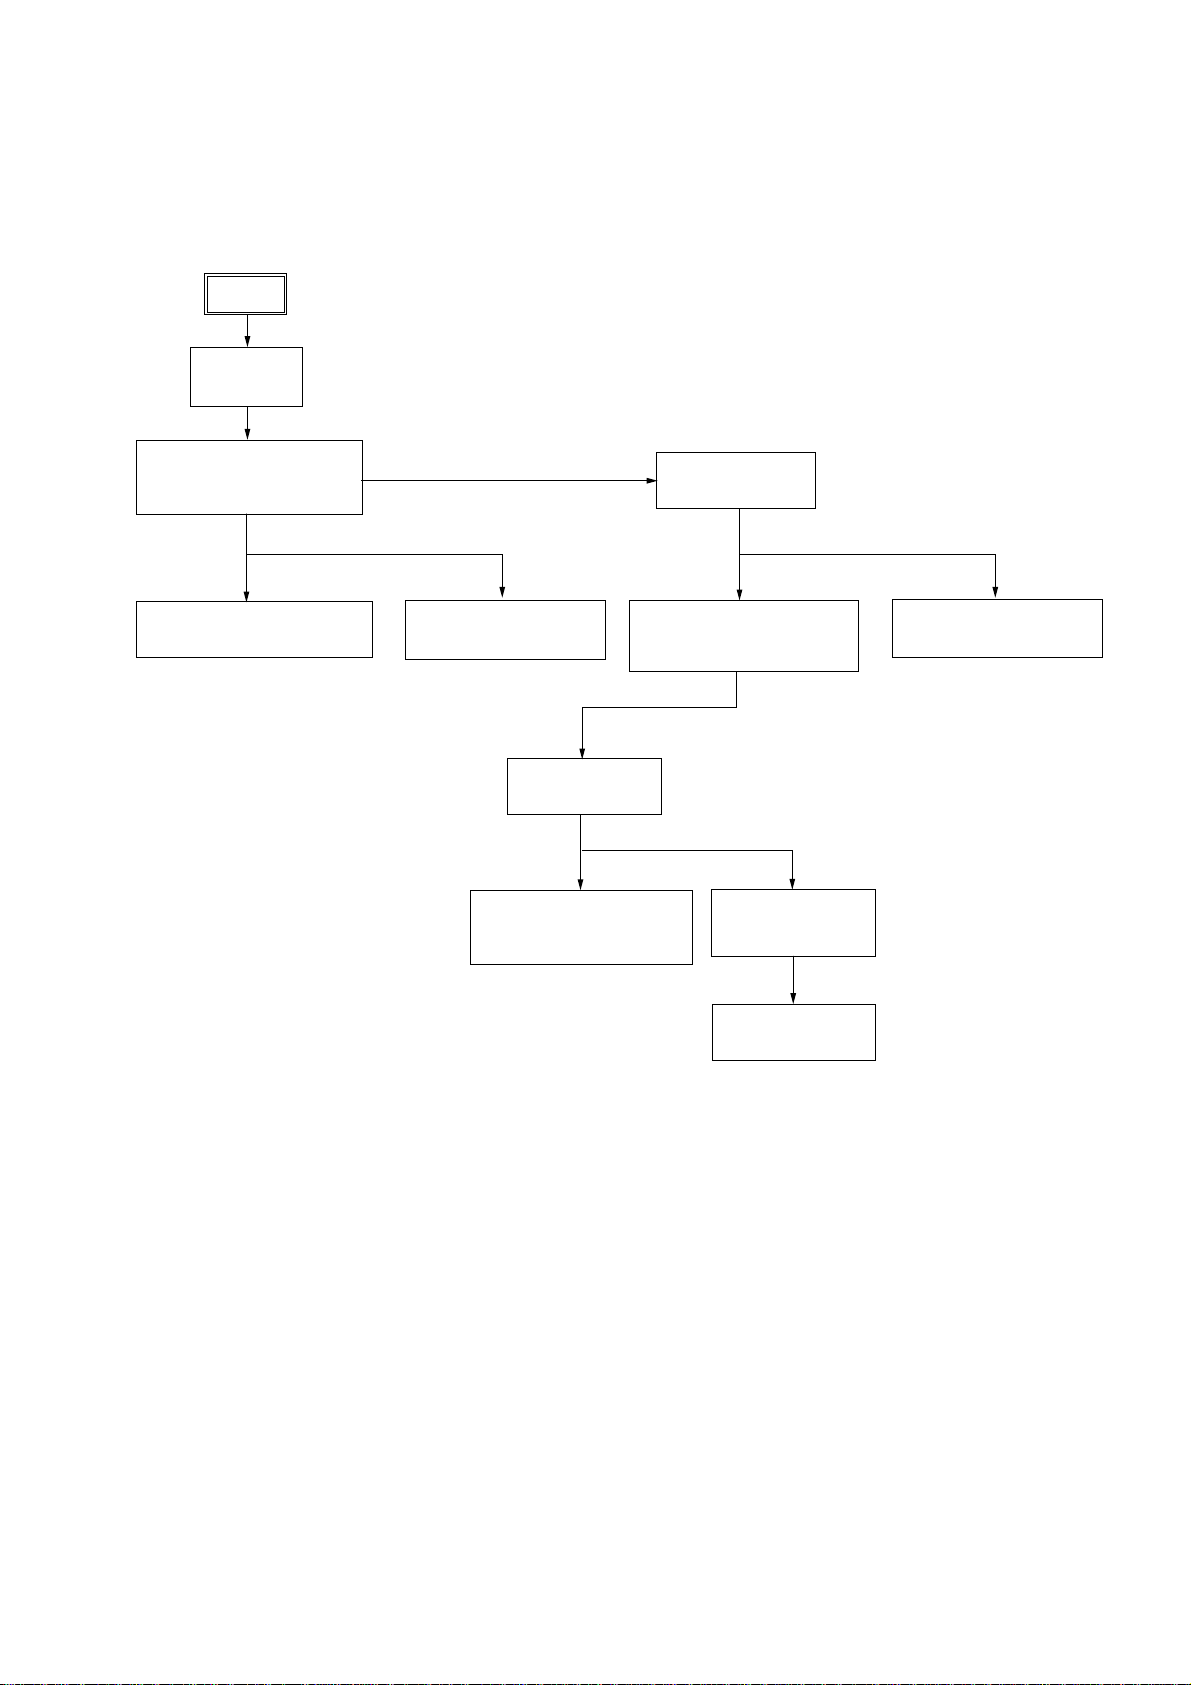
• This set can be disassembled in the order shown below.
3-1. DISASSEMBLY FLOW
SET
3-2.CASE
(Page 8)
HCD-CPX22/NXM3
SECTION 3
DISASSEMBLY
3-3.MAIN BOARD,
FRONT PANEL SECTION
(Page 8)
3-4.TAPE MECHANISM DECK
(Page 9)
3-5.PANEL BOARD
(Page 9)
3-9.TRAY
(Page 11)
3-10.M761 (LD/ST MOTOR),
M762 (BU U/D MOTOR)
(Page 12)
3-6.BACK PANEL
(Page 10)
3-7.CD MECHANISM DECK
(CDM81B-F1BD81A)
(Page 10)
3-11.BASE UNIT
(BU-F1BD81A)
(Page 12)
3-12.BD BOARD
(Page 13)
3-8.S-MASTER BOARD
(Page 11)
7
Page 8
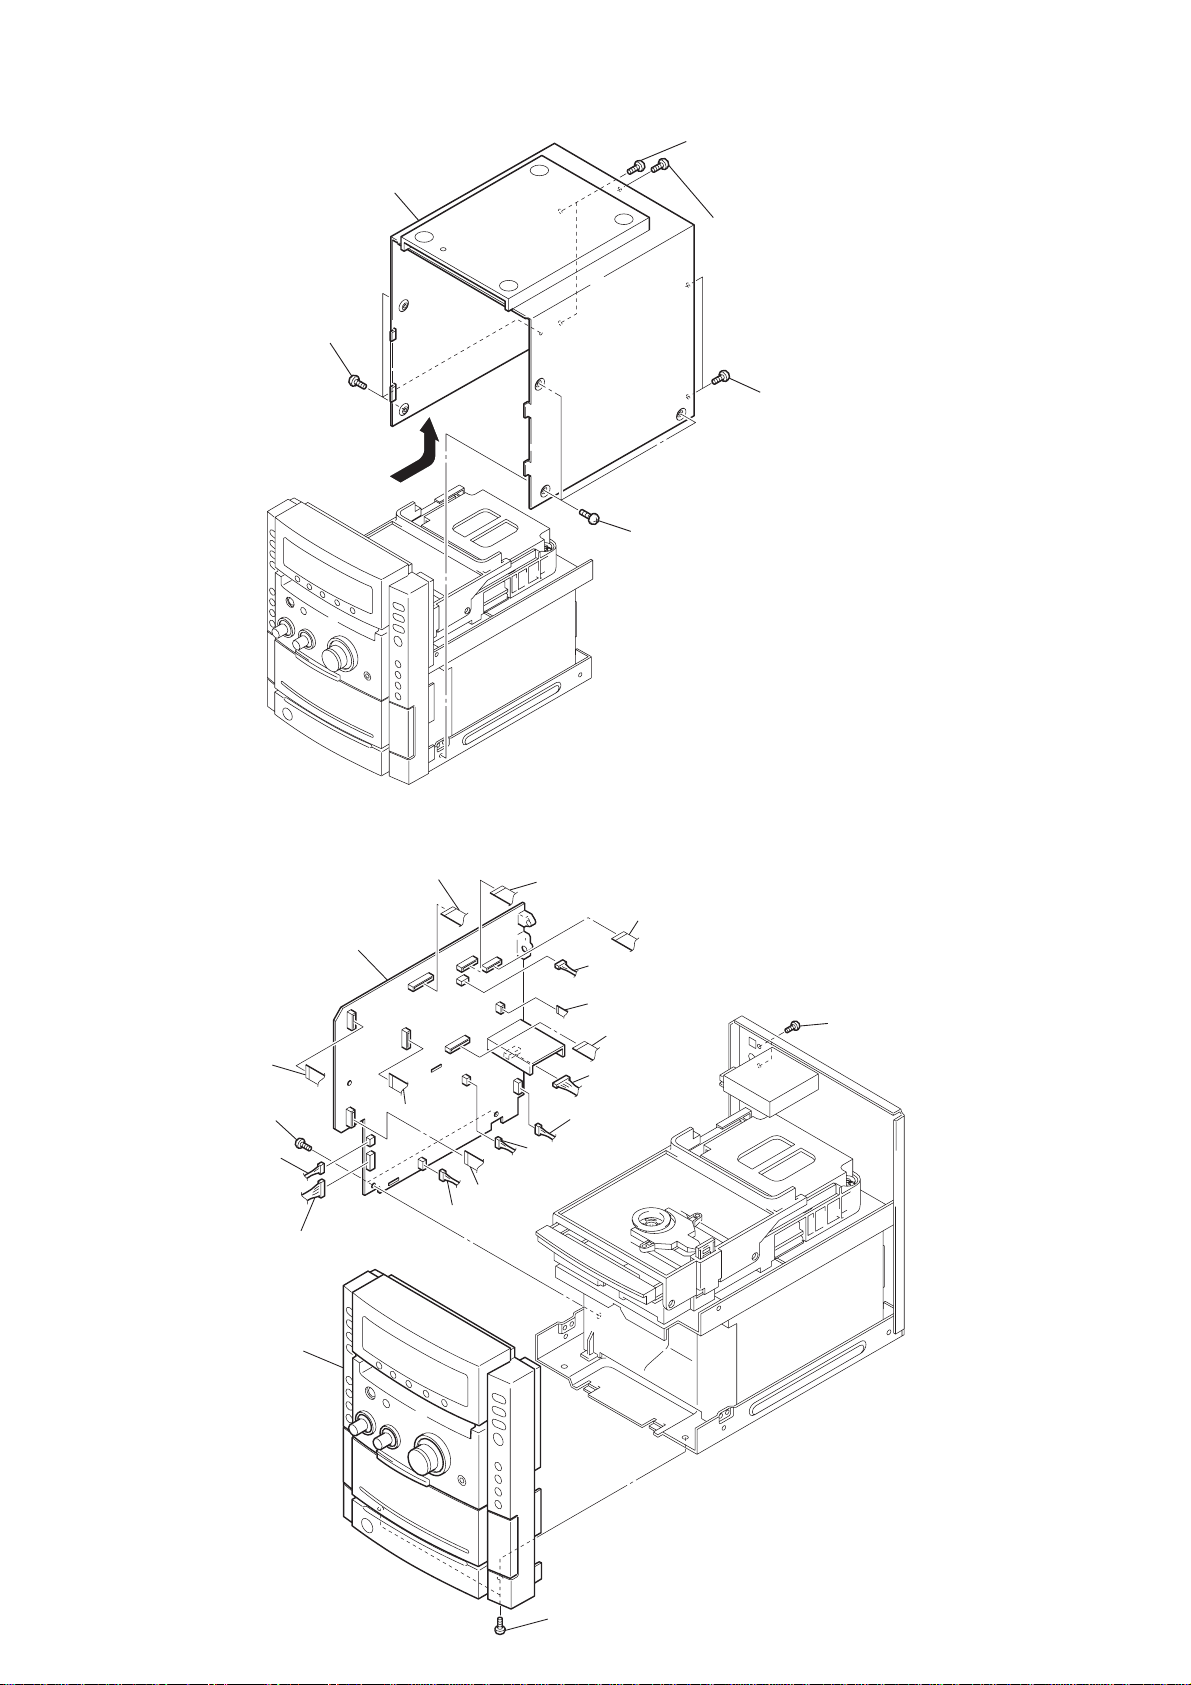
HCD-CPX22/NXM3
)
)
Note: Follow the disassembly procedure in the numerical order given.
3-2. CASE
2
three
(CASE 3 TP2)
screws
7
CASE
6
4
two
screws
(+BVTP 3X8)
5
screw
(+BVTP 3X8)
1
three
(CASE 3 TP2)
screws
3
two
screws
(+BVTP 3X8
3-3. MAIN BOARD, FRONT PANEL SECTION
qh
CN371
3
MAIN board
qj
CN109
1
two
screws
(+BVTP 3X8)
4
connector
(CN301)
5
connector
(CN302)
w;
front panel section
qk
CN110
6
(CN107)
8
(CN304)
7
CN303
connector
qg
CN372
9
(CN105)
connector
qf
qd
connector
(CN401)
qs
CN112
qa
CN106
0
connector
(CN101)
connector
CN204
2
two
(+BVTP 2.6X8
screws
ql
two
screws
8
(+BVTP 3X8)
Page 9
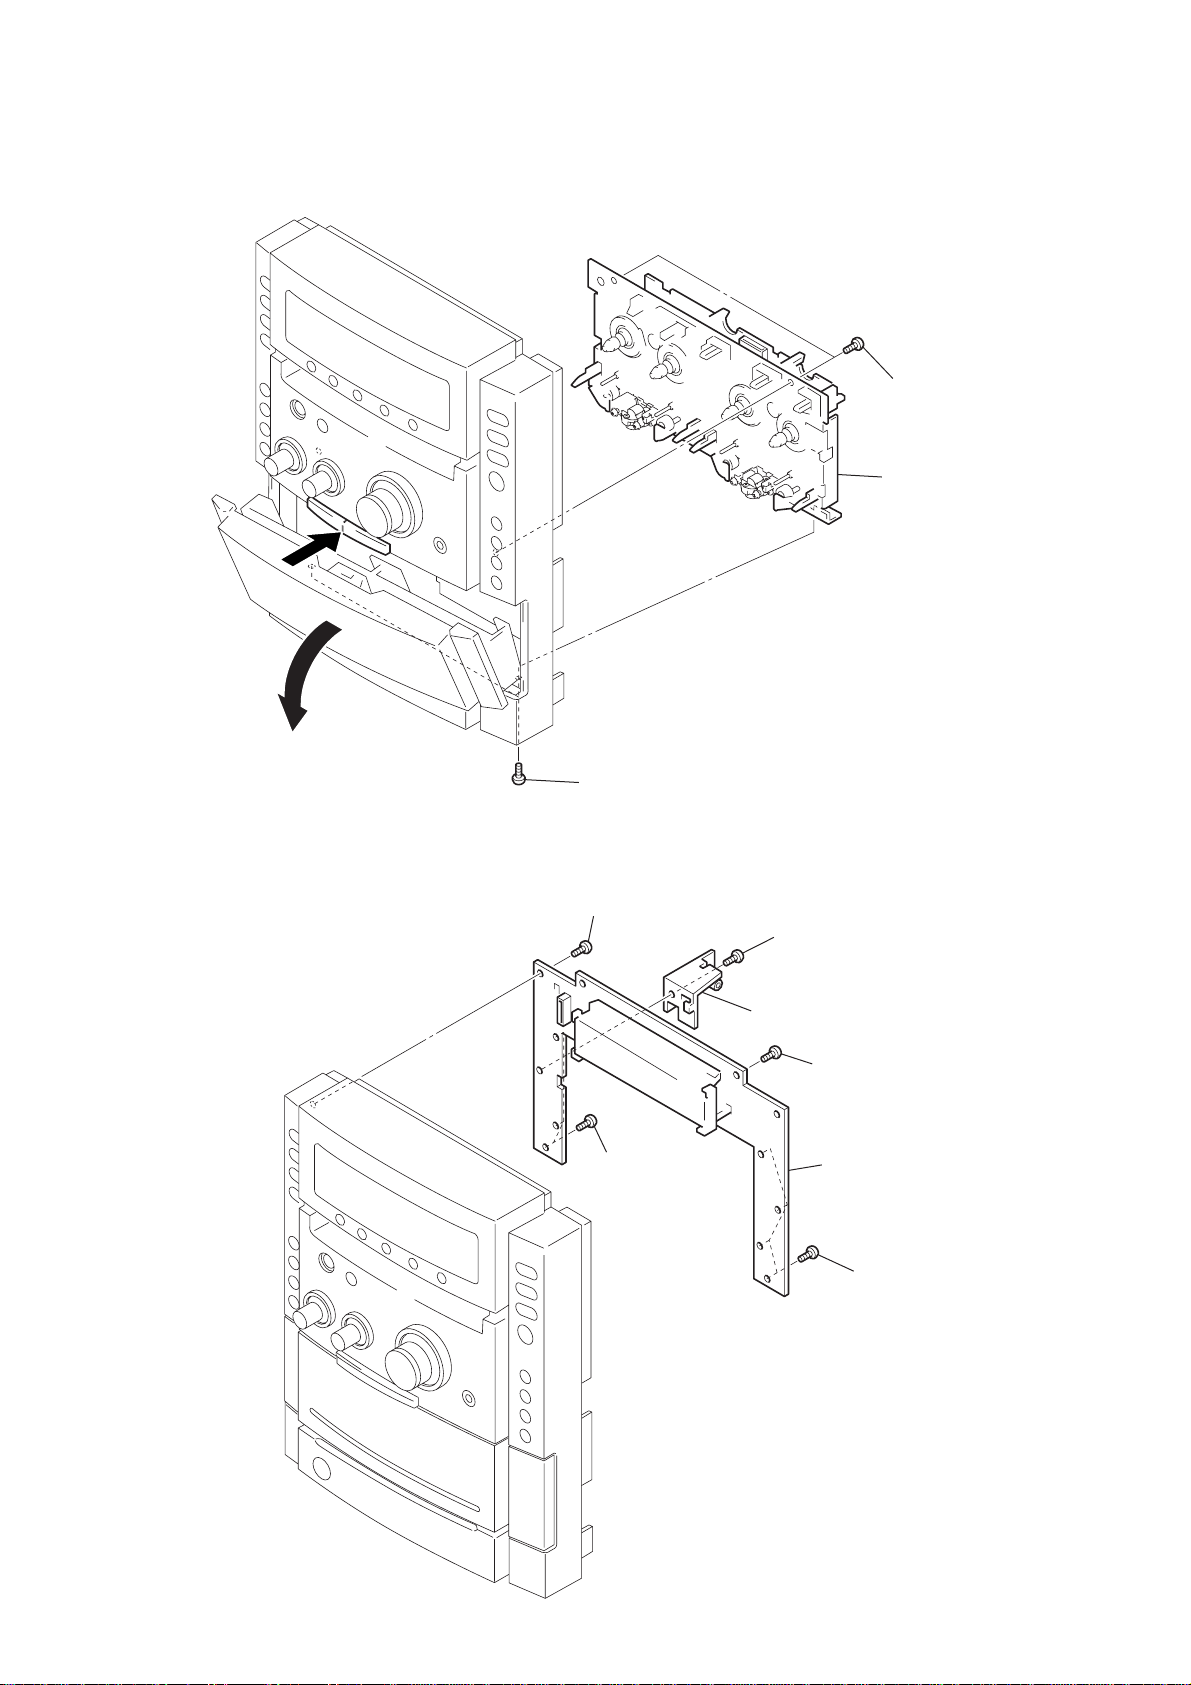
3-4. TAPE MECHANISM DECK
k
1
HCD-CPX22/NXM3
4
two
screws
(+BV (B3))
5
tape mechanism dec
2
3-5. PANEL BOARD
3
two
screws
(+BV (B3))
5
screw
(+BVTP 2.6X8)
6
three
(+BVTP 2.6X8)
screws
3
screw
(+BVTP 2.6X8)
4
bracket (main)
2
screw
(+BVTP 2.6X8)
7
PANEL board
1
four
screws
(+BVTP 2.6X8)
9
Page 10
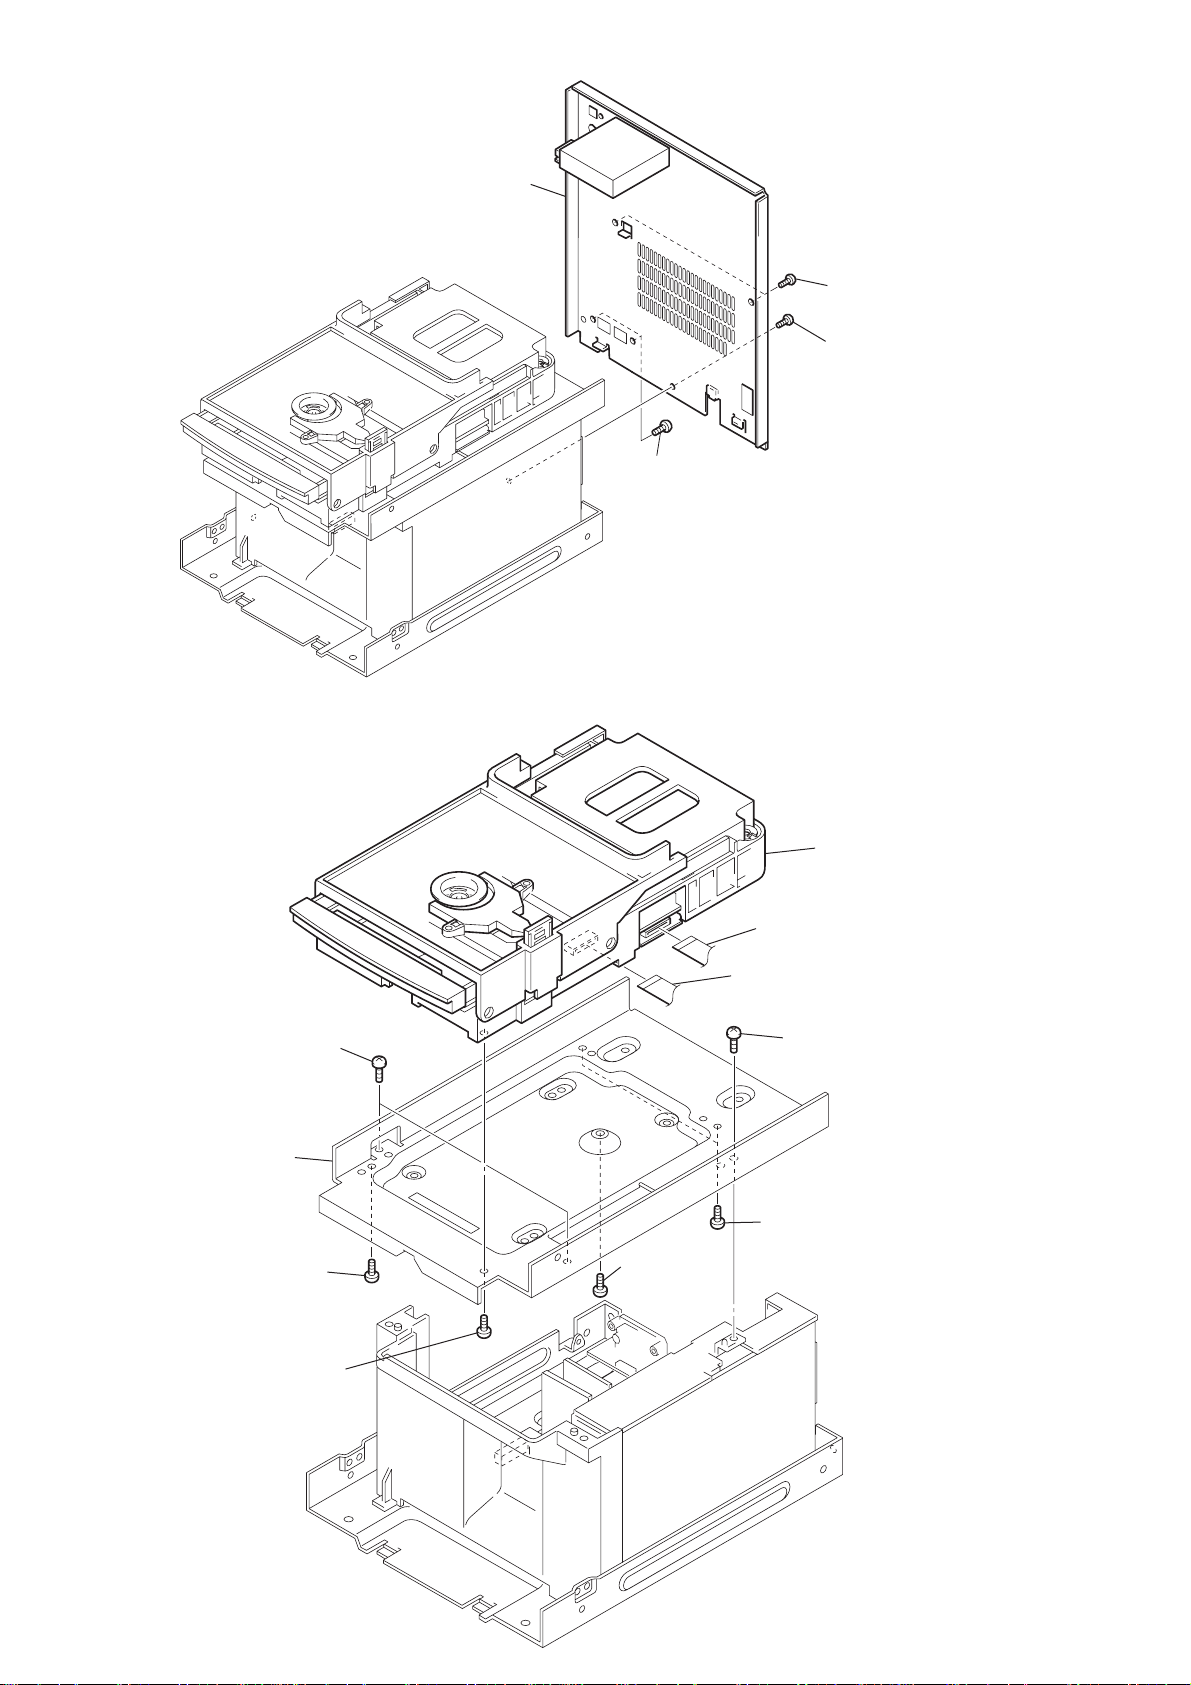
HCD-CPX22/NXM3
)
k
)
3-6. BACK PANEL
4
back panel section
3
two
screws
(+BVTP 2.6X8)
2
two
screws
(+BVTP 3X8
1
screw
(+BVTP 3X8)
3-7. CD MECHANISM DECK (CDM81B-F1BD81A)
2
two
screws
(+BVTP 3X8)
3
bracket
7
screw
(+BVTP 3X8)
5
screw
(+BVTP 3X8)
9
CN701
0
CN201
1
(+BVTP 3X8)
4
two
(+BVTP 3X8)
8
CD mechanism dec
(CDM81B-F1BD81A
screw
screws
10
6
screw
(+BVTP 3X8)
Page 11
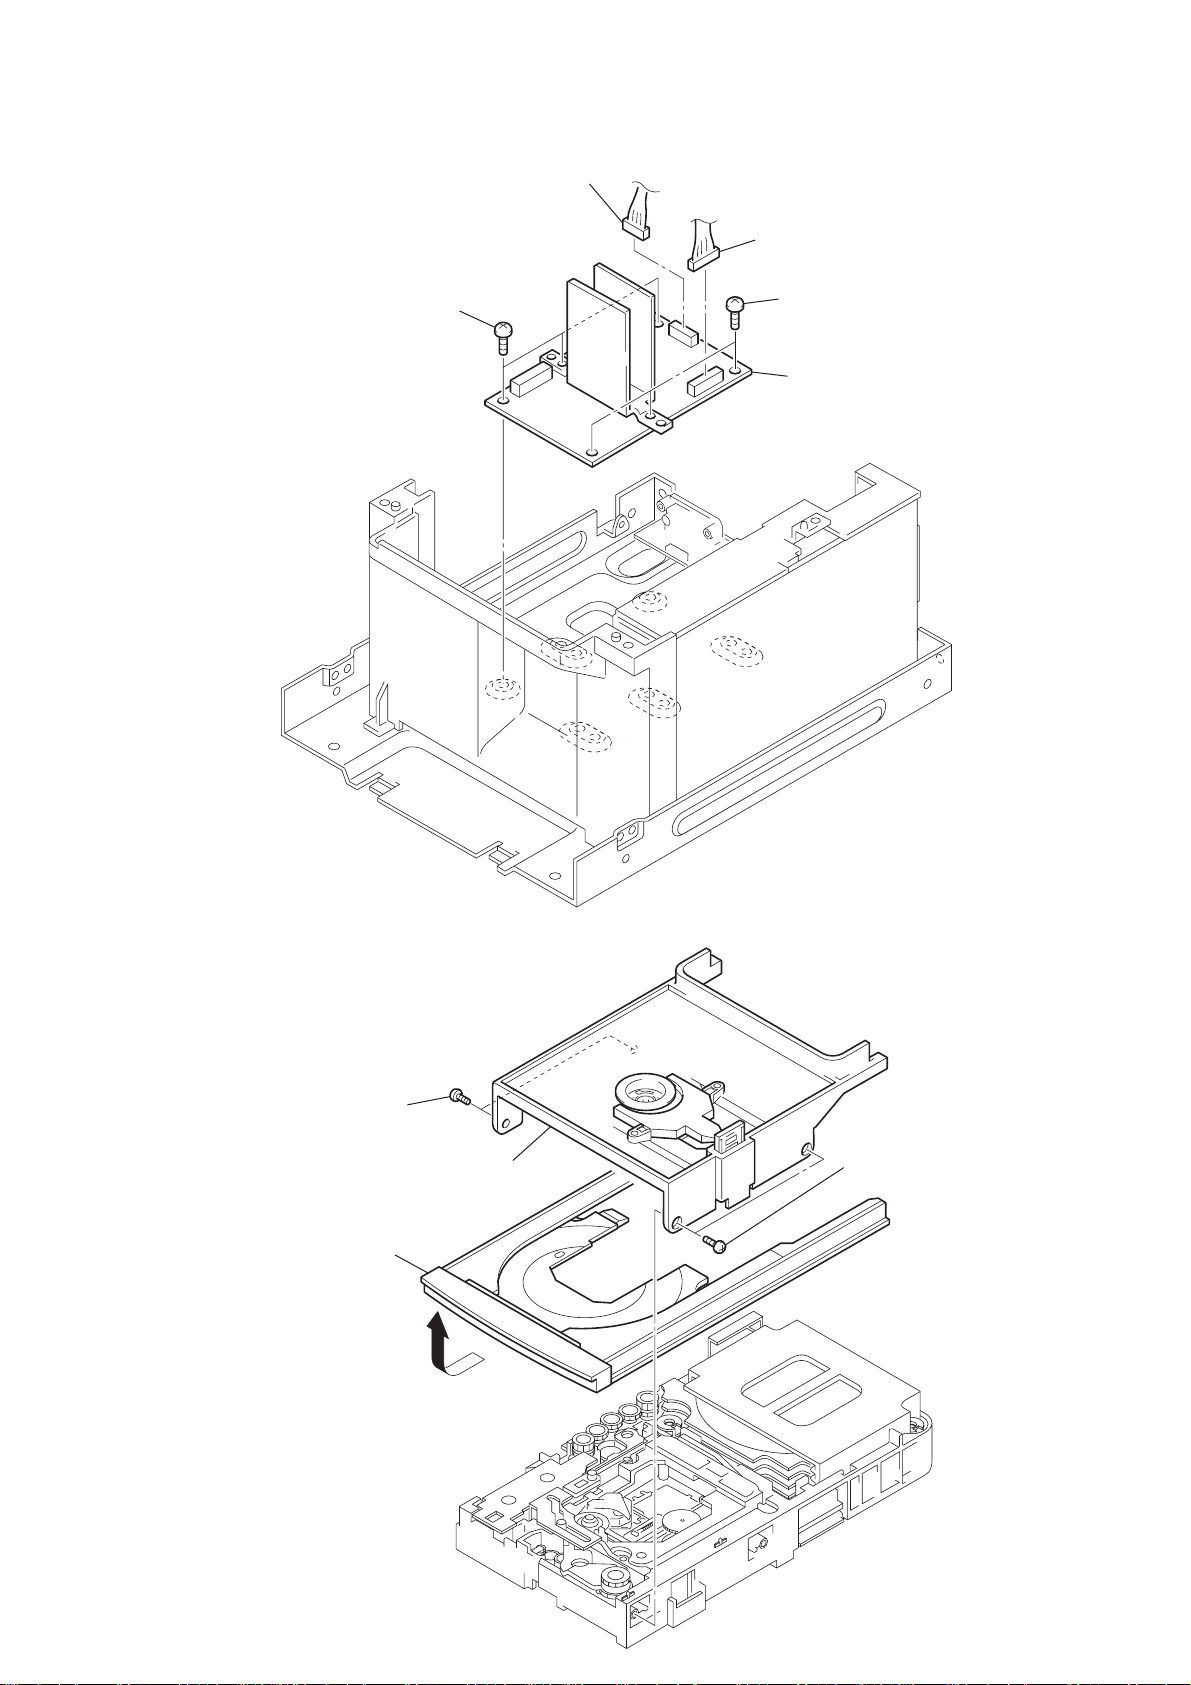
HCD-CPX22/NXM3
3-8. S-MASTER BOARD
4
two
screws
(+BVTP 3X8)
3
connector
(CN702)
1
connector
(CN701)
2
two
screws
(+BVTP 3X8)
5
S-MASTER board
3-9. TRA Y
2
two
screws
(+BTP 2.6X8)
5
tray
4
3
bracket
1
two
screws
(+BTP 2.6X8)
11
Page 12
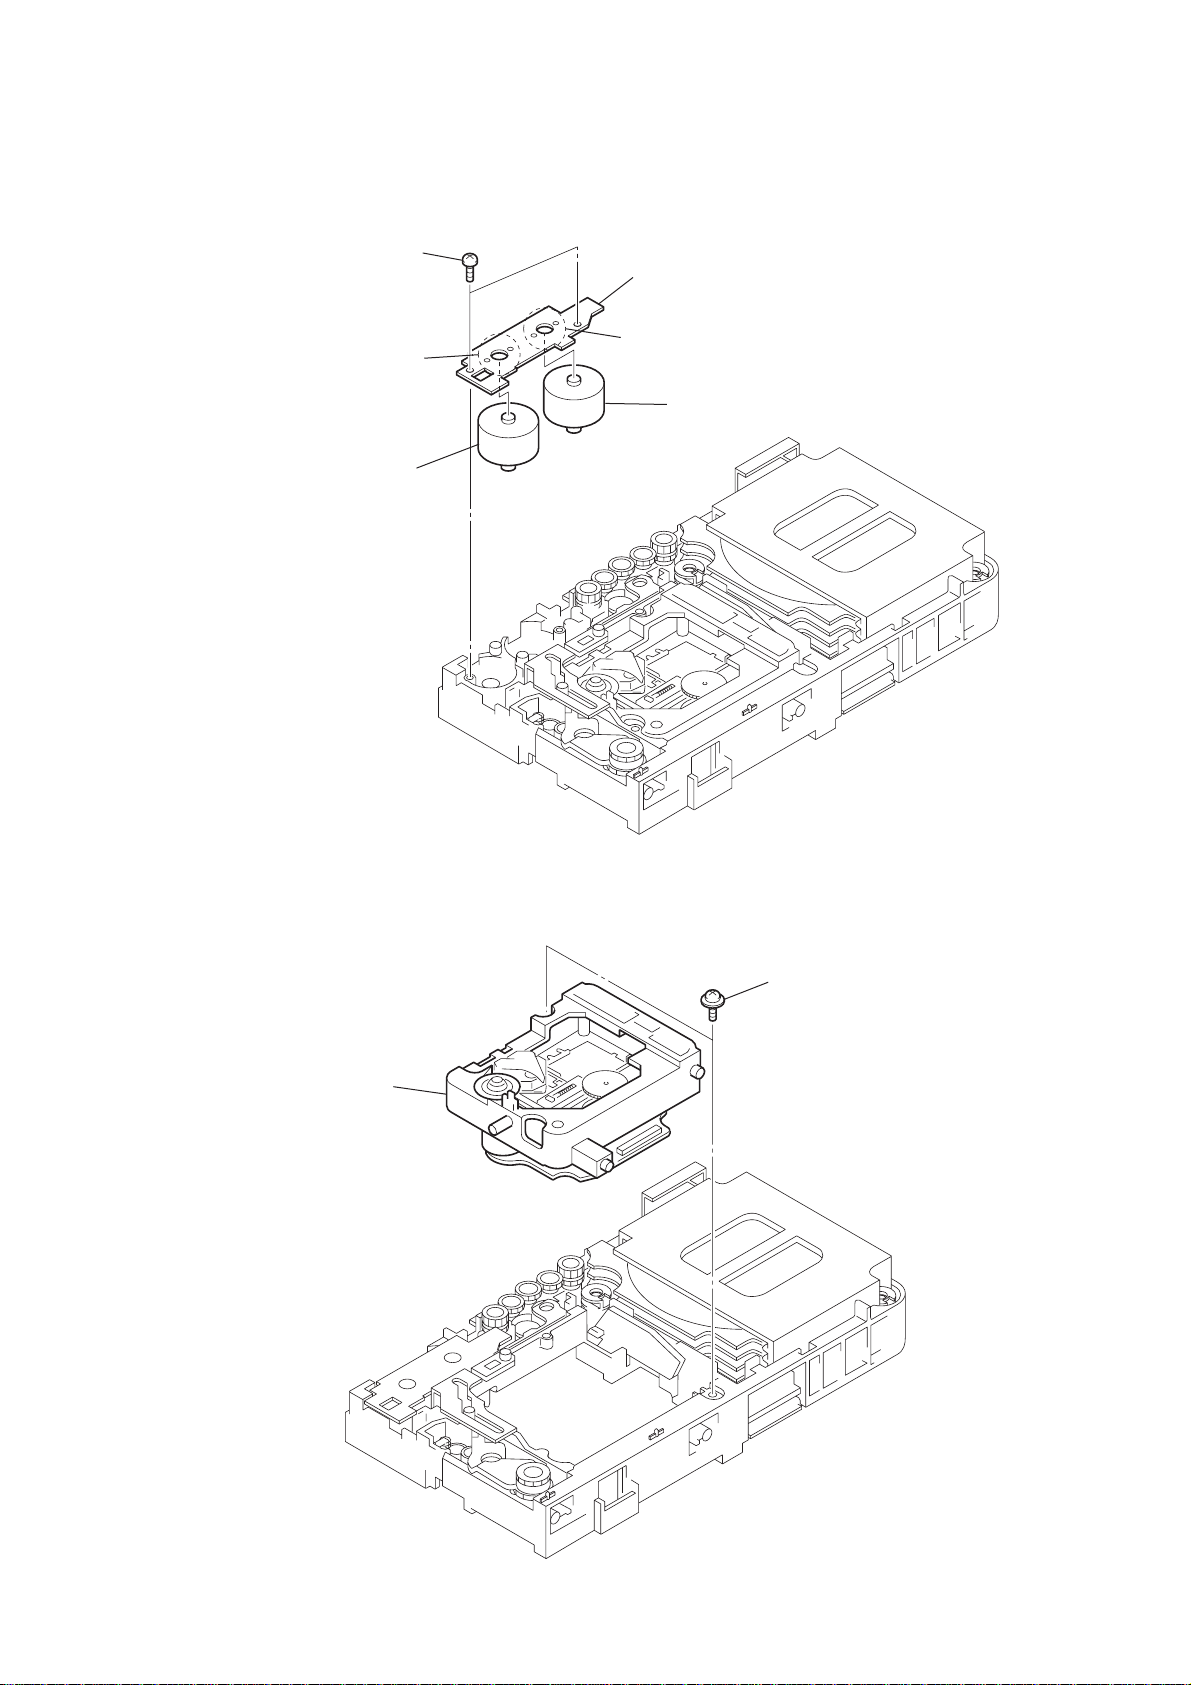
HCD-CPX22/NXM3
s
3-10. M761 (LD/ST MOTOR), M762 (BU U/D MOTOR)
1
two
screws
(+BTP 2.6X8)
5
Remove soldering from the two points.
6
M762 (BU U/D MOTOR)
2
MOTOR board
3
Remove soldering from the two points.
4
M761 (LD/ST MOTOR)
3-11. BASE UNIT (BU-F1BD81A)
2
base unit (BU-F1BD81A)
1
two floating
(+PTPWH2.6)
screw
12
Page 13
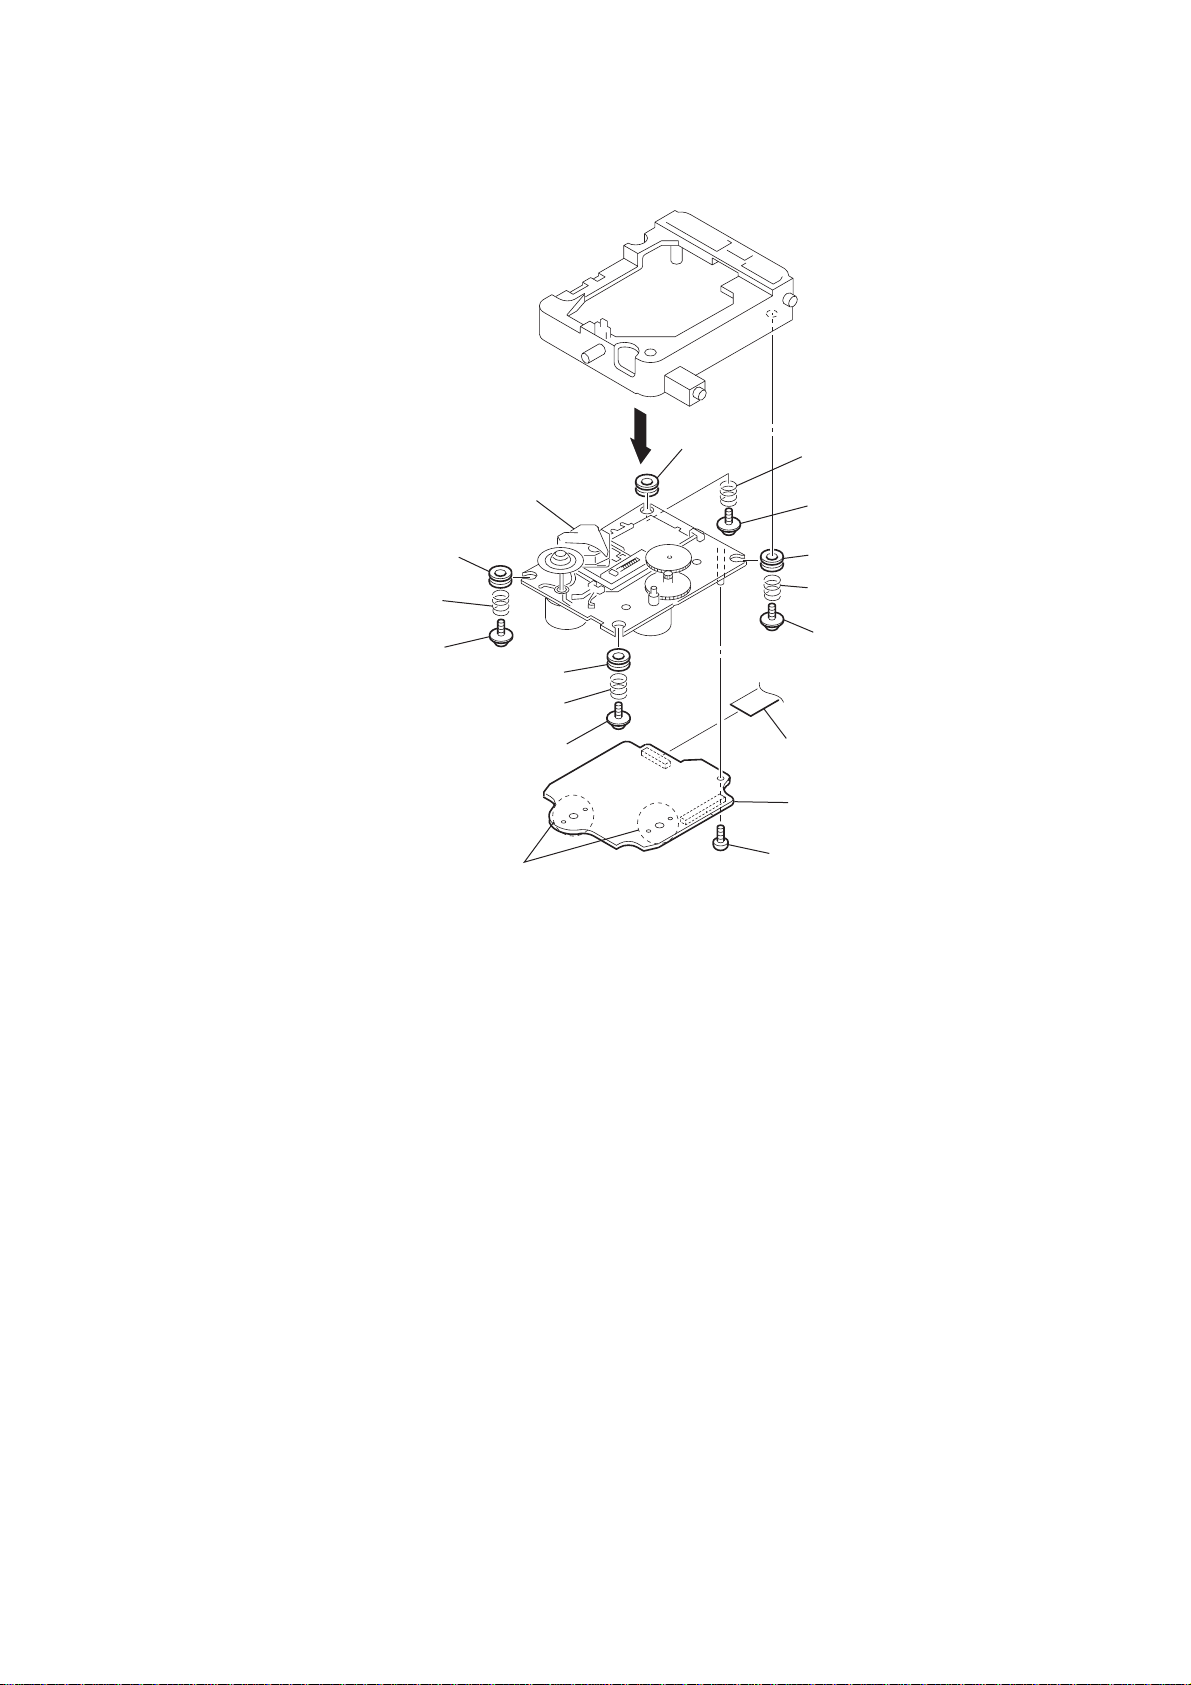
3-12. BD BOARD
w
)
HCD-CPX22/NXM3
qf
optical pick-up
(KSM-215DCP/C2NP)
qs
insulator
qa
coil spring
(insulator)
0
floating
(+PTPWH2.6)
qh
screw
9
insulator
8
coil spring
(insulator)
7
floating
(+PTPWH2.6)
Remove the four solderings of motor.
screw
qd
6
insulator
5
coil spring
(insulator)
4
floating
(+PTPWH2.6)
3
2
(insulator)
1
(+PTPWH2.6
qg
CN101
qk
BD board
qj
screw
(+BVTP 2.6X8)
screw
insulator
coil spring
floating
scre
13
Page 14
HCD-CPX22/NXM3
SECTION 4
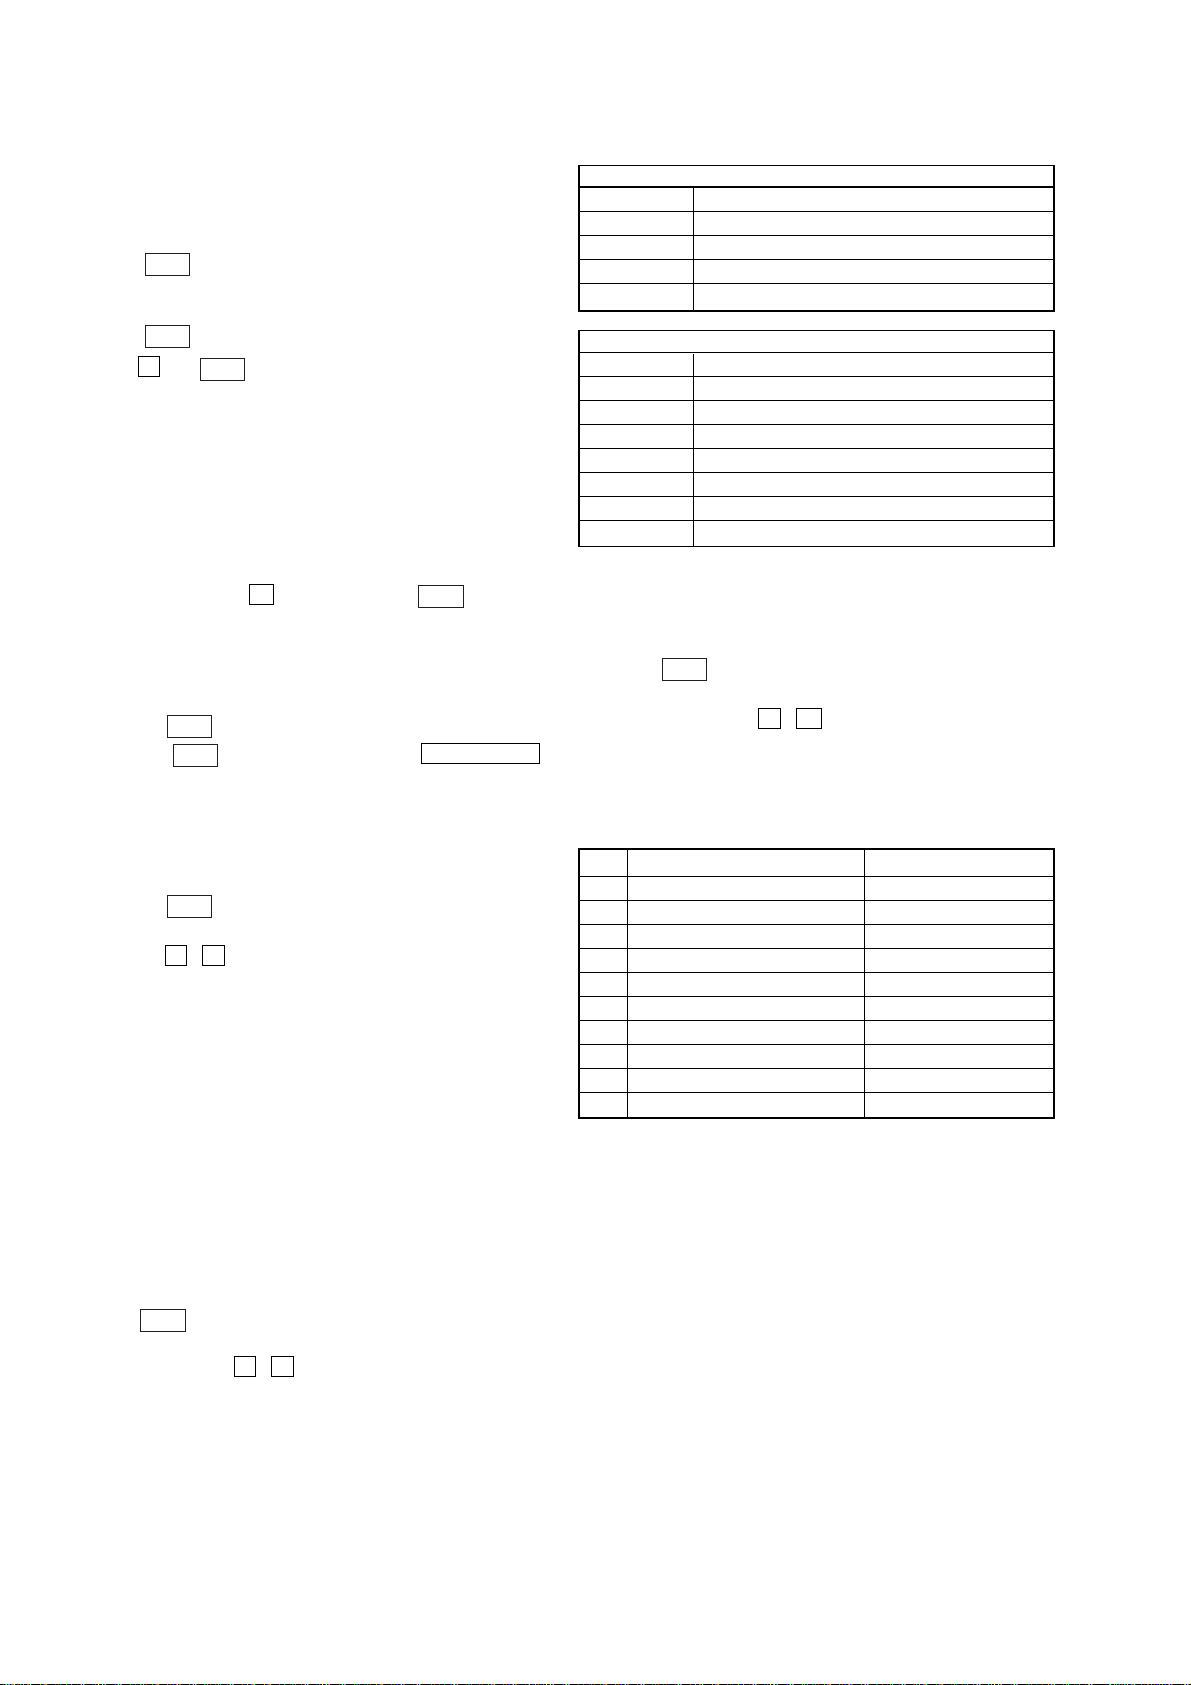
TEST MODE
[Change-over of AM Tuner Step between 9 kHz and 10 kHz]
•A step of AM channels can be changed over between 9 kHz
and 10 kHz.
Procedure:
1. Press
button to turn the set ON.
?/1
2. Select the function “TUNER”, and press [TUNER/BAND]
button to select the BAND “AM”.
3. Press
4. Press x and
button to turn the set OFF.
?/1
buttons simultaneously, and the display
?/1
of fluorescent indicator tube changes to “AM 9 kHz step” or
“AM 10 kHz step”, and thus the channel step is changed over.
[Cold Reset]
• The cold reset clears all data including preset data stored in
the RAM to initial conditions. Execute this mode when
returning the set to the customer.
Procedure:
1.
Press three buttons x , [DIMMER] ,and
?/1
simultaneously.
[Switching MD/VIDEO Functions]
Procedure:
1. Press the
2. Press the
button to turn the set ON.
?/1
button while holding the VIDEO (MD)
?/1
button depressed to toggle between “MD” and “VIDEO.” The
selected mode is displayed.
[Error code indication]
Procedure:
1. Press the
button to turn the set ON.
?/1
2. Select the “CD” function.
3. Press the x , X , and [DISPLAY] buttons simultaneously.
4. The error code is displayed.
5. Press the [TUNING +] button to display the next error code.
Press the[TUNING -] button to display the previous error
code.
[Aging Mode]
This mode can be used for operation check CD section and Tape
deck section.
• If an error occurred:
The aging operation stops and is displayed status.
• If no error occurs:
The aging operation continues repeatedly
1) Error display
Disc error
Display Error
E00D01022 Focus error (No disc)
E00D02022 Sub Q error (Focus is good)
E00D02023 TOC reading error
E00D02014 Access error (Unable within regular time)
Mechanism error
Display Error
E00M__E_0 Error during opening tray
E00M__C_2 EX-CHANGE disc error
E00M__D_0 Error during closing tray
E00M__F_3 EX-OPEN error
E00M__D_5 EX-CLOSE error
E00M__C_2 Chuck-up error
E00M__C_3 Unchucking error
2. Aging mode in Tape Deck section
Procedure:
1. Load the tapes into the decks A and B respectively.
2. Press
button on the set ON
?/1
3. Select the function “TAPE A”
4. Press three buttons x , X , and [TAPE A/B]
simultaneously, and aging mode is started.
5. To exit from the aging mode perform [Cold Reset].
• In the aging mode ,the program is executed in the following
sequence.
Step Operation Display
1 Rewind the TAPE A TAPE A AG-1
2 Rewind the TAPE B TAPE B AG-1
3 Play the TAPE A (t) (2 minute) TAPE A AG-2
4 F•F. (AMS) the TAPE A TAPE A AG-3
5 Play the TAPE A (T) (2 minute) TAPE A AG-4
6 Rewind the TAPE A TAPE A AG-5
7 Play the TAPE B (t) (2 minute) TAPE B AG-2
8 F•F.(AMS) the TAPE B TAPE B AG-3
9 Play the TAPE B (T) (2 minute) TAPE B AG-4
10 Rewind the TAPE B TAPE B AG-5
1. Aging mode in CD section
Procedure:
1. Press
button on the set ON
?/1
2. Select the function “CD”
3. Press three buttons x , X , and [DISC 3] simultaneously.
The “Aging in” display and aging mode is set.
4. Press [DISC 1] button, starts aging mode of all trays check.
5. Press [DISC 2] button ,starts measurement loading time.
6. To exit from the aging mode perform [Cold Reset].
14
Page 15
HCD-CPX22/NXM3
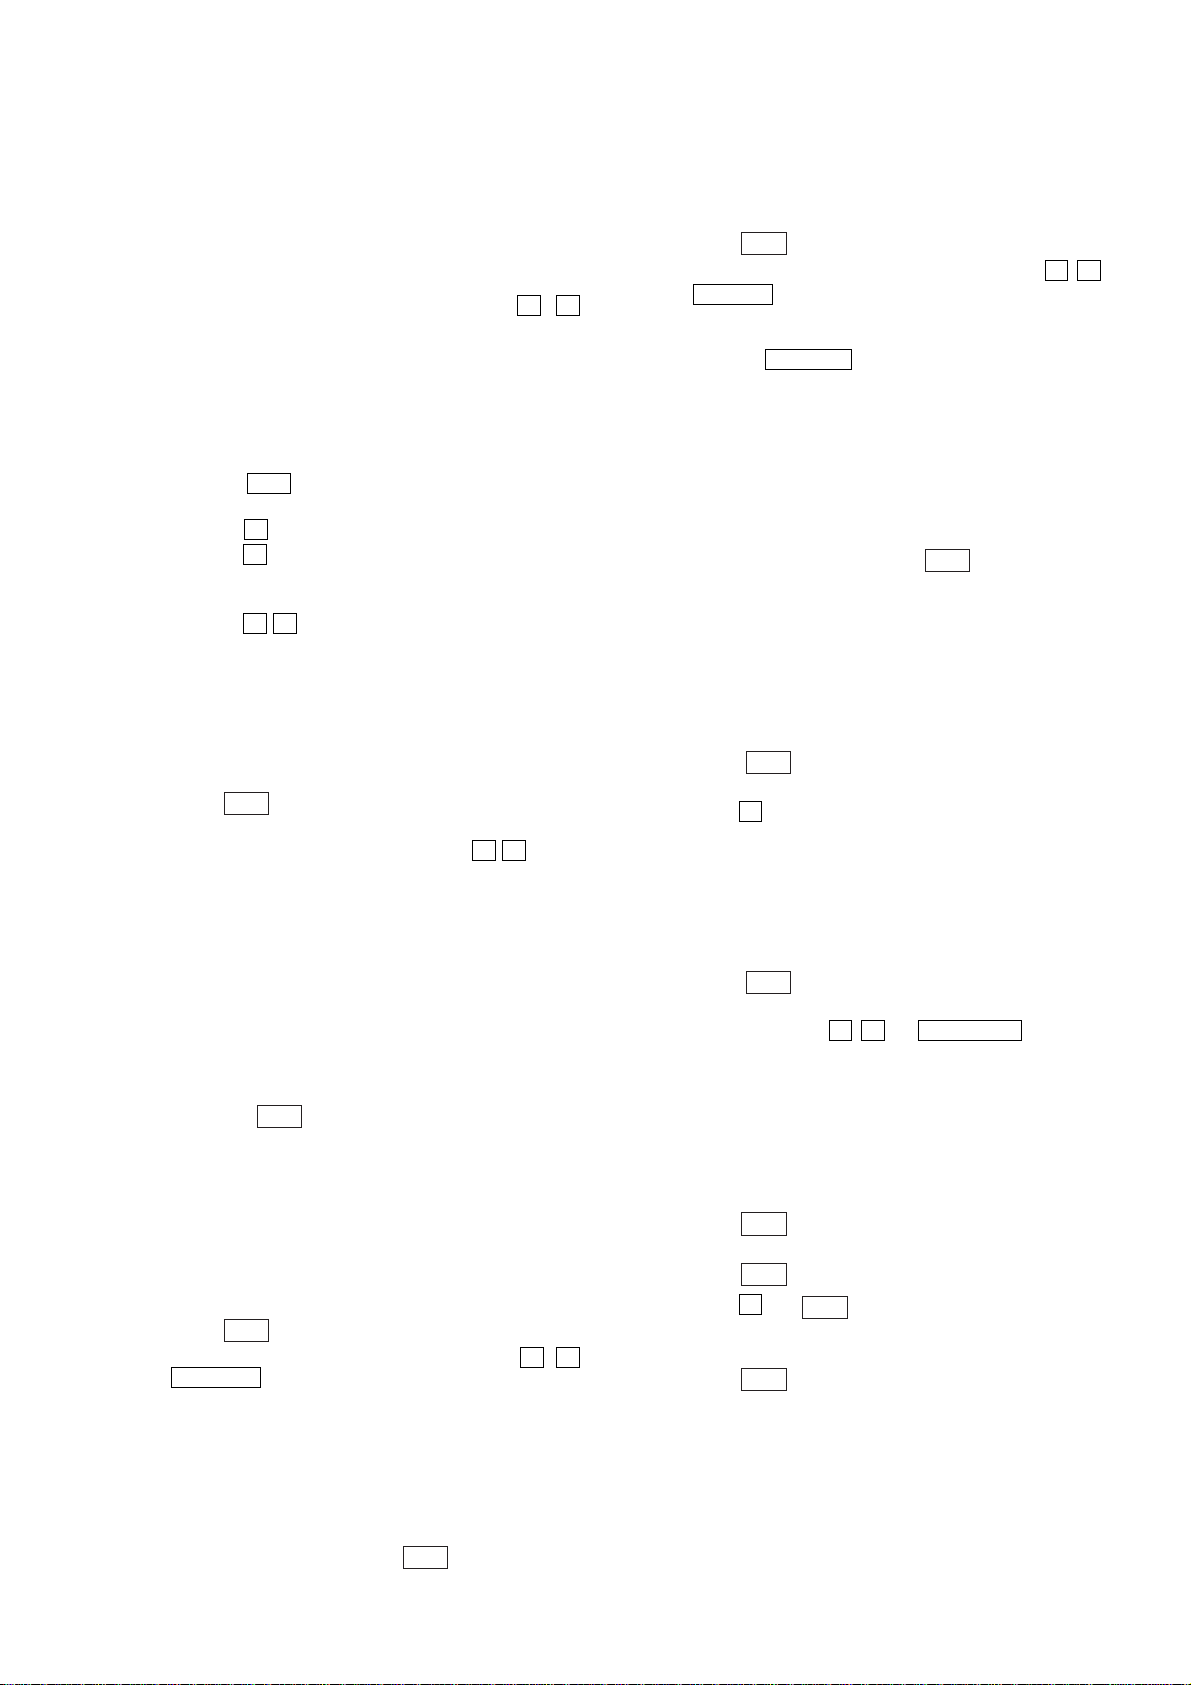
[GC Test Mode]
• All fluorecent segments and LEDs are tested.
• Microprocessor virsion.
• Keyboard check.
• Display check.
Procedure:
1. To enter the test mode, press the three buttons x , X and
[TUNER/BAND] simultaneously.
2. All segments and LEDs (without ST ANDBY LED) are turned
on.
3. Press the [TUNING -] button to increment the microprocessor
software version.
4. Press the [TUNING +] button to change the indication for the
microprocessor software version.
3. Press the b B button to set the check mode for the entries
(KEY, JOG, etc.).
4. Press the X button to display the current VACS level.
7. Press the x button to enter the mode to check the display. If
you press this button repeatedly, the display will change
sequentially as the button is pressed.
8. Press the x , X and [TUNER/BAND] buttons simultaneously
to set the standby mode.
[CD Service Mode]
• This mode can run the CD sled motor freely. Use this mode,
for instance, when cleaning the pick-up.
Procedure:
1. Press
button to turn the set ON.
?/1
2. Select the function “CD”.
3. To enter the test mode, press three buttons x , X , and [DISC
1] simultaneously.
4. The CD service mode is selected.The message ‘‘CD SERVICE
MODE’’ is displayed.
5. While holding the [TUNING -] button depressed , to move
the sled to the inside. “SLED IN” is displayed.
While holding the [TUNING +] button depressed, to move
the sled to the outside. “SLED OUT” is displayed.
6. Press the [CD SYNC] button so that “LD ON” and “LD OFF”
are displayed to switch between Laser ON/OFF.
7. To exit from this mode, perform as follows:
1) Move the pick-up to the most inside track.
2) Press
Note: • Always move the pick-up to most inside track when exiting from
this mode. Otherwise, a disc will not be unloaded.
• Do not run the sled motor excessively, otherwise the gear can be
chipped.
button to turn the set OFF.
?/1
[MC Test Mode] (Amplifier SECTION)
• This mode is used to test the function of the amplifier section.
Procedure:
1. Press
2. To enter the test mode, press the three buttons x , X and
button to turn the set ON.
?/1
z/START simultaneously.
3. Turn [VOLUME] knob to counter-clockwise, the function of
the equalizer is set to “MIN”.
4. Turn [VOLUME] knob to clockwise, the function of the
equalizer is set to “MAX”.
5. Whenever turn [BASS] knob to clockwise, the display switches
as follows.
“TONE MAX” t“TONE MIN” t“TONE FLAT”
6. To exit from this mode, press
button to turn the set
?/1
OFF.
[MC Test Mode] (Tape section)
• This mode is used to test the functions of the Tape Procedure.
Procedure:
1. Press
2. To enter the test mode, press the three buttons x , X and
z/START simultaneously.
button to turn the set ON.
?/1
3. While holding the [DIMMER] button depressed, turn the ALC
ON.
4. Press the z/START button to start REC (recording).
5. While recording, press the [TUNING +] button to perform
automatic rewind and automatic playback (for FF version).
Also, press the [TUNING -] button to perform automatic rewind
and automatic playback (for FR version).
6. Select the function “TAPE A” or “TAPE B”
7. Press the [CD-SYNC] button while “TAPE A” or “TAPE B”
is selected, to perform AMS check. “EDG[ ]” is displayed.
A number appears inside[ ].
8. To exit from this mode, press
button to turn the set
?/1
OFF.
[CD Ship Mode (LOCK) ]
• This mode moves the pick-up to the position durable to
vibration. Use this mode when returning the set to the customer
after repair.
Procedure:
1. Press
button to turn the set ON.
?/1
2. Select the function “CD”.
3. Press x button and [CD] button simultaneously.
4. The “ST ANDBY” display blinks instantaneously , and the CD
ship mode is set.
5. To fluorescent indicator tube displays ‘‘LOCK’’.
[CD Ship (LOCK) & COLD RESET MODE]
Procedure:
1. Press
button to turn the set ON.
?/1
2. Select the function “CD”.
3.
Press three buttons x , X and VIDEO (MD) simultaneously .
4. The “ST ANDBY” display blinks instantaneously and CD ship
mode is set.
5. To fluorescent indicator tube displays “LOCK” and the set is
reset.
[CD power -manage function]
Procedure:
1. Press
button to the set ON
?/1
2. Select the function “CD”.
3. Press
4. Press x and
button to turn the set OFF.
?/1
?/1
buttons simultaneously ,and the display
of fluorescent indicator tube changes “CD POWER OFF” or
“CD POWER ON”.
5. Press
button to turn the set OFF.
?/1
15
Page 16
HCD-CPX22/NXM3
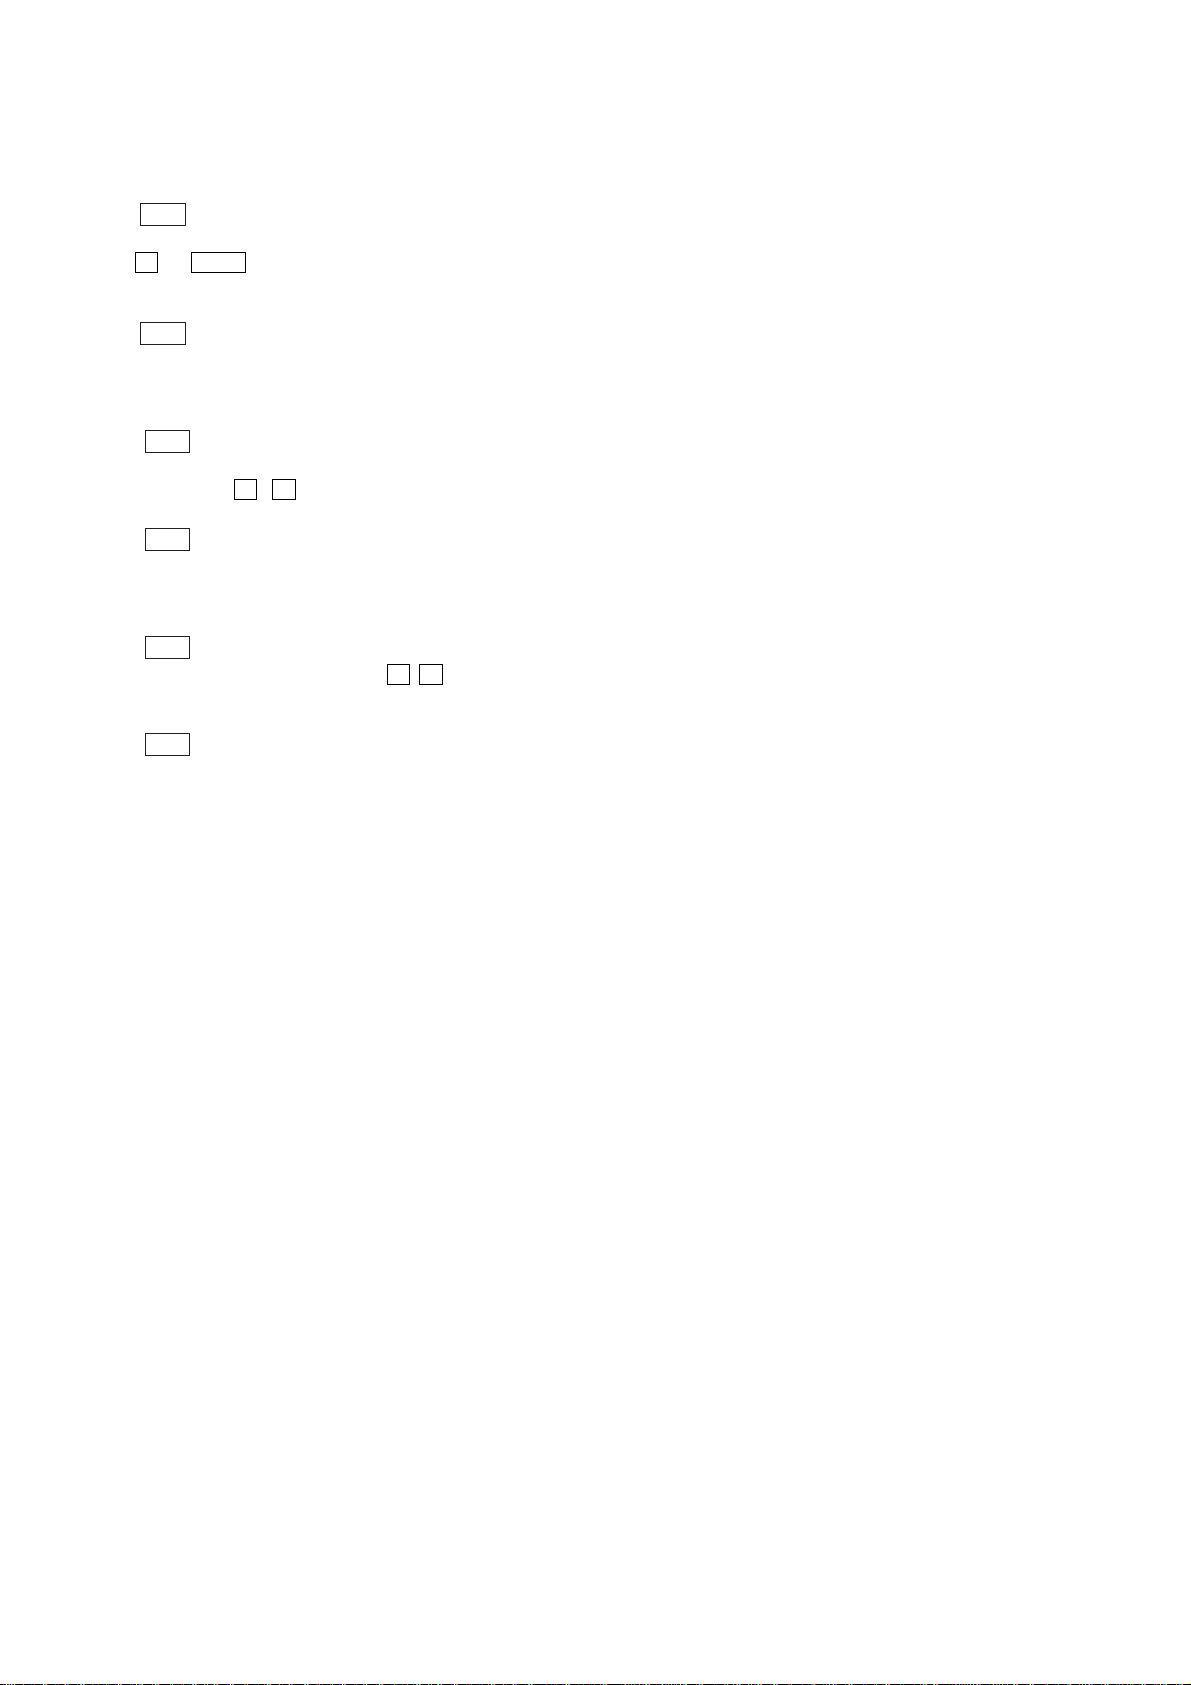
[DISC T ray Lock]
Procedure:
1. Press
2. Select the function “CD”.
3. Press x and CD Z buttons simultaneously for 5 seconds.
And the displays of fluorescent indicator tube changes to
“LOCKED” or “UNIOCKED”.
4. Press
[CD Repeat 5 Times Limit Release Mode]
Procedure:
1. Press
2. Select the function “CD”.
3. Press three buttons x , X and [CD SYNC] simultaneously.
4. The message “LIMIT OFF” is displayed.
5. Press
[AMP TEST MODE]
Procedure:
1. Press
2. To enter the test mode, press three buttons x , X and [DSGX]
simultaneously.
3. Display will changes ‘‘VACS ON’’ to ‘‘VACS OFF’’.
4. Press
button to the set ON.
?/1
button to turn the set OFF.
?/1
button to turn the set ON.
?/1
button the set OFF.
?/1
button to turn the set ON.
?/1
button to turn the set OFF.
?/1
16
Page 17
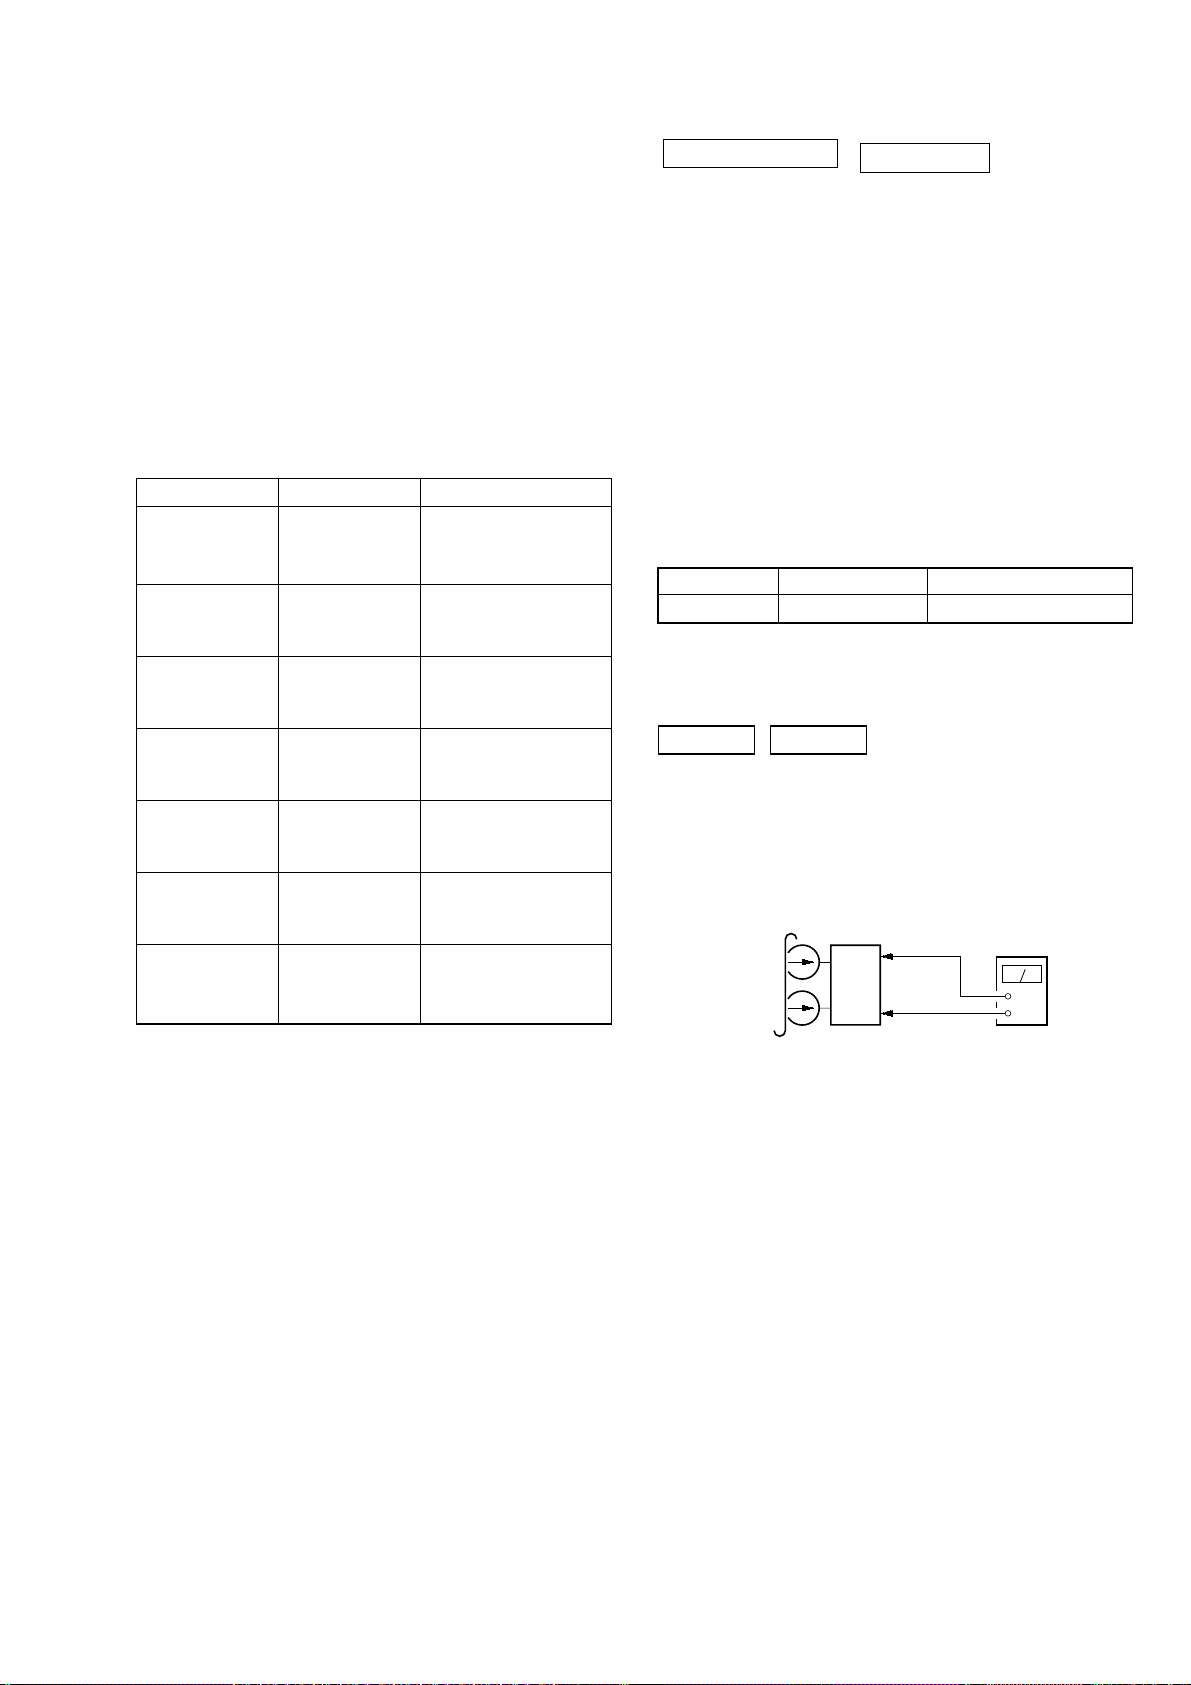
HCD-CPX22/NXM3
SECTION 5
MECHANICAL ADJUSTMENTS
Precaution
1. Clean the following parts with a denatured alcohol-moistened
swab:
record/playback heads pinch rollers
erase head rubber belts
capstan idlers
2. Demagnetize the record/playback head with a head
demagnetizer.
3. Do not use a magnetized screwdriver for the adjustments.
4. After the adjustments, apply suitable locking compound to
the parts adjusted.
5. The adjustments should be performed with the rated power
supply voltage unless otherwise noted.
Torque Measurement
Mode Torque meter Meter reading
3.06 N • m to 6.96 N • m
FWD CQ-102C 31 to 71 g • cm
(0.43 – 0.98 oz • inch)
FWD
back tension
REV CQ-102RC 31 to 71 g • cm
REV
back tension
FF/REW CQ-201B 71 to 143 g • cm
FWD tension CQ-403A 100 g or more
REV tension CQ-403R 100 g or more
CQ-102C 2 to 6 g • cm
CQ-102RC 2 to 6 g • cm
0.19 N • m to 0.58 N • m
(0.02 – 0.08 oz • inch)
3.06 N • m to 6.96 N • m
(0.43 – 0.98 oz • inch)
0.19 N • m to 0.58 N • m
(0.02 – 0.08 oz • inch)
6.96 N • m to 14.02 N • m
(0.98 – 1.99 oz • inch)
9.80 N • m
(3.53 oz or more)
9.80 N • m
(3.53 oz or more)
SECTION 6
ELECTRICAL ADJUSTMENTS
DECK SECTION
1. Demagnetize the record/playback head with a head
demagnetizer.
2. Do not use a magnetized screwdriver for the adjustments.
3. After the adjustments, apply suitable locking compound to the
parts adjust.
4. The adjustments should be performed with the rated power
supply voltage unless otherwise noted.
5. The adjustments should be performed in the order given in
this service manual. (As a general rule, playback circuit
adjustment should be completed before performing recording
circuit adjustment.)
6. The adjustments should be performed for both L-CH and RCH.
7. Switches and controls should be set as follows unless otherwise
specified.
•Test Tape
Tape Signal Used for
P-4-A100 10 kHz, –10 dB Azimuth Adjustment
RECORD/PLAYBACK HEAD AZIMUTH ADJUST-MENT
DECK A DECK B
Note: Perform this adjustments for both decks
Procedure:
1. Mode: Playback
test tape
P-4-A100
(10 kHz, –10 dB)
0 dB=0.775 V
MAIN board
CN304
Pin
1
(L-CH)
Pin
3
(R-CH)
set
MAIN board
CN304
Pin
2
(GND)
level meter
+
–
17
Page 18
HCD-CPX22/NXM3
e
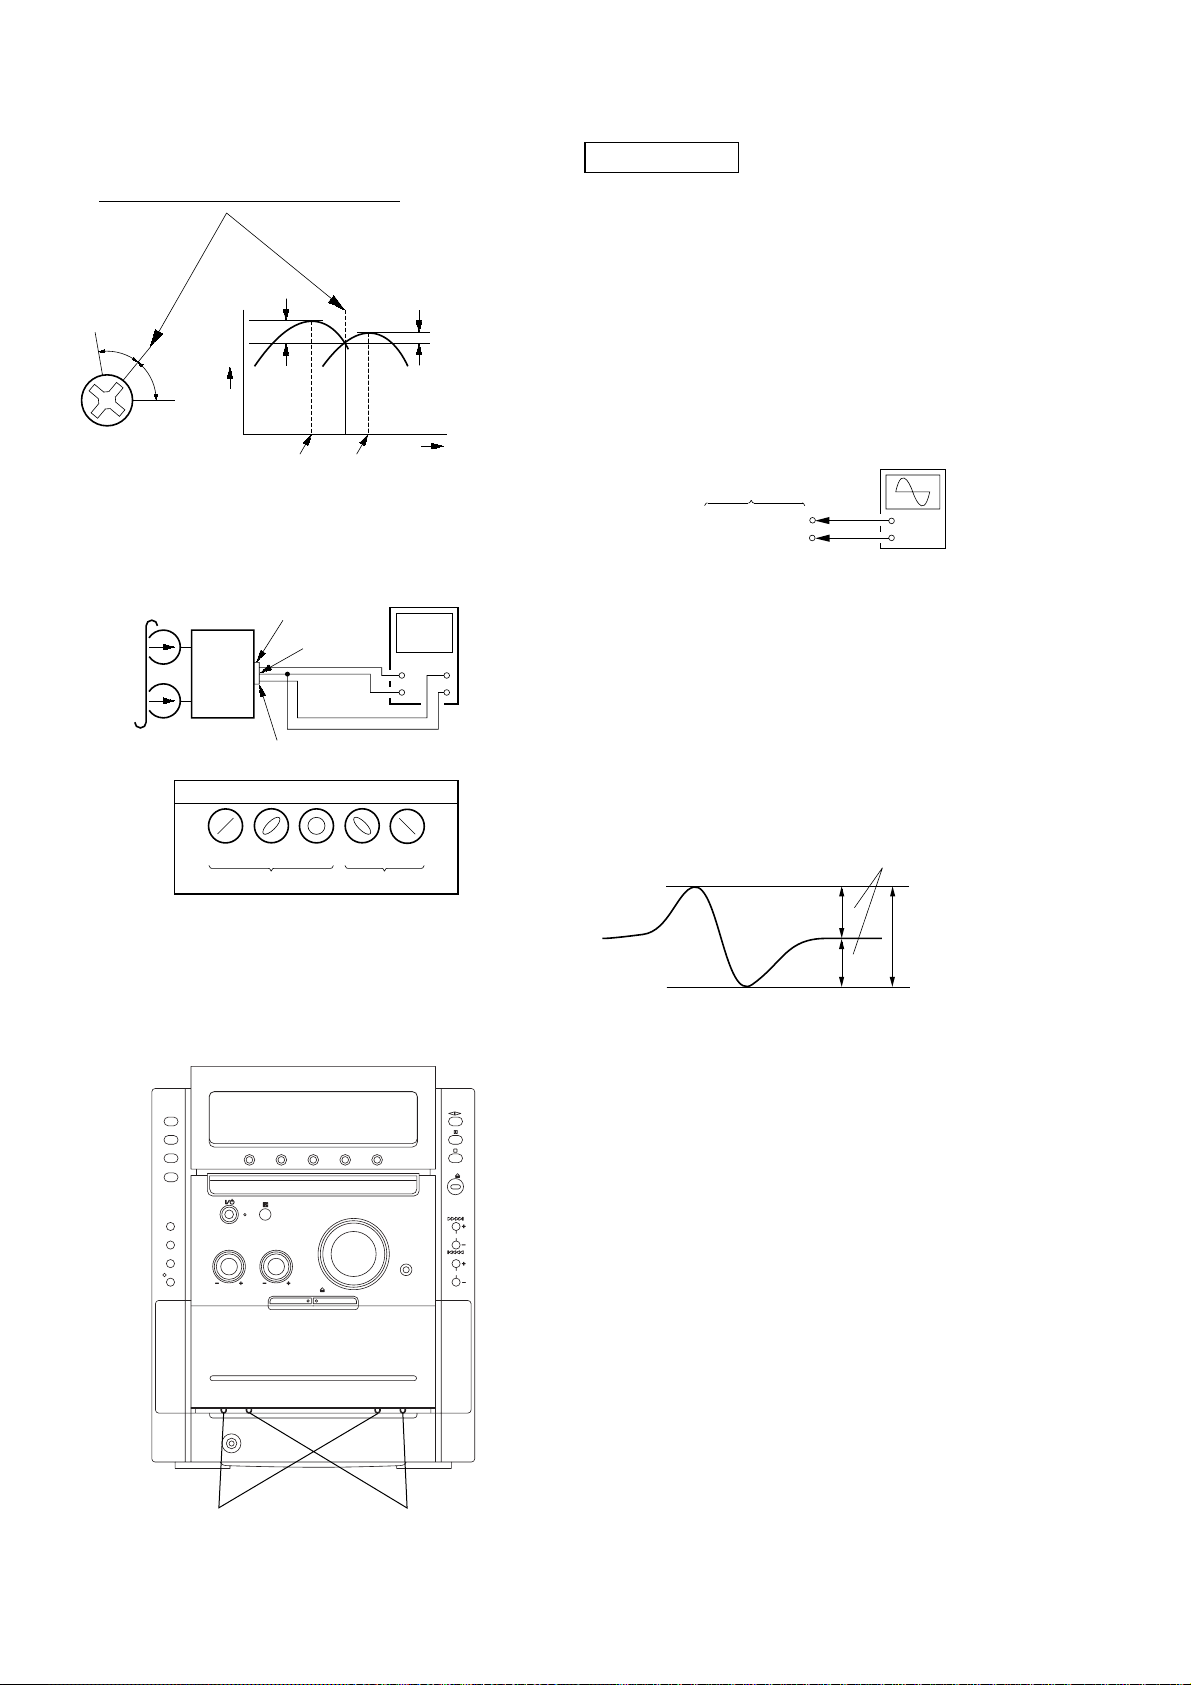
2. Turn the adjustment screw and check output peaks. If the peaks
do not match for L-CH and R-CH, turn the adjustment screw
so that outputs match within 1dB of peak.
Output
level
within
1dB
L-CH
peak
R-CH
peak
within
1dB
Screw
position
L-CH
peak
Screw
position
R-CH
peak
3. Mode: Playback
test tape
P-4-A100
(10 kHz, –10 dB)
L-CH
MAIN
board
CN301
set
R-CH
waveform of oscilloscope
pin
L
R
pin
1
pin
3
2
oscilloscop
H
V
CD SECTION
Note:
1. CD Block is basically designed to operate without adjustment.
Therefore, check each item in order given.
2. Use YEDS-18 disc (3-702-101-01) unless otherwise indicated.
3. Use an oscilloscope with more than 10MW impedance.
4. Clean the object lens by an applicator with neutral detergent
when the signal level is low than specified value with the
following checks.
S-curve Check
Connection:
oscilloscope
CD board
TPO102 (FE1)
TP117 (VC)
Procedure:
1. Connect an oscilloscope to test point TPO102 (FE1) and TP
117(VC) on the CD board.
2. Turn the power on.
3. Put the disc (YEDS-18) in and turned power switch on again
and actuate the focus search. (actuate the focus search when
disc table is moving in and out)
4. Check the oscilloscope waveform (S-curve) is symmetrical
between A and B. And confirm peak to peak level within 2.4
± 1 Vp-p.
+
–
in phase 45°90°135°180
good
°
wrong
4. After the adjustments, apply suitable locking compound to
the pats adjusted.
Adjustment Location: Playback Head (Deck A).
Record/Playback/Erase Head (Deck B).
S-curve waveform
symmetry
A
within 2.4
B
Note:
•Try to measure several times to make sure than the ratio
of A : B or B : A is more than 10 : 7.
•Take sweep time as long as possible and light up the
brightness to obtain best waveform.
Checking Location: CD board (SIDE B)
(See page 20.)
±
1 Vp-p
18
reverse
forward
Page 19
HCD-CPX22/NXM3
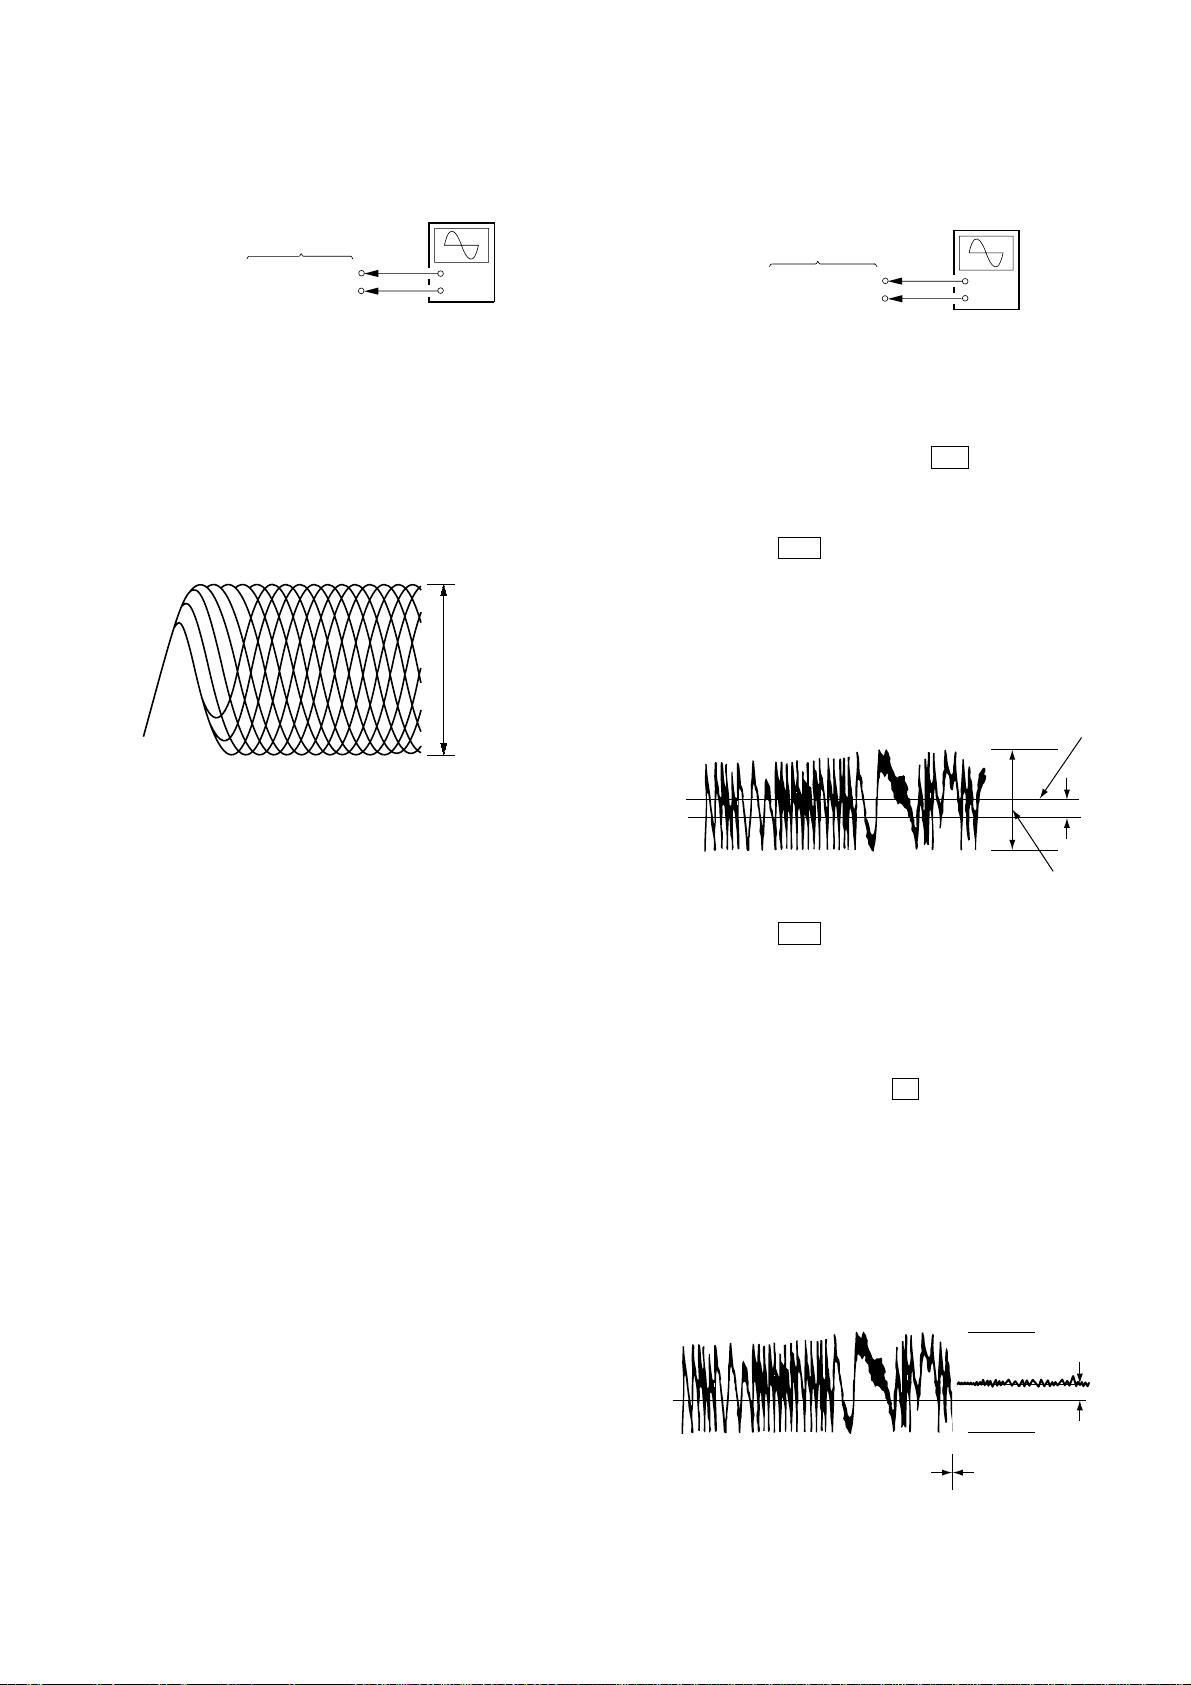
RFAC Level Check
Connection:
oscilloscope
CD board
TP124 (RFAC)
TP117 (VC)
+
–
Procedure:
1. Connect an oscilloscope to test point TP124 (RFAC) and TP
117(VC) on the CD board.
2. Turn the power on.
3. Put the disc (YEDS-18) in to playback the number five track.
4. Confirm that oscilloscope waveform is clear and check RF AC
signal level is correct or not.
Note: A clear RFAC signal waveform means that the shape “◊” can be
RFAC signal waveform
clearly distinguished at the center of the waveform.
VOLT/DIV: 200 mV
TIME/DIV: 500 ns
level: 0.9 ± 0.4 Vp-p
E-F Balance Check
Connection:
oscilloscope
CD board
TPO103 (TE1)
TP117 (VC)
+
–
Procedure:
1. Connect an oscilloscpe to test point TPO103 (TE1) and TP1 17
(VC) on the CD board.
2. Turn the power on.
3. Select the function “CD”.
4. Press three buttons of [ENTER], M , and
[SURRUUND MODE] simultaneously to set the CD service
mode.
5. Put the disc (YEDS-18) in to playback the number five track.
6. Press the . button. The message “TRAVERSE” is
displayed. (The tracking servo and the sledding servo are
turned OFF)
7. Check the level B of the oscilliscope's waveform and the A
(DC voltage) of the center of the Traverse waveform.
Confirm the following :
A/B x 100 = less than ± 22%
Traverse Wav eform
Center of
the waveform
Checking Location: CD board (SIDE B)
(See page 20.)
B
0V
level: 1.0 ± 0.5 Vp-p
8. Press the . button. The message “TRAVERSE” is
A (DC
voltage)
displayed. (The tracking servo and sledding servo are turned
ON)
Confirm the C (DC voltage) is almost equal to the A (DC
voltage) is step 5.
9. To exit from this mode, perform as follows.
1) Move the optical pick-up to the most inside track.
2) Press three buttons of x , [CLEAR], and [DISPLAY]
simultaneously. (cold reset)
Notes:
• Always move the optical pick-up to most inside track
when exiting from this mode. Otherwise, a disc will not
be unloaded.
• Do not run the sled motor excessively, otherwise the gear
can be chipped.
Traverse Wav eform
0V
Tracking servo
Sled servo
OFF
Tracking servo
Sled servo
ON
Checking Location: CD board (SIDE B) (See page 20.)
C (DC
voltage)
19
Page 20
HCD-CPX22/NXM3
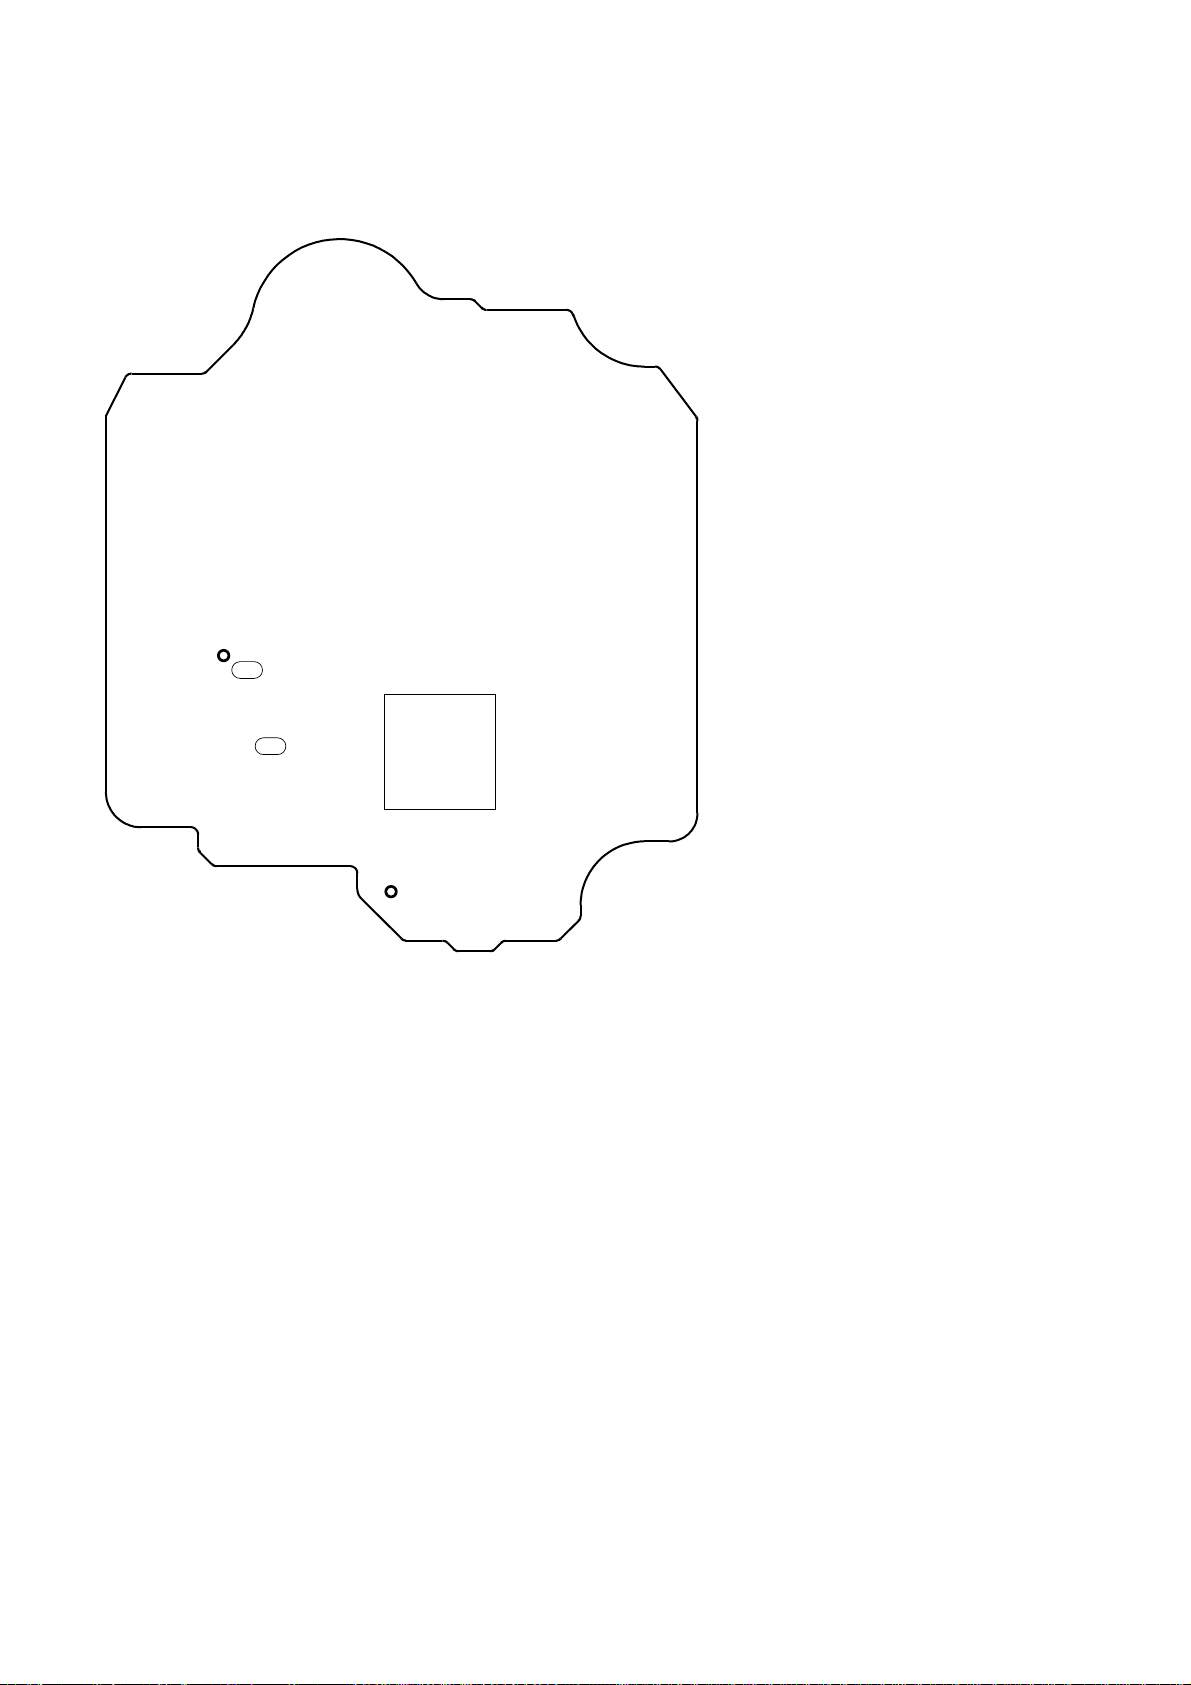
Checking Location:
– CD BOARD (SIDE B) –
TP117 (VC)
JPO103 (TE1)
JPO102 (FE1)
IC101
TP124 (RFAC)
20
Page 21
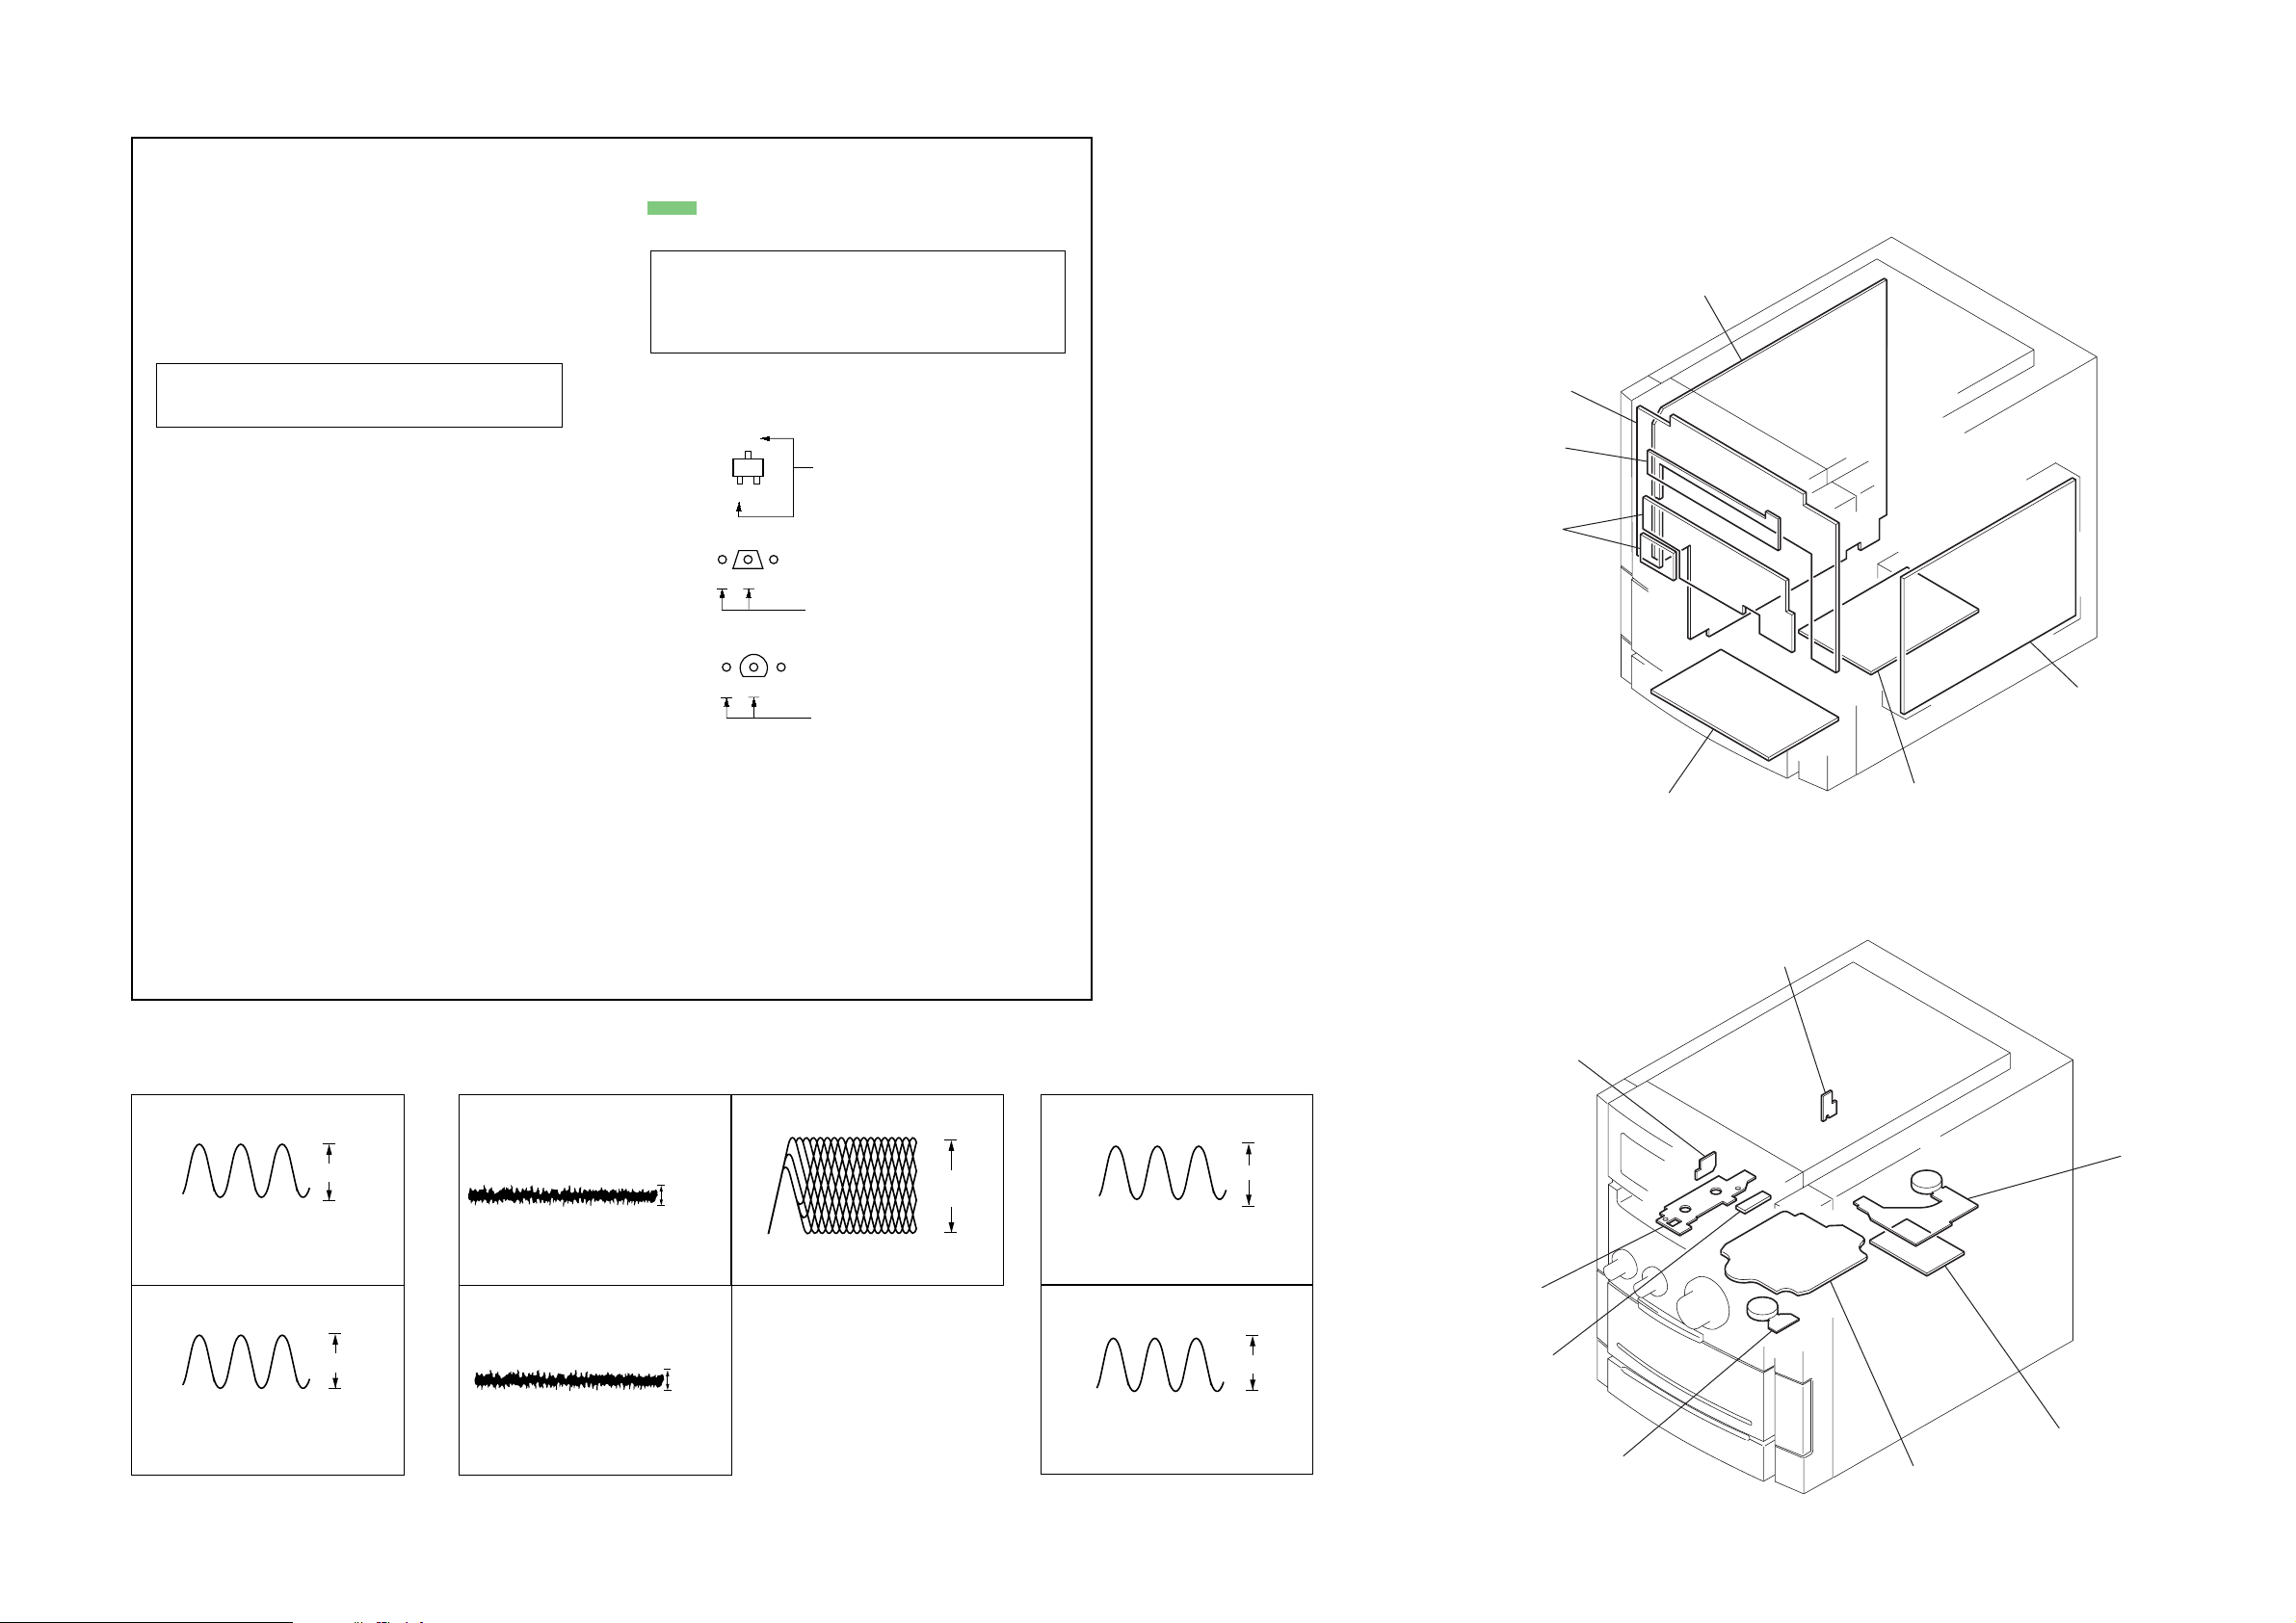
49.152MHz
4Vp-p
p
SECTION 7
MAIN board
PANEL board
DISC SW board
VOL board
HP board
S-MASTER board
switching regulator
SW(2) board
SW(1) board
MOTOR board
SENSOR board
ENCODER board
BD board
RELAY board
SP OUT board
DIAGRAMS
HCD-CPX22/NXM3
For schematic diagrams.
Note:
• All capacitors are in µF unless otherwise noted. (p: pF)
50 WV or less are not indicated except for electrolytics
and tantalums.
• All resistors are in Ω and
specified.
•%: indicates tolerance.
• f : internal component.
• 2 : nonflammable resistor.
• 5 : fusible resistor.
Note: The components identified by mark 0 or dotted line
with mark ! are critical for safety.
Replace only with part number specified.
• C : panel designation.
• A : B+ Line.
• B : B– Line.
• H : adjustment for repair.
•Voltages and waveforms are dc with respect to ground
under no-signal conditions.
no mark: TUNER (FM/AM)
( ): CD PLAY
< >: TAPE PLAY
[ ]: TAPE REC
* : Impossible to measure
•Voltages are taken with a VOM (Input impedance 10 MΩ).
Voltage variations may be noted due to normal production tolerances.
•Waveforms are taken with a oscilloscope.
Voltage variations may be noted due to normal production tolerances.
• Signal path.
F : TUNER (FM/AM)
E : TAPE PLAY (DECK A)
d : TAPE PLAY (DECK B)
G : RECORD
J : CD PLAY (ANALOG OUT)
c : CD PLAY (DIGITAL OUT)
1
4
/
W or less unless otherwise
Note on Printed Wiring Boards:
Note:
• X : parts extracted from the component side.
•
• Indication of transistor.
• Abbreviation
: Pattern from the side which enables seeing.
(The other layers' patterns are not indicated.)
Caution:
Parts face side: Parts on the parts face side seen from
(Side A) the parts face are indicated.
Pattern face side: Parts on the pattern face side seen from
(Side B) the pattern face are indicated.
C
Q
B
E
Q
B
CE
Q
B
CE
E3 : 240V AC Area in E model
E51 : Chilean and Peruvian model
EA : Saudi Arabia mdoel
RU : Russian model
These are omitted.
These are omitted.
These are omitted.
7-1. CIRCUIT BOARD LOCATION
• Abbreviation
E3 : 240V AC Area in E model
E51 : Chilean and Peruvian model
EA : Saudi Arabia mdoel
RU : Russian model
•WAVEFORMS
– MAIN BOARD –
IC401 0 XC-IN
1
32.768KHz
IC401 qg X-IN
2
16MHz
1.5Vp-p
VOL/DIV : 0.5 V AC
TIME/DIV : 2.0
1.5Vp-p
VOL/DIV : 0.5 V AC
TIME/DIV : 50 nsec
– BD BOARD –
IC101 wa TEI
1
0.15Vp-p
µ
sec
IC101 wd FEI
2
VOL/DIV : 0.2 V AC
TIME/DIV : 0.2 msec
VOL/DIV : 0.1 V AC
TIME/DIV : 1 msec
0.4Vp-
IC101 ra RFACO
3
0.96Vp-p
VOL/DIV : 0.2 V AC
TIME/DIV : 0.5 µsec
– S-MASTER BOARD –
IC705 rk XFSOIN
1
VOL/DIV : 2 V AC
TIME/DIV : 20 nsec
IC703 6
2
12.288 MHz
VOL/DIV : 1 V AC
TIME/DIV : 50 nsec
2Vp-p
HCD-CPX22/NXM3
2121
Page 22
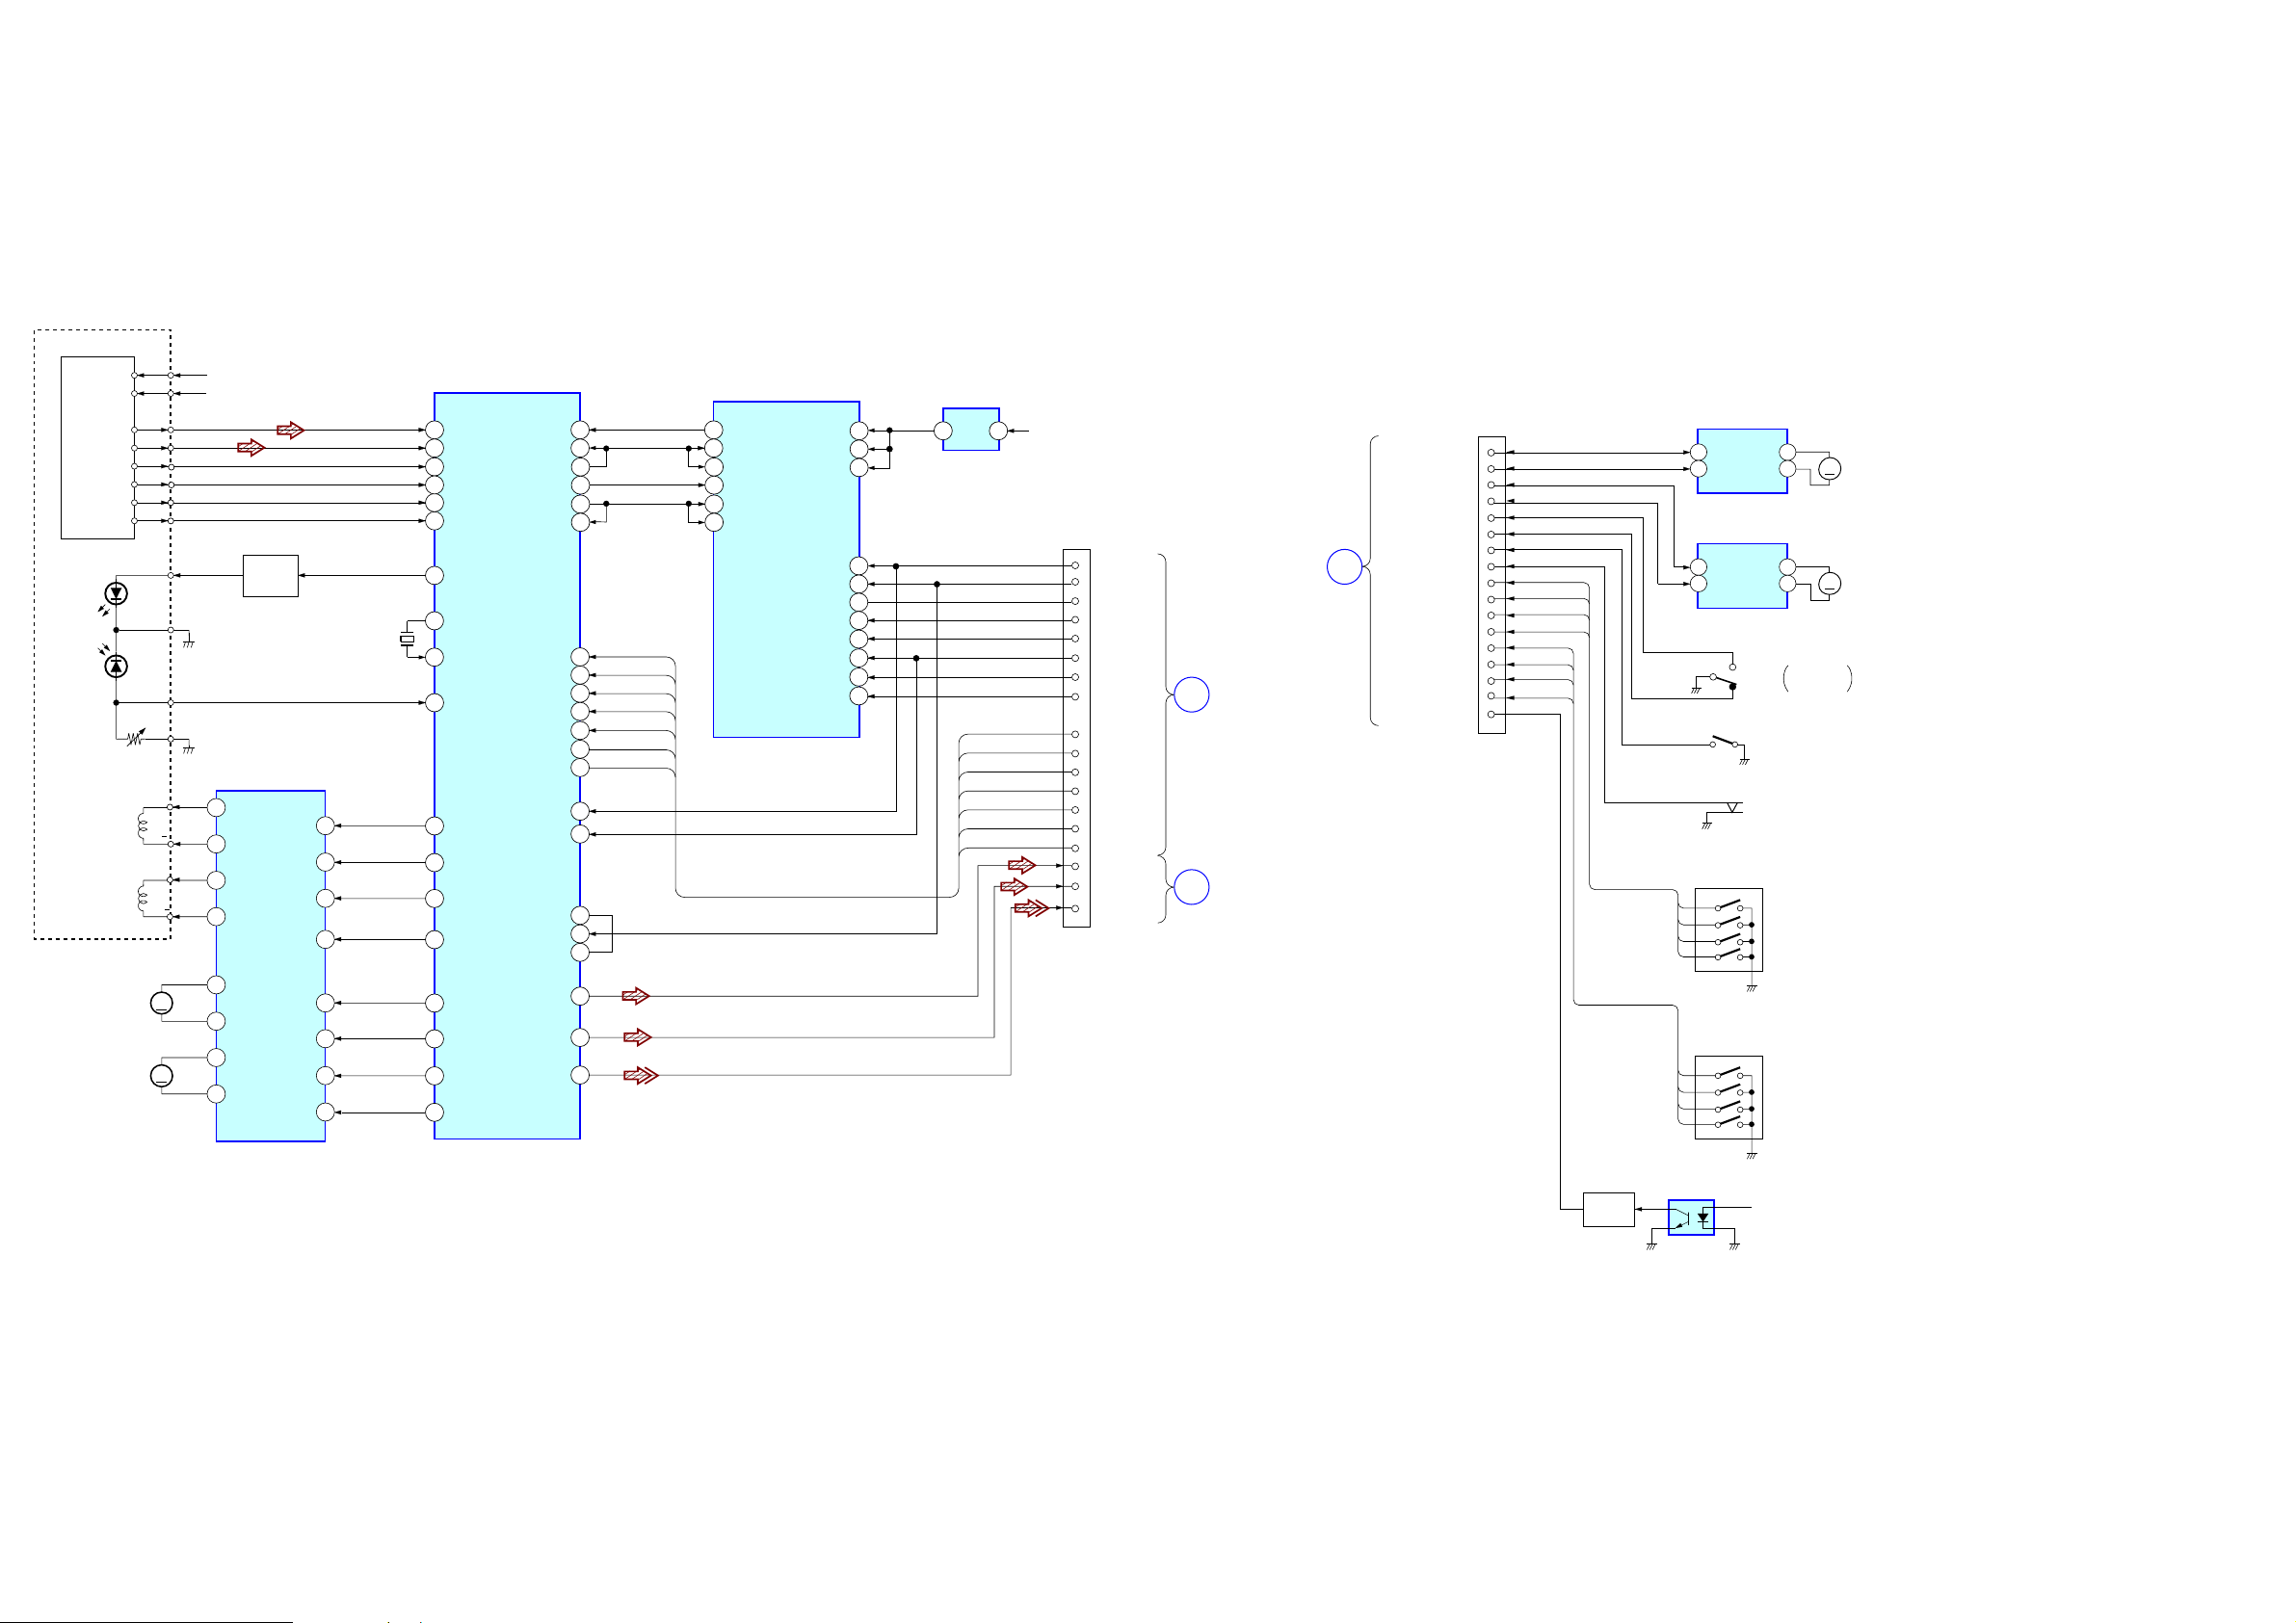
HCD-CPX22/NXM3
7-2. BLOCK DIAGRAM – CD SERVO SECTION –
OPTICAL PICK-UP
BLOCK
(KSM-215DCP)
DETECTOR
VCC
FOCUS
COIL
TRACKING
COIL
M101
(SPINDLE)
M102
(SLED)
VC
A
B
C
D
E
F
LD
GND
PD
VR
+1.7V
+3.3V
26
A
27
B
28
C
29
D
19
E
20
F
Q10
LD
DRIVER
X171
16.9MHz
IC251
SL/SP MOTOR
16
15
17
18
19
20
21
22
DRIVER
CH2OUT-F
CH2OUT-R
CH1OUT-R
CH1OUT-F
CH4OUT-R
CH4OUT-F
CH3OUT-F
CH3OUT-R
CH1FIN
CH1RIN
CH2FIN
CH2RIN
CH3FIN
CH3RIN
OPIN+
MUTE
5
6
7
8
30
29
3
24
F+
F
T+
T
M
M
36
LD
XTAO
77
XTAI
78
37
PD
11
TFDR
12
TRDR
13
FFDR
14
FRDR
9
SFDR
10
SRDR
6
MPD
100
XRST
IC101
RF AMP
PCMDI
LRCKI
LRCK
PCMD
BCK
BCKI
XTACN
XRST
DATA
XLAT
CLOCK
SENS
SCOR
GFS
C2P0
FOK
AOUT1
AOUT2
DOUT
61
62
63
65
66
60
95
100
102
104
105
107
115
113
114
81
86
71
IC301
DIGITAL
SIGNAL PROCESSOR
11
SDO0
16
LRCKIA
19
SFSY/LRCKIB
14
SDIO
15
BCKIA
18
SBSY/BCKIB
PO11/BUCK/AD1
XTACN
XRST
DATA
XLT
CLOCK
SENS
SCOR
1
2
3
VDD
VDD
VDDM
STANBY
MIACK
MICK
MIDIO
MILP
MICS
RESET
55
21
40
3
36
8
7
6
5
4
2
IC303
REG
5 1
SCOR
SENS
CLOCK
XLT
DATA
XRST
XTACN
+3.3V
CN201
MP3STB
MP3REQ
MIACK
MICK
MIDIO
MILP
MICS
MP3RST
SCOR
SENS
CLOCK
XLT
DATA
XRST
XTACN
LOUT
ROUT
DOUT
MAIN
A
SECTION
(Page 24)
TUNER/TAPE DECK
B
SECTION
(Page 23)
MAIN
SECTION
(Page 24)
SW1 SUB TRAY OUT
SW2 SUB TRAY OUT
SW3 SUB TRAY OUT
D
LD/ST MTR NEG
LD/ST MTR POS
BU U/D MTR NEG
BU U/D MTR POS
SW4SUB TRAY OUT
ST-E1
ST-E2
ST-E3
ST-E4
MD-E1
MD-E2
MD-E3
MD-E4
D.SEMSOR
CN701
IC701
LD/ST MOTOR DRIVER
RIN
OUT1
9
FIN
OUT2
7
IC711
U/DOTOR DRIVER
RIN
OUT1
9
FIN
OUT2
7
S721
OPEN
CLOSE
S731
(SUB TRAY OUT)
S761
(SUB TRAY OUT)
S781
ROTARY
ENCODER
(ST U/D)
S771
ROTARY
ENCODER
4
2
4
2
MAIN TRAY
OPEN/IN
(MD)
M761
M
(LD/ST)
M762
M
(U/D)
HCD-CPX22/NXM3
Q751
SENSE
SWITCH
IC751
(DISC SENSOR)
D+3.3V
• Signal path
J : CD PLAY (ANALOG)
c : CD PLAY (DIGITAL)
2222
Page 23
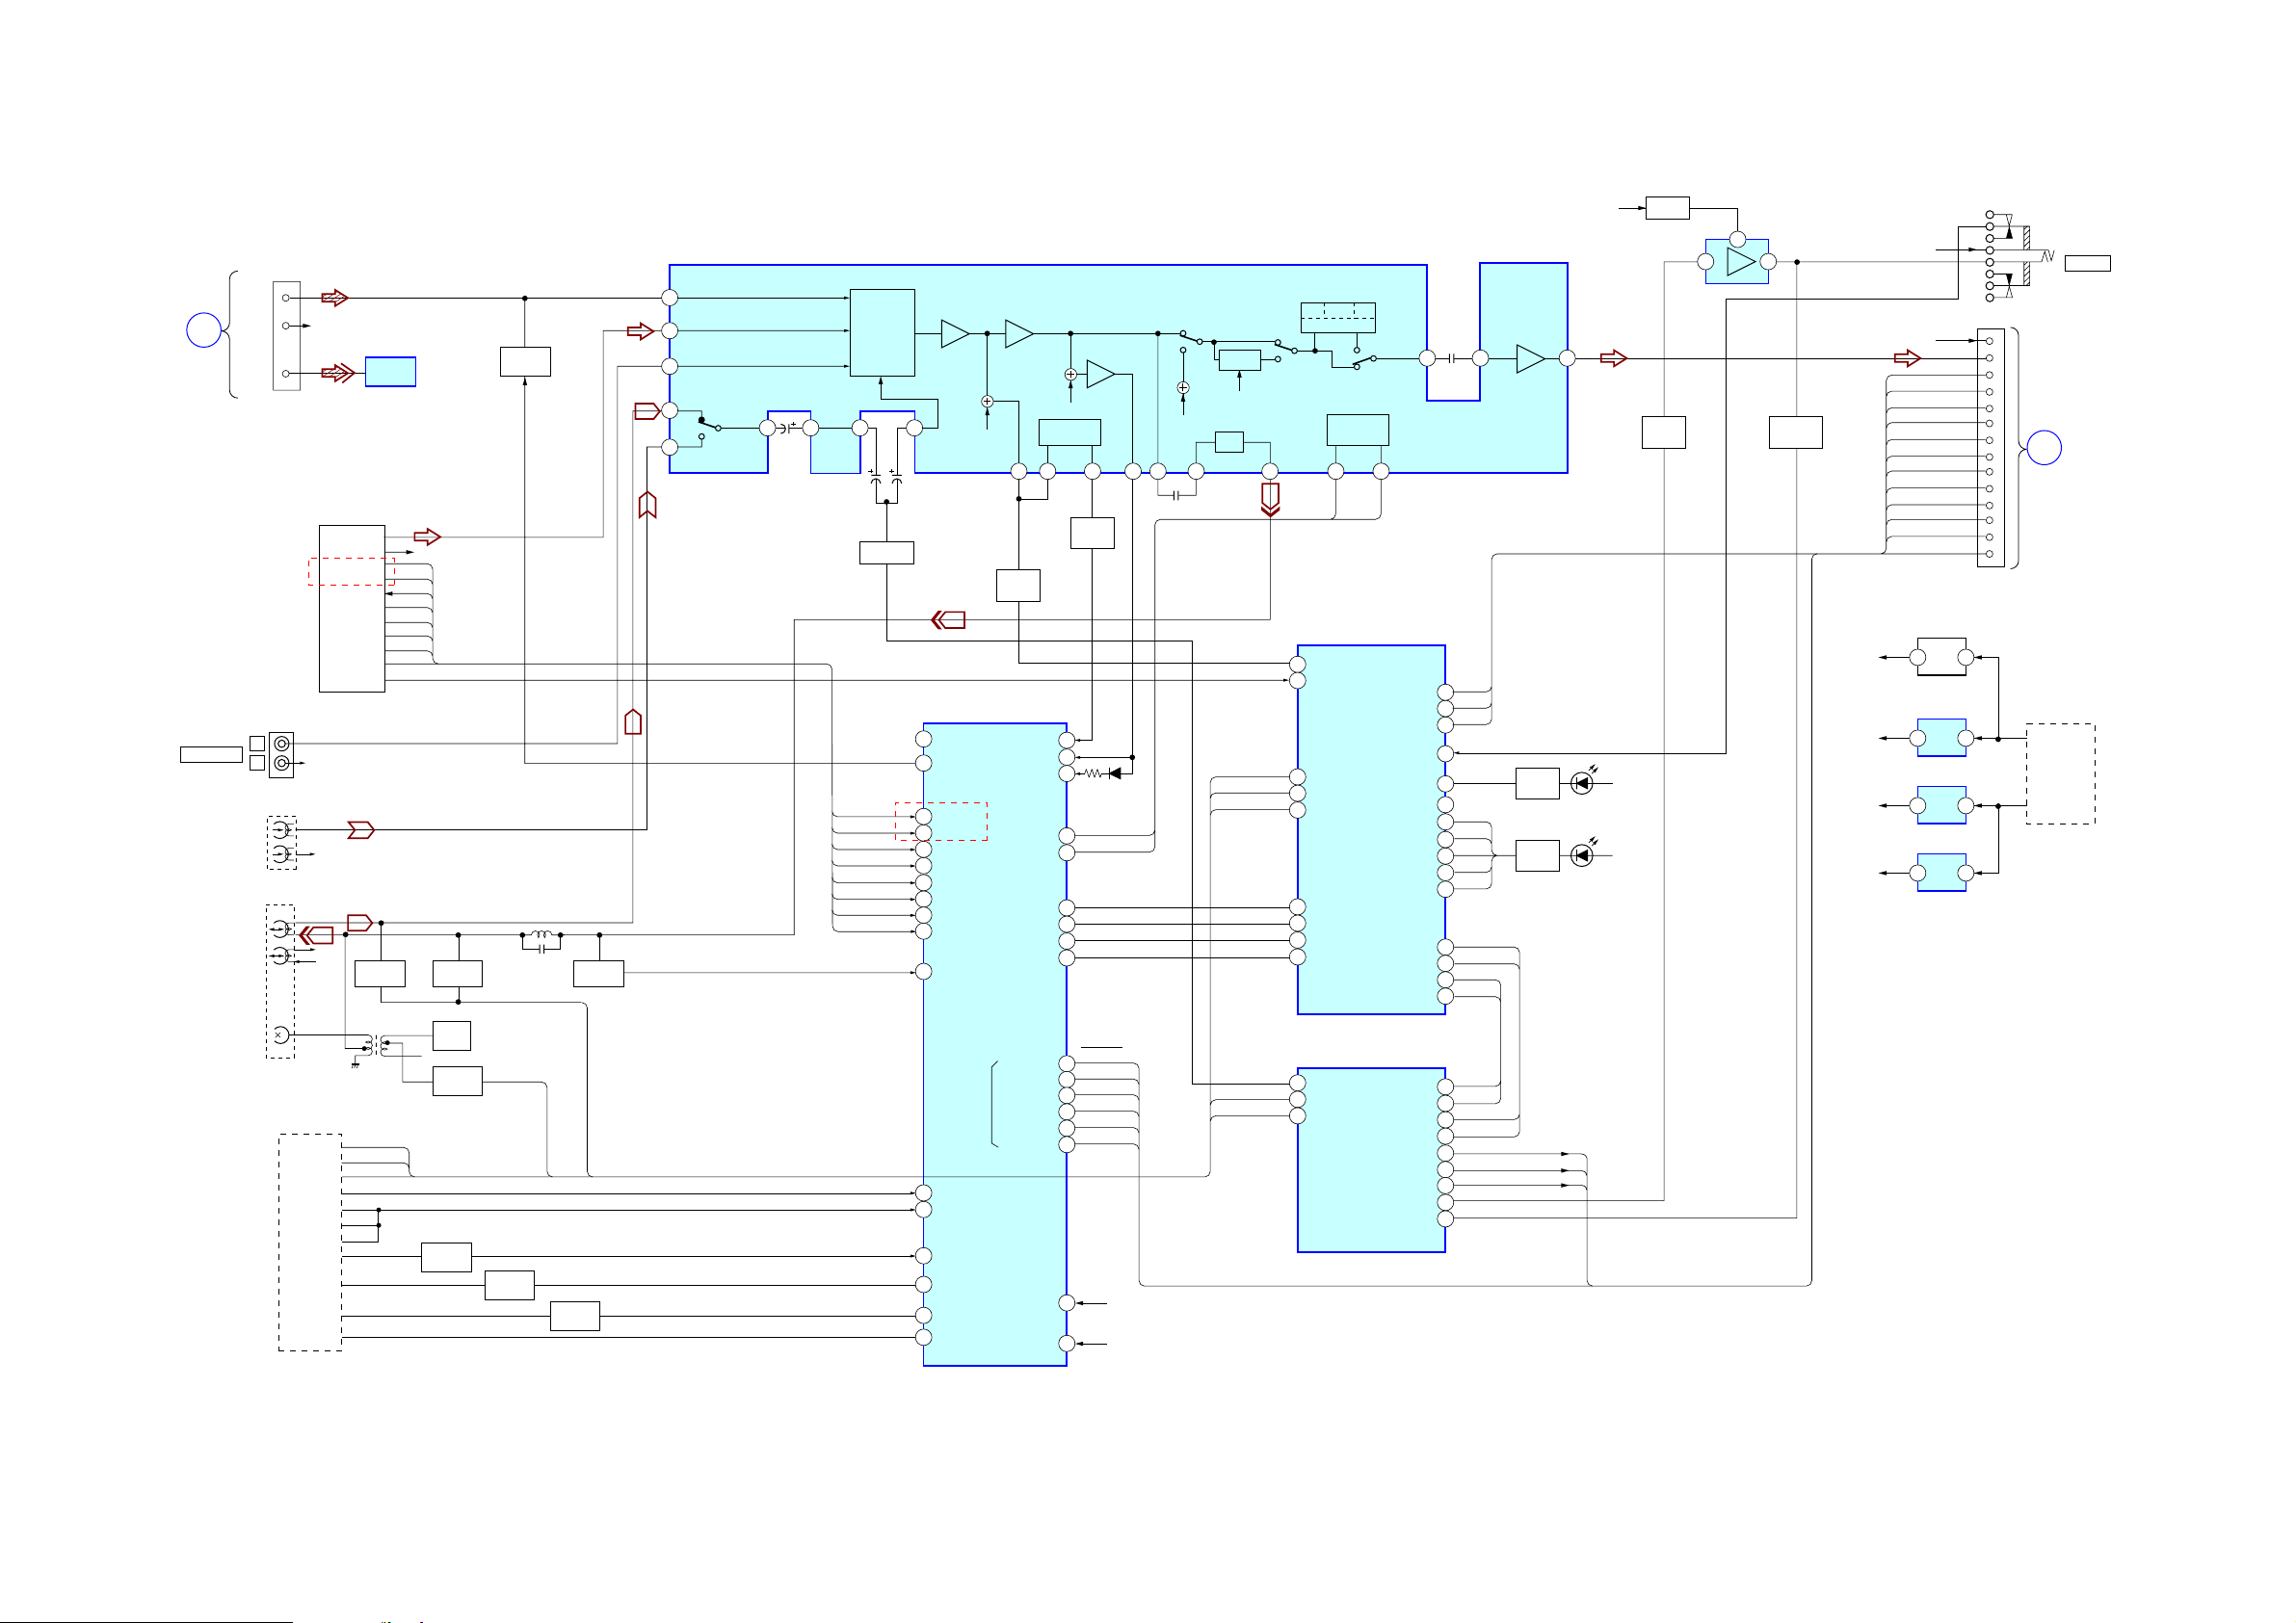
7-3. BLOCK DIAGRAM – TUNER/TAPE DECK SECTION –
HCD-CPX22/NXM3
CD SERVO
SECTION
(Page 22)
B
VIDEO(MD)
HRP2
HRP1
L OUT
R OUT
D OUT
L
R
LRHP2
HP1
L
R
HE
CN371
R-CH
TUNER
AEP, UK
DECK-A
DECK-B
MECHANISM DECK
R-CH
TAPE
B PLAY
A PLAY
A HALF
B SHUT
R-REC
B HALF
F REC
A SHUT
CAPM+
A TRIG+
B TRIG+
RDS DATA
RDS INT
ST-MUTE
ST D OUT
R-CH
R-CH
L OUT
R OUT
TUNER
ST-CE
ST D IN
ST CLK
STEREO
B PLAY
A PLAY
A HALF
IC301
DIGITAL
OUT
REC/PB
SWITCH
T301
Q303
Q314,315
R-CH
SWITCH
Q316,317
SWITCH
Q326,327
CAP M
DRIVE
REC/PB
Q318
BIAS
OSC
BIAS
Q301,302
Q311-313
Q323,324
A TRIG
SWITCH
DRIVE
MUTE
BIAS
Q25,26
Q270
REC/PB
TC REC
Q321,322
B TRIG
DRIVE
MUTE
Q104
Q31,22
VCC
LED 9V
Q8
REG
MUTE
SWITCH
Q21,22
Q1
BUFFER
8
3 1
IC3
HP MUTE
SWITCH
Q27,28
Q71
D+3.3V
CD+3.3V
AUDIO+9V
M+9V
LED9V
L-CH
R-CH
R-CH
P-DOWN
SCLATCH
SCSHIFT
PGMUTE
SOFTMUTE
NSPMUTE
Q906
REG
3
IC903
REG
3
IC901
REG
3
IC902
REG
3
FR-OUT
FL-OUT
/RST
INIT
SCDT
OVF
/OTW
J1063
PHONES
S-MASTER
SECTION
C
(Page 25)
SD
1
SWITCHING
REGULATOR
1
1
1
UNREG+5V
UNREG+12V
Q1026
LED
SWITCH
LED
SWITCH
AUDIO +9V
FL
D1021
D1001-1005
IC101
INPUT SELECT SWITCH
ELECTRICAL VOLUME
64
63
62
71
68 67 66 65
70
SELECTOR
Q103
Q29,30
PB MUTE
AEP, UK
IC401 (1/2)
SYSTEM CONTROL
61
LINE MUTE
27
A MUTE
RDS-DATA
49
RDS-INT
18
ST-MUTE
50
TUNED
51
52
ST-CE
ST-DOUT
53
54
ST-DIN
55
ST-CLK
63
TC REC MUTE
S-MASTER
90
B SHUT
91
B HALF
89
A SHUT
CAPM-CNT1
86
A TRIG
87
B TRIG
88
SURR
R-CH
R-CH
M16537 DATA
M16537 CLK
I/O EXP DATYA IN
I/O EXP DATA OUT
STBY RELAY
MAIN TRANS-OUT
AMS
7 8 11 53 51 50 48 34 35
Q341-343
AMS
BUFFER
Q140
Q33,34
AMS
MUTE
100
AMS IN
97
VACS IN
92
SPEC-IN
I/O EXP CLK
I/O EXP LAT
ADC-POWR
ENABLE
LATCH
CLK
DATA
INT
D182
DATA
80
CLK
81
66
67
68
69
P-DOWN
61
/RST
60
INTI
59
SCLATCH
58
SC SHUT
57
SCDT
56
65
ON/OFF
(SWITCHING REGULATOR)
93
D+3.3V
DPL-2
S2
EQ
MD BUS
CLK DATA
CLK DATA
18
AMS-MUTE
5
STEREO
10
B PLAY
11
A PLAY
12
A HALF
3
CLK
LATCH
4
26
DI 1
DO 2
25
17
MUTE
18
REC/PB
19
BIAS
TRE
TONE
MCU
I/F
IC951
I/O EXPANDER
PROTECT HP IN
IC971
I/O EXPANDER
42 41 37
SD
6
SD
/OTW
DISC1
DISC2
DISC3
DISC4
DISC5
LATCH
CLK
DATA 1
DATA 2
DI 1
DO 2
CLK
LATCH
NSP
SOFT HP
TA MUTE
HP MUTE
PG
7
OVF
8
9
17
18
19
20
21
22
23
LATCH
13
CLK
14
DATA 1
15
DATA 2
16
DATA1
26
DATA 2
25
CLK
3
LATCH
4
NSP MUTE
7
SOFT MUTE
8
PG MUTE
9
22
21
OVER TEMP
OVER FLOW
HALF PLAY
AMS MUTE
Q1001-1005
HCD-CPX22/NXM3
• R-ch is omitted due to same as L-ch.
• Signal path
K : TUNER (FM/AM)
E : PLAYBACK (DECK A)
d : PLAYBACK (DECK B)
G : RECORD
J : CD PLAY (ANALOG)
c : CD PLAY (DIGITAL)
2323
Page 24
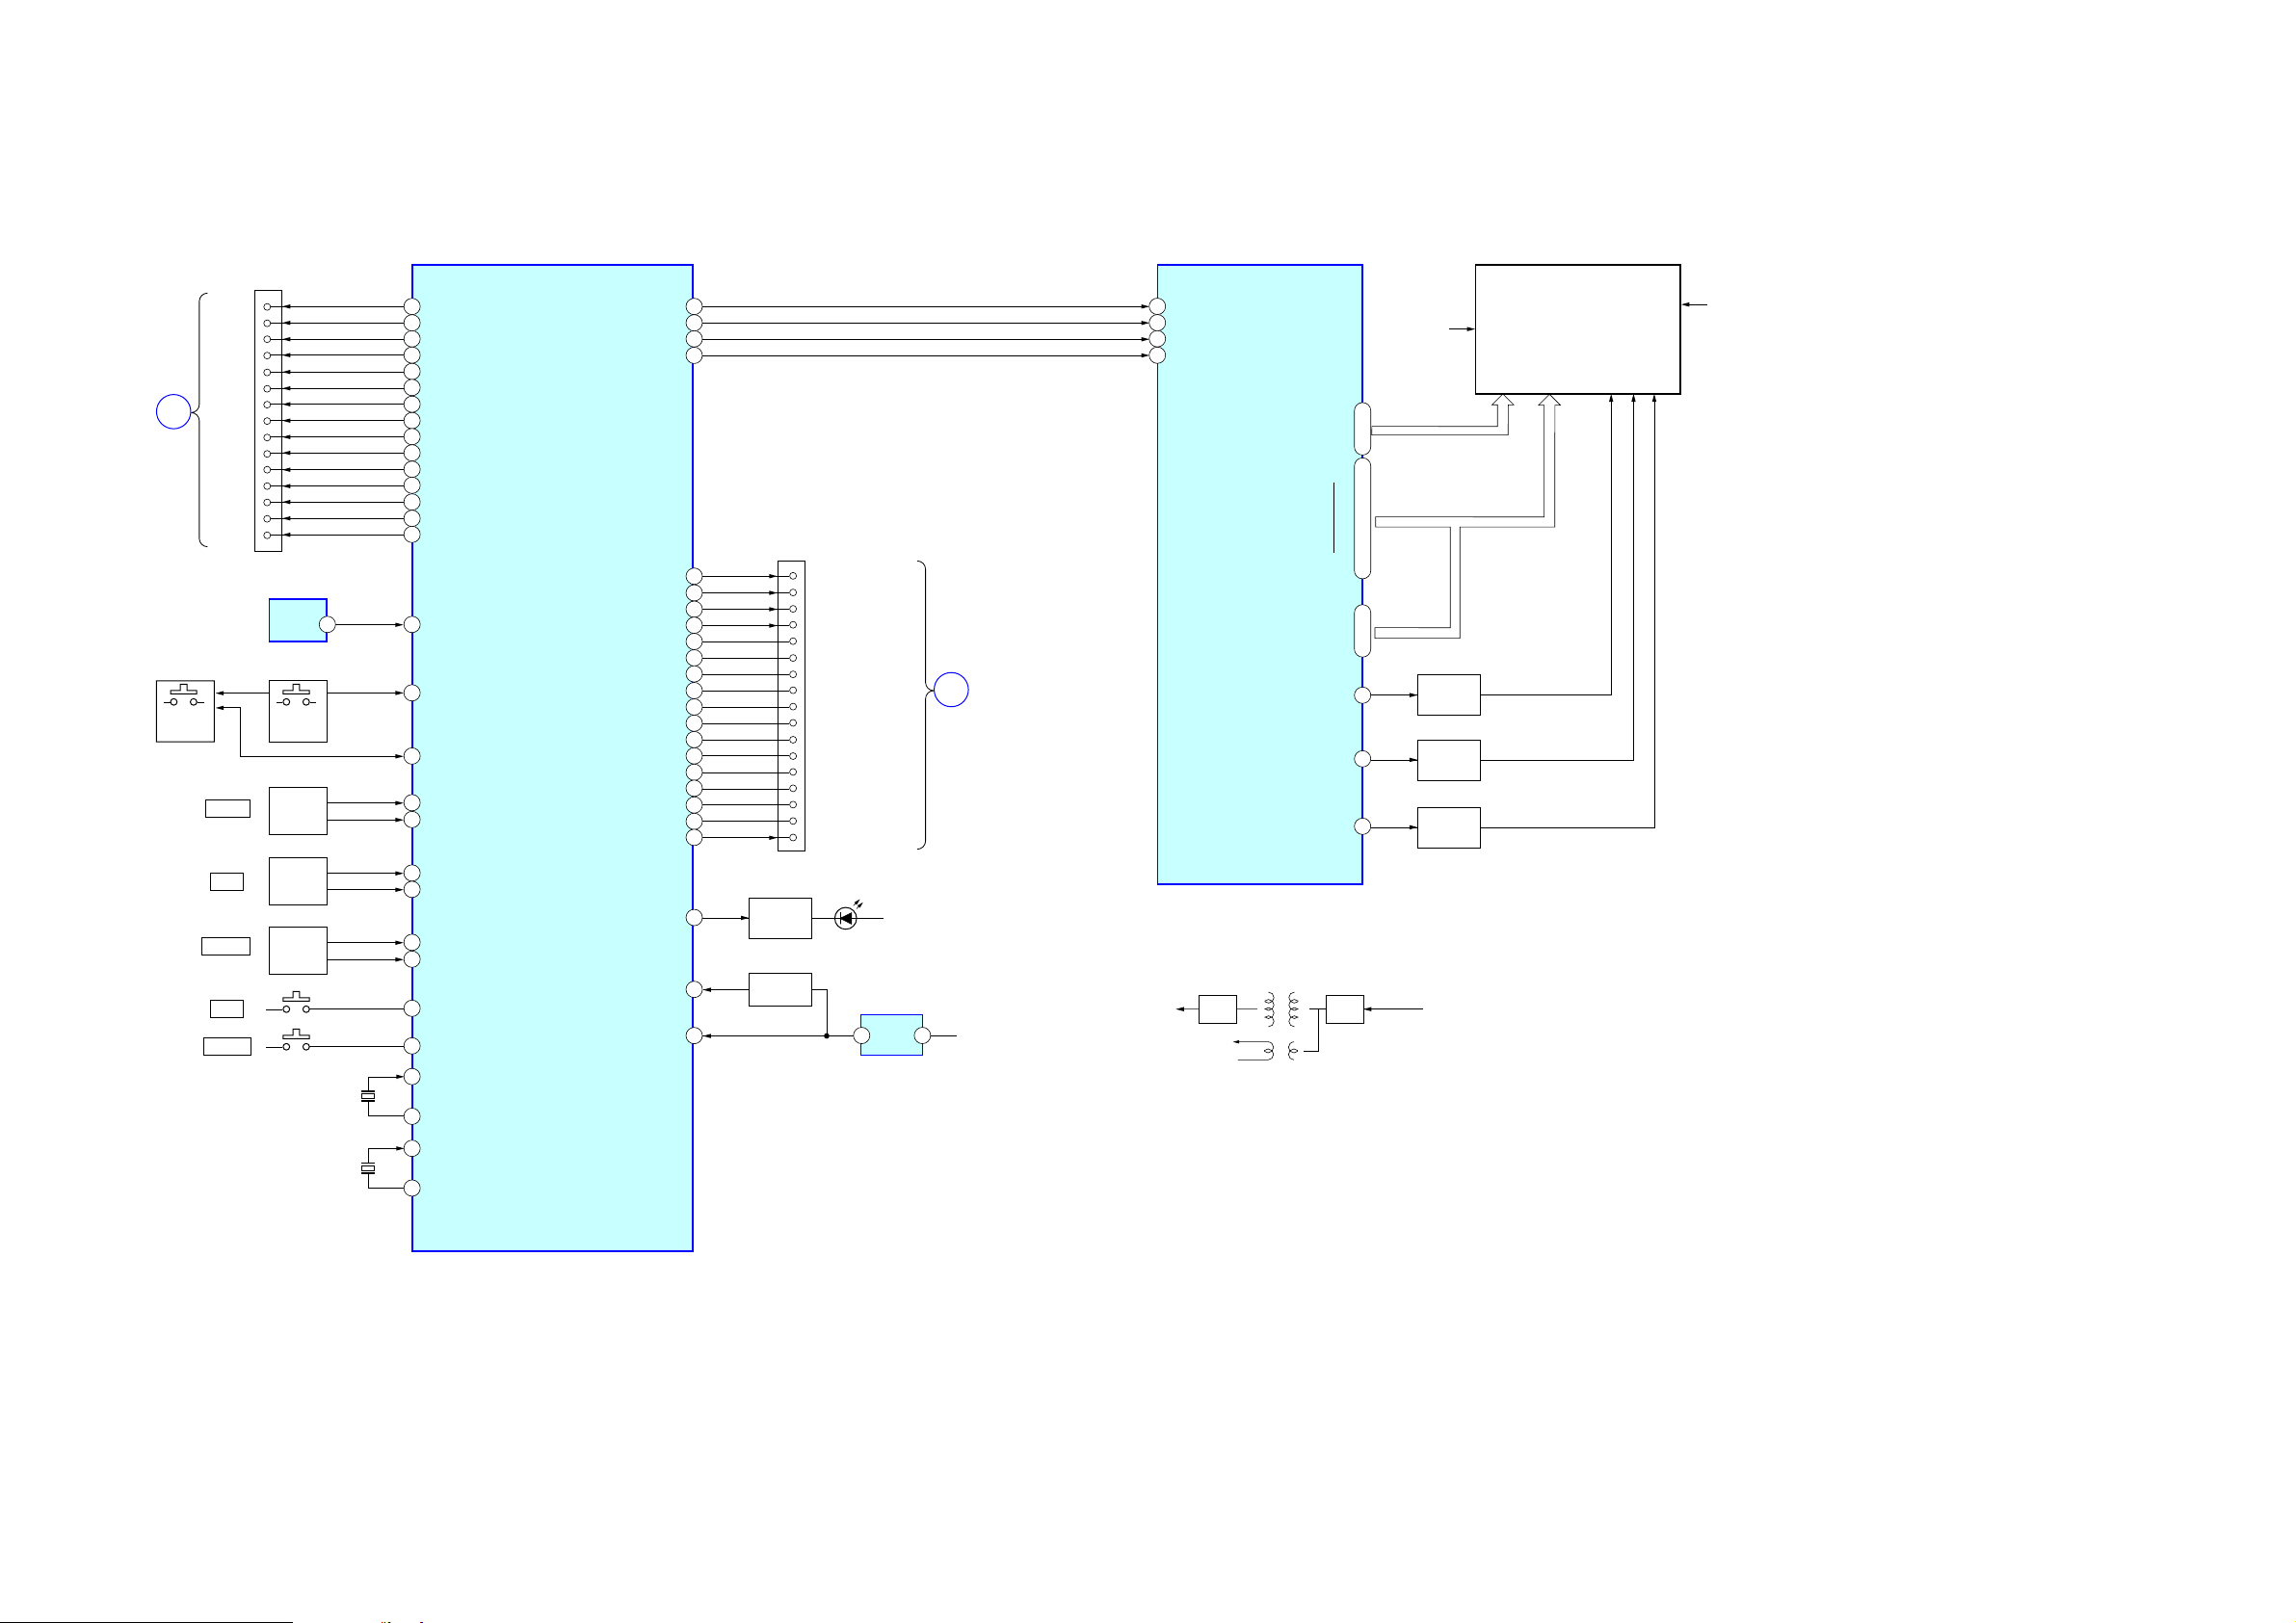
HCD-CPX22/NXM3
7-4. BLOCK DIAGRAM – MAIN SECTION –
MP3STB
MP3REQ
MIACK
MICK
MID10
MILP
KEY
MICS
HP3RST
SCOR
SENS
CLOCK
DATA
XRST
XTACN
REMOTE
CONTROL
RECEIVER
TREBLE
BASS
VOLUME
BASS
DISPLAY
A
CD SERVO
SECTION
(Page 22)
S1021-1027,1029-1031
S1032-1036
NETWORK
XLT
CN371
IC1050
S1001-1005
NETWORK
ROTARY
ENCODER
ROTARY
ENCODER
ROTARY
ENCODER
OUT
S1043
KEY
S1051
S1050
S1052
36.768kHz
X401
X402
16MHz
S1042
S1028
SIRCS
KEY2-1KEY2-2
28
MP3STB
31
MP3REQ
3
MP3 ACK
7
MP3 CK
5
MP3 DATA OUT
2
MP3 LP
1
MP3 CS
32
RESET
19
SCOR
21
SENS
23
CD-CLK
24
XLT
22
CD-DATA
25
XRST
26
XTCN
41
SIRCD
94
AD-KEY2
95
AD-KEY1
JOG2-A
78
JOG2-B
79
76
JOG1-A
77
JOG1-B
70
VOL-A
71
VOL-B
74
POWER KEY
73
DISPLAY KEY
10
XC-IN
11
XC-OUT
13
X-OUT
X-IN
15
IC401 (2/2)
SYSTEM CONTROL
CDN-MOT-NEG-1(LD)
CDN-MOT-POS-1(LD)
CDN-MOT-NEG-2(U/D)
CDN-MOT-POS-2(U/D)
CDN-MAIN-SW-OPEN(SW2)
CDN-MAIN-SW-CLOSE(SW4)
CDN-SUB-SW-OPEN(SW2)
CDN-SUB-SW-CLOSE(SW3)
CDN-ENC-A-0(STE1)
CDN-ENC-A-1(STE2)
CDN-ENC-A-2(STE3)
CDN-ENC-A-3(STE4)
CDN-ENC-B-0(MDM1)
CDN-ENC-B-1(MDM2)
CDN-ENC-B-2(MDM3)
CDN-ENC-B-3(MDM4)
FL-DATA
FL-CLK
FL-CS
FL-RESET
DISC SENS
LED-STANDBY
RESET
AC-CUT
IC1020
DISPLAY CONTROL/KEY CONTROL
SDATA
85
84
83
82
CN372
48
33
47
34
46
35
45
36
44
37
43
38
42
39
41
40
75
72
12
20
Q1041
LED
SWITCH
Q391
RESET
LD/ST MTR NEG
LD-ST MTR POS
BU U/D MTR NEG
BU U/D MTR POS
SW1 TRAY OPEN SW
SW4 TRAY CLOSE SW
SW3 SUB TRAY IN
SW3 SUB TRAY OUT
ST-E1
ST-E2
ST-E3
ST-E4
MD-E1
MD-E2
MD-E3
MD-E4
D,SENSER
D1050
EVER+4V
IC391
LEVEL
3 1
DETECT
D
CD SERVO
SECTION
(Page 22)
EVER+4V
8
SCK
7
6
CS
5
RESET
SEG00
51
I
I
SEG35
15
3
DEG01
•
2
•
1
•
64
I
57
DEG11
DEG12/SEG36
DEG13/SEG37
DIG14SEG38
D1023-1026
VP
VP D/D CON+9V
RECT
VF1
VF2
T801
DG00
Q1024
BIAS
OSC
56
•
55
4
54
55
F1
Q1021
GREID
DRIVE
Q1022
GRID
DRIVE
Q1023
GRID
DRIVE
FL1020
FLUORESCENT
INDICATOR
TUBE
F2
HCD-CPX22/NXM3
2424
Page 25
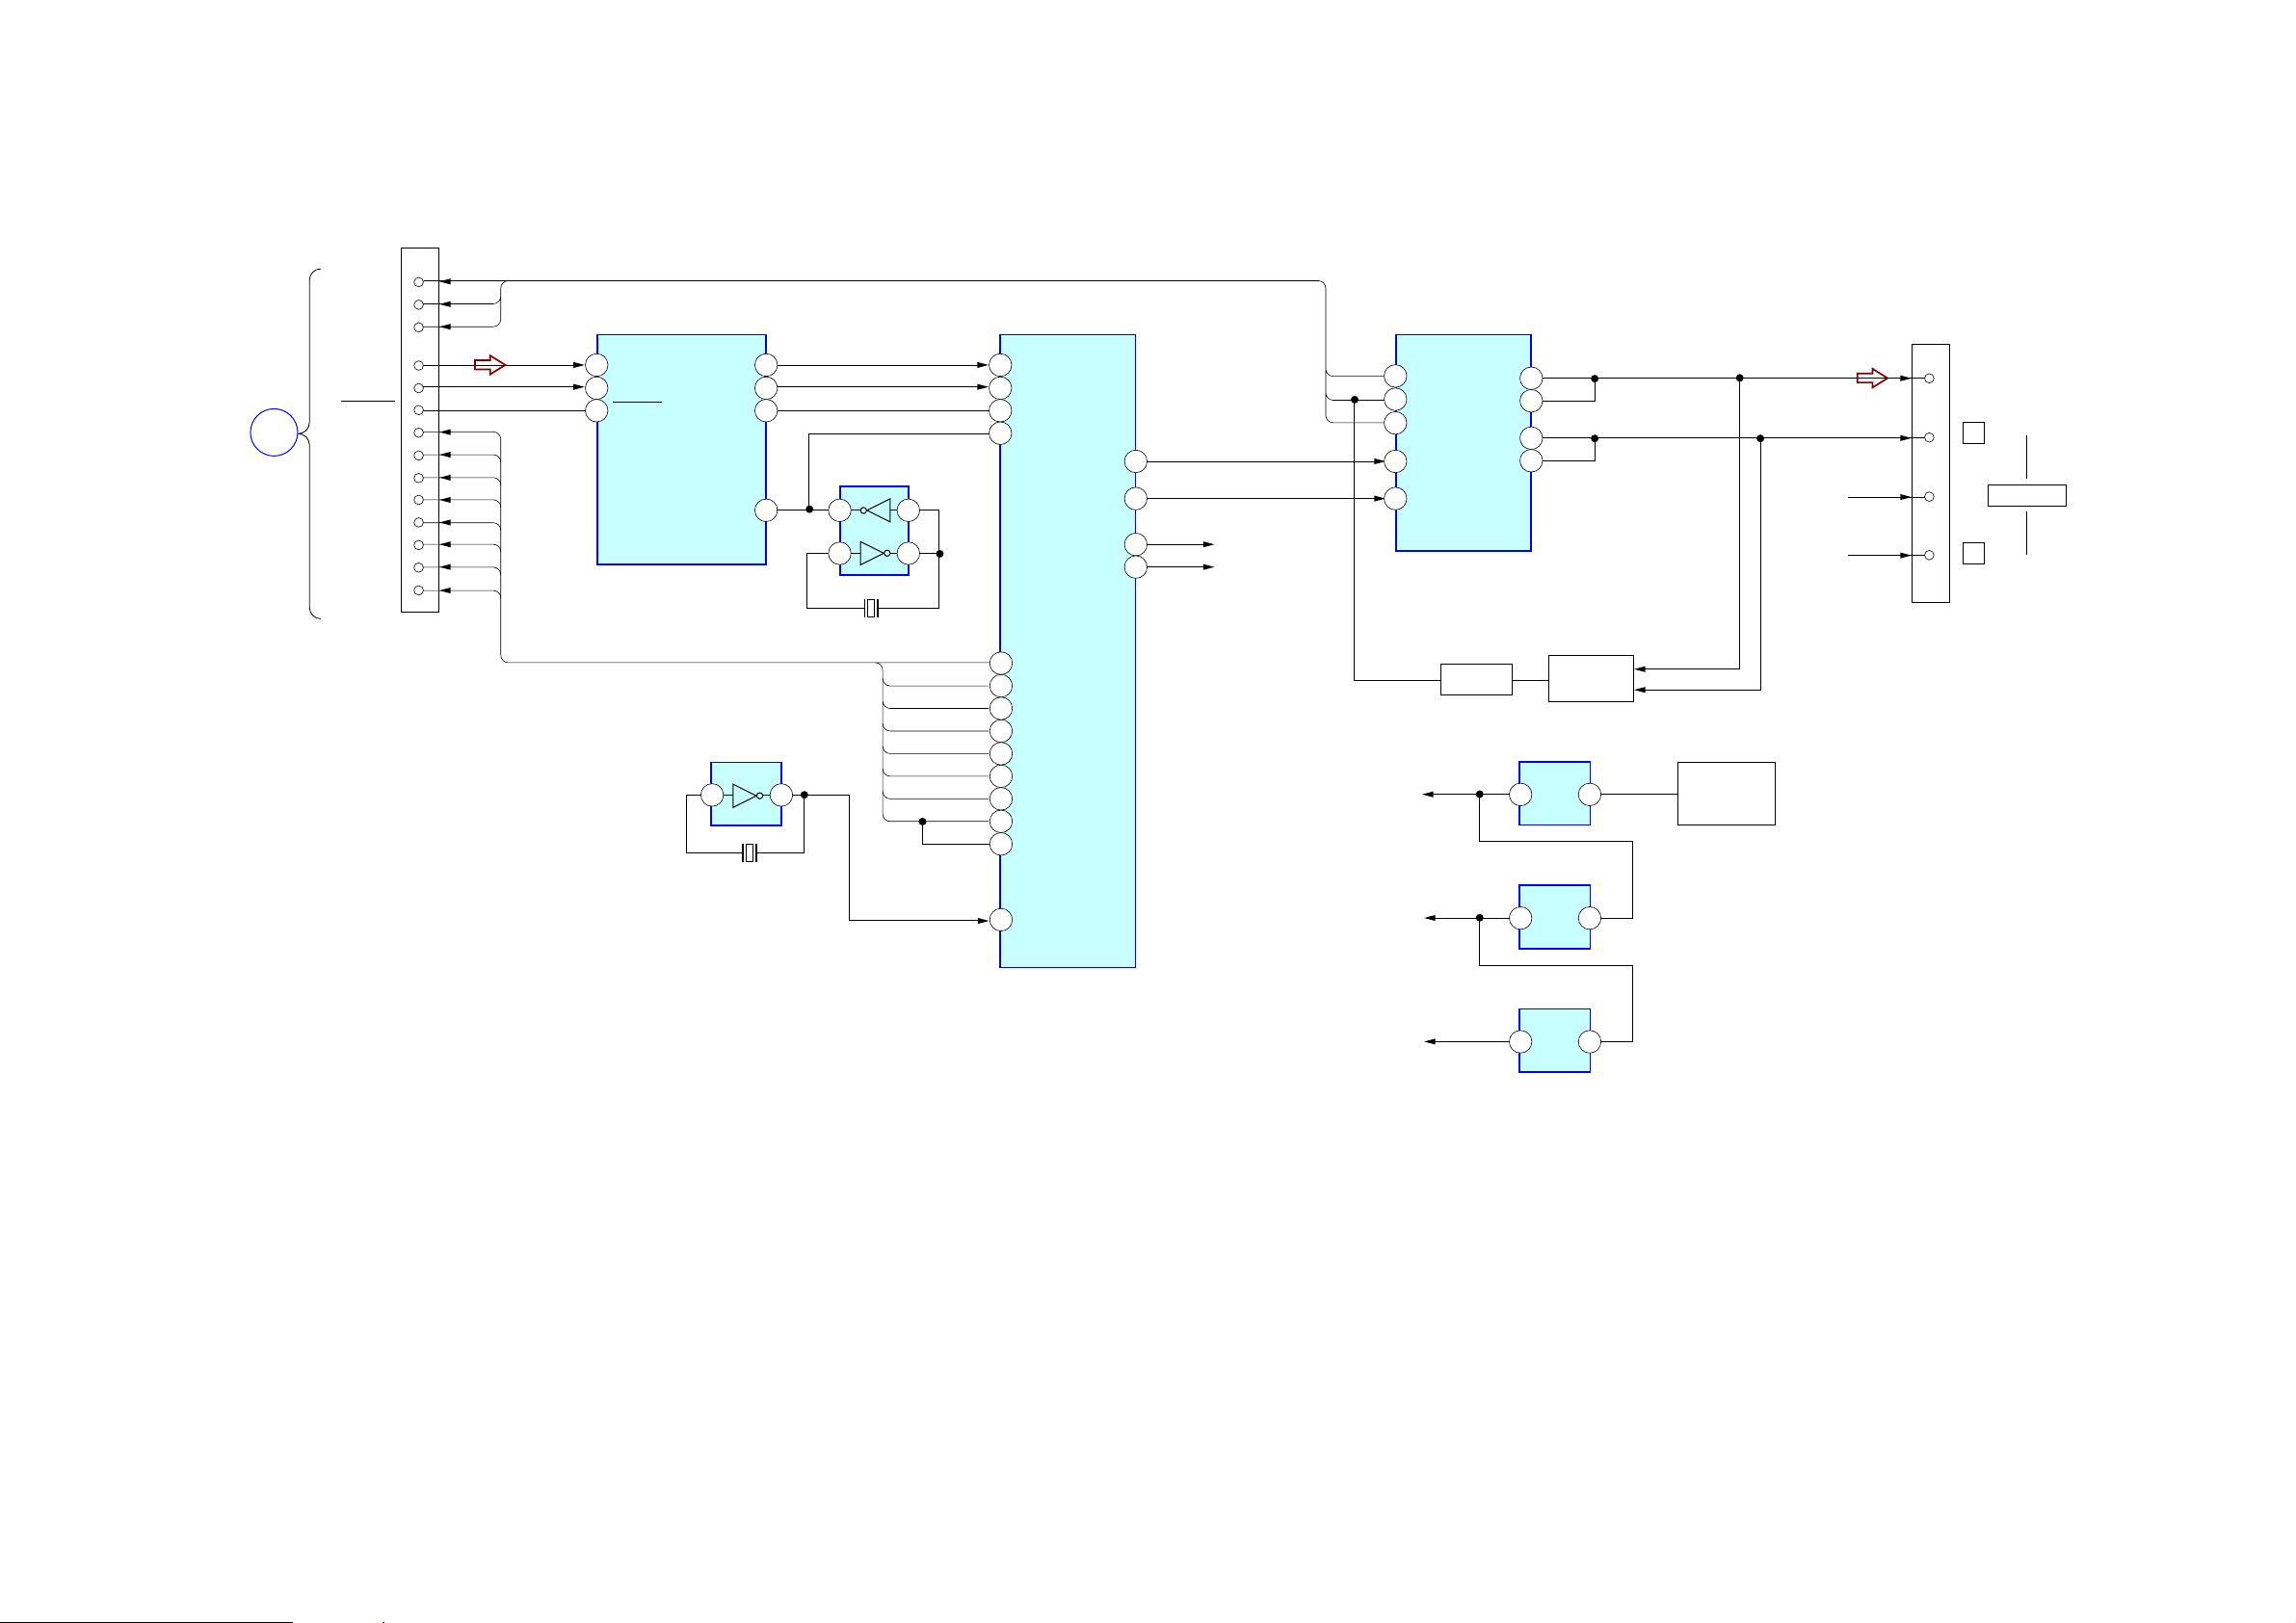
7-5. BLOCK DIAGRAM – S-MASTER SECTION –
CN700
/RST
/OTW
/SD
TUNER/TAPE
SECTION
(Page 23)
C
L-IN
R-IN
P-DOWN
INIT
SCLATCH
SCSHIFT
SCDT
PGMUTE
SOFTMUTE
MSPMUTE
OVF
R-IN
A/D CONVERTER
1
L-IN
R-IN
2
7
P-DWN
IC701
DOUT
BCK
LRCK
SCKI
13
11
10
15
IC703
7 1
6 2
IC705
DATA CONVERTER
31
DATA
BCK
30
LRCK
29
XFSI IN
36
OUTL1
OUTL2
OUTR1
OUTR2
11
HCD-CPX22/NXM3
IC707
DIGITAL POWER AMP
4
/RST
/SD
13
15
/OTW
2
BP
9
6
4
R-CH
R-CH
17
AP
OUT B
OUT B
OUT A
OUT A
30
29
26
25
L+
L-
R+
R-
TM504
L
SPEAKER
R
IC709
2
X702
X701
27
INIT
23
SCLATCH
22
SCSHIFT
SCDT
21
20
PGMUTE
19
4
SOFTMUTE
NSPMUTE
18
25
FLAGL OVF
OVF FLAGR
24
A+5V
Q701
PROTECT
IC710
A+5V
3
REG
Q702,703
OVER LOAD
DETECT
1
A+9V
SWITCHING
REGULATOR
IC706
D+3.3V
48
XFSD IN
D+3.3V
3
REG
1
IC704
1.8V
+1.8V
4
REG
5
• R-ch is omitted due to same as L-ch.
• Signal path
F : AUDIO
HCD-CPX22/NXM3
2525
Page 26
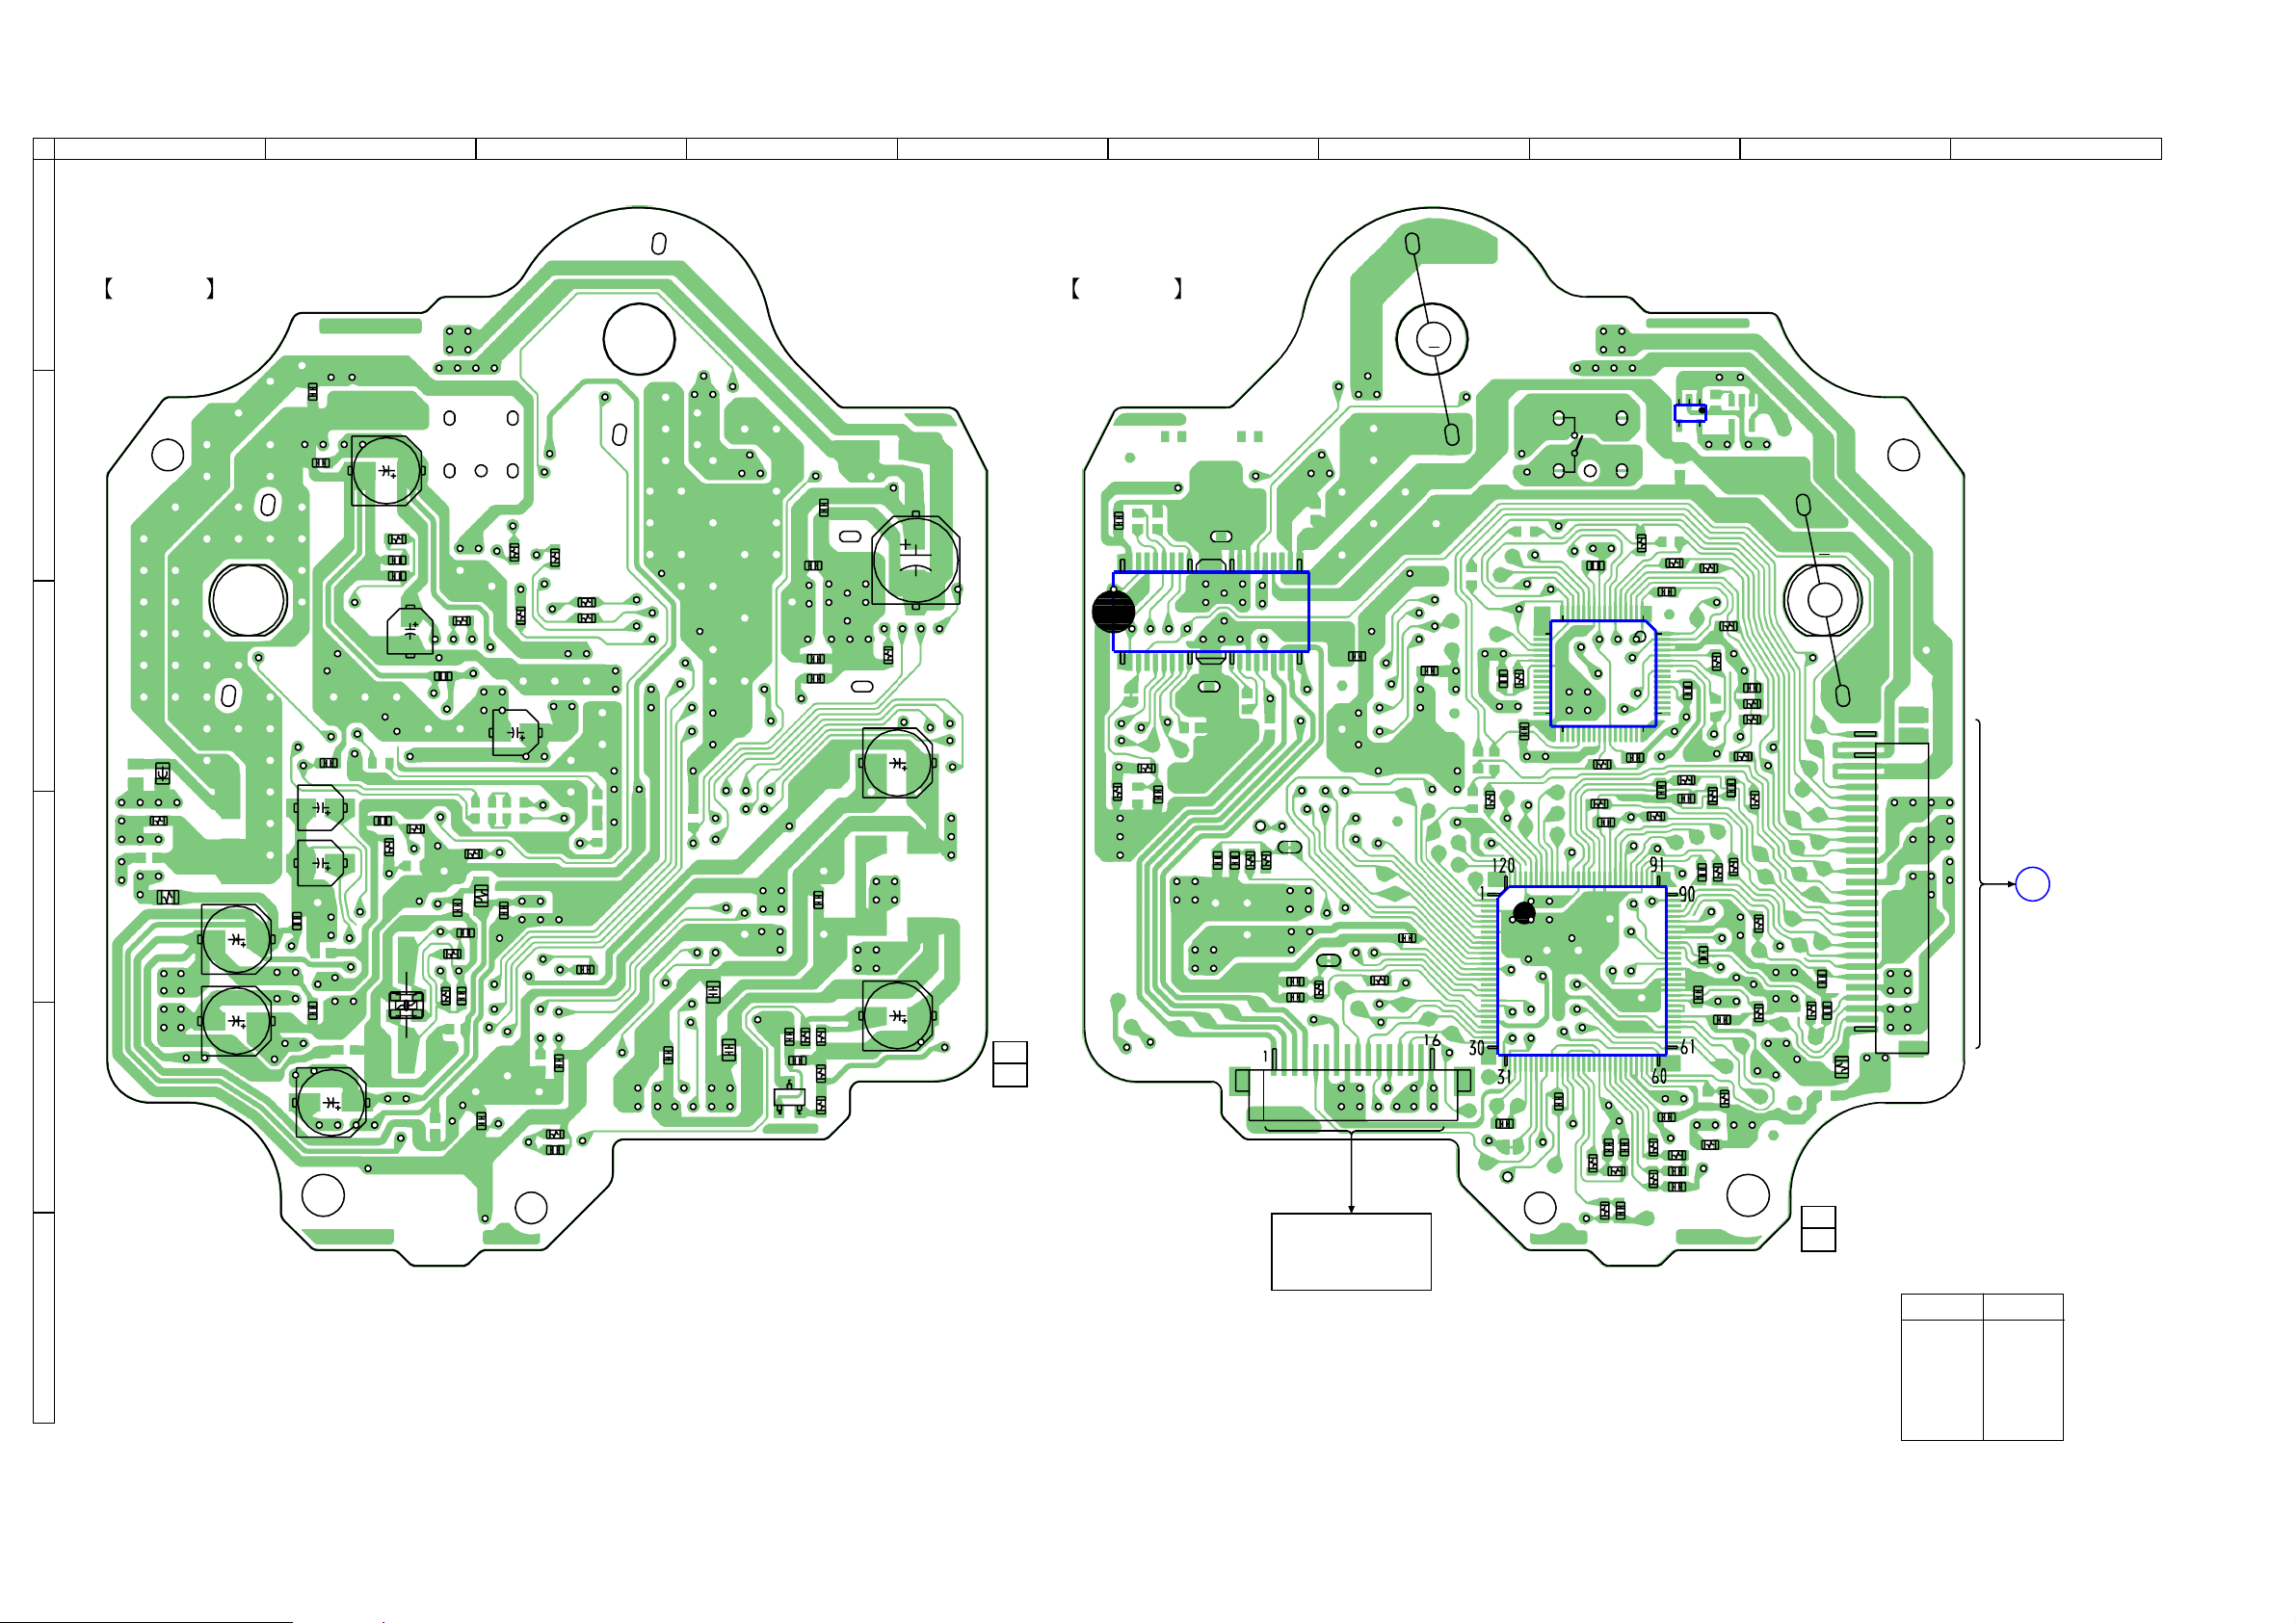
HCD-CPX22/NXM3
7-6. PRINTED WIRING BOARD – BD SECTION –
1
A
2
BD BOARD (SIDE A)
C302
C318
C182
C151
C314
C210
C305
R165
X171
R313
C315
C316
C312
R162
R172
R302
R191
C174
R171
R173
C172
B
C303
C
FB301
C184
R205
C183
D
R201
C201
C203
C209
E
F
C171
C134
• See page 21 for Circuit Boards Location.
3 4 5 6 7
R405
R354
C196
C308
R121
C123
R351
R352
R353
C195
C125
C15
C10
C11
C257
C258
C259
C18
C16
Q10
E
C255
C14
R11
R12
R13
R10
C260
R253
C116
C17
1-860-502-
12
(12)
BD BOARD (SIDE B)
C252
27
36
28
IC251
R252
9
C251
10
C114
TP117
(VC)
R113
C113
1
R251
19
18
JPO103 (TE1)
R114
C112
C111
R112
OPTICAL PICK-UP
BLOCK
(KSM-215DCP)
C206
C115
JPO102 (FE1)
R111
CN101
M
C320
M101
SPINDLE
MOTOR
C307
C309
R411
C122
TP124
(RFAC)
17
R307
32
C124
S101
(LIMIT)
C306
16
33
R303
R407
IC101
R132
IC301
C163
C133
R133
R131
8
R404
C310
C132
IC303
R419
1
48
C212
R163
R141
R143
C131
1
3
5
4
R403
C313
64
R306
C311
49
R409
C211
R408
C194
C181
C162
C161
C143
R142
C141
C142
1-860-502-
R401
C213
R412
R203
R301
R406
R151
C317
R305
R402
R410
R161
R182
9 10
M102
M
R181
SLED
MOTOR
1
CN201
C186
C185
27
R204
12
(12)
• Semiconductor
Location
Ref. No. Location
IC101 D-8
IC251 C-6
IC301 C-8
IC303 B-8
A
MAIN
BOARD
(Page 30)
HCD-CPX22/NXM3
Q10 E-4
2626
Page 27
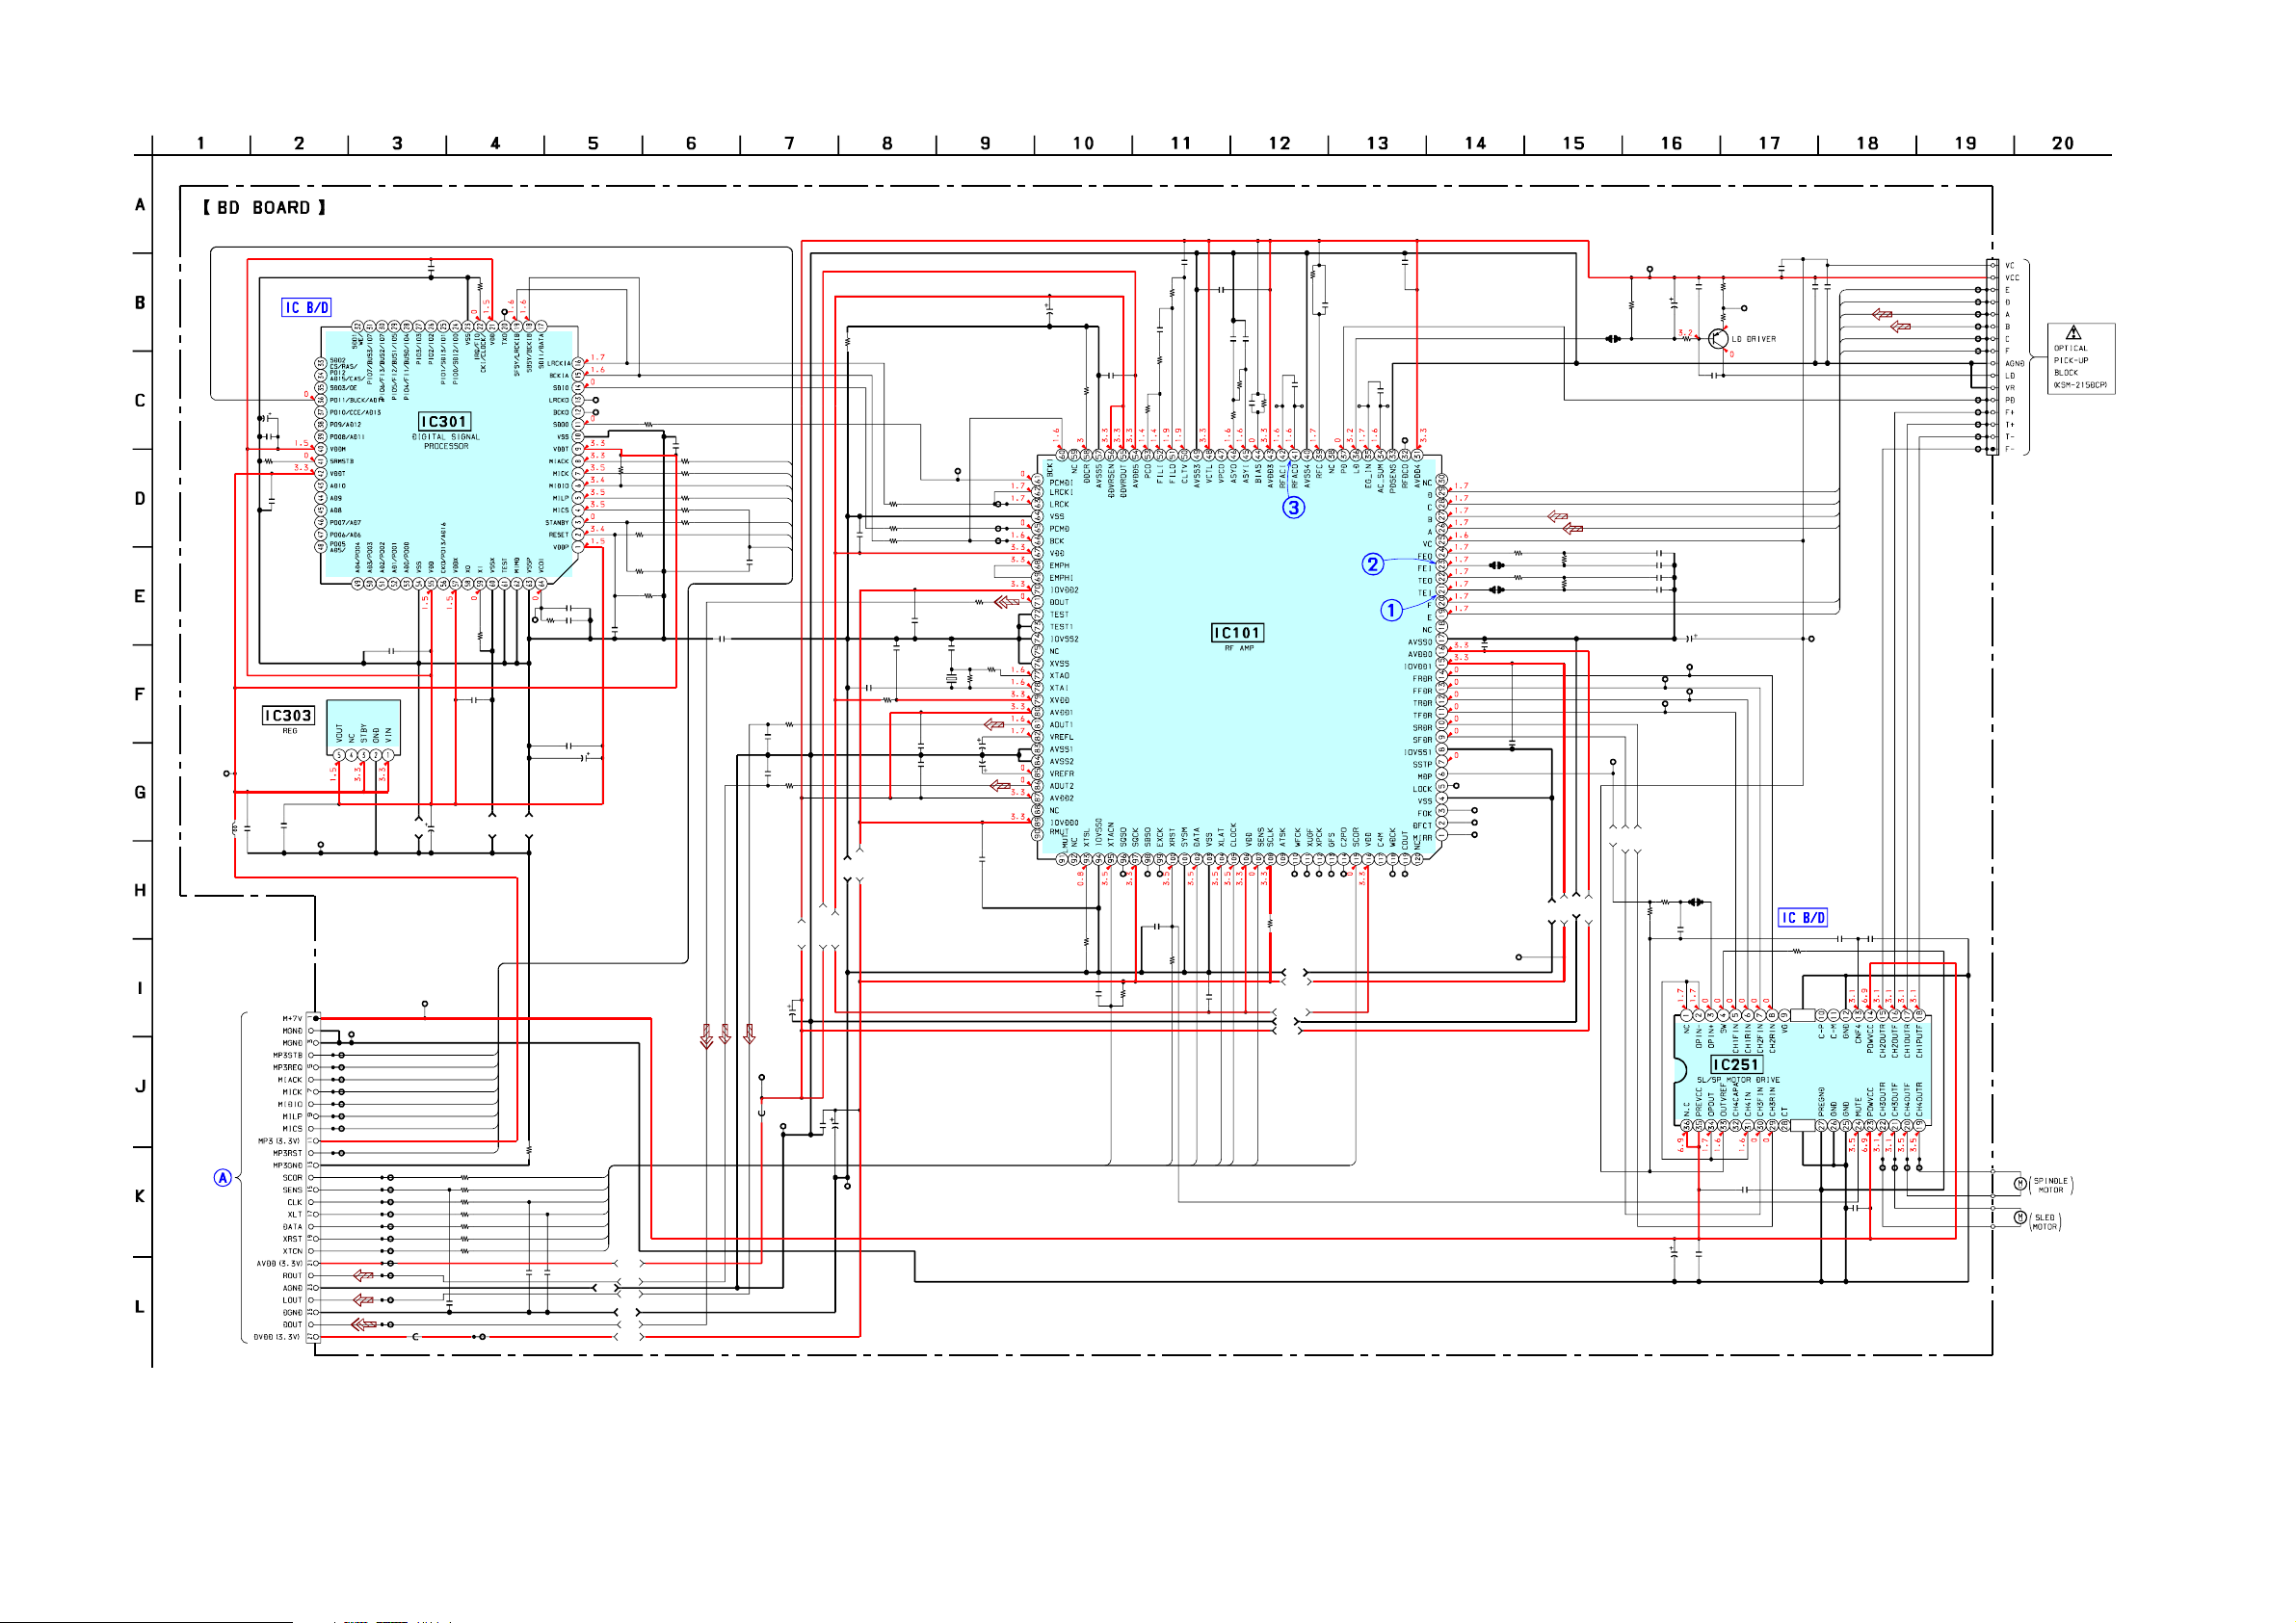
HCD-CPX22/NXM3
7-7. SCHEMATIC DIAGRAM – BD BOARD –
R307
10k
TP304
-002
R306
0
C312
0.1
220
VSSX
4V
MP3STB
MP3REQ
MIACK
MICK
MIDIO
MILP
MICS
MP3RST
100
R411
100
R410
100
R409
100
R408
100
R407
100
R406
100
R412
C212
22p
C213
DVDD
TP435
TP433
MP3VDD
(Page 33)
MP3REQ
FB301
MAIN
BOARD
C309
0.1
R303
100k
C302
C307
0.1
C308
47
4V
IC301
TC94A34FG
C310
0.1
C311
0.1
IC303
BH15FB1W
TP417
TP416
TP415
TP414
TP413
TP412
TP419
TP434
TP410
TP411
TP409
R204
VSS
SCOR
SENS
CLK
XLT
DATA
XRST
XTCN
AVDD
ROUT
LOUT
DOUT
0
TP186
MVDD
C305
C303
0.1
0.1
TP422
MP3GND
CN201
27P
TP187
MGND
MP3STB
TP401
MP3REQ
TP402
MIACK
TP403
MICK
TP404
MIDIO
TP405
MILP
TP406
MICS
TP407
MP3RST
TP408
• See page 41 for IC Pin Function Description.
TP302
R351
TP303
100
C306
0.1
R405
10k
R302
R401
R301
C314
220p
47
4V
SCOR
SENS
CLOCK
DATA
XRST
XTACN
100k
C317
0.01
XLT
A3.3V
ROUT
AGND
LOUT
DGND
DOUT
D3.3V
C316
0.0022
TP301
R313
C315
220
0.1
C313
0.1
VSSP
R205
0
22p
C211
R404
R419
R403
R402
100
R305
100k
MIACK
100
100
100
100
100
C320
MICK
MIDIO
MILP
MP3STB
MP3RST
MICS
C318
0.01
0
C185
R181
100
2200p
R182
100
C186
2200p
A3.3V
C201
100
10V
TP436
AVDD
0
TP420
AGND
R201
C209
0.01
DDC2.5V
A3.3V DDC
C203
100
10V
TP421
DGND
R203
C161
0.1
DVSS
0
C174
0.1
R173
D3.3V
C172
27p
0
R352
C162
0.1
R353
R354
C181
C182
0.1
100
0.1
100
100
X171
16.9MHz
TP427
PCMDI
C171
22p
R172
C183
6.3V
C184
6.3V
C194
TP102
TP15
TP16
TP17
TP18
TP19
TP10
TP11
TP12
TP13
TP14
CN101
16P
E
D
A
B
C
F
PD
F+
FTF-
M101
M102
0.1
C11
10
R253
10k
IC251
BA5947FM
(HSOP28)
C10
TP177
VC
10
E
D
A
B
C
F
D
C
B
A
F
E
C259
C258
0.1
0.1
SP-
SL+
SL-
SP+
TP250
TP252
TP253
TP251
C257
0.1
15k
15k
A3.3V
JPO10
TP432
MDP
APC
MDP
100k
R12
TP429
TP431
SFDR
SRDR
TP423
IOP1
FFDR
TFDR
R251
10k
C260
220
10V
C17
220
4V
R252
C16
R13
1
R10
3.3
R11
0
0.001
0.0033
C111
470p
C112
0.0033
C113
470p
C114
C116
100
TP428
TP430
JPO004
MDP
22k
C251
0.0068
C255
C15
1
TP424
IOP2
Q10
2SB1690K
C18
10V
FRDR
TRDR
C252
0.1
0.1
C142
0.0015
C134
EXCK
TP149
XRST
DATA
C196
0.1
0.1
C133
0.01
R133
180k
R132
10k
CXD3059A
XLT
R143
C143
0.1
XTACN
SQSO
TP142
R162
3.3k
C141
0.1
R142
1k
R141
4.7k
SBSO
TP148
C163
0.1
R163
100
47k
C151
100
10V
R151
0
TP103
LRCK
TP104
PCMD
TP105
BCK
R161
100
R171
470
1M
22
22
0.1
R165
*
C210
0.1
IC101
C132
0.47
CLOCK
100p
C131
R
SENS
1M
R131
R121
C124
330p
RFACI
TP125
R191
0
DVSS
D3.3V
DDC2.5V
AVSS
A3.3V
15k
RFACO
TP124
XUGF
WFCK
XPCK
TP144
TP145
TP147
C123
0.1
GFS
TP153
C2PO
TP146
SCOR
C122
0.1
TP123
C125
0.1
TP122
WDCK
TP160
RFDCO
TP121
COUT
TP162
TP167
JPO102
JPO103
C115
0.1
LOCK
TP178
TP166
TP165
FEI
TEI
C195
FOK
DFCT
MIRR
TP426
R111
1k
R112
R113
1k
R114
0.1
AVSS
D3.3V
DVSS
SW-
HCD-CPX22/NXM3
2727
Page 28
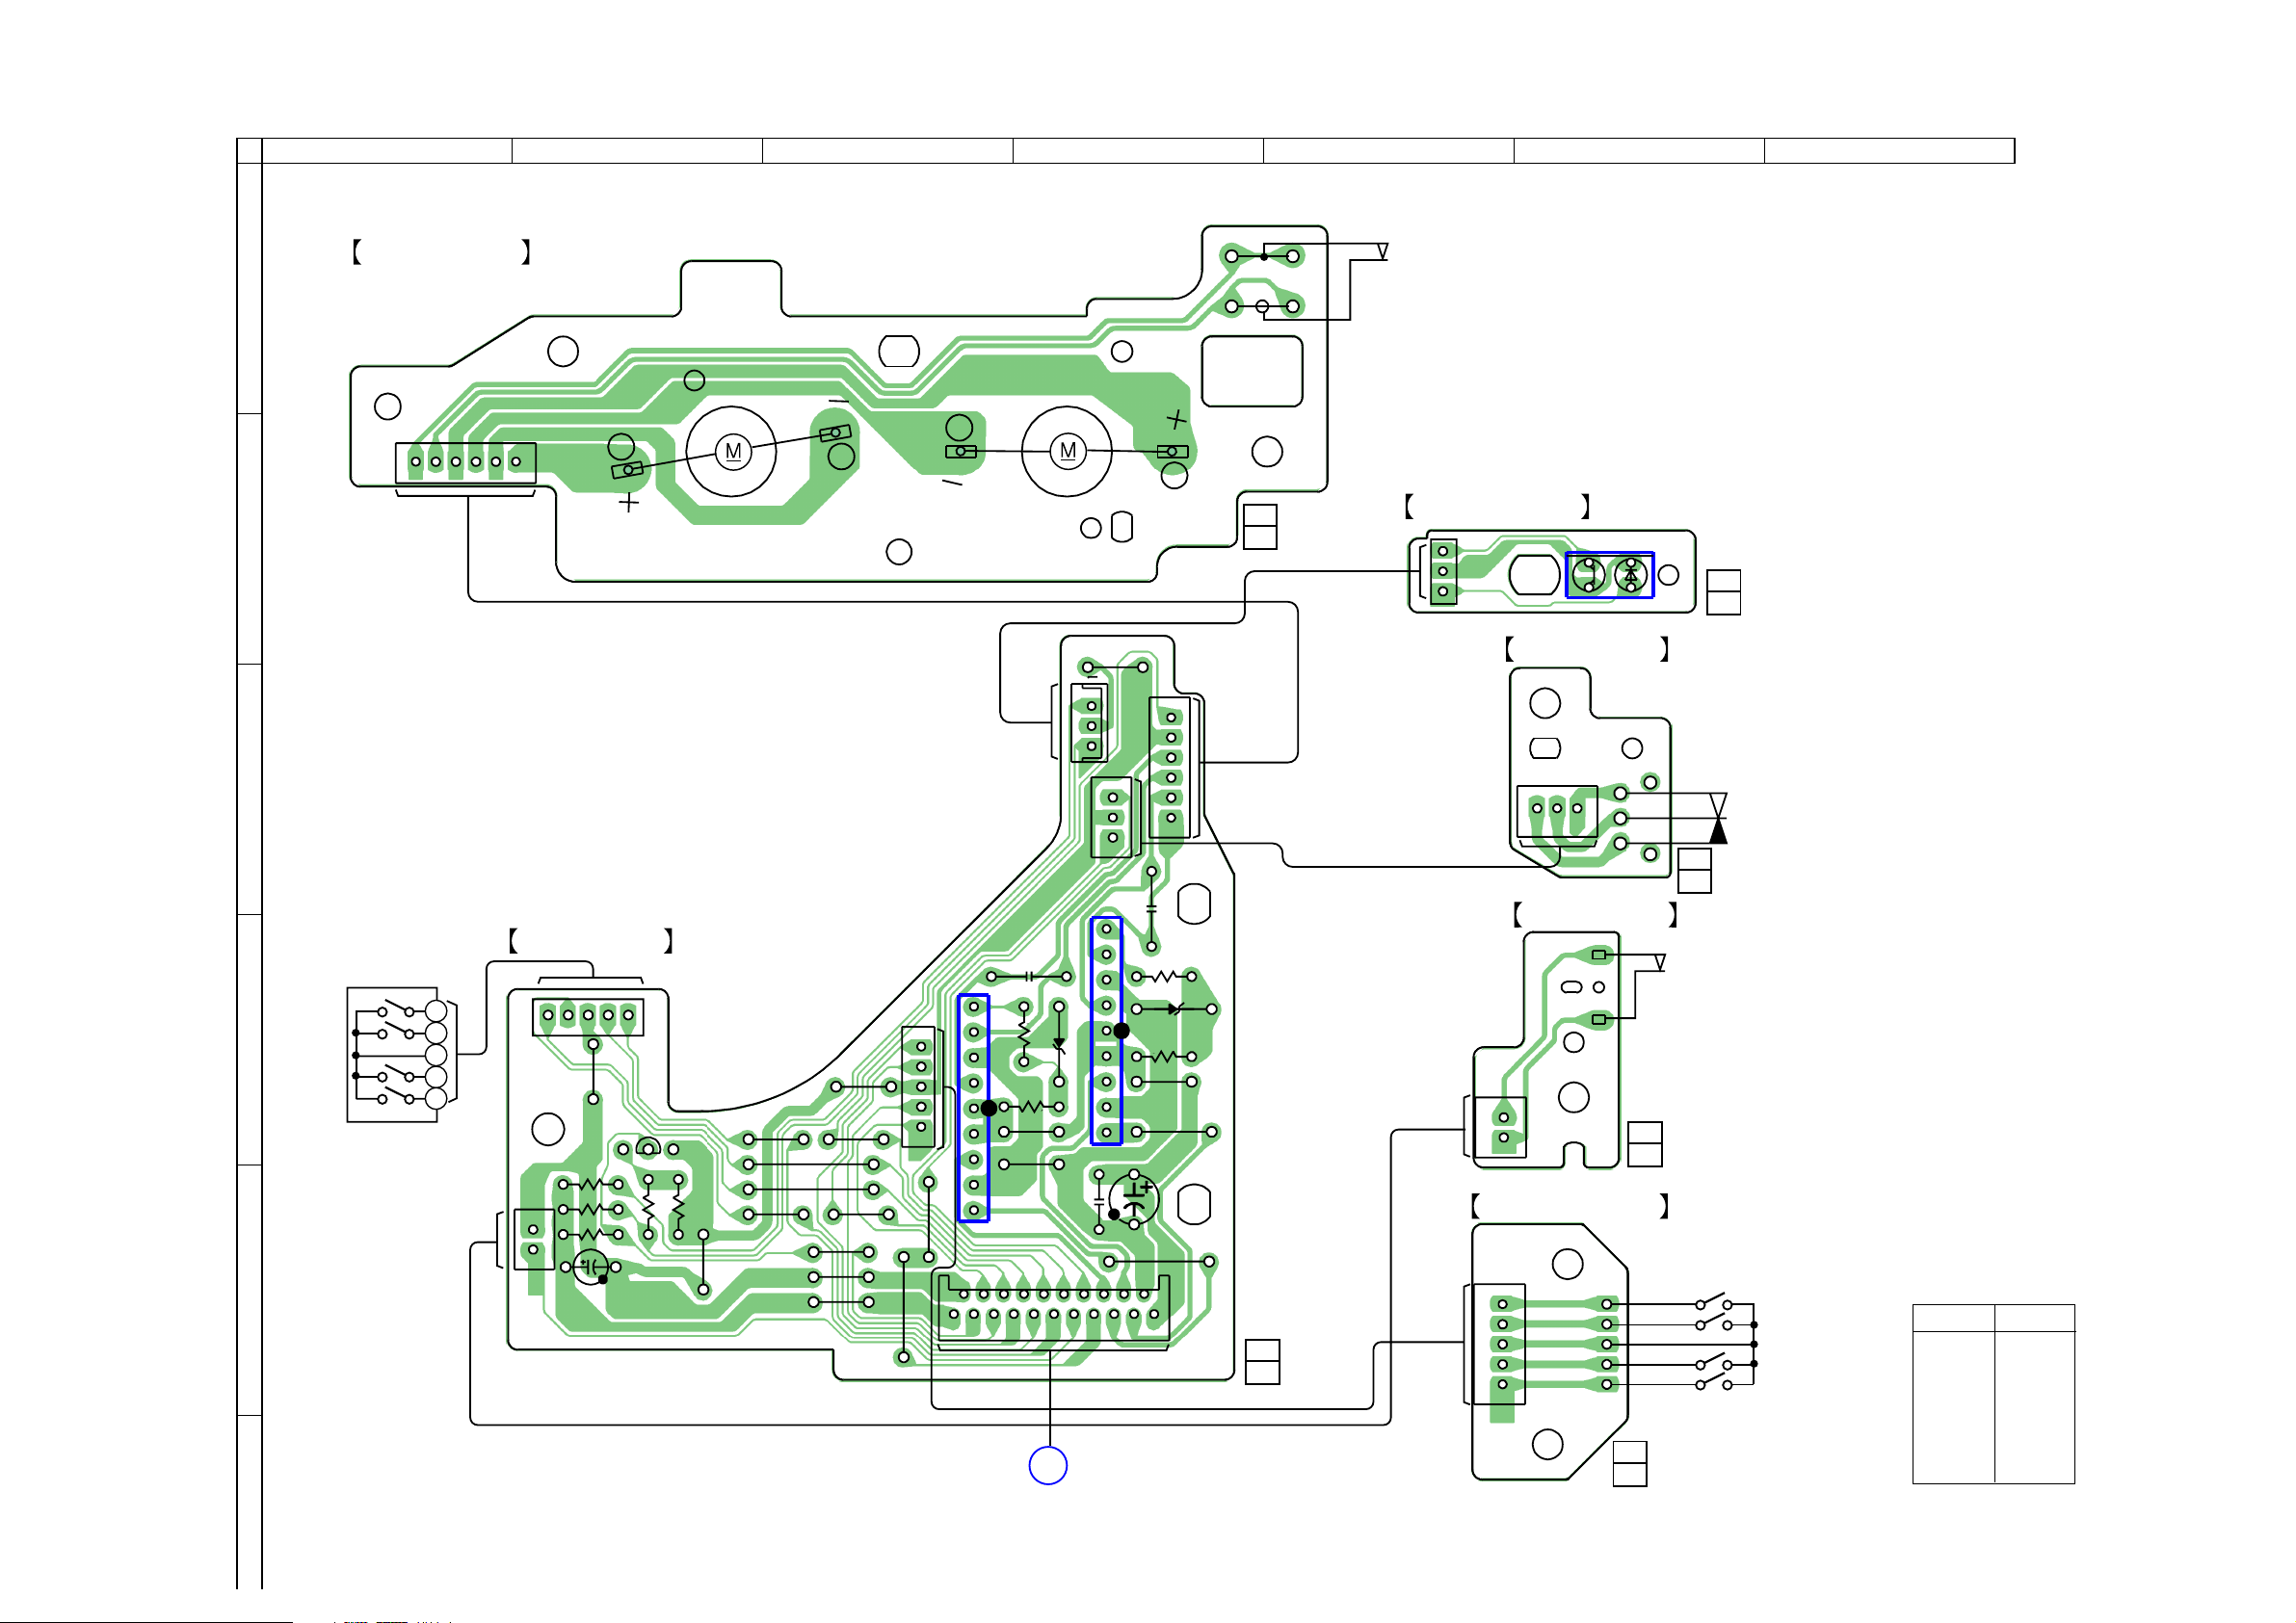
HCD-CPX22/NXM3
7-8. PRINTED WIRING BOARD – CD MECHANISM BOARD –
1
2
MOTOR BOARD
A
CN761
6
B
1
M761
(LD/ST MOTOR)
• See page 21 for Circuit Boards Location.
3 4 5 6 7
S761
(SUB TRAY OUT)
M762
(BU U/D MOTOR)
JW701
1-861-240-
11
(11)
SENSOR BOARD
IC751
3
1
CN751
SW(1) BOARD
11
(11)
1-861-244-
1
3
C
3
CN702
1
CN705
CN706
6
CN721
1
1
3
1-861-241-
11
(11)
S721
(MAIN TRAY IN/OUT)
IC701
SW(2) BOARD
CN731
1-861-242-
11
(11)
ENCODER BOARD
CN771
1-861-243-
11
(11)
S731
(SUB TRAY N)
S771
ROTARY ENCODER
(MD)
• Semiconductor
Location
Ref. No. Location
D701 D-4
D711 D-4
IC701 D-4
IC711 E-3
IC751 B-6
Q751 D-2
D711
C703
CN701
B
1
9
MAIN
BOARD
(Page30)
R702
R701
JW702
JW716
C701
JW715
1-861-245-
C761
D701
2
1
11
(11)
S781
ROTARY ENCODER
(ST U/D)
4
D
3
G
2
1
E
RELAY BOARD
3
G
JW713
R753
C702
1
2
Q751
4
R751
R754
1
2
CN703
R752
R755
JW708
JW706
JW712
JW707
JW709
JW710
JW711
JW714
JW705
JW718
JW720
1
2
G
3
4
CN707
JW719
1
JW717
20
21
9
C762
R712
R711
JW703
JW704
IC711
HCD-CPX22/NXM3
F
2828
Page 29
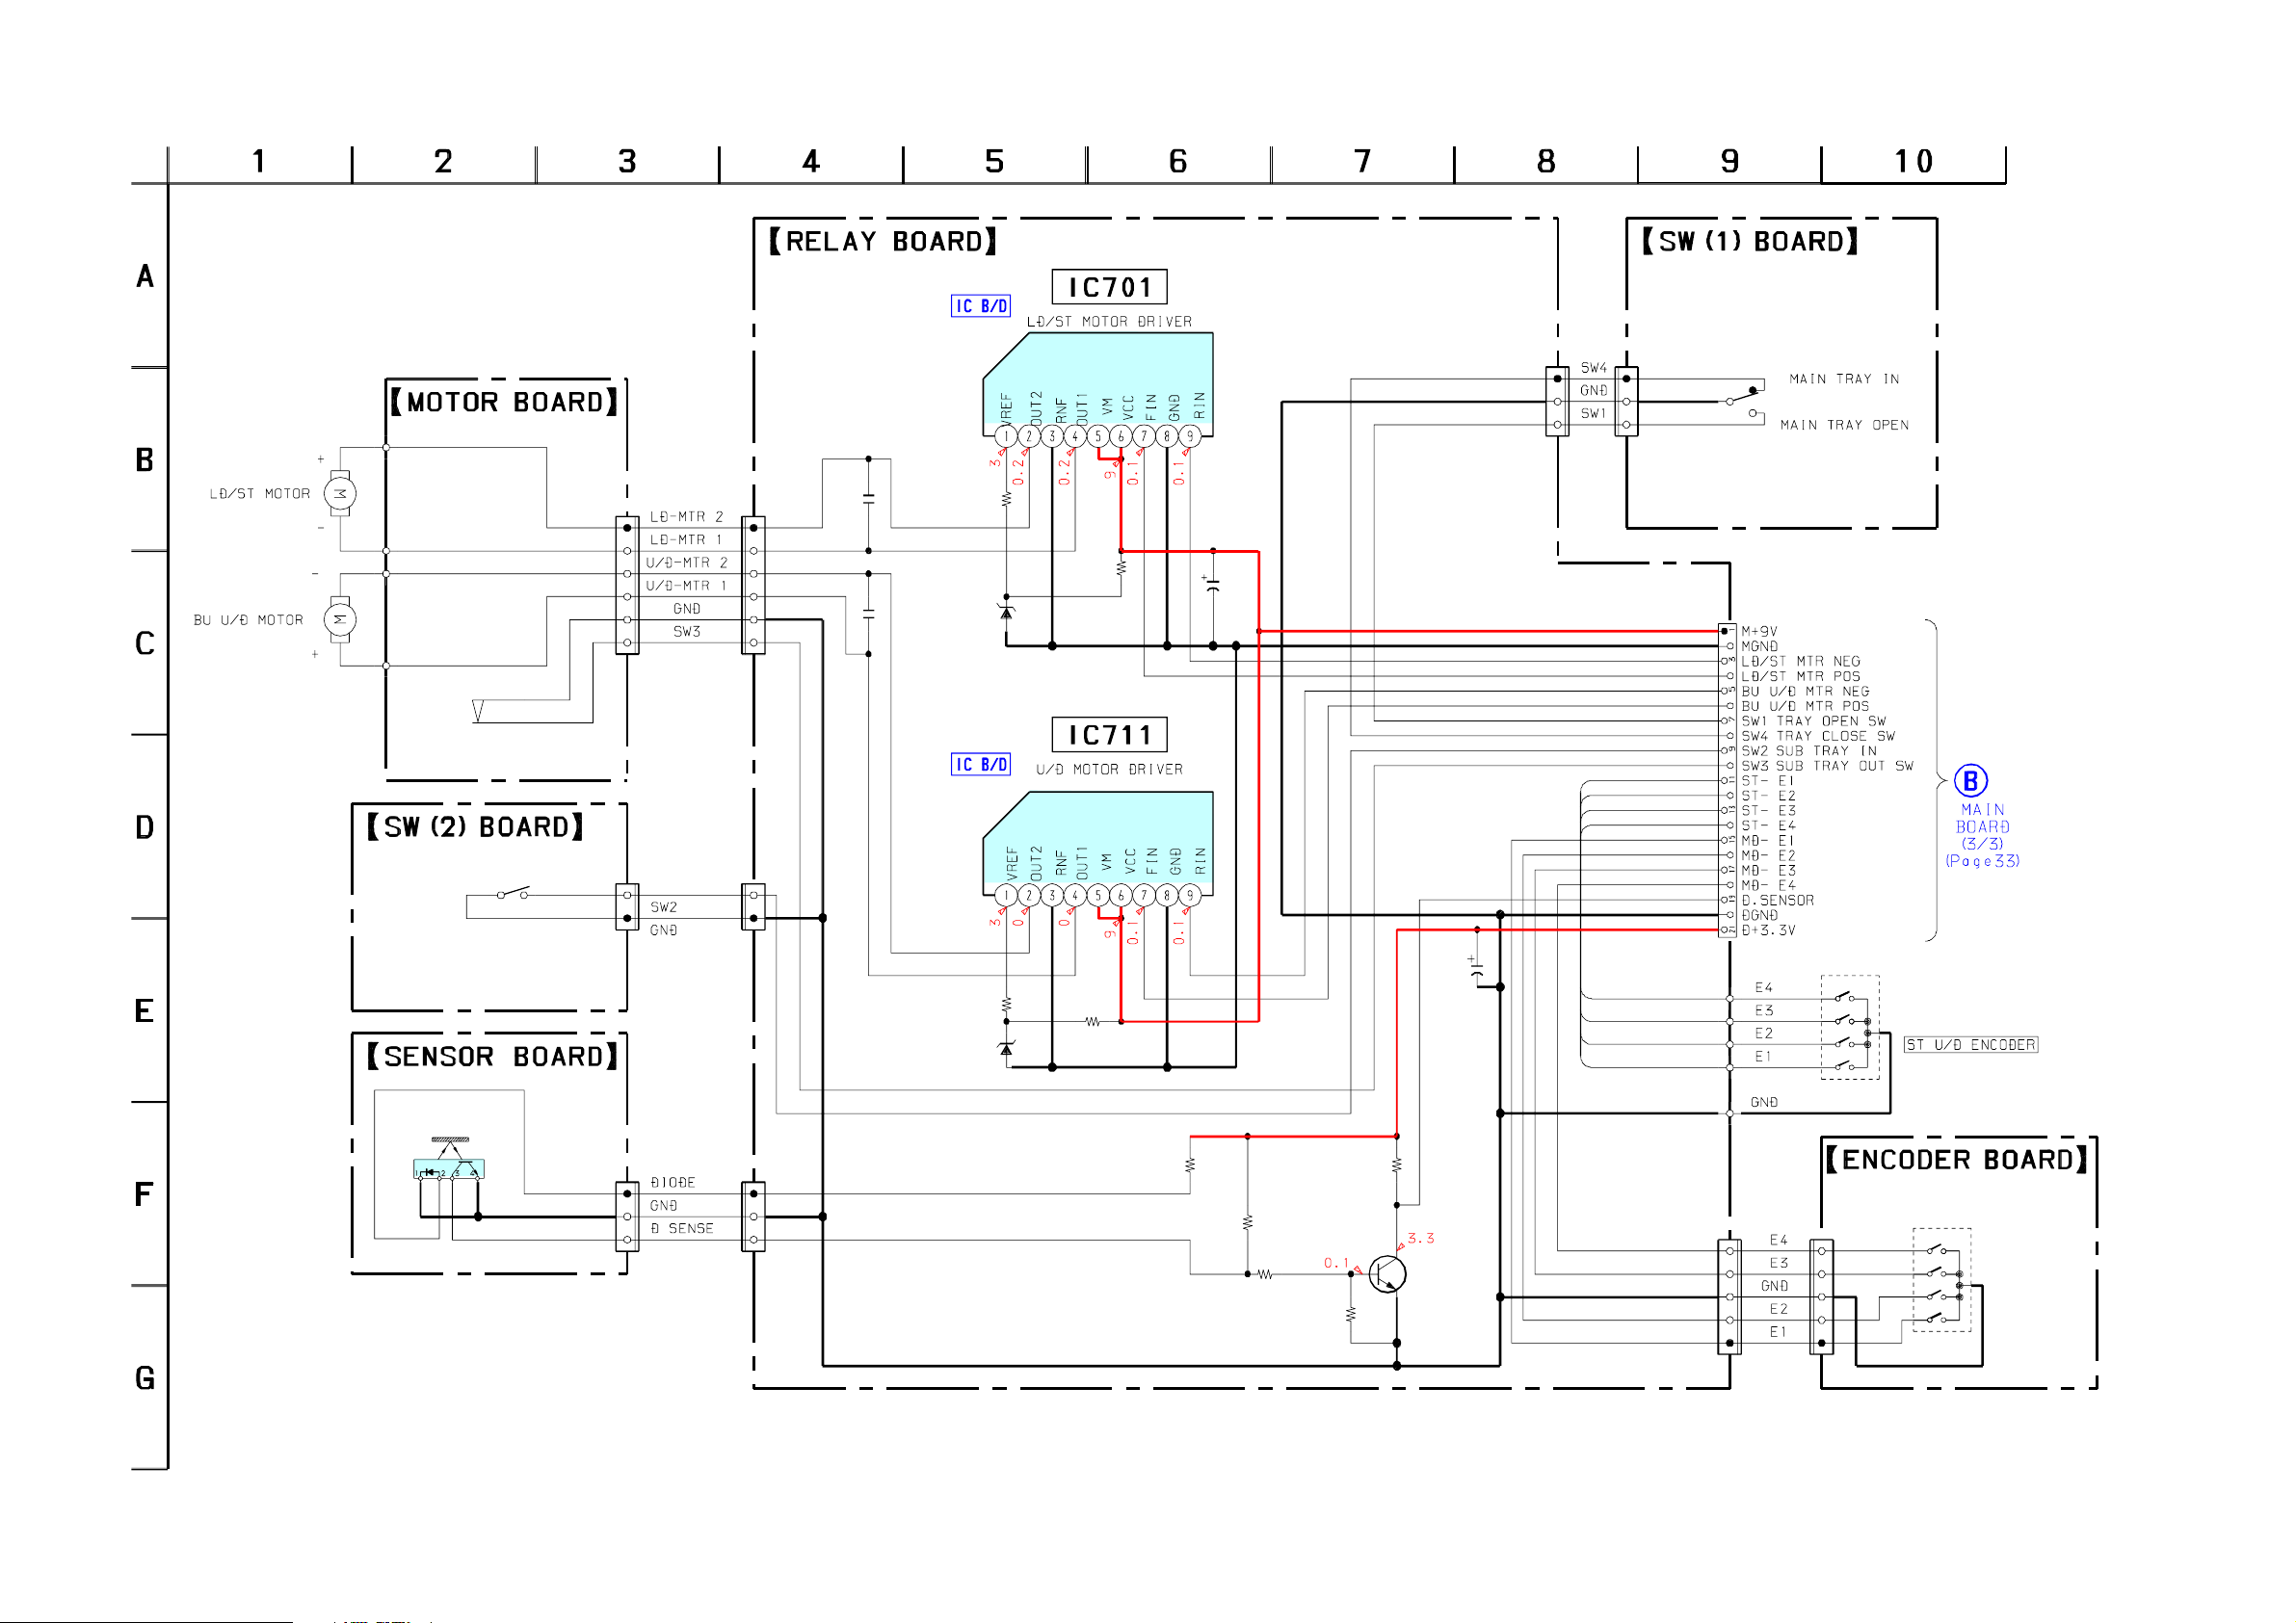
7-9. SCHEMATIC DIAGRAM – CD MECHANISM BOARD –
M761
RF500TB
M762
RF500TB
CN761
6P
CN706
6P
C761
0.01
C762
0.01
R702
100
IC701
BA6956AN
R701
680
C701
47
16V
CN702
3P
CN721
3P
HCD-CPX22/NXM3
S721
(MAIN TRAY
IN/OUT)
CN701
21PIN
S761
(SUB TRAY OUT)
S731
(SUB TRAY IN)
IC751
RPR-359F
CN751
3P
CN731
2P
CN703
2P
CN705
3P
MTZJ-T-77-4.7B
R712
100
D711
MTZJ-T-77-4.3A
D701
IC711
BA6956AN
R711
680
R751
91
R754
12k
R753
10k
Q751
2SC2785-HFE
C702
10
16V
ST-E1
ST-E2
ST-E3
ST-E4
ST-E4
ST-E3
ST-E2
ST-E1
CN707
5P
ROTARY ENCODER
CN771
5P
S781
ROTARY
ENCODER
S771
(MD)
HCD-CPX22/NXM3
R752
10k
R755
10k
2929
Page 30
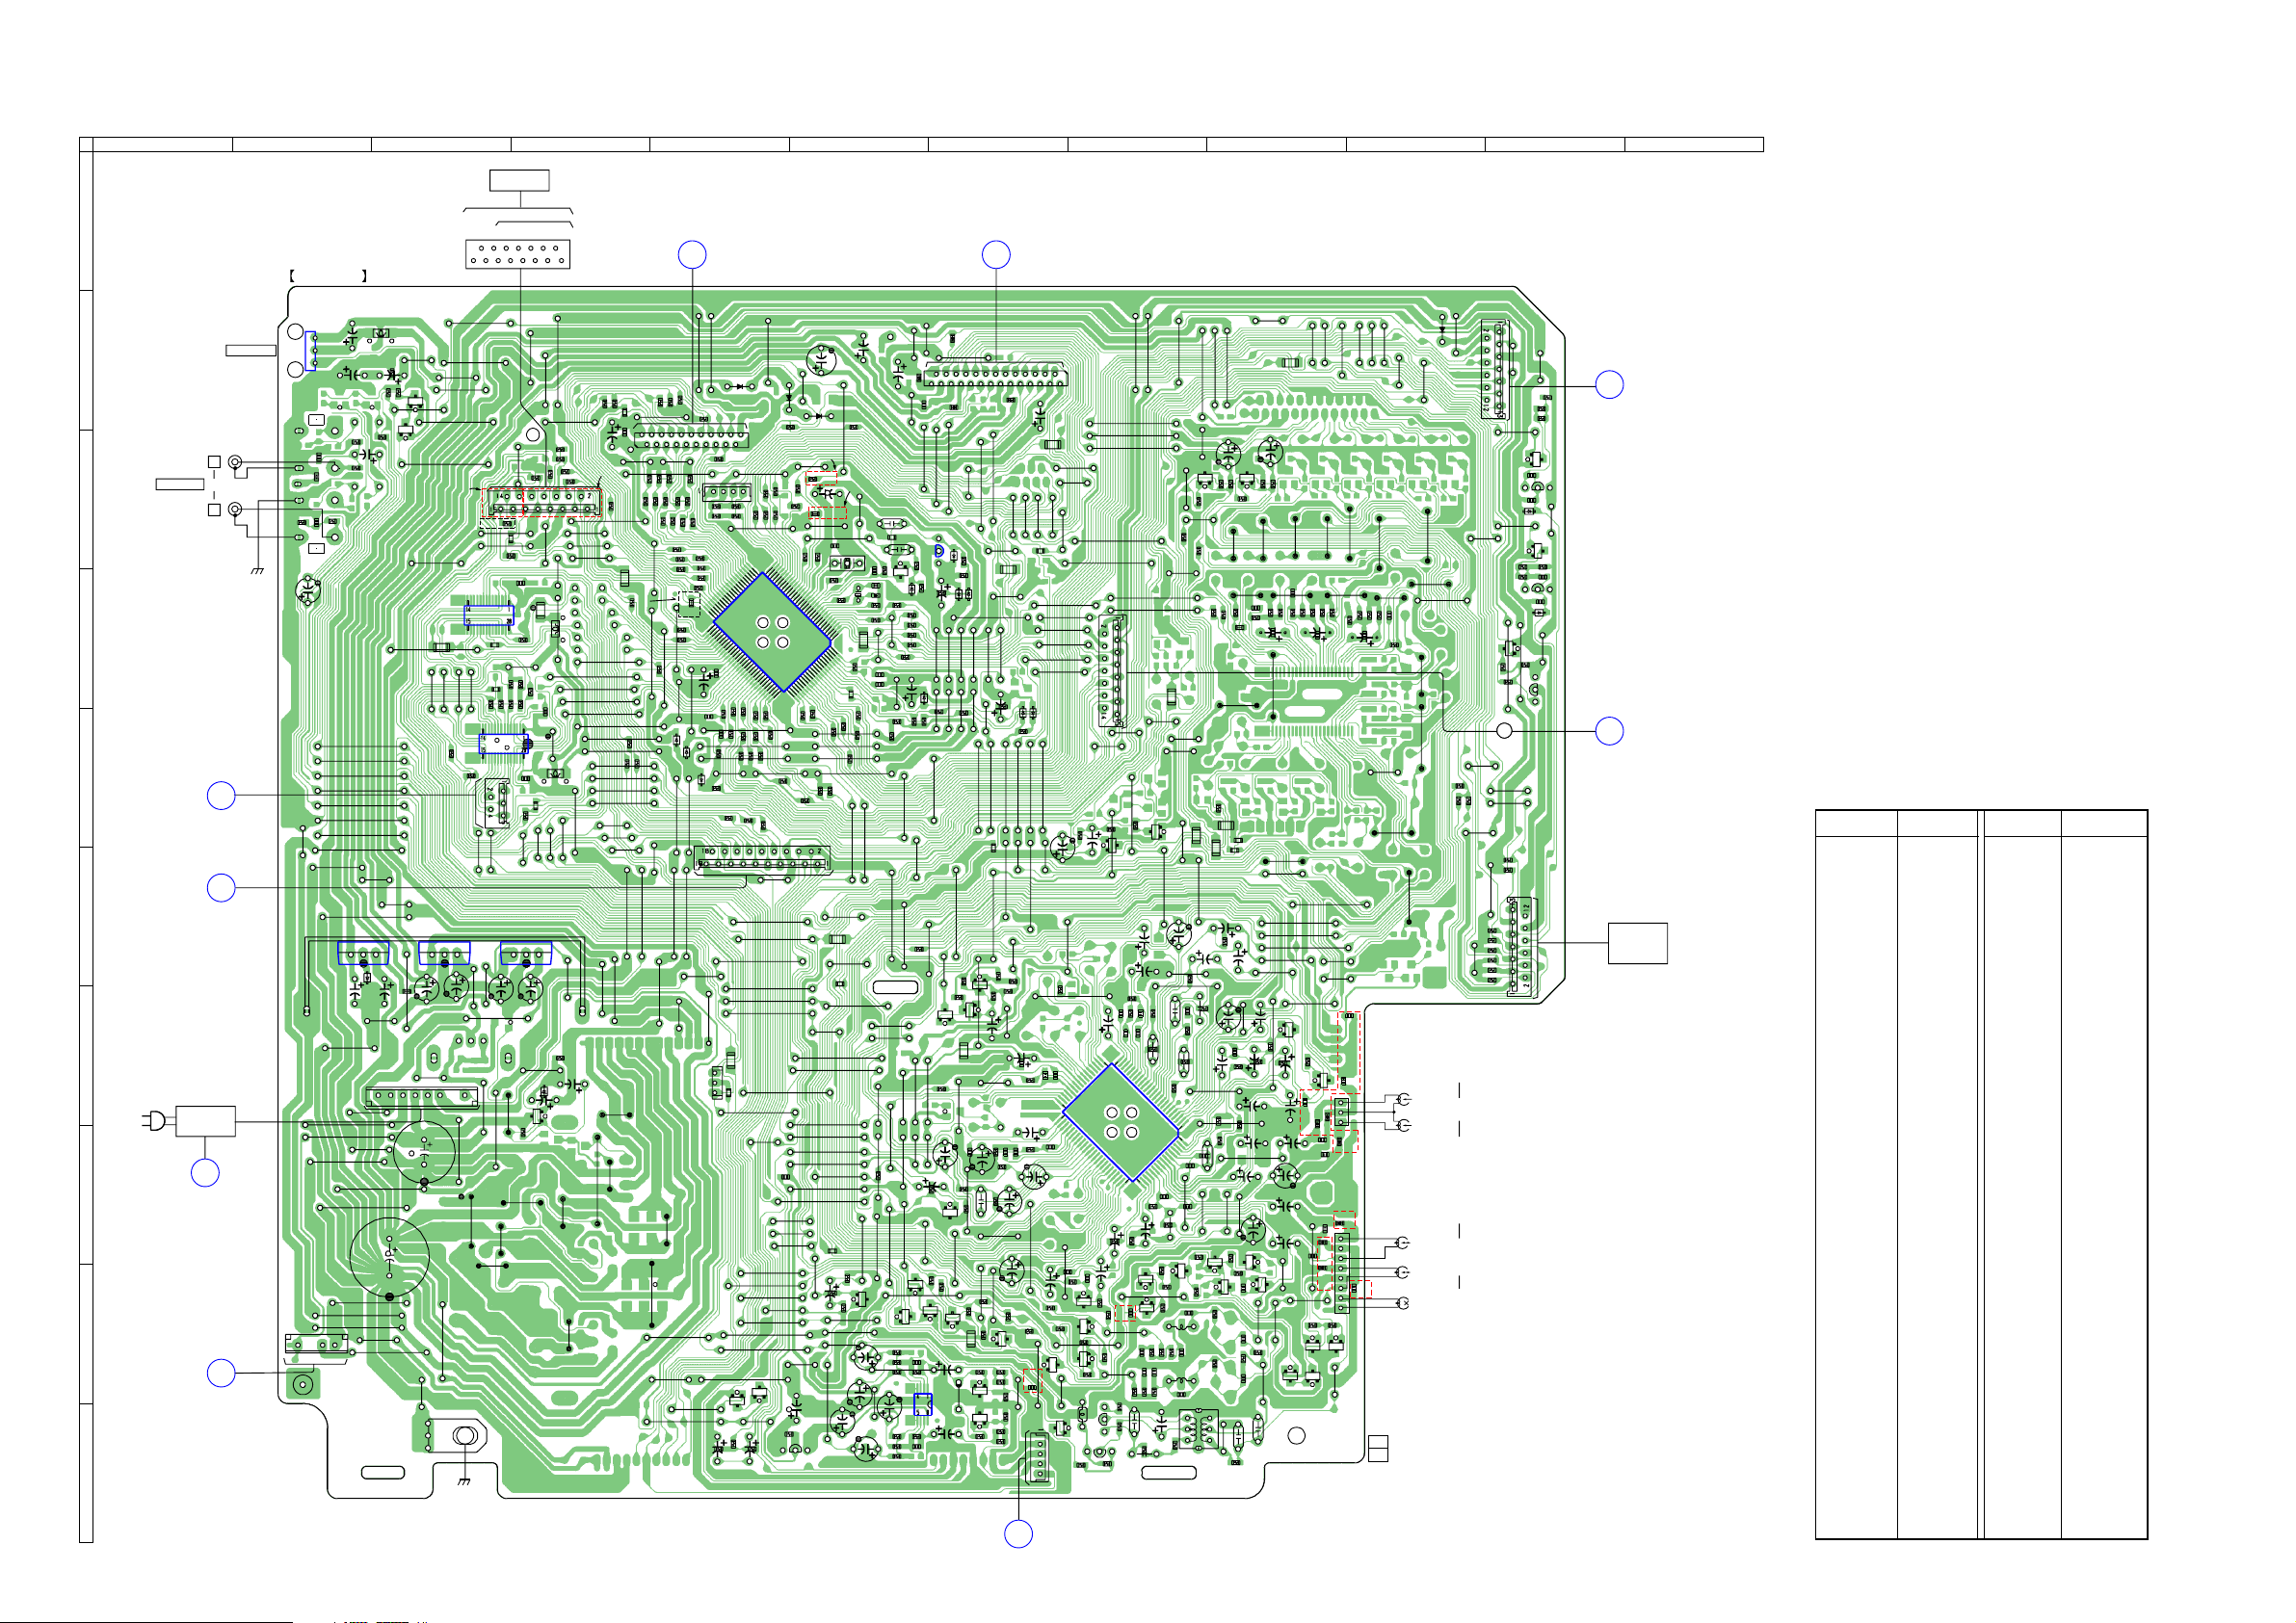
HCD-CPX22/NXM3
7-10. PRINTED WIRING BOARD – MAIN BOARD –
1
2
A
MAIN BOARD
C370
IC301
IC301
UT
J102
L
IN
R
DIGITAL O
OPTICAL
J102
CHASSIS
R192
C141
C100
C191
B
VIDEO(MD)
C
DGND
3.3V
DOUT
C28
C192
R191
R142
L370
R145
C142
R141
D
JW229
JW230
JW435
JW243
JW9
JW231
JW232
JW233
JW234
JW235
JW426
JW425
IC902
3
C904
JW489
1
2
D904
JW436
E
D
VOL
BOARD
(Page36)
G
F
S-MASTER
BOARD
(Page38)
G
CN101
AC IN
SWITCHING
REG
I
H
I
S-MASTER
BOARD
(Page38)
CN105
JW447
JW496
JW446
JW450
JW438
JW452
JW900
7
JW320
JW493
JW161
JW463
JW491
H
S-MASTER
BOARD
(Page38)
J
3 4 5 6 7
15P(AEP,UK)
15
JW350
JW197
JW198
R31
JW199
C27
JW200
Q28
R30
E
R32
JW239
Q27
JW201
E
JW202
15P
AEP,UK
AEP,UK
R449
JW223
IC971
JW483
JW455
JW499
JR123
JR112
JW383
JR111
IC951
R958
R959
CN112
JW7
IC903
3
1
2
JR1
C905
C906
C903
JW10
1
JW449
C930
JW497
C900
JW902
JW462
JW488
EP901
CHASSIS
HCD-CPX22/NXM3
CN204
JR128
R450
R955
JW415
JW498
TUNER
11P(U
11
C973
C972
R968
R953
R954
C952
JW414
IC901
3
JW444
JW443
JW445
JW453
• See page 21 for Circuit Boards Location.
U)
S,E3,E51,EA,R
JW195
JW203
R243
L971
R984
R970
R952
R956
L951
JR121
R957
JW410
JW403
1
2
C902
C901
R915
D905
E
Q906
R914
JW416
R241
JR104
C953
JW245
JW409
C920
JW901
1
JW194
JW205
R247
R246
R451
JW249
JW6
JW355
JW408
C919
R452
JW214
JW215
JW216
JW204
JW427
11P
EXCEPT
AEP,UK
JW240
JW244
JW241
JW242
JW3
JW401
JW465
R387
C384
R456
JW407
JW404
JW464
R385
R448
JR127
R457
JW353
JR110
C383
JW124
R388
R458
JW485
21
R439
R440
R455
JW431
JW224
EXCEPT AEP,UK
JW424
R438
R441
R443
R445
R383
R386
R437
JW250
R465
JW406
JW904
JW429
R381
15
JW101
R382
R436
JW251
JW439
JW500
R379
R378
R384
R447
R453
D397
JW405
JW423
JW903
JW481
JW354
B
10
R415
R435
JR449
R454
JW252
D395
JW422
JW297
JW399
R377
JW206
R380
R416
R434
50
1
C475
C476
JW402
R22
RELAY
BOARD
(Page28)
JW191
JW192
5
R433
CN401
R442
R444
R446
C462
C463
R470
R471
R414
R412
D396
R459
JW8
CN304
C22
R430
E
Q21
D371
1
R472
R473
R460
JR120
JW362
R21
R474
R408
JR261
JW482
CN372
R429
R426
31
R477
R410
JW343
JW421
JW346
JW348
JW377
JW366
JW376
JW396
JW397
Q22
R23
C21
R424
R425
R479
R476
R493
JW467
JW344
JW386
JW495
JW387
JW389
JW388
E
JW466
R431
R422
R423
30
80
R478
R461
CN106
JW349
JW382
JW384
JW490
D372
R419
R421
IC401
81
R466
R467
C368
JW395
R98
Q82
JW5
D373
C416
R420
R482
JW417
C93
E
AEP,UK
R418
C417
JR418
R417
R413
R411
R483
R468
JR118
JW363
JW371
JW372
JW373
JR119
C379
JR124
JW322
JW323
JW365
JW374
JW375
JW385
C2
JW189
R432
US,E3,E51,EA,RU
X402
X401
R409
R406
1
100
JR103
R497
C497
JR102
R486
R490
R484
R489
R485
R469
JW319
JW442
JW475
JW347
R5
Q2
R6
R4
C75
JW394
C94
C85
C375
C79
JW209
C412
C499
JW318
JW351
JW381
R391
C411
C410
R492
JW296
JW380
R78
R75
R50
E
R496
R3
JW379
Q29
E
JW911
R60
R85
R88
C372
C392
JR101
Q391
D391
R407
JW428
R86
C90
R404
JW260
R188
JW378
C89
JW132
FB371
1
C373
JW134
C391
R405
R403
R402
R401
C498
R495
JW317
C1
Q30
E
Q31
C70
R76
IC3
JW144
R393
R392
D182
R494
Q343
R126
R33
JW133
R396
JW190
E
R1
JW312
R39
E
C77
C87
FB374
JW136
FB372
JW145
JW146
IC391
D392
C393
D393
R499
R345
Q342
E
JR117
C104
R103
Q1
Q32
R394
R498
R343
C111
E
JR126
R80
E
Q71
Q81
10
JW139
R395
D394
E
E
R2
R36
R90
A
FB373
JW147
JW148
JW131
JR113
JW177
JW178
R187
JW246
JW266
JR116
JW315
R347
Q341
R344
C390
C124
JW331
C109
R104
R189
C106
C105
R101
JW334
R35
E
R34
AEP,UK,EA,RU
R69
R79
E
BOARD
(Page
D181
C183
JW267
JW310
R342
R341
C107
C108
R37
Q33
R77
R87
R59
R89
F
BD
20
JW173
JR114
R186
JW268
JW471
C123
R127
R105
C102
26)
CN371
JR105
JW174
JW269
JW309
C101
R118
R38
R168
Q34
E
C37
BOARD
(Page36)
JW149
JW163
JW164
JW162
JW167
JW168
JW169
D183
JW270
JW472
C174
40
41
C112
C103
HP
C382
JW150
C110
Q103
Q104
CN107
JW143
JW151
C26
R158
C173
C146
R110
R152
Q154
Q317
Q316
3030
27
JW236
E
R169
JW454
R315
R29
JW170
R28
C25
R111
C116
C41
E
E
L311
JW159
JW160
E
C162
25 24
IC101
R102
Q318
R314
8
JW140
JW141
JW142
CN110
JW179
Q25
R154
C161
R155
C160
64 65
C115
R112
Q312
R109
E
C40
AEP,UK,EA,RU
R119
R359
R316
R320
C312
JW176
R27
C159
C157
C308
C358
Q26
C156
C117
R312
R357
C311
C158
C155
E
Q313
R307
R317
JW175
JR108
E
R153
R151
C147
R113
R311
C357
C313
C133
C198
C118
E
R309
R356
R294
JW476
JW152
JW153
JW305
R131
Q311
R313
C306
R306
C356
R318
JW418
JW138
C154
R121
C121
1
80
R114
L301
Q270
R272
JW137
R298
JR122
JW469
C134
R122
C131
R132
R351
C307
L351
T301
JW154
JR107
JW352
R129
C132
C197
C168
C148
R352
JW128
E
R232
JR200
C135
C152
C165
Q352
E
R304
R354
R319
9 10 11 12
JW930
JW103
JW130
JW114
R208
JW129
JW106
JW273
R CH
L CH
L CH
R CH
HE901
ERASE
HEAD
JW102
JW112
JW111
D903
JW113
R338
R330
R336
R332
HP901
PB HEAD
HRP901
REC/PB
HEAD
JW411
R339
JW105
R340
R333
R335
CN109
JW274
Q326
R328
R337
JW108
Q324
D322
R321
R322
Q322
R327
JW412
JW413
JW278
C323
JW110
Q321
CN303
C321
D321
E
R331
R334
R325
R324
JW172
R326
Q323
E
E
R329
JW171
C324
E
JW109
R323
C322
E
JW276
E
Q327
JW127
R299
JW157
R18
JR125
JR109
R162
E
R231
R123
R161
R163
Q351
JW126
C270
R270
R164
R302
R301
Q271
JW121
C223
C122
C196
C196
C126
Q302
E
R275
R222
JR106
C166
C127
C125
C119
E
C32
C315
E
C305
R355
C355
C314
C271
R273
R296
JW120
R221
C222
JW474
JW480
JW281
JW282
JW284
JW420
C151
Q153
E
R159
C167
R180
R160
C169
C304
Q301
AEP,UK,EA,RU
JW299
R305
E
JW301
JR115
R220
C352
C354
C353
JW298
Q353
Q315
R256
JW283
R353
JW165
JW119
C257
C255
JW468
JW193
JW222
JW280
R133
Q140
E
FB50
C38
FB30
C351
C301
C302
AEP,UK,EA,RU
C303
FB54
FB84
R303
E
E
Q303
E
Q314
1-861-417-
JW166
JW158
JW118
JW116
C207
R206
C205
C39
AEP,UK,EA,RU
C36
FB80
FB34
C35
CN302
JW261
JW125
CN301
AEP,UK,EA,RU
11
(11)
E
BOARD
C
BOARD
MECHANISM
PANEL
(Page34)
VOL
(Page36)
TAPE
DECK
• Semiconductor Location
Ref. No. Location
D181 E-7
D182 D-6
D183 E-7
D321 D-11
D322 C-11
D371 B-5
D372 B-5
D373 B-6
D391 D-6
D392 C-7
D393 D-7
D394 D-7
D395 E-5
D396 E-5
D397 E-5
D903 B-10
D904 F-2
D905 G-4
IC3 I-6
IC101 G-8
IC301 B-2
IC391 C-7
IC401 D-6
IC901 F-4
IC902 F-2
IC903 F-3
IC951 E-3
IC971 D-3
Q1 H-7
Q2 I-6
Q21 I-5
Q22 I-5
Q25 E-8
Q26 E-8
Q27 B-3
Q28 B-3
Q29 I-6
Q30 I-6
Ref. No. Location
Q31 I-6
Q32 I-7
Q33 I-7
Q34 I-7
Q71 I-7
Q81 J-7
Q82 J-6
Q103 I-8
Q104 I-8
Q140 G-9
Q153 G-9
Q154 I-8
Q270 C-8
Q271 C-9
Q301 I-9
Q302 H-9
Q303 I-9
Q311 I-8
Q312 I-8
Q313 I-8
Q314 I-9
Q315 I-9
Q316 J-7
Q317 J-8
Q318 J-8
Q321 C-11
Q322 D-11
Q323 C-11
Q324 C-11
Q326 D-11
Q327 D-11
Q341 F-7
Q342 G-7
Q343 G-7
Q351 I-9
Q352 H-9
Q353 I-9
Q391 D-6
Q906 G-4
Page 31
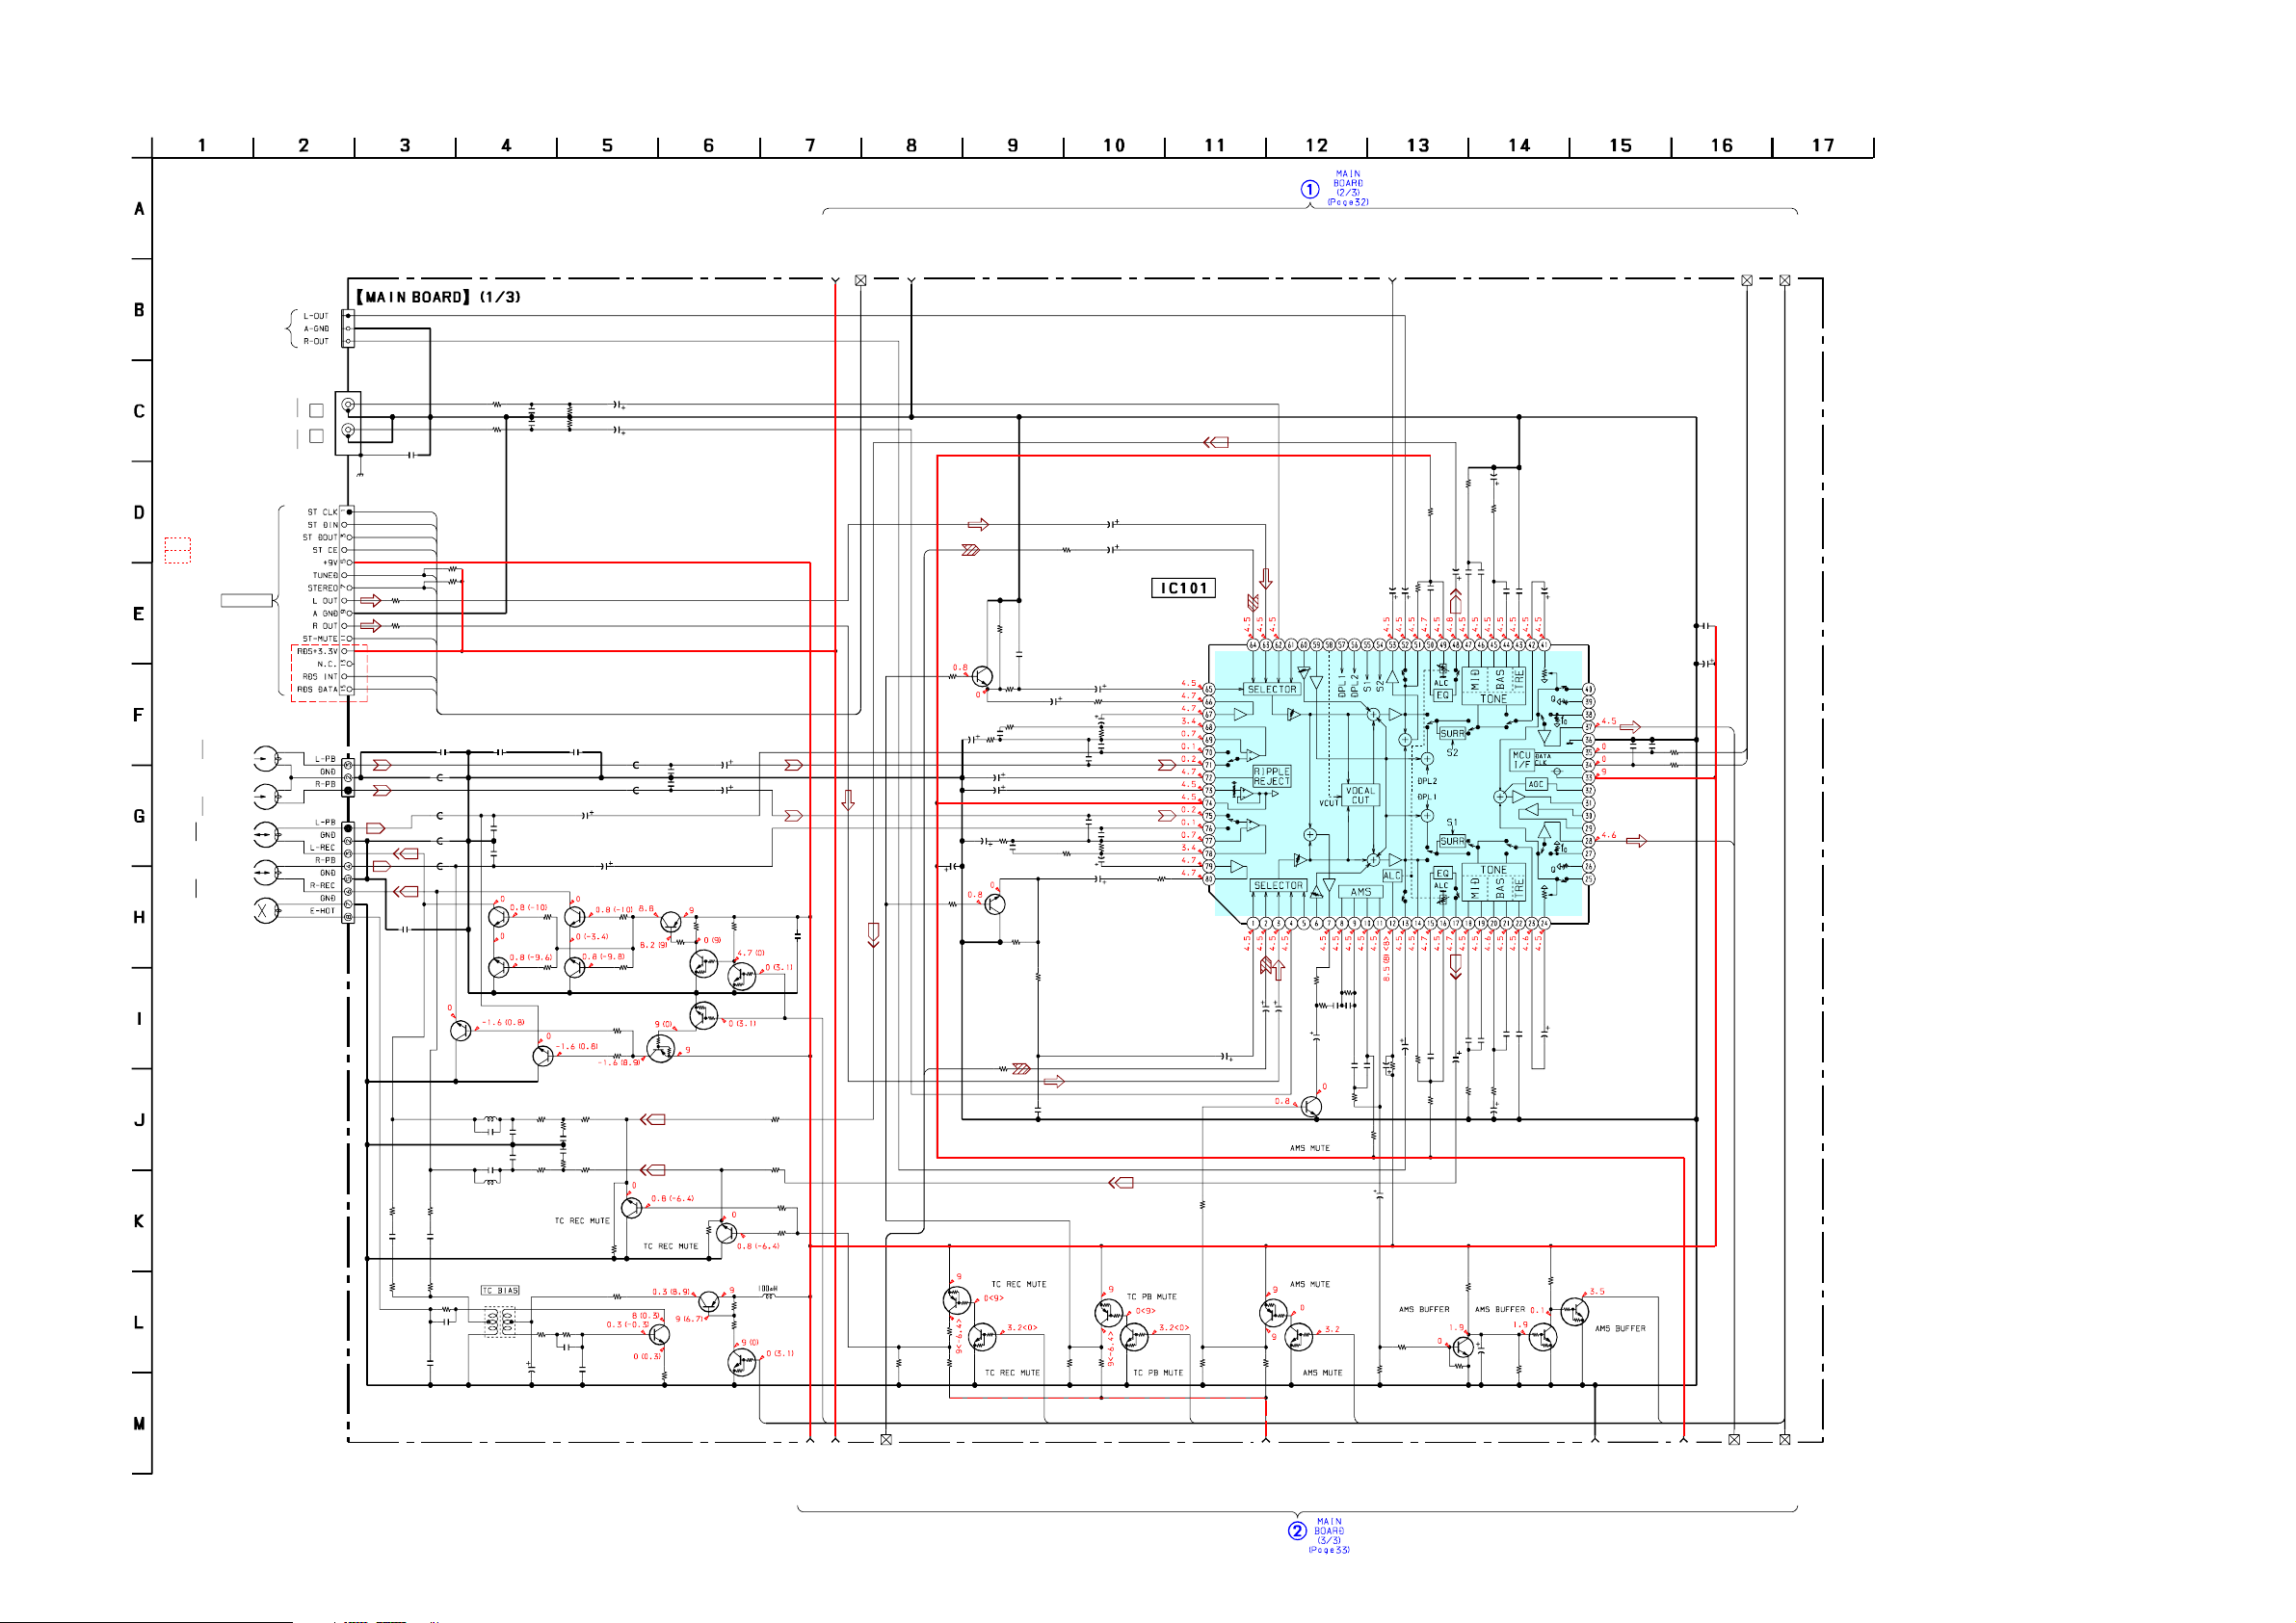
7-11. SCHEMATIC DIAGRAM – MAIN BOARD (1/3) –
CN304
3P
(FOR CHECK)
CDM D+ 3.3V
HCD-CPX22/NXM3
B-5
GND
B-1
53
B-7
*CN204
15P
11P
DECK
DECK
A
B
HEAD
HP901
REC/PB
HEAD
HRP901
AEP,UK
US,E3,E51,EA
PB
ERASE
HEAD
HE901
L-CH
R-CH
L-CH
R-CH
TUNER
IN
AEP,UK
R247
10k
Q353
L351
27mH
27mH
100p
R141
R191
1k
2SC3624A
L301
C356
SUMIDA
1k
C37
0.1
Q301
2SC3624A
T301
C303
330p
C353
330p
Q302
C313
C141
220p
B
C191
220p
B
B
B
R301
4.7k
R302
4.7k
2SC3624A
R306
8.2k
C307
330p
C357
330p
R356
8.2k
R318
47
C312
0.01
PET
47
10V
J102
L
R
CN204
CN301
PH-L
CN302
*
3P
8P
PH-L
(CHASSIS)
R241
R243
0.01
C314
C35
R304
R305
4.7k
0.1
15k
C305
0.001
C100
0.1
51
A5
0
0
B
R319
3.3k
C315
0.0047
100V
55
54
53
52
R246
10k
50
18
49
C36
0.1
FB50
0
FB34
0
FB54
0
FB84
0
2SC3624A
C306
100p
R354
15k
C355
0.001
B
R355
4.7k
R142
100k
R192
100k
Q303
2SC3624A
R317
C38
0.1
R307
C308
C358
R357
Q104
10k
C304
10
50V
Q351
2SC3624A
Q352
2SC3624A
R309
2.2k
10k
0.01
0.01
10k
R359
2.2k
R102
47k
C311
0.0068
C142
10
50V
C192
10
50V
C102
10
50V
DM-L
Q103
2SC3624A
PB MUTE
R110
1k
C119
47
C302
R312
10k
REC/PB SWITCH
R152
RT1P137L
BIAS SWITCH
Q318
2SC2001
BIAS OSC
DTC114EKA
BIAS SWITCH
Q301-303,
Q311-315
47k
Q317
Q316
R311
10k
DTC114EKA
C352
50V
10
50V
Q315
10
DTC114EKA
R313
R314
47k
R315
4.7k
C40
10k
0.1
Q313
R118
100
R168
100
R119
10k
R169
10k
L311
B19
B18
FB30
C301
0
330p
C351
FB80
330p
0
C354
10
50V
Q311
2SA812
R351
4.7k
Q312
R352
4.7k
DTC114EKA
Q314
DTA114EKA
R353
1k
R303
1k
B
B
Q154
2SC3624A
R320
33
R316
PET
10
16V
R114
C127
100
C169
10V
47
16V
R160
1k
Q153
2SC3624A
PB MUTE
DM-R
R39
0
R35
R36
22k
100k
DTC114EKA
100
R130
C118
180
C125
C126
R164
R159
47k
R294
1k
Q32
DTA114EKA
Q31
R112
C168
R109
47k
0.0068
C146
0.01
R298
C101
1k
10
50V
C115
B
10
C116
50V
10
50V
R111
1k
12k
PET
100
10V
100
10V
180
0.01
R162
R180
100
C196
0.0068
R34
22k
63
C117
R113
C147
C148
C198
C197
R163
PET
C167
12k
C166
10
50V
R33
100k
INPUT SELECT SWITCH,
ELECTRICAL VOLUME
1
50V
330k
100p
100p
CH
100p
CH
100p
330k
1
50V
Q30
DTA114EKA
Q29
DTC114EKA
CH
CH
R161
1k
IC101
M61537FP
R131
2.2k
R121
2.2M
R132
50V
27k
10
MF
C121
C165
50V
R133
10k
R38
22k
B17
50V
10
10
C151
R37
100k
C152
C122
4.7
50V
Q140
2SC3624A
Q34
DTA114EKA
DTC114EKA
1
C132
0.01
PET
R122
15k
R129
Q33
R103
2.2k
MF
50V
50V
15k
10
10
0.1
R101
C103
C105
C104
CH
22p
50V
PET
MF
10
C131
50V
0.1
15k
1
0.01
C154
C155
R151
C135
C133
1M
R123
2.2k
R153
15k
C134
10
50V
Q341
2SC1623
R342
4.7k
R341
10k
A18
R347
2.2k
R343
C109
10
50V
R104
2.2k
R105
B
B
10k
50V
10
C106
50V
10
C156
22k
0.022
C107
B
0.022
C157
2.2k
R154
C159
0.022
C108
B
0.022
C158
10
50V
B
0.047
C110
B
0.047
C160
10k
R155
Q342
DTC114EKA
C390
22
50V
R344
10k
B
50V
10
0.0082
C112
C111
C123
0.1
F
C124
100
10V
C173
100p
C174
100p
R127
R126
B
50V
10
0.0082
C162
C161
R345
10k
Q343
DTC114EKA
100
FL
220
80
81
220
FR
HCD-CPX22/NXM3
ST A+9V
B-4
CDM D+ 3.3V
-B
GND
AUDIO A+4.5V
B-5
B-6
3131
Page 32
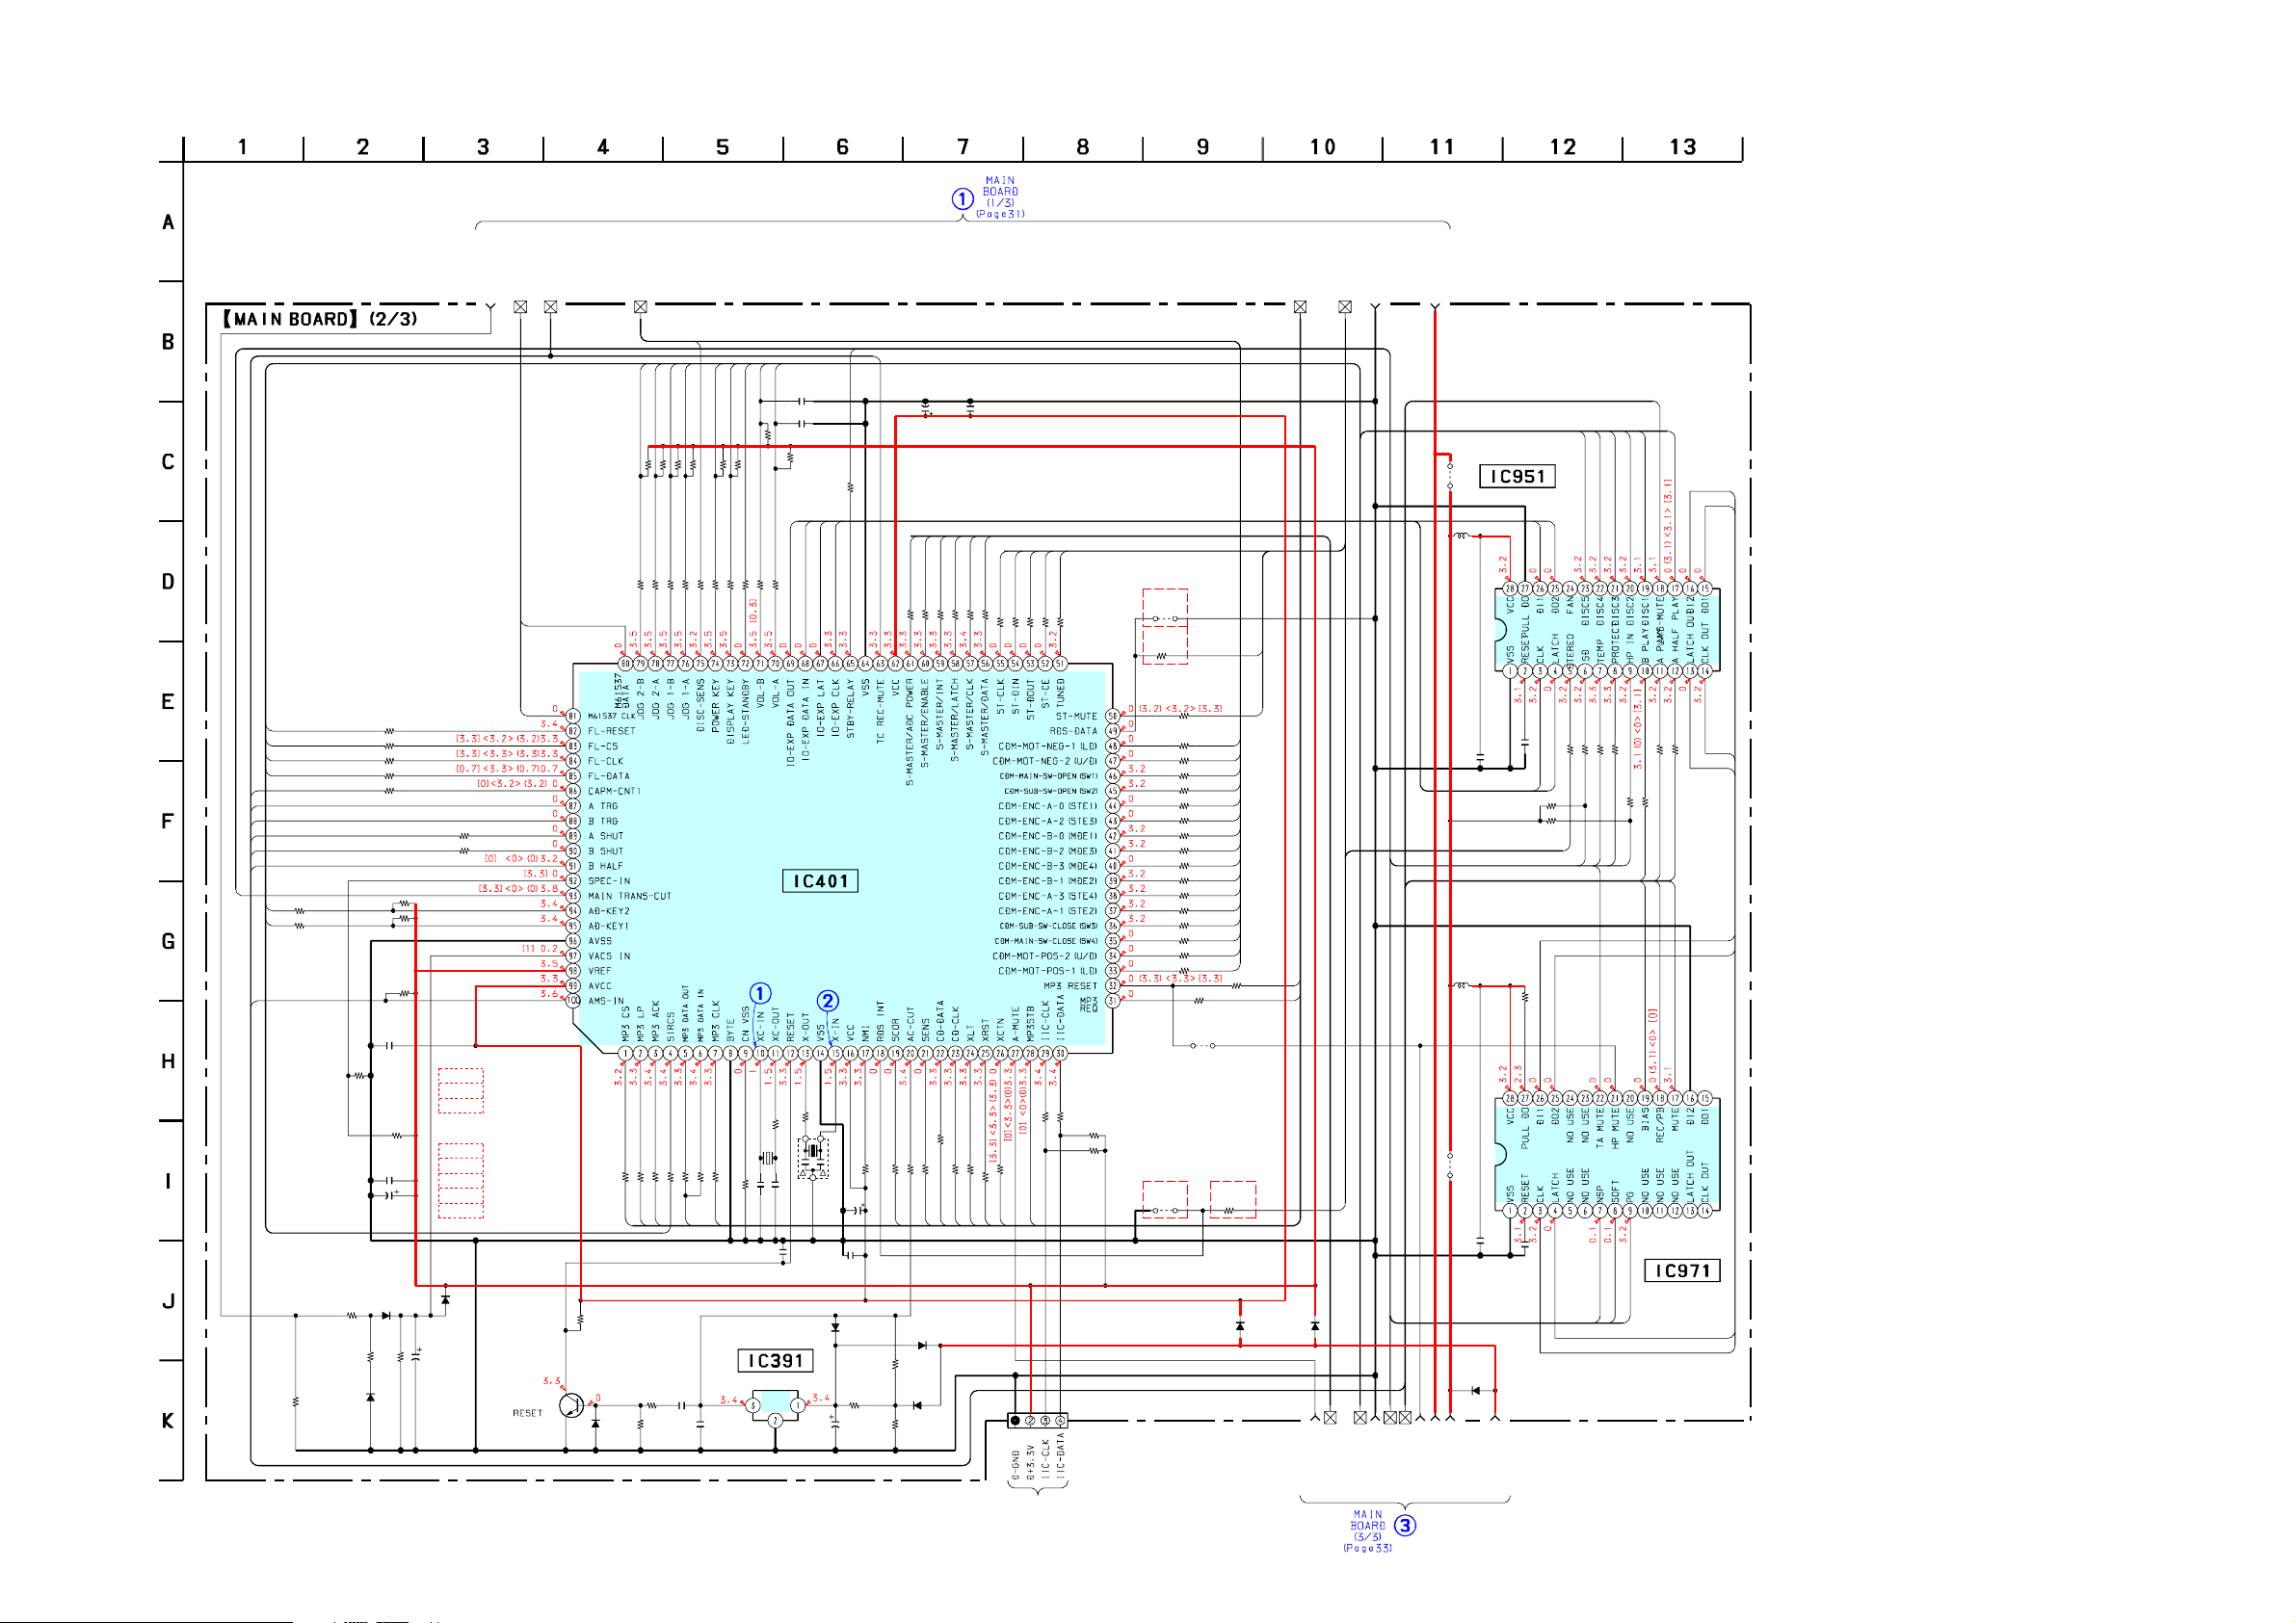
HCD-CPX22/NXM3
7-12. SCHEMATIC DIAGRAM – MAIN BOARD (2/3) –
B-5
B-7
53
80
EA
EXCEPT E3,EA
E3
E51
US
E3,EA
AEP,UK
RU
Q391
2SC1623
81
R391
10k
D391
1SS355
82
83
84
85
86
87
88
89
90
91
93
94
95
100
R498
R499
47k
R189
10
10
D183
1SS355
R482
R483
R484
R485
R486
R188
330
100
100
100
100
100
1SS355
0
R186
D181
C499
R496
C497
C498
50V
100
R489
100
R490
3.3k
R494
3.3k
R495
R497
10k
0.1
F
*R496
*
R492
0.1
F
10
470k
R187
1K
4.7K
50V
1
C183
D182
1SS355
*R492
2.2K
4.7K
0
1K
0
150
*
100
R401
1
79
100
R479
100
R402
2
B-3
R393
• See page 44 for IC Pin Function Description.
B-1
B-2
75
74
73
76
78
77
10k
10k
10k
10k
R466
R467
R468
R469
100
100
100
100
100
R493
R474
R476
R477
R478
100
100
100
100
100
R407
R406
R405
R404
R403
7
5
3
4
C391
22k
0.1
MF
R392
22k
C392
10k
R410
100
R473
MF
0.1
72
71
10k
R414
10k
R408
100
100
R471
R472
330k
32.768K
R411
X401
CH
10k
18p
R409
C410
IC391
M62703
LEVEL DETECT
70
0.01
C476
0.01
C475
R412
68
69
100
R470
IC401
M30622M
SYSTEM CONTROL
CH
18p
C411
C412
0.1
67
GN-B28FP
0
R413
C417
10k
1000
6.3V
R465
100
66
65
16M
X402
C416
0.1
D392
1SS355
R395
220
C393
63
C462
C463
100
0.1
10V
59
100
R459
100
R422
100
R421
22
100
R458
58
100
R423
23
57
100
R457
100
R424
24
100
R456
100
R425
56
25
55
100
R455
26
52
54
53
100
100
100
R452
R453
R454
100
R426
28
(FOR CHECK)
51
100
R451
100
R429
100
R430
CN401
4P
AMP-S
R416
R415
10k
10k
EXCEPT
AEP,U
JR449
R449
100
AEP,UK
EXCEPT
AEP,UK
JR418
K
0
49
R450
100
50
100
R448
48
100
R447
47
100
R446
46
100
R445
45
100
R444
44
100
R443
43
100
R442
42
100
R441
41
100
R440
40
100
R439
39
100
R438
38
100
R437
37
100
R436
36
R435
100
35
R434
100
34
R433
100
33
100
100
AEP,UK
R418
32
31
0
D396
1SS355
18
A-MUTE
R432
R431
JW5
0
D395
1SS355
60
61
100
100
R461
R460
10k
100
4.7k
R417
R420
R419
19
21
D393
1SS355
R394
4.7k
D394
1SS355
50V
10
R396
10k
GND
B-9
GND
B-10
CDM D+ 3.3V
IC951
PT8300R
JW3
I/O EXPANDER
L951
0
3216
F
0.1
C952
F
0.1
C953
R968
R970
R984
10k
L971
0
3216
JW6
C972
0.1
F
C973
0.1
D397
1SS355
B-5
B-8
C32
CDM D+ 3.3V
TC D+3.3V
EVER+4V
A23
A22
68
69
100
100
100
R952
R954
R953
67
66
10k
10k
A5
A6
A7
B22
F
B7
A18
A17
A19
A21
A20
DATA2
DATA1
100
R958
A12
B17
IC971
PT8300R
100
R959
DATA1
DATA2
LATCH
LATCH
CLK
CLK
100
R955
100
100
R957
R956
A8
A9
A10
A11
B19
B18
I/O EXPANDER
B8
B9
HCD-CPX22/NXM3
3232
Page 33
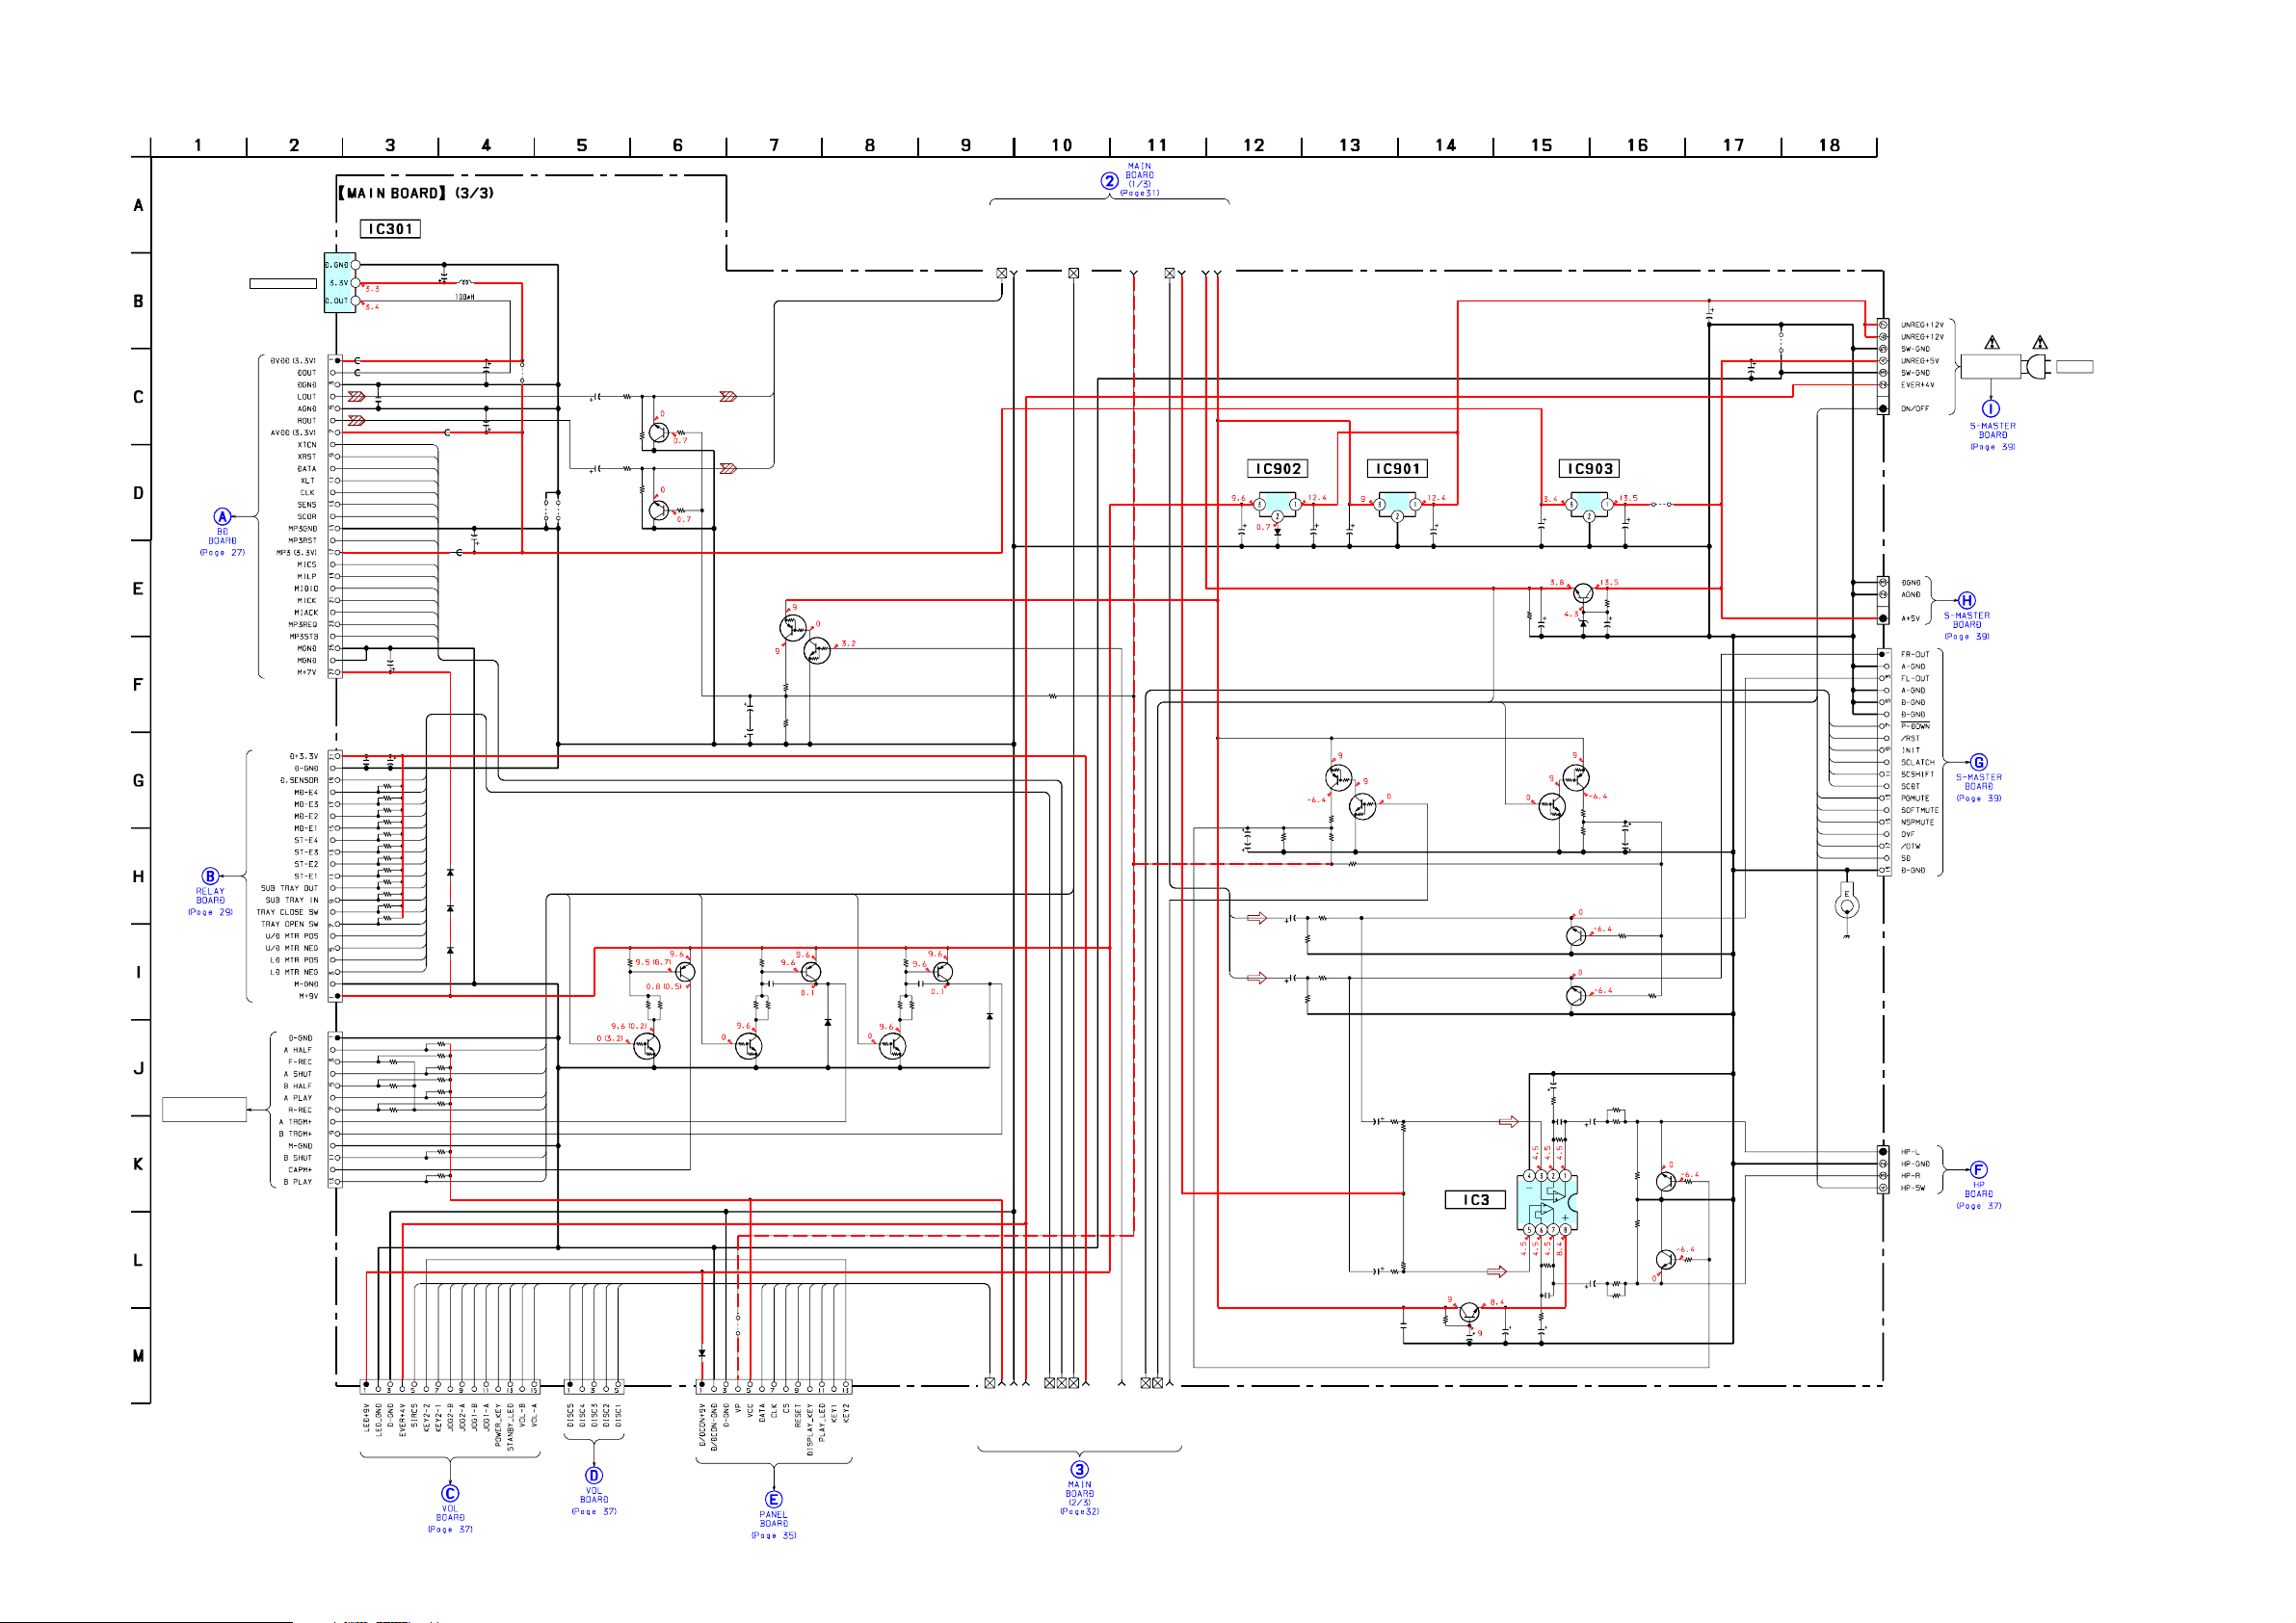
7-13. SCHEMATIC DIAGRAM – MAIN BOARD (3/3)–
IC301
TOTX141
C384
470
6.3V
FB374
C373
C370
100
10V
L370
C372
470
6.3V
0
C375
1000
6.3V
0
47k
4.7k
47k
4.7k
47k
4.7k
47k
47k
C379
470
6.3V
D373
10EDB40
D372
10EDB40
D371
10EDB40
76
JR1
JW8
JW7
MUTE SWITCH
86
A12
89
A11
91
90
A10
71
74
70
72
A23
A22
0
0.1
26
0
FB372
25
22
24
23
21
19
32
1
FB373
2
5
7
3
31
28
C382
470
10V
75
40
41
39
42
38
43
37
44
36
45
35
46
34
47
33
48
R335
22k
10k
47k
R332
R336
R330
R333
R340
R334
R331
4
77
79
78
94
TAPE MECHANISM
DECK
DIGITAL OUT
CN371
27P
1MMFFC-S
CN372
21P
1MMFFC-S
CN303
1.25M
13P
MFFC-S
1.25M
CN110
15P
MFFC-S
FB371
DIGITAL OUT
0
C383
0.1
R388
10k
R387
10k
R386
10k
R385
10k
R384
10k
R383
10k
R382
10k
R381
10k
R380
10k
R379
10k
R378
10k
R377
10k
R337
R338
R339
C270
10
50V
C271
10
50V
Q271
2SC3624A
A21
HCD-CPX22/NXM3
EVER+4V
B-5
R29
100k
B-3
B-2
B-5
B-4
GND
Q270
R270
2SC3624A
2.2k
MUTE SWITCH
R272
1k
R299
10k
R273
2.2k
R296
10k
R275
1k
Q327
2SB1116
CAP M
DRIVE
R329
47k
R327
R328
2.2k
2.2k
Q326
DTC114EKA
CAP M
DRIVE
A19
A20
D903
CN112
10EDB40
5P
MFFC-S
1.25M
CN109
13P
MFFC-S
1.25M
DM-L
DM-R
Q26
DTA114EKA
ITCH
MUTE SW
Q25
A
DTC114EK
ITCH
MUTE SW
R27
4.7k
C25
4.7
50V
C26
4.7
50V
87
0.0047
R326
1k
C324
R325
2.2k
Q323
DTC114EKA
A TRIG
DRIVE
JW930
R28
22k
88
Q324
2SB1116
A TRIG
DRIVE
R324
2.2k
D322
1SS355
95
73
83
85
82
84
A17
R322
2.2k
C322
0.0047
Q322
2SB1116
B TRIG
DRIVE
R323
1k
R321
2.2k
D321
1SS355
Q321
A
DTC114EK
B TRIG
DRIVE
GND
B-10
TC D+3.3V
CDM D+ 3.3V
A-MUTE
-B
B-9
B-8
B-6
AUDIO A+4.5V
C32
ST A+9V
CDM D+ 3.3V
C904
100
10V
C28
100
10V
CN101
6P
EP901
1.25M
EH-S(2X)
CN105
3P
EH-S(2X)
CN106
19P
MFFC-S
CN107
4P
AMP-S
SWITCHING
REGULATOR
AC IN
C900
4700
16V
C930
2200
JW900
16V
65
IC902
TA7809S
+9V REG
C903
10
D904
1SS355
C27
100
10V
R31
22k
FL
FR
50V
R30
4.7k
R32
100k
R1
C1
10
50V
2.2k
R2
10k
C2
R4
10
50V
2.2k
R5
10k
DTA114EKA
MUTE SW
R23
100k
C902
100
10V
Q28
DTC114EKA
MUTE SW
C75
10
50V
C85
10
50V
ITCH
Q27
C39
IC901
TA7809S
+9V REG
ITCH
R78
1k
R50
47k
R60
47k
R88
1k
0.1
IC903
TA78033LS
+3.3V REG
R915
1k
B22
Q21
2SC3624A
MUTE SW
2SC3624A
MUTE SWITCH
R86
47k
C94
100
10V
A
ITCH
Q1
Q2
C90
22p
C906
100
10V
2SC1623
+3.3V REG
C920
10
50V
UDZS-TE-17-4.3B
ITCH
C79
10
50V
R75
C70
10k
22p
R85
10k
C89
10
50V
Q906
D905
R21
4.7k
R22
22k
C77
R76
470
47k
10V
C87
470
10V
C901
0.1
50V
93
DTC114EK
MUTE SW
IC3
V
NJM3414A
BUFFER
Q82
2SD2525
REG.
R98
1k
C93
1000
10V
DTA114EKA
MUTE SW
R69
47
R79
47
R89
47
R59
47
JW10
C905
0.1
50V
R914
1k
C919
10
50V
61
60
59
B9
B8
B7
A8
A7
A6
(CHASSIS)
A9
58
57
56
Q22
ITCH
C21
4.7
50V
C22
4.7
50V
R3
1k
R6
1k
Q71
2SC3624A
ITCH
MUTE SW
R77
100k
R87
100k
2SC3624A
MUTE SWITCH
R80
10k
R90
10k
Q81
HCD-CPX22/NXM3
3333
Page 34
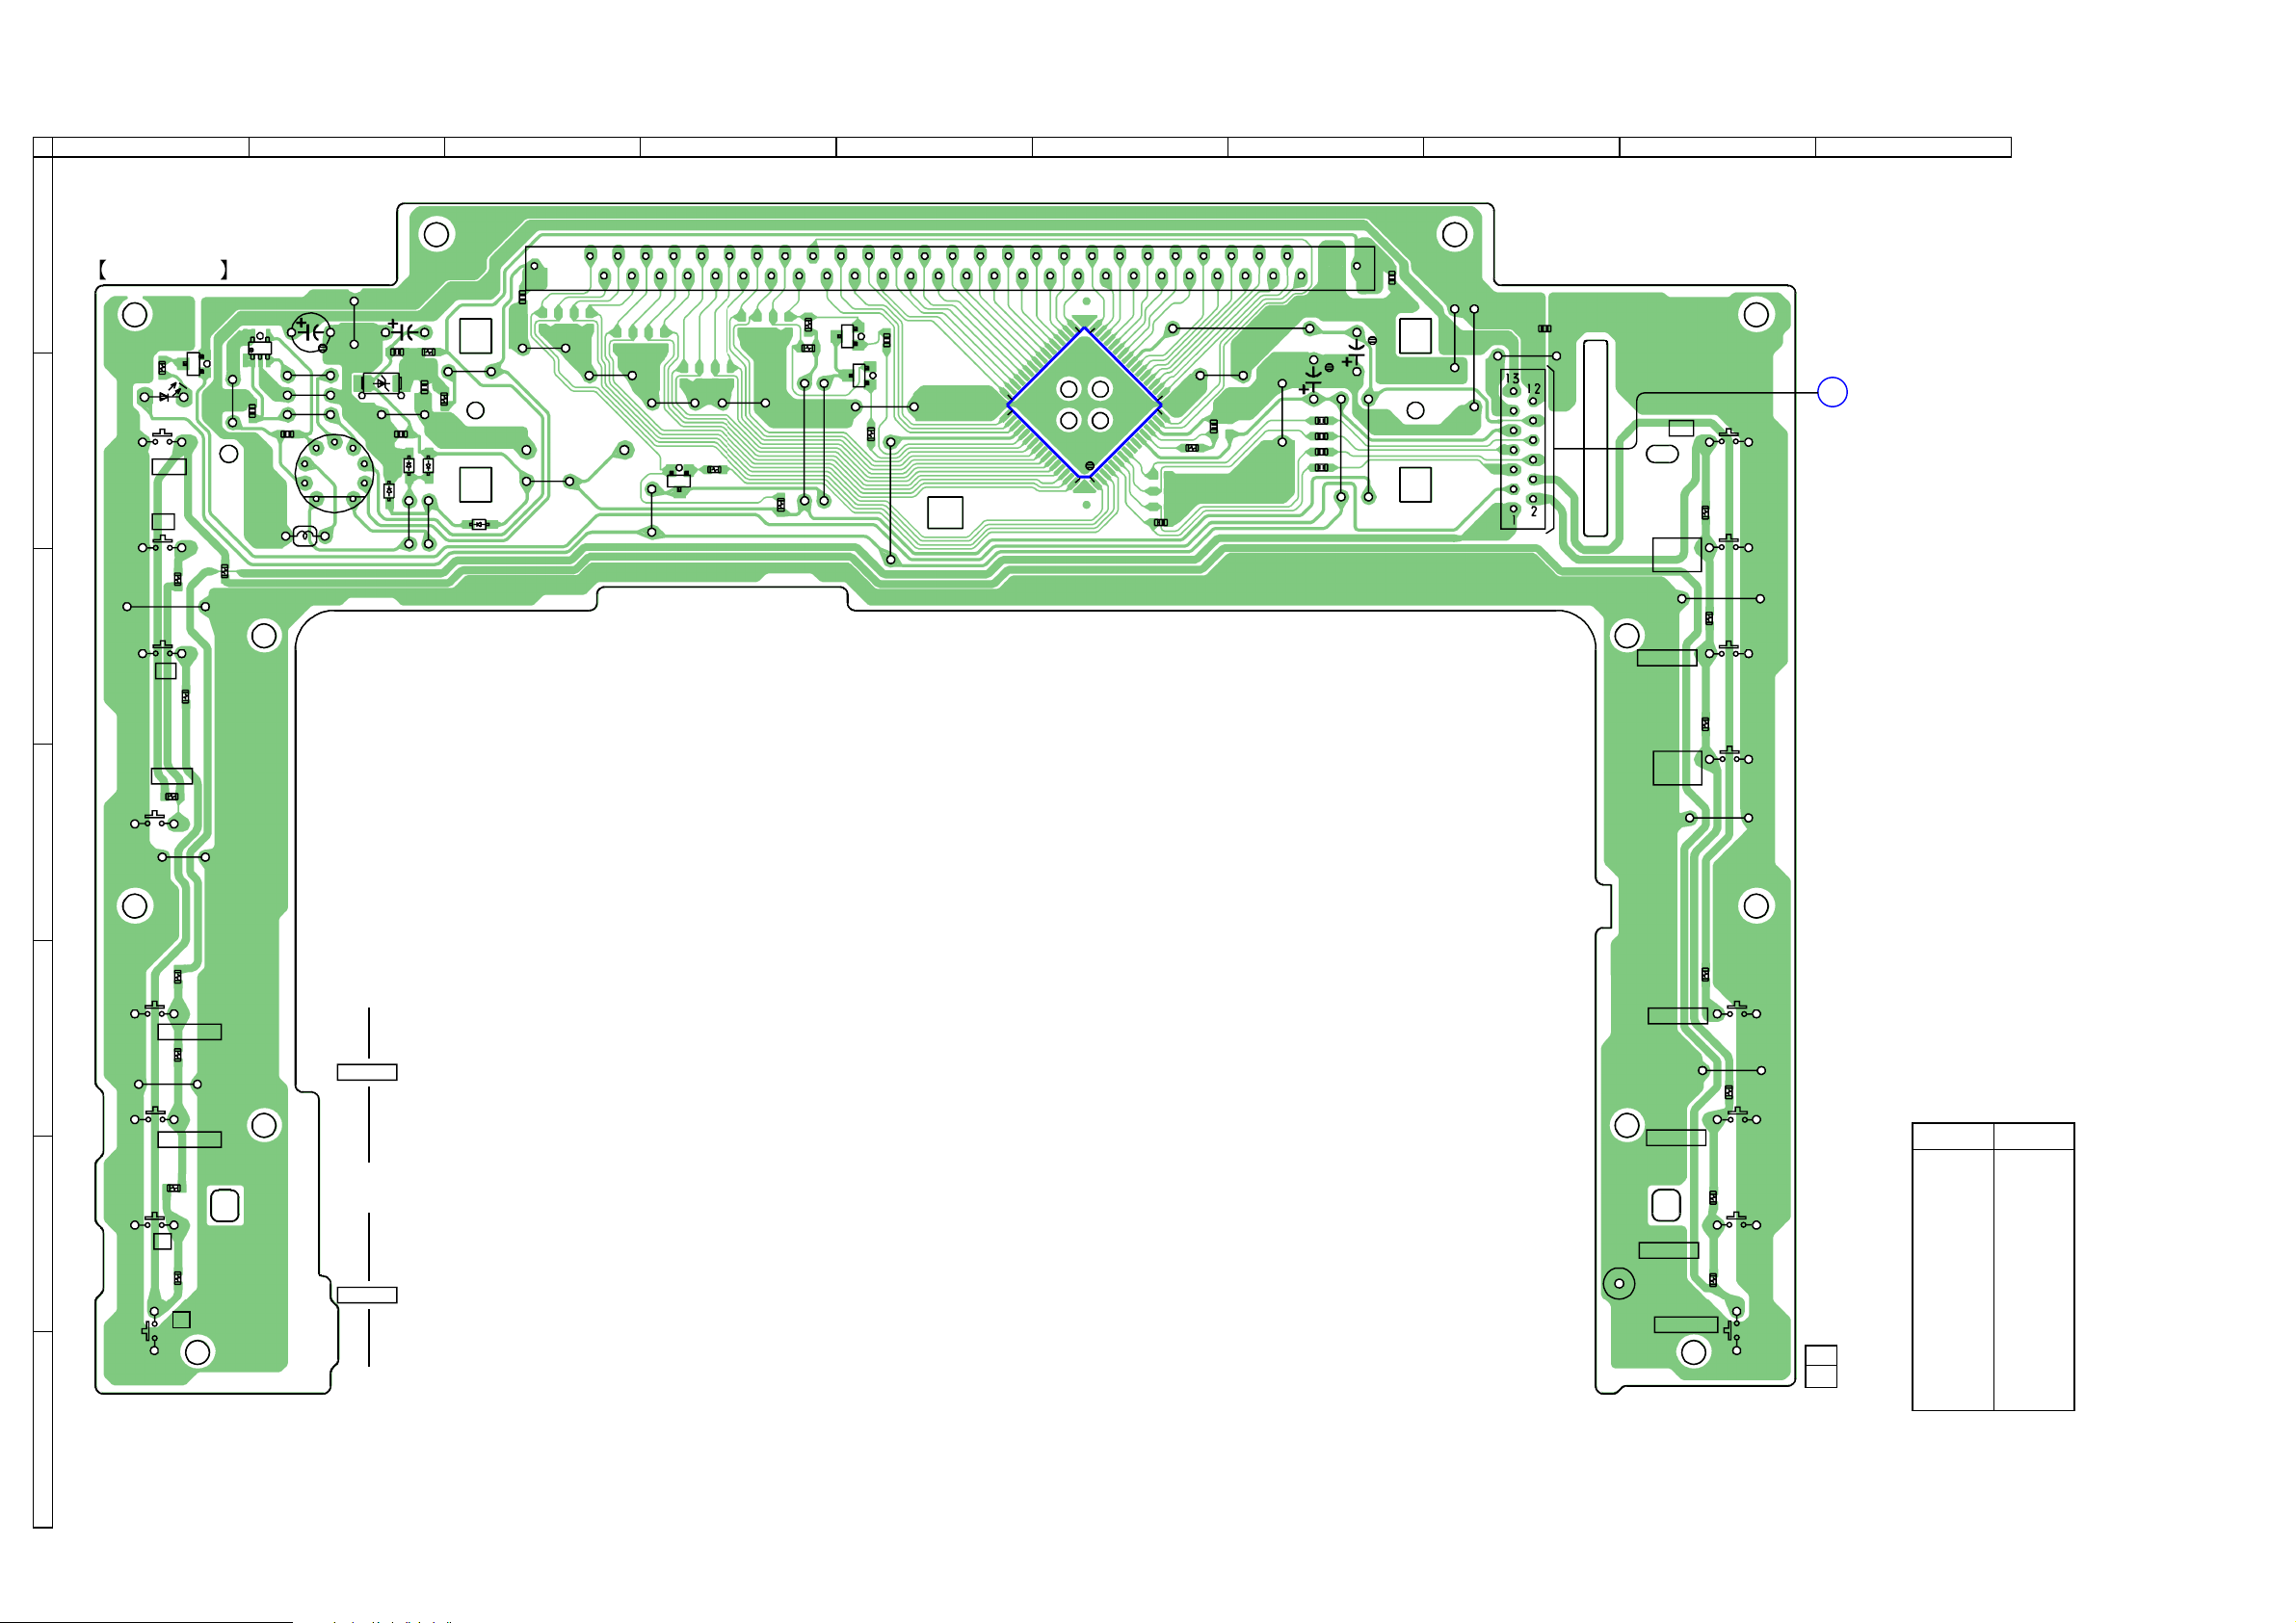
HCD-CPX22/NXM3
7-14. PRINTED WIRING BOARD – PANEL BOARD –
1
A
2
PANEL BOARD
C1053
Q1024
5
1
JW1040
R1033
4
3
R1045
T801
JW1081
JW1043
JW1050
C1054
L1021
Q1026
R1020
D1021
B
S1029
S1031
JW1033
E
b B
X
R1035
C
x
S1036
JW1039
C1050
D1022
C1052
C1051
R1052
D1026
D1024
R1046
R1051
D1025
JW1042
JW1041
JW1037
D1023
• See page 21 for Circuit Boards Location.
3 4 5 6 7
1
C1029
JW1032
JW1038
5
JW1031
10
JW1030
Q1021
E
FLOURESCENT INDICATOR TUBE
15
JW1029
R1100
JW1047
20
R1042
R1043
FL1020
R1041
JW1046
Q1023
JW1045
25
E
E
Q1022
R1101
R1102
JW1036
30
JW1028
35
40
33 32
IC1020
48
49
45
50
JW1027
JW1026
17
16
R1025
64 1
C1021
55
C1025
56
R1024
JW1024
R1023
R1022
R1021
60
C1026
JW1025
JW1048
C1048
C1028
JW1049
JW1023
8
JW1071
CN1021
C1006
S1021
CD
S1022
TUNER/
BAND
S1023
TAPE A/B
9 10
E
MAIN
BOARD
(Page30)
R1026
JW1020
R1027
S1024
(MD)
S1028
S1025
R1028
JW1021
R1032
JW1022
R1029
R1030
• Semiconductor
Location
Ref. No. Location
D1021 B-1
D1022 B-2
D1023 B-3
R1040
S1030
CD Z
R1034
D
E
S1032
S1033
JW1034
M>
.m
R1038
R1036
R1037
JW1035
TUNING
VIDEO
DISPLAY
DIMMER
D1024 B-2
F
S1034
S1035
+
R1039
–
ALBUM
LP1001
S1026
CD SYNC
S1027
z START
R1031
11
1-861-474-
(11)
D1025 B-2
D1026 B-2
IC1020 B-6
Q1021 B-4
Q1022 B-5
Q1023 A-5
Q1024 A-2
Q1026 B-1
G
HCD-CPX22/NXM3
3434
Page 35
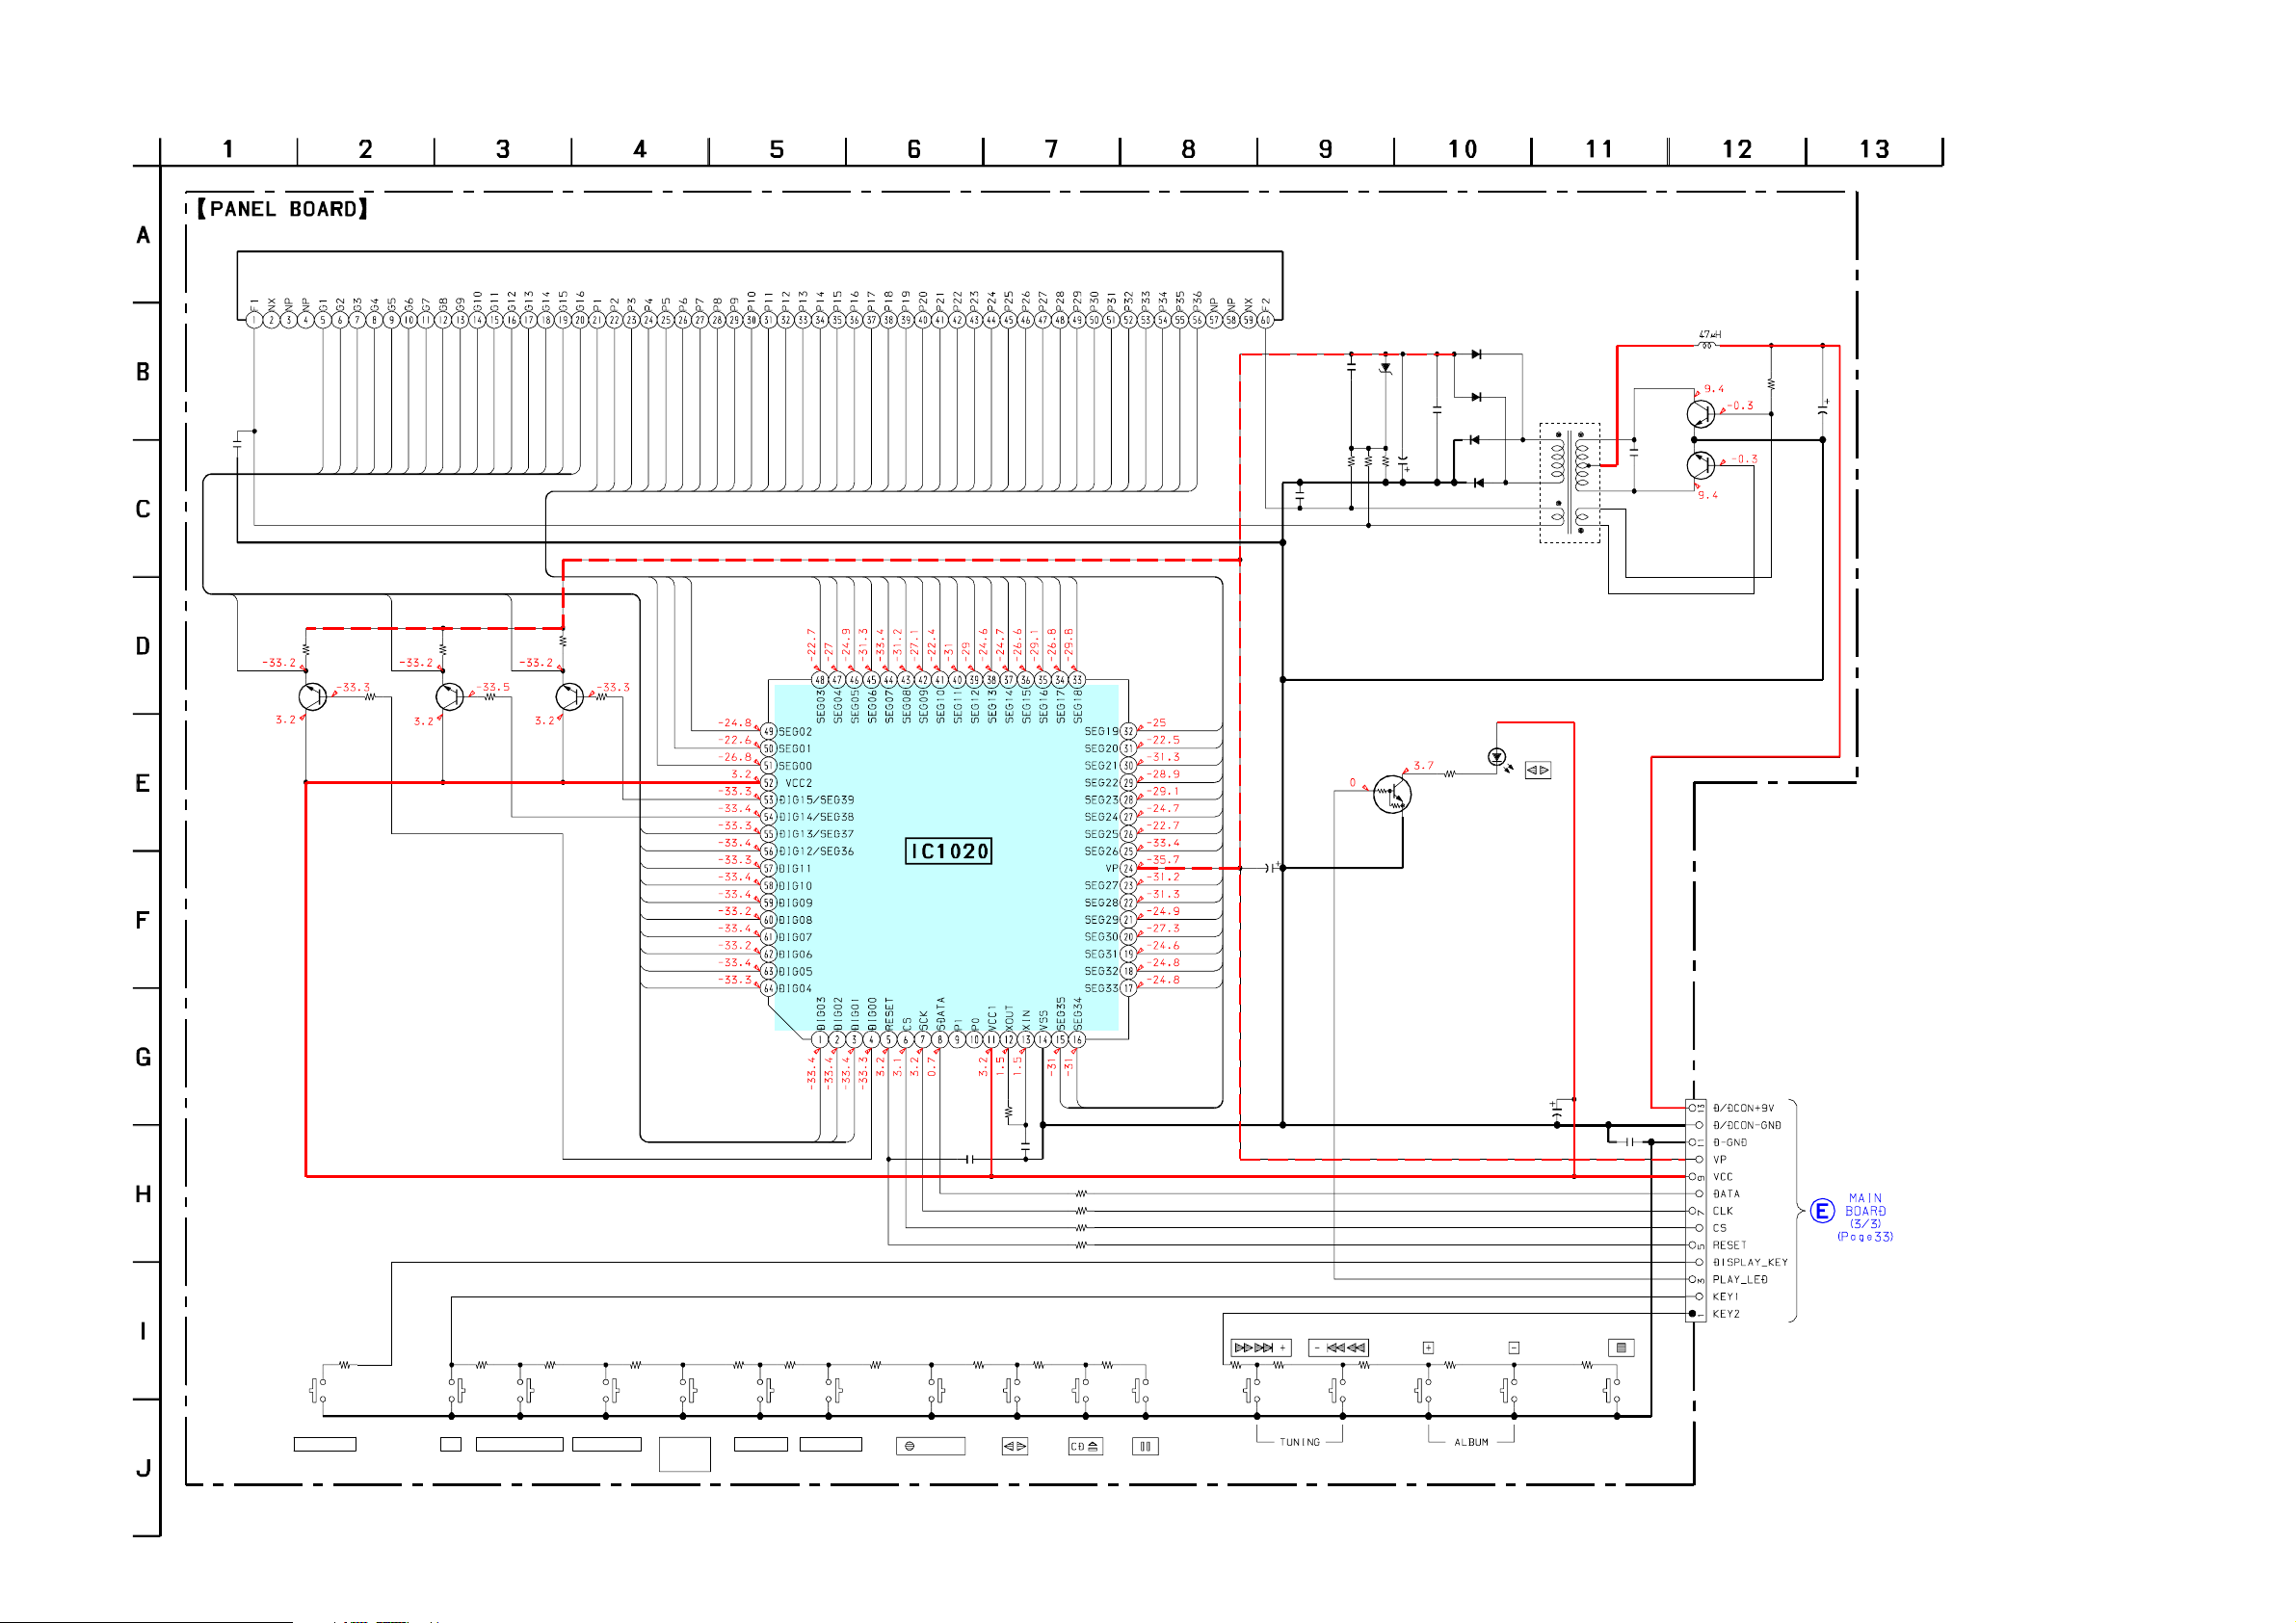
7-15. SCHEMATIC DIAGRAM – PANEL BOARD –
HCD-CPX22/NXM3
C1029
0.1
FL1020
CRYSTAL
LIQUID
37
38
39
40
41
42
43
44
R1100
10k
51
R1042
100k
2SC1623
GRID
DRIVE
Q1021-1023
37
R1043
100k
Q1021
2SC1623
45
Q1022
46
R1101
10k
48
47
52
49
R1041
100k
50
52
51
Q1023
2SC1623
36
R1102
10k
1
2
6
4
2
3
1
50
49
48
47
46
45
44
43
42
41
7
5
3
DISPLAY
C1052
0.01
C1051
220
50V
R1020
100
D1023
1SS355
D1025
1SS355
D1024
1SS355
D1026
1SS355
T801
DC-DC CONVERTER
D1021
SEL5423
D1022
RD6.2FM
C1050
0.01
R1051
100
R1052
C1048
0.1
100
C1028
10
50V
35V
R1046
10k
Q1026
DTC114EKA
LED SWITCH
9
12
10
8
16
14
17
18
19
20
21
22
23
24
25
26
27
6
4
7
5
8
9
10
11
12
13
14
15
16
17
18
IC1020
M66005
-0131AHPRBOT
DISPLAY CONTROL
/KEY CONTROL
31
29
30
28
19
35
33
34
32
20
21
22
23
24
25
26
27
28
29
30
31
32
33
34
15
13
11
Q1024(1/2)
CPH5504-TL-E
C1054
0.0047
Q1024(2/2)
CPH5504-TL-E
Q1024
SWITCHING
REGULATOR
L1021
R1045
3.3k
C1053
50V
22
HCD-CPX22/NXM3
R1032
S1028
DISPLAY
2.2k
S1021
CD
R1026
220
S1022
TUNER/BAND
R1027
330
S1023
TAPE A/B
R1028
470
S1024
VIDEO
(MD)
R1029
680
S1025
DIMMER
R1030
1k
39
40
S1026
CD SYNC
38
R1031
1.5k
S1027
/START
C1021
0.001
R1033
2.2k
R1025
10k
S1029
R1034
4.7k
C1025
220p
36
35
S1030
R1024
R1023
R1022
R1021
R1035
10k
1k
100
100
1k
S1031
CN1021
13P
R1036
1.5k
S1032
R1037
2.2k
S1033
R1038
4.7k
S1034
R1039
10k
S1035
C1026
10
50V
R1040
33k
C1006
S1036
0.1
3535
Page 36
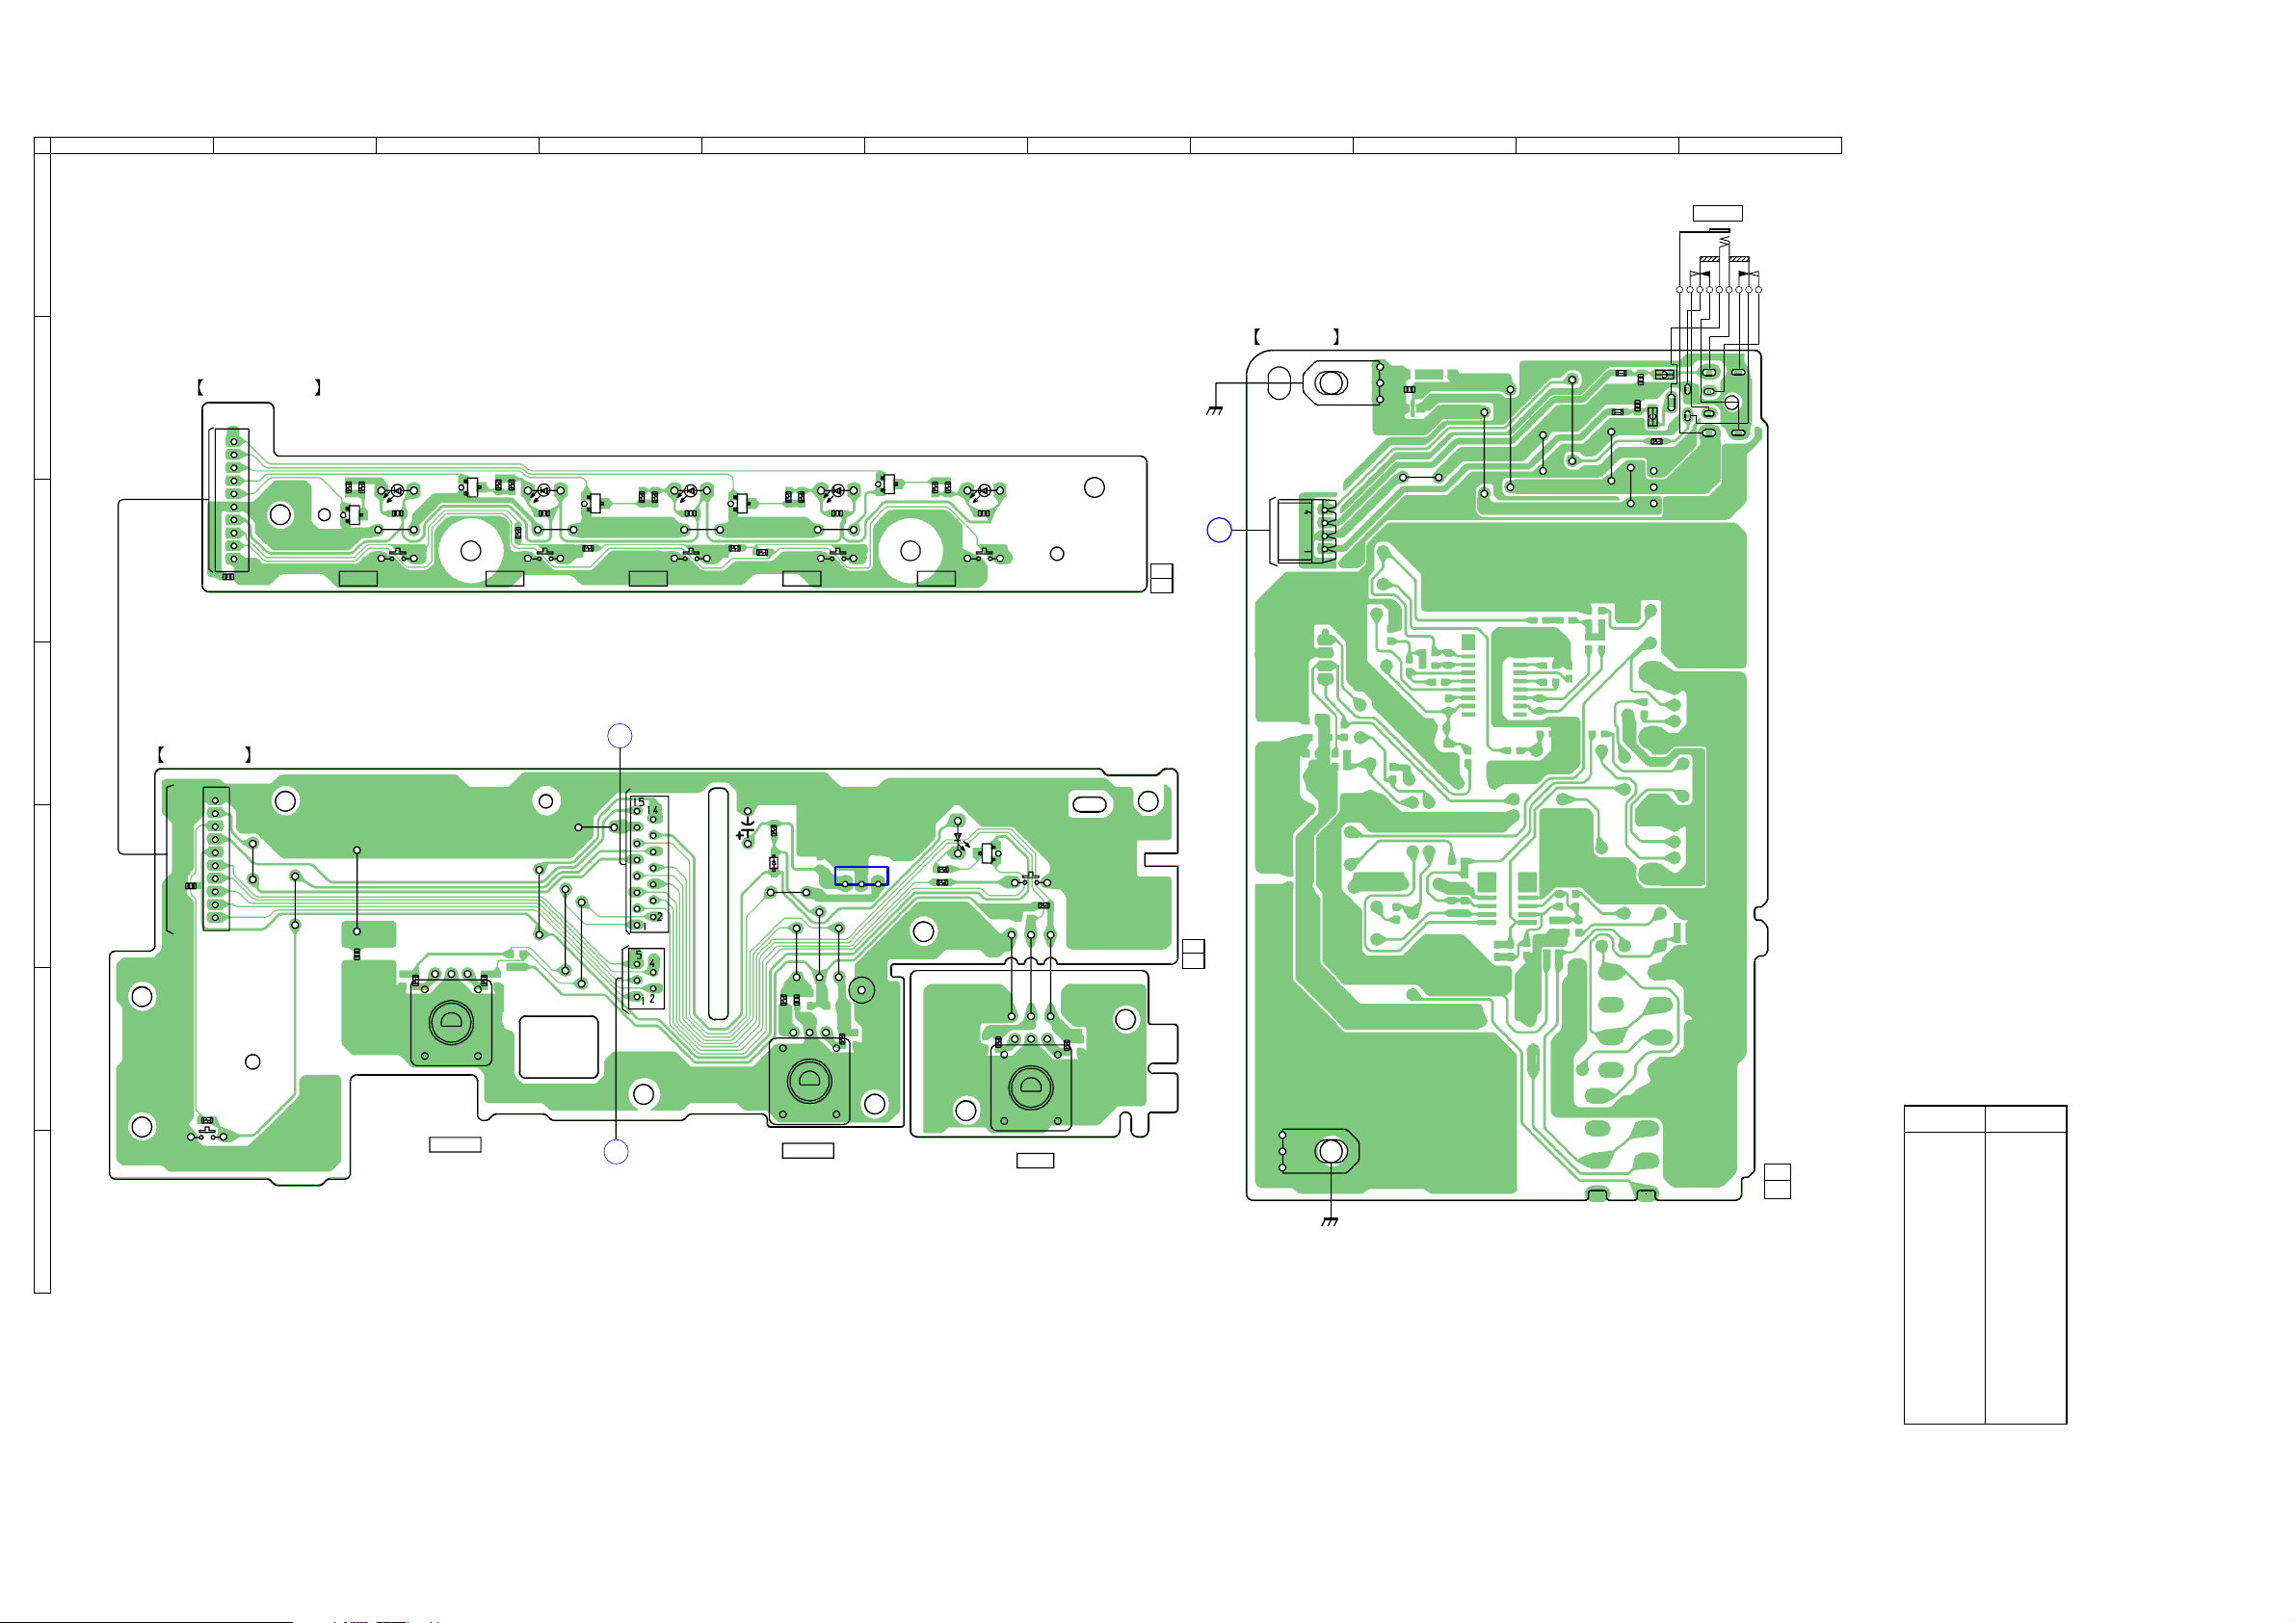
HCD-CPX22/NXM3
7-16. PRINTED WIRING BOARD – DISC SW, VOL, HP BOARD –
1
2
A
B
C
DISC SW BOARD
NO1001
10
1
C1009
R1010
E
Q1005
S1005
DISC 5
D1005
R1009
3 4 5 6 7
C1005
Q1004
E
JW1076
R1014
S1004
DISC 4
R1007
R1008
D1004
JW1002
C1004
Q1003
E
R1013
R1006
S1003
DISC 3
R1005
• See page 21 for Circuit Boards Location.
Q1001
R1004
S1002
DISC 2
D1002
R1003
C1002
JW1004
D1001
E
S1001
DISC 1
R1002
R1001
C1001
D1003
C1003
Q1002
E
JW1003
R1012
R1011
1-861-475-
11
(11)
CHASSIS
F
MAIN
BOARD
(Page30)
8
HP BOARD
CN1062
EP1061
9 10 11
FB1001
JR1081
JR1080
JW1072
C1093
C1094
JW1098
FB1002
R1088
JW1097
C1096
JW1099
JW1075
JW1083
JW1070
J1063
PHONES
D
VOL BOARD
1
JW1073
E
C1007
NO1052
JW1069
10
JW1077
C1008
JW1001
R1094
R1095
JW1078
JW1059
JW1058
C
MAIN
BOARD
(Page30)
CN1050
CN1051
C1013
R1059
IC1050
D1051
JW1057
R1092
JW1056
C1016
JW1054
JW1055
R1093
1 2 3
W1001
R1050
R1048
D1050
Q1041
R1090
E
JW1053
S1042
JW1052
R1054
JW1051
R1091
1-861-476-
11
(11)
F
• Semiconductor
Location
R1049
S1043
S1052
VOLUME
D
MAIN
BOARD
(Page30)
S1051
TREBLE
S1050
BASS
G
EP1060
CHASSIS
1-861-477-
11
(11)
Ref. No. Location
D1001 C-6
D1002 C-5
D1003 C-4
D1004 C-4
D1005 C-3
D1050 E-6
D1051 E-5
HCD-CPX22/NXM3
IC1050 E-5
Q1001 B-6
Q1002 C-5
Q1003 C-4
Q1004 C-3
Q1005 C-2
Q1041 E-6
3636
Page 37
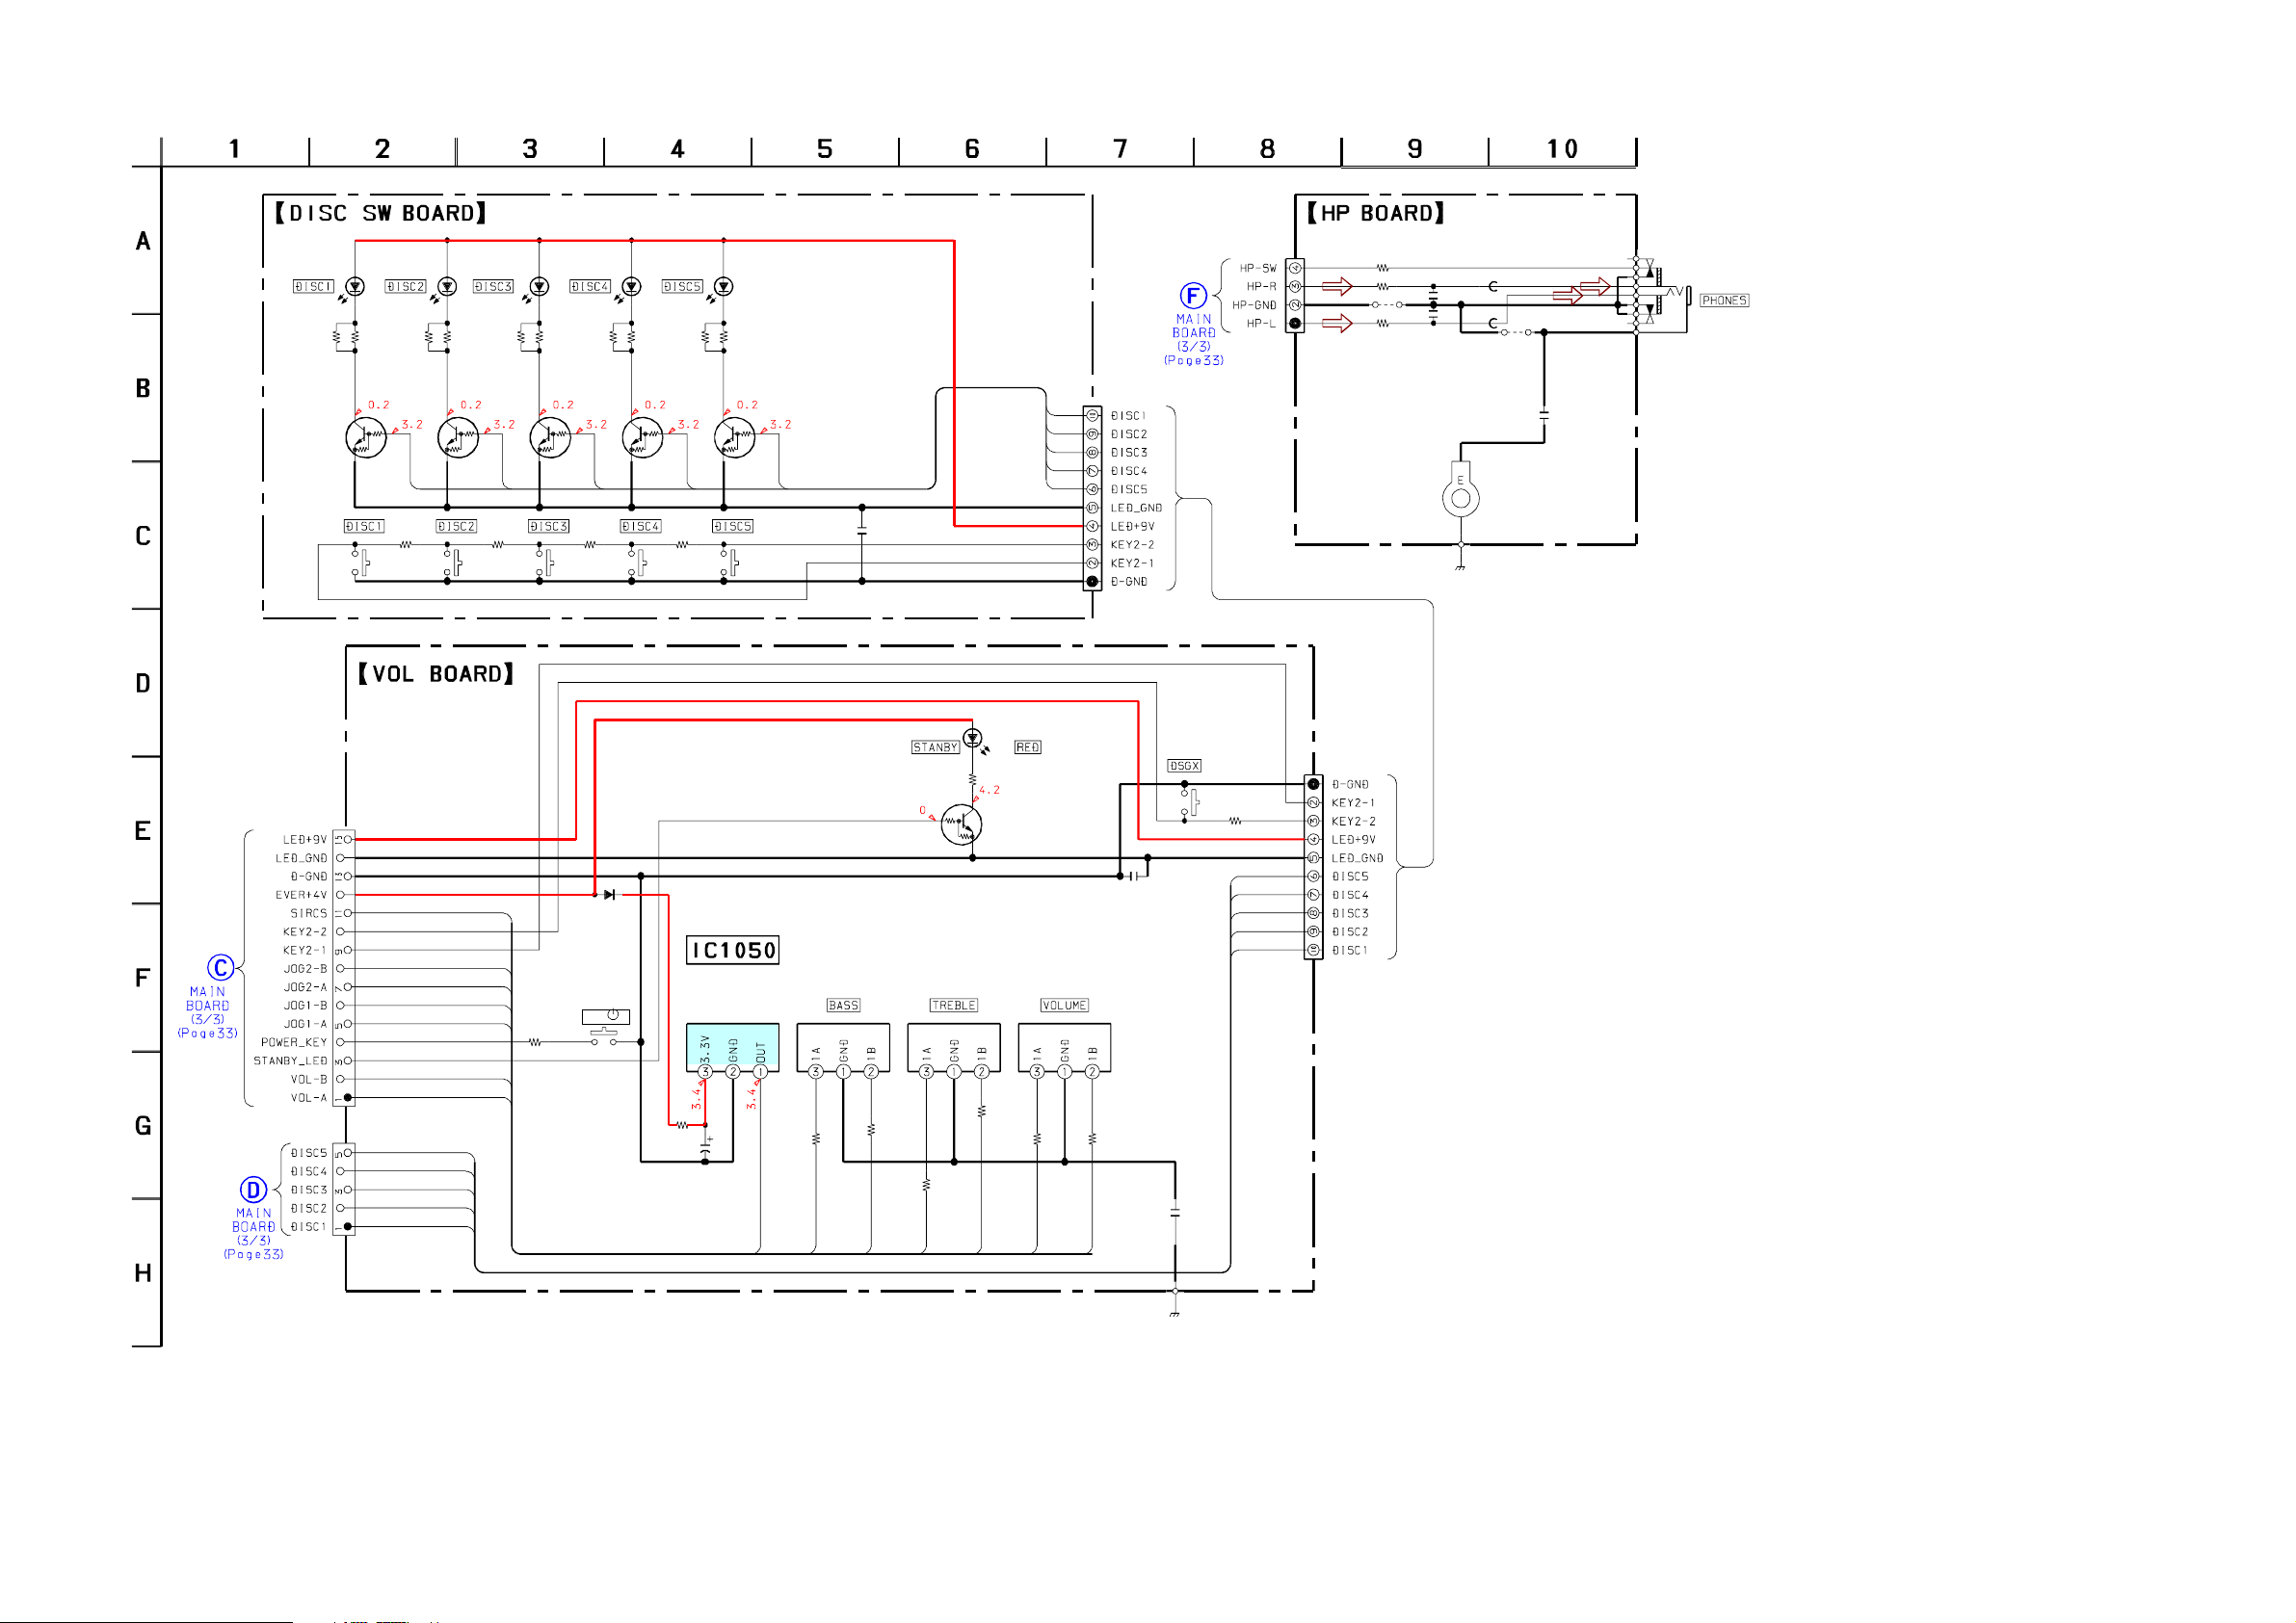
7-17. SCHEMATIC DIAGRAM – DISC SW, VOL, HP BOARD –
HCD-CPX22/NXM3
D1001
SEL5823A
R1002
680
SEL5823A
R1001
680
Q1001
DTC114EKA
LED DRIVE
S1001
CN1050
15P
D1002
R1003
680
R1011
220
1
D1003
SEL5823A
R1004
680
R1006
680
Q1002
DTC114EKA
LED DRIVE
R1012
330
S1002
7
1
2
3
4
2
R1048
2.2k
D1004
SEL5823A
R1005
680
R1007
680
Q1003
DTC114EKA
LED DRIVE
R1013
470
S1003
1SS355
S1042
I/
3
D1051
D1005
SEL5823A
R1008
680
R1010
680
Q1004
DTC114EKA
LED DRIVE
R1014
680
S1004
R1009
680
Q1005
DTC114EKA
LED DRIVE
4
S1005
IC1050
NJM74M400A
REMOTE
CONTROL
RECEIVER
5
Q1001-1005
LED
SWITCH
S1050
C1009
0.1
R1050
220
S1051
D1050
SEL5223S
Q1041
DTC114EKA
LED
SWITCH
1
2
3
4
5
S1052
NO1001
10P
C1007
0.1
S1043
R1049
1k
CN1062
4P
12
11
10
9
8
NO1052
10P
R1088
JR1081
JW1099
JR1080
0
C1093
0
0.001
0
C1094
0.001
EP1061
FB1001
FB1002
JW1098
(CHASSIS)
C1096
1000p
J1063
HCD-CPX22/NXM3
CN1051
5P
5
6
R1091
12
11
10
9
8
R1059
47
C1013
47
16V
R1090
1k
4
7
1k
R1092
1k
3
2
R1093
1
1k
R1094
1k
R1095
1k
C1008
0.1
6
5
(CHASSIS)
3737
Page 38
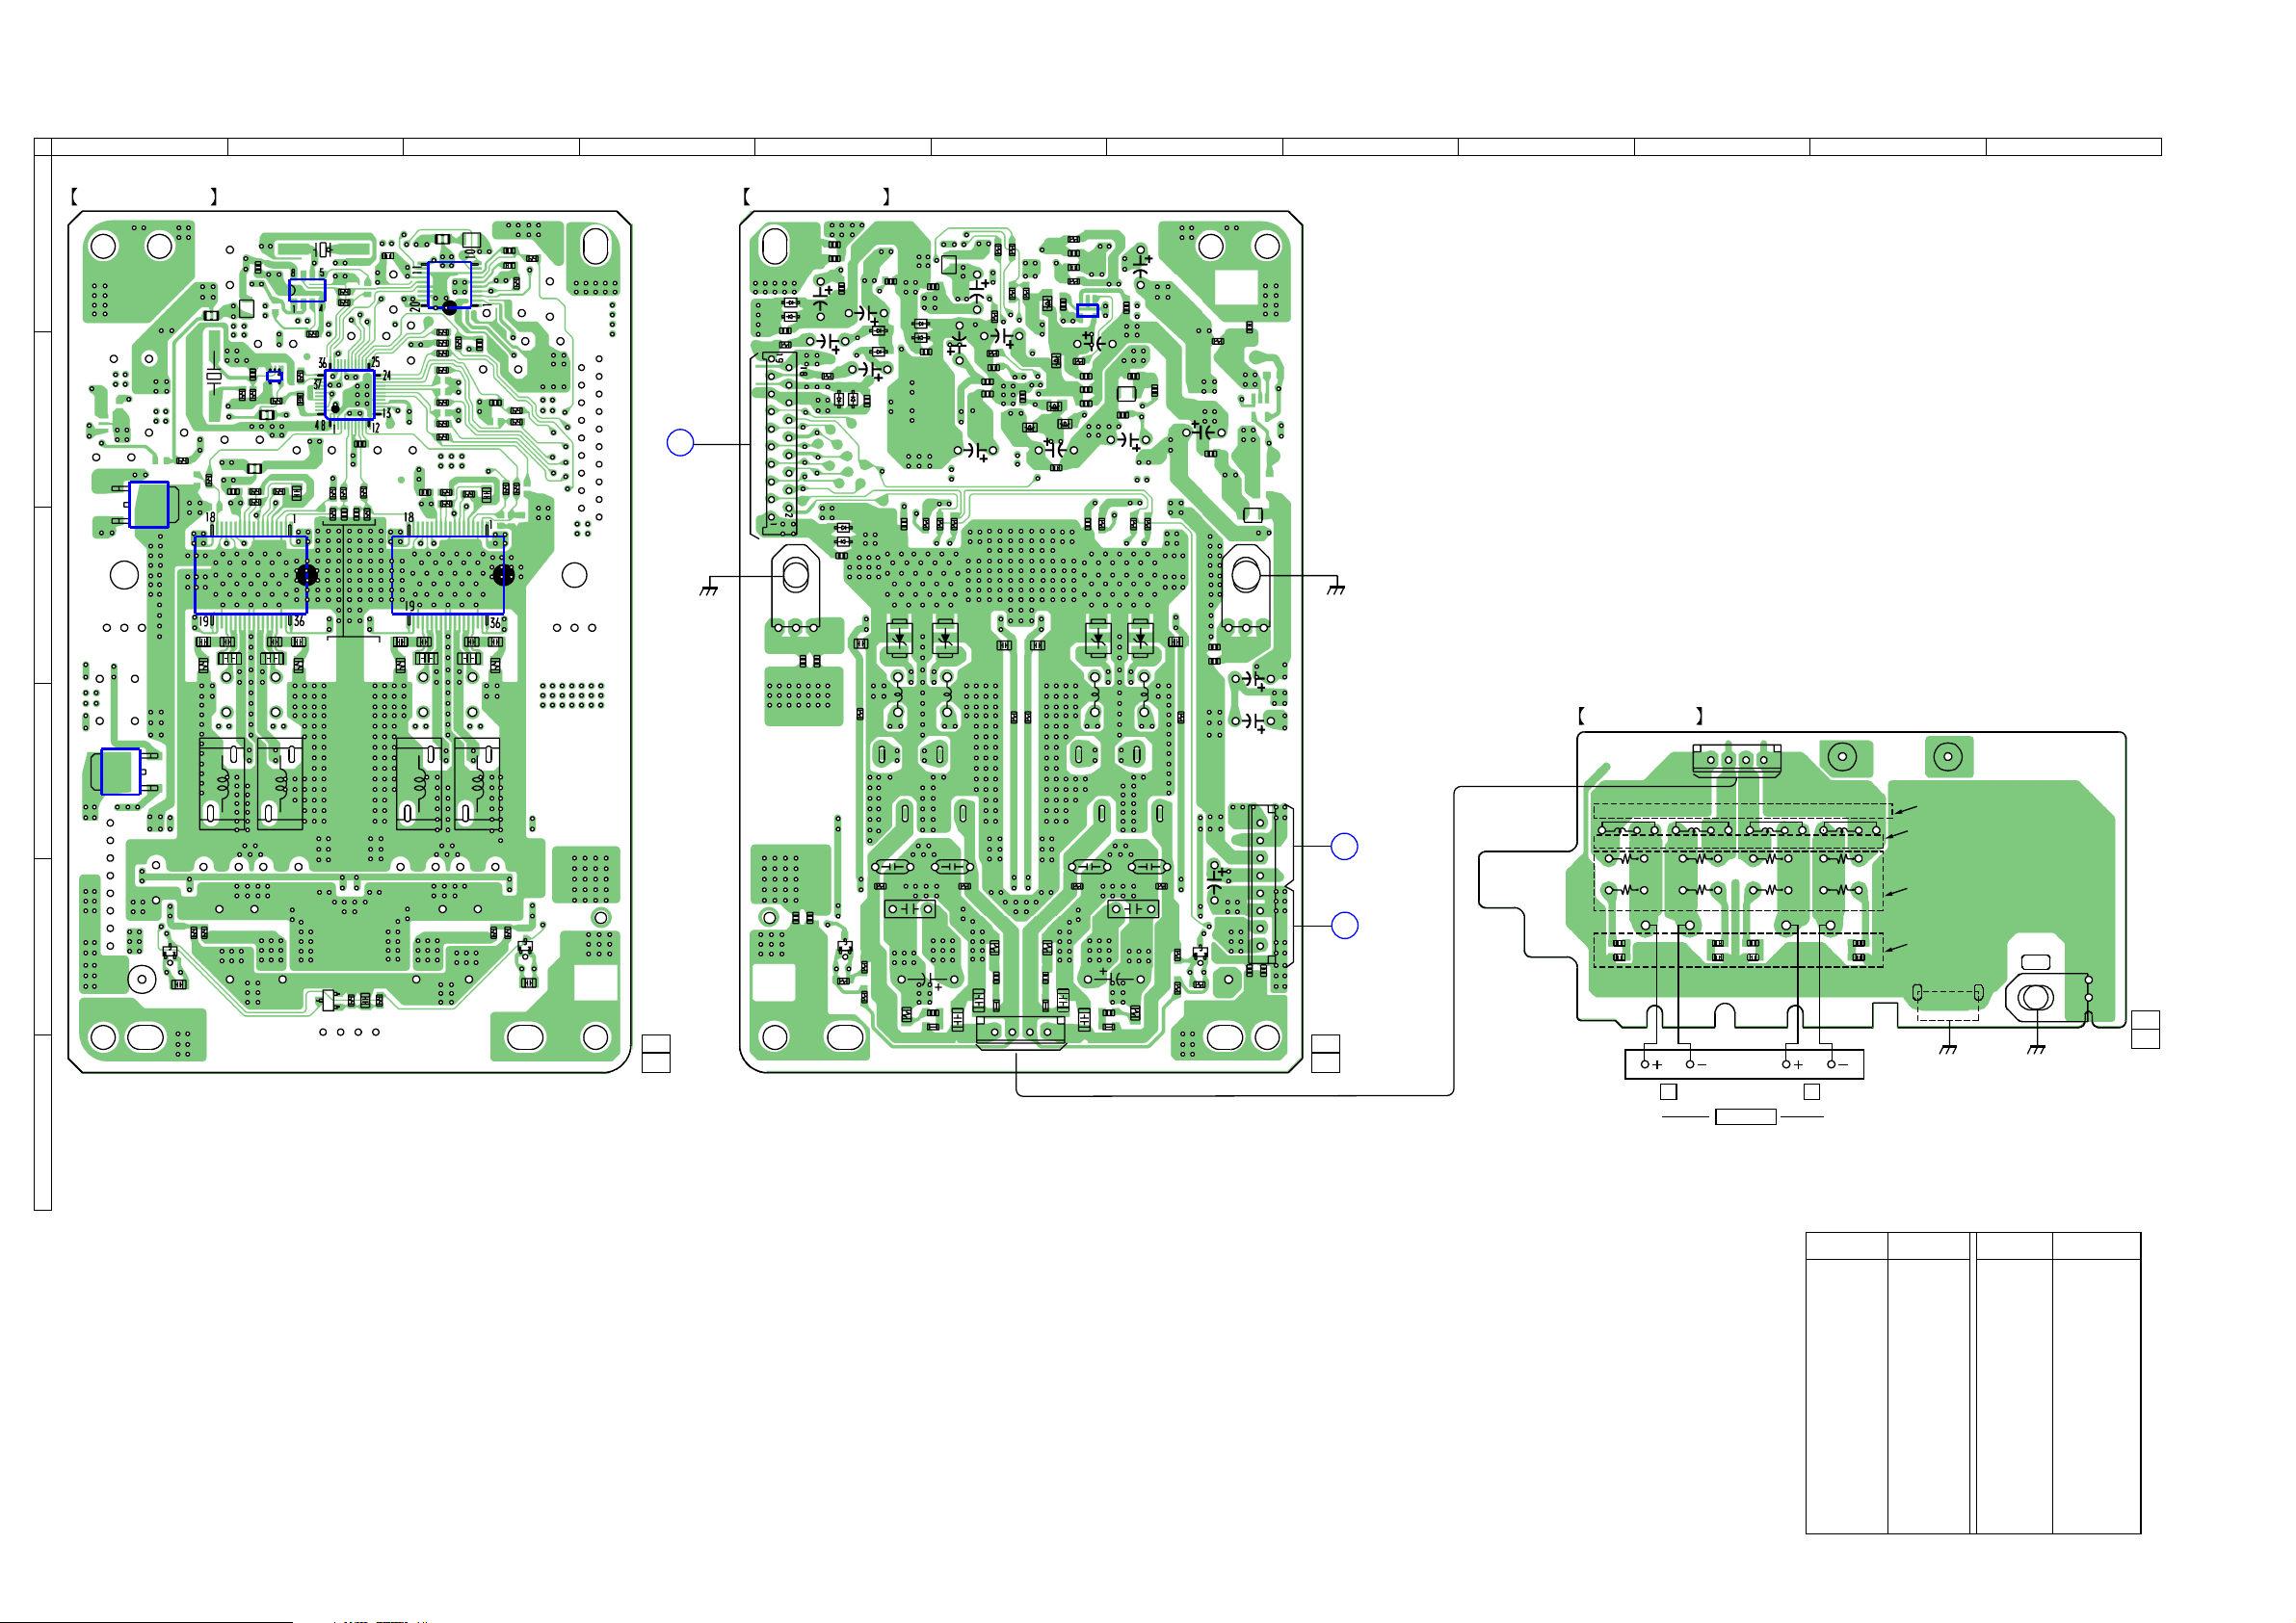
HCD-CPX22/NXM3
7-18. PRINTED WIRING BOARD – S-MASTER BOARD –
1
S-MASTER BOARD (SIDE A)
A
FL703
X702
B
R739
1
IC706
2
3
C
D
3
2
1
R764
IC708
C765
R769
IC710
R766
E
F
LP701
Q753
E
C778
C764
C763
L761
R773
L703
R781
FL706
FL704
R758
C759
C737
IC703
IC709
3
C785
4
R782
R757
R759
C766
C768
5
R783
L760
R779
1
C767
R735
FB702
2
X701
C758
R770
Q701
R731
R732
R756
R752
E
C734
C704
R754
C757
R793
IC705
C715
C710
R713
C794
IC701
C709
R714
R719
R792
FL702
R741
R787
R786
R785
R709
C714
C713
L711
3 4 5 6 7
L701
C733
R730
C732
R743
C806
R742
R790
C807
R789
R707
C716
C718
L710
C708
C717
R723
R788
R706
R720
R716
C726
R704
R784
R708
R729
IC707
Q702
E
1-861-480-
• See page 21 for Circuit Boards Location.
S-MASTER BOARD (SIDE B)
C781
C702
C795
L709
C722
R724
D704
R710
C728
C719
C723
C729
R711
L708
L702
C745
C788
C787
R718
BOARD
(Page30)
11
(11)
G
MAIN
CHASSIS
R701
C800
CN700
C822
C748
D707
D708
D712
D711
C827
C701
R751
C802
EP701
C821
R722
C828
Q703
R727
C826
C825
D709
C706
E
C749
C751
D710
R721
C730
C731
D701
D703
D702
C801
D705
C720
R726
R728
C735
C703
R712
D706
C721
C747
C727
R744
C712
R745
R749
R725
C724
C725
R746
R747
L716
R717
R748
C700
C756
R772
CN702
L715
C780
R771
C773
C772
L713
C798
L714
R774
C746
L704
C753
C754
C771
R737
C738
C739
R736
3
4
C782
D755
C770
C769
1
5
R750
C750
C799
C779
L759
C775
C776
IC704
C786
C741
R761
R760
C791
C774
C783
L758
C777
R768
C736
C797
L705
R775
C784
R762
D756
C762
R776
C790
R767
Q752
R778
R795
C805
L712
C792
E
R777
1-861-480-
C823
C824
C804
C803
C829
C752
EP702
1
3
4
8
C830
CHASSIS
CN701
(11)
H
BOARD
(Page30)
I
SWITCHING
REGURATOR
(Page30)
11
8
MAIN
9 10 11 12
SP OUT BOARD
LP591
EXCEPT AEP,UK,EA,RU
AEP,UK,EA,RU
AEP,UK,EA,RU
AEP,UK,EA,RU
EP504
CHASSIS
EP505
1-861-479-
CHASSIS
L590
JW591
R596
R595
C591
C597
CN510
L591
L
R597
C595
C596
JW590
R594
L592
SPEAKER
R598
R593
C599
C592
JW592
LP592
JW593
L593
R599
R592
C594
C598
TM504
R
11
(11)
HCD-CPX22/NXM3
• Semiconductor
Location
Ref. No. Location
D701 A-5
D702 B-5
D703 B-5
D704 A-5
D705 C-5
D706 C-6
D707 A-5
D708 A-5
D709 B-5
D710 B-5
D711 C-5
D712 C-5
D755 C-6
D756 C-7
Ref. No. Location
IC701 A-3
IC703 A-2
IC704 A-6
IC705 B-2
IC706 B-1
IC707 C-3
IC708 C-1
IC709 B-2
IC710 D-1
Q701 E-2
Q702 E-3
Q703 E-5
Q752 E-7
Q753 E-1
3838
Page 39
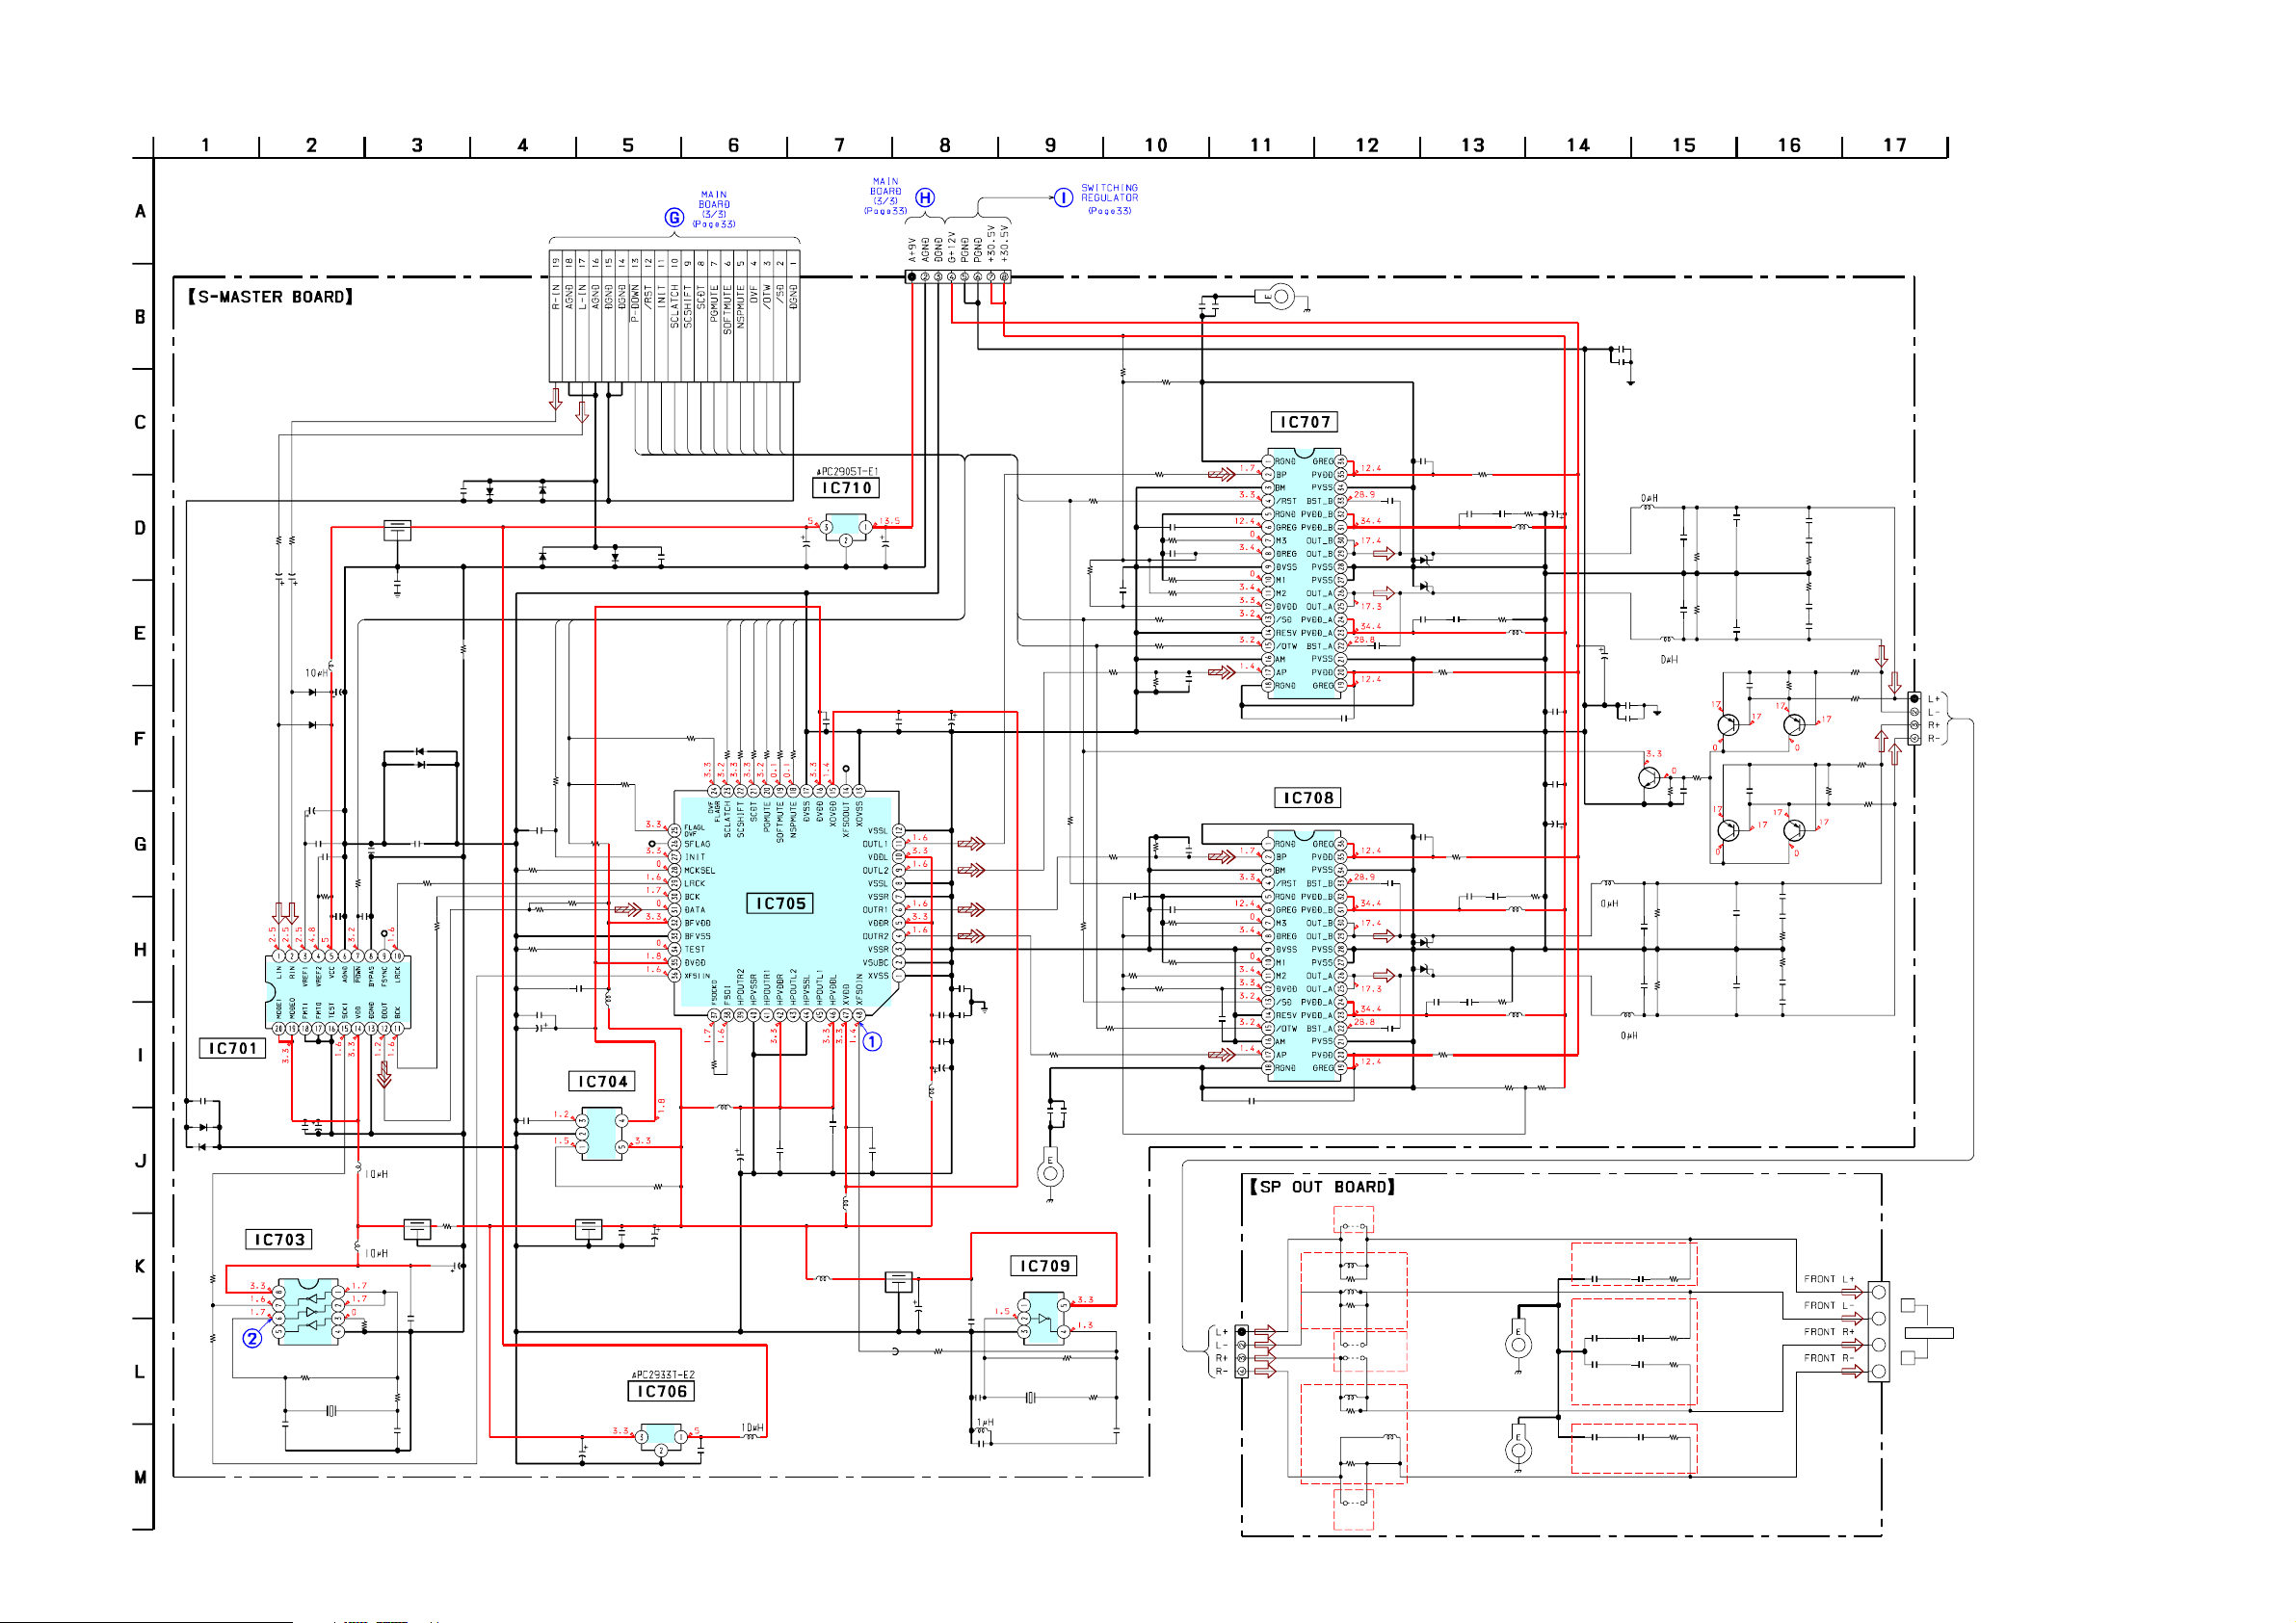
7-19. SCHEMATIC DIAGRAM – S-MASTER BOARD –
CN700
19P
FFC-S
D710
D709
1SS355TE-17
1SS355TE-17
D708
1SS355TE-17
R743
100
C806
0.1
R744
0
R747
100
R749
0
C746
0.1
C747
100
10V
C797
0.01
1SS355TE-17
INIT
OVF
R748
47k
C745
0.1
IC704
NJM2870F18
+1.8V REGULATOR
FL704
0UH
C790
100
10V
PCM1802DBR
A/D CONVERTER
C802
0.1
D711
1SS355TE-17
R731
100
R732
100
R751
C751
D701
1SS355TE-17
D702
1SS355TE-17
C732
IC701
D712
1SS355TE-17
TC7WU04F-TE12L
50V
C730
R729
0.1
0
1
0.1
1k
IC703
BUFFER
C739
10p
C734
C801
0UH
D703
1SS355TE-17
D704
1SS355TE-17
C795
0.1
R745
100
R746
100
FL703
0UH
C737
0.1
R795
R739
C736
50V
0.1
0
0
4.7
FL702
R701
0
C701
1
50V
L701
C748
10
50V
C749
0.1
C735
10
50V
0.1
R736
1M
12.288M
X701
PDWN
C731
100
10V
C729
L702
L703
0.1
R735
C752
0.1
R730
100
C733
0.1
0
R737
C738
10p
1k
R742
10k
D707
L713
C750
0.01
R741
100
0
PDWN
/RST
INIT
R750
100k
C798
100
10V
IC706
D+3.3V
REGULATOR
SCLATCH
C800
0.1
R790
SCSHIFT
SCDT
100
R779
0
PGMUTE
L714
C700
100
10V
C805
0.1
SOFTMUTE
SCLATCH
100
R789
0
NSPMUTE
OVF
/SD
/OTW
C804
100
10V
SCDT
SCSHIFT
PGMUTE
NSPMUTE
SOFTMUTE
100
100
100
100
100
R786
R788
R785
R787
R784
IC705
CXD9788AR
DATA CONVERTER
C799
0.1
L712
IC710
A+5V REGULATOR
C788
0.1
C779
0.1
L715
0
L704
0
C780
0.1
C803
50V
C787
FL706
0UH
FB702
HCD-CPX22/NXM3
CN701
8P
EH-S
C821
C822
0
0
R723
47k
1/10W
/RST
R706
100
/SD
/OTW
R756
R764
C823
0
(CHASSIS)
IC709
CLOCK GEN
X702
R710
100
100
R761
100
0
C824
0
EP702
R782
1M
R781
100
C784
0.001
0.1
C703
100
10V
0.1
C826
0
C704
0.1
C825
0
C754
0.1
C753
100
10V
L716
0
MC74VHC1GU04
C741
22
C786
50V
0.01
R783
0
0
C785
5p
L705
C783
10p
49.152M
C709
0.1
R714
R754
C758
R759
R762
100
R716
4.7k
1/10W
R704
0
C781
0.1
R707
0
C708
1
R708
0
R709
0
R711
100
R712
100
560
560
1
0
R713
22k
R752
22k
R760
100
C782
R757
R758
C710
C757
47p
C759
0.1
CN510
EH-S
4P
DIGITAL POWER AMP
C762
1
47p
0.1
0
0
(CHASSIS)
EP701
IC707
CXD9775M
DIGITAL POWER AMP
IC708
CXD9775M
R596
10
1/2W
R597
10
1/2W
R598
10
1/2W
R599
10
1/2W
JW591
JW593
C713
C712
1
L591
JW590
JW592
L590
0.033
EXCEPT
AEP,UK,EA,RU
L592
L593
EXCEPT
AEP,UK,EA,RU
C706
1
C718
0.033
D705
P6SMB39AT3
P6SMB39AT3
C714
C715
0.22
0.22
R717
0
C756
1
R772
C768
0.033
D755
P6SMB39AT3
P6SMB39AT3
C764
0.22
C763
0.033
R767
0
AEP,UK,EA,RU
EXCEPT
AEP,UK,EA,RU
AEP,UK,EA,RU
D706
0
D756
R722
C716
0.22
C766
0.22
C765
0.22
(CHASSIS)
0
3.3
C767
EP505
EP504
C717
0.22
R719
1/4W
0.22
R766
4.7k
1/10W
(CHASSIS)
L708
L759
L758
L709
0
0
R769
1/4W
0
R720
3.3
1/4W
0
C702
0.1
C791
0.1
C769
2200
35V
R770
1/4W
3.3
3.3
1/10W
R773
47k
C719
2200
35V
C829
C792
470
16V
Q701
2SC1623
PROTECT
Q702,703,752,753
OVER LOAD
L760
C597
100000p
C596
100000p
C592
100000p
C598
100000p
C830
0
0
C828
C827
DETECT
C770
C777
L761
L710
0
0
1
1
C591
100000p
C595
100000p
C599
100000p
C594
100000p
C720
C728
L711
R793
100k
R771
4.7k
1/10W
R768
4.7k
1/10W
R595
1/2W
R594
1/2W
R593
1/2W
R592
1/2W
1
1
10
10
10
10
1/10W
1/10W
Q702
2SA1602
PNP
R792
0
C794
1
C721
0.22
R721
4.7k
R718
4.7k
C726
2.2
2SA1602
C771
0.22
C776
0.22
AEP,UK,EA,RU
EXCEPT
AEP,UK,EA,RU
AEP,UK,EA,RU
0.22
Q752
PNP
C727
C778
2.2
C772
0.0022
R774
2.7
1/10W
R775
2.7
1/10W
C775
0.0022
R727
100k
C722
0.0022
R724
2.7
1/10W
C724
0.0022
0.0022
0.0022
C773
C774
C723
0.0022
R725
2.7
1/10W
C725
0.0022
Q703
2SA1602
PNP
Q753
2SA1602
PNP
R777
100k
R728
100k
R726
100k
R778
100k
R776
100k
TM504
2P
CN702
EH-S
L
SPEAKER
R
4P
HCD-CPX22/NXM3
3939
Page 40
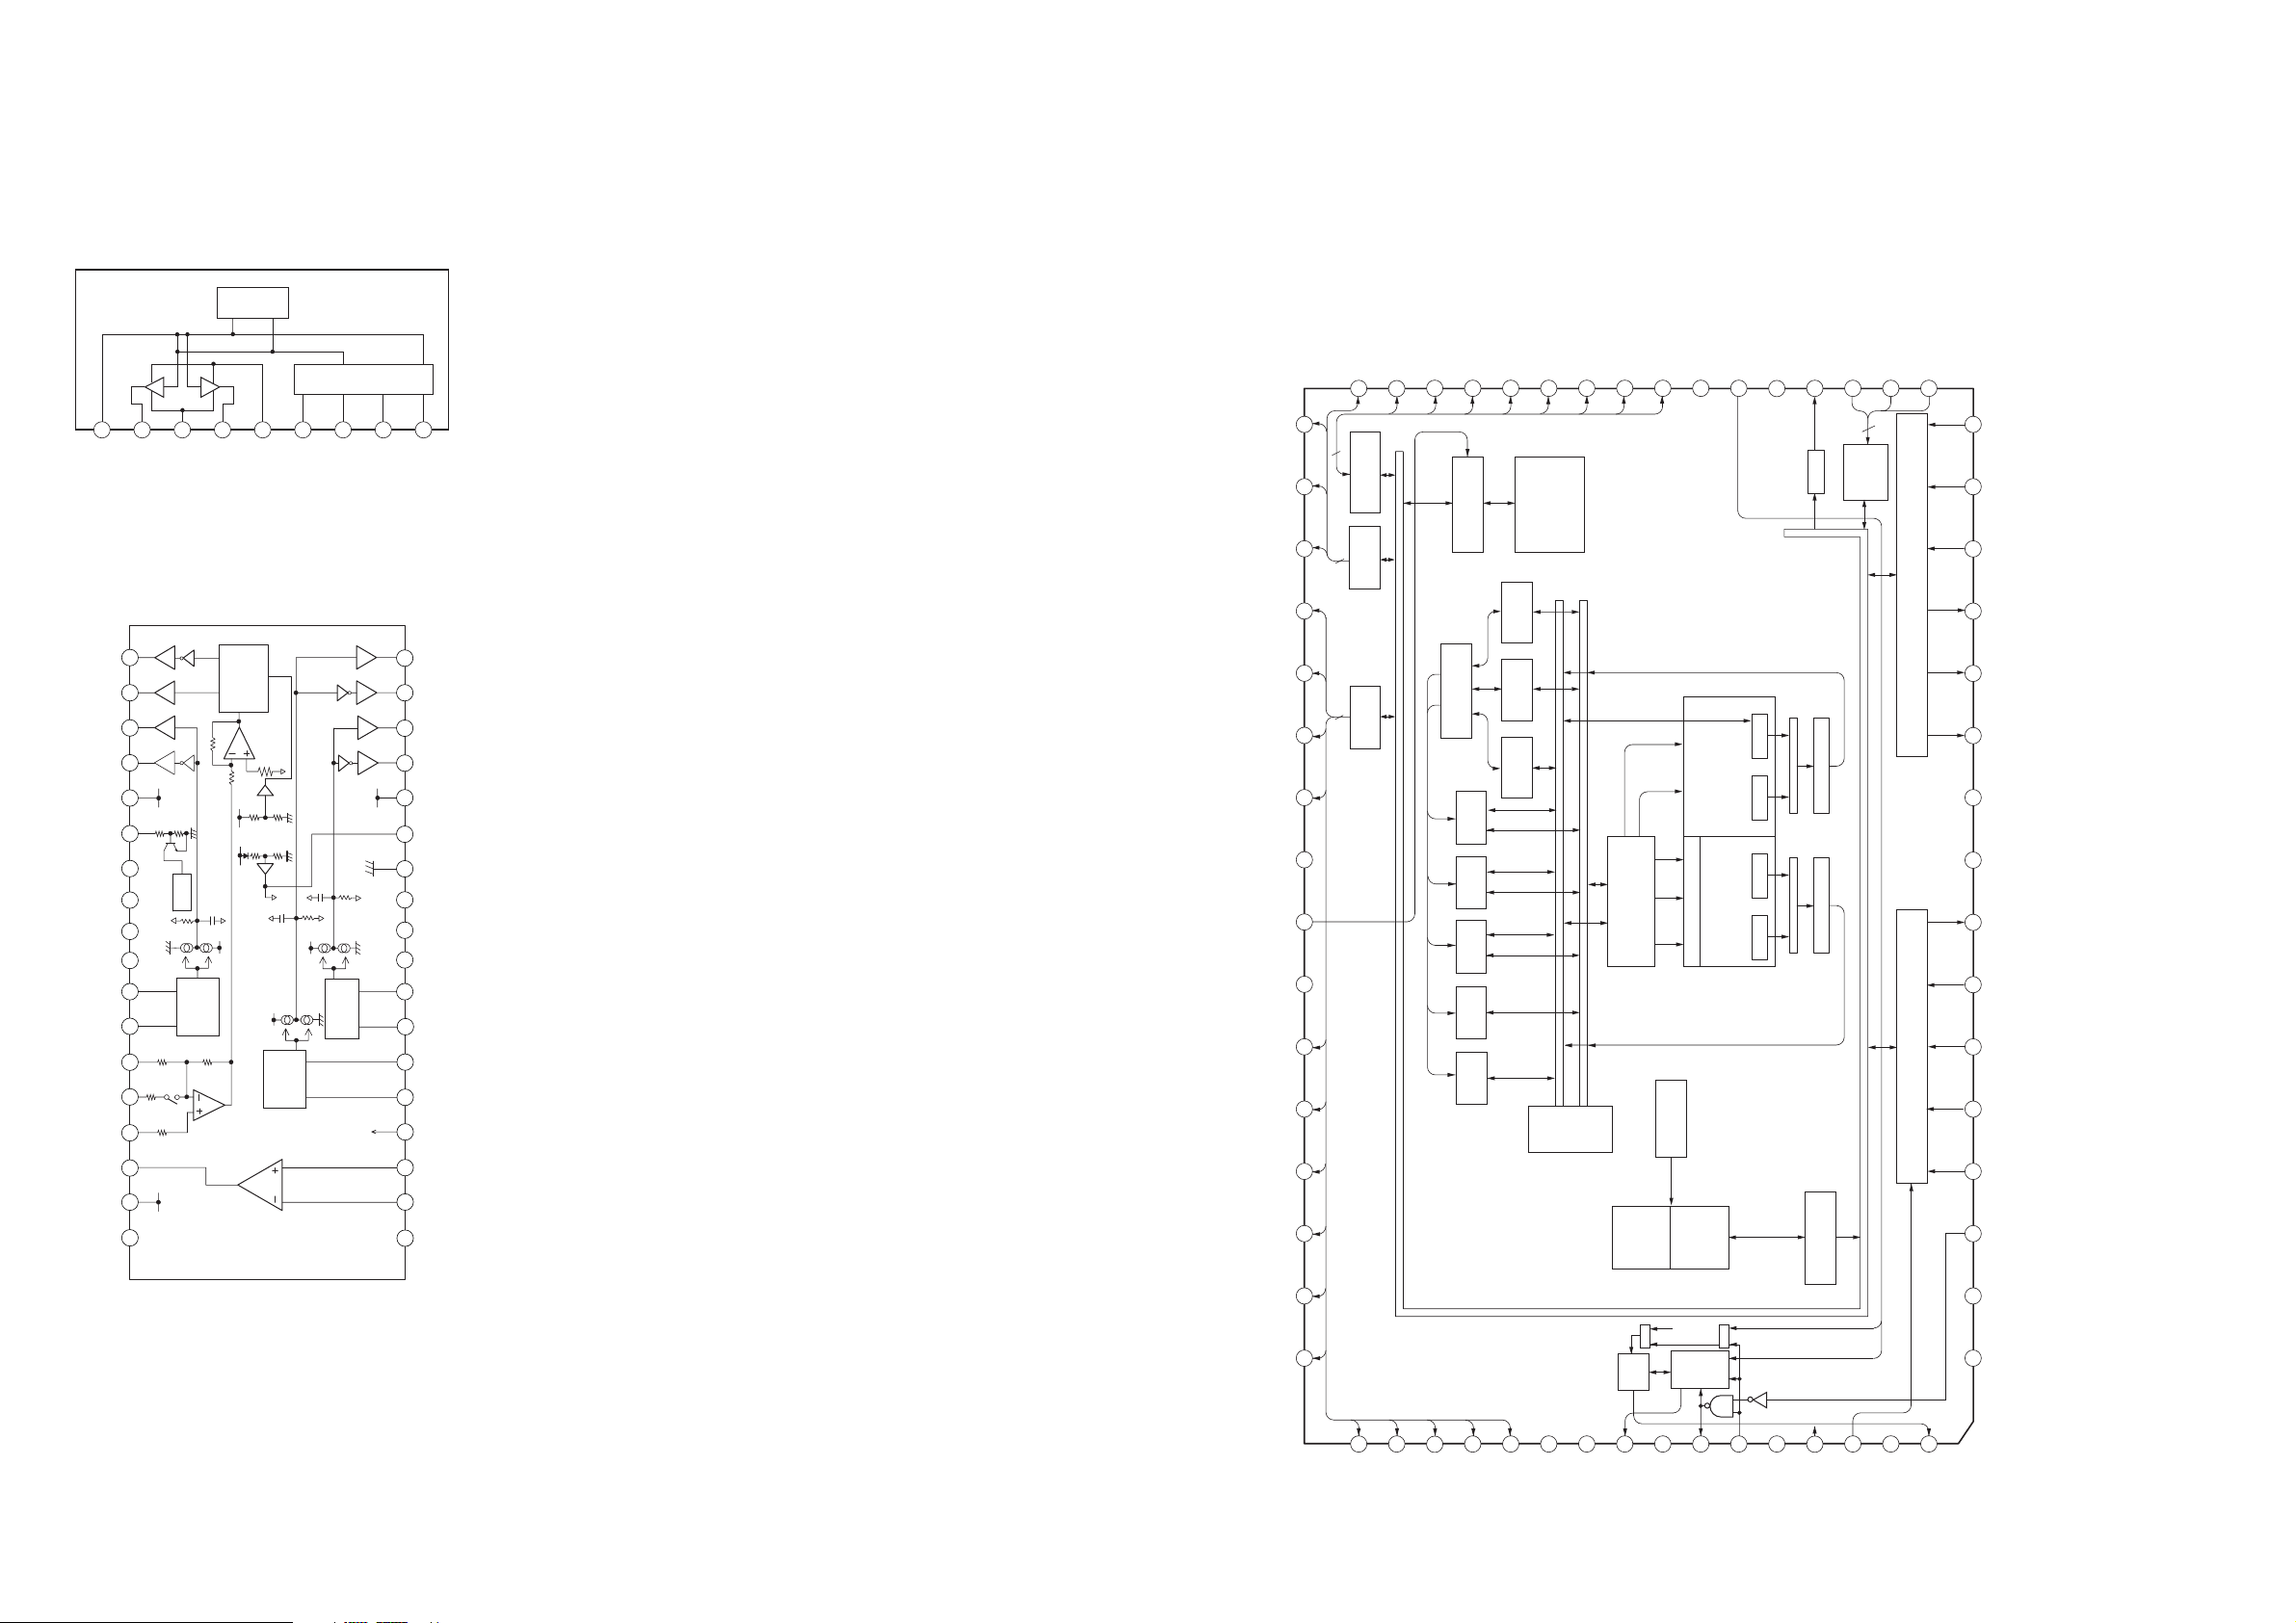
HCD-CPX22/NXM3
33
34
35
36
37
38
39
40
41
42
1
8
43
61 62 63 646059565250
47
46
45
44
48
49
2526272829303132 1718192021222324
9
10
11
2
3
4
5
6
7
5857555351
12
13
14
15
16
54
CS/RAS/ADO2
AD15/CAS/PD12
SDO3/OE
WE/SDO1
PIO7/BUS3/IO7
PIO6/FI3/BUS2/IO7
PIO5/FI2/BUS1/IO5
PIO4/FI1/BUS0/IO4
Bus
Switch
PO11/BUCK/AD14
PO10/CCE/AD13
PO9/AD12
PO08/AD11
General
In/Output Port
Address Calc.
2sets
Y-Pointer
register
C-Pointer
register
X-Pointer
register
VDDM
SRMSTB
VDDT
AD10
AD9
ERAM
2k word
CRAM
4k word
CROM
4k word
YRAM
4k word
XRAM
4k word
SRAM/
DRAM I/F
SRAM I/F
1Mbit
SRAM
X-Bus
Y-Bus
PO07/AD7
PO06/AD6
PO05/AD5
AD8
VC0
Timing
Generator
PRAM
Instruction
Decoder
Program
Control
MCU. I/F
register
XO • X1 • X2
Y0 • Y1 • Y2
MX MY MZ
MAC
A0 A1
AX AY
ALU
A2 A3
DIT
round & limit round & limit
Audio I/F
LRCKIA
BCKIA
SDI0
LRCKO
BCKO
SDO0
VSS
VDDT
MIACK
MICK
MIDIO
MILP
MICS
STANBY
RESET
VDDP
AD4/PO04
AD3/PO03
AD2/PO02
AD1/PO01
AD0/PO00
VSS
VDD
CKO/PO13/AD16
VDDX
XO
TEST
VCOI
VSSX
XI
MIMD
VSSP
PIO3/IO3
PIO2/IO2
PIO1/SDI3/IO1
PIO0/SDI2/IO0
VSS
CKI/CLOCK/IRQ/FIO
VDD
TXO
SFSY/LRCKIB
SBSY/BCKIB
SDI1/DATA
POM
Sub code
I/F
CDP Cont
I/F
7-20. IC Block Diagram
– RELAY Board –
IC701, 711 BA6956AN
– BD Board –
IC301 TC94A34FG-002
TSD
CONTROL LOGIC
– BD Board –
IC251 BA5947FM
CH4OUTR
CH4OUTF
CH3OUTF
CH3OUTR
POWVCC
PREGND
CH3RIN
CH3FIN
CH4IN
CH4CAPA
OUTVREF
DPOUT
TREVCC
MUTE
GND
GND
1 2 3 4 5 6 7 8 9
VREF
CT
NC
RNF
OUT2
D
19
D
20
D
21
22
23
50k 50k
24
25
26
27
28
29
30
100k
31
32
10k
33
34
35
36
D
POW
VCC
(ch3, 4)
R
R
F
PIN3
50k
Pre
Vcc
MUTE
INTER
FACE
19k
10k
F
OUT1
LEVEL
SHIFT
POW
VCC
Vref
50k
50k 50k
VM
VCC
PIN26
6.5k
50k
Vref
F
INTER
FACE
F
INTER
R
F
FIN
(ch1, 2)
R
FACE
D
D
D
D
POW
VCC
R
F
SW
GND
18
17
16
15
14
13
12
11
10
9
8
7
6
5
4
3
2
1
RIN
CH1PUTF
CH1OUTR
CH2OUTF
CH2OUTR
POWVCC
CNF4
GND
C-M
C-P
VG
CH2RIN
CH2FIN
CH1RIN
CH1FIN
SW
OPIN+
OPIN-
NC
HCD-CPX22/NXM3
4040
Page 41
7-21. IC Pin Function Descriptions
• IC101 CXD3059AR (RF AMP) (BD BOARD)
Pin No. Pin Name I/O Description
1MIRR I/O Mirror signal input/output(Not used)
2 DFCT I/O Defect signal input/output (Not used)
3 FOK I/O Focus OK signal input/output (Not used)
4 VSS — Internal digital ground
5 LOCK I/O Not used
6 MDP O Spindle motor servo control output
7 SSTP I Disk innermost detection signal input
8 IOVSS1 — I/O digital ground
9 SFDR O Sled drive output
10 SFDR O Sled drive output
11 TFDR O Tracking drive output
12 TRDR O Tracking drive output
13 FFDR O Focus drive output
14 FFDR O Focus drive output
15 IOVDD1 — I/O digital power supply
16 AVDD0 — Analog power supply
17 AVSS0 — Analog ground
18 NC — Not used
19 E I E signal input
20 F I F signal input
21 TEI I Tracking error signal input
22 TEO O Tracking error signal output
23 FEI I Focus error signal input
24 FEO O Focus error signal output
25 VC I/O Center voltage output from RF amplifier block
26 A I A signal input
27 B I B signal input
28 C I C signal input
29 D I D signal input A
30 NC — Not used
31 AVDD4 — Analog power supply
32 RFDCO O RFDC signal output (Not used)
33 PDSENS I Reference voltage pin
34 AC_SUM O RFAC summing amplifier output
35 EQ_IN I Equalizer circuit input
36 LD O APC output
37 PD I APC input
38 NC — Not used
39 RFC I Equalizer cut-off frequency adjustment pin
40 AVSS4 — Analog ground
41 RFACO O RFAC signal output
42 RFACI I RFAC signal input or EFM signal input
43 AVDD3 — Analog power supply
44 BIAS I Asymmetry circuit constant current input
45 ASYI I Asymmetry comparator voltage input
46 ASYO O EFM full-swing output
47 VPCO O Not used
48 VCTL I Wide-band EFM PLL VCO2 control voltage input
HCD-CPX22/NXM3
41
Page 42
HCD-CPX22/NXM3
Pin No. Pin Name I/O Description
49 AVSS3 — Analog ground
50 CLTV I Multiplier VCO1 control voltage input
51 FILO O Master PLL (slave = digital PLL) filter output
52 FILI I Master PLL filter input
53 PCO O Master PLL charge pump output
54 AVDD5 — Analog power supply
55 DDVROUT O DC/DC converter output
56 DDVRSEN I DC/DC converter output voltage monitor input
57 AVSS5 — Analog ground
58 DDCR I DC/DC converter reset input
59 NC — Not used
60 BCKI I D/A interface bit clock input
61 PCMDI I D/A interface serial data input (2’s COMP, MSB first)
62 LRCKl I D/A interface LR clock input
63 LRCK O D/A interface LR clock output f = Fs
64 VSS — Internal digital ground
65 PCMD O D/A interface serial data output (2’s COMP, MSB first)
66 BCK O D/A interface bit clock output
67 VDD — Internal digital power supply
68 EMPH O High when the playback disc has emphasis, low it has not
69 EMPHI I High when de-emphasis is ON, low when input OFF
70 IOVDD2 — I/O digital power supply
71 DOUT O Digital Out output
72 TEST I Test pin Normally ground
73 TES1 I Test pin Normally ground
74 IOVss2 — I/O digital ground
75 NC — Not used
76 XVSS — Master clock ground
77 XTAO O Crystal oscillation circuit output
78 XTAI I Crystal oscillation circuit input
79 XVDD — Master clock power supply
80 AVDD1 — Analog power supply
81 AOUT1 O Lch analog output
82 VREFL O Lch reference voltage
83 AVSS1 — Analog ground
84 AVSS2 — Analog ground
85 VREFR O Rch reference voltage
86 AOUT2 O Rch analog output
87 AVDD2 — Analog power supply
88 NC — Not used
89 IOVDD0 — I/O digital power supply
90 RMUT O Rch “0” detection flag (Not used)
91 LMUT O Lch “0” detection flag (Not used)
92 NC — Not used
93 XTSL I Crystal selection input (Not used)
94 IOVSS0 — I/O digital ground
95 XTACN I
96 SQSO O Subcode Q 80-bit and PCM peak and level data output (Not used)
97 SQCK I SQSO readout clock input
Oscillation circuit control
Self-oscillation when high, oscillation stop when low
42
Page 43
HCD-CPX22/NXM3
Pin No. Pin Name I/O Description
98 SBSO O Subcode P to W serial output (Not used)
99 EXCK I SBSO readout clock input (Not used)
100 XRST I System reset input
101 SYSM I Mute input
102 D ATA I Serial data input from CPU
103 VSS — Internal digital ground
104 XLAT I Latch input from CPU
105 CLOCK I Serial data transfer clock input from CPU
106 VDD — Sled drive output Internal digital power supply Tracking drive output
107 SENS O SENS output to CPU
108 SCLK I SENS serial data readout clock input
109 ATSK I/O Anti-shock input/output (Not used)
110WFCK O WFCK output (Not used)
111 XUGF O XUGF output (Not used)
112XPCK O XPCK output (Not used)
113 GFS O GFS output (Not used)
114C2PO O C2PO output (Not used)
115 SCOR O High output when the subcode sync, S0 or S1, is detected
116 VDD — Internal digital power supply
117 C4M O 4 2336MHz output (Not used)
118WDCK O Word clock output f = 2Fs (Not used)
119 COUT I/O Track number count signal input/output (Not used)
120 NC — Not used
43
Page 44
HCD-CPX22/NXM3
• IC401 M30622MGN-B28FPUO (SYSTEM CONTROL) (MAIN Board)
Pin No. Pin Name I/O Description
1 MP3 CS O Chip select signal to CD Digital Processor
2 MP3 LP O Latch pulse output to CD Digital Processor and Motor signal output
3 MP3 ACK I ACK input from CD Digital Processor and Motor signal input
4 SIRCS I Remote commander signal input
5 MP3 DATA OUT O Serial data output to the MP3 circuit
6 MP3 DATA IN I Serial data input from the MP3 circuit
7 MP3 CLK O Serial clock output to the MP3 circuit
8 BYTE I External data bus width select input (connected to ground)
9 CN VSS I Processor modes switch
10 Xcin I Sub clock input (32.768kHz)
11 Xcout O Sub clock output (32.768kHz)
12 RESET I System reset input
13 Xout O Main system clock output (16MHz)
14 Vss – Ground
15 Xin I Main system clock input (16MHz)
16 Vcc – Power supply
17 NMI I Non-maskable interrupt input
18 RDS-INT I Sirial data taransfer clock signal input
19 SCOR I CD Q-DATA request
20 AC-CUT I AC cut-off detection signal input
21 SENS I Internal status(SENSE) signal input from CXD3059AR
22 CD-DATA O Serial data output
23 CD-CLK O Serial data transfer clock signal output
24 XLT O Serial data latch pulse output
25 XRST O Reset signal output to the CD mechanism
26 XCTN O XCTN signal output (for Tuner noise reduction)
27 A-MUTE O Audio muting on/off control signal output
28 MP3-STANDBY O Standby signal output to the MP3 circuit
29 IIC_CLK I/O Communication data reading clock signal input or transfer clock siganal output
30 IIC_DATA I/O Communication data bus with CD mechanism and Fluorescent indicater
31 MP3 REQ I REQ signal input from MP3 circuit
32 MP3 RESET O RESET signal output to the MP3 circuit
33 CDM-MOT-POS-1 O Motor drive signal output (L/D)
34 CDM-MOT-POS-2 O Motor drive signal output (U/D)
35 CDM-MAIN-SW-CLS I Detection signal input from disc tray close detect main switch
36 CDM-SUB-SW-OPN I Detection signal input from disc tray open detect sub switch
37 CDM-ENC-A-1 I Detection signal input from the disc tray address detect rotary encoder
38 CDM-ENC-A-3 I Detection signal input from the disc tray address detect rotary encoder
39 CDM-ENC-B-1 I Detection signal input from the disc tray address detect rotary encoder
40 CDM-ENC-B-3 I Detection signal input from the disc tray address detect rotary encoder
41 CDM-ENC-B-2 I Detection signal input from the disc tray address detect rotary encoder
42 CDM-ENC-B-0 I Detection signal input from the disc tray address detect rotary encoder
43 CDM-ENC-A-2 I Detection signal input from the disc tray address detect rotary encoder
44 CDM-ENC-A-0 I Detection signal input from the disc tray address detect rotary encoder
45 CDM-SUB-SW-CLS I Detection signal input from disc tray close detect sub switch
46 CDM-MAIN-SW-OPN I Detection signal input from disc tray open detect main switch
47 CDM-MOT-NEG-2 O Motor drive signal output (U/D)
48 CDM-MOT-NEG-1 O Motor drive signal output (L/D)
49 RDS-DATA I RDS data input
50 ST-MUTE O Tuner muting control signal output to tuner unit
44
Page 45
HCD-CPX22/NXM3
Pin No. Pin Name I/O Description
51 TUNED IN I Tuning detecton signal input from tuner unit
52 ST-CE O PLL chip enable signal output to tuner unit
53 ST-DOUT O PLL serial data output to tuner unit
54 ST-DIN I PLL serial data input from tuner unit
55 ST-CLK O PLL serial tansfer clock signal output to tuner unit
56 SM-DATA O Serial data output to the S-Master circuit
57 SM-CLK O Serial data transfer outout to the S-Master circuit
58 SM-LAT O Serial data latch pulse output to the S-Master circuit
59 SM-INT O Initial signal output to the S-Master (Power reset)
60 SM-ENB O ENABLE signal output to the S-Master
61 SM-ADC-POWR O ADC signal to the S-Master
62 VCC – Power supply
63 TC-REC-MUTE O Recording muting on/off selection signal output
64 VSS – Ground
65 STBY-RELAY O Main power on/off control signal output
66 IO-EXP:CLK O Serial data transfer output to the I/O expander circuit
67 IO-EXP:LAT O Serial data latch pulse output to the I/O expander circuit
68 IO-EXP DATA IN I Serial data input from the I/O expander circuit
69 IO-EXP DATA OUT O Serial data output to the I/O expander circuit
70 VOL-A I Jog dial pulse input from the rotary encoder (Volume)
71 VOL-B I Jog dial pulse input from the rotary encoder (Volume)
72 LED:STANDBY O Standby signal output to the LED driver
73 DISPLAY KEY I Display key input signal
74 POWER KEY I Power key input signal
75 DISC-SENS I Disc status detection signal input
76 JOG 1-A I Jog dial pulse input from the rotary encoder (Bass)
77 JOG 1-B I Jog dial pulse input from the rotary encoder (Bass)
78 JOG 2-A I Jog dial pulse input from the rotary encoder (Treble)
79 JOG 2-B I Jog dial pulse input from the rotary encoder (Treble)
80 AMP-DATA O Serial data output to the Front Amp circuit
81 AMP-CLK O Serial clock output to the Front Amp circuit
82 FL-RESET O Reset signal output to the FL indicator tubu circuit
83 FL-CS O Chip select signal output to the FL indicator tubu circuit
84 FL-CLK O Serial clock output to the FL indicator tubu circuit
85 FL-DATA O Serial data output to the FL indicator tubu circuit
86 CAMP-CNT1 O Capstan motor drive signal output
87 A TRG O Deck-A side trigger plunger drive signal output
88 B TRG O Deck-B side trigger plunger drive signal output
89 A SHUT I Shut off detection signal input from the deck-A side reel pulse detector
90 B SHUT I Shut off detection signal input from the deck-B side reel pulse detector
91 B HALF I Detection input from the deck-B half detect switch
92 SPEC-IN I Setting terminal for the version
93 MAIN-TRANS-CUT I Main transformer cut detect signal input
94 AD-KEY 2 I AD key 2 signal input
95 AD-KEY 1 I AD key 1 signal input
96 AVSS – Ground
97 VACS IN I VACS signal input
98 VREF I Reference voltage input
99 AVCC – Analog power supply
100 AMS-IN I Automatic music senser signal input
45
Page 46
HCD-CPX22/NXM3
• IC705 CXD9788AR (DATA CONTOL) (S-MASTER Board)
Pin No. Pin Name I/O Description
1 XVss – Ground
2 Vsubc – Ground
3VssR – Ground
4 OUTR2 O PWM2 output for R-ch power stage.
5 VddR – Power supply(+3.3v)
6 OUTR1 O PWM1 output for R-ch power stage.
7VssR – Ground
8VssL – Ground
9 OUTL2 O PWM2 output for L-ch power stage.
10 VddL – Power supply(+3.3v)
11 OUTL1 O PWM1 output for R-ch power stage.
12 VssL – Ground
13 XOVss – Ground
14 XfsoOUT O Secondary master clock buffer output
15 XOVdd – Power supply(+3.3v)
16 DVdd – Power supply(power supply for digital section +1.8v)
17 DVss – Ground
18 NSPMUTEI I PWM duty50% mute and delta/sigma registor clear signal input
19 SoftMUTE I Soft mute signal input
20 PGMUTE I Mute signal input for PWM output data
21 SCDT I Serial control data input
22 SCSHIFT I Serial control shift clock input
23 SCLATCH I Serial control latch signal input
24 OVFFLAG O R-ch arithmetic section overflow detect flag output
25 OVFFLAG O L-ch arithmetic section overflow detect flag output
26 SFLAG O Anti-synchronize detect flag output
27 INIT I Initalise signal input (power reset)
28 MCKSEL I Secondary master clock select input
29 LRCK I Sampling clock input (correspond to CD/MD/DVDaudio etc)
30 BCK I Bit clock input(correspond to CD/MD/DVDaudio etc)
31 DATA I Audio data input(correspond to CD/MD/DVDaudio etc)
32 BFVdd – Power supply(+3.3v)
33 BFVss – Ground
34 TEST I Test terminal(normaly ground)
35 DVdd – Power supply(power supply for digital section +1.8v)
36 XFfsilN I Primary master clock input
37 FsoCKO O Secondary fso clock M-output
38 Fsol I Secondary fso clock input
39 HPOUTR2 O Not used
40 HPVssR – Ground
41 HPOUTR1 O Not used
42 HPVddR – Power supply(+3.3v)
43 HPOUTL2 O Not used
44 HPVddL – Ground
45 HPOUT O Not used
46 HPVddL – Power supply(+3.3v)
47 XVdd – Power supply(+3.3v)
48 XfsoIN I Secondary master clock input(1024/512fso)
46
Page 47
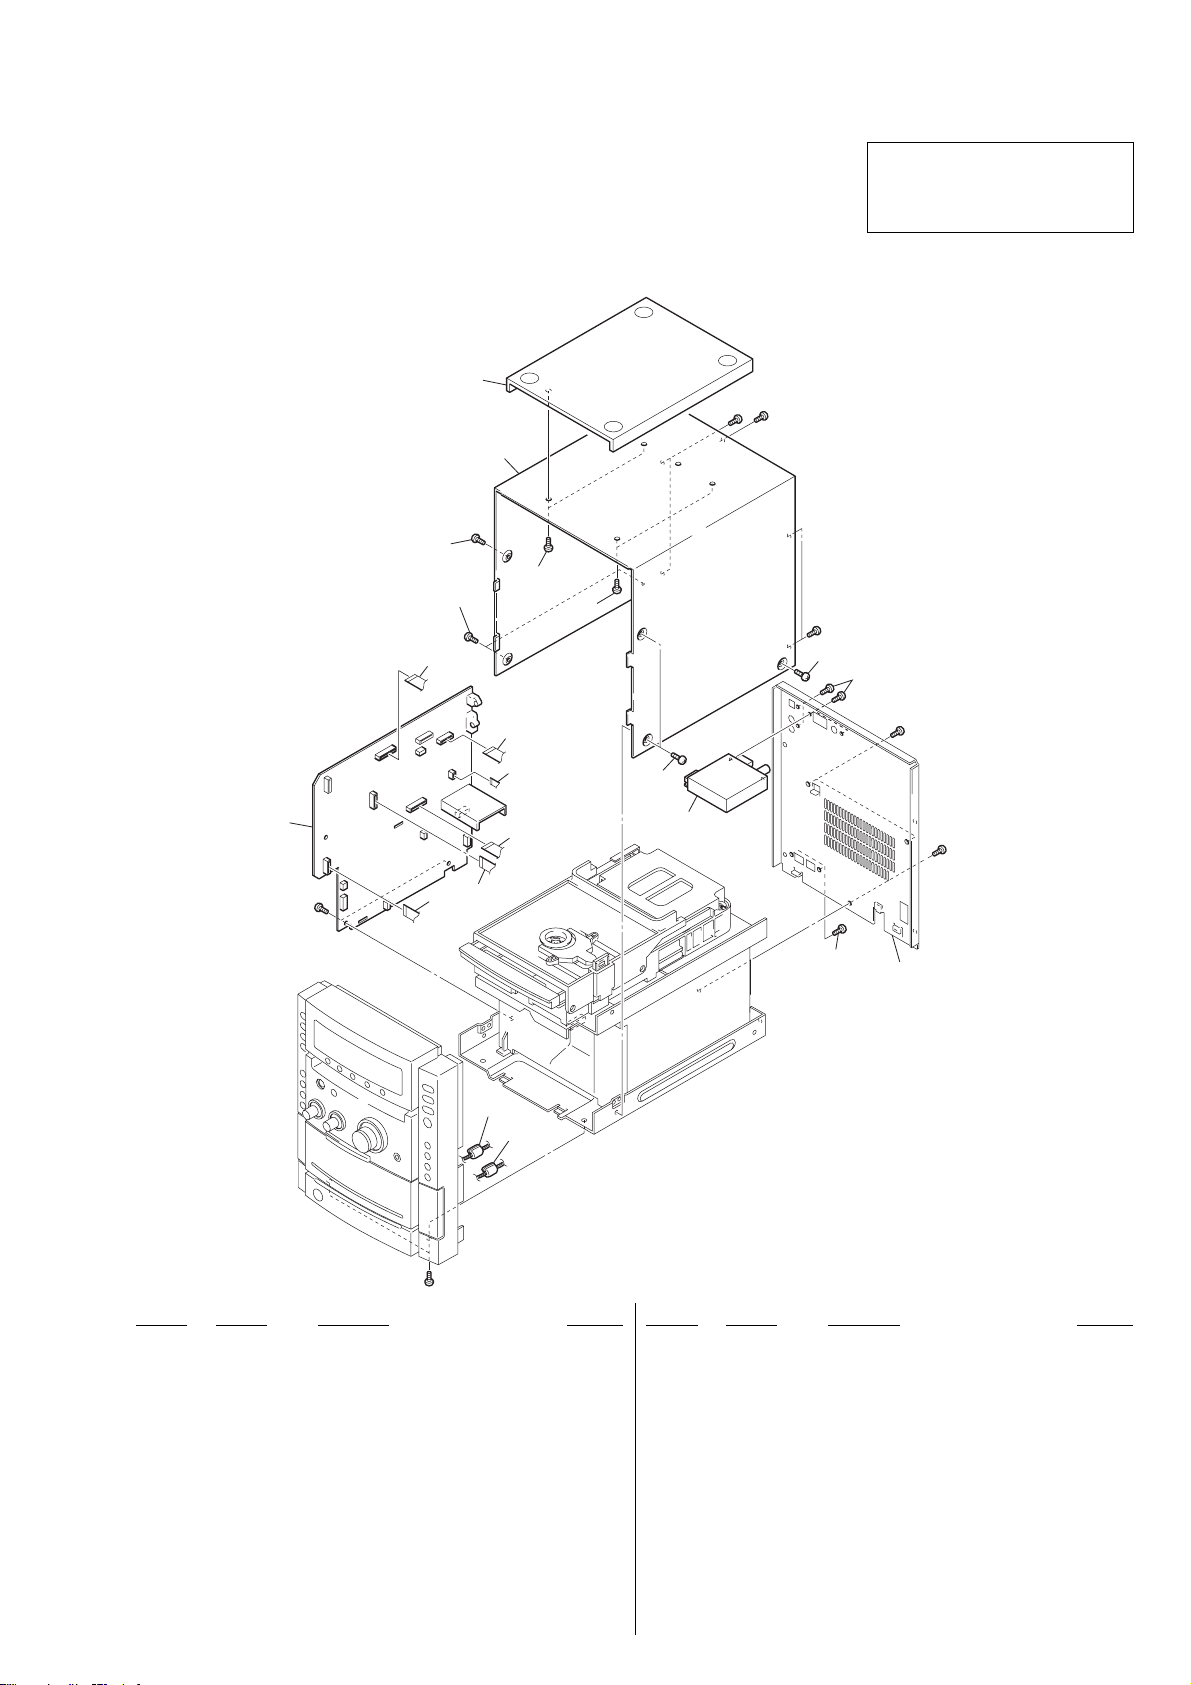
NOTE:
d
• -XX, -X mean standardized parts, so they may
have some differences from the original one.
• Items marked “*” are not stocked since they
are seldom required for routine service. Some
delay should be anticipated when ordering these
items.
• The mechanical parts with no reference number
in the exploded views are not supplied.
8-1. MAIN SECTION
10
7
7
SECTION 8
EXPLODED VIEWS
• Abbreviation
E3 : 240V AC Area in E model
E51 : Chilean and Peruvian model
EA : Saudi Arabia model
RU : Russian model
9
8
8
#1
HCD-CPX22/NXM3
The components identified by mark 0 or
dotted line with mark 0 are critical for
safety.
Replace only with part number specified.
#1
#1
13
6
5
1
#1
3
12
4
7
11
7
8
8
#1
#1
not supplie
14
14
#1
Ref. No. Part No. Description Remarks
1 A-1052-039-A MAIN BOARD, COMPLETE (EA)
1 A-4750-856-A MAIN BOARD, COMPLETE (AEP, UK)
1 A-4750-931-A MAIN BOARD, COMPLETE (RU)
1 A-4750-933-A MAIN BOARD, COMPLETE (E3)
1 A-4750-935-A MAIN BOARD, COMPLETE (E51)
1 A-4750-937-A MAIN BOARD, COMPLETE (US)
3 1-769-984-11 WIRE (FLAT TYPE) (13 CORE)
4 1-765-332-11 WIRE (FLAT TYPE) (15 CORE)
5 1-769-869-11 WIRE (FLAT TYPE) (5 CORE)
6 1-769-939-11 WIRE (FLAT TYPE) (11 CORE) (EXCEPT AEP, UK)
6 1-773-003-11 WIRE (FLAT TYPE) (15 CORE) (AEP, UK)
7 3-363-099-22 SCREW (CASE 3 TP2)
Ref. No. Part No. Description Remarks
8 4-951-620-01 SCREW (2.6X8), +BVTP
9 4-252-541-51 CASE
10 4-252-538-01 PANEL, TOP
11 1-693-603-31 TUNER (FM/AM) (E3, E51, EA)
11 1-693-604-11 TUNER (FM/AM) (AEP, UK)
11 1-693-623-31 TUNER (FM/AM) (US)
11 1-693-654-11 TUNER (FM/AM) (RU)
12 1-773-119-11 WIRE (FLAT TYPE) (19CORE)
13 1-827-488-11 WIRE (FLAT TYPE) (27CORE)
14 1-500-386-11 FILTER, CLAMP (FERRITE CORE)
#1 7-685-646-79 SCREW +BVTP 3X8 TYPE2 IT-3
#2 7-685-647-79 SCREW +BVTP 3X10 TYPE2 TT (B)
47
Page 48
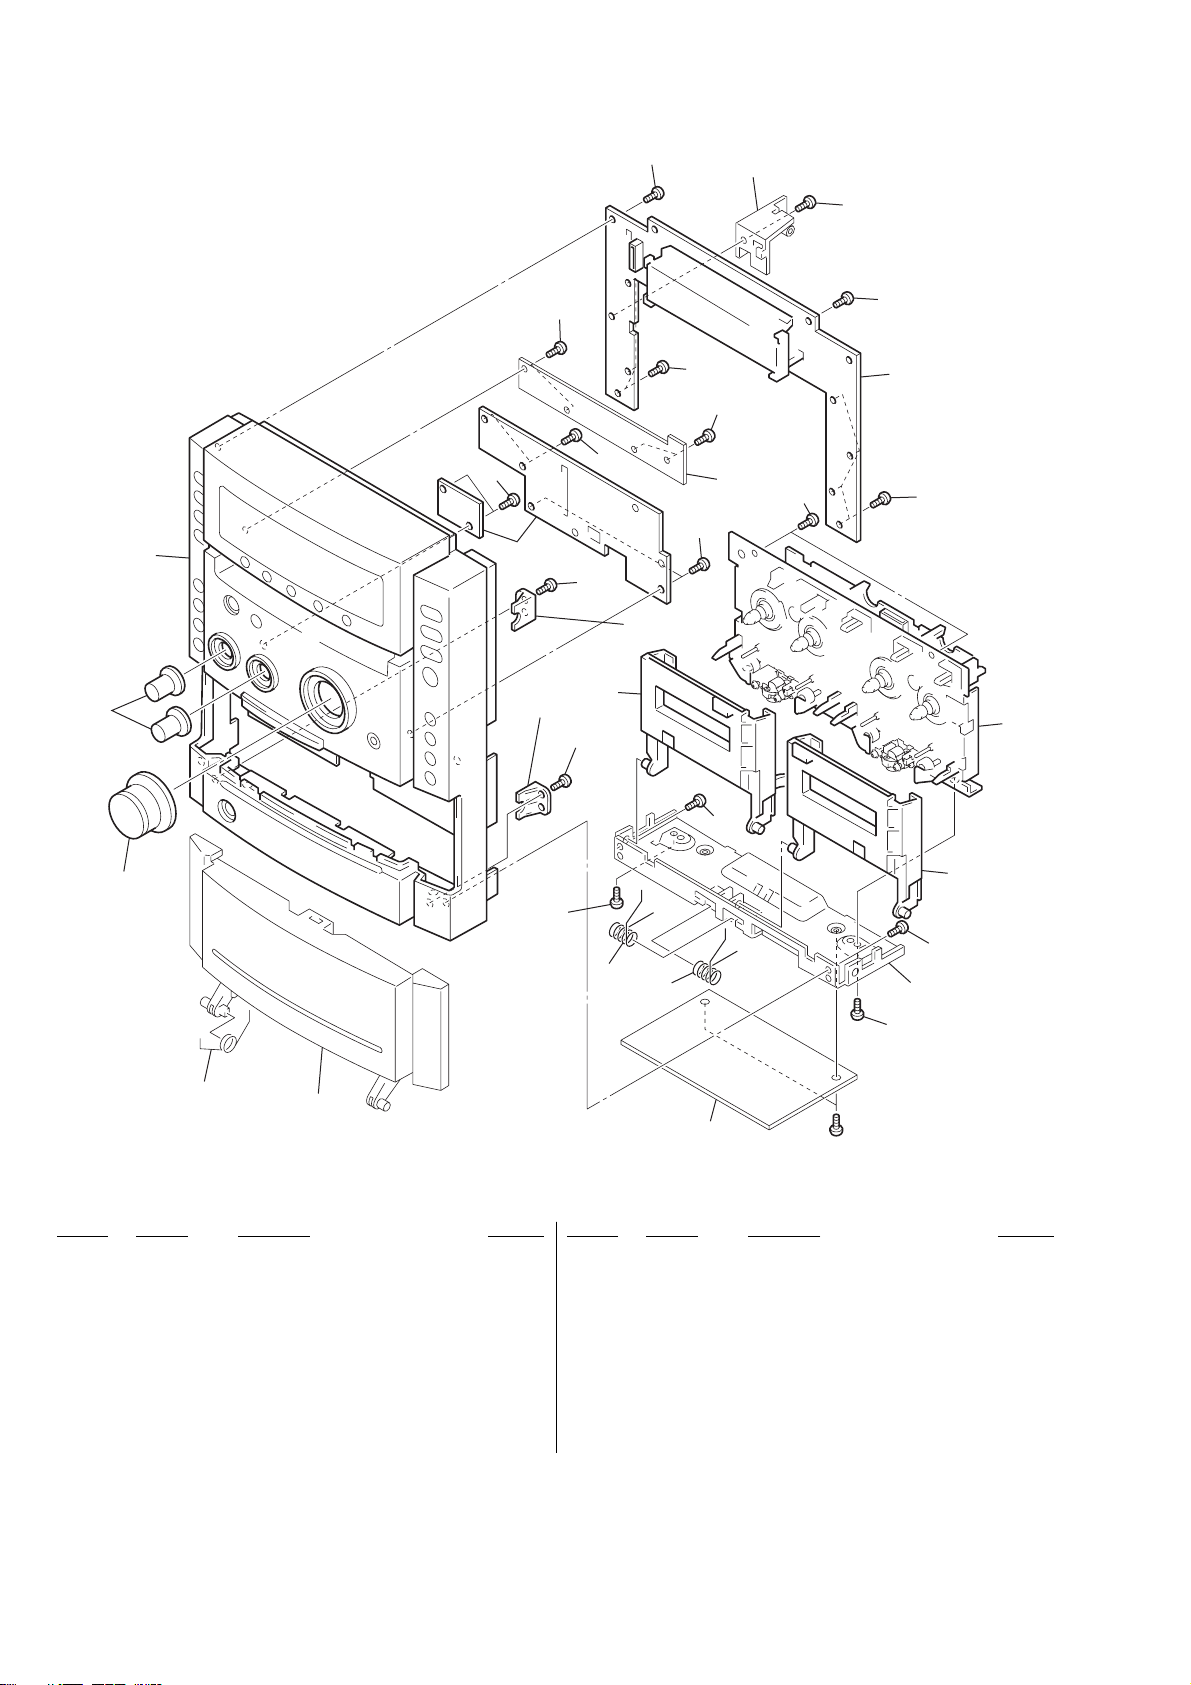
HCD-CPX22/NXM3
8-2. FRONT PANEL SECTION
53
52
57
57
56
not
supplied
57
57
57
60
57
57
57
not supplied
not supplied
57
not supplied
57
57
57
58
57
59
57
51
61
55
57
62
63
not supplied
55
not supplied
Ref. No. Part No. Description Remarks Ref. No. Part No. Description Remarks
51 4-252-535-11 KNOB (VOL)
52 4-252-536-11 KNOB (B/T)
53 X-4956-194-1 PANEL ASSY (U) (CPX22), FRONT (US)
53 X-4956-200-1 PANEL ASSY (CPX22), FRONT (AEP, UK)
53 X-4956-262-1 PANEL ASSY, FRONT (E3, E51, EA)
53 X-4956-333-1 PANEL ASSY, FRONT (RU)
55 3-970-608-01 SUMITITE (B3), +BV
56 A-4750-851-A VOL BOARD, COMPLETE
57 4-951-620-01 SCREW (2.6X8), +BVTP
not supplied
not supplied
58 A-4750-849-A FL COM BOARD, COMPLETE
59 1-796-880-11 DECK, MECHANISM
60 X-4956-197-1 HOLDER (A) (TC) ASSY
61 X-4956-198-1 HOLDER (B) (TC) ASSY
62 4-252-530-01 SPRING (HB)
63 4-252-529-01 SPRING (HA)
#1 7-685-646-79 SCREW +BVTP 3X8 TYPE2 IT-3
#1
48
Page 49
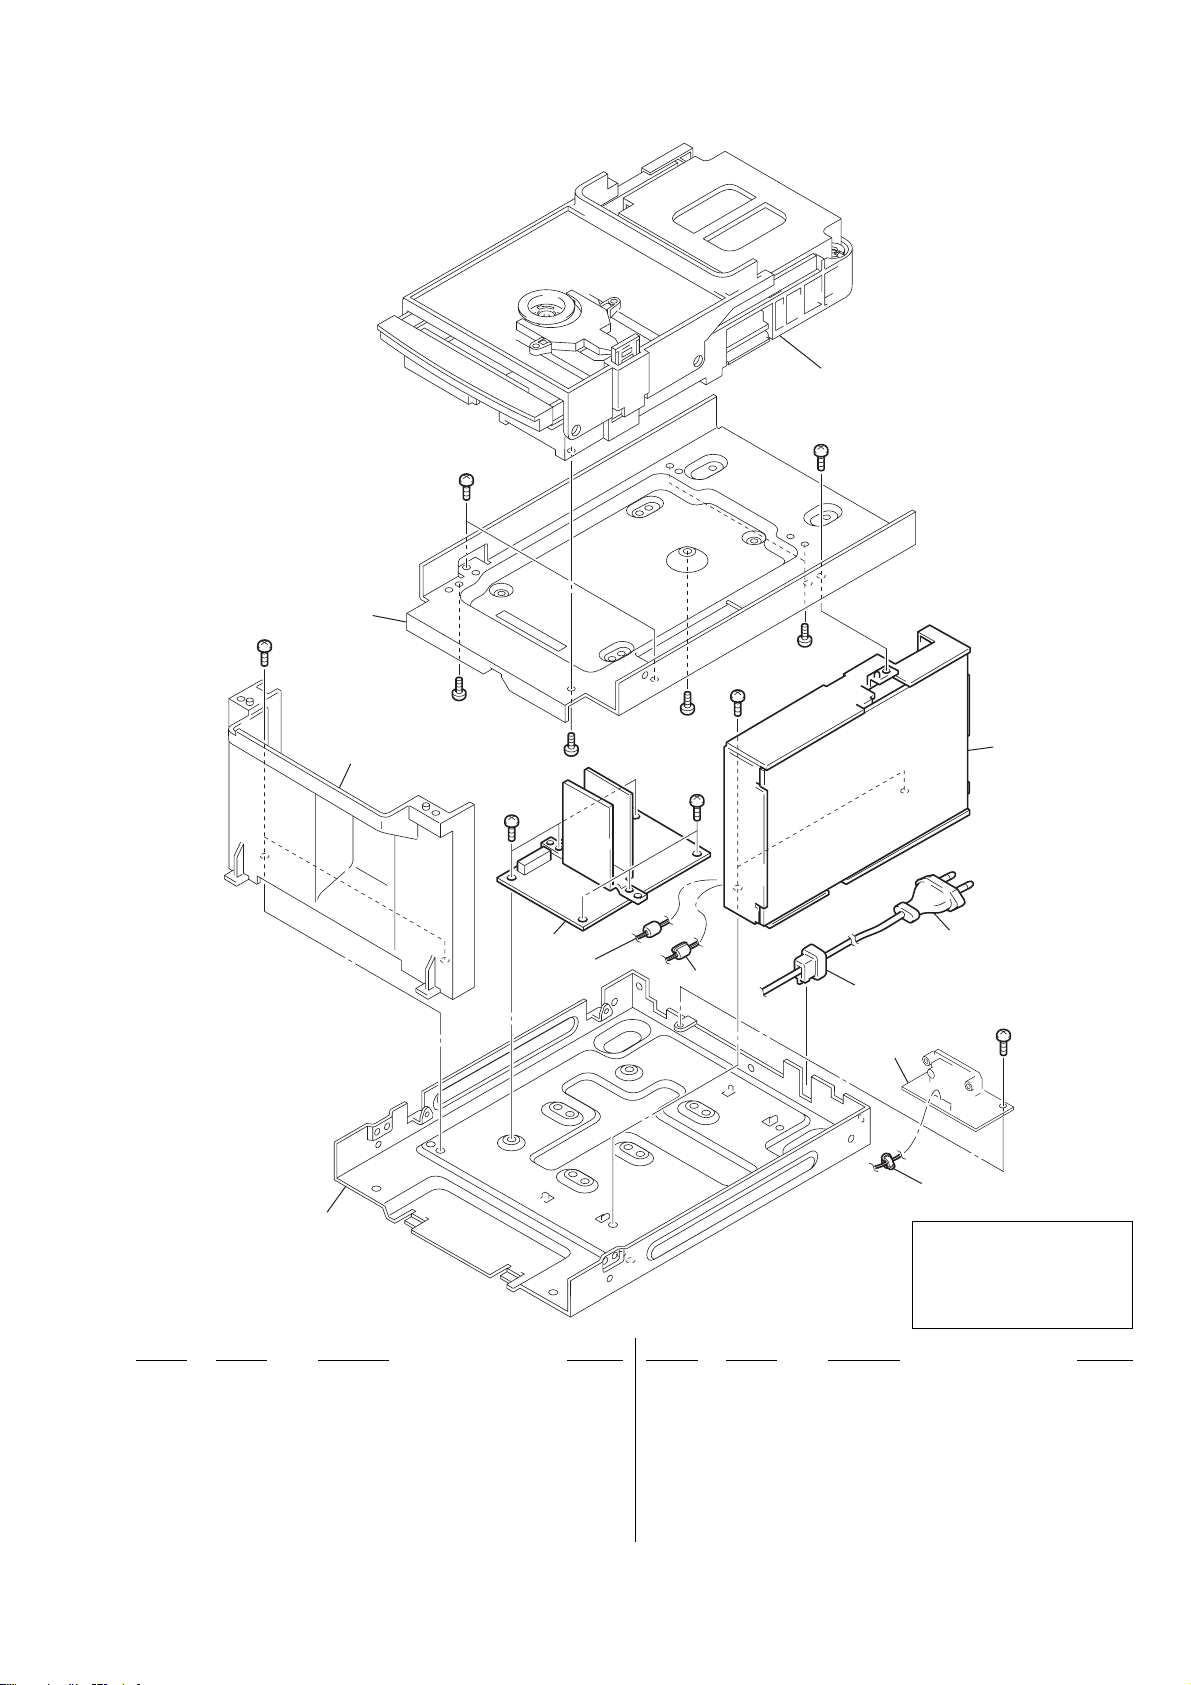
8-3. CHASSIS SECTION
not supplied
#1
#1
#1
HCD-CPX22/NXM3
CDM81B-F1BD81A
#1
#1
#1
#1
not supplied
not supplied
#1
101
107
#1
#1
105
102
103
104
#1
not supplied
106
The components identified by
mark 0 or dotted line with mark
0 are critical for safety.
Replace only with part number
specified.
Ref. No. Part No. Description Remarks
101 A-4750-863-A S-MASTER (A) BOARD, COMPLETE
0102 1-468-813-11 REGULATOR, SWITCHING (AEP, UK, RU)
0102 1-468-819-11 REGULATOR, SWITCHING (US)
0102 1-468-821-11 REGULATOR, SWITCHING (E3, E51, EA)
0103 1-775-786-21 CORD, POWER (UK, EA)
0103 1-777-071-53 CORD, POWER (AEP, E51, RU)
0103 1-783-820-11 CORD, POWER (US)
Ref. No. Part No. Description Remarks
0103 1-827-226-11 CORD, POWER (E3)
* 104 3-703-244-00 BUSHING (2104), CORD (EXCEPT E3)
104 3-703-571-11 BUSHING (S) (4516), CORD (E3)
105 1-500-497-11 FILTER, CLAMP (FERRITE CORE)
106 1-469-854-11 CORE, FERRITE (US)
107 1-500-386-11 FILTER, CLAMP (FERRITE CORE) (US)
#1 7-685-646-79 SCREW +BVTP 3X8 TYPE2 IT-3
49
Page 50
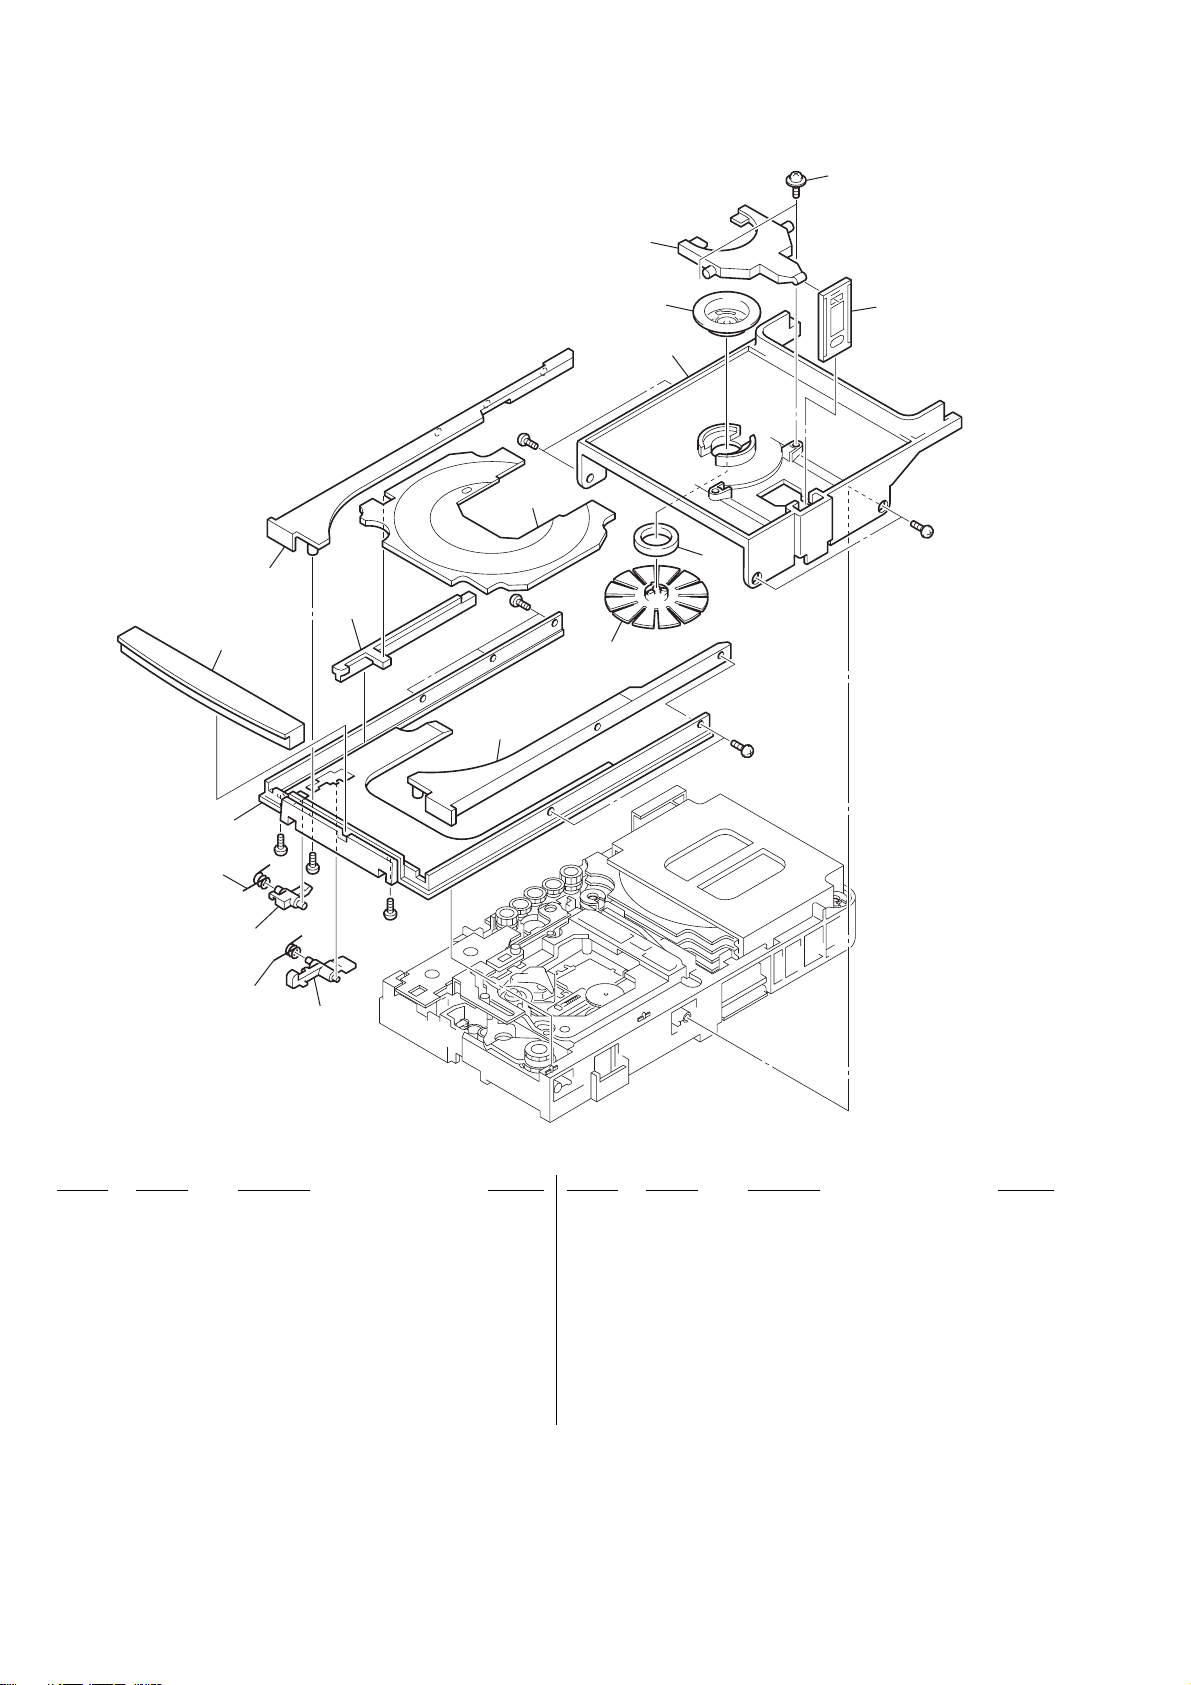
HCD-CPX22/NXM3
8-4. CD MECHANISM DECK SECTION-1
(CDM81B-F1BD81A)
166
165
156
155
152
159
#5
#3
158
#5
157
#3
160
161
164
163
162
167
#3
#5
151
#3
154
153
Ref. No. Part No. Description Remarks Ref. No. Part No. Description Remarks
151 4-251-849-01 LEVER (SW2)
152 4-251-991-01 SPRING (SW2), TORSION
153 4-251-860-01 LEVER (LOCK)
154 4-251-867-01 SPRING (LOCK), TORSION
155 4-251-828-01 TRAY (MAIN)
156 4-252-533-11 PANEL, LOADING
157 4-251-857-01 COVER (R)
158 4-251-830-01 SLIDER (ST)
159 4-251-858-01 COVER (L)
160 4-251-829-01 TRAY (SUB)
161 X-4955-707-2 PULLEY (A5) ASSY, CHUCKING (CPX22)
161 X-4955-707-3 PULLEY (A5) ASSY, CHUCKING (NXM3)
162 1-471-035-11 MAGNET ASSY
163 4-251-821-01 BRACKET (TOP)
164 4-231-189-01 PULLEY (B), CHUCKING
165 4-251-824-01 LIFTER
166 4-985-672-01 SCREW (+PTPWHM2.6), FLOATING
167 4-251-822-01 JOINT (LIFTER)
#3 7-685-534-19 SCREW +BTP 2.6X8 TYPE2 N-S
#5 7-685-102-19 SCREW +P 2X4 NON-SLIT TYPE 2
50
Page 51
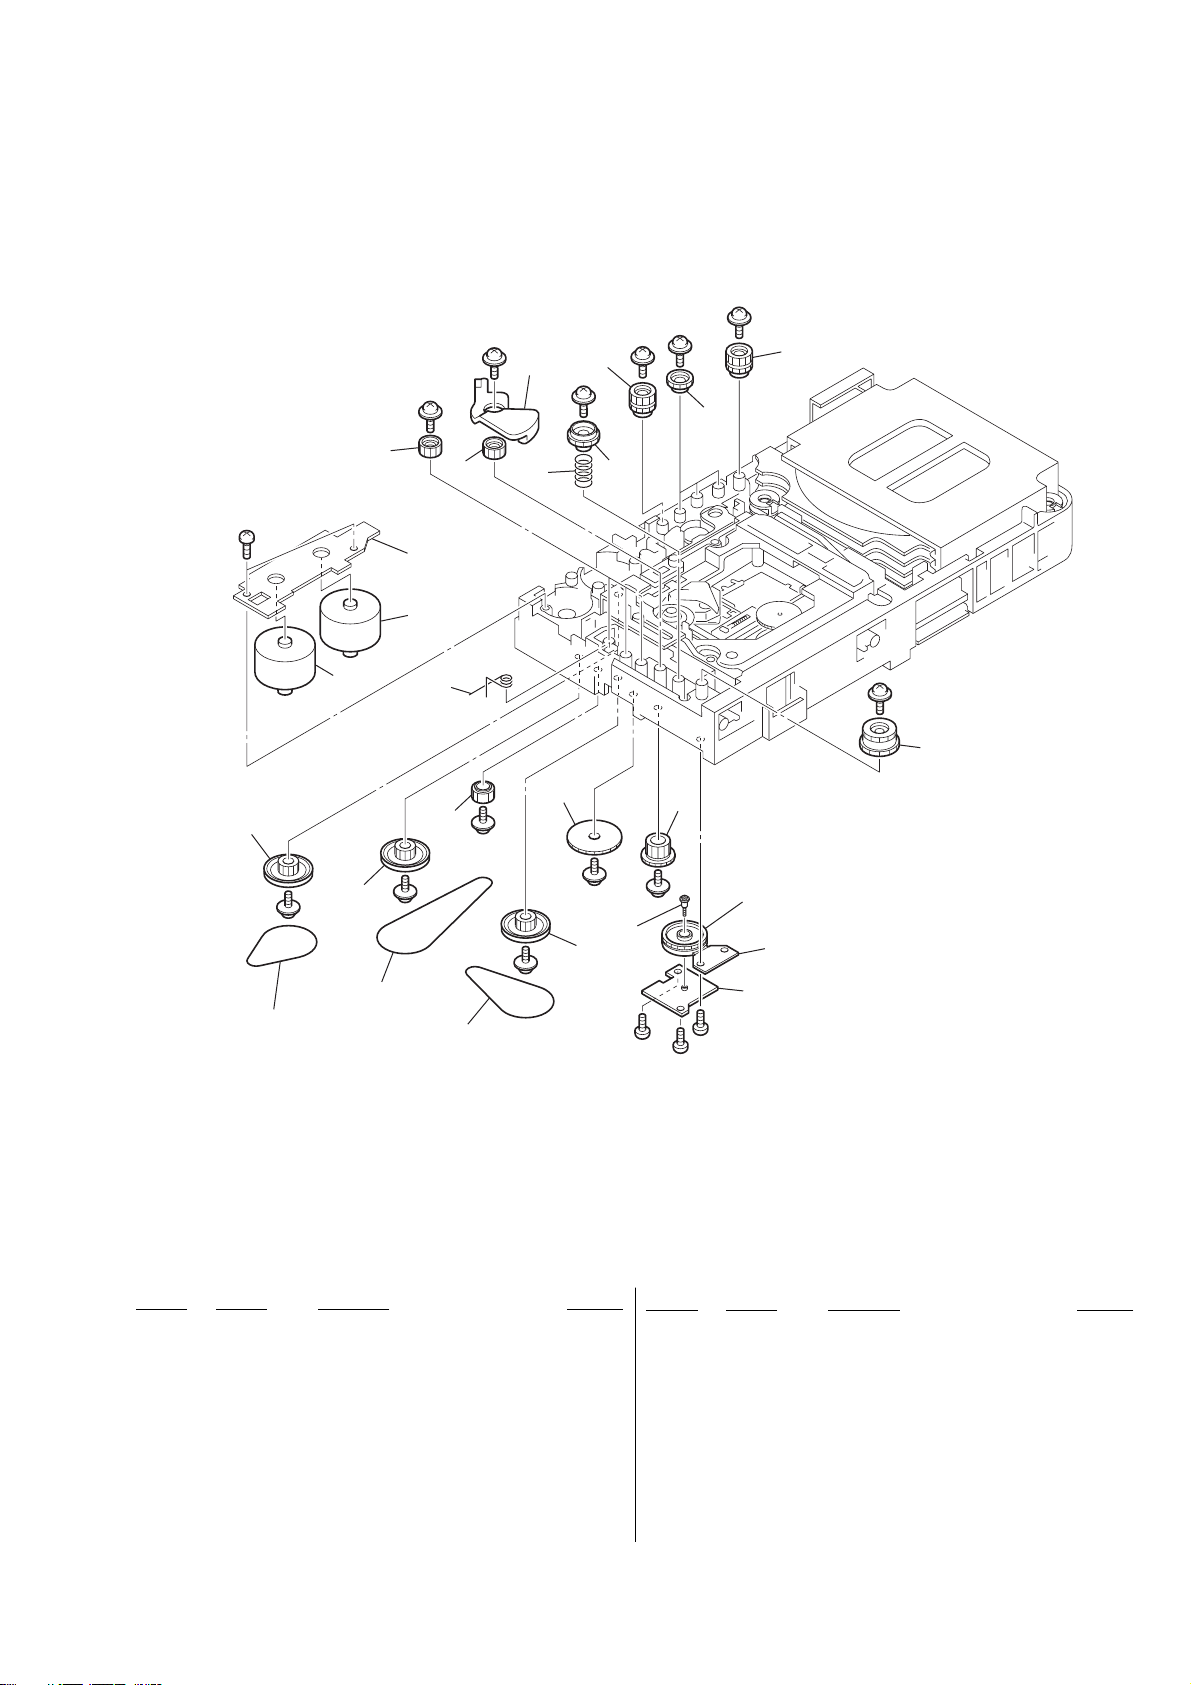
8-5. CD MECHANISM DECK SECTION-2
(CDM81B-F1BD81A)
#4
209
#4
203
203
#3
not supplied
M761
204
#4
214
215
#4
HCD-CPX22/NXM3
#4
#4
214
203
208
#4
201
M762
208
#4
202
206
212
207
#4
213
#4
#4
208
205
#3
#4
#4
210
211
S771
not supplied
not supplied
#3
#3
Ref. No. Part No. Description Remarks
201 4-251-870-01 BELT (BU)
202 4-251-869-01 BELT (MAIN TRAY)
203 4-251-841-01 GEAR (SUB TRAY 1)
204 4-251-873-01 SPRING (MODE), COMPRESSION
205 4-239-618-02 SCREW (+PWH, 2X6), STEP TAPPING
206 4-251-872-01 SPRING (LEVER), TORSION
207 4-251-868-01 BELT (SUB TRAY)
208 4-251-853-01 PULLEY (BU)
209 4-251-834-01 LEVER (MAIN TRAY)
210 4-251-852-01 GEAR (MAIN TRAY 3)
Ref. No. Part No. Description Remarks
211 4-251-854-01 GEAR (BU1)
212 4-251-850-01 GEAR (MAIN TRAY 1)
213 4-251-856-01 GEAR (BU2)
214 4-251-842-01 GEAR (SUB TRAY 2)
215 4-251-851-01 GEAR (MAIN TRAY 2)
M761 A-4713-174-A MOTOR (81) ASSY (LD/ST MOTOR)
M762 A-4713-174-A MOTOR (81) ASSY (BU U/D MOTOR)
S771 1-478-552-11 ENCODER, ROTARY
#3 7-685-534-19 SCREW +BTP 2.6X8 TYPE2 N-S
#4 7-685-902-21 SCREW +PTPWH 2.6X8 (TYPE2)
51
Page 52
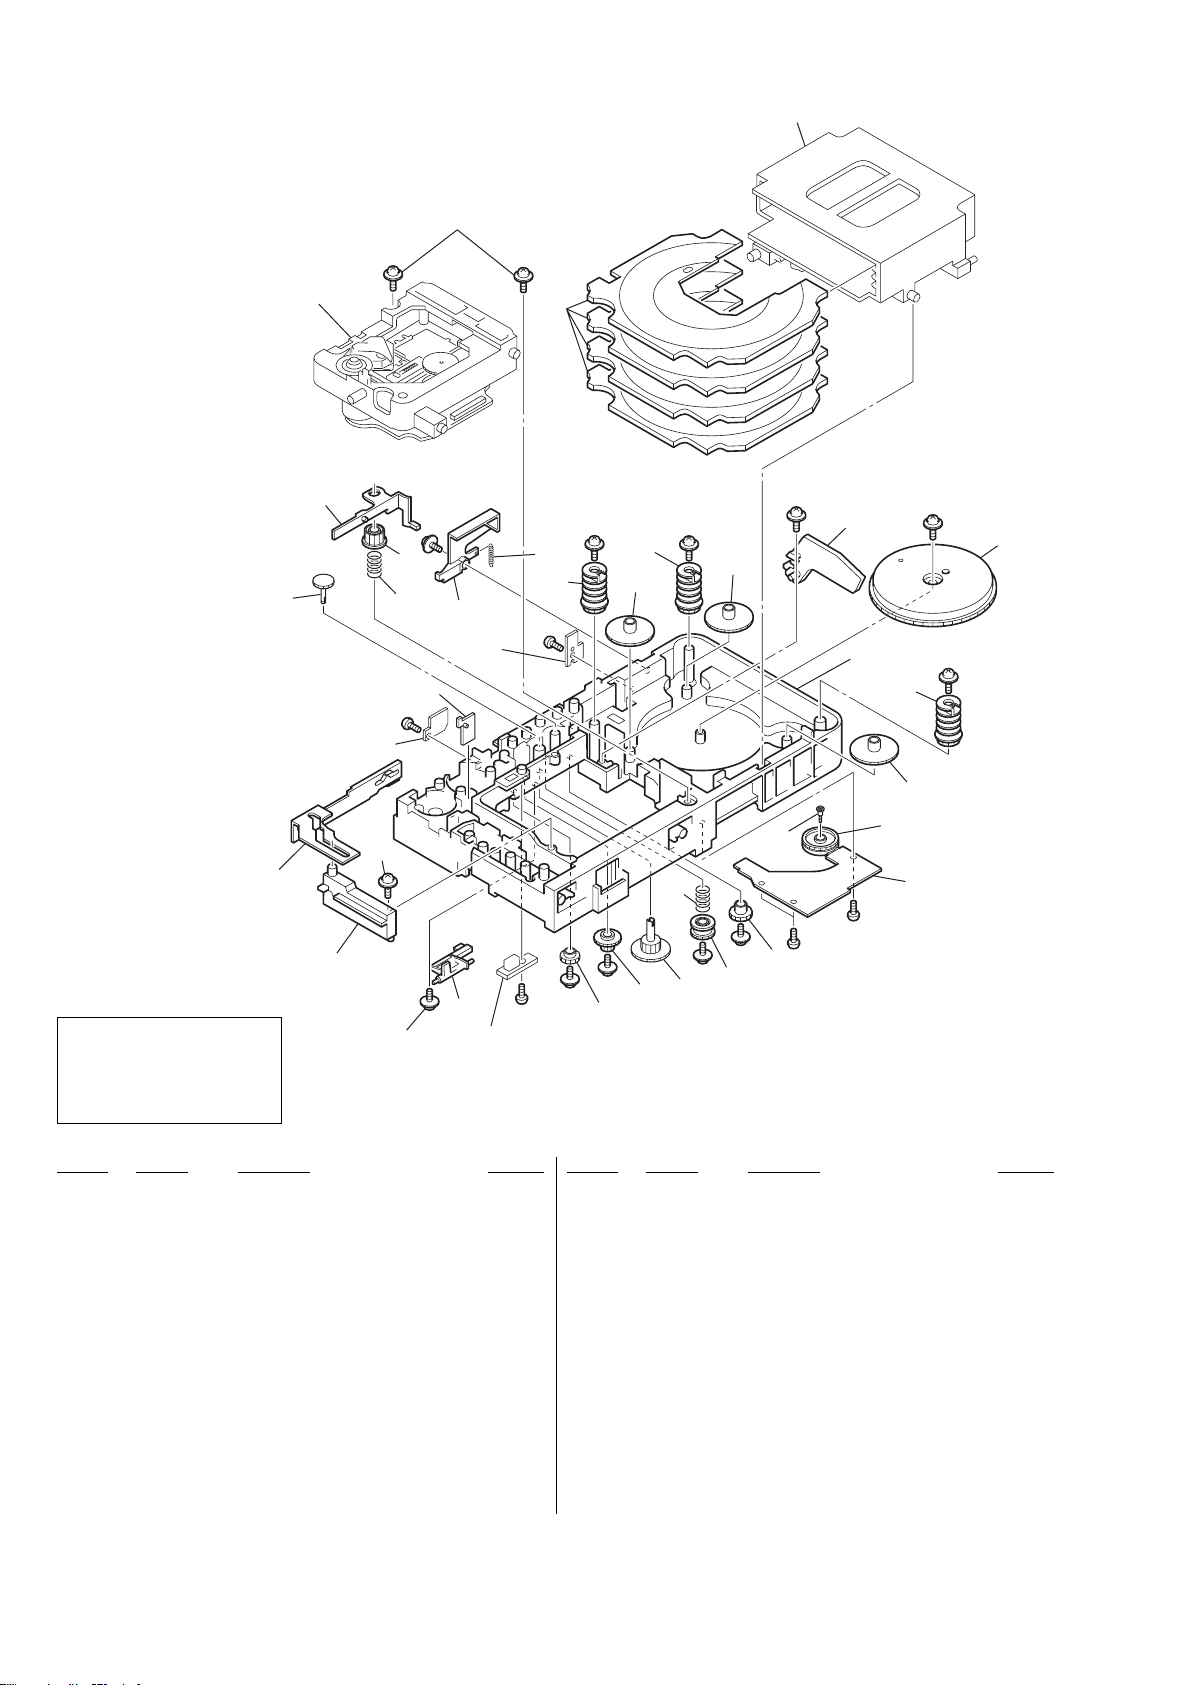
HCD-CPX22/NXM3
8-6. CD MECHANISM DECK SECTION-3
(CDM81B-F1BD81A)
not supplied
251
BU-F1BD81A
258
The components identified by
mark 0 or dotted line with mark
0 are critical for safety.
Replace only with part number
specified.
273
256
not supplied
251
268
272
252
257
#3
251
#4
270
not supplied
269
not supplied
#3
261
253
262
#3
#4
#4
272
262
263
254
252
#4#4
260
#4
263
271
#4
267
255
#4
#3
259
265
#3
#4
264
#4
262
263
S781
266
Ref. No. Part No. Description Remarks Ref. No. Part No. Description Remarks
251 4-985-672-01 SCREW (+PTPWHM2.6), FLOATING
252 4-251-873-01 SPRING (MODE), COMPRESSION
253 4-251-874-01 SPRING (SW), TENSION
254 4-251-844-01 GEAR (SS2)
255 4-251-835-01 GEAR (STOCKER 1)
256 4-251-833-01 LEVER (SUB TRAY)
257 4-251-843-01 LEVER (RELEASE)
258 4-251-831-01 LEVER (MODE)
259 4-251-862-01 SHUTTER (TRAY)
260 4-251-845-01 GEAR (SS3)
261 4-251-829-01 TRAY (SUB)
262 4-251-827-01 CAM (STOCKER)
263 4-251-836-01 GEAR (STOCKER 2)
264 4-251-838-01 GEAR (STOCKER 3)
265 4-251-823-01 CHASSIS (CDM81)
266 A-4750-232-A RELAY MOUNTED PC BOARD
267 4-239-618-02 SCREW (+PWH, 2X6), STEP TAPPING
268 4-251-825-01 CAM (BU)
269 4-251-832-01 LEVER (STOCKER)
270 4-251-861-01 LEVER (SW)
271 4-251-839-01 GEAR (STOCKER 4)
272 4-251-840-01 GEAR (SUB TRAY)
273 4-251-847-01 GEAR (SS4)
S781 1-478-551-11 ENCODER, ROTARY
#3 7-685-534-19 SCREW +BTP 2.6X8 TYPE2 N-S
#4 7-685-902-21 SCREW +PTPWH 2.6X8 (TYPE2)
52
Page 53
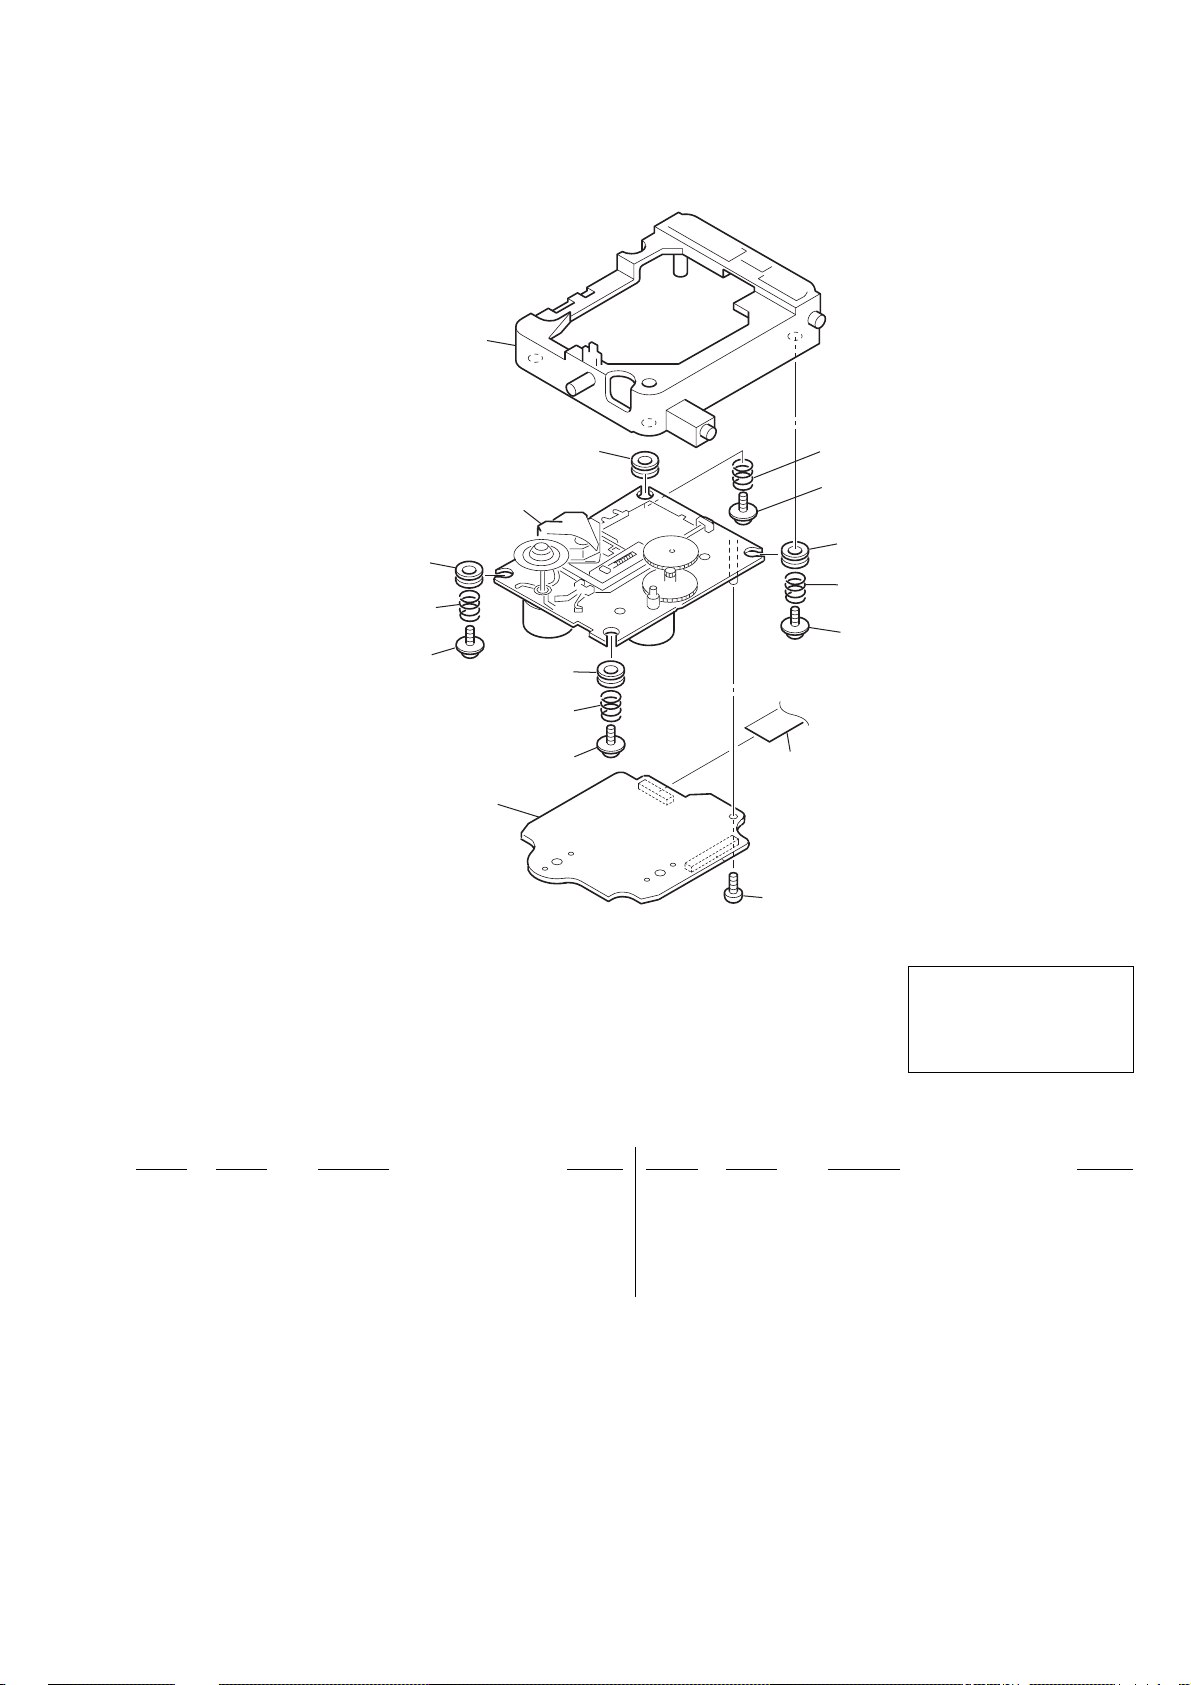
8-7. BASE UNIT (BU-F1BD81A)
HCD-CPX22/NXM3
301
303
304
305
307
302
303
304
305
303
304
305
303
304
305
306
308
The components identified by
mark 0 or dotted line with mark
0 are critical for safety.
Replace only with part number
specified.
Ref. No. Part No. Description Remarks
301 X-4956-102-1 HOLDER (215) ASSY
0302 8-820-244-01 OPTICAL PICK-UP (KSM-215DCP/C2NP)
303 4-227-549-11 INSULATOR
304 4-227-045-11 SPRING (INSULATOR), COIL
305 4-985-672-01 SCREW (+PTPWHM2.6), FLOATING
Ref. No. Part No. Description Remarks
306 1-827-992-11 WIRE (FLAT TYPE) (16 CORE)
307 A-4751-045-A CD (A) BOARD, COMPLETE
308 4-951-620-01 SCREW (2.6X8), +BVTP
53
Page 54
HCD-CPX22/NXM3
SECTION 9
BD
NOTE:
• Due to standardization, replacements in the
parts list may be different from the parts
specified in the diagrams or the components
used on the set.
• -XX, -X mean standardized parts, so they
may have some difference from the original
one.
• Items marked “*” are not stocked since they
are seldom required for routine service.
Some delay should be anticipated when
ordering these items.
• CAPACITORS:
uF: µF
• RESISTORS
All resistors are in ohms.
METAL: metal-film resistor
METAL OXIDE: Metal Oxide-film resistor
F: nonflammable
Ref. No. Part No. Description Remarks Ref. No. Part No. Description Remarks
A-4751-045-A BD BOARD, COMPLETE
*****************
ELECTRICAL PARTS LIST
• COILS
uH: µH
•SEMICONDUCTORS
In each case, u: µ, for example:
uA...: µA... , uPA... , µPA... ,
uPB... , µPB... , uPC... , µPC... ,
uPD..., µPD...
• Abbreviation
E3 : 240V AC Area in E model
E51 : Chilean and Peruvian model
EA : Saudi Arabia model
RU : Russian model
C195 1-164-360-11 CERAMIC CHIP 0.1uF 16V
C196 1-164-360-11 CERAMIC CHIP 0.1uF 16V
The components identified by mark 0
or dotted line with mark 0 are critical
for safety.
Replace only with part number specified.
When indicating parts by reference
number, please include the board.
< CAPACITOR >
C10 1-165-989-11 CERAMIC CHIP 10uF 10% 6.3V
C11 1-165-989-11 CERAMIC CHIP 10uF 10% 6.3V
C14 1-164-360-11 CERAMIC CHIP 0.1uF 16V
C15 1-164-360-11 CERAMIC CHIP 0.1uF 16V
C16 1-115-156-11 CERAMIC CHIP 1uF 10V
C17 1-126-246-11 ELECT CHIP 220uF 20% 4V
C18 1-162-964-11 CERAMIC CHIP 0.001uF 10% 50V
C111 1-162-967-11 CERAMIC CHIP 0.0033uF 10% 50V
C112 1-164-315-11 CERAMIC CHIP 470PF 5% 50V
C113 1-162-967-11 CERAMIC CHIP 0.0033uF 10% 50V
C114 1-164-315-11 CERAMIC CHIP 470PF 5% 50V
C115 1-164-360-11 CERAMIC CHIP 0.1uF 16V
C116 1-128-995-21 ELECT CHIP 100uF 20% 10V
C122 1-107-826-11 CERAMIC CHIP 0.1uF 10% 16V
C123 1-107-826-11 CERAMIC CHIP 0.1uF 10% 16V
C124 1-162-959-11 CERAMIC CHIP 330PF 5% 50V
C125 1-164-360-11 CERAMIC CHIP 0.1uF 16V
C131 1-162-927-11 CERAMIC CHIP 100PF 5% 50V
C132 1-117-863-11 CERAMIC CHIP 0.47uF 10% 6.3V
C133 1-162-970-11 CERAMIC CHIP 0.01uF 10% 25V
C134 1-164-360-11 CERAMIC CHIP 0.1uF 16V
C141 1-107-826-11 CERAMIC CHIP 0.1uF 10% 16V
C142 1-162-965-11 CERAMIC CHIP 0.0015uF 10% 50V
C143 1-164-360-11 CERAMIC CHIP 0.1uF 16V
C151 1-128-995-21 ELECT CHIP 100uF 20% 10V
C161 1-164-360-11 CERAMIC CHIP 0.1uF 16V
C162 1-164-360-11 CERAMIC CHIP 0.1uF 16V
C163 1-164-360-11 CERAMIC CHIP 0.1uF 16V
C171 1-162-919-11 CERAMIC CHIP 22PF 5% 50V
C172 1-162-920-11 CERAMIC CHIP 27PF 5% 50V
C201 1-128-995-21 ELECT CHIP 100uF 20% 10V
C203 1-128-995-21 ELECT CHIP 100uF 20% 10V
C209 1-162-970-11 CERAMIC CHIP 0.01uF 10% 25V
C210 1-107-826-11 CERAMIC CHIP 0.1uF 10% 16V
C211 1-164-230-11 CERAMIC CHIP 220PF 5% 50V
C212 1-162-919-11 CERAMIC CHIP 22PF 5% 50V
C213 1-162-919-11 CERAMIC CHIP 22PF 5% 50V
C251 1-162-969-11 CERAMIC CHIP 0.0068uF 10% 25V
C252 1-164-360-11 CERAMIC CHIP 0.1uF 16V
C255 1-164-360-11 CERAMIC CHIP 0.1uF 16V
C257 1-164-360-11 CERAMIC CHIP 0.1uF 16V
C258 1-164-360-11 CERAMIC CHIP 0.1uF 16V
C259 1-164-360-11 CERAMIC CHIP 0.1uF 16V
C260 1-128-394-11 ELECT CHIP 220uF 20% 10V
C302 1-164-360-11 CERAMIC CHIP 0.1uF 16V
C303 1-164-360-11 CERAMIC CHIP 0.1uF 16V
C305 1-126-246-11 ELECT CHIP 220uF 20% 4V
C306 1-164-360-11 CERAMIC CHIP 0.1uF 16V
C307 1-164-360-11 CERAMIC CHIP 0.1uF 16V
C308 1-126-208-21 ELECT CHIP 47uF 20% 4V
C309 1-164-360-11 CERAMIC CHIP 0.1uF 16V
C310 1-164-360-11 CERAMIC CHIP 0.1uF 16V
C311 1-164-360-11 CERAMIC CHIP 0.1uF 16V
C312 1-164-360-11 CERAMIC CHIP 0.1uF 16V
C313 1-164-360-11 CERAMIC CHIP 0.1uF 16V
C314 1-126-208-21 ELECT CHIP 47uF 20% 4V
C315 1-107-826-11 CERAMIC CHIP 0.1uF 10% 16V
C316 1-162-966-11 CERAMIC CHIP 0.0022uF 10% 50V
C317 1-162-970-11 CERAMIC CHIP 0.01uF 10% 25V
C318 1-162-970-11 CERAMIC CHIP 0.01uF 10% 25V
C320 1-216-864-11 SHORT CHIP 0
C174 1-164-360-11 CERAMIC CHIP 0.1uF 16V
C181 1-164-360-11 CERAMIC CHIP 0.1uF 16V
C182 1-164-360-11 CERAMIC CHIP 0.1uF 16V
C183 1-124-778-00 ELECT CHIP 22uF 20% 6.3V
C184 1-124-778-00 ELECT CHIP 22uF 20% 6.3V
C185 1-164-315-11 CERAMIC CHIP 470PF 5% 50V
C186 1-164-315-11 CERAMIC CHIP 470PF 5% 50V
C194 1-164-360-11 CERAMIC CHIP 0.1uF 16V
54
< CONNECTOR >
CN101 1-770-425-11 CONNECTOR, FFC/FPC 16P
CN201 1-818-350-11 CONNECTOR (FFC) 27P
< FERRITE BEAD >
FB301 1-500-445-21 FERRITE, EMI (SMD) (2012)
Page 55
HCD-CPX22/NXM3
BD
Ref. No. Part No. Description Remarks Ref. No. Part No. Description Remarks
< IC >
IC101 8-752-425-12 IC CXD3059AR
IC251 6-705-808-01 IC BA5947FM
IC301 6-705-365-01 IC TC94A34FG-002
IC303 6-705-807-01 IC BH15FB1WG
< TRANSISTOR >
Q10 6-550-363-01 TRANSISTOR 2SB1690KT146
< RESISTOR >
R10 1-216-791-11 METAL CHIP 3.3 5% 1/10W
R11 1-216-864-11 SHORT CHIP 0
R12 1-216-845-11 METAL CHIP 100K 5% 1/10W
R13 1-218-446-11 METAL CHIP 1 5% 1/10W
R111 1-216-821-11 METAL CHIP 1K 5% 1/10W
R405 1-216-809-11 METAL CHIP 100 5% 1/10W
R406 1-216-809-11 METAL CHIP 100 5% 1/10W
R407 1-216-809-11 METAL CHIP 100 5% 1/10W
R408 1-216-809-11 METAL CHIP 100 5% 1/10W
R409 1-216-809-11 METAL CHIP 100 5% 1/10W
R410 1-216-809-11 METAL CHIP 100 5% 1/10W
R411 1-216-809-11 METAL CHIP 100 5% 1/10W
R412 1-216-809-11 METAL CHIP 100 5% 1/10W
R419 1-216-809-11 METAL CHIP 100 5% 1/10W
< SWITCH >
S101 1-771-853-11 SWITCH, DETECTION (LIMIT)
< VIBRATOR >
X171 1-767-408-21 VIBRATOR, CRYSTAL (16.9MHz)
DISC SW
************************************************************
R112 1-216-835-11 METAL CHIP 15K 5% 1/10W
R113 1-216-821-11 METAL CHIP 1K 5% 1/10W
R114 1-216-835-11 METAL CHIP 15K 5% 1/10W
R121 1-216-835-11 METAL CHIP 15K 5% 1/10W
R131 1-216-857-11 METAL CHIP 1M 5% 1/10W
DISC SW BOARD
*************
< CAPACITOR >
R132 1-216-833-11 METAL CHIP 10K 5% 1/10W
R133 1-216-848-11 METAL CHIP 180K 5% 1/10W
R141 1-216-829-11 METAL CHIP 4.7K 5% 1/10W
R142 1-216-821-11 METAL CHIP 1K 5% 1/10W
R143 1-216-827-11 METAL CHIP 3.3K 5% 1/10W
R151 1-216-864-11 SHORT CHIP 0
R161 1-216-809-11 METAL CHIP 100 5% 1/10W
R162 1-216-841-11 METAL CHIP 47K 5% 1/10W
R163 1-216-809-11 METAL CHIP 100 5% 1/10W
R165 1-216-864-11 SHORT CHIP 0
R171 1-216-817-11 METAL CHIP 470 5% 1/10W
R172 1-216-857-11 METAL CHIP 1M 5% 1/10W
R173 1-216-295-91 SHORT CHIP 0
R181 1-216-809-11 METAL CHIP 100 5% 1/10W
R182 1-216-809-11 METAL CHIP 100 5% 1/10W
R191 1-216-864-11 SHORT CHIP 0
R201 1-500-445-21 FERRITE, EMI (SMD) (2012)
R203 1-216-864-11 SHORT CHIP 0
R204 1-500-445-21 FERRITE, EMI (SMD) (2012)
R205 1-216-864-11 SHORT CHIP 0
R251 1-216-833-11 METAL CHIP 10K 5% 1/10W
R252 1-216-837-11 METAL CHIP 22K 5% 1/10W
R253 1-216-833-11 METAL CHIP 10K 5% 1/10W
R301 1-216-845-11 METAL CHIP 100K 5% 1/10W
R302 1-216-833-11 METAL CHIP 10K 5% 1/10W
R303 1-216-845-11 METAL CHIP 100K 5% 1/10W
R305 1-216-845-11 METAL CHIP 100K 5% 1/10W
R306 1-216-864-11 SHORT CHIP 0
R307 1-216-833-11 METAL CHIP 10K 5% 1/10W
R313 1-216-813-11 METAL CHIP 220 5% 1/10W
R351 1-216-809-11 METAL CHIP 100 5% 1/10W
R352 1-216-809-11 METAL CHIP 100 5% 1/10W
R353 1-216-809-11 METAL CHIP 100 5% 1/10W
C1009 1-164-156-11 CERAMIC CHIP 0.1uF 25V
< DIODE >
D1001 8-719-058-64 DIODE SEL5823A-TP15 (DISC 1)
D1002 8-719-058-64 DIODE SEL5823A-TP15 (DISC 2)
D1003 8-719-058-64 DIODE SEL5823A-TP15 (DISC 3)
D1004 8-719-058-64 DIODE SEL5823A-TP15 (DISC 4)
D1005 8-719-058-64 DIODE SEL5823A-TP15 (DISC 5)
< TRANSISTOR >
Q1001 8-729-027-43 TRANSISTOR DTC114EKA-T146
Q1002 8-729-027-43 TRANSISTOR DTC114EKA-T146
Q1003 8-729-027-43 TRANSISTOR DTC114EKA-T146
Q1004 8-729-027-43 TRANSISTOR DTC114EKA-T146
Q1005 8-729-027-43 TRANSISTOR DTC114EKA-T146
< RESISTOR >
R1001 1-216-819-11 METAL CHIP 680 5% 1/10W
R1002 1-216-819-11 METAL CHIP 680 5% 1/10W
R1003 1-216-819-11 METAL CHIP 680 5% 1/10W
R1004 1-216-819-11 METAL CHIP 680 5% 1/10W
R1005 1-216-819-11 METAL CHIP 680 5% 1/10W
R1006 1-216-819-11 METAL CHIP 680 5% 1/10W
R1007 1-216-819-11 METAL CHIP 680 5% 1/10W
R1008 1-216-819-11 METAL CHIP 680 5% 1/10W
R1009 1-216-819-11 METAL CHIP 680 5% 1/10W
R1010 1-216-819-11 METAL CHIP 680 5% 1/10W
R1011 1-216-813-11 METAL CHIP 220 5% 1/10W
R1012 1-216-815-11 METAL CHIP 330 5% 1/10W
R1013 1-216-817-11 METAL CHIP 470 5% 1/10W
R1014 1-216-819-11 METAL CHIP 680 5% 1/10W
< SWITCH >
R354 1-216-809-11 METAL CHIP 100 5% 1/10W
R401 1-216-809-11 METAL CHIP 100 5% 1/10W
R402 1-216-809-11 METAL CHIP 100 5% 1/10W
R403 1-216-809-11 METAL CHIP 100 5% 1/10W
R404 1-216-809-11 METAL CHIP 100 5% 1/10W
S1001 1-762-875-21 SWITCH, KEYBOARD (DISC 1)
S1002 1-762-875-21 SWITCH, KEYBOARD (DISC 2)
S1003 1-762-875-21 SWITCH, KEYBOARD (DISC 3)
S1004 1-762-875-21 SWITCH, KEYBOARD (DISC 4)
S1005 1-762-875-21 SWITCH, KEYBOARD (DISC 5)
************************************************************
55
Page 56
HCD-CPX22/NXM3
HP MAIN
Ref. No. Part No. Description Remarks Ref. No. Part No. Description Remarks
HP BOARD
********
C85 1-126-964-11 ELECT 10uF 20% 50V
C87 1-126-925-91 ELECT 470uF 20% 10V
< CAPACITOR >
C1093 1-162-971-11 CERAMIC CHIP 0.001uF 10% 50V
C1094 1-162-971-11 CERAMIC CHIP 0.001uF 10% 50V
< CONNECTOR >
CN1062 1-785-330-11 PIN, CONNECTOR (LIGHT ANGLE) 4P
< FERRITE BEAD >
FB1001 1-500-245-11 INDUCTOR, FERRITE BEAD
FB1002 1-500-245-11 INDUCTOR, FERRITE BEAD
FB1003 1-500-245-11 INDUCTOR, FERRITE BEAD
FB1004 1-500-245-11 INDUCTOR, FERRITE BEAD
< JACK >
J1063 1-750-032-11 JACK (DIA. 3.5) (PHONES)
< SHORT >
JR1080 1-216-864-11 SHORT CHIP 0
JR1081 1-216-864-11 SHORT CHIP 0
< RESISTOR >
R1088 1-216-864-11 SHORT CHIP 0
************************************************************
C89 1-126-964-11 ELECT 10uF 20% 50V
C90 1-162-919-11 CERAMIC CHIP 22PF 5% 50V
C93 1-126-926-11 ELECT 1000uF 20% 10V
C94 1-104-658-91 ELECT 100uF 20% 10V
C100 1-164-156-11 CERAMIC CHIP 0.1uF 25V
C101 1-126-964-11 ELECT 10uF 20% 50V
C102 1-126-964-11 ELECT 10uF 20% 50V
C103 1-126-964-11 ELECT 10uF 20% 50V
C104 1-126-964-11 ELECT 10uF 20% 50V
C105 1-136-497-81 FILM 0.1uF 5% 50V
C106 1-126-964-11 ELECT 10uF 20% 50V
C107 1-164-227-11 CERAMIC CHIP 0.022uF 10% 25V
C108 1-164-227-11 CERAMIC CHIP 0.022uF 10% 25V
C109 1-126-964-11 ELECT 10uF 20% 50V
C110 1-165-176-11 CERAMIC CHIP 0.047uF 10% 16V
C111 1-164-174-11 CERAMIC CHIP 0.0082uF 10% 25V
C112 1-126-964-11 ELECT 10uF 20% 50V
C115 1-126-964-11 ELECT 10uF 20% 50V
C116 1-126-964-11 ELECT 10uF 20% 50V
C117 1-126-960-11 ELECT 1uF 20% 50V
C118 1-130-483-00 MYLAR 0.01uF 5% 50V
C119 1-126-947-11 ELECT 47uF 20% 35V
C121 1-136-177-00 FILM 1uF 5% 50V
C122 1-126-963-11 ELECT 4.7uF 20% 50V
C123 1-164-156-11 CERAMIC CHIP 0.1uF 25V
A-1052-039-A MAIN BOARD, COMPLETE (EA)
A-4750-856-A MAIN BOARD, COMPLETE (AEP, UK)
A-4750-931-A MAIN BOARD, COMPLETE (RU)
A-4750-933-A MAIN BOARD, COMPLETE (E3)
A-4750-935-A MAIN BOARD, COMPLETE (E51)
A-4750-937-A MAIN BOARD, COMPLETE (US)
********************
7-685-646-79 SCREW +BVTP 3X8 TYPE2 IT-3
< CAPACITOR >
C1 1-126-964-11 ELECT 10uF 20% 50V
C2 1-126-964-11 ELECT 10uF 20% 50V
C21 1-126-963-11 ELECT 4.7uF 20% 50V
C22 1-126-963-11 ELECT 4.7uF 20% 50V
C25 1-126-963-11 ELECT 4.7uF 20% 50V
C26 1-126-963-11 ELECT 4.7uF 20% 50V
C27 1-104-658-91 ELECT 100uF 20% 10V
C28 1-104-658-91 ELECT 100uF 20% 10V
C35 1-164-156-11 CERAMIC CHIP 0.1uF 25V
C36 1-164-156-11 CERAMIC CHIP 0.1uF 25V
C37 1-164-156-11 CERAMIC CHIP 0.1uF 25V
C38 1-164-156-11 CERAMIC CHIP 0.1uF 25V
C39 1-164-156-11 CERAMIC CHIP 0.1uF 25V
C40 1-164-156-11 CERAMIC CHIP 0.1uF 25V
C70 1-162-919-11 CERAMIC CHIP 22PF 5% 50V
C124 1-104-658-91 ELECT 100uF 20% 10V
C125 1-104-658-91 ELECT 100uF 20% 10V
C126 1-104-658-91 ELECT 100uF 20% 10V
C127 1-104-658-91 ELECT 100uF 20% 10V
C131 1-162-919-11 CERAMIC CHIP 22PF 5% 50V
C132 1-130-483-00 MYLAR 0.01uF 5% 50V
C133 1-130-483-00 MYLAR 0.01uF 5% 50V
C134 1-126-964-11 ELECT 10uF 20% 50V
C135 1-126-960-11 ELECT 1uF 20% 50V
C141 1-162-960-11 CERAMIC CHIP 220PF 10% 50V
C142 1-126-964-11 ELECT 10uF 20% 50V
C146 1-162-969-11 CERAMIC CHIP 0.0068uF 10% 25V
C147 1-162-927-11 CERAMIC CHIP 100PF 5% 50V
C148 1-162-927-11 CERAMIC CHIP 100PF 5% 50V
C150 1-163-077-00 CERAMIC CHIP 0.1uF 50V
C151 1-126-964-11 ELECT 10uF 20% 50V
C152 1-126-964-11 ELECT 10uF 20% 50V
C154 1-126-964-11 ELECT 10uF 20% 50V
C155 1-136-497-81 FILM 0.1uF 5% 50V
C156 1-126-964-11 ELECT 10uF 20% 50V
C157 1-164-227-11 CERAMIC CHIP 0.022uF 10% 25V
C158 1-164-227-11 CERAMIC CHIP 0.022uF 10% 25V
C159 1-126-964-11 ELECT 10uF 20% 50V
C160 1-165-176-11 CERAMIC CHIP 0.047uF 10% 16V
C161 1-164-174-11 CERAMIC CHIP 0.0082uF 10% 25V
C75 1-126-964-11 ELECT 10uF 20% 50V
C77 1-126-925-91 ELECT 470uF 20% 10V
C79 1-126-964-11 ELECT 10uF 20% 50V
56
C162 1-126-964-11 ELECT 10uF 20% 50V
C165 1-126-964-11 ELECT 10uF 20% 50V
C166 1-126-964-11 ELECT 10uF 20% 50V
Page 57

HCD-CPX22/NXM3
MAIN
Ref. No. Part No. Description Remarks Ref. No. Part No. Description RemarksRef. No. Part No. Description Remarks
C167 1-126-960-11 ELECT 1uF 20% 50V
C168 1-130-483-00 MYLAR 0.01uF 5% 50V
C169 1-126-947-11 ELECT 47uF 20% 35V
C173 1-162-960-11 CERAMIC CHIP 220PF 10% 50V
C174 1-162-960-11 CERAMIC CHIP 220PF 10% 50V
C183 1-126-960-11 ELECT 1uF 20% 50V
C191 1-162-960-11 CERAMIC CHIP 220PF 10% 50V
C192 1-126-964-11 ELECT 10uF 20% 50V
C196 1-162-969-11 CERAMIC CHIP 0.0068uF 10% 25V
C197 1-162-927-11 CERAMIC CHIP 100PF 5% 50V
C198 1-162-927-11 CERAMIC CHIP 100PF 5% 50V
C270 1-126-964-11 ELECT 10uF 20% 50V
C271 1-126-964-11 ELECT 10uF 20% 50V
C301 1-162-961-11 CERAMIC CHIP 330PF 10% 50V
C302 1-126-964-11 ELECT 10uF 20% 50V
C303 1-162-961-11 CERAMIC CHIP 330PF 10% 50V
C304 1-126-964-11 ELECT 10uF 20% 50V
C497 1-164-156-11 CERAMIC CHIP 0.1uF 25V
C498 1-126-964-11 ELECT 10uF 20% 50V
C499 1-164-156-11 CERAMIC CHIP 0.1uF 25V
C900 1-126-937-11 ELECT 4700uF 20% 16V
C901 1-126-956-91 ELECT 0.1uF 20% 50V
C902 1-104-658-91 ELECT 100uF 20% 10V
C903 1-126-964-11 ELECT 10uF 20% 50V
C904 1-104-658-91 ELECT 100uF 20% 10V
C905 1-126-956-91 ELECT 0.1uF 20% 50V
C906 1-104-658-91 ELECT 100uF 20% 10V
C919 1-126-964-11 ELECT 10uF 20% 50V
C920 1-126-964-11 ELECT 10uF 20% 50V
C930 1-126-768-11 ELECT 2200uF 20% 16V
C952 1-164-156-11 CERAMIC CHIP 0.1uF 25V
C953 1-164-156-11 CERAMIC CHIP 0.1uF 25V
C972 1-164-156-11 CERAMIC CHIP 0.1uF 25V
C973 1-164-156-11 CERAMIC CHIP 0.1uF 25V
C305 1-162-964-11 CERAMIC CHIP 0.001uF 10% 50V
C306 1-162-927-11 CERAMIC CHIP 100PF 5% 50V
C307 1-162-961-11 CERAMIC CHIP 330PF 10% 50V
C308 1-162-970-11 CERAMIC CHIP 0.01uF 10% 25V
C311 1-130-481-00 MYLAR 0.0068uF 5% 50V
C312 1-130-483-00 MYLAR 0.01uF 5% 50V
C313 1-126-947-11 ELECT 47uF 20% 35V
C314 1-137-150-11 FILM 0.01uF 5% 100V
C315 1-130-479-00 MYLAR 0.0047uF 5% 50V
C322 1-162-968-11 CERAMIC CHIP 0.0047uF 10% 50V
C324 1-162-968-11 CERAMIC CHIP 0.0047uF 10% 50V
C351 1-162-961-11 CERAMIC CHIP 330PF 10% 50V
C352 1-126-964-11 ELECT 10uF 20% 50V
C353 1-162-961-11 CERAMIC CHIP 330PF 10% 50V
C354 1-126-964-11 ELECT 10uF 20% 50V
C355 1-162-964-11 CERAMIC CHIP 0.001uF 10% 50V
C356 1-162-927-11 CERAMIC CHIP 100PF 5% 50V
C357 1-162-961-11 CERAMIC CHIP 330PF 10% 50V
C358 1-162-970-11 CERAMIC CHIP 0.01uF 10% 25V
C370 1-104-658-91 ELECT 100uF 20% 10V
C372 1-104-655-91 ELECT 470uF 20% 6.3V
C373 1-164-156-11 CERAMIC CHIP 0.1uF 25V
C375 1-126-916-11 ELECT 1000uF 20% 6.3V
C379 1-104-655-91 ELECT 470uF 20% 6.3V
C382 1-126-925-91 ELECT 470uF 20% 10V
< CONNECTOR >
CN101 1-691-768-11 PLUG (MICRO CONNECTOR) 6P
CN105 1-691-765-11 PLUG (MICRO CONNECTOR) 3P
CN106 1-784-780-11 CONNECTOR, FFC 19P
CN107 1-785-316-11 PIN, CONNECTOR (STRAIGHT) 4P
CN109 1-784-774-11 CONNECTOR, FFC 13P
CN110 1-784-776-11 CONNECTOR, FFC 15P
CN112 1-784-766-11 CONNECTOR, FFC 5P
CN204 1-568-830-11 CONNECTOR, FFC 11P (EXCEPT AEP, UK)
CN204 1-784-776-11 CONNECTOR, FFC 15P (AEP, UK)
* CN301 1-564-719-11 PIN, CONNECTOR (SMALL TYPE) 3P
* CN302 1-564-724-11 PIN, CONNECTOR (SMALL TYPE) 8P
CN303 1-784-774-11 CONNECTOR, FFC 13P
* CN304 1-568-449-11 HOUSING, CONNECTOR (PC BOARD) 3P
CN371 1-779-295-11 CONNECTOR, FFC (LIF (NON-ZIF)) 27P
CN372 1-779-289-11 CONNECTOR, FFC (LIF (NON-ZIF)) 21P
CN401 1-785-316-11 PIN, CONNECTOR (STRAIGHT) 4P
< DIODE >
D181 8-719-988-61 DIODE 1SS355TE-17
D182 8-719-988-61 DIODE 1SS355TE-17
D183 8-719-988-61 DIODE 1SS355TE-17
D321 8-719-988-61 DIODE 1SS355TE-17
D322 8-719-988-61 DIODE 1SS355TE-17
C383 1-164-156-11 CERAMIC CHIP 0.1uF 25V
C384 1-104-655-91 ELECT 470uF 20% 6.3V
C390 1-126-965-91 ELECT 22uF 20% 50V
C391 1-136-497-81 FILM 0.1uF 5% 50V
C392 1-136-497-81 FILM 0.1uF 5% 50V
C393 1-126-964-11 ELECT 10uF 20% 50V
C410 1-162-918-11 CERAMIC CHIP 18PF 5% 50V
C411 1-162-918-11 CERAMIC CHIP 18PF 5% 50V
C412 1-164-156-11 CERAMIC CHIP 0.1uF 25V
C416 1-164-156-11 CERAMIC CHIP 0.1uF 25V
C417 1-126-916-11 ELECT 1000uF 20% 6.3V
C462 1-104-658-91 ELECT 100uF 20% 10V
C463 1-164-156-11 CERAMIC CHIP 0.1uF 25V
C475 1-162-970-11 CERAMIC CHIP 0.01uF 10% 25V
C476 1-162-970-11 CERAMIC CHIP 0.01uF 10% 25V
D371 6-500-522-31 DIODE 10EDB40-TB5
D372 6-500-522-31 DIODE 10EDB40-TB5
D373 6-500-522-31 DIODE 10EDB40-TB5
D391 8-719-988-61 DIODE 1SS355TE-17
D392 8-719-988-61 DIODE 1SS355TE-17
D393 8-719-988-61 DIODE 1SS355TE-17
D394 8-719-988-61 DIODE 1SS355TE-17
D395 8-719-988-61 DIODE 1SS355TE-17
D396 8-719-988-61 DIODE 1SS355TE-17
D397 8-719-988-61 DIODE 1SS355TE-17
D903 6-500-522-31 DIODE 10EDB40-TB5
D904 8-719-988-61 DIODE 1SS355TE-17
D905 8-719-083-58 DIODE UDZSTE-173.9B
57
Page 58
HCD-CPX22/NXM3
MAIN
Ref. No. Part No. Description Remarks Ref. No. Part No. Description Remarks
< EARTH TERMINAL >
EP901 1-537-738-21 TERMINAL, GROUND
< FERRITE BEAD >
JR125 1-216-864-11 SHORT CHIP 0
JR126 1-216-296-11 SHORT CHIP 0
JR127 1-216-296-11 SHORT CHIP 0
JR128 1-216-864-11 SHORT CHIP 0
JR203 1-216-864-11 SHORT CHIP 0
FB30 1-469-125-21 FERRITE, EMI (SMD) (1608)
FB34 1-469-125-21 FERRITE, EMI (SMD) (1608)
FB50 1-469-125-21 FERRITE, EMI (SMD) (1608)
FB54 1-469-125-21 FERRITE, EMI (SMD) (1608)
FB80 1-469-125-21 FERRITE, EMI (SMD) (1608)
FB84 1-469-125-21 FERRITE, EMI (SMD) (1608)
FB371 1-216-864-11 SHORT CHIP 0
FB372 1-216-864-11 SHORT CHIP 0
FB373 1-216-864-11 SHORT CHIP 0
FB374 1-216-864-11 SHORT CHIP 0
< IC >
IC3 8-759-359-49 IC NJM3414AV (TE2)
IC101 6-705-667-01 IC M61537FP-RF0G
IC301 8-749-019-25 IC TOTX141 (DIGITAL OUT)
IC391 8-759-532-64 IC M62703SL-TP
IC401 6-803-926-01 IC M30622MGN-B28FPU0
IC901 8-759-701-59 IC NJM78M09FA
IC902 8-759-701-59 IC NJM78M09FA
IC903 6-702-771-01 IC TA78033LS
IC951 6-703-679-11 IC PT8300R-TP
IC971 6-703-679-11 IC PT8300R-TP
< JACK >
J102 1-778-940-11 JACK 2P (VIDEO(MD))
< SHORT >
JR1 1-216-864-11 SHORT CHIP 0
JR101 1-216-864-11 SHORT CHIP 0
JR102 1-216-864-11 SHORT CHIP 0
JR103 1-216-296-11 SHORT CHIP 0
JR104 1-216-296-11 SHORT CHIP 0
JR105 1-216-296-11 SHORT CHIP 0
JR106 1-216-864-11 SHORT CHIP 0
JR107 1-216-296-11 SHORT CHIP 0
JR108 1-216-296-11 SHORT CHIP 0
JR109 1-216-296-11 SHORT CHIP 0
JR110 1-216-864-11 SHORT CHIP 0
JR111 1-216-296-11 SHORT CHIP 0
JR112 1-216-864-11 SHORT CHIP 0
JR113 1-216-296-11 SHORT CHIP 0
JR114 1-216-864-11 SHORT CHIP 0
JR115 1-216-296-11 SHORT CHIP 0
JR116 1-216-864-11 SHORT CHIP 0
JR117 1-216-296-11 SHORT CHIP 0
JR118 1-216-864-11 SHORT CHIP 0
JR119 1-216-864-11 SHORT CHIP 0
JR120 1-216-864-11 SHORT CHIP 0
JR121 1-216-864-11 SHORT CHIP 0
JR122 1-216-296-11 SHORT CHIP 0
JR123 1-216-864-11 SHORT CHIP 0
JR124 1-216-296-11 SHORT CHIP 0
JR204 1-216-296-11 SHORT CHIP 0
JR205 1-216-296-11 SHORT CHIP 0
JR206 1-216-296-11 SHORT CHIP 0
JR261 1-216-296-11 SHORT CHIP 0
JR418 1-216-864-11 SHORT CHIP 0 (EXCEPT AEP, UK)
JR449 1-216-864-11 SHORT CHIP 0 (EXCEPT AEP, UK)
< COIL >
L301 1-410-780-11 INDUCTOR 27mH
L311 1-414-189-31 INDUCTOR 100uH
L351 1-410-780-11 INDUCTOR 27mH
L370 1-412-064-11 INDUCTOR 100uH
L951 1-216-296-11 SHORT CHIP 0
L971 1-216-296-11 SHORT CHIP 0
< TRANSISTOR >
Q1 6-550-889-01 TRANSISTOR 2SC5938-T112-1B
Q2 6-550-889-01 TRANSISTOR 2SC5938-T112-1B
Q21 8-729-027-43 TRANSISTOR DTC114EKA-T146
Q22 8-729-027-23 TRANSISTOR DTA114EKA-T146
Q25 8-729-027-43 TRANSISTOR DTC114EKA-T146
Q26 8-729-027-23 TRANSISTOR DTA114EKA-T146
Q27 8-729-027-43 TRANSISTOR DTC114EKA-T146
Q28 8-729-027-23 TRANSISTOR DTA114EKA-T146
Q29 8-729-027-43 TRANSISTOR DTC114EKA-T146
Q30 8-729-027-23 TRANSISTOR DTA114EKA-T146
Q31 8-729-027-43 TRANSISTOR DTC114EKA-T146
Q32 8-729-027-23 TRANSISTOR DTA114EKA-T146
Q33 8-729-027-43 TRANSISTOR DTC114EKA-T146
Q34 8-729-027-23 TRANSISTOR DTA114EKA-T146
Q71 6-550-889-01 TRANSISTOR 2SC5938-T112-1B
Q81 6-550-889-01 TRANSISTOR 2SC5938-T112-1B
Q82 8-729-142-48 TRANSISTOR 2SD1616-TP-LK
Q103 6-550-889-01 TRANSISTOR 2SC5938-T112-1B
Q104 6-550-889-01 TRANSISTOR 2SC5938-T112-1B
Q140 6-550-889-01 TRANSISTOR 2SC5938-T112-1B
Q153 6-550-889-01 TRANSISTOR 2SC5938-T112-1B
Q154 6-550-889-01 TRANSISTOR 2SC5938-T112-1B
Q270 6-550-889-01 TRANSISTOR 2SC5938-T112-1B
Q271 6-550-889-01 TRANSISTOR 2SC5938-T112-1B
Q301 8-729-141-73 TRANSISTOR 2SC3624A-T1L15L16
Q302 8-729-141-73 TRANSISTOR 2SC3624A-T1L15L16
Q303 8-729-141-73 TRANSISTOR 2SC3624A-T1L15L16
Q311 8-729-216-22 TRANSISTOR 2SA1162-G
Q312 8-729-027-43 TRANSISTOR DTC114EKA-T146
Q313 8-729-027-43 TRANSISTOR DTC114EKA-T146
Q314 8-729-027-23 TRANSISTOR DTA114EKA-T146
Q315 8-729-027-43 TRANSISTOR DTC114EKA-T146
Q316 8-729-027-43 TRANSISTOR DTC114EKA-T146
Q317 8-729-040-20 TRANSISTOR RT1P137L-TP
Q318 8-729-142-46 TRANSISTOR 2SC2001-LK
58
Page 59
HCD-CPX22/NXM3
MAIN
Ref. No. Part No. Description Remarks Ref. No. Part No. Description Remarks
Q321 8-729-027-43 TRANSISTOR DTC114EKA-T146
Q322 8-729-140-04 TRANSISTOR 2SB1116A-L
Q323 8-729-027-43 TRANSISTOR DTC114EKA-T146
Q324 8-729-140-04 TRANSISTOR 2SB1116A-L
Q326 8-729-027-43 TRANSISTOR DTC114EKA-T146
Q327 8-729-140-04 TRANSISTOR 2SB1116A-L
Q341 8-729-120-28 TRANSISTOR 2SC1623-L5L6
Q342 8-729-027-43 TRANSISTOR DTC114EKA-T146
Q343 8-729-027-43 TRANSISTOR DTC114EKA-T146
Q351 8-729-141-73 TRANSISTOR 2SC3624A-T1L15L16
Q352 8-729-141-73 TRANSISTOR 2SC3624A-T1L15L16
Q353 8-729-141-73 TRANSISTOR 2SC3624A-T1L15L16
Q391 8-729-120-28 TRANSISTOR 2SC1623-L5L6
Q906 8-729-120-28 TRANSISTOR 2SC1623-L5L6
< RESISTOR >
R1 1-216-825-11 METAL CHIP 2.2K 5% 1/10W
R2 1-216-833-11 METAL CHIP 10K 5% 1/10W
R3 1-216-821-11 METAL CHIP 1K 5% 1/10W
R4 1-216-825-11 METAL CHIP 2.2K 5% 1/10W
R5 1-216-833-11 METAL CHIP 10K 5% 1/10W
R6 1-216-821-11 METAL CHIP 1K 5% 1/10W
R21 1-216-829-11 METAL CHIP 4.7K 5% 1/10W
R22 1-216-837-11 METAL CHIP 22K 5% 1/10W
R23 1-216-845-11 METAL CHIP 100K 5% 1/10W
R27 1-216-829-11 METAL CHIP 4.7K 5% 1/10W
R28 1-216-837-11 METAL CHIP 22K 5% 1/10W
R29 1-216-845-11 METAL CHIP 100K 5% 1/10W
R30 1-216-829-11 METAL CHIP 4.7K 5% 1/10W
R31 1-216-837-11 METAL CHIP 22K 5% 1/10W
R32 1-216-845-11 METAL CHIP 100K 5% 1/10W
R33 1-216-845-11 METAL CHIP 100K 5% 1/10W
R34 1-216-837-11 METAL CHIP 22K 5% 1/10W
R35 1-216-845-11 METAL CHIP 100K 5% 1/10W
R36 1-216-837-11 METAL CHIP 22K 5% 1/10W
R37 1-216-845-11 METAL CHIP 100K 5% 1/10W
R38 1-216-837-11 METAL CHIP 22K 5% 1/10W
R39 1-216-864-11 SHORT CHIP 0
R50 1-216-841-11 METAL CHIP 47K 5% 1/10W
R59 1-216-805-11 METAL CHIP 47 5% 1/10W
R60 1-216-841-11 METAL CHIP 47K 5% 1/10W
R69 1-216-805-11 METAL CHIP 47 5% 1/10W
R75 1-216-833-11 METAL CHIP 10K 5% 1/10W
R76 1-216-841-11 METAL CHIP 47K 5% 1/10W
R77 1-216-845-11 METAL CHIP 100K 5% 1/10W
R78 1-216-821-11 METAL CHIP 1K 5% 1/10W
R79 1-216-805-11 METAL CHIP 47 5% 1/10W
R80 1-216-833-11 METAL CHIP 10K 5% 1/10W
R85 1-216-833-11 METAL CHIP 10K 5% 1/10W
R86 1-216-841-11 METAL CHIP 47K 5% 1/10W
R87 1-216-845-11 METAL CHIP 100K 5% 1/10W
R88 1-216-821-11 METAL CHIP 1K 5% 1/10W
R89 1-216-805-11 METAL CHIP 47 5% 1/10W
R90 1-216-833-11 METAL CHIP 10K 5% 1/10W
R98 1-216-821-11 METAL CHIP 1K 5% 1/10W
R101 1-216-835-11 METAL CHIP 15K 5% 1/10W
R102 1-216-841-11 METAL CHIP 47K 5% 1/10W
R103 1-216-825-11 METAL CHIP 2.2K 5% 1/10W
R104 1-216-825-11 METAL CHIP 2.2K 5% 1/10W
R105 1-216-833-11 METAL CHIP 10K 5% 1/10W
R109 1-216-841-11 METAL CHIP 47K 5% 1/10W
R110 1-216-821-11 METAL CHIP 1K 5% 1/10W
R111 1-216-821-11 METAL CHIP 1K 5% 1/10W
R112 1-216-834-11 METAL CHIP 12K 5% 1/10W
R113 1-216-851-11 METAL CHIP 330K 5% 1/10W
R114 1-216-812-11 METAL CHIP 180 5% 1/10W
R118 1-216-809-11 METAL CHIP 100 5% 1/10W
R119 1-216-833-11 METAL CHIP 10K 5% 1/10W
R121 1-216-861-11 METAL CHIP 2.2M 5% 1/10W
R122 1-216-835-11 METAL CHIP 15K 5% 1/10W
R123 1-216-857-11 METAL CHIP 1M 5% 1/10W
R126 1-216-813-11 METAL CHIP 220 5% 1/10W
R127 1-216-813-11 METAL CHIP 220 5% 1/10W
R129 1-216-835-11 METAL CHIP 15K 5% 1/10W
R130 1-216-809-11 METAL CHIP 100 5% 1/10W
R131 1-216-825-11 METAL CHIP 2.2K 5% 1/10W
R132 1-216-838-11 METAL CHIP 27K 5% 1/10W
R133 1-216-833-11 METAL CHIP 10K 5% 1/10W
R141 1-216-821-11 METAL CHIP 1K 5% 1/10W
R142 1-216-845-11 METAL CHIP 100K 5% 1/10W
R151 1-216-835-11 METAL CHIP 15K 5% 1/10W
R152 1-216-841-11 METAL CHIP 47K 5% 1/10W
R153 1-216-825-11 METAL CHIP 2.2K 5% 1/10W
R154 1-216-825-11 METAL CHIP 2.2K 5% 1/10W
R155 1-216-833-11 METAL CHIP 10K 5% 1/10W
R159 1-216-841-11 METAL CHIP 47K 5% 1/10W
R160 1-216-821-11 METAL CHIP 1K 5% 1/10W
R161 1-216-821-11 METAL CHIP 1K 5% 1/10W
R162 1-216-834-11 METAL CHIP 12K 5% 1/10W
R163 1-216-851-11 METAL CHIP 330K 5% 1/10W
R164 1-216-812-11 METAL CHIP 180 5% 1/10W
R168 1-216-809-11 METAL CHIP 100 5% 1/10W
R169 1-216-833-11 METAL CHIP 10K 5% 1/10W
R180 1-216-809-11 METAL CHIP 100 5% 1/10W
R186 1-216-864-11 SHORT CHIP 0
R187 1-216-853-11 METAL CHIP 470K 5% 1/10W
R188 1-216-815-11 METAL CHIP 330 5% 1/10W
R189 1-216-841-11 METAL CHIP 47K 5% 1/10W
R191 1-216-821-11 METAL CHIP 1K 5% 1/10W
R192 1-216-845-11 METAL CHIP 100K 5% 1/10W
R241 1-216-864-11 SHORT CHIP 0
R243 1-216-864-11 SHORT CHIP 0
R246 1-216-833-11 METAL CHIP 10K 5% 1/10W
R247 1-216-833-11 METAL CHIP 10K 5% 1/10W
R270 1-216-825-11 METAL CHIP 2.2K 5% 1/10W
R272 1-216-821-11 METAL CHIP 1K 5% 1/10W
R273 1-216-825-11 METAL CHIP 2.2K 5% 1/10W
R275 1-216-821-11 METAL CHIP 1K 5% 1/10W
R294 1-216-821-11 METAL CHIP 1K 5% 1/10W
R296 1-216-833-11 METAL CHIP 10K 5% 1/10W
R298 1-216-821-11 METAL CHIP 1K 5% 1/10W
R299 1-216-833-11 METAL CHIP 10K 5% 1/10W
R301 1-216-829-11 METAL CHIP 4.7K 5% 1/10W
R302 1-216-829-11 METAL CHIP 4.7K 5% 1/10W
R303 1-216-821-11 METAL CHIP 1K 5% 1/10W
R304 1-216-835-11 METAL CHIP 15K 5% 1/10W
59
Page 60
HCD-CPX22/NXM3
MAIN
Ref. No. Part No. Description Remarks Ref. No. Part No. Description Remarks
R305 1-216-829-11 METAL CHIP 4.7K 5% 1/10W
R306 1-216-832-11 METAL CHIP 8.2K 5% 1/10W
R307 1-216-833-11 METAL CHIP 10K 5% 1/10W
R309 1-216-825-11 METAL CHIP 2.2K 5% 1/10W
R311 1-216-833-11 METAL CHIP 10K 5% 1/10W
R312 1-216-833-11 METAL CHIP 10K 5% 1/10W
R313 1-216-833-11 METAL CHIP 10K 5% 1/10W
R314 1-216-841-11 METAL CHIP 47K 5% 1/10W
R315 1-216-829-11 METAL CHIP 4.7K 5% 1/10W
R316 1-216-797-11 METAL CHIP 10 5% 1/10W
R317 1-216-833-11 METAL CHIP 10K 5% 1/10W
R318 1-216-805-11 METAL CHIP 47 5% 1/10W
R319 1-216-827-11 METAL CHIP 3.3K 5% 1/10W
R320 1-216-803-11 METAL CHIP 33 5% 1/10W
R321 1-216-825-11 METAL CHIP 2.2K 5% 1/10W
R322 1-216-825-11 METAL CHIP 2.2K 5% 1/10W
R323 1-216-821-11 METAL CHIP 1K 5% 1/10W
R324 1-216-825-11 METAL CHIP 2.2K 5% 1/10W
R325 1-216-825-11 METAL CHIP 2.2K 5% 1/10W
R326 1-216-821-11 METAL CHIP 1K 5% 1/10W
R327 1-216-825-11 METAL CHIP 2.2K 5% 1/10W
R328 1-216-825-11 METAL CHIP 2.2K 5% 1/10W
R329 1-216-841-11 METAL CHIP 47K 5% 1/10W
R330 1-216-829-11 METAL CHIP 4.7K 5% 1/10W
R331 1-216-841-11 METAL CHIP 47K 5% 1/10W
R332 1-216-829-11 METAL CHIP 4.7K 5% 1/10W
R333 1-216-841-11 METAL CHIP 47K 5% 1/10W
R334 1-216-841-11 METAL CHIP 47K 5% 1/10W
R335 1-216-841-11 METAL CHIP 47K 5% 1/10W
R336 1-216-841-11 METAL CHIP 47K 5% 1/10W
R337 1-216-837-11 METAL CHIP 22K 5% 1/10W
R338 1-216-833-11 METAL CHIP 10K 5% 1/10W
R339 1-216-841-11 METAL CHIP 47K 5% 1/10W
R340 1-216-829-11 METAL CHIP 4.7K 5% 1/10W
R341 1-216-833-11 METAL CHIP 10K 5% 1/10W
R342 1-216-829-11 METAL CHIP 4.7K 5% 1/10W
R343 1-216-837-11 METAL CHIP 22K 5% 1/10W
R344 1-216-833-11 METAL CHIP 10K 5% 1/10W
R345 1-216-833-11 METAL CHIP 10K 5% 1/10W
R347 1-216-825-11 METAL CHIP 2.2K 5% 1/10W
R351 1-216-829-11 METAL CHIP 4.7K 5% 1/10W
R352 1-216-829-11 METAL CHIP 4.7K 5% 1/10W
R353 1-216-821-11 METAL CHIP 1K 5% 1/10W
R354 1-216-835-11 METAL CHIP 15K 5% 1/10W
R355 1-216-829-11 METAL CHIP 4.7K 5% 1/10W
R356 1-216-832-11 METAL CHIP 8.2K 5% 1/10W
R357 1-216-833-11 METAL CHIP 10K 5% 1/10W
R359 1-216-825-11 METAL CHIP 2.2K 5% 1/10W
R377 1-216-833-11 METAL CHIP 10K 5% 1/10W
R378 1-216-833-11 METAL CHIP 10K 5% 1/10W
R379 1-216-833-11 METAL CHIP 10K 5% 1/10W
R380 1-216-833-11 METAL CHIP 10K 5% 1/10W
R381 1-216-833-11 METAL CHIP 10K 5% 1/10W
R382 1-216-833-11 METAL CHIP 10K 5% 1/10W
R383 1-216-833-11 METAL CHIP 10K 5% 1/10W
R384 1-216-833-11 METAL CHIP 10K 5% 1/10W
R385 1-216-833-11 METAL CHIP 10K 5% 1/10W
R386 1-216-833-11 METAL CHIP 10K 5% 1/10W
R387 1-216-833-11 METAL CHIP 10K 5% 1/10W
R388 1-216-833-11 METAL CHIP 10K 5% 1/10W
R391 1-216-833-11 METAL CHIP 10K 5% 1/10W
R392 1-216-837-11 METAL CHIP 22K 5% 1/10W
R393 1-216-837-11 METAL CHIP 22K 5% 1/10W
R394 1-216-829-11 METAL CHIP 4.7K 5% 1/10W
R395 1-216-813-11 METAL CHIP 220 5% 1/10W
R396 1-216-833-11 METAL CHIP 10K 5% 1/10W
R401 1-216-809-11 METAL CHIP 100 5% 1/10W
R402 1-216-809-11 METAL CHIP 100 5% 1/10W
R403 1-216-809-11 METAL CHIP 100 5% 1/10W
R404 1-216-809-11 METAL CHIP 100 5% 1/10W
R405 1-216-809-11 METAL CHIP 100 5% 1/10W
R406 1-216-809-11 METAL CHIP 100 5% 1/10W
R407 1-216-809-11 METAL CHIP 100 5% 1/10W
R408 1-216-833-11 METAL CHIP 10K 5% 1/10W
R409 1-216-833-11 METAL CHIP 10K 5% 1/10W
R410 1-216-833-11 METAL CHIP 10K 5% 1/10W
R411 1-216-851-11 METAL CHIP 330K 5% 1/10W
R412 1-216-833-11 METAL CHIP 10K 5% 1/10W
R413 1-216-864-11 SHORT CHIP 0
R414 1-216-833-11 METAL CHIP 10K 5% 1/10W
R415 1-216-833-11 METAL CHIP 10K 5% 1/10W
R416 1-216-833-11 METAL CHIP 10K 5% 1/10W
R417 1-216-833-11 METAL CHIP 10K 5% 1/10W
R418 1-216-809-11 METAL CHIP 100 5% 1/10W
(AEP, UK)
R419 1-216-809-11 METAL CHIP 100 5% 1/10W
R420 1-216-829-11 METAL CHIP 4.7K 5% 1/10W
R421 1-216-809-11 METAL CHIP 100 5% 1/10W
R422 1-216-809-11 METAL CHIP 100 5% 1/10W
R423 1-216-809-11 METAL CHIP 100 5% 1/10W
R424 1-216-809-11 METAL CHIP 100 5% 1/10W
R425 1-216-809-11 METAL CHIP 100 5% 1/10W
R426 1-216-809-11 METAL CHIP 100 5% 1/10W
R429 1-216-809-11 METAL CHIP 100 5% 1/10W
R430 1-216-809-11 METAL CHIP 100 5% 1/10W
R431 1-216-809-11 METAL CHIP 100 5% 1/10W
R432 1-216-809-11 METAL CHIP 100 5% 1/10W
R433 1-216-809-11 METAL CHIP 100 5% 1/10W
R434 1-216-809-11 METAL CHIP 100 5% 1/10W
R435 1-216-809-11 METAL CHIP 100 5% 1/10W
R436 1-216-809-11 METAL CHIP 100 5% 1/10W
R437 1-216-809-11 METAL CHIP 100 5% 1/10W
R438 1-216-809-11 METAL CHIP 100 5% 1/10W
R439 1-216-809-11 METAL CHIP 100 5% 1/10W
R440 1-216-809-11 METAL CHIP 100 5% 1/10W
R441 1-216-809-11 METAL CHIP 100 5% 1/10W
R442 1-216-809-11 METAL CHIP 100 5% 1/10W
R443 1-216-809-11 METAL CHIP 100 5% 1/10W
R444 1-216-809-11 METAL CHIP 100 5% 1/10W
R445 1-216-809-11 METAL CHIP 100 5% 1/10W
R446 1-216-809-11 METAL CHIP 100 5% 1/10W
R447 1-216-809-11 METAL CHIP 100 5% 1/10W
R448 1-216-809-11 METAL CHIP 100 5% 1/10W
R449 1-216-809-11 METAL CHIP 100 5% 1/10W
(AEP, UK)
R450 1-216-809-11 METAL CHIP 100 5% 1/10W
60
Page 61
HCD-CPX22/NXM3
MAIN
Ref. No. Part No. Description Remarks Ref. No. Part No. Description Remarks
R451 1-216-809-11 METAL CHIP 100 5% 1/10W
R452 1-216-809-11 METAL CHIP 100 5% 1/10W
R453 1-216-809-11 METAL CHIP 100 5% 1/10W
R454 1-216-809-11 METAL CHIP 100 5% 1/10W
R455 1-216-809-11 METAL CHIP 100 5% 1/10W
R456 1-216-809-11 METAL CHIP 100 5% 1/10W
R457 1-216-809-11 METAL CHIP 100 5% 1/10W
R458 1-216-809-11 METAL CHIP 100 5% 1/10W
R459 1-216-809-11 METAL CHIP 100 5% 1/10W
R460 1-216-809-11 METAL CHIP 100 5% 1/10W
R461 1-216-809-11 METAL CHIP 100 5% 1/10W
R465 1-216-809-11 METAL CHIP 100 5% 1/10W
R466 1-216-833-11 METAL CHIP 10K 5% 1/10W
R467 1-216-833-11 METAL CHIP 10K 5% 1/10W
R468 1-216-833-11 METAL CHIP 10K 5% 1/10W
R469 1-216-833-11 METAL CHIP 10K 5% 1/10W
R470 1-216-809-11 METAL CHIP 100 5% 1/10W
R471 1-216-809-11 METAL CHIP 100 5% 1/10W
R472 1-216-809-11 METAL CHIP 100 5% 1/10W
R473 1-216-809-11 METAL CHIP 100 5% 1/10W
R474 1-216-809-11 METAL CHIP 100 5% 1/10W
R956 1-216-809-11 METAL CHIP 100 5% 1/10W
R957 1-216-809-11 METAL CHIP 100 5% 1/10W
R958 1-216-809-11 METAL CHIP 100 5% 1/10W
R959 1-216-809-11 METAL CHIP 100 5% 1/10W
R968 1-216-833-11 METAL CHIP 10K 5% 1/10W
R970 1-216-833-11 METAL CHIP 10K 5% 1/10W
R984 1-216-833-11 METAL CHIP 10K 5% 1/10W
T301 1-433-372-11 TRANSFORMER, BIAS OSCILLATION
X401 1-567-098-41 VIBRATOR, CRYSTAL (32.768kHz)
X402 1-795-482-11 VIBRATOR, CERAMIC (16MHz)
************************************************************
S761 1-786-704-11 SWITCH, LEVER (SUB TRAY OUT)
MOTOR PANEL
< TRANSFORMER >
< VIBRATOR >
MOTOR BOARD
***********
< SWITCH >
************************************************************
R476 1-216-809-11 METAL CHIP 100 5% 1/10W
R477 1-216-809-11 METAL CHIP 100 5% 1/10W
R478 1-216-809-11 METAL CHIP 100 5% 1/10W
R479 1-216-809-11 METAL CHIP 100 5% 1/10W
R482 1-216-809-11 METAL CHIP 100 5% 1/10W
A-4750-849-A PANEL BOARD, COMPLETE
*******************
< CAPACITOR >
R483 1-216-809-11 METAL CHIP 100 5% 1/10W
R484 1-216-809-11 METAL CHIP 100 5% 1/10W
R485 1-216-809-11 METAL CHIP 100 5% 1/10W
R486 1-216-809-11 METAL CHIP 100 5% 1/10W
R489 1-216-809-11 METAL CHIP 100 5% 1/10W
R490 1-216-809-11 METAL CHIP 100 5% 1/10W
R492 1-216-811-11 METAL CHIP 150 5% 1/10W
R492 1-216-821-11 METAL CHIP 1K 5% 1/10W
(E51)
R492 1-216-825-11 METAL CHIP 2.2K 5% 1/10W
R492 1-216-829-11 METAL CHIP 4.7K 5% 1/10W
(E3, EA)
R492 1-216-864-11 SHORT CHIP 0 (AEP, UK)
R493 1-216-809-11 METAL CHIP 100 5% 1/10W
R494 1-216-827-11 METAL CHIP 3.3K 5% 1/10W
R495 1-216-827-11 METAL CHIP 3.3K 5% 1/10W
R496 1-216-821-11 METAL CHIP 1K 5% 1/10W
R496 1-216-829-11 METAL CHIP 4.7K 5% 1/10W
(EXCEPT E3, EA)
R496 1-216-864-11 SHORT CHIP 0 (E3)
R497 1-216-833-11 METAL CHIP 10K 5% 1/10W
R498 1-216-797-11 METAL CHIP 10 5% 1/10W
R499 1-216-797-11 METAL CHIP 10 5% 1/10W
R914 1-216-821-11 METAL CHIP 1K 5% 1/10W
R915 1-216-821-11 METAL CHIP 1K 5% 1/10W
R952 1-216-809-11 METAL CHIP 100 5% 1/10W
R953 1-216-809-11 METAL CHIP 100 5% 1/10W
R954 1-216-809-11 METAL CHIP 100 5% 1/10W
R955 1-216-809-11 METAL CHIP 100 5% 1/10W
(RU)
(US)
(EA)
C1006 1-164-156-11 CERAMIC CHIP 0.1uF 25V
C1021 1-162-964-11 CERAMIC CHIP 0.001uF 10% 50V
C1025 1-162-960-11 CERAMIC CHIP 220PF 10% 50V
C1026 1-126-964-11 ELECT 10uF 20% 50V
C1028 1-126-964-11 ELECT 10uF 20% 50V
C1029 1-131-992-91 CERAMIC CHIP 100000PF 35V
C1048 1-131-992-91 CERAMIC CHIP 100000PF 35V
C1050 1-162-974-11 CERAMIC CHIP 0.01uF 50V
C1051 1-126-969-11 ELECT 220uF 20% 50V
C1052 1-162-974-11 CERAMIC CHIP 0.01uF 50V
C1053 1-126-965-91 ELECT 22uF 20% 50V
C1054 1-162-968-11 CERAMIC CHIP 0.0047uF 10% 50V
< CONNECTOR >
CN1021 1-784-774-11 CONNECTOR, FFC 13P
< DIODE >
D1021 8-719-058-03 DIODE SEL5423E-TP15 (n N)
D1022 8-719-059-18 DIODE RD6.2FM-T1
D1023 8-719-988-61 DIODE 1SS355TE-17
D1024 8-719-988-61 DIODE 1SS355TE-17
D1025 8-719-988-61 DIODE 1SS355TE-17
D1026 8-719-988-61 DIODE 1SS355TE-17
< FILTER >
FL1020 1-518-979-11 INDICATOR TUBE, FLUORESCENT
< IC >
IC1020 6-705-745-01 IC M66005-0131AHPRB0T
61
Page 62
HCD-CPX22/NXM3
RELAYPANEL SENSOR S-MASTER
Ref. No. Part No. Description Remarks Ref. No. Part No. Description Remarks
< COIL >
L1021 1-410-671-31 INDUCTOR 47uH
S1033 1-762-875-21 SWITCH, KEYBOARD (.b TUNING -)
S1034 1-762-875-21 SWITCH, KEYBOARD (ALBUM +)
S1035 1-762-875-21 SWITCH, KEYBOARD (ALBUM -)
< TRANSISTOR >
Q1021 8-729-120-28 TRANSISTOR 2SC1623-L5L6
Q1022 8-729-120-28 TRANSISTOR 2SC1623-L5L6
Q1023 8-729-120-28 TRANSISTOR 2SC1623-L5L6
Q1024 6-550-065-01 TRANSISTOR CPH5504-TL-E
Q1026 8-729-027-43 TRANSISTOR DTC114EKA-T146
< RESISTOR >
R1020 1-216-809-11 METAL CHIP 100 5% 1/10W
R1021 1-216-821-11 METAL CHIP 1K 5% 1/10W
R1022 1-216-809-11 METAL CHIP 100 5% 1/10W
R1023 1-216-809-11 METAL CHIP 100 5% 1/10W
R1024 1-216-821-11 METAL CHIP 1K 5% 1/10W
R1025 1-216-833-11 METAL CHIP 10K 5% 1/10W
R1026 1-216-813-11 METAL CHIP 220 5% 1/10W
R1027 1-216-815-11 METAL CHIP 330 5% 1/10W
R1028 1-216-817-11 METAL CHIP 470 5% 1/10W
R1029 1-216-819-11 METAL CHIP 680 5% 1/10W
R1030 1-216-821-11 METAL CHIP 1K 5% 1/10W
R1031 1-216-823-11 METAL CHIP 1.5K 5% 1/10W
R1032 1-216-864-11 SHORT CHIP 0
R1033 1-216-825-11 METAL CHIP 2.2K 5% 1/10W
R1034 1-216-829-11 METAL CHIP 4.7K 5% 1/10W
R1035 1-216-833-11 METAL CHIP 10K 5% 1/10W
R1036 1-216-823-11 METAL CHIP 1.5K 5% 1/10W
R1037 1-216-825-11 METAL CHIP 2.2K 5% 1/10W
R1038 1-216-829-11 METAL CHIP 4.7K 5% 1/10W
R1039 1-216-833-11 METAL CHIP 10K 5% 1/10W
R1040 1-216-839-11 METAL CHIP 33K 5% 1/10W
R1041 1-216-845-11 METAL CHIP 100K 5% 1/10W
R1042 1-216-845-11 METAL CHIP 100K 5% 1/10W
R1043 1-216-845-11 METAL CHIP 100K 5% 1/10W
R1045 1-216-827-11 METAL CHIP 3.3K 5% 1/10W
R1046 1-216-833-11 METAL CHIP 10K 5% 1/10W
R1051 1-216-809-11 METAL CHIP 100 5% 1/10W
R1052 1-216-809-11 METAL CHIP 100 5% 1/10W
R1100 1-216-833-11 METAL CHIP 10K 5% 1/10W
R1101 1-216-833-11 METAL CHIP 10K 5% 1/10W
R1102 1-216-833-11 METAL CHIP 10K 5% 1/10W
< SWITCH >
S1021 1-762-875-21 SWITCH, KEYBOARD (CD)
S1022 1-762-875-21 SWITCH, KEYBOARD (TUNER/BAND)
S1023 1-762-875-21 SWITCH, KEYBOARD (TAPE A/B)
S1024 1-762-875-21 SWITCH, KEYBOARD (VIDEO(MD))
S1025 1-762-875-21 SWITCH, KEYBOARD (DIMMER)
S1026 1-762-875-21 SWITCH, KEYBOARD (CD SYNC)
S1027 1-762-875-21 SWITCH, KEYBOARD (z /START)
S1028 1-762-875-21 SWITCH, KEYBOARD (DISPLAY)
S1029 1-762-875-21 SWITCH, KEYBOARD (n N)
S1030 1-762-875-21 SWITCH, KEYBOARD (CD Z)
S1036 1-762-875-21 SWITCH, KEYBOARD (x)
< TRANSFORMER >
T801 1-443-389-11 TRANSFORMER, DC-DC CONVERTER
************************************************************
A-4750-232-A RELAY BOARD, COMPLETE
*********************
< CAPACITOR >
C701 1-126-786-11 ELECT 47uF 20% 16V
C702 1-126-791-11 ELECT 10uF 20% 35V
C761 1-162-306-11 CERAMIC 0.01uF 20% 16V
C762 1-162-306-11 CERAMIC 0.01uF 20% 16V
< CONNECTOR >
CN701 1-779-558-21 CONNECTOR, FFC (LIF (NON-ZIF)) 21P
< DIODE >
D701 8-719-921-40 DIODE MTZJ-4.7C
D711 8-719-982-10 DIODE MTZJ-4.3A
< IC >
IC701 8-759-598-69 IC BA6956AN
IC711 8-759-598-69 IC BA6956AN
< TRANSISTOR >
Q751 8-729-119-78 TRANSISTOR 2SC2785-HFE
< RESISTOR >
R701 1-249-415-11 CARBON 680 5% 1/4W
R702 1-247-807-31 CARBON 100 5% 1/4W
R711 1-249-415-11 CARBON 680 5% 1/4W
R712 1-247-807-31 CARBON 100 5% 1/4W
R751 1-247-806-11 CARBON 91 5% 1/4W
R752 1-249-429-11 CARBON 10K 5% 1/4W
R753 1-249-429-11 CARBON 10K 5% 1/4W
R754 1-249-430-11 CARBON 12K 5% 1/4W
R755 1-249-429-11 CARBON 10K 5% 1/4W
************************************************************
SENSOR BOARD
************
< IC >
IC751 8-759-989-76 IC RPR-359F
************************************************************
A-4750-863-A S-MASTER BOARD, COMPLETE
**********************
< CAPACITOR >
S1031 1-762-875-21 SWITCH, KEYBOARD (X)
S1032 1-762-875-21 SWITCH, KEYBOARD (B> TUNING +)
62
C700 1-104-658-91 ELECT 100uF 20% 10V
C701 1-126-960-11 ELECT 1uF 20% 50V
Page 63
HCD-CPX22/NXM3
S-MASTER
Ref. No. Part No. Description Remarks Ref. No. Part No. Description Remarks
C702 1-136-850-11 MYLAR 0.1uF 5% 63V
C703 1-104-658-91 ELECT 100uF 20% 10V
C704 1-164-156-11 CERAMIC CHIP 0.1uF 25V
C706 1-164-346-11 CERAMIC CHIP 1uF 16V
C708 1-164-346-11 CERAMIC CHIP 1uF 16V
C709 1-164-156-11 CERAMIC CHIP 0.1uF 25V
C710 1-162-923-11 CERAMIC CHIP 47PF 5% 50V
C712 1-164-346-11 CERAMIC CHIP 1uF 16V
C713 1-163-078-11 CERAMIC CHIP 0.033uF 10% 25V
C714 1-115-340-11 CERAMIC CHIP 0.22uF 10% 25V
C715 1-115-340-11 CERAMIC CHIP 0.22uF 10% 25V
C716 1-115-340-11 CERAMIC CHIP 0.22uF 10% 25V
C717 1-115-340-11 CERAMIC CHIP 0.22uF 10% 25V
C718 1-163-078-11 CERAMIC CHIP 0.033uF 10% 25V
C719 1-100-924-21 CAP, ELECT
C720 1-136-177-00 FILM 1uF 5% 50V
C721 1-125-898-91 CERAMIC CHIP 0.22uF 10% 50V
C722 1-162-966-11 CERAMIC CHIP 0.0022uF 10% 50V
C723 1-162-966-11 CERAMIC CHIP 0.0022uF 10% 50V
C724 1-162-966-11 CERAMIC CHIP 0.0022uF 10% 50V
C725 1-162-966-11 CERAMIC CHIP 0.0022uF 10% 50V
C726 1-164-505-11 CERAMIC CHIP 2.2uF 16V
C727 1-125-898-91 CERAMIC CHIP 0.22uF 10% 50V
C728 1-136-177-00 FILM 1uF 5% 50V
C729 1-164-156-11 CERAMIC CHIP 0.1uF 25V
C730 1-164-156-11 CERAMIC CHIP 0.1uF 25V
C731 1-104-658-91 ELECT 100uF 20% 10V
C732 1-164-156-11 CERAMIC CHIP 0.1uF 25V
C733 1-164-156-11 CERAMIC CHIP 0.1uF 25V
C734 1-164-156-11 CERAMIC CHIP 0.1uF 25V
C735 1-126-964-11 ELECT 10uF 20% 50V
C736 1-126-963-11 ELECT 4.7uF 20% 50V
C737 1-107-826-11 CERAMIC CHIP 0.1uF 10% 16V
C738 1-162-915-11 CERAMIC CHIP 10PF 0.5PF 50V
C739 1-162-915-11 CERAMIC CHIP 10PF 0.5PF 50V
C741 1-126-965-91 ELECT 22uF 20% 50V
C745 1-164-156-11 CERAMIC CHIP 0.1uF 25V
C746 1-164-156-11 CERAMIC CHIP 0.1uF 25V
C747 1-104-658-91 ELECT 100uF 20% 10V
C748 1-126-964-11 ELECT 10uF 20% 50V
C749 1-164-156-11 CERAMIC CHIP 0.1uF 25V
C750 1-162-970-11 CERAMIC CHIP 0.01uF 10% 25V
C751 1-126-960-11 ELECT 1uF 20% 50V
C752 1-107-826-11 CERAMIC CHIP 0.1uF 10% 16V
C753 1-104-658-91 ELECT 100uF 20% 10V
C754 1-164-156-11 CERAMIC CHIP 0.1uF 25V
C756 1-164-346-11 CERAMIC CHIP 1uF 16V
C757 1-162-923-11 CERAMIC CHIP 47PF 5% 50V
C758 1-164-346-11 CERAMIC CHIP 1uF 16V
C759 1-164-156-11 CERAMIC CHIP 0.1uF 25V
C762 1-164-346-11 CERAMIC CHIP 1uF 16V
C763 1-163-078-11 CERAMIC CHIP 0.033uF 10% 25V
C764 1-115-340-11 CERAMIC CHIP 0.22uF 10% 25V
C765 1-115-340-11 CERAMIC CHIP 0.22uF 10% 25V
C766 1-115-340-11 CERAMIC CHIP 0.22uF 10% 25V
C767 1-115-340-11 CERAMIC CHIP 0.22uF 10% 25V
C768 1-163-078-11 CERAMIC CHIP 0.033uF 10% 25V
C769 1-100-924-21 CAP, ELECT 2200uF 35V
C770 1-136-177-00 FILM 1uF 5% 50V
C771 1-125-898-91 CERAMIC CHIP 0.22uF 10% 50V
C772 1-162-966-11 CERAMIC CHIP 0.0022uF 10% 50V
C773 1-162-966-11 CERAMIC CHIP 0.0022uF 10% 50V
C774 1-162-966-11 CERAMIC CHIP 0.0022uF 10% 50V
C775 1-162-966-11 CERAMIC CHIP 0.0022uF 10% 50V
C776 1-125-898-91 CERAMIC CHIP 0.22uF 10% 50V
C777 1-136-177-00 FILM 1uF 5% 50V
C778 1-164-505-11 CERAMIC CHIP 2.2uF 16V
C779 1-164-156-11 CERAMIC CHIP 0.1uF 25V
C780 1-164-156-11 CERAMIC CHIP 0.1uF 25V
C781 1-164-156-11 CERAMIC CHIP 0.1uF 25V
C782 1-164-156-11 CERAMIC CHIP 0.1uF 25V
C783 1-162-915-11 CERAMIC CHIP 10PF 0.5PF 50V
C784 1-162-964-11 CERAMIC CHIP 0.001uF 10% 50V
C785 1-162-910-11 CERAMIC CHIP 5PF 0.25PF 50V
C786 1-162-970-11 CERAMIC CHIP 0.01uF 10% 25V
C787 1-164-156-11 CERAMIC CHIP 0.1uF 25V
C788 1-164-156-11 CERAMIC CHIP 0.1uF 25V
C790 1-104-658-91 ELECT 100uF 20% 10V
C791 1-136-850-11 MYLAR 0.1uF 5% 63V
C792 1-126-935-11 ELECT 470uF 20% 16V
C794 1-164-346-11 CERAMIC CHIP 1uF 16V
C795 1-164-156-11 CERAMIC CHIP 0.1uF 25V
C797 1-162-970-11 CERAMIC CHIP 0.01uF 10% 25V
C798 1-104-658-91 ELECT 100uF 20% 10V
C799 1-164-156-11 CERAMIC CHIP 0.1uF 25V
C800 1-164-156-11 CERAMIC CHIP 0.1uF 25V
C801 1-164-156-11 CERAMIC CHIP 0.1uF 25V
C802 1-164-156-11 CERAMIC CHIP 0.1uF 25V
C803 1-126-956-91 ELECT 0.1uF 20% 50V
C804 1-104-658-91 ELECT 100uF 20% 10V
C805 1-107-826-11 CERAMIC CHIP 0.1uF 10% 16V
C806 1-164-156-11 CERAMIC CHIP 0.1uF 25V
C821 1-216-864-11 SHORT CHIP 0
C822 1-216-864-11 SHORT CHIP 0
C823 1-216-864-11 SHORT CHIP 0
C824 1-216-864-11 SHORT CHIP 0
C825 1-216-864-11 SHORT CHIP 0
C826 1-216-864-11 SHORT CHIP 0
C827 1-216-864-11 SHORT CHIP 0
C828 1-216-864-11 SHORT CHIP 0
C829 1-216-864-11 SHORT CHIP 0
C830 1-216-864-11 SHORT CHIP 0
< CONNECTOR >
CN700 1-784-780-11 CONNECTOR, FFC 19P
* CN701 1-564-511-11 PLUG, CONNECTOR 8P
CN702 1-564-507-11 PLUG, CONNECTOR 4P
< DIODE >
D701 8-719-988-61 DIODE 1SS355TE-17
D702 8-719-988-61 DIODE 1SS355TE-17
D703 8-719-988-61 DIODE 1SS355TE-17
D704 8-719-988-61 DIODE 1SS355TE-17
D705 6-500-260-01 DIODE P6SMB39AT3
D706 6-500-260-01 DIODE P6SMB39AT3
D707 8-719-988-61 DIODE 1SS355TE-17
63
Page 64
HCD-CPX22/NXM3
S-MASTER
Ref. No. Part No. Description Remarks Ref. No. Part No. Description Remarks
D708 8-719-988-61 DIODE 1SS355TE-17
D709 8-719-988-61 DIODE 1SS355TE-17
D710 8-719-988-61 DIODE 1SS355TE-17
D711 8-719-988-61 DIODE 1SS355TE-17
D712 8-719-988-61 DIODE 1SS355TE-17
D755 6-500-260-01 DIODE P6SMB39AT3
D756 6-500-260-01 DIODE P6SMB39AT3
< EARTH TERMINAL >
EP701 1-537-738-21 TERMINAL, GROUND
EP702 1-537-738-21 TERMINAL, GROUND
R701 1-216-864-11 SHORT CHIP 0
R704 1-216-864-11 SHORT CHIP 0
R706 1-216-809-11 METAL CHIP 100 5% 1/10W
R707 1-216-864-11 SHORT CHIP 0
R708 1-216-864-11 SHORT CHIP 0
R709 1-216-864-11 SHORT CHIP 0
R710 1-216-809-11 METAL CHIP 100 5% 1/10W
R711 1-216-809-11 METAL CHIP 100 5% 1/10W
R712 1-216-809-11 METAL CHIP 100 5% 1/10W
R713 1-216-837-11 METAL CHIP 22K 5% 1/10W
< RESISTOR >
< FERRITE BEAD >
FB702 1-216-864-11 SHORT CHIP 0
< FILTER >
FL702 1-234-177-21 FILTER, CHIP EMI
FL703 1-234-177-21 FILTER, CHIP EMI
FL704 1-234-177-21 FILTER, CHIP EMI
FL706 1-234-177-21 FILTER, CHIP EMI
< IC >
IC701 6-701-834-01 IC PCM1802DBR
IC703 8-759-387-77 IC TC7WU04F (TE12R)
IC704 6-700-263-01 IC NJM2870F18 (TE2)
IC705 6-705-979-01 IC CXD9788AR
IC706 8-759-583-47 IC uPC2933T-E2
IC707 6-705-695-01 IC CXD9775M
IC708 6-705-695-01 IC CXD9775M
IC709 6-701-189-01 IC MC74VHC1GU04DFT1
IC710 8-759-473-95 IC uPC2905T-E1
< COIL >
L701 1-412-951-11 INDUCTOR 10uH
L702 1-412-951-11 INDUCTOR 10uH
L703 1-412-951-11 INDUCTOR 10uH
L704 1-216-295-91 SHORT CHIP 0
L705 1-412-939-11 INDUCTOR 1uH
L708 1-456-813-11 COIL, AIR-CORE
L709 1-456-813-11 COIL, AIR-CORE
L710 1-456-680-11 COIL, CHOKE 10UF
L711 1-456-680-11 COIL, CHOKE 10UF
L712 1-412-951-11 INDUCTOR 10uH
L713 1-216-295-91 SHORT CHIP 0
L714 1-216-295-91 SHORT CHIP 0
L715 1-216-295-91 SHORT CHIP 0
L716 1-216-295-91 SHORT CHIP 0
L758 1-456-813-11 COIL, AIR-CORE
L759 1-456-813-11 COIL, AIR-CORE
L760 1-456-680-11 COIL, CHOKE 10UF
L761 1-456-680-11 COIL, CHOKE 10UF
R714 1-216-818-11 METAL CHIP 560 5% 1/10W
R716 1-216-829-11 METAL CHIP 4.7K 5% 1/10W
R717 1-216-864-11 SHORT CHIP 0
R718 1-216-829-11 METAL CHIP 4.7K 5% 1/10W
R719 1-220-942-11 METAL CHIP 3.3 1% 1/4W
R720 1-220-942-11 METAL CHIP 3.3 1% 1/4W
R721 1-216-829-11 METAL CHIP 4.7K 5% 1/10W
R722 1-216-864-11 SHORT CHIP 0
R723 1-216-841-11 METAL CHIP 47K 5% 1/10W
R724 1-216-302-00 RES-CHIP 2.7 5% 1/10W
R725 1-216-302-00 RES-CHIP 2.7 5% 1/10W
R726 1-216-845-11 METAL CHIP 100K 5% 1/10W
R727 1-216-845-11 METAL CHIP 100K 5% 1/10W
R728 1-216-845-11 METAL CHIP 100K 5% 1/10W
R729 1-216-821-11 METAL CHIP 1K 5% 1/10W
R730 1-216-809-11 METAL CHIP 100 5% 1/10W
R731 1-216-809-11 METAL CHIP 100 5% 1/10W
R732 1-216-809-11 METAL CHIP 100 5% 1/10W
R735 1-216-864-11 SHORT CHIP 0
R736 1-216-857-11 METAL CHIP 1M 5% 1/10W
R737 1-216-821-11 METAL CHIP 1K 5% 1/10W
R739 1-216-864-11 SHORT CHIP 0
R741 1-216-809-11 METAL CHIP 100 5% 1/10W
R742 1-216-833-11 METAL CHIP 10K 5% 1/10W
R743 1-216-809-11 METAL CHIP 100 5% 1/10W
R744 1-216-864-11 SHORT CHIP 0
R745 1-216-809-11 METAL CHIP 100 5% 1/10W
R746 1-216-809-11 METAL CHIP 100 5% 1/10W
R747 1-216-809-11 METAL CHIP 100 5% 1/10W
R748 1-216-841-11 METAL CHIP 47K 5% 1/10W
R749 1-216-864-11 SHORT CHIP 0
R750 1-216-845-11 METAL CHIP 100K 5% 1/10W
R751 1-216-864-11 SHORT CHIP 0
R752 1-216-837-11 METAL CHIP 22K 5% 1/10W
R754 1-216-818-11 METAL CHIP 560 5% 1/10W
R756 1-216-809-11 METAL CHIP 100 5% 1/10W
R757 1-216-864-11 SHORT CHIP 0
R758 1-216-864-11 SHORT CHIP 0
R759 1-216-864-11 SHORT CHIP 0
R760 1-216-809-11 METAL CHIP 100 5% 1/10W
< TRANSISTOR >
Q701 8-729-120-28 TRANSISTOR 2SC1623-L5L6
Q702 8-729-602-36 TRANSISTOR 2SA1602-F
Q703 8-729-602-36 TRANSISTOR 2SA1602-F
Q752 8-729-602-36 TRANSISTOR 2SA1602-F
Q753 8-729-602-36 TRANSISTOR 2SA1602-F
64
R761 1-216-809-11 METAL CHIP 100 5% 1/10W
R762 1-216-809-11 METAL CHIP 100 5% 1/10W
R764 1-216-864-11 SHORT CHIP 0
R766 1-216-829-11 METAL CHIP 4.7K 5% 1/10W
R767 1-216-864-11 SHORT CHIP 0
Page 65
HCD-CPX22/NXM3
S-MASTER SW (1) SW (2) VOL
Ref. No. Part No. Description Remarks Ref. No. Part No. Description Remarks
R768 1-216-829-11 METAL CHIP 4.7K 5% 1/10W
R769 1-220-942-11 METAL CHIP 3.3 1% 1/4W
R770 1-220-942-11 METAL CHIP 3.3 1% 1/4W
R771 1-216-829-11 METAL CHIP 4.7K 5% 1/10W
R772 1-216-864-11 SHORT CHIP 0
R773 1-216-841-11 METAL CHIP 47K 5% 1/10W
R774 1-216-302-00 RES-CHIP 2.7 5% 1/10W
R775 1-216-302-00 RES-CHIP 2.7 5% 1/10W
R776 1-216-845-11 METAL CHIP 100K 5% 1/10W
R777 1-216-845-11 METAL CHIP 100K 5% 1/10W
R778 1-216-845-11 METAL CHIP 100K 5% 1/10W
R779 1-216-864-11 SHORT CHIP 0
R781 1-216-809-11 METAL CHIP 100 5% 1/10W
R782 1-216-857-11 METAL CHIP 1M 5% 1/10W
R783 1-216-864-11 SHORT CHIP 0
R784 1-216-809-11 METAL CHIP 100 5% 1/10W
R785 1-216-809-11 METAL CHIP 100 5% 1/10W
R786 1-216-809-11 METAL CHIP 100 5% 1/10W
R787 1-216-809-11 METAL CHIP 100 5% 1/10W
R788 1-216-809-11 METAL CHIP 100 5% 1/10W
R789 1-216-809-11 METAL CHIP 100 5% 1/10W
R790 1-216-809-11 METAL CHIP 100 5% 1/10W
R792 1-216-864-11 SHORT CHIP 0
R793 1-216-845-11 METAL CHIP 100K 5% 1/10W
R795 1-216-864-11 SHORT CHIP 0
< VIBRATOR >
SP OUT
< COIL >
L590 1-420-872-52 COIL, AIR-CORE (AEP, UK, EA, RU)
L591 1-420-872-52 COIL, AIR-CORE (AEP, UK, EA, RU)
L592 1-420-872-52 COIL, AIR-CORE (AEP, UK, EA, RU)
L593 1-420-872-52 COIL, AIR-CORE (AEP, UK, EA, RU)
< RESISTOR >
R592 1-249-625-31 CARBON 10 5% 1/2W
(AEP, UK, EA, RU)
R593 1-249-625-31 CARBON 10 5% 1/2W
(AEP, UK, EA, RU)
R594 1-249-625-31 CARBON 10 5% 1/2W
(AEP, UK, EA, RU)
R595 1-249-625-31 CARBON 10 5% 1/2W
(AEP, UK, EA, RU)
R596 1-249-625-31 CARBON 10 5% 1/2W
(AEP, UK, EA, RU)
R597 1-249-625-31 CARBON 10 5% 1/2W
(AEP, UK, EA, RU)
R598 1-249-625-31 CARBON 10 5% 1/2W
(AEP, UK, EA, RU)
R599 1-249-625-31 CARBON 10 5% 1/2W
(AEP, UK, EA, RU)
< TERMINAL >
TM504 1-537-114-21 TERMINAL BOARD (SPEAKER)
************************************************************
X701 1-795-843-11 VIBRATOR, CRYSTAL (12.288MHz)
X702 1-795-660-21 QUARTZ CRYSTAL UNIT (49.152MHz)
************************************************************
SP OUT BOARD
************
< CAPACITOR >
C591 1-131-992-91 CERAMIC CHIP 100000PF 35V
(AEP, UK, EA, RU)
C592 1-131-992-91 CERAMIC CHIP 100000PF 35V
(AEP, UK, EA, RU)
C594 1-131-992-91 CERAMIC CHIP 100000PF 35V
(AEP, UK, EA, RU)
C595 1-131-992-91 CERAMIC CHIP 100000PF 35V
(AEP, UK, EA, RU)
C596 1-131-992-91 CERAMIC CHIP 100000PF 35V
(AEP, UK, EA, RU)
C597 1-131-992-91 CERAMIC CHIP 100000PF 35V
(AEP, UK, EA, RU)
C598 1-131-992-91 CERAMIC CHIP 100000PF 35V
(AEP, UK, EA, RU)
C599 1-131-992-91 CERAMIC CHIP 100000PF 35V
(AEP, UK, EA, RU)
< CONNECTOR >
CN510 1-564-507-11 PLUG, CONNECTOR 4P
< EARTH TERMINAL >
EP505 1-537-738-21 TERMINAL, GROUND
SW (1) BOARD
***********
< SWITCH >
S721 1-786-084-11 SWITCH, DETECTION (MAIN TRAY IN/OUT)
************************************************************
SW (2) BOARD
***********
< SWITCH >
S731 1-786-382-11 SWITCH, PUSH (1 KEY) (SUB TRAY IN)
************************************************************
A-4750-851-A VOL BOARD, COMPLETE
*******************
< CAPACITOR >
C1007 1-164-156-11 CERAMIC CHIP 0.1uF 25V
C1008 1-164-156-11 CERAMIC CHIP 0.1uF 25V
C1013 1-126-947-11 ELECT 47uF 20% 35V
< CONNECTOR >
CN1050 1-784-776-11 CONNECTOR, FFC 15P
CN1051 1-784-766-11 CONNECTOR, FFC 5P
< DIODE >
D1050 8-719-071-44 DIODE SELS5223C-TP15 (^/1)
D1051 8-719-988-61 DIODE 1SS355TE-17
65
Page 66
HCD-GN880
VOL
Ref. No. Part No. Description Remarks
< IC >
IC1050 6-600-349-31 IC NJL24H400A
< TRANSISTOR >
Q1041 8-729-027-43 TRANSISTOR DTC114EKA-T146
< RESISTOR >
R1048 1-216-864-11 SHORT CHIP 0
R1049 1-216-821-11 METAL CHIP 1K 5% 1/10W
R1050 1-216-823-11 METAL CHIP 1.5K 5% 1/10W
R1059 1-216-805-11 METAL CHIP 47 5% 1/10W
R1090 1-216-821-11 METAL CHIP 1K 5% 1/10W
R1091 1-216-821-11 METAL CHIP 1K 5% 1/10W
R1092 1-216-821-11 METAL CHIP 1K 5% 1/10W
R1093 1-216-821-11 METAL CHIP 1K 5% 1/10W
R1094 1-216-821-11 METAL CHIP 1K 5% 1/10W
R1095 1-216-821-11 METAL CHIP 1K 5% 1/10W
< SWITCH >
S1042 1-762-875-21 SWITCH, KEYBOARD (^/1)
S1043 1-762-875-21 SWITCH, KEYBOARD (DSGX)
S1050 1-786-418-11 SWITCH, ROTARY (ENCODER) (BASS)
S1051 1-786-418-11 SWITCH, ROTARY (ENCODER) (TREBLE)
S1052 1-418-725-51 ENCODER, ROTARY (12 TYPE) (VOLUME)
************************************************************
MISCELLANEOUS
*************
3 1-769-972-11 WIRE (FLAT TYPE) (13 CORE)
4 1-765-332-11 WIRE (FLAT TYPE) (15 CORE)
5 1-769-869-11 WIRE (FLAT TYPE) (5 CORE)
6 1-769-939-11 WIRE (FLAT TYPE) (11 CORE) (EXCEPT AEP, UK)
6 1-773-003-11 WIRE (FLAT TYPE) (15 CORE) (AEP, UK)
11 1-693-603-31 TUNER (FM/AM) (E3, E51, EA)
11 1-693-604-11 TUNER (FM/AM) (AEP, UK)
11 1-693-623-31 TUNER (FM/AM) (US)
11 1-693-654-11 TUNER (FM/AM) (RU)
59 1-796-880-11 DECK, MECHANISM
0102 1-468-813-11 REGULATOR, SWITCHING (AEP, UK, RU)
0102 1-468-819-11 REGULATOR, SWITCHING (US)
0102 1-468-821-11 REGULATOR, SWITCHING (E3, E51, EA)
0103 1-775-786-21 CORD, POWER (UK, EA)
0103 1-777-071-53 CORD, POWER (AEP, E51, RU)
0103 1-783-820-11 CORD, POWER (US)
0103 1-827-226-11 CORD, POWER (E3)
162 1-471-035-11 MAGNET ASSY
256 1-827-992-11 WIRE (FLAT TYPE) (16 CORE)
0259 8-820-244-01 OPTICAL PICK-UP (KSM-215DCP/C2NP)
M761 A-4713-174-A MOTOR (81) ASSY (LD/ST MOTOR)
M762 A-4713-174-A MOTOR (81) ASSY (BU U/D MOTOR)
S771 1-478-552-11 ENCODER, ROTARY (MD)
S781 1-478-551-11 ENCODER, ROTARY (ST U/D)
66
The components identified by
mark 0 or dotted line with mark
0 are critical for safety.
Replace only with part number
specified.
Page 67

MEMO
HCD-CPX22/NXM3
67
Page 68
HCD-CPX22/NXM3
REVISION HISTORY
Clicking the version allows you to jump to the revised page.
Also, clicking the version at the upper right on the revised page allows you to jump to the next revised
page.
Ver. Date Description of Revision
1.0 2004.04 New
 Loading...