

Page 1
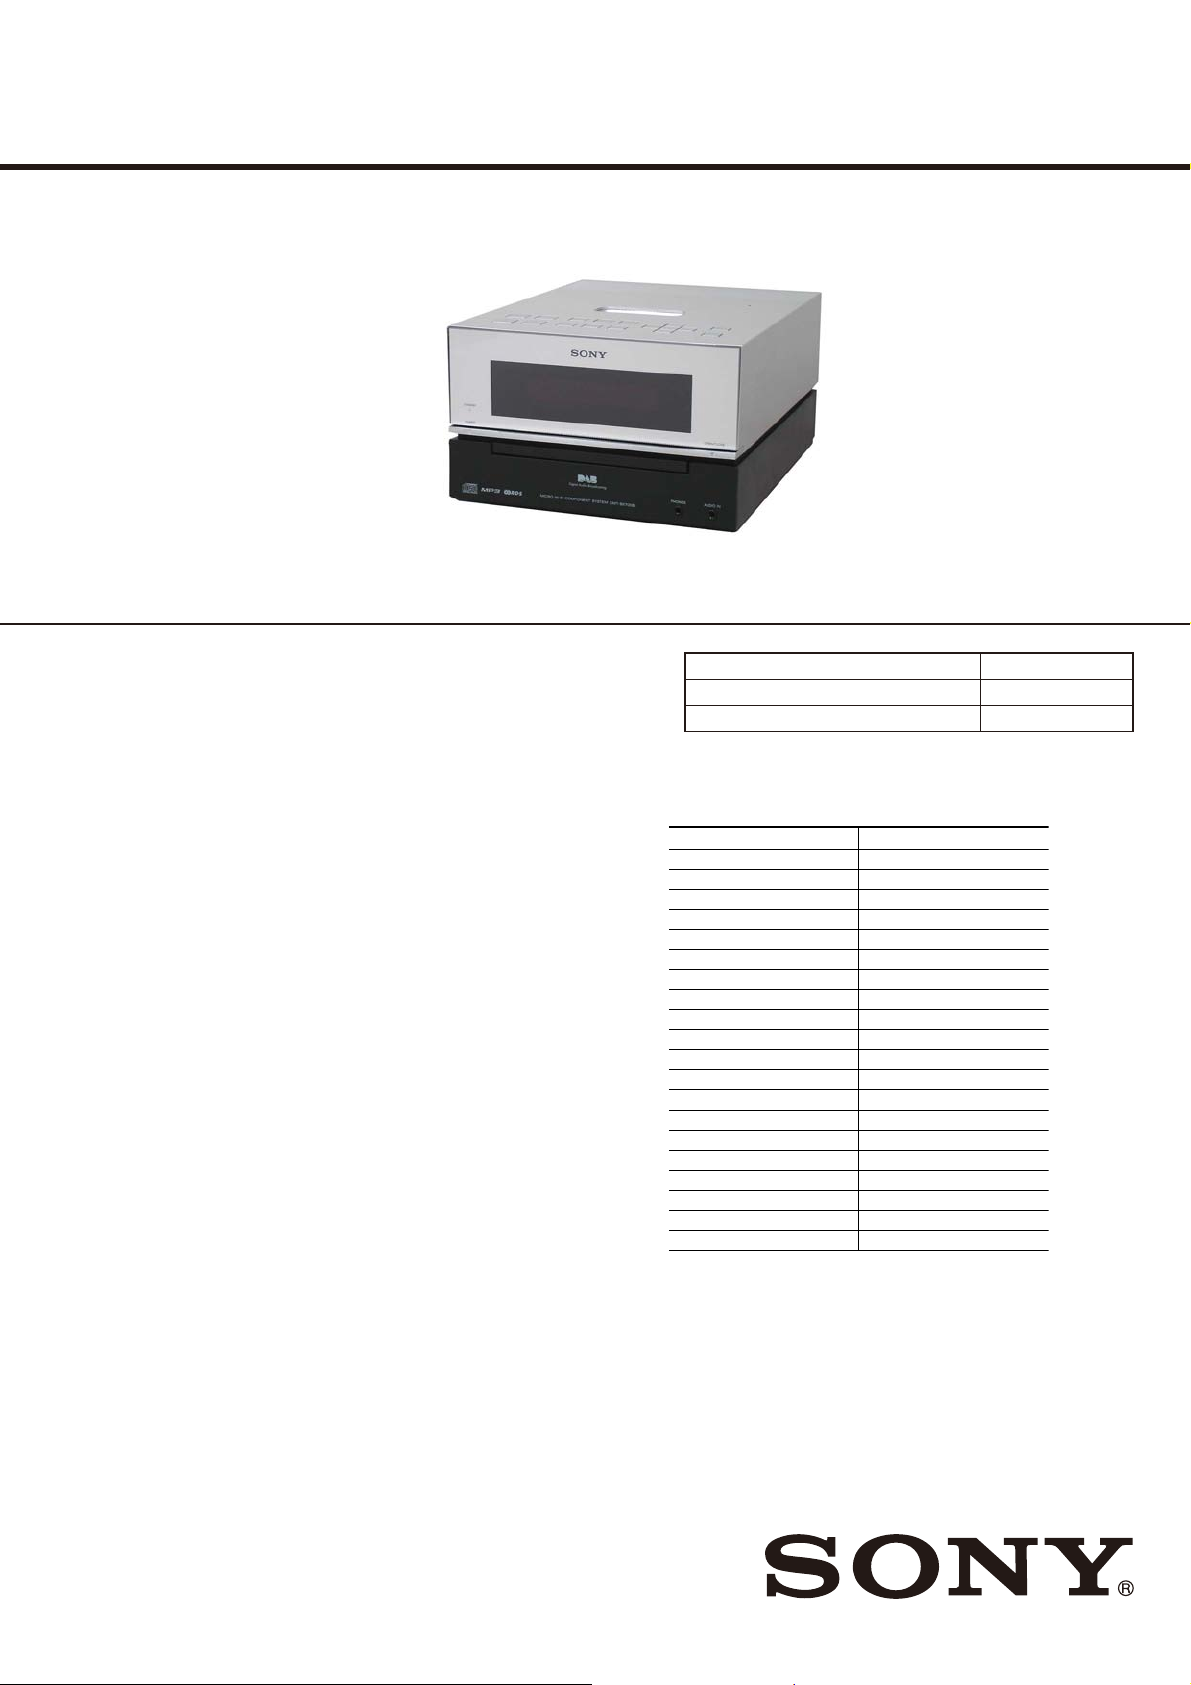
HCD-BX70DBi
SERVICE MANUAL
Ver. 1.2 2009.02
• HCD-BX70DBi is the amplifi er, CD player, tuner
and iPod section in CMT-BX70DBi.
iPod is a trademark of Apple Inc., registered in the U.S. and other countries.
MPEG Layer-3 audio coding technology and patents licensed from Fraunhofer
IIS and Thomson.
All other trademarks and registered trademarks are of their respective holders.
In this manual,
TM
and®marks are not specified.
Amplifier section
DIN poweroutput (rated):
18 + 18 W (6 ohms at 1 kHz, DIN)
Continuous RMS power output (reference): 25 + 25 W (6 ohms at 1 kHz,
10% THD)
Music power output (reference): 38 + 38 W (6 ohms at 1 kHz, 10% THD)
Inputs
AUDIO IN (stereo mini jack):voltage 250 mV, impedance 47 kilohms
Outputs
PHONES (stereo mini jack): accepts headphones of 8 ohms or more
SPEAKER: accepts impedance of 6 to 16 ohms
CD player section
System: Compact disc and digital audio system
Laser Diode Properties
Emission Duration: Continuous
Laser Output*:Less than 44.6μW
This output is the value measurement at a distance of 200mm from the
*
objective lens surface on the Optical Pick-up Block with 7mm aperture.
Frequency response: 20 Hz – 20 kHz
Signal-to-noise ratio: More than 90 dB
Dynamic range: More than 90 dB
Tuner section
DAB tuner section:
Frequency range*
Band-III: 174.928 (5A) – 239.200 (13F) MHz
* For details, see “DAB frequency table” below.
Antenna: FM/DAB lead antenna
Antenna terminal: 75 ohms, F female
FM stereo, FM/AM superheterodyne tuner
FM tuner section:
Tuning range: 87.5 – 108.0 MHz (50 kHz step)
Antenna: FM/DAB lead antenna
Antenna terminals: 75 ohms unbalanced
Intermediatefrequency: 10.7 MHz
AM tuner section:
Tuning range:531 – 1,602 kHz (with 9 kHz tuning interval)
Antenna: AM loop antenna, external antenna terminal
Intermediatefrequency: 450 kHz
SPECIFICATIONS
AEP Model
UK Model
Model Name Using Similar Mechanism HCD-EC68
Base Unit Name BU-K6BD90-WOD
Optical Pick-up Block Name KSM-213DCP
DAB frequency table (Band-III)
Frequency Label Frequency Label
174.928 MHz 5A 209.936 MHz 10A
176.640 MHz 5B 211.648 MHz 10B
178.352 MHz 5C 213.360 MHz 10C
180.064 MHz 5D 215.072 MHz 10D
181.936 MHz 6A 216.928 MHz 11A
183.648 MHz 6B 218.640 MHz 11B
185.360 MHz 6C 220.352 MHz 11C
187.072 MHz 6D 222.064 MHz 11D
188.928 MHz 7A 223.936 MHz 12A
190.640 MHz 7B 225.648 MHz 12B
192.352 MHz 7C 227.360 MHz 12C
194.064 MHz 7D 229.072 MHz 12D
195.936 MHz 8A 230.784 MHz 13A
197.648 MHz 8B 232.496 MHz 13B
199.360 MHz 8C 234.208 MHz 13C
201.072 MHz 8D 235.776 MHz 13D
202.928 MHz 9A 237.488 MHz 13E
204.640 MHz 9B 239.200 MHz 13F
206.352 MHz 9C
208.064 MHz 9D
– Continued on next page –
9-889-139-03
2009B00-1
2009.02
©
COMPACT DISC RECEIVER
Sony Corporation
Audio&Video Business Group
Published by Sony Techno Create Corporation
Page 2

HCD-BX70DBi
iPod section
Compatible iPod models:
iPod nano 3rd
generation
iPod touch
iPod nano 2nd
generation
(aluminum)
iPod 4th
generation
(color display)
General
Power requirements:230 V AC, 50/60 Hz
Power consumption: 63 watts
Dimensions (w/h/d) (excl. speakers): Approx. 215 × 140 × 298 mm
Mass (excl. speakers):
Design and specications are subject to change without notice.
(video)
iPod 5th
generation
(video)
iPod 4th
generation
Approx. 3.9 kg
iPod classic
iPod nano 1st
generation
iPod mini
NOTES ON CHIP COMPONENT REPLACEMENT
• Never reuse a disconnected chip component.
• Notice that the minus side of a tantalum capacitor may be damaged by heat.
FLEXIBLE CIRCUIT BOARD REPAIRING
• Keep the temperature of soldering iron around 270 °C during
repairing.
• Do not touch the soldering iron on the same conductor of the
circuit board (within 3 times).
• Be careful not to apply force on the conductor when soldering
or unsoldering.
CAUTION
Use of controls or adjustments or performance of procedures
other than those specifi ed herein may result in hazardous radia-
tion exposure.
TABLE OF CONTENTS
1. SERVICING NOTES ............................................. 3
2. GENERAL .................................................................. 4
3. DISASSEMBLY
3-1. Disassembly Flow ........................................................... 6
3-2. Panel (Side L/R) .............................................................. 7
3-3. Top Panel Block .............................................................. 7
3-4. TOP KEY Board, IP Board, Panel Top (IP) .................... 8
3-5. Front Panel Block ........................................................... 8
3-6. Rear Panel Block ............................................................ 9
3-7. Panel (Rear) .................................................................... 9
3-8. AMP Board Block ........................................................... 10
3-9. POWER Board Block ..................................................... 10
3-10. MAIN Board ................................................................... 11
3-11. DAB Board, Module (DAB Tuner) ................................ 11
3-12. Loading Mechanism Block ............................................. 12
3-13. Base Unit ......................................................................... 12
3-14. Belt .................................................................................. 13
3-15. OP Base Assy (KSM-213D) ........................................... 13
4. TEST MODE ............................................................ 14
5. ELECTRICAL CHECKS ...................................... 16
6. DIAGRAMS
6-1. Block Diagram - CD SERVO Section - .......................... 17
6-2. Block Diagram - iPod, TUNER, DAB Section - ............ 18
6-3. Block Diagram - MAIN Section - ................................... 19
6-4. Block Diagram
- PANEL, POWER SUPPLY Section - ........................... 20
6-5. Printed Wiring Boards - CD Section - ............................ 22
6-6. Schematic Diagram - CD Board - ................................... 23
6-7. Printed Wiring Board - DAB Board - ............................. 24
6-8. Schematic Diagram - DAB Board - ................................ 25
6-9. Printed Wiring Board - IP Board - .................................. 26
6-10. Schematic Diagram - IP Board - ..................................... 27
6-11. Printed Wiring Boards - MAIN Section - ....................... 28
6-12. Schematic Diagram - MAIN Section (1/3) - ................... 29
6-13. Schematic Diagram - MAIN Section (2/3) - ................... 30
6-14. Schematic Diagram - MAIN Section (3/3) - ................... 31
6-15. Printed Wiring Boards
- AMP/HEADPHONE Section - ..................................... 32
6-16. Schematic Diagram - AMP/HEADPHONE Section - .... 33
6-17. Printed Wiring Boards - PANEL Section - ..................... 34
6-18. Schematic Diagram - PANEL Section - .......................... 35
6-19. Printed Wiring Board - POWER Board - ........................ 36
6-20. Schematic Diagram - POWER Board - .......................... 37
This appliance is classifi ed as
a CLASS 1 LASER product.
This marking is located on the
rear or bottom exterior.
SAFETY-RELATED COMPONET WARNING!
COMPONENTS IDENTIFIED BY MARK 0 OR DOTTED LINE
WITH MARK 0 ON THE SCHEMATIC DIAGRAMS AND IN
THE PARTS LIST ARE CRITICAL TO SAFE OPERATION.
REPLACE THESE COMPONENTS WITH SONY PARTS
WHOSE PART NUMBERS APPEAR AS SHOWN IN THIS
MANUAL OR IN SUPPLEMENTS PUBLISHED BY SONY.
2
7. EXPLODED VIEWS
7-1. Panel Sectiom ................................................................. 45
7-2. Top Panel Section ........................................................... 46
7-3. Front Panel Section ......................................................... 47
7-4. MAIN Board Section ...................................................... 48
7-5. POWER Board Section ................................................... 49
7-6. Loading Mechanism Section .......................................... 50
7-7. Base Unit Section (BU-K6BD90-WOD) ........................ 51
8. ELECTRICAL PARTS LIST .............................. 52
Page 3
SECTION 1
SERVICING NOTES
HCD-BX70DBi
NOTES ON HANDLING THE OPTICAL PICK-UP
BLOCK OR BASE UNIT
The laser diode in the optical pick-up block may suffer electrostatic break-down because of the potential difference generated by the
charged electrostatic load, etc. on clothing and the human body.
During repair, pay attention to electrostatic break-down and also
use the procedure in the printed matter which is included in the
repair parts.
The fl exible board is easily damaged and should be handled with
care.
NOTES ON LASER DIODE EMISSION CHECK
The laser beam on this model is concentrated so as to be focused
on the disc refl ective surface by the objective lens in the optical
pickup block. Therefore, when checking the laser diode emission,
observe from more than 30 cm away from the objective lens.
UNLEADED SOLDER
Boards requiring use of unleaded solder are printed with the leadfree mark (LF) indicating the solder contains no lead.
(Caution: Some printed circuit boards may not come printed with
the lead free mark due to their particular size)
: LEAD FREE MARK
Unleaded solder has the following characteristics.
• Unleaded solder melts at a temperature about 40 °C higher
than ordinary solder.
Ordinary soldering irons can be used but the iron tip has to be
applied to the solder joint for a slightly longer time.
Soldering irons using a temperature regulator should be set to
about 350 °C.
Caution: The printed pattern (copper foil) may peel away if
the heated tip is applied for too long, so be careful!
• Strong viscosity
Unleaded solder is more viscous (sticky, less prone to fl ow)
than ordinary solder so use caution not to let solder bridges
occur such as on IC pins, etc.
• Usable with ordinary solder
It is best to use only unleaded solder but unleaded solder may
also be added to ordinary solder.
ANTITHEFT UNLOCK MODE
Procedure:
1. Press the [
2. Press the [FUNCTION] button to select “CD”.
3. Press two buttons of [
4. The message “UNLOCKED” is displayed on the fl uorescent
indicator tube and the disc tray is unlocked.
] button to turn the power on.
?/1
x/CANCEL
] and [
] for 5 seconds.
A
Note: When “LOCKED” is displayed, the tray lock is not released by
turning power on/off with the [?/1] button.
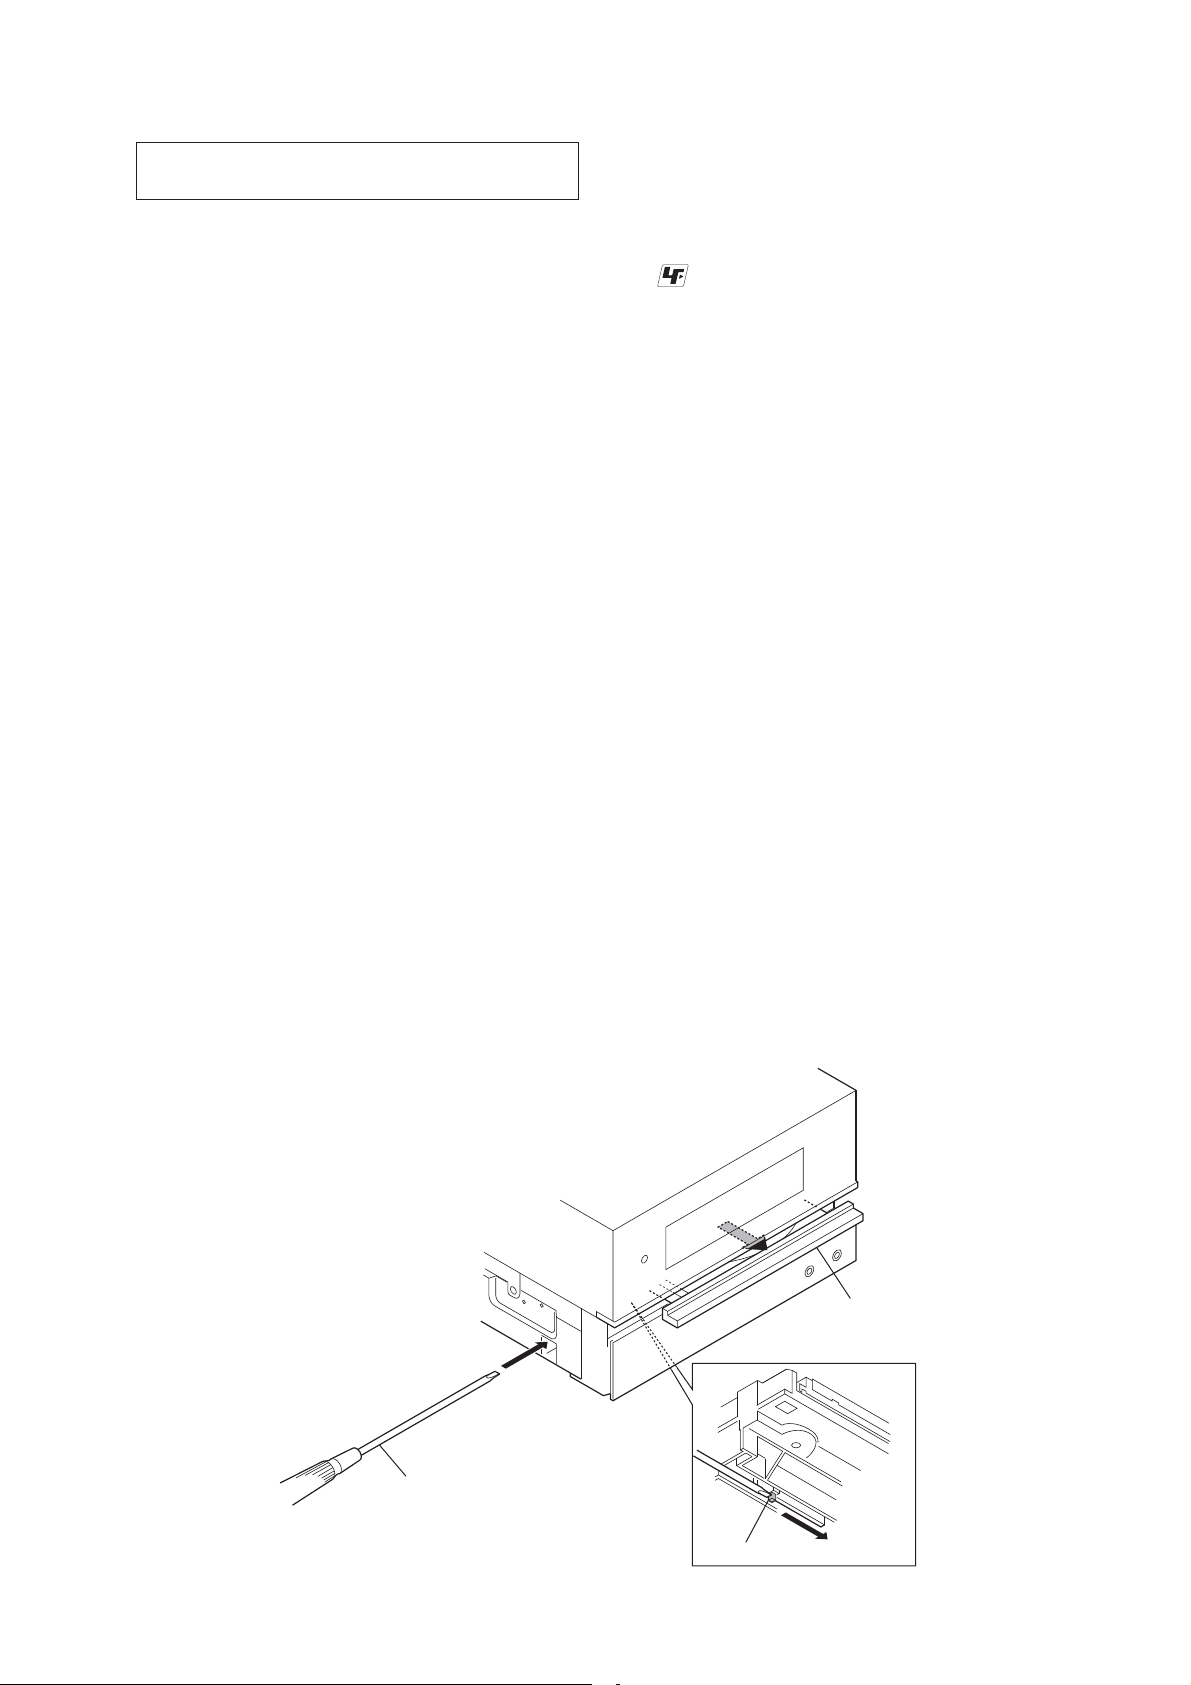
HOW TO OPEN THE TRAY WHEN POWER SWITCH TURN OFF
Note: Please insert a screwdriver after removing the panel (side L).
About disassembly of the panel (side L), please refer to “3-2. Panel (Side L/R)” (page 7).
Open the tray.
Insert the driver.
Push the boss.
3
Page 4

HCD-BX70DBi
Basic Operations
is manual mainly explains operations using the
remote, but the same operations can also be performed
using the buttons on the unit having the same or similar
names.
Before using the system
To use the remote
Slide and remove the battery compartment lid , and
insert the two supplied R6 (size AA) batteries, side
rst, matching the polarities shown below.
Notes on using the remote
With normal use, the batteries should last for about six months.
Do not mix an old battery with a new one or mix dierent types of
batteries.
If you do not use the remote for a long period of time, remove the
batteries to avoid damage from battery leakage and corrosion.
To set the clock
Use buttons on the remote to set the clock.
1 Turn on the system.
Press (power)
2 Select the clock set mode.
Press TIMER MENU
on the display, press /
“CLOCK SET?” and then press
3 Set the time.
Press /
press
minutes.
e clock settings are lost when you disconnect the
power cord or if a power failure occurs.
To display the clock when the system is o, press
DISPLAY
seconds.
To run the DAB Automatic Scan
When you turn on the system for the rst time aer
you purchase the system, DAB Automatic Scan starts
automatically and creates a list of available services.
If you want to run the DAB Automatic Scan again,
perform the procedure below.
1 Press DAB AUTO SCAN
“Auto Scan?” and “Push Enter” appear.
2 Press (enter)
Scanning begins. “” appears. Depending on
the DAB services available in your area, scanning may
take a few minutes.
When scanning is complete, a list of available services
is created.
.
. If the current mode appears
repeatedly to select
(enter) .
repeatedly to set the hour, and then
(enter) . Use the same procedure to set the
. e clock is displayed for about 8
on the unit.
.
SECTION 2
GENERAL
Notes
If your country or region does not support DAB broadcast, “No
Service” appears.
Do not press any button on the unit or the remote during DAB
Automatic Scan. If scanning is interrupted, run the DAB Automatic
Scan again.
If you move to another area, repeat this procedure to store the
stations for your new area.
is procedure clears all previously stored presets.
Before unplugging the DAB antenna, make sure the system is turned
o to preserve your own DAB settings.
is tuner does not support data services.
To use the iPod
Insert an iPod Dock Adapter into the unit’s connector
before use.
For details on the supplied iPod Dock Adapters, refer to
the instructions supplied with the Dock Adapters.
To remove the iPod Dock Adapter, pull it up with your
ngernail or a at object using the slot inside the adapter.
Adjusting the sound
To adjust the volume
Press VOLUME +/ (or VOL +/ on the unit) .
To add a sound eect
To Pr es s
Generate a more dynamic
sound (Dynamic Sound
Generator X-tra)
Set the sound eect
Playing a CD/MP3 disc
1 Select the CD function.
Press FUNCTION +/ (or FUNCTION on the unit)
repeatedly.
2 Place a disc.
Press (open/close)
with the label side up on the disc tray.
To close the disc tray, press (open/close) on the
unit.
Do not force the disc tray closed with your nger, as
this may damage the unit.
3 Start playback.
Press (play) (or CD (play/pause) on the
.
unit)
To Press
Pause playb ack
Stop playback
Select a folder on an
MP3 disc
Select a track or le
Find a point in a
track or le
Select Repeat Play
To change the play mode
Press PLAY MODE repeatedly while
stopped. You can select normal play (“
les in the folder on the disc), shue play (“SHUF” or
SHUF*”), or program play (“PGM”).
“
* When playing a CD-DA disc, (SHUF) Play performs the same
operation as normal (shue) play.
Notes on Repeat Play
All tracks or les on a disc are played repeatedly up to ve times.
“REP1” indicates that a single track or le is repeated until you stop
it.
Slot
on the unit.
DSGX
repeatedly to select
EQ
“BASS” or “TREBLE,” and
then press +/
to adjust the level.
(pause) (or CD (play/
pause) on the unit)
To resume play, press the button
again.
(stop) (or /CANCEL on the
unit)
+/ (select folder) .
/
.
Hold down / (rewind/
fast forward)
and release the button at the
desired point.
REPEAT
“REP” or “REP1” appears.
repeatedly
on the unit, and place a disc
.
.
(go back/go forward)
during playback,
repeatedly until
the player is
”
for all MP3
Notes on playing MP3 discs
Do not save other types of tracks or les or unnecessary folders on a
disc that has MP3 les.
Folders that have no MP3 les are skipped.
MP3 les are played back in the order that they are recorded onto
the disc.
e system can only play MP3 les that have a le extension of
“.MP3”.
If there are les on the disc that have the “.MP3” le extension,
but that are not MP3 les, the unit may produce noise or may
malfunction.
e maximum number of:
folders is 255 (including the root folder).
MP3 les is 511.
MP3 les and folders that can be contained on a single disc is 512.
folder levels (the tree structure of les) is 8.
Compatibility with all MP3 encoding/writing soware, recording
device, and recording media cannot be guaranteed. Incompatible MP3
discs may produce noise or interrupted audio or may not play at all.
Notes on playing multisession discs
If the disc begins with a CD-DA (or MP3) session, it is recognized as
a CD-DA (or MP3) disc, and other sessions are not played back.
A disc with a mixed CD format is recognized as a CD-DA (audio)
disc.
Listening to the radio
Before you can receive DAB, you must complete the
DAB Automatic Scan procedure (see “Before using the
system”).
1 Select “ TUNER DAB,” “TUNER FM” or “TUNER AM.”
Press FUNCTION +/ (or FUNCTION on the unit)
repeatedly. You can also select DAB directly by
pressing DAB AUTO SCAN
2 Select the tuning mode.
Press TUNING MODE
appears.
3 Tune in the desired station.
Press +/ (or TUNE +/ on the unit)
stops automatically when a station is tuned in, and
then “TUNED” and “STEREO” (for stereo programs
only) appear.
When you tune in a DAB station or an FM station that
provides RDS services, the service name or station
name appears on the display.
To stop automatic scanning (FM/AM bands
only)
Press (stop) (or /CANCEL on the unit) .
To tune in a station with a weak signal (FM/AM
bands only)
If “TUNED” does not appear and the scanning does not
stop, press TUNING MODE
and “PRESET” disappear, and then press +/ (or TUNE
+/ on the unit)
station.
To reduce static noise on a weak FM stereo
station
Press FM MODE repeatedly until “MONO” appears
to turn o stereo reception.
Notes on listening to DAB stations
When tuning in a DAB station, it may take a few seconds before you
hear any sound.
Primary service is automatically received when secondary service
ends.
on the unit.
repeatedly until “AUTO”
repeatedly until “AUTO”
repeatedly to tune in the desired
Playing the iPod
1 Select the iPod function.
Press FUNCTION +/ (or FUNCTION on the unit)
repeatedly.
2 Place the iPod.
3 Start playback.
Press (play) (or iPod (play/pause) on the
.
unit)
To control the iPod
You can control your iPod with the following buttons on
the remote or unit.
To Pr es s
Pause playb ack
Scroll up/down the
iPod menus
Select a track
or chapter of
audiobook/podcast
Choose the selected
item
(pause) (or iPod
(play/pause) on the unit)
.
(stop)
. You can scroll up or
/
down the iPod menus much like
the Click Wheel operations of
the iPod or the drag up-or-down
operations of the iPod touch.
(go back/go forward)
/
. To fast-forward or fast-
rewind, hold down the button.
/ (enter) (or ENTER on
the unit)
selected item much like the center
button on the iPod or the touch
operation of the iPod touch.
. Scanning
or
. You can choose the
This section is extracted
from instruction manual.
To Press
Find a point in a
track or chapter of
audiobook/podcast
Return to the
previous menu or
select a menu
To use the system as a battery charger
You can use the system as a battery charger for the iPod
when the system is both on and o.
e charging begins when the iPod is placed on the unit’s
. e charging status appears in the iPod
connector
display. For details, see the user’s guide of your iPod.
To stop charging the iPod
Remove the iPod. If you stop charging the iPod when
the system is o, press DISPLAY
disappears in the display.
Notes
When placing or removing the iPod, handle the iPod in the same
angle as that of the iPod connector
or sway the iPod to prevent connector damage.
Do not carry the unit with an iPod set on the connector. Doing so
may cause a malfunction.
When placing or removing the iPod, brace the unit with one hand
and take care not to press the controls of the iPod by mistake.
Before disconnecting the iPod, pause playback.
While playing video, you cannot use /
rewind (fast forward) by holding down /
To change the volume level, use VOLUME +/ (or VOL +/ on the
unit)
. e volume level does not change even if adjusted on the
iPod.
is system is designed for iPod only. You cannot connect any other
portable audio players.
To use an iPod, refer to the user’s guide of your iPod.
Sony cannot accept responsibility in the event that data recorded to
iPod is lost or damaged when using an iPod with this unit.
(fast rewind/fast
/
during playback, and
forward)
release the button at the desired
point.
/TOOL MENU /
(return) . You can return to the
previous menu or select a menu
much like the Menu button on
the iPod or the touch operation
of the iPod touch.
on the unit and do not twist
until the clock
. You can fast
.
Changing the display
To Pr es s
Change
information on the
display
Check the clock
when the system
2)
is o
1)
For example, you can view CD/MP3 disc information, such as;
track or le number during normal play.
track or le name (“
artist name (“
album or folder name (“
total playing time while the player is stopped.
You can also view DAB station information such as the service
name, channel label, preset number, frequency, DLS (Dynamic Label
Segment), or ensemble label.
2)
e clock is displayed continuously while the iPod is being charged.
To turn o the clock display, press DISPLAY
charging the iPod”).
3)
e STANDBY indicator on the unit lights up when the system is
o.
Notes on the display information
Characters that cannot be displayed appear as “_”.
e following are not displayed:
total playing time for a CD-DA disc depending on the play mode.
total playing time and remaining playing time for an MP3 disc.
e following are not displayed correctly:
folder and le names that do not follow either ISO9660 Level1,
Level 2 or Joliet in the expansion format.
e following is displayed:
ID3 tag information for MP3 les when ID3 version 1 and version
2 tags are used (up to 62 characters).
up to 8 characters of service name, up to 128 characters of DSL
(Dynamic Label Segment) and up to 16 characters of ensemble
label.
DISPLAY repeatedly when the
system is on.
1)
DISPLAY when the system is
3)
o
seconds.
”) during normal play.
”) during normal play.
. e clock is displayed for 8
”) during normal play.
(See “To stop
Using optional audio components
To connect an optional headphones
Connect headphones to the PHONES jack on the
unit.
To connect an optional component
Connect additional audio component to the AUDIO
on the unit using an audio analog cord (not
IN jack
supplied). Turn down the volume on the system, and
then select the AUDIO IN function.
4
Page 5

Other Operations
HCD-BX70DBi
Creating your own program
(Program Play)
1 Press FUNCTION +/ (or FUNCTION on the unit)
repeatedly to select the CD function.
2 Press PLAY MODE
while the player is stopped.
3 Press /
track or le number appears.
When programming les, press
to select the desired folder, and then select the desired
le.
4 Press (or ENTER on the unit)
or le to the program.
“.” appears when the total program time
exceeds 100 minutes for a CD, or when you select a
CD track whose number is 21 or over, or when you
select an MP3 le.
5 Repeat steps 3 through 4 to program additional
tracks or les, up to a total of 25 tracks or les.
6 To play your program of tracks or les, press (or
CD on the unit)
e program remains available until you open the disc
tray. To play the same program again, press (or
CD on the unit)
To cancel Program Play
Press PLAY MODE repeatedly until “PGM”
disappears while the player is stopped.
To delete the last track or le of the program
Press CLEAR while the player is stopped.
repeatedly until “PGM” appears
repeatedly until the desired
Selected track or le
number
.
.
+/ repeatedly
Total playing time of program
(including selected track
or le)
to add the track
Presetting radio stations
You can preset your favorite radio stations and tune
them in instantly by selecting the corresponding preset
number.
Use buttons on the remote to preset stations.
1 Tune in the desired station (See “Listening to the
radio”).
2 Press TUNER MEMORY
3 Press +/
preset number.
If another station is already assigned to the selected
preset number, the station is replaced by the new
stations.
4 Press
5 Repeat steps 1 through 4 to store other stations.
You can preset up to 20 DAB, 20 FM and 10 AM
stations. e preset stations are retained for about half
a day even if you disconnect the power cord or if a
power failure occurs.
6 To call up a preset radio station, press TUNING
MODE
then press +/
preset number.
Note on presetting DAB stations
You can preset a DAB service only when it can be received.
.
Preset number
repeatedly to select your desired
.
repeatedly until “PRESET” appears, and
repeatedly to select the desired
Using the Timers
e system oers two timer functions. If you use the Play
Timer with the Sleep Timer, the Sleep Timer has priority.
Use buttons on the remote to use the timer functions.
Sleep Timer:
You can fall asleep to music. is function works even if
the clock is not set.
Press SLEEP
system automatically turns o aer the current disc stops
or in 100 minutes.
Play Timer:
You can wake up to CD, tuner or iPod at a preset time.
Make sure you have set the clock.
1 Prepare the sound source.
2 Press TIMER MENU
3 Press
4 Set the time to start playback.
5 Use the same procedure as in step 4 to set the time
6 Select the sound source.
7 Press
To activate or check the timer again
1 Press TIMER MENU
2 Press
3 Press
To cancel the timer
Repeat the same procedure as above until “TIMER
OFF?” appears in step 3, and then press
To change the setting
Start over from step 1.
Note on the iPod touch user
e Play Timer may not be activated depending on the status of the
connected iPod touch.
Tip
e Play Timer setting remains as long as the setting is not canceled
manually.
repeatedly. If you select “AUTO,” the
Prepare the sound source, and then press VOLUME
to adjust the volume.
+/
To start from a specic track or le, create your own
program.
then press
“ON” appears, and the hour indication ashes.
Press /
press
e minute indication ashes. Use the procedure
above to set the minutes.
to stop playback.
Press /
source appears, and then press
shows the timer settings.
e system turns on 15 seconds before the preset time.
If the system is on at the preset time, the Play Timer
will not play.
“TIMER SEL?” ashes in the display.
press
.
repeatedly to select “PLAY SET?,” and
/
.
repeatedly to set the hour, and then
.
repeatedly until the desired sound
to turn o the system.
.
.
repeatedly to select “PLAY SEL?,” then
/
.
. e display
.
5
Page 6

HCD-BX70DBi
DISASSEMBLY
• This set can be disassembled in the order shown below.
3-1. DISASSEMBLY FLOW
SET
3-2. PANEL (SIDE L/R)
(Page 7)
3-3. TOP PANEL BLOCK
(Page 7)
SECTION 3
3-5. FRONT PANEL BLOCK
(Page 8)
3-12. LOADING MECHANISM
BLOCK
(Page 12)
3-13. BASE UNIT
(Page 12)
3-14. BELT
(Page 13)
3-15. OP BASE ASSY (KSM-213D)
(Page 13)
3-6. REAR PANEL BLOCK
(Page 9)
3-8. AMP BOARD BLOCK
(Page 10)
3-10. MAIN BOARD
(Page 11)
3-4. TOP KEY BOARD,
IP BOARD, PANEL TOP (IP)
(Page 8)
3-9. POWER BOARD BLOCK
(Page 10)
3-11. DAB BOARD,
MODULE (DAB TUNER)
(Page 11)
3-7. PANEL (REAR)
(Page 9)
6
Page 7
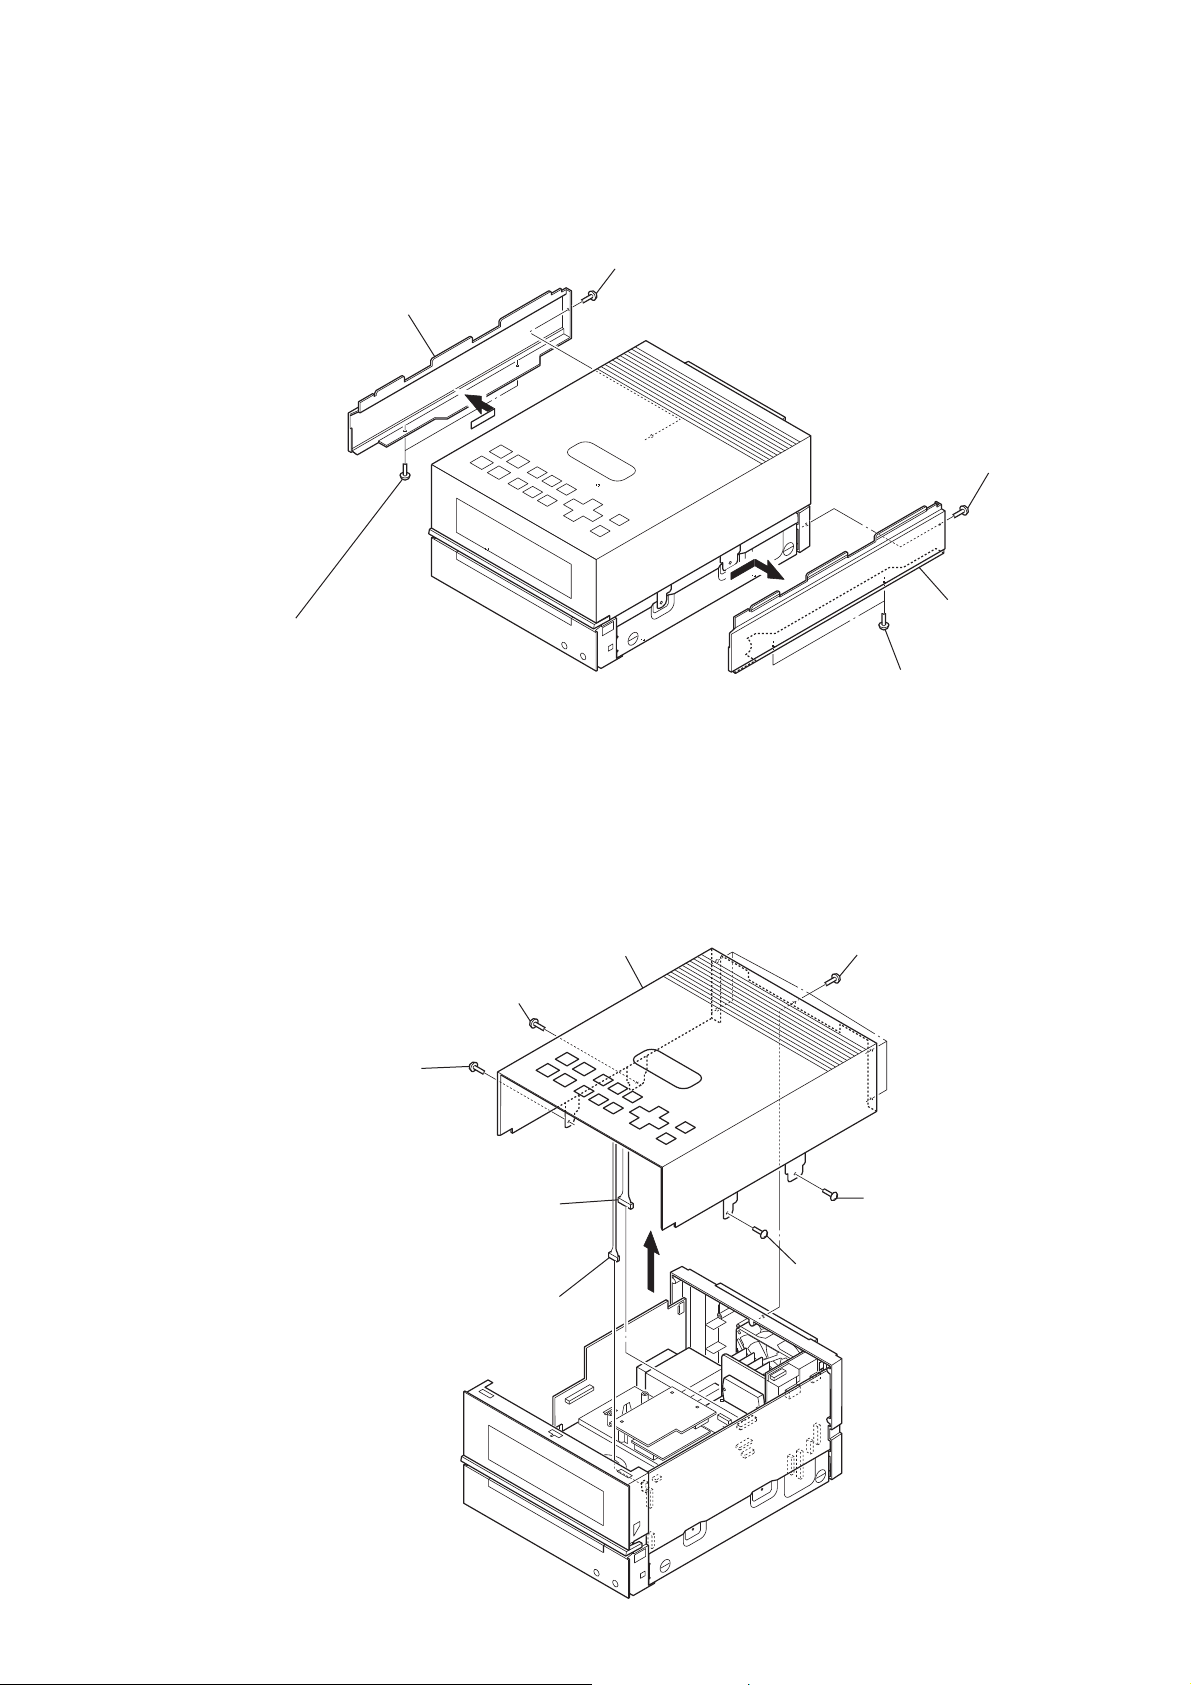
Note: Follow the disassembly procedure in the numerical order given.
3-2. PANEL (SIDE L/R)
panel (side L)
two screws
(BVST3 × 6)
screw
(BVTP3 × 10)
HCD-BX70DBi
screw
(BVTP3 × 10)
panel (side R)
3-3. TOP PANEL BLOCK
screw
(BVTT3 × 6)
screw
(PWH3 × 6)
connector
(CN325)
connector
(CN322)
top panel block
two screws
(BVST3 × 6)
five screws
(BVTP3 × 10)
screw
(PWH3 × 6)
screw
(BVTT3 × 6)
7
Page 8

HCD-BX70DBi
3-4. TOP KEY BOARD, IP BOARD, PANEL TOP (IP)
panel top (IP)
RI
button (function)
button (function B)
button (tune)
button (enter)
connector
TOP KEY board
RT
(CN101)
base (IP) assy
RH
escutcheon
RB
four screws
RG
(BVTP2.6 )
four screws
(BVTP2.6)
3-5. FRONT PANEL BLOCK
(BVTP2.6)
screw
(BVTT3 × 6)
five screws
button
(VOL)
two screws
(PWH2.6 × 10)
IP board
RE
four screws
(PTP2 × 5)
HOLD board
flexible flat cable (13 core)
(CN306)
front panel block
two screws
(BVST3 × 6)
8
Page 9

3-6. REAR PANEL BLOCK
rear panel block
fan motor connector (CN313)
flexible flat cable (11 core)
(CN310)
two screws
(BVTP3 × 10)
three screws
(BVST3 × 6)
HCD-BX70DBi
3-7. PANEL (REAR)
D.C. fan
(M901)
panel (rear)
two screws
(BVTP3 × 16)
plate
(GND TU)
tuner (FM/AM)
two feet (felt)
two screws
(BVST3 × 6)
flexible flat cable (11 core)
9
Page 10
HCD-BX70DBi
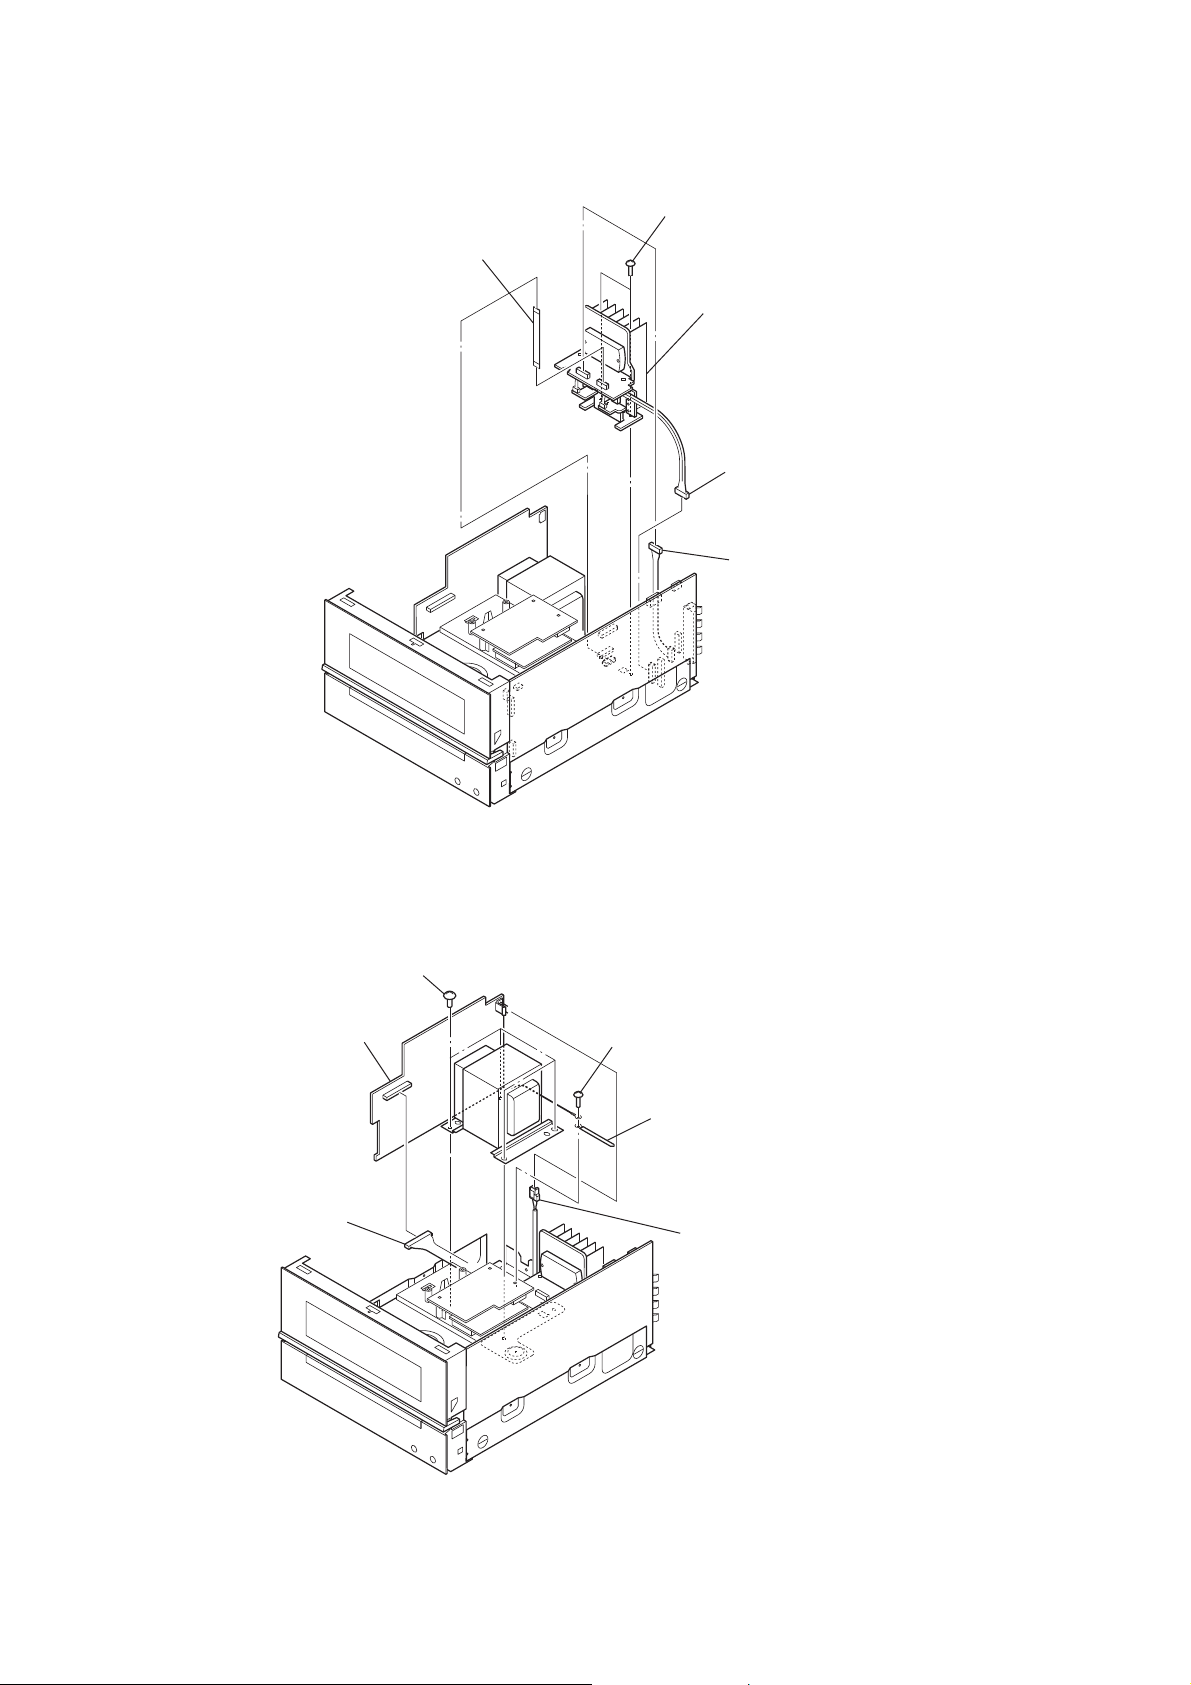
3-8. AMP BOARD BLOCK
flexible flat cable (7 core)
(AMP board: CN308/MAIN board: CN309)
two screws
(BV3)
AMP board block
connector (CN312)
connector (CN320)
3-9. POWER BOARD BLOCK
four screws
POWER board block
connector (CN904)
screw
(BV3)
coating clip
power cord connector (CN901)
10
Page 11
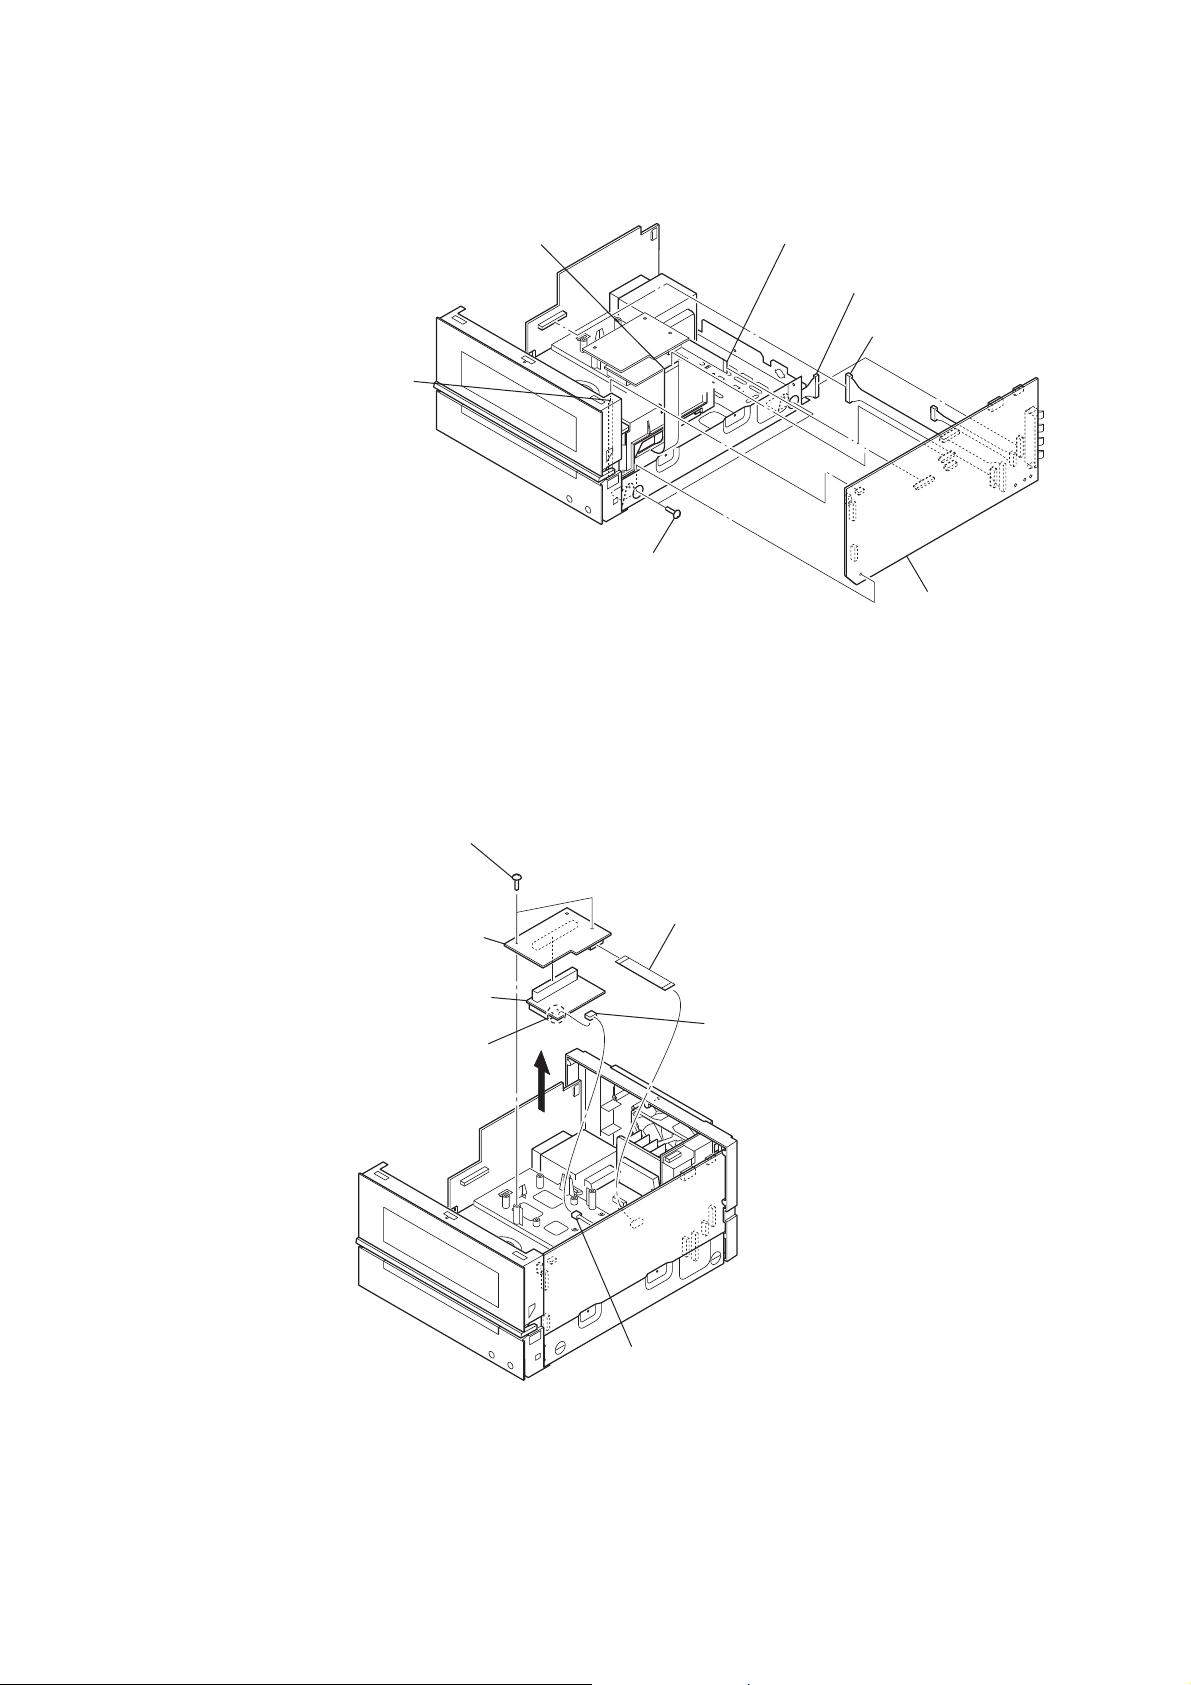
3-10. MAIN BOARD
flexible flat cable (5P)
(CN311)
flexible flat cable (21 core)
(CN305)
two screws
(BVTT3 × 6)
flexible flat cable (11 core)
(CN326)
connector
(CN316)
connector
(CN904)
HCD-BX70DBi
MAIN board
3-11. DAB BOARD, MODULE (DAB TUNER)
two screws
(BVTP3 × 8)
DAB board
module (DAB tuner)
Remove two solders.
flexible flat cable
(DAB board: CN801/MAIN board: CN326)
connector pin 2P
DAB cable connector
11
Page 12
HCD-BX70DBi
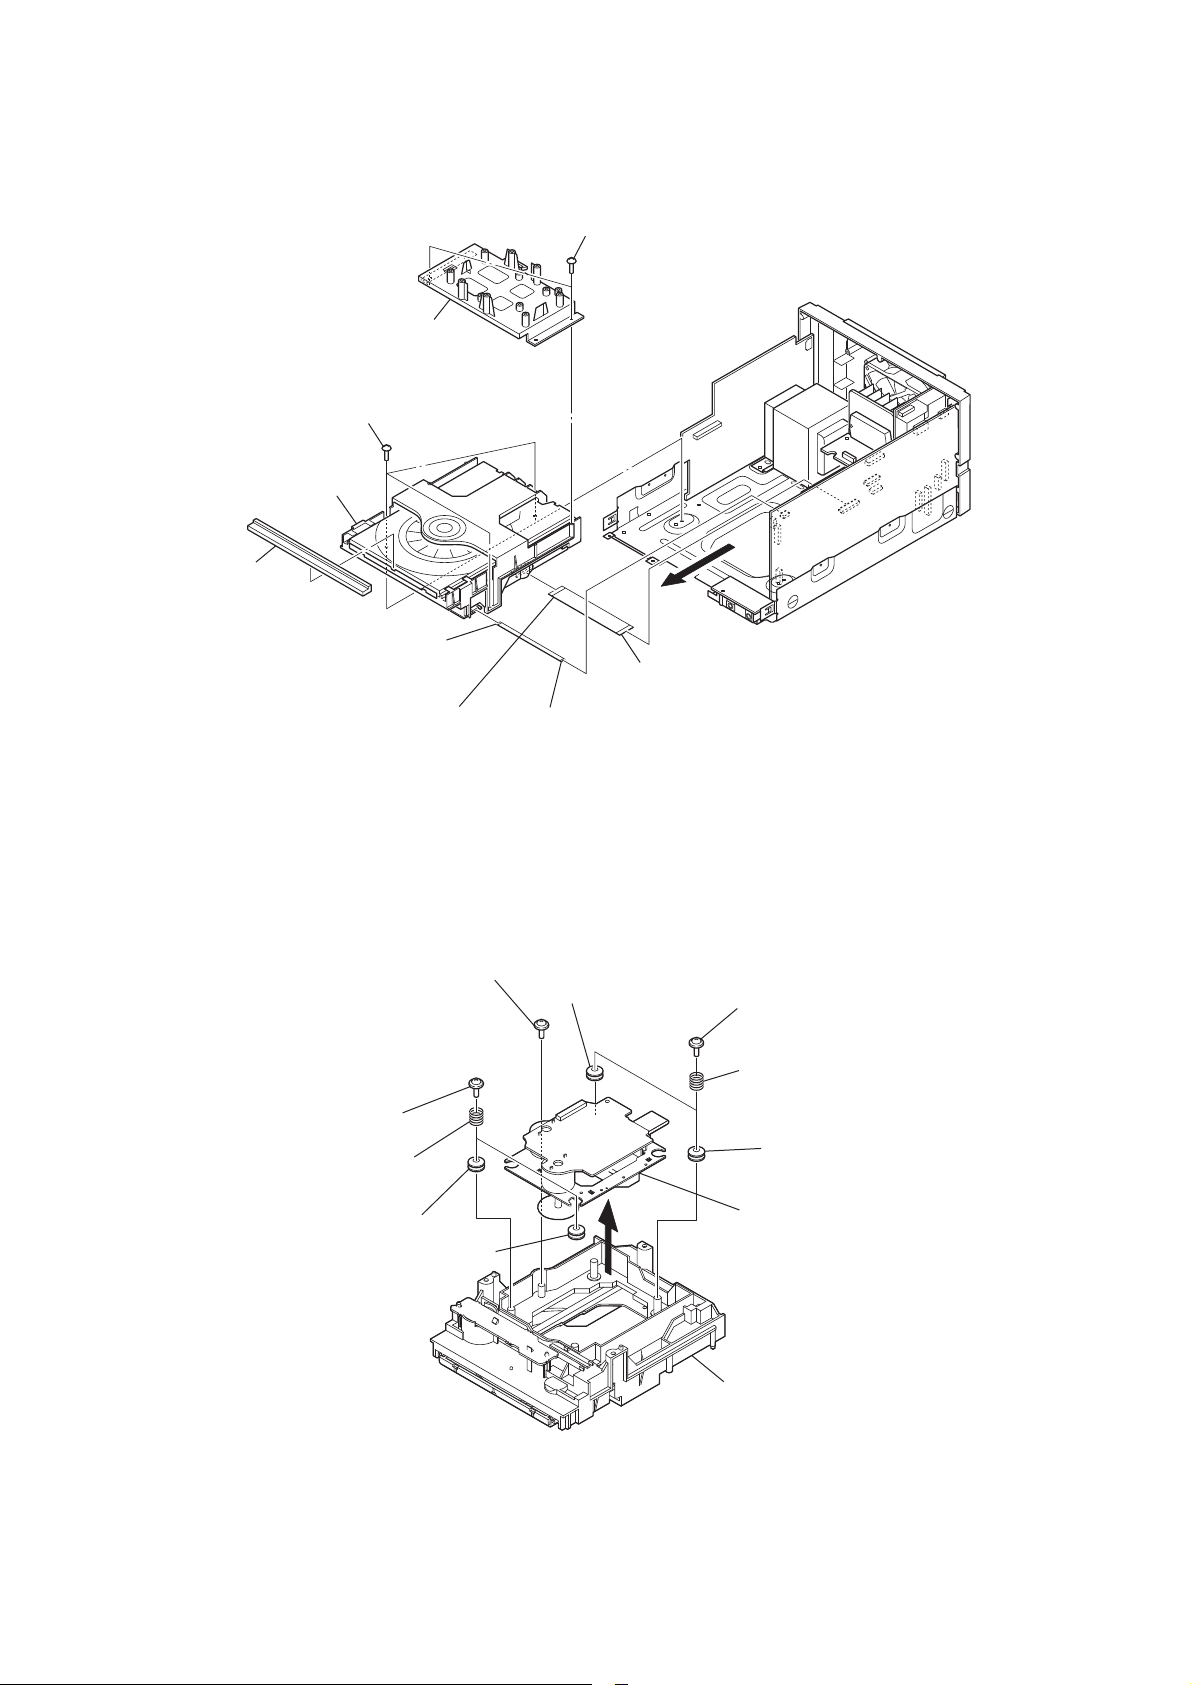
3-12. LOADING MECHANISM BLOCK
holder (CD)
three screws
(BV3)
loading mechanism block
door CD
two screws
(BVTP2.6)
3-13. BASE UNIT
flexible flat cable (5 core)
(CN001)
flexible flat cable (21 core)
(CN201)
two floating screws
two springs (insulator)
insulator
floating screw
insulator
flexible flat cable (21 core)
(CN305)
flexible flat cable (5 core)
(CN311)
insulator
two floating screws
two springs
(insulator)
insulator
base unit
12
loading (BK) assy
– Bottom view –
Page 13

3-14. BELT
HCD-BX70DBi
position of belt
belt
belt
claw
tray (AU)
3-15. OP BASE ASSY (KSM-213D)
claw
op base assy
(KSM-213D)
Remove four solders.
flexible flat cable (16 core)
(CN301)
CD board
13
Page 14

HCD-BX70DBi
SECTION 4
TEST MODE
COLD RESET
The cold reset clears all data including preset data stored in the
RAM to initial conditions. Execute this mode when returning the
set to the customer.
Procedure:
1. Press three buttons of [x/CANCEL], [VOL +] and [?/1] simultaneously.
2. The system is reset and becomes standby states.
COMMON TEST MODE
This mode is used to check operations of amplifi er.
Procedure:
1. Press the [
2. Press three buttons of [TUNER/BAND], [x/CANCEL] and
[ENTER] simultaneously.
3. When the COMMON test mode is activated, “AUDIO IN” is
displayed on the liquid crystal display and “cPLAY SLEEP”
blink on the fl uorescent indicator tube.
4. Each time [EQ] button on the remote commander is pressed,
the display changes starting “TONE MAX”, “TONE MIN”
and “TONE FLAT” this order.
5. Press the [VOL –] button, “VOLUME MIN” is displayed
on the fl uorescent indicator tube. Press the [VOL +] button,
“VOLUME MAX” is displayed on the fl uorescent indicator
tube.
6. To release this mode, press the [
PANEL TEST MODE
This mode is used to check the liquid crystal display, LED, model,
destination, software version and key.
Procedure:
1. Press the [?/1] button to turn the power on.
2. Press three buttons of [TUNER/BAND], [DSGX] and [ENTER] simultaneously.
3. All segments on the fl uorescent indicator tube, [STANDBY]
LED light up.
4. Press the [ENTER] button, the model and destination are alternately displayed on the fl uorescent indicator tube.
5. Press the [ENTER] button again, MC version is displayed on
the fl uorescent indicator tube.
6. Each time [ENTER] button is pressed, the display changes
starting from MC version, GC version, CLA version, CD version, CDD version, CDMA version, CDMB version, BDA version, BDB version, ST version, TA version and TM version
this order, and returns to the MC version display.
7. When [x/CANCEL] button is pressed while the MC version
is displayed, year, month and day of the software creation is
displayed. When [x/CANCEL] button is pressed again, the
display returns to the MC version display.
8. Press the [DSGX] button, the key test mode is activated and
“K 0” is displayed on the fl uorescent indicator tube.
9. Each time a button is pressed, “K” value increases. However,
once a button is pressed, it is no longer taken into account.
All keys are pressed, display becomes “K19”.
10. Press the [VOL +] button, the key AD monitor mode is activated and “FFFFFF” is displayed on the fl uorescent indicator
tube.
11. Each time a button is pressed, the AD of each button is displayed on the fl uorescent indicator tube.
12. To release this mode, press three buttons in the same manner as
step 2, or disconnect the power cord.
] button to turn the power on.
?/1
?/1
] button.
CD SHIP MODE
This mode moves the optical pick-up to the position durable to
vibration. Use this mode when returning the set to the customer
after repair.
Procedure:
1. Press the [?/1] button to turn the power on.
2. Press the [FUNCTION] button to select “CD”.
3. Press three buttons of [DSGX], [VOL +] and [
ously.
4. After the “STANDBY” display blinks, “LOCK” is displayed
on the fl uorescent indicator tube, the ship mode is set.
CD SHIP MODE & MEMORY CLEAR
This mode is used to perform CD ship mode and cold reset simultaneously.
Procedure:
1. Press the [
2. Press three buttons of [
taneously.
3. After the “STANDBY” display blinks, “LOCK” is displayed
on the fl uorescent indicator tube the ship mode is set and the
system is reset.
ANTITHEFT LOCK MODE
This mode is used to unable to take sample disc out of disc tray in
the shop.
Procedure:
1. Press the [
2. Press the [
3. Press the [
4. Press the [FUNCTION] button to select “CD”.
5. Press two buttons of [x/CANCEL] and [A] for 5 seconds.
6. The message “LOCKED” is displayed on the fl uorescent indi-
cator tube and the disc tray is locked. (Even if pressing the Z
button, the message “LOCKED” is displayed on the fl uores-
cent indicator tube and the disc tray is locked)
7. To release from this mode, press two buttons of [x/CANCEL]
and [A] for 5 seconds.
8. The message “UNLOCKED” is displayed on the fl uorescent
indicator tube and the disc tray is unlocked.
CD POWER MANAGE
This mode is used to changed over CD power on/off for decreasing
of reception noise in the tuner mode.
Procedure:
1. Press the [?/1] button to turn the power on.
2. Press the [FUNCTION] button to select “CD”.
3. Press the [?/1] button again to turn the power off.
4. Press two buttons of [x/CANCEL] and [?/1] simultaneously.
5. The message “CD POWER”, “ON” or “CD POWER”, “OFF”is
displayed on the fl uorescent indicator tube, and CD power on/
off is changed over in the tuner mode.
] button to turn the power on.
?/1
/CANCEL], [VOL +] and [A] simul-
x
] button to turn the set on.
?/1
] button to open the disc tray and set the CD disc.
A
] button to close the disc tray.
A
] simultane-
A
14
Page 15

CD SERVICE MODE
This mode can run the CD sled motor freely. Use this mode, for
instance, when cleaning the optical pick-up.
Procedure:
1. Press the [?/1] button to turn the power on.
2. Press the [FUNCTION] button to select “CD”.
3. Press three buttons of [x/CANCEL], [VOL –] and [A] simultaneously, the message “SERVICE MO” is displayed on the
fl uorescent indicator tube.
4. Press the [l m TUNE –] button to move the optical pickup to inside track and the message “SLED IN” is displayed on
the fl uorescent indicator tube, or press the [M L TUNE
+] button to outside track and the message “SLED OUT” is
displayed on the fl uorescent indicator tube.
5. Press the [CD u] button, “LD ON” or “LD OFF” is displayed
on the fl uorescent indicator tube. Each time [CD u] button is
pressed, laser diode on/off is changed over.
6. To release this mode, press the [
?/1
] button.
HCD-BX70DBi
15
Page 16

HCD-BX70DBi
SECTION 5
ELECTRICAL CHECKS
TUNER SECTION CD SECTION
FM TUNE LEVEL CHECK
signal
generator
set
Procedure:
1. Turn on the set.
2. Input the following signal from signal generator to FM antenna
input directly.
Carrier frequency : A = 87.5 MHz, B = 98 MHz, C = 108 MHz
Deviation : 75 kHz
Modulation : 1 kHz
ANT input : 35 dBu (EMF)
Note: Use 75 ohm coaxial cable to connect signal generator and the set.
You cannot use video cable for checking.
Use signal generator whose output impedance is 75 ohm.
3. Set to FM tuner function and tune A, B and C signals.
4. Confi rm “TUNED” is lit on the display for A, B and C sig-
nals.
When the selected station signal is received in good condition,
“TUNED” is displayed.
Note:
1. CD Block is basically constructed to operate without adjustment.
2. Use YEDS-18 disc (3-702-101-01) unless otherwise indicated.
3. Use an oscilloscope with more than 10 MΩ impedance.
4. Clean the object lens by an applicator with neutral detergent when the
signal level is low than specifi ed value with the following checks.
5. Check the focus bias check when optical pick-up block is replaced.
FOCUS BIAS CHECK
oscilloscope
(DC range)
CD board
TP121 (RFI)
TP124 (VC)
+
–
Procedure:
1. Connect oscilloscope to TP121 (RFI) and TP124 (VC) on the
CD board.
2. Press the [
3. Set disc (YEDS-18) on the disc tray and press the [CD
] button to turn the power on.
?/1
u
button to playback.
4. Confi rm that oscilloscope waveform is as shown in the fi gure
below. (eye pattern)
A good eye pattern means that the diamond shape (◊) in the
center of the waveform can be clearly distinguished.
VOLT/DIV: 200 mV
TIME/DIV: 500 ns
]
Checking Location:
– CD Board (Conductor Side) –
TP124
(VC)
TP121
(RFI)
IC101
level:
1.2 ± 0.3 Vp-p
16
Page 17

HCD-BX70DBi
HCD-BX70DBi
1717
SECTION 6
DIAGRAMS
6-1. BLOCK DIAGRAM - CD SERVO Section -
SYSTEM CONTROLLER
IC301 (1/4)
CD-MP3 PROCESSOR
IC101
MUTE
2-AXIS
DEVICE
(TRACKING)(FOCUS)
95
89
A
AVDD
+3.3V
DETECTOR
FNi1 (A)
RFo
97 FPi1 (B)
88
2
AGCi
3RFRP RFZI
76TEi TEZi
83RFEQo 81 RFi
82 RFRPi
30LO
27RO
38BUS0
R-CH
94 FNi2 (C)
96 FPi2 (D)
100 TNi (E)
98 TPi (F)
91 LDo 92MDi
2VO1+
1VO1–
13 DMo
AUTOMATIC
POWER CONTROL
Q301
LD
PD
LASER DIODE
OPTICAL PICK-UP
BLOCK
(KSM-213DCP)
B
C
D
E
F
12 FMo
10 TRO
9FMO
20 IO0 (/HSO)
I-V AMP
M401
(SPINDLE)
M402
(SLED)
12 VO2–
11 VO2+
18 VO3+
17 VO3–
26 VO4+
27
7
IN4’
24
IN3’
20
IN2’
9
IN1
3
BIAS
23
84 VRo
VO4–
M
M
FOCUS/TRACKING COIL DRIVE,
SLED/SPINDLE MOTOR DRIVE
IC401
S201
(LIMIT)
DVDD
+3.3V
24
XO
23
XI
X102
16.9344MHz
60 CD DRIVER MUTE
LOADING
MOTOR DRIVE
IC311
CDM LOAD IN
85
CDM LOAD OUT
CDM SW (OPEN)
CDM SW (CLOSE)
84
88
87
M
A
CD-L
: CD PLAY
SIGNAL PATH
R-ch is omitted due to same as L-ch.
VCC
A
B
C
D
E
F
LD
PD
SP+
VC
SP–
SL+
SL–
T+
T–
F+
F–
3 CD BUS0
39BUS1 2 CD BUS1
40BUS2 (SO) 1 CD BUS2
70 CD CLK
41BUS3 (SI)
100
CD BUS3
42BUCK (CLK)
69 CD CCE
43XCCE
54SBSY
48PIO0
68 MP3 IREQ
19 SBSY
37XRST
59 CD RESET
S001
DISC TRAY
OPEN/CLOSE DETECT
OPEN
CLOSE
M001
(LOADING)
(Page 19)
Page 18

HCD-BX70DBi
HCD-BX70DBi
1818
6-2. BLOCK DIAGRAM - iPod, TUNER, DAB Section -
37 AUDIO_MUTE
iPod INTERFACE
IC101
78 CLINK_RX_DIN
SYSTEM CONTROLLER
IC301 (2/4)
CN102
(iPod)
27
28
18
L-CH
R-CH
LINE-OUT-L
LINE-OUT-R
24 TXD_iPod
RXD
19
23 RXD_iPod
TXD
30
46
DGND
8
8 RESET
VBUS +5V
VBUS
B
iPod-L
MUTING
CONTROL
SWITCH
Q106
RESET SIGNAL
GENERATOR
IC103
MUTING
Q103, 105
E
TUNER-L
F
DAB-L
28TXD_DMPORT
77 CLINK_TX_DOUT29RXD_DMPORT
73 NC
DETECT
9
XOUT
11
XIN
X101
20MHz
TUNER (FM/AM)
AM
FM ANT
AM ANT
L OUT
R OUT
DO/STEREO
R-CH
ST DIN
ST CLK
ST CE
FM 75 Ω
COAXIAL
ANTENNA
26 DATA IN/STEREO
TUNED
6 TUNER TUNED
RDS CLK
18 RDS INT
RDS DATA
7 RDS DATA
28 ST DATA OUT
27 ST CLK
25
DAB TUNER MODULE
AUDL
AUDR
S1_DIN
R-CH
S1_DOUT
ANTENNA
DAB 75 Ω
47
48
ST CE
DAB TXD
DAB RXD
: TUNER (FM/AM)
SIGNAL PATH
R-ch is omitted due to same as L-ch.
: DAB
: AUDIO
D104
D102
LINE AMP
IC303
: iPod
LINE AMP
IC803
(Page 19)
(Page 19)
(Page 19)
Page 19
HCD-BX70DBi
HCD-BX70DBi
1919
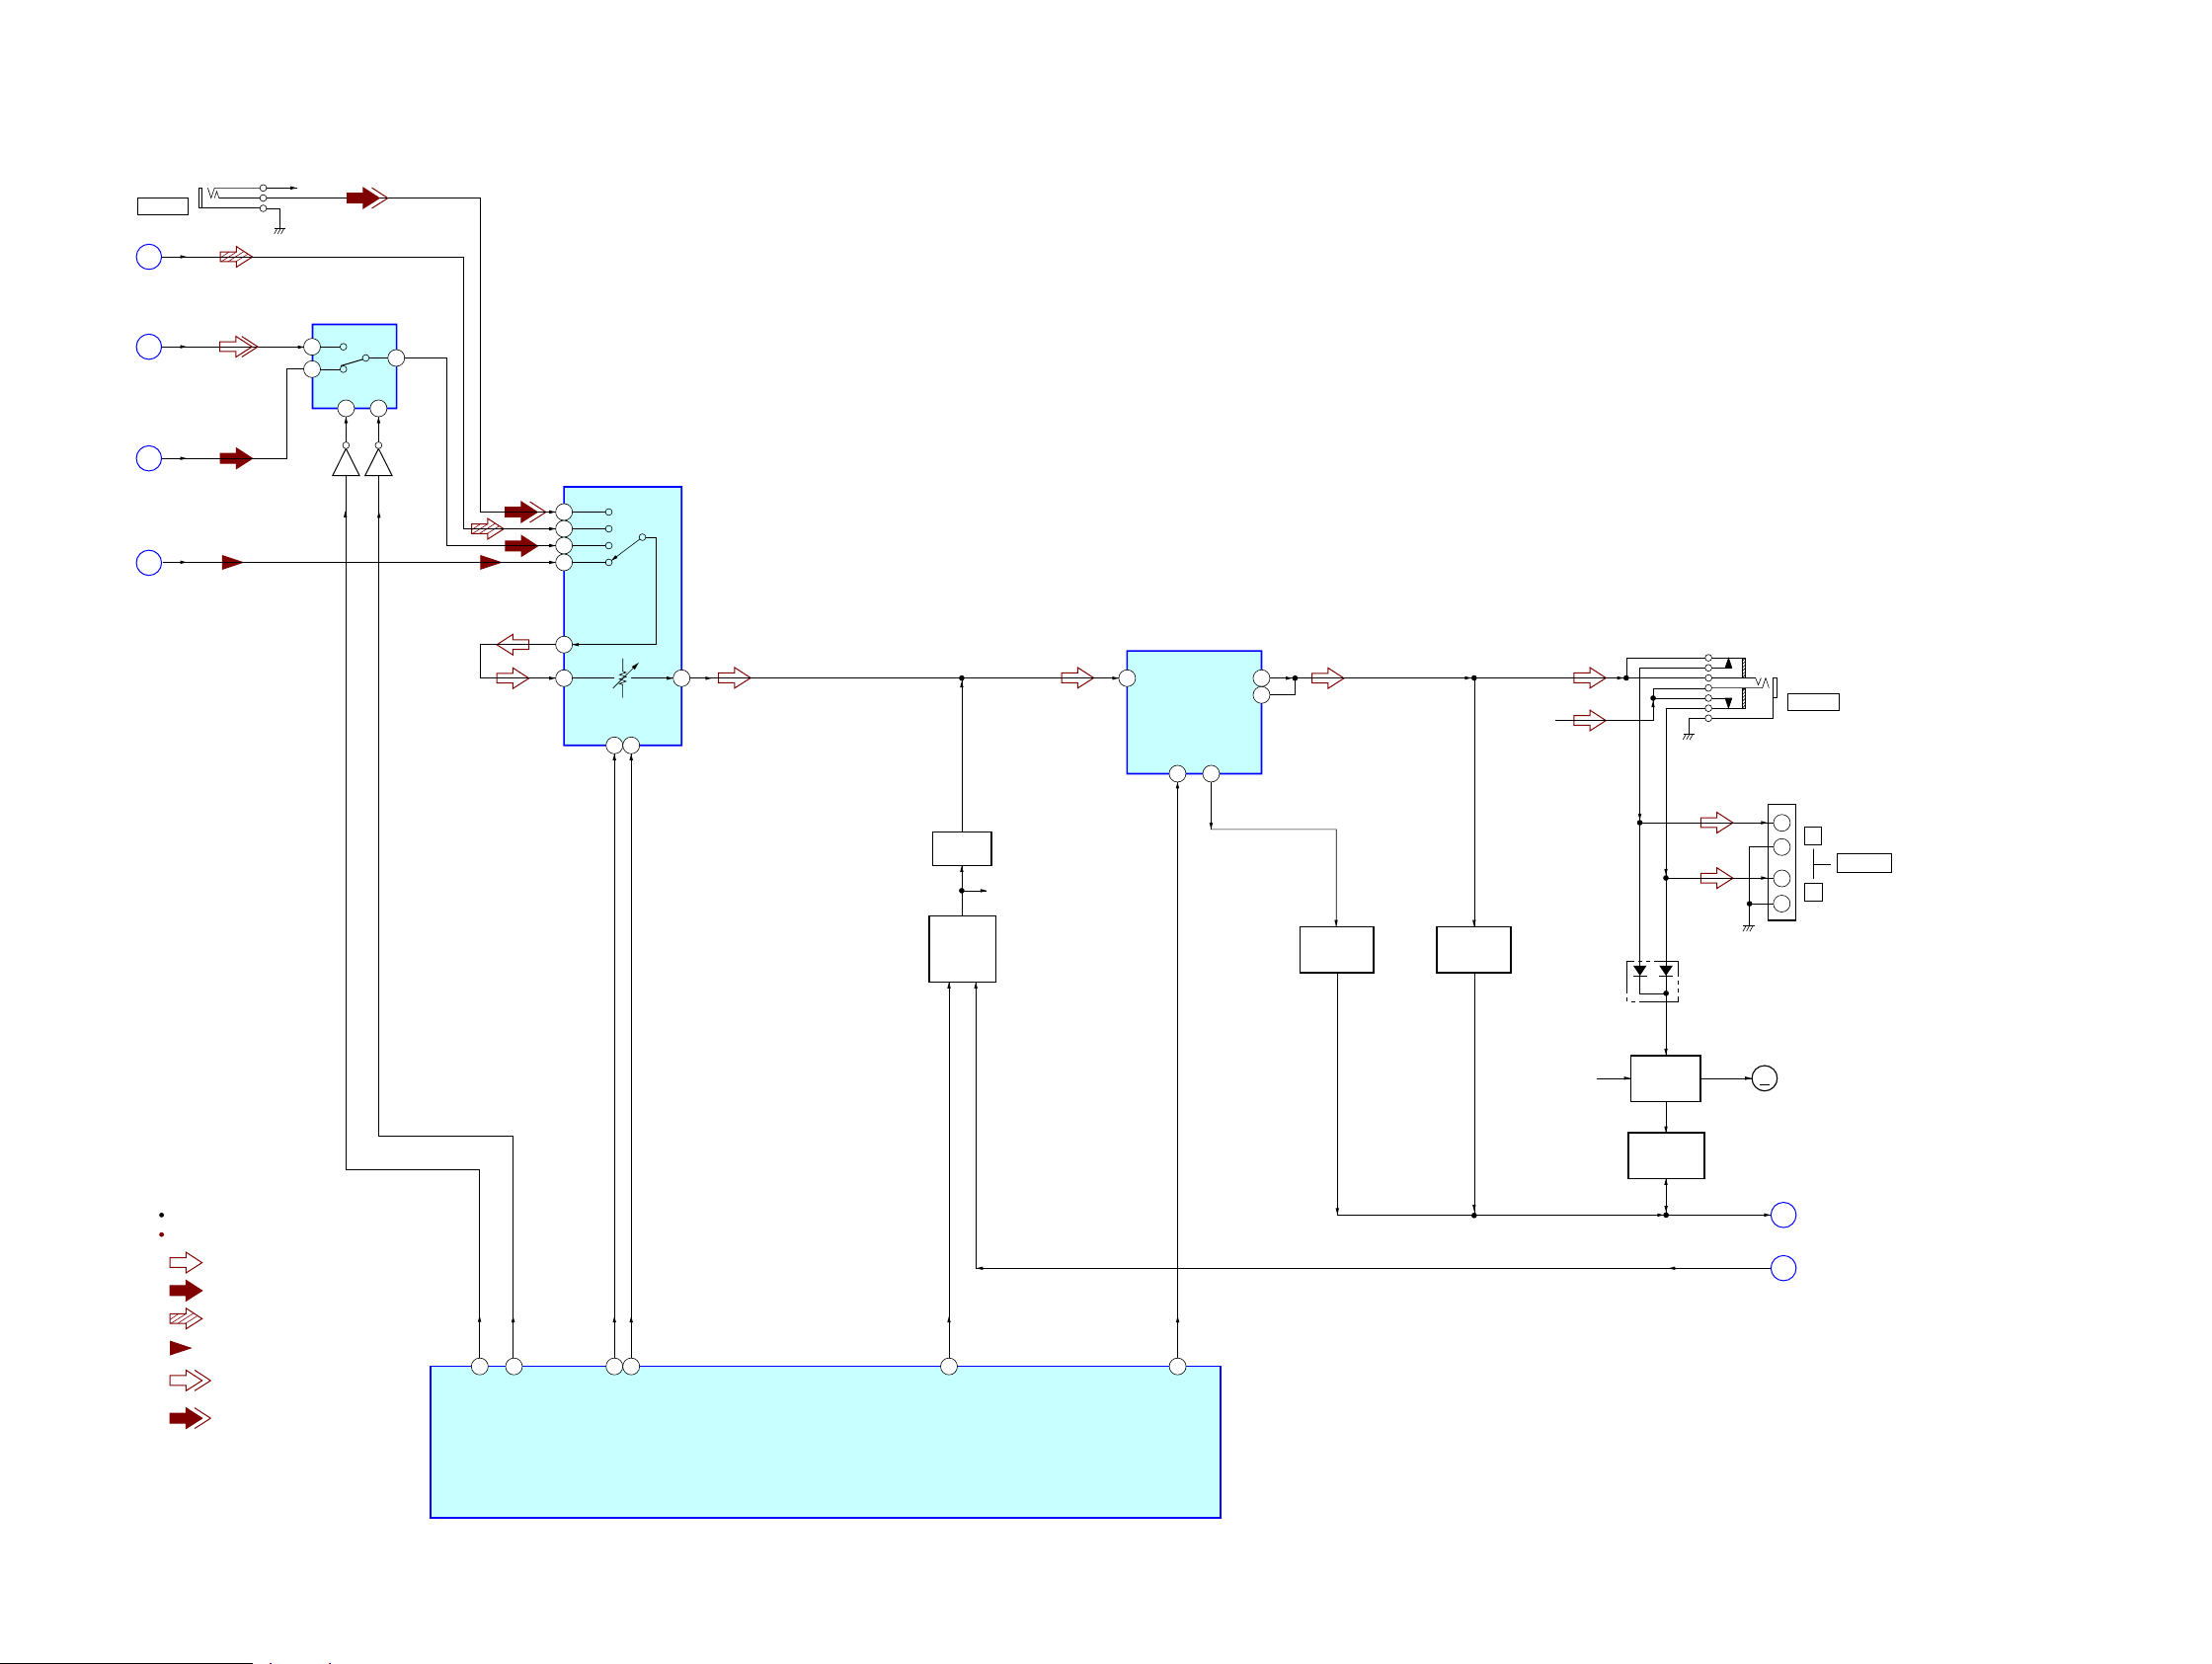
6-3. BLOCK DIAGRAM - MAIN Section -
AUDIO IN
R-CH
J301
CD-L
A
DAB-L
F
TUNER-L
E
iPod-L
B
PROTECT
J
10
3
1
26
SDA25SCL
AMP DATA
24
AMP CLOCK
22
INH
40
SEL A
39
TA LINE MUTE
23
OUT1
INPUT SELECTOR,
ELECTRICAL VOLUME,
SURROUND/TONE CONTROL
IC304
SYSTEM CONTROLLER
IC301 (3/4)
: AUDIO
: CD PLAY
SIGNAL PATH
R-ch is omitted due to same as L-ch.
: AUDIO IN
: TUNER (FM/AM)
D1
5
C1
SEL1
VOL1
B1
A1
INPUT SELECTOR
IC312
A
13
14
12
10
X1
X0
Q319
INH
6
Q320
X
11
MUTING
Q103
R-CH
23
MUTING
CONTROL
SWITCH
Q340, 341
: DAB
POWER AMP
IC601
11 CH1 IN
10
MONITOR
CH1 OUT+
4
CH1 OUT–
5
13
STBY
J500
R-CH
PHONES
SPEAKER
+
–
–
+
R
L
J302
DC
DETECT
Q342 – 344
POWER
MONITOR
Q345
M901
(FAN)
+9V
MM
AC DET
K
D313
STK-ON
53
FAN MOTOR
DRIVE
Q316, 317
FAN MOTOR
DETECT
Q307, 347, 348
: iPod
7
(Page 17)
(Page 18)
(Page 18)
(Page 18)
(Page 20)
(Page 20)
Page 20
HCD-BX70DBi
HCD-BX70DBi
2020
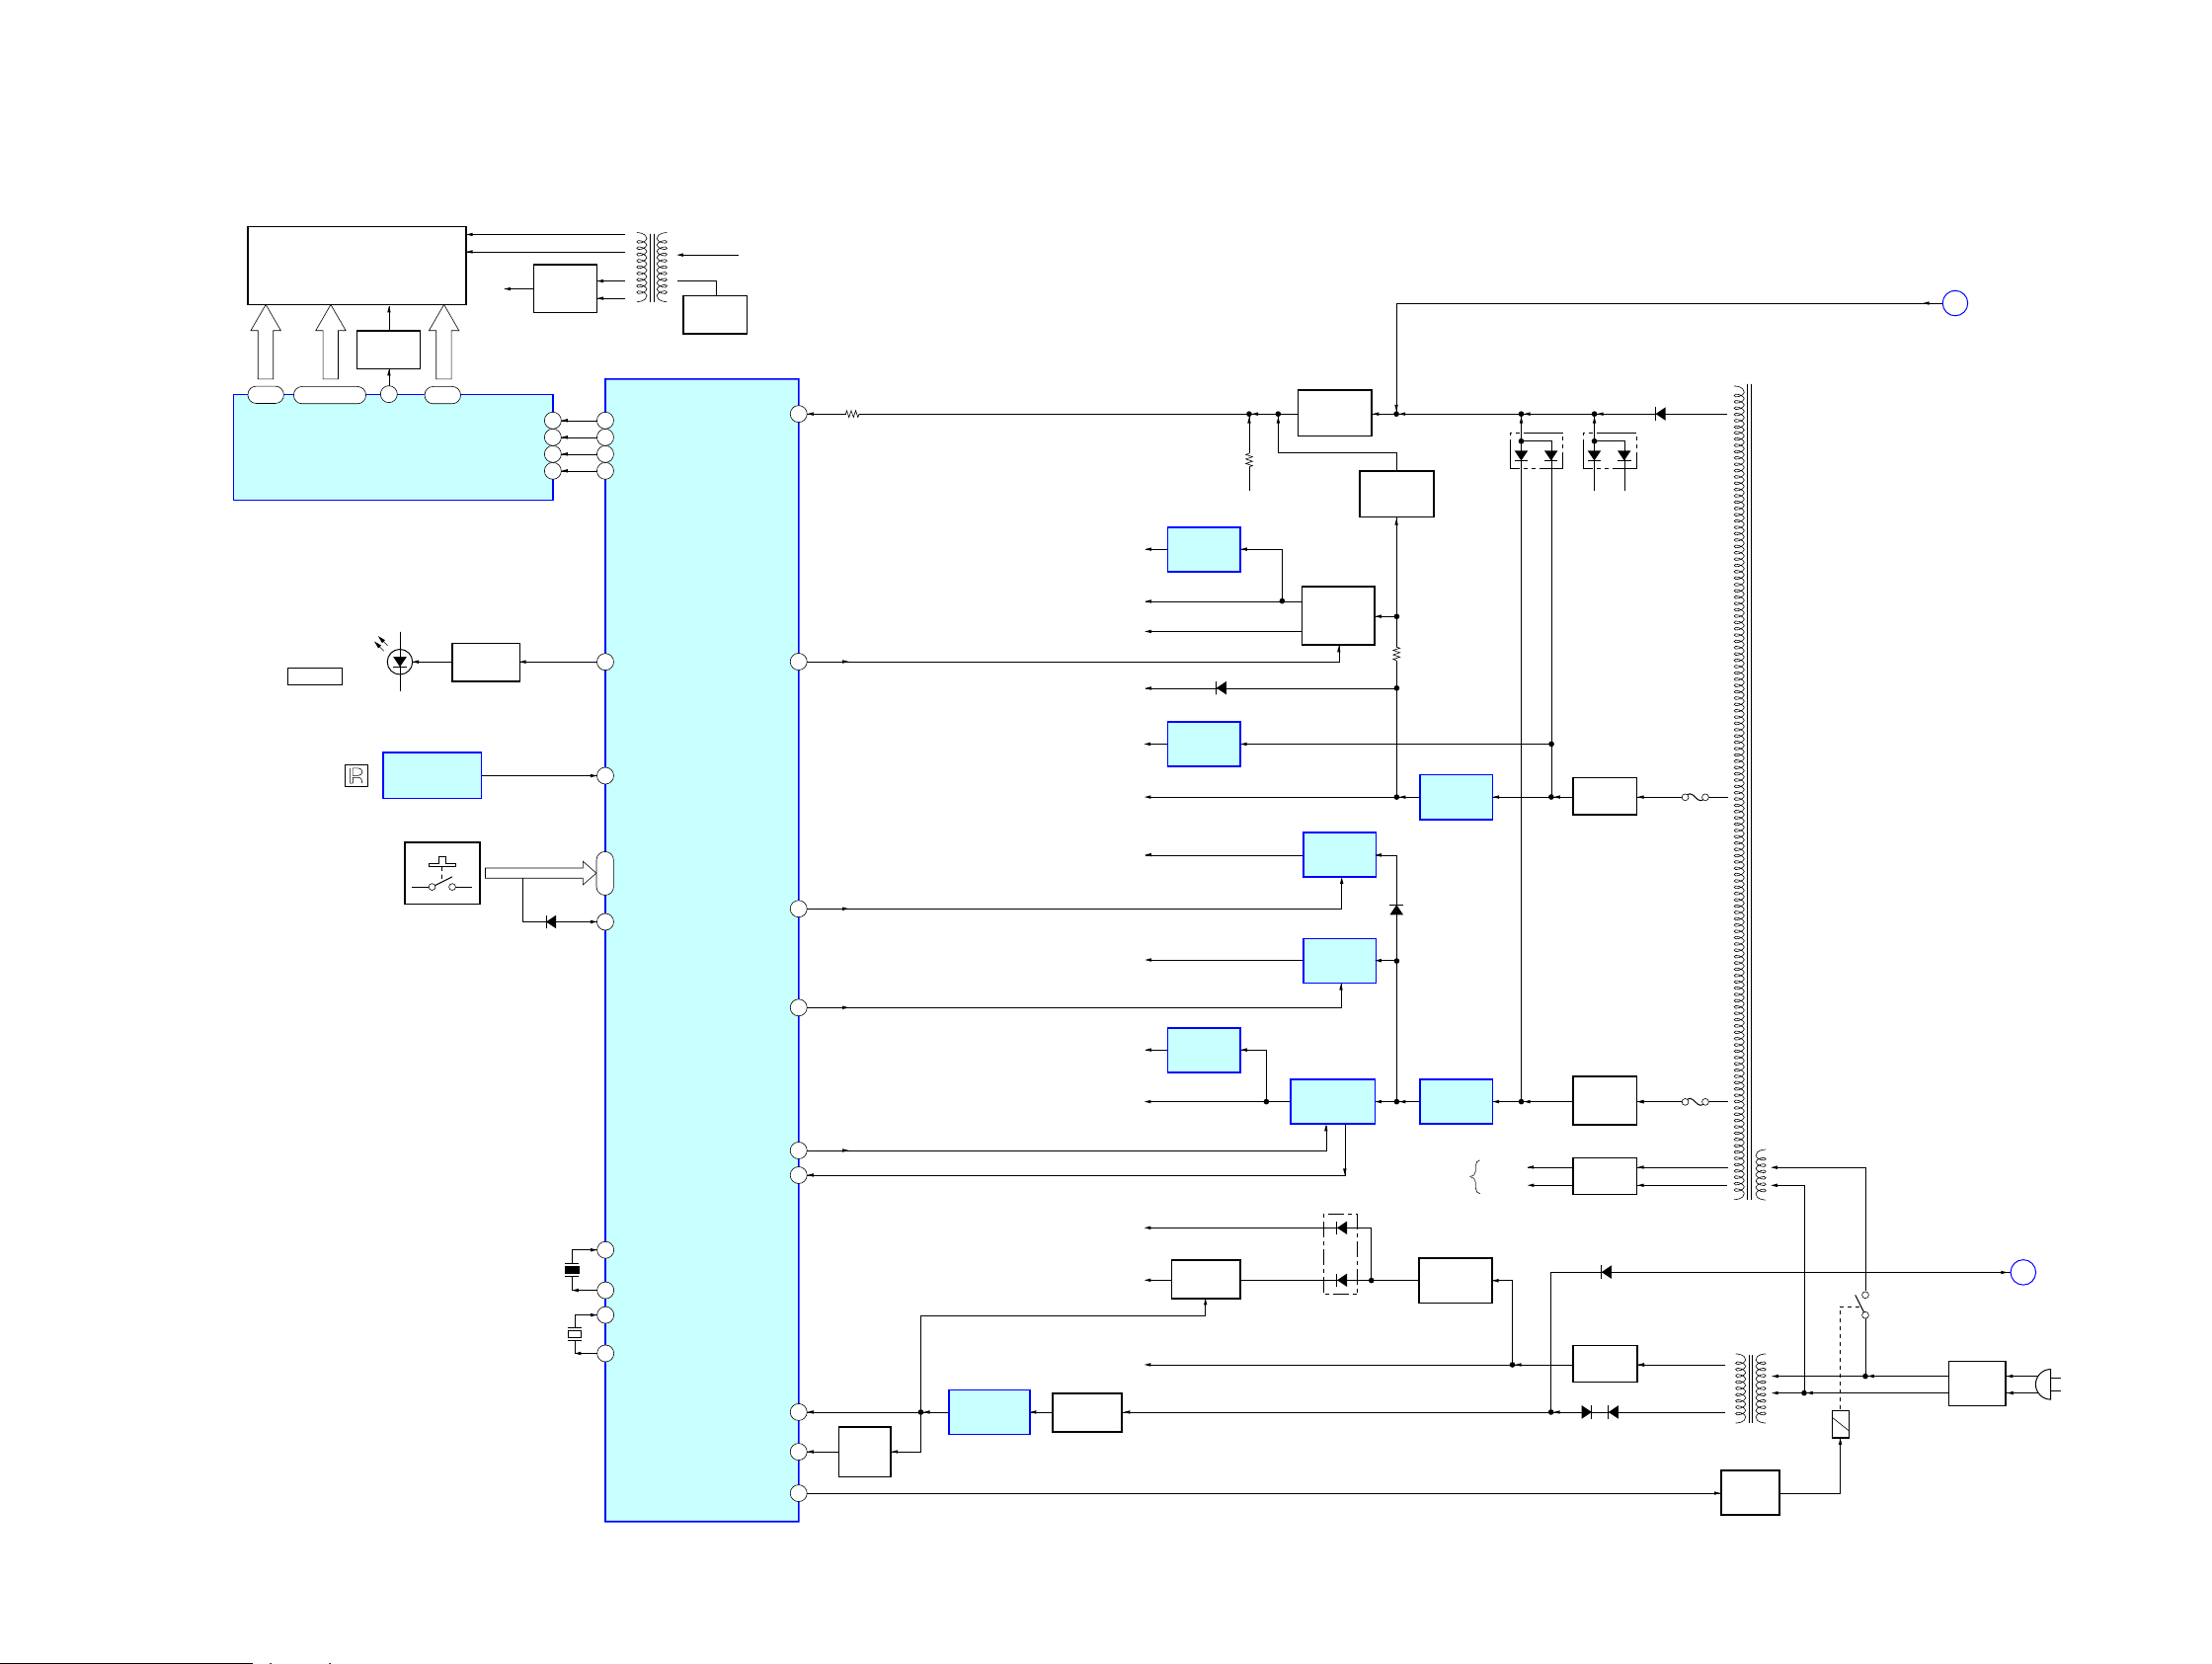
6-4. BLOCK DIAGRAM - PANEL, POWER SUPPLY Section -
SIRCS
4
SYSTEM CONTROLLER
IC301 (4/4)
(AC IN)
T902
SUB POWER
TRANSFORMER
RY901
T901
MAIN POWER
TRANSFORMER
RECT
D911 – 914
D923D922
D330
D920
PROTECT
D332 D322
D318, 321
D303
D804, 805
AMP B+
F901
F902
TO
POWER AMP
AMP B–
+9V
REGULATOR
IC305
REGULATOR
Q304 - 306
UNREG SUB
UNREG SUB
SYS +3.3V
+9V
RECT
D907, 908
EVER +3.3V
RESET SIGNAL
GENERATOR
IC310
RELAY
DRIVE
Q315
LF901
LINE
FILTER
TUNER, DAB +9V
5STBY-RELAY
20AC CUT
66I-POWER MONITOR
12RESET
REMOTE CONTROL
RECEIVER
IC901
X301
32.768kHz
11
10
XCOUT
INOUT
13
15
X302
5MHz
XOUT
XIN
S801, 803 – 807,
S809 – 821
(FRONT PANEL KEYS)
KEY1 – KEY3
RESET
SWITCH
Q309
AC DETECT
Q301
B+ SWITCH
Q312, 313
VM +7V
RECT
D924 – 927
+5V
REGULATOR
IC306
VBUS POWER
ON/OFF SWITCH
IC201
VBUS +5V
DAB +3.3V
DAB +1.2V
+3.3V
REGULATOR
IC801
+1.2V
REGULATOR
IC802
IP +3.3V
+3.3V
REGULATOR
IC102
CD +1.5V
+1.5V
REGULATOR
IC201
KEY WAKE UP
74
D774
STANDBY
D902
STANDBY LED
89
LED DRIVE
Q901
57CD ON
94X5V FLAG
80DMPORT POWER
52
51DAB-POWER 1.2V
DAB-POWER 3.3V
AVDD +3.3V
DVDD +3.3V
+3.3V
REGULATOR
Q302, 303,
Q390, 392
RECT
D916 – 919
AC DET
K
PROTECT
J
+9V +4V
VOLTAGE
DETECT
Q393
PROTECT
DETECT
Q333, 338
VFL
FL901
FLUORESCENT
INDICATOR TUBE
T801
DC/DC
CONVERTER
RECT
D904, 905
OSC
Q903
GRID DRIVE
Q905
90
91
93
92
FL RESET
FL CS
FL SCLK
FL SD
RSTB
CSB
CLKB
DIN
GR1AD2, AD1 SG5 – SG35,
SG1 – SG4
GR2 – GR11
FLUORESCENT
INDICATOR TUBE DRIVER
IC902
+9V
52
32
53
54
55
1 – 31, 61 – 64 33 – 42
59, 60
81 – 83
+9V
REGULATOR
IC307
(Page 19)
(Page 19)
Page 21
HCD-BX70DBi
HCD-BX70DBi
2121
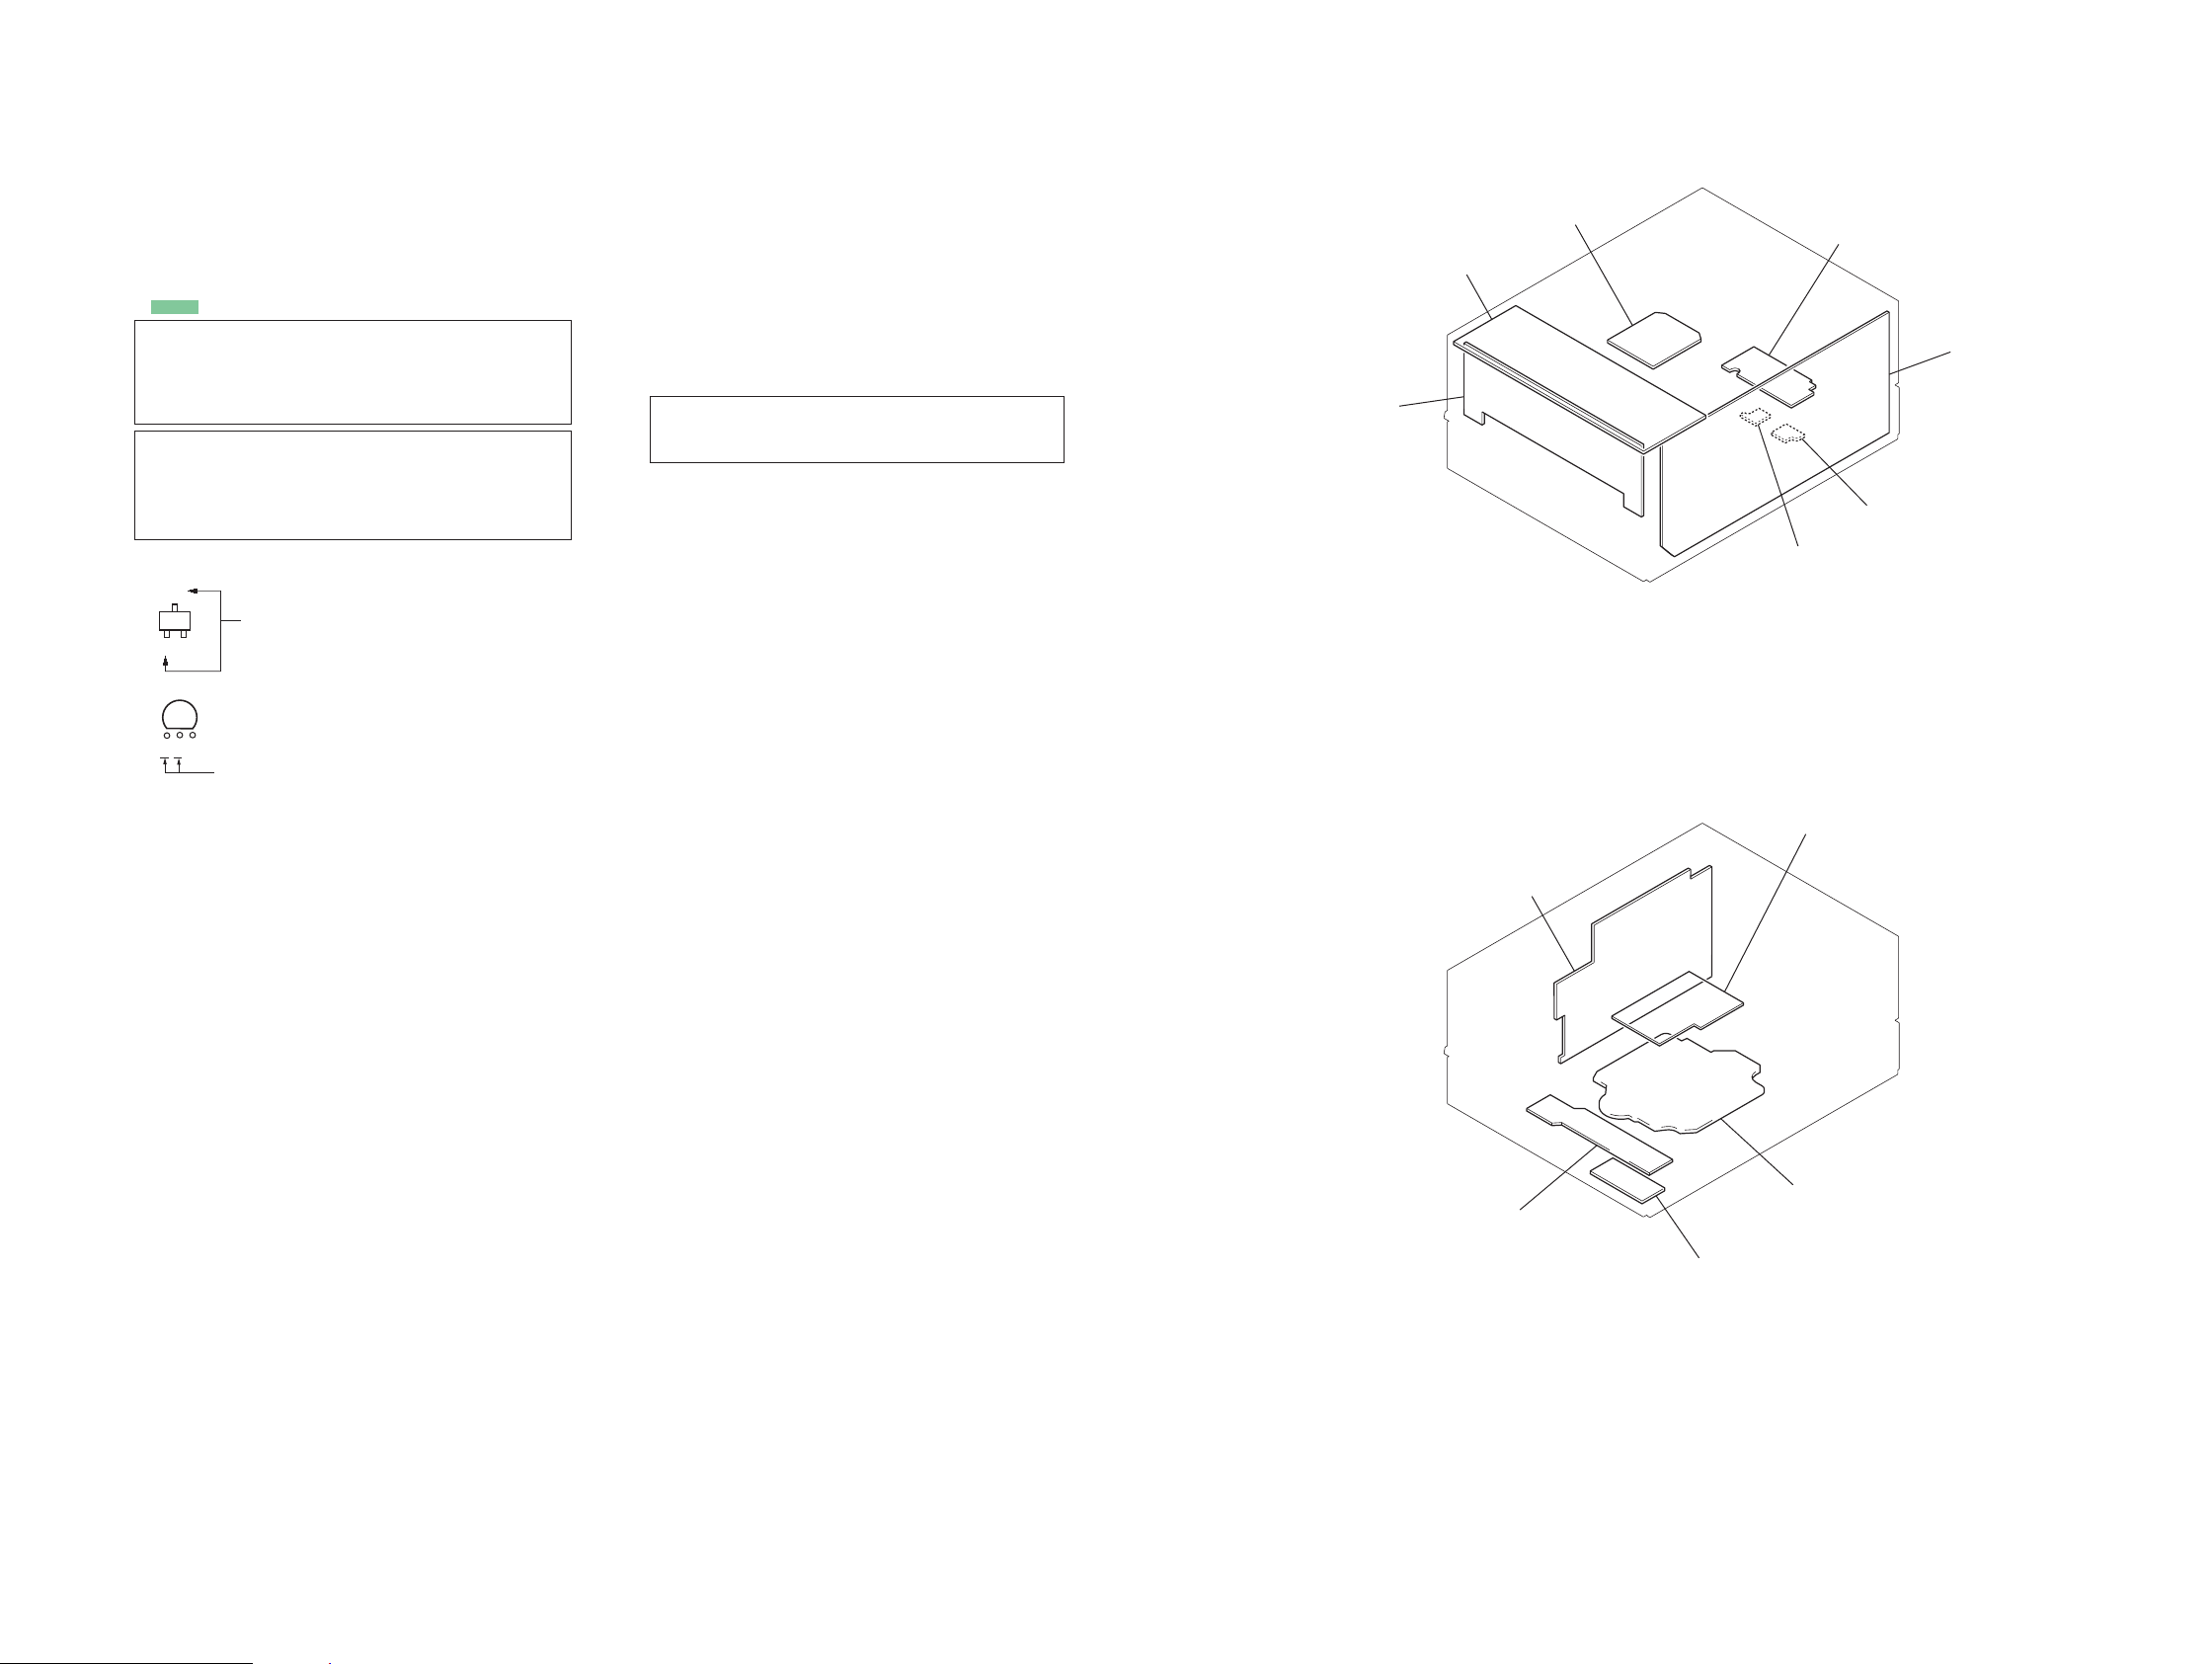
For Schematic Diagrams.
Note:
• All capacitors are in μF unless otherwise noted. (p: pF) 50
WV or less are not indicated except for electrolytics and
tantalums.
• All resistors are in Ω and 1/4 W or less unless otherwise
specifi ed.
• f : internal component.
• 2 : nonfl ammable resistor.
• C : panel designation.
THIS NOTE IS COMMON FOR PRINTED WIRING BOARDS AND SCHEMATIC DIAGRAMS.
(In addition to this, the necessary note is printed in each block.)
• A : B+ Line.
• B : B– Line.
• Voltages and waveforms are dc with respect to ground
under no-signal (detuned) conditions.
– CD board –
no mark : CD PLAY
– DAB board –
no mark : DAB
– IP board –
no mark : iPod
– Other boards –
no mark : TUNER (FM/AM)
( ) : CD PLAY
[ ] : iPod
< > : DAB
• Voltages are taken with VOM (Input impedance 10 MΩ).
Voltage variations may be noted due to normal production
tolerances.
• Waveforms are taken with a oscilloscope.
Voltage variations may be noted due to normal production
tolerances.
• Circled numbers refer to waveforms.
• Signal path.
F : AUDIO
f : TUNER (FM/AM)
J : CD PLAY
O : iPod
L : DAB
h : AUDIO IN
For Printed Wiring Boards.
Note:
• X : Parts extracted from the component side.
• Y : parts extracted from the conductor side.
• f : internal component.
• : Pattern from the side which enables seeing.
• Indication of transistor.
CEB
These are omitted.
Caution:
Pattern face side:
(SIDE B)
Parts face side:
(SIDE A)
Parts on the pattern face side seen from
the pattern face are indicated.
Parts on the parts face side seen from
the parts face are indicated.
Note: The components identifi ed by mark 0 or dotted
line with mark 0 are critical for safety.
Replace only with part number specifi ed.
Caution:
Pattern face side:
(Conductor Side)
Parts face side:
(Component Side)
Parts on the pattern face side seen from
the pattern face are indicated.
Parts on the parts face side seen from
the parts face are indicated.
• Circuit Boards Location.
C
Q
B
E
These are omitted.
TOP KEY board
PANEL board
IP board
POER board
AMP board
MAIN board
9VREG board
5VREG board
DAB board
CD board
MOTOR board
HP board
Page 22
HCD-BX70DBi
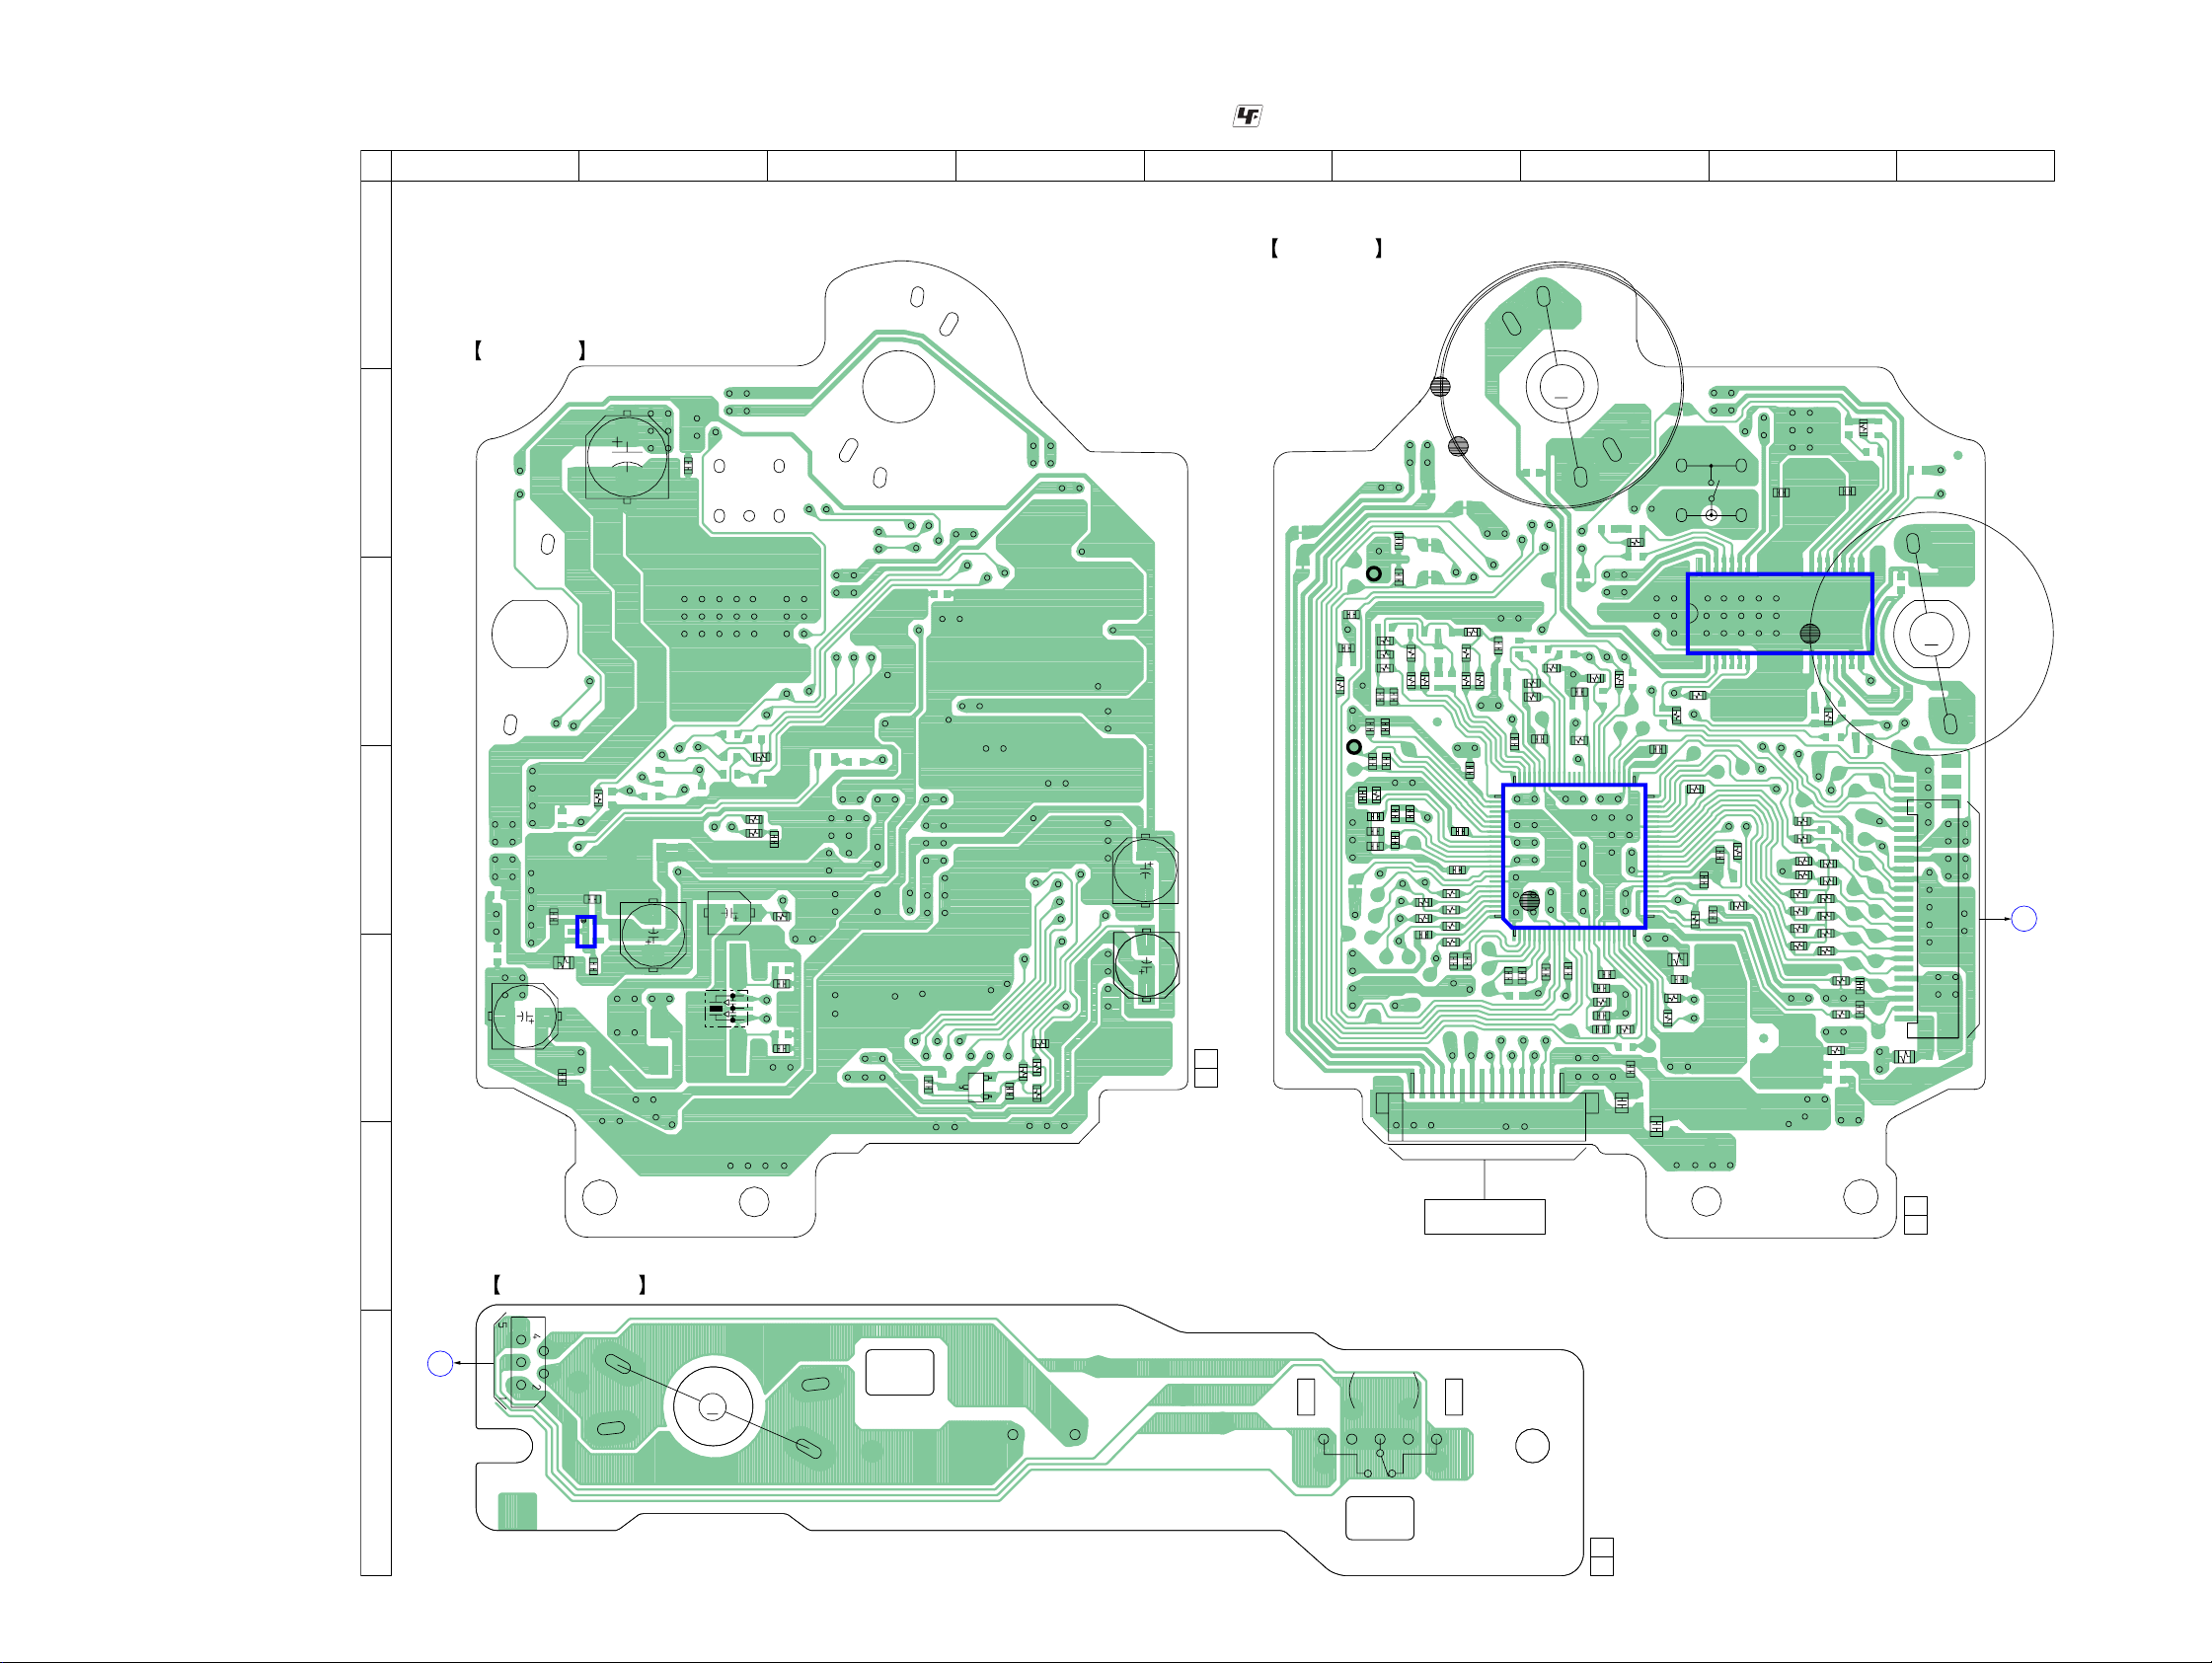
6-5. PRINTED WIRING BOARDS - CD Section -
123456789
A
CD BOARD (COMPONENT SIDE)
B
C401
C405
C
R212
R211
D
C207
IC201
5
C206
314
R201
E
C202
C204
C201
C205
X102
C115
R112
R111
C133
R155
C130
C128
• See page 21 for Circuit Boards Location.
C106
C306
R303
R302
E
C309
Q301
C307
R301
R304
1-872-135-
• : Uses unleaded solder.
CD BOARD (CONDUCTOR SIDE)
C125
TP124
(VC)
C122
C123
R142
R151
TP121
(RFI)
C144
C148
C149
11
(11)
C124
R140
R136
R135
R143
C138
C137
C140
C139
C141
C142
R144
C146
C143
C147
R146
R148
C150
C145
R134
C105
C104
C118
R139
R130
C100
R145
R147
R149
R150
R129
76
C117
CN301
M
C136
R126
R127
R128
R125
C107
C112
IC101
100
1
C101
C120
C119
M401
(SPINDLE)
C403
R405
M402
(SLED)
R402
S201
(LIMIT)
C404
28 22 21 15
IC401
M
R118
C153
R114
C102
C103
C126
C127
161
R120
5175
25
C113
R101
R102
C303
17 814
R415
R414
C108
R113
50
R210
R110
R209
C110
R218
R219
R220
R153
R221
R222
C116
R223
C301
C302
26
R106
C109
R154
R104
C132
R105
R156
R108
R157
R408
R208
R207
R206
R205
R204
R203
C151
C152
21
R202
1
CN201
A
MAIN
BOARD
CN305
(Page 28)
HCD-BX70DBi
F
OPTICAL PICK-UP BLOCK
(KSM-213DCP)
1-872-135-
11
(11)
MOTOR BOARD
K
MAIN BOARD
CN311
(Page 28)
G
CN001
M
M001
(LOADING)
S001
DISC TRAY
OPEN/CLOSE
DETECT
OPEN
5CLOSE
1-866-548-
21
(21)
2222
Page 23
HCD-BX70DBi
Ver. 1.2
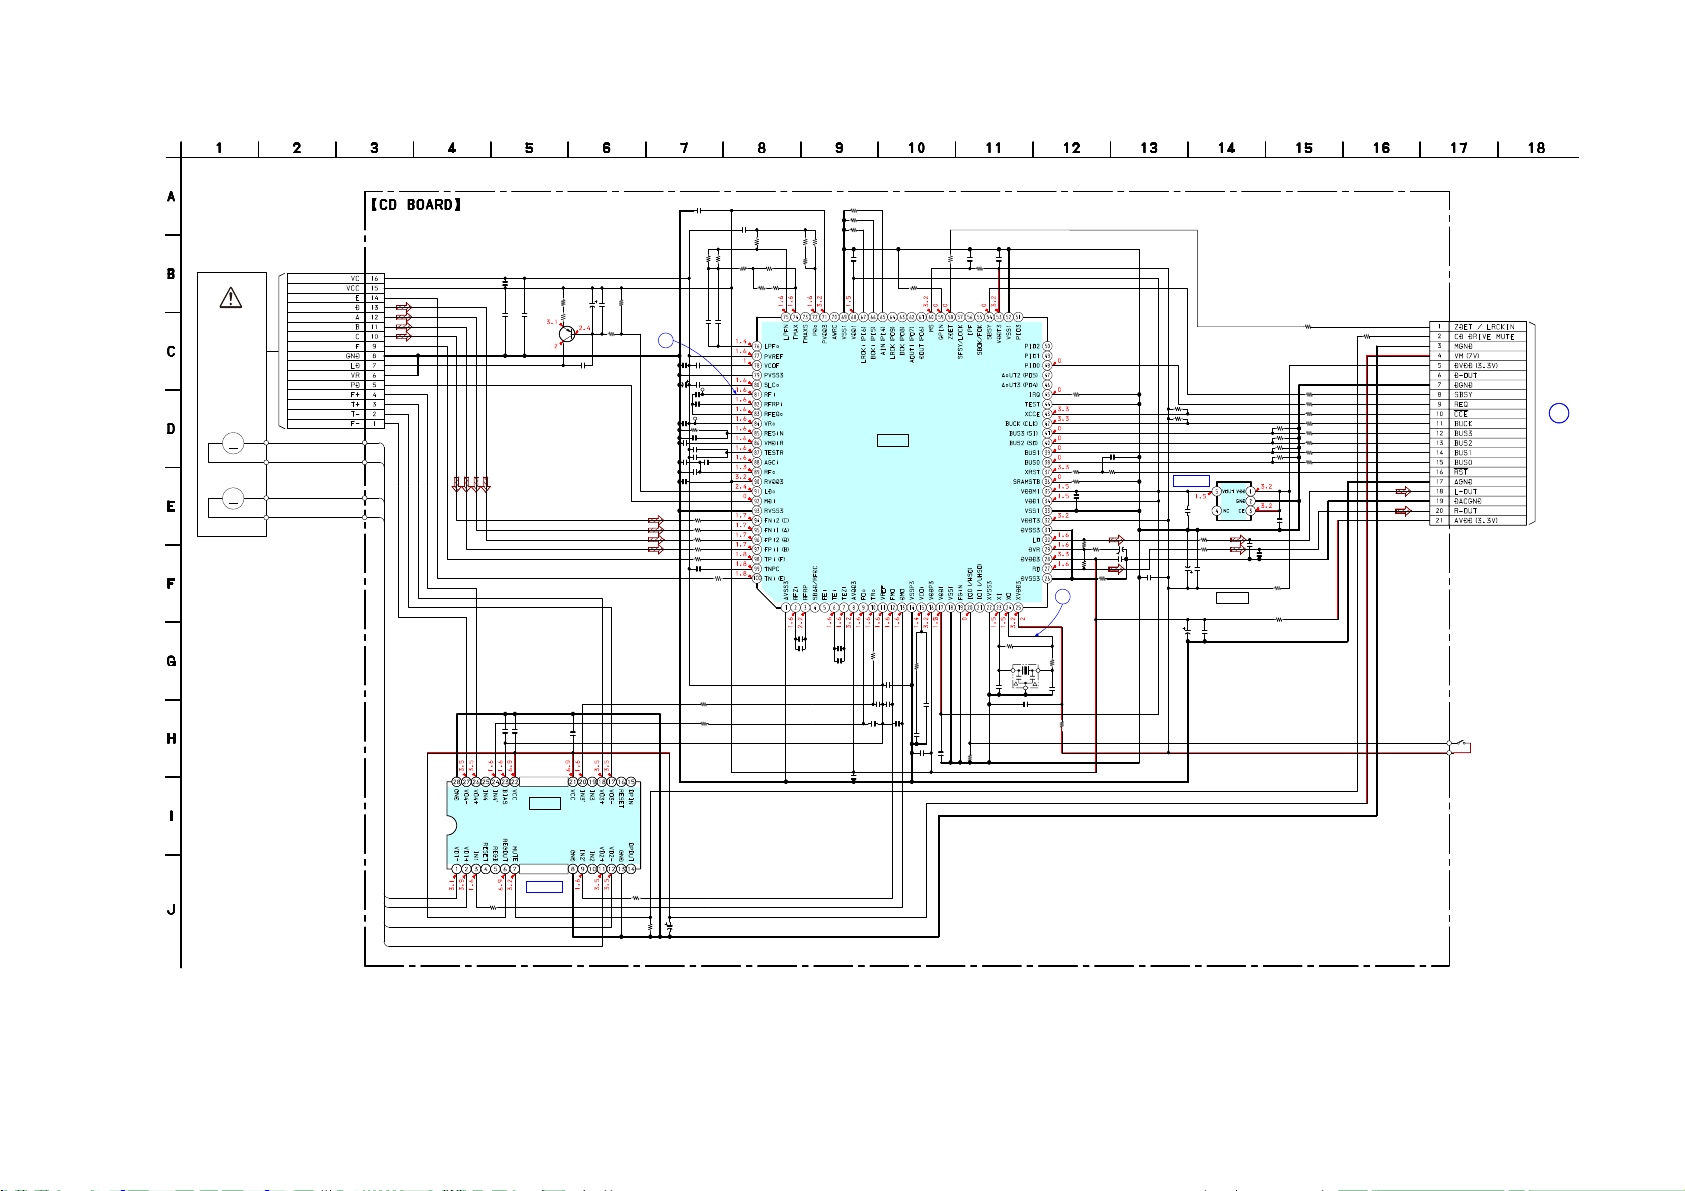
6-6. SCHEMATIC DIAGRAM - CD Board -
CN301
16P
OPTICAL
PICK-UP
BLOCK
(KSM-213DCP)
M401
(SPINDLE)
M
M402
(SLED)
M
SP-
SP+
SL+
SL-
• See page 24 for waveforms. • See page 38 for IC Block Diagrams. • See page 40 for IC Pin Function Description.
R127
0
0
R126
R125
0
470k
C112 C108
0.1 0.1
R128
IC101
CD-MP3 PROCESSOR
IC101
TC94A70FG-006
C117
0.022
0.022
0
C119
R151
0.1
C120
0.01
C102
C123
470p
C122
470p
C101
0.1
C153
R120
0
R118
100k
220
R101
0.0022
C127
0.0047
0.1
C124
C126
0.1
0.0047
C113
C125
C103
0.1
R114
0.1
10k
10k
R113
0.1
C133
R112
100
R111
R110
10k
0.1
C110
R153
1M
R155
47
0.1
C116
R154
1M
R108
0
32
1k
R105
1M
R106
X102
16.9344MHz
5p
C128
R102
10k
5p
C130
C132
0.1
R104
0
C301
0.1
C303C302
1010
C405
0.1
FOCUS/TRACKING COIL DRIVE,
SLED/SPINDLE MOTOR DRIVE
AUTOMATIC POWER
C404
0.1
IC401
BA5826SFP-E2
IC401
Q301
2SA2119K
CONTROL
C403
C107
C136
0.1
47p
R142 R139
22k 47k
R143
47k
C306
R303
R301
100
C307
2.2
100k
10V
1
R304
2.2
R302
31
0
C309
0.001
0.1
470p
C138
C137
0.01
C100
0.1
0.01
C139
C106
0.01
C140
100
10V
TP121 (RFI)
0.0022
C141
0.1
C142
TP124 (VC)
C105
0.1
22k
R144
C143
0.01
C144
0.1
C146
470p
C145
0.01
C148
47p
0.1
C147
C149
22p
C104
0.1
R145
0
R146
0
R147
0
R148
0
R149
0
0.001
C150
R150
0
R405
10k
R402
2.2k
R129
1k
R134
R140
R130
1M
0
4.7k
R136 R135
22k 470k
C118
0.01
CN201
21P
R211
R212
100
R210
R209
R218
100k
R219
100k
R220
R221
R222
R157
100
R156
100
C205
0.1
TK63115SCL-G@GT
IC201
+1.5V REGULATOR
C204
0.1
R223
C151
IC201
100
IC B/D
C207
1
C115
22
6.3V
C201
100
10V
C109
0.1
C202
100
10V
R208
R207
100k
R206
R205
100k
R204
100k
R203
100k
C206
1
470p
C152
470p
R201
0
R202
0
100
100
100
100
100
100
100
100
100
S201
(LIMIT)
A
MAIN
BOARD(1/3)
CN305
(Page 29)
HCD-BX70DBi
SPSP+
IC B/D
R414
4.7k
SL+
SL-
R408
2.2k
C401
R415
220
47k
10V
2323
Page 24
HCD-BX70DBi
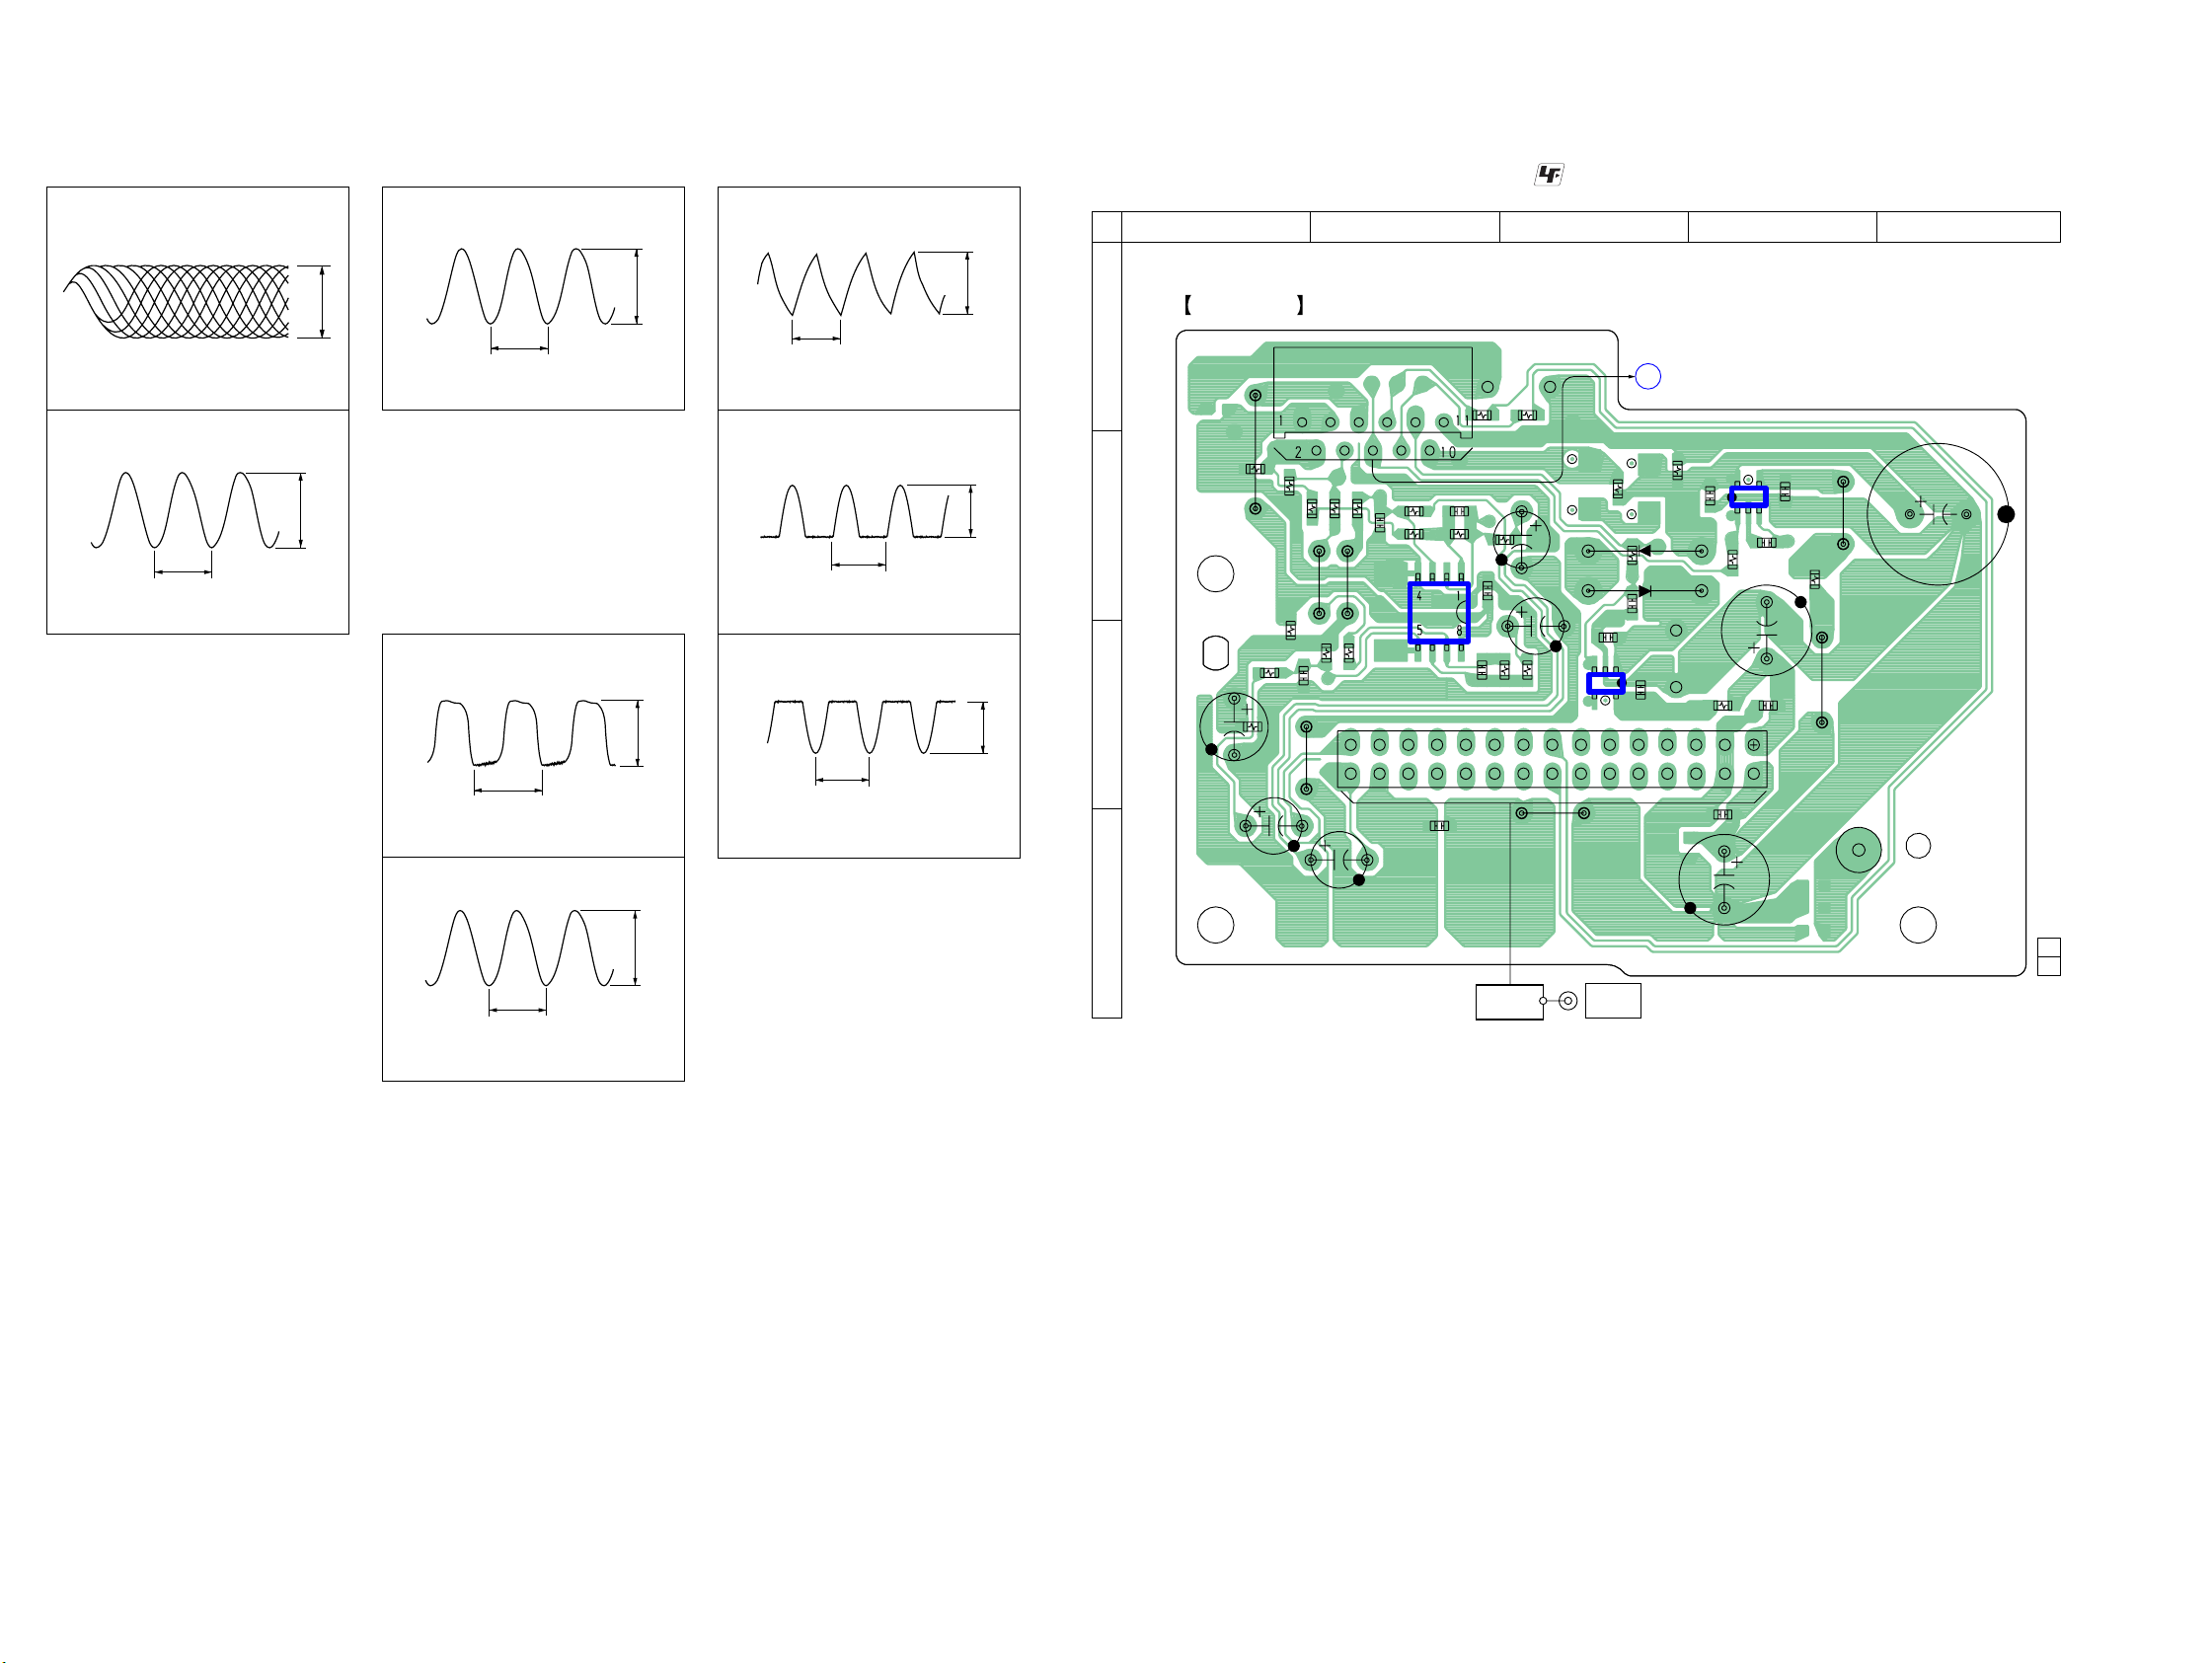
• Waveforms
IC101 JB (RFi)
FB
(CD play mode)
200 mV/DIV, 500 ns/DIV
IC101 XG (XO)
FT
(CD play mode)
59.1 ns
1 V/DIV, 20 ns/DIV
0.5 to 1.3 Vp-p
3.3 Vp-p
- IP Board -- CD Board -
IC101 (XOUT)
XB
1 V/DIV, 20 ns/DIV
- MAIN Board -
IC301 RB (XCOUT)
30.6 µs
1 V/DIV, 100 ns/DIV
IC301 RE (XOUT)
200 ns
50 ns
1.7 Vp-p
2.8 Vp-p
3.1 Vp-p
- PANEL Board -
IC902 U (OSCI)
RB
1.3 µs
1 V/DIV, 1 µs/DIV
Q903 (Collector)
RT
11. 2 µs
20 V/DIV, 5 µs/DIV
Q903 (Base)
RE
11. 2 µs
2 V/DIV, 5 µs/DIV
1.7 Vp-p
32 Vp-p
3.2 Vp-p
6-7. PRINTED WIRING BOARD - DAB Board -
• See page 21 for Circuit Boards Location.
• : Uses unleaded solder.
12345
DAB BOARD
A
CN801
C812
R832 R830
C834
JW802
R818
R817
R815
R816
R814
R810
C814
B
R804
R806
R808
C825
JW804
JW806
R825
R811
C805
C
C813
R826
JW807
C817
R813
C818
R803
IC803
29
30
C827
C811
C833
R805
D
DAB TUNER
MODULE
IC802
R807
CN800
JW805
R809
13
45
ANTENNA
DAB 75Ω
R801
C808
C802
B
C807
(Page 28)
MAINT BOARD
CN326
R802
D804
D805
C823
C803
FB802
IC801
45
13
R800
C821
1
2
C820
C806
C804
C824
JW808
JW801
FB801
W801
C828
1-876-414-
11
(11)
HCD-BX70DBi
1 V/DIV, 100 ns/DIV
2424
Page 25
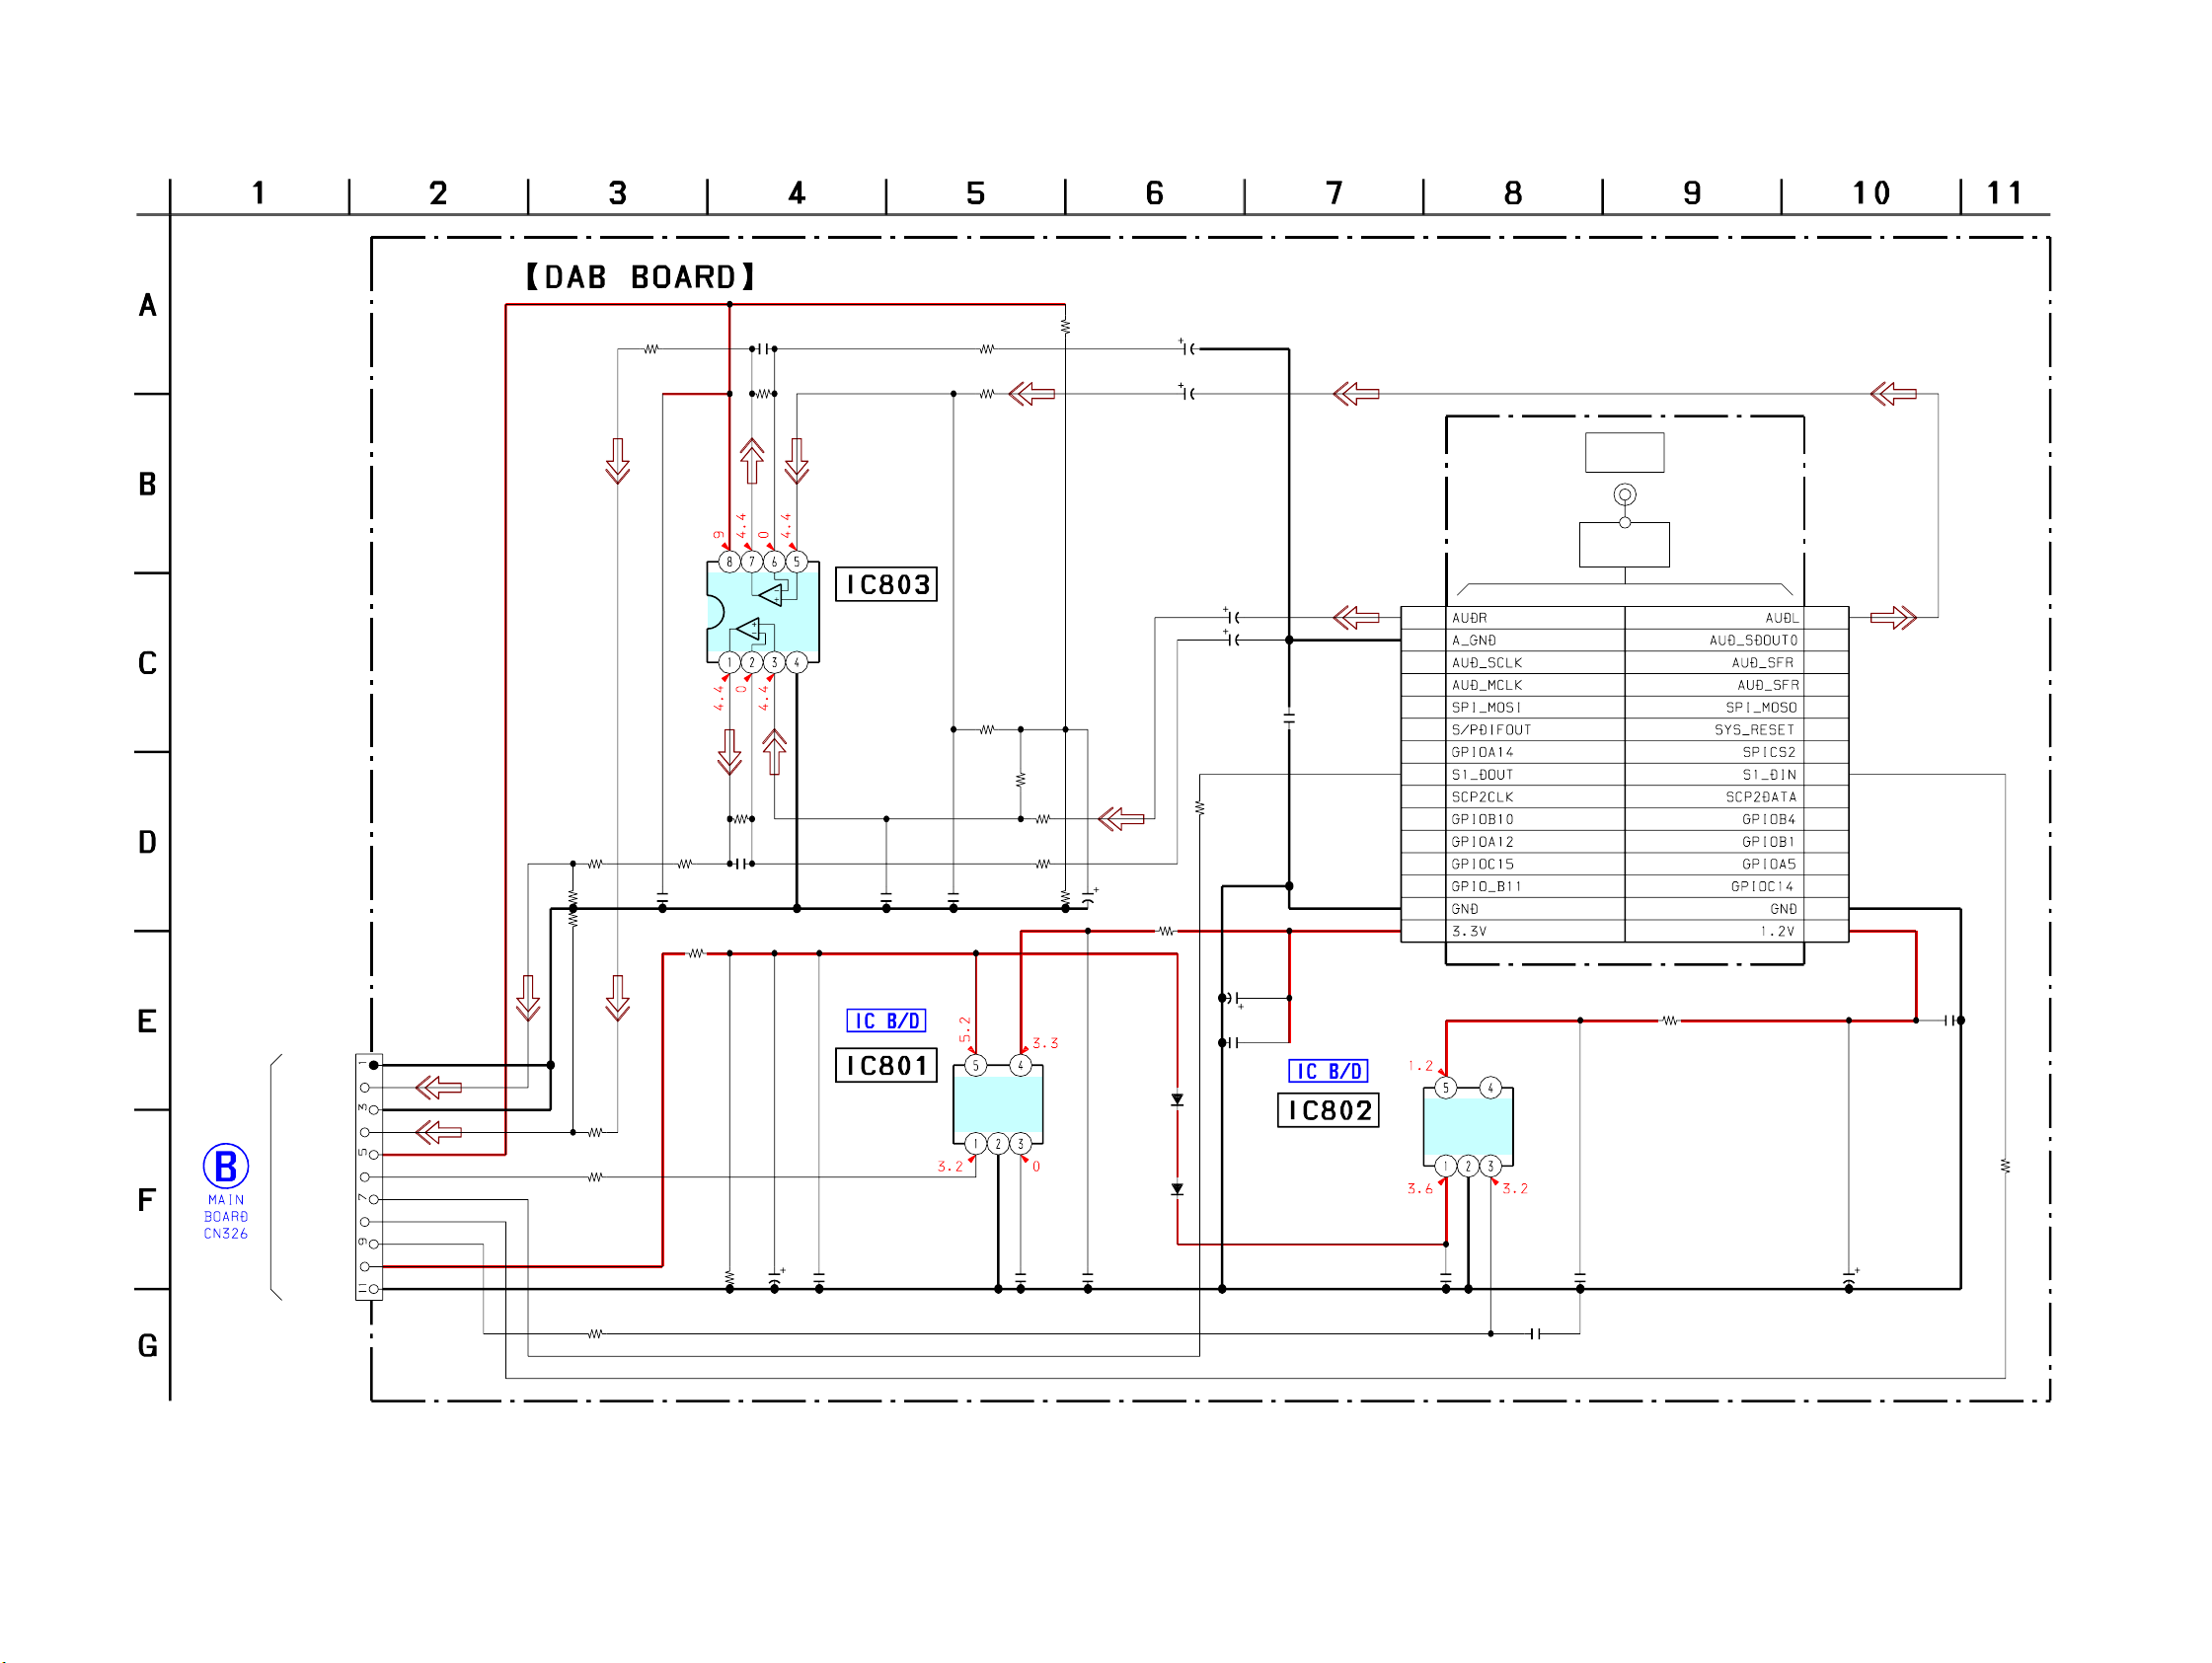
HCD-BX70DBi
6-8. SCHEMATIC DIAGRAM - DAB Board -
R818
CN801
11P
(Page 31)
AGND
DAB_R
AGND
DAB_L
DAB9V
3.3V_ON
S1DO
S1DI
1.2V_ON
5V
DGND
• See page 38 for IC Block Diagrams.
R803
0
R815
1k
47k
R817
47k
R816
1k
R800
10k
R801
47k
C825
R804
0
0.1
R809
C811
220p
VDD
R806
22k
C812 C813C814
220p 220p220p
0
C828
R802
4700
4.7k
10V
R805
22k
R807
22k
R811
22k
LINE AMP
GND
IC803
NJM4558M-
TE2
R813
22k
R814
22k
R810
22k
R808
22k
R826
4.7k
CONT
VI
VO
GND
NOISE
+3.3V
REGULATOR
IC801
TK11133CSCL
C803 C806 C804
0.22 0.01 1
R825
4.7k
C805
100
16V
D804
1N4002-B5
D805
1N4002-B5
FB801
C833
1
50V
C817
1
50V
C818
1
50V
C834
1
50V
C827
1
R832
100
0
C823
220
10V
C820
0.1
+1.2V
REGULATOR
IC802
TK68112AS2G0L-C
CN800
30P
C802
30
28
26
24
22
20
18
16
14
12
10
8
6
4
2
NC
OUT
CE
VDD
GND
1
C808
1
C807
ANTENNA
DAB 75Ω
DAB TUNER
MODULE
29
27
25
23
21
19
17
15
13
11
9
7
5
3
1
FB802 C821
00.1
R830
100
C824
220
0.1
10V
HCD-BX70DBi
2525
Page 26
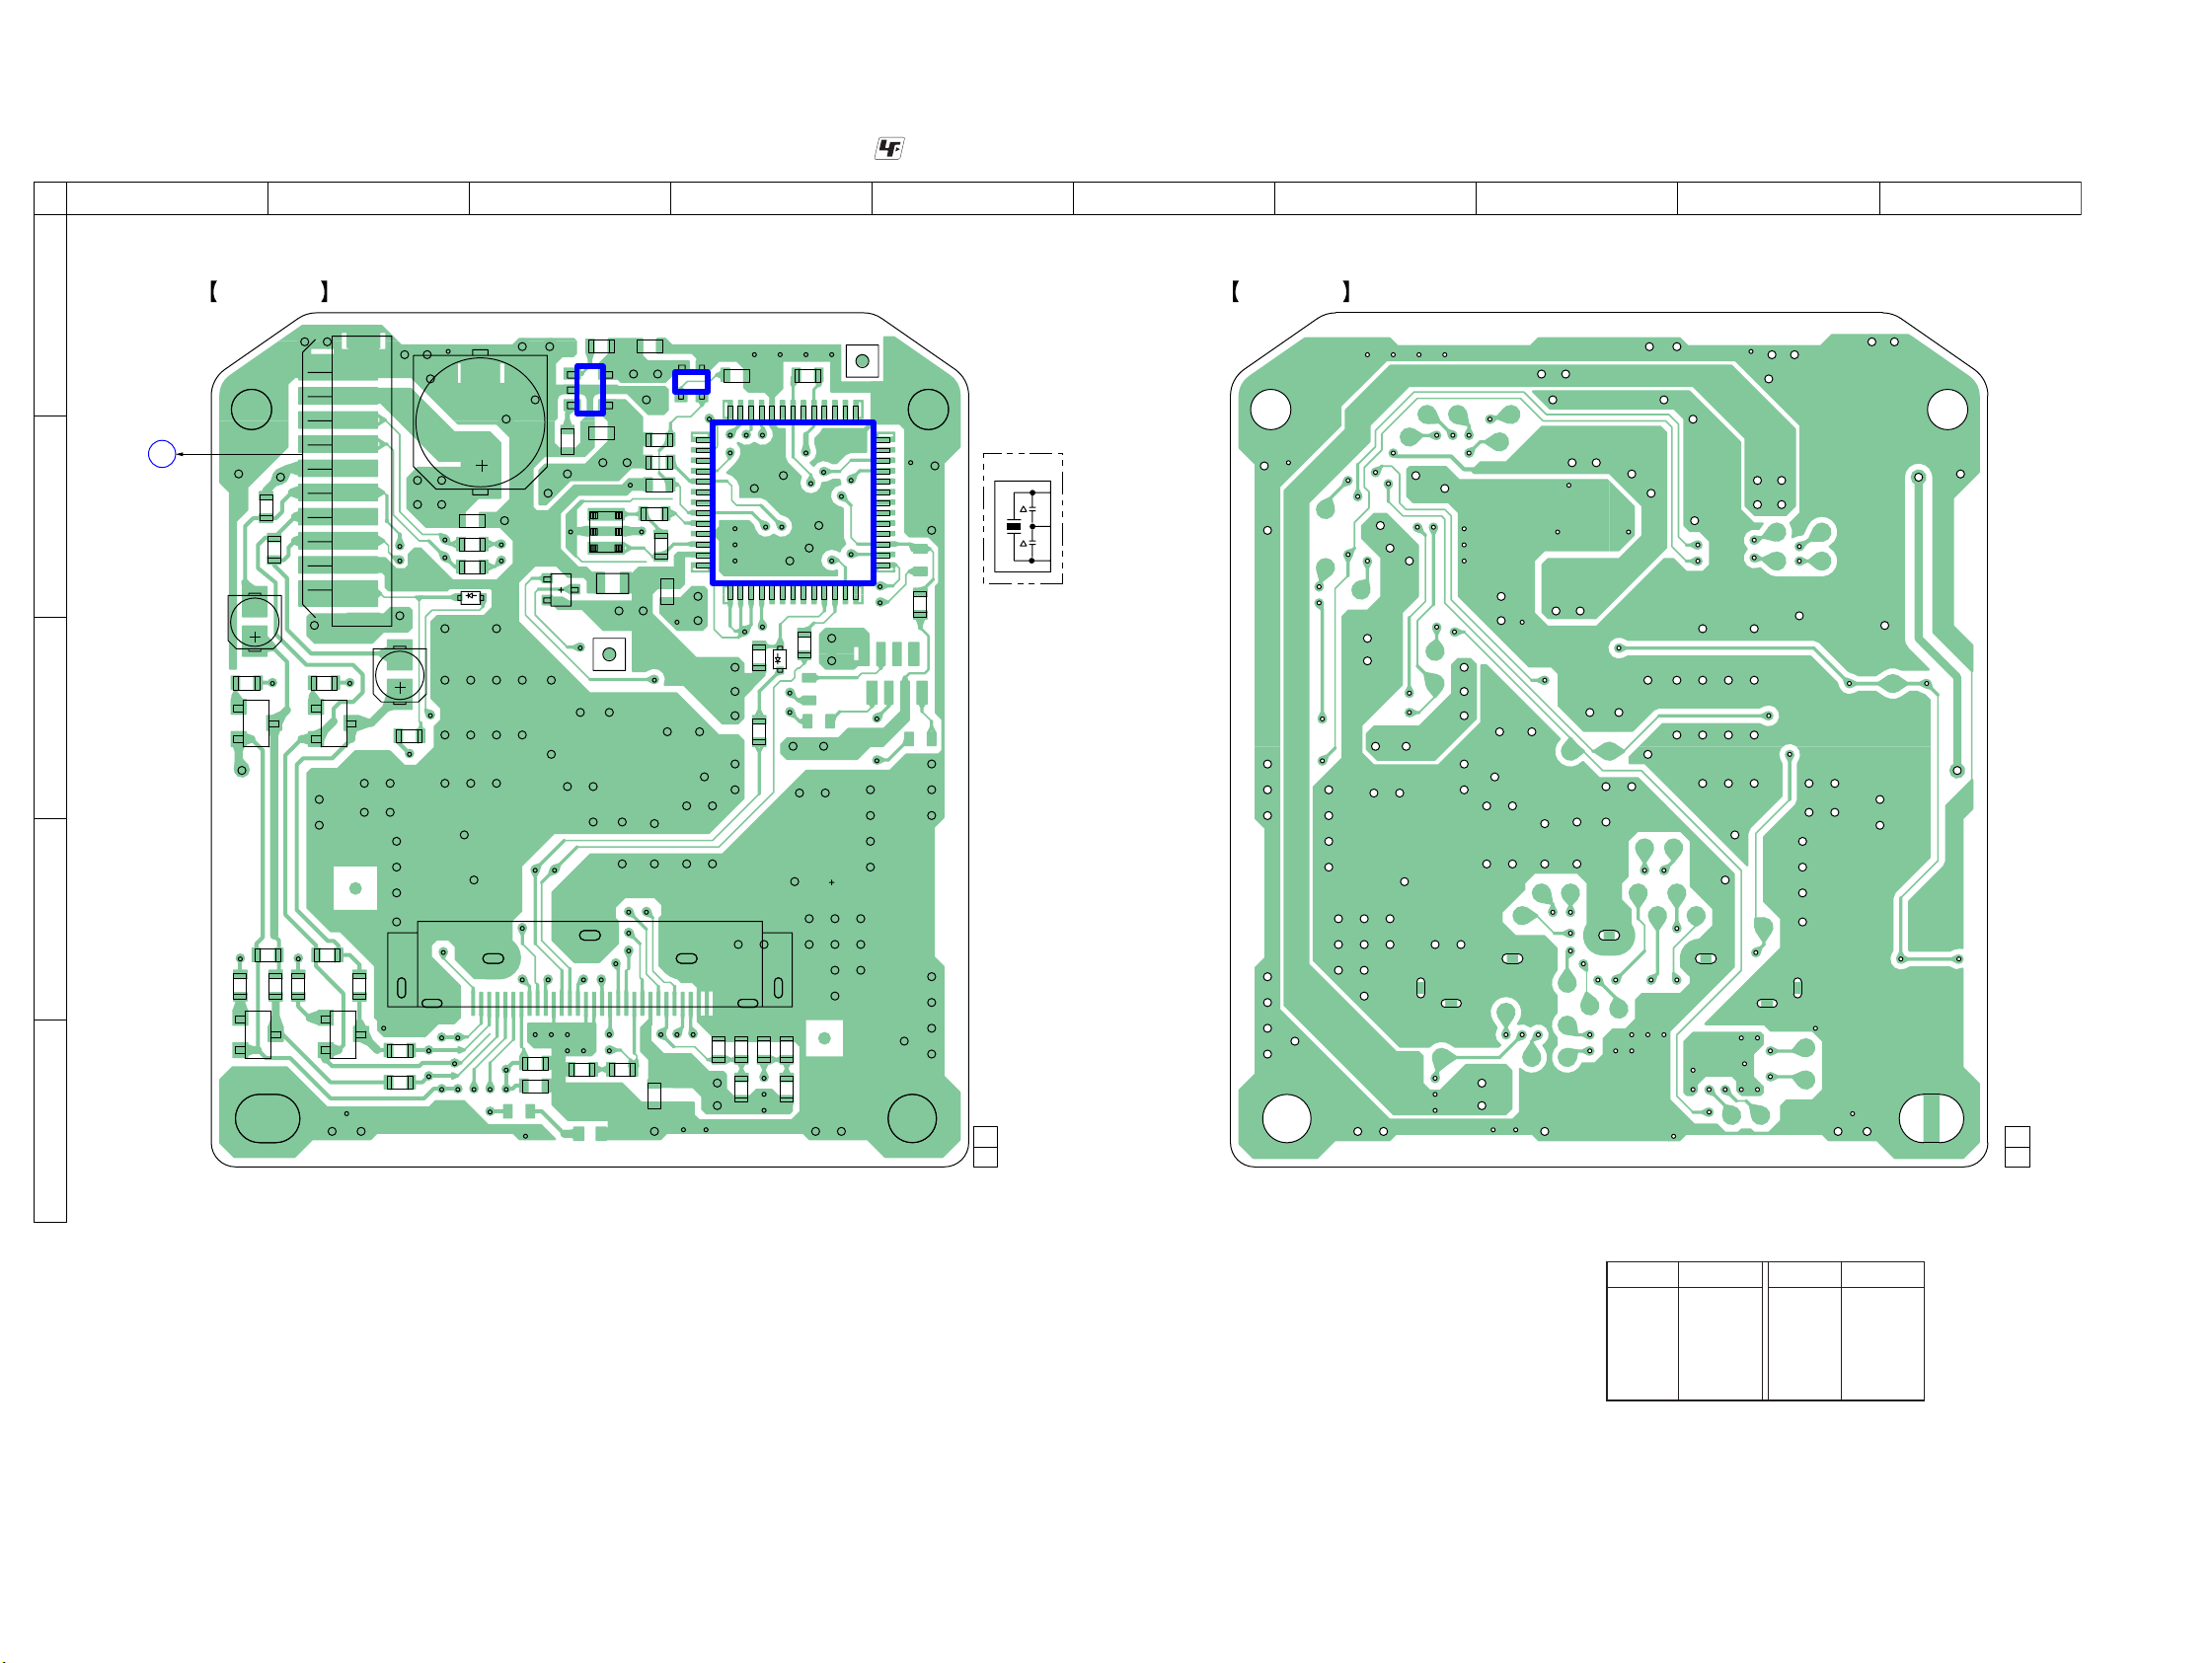
HCD-BX70DBi
6-9. PRINTED WIRING BOARD - IP Board -
12345678910
IP BOARD (SIDE A)
A
1
C
MAIN BOARD
CN325
B
(Page 28)
C
R139
R140
C114
Q105
E
CN101
10
R143R144
E
Q104
C115
R136
• See page 21 for Circuit Boards Location.
C102
K
C109
C118
R103
R104
D104
R105
1
3
C101
C103
X101
A
E
C108
Q106
5
4
IC102
R122
C119
R118
IC103
1
2
C105
52 40
3
4
1
R132
R117
13
14
C120
R135
IC101
A
D102
K
R150
R115
• : Uses unleaded solder.
39
X101
27
26
R114
R146
IP BOARD (SIDE B)
D
R147 R148
R142
E
R138
Q103
R141
E
Q102
R137
R101
R102
30
E
R149
C111
CN102
(iPod)
1
R107
R109
R110
C104
R112R113
R108
R111
R106
1-876-184-
(11)
11
1-876-184-
11
(11)
• Semiconductor Location
Ref. No. Location
D102 C-4
D104 B-3
IC101 B-4
IC102 A-3
IC103 A-4
Ref. No. Location
Q102 E-2
Q103 E-1
Q104 C-2
Q105 C-1
Q106 B-3
HCD-BX70DBi
2626
Page 27
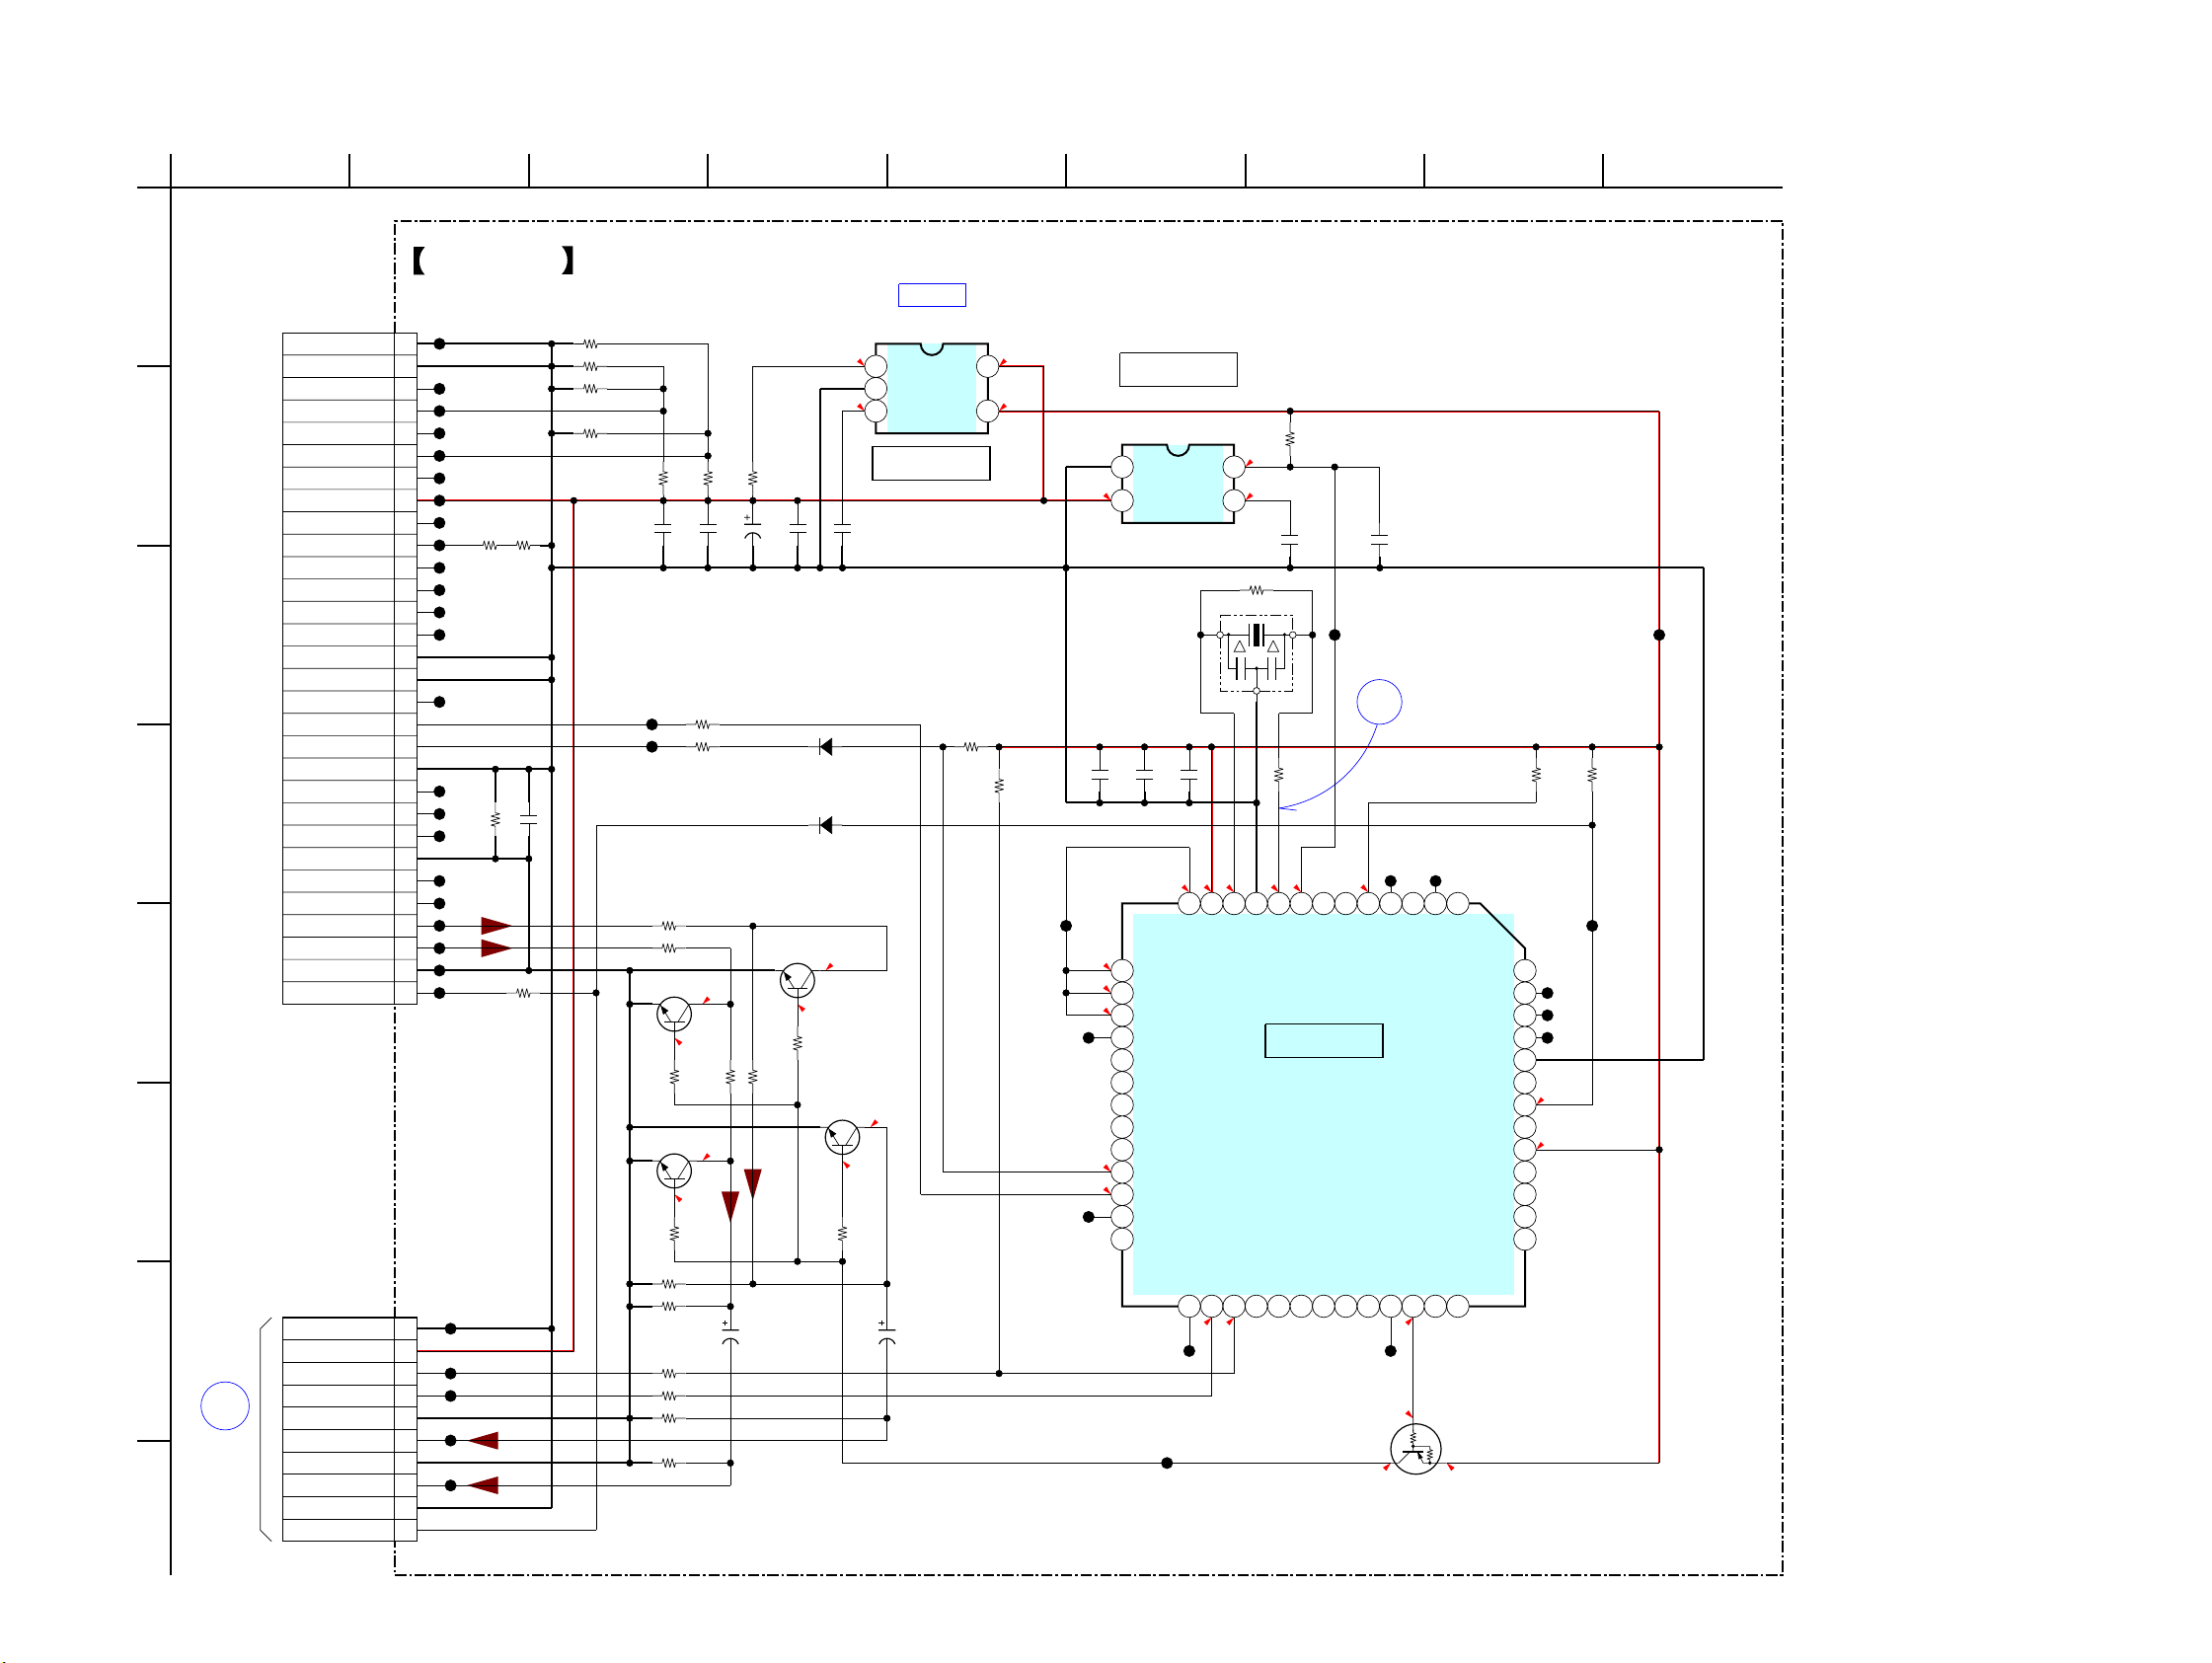
HCD-BX70DBi
6-10. SCHEMATIC DIAGRAM - IP Board -
1
IP BOARD
A
B
C
D
E
USB D+
USB D-
ACC ID
ACC PWR
RESERVED
RESERVED
ACC DET
S-VIDEO-Y
S-VIDEO-C
VIDEO-OUT
REMOTE SENSE
LINE-IN-L
LINE-IN-R
LINE-OUT-L
LINE-OUT-R
DGND
DGND
TPA+
TPA-
TPB+
VBUS
TPB-
PWR+
PWR+
DGND
DGND
RXD
TXD
A-GND
DGND
10
11
12
13
14
15
16
17
18
19
20
21
22
23
24
25
26
27
28
29
30
1
2
3
4
5
6
7
8
9
CN102
30P
(iPod)
CL109
CL150
CL103
CL149
CL104
CL148
CL102
CL147
CL105
CL146
CL145
CL144
CL143
CL142
CL141
CL140
CL139
CL138
CL137
CL110
CL111
CL106
CL112
R112
220k
R136
100
F
CN101
10P
CL113
1
2
CL115
3
CL116
4
5
CL118
6
7
CL120
8
9
10
G
H
C
MAIN
BOARD
(3/3)
CN325
(Page 31)
PGND
VBUS 5V
RXD
TXD
L-
L+
R-
R+
SHIELD
DETECT
• See page 24 for waveforms. • See page 38 for IC Block Diagrams. • See page 40 for IC Pin Function Description.
6
72
IC103
RESET SIGNAL GENERATOR
PST3641UL
1
GND
2
VDD CD
X101
20MHz
IC103
OUT
4
3
C105
0.22
R122
10k
3.4
4.7
C119
1000p
33kR117
CL151
21
C120
C108
0.1
10
0.1
R118
0
RESET
IC101
P10
P44
P31
678910111213
P34
P30
3.4
35 36 37 38 39
-1.1 3.4
3.4
1.7
1.7
3.4
3.4
XIN
LED
LED
14
LED
15
LED
16
P23
17
P22
18
P21
19
P20
20
P17
21
P16
22
RXD_iPod
23
TXD_iPod
24
P13
25
NC
26 40
AC CUT
27 28 29 30 31 32 33 34
CL155
VSS
VCC
XOUT
IC101
iPod INTERFACE
R5F21246SN060FP
RXD_DMPORT
P12
TXD_DMPORT
3.4
P11
3.2
MODE
P65
CL130CL132
3.4
CL122CL123
345
P33
SDA
VIDEO_MUTE
AUDIO_MUTE
3.4
R113
330k
100R149
3
45
IC B/D
100kR110
100kR108
100kR107
100kR109
R111
75k
R115
100R102
100R101
-1.1
R137
-1.1
100kR147
100kR148
100R103
100R104
100kR139
100kR140
C118
0.1
100
0
0
R105
10k
C109
470
6.3V
100R114
100
Q102-105
MUTING
C115
16V
C102
0.1
RB521S-30-TE61
RB521S-30-TE61
Q103
2SD2114KT146W
R142
1k
R138
100
R144
10
D102
D104
0
-1.1
Q105
2SD2114KT146W
-1.1
1k
R106
75k
C104
0.1
CL107
CL108
0.1C111
Q102
R141
2SD2114KT146W
1k
Q104
R143
2SD2114KT146W
1k
TK11133CSCL-G
1
CONT
2
GND
NP
IC102
+3.3V REGULATOR
C103
0.1
0
C114
10
16V
IC102
VOUT
5.14.9
5
VIN
3.41.3
43
5.1
R150
10k
R146
10k
C101
3.4
3.4
3.4
CL135
3.3
3.3
CL133
8
R132
10k
2
1
NC
SCL
P37
52
KEY0
51
KEY1
50
DEST
49
MODEL
48
P61
47
DETECT
46
P60
45
VREF
44
P04
43
P05
42
P06
41
NC
P07
NC
Q106
RT1P141M-TP-1
MUTING CONTROL SWITCH
CL153CL154
CL124
CL156
CL125
1.6
3.4
R135
10k
9
CL152
HCD-BX70DBi
2727
Page 28
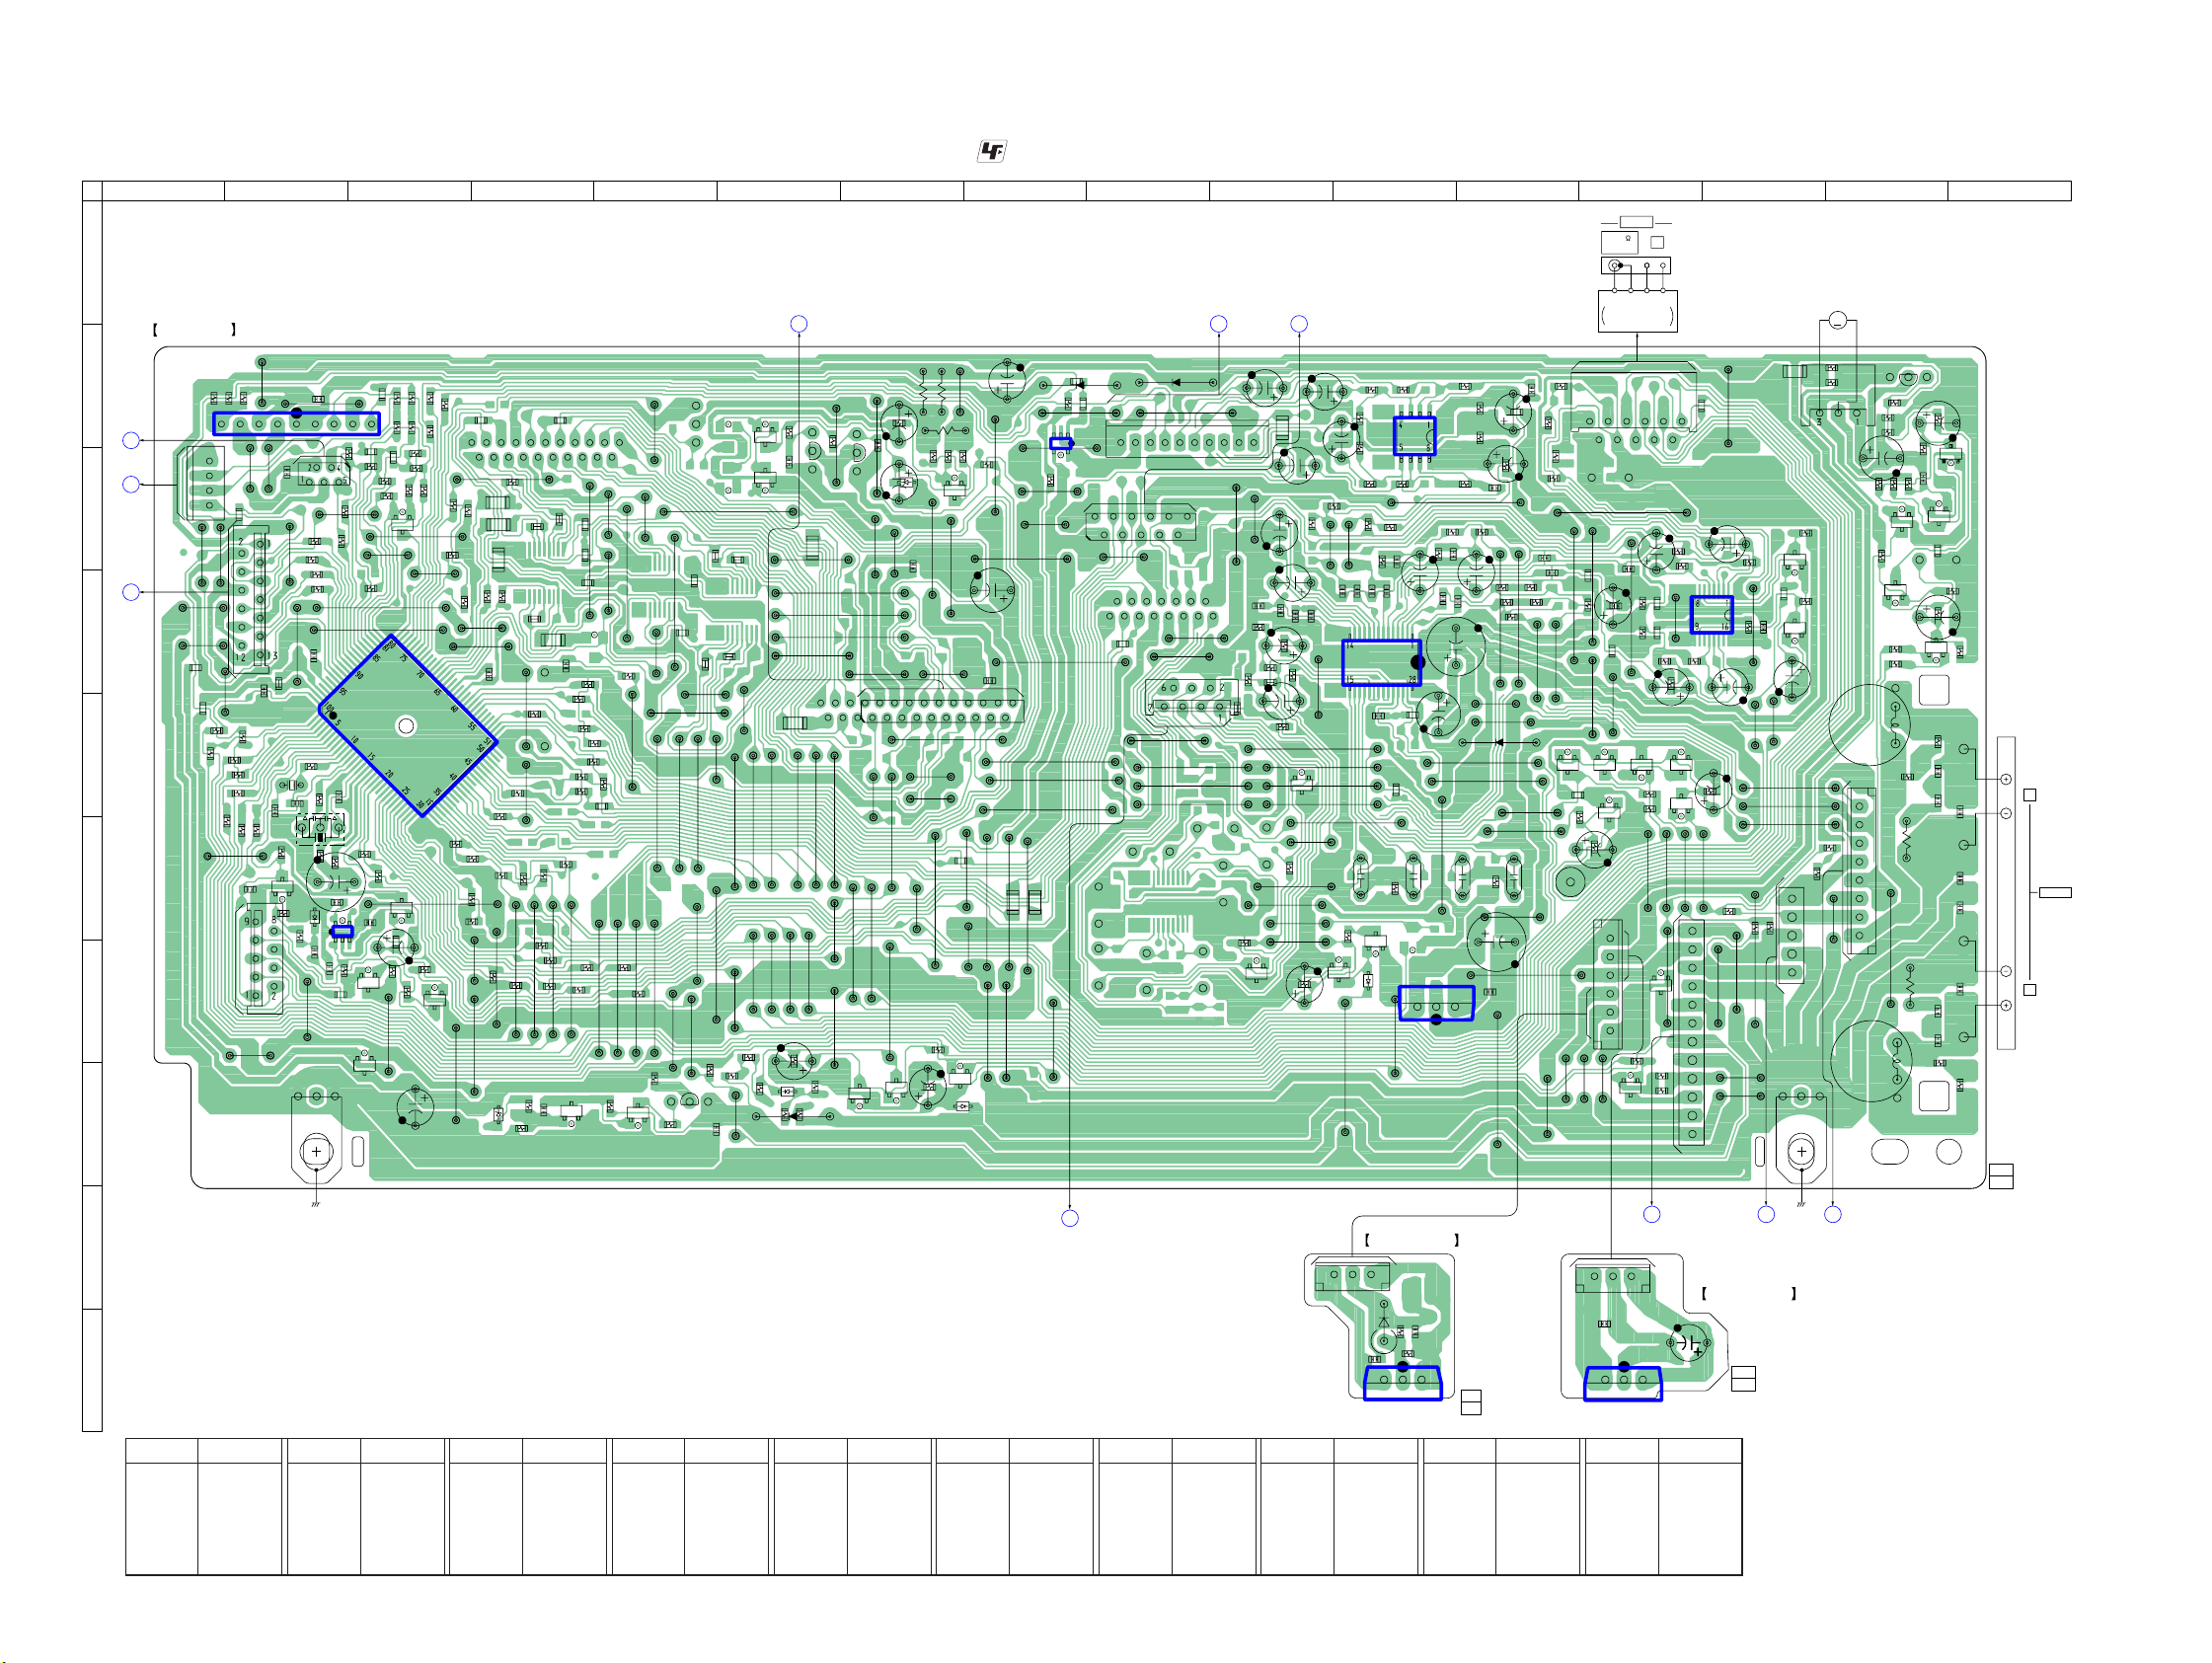
HCD-BX70DBi
6-11. PRINTED WIRING BOARDS - MAIN Section -
1 2 3 4 5 6 7 8 9 10 11 12 13 14 15 16
A
MAIN BOARD
R301
R408
B
(Page
22)
IC311
K
MOTOR
BOARD
CN001
F
TOP KEY
BOARD
C
CN802
(Page
34)
E
PANEL
BOARD
(Page
D
34)
JR336
E
F
R462
19
4
JW473
CN322
JR335
1
JW476
JW477
JW478
CN306
JW479
JW480
JR337
R700
R704
R702
R701
R703
R706
R705
R707
R709
JW481
C333
(NC)
G
JW483
H
I
J
• Semiconductor Location
Ref. No. Location
D302 H-4
D303 H-3
D304 C-7
D305 J-11
D309 F-2
D313 D-15
JW465
C338
CN311
JW472
C366
R789
R791
JW474
R792
R793
JW475
C498
JR498
C499
R711
X301
R713
C311
C310
R412
R716
Q309
E
R466
R465
CN301
C342
JW482
EP302
(CHASSIS) (CHASSIS)
Ref. No. Location Ref. No. Location Ref. No. Location Ref. No. Location Ref. No. Location Ref. No. Location Ref. No. Location Ref. No. Location Ref. No. Location
D318 B-8
D319 E-12
D320 E-13
D321 B-9
D322 H-7
D323 E-12
JW464
R717
C344
54
D309
1
IC310
C341
JR341
JR332
R778
R467
R468
R777
JR331
R784
R785
R780
JR334
R472
R487
R494
R783
R488
JW466
R477
C316
X302
C340
C339
3
E
R464
Q313
KK
D303
A
JW470
JW471
R719
JW468
R786
JR340
K
D774
A
IC301
R720
Q301
C301
R316
JW490
JR333
R782
R493
R492
K
JW467
JW469
JW450
E
E
Q312
R313
C303
JW447
R781
R774
R432
R311
R770
R775
JR344
R473
JR222
JR343
JR342
R769
R768
R773
JR221
R731
R429
JW463
JW451
JW452
R741
R433
R430
JW461
JW462
JR329
C362
R753
JW454
R746
JW455
R734
R733
R728
JW459
R727
R424
R422
R724
JW460
JW457
JW458
R403
C305
D302
R404
D325 H-8
D329 H-6
D330 G-11
D331 H-6
D332 G-13
D774 C-3
• See page 21 for Circuit Boards Location.
(Page 22)
CD BOARD
A
CN201
JR223
JR325
JW414
JR326
JR327
JR328
R760
C766
R759
R757
R485
R751
R748
R747
R732
R726
R722
JW456
JW446
Q305
E
JW381
JW412
JW408
JW411
JW413
R752
JR330
JW409
JR324
JW410
R766
JW417
JW428
JW426
JW425
JW427
R725
JW445
JW444
R406
Q306
JW441
R718
JW443
JW442
JW440
Q304
R414
E
R417
IC201 B-8
IC301 E-3
IC303 B-11
IC304 D-11
IC305 J-13
JW416
JR213
JW382
JR219
JR214
JR323
JR211
JW424
JW423
JW437
JW438
R463
R411
E
JW439
C302
R364
E
Q303
Q392
Q302
C355
E
JW385
JW389
JR322
JW415
JW420
JW422
JW421
JW435
JW436
JW433
JW434
R419
C336
R410
R413
D329
D331
R425
R461
IC306 J-11
IC307 G-11
IC310 F-2
IC311 B-2
IC312 D-14
E
JW419
JR321
R344
Q390
JW380
E
JW386
JW387
JW388
JW418
JW431
JW430
JW432
R431
Q333
E
JW391
20
JW396
JW429
C361
JW384
• : Uses unleaded solder.
ANTENNA
FM 75
AM
COAXIAL
JR304
R470
R360
Q320
Q319
JW304
JW305
JW306
5
CN321
1
EP301
M901
(FAN)
R459
E
R359
E
C395
R439
R421
JW308
HP BOARD
CN317
(Page 32)
M
CN313
E
R460
Q317
R475
R478
R482
R481
C307
R484
Q348
E
R253
JW217
E
C337
E
R349
Q347
JR301
R495
R415
C304
K
R409
D313
AA
R129
C122
C119
C222
C219
R229
1-876-051-
C123
C125
C225
C223
R230
11, 12
(11, 12)
L
J302
SPAEKER
R
C387
R348
R347
E
Q307
R428
Q316
R489
R498
L101
R130
8
R153
CN316
1
JW307
L201
(Page 26) (Page 24)
IP BOARD
C
CN101
C364
R314
R312
C324
JW448
C319
JW383
JW395
JW407
Q338
JW377
R356
R308
JW375
R307
R315
R396
R317
E
D304
Q393
C348
JW378
JW379
C391
JW390
CN305
JW392
JW393
JW394
JR320
JW402
JW403
R427
C350
E
R416
JW400
KK
D322
A
JW401
C330
JW399
JW398
JW406
JW405
D325
Q103 E-10
Q203 G-10
Q301 F-3
Q302 C-6
Q303 B-6
Q304 H-5
JW376
121
2
JR319
IC201
JW350
JW397
JR318
JR315
D318
R303
JR316
JW349
3
1
1
45
R302
JW485
JW351
1
CN326
210
JW352
JR317
JW356
JW366
JW367
JW368
JW404
D
AMP BOARD
CN308
(Page 32)
JW363
JW364
JW365
Q305 H-4
Q306 H-5
Q307 C-15
Q309 F-2
Q312 G-3
Q313 G-3
JW355
JW362
CN325
CN309
D321
JW348
11
JW354
10
JW347
C111
R117
JR201
R234
E
DAB BOARD
B
CN801
C127
JW346
R101
R217
R201
Q203
JR101
C126
C227
JR345
C226
C108
R206
JW345
C208
C132
C232
C211
C116
R128
R228
JW353
C216
JW357
JW358
E
JW359
Q103
JW360
JW487
JW361
R134
JW369
JW370
JW371
JW372
E
R345
Q340
C394
JW374
Q315 H-13
Q316 D-15
Q317 B-15
Q319 D-14
Q320 C-14
Q333 H-7
R122
R110
R210
R222 R223
R205
R106
JW344
C204
C217
C117
IC304
C368
C371
R227
Q341
E
D330
5VREG BOARD
13
CN324
D305
C373
1
R123
IC303
R231
R105
R103
C202
R203
C213
C201
C104
JR313
JR314
C375
JW337
R209
IC307
31
JW373
C380
R437
R401
3
IC306
1-876-058-
Q338 H-7
Q340 G-11
Q341 G-11
Q342 E-13
Q343 E-13
Q344 E-13
R131
JW317
R202
C113
C101
C367
C369
C377
11, 12
(11, 12)
R204
JW323
R104
JW324
C109
C352
R611
JR309
R600
C386
R511
R500
C209
R309
R102
C203
C103
C102
R126
R125
R225
R226
R224
JW315
JW314
JW318
JW316
JW322
JW321
D323
JR312
JW329
JW486
C379
CLP311
R109
JW336
C365
JW338
C359
JW343
JW341
TUNER (FM/AM)
SUPPLIED WITH THE
ASSEMBLED BLOCK
CN310
1
210
JW488
JW312
C230
JR307
C389
JW311
C130
R124
JR308
JW313
JW489
EKA
D319
Q343
A/K
E
Q345
R435
C363
R436
6
CN312
1
R441
E
JW339
JW340
JW342
Q315
CN314
C335
13
IC305
11
R221
C220
R220
R362
JR305
IC312
R361
JW309
JR306
R119
R121
R120
JW310
C120
(BX50BTi)
E
Q342
Q344
E
K/A
R471
D320
R496
KA
JW328
JW326
JW327
12
JW335
KK
D332
A
CN303
R449
R450
1
J H G
(Page
POWER BOARD
CN904
36)
13
C325
1-876-057-
Q345 E-13
Q347 C-15
Q348 C-16
Q390 C-7
Q392 C-6
Q393 C-7
JR302
JW484
JR303
C214
R219
JW301
R453
C382
C114
JW303
C351
R458
JW325
R420
R469
JW331
JW330
JW332
JW333
JW334
AMP BOARD
CN320
(Page 32)
9VREG BOARD
11, 12
(11, 12)
JW302
HCD-BX70DBi
2828
Page 29
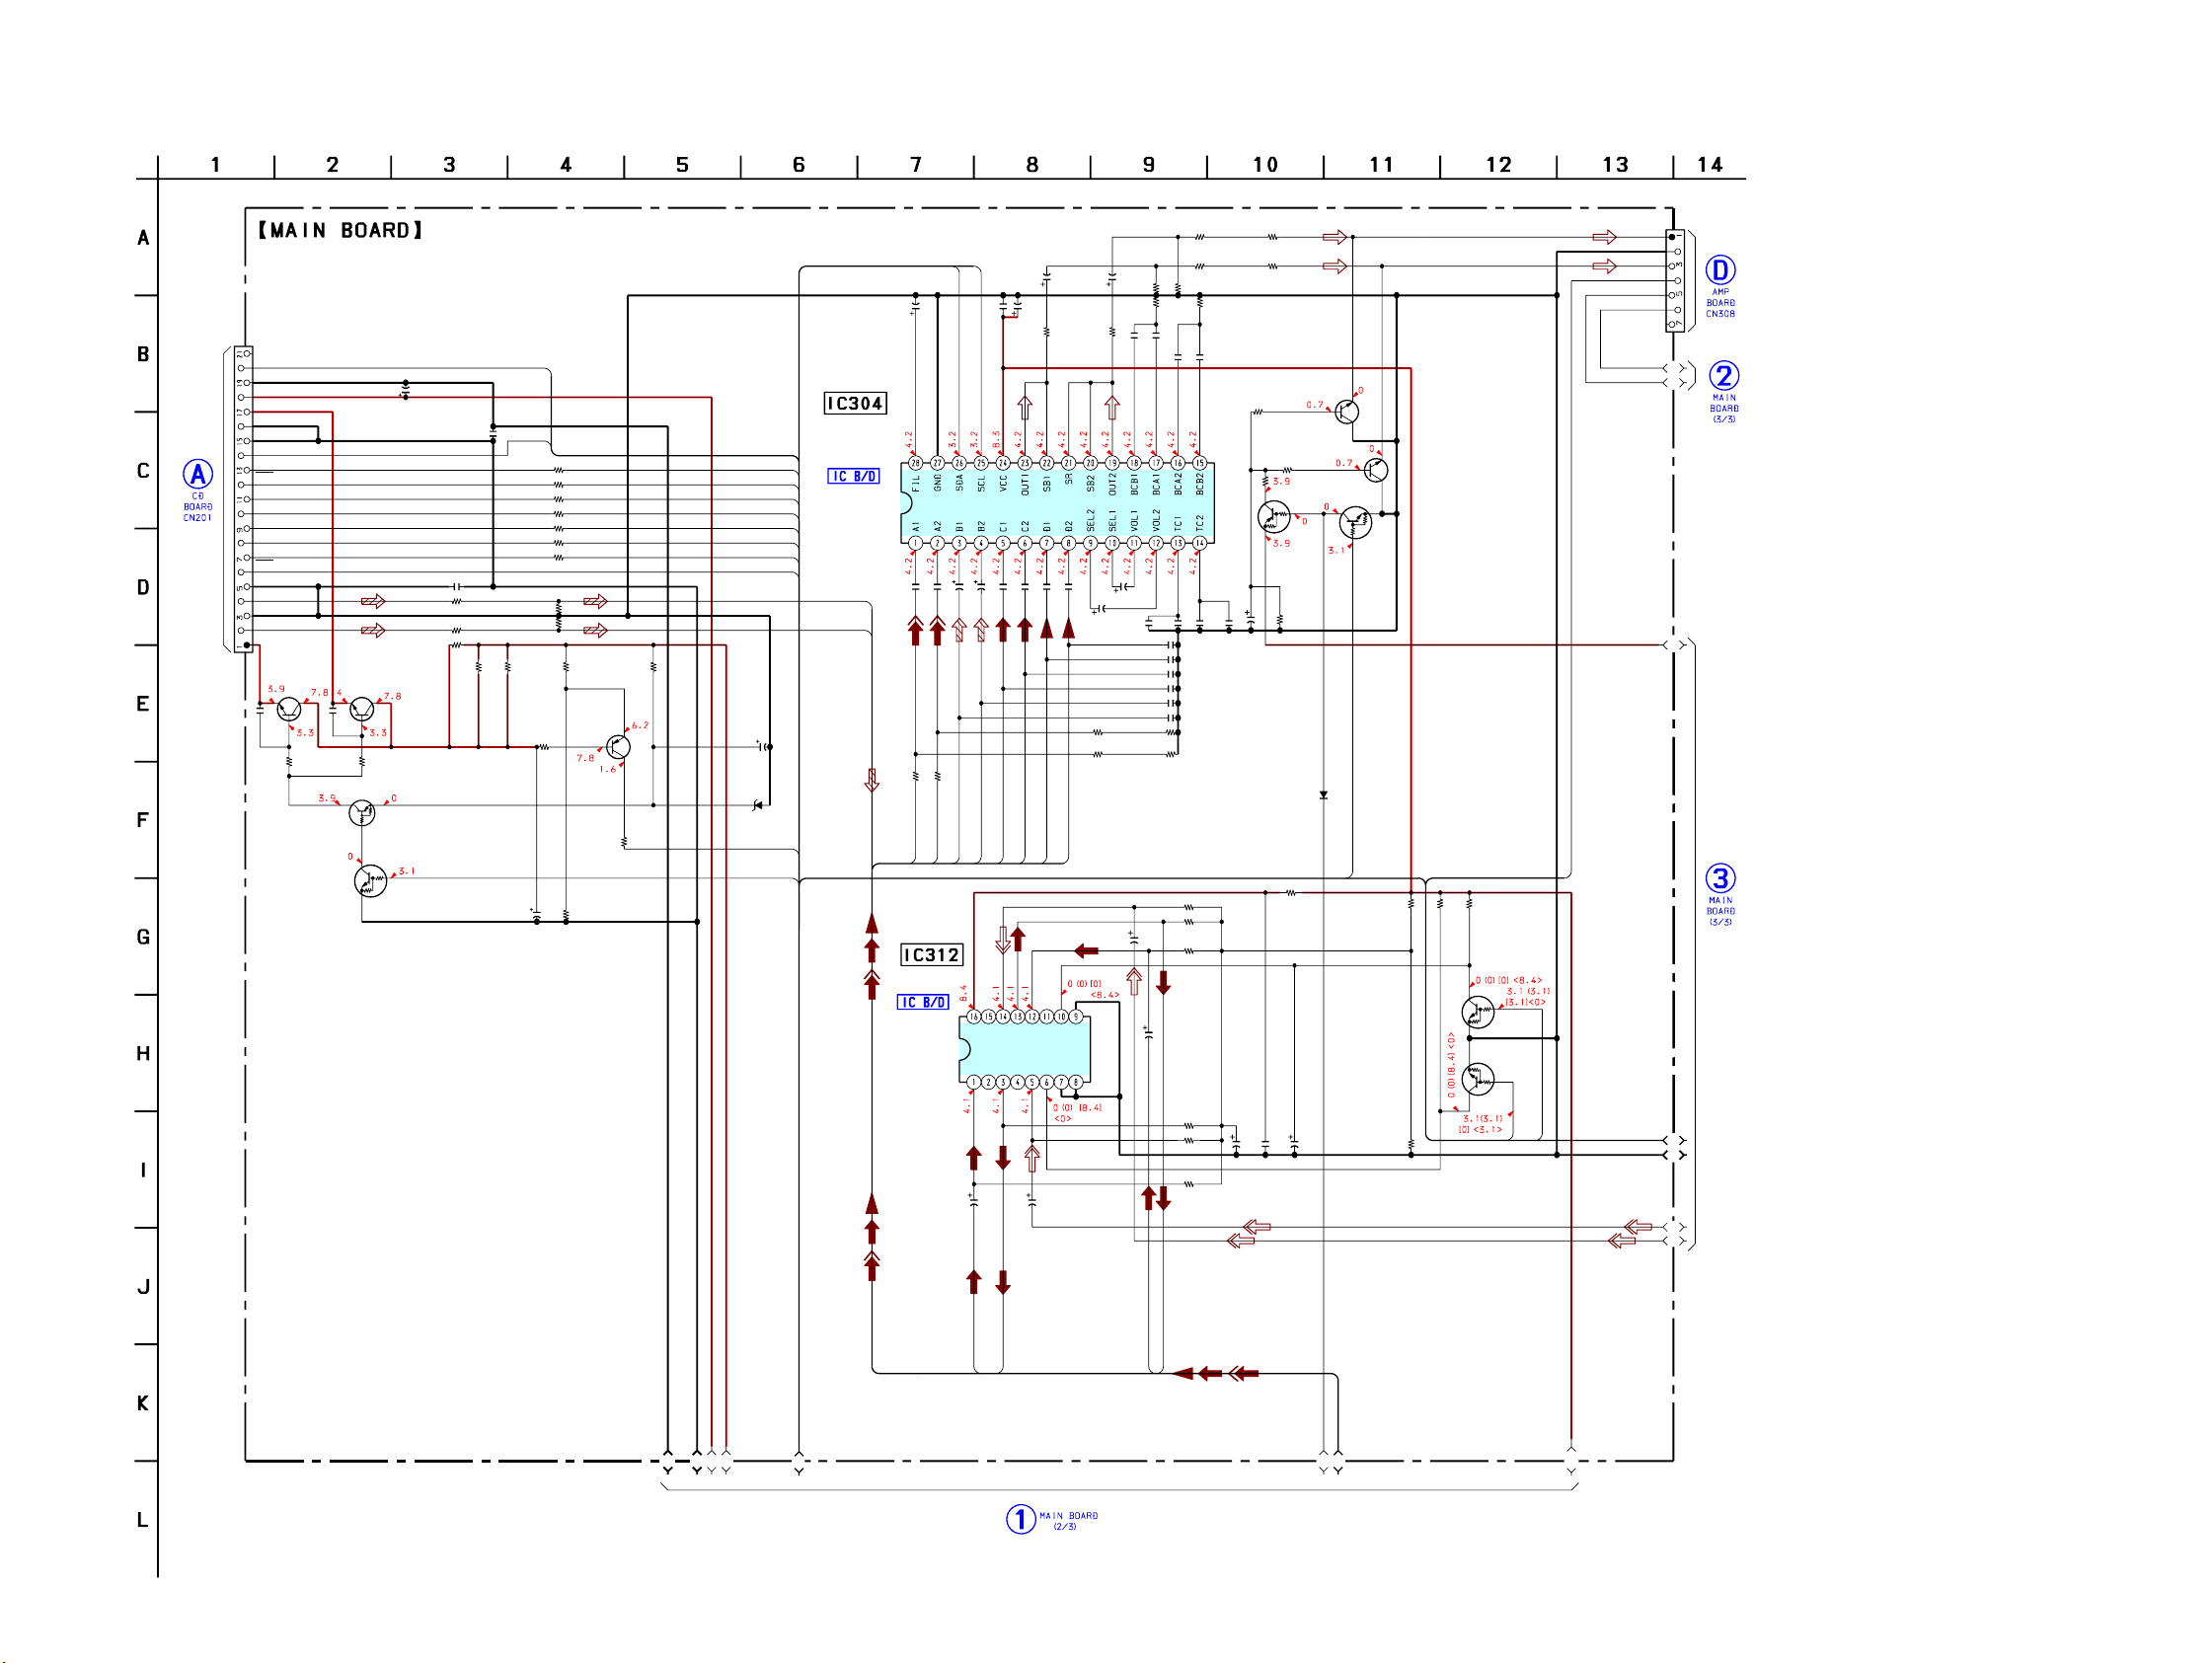
HCD-BX70DBi
6-12. SCHEMATIC DIAGRAM - MAIN Section (1/3) -
(1/3)
CN305
21P
(Page 23)
ZDET/LRCKIN
CD DRIVE MUTE
MGND
VM(7V)
DVDD(3.3V)
D-OUT
DGND
SBSY
REQ
CCE
BUCK
BUS3
BUS2
BUS1
BUS0
RST
AGND
L-OUT
DACGND
R-OUT
AVDD(3.3V)
Q390
KTC3205Y-A
C361
0.1
R344 R364
C355
100 100
0.1
RT1P441C
C391
470 10V
C348
0.1
C330
0.1
R102
4.7k
R202
4.7k
R314
47
R312
47
Q392
KTC3203Y-A
Q303
Q302,303,390,392
Q302
RT1N141C
+3.3V
REGULATOR
60
19
JR221
0
JR222
0
JR223
0
JR211
0
JR213
0
JR219
0
JR214
0
R103
47k
R203
47k
R308
R396
47
22k
Q393
ISA1235
AC1TP
VOLTAGE
R315
DETECT
100k
C324
R356
100
47k
16V
• See page 38 for IC Block Diagrams.
C369
10
16V
INPUT SELECTOR,
ELECTRICAL VOLUME,
SURROUND/
TONE CONTROL
68
69
70
100
1
2
3
59
R307
1k
C319
220
10V
D304
UDZW-TE17-
R317
47k
3.9B
57
CD/USB_L
CD/USB_R
IC304
BD3499FV
INPUT SELECTOR
R124 R224
22k 22k
AIN_L
R201
2.2k
R101
2.2k
R217
47k
R109
R209
4.7k
4.7k
C377
0.1
C108
2.2
50V
C371C375
0.10.1
C132
0.0022
0.0022
C111
0.0047
C232
470P
470P
470p
470p
470p
470p
R226
22k
R126
22k
R120
100K
R121
100K
R119
100K
0.1
TUNER/DAB
C367
470
16V
C203C103C202C102C201C101
TUNER/DAB
C116 C216
R128 R228
C104 C204
111
IPOD_L
4.7
50V
1k 1k
11
IPOD_R
4.7
R117
50V
47k
C379
0.1
C211
C208
2.2
0.0047
50V
C217
C117
C230
C130
C213
C113
R225
22k
R125
22k
C120
1
50V
C368
22
24
11
50V150V
AIN_R
CD/USB_R
CD/USB_L
JR201
0
JR101
0
Q203R234
2SC59384.7k
MUTING
R134R227
4.7k22k
Q103
2SC5938
Q341
RT1P441C
MUTING
Q340
RT1N141C
-TP-1
R345
47k
C394
2.2
50V
D330
MA2J1110GLS0
23
R453 R361 R360 R359
100 2.2K 10K 10K
Q340,341
MUTING
CONTROL
SWITCH
Q319
RT1N141C-TP-1
INVERTER
53
CN309
R-IN
AGND
L-IN
STBY
±PRE
MNT
NC
(Page 33)
7P
C1
C2
(Page 31)
C3
(Page 31)
X
A
B
X3
X0
X1
X2
MC14052BDTR2
A1
A2
A3
A4
A6
Y0
TUNER_R
Y
Y2
Y1
Y3
VEE
INH
GND
C220
C214
50V
1
1
50V
TUNER/DAB
50V
1
C114
R221
TUNER_L
R220
TUNER/DAB
100K
R219
100K
100K
C389 C382 C395
100
0.1 2.2
16V
50V
A8
R362
2.2K
A9
VCC
IC312
Q320
RT1N141C-TP-1
INVERTER
396640
A10
C4
C5
C6
C7
(Page 30)
HCD-BX70DBi
2929
Page 30
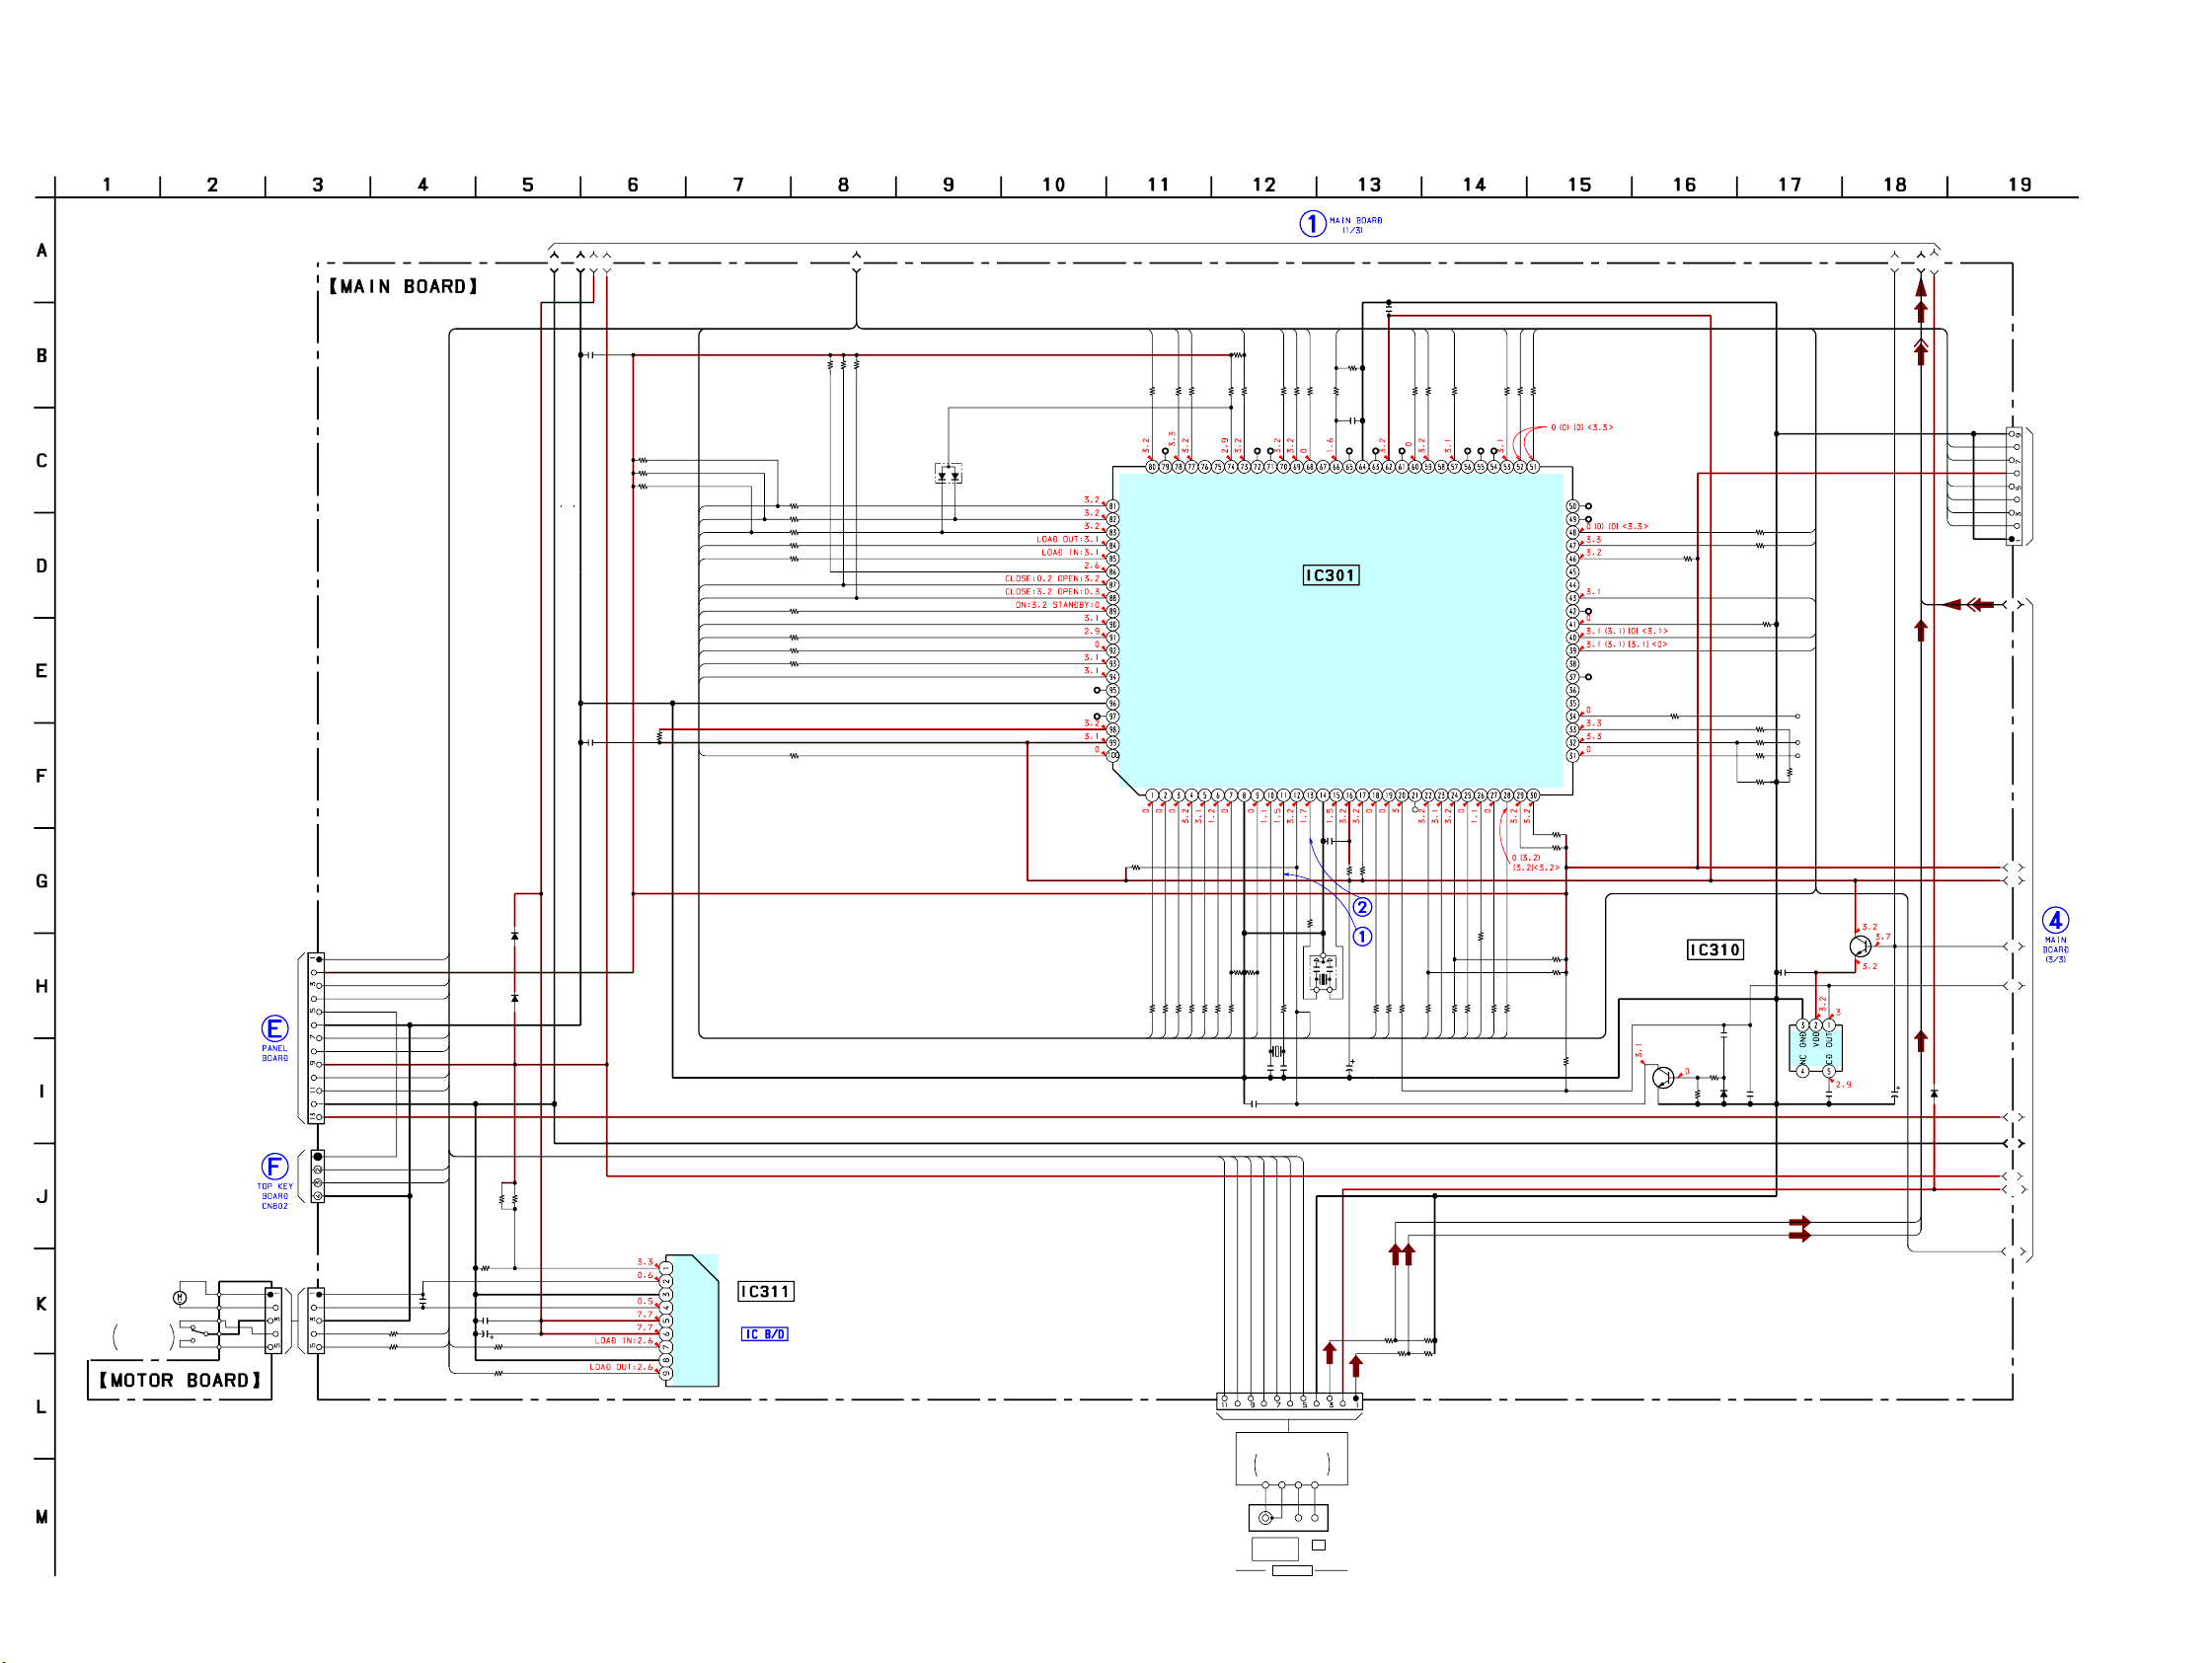
HCD-BX70DBi
6-13. SCHEMATIC DIAGRAM - MAIN Section (2/3) -
(2/3)
D318
4
89
83
90
91
92
93
82
81
C366
0.1
87
88 85
1N4002-B5
D321
1N4002-B5
R408
2.2k
R462
1k
C338
C364
R467
R468
84
M001
(LOADING)
S001
DISC TRAY
OPEN/CLOSE
DETECT
(Page 35)
(Page 35)
CN306
13P
SIRCS
EVER 3.3V
STBY LED
KEY1
KEY1 RETURN
DGND
FL RESET
FL CS
+9V
FL DATA
FL CLOCK
FL GND
4V
KEY1 RETURN
KEY2
KEY3
DGND
CN322
4P
CN311
5P
OPEN
CLOSE
DGND
CLOSE SW
OPEN SW
R472
1k
R477
1k
• See page 24 for waveforms. • See page 38 for IC Block Diagrams. • See page 40 for IC Pin Function Description.
(Page 29)
A6
C362
77
78
R780 R778
100 100
KEY3
KEY2
KEY1
CDM LOAD OUT
CDM LOAD IN
SPEC IN
CDM SW(CLOSE)
CDM SW(OPEN)
STANDBY LED
FL RESET
FL CS
FL SD
FL SCLK
X5V FLAG
NC
AVSS
NC
VREF
AVCC
CD
BUS3
R412
10k
R701
100
80
100
R777
NC
POWER
DMPORT
USB CTS
USB RESET
CLINK_RX_DIN
CLINK_TX_DOUT
TUNER TUNED
CD BUS0
CD BUS1
CD BUS2
STBY-RELAY
SIRCS
100
100
100
100
100
R702
R703
R704
R706
R705
2
4
1
5
3
6
7
CN310
11P
RDS DATA
R487
10k
R786
R488
4.7k
10k
D774
MC2836
70
73
69
68
R473
10K
100
100
R773
100
NC
BYTE
C310
22p
26
DO/STEREO
100
R770
R769
R768
NC
NC
CD CLK
CD CCE
SYSTEM CONTROLLER
R5F3640DDFAR
CN VSS
XCOUT
XCIN
RESET
0
R713
220k
10k
R711
R709
9
32.768KHz
0.22F 5.5V
C311
22p
0.1
C333
6
28
27
25
ST CLK
ST DIN
ST CE
TUNED
1M
R774
KEY WAKE UP
RDS DATA
0
R407
100
R707
7
18
RDS CLK
0.1
66
R485
100k
R766
220k
C766
0.01
MP3 IREQ
DEC BUS SEL
I-POWER MONITOR
IC301
VSS
XOUT
XIN
0.1
C316
X302
5MHz
12
X301
C344
+9V
R OUT
AGND
60
59
100
R760
R759
100
NC
NC
VSS
VCC
CD RESET
MODEL IN
CD DRIVER MUTE
AMP CLOCK
SBSY
VCC
R611
NC
RDS INT
AC CUT
NMI
0
10k
R716
R717
100
47k
100
R719
R720
R718
19
18
22
R600
4.7k
22k
R511
4.7k
R500
22k
L OUT
0.1
10 50V
A1
A2
A4
A3
C498
0.1
R492
10k
R493
10k
R494
10k
81
82
83
84
85
87
88
89
90
91
92
93
94
JR498
C499
R301
5.6k
4.7k
4.7k
0
0.1
IC311
BA6956AN
100
VC
O+
GND
O-
VCC
VM
I-
GND
I+
R789
R791
R792
R793
LOADING
MOTOR DRIVE
R781
100
R782
100
R783
100
R784
100
R785
100
1k
100
100
100
R700
100
A8
A9
A10
57
100
R757
NC
CD ON
USB POWER
AMP DATA
ST CE
TA LINE MUTE
100
100
R722
R724
25
24
23
NC
DATA IN/STEREO
100
R726
100
R725
27
26
51
52
53
100
100
100
R753
R752
R751
NC
3.3V
1.2V
STK-ON
DAB-POWER
DAB-POWER
DAB RXD
DAB TXD
PULL UP
BT_RESET
BT_AV_ROLE
BT AUDIO OUT MUTE
PULL DOWN
USB RTS
USB RXD
USB TXD
BT_RTS
BT DOUT
IIC CLK
DATA
IIC
ST DATA OUT
ST CLK
4.7k
R424
4.7k
R422
100
R728
100
R727
28
BT CTS
BT DIN
GND
RXD
31
BUSY
34
VDD
SCLK
33
NC
NC
R746
10k
NC
INH
SEL A
NC
R734
100
R430
4.7k
R429
4.7k
Q309
2SC3052F
R464
10k
RESET SWITCH
R466
47k
RESET SIGNAL
GENERATOR
R465
47k
C342
0.1
R748
R733
100
R732
100
R731
100
R432
4.7K
(BX20i)
D309
MA2J1110GLS0
100
R747
100
R741
10k
R433
4.7K
C339
0.1
C341 C340
0.1 0.1
48
47
43
40
39
2SC3052F
AC DETECT
Q301
IC310
PST3628NR
C301
4.7
50V
TUNER_R
TUNER_L
32
9
12
D323
1N4002-B5
5
(NC)
TXD
PGM
RST
GND
CN301
9P
B1
B2
B3
B4
(Page
B5
31)
B6
B8
B9
B10
B11
HCD-BX70DBi
(FM/AM)
TUNER
SUPPLIED WITH THE
ASSEMBLED BLOCK
FM 75Ω
AM
COAXIAL
ANTENNA
3030
Page 31
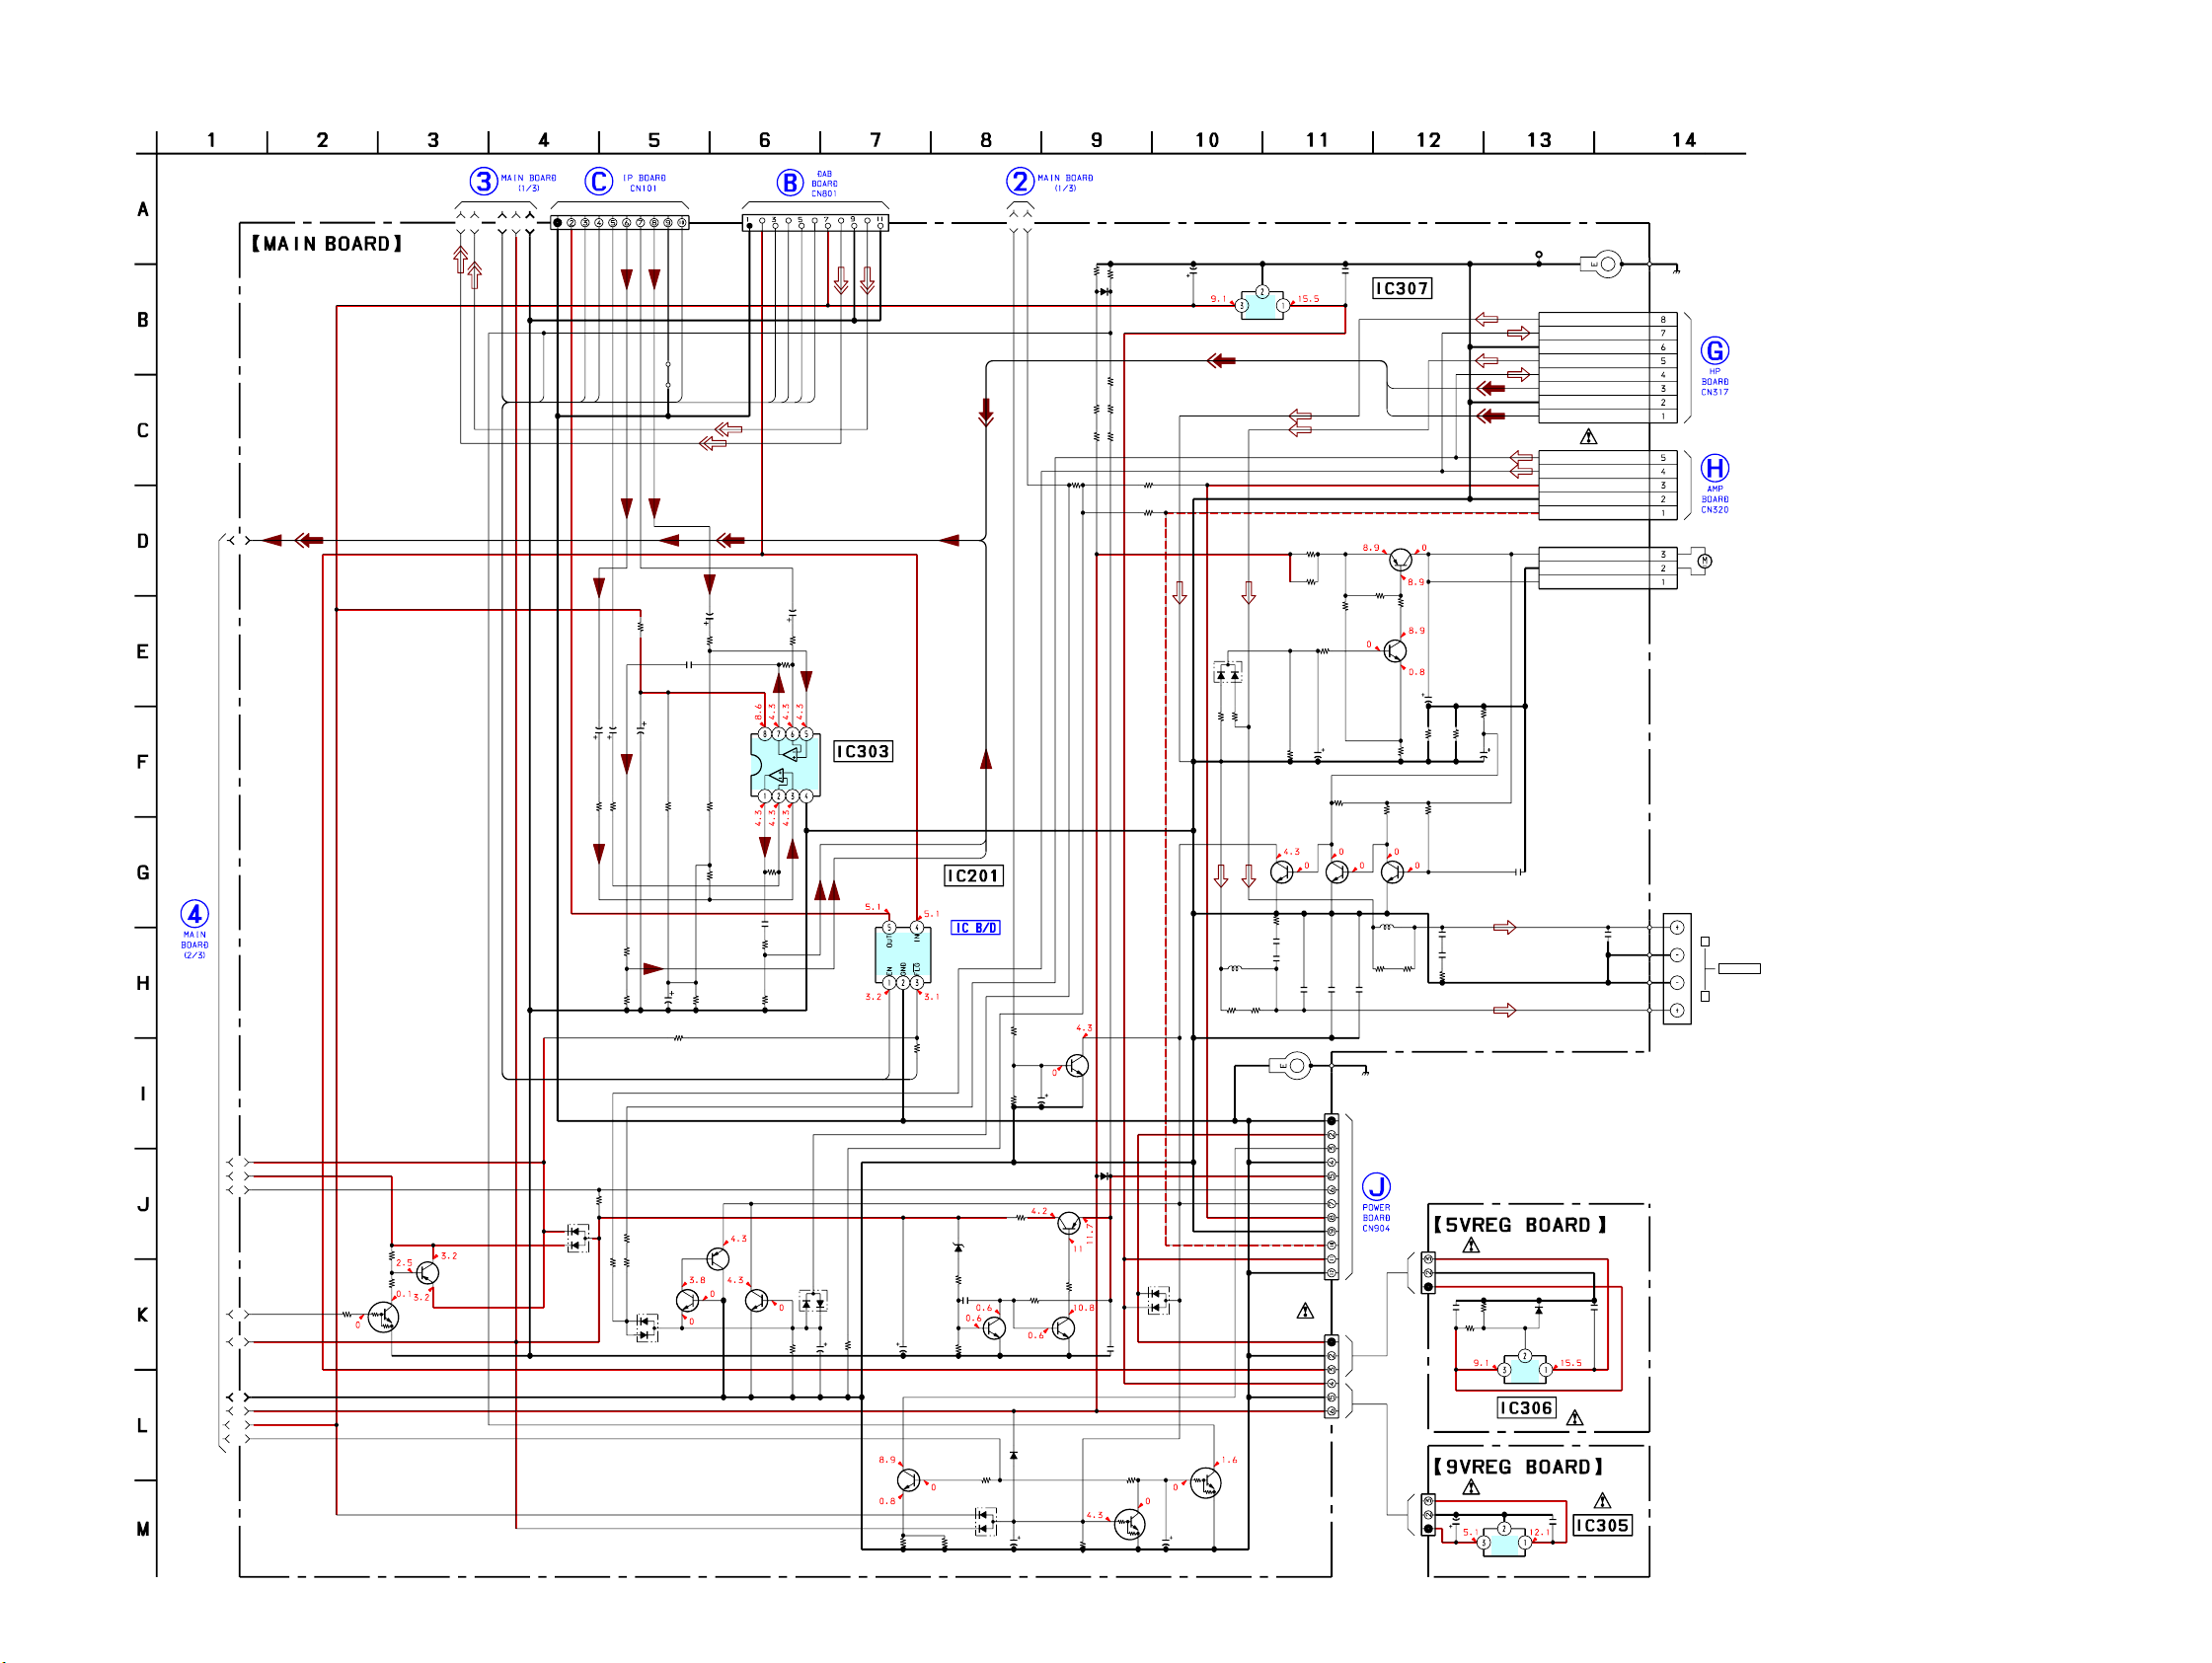
HCD-BX70DBi
6-14. SCHEMATIC DIAGRAM - MAIN Section (3/3) -
HCD-BX70DBi
(Page
30)
• See page 38 for IC Block Diagrams.
(Page 29)
C7
C6
C4
C3
C5
(3/3)
66
B1
B2
B3
B4
R316
100k
R313
2.2k
R311
B5
B6
B8
B9
B10
B11
47k
Q312
RT1N441C
Q313
ISA1235
Q312,313
B+ SWITCH
TXD
RXD
PGND
VBUS 5V
78
77
C126
1
50V
R122
22k
R463
10k
D303
MC2836
L-
R205
4.7k
R206 R104
47k
R420
(Page 27) (Page 25)
L+
R-
R+
R309
100
50V
1
C386
C127
22k
R204
4.7k
R123
C352
47
10V47 k 4.7k
R421
10k
R439
47k
Q344
2SC3052F
CN325
10P
SHIELD
DETECT
JW348
73
C209
1
22
25V
R210
22k
R110
22k
R302
100k
Q342
ISA1235
D320
MC2837
CN326
11P
C227
50V
R222
22k
Q342-344
DC DETECT
1
5V
S1DI
DGND
1.2V_ON
47
51
R231
22k
VCC
R131
22k
C109
1
R105
4.7k
R106
47k
Q343 D319
2SC3052F MC2837
R458
47k
C1
C2
S1DO
3.3V_ON
52
48
C226
1
50V
R223
22k
GND
C351
100
16V
DAB 9V
R496
100k
AGND
DAB_L
LINE AMP
IC303
NJM4558M-TE2
DAB_R
AGND
IPOD_L
IPOD_R
VBUS POWER
ON/OFF SWITCH
IC201
R5523N001B-TR-F
R435
2.2k
Q304-306
REGULATOR
Q305
2SC3052F
R414
47
C350
10
50V
2SC3052F
POWER
MONITOR
R436
22k
Q304
KTA1266GR
Q306
2SC3052F
R406
220k
MA2J1110GLS0
D325
R303
100k
94
80
D302
UDZW-TE17-
3.6B
R403
C305
680
0.01
C303
R404
100
680
16V
Q315
2SC3052F
RELAY
R441
4.7k
DRIVE
D322
MC2836
R450R449
2.22.2
Q345
C363
100
16V
1N4002-B5
D331
R425
100k
R461
47k
10k
R471
R417
10k
R416
47k
(Page 29)
R419R431
47k47k
D329
MA2J1110GLS0
47k
R413
100k
R410
4.7k
R411
R470
100k
R469
100k
0.1
C302
R427
RT1N141C-TP-1
22k
Q333
RT1N141C-TP-1
D332
MC2836
C337
1
D305
1N4002-B5
OGI
+5V REGULATOR
OGI
IC305
KIA7809API
CLP311 EP301
Q307,347,348
FAN MOTOR DETECT
C223
0.01
C373R437C380
0.1101
IC306
TA7805S
+9V
C335C325
REGULATOR
0.1100
AUDIO-IN R
AUDIO-IN L
CN316
HPGND
CN321
CN313
(CHASSIS)
8P
SP-L
HP-L
SP-R
HP-R
GND
5P
R-OUT
L-OUT
+B
GND
3P
FAN+
GND
FAN+
(Page 33)
-B
(Page 33)
M901
(FAN)
R
J302
SPEAKER
L
IC307
KIA7809API
C359C365
R460
R459
C304
12P
RELAY
ACDET
UNREG
6P
47
47
C225 C125
0.47 0.47
+B
GND
R428
1k
R415
10k
2SC3052F2SC3052F 2SC3052F
(CHASSIS)
-B
0.1470
+9V
REGULATOR
AIN_R
AIN_L
Q317
KTA1266GR
R478
10k
Q316
2SC3052F
R495R409
Q348Q307 Q347
L201
R230 R229
4.7 4.7
(Page 37)
R475
4.7k
R481 R482
47 10
Q316,317
FAN MOTO R
C387
47
16V
R349R348R347
1M22k470k
R253
10
1/2W
CN324
3P
CN314
3P
DRIVE
R484
220k
C307
47
16V10047k4716V
C219
0.1
C222
0.1
R401
470
16V
16V
OGI
D313
MC2838
2.2k
2.2k
R498
R489
R153
10
C122
1/2W
0.1
C119
L101
0.1
C123
0.01
R130R129
4.7 4.7
EP302
CN303
USB UNREG GND
USB UNREG
SUB GND
UNREG SUB
PROTECT
UNREG GND
CN312
Q338
Q333,338
PROTECT
DETECT
C336
22
50V
3131
Page 32
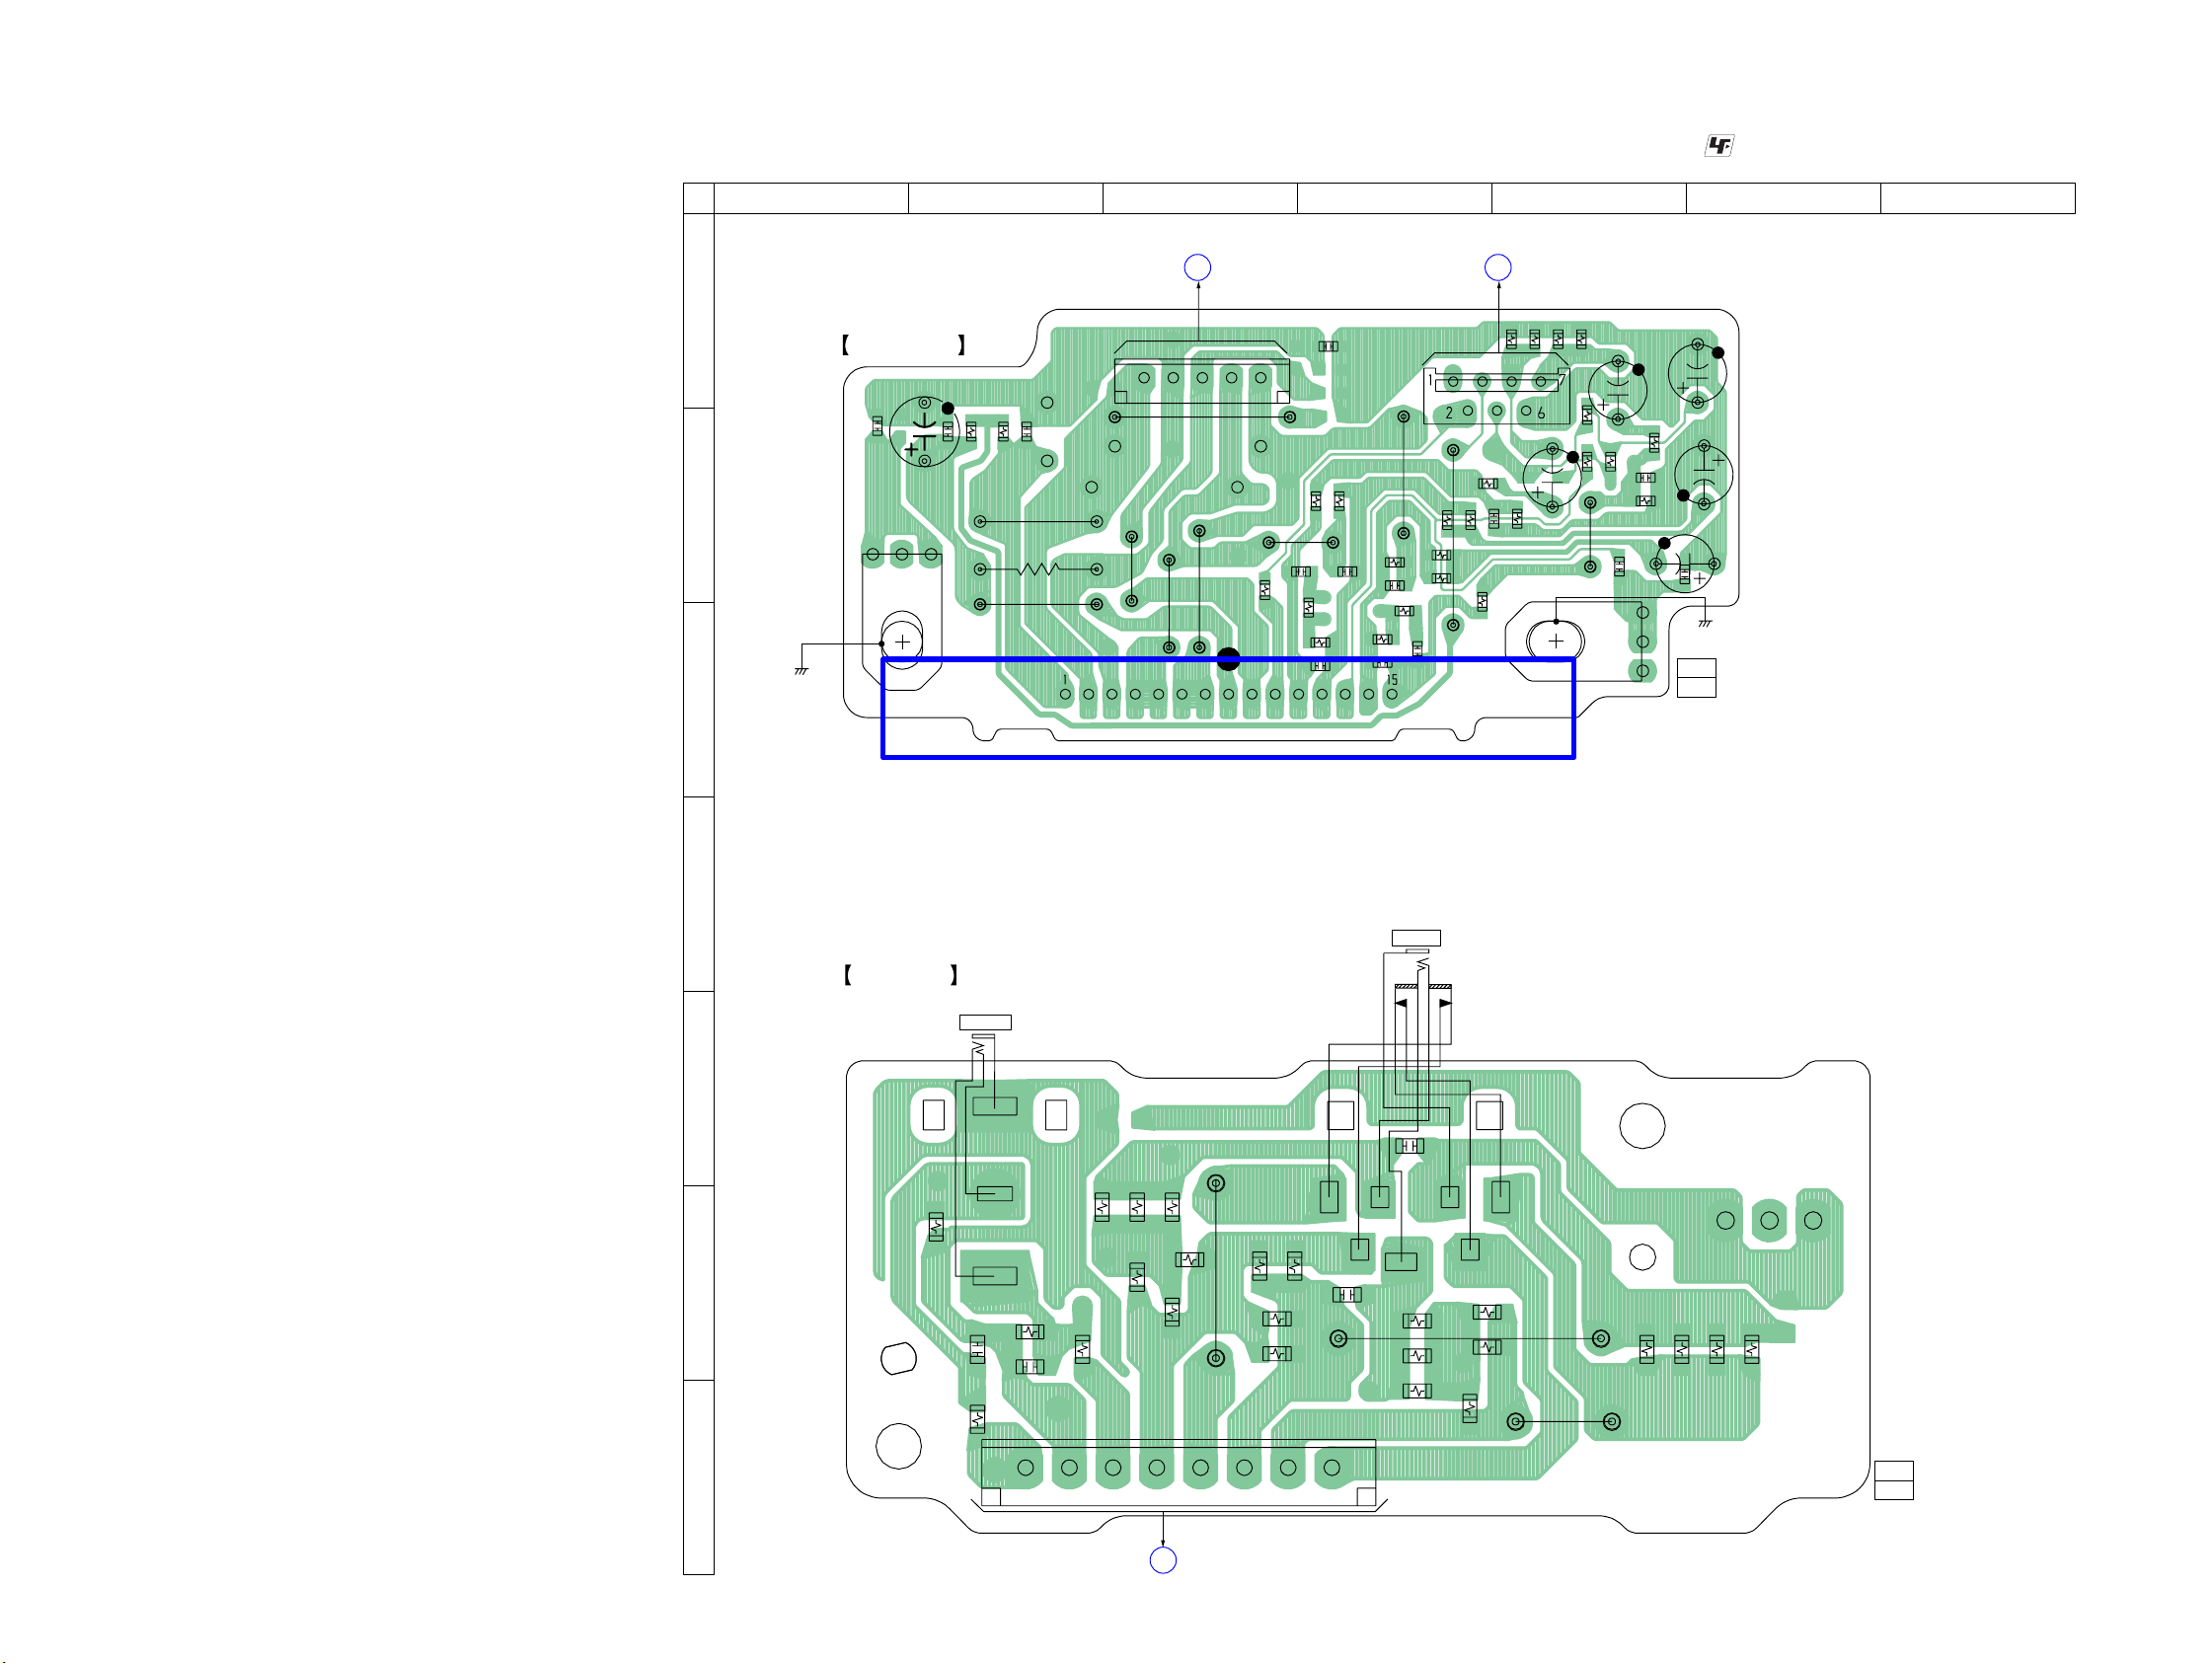
HCD-BX70DBi
6-15. PRINTED WIRING BOARDS - AMP/HEADPHONE Section -
1234567
(Page 28) (Page 28)
MAIN BOARD
H
CN321
A
AMP BOARD
C529
C515
R543
R544
C526
B
EP501
(CHASSIS)
C525
R541
R542
JW588
C
15
CN320
JW589
JW585
JW587
JW586
R545
IC601
• See page 21 for Circuit Boards Location.
MAIN BOARD
D
CN309
JW584
C527
R512
R510
C518
R522
C523
C505
R509
R507
C501
R504
C524
JW583
R513
C528
R503
R523
R508
JW582
CN308
R506
R524
R521
C504
R516
R505
C512
R517
R518
R519
R514
R546
JW581
C511
C522
EP502
R515
C502
R502
1-876-053-
• : Uses unleaded solder.
C519
R501
C506
C503
C521
(CHASSIS)
11, 12
(11, 12)
D
J500
PHONES
HP BOARD
J301
AUDIO IN
E
C581
R585
R583
R581
CN317
R586
R582
JW505
R587
R590
R589
R588
C531
R536
R535
R534
18
R531
R532
R533
JW501
JW502
R537
R539
R538
R540
1-876-056-
11, 12
(11, 12)
R584
R132
F
R232
C131
C231
R133
R233
G
HCD-BX70DBi
G
MAIN BOARD
CN316
(Page 28)
3232
Page 33
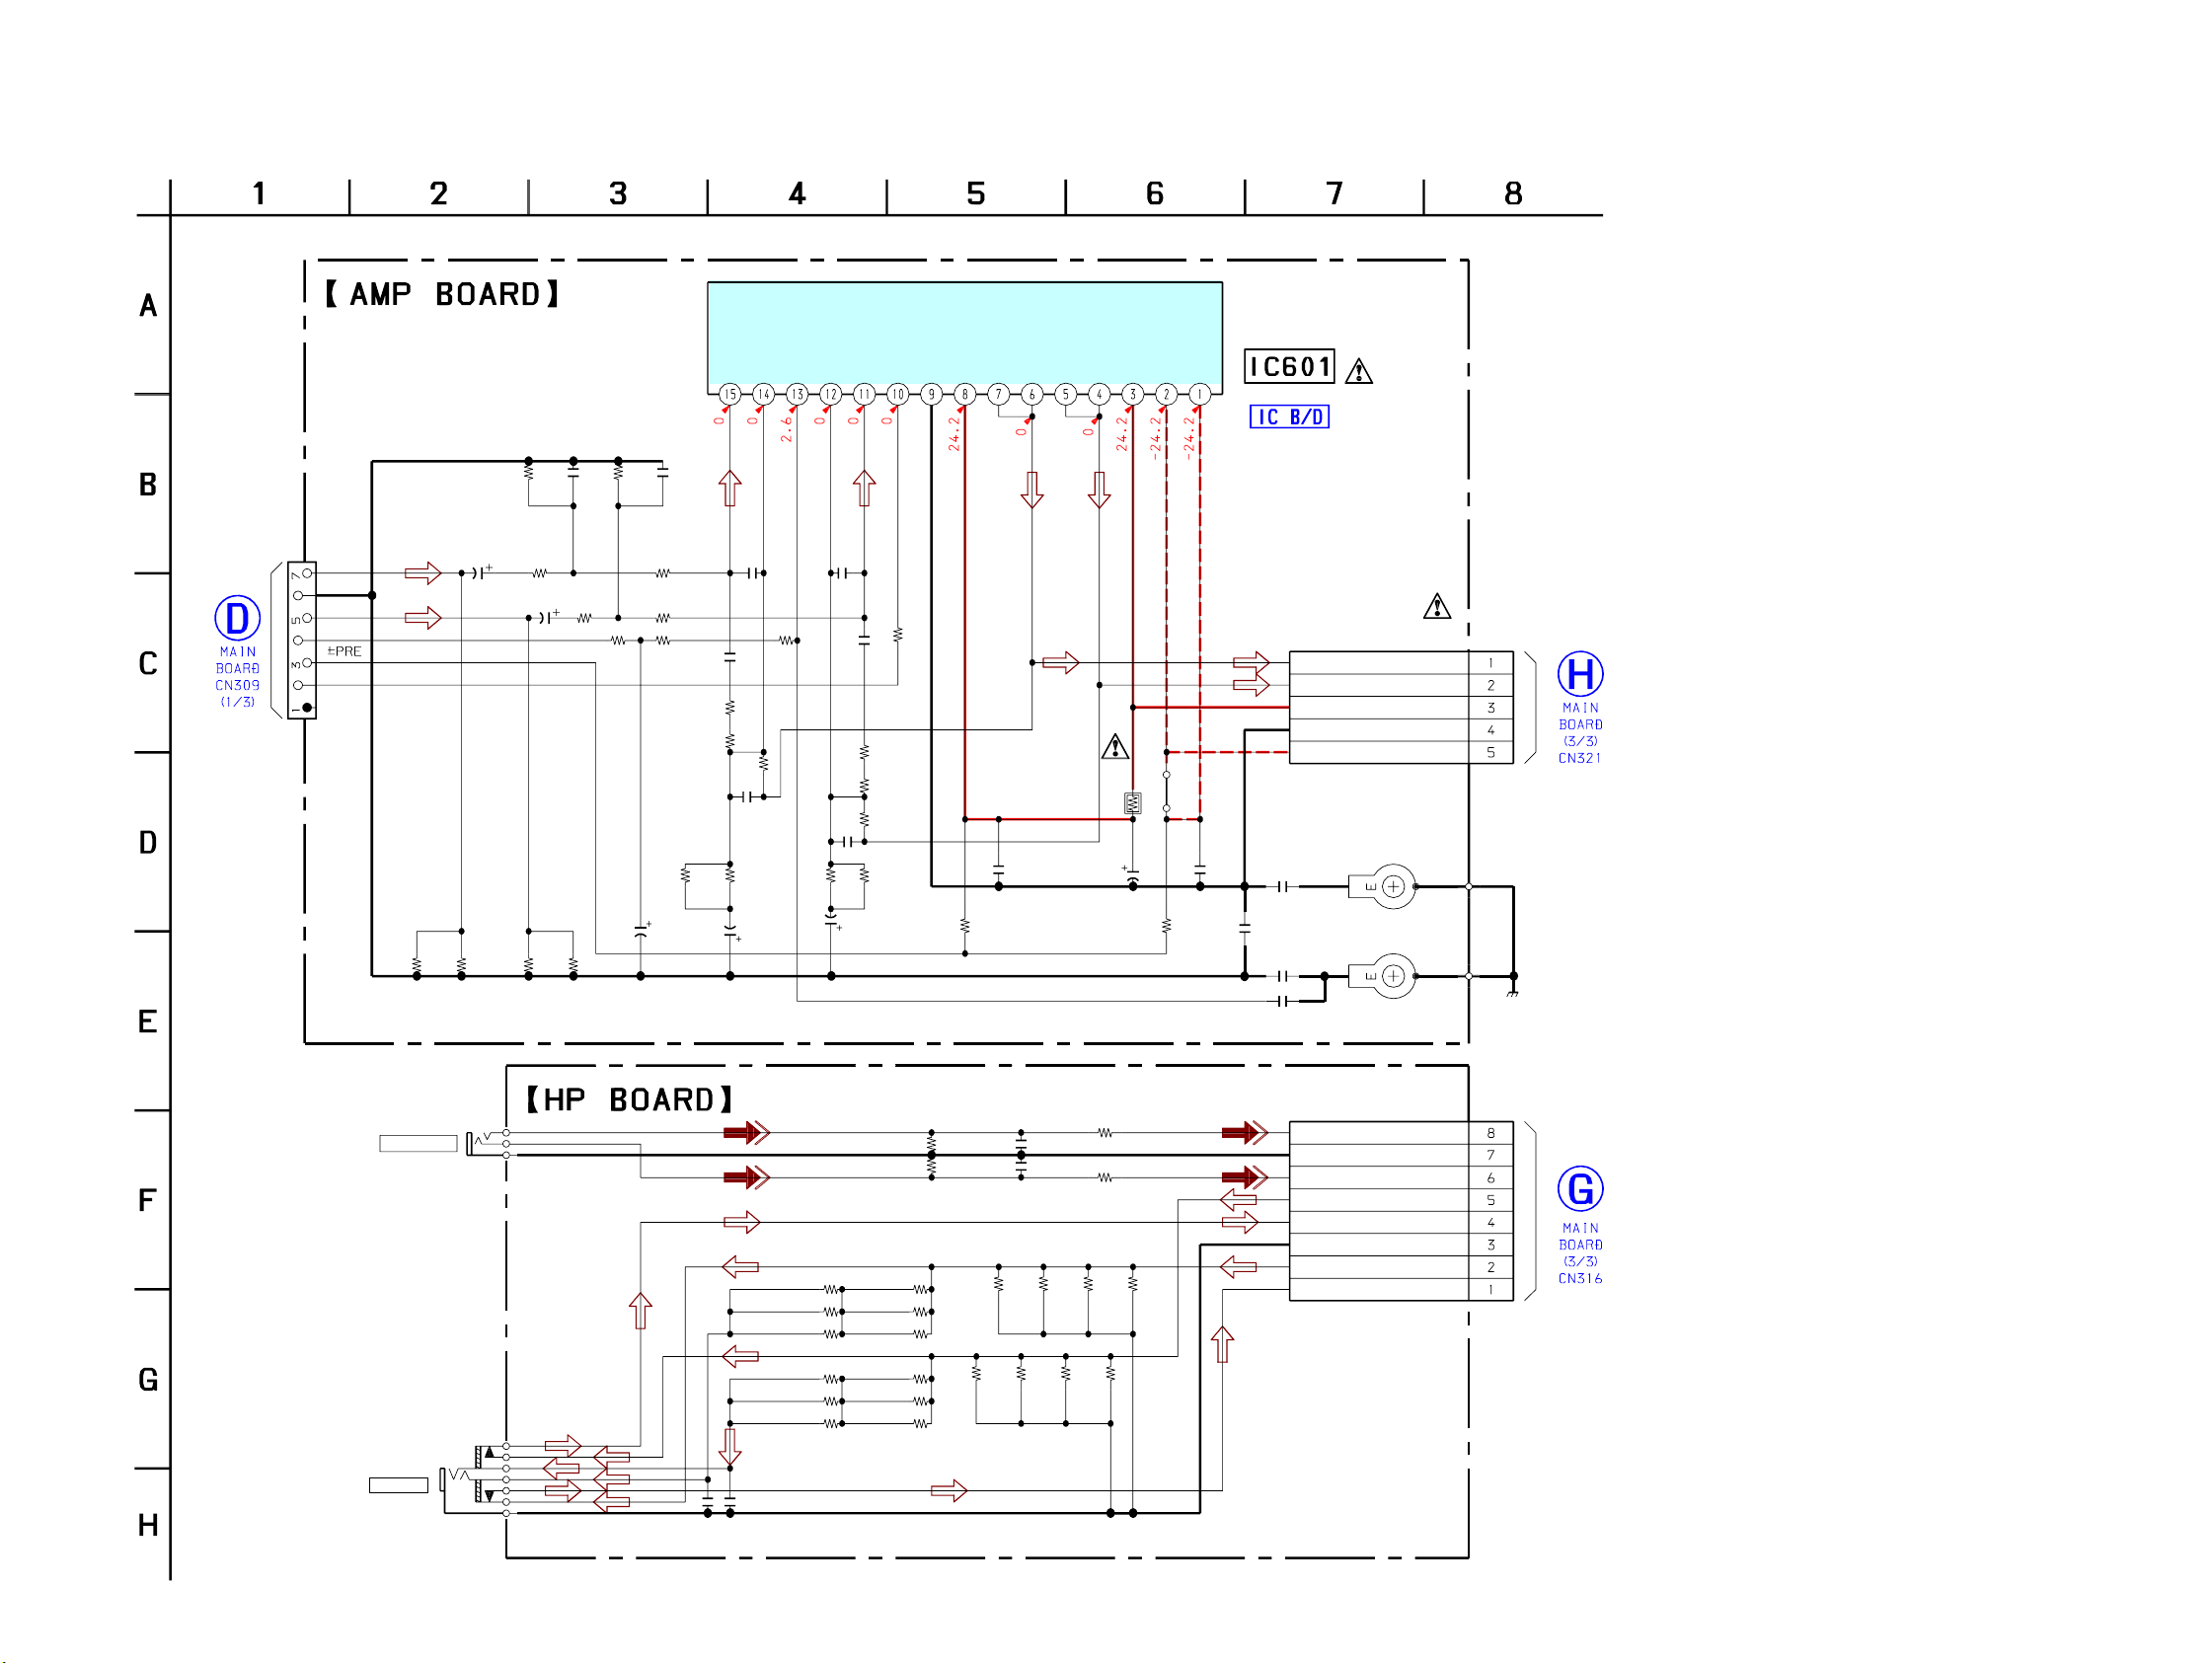
HCD-BX70DBi
6-16. SCHEMATIC DIAGRAM - AMP/HEADPHONE Section -
C504R505C502R502
470p47k470p47k
C511
R501
10
50V 470
470
C512 R506
10 50V 470
R514
1k
C519
470
R516R517R518R519
22k22k
10V
R521
R522
470
R515
R523
2.2k
0
(Page 29)
CN308
7P
R-IN
GND
L-IN
STBY
MNT
NC
2.2K 2.2K
• See page 38 for IC Block Diagrams.
CH2 NF
C528
2200p
R513
R507
2.2k
1k
C524
R503
C503
CH21 IN
R504
47k
10p
1k
47
25V
STBY
C501 C505
100p 100p
R546
CH1 IN
CH1 NF
0
C523
10p
R508
1k
C527
C506
25V
2200p
47
R512
R510
2.2k
R524
2.2k
1k
R509
47k
MONITOR
R545
SUB
10k
R544
470k
+PRE
C526
0.0022
IC601
STK433-730-E
CH2 OUT-
CH2 OUT+-
CH1 OUT-
CH1 OUT+
C529
+VCC
R542
100
1/2W
100
35V
R543
470k
-VCC
R541
C525
0.0022
-PRE
POWER AMP
CN320
5P
R-OUT
L-OUT
+B
GND
-B
(Page 31)
EP501
EP502
C518
C515
0.1
0.1
C521
0.1
J500
PHONES
J301
AUDIO IN
C531 C581
0.01 0.01
R536
R535
R534
R586
R585
R584
C522
0.1
R132
47k
R533
R532
R531
R583
R582
R581
470
470
470
470
470
470
470
470
470
470
470
470
C131
470p
C231R232
470p47k
R133
1k
R233
1k
R537R538R539R540
10k10k10k10k
R587R588R589R590
10k10k10k10k
CN317
AUDIO-IN L
AUDIO-IN R
HP-R
SP-R
HPGND
HP-L
SP-L
(CHASSIS)
8P
GND
(Page 31)
HCD-BX70DBi
3333
Page 34
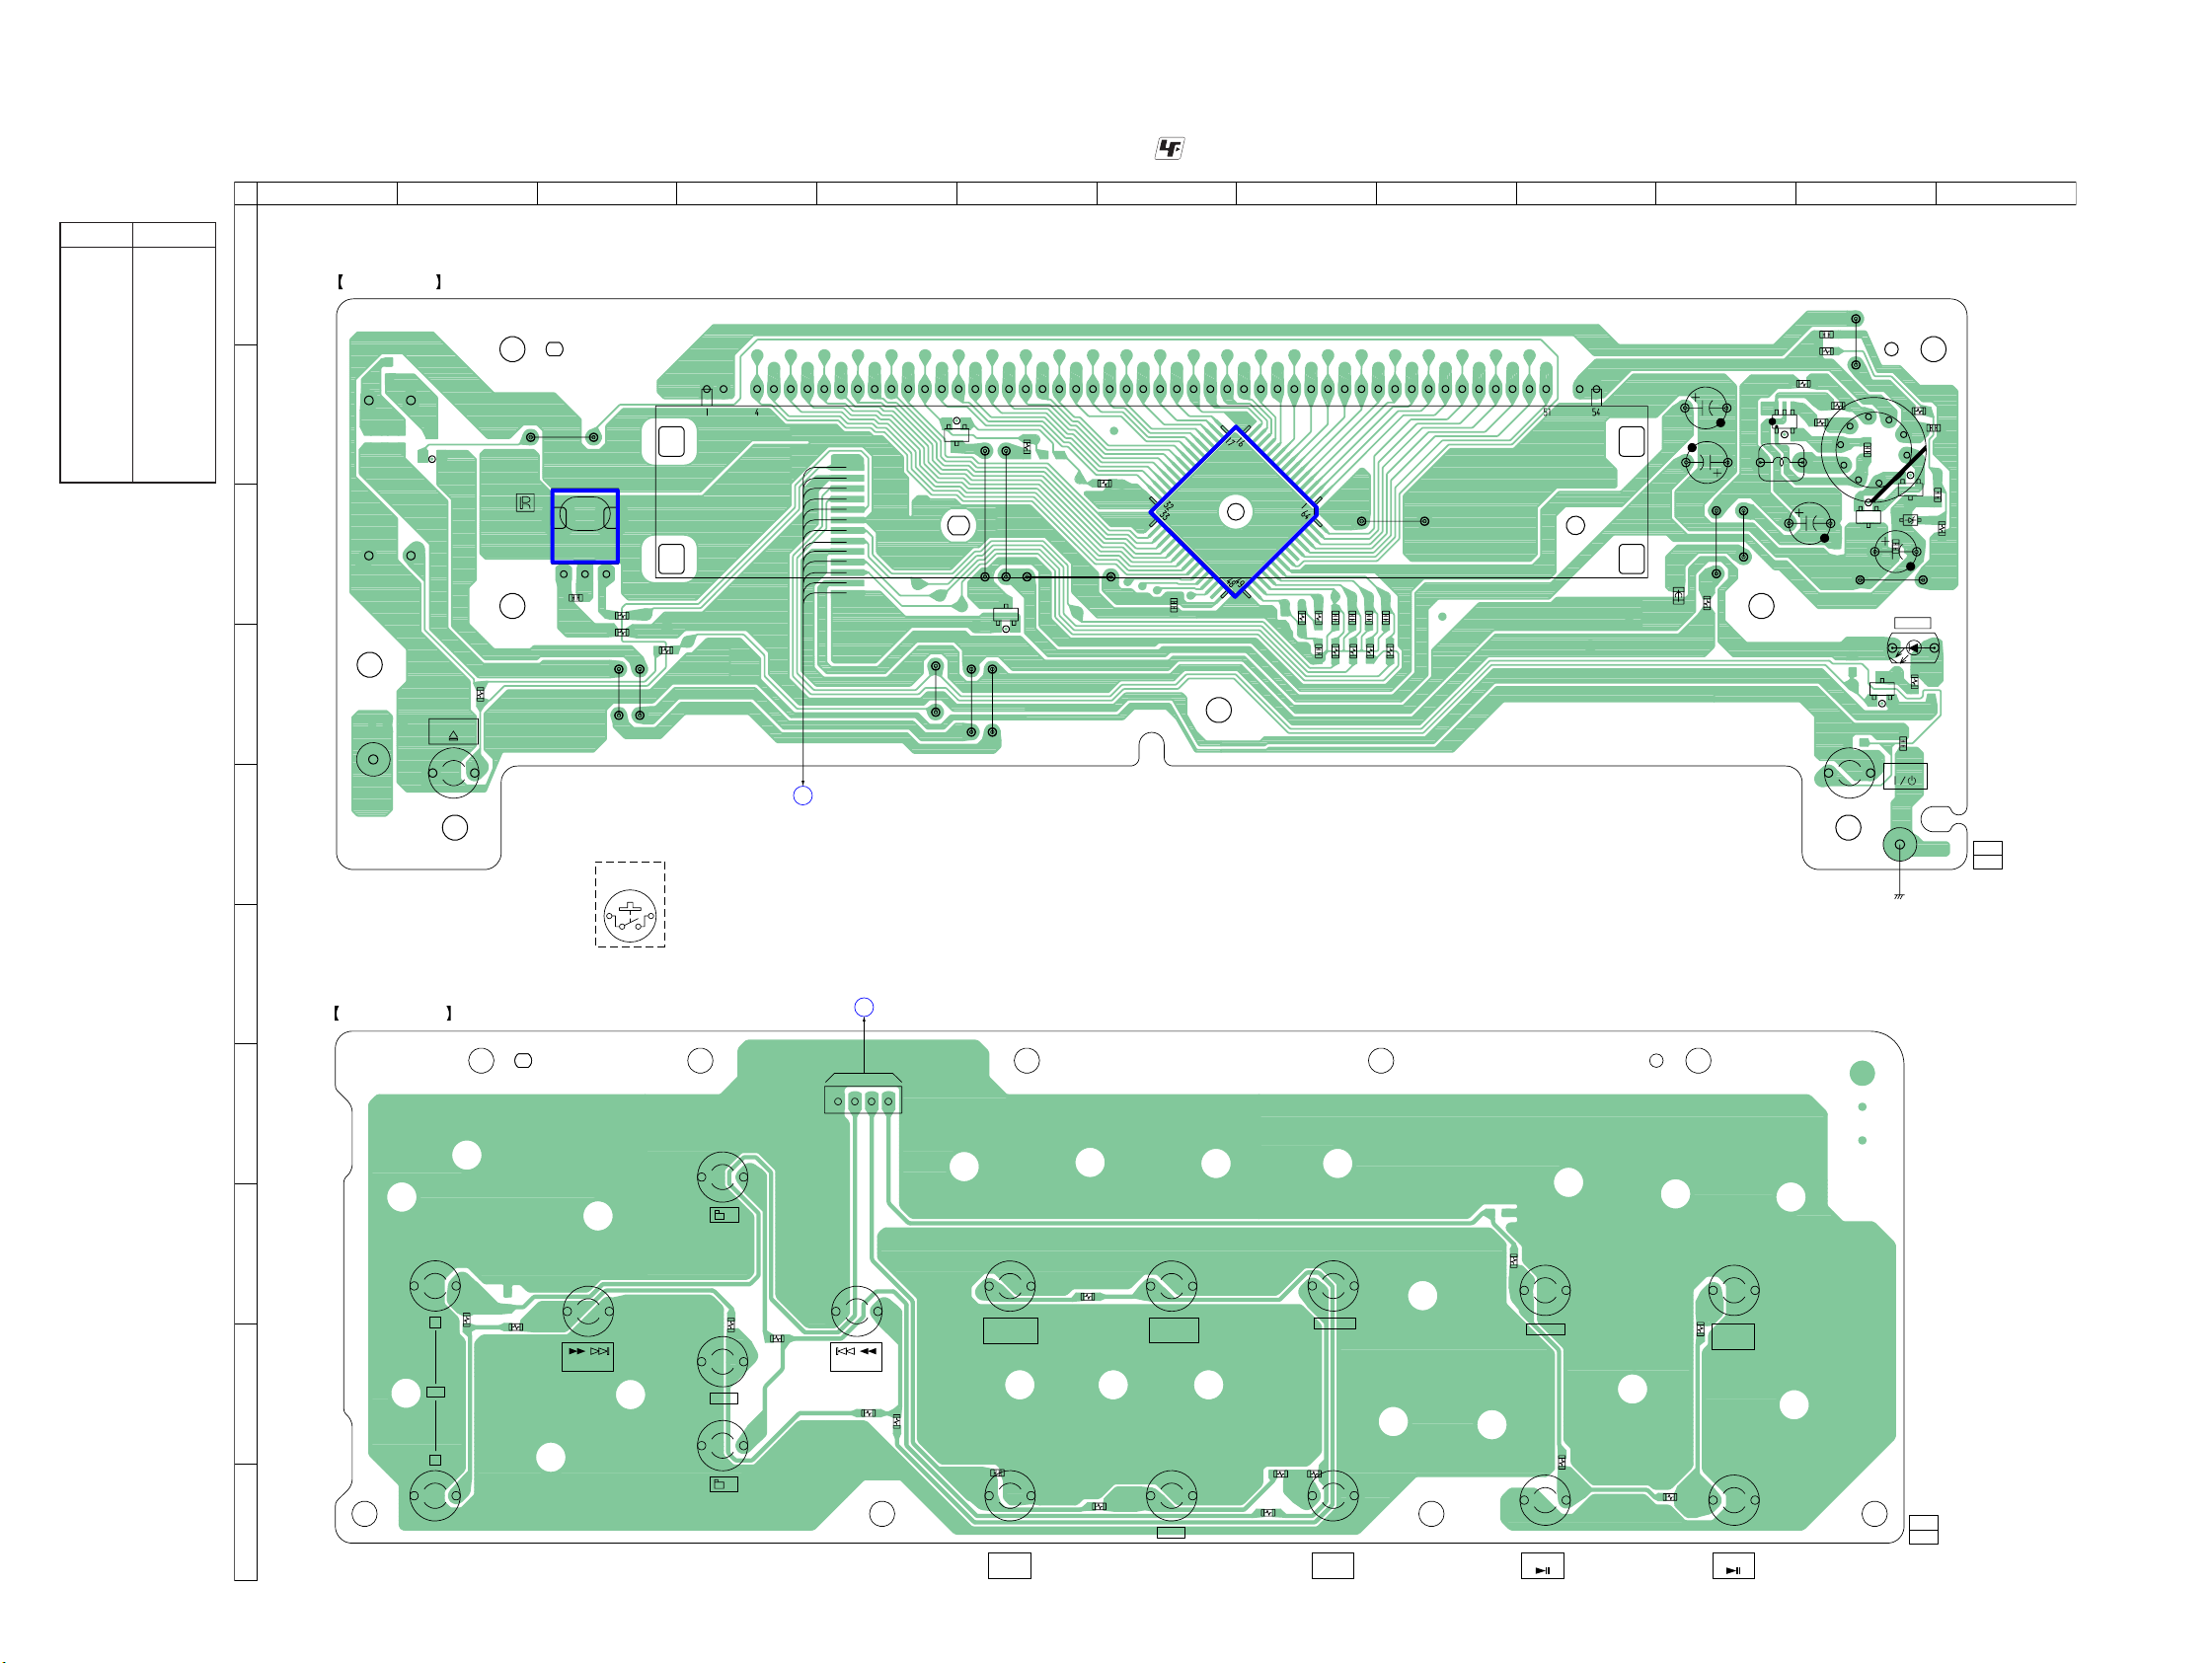
HCD-BX70DBi
• Semiconductor
Location
Ref. No. Location
D807 C-12
D902 D-12
D903 B-1
D904 C-12
D905 C-12
D915 C-6
IC901 C-3
IC902 C-7
Q901 D-12
Q903 B-11
Q905 B-6
6-17. PRINTED WIRING BOARDS - PANEL Section -
12345678910111213
A
B
C
D
E
PANEL BOARD
W801
OPEN/CLOSE
S803
JW812
IC901
13
C804
R921
R922
R851
R852
JW814
JW813
S801, 803– 807,
S809 – 821
• See page 21 for Circuit Boards Location.
E
MAIN BOARD
CN306
(Page 28)
E
Q905
1
13
JW811
JW810
JW808
AA
JW809
D915
R943
R942
JW807
JW806
K
• : Uses unleaded solder.
FL901
FLUORESCENT INDICATOR TUBE
IC902
R934
R944
C917
C924
C918
R936
R935
C816
C919
R937
JW805
C812
JW801
R933
R919
4
3
T801
DC/DC CONVERTER
6
5
C907
1
2
A
A
D905
K
JW802
Q901
S801
(CHASSIS)
C909
E
7
9
STANDBY
POWER
W802
R932
C811
8
K
K
D904
C910
A
D807
R931
C908
D902
R925
C841
11, 1 2
(11, 12)
1-876-052-
R930
1B
E
JW803
2B
Q903
R920
1C
2C
L901
C805
C814
C815
JW804
FB901
C920
R938
R929
HCD-BX70DBi
F
TOP KEY BOARD
F
CN802
(Page 28)
MAIN BOARD
CN322
14
G
S814
+
H
S815
R864
+
I
VOL
–
S816
R865
S817
TUNE +
S818
ENTER
S813
R866
R868
–
S819
TUNE –
R867
R869
J
S821 S820
PLAY MODE/
TUNING MODE
C838
DAB
AUTOSCAN
R857
R860
REPEAT/
FM MODE
S810S809
DSGX
R861
R863
S812
FUNCTION
R862
S811
Y
CANCEL
R853
S804
AUDIO IN
S805
CD
R854
R855
S807
TUNER/
R856
BAND
S806
11, 12
(11, 12)
1-876-055-
iPod
3434
Page 35
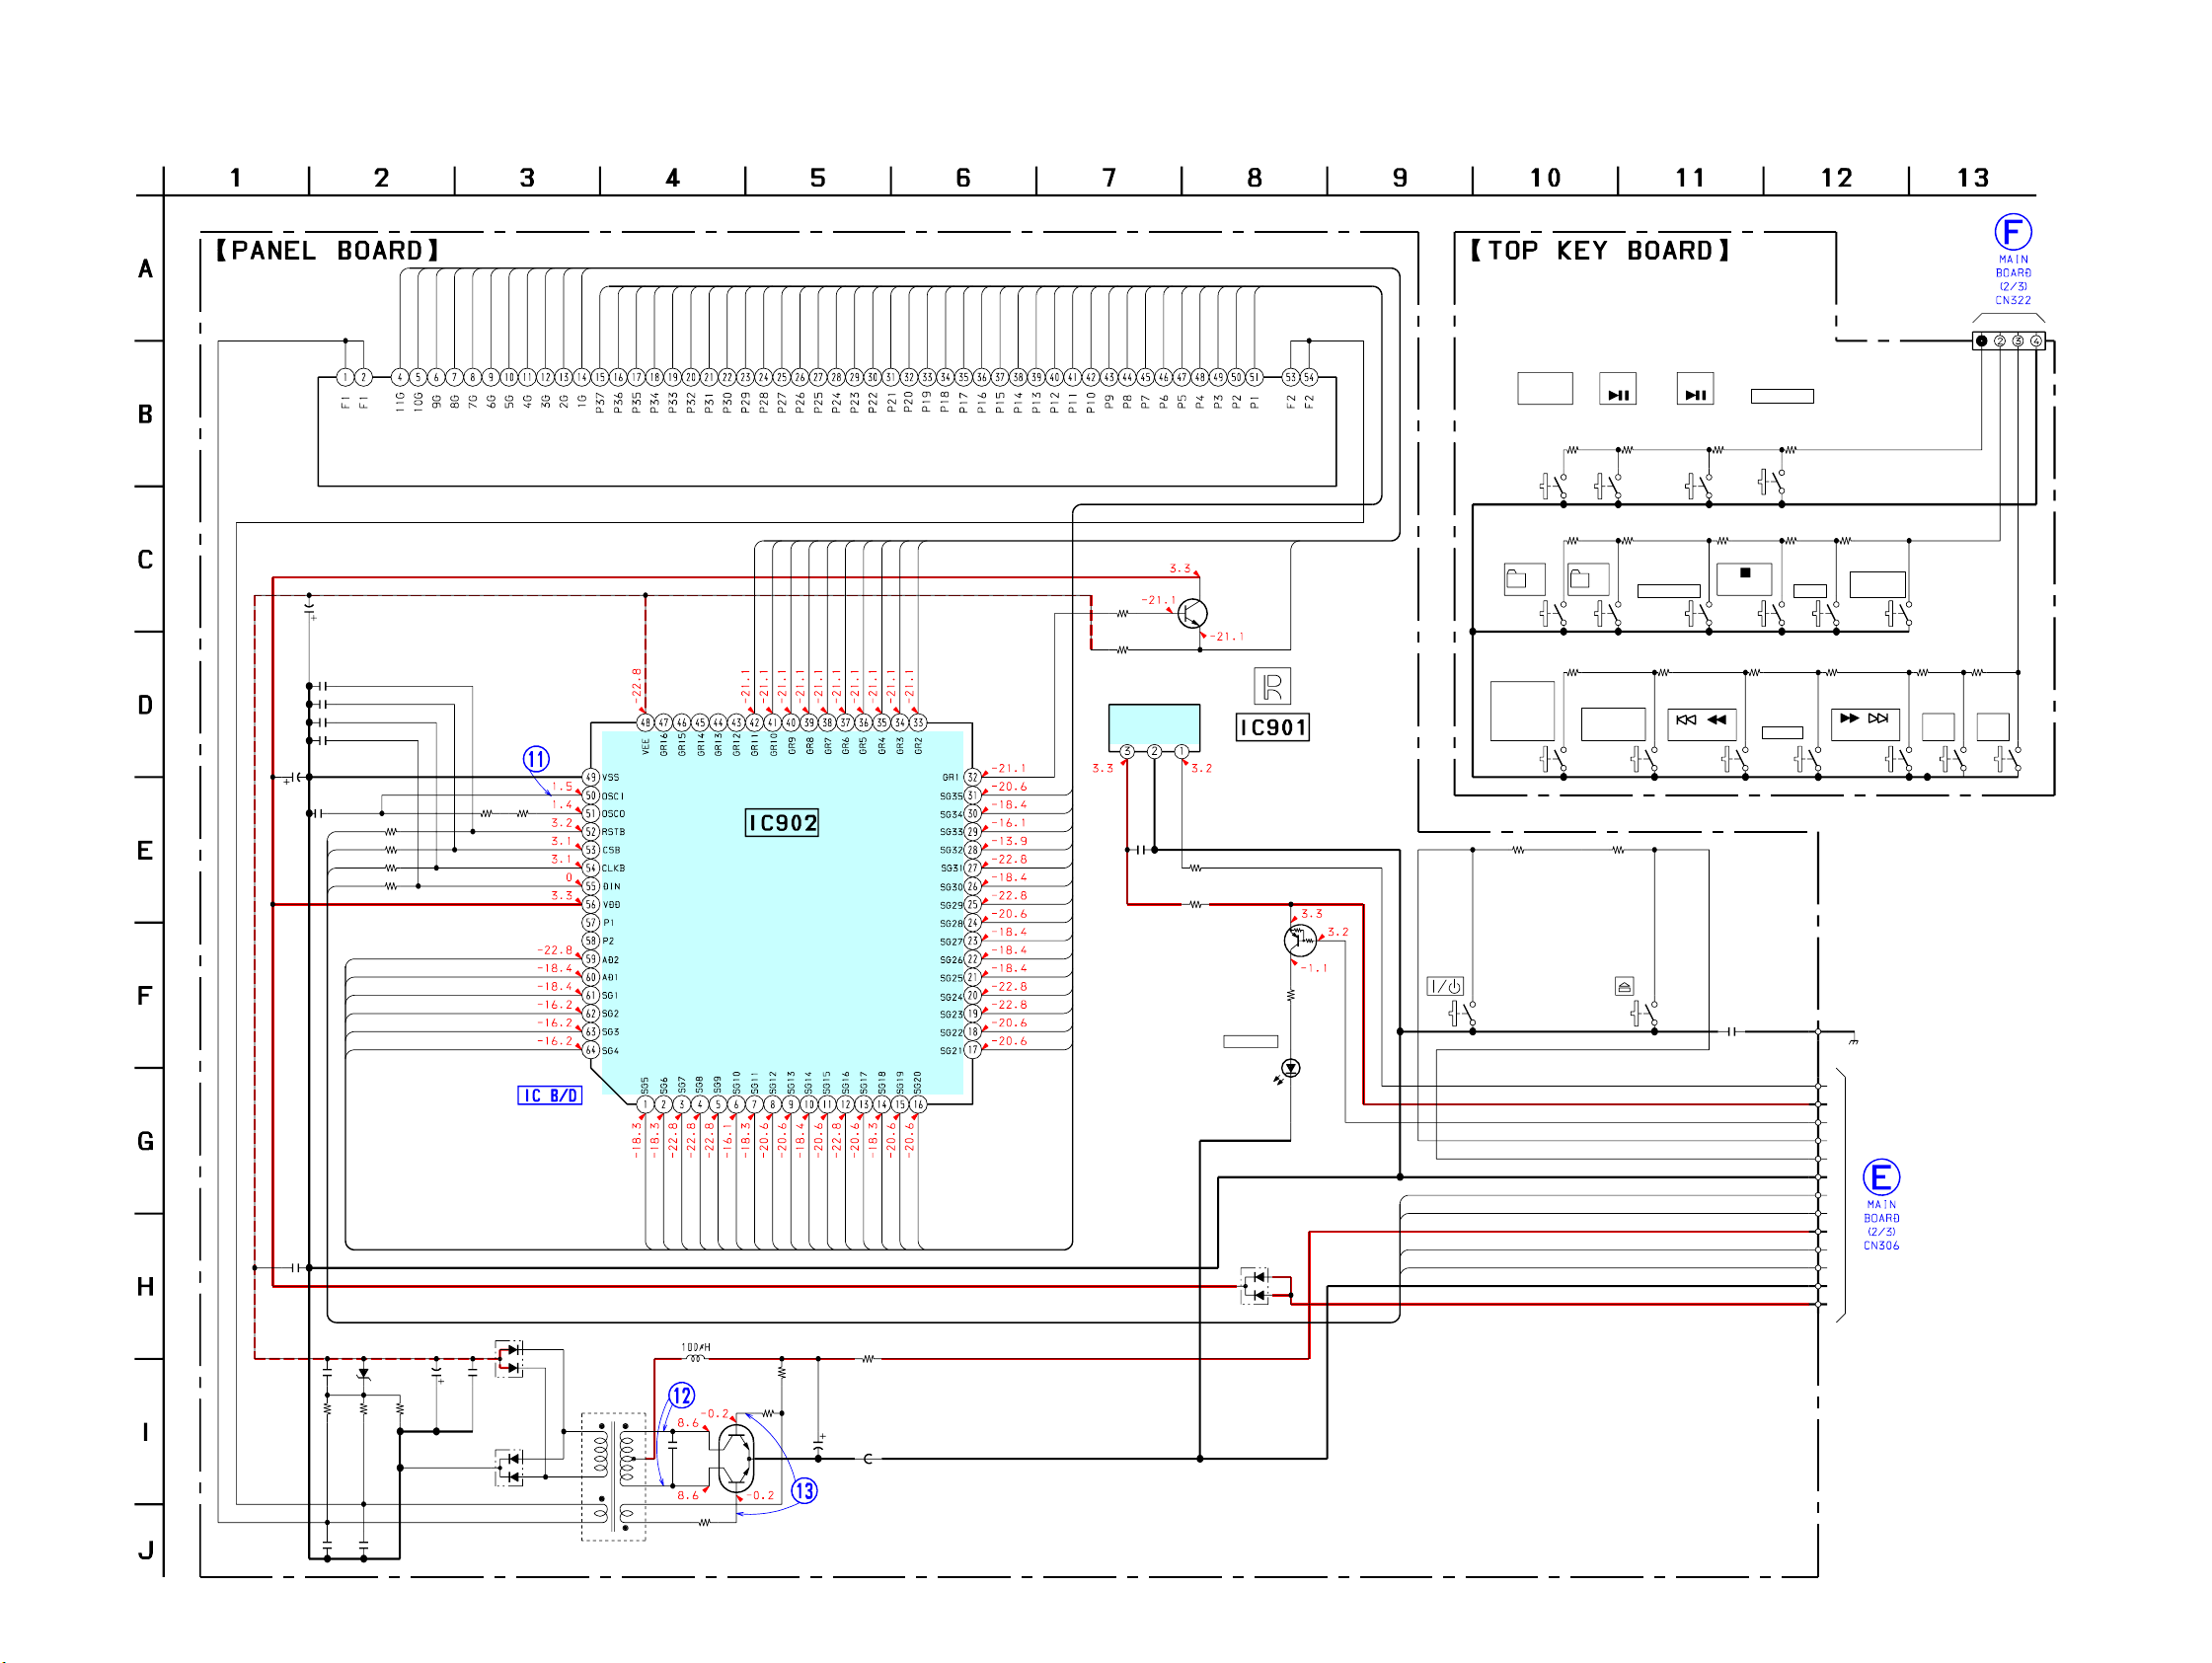
HCD-BX70DBi
6-18. SCHEMATIC DIAGRAM - PANEL Section -
2G
3G
4G
5G
6G
7G
8G
9G
10G
11G
C815
22
50V
C917
0.001
100p
C918
100p
C919
100p
C920
C814
22
50V
C924
100p
C816
52
53
54
55
C910
0.01
R932 R933
C811 C812
0.01 0.01
47p
R935
R936
R937
R938
P1
P2
P3
P4
P5
P6
D807
UDZW-TE17-
6.2B
100 100
1k
0
0
0
C908
0.01
C909
47
50V
R931
10k
R944
R934
D904
MC2836
D905
MC2838
2.2k
1k
• See page 24 for waveforms. • See page 38 for IC Block Diagrams.
1G
P10
P11
P12
P13
P14
P15
P16
P17
P18
P19
P20
P21
P22
P23
P24
P25
P26
P27
P28
P29
P30
P31
P32
P33
P34
P35
P36
P37
FL901
FLUORESCENT INDICATOR TUBE
2G
3G
4G
5G
6G
7G
8G
9G
11G
10G
P37
P36
P35
P34
P33
P32
P31
P30
P29
P28
P27
P26
P25
P24
P23
P11
P10
P9
P8
P7
L901
T801
DC/DC
CONVERTER OSC
2
1
3
9
4
6
7
5
8
0.022
C907
CPH5504-TL-E
R920
0
FLUORESCENT
INDICATOR TUBE
P13
P12
Q903
-2
-1
DRIVER
IC902
PT6302
P14
P22
P21
P20
P19
P18
P17
P16
P15
R929
2.2
R930
2.2k
R919
0
C805
47
25V
FB901
P9
R943
22k
P7
P8
IC901
NJL24H400A
+3.3V
C804
(Page
30)
P1
P2
P3
P4
P5
P6
CN802
4P
S812
FUNCTION
CD
TUNE - TUNE +ENTER
CANCEL
C841
0.1
AUDIO INBAND
S804
S811
S818
EVER 3.3V
STBY LED
KEY1 RETURN
FL CLOCK
SIRCS
FL RESET
FL DATA
FL GND
KEY1
DGND
FL CS
DGND
KEY3
KEY2
KEY1 RETURN
S809
(CHASSIS)
1
DAB
AUTOSCAN
S817S819
R864R865R866R867R869R857
1k2.2k2.2k4.7k10k15k
S815S816
VOL
VOL
-
+
S810
DSGX
+9V
(Page 30)
4V
13
TUNER/
S807 S806 S805
1G
Q905R942
2SC3052F10k
GRID DRIVE
GND
OUT
REMOTE CONTROL
RECEIVER
1
R921
47
R922
47
Q901
RT1P441C
LED
DRIVE
D902
SLR325VCT31P
STANDBY
D915
MC2838
R925
470
S801
52
53
55
54
+
S821
PLAY
MODE/
TUNING
MODE
R851 R852
1k 2.2k
iPod
R856 R855 R854 R853
15k 10k 4.7k 2.2k
R868 R863 R862 R861 R860
10k 4.7k 2.2k 2.2k 1k
S813S814
-
S820
REPEAT/
FM MODE
S803
HCD-BX70DBi
3535
Page 36
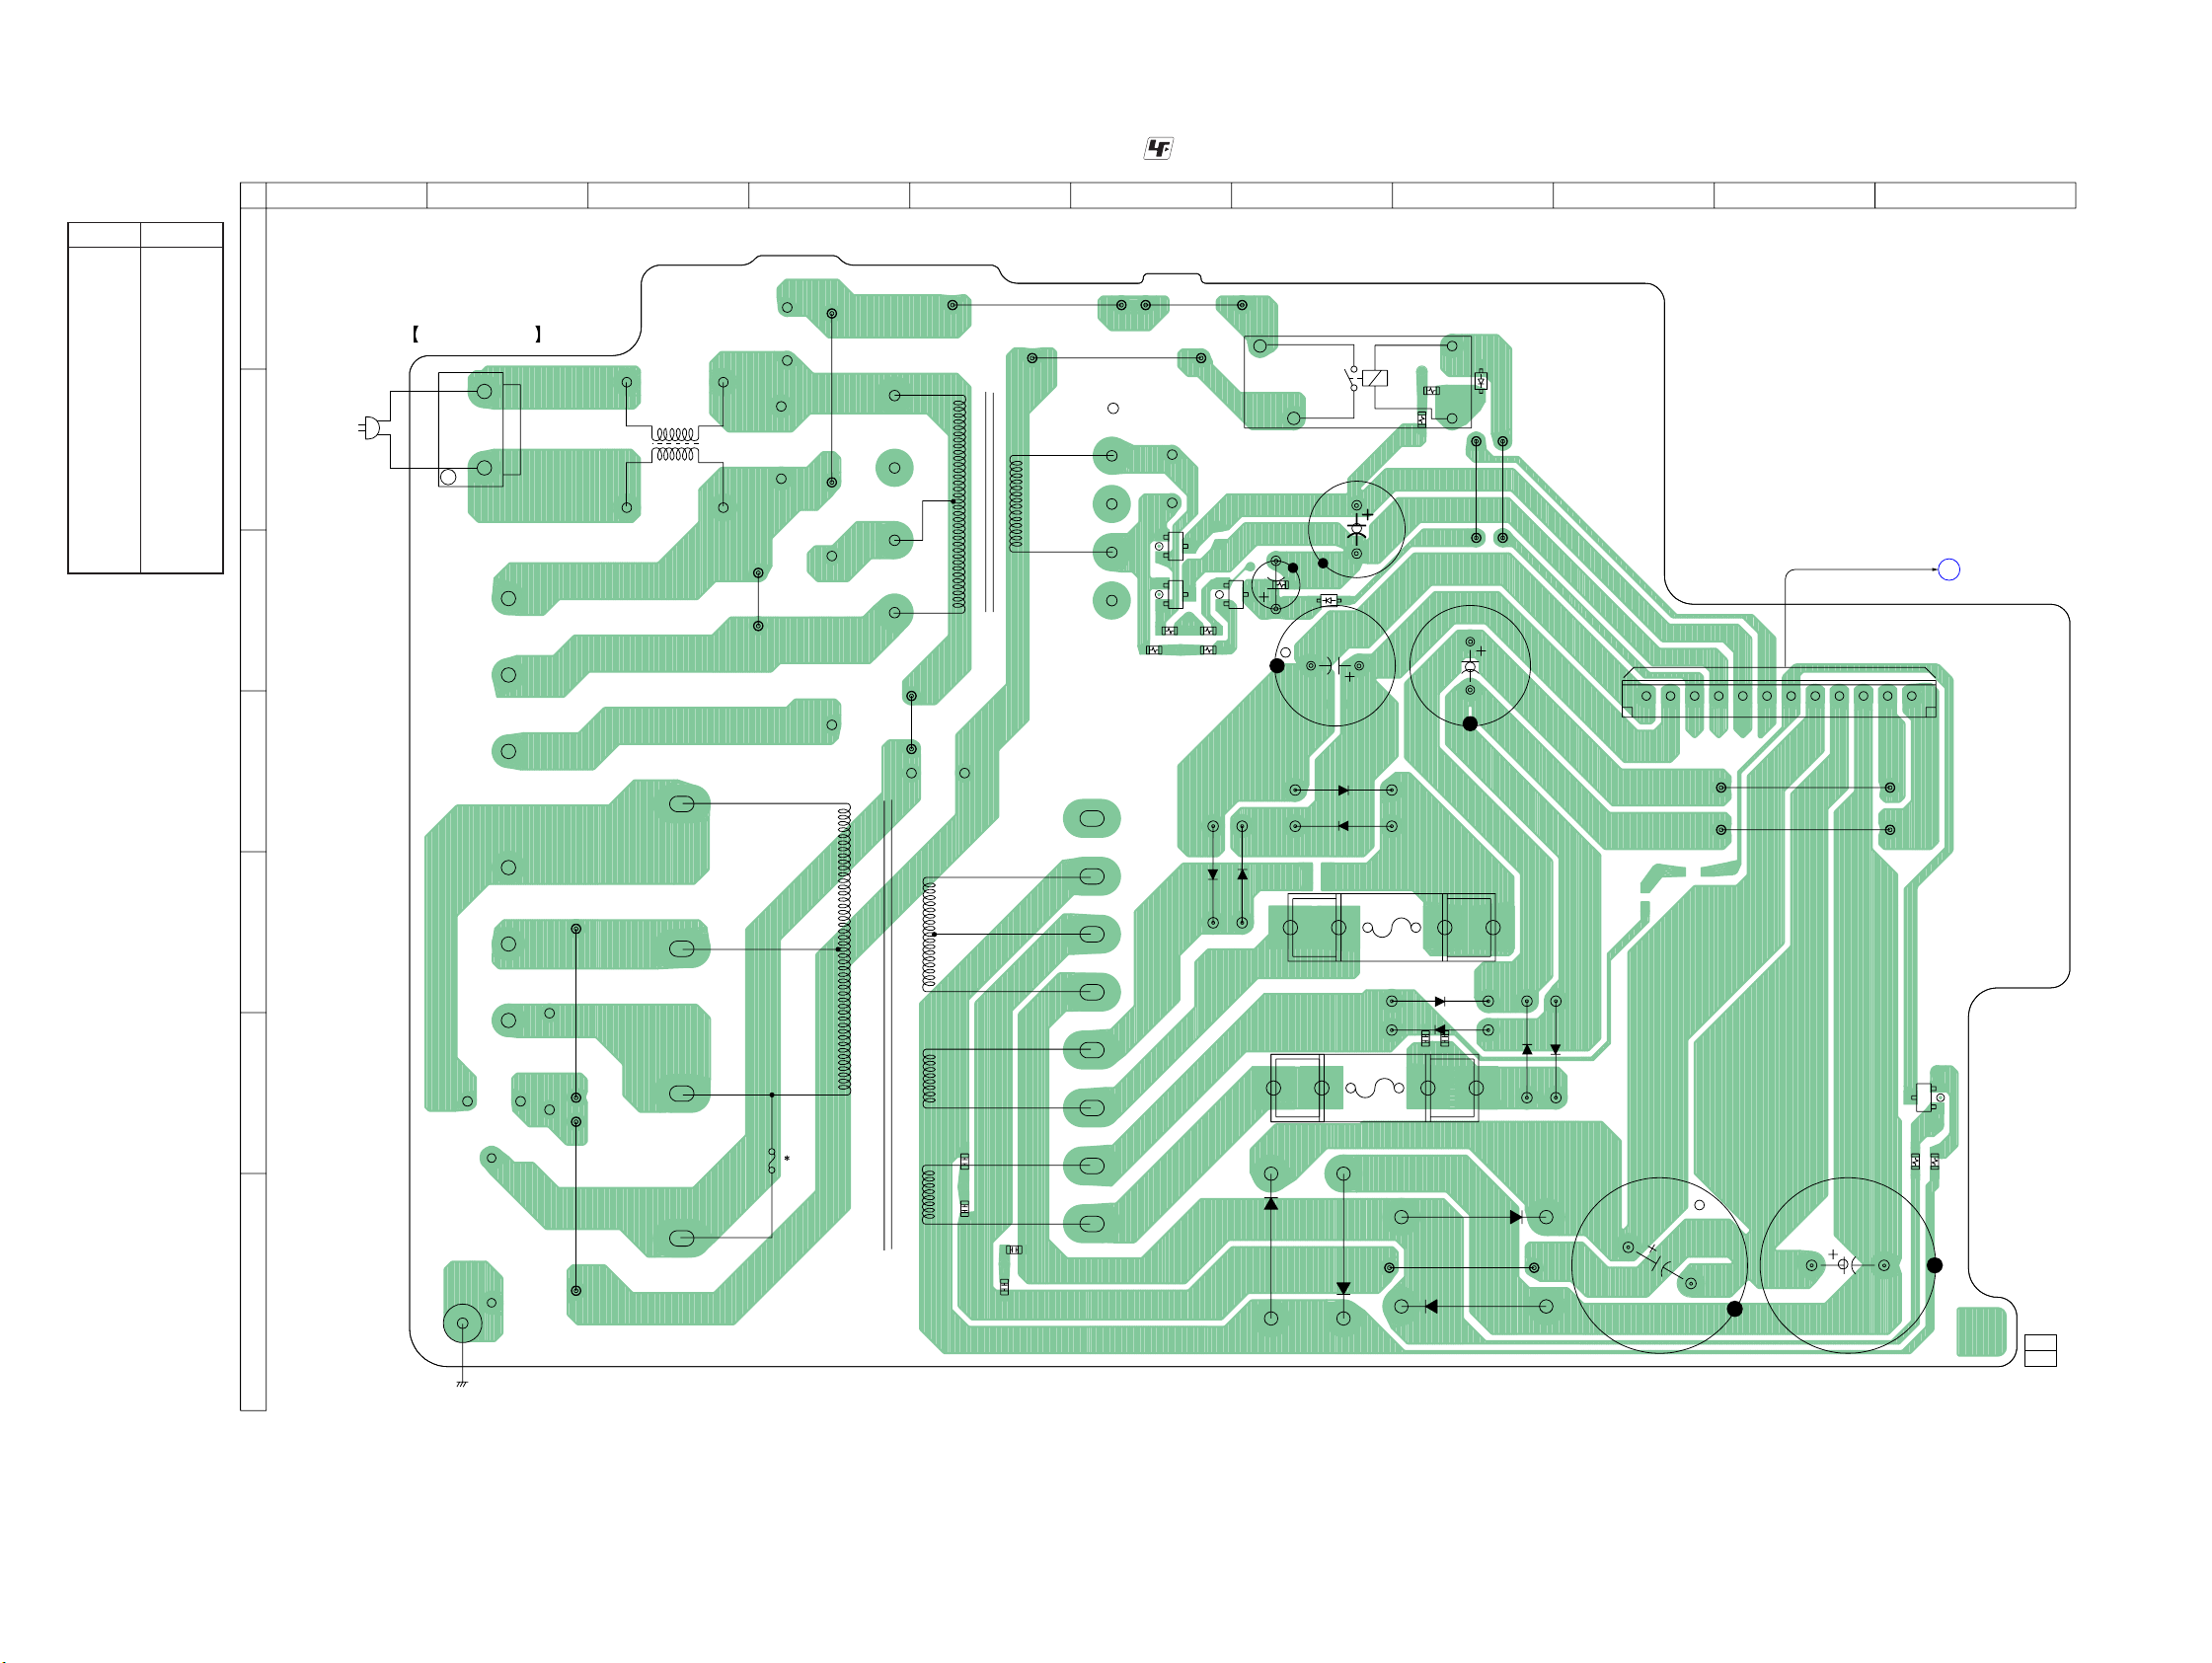
HCD-BX70DBi
• Semiconductor
Location
Ref. No. Location
D906 B-8
D907 C-6
D908 C-6
D911 F-8
D912 F-9
D913 E-8
D914 F-8
D916 G-8
D917 G-7
D918 G-8
D919 G-7
D920 F-11
D922 C-7
D923 C-7
D924 E-6
D925 D-7
D926 D-7
D927 E-7
6-19. PRINTED WIRING BOARD - POWER Board -
12345678910 11
A
POWER BOARD
3
(AC IN)
B
CN901
1
LF901
LINE FILTER
C
• See page 21 for Circuit Boards Location.
JW925
T902
SUB POWER
TRANSFORMER
JW924
JW923
JW929
• : Uses unleaded solder.
JW926
JW927
A
A
K
K
R908
R909
D908
D907
K
A
C914
A
D923
A
R904
R905
R906
K
C925
C921
D922
RY901
R911
R910
C936
JW909
D906
JW910
CN904
(Page 28)
MAIN BOARD
J
CN303
112
FH901
FH903
D917
D925
D926
F901
F902
C911
D916
D911
D913
FH902
C903
JW920
FH904
D918
D914
JW911
JW914
D912
A
K
D920
A
R902
R901
C922
C923
1-876-054-
11, 1 2
(11, 12)
D
D924
D927
E
JW932
F
C901
NOT REPLACEABLE:
BUILT IN TRANSFORMER
JW931
T901
MAIN POWER
G
WIRE900
TRANSFORMER
C905
C902
C906
D919
HCD-BX70DBi
(CHASSIS)
3636
Page 37
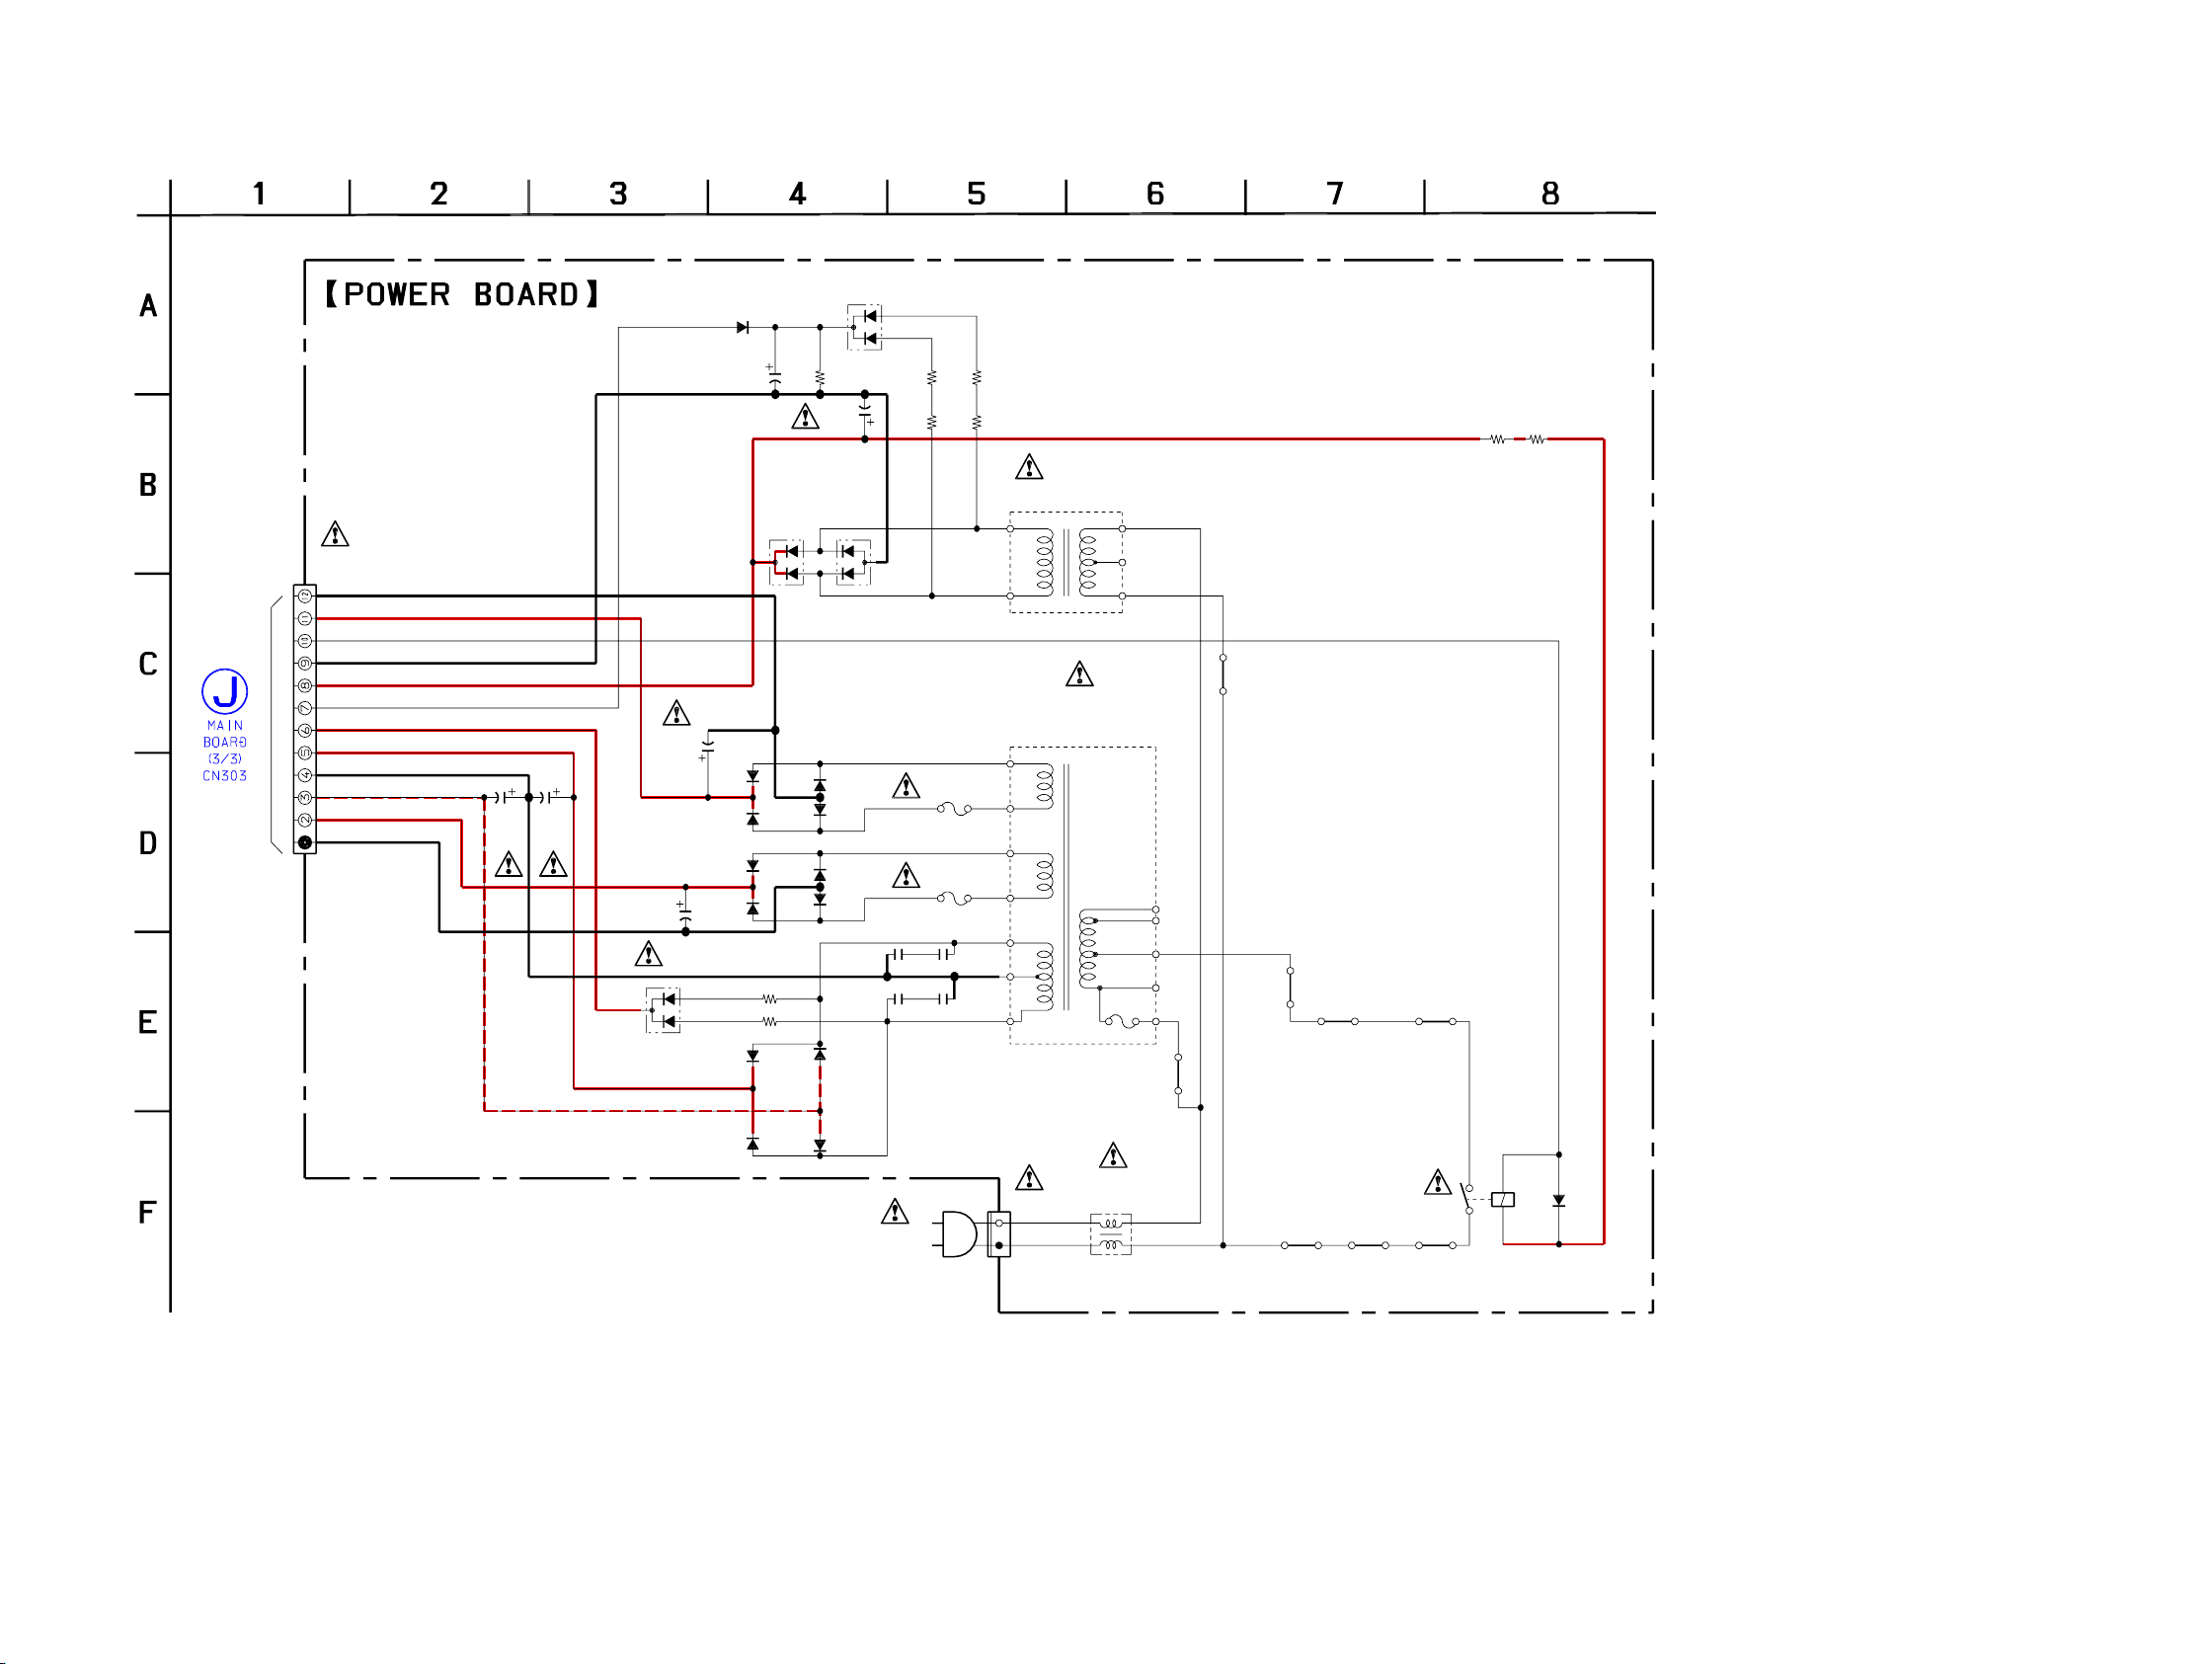
HCD-BX70DBi
HCD-BX70DBi
3737
6-20. SCHEMATIC DIAGRAM - POWER Board -
R910 R911R908
R904R905
R909
D923
D922
C914
R906
C921
D908
D907
C922C923
F901
C901C905
C906
C902
D917
D916
D919
D918
D920
R902
R901
D911
D912
C936
D913
D914
CN901
RY901
D906
CN904
D927
D924
D925
D926
C925
JW924 JW925 JW926
JW931
JW927
LF901
F902
JW929
JW932
JW923
T902
T901
001k
4.7k4.7k
1k
MC2838
MA2J1110GLS0
10
50V 10k
1000
16V
MC2838
MC2836
2200
35V
2200
35V
T2AL 250V
0.10.1
0.1
0.1
1N5401
1N5401
1N5401
1N5401
MC2838
22k
22k
1N4002B
1N4002B
2200
25V
1N4002B
1N4002B
3P
MA2J1110GLS0
12P
1N4002-B5
1N4002-B5
1N4002-B5
1N4002-B5
2200
16V
T2AL 250V
USB UNREG GND
USB UNREG
RELAY
SUB GND
UNREG SUB
ACDET
PROTECT
+B
GND
-B
UNREG
UNREG GND
TRANSFORMER
SUB
TRANSFORMER
MAIN
LINE FILTER
(AC IN)
NOT REPLACEABLE:
∗
∗
BUILD IN TRANSFORMER
(Page 31)
Page 38
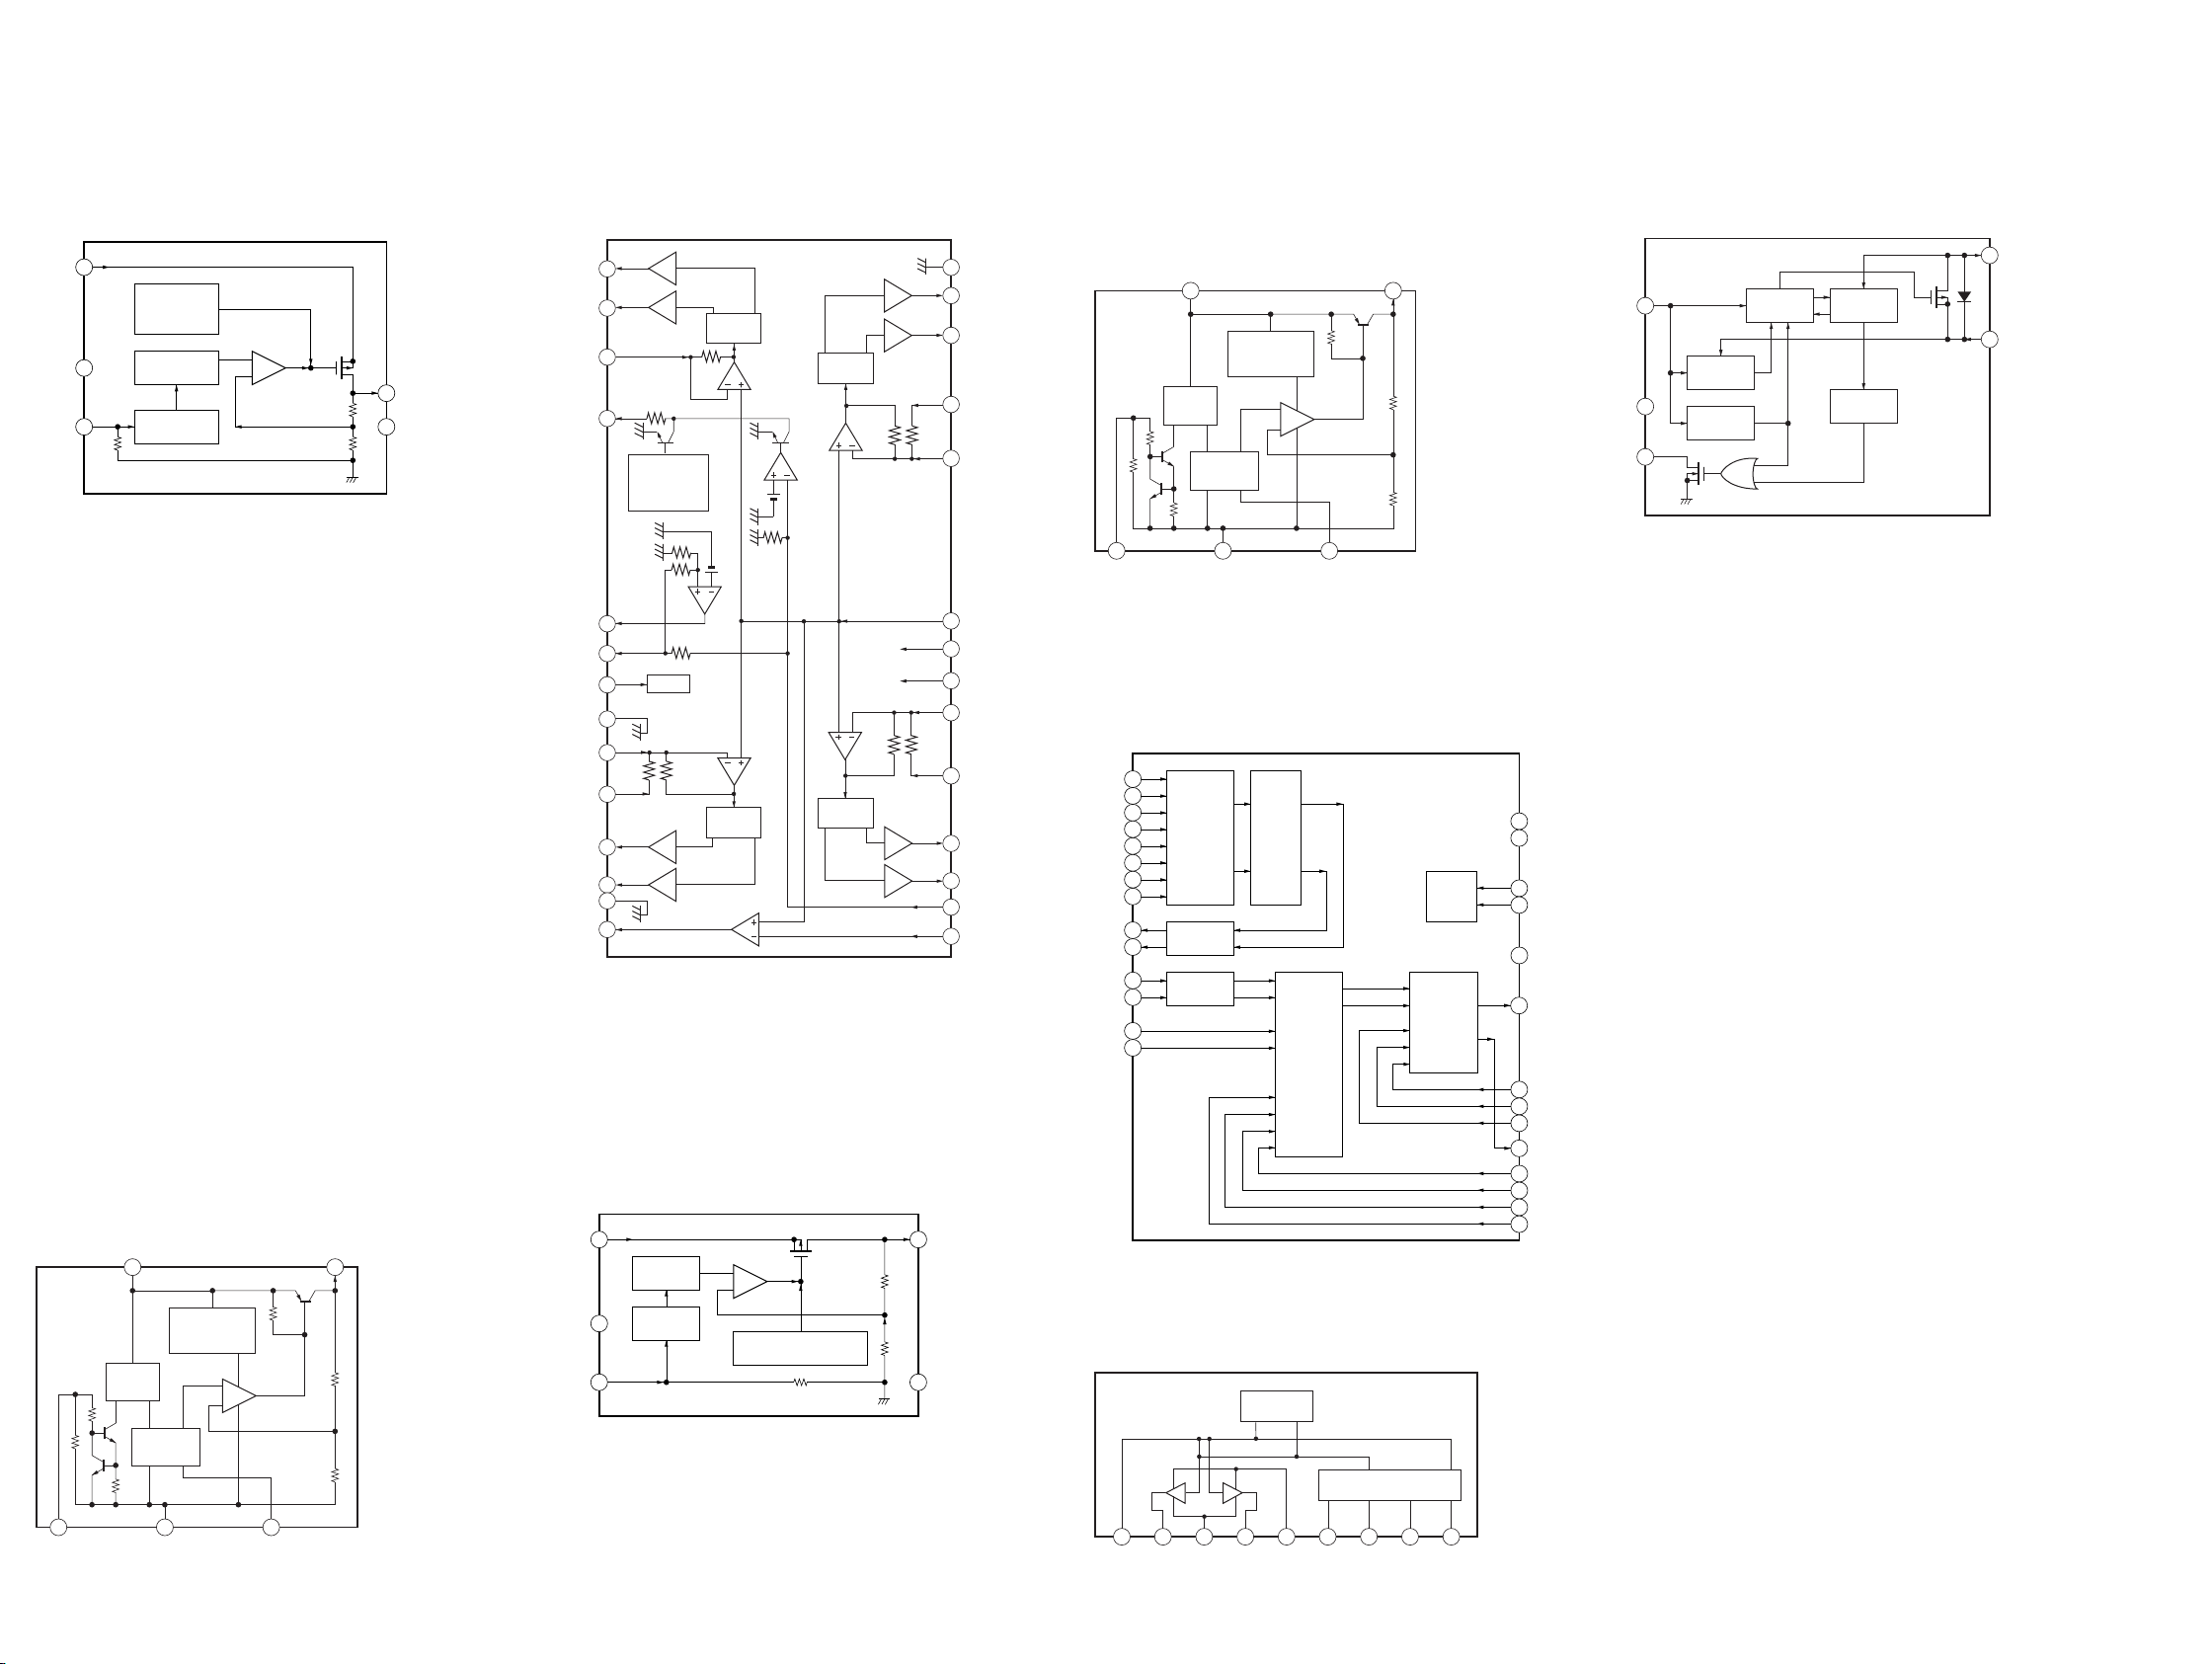
HCD-BX70DBi
HCD-BX70DBi
3838
• IC Block Diagrams
– CD Board –
IC201 TK63115SCL-G@GT
IC401 BA5826SFP-E2
– DAB Board –
IC801 TK11133CSCL-G
IC802 TK68112AS2G0L-C
– IP Board –
IC102 TK11133CSCL-G
CONTROL
CIRCUIT
BANDGAP
REFERENCE
+
–
OVER HEAT &
OVER CURRENT
PROTECTION
1
VCONT
3
NP
2
GND
4
VOUT
5
VIN
– MAIN Board –
IC201 R5523N001B-TR-F
IC304 BD3499FV-E2
1A1
18 BCB1
17 BCA1
16 BCA2
20 SB2
19 OUT2
22 SB1
21 SR
24 VCC
23 OUT1
26
SDA
25
SCL
28 FIL
27 GND
15 BCB2
2A2
3B1
5C1
6C2
4
B2
11
VOL1
12
VOL2
13TC2
14TC1
7D1
8D2
9SEL2
10SEL1
INPUT
SELECTOR
TREBLE/
BASS
INVERTER
VOLUME
INPUT
GAIN
SURROUND
PC BUS
LOGIC
IC311 BA6956AN
1 2 3 4 5 6 7 8 9
CONTROL LOGIC
TSD
VREF
OUT2
OUT1
RNF
VM
VCC
FIN
GND
RIN
1
VIN
THERMAL &
OVER CURRENT
PROTECTION
2
GND
3NC4
VCONT
VOLTAGE
REFERENCE
ON/OFF
CONTROL
–
+
28
27
26
25
24
23
22
21
20
19
18
17
16
15
GND
VO4(–)
VO4(+)
IN4
IN4'
BIAS
VCC
VCC
IN3'
IN3
VO3(+)
VO3(–)
RESETt
OPIN
1
VO1(–)
VO1(+)
VOUT
5
RESET
REGB
REGOUT
MUTE
VO2(+)
VO2(–)
OPOUT
GND
IN2'
GND
D.BUFF
2
D.BUFF
3
IN1
4
THERMAL
SHUT-DOWN
REGULATOR
BIAS TRAP
5
6
MUTE
7
8
9
IN2
10
D.BUFF
11
D.BUFF
12
13
14
LEVEL
SHIFT
REGULATOR
LEVEL
SHIFT
LEVEL
SHIFT
LEVEL
SHIFT
D.BUFF
D.BUFF
VCC
VCC
D.BUFF
D.BUFF
UVLO
GATE
CONTROL
1EN
2GND
THERMAL
SHUTDOWN
3FLG
CURRENT
LIMIT
FLAG
DELAY
5OUT
4IN
1
VCONT
CONTROL
CIRCUIT
VIN
5
BANDGAP
REFERENCE
OVER HEAT &
OVER CURRENT
PROTECTION
2
GND
–
+
3
NP
VOUT
4
1VIN
2GND
3VCONT
REFERENCE
VOLTAGE
ON/OFF
CONTROL
–
+
CURRENT PROTECTION
THERMAL & OVER
5
VOUT
NC
4
Page 39
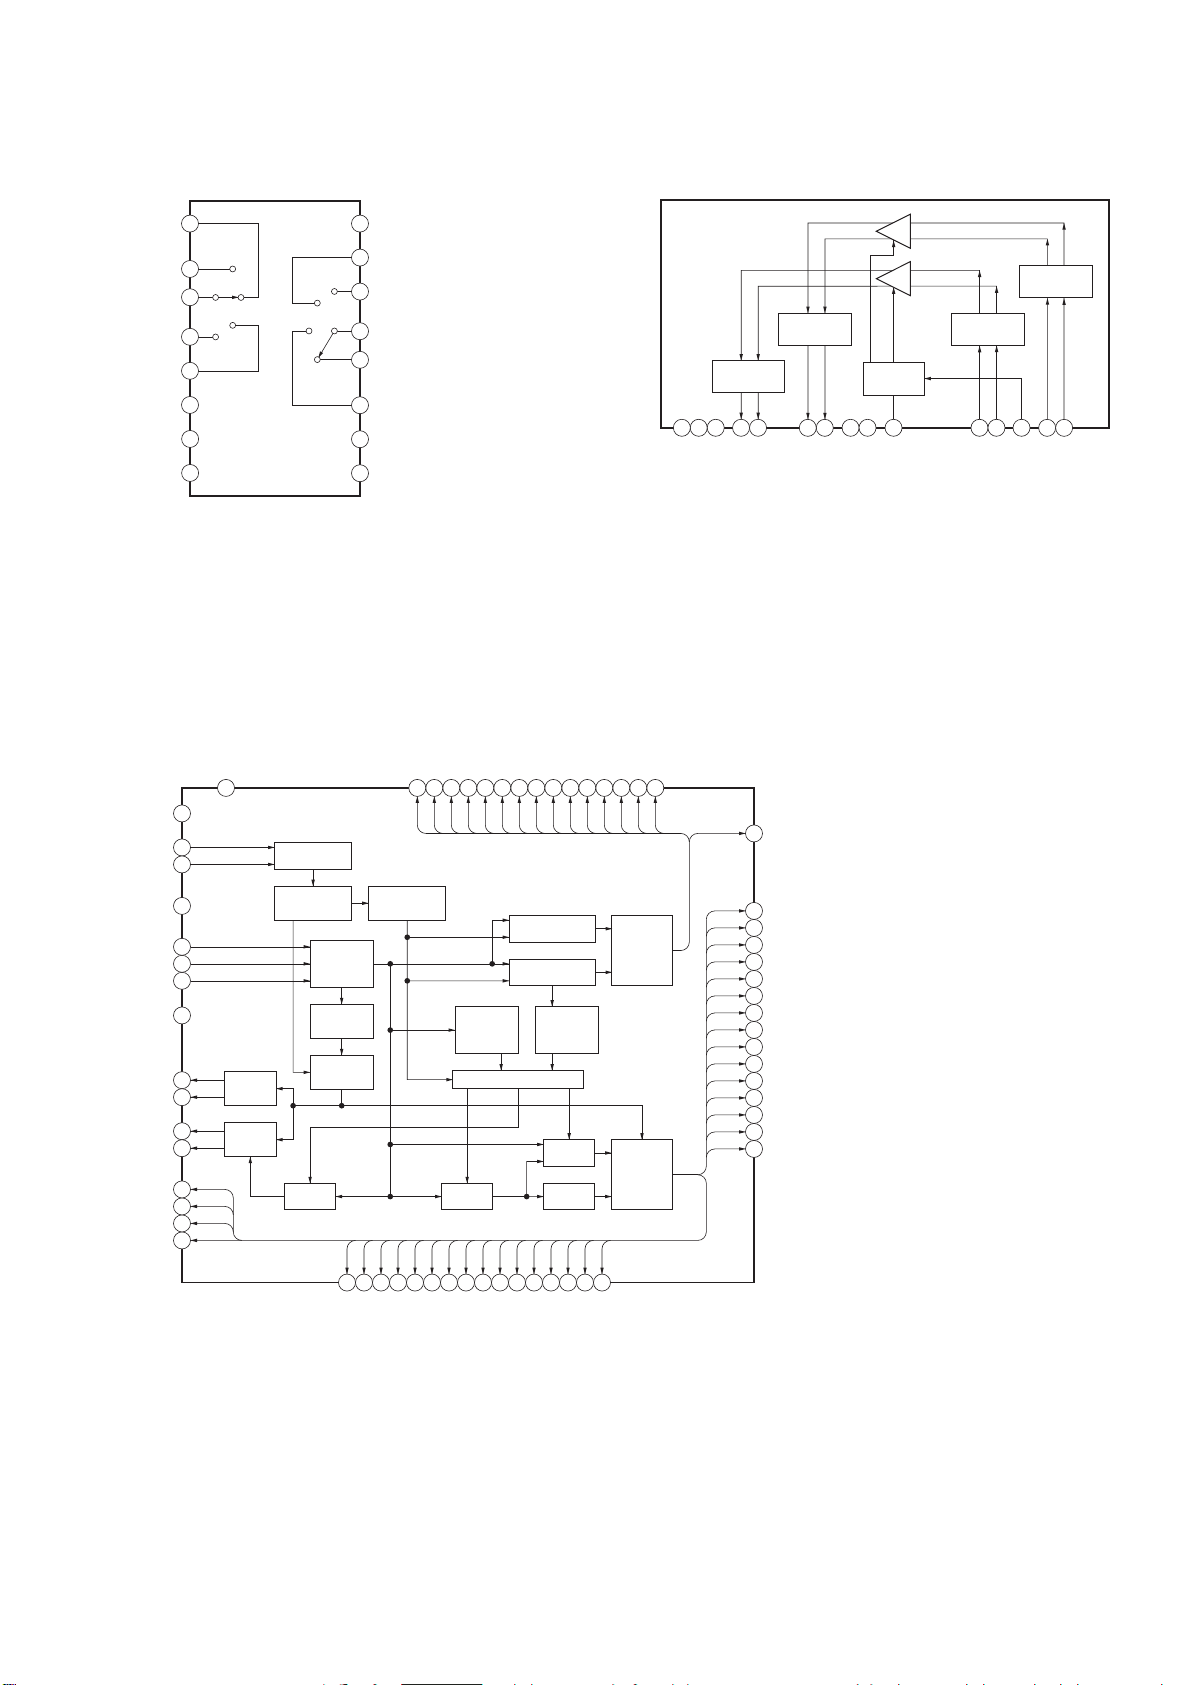
IC312 MC14052BDTR2
1
2Y0
2Y2
2
3
2-COM
2Y3
4
5
2Y1
6
INH
7
GND
GND
8
HCD-BX70DBi
– AMP Board –
IC601 STK433-730-E
16
VCC
15
1Y2
1Y1
14
PRE DRIVE
CH1
4
5
CH1+
CH1-
FINAL DRIVE
CH2
6
7
CH2+
CH2-
8
9
+PRE
STANDBY
CIRCUIT
10
GND/SUB
MONITOR
1-COM
13
12
1Y0
11
1Y3
A
10
9
B
1
2
-PRE
FINAL DRIVE
3
-VCC
+VCC
PRE DRIVE
CH2
CH1
11
13
12
14
15
IN/1
NF/1
ST-BY
NF/2
IN/2
– PANEL Board –
IC902 PT6302LQ-010
VEE
48
VSS
49
50
OSCI
OSCO
RSTB
CSB 53
CLKB 54
DIN
VDD
P1 57
P2 58
AD2
AD1 60
SG1
SG2
SG3
SG4
51
52
55
56
59
61
62
63
64
PORT
DRIVER
AD
DRIVER
OSCILLATOR
TIMING
GENERATOR 1
AD-RAM
8 BIT
SHIFT
REGISTER
COMMAND
DECODER
CONTROL
CIRCUIT
GR16
47
TIMING
GENERATOR 2
GR13
GR14
GR15
44
45
46
WRITE
ADDRESS
COUNTER
ADDRESS SELECTOR
DC-RAM
GR1142GR12
43
41
DUTY CONTROL
DIGIT CONTROL
READ
ADDRESS
COUNTER
CG-RAM
CG-ROM
GR334GR435GR536GR637GR738GR839GR940GR10
33
GRID
DRIVER
SEGMENT
DRIVER
GR2
32
GR1
SG3531
SG3430
SG3329
SG3228
SG3127
SG3026
SG2925
SG2824
SG2723
SG2622
SG2521
SG2420
SG2319
SG2218
SG2117
1
6
SG95SG84SG73SG62SG5
SG10
SG11
SG12
SG13
SG14
SG15
SG16
SG17
SG18
SG19
SG20
16
15
14
13
12
11
10
9
8
7
39
Page 40
HCD-BX70DBi
Ver. 1.2
• IC Pin Function Description
CD BOARD IC101 (CD-MP3 PROCESSOR) TC94A70FG-006
Pin No. Pin Name I/O Description
1 AVSS3 - Ground terminal
2 RFZi I RF ripple zero crossing signal input terminal
3 RFRP O RF ripple signal output terminal
4 SBAD/RFDC O Sub beam addition signal or RF peak detection signal output terminal Not used
5 FEi O Focus error signal output terminal Not used
6 TEi O Tracking error signal output terminal
7 TEZi I Tracking error zero crossing signal input terminal
8 AVDD3 - Power supply terminal (+3.3 V)
9 FOo O Focus coil drive signal output terminal
10 TRo O Tracking coil drive signal output terminal
11 VREF I Reference voltage (+1.65V) input terminal
12 FMo O Sled motor drive signal output terminal
13 DMo O Spindle motor drive signal output terminal
14 VSSP3 - Ground terminal
15 VCOi I VCO control voltage input terminal
16 VDDP3 - Power supply terminal (+3.3 V)
17 VDD1 - Power supply terminal (+1.5 V)
18 VSS - Ground terminal
19 FGiN I FG signal input terminal Not used
20 IO0 (/HSO) I Disc inner position detection signal input terminal
21 IO1 (/UHSO) O Not used
22 XVSS3 - Ground terminal
23 XI I System clock input terminal (16.9344 MHz)
24 XO O System clock output terminal (16.9344 MHz)
25 XVDD3 - Power supply terminal (+3.3 V)
26 DVSS3 - Ground terminal
27 RO O Audio data (R-ch) output to the input selector
28 DVDD3 - Power supply terminal (+3.3 V)
29 DVR O Reference voltage (+1.65V) output terminal
30 LO O Audio data (L-ch) output to the input selector
31 DVSS3 - Ground terminal
32 VDDT3 - Power supply terminal (+3.3 V)
33 VSS1 - Ground terminal
34 VDD1 - Power supply terminal (+1.5 V)
35 VDDM1 - Power supply terminal (+1.5 V)
36 SRAMSTB I S-RAM standby mode control signal input terminal Fixed at "L" in this set
37 XRST I Reset signal input from the system controller "L": reset
38, 39 BUS0, BUS1 I Serial data input from the system controller
40 BUS2 (SO) I Serial data input from the system controller
41 BUS3 (SI) I Serial data input from the system controller
42 BUCK (CLK) I Serial data transfer clock signal input from the system controller
43 XCCE I Chip enable signal input from the system controller
44 TEST I Setting terminal for test mode Normally fi xed at "L"
45 IRQ I Interrupt request signal input terminal Not used
46 AoUT3 (PO4) O Request signal output terminal Not used
47 AoUT2 (PO5) O Audio data output terminal Not used
48 PIO0 O Request signal output to the system controller
49, 50 PIO1, PIO2 O Not used
51 PIO3 I Gate signal input terminal Not used
52 VSS1 - Ground terminal
53 VDDT3 - Power supply terminal (+3.3 V)
54 SBSY O Subcode block sync signal output to the system controller
55 SBOK/FOK O Not used
56 IPF O Not used
40
Page 41
HCD-BX70DBi
Pin No. Pin Name I/O Description
57 SFSY/LOCK O Not used
58 ZDET O Zero detection signal output terminal Not used
59 GPIN I Not used
60 MS I Microcomputer interface mode selection signal input terminal Fixed at "H" in this set
61 DOUT (PO6) O Digital audio data output terminal Not used
62 AOUT (PO7) O Audio data output terminal Not used
63 BCK (PO8) O Bit clock signal output terminal Not used
64 LRCK (PO9) O L/R sampling clock signal output terminal Not used
65 AIN (PI4) I Digital audio data input terminal Not used
66 BCKi (PI5) I Bit clock signal input terminal Not used
67 LRCKi (PI6) I L/R sampling clock signal input terminal Not used
68 VDD1 - Power supply terminal (+1.5 V)
69 VSS - Ground terminal
70 AWRC - Not used
71 PVDD3 - Power supply terminal (+3.3 V)
72 PDO O Phase error margin signal between EFM signal and PLCK signal output terminal
73 TMAXS O TMAX detection signal output terminal Not used
74 TMAX O TMAX detection signal output terminal
75 LPFN I Inverted signal input from the operation amplifi er for PLL loop fi lter
76 LPFo O Signal output from the operation amplifi er for PLL loop fi lter
77 PVREF I Reference voltage (+1.65V) input terminal
78 VCOF O VCO fi lter output terminal
79 PVSS3 - Ground terminal
80 SLCo O EFM slice level output terminal
81 RFi I RF signal input terminal
82 RFRPi I RF ripple signal input terminal
83 RFEQo O EFM slice level output terminal
84 VRo O Reference voltage (+1.65V) output terminal
85 RESiN O External resistor connection terminal
86 VMDiR O Reference voltage (+1.65V) output terminal for automatic power control circuit
87 TESTR O Low-pass fi lter terminal for RFEQO offset correction
88 AGCi I RF signal amplitude adjustment amplifi cation input terminal
89 RFo O RF signal generation amplifi cation output terminal
90 RVDD3 - Power supply terminal (+3.3 V)
91 LDo O
92 MDi I Light amount monitor input from the laser diode of optical pick-up block
93 RVSS3 - Ground terminal
94 FNi2 (C) I Main beam (C) input from the optical pick-up block
95 FNi1 (A) I Main beam (A) input from the optical pick-up block
96 FPi2 (D) I Main beam (D) input from the optical pick-up block
97 FPi1 (B) I Main beam (B) input from the optical pick-up block
98 TPi (F) I Sub beam (F) input from the optical pick-up block
99 TNPC O External capacitor connection terminal
100 TNi (E) I Sub beam (E) input from the optical pick-up block
Laser diode on/off control signal output to the automatic power control circuit
"H": laser diode on
41
Page 42
HCD-BX70DBi
IP BOARD IC101 R5F21246SN060FP (iPod INTERFACE)
Pin No. Pin Name I/O Description
1 NC - Not used
2 SCL O Not used
3 P33 O Not used
4 SDA O Not used
5 MODE I Mode selection signal input terminal "L": single chip mode, "H": serial I/O mode,
6, 7 P34, P44 O Not used
8 RESET I Reset signal input from the reset signal generator "L": reset
9 XOUT O System clock output terminal (20 MHz)
10 VSS - Ground terminal
11 XIN I System clock input terminal (20 MHz)
12 VCC - Power supply terminal (+3.3V)
13 to 16 LED O LED drive signal output terminal Not used
17 to 22 P23 to P20, P17, P16 O Not used
23 RXD_iPod I Serial data input from the iPod connector
24 TXD_iPod O Serial data output to the iPod connector
25 P13 O Not used
26 NC - Not used
27 AC CUT O Not used
28 TXD_DMPORT O Serial data output to the system controller
29 RXD_DMPORT I Serial data input from the system controller
30 to 35
36 VIDEO_MUTE O Not used
37 AUDIO_MUTE O Audio muting on/off control signal output terminal "L": muting on
38 P07 O Not used
39, 40 NC - Not used
41 to 43 P06 to P04 O Not used
44 VREF I Reference voltage (+3.3V) input terminal
45 P60 O Not used
46 DETECT I iPod connection detection signal input from the iPod connector "L": iPod is connected
47 P61 O Not used
48 MODEL I Not used
49 DEST O Not used
50, 51 KEY0, KEY1 O Not used
52 P37 O Not used
P12 to P10, P31, P30,
P65
O Not used
42
Page 43
MAIN BOARD IC301 R5F3640DDFAR (SYSTEM CONTROLLER)
Pin No. Pin Name I/O Description
1 to 3 CD BUS2 to CD BUS0 O
4 SIRCS I
5 STBY-RELAY O
6 TUNER TUNED I
7 RDS DATA I
8 BYTE I
9 CN VSS I
10 XCIN I
11 XCOUT O
12 RESET I
13 XOUT O
14 VSS 15 XIN I
16 VCC 17 NMI I
18 RDS INT I
19 SBSY I
20 AC CUT I
21 NC O
22 AMP CLOCK O
23 TA LINE MUTE O
24 AMP DATA O
25 ST CE O
26 DATA IN/STEREO I
27 ST CLK O
28 ST DATA OUT O
29 IIC CLK I/O
30 IIC DATA I/O
31 BT DOUT O
32 BT DIN O
33 BT CTS I
34 BT_RTS O
35 USB TXD O
36 USB RXD I
37 NC O
38 USB RTS O
39 SEL A O
40 INH O
41 PULL DOWN O
42 NC O
43 BT AUDIO OUT MUTE O
44 BT_AV_ ROLE O
45 BT_RESET O
46 PULL UP O
47 DAB TXD O
48 DAB RXD I
49, 50 NC O
51 DAB-POWER 1.2V O
52 DAB-POWER 3.3V O
53
54 to 56 NC O
57 CD ON O
58 USB POWER O
59 CD RESET O
STK-ON O
Serial data output to the CD-MP3 processor
SIRCS signal input from the remote control receiver
Power on/off control signal output terminal "H": power on
Tuning detection signal input from the tuner (FM/AM)
RDS data input from the tuner (FM/AM)
External data bus width selection signal input terminal
Processor mode switch input terminal (for test)
Sub system clock input terminal (32.768 kHz)
Sub system clock output terminal (32.768 kHz)
System reset signal input from the reset signal generator "L": reset
For several hundreds msec. after the power supply rises, "L" is input, then it changes to "H"
Main system clock output terminal (5 MHz)
Ground terminal
Main system clock input terminal (5 MHz)
Power supply terminal (+3.3V)
Non-maskable interrupt signal input terminal Not used
RDS data transfer clock signal input from the tuner (FM/AM)
Subcode block sync signal input from the CD-MP3 processor
AC cut on/off detection signal input terminal "L": AC cut on
Not used
Serial data transfer clock signal output to the electrical volume
Line muting on/off control signal output terminal "H": muting on
Serial data output to the electrical volume
Chip enable signal output to the tuner (FM/AM)
Serial data and stereo detection signal input from the tuner (FM/AM)
Serial data transfer clock signal output to the tuner (FM/AM)
Serial data output to the tuner (FM/AM)
Two-way IIC clock bus terminal Not used
Two-way IIC data bus terminal Not used
Serial data output terminal Not used
Serial data input terminal Not used
Clear to send signal input terminal Not used
Ready to send signal output terminal Not used
Serial data output terminal Not used
Serial data input terminal Not used
Not used
Ready to send signal output terminal Not used
Input selection control signal output terminal
Input selection control signal output terminal
Connected to the ground
Not used
Blutetooth muting on/off control signal output terminal Not used
Transmission/reception mode notifi cation signal output terminal Not used
Reset signal output terminal Not used
Connected to the power supply
Serial data output terminal for DAB section
Serial data input terminal for DAB section
Not used
Power supply (+1.2V) on/off control signal output terminal for DAB section
Power supply (+3.3V) on/off control signal output terminal for DAB section
Standby control signal output to the power amplifi er
Not used
Power on/off control signal output terminal for CD section "H": power on
Power on/off control signal output terminal for USB section Not used
Reset signal output to the CD-MP3 processor "L": reset
HCD-BX70DBi
43
Page 44
HCD-BX70DBi
Pin No. Pin Name I/O Description
60 CD DRIVER MUTE O
61 MODEL IN I
62 VCC 63 NC O
64 VSS 65 NC O
66 I-POWER MONITOR I
67 DEC BUS SEL O
68 MP3 IREQ I
69 CD CCE O
70 CD CLK O
71, 72 NC O
73 NC I
74 KEY WAKE UP I
75 USB RESET O
76 USB CTS I
77 CLINK-TX-DOUT O
78 CLINK-RX-DIN I
79 NC O
80 DMPORT POWER O
81 to 83 KEY3 to KEY1 I
84 CDM LOAD OUT O
85 CDM LOAD IN O
86 SPEC IN I
87 CDM SW (OPEN) I
88 CDM SW (CLOSE) I
89 STANDBY LED O
90 FL RESET O
91 FL CS O
92 FL SD O
93 FL SCLK O
94 X5V FLAG I
95 NC O
96 AVSS 95 NC O
98 VREF I
99 AVCC -
100 CD BUS3 O
Muting signal output to the coil/motor driver
Setting terminal for the model Not used
Power supply terminal (+3.3V)
Not used
Ground terminal
Not used
Power monitor input terminal
Bus selection signal output terminal Not used
Request signal input from the CD-MP3 processor
Chip enable signal output to the CD-MP3 processor
Serial data transfer clock signal output to the CD-MP3 processor
Not used
iPod connection detection signal input from the iPod connector "L": iPod is connected
Wake up signal input terminal
Reset signal output terminal (for USB section) Not used
Clear to send signal input terminal (for USB section) Not used
Serial data output to the iPod interface
Serial data input from the iPod interface
Not used
VBUS power on/off control signal output terminal "H": power on
Top and front panel key input terminal (A/D input)
Loading motor control signal output terminal (for loading out)
Loading motor control signal output terminal (for loading in)
Setting terminal for the destination
Disc tray open position detection signal input terminal "L": disc tray is opened
Disc tray close position detection signal input terminal "L": disc tray is closed
LED drive signal output terminal for STANDBY indicator "L": LED on
Reset signal output to the fl uorescent indicator tube "L": reset
Chip select signal output to the fl uorescent indicator tube
Serial data output to the fl uorescent indicator tube
Serial data transfer clock signal output to the fl uorescent indicator tube
VBUS voltage detection signal input terminal
Not used
Ground terminal
Not used
Reference voltage (+3.3V) input terminal
Power supply terminal (+3.3V)
Serial data output to the CD-MP3 processor
44
Page 45
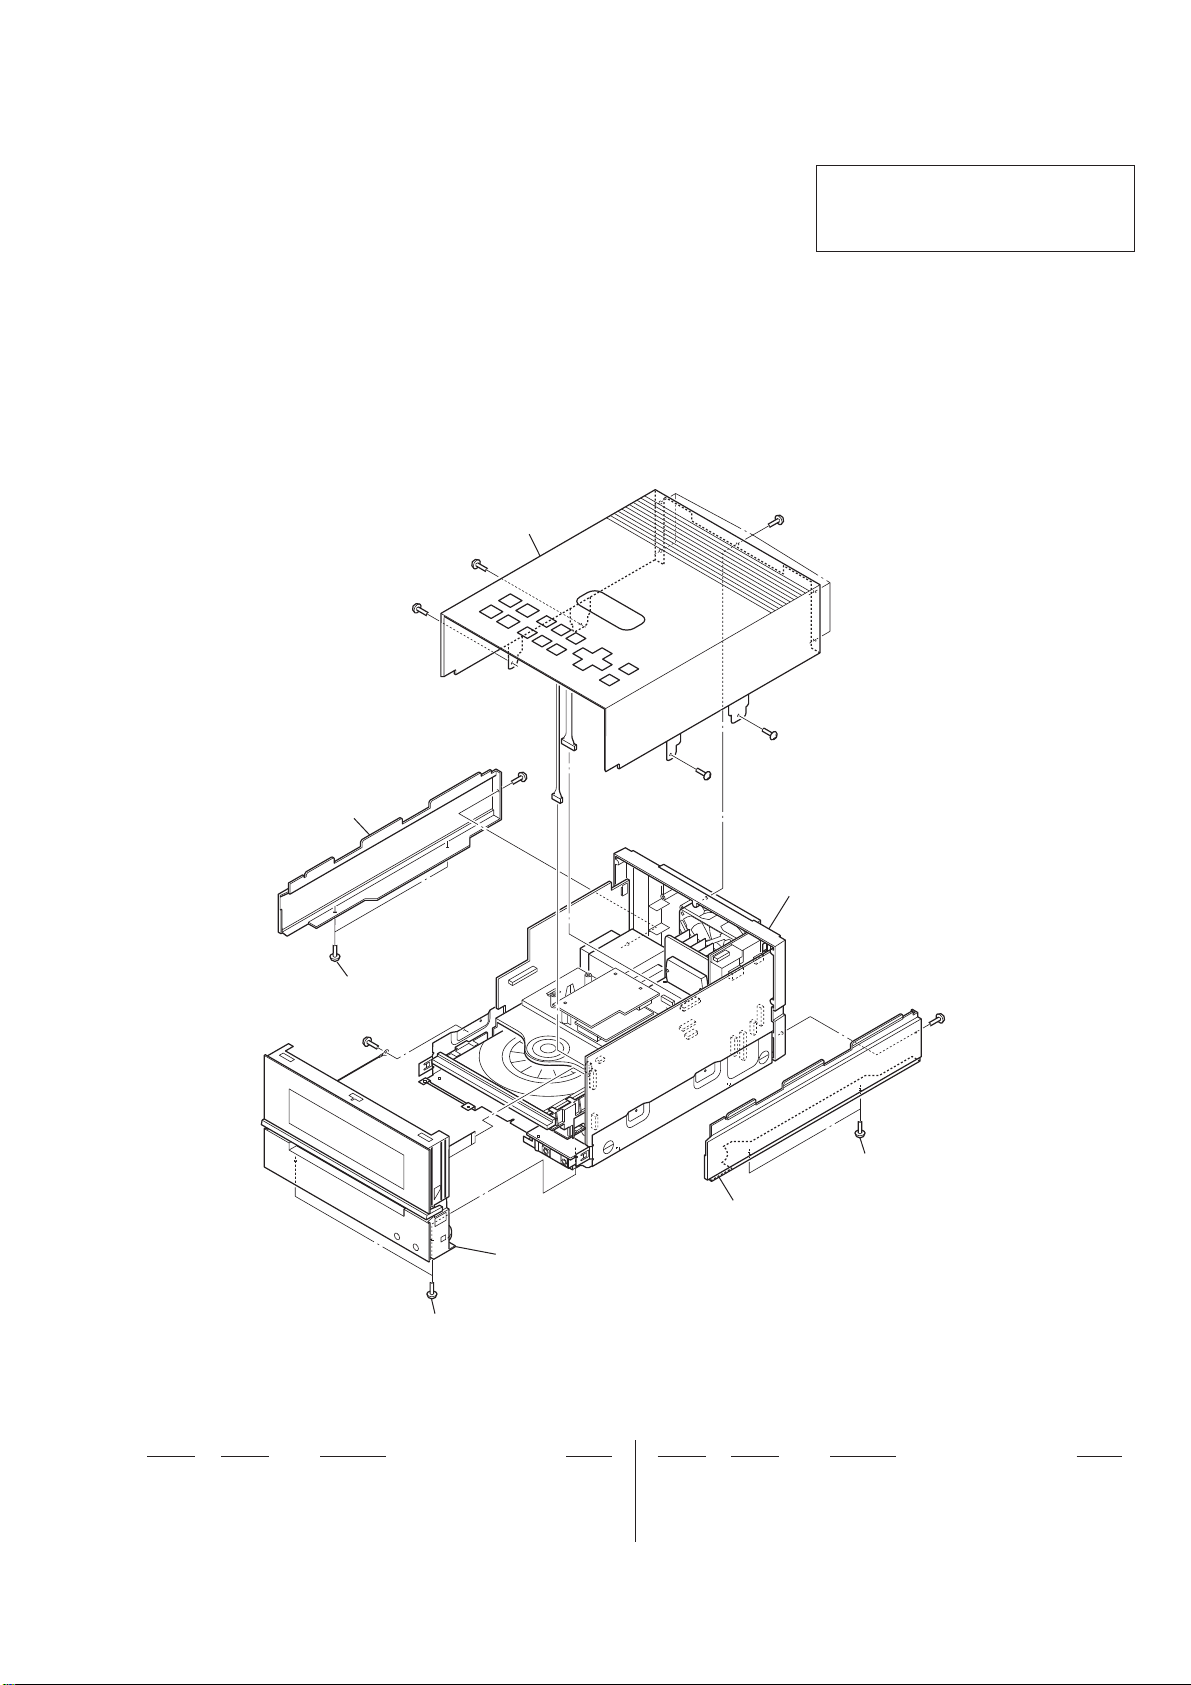
Note:
• -XX and -X mean standardized parts, so
they may have some difference from the
original one.
• Items marked “*” are not stocked since
they are seldom required for routine service. Some delay should be anticipated
when ordering these items.
7-1. PANEL SECTION
SECTION 7
EXPLODED VIEWS
• The mechanical parts with no reference
number in the exploded views are not supplied.
• Color Indication of Appearance Parts Example:
KNOB, BALANCE (WHITE) . . . (RED)
↑ ↑
Parts Color Cabinet’s Color
HCD-BX70DBi
The components identifi ed by mark 0
or dotted line with mark 0 are critical for
safety.
Replace only with part number specifi ed.
#1
top panel section
#8
#1
#3
#1
#3
#8
1
MAIN board section
3
#3
3
2
front panel section
3
Ref. No. Part No. Description Remark Ref. No. Part No. Description Remark
1 3-282-727-11 PANEL (SIDE L)
2 3-282-728-11 PANEL (SIDE R)
3 2-580-628-01 SCREW, +BVST 3X6
#1 7-685-871-01 SCREW +BVTT 3X6 (S)
#3 7-685-647-79 SCREW +BVTP 3X10 TYPE2 IT-3
#8 7-685-903-11 TAPPING +PWH 3X6 TYPE2 N-S
45
Page 46
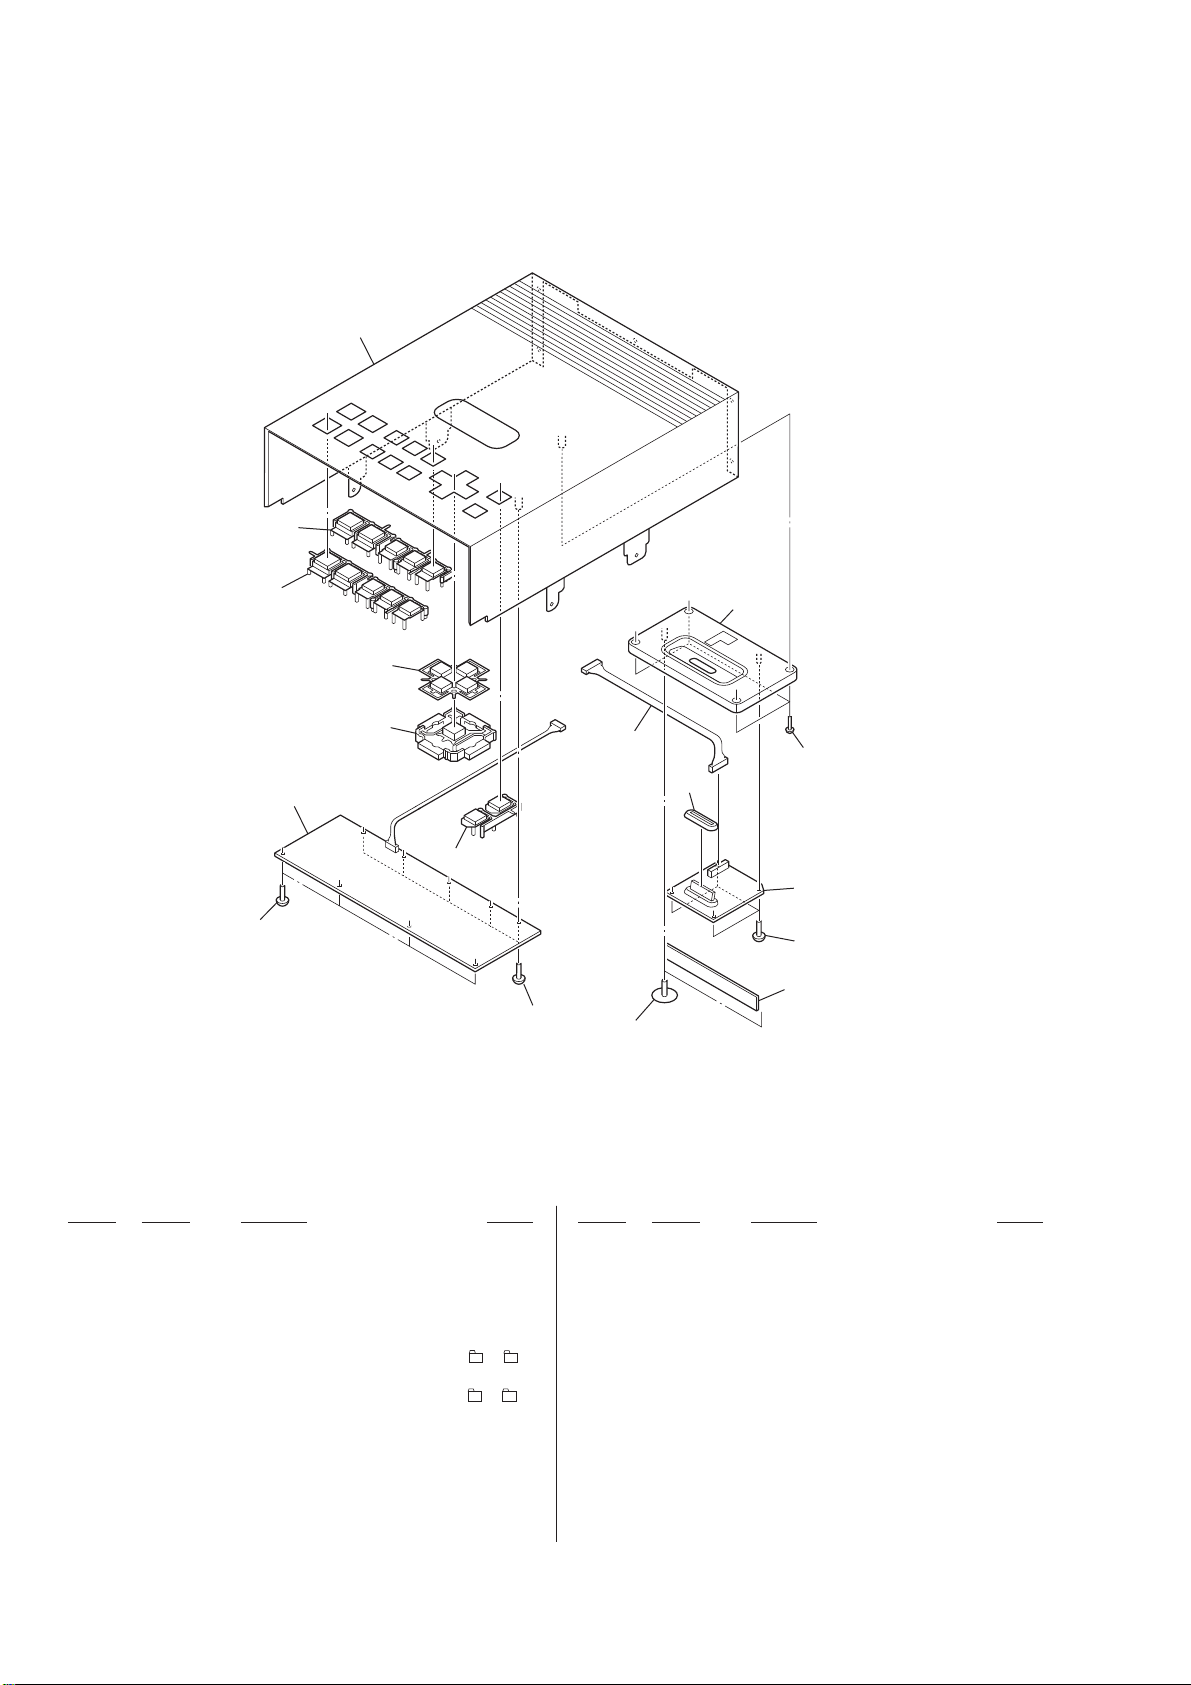
HCD-BX70DBi
7-2. TOP PANEL SECTION
56
57
55
not supplied
(TOP KEY board)
51
54
53
52
51
58
not supplied
51
62
60
61
not supplied
(HOLD board)
63
Ref. No. Part No. Description Remark Ref. No. Part No. Description Remark
51 3-087-053-01 +BVTP2.6 (3CR)
52 3-282-748-01 BUTTON (VOL) (VOL +, VOL –) (BLACK)
52 3-282-748-22 BUTTON (VOL) (VOL +, VOL –) (SILVER)
53 3-282-738-01 BUTTON (ENTER) (BLACK)
53 3-282-738-22 BUTTON (ENTER) (SILVER)
54 3-282-739-01 BUTTON (TUNE) (lm TUNE –, +, –,
ML TUNE +) (BLACK)
54 3-282-739-22 BUTTON (TUNE) (lm TUNE –, +, –,
ML TUNE +) (SILVER)
55 3-282-733-51 BUTTON (FUNCTION B) (iPod u, CD u,
x CANCEL, DSGX, DAB AUTO SCAN) (BLACK)
55 3-282-733-61 BUTTON (FUNCTION B) (iPod u, CD u,
x CANCEL, DSGX, DAB AUTO SCAN) (SILVER)
56 3-282-732-21 BUTTON (FUNCTION) (TUNER/BAND, AUDIO IN,
FUNCTION, REPEAT/FM MODE, PLAY MODE/
TUNING MODE) (BLACK)
56 3-282-732-51 BUTTON (FUNCTION) (TUNER/BAND, AUDIO IN,
FUNCTION, REPEAT/FM MODE, PLAY MODE/
TUNING MODE) (SILVER)
57 3-282-746-11 PANEL TOP (IP) (BLACK)
57 3-282-746-21 PANEL TOP (IP) (SILVER)
58 A-1541-488-A BASE (IP) ASSY (BLACK)
58 A-1541-489-A BASE (IP) ASSY (SILVER)
60 A-1466-251-A IP BOARD, COMPLETE
61 4-674-137-11 SCREW (PTP2X5)
62 3-277-576-01 ESCUTCHEON
63 3-921-725-01 SCREW (2.6X10), +PWH
46
Page 47
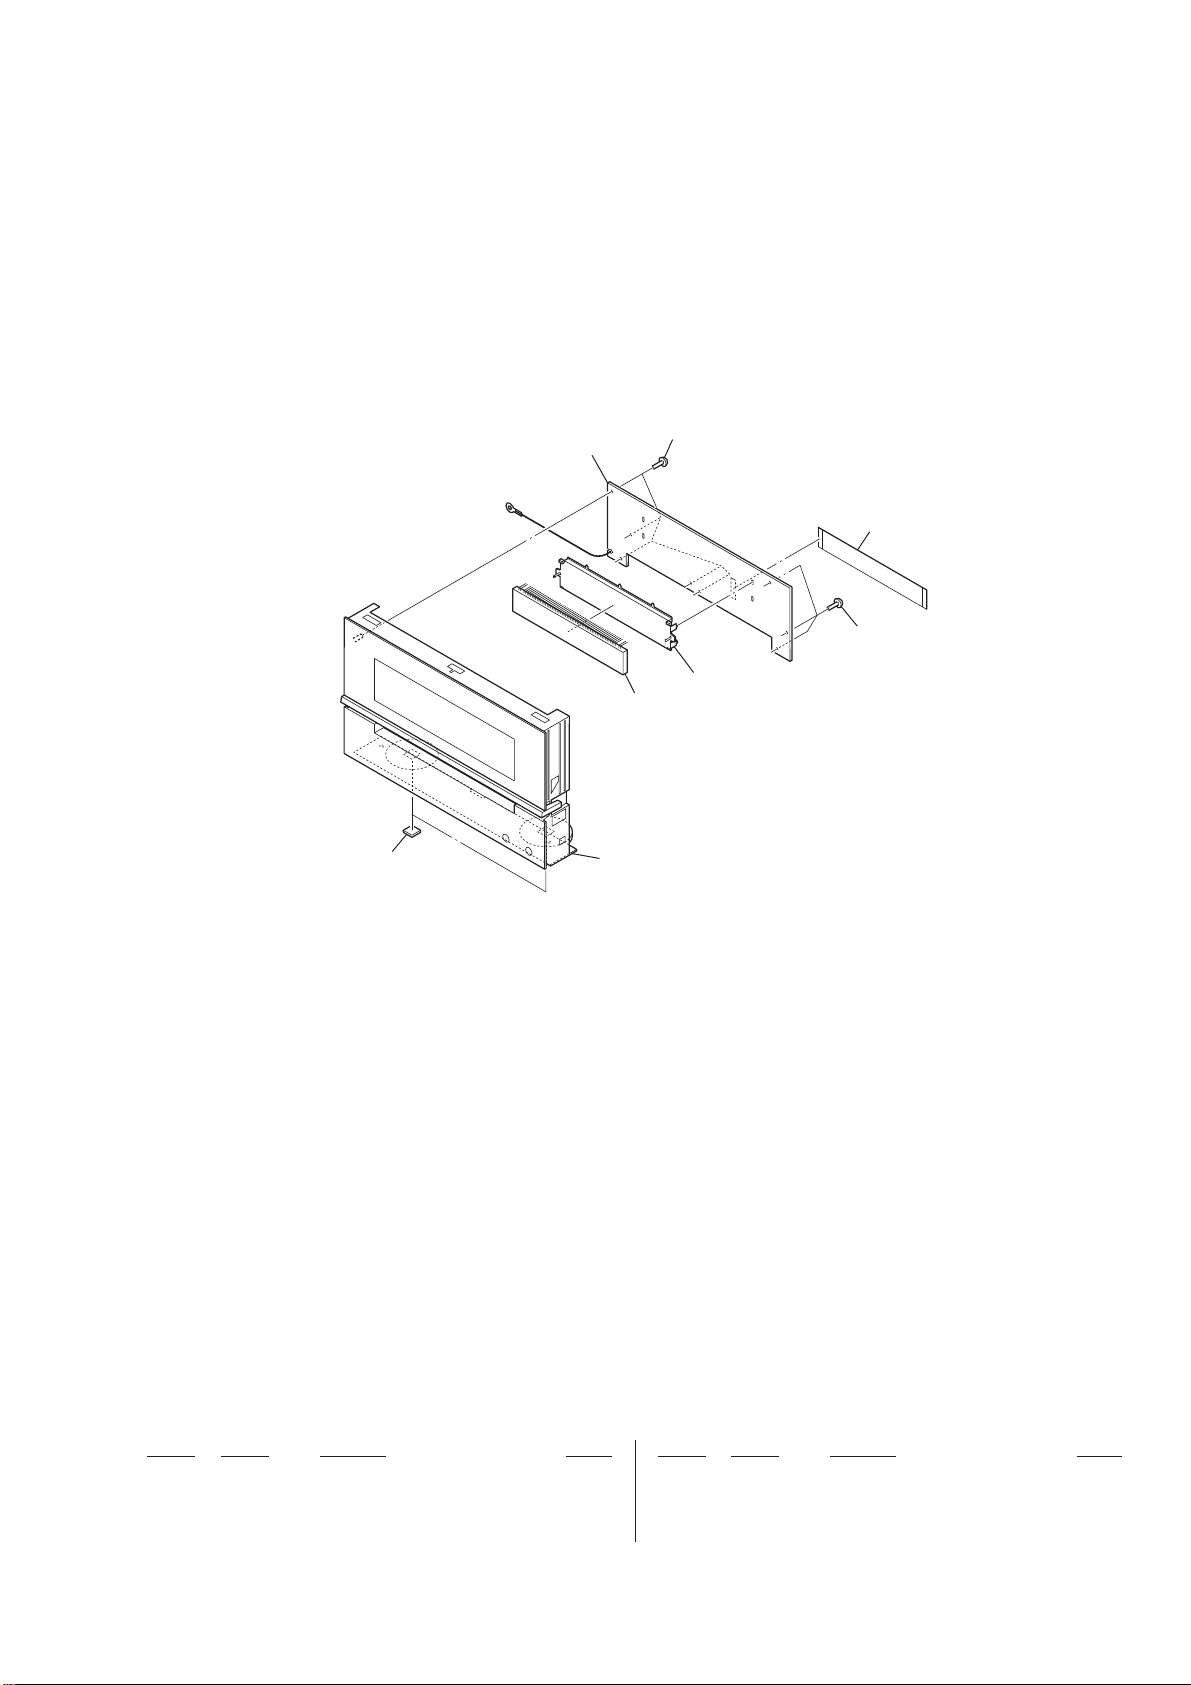
7-3. FRONT PANEL SECTION
HCD-BX70DBi
102
not supplied
(PANEL board)
104
105
104
not supplied
FL901
101
Ref. No. Part No. Description Remark Ref. No. Part No. Description Remark
101 A-1507-149-A PANEL ASSY, FRONT (for BLACK)
101 A-1510-810-A PANEL ASSY, FRONT (for SILVER)
102 4-233-372-02 FOOT (FELT)
104 3-087-053-01 +BVTP2.6 (3CR)
105 1-831-997-21 CABLE, FLEXIBLE FLAT (13 CORE)
FL901 1-519-993-21 INDICATOR TUBE, FLUORESCENT
47
Page 48
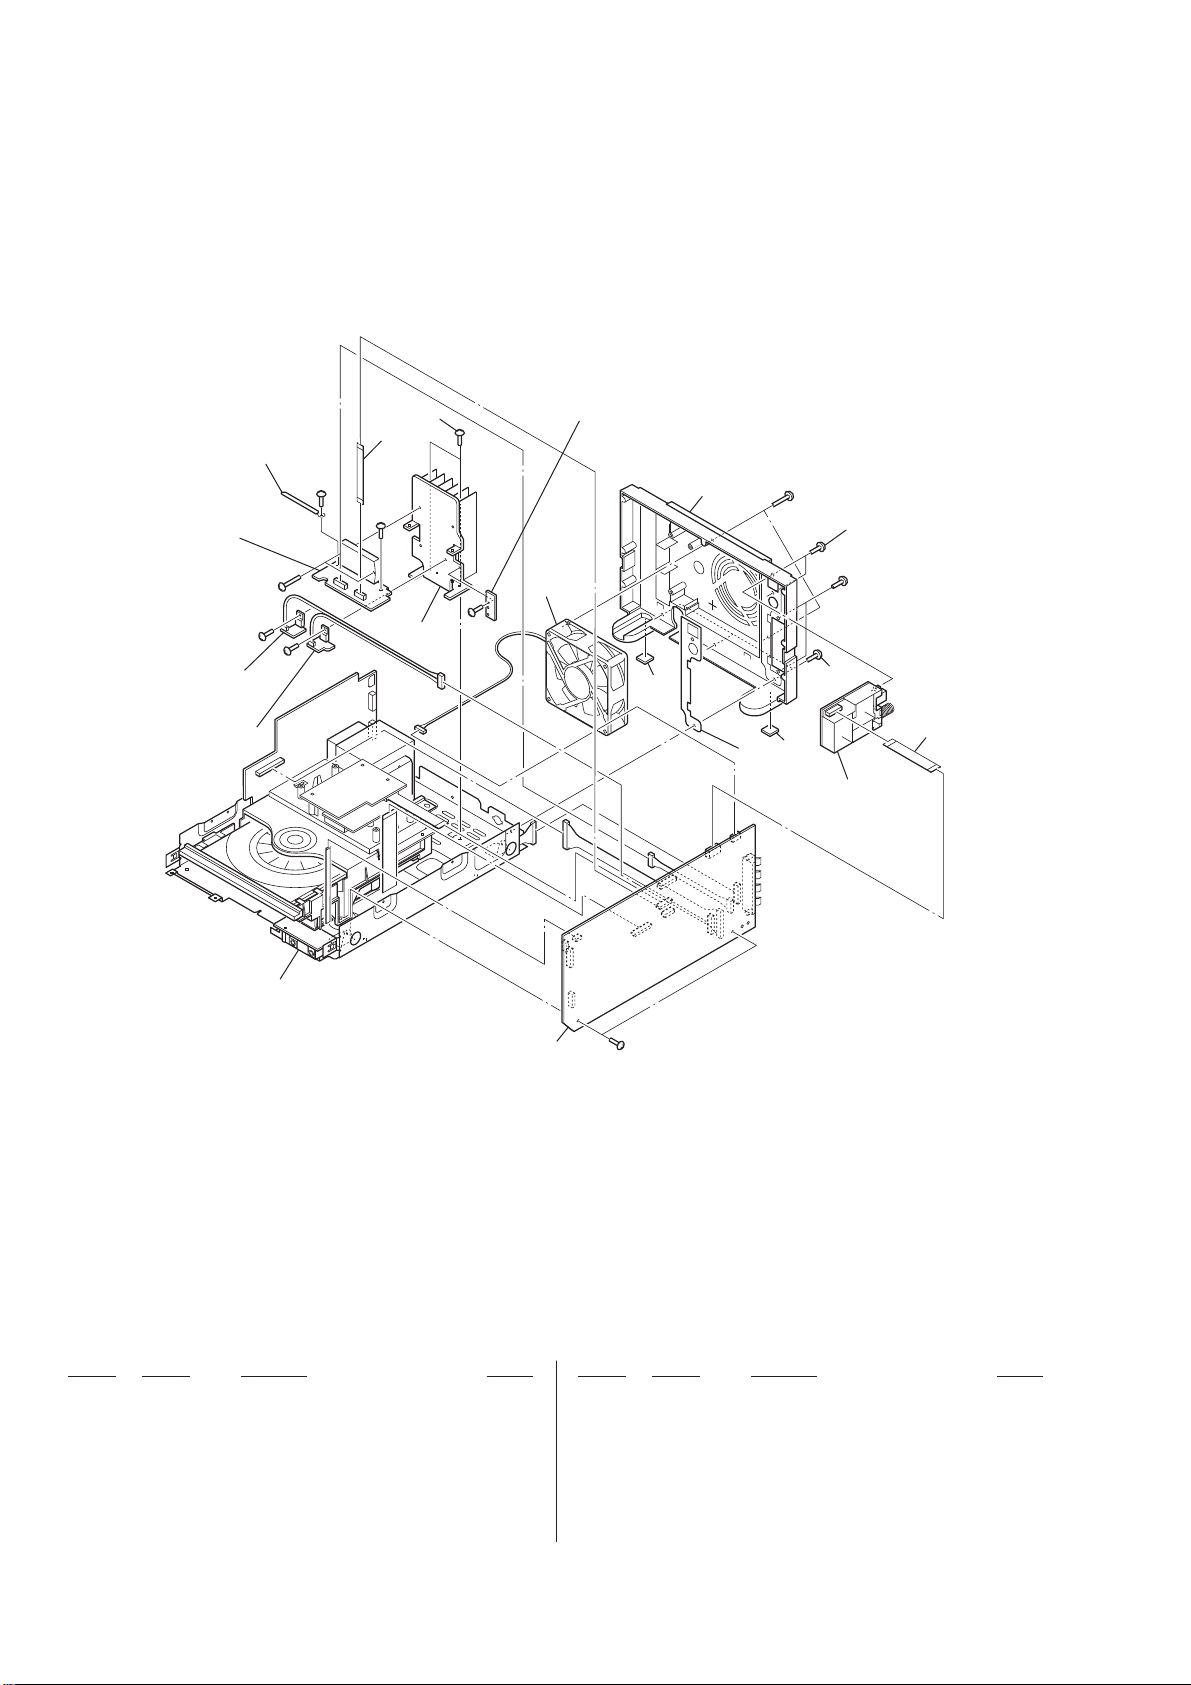
HCD-BX70DBi
7-4. MAIN BOARD SECTION
not supplied
#5
not supplied
(AMP board)
152
#5
153
not supplied
(GUARD board)
154
#7
160
not supplied
(5VREG board)
not supplied
(9VREG board)
POWER board section
#5
#7
#5
not
supplied
#5
M901
151
#1
157
not
supplied
#3
160
156
157
158
Ref. No. Part No. Description Remark Ref. No. Part No. Description Remark
151 A-1507-146-A MAIN BOARD, COMPLETE
152 1-832-803-21 CABLE, FLEXIBLE FLAT (7 CORE)
153 3-077-331-01 +BV3 (3-CR)
154 3-282-726-31 PANEL (REAR)
156 1-832-821-21 CABLE, FLEXIBLE FLAT (11 CORE)
157 4-233-372-02 FOOT (FELT)
158 1-693-759-11 TUNER (FM/AM)
160 2-580-628-01 SCREW, +BVST 3X6
M901 1-787-400-11 D.C. FAN
#1 7-685-871-01 SCREW +BVTT 3X6 (S)
#3 7-685-647-79 SCREW +BVTP 3X10 TYPE2 IT-3
#5 7-685-646-79 SCREW +BVTP 3X8 TYPE2 IT-3
#7 7-685-650-79 SCREW +BVTP 3X16 TYPE2 IT-3
48
Page 49
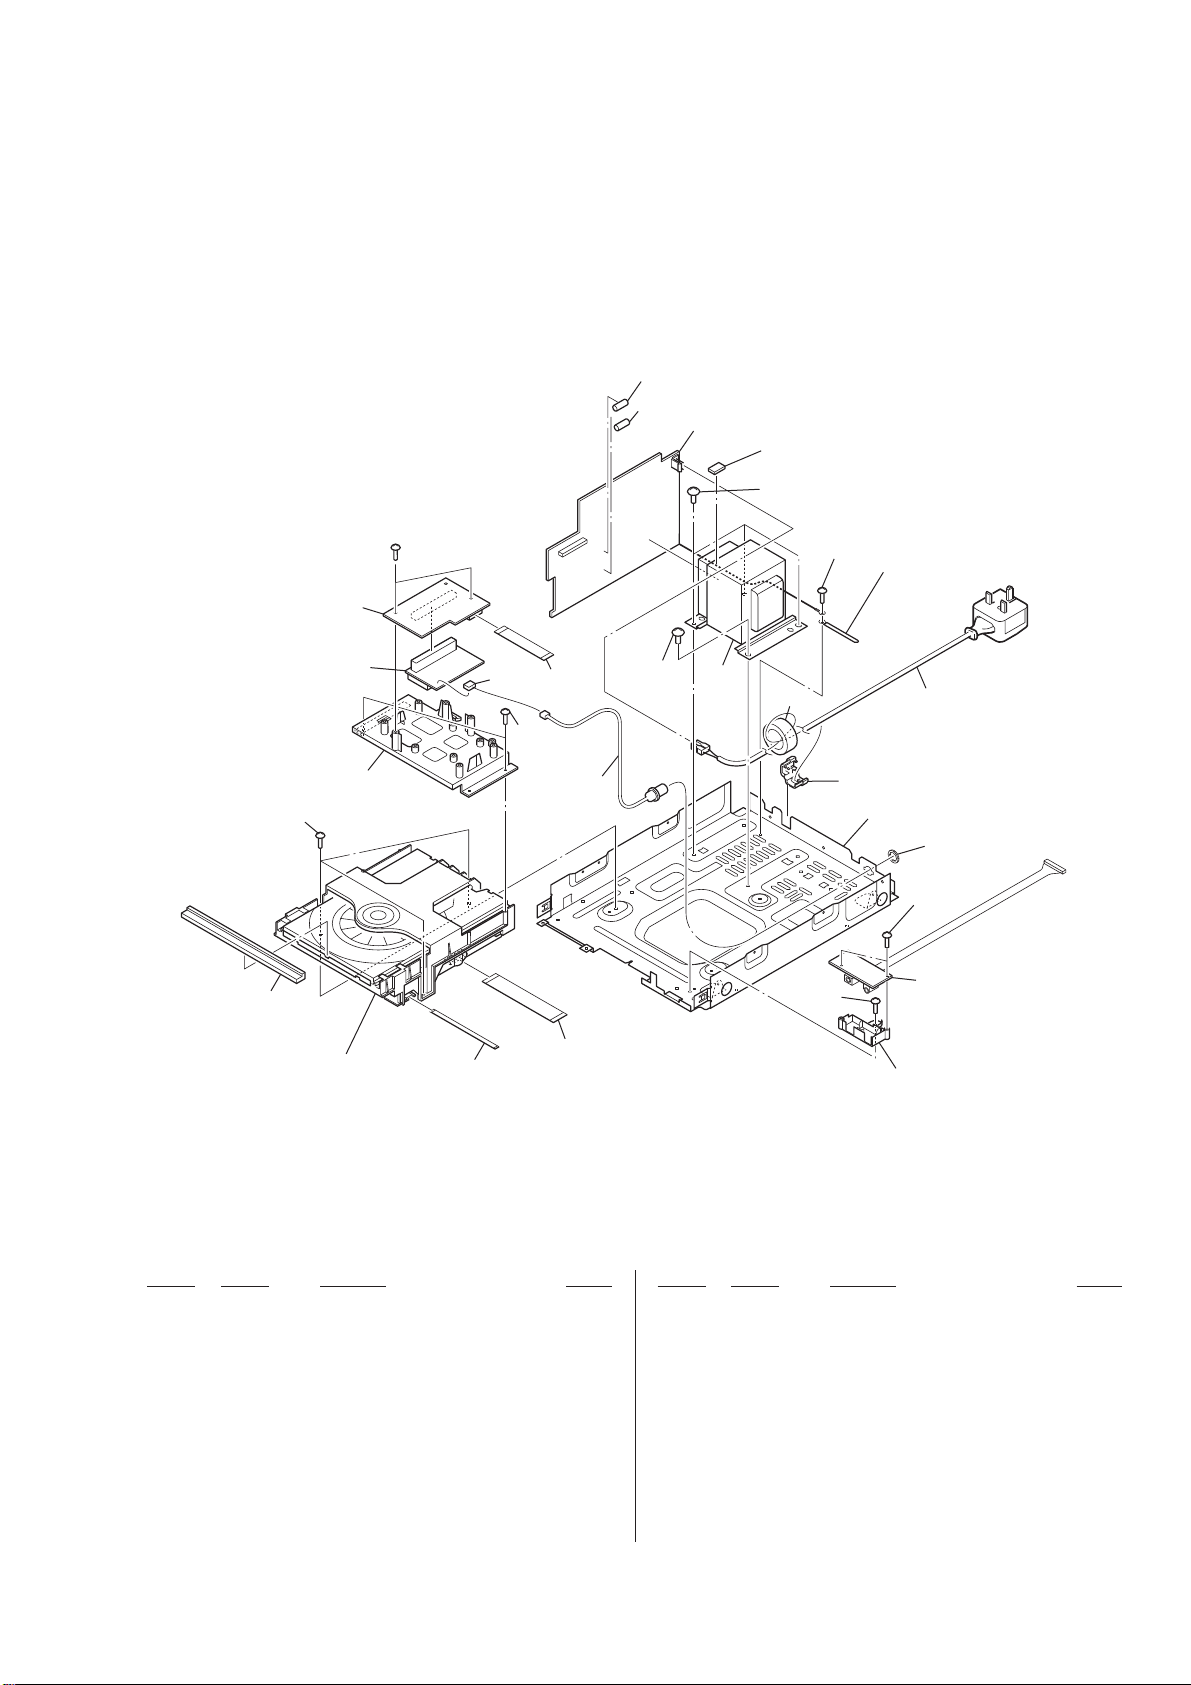
7-5. POWER BOARD SECTION
F902
F901
HCD-BX70DBi
Ver. 1.1
not supplied
(POWER board)
210
209
#5
218
215
not supplied
214
203
loading mechanism section
202
217
211
not supplied
219
201
209
T901
216
204
214
not supplied
212
213
not supplied
not supplied
211
not supplied
(HP board)
not supplied
Ref. No. Part No. Description Remark Ref. No. Part No. Description Remark
201 1-832-615-21 CABLE, FLEXIBLE FLAT (21 CORE)
202 1-834-979-21 CABLE, FLEXIBLE FLAT (5P)
203 3-281-653-01 DOOR CD (Mat Black) (for BLACK)
203 3-281-653-21 DOOR CD (Metallic Black) (for SILVER)
204 3-077-331-21 +BV3 (3-CR)
209 4-900-386-01 SCREW
210 2-594-960-41 SPACER (TRANSFORMER)
211 3-087-053-01 +BVTP2.6 (3CR)
0 212 1-834-966-21 CORD, POWER (AEP)
0 212 1-835-078-21 CORD, POWER (UK)
213 3-703-244-00 BUSHING (2104), CORD
214 3-077-331-01 +BV3 (3-CR)
215 1-480-340-41 MODULE (DAB TUNER)
216 1-500-868-11 CORE, FERRITE
217 1-821-551-11 PIN, CONNECTOR 2P
218 A-1507-152-A DAB BOARD, COMPLETE
219 1-831-706-21 CABLE, FLEXIBLE FLAT (11 CORE)
0 F901 1-532-388-33 FUSE (T2AL/250V)
0 F902 1-532-388-33 FUSE (T2AL/250V)
0 T901 1-445-142-11 TRANSFORMER, POWER
#5 7-685-646-79 SCREW +BVTP 3X8 TYPE2 IT-3
49
Page 50
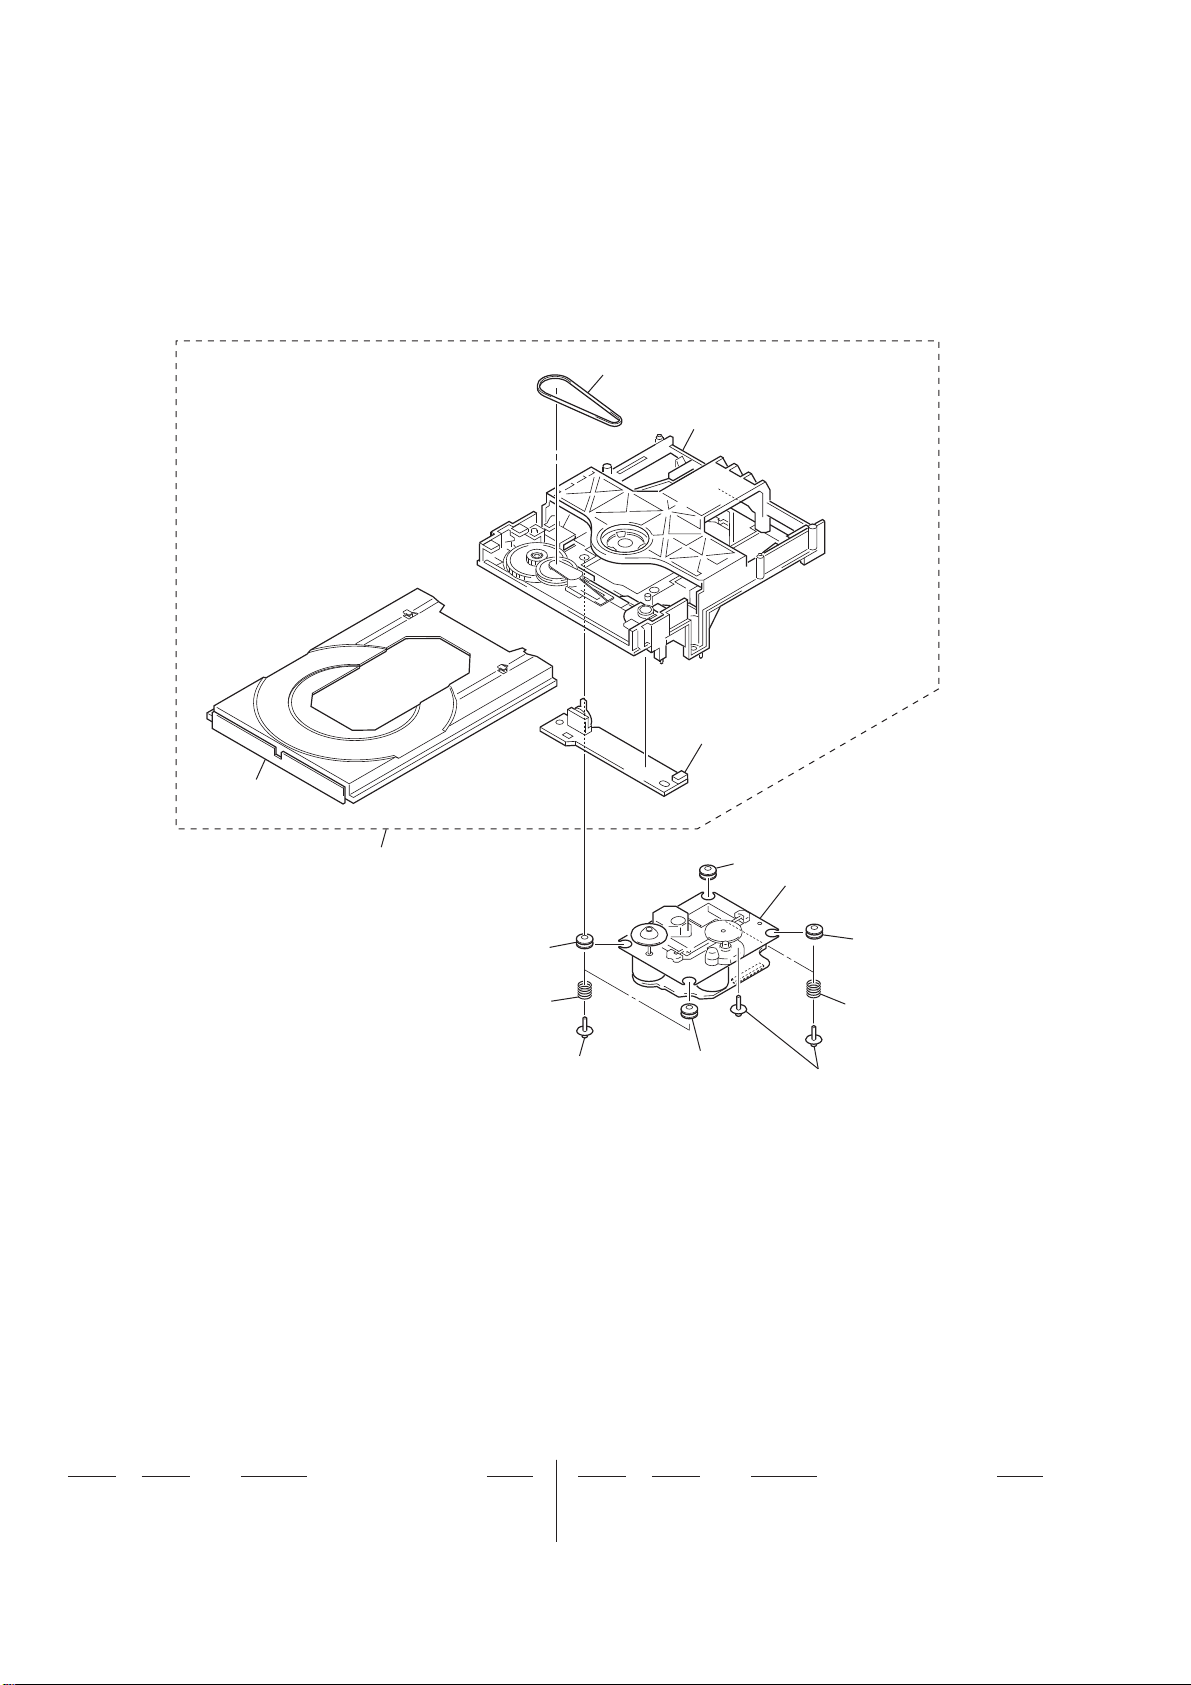
HCD-BX70DBi
7-6. LOADING MECHANISM SECTION
252
not supplied
not supplied
251
255
254
253
not supplied
(MOTOR board)
255
255
base unit section
255
254
253
Ref. No. Part No. Description Remark Ref. No. Part No. Description Remark
251 A-1242-967-A LOADING (BK) ASSY
252 3-080-478-01 BELT
253 4-985-672-01 SCREW (+PTPWH M2.6), FLOATING
254 4-227-045-41 SPRING (INSULATOR)
255 4-229-005-41 INSULATOR
50
Page 51
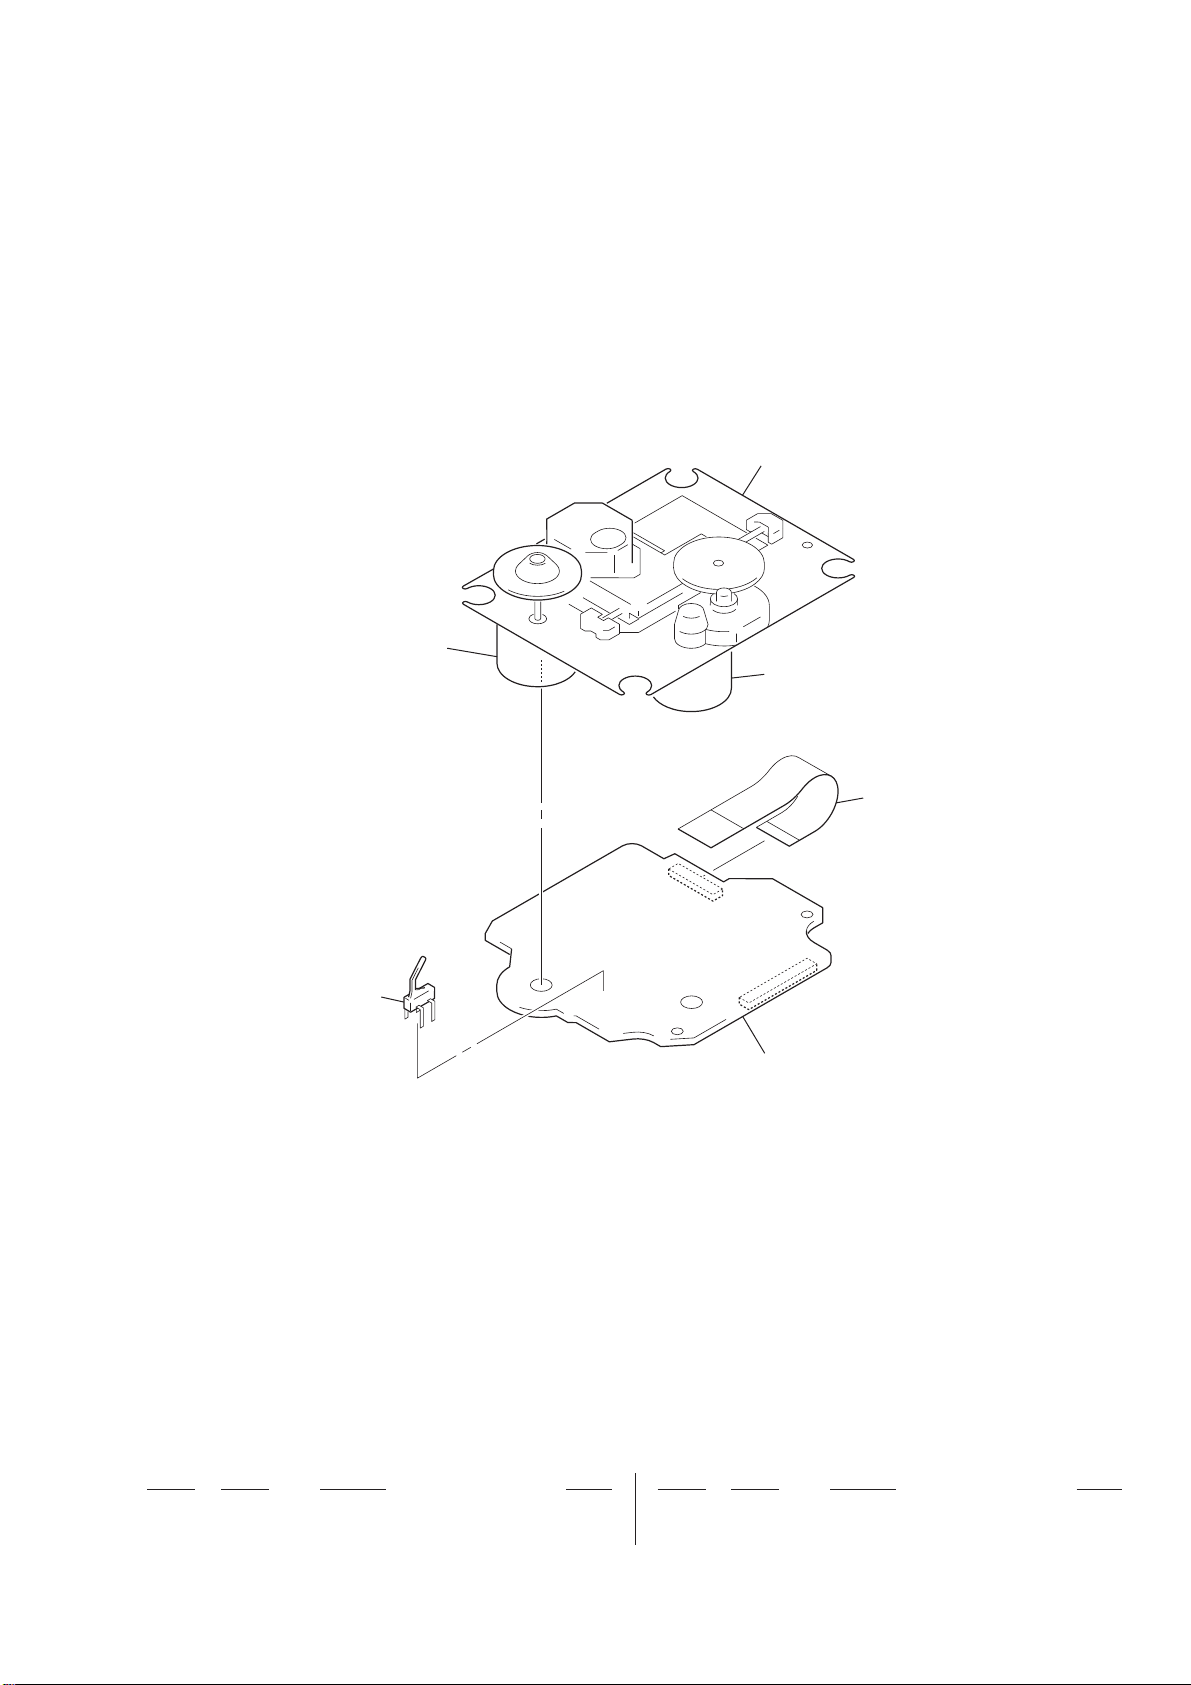
7-7. BASE UNIT SECTION
(BU-K6BD90-WOD)
HCD-BX70DBi
301
(including sled motor (M402),
spindle motor (M401))
spindle motor (M401)
S201
sled motor (M402)
302
303
Ref. No. Part No. Description Remark Ref. No. Part No. Description Remark
0 301 A-4735-357-A BASE ASSY, OP (KSM-213D)
302 1-832-404-21 CABLE, FLEXIBLE FLAT (16 CORE)
303 A-1217-914-A CD BOARD, COMPLETE
S201 1-771-853-11 SWITCH, DETECTION (LIMIT)
51
Page 52
HCD-BX70DBi
SECTION 8
5VREG
Note:
• Due to standardization, replacements in
the parts list may be different from the
parts specifi ed in the diagrams or the com-
ponents used on the set.
• -XX and -X mean standardized parts, so
they may have some difference from the
original one.
• Items marked “*” are not stocked since
they are seldom required for routine service. Some delay should be anticipated
when ordering these items.
• CAPACITORS
uF: μF
• COILS
uH: μH
Ref. No. Part No. Description Remark Ref. No. Part No. Description Remark
5VREG BOARD
************
< CAPACITOR >
C373 1-107-826-11 CERAMIC CHIP 0.1uF 10% 16V
C380 1-165-908-11 CERAMIC CHIP 1uF 10% 10V
< DIODE >
9VREG AMP
ELECTRICAL PARTS LIST
• RESISTORS
All resistors are in ohms.
METAL: Metal-fi lm resistor.
METAL OXIDE: Metal oxide-fi lm resistor .
F: nonfl ammable
• SEMICONDUCTORS
In each case, u: μ, for example:
uA. . : μA. . , uPA. . , μPA. . ,
uPB. . : μPB. . , uPC. . , μPC. . ,
uPD. . : μPD. .
C522 1-164-156-11 CERAMIC CHIP 0.1uF 25V
C523 1-162-915-11 CERAMIC CHIP 10PF 0.5PF 50V
C524 1-162-915-11 CERAMIC CHIP 10PF 0.5PF 50V
C525 1-162-966-11 CERAMIC CHIP 0.0022uF 10% 50V
C526 1-162-966-11 CERAMIC CHIP 0.0022uF 10% 50V
C527 1-162-966-11 CERAMIC CHIP 0.0022uF 10% 50V
C528 1-162-966-11 CERAMIC CHIP 0.0022uF 10% 50V
C529 1-126-948-11 ELECT 100uF 20% 35V
When indicating parts by reference number, please include the board name.
The components identifi ed by mark 0
or dotted line with mark 0 are critical for
safety.
Replace only with part number specifi ed.
D305 6-501-582-01 DIODE 1N4002-B5
< IC >
0 IC306 8-759-231-53 IC TA7805S
< RESISTOR >
R401 1-216-817-11 METAL CHIP 470 5%
R437 1-216-797-11 METAL CHIP 10 5% 1/10W
************************************************************
9VREG BOARD
************
< CAPACITOR >
C325 1-126-933-11 ELECT 100uF 20% 16V
C335 1-164-156-11 CERAMIC CHIP 0.1uF 25V
< IC >
0 IC305 6-700-830-01 IC KIA7809API
************************************************************
AMP BOARD
**********
< CAPACITOR >
C501
C502 1-162-962-11 CERAMIC CHIP 470PF 10% 50V
C503 1-126-947-11 ELECT 47uF 20% 35V
C504 1-162-962-11 CERAMIC CHIP 470PF 10% 50V
C505 1-162-927-11 CERAMIC CHIP 100PF 5% 50V
C506 1-126-947-11 ELECT 47uF 20% 35V
C511 1-126-964-11 ELECT 10uF 20% 50V
C512 1-126-964-11 ELECT 10uF 20% 50V
C515 1-164-156-11 CERAMIC CHIP 0.1uF 25V
C518 1-164-156-11 CERAMIC CHIP 0.1uF 25V
C519 1-126-925-91 ELECT 470uF 20% 10V
C521 1-164-156-11 CERAMIC CHIP 0.1uF 25V
1-162-927-11 CERAMIC CHIP 100PF 5% 50V
1/10W
< CONNECTOR >
CN308 1-568-826-11 CONNECTOR, FFC 7P
0 CN320 1-819-133-11 PIN, CONNECTOR
< EARTH TERMINAL >
EP501 1-537-771-21 TERMINAL BOARD, GROUND
EP502 1-537-771-21 TERMINAL BOARD, GROUND
< IC >
0 IC601 6-711-987-01 IC STK433-730-E
< RESISTOR >
R501 1-216-817-11 METAL CHIP 470 5% 1/10W
R502 1-216-841-11 METAL CHIP 47K 5% 1/10W
R503 1-216-821-11 METAL CHIP 1K 5% 1/10W
R504 1-216-841-11 METAL CHIP 47K 5% 1/10W
R505 1-216-841-11 METAL CHIP 47K 5% 1/10W
R506 1-216-817-11 METAL CHIP 470 5% 1/10W
R507 1-216-825-11 METAL CHIP 2.2K 5% 1/10W
R508 1-216-821-11 METAL CHIP 1K 5% 1/10W
R509 1-216-841-11 METAL CHIP 47K 5% 1/10W
R510 1-216-825-11 METAL CHIP 2.2K 5% 1/10W
R512 1-216-821-11 METAL CHIP 1K 5% 1/10W
R513 1-216-821-11 METAL CHIP 1K 5% 1/10W
R514 1-216-821-11 METAL CHIP 1K 5% 1/10W
R515 1-216-864-11 SHORT CHIP 0
R516 1-216-825-11 METAL CHIP 2.2K 5% 1/10W
R517 1-216-837-11 METAL CHIP 22K 5% 1/10W
R518 1-216-837-11 METAL CHIP 22K 5% 1/10W
R519 1-216-825-11 METAL CHIP 2.2K 5% 1/10W
R521 1-216-817-11 METAL CHIP 470 5% 1/10W
R522 1-216-817-11 METAL CHIP 470 5% 1/10W
R523 1-216-825-11 METAL CHIP 2.2K 5% 1/10W
R524 1-216-825-11 METAL CHIP 2.2K 5% 1/10W
0 R542 1-260-087-11 CARBON 100 5% 1/2W F
R543 1-216-853-11 METAL CHIP 470K 5% 1/10W
52
Page 53
HCD-BX70DBi
Ver. 1.2
AMP
Ref. No. Part No. Description Remark Ref. No. Part No. Description Remark
R544 1-216-853-11 METAL CHIP 470K 5% 1/10W
R545 1-216-833-11 METAL CHIP 10K 5% 1/10W
R546 1-216-864-11 SHORT CHIP 0
************************************************************
A-1217-914-A CD BOARD, COMPLETE
******************
< CAPACITOR >
C206 1-165-908-11 CERAMIC CHIP 1uF 10% 10V
C207 1-165-908-11 CERAMIC CHIP 1uF 10% 10V
C301 1-164-360-11 CERAMIC CHIP 0.1uF 16V
C302 1-137-710-91 CERAMIC CHIP 10uF 20% 6.3V
C303 1-137-710-91 CERAMIC CHIP 10uF 20% 6.3V
C306 1-128-995-21 ELECT CHIP 100uF 20% 10V
C307 1-165-908-11 CERAMIC CHIP 1uF 10% 10V
C309 1-162-964-11 CERAMIC CHIP 0.001uF 10% 50V
C401 1-128-394-11 ELECT CHIP 220uF 20% 10V
CD
C100 1-164-360-11 CERAMIC CHIP 0.1uF 16V
C101 1-164-360-11 CERAMIC CHIP 0.1uF 16V
C102 1-164-360-11 CERAMIC CHIP 0.1uF 16V
C103 1-164-360-11 CERAMIC CHIP 0.1uF 16V
C104 1-164-360-11 CERAMIC CHIP 0.1uF 16V
C105 1-164-360-11 CERAMIC CHIP 0.1uF 16V
C106 1-128-995-21 ELECT CHIP 100uF 20% 10V
C107 1-164-360-11 CERAMIC CHIP 0.1uF 16V
C108 1-164-360-11 CERAMIC CHIP 0.1uF 16V
C109 1-164-360-11 CERAMIC CHIP 0.1uF 16V
C110 1-164-360-11 CERAMIC CHIP 0.1uF 16V
C112 1-164-360-11 CERAMIC CHIP 0.1uF 16V
C113 1-164-360-11 CERAMIC CHIP 0.1uF 16V
C115 1-124-778-00 ELECT CHIP 22uF 20% 6.3V
C116 1-164-360-11 CERAMIC CHIP 0.1uF 16V
C117 1-164-227-11 CERAMIC CHIP 0.022uF 10% 25V
C118 1-162-970-11 CERAMIC CHIP 0.01uF 10% 25V
C119 1-164-227-11 CERAMIC CHIP 0.022uF 10% 25V
C120 1-162-970-11 CERAMIC CHIP 0.01uF 10% 25V
C122 1-164-315-11 CERAMIC CHIP 470PF 5% 50V
C123 1-164-315-11 CERAMIC CHIP 470PF 5% 50V
C124 1-162-968-11 CERAMIC CHIP 0.0047uF 10% 50V
C125 1-162-968-11 CERAMIC CHIP 0.0047uF 10% 50V
C126 1-107-826-11 CERAMIC CHIP 0.1uF 10% 16V
C127 1-162-966-11 CERAMIC CHIP 0.0022uF 10% 50V
C128 1-162-910-11 CERAMIC CHIP 5PF 0.25PF 50V
C130 1-162-910-11 CERAMIC CHIP 5PF 0.25PF 50V
C132 1-164-360-11 CERAMIC CHIP 0.1uF 16V
C133 1-107-826-11 CERAMIC CHIP 0.1uF 10% 16V
C136 1-162-923-11 CERAMIC CHIP 47PF 5% 50V
C137 1-162-970-11 CERAMIC CHIP 0.01uF 10% 25V
C138 1-164-315-11 CERAMIC CHIP 470PF 5% 50V
C139 1-162-970-11 CERAMIC CHIP 0.01uF 10% 25V
C140 1-162-970-11 CERAMIC CHIP 0.01uF 10% 25V
C141 1-162-966-11 CERAMIC CHIP 0.0022uF 10% 50V
C142 1-107-826-11 CERAMIC CHIP 0.1uF 10% 16V
C143 1-162-970-11 CERAMIC CHIP 0.01uF 10% 25V
C144 1-107-826-11 CERAMIC CHIP 0.1uF 10% 16V
C145 1-162-970-11 CERAMIC CHIP 0.01uF 10% 25V
C146 1-164-315-11 CERAMIC CHIP 470PF 5% 50V
C147 1-107-826-11 CERAMIC CHIP 0.1uF 10% 16V
C148 1-162-923-11 CERAMIC CHIP 47PF 5% 50V
C149 1-162-919-11 CERAMIC CHIP 22PF 5% 50V
C150 1-162-964-11 CERAMIC CHIP 0.001uF 10% 50V
C151 1-164-315-11 CERAMIC CHIP 470PF 5% 50V
C152 1-164-315-11 CERAMIC CHIP 470PF 5% 50V
C153 1-164-360-11 CERAMIC CHIP 0.1uF 16V
C201 1-128-995-21 ELECT CHIP 100uF 20% 10V
C202 1-128-995-21 ELECT CHIP 100uF 20% 10V
C204 1-164-360-11 CERAMIC CHIP 0.1uF 16V
C205 1-164-360-11 CERAMIC CHIP 0.1uF 16V
C403 1-164-360-11 CERAMIC CHIP 0.1uF 16V
C404 1-164-360-11 CERAMIC CHIP 0.1uF 16V
C405 1-164-360-11 CERAMIC CHIP 0.1uF 16V
< CONNECTOR >
CN201 1-784-833-51 CONNECTOR, FFC (LIF (NON-ZIF)) 21P
CN301 1-770-425-51 CONNECTOR, FFC/FPC 16P
< IC >
IC101 6-709-624-01 IC TC94A70FG-006
IC201 6-710-808-01
IC401 6-710-637-01 IC BA5826SFP-E2
< TRANSISTOR >
Q301 6-551-120-01 TRANSISTOR 2SA2119K
< RESISTOR >
R101 1-216-813-11 METAL CHIP 220 5% 1/10W
R102 1-216-833-11 METAL CHIP 10K 5% 1/10W
R104 1-216-295-91 SHORT CHIP 0
R105 1-216-857-11 METAL CHIP 1M 5% 1/10W
R106 1-216-821-11 METAL CHIP 1K 5% 1/10W
R108 1-216-864-11 SHORT CHIP 0
R110 1-216-833-11 METAL CHIP 10K 5% 1/10W
R111 1-216-809-11 METAL CHIP 100 5% 1/10W
R112 1-216-809-11 METAL CHIP 100 5% 1/10W
R113 1-216-833-11 METAL CHIP 10K 5% 1/10W
R114 1-216-833-11 METAL CHIP 10K 5% 1/10W
R118 1-216-845-11 METAL CHIP 100K 5% 1/10W
R120 1-216-864-11 SHORT CHIP 0
R125 1-216-864-11 SHORT CHIP 0
R126 1-216-864-11 SHORT CHIP 0
R127 1-216-864-11 SHORT CHIP 0
R128 1-216-853-11 METAL CHIP 470K 5% 1/10W
R129 1-216-821-11 METAL CHIP 1K 5% 1/10W
R130 1-216-829-11 METAL CHIP 4.7K 5% 1/10W
R134 1-216-857-11 METAL CHIP 1M 5% 1/10W
R135 1-216-853-11 METAL CHIP 470K 5% 1/10W
R136 1-216-837-11 METAL CHIP 22K 5% 1/10W
R139 1-216-841-11 METAL CHIP 47K 5% 1/10W
R140 1-216-864-11 SHORT CHIP 0
R142 1-216-837-11 METAL CHIP 22K 5% 1/10W
R143 1-216-841-11 METAL CHIP 47K 5% 1/10W
R144 1-216-837-11 METAL CHIP 22K 5% 1/10W
R145 1-216-864-11 SHORT CHIP 0
R146 1-216-864-11 SHORT CHIP 0
R147 1-216-864-11 SHORT CHIP 0
R148 1-216-864-11 SHORT CHIP 0
R149 1-216-864-11 SHORT CHIP 0
R150 1-216-864-11 SHORT CHIP 0
R151 1-216-864-11 SHORT CHIP 0
IC TK63115SCL-G@GT
5353
Page 54
HCD-BX70DBi
CD
DAB HP
Ref. No. Part No. Description Remark Ref. No. Part No. Description Remark
R153 1-216-857-11 METAL CHIP 1M 5% 1/10W
C828 1-126-929-11 ELECT 4700uF 20% 10V
R154 1-216-857-11 METAL CHIP 1M 5% 1/10W
R155 1-216-805-11 METAL CHIP 47 5% 1/10W
R156 1-216-809-11 METAL CHIP 100 5% 1/10W
R157 1-216-809-11 METAL CHIP 100 5% 1/10W
R201 1-216-295-91 SHORT CHIP 0
R202 1-216-295-91 SHORT CHIP 0
R203 1-216-809-11 METAL CHIP 100 5% 1/10W
R204 1-216-809-11 METAL CHIP 100 5% 1/10W
R205 1-216-809-11 METAL CHIP 100 5% 1/10W
R206 1-216-809-11 METAL CHIP 100 5% 1/10W
R207 1-216-809-11 METAL CHIP 100 5% 1/10W
R208 1-216-809-11 METAL CHIP 100 5% 1/10W
R209 1-216-809-11 METAL CHIP 100 5% 1/10W
R210 1-216-809-11 METAL CHIP 100 5% 1/10W
R211 1-216-809-11 METAL CHIP 100 5% 1/10W
R212 1-216-809-11 METAL CHIP 100 5% 1/10W
R218 1-216-845-11 METAL CHIP 100K 5% 1/10W
R219 1-216-845-11 METAL CHIP 100K 5% 1/10W
R220 1-216-845-11 METAL CHIP 100K 5% 1/10W
R221 1-216-845-11 METAL CHIP 100K 5% 1/10W
R222 1-216-845-11 METAL CHIP 100K 5% 1/10W
R223 1-216-845-11 METAL CHIP 100K 5% 1/10W
R301 1-216-845-11 METAL CHIP 100K 5% 1/10W
R302 1-216-864-11 SHORT CHIP 0
R303 1-216-789-11 METAL CHIP 2.2 5% 1/10W
R304 1-216-789-11 METAL CHIP 2.2 5% 1/10W
R402 1-216-825-11 METAL CHIP 2.2K 5% 1/10W
R405 1-216-833-11 METAL CHIP 10K 5% 1/10W
R408 1-216-825-11 METAL CHIP 2.2K 5% 1/10W
R414 1-216-829-11 METAL CHIP 4.7K 5% 1/10W
R415 1-216-841-11 METAL CHIP 47K 5% 1/10W
C833 1-126-160-11 ELECT 1uF 20% 50V
C834 1-126-160-11 ELECT 1uF 20% 50V
< CONNECTOR >
CN800 1-821-719-11 P.W.B CONNECTOR 30P
CN801 1-568-854-11 CONNECTOR, FFC 11P
< DIODE >
D804 6-501-582-01 DIODE 1N4002-B5
D805 6-501-582-01 DIODE 1N4002-B5
< JUMPER RESISTOR >
FB801 1-216-864-11 SHORT CHIP 0
FB802 1-216-864-11 SHORT CHIP 0
< IC >
IC801 6-702-302-01 IC TK11133CSCL-G
IC802 6-711-033-01 IC TK68112AS2G0L-C
IC803 8-759-100-96
< RESISTOR >
R800 1-216-833-11 METAL CHIP 10K 5% 1/10W
R801 1-216-841-11 METAL CHIP 47K 5% 1/10W
R802 1-216-829-11 METAL CHIP 4.7K 5% 1/10W
R803 1-216-864-11 SHORT CHIP 0
R804 1-216-864-11 SHORT CHIP 0
R805 1-216-837-11 METAL CHIP 22K 5% 1/10W
R806 1-216-837-11 METAL CHIP 22K 5% 1/10W
R807 1-216-837-11 METAL CHIP 22K 5% 1/10W
R808 1-216-837-11 METAL CHIP 22K 5% 1/10W
R809 1-216-864-11 SHORT CHIP 0
IC uPC4558G2
< VIBRATOR >
X102 1-795-101-21 VIBRATOR, CERAMIC (16.9344MHz)
************************************************************
A-1507-152-A DAB BOARD, COMPLETE
********************
< CAPACITOR >
C802 1-165-908-11 CERAMIC CHIP 1uF 10% 10V
C803 1-115-467-11 CERAMIC CHIP 0.22uF 10% 10V
C804 1-165-908-11 CERAMIC CHIP 1uF 10% 10V
C805 1-125-972-91 ELECT 100uF 20% 16V
C806 1-107-726-91 CERAMIC CHIP 0.01uF 10% 16V
C807 1-107-826-11 CERAMIC CHIP 0.1uF 10% 16V
C808 1-165-908-11 CERAMIC CHIP 1uF 10% 10V
C811 1-162-960-11 CERAMIC CHIP 220PF 10% 50V
C812 1-162-960-11 CERAMIC CHIP 220PF 10% 50V
C813 1-162-960-11 CERAMIC CHIP 220PF 10% 50V
C814 1-162-960-11 CERAMIC CHIP 220PF 10% 50V
C817 1-126-160-11 ELECT 1uF 20% 50V
C818 1-126-160-11 ELECT 1uF 20% 50V
C820 1-164-156-11 CERAMIC CHIP 0.1uF 25V
C821 1-164-156-11 CERAMIC CHIP 0.1uF 25V
C823 1-126-176-11 ELECT 220uF 20% 10V
C824 1-126-176-11 ELECT 220uF 20% 10V
C825 1-107-826-11 CERAMIC CHIP 0.1uF 10% 16V
C827 1-165-908-11 CERAMIC CHIP 1uF 10% 10V
R810 1-216-837-11 METAL CHIP 22K 5% 1/10W
R811 1-216-837-11 METAL CHIP 22K 5% 1/10W
R813 1-216-837-11 METAL CHIP 22K 5% 1/10W
R814 1-216-837-11 METAL CHIP 22K 5% 1/10W
R815 1-216-821-11 METAL CHIP 1K 5% 1/10W
R816 1-216-821-11 METAL CHIP 1K 5% 1/10W
R817 1-216-841-11 METAL CHIP 47K 5% 1/10W
R818 1-216-841-11 METAL CHIP 47K 5% 1/10W
R825 1-216-829-11 METAL CHIP 4.7K 5% 1/10W
R826 1-216-829-11 METAL CHIP 4.7K 5% 1/10W
R830 1-216-809-11 METAL CHIP 100 5% 1/10W
R832 1-216-809-11 METAL CHIP 100 5% 1/10W
************************************************************
HP BOARD
*********
< CAPACITOR >
C131 1-162-962-11 CERAMIC CHIP 470PF 10% 50V
C231 1-162-962-11 CERAMIC CHIP 470PF 10% 50V
C531 1-162-974-11 CERAMIC CHIP 0.01uF 50V
C581 1-162-974-11 CERAMIC CHIP 0.01uF 50V
< JACK >
J301 1-566-822-51 JACK (AUDIO)
J500 1-815-629-21 JACK (PHONES)
54
Page 55
HCD-BX70DBi
HP IP MAIN
Ref. No. Part No. Description Remark Ref. No. Part No. Description Remark
< RESISTOR >
R132 1-216-841-11 METAL CHIP 47K 5% 1/10W
R133 1-216-821-11 METAL CHIP 1K 5% 1/10W
R232 1-216-841-11 METAL CHIP 47K 5% 1/10W
R233 1-216-821-11 METAL CHIP 1K 5% 1/10W
R531 1-216-817-11 METAL CHIP 470 5% 1/10W
R532 1-216-817-11 METAL CHIP 470 5% 1/10W
R533 1-216-817-11 METAL CHIP 470 5% 1/10W
R534 1-216-817-11 METAL CHIP 470 5% 1/10W
R535 1-216-817-11 METAL CHIP 470 5% 1/10W
R536 1-216-817-11 METAL CHIP 470 5% 1/10W
R537 1-216-833-11 METAL CHIP 10K 5% 1/10W
R538 1-216-833-11 METAL CHIP 10K 5% 1/10W
R539 1-216-833-11 METAL CHIP 10K 5% 1/10W
R540 1-216-833-11 METAL CHIP 10K 5% 1/10W
R581 1-216-817-11 METAL CHIP 470 5% 1/10W
R582 1-216-817-11 METAL CHIP 470 5% 1/10W
R583 1-216-817-11 METAL CHIP 470 5% 1/10W
R584 1-216-817-11 METAL CHIP 470 5% 1/10W
R585 1-216-817-11 METAL CHIP 470 5% 1/10W
R586 1-216-817-11 METAL CHIP 470 5% 1/10W
R587 1-216-833-11 METAL CHIP 10K 5% 1/10W
R588 1-216-833-11 METAL CHIP 10K 5% 1/10W
R589 1-216-833-11 METAL CHIP 10K 5% 1/10W
R590 1-216-833-11 METAL CHIP 10K 5% 1/10W
************************************************************
A-1466-251-A IP BOARD, COMPLETE
******************
< CAPACITOR >
Q103 6-551-750-01 TRANSISTOR 2SD2114KT146W
Q104 6-551-750-01 TRANSISTOR 2SD2114KT146W
Q105 6-551-750-01 TRANSISTOR 2SD2114KT146W
Q106 8-729-028-73 TRANSISTOR DTA114EUA-T106
< RESISTOR >
R101 1-216-809-11 METAL CHIP 100 5% 1/10W
R102 1-216-809-11 METAL CHIP 100 5% 1/10W
R103 1-216-809-11 METAL CHIP 100 5% 1/10W
R104 1-216-809-11 METAL CHIP 100 5% 1/10W
R105 1-216-833-11 METAL CHIP 10K 5% 1/10W
R106 1-218-892-11 METAL CHIP 75K 0.5% 1/10W
R107 1-218-895-11 METAL CHIP 100K 0.5% 1/10W
R108 1-218-895-11 METAL CHIP 100K 0.5% 1/10W
R109 1-218-895-11 METAL CHIP 100K 0.5% 1/10W
R110 1-218-895-11 METAL CHIP 100K 0.5% 1/10W
R111 1-218-892-11 METAL CHIP 75K 0.5% 1/10W
R112 1-218-903-11 METAL CHIP 220K 0.5% 1/10W
R113 1-218-907-11 METAL CHIP 330K 0.5% 1/10W
R114 1-216-809-11 METAL CHIP 100 5% 1/10W
R115 1-216-809-11 METAL CHIP 100 5% 1/10W
R117 1-216-839-11 METAL CHIP 33K 5% 1/10W
R118 1-216-864-11 SHORT CHIP 0
R122 1-216-833-11 METAL CHIP 10K 5% 1/10W
R132 1-216-833-11 METAL CHIP 10K 5% 1/10W
R135 1-216-833-11 METAL CHIP 10K 5% 1/10W
R136 1-216-809-11 METAL CHIP 100 5% 1/10W
R137 1-216-809-11 METAL CHIP 100 5% 1/10W
R138 1-216-809-11 METAL CHIP 100 5% 1/10W
R139 1-216-845-11 METAL CHIP 100K 5% 1/10W
R140 1-216-845-11 METAL CHIP 100K 5% 1/10W
C101 1-107-826-11 CERAMIC CHIP 0.1uF 10% 16V
C102 1-107-826-11 CERAMIC CHIP 0.1uF 10% 16V
C103 1-107-826-11 CERAMIC CHIP 0.1uF 10% 16V
C104 1-107-826-11 CERAMIC CHIP 0.1uF 10% 16V
C105 1-115-467-11 CERAMIC CHIP 0.22uF 10% 10V
C108 1-165-989-11 CERAMIC CHIP 10uF 10% 6.3V
C109 1-128-392-11 ELECT CHIP 470uF 20% 6.3V
C111 1-107-826-11 CERAMIC CHIP 0.1uF 10% 16V
C114 1-128-004-11 ELECT CHIP 10uF 20% 16V
C115 1-128-004-11 ELECT CHIP 10uF 20% 16V
C118 1-107-826-11 CERAMIC CHIP 0.1uF 10% 16V
C119 1-162-964-11 CERAMIC CHIP 0.001uF 10% 50V
C120 1-107-826-11 CERAMIC CHIP 0.1uF 10% 16V
< CONNECTOR >
CN101 1-766-382-21 PIN, CONNECTOR (1.5mm) (SMD) 10P
CN102 1-820-701-11 PIN, CONNECTOR 30P (iPod)
< DIODE >
D102 8-719-071-34 DIODE RB521S-30-TE61
D104 8-719-071-34 DIODE RB521S-30-TE61
< IC >
IC101 6-807-873-01 IC R5F21246SN060FP
IC102 6-702-302-01 IC TK11133CSCL-G
IC103 6-707-593-01 IC PST3641UL
Q102 6-551-750-01 TRANSISTOR 2SD2114KT146W
< TRANSISTOR >
R141 1-216-821-11 METAL CHIP 1K 5% 1/10W
R142 1-216-821-11 METAL CHIP 1K 5% 1/10W
R143 1-216-821-11 METAL CHIP 1K 5% 1/10W
R144 1-216-821-11 METAL CHIP 1K 5% 1/10W
R146 1-216-833-11 METAL CHIP 10K 5% 1/10W
R147 1-216-845-11 METAL CHIP 100K 5% 1/10W
R148 1-216-845-11 METAL CHIP 100K 5% 1/10W
R149 1-216-809-11 METAL CHIP 100 5% 1/10W
R150 1-216-833-11 METAL CHIP 10K 5% 1/10W
< VIBRATOR >
X101 1-795-375-11 VIBRATOR, CERAMIC (20MHz)
************************************************************
A-1507-146-A MAIN BOARD, COMPLETE
********************
< CAPACITOR >
C101 1-165-908-11 CERAMIC CHIP 1uF 10% 10V
C102 1-126-960-11 ELECT 1uF 20% 50V
C103 1-165-908-11 CERAMIC CHIP 1uF 10% 10V
C104 1-165-908-11 CERAMIC CHIP 1uF 10% 10V
C108 1-126-961-11 ELECT 2.2uF 20% 50V
C109 1-165-908-11 CERAMIC CHIP 1uF 10% 10V
C111 1-162-968-11 CERAMIC CHIP 0.0047uF 10% 50V
C113 1-162-962-11 CERAMIC CHIP 470PF 10% 50V
C114 1-126-960-11 ELECT 1uF 20% 50V
C116 1-126-963-11 ELECT 4.7uF 20% 50V
C117 1-162-962-11 CERAMIC CHIP 470PF 10% 50V
C119 1-100-597-91 CERAMIC CHIP 0.1uF 10% 25V
5555
Page 56

HCD-BX70DBi
MAIN
Ref. No. Part No. Description Remark Ref. No. Part No. Description Remark
C120 1-126-960-11 ELECT 1uF 20% 50V
C122 1-100-597-91 CERAMIC CHIP 0.1uF 10% 25V
C123 1-162-974-11 CERAMIC CHIP 0.01uF 50V
C366 1-164-156-11 CERAMIC CHIP 0.1uF 25V
C367 1-126-935-11 ELECT 470uF 20% 16V
C368 1-164-156-11 CERAMIC CHIP 0.1uF 25V
C125 1-117-863-11 CERAMIC CHIP 0.47uF 10% 6.3V
C126 1-126-960-11 ELECT 1uF 20% 50V
C127 1-126-960-11 ELECT 1uF 20% 50V
C130 1-162-962-11 CERAMIC CHIP 470PF 10% 50V
C132 1-162-966-11 CERAMIC CHIP 0.0022uF 10% 50V
C201 1-165-908-11 CERAMIC CHIP 1uF 10% 10V
C202 1-126-960-11 ELECT 1uF 20% 50V
C203 1-165-908-11 CERAMIC CHIP 1uF 10% 10V
C204 1-165-908-11 CERAMIC CHIP 1uF 10% 10V
C208 1-126-961-11 ELECT 2.2uF 20% 50V
C209 1-165-908-11 CERAMIC CHIP 1uF 10% 10V
C211 1-162-968-11 CERAMIC CHIP 0.0047uF 10% 50V
C213 1-162-962-11 CERAMIC CHIP 470PF 10% 50V
C214 1-126-160-11 ELECT 1uF 20% 50V
C216 1-126-963-11 ELECT 4.7uF 20% 50V
C217 1-162-962-11 CERAMIC CHIP 470PF 10% 50V
C219 1-100-597-91 CERAMIC CHIP 0.1uF 10% 25V
C220 1-126-160-11 ELECT 1uF 20% 50V
C222 1-100-597-91 CERAMIC CHIP 0.1uF 10% 25V
C223 1-162-974-11 CERAMIC CHIP 0.01uF 50V
C225 1-117-863-11 CERAMIC CHIP 0.47uF 10% 6.3V
C226 1-126-960-11 ELECT 1uF 20% 50V
C227 1-126-960-11 ELECT 1uF 20% 50V
C230 1-162-962-11 CERAMIC CHIP 470PF 10% 50V
C232 1-162-966-11 CERAMIC CHIP 0.0022uF 10% 50V
C301 1-126-963-11 ELECT 4.7uF 20% 50V
C302 1-164-156-11 CERAMIC CHIP 0.1uF 25V
C303 1-126-933-11 ELECT 100uF 20% 16V
C304 1-124-589-11 ELECT 47uF 20% 16V
C305 1-162-970-11 CERAMIC CHIP 0.01uF 10% 25V
C307 1-124-589-11 ELECT 47uF 20% 16V
C310 1-162-919-11 CERAMIC CHIP 22PF 5% 50V
C311 1-162-919-11 CERAMIC CHIP 22PF 5% 50V
C316 1-164-156-11 CERAMIC CHIP 0.1uF 25V
C319 1-126-923-91 ELECT 220uF 20% 10V
C324 1-126-933-11 ELECT 100uF 20% 16V
C330 1-164-156-11 CERAMIC CHIP 0.1uF 25V
C333 1-164-156-11 CERAMIC CHIP 0.1uF 25V
C336 1-126-965-91 ELECT 22uF 20% 50V
C337 1-165-908-11 CERAMIC CHIP 1uF 10% 10V
C338 1-164-156-11 CERAMIC CHIP 0.1uF 25V
C339 1-164-156-11 CERAMIC CHIP 0.1uF 25V
C340 1-164-156-11 CERAMIC CHIP 0.1uF 25V
C341 1-107-826-11 CERAMIC CHIP 0.1uF 10% 16V
C342 1-107-826-11 CERAMIC CHIP 0.1uF 10% 16V
C344 1-115-456-21 DOUBLE LAYER 0.22F 5.5V
C348 1-164-156-11 CERAMIC CHIP 0.1uF 25V
C350 1-126-964-11 ELECT 10uF 20% 50V
C351 1-126-933-11 ELECT 100uF 20% 16V
C352 1-126-947-11 ELECT 47uF 20% 35V
C369 1-126-157-11 ELECT 10uF 20% 16V
C371 1-130-495-00 MYLAR 0.1uF 5% 50V
C375 1-130-495-00 MYLAR 0.1uF 5% 50V
C377 1-130-495-00 MYLAR 0.1uF 5% 50V
C379 1-130-495-00 MYLAR 0.1uF 5% 50V
C382 1-164-156-11 CERAMIC CHIP 0.1uF 25V
C386 1-104-662-91 ELECT 22uF 20% 25V
C387 1-124-589-11 ELECT 47uF 20% 16V
C389 1-125-972-91 ELECT 100uF 20% 16V
C391 1-126-925-91 ELECT 470uF 20% 10V
C394 1-126-961-11 ELECT 2.2uF 20% 50V
C395 1-126-961-11 ELECT 2.2uF 20% 50V
C498 1-164-156-11 CERAMIC CHIP 0.1uF 25V
C499 1-164-156-11 CERAMIC CHIP 0.1uF 25V
C766 1-107-726-91 CERAMIC CHIP 0.01uF 10% 16V
< CONNECTOR >
CN301 1-784-770-11 CONNECTOR, FFC 9P
CN305 1-779-289-11 CONNECTOR, FFC (LIF (NON-ZIF)) 21P
CN306 1-784-774-11 CONNECTOR, FFC 13P
CN309 1-568-826-11 CONNECTOR, FFC 7P
CN310 1-568-854-11 CONNECTOR, FFC 11P
CN311 1-779-273-11 CONNECTOR, FFC (LIF (NON-ZIF)) 5P
0 CN312 1-819-134-11 PIN, CONNECTOR 6P
CN313 1-819-145-11 PIN, CONNECTOR 3P
CN316 1-819-136-11 PIN, CONNECTOR 8P
CN322 1-815-445-11 PIN, CONNECTOR (PWB) 4P
* CN325 1-815-451-11 PIN, CONNECTOR (PWB) 10P
CN326 1-568-830-11 CONNECTOR, FFC 11P
< DIODE >
D302 6-501-163-01 DIODE UDZW-TE17-3.6B
D303 6-500-334-01 DIODE MC2836-T112-1
D304 6-501-164-01 DIODE UDZW-TE17-3.9B
D309 6-501-817-01 DIODE MA2J1110GLS0
D313 6-500-335-01 DIODE MC2838-T112-1
D318 6-501-582-01 DIODE 1N4002-B5
D319 6-501-579-01 DIODE MC2837
D320 6-501-579-01 DIODE MC2837
D321 6-501-582-01 DIODE 1N4002-B5
D322 6-500-334-01 DIODE MC2836-T112-1
D323 6-501-582-01 DIODE 1N4002-B5
D325 6-501-817-01 DIODE MA2J1110GLS0
D329 6-501-817-01 DIODE MA2J1110GLS0
D330 6-501-817-01 DIODE MA2J1110GLS0
D331 6-501-582-01 DIODE 1N4002-B5
D332 6-500-334-01 DIODE MC2836-T112-1
D774 6-500-334-01 DIODE MC2836-T112-1
< EARTH TERMINAL >
C355 1-107-826-11 CERAMIC CHIP 0.1uF 10% 16V
C359 1-164-156-11 CERAMIC CHIP 0.1uF 25V
C361 1-107-826-11 CERAMIC CHIP 0.1uF 10% 16V
C362 1-164-156-11 CERAMIC CHIP 0.1uF 25V
C363 1-126-933-11 ELECT 100uF 20% 16V
C364 1-126-964-11 ELECT 10uF 20% 50V
C365 1-126-935-11 ELECT 470uF 20% 16V
56
EP301 1-537-771-21 TERMINAL BOARD, GROUND
EP302 1-537-771-21 TERMINAL BOARD, GROUND
< IC >
IC201 6-710-887-01 IC R5523N001B-TR-F
IC301 A-1548-734-A IC R5F3640DDFAR (for SERVICE)
IC303 8-759-100-96 IC uPC4558G2
Page 57

HCD-BX70DBi
MAIN
Ref. No. Part No. Description Remark Ref. No. Part No. Description Remark
IC304 6-712-055-01 IC BD3499FV-E2
IC307 6-700-830-01 IC KIA7809API
JR498 1-216-864-11 SHORT CHIP 0
IC310 6-702-038-11 IC PST3628NR
IC311 8-759-598-69 IC BA6956AN
IC312 8-759-430-37 IC MC14052BDTR2
< JACK >
J302 1-780-275-11 TERMINAL BOARD, PUSH (4P) (SPEAKER L/R)
< JUMPER RESISTOR >
JR101 1-216-864-1
JR201 1-216-864-11 SHORT CHIP 0
JR211 1-216-864-11 SHORT CHIP 0
JR213 1-216-864-11 SHORT CHIP 0
JR214 1-216-864-11 SHORT CHIP 0
JR219 1-216-864-11 SHORT CHIP 0
JR221 1-216-864-11 SHORT CHIP 0
JR222 1-216-864-11 SHORT CHIP 0
JR223 1-216-864-11 SHORT CHIP 0
JR301 1-216-864-11 SHORT CHIP 0
JR302 1-216-296-11 SHORT CHIP 0
JR303 1-216-864-11 SHORT CHIP 0
JR304 1-216-864-11 SHORT CHIP 0
JR305 1-216-864-11 SHORT CHIP 0
JR306 1-216-864-11 SHORT CHIP 0
JR307 1-216-864-11 SHORT CHIP 0
JR308 1-216-864-11 SHORT CHIP 0
JR309 1-216-864-11 SHORT CHIP 0
JR312 1-216-864-11 SHORT CHIP 0
JR313 1-216-864-11 SHORT CHIP 0
JR314 1-216-864-11 SHORT CHIP 0
JR315 1-216-864-11 SHORT CHIP 0
JR316 1-216-864-11 SHORT CHIP 0
JR317 1-216-864-11 SHORT CHIP 0
JR318 1-216-296-11 SHORT CHIP 0
JR319 1-216-296-11 SHORT CHIP 0
JR320 1-216-864-11 SHORT CHIP 0
JR321 1-216-296-11 SHORT CHIP 0
JR322 1-216-296-11 SHORT CHIP 0
JR323 1-216-864-11 SHORT CHIP 0
JR324 1-216-864-11 SHORT CHIP 0
JR325 1-216-864-11 SHORT CHIP 0
JR326 1-216-864-11 SHORT CHIP 0
JR327 1-216-864-11 SHORT CHIP 0
JR328 1-216-864-11 SHORT CHIP 0
JR329 1-216-296-11 SHORT CHIP 0
JR330 1-216-864-11 SHORT CHIP 0
JR331 1-216-864-11 SHORT CHIP 0
JR332 1-216-864-11 SHORT CHIP 0
JR333 1-216-864-11 SHORT CHIP 0
JR334 1-216-864-11 SHORT CHIP 0
JR335 1-216-864-11 SHORT CHIP 0
JR336 1-216-864-11 SHORT CHIP 0
JR337 1-216-864-11 SHORT CHIP 0
JR340 1-216-864-11 SHORT CHIP 0
JR341 1-216-864-11 SHORT CHIP 0
JR342 1-216-296-11 SHORT CHIP 0
JR343 1-216-296-11 SHORT CHIP 0
JR344 1-216-296-11 SHORT CHIP 0
JR345 1-216-296-11 SHORT CHIP 0
1 SHORT CHIP 0
< COIL >
L101 1-422-009-13 COIL, AIR-CORE
L201 1-422-009-13 COIL, AIR-CORE
< TRANSISTOR >
Q103 6-550-889-01 TRANSISTOR 2SC5938-T112-1B
Q203 6-550-889-01 TRANSISTOR 2SC5938-T112-1B
Q301 8-729-120-28 TRANSISTOR 2SC1623-L5L6
Q302 8-729-027-43 TRANSISTOR DTC114EKA-T146
Q303 8-729-027-38 TRANSISTOR DTA144EKA-T146
Q304 8-729-037-03 TRANSISTOR KTA1266GR-AT
Q305 8-729-120-28 TRANSISTOR 2SC1623-L5L6
Q306 8-729-120-28 TRANSISTOR 2SC1623-L5L6
Q307 8-729-120-28 TRANSISTOR 2SC1623-L5L6
Q309 8-729-120-28 TRANSISTOR 2SC1623-L5L6
Q312 8-729-038-28 TRANSISTOR RT1N441C-TP-1
Q313 6-551-696-01 TRANSISTOR ISA1235AC1TP-1EF
Q315 8-729-120-28 TRANSISTOR 2SC1623-L5L6
Q316 8-729-120-28 TRANSISTOR 2SC1623-L5L6
Q317 8-729-037-03 TRANSISTOR KTA1266GR-AT
Q319 8-729-027-43 TRANSISTOR DTC114EKA-T146
Q320 8-729-027-43 TRANSISTOR DTC114EKA-T146
Q333 8-729-027-43 TRANSISTOR DTC114EKA-T146
Q338 8-729-027-43 TRANSISTOR DTC114EKA-T146
Q340 8-729-027-43 TRANSISTOR DTC114EKA-T146
Q341 8-729-027-38 TRANSISTOR DTA144EKA-T146
Q342 6-551-696-01 TRANSISTOR ISA1235AC1TP-1EF
Q343 8-729-120-28 TRANSISTOR 2SC1623-L5L6
Q344 8-729-120-28 TRANSISTOR 2SC1623-L5L6
Q345 8-729-120-28 TRANSISTOR 2SC1623-L5L6
Q347 8-729-120-28 TRANSISTOR 2SC1623-L5L6
Q348 8-729-120-28 TRANSISTOR 2SC1623-L5L6
Q390 8-729-028-54 TRANSISTOR KTC3205
Q392 8-729-036-86 TRANSISTOR KTC3203Y-AT
Q393 6-551-696-01 TRANSISTOR ISA1235AC1TP-1EF
< RESISTOR >
R101 1-216-825-11 METAL CHIP 2.2K 5% 1/10W
R102 1-216-829-11 METAL CHIP 4.7K 5% 1/10W
R103 1-216-841-11 METAL CHIP 47K 5% 1/10W
R104 1-216-829-11 METAL CHIP 4.7K 5% 1/10W
R105 1-216-829-11 METAL CHIP 4.7K 5% 1/10W
R106 1-216-841-11 METAL CHIP 47K 5% 1/10W
R109 1-216-829-11 METAL CHIP 4.7K 5% 1/10W
R110 1-216-837-11 METAL CHIP 22K 5% 1/10W
R117 1-216-841-11 METAL CHIP 47K 5% 1/10W
R119 1-216-845-11 METAL CHIP 100K 5% 1/10W
R120 1-216-845-11 METAL CHIP 100K 5% 1/10W
R121 1-216-845-11 METAL CHIP 100K 5% 1/10W
R122 1-218-879-11 METAL CHIP 22K 0.5% 1/10W
R123 1-218-879-11 METAL CHIP 22K 0.5% 1/10W
R124 1-216-837-11 METAL CHIP 22K 5% 1/10W
R125 1-216-837-11 METAL CHIP 22K 5% 1/10W
R126 1-216-837-11 METAL CHIP 22K 5% 1/10W
R128 1-216-821-11 METAL CHIP 1K 5% 1/10W
R129 1-216-793-11 METAL CHIP 4.7 5% 1/10W
R130 1-216-793-11 METAL CHIP 4.7 5% 1/10W
5757
Page 58

HCD-BX70DBi
MAIN
Ref. No. Part No. Description Remark Ref. No. Part No. Description Remark
R131 1-216-837-11 METAL CHIP 22K 5% 1/10W
R134 1-216-829-11 METAL CHIP 4.7K 5% 1/10W
R153 1-260-304-51 CARBON 10 5% 1/2W
R201 1-216-825-11 METAL CHIP 2.2K 5% 1/10W
R202 1-216-829-11 METAL CHIP 4.7K 5% 1/10W
R413 1-216-841-11 METAL CHIP 47K 5% 1/10W
R414 1-216-805-11 METAL CHIP 47 5% 1/10W
R415 1-216-833-11 METAL CHIP 10K 5% 1/10W
R416 1-216-841-11 METAL CHIP 47K 5% 1/10W
R417 1-216-833-11 METAL CHIP 10K 5% 1/10W
R203 1-216-841-11 METAL CHIP 47K 5% 1/10W
R204 1-216-829-11 METAL CHIP 4.7K 5% 1/10W
R205 1-216-829-11 METAL CHIP 4.7K 5% 1/10W
R206 1-216-841-11 METAL CHIP 47K 5% 1/10W
R209 1-216-829-11 METAL CHIP 4.7K 5% 1/10W
R210 1-216-837-11 METAL CHIP 22K 5% 1/10W
R217 1-216-841-11 METAL CHIP 47K 5% 1/10W
R219 1-216-845-11 METAL CHIP 100K 5% 1/10W
R220 1-216-845-11 METAL CHIP 100K 5% 1/10W
R221 1-216-845-11 METAL CHIP 100K 5% 1/10W
R222 1-218-879-11 METAL CHIP 22K 0.5% 1/10W
R223 1-218-879-11 METAL CHIP 22K 0.5% 1/10W
R224 1-216-837-11 METAL CHIP 22K 5% 1/10W
R225 1-216-837-11 METAL CHIP 22K 5% 1/10W
R226 1-216-837-11 METAL CHIP 22K 5% 1/10W
R227 1-216-837-11 METAL CHIP 22K 5% 1/10W
R228 1-216-821-11 METAL CHIP 1K 5% 1/10W
R229 1-216-793-11 METAL CHIP 4.7 5% 1/10W
R230 1-216-793-11 METAL CHIP 4.7 5% 1/10W
R231 1-216-837-11 METAL CHIP 22K 5% 1/10W
R234 1-216-829-11 METAL CHIP 4.7K 5% 1/10W
R253 1-260-304-51 CARBON 10 5% 1/2W
R301 1-216-830-11 METAL CHIP 5.6K 5% 1/10W
R302 1-216-845-11 METAL CHIP 100K 5% 1/10W
R303 1-216-845-11 METAL CHIP 100K 5% 1/10W
R307 1-216-821-11 METAL CHIP 1K 5% 1/10W
R308 1-249-401-11 CARBON 47 5% 1/4W
R309 1-216-809-11 METAL CHIP 100 5% 1/10W
R311 1-216-841-11 METAL CHIP 47K 5% 1/10W
R312 1-249-401-11 CARBON 47 5% 1/4W
R419 1-216-841-11 METAL CHIP 47K 5% 1/10W
R420 1-216-841-11 METAL CHIP 47K 5% 1/10W
R421 1-216-833-11 METAL CHIP 10K 5% 1/10W
R422 1-216-829-11 METAL CHIP 4.7K 5% 1/10W
R424 1-216-829-11 METAL CHIP 4.7K 5% 1/10W
R425 1-216-845-11 METAL CHIP 100K 5% 1/10W
R427 1-216-837-11 METAL CHIP 22K 5% 1/10W
R428 1-216-821-11 METAL CHIP 1K 5% 1/10W
R429 1-216-829-11 METAL CHIP 4.7K 5% 1/10W
R430 1-216-829-11 METAL CHIP 4.7K 5% 1/10W
R431 1-216-841-11 METAL CHIP 47K 5% 1/10W
R432 1-216-829-11 METAL CHIP 4.7K 5% 1/10W
R433 1-216-829-11 METAL CHIP 4.7K 5% 1/10W
R435 1-216-825-11 METAL CHIP 2.2K 5% 1/10W
R436 1-216-837-11 METAL CHIP 22K 5% 1/10W
R439 1-216-841-11 METAL CHIP 47K 5% 1/10W
R441 1-216-829-11 METAL CHIP 4.7K 5% 1/10W
R449 1-216-789-11 METAL CHIP 2.2 5% 1/10W
R450 1-216-789-11 METAL CHIP 2.2 5% 1/10W
R453 1-216-809-11 METAL CHIP 100 5% 1/10W
R458 1-216-841-11 METAL CHIP 47K 5% 1/10W
R459 1-216-805-11 METAL CHIP 47 5% 1/10W
R460 1-216-805-11 METAL CHIP 47 5% 1/10W
R461 1-216-841-11 METAL CHIP 47K 5% 1/10W
R462 1-216-821-11 METAL CHIP 1K 5% 1/10W
R463 1-216-833-11 METAL CHIP 10K 5% 1/10W
R464 1-216-833-11 METAL CHIP 10K 5% 1/10W
R465 1-216-841-11 METAL CHIP 47K 5% 1/10W
R466 1-216-841-11 METAL CHIP 47K 5% 1/10W
R467 1-216-829-11 METAL CHIP 4.7K 5% 1/10W
R313 1-216-825-11 METAL CHIP 2.2K 5% 1/10W
R314 1-249-401-11 CARBON 47 5% 1/4W
R315 1-216-845-11 METAL CHIP 100K 5% 1/10W
R316 1-216-845-11 METAL CHIP 100K 5% 1/10W
R317 1-216-841-11 METAL CHIP 47K 5% 1/10W
R344 1-216-809-11 METAL CHIP 100 5% 1/10W
R345 1-216-841-11 METAL CHIP 47K 5% 1/10W
R347 1-216-853-11 METAL CHIP 470K 5% 1/10W
R348 1-216-837-11 METAL CHIP 22K 5% 1/10W
R349 1-216-857-11 METAL CHIP 1M 5% 1/10W
R356 1-216-841-11 METAL CHIP 47K 5% 1/10W
R359 1-216-833-11 METAL CHIP 10K 5% 1/10W
R360 1-216-833-11 METAL CHIP 10K 5% 1/10W
R361 1-216-825-11 METAL CHIP 2.2K 5% 1/10W
R362 1-216-825-11 METAL CHIP 2.2K 5% 1/10W
R364 1-216-809-11 METAL CHIP 100 5% 1/10W
R396 1-216-837-11 METAL CHIP 22K 5% 1/10W
R403 1-216-819-11 METAL CHIP 680 5% 1/10W
R404 1-216-819-11 METAL CHIP 680 5% 1/10W
R406 1-216-849-11 METAL CHIP 220K 5% 1/10W
R408 1-216-825-11 METAL CHIP 2.2K 5% 1/10W
R409 1-216-841-11 METAL CHIP 47K 5% 1/10W
R410 1-216-845-11 METAL CHIP 100K 5% 1/10W
R411 1-216-829-11 METAL CHIP 4.7K 5% 1/10W
R412 1-216-833-11 METAL CHIP 10K 5% 1/10W
R468 1-216-829-11 METAL CHIP 4.7K 5% 1/10W
R469 1-216-845-11 METAL CHIP 100K 5% 1/10W
R470 1-216-845-11 METAL CHIP 100K 5% 1/10W
R471 1-216-833-11 METAL CHIP 10K 5% 1/10W
R472 1-216-821-11 METAL CHIP 1K 5% 1/10W
R473 1-216-833-11 METAL CHIP 10K 5% 1/10W
R475 1-216-829-11 METAL CHIP 4.7K 5% 1/10W
R477 1-216-821-11 METAL CHIP 1K 5% 1/10W
R478 1-216-833-11 METAL CHIP 10K 5% 1/10W
R481 1-216-805-11 METAL CHIP 47 5% 1/10W
R482 1-216-797-11 METAL CHIP 10 5% 1/10W
R484 1-216-849-11 METAL CHIP 220K 5% 1/10W
R485 1-216-845-11 METAL CHIP 100K 5% 1/10W
R487 1-216-833-11 METAL CHIP 10K 5% 1/10W
R488 1-216-833-11 METAL CHIP 10K 5% 1/10W
R489 1-216-825-11 METAL CHIP 2.2K 5% 1/10W
R492 1-216-833-11 METAL CHIP 10K 5% 1/10W
R493 1-216-833-11 METAL CHIP 10K 5% 1/10W
R494 1-216-833-11 METAL CHIP 10K 5% 1/10W
R495 1-216-809-11 METAL CHIP 100 5% 1/10W
R496 1-216-845-11 METAL CHIP 100K 5% 1/10W
R498 1-216-825-11 METAL CHIP 2.2K 5% 1/10W
R500 1-216-837-11 METAL CHIP 22K 5% 1/10W
R511 1-216-829-11 METAL CHIP 4.7K 5% 1/10W
R600 1-216-837-11 METAL CHIP 22K 5% 1/10W
58
Page 59
HCD-BX70DBi
MAIN MOTOR PANEL
Ref. No. Part No. Description Remark Ref. No. Part No. Description Remark
R611 1-216-829-11 METAL CHIP 4.7K 5% 1/10W
R700 1-216-809-11 METAL CHIP 100 5% 1/10W
R701 1-216-809-11 METAL CHIP 100 5% 1/10W
R702 1-216-809-11 METAL CHIP 100 5% 1/10W
R703 1-216-809-11 METAL CHIP 100 5% 1/10W
X302 1-814-062-21 VIBRATOR, CERAMIC (5MHz)
************************************************************
MOTOR BOARD
*************
R704 1-216-809-11 METAL CHIP 100 5% 1/10W
R705 1-216-809-11 METAL CHIP 100 5% 1/10W
R706 1-216-809-11 METAL CHIP 100 5% 1/10W
R707 1-216-809-11 METAL CHIP 100 5% 1/10W
R709 1-216-833-11 METAL CHIP 10K 5% 1/10W
R711 1-216-849-11 METAL CHIP 220K 5% 1/10W
R713 1-216-864-11 SHORT CHIP 0
R716 1-216-864-11 SHORT CHIP 0
R717 1-216-833-11 METAL CHIP 10K 5% 1/10W
R718 1-216-809-11 METAL CHIP 100 5% 1/10W
R719 1-216-809-11 METAL CHIP 100 5% 1/10W
R720 1-216-841-11 METAL CHIP 47K 5% 1/10W
R722 1-216-809-11 METAL CHIP 100 5% 1/10W
R724 1-216-809-11 METAL CHIP 100 5% 1/10W
R725 1-216-809-11 METAL CHIP 100 5% 1/10W
R726 1-216-809-11 METAL CHIP 100 5% 1/10W
R727 1-216-809-11 METAL CHIP 100 5% 1/10W
R728 1-216-809-11 METAL CHIP 100 5% 1/10W
R731 1-216-809-11 METAL CHIP 100 5% 1/10W
R732 1-216-809-11 METAL CHIP 100 5% 1/10W
R733 1-216-809-11 METAL CHIP 100 5% 1/10W
R734 1-216-809-11 METAL CHIP 100 5% 1/10W
R741 1-216-833-11 METAL CHIP 10K 5% 1/10W
R746 1-216-833-11 METAL CHIP 10K 5% 1/10W
R747 1-216-809-11 METAL CHIP 100 5% 1/10W
R748 1-216-809-11 METAL CHIP 100 5% 1/10W
R751 1-216-809-11 METAL CHIP 100 5% 1/10W
R752 1-216-809-11 METAL CHIP 100 5% 1/10W
R753 1-216-809-11 METAL CHIP 100 5% 1/10W
R757 1-216-809-11 METAL CHIP 100 5% 1/10W
< CONNECTOR >
CN001 1-779-542-21 CONNECTOR, FFC (LIF (NON-ZIF)) 5P
< SWITCH >
S001 1-786-509-11 SWITCH, ROTARY
(DISC TRAY OPEN/CLOSE DETECT)
************************************************************
PANEL BOARD
************
< CAPACITOR >
C804 1-165-908-11 CERAMIC CHIP 1uF 10% 10V
C805 1-126-947-11 ELECT 47uF 20% 35V
C811 1-162-974-11 CERAMIC CHIP 0.01uF 50V
C812 1-162-974-11 CERAMIC CHIP 0.01uF 50V
C814 1-126-965-91 ELECT 22uF 20% 50V
C815 1-126-965-91 ELECT 22uF 20% 50V
C816 1-162-923-11 CERAMIC CHIP 47PF 5% 50V
C841 1-164-156-11 CERAMIC CHIP 0.1uF 25V
C907 1-164-227-11 CERAMIC CHIP 0.022uF 10% 25V
C908 1-162-974-11 CERAMIC CHIP 0.01uF 50V
C909 1-126-967-11 ELECT 47uF 20% 50V
C910 1-162-974-11 CERAMIC CHIP 0.01uF 50V
C917 1-162-964-11 CERAMIC CHIP 0.001uF 10% 50V
C918 1-162-927-11 CERAMIC CHIP 100PF 5% 50V
C919 1-162-927-11 CERAMIC CHIP 100PF 5% 50V
C920 1-162-927-11 CERAMIC CHIP 100PF 5% 50V
C924 1-162-927-11 CERAMIC CHIP 100PF 5% 50V
R759 1-216-809-11 METAL CHIP 100 5% 1/10W
R760 1-216-809-11 METAL CHIP 100 5% 1/10W
R766 1-216-849-11 METAL CHIP 220K 5% 1/10W
R768 1-216-809-11 METAL CHIP 100 5% 1/10W
R769 1-216-809-11 METAL CHIP 100 5% 1/10W
R770 1-216-809-11 METAL CHIP 100 5% 1/10W
R773 1-216-809-11 METAL CHIP 100 5% 1/10W
R774 1-216-857-11 METAL CHIP 1M 5% 1/10W
R777 1-216-809-11 METAL CHIP 100 5% 1/10W
R778 1-216-809-11 METAL CHIP 100 5% 1/10W
R780 1-216-809-11 METAL CHIP 100 5% 1/10W
R781 1-216-809-11 METAL CHIP 100 5% 1/10W
R782 1-216-809-11 METAL CHIP 100 5% 1/10W
R783 1-216-809-11 METAL CHIP 100 5% 1/10W
R784 1-216-809-11 METAL CHIP 100 5% 1/10W
R785 1-216-809-11 METAL CHIP 100 5% 1/10W
R786 1-216-829-11 METAL CHIP 4.7K 5% 1/10W
R789 1-216-821-11 METAL CHIP 1K 5% 1/10W
R791 1-216-809-11 METAL CHIP 100 5% 1/10W
R792 1-216-809-11 METAL CHIP 100 5% 1/10W
R793 1-216-809-11 METAL CHIP 100 5% 1/10W
< VIBRATOR >
X301 1-814-067-11 OSCILLATOR, CRYSTAL (32.768kHz)
< DIODE >
D807 6-501-169-01 DIODE UDZW-TE17-6.2B
D902 6-500-641-01 LED SLI-325URC (STANDBY)
D904 6-500-334-01 DIODE MC2836-T112-1
D905 6-500-335-01 DIODE MC2838-T112-1
D915 6-500-335-01 DIODE MC2838-T112-1
< FERRITE BEAD >
FB901 1-414-235-22 INDUCTOR, FERRITE BEAD
< FLUORESCENT INDICATOR TUBE >
FL901 1-519-993-21 INDICATOR TUBE, FLUORESCENT
< IC >
IC901 6-600-349-31 IC NJL24H400A
IC902 6-711-008-01 IC PT6302LQ-010
< COIL >
L901
< TRANSISTOR >
Q901
Q903 6-550-065-01 TRANSISTOR CPH5504-TL-E
Q905 8-729-120-28 TRANSISTOR 2SC1623-L5L6
1-410-645-31 INDUCTOR 100uH
8-729-027-38 TRANSISTOR DTA144EKA-T146
5959
Page 60
HCD-BX70DBi
PANEL POWER TOP KEY
Ref. No. Part No. Description Remark Ref. No. Part No. Description Remark
< RESISTOR >
R851 1-216-821-11 METAL CHIP 1K 5% 1/10W
R852 1-216-825-11 METAL CHIP 2.2K 5% 1/10W
R919 1-216-864-11 SHORT CHIP 0
R920 1-216-864-11 SHORT CHIP 0
R921 1-216-805-11 METAL CHIP 47 5% 1/10W
R922 1-216-805-11 METAL CHIP 47 5% 1/10W
R925 1-216-817-11 METAL CHIP 470 5% 1/10W
R929 1-216-789-11 METAL CHIP 2.2 5% 1/10W
R930 1-216-825-11 METAL CHIP 2.2K 5% 1/10W
R931 1-216-833-11 METAL CHIP 10K 5% 1/10W
R932 1-216-809-11 METAL CHIP 100 5% 1/10W
R933 1-216-809-11 METAL CHIP 100 5% 1/10W
R934 1-216-825-11 METAL CHIP 2.2K 5% 1/10W
R935 1-216-821-11 METAL CHIP 1K 5% 1/10W
R936 1-216-864-11 SHORT CHIP 0
D918 6-501-569-01 DIODE 1N5401-C352
D919 6-501-569-01 DIODE 1N5401-C352
D920 6-500-335-01 DIODE MC2838-T112-1
D922 6-501-817-01 DIODE MA2J1110GLS0
D923 6-500-335-01 DIODE MC2838-T112-1
D924 6-501-582-01 DIODE 1N4002-B5
D925 6-501-582-01 DIODE 1N4002-B5
D926 6-501-582-01 DIODE 1N4002-B5
D927 6-501-582-01 DIODE 1N4002-B5
< FUSE HOLDER >
FH901 1-533-233-31 FUSE HOLDER
FH902 1-533-233-31 FUSE HOLDER
FH903 1-533-233-31 FUSE HOLDER
FH904 1-533-233-31 FUSE HOLDER
< LINE FILTER >
R937 1-216-864-11 SHORT CHIP 0
R938 1-216-864-11 SHORT CHIP 0
R942 1-216-833-11 METAL CHIP 10K 5% 1/10W
R943 1-216-837-11 METAL CHIP 22K 5% 1/10W
R944 1-216-821-11 METAL CHIP 1K 5% 1/10W
< SWITCH >
S801 1-762-875-21 SWITCH, KEYBOARD (l/1)
S803 1-762-875-21 SWITCH, KEYBOARD (OPEN/CLOSE A)
< TRANSFORMER >
T801 1-445-365-11 TRANSFORMER, DC-DC CONVERTER
************************************************************
POWER BOARD
*************
< CAPACITOR >
C901 1-165-621-91 CERAMIC CHIP 0.1uF 50V
C902 1-165-621-91 CERAMIC CHIP 0.1uF 50V
C905 1-165-621-91 CERAMIC CHIP 0.1uF 50V
C906 1-165-621-91 CERAMIC CHIP 0.1uF 50V
C914 1-126-964-11 ELECT 10uF 20% 50V
0 C921 1-126-767-51 ELECT 1000uF 20% 16V
0 C922 1-126-953-61 ELECT 2200uF 20% 35V
0 C923 1-126-953-61 ELECT 2200uF 20% 35V
0 C925 1-126-768-11 ELECT 2200uF 20% 16V
0 C936 1-126-943-51 ELECT 2200uF 20% 25V
< CONNECTOR >
0 LF901 1-443-993-11 TRANSFORMER, LINE FILTER (LFT)
< RESISTOR >
R901 1-216-837-11 METAL CHIP 22K 5% 1/10W
R902 1-216-837-11 METAL CHIP 22K 5% 1/10W
R904 1-216-829-11 METAL CHIP 4.7K 5% 1/10W
R905 1-216-829-11 METAL CHIP 4.7K 5% 1/10W
R906 1-216-833-11 METAL CHIP 10K 5% 1/10W
R908 1-216-821-11 METAL CHIP 1K 5% 1/10W
R909 1-216-821-11 METAL CHIP 1K 5% 1/10W
R910 1-216-864-11 SHORT CHIP 0
R911 1-216-864-11 SHORT CHIP 0
< RELAY >
0 RY901 1-755-334-11 RELAY, AC POWER
< TRANSFORMER >
0 T902 1-443-912-11 TRANSFORMER, POWER
************************************************************
TOP KEY BOARD
*************
< RESISTOR >
R853 1-216-825-11 METAL CHIP 2.2K 5% 1/10W
R854 1-216-829-11 METAL CHIP 4.7K 5% 1/10W
R855 1-216-833-11 METAL CHIP 10K 5% 1/10W
R856 1-216-835-11 METAL CHIP 15K 5% 1/10W
R857 1-216-835-11 METAL CHIP 15K 5% 1/10W
0 CN901 1-793-660-11 PIN, CONNECTOR (PC BOARD) 3P
CN904 1-819-140-11 PIN, CONNECTOR 12P
< DIODE >
D906 6-501-817-01 DIODE MA2J1110GLS0
D907 6-500-334-01 DIODE MC2836-T112-1
D908 6-500-335-01 DIODE MC2838-T112-1
D911 6-501-582-01 DIODE 1N4002-B5
D912 6-501-582-01 DIODE 1N4002-B5
D913 6-501-582-01 DIODE 1N4002-B5
D914 6-501-582-01 DIODE 1N4002-B5
D916 6-501-569-01 DIODE 1N5401-C352
D917 6-501-569-01 DIODE 1N5401-C352
60
R860 1-216-821-11 METAL CHIP 1K 5% 1/10W
R861 1-216-825-11 METAL CHIP 2.2K 5% 1/10W
R862 1-216-825-11 METAL CHIP 2.2K 5% 1/10W
R863 1-216-829-11 METAL CHIP 4.7K 5% 1/10W
R864 1-216-821-11 METAL CHIP 1K 5% 1/10W
R865 1-216-825-11 METAL CHIP 2.2K 5% 1/10W
R866 1-216-825-11 METAL CHIP 2.2K 5% 1/10W
R867 1-216-829-11 METAL CHIP 4.7K 5% 1/10W
R868 1-216-833-11 METAL CHIP 10K 5% 1/10W
R869 1-216-833-11 METAL CHIP 10K 5% 1/10W
< SWITCH >
S804 1-762-875-21 SWITCH, KEYBOARD (AUDIO IN)
S805 1-762-875-21 SWITCH, KEYBOARD (CD u)
Page 61

Ref. No. Part No. Description Remark
S806 1-762-875-21 SWITCH, KEYBOARD (iPod u)
S807 1-762-875-21 SWITCH, KEYBOARD (TUNER/BAND)
S809 1-762-875-21 SWITCH, KEYBOARD (DAB AUTOSCAN)
S810 1-762-875-21 SWITCH, KEYBOARD (DSGX)
S811 1-762-875-21 SWITCH, KEYBOARD (x CANSEL)
S812 1-762-875-21 SWITCH, KEYBOARD (FUNCTION)
S813 1-762-875-21 SWITCH, KEYBOARD (FOLDER +)
S814 1-762-875-21 SWITCH, KEYBOARD (FOLDER –)
S815 1-762-875-21 SWITCH, KEYBOARD (VOL +)
S816 1-762-875-21 SWITCH, KEYBOARD (VOL –)
S817 1-762-875-21 SWITCH, KEYBOARD (M L, TUNE +)
S818 1-762-875-21 SWITCH, KEYBOARD (ENTER)
S819 1-762-875-21 SWITCH, KEYBOARD (l m, TUNE –)
S820 1-762-875-21 SWITCH, KEYBOARD (REPEAT/FM MODE)
S821 1-762-875-21 SWITCH, KEYBOARD
(PLAY MODE/TUNING MODE)
*************************************************************
MISCELLANEOUS
**************
HCD-BX70DBi
Ver. 1.1
TOP KEY
105 1-831-997-21 CABLE, FLEXIBLE FLAT (13 CORE)
152 1-832-803-21 CABLE, FLEXIBLE FLAT (7 CORE)
156 1-832-821-21 CABLE, FLEXIBLE FLAT (11 CORE)
158 1-693-759-11 TUNER (FM/AM)
201 1-832-615-21 CABLE, FLEXIBLE FLAT (21 CORE)
202 1-834-979-21 CABLE, FLEXIBLE FLAT (5P)
0 212 1-834-966-21 CORD, POWER (AEP)
0 212 1-835-078-21 CORD, POWER (UK)
215 1-480-340-41 MODULE (DAB TUNER)
216 1-500-868-11 CORE, FERRITE
217 1-821-551-11 PIN, CONNECTOR 2P
219 1-831-706-21 CABLE, FLEXIBLE FLAT (11 CORE)
251 A-1242-967-A LOADING (BK) ASSY
0 301 A-4735-357-A BASE ASSY, OP (KSM-213D)
302 1-832-404-21 CABLE, FLEXIBLE FLAT (16 CORE)
0 F901 1-532-388-33 FUSE (T2AL/250V)
0 F902 1-532-388-33 FUSE (T2AL/250V)
M901 1-787-400-11 D.C. FAN
S201 1-771-853-11 SWITCH, DETECTION (LIMIT)
0 T901 1-445-142-11 TRANSFORMER, POWER
6161
Page 62

HCD-BX70DBi
REVISION HISTORY
Checking the version allows you to jump to the revised page.
Also, clicking the version at the top of the revised page allows you to jump to the next revised page.
Ver. Date Description of Revision
1.0 2008.06 New
1.1 2008.09 Addition of AEP model
1.2 2009.02 Change of Part for Ref.No.IC101 on CD board (SMR-08232)
(SMR-08144)
 Loading...