

Page 1

HBD-TZ210/TZ230/TZ510/
TZ630/TZ710
SERVICE MANUAL
Ver. 1.1 2010.05
Photo: HBD-TZ210
• HBD-TZ210/TZ230/TZ510/TZ630/TZ710 are the amplifi er,
DVD/CD and tuner section in DAV-TZ210/TZ230/TZ510/
TZ630/TZ710.
This system incorporates with Dolby* Digital and Dolby Pro Logic
(II) adaptive matrix surround decoder and the DTS** Digital Surround
System.
* Manufactured under license from Dolby Laboratories.
Dolby, Pro Logic, and the double-D symbol are trademarks of
Dolby Laboratories.
** Manufactured under license under U.S. Patent #’s:
5,451,942; 5,956,674; 5,974,380; 5,978,762; 6,487,535 & other
U.S. and worldwide patents issued & pending. DTS and DTS
Digital Surround are registered trademarks and the DTS logos and
Symbol are trademarks of DTS, Inc. © 1996-2008 DTS, Inc. All
Rights Reserved.
Amplifi er Section
(DAV-TZ210/DAV-TZ510/DAV-TZ710)
POWER OUTPUT (rated):
Front L + Front R 65 W + 65 W (at 3 ohms, 1
kHz, 1% THD)
POWER OUTPUT (reference):
Front L/Front R/Center/
Surround L/Surround R:
100 watts (per channel at 3
ohms, 1 kHz)
Subwoofer: 100 watts (at 3
ohms, 80 Hz)
Inputs (Analog)
Canadian model: TV/CABLE (AUDIO IN)
Sensitivity: 450/250 mV
Other models: TV (AUDIO IN)
Sensitivity: 450/250 mV
Amplifi er Section
(DAV-TZ230/DAV-TZ630)
POWER OUTPUT (rated):
Front L + Front R 65 W + 65 W (at 3 ohms, 1
kHz, 1% THD)
POWER OUTPUT (reference):
Front L/Front R/Center/
Surround L/Surround R:
100 watts (per channel at 3
ohms, 1 kHz)
Subwoofer: 100 watts (at 3
ohms, 80 Hz)
Inputs (Analog)
TV (AUDIO IN) Sensitivity: 450/250 mV
Super Audio CD/DVD System
(DAV-TZ210/DAV-TZ510/DAV-TZ710)
Laser Diode Properties Emission Duration:
Continuous
Laser Output: Less than
44.6 PW
* This output is the value measurement at a distance
of 200 mm from the objective lens surface on the
Optical Pick-up Block with 7 mm aperture.
Signal format system
Mexican and Latin American models:
NTSC
Other models: NTSC/PAL
Super Audio CD/DVD System
(DAV-TZ230/DAV-TZ630)
Laser Diode Properties Emission Duration:
Continuous
Laser Output: Less than
44.6 PW
* This output is the value measurement at a distance
of 200 mm from the objective lens surface on the
Optical Pick-up Block with 7 mm aperture.
Signal format system PAL/NTSC
USB Section
(USB) port:
Maximum current: 500 mA
Model Name Using Similar Mechanism
Mechanism Type CDM85MB-DVBU102
Optical Pick-up Name KHM-313CAA
SPECIFICATIONS
Canadian Model
HBD-TZ210/TZ510
AEP Model
HBD-TZ230/TZ630
UK Model
HBD-TZ230
E Model
HBD-TZ210/TZ510/TZ710
Australian Model
HBD-TZ210
Chinese Model
HBD-TZ710
Russian Model
HBD-TZ210/TZ710
HBD-DZ170/DZ171/DZ175/
DZ310/DZ510/DZ610/DZ810
Tuner Section
System PLL quartz-locked digital
synthesizer
Tuning range
Canadian model: 87.5 MHz - 108.0 MHz
(100 kHz step)
Other models: 87.5 MHz - 108.0 MHz (50
kHz step)
Antenna (aerial) FM wire antenna (aerial)
Antenna (aerial) terminals 75 ohms, unbalanced
Intermediate frequency 10.7 MHz
Video Section
(DAV-TZ210/DAV-TZ510/DAV-TZ710)
Outputs VIDEO: 1 Vp-p 75 ohms
HDMI OUT: Type A (19
pin)
Video Section
(DAV-TZ230/DAV-TZ630)
Outputs VIDEO: 1 Vp-p 75 ohms
R/G/B: 0.7 Vp-p 75 ohms
HDMI OUT: Type A (19
pin)
– Continued on next page –
DVD RECEIVER
9-889-755-02
2010E04-1
2010.05
©
Sony Corporation
Audio&Video Business Group
Published by Sony Techno Create Corporation
Page 2

HBD-TZ210/TZ230/TZ510/TZ630/TZ710
Ver. 1.1
General
(DAV -TZ210/DAV -TZ510/DAV-TZ710)
Power requirements
North American and Mexican models:
120 V AC, 60 Hz
Taiwan models: 120 V AC, 50/60 Hz
Argentine models: 220 V - 240 V AC, 50/60 Hz
Latin American models: 110 V - 240 V AC, 50/60 Hz
Saudi Arabian models: 127 V - 240 V AC, 50/60 Hz
Other models: 220 V - 240 V AC, 50/60 Hz
Power consumption On: 105 W
Standby: 0.2 W*
* Valid when the system is in the following status:
– “DEMO” is set to “OFF.”
– [CONTROL FOR HDMI] is set to [OFF].
Dimensions (approx.) 430 mm u 67 mm u 335 mm
(17 in
incl. projecting parts
Mass (approx.) 3.6 kg (7 lb 15 oz)
General
(DAV -TZ230/DAV-TZ630)
Power requirements 220 V - 240 V AC, 50/60 Hz
Power consumption On: 105 W
Standby: 0.2 W*
* Valid when the system is in the following status:
– “DEMO” is set to “OFF.”
– [CONTROL FOR HDMI] is set to [OFF].
Dimensions (approx.) 430 mm u 67 mm u 335 mm (w/h/d)
incl. projecting parts
Mass (approx.) 3.6 kg
u
2
3/4
in u 13
1/4
in) (w/h/d)
Supported fi le format
MP3 (MPEG 1 Audio Layer-3)
File Extension: mp3
Bitrate: 32 kbps - 320 kbps
Sampling frequencies: 32/44.1/48 kHz
WMA (USB device only)
File Extension: wma
Bitrate: 48 kbps - 192 kbps
Sampling frequencies: 44.1 kHz
AAC (USB device only)
File Extension: m4a
Bitrate: 48 kbps - 320 kbps
Sampling frequencies: 44.1 kHz
DivX (except for Canadian, UK models)
File Extension: avi/divx
Video codec: DivX video
Bitrate: 10.08 Mbps (MAX)
Frame rate: 30 fps
Resolution: 720
Audio codec: MP3
MPEG4
File format: MP4 File Format
File Extension: mp4/m4v
Video codec: MPEG4 Simple Pro
(AVC is not compatible.)
Bitrate: 4 Mbps
Frame rate: 30 fps
Resolution: 720
Audio codec: AAC-LC (HE-AAC is not compatible.)
DRM: Not compatible
fi
Design and speci
cations are subject to change without notice.
u
u
576
576
fi
le
SAFETY-RELATED COMPONENT WARNING!
0
COMPONENTS IDENTIFIED BY MARK
WITH MARK
0
ON THE SCHEMATIC DIAGRAMS AND IN
OR DOTTED LINE
THE PARTS LIST ARE CRITICAL T O SAFE OPERATION.
REPLACE THESE COMPONENTS WITH SONY PARTS
WHOSE PART NUMBERS APPEAR AS SHOWN IN THIS
MANUAL OR IN SUPPLEMENTS PUBLISHED BY SONY.
ATTENTION AU COMPOSANT A YANT RAPPORT
À LA SÉCURITÉ!
0
LES COMPOSANTS IDENTIFIÉS PAR UNE MARQUE
SUR
LES DIAGRAMMES SCHÉMATIQUES ET LA LISTE DES
PIÈCES SONT CRITIQUES POUR LA SÉCURITÉ DE FONCTIONNEMENT. NE REMPLACER CES COMPOSANTS QUE
PAR DES PIÈCES SONY DONT LES NUMÉROS SONT DONNÉS DANS CE MANUEL OU DANS LES SUPPLÉMENTS
PUBLIÉS PAR SONY.
2
SPECIAL COMPONENT NOTICE
The components identifi ed by mark 9 contain confi dential information.
Strictly follow the instructions whenever the components are repaired and/or replaced.
NOTICE POUR COMPOSANTS SPÉCIAUX
Les composants identifi és par la marque 9 contiennent des informations con
fi
dentielles.
Suivre scrupuleusement les instructions chaque fois qu’un composant est remplacé et / ou réparé.
Page 3

Laser component in this product is capable of emitting radiation
exceeding the limit for Class 1.
This appliance is classifi ed as
a CLASS 1 LASER product.
This marking is located on the
rear or bottom exterior.
CAUTION
Use of controls or adjustments or performance of procedures
other than those specifi ed herein may result in hazardous radiation exposure.
NOTES ON CHIP COMPONENT REPLACEMENT
• Never reuse a disconnected chip component.
• Notice that the minus side of a tantalum capacitor may be damaged by heat.
FLEXIBLE CIRCUIT BOARD REPAIRING
• Keep the temperature of soldering iron around 270 °C during
repairing.
• Do not touch the soldering iron on the same conductor of the
circuit board (within 3 times).
• Be careful not to apply force on the conductor when soldering
or unsoldering.
HBD-TZ210/TZ230/TZ510/TZ630/TZ710
UNLEADED SOLDER
Boards requiring use of unleaded solder are printed with the leadfree mark (LF) indicating the solder contains no lead.
(
Caution:
Some printed circuit boards may not come printed with
the lead free mark due to their particular size)
: LEAD FREE MARK
Unleaded solder has the following characteristics.
• Unleaded solder melts at a temperature about 40 °C higher
than ordinary solder.
Ordinary soldering irons can be used but the iron tip has to be
applied to the solder joint for a slightly longer time.
Soldering irons using a temperature regulator should be set to
about 350 °C.
Caution:
The printed pattern (copper foil) may peel away if
the heated tip is applied for too long, so be careful!
• Strong viscosity
Unleaded solder is more viscous (sticky, less prone to
fl
ow)
than ordinary solder so use caution not to let solder bridges
occur such as on IC pins, etc.
• Usable with ordinary solder
It is best to use only unleaded solder but unleaded solder may
also be added to ordinary solder.
3
Page 4

HBD-TZ210/TZ230/TZ510/TZ630/TZ710
Ver. 1.1
Self-diagnosis Function
(When letters/numbers appear in the
display)
When the self-dia g no sis function is activated to
prevent the system from malfunctioni ng , a 5character service number (e.g., C 13 50) with a
combination of a letter and 4 digits appears on
the TV screen or front panel display. In this case,
check the following table.
C:13:50
First 3
characters of
the service
number
C 13 The disc is dirty.
E XX
(XX is a
number)
When the version number
appears on the TV screen
When you turn on the sys t em , th e version
number [VER.X.XX] (X is a number) may
appear on the TV screen. A l th ough this is not a
malfunction and f o r S ony service use only,
normal system operat i on w i l l no t be possible.
Turn off the system, and then turn on the system
again to operate.
Cause and/or corrective action
,Clean the disc with a soft cloth
(page 63).
To prevent a malfunction, the
system has performed the selfdiagnosis function.
,Contact your nearest Sony
dealer or local authorized Sony
service facility and give the 5character service number.
Example: E 61 10
VER.X.XX
MODEL IDENTIFICA TION
– Back Panel –
Model Part No.
TZ210: CND model
TZ230: AEP, UK models
TZ210: E12 model
TZ210: E3, SAF models
TZ210: EA model
TZ210: SP model
TZ210: PH model
TZ210: HK model
TZ210: AUS model
TZ210: TH model
TZ210: RU model
TZ210: E32 model
TZ210: MX model
TZ210: AR model
TZ510: CND model
TZ510: SP model
TZ510: E32 model
TZ510: MX model
TZ510: SAF model
TZ630: AEP model
TZ710: E3 model
TZ710: RU model
TZ710: CH model
TZ710: HK model
TZ710: MX model
TZ710: TH model
TZ510: TH model
TZ510: TW model
Parts No.
4-161-835-0[]
4-161-835-1[]
4-161-835-2[]
4-161-835-3[]
4-161-835-4[]
4-161-835-5[]
4-161-835-6[]
4-161-835-7[]
4-161-835-8[]
4-161-835-9[]
4-161-836-0[]
4-161-836-1[]
4-161-836-2[]
4-161-836-4[]
4-161-836-5[]
4-161-836-6[]
4-161-836-7[]
4-161-836-8[]
4-161-836-9[]
4-161-837-0[]
4-161-837-1[]
4-161-837-2[]
4-161-837-3[]
4-161-837-5[]
4-161-837-6[]
4-161-837-7[]
4-161-837-8[]
4-161-837-9[]
• Abbreviation
AR : Argentina model
AUS : Australian model
CH : Chinese model
CND : Canadian model
E3 : 240V AC area in E model
E12 : 220 – 240V AC area in E model
E32 : 110 – 240V AC area in E model
EA : Saudi Arabia model
HK : Hong Kong model
MX : Mexican model
PH : Philippines model
RU : Russian model
SAF : South African model
SP : Singapore model
TH : Thai model
TW : Taiwan model
4
Page 5

HBD-TZ210/TZ230/TZ510/TZ630/TZ710
T ABLE OF CONTENTS
1. SERVICING NOTES
............................................. 6
2. DISASSEMBLY
2-1. Case (KZ) ....................................................................... 9
2-2. Loading Panel ................................................................. 10
2-3. Front Panel Section ......................................................... 10
2-4. FL Board, USB KEY Board, USB Board ....................... 11
2-5. KEY-SW Board, P-SW Board ........................................ 12
2-6. Back Panel Section (TZ230/TZ630) ............................... 13
2-7. Back Panel Section (TZ210/TZ510/TZ710) ................... 13
2-8. MAIN Board ................................................................... 14
2-9. POWER Board ................................................................ 15
2-10. DVD Mechanism Deck Section ...................................... 15
2-11. Tray ................................................................................. 16
2-12. Belt .................................................................................. 16
2-13. MS-203 Board ................................................................. 17
2-14. Base Unit ......................................................................... 17
2-15. Optical Pick-up ............................................................... 18
3. TEST MODE
4. ELECTRICAL ADJUSTMENTS
............................................................ 19
........................ 23
5. DIAGRAMS
5-1. Block Diagram –RF Section– ......................................... 25
5-2. Block Diagram –VIDEO Section– ................................. 26
5-3. Block Diagram –AUDIO Section– ................................. 27
5-4. Block Diagram –AMP Section– ..................................... 28
5-5. Block Diagram –POWER Section– ................................ 29
5-6. Printed Wiring Board –MAIN Section (1/2)– ................. 31
5-7. Printed Wiring Boards –MAIN Section (2/2)– ............... 32
5-8. Schematic Diagram –MAIN Section (1/8)– ................... 33
5-9. Schematic Diagram –MAIN Section (2/8)– ................... 34
5-10. Schematic Diagram –MAIN Section (3/8)– ................... 35
5-11. Schematic Diagram –MAIN Section (4/8)– ................... 36
5-12. Schematic Diagram –MAIN Section (5/8)– ................... 37
5-13. Schematic Diagram –MAIN Section (6/8)– ................... 38
5-14. Schematic Diagram –MAIN Section (7/8)– ................... 39
5-15. Schematic Diagram –MAIN Section (8/8)– ................... 40
5-16. Printed Wiring Board –SCART Section– ....................... 41
5-17. Schematic Diagram –SCART Section– .......................... 42
5-18. Printed Wiring Board –FL Section–................................ 43
5-19. Schematic Diagram –FL Section– .................................. 44
5-20. Printed Wiring Boards
–KEY-SW, P-SW, USB, USB KEY Section– ................. 45
5-21. Schematic Diagram –KEY-SW, P-SW Section– ............. 46
5-22. Schematic Diagram –USB, USB KEY Section– ............ 47
5-23. Printed Wiring Board –POWER Section– ...................... 48
5-24. Schematic Diagram –POWER Section– ......................... 49
6. EXPLODED VIEWS
6-1. Overall Section ............................................................... 61
6-2. Front Panel Section ......................................................... 62
6-3. Front Boards Section ...................................................... 63
6-4. Chassis Section ............................................................... 64
6-5. DVD Mechanism Deck Section
(CDM85MB-DVBU102) ................................................ 65
7. ELECTRICAL PARTS LIST
.............................. 66
5
Page 6
HBD-TZ210/TZ230/TZ510/TZ630/TZ710
SECTION 1
SERVICING NOTES
NOTES ON HANDLING THE OPTICAL PICK-UP
BLOCK OR BASE UNIT
The laser diode in the optical pick-up block may suffer electrostatic break-down because of the potential difference generated by
the charged electrostatic load, etc. on clothing and the human body .
During repair, pay attention to electrostatic break-down and also
use the procedure in the printed matter which is included in the
repair parts.
fl
exible board is easily damaged and should be handled with
The
care.
NOTES ON LASER DIODE EMISSION CHECK
The laser beam on this model is concentrated so as to be focused
on the disc re
fl
ective surface by the objective lens in the optical
pickup block. Therefore, when checking the laser diode emission,
observe from more than 30 cm away from the objective lens.
LASER DIODE AND FOCUS SEARCH
1. Open the case and turn POWER on with no disc inserted.
fi
rm that the following operation is performed while ob-
2. Con
serving the objecting lens from the clearance of DVD mechanism deck.
1) Con
fi
rm that laser beam is spread.
2) Up and down motion of the objective lens. (2 times)
DISC TRAY LOCK
The disc tray lock function for the antitheft of an demonstration
disc in the store is equipped.
Setting Procedure :
1. Press the [
] button to turn the set on.
?/1
2. Press the [FUNCTION] button to set DVD/CD function.
3. Insert a disc.
4. Press the [
] button and the [Z] button simultaneously for fi ve
x
seconds.
5. The message “LOCKED” is displayed and the tray is locked.
Releasing Procedure :
1. Press the [x] button and the [Z] button simultaneously for fi ve
seconds again.
2. The message “UNLOCKED” is displayed and the tray is un-
locked.
Note:
When “LOCKED” is displayed, the tray lock is not released by
turning power on/off with the [
?/1
] button.
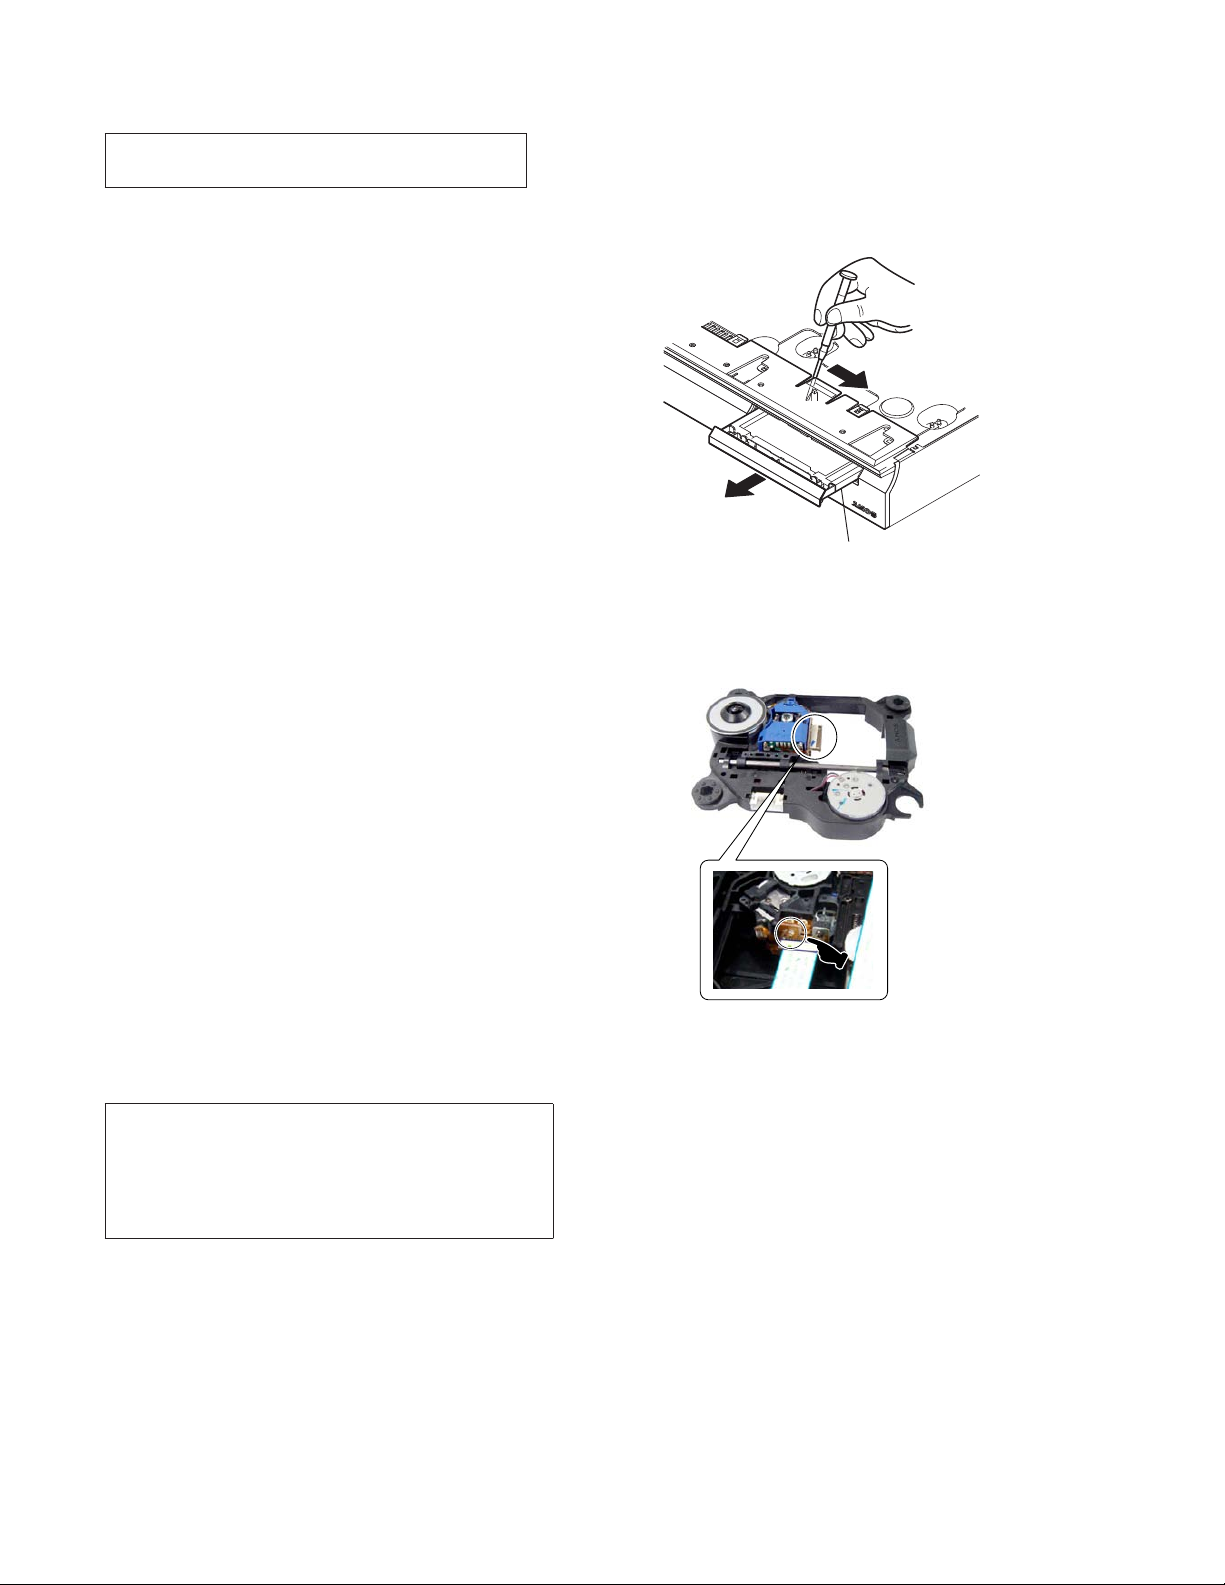
How to open the disc table when power switch turns off
Insert a tapering driver into the aperture of the unit bottom, and
slide it in the direction of the arrow.
Insert a screwdriver from between the front panel and
the chassis and slide the rod in the direction of the arrow.
tray
Precaution when installing a new OP unit/
Precaution before unsoldering the static electricity
prevention solder bridge
On cleaning discs, disc/lens cleaners
• Do not use cleaning discs or disc/lens cleaners (including wet
or spray types). These may cause the apparatus to malfunction.
IMPORTANT NOTICE
Caution: This system is capable of holding a still video image or onscreen display image on your television screen inde
the still video image or on-screen display image displayed on your TV
for an extended period of time you risk permanent damage to your television screen.
Projection televisions are especially susceptible to this.
fi
nitely. If you leave
6
When installing a new OP unit, be sure to connect the fl exible
printed circuit board
fi
rst of all before removing the static electricity prevention solder bridge by unsoldering.
Remove the static electricity prevention solder bridge by unsolder-
fl
ing after the
exible printed circuit board has already been connected.
(Do not remove nor unsolder the solder bridge as long as the OP
unit is kept standalone.)
Page 7

HBD-TZ210/TZ230/TZ510/TZ630/TZ710
Discharge the charged electricity in capacitors to prevent electric shock as follows
When disassembling the machine, be sure to discharge the charged electricity in the following capacitors.
Use a resistor of 800 ohms, 2 Watts for discharging the following capacitors.
POWER board
C903: 390V
C932, C933, C934, CN904: 30V
Point of capacitor discharge for C932, C933, C934:
Connect to the red and black wire of CN904.
800:/2W
Arranging the USB wire
Pass the wire from CN509 over the USB wire and insert it into CN906.
CN906
CN509
Point of capacitor discharge for C903:
Connect to the foot of C903.
USB wire
Tie up with LP3002.
Keep the wire tied up from lying on
the heat sink and the POWER board.
Keep a distance of more than 6.5 mm
between the wire and CN901.
CN901
Draw the USB wire through CN3000.
brack
red
Have the USB wire spread on the inside
of the claws of the chassis.
CN3000
USB wire
7
Page 8

HBD-TZ210/TZ230/TZ510/TZ630/TZ710
SECTION 2
DISASSEMBLY
• This set can be disassembled in the order shown below.
SET
2-1. CASE (KZ)
(Page 9)
2-2. LOADING PANEL
(Page 10)
2-9. POWER BOARD
(Page 15)
2-3. FRONT PANEL SECTION
(Page 10)
2-4. FL BOARD,
USB KEY BOARD,
USB BOARD
(Page 11)
2-6. BACK PANEL SECTION
(TZ230/TZ630)
(Page 13)
2-8. MAIN BOARD
(Page 14)
2-10. DVD MECHANISM DECK SECTION
(Page 15)
2-11. TRAY
(Page 16)
2-7. BACK PANEL SECTION
(TZ210/TZ510/TZ710)
(Page 13)
2-5. KEY-SW BOARD,
P-SW BOARD
(Page 12)
2-12. BELT
(Page 16)
2-13. MS-203 BOARD
(Page 17)
2-14. BASE UNIT
(Page 17)
2-15. OPTICAL PICK-UP
(Page 18)
8
Page 9
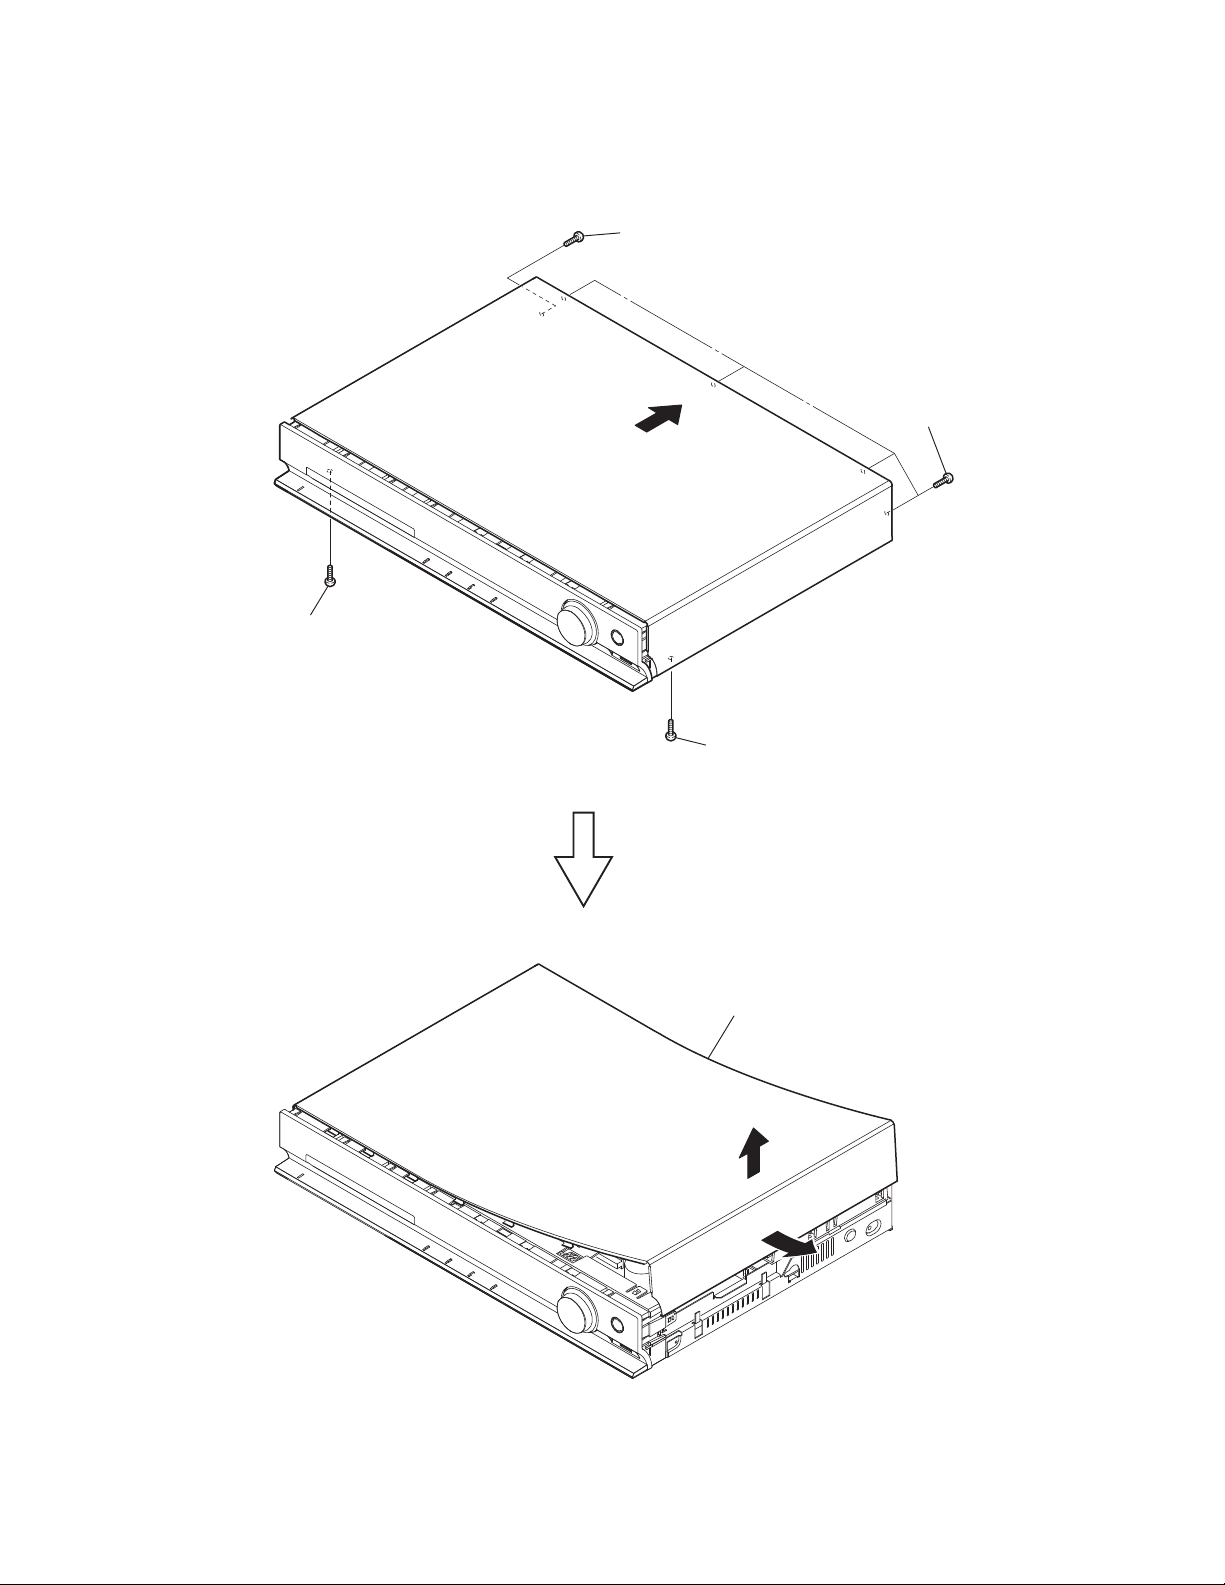
Note:
Follow the disassembly procedure in the numerical order given.
2-1. CASE (KZ)
HBD-TZ210/TZ230/TZ510/TZ630/TZ710
4 screw
(+BV3 (3-CR))
2 screw
(+BV3 (3-CR))
5
1 screw
(+BV3 (3-CR))
3 four screws
(+BV3 (3-CR))
8 case (KZ)
7
6 Raise one side of the case.
9
Page 10

HBD-TZ210/TZ230/TZ510/TZ630/TZ710
2-2. LOADING PANEL
3 loading panel
Insert a screwdriver from between the front panel
and the chassis and slide the rod in the direction
of the arrow.
2-3. FRONT PANEL SECTION
2 two ground plate (front)
8 claw
1
tray
2
1 two screws
(+BV3 (3-CR))
qa CN5000 (4P)
0
10
6 four claws
9 three claws
4 nut
3 VOL (KZ) knob
7 claw
qs front panel section
5 four screws
(+BV3 (3-CR))
Page 11
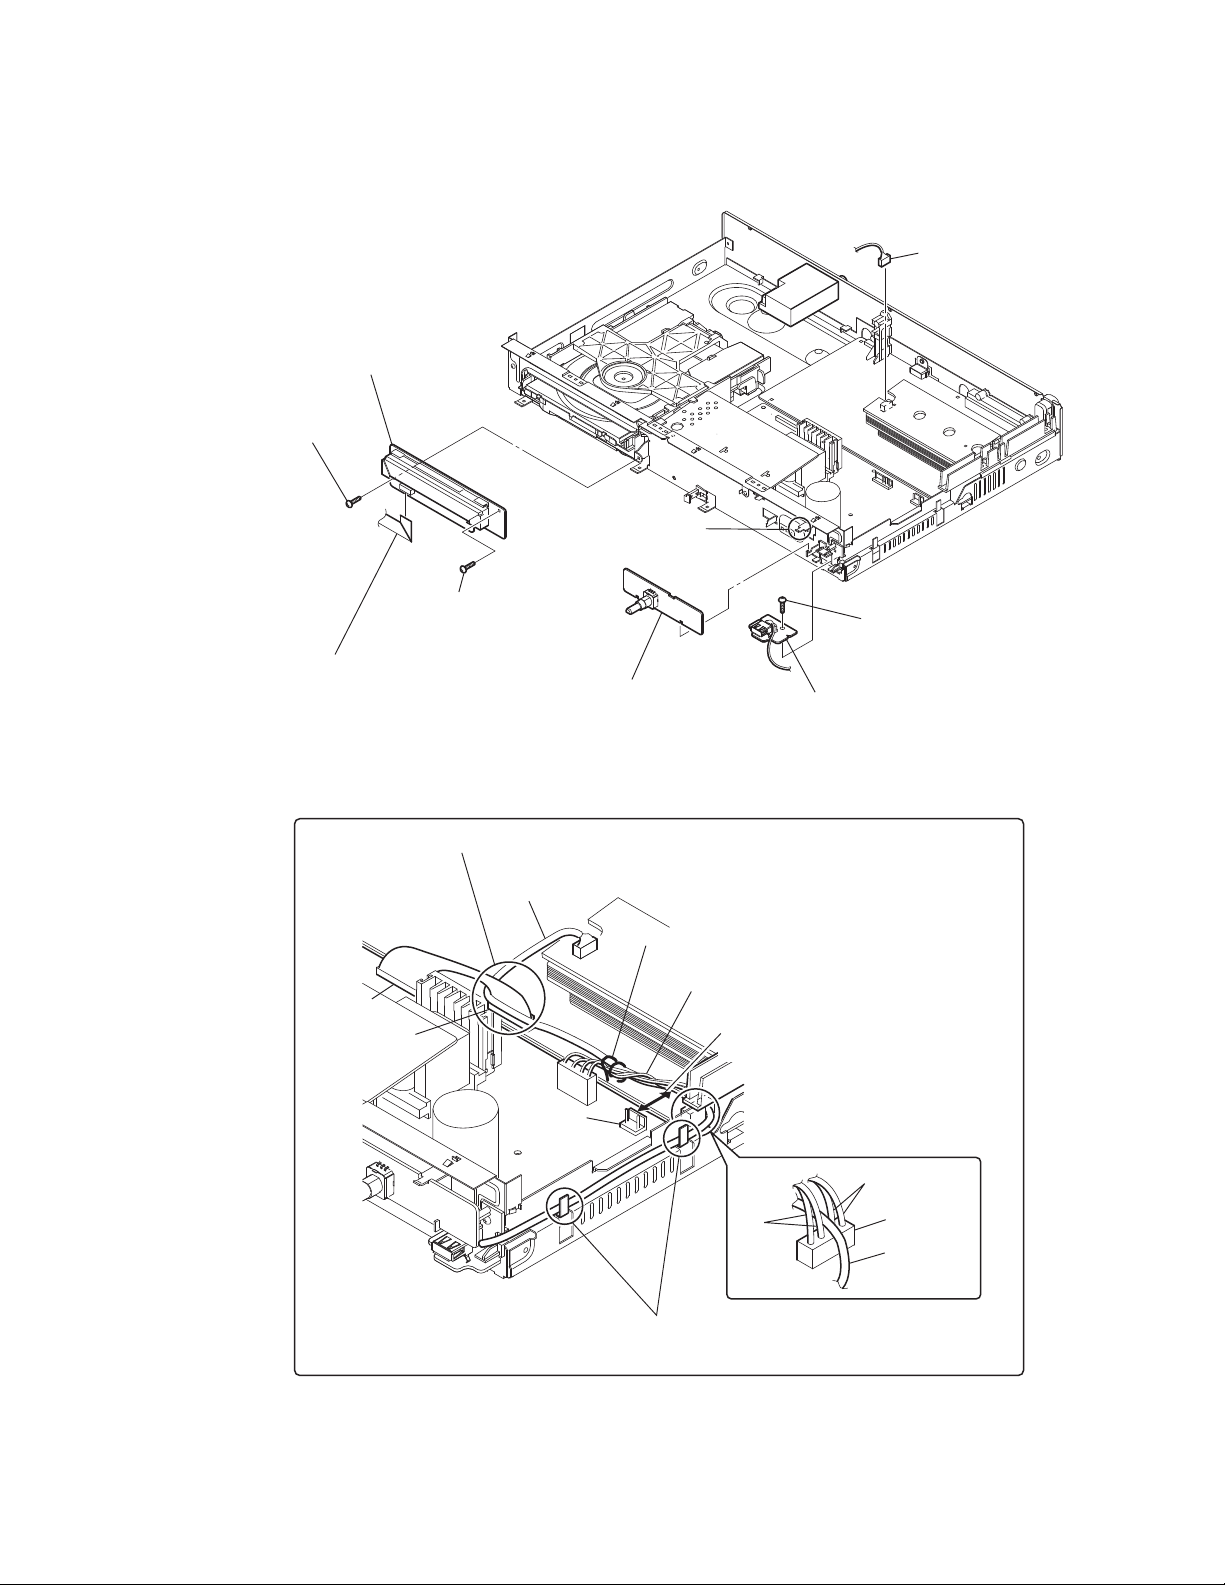
2-4. FL BOARD, USB KEY BOARD, USB BOARD
4 FL board
2 screw
(+BV3 (3-CR))
3 screw
(+BV3 (3-CR))
1 wire (flat type) (11 core) (CN5005)
6 USB KEY board
HBD-TZ210/TZ230/TZ510/TZ630/TZ710
7 CN2101 (5P)
5 claw
8 screw
(+BV3 (3-CR))
9 USB board
Arranging the USB wire
Pass the wire from CN509 over the USB wire and insert it into CN906.
CN906
CN509
USB wire
CN901
Tie up with LP3002.
Keep the wire tied up from lying on
the heat sink and the POWER board.
Keep a distance of more than 6.5 mm
between the wire and CN901.
Draw the USB wire through CN3000.
brack
red
Have the USB wire spread on the inside
of the claws of the chassis.
CN3000
USB wire
11
Page 12
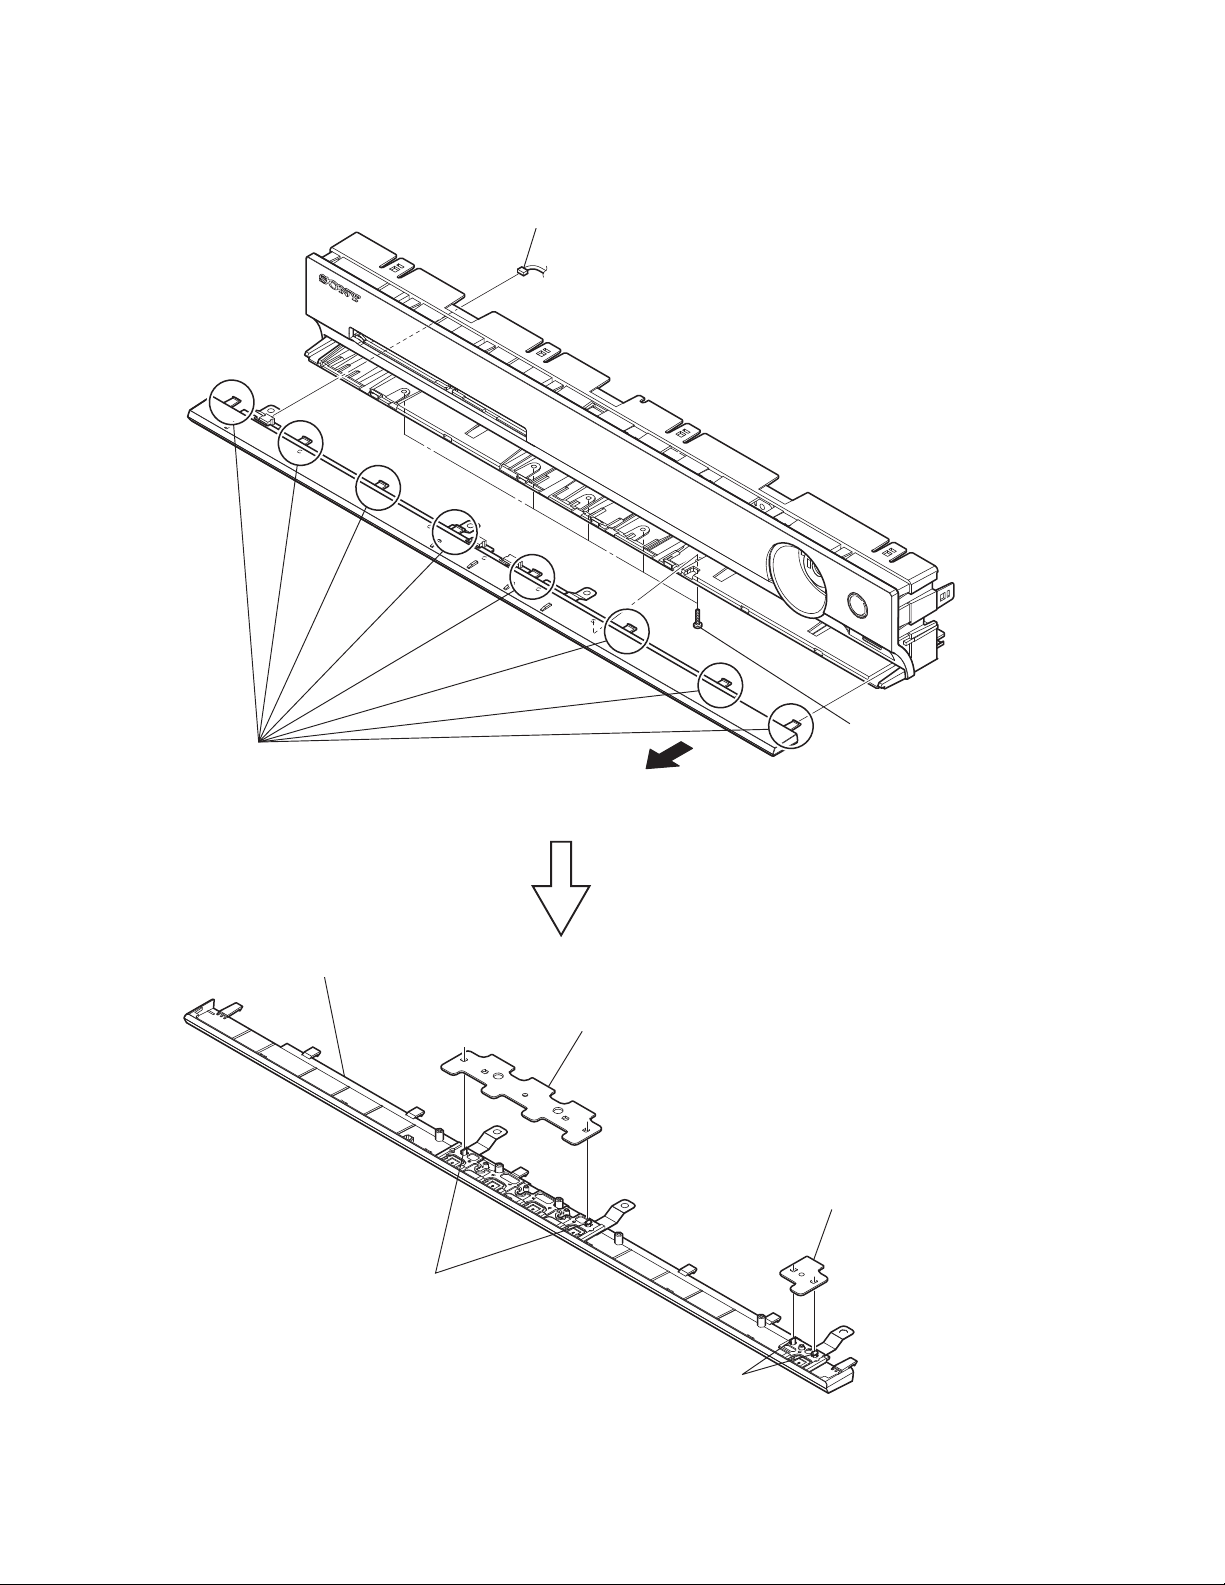
HBD-TZ210/TZ230/TZ510/TZ630/TZ710
2-5. KEY-SW BOARD, P-SW BOARD
1 CN5301 (2P)
3 eight claws
escutcheon (KZ)
2 five screws
(+BTP 2 u6)
4
8 KEY-SW board
6 P-SW board
7 two claws
12
5 two claws
Page 13

2-6. BACK PANEL SECTION (TZ230/TZ630)
8 back panel section
3 wire (flat type) (9 core)
(CN400)
HBD-TZ210/TZ230/TZ510/TZ630/TZ710
4 screw
(+BV3 (3-CR))
5 screw
(+B 3 u6)
2 wire (flat type) (17 core)
(CN402)
6 screw
(+BV3 (3-CR))
7 two screws
(+BV3 (3-CR))
2-7. BACK PANEL SECTION (TZ210/TZ510/TZ710)
8 back panel section
2 wire (flat type) (9 core)
(CN400)
1 CN901 (2P)
3 screw
(+BV3 (3-CR))
4 screw
(+BV3 (3-CR))
5 screw
(+B 3 u6)
6 screw
(+BV3 (3-CR))
7 two screws
(+BV3 (3-CR))
1 CN901 (2P)
13
Page 14

HBD-TZ210/TZ230/TZ510/TZ630/TZ710
Ver. 1.1
2-8. MAIN BOARD
5 wire (flat type) (24 core) (CN1101)
6 CN1501 (6P)
qf two screws
(+BV3 (3-CR))
7 wire (flat type) (5 core)
(CN1502)
8 wire (flat type) (11 core)
(CN506)
9 CN906 (11P)
• Abbreviation
AUS : Australian model
CH : Chinese model
qa four screws
(+BV3 (3-CR))
qs heat sink section
qd holder (IC)
4 CN2101 (5P)
When the heat sink has been removed,
apply oil compound (G-747) to it.
qg three screws
(+BV3 (3-CR))
qh MAIN board
CND : Canadian model
EA : Saudi Arabia model
HK : Hong Kong model
RU : Russian model
SAF : South African model
TW : Taiwan model
1 two screws
(+BV3 (3-CR))
Arranging the USB wire
Pass the wire from CN509 over the USB wire and insert it into CN906.
CN906
CN509
USB wire
CN901
3 plate shield (PC)
0 CN904 (5P)
Tie up with LP3002.
Keep the wire tied up from lying on
the heat sink and the POWER board.
Keep a distance of more than 6.5 mm
between the wire and CN901.
(TZ210: CND, AUS, EA, HK, RU, SAF/
TZ230/TZ510: CND, SAF, TW/
TZ630/TZ710: HK, CH, RU)
Draw the USB wire through CN3000.
2 insulated plate
(POW)
brack
14
red
Have the USB wire spread on the inside
of the claws of the chassis.
CN3000
USB wire
Page 15

2-9. POWER BOARD
HBD-TZ210/TZ230/TZ510/TZ630/TZ710
5 plate flow control (AMP)
7 four screws
(+BV3 (3-CR))
9 POWER board
4 screw
(+BV3 (3-CR))
3 CN906 (11P)
2 CN904 (5P)
1 CN901 (2P)
6 four screws
(+BV3 (3-CR))
8 holder PC board
2-10. DVD MECHANISM DECK SECTION
4 two screws
(+BV3 (3-CR))
6 DVD mechanism deck
5 screw
(+BV3 (3-CR))
3 wire (flat type) (5 core)
(CN1502)
2 CN1501 (6P)
1 wire (flat type) (24 core) (CN1101)
15
Page 16

HBD-TZ210/TZ230/TZ510/TZ630/TZ710
2-11. TRAY
1 Move the chuck cam
in the direction of the arrow.
bottom side
2
3 two claws
2-12. BELT
2
chuck cam
4
3
belt
5 tray
16
1 two claws
Page 17

2-13. MS-203 BOARD
3
MS-203 board
4
DC motor
2 three claws
HBD-TZ210/TZ230/TZ510/TZ630/TZ710
1 screw
(M 1.7 u 2.5)
2-14. BASE UNIT
2
chuck cam
3 two claws
1 two claws
4 base unit
17
Page 18
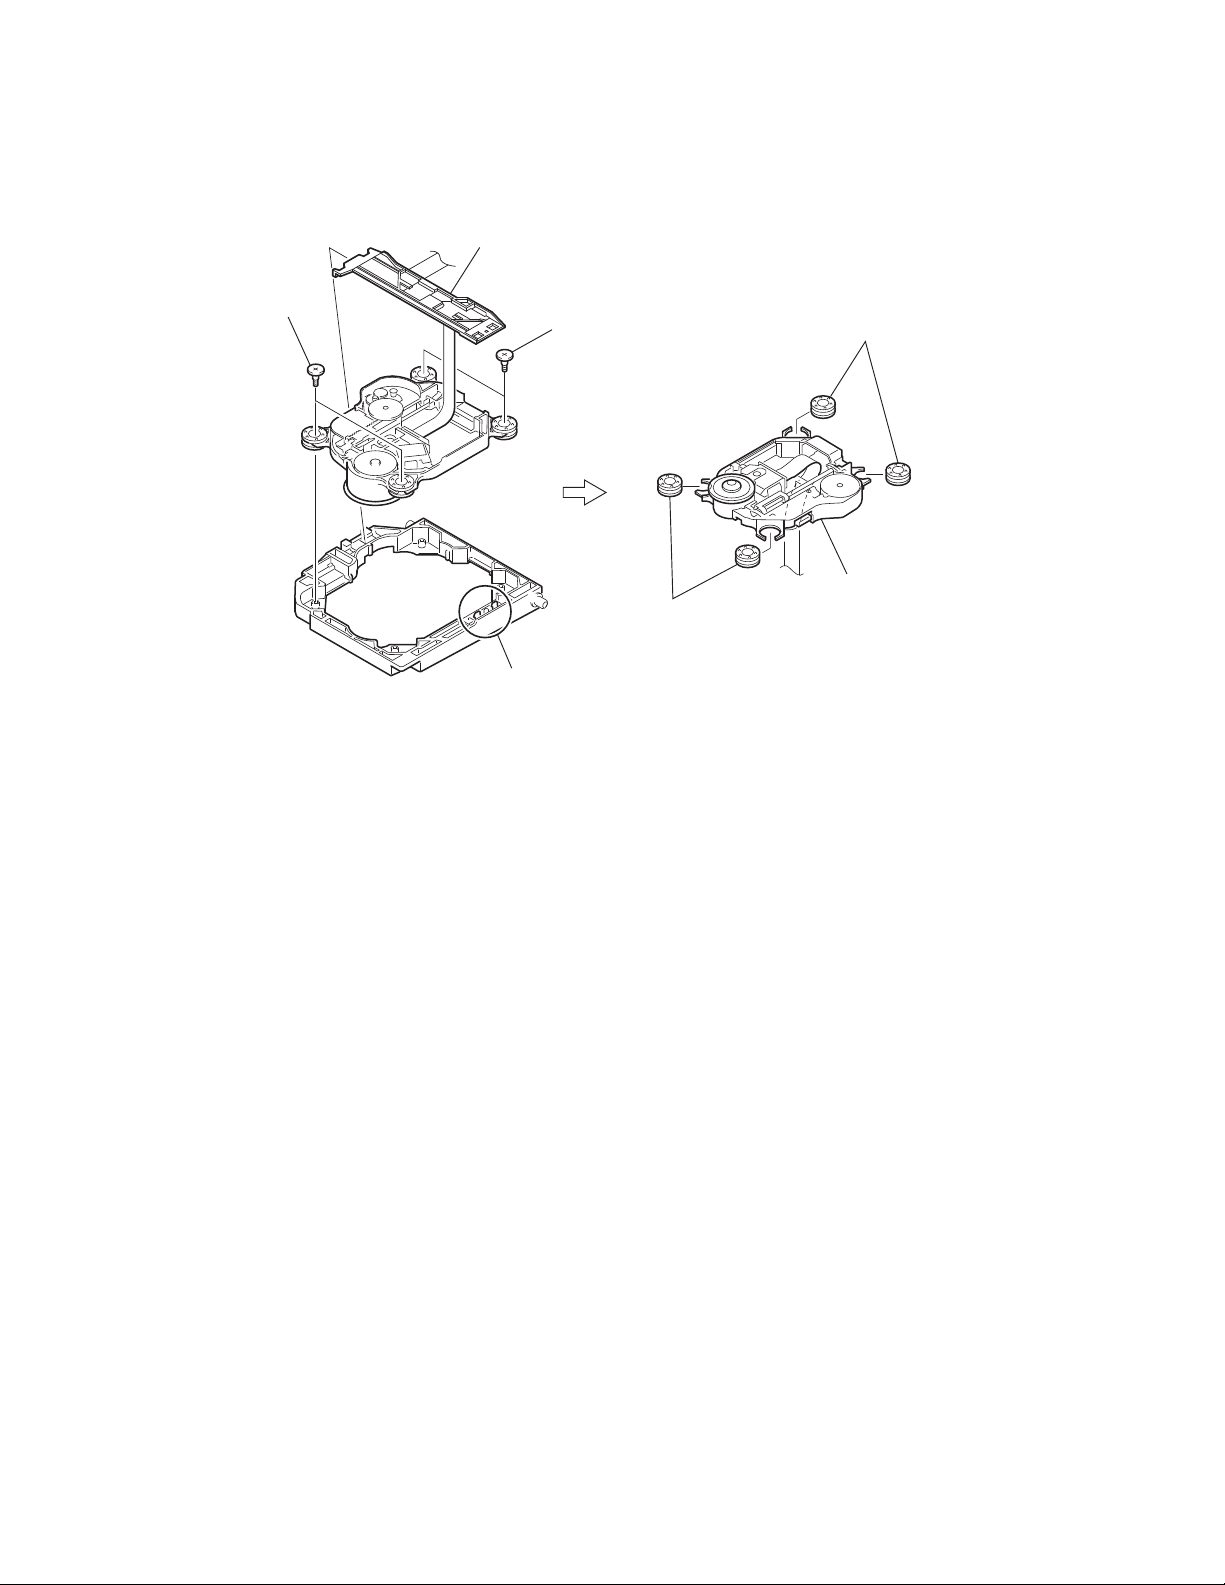
HBD-TZ210/TZ230/TZ510/TZ630/TZ710
2-15. OPTICAL PICK-UP
2 FFC holder
4 two insulator screws
3 two insulator screws
6 two insulators
5 two insulators
7 optical pick-up
(KHM-313CAA)
1 two claws
18
Page 19

HBD-TZ210/TZ230/TZ510/TZ630/TZ710
SECTION 3
TEST MODE
Note:
Incorrect operations may be performed if the test mode is not
entered properly.
In this case, press the [
retry to enter the test mode.
?/1
] button to turn the power off, and
1. Cold Reset
• The cold reset clears all data including preset data stored
in the RAM to initial conditions. Execute this mode when
returning the set to the customers.
Procedure:
1. Press the [
2. Press three buttons [
] button to turn the power on.
?/1
], [FUNCTION] and [
N
] simultane-
?/1
ously.
3. When this button is operated, display as “COLD RESET” for
a while and all of the settings are reset.
2. Panel Test Mode
• This mode is used to check the software version, FL and
KEY.
2-1. Display Test Mode
Procedure:
1. Press the [
2. While pressing the [
] button to turn the power on.
?/1
] and the [N] buttons simultaneously,
x
turn the [VOLUME] control in the direction of (+).
3. When the display test mode is activated, all segments are
turned on.
4. To exit from this mode, while pressing the [
] and the [N]
x
buttons simultaneously, turn the [VOLUME] control in the direction of (+).
2-2. Version Test Mode
Procedure:
1. When the display test mode is activated, press the [FUNCTION] button and the message “KZ2” (TZ210/TZ230),
“KZ4L” (TZ510), “KZ5” (TZ630), “KZ8L” (TZ710) are displayed, the version test mode is activated.
2. Whenever the [FUNCTION] button is pressed, the display
changes in the following order.
“KZ2” (Model name) t “NA*1” (Destination) t MC Version
*1: NA changes depending on destination.
3. Press the [REC TO USB] button when the MC version is on
display. The date of software production is displayed.
4. Press the [REC TO USB] button again and the version is displayed.
5. To exit from this mode, while pressing the [x] and the [N]
buttons simultaneously, turn the [VOLUME] control in the direction of (+).
2-3. FL Pattern Test Mode
Procedure:
1. When the display test mode is activated, press the [Z] button,
to select the FL pattern test mode. When the FL pattern test
mode, half segments of FL display.
2. Press the [
3. Next press the [
] button, half segments of FL display.
Z
] button, all segments of FL display is turn
Z
on.
4. To exit from this mode, while pressing the [
] and the [N]
x
buttons simultaneously, turn the [VOLUME] control in the direction of (+).
2-4. Key Test Mode
Procedure:
1. When the display test mode is activated, press the [
?/1
] but-
ton, to select the key test mode.
2. To enter the KEY test mode, the
fl
uorescent indicator displays
“K0 V0”. Each time an another button is pressed, “KEY” value
increases. However, once a button is pressed, it is no longer
taken into account. When all keys are pressed correctly, “K6
V0” is displayed.
3. When the [VOLUME] control is turned in the direction of (+),
“V0” is changed to “V1”, then ... “V9”.
When the [VOLUME] control is turned in the direction of (–),
“V0” is changed to “V9”, then ... “V1”.
4. To exit from this mode, while pressing the [
] and the [N]
x
buttons simultaneously, turn the [VOLUME] control in the direction of (+).
3. Disc Tray Lock
• The disc tray lock function for the antitheft of an demonstra-
tion disc in the store is equipped.
Setting Procedure :
1. Press the [
] button to turn the set on.
?/1
2. Press the [FUNCTION] button to set DVD/CD function.
3. Insert a disc.
4. Press the [
] button and the [Z] button simultaneously for fi ve
x
seconds.
5. The message “LOCKED” is displayed and the tray is locked.
Releasing Procedure :
1. Press the [x] button and the [Z] button simultaneously for fi ve
seconds again.
2. The message “UNLOCKED” is displayed and the tray is unlocked.
Note:
When “LOCKED” is displayed, the tray lock is not released by
turning power on/off with the [
?/1
] button.
4. DVD Version Display
• The STR and DVD microprocessor versions are displayed.
Procedure:
1. Press the [
2. Press the [
] button to turn the set on.
?/1
] button and the [
N
] button simultaneously for
?/1
three seconds. SC version display is presented.
3. Pressing the [FUNCTION] button presents a DV version display. Pressing the [FUNCTION] button again returns to the SC
version display.
4. To exit from this mode, press any button other than the [FUNCTION] button.
5. Product Out
• This mode moves the optical pick-up to the position durable
to vibration and clears all data including preset data stored
in the STR RAM to initial conditions. Use this mode when
returning the set to the customer after repair.
Procedure:
1. Press the [
] button to turn the power on.
?/1
2. Press the [FUNCTION] button to set the function “DVD/CD”.
3. Remove all discs.
4. While pressing the [
] and the [Z] buttons simultaneously,
x
turn the [VOLUME] control in the direction of (+).
5. Displayed to message “SERVICE IN” on the
cator tube when pressing in turn the [4]
fl
uorescent indi-
t
[DVD MENU] t
[CLEAR] buttons on the remote commander.
fi
6. After the “STANDBY” blinking display
“MECHA LOCK”
h
“UNPLUG” is displayed on the fl uo-
nishes, the message
rescent indicator tube disconnect the AC power plug, then the
product out mode is set.
The STR RAM initialization is executed upon a next power-on
after the power is turned off.
19
Page 20
HBD-TZ210/TZ230/TZ510/TZ630/TZ710
Ver. 1.1
6. Color System Change (EXCEPT CND, AEP, UK, E32,
CH, RU, AR, MX, TW models)
• Color system change to video signal format (NTSC/PAL).
Procedure:
1. Press the [
] button to turn the set on.
?/1
2. Press the [FUNCTION] button to set the function “DVD/CD”.
3. Press the [
4. Press two buttons [FUNCTION] and [
and the display of
] button to turn the set OFF.
?/1
fl
uorescent indicator tube changes to “COL-
?/1
] simultaneously,
OR PAL” or “COLOR NTSC”.
7. PROTECTION FACTOR (SD DETECTION/
DC DETECTION/TSD DETECTION) IDENTIFICATION
TEST MODE
When an error is detected, the FL tube alternately displays
“PROTECTOR”
Press the [
r
* Buttons other than the [
h
“PUSH POWER”.
] button.
?/1
] button are invalid.
?/1
“STANDBY” blinks three times on the FL tube.
r
The protection release state (POWER OFF) is established.
(No FL tube display)
r
Press the [
] button two times.
?/1
The power to the system turns on, and the normal operation is
established. (Restore)
During the protection state:
1. If the AC plug is connected or disconnected during the protection state, the protection state is released, and the normal operation is established. (The protection state is not maintained.)
2. The protection factor is displayed by pressing the [RETURN]
t
[3] t [2] t [0] t [0] t [ANGLE] buttons of the re-
mote commander.
h
(during the “PROTECTOR”
k
When SD is detected: Repeats
“SD DETECT”
k
When DC is detected: Repeats
“DC DETECT”
k
When TSD is detected: Repeats
“TMP DETECT”
h
h
h
“PUSH POWER” display).
“PROTECTOR”.
“PROTECTOR”.
“PROTECTOR”.
PL: SD detection
When the “L” output from the SD (shutdown) port on the
S-MASTER POWER Driver Shutdown and voltage descent
(15V or less) of 26V power supply (PVDD) are detected.
DC detection
When the “L” output from the power/speaker error detection
circuit (DC detection port) is detected for two seconds continually, the power system other than that of the FL tube is
turned off, and the protection state is established.
TSD detection
When the “L” output from the thermal shutdown port
(TSDM) on the motor driver is detected.
• Abbreviation
AR : Argentina model
CH : Chinese model
CND : Canadian model
E32 : 110 – 240V AC area in E model
MX : Mexican model
RU : Russian model
TW : Taiwan model
DVD SECTION
8-1. GENERAL DESCRIPTION
• The IOP measurement allows you to make diagnosis and adjustment simply by using the remote commander and monitor TV. The instructions, diagnosis results, etc. are given on
the on-screen display (OSD).
Be sure to execute the IOP measurement when a BU (Base
Unit) is replaced.
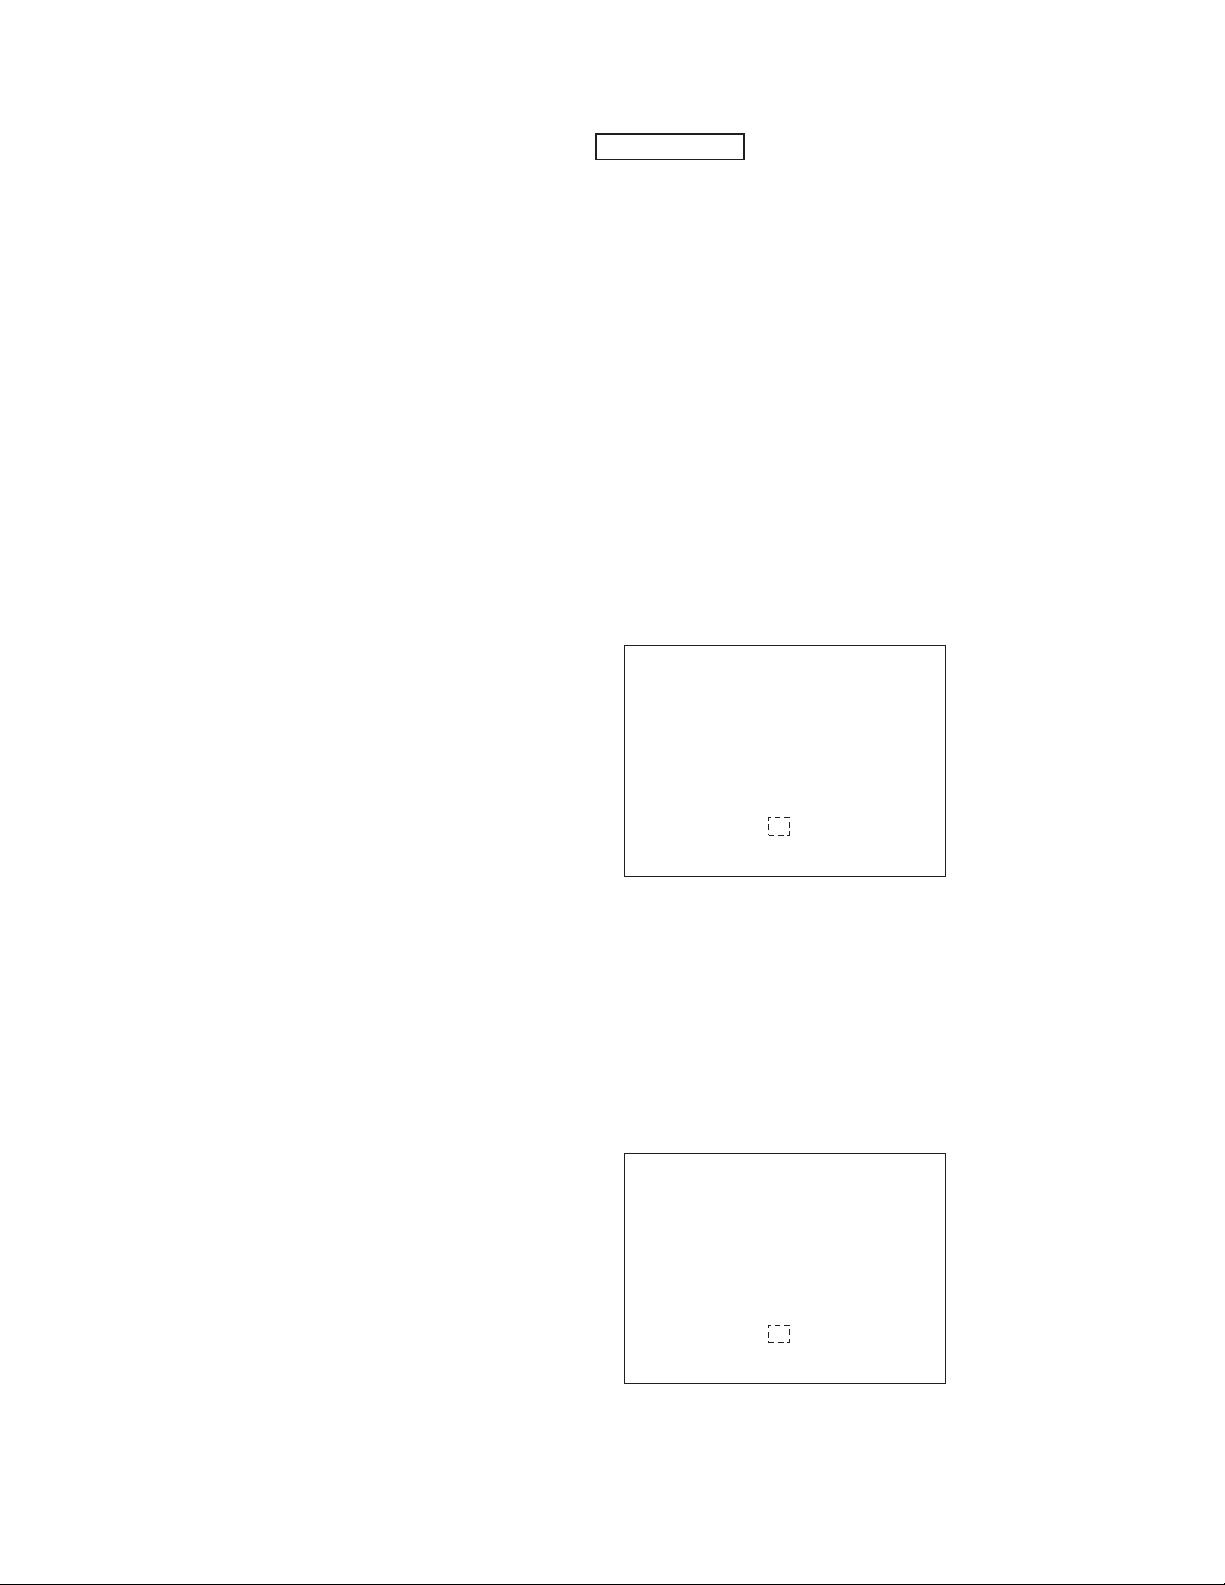
8-2. HOW TO ENTER TEST MODE
While pressing the [
the [VOLUME] control in the direction of (+) with the DVD player in power on.
The Test Mode starts, displayed “SERVICE IN” on this model
display then the menu shown below will be displayed on the TV
screen.
* The display of the “Model Name” of the “Remocon Diagnosis
Menu” change with the model and the destination. Refer to
below on the model name.
TZ210 : KZ2
TZ230 : KZ2
TZ510 : KZ4L
TZ630 : KZ5
TZ710 : KZ8L
0. External Chip Check
1. Servo Parameter Check
2. Drive Manual Operation
3. Emergency History
4. Version Information
5. USB Test Mode Setting
Model Name
IF-con : Ver. XX.XX (XXXX)
Syscon : Ver. X.XXX
*1: Changes depending on destination
The menu above is the Remocon Diagnosis Menu screen which
consists of
fi
ve main functions. At the bottom of the menu screen,
the model name and IF-con version. To exit from the Test Mode,
press the [
?/1
8-3. EXECUTING IOP MEASUREMENT
In order to execute IOP measurement, the following standard procedures must be followed.
(1) In power on, while pressing the [
taneously, turn the [VOLUME] control in the direction of (+).
0. External Chip Check
1. Servo Parameter Check
2. Drive Manual Operation
3. Emergency History
4. Version Information
5. USB Test Mode Setting
Model Name : KZ2_XX
IF-con : Ver. XX.XX (XXXX)
Syscon : Ver. X.XXX
*1: Changes depending on destination
] and the [Z] buttons simultaneously, turn
x
Remocon Diagnosis Menu
1
: KZ2_XX
*
] button on the remote commander.
] and the [Z] buttons simul-
x
Remocon Diagnosis Menu
1
*
20
Page 21

HBD-TZ210/TZ230/TZ510/TZ630/TZ710
(2) Select “2. Drive Manual Operation” by pressing the [2] button
on the remote commander. The screen will appear as shown.
Drive Manual Operation
1. Servo Control
2. Track/Layer Jump
3. Manual Adjustment
4. Tray Aging Mode
5. MIRR time adjust
0. Return to Top Menu
(3) Select “3. Manual Adjustment” by pressing the [3] button on
the remote commander. The screen will appear as shown.
Manual Adjust
1. Track Balance Adjust:
2. Track Gain Adjust:
3. Focus Balance Adjust:
4. Focus Gain Adjust:
5. Eq Boost Adjust:
6. Iop:
7. TRV. Level:
8. S curve(FE) Level:
9. RFL(PI) Level:
0. MIRR Time:
Oo
Change Value
[RETURN] Return to previous menu
(4) Select “6. IOP” by pressing the [6] button on the remote com-
mander.
(5) Wait until a hexadecimal number appear.
Manual Adjust
1. Track Balance Adjust:
2. Track Gain Adjust:
3. Focus Balance Adjust:
4. Focus Gain Adjust:
5. Eq Boost Adjust:
6. Iop. 47:
7. TRV. Level:
8. S curve(FE) Level:
9. RFL(PI) Level:
0. MIRR Time:
Oo
Change Value
[RETURN] Return to previous menu
(6) Convert each data from hexadecimal to decimal using conver-
sion table.
fi
(7) Please
nd the label on the rear of the BU (Base Unit).
The default IOP value is written in the label.
(8) Subtract between these two values.
(9) If the remainder is smaller than 93 (decimal), then it is OK.
However if the value is higher than 93, then the BU is defective and need to be change.
(10) Press the [RETURN] button on the remote commander to re-
turn back to previous menu.
(11) Press the [0] button on the remote commander to return to Top
Menu.
8-4. EMERGENCY HISTORY
To check the emergency history, please follow the following procedure.
(1) From the Top Menu of Remocon Diagnosis Menu, select “3.
Emergency History Check” by pressing the [3] button on the
remote commander. The following screen appears on the onscreen display.
Emg. History Check
Laser Hours CD 999h 59min
01. 01 05 04 04
00 00 00 00 00 00 23 45
02. 02 02 01 01 00 A9 4B 00
00 00 00 00 00 00 23 45
[Next] Next Page [Prev] Prev Page
[O] Return to Top Menu
DVD 999h 59min
00 92 46 00
(2) You can check the total time when the laser is turned on during
playback of DVD and CD from the above menu. The maximum time, which can be displayed are 999h 59min.
(3) You can check the error code of latest 10 emergency history
from the above menu. To view the previous or next page of
emergency history, press [.] or [>] button on the remote
commander. The error code consists of the following three
blocks. The
fi
rst block indicates the error code. The second
block indicates the parameter and the third block indicates the
time of error code as shown below.
• Error Code
Emg. History Check
Laser Hours CD 999h 59min
*1*
01. 01 05 04 04
00 00 00 00 00 00 23 45
02. 02 02 01 01 00 A9 4B 00
00 00 00 00 00 00 23 45
[Next] Next Page [Prev] Prev Page
[O] Return to Top Menu
DVD 999h 59min
2
00 92 46 00
*
3
*1 : Error Code
*2 : Parameter of error code
*3 : Time of error code
The meaning of error code is as below:
01: Communication error (No reply from syscon)
02: Syscon hung up
03: Power OFF request when syscon hung up
19: Thermal shutdown
24: MoveSledHome error
25: Mechanical move error (5 Changer)
26: Mechanical move stack error
30: DC motor adjustment error
31: DPD offset adjustment error
32: TE balance adjustment error
33: TE sensor adjustment error
34: TE loop gain adjustment error
35: FE loop gain adjustment error
36: Bad jitter after adjustment
40: Focus NG
42: Focus layer jump NG
51: Spindle stop error
52: Open kick spindle error
21
Page 22

HBD-TZ210/TZ230/TZ510/TZ630/TZ710
60: Focus on error
61: Seek fail error
62: Read Q data/ID error
70: Lead in data read fail
71: TOC read time out (CD)
80: Can’t buffering
81: Unknown media type
8-4-1. Clear the Laser Hour
DISPLA Y] button and then press [CLEAR] button on the
Press [
remote commander. The data for both CD and DVD data are reset.
Emg. History Check
Laser Hours CD 0h 0min
01. 01 05 04 04
00 00 00 00 00 00 23 45
02. 02 02 01 01 00 A9 4B 00
00 00 00 00 00 00 23 45
[Next] Next Page [Prev] Prev Page
[O] Return to Top Menu
DVD 0h 0min
00 92 46 00
8-4-2. Clear the Emergency History
Press [DVD TOP MENU] button and then press [CLEAR] button
on the remote commander. The error code for all emergency history would be reset.
8-5. CHECK VERSION INFORMATION
To check the version information, please follow the following procedure.
(1) From the Top Menu of Remocon Diagnosis Menu, select “4.
Version Information” by pressing the [4] button on the remote
commander. The following screen appears on the on-screen
display.
Version information
Firm (Main) : Ver. xxxxx
Firm (Sub) : xxxxx
RISC : xxxxx
8032 : xxxxx
Audio DSP : xxxxx
Servo DSP : xxxxx
Phy,Adr, : F.F.F.F
[O] Return to Top Menu
To return to the Top Menu of Remocon Diagnosis Menu, press
[0] button on the remote commander.
Emg. History Check
Laser Hours CD 999h 59min
01. 00 00 00 00
00 00 00 00 00 00 00 00
02. 00 00 00 00 00 00 00 00
00 00 00 00 00 00 00 00
[Next] Next Page [Prev] Prev Page
[O] Return to Top Menu
DVD 999h 59min
00 00 00 00
8-4-3. Clear the Initialize Setup Data
Press [DVD MENU] button and then press [CLEAR] button on the
remote commander.
Emg. History Check
Laser Hours CD 999h 59min
[Next] Next Page [Prev] Prev Page
[O] Return to Top Menu
DVD 999h 59min
initialize setup data...
8-4-4. Return to the Top Menu of Remocon Diagnosis
Menu
Press [0] button on the remote commander.
22
Page 23

SECTION 4
ELECTRICAL ADJUSTMENTS
DVD SECTION
When the optical pick-up assy is replaced, perform the “EXECUT ING IOP MEASUREMENT”.
EXECUTING IOP MEASUREMENT (See page 20)
TUNER SECTION
[FM Tune Level Check]
generator
SET
Procedure:
1. Turn the power on.
2. Input the following signal from Signal Generator to FM antenna input directly.
FM ANTENNA
OUT (75 :)
HBD-TZ210/TZ230/TZ510/TZ630/TZ710
* Carrier Freq : A = 87.5 MHz, B = 98 MHz, C = 108 MHz
Deviation : 75 kHz
Modulation : 1 kHz
ANT input : 35 dBu (EMF)
Note:
Please use 75 ohm “coaxial cable” to connect SG and the set. You
cannot use video cable for checking.
Please use SG whose output impedance is 75 ohm.
3. Set to FM tuner function and tune A, B and C signals.
4. Con
fi
rm “TUNED” is lit on the display for A, B and C signals.
The mark of “TUNED” means “The selected station signal is received in good condition.”
23
Page 24
HBD-TZ210/TZ230/TZ510/TZ630/TZ710
Ver. 1.1
SECTION 5
DIAGRAMS
THIS NOTE IS COMMON FOR PRINTED WIRING BOARDS AND SCHEMATIC DIAGRAMS.
(In addition to this, the necessary note is printed in each block.)
For Printed Wiring Boards.
Note:
• X : Parts extracted from the component side.
• a : Through hole.
•
(The other layers’ patterns are not indicated.)
• Indication of transistor.
• Abbreviation
AR : Argentina model
AUS : Australian model
CH : Chinese model
CND : Canadian model
E3 : 240V AC area in E model
E12 : 220 – 240V AC area in E model
E32 : 110 – 240V AC area in E model
EA : Saudi Arabia model
HK : Hong Kong model
MX : Mexican model
PH : Philippines model
RU : Russian model
SAF : South African model
SP : Singapore model
TH : Thai model
TW : Taiwan model
: Pattern from the side which enables seeing.
Caution:
Pattern face side:
(SIDE B)
Parts face side:
(SIDE A)
C
Q
B
E
CEB
These are omitted.
Parts on the pattern face side seen
from the pattern face are indicated.
Parts on the parts face side seen from
the parts face are indicated.
These are omitted.
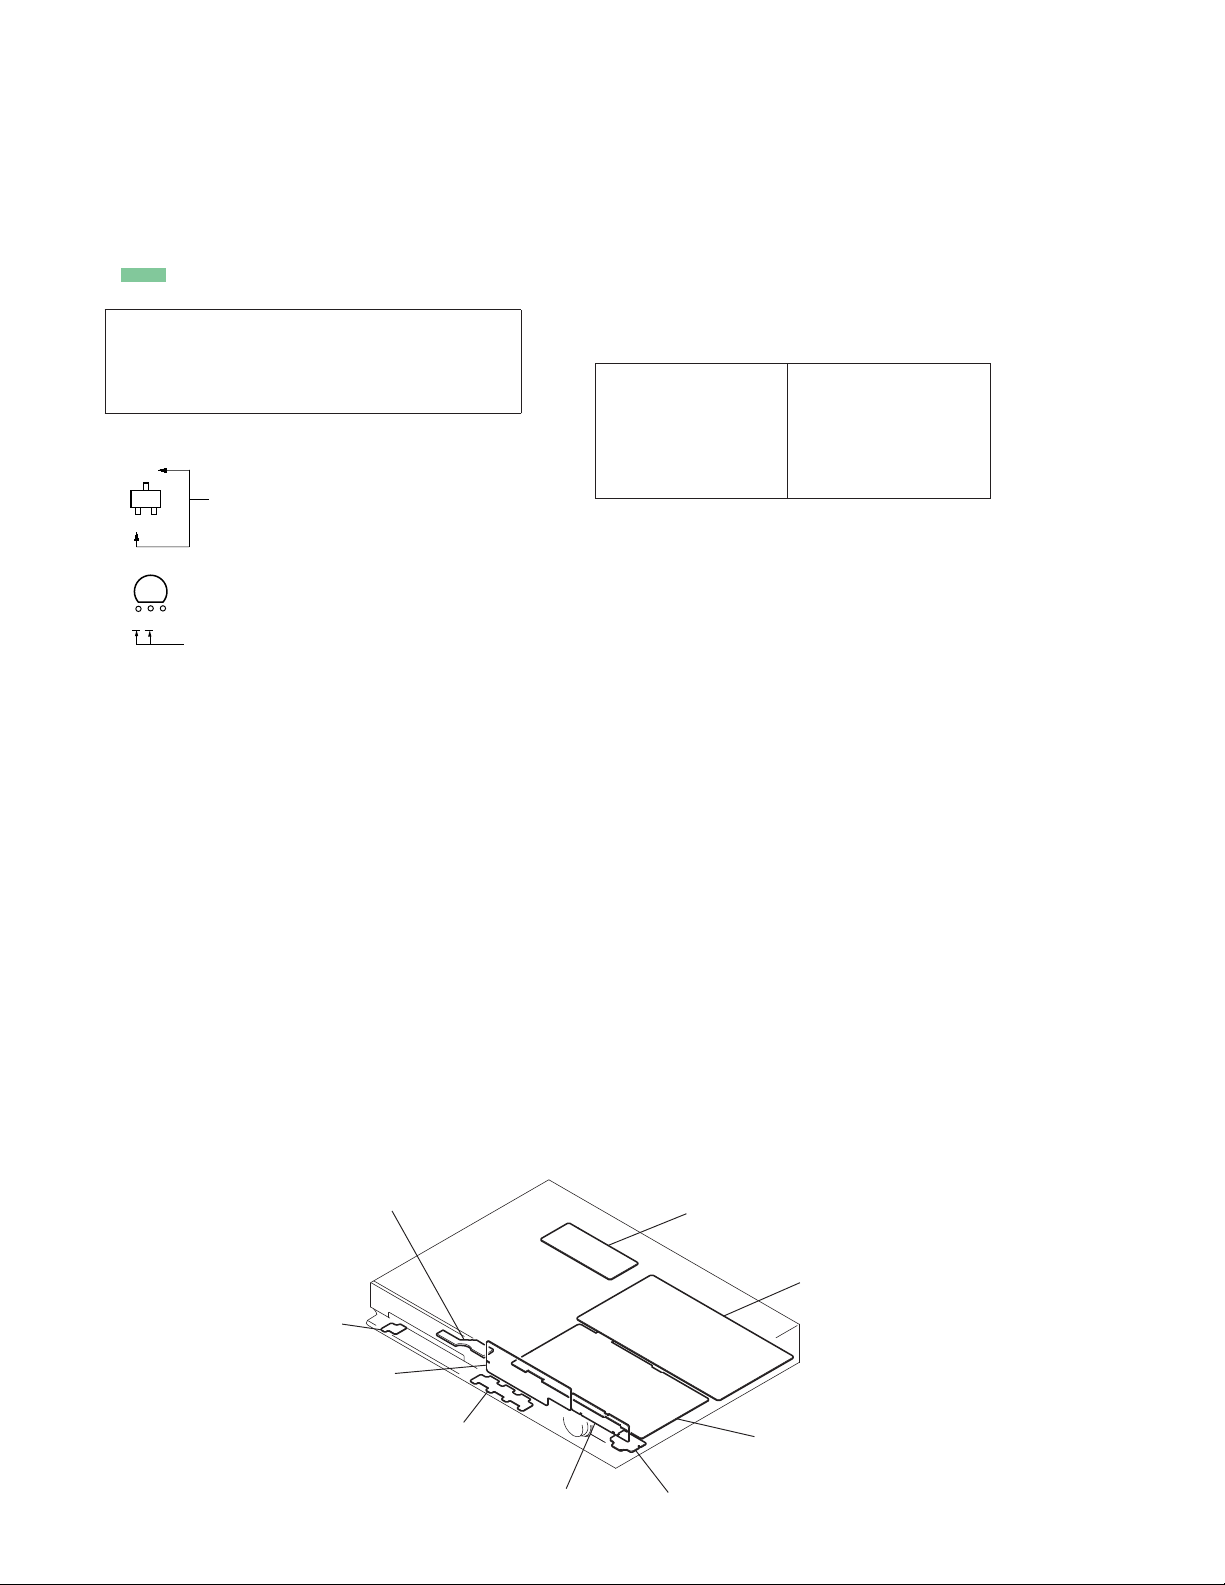
• Circuit Boards Location
For Schematic Diagrams.
Note:
• All capacitors are in PF unless otherwise noted. (p: pF) 50
WV or less are not indicated except for electrolytics and
tantalums.
• All resistors are in : and 1/4 W or less unless otherwise
specifi ed.
• f : Internal component.
• C : Panel designation.
Note:
The components identifi ed by mark 0 or dotted
line with mark 0 are critical for safety.
Replace only with part
number specifi ed.
• A : B+ Line.
• B : B– Line.
• Voltages and waveforms are dc with respect to ground
under no-signal (detuned) conditions.
• Voltages and waveforms are dc with respect to ground in
service mode.
• Waveforms are taken with a oscilloscope.
Voltage variations may be noted due to normal production
tolerances.
no mark : TUNER (FM)
< > : DVD PLAY
: Impossible to measure
*
• Voltages are taken with VOM (Input impedance 10 M:).
• Circled numbers refer to waveforms.
• Signal path.
F : TUNER
J : DVD PLAY
L : VIDEO
r : COMPONENT VIDEO
• Abbreviation
AR : Argentina model
AUS : Australian model
CH : Chinese model
CND : Canadian model
E3 : 240V AC area in E model
E12 : 220 – 240V AC area in E model
E32 : 110 – 240V AC area in E model
EA : Saudi Arabia model
HK : Hong Kong model
MX : Mexican model
PH : Philippines model
RU : Russian model
SAF : South African model
SP : Singapore model
TH : Thai model
TW : Taiwan model
Note:
Les composants identifi és
par une marque 0 sont
critiques pour la sécurité.
Ne les remplacer que par
une pièce portant le numéro spécifi é.
24
P-SW board
MS-203 board
FL board
KEY-SW board
USB KEY board
SCART board (TZ230/TZ630)
MAIN board
POWER board
USB board
Page 25
AUDIO
SECTION
B
L-IN
R-IN
(SERVICE JIG)
TXD
RXD
V2REFO
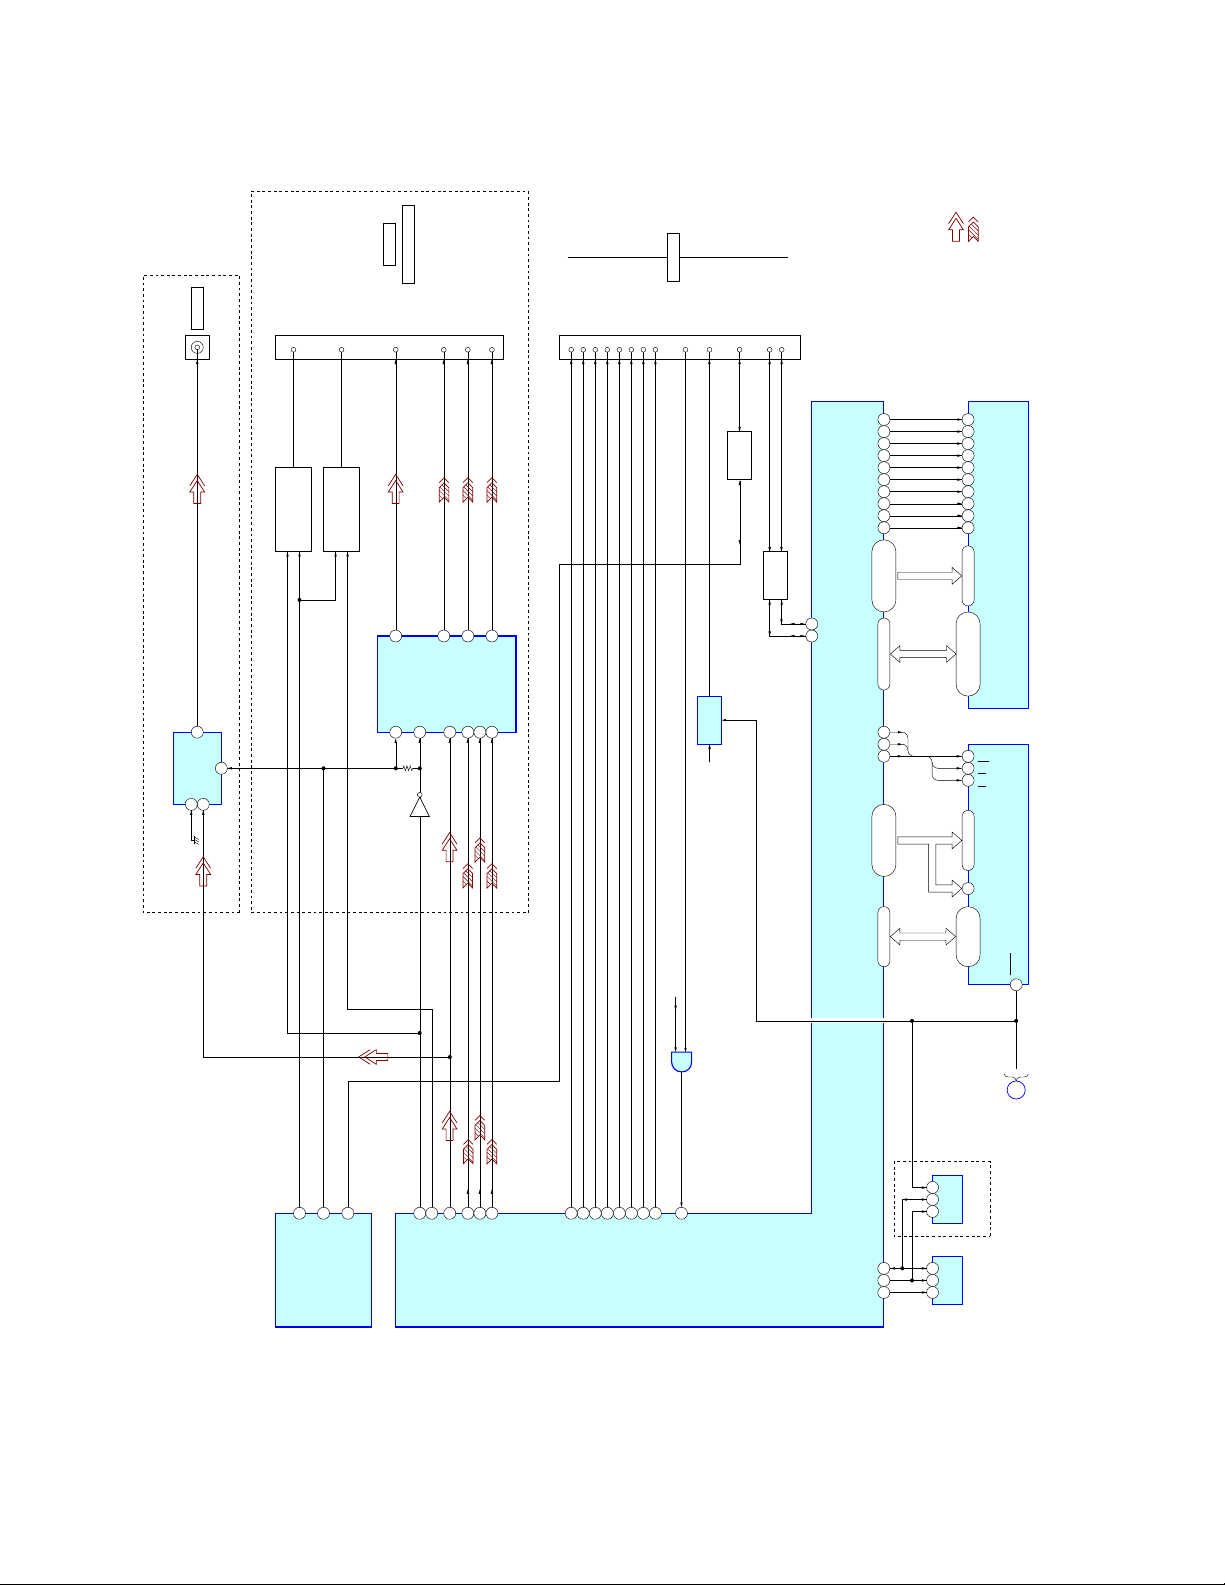
RFMON
125
6
HBD-TZ210/TZ230/TZ510/TZ630/TZ710
CN1105
27
105
106
TXD
RXD
V2REFO
13
VINL
IC404
A/D CONVERTER
DOUT
9
6
206
MC_DATA (ADIN)
(Page 27)
14
VINR
LRCK7SCKI
BCK
8
MCKO
IC471
BUS BUFFER
2 18
203
ACLK
LRCKO
4 16
205
ALRCK
BCKO
AMP
5 15
204
ABCK
SECTION
A
AMP_D3
6 14
223
ASDATA2
(Page 28)
AMP_D2
AMP_D1
7 13
225
ASDATA1
: TUNER
: DVD PLAY
x SIGNAL PA TH
S001
(CHUCK/TRAY DETECT)
AUDIO
SECTION
(Page 27)
C
8 12
OCSW
104
OCSW
103
CKSW
226
ASDATA0
OCSW1/REVOCSW
CKSW/FWDCKSW
LDM+
M001
(LOADING MOTOR)
M
LDM-
DVDRFIP
10
RF
DVDB7DVDC8DVDD9TNI
DVDA
6
VOA/A
VOB/B
VOC/C
VOD/D
LIMITSW
53
(LIMITSW)
IC1101 (1/3)
CD/DVD RF AMP ,
DVD SYSTEM CONTROL, DSP
FOCUS/TRACKING ERROR AMP ,
IC1501
FOCUS/TRACKING DRIVER,
LOADING/SPINDLE/SLED MOTOR DRIVER
54
MSW
MB
TPI
MA
V20 (2.0V)28LD0122MDI119MDI2
11
17
18
12MC13MD14
A
BCD
A
B
C
D
VOF/F+H
VOE/E+G
LD DRIVE
Q1102 (1/2)
CONTROL (FOR CD)
VC
LD (780)
LD02
20
21
IOP
Q1103
Q1101
Q1102 (2/2)
CONTROL (FOR DVD)
CONTROL
PD VOLUME
VR (650)
VR (780)
MSW
VCC
LD DRIVE
PD
LD (650)
39
IOPMON
30
BUFFER
28
29
29
VREFO
26
VCI
FMO
37
FMO
FOO
FOO
24
DRIVE
FOCUS COIL
6
7
FCS-
FCS+
DMO
STBY
TRK+
VREFO
IOPMON
40
TRO
TRO
FMO
22
23
DRIVE
TRACKING COIL
9
8
REG02
TRK-
DMO
FWD94REV
95
REG DRIVER
2
391110
REG01
REGRST
TROPENPWM
38
157
REGRST
3618201921
SLED MOTOR
SL-
SL+
MM
(SLED MOTOR)
DRIVE
OP_INP
35
SPFG
27
MUTE
TSD_M
130
158
14
35
34
DRIVE
SPINDLE MOTOR
12
13
SP-
SP+
15
LOADING
CONTROL
MM
(SPINDLE MOTOR)
FOO41DMO36TRO
2525
DETECTOR
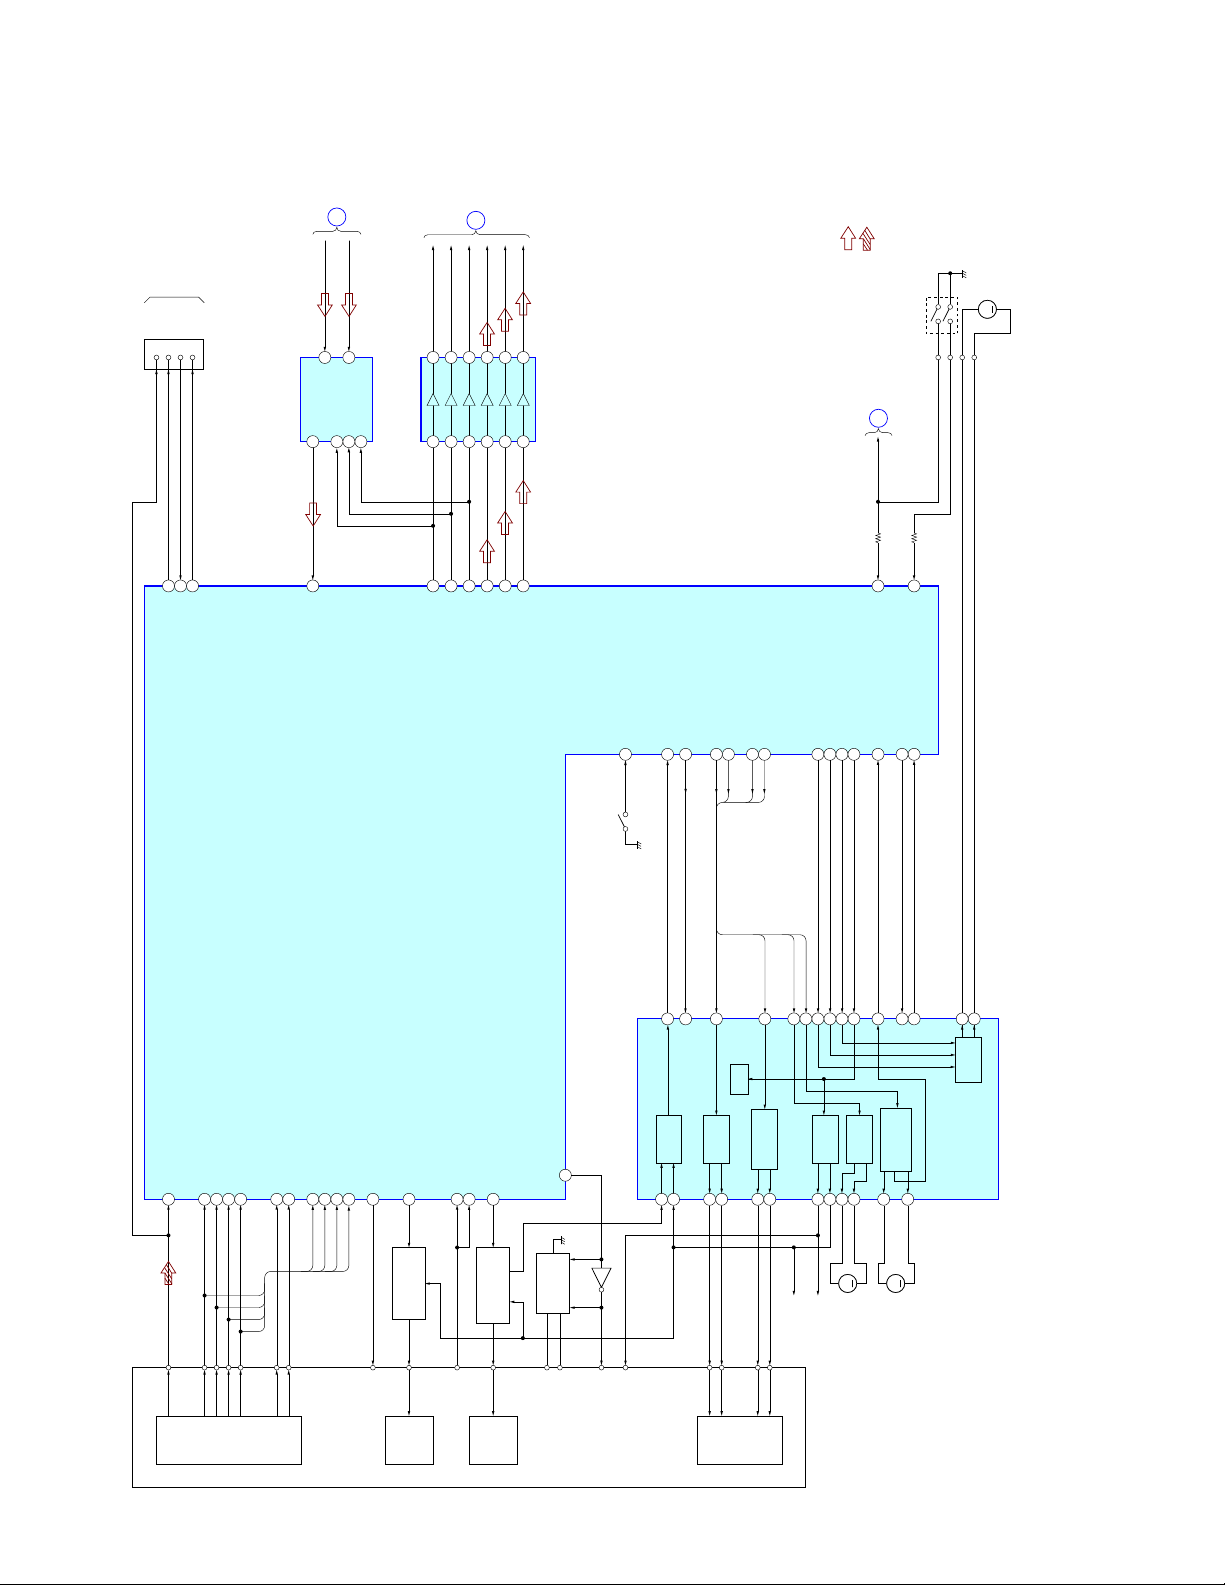
5-1. BLOCK DIAGRAM – RF Section –
BLOCK
OPTICAL PICK-UP
(KHM-313CAA)
LASER
DIODE
(FOR CD)
LASER
DIODE
(FOR DVD)
2AXIS
DEVICE
FOCUS/
COIL
TRACKING
HBD-TZ210/TZ230/TZ510/TZ630/TZ710
Page 26
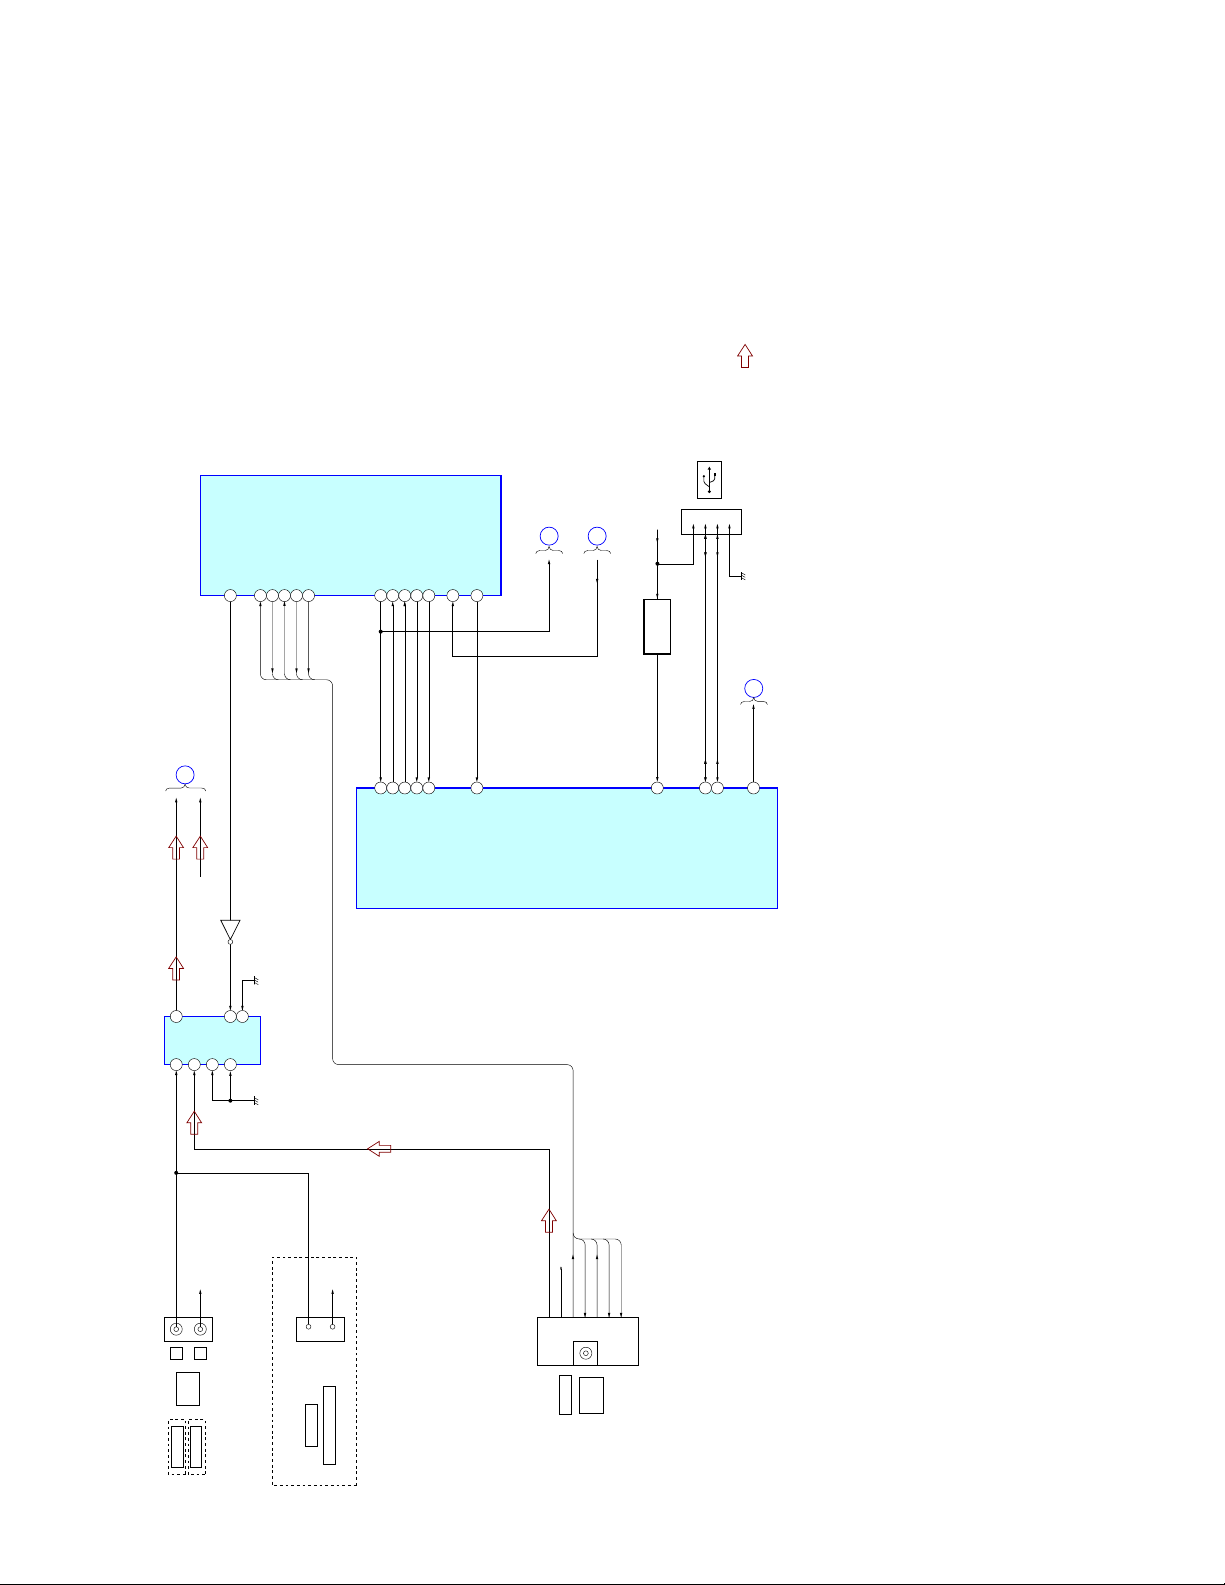
TZ230/TZ630
: VIDEO
: COMPONEN T VIDEO
EURO AV
T OUTPUT (TO TV)
HDMI OUT
x SIGNAL PA TH
TZ210/TZ510/TZ710
J400(1/2)
IC400
VIDEO BUFFER
VIDEO OUT
2
OUT
IN1
IN2
4
6
TMDS DATA2 –4TMDS DATA1 +6TMDS DATA1 –7TMDS DATA0 +9TMDS DATA0 –
CN1701
TMDS DATA2 +
1
3
TMDS CLOCK +12TMDS CLOCK –19HPD
10
+5V POWER13CEC15SCL16SDA
18
Q9730
LEVEL SHIFT
CEC_TX_OUT
IC1707
+5V REG.
+6V
LEVEL SHIFT
Q1701
CKE
147
DQM1
132
DQM0
111
_CAS
134
_RAS
135
_RWE
133
_RCS
136
DRCLK
146
BA1
138
BA0
137
149–155
RA0–RA11
139–141,143,144
DDC_DA
159
DDC_CLK
161
RD0–RD15
117–113,1 19–129
XWR
66
XRD
78
XROMCS
76
37
39
15
17
18
16
19
38
21
20
RA0–RA11
22–26,29–35
44,45,47,48,50,51,53
2,4,5,7,8,10,11,13,42,
XWR
11
XRD
28
XROMCS
2645
CLKE
UDQM
LDQM
/CAS
/RAS
/WE
/CS
CLK
BA1
BA0
RD0–RD15
WE
OE
CE
IC1104
SDRAM
2626
A1–A21
87,91,92
HA0–HA21
56–64,67–75,77,
A0–A21
A0
A0–A19,N.CDQ15/A-1
25–16,10–1,48
IC1102
FLASH ROM
BLANKING OUT
8
Q4005,4006(1/2)
FUNCTION SWITCH
IC4000
VIDEO DRIVER
19
VOUT
23CVBSOUT
3MUTE1
Q4001
16
CN4000(1/2)
Q4000,4003,4006(2/2)
BLANKING CONTROL
1
SW
13 MUTE2
11
CYOUT
20CYOUT
4 CVBSIN
7
CBOUT
18CbOUT
10 CVIN
12 CBIN
15
CROUT
16CrOUT
14 CRIN
R/C OUT
B OUT
G OUT
CVBS OUT
FUNCTION SW
IC503 (1/4)
SYSTEM CONTROL
5-2. BLOCK DIAGRAM – VIDEO Section –
52TV_SEL
81V_SEL0
CEC_TX_OUT
17
CEC
187CVBS
210RGB_SEL/DSEL
209WIDE
HD0–HD7
79,80,82–86,89
HD0–HD7
D3.3V
1
2
4
IC1705
BUFFER
185Y/G
183B/Cb/Pb
182R/Cr/Pr
180TX2P
179TX2N
177TX1P
176TX1N
174TX0P
173TX0N
171TCKP
170TCKN
162HTPLG
IC1101 (2/3)
DVD SYSTEM CONTROL, DSP
SDA
SCL
112 101 102
4
13
12
5
6
7
HD0–HD7
RES
P1
P2
SDA
SCL
WE EEWP
DQ0–DQ7
38,40,42,44
29,31,33,35,
IC2200
FLASH ROM
IC1103
EEPROM
RESET
12
XSYSRST
D
AUDIO
SECTION
(Page 27)
TZ210:AUS/TZ230:UK/
TZ510:CND
HBD-TZ210/TZ230/TZ510/TZ630/TZ710
HBD-TZ210/TZ230/TZ510/TZ630/TZ710
Page 27
Ver. 1.1
HBD-TZ210/TZ230/TZ510/TZ630/TZ710
IC503 (2/4)
SYSTEM CONTROL
L-CH
RF
SECTION
B
(Page 25)
R-CH
ASEL0
84
ST_DI/MIC_DATA77TUNED
80
TUNEDDIDO
ST_CLK/MIC_CLK
ST_DO
ST_CE
76
79
78
CE
CLK
DVD_SCO49DVD_SOD48DVD_SID47DVD XIFCS51CDM_OPEN_SW
DVD_RST
45
IFSCK
XSYSRST
98
108
IFCK
XSYSRST
IFSDO
97
IFSDO
IFSDI
100
IFSDI
44
XIFCS
99
XIFCS
DVD_XIFBUSY
50
110
IFBSY
VIDEO
SECTION
D
XSYSRST
RF
(Page 26)
OCSW
SECTION
C
(Page 25)
CN5200
123
USB 5V
VBUSD-D+
Q2101
VBUS DETECT
197
VBUS_OC
: TUNER
R-ch is omitted due to same as L-ch.
SIGNAL PATH
x
x
(USB)
4
GND
POWER
SECTION
(Page 29)
E
VBUS_SW
45
44
196
USB_DP
USB_DM
VBUS_OE
2727
IC401
AUDIO
SELECT
Y1 Y
5 3
J400(2/2)
L
AUDIO
TV/CABLE
TZ210:CND/
TZ510:CND
5-3. BLOCK DIAGRAM – AUDIO Section –
R-CH
Q400
Y0
1Y22Y34
R-CH
R
IN
TV
TZ210:EXCEPT CND/
TZ510:EXCEPT CND/
10
A
TZ710
9
B
CN4000(2/2)
TZ230/TZ630
6
A (L) IN
IC1101 (3/3)
USB CONTROL
DSP INTERFACE,
R-CH
R-CH
L-CH
R-CH
TUNEDDIDO
CLK
CE
3
A (R) IN
EURO AV
OUTPUT (TO TV)
T
TU401
FM
PACK
TUNER
ANTENNA
FM
:
75
COAXIAL
HBD-TZ210/TZ230/TZ510/TZ630/TZ710
Page 28
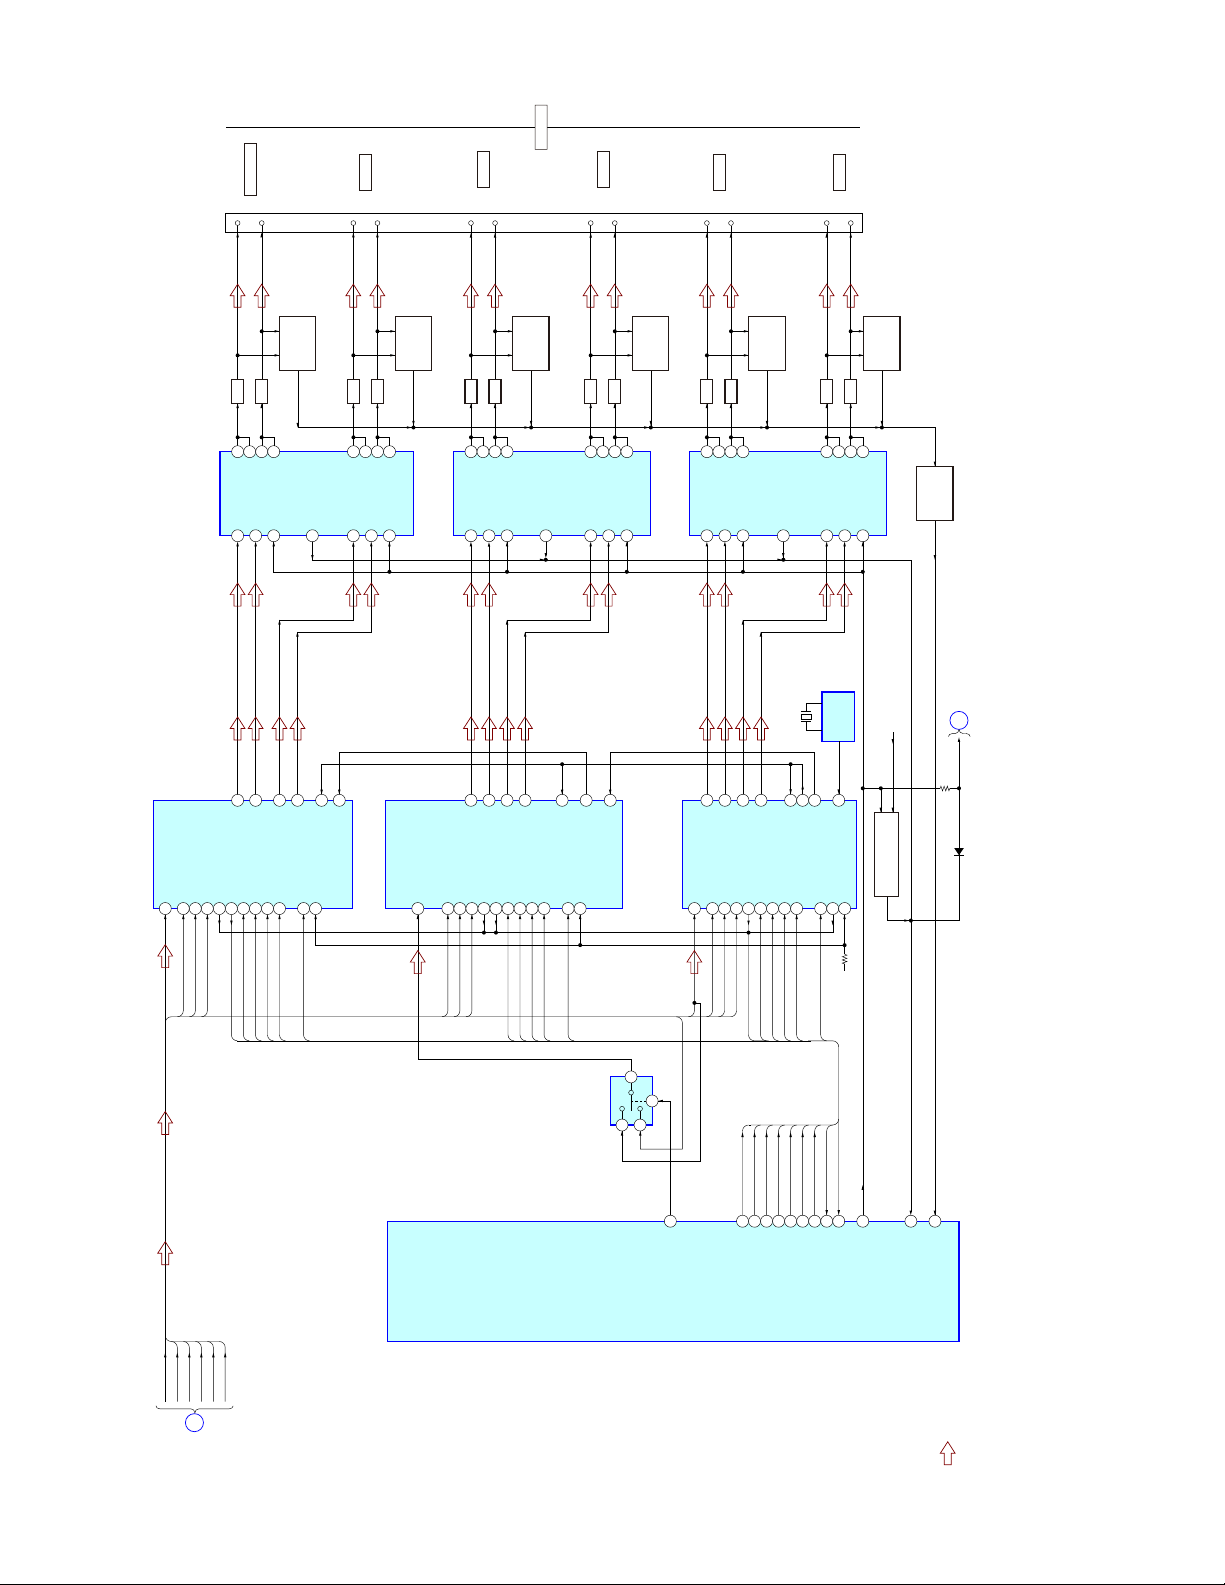
SPEAKERS
SUBWOOFER
(+)
TB3001
LPF
363439
BST_B
OUT_B
IC3000
DIGITAL POWER AMP
8 PWM_B
6 PWM_A
SW+
SW–C+C–
6
4OUTR2(–)
(–)
LPF
OUT_A
DC BALANCE
43
BST_A
7 /RESET_AB
11OUTL1(+)
Q3005
DETECT
9OUTL2(–)
SUR L
(+)
(–)
DETECT
DC BALANCE
LPF
LPF
394336
34
BST_A
BST_B
OUT_A
OUT_B
6 PWM_A
8 PWM_B
14XFS0OUT
7 /RESET_AB
48XFS0IN
5/SD
38FS0I
(+)
Q3009
LPF
313328
OUT_C
IC3004
DIGITAL POWER AMP
16 PWM_C
FR+
6
FRONT R
(–)
LPF
BST_C
OUT_D
8 PWM_D
FR–
4OUTR2(–)
24
BST_D
17 /RESET_CD
FL+
FL–
11OUTL1(+)
Q3015
DETECT
DC BALANCE
9OUTL2(–)
5/SD
X3000
49.152MHz
38FS0I
37FSCKO
(+)
LPF
394336
OUT_A
8 PWM_A
CLOCK
14XFS0OUT
FRONT L
(–)
LPF
34
BST_A
BST_B
OUT_B
/RESET_AB
7
16 PWM_B
IC3007
GENERATOR
48XFS0IN
Q3013
DETECT
DC BALANCE
PVDD (+26V)
Q3004
PROTECT
DC BALANCE
POWER
SECTION
F
EN
(Page 29)
2828
Q3007
IC3002
DIGITAL POWER AMP
(+)
LPF
313328
OUT_C
16 PWM_C
SR+
6
SUR R
BST_C
18 PWM_D
SR–
4OUTR2(–)
(–)
LPF
OUT_D
SL+
DC BALANCE
24
BST_D
17 /RESET_CD
SL–
9OUTL2(–)
11OUTL1(+)
Q3011
DETECT
CENTER
(+)
(–)
DETECT
DC BALANCE
LPF
LPF
282431
33
BST_D
BST_C
OUT_D
OUT_C
5/SD
18 PWM_D
16 PWM_C
17 /RESET_CD
48XFS0IN
38FS0I
S-MASTER PROCESSOR
5-4. BLOCK DIAGRAM – AMP Section –
IC3001
DATA
31
AMP_D1 AMP_D3
AMP_D2
36 XFSIIN
MCK0
AMP_D3
30 BCK
BCK0
BCKO
A
RF
29 LRCK
LRCK0
LRCKO
SECTION
(Page 25)
OUTR1(+)
25 OVF FLAGL
24 OVF FLAGR
OVF2
SCDT
MCKO
21 SCDT
22 SCSHIFT
SHIFT
OUTR1(+)
IC3003
S-MASTER PROCESSOR
23 SCLATCH
27 INIT
19 SOFTMUTE
18 NSPMUTE
LAT3
NS_INIT
SOFTMUTE
DATA
31
AMP_D2
IC503 (3/4)
SYSTEM CONTROL
MCK0
36 XFSIIN
BCK0
30 BCK
29 LRCK
25 OVF FLAGL
24 OVF FLAGR
21 SCDT
22 SCSHIFT
23 SCLATCH
27 INIT
19 SOFTMUTE
18 NSPMUTE
LRCK0
SCDT
SHIFT
LAT2
NS_INIT
SOFTMUTE
5
IC307
DATA SELECT
2
1
IC3005
S-MASTER PROCESSOR
DATA
31
AMP_D1
AMP_D2
6
M_ST
63
LINK_SW
OUTR1(+)
36 XFSIIN
MCK0
BCK0
30 BCK
29 LRCK
25 OVF FLAGL
21 SCDT
22 SCSHIFT
LRCK0
SCDT
OVF1
SHIFT
LAT1
LAT2
SCDT
SHIFT
1DAMP_SCDT/DIR_DIN
2DAMP_SHIFT/DIR_CLK
59DAMP_LAT1
60DAMP_LAT2
23 SCLATCH
LAT1
NS_INIT
LAT3
61DAMP_LAT3
27 INIT
NS_INIT
57DAMP_INIT
19 SOFTMUTE
SOFTMUTE
OVF1
SOFTMUTE
58SOFT_MUTE
55OVERFLOW1
24 OVF FLAGR
18 NSPMUTE
D3.3V
OVF2
56OVERFLOW2
Q3003
PVDD DOWN PROTECT
EN
54DRIVE_RST(EN)
DC-DET
SD_PVDD_DET
67SD/PVDD_DET
66DC_DET
D4004
: TUNER
x SIGNAL PA TH
HBD-TZ210/TZ230/TZ510/TZ630/TZ710
HBD-TZ210/TZ230/TZ510/TZ630/TZ710
Page 29
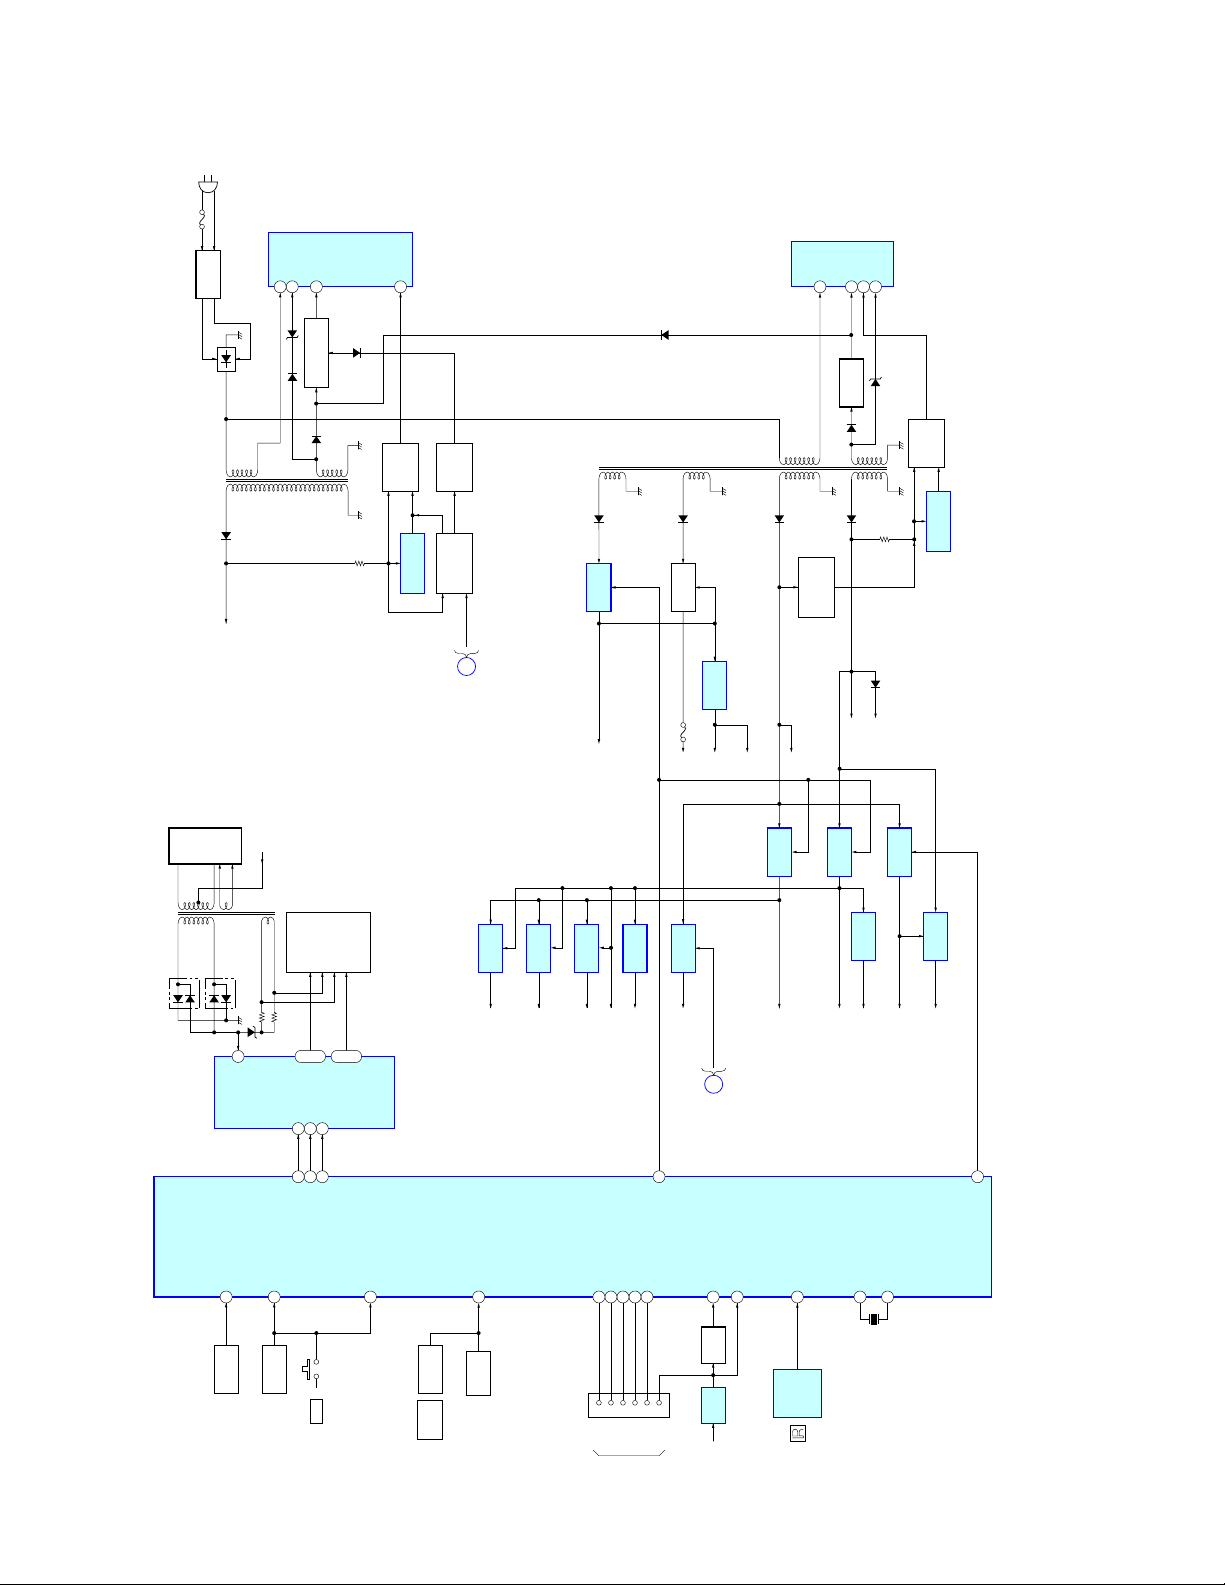
Ver. 1.1
(AC IN)
F901
IC901
SWITCHING
REGULATOR
FILTER
LF901,902
HBD-TZ210/TZ230/TZ510/TZ630/TZ710
D901
T901
MAIN
TRANSFORMER
D931
Q5000
DC/DC
PVDD (+26V)
(DIGITAL AMP)
CONVERTER
5V (FL)
3D
D914 DZ915
1 OCP/SYNC
POWER CONTROL
D908
4VCC
Q901
D909
5FB/OLP
PC901
FEED BACK
SHUNT REG.
IC932
STANDBY
POWER
PC903
CONTROL
PROTECT
Q943,949,950
EN
F
AMP
SECTION
(Page 28)
SUB
T903
TRANSFORMER
D954
+12V REG.
12V
A12V
IC941
P.CONT1
D910
D955
Q945
B+ SWITCH
M+9V
F945
M+9V
+6V
IC403
+9V REG.
+9V
+9V
SWITCHING
REGULATOR
D942
6V
(TUNER)
+5V REG.
IC921
IC507
3 VCC/OVP
5FB/OLP
6BD
1D
Q922
DZ903
+21V REG.
D902
D943
Q969
POWER
PROTECT
E+4V
E4V
+6V
IC510
D+3.3V REG.
E3.3V
D503
IC504
+5V REG.
PC902
FEED BACK
SHUNT REG.
IC923
2929
T5000
DC/DC
CONVERTER
TRANSFORMER
D5000
IC503 (4/4)
SYSTEM CONTROL
FL DISPLAY
IC5001
DRIVER
S5202,5203
30VEE
94 KEY2
KEY
FUNCTION
D5001
D5002
S5201
FUNCTION
97 KEY0
KEY
TUBE
INDICATOR
FLUORESCENT
F2
F1
15 –29
42 –31
S2 – 16
8CLK
7DIN
9 STB
7FL_CLK/LED_CLK
5FL_DATA/LED_DA TA
3
FL_STB
@/1
S5301
ND5000
G1 – 12
5-5. BLOCK DIAGRAM – POWER Section –
73 KEY_INT
IC1105
+3.3V REG.
+3.3V-3
(IC1101)
IC1107
+3.3V REG.
(IC1101)
RF+3.3V
IC1708
+3.3V REG.
+3.3V-2
(IC1101)
+3.3V-1
+1.8V REG.
(IC1101)
+1.8V
IC3006
D3.3V
+1.8V REG.
+1.8V
(S-MASTER)
IC509
IC1110
+5V REG.
(IC1101)
USB 5V
VBUS_SW
+5V
IC5000
+3.3V REG.
5V
(FL)
+3.3V
(IC5001)
E
P.CONT1
AUDIO
SECTION
(Page 27)
39P_CONT1
Xin
IC5002
RECEIVER
Xout
15
13
X501
5MHz
95 KEY1
KEY
SWITCH
ROTARY
FUNCTION
S5114,5204
S5113
MASTER
VOLUME
CN508
31 I2C_DATA/TXD1
TXD1
34 RST1
RTS1
33 CLK1
532
CLK1
FOR
WRITE
9 CNVSS
32 I2C_CLK/RXD1
7
6
8
RXD1
RESET
CNVSS
JIG
12 RESET
RESET
RESET
E4V
Q501
IC506
20 AC CUT
REMOTE
CONTROL
4 SIRCS_IN
P_CONT3
41WRITE P_CONT3
HBD-TZ210/TZ230/TZ510/TZ630/TZ710
Page 30
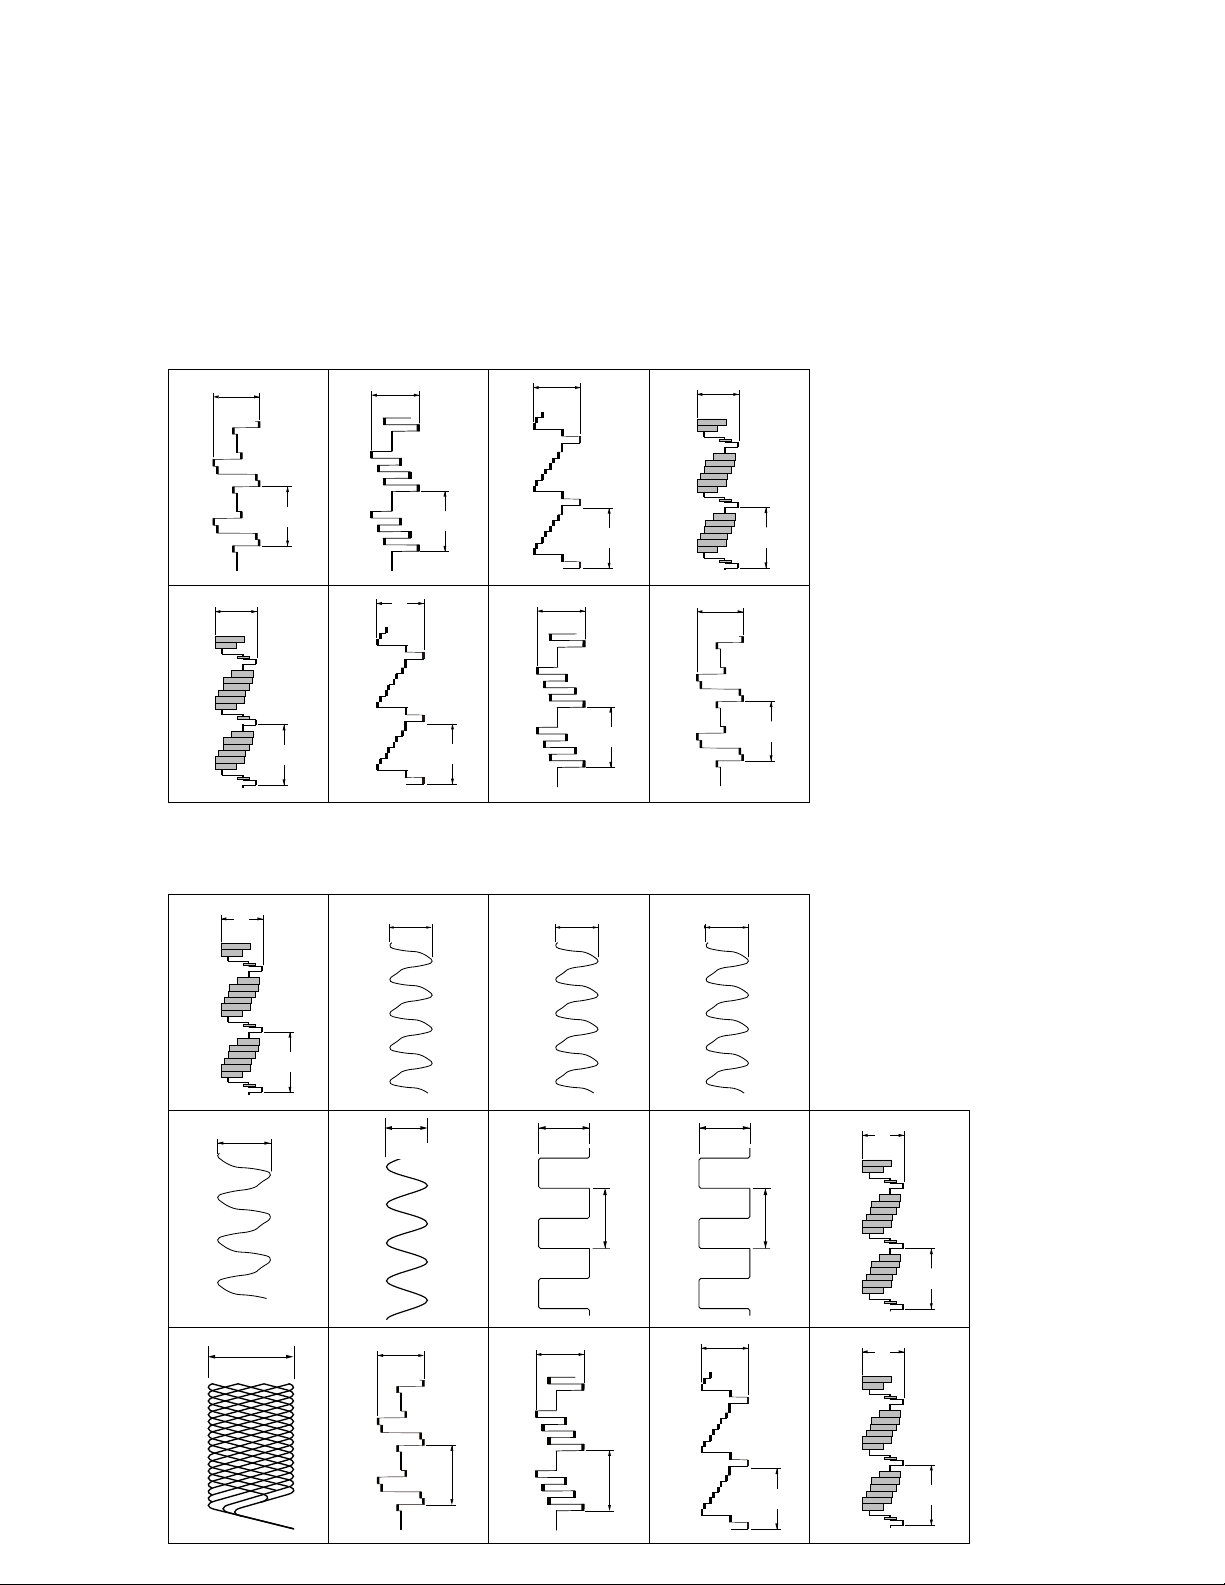
1.4 Vp-p
1.4 Vp-p
2 Vp-p
2.5 Vp-p
H
5 IC4000 qh (Crout)
1.3 Vp-p
H
1 IC4000 4 (CVBSin)
2.6 Vp-p
H
(TZ210/TZ510/TZ710)
qa IC400 2 (OUT)
s/DIV
P
500 mV/DIV, 20
s/DIV
P
500 mV/DIV, 20
s/DIV
P
1 V/DIV, 20
6 IC4000 qk (Cbout)
2 IC4000 0 (CVin)
qs IC3007 4 (Y)
1 Vp-p
s/DIV
P
H
500 mV/DIV, 20
s/DIV
P
H
500 mV/DIV, 20
4.8 Vp-p
49.152 MHz
1 V/DIV, 10 ns/DIV
7 IC4000 w; (CYout)
3 IC4000 qs (Cbin)
qd IC3005 rk (XFSOIN)
H
0.72 Vp-p
H
4.2 Vp-p
49.152 MHz
s/DIV
P
1 V/DIV, 20
8 IC4000 wd (CVBSout)
s/DIV
P
200 mV/DIV, 20
4 IC4000 qf (Crin)
1 V/DIV, 10 ns/DIV
qf IC3005 qf (XFSOOUT)
H
0.72 Vp-p
H
4 Vp-p
49.152 MHz
s/DIV
P
1 V/DIV, 20
s/DIV
P
200 mV/DIV, 20
1 V/DIV, 10 ns/DIV
3030
1.6 Vp-p
27 MHz
6 IC1101 <xc, (XTALO)
HBD-TZ210/TZ230/TZ510/TZ630/TZ710
• Waveforms
1 IC1101 0 (DVDRFIP)
– MAIN Board – – SCART Board – (TZ230/TZ630)
500 mV/DIV, 20 ns/DIV
540 mVp-p
100 mV/DIV, 100 ns/DIV
3.4 Vp-p
7 IC503 qd (Xout)
(TZ230/TZ630)
2 IC1101 <z,x (R/Cr/Pr)
5 MHz
0.7 Vp-p
H
1 V/DIV, 100 ns/DIV
8 IC404 7 (LRCK)
s/DIV
P
200 mV/DIV, 20
3 IC1101 <z,c (B/Cb/Pb)
3.2 Vp-p
20.8 Psec
0.7 Vp-p
H
(TZ230/TZ630)
s/DIV
P
1 V/DIV, 10
s/DIV
P
200 mV/DIV, 20
9 IC404 8 (BCK)
4 IC1101 <z,b (Y/G)
3.2 Vp-p
0.326 Psec
1 Vp-p
H
(TZ230/TZ630)
1.3 Vp-p
s/DIV
P
1 V/DIV, 0.1
(TZ210/TZ510/TZ710)
1.3 Vp-p
s/DIV
P
500 mV/DIV, 20
5 IC1101 <z,m (CVBS) 0 IC400 4 (IN2)
s/DIV
P
H
500 mV/DIV, 20
s/DIV
P
H
500 mV/DIV, 20
HBD-TZ210/TZ230/TZ510/TZ630/TZ710
Page 31
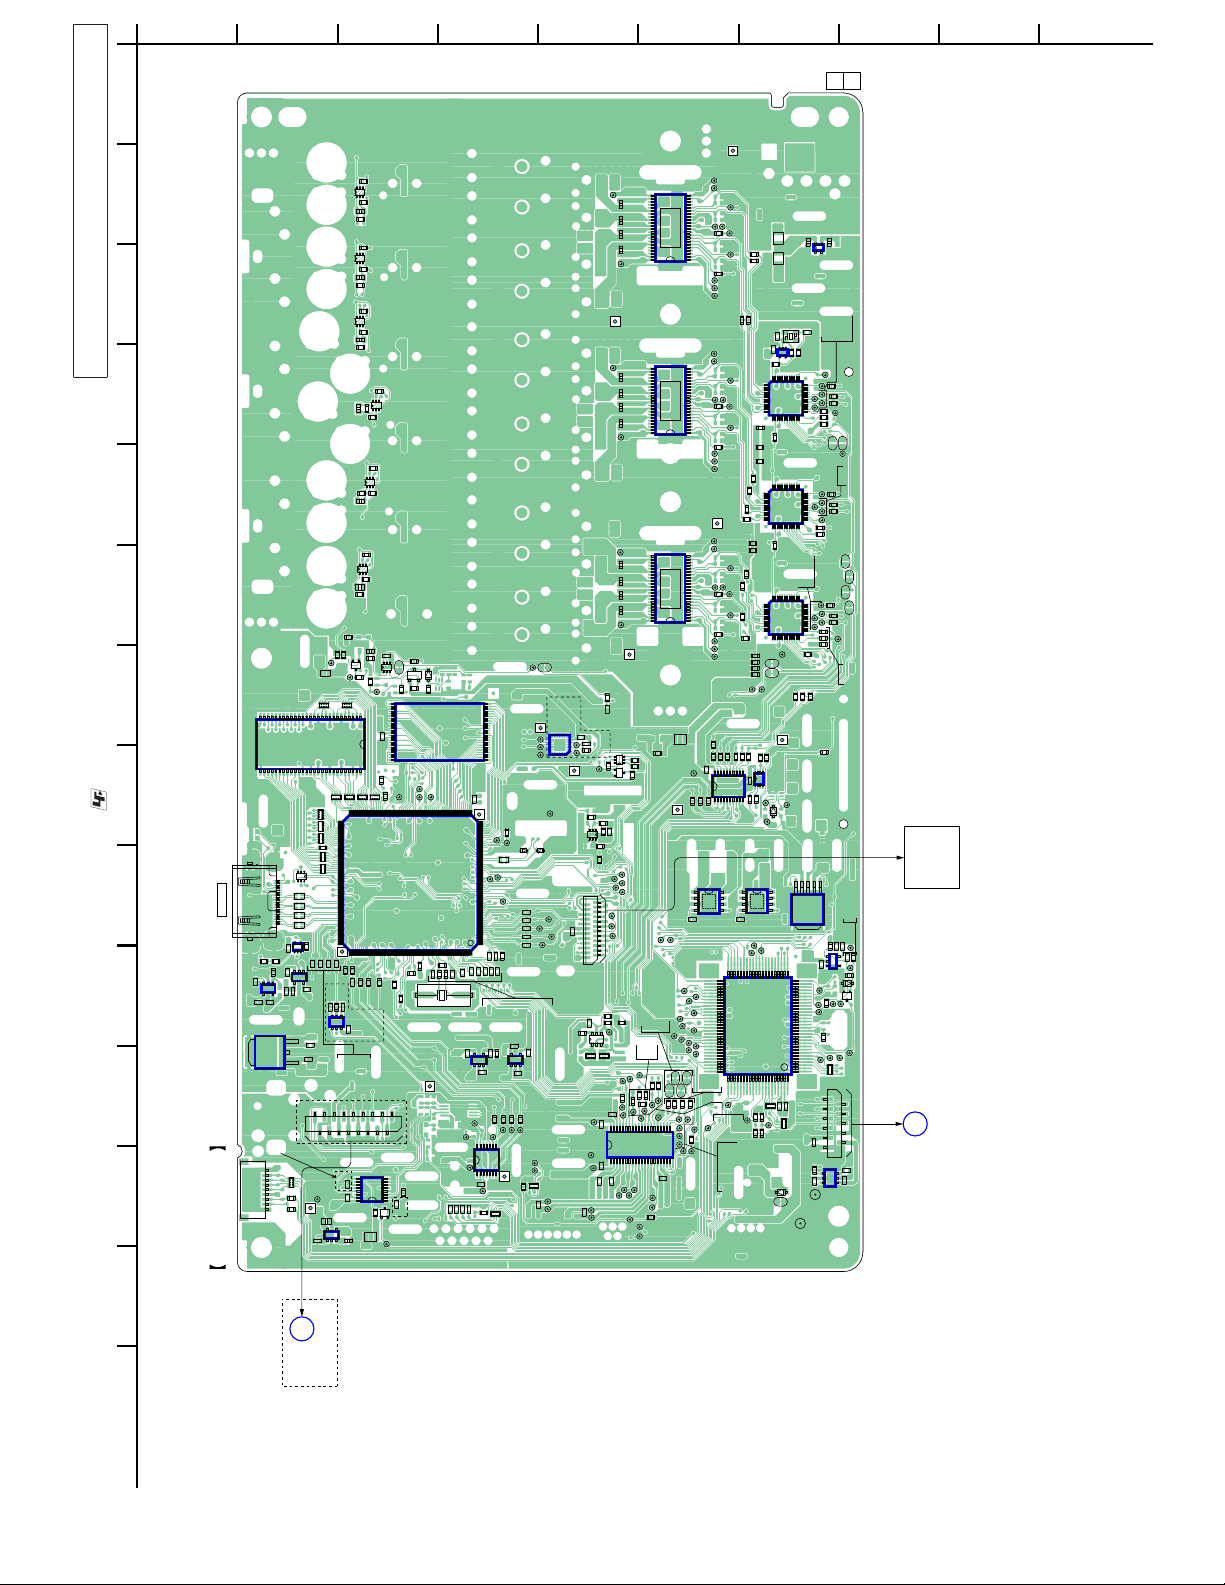
A
Ver. 1.1
HBD-TZ210/TZ230/TZ510/TZ630/TZ710
1234567891011121314
When IC507 and IC1501 on the Main board are damaged, exchange
the new Main board for the Main board which IC damaged.
Note:
B
R3017
R3015
JL3049
FB1106
JL3050
27
RB1106
IC1104
28
• : Uses unleaded solder.
22202123
CN1701
CN1701
HDMI OUT
R1752
R1732
3
C1727
4
IC1707
C1729
• See page 24 for Circuit Boards Location.
9
CN508
(TO WRITE JIG)
1
34
Q1701
119
5
C1725
IC1705
13
1
C1732
4
5
C1733
C1734
C1730
O
I
IC1110
TZ230/TZ630
SAF,AEP ,UK,CH,RU
R1742
RB603
R607
R614
1
6
R1741
4
3
1
5
IC1708
CL401
RB1111
RB1103
RB1104
R2114
C1731
RB1109
128
RB1115
RB1114
L1704
L1703
L1702
L1701
192 129
R2101
R426
C420
C421
64
3
1
C1183
C1198
FB2120
17
16
C419
C423
C429
R434
MAIN BOARD (SIDE A)
R3112
6
Q3015
1
R3111
C3121
R3105
6
Q3013
1
C3109
R3094
6
Q3011
1
C3077
R3078
C3048
R3038
Q3005
C3009
R3025
R3008
Q3004
RB1105
193
FB2126
C417
FB2121
IC403
C427
R3099
R3098
R3082
R3081
Q3007
R3031
6
1
R3030
RB1110
FB2122
9
16
6
1
R3000
1
54
R1159
R1160
4
3
4
3
4
3
R3009
CN402
R3060
C3022
34
RB1113
R1161
FB2125
R427
6
1
CL1702
RB1112
L400
34
R9945
C1110
IC400
IC401
C
R3064
4
Q3009
3
R3063
R3045
R3044
C3003
C3000
SL3000
Q3003
4
6
3
1
GS
R9946
25
48
R1156
R2115
JL1160
R1185
R1183
R1125
R1184
TZ210/TZ510/TZ710
1
2
8
R420
1
C418
Q400
JL548
R3007
Q9730
R9942
CL2102
CL2101
IC1101
R2169
SAF,AEP ,UK,CH,RU
D9712
CL1121
R9941
IC1102
R1142
X1101
C404
C405
C1136
65
256
C1186
131
CL403
CL404
C438
C402
C403
1
IC1105
454
CL405
14
1
D
24
CL2201
CL2200
CL2202
1
64
R2127
CL1110
CL2107
L2101
D2102
CL1105
CL1108
CL1101
C1124
C1123
C1122
C1121
C1120
R1136
C1132
C1133
C1138
C1139
R2167
R2168
C1152
C1153
C1147
C1148
C1193
C1195
R1151
C1182
5
3
C1184
C1192
R316
R317
R318
R319
JL423
JL424
CL410
CL409
78
IC404
CL406
R1504
C1503
R406
RB400
JL3000
D2103
CL1117
CL1118
CL1115
CL1116
C1137
C1135
IC1107
RB1500
SL3001
CL2108
CL1505
CL1506
IC2200
E
JL3048
C3141
C3123
C3120
C3108
JL3033
JL3032
C3102
C3071
C3066
C3046
JL3017
JL3016
C3040
C3023
C3021
C3008
JL3001
R3002
C3001
TZ210:AUS/TZ230:UK/TZ510:CND
C2200
CL2204
C2201
R2202
Q1101
4
CL2203
13
6
CL2109
R1117
Q1103
R2193
R2192
13
Q2101
C2102
R2194
46
R2191
R2110
CL1302
CL1303
23
CL1113
CL1114
C1101
CN1101
224
1
R1124
R1110
C1113
R1107
CL2103
R1114
4
6
Q1102
1
3
RB1117
RB1116
CL1525
CL1524
R1543
CL1522
CL1523
C1512
40
CL1521
C1513
1
C1509
1
CL1501
CL1508
CL1509
CL1510
CL1507
CL1512
C1508
C1510
CL1513
CL1514
CL1515
C1504
CL1502
CL1112
CL1527
CL1511
R1527
CL1301
CL1304
CL1305
SL1502
R1532
CL1531
23
44
23
44
23
44
R1108
R1111
R1116
SL1503
SL1504
R1519
R1518
R1526
R1525
IC1501
JL546
CL1504
CL1503
R471
JL545
SL1505
CL1532
C1511
R1501
JL518
JL539
21
20
22
IC3004IC3002IC3000
1
22
1
22
1
L471
JL471
14
JL515
JL521
JL513
JL538
JL502
CL1519
CL1516
CL1517
F
JL3047
JL3046
JL3042JL3044
R3100
R3096
JL3037
JL3035
JL3034
JL3031
JL3030
JL3026
R3066
R3061
JL3021
JL3019
JL3018
JL3015
JL3014
JL3010
R3034
R3029
JL3006
JL3004
JL3002
FB471
C476
R472
R473
R474
C542
JL516
JL514
JL512
JL537
R1539
R1540
R1541
JL505
CL1537
R1513
CL1518
JL3023
R488
R486
20
1
IC510
JL536
JL503
R1542
CL1526
CL1535
JL3045
JL3039
JL3012
R483
IC471
85
JL425
CL1528
JL3013
JL3008
JL3007
R482
CL1529
CL1536
CL1534
CL1533
CL1520
R3069
R3067
14
CL1530
R3103
JL3029
JL3027
R3075
R3059
R3047
JL541
R481
10 11
C533
JL522
CL528
JL3040
R3104
R3040
R3035
R3145
R3144
R3143
R3142
R480
C333
R410
JL3024
R3110
R3109
IC3007
112
IC3005
R3077
R3042
112 112
R3032
R413
R409
IC507
JL523
IC503
R532
R536
R531
R535
R3114
R3093
C3151
R3119
13
R412
JL535
JL533
JL524
48
13
R3083
48
13
R3062
48
RB541
CL529
SL501
4
D4004
85
L3018
L3020
X3000
C3154
1
3
5
R3097
IC3003
JL542
IC307 IC3001
C514
C515
D503
G
R3121
CL3005
R3041
RB540
R3122
24
37
24
37
24
SL3007
SL3006
CL501
C3150
37
CL3007
CL3004
36
R3046
JL534
6
C522
C3149
4
3
2
1
IC3006
C3146
CL3033
CL3032
36
25
R3102
SL3003
CL3022
R3080
25 36
CL3009
CL3008
CL3006
25
R3022
R3043
R628
15
R599
IC506
C525
JL528
JL527
JL519
R597
R564
JL510
JL508
111
CN506
R569
1
C520
3
CL502
IC504
11
CL3030
CL3028
R3095
R3101
CL3014
R3065
R3058
SL3005
SL3004
R3048
CL3003
IC509
C524
C527
R596
JL531
JL529
JL511
RB550
210
6
4
(11)
1-880-741-
CL3031
CL3029
LP3002
R3113
R3108
R3106
CL3027
SL3002
JL540
CL3019
CL3017
CL3015
R3073
R3071
SL3009
SL3008
R3037
R3036
R3033
R3026
R3028
LP501
R598
C523
JL532
JL530
D502
Q501
JL517
C521
C516
H
(1/2)
OPTICAL
DVD DRIVE
FL
B
PICK-UP
(KHM-313CAA)
BOARD
CN5005
(Page 43)
I
J
3131
E
SCART
BOARD
CN4018
(Page 41)
TZ230/TZ630
5-6. PRINTED WIRING BOARD – MAIN Section (1/2) –
HBD-TZ210/TZ230/TZ510/TZ630/TZ710
Page 32
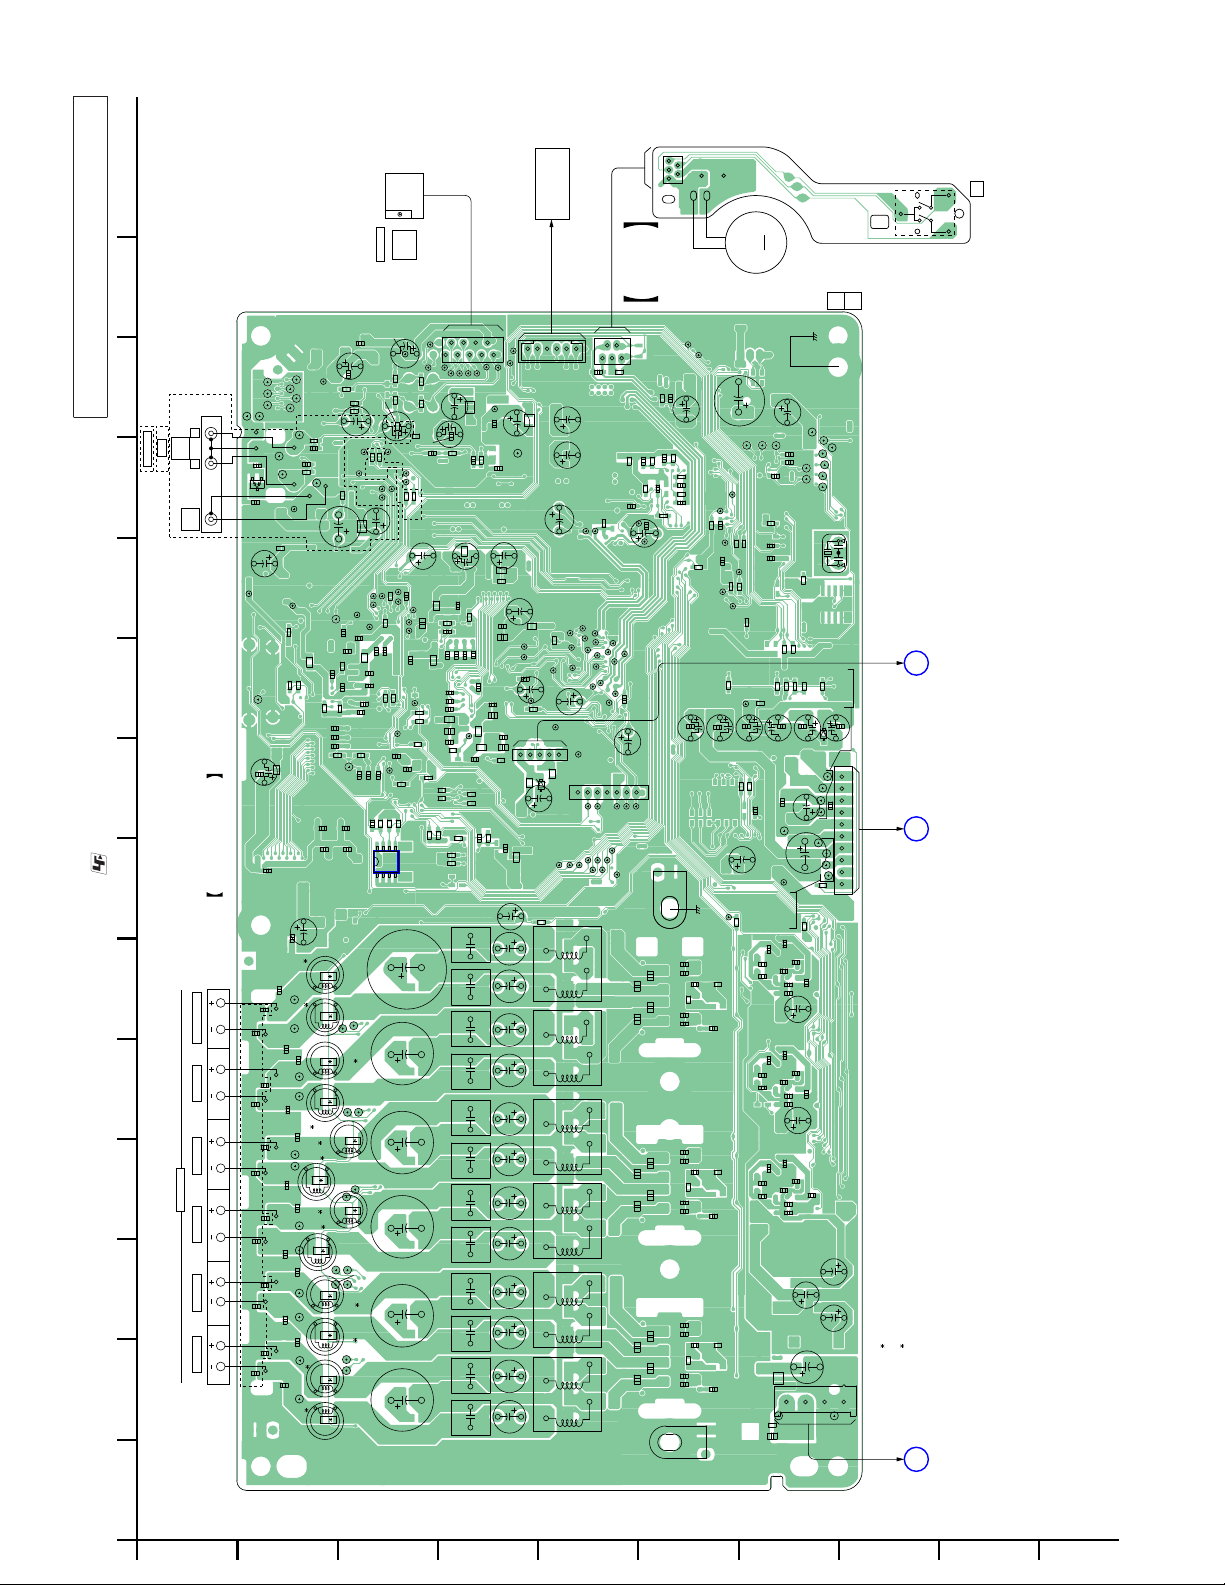
When IC1103 on the Main board is damaged, exchange the
new Main board for the Main board which IC damaged.
Note:
TZ210:CND/TZ510:CND
TZ210:EXCEPT CND/TZ510:EXCEPT CND/TZ710
L
IN
TV
AUDIO
TV/CABLE
R
OUT
VIDEO
TZ210/TZ510/TZ710
• : Uses unleaded solder.
SUBWOOFER
• See page 24 for Circuit Boards Location.
TB3001
SPEAKERS
FRONT R FRONT L SUR R SUR L CENTER
234567891011121314
CL553
CL552
CL551
CL549
CL400
C401
JL1702
CL1701
C9973
CL548
CL555
JL402
JL404
D400
JL400
JL403
JL401
R2178
JL1703
R1744
FB1113
R1750
R1749
C1190
FB1108
C1197
J400
C400
C1187
MAIN BOARD (SIDE B)
C1177
C3155
1
C3054
C3058
C3059
C3055
C3067
C3065
C3080
C3078
C3094
C3087
C3086
C3093
CND,AUS,EA,
HK,SAF,AEP,
UK,CH,RU,TW
C3051
C3056
C3079
C3089
C3052
C3068
CL3010
CL3018
CL3016
C3097
C3057
CL3012
C3069
C3081
CL3021
CL3020
C3098
CL3025
C3088
CL3023
CL3024
L3003
CL3011
L3002
L3004
CL3026
L3012
L3013
1
CL3013
1
1
TB3001
111291078563412
1
5
42
1
MS-203
BOARD
4
5
R1544
C1522
R1517
R1535
R1521
C1516
CL1106
C1106
CL1107
JL2107
JL2124
JL2121
C1199
6
CN1105
JL1111
JL1112
C3013
C3018
C3028
C3033
C3053
C3064
C3082
C3092
C3112
C3117
C3128
C3134
C1518
R1512
C1506
C1524
R1537
R1529
C1105
(FOR SERVICE JIG)
ET3003
C3044
C3103
C3104
C3106
C3107
C3142
C3143
C3006
C3007
C3041
C3042
C3045
CN001
R3123
R3125
R3127
JL549
C1520
C3024
C3124
BLK
RED
M
M001
(LOADING)
11
(11)
C537
JL547
R1538
C1525
R1536
C1523
C538
C3072
ET3000
R563
C528
R548
JL509
C517
JL544
C540
(CHASSIS)
CL3002
C3043
C3105
C3144
JL501
R625
C539
R3039
R3074
R3107
C500
JL543
C471
CL526
CL527
JL504
R549
R550
CL579
R577
R627
R585
CL568
R609
C530
C529
R476
R478
C334
R3005
C3016
C3025
C3062
C3075
C3111
C3118
C3126
R3117
C3047
C3145
L3019
CL3034
CL534
R615
C551
CL561
C3010
C3038
C3101
C532
CL567
C3050
C3113
C512
C3037
C3036
4
C3100
C3099
(CHASSIS)
1-880-741-
C536
CL532
CL531
CL530
C511
CL533
CL535
CL536
C513
CL537
CL539
CL538
R556
C519
C518
X501
R582
R581
R579
CL566
CL565
CL563
CL562
R621
R626
R620
R622
C541
C546
C531
D4002
C545
C543
1
C552
C550
CN509
C553
R629
10
CL560
CL559
CL557
CL556
R3021
C3012
C3026
C3029
C3034
C3076
C3083
C3096
C3127
C3130
C3139
C3138
C3137
C3132
C3152
C3148
C3140
CN3000
CL3035
L3002–3005, 3007–3010, 3012–3015
(CND, AUS, EA, HK, SAF, AEP, UK, CH, RU, TW)2R3054–3057, 3070, 3072, 3076, 3079, 3084–3087
(E3, E12, E13, AR, MX, PH, SP, TH)
1
1
FM
TU401
TUNER
FM
75:
COAXIAL
ANTENNA
C410
JL406
C409
C425
CL554
CL402
R421
CL550
C416
R414
C412
C413
R415
C411
JL305
C1169
C1163
R1730
C2502
C1108
R1781
R1782
C1176
C1162
C1164
R1133
C1181
C1180
R3055
2
R3054
2
R3057
2
R3056
2
1
1
L3008
1
L3007
R3070
2
1
L3010
1
L3009
R3076
2
R3086
2
R3087
2
R3084
2
2
R3085
R424
JL3028
R425
JL3003
JL3009
JL3020
JL416
R411
CL2139
CL2120
C1191
C1179
L3005
2
2
JL3025
L3014
L3015
C426
JL419
FB1118
C2119
JL3005
1
JL3011
R3072
JL3022
R3079
1
1
L401
CL2138
C1172
C1109
CL2135
CL2140
C1174
R1140
C1158
JL3043
JL3041
R402
C1175
C2130
JL3036
JL3038
JL422
JL421
C1161
C1156
8
1
C3019
C415
R405
C1160
C3039
R422
CL2141
R2180
C1171
R2185
R1135
C3119
C3135 C3070C3095
JL415
R2176
CL2121
CL1123
R1193
JL420
C414
CL2124
R2184
5
R416
CL2137
R1191
4
R418
C1145
CL2123
C1144
R400
C1170
CL2125
CL2122
R1154
R404
R403
R423
R401
CL2126
C1154
R2179
R1171
C1155
IC1103
JL413
JL414
C435
C432
JL418
JL417
TZ230/TZ630
FB1109
C2108
FB1107
R1155
R2152
R2156
R2158
R2150
R2151
CN400
8
2
9
1
JL407
JL405
JL412
JL411
JL408
JL409
JL410
C439
L402
CL407
C441
C436
C431
R437
R438
R439
FB2103
C2109
C2110
FB2101
R2105
C1165
R1141
C1111
C1159
R1132
C1129
C1151
C1149
C1130
C1140
C1146
C1115
C1125
C1116
C2118
C1126
FB1115
FB1117
C2115
FB1116
C2114
CL1109
R1103
C1127
R2157
R2159
R1198
C2100
R2160
R1105
R1106
C3002
C3060C3061C3084C3085
C3114C3115
C3129C3131 C3014C3015C3030C3031
R2155
C1102
JL506
JL507
C1117
C2503
C2116
C2117
C440
1
C3011
C3017
C3027
C3032
C3049
C3063
C3074
C3091
C3110
C3116
C3125
C3133
JL2116
JL2115
FB1111
CL408
C1114
JL2117
FB2104
MOTOR
SPINDLE/SLED
DVD DRIVE(2/2)
( )
16
CN1501
L403
C1112
JL2109
FB1112
R1102
JL2105
JL2111
JL2110
JL2119
JL2120
C1118
R1101
JL2113
CN2101
5
FB2105
D2101
1
C2112
CL574
CL575
CL578
R3006
C1507
C1514
CL2104
JL2103
JL1109
JL1107
CL577
JL2114
CL573
JL2118
JL2112
1
JL2102
JL2106
JL1108
CL576
2
JL2108
JL2122
CL570
C1505
R2129
JL2104
CL569
L3000L3001L3006
L3011
L3016L3017
CN1502
JL2123
JL2101
C1119
JL1110
CL3001
CL3000
A
C
D
S001
USB
POWER
POWER
BOARD
CN5201
CN906
BOARD
CN904
BOARD
21
1-861-327-
(CHUCK/TRAY DETECT)
(Page 45)
(Page 48)
(Page 48)
3232
HBD-TZ210/TZ230/TZ510/TZ630/TZ710
Ver. 1.1
5-7. PRINTED WIRING BOARDS – MAIN Section (2/2) –
A
B
C
D
E
F
G
H
I
J
HBD-TZ210/TZ230/TZ510/TZ630/TZ710
Page 33
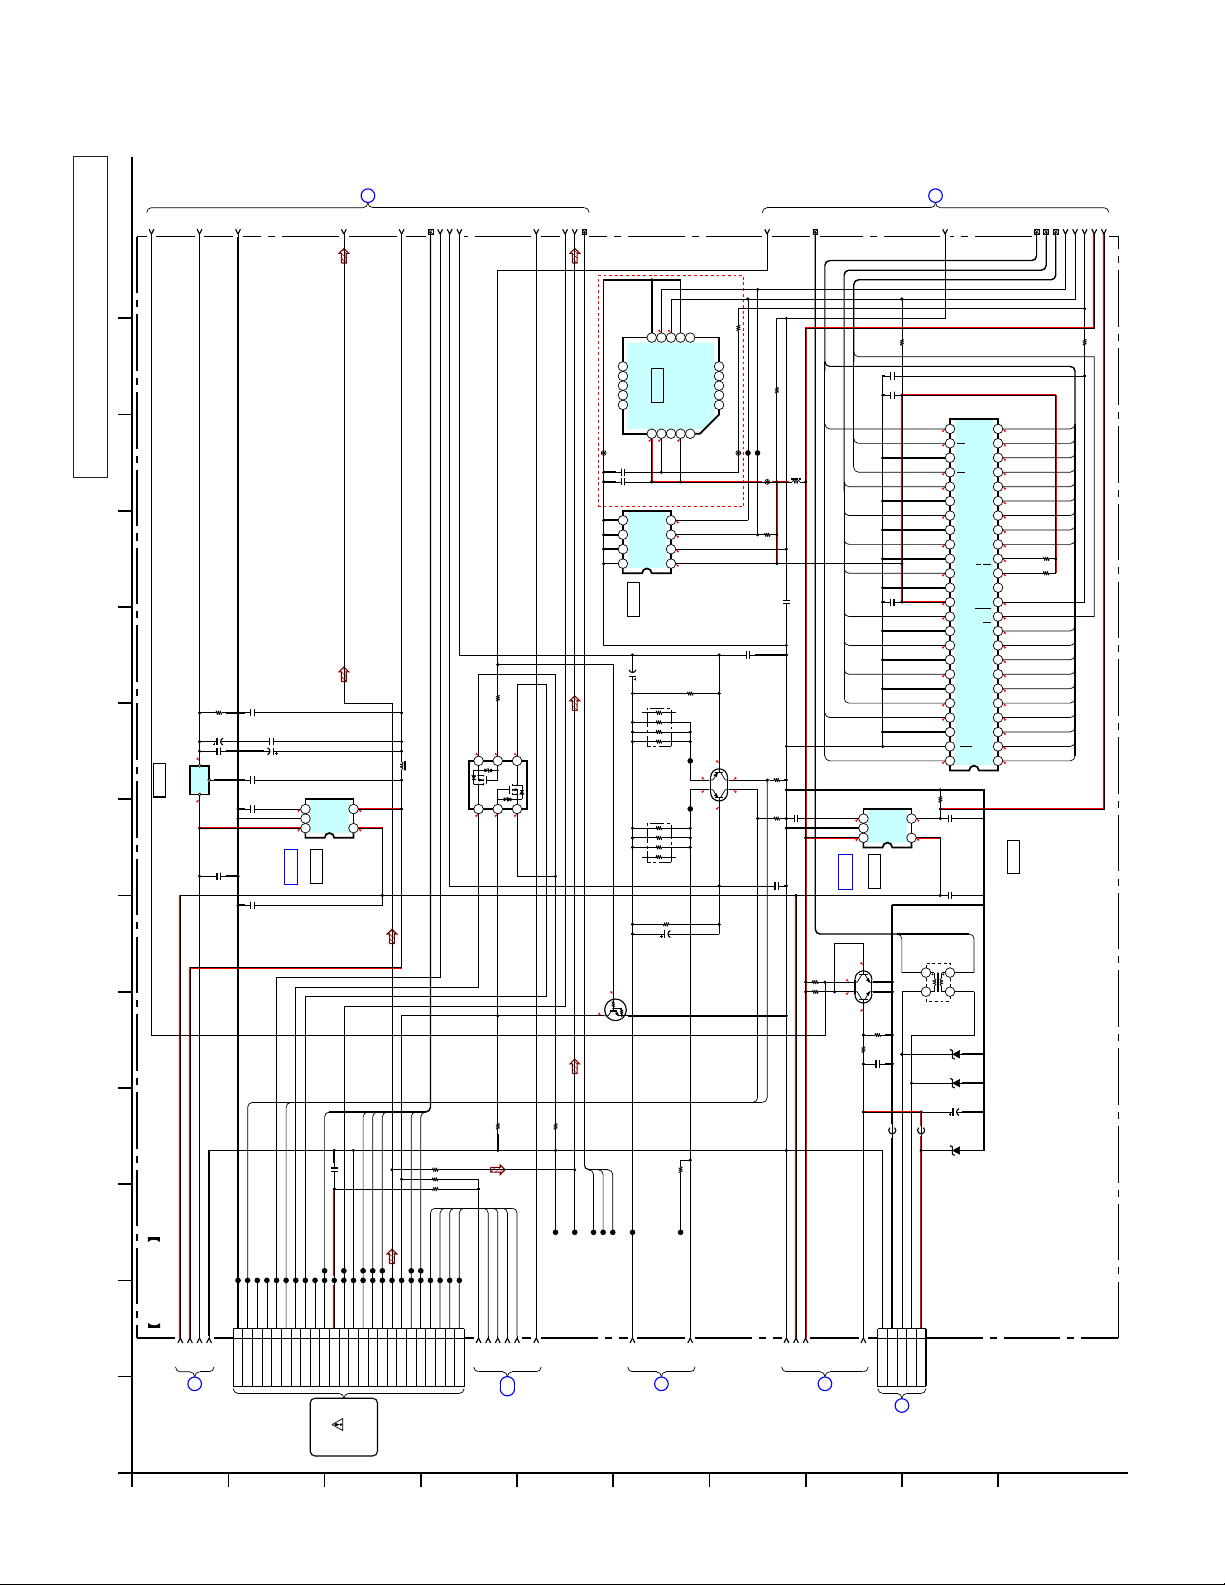
Ver. 1.1
1
2
3
4
134
HBD-TZ210/TZ230/TZ510/TZ630/TZ710
When IC1103 on the Main board is damaged, exchange the
new Main board for the Main board which IC damaged.
11
Note:
10
9125
0.1
1k
C1159
R2178
10
47
10V
C1129
8
67
• See page 50 for IC Block Diagrams.
31
2
5-8. SCHEMATIC DIAGRAM – MAIN Section (1/8) –
C1187
C1183
G
IC1110
IO
IC1110
+1.8V REG.
MM1661JTRE
3.3 1.8
C1198
(1/8)
MAIN BOARD
5V
D3.3V
D-GND
RF+3.3V
5
(4/8)
MAIN
BOARD
(Page 36)
A
0.33
0.22
C1111
C1195
0.1
C1192
1
0.22
C1193
DVD_LD
JL2101
JL2102
JL2103
JL2104
24P
CN1101
123456789
NC
NC
LD (650)
GND (LD)
100
10V
NOISE
321
GND
CONT
IC1107
IC1107
+3.3V REG.
IC B/D
TK11133CSCL-G
CD_LD
VOE
0.01C1101
CL1112
CL1113
JL2105
JL2106
JL2107
JL2108
JL2110
JL2111
JL2112
JL2109
101112131415161718192021222324
PD
NC
VCC
LD (780)
VR (650)
VR (780)
VOE/E+G
(1/2)
DVD DRIVE
B
VOUT
VIN
VC
MAIN
BOARD
54
53.3
VOF
CL1114
JL2113
JL2114
VOF/F+H
GND (PDIC)
OPTICAL
PICK-UP
(Page 34)
(2/8)
1
5
3.3 1.3
VOB
VOA
CL1115
CL1116
JL2115
JL2116
JL2117
JL2118
RF
VOA/A
VOB/B
(KHM-313CAA)
C
FB1112
VOC
VOD
1kR1116
TRK-
CL1117
CL1118
JL2119
JL2120
JL2121
VOD/D
VOC/C
(LO:DVD.HI:CD)MSW
BUS4
678
R1117
3.30
5
4
S2
G2
Q1101
RT3K66M-T111-1
D2
G1
PD VOLUME CONTROL
3
2
00
1MR1108
100R1101
R1102 0
FCS-
TRK-
FCS+
FCS+
TRK+
TRK+
JL2122
JL2123
JL2124
TRK-
FCS-
TRK+
FCS+
TRK-
TRK+
REG01
MAIN
D
47k
FCS+
25
BOARD
00
S1
FCS-
(4/8)
6
D1
1
FCS-
(Page 36)
91011
100R1111
D-GND
VREFO
BUS5
TZ210:AUS/TZ230:UK/TZ510:CND
Q1103
RT1N241M-TP-1
0
FE
TE
CL1301RFCL1302
CL1303FECL1304TECL1305
E
INVERTER
CL2202
3.3
PI
PI
NC
10
NC
NC
NC
NC
6789
0.01
C2201
0.1
C2200
432
A2
A1
A0
1
IC1103
CL1106
REG02
11
VSS
VCC
3.3
GNDSDA
IC1103
EEP ROM
BR24S64F-WE2
47
16V
C1112
MAIN
3.33.3
3.3
121314
P2P1P3
IC2200
IC2200
FLASH ROM
MFI341S2161
RES
3.3
SCL
WE
VCC
8765
22X4
RB1117
CL2103 CL2104
22X4
RB1116
47k
R1110
47
16V
C1105
10k
R1107
CL1107
6
(4/8)
BOARD
(Page 36)
F
(Page 34)
(2/8)
MAIN
BOARD
2
BUS6
12
100
R2202
15
NC
NC
1617181920
NC
NC
NC
NC
NCP4NC
12345
3.3
3.3
3.3
3.3
47k
R1124
3.5
1
4
3.5 <3.2>
IOP
3.3
5
2
3.3 <2.6>
1k
R1135
CL2204
CL2200
CL2201
FB1111
CL2203
1k
R1193
0.01
C2130
0.01
C1113
Q1102
QST8TR
CD/DVD
LD DRIVE
100k
0
R1114
6
3
0 <2.3>
DVD_LD
CD_LD
0.1
C1184
100k
R2129
0.01
C1106
5V
D3.3V
D-GND
XWR
0.01
C2100
0.1
C1110
A1
XROMCS
XRD
HD0
HD1
HD2
HD3
1
C1102
HD4
HD5
HD6
HD7
A0
A17
NOISE
321
GND
CONT
IC1105
IC B/D
0
5
10k
2.90
R2192
3
4
6
1
2
10k
R2191
0.6
Q2101
RT3CLLM
VBUS DETECT
2.2k
10k
R2194
R2193
0.1
C2102
FB2105
5P
CN2101
SHIELD
USB5V
IC1105
TK11133CSCL-G
+3.3V REG.
USBP
GND
1k
R1191
VOUT
VIN
54
D-
D+
13
A0
CE
VSS
OE
0
DQ0
1.4
DQ8
30 29 28 27 26 25
DQ1
1.4
DQ9
DQ2
1.5 <1.1>
DQ10
DQ3
1.5 <1.3>
DQ11
36 3132333435
VCC
DQ4
1.6 <1.3>
DQ12
DQ5
DQ13
DQ6
2 <1.6>
DQ14
DQ7
2 <1.5>
1.8
VSS
46
BYTE
47 45 44 42 41 37383940
A16
48 43
10k
R1151
3.3 1.3
0.22
C1182
53.3
0.22
C1186
USBM
12
34
90uH
L2101
EDZCTE616.8B
D2103
EDZCTE616.8B
D2102
220
10V
C2112
MAZ8082G0LS0
D2101
FB2104
12345
VBUS
BUS7
BUS8
BUS9
1415161718
A1
2.1 1.9
DQ15/A-1
A2
A3
A4
A5
A6
A7
A17
A18
RY/BY
N.C.
N.C.
RESET
WE
N.C
A19
A8
A9
A10
A11
A12
A13
A14
A15
242322212019
181716151413
1210 11987
65
4321
A2
2.3 0
A3
1.9 <2.1>
A4
2.4 <1.8>
A5
2.5 <2.2>
A6
1.8 <1.5>
A7
0.9 <2.1>
A8
1 <2.8>
A18
10k
0.1
A19
R1106
3.3
3.3
10k
R1105
3.3 3.3
3.3
0
A21
02
A20
1.1 <1.5>
A9
1.8 <1.4>
A10
2.1 <1.9>
A11
1.6 <0.9>
A12
2 <0.5>
A13
A14
2.3 <1.2>
2 <0.6>
A15
1 <0.1> 0.7 <2.1>
A16
IC1102
IC1102
FLASH ROM
(CND,E32,AR,MX)
(HK,PH,SP,TH,CH,TW)
MX29LV320DBTI-70-OHI-1002CE
MX29LV320DBTI-70-OHI-1002GA
MX29LV320DBTI-70-OHI-1002UC
(E3,E12,AUS,EA,SAF,AEP,UK,RU)
100
R1198
3333
7
(6/8)
MAIN
BOARD
G
(Page 38)
H
USB
A
BOARD
CN5201
(Page 47)
I
J
HBD-TZ210/TZ230/TZ510/TZ630/TZ710
Page 34
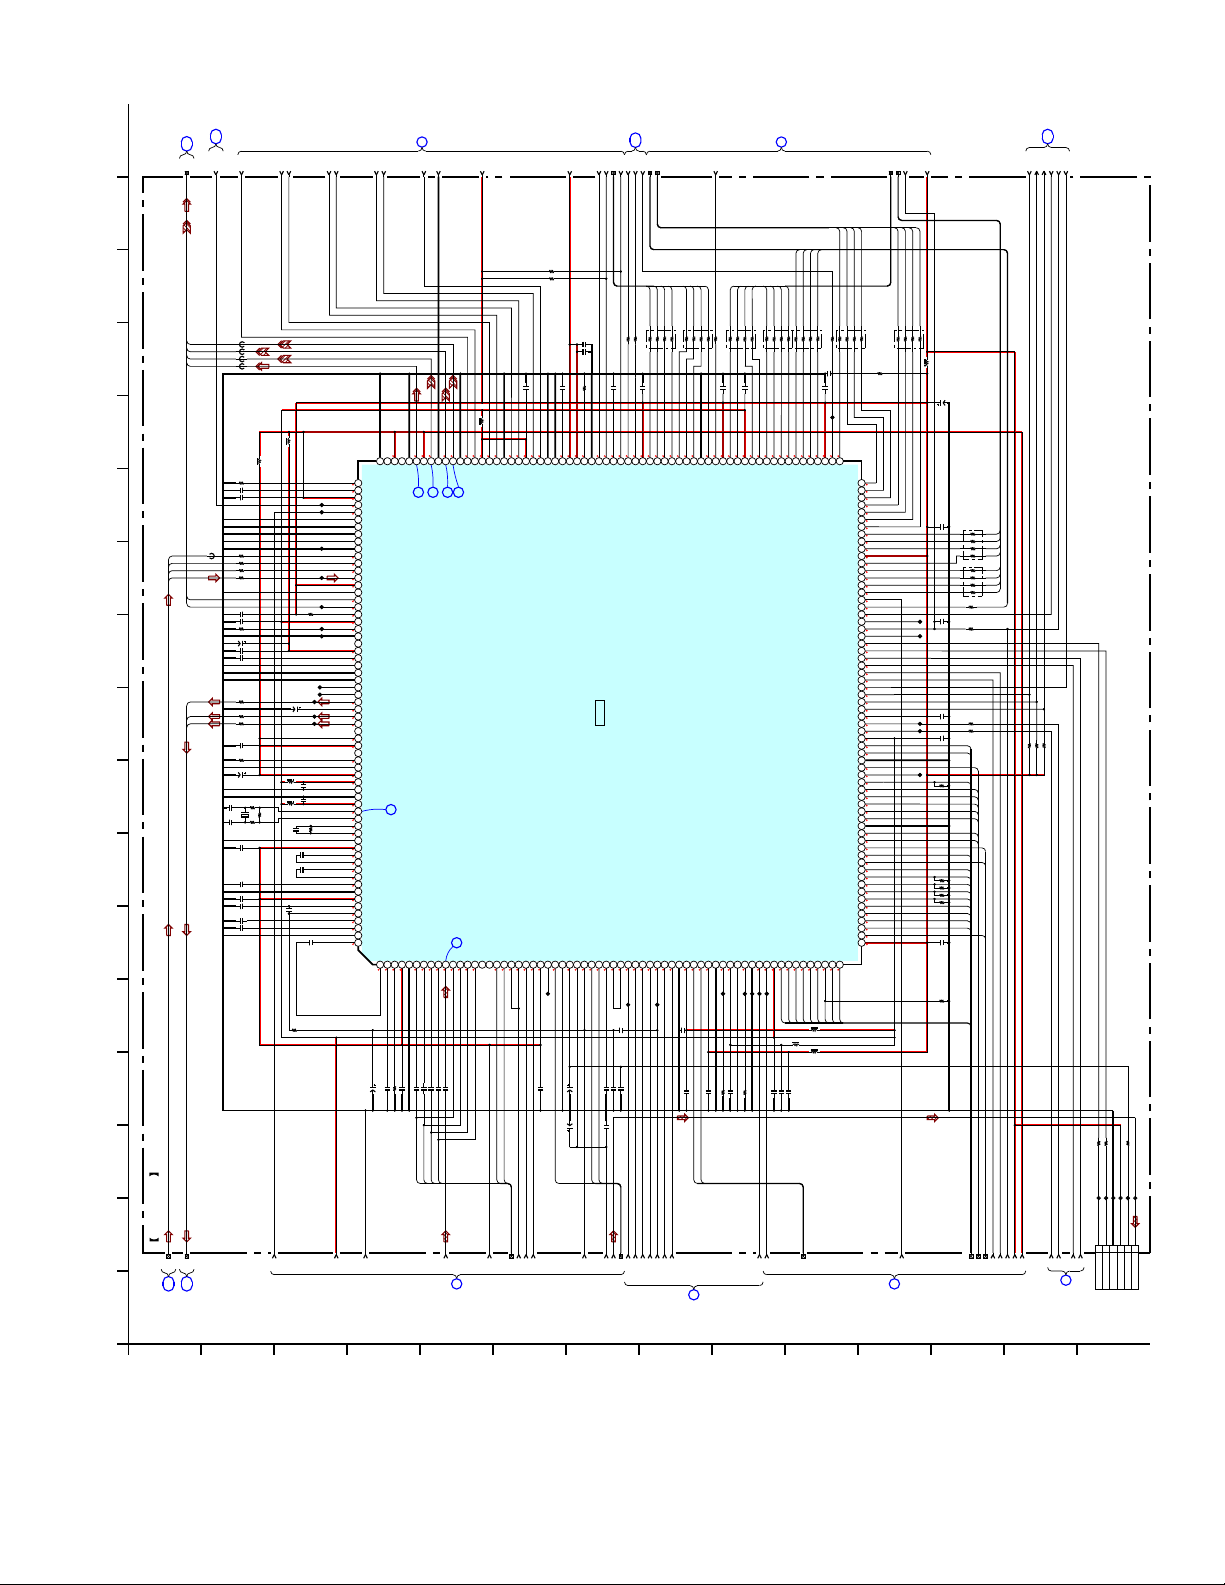
(6/8)
MAIN
BOARD
(5/8)
MAIN
BOARD
18
(Page 38)
11
(Page 37)
19
20
21
22
VBUS_SW
BUS1
23
15
FB2120
CR/R
FB2121
CB/B
FB2122
1413
11
10
9125
8
67 17
Y/G
Y
FB2125
FB2101
FB2103
0.5%560
R2101
C1169 0.1
0.01C1163
FB2126
ACLK
47R1159
ABCK
47R1160
ALRCK
47R1161
ADIN
R1125 47
WIDE
RGB_SEL
0.01C1161
0.01C1156
10kR2176
100
10V
C2110
0.1C1171
1500pC1170
47R1183
ASDATA2
ASDATA1
ASDATA0
100
10V
C2109
12p
C1153
12p
C1152
47R1184
47R1185
4.7C2108
10kR2169
X1101
27MHz
0.1C1149
0.1C1146
0.1C1140
22pC1139
0.1C1137
0.033C1135
50V10C1145
FB1109
330
R2168
FB1107
100k
R1142
0
R2167
1000p
680kR1141
C1151
0.047
C1148
0.047
C1147
1000pC1138
0.1C1133
CL2121
CL2122
CL2139
CL2140
CL2135
10kR2180
CL2137
CL2138
CL2141
CL2123
CL2124
CL2125
CL2126
0.1C1165
0.1C1154
1.2
1.2
3.3
3.3
2.9
1.3
1.6
1.6
1.2
3.3
0 <3.3>
3.3
2.9
1.8
0
3.3
1.6
0.6 <1.2>
1.6
0 <1.2>
1.2
3.3
3.3
0
3.3
1.8
1.8
0.7
0.8
1
1
3.3
2.1
0
1.9
0.1
3.3
3.3
0
1.4
3.3
1.4
1.6
FS
193194195196197198199200201202203204205206207208209210
MIC
1
21
212213214215216
217218219220221222
223224225226227228229
230240 231232233234235236237
238239241242243244
253254
255256 245246247248249250251252
• See page 30 for waveforms. • See page 55 for IC Pin Function Description of IC1101.
100k
R1132
4
3 161
(2/8)
16V47C1119
24
25
191
192
Y
DACVSSC
VREF
DACVDDC
VBUS_OE
VBUS_OC
SPMCK
SPBCK
SPLRCK
ADIN(SPDATA)
ACLK
ABCK
ALRCK
DVDD3
WIDE
TRG_SW
DVDD18
KMOD
SPDIF
APLLVDD3
APLLCAP
APLLVSS
ADACVSS2
ADACVSS1
DIR_CE
ASDATA3
ASDATA2
AVCM
ASDATA1
ASDATA0
DIR_CL
ADACVDD1
ADACVDD2
Rt/DIR_DI
Lt/DIR_DO
ADACVSS3
ADACVDD3
SADCVDD18
SADCVSS18
RFGND18
RFVDD18
XTALO
XTALI
JITFO
JITFN
PLLVSS
PLLVDD3
LPFON
LPFIP
LPFIN
LPFOP
ADCVDD3
ADCVSS
RFVDD3
RFRPDC
RFRPAC
HRFZC
CRTPLP
RFGND18
OSP
OSN
RFGC
1234567
1.6
1.1
0.1C1132
3.3
189
190
C
DACVDDB
SCORE/DIR_XSTATE
MC_DATA(ADIN)
RGB_SEL/DSEL
XVOICE/DIR_CSFLAG
IREF
AVDD3
0.9
3.3
0.1C1130
15kR1136
188
DACVSSB
(3/8)
MAIN
BOARD
3
(Page 35)
26
27
0.4
3.3
2.6
2.6
183
184
185
186
187
Y/G
CVBS
B/Cb/Pb
DACVSSA
DACVDDA
46315
AGND
DVDA
DVDB
DVDC
DVDD
DVDRFIPMAMBMCMDSASB
9
8
10111213141516171819202122
1.6
1.6
1.6
1.6
1.6
1C1122
1C1124
1C1121
1C1123
1C1120
VOD
VOC
VOB
VOA
28
FB1118
2.6
0.1
0.1
1.8
0.1
0.1
0.1
175
176
177
178
179
180
181
182
TX1P
TX2P
TX1N
TX2N
R/Cr/Pr
AVDD18
AGND18
AGND18
2
TNI
TPI
222
2
2
VOE
VOF
293031
3.3k
R1781
3.3k
R1782
0.1C1172
2.7kR1730
5600pC2502
0.1
1.80003.3
3.3
165
166
167
168
169
170
171
172
173
174
TX0P
TX0N
TXCP
TXCN
AVDD3
AVDD3
AGND3
AVDD18
AGND18
EXT_CAP
CSO
RFLVL
SGND
V2REFO
MDI1
020
V2O
MDI2
LDO2
LDO1
SVDD3
2425262728293031323334353637383940414243444546474849505152535455565758596061626364
23
3.3
3.322.8
3.3 <2.6>
0.5 <2.1>
CL1101
0.1C1125
16V47C1118 16V47C1117
PI
0.1
C1109
0.1
C1108
1.303.2
163
164
AGND3
EXT_RES
VREFO
FEO
1.4
1.4
FE
162
HTPLG
1.5
TE
161
DDC_CLK
IC1101
TEO
1.5
0.1C1126
0.1C1115
32
BUS10
0.01C1175
1.8
3.2
159
160
DVDD18
DDC_DA
IC1101
CXD9927R-B(CND,UK)
CXD9917R-B(EXCEPT CND,UK)
CD/DVD RF AMP,FOCUS/TRACKING ERROR A MP ,
TEZISLV
OP_OUT
OP_INN
1.8
1.8
C1199
0.1C1116
0.1C1114
(4/8)
MAIN
BOARD
17
MUTE
REGRST
TSD_M
100R2184
100R2185
0.01C1174
3.3
3.3
3.3
156
157
158
MUTE
DVDD3
REGRST
DVD SYSTEM CONTROL,DSP,USB/HDMI CONTROL
FMO
OP_INP
DMO
1.4
1.4 <2>
1.4 <0.4>
CL1105
4700p
(Page 36)
BUS11
BUS12
RA4
RA5
RA6
47X4
RB1114
1.6
1.4
1.4
153
154
155
RA6
RA5
RA4
TROPENPWM
IOPMON
1.401.6
CL1108
RA8
RA7
47X4
RB1115
1.70003.3
150
151
152
RA9
RA8
RA7
TRO
FOO
AGND18
AVDD18
1.8
1.4
0.1C2118
4.7C2503
(3/8)
MAIN
BOARD
4
143
USB_VSS
RA1
0.01C1162
1.8
DVDD18
0
CL2107
R2127 10k
RA0
1.6
0.601.6
141
142
RA1
DIR_ERROR/NC
DIR_AUDIO/NC
0 <3.3>
CL1110
CL2108
(Page 35)
34
35
BUS13
BUS14
RD8
RD9
RD10
RD11
RD12
RD13
RD14
RAS
CAS
RWE
DQM1
BA1
BA0
RCS
RA10
47X4
RB1103
140
RA0
LIMITSW
0 <3.3>
CL2109
47X4
RB1111
0R1133
1000p
C2119
0.01C1164
CL2120
1.7
2.8
3.133.2
1.8
3.3
1.9
1.3
129
130
131
132
133
134
135
136
137
138
139
BA0
BA1
RA10
MSW
DVDD18
2.1
1.8
A2
10C2117
0.01C1127
_RCS
HA3
HA2
2.3
A3A4A5A6A7
10C2115
1.8 <2.1>
RD8
_CAS
_RAS
_RWE
DQM1
DVDD3
TSD_M
RD9
RD10
RD11
RD12
RD13
RD14
RD15
RD0
RD1
RD2
DVDD3
RD3
RD4
RD5
RD6
RD7
EEWP
DQM0
xIFBSY
RESERVED
xSYSRST
ICE
TXD
RXD
OCSW
CKSW
SDA
SCL
IFSDI
xIFCS
IFCK
IFSDO
DVDD3
REV
FWD
DVDD18
HA0
HA17
DVSS
HD7
RESERVED
HA21
HD6
HD5
HD4
HD3
HD2
DVSS
HD1
HD0
XRD
HA1
XROMCS
HA20
HA9
HA10
HA11
HA12
HA13
HA14
HA15
HA16
XWR
DVDD3
HA6
HA5
HA4
HA7
HA18
HA8
HA19
0.1
0.9 <2>
1.1 <2.8>
1.8 <1.5>
2.5 <2.2>
2.4 <1.8>
A8
A18
A19
FB1117
FB1116
FB1115
RD15
47X4
47X4
RB1110
RB1109
4.7k
FB1106
R1140
47
10V
C1177
1.1
128
1.3
1.3
1.3
1.5
1.5
1.2
1.3
1
120 121 122 123 124 125 126 127
0.9
119
3.3
1.4
117 118
1.2
116
1.1
1.1
114 115
1
113
3.3
112
111
2.2 <1.9>
2.6
110
3.3
3.3
3.3
0
0
3.3
3.3
101 102 103 104 105 106 107 108 109
0.5 <3.3>
100
3.3
3.3
0
3.3
3.3
3.3
1.8
1.8
0.8 <2.4>
2 <1.4>
1.1
0
2 <1.6>
2
1.6
1.5 <1.3>
1.5 <1.1>
1.4
1.5
0
1.9
0
0
1.1 <1.6>
1.6 <1.4>
2.1 <1.9>
1.7 <0.8>
2.1 <0.6>
69 70 71 72 73 74 75 76 77 78 79 80 81 82 83 84 85 86 87 88 89 90 91 92 93 94 95 96 97 98 99
2.2 <1.5>
2.1 <0.7>
0.9 <0.1>
3.3
65 66 67 68
3.3
JL1160
CL1123
CL2102
CL2101
CL1121
10kR2159
10kR2158
10kR2157
10kR2156
0.01
0X4
C1158
RB1113
RD0
RD1
RD2
RD3
RD4
RD5
RD6
RD7
0X4
RB1112
R2115 0
0.01
C1160
100R1156
0.01
C1144
100R2179
100R1171
0.01
C1155
A0
A17
HD7
A21
R2160 10k
HD6
HD5
HD4
HD3
HD2
HD1
HD0
XRD
A1
XROMCS
A20
A9
A10
A11
A12
A13
A14
A15
A16
XWR
0.01
C1136
10k
R2155
33
RA9
RA2
RA3
RA11
CLKE
47X4
RB1104
22R2114
0.01C1176
1.3
3.3
1.5
1.8
144
145
146
147
148
149
RA2
RA3
CKE
RA11
DVSS
DVDD3
DRCLK
USB_DP
USB_DM
USB_VDD3
USB_VSS
PAD_VRT
USB_VDD18
0
0
0.7
3.3
1.8
CL1109
0.5%5.1kR1103
0.1C2114
0.1C2116
USBP
USBM
(6/8)
MAIN
BOARD
14
(Page 38)
IFSCK
IFSDO
XSYSRST
XIFCS
XIFBSY
IFSDI
DQMO
3.3kR2150
3.3kR2152
3.3kR2151
3434
100R1154
100R1155
2.7kR2110
JL1107
JL1108
JL1109
JL1110
JL1111
JL1112
MAIN BOARD
2
BUS3
BUS2
12
13
(5/8)
(6/8)
MAIN
MAIN
BOARD
BOARD
(Page 38)
(Page 37)
5-9. SCHEMATIC DIAGRAM – MAIN Section (2/8) –
A
1
B
2
C
HBD-TZ210/TZ230/TZ510/TZ630/TZ710
6P
CN1105
12345
6
3
4
567
8
9
10
11
TRO
FOO
FMO
DMO
BUS4
1
(1/8)
MAIN
BOARD
(Page 33)
D
E
F
SPFG
BUS5
IOPMON
TROPENPWM
8
(4/8)
MAIN
BOARD
G
H
(Page 36)
12
BUS6
LIMITSW
I
J
MAIN
13
2
(1/8)
BOARD
K
(Page 33)
1415161718
BUS8
BUS9
BUS7
L
TXD
RXD
GND
MAIN
9
BOARD
CKSW
OCSW
(4/8)
(Page 36)
+3.3V
RFMON
V2REFO
(FOR SERVICE JIG)
N
REV
FWD
M
HBD-TZ210/TZ230/TZ510/TZ630/TZ710
Page 35
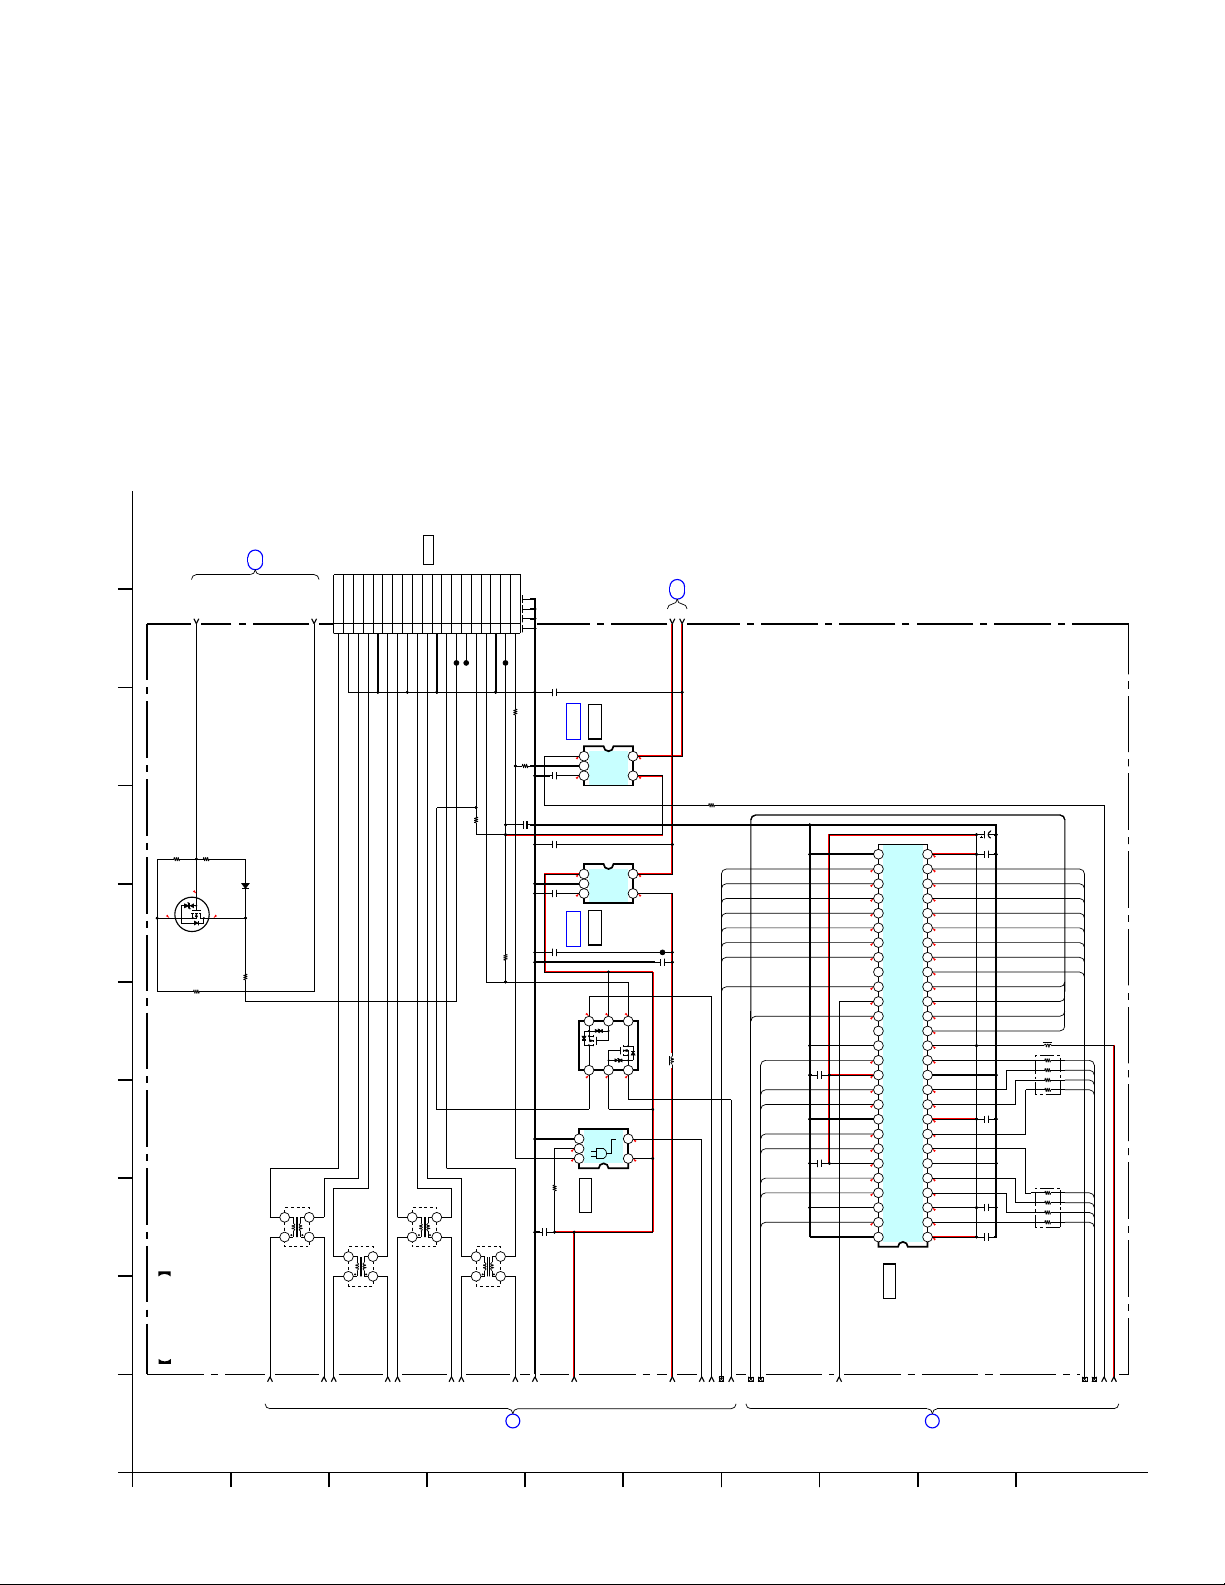
HBD-TZ210/TZ230/TZ510/TZ630/TZ710
10
E3.3V
MAIN
BOARD
(6/8)
15
(Page 38)
95
8
27k
27k
R9941
R9942
3.3
D9712
MA2J1110GLS0
3.3
3.3
S
67
Q9730
LEVEL SHIFT
INK0001AC1-T112A-1
220
R9945
0
R9946
• See page 50 for IC Block Diagrams.
4
31
34
(3/8)
2
MAIN BOARD
CN1701
CEC_TX_OUT
TMDS DATA2+2TMDS DATA2 SHIELD3TMDS DATA2-4TMDS DATA1+5TMDS DATA1 SHIELD6TMDS DATA1-7TMDS DATA0+8TMDS DATA0 SHIELD9TMDS DATA0-10TMDS CLOCK+11TMDS CLOCK SHIELD12TMDS CLOCK-13CEC14Reserved15SCL16SDA17DOC/CEC GND18+5 POWER19HPD
1
19P
CN1701
90uH
L1701
12
34
90uH
L1702
12
34
L1703
HDMI OUT
12
90uH
CL1702
CL1701
(6/8)
MAIN
BOARD
(Page 38)
16
5V
+6V
0.22
JL1702
C1730
1k
R1752
47k
R1742
0.22
C1729
1.8k
R1750
1.8kR1749
R1744
C1725
90uH
L1704
34
12
IC B/DIC B/D
321
1.3
0.1
C1727
0.22
C1731
321
0.1
C1732
0.22
C1733
3.24.9
465
S2
Q1701
LEVEL SHIFT
RT3K66M-T111-1
D2
3
VSS
321
B
3.3
A
03.3
4.7k
IC1705
0.01
IC1707
TK11150CSCL-G
CONT
VIN
GND
NOISE
VOUT
CONT
VIN
GND
NOISE
VOUT
IC1708
IC1708 IC1707
+3.3V REG. +5V REG.
TK11133CSCL-G
3.33.3
4.93.2
G2
G1
2
Y
VDD
IC1705
BUFFER
TC7SZ08FU(TE85R)
54
6.7 3.3
4.9
54
53.3
3.3 1.3
D1
S1
1
0
54
JL1703
C1734
0
R1732
100
10V
1.2 <0.8>
C1190
0.1
C1197
0.1
C1180
0.1
C1179
100p
C9973
RA3
RA2
RA1
RA0
RA10
BA1
BA0
RCS
RAS
CAS
RWE
DQMO
FB1108
RD7
RD6
RD5
RD4
47X4
RB1106
47X4
RB1105
RD3
RD2
RD1
RD0
VDD28VSS
3.3
27
A3
A4
RA4
RA5
RA6
RA7
RA8
RA9
1
FB1113
RA11
CLKE
DQM1
RD8
0.1
C1181
RD9
RD10
RD11
RD12
0.1
C1191
RD13
RD14
RD15
29
30
31
32
33
34
35
36
3.33.1
37
1.33
38
1.83.2
39
40
41
1.4
42
3.3
43
1.5 <1>
44
1.2 <1>
45
46
47
1.7 <1>
48
3.3
49
1.6 <1.3>
50
51
52
11.6
53
54
1.5 1.6
26
A2
A5
1.8 1.4
25
A1
A6
1.6 1.4
24
A0
A7
0.6 1.7
23
A10
A8
00
22
BA1
A9
1.6 0
21
BA0
A11
1.7 0
20
/CS
NC
2.8
19
/RAS
CKE
18
/CAS
CLK
17
/WE
UDQM
16
LDQM
NC
1.8
15
VDD
VSS
3.3
14
DQ7
DQ8
13
VSSQ
VDDQ
12
DQ6
DQ9
0.9
11
DQ5
DQ10
1.1
10
VDDQ
VSSQ
9
3.3
DQ4
DQ11
8
1.3 1.4
DQ3
DQ12
7
1.5
VSSQ
VDDQ
6
DQ2
DQ13
5
1.1
DQ1
DQ14
4
1.3 1.6
VDDQ
VSSQ
3
3.3
DQ0
DQ15
2
VDD
VSS
1
3.3
IC1104
SDRAM
IC1104
W9864G6IH-6J-ER10
3535
19
5-10. SCHEMATIC DIAGRAM – MAIN Section (3/8) –
A
B
20
21
22
23
24
25
26
27
28
3
(2/8)
MAIN
BOARD
(Page 34)
C
D
E
293031
F
BUS10
32
BUS11
BUS12
33
BUS13
BUS14
34
35
4
(2/8)
MAIN
BOARD
(Page 34)
G
H
I
J
HBD-TZ210/TZ230/TZ510/TZ630/TZ710
Page 36
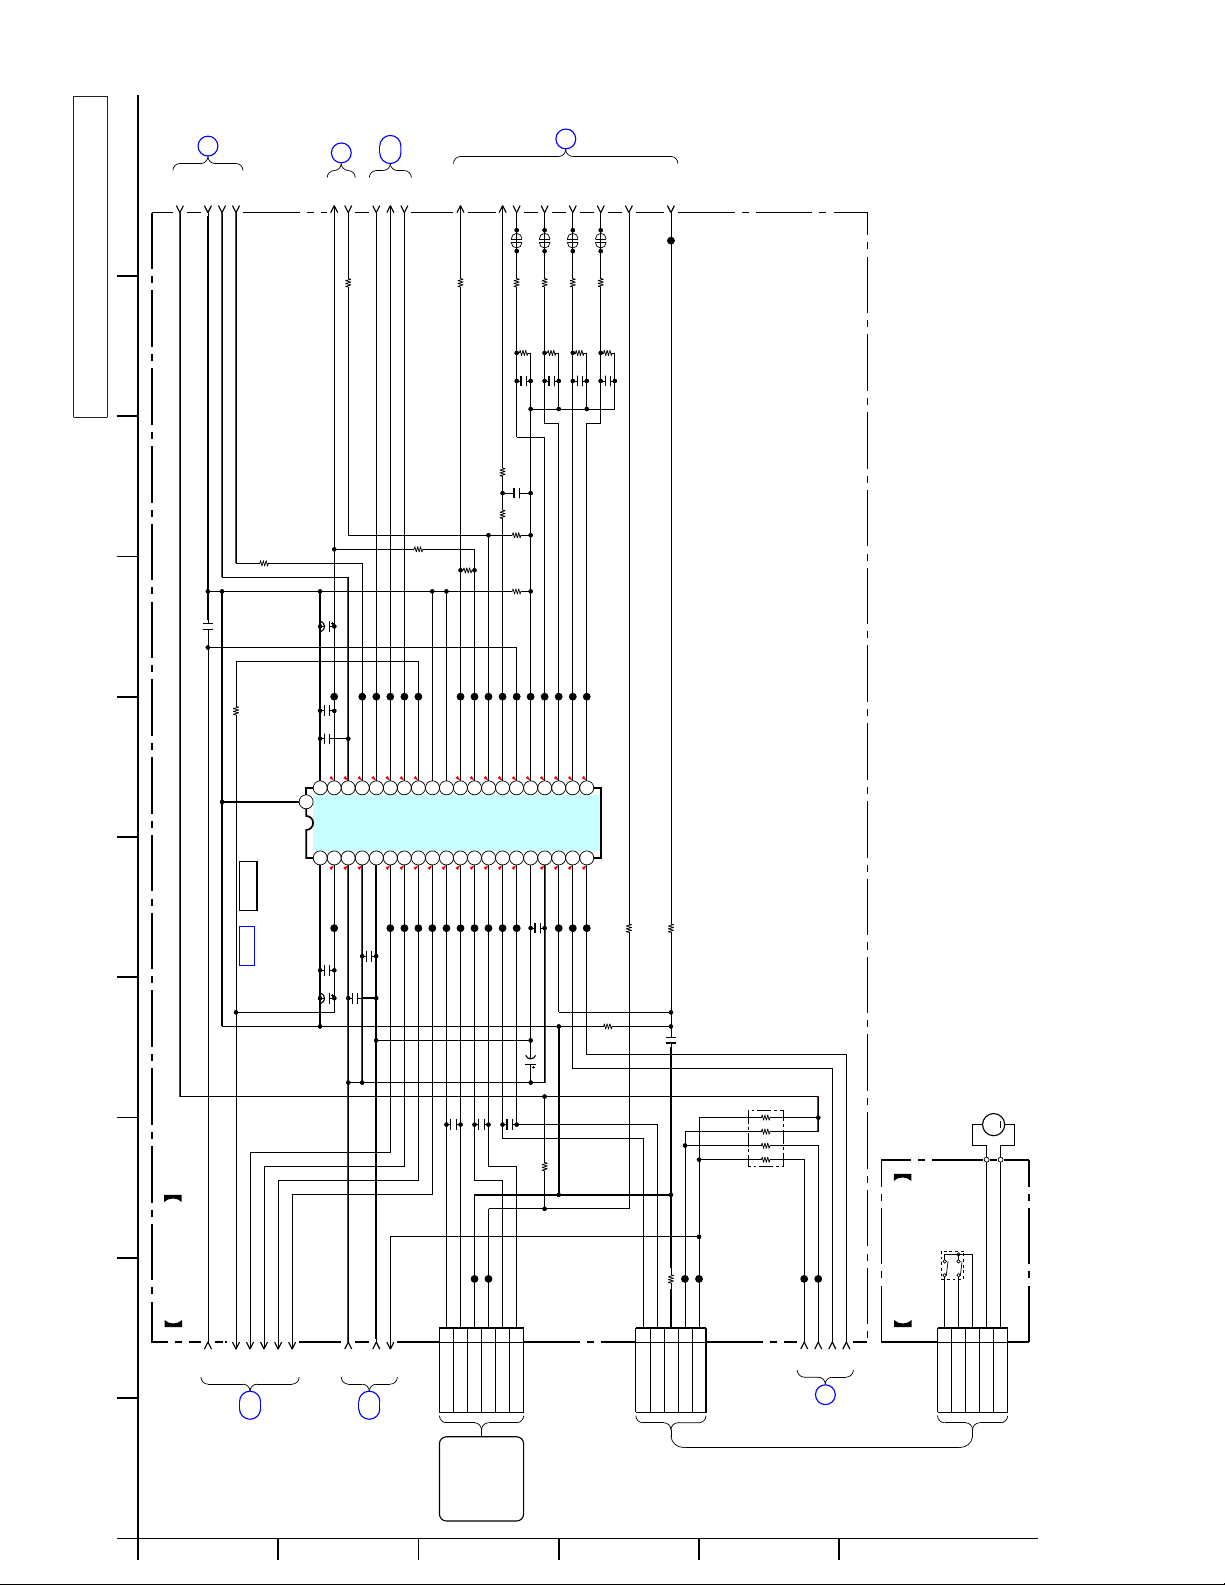
10
D3.3V
MAIN
(1/8)
BOARD
5
D-GND
(Page 33)
5V
RF+3.3V
MAIN
BOARD
(Page 33)
6
REG02
(2/8)
MAIN
(2/8)
MAIN
BOARD
(1/8)
(Page 34)
17
REGRST
MUTE
IOP
TSD_M
IOPMON
SPFG
BOARD
(Page 34)
8
FOO
TRO
FMO
DMO
LIMITSW
TROPENPWM
95
When IC1501 on the Main board is damaged, exchange the
new Main board for the Main board which IC damaged.
Note:
10k
R1543
10
C1516
1000p
R1527
IC B/D
C1514
10k
IC1501
IC1501
BD8203EFV-E2
FOCUS/TRACKING DRIVER
LOADING/SPINDLE/SLED MOTOR DRIVER
C1507
50V
CL1521
0.1
C1513
0.1
C1512
59.9
39
40
41
SGND
REGVAR
SGND2REG53PREVCC4PVCC15PGND6VO1+7VO1-8VO2+9VO2-10VO3+11VO3-12VO4+13VO4-14VO5+15VO5-16PGND17PVCC218VCTL
1
53.5
CL1507
0.1
C1509
0.1C1508
10
50V
38
R1525
CL1522
3.39.9
REGVARVCC
0.1C1510
0.5%
15k
37
REGCTL
CL1523
3.3
36
CL1525
CL1524
1.954.6
0 <3.3>
35
TSDM
REGRST
4.9 <4.7>
CL1508
CL1509
R1519
CL1526CL1510
34
MUTE4
4.9 <4.7>
18k
0.5%
33
MUTE123
4.9
CL1511
R1532
33k
R1518
4.5
CL1512
10k
0.5%
31
SGND32SGND
CL1528
CL1527
3.2 <3>
2.6 <1.8>
30
OPOUT
4.5
2.8 <5.3>
CL1513
CL1514
CL1529
3.2 <3>
29
OPIN-
2.8 <3.6>
CL1515
R1529
R1526
28
0
15k
CL1530
1.4 <0.4>
OPIN+
4.5
CL1516
27
C1518
R1521
R1517
CL1531
1.44.5
VSPDL
CL1517
82k
26
R1535
0.1
0.5%
330
CL1532
1.4
VCI
0.1C1511
SL1502
R1539
0.5%4.7k
25
0.5%4.7k
1200pC1522
VCO
CL1533
1.49.9
R1540
R1536
CL1534
1.40
CL1518
SL1503
0.5%6.8k
0.5%4.7k
1000pC1523
CL1535
1.43.3
FWD20RVS
19
CL1519
SL1504
R1541
0.5%1.8k
R1537
CL1536
1.4 <1.6>
3.3
CL1520
SL15050.5%4.7k
CL1537
0.5%6.8k
0.5%4.7k
R1542
R1538
0.068C1524
0.033C1525
21
IN422IN323IN224IN1
1k
22k
0.5%
R1513
R1501
3636
4
• See page 50 for IC Block Diagram.
(4/8)
31 867
MAIN BOARD
2
FCS-
TRK-
FCS+
TRK+
REG01
VREFO
25
(1/8)
MAIN
BOARD
(Page 33)
HBD-TZ210/TZ230/TZ510/TZ630/TZ710
5-11. SCHEMATIC DIAGRAM – MAIN Section (4/8) –
A
M+9V
B
MAIN
M-GND
10
BOARD
OCSW1
(6/8)
(Page 38)
6P
CN1501
0.1C1504
0.1C1503
CL1501
6
SL-
SL+
(2/2)
DVD DRIVE
0.1C1505
CL1502
LIMIT
(GND)LIMIT
SPINDLE/SLED
)(
C
16V47C1520
4.7k
R1504
12345
SP-
SP+
MOTOR
R1512
47k
0.5%
5P
CN1502
D
C1506
10R1544
CL1503
12345
GND
LDM-
LDM+
CKSW1/FWD
0.022
CL1504
OCSW1/REV
1kX4
RB1500
E
CL1505
OCSW
CL1506
CKSW
MAIN
FWD
9
BOARD
REV
(2/8)
(Page 34)
MOO1
(LOADING)
-
+
M
)
S001
DETECT
CHUCK/TRAY
(
MS-203 BOARD
5P
CN001
12345
GND
LDM-
LDM+
OCSW1/REV
CKSW1/FWD
F
HBD-TZ210/TZ230/TZ510/TZ630/TZ710
Page 37
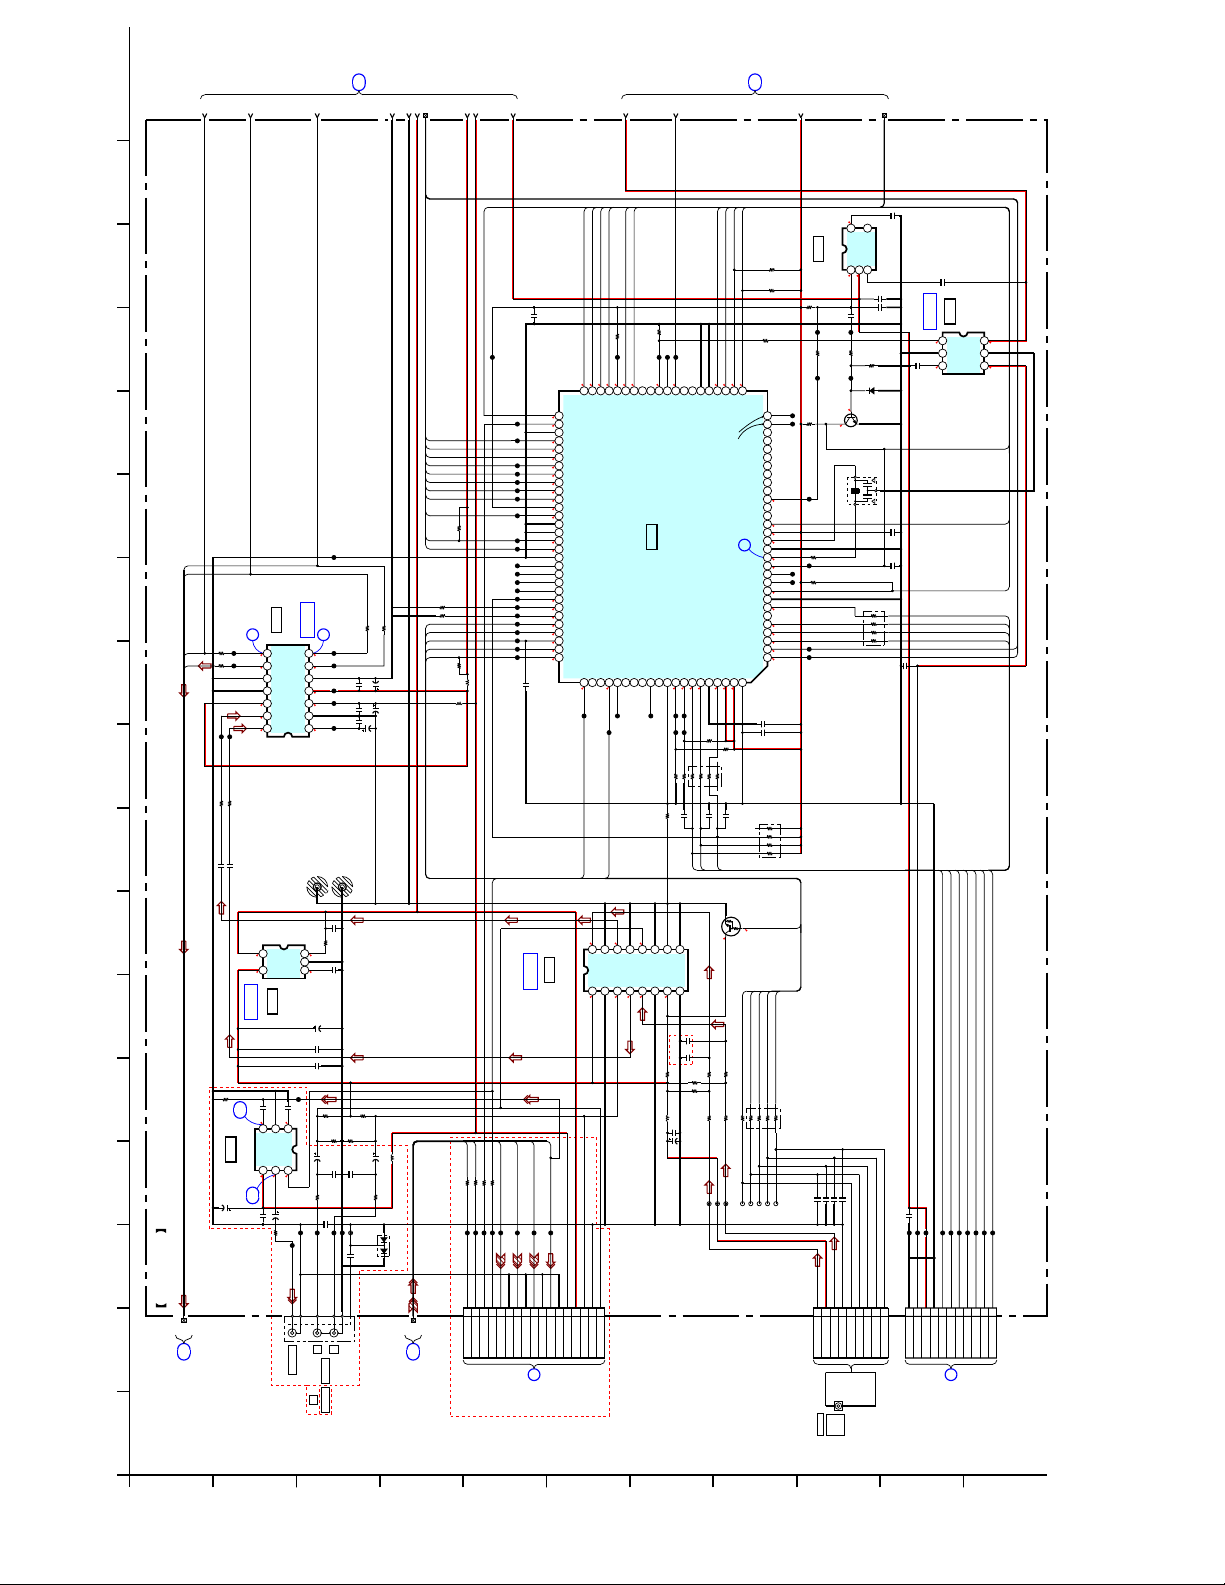
Ver. 1.1
36
37
38
161
155
HBD-TZ210/TZ230/TZ510/TZ630/TZ710
132 9 17
IC404
BCK
FMT
VinL
IC404
DOUT
MOD0
MOD1
VinR
PCM1808PWR
A/D CONVERTER
LRCK
7654321
SCKI
DGND
DVdd
AVcc
AGND
Vref
IC B/D
8
1.6 1.6
1.4 1.2
3.3
53.3
2.5 2.5
CL408
CL410
CL409
CL407
CL406
CL404
ACLK
ALRCK
11
9
JL424
22
R318
ABCK
ADIN
JL423
22
10 12
R319
2.5
14 13 12 11 10 9 8
CL403
CL405
47R437
47
R438
(6/8)
MAIN
BOARD
(Page 38)
19
394041
22
22
R317
R316
10
0.1
50V
C441
C440
10
0.1
50V
C438
C439
0.1
C435
10
50V
C436
42
SOFT_MUTE
R550 10K
R549 10K
L403
L402
SD_PVDD_DET
10uH
10uH
44
43
XIFCS
0.1
C517
JL514
3.3
51
0
JL543
52
53
3.3
JL521
54
3.3
55
3.3
56
3.3
JL516
57
3.3
JL515
58
3.3
JL540
59
3.3
JL541
60
3.33.3
JL542
61
3.3
62
JL518
3.3 <0>
63
64
65
3.31.6
JL513
66
3.3
JL512
67
68
JL539
69
JL538
70
JL537
71
JL536
72
3.3
JL509
73
03.3
JL507
74
0
JL506
75
03.3
JL505
76
0 <3.3>
JL503
77
0 <2.9>
JL504
78
00
JL502
79
JL501
0.2 <3.2>
80
47p
C500
BUS15
EN
OVF1
OVF2
NS_INIT
LAT1
LAT2
LAT3
M_ST
10k
R563
DC-DET
ST_CE
ST_DI
ST_DO
ST_CLK
TUNED
10k
R548
45
IFSDI
IFSCK
IFSDO
XIFBSY
XSYSRST
OCSW1SIG
10kR577
10k
R585
JL523
JL522
JL544
3.303.3
3.3
3.303.3
2.6
44
48
41
42
40
47
50
43
45
46
NO USE
DVD_SDI
DVD_RST
DC_CONT
DVD_SDO49DVD_SCO
DVD_XIFCS
Vcc
Vss
TV_SEL
K-MOD
LINK_SW
DC_DET
NO USE
NO USE
HP MUTE
KEY_INT
RDS_CLK
ST_CE
ST_DO
TUNED
3.3
JL549
MIC_GAIN
WRITE CE
DVD_XIFBUSY
CDM_OPEN_SW
DRIVER_RST(EN)
OVERFLOW1
OVERFLOW2
DAMP_INIT
SOFT_MUTE
DAMP_LAT1
DAMP_LAT2
DAMP_LAT3
SD/PVDD_DET
HDMI_PCONT
RDS_DATA
ST_DI/MIC_DATA
ST_CLK/MIC_CLK
V_SEL082NO USE83NO USE84ASEL085ASEL186ASEL287NO USE88NO USE89EUP_IN90NO USE91A.CAL MIC LEVEL/DSP_MASTER
81
JACK1/JACK2/DMP_DET
A.CAL_OUT/DSP_INTR
3.3 <0>
JL425
JL548
WRITE EMP P_CONT3
IC503
IC503
R5F364AEDFA
JL547
0
R439
46
JL524
3.3
38
37
39
P_CONT1
S-AIR_RST/C_SWR_SEL
S-AIR_ADC_SEL/DRIVER_C_EN
SYSTEM CONTROL
DESTINATION93MODEL94KEY295KEY196Vss97KEY098Vref99Vcc
92
0.403.3
3.3
CL528
CL529
CL526
CL527
*1*4*3
R535
R531
0.1C512
(6/8)
MAIN
BOARD
(Page 38)
20
47
RST1
CLK1
TXD1
RXD1
IC506
4.7k
R579
4.7k
R581
10k
R599
JL53147k
1k
R569
47k
R597
3.3
0
0
31
32
33
34
35
CLK1
RST1
NO USE36NO USE
I2C_CLK/RXD1
I2C_DATA/TXD1
E2P_SDA/S-AIR_SDA
E2P_CLK/S-AIR_CLK
7
SERIES
100
3.3
3.3
3.3 3.3
R536
*2
R532
1kX4
RB541
0.1C513
0.1C511
JL528
30
JL527
29
DIR_HCE
28
NO USE
27
CEC_TX_OUT
26
NO USE
25
NO USE
24
NO USE
23
NOUSE
22
NO USE
21
AC_CUT
20
NO USE
19
NO USE
18
CEC
3.3
17
Vcc
3.3
16
Xin
15
Vss
14
Xout
1.9
13
RESET
3.3
12
NO USE
JL511
11
NO USE
JL510
10
CNVss
9
3.3
BYTE
8
FL_CLK/LED_CLK
7
CEC_RX_IN
6
FL_DATA/LED_DATA
5
SIRCS_IN
4
2
FL_STB
3
3.3
DAMP_SHIFT/DIR_CLK
2
DAMP_SCDT/DIR_DIN
1
0
0.1
C514
0.1
C515
10kX4
RB540
JL529
R582
JL519
0R564
10kR556
BUS16
5
43
C527
0.022
Cd
NC
IC506
RESET
OUT
VDD
GND
2
1
S-80935CNMC-G85T2G
4.1
0.1C525
0.01C524
0.22
C523
JL532
47k
R598
100k
R596
JL530
MA2J1110GLS0
D502
03.30
Q501
RESET
2SC4154TP-1EF
3.3
X501
5MHz
3
12
0.1
C518
0.1
JL517
JL546
JL545
C519
100X4
RB550
1
C516
1
C521
IC504
IC B/D
123
Np
1.34.9
0.1
C520
GND
CONT
IC504
TK11250CMCL-G
+5V REG.
Vin
GND
Vout
6.7 3.3
456
RESET
CEC_TX_OUT
CNVSS
FL_CLK
FL_DATA
SIRCS
FL_CS
SHIFT
SCDT
3737
• See page 30 for waveform. • See page 50, 51, 53 for IC Block Diagrams. • See page 59 for IC Pin Function Description of IC503.
7 14
6
4
3 8
(5/8)
TZ210/TZ510/TZ710
MAIN BOARD
BUS3
13
(2/8)
MAIN
BOARD
(Page 34)
1C431
R426
C414
C432
150
0.5%
IC400
100
10V
1
54
11.9
9
IC B/D
10
IN2
IC400
VCC
MM1508XNRE
VIDEO BUFFER
51.5
11
0.1
C417
VIN
VOUT
IC403
IC403
+9V REG.
TK11190CSCL-G
1
C420
1.43.3
5
6
IN1
GND
SW
OUT
1234
1.6 <1.9>
6.3V
1000
C411
75
0.5%
R411
JL400
YEL
J400
Cont
GND
NOISE
0.1
C421
JL401
VIDEO OUT
TZ210:EXCEPT CND/
TZ510:EXCEPT CND/
321
JL305
TZ710
KEY2
KEY1
7654321
INH
VEE
VSS
BAX3X0XX1X2
98
11
10
0 <8.9>
0.01
C419
0.01
C418
SAF,AEP,UK,CH,RU
10k
R418
R427
R416
L400
10uH
0.1
C410
100
16V
C409
100k
100k
0
R4030R404
JL405
KEY0
KEY2
KEY0
KEY1
SIRCS
FL_CS
FL_CLK
(RU)
1.5k
CN506
C522
(CH)
3.3k
0.1
11P
FL_DATA
CL531
CL536
CL539
CL538
CL530
11
D_GND
CL537
CL535
CL534
CL532
CL533
10
5V
E4V
123456789
KEY2
KEY1
KEY0
SIRCS
FL_CS
D_GND
FL_CLK
FL_DATA
B
FL
BOARD
CN5005
(Page 44)
Q400
INVERTER
RT1N241M-TP-1
ASEL0
3.3 <0>
0 <8.9>
(TZ210/TZ230)
(TZ510/TZ630)*4 (TZ710)
(TZ630)
(EXCEPT SAF,AEP ,UK,CH,RU)
(SAF,AEP,UK,CH,RU)
R535
1k
47k
R536
4.7k
10k
15K
R420,421
0
*3
(TZ510)
(UK)
(E12)
(EA,SAF)
(AUS)
(CND,E32,AR,MX,CH,RU)*2 (AEP)
(HK,PH,SP,TH)
R531
1k
1.5k
3.3k
6.8k
10k
15k
47k
(E3)
*1
100pC403
100pC402
100pC404
100pC405
9P
123456789
GND
L -CH
+B 9V
R -CH
TUNED
FM
TU401
FM
75ȍ
COAXIAL
ANTENNA
*5
(TW)
33k
R532
CE
UNIT
TUNER
100
(MX)
4.7k
6.8k
DI
CL
(CND)
(E3,E12,AUS,EA,SAF,UK,TW)
10k
22k
47k
(E32,AR)
DO
ST_DI
ST_CE
ST_DO
TUNED
ST_CLK
*5
*5
R421
R420
100
R406
100X4
RB400
JL407
JL410
JL411
JL406
JL412
JL408
JL409
CN400
CL402
CL401
VSEL0
1
C429
100
R434
11.9
1.3
0.1
C427
47
16V
C425
0.1
C423
0.22
C426
47k
47k
R422
R424
47k
47k
R425
R423
MAIN
BUS1
11
(2/8)
BOARD
(Page 34)
TZ230/TZ630
WIDE
RGB_SEL
R401 100
R400 100
JL418
JL417
17P
CN402
123456789
WIDE
22
22
25V
25V
C415
220p
C412
22k
R414
0.1
C401
JL402
JL403
RED
WHT
L
R
AUDIO IN
TV
TV/CABLE
TZ210:CND/
JL404
C413
CL400
G
TZ510:CND
L401
C416
10uH
220p
22k
R415
D400
0.1
C400
MC2840-T112-1
RGB_SEL
IC B/D
Y/G
CR/R
CB/B
R405 100
R402 100
JL420
JL419
JL415
JL422
JL421
10111213141516
R
VGNDBVGNDGVGND
VSEL0
TV_SEL
E
SCART
CN4018
BOARD
IC401
IC401
MC14052BDTR2
Y
JL416
CVBS
VGND
(Page 42)
VSEL0
Y0
VDD
AUDIO IN SELECT
1615141312
94.4
5V
12V
AGND
SCART Rch
ASEL0
Y2YY3
17
SCART Lch
4.44.4
4.44.4
Y1
4.4
5-12. SCHEMATIC DIAGRAM – MAIN Section (5/8) –
A
B
C
D
E
F
G
H
I
J
K
HBD-TZ210/TZ230/TZ510/TZ630/TZ710
Page 38
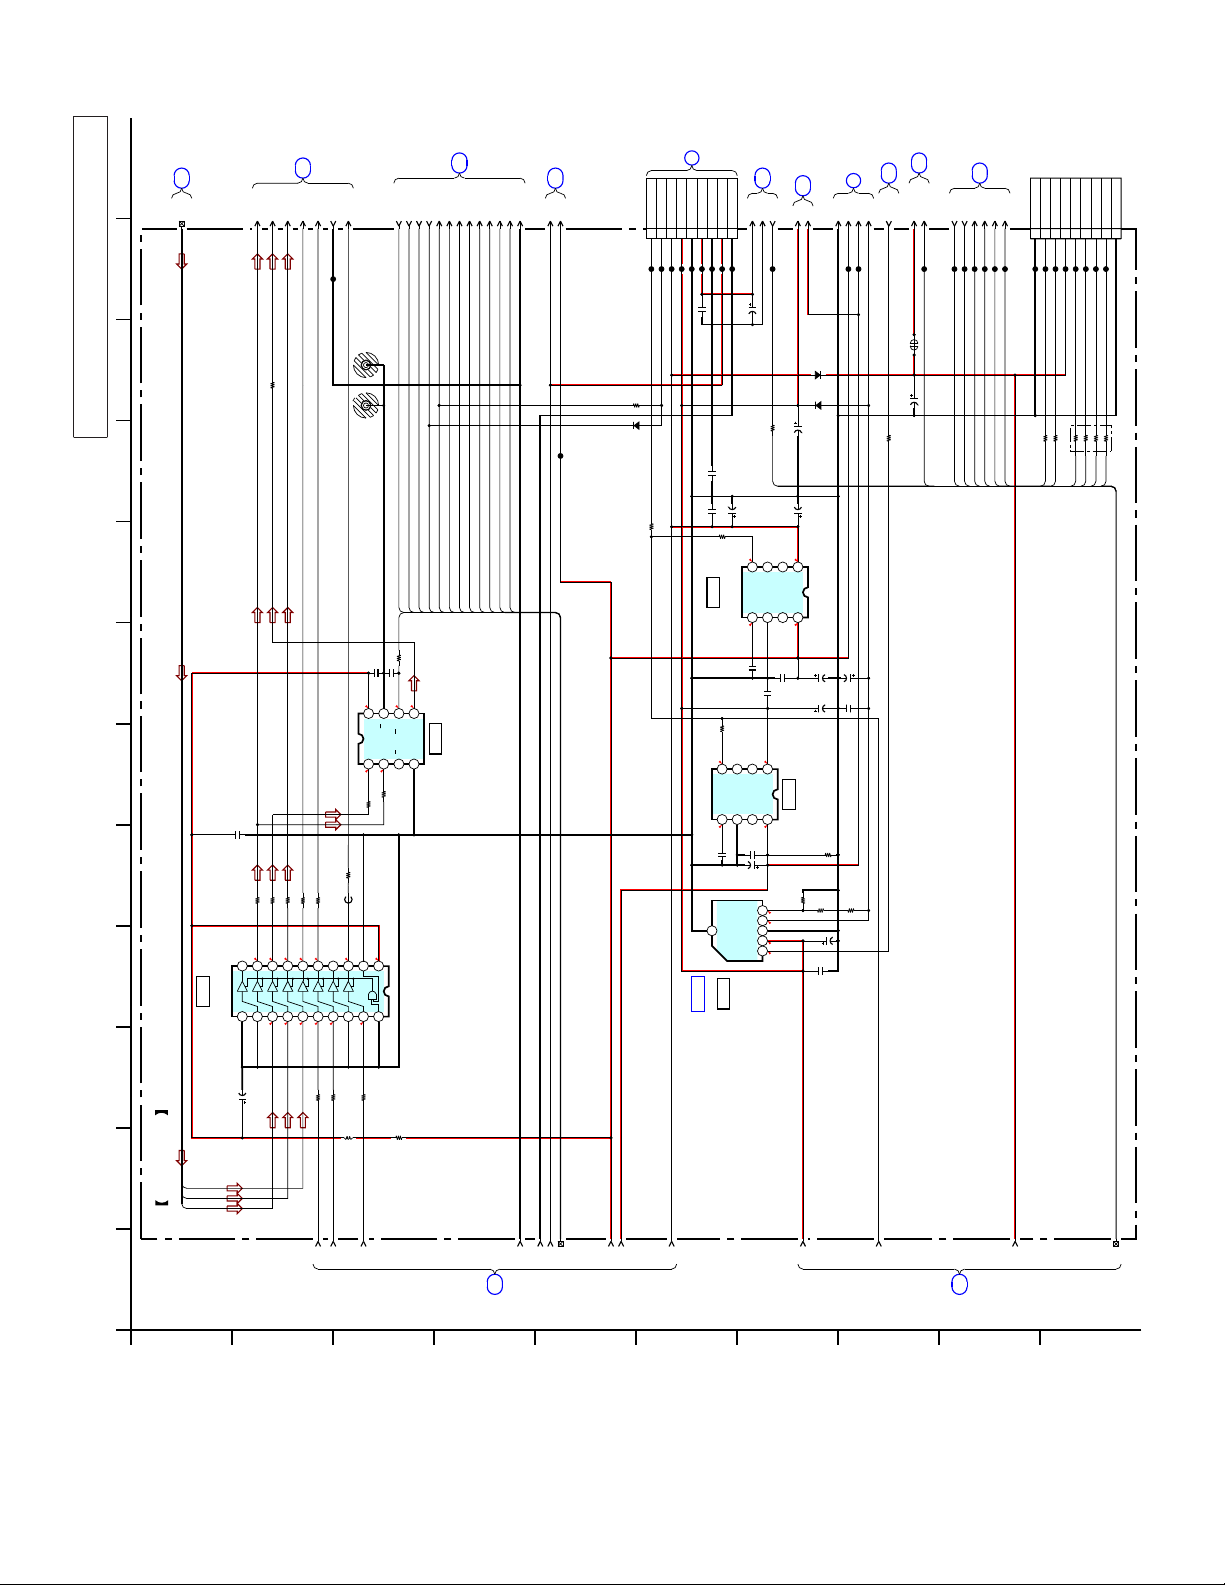
(Page 49)
M-GND
A12V
AGND
9
10
CL565
CL563
CL566
(Page 36)
(4/8)
MAIN
BOARD
(3/8)
MAIN
BOARD
(Page 35)
10
16
+6V
M+9V
M-GND
OCSW1
5V
CL579
100
16V
C552
P_CONT1
PVDD_CON
E4V6VD-GND
1345678
10P
CL556
CL557
CL559
CN906
BOARD
POWER
C
M+9V
CL561
CL560
CL562
0.1C550
(7/8)
MAIN
OVF2
OVF1
SD_PVDD_DET
BOARD
(Page 39)
22
LAT3
EN
SOFT_MUTE
SCDT
SHIFT
LAT1
LAT2
NS_INIT
D-GND
(8/8)
MAIN
BOARD
(Page 40)
23
D3.3V
A12V
CN509
(7/8)
MAIN
AMP_D1
AMP_D2
AMP_D3
BOARD
21
AMP_BCKO
(Page 39)
D-GND
AMP_LRCKO
JL471
AMP_MCKO
DC-DET
(2/8)
MAIN
BOARD
(Page 34)
12
BUS2
11
MAIN
D-GND
CL567
(Page 33)
(1/8)
BOARD
7
D3.3V
CL568
USB5V
(Page 34)
(2/8)
MAIN
BOARD
18
VBUS_SW
MAIN
E3.3V
(3/8)
BOARD
15
CEC_TX_OUT
CL569
(Page 35)
IFSCK
IFSDO
CL574
CL573
(2/8)
MAIN
BOARD
(Page 34)
14
XSYSRST5VXIFCS
IFSDI
XIFBSY
CL576
CL578
CL577
CL575
D-GND
1234567
9P
CN508
CL555
CL554
(FOR WRITE JIG)
TXD1
RTS1
3.3V
CLK1
RXD1
CNVSS
RESET
D-GND
9
8
CL553
CL552
CL551
CL550
CL549
CL548
10
When IC507 on the Main board is damaged, exchange the
new Main board for the Main board which IC damaged.
100
R412
Note:
9125
8
67
0.01
C476
100
R488
33R486
47R483
47R481
47R480
47R482
0.6 <1.2>
0 <1.2>
1.2
1.7
1.61.6
0.6 <1.2>
1.7
1.6
IC471
IC471
TC74LCX541FT(EKJ)
11
BUS BUFFER
10
987654321
1.2
0 <1.2>
• See page 50 for IC Block Diagrams.
4
31
22
22
R473
R472
L471
2
100
(6/8)
MAIN BOARD
C471
ASDATA2
ASDATA1
ASDATA0
16V
47uH
FB471
1.5
CL501 CL502
C333
3.3
876
VCC
ABY
0 <1.2>
R410
3.3
201918171615141312
22
R474
D503
MA2J1110GLS0
1k
R628
470
100
16V
C553
R627
D4002
OCSW1SIG
100
16V
C540
876
NC
NC
Vin
VoutNCGND
321
3.3 4.1
C537
0.01
C538
C532
876
Vin
IC507
+5V REG.
IC507
VoutNCGND
MM1665AHBE
56.7
10k
R622
0.5%
R626
5
1
5
6.7
1234
3.3
C541
MA2J1110GLS0
100
100
39k
0.01
10V
C545
16V
C546
10k
R609
0.5%
R620
C543
JL533
SD_PVDD_DET
OVF2
OVF1
DC-DET
LAT3
LAT2
LAT1
SHIFT
SCDT
SOFT_MUTE
IC307
DATA SELECT
TC7WH157FK(TE85R)
NS_INIT
EN
M_ST
100
0.1
0.1
R413
C334
3.3 <0>
1.2
54
G
A/B
IC307
GND Y
321
1.2
100
R409
100
0
R471
D4004
MA2J1110GLS0
100
R629
1000pC551
IC510
1k
R615
470p
C533
6
IC B/D
3.3 3.3
C539
R625
54
0.01
1k
IC510
Cn Cont
IC509
220
C536
D+3.3V REG.
MM1663DHBE
470p
C542
NC
321
IC509
SI-3010KM-TLS
10V
54
Cn Cont
1.9 3.3
NC
C530
100
C529
Sense
Vout
GND
Vin
Vcont
+5V REG.
0.01
C531
0.1
10V
SL501
6.3V
2200
C528
1k
R621
XSYSRST
XIFBSY
CEC_TX_OUT
IFSCK
IFSDO
IFSDI
XIFCS
100
10V
0.1
100X4
RB603
R614 100
R607 100
TXD1
RST1
CLK1
RXD1
CNVSS
RESET
3838
1.5k
0.5%
22
50V
36
37
5-13. SCHEMATIC DIAGRAM – MAIN Section (6/8) –
A
B
HBD-TZ210/TZ230/TZ510/TZ630/TZ710
38
C
394041
19
(5/8)
MAIN
BOARD
(Page 37)
D
BUS15
42
44
43
45
46
47
BUS16
20
(5/8)
MAIN
BOARD
E
F
G
H
(Page 37)
I
J
HBD-TZ210/TZ230/TZ510/TZ630/TZ710
Page 39
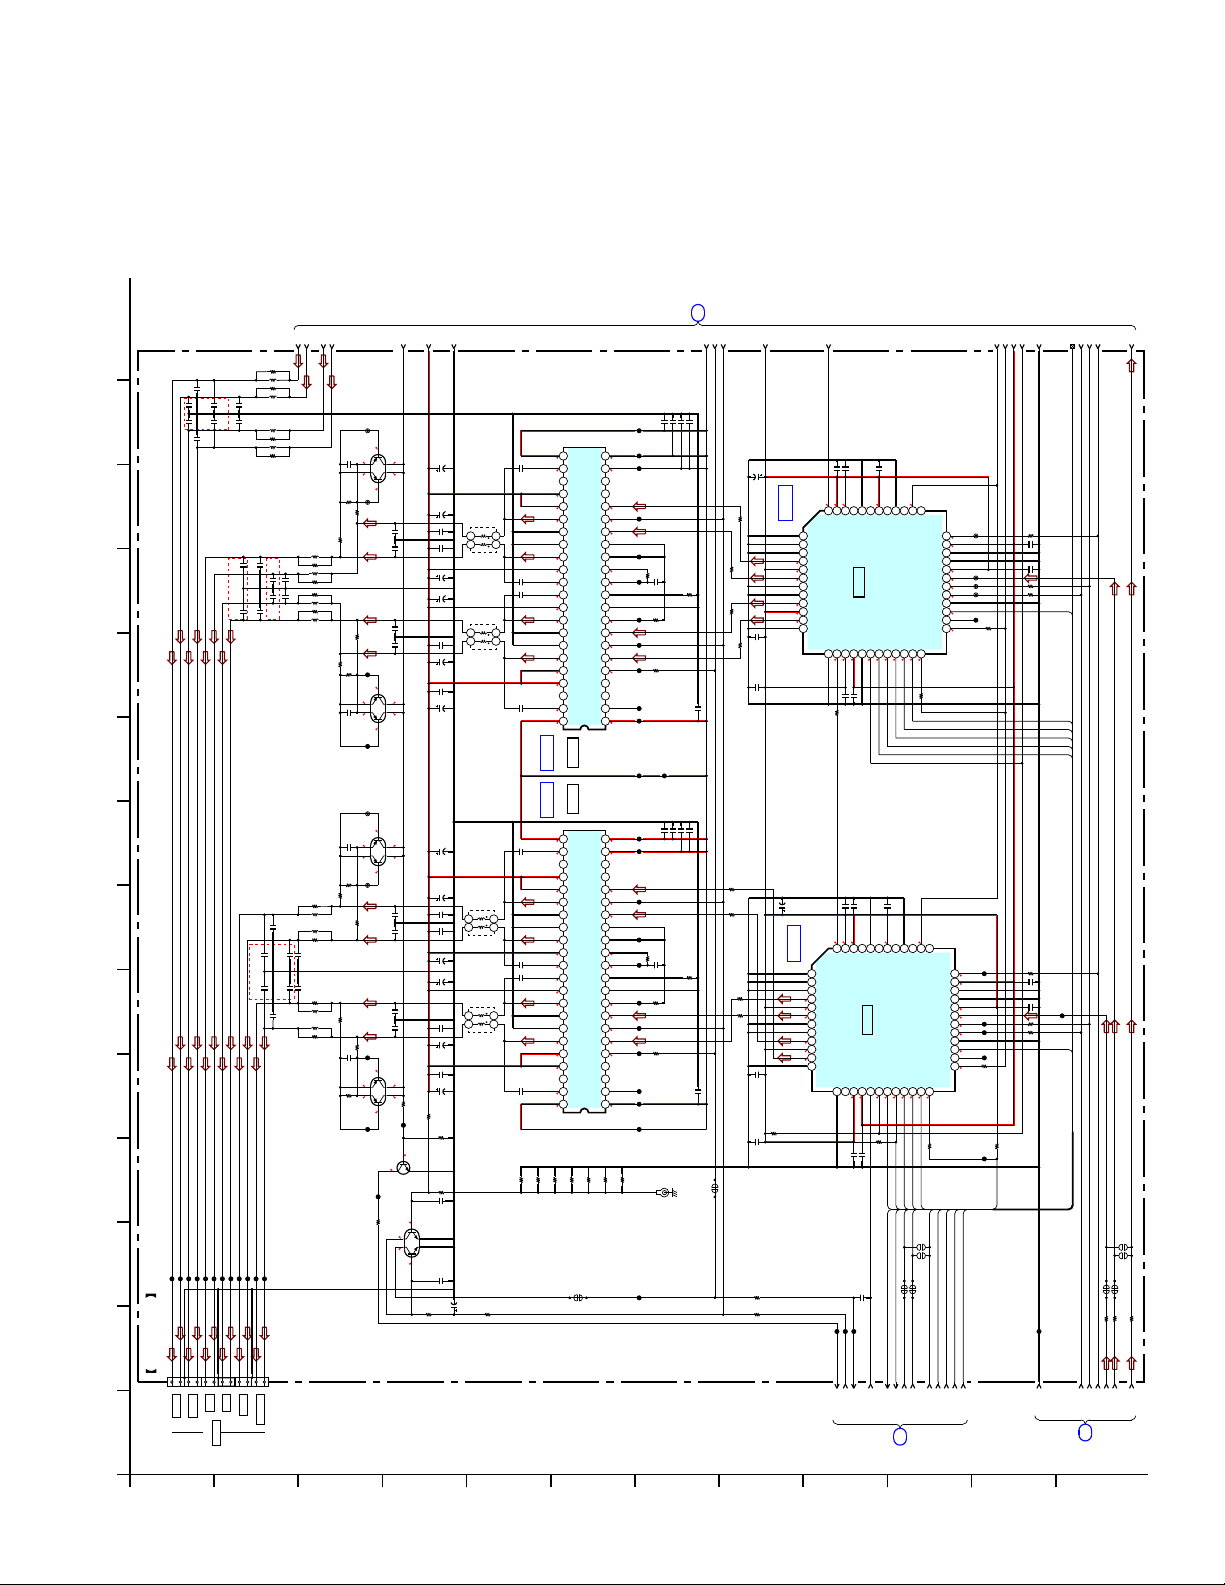
Ver. 1.1
484950
51
*2
CND,AUS,EA,HK,SAF,AEP,UK,CH,RU,TW
C3080
C3065
CL3018
CL3016
SUR L
C3097
1000p
1000p
CND,AUS,EA,HK,SAF,AEP,UK,CH,RU,TW
CL3013
101112
CENTER
0.01
0.01
C3098
C3081
C3068
CL3012
-
0.01
0.01
1000p
C3059
1000p
C3058
+
B
*1
*2
*1
*1
*2
*1
*2
CL3011
-
SUBWOOFER
R3084
L3012
R3085
L3013
L3014
R3086
L3015
R3087
CND,AUS,EA,HK,SAF,AEP,UK,CH,RU,TW
0.01
1000p
C3079
C3078
0.01
1000p
C3067
C3069
(CND,AUS,EA,HK,SAF,AEP,UK,CH,RU,TW)
L3002-3005,3007-3010,3012-3015
0.6 μ H
*1
0.01
C3057
1000p
C3055
1000p
C3054
0.01
C3056
CL3010
C3077
R3078
R3082
R3081
*1
L3010
*2
R3079
*1
L3009
*2
R3076
R3072
*2
L3008
*1
R3070
*2
L3007
*1
R3064
R3063
R3060
C3048
(E3,E12,E32,AR,MX,PH,SP,TH)
R3054-3057,3070,3072,3076,3079
R3084-3087
0
*2
C3022
R3038
*2
R3057
R3044
L3005
*1
*1
L3004
R3045
R3056
*2
0.01
C3052
0.01
C3051
*2
R3055
L3003
*1
*1
L3002
R3030
R3054
*2
R3031
C3009
R3025
C
HBD-TZ210/TZ230/TZ510/TZ630/TZ710
0.01
1000p
1000p
C3093
132 9
11
10 12
7 14
6
5
• See page 51, 52 for IC Block Diagrams.
4
3 8
(7/8)
MAIN BOARD
1
5-14. SCHEMATIC DIAGRAM – MAIN Section (7/8) –
C3086
1000p
C3087
C3094
0.01
C3089 C3088
CND,AUS,EA,HK,SAF,AEP,UK,CH,RU,TW
CL3021
CL3025
CL3023
CL3020
CL3026
CL3024
123456789
-
+
+-+-+-+
SUR R
FRONT L
FRONT R
TB3001
SPEAKERS
A
1000p
(8/8)
MAIN
BOARD
(Page 40)
24
52
53
54
JL3025
13.1
Q3011
DETECT
RT3AMMM
DC BLANCE
2.2
126
35V
1000
C3095
4
3
00
13.1 13.1
5
100k
13.113.1
JL3028
1
100k
100k
100k
100k
100k
2.2
2.210
100k
100k
100k
100k
100k
100k
13.1 13.1
13.1 13.1
13.1 13.1
JL3022
126
4
5
13.1
JL3020
JL3009
126
4
5
13.1 13.1
JL3011
JL3005
126
4
5
13.1 13.1
JL3003
JL3050
0
R3000
3
Q3009
RT3AMMM
Q3007
RT3AMMM
3
Q3005
RT3AMMM
3
Q3004
DC BLANCE
2SC4154TP-1EF
3.3
Q3003
RT3CLLM
C3085
1
C3084
1
C3061
1
C3060
00
DETECT
DC BLANCE
DETECT
DC BLANCE
00
1
C3030
1
C3031
1
C3014
1
C3015
DETECT
DC BLANCE
003.3 0
R3017
JL3049
PROTECT
0
2
DETECT
PVDD DOWN
6
3
5
00.5
100
35V
C3091
0.1
C3092
0.1
C3082
100
35V
C3074
35V
1000
C3070
0.1
C3064
100
35V
C3063
0.1
C3053
100
35V
C3049
1000
C3039
100
C3032
0.1
C3033
0.1 35V
C3028
100
35V
C3027
35V
2200
C3019
0.1
C3018
100
35V
C3017
0.1
C3013
100
35V
C3011
0
1
4
10uH
L3011
3
4
2
1
3
4
2
1
10uH
L3006
10uH
L3001
2
1
3
4
2
1
3
4
10uH
L3000
220k
0.5%
R3008
100k
R3015
10k
0.5%
R3009
0.1
C3003
0.01
C3000
47
10V
C3002
R3006 47k
R3007 22k
D
E
GVDD_D
BST_D
24.3
0.033
C3102
NC
PVDD_D
26.3
PVDD_D
27 26 25 24 23
OUT_D
13.1
28293031
GND_D
GND_C
OUT_C
13.1
PVDD_C
0.033
26.3
C3071
BST_C
24.2
BST_B
24.2
0.033
C3066
PVDD_B
26.3
OUT_B
13.1
GND_B
37 36 35 34 33 32
GND_A
OUT_A
13.1
PVDD_A
26.3
PVDD_A
26.3
NC
0.033
C3046
BST_A
24.3
GVDD_A
11.9
44 383940414243
IC3002
IC3002IC3000
IC3000
IC B/D IC B/D
GVDD_D
BST_D
24.3
0.033
C3040
NC
PVDD_D
26.3
PVDD_D
27 26 25 24 23
OUT_D
13.2
28293031
GND_D
GND_C
OUT_C
13.1
PVDD_C
0.033
26.3
C3023
BST_C
24.2
BST_B
24.2
0.033
C3021
PVDD_B
26.3
OUT_B
13.1
GND_B
37 36 35 34 33 32
GND_A
OUT_A
13.2
PVDD_A
26.3
PVDD_A
26.3
NC
0.033
C3008
BST_A
24.3
GVDD_A
11.9
44 383940414243
0
R31420R31430R31440R3145
SL3000
DIGITAL
CXD9965TN
DIGITAL
CXD9965TN
/RESET_AB
R30470R3059
F
GVDD_C
VDD
NC
NC
PWM_D
/RESET_CD
PWM_C
M1
M2
M3
VREG
AGND
GND
OC_ADJ
PWM_B
/RESET_AB
PWM_A
/SD
NC
NC
/DTW
GVDD_B
AMP
POWER
AMP
POWER
GVDD_C
VDD
NC
NC
PWM_D
/RESET_CD
PWM_C
M1
M2
M3
VREG
AGND
GND
OC_ADJ
PWM_B
PWM_A
/SD
NC
NC
/DTW
GVDD_B
0
JL3032
11.9 11.9
2221201918
JL3031
11.9
JL3030
1.6 26.3
3.3
171615141312
JL3029
1.6
JL3027
3.3
0
R3125
3.3
JL3026
1.1
JL3024
891011
1.6
7654321
3.3
JL3023
1.6
3.3
JL3021
JL3019
11.9
JL3018
JL3016
11.9 11.9
2221201918
JL3015
11.9
JL3014
1.6 26.3
3.3
171615141312
JL3013
1.6
JL3012
3.3
0
R3123
3.2
JL3010
1.1
JL3008
891011
1.6
7654321
3.3
JL3007
1.6
3.3
JL3006
JL3004
11.9
JL3002
JL3001
0
R3083
JL3000
555657
58
0.1
0.1
0.1
0.1
C3104
C3103
C3105
C3045
47
16V
C3096
47
R3077
47
C3041
(CHASSIS)
R3075
3.30.1
R3074
47
R3069
47
0.1
R3067
C3075
0.1
C3062
C3044
0.1
0.1
C3007
47
R3042
47
R3040
3.3
R3039
47
R3032
47
R3035
0.1
0.1
C3006
C3025
0.1
C3016
SL3001
100R3002
100R3005
0.1
C3072
22k
R3066
0
R3061
JL3017
0.1
0.1
C3042
C3043
0.1
C3024
22k
R3034
0
R3029
E
ET3000
59
0.1
0.1
0.1
C3099
C3101
C3100
1.5
3.3
3.3
3.3
1.6
37383940414243
44
454647
48
IC B/D
XVDD
XFSOIN
HPVDDL
XVSS
12345678
VSUBC
VSSR
OUTR2(-)
1.6
VDDR
3.3
OUTR1(+)
1.6
VSSR
VSSL
OUTL2(-)
9101112
1.6
VDDL
3.3
OUTL1(+)
1.6
VSSL
XOVSS
XFSOOUT
XOVDD
131415
1.5
3.3
1.8
47
0.1
R3062
C3047
0.1
C3036
47
16V
C3034
1.5
3.3
3.3
48
IC B/D
XVDD
XFSOIN
XVSS
12345678
VSUBC
VSSR
OUTR2(-)
1.6
VDDR
3.3
OUTR1(+)
1.6
VSSR
VSSL
OUTL2(-)
9101112
1.6
VDDL
3.3
OUTL1(+)
1.6
VSSL
XOVSS
XFSOOUT
131415
3.3
10k
R3021
CL3002
CL3001
CL3000
EN
DC-DET
HPVSSL
HPVDDR
HPOUTL2
HPOUTL1
IC3003
IC3003
CXD9788AR
S-MASTER PROCESSOR
DVDD
DVSS
NSPMUTE
17181920212223
16
3.3
3.3
0.1
C3050
0.1
C3037
44
454647
HPVSSL
HPVDDL
HPOUTL2
HPOUTL1
IC3001
IC3001
XOVDD
DVDD
DVSS
NSPMUTE
17181920212223
16
1.8
3.3
R3022
0.1
0.1
C3012
C3010
0.01
C3001
D-GND
SD_PVDD_DET
HPVSSR
HPOUTR2
HPOUTR1
SOFTMUTE
PGMUTE
SCDT
SCSHIFT
0
0
3.3
3.3
0.1
C3038
3.3
HPVSSR
HPVDDR
HPOUTR1
CXD9788AR
S-MASTER PROCESSOR
SOFTMUTE
PGMUTE
SCDT
0
0
3.3
3.3
10k
SHIFT
SCDT
PGMUTE
LAT3
LAT2
OVF2 SOFT_MUTE
OVF1
SL3006
LAT3
OVF1
OVF2
FSOI
SCSHIFT
LAT2
SCLATCH
3.3
1.6
HPOUTR2
3.3
LAT3
FSOCKO
OVF FLAGR
24
FSOI
SCLATCH
SL3002SL3003
SL3007
R3058
37383940414243
OVF FLAGR
24
3.3
LAT1
LAT1
470
FSOCKO
R3026
SHIFT
22
(6/8)
MAIN
BOARD
G
H
I
(Page 38)
J
XFSIIN
DVDD
TEST
BFVSS
BFVDD
DATA
BCK
LRCK
MCKSEL
INIT
SFLAG
OVF FLAGL
470
SHIFT
SCDT
29 30 31 32 33 34 35 36
25 26 27 28
XFSIIN
DVDD
TEST
BFVSS
BFVDD
DATA
BCK
LRCK
MCKSEL
INIT
SFLAG
OVF FLAGL
SCDT
1.7
1.8
3.3
1.2
1.7
1.6
3.3
3.3
25 26 27 28 29 30 31 32 33 34 35 36
NS_INIT
SOFT_MUTE
SOFT_MUTE
NS_INIT
1.7
1.8
3.3
1.7
1.6
3.3
3.3
6061626364
CL3022
CL3019
CL3017
CL3015
CL3014
470
R3065
CL3009
0.6 <1.2>
CL3007
CL3006
CL3004
470
R3033
CL3003
OVF2
65666768BUS17
0
R3080
0.1
C3083
0.1
C3076
100R3073
22R3071
NS_INIT
LAT2
SHIFT
SCDT
PGMUTE
SOFT_MUTE
0
R3048
0.1
C3029
CL3008
0.1
C3026
100R3037
22R3036
NS_INIT
10k
R3028
SL3004SL3005
SL3009
SL3008
47R3041
AMP_BCKO
AMP_LRCKO
AMP_MCKO
AMP_D3
R3043 47
AMP_D2
CL3005
D-GND
3939
47R3046
AMP_D1
21
(6/8)
MAIN
BOARD
K
(Page 38)
L
HBD-TZ210/TZ230/TZ510/TZ630/TZ710
Page 40
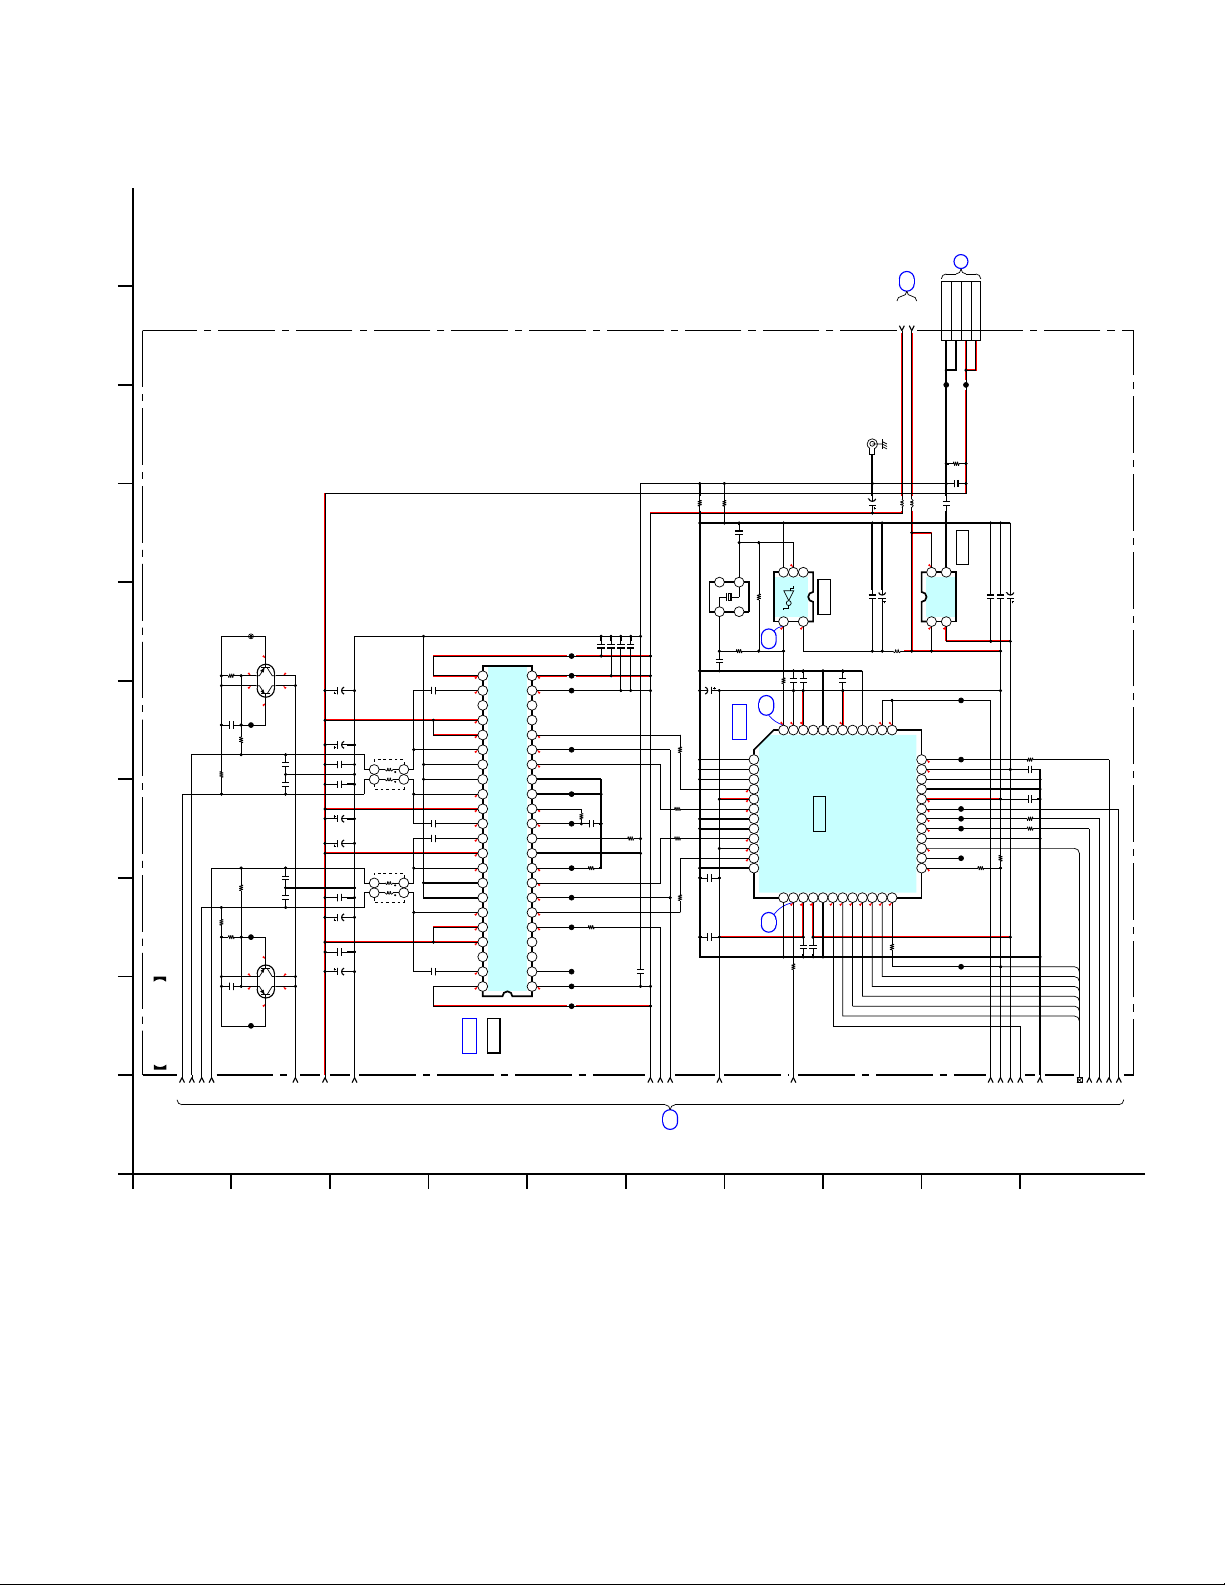
10
MAIN
BOARD
23
95
A12V
(8/8)
D3.3V
(Page 38)
P-GND
123
4P
CN3000
CL3035
POWER
BOARD
P-GND
CL3034
CN904
D
+26.0V
(Page 49)
+26.0V
4
8
67
• See page 30 for IC Block Diagrams. • See page 51, 52 for IC Block Diagrams.
4
31
(8/8)
2
MAIN BOARD
484950
51
5-15. SCHEMATIC DIAGRAM – MAIN Section (8/8) –
A
Q3015
13.113.1
RT3AMMM
100k
DC BLANCE DETECTDC BLANCE DETECT
R3105
126
453
00
35V
1000
JL3038 JL3043 JL3041
126
4
JL3036
5
13.1 13.1
C3131
C3129
C3115
C3114
3
Q3013
RT3AMMM
C3135
1
100
35V
C3133
0.1
C3134
0.1
C3128
1
100
35V
C3125
35V
1000
C3119
1
0.1
C3117
1
100
C3116
0.1
C3112
100
35V
C3110
00
52
4
2
4
2
35V
53
54
13.1 13.1
2.2
100k
R3112
100k
R3111
100k
R3099
100k
R3098
100k
R3094 C3121
13.1 13.1
2.2
C3109
B
0.033
C3141
10uH
L3017
3
1
0.033
C3123
0.033
C3120
3
1
10uH
L3016
0.033
C3108
C
GVDD_D
GVDD_C
BST_D
VDD
24.311. 9
NC
NC
PVDD_D
NC
26.3
PVDD_D
PWM_D
26.31.6
27 26 25 24 23
OUT_D
/RESET_CD
13.13.3
28293031
GND_D
PWM_C
GND_C
M1
OUT_C
M2
13.1
PVDD_C
M3
26.3
BST_C
VREG
24.33.3
BST_B
AGND
24.3
PVDD_B
GND
26.3
OUT_B
OC_ADJ
13.11.1
GND_B
PWM_B
37 36 35 34 33 32
GND_A
/RESET_AB
OUT_A
PWM_A
13.11.6
PVDD_A
/SD
26.33.3
PVDD_A
NC
26.3
NC
NC
BST_A
/DTW
24.3
GVDD_A
GVDD_B
11.911. 9
44 383940414243
IC3004
IC3004
IC B/D
CXD9965TN
DIGITAL POWER AMP
D
ET3003
E
(CHASSIS)
0
R30930R3114
4p
C3154
1
1k
R3122
IC B/D
1.6
3.3
1.6
1.6
3.3
1.6
1M
R3121
12
47
R3119
13
XVSS
12345678
VSUBC
VSSR
VDDR
VSSR
VSSL
9101112
VDDL
VSSL
14
1.6
2
A
GND
Y
43
1.7
3.3
0.1
C3137
3.3
1.7
48
XVDD
XFSOIN
OUTR2(-)
OUTR1(+)
OUTL2(-)
OUTL1(+)
XOVSS
XFSOOUT
1314151617181920212223
3.3 3.3
1.5
47
R3097
59
X3000
49.152MHz
0.1
0.1
0.1
0.1
C3144
C3107
C3142
C3143
JL3048
11.9 11.9
2221201918
JL3047
JL3046
171615141312
JL3045
1.6
JL3044
3.3
0
R3127
0.1
JL3042
3.3
C3124
R3107
JL3040
22k
891011
7654321
R3100
1.6
3.3
JL3039
JL3037
0
R3096
0.1
JL3035
C3106
JL3034
JL3033
555657
2
4p
C3146
47
16V
C3132
47
R3110
47
R3109
47
R3104
0.1
C3126
47
R3103
0.1
C3118
58
C3138
XOVDD
C3111
1
NC
5
VCC
0.1
HPVDDL
1.8
0.1
DVDD
C3113
454647
HPOUTL1
0.1
IC3007
44
HPVSSL
IC3005
DVSS
3.3
220
C3140
C3151
IC3007
CLOCK GENERATOR
TC7SHU04FU(T5RSOJF)
0.1
C3139
HPVDDR
HPOUTL2
HPOUTR1
IC3005
CXD9788AR
S-MASTER PROCESSOR
NSPMUTE
SOFTMUTE
PGMUTE
SCDT
0
3.3 3.3
3.3
16V
0.01
HPVSSR
SCSHIFT
0
HPOUTR2
SCLATCH
3.3 1.6
FSOI
3.3 1.6
10uH
L3019
220
10V
C3152
10uH
L3020
37383940414243
FSOCKO
OVF FLAGR
24
R3095
470
L3018
XFSIIN
DVDD
TEST
BFVSS
BFVDD
DATA
BCK
LRCK
29 30 31 32 33 34 35 36
MCKSEL
INIT
SFLAG
25 26 27 28
OVF FLAGL
1608
100k
R3117
0.1
C3145
10uH
1000p
C3155
IC3006
+1.8V REG.
IC3006
MM3404A18URE
1
2
16V100C3148
1C3150
GND
0.01C3149
CONT
VIN
VOUT
3
4
1.8
3.3 3.3
CL3033
0
CL3032
CL3031
CL3030
CL3029
10kR3101
CL3028
470
R3102
CL3027
6061626364
R3113
0.1
C3130
0.1
C3127
100R3108
22R3106
NS_INIT
OVF1
LAT1
SHIFT
SCDT
PGMUTE
SOFT_MUTE
BUS17
656667
68
4040
1.7
1.8
3.3
1.2
1.7
1.6
3.3
3.3
24
(7/8)
MAIN
BOARD
(Page 39)
E
F
G
H
I
J
HBD-TZ210/TZ230/TZ510/TZ630/TZ710
HBD-TZ210/TZ230/TZ510/TZ630/TZ710
Page 41
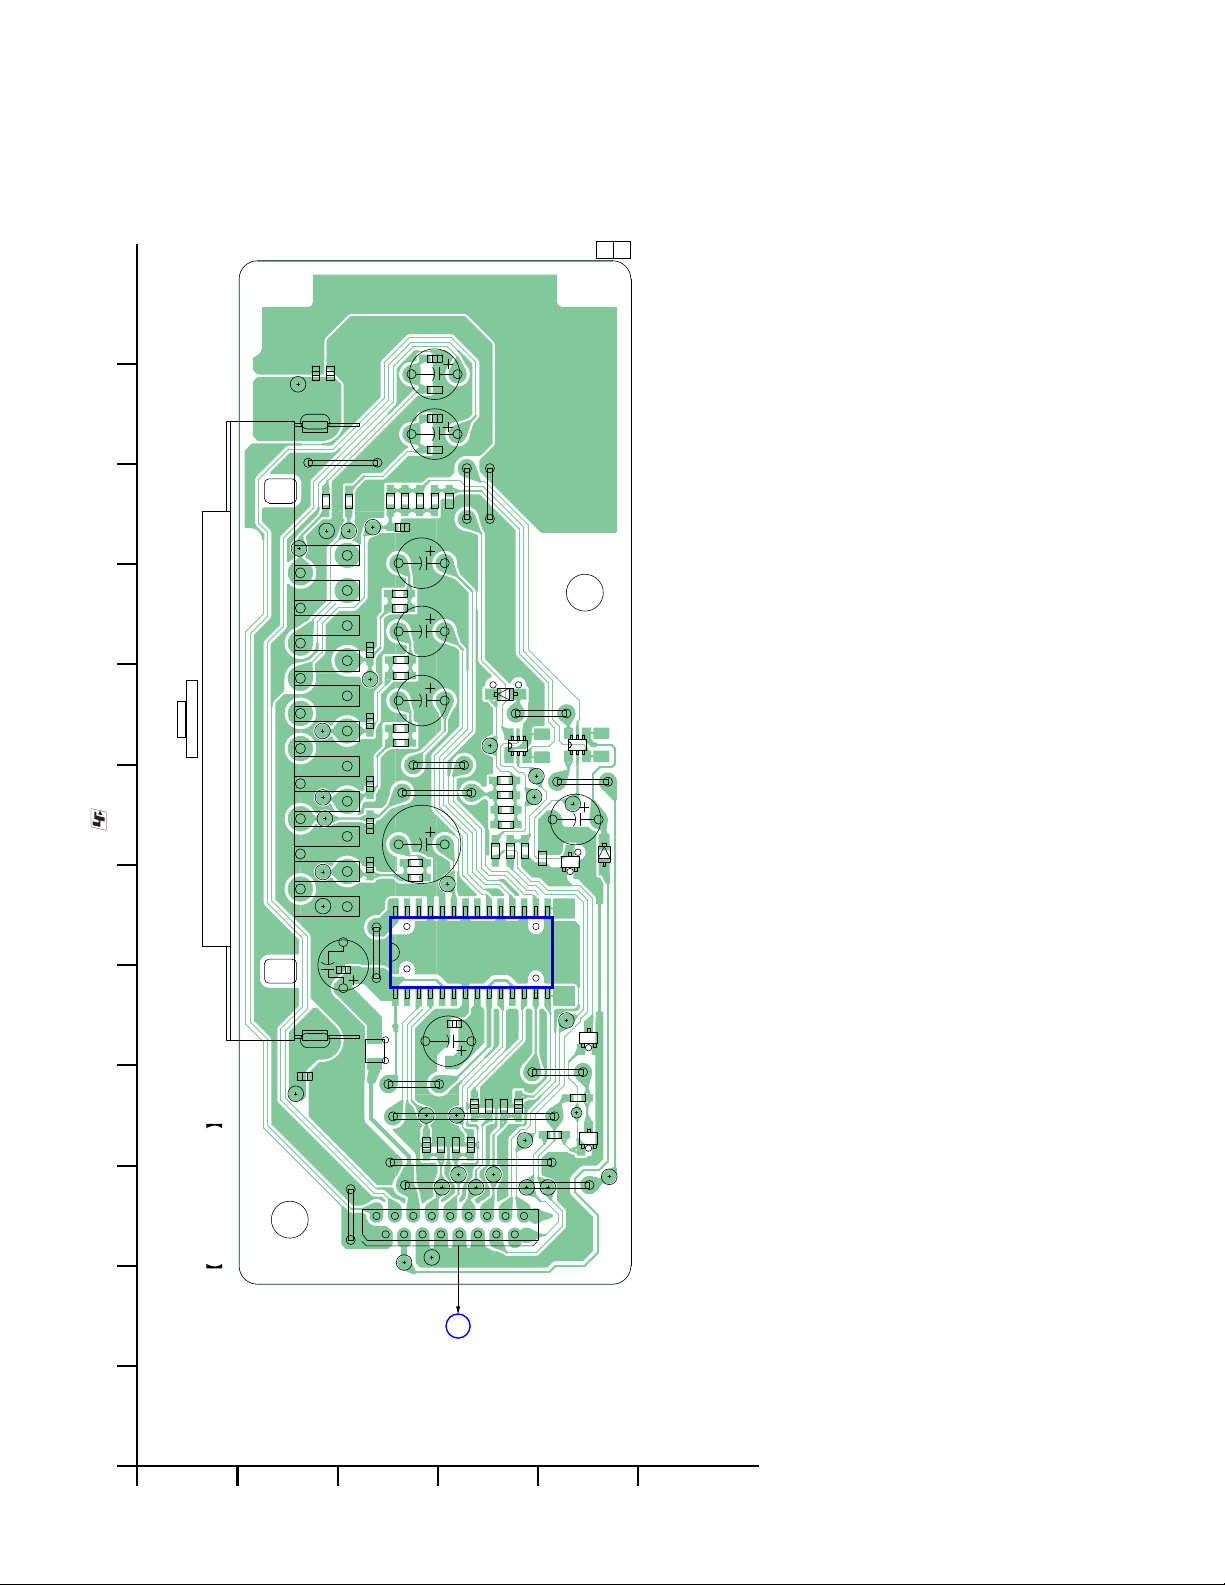
HBD-TZ210/TZ230/TZ510/TZ630/TZ710
JL4000
C4001
C4002
R4041
JL4003
JL4001
JL4002
1
2
JL4006
CN4000
EURO AV
T OUTPUT (TO TV)
• : Uses unleaded solder.
• See page 24 for Circuit Boards Location.
SCART BOARD (TZ230/TZ630)
CN4000
23 22
JL4007
JL4008
JL4009
20
21
JL4010
C4023
C4014
JL4011
JW4005
JW4000
R4035
C4022
JL4005
C4006
C4008
C4009
C4011
C4010
JW4003
L4020
17
16
R4014
C4013
C4016
JL4004
C4005
C4018
JL4021
28
1
C4038
C4033
R4013
C4007
C4017
C4021
R4012
R4015
R4011
R4019
R4018
R4008
R4006
JW4015
JW4004
JW4007
R4007
JL4023
R4021
C4035
JW4013
JW4001
R4017
R4016
JL4018
JL4012
R4005
JL4017
JW4012
CL4000
JL4022
R4027
R4037
C4032
R4033
JL4028
IC4000
C4019
C4012
C4015
CN4018
JW4014
R4004
R4026
JL4019
R4002
R4001
R4000
R4022
D4001
R4025
6
1
JL4027
R4024
C4004
JW4011
Q4005
34
JL4026
C4003
R4010
R4003
15
14
JW4008
JL4015
JL4020
JL4013
JL4122
1
2
6
1
Q4003
JL4014
JW4009
R4023
11
Q4006
34
JW4002
JL4025
D4002
Q4000
R4009
JL4024
Q4001
(11)
1-880-747-
4141
JL4016
23456789101112
1
5-16. PRINTED WIRING BOARD – SCART Section –
A
B
E
MAIN
CN402
BOARD
(Page 31)
C
D
E
F
HBD-TZ210/TZ230/TZ510/TZ630/TZ710
Page 42
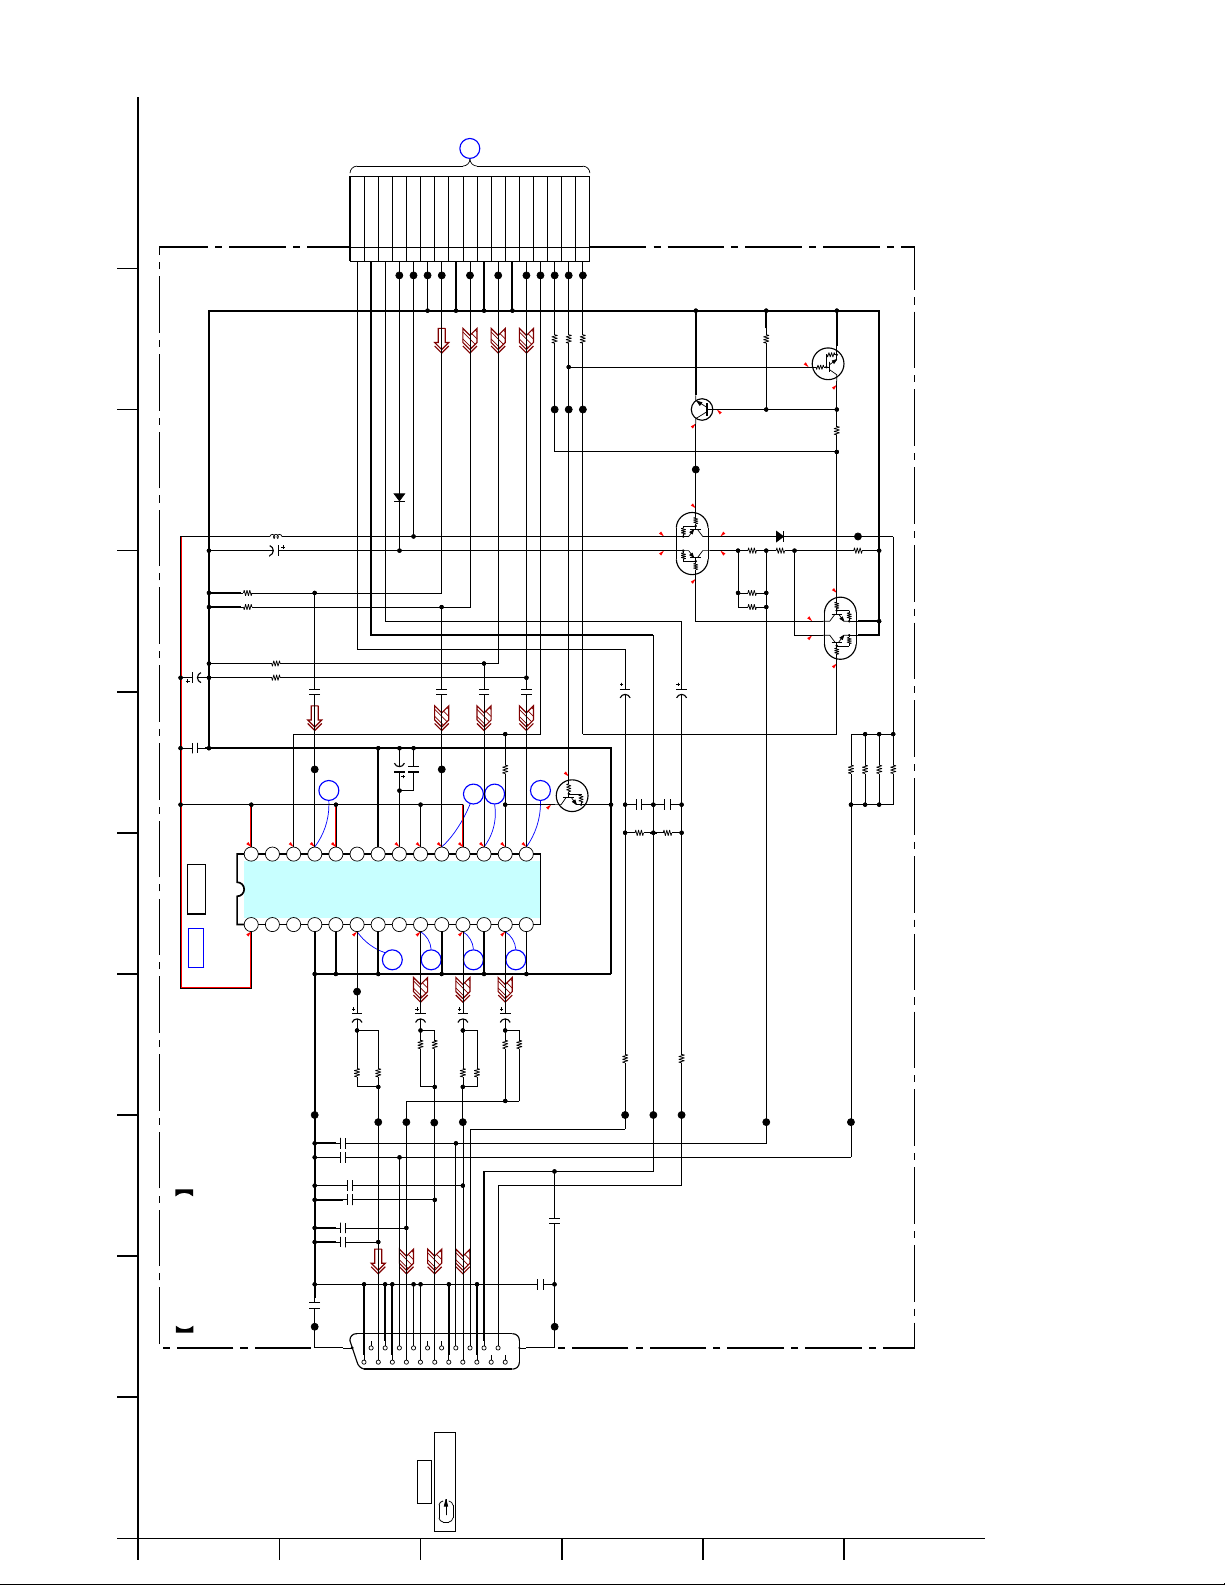
10
MAIN
BOARD
E
(5/8)
CN402
(Page 37)
17P
CN4018
AGND
SCART Lch
17
SCART Rch
JL4021
12V
5V
JL4016
JL4012
VGND
CVBS
JL4017
VGND
10111213141516
G
JL4018
VGND
B
JL4019
VGND
JL4020
95
D4002
MA2J1110GLS0
0.1
0.1
C4012
C4015
50V
0.1
C4019
C4017
22
JL4022
2
2.451.852.602.6
7
8
9
11
12
10
I/P
CLP
CVin
BIAS
GND1
GND2
Cbout
GND2
CY out
Yout
GND2
21
20
2
8
17
18
19
1.9
6
7
Cbin
10k
R4009
3
2
C4004
13
MUTE2
Crout
16
0.1
5
100
C4023
0.1
C4022
IC4000
IC B/D
L4020
C4003
150
0.5%0.5%
R4021
150
R4027
16V
R4026
R4025
5
2
1
Cin
Vcc1
IC4000
S-DCout
Vcc2
MM1758AFBE
VIDEO DRIVER
28272625242322
4.9
10uH
100
16V
150
0.5%
1
150
C4021
0.5%
JL4023
1
2.4
5
0 <3.3>
6
5
4
3
MUTE1
Cout
CVBSin
S1
YC MIX
S2
Yin
CVBSout
2
Crin
GND2
15 14
R
VSEL0
JL4013
4
1kR4024
0
TV_SEL
JL4014
JL4026
RGB_SEL
JL4015
JL4122
100R4023
100R4022
JL4024
JL4027
3.3
Q4001
RT1N241M-TP-1
123456789
WIDE
220k
R4003
3.3
Q4000
RT1N441M-TP-1
0
0
Q4003
2SC4154TP-1EF
4.9
JL4025
4.9
Q4006
2
RT3P11M-TP-1
5
11.3
22
25V
C4033
100p
C4032
C4035
100k
R4033
INVERTER
R4037
0
6
1
4
3
11.2
2.2k
R40141kR4007
5
0
2.2k
R4013
22
25V
C4038
100p
100k22k
D4001
R4012
MA2J1110GLS0
2.2k
R4010
0
6
3
10.4 <0>
47k
0
0 <3.3>
2
5
330R4004
JL4028
22k
R4005
1
4
Q4005
RT3N33M-T111-1
330R4002
330R4001
Q4000,4003,4006(2/2)
BLANKING CONTROL
Q4005,4006(1/2)
FUNCTION SWITCH
330R4000
4242
6.3V
1000
C4018
4
150
0.5%
R4016
JL4010
1000p
C4007
(TZ230/TZ630)
31 867
• See page 30 for waveforms. • See page 53 for IC Block Diagram.
SCART BOARD
2
HBD-TZ210/TZ230/TZ510/TZ630/TZ710
5-17. SCHEMATIC DIAGRAM – SCART Section –
A
C4014
1000p
C4011
C4009
C4010
JL4011
1000p
100p
100p
21P
CN4000
B
CL4000
JL4009
100p
C4006
100p
C4008
20
21
CVBS IN
GND PULUG
100
C4016
150
R4019
150
0.5%
R4017
JL4007
16
18
17
19
R/C OUT
CVBS OUT
VIDEO IN GND
BLANKING OUT
VIDEO OUT GND
16V
C4013
0.5%
R4018
R4015
JL4006
10
12
14
11
13
15
NC
NC
G OUT
R GND
BLANKING GND
CN4000
EURO AV
100
16V
150
0.5%
150
0.5%
JL4004
6
8
9
B OUT
G GND
FUNCTION SW
OUTPUT(TO TV)
7
A(L) IN
100
C4005
150
R4008
R4011
4
5
B GND
A(L) OUT
AUDIO GND
16V
0.5%
150
2
3
C
0.5%
A(R) IN
A(R) OUT
150
0.5%
R4006
1000p
C4002
1000p
C4001
JL4000
22 23
1
R4035
22k
JL4003
R4041
JL4001
JL4002
D
JL4005
JL4008
E
F
HBD-TZ210/TZ230/TZ510/TZ630/TZ710
Page 43
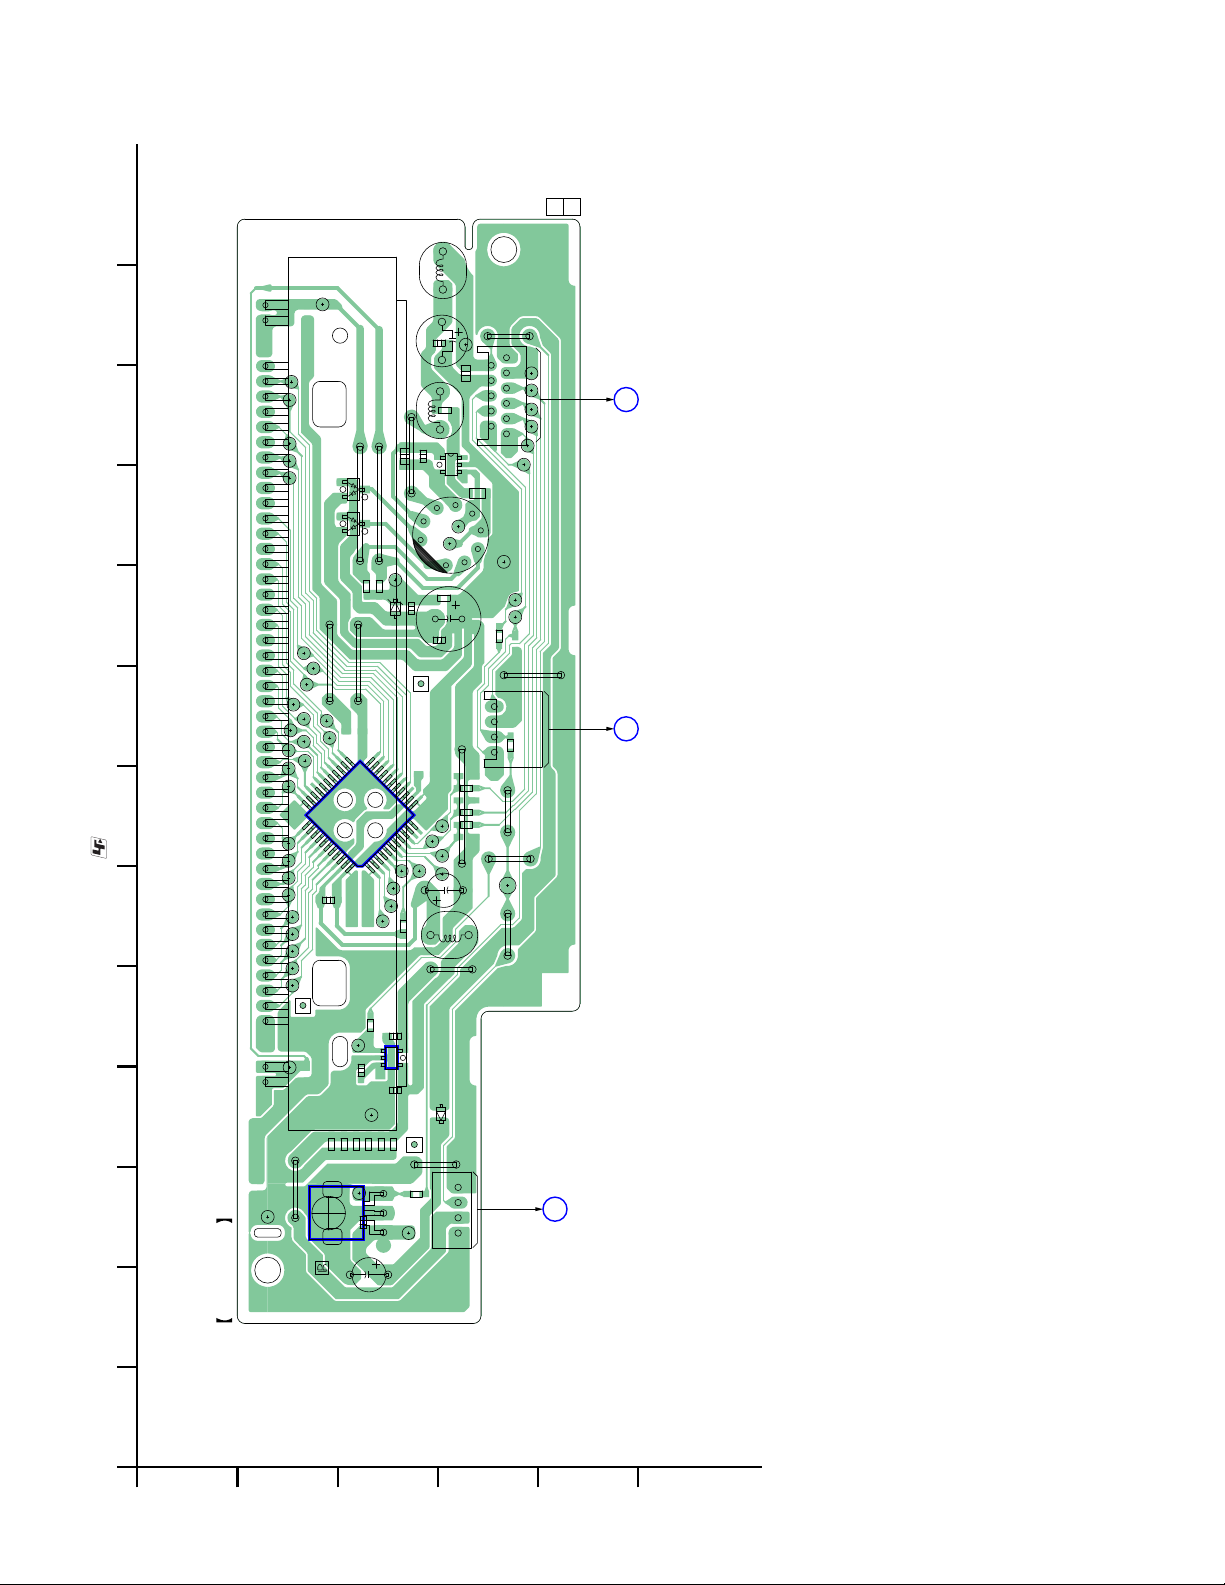
11
(11)
CL5000
HBD-TZ210/TZ230/TZ510/TZ630/TZ710
• : Uses unleaded solder.
CL5018
CL5003
CL5005
CL5006
CL5007
CL5014
33
CL5021
34
CL5004
ND5000
CL5009
FLUORESCENT INDICATOR TUBE
CL5010
CL5011
CL5016
CL5020
CL5022
CL5025
CL5027
CL5030
CL5033
CL5035
CL5037
CL5038
CL5039
CL5015
CL5017
CL5019
D5000
D5001
JW5004
23
44
L5000
C5002
C5003
L5001
45
C5005
JW5001
R5008
JW5005
CL5012
CL5013
C5004
JW5003
3
2
JW5002
1
T5000
CL5001
CL5040
C5010
D5002
R5006
C5008
12
CL5036
R5009
22
IC5001
CL5034
CL5023
CL5026
CL5028
CL5024
CL5031
CL5029
R5013
111
C5012
R5000
13
4
9
8
JW5007
CL5032
L5002
JW5011
CL5044
C5000
Q5000
5
CL5002
7
C5009
C5011
CN5005
JR
6
10
2
JR5000
R5012
R5011
R5010
R5014
1
4
JW5013
CL5048
R5002
JW5000
11
1
CL5050
JW5009
JW5010
CL5057
CL5053
CN5000
JW5006
CL5056
CL5055
1-880-742-
CL5046
CL5049
CL5052
CL5054
B
MAIN
CN506
BOARD
(Page 31)
F
BOARD
CN5202
KEY-SW
(Page 45)
4343
CL5042
12 5 48 51 52
• See page 24 for Circuit Boards Location.
JW5014
CL5051
IC5002
IC5002
2345678910111213
FL BOARD
1
5-18. PRINTED WIRING BOARD – FL Section –
A
B
R5084
R5083
C5020
CL5041
C5061
R5007
CL5043
R5005
O
C5021
13
CL5047
R5001
R5004
C5007
C5006
R5003
VCC OUT
C
45
R5018
IC5000
CL5045
JW5015
14
CN5006
D5006
G
BOARD
CN5100
(Page 45)
USB KEY
D
E
F
HBD-TZ210/TZ230/TZ510/TZ630/TZ710
Page 44
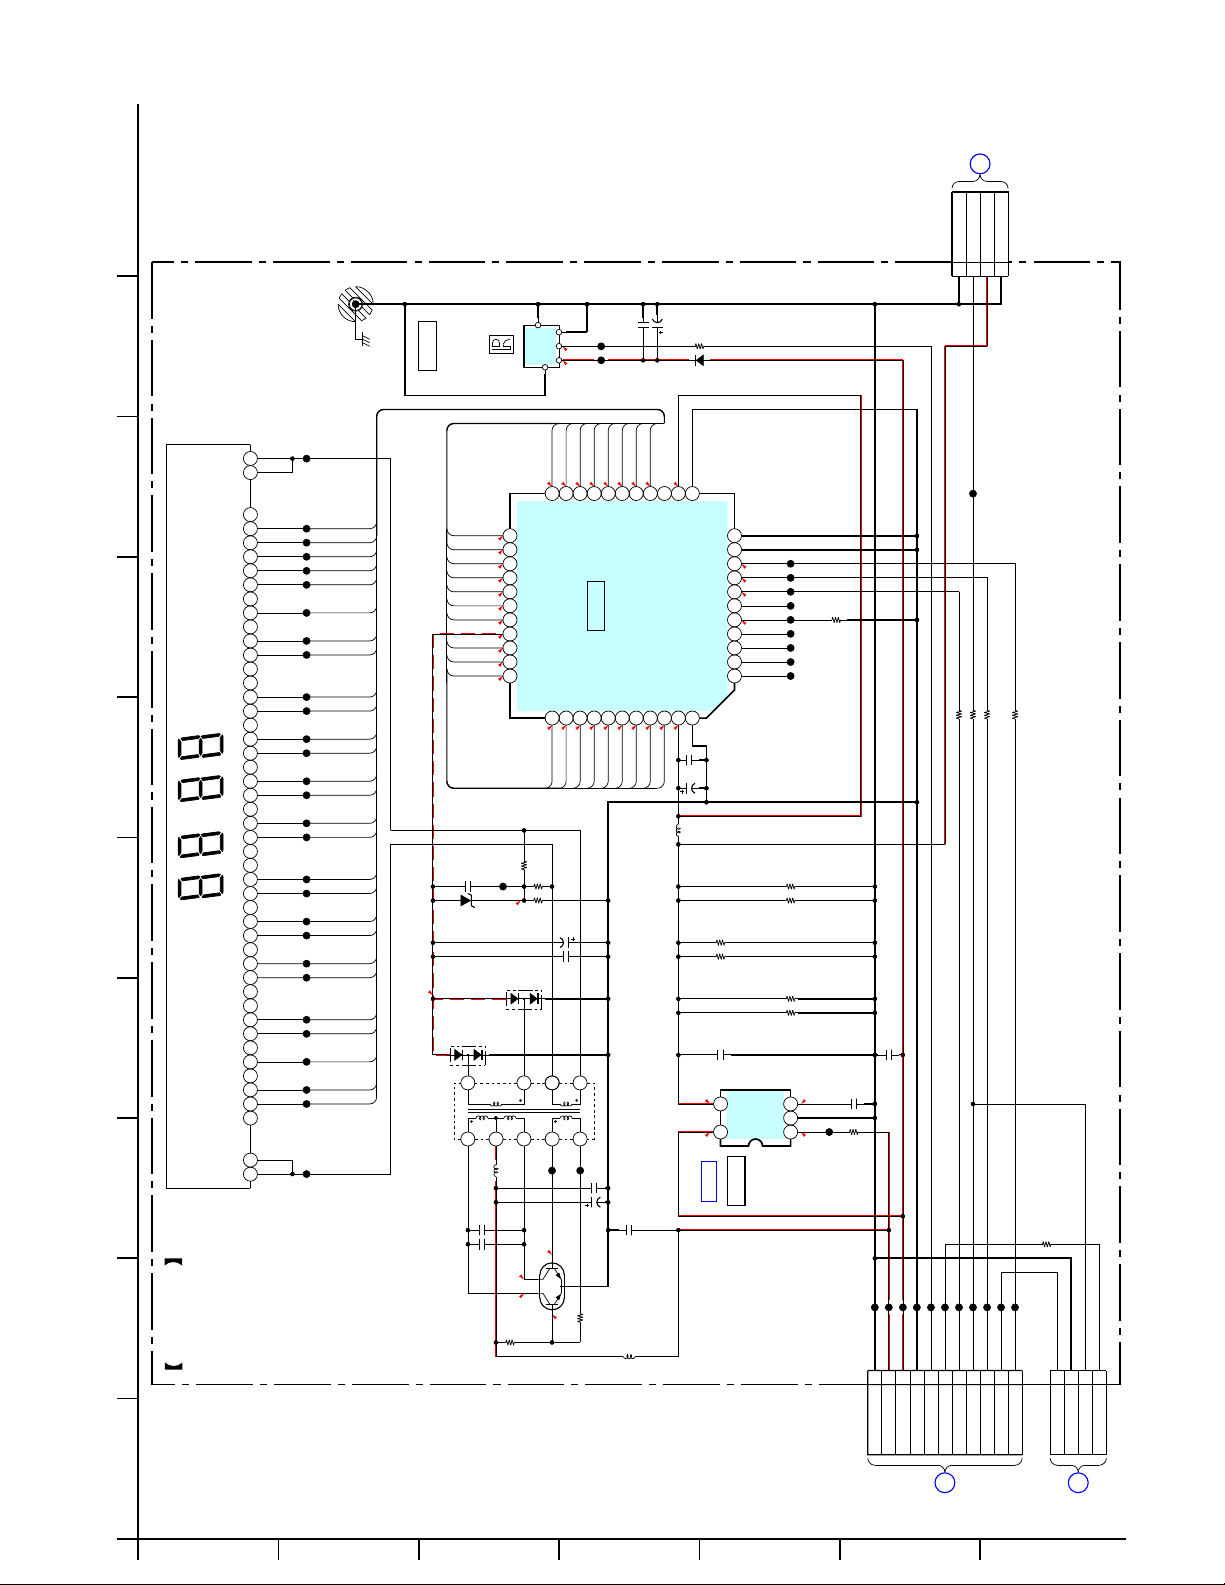
10
CL5051
95
15678910111213141516171819202122232425262728293031323334353637383940414243444546474852 251
67
4
ND5000
FLUORESCENT INDICATOR TUBE
CL5042
CL5039
CL5038
CL5037
CL5035
CL5033
CL5030
CL5027
CL5025
CL5022
CL5021
CL5020
CL5019
CL5018
CL5017
CL5016
CL5015
CL5014
CL5013
CL5012
CL5011
CL5010
CL5009
CL5007
CL5006
CL5005
CL5004
CL5003
CL5000
31 8
• See page 50 for IC Block Diagram.
2
FL BOARD
(CHASSIS)
G1
G2
G3
G4
G5
G6
G7
G8
G9
G10
G11
G12
S16
S15
S14
S13
S12
S11
S10
S9
S8
S7
S6
S5
S4
S3
S2
IC5002
IC5002
-27.8
T5000
REMOTE
RECEIVER
CONTROL
PNA4823M02S0
S10
S11
S12
S13
S14
S15
S16
G12
G11
G10
0.1
C5010
D5002
D5000
MC2840
1
2
0.022
C5005
4700p
C5004
GND
OUT
VCC
S9G9
-21.1-25.4
SG9
SG10
-16.8
2324252627282930313233
SG11
-18.9
SG12
-27.3
SG13
-27.4
SG14
-27.3
SG15
-20.9
SG16
-25.2
VEE
-27.8
GR12
-25.5
GR11
-25.4
GR10
-25.4
GR9
3435363738394041424344
47
47
R5009
R5008
CL5040
MAZ8051GLLS0
33k
-22.8
R5006
D5001
MC2840
8
3
5
49
47uH
L5001
CL5002
-0.1
1
4.7
45
4.7
3
3.9k
R5000
0.3
3.5
S8
S7
SG7
SG8
GR8
GR7
-25.5 -21.1
-25.4 -16.9
G8
G7
47
50V
C5009
0.01
C5008
7
6
CL5001
Q5000
CPH5504-TL-E
DC/DC CONVERTER
2
-0.1
S6
SG6
IC5001
GR6
-25.6 -18.8
G6
0.1
C5003
100
C5002
0
JR5000
S5
-25.4 -25.3
G5
10V
SG5
GR5
S4
SG4
IC5001
HT16515
GR4
-25.4 -27.3
G4
C5021
CL5047
CL5045
S3
FL DISPLAY DRIVER
-25.4 -25.3
G3
C5000
L5000
0.01
SG3
GR3
10
47uH
CN5100
BOARD
USB KEY
(Page 47)
G
DGND
KEY1
3.3V
GND
123
KEY0
100R5010
CL5052
FL_DATA
CL5057
1kR5002
CL5053
KEY1
100R5011
CL5054
FL_CLK
4
CL5055
KEY2
100R5012
CL5056
1234567
FL_CS
R5014
4P
CN5000
100
123
KEY2
D_GND
KEY1
4444
4
KEY0
4P
CN5006
10
16V
47
C5020
R5018
MA2J1110GLS0
D5006
S2
3.33.3
1213141516171819202122
SG1
SG2
VSS
VDD
K2
K1
STB
3.3
CLK
3.3
DIN
3.3
DOUT
OSC
2.2
LED4
LED3
LED2
LED1
1234567891011
GR2
GR1
VDD
VSS
-25.6 -17
-25.4
G1
G2
L5002
47uH
0.1
C5012
10
16V
C5011
220
R5007
220
R5005
1
C5007
3.3
54
4.1
IC B/D
VOUT
VIN
IC5000
IC5000
TK11133CSCL-G
R5084
R5083
R5004
R5003
NC
321
VSS
xSD
+3.3V REG.
CL5036
CL5034
CL5032
CL5031
CL5029
CL5028
82k
R5013
CL5026
CL5024
CL5023
220
220
220
220
1.3
4.9
CL5041
1000p
C5061
3.3k
R5001
11P
CN5005
CL5043
11
C5006
CL5044
D_GND
10
1
5V
CL5046
9
E4V
CL5049
CL5048
8
D_GND(FL)
CL5050
SIRCS
HBD-TZ210/TZ230/TZ510/TZ630/TZ710
5-19. SCHEMATIC DIAGRAM – FL Section –
A
B
(5/8)
MAIN
CN506
BOARD
(Page 37)
B
C
D
E
F
F
BOARD
CN5202
KEY-SW
(Page 46)
G
HBD-TZ210/TZ230/TZ510/TZ630/TZ710
Page 45
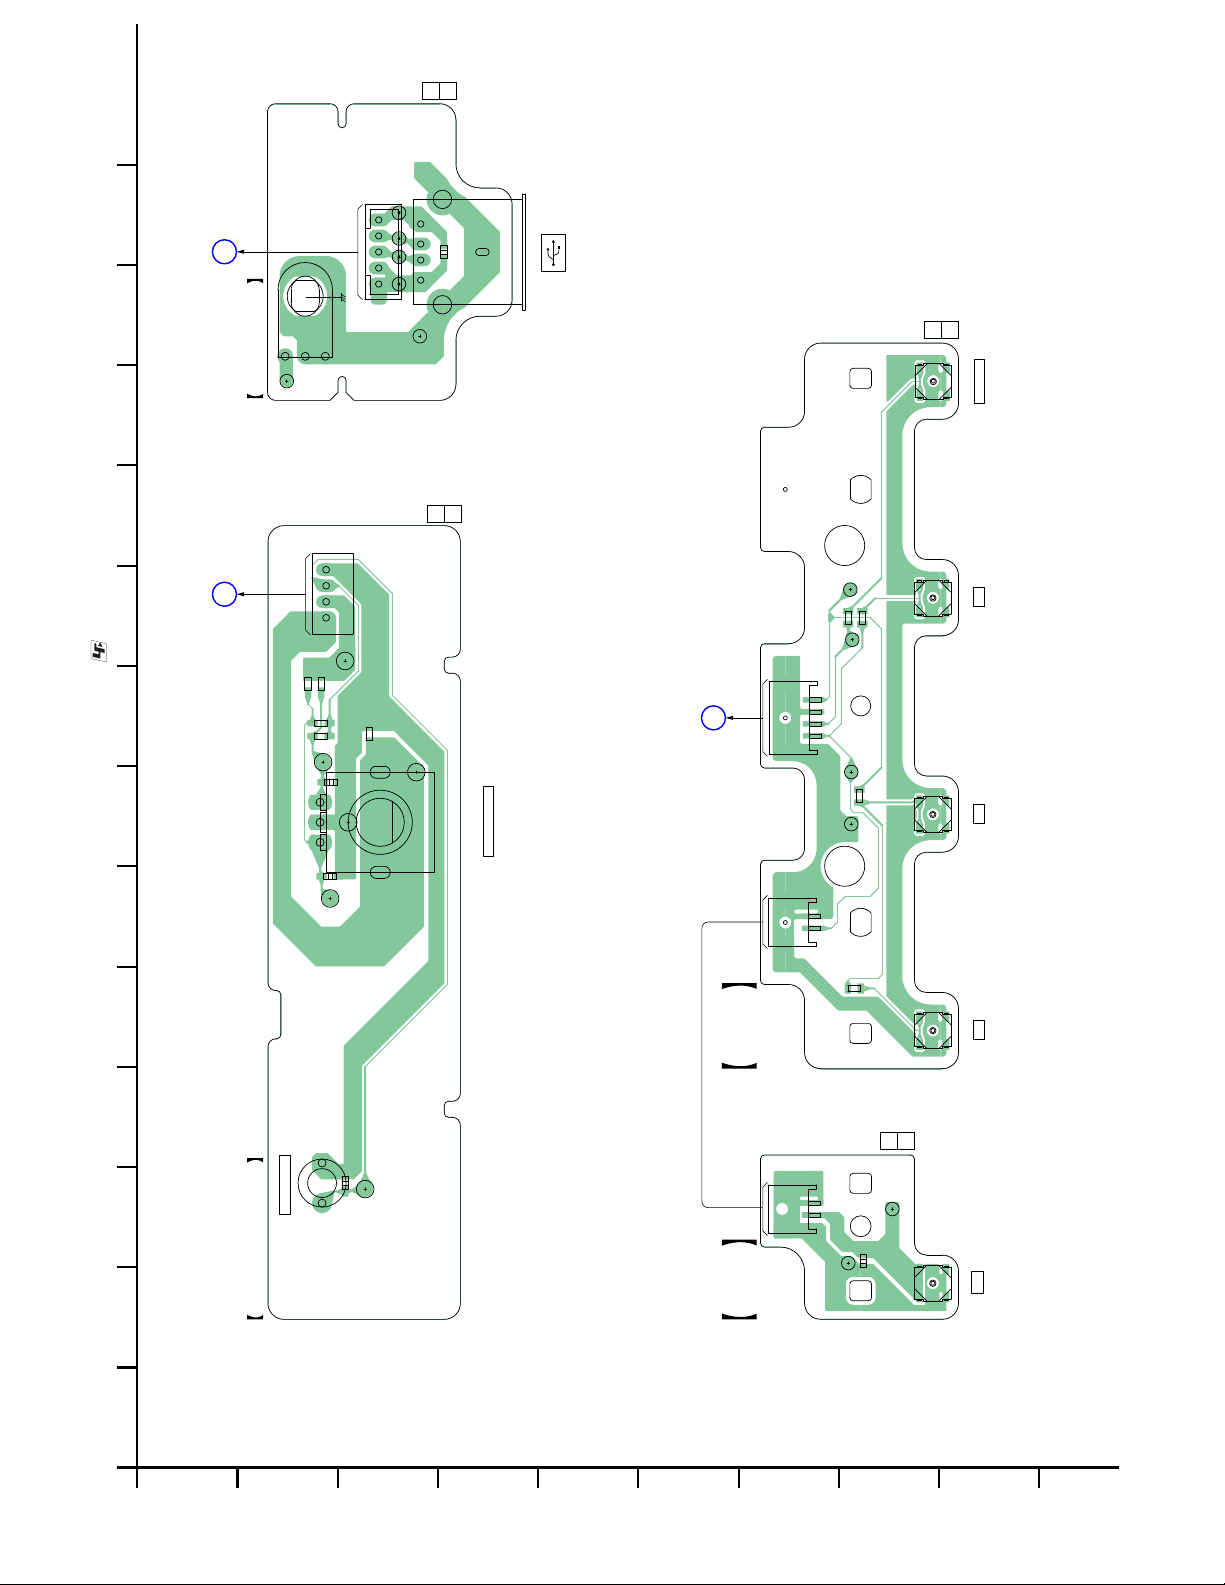
A
MAIN
BOARD
CN2101
(Page 32)
ET5001
HBD-TZ210/TZ230/TZ510/TZ630/TZ710
CL5205
(CHASSIS)
1
CN5201
5
CL5201
CL5202
CL5203
CL5204
11
1
4
CL5200
(11)
1-880-743-
6
7
11
C5200
(11)
5
CN5200
CN5200
(USB)
11
1-880-737-
(11)
S5204
FUNCTION
FL
G
BOARD
CN5006
(Page 43)
• : Uses unleaded solder.
R5128
R5125
R5126
CL5109
R5127
C5112
C5111
• See page 24 for Circuit Boards Location.
CN5100
14
CL5113
R5129
CL5110
S5113
CL5108
CL5107
1-880-746-
S5113
MASTER VOLUME
FL
BOARD
(Page 43)
CN5000
F
KEY-SW
BOARD
CL5204
R5201
R5202
CL5202
1124
CN5202CN5201
CL5201
R5203
CL5203
R5204
S5203 S5202 S5201 S5204
11
(11)
S5201
S5202
S5203
x
N
Z
4545
234567891011121314
1
5-20. PRINTED WIRING BOARDS – KEY-SW, P -S W, USB, USB KEY Section –
S5114
C5114
REC TO USB
CL5111
USB KEY BOARD USB BOARD
A
B
C
D
E
F
P-SW
BOARD
12
G
CN5301
CL5302
C5301
CL5301
H
1-880-738-
S5301
S5301
"/1
I
J
HBD-TZ210/TZ230/TZ510/TZ630/TZ710
Page 46
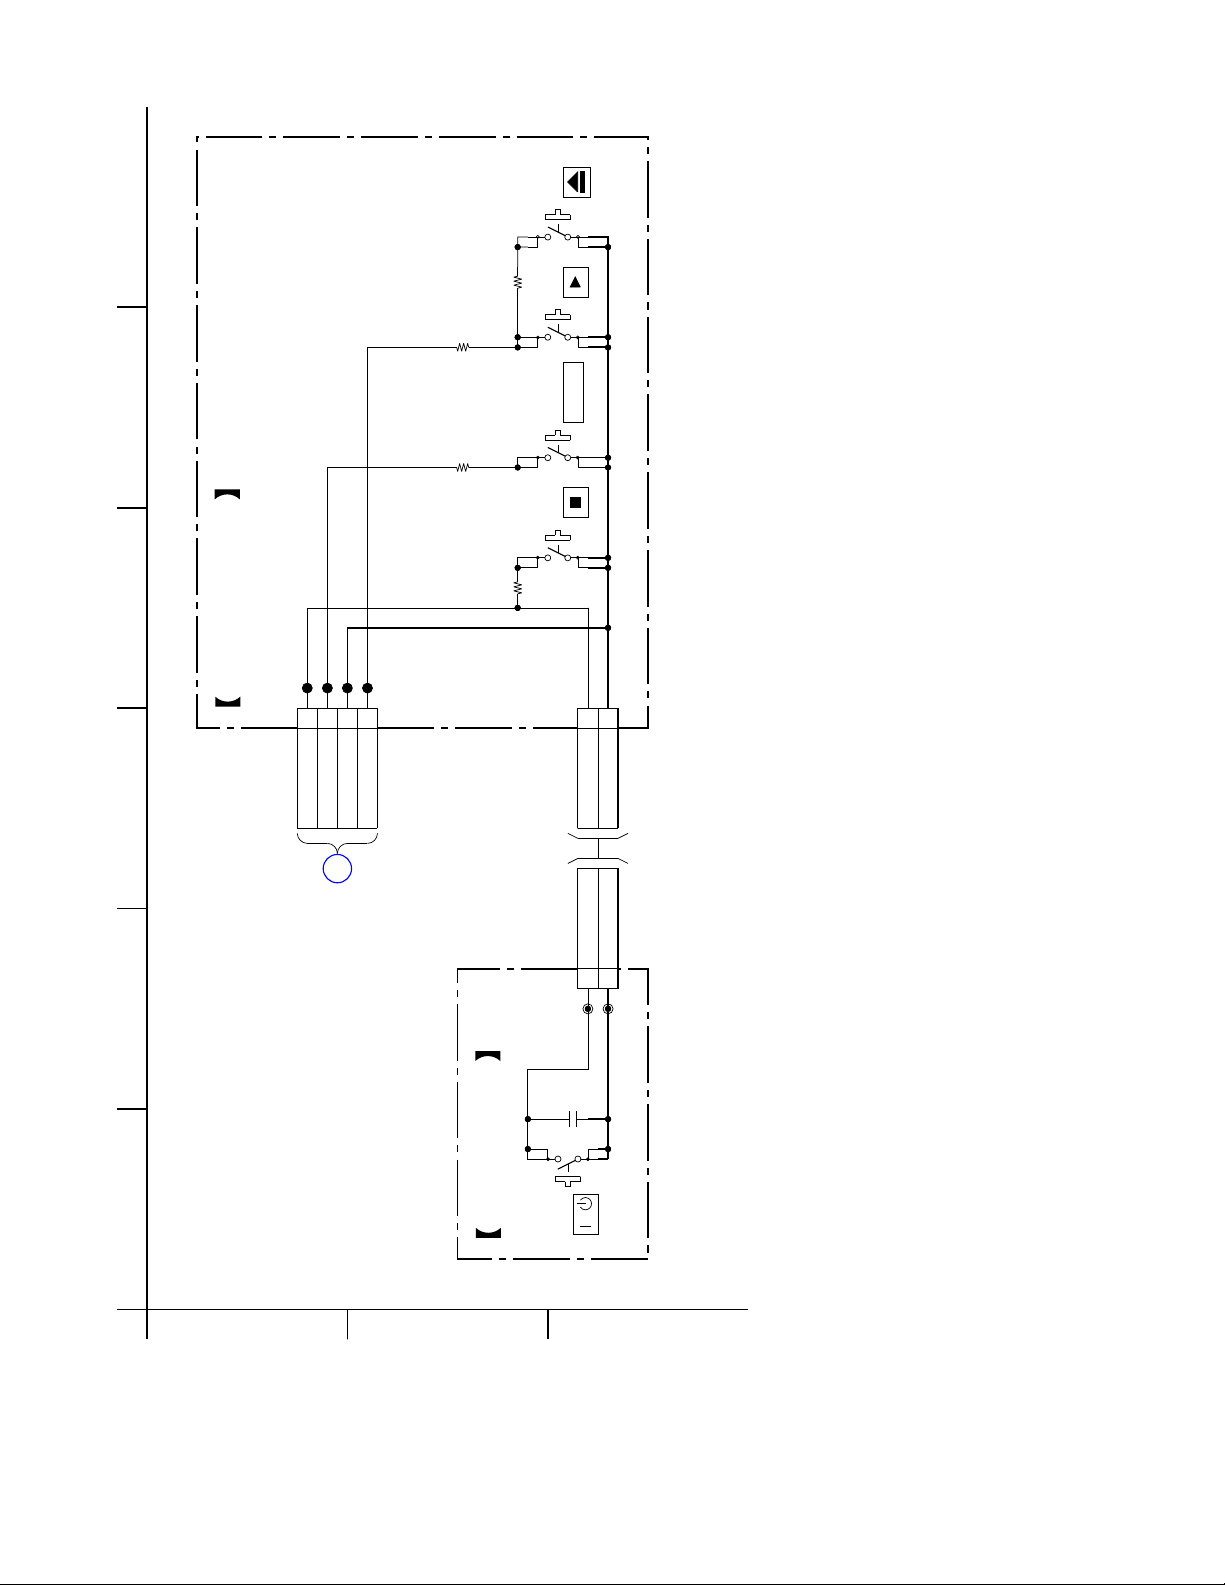
6
S5203
2.2k
S5202S5201 S5204
FUNCTION
1k
2P
CN5201
1
2
CL5201
CL5202
CL5203
KEY -SW BOARD
4P
CN5202
CL5204
1
2
3
4
1k
R5203
100
R5202
R5204
R5201
KEY0
KEY1
GND
KEY2
KEY0
GND
F
FL
BOARD
CN5000
(Page 44)
KEY0
GND
1
2
254
13
5-21. SCHEMATIC DIAGRAM – KEY-SW, P-SW Section –
A
P-SW BOARD
B
CN5301
CL5301
100p
C5301
S5301
CL5302
/
C
4646
HBD-TZ210/TZ230/TZ510/TZ630/TZ710
HBD-TZ210/TZ230/TZ510/TZ630/TZ710
Page 47
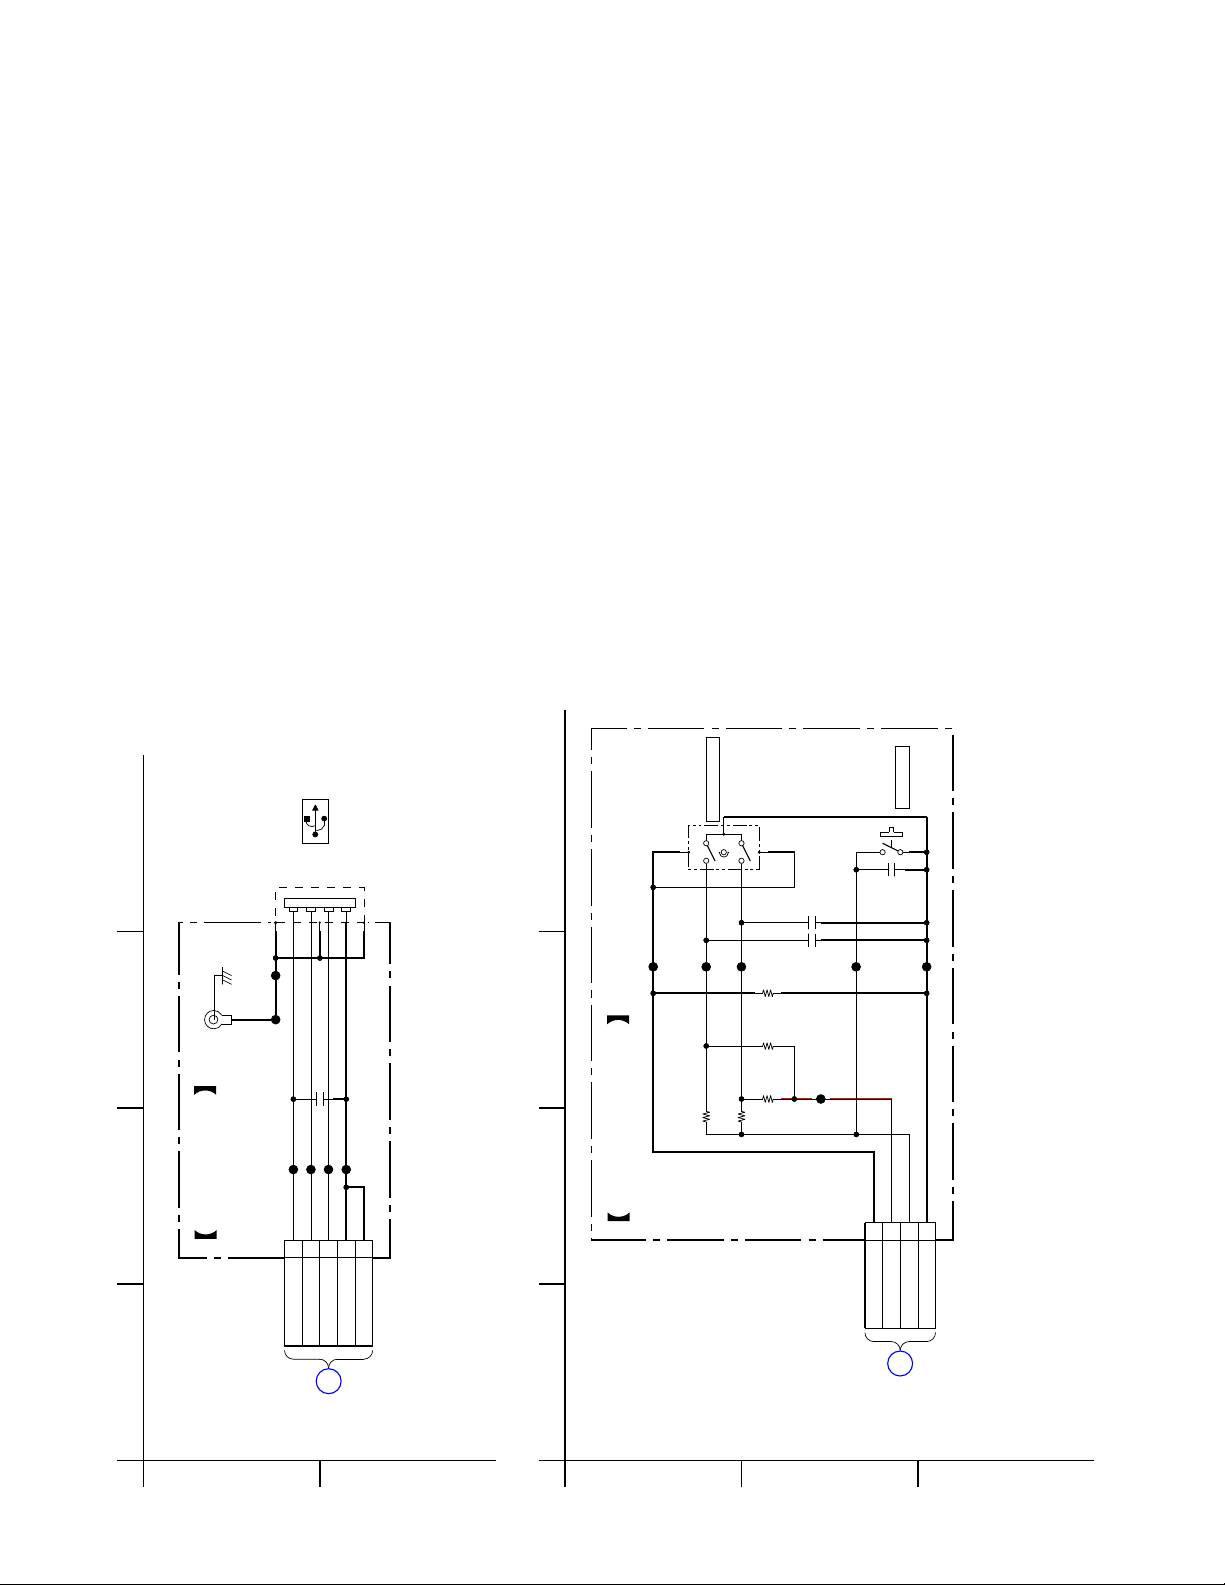
HBD-TZ210/TZ230/TZ510/TZ630/TZ710
4747
CL5111
4P
CN5100
S5114
1000p
C5114
123
3.3V
GND
REC TO USB
CL5108
KEY1
4
D-GND
S5113
4231
(USB)
4P
CN5200
123
4
CL5205
(CHASSIS)
E
ET5001
CL5200
C5200 0.1
CL5203
CL5204
CL5202
CL5201
USB BOARD
5P
CN5201
12345
D-
D+
GND
VBUS
SHIELD
4
CL5110
23
USB KEY BOARD
MASTER VOLUME
CL5107
10k
R5125
CL5109
22k
R5126
0
R5129
4.7k
R5128
4.7k
R5127
0.01
C5112
0.01
C5111
CL5113
5-22. SCHEMATIC DIAGRAM – USB, USB KEY Section –
A
(1/8)
MAIN
BOARD
CN2101
(Page 33)
A
B
1
A
B
FL
G
BOARD
CN5006
(Page 44)
C
HBD-TZ210/TZ230/TZ510/TZ630/TZ710
Page 48
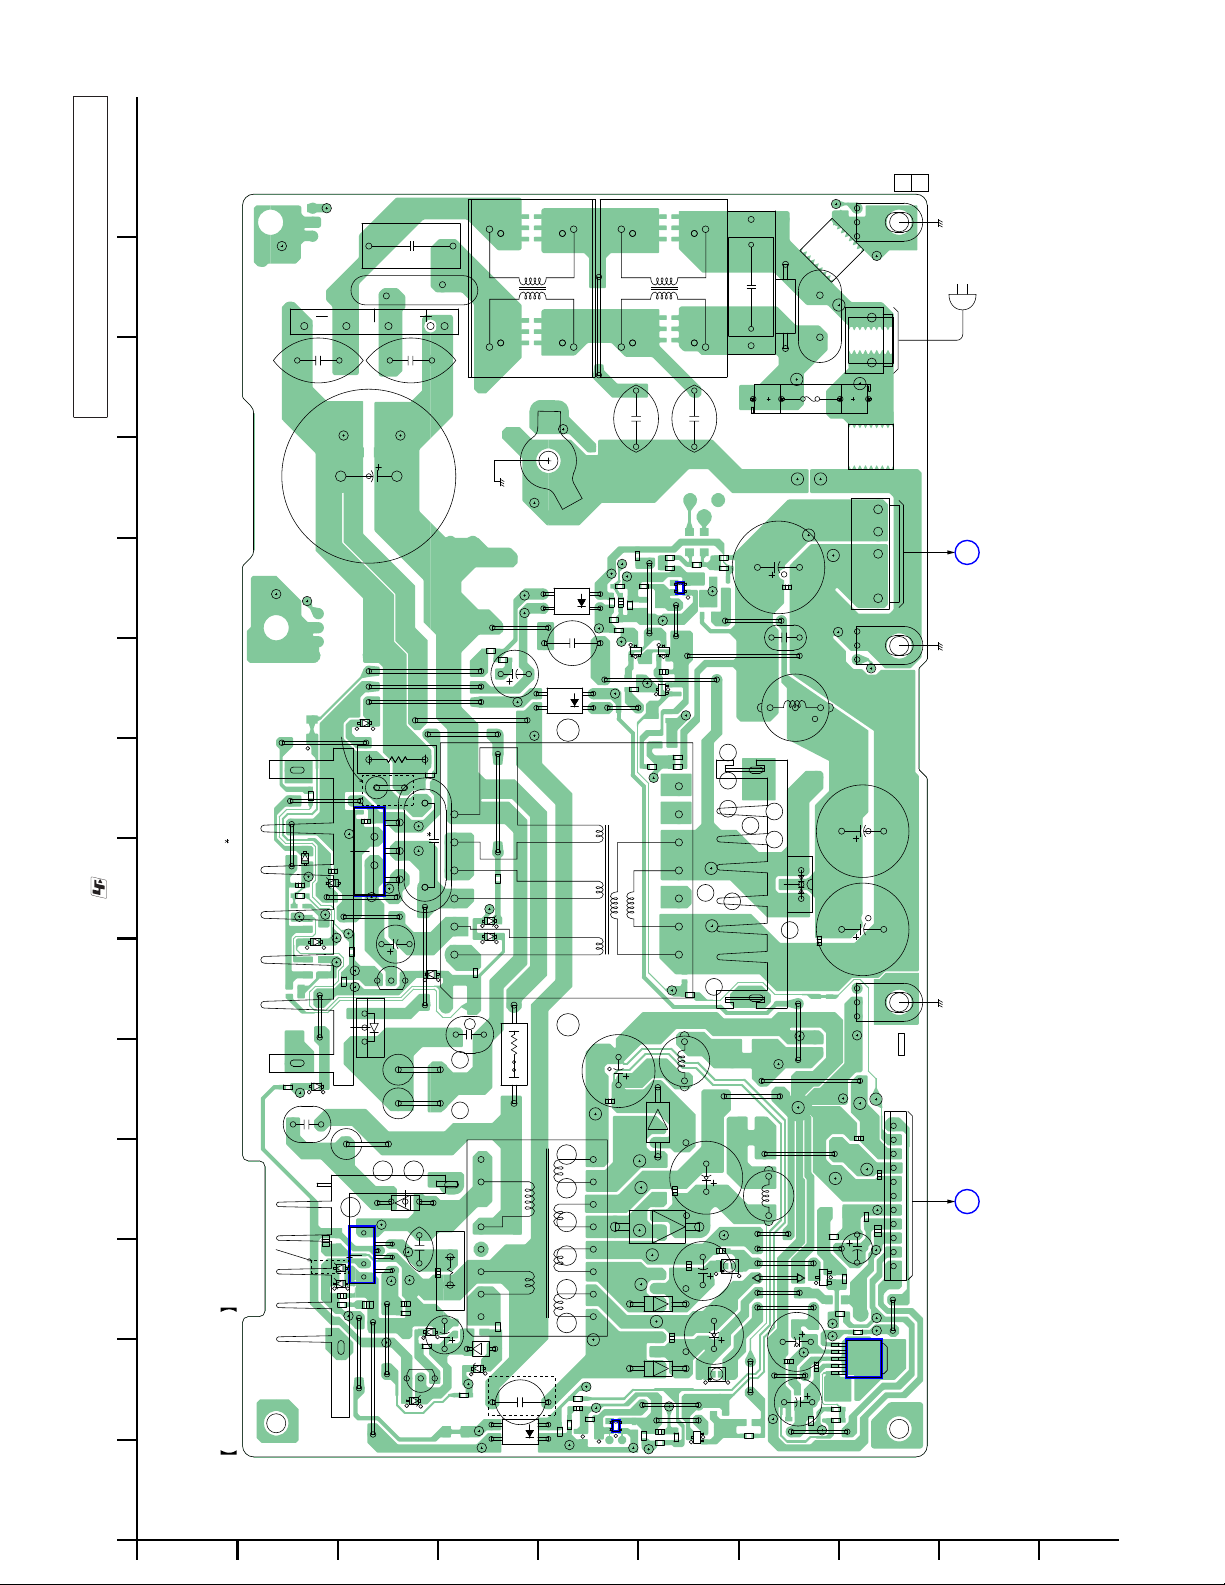
CL016
CL005
When IC921 on the Power board is damaged, exchange the
new Power board for the Power board which IC damaged.
C918
Note:
TP934
C903
CL009
CL004
EXCEPT CND,MX,TW
JW941
R908
IC901
JW935
C980(CND,MX,TW)
1 C906 (EXCEPT CND,MX,TW)
• : Uses unleaded solder.
R925
CL022
JW939
D907
C981
C907
DZ905
R906
CL051
CL053
CL052
D906
CL050
CL055
CL054
R907
JW945
HS901
D910
CL056
C924
• See page 24 for Circuit Boards Location.
C916
EXCEPT CND,MX,TW
DZ954
DZ951
C998
R923
CL029
234567891011121314
HS921
POWER BOARD
JW920
175
JW925
R978
C922
D901
D909
C909
24
CL036
CL037
R916
IC921
JW909
12
(12)
CL003
C902
TH901
C920
TP933
JW943
JW905
JW932
R914
R912
135
1
CL021
CL023
CL024
CL025
JW915
C908
JW914
D908
B
E
Q901
D913
R903
R904
D946
CL026
3
C921
642
CL027
CL031
CL030
C923
R926
DZ902
CL028
C926
R917
JW919
E
B
Q922
DZ901
LF901
(CHASSIS)
EB908
CL010
43
CL045
C
E
CL044
JW901
R910
C910
JW913
JW921
R911
JW934
R919
CL061
DZ915
D914
123456
R905
C905
FR929
C925
R922
12345 78
D902
DZ903
CL060
R951
CL049
34
CL048
C938
R909
43
CE
PC903
CL041
CL040
T903
R992
EXCEPT CND,MX,TW
C994
1
R955
C
E
PC902
2
CL047
LF902
JW902
C964
CL070
R945
R936
C937
CL069
JW910
C993
TP927
TP926
TP925
TP923
IC923
A
CL017
C963
R965
R932
R931
JW911
CL033
A
K
R939
CL032
JW936
R946
IC932
Q949
Q950
C950
R949
JW922
Q943
CL039
CL072
R940
R937
R938
891011121314
CL068
TP905
TP906
CL067
R967
L954
D943
C928
C992
D942
TP924
C991
D955
C940
TP922
C990
D954
L964
CL063
JW916
JW906
R998
C984
CL062
Q969
R963
R999
CL011
CL042
R933
12
R935
PC901
R934
CL043
12
CL038
T901
C927
TP928
910111213141516
TP921
CL046
R956
C983
CL018
R954
R959
K
C901
R901
TP909
FH902
F901
CL020
TP903
R962
R952
C934
CL071
TP916
C975
L967
C936
JW903
JW924
C929
JW912
R976
C939
L931
HS931
C935
JW946
CL034
CL035
JW904
CL001
JW931
L956
JW907
JW944
JW927
D
JS938
JW918
JW917
C942
C971
TP919
JW942
C943
TP918
EB901
CAM903
CL015
1-880-731-
VDR901
TP902
CN901
CAM901
13
TP901
FH901
CAM902
CL019
CN90415
TP904
CL014
EB907
CL006
C933
D931
C932
EB904
CL007
JW908
TP914
CL013
TP912
111
C972
C973
TP908
TP911
TP915
CN906
R974
C997
F945
C976
Q945
TP910
GS
R957
R958
TP907
CL065
JW933
R966
TP920
TP913
1
6
IC941
5
C951
R941
R942
R972
JW940
CL064
(AC IN)
(CHASSIS) (CHASSIS) (CHASSIS)
D
MAIN
BOARD
CN3000
(Page 32)
4848
C
MAIN
CN509
BOARD
(Page 32)
1
HBD-TZ210/TZ230/TZ510/TZ630/TZ710
Ver. 1.1
5-23. PRINTED WIRING BOARD – POWER Section –
A
B
C
D
E
F
G
H
I
J
HBD-TZ210/TZ230/TZ510/TZ630/TZ710
Page 49
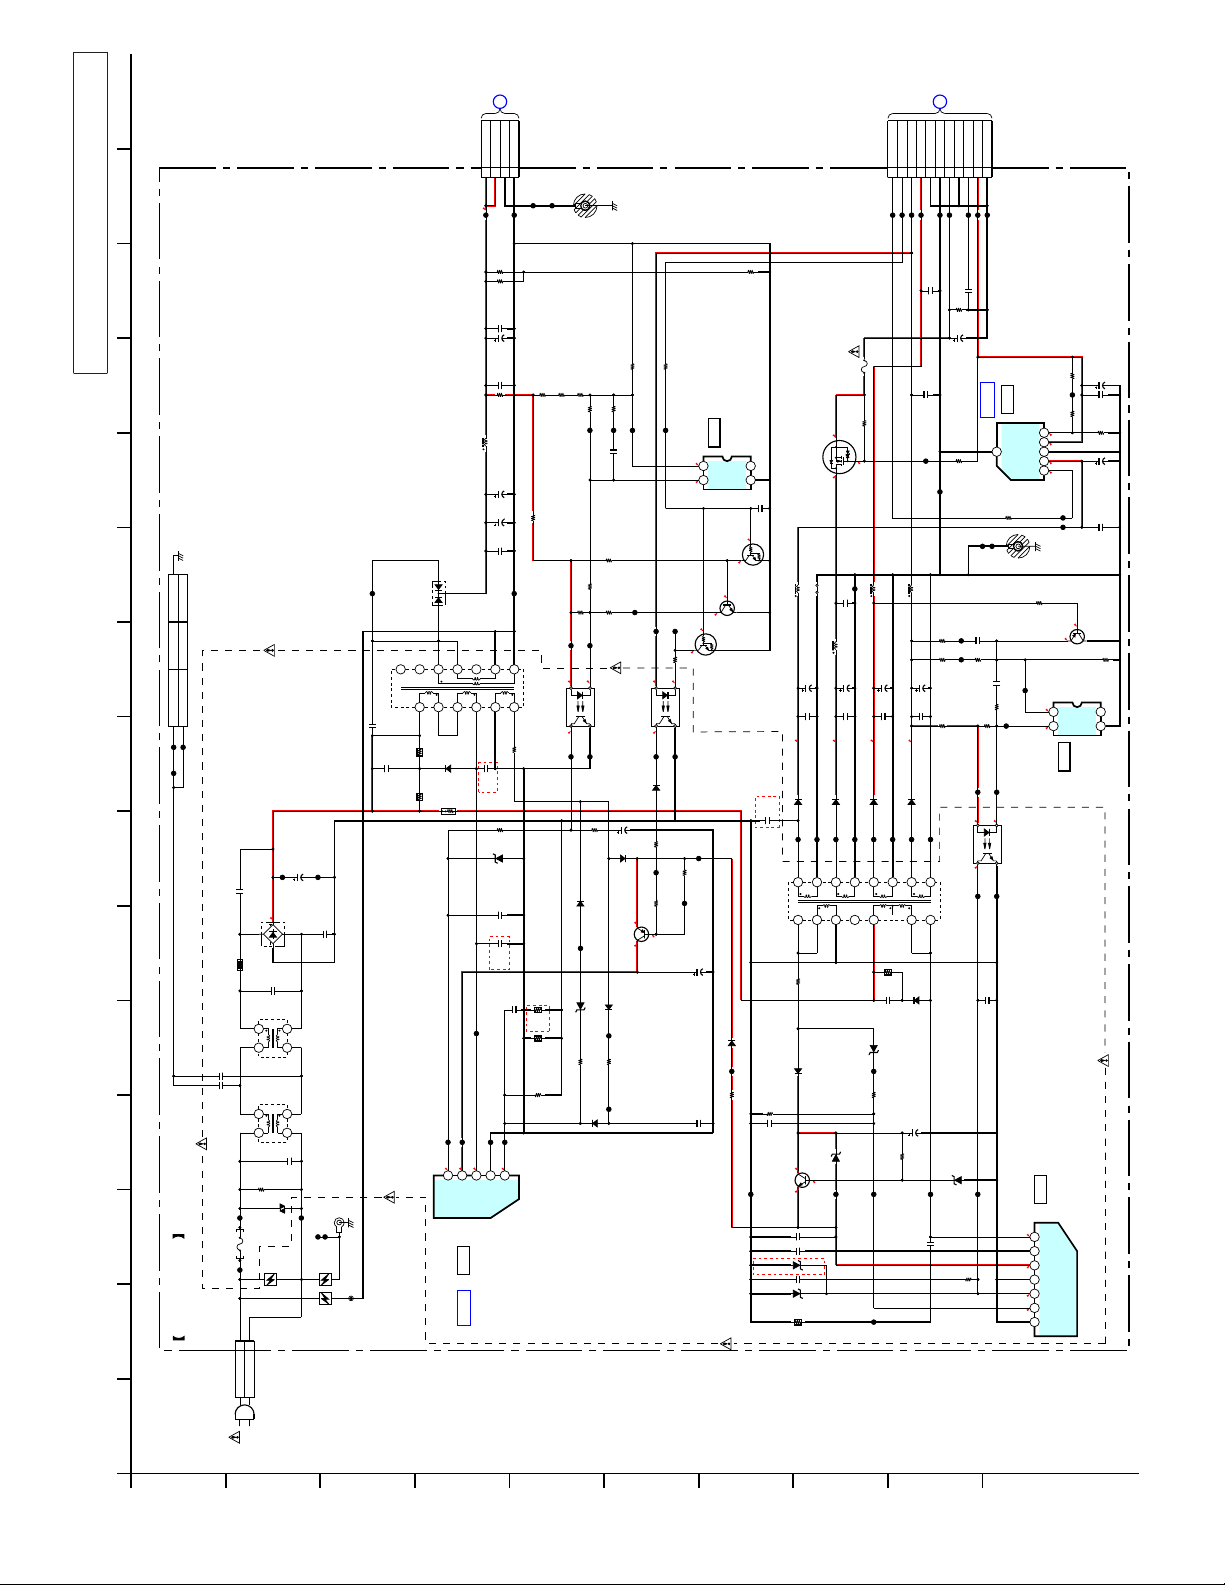
Ver. 1.1
When IC921 on the Power board is damaged, exchange the
new Power board for the Power board which IC damaged.
Note:
HBD-TZ210/TZ230/TZ510/TZ630/TZ710
11 12
(CHASSIS)
10
EB908
411347101
Mount Mecha
CL010
CL011
8 136
CL020
7
0.01
C920
250V
D901
D5SBA60F01
TH901
54
*4*4
C964
250V
C963
250V
• See page 50, 54 for IC Block Diagrams.
3
2
TP909
(CND,MX,TW)
(EXCEPT CND,E32,EA,MX,TW)
(E32,EA)
F901
5A 250V
8A 125V
6.3A 250V
TP901
POWER BOARD
3P
1
CN901
LIVE
FH901 FH902
LF902
LF901
3
NUTRAL
160(CND,MX)
-
32
32
*9
R901
315(EXCEPT CND,MX)
*1
C902
1/2W
3.4
CAM901
TP933
-
310V
14
14
0.22
C901
310V
VDR901
*2
C903
TP934
0.01
C918
250V
EB901
TP902
E
CL003
CL015
6.5
CAM903
6.5
CAM902
CL019
(CHASSIS)
TP905
T901
C938
MAIN TRANSFORMER
470p
250V
3W
*10*10
R904
*3
C905
400V
3W
R903
D931
NCNCNC
9
6
FMX-22SL
10
584
FR929
CL025
3.3
D913
1
5
FB/OLP
SARS03
1/2W
11
CL024
19.7
5P
CN904
L931
2.2uH
121314
3
(CND,MX,TW)
CL023
314(EXCEPT CND,MX,TW)
159(CND,MX,TW)
4
D
VCC
IC901
IC901
IC B/D
(8/8)
MAIN
BOARD
CN3000
D
P-GND
P-GND
PVDD(+32.5V)
PVDD(+32.5V)
134
5
26.4
TP903
TP904
10k
0.5%
R940
10k
0.5%
R937
0.1
C939
35V
2200
C934
0.01
C936C935
0
R962
35V
2200
C933
35V
2200
C932
0.01
TP906
2
1
10
R905
(EXCEPT CND,MX,TW)
C906
1.5kV
1000p
2.2k
R910
*7
DZ905
C981
4700p
C980
1.5kV
0.0033
220p
C909
CL021
CL022
0.4
123
GND
OCP/SYNC
SWITCHING REGULATOR
STR-F6168-LF1352 STR-F6138-LF1352
(EXCEPT CND,MX,TW) (CND,MX,TW)
(Page 40)
CL006
CL014
0
R931
0
R952
PC901
2W
0.33
R912
*8
5W
R914
220
R911
(CND,TW)
(MX)
(EXCEPT CND,E32,EA,MX,TW)
(CND,E32,EA,MX,TW)
C902
0.22
0.33
C903
1000 200V
1000 250V
*1
*2
4.7k
R965
CL042
PS2561AL1-1-V-W
CL045
(AEP,UK)
1000 400V
0.5%
26.41.6
(EXCEPT CND,MX,TW)
(EXCEPT CND,MX,AEP,UK,TW)
330 450V
E
22k
0.5%
R932
470k
R936
CL032
1k
R934
1k
R935
CL043CL044
25.2
1
4
D914
CL061
DZ915
22k
R919
(CND,MX,TW)
(EXCEPT CND,MX,TW)
C905
0.01
0.0033
C963,964
*3
*4
1k
R933
CL070
C937
0.047
22k
R945
3.3k
R946
23
10k
R909
MA2J1110GLS0
MAZ8100GMLS0
CL055
3.3k
R906
D907
MA2J1110GLS0
(EXCEPT CND,MX,TW)
(CND,MX,TW)*5 (EXCEPT CND,MX,TW)
470p
0.001
C907
EB907
(CHASSIS)
2.2k
0.5%
R939
CL033
CL069
*6
50V
C910
D908
MA2J1110GLS0
19.8
Q901
2SA1015TP-YGR
POWER CONTROL
19.7
D906
MA2J1110GLS0
CL051
(CND,MX,TW)
(EXCEPT E32,EA)
0.001
0.0015
C9102247
*6
CL038
1
PC903
4
PS2561AL1-1-V-W
10.7 4.1
CL041
D909
MA2J1110GLS0
4.7k
R908
CL050
4.7k
R978
19.1
(EXCEPT CND,MX,TW)
(CND,MX,TW)
(E32,EA)
DZ905
MAZ8300GMLS0
UPZSUSTE-1730B
*7
1k
R967
CL067
CL039CL040
3.3k
R949
3.1
23
10k
R907
CL036
%
(EXCEPT CND,MX,TW)
(CND,MX,TW)
R914
0.1 10
0.034 5%
R9011M1.5M
*8
*9
IC932
2.5
43
24.8
K Vref
Q949
2SC4154TP-1EF
POWER PROTECT
3.1
25.2
0
Q943
RT1N441M-TP-1
POWER PROTECT
CL037
47
50V
C908
*7
C907
(CND,MX,TW)
(EXCEPT CND,MX,TW)
(EXCEPT CND,MX,TW)
(CND,MX,TW)
R903,904
100k
33k
*10
IC932
MM1431CURE
0
SHUNT REG.
NC
A
0
D910
CL056
R925
1k
R938
12
3.1
Q950
(EXCEPT CND,MX,TW)
MA2J1110GLS0
10
CL031
(EXCEPT CND,MX,TW)
0.5%
0.1
C950
RT1N441M-TP-1
POWER PROTECT
470p
C994
250V
T903
1k
0.5%
R926
330p
C923
Q922
Q945
2SK3577
L964
4.7uH
25V
1000
C929
0.1
C990
14.6
D954
EK19-V0
TP921
TP922
1
SUB TRANSFORMER
4.7
R992
D902
D1NL20U-TR2
+21V REG.
2SC3243-TP-E
20.7 28.7
C916 1
C925 0.1
4.7C922
2W
0.39
R922
S
B+ SWITCH
JS938
D955
EK19-V0
TP923
15
2
DZ901
MAZ8180GMLS0
21.4
CL028
DZ954 UDZSTE-1730B
DZ951 UDZSTE-1730B
10
10
10.1
141613
3
F945
TP916
0.1
C975
L967
4.7uH
1000
C940
0.1
C991
TP924
2A
32V
47k
R957
16V
4
11.9
D942
50PQSA065-FA9
TP925
DZ903
MAZ8220GMLS0
CL030
P_CONT1ENE+4.2V6VD-GND
123456789
11P
CN906
TP914
TP912
TP913
L956
10uH
L954
10uH
16V
2700
C928
0.01
C992
6.7
4.1
D943
RK36LF-B3
TP926
TP927
121011
5
3W
100k
R916
C924
400V
3300p
CL060
15k
0.5%
R951
C926
4.7k
R917
CL027
(6/8)
MAIN
CN509
BOARD
(Page 38)
C
D-GND
M+9V
M-GND
14V
12V
A-GND
10
11
TP911
TP908
3300
C927
C993
7
D946
EG01CV0
22
100V
2kV
150p
C921
TP918
TP915
TP910
TP907
1
C997
0.1
3.3k
R974
100
16V
C976
470
16V
C943
10k
0.5%
0.1 C973
C972
IC B/D
6
1k
R958
CL065
CL001
CL007
CL013
0.01
C984
10k
0.5%
R999
470
2.2k
0.5%
0.5%
R998
R963
CL062 CL063
10V
0.1
1k
470
R955
R956
CL046
CL047CL048
3.51.4
2.5
1
PC902
PS2561AL1-1-V-W
DZ902
MAZ8220GLLSO
2
3
4
CL049
C998
4700p
CL029
22k
0.5%
R923
TP928
9
8
CL026
R972
CL064
IC941
IC941
+12V REG.
SI-3010KM-TLS
Sense
Vout
GND
Vin
Vcont
1k
R966
E
EB904
10k
R976
C983
0.047
CL018
2.4
10k
0.5%
R959
2.5
CL017
IC921
159(CND,MX)
314(EXCEPT CND,MX)
D
1234567
20.7
1.4
0.3
100k
R941
5
1
12
14.6
1234
3.3
TP920
TP919
(CHASSIS)
2.4
43
KVref
IC923
IC921
STR-Y6763
SWITCHING REGULATOR
S/GND
Vcc/OVP
GND
FB/OLP
BD
NC
0.5%
6.6
Q969
ISA1602AM1TP-1EF
NC
A
IC923
SHUNT REG.
MM1431CURE
0.1
C951
10k
0.5%
R942
470
25V
C942
0.01
C971
POWER PROTECT
3.9k
0.5%
R954
12
4949
1 149
5-24. SCHEMATIC DIAGRAM – POWER Section –
A
AC IN
B
C
D
E
F
G
H
I
J
HBD-TZ210/TZ230/TZ510/TZ630/TZ710
Page 50
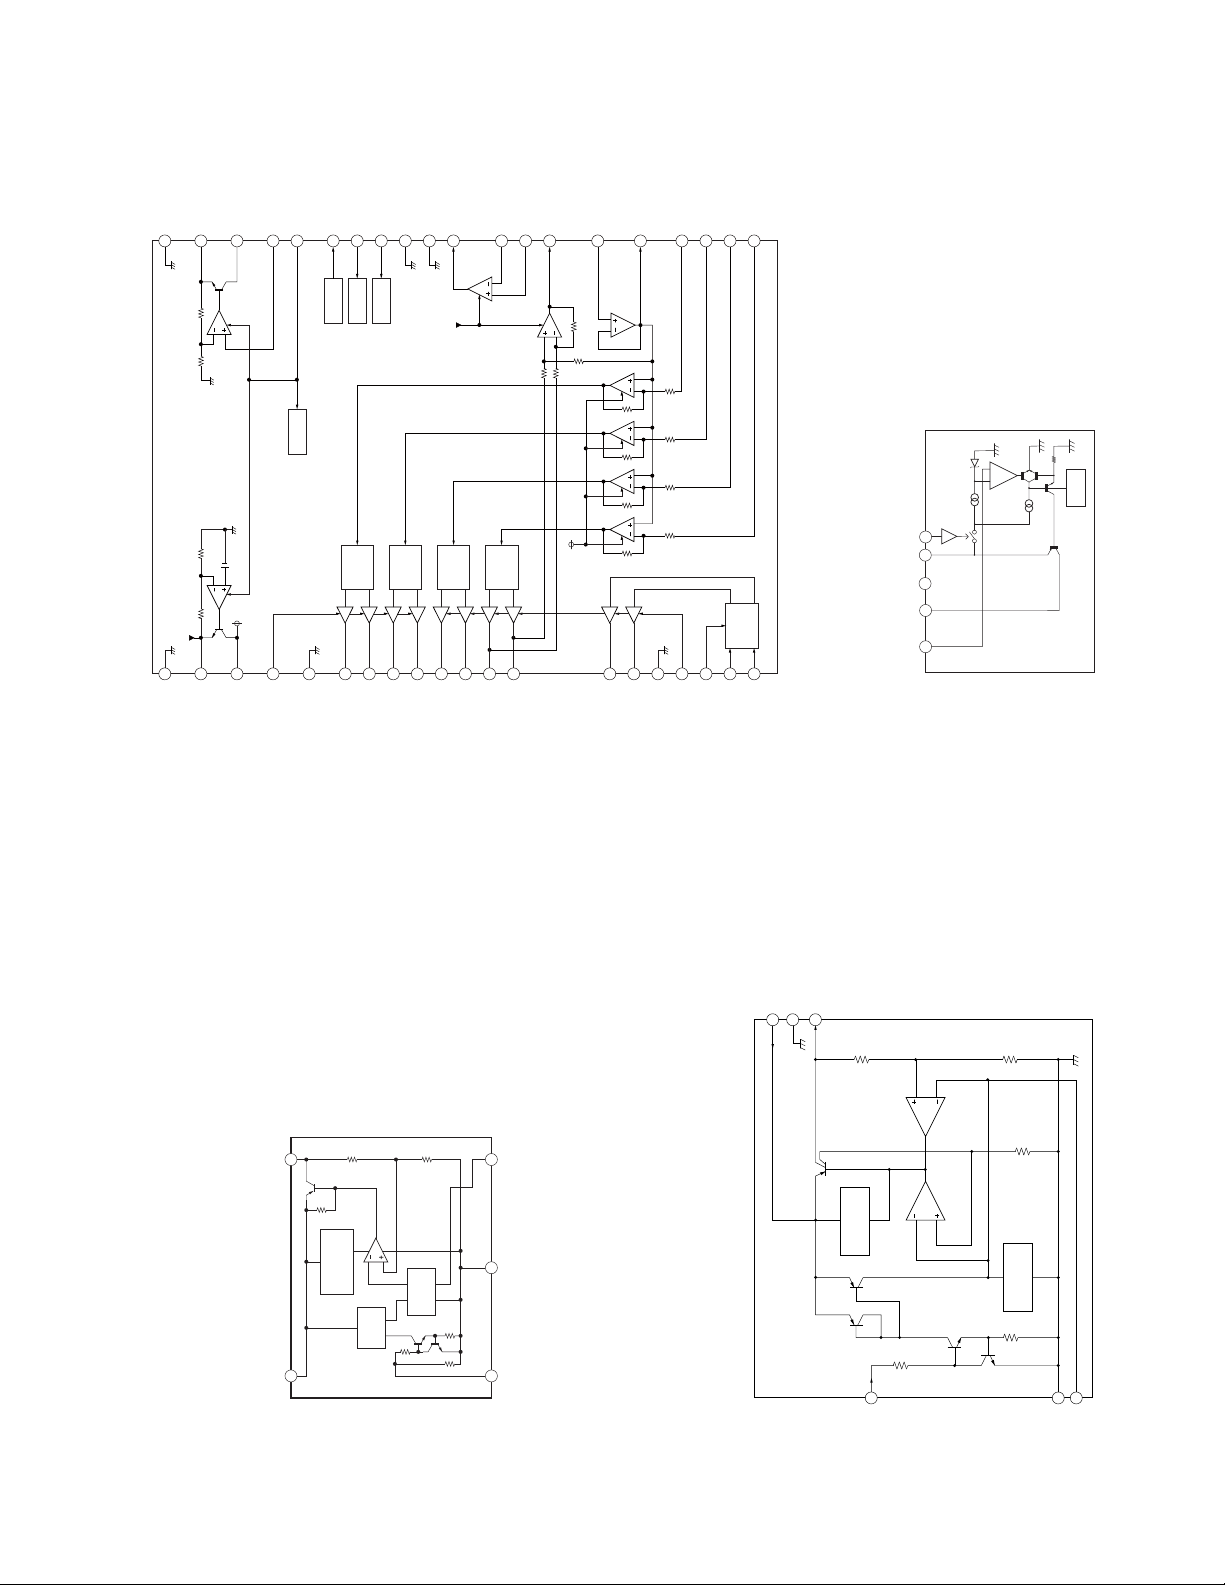
SGND
REGVAR
39
40
SGND
SGND
SGND
SGND
OPVCC
IC1501 BD8203EFV-E2 (MAIN Board (4/8))
1
2
REG5
SGND
REGVARVCC38REGCTL
37
PREVCC
3
4
PVCC1
PREVCC
REGRST
36
STBY
5
PGND
PGND
TSDM
35
TSD
6
VO1+
MUTE4
34
MUTE4
LEVEL
SHIFT
7
VO1–
MUTE123
33
MUTE123
8
VO2+
SGND
32
LEVEL
SGND
SHIFT
9
VO2–
SGND
31
SGND
10
VO3+
OPOUT
30
OPVCC
LEVEL
SHIFT
11
VO3–
12
VO4+
OPIN–
29
LEVEL
SHIFT
13
VO4–
OPIN+
28
VSPDL
27
PREVCC
18
VCTL
LOADING
19
FWD
IN421IN322IN223IN1
CONTROL
20
RVS
+
REF
–
VCONT
15
VIN
2
GND
3
VOUT
4
SENSE
IC509 SI-3010KM-TLS (MAIN Board (6/8))
IC941 SI-3010KM-TLS (POWER Board)
TSD
VCO
VCI
26
14
VO5+
15
VO5–
24
25
(VC)
PGND
16
17
PGND
PVCC2
5050
VOUT
OVER HEAT &
OVER CURRENT
1150CSCL-G (MAIN Board (3/8))
VIN
5 4
IC1105 TK11133CSCL-G (MAIN Board (1/8))
IC1107 TK11133CSCL-G (MAIN Board (1/8))
IC1707 TK1
IC1708 TK11133CSCL-G (MAIN Board (3/8))
IC403 TK11190CSCL-G (MAIN Board (5/8))
IC5000 TK11133CSCL-G (FL Board)
HBD-TZ210/TZ230/TZ510/TZ630/TZ710
• IC Block Diagrams
PROTECTION
CIRCUIT
CONTROL
BANDGAP
REFERENCE
GND
VIN6VOUT
5
4
NOISE
THERMAL
PROTECTION
GND
BANDGAP
REFERENCE
CONT
1 2 3
IC504 TK11250CMCL-G (MAIN Board (5/8))
1
CONT
2NP3
GND
HBD-TZ210/TZ230/TZ510/TZ630/TZ710
Page 51
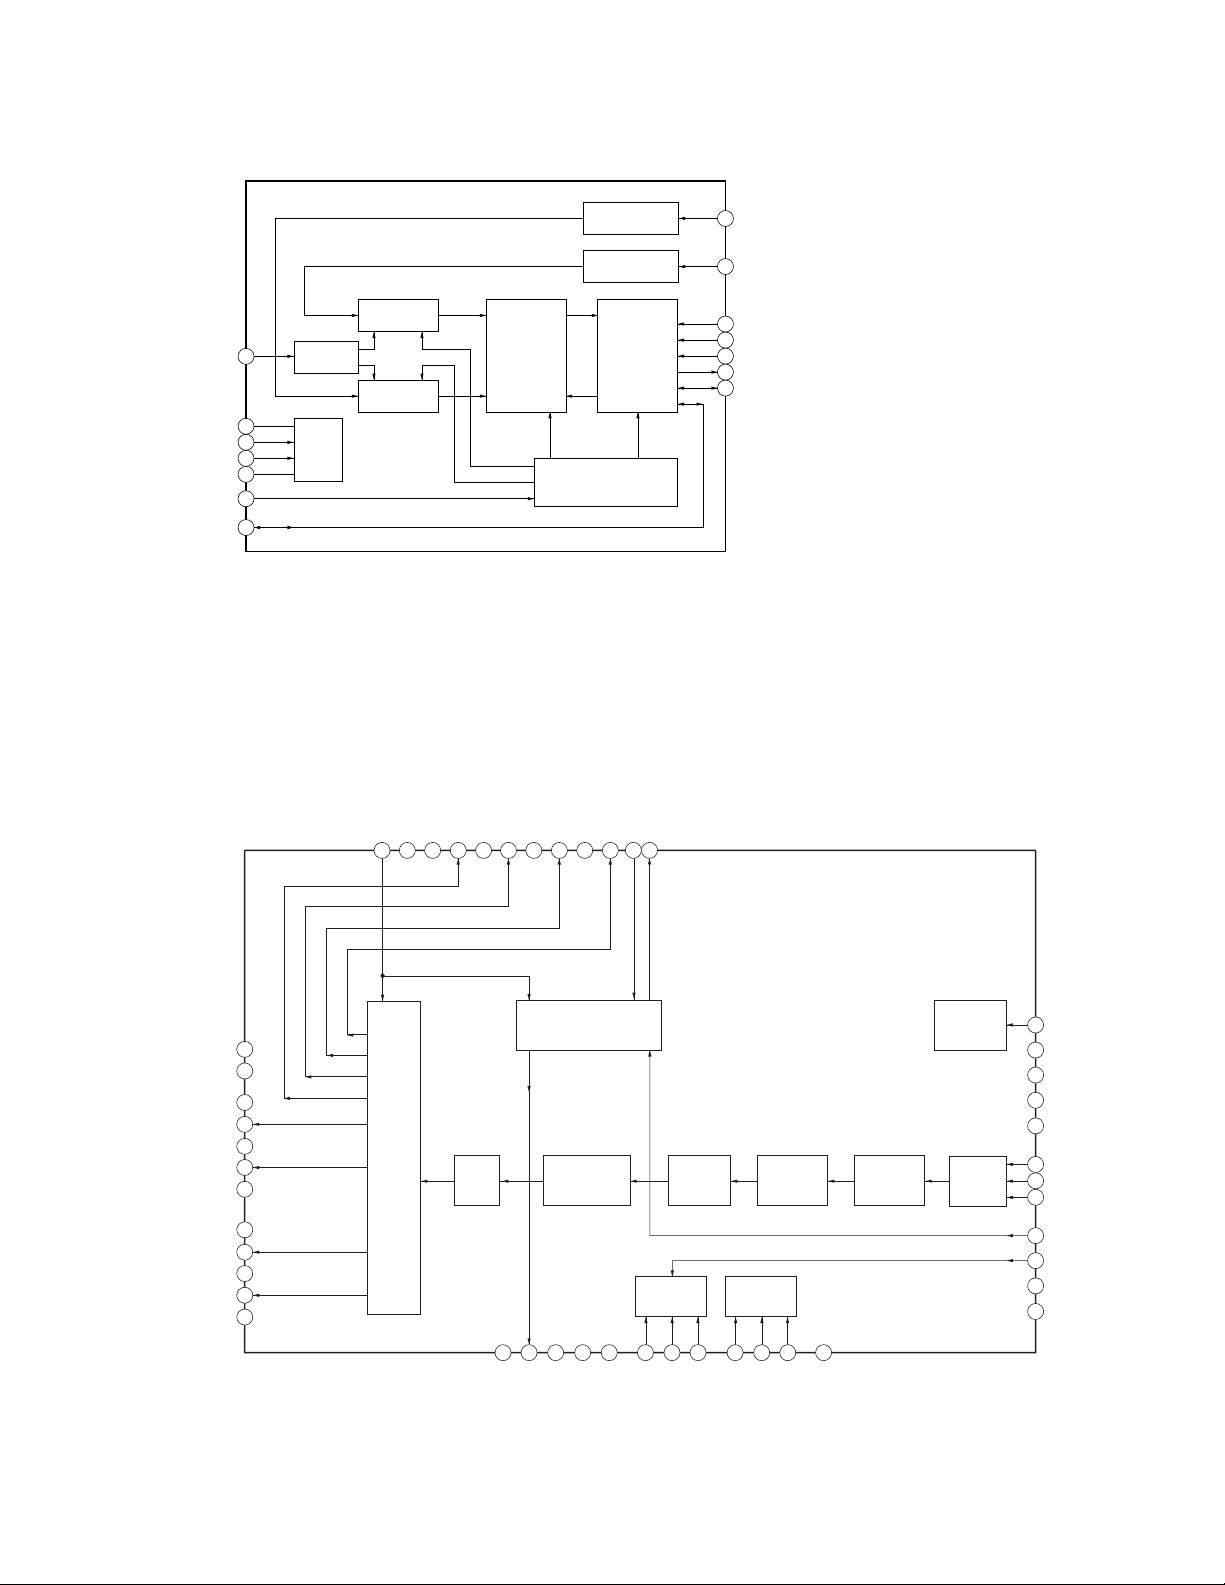
IC404 PCM1808PWR (MAIN Board (5/8))
HBD-TZ210/TZ230/TZ510/TZ630/TZ710
DELT A-SIGMA
MODULATOR
VREF 1
AGND
AVCC
DVDD
DGND
SCKI
LRCK
REFERENCE
DELT A-SIGMA
MODULATOR
2
3
POWER
SUPPLY
4
5
6
7
IC3001 CXD9788AR (MAIN Board (7/8))
IC3003 CXD9788AR (MAIN Board (7/8))
IC3005 CXD9788AR (MAIN Board (8/8))
u1/64
DECIMATION
FILTE R
WITH
HIGH-PASS
FILTE R
CLOCK & TIMING CONTROL
ANTIALIAS
LOW -PASS FIL TER
ANTIALIAS
LOW -PASS FIL TER
SERIAL
INTERFACE
&
MODE/FORMAT
CONTROL
VINR
14
VINL
13
FMT12
MD111
MD010
DOUT9
BCK8
XVSS
VSUBC
VSSR
OUTR2(–)
VDDR
OUTR1(+)
VSSR
VSSL
OUTL2(–)
VDDL
OUTL1(+)
VSSL
XVDD
HPVDDL
HPOUTL1
HPVSSL
HPOUTL2
HPVDDR
XOVSS
42 41
14
XFSOOUT
15
HPOUTR1
GENERATOR
(SECONDARY)
LINER
INTERPOLATOR
16
XOVDD
XFSOIN
48
47
46 45
44 43
1
2
3
4
5
6
7
8
9
10
11
12
PWM
'6
13
HPVSSR40HPOUTR2
39
CLOCK
17
DVSS
DVDD
38
FSOI
37
18
NSPMUTE
CONTROL
INIT/
MUTE
19
SOFTMUTE
GAIN
20
PGMUTE
FILTER &
LOW CUT
FILTE R
SERIAL
CONTROLLER
21
22
SCDT
SCSHIFT
CLOCK
GENERATOR
(PRIMARY)
SAMPLING
RATE
CONVERTER
23
24
SCLATCH
OVF FLAGR
S g P
36
35
34
33
32
31
30
29
28
27
26
25
XFSIIN
DVDD
TEST
BFVSS
BFVDD
DATA
BCK
LRCK
MCKSEL
INIT
SFLAG
OVF FLAGL
FSOCKO
51
Page 52
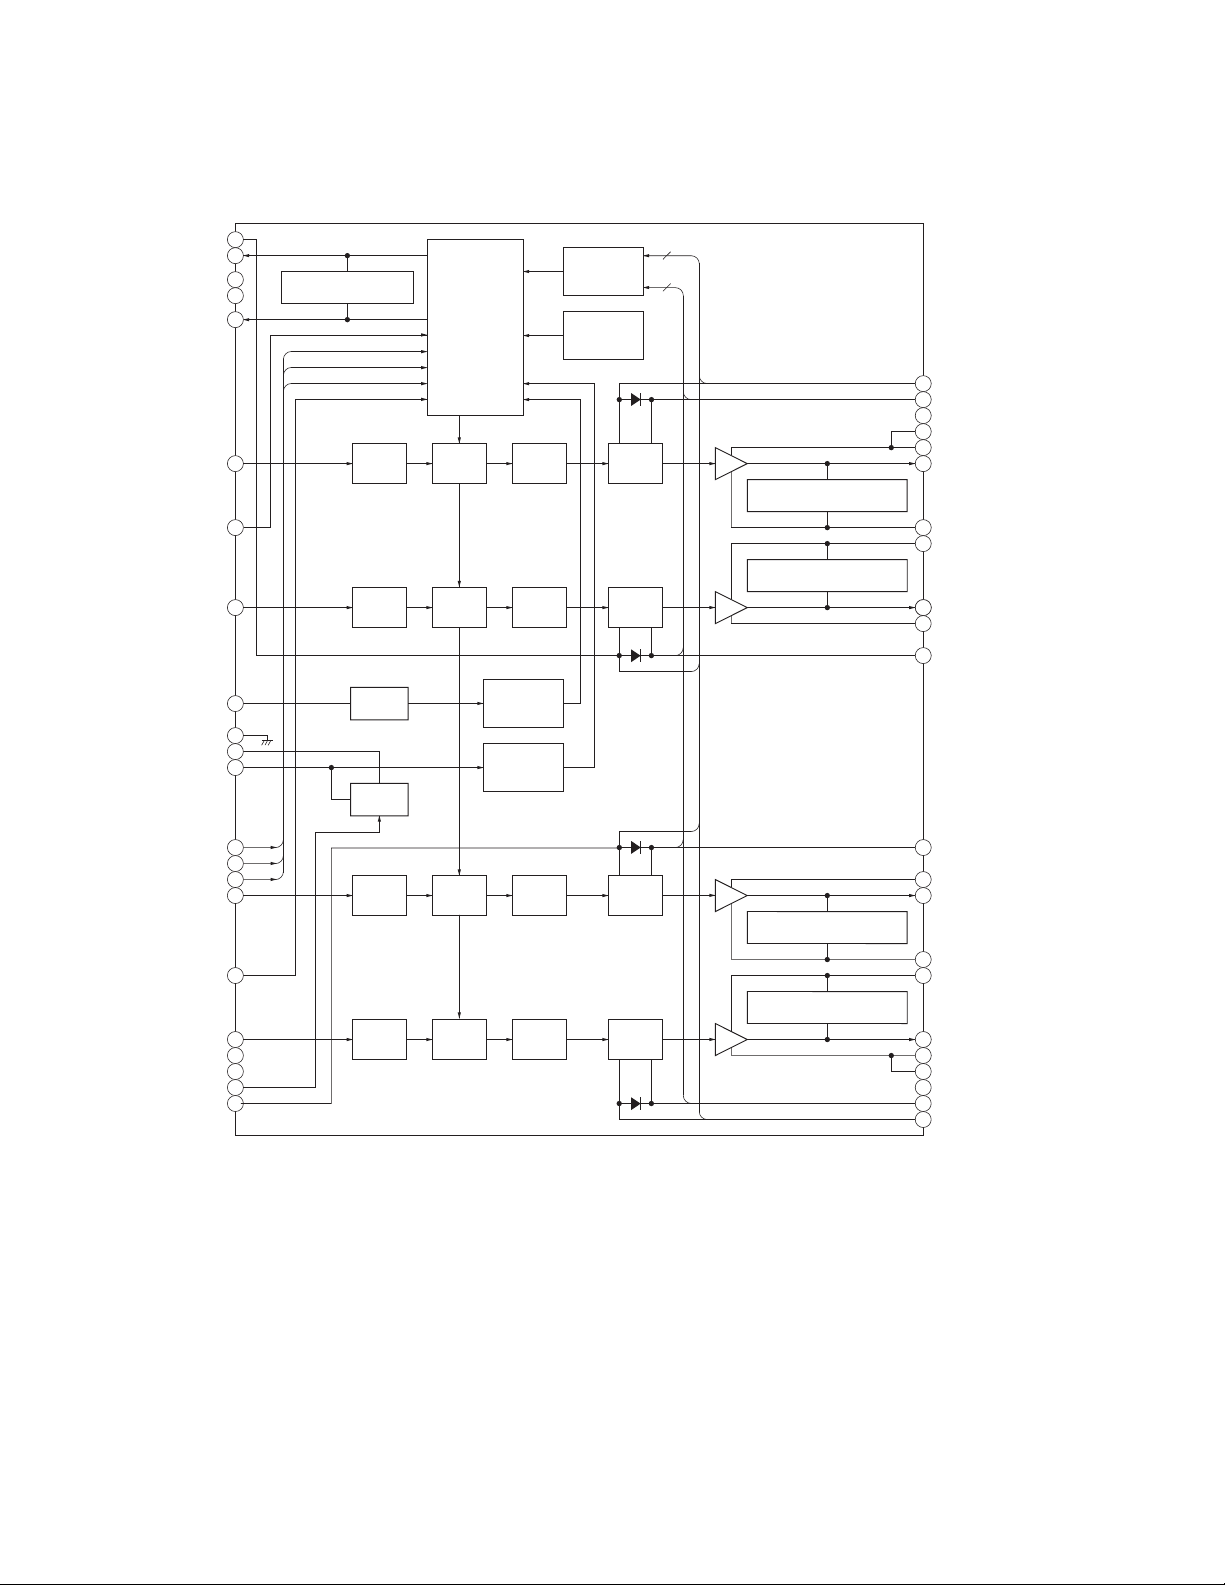
HBD-TZ210/TZ230/TZ510/TZ630/TZ710
IC3000 CXD9965TN (MAIN Board (7/8))
IC3002 CXD9965TN (MAIN Board (7/8))
IC3004 CXD9965TN (MAIN Board (8/8))
1
GVDD_B
2
/DTW
3
PWM_A
/RESET_AB
PWM_B
NC
4
NC
/SD
5
6
7
8
INTERNAL PULLUP
RESISTORS TO VREG
PWM
RCV.
PWM
RCV.
PROTECTION
AND
I/O LOGIC
CTRL
CTRL
TIMING
TIMING
UNDER-
VOLTAGE
PROTECTION
TEMP.
SENSE
GATE
DRIVE
GATE
DRIVE
4
4
GVDD_A
44
BST_A
43
NC
42
41
PVDD_A
40
PVDD_A
39
OUT_A
BTL/PBTL-CONFIGURATION
PULLDOWN RESISTOR
38
GND_A
37
GND_B
BTL/PBTL-CONFIGURATION
PULLDOWN RESISTOR
27
36
OUT_B
35
PVDD_B
BST_B
34
OC_ADJ
GND
AGND
VREF
PWM_C
/RESET_CD
PWM_D
VDD
GVDD_C
CTRL
CTRL
OVERLOAD
PROTECTION
POWER
ON
RESET
TIMING
TIMING
GATE
DRIVE
GATE
DRIVE
BTL/PBTL-CONFIGURATION
PULLDOWN RESISTOR
BTL/PBTL-CONFIGURATION
PULLDOWN RESISTOR
33
32
31
30
29
28
27
26
25
24
23
BST_C
PVDD_C
OUT_C
GND_C
GND_D
OUT_D
PVDD_D
PVDD_D
NC
BST_D
GVDD_D
9
10
11
12
M3
13
M2
14
M1
15
16
17
18
19
NC
20
NC
21
22
I-SENSE
VREG
PWM
RCV.
PWM
RCV.
52
Page 53
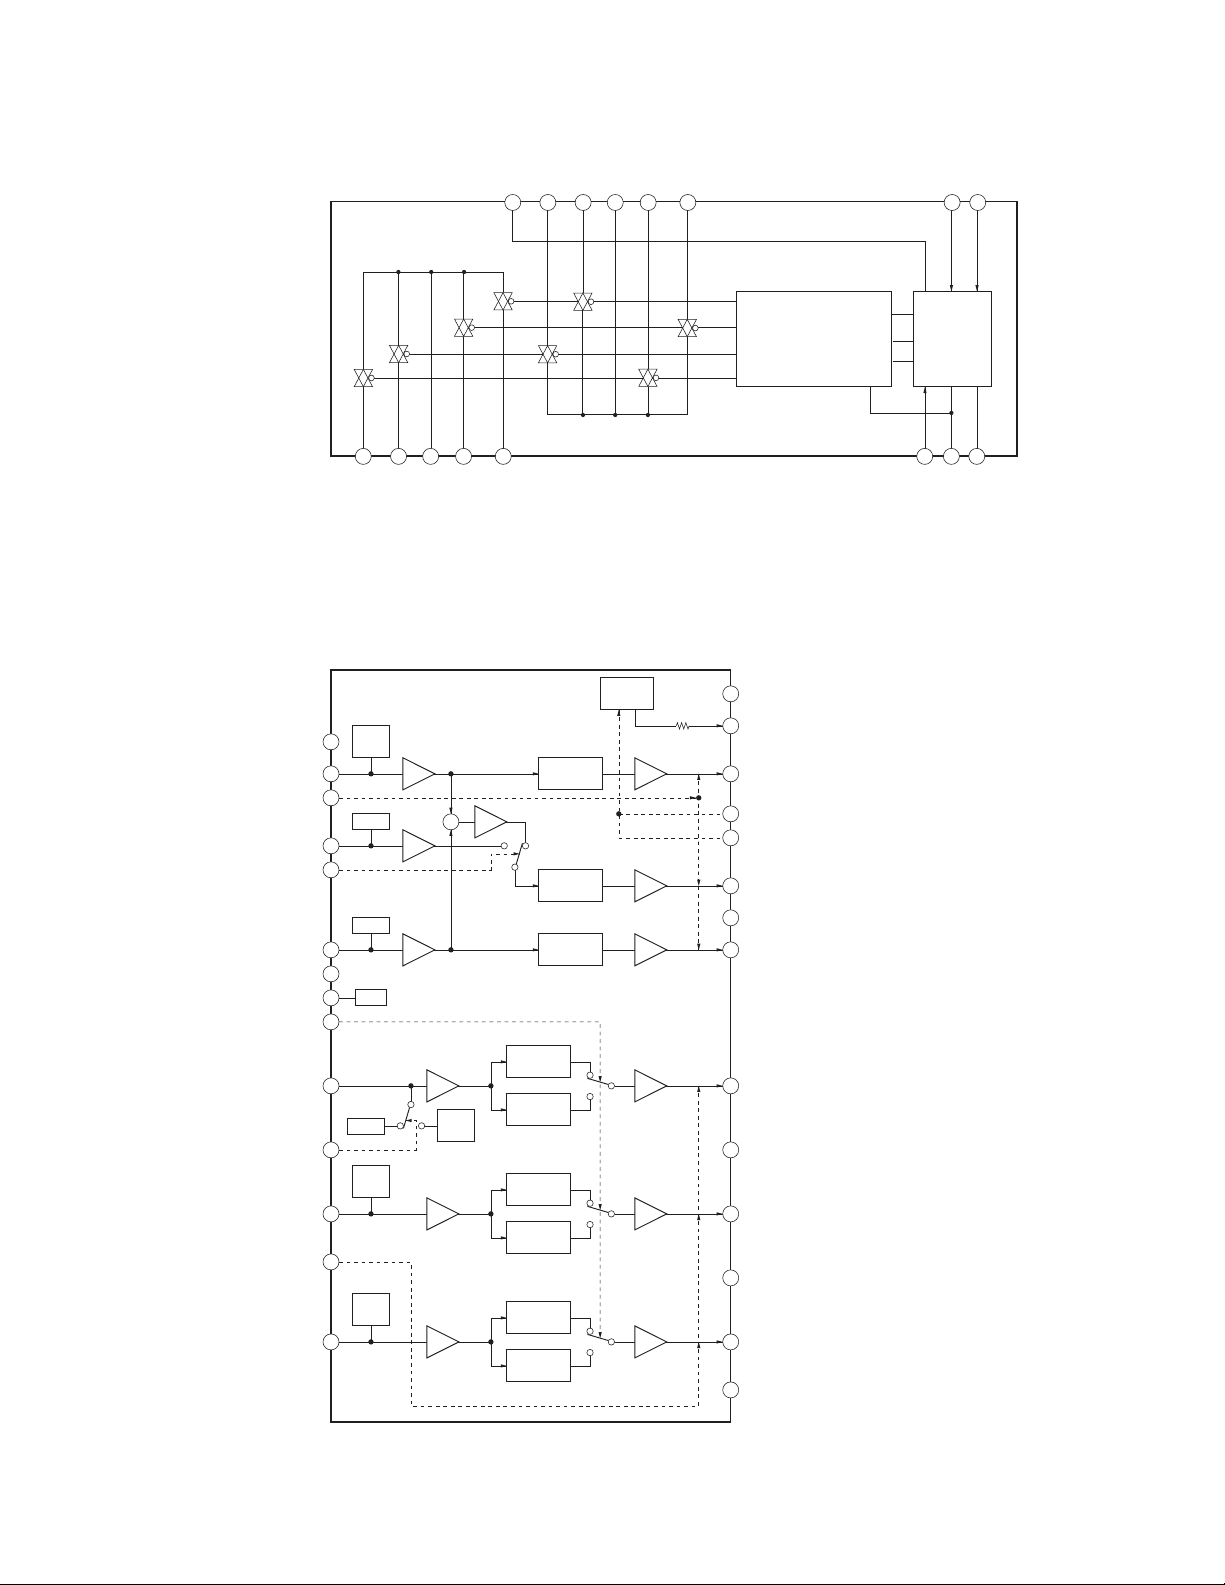
IC401 MC14052BDR2 (MAIN Board (5/8))
HBD-TZ210/TZ230/TZ510/TZ630/TZ710
VDD
15X214X113X12X011
16
1Y02Y23Y4Y35
Y1
IC4000 MM1758AFBE (SCART Board) (TZ230/TZ630)
S-DC OUT
CIN
YIN
CLP
CrIN
150k:
1
BIAS
CLAMP
CLAMP
BIAS
CLAMP
150k:
BIAS
150k:
BIAS
6dB
6dB
6dB
6dB
6dB
6dB
+
150k:
BIAS
6dB–6dB
2
3
4
5
6
7
8
I/P
9
10
11
12
13
14
6.75MHz
LOW-PASS
FILTE R
LOW-PASS
FILTE R
13.5MHz
6.75MHz
LOW-PASS
FILTE R
LOW-PASS
FILTE R
13.5MHz
6.75MHz
LOW-PASS
FILTE R
LOW-PASS
FILTE R
13.5MHz
6.75MHz
LOW-PASS
FILTE R
6.75MHz
LOW-PASS
FILTE R
6.75MHz
LOW-PASS
FILTE R
VCC1
MUTE 1
CVBS IN
YC MIX
GND1
BIAS
CYIN
CbIN
MUTE2
S1/S2
75:
DRIVER
75:
DRIVER
75:
DRIVER
75:
DRIVER
75:
DRIVER
75:
DRIVER
X3
BINARY TO 1 OF 4
DECODER WITH INHIBIT
28 VCC2
27 S-DCOUT
26 COUT
25 S1
24 S2
23 CVBS OUT
22 GND2
21 YOUT
20 CYOUT
19 GND2
18 CbOUT
17 GND2
16 CrOUT
15 GND2
10A9
LEVEL
CONVERTER
6
INH7VEE8VSS
B
53
Page 54
HBD-TZ210/TZ230/TZ510/TZ630/TZ710
Ver. 1.1
IC901 STR-F6138-LF1352 (POWER Board) (CND, MX, TW)
IC901 STR-F6168-LF1352 (POWER Board) (EXCEPT CND, MX, TW)
5
4
FB/OLP
VCC
Reg1
Internal
Bias
UVL0
+
ON=16V
–
OFF=10.5V
OVP
TSD
IOLP
+
–
Volp
Reg3
Current mirror
OSC
Reg2
Delay
Latch
Boottom Skip
Logic
OCP2
Logic
Delay
Rg1
OCP1
+
–
Vocp
INH1
+
–
Vth1
INH2
+
–
Vth2
FB
–
+
OCP2
–
+
Vocp(BSIN,OUT)
Rg2
Rg3
POWER
MOS FET
D
3
GND
2
OCP/SYNC
1
54
Page 55
HBD-TZ210/TZ230/TZ510/TZ630/TZ710
• IC Pin Function Description
MAIN BOARD (2/8) IC1101 CXD9917R-B (EXCEPT CND, UK)/CXD9927R-B (CND, UK)
(CD/DVD RF AMP, FOCUS/TRACKING ERROR AMP , DVD SYSTEM CONTROL, DSP, DIR/USB/HDMI CONTROL)
Pin No. Pin Name I/O Description
1 OSN — RF offset cancellation capacitor connecting terminal
2 RFGC I RF AGC loop capacitor connecting terminal
3 IREF I Current reference setting terminal
4 AVDD3 — Power supply (VDD3.3V)
5 AGND — Ground
6 DVDA I AC coupled input path A
7 DVDB I AC coupled input path B
8 DVDC I AC coupled input path C
9 DVDD I AC coupled input path D
10 DVDRFIP I DC coupled DVD RF signal input RFIP
11 MA I DC coupled main-beam RF signal input A
12 MB I DC coupled main-beam RF signal input B
13 MC I DC coupled main-beam RF signal input C
14 MD I DC coupled main-beam RF signal input D
15 SA — Not used. (Open)
16 SB — Not used. (Open)
17 TNI I DC coupled main-beam RF signal input E
18 TPI I DC coupled main-beam RF signal input F
19 MDI1 I Laser power monitor input
20 MDI2 I Laser power monitor input
21 LDO2 O Laser diode (DVD) drive signal output
22 LDO1 O Laser diode (CD) drive signal output
23 SVDD3 — Power supply (RF+3.3V)
24 CSO O Not used. (Open)
25 RFLVL O RFRP low pass output
26 SGND — Ground
27 V2REFO O Reference voltage (2.8V) output
28 V20 O Reference voltage (2.0V) output
29 VREFO O Reference voltage (1.4V) output
30 FEO O Focus error monitor output
31 TEO O Tracking error monitor output
32 TEZISLV O TE Slicing Level output
33 OP_OUT O Op amp output
34 OP_INN I Op amp negative input
35 OP_INP I Spindle feedback signal input
36 DMO O Spindle motor control PWM signal output
37 FMO O Sled motor control PWM signal output
38 TROPENPWM O Tray Loading motor PWM signal output
39 IOPMON I Iop Monitor input
40 TRO O Tracking servo control signal output
41 FOO O Focus servo control signal output
42 AGND18 — Ground
43 AVDD18 — Power supply (+1.8V)
44 USB_DP I/O USB port serial data input/output
45 USB_DM I/O USB port serial data input/output
46 USB_VDD3 — USB power supply (+3.3V)
47 USB_VSS — USB ground
48 PAD_VRT — Not used. (Pull up)
49 USB_VDD18 — Power supply (+1.8V)
50 USB_VSS I Ground
51 DIR_ERROR/NC I Not used. (Pull down)
52 DIR_AUDIO/NC I Not used. (Pull down)
53 LIMITSW I LIMIT SW signal input
54 MSW O DVD/CD PD –VR select signal output
55 DVDD18 — Power supply (+1.8V)
56 to 62 HA2 to HA8 O Flash ROM address bus A2 to A8 output
55
Page 56
HBD-TZ210/TZ230/TZ510/TZ630/TZ710
Pin No. Pin Name I/O Description
63, 64 HA18, HA19 O Flash ROM address bus A18, A19 output
65 DVDD3 — Power supply (+3.3V)
66 XWR O Flash ROM write signal output
67 to 74 HA16 to HA9 O Flash ROM address bus A16 to A9 output
75 HA20 Flash ROM address bus A20 output
76 XROMCS O Flash ROM chip select signal output
77 HA1 O Flash ROM address bus A1 output
78 XRD O Flash ROM read signal output
79, 80 HD0, HD1 I/O Flash ROM data bus D0, D1 input/output
81 DVSS — Ground terminal
82 to 86 HD2 to HD6 I/O Flash ROM data bus D2 to D6 input/output
87 HA21 I/O Flash ROM data bus D21 input/output
88 RESERVED — Not used. (Open)
89 HD7 I/O Flash ROM data bus D7 input/output
90 DVSS — Ground terminal
91, 92 HA17, HA0 O Flash ROM address bus A17, A0 output
93 DVDD18 — Power supply (+1.8V)
94 FWD O Tray loading motor control (FWR) signal output
95 REV O Tray loading motor control (REV) signal output
96 DVDD3 — Power supply (+3.3V)
97 IFSDO O CPU I/F serial data output
98 IFCK O CPU I/F serial clock output
99 xIFCS O CPU I/F chip select output
100 IFSDI I CPU I/F serial data input
101 SCL O EEPROM serial clock output
102 SDA I/O EEPROM serial data input/output
103 CKSW I Chuck/Tray detect switch signal input
104 OCSW I Chuck/Tray detect switch signal input
105 RXD I RXD signal input from Jig
106 TXD O TXD signal output to Jig
107 ICE O Not used. (Open)
108 xSYSRST I System reset signal input
109 RESERVED I Not used. (Open)
110 xIFBSY I Busy signal input from CPU I/F
111 DQM0 O SDRAM lower byte mask enable signal output
112 EEWP O EEPROM ready/Busy wake up signal output
113 to 117 RD7 to RD3 I/O SDROM data bus D7 to D3 input/output
118 DVDD3 — Power supply (+3.3V)
119 to 121 RD2 to RD0 I/O SDROM data bus D2 to D0 input/output
122 to 129 RD15 to RD8 I/O SDROM data bus D15 to D8 input/output
130 TSD_M I TSD signal input
131 DVDD3 — Power supply (+3.3V)
132 DQM1 O SDRAM upper byte mask enable signal output
133 _RWE O SDRAM write enable signal output
134 _CAS O SDRAM column address strobe signal output
135 _RAS O SDRAM row address strobe signal output
136 _RCS O SDRAM chip select signal output
137, 138 BA0, BA1 O SDRAM bank address 0, 1 output
139 RA10 O SDRAM address bus A10 output
140, 141 RA0, RA1 O SDRAM address bus A0, A1 output
142 DVDD18 — Power supply (+1.8V)
143, 144 RA2, RA3 O SDRAM address bus A0, A3 output
145 DVDD3 — Power supply (+3.3V)
146 DRCLK O SDRAM clock output
147 CKE O SDRAM clock enable signal output
148 DVSS — Ground
149 RA11 O SDRAM address bus A11 output
150 to 155 RA9 to RA4 O SDRAM address bus A9 to A4 output
156 DVDD3 — Power supply (+3.3V)
56
Page 57
HBD-TZ210/TZ230/TZ510/TZ630/TZ710
Pin No. Pin Name I/O Description
157 REGRST O REG reset signal output for Focus/Tracking/Sledding motor driver
158 MUTE O Mute signal output for Spindle motor
159 DDC_DA I/O HDMI DDC line data input/output
160 DVDD18 — Power supply (+1.8V)
161 DDC_CLK I/O HDMI DDC line clock input/output
162 HTPLG I HDMI HPD signal input
163 AGND3 — Ground
164 EXT_RES — Ext. resistor connected terminal
165, 166 AVDD3 — Power supply (+3.3V)
167 EXT_CAP — Ext. capacitor connected terminal
168, 169 AGND3, AGND18 — Ground
170 TXCN O HDMI TXD-clock output
171 TXCP O HDMI TXD-clock output
172 AVDD18 — Power supply (+1.8V)
173 TX0N O HDMI TXD-0 output
174 TX0P O HDMI TXD-0 output
175 AGND18 — Power supply (+1.8V)
176 TX1N O HDMI TXD-1 output
177 TX1P O HDMI TXD-1 output
178 AVDD18 — Power supply (+1.8V)
179 TX2N O HDMI TXD-2 output
180 TX2P O HDMI TXD-2 output
181 AGND18 — Power supply (+1.8V)
182 R/Cr/Pr O Video chroma R/Cr/Pr signal output
183 B/Cb/Pb O Video chroma B/Cb/Pb signal output
184 DACVSSA — Ground
185 Y/G O Video Y/chroma G signal output
186 DACVDDA — Power supply (+3.3V)
187 CVBS O Video Composite signal output
188 DACVSSB — Ground
189 C O Video chroma signal output (Not used in this set)
190 DACVDDB — Power supply (+3.3V)
191 Y O Video Y signal output (Not used in this set)
192 DACVSSC — Ground
193 FS I Full Scale Adjustment setting terminal
194 VREF I Reference Voltage input terminal
195 DACVDDC — Power supply (+3.3V)
196 VBUS_OE O VBUS power control signal output
197 VBUS_OC I VBUS over current detect signal input
198 SCORE/DIR_XSTATE — Not used. (Connected to ground)
199 SPMCK — Not used. (Connected to ground)
200 SPBCK — Not used. (Connected to ground)
201 SPLRCK — Not used. (Connected to ground)
202 ADIN (SPDATA) — Not used. (Connected to ground)
203 ACLK O A/D converter and DAMP clock output
204 ABCK O A/D converter and DAMP BCK clock output
205 ALRCK O A/D converter and DAMP LRCK clock output
206 MC_DATA (ADIN) I A/D converter digital data input
207 DVDD3 — Power supply (+3.3V)
208 MIC — Mic detect status signal input Not used. (Connected to ground)
209 WIDE O WIDE select signal output for EURO AV terminal
210 RGB_SEL/DSEL O Video output select signal output for EURO AV terminal
211 TRG_SW I Not used. (Pull up)
212 DVDD18 — Power supply (+3.3V)
213 KMOD O KARAOKE mode information signal output (Not used in this set)
214 XVOICE/DIR_CSFLAG — Not used. (Connected to ground)
215 SPDIF O Not used. (Open)
216 APLLVDD3 — Power supply (+3.3V)
217 APLLCAP — Ext capacitor connected terminal
57
Page 58
HBD-TZ210/TZ230/TZ510/TZ630/TZ710
Pin No. Pin Name I/O Description
218 APLLVSS — Ground
219 ADACVSS2 — Ground
220 ADACVSS1 — Ground
221 DIR_CE — Not used. (Open)
222 ASDATA3 — Not used. (Open)
223 ASDATA2 O Audio digital signal output to D-AMP
224 AVCM — Ext capacitor connected terminal
225 ASDATA1 O Audio digital signal output to D-AMP
226 ASDATA0 O Audio digital signal output to D-AMP
227 DIR_CL — Not used. (Open)
228 ADACVDD1 — Power supply (+3.3V)
229 ADACVDD2 — Power supply (+3.3V)
230 Rt/DIR_DI — Not used. (Open)
231 Lt/DIR_DO — Not used. (Open)
232 ADACVSS3 — Ground
233 ADACVDD3 — Power supply (+3.3V)
234 SADCVDD18 — Power supply (+1.8V)
235 SADCVSS18 — Ground
236 RFGND18 — Ground
237 RFVDD18 — Power supply (+1.8V)
238 XTALO O Crystal output for main clock (27MHz)
239 XTALI I Crystal input for main clock (27MHz)
240 JITFO O The output terminal of RF jitter meter
241 JITFN I The input terminal of RF jitter meter
242 PLLVSS — Ground
243 PLLVDD3 — Power supply (+3.3V)
244 LPFON O The negative output of loop fi lter amplifi er
245 LPFIP I The positive input terminal of loop fi lter amplifi er
246 LPFIN I The negative input terminal of loop fi lter amplifi er
247 LPFOP O The positive output of loop fi lter amplifi er
248 ADCVDD3 — Power supply (+3.3V)
249 ADCVSS — Ground
250 RFVDD3 — Power supply (+3.3V)
251 RFRPDC O RF ripple detect output
252 RFRPAC I RF ripple detect input (through AC-coupling)
253 HRFZC I High frequency RF ripple zero crossing
254 CRTPLP O Defect level fi lter capacitor connected terminal
255 RFGND18 — Power supply (+3.3V)
256 OSP O RF offset cancellation capacitor connecting terminal
58
Page 59
HBD-TZ210/TZ230/TZ510/TZ630/TZ710
MAIN BOARD (5/8) IC503 R5F364AEDFA (SYSTEM CONTROL)
Pin No. Pin Name I/O Description
1 DAMP_SCDT/DIR_DIN O DAMP processor data output
2
3 FL_STB O FL driver chip select signal output
4 SIRCS_IN I Sircs signal input
5 FL_DATA/LED_DATA O FL and LED driver data output
6 CEC_RX_IN O CEC data input (Not used in this set)
7 FL_CLK/LED_CLK O FL driver clock output
8 BYTE I External data bus input. (Connected to ground)
9 CNVSS I Change processor mode input
10 NO USE O Not used. (Open)
11 NO USE O Not used. (Open)
12 RESET I System reset signal input
13 XOUT O Crystal output for main clock (5MHz)
14 VSS — Ground
15 XIN I Crystal input for main clock (5MHz)
16 VCC — Power supply (BUP +3.3V)
17 CEC I/O CEC data input/output
18 NO USE O Not used. (Open)
19 NO USE O Not used. (Open)
20 AC_CUT I AC-CUT detect signal input
21 NO USE O Not used. (Open)
22 NO USE O Not used. (Open)
23 NO USE O Not used. (Open)
24 NO USE O Not used. (Open)
25 NO USE O Not used. (Open)
26 CEC_TX_OUT O CEC data output (Not used in this set)
27 NO USE O Not used. (Open)
28 DIR_HCE O Not used. (Open)
29 E2P_CLK/S-AIR_SCL O Serial clock input/output (Not used in this set)
30 E2P_SDA/S-AIR_SDA O Serial data input/output (Not used in this set)
31 I2C_DATA/TXD1 I/O I2C data (debug) and Flash Write TXD data input/output
32 I2C_CLK/RXD1 I/O I2C clock (debug) and Flash Write RXD data input/output
33 CLK1 O Flash Write CLK signal output
34 RST1 O Flash Write RST signal output
35 NO USE I Not used. (Connected to ground)
36 NO USE I Not used. (Connected to ground)
37
38
39 P_CONT1 O Power control signal output
40 NO USE O Not used. (Open)
41 WRITE EMP P_CONT3 O Power control signal output
42 DC_CONT O Not used. (Open)
43 MIC_GAIN O Not used. (Open)
44 CDM_OPEN_SW I CDM open switch signal input
45 DVD_RST O Reset signal output to CDX9917R or CDX9927R
46 WRITE CE I Not used. (Pull up)
47 DVD_SID O Serial data output to CDX9917R or CDX9927R
48 DVD_SOD I Serial data input from CDX9917R or CDX9927R
49 DVD_SCO I Serial clock input from CDX9917R or CDX9927R
50 DVD_XIFBUSY O Busy request signal output to CDX9917R or CDX9927R
51 DVD XIFCS I Chip select signal input from CDX9917R or CDX9927R
52 TV_SEL O TV control signal output for EURO AV terminal
53 K-MOD I Not used. (Connected to ground)
54 DRIVER_RST(EN) O D-AMP driver reset signal output
55 OVERFLOW1 I D-AMP processor F/C/S over fl ow detect signal input
56 OVERFLOW2 I D-AMP processor SW over fl ow detect signal input
DAMP_SHIFT/
DIR_CLK
S-AIR_RST/
C_SWR_SEL
S-AIR_ADC_SEL/
DRIVER_C_EN
O DAMP processor clock output
O Not used. (Open)
O Not used. (Open)
59
Page 60
HBD-TZ210/TZ230/TZ510/TZ630/TZ710
Pin No. Pin Name I/O Description
57 DAMP INIT O D-AMP processor reset signal output
58 SOFT_MUTE O D-AMP processor soft muting signal output
59 DAMP_LATCH1 O D-AMP processor latch-1 (Front L/R) signal output
60 DAMP_LATCH2 O D-AMP processor latch-2 (Surround L/R) signal output
61 DAMP_LATCH3 O D-AMP processor latch-3 (Center/Subwoofer) signal output
62 VCC — Power supply (BUP+3.3V)
63 LINK_SW O D-AMP data select signal output
64 VSS — Ground
65
66 DC_DET I Speaker DC balance protect signal input
67 SD/PVDD_DET I D-AMP driver shut down signal and PVDD detect signal input
68
69 NO USE O Not used. (Open)
70 NO USE O Not used. (Open)
71 HP MUTE O Not used. (Open)
72 HDMI_PCONT O Not used. (Open)
73 KEY_INT I Wakeup signal input from function key
74 RDS-DATA I RDS data input (Not used in this set)
75 RDS_CLK I RDS clock input (Not used in this set)
76 ST_CE O TUNER chip enable signal output
77 ST_DI/MIC_DATA O TUNER serial data output
78 ST_DO I TUNER serial data input
79 ST_CLK/MIC_CLK O TUNER serial clock output
80 TUNED I TUNER TUNED signal input
81 V_SEL0 O Video select signal output
82 NO USE O Not used. (Open)
83 NO USE O Not used. (Open)
84 ASEL0 O Audio select signal output
85 ASEL1 O Not used. (Open)
86 ASEL2 O Not used. (Open)
87 NO USE O Not used. (Open)
88 NO USE O Not used. (Open)
89 EUP_IN O Not used.
90 NO USE O Not used. (Open)
91
92 DESTINATION I Destination select input
93 MODEL I Model select input
94 KEY2 I Key 2 input
95 KEY1 I Key 1 input
96 VSS — Ground
97 KEY0 I Key 0 input
98 Vref — Reference voltage (3.3V)
99 VCC — Power supply (+3.3V)
100 SERIES I Series select input (Connected to ground)
JACK1/JACK2/
DAP_DET
A.CAL_OUT/
DSP_INTR
A.CAL MIC LEVEL/
DSP_MASTER
I Not used. (Connected to ground)
I Not used. (Connected to ground)
I Not used. (Connected to ground)
60
Page 61
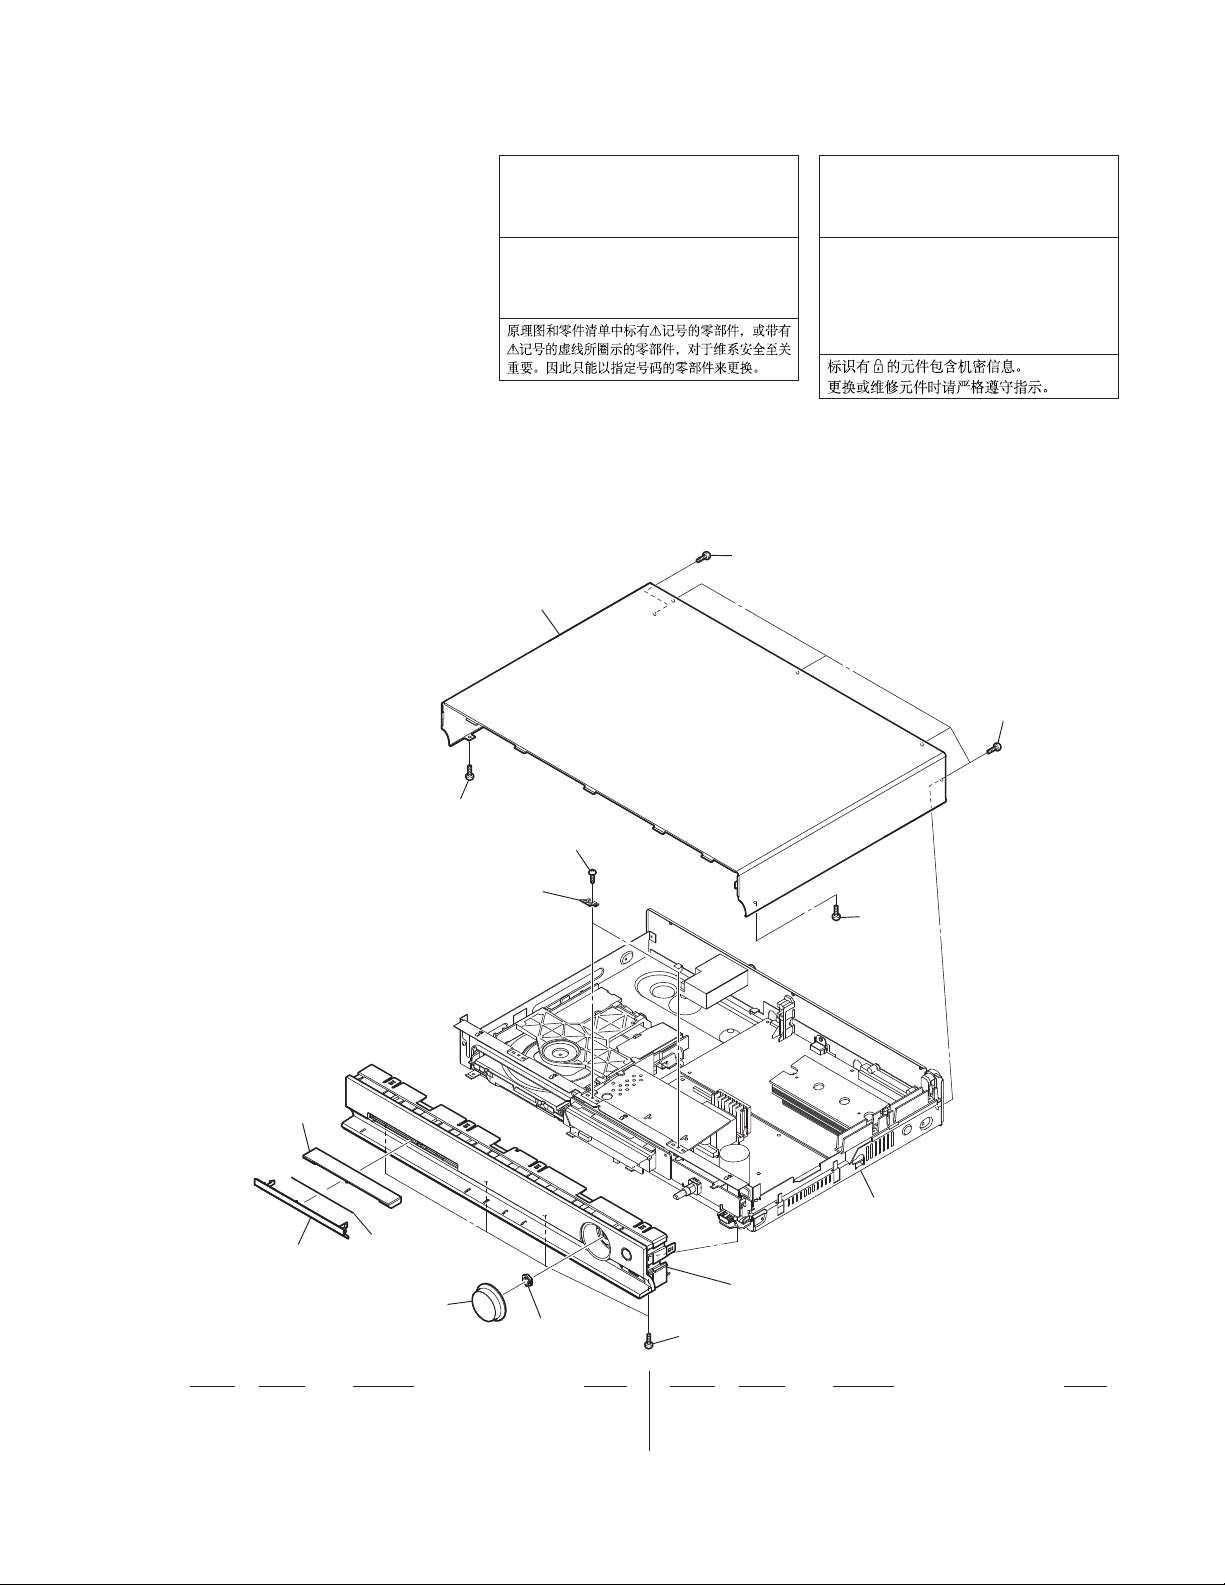
Note:
• Items marked “
they are seldom required for routine service. Some delay should be anticipated
when ordering these items.
• The mechanical parts with no reference
number in the exploded views are not supplied.
• Accessories are given in the last of the
electrical parts list.
• Abbreviation
AR : Argentina model
AUS : Australian model
CH : Chinese model
CND : Canadian model
E3 : 240V AC area in E model
E12 : 220 – 240V AC area in E model
E32 : 110 – 240V AC area in E model
EA : Saudi Arabia model
HK : Hong Kong model
MX : Mexican model
*
” are not stocked since
HBD-TZ210/TZ230/TZ510/TZ630/TZ710
SECTION 6
EXPLODED VIEWS
The components identifi ed by mark 0
or dotted line with mark 0 are critical for
safety.
Replace only with part number specifi ed.
Les composants identifi és par une marque
0 sont critiques pour la sécurité.
Ne les remplacer que par une pièce portant le numéro spécifi é.
PH : Philippines model
RU : Russian model
SAF : South African model
SP : Singapore model
TH : Thai model
TW : Taiwan model
Ver. 1.1
The components identifi ed by mark 9 contain confi dential information.
Strictly follow the instructions whenever the
components are repaired and/or replaced.
Les composants identifi és par la marque
9 contiennent des informations confi dentielles.
Suivre scrupuleusement les instructions
chaque fois qu’un composant est remplacé
et / ou réparé.
6-1. OVERALL SECTION
5
2
1
2
2
2
not supplied
2
front boards section
4
not supplied
front panel section
3
supplied with
S5113
Ref. No. Part No. Description Remark Ref. No. Part No. Description Remark
1 4-161-839-11 CASE (KZ)
2 3-077-331-21 +BV3 (3-CR)
3 4-161-832-01 KNOB, VOL (KZ)
2
4 4-159-492-01 PANEL, LOADING
5 4-159-493-02 BASE, LOADING
61
Page 62
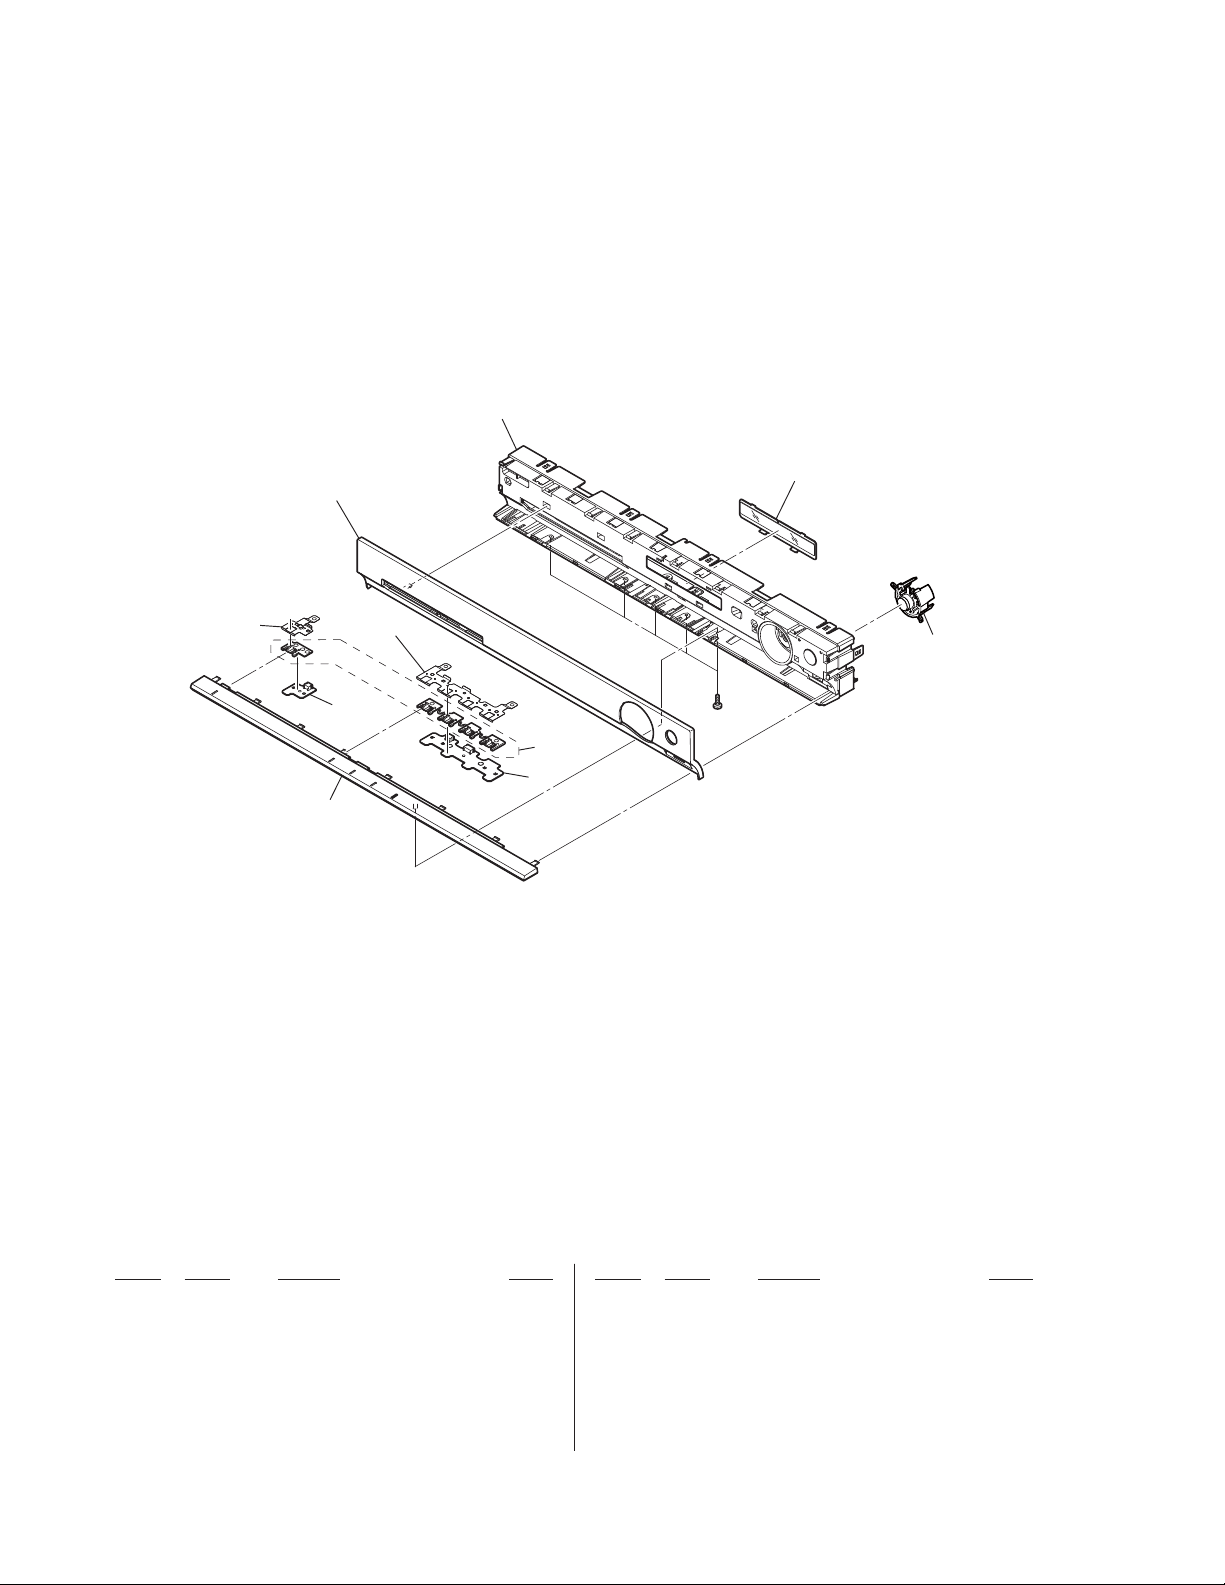
HBD-TZ210/TZ230/TZ510/TZ630/TZ710
Ver. 1.1
6-2. FRONT PANEL SECTION
56
55
not supplied
not supplied
not supplied
54
51
57
#1
53
52
Ref. No. Part No. Description Remark Ref. No. Part No. Description Remark
51 4-161-829-01 ESCUTCHEON (KZ) (TZ210:EXCEPT CND)
51 4-161-829-11 ESCUTCHEON (KZ) (TZ510:EXCEPT CND)
51 4-161-829-21 ESCUTCHEON (KZ) (TZ630)
51 4-161-829-31 ESCUTCHEON (KZ) (TZ710)
51 4-161-829-41 ESCUTCHEON (KZ) (TZ230:AEP)
51 4-161-829-51 ESCUTCHEON (KZ) (TZ230:UK)
51 4-161-829-71 ESCUTCHEON (KZ) (TZ210:CND)
51 4-161-829-81 ESCUTCHEON (KZ) (TZ510:CND)
52 A-1746-218-A KEY-SW BOARD, COMPLETE
53 4-159-495-02 BUTTON (PLAY)
54 A-1746-219-A P-SW BOARD, COMPLETE
55 4-161-827-01 WINDOW (KZ)
56 4-161-828-01 BASE, FRONT (KZ) (EXCEPT CND)
56 4-161-828-12 BASE, FRONT (KZ) (CND)
57 4-161-830-01 BUTTON (USB-KZ)
#1 7-685-504-19 SCREW +BTP 2X6 TYPE2 N-S
62
Page 63
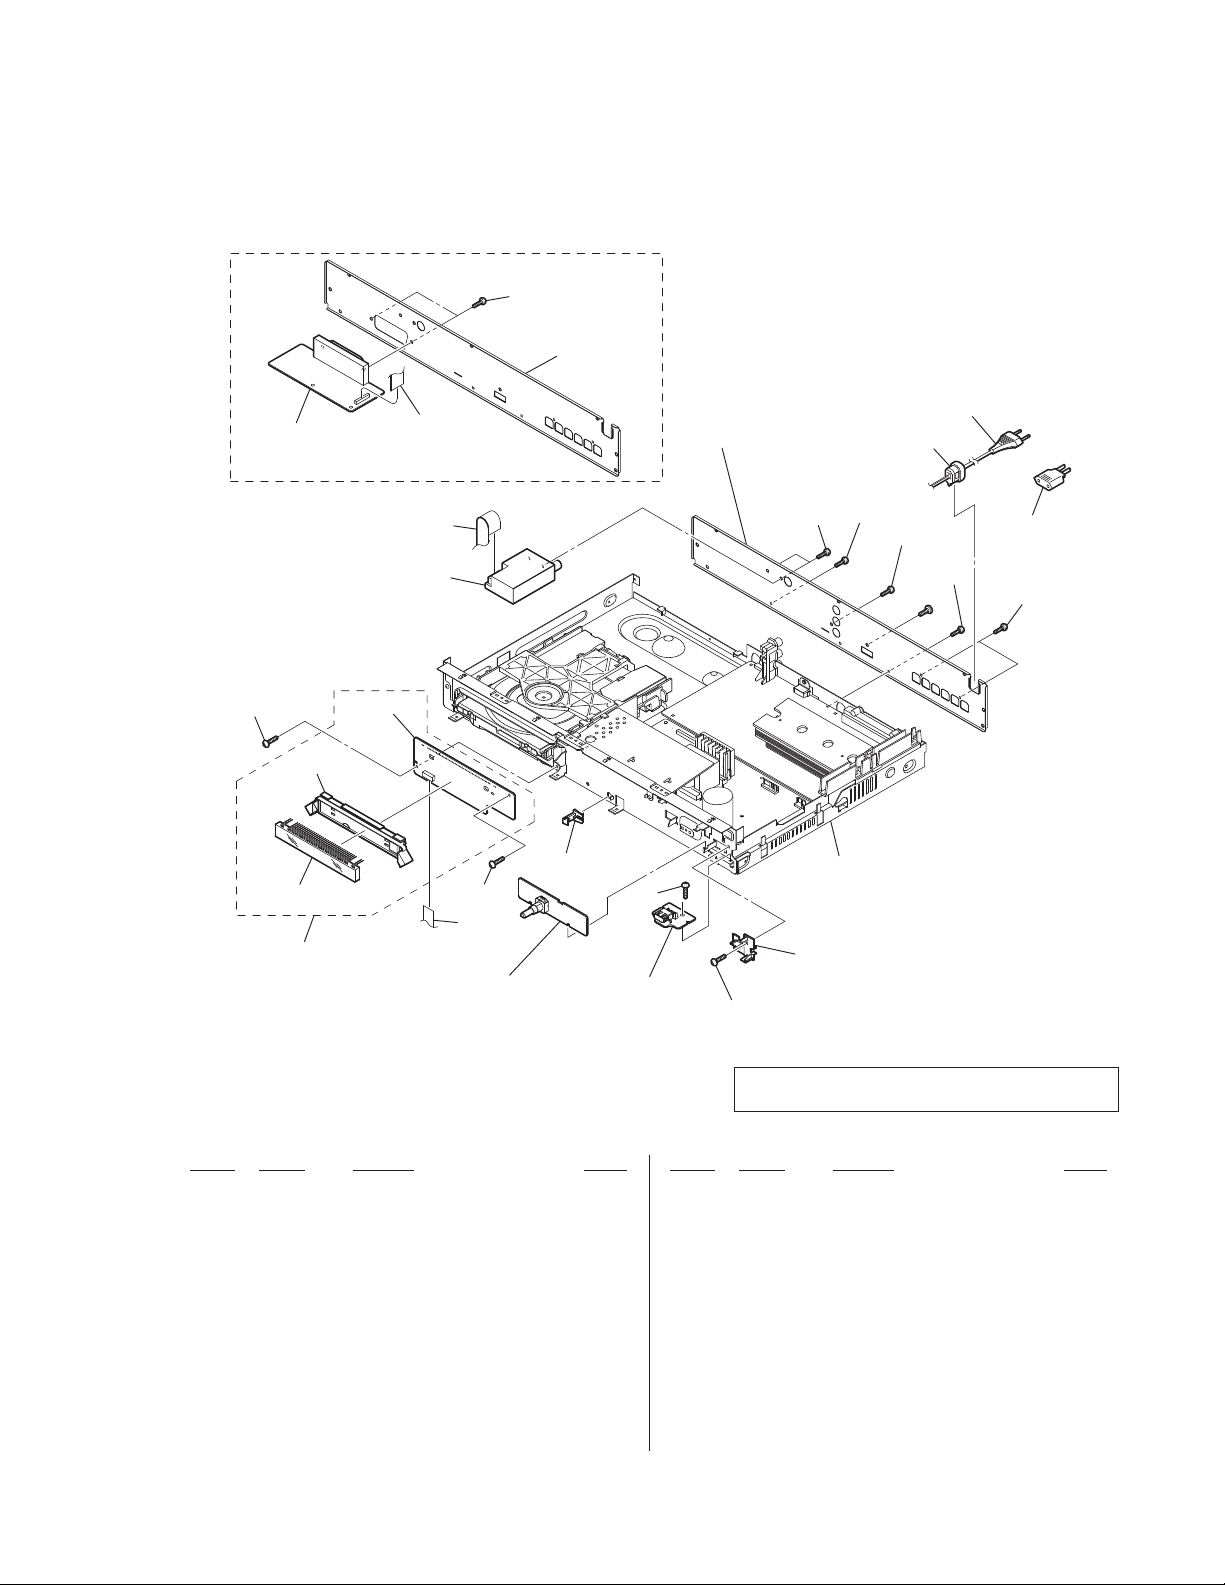
6-3. FRONT BOARDS SECTION
HBD-TZ210/TZ230/TZ510/TZ630/TZ710
Ver. 1.1
TZ230/TZ630
108
not supplied
not supplied
(SCART board)
101
not supplied
ND5000
103
not supplied
109
104
TU401
not supplied
101
102
not supplied
(USB-KEY board)
101
not supplied
(USB board)
not supplied
(TZ210/TZ510/TZ710)
108
chassis section
not supplied
101
108
108
105
#2
106
107
108
108
Note:
If the wire (fl at type) was replaced, fold it some as the
fl
at type) before replacement.
wire (
Ref. No. Part No. Description Remark Ref. No. Part No. Description Remark
101 3-077-331-21 +BV3 (3-CR)
102 1-828-322-11 WIRE (FLAT TYPE) (11 CORE)
103 A-1746-214-A FL BOARD, COMPLETE
104 1-828-955-11 WIRE (FLAT TYPE) (9 CORE)
105 3-703-244-00 BUSHING, CORD (2104) (EXCEPT TH)
105 4-916-783-01 BUSHING, CORD (TH)
0
106 1-834-288-12 CORD, POWER (TH)
0
106 1-834-966-41 CORD, POWER-SUPPLY
(E3,E12,E32,PH,RU,SAF,SP,AEP)
0
106 1-835-068-21 CORD, POWER (AUS)
0
106 1-835-078-31 CORD, POWER (EA,HK,UK)
0
106 1-837-308-11 CORD, POWER-SUPPLY (CND)
0
106 1-837-312-11 CORD, POWER-SUPPLY (AR)
0
106 1-837-344-11 CORD, POWER-SUPPLY (MX)
0
106 1-837-345-11 CORD, POWER-SUPPLY (TW)
0
106 1-837-822-21 CORD, POWER-SUPPLY (CH)
0
107 1-569-008-33 ADAPTOR, CONVERSION (E32)
108 3-077-331-11 +BV3 (3-CR)
109 1-823-718-11 WIRE (FLAT TYPE) (17 CORE) (TZ230/TZ630)
ND5000 1-483-107-11 FLUORESCENT INDICATOR TUBE
TU401 1-693-780-21 TUNER (FM) (ANTENNA)
(EXCEPT CND,RU,SAF,AEP,UK,CH)
TU401 1-693-781-21 TUNER (FM) (ANTENNA) (CND)
TU401 1-693-788-21 TUNER (FM) (ANTENNA) (RU,SAF,AEP,UK,CH)
#2 7-682-547-04 SCREW +B 3X6
63
Page 64
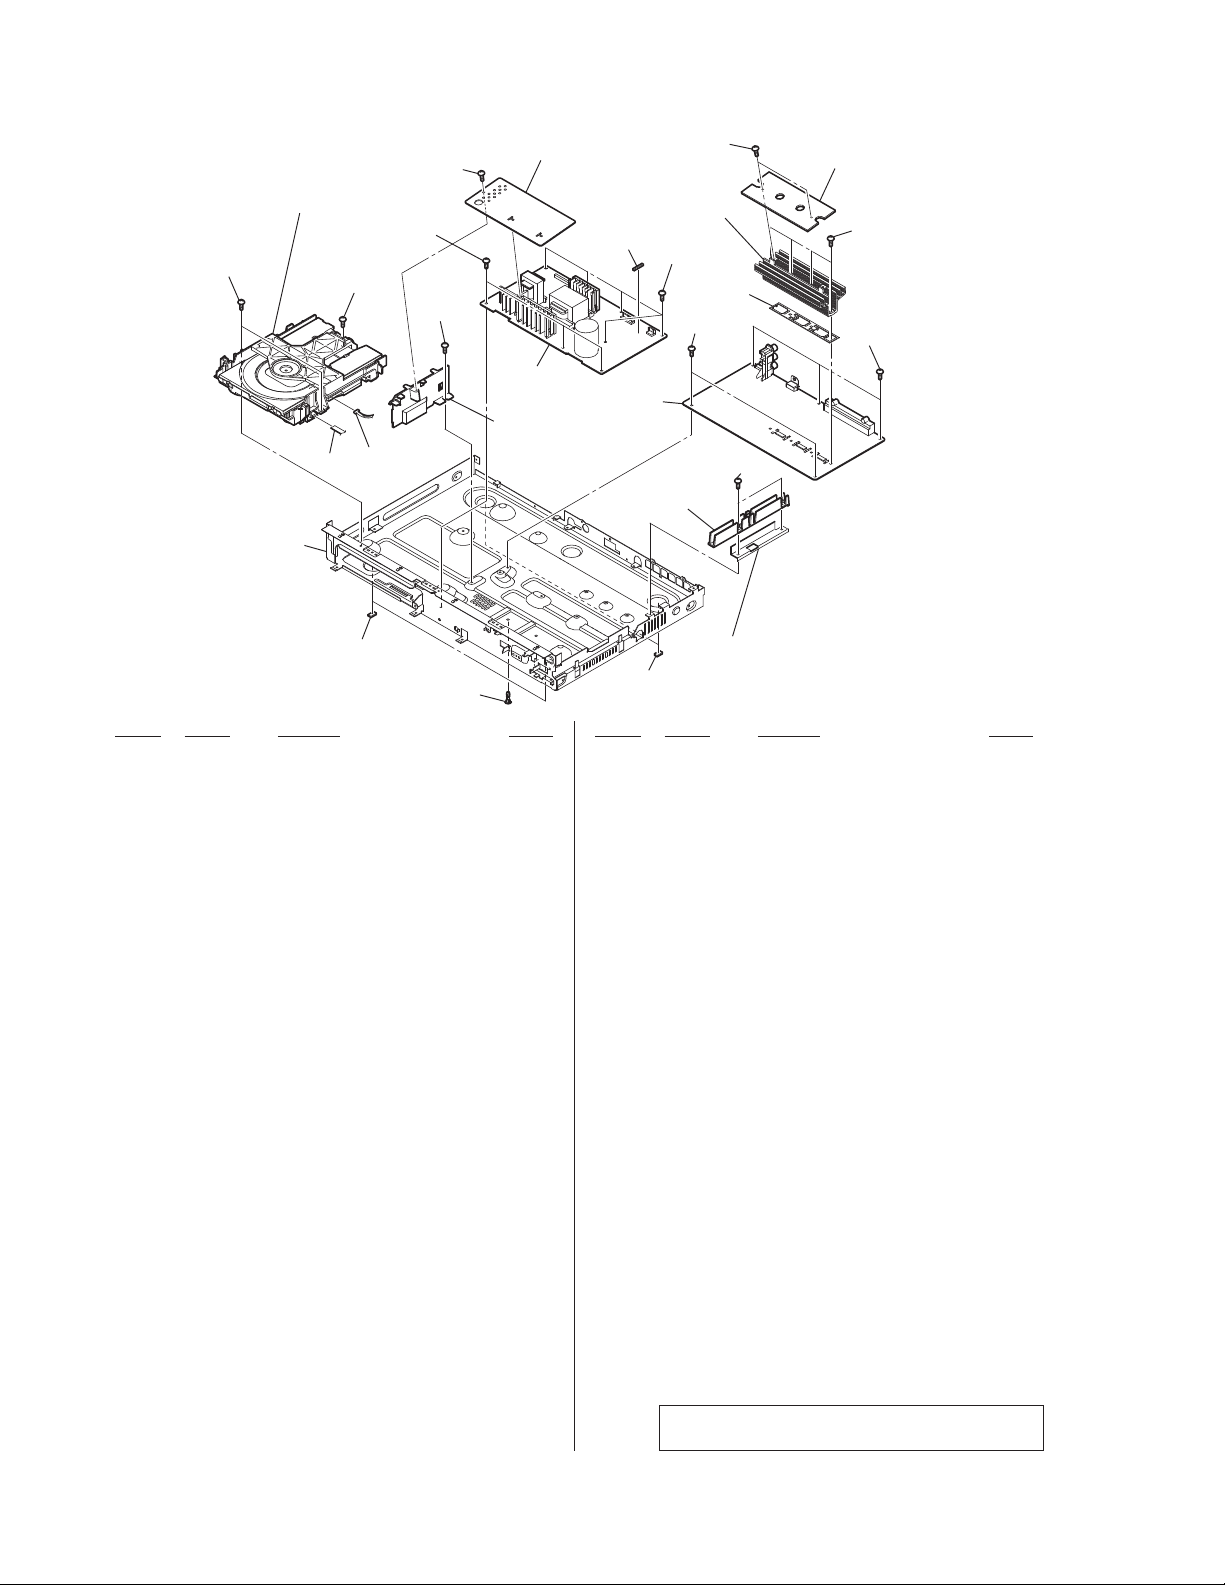
HBD-TZ210/TZ230/TZ510/TZ630/TZ710
Ver. 1.1
6-4. CHASSIS SECTION
CDM85MB-DVBU102
153
153
153
153
not supplied
F901
153
153
not supplied
153
not supplied
153
not supplied
153
153
154
155
not supplied
not supplied
152
not supplied
not supplied
151
not supplied
Ref. No. Part No. Description Remark Ref. No. Part No. Description Remark
151 4-151-413-01 CUSHION (EGD)
152 1-828-291-11 WIRE (FLAT TYPE) (5 CORE)
153 3-077-331-21 +BV3 (3-CR)
154 A-1745-469-A POWER BOARD, COMPLETE (AEP,UK)
154 A-1745-471-A POWER BOARD, COMPLETE
(E3,E12,AUS,AR,HK,PH,RU,SAF,SP,TH,CH)
154 A-1745-473-A POWER BOARD, COMPLETE (CND,TW)
154 A-1745-475-A POWER BOARD, COMPLETE (MX)
154 A-1745-477-A POWER BOARD, COMPLETE (E32,EA)
9
155 A-1746-824-A MAIN BOARD, COMPLETE (for SERVICE)
(TZ210:CND)
9
155 A-1746-825-A MAIN BOARD, COMPLETE (for SERVICE)
(TZ230:AEP)
9
155 A-1746-826-A MAIN BOARD, COMPLETE (for SERVICE)
(TZ230:UK)
9
155 A-1746-827-A MAIN BOARD, COMPLETE (for SERVICE)
(TZ210:E12)
9
155 A-1746-828-A MAIN BOARD, COMPLETE (for SERVICE)
(TZ210:SAF)
9
155 A-1746-829-A MAIN BOARD, COMPLETE (for SERVICE)
(TZ210:PH,SP,TH)
9
155 A-1746-830-A MAIN BOARD, COMPLETE (for SERVICE)
(TZ210:AUS)
9
155 A-1746-831-A MAIN BOARD, COMPLETE (for SERVICE)
(TZ210:E32)
9
155 A-1746-832-A MAIN BOARD, COMPLETE (for SERVICE)
(TZ210:MX)
9
155 A-1746-833-A MAIN BOARD, COMPLETE (for SERVICE)
(TZ510:SP,TH)
9
155 A-1746-834-A MAIN BOARD, COMPLETE (for SERVICE)
(TZ510:TW)
9
155 A-1746-835-A MAIN BOARD, COMPLETE (for SERVICE)
(TZ630:AEP)
9
155 A-1746-836-A MAIN BOARD, COMPLETE (for SERVICE)
(TZ710:CH)
151
9
155 A-1760-404-A MAIN BOARD, COMPLETE (for SERVICE)
(TZ210:E3)
9
155 A-1760-415-A MAIN BOARD, COMPLETE (for SERVICE)
(TZ210:HK)
9
155 A-1760-447-A MAIN BOARD, COMPLETE (for SERVICE)
(TZ210:AR)
9
155 A-1760-469-A MAIN BOARD, COMPLETE (for SERVICE)
(TZ510:CND)
9
155 A-1760-480-A MAIN BOARD, COMPLETE (for SERVICE)
(TZ510:E32)
9
155 A-1760-487-A MAIN BOARD, COMPLETE (for SERVICE)
(TZ510:MX)
9
155 A-1760-505-A MAIN BOARD, COMPLETE (for SERVICE)
(TZ710:E3)
9
155 A-1760-520-A MAIN BOARD, COMPLETE (for SERVICE)
(TZ710:TH)
9
155 A-1760-527-A MAIN BOARD, COMPLETE (for SERVICE)
(TZ710:HK)
9
155 A-1760-534-A MAIN BOARD, COMPLETE (for SERVICE)
(TZ710:MX)
9
155 A-1770-774-A MAIN BOARD, COMPLETE (for SERVICE)
(TZ210:EA)
9
155 A-1771-236-A MAIN BOARD, COMPLETE (for SERVICE)
(TZ210:RU)
9
155 A-1771-247-A MAIN BOARD, COMPLETE (for SERVICE)
(TZ510:SAF)
9
155 A-1771-254-A MAIN BOARD, COMPLETE (for SERVICE)
(TZ710:RU)
0
F901 1-533-311-12 FUSE, GLASS (DIA. 5) (8A/125V) (CND,MX,TW)
0
F901 1-576-232-51 FUSE (H.B.C.) (5A/250V)
(EXCEPT CND,E32,EA,MX,TW)
0
F901 1-576-233-51 FUSE (H.B.C.) (6.3A/250V) (E32,EA)
153
not supplied
(TZ210: CND, AUS, EA, HK, RU, SAF)
(TZ230/TZ510: CND, SAF, TW)
(TZ630/TZ710: HK, CH, RU)
Note:
If the wire (fl at type) was replaced, fold it some as the
wire (
fl
at type) before replacement.
64
Page 65
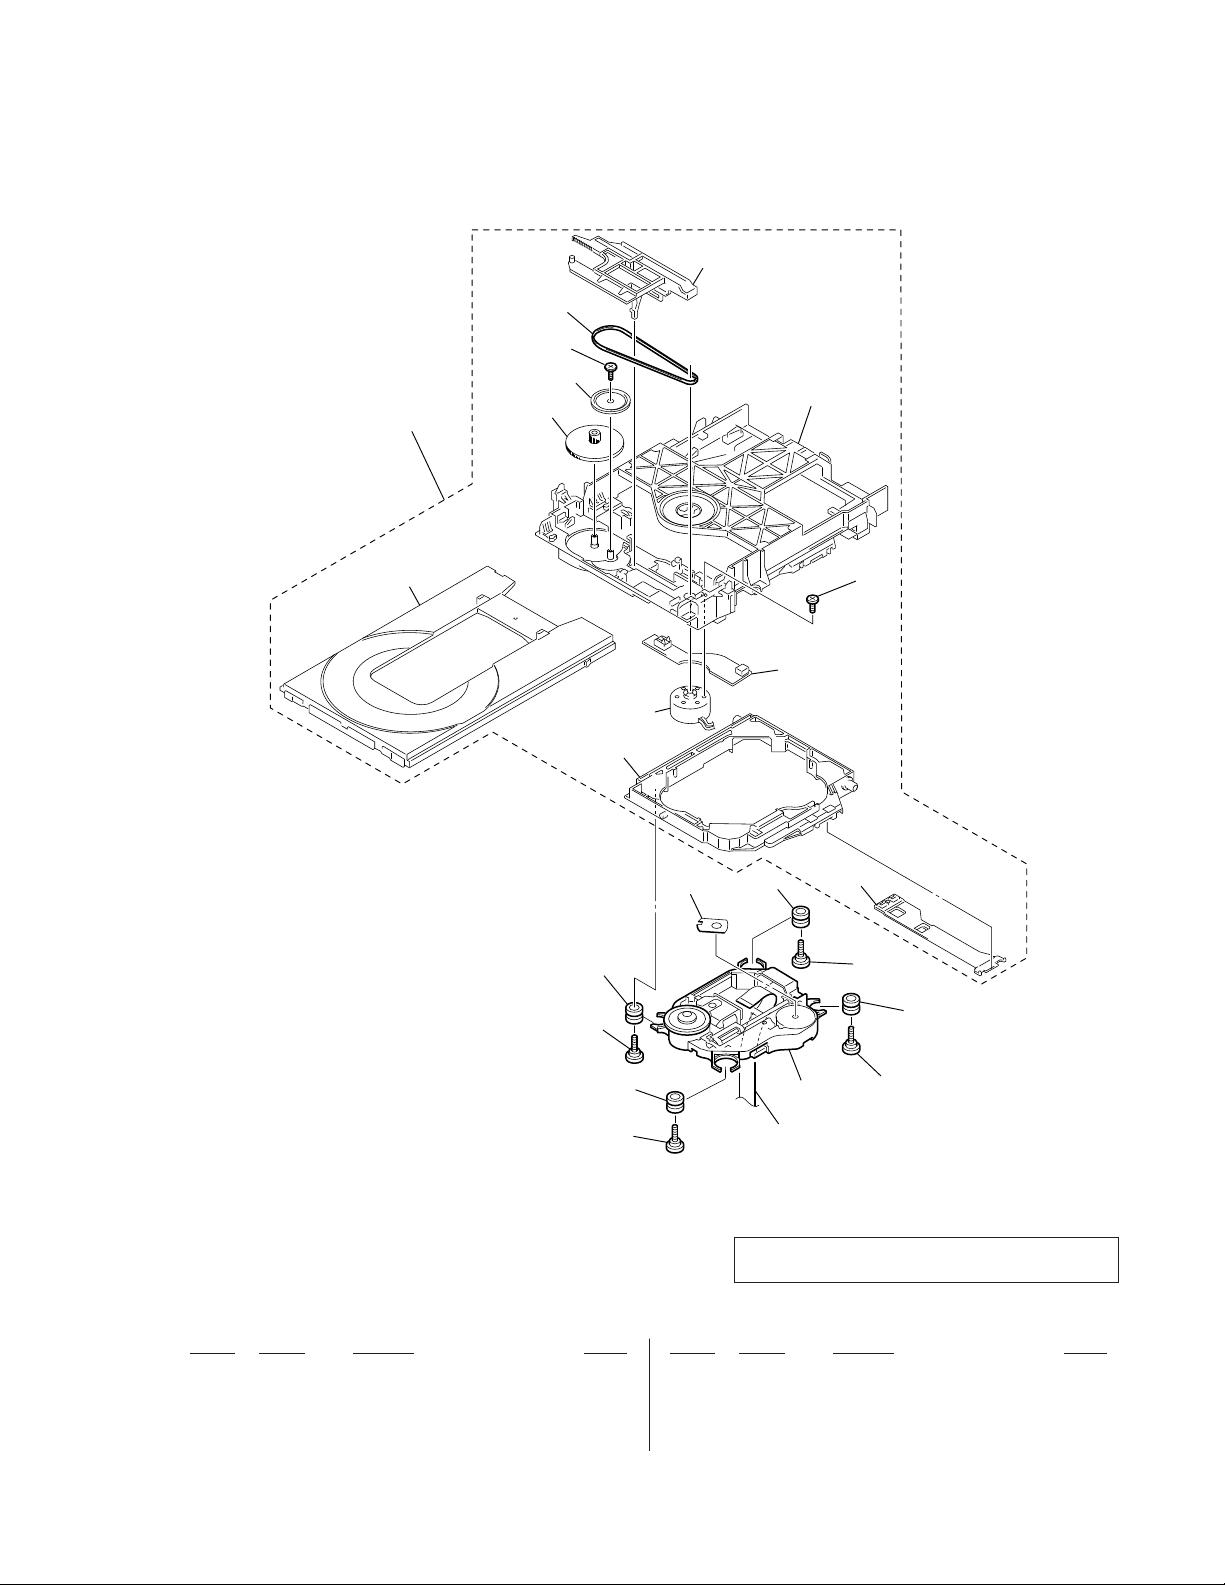
6-5. DVD MECHANISM DECK SECTION
(CDM85MB-DVBU102)
202
204
not supplied
201
not supplied
HBD-TZ210/TZ230/TZ510/TZ630/TZ710
not supplied
not supplied
not supplied
not supplied
not supplied
205
206
205
206
209
not supplied
(MS-203 board)
205
207
208
203
not
supplied
206
205
206
Note:
If the wire (fl at type) was replaced, fold it some as the
wire (
fl
at type) before replacement.
Ref. No. Part No. Description Remark Ref. No. Part No. Description Remark
201 A-1749-923-A CDM85 (MB) ASSY
202 3-088-371-01 BELT
203 4-974-725-11 SCREW (M1.7X2.5), P
204 4-674-137-11 SCREW (PTP2X5)
205 2-634-618-01 INSULATOR
206 3-087-599-01 SCREW, INSULATOR
0
207 8-820-321-12 OPTICAL PICK-UP (KHM-313CAA/C2RP1)
208 1-828-773-51 WIRE (FLAT TYPE) (24 CORE)
209 3-113-851-01 SHEET (E12)
65
Page 66
HBD-TZ210/TZ230/TZ510/TZ630/TZ710
Ver. 1.1
FL
ELECTRICAL PARTS LIST
SECTION 7
Note:
• Due to standardization, replacements in
the parts list may be different from the
parts specifi ed in the diagrams or the components used on the set.
• -XX and -X mean standardized parts, so
they may have some difference from the
original one.
• Items marked “
they are seldom required for routine service. Some delay should be anticipated
when ordering these items.
• RESISTORS
All resistors are in ohms.
METAL: Metal-fi lm resistor.
METAL OXIDE: Metal oxide-fi lm resistor.
F: nonfl ammable
• CAPACITORS
uF: µF
• COILS
uH: µH
• SEMICONDUCTORS
In each case, u: µ, for example:
uA. . : µA. . , uPA. . , µPA. . ,
uPB. . : µPB. . , uPC. . , µPC. . ,
uPD. . : µPD. .
Ref. No. Part No. Description Remark Ref. No. Part No. Description Remark
A-1746-214-A FL BOARD, COMPLETE
< CAPACITOR >
C5000 1-100-909-11 CERAMIC CHIP 10uF 10% 6.3V
C5002 1-126-382-11 ELECT 100uF 20% 16V
C5003 1-107-826-11 CERAMIC CHIP 0.1uF 10% 16V
C5004 1-162-968-11 CERAMIC CHIP 0.0047uF 10% 50V
C5005 1-163-037-11 CERAMIC CHIP 0.022uF 10% 50V
C5006 1-165-908-11 CERAMIC CHIP 1uF 10% 10V
C5007 1-165-908-11 CERAMIC CHIP 1uF 10% 10V
C5008 1-162-974-11 CERAMIC CHIP 0.01uF 50V
C5009 1-119-943-11 ELECT 47uF 20% 50V
C5010 1-107-826-11 CERAMIC CHIP 0.1uF 10% 16V
C5011 1-126-157-11 ELECT 10uF 20% 16V
C5012 1-107-826-11 CERAMIC CHIP 0.1uF 10% 16V
C5020 1-126-157-11 ELECT 10uF 20% 16V
C5021 1-162-970-11 CERAMIC CHIP 0.01uF 10% 25V
C5061 1-162-964-11 CERAMIC CHIP 0.001uF 10% 50V
< CONNECTOR >
CN5000 1-564-720-11 PIN, CONNECTOR (SMALL TYPE) 4P
CN5005 1-779-548-21 CONNECTOR, FFC (LIF (NON-ZIF)) 11P
*
” are not stocked since
******************
• Abbreviation
AR : Argentina model
AUS : Australian model
CH : Chinese model
CND : Canadian model
E3 : 240V AC area in E model
E12 : 220 – 240V AC area in E model
E32 : 110 – 240V AC area in E model
When indicating parts by reference number, please include the board name.
The components identifi ed by mark 0
or dotted line with mark 0 are critical for
safety.
Replace only with part number specifi ed.
Les composants identifi és par une marque
0 sont critiques pour la sécurité.
Ne les remplacer que par une pièce portant le numéro spécifi é.
< COIL >
L5000 1-410-671-31 INDUCTOR 47uH
L5001 1-410-671-31 INDUCTOR 47uH
L5002 1-410-671-31 INDUCTOR 47uH
< FLUORESCENT INDICATOR TUBE >
ND5000 1-483-107-11 FLUORESCENT INDICATOR TUBE
< TRANSISTOR >
Q5000 6-550-065-01 TRANSISTOR CPH5504-TL-E
< RESISTOR >
R5000 1-216-828-11 METAL CHIP 3.9K 5% 1/10W
R5001 1-216-827-11 METAL CHIP 3.3K 5% 1/10W
R5002 1-216-821-11 METAL CHIP 1K 5% 1/10W
R5003 1-216-813-11 METAL CHIP 220 5% 1/10W
R5004 1-216-813-11 METAL CHIP 220 5% 1/10W
R5005 1-216-813-11 METAL CHIP 220 5% 1/10W
R5006 1-216-839-11 METAL CHIP 33K 5% 1/10W
R5007 1-216-813-11 METAL CHIP 220 5% 1/10W
R5008 1-216-805-11 METAL CHIP 47 5% 1/10W
R5009 1-216-805-11 METAL CHIP 47 5% 1/10W
EA : Saudi Arabia model
HK : Hong Kong model
MX : Mexican model
PH : Philippines model
RU : Russian model
SAF : South African model
SP : Singapore model
TH : Thai model
TW : Taiwan model
The components identifi ed by mark 9 contain confi dential information.
Strictly follow the instructions whenever the
components are repaired and/or replaced.
Les composants identifi és par la marque
9 contiennent des informations confi dentielles.
Suivre scrupuleusement les instructions
chaque fois qu’un composant est remplacé
et / ou réparé.
< DIODE >
D5000 6-500-848-01 DIODE MC2840-T112-1
D5001 6-500-848-01 DIODE MC2840-T112-1
D5002 6-501-729-01 DIODE MAZ8051GLLS0
D5006 6-501-817-01 DIODE MA2J1110GLS0
< IC >
IC5000 6-702-302-01 IC TK11133CSCL-G
IC5001 6-713-497-01 IC HT16515
IC5002 6-600-767-01 IC PNA4823M02S0 (IR)
< JUMPER RESISTOR >
JR5000 1-216-295-91 SHORT
CHIP 0
66
R5010 1-216-809-11 METAL CHIP 100 5% 1/10W
R5011 1-216-809-11 METAL CHIP 100 5% 1/10W
R5012 1-216-809-11 METAL CHIP 100 5% 1/10W
R5013 1-216-844-11 METAL CHIP 82K 5% 1/10W
R5014 1-216-809-11 METAL CHIP 100 5% 1/10W
R5018 1-216-805-11 METAL CHIP 47 5% 1/10W
R5083 1-216-813-11 METAL CHIP 220 5% 1/10W
R5084 1-216-813-11 METAL CHIP 220 5% 1/10W
< TRANSFORMER >
T5000 1-443-645-11 TRANSFORMER, DC CONVERTER
************************************************************
Page 67
HBD-TZ210/TZ230/TZ510/TZ630/TZ710
Ver. 1.1
KEY-SW
Ref. No. Part No. Description Remark Ref. No. Part No. Description Remark
A-1746-218-A KEY-SW BOARD, COMPLETE
< CONNECTOR >
*
CN5201 1-580-055-21 PIN, CONNECTOR (SMD) 2P
CN5202 1-580-057-11 PIN, CONNECTOR (SMD) 4P
< RESISTOR >
R5201 1-216-821-11 METAL CHIP 1K 5% 1/10W
R5202 1-216-809-11 METAL CHIP 100 5% 1/10W
R5203 1-216-821-11 METAL CHIP 1K 5% 1/10W
R5204 1-216-825-11 METAL CHIP 2.2K 5% 1/10W
< SWITCH >
S5201 1-786-650-21 SWITCH, TACTILE (
S5202 1-786-650-21 SWITCH, TACTILE (
S5203 1-786-650-21 SWITCH, TACTILE (
S5204 1-786-650-21 SWITCH, TACTILE (FUNCTION)
*************************************************************
9
A-1746-824-A MAIN BOARD, COMPLETE (for SERVICE)
(TZ210:CND)
9
A-1746-825-A MAIN BOARD, COMPLETE (for SERVICE)
(TZ230:AEP)
9
A-1746-826-A MAIN BOARD, COMPLETE (for SERVICE)
(TZ230:UK)
9
A-1746-827-A MAIN BOARD, COMPLETE (for SERVICE)
(TZ210:E12)
9
A-1746-828-A MAIN BOARD, COMPLETE (for SERVICE)
(TZ210:SAF)
9
A-1746-829-A MAIN BOARD, COMPLETE (for SERVICE)
(TZ210:PH,SP,TH)
9
A-1746-830-A MAIN BOARD, COMPLETE (for SERVICE)
(TZ210:AUS)
9
A-1746-831-A MAIN BOARD, COMPLETE (for SERVICE)
(TZ210:E32)
9
A-1746-832-A MAIN BOARD, COMPLETE (for SERVICE)
(TZ210:MX)
9
A-1746-833-A MAIN BOARD, COMPLETE (for SERVICE)
(TZ510:SP,TH)
9
A-1746-834-A MAIN BOARD, COMPLETE (for SERVICE)
(TZ510:TW)
9
A-1746-835-A MAIN BOARD, COMPLETE (for SERVICE)
(TZ630:AEP)
9
A-1746-836-A MAIN BOARD, COMPLETE (for SERVICE)
(TZ710:CH)
9
A-1760-404-A MAIN BOARD, COMPLETE (for SERVICE)
(TZ210:E3)
9
A-1760-415-A MAIN BOARD, COMPLETE (for SERVICE)
(TZ210:HK)
9
A-1760-447-A MAIN BOARD, COMPLETE (for SERVICE)
(TZ210:AR)
9
A-1760-469-A MAIN BOARD, COMPLETE (for SERVICE)
(TZ510:CND)
9
A-1760-480-A MAIN BOARD, COMPLETE (for SERVICE)
(TZ510:E32)
9
A-1760-487-A MAIN BOARD, COMPLETE (for SERVICE)
(TZ510:MX)
9
A-1760-505-A MAIN BOARD, COMPLETE (for SERVICE)
(TZ710:E3)
9
A-1760-520-A MAIN BOARD, COMPLETE (for SERVICE)
(TZ710:TH)
9
A-1760-527-A MAIN BOARD, COMPLETE (for SERVICE)
(TZ710:HK)
***********************
x
)
N
)
Z
)
9
A-1760-534-A MAIN BOARD, COMPLETE (for SERVICE)
(TZ710:MX)
9
A-1770-774-A MAIN BOARD, COMPLETE (for SERVICE)
(TZ210:EA)
9
A-1771-236-A MAIN BOARD, COMPLETE (for SERVICE)
(TZ210:RU)
9
A-1771-247-A MAIN BOARD, COMPLETE (for SERVICE)
(TZ510:SAF)
9
A-1771-254-A MAIN BOARD, COMPLETE (for SERVICE)
(TZ710:RU)
< CAPACITOR >
C333 1-107-826-11 CERAMIC CHIP 0.1uF 10% 16V
C334 1-107-826-11 CERAMIC CHIP 0.1uF 10% 16V
C400 1-107-826-11 CERAMIC CHIP 0.1uF 10% 16V
(TZ210/TZ510/TZ710)
C401 1-107-826-11 CERAMIC CHIP 0.1uF 10% 16V
(TZ210/TZ510/TZ710)
C402 1-162-927-11 CERAMIC CHIP 100PF 5% 50V
C403 1-162-927-11 CERAMIC CHIP 100PF 5% 50V
C404 1-162-927-11 CERAMIC CHIP 100PF 5% 50V
C405 1-162-927-11 CERAMIC CHIP 100PF 5% 50V
C409 1-126-933-11 ELECT 100uF 20% 16V
C410 1-107-826-11 CERAMIC CHIP 0.1uF 10% 16V
C411 1-126-916-11 ELECT 1000uF 20% 6.3V
(TZ210/TZ510/TZ710)
C412 1-162-960-11 CERAMIC CHIP 220PF 10% 50V
(TZ210/TZ510/TZ710)
C413 1-162-960-11 CERAMIC CHIP 220PF 10% 50V
(TZ210/TZ510/TZ710)
C414 1-104-658-91 ELECT 100uF 20% 10V
(TZ210/TZ510/TZ710)
C415 1-104-662-91 ELECT 22uF 20% 25V
(TZ210/TZ510/TZ710)
C416 1-104-662-91 ELECT 22uF 20% 25V
(TZ210/TZ510/TZ710)
C417 1-107-826-11 CERAMIC CHIP 0.1uF 10% 16V
(TZ210/TZ510/TZ710)
C418 1-162-970-11 CERAMIC CHIP 0.01uF 10% 25V
(RU,SAF,AEP,UK,CH)
C419 1-162-970-11 CERAMIC CHIP 0.01uF 10% 25V
(RU,SAF,AEP,UK,CH)
C420 1-165-908-11 CERAMIC CHIP 1uF 10% 10V
(TZ210/TZ510/TZ710)
C421 1-107-826-11 CERAMIC CHIP 0.1uF 10% 16V
(TZ210/TZ510/TZ710)
C423 1-107-826-11 CERAMIC CHIP 0.1uF 10% 16V
C425 1-126-947-11 ELECT 47uF 20% 35V
C426 1-127-715-11 CERAMIC CHIP 0.22uF 10% 16V
C427 1-107-826-11 CERAMIC CHIP 0.1uF 10% 16V
C429 1-127-573-11 CERAMIC CHIP 1uF 10% 16V
C431 1-165-908-11 CERAMIC CHIP 1uF 10% 10V
C432 1-165-908-11 CERAMIC CHIP 1uF 10% 10V
C435 1-107-826-11 CERAMIC CHIP 0.1uF 10% 16V
C436 1-126-964-11 ELECT 10uF 20% 50V
C438 1-107-826-11 CERAMIC CHIP 0.1uF 10% 16V
C439 1-126-964-11 ELECT 10uF 20% 50V
C440 1-126-964-11 ELECT 10uF 20% 50V
C441 1-107-826-11 CERAMIC CHIP 0.1uF 10% 16V
C471 1-126-933-11 ELECT 100uF 20% 16V
C476 1-162-970-11 CERAMIC CHIP 0.01uF 10% 25V
C500 1-162-923-11 CERAMIC CHIP 47PF 5% 50V
C511 1-107-826-11 CERAMIC CHIP 0.1uF 10% 16V
*********************
MAIN
6767
Page 68
HBD-TZ210/TZ230/TZ510/TZ630/TZ710
Ver. 1.1
MAIN
Ref. No. Part No. Description Remark Ref. No. Part No. Description Remark
C512 1-107-826-11 CERAMIC CHIP 0.1uF 10% 16V
C513 1-107-826-11 CERAMIC CHIP 0.1uF 10% 16V
C514 1-107-826-11 CERAMIC CHIP 0.1uF 10% 16V
C515 1-107-826-11 CERAMIC CHIP 0.1uF 10% 16V
C516 1-165-908-11 CERAMIC CHIP 1uF 10% 10V
C1130 1-107-826-11 CERAMIC CHIP 0.1uF 10% 16V
C1132 1-107-826-11 CERAMIC CHIP 0.1uF 10% 16V
C1133 1-107-826-11 CERAMIC CHIP 0.1uF 10% 16V
C1135 1-164-677-11 CERAMIC CHIP 0.033uF 10% 16V
C1136 1-162-970-11 CERAMIC CHIP 0.01uF 10% 25V
C517 1-107-826-11 CERAMIC CHIP 0.1uF 10% 16V
C518 1-107-826-11 CERAMIC CHIP 0.1uF 10% 16V
C519 1-107-826-11 CERAMIC CHIP 0.1uF 10% 16V
C520 1-107-826-11 CERAMIC CHIP 0.1uF 10% 16V
C521 1-165-908-11 CERAMIC CHIP 1uF 10% 10V
C522 1-107-826-11 CERAMIC CHIP 0.1uF 10% 16V
C523 1-127-715-11 CERAMIC CHIP 0.22uF 10% 16V
C524 1-162-970-11 CERAMIC CHIP 0.01uF 10% 25V
C525 1-107-826-11 CERAMIC CHIP 0.1uF 10% 16V
C527 1-164-227-11 CERAMIC CHIP 0.022uF 10% 25V
C528 1-104-656-11 ELECT 2200uF 20% 6.3V
C529 1-104-658-91 ELECT 100uF 20% 10V
C530 1-107-826-11 CERAMIC CHIP 0.1uF 10% 16V
C531 1-162-970-11 CERAMIC CHIP 0.01uF 10% 25V
C532 1-126-933-11 ELECT 100uF 20% 16V
C533 1-164-315-11 CERAMIC CHIP 470PF 5% 50V
C536 1-126-923-91 ELECT 220uF 20% 10V
C537 1-104-658-91 ELECT 100uF 20% 10V
C538 1-162-970-11 CERAMIC CHIP 0.01uF 10% 25V
C539 1-162-970-11 CERAMIC CHIP 0.01uF 10% 25V
C540 1-126-933-11 ELECT 100uF 20% 16V
C541 1-162-970-11 CERAMIC CHIP 0.01uF 10% 25V
C542 1-164-315-11 CERAMIC CHIP 470PF 5% 50V
C543 1-126-965-91 ELECT 22uF 20% 50V
C545 1-104-658-91 ELECT 100uF 20% 10V
C546 1-107-826-11 CERAMIC CHIP 0.1uF 10% 16V
C550 1-107-826-11 CERAMIC CHIP 0.1uF 10% 16V
C551 1-162-964-11 CERAMIC CHIP 0.001uF 10% 50V
C552 1-126-933-11 ELECT 100uF 20% 16V
C553 1-126-935-11 ELECT 470uF 20% 16V
C1137 1-107-826-11 CERAMIC CHIP 0.1uF 10% 16V
C1138 1-162-964-11 CERAMIC CHIP 0.001uF 10% 50V
C1139 1-162-919-11 CERAMIC CHIP 22PF 5% 50V
C1140 1-107-826-11 CERAMIC CHIP 0.1uF 10% 16V
C1144 1-162-970-11 CERAMIC CHIP 0.01uF 10% 25V
C1145 1-126-964-11 ELECT 10uF 20% 50V
C1146 1-107-826-11 CERAMIC CHIP 0.1uF 10% 16V
C1147 1-165-176-11 CERAMIC CHIP 0.047uF 10% 16V
C1148 1-165-176-11 CERAMIC CHIP 0.047uF 10% 16V
C1149 1-107-826-11 CERAMIC CHIP 0.1uF 10% 16V
C1151 1-162-964-11 CERAMIC CHIP 0.001uF 10% 50V
C1152 1-162-916-11 CERAMIC CHIP 12PF 5% 50V
C1153 1-162-916-11 CERAMIC CHIP 12PF 5% 50V
C1154 1-107-826-11 CERAMIC CHIP 0.1uF 10% 16V
C1155 1-162-970-11 CERAMIC CHIP 0.01uF 10% 25V
C1156 1-162-970-11 CERAMIC CHIP 0.01uF 10% 25V
C1158 1-162-970-11 CERAMIC CHIP 0.01uF 10% 25V
C1159 1-107-826-11 CERAMIC CHIP 0.1uF 10% 16V
C1160 1-162-970-11 CERAMIC CHIP 0.01uF 10% 25V
C1161 1-162-970-11 CERAMIC CHIP 0.01uF 10% 25V
C1162 1-162-970-11 CERAMIC CHIP 0.01uF 10% 25V
C1163 1-162-970-11 CERAMIC CHIP 0.01uF 10% 25V
C1164 1-162-970-11 CERAMIC CHIP 0.01uF 10% 25V
C1165 1-107-826-11 CERAMIC CHIP 0.1uF 10% 16V
C1169 1-107-826-11 CERAMIC CHIP 0.1uF 10% 16V
C1170 1-162-965-11 CERAMIC CHIP 0.0015uF 10% 50V
C1171 1-107-826-11 CERAMIC CHIP 0.1uF 10% 16V
C1172 1-107-826-11 CERAMIC CHIP 0.1uF 10% 16V
C1174 1-162-970-11 CERAMIC CHIP 0.01uF 10% 25V
C1175 1-162-970-11 CERAMIC CHIP 0.01uF 10% 25V
C1101 1-162-970-11 CERAMIC CHIP 0.01uF 10% 25V
C1102 1-165-908-11 CERAMIC CHIP 1uF 10% 10V
C1105 1-126-947-11 ELECT 47uF 20% 35V
C1106 1-162-970-11 CERAMIC CHIP 0.01uF 10% 25V
C1108 1-107-826-11 CERAMIC CHIP 0.1uF 10% 16V
C1109 1-107-826-11 CERAMIC CHIP 0.1uF 10% 16V
C1110 1-107-826-11 CERAMIC CHIP 0.1uF 10% 16V
C1111 1-104-658-91 ELECT 100uF 20% 10V
C1112 1-126-947-11 ELECT 47uF 20% 35V
C1113 1-162-970-11 CERAMIC CHIP 0.01uF 10% 25V
C1114 1-107-826-11 CERAMIC CHIP 0.1uF 10% 16V
C1115 1-107-826-11 CERAMIC CHIP 0.1uF 10% 16V
C1116 1-107-826-11 CERAMIC CHIP 0.1uF 10% 16V
C1117 1-126-947-11 ELECT 47uF 20% 35V
C1118 1-126-947-11 ELECT 47uF 20% 35V
C1119 1-126-947-11 ELECT 47uF 20% 35V
C1120 1-165-908-11 CERAMIC CHIP 1uF 10% 10V
C1121 1-165-908-11 CERAMIC CHIP 1uF 10% 10V
C1122 1-165-908-11 CERAMIC CHIP 1uF 10% 10V
C1123 1-165-908-11 CERAMIC CHIP 1uF 10% 10V
C1124 1-165-908-11 CERAMIC CHIP 1uF 10% 10V
C1125 1-107-826-11 CERAMIC CHIP 0.1uF 10% 16V
C1126 1-107-826-11 CERAMIC CHIP 0.1uF 10% 16V
C1127 1-162-970-11 CERAMIC CHIP 0.01uF 10% 25V
C1129 1-100-909-11 CERAMIC CHIP 10uF 10% 6.3V
C1176 1-162-970-11 CERAMIC CHIP 0.01uF 10% 25V
C1177 1-126-947-11 ELECT 47uF 20% 35V
C1179 1-107-826-11 CERAMIC CHIP 0.1uF 10% 16V
C1180 1-107-826-11 CERAMIC CHIP 0.1uF 10% 16V
C1181 1-107-826-11 CERAMIC CHIP 0.1uF 10% 16V
C1182 1-127-715-11 CERAMIC CHIP 0.22uF 10% 16V
C1183 1-128-934-11 CERAMIC CHIP 0.33uF 20% 10V
C1184 1-107-826-11 CERAMIC CHIP 0.1uF 10% 16V
C1186 1-127-715-11 CERAMIC CHIP 0.22uF 10% 16V
C1187 1-126-947-11 ELECT 47uF 20% 35V
C1190 1-104-658-91 ELECT 100uF 20% 10V
C1191 1-107-826-11 CERAMIC CHIP 0.1uF 10% 16V
C1192 1-107-826-11 CERAMIC CHIP 0.1uF 10% 16V
C1193 1-127-715-11 CERAMIC CHIP 0.22uF 10% 16V
C1195 1-127-715-11 CERAMIC CHIP 0.22uF 10% 16V
C1197 1-107-826-11 CERAMIC CHIP 0.1uF 10% 16V
C1198 1-165-908-11 CERAMIC CHIP 1uF 10% 10V
C1199 1-162-968-11 CERAMIC CHIP 0.0047uF 10% 50V
C1503 1-107-826-11 CERAMIC CHIP 0.1uF 10% 16V
C1504 1-107-826-11 CERAMIC CHIP 0.1uF 10% 16V
C1505 1-107-826-11 CERAMIC CHIP 0.1uF 10% 16V
C1506 1-164-227-11 CERAMIC CHIP 0.022uF 10% 25V
C1507 1-126-964-11 ELECT 10uF 20% 50V
C1508 1-107-826-11 CERAMIC CHIP 0.1uF 10% 16V
C1509 1-107-826-11 CERAMIC CHIP 0.1uF 10% 16V
68
Page 69
HBD-TZ210/TZ230/TZ510/TZ630/TZ710
Ver. 1.1
MAIN
Ref. No. Part No. Description Remark Ref. No. Part No. Description Remark
C1510 1-107-826-11 CERAMIC CHIP 0.1uF 10% 16V
C1511 1-107-826-11 CERAMIC CHIP 0.1uF 10% 16V
C1512 1-107-826-11 CERAMIC CHIP 0.1uF 10% 16V
C1513 1-107-826-11 CERAMIC CHIP 0.1uF 10% 16V
C1514 1-126-964-11 ELECT 10uF 20% 50V
C3025 1-107-826-11 CERAMIC CHIP 0.1uF 10% 16V
C3026 1-107-826-11 CERAMIC CHIP 0.1uF 10% 16V
C3027 1-112-246-11 ELECT 100uF 20% 35V
C3028 1-115-339-11 CERAMIC CHIP 0.1uF 10% 50V
C3029 1-107-826-11 CERAMIC CHIP 0.1uF 10% 16V
C1516 1-162-964-11 CERAMIC CHIP 0.001uF 10% 50V
C1518 1-107-826-11 CERAMIC CHIP 0.1uF 10% 16V
C1520 1-126-947-11 ELECT 47uF 20% 35V
C1522 1-164-730-11 CERAMIC CHIP 0.0012uF 10% 50V
C1523 1-162-964-11 CERAMIC CHIP 0.001uF 10% 50V
C1524 1-110-563-11 CERAMIC CHIP 0.068uF 10% 16V
C1525 1-100-436-91 CERAMIC CHIP 0.033uF 10% 25V
C1725 1-162-970-11 CERAMIC CHIP 0.01uF 10% 25V
C1727 1-107-826-11 CERAMIC CHIP 0.1uF 10% 16V
C1729 1-127-715-11 CERAMIC CHIP 0.22uF 10% 16V
C1730 1-127-715-11 CERAMIC CHIP 0.22uF 10% 16V
C1731 1-127-715-11 CERAMIC CHIP 0.22uF 10% 16V
C1732 1-107-826-11 CERAMIC CHIP 0.1uF 10% 16V
C1733 1-127-715-11 CERAMIC CHIP 0.22uF 10% 16V
C1734 1-165-908-11 CERAMIC CHIP 1uF 10% 10V
C2100 1-162-970-11 CERAMIC CHIP 0.01uF 10% 25V
C2102 1-107-826-11 CERAMIC CHIP 0.1uF 10% 16V
C2108 1-127-760-11 CERAMIC CHIP 4.7uF 10% 6.3V
C2109 1-104-658-91 ELECT 100uF 20% 10V
C2110 1-104-658-91 ELECT 100uF 20% 10V
C2112 1-126-923-91 ELECT 220uF 20% 10V
C2114 1-107-826-11 CERAMIC CHIP 0.1uF 10% 16V
C2115 1-100-909-11 CERAMIC CHIP 10uF 10% 6.3V
C2116 1-107-826-11 CERAMIC CHIP 0.1uF 10% 16V
C2117 1-100-909-11 CERAMIC CHIP 10uF 10% 6.3V
C2118 1-107-826-11 CERAMIC CHIP 0.1uF 10% 16V
C2119 1-162-964-11 CERAMIC CHIP 0.001uF 10% 50V
C2130 1-162-970-11 CERAMIC CHIP 0.01uF 10% 25V
C2200 1-107-826-11 CERAMIC CHIP 0.1uF 10% 16V
(TZ210:AUS/TZ230:UK/TZ510:CND)
C2201 1-162-970-11 CERAMIC CHIP 0.01uF 10% 25V
(TZ210:AUS/TZ230:UK/TZ510:CND)
C2502 1-164-172-11 CERAMIC CHIP 0.0056uF 10% 25V
C2503 1-127-760-11 CERAMIC CHIP 4.7uF 10% 6.3V
C3000 1-162-970-11 CERAMIC CHIP 0.01uF 10% 25V
C3001 1-162-970-11 CERAMIC CHIP 0.01uF 10% 25V
C3002 1-126-947-11 ELECT 47uF 20% 35V
C3003 1-107-826-11 CERAMIC CHIP 0.1uF 10% 16V
C3006 1-107-826-11 CERAMIC CHIP 0.1uF 10% 16V
C3007 1-107-826-11 CERAMIC CHIP 0.1uF 10% 16V
C3008 1-100-436-91 CERAMIC CHIP 0.033uF 10% 25V
C3009 1-100-909-11 CERAMIC CHIP 10uF 10% 6.3V
C3010 1-107-826-11 CERAMIC CHIP 0.1uF 10% 16V
C3011 1-112-246-11 ELECT 100uF 20% 35V
C3012 1-107-826-11 CERAMIC CHIP 0.1uF 10% 16V
C3013 1-115-339-11 CERAMIC CHIP 0.1uF 10% 50V
C3014 1-114-885-51 FILM 1uF 5% 50V
C3015 1-114-885-51 FILM 1uF 5% 50V
C3016 1-107-826-11 CERAMIC CHIP 0.1uF 10% 16V
C3017 1-112-246-11 ELECT 100uF 20% 35V
C3018 1-115-339-11 CERAMIC CHIP 0.1uF 10% 50V
C3019 1-126-953-11 ELECT 2200uF 20% 35V
C3021 1-100-436-91 CERAMIC CHIP 0.033uF 10% 25V
C3022 1-114-869-11 CERAMIC CHIP 2.2uF 10% 6.3V
C3023 1-100-436-91 CERAMIC CHIP 0.033uF 10% 25V
C3024 1-107-826-11 CERAMIC CHIP 0.1uF 10% 16V
C3030 1-114-885-51 FILM 1uF 5% 50V
C3031 1-114-885-51 FILM 1uF 5% 50V
C3032 1-112-246-11 ELECT 100uF 20% 35V
C3033 1-115-339-11 CERAMIC CHIP 0.1uF 10% 50V
C3034 1-126-947-11 ELECT 47uF 20% 35V
C3036 1-107-826-11 CERAMIC CHIP 0.1uF 10% 16V
C3037 1-107-826-11 CERAMIC CHIP 0.1uF 10% 16V
C3038 1-107-826-11 CERAMIC CHIP 0.1uF 10% 16V
C3039 1-126-952-11 ELECT 1000uF 20% 35V
C3040 1-100-436-91 CERAMIC CHIP 0.033uF 10% 25V
C3041 1-107-826-11 CERAMIC CHIP 0.1uF 10% 16V
C3042 1-107-826-11 CERAMIC CHIP 0.1uF 10% 16V
C3043 1-107-826-11 CERAMIC CHIP 0.1uF 10% 16V
C3044 1-107-826-11 CERAMIC CHIP 0.1uF 10% 16V
C3045 1-107-826-11 CERAMIC CHIP 0.1uF 10% 16V
C3046 1-100-436-91 CERAMIC CHIP 0.033uF 10% 25V
C3047 1-107-826-11 CERAMIC CHIP 0.1uF 10% 16V
C3048 1-114-869-11 CERAMIC CHIP 2.2uF 10% 6.3V
C3049 1-112-246-11 ELECT 100uF 20% 35V
C3050 1-107-826-11 CERAMIC CHIP 0.1uF 10% 16V
C3051 1-114-323-11 CERAMIC CHIP 0.01uF 10% 50V
C3052 1-114-323-11 CERAMIC CHIP 0.01uF 10% 50V
C3053 1-115-339-11 CERAMIC CHIP 0.1uF 10% 50V
C3054 1-162-964-11 CERAMIC CHIP 0.001uF 10% 50V
(CND,AUS,EA,HK,RU,SAF,AEP,UK,TW,CH)
C3055 1-162-964-11 CERAMIC CHIP 0.001uF 10% 50V
(CND,AUS,EA,HK,RU,SAF,AEP,UK,TW,CH)
C3056 1-114-323-11 CERAMIC CHIP 0.01uF 10% 50V
C3057 1-114-323-11 CERAMIC CHIP 0.01uF 10% 50V
C3058 1-162-964-11 CERAMIC CHIP 0.001uF 10% 50V
(CND,AUS,EA,HK,RU,SAF,AEP,UK,TW,CH)
C3059 1-162-964-11 CERAMIC CHIP 0.001uF 10% 50V
(CND,AUS,EA,HK,RU,SAF,AEP,UK,TW,CH)
C3060 1-114-885-51 FILM 1uF 5% 50V
C3061 1-114-885-51 FILM 1uF 5% 50V
C3062 1-107-826-11 CERAMIC CHIP 0.1uF 10% 16V
C3063 1-112-246-11 ELECT 100uF 20% 35V
C3064 1-115-339-11 CERAMIC CHIP 0.1uF 10% 50V
C3065 1-162-964-11 CERAMIC CHIP 0.001uF 10% 50V
(CND,AUS,EA,HK,RU,SAF,AEP,UK,TW,CH)
C3066 1-100-436-91 CERAMIC CHIP 0.033uF 10% 25V
C3067 1-162-964-11 CERAMIC CHIP 0.001uF 10% 50V
(CND,AUS,EA,HK,RU,SAF,AEP,UK,TW,CH)
C3068 1-114-323-11 CERAMIC CHIP 0.01uF 10% 50V
C3069 1-114-323-11 CERAMIC CHIP 0.01uF 10% 50V
C3070 1-126-952-11 ELECT 1000uF 20% 35V
C3071 1-100-436-91 CERAMIC CHIP 0.033uF 10% 25V
C3072 1-107-826-11 CERAMIC CHIP 0.1uF 10% 16V
C3074 1-112-246-11 ELECT 100uF 20% 35V
C3075 1-107-826-11 CERAMIC CHIP 0.1uF 10% 16V
C3076 1-107-826-11 CERAMIC CHIP 0.1uF 10% 16V
C3077 1-114-869-11 CERAMIC CHIP 2.2uF 10% 6.3V
C3078 1-162-964-11 CERAMIC CHIP 0.001uF 10% 50V
(CND,AUS,EA,HK,RU,SAF,AEP,UK,TW,CH)
C3079 1-114-323-11 CERAMIC CHIP 0.01uF 10% 50V
C3080 1-162-964-11 CERAMIC CHIP 0.001uF 10% 50V
(CND,AUS,EA,HK,RU,SAF,AEP,UK,TW,CH)
6969
Page 70
HBD-TZ210/TZ230/TZ510/TZ630/TZ710
Ver. 1.1
MAIN
Ref. No. Part No. Description Remark Ref. No. Part No. Description Remark
C3081 1-114-323-11 CERAMIC CHIP 0.01uF 10% 50V
C3082 1-115-339-11 CERAMIC CHIP 0.1uF 10% 50V
C3083 1-107-826-11 CERAMIC CHIP 0.1uF 10% 16V
C3084 1-114-885-51 FILM 1uF 5% 50V
C3085 1-114-885-51 FILM 1uF 5% 50V
C3141 1-100-436-91 CERAMIC CHIP 0.033uF 10% 25V
C3142 1-107-826-11 CERAMIC CHIP 0.1uF 10% 16V
C3143 1-107-826-11 CERAMIC CHIP 0.1uF 10% 16V
C3144 1-107-826-11 CERAMIC CHIP 0.1uF 10% 16V
C3145 1-115-339-11 CERAMIC CHIP 0.1uF 10% 50V
C3086 1-162-964-11 CERAMIC CHIP 0.001uF 10% 50V
(CND,AUS,EA,HK,RU,SAF,AEP,UK,TW,CH)
C3087 1-162-964-11 CERAMIC CHIP 0.001uF 10% 50V
(CND,AUS,EA,HK,RU,SAF,AEP,UK,TW,CH)
C3088 1-114-323-11 CERAMIC CHIP 0.01uF 10% 50V
C3089 1-114-323-11 CERAMIC CHIP 0.01uF 10% 50V
C3091 1-112-246-11 ELECT 100uF 20% 35V
C3092 1-115-339-11 CERAMIC CHIP 0.1uF 10% 50V
C3093 1-162-964-11 CERAMIC CHIP 0.001uF 10% 50V
(CND,AUS,EA,HK,RU,SAF,AEP,UK,TW,CH)
C3094 1-162-964-11 CERAMIC CHIP 0.001uF 10% 50V
(CND,AUS,EA,HK,RU,SAF,AEP,UK,TW,CH)
C3095 1-126-952-11 ELECT 1000uF 20% 35V
C3096 1-126-947-11 ELECT 47uF 20% 35V
C3097 1-114-323-11 CERAMIC CHIP 0.01uF 10% 50V
C3098 1-114-323-11 CERAMIC CHIP 0.01uF 10% 50V
C3099 1-107-826-11 CERAMIC CHIP 0.1uF 10% 16V
C3100 1-107-826-11 CERAMIC CHIP 0.1uF 10% 16V
C3101 1-107-826-11 CERAMIC CHIP 0.1uF 10% 16V
C3102 1-100-436-91 CERAMIC CHIP 0.033uF 10% 25V
C3103 1-107-826-11 CERAMIC CHIP 0.1uF 10% 16V
C3104 1-107-826-11 CERAMIC CHIP 0.1uF 10% 16V
C3105 1-107-826-11 CERAMIC CHIP 0.1uF 10% 16V
C3106 1-107-826-11 CERAMIC CHIP 0.1uF 10% 16V
C3107 1-107-826-11 CERAMIC CHIP 0.1uF 10% 16V
C3108 1-100-436-91 CERAMIC CHIP 0.033uF 10% 25V
C3109 1-114-869-11 CERAMIC CHIP 2.2uF 10% 6.3V
C3110 1-112-246-11 ELECT 100uF 20% 35V
C3111 1-107-826-11 CERAMIC CHIP 0.1uF 10% 16V
C3112 1-115-339-11 CERAMIC CHIP 0.1uF 10% 50V
C3113 1-107-826-11 CERAMIC CHIP 0.1uF 10% 16V
C3114 1-114-885-51 FILM 1uF 5% 50V
C3115 1-114-885-51 FILM 1uF 5% 50V
C3116 1-112-246-11 ELECT 100uF 20% 35V
C3146 1-162-909-11 CERAMIC CHIP 4PF 0.25PF 50V
C3148 1-126-933-11 ELECT 100uF 20% 16V
C3149 1-162-970-11 CERAMIC CHIP 0.01uF 10% 25V
C3150 1-165-908-11 CERAMIC CHIP 1uF 10% 10V
C3151 1-162-970-11 CERAMIC CHIP 0.01uF 10% 25V
C3152 1-126-923-91 ELECT 220uF 20% 10V
C3154 1-162-909-11 CERAMIC CHIP 4PF 0.25PF 50V
C3155 1-162-964-11 CERAMIC CHIP 0.001uF 10% 50V
C9973 1-162-927-11 CERAMIC CHIP 100PF 5% 50V
< CONNECTOR >
CN400 1-784-770-11 CONNECTOR, FFC 9P
CN402 1-820-116-41 CONNECTOR, FFC/FPC 17P (TZ230/TZ630)
CN506 1-820-113-41 CONNECTOR, FFC/FPC 11P
CN508 1-784-861-51 CONNECTOR, FFC (LIF (NON-ZIF)) 9P
CN1101 1-815-763-32 CONNECTOR, FFC/FPC 24P
CN1105 1-564-708-11 PIN, CONNECTOR (SMALL TYPE) 6P
CN1501 1-564-708-11 PIN, CONNECTOR (SMALL TYPE) 6P
CN1502 1-779-273-11 CONNECTOR, FFC (LIF (NON-ZIF)) 5P
CN1701 (Not supplied) CONNECTOR, HDMI 19P (HDMI OUT)
CN2101 1-564-707-11 PIN, CONNECTOR (SMALL TYPE) 5P
< DIODE >
D400 6-500-848-01 DIODE MC2840-T112-1 (TZ210/TZ510/TZ710)
D502 6-501-817-01 DIODE MA2J1110GLS0
D503 6-501-817-01 DIODE MA2J1110GLS0
D2101 6-501-749-01 DIODE MAZ8082G0LS0
D2102 6-501-592-01 DIODE EDZCTE616.8B
D2103 6-501-592-01 DIODE EDZCTE616.8B
D4002 6-501-817-01 DIODE MA2J1110GLS0
D4004 6-501-817-01 DIODE MA2J1110GLS0
D9712 6-501-817-01 DIODE MA2J1110GLS0
< FERRITE BEAD >
C3117 1-115-339-11 CERAMIC CHIP 0.1uF 10% 50V
C3118 1-107-826-11 CERAMIC CHIP 0.1uF 10% 16V
C3119 1-126-952-11 ELECT 1000uF 20% 35V
C3120 1-100-436-91 CERAMIC CHIP 0.033uF 10% 25V
C3121 1-114-869-11 CERAMIC CHIP 2.2uF 10% 6.3V
C3123 1-100-436-91 CERAMIC CHIP 0.033uF 10% 25V
C3124 1-107-826-11 CERAMIC CHIP 0.1uF 10% 16V
C3125 1-112-246-11 ELECT 100uF 20% 35V
C3126 1-107-826-11 CERAMIC CHIP 0.1uF 10% 16V
C3127 1-107-826-11 CERAMIC CHIP 0.1uF 10% 16V
C3128 1-115-339-11 CERAMIC CHIP 0.1uF 10% 50V
C3129 1-114-885-51 FILM 1uF 5% 50V
C3130 1-107-826-11 CERAMIC CHIP 0.1uF 10% 16V
C3131 1-114-885-51 FILM 1uF 5% 50V
C3132 1-126-947-11 ELECT 47uF 20% 35V
C3133 1-112-246-11 ELECT 100uF 20% 35V
C3134 1-115-339-11 CERAMIC CHIP 0.1uF 10% 50V
C3135 1-126-952-11 ELECT 1000uF 20% 35V
C3137 1-107-826-11 CERAMIC CHIP 0.1uF 10% 16V
C3138 1-107-826-11 CERAMIC CHIP 0.1uF 10% 16V
C3139 1-107-826-11 CERAMIC CHIP 0.1uF 10% 16V
C3140 1-126-934-11 ELECT 220uF 20% 16V
70
FB471 1-500-283-11 INDUCTOR, FERRITE BEAD
*
FB1106 1-400-973-21 INDUCTOR (EMI FERRITE)
*
FB1107 1-400-973-21 INDUCTOR (EMI FERRITE)
*
FB1108 1-400-973-21 INDUCTOR (EMI FERRITE)
*
FB1109 1-400-973-21 INDUCTOR (EMI FERRITE)
*
FB1111 1-400-974-21 INDUCTOR (EMI FERRITE)
*
FB1112 1-400-974-21 INDUCTOR (EMI FERRITE)
*
FB1113 1-400-974-21 INDUCTOR (EMI FERRITE)
*
FB1115 1-400-974-21 INDUCTOR (EMI FERRITE)
*
FB1116 1-400-974-21 INDUCTOR (EMI FERRITE)
*
FB1117 1-400-974-21 INDUCTOR (EMI FERRITE)
*
FB1118 1-400-974-21 INDUCTOR (EMI FERRITE)
*
FB2101 1-400-973-21 INDUCTOR (EMI FERRITE)
*
FB2103 1-400-973-21 INDUCTOR (EMI FERRITE)
FB2104 1-469-379-11 FERRITE, EMI (SMD) (2012)
FB2105 1-469-379-11 FERRITE, EMI (SMD) (2012)
FB2120 1-469-118-21 FERRITE, EMI (SMD) (1608)
FB2121 1-469-118-21 FERRITE, EMI (SMD) (1608)
FB2122 1-469-118-21 FERRITE, EMI (SMD) (1608)
FB2125 1-469-118-21 FERRITE, EMI (SMD) (1608)
FB2126 1-500-283-11 INDUCTOR, FERRITE BEAD
Page 71
HBD-TZ210/TZ230/TZ510/TZ630/TZ710
Ver. 1.1
MAIN
Ref. No. Part No. Description Remark Ref. No. Part No. Description Remark
< IC >
IC307 8-759-680-48 IC TC7WH157FK(TE85R)
IC400 6-703-622-01 IC MM1508XNRE (TZ210/TZ510/TZ710)
IC401 8-759-430-37 IC MC14052BDTR2
IC403 6-712-744-01 IC TK11190CSCL-G
IC404 6-710-554-01 IC PCM1808PWR
IC471 6-707-853-01 IC TC74LCX541FT(EKJ)
IC503 A-1748-165-A IC R5F364AEDFA (for SERVICE)
IC504 6-705-338-01 IC TK11250CMCL-G
IC506 6-705-203-01 IC S-80935CNMC-G85T2G
IC507 (Not supplied) IC MM1665AHBE
IC509 6-712-613-01 IC SI-3010KM-TLS
IC510 6-709-584-01 IC MM1663DHBE
IC1101 6-714-722-01 IC CXD9927R-B (CND,UK)
IC1101 6-714-723-01 IC CXD9917R-B (EXCEPT CND,UK)
IC1102 6-715-433-01 IC MX29LV320DBTI-70-OHI-1002UC
(CND,E32,AR,MX)
IC1102 6-715-434-01 IC MX29LV320DBTI-70-OHI-1002CE
(E3,E12,AUS,EA,RU,SAF,AEP,UK)
IC1102 6-715-435-01 IC MX29LV320DBTI-70-OHI-1002GA
(HK,PH,SP,TH,TW,CH)
IC1103 (Not supplied) IC BR24S64F-WE2
IC1104 6-713-754-01 IC W9864G6IH-6J-ER10
IC1105 6-702-302-01 IC TK11133CSCL-G
IC1107 6-702-302-01 IC TK11133CSCL-G
IC1110 6-707-739-01 IC MM1661JTRE
IC1501 (Not supplied) IC BD8203EFV-E2
IC1705 8-759-592-47 IC TC7SZ08FU(TE85R)
IC1707 6-705-337-01 IC TK11150CSCL-G
L3002 1-457-077-11 COIL, AIR-CORE
(CND,AUS,EA,HK,RU,SAF,AEP,UK,TW,CH)
L3003 1-457-078-11 COIL, AIR-CORE
(CND,AUS,EA,HK,RU,SAF,AEP,UK,TW,CH)
L3004 1-457-077-11 COIL, AIR-CORE
(CND,AUS,EA,HK,RU,SAF,AEP,UK,TW,CH)
L3005 1-457-078-11 COIL, AIR-CORE
(CND,AUS,EA,HK,RU,SAF,AEP,UK,TW,CH)
L3006 1-457-579-11 COIL, CHOKE 10uH
L3007 1-457-077-11 COIL, AIR-CORE
(CND,AUS,EA,HK,RU,SAF,AEP,UK,TW,CH)
L3008 1-457-078-11 COIL, AIR-CORE
(CND,AUS,EA,HK,RU,SAF,AEP,UK,TW,CH)
L3009 1-457-077-11 COIL, AIR-CORE
(CND,AUS,EA,HK,RU,SAF,AEP,UK,TW,CH)
L3010 1-457-078-11 COIL, AIR-CORE
(CND,AUS,EA,HK,RU,SAF,AEP,UK,TW,CH)
L3011 1-457-579-11 COIL, CHOKE 10uH
L3012 1-457-078-11 COIL, AIR-CORE
(CND,AUS,EA,HK,RU,SAF,AEP,UK,TW,CH)
L3013 1-457-077-11 COIL, AIR-CORE
(CND,AUS,EA,HK,RU,SAF,AEP,UK,TW,CH)
L3014 1-457-078-11 COIL, AIR-CORE
(CND,AUS,EA,HK,RU,SAF,AEP,UK,TW,CH)
L3015 1-457-077-11 COIL, AIR-CORE
(CND,AUS,EA,HK,RU,SAF,AEP,UK,TW,CH)
L3016 1-457-579-11 COIL, CHOKE 10uH
L3017 1-457-579-11 COIL, CHOKE 10uH
L3018 1-469-525-91 INDUCTOR 10uH
L3019 1-469-525-91 INDUCTOR 10uH
L3020 1-469-525-91 INDUCTOR 10uH
IC1708 6-702-302-01 IC TK11133CSCL-G
IC2200 6-713-555-01 IC MFI341S2161
(TZ210:AUS/TZ230:UK/TZ510:CND)
IC3000 6-713-634-01 IC CXD9965TN
IC3001 6-705-979-01 IC CXD9788AR
IC3002 6-713-634-01 IC CXD9965TN
IC3003 6-705-979-01 IC CXD9788AR
IC3004 6-713-634-01 IC CXD9965TN
IC3005 6-705-979-01 IC CXD9788AR
IC3006 6-714-743-01 IC MM3404A18URE
IC3007 6-706-492-01 IC TC7SHU04FU(T5RSOJF)
< JACK >
J400 1-822-338-11 JACK, PIN 3P (VIDEO OUT,
TV/CABLE (AUDIO IN L/R))
(TZ210:CND/TZ510:CND)
J400 1-822-338-11 JACK, PIN 3P (VIDEO OUT,TV (AUDIO IN L/R))
(TZ210:EXCEPT CND/TZ510:EXCEPT CND/TZ710)
< COIL >
L400 1-469-525-91 INDUCTOR 10uH
L401 1-469-525-91 INDUCTOR 10uH (TZ210/TZ510/TZ710)
L402 1-469-525-91 INDUCTOR 10uH
L403 1-469-525-91 INDUCTOR 10uH
L471 1-469-527-91 INDUCTOR 47uH
L1701 1-457-374-21 COIL, COMMON MODE CHOKE
L1702 1-457-374-21 COIL, COMMON MODE CHOKE
L1703 1-457-374-21 COIL, COMMON MODE CHOKE
L1704 1-457-374-21 COIL, COMMON MODE CHOKE
L2101 1-457-374-21 COIL, COMMON MODE CHOKE
L3000 1-457-579-11 COIL, CHOKE 10uH
L3001 1-457-579-11 COIL, CHOKE 10uH
< TRANSISTOR >
Q400 8-729-029-06 TRANSISTOR DTC124EUA-T106
Q501 8-729-620-13 TRANSISTOR 2SC4154TP-1EF
Q1101 6-552-279-01 FET RT3K66M-T111-1
Q1102 6-550-653-01 TRANSISTOR QST8TR
Q1103 8-729-029-06 TRANSISTOR DTC124EUA-T106
Q1701 6-552-279-01 FET RT3K66M-T111-1
Q2101 6-551-272-01 TRANSISTOR RT3CLLM
Q3003 6-551-272-01 TRANSISTOR RT3CLLM
Q3004 8-729-620-13 TRANSISTOR 2SC4154TP-1EF
Q3005 6-551-271-01 TRANSISTOR RT3AMMM
Q3007 6-551-271-01 TRANSISTOR RT3AMMM
Q3009 6-551-271-01 TRANSISTOR RT3AMMM
Q3011 6-551-271-01 TRANSISTOR RT3AMMM
Q3013 6-551-271-01 TRANSISTOR RT3AMMM
Q3015 6-551-271-01 TRANSISTOR RT3AMMM
Q9730 6-551-714-01 FET INK0001AC1-T112A-1
< RESISTOR >
R316 1-216-801-11 METAL CHIP 22 5% 1/10W
R317 1-216-801-11 METAL CHIP 22 5% 1/10W
R318 1-216-801-11 METAL CHIP 22 5% 1/10W
R319 1-216-801-11 METAL CHIP 22 5% 1/10W
R400 1-216-809-11 METAL CHIP 100 5% 1/10W
(TZ230/TZ630)
R401 1-216-809-11 METAL CHIP 100 5% 1/10W
(TZ230/TZ630)
R402 1-216-809-11 METAL CHIP 100 5% 1/10W
(TZ230/TZ630)
R403 1-216-864-11 SHORT CHIP 0
R404 1-216-864-11 SHORT CHIP 0
Note:
When IC507, IC1103 and IC1501on the Main board is damaged, exchange
the new Main board for the Main board which IC damaged.
7171
Page 72
HBD-TZ210/TZ230/TZ510/TZ630/TZ710
Ver. 1.1
MAIN
Ref. No. Part No. Description Remark Ref. No. Part No. Description Remark
R405 1-216-809-11 METAL CHIP 100 5% 1/10W
(TZ230/TZ630)
R406 1-216-809-11 METAL CHIP 100 5% 1/10W
R409 1-216-809-11 METAL CHIP 100 5% 1/10W
R410 1-216-809-11 METAL CHIP 100 5% 1/10W
R411 1-211-990-11 METAL CHIP 75 0.5% 1/10W
(TZ210/TZ510/TZ710)
R412 1-216-809-11 METAL CHIP 100 5% 1/10W
R413 1-216-809-11 METAL CHIP 100 5% 1/10W
R414 1-216-837-11 METAL CHIP 22K 5% 1/10W
(TZ210/TZ510/TZ710)
R415 1-216-837-11 METAL CHIP 22K 5% 1/10W
(TZ210/TZ510/TZ710)
R416 1-216-845-11 METAL CHIP 100K 5% 1/10W
R418 1-216-845-11 METAL CHIP 100K 5% 1/10W
R420 1-216-809-11 METAL CHIP 100 5% 1/10W
(RU,SAF,AEP,UK,CH)
R420 1-216-864-11 SHORT CHIP 0
(EXCEPT RU,SAF,AEP,UK,CH)
R421 1-216-809-11 METAL CHIP 100 5% 1/10W
(RU,SAF,AEP,UK,CH)
R421 1-216-864-11 SHORT CHIP 0
(EXCEPT RU,SAF,AEP,UK,CH)
R422 1-216-841-11 METAL CHIP 47K 5% 1/10W
R423 1-216-841-11 METAL CHIP 47K 5% 1/10W
R424 1-216-841-11 METAL CHIP 47K 5% 1/10W
R425 1-216-841-11 METAL CHIP 47K 5% 1/10W
R426 1-218-827-11 METAL CHIP 150 0.5% 1/10W
(TZ210/TZ510/TZ710)
R427 1-216-833-11 METAL CHIP 10K 5% 1/10W
R434 1-216-809-11 METAL CHIP 100 5% 1/10W
R437 1-216-805-11 METAL CHIP 47 5% 1/10W
R438 1-216-805-11 METAL CHIP 47 5% 1/10W
R439 1-216-864-11 SHORT CHIP 0
R471 1-216-864-11 SHORT CHIP 0
R472 1-216-801-11 METAL CHIP 22 5% 1/10W
R473 1-216-801-11 METAL CHIP 22 5% 1/10W
R474 1-216-801-11 METAL CHIP 22 5% 1/10W
R480 1-216-805-11 METAL CHIP 47 5% 1/10W
R481 1-216-805-11 METAL CHIP 47 5% 1/10W
R482 1-216-805-11 METAL CHIP 47 5% 1/10W
R483 1-216-805-11 METAL CHIP 47 5% 1/10W
R486 1-216-803-11 METAL CHIP 33 5% 1/10W
R488 1-216-809-11 METAL CHIP 100 5% 1/10W
R531 1-216-821-11 METAL CHIP 1K 5% 1/10W
(HK,PH,SP,TH)
R531 1-216-823-11 METAL CHIP 1.5K 5% 1/10W
(UK)
R531 1-216-827-11 METAL CHIP 3.3K 5% 1/10W
(E3)
R531 1-218-867-11 METAL CHIP 6.8K 0.5% 1/10W
(E12)
R531 1-216-833-11 METAL CHIP 10K 5% 1/10W
(EA,SAF)
R531 1-216-835-11 METAL CHIP 15K 5% 1/10W
(AUS)
R531 1-216-839-11 METAL CHIP 33K 5% 1/10W
(TW)
R531 1-216-841-11 METAL CHIP 47K 5% 1/10W
(CND,E32,AR,MX,RU,CH)
R532 1-216-823-11 METAL CHIP 1.5K 5% 1/10W
(RU)
R532 1-216-827-11 METAL CHIP 3.3K 5% 1/10W
(CH)
R532 1-216-829-11 METAL CHIP 4.7K 5% 1/10W
(AEP)
R532 1-218-867-11 METAL CHIP 6.8K 0.5% 1/10W
(MX)
R532 1-216-833-11 METAL CHIP 10K 5% 1/10W
(E32,AR)
R532 1-216-837-11 METAL CHIP 22K 5% 1/10W
(CND)
R532 1-216-841-11 METAL CHIP 47K 5% 1/10W
(E3,E12,AUS,EA,SAF,UK,TW)
R535 1-216-821-11 METAL CHIP 1K 5% 1/10W
(TZ210/TZ230)
R535 1-216-841-11 METAL CHIP 47K 5% 1/10W
(TZ510/TZ630)
R536 1-216-829-11 METAL CHIP 4.7K 5% 1/10W
(TZ710)
R536 1-216-833-11 METAL CHIP 10K 5% 1/10W
(TZ630)
R536 1-216-835-11 METAL CHIP 15K 5% 1/10W
(TZ510)
R548 1-216-833-11 METAL CHIP 10K 5% 1/10W
R549 1-216-833-11 METAL CHIP 10K 5% 1/10W
R550 1-216-833-11 METAL CHIP 10K 5% 1/10W
R556 1-216-833-11 METAL CHIP 10K 5% 1/10W
R563 1-216-833-11 METAL CHIP 10K 5% 1/10W
R564 1-216-864-11 SHORT CHIP 0
R569 1-216-821-11 METAL CHIP 1K 5% 1/10W
R577 1-216-833-11 METAL CHIP 10K 5% 1/10W
R579 1-216-829-11 METAL CHIP 4.7K 5% 1/10W
R581 1-216-829-11 METAL CHIP 4.7K 5% 1/10W
R582 1-216-841-11 METAL CHIP 47K 5% 1/10W
R585 1-216-833-11 METAL CHIP 10K 5% 1/10W
R596 1-216-845-11 METAL CHIP 100K 5% 1/10W
R597 1-216-841-11 METAL CHIP 47K 5% 1/10W
R598 1-216-841-11 METAL CHIP 47K 5% 1/10W
R599 1-216-833-11 METAL CHIP 10K 5% 1/10W
R607 1-216-809-11 METAL CHIP 100 5% 1/10W
R609 1-216-833-11 METAL CHIP 10K 5% 1/10W
R614 1-216-809-11 METAL CHIP 100 5% 1/10W
R615 1-216-821-11 METAL CHIP 1K 5% 1/10W
R620 1-218-851-11 METAL CHIP 1.5K 0.5% 1/10W
R621 1-216-821-11 METAL CHIP 1K 5% 1/10W
R622 1-218-885-11 METAL CHIP 39K 0.5% 1/10W
R625 1-216-821-11 METAL CHIP 1K 5% 1/10W
R626 1-218-871-11 METAL CHIP 10K 0.5% 1/10W
R627 1-216-809-11 METAL CHIP 100 5% 1/10W
R628 1-216-821-11 METAL CHIP 1K 5% 1/10W
R629 1-216-809-11 METAL CHIP 100 5% 1/10W
R1101 1-216-809-11 METAL CHIP 100 5% 1/10W
R1102 1-216-864-11 SHORT CHIP 0
R1103 1-218-864-11 METAL CHIP 5.1K 0.5% 1/10W
R1105 1-216-833-11 METAL CHIP 10K 5% 1/10W
R1106 1-216-833-11 METAL CHIP 10K 5% 1/10W
R1107 1-216-833-11 METAL CHIP 10K 5% 1/10W
R1108 1-216-857-11 METAL CHIP 1M 5% 1/10W
R1110 1-216-841-11 METAL CHIP 47K 5% 1/10W
R1111 1-216-809-11 METAL CHIP 100 5% 1/10W
R1114 1-216-845-11 METAL CHIP 100K 5% 1/10W
R1116 1-216-821-11 METAL CHIP 1K 5% 1/10W
R1117 1-216-841-11 METAL CHIP 47K 5% 1/10W
R1124 1-216-841-11 METAL CHIP 47K 5% 1/10W
R1125 1-216-805-11 METAL CHIP 47 5% 1/10W
72
Page 73
HBD-TZ210/TZ230/TZ510/TZ630/TZ710
Ver. 1.1
MAIN
Ref. No. Part No. Description Remark Ref. No. Part No. Description Remark
R1132 1-216-845-11 METAL CHIP 100K 5% 1/10W
R1133 1-216-864-11 SHORT CHIP 0
R1135 1-216-821-11 METAL CHIP 1K 5% 1/10W
R1136 1-216-835-11 METAL CHIP 15K 5% 1/10W
R1140 1-216-829-11 METAL CHIP 4.7K 5% 1/10W
R2151 1-216-827-11 METAL CHIP 3.3K 5% 1/10W
R2152 1-216-827-11 METAL CHIP 3.3K 5% 1/10W
R2155 1-216-833-11 METAL CHIP 10K 5% 1/10W
R2156 1-216-833-11 METAL CHIP 10K 5% 1/10W
R2157 1-216-833-11 METAL CHIP 10K 5% 1/10W
R1141 1-216-855-11 METAL CHIP 680K 5% 1/10W
R1142 1-216-845-11 METAL CHIP 100K 5% 1/10W
R1151 1-216-833-11 METAL CHIP 10K 5% 1/10W
R1154 1-216-809-11 METAL CHIP 100 5% 1/10W
R1155 1-216-809-11 METAL CHIP 100 5% 1/10W
R1156 1-216-809-11 METAL CHIP 100 5% 1/10W
R1159 1-216-805-11 METAL CHIP 47 5% 1/10W
R1160 1-216-805-11 METAL CHIP 47 5% 1/10W
R1161 1-216-805-11 METAL CHIP 47 5% 1/10W
R1171 1-216-809-11 METAL CHIP 100 5% 1/10W
R1183 1-216-805-11 METAL CHIP 47 5% 1/10W
R1184 1-216-805-11 METAL CHIP 47 5% 1/10W
R1185 1-216-805-11 METAL CHIP 47 5% 1/10W
R1191 1-216-821-11 METAL CHIP 1K 5% 1/10W
R1193 1-216-821-11 METAL CHIP 1K 5% 1/10W
R1198 1-216-809-11 METAL CHIP 100 5% 1/10W
R1501 1-216-821-11 METAL CHIP 1K 5% 1/10W
R1504 1-216-829-11 METAL CHIP 4.7K 5% 1/10W
R1512 1-218-887-11 METAL CHIP 47K 0.5% 1/10W
R1513 1-218-879-11 METAL CHIP 22K 0.5% 1/10W
R1517 1-216-815-11 METAL CHIP 330 5% 1/10W
R1518 1-218-883-11 METAL CHIP 33K 0.5% 1/10W
R1519 1-218-877-11 METAL CHIP 18K 0.5% 1/10W
R1521 1-218-893-11 METAL CHIP 82K 0.5% 1/10W
R1525 1-218-875-11 METAL CHIP 15K 0.5% 1/10W
R1526 1-216-835-11 METAL CHIP 15K 5% 1/10W
R1527 1-216-833-11 METAL CHIP 10K 5% 1/10W
R1529 1-216-864-11 SHORT CHIP 0
R1532 1-216-833-11 METAL CHIP 10K 5% 1/10W
R1535 1-218-863-11 METAL CHIP 4.7K 0.5% 1/10W
R1536 1-218-863-11 METAL CHIP 4.7K 0.5% 1/10W
R1537 1-218-853-11 METAL CHIP 1.8K 0.5% 1/10W
R1538 1-218-863-11 METAL CHIP 4.7K 0.5% 1/10W
R1539 1-218-863-11 METAL CHIP 4.7K 0.5% 1/10W
R1540 1-218-867-11 METAL CHIP 6.8K 0.5% 1/10W
R1541 1-218-863-11 METAL CHIP 4.7K 0.5% 1/10W
R1542 1-218-867-11 METAL CHIP 6.8K 0.5% 1/10W
R1543 1-216-833-11 METAL CHIP 10K 5% 1/10W
R1544 1-216-797-11 METAL CHIP 10 5% 1/10W
R1730 1-216-826-11 METAL CHIP 2.7K 5% 1/10W
R1732 1-216-864-11 SHORT CHIP 0
R1742 1-216-841-11 METAL CHIP 47K 5% 1/10W
R1744 1-216-829-11 METAL CHIP 4.7K 5% 1/10W
R1749 1-216-824-11 METAL CHIP 1.8K 5% 1/10W
R1750 1-216-824-11 METAL CHIP 1.8K 5% 1/10W
R1752 1-216-821-11 METAL CHIP 1K 5% 1/10W
R1781 1-216-827-11 METAL CHIP 3.3K 5% 1/10W
R1782 1-216-827-11 METAL CHIP 3.3K 5% 1/10W
R2101 1-218-841-11 METAL CHIP 560 0.5% 1/10W
R2110 1-216-826-11 METAL CHIP 2.7K 5% 1/10W
R2114 1-216-801-11 METAL CHIP 22 5% 1/10W
R2115 1-216-864-11 SHORT CHIP 0
R2127 1-216-833-11 METAL CHIP 10K 5% 1/10W
R2129 1-216-845-11 METAL CHIP 100K 5% 1/10W
R2150 1-216-827-11 METAL CHIP 3.3K 5% 1/10W
R2158 1-216-833-11 METAL CHIP 10K 5% 1/10W
R2159 1-216-833-11 METAL CHIP 10K 5% 1/10W
R2160 1-216-833-11 METAL CHIP 10K 5% 1/10W
R2167 1-216-864-11 SHORT CHIP 0
R2168 1-216-815-11 METAL CHIP 330 5% 1/10W
R2169 1-216-833-11 METAL CHIP 10K 5% 1/10W
R2176 1-216-833-11 METAL CHIP 10K 5% 1/10W
R2178 1-216-821-11 METAL CHIP 1K 5% 1/10W
R2179 1-216-809-11 METAL CHIP 100 5% 1/10W
R2180 1-216-833-11 METAL CHIP 10K 5% 1/10W
R2184 1-216-809-11 METAL CHIP 100 5% 1/10W
R2185 1-216-809-11 METAL CHIP 100 5% 1/10W
R2191 1-216-833-11 METAL CHIP 10K 5% 1/10W
R2192 1-216-833-11 METAL CHIP 10K 5% 1/10W
R2193 1-216-833-11 METAL CHIP 10K 5% 1/10W
R2194 1-216-825-11 METAL CHIP 2.2K 5% 1/10W
R2202 1-216-809-11 METAL CHIP 100 5% 1/10W
(TZ210:AUS/TZ230:UK/TZ510:CND)
R3000 1-216-864-11 SHORT CHIP 0
R3002 1-216-809-11 METAL CHIP 100 5% 1/10W
R3005 1-216-809-11 METAL CHIP 100 5% 1/10W
R3006 1-216-841-11 METAL CHIP 47K 5% 1/10W
R3007 1-216-837-11 METAL CHIP 22K 5% 1/10W
R3008 1-218-903-11 METAL CHIP 220K 0.5% 1/10W
R3009 1-218-871-11 METAL CHIP 10K 0.5% 1/10W
R3015 1-216-845-11 METAL CHIP 100K 5% 1/10W
R3017 1-216-864-11 SHORT CHIP 0
R3021 1-216-833-11 METAL CHIP 10K 5% 1/10W
R3022 1-216-833-11 METAL CHIP 10K 5% 1/10W
R3025 1-216-845-11 METAL CHIP 100K 5% 1/10W
R3026 1-216-817-11 METAL CHIP 470 5% 1/10W
R3028 1-216-833-11 METAL CHIP 10K 5% 1/10W
R3029 1-216-864-11 SHORT CHIP 0
R3030 1-216-845-11 METAL CHIP 100K 5% 1/10W
R3031 1-216-845-11 METAL CHIP 100K 5% 1/10W
R3032 1-216-805-11 METAL CHIP 47 5% 1/10W
R3033 1-216-817-11 METAL CHIP 470 5% 1/10W
R3034 1-216-837-11 METAL CHIP 22K 5% 1/10W
R3035 1-216-805-11 METAL CHIP 47 5% 1/10W
R3036 1-216-801-11 METAL CHIP 22 5% 1/10W
R3037 1-216-809-11 METAL CHIP 100 5% 1/10W
R3038 1-216-845-11 METAL CHIP 100K 5% 1/10W
R3039 1-216-791-11 METAL CHIP 3.3 5% 1/10W
R3040 1-216-805-11 METAL CHIP 47 5% 1/10W
R3041 1-216-805-11 METAL CHIP 47 5% 1/10W
R3042 1-216-805-11 METAL CHIP 47 5% 1/10W
R3043 1-216-805-11 METAL CHIP 47 5% 1/10W
R3044 1-216-845-11 METAL CHIP 100K 5% 1/10W
R3045 1-216-845-11 METAL CHIP 100K 5% 1/10W
R3046 1-216-805-11 METAL CHIP 47 5% 1/10W
R3047 1-216-864-11 SHORT CHIP 0
R3048 1-216-864-11 SHORT CHIP 0
R3054 1-216-296-11 SHORT CHIP 0
(E3,E12,E32,AR,MX,PH,SP,TH)
R3055 1-216-296-11 SHORT CHIP 0
(E3,E12,E32,AR,MX,PH,SP,TH)
7373
Page 74
HBD-TZ210/TZ230/TZ510/TZ630/TZ710
Ver. 1.1
MAIN MS-203
Ref. No. Part No. Description Remark Ref. No. Part No. Description Remark
R3056 1-216-296-11 SHORT CHIP 0
(E3,E12,E32,AR,MX,PH,SP,TH)
R3057 1-216-296-11 SHORT CHIP 0
(E3,E12,E32,AR,MX,PH,SP,TH)
R3058 1-216-817-11 METAL CHIP 470 5% 1/10W
R3059 1-216-864-11 SHORT CHIP 0
R3060 1-216-845-11 METAL CHIP 100K 5% 1/10W
R3061 1-216-864-11 SHORT CHIP 0
R3062 1-216-805-11 METAL CHIP 47 5% 1/10W
R3063 1-216-845-11 METAL CHIP 100K 5% 1/10W
R3064 1-216-845-11 METAL CHIP 100K 5% 1/10W
R3065 1-216-817-11 METAL CHIP 470 5% 1/10W
R3066 1-216-837-11 METAL CHIP 22K 5% 1/10W
R3067 1-216-805-11 METAL CHIP 47 5% 1/10W
R3069 1-216-805-11 METAL CHIP 47 5% 1/10W
R3070 1-216-296-11 SHORT CHIP 0
(E3,E12,E32,AR,MX,PH,SP,TH)
R3071 1-216-801-11 METAL CHIP 22 5% 1/10W
R3072 1-216-296-11 SHORT CHIP 0
(E3,E12,E32,AR,MX,PH,SP,TH)
R3073 1-216-809-11 METAL CHIP 100 5% 1/10W
R3074 1-216-791-11 METAL CHIP 3.3 5% 1/10W
R3075 1-216-805-11 METAL CHIP 47 5% 1/10W
R3076 1-216-296-11 SHORT CHIP 0
(E3,E12,E32,AR,MX,PH,SP,TH)
R3077 1-216-805-11 METAL CHIP 47 5% 1/10W
R3078 1-216-845-11 METAL CHIP 100K 5% 1/10W
R3079 1-216-296-11 SHORT CHIP 0
(E3,E12,E32,AR,MX,PH,SP,TH)
R3080 1-216-864-11 SHORT CHIP 0
R3081 1-216-845-11 METAL CHIP 100K 5% 1/10W
R3082 1-216-845-11 METAL CHIP 100K 5% 1/10W
R3083 1-216-864-11 SHORT CHIP 0
R3084 1-216-296-11 SHORT CHIP 0
(E3,E12,E32,AR,MX,PH,SP,TH)
R3085 1-216-296-11 SHORT CHIP 0
(E3,E12,E32,AR,MX,PH,SP,TH)
R3086 1-216-296-11 SHORT CHIP 0
(E3,E12,E32,AR,MX,PH,SP,TH)
R3114 1-216-864-11 SHORT CHIP 0
R3117 1-216-845-11 METAL CHIP 100K 5% 1/10W
R3119 1-216-805-11 METAL CHIP 47 5% 1/10W
R3121 1-216-857-11 METAL CHIP 1M 5% 1/10W
R3122 1-216-821-11 METAL CHIP 1K 5% 1/10W
R3123 1-216-864-11 SHORT CHIP 0
R3125 1-216-864-11 SHORT CHIP 0
R3127 1-216-864-11 SHORT CHIP 0
R3142 1-216-864-11 SHORT CHIP 0
R3143 1-216-864-11 SHORT CHIP 0
R3144 1-216-864-11 SHORT CHIP 0
R3145 1-216-864-11 SHORT CHIP 0
R9941 1-216-838-11 METAL CHIP 27K 5% 1/10W
R9942 1-216-838-11 METAL CHIP 27K 5% 1/10W
R9945 1-216-813-11 METAL CHIP 220 5% 1/10W
R9946 1-216-864-11 SHORT CHIP 0
< NETWORK RESISTOR >
RB400 1-234-372-11 RES, NETWORK 100X4 (1005)
RB540 1-234-378-21 RES, NETWORK 10KX4 (1005)
RB541 1-234-375-21 RES, NETWORK 1KX4 (1005)
RB550 1-234-372-11 RES, NETWORK 100X4 (1005)
RB603 1-234-372-11 RES, NETWORK 100X4 (1005)
RB1103 1-234-371-21 RES, NETWORK 47X4 (1005)
RB1104 1-234-371-21 RES, NETWORK 47X4 (1005)
RB1105 1-234-371-21 RES, NETWORK 47X4 (1005)
RB1106 1-234-371-21 RES, NETWORK 47X4 (1005)
RB1109 1-234-371-21 RES, NETWORK 47X4 (1005)
RB1110 1-234-371-21 RES, NETWORK 47X4 (1005)
RB1111 1-234-371-21 RES, NETWORK 47X4 (1005)
RB1112 1-234-400-21 CONDUCTOR, NETWORK 0X4 (1005)
RB1113 1-234-400-21 CONDUCTOR, NETWORK 0X4 (1005)
RB1114 1-234-371-21 RES, NETWORK 47X4 (1005)
RB1115 1-234-371-21 RES, NETWORK 47X4 (1005)
RB1116 1-234-370-21 RES, NETWORK 22X4 (1005)
RB1117 1-234-370-21 RES, NETWORK 22X4 (1005)
RB1500 1-234-375-21 RES, NETWORK 1KX4 (1005)
R3087 1-216-296-11 SHORT CHIP 0
(E3,E12,E32,AR,MX,PH,SP,TH)
R3093 1-216-864-11 SHORT CHIP 0
R3094 1-216-845-11 METAL CHIP 100K 5% 1/10W
R3095 1-216-817-11 METAL CHIP 470 5% 1/10W
R3096 1-216-864-11 SHORT CHIP 0
R3097 1-216-805-11 METAL CHIP 47 5% 1/10W
R3098 1-216-845-11 METAL CHIP 100K 5% 1/10W
R3099 1-216-845-11 METAL CHIP 100K 5% 1/10W
R3100 1-216-837-11 METAL CHIP 22K 5% 1/10W
R3101 1-216-833-11 METAL CHIP 10K 5% 1/10W
R3102 1-216-817-11 METAL CHIP 470 5% 1/10W
R3103 1-216-805-11 METAL CHIP 47 5% 1/10W
R3104 1-216-805-11 METAL CHIP 47 5% 1/10W
R3105 1-216-845-11 METAL CHIP 100K 5% 1/10W
R3106 1-216-801-11 METAL CHIP 22 5% 1/10W
R3107 1-216-791-11 METAL CHIP 3.3 5% 1/10W
R3108 1-216-809-11 METAL CHIP 100 5% 1/10W
R3109 1-216-805-11 METAL CHIP 47 5% 1/10W
R3110 1-216-805-11 METAL CHIP 47 5% 1/10W
R3111 1-216-845-11 METAL CHIP 100K 5% 1/10W
R3112 1-216-845-11 METAL CHIP 100K 5% 1/10W
R3113 1-216-864-11 SHORT CHIP 0
74
< TERMINAL BOARD >
TB3001 1-780-838-11 TERMINAL BOARD (SPEAKER) 6P (SPEAKERS
(FRONT R/L,SUR R/L,CENTER,SUBWOOFER))
< VIBRATOR >
X501 1-795-058-21 VIBRATOR, CERAMIC (5MHz)
X1101 1-814-381-11 QUARTZ CRYSTAL UNITS (27MHz)
X3000 1-814-266-11 VIBRATOR, CRYSTAL (49.152MHz)
*************************************************************
MS-203 BOARD
< CONNECTOR >
CN001 1-815-412-11 CONNECTOR, FFC/FPC 5P
< SWITCH >
S001 1-786-693-11 SWITCH, DETECTION (CHUCK/TRAY DETECT)
*************************************************************
************
Page 75
HBD-TZ210/TZ230/TZ510/TZ630/TZ710
Ver. 1.1
P-SW POWER
Ref. No. Part No. Description Remark Ref. No. Part No. Description Remark
A-1746-219-A P-SW BOARD, COMPLETE
< CAPACITOR >
C5301 1-162-927-11 CERAMIC CHIP 100PF 5% 50V
< CONNECTOR >
*
CN5301 1-580-055-21 PIN, CONNECTOR (SMD) 2P
< SWITCH >
S5301 1-786-650-21 SWITCH, TACTILE (
*************************************************************
A-1745-469-A POWER BOARD, COMPLETE (AEP,UK)
A-1745-471-A POWER BOARD, COMPLETE
(E3,E12,AUS,AR,HK,PH,RU,SAF,SP,TH,CH)
A-1745-473-A POWER BOARD, COMPLETE (CND,TW)
A-1745-475-A POWER BOARD, COMPLETE (MX)
A-1745-477-A POWER BOARD, COMPLETE (E32,EA)
7-685-647-79 SCREW +BVTP 3X10 TYPE2 IT-3
< CAPACITOR >
*********************
?/1
)
***********************
C928 1-112-232-11 ELECT 2700uF 20% 16V
C929 1-112-241-21 ELECT 1000uF 20% 25V
C932 1-114-994-11 ELECT 2200uF 20% 35V
C933 1-114-994-11 ELECT 2200uF 20% 35V
C934 1-126-953-11 ELECT 2200uF 20% 35V
C935 1-114-323-11 CERAMIC CHIP 0.01uF 10% 50V
C936 1-114-323-11 CERAMIC CHIP 0.01uF 10% 50V
C937 1-100-756-91 CERAMIC CHIP 0.047uF 10% 50V
0
C938 1-112-869-51 CERAMIC 470PF 10% 250V
C939 1-136-165-00 FILM 0.1uF 5% 50V
C940 1-112-228-21 ELECT 1000uF 20% 16V
C942 1-126-941-11 ELECT 470uF 20% 25V
C943 1-126-934-11 ELECT 220uF 20% 16V
C950 1-100-566-91 CERAMIC CHIP 0.1uF 10% 25V
C951 1-100-566-91 CERAMIC CHIP 0.1uF 10% 25V
0
C963 1-112-869-51 CERAMIC 470PF 10% 250V
(EXCEPT CND,MX,TW)
0
C963 1-112-870-51 CERAMIC 0.001uF 20% 250V
(CND,MX,TW)
0
C964 1-112-869-51 CERAMIC 470PF 10% 250V
(EXCEPT CND,MX,TW)
0
C964 1-112-870-51 CERAMIC 0.001uF 20% 250V
(CND,MX,TW)
C971 1-162-970-11 CERAMIC CHIP 0.01uF 10% 25V
0
C901 1-114-594-11 FILM 0.22uF 10% 310V
0
C902 1-114-594-11 FILM 0.22uF 10% 310V
(EXCEPT CND,E32,EA,MX,TW)
0
C902 1-116-397-21 FILM 0.33uF 10% 310V
(CND,E32,EA,MX,TW)
0
C903 1-114-344-21 ELECT(BLOCK) 1000uF 20% 250V
(MX)
0
C903 1-114-345-21 ELECT(BLOCK) 1000uF 20% 200V
(CND,TW)
0
C903 1-114-346-21 ELECT(BLOCK) 330uF 20% 400V
(AEP,UK)
0
C903 1-114-347-21 ELECT(BLOCK) 330uF 20% 450V
(EXCEPT CND,MX,AEP,UK,TW)
0
C905 1-116-392-11 FILM 0.01uF 5% 400V
(CND,MX,TW)
0
C905 1-116-393-11 FILM 0.0033uF 5% 400V
(EXCEPT CND,MX,TW)
0
C906 1-117-815-11 FILM 0.001uF 3% 1.5KV
(EXCEPT CND,MX,TW)
0
C907 1-162-964-11 CERAMIC CHIP 0.001uF 10% 50V
(EXCEPT CND,MX,TW)
0
C907 1-162-965-11 CERAMIC CHIP 0.0015uF 10% 50V
(CND,MX,TW)
0
C908 1-107-909-11 ELECT 47uF 20% 50V
0
C909 1-162-960-11 CERAMIC CHIP 220PF 10% 50V
0
C910 1-126-965-91 ELECT 22uF 20% 50V
(EXCEPT E32,EA)
0
C910 1-126-967-11 ELECT 47uF 20% 50V
(E32,EA)
0
C916 1-116-078-11 CERAMIC CHIP 1uF 10% 50V
0
C918 1-112-887-51 CERAMIC 0.01uF 20% 250V
0
C920 1-112-887-51 CERAMIC 0.01uF 20% 250V
0
C921 1-117-220-81 CERAMIC 150PF 5% 2KV
0
C922 1-112-300-91 CERAMIC CHIP 4.7uF 10% 10V
0
C923 1-162-959-11 CERAMIC CHIP 330PF 5% 50V
0
C924 1-116-393-11 FILM 0.0033uF 5% 400V
0
C925 1-100-566-91 CERAMIC CHIP 0.1uF 10% 25V
0
C926 1-107-930-91 ELECT 22uF 20% 100V
C927 1-112-223-11 ELECT 3300uF 20% 10V
C972 1-100-566-91 CERAMIC CHIP 0.1uF 10% 25V
C973 1-100-566-91 CERAMIC CHIP 0.1uF 10% 25V
C975 1-100-566-91 CERAMIC CHIP 0.1uF 10% 25V
C976 1-126-933-11 ELECT 100uF 20% 16V
0
C980 1-117-828-11 FILM 0.0033uF 3% 1.5KV
(CND,MX,TW)
0
C981 1-162-968-11 CERAMIC CHIP 0.0047uF 10% 50V
C983 1-100-756-91 CERAMIC CHIP 0.047uF 10% 50V
C984 1-162-970-11 CERAMIC CHIP 0.01uF 10% 25V
C990 1-100-566-91 CERAMIC CHIP 0.1uF 10% 25V
C991 1-100-566-91 CERAMIC CHIP 0.1uF 10% 25V
C992 1-162-970-11 CERAMIC CHIP 0.01uF 10% 25V
C993 1-100-566-91 CERAMIC CHIP 0.1uF 10% 25V
0
C994 1-112-869-51 CERAMIC 470PF 10% 250V
(EXCEPT CND,MX,TW)
C997 1-116-078-11 CERAMIC CHIP 1uF 10% 50V
0
C998 1-162-968-11 CERAMIC CHIP 0.0047uF 10% 50V
< CONNECTOR >
CN901 1-564-321-00 PIN, CONNECTOR (3.96mm PITCH) 2P
CN904 1-785-102-11 PIN, CONNECTOR (3.96mm PITCH) 4P
*
CN906 1-764-334-11 PLUG, CONNECTOR 11P
< DIODE >
0
D901 8-719-082-57 DIODE D5SBA60F01
0
D902 8-719-063-74 DIODE D1NL20U-TR2
0
D906 6-501-817-01 DIODE MA2J1110GLS0
0
D907 6-501-817-01 DIODE MA2J1110GLS0
0
D908 6-501-817-01 DIODE MA2J1110GLS0
0
D909 6-501-817-01 DIODE MA2J1110GLS0
0
D910 6-501-817-01 DIODE MA2J1110GLS0
0
D913 6-500-241-01 DIODE SARS03
0
D914 6-501-817-01 DIODE MA2J1110GLS0
D931 6-501-849-01 DIODE FMX-22SL
D942 6-502-518-01 DIODE 50PQSA065-FA9
D943 8-719-080-53 DIODE RK36LF-B3
0
D946 8-719-030-25 DIODE EG01CV0
D954 8-719-080-59 DIODE EK19-V0
7575
Page 76
HBD-TZ210/TZ230/TZ510/TZ630/TZ710
Ver. 1.1
POWER
Ref. No. Part No. Description Remark Ref. No. Part No. Description Remark
D955 8-719-080-59 DIODE EK19-V0
0
DZ901 6-501-782-01 DIODE MAZ8180GMLS0
0
DZ902 6-502-231-01 DIODE MAZ8220GLLSO
0
DZ903 6-501-787-01 DIODE MAZ8220GMLS0
0
DZ905 6-501-792-01 DIODE MAZ8300GMLS0 (EXCEPT CND,MX,TW)
0
DZ905 8-719-083-71 DIODE UDZSUSTE-1730B (CND,MX,TW)
0
DZ915 6-501-760-01 DIODE MAZ8100GMLS0
0
DZ951 8-719-083-71 DIODE UDZSUSTE-1730B
0
DZ954 8-719-083-71 DIODE UDZSUSTE-1730B
(EXCEPT CND,MX,TW)
< FUSE >
0
F945 1-576-794-11 FUSE, MICRO (1608) 2A
< FUSE HOLDER >
FH901 1-533-217-41 HOLDER, FUSE
FH902 1-533-217-41 HOLDER, FUSE
< RESISTOR >
0
FR929 1-246-373-11 FUSIBLE 1 10% 1/2W F
< IC >
0
IC901 6-707-741-01 IC STR-F6138-LF1352 (CND,MX,TW)
0
IC901 6-707-742-01 IC STR-F6168-LF1352 (EXCEPT CND,MX,TW)
0
IC921 6-714-671-01 IC STR-Y6763
IC923 6-711-947-01 IC MM1431CURE
IC932 6-711-947-01 IC MM1431CURE
IC941 6-712-613-01 IC SI-3010KM-TLS
< RESISTOR >
0
R901 1-219-759-11 METAL 1M 5% 1/2W F
(CND,MX,TW)
0
R901 1-240-938-91 METAL 1.5M 5% 1/2W F
(EXCEPT CND,MX,TW)
0
R903 1-250-297-65 METAL OXIDE 100K 5% 3W F
(EXCEPT CND,MX,TW)
0
R903 1-250-299-65 METAL OXIDE 33K 5% 3W F
(CND,MX,TW)
0
R904 1-250-297-65 METAL OXIDE 100K 5% 3W F
(EXCEPT CND,MX,TW)
0
R904 1-250-299-65 METAL OXIDE 33K 5% 3W F
(CND,MX,TW)
0
R905 1-216-797-11 METAL CHIP 10 5% 1/10W
0
R906 1-216-827-11 METAL CHIP 3.3K 5% 1/10W
0
R907 1-216-833-11 METAL CHIP 10K 5% 1/10W
0
R908 1-216-829-11 METAL CHIP 4.7K 5% 1/10W
0
R909 1-216-833-11 METAL CHIP 10K 5% 1/10W
0
R910 1-216-825-11 METAL CHIP 2.2K 5% 1/10W
0
R911 1-216-813-11 METAL CHIP 220 5% 1/10W
0
R912 1-216-363-00 METAL OXIDE 0.33 5% 2W F
(EXCEPT CND,MX,TW)
0
R914 1-220-891-11 METAL 0.1 10% 5W F
(EXCEPT CND,MX,TW)
0
R914 1-248-180-11 METAL 0.034 5% 5W F
(CND,MX,TW)
0
R916 1-250-297-65 METAL OXIDE 100K 5% 3W F
0
R917 1-216-829-11 METAL CHIP 4.7K 5% 1/10W
0
R919 1-216-837-11 METAL CHIP 22K 5% 1/10W
0
R922 1-250-262-41 METAL 0.39 5% 2W F
< COIL >
L931 1-457-878-65 COIL, CHOKE 2.2uH
L954 1-457-578-11 COIL, CHOKE 10uH
L956 1-457-578-11 COIL, CHOKE 10uH
L964 1-457-725-11 COIL, CHOKE 4.7uH
L967 1-457-725-11 COIL, CHOKE 4.7uH
< LINE FILTER >
0
LF901 1-457-054-21 COIL, LINE FILTER
(EXCEPT CND,E32,EA,MX,TW)
0
LF901 1-457-449-11 COIL, LINE FILTER (CND,E32,EA,MX,TW)
0
LF902 1-457-054-21 COIL, LINE FILTER
(EXCEPT CND,E32,EA,MX,TW)
0
LF902 1-457-449-11 COIL, LINE FILTER (CND,E32,EA,MX,TW)
< PHOTO COUPLER >
0
PC901 6-600-276-01 PHOTO COUPLER PS2561AL1-1-V-W
0
PC902 6-600-276-01 PHOTO COUPLER PS2561AL1-1-V-W
0
PC903 6-600-276-01 PHOTO COUPLER PS2561AL1-1-V-W
< TRANSISTOR >
0
Q901 8-729-201-53 TRANSISTOR 2SA1015-GR
0
Q922 6-550-702-01 TRANSISTOR 2SC3243-TP-E
Q943 8-729-029-14 TRANSISTOR DTC144EUA-T106
Q945 6-552-458-01 FET 2SK3577-T1B-AT
Q949 8-729-620-13 TRANSISTOR 2SC4154TP-1EF
Q950 8-729-029-14 TRANSISTOR DTC144EUA-T106
Q969 6-551-699-01 TRANSISTOR ISA1602AM1TP-1EF
0
R923 1-218-879-11 METAL CHIP 22K 0.5% 1/10W
0
R925 1-216-797-11 METAL CHIP 10 5% 1/10W
0
R926 1-218-847-11 METAL CHIP 1K 0.5% 1/10W
R931 1-216-864-11 SHORT CHIP 0
R932 1-218-879-11 METAL CHIP 22K 0.5% 1/10W
R933 1-216-821-11 METAL CHIP 1K 5% 1/10W
R934 1-216-821-11 METAL CHIP 1K 5% 1/10W
R935 1-216-821-11 METAL CHIP 1K 5% 1/10W
R936 1-216-853-11 METAL CHIP 470K 5% 1/10W
R937 1-218-871-11 METAL CHIP 10K 0.5% 1/10W
R938 1-218-847-11 METAL CHIP 1K 0.5% 1/10W
R939 1-218-855-11 METAL CHIP 2.2K 0.5% 1/10W
R940 1-218-871-11 METAL CHIP 10K 0.5% 1/10W
R941 1-218-895-11 METAL CHIP 100K 0.5% 1/10W
R942 1-218-871-11 METAL CHIP 10K 0.5% 1/10W
R945 1-216-837-11 METAL CHIP 22K 5% 1/10W
R946 1-216-827-11 METAL CHIP 3.3K 5% 1/10W
R949 1-216-827-11 METAL CHIP 3.3K 5% 1/10W
0
R951 1-218-875-11 METAL CHIP 15K 0.5% 1/10W
R952 1-216-864-11 SHORT CHIP 0
R954 1-218-861-11 METAL CHIP 3.9K 0.5% 1/10W
R955 1-216-821-11 METAL CHIP 1K 5% 1/10W
R956 1-216-817-11 METAL CHIP 470 5% 1/10W
R957 1-216-841-11 METAL CHIP 47K 5% 1/10W
R958 1-216-821-11 METAL CHIP 1K 5% 1/10W
R959 1-218-871-11 METAL CHIP 10K 0.5% 1/10W
R962 1-216-864-11 SHORT CHIP 0
R963 1-218-839-11 METAL CHIP 470 0.5% 1/10W
R965 1-216-864-11 SHORT CHIP 0
R966 1-216-821-11 METAL CHIP 1K 5% 1/10W
Note:
When IC921 on the Power board is damaged, exchange the
new Power board for the Power board which IC damaged.
76
R967 1-216-821-11 METAL CHIP 1K 5% 1/10W
Page 77
HBD-TZ210/TZ230/TZ510/TZ630/TZ710
Ver. 1.1
SCARTPOWER
Ref. No. Part No. Description Remark Ref. No. Part No. Description Remark
R972 1-218-871-11 METAL CHIP 10K 0.5% 1/10W
R974 1-216-827-11 METAL CHIP 3.3K 5% 1/10W
R976 1-216-833-11 METAL CHIP 10K 5% 1/10W
0
R978 1-216-829-11 METAL CHIP 4.7K 5% 1/10W
0
R992 1-216-793-11 METAL CHIP 4.7 5% 1/10W
R998 1-218-855-11 METAL CHIP 2.2K 0.5% 1/10W
R999 1-218-871-11 METAL CHIP 10K 0.5% 1/10W
< DIODE >
D4001 6-501-817-01 DIODE MA2J1110GLS0
D4002 6-501-817-01 DIODE MA2J1110GLS0
< IC >
IC4000 6-710-470-01 IC MM1758AFBE
< TRANSFORMER >
0
T901 1-443-649-11 TRANSFORMER, CONVERTER (CND,MX,TW)
0
T901 1-443-874-11 TRANSFORMER, CONVERTER
(EXCEPT CND,MX,TW)
0
T903 1-445-320-11 TRANSFORMER, CONVERTER
< THERMISTOR >
0
TH901 1-805-841-21 THERMISTOR, NTC 3.0 (CND,E32,EA,MX,TW)
0
TH901 1-805-842-21 THERMISTOR, NTC 6.0
(EXCEPT CND,E32,EA,MX,TW)
< VARISTOR >
0
VDR901 1-802-839-11 VARISTOR
*************************************************************
SCART BOARD (TZ230/TZ630)
< CAPACITOR >
C4001 1-162-964-11 CERAMIC CHIP 0.001uF 10% 50V
C4002 1-162-964-11 CERAMIC CHIP 0.001uF 10% 50V
C4003 1-126-933-11 ELECT 100uF 20% 16V
C4004 1-107-826-11 CERAMIC CHIP 0.1uF 10% 16V
C4005 1-126-933-11 ELECT 100uF 20% 16V
C4006 1-162-927-11 CERAMIC CHIP 100PF 5% 50V
C4007 1-162-964-11 CERAMIC CHIP 0.001uF 10% 50V
C4008 1-162-927-11 CERAMIC CHIP 100PF 5% 50V
C4009 1-162-927-11 CERAMIC CHIP 100PF 5% 50V
C4010 1-162-927-11 CERAMIC CHIP 100PF 5% 50V
C4011 1-162-964-11 CERAMIC CHIP 0.001uF 10% 50V
C4012 1-107-826-11 CERAMIC CHIP 0.1uF 10% 16V
C4013 1-126-933-11 ELECT 100uF 20% 16V
C4014 1-162-964-11 CERAMIC CHIP 0.001uF 10% 50V
C4015 1-107-826-11 CERAMIC CHIP 0.1uF 10% 16V
C4016 1-126-933-11 ELECT 100uF 20% 16V
C4017 1-126-965-91 ELECT 22uF 20% 50V
C4018 1-126-916-11 ELECT 1000uF 20% 6.3V
C4019 1-107-826-11 CERAMIC CHIP 0.1uF 10% 16V
C4021 1-165-908-11 CERAMIC CHIP 1uF 10% 10V
C4022 1-107-826-11 CERAMIC CHIP 0.1uF 10% 16V
C4023 1-126-933-11 ELECT 100uF 20% 16V
C4032 1-162-927-11 CERAMIC CHIP 100PF 5% 50V
C4033 1-104-662-91 ELECT 22uF 20% 25V
C4035 1-162-927-11 CERAMIC CHIP 100PF 5% 50V
************
< COIL >
L4020 1-469-525-91 INDUCTOR 10uH
< TRANSISTOR >
Q4000 8-729-029-14 TRANSISTOR DTC144EUA-T106
Q4001 8-729-029-06 TRANSISTOR DTC124EUA-T106
Q4003 8-729-620-13 TRANSISTOR 2SC4154TP-1EF
Q4005 6-551-469-01 TRANSISTOR RT3N33M-T111-1
Q4006 6-551-691-01 TRANSISTOR RT3P11M-TP-1
< RESISTOR >
R4000 1-216-815-11 METAL CHIP 330 5% 1/10W
R4001 1-216-815-11 METAL CHIP 330 5% 1/10W
R4002 1-216-815-11 METAL CHIP 330 5% 1/10W
R4003 1-216-849-11 METAL CHIP 220K 5% 1/10W
R4004 1-216-815-11 METAL CHIP 330 5% 1/10W
R4005 1-216-837-11 METAL CHIP 22K 5% 1/10W
R4006 1-218-827-11 METAL CHIP 150 0.5% 1/10W
R4007 1-216-821-11 METAL CHIP 1K 5% 1/10W
R4008 1-218-827-11 METAL CHIP 150 0.5% 1/10W
R4009 1-216-833-11 METAL CHIP 10K 5% 1/10W
R4010 1-216-841-11 METAL CHIP 47K 5% 1/10W
R4011 1-218-827-11 METAL CHIP 150 0.5% 1/10W
R4012 1-216-825-11 METAL CHIP 2.2K 5% 1/10W
R4013 1-216-825-11 METAL CHIP 2.2K 5% 1/10W
R4014 1-216-825-11 METAL CHIP 2.2K 5% 1/10W
R4015 1-218-827-11 METAL CHIP 150 0.5% 1/10W
R4016 1-218-827-11 METAL CHIP 150 0.5% 1/10W
R4017 1-218-827-11 METAL CHIP 150 0.5% 1/10W
R4018 1-218-827-11 METAL CHIP 150 0.5% 1/10W
R4019 1-218-827-11 METAL CHIP 150 0.5% 1/10W
R4021 1-218-827-11 METAL CHIP 150 0.5% 1/10W
R4022 1-216-809-11 METAL CHIP 100 5% 1/10W
R4023 1-216-809-11 METAL CHIP 100 5% 1/10W
R4024 1-216-821-11 METAL CHIP 1K 5% 1/10W
R4025 1-218-827-11 METAL CHIP 150 0.5% 1/10W
R4026 1-218-827-11 METAL CHIP 150 0.5% 1/10W
R4027 1-218-827-11 METAL CHIP 150 0.5% 1/10W
R4033 1-216-845-11 METAL CHIP 100K 5% 1/10W
R4035 1-216-837-11 METAL CHIP 22K 5% 1/10W
R4037 1-216-845-11 METAL CHIP 100K 5% 1/10W
R4041 1-216-837-11 METAL CHIP 22K 5% 1/10W
*************************************************************
C4038 1-104-662-91 ELECT 22uF 20% 25V
< CONNECTOR >
CN4000 1-816-044-11 CONNECTOR, SQUARE TYPE 21P
(EURO AV
CN4018 1-779-285-11 CONNECTOR, FFC (LIF (NON-ZIF)) 17P
T
OUTPUT(TO TV))
7777
Page 78

HBD-TZ210/TZ230/TZ510/TZ630/TZ710
Ver. 1.1
USB USB KEY
Ref. No. Part No. Description Remark
USB BOARD
< CAPACITOR >
C5200 1-107-826-11 CERAMIC CHIP 0.1uF 10% 16V
< CONNECTOR >
CN5200 1-822-423-11 CONNECTOR, USB (A) 4P (USB)
CN5201 1-564-707-11 PIN, CONNECTOR (SMALL TYPE) 5P
*************************************************************
USB KEY BOARD
< CAPACITOR >
C5111 1-162-970-11 CERAMIC CHIP 0.01uF 10% 25V
C5112 1-162-970-11 CERAMIC CHIP 0.01uF 10% 25V
C5114 1-162-964-11 CERAMIC CHIP 0.001uF 10% 50V
< RESISTOR >
R5125 1-216-833-11 METAL CHIP 10K 5% 1/10W
R5126 1-216-837-11 METAL CHIP 22K 5% 1/10W
R5127 1-216-829-11 METAL CHIP 4.7K 5% 1/10W
R5128 1-216-829-11 METAL CHIP 4.7K 5% 1/10W
R5129 1-216-864-11 SHORT CHIP 0
**********
**************
< ROTARY ENCODER >
S5113 1-480-136-11 ENCODER, ROTARY (12 TYPE)
(MASTER VOLUME)
< SWITCH >
S5114 1-762-875-21 SWITCH, KEYBOARD (REC TO USB)
*************************************************************
MISCELLANEOUS
102 1-828-322-11 WIRE (FLAT TYPE) (11 CORE)
104 1-828-955-11 WIRE (FLAT TYPE) (9 CORE)
0
106 1-834-288-12 CORD, POWER (TH)
0
106 1-834-966-41 CORD, POWER-SUPPLY
(E3,E12,E32,PH,RU,SAF,SP,AEP)
0
106 1-835-068-21 CORD, POWER (AUS)
0
106 1-835-078-31 CORD, POWER (EA,HK,UK)
0
106 1-837-308-11 CORD, POWER-SUPPLY (CND)
0
106 1-837-312-11 CORD, POWER-SUPPLY (AR)
0
106 1-837-344-11 CORD, POWER-SUPPLY (MX)
0
106 1-837-345-11 CORD, POWER-SUPPLY (TW)
0
106 1-837-822-21 CORD, POWER-SUPPLY (CH)
0
107 1-569-008-33 ADAPTOR, CONVERSION (E32)
109 1-823-718-11 WIRE (FLAT TYPE) (17 CORE) (TZ230/TZ630)
152 1-828-291-11 WIRE (FLAT TYPE) (5 CORE)
0
207 8-820-321-12 OPTICAL PICK-UP (KHM-313CAA/C2RP1)
208 1-828-773-51 WIRE (FLAT TYPE) (24 CORE)
0
F901 1-533-311-12 FUSE, GLASS (DIA. 5) (8A/125V) (CND,MX,TW)
0
F901 1-576-232-51 FUSE (H.B.C.) (5A/250V)
(EXCEPT CND,E32,EA,MX,TW)
0
F901 1-576-233-51 FUSE (H.B.C.) (6.3A/250V) (E32,EA)
TU401 1-693-780-21 TUNER (FM) (ANTENNA)
(EXCEPT CND,RU,SAF,AEP,UK,CH)
**************
TU401 1-693-781-21 TUNER (FM) (ANTENNA) (CND)
TU401 1-693-788-21 TUNER (FM) (ANTENNA) (RU,SAF,AEP,UK,CH)
78
Page 79

MEMO
HBD-TZ210/TZ230/TZ510/TZ630/TZ710
79
Page 80
HBD-TZ210/TZ230/TZ510/TZ630/TZ710
REVISION HISTORY
Checking the version allows you to jump to the revised page.
Also, clicking the version at the top of the revised page allows you to jump to the next revised page.
Ver. Date Description of Revision
1.0 2010.02 New
Addition of Russian model of HBD-TZ210.
1.1 2010.05
Addition of Taiwan model of HBD-TZ510.
Addition of Chinese and Russian models of DAV
-TZ710.
 Loading...