

Page 1
GC89
Sony Ericsson GC89
User Guide
Page 2

Content
Introduction . . . . . . . . . . . . . . . . . . . . . . . . . . . . . . . . . . . . . . . . . . 6
Hardware Overview . . . . . . . . . . . . . . . . . . . . . . . . . . . . . . . . . . . . . . . . . . 6
Software Overview . . . . . . . . . . . . . . . . . . . . . . . . . . . . . . . . . . . . . . . . . . . 7
Documentation . . . . . . . . . . . . . . . . . . . . . . . . . . . . . . . . . . . . . . . . . . . . . . 7
Getting Started . . . . . . . . . . . . . . . . . . . . . . . . . . . . . . . . . . . . . . . . 8
Checklist . . . . . . . . . . . . . . . . . . . . . . . . . . . . . . . . . . . . . . . . . . . . . . . . . . . 8
System Requirements . . . . . . . . . . . . . . . . . . . . . . . . . . . . . . . . . . . . . . . . 8
Services Available Over the Internet . . . . . . . . . . . . . . . . . . . . . . . . . . . . . 10
Installation . . . . . . . . . . . . . . . . . . . . . . . . . . . . . . . . . . . . . . . . . . . 11
GC89 Hardware Set Up . . . . . . . . . . . . . . . . . . . . . . . . . . . . . . . . . . . . . . . 11
Installing the Software . . . . . . . . . . . . . . . . . . . . . . . . . . . . . . . . . . . . . . . . 12
Create a EDGE/GPRS or CSD Connection. . . . . . . . . . . . . . . . . . 14
GPRS/EDGE Connection . . . . . . . . . . . . . . . . . . . . . . . . . . . . . . . . . . . . . . 14
CSD Connection . . . . . . . . . . . . . . . . . . . . . . . . . . . . . . . . . . . . . . . . . . . . . 15
Modify a Connection . . . . . . . . . . . . . . . . . . . . . . . . . . . . . . . . . . . . . . . . . . 16
Delete a Connection . . . . . . . . . . . . . . . . . . . . . . . . . . . . . . . . . . . . . . . . . . 16
Using your Connection . . . . . . . . . . . . . . . . . . . . . . . . . . . . . . . . . . . . . . . . 16
Browse the Internet via a GSM/GPRS/EDGE Connection . . . . . . . . . . . . . 17
Send and Receive emails . . . . . . . . . . . . . . . . . . . . . . . . . . . . . . . . . . . . . . 17
Create a Wireless LAN Connection . . . . . . . . . . . . . . . . . . . . . . . 18
Making a Basic Network Connection Windows 2000/XP . . . . . . . . . . . . . . 18
Making a Basic Network Connection in Windows Millennium . . . . . . . . . . 28
Making a Basic Network Connection in Windows 98SE. . . . . . . . . . . . . . . 33
Using the Sony Ericsson Wireless Utility . . . . . . . . . . . . . . . . . . . . . . . . . . 38
Advanced Wireless LAN Features . . . . . . . . . . . . . . . . . . . . . . . . 44
Setting up an Ad Hoc Group Network. . . . . . . . . . . . . . . . . . . . . . . . . . . . . 44
Configuring Your Ad Hoc Network with No Security . . . . . . . . . . . . . . . . . . 45
Configuring Your Ad Hoc Network with WEP Security . . . . . . . . . . . . . . . . 46
Sharing an Internet Connection . . . . . . . . . . . . . . . . . . . . . . . . . . . . . . . . . 47
Static IP Number Management. . . . . . . . . . . . . . . . . . . . . . . . . . . . . . . . . . 49
Wireless LAN Adapter Diagnostics. . . . . . . . . . . . . . . . . . . . . . . . . . . . . . . 49
GC89 WLAN Information . . . . . . . . . . . . . . . . . . . . . . . . . . . . . . . . . . . . . . 50
Concurrent WLAN and GPRS . . . . . . . . . . . . . . . . . . . . . . . . . . . . . . . . . . 50
Wireless Manager Status Screen . . . . . . . . . . . . . . . . . . . . . . . . . 51
GSM Connection Status . . . . . . . . . . . . . . . . . . . . . . . . . . . . . . . . . . . . . . . 51
Wireless LAN Connection Status . . . . . . . . . . . . . . . . . . . . . . . . . . . . . . . . 52
Usage Statistics . . . . . . . . . . . . . . . . . . . . . . . . . . . . . . . . . . . . . . . . . . . . . 52
2 Contents
Page 3

Start Using Wireless Manager. . . . . . . . . . . . . . . . . . . . . . . . . . . . 53
Wireless Manager Icon . . . . . . . . . . . . . . . . . . . . . . . . . . . . . . . . . . . . . . . . 53
Icon Menus . . . . . . . . . . . . . . . . . . . . . . . . . . . . . . . . . . . . . . . . . . . . . . . . . 55
Making Windows
Wireless Manager GSM/GPRS/EDGE Preferences . . . . . . . . . . . . . . . . . . 58
Windows
®
®
Network Connections Visible . . . . . . . . . . . . . . . . . . . . 57
Log on Using GPRS/EDGE Dial-up Connection . . . . . . . . . . . . 62
Wireless Manager Telephony Settings Screen . . . . . . . . . . . . . . 63
Phone Numbers . . . . . . . . . . . . . . . . . . . . . . . . . . . . . . . . . . . . . . . . . . . . . 63
Locks . . . . . . . . . . . . . . . . . . . . . . . . . . . . . . . . . . . . . . . . . . . . . . . . . . . . . 64
Networks. . . . . . . . . . . . . . . . . . . . . . . . . . . . . . . . . . . . . . . . . . . . . . . . . . . 65
Frequency Band . . . . . . . . . . . . . . . . . . . . . . . . . . . . . . . . . . . . . . . . . . . . . 66
Forward Calls (Divert) . . . . . . . . . . . . . . . . . . . . . . . . . . . . . . . . . . . . . . . . . 67
Restrict Calls. . . . . . . . . . . . . . . . . . . . . . . . . . . . . . . . . . . . . . . . . . . . . . . . 68
SMS . . . . . . . . . . . . . . . . . . . . . . . . . . . . . . . . . . . . . . . . . . . . . . . . . . . . . . 69
Wireless . . . . . . . . . . . . . . . . . . . . . . . . . . . . . . . . . . . . . . . . . . . . . . . . . . . 69
Wireless Manager SMS Messages Screen. . . . . . . . . . . . . . . . . . 70
SMS Manager Functionality . . . . . . . . . . . . . . . . . . . . . . . . . . . . . . . . . . . . 71
Wireless Manager Phone Book Screen . . . . . . . . . . . . . . . . . . . . 74
The Phone Book Screen. . . . . . . . . . . . . . . . . . . . . . . . . . . . . . . . . . . . . . . 74
Phone Book Functionality . . . . . . . . . . . . . . . . . . . . . . . . . . . . . . . . . . . . . . 75
Wireless Manager Online Services Screen . . . . . . . . . . . . . . . . . 78
Troubleshooting . . . . . . . . . . . . . . . . . . . . . . . . . . . . . . . . . . . . . . . 79
Status Information. . . . . . . . . . . . . . . . . . . . . . . . . . . . . . . . . . . . . . . . . . . . 79
Status Log. . . . . . . . . . . . . . . . . . . . . . . . . . . . . . . . . . . . . . . . . . . . . . . . . . 79
Wireless Manager Icon Errors . . . . . . . . . . . . . . . . . . . . . . . . . . . . . . . . . . 80
Software Errors . . . . . . . . . . . . . . . . . . . . . . . . . . . . . . . . . . . . . . . . . . . . . . 80
GSM/EDGE/GPRS Error Messages. . . . . . . . . . . . . . . . . . . . . . . . . . . . . . 80
SIM Card Errors . . . . . . . . . . . . . . . . . . . . . . . . . . . . . . . . . . . . . . . . . . . . . 81
Wireless LAN Error Messages . . . . . . . . . . . . . . . . . . . . . . . . . . . . . . . . . . 81
Wireless LAN Performance and Connectivity Problems. . . . . . . . . . . . . . . 82
Windows
®
Error Codes. . . . . . . . . . . . . . . . . . . . . . . . . . . . . . . . . . . . . . . . 83
Additional Information . . . . . . . . . . . . . . . . . . . . . . . . . . . . . . . . . . 87
Sony Ericsson Support Website . . . . . . . . . . . . . . . . . . . . . . . . . . . . . . . . . 87
Guidelines for Safe and Efficient Use . . . . . . . . . . . . . . . . . . . . . . . . . . . . . 87
Technical Specifications . . . . . . . . . . . . . . . . . . . . . . . . . . . . . . . . . . . . . . . 90
License Agreement . . . . . . . . . . . . . . . . . . . . . . . . . . . . . . . . . . . . . . . . . . . 97
Term . . . . . . . . . . . . . . . . . . . . . . . . . . . . . . . . . . . . . . . . . . . . . . . . . . . . . . 97
Limited Warranty. . . . . . . . . . . . . . . . . . . . . . . . . . . . . . . . . . . . . . . . . . . . . 97
Intended use . . . . . . . . . . . . . . . . . . . . . . . . . . . . . . . . . . . . . . . . . . . . . . . . 99
Limitation of liability. . . . . . . . . . . . . . . . . . . . . . . . . . . . . . . . . . . . . . . . . . . 99
Disputes and Governing Law . . . . . . . . . . . . . . . . . . . . . . . . . . . . . . . . . . . 100
Declaration of Conformity . . . . . . . . . . . . . . . . . . . . . . . . . . . . . . .101
FCC Statement . . . . . . . . . . . . . . . . . . . . . . . . . . . . . . . . . . . . . . . . . . . . . . 102
WiFi Certificate . . . . . . . . . . . . . . . . . . . . . . . . . . . . . . . . . . . . . . . . . . . . . . 102
Contents 3
Page 4

Appendix A - Connection Parameters . . . . . . . . . . . . . . . . . . . . .103
General Connection Parameters for CSD and GPRS . . . . . . . . . . . . . . . . 103
CSD Specific Parameters . . . . . . . . . . . . . . . . . . . . . . . . . . . . . . . . . . . . . . 104
TCP/IP Optimisation . . . . . . . . . . . . . . . . . . . . . . . . . . . . . . . . . . . . . . . . . . 104
Appendix B - Changing the GC89
Wireless LAN Adapter Properties. . . . . . . . . . . . . . . . . . . . . . . . .107
Glossary . . . . . . . . . . . . . . . . . . . . . . . . . . . . . . . . . . . . . . . . . . . . .109
Index . . . . . . . . . . . . . . . . . . . . . . . . . . . . . . . . . . . . . . . . . . . . . . . .112
4 Contents
Page 5

Sony Ericsson GC89
First edition (January 2005)
This manual is published by Sony Ericsson Mobile Communications AB, without any
warranty. Improvements and changes to this manual necessitated by typographical errors,
inaccuracies of current information, or improvements to programs and/or equipment, may be
made by Sony Ericsson at any time and without notice. Such changes will, however, be
incorporated into new editions of this manual.
This manual is copyrighted work of Sony Ericsson Mobile Communications AB, Sweden.
The programs referred to herein are copyrighted and trademarked works of Sony Ericsson
Mobile Communications AB, Sweden. Reproduction in whole or in part, including utilization
in machines capable of reproduction or retrieval, without the express written permission of
the copyright holders is prohibited. Reverse engineering is also prohibited.
All other product or service names mentioned in this manual are trademarks of their
respective companies.
All rights reserved.
© Sony Ericsson Mobile Communications AB, 2005
Publication number: EN/LZT 123 8048 P1C
Contents 5
Page 6

Introduction
Congratulations and thank you for buying a Sony Ericsson GC89.
The GC89 is a combined wireless LAN (WLAN) adapter and quad band GSM product, that allows
you to access wireless local area networks, share local printers and files with others in the network,
access the internet and roam the office, wire free. The GC89 is designed for use in the home and at
work; it is very simple to install and use; the software provided allows you to select the best data
service available so that the GC89 is always available for data transfer.
The GC89 enables your laptop PC to:
• Connect to your corporate network
• Browse the Internet
• Send and receive e-mails
• Receive information services in real time
• Access files, databases and discussion groups
• Send and receive SMS text messages
• Edit SIM card entries
Note:
Before using your GC89 you MUST read Guidelines for Safe and Efficient Use on page 87.
The GC89 wireless LAN facility is based on the IEEE 802.11 standard. A LAN is composed of two
or more computers connected to each other to share files or common equipment such as a printer or
an internet connection. A wireless LAN provides the same functionality of a wired network without
the need to install networking cables and other networking equipment. Not only is a wireless LAN
easier to deploy, but it also allows for roaming. For example, when using the GC89 wireless LAN
facility, it is possible to roam from one room in the house to another, or from a conference room to
an office without being disconnected from the network.
The GC89s wireless LAN facilities can be used wherever there are connection “hotspots”. Wireless
LAN hotspots are becoming increasingly common in both public places, such as hotels and airports
(allowing Internet connection), and within offices (providing connections to corporate networks).
The GC89s GSM, GPRS and EDGE facilities provide almost worldwide portable modem access to
the Internet or to corporate networks.
Hardware Overview
The GC89 is a standard 32-bit Cardbus PC card with a 15mm extension which contains the GSM and
WLAN antennas.
The amount of power drawn from the laptop battery is dependant upon a number of factors including
status, frequency band, distance to the base station and number of timeslots used. See Technical
Specifications on page 90 for a general guide to power consumption.
Before using the GC89, you must install the software and drivers on your computer, see GC89
Hardware Set Up on page 11.
6 Introduction
Page 7

SIM Card
When you subscribe to a mobile network operator, you are issued with a SIM card (Subscriber
Identity Module card). The SIM contains your personal subscriber data. You need to insert a SIM
into your GC89 before it will work.
Software Overview
Wireless Manager
You can use the Wireless Manager to:
• Display GSM/GPRS/EDGE and wireless LAN status information
• Create or modify connection settings
• Connect to the Internet or a corporate network
• Manage GC89 settings
• Manage SIM card and PC phone books
• Send and receive SMS messages
Using the GC89 with your Applications
Data Programs
You can use the GC89 as a modem to provide Intranet/Internet connectivity for a wide range of
applications.
Documentation
The GC89’s documentation is designed to enhance your understanding of its capabilities.
The following guides are provided:
• A printed Quick Start Guide aimed at getting you operational as quickly as possible.
• An online User’s Guide (this document) containing a comprehensive description of the GC89
The User’s Guide is located on GC89 CD-ROM as Adobe Acrobat PDF files. The GC89 CD-ROM
also contains Adobe Acrobat Reader
Illustrations
The illustrations in this manual were obtained using the GC89 on a Microsoft Windows
operating system. The dialogs that appear on your PC may differ depending on the version of
Windows
functionality. You can read the guide on the computer screen or print it onto either European A4
or American Letter sized paper.
®
which you can install if necessary.
®
XP
®
in use.
Introduction 7
Page 8

Getting Started
Checklist
Make sure the following items are in the box when you unpack it:
• Aluminium protective case for storing the GC89
•GC89
•Quick Start Guide
•CD-ROM
The CD contains: drivers, software, documentation and a readme file
System Requirements
This section lists the network subscriptions, hardware and software requirements for running the
GC89.
Wireless LAN Connection
In order to use your GC89 as a wireless LAN adapter for a corporate network, you must have the
appropriate access and log-on rights. Contact your corporate IT support function to arrange access
and request the following information:
• Network names (SSID) of the specific wireless networks to connect to.
• WPA (Wi-Fi Protected Access) wireless network key information (may include network
authentication type, encryption type, network key) for any WPA-enabled networks you want
to connect to.
• WEP (Wired Equivalent Privacy) wireless network key information (network key) for any
WEP-enabled networks you want to connect to.
• An IP address (if not using a DHCP server).
• Networks connected to an authentication server, if any.
Note:
If you require access to a network account, you will also require the accounts domain name,
a user name and a password.
In order to use your GC89 as a wireless LAN adapter with a small office or home network, you must
have the appropriate access and log-on rights. The Access Point that communicates with the GC89
has a predefined name (SSID) that your computer recognizes upon startup.
• If you are connecting to an existing WEP-enabled network, obtain the network key from the
AP (access point) installer.
• If you are connecting to a WPA-enabled AP (access point), obtain the WPA (Wi-Fi Protected Access) wireless network key information (network authentication type, encryption
type, network key) from the AP (access point) installer.
• If you are setting up a new wireless network and want to enable WEP security, use any
string of characters for the network key.
8 Getting Started
Page 9

Note:
Your network key is either 5 or 13 ASCII (text) characters, or 10 or 26 hexadecimal (0-9, A-F)
characters.
Network and Subscription
The network subscription you use in conjunction with your GC89 depends on the functions and
features your network operator can provide. Contact your network operator or service provider to
make sure the options you require are available. Make sure that data options are included in your
subscription, as these are usually optional services.
Note:
Mobile operators often provide a number of connectivity options via EDGE/GPRS such as
WAP and Internet. Verify the service you require, such as Internet, email or corporate VPN
(Virtual Private Network) service is available through your mobile operator and enabled on
your subscription.
The functionality of the different subscriptions available from networks operators are discussed
below:
Circuit Switched Data (CSD)
CSD is the original GSM network data transfer method, used in the past for WAP. Almost all GSM
networks have this capability at 9.6 kbps. It is possible for the network to upgrade the speed to
14.4 kbps. The GC89 operates at this higher speed where available.
General Packet Radio Service (GPRS)
GPRS is a type of network connection which provides “always on” mobility. The connection set up
is fast and, once connected, applications may send and receive data whenever required. In today’s
GPRS networks, the GC89 receives data at speeds up to 53.6 kbps and transmits at speeds up to
26.8 kbps.
Enhanced Data Rates for Global Evolution (EDGE)
EDGE enhances GPRS by increasing data throughput by a factor of 3. GPRS networks enhanced
with EDGE are often referred to as E-GPRS (Enhanced GPRS) networks. EDGE provides the
“always on” capability of GPRS but at faster speeds. EDGE technology is transparent, simply make
a GPRS connection as usual and benefit from the increase in speed where EDGE is available in a
network. When EDGE is available you can expect increased speeds of up to 200 kbps, dependent on
network coverage.
Short Message Service (SMS)
The PC can send and receive SMS text messages using the SMS Messages screen in the Wireless
Manager, see Wireless Manager SMS Messages Screen on page 70, for more details.
Getting Started 9
Page 10

Hardware
You will need:
• A PC that has the minimum specification recommended by Microsoft to run the version of
Windows
®
installed on it.
• A 32-bit Cardbus PC Card slot.
• A Sony Ericsson GC89.
• A SIM card.
Software
You will need:
•Windows
®
98SE, Me, 2000 (SP4) or XP.
• Sony Ericsson Wireless Manager CD-ROM.
Note:
The Wireless Manager can be downloaded from the Sony Ericsson website, details are given
below.
Services Available Over the Internet
The Sony Ericsson website contains support to facilitate easy communications and rapid information
retrieval, wherever you are. It gives you access to on-line customer services, on-line user manuals,
software downloads, and useful information. The address is:
http://www.SonyEricsson.com
General information on wireless LAN can be obtained from:
http://www.wlana.org
10 Getting Started
Page 11
Installation
The Wireless Manager CD-ROM contains the software required to operate your GC89.
You will also need to make sure that the GSM services you require are included on your SIM card
subscription. For an explanation of the services that are available see Network and Subscription on
page 9. Contact the organization that supplied you with your SIM card and request that the specific
services (EDGE, GPRS, CSD or SMS) you require are added to your subscription. If you are
intending to use WLAN, you will need to have access rights to corporate networks and hotspots you
intend to use.
Note:
If you are installing onto a Windows 98SE operating system, make sure you have your
Windows
The CD-ROM contains the following software:
• Wireless Manager
• User Documentation
• On-line Help
• ReadMe text file containing the latest information about the GC89.
®
installation CD-ROM as it may be required.
GC89 Hardware Set Up
1. Remove your GC89 card from its protective cover.
2. Insert your SIM card into the slot on the back of GC89, with the gold contacts facing downwards.
Note:
The cut corner of the SIM card must be placed into the PC card as demonstrated below. The
gold contacts should face downwards.
SIM
Card
564464
8695
89034
To use the PCMCIA slot for another device, remove the EDGE card as instructed in Safe Removal
of the GC89 on page 57, then insert the other device.
Installation 11
Page 12

When the GC89 is not in use it is recommended that you store it in the protective carrier box
provided.
Important!
Do not insert the card into the laptop until you have installed the software from the CD-ROM.
Simply cancel the New Hardware wizard if the card is accidentally inserted prior to software
installation.
Installing the Software
1. Insert the GC89 CD-ROM in your CD drive.
After a few seconds a Sony Ericsson splash screen is displayed.
Note:
If the CD-ROM does not autorun, select Start Run and type D:\Setup.exe into the Run
dialog. (Where D is your CD drive.)
2. The Wireless Manager is installed in the same language as your Windows® installation, or
English if your Windows
®
language is not available. See Supported Languages on page 96 for
more details.
3. The InstallShield Wizard for Sony Ericsson Wireless Manager opens; follow the instructions on
screen. Installation will appear to pause around 65% whilst drivers are installed; do not cancel.
When installation is complete click Finish.
4. Insert the GC89. Make sure it is fully inserted.
GC89
EDGE/Wireless LAN PC Card
5. After a few seconds, the New Hardware Wizard opens and installs the necessary drivers onto
your PC from the GC89 CD. The wizard may require you to locate a specific driver file. If this
happens, a dialog opens; click Browse and select one of the following:
12 Installation
Page 13

Component
GC89 CD-ROM
Location
EDGE/GPRS Drivers on a
Windows 98SE or ME machine
EDGE/GPRS Drivers on a
Windows 2000/XP machine
Wireless LAN Driver (semwl5.inf) on a
Windows 2000/XP machine
Wireless LAN Driver (semwl5a.inf) on
a Windows 98SE/ME machine
D:\Driver\Driver9x
D:\Driver\Driver2k
D:\WLAN-2k
D:\WLAN-9k
In the above table, D is referred to as your CD drive.
Note:
When installing on Windows 98SE, Windows® may prompt for the original Windows 98SE CDROM to be inserted. If the CD-ROM is not inserted when requested, Windows
subsequently reboot with error messages relating to missing files. Therefore, it is strongly
recommended that the Windows 98SE CD-ROM is available before installation starts.
®
will
6. Select the driver file requested by the Wizard and click Open. The Hardware Wizard finishes the
installation.
7. Select Programs Sony Ericsson Wireless Manager to start using your GC89.
Note:
If you are prompted to reboot the laptop during software installation, you may find that the
Wireless Manager attempts to start before all of the drivers are installed. The reason this
occurs is the New Hardware Wizard is still busy installing the 3 device drivers. The Wireless
Manager splash screen appears, followed by a warning dialog saying “You must have a Sony
Ericsson GC89 EGPRS Modem installed to run this application. Please install a Sony Ericsson
GC89 EGPRS Modem and try again”. If this occurs:
1. Click Ok.
2. Wait for
3. Reboot the laptop.
4. Start the Wireless Manager using the icon on the desktop or via Programs Sony
Ericsson Wireless Manager.
the New Hardware Wizard to complete the driver installation.
Installation 13
Page 14

Create a EDGE/GPRS or CSD Connection
Predefined customised connection settings may have already been entered by your mobile operator
or IT Manager. Check the connection drop-down menu for any existing entries, if they are available
go to Using your Connection on page 16.
If no predefined customised connections exist, the Network Connection Wizard automatically starts
when the Wireless Manager is opened for the first time.
1. Click or select View Connection Wizard. The Connection Wizard opens.
2. Select the radio button next to Create a new connection. Enter a name, for example ‘My
Connection’. Click Next.
Note:
Your connection name should not exceed 16 characters for it to be fully visible in Wireless
Manager.
3. The Type of Connection screen opens. Select the type of connection you require:
• For EDGE/GPRS see steps 4 to 8
• For CSD see steps 9 to 12
GPRS/EDGE Connection
4. Select GPRS/EDGE. Select your Network Operator from the Choose Network drop down list.
If your Network Operator is not listed, select <Other>. Click Next.
See Network and Subscription on page 9 for more information on GPRS.
5. If the Access Point Name dialog opens, check the APN displayed (for some operators it is
deliberately blank). If you selected <Other> enter the APN for your operator. Contact your
Network Operator if necessary to find out the correct APN.
6. To modify the selected APN’s settings, Click Advanced.... See Appendix A - Connection
Parameters on page 103, for descriptions of the updateable parameters in the Advanced dialog.
The Secondary APN information is only used in special customised cases where the information
will be filled in for you. Otherwise the tick-box must be left un-ticked and secondary APN name
blank. Click Apply to save any changes before closing the dialog. Click Next.
Note:
Your connection will automatically switch to EDGE when the network is available, allowing
your PC Card to work at faster speeds.
7. If the operator you have selected in step 4 does not require a User ID and Password leave this
dialog blank if it is displayed. If you have to logon to your service provider, enter your User ID
and Password into the specific fields. If you want to enter your User ID and Password every
time you connect, de-select the Save Password box. Click Next.
Note:
Some versions of Windows® deliberately change the number of asterisks that represent a
password and place asterisks in the password field when the password is blank in order to
make the display secure.
8. Click Finish to create your connection or Back to review your settings.
14 Create a EDGE/GPRS or CSD Connection
Page 15
CSD Connection
9. Select CSD. Select your service provider from the Choose Network drop down list. If your
service provider isn’t listed select <Other> or <North America> depending on your location.
Click Next.
10. If you selected a Network Operator from the Choose Network drop down list, the telephone
number dialog should be automatically filled in.
If you selected <Other> or <North America> from the Choose Network drop down list, enter
the number you need to dial to connect to your Network Operator in the Telephone Number
field, include your country and area code. Ensure Use Area Code and Country Code is deselected.
Note:
Contact your Network Operator for a telephone number if necessary.
11. Click Advanced.... You can specify your preferred CSD network connection speed from the
drop down list and the method you want to use to connect to the network on the Speed tab of the
Advanced dialog. Click Next.
Note:
If you are unsure which speed to choose from the Speed tab, start with Analogue 9600,and
check to see if it works. Once your connection works on Analog, you can try the V110/V120
settings. V110/V120 connects faster than analog. When roaming you may need to repeat this
procedure to adapt your settings to the capability of the network.
12. Select the Options tab in the Advanced dialog to specify a
callback number, if required. Callback is a service that allows the
call direction to be reversed. If you want to watch the progress of
a callback in a terminal window click the Show Terminal
Window After Dialing box.
See Appendix A - Connection Parameters on page 103, for
descriptions of the updateable parameters in the Advanced dialog. Click Apply to save any
changes before closing the dialog.
Create a EDGE/GPRS or CSD Connection 15
Page 16

13. If you need a User ID and Password to logon to your service provider enter them into the
specific fields. If you do not need a username and password leave the fields blank. Click Next.
Note:
Some versions of Windows® deliberately change the number of asterisks that represent a
password and place asterisks in the password field when the password is blank in order to
make the display secure.
14. Click Finish to create your connection or Back to review your settings.
Modify a Connection
1. Select Modify a Connection. The Select a Connection drop down menu is activated. Click on
the menu and select the connection you want to modify.
2. Click Next.
3. Change settings as required.
Delete a Connection
1. Select Delete a Connection. The Select a Connection drop down menu is activated. Click on
the menu and select the connection you want to delete.
2. Click Next. The Success dialog is displayed. Click Finish to close the Connection Wizard.
Using your Connection
To Connect
1. Open Wireless Manager.
2. If requested, enter your SIM Card PIN and click OK. The Status screen is displayed.
3. Select the connection you require from the drop down list and click Connect. If requested, enter
your User ID and Password.
To disconnect an active connection
1. Click Disconnect on the Status screen.
The Wireless Manager ends the connection.
Alternatively:
Right click on the Wireless Manager icon in the system tray and select Disconnect.
Note:
You can also use the Preferences dialog to set up an auto connection when the Wireless
Manager is opened. See Wireless Manager GSM/GPRS/EDGE Preferences on page 58 for
more details.
16 Create a EDGE/GPRS or CSD Connection
Page 17

Browse the Internet via a GSM/GPRS/EDGE Connection
You can connect to the Internet using a CSD or GPRS/EDGE connection:
1. Open your preferred connection from the Status screen. See Using your Connection on page 16
for details on opening a connection.
2. Start your Internet browser. You are online and can browse the Internet.
Send and Receive emails
You will need an email program installed on your PC in order to send and receive emails. You can
send and receive emails using a CSD or GPRS/EDGE connection:
1. Open your preferred connection from the Status screen. See Connection on page 52 for details
on opening a connection.
2. Start your email program. You are online and can send and receive emails.
Create a EDGE/GPRS or CSD Connection 17
Page 18

Create a Wireless LAN Connection
The method used to create a Wireless LAN Connection depends on the Windows Operating System
you have installed on your PC. Go to the section that covers your Operating System:
• Making a Basic Network Connection Windows 2000/XP on page 18
• Making a Basic Network Connection in Windows Millennium on page 28
• Making a Basic Network Connection in Windows 98SE on page 33
Making a Basic Network Connection Windows 2000/XP
To configure a wireless network in Windows 2000/XP, use one of the following methods:
• The native Windows 2000/XP support (Windows
• The Sony Ericsson Wireless Utility, see Configuring your WIndows 2000/XP Network Using the
Sony Ericsson Wireless Utility on page 23 for more details.
®
Zero Configuration Service)
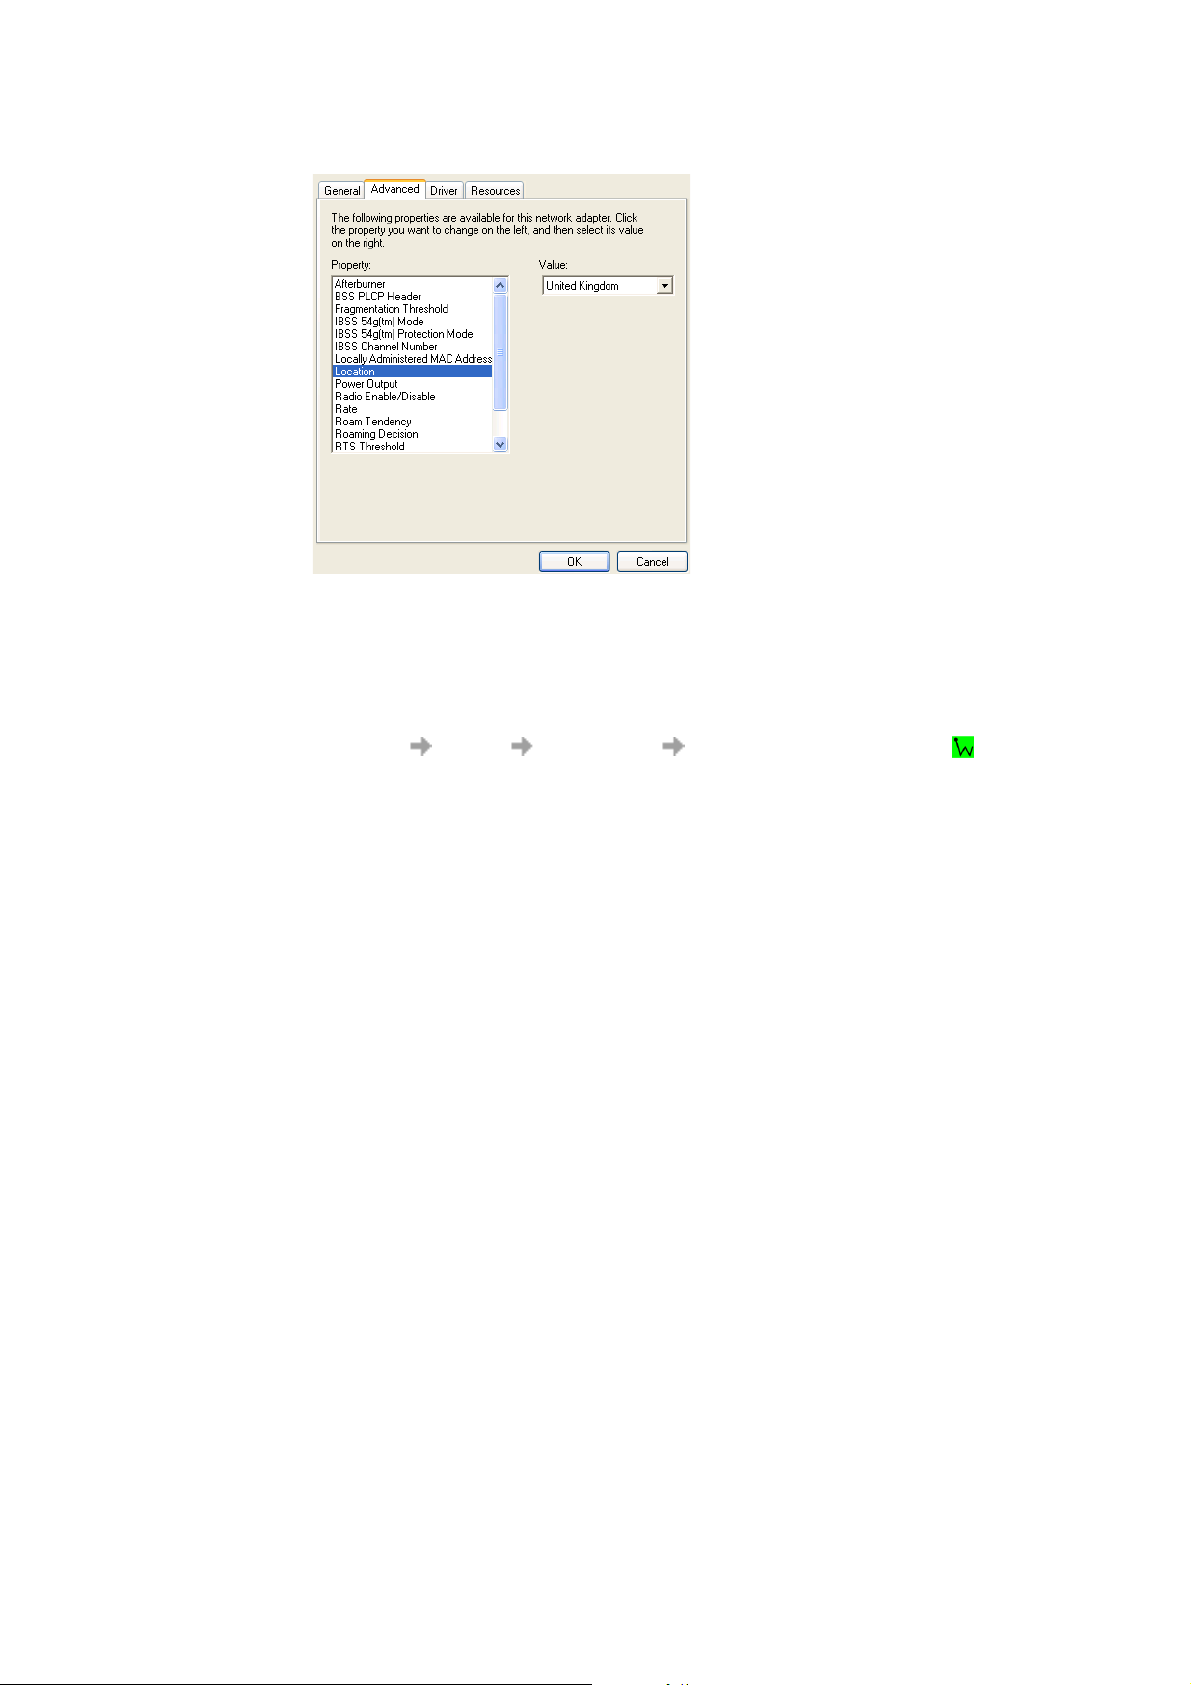
Configuring Your Network Using Windows
In countries other than the United States and Japan you must set the Location property to the country
in which you are using your Sony Ericsson 802.11 Wireless LAN Adapter. This ensures compliance
with local regulatory restrictions on transmit power and optimizes network performance.
Configuring Your Location
1. Click Start Control Panel.
2. If you are not in Classic View, click Switch to Classic View in the upper left corner of Control
Panel.
3. Double-click Network Connections.
4. Right-click Wireless Network Connection Properties.
5. On the General tab of Wireless Network Connection Properties dialog box, click Configure.
6. Click the Advanced tab on Sony Ericsson 802.11 Wireless LAN Adapter Properties dialog box.
7. In the Property list, click Location, and then click the name of your location in the Val ue list.
Note:
If your location is not listed, click Default.
®
Zero Configuration Service
18 Create a Wireless LAN Connection
Page 19
8. Click OK.
Configuring Your Network
Before you attempt to connect to your network, verify that your access point is connected correctly
and working. Consult your access point documentation to configure your access point. After you
have configured your access point, follow the steps described below to configure your wireless
network.
To manually configure your network connection
1. Click Start Control Panel.
2. If you are not in Classic View, click Switch to Classic View in the upper left corner of Control
Panel.
3. Double-click Network Connections.
4. Right-click Wireless Network Connection Properties.
5. In Wireless Network Connection Properties, click the Wireless Networks tab.
6. Verify that the Use Windows to configure my wireless network settings check box is selected.
If it is not, select the check box.
Create a Wireless LAN Connection 19
Page 20
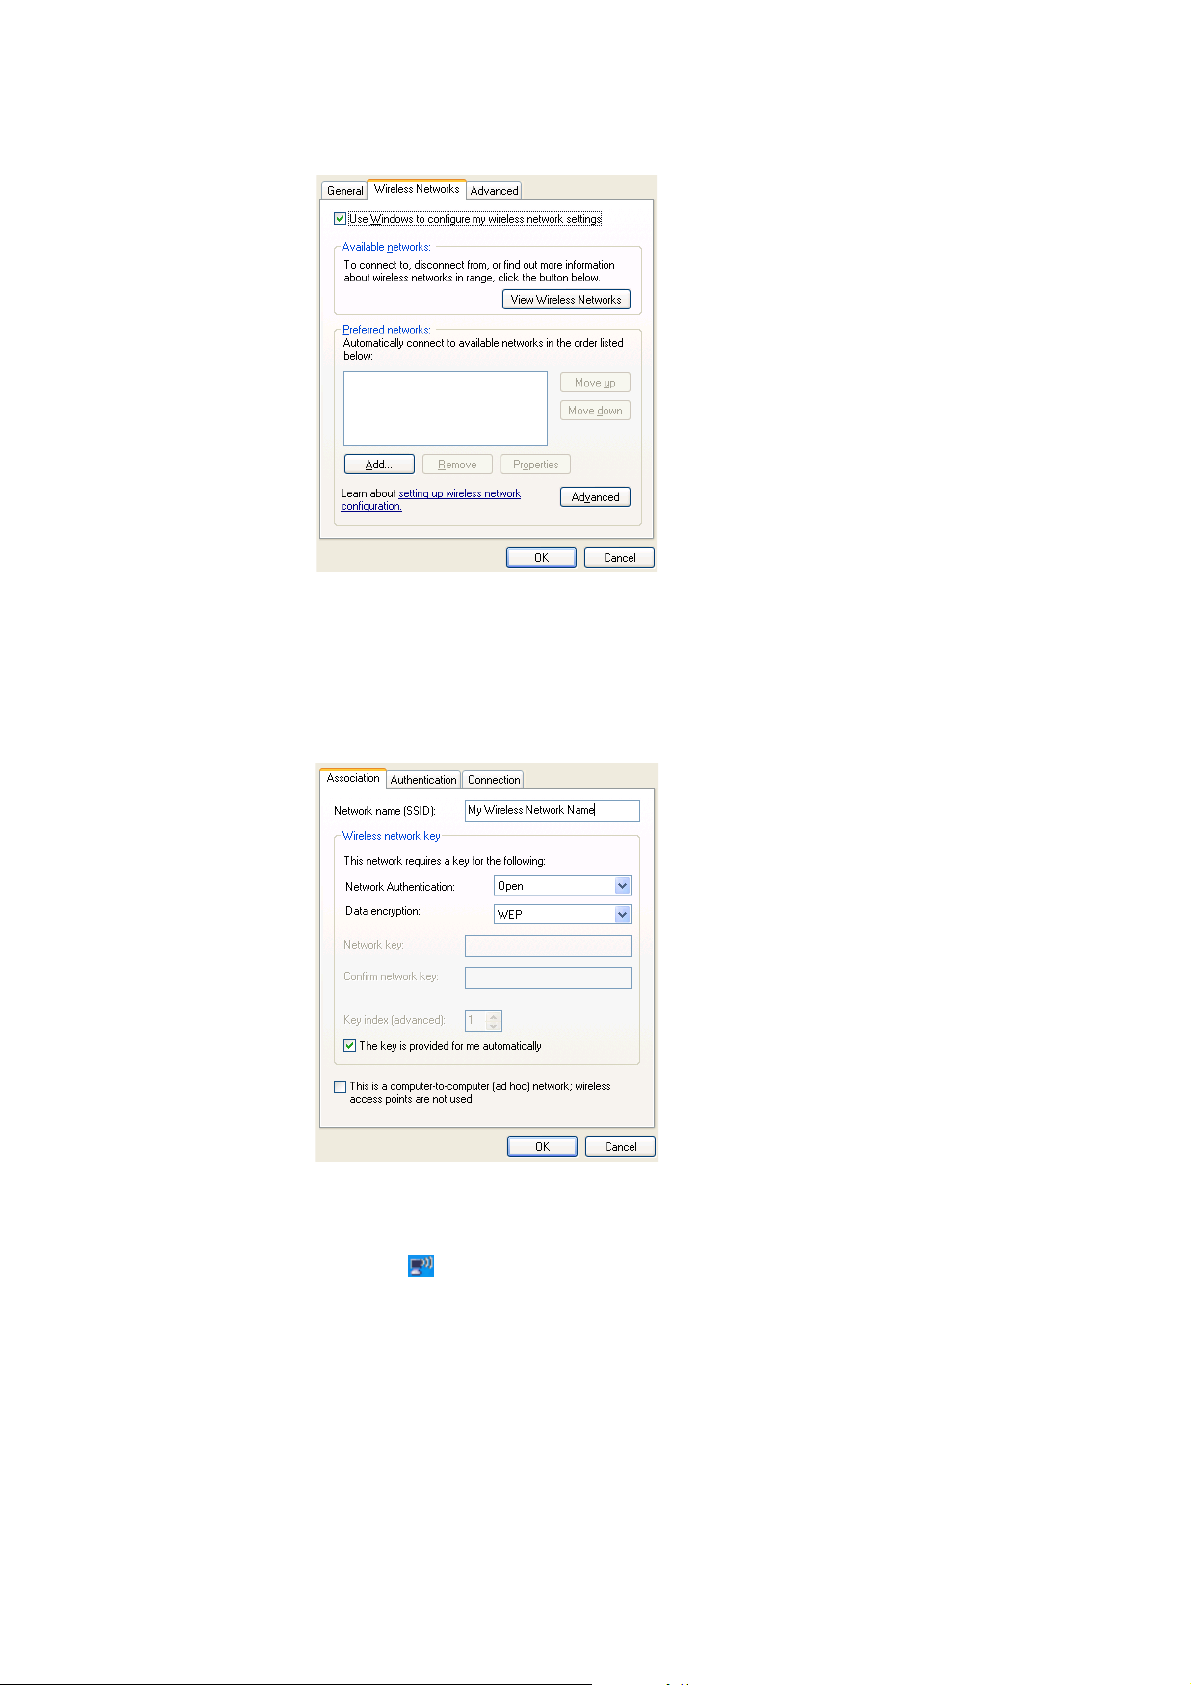
7. Click Add.
8. On the Association tab, type the name of your network in the Network name (SSID) box.
Note:
To automatically connect to your network when it is in range, select the Connect when the
network is in range check box on the Connection tab.
9. Click OK.
Your network name is displayed on the Wireless Networks tab under Preferred networks.
To connect to or disconnect from wireless networks in range
1. Right-click in the taskbar at the lower right corner of your screen, and then click View
Available Wireless Networks.
2. To connect to one of the listed networks, select the network and click Connect; if you are
already connected to one of the listed networks and you want to disconnect, select the network
and click Disconnect.
Network security settings must now be configured. The two most basic options are no security and
WEP. Either of these two options is usually appropriate for home users. The no security option
20 Create a Wireless LAN Connection
Page 21
provides no network security, allowing anyone to access your wireless network. The WEP option
provides a basic level of security to your wireless network.
Additional advanced security settings are also available, which are typically used in corporate
environments or for advanced users who require higher levels of security. You must ensure that the
security settings chosen for the wireless connection exactly match those on the access point.
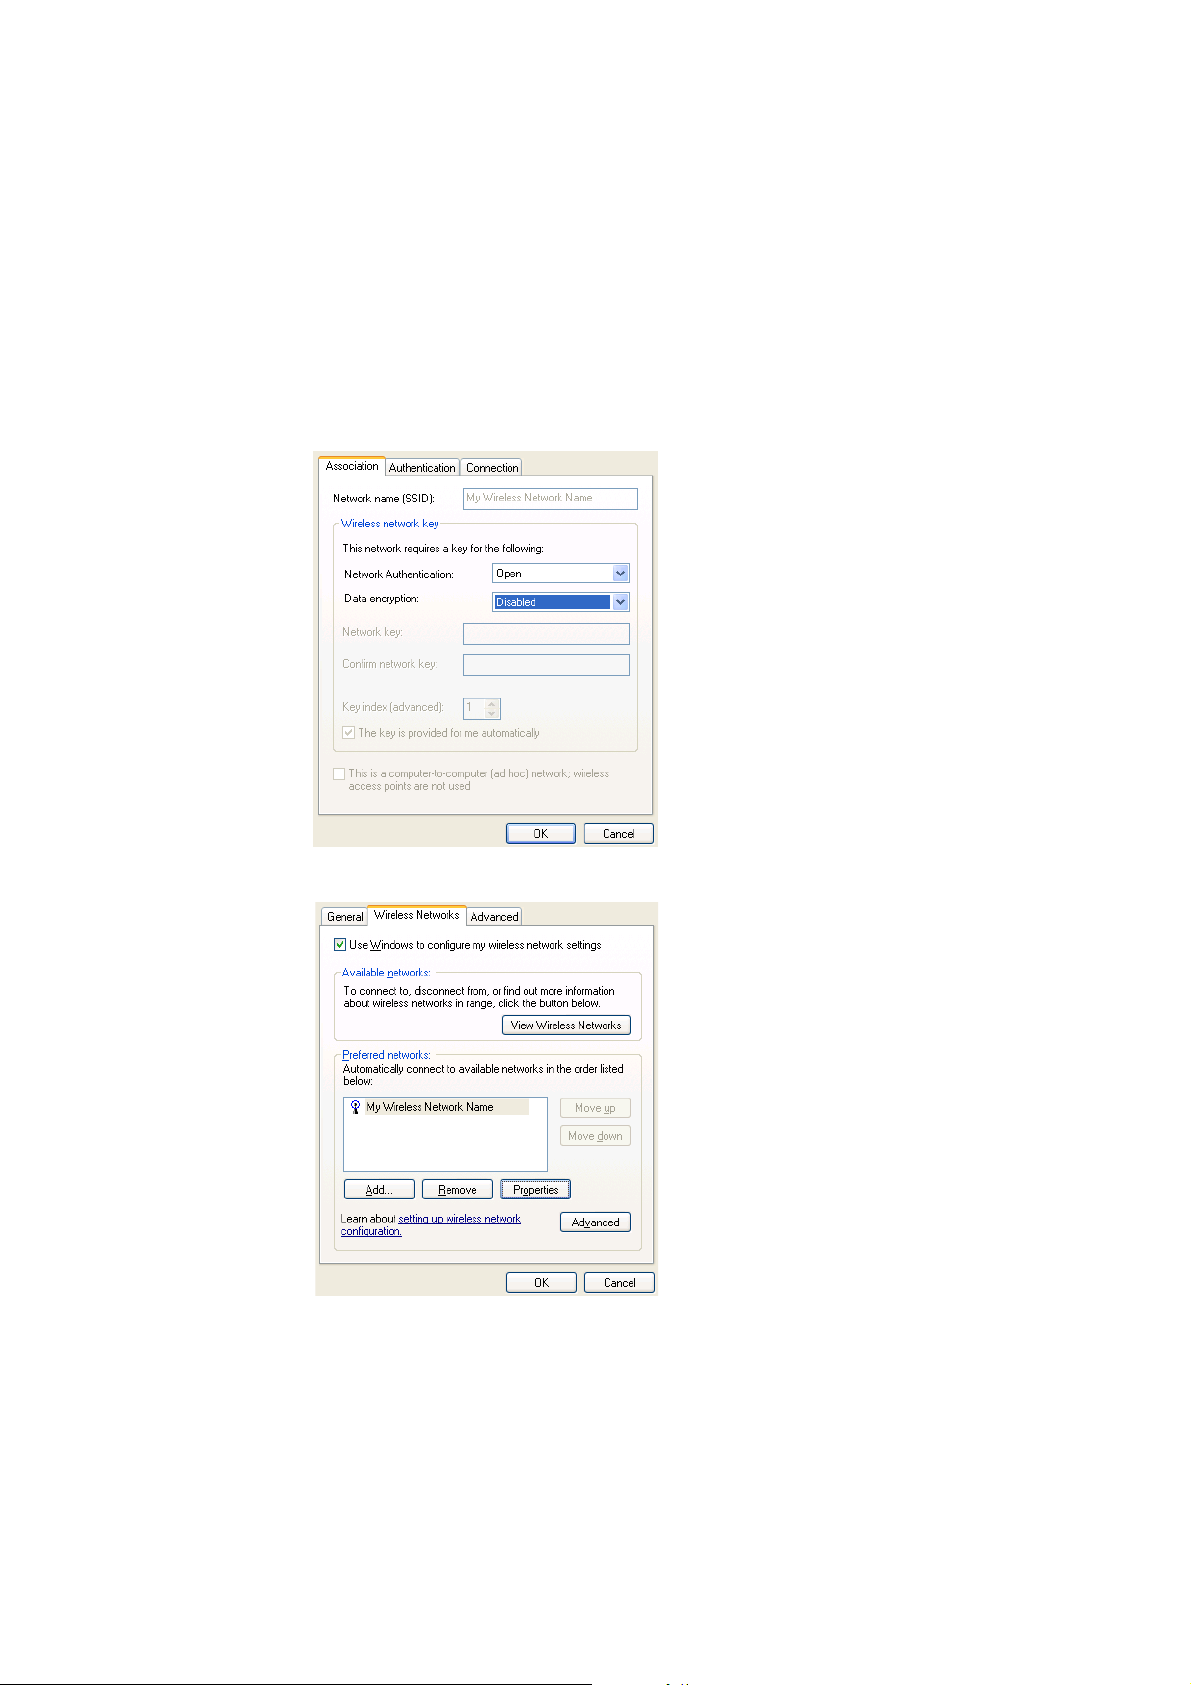
Setting Your Wireless Network Connection To Have No Security
1. Under Preferred networks, click the name of your wireless network.
2. Click Properties.
3. Click Open from the Network Authentication list.
4. Click Disabled in the Data encryption list.
5. Click OK.
6. Click OK.
The configuration of your wireless network connection is now complete. For information about the
status of your connection, see Viewing the Status of Your Wireless Connection on page 39.
Create a Wireless LAN Connection 21
Page 22
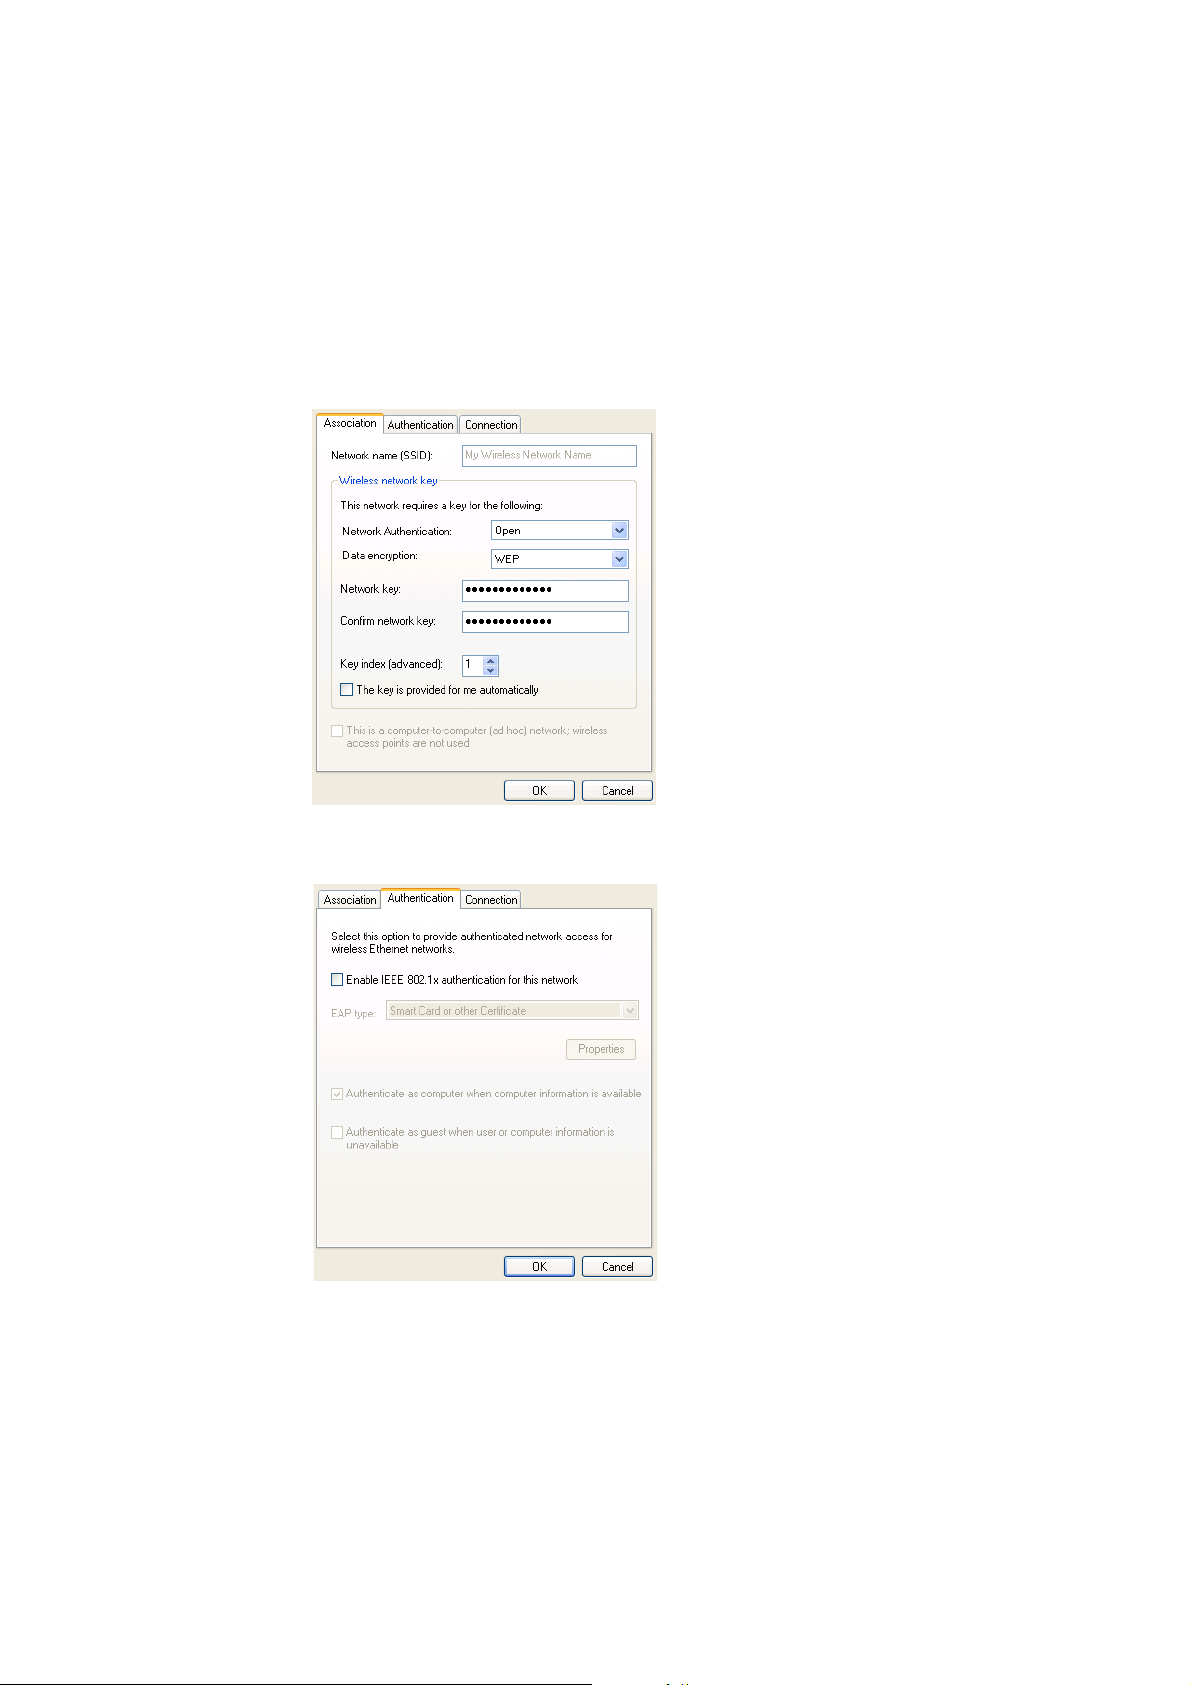
Setting Your Wireless Network Connection With WEP Security
1. Under Preferred networks, click the name of your wireless network.
2. Click Properties.
3. Select Open from the Network Authentication drop down list.
4. The key is provided for me automatically check box should be cleared.
5. Type the WEP network key in the Network key field. Your network key must exactly match the
network key of the access point. Your network key is either 5 or 13 ASCII (text) characters, or
10 or 26 hexadecimal (0-9, A-F) characters.
6. Type the key again in the Confirm network key field.
7. Click the Authentication tab and clear the Enable IEEE 802.1X authentication for the
network check box.
22 Create a Wireless LAN Connection
Page 23

8. Click OK.
9. Click OK.
The configuration of your wireless network connection is now complete.
Configuring your WIndows 2000/XP Network Using the Sony Ericsson Wireless Utility
This section is relevant to users on Windows XP, with Windows Zero Configuration enabled, and to
users on Windows 2000.
In countries other than the United States and Japan you must set the Location property to the country
in which you are using your Sony Ericsson 802.11 Wireless LAN Adapter. This ensures compliance
with local regulatory restrictions on transmit power and optimizes network performance.
Configuring Your Location
1. Click Start Settings Network and Dial-up Connections Local Area Connection.
2. Click Properties.
3. On the General tab of Local Area Connection Properties, click Configure.
4. Click the Advanced tab on Sony Ericsson 802.11 Wireless LAN Adapter Properties.
5. In the Property list, click Location, and then click the name of your location in the Valu e list.
Note:
If your location is not listed, click Default.
Create a Wireless LAN Connection 23
Page 24
6. Click OK.
Configuring Your Network
Before you attempt to connect to your network, verify that your access point is connected correctly
and is working. Consult your access point documentation to configure your access point. After you
have configured your access point, follow the steps described below to configure your wireless
network.
1. Click Start Settings Control Panel Sony Ericsson Wireless Utility .
2. Click the Wireless Networks tab in Sony Ericsson Wireless Utility. Windows 2000 users can
skip to step 4.
Note:
The names of wireless networks that are visible to your computer are shown under Available
networks. The name of your network is usually shown here.
3. Verify that the Let this tool manage your wireless network settings check box is selected. If it
is not, select it, and then click Apply.
Note:
If this checkbox is unavailable, you cannot use the Sony Ericsson Wireless Utility to manage
your wireless settings. For this checkbox to be available, you must log on to your system as
Administrator. If you are unable to log on as Administrator, contact your network administrator
for assistance. Your network administrator can either grant Administrator rights or arrange to
have your computer automatically import the appropriate preferred networks. Alternatively, if
you are using Windows XP you can use Windows
your wireless settings.
®
Zero Configuration Service to manage
24 Create a Wireless LAN Connection
Page 25

4. If you see the name of your network under Available networks, click the network name, and
then click Configure. If you do not see your network listed, click Add.
5. In Wireless Network Properties, if the name of your network does not already appear in the
Network name (SSID) box, type the name of your network in the Network name (SSID) box.
6. Click OK.
Create a Wireless LAN Connection 25
Page 26

Note:
Authenticate Prior to Windows® Login is used to guarantee a network connection (including
association, authentication, and DHCP. To enable this feature, click the Authenticate Prior to
Windows® Login check box. To disable this feature, clear the check box.
Your network name is displayed on the Wireless Networks tab under Preferred networks.
Network security settings must now be configured. The two most basic options are no security and
WEP. Either of these two options is usually appropriate for home users. The no security option
provides no network security, allowing anyone to access your wireless network. The WEP option
provides a basic level of security to your wireless network.
Additional advanced security settings are also available, which are typically used in corporate
environments or for advanced users who require higher levels of security. You must ensure that the
security settings chosen for the wireless connection exactly match those on the access point.
Setting Your Wireless Network Connection To Have No Security
1. Under Preferred networks, click the name of your wireless network.
2. Click Properties.
3. Click Open from the Network Authentication list.
4. Click Disabled in the Data encryption list.
5. Click OK.
6. Click OK.
The configuration of your wireless network connection is now complete.
Setting Your Wireless Network Connection With WEP Security
1. Under Preferred networks, click the name of your wireless network.
26 Create a Wireless LAN Connection
Page 27
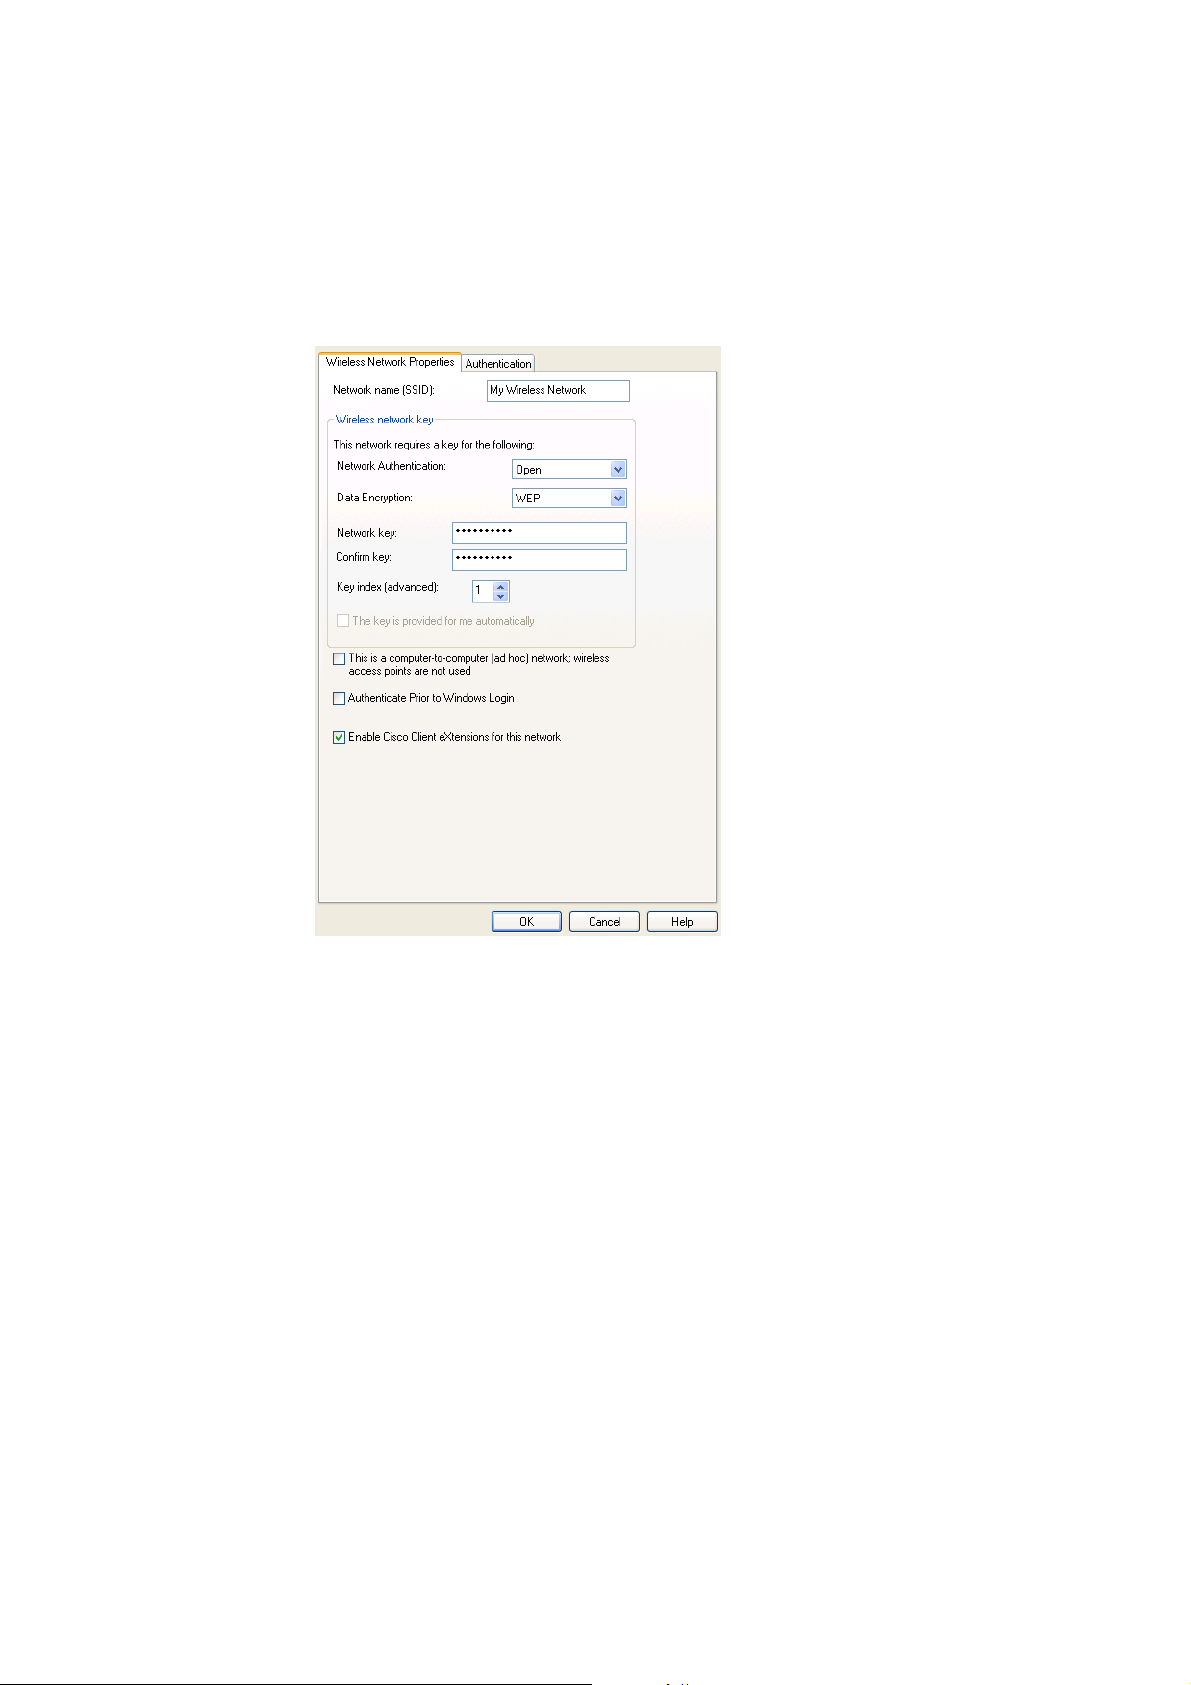
2. Click Properties.
3. Click Open from the Network Authentication list.
4. Click WEP in the Data encryption list.
5. Type the WEP network key in the Network key box. Your network key must exactly match the
network key of the access point. Your network key is either 5 or 13 ASCII (text) characters, or
10 or 26 hexadecimal (0-9, A-F) characters.
6. Type this key again in the Confirm key box.
Create a Wireless LAN Connection 27
Page 28
7. Click OK.
8. Click OK.
The configuration of your wireless network connection is now complete. For information about the
status of your connection, see Viewing the Status of Your Wireless Connection on page 39.
Making a Basic Network Connection in Windows Millennium
These instructions are based on the assumption that your Sony Ericsson 802.11 Wireless LAN
Adapter is factory installed and that your software has been installed. If you received your wireless
network card as part of your computer, both of these procedures have been done for you. If you did
not receive your wireless network card as part of a computer, consult the Quick Start Guide that came
with your wireless network card for instructions on installing the hardware and software.
Windows Millennium users must use the Sony Ericsson Wireless Utility to configure wireless
network connections, as described in this section.
In countries other than the United States and Japan you must set the Location property to the country
in which you are using your Sony Ericsson 802.11 Wireless LAN Adapter. This ensures compliance
with local regulatory restrictions on transmit power and optimizes network performance.
Configuring Your Location
1. Click Start Settings Network and Dial-up Connections Local Area Connection.
2. Click Properties.
3. On the General tab of Local Area Connection Properties, click Configure.
4. Click the Advanced tab on Sony Ericsson 802.11 Wireless LAN Adapter Properties.
5. In the Property list, click Location, and then click the name of your location in the Val ue list.
Note:
If your location is not listed, click Default.
28 Create a Wireless LAN Connection
Page 29

6. Click OK.
Configuring Your Network
Before you attempt to connect to your network, verify that your access point is connected correctly
and is working. Consult your access point documentation to configure your access point. After you
have configured your access point, follow the steps described below to configure your wireless
network.
1. Click Start Settings Control Panel Sony Ericsson Wireless Utility .
2. Click the Wireless Networks tab in Sony Ericsson Wireless Utility.
Note:
The names of wireless networks that are visible to your computer are shown under Available
networks. The name of your network is usually shown here.
3. Verify that the Let this tool manage your wireless network settings check box is selected. If it
is not, select it, and click Apply.
Note:
If this checkbox is unavailable, you cannot use the Sony Ericsson Wireless Utility to manage
your wireless settings. For this checkbox to be available, you must log on to your system as
Administrator. If you are unable to log on as Administrator, contact your network administrator
for assistance. Your network administrator can either grant Administrator rights or arrange to
have your computer automatically import the appropriate preferred networks. Alternatively, if
you are using Windows XP you can use Windows
your wireless settings.
®
Zero Configuration Service to manage
Create a Wireless LAN Connection 29
Page 30
4. If you see the name of your network under Available networks, click the network name, and
then click Configure. If you do not see your network listed, click Add.
5. In Wireless Network Properties, if the name of your network does not already appear in the
Network name (SSID) box, type the name of your network in the Network name (SSID) box.
6. Click OK.
Your network name is displayed on the Wireless Networks tab under Preferred networks.
30 Create a Wireless LAN Connection
Page 31

Network security settings must now be configured. The two most basic options are no security and
WEP. Either of these two options is usually appropriate for home users. The no security option
provides no network security, allowing anyone to access your wireless network. The WEP option
provides a basic level of security to your wireless network.
Additional advanced security settings are also available, which are typically used in corporate
environments or for advanced users who require higher levels of security. You must ensure that the
security settings chosen for the wireless connection exactly match those on the access point.
Setting Your Wireless Network Connection To Have No Security
1. Under Preferred networks, click the name of your wireless network.
2. Click Properties.
3. Click Open from the Network Authentication list.
4. Click Disabled in the Data encryption list.
5. Click OK.
6. Click OK.
The configuration of your wireless network connection is now complete.
Setting Your Wireless Network Connection With WEP Security
1. Under Preferred networks, click the name of your wireless network.
2. Click Properties.
3. Click Open from the Network Authentication list.
4. Click WEP in the Data encryption list.
Create a Wireless LAN Connection 31
Page 32

5. Type the WEP network key in the Network key box. Your network key must exactly match the
network key of the access point. Your network key is either 5 or 13 ASCII (text) characters, or
10 or 26 hexadecimal (0-9, A-F) characters.
6. Type this key again in the Confirm key box.
7. Click OK.
8. Click OK.
9. The configuration of your wireless network connection is now complete.
32 Create a Wireless LAN Connection
Page 33

Making a Basic Network Connection in Windows 98SE
These instructions are based on the assumption that your Sony Ericsson 802.11 Wireless LAN
Adapter is factory installed and that your software has been installed. If you received your wireless
network card as part of your computer, both of these procedures have been done for you. If you did
not receive your wireless network card as part of a computer, consult the Quick Start Guide that came
with your wireless network card for instructions on installing the hardware and software.
Windows 98SE users must use the Sony Ericsson Wireless Utility to configure wireless network
connections, as described in this section (for additional information on the Sony Ericsson Wireless
Utility, see Using the Sony Ericsson Wireless Utility on page 38).
In countries other than the United States and Japan you must set the Location property to the country
in which you are using your Sony Ericsson 802.11 Wireless LAN Adapter. This ensures compliance
with local regulatory restrictions on transmit power and optimizes network performance.
Configuring Your Location
1. Click Start Settings Network and Dial-up Connections Local Area Connection.
2. Click Properties.
3. On the General tab, click Configure.
4. Click the Advanced tab on Sony Ericsson 802.11 Wireless LAN Adapter Properties.
5. In the Property list, click Location, and then click the name of your location in the Val ue list.
Note:
If your location is not listed, click Default.
6. Click OK.
Configuring Your Network
Before you attempt to connect to your network, verify that your access point is connected correctly
and is working. Consult your access point documentation to configure your access point. After you
have configured your access point, follow the steps described below to configure your wireless
network.
1. Click Start Settings Control Panel Sony Ericsson Wireless Utility .
2. Click the Wireless Networks tab in Sony Ericsson Wireless Utility.
Create a Wireless LAN Connection 33
Page 34

Note:
The names of wireless networks that are visible to your computer are shown under Available
networks. The name of your network is usually shown here.
3. Verify that the Let this tool manage your wireless network settings check box is selected. If it
is not, select it, and then click Apply.
Note:
If this checkbox is unavailable, you cannot use the Sony Ericsson Wireless Utility to manage
your wireless settings. For this checkbox to be available, you must log on to your system as
Administrator. If you are unable to log on as Administrator, contact your network administrator
for assistance. Your network administrator can either grant Administrator rights or arrange to
have your computer automatically import the appropriate preferred networks. Alternatively, if
you are using Windows XP you can use Windows
your wireless settings.
®
Zero Configuration Service to manage
4. If you see the name of your network under Available networks, click the network name, and
then click Configure. If you do not see your network listed, click Add.
5. In Wireless Network Properties, if the name of your network does not already appear in the
Network name (SSID) box, type the name of your network in the Network name (SSID) box.
34 Create a Wireless LAN Connection
Page 35

6. Click OK.
Your network name is displayed on the Wireless Networks tab under Preferred networks.
Network security settings must now be configured. The two most basic options are no security and
WEP. Either of these two options is usually appropriate for home users. The no security option
provides no network security, allowing anyone to access your wireless network. The WEP option
provides a basic level of security to your wireless network.
Additional advanced security settings are also available, which are typically used in corporate
environments or for advanced users who require higher levels of security. You must ensure that the
security settings chosen for the wireless connection exactly match those on the access point.
Setting Your Wireless Network Connection To Have No Security
1. Under Preferred networks, click the name of your wireless network.
2. Click Properties.
3. Click Open from the Network Authentication list.
Create a Wireless LAN Connection 35
Page 36

4. Click Disabled in the Data encryption list.
5. Click OK.
6. Click OK.
The configuration of your wireless network connection is now complete.
Setting Your Wireless Network Connection With WEP Security
1. Under Preferred networks, click the name of your wireless network.
2. Click Properties.
3. Click Open from the Network Authentication list.
4. Click WEP in the Data encryption list.
5. Type the WEP network key in the Network key box. Your network key must exactly match the
network key of the access point. Your network key is either 5 or 13 ASCII (text) characters, or
10 or 26 hexadecimal (0-9, A-F) characters.
36 Create a Wireless LAN Connection
Page 37

6. Type this key again in the Confirm key box.
7. Click OK.
8. Click OK.
The configuration of your wireless network connection is now complete.
Create a Wireless LAN Connection 37
Page 38

Using the Sony Ericsson Wireless Utility
The user interface you see when you start the Sony Ericsson Wireless Utility may look slightly
different than the illustrations shown in this user guide, depending on the operating system you are
using.
In addition to providing a means for viewing the link status of a connection, monitoring the available
networks that within range, running diagnostic tests, viewing statistics about network activity, and
viewing important information about your Sony Ericsson 802.11 Wireless LAN Adapter, the Sony
Ericsson Wireless Utility can also be used to configure your wireless network connection.
Opening the Sony Ericsson Wireless Utility
The Sony Ericsson 802.11 Wireless LAN Adapter Utility starts automatically every time you start
your computer. When the system startup process is complete, is displayed in the taskbar at the
lower right corner of your screen. The utility begins scanning across the wireless frequencies for
wireless APs and other wireless clients. The appearance of the utility icon varies, depending on the
strength of the signal being received from the wireless AP or wireless client (if any) with which your
computer has associated. If your computer has not yet established a wireless network connection, all
of the bars in the icon are uncolored .
If the utility icon is not in the system tray, select the Show wireless configuration icon in system
tray check box on the Wireless Networks tab.
Opening the Utility in Windows 2000/ME and 98SE
9. Click Start Settings Control Panel Sony Ericsson Wireless Utility .
10. Click the Wireless Networks tab.
11. Enable the radio by selecting the Enable Radio check box (if it is not already selected).
Opening the Utility in Windows XP
1. Click Start Control Panel (Classic View).
38 Create a Wireless LAN Connection
Page 39

2. Double-click Sony Ericsson Wireless Utility .
3. Click the Wireless Networks tab.
4. Enable the radio by selecting the Enable Radio check box (if it is not already selected).
Enabling and Disabling the Radio
To disable the radio, right-click in the taskbar and select Disable Radio. To enable the radio,
right-click and select Enable Radio.
Viewing the Status of Your Wireless Connection
The quality of your wireless network connection is affected by two things:
• The strength of your wireless networking signal.
• The level of noise created by other wireless signals in your home or office.
The signal strength is graphically indicated by in the taskbar (located at the lower right corner of
your screen). The appearance of the icon indicates the strength or weakness of the signal.
To view the client IP address, and the name, speed, signal strength, and status of your wireless
network connection, move your mouse pointer over .
Note:
On Windows XP you can also view the connection status and signal strength by moving your
mouse pointer over the Windows
®
Wireless Network Connection icon in the taskbar.
A fully green icon indicates that the signal strength is very good or
excellent.
A partially green icon indicates that the signal is good or low.
Suggested action: Move closer to the access point.
Create a Wireless LAN Connection 39
Page 40

A grey icon indicates that there is no signal being received.
Probable causes:
The computer is trying to establish an initial connection but has
not yet succeeded.
You may have moved out of range of the access point.
Suggested action:
Wait.
Move closer to the access point.
An icon with a red bar indicates that there is no radio connection.
Suggested action: Enable the WLAN radio by right-clicking the
icon and then selecting Enable Radio.
Wireless Networks
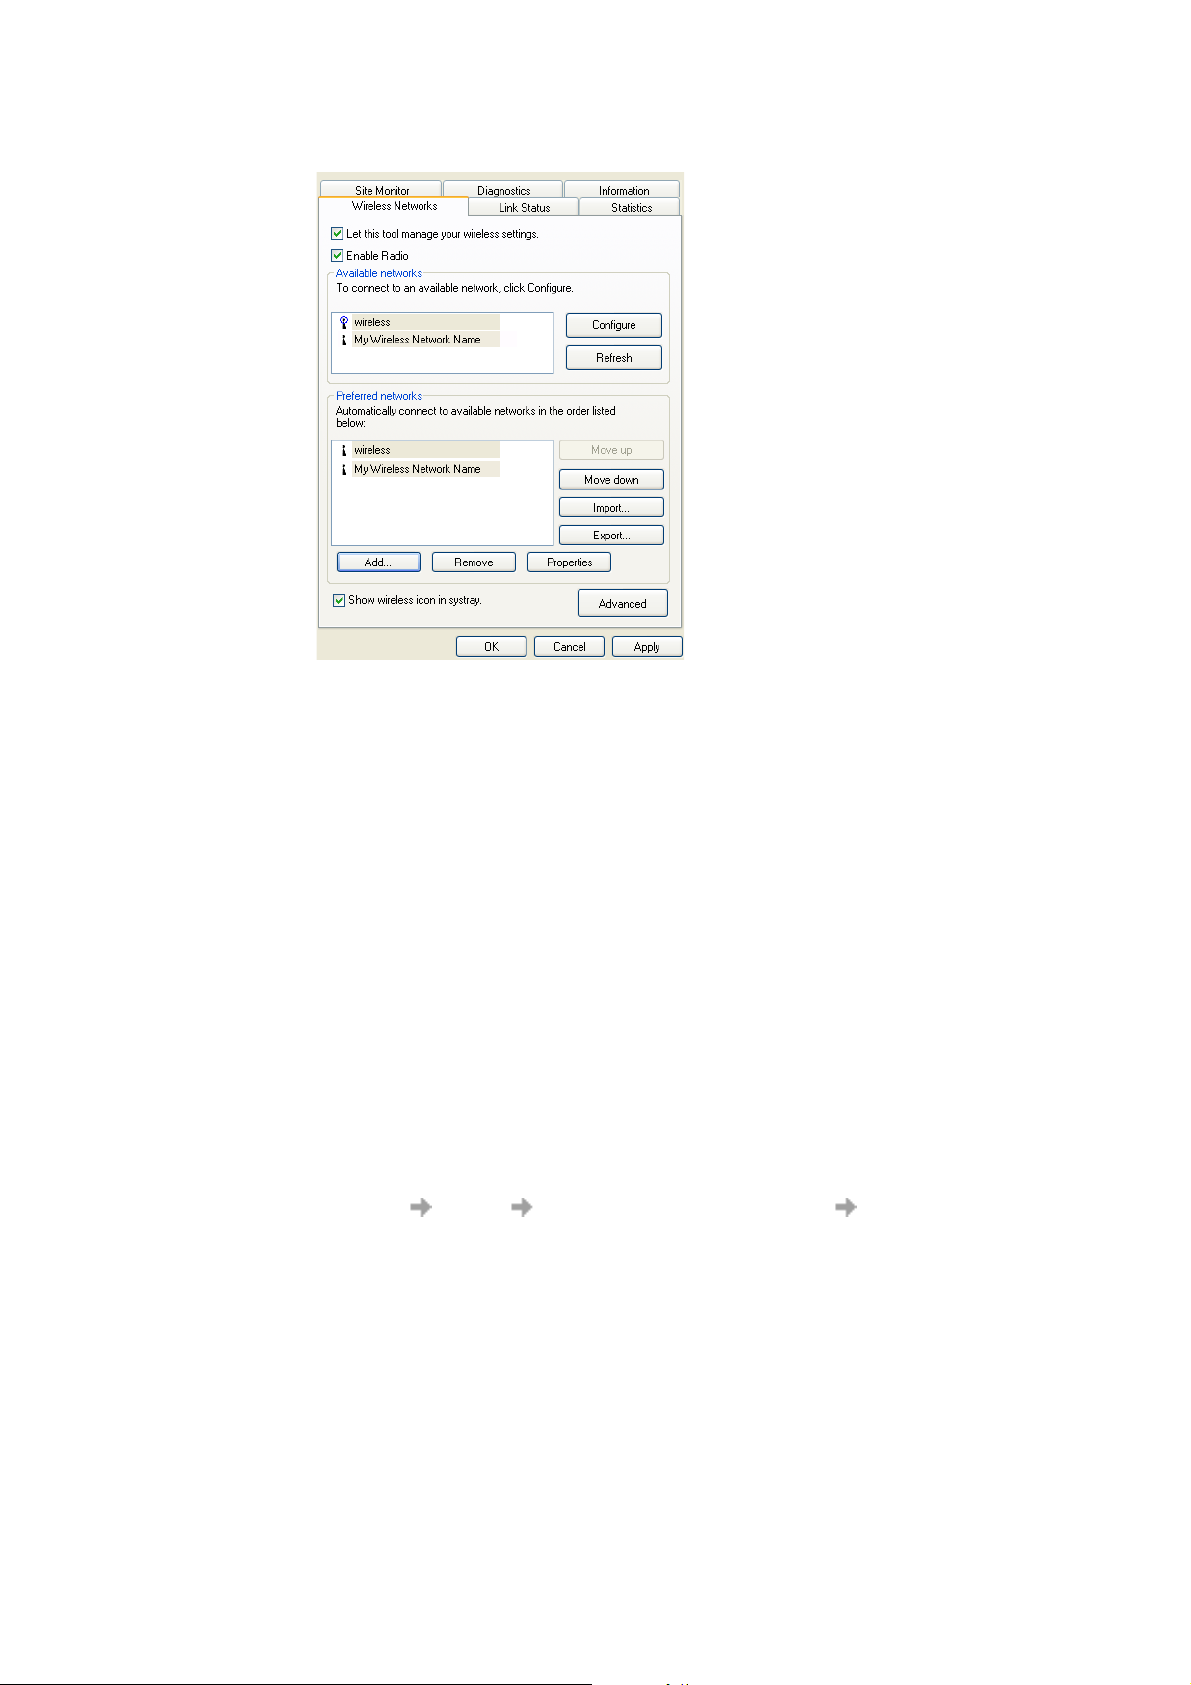
The Wireless Networks tab allows you to configure your wireless network connection. Before you
begin, ensure that the Enable Radio and Let this tool manage your wireless settings check boxes
are both selected.
For instructions on how to configure your wireless network connection using the Sony Ericsson
Wireless Utility, see:
40 Create a Wireless LAN Connection
Page 41

• Making a Basic Network Connection Windows 2000/XP on page 18
• Making a Basic Network Connection in Windows Millennium on page 28
• Making a Basic Network Connection in Windows 98SE on page 33
Link Status
The Link Status tab provides information on the status of your wireless network connection. The
signal panel on this tab provides advanced information (signal strength and noise level) about the
access point signal detected by your Sony Ericsson 802.11 Wireless LAN Adapter.
The two-character country code that represents the country for which the operating characteristics of
your Sony Ericsson 802.11 Wireless LAN Adapter have been set is shown opposite Location. If you
are not in the United States or Japan and plan to use your computer in a different country, you may
need to change the Location property.
To identify the country represented by the two-character country code refer to the Country Decoding
Table.
Create a Wireless LAN Connection 41
Page 42

Statistics
Transmission activity information is shown on the Statistics tab.
Site Monitor
The broadcasting wireless networks that are within range of your Sony Ericsson 802.11 Wireless
LAN Adapter are listed on the Site Monitor tab. Network properties such as the channel on which
the network is operating, the strength of the received signal, and the type of security are shown for
each network. By clicking the name of a listed network, you can see under Selected Network the
operating mode for that network, the data rates that are supported, and an indication of the signal
strength. To see advanced site monitoring details and to start a log file, double-click the network
name.
Note:
Use of Site Monitor may degrade performance of the IEEE 802.11 network while Site Monitor
is in use.
Diagnostics
You can run a number of diagnostic tests on your Sony Ericsson 802.11 Wireless LAN Adapter to
verify its operational and functional status.
Note:
The network connection is lost when you run the diagnostics. When the test run is over,
however, your network connection is automatically reestablished.
To run a diagnostic test
1. Open the Sony Ericsson Wireless Utility .
2. Click the Diagnostics tab.
3. To see a description of the test, click each test and look in the Recommendations area.
4. To run an individual test, or some but not all of the tests, clear the check box (by clicking it) for
those tests that you do not want to run. All tests are selected by default.
42 Create a Wireless LAN Connection
Page 43

5. Click Run.
• If the Sony Ericsson 802.11 Wireless LAN Adapter fails any of the diagnostics tests, see
Troubleshooting on page 79.
Information
Important information about your Sony Ericsson Wireless Utility and your Sony Ericsson 802.11
Wireless LAN Adapter are shown on the Information tab.
Create a Wireless LAN Connection 43
Page 44

Advanced Wireless LAN Features
Setting up an Ad Hoc Group Network
In ad-hoc mode, a peer-to-peer network is created. An example might be networking laptops in a
meeting room in order to share information. The network is set up at the start of the meeting and
disappears when the last laptop is shut down. The following instructions explain how to set up an ad
hoc network using two PCs, however you can network any number of PCs together, just make sure
they have a unique IP number.
1. Click Start, point to Settings, point to Control Panel, and then click Sony Ericsson Wireless
Utility.
2. Click the Wireless Networks tab.
3. Verify that the Let this tool manage your wireless network settings check box is selected. If it
is not, select it, and then click Apply.
Note:
If this checkbox is unavailable, you cannot use the Sony Ericsson Wireless Utility to manage
your wireless settings. For this checkbox to be available, you must log on to your system as
Administrator. If you are unable to log on as Administrator, contact your network administrator
for assistance. Your network administrator can either grant Administrator rights or arrange to
have your computer automatically import the appropriate preferred networks. Alternatively, if
you are using Windows XP you can use Windows
®
Zero Configuration Service.
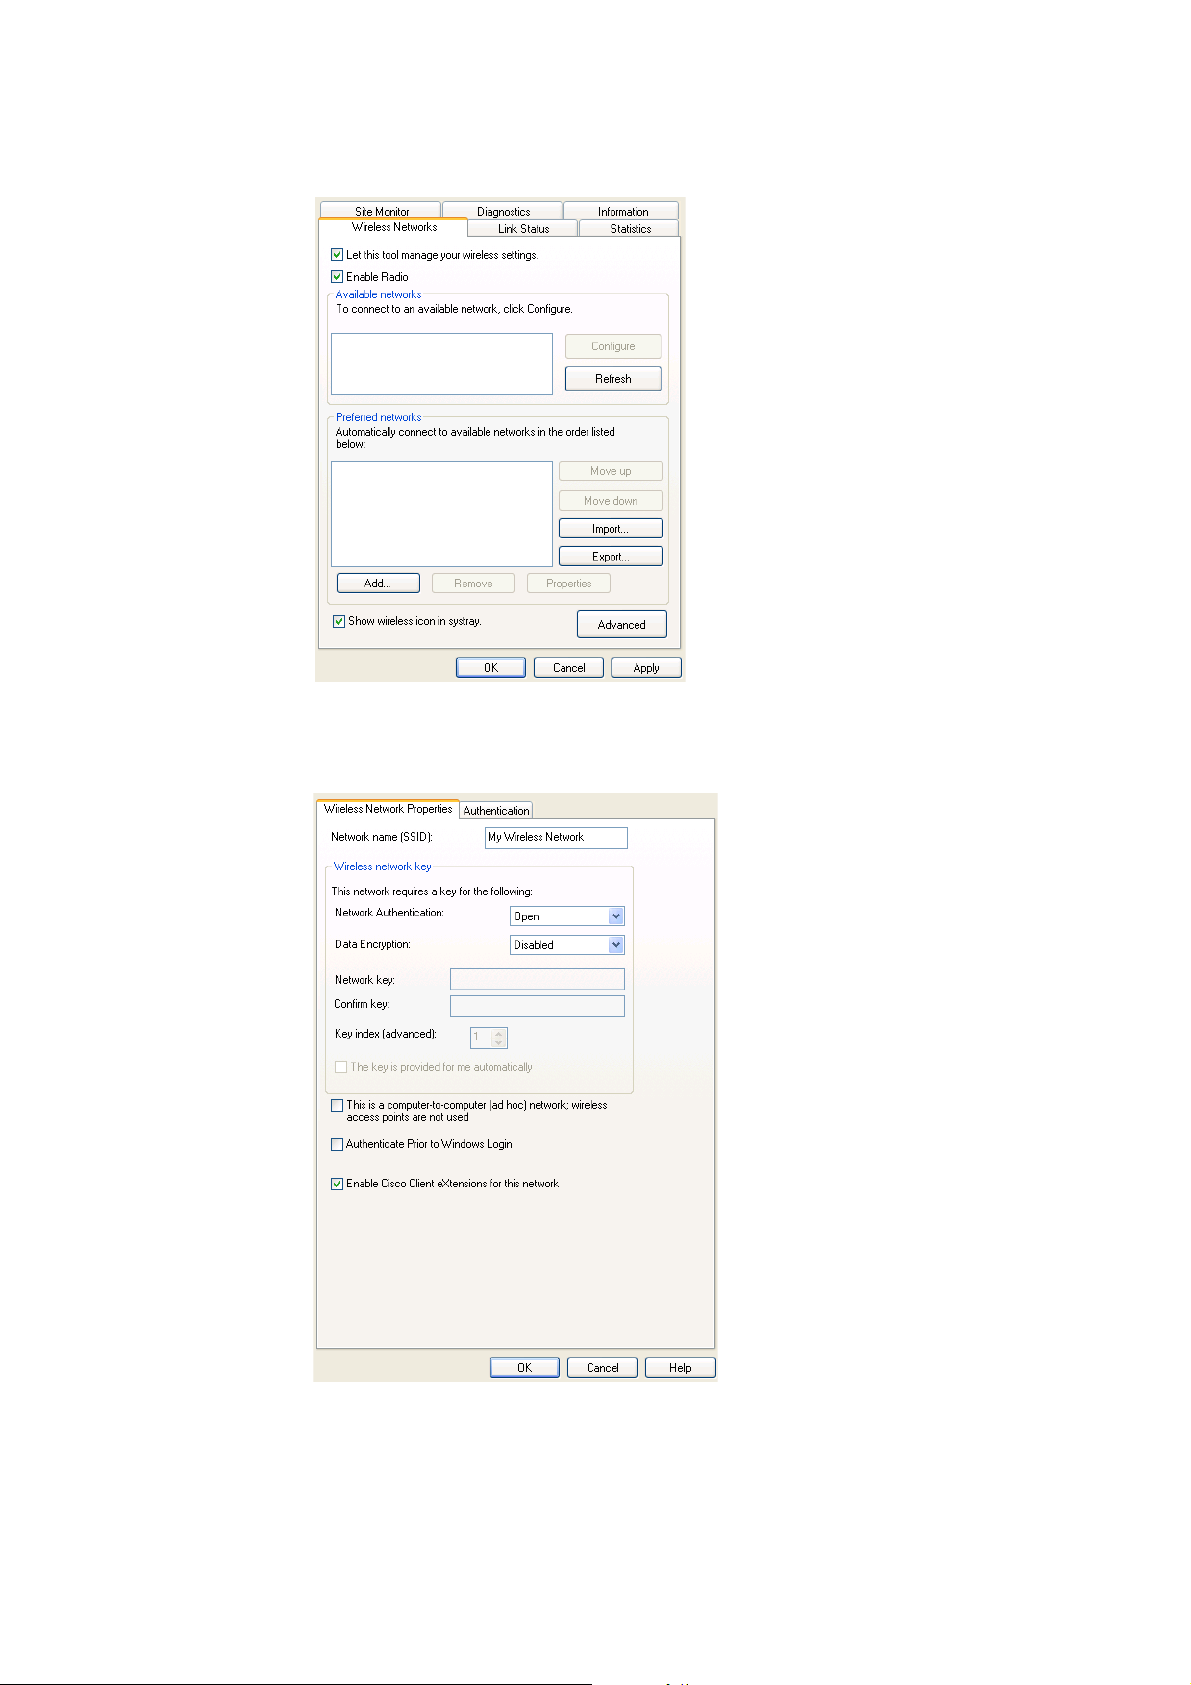
4. Under Preferred networks, click Add.
5. Type the name of your ad hoc network in the Network name (SSID) box.
44 Advanced Wireless LAN Features
Page 45

6. Select the This is a computer-to-computer (ad hoc) network; wireless access points are not
used check box.
7. Click OK.
Your network name is displayed on the Wireless Networks tab under Preferred networks.
For information about the status of your connection, see Viewing the Status of Your Wireless
Connection on page 39.
Network security settings must now be made. The two security options for ad hoc networks are no
security and WEP. Additional security options are available only on infrastructure networks. The no
security option provides no network security, allowing anyone to access your wireless network. The
WEP option provides some level of security to your wireless network.
Configuring Your Ad Hoc Network with No Security
1. Under Preferred networks, click the name of your wireless ad hoc network.
2. Click Properties.
3. Click Open in the Network Authentication list.
4. Click Disabled in the Data encryption list.
5. Click OK.
6. Click OK.
Your ad hoc network configuration is now complete. For information about the status of your
connection, see Viewing the Status of Your Wireless Connection on page 39.
Advanced Wireless LAN Features 45
Page 46

Configuring Your Ad Hoc Network with WEP Security
1. Under Preferred networks, click the name of your wireless ad hoc network.
2. Click Properties.
3. Click Open in the Network Authentication list.
4. Click WEP in the Data encryption list.
5. Type the WEP network key in the Network key box. Your network key must exactly match the
network key of the other computers in your ad hoc network. Your network key is either 5 or 13
ASCII (text) characters, or 10 or 26 hexadecimal (0-9, A-F)) characters.
6. Type this key again in the Confirm key box.
7. Click OK.
8. Click OK.
Your ad hoc network configuration is now complete. For information about the status of your
connection, see Viewing the Status of Your Wireless Connection on page 39.
Connecting the PCs
1. Select one of the laptops, right click My Computer and select Map Network Drive. In the
dropdown list, select a free hardrive name that is not occupied by any other name.
2. Type \\laptop name or IP address\C$ into the Folder field. For example, enter
\\192.168.0.1\C$ to connect to the 1st laptop we set up. C$ is specifying the drive on the laptop
that you want to connect to.
Note:
To find a computers name, open a Command Prompt on the PC you want to find the name of.
Type hostname and press return. The computer name is returned.
Note:
You can also use a Command Prompt to make sure you can see the other PC. Type ping <IP
address> and press return (The IP address belongs to the PC you are trying to contact). In
the example, we would enter ping 192.168.0.1. PC 1 sends a small amount of data to PC 2,
and if connection is established between the PCs, replies for each packet of data sent are
returned to PC 1.
3. If you are required to log on to the PC before access is granted, select Connect using a
different user name. Make sure you have an alias and password set-up on the PC you are
connecting to.
4. Enter your User name and Password into the Connect As... dialog.
5. Click OK and Finish.
After a while, a new window should popup in PC2 showing the hardrive of PC1. It is also listed with
your Network Drives.
Tip:
See your Windows® documentation for further details on setting up a network of Windows®
PCs.
Caution!
Unwanted users may try to connect to your ad hoc network. Use of security features such as WEP is
recommended.
46 Advanced Wireless LAN Features
Page 47

Disable the WLAN
1. Right click and select Disable radio.
Sharing an Internet Connection
To connect a group of computers using a shared Internet connection, select one of the desktop
computers to serve as the host computer (all other computers are called clients).
The host computer is the only computer that connects directly to the Internet. It is recommended that
the desktop computer having the fastest microprocessor and the most memory is used as the host
computer.
The host computer must be running either the Windows 2000 or Windows XP operating system.
Connection sharing requires that the host computer has either a modem or another network adapter
in addition to the GC89. The modem or the additional network adapter is used to access the internet.
The GC89 is used to share the connections with other clients.
Setting up Internet Connection Sharing (ICS) on the Host Computer
1. Connect the host computer to the internet.
2. Click the Start button.
3. Select Settings Control Panel.
4. Double-click Network and Dial-up Connections.
5. If the host computer is connected to the internet using a dial-up connection, double-click Dial-
up Connection Properties Sharing, and then ensure that both Enable Internet
Connection Sharing for this connection and Enabled on-demand dialing are selected.
If the host computer is connected to the internet using a cable or DSL modem, double-click
Local Area Connection Properties Sharing, and then ensure that the Enable Internet
Connection Sharing for this connection option is selected.
Note:
For Windows 2000, you must enable local network sharing and select the Local Area
Connection relating to the Sony Ericsson 802.11g adaptor. You can check this by looking at
the Device Name in the Network and Dial-Up Connections list. If your Sony Ericsson 802.11g
adaptor is listed as Local Area Connection 3, then select Local Area Connection 3 in the 'For
local Network' drop-down box.
For Windows XP, follow the Bridging instructions below.
Bridge connections on Windows XP
The network bridge allows you to connect network segments by selecting the appropriate network
connection and bridging them together. The network bridge manages your network segments, and
creates a single IP subnet for the entire network. There is no configuration required, and you do not
need to purchase additional hardware such as routers or bridges. IP addressing, address allocation,
and name resolution is highly simplified in a single subnet IP network.
Only one bridge may exist on a Windows XP computer, but it can be used to bridge as many different
network connections as the computer can physically accommodate.
Before you begin make sure you are logged on to the computer as an administrator.
Advanced Wireless LAN Features 47
Page 48

1. Select Start Control Panel, and then double-click Network Connections.
2. Under LAN or High-Speed Internet select each of the private network connections that you
want to be part of the bridge.
You must select at least two eligible network connections in order for Bridge Connections to
create a bridge.
3. Right click one of the highlighted private network connections, and select Bridge Connections.
You can create only one network bridge on a computer, but the bridge can accommodate any
number of network connections.
Caution!
Do not use this method to share a corporate network connection without first agreeing upon
security procedures with the network administrator.
Note:
• Adapters that have Internet Connection Sharing (ICS) or Internet Connection Firewall
(ICF) enabled cannot be part of the network bridge and will not appear on the Network
Bridge checklist. Similarly, the Add to Bridge menu command is available only for
adapters that you can add as connections to Network Bridge.
• Only Ethernet, IEEE-1394 adapters, or Ethernet compatible adapters such as wireless
and home phoneline adapters (HPNA), can be part of the network bridge.
• Do not create a bridge between the public Internet connection and the private network
connection, or add the public Internet connection to an existing network bridge, if you do
not have ICF or Internet Connection Sharing (ICS) enabled. To do so will create an
unprotected link between your network and the Internet, and your network will be
vulnerable to intrusions.
• If you remove adapters from the network bridge, and less than two adapters remain,
Network Bridge will not perform its intended function, but it will continue to use system
resources.
• Network adapters that previously appeared under LAN or High-Speed Internet, appear
under Network Bridge when they are added as connections. Network adapters that
provide Internet connectivity, such as DSL and cable modems, cannot be bridged and
will always appear under LAN or High-Speed Internet.
• Network bridges with wireless or IEEE-1394 connections support traffic using Internet
Protocol version 4 (IPv4) only.
4. Internet Connection Sharing, Internet Connection Firewall, Discovery and Control, and
Network Bridge are not available on Windows XP 64-Bit Edition.
Caution!
When sharing an internet connection, unwanted users within the reach of the wireless LAN
may be able to use it too. The use of security features such as WEP and WPA network keys
are recommended.
Creating profiles for ICS Client machines
Set up an ad hoc network on your host machine and each client. Follow the Create a Wireless LAN
Connection on page 18.
48 Advanced Wireless LAN Features
Page 49

Static IP Number Management
Some users may require a static IP number for the WLAN connection in the office and a dynamic IP
number outside the office.
If you are using Windows 98SE/Me/2000, it is necessary to manually change the TCP/IP properties
of the Sony Ericsson 802.11g Wireless LAN adaptor:
1. Select Control Panel Network and Dial-up Connections.
2. Right click the WLAN connection and select Properties General Internet Protocol
(TCP/IP) Properties.
3. Enter the static IP address for use in the office or select Obtain IP address automatically for
use outside.
Under Windows XP, this situation can be automated:
1. Go to Control Panel Network Connections Wireless Network Connection
General Internet Protocol (TCP/IP) Properties.
2. In the General tab select Obtain IP address automatically.
3. In the Alternate Configuration tab select User configured and enter static IP address and any
other network parameters that are required.
Wireless LAN Adapter Diagnostics
You can run a number of diagnostics on your GC89 wireless LAN adapter to verify its operational
and functional status.
Note:
Your network connection is lost when you run the diagnostics. When the test run is over, your
network connection is automatically re-established.
Advanced Wireless LAN Features 49
Page 50

1. Open the Wireless Configuration Utility, as described in Create a Wireless LAN Connection
on page 18, and click on the Diagnostics tab.
2. Select the tests you want to run. All tests are selected by default. To run an individual test or
some but not all of the tests, clear the check box for those tests that you do not want to run.
3. Click Run.
GC89 WLAN Information
You can view detailed technical information about your GC89 WLAN connection by selecting the
Information tab in the Sony Ericsson Wireless Configuration Utility. Your MAC number is listed on
this screen.
Concurrent WLAN and GPRS
The GC89 supports concurrent connections to GPRS and WLAN, however this ability may have
been disabled for security reasons.
Switching between GPRS and WLAN connection is not automatic, even if both are available or the
WLAN connection is established automatically as you enter the hotspot. This is because the
connections will have different IP numbers. You are advised to check your connections as you enter
and leave hotspots. You may need to re-request a transaction (for example refresh a web page) or restart an application.
50 Advanced Wireless LAN Features
Page 51

Wireless Manager Status Screen
To view the Status screen either start Wireless Manager select Start Programs Sony
Ericsson Wireless Manager or select your desktop shortcut or select View Status.
The Status screen shows information about your GSM and wireless LAN network connections. The
body of the screen is divided into two.
GSM Connection Status
The left side of the screen shows information about your GSM connection, including icons
representing:
• Receive signal strength
• GPRS/EDGE service status. See GPRS/EDGE Icons on page 54 for more information.
• Unread SMS Text Messag
SMS Messages Screen on page 70 for more details.
• Connection status
The left side of the screen also displays:
• The current Network Status, e.g. searching, radio off
• The connection progress messages
SMS
e status (or SIM Full indication ). See Wireless Manager
Wireless Manager Status Screen 51
Page 52

Connection
When a connection is established, the connection statistics (duration, bytes transmitted, bytes
received) are displayed and updated at regular intervals.
Note:
Statistics display is not supported on Window 98(SE) or Me platforms. To view statistic data
when using these operating systems, hover your mouse cursor over the standard Windows
Dial-up Networking icon.
To connect, cancel or disconnect a GPRS/EDGE or CSD data session use
the Connect/Disconnect drop down menu. The menu displays all the
connections you have defined, so you can quickly select the required
connection.
The Control button, located underneath the drop down menu, changes its
appearance depending on the state of the GC89 connection. The button
allows you to:
• Initiate a connection (Connect)
• Cancel connection attempt (Cancel)
• Disconnect (Hang-up) an existing session
To create a connection see Create a EDGE/GPRS or CSD Connection on page 14.
Note:
You can also launch or terminate a CSD dialup networking session directly from the Windows®
Network Connections icon.
®
Wireless LAN Connection Status
The right side of the Status screen shows information about your wireless LAN connection,
including:
• Wireless LAN connection status
• Connection speed
• Signal strength
• Network name (SSID)
The Disable/Enable button allows you to switch the wireless LAN radio on and off.
Usage Statistics
Select View Usage. A dialog displays the total connection time, data received and data sent for
GPRS/EDGE, CSD and WLAN.
Click the Reset button to clear the counters. You may wish to clear the counters to correspond with
your billing intervals.
Note:
Information in this dialog is indicative and may not correspond to the accurate billing
information maintained by your network operator.
52 Wireless Manager Status Screen
Page 53

Start Using Wireless Manager
1. To start Wireless Manager select Start Programs Sony Ericsson Wireless Manager
or select your desktop shortcut .
2. If requested, enter your SIM Card PIN and/or Phone Lock code, click OK. It is only necessary
to enter the PIN and/or code once during a PC session.
You are allowed three attempts to enter the correct PIN and/or code. If you fail to enter the SIM
PIN correctly, it is blocked and if you fail to enter the Phone Lock code correctly, your GC89 is
locked. Contact your network operator for your personal unblocking code (PUK). Enter the
unblock code into the Card Blocked dialog and enter a new PIN code and confirm it.
To set the SIM Card PIN and Phone Lock code, see Locks on page 64.
3. The Wireless Manager opens, displaying the Status screen. Connectivity details are displayed
on this screen. The current signal strength and EDGE/GPRS availability are shown. See
Wireless Manager Status Screen on page 25, for more details.
4. The Wireless Manager Icon is displayed in the system tray of your PC.
Note:
There must be a SIM card in the GC89 for the Wireless Manager application to operate.
However, the Wireless LAN functions may be used without a SIM card.
tray, to access the WLAN functions.
Click , in the status
Wireless Manager Icon
The Wireless Manager icons, displayed in your desktop system tray, allow you to view the current
status of the GC89. Simply place your mouse cursor over an icon to display text.
Some of these icons have menus associated with them. See Icon Menus on page 55 for details.
Start Using Wireless Manager 53
Page 54

GPRS/EDGE Icons
G
EDGE
PRS
Wireless LAN Icons
GSM/GPRS/EDGE radio is disabled.
The GSM/GPRS/EDGE radio transmitter is enabled, but there is no GSM
or GPRS/EDGE service available.
Wireless Manager is waiting for the GC89 card to be inserted.
The GC89 has GSM service and indicates a signal strength of 3 out of
5 bars. CSD, SMS and fax may be used, provided these are supported by
the subscription. If you have selected a GPRS connection and the
Connect button is grey, GPRS/EDGE is not available. If the Connect
button is available, your mobile operator has configured the Wireless
Manager to search for GPRD/EDGE when you connect. If the connection
is successful, GPRS/EDGE is available and GPRS/EDGE availability is
indicated as below when connected. When you disconnect, the signal
meter returns to this state.
The GC89 has GSM and GPRS service. GPRS, CSD, SMS and fax may
be used, provided these are supported by the subscription.
The GC89 has GSM and EDGE service. EDGE, CSD, SMS and fax may
be used, provided these are supported by the subscription.
Windows
Wireless LAN radio is disabled.
The wireless LAN radio transmitter is enabled, but there is no network
available.
The GC89 has made a wireless LAN network connection. The degree to
which this icon is green indicates the signal strength.
®
Icons
In addition, the following standard Windows
®
operating system icons also appear in the system tray
54 Start Using Wireless Manager
Page 55

when the GC89 is inserted in your PC and in use.
Active Windows® dial-up or wireless connection. Hover your mouse over
the icon or double click it to display information about the network
connection (e.g. number of bytes sent/received). Up to two of these icons
may be displayed, representing either Dial-up or GSM/GPRS/EDGE, and
wireless LAN connections.
Disconnected Windows® Local Area Connection. Up to two of these icons
may be displayed, representing GSM/GPRS/EDGE and wireless LAN
connections.
These icons allow you to edit your Windows
connections. See Making Windows® Network Connections Visible
on page 57 for details.
PC Card icon. This indicates that a PC card is present. It allows you to
see certain properties and also to stop / remove the card. See Windows®
Log on Using GPRS/EDGE Dial-up Connection on page 62 for details.
Icon Menus
GC89 GSM/GPRS/EDGE menu
Right click one of the following icons to see the GC89 GSM/GPRS/EDGE menu options.
The GC89 GSM/GPRS/EDGE menu is displayed.
or
or
or
Open Wireless Manager
Turn Radio Off
Connect to MyGPRSservice
Help
About Wireless Manager
Hide to tray
Exit
®
Network dial-up
Note:
Some of these menu options are disabled, depending on the current state of the GC89.
The GC89 GSM/GPRS/EDGE menu options are described below.
Open Wireless Manager
Select Open Wireless Manager or double click on the Wireless Manager icon to open the Wireless
Manager.
Radio Status (Turn GSM/GRPS Radio On/Off)
This menu option is dynamic. It monitors the current state of the GC89 GPRS/EDGE radio
transmitter and gives you the option to switch to the opposite state. (For example, if your GC89
GPRS/EDGE radio transmitter is on the menu option reads Turn GPRS/EDGE Radio Off.)
You can also set the status of the GPRS/EDGE radio transmitter by selecting Turn G P RS / E DG E
Radio On/Off in the Wireless Manager File menu.
Start Using Wireless Manager 55
Page 56

Connect/Disconnect
If you are currently disconnected, the menu gives you the option to connect to the most recently used
GC89 GPRS/EDGE connection. If you are connected the menu gives you the option to disconnect.
Help
Opens the Wireless Manager Online Help. You can also launch the Online Help from the Wireless
Manager Help Menu. Pressing F1 in any of the Wireless Manager dialogs opens the relevant help
screen.
About
Displays a dialog that contains Wireless Manager software information.
Hide to Tray
Select the Hide to Tray option to visually close Wireless Manager leaving only the icons visible in
the system tray. Use the Open Wireless Manager option to view the software again.
Exit
Exits the Wireless Manager application completely. Use the stop/remove commands if you wish it
to remain in the background. See Safe Removal of the GC89 on page 57 for more details.
GC89 Wireless Control menu
Right click on one of the following icons to see the GC89 Wireless Control menu options.
The GC89 Wireless Control menu is displayed.
or
or
The GC89 Wireless Control menu options are described below.
Help
This menu option provides information about the GC89 Wireless Control Utility.
Country (Where provided)
This menu option allows you to select the operating characteristics that comply with the regulations
that apply in a particular country. Before connecting to a wireless network, you should verify that
the Country value is correct. If you travel to different countries, you must remember to change the
Country as appropriate.
If the destination country is not listed, set the value to Worldwide.
Open Utility
Opens the Wireless Configuration Utility.
See Create a Wireless LAN Connection on page 18 for details.
Note:
Use this option to access the WLAN functions if there is no SIM in the GC89.
56 Start Using Wireless Manager
Page 57

Radio Status (Enable / Disable Radio)
This menu option is dynamic. It monitors the current state of the GC89 wireless LAN radio
transmitter and gives you the option to switch to the opposite state (for example, if your GC89 Radio
transmitter is on, the menu option reads Disable Radio).
You can also set the status of the wireless LAN radio transmitter by selecting Turn Radio On/Off in
the Wireless Manager File menu.
Hide
This menu option allows you to hide the icon from view on the system tray.
Making Windows® Network Connections Visible
The Windows® connection icons, displayed in the system tray, normally disappear once a
connection is made. This means that you may not necessarily see an icon corresponding to each of
the icons for your GPRS/EDGE and CSD.
To make the icon visible, follow the steps described below.
• Right click the appropriate icon and select Open Network Connections. Alternatively
select Start Settings Network Connections.
• A dialog opens displaying all the network and dial-up connections available on your PC.
Right click the one you want to edit.
• Click the Show icon in taskbar when connected box. Click OK to close the dialog.
When you have an active connection, use your mouse to hover over the icon to view
connectivity details.
• PC Card icon
Indicates that a PC card is present and allows the user to see certain properties and to
stop/remove the card.
Safe Removal of the GC89
You must stop the GC89 before attempting to remove it.
1. Close any active GC89 Networking Connections.
2. Exit Wireless Manager.
3. Click on the PC Card icon. All the currently connected devices are listed. Select Stop Sony
Ericsson GC89 EGPRS Modem.
4. A dialog is displayed telling you it is safe to remove the card.
5. The GC89 can now be removed safely.
Important!
Incorrect removal of the GC89 can damage the card.
Start Using Wireless Manager 57
Page 58

Wireless Manager GSM/GPRS/EDGE Preferences
You can change the general behavior of the Wireless Manager by selecting specific options in the
Preferences... dialog.
1. From the File menu, select Preferences. The Preferences dialog opens, the Radio Power tab
is displayed.
Radio Power Tab
You can use this tab to manage the state of the radio transmitter.
Enable Radio immediately
when card inserted
You should normally leave this checkbox turned off. When
enabled, the Windows® driver turns the radio transmitter
on when the card is inserted and leaves it enabled even
when the card is not in use. You should check this option if
your Windows
up connection; see Windows® Log on Using GPRS/EDGE
Dial-up Connection on page 62 for more details. When
you click OK to activate this option the Wireless Manager
displays the following dialog.
When this option is selected, the Wireless Manager radio
power startup and shutdown choices are disabled.
®
logon requires you to log on using a dial-
58 Start Using Wireless Manager
Page 59

The radio mode you specify at Wireless Manager start-up appears selected on the Radio tab.
On
Off
Ask Me Triggers a dialog to be displayed every time the PC is
Turn Radio Off At shutdown the radio is turned off.
Reset card
When the Wireless Manager is running in radio on mode
it is registered to the network, connections can be made
and SMS sent and received. The radio can be enabled in
several ways;
•Select Radio On when the Wireless Manager starts.
• Specify the required radio state in
Preferences Radio Power.
See Wireless Manager GSM/GPRS/EDGE Preferences
on page 58 for more details.
Radio Off indicates that the GC89 will not register to the
mobile network. You may perform non-communication
related activities such as phone book maintenance, but
you must turn on the radio in order to make a connection
or to send/receive SMS.
turned on. The dialog asks you if the radio transmitter
should be turned on or off during the active PC session.
This is also called Aeroplane mode, because it prevents
the radio transmitter from automatically turning on. This is
a useful feature in areas where radio transmitters are not
allowed; aircrafts, hospitals or blasting areas.
Turns the radio off and resets the card.
Text Messaging Tab
You can use this tab to enable reception of specific message classes from the SMS Cell Broadcast
service and to set the SMS received audio alarm to on or off. Select the radio buttons to activate the
options.
Example of SMS Cell Broadcast message types:
To enter multiple SMS Cell Broadcast message types separate each entry with a comma, for
example: 000, 034, 076.
Note:
SMS Cell Broadcast message types are network operator specific. Contact your network
operator for more details.
Leave Radio As Is When the Wireless Manager closes the radio, it remains in
its current state, i.e. if the radio is currently on it will remain
on and you will still be able to use the Wireless LAN
capabilities of the GC89.
Code: Cell Broadcast Message
000 Index
010 News Flashes
020 Hospitals
030 Long-distance road reports
040 Weather
This screen also allows you to set a validity period for the SMS messages that you are sending. For
example, if a message you send cannot be delivered because the recipient doesn't have their phone
Start Using Wireless Manager 59
Page 60

on, the validity period sets a time limit on how long the service center should keep attempting
delivery.
Notifications Tab
Click the Notifications tab. From here you can decide if you want to:
• display a splash screen every time Wireless Manager is opened.
• display a splash screen every time Wireless Manager is closed.
• display a program end confirmation box.
Select the check box to activate the options.
GPRS Connection Tab
Establish GPRS connection at startup
Select this option to automatically connect to your chosen network when Wireless Manager is
started. Wireless Manager waits until GPRS is registered and then it establishes the specified GPRS
connection.
Simply select the name of the connection to be established from the drop down list.
To automatically connect when you start or restart your PC, see the example below. If you need to
connect at Windows
on page 62.
®
log on see Windows® Log on Using GPRS/EDGE Dial-up Connection
Example: If you want your GC89 to be available and a GPRS internet connection to be
Miscellaneous Tab
Click the Miscellaneous tab.
automatically established when you boot your laptop:
- Set Preferences Miscellaneous Run this program when
Windows Starts
- Set Preferences GPRS Connection Establish GPRS Connection At
Startup and select the GPRS connection required.
60 Start Using Wireless Manager
Page 61

• Hide to tray when minimized
If enabled, when the Wireless Manager is minimized, it removes any window from the taskbar
and only shows the small icon in the system tray. To re-open the main window, double-click the
tray icon or select open from the icon menu.
• Run this program when Windows starts
If enabled, the Wireless Manager starts when Windows
®
is started. If a GC89 is detected, the
Wireless Manager runs. If not, the program closes (and runs in the background if permitted).
When used with Establish GPRS connection at startup, this allows a GPRS session to be
automatically connected when the user logs on, see Windows® Log on Using GPRS/EDGE
Dial-up Connection on page 62 for more details.
• Minimize when Windows starts
If enabled, the Wireless Manager starts when a user logs on to Windows
®
and it appears as an
icon in the task bar only. If a GC89 is detected, the Wireless Manager runs and connects. If not,
the program closes (and runs in the background if permitted).
• Allow this program to run in the background
If enabled, the Wireless Manager runs in the background, waiting for a GC89 to be inserted.
When the card is detected, the Wireless Manager automatically opens and begins normal
operations.
When the close box or File Exit is selected, the Wireless Manager closes but does not exit. It
releases control of the card, so it may be stopped and removed, and runs in the background.
You can start the program again from the Start menu, double-clicking the system tray icon, or
by re-inserting the GC89.
You can stop Wireless Manager running in the background by right clicking on the PC screen
and selecting Exit.
If you attempt to start Wireless Manager with no GC89 inserted, a warning dialog is displayed,
informing you that the GC89 is not present, and Wireless Manager switches back to background
mode.
• Hide tray icon when no card inserted
If this option is selected, Wireless Manager runs in background mode, the Wireless Manager
icon is not displayed in the system tray. If the card is inserted and the icon reappears and the
Wireless Manager is started.
Examples: If you want to activate your GC89 when the laptop is booted, so that it is ready to
make a connection and send/receive SMS:
- Set Preferences Miscellaneous Run this program when Windows
Starts.
If you want your GC89 to be available and a GPRS internet connection to be
automatically established when you boot your laptop:
- Set Preferences Miscellaneous Run this program when Windows
Starts.
- Set Preferences GPRS Connections Establish GPRS Connection At
Startup.
- Select the GPRS connection required.
If you remove the GC89 during usage and want it to be automatically reactivated
when you re-insert it:
- Set Preferences Miscellaneous Allow this program to run in the
background.
Note: If you have Establish GPRS connection at Startup set, then the connection
will also be automatically established when you insert the card.
If you want to start the laptop with the GC89 removed and have it automatically
Start Using Wireless Manager 61
Page 62

activated when it is later inserted:
- Set Preferences Miscellaneous Run this program when Windows
Starts.
- Set Preferences Miscellaneous Allow this program to run in the
background.
Windows® Log on Using GPRS/EDGE Dial-up Connection
The GC89 supports the Windows® Log on using dial-up connection feature.
®
To log on to Windows
before you log on. To enable the radio prior to logon, select Enable radio immediately when card
inserted checkbox in the Radio Power preferences tab. See Radio Power Tab on page 58 for more
details.
Important!
Never start your PC in this mode if you are in a location where mobile devices shouldn’t be
used (for example, on an aeroplane, in hospital or near a blast site).
Only check this option if you need to log on to a Windows® Domain via a wireless dial-up
connection. This will permit the GC89 to register with the network and establish a connection when
the Windows
®
logon screen is displayed.
Note:
It is not possible to display network status or signal strength during the Windows® logon
procedure, so you should allow enough time for the GC89 to find and register with the wireless
network prior to attempting to log on.
using a dial-up connection, the GC89 must be inserted and the radio enabled
The dial-up connections available to the Windows® Logon must have been created by a user account
with Administrator privilege and designated For all users. This must be done using the Windows
Network Connection Wizard, because the Wireless Manager can only create connections for the
current user ID.
Normally the Windows Logon using dial-up connection will be using a CSD session to a corporate
network, so that the logon credentials can be validated by a Windows
®
Domain Server.
There may be special circumstances where a GPRS dial-up connection is required for logon. To
create a GPRS dial-up connection, follow these steps:
1. Create the Windows
®
dial-up connection using the Windows Network Connection Wizard.
For the telephone number, use *99***3#.
2. Set the GPRS context parameters in the GC89 using the following AT commands. Type the AT
Commands into the Windows
®
Hyperterminal program.
AT+CGDCONT=3,“IP”,“<AccessPointName>”,“”,0,0
where <AccessPointName> is the name of the special GPRS access point for your corporate
GPRS service.
Note:
In this example, we used GPRS Context 3. There are 10 possible contexts supported by the
GC89 (1..10). Context ID 2 is reserved for use by connections created by the Wireless
Manager. The context definition is stored in nonvolatile memory in the GC89 and only needs
to be set up once. Cards could be set up, for example, by the IT Manager using a different
laptop.
Refer to the AT Command Manual or contact your service provider for further assistance.
62 Start Using Wireless Manager
Page 63

Wireless Manager Telephony Settings Screen
The Telephony Settings screen allows you to view and change the GSM settings of the GC89.
The functions of the Telephony Settings screen are very similar to the settings that you have access
to via a mobile phone’s display. A Wireless 802.11 option provides access to the Sony Ericsson
Wireless Configuration Utility.
Note:
Your GC89 has to be inserted into your computer to make changes to the settings.
1. Click or select View Telephony Settings.
The window is divided into two areas: the navigation area on the left and the information area on the
right.
When you have selected a setting in the navigation area, Wireless Manager retrieves the current
setting information from the GC89 and displays the information in the right area.
Phone Numbers
My numbers
You can list all your own numbers here. The numbers are for personal reference only and have
no operational effect on the GC89.
Wireless Manager Telephony Settings Screen 63
Page 64

Voice line 1 and 2:
The voice number or numbers issued with your SIM card that you use for normal voice calls.
If you have line 2 (alternate line service) enter in the Voice Line 2 number field.
Data:
The number used to make a data call to the GC89 (Mobile Terminated).
Fax:
Fax is not supported by the GC89.
SMS Service Centre
When you send a text message it goes to your operator's service centre. They then forward it to the
correct recipient. The SMS service centre is identified by a telephone number.
Note:
The SMS Service Centre number is normally read automatically from your SIM card.
To Set or change the service centre address:
1. Enter your operator's service centre phone number in the Number text box.
2. Click Apply to transfer the setting to your GC89.
Locks
Phone lock
The phone lock protects the GC89 against unauthorized use if it is stolen and used with another SIM
card. Phone Lock is not activated when you buy the GC89.
You can use this screen to change a default phone lock security code (0000) to any four to eight digit
personalized code.
You can set the Phone Lock Status to one of the following states:
• On - A brief message Phone lock is displayed each time you turn on the computer. The Enter
phone lock code dialog opens. Enter your code into the dialog and click OK.
• Off - The GC89 is not locked.
• Automatic - If the Automatic setting is selected, the message Phone lock only appears when a
different SIM card is inserted into the GC89. After the security code has been entered correctly,
the GC89 can be used with the new SIM card.
Note:
The Phone Lock code has four to eight digits and is shown as asterisks upon entry in the
dialog.
To Change the Phone Lock code:
1. Click .
Change Phone Code
2. The Change the Phone Lock Code dialog opens. Make the required changes and click OK.
3. Click Apply when you have finished, to transfer the changes back to your GC89. This may take
a few seconds.
64 Wireless Manager Telephony Settings Screen
Page 65

SIM lock
Some SIM cards are protected with a PIN (Personal Identity Number) at the time of purchase. If the
SIM card lock is activated, you have to enter the PIN every time you turn on your PC and open
Wireless Manager. If you enter your PIN incorrectly three times in succession, the SIM card is
blocked and you need a PUK code, from your network operator, to unblock the SIM card.
• To activate the SIM card lock, select the On radio button.
Caution!
Only activate the SIM card lock if you know the PIN code.
• To cancel the SIM card lock, select the Off radio button.
Note:
You have to use your PIN code to turn the SIM card lock off.
To Change the PIN Code:
1. Click .
2. Enter your old PIN code, followed by your new four to eight digit PIN code. Confirm the new
code by entering it again.
3. Click OK.
Note:
The SIM card lock only protects your subscription and not your GC89 from unauthorized use.
If you change your SIM card, the GC89 will still work with a new SIM card.
Change Pin Code...
Networks
Current Network
4. Click Apply when you have finished to transfer the changes to your GC89. This may take a few
seconds.
You can select which network you want to use by going to Networks and then choosing Current
Network.
Searching for the available networks:
• Click Retrieve. The current network appears in the box with all the other currently available
networks.
The available networks will fall into one of the following three categories:
• The home network.
• Available networks. These are networks that your home mobile operator has a roaming
agreement with.
• Forbidden networks. These are networks that you can not use except for emergency calls. If
your home network and a forbidden network come to an agreement that allows you to use the
forbidden network, you can select this network even though it is forbidden.
Wireless Manager Telephony Settings Screen 65
Page 66

Choosing another network:
1. Uncheck Automatically choose a network for me.
2. Select the network that you want to use.
3. Click Apply to transfer the setting to your GC89.
The message Please wait appears briefly on the screen. If you are not allowed to use the network that
you have chosen, Forbidden is displayed.
Preferred Network
A list of preferred networks is stored on the SIM card. This is typically set up by your mobile
operator as part of SIM manufacture. Preferred roaming partners are placed in the list so that you
have the greatest range of available services when roaming. When the home network is not available,
the GC89 will check the available networks against the preferred network list and select the one
placed highest. Automatic network selection must be enabled.
Note:
GPRS is commonly available in GSM networks, but fewer roaming agreements are in place.
You may therefore need to explicitly select one of the available networks in order to use GPRS
when abroad. Check with your home operator to find out which networks are GPRS roaming
partners in the country or region in which you want to roam.
Note:
This option is only available if your operator provides it.
If you want to add a new network:
1. Click Add. A new dialog with all the networks known to the GC89 appears on the screen.
2. Select the network that you want to add and click OK.
3. Click Apply to transfer the setting to your GC89 SIM card.
If you want to delete a network from the list:
1. Select the network that you want to delete.
2. Click Remove.
3. Click Apply to transfer the setting to your GC89’s SIM card.
If you want to re-arrange the order of the networks listed:
1. Select the network that you want to move.
2. Click the Move Up or Move Down arrows to rearrange the order.
3. Click Apply to transfer the setting to your GC89’s SIM card.
Note:
If the list of preferred networks is full, the Add button is disabled (grey).
Frequency Band
GSM operates in a number of different frequency bands. 900 and 1800MHz are used in Europe, Asia,
Australia, Asia and Africa, while 850 and 1900MHz are used in North and South America.
By default your GC89 will operate in 'quad-band' mode and automatically find available networks
in any of these frequency bands. It is not recommended to change this setting.
66 Wireless Manager Telephony Settings Screen
Page 67

To change the frequency band setting:
1. Select the button to the left of the desired band.
2. Click Apply to transfer the setting to your GC89 PC Card.
Forward Calls (Divert)
Note:
The GC89 does not make or answer voice calls. The forward function enables you to send a
voice call to an alternative number where it can be answered. For example, the mobile network
voicemail service. However, you can make and answer data calls, provided you have
appropriate software on your PC to handle them.
Voice
You can use the forwarding service to forward your voice calls to another phone number.
Note:
The Call forward service may not be available on all networks.
Selecting a call forward setting:
1. To obtain your current call forwarding settings from the network, click Retrieve.
2. Make your changes and select in which situation you want to forward your incoming calls.
You can select from four different diversion options:
– Always: this forwards all incoming calls to the phone number that you have entered in the
text box
– When busy
–No reply
– Not reachable: for example, when your phone is turned off
3. If you know which phone number to forward your calls to, type the number in the text box next
to the forward option you have chosen.
Or
Click to choose a phone number from your phone book.
4. Click Apply to transfer them to your GC89. This may take a few seconds.
Your Line 1 forward setting has now been stored in the network.
Fax
The GC89 does not support fax, but you can forward incoming fax calls to another number.
Note:
The Call divert service may not be available on all networks. Also, if you are using the Call
restricting function, this may influence Call divert.
Selecting a fax divert setting:
1. To obtain your current fax divert settings from the network, click Retrieve.
2. Select Always if you want to divert all the incoming calls to a specific phone number.
3. If you know which phone number to divert your calls to, type the number in the text box next to
Always.
Wireless Manager Telephony Settings Screen 67
Page 68

Data
Or
Click to choose a phone number from your phone book.
4. Click Apply to transfer your settings to your GC89. This may take a few seconds.
Your fax divert setting has now been stored in the network.
If you want to route your incoming data calls to another number, you can use the Call forward
service.
Note:
The Call forward service may not be available on all networks. Also, if you are using the
Call restricting function, this may influence Call forward.
Selecting a data forward setting:
1. To obtain your current data forwarding settings from the network, click Retrieve.
2. Select Always if you want to forward all the incoming calls to a specific phone number.
3. Select the Always check box and enter the destination number or click to choose a phone
number from your phone book. Click OK.
4. Click Apply to transfer your settings to your GC89. This may take a few seconds.
Your data forward setting has now been stored in the network.
Restrict Calls
Restricting a certain type of call means that this type of call cannot be made to or from your GC89.
You can restrict different types of outgoing and incoming calls.
The following restrictions can be set:
• all outgoing calls.
• all outgoing international calls.
• all outgoing international calls except to your own country.
• all incoming calls.
• all incoming calls when you are abroad (when roaming).
A password, issued with your subscription, is required to turn a call restrict on or off.
Contact your network operator for further information.
Setting up Call restriction
To Change the call restrict status:
1. Click on the type of call you wish to restrict (e.g. Data).
2. To get your current call restrict settings from the network, click Retrieve.
3. Tick the boxes next to the call types that you want to restrict.
4. Only select one outgoing and one incoming option.
5. When you have finished, click Apply.
6. Type your restriction password into the dialog and click OK.
68 Wireless Manager Telephony Settings Screen
Page 69

SMS
Bearer
Wireless
802.11
Note:
Data Call Restriction applies to CSD Data calls. There is no equivalent function to restrict
GPRS/EDGE connections.
Specify the connection method that is to be used for sending SMSs. You can specify a specific
connection method or register a preference.
To configure, monitor and control your GC89 wireless connections, click on the Launch Wireless
Control Panel button.
The Wireless Configuration Utility is displayed. See Create a Wireless LAN Connection on page 18
for details.
Wireless Manager Telephony Settings Screen 69
Page 70

Wireless Manager SMS Messages Screen
The Wireless Manager’s SMS Messages screen enables you to view, compose, edit, save, copy,
delete, reply or forward SMS messages from your GC89 to other mobile devices.
Note:
To use Message functionality, SMS must be included in your subscription (contact your
network operator for more details).
The SMS Messages screen is split in to a left and right area.
The left area displays the folders: SIM SMS, Saved Messages, Sent Items and Unsent Items.
The right area displays the contents of the selected folder. The top half of the right pane displays a
list of received messages (sorted by date), and the bottom half of the screen displays the content of
a selected message. This is referred to as the Information View.
The folders and their names are static, therefore you cannot change them.
Click to display the contents of the SIM Inbox. When Wireless Manager is opened,
any new SMS in the SIM Inbox are uploaded to the PC automatically.
A status flag indicates whether a message is read or unread.
If a new SMS arrives when the Wireless Manager is open, is displayed on the
Status screen and the SMS audio sound is played, if enabled in the Setting dialog.
See Wireless Manager GSM/GPRS/EDGE Preferences on page 58.
If you want to keep an SMS, use the copy or move menu options to place it in the
Saved folder. Click on the folder icon to display the contents of the Saved folder.
SMS
70 Wireless Manager SMS Messages Screen
Page 71

A copy of each SMS that you have sent is stored in this folder. Click on the folder icon
to display them.
Any composed messages that have not been sent are displayed when you click on
this icon.
SMS stored in this folder can be edited or sent when the GC89 is inserted. Any SMS
messages that fail during transmission are also stored here; you can resend them at
any time.
Each time the SMS Messages screen receives a new SMS message from the SIM, it checks the status
of the SIM Inbox. If the SIM Inbox is full, a SIM Full icon is displayed in the left pane of the screen.
See SIM Inbox is Full: on page 73.
Note:
For all the SMS Messages, screen menu options to operate the GC89 must be registered
successfully on a network. You must have a GSM signal to Send SMS; the button is disabled
(grey) if you don’t have a signal.
Class 0 messages
If you receive a Class 0 message, it will appear in a pop-up dialog, which you can save or dismiss.
If you choose to save the message it will be stored in you Saved Messages folder.
SMS Manager Functionality
To Send an SMS:
1. Select Create New Message... from the Messages menu or click .
2. The New Message dialog opens.
3. Enter the recipient’s mobile phone number in the To: field or select a number from a phone
4. Type your message into the Message: field.
5. If required, you can click the Calculate SMS blocks to see how many SMSs your message will
6. Click Send to send the SMS or Cancel to close the dialog without sending the SMS.
To Edit a Message:
When you are working with a message, you can edit the text by cutting, copying and pasting.
Moving Text:
1. Select the text you want to move (the text can be in another PC application).
2. Select Cut from the Edit menu or Ctrl and X on the keyboard.
3. Place the cursor where you want to insert the text and select Paste from the Edit menu or Ctrl
book by clicking Lookup...
To send an SMS to multiple numbers, hold down Ctrl when selecting the numbers from the
phone book.
be split into. You can check the Request Status Report to get confirmation when the SMS
arrives at its destination (if this service is supported by your network).
and V on the keyboard.
Note:
If you want to copy text, select Copy (Ctrl and C) from the Edit menu instead of Cut (Ctrl and
X).
Wireless Manager SMS Messages Screen 71
Page 72

Reply to an SMS:
1. Select the folder where the message is located.
2. From the list, select the message to which you wish to reply. The contents of the message are
displayed in the information view.
3. Select Reply in the Messages menu. A dialogue appears. The To: field is automatically filled
in and the original message is displayed in the Message: field.
4. If required you can click the Calculate SMS blocks to see how many SMSs your message will
be split into. Also you can check the Request Status Report to get confirmation when the SMS
arrives at its destination.
5. Type your reply and click Send.
To Forward an SMS:
1. Select the folder where the message is located.
2. From the list, select the message you want to forward. The contents of the message are
displayed in the information view.
3. Select Forward in the Messages menu, a dialogue box opens.
4. Enter the phone number in the To : field or click Lookup... to select a number from a phone
book.
To send an SMS to multiple numbers, hold down Ctrl when selecting the numbers from the
phone book.
5. If required, you can click the Calculate SMS blocks to see how many SMSs your message will
be split into. You can check the Request Status Report to get confirmation when the SMS
arrives at its destination.
6. Click Send.
Delete an SMS:
1. Select the folder where the message is located.
2. From the list, select the message you want to delete. The contents of the message are displayed
in the information view.
3. Select Delete from the Edit menu, or press the Delete button on your keyboard.
4. A confirmation message box opens, click Ye s to delete the message.
Note:
To delete all messages, click Select All from the Edit menu before you select Delete.
Folder Management:
Sorting SMS:
1. Select the folder where the messages you want to sort are located.
2. Click the Date column heading to sort the SMS in ascending or descending date order.
72 Wireless Manager SMS Messages Screen
Page 73

Moving SMS:
1. Select the folder where the message you want to move is located.
2. From the list, select the message. The contents of the message are displayed in the information
view.
3. Click Move to from the Messages menu. A progress dialog is displayed informing you that the
SIM card is being updated.
4. The selected message is moved.
Note:
To move all messages, click Select All from the Edit menu before you select Move to.
Copy an SMS:
1. Select the folder where the message you want to copy is located.
2. From the list, select the message. The contents of the message are displayed in the
information view.
3. Click Copy to from the Messages menu. A progress dialog is displayed informing you that the
SIM card is being updated.
4. The selected message is copied.
Note:
To copy all messages, click Select All from the Edit menu before you select Copy to.
SIM Inbox is Full:
When the Wireless Manager detects that the SIM SMS storage is full, it displays on the Status
screen and in the SMS Messages screen. You must move or delete some SMS messages from the
SIM Inbox to free storage space so that you can continue receiving new SMS messages from the
network. To do this you can either:
• Move your SMS from SIM SMS to Saved Messages
• Right click on an SMS in SIM SMS and select delete.
Wireless Manager SMS Messages Screen 73
Page 74

Wireless Manager Phone Book Screen
The Wireless Manager Phone Book screen helps you to organize your GC89’s SIM Phone Book.
The Phone Book Screen
A SIM Phone Book can easily become disorganized; you can use the Phone Book screen to manage
your SIM Phone Book entries.
You can add new numbers, edit existing numbers, export and import entries.
1. Click to display the Phone Book screen.
2. Icons appear in the left pane representing the SIM Phone Book and Saved Phone Book
. You can manage your Phone Book entries by copying entries to the SIM Phone Book or
the Saved Phone Book.
3. Click on the icon to display the Phone Book entries in the right pane.
Note:
Your GC89 must be inserted to display this information.
74 Wireless Manager Phone Book Screen
Page 75

Phone Book Functionality
To Add a Number:
1. Select Add New in the Phone Book menu or click on the toolbar or key Ctrl and N.
2. The New Phone Book Entry dialog opens.
3. Enter the name and phone number.
4. Click OK to save the entry or Cancel to close the dialog.
Note:
Phone Book numbers are limited to 20 digits (including +) and names are limited to 18
alphanumeric characters.
New entries are added to the next available SIM index position.
To Modify a number:
1. Select the number you want to modify.
2. Select Modify... in the Phone Book menu.
3. The Edit Phone Book Entry dialog opens.
4. The fields in the dialog display the current entry’s name and number.
5. Edit the information.
6. Click OK to save the entry or Cancel to close the dialog
If the modified entry is in the SIM Phone Book, the changes are automatically sent to the SIM.
To Find Entries:
1. Select Find in the Phone Book menu or key Ctrl and F.
2. The Find dialog opens. Enter the text or number you want to search for in the Look for field.
3. Click Find. The Wireless Manager searches both Phone Books; when a match is found it is
4. Click Close when you have finished searching.
To Copy an Entry:
1. Select an entry from the SIM Phone Book or the Saved Phone Book.
2. Select Copy To in the Phone Book menu. The Copy To option is followed by the name of the
3. A duplicate entry is made in the specified Phone Book. The new entry is assigned the next
The entry can be complete or incomplete.
displayed in the right pane. Click Find Next to search again.
Phone Book you have not selected the entry from.
available position in the destination Phone Book.
Wireless Manager Phone Book Screen 75
Page 76

To Move an Entry:
1. Select an entry.
2. Select Move To in the Phone Book menu. The Move To option is followed by the name of the
Phone Book you have selected the entry from.
3. The entry is moved from its current Phone Book and placed in the selected one. The new entry
is assigned the next available position in the destination Phone Book.
To Import an Entry or Phone Book:
1. Select Import from the Phone Book menu.
2. Select the Replace Existing Phone Book or Merge with existing Phone Book radio button.
3. Click and browse to find the file you want to import.
Note:
The file must be a text file in comma separated value (CSV) format. Any invalid lines or files
will be ignored. Microsoft
4. Click OK in the browse dialog. The path and file name are displayed in the Import File Name
field.
5. Click Import to complete the import procedure.
To Export an Entry or Phone Book:
1. Highlight the entries or open the Phone Book you want to export.
2. Select Export from the Phone Book menu.
3. Select All to export the entire Phone Book, or Selected Items to export the highlighted entries.
4. Type a name for the file into the Export File Name field.
®
Excel can be used to edit this file.
5. Click and identify the save location.
76 Wireless Manager Phone Book Screen
Page 77

Note:
The file will be saved as a text file in comma separated value (CSV) format. Microsoft® Excel
can be used to edit this file.
6. Click OK in the browse dialog. The path and file name are displayed in the Export File Name
field.
7. Click Export to complete the procedure.
Delete a number
1. Select the number that you want to delete.
2. Select Delete, from the Edit menu.
3. A confirmation dialog opens. Click Ye s to delete the number.
Note:
If you want to delete all numbers, select Select All from the Edit menu before clicking Delete.
To Send a New SMS Message:
1. Select an entry from a Phone Book.
2. Select Create New Message from the Messages menu.
3. A new SMS Message dialog is opened and pre-addressed with the selected entries details.
Wireless Manager Phone Book Screen 77
Page 78

Wireless Manager Online Services Screen
Online Services is a customized service offered by network operators. This service is network or
subscription dependant. The Online Services screen provides a mechanism that allows applications
that exist on the SIM to interact and operate with the GC89. Typical services offered by network
operators include:
• sports scores
•news
• financial data
• horoscopes
• interactive text game messages
Online Services are placed on your SIM card by your operator. Wireless Manager detects if these
services are on the SIM card and displays the if they are.
1. Click to display the Online services screen. You can also display the Online Services screen
from the View menu.
The screen displays a menu of the online services offered by your network operator.
Click on the category you require and click Select.
More detailed choices are sometimes displayed. If necessary select the required option and click
Select.
The response may take various forms, depending on the network operator. For example, the news
headlines might be sent as an SMS, which will be delivered to the SMS inbox.
Online Services menus are sometimes used to provide a list of voice-based services such as directory
enquiries. If one of these is selected, you will not be connected because the GC89 does not support
voice calls.
Note:
Contact your operator to find out which services are available for your account.
78 Wireless Manager Online Services Screen
Page 79

Troubleshooting
This chapter lists some problems that you might encounter while using your GC89. Some problems
require you to contact your service provider, but most of the problems you can easily correct
yourself.
Status Information
View Wireless Manager Information displays a dialog box containing useful information about
connection status.
Status Log
The Wireless Manager creates a status log that can be used for customer support and field diagnostic
assistance.
Each time the Wireless Manager runs, it creates a text file in the Windows
Wireless Manager_Log.txt. If the file is already present, it is overwritten.
An example of the contents of the log file is shown below:
®
temp folder, called
03/05/01 14:17:56 - Signal Strength: 0
03/05/01 14:17:56 - Provider Name: MyOperator
03/05/01 14:17:57 - Radio State: 1
03/05/01 14:17:57 - GSM Registration: Searching
03/05/01 14:17:57 - GPRS Registration: Searching
03/05/01 14:17:57 - Network Operator:
03/05/01 14:18:06 - GSM Registration: Home Network
03/05/01 14:18:06 - GPRS Registration: Home Network
03/05/01 14:18:06 - Network Operator: MyOperator
03/05/01 14:18:21 - User: Connect: operatorinternet.apn
03/05/01 14:18:21 - Connection: Port successfully opened
03/05/01 14:18:21 - Signal Strength: 4
03/05/01 14:18:25 - Connection: Established: operatorinternet.apn
03/05/01 14:18:25 - Signal Strength: 4
03/05/01 14:18:32 - User: Disconnect
03/05/01 14:18:32 - Connection: Starting disconnect
03/05/01 14:18:34 - Connection: Disconnected
03/05/01 14:18:34 - Connection: Bytes Transmitted : 156
03/05/01 14:18:34 - Connection: Bytes Received : 468
03/05/01 14:18:34 - Signal Strength: 3
03/05/01 14:18:35 - User: Close Program
03/05/01 14:18:39 - User: Exit
Tip:
To easily locate the temp folder, enter %TEMP% in the Start Run dialog, or in the
address bar of Windows
®
Explorer.
Troubleshooting 79
Page 80

Wireless Manager Icon Errors
appears
in the task bar
appears in
the task bar
A signal is
present but you
can’t connect to
the GPRS/EDGE
network
appears in
the task bar
appears in
the task bar
appears in
the task bar
Indicates that the Radio is turned off. Right click the CMI, select
Radio Settings from the sub menu, select On.
Indicates that the GC89 cannot find a network, there is no network
within range or the received signal is too weak. You have to move
to get a stronger signal.
Indicates that a GSM network is present, but no GPRS/EDGE
service is available. This can be caused by: no GPRS/EDGE
service in the area, you are roaming on a network for which no
GPRS/EDGE roaming agreement exists or there is a temporary
fault on the network. Contact your network operator for more
details.
GC89 isn't present, please insert.
Indicates that the wireless LAN radio is turned off. Right-click the
icon and select Enable Radio.
Indicates that the GC89 cannot find a wireless network, there is no
network within range or the received signal is too weak. You have
to move to get a stronger signal.
Software Errors
Grey menu
options in the
software
applications
Grey text indicates a function that is temporarily unavailable, for
example, due to your subscription or due to a certain setting which
has not been turned on.
GSM/EDGE/GPRS Error Messages
General
Modem not
responding....
Error
Dial-Up fails Try to connect again.
Check the radio is turned on.
80 Troubleshooting
Page 81

SIM Card Errors
Wrong PIN/
Wrong PIN2
Codes do not
match
PIN blocked/
PIN2 blocked
PUK blocked –
contact operator
You have entered your PIN or PIN2 incorrectly. Enter the correct
PIN or PIN2, and click OK. See SIM lock on page 65.
When you want to change a security code (for example your PIN),
you have to confirm the new code by entering it again. This error
occurs when the two codes, that you have entered, do not match.
See Phone lock on page 64.
You have entered your PIN or PIN2 incorrectly three times in
succession. To unblock, see SIM lock on page 65.
You have entered your personal unblocking key code (PUK)
incorrectly 10 times in succession. Contact your network operator
or service provider.
Wireless LAN Error Messages
Medium Cable
Disconnected
A number of possible causes:
• You have moved out of range of the wireless LAN signal. Move
• The wireless LAN is switched off. Right-click the icon and
back closer to the hotspot.
select Enable Radio.
• The network transmission has been interrupted. Contact the
Network Administrator.
Troubleshooting 81
Page 82

Wireless LAN Performance and Connectivity Problems
Data transfer is sometimes very slow
Microwave ovens and some cordless phones operate at the same radio frequency as the GC89
wireless LAN adapter. When the microwave oven or cordless phone is in use, it interferes with the
wireless network.
Therefore, check for possible sources of interference in the path between the GC89 and the network
access point (AP).
Data transfer is always very slow
Some homes and most offices are steel-framed structures. The steel in such buildings may interfere
with your network’s radio signals, thus causing a slowdown in the data transmission rate. Try
moving your computers to different locations in the building to see if performance improves.
Computer is not communicating with the network
If your network has a wireless LAN access point, check all cables and make sure the power LED on
the front of the AP is green. Verify that all of the wireless network properties settings are correct; see
Create a Wireless LAN Connection on page 18.
Also, make sure that your computer is receiving a good signal from the access point; see Viewing the
Status of Your Wireless Connection on page 39.
Network performance is really slow when the system is docked to a docking station
that has an active Ethernet port
This condition occurs if you dock your system into a docking station that has an active Ethernet port
while your GC89 is still active and connected to a wireless LAN access point. This is because
Windows
You must either disconnect the Ethernet cable from your docking station, or disable the wireless
LAN radio on your GC89. If you disconnect the ethernet cable, you need to turn the proxy server off,
go to Tools Internet Options Connections tab LAN Settings and uncheck the Proxy
Server checkbox.
®
must now handle two active network connections.
To disable the GC89 wireless LAN radio, right-click the icon and then select Disable Radio.
Note:
The radio is not automatically enabled when your computer next starts. To enable the radio,
right-click the icon and then select Enable Radio.
82 Troubleshooting
Page 83

Windows® Error Codes
Windows® 98 (SE)
Error 619: The
port is
disconnected
during dial-up
Error 629: The
port was
disconnected
by the remote
machine during
dial-up
Error 630: The
port was
disconnected
due to hardware
failure during
dial-up
Error 645:
Internal
authentication
error during
dial-up
An ISDN mode (V110 or V120) has been selected when creating a
connection, but is not supported by the network.
Select Analogue mode when creating the connection in the
Connection Wizard.
Telephony settings are set to pulse dialing, change to tone dialing.
Check the dialing settings for the current location (In Control
Panel Phone and Modem Option Dialing Rules
Location Edit) and change the Dial using setting to tone, or (if
Pulse is a necessity), create a new location called EDGE
Anywhere and set the dialing to Tone. EDGE anywhere location
should then be used whenever you use the GC89.
A Dial-up networking connection is already connected. Close the
connected dial-up and try again.
Incorrect APN or CID selected for network.
Modify your Dial-up Connection, see Create a Connection on page
21 for more details. Make sure that the APN file contains the name
of the access point your network operator is using. The Dialup
Wizard should do this automatically. If you are experiencing
problems, contact your network operator.
Error 650: The
Remote Access
server is not
responding
during dial-up
Error 720: No
PPP control
protocols
configured
during dial-up
Incorrect User ID and/or password. Re-enter correctly.
The service is not supported by the SIM. This usually appears
when you are trying to connect to GPRS Internet. Contact service
provider to enable GPRS Internet access on SIM card
Troubleshooting 83
Page 84

Windows
®
2000
All Windows
Error 619: The
port is
disconnected
during dial-up
Error 691:
Access denied,
An ISDN mode (V110 or V120) has been selected when creating a
connection, but is not supported by the network.
Select Analogue mode when creating the connection in the
Connection Wizard.
The domain name entry is incorrect.
Correct the domain name entry or delete if not required.
user name and
password
incorrect on the
domain during
dial-up
Error 718:
The card was
unable to dial
during dial-up
This error indicates a PPP conversation started, but it was
terminated because the remote server did not respond within an
appropriate time. This can be caused by poor line quality or a
problem with the server (ISP). This error can occur when your
modem has connected to the ISP and has sent a username and
password, but there is no response from the server.
Wait a few minutes and try again.
®
Operating Systems
Error 734: The PPP link
control protocol was
terminated during dial-up
The APN entry is incorrect, the signal is weak or the
connection is lost whilst dialing.
If you are experiencing problems contact your network
operator and check the APN.
Error 678: Computer you
are dialing is not
responding during dial-up
Connection Failed or
Activation Failed. Please
contact your Service
Provider.
Connection Failed. Invalid
APN. Please check and
enter the APN again.
Either: Service is not supported by SIM (usually for CSD)
or the computer is not answering.
Check SIM settings with your service provider if necessary.
Make sure that the server you are dialing is OK.
If you are unsure which speed to choose from the Speed
tab, start with Analogue 9600, and check to see if it works.
Once your connection works on Analog, you can try the
V110/V120 settings to see if faster speeds are available.
V110/V120 also connects faster than analog. When
roaming you may need to repeat this procedure to adapt
your settings to the capability of the local network operator.
No specific reason for failure is available. Wait a few
minutes and try again. If you continue to get this error
check your connection settings or call your service provider
for help.
The APN entry is incorrect, the signal is weak or the
connection is lost whilst dialing. If you are experiencing
problems contact your network operator and check the
APN.
84 Troubleshooting
Page 85

Connection Failed. Invalid
User Name or Password.
Please check and enter the
User Name and/or
Password in your
connection profile.
Choose to modify your connection in the Connection
Wizard. Go to the User ID screen and re-enter the User
Name and Password given to you by your service provider.
If you were not supplied with a User Name and Password
leave the fields blank. Contact your service provider if you
continue to have problems.
Connection Failed. Invalid
Profile. Please check and
re-enter your connection
profile information, and
try again. If the problem
continues please contact
your Service Provider.
Disconnected from
Network
Connection failed.
Temporary Network
problem.
Please try again. If the
problem continues please
contact your Service
Provider.
Connection Failed. Not
authorised to access
network. Please contact
your Service Provider.
Connection Failed. SIM is
invalid for GPRS service.
Please contact your
Service Provider.
Your service provider does not recognise you. Check the
setting you have entered to create your connection. If you
still get the error, contact your service provider and check
whether you have GPRS Internet enabled on your
subscription and the setting you should enter to create a
connection.
You have been disconnected from the network. Wait a few
minutes and try again. If the problem persists, contact your
service provider.
This error indicates a PPP conversation started, but it was
terminated because the remote server did not respond
within an appropriate time. This can be caused by poor line
quality or a problem with the server (ISP). This error can
occur when your modem has connected to the ISP and has
sent a username and password, but there is no response
from the server.
Wait a few minutes and try again.
Your service provider does not think you are authorised to
access their network. Check the setting you have entered
to create your connection. If you still get the error, contact
your service provider and check your subscription.
Contact your service provider and request the GPRS
Internet subscription is activated for your SIM.
Connection Failed. Access
to network not allowed.
Please contact your
Service Provider.
Connection Failed.
Roaming not allowed.
Please contact your
Service Provider.
Connection Failed. Please
try again. If the problem
continues please contact
your Service Provider.
Your service provider is not allowing you to access their
network. Check the setting you have entered to create your
connection. If you still get the error contact your service
provider and check your subscription.
Contact your service provider to get your roaming
activated.
You could not connect to the network. Wait a few minutes
and try again. If the problem persists contact your service
provider.
Troubleshooting 85
Page 86

Connection Failed. Service
not supported. Please try
again. If the problem
continues please contact
your Service Provider.
Your service provider is not allowing you to access their
network. Contact your service provider and check that you
have the subscriptions required activated for your SIM.
Connection Failed.
Network Problem. Please
try again. If the problem
continues please contact
your Service Provider.
You could not connect to the network. Wait a few minutes
and try again. If the problem persists contact your service
provider.
86 Troubleshooting
Page 87

Additional Information
Sony Ericsson Support Website
At www.SonyEricsson.com/support you can find help and tips in a few clicks. The support site
gives you access to:
• the latest software updates
• tips on how to use your GC89 efficiently
• function guides
• additional help
Guidelines for Safe and Efficient Use
Please read this information before using your GC89.
Recommendations
• Always treat your product with care and keep it in a clean and dust-free place.
• Do not expose your product to liquid or moisture or humidity.
Antenna
Efficient Use
• Do not expose your product to extreme high or low temperatures.
• Do not expose your product to open flames or lit tobacco products.
• Do not drop, throw or try to bend your product.
• Do not paint your product.
• Do not use your product near medical equipment without requesting permission.
• Do not use your product when in, or around aircraft, or areas posted “turn off two-way radio”.
• Do not use your product in an area where a potentially explosive atmosphere exists.
• Do not place your product or install wireless equipment in the area above your car’s air bag.
• Do not attempt to disassemble your product. Only Sony Ericsson authorised personnel should
perform service.
Only use an antenna that has been specifically designed by Sony Ericsson for your GC89. Use of
unauthorised or modified antennas could damage your GC89 and may violate regulations, causing
loss of performance and SAR levels above the recommended limits (see below).
Do not cover the antenna when in use, as this affects call quality and may cause the GC89 to operate
at a higher power level than needed, thus shortening talk and standby times.
Additional Information 87
Page 88

Radio Frequency (RF) Exposure and SAR
Your PC Card is a low-power radio transmitter and receiver (transceiver). When it is turned on, it
emits low levels of radio frequency energy (also known as radio waves or radio frequency fields).
Governments around the world have adopted comprehensive international safety guidelines,
developed by scientific organizations, e.g. ICNIRP (International Commission on Non-Ionizing
Radiation Protection) and IEEE (The Institute of Electrical and Electronics Engineers Inc.), through
periodic and thorough evaluation of scientific studies. These guidelines establish permitted levels of
radio wave exposure for the general population. The levels include a safety margin designed to
assure the safety of all persons, regardless of age and health, and to account for any variations in
measurements.
Specific Absorption Rate (SAR) is the unit of measurement for the amount of radio frequency energy
absorbed by the body when using a transceiver. The SAR value is determined at the highest certified
power level in laboratory conditions, but the actual SAR level of the transceiver while operating can
be well below this value. This is because the transceiver is designed to use the minimum power
required to reach the network.
Variations in SAR below the radio frequency exposure guidelines do not mean that there are
variations in safety. While there may be differences in SAR levels among mobile phones, all Sony
Ericsson PC Cards are designed to meet radio frequency exposure guidelines.
Before a PC Card is available for sale to the public, it must be tested and certified to the FCC that it
does not exceed the limit established by the government-adopted requirement for safe exposure. The
tests are performed in positions and locations as required by the FCC for each model. For body worn
operation, this PC Card has been tested and meets FCC RF exposure guidelines for fixed and mobile
use when the PC Card is installed in a PCMCIA card slot of a standard Laptop PC with the original
antenna.
Sony Ericsson has not measured, and makes no representation about, the body worn SAR levels
when the PC Card is used in any portable host equipment or when any changes to the original product
has been made.
More information on radio frequency exposure and SAR can be found on: www.SonyEricsson.com.
Personal Medical Devices
EDGE PC Cards may affect the operation of cardiac pacemakers and other implanted equipment. If
a minimum distance of 15 cm (6 inches) is kept between the GC89 and the pacemaker, the risk of
interference is limited. If you have any reason to suspect that interference is taking place,
immediately turn off your GC89. Contact your cardiologist for more information.
For other medical devices, please consult the manufacturer of the device.
Children
DO NOT ALLOW CHILDREN TO PLAY WITH YOUR GC89 OR ITS ANTENNA. THEY
COULD HURT THEMSELVES OR OTHERS, OR COULD ACCIDENTALLY DAMAGE THE
GC89 OR ANTENNA. YOUR GC89 OR ITS ANTENNA MAY CONTAIN SMALL PARTS
THAT COULD BE DETACHED AND CREATE A CHOKING HAZARD.
Disposing of the Product
Your GC89 should not be placed in municipal waste. Please check local regulations for disposal of
electronic products.
88 Additional Information
Page 89

Emergency Calls
EDGE PC Cards manufactured by Sony Ericsson do not support voice calls, hence their use for
essential communications (e.g. medical emergencies) is not possible.
Inserting and removing the SIM card – precautions against electrostatic discharge (ESD)
Do not touch the SIM card connectors. As a precaution, always make sure that the GC89 is already
in your hand before you insert or remove the SIM card.
Additional Information 89
Page 90

Technical Specifications
Product name GC89
System WLAN 2.4GHz ISM band
PC Card Type Type II, 32-bit Cardbus
Services supported WLAN: 802.11b/g
SIM Card SIM Lock supported
GSM 850
E-GSM 900
GSM 1800
GSM 1900
GSM: CSD, GPRS/EDGE, SMS
Speech services are not supported
Regular (non-GPRS-aware) and GPRS-aware SIMs
supported
Standard, GPRS-aware and USIM (2G functionality)
1.8v & 3v
Type Number
Exterior Description
Size 32-bit PCMCIA PC Card, Type II.
Weight 44g including antenna, excluding SIM card
Battery Powered via the PC card slot i.e. uses laptop battery
Antenna 50 ohm interface; Antenna supplied
Antenna Connector MMCX connector (for optional external GSM antenna)
FAF-1051011-BV
Card part: 85.6 mm x 54.0 mm x 5.0 mm
Extension part: 15.4 mm x 55.0 mm x 10.5 mm
90 Additional Information
Page 91

Ambient Temperatures
Operating -10 to 55 degrees C
Storage -20 to 65 degrees C
Operating System Support
Supported
Operating
Systems
Minimum PC
Specification
Electrical Characteristics
Supported Voltages 3.3V
Nominal Operating Voltage 3.3V
Average Standby Current/Power (Inserted, not
active)
Average Idle Current/Power (GSM attached,
WLAN disabled)
Data Transfer Current/Power (Worst case GSM
xfer and WLAN active)
Microsoft Windows
Microsoft Windows
Microsoft Windows
Microsoft Windows
®
98 (SE)
®
Me
®
2000 (SP4)
®
XP (SP1)
Processor size as recommended by Microsoft for the version of Windows
PC Card slot
30 MB free disk space
± 10%
< 30mW
< 150mW
< 2.8W
®
GSM Performance and technical characteristics
Dimension GSM 850 GSM 900
GSM 1800 GSM 1900
E-GSM 900
Frequency
Range
Channel
TX: 824 – 849 MHz
RX: 869 – 894 MHz
TX: 880 –914 MHz
RX: 925 – 959 MHz
TX: 1710 – 1785 MHz
RX: 1805 – 1880 MHz
TX: 1850 – 1910 MHz
RX: 1930 – 1990 MHz
200 kHz 200 kHz 200 kHz 200 kHz
Spacing
Number of
Channels
124 Carriers * 8
(TDMA)
175 Carriers * 8
(TDMA)
374 Carriers * 8
(TDMA)
299 Carriers * 8
(TDMA)
Modulation GMSK/8-PSK GMSK/8-PSK GMSK/8-PSK GMSK/8-PSK
Additional Information 91
Page 92

Power
Classes
Class 4 (2W) for
GSM/GPRS and
EGPRS/MCS 1-4
(GMSK);
Class E2 (0.5W) for
EGPRS/MCS 5-9
(8-PSK)
Class 4 (2W) for
GSM/GPRS and
EGPRS/MCS 1-4
(GMSK);
Class E2 (0.5W) for
EGPRS/MCS 5-9
(8-PSK)
Class 1 (1W) for
GSM/GPRS and
EGPRS/MCS 1-4
(GMSK);
Class E2 (0.4W) for
EGPRS/MCS 5-9 (8PSK)
Class 1 (1W) for
GSM/GPRS and
EGPRS/MCS 1-4
(GMSK);
Class E2 (0.4W) for
EGPRS/MCS 5-9 (8PSK)
Transmitter
Output
Impedance
Transmitter
Spurious
Emission
50
Ω 50Ω 50Ω 50Ω
According to GSM
specification
According to GSM
specification
According to GSM
specification
According to GSM
specification
92 Additional Information
Page 93

GSM Features Supported
ME SIM Lock Network, Network Subset, Service Provider and Corporate
Online Services
(SIM-AT)
USSD Support is provided via AT commands; No MMI is provided
Speech Coding Not applicable (GC89 does not support speech services)
CSD technical data
Standards AT commands industry standard ETSI 07.05, 07.07 and
CSD Data Rates 9.6 kbps or 14.4 kbps depending on the GSM network
Compression MNP5 (Increases data rate up to 2x depending on data type)
Error Correction End to End MNP2 and LAPM (V.42)
GSM/ISDN According to V.110 and V.120
GPRS technical data
Class 2 with call control.
07.10, V.25ter command set supported
V.42bis (Increases data rate up to 4x depending on data type)
GSM network support required for compression
RLP
Requires GSM Network support
GPRS Specification
SMG31bis
SMG
Data Rates Multislot class 10 supported (see table below).
Coding schemes: CS-1, CS-2, CS-3 and CS-4
Mode of Operation Class B (attaches to both GSM and GPRS at the same time;
data connection is established using CS (CSD or GPRS) The
user may select CSD or GPRS modes via Dial-Up Networking
configurations in Windows
®
Attach Modes GPRS Attach
GPRS Detach
Combined Attach (CS+GPRS) (CCCH)
Combined Detach (CCCH)
Combined Attach (CS+GPRS) (PCCCH)
Combined Detach (PCCCH)
Network modes Network Mode 1
Network Mode 2
Network Mode 3
R Reference Point Physical layer: RS232 virtual COM port
Authentication mechanisms PAP and CHAP supported
IP Connectivity PDP type IP is supported
IPv4
Additional Information 93
Page 94

SMS over GPRS Mobile Originated and Mobile Terminated
QoS Support for all 4 classes.
QoS Negotiation
PDP Context Up to 10 PDP context details are stored in GC89 memory.
PDP Context description edited via supplied Wizard or AT
command.
Number of parallel PDP Context activated (both MO and
MT):1
Number of PDP Context with traffic in parallel:1
PDP Context modification (e.g. QoS renegotiation).
Network initiated PDP Context modification.
Network initiated PDP Context deactivation.
Collision of MS and Network initiated PDP Context activation.
SIM Support for GPRS aware as well as non-GPRS-aware SIMs
Compression TCP/IP Header Compression
V42bis
GPRS Encryption GEA1
GEA2
GPRS Frequency
Hopping
GPRS IP allocation Dynamic
GPRS Maximum Data Rates
4 + 1 RX 36.2 53.6 62.4 85.6
TX 9.05 13.4 15.6 21.4
3 + 2 RX 27.15 40.2 46.8 64.2
TX 18.1 26.8 31.2 42.8
Speed achieved depends on the Coding Scheme supported by the GSM Network. The speeds given
are maximums. Sony Ericsson cannot guarantee how fast your network will operate.
Data rate is the payload per slot: header plus data.
EDGE Technical Data
CS-1
9.05 kbps
Supported
Static
CS-2
13.4 kbps
CS-3
15.6 kbps
CS-4
21.4 kbps
Modulation Coding
Schemes
EDGE features Link Adaptation
94 Additional Information
MCS-1 to MCS-9
Incremental Redundancy
Extended Uplink Temporary Block Flow (TBF)
Single Phase Access on RACH
Page 95

EDGE Maximum Data Rates
4 + 1 3 + 2
Coding
Scheme
MCS-1 10.60 42.40 10.60 31.80 21.20
MCS-2 13.00 52.00 13.00 39.00 26.00
MCS-3 16.60 66.40 16.60 49.80 33.20
MCS-4 19.40 77.60 19.40 58.20 38.80
MCS-5 24.05 96.20 24.05 72.15 48.10
MCS-6 31.25 125.00 31.25 93.75 62.50
MCS-7 47.45 189.80 47.45 142.35 94.90
MCS-8 57.05 228.20 57.05 171.15 114.10
MCS-9 61.85 247.40 61.85 185.55 123.70
Speed achieved depends on the Coding Scheme supported by the GSM Network. The speeds given
are maximums, Sony Ericsson cannot guarantee how fast your network will operate.
Data rate is the payload per slot: header plus data.
SMS Technical Data
Data Rate
per slot
Rx Tx Rx Tx
Concatenated SMS Ye s.
SMS Cell Broadcast Supported in Wireless Manager and by AT
SMS Immediate
Display
SMS interface Wireless Manager, Communications Suite, pocket PC
Software Upgrade
PC Card firmware
upgrade
Wireless Manager
upgrade
Commands (excluding Cell ID).
Supported in Wireless Manager and by AT
Commands.
Suite.
AT Command
Via Internet, www.SonyEricsson.com or at Sony
Ericsson Service Points
Internet download
Additional Information 95
Page 96

Supported Languages
Product support GC89
Quick Start Guide
PC Software
User’s Guide (PDF)
AT Commands Manual English
English
Danish (DA)
Dutch (NL)
Finnish (FL)
French (FR)
German (DE)
Greek (EL)
Hungarian (HU)
Italian (IT)
Norwegian (NO)
Polish (PL)
Brazilian Portuguese (PB)
Portuguese (PT)
Russian (RU)
Spanish (ES)
Swedish (SV)
Thai (TH)
Turkish (TR)
Chinese Simplified (ZS)
Chinese Traditional (ZT)
96 Additional Information
Page 97

License Agreement
License
Any use of the enclosed compact disc, diskette or any other media including upgrades thereof (“the
Software”) shall be in accordance with the below stated license terms and conditions. By opening
the sealed Software package and/or using the Software you agree to be bound by the terms and
conditions stated below. These terms and conditions are binding and create a legal obligation (the
“License Agreement”) between you (the “Licensee”) and Sony Ericsson Mobile Communications
AB (the “Vendor”).
The Software licensed hereunder may be delivered in an inseparable package also containing other
software programs than this particular Software (e.g. bundled with other software). As a safeguard
you should not in any way use the other software programs before reading the specific license terms
and conditions of such other software.
License
You are hereby granted a non-transferable, non-exclusive right to use (“License”) the Software.
You may only (a) use this Software on one single computer at a time; (b) physically transfer the
Software from one computer to another if the Software is used only on one computer at a time and
provided you remove any copies of the Software from the computer from which the Software is
being transferred and/or on which it was originally used; (c) if necessary, make copies of the
Software solely for purposes of backup. The copyright notice must always be reproduced and
included on a label on any backup copy.
You may not according to the EC Council Directive of May 14, 1991 on the legal protection of
computer programs (91/250/EEG) (the “Software Directive”) distribute any copy of this Software or
its documentation to others; nor modify, rent, lease or grant any rights to this Software whatsoever
to another person or entity. In addition, you may not translate, reverse engineer, decompile,
disassemble, reproduce or otherwise alter or modify the Software, its source code, documentation
nor disclose any information designated as confidential or proprietary at the time of disclosure or,
information which by its nature, is confidential or proprietary.
Term
Your License remains effective from the date of your cash receipt/proof of payment until terminated.
You can terminate your License at any time by destroying the Software together with all copies of
the Software in whichever form they may be. Your License will automatically terminate without
prior notice if you fail to comply with any term or condition of this Agreement. In the event of
termination of your License you must immediately destroy all copies of the Software in whichever
form they may be.
Limited Warranty
Sony Ericsson Mobile Communications AB, S-221 88 Lund, Sweden, (Sony Ericsson), provides this
Limited Warranty for your PC Card and original accessory delivered with your PC Card (hereinafter
referred to as “Product”).
Should your Product need warranty service, please return it to the dealer from whom it was
purchased, or contact your local Sony Ericsson Customer Care Centre (national rates may apply) or
visit www.SonyEricsson.com to get further information.
Additional Information 97
Page 98

Our Warranty
Subject to the conditions of this Limited Warranty, Sony Ericsson warrants this Product to be free
from defects in design, material and workmanship at the time of its original purchase by a consumer,
and for a subsequent period of one (1) year.
What We Will Do
If, during the warranty period, this Product fails to operate under normal use and service, due to
defects in design, materials or workmanship, Sony Ericsson authorised distributors or service
partners, in the country/region* where you purchased the Product, will, at their option, either repair
or replace the Product in accordance with the terms and conditions stipulated herein.
Sony Ericsson and its service partners reserve the right to charge a handling fee if a returned Product
is found not to be under warranty according to the conditions below.
Please note that your personal settings/downloads might be lost when the Product is repaired or
replaced.
Conditions
1. The warranty is valid only if the original proof of purchase issued to the original purchaser by
an, for this Product, Sony Ericsson authorised dealer, specifying the date of purchase and serial
number**, is presented with the Product to be repaired or replaced. Sony Ericsson reserves the
right to refuse warranty service if this information has been removed or changed after the
original purchase of the Product from the dealer.
2. If Sony Ericsson repairs or replaces the Product, the repaired or replaced Product shall be
warranted for the remaining time of the original warranty period or for ninety (90) days from the
date of repair, whichever is longer. Repair or replacement may involve the use of functionally
equivalent reconditioned units. Replaced parts or components will become the property of Sony
Ericsson.
3. This warranty does not cover any failure of the Product due to normal wear and tear, or due to
misuse, including but not limited to use in other than the normal and customary manner, in
accordance with the Sony Ericsson instructions for use and maintenance of the Product. Nor
does this warranty cover any failure of the Product due to accident, software or hardware
modification or adjustment, acts of God or damage resulting from liquid.
4. Since the cellular system on which the Product is to operate is provided by a carrier independent
from Sony Ericsson, Sony Ericsson will not be responsible for the operation, availability,
coverage, services or range of that system.
5. This warranty does not cover Product failures caused by installations, modifications, or repair or
opening of the Product performed by a non-Sony Ericsson authorised person.
6. The warranty does not cover Product failures which have been caused by use of accessories or
other peripheral devices which are not Ericsson or Sony Ericsson branded original accessories
intended for use with the Product.
7. Tampering with any of the seals on the Product will void the warranty.
8. THERE ARE NO EXPRESS WARRANTIES, WHETHER WRITTEN OR ORAL, OTHER
THAN THIS PRINTED LIMITED WARRANTY. ALL IMPLIED WARRANTIES,
INCLUDING WITHOUT LIMITATION THE IMPLIED WARRANTIES OF
MERCHANTABILITY OR FITNESS FOR A PARTICULAR PURPOSE, ARE LIMITED TO
THE DURATION OF THIS LIMITED WARRANTY. IN NO EVENT SHALL SONY
ERICSSON OR ITS LICENSORS BE LIABLE FOR INCIDENTAL OR CONSEQUENTIAL
DAMAGES OF ANY NATURE WHATSOEVER, INCLUDING BUT NOT LIMITED TO
LOST PROFITS OR COMMERCIAL LOSS, TO THE FULL EXTENT THOSE DAMAGES
CAN BE DISCLAIMED BY LAW.
98 Additional Information
Page 99

Some countries/states do not allow the exclusion or limitation of incidental or consequential
damages, or limitation of the duration of implied warranties, so the preceding limitations or
exclusions may not apply to you.
The warranty provided does not affect the consumer's statutory rights under applicable legislation in
force, nor the consumer's rights against the dealer arising from their sales/ purchase contract.
* European Union (EU)
If you have purchased your Product in an EU country you can have your Product serviced, under the
conditions set out above, within the warranty period in any EU country where an identical Product
is sold by an authorised Sony Ericsson distributor. To find out if your Product is sold in the EU
country you are in, please call the local Sony Ericsson Customer Care Centre. Please observe that
certain services may not be possible elsewhere than in the country of original purchase, for example
due to the fact that your Product may have an interior or exterior which is different from equivalent
models sold in other EU countries. It may not be possible to repair SIM-locked Products.
** In some countries/regions additional information is requested. If so, this is clearly shown on the
valid proof of purchase.
Vendor warrants the media on which the Software is provided, to be free from defects in materials
and workmanship under normal use for ninety (90) days after the date of your cash receipt/proof of
payment. The Vendor's and its suppliers' entire liability and your exclusive remedy under this
warranty will at Vendor's option be (and provided you return the Software to an authorized reseller/
supplier together with a copy of your cash receipt/proof of payment), to replace the disc(s)/
diskette(s) or refund the purchase price and terminate this Agreement including the License.
Except for the above express limited warranties, Vendor and its suppliers do not provide nor do you
receive any warranties or conditions whether express, implied, statutory or otherwise and Vendor
and its suppliers specifically disclaim any implied warranties of satisfactory quality and/or fitness
for a particular purpose. If your jurisdiction does not allow limitations on implied warranties to
consumers, the above limitation may not apply to you.
Vendor does not warrant that your use of the Software will be uninterrupted or error free. You
assume full responsibility for the selection of this Software and your selected hardware and for the
Software and hardware together achieving your intended results, as well as for any installation or use
of or result obtained from the Software.
Intended use
The Software shall be used in accordance with the instructions and for its intended use and purpose
only. The Software or part thereof may not be used in e.g. life support systems, nuclear facility
applications, nor for the purposes of missile technology, chemical or biologized industry, flight
navigation or communication of air, ground support equipment or other similar business or for any
other purpose where any failure by the Software to perform may result in personal injury, death,
damage to tangibles or the environment.
Limitation of liability
In no event shall Vendor or its suppliers be liable for any indirect or consequential losses or damages
whatsoever irrespective of the cause for such losses or damages, including loss of data, loss of
business profits or revenue, or any business interruption arising out of the use of or inability to use
Additional Information 99
Page 100

this Software. Vendor and its suppliers' total liability under this Agreement shall be limited to the
amount actually paid by Licensee for the Software.
Disputes and Governing Law
The validity, construction and performance of this Agreement shall be governed by the laws of
Sweden. All disputes, differences or questions between the parties with respect to any matter arising
out of or relating to this Agreement shall be finally settled under the Rules of Conciliation and
Arbitration of the International Chamber of Commerce, in Stockholm, by three (3) arbitrators
appointed in accordance with the said Rules. The proceeding shall be conducted in the English
language.
100 Additional Information
 Loading...