


EDGE PC Card
Sony Ericsson EDGE PC Cards GC82, GC83 and GC85
User Guide

Content
Introduction . . . . . . . . . . . . . . . . . . . . . . . . . . . . . . . . . . . . . . . . . . 5
Hardware Overview . . . . . . . . . . . . . . . . . . . . . . . . . . . . . . . . . . . . . . . . . . 5
Software Overview . . . . . . . . . . . . . . . . . . . . . . . . . . . . . . . . . . . . . . . . . . . 6
Documentation . . . . . . . . . . . . . . . . . . . . . . . . . . . . . . . . . . . . . . . . . . . . . . 6
Getting Started . . . . . . . . . . . . . . . . . . . . . . . . . . . . . . . . . . . . . . . . 7
Checklist . . . . . . . . . . . . . . . . . . . . . . . . . . . . . . . . . . . . . . . . . . . . . . . . . . . 7
System Requirements . . . . . . . . . . . . . . . . . . . . . . . . . . . . . . . . . . . . . . . . 7
Services Available Over the Internet . . . . . . . . . . . . . . . . . . . . . . . . . . . . . 8
Installation . . . . . . . . . . . . . . . . . . . . . . . . . . . . . . . . . . . . . . . . . . . 9
EDGE PC Card Hardware Set Up . . . . . . . . . . . . . . . . . . . . . . . . . . . . . . . 9
Installing the Software . . . . . . . . . . . . . . . . . . . . . . . . . . . . . . . . . . . . . . . . 10
Start Using Wireless Manager. . . . . . . . . . . . . . . . . . . . . . . . . . . . 12
Wireless Manager Icon . . . . . . . . . . . . . . . . . . . . . . . . . . . . . . . . . . . . . . . . 12
Wireless Manager Preferences . . . . . . . . . . . . . . . . . . . . . . . . . . . . . . . . . 15
Windows Log on Using GPRS/EDGE Dial-up Connection . . . . . . . . . . . . . 19
Create a Connection . . . . . . . . . . . . . . . . . . . . . . . . . . . . . . . . . . . 21
GPRS Connection . . . . . . . . . . . . . . . . . . . . . . . . . . . . . . . . . . . . . . . . . . . 21
CSD Connection . . . . . . . . . . . . . . . . . . . . . . . . . . . . . . . . . . . . . . . . . . . . . 22
Modify a Connection . . . . . . . . . . . . . . . . . . . . . . . . . . . . . . . . . . . . . . . . . . 23
Delete a Connection . . . . . . . . . . . . . . . . . . . . . . . . . . . . . . . . . . . . . . . . . . 23
Using your Connection . . . . . . . . . . . . . . . . . . . . . . . . . . . . . . . . . . . . . . . . 23
Browse the Internet. . . . . . . . . . . . . . . . . . . . . . . . . . . . . . . . . . . . . . . . . . . 24
Send and Receive emails . . . . . . . . . . . . . . . . . . . . . . . . . . . . . . . . . . . . . . 24
Wireless Manager Status Screen . . . . . . . . . . . . . . . . . . . . . . . . . 25
Connection . . . . . . . . . . . . . . . . . . . . . . . . . . . . . . . . . . . . . . . . . . . . . . . . . 26
Wireless Manager Telephony Settings Screen . . . . . . . . . . . . . . 27
Phone Numbers . . . . . . . . . . . . . . . . . . . . . . . . . . . . . . . . . . . . . . . . . . . . . 27
Locks . . . . . . . . . . . . . . . . . . . . . . . . . . . . . . . . . . . . . . . . . . . . . . . . . . . . . 28
Networks. . . . . . . . . . . . . . . . . . . . . . . . . . . . . . . . . . . . . . . . . . . . . . . . . . . 29
Forward Calls (Divert) . . . . . . . . . . . . . . . . . . . . . . . . . . . . . . . . . . . . . . . . . 30
Restrict Calls. . . . . . . . . . . . . . . . . . . . . . . . . . . . . . . . . . . . . . . . . . . . . . . . 32
Wireless Manager SMS Messages Screen. . . . . . . . . . . . . . . . . . 33
SMS Manager Functionality . . . . . . . . . . . . . . . . . . . . . . . . . . . . . . . . . . . . 34
Wireless Manager Phone Book Screen . . . . . . . . . . . . . . . . . . . . 37
The Phone Book Screen. . . . . . . . . . . . . . . . . . . . . . . . . . . . . . . . . . . . . . . 37
Phone Book Functionality . . . . . . . . . . . . . . . . . . . . . . . . . . . . . . . . . . . . . . 38
Wireless Manager Online Services Screen . . . . . . . . . . . . . . . . . 41
2 Contents

Troubleshooting . . . . . . . . . . . . . . . . . . . . . . . . . . . . . . . . . . . . . . . 42
Wireless Manager Icon Errors . . . . . . . . . . . . . . . . . . . . . . . . . . . . . . . . . . 42
Software Errors . . . . . . . . . . . . . . . . . . . . . . . . . . . . . . . . . . . . . . . . . . . . . . 42
Error Messages . . . . . . . . . . . . . . . . . . . . . . . . . . . . . . . . . . . . . . . . . . . . . 42
SIM Card Errors . . . . . . . . . . . . . . . . . . . . . . . . . . . . . . . . . . . . . . . . . . . . . 43
Error Codes . . . . . . . . . . . . . . . . . . . . . . . . . . . . . . . . . . . . . . . . . . . . . . . . 43
Additional Information . . . . . . . . . . . . . . . . . . . . . . . . . . . . . . . . . . 47
Sony Ericsson Support Web Site . . . . . . . . . . . . . . . . . . . . . . . . . . . . . . . . 47
Guidelines for Safe and Efficient Use . . . . . . . . . . . . . . . . . . . . . . . . . . . . . 47
Technical Specifications . . . . . . . . . . . . . . . . . . . . . . . . . . . . . . . . . . . . . . . 50
License Agreement . . . . . . . . . . . . . . . . . . . . . . . . . . . . . . . . . . . . . . . . . . . 57
Term . . . . . . . . . . . . . . . . . . . . . . . . . . . . . . . . . . . . . . . . . . . . . . . . . . . . . . 57
Limited Warranty. . . . . . . . . . . . . . . . . . . . . . . . . . . . . . . . . . . . . . . . . . . . . 57
Intended use . . . . . . . . . . . . . . . . . . . . . . . . . . . . . . . . . . . . . . . . . . . . . . . . 59
Limitation of liability. . . . . . . . . . . . . . . . . . . . . . . . . . . . . . . . . . . . . . . . . . . 59
Disputes and Governing Law . . . . . . . . . . . . . . . . . . . . . . . . . . . . . . . . . . . 60
FCC Statement . . . . . . . . . . . . . . . . . . . . . . . . . . . . . . . . . . . . . . . . . . . . . . 61
Appendix A - Connection Parameters . . . . . . . . . . . . . . . . . . . . .62
General Connection Parameters for CSD and GPRS . . . . . . . . . . . . . . . . 62
CSD Specific Parameters . . . . . . . . . . . . . . . . . . . . . . . . . . . . . . . . . . . . . . 63
TCP/IP Optimisation . . . . . . . . . . . . . . . . . . . . . . . . . . . . . . . . . . . . . . . . . . 63
Glossary . . . . . . . . . . . . . . . . . . . . . . . . . . . . . . . . . . . . . . . . . . . . . 65
Index . . . . . . . . . . . . . . . . . . . . . . . . . . . . . . . . . . . . . . . . . . . . . . . . 68
Contents 3

Sony Ericsson EDGE PC Cards GC82, GC83 and GC85
First edition (April 2004)
This manual is published by Sony Ericsson Mobile Communications AB, without any
warranty. Improvements and changes to this manual necessitated by typographical errors,
inaccuracies of current information, or improvements to programs and/or equipment,
may be made by Sony Ericsson at any time and without notice. Such changes will, however,
be incorporated into new editions of this manual.
This manual is copyrighted work of Sony Ericsson Mobile Communications AB, Sweden.
The programs referred to herein are copyrighted and trademarked works of Sony Ericsson
Mobile Communications AB, Sweden. Reproduction in whole or in part, including utilization
in machines capable of reproduction or retrieval, without the express written permission
of the copyright holders is prohibited. Reverse engineering is also prohibited.
All other product or service names mentioned in this manual are trademarks of their
respective companies.
All rights reserved.
© Sony Ericsson Mobile Communications AB, 2004
Publication number: EN/LZT 123 **** P1A
4 Contents

Introduction
Congratulations and thank you for buying a Sony ericsson EDGE PC Card. EDGE PC Cards are
standard size type II PC cards, they enable laptop users to have mobile access to the internet or
corporate network with flexibility and high speed, including ‘always online’ capability via GPRS/
EDGE. The EDGE PC Card is very simple to install and use; the software provided allows you to
select the best data service available so that the EDGE PC Card is always available for data transfer.
Edge PC Card Band Countries supported
GC82 GSM/GPRS/EDGE
850/1900
GC83 GSM/GPRS/EDGE
850/1800/1900
GC85 GSM/GPRS/EDGE
900/1800/1900
North and South America
North and South America; includes
capability to roam on 1800 networks in
Europe and Asia.
Rest of world, includes ability to roam in
North and South America on 1900.
The EDGE PC Card enables your laptop PC to:
• Browse the Internet
• Send and receive e-mails
• Receive information services in real time
• Access files, databases and discussion groups
• Send and receive SMS text messages
• Edit SIM card entries
Note:
Before using your EDGE PC Card you MUST read Guidelines for Safe and Efficient Use on
page 47.
Hardware Overview
The EDGE PC Card is a standard type II Cardbus PC card. The card is standard length and only the
antenna protrudes outside the PC card slot.
The amount of power drawn from the laptop battery is dependant upon a number of factors including
status, distance to the base station and number of timeslots used. See Technical Specifications on
page 50 for a general guide to power consumption.
Before you can start using the EDGE PC Card you need to put the hardware together. You will also
need a SIM card.
SIM Card
When you subscribe to a mobile network operator, you are issued with a SIM card (Subscriber
Identity Module card). The SIM contains your personal subscriber data. You need a SIM to use the
EDGE PC Cards.
Introduction 5

Software Overview
Wireless Manager
You can use the Wireless Manager to:
• Display EDGE PC Card status information
• Create or modify connection settings
• Connect to the Internet or a corporate network
• Manage EDGE PC Card settings
• Manage SIM card and PC phone books
• Send and receive SMS messages
Using the EDGE PC Card with your Applications
Data Programs
You can use the EDGE PC Card as a modem to provide Intranet/Internet connectivity for a wide
range of applications.
GC82
Only
Fax Programs
You can use the GC82 as a fax provided you have the correct software, e.g. Microsoft Fax
(Windows 2000 and XP).
Documentation
The EDGE PC Card’s documentation is designed to enhance your understanding of its capabilities.
The following guides are provided:
• A printed Quick Start Guide aimed at getting you operational as quickly as possible.
• An online User’s Guide (this document) containing a comprehensive description of the EDGE
The User’s Guide is located on EDGE PC Card CD-ROM as Adobe Acrobat PDF files. The EDGE
PC Card CD-ROM also contains Adobe Acrobat Reader
Illustrations
The illustrations in this manual were obtained using the EDGE PC Card on a Microsoft Windows
2000 operating system. The dialogs that appear on your PC may differ depending on the version
of Windows
PC Card functionality. You can read the guide on the computer screen or print it on to either
European A4 or American Letter sized paper.
®
which you can install if necessary.
®
in use.
®
6 Introduction

Getting Started
Checklist
Make sure the following items are in the box when you unpack it:
• Aluminium protective case for storing the EDGE PC Card and its antenna
• GC82, GC83 or GC85 PC Card
• Antenna
•Quick Start Guide
•CD-ROM
The CD contains; drivers, software, documentation and a readme file.
System Requirements
This section lists the network subscriptions, hardware and software requirements for running
the EDGE PC Card.
Network and Subscription
The network subscription you use in conjunction with your EDGE PC Card depends on the
subscriptions your network operator can provide. Contact your network operator or service provider
to make sure the options you require are available. Make sure that data options are included in your
subscription, as these are usually optional services.
Note:
Mobile operators often provide a number of connectivity options via GPRS such as WAP and
Internet, so check that the Internet or VPN service you require is enabled for your subscription.
The functionality of the different subscriptions available from networks operators are
discussed below:
Circuit Switched Data (CSD)
CSD is the original GSM network data transfer method, used in the past for WAP. Almost all GSM
networks have this capability at 9.6 kbps. It is possible for the network to upgrade the speed
to 14.4 kbps. The EDGE PC Card operates at this higher speed where available.
Note:
GC85 does not have CSD connectivity. An upgrade will be available to add this functionality
to the GC85, contact your service operator for more details.
General Packet Radio Service (GPRS)
GPRS is a new network connection which provides “always on” mobility. The connection set up
is fast and, once connected, applications may send and receive data whenever required. In today’s
GPRS networks, the EDGE PC Card receives data at speeds up to 53.6 kbps and transmits at speeds
up to 26.8 kbps.
Getting Started 7

Hardware
Enhanced Data Rates for Global Evolution (EDGE)
EDGE enhances GPRS by increasing data throughput by a factor of 3. GPRS networks enhanced
with EDGE are often referred to as E-GPRS (Enhanced GPRS) networks. EDGE provides the
“always on” capability of GPRS but with greater speed. EDGE technology is transparent, simply
make a GPRS connection as usual and benefit from the increase in speed where EDGE is available
in a network.
Short Message Service (SMS)
The PC can send and receive SMS text messages using the SMS Messages screen in the Wireless
Manager, see Wireless Manager SMS Messages Screen on page 33, for more details.
You will need:
• A PC that has the minimum specification recommended by Microsoft to run the version
of Windows
®
installed on it.
• A 16 bit type II PC Card slot.
• A Sony Ericsson EDGE PC Card (GC82, GC83 or GC85)
• a SIM card
Software
You will need:
•Windows
®
98SE, Me, 2000 (SP4) or XP.
• Sony Ericsson Wireless Manager CD-ROM.
Services Available Over the Internet
The Sony Ericsson web site contains support to facilitate easy communications and rapid information
retrieval, wherever you are. It gives you access to on-line customer services, on-line user manuals,
software downloads, and useful information. The address is:
http://www.SonyEricsson.com/support
Sony Ericsson’s home page address is:
http://www.SonyEricsson.com
8 Getting Started
Installation
The Wireless Manager CD-ROM contains the software required to operate your EDGE PC Card.
The software is simple to set up and operate, but before you begin you will need to make sure that
the services you require are included on your SIM card subscription. For an explanation of the
services that are available see Network and Subscription on page 7. Contact the organization that
supplied you with your SIM card and request that the specific services (EDGE, GPRS, CSD or SMS)
you require are added to your subscription.
The CD-ROM contains the following software:
• Wireless Manager
• User Documentation
• On-line Help
• ReadMe text file containing the latest information about the EDGE PC Card
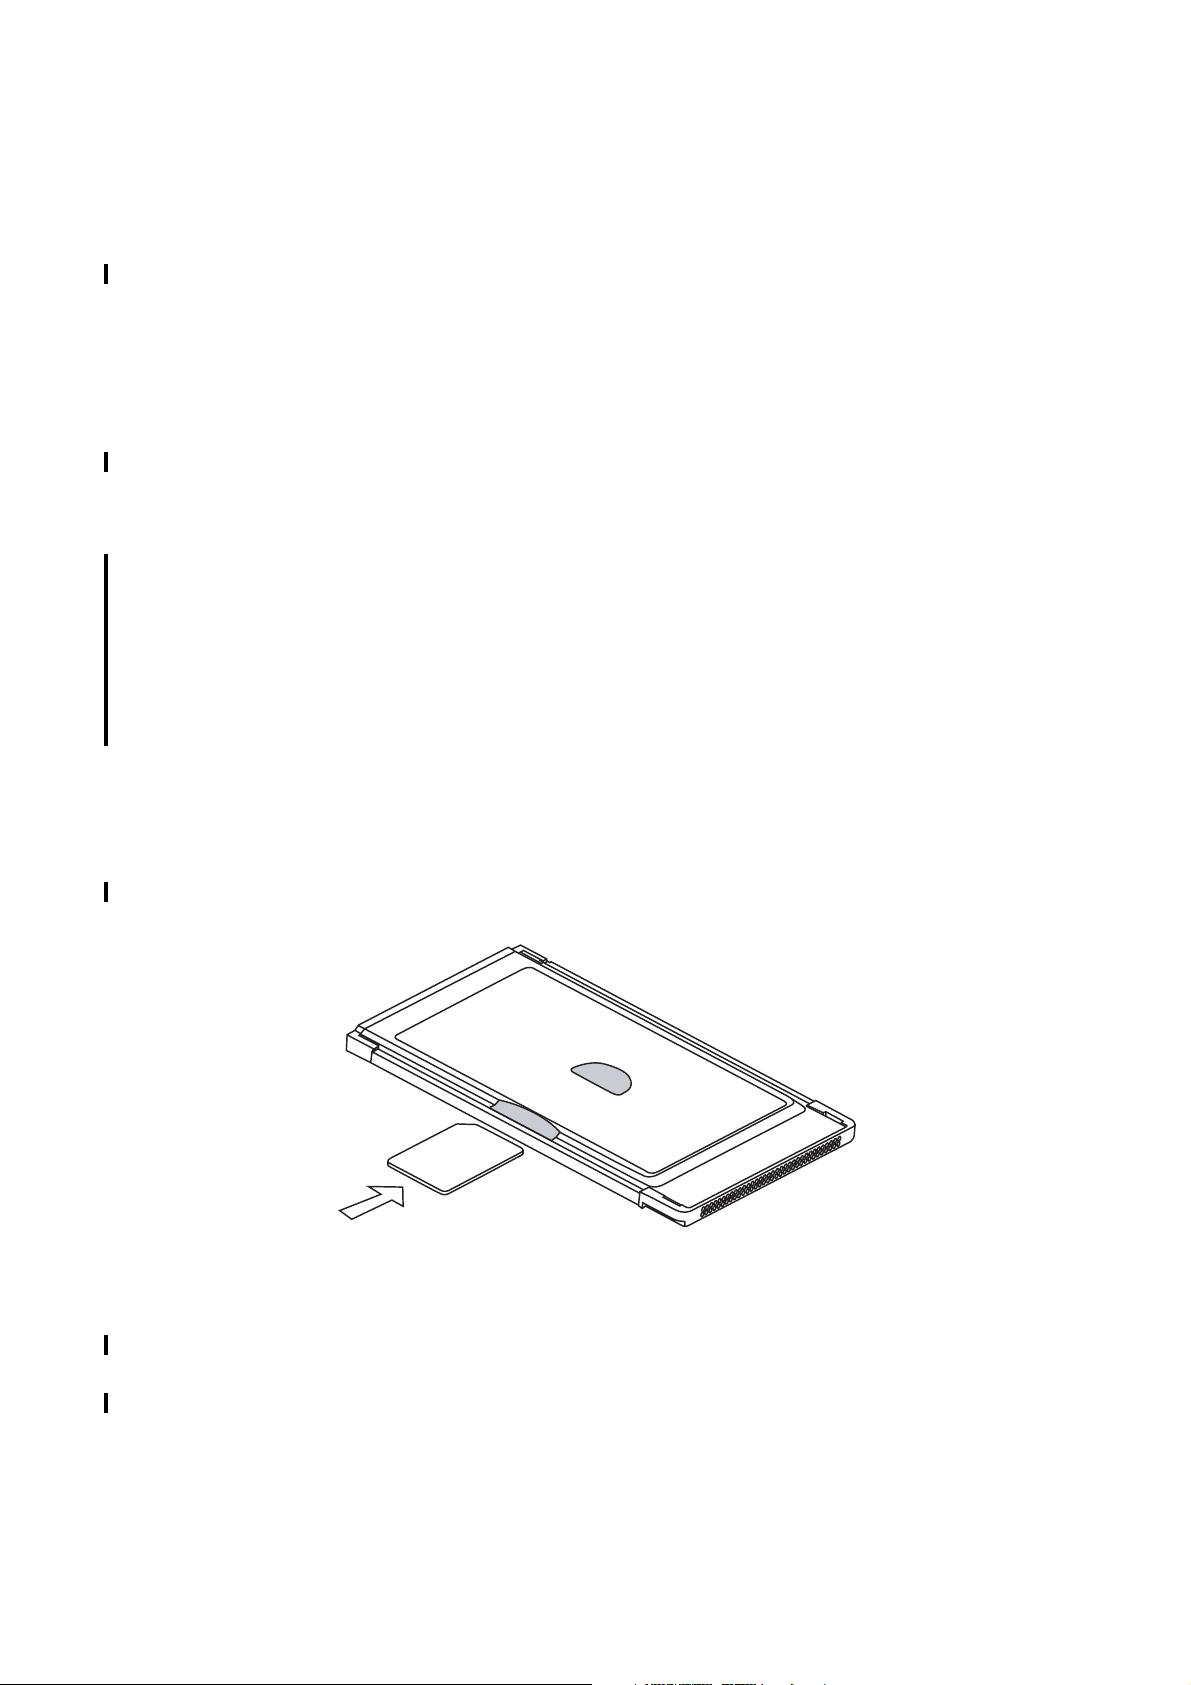
EDGE PC Card Hardware Set Up
1. Collect your EDGE PC Card, antenna and SIM card together.
2. Insert your SIM card into the slot on the back of EDGE PC Card, with the gold contacts facing
downwards
Note:
The cut corner of the SIM card must be placed into the PC card as demonstrated below,
the gold contacts should face downwards.
3. Connect the antenna to the end of the EDGE PC Card.
If the antenna is obstructing your use of the keyboard you can turn it to a horizontal position and still
connect to the network.
If you want to use your other PC card port remove the EDGE PC Card whilst you insert the other
card. See Safe Removal of the EDGE PC Card on page 13 for more details.
When the EDGE PC Card isn't in use it is recommended that you store it in the protective carrier box
provided. The unit, especially the antenna could be damaged if it remains in PC.
Installation 9

Important!
Do not insert the card into the laptop until you have installed the software from the CD-ROM.
Simply cancel the New Hardware wizard if the card is accidentally inserted prior to software
installation.
Installing the Software
1. Insert the EDGE PC Card CD-ROM in your CD drive.
After a few seconds a Sony Ericsson splash screen is displayed.
Note:
If the CD-ROM does not autorun, select Start Run and type D:\Setup.exe into the Run
dialog. (Where D is your CD drive.)
2. The Choose Language dialog opens. Click on the drop down list and select the installation
language for your EDGE PC Card Software. Click OK.
3. The InstallShield Wizard for Sony Ericsson Wireless Manager opens; follow the instructions
on screen. When installation is complete click Finish.
4. Insert the EDGE PC Card. Make sure the EDGE PC Card is fully inserted.
m
e
d
o
M
rd
a
C
C
P
S
R
P
GC82
G
5. After a few seconds, the New Hardware Wizard opens and installs the necessary drivers onto
your PC from the EDGE PC Card CD. The wizard may require you to locate a specific driver file.
If this happens a dialog opens, click Browse and select:
Component
EDGE/GPRS Drivers on a
Windows 98SE or ME machines
EDGE/GPRS Drivers on a
Windows 2000/XP machine
EDGE PC Card CD-ROM
Location
D:\Driver\Driver9x
D:\Driver\Driver2k
In the above table D is referred to as your CD drive.
Note:
When installing on Windows 98SE, Windows may prompt for the original Windows 98
CD-ROM to be inserted. If the CD-ROM is not inserted when requested, Windows will
10 Installation

subsequently reboot with error messages relating to missing files. Therefore, it is strongly
recommended that the Windows 98SE CD-ROM is available before installation starts.
6. Select the driver file requested by the Wizard and click Open. The Hardware Wizard finishes the
installation.
Note:
If you are prompted to reboot the laptop during software installation, you may find that the
Wireless Manager attempts to start before all of the drivers are installed. The scenario is that
the New Hardware Wizard is still busy installing the 3 device drivers, the Wireless Manager
splash screen appears, followed by a warning dialog saying ”You must have a EDGE PC Card
Wireless Modem installed to run this application. Please install a EDGE PC Card Wireless
Modem and try again”. Click OK. Wait for the New Hardware Wizard to complete, rebooting
the laptop if required, then start the PC Card Manager using the icon on the desktop or via
Programs Sony Ericsson Wireless Manager.
7. Select Programs Sony Ericsson Wireless Manager to start using your EDGE PC Card.
8. The EDGE PC Card and Wireless Manager are ready for use.
Installation 11

Start Using Wireless Manager
1. To start Wireless Manager select Start Programs Sony Ericsson Wireless Manager
or select your desktop shortcut .
2. If requested, enter your SIM Card/Phone Lock PIN and click OK. It is only necessary to enter
the PIN number once during a PC session.
You are allowed three attempts to enter the correct PIN code. If you fail to enter the SIM PIN
correctly it is blocked and if you fail to enter the Phone Lock PIN correctly your EDGE PC Card is
locked. Contact your network operator for an unblock code (PUK). Enter the unblock code into
the Card Blocked dialog and enter a new PIN code and confirm it.
To set the SIM Card PIN and Phone Lock PIN, see Locks on page 28.
3. The Radio dialog opens, select the required state for your EDGE PC Card radio transmission.
See Wireless Manager Preferences on page 15 for more details.
4. The Wireless Manager opens, displaying the Status screen. Connectivity details are displayed
on this screen, the current signal strength and GPRS availability should be listed. See Wirele ss
Manager Status Screen on page 25, for more details.
5. The Wireless Manager Icon is displayed in the system tray of your PC.
Wireless Manager Icon
The Wireless Manager Icon shows the current status of the EDGE PC Card, which is typically the
current network signal strength and the GSM/GPRS/EDGE service status, similar to a mobile phone
display. If you right click on the Wireless Manager Icon a menu is displayed, see The Wireless
Manager Icon Menus on page 14 for details on the menu options.
Place your mouse cursor over the Wireless Manager Icon to display text indicating:
• GSM or GPRS/EDGE Service availability
•Network name
• Connection information
Three standard Windows
Card is inserted in your PC and connected. They are the Sony Ericsson Wireless WAN Adapter
icon, Dial-up Networking icon and the PC card icon.
Wireless
Manager Icon
PC Card icon
®
operating system icons also appear in the system tray when the EDGE PC
PC Card icon
Sony Ericsson Wireless WAN
Adapter icon (connected)
1:07 PM
Dial-up
Networking icon
Wireless Manager Icon
Sony Ericsson Wireless WAN
Adapter icon (disconnected)
2:07 PM
12 Start Using Wireless Manager

• Making Windows Network Connections Visible
The Windows connection icons, displayed in the system tray, normally disappear once a
connection is made. This means that you may not necessarily see a icon corresponding to each
of the icons for your GPRS/EDGE and CSD.
To make the icon visible, follow the steps described below.
• Right click the appropriate icon and select Open Network Connections. Alternatively
select Start Settings Network Connections.
• A dialog opens displaying all the network and dial-up connections available on your PC.
Right click the one you want to edit.
• Click the Show icon in taskbar when connected box. Click OK to close the dialog.
When you have an active connection use your mouse to hover over the icon to view
connectivity details.
• PC Card icon
Indicates that a PC card is present and allows the user to see certain properties and also
to stop/remove the card.
Safe Removal of the EDGE PC Card
You must stop the EDGE PC Card before attempting to remove it.
1. Close any active EDGE PC Card Networking Connections.
2. Exit Wireless Manager.
3. Click on the PC Card icon. A list of currently connected PC Cards is displayed. Select Stop
Sony Ericsson EDGE Wireless Card.
4. A dialog is displayed telling you it is safe to remove the card.
5. The EDGE PC Card can now be removed safely.
Important!
Incorrect removal of the EDGE PC Card can damage the card.
Wireless Manager Icon Status
The Wireless Manager Icon displays the status of the EDGE PC Card network connection.
Radio is set to off or the Wireless Manager has disconnected the EDGE PC
Card
The radio transmitter is enabled, but there is no GSM or GPRS service available
The EDGE PC Card has GSM service and indicates a signal strength of 3 out of
5 bars. CSD, SMS and fax (GC82 only) may be used, provided these are
supported by the subscription. GPRS/EDGE is not available
The EDGE PC Card has GSM and GPRS/EDGE service.
If EDGE connectivity is available there is no visible indication of this in the
Wireless Manager.
Wireless Manager is waiting for the EDGE PC Card to be inserted.
Start Using Wireless Manager 13

The Wireless Manager Icon Menus
Right click one of the following icons to see the EDGE PC Card GPRS/EDGE menu options.
The EDGE PC Card GPRS/EDGE menu is displayed.
or
or
or
Open GC82 Manager
Turn Radio Off
Connect to MyGPRSservice
Help
About GC82 Manager
Hide to tray
Exit
Note:
Some of these menu options are disabled, depending on the current state of the EDGE PC
Card.
Note:
EDGE capability is not indicated by the EDGE PC Card GPRS/EDGE icons.
The Wireless Manager Icon menu options are described below.
Open Wireless Manager
Select Open Wireless Manager or double click on the Wireless Manager icon to open the Wireless
Manager.
Radio Status
This menu option is dynamic. It monitors the current state of the EDGE PC Card radio transmitter
and gives you the option to switch to the opposite state, for example, if your EDGE PC Card Radio
transmitter is on the menu option reads Turn Radio Off.
You can also set the status of the radio transmitter by selecting Turn R ad i o On/ O f f in the EDGE
PC Card Manager File menu.
Connect/Disconnect
If you are currently disconnected the menu gives you the option to connect to the most recently used
EDGE PC Card connection. If you are connected the menu gives you the option to disconnect.
Help
Opens the Wireless Manager Online Help. You can also launch the Online Help from the Wireless
Manager Help Menu. Pressing F1 in any of the Wireless Manager dialogs opens the relevant help
screen.
About
Displays a dialog that contains Wireless Manager software information.
Hide to Tray
Select the Hide to Tray option to visually close Wireless Manager leaving only the Wireless
Manager Icon visible in the system tray. Use the Open Wireless Manager to view the software
again.
14 Start Using Wireless Manager
Exit
Closes the Wireless Manager application, the Wireless Manager Icon will remain in the system tray
if you have set it to run in the background. See Wireless Manager Preferences below for more details.
Wireless Manager Preferences
You can change the general behavior of the Wireless Manager by selecting specific options in the
Preferences... dialog.
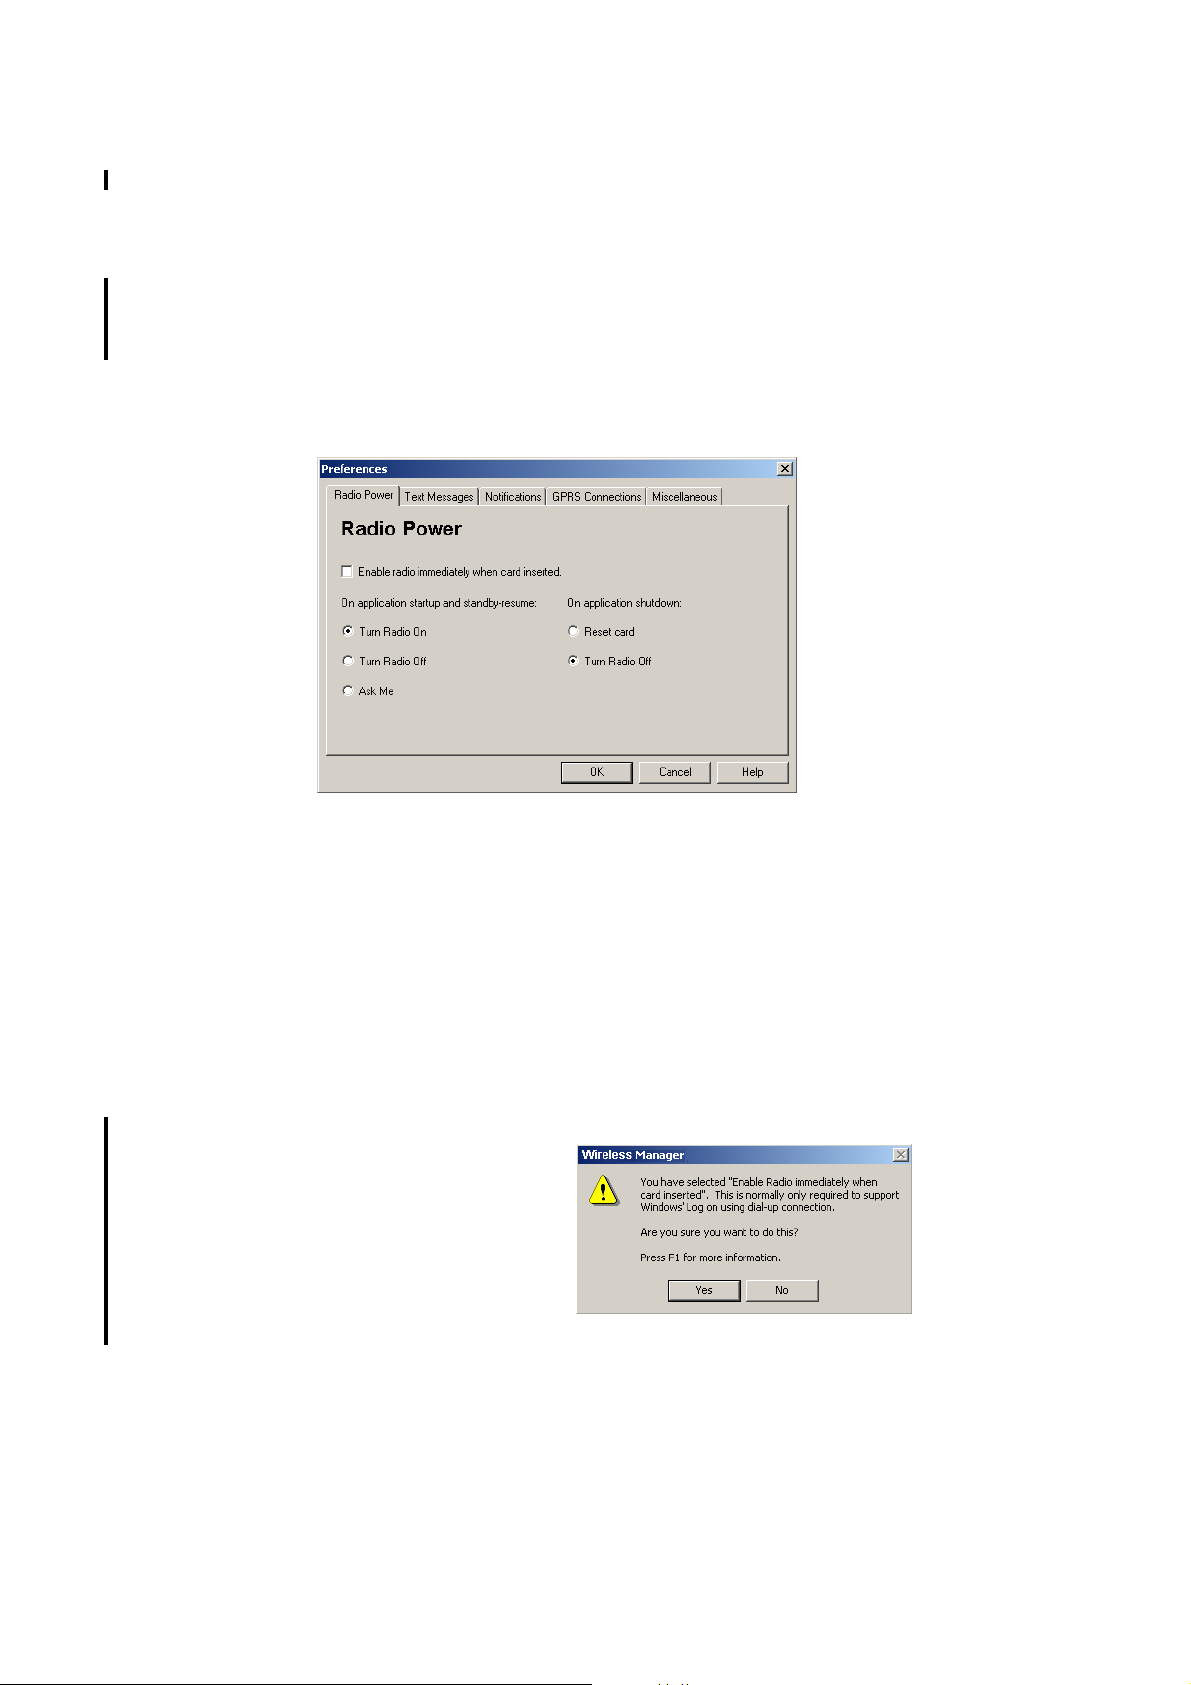
1. Select Preferences... in the File menu. The Preferences dialog opens, the Radio Power tab
is displayed.
Radio Power Tab
You can use this tab to manage the state of the radio transmitter.
Enable Radio immediately
when card inserted
You should normally leave this checkbox turned off.
When enabled, the Windows driver turns the radio
transmitter on when the card is inserted and leaves
it enabled even when the card is not in use. You should
check this option if your Windows logon requires you to log
on using a dial-up connection, see Windows Log on Using
GPRS/EDGE Dial-up Connection on page 19 for more
details. When you click OK to activate this option the
Wireless Manager displays the following dialog.
When this option is selected, the Wireless Manager radio
power startup and shutdown choices are disabled.
Start Using Wireless Manager 15

The radio mode you specify at Wireless Manager start-up appears selected on the Radio tab.
On
Off
Ask Me Triggers a dialog to be displayed every time the PC
Turn Radio Off At shutdown the radio is turned off.
Reset card
When the Wireless Manager is running in radio on mode
it is registered to the network and connections can
be made and SMS sent and received. The radio can
be enabled in several ways;
•Select Radio On when the Wireless Manager starts.
• Specify the required radio state in
Preferences Radio Power.
See Wireless Manager Preferences on page 15 for
more details.
Radio Off indicates that the EDGE PC Card will not
register to the mobile network. You may perform noncommunication related activities such as phone book
maintenance, but you must turn on the radio in order to
make a connection or to send/receive SMS.
is turned on. The dialog asks you if the radio transmitter
should be turned on or off during the active PC session.
This is also called Aeroplane mode, because it prevents
the radio transmitter automatically turning on. This is
a useful feature in areas where radio transmitters are
not allowed; aircrafts, hospitals or blasting areas.
Your EDGE PC Card is set to Ask by default.
Turns the radio off and resets the card.
Text Messaging Tab
You can use this tab to enable reception of specific message classes from the SMS Cell Broadcast
service and to set the SMS received audio alarm to on or off. Select the radio buttons to activate
the options.
Example of SMS Cell Broadcast message types:
To enter multiple SMS Cell Broadcast message types separate each entry with a comma,
for example, 000, 034, 076.
Note:
SMS Cell Broadcast message types are network operator specific. Contact your network
operator for more details.
This screen also allows you to set a validity period for the SMS messages that you are sending.
If your message can not be delivered, for example, if the recipient hasn’t inserted their EDGE PC
Card, the validity period tells your service centre how long to keep trying to send the message.
Code: Cell Broadcast Message
000 Index
010 News Flashes
020 Hospitals
030 Long-distance road reports
040 Weather
16 Start Using Wireless Manager
Notifications Tab
Click the Notifications tab. You can decide if you want to display a splash screen every time
Wireless Manager is opened or closed and a program end confirmation box. Select the radio buttons
to activate the options.
GPRS Connection Tab
Establish GPRS connection at startup
Select this option to automatically connect to your chosen network when Wireless Manager is
started. Wireless Manager waits until GPRS is registered and then it establishes the specified GPRS
connection.
Simply select the name of the connection to be established from the drop down list.
To automatically connect when you start or restart your PC see the example below. If you need
to connect at Windows log on see Windows Log on Using GPRS/EDGE Dial-up Connection
on page 19.
Example: If you want your EDGE PC Card to be available and a GPRS internet connection
to be automatically established when you boot your laptop:
- Set Preferences Miscellaneous Run this program when
Windows Starts
- Set Preferences GPRS Connection Establish GPRS Connection
At Startup and select the GPRS connection required.
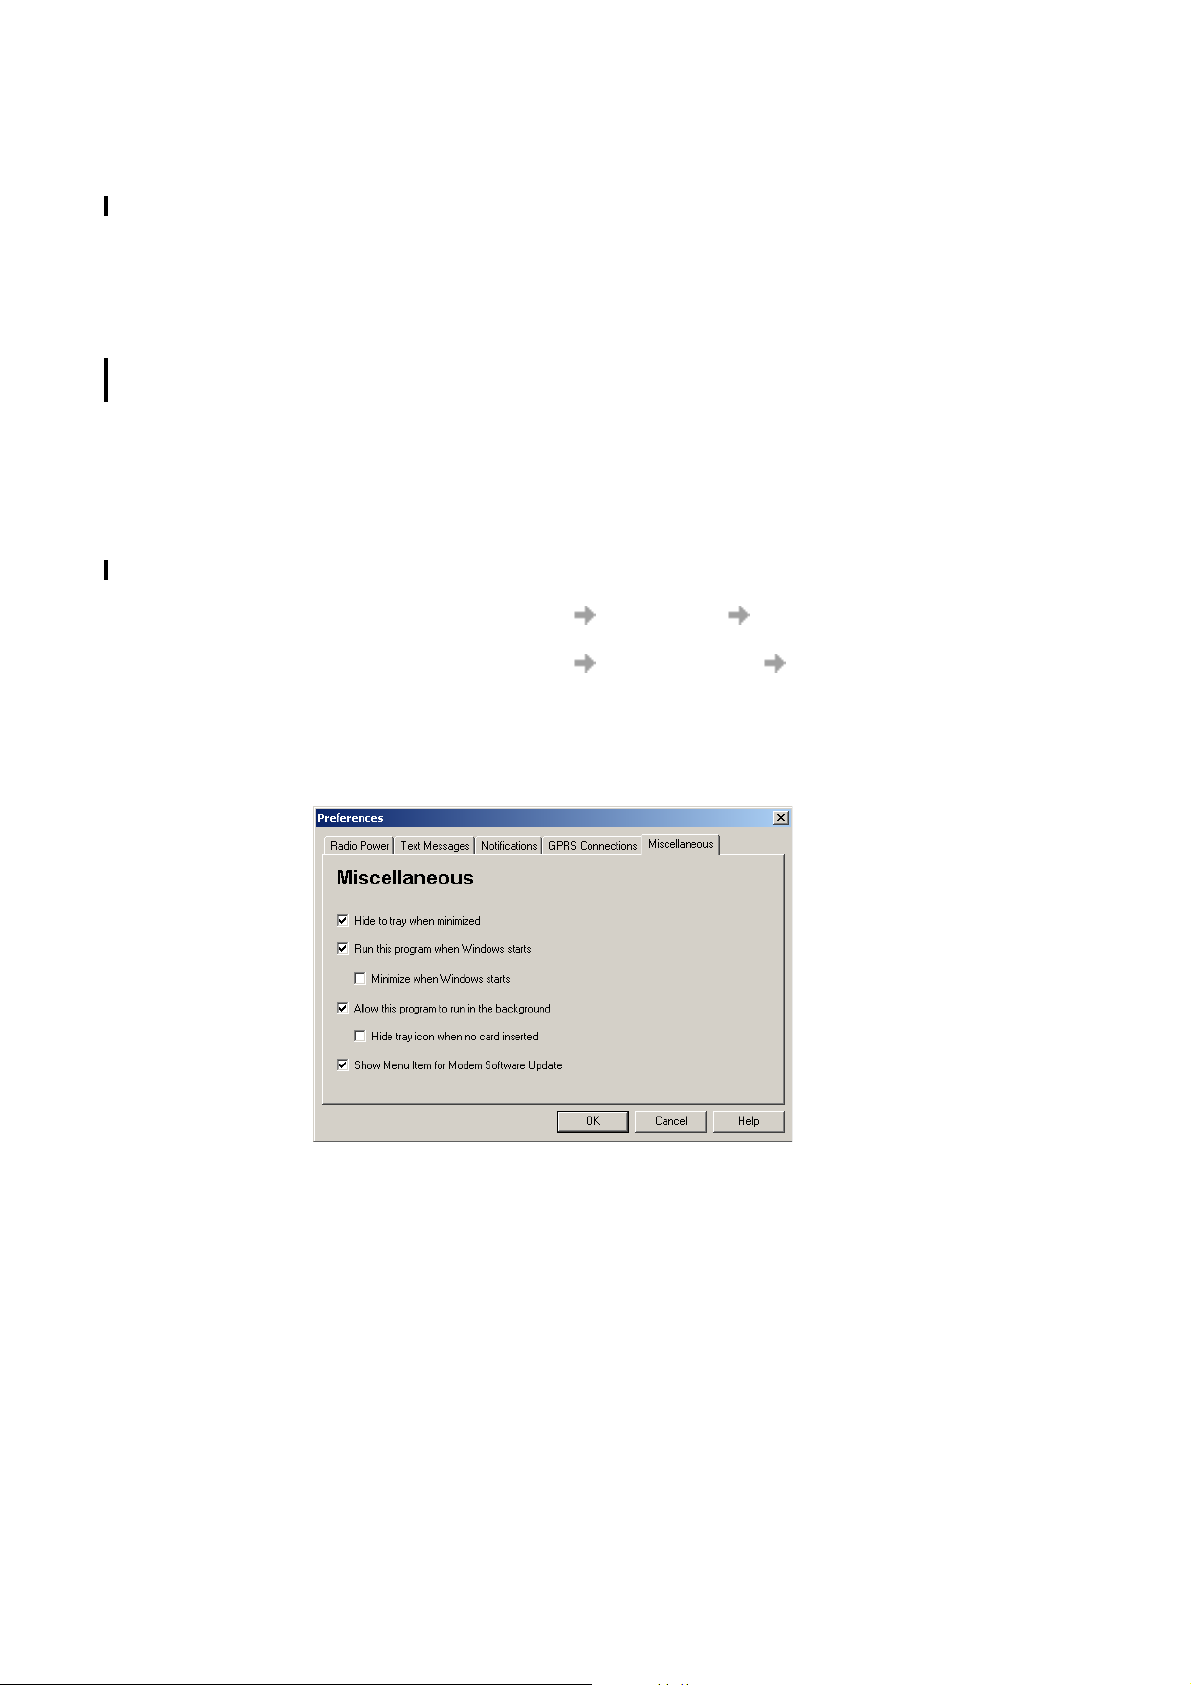
Miscellaneous Tab
Click the Miscellaneous tab.
Start Using Wireless Manager 17

• Hide to tray when minimized
If enabled, when the Wireless Manager is minimized, it removes any window from the taskbar,
and only shows the small icon in the system tray. To re-open the main window, double-click
the tray icon, or select open from the icon menu.
• Run this program when Windows starts
If enabled, the Wireless Manager starts when Windows is started. If a EDGE PC Card is
detected, the Wireless Manager runs. If not, the program closes (and runs in the background if
permitted).
When used with Establish GPRS connection at startup, this allows a GPRS session to be
automatically connected when the user logs on, see Windows Log on Using GPRS/EDGE Dial-
up Connection on page 19 for more details.
• Minimize when Windows starts
If enabled, the Wireless Manager starts when a user logs on to Windows, it appears as an icon in
the task bar only. If a EDGE PC Card is detected, the Wireless Manager runs and connects. If
not, the program closes (and runs in the background if permitted).
• Allow this program to run in the background
If enabled, the Wireless Manager runs in the background, waiting for a EDGE PC Card to be
inserted. When the card is detected, the Wireless Manager automatically opens and begins normal
operations.
When the close box, or File Exit is selected, the Wireless Manager closes but does not exit.
It releases control of the card, so it may be stopped and removed, and runs in the background.
You can start the program again from the Start menu, double-clicking the system tray icon,
or by re-inserting the EDGE PC Card.
You can stop Wireless Manager running in the background by right clicking on the PC screen
and selecting Exit.
If you attempt to start Wireless Manager with no EDGE PC Card inserted a warning dialog is
displayed, informing you that the EDGE PC Card is not present, and Wireless Manager switches
back to background mode.
• Hide tray icon when no card inserted
If this option is selected, Wireless Manager runs in background mode, the Wireless Manager
icon is not displayed in the system tray. If the card is inserted, the icon reappears and the
Wireless Manager is started.
• Show menu item for Modem Software Update
If this option is checked, a File Modem Software Update... menu item is enabled. Selecting
this menu command prepares the modem to receive a software update from the Sony Ericsson
Update Service. More information about this service can be found at
http://www.sonyericsson.com/updateservice/
EDGE PC Card/.
Examples: If you want to activate your EDGE PC Card when the laptop is booted, so that it is
ready to make a connection and send/receive SMS:
- Set Preferences Miscellaneous Run this program when Windows
Starts.
If you want your EDGE PC Card to be available and a GPRS internet connection
to be automatically established when you boot your laptop:
- Set Preferences Miscellaneous Run this program when Windows
Starts.
- Set Preferences GPRS Connections Establish GPRS Connection
At Startup.
- Select the GPRS connection required.
If you remove the EDGE PC Card during usage and want it to be automatically
reactivated when you re-insert it:
18 Start Using Wireless Manager

- Set Preferences Miscellaneous Allow this program to run in the
background.
Note: If you have Establish GPRS connection at Startup set, then the connection
will also be automatically established when you insert the card.
If you want to start the laptop with the EDGE PC Card removed and have it
automatically activated when it is later inserted:
- Set Preferences Miscellaneous Run this program when Windows
Starts.
- Set Preferences Miscellaneous Allow this program to run in the
background.
Windows Log on Using GPRS/EDGE Dial-up Connection
The EDGE PC Card supports the Windows Log on using dial-up connection feature.
To log on to Windows using a dial-up connection the EDGE PC Card must be inserted and the radio
enabled before you log on. To enable the radio prior to logon, select Enable radio immediately
when card inserted checkbox on the Radio Power preferences tab, see Radio Power Tab
on page 15 for more details.
Important!
Never start your PC in this mode if you are in a location where mobile devices shouldn’t
be used, for example, on an aeroplane, in hospital or near a blast site.
Only check this option if you need to log on to a Windows Domain via a wireless dial-up connection.
This will permit the EDGE PC Card to register with the network and establish a connection when the
Windows logon screen is displayed.
Note:
It is not possible to display network status or signal strength during the Windows logon
procedure, so you should allow enough time for the EDGE PC Card to find and register with
the wireless network prior to attempting to log on.
The dial-up connections available to the Windows Logon must have been created by a user account
with Administrator privilege and designated For all users. This must be done using the Windows
Network Connection Wizard, because the Wireless Manager can only create connections for the
current user ID.
Normally the Windows Logon using dial-up connection will be using a CSD session to a corporate
network, so that the logon credentials can be validated by a Windows Domain Server.
There may be special circumstances where a GPRS dial-up connection is required for logon.
To create a GPRS dial-up connection, follow these steps:
1. Create the Windows dial-up connection using the Windows Network Connection Wizard.
For the telephone number, use *99***3#.
2. Set the GPRS context parameters in the EDGE PC Card using the following AT commands.
Type the AT Commands into the Windows Hyperterminal program.
AT+CGDCONT=3,“IP”,“<AccessPointName>”,“”,0,0
where <AccessPointName> is the name of the special GPRS access point for your corporate
GPRS service.
Start Using Wireless Manager 19

Note:
In this example, we used GPRS Context 3. There are 10 possible contexts supported
by the EDGE PC Card (1..10). Context ID 2 is reserved for use by connections created
by the Wireless Manager.
Refer to the AT Command Manual or contact your service provider for further assistance.
20 Start Using Wireless Manager

Create a Connection
Your mobile operator may have entered predefined customised connection settings for you. Check
the connection drop-down menu for any existing entries, if they are available go directly to Using
your Connection on page 23.
1. Click or select View Connection Wizard. The Connection Wizard opens.
2. Select the radio button next to Create a new connection, enter a name, for example ‘My
Connection’, click Next.
Note:
Your connection name should not exceed 16 characters for it to be fully visible in Wireless
Manager.
3. The Type of Connection screen opens. From here you select the type of connection you require:
• For GPRS/EDGE see steps 4 to 8
• For CSD see steps 9 to 12
GPRS Connection
4. Select GPRS/EDGE. Select your Network Operator from the Choose Network drop down list.
If your Network Operator isn’t listed selected <Other>. Click Next.
See Network and Subscription on page 7 for more information on GPRS.
Note:
Type the first letter of the Network Operator you require into the field to list all the operators that
start with that letter.
5. If the Access Point Name dialog opens, select the APN you want to use from the list displayed.
If no APNs are listed contact your Network Operator and ask them to supply an APN.
6. To modify the selected APN’s settings, Click Advanced.... See Appendix A - Connection
Parameters on page 62, for descriptions of the updateable parameters in the Advanced dialog.
Click Apply to save any changes before closing the dialog. Click Next.
Note:
Your connection will automatically switch to EDGE when the network is available, allowing your
PC Card to work at faster speeds.
7. If the operator you have selected in step 4 does not require a User ID and Password leave this
screen blank if it is displayed. If you have to logon to your service provider, enter you User ID
and Password into the specific fields. If you want to enter your User ID and PAssword every
time you connect tick the box provided. Click Next.
Note:
Some versions of Windows® deliberately change the number of asterisks that represent
a password and place asterisks in the password field when the password is blank in order
to make the display secure.
8. Click Finish to create your connection or Back to review your settings.
Create a Connection 21
 Loading...