


EBS-N200
Network Display Adapter
Users Guide
IN THIS DOCUMENT
Getting Started
Installing the EBS-N200
Using the Software
Control Web Pages
Version 1.0

Table of Contents
Getting Started ................................................................................................................................................ 4
Introduction to EBS-N200 .......................................................................................................................... 4
Package Contents........................................................................................................................................4
Hardware and Software............................................................................................................................... 4
Browser Requirements................................................................................................................................ 4
Installing the EBS-N200.................................................................................................................................5
Overview..................................................................................................................................................... 5
Connecting the Hardware ...........................................................................................................................5
Plasma Hookup.......................................................................................................................................5
Plasma Hookup with Surround Sound....................................................................................................6
TV Hookup ............................................................................................................................................. 7
Detecting and Setting Up the Initial IP Address ......................................................................................... 8
Configuring the EBS-N200.........................................................................................................................9
Using the Software........................................................................................................................................ 10
Overview................................................................................................................................................... 10
Launching the Software ............................................................................................................................ 10
Screen Layout ........................................................................................................................................... 11
General Information.............................................................................................................................. 12
Control Web Pages ............................................................................................................................... 13
Body...................................................................................................................................................... 13
Control Web Pages ....................................................................................................................................... 14
Configuration............................................................................................................................................14
Basic Settings........................................................................................................................................ 14
Advanced Settings ................................................................................................................................17
Date/Time Settings ............................................................................................................................... 21
Input Mapping....................................................................................................................................... 22
Main..........................................................................................................................................................23
Power .................................................................................................................................................... 25
Input Selection ...................................................................................................................................... 25
Picture/Volume ..................................................................................................................................... 26
Picture Mode......................................................................................................................................... 27
Aspect Ratio.......................................................................................................................................... 28
Zoom..................................................................................................................................................... 28
Picture Settings ......................................................................................................................................... 28
Resets....................................................................................................................................................28
More Settings........................................................................................................................................29
Remote View ............................................................................................................................................29
First Time Setup.................................................................................................................................... 30
Open Access Session ............................................................................................................................ 33
Hosted Session......................................................................................................................................34
Video Player .............................................................................................................................................39
Player Commands.................................................................................................................................39
Playlist Setup ............................................................................................................................................40
Creating a New Playlist ........................................................................................................................ 41
Editing an Existing Playlist................................................................................................................... 43
Deleting an Existing Playlist................................................................................................................. 43
Entry Types........................................................................................................................................... 44
Maintenance (Plasma only)....................................................................................................................... 49
Energy Saving....................................................................................................................................... 49
Picture Inversion................................................................................................................................... 50
Picture Orbit.......................................................................................................................................... 50
Screen Saver (X1 only)......................................................................................................................... 51
EBS-N200 Network Display Adapter 2

Appendix A...................................................................................................................................................52
Playlist File Format................................................................................................................................... 52
EBS-N200 Network Display Adapter 3

Introduction to EBS-N200
Getting Started
The EBS-N200 Network Display Adapter lets you control the
delivery of audio and video content over IP based networks to
displays, such as plasmas or projectors.
Package Contents
The packing box contains the following items:
EBS-N200
CD containing User Guide (this document)
Power Adapter
Power Cord
Warranty Card
Quick Start Guide
Hardware and Software
To begin using the EBS-N200, you must first install the hardware
then configure the software to the display model.
Browser Requirements
To use the EBS-N200, you must have Internet Explorer 6.0 or
newer installed.
EBS-N200 Network Display Adapter 4
Overview
Installing the EBS-N200
The EBS-N200 comes ready to install. To install it, you simply
connect the unit to a display and detect or setup the initial IP
address. After that, you are ready to configure the software to
meet your individual specifications.
Connecting the Hardware
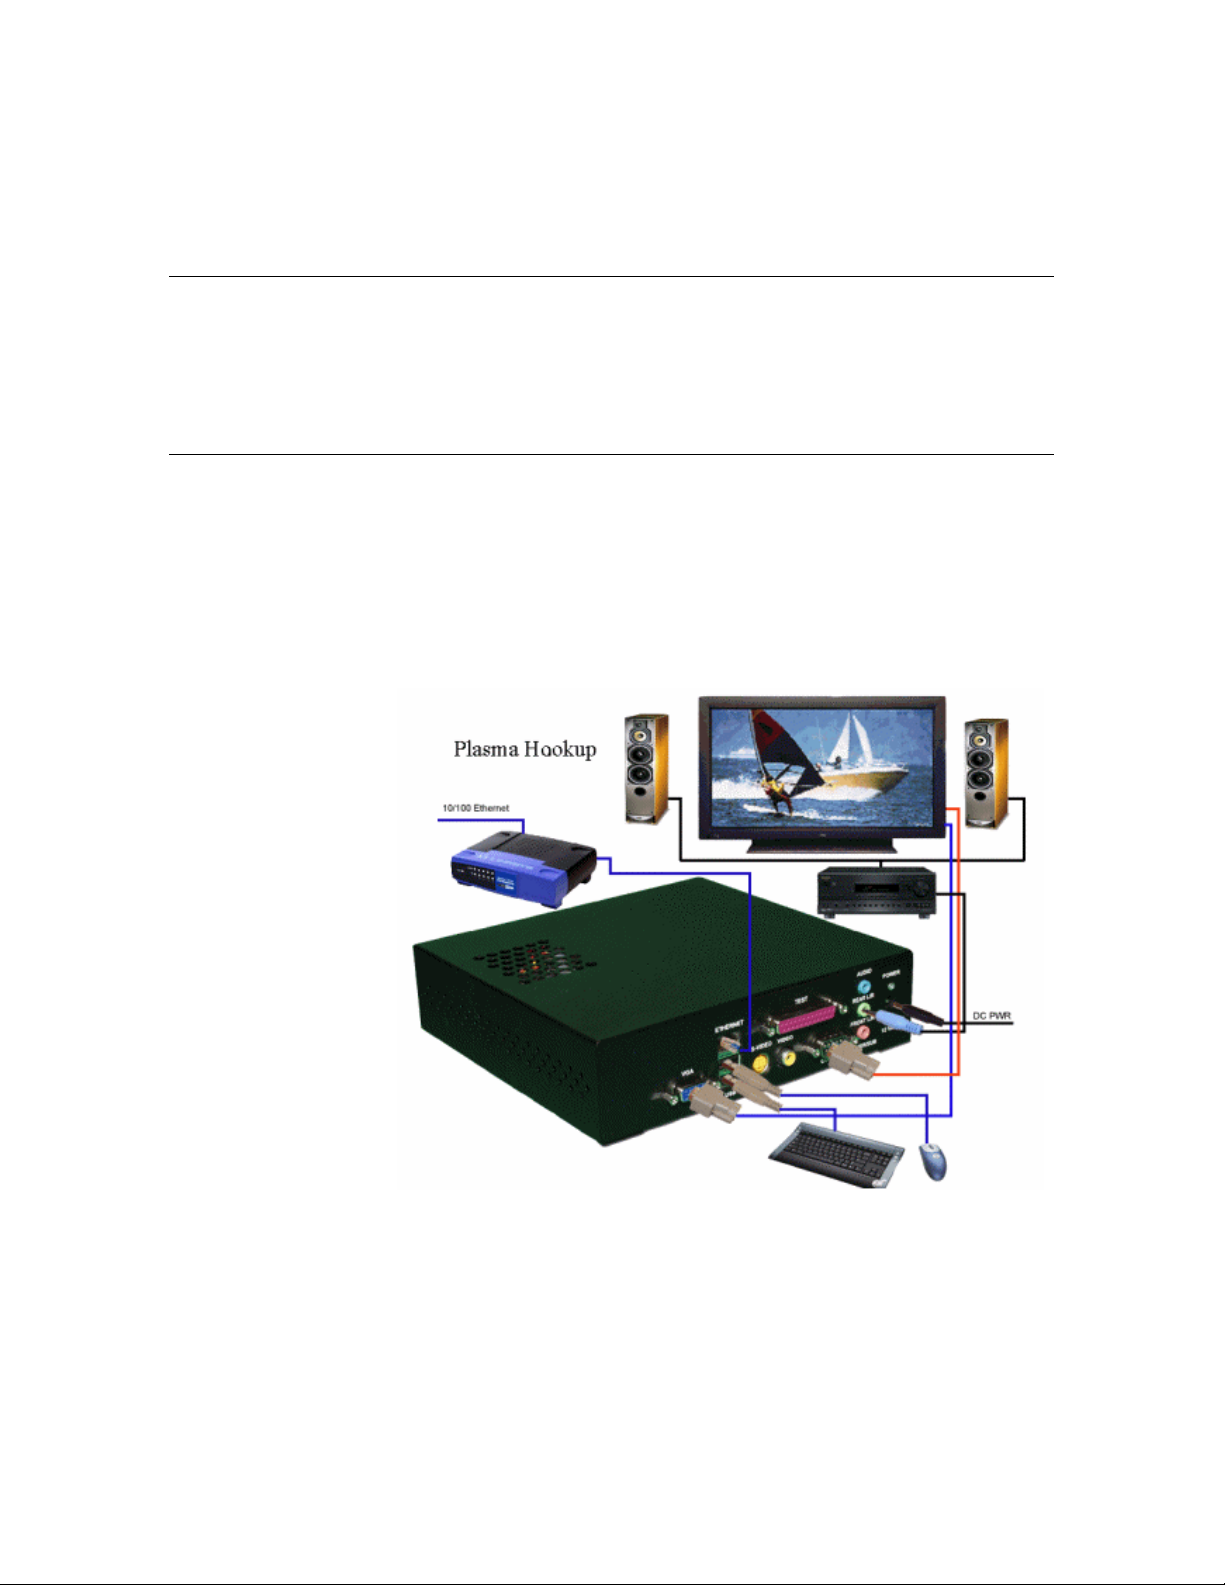
Plasma Hookup
You can connect the EBS-N200 to various types of displays. This
section provides images on connecting the unit to a plasma, a
plasma with surround sound, and a TV.
The following image displays how to connect the EBS-N200 to a
plasma:
EBS-N200 Network Display Adapter 5
Installing the EBS-N200, continued
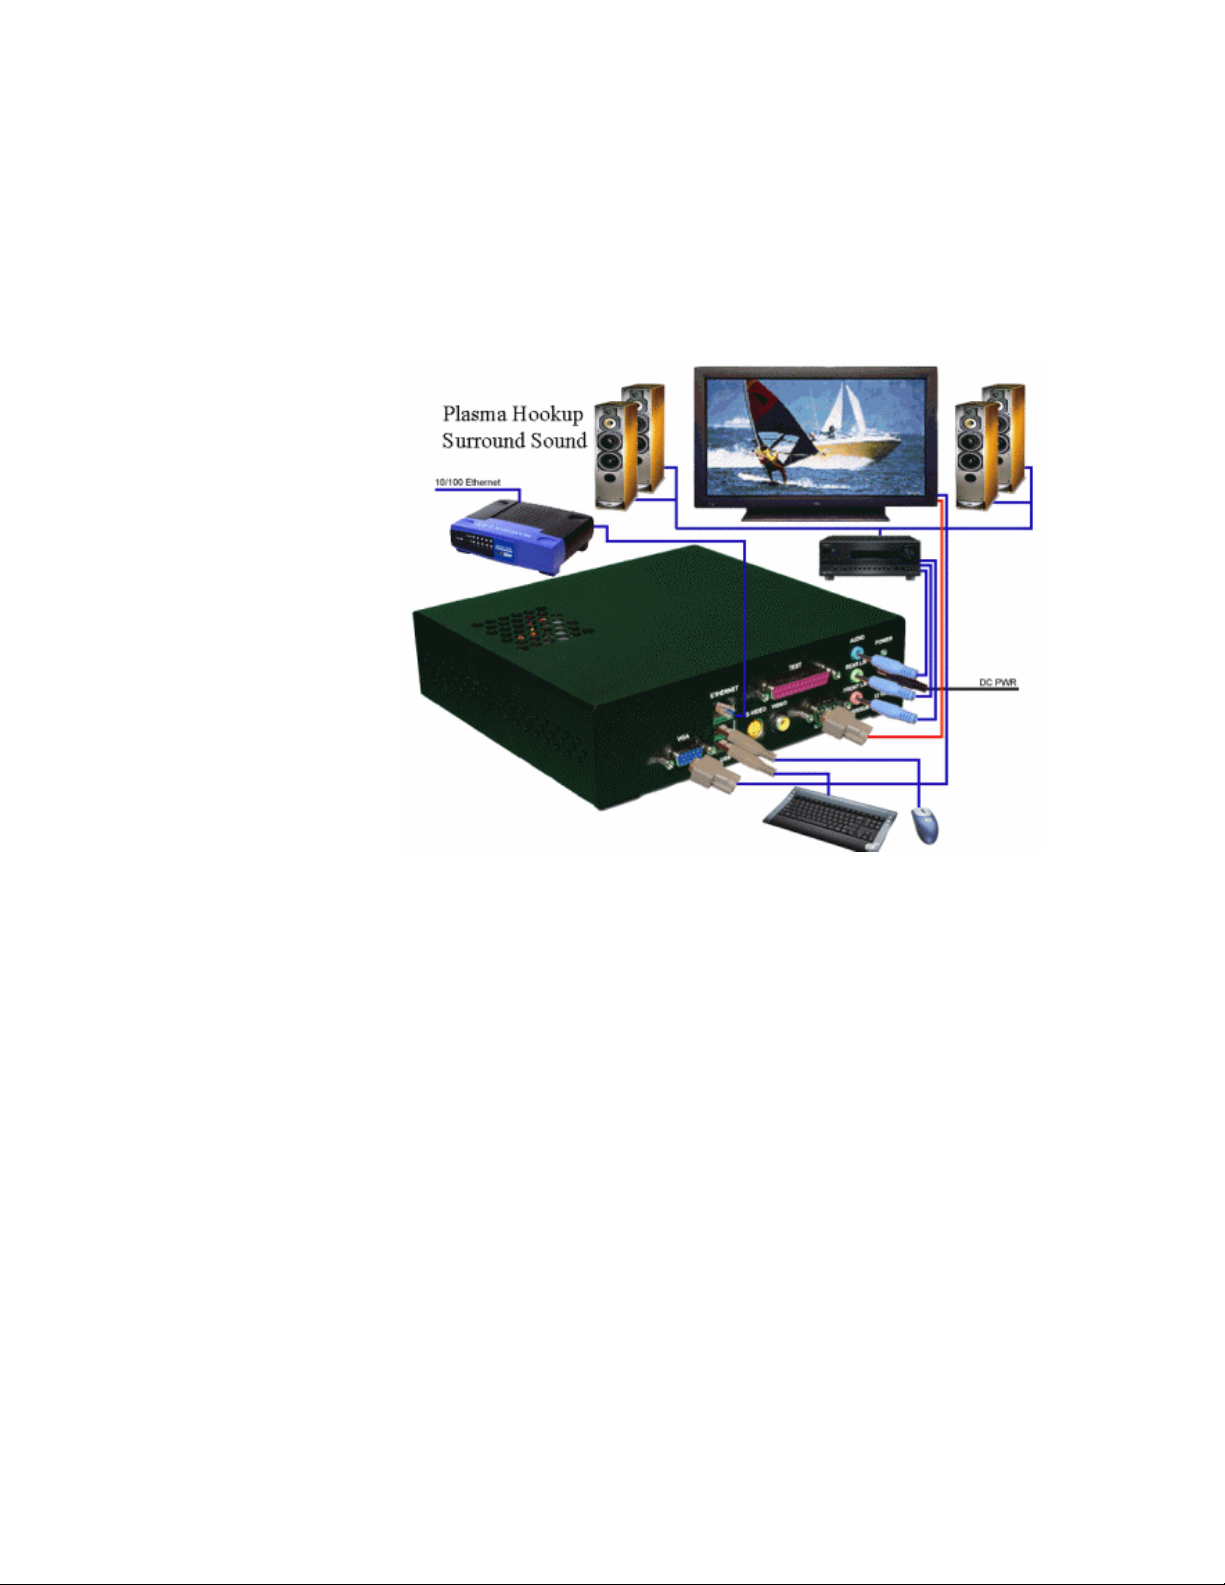
Plasma Hookup with Surround Sound
The following image displays how to connect the EBS-N200 to a
plasma with surround sound:
EBS-N200 Network Display Adapter 6
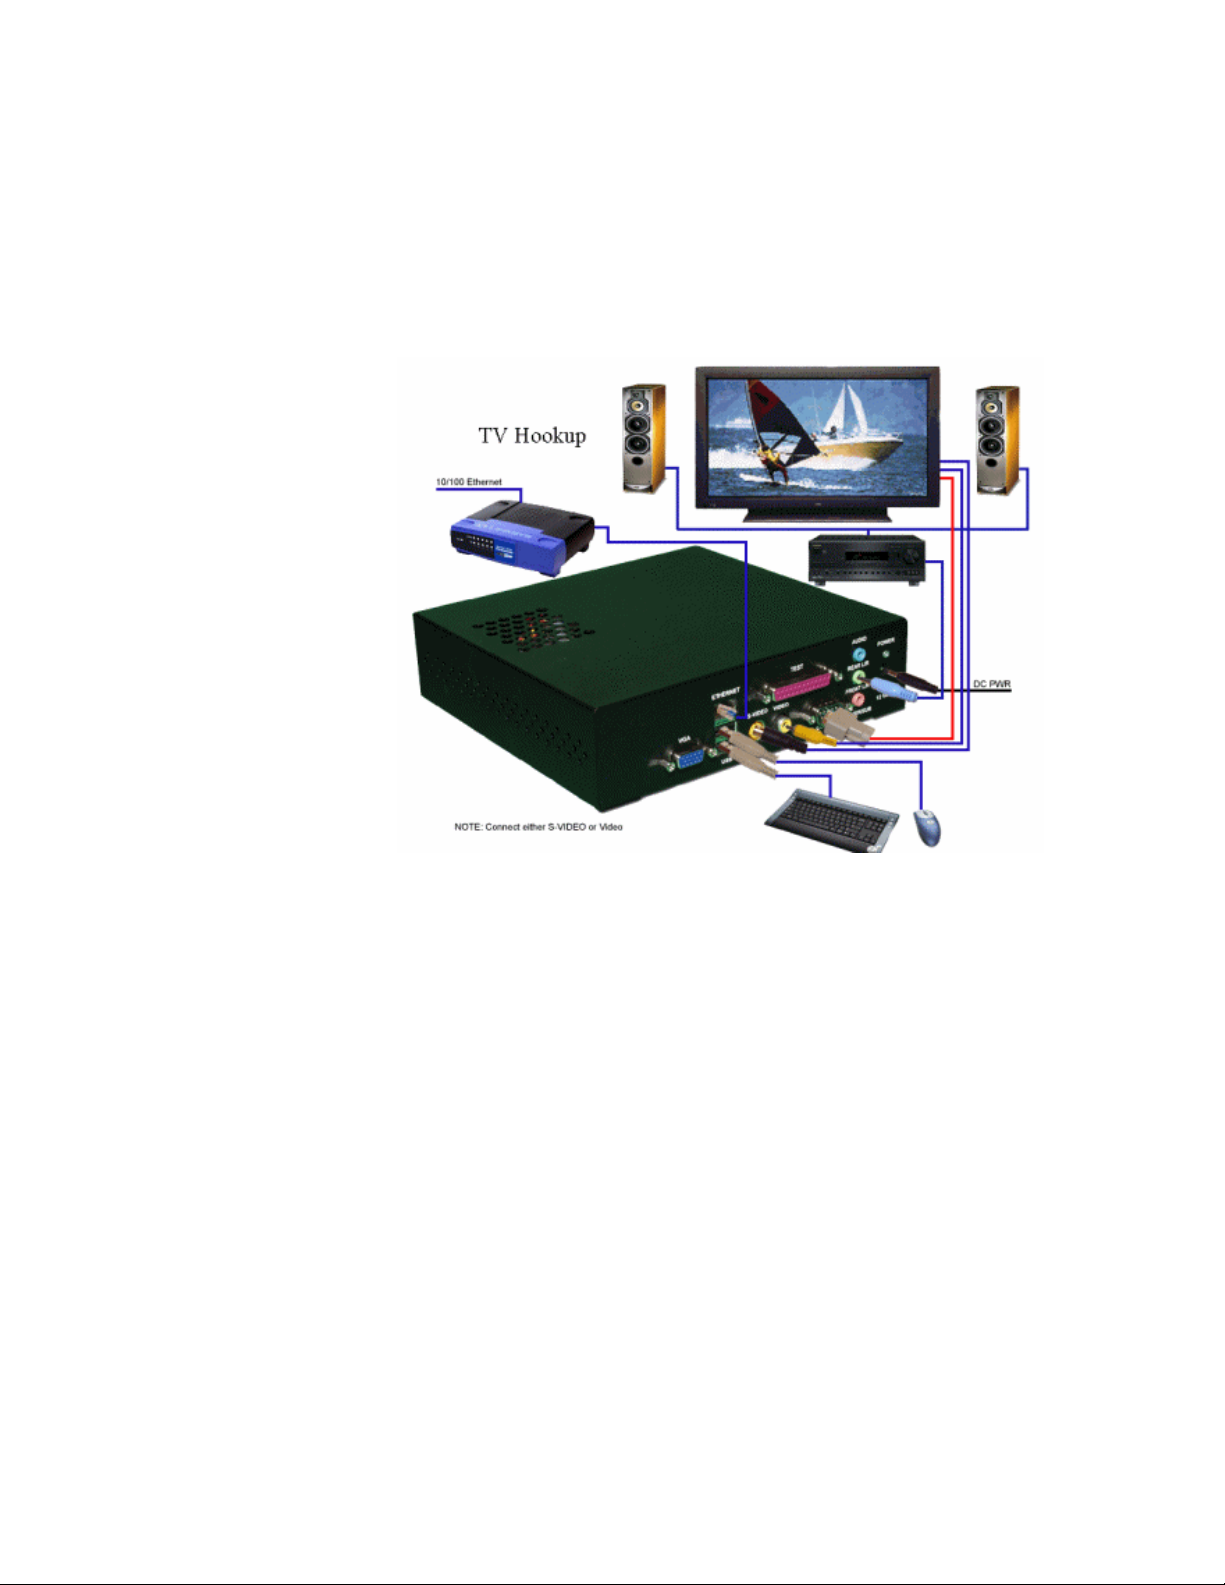
TV Hookup
Installing the EBS-N200, continued
The following image displays how to connect the EBS-N200 to a
TV:
EBS-N200 Network Display Adapter 7

Detecting and Setting Up the Initial IP Address
Once power has been applied to the unit, an IP address must be
assigned either automatically thru DHCP or manually thru the
EBS-N200’s web interface. Diskless and hard drive equipped
EBS-N200s are pre-configured differently as follows:
Diskless EBS-N200 IP Address Configuration:
All diskless EBS-N200’s are shipped with the DHCP enabled and
rely on the boot server to supply an IP address. Diskless systems
are also set up to work with a Domain Name Server (DNS)
allowing an actual text string to be used as opposed to the units IP
address when accessing the unit thru a browser. The default
name of “EBS-N200” can be used for initial access to the unit thru
a browser and should be changed during configuration since
additional un-configured EBS-N200s on the network will have the
same name. Because of this only one EBS-N200 should be
powered up and configured at a time to prevent network conflicts.
Refer to the EBS-N200 Sever Software Users Guide for Server,
DHCP, and DNS set up.
Hard Drive Equipped EBS-N200 IP Address Configuration:
All EBS-N200’s equipped with a hard drive are shipped with a
Static IP Address of 192.168.0.10. This IP address can be
changed as follow:
• Connect the EBS-N200 to a computer with the same subnet (192.168.0.XXX)
• Start the computers browser and enter 192.168.0.10
• The EBS-N200’s main web page will appear; select the
Configure tab and the following page will appear
• Set the desired IP address, Subnet Mask, and Default
Gateway and document
• Select Submit and Restart to reboot the unit for the new
IP Address to take effect
EBS-N200 Network Display Adapter 8
Installing the EBS-N200, continued
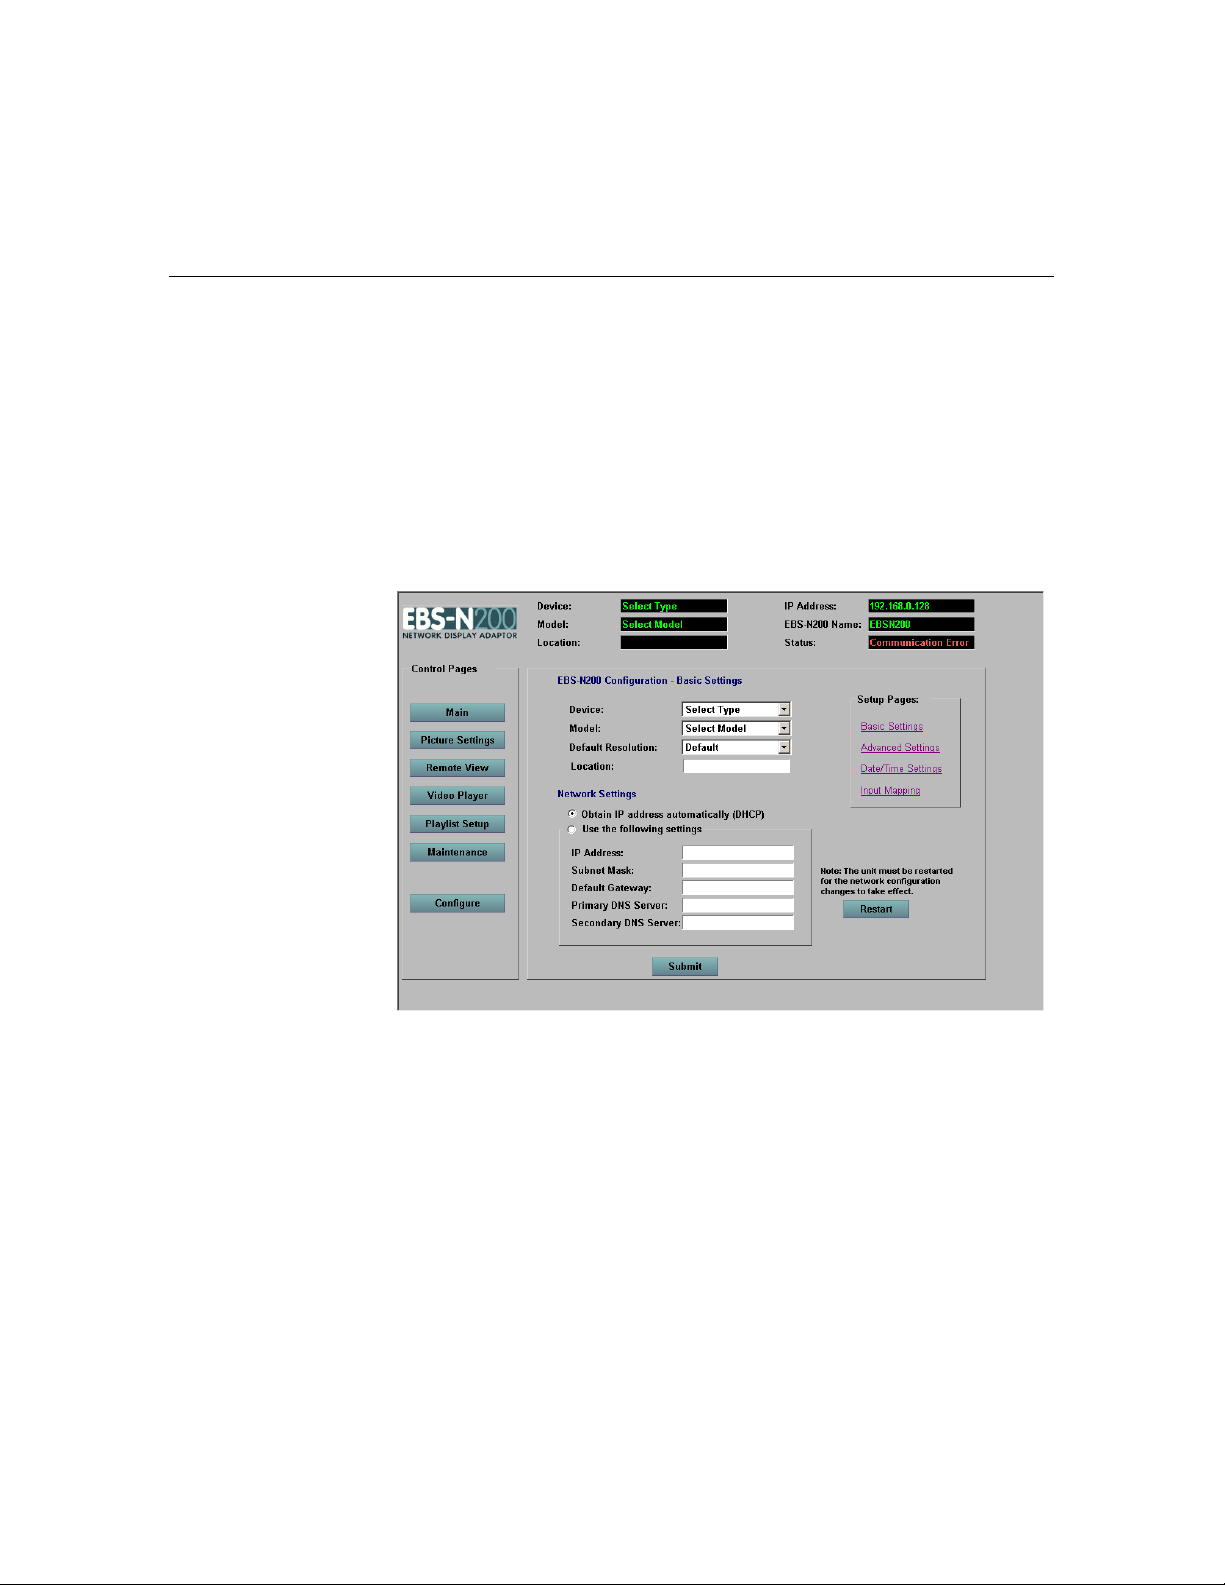
Configuring the EBS-N200
Before you begin using the EBS-N200, you must enter the display
type and model to which it is connected. The controls available in
the user interface (EBS-N200 software) directly correspond to the
display type and model that you select. The first time you power
on the unit, the initial Configuration control page displays. This is
the page where you enter the display type and model. Once you
enter that information, the Main control page will be the default
page that displays each time you power on the unit.
The following image displays an example of the Configuration
control page:
To enter the display type and model, perform the following steps:
1. In the Device field, select the type of display to which the
EBS-N200 is connected.
2. In the Model field, select the model of the device.
3. In the Location field, enter the location of the EBS-N200,
such as a room number or a conference room. This
information is helpful to identify the EBS-N200 unit.
4. Click the Submit button. The controls available on the
user interface will directly correspond to the selected
display and model.
EBS-N200 Network Display Adapter 9
Overview
Using the Software
The EBS-N200 software is a user interface that allows you to
control the audio and video inputs. This section describes how to
launch the software and the screen layout.
Launching the Software
To launch the EBS-N200 software, perform the following steps:
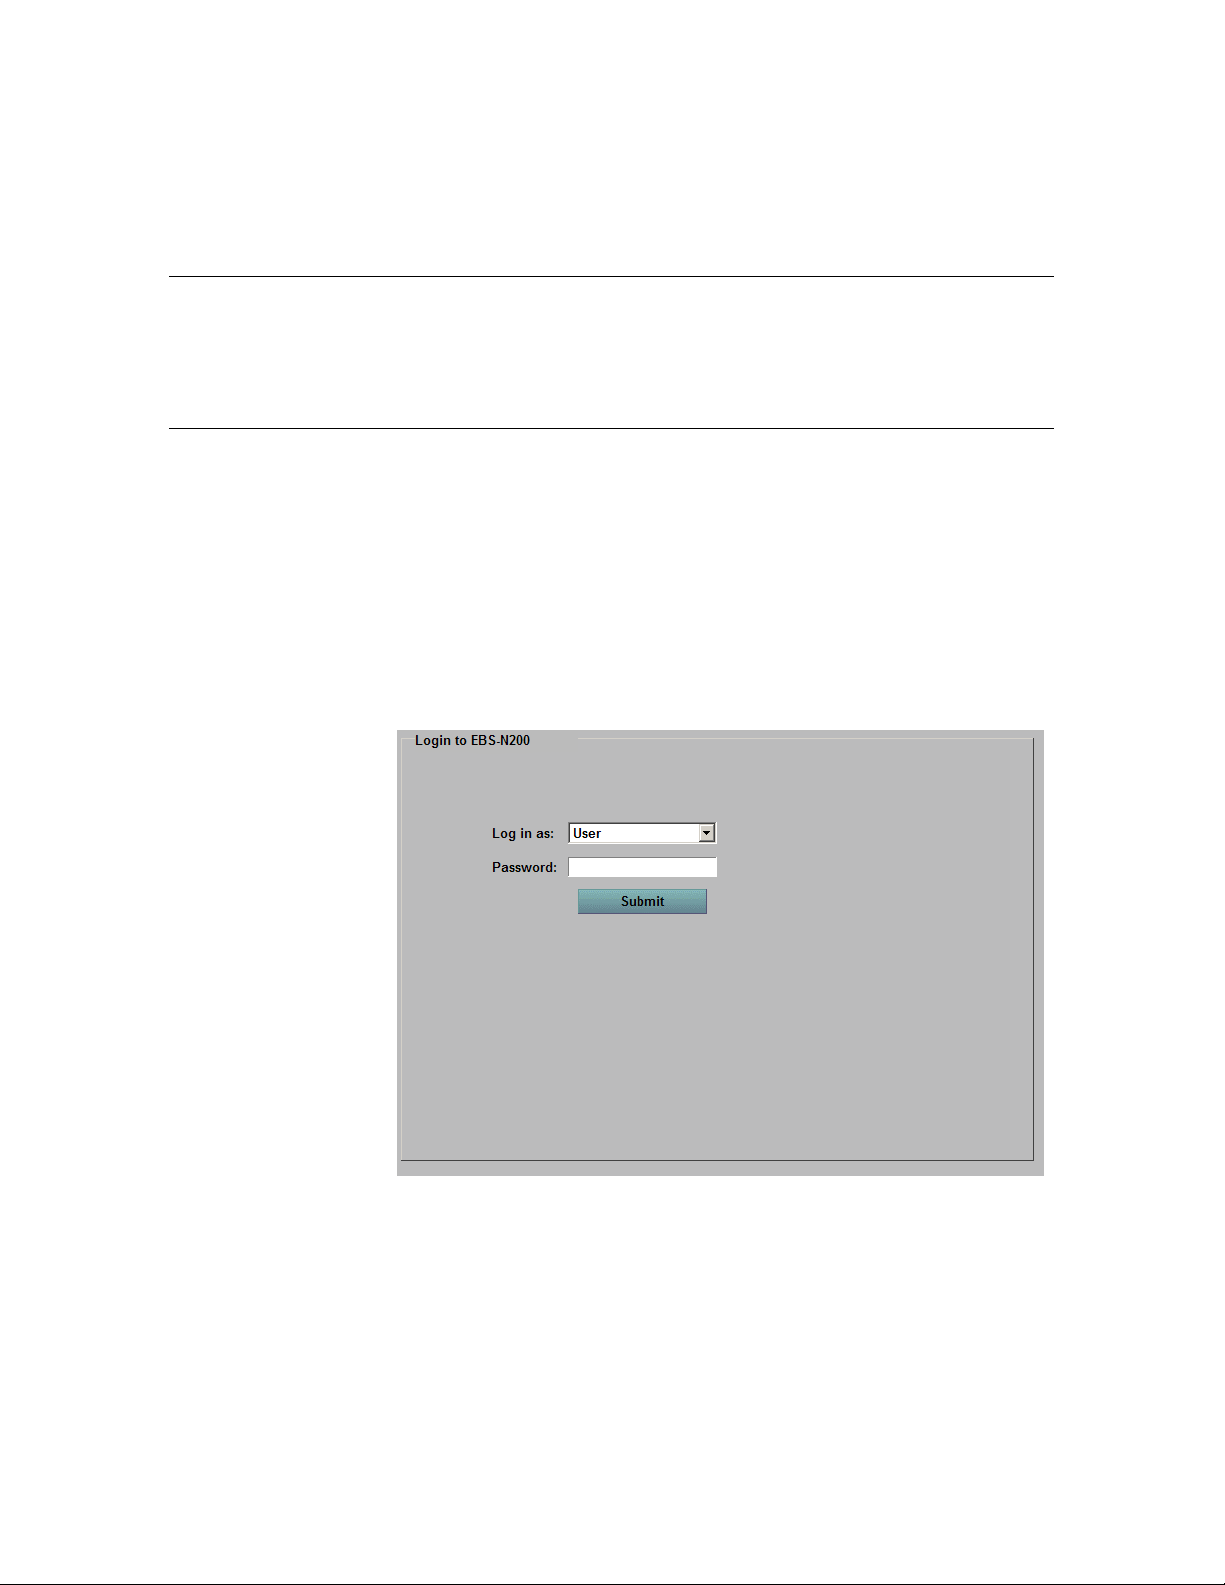
1. In the Address Bar of your Internet browser, enter the IP
address to which you want to connect and press Enter. If
a password is required to access the software, the Login
to EBS-N200 screen displays. If no password is required,
the Main control page displays and you do not have to
complete steps 2 through 4.
The following image displays an example of the EBS-
N200 screen:
2. In the Log in as field, select User, Remote View Host, or
Administrator from the drop-down list.
3. In the Password field, enter the EBS-N200 password.
4. Click the Submit button.
EBS-N200 Network Display Adapter 10
Screen Layout
Using the Software, continued
General
Information
Control
Web Pages
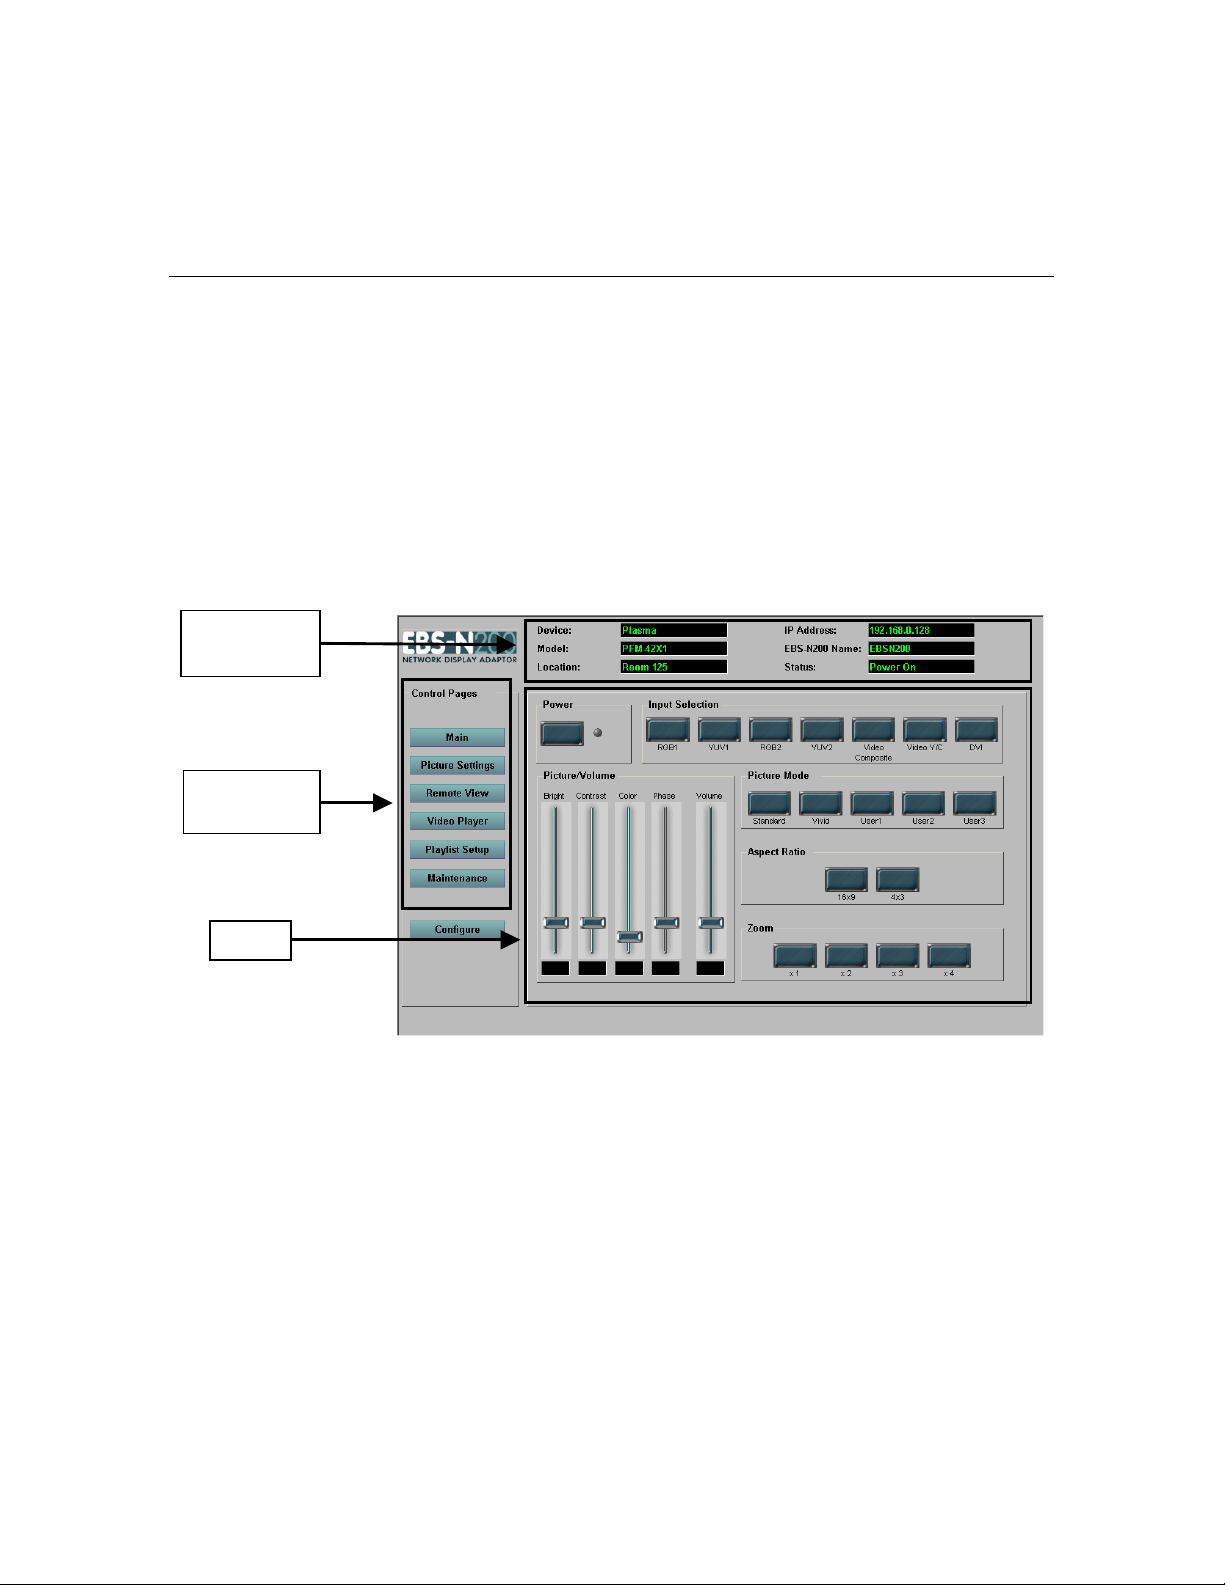
The user interface screen contains three major sections:
General Information
Control Web Pages
Body
The Main control page is the default screen. To navigate to and
display any other control page, click the button for that page. Use
these screens to enter initial information and then edit and
maintain information, as necessary. The interface refreshes
automatically every few seconds and updates the screen with the
changes.
The following image displays an example of the user interface:
Body
EBS-N200 Network Display Adapter 11

General Information
Using the Software, continued
The General Information section is located at the top of the
screen. It contains information that is either automatically
populated or completed by a network administrator. You can
change the information displayed in this section by clicking the
Configure button in the Control Web Pages section.
Refer to the following table for a description of the fields in the
General Information section:
Field Description
Device
The Device field displays the
type of device to which the
EBS-N200 is connected.
Model
The Model field displays the
model of the device.
Location
The Location field displays
the location of the EBS-N200,
for example, a room number
or a conference room. This
information is helpful to
identify the EBS-N200 unit.
IP Address
The IP Address field displays
the IP address of the EBSN200.
EBS-N200 Name
The EBS-N200 Name field
displays the name of the EBSN200 unit.
Status The Status field displays
current status of the EBS-
N200 unit, such as Power On
or Standby.
EBS-N200 Network Display Adapter 12

Control Web Pages
Using the Software, continued
Body
The Control Web Pages section is located at the left side of the
screen. It contains various pages on which you can setup and
maintain information. This section includes the following options:
Main
Picture Settings
Remote View
Video Player
Playlist Setup
Maintenance
Configure
The Body section is located in the middle of the screen. The
Control Web Page that you select determines the information
displayed in the body. Additionally, the information in this section
varies by the display type and model.
EBS-N200 Network Display Adapter 13
Configuration
Control Web Pages
Basic Settings
The Configure control page allows you to configure the EBSN200. If passwords are required to access the software, you must
be logged in to EBS-N200 as Administrator; you cannot access
the Configure control page logged in as User or Remote View
Host.
Note: You cannot make changes to the display using the
Configure control page. To make those changes, use the Main
control page.
The Configure control page is comprised of four screens:
Basic Settings
Advanced Settings
Date/Time Settings
Input Mapping
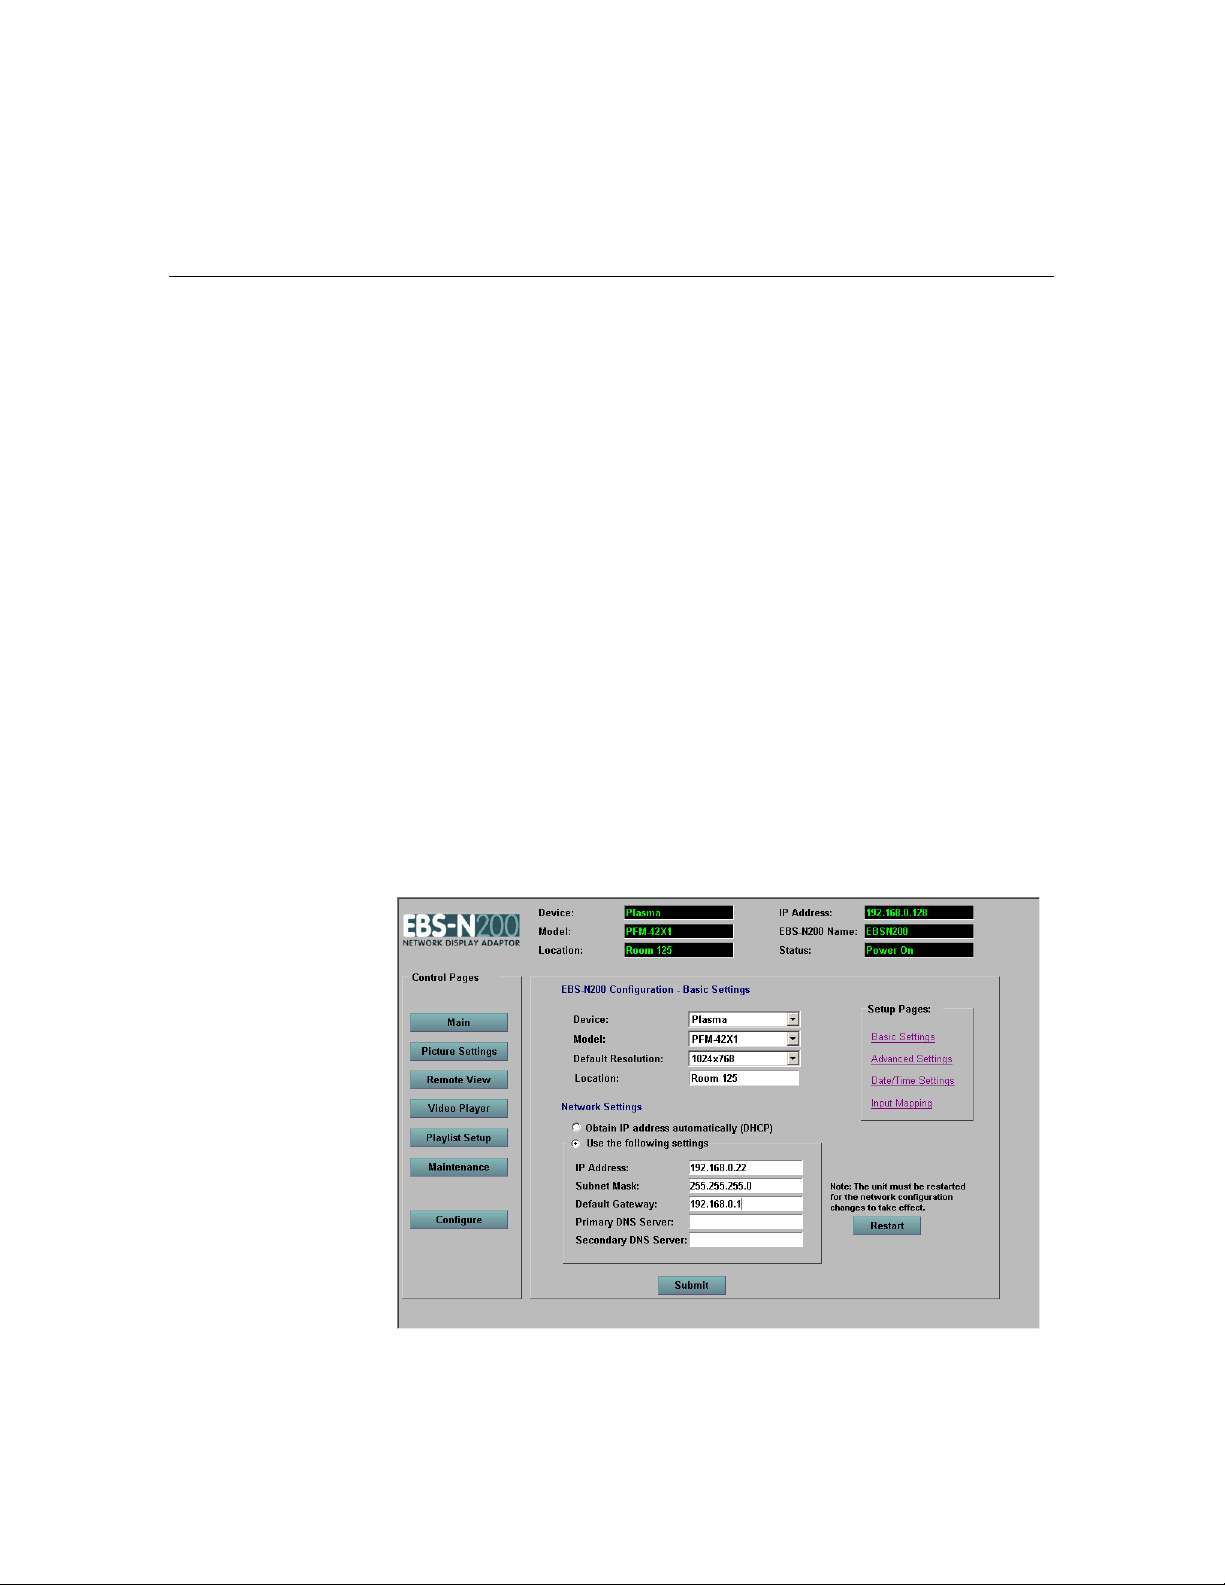
Use this screen to select the display type and model to which the
EBS-N200 is connected and make changes to the IP address.
The following image displays an example of the Basic Settings
screen:
EBS-N200 Network Display Adapter 14

EBS-N200 Configuration
Control Web Pages, continued
The EBS-N200 Configuration section allows you to select the
display type and model to which the EBS-N200 is connected.
Additionally, you can enter a location of the EBS-N200, which can
be used to identify the unit.
Refer to the following table for a description of the fields in the
EBN-N200 Configuration section:
Field Description
Device Select the device to which the
EBS-N200 is connected.
Model Select the model of the
device. The models displayed
in the drop-down list
correspond to the device that
you select.
Default Resolution Select the default resolution
for the display.
Location Enter the location of the EBS-
N200, for example a room
number or a conference room.
This information is helpful to
identify the EBS-N200 unit.
Network Settings
The Network Settings section displays the IP address used for
network connectivity. DHCP or Static IP addressing is available.
After you make changes to the network settings, you must restart
the EBS-N200 for the changes to take effect.
EBS-N200 Network Display Adapter 15

Network Settings, continued
Control Web Pages, continued
Refer to the following table for a description of the fields in the
Network Settings section:
Field Description
Obtain IP Address
Automatically (DHCP)
Select this radio button to
have the software
automatically detect the IP
address.
Use the following settings: Select this radio button to
enter specific network settings
and then enter the
information, as necessary, in
the following fields:
- IP Address
- Subnet Mask
- Default Gateway
- Primary DNS Server
- Secondary DNS Server
EBS-N200 Network Display Adapter 16
Advanced Settings
Control Web Pages, continued
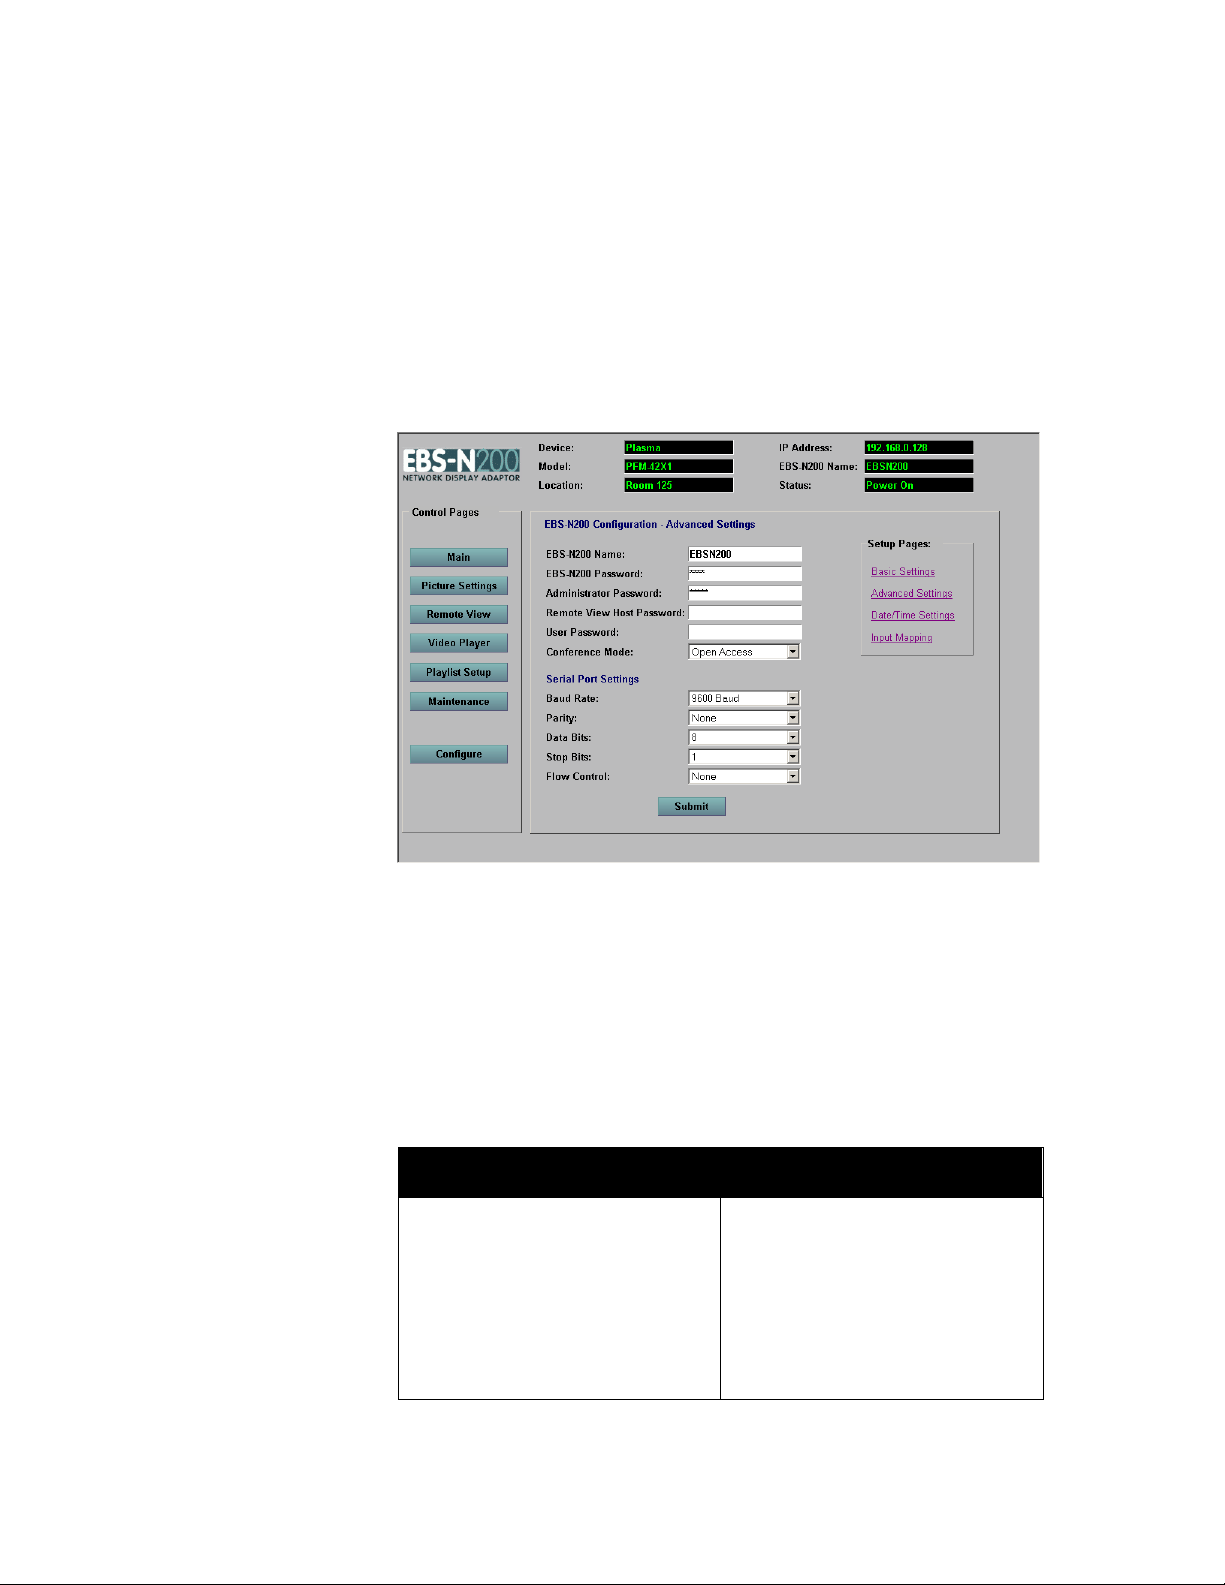
Use this screen to enter a name for the EBS-N200, enter
passwords for access to the unit, and change serial port settings.
The following image displays an example of the Advanced
Settings screen:
EBS-N200 Configuration – Advanced Settings
The EBS-N200 Configuration – Advanced Settings section
allows you to specify a name for the EBS-N200 unit and restrict
access to the EBS-N200. If the password fields are blank, there is
unrestricted access to the EBS-N200. If the password fields are
populated, a user must login to the EBS-N200 to gain access.
Refer to the following table for a description of the fields in the
EBS-N200 Configuration – Advanced Settings section:
Field Description
EBS-N200 Name Enter a name for the EBS-
N200 unit. This name directly
corresponds to the IP address
of the unit. The IP address
and the EBS-N200 name can
both be used to identify the
unit.
EBS-N200 Network Display Adapter 17

Control Web Pages, continued
EBS-N200 Configuration – Advanced Settings, continued
Field Description
EBS-N200 Password The EBS-N200 Password is
used to access nonaccelerated media files on
remote servers
Administrator Password Enter a password for users to
gain access to all EBS-N200
functionality. If you enter this
password when you initially
log in to the software, you can
access any control page
without entering any additional
passwords. If you initially log
in as User or Remote View
Host, you must enter this
password to access the
Configure control page.
Remote View Host Password Enter a password for users to
log in as a host for remote
view sessions. If you initially
log in to the software as User,
you must enter this password
to host a remote view session.
Note: If a user logs in as an
administrator, this password is
not required.
EBS-N200 Network Display Adapter 18

Control Web Pages, continued
EBS-N200 Configuration – Advanced Settings, continued
Field Description
User Password Enter a password for users to
access the software. This
password will not allows users
to host remote view sessions
or access the Configure
control page.
Conference Mode This determines access to the
Remote View control page
functionality. Select Open
Access to allow anyone the
ability to project their screen
on a display. Select Hosted to
require a host for remote view
sessions.
EBS-N200 Network Display Adapter 19

Serial Port Settings
Control Web Pages, continued
The Serial Port Settings section displays information based on
the device and model selected. This information automatically
populates, however, you can change it as necessary.
Refer to the following table for a description of the fields in the
Serial Port Settings section:
Field Description
Baud Rate
The Baud Rate field
automatically populates based
on the device and model
selected. If necessary, select
another setting from the dropdown list.
Parity
The Parity field automatically
populates based on the device
and model selected. If
necessary, select another
setting from the drop-down
list.
Data Bits
Stop Bits
Flow Control
The Data Bits field
automatically populates based
on the device and model
selected. If necessary, select
another setting from the dropdown list.
The Stop Bits field
automatically populates based
on the device and model
selected. If necessary, select
another setting from the dropdown list.
The Flow Control field
automatically populates based
on the device and model
selected. If necessary, select
another setting from the dropdown list.
EBS-N200 Network Display Adapter 20

Date/Time Settings
Control Web Pages, continued
Use this screen to enter and maintain the current date and time.
This is especially important if you want to synchronize several
EBS-N200 units.
The following image displays an example of the Date/Time
Settings screen:
To make enter or change the current date and time, perform the
following steps:
1. In the New Date field, select the current year, month, and
day from the drop-down lists.
2. In the New Time field, select the current hour, minute,
and second from the drop down list.
Note: The time in the New Time field is displayed in the
24-hour clock format.
3. Click the Submit button.
EBS-N200 Network Display Adapter 21

Input Mapping
Control Web Pages, continued
Use this screen to assign input numbers to corresponding actual
inputs for a specific display type and model. The inputs initially
default in the same order they are displayed on the Main control
page in the Input Selection section.
The following image displays an example of the Input Mapping
screen:
To change the input number of an actual input, perform the
following steps:
1. In the drop-down list corresponding to the actual input you
want to change, select the new input number.
2. Click the Submit button. The changes will be saved.
Note: If you make input mapping changes and then want to revert
back to the default mapping, click the Reset button.
EBS-N200 Network Display Adapter 22

Main
Control Web Pages, continued
The Main control page changes the way video looks and audio
sounds on the display. The features available on this control page
change according to the selected device and model. Occasionally
the control page displays features that are not applicable for a
specific device and model. If this occurs, the functionality of that
feature does not work.
Some features work only in combination with other features. For
example, Bright in the Picture/Volume section only works if the
User button is depressed in the Picture Mode section and a
video signal is provided to the display. Additionally, some of the
inputs are only available if the display has an expansion card
installed.
Note: The validity of certain functions depends on the particular
device and model, selection of inputs, and whether input
connection is provided. If you press a button and attempt to
change a setting that is not valid in the current context, the button
will automatically return to its original position.
The Main control page contains the following sections:
Power
Input Selection
Picture/Volume
Picture Mode
Aspect Ratio
Zoom
EBS-N200 Network Display Adapter 23

Main, continued
Control Web Pages, continued
The following image displays an example of the Main control
page:
EBS-N200 Network Display Adapter 24

Power
Control Web Pages, continued
The Power button turns the display on and off.
Refer to the following table to determine the status of the display:
If the Power button is… Then, the display is…
Depressed and the indicator
Turned on
light is green
Not depressed and the
In standby mode
indicator light is red
Not depressed and the
Undefined or error condition
indicator light is gray
To turn a display on, perform the following steps:
1. Press the Power button. The button remains depressed
and the indicator light turns green.
To change a display to standby mode, perform the following
steps:
1. With the Power button depressed, press the button again.
The button returns to the original position and the
indicator light turns red.
Input Selection
The Input Selection section allows you to select the source of the
input signal to the EBS-N200.
The device and model displayed in the General Information
section determine the buttons available in this section.
To change the input selection, perform the following steps:
1. Press the button corresponding to the input selection you
want to activate. If the command is successful, the display
displays video from that input. If the command is not
successful, the button returns to its original position.
EBS-N200 Network Display Adapter 25

Picture/Volume
Control Web Pages, continued
The Picture/Volume section has controls to adjust settings, such
as bright, contrast, color, phase, and volume of the display. The
numbers displayed at the bottom of the controls indicate the
current setting.
To change a setting, perform the following steps:
1. Place your cursor over the slider of the setting that you
want to change.
2. Click and hold down your left mouse button and drag the
slider to the new setting.
3. Release your left mouse button.
EBS-N200 Network Display Adapter 26

Picture Mode
Control Web Pages, continued
The Picture Mode section allows you to control the color scheme
displayed on the display by using preset values. There are two
types of preset values: values that are preset by the factory and
values that are preset by a user. For example, press the
Standard button to use the factory default settings for bright,
contrast, color, phase and volume corresponding to the device
and model specified, or press the User1 button to use user
defined default settings.
Note: The buttons displayed in the Picture Mode section exactly
correspond to the controls available in the on-screen setup menu
for the display. These are the controls that are accessible using
the display’s remote control. For more information, refer to the
user guide for the display.
To change a setting, perform the following steps:
1. Press a button, for example Standard, to use the default
color scheme associated with that button. You cannot
manually change the settings associated with that button
by using the picture/volume sliders.
To define user default settings, perform the following steps:
1. Press the button for which you want to define default
settings, for example User1, User2, or User3.
2. In the Picture/Volume section, place your cursor over the
slider of the setting that you want to change.
3. Click and hold down your left mouse button and drag the
slider to the new setting.
4. Release your left mouse button.
5. Repeat steps 2 through 4 for each setting that you want to
change. These settings are automatically saved and each
time you press the associated button, the default color
scheme is applied.
EBS-N200 Network Display Adapter 27

Aspect Ratio
Control Web Pages, continued
Zoom
Picture Settings
The Aspect Ratio section allows you to specify the layout
proportion of width to height on the display screen.
The device and model displayed in the General Information
section determine the buttons available in this section.
To change the aspect ratio, perform the following steps:
1. Press the button corresponding to the width to height
proportion you want to display on the display.
The Zoom section has controls to cause the picture to appear
larger on the display.
To zoom the picture, perform the following steps:
1. Press the x 2, x 3, or x 4 button to incrementally increase
the size of the picture on the display.
2. Press the x 1 button to return the picture to the original
size (default, unmagnified state).
Resets
The Picture Settings control page provides additional settings
not included on the Main control page.
The Resets section allows you to quickly reset the picture, audio,
and size settings to the display default settings.
To reset a setting, perform the following steps:
1. Press the Reset Picture button, the Reset Audio button,
or the Reset Size button.
EBS-N200 Network Display Adapter 28

More Settings
Control Web Pages, continued
Remote View
The More Settings section allows you to change the color
temperature, aperture, and color system settings. The available
options display in the drop-down list for each field. These options
change according to the display attached to the EBS-N200.
To change the color temperature, aperture, or color system
settings, perform the following steps:
1. In the Color Temperature, Aperture, or Color System
field, select the new setting from the drop-down list.
The Remote View control page provides a tool for remote
conferencing and presentations. To use remote view, you must
have VNC installed and running. VNC is a software application,
launched independently from the EBS-N200 software application,
which allows you to view and interact with one computer using a
simple program on another computer anywhere on the network.
This means that you can display your desktop on a display
connected to an EBS-N200 unit and share it with an audience.
Remote view sessions can either be open access or hosted. Open
access allows anyone the ability to begin and control a remote
view session. Hosted limits the control of a remote view session to
one person, the host. If a remote view session is hosted, you must
log in as either a participant or the host.
Note: The network administrator configures the Remote View
control page to open access or hosted. This is done using the
Configure control page.
EBS-N200 Network Display Adapter 29

First Time Setup
Control Web Pages, continued
The first time you use remote view, you must download and install
the VNC software and change the password. You can download
this software directly from the Remote View control page. This
page allows you to select the appropriate VNC version for your
operating system. The procedure to download and install VNC is
the same for both remote view open access sessions and remote
view hosted sessions.
The following image displays an example of the Remote View
control page (open access):
EBS-N200 Network Display Adapter 30

Downloading VNC
Control Web Pages, continued
To download VNC, perform the following steps:
1. For Open Access sessions, under Before connecting,
the first step indicates, If you don’t have VNC software
installed, click here. For Hosted sessions, the note
indicates, To install VNC software, click here. On either
screen, click the click here hyperlink. The following
screen displays:
2. In the Select Operating System field, select the
appropriate platform.
3. Click the Download button to download the VNC
software.
4. At the prompt, save the download file to a directory of
your choice or immediately open the file to install the
software.
EBS-N200 Network Display Adapter 31

Control Web Pages, continued
Installing VNC for Windows 9x/2000/NT/XP
To install VNC for Windows, perform the following steps:
Note: When you install VNC, you must select all of the default
settings. For more detailed information regarding VNC, refer to the
VNC Web site at www.realvnc.com.
VNC server is now ready to accept incoming connections from the
EBS-N200.
Installing VNC for MAC OS X
1. Run the self-extracting executable file and follow the
instructions to install the VNC server and viewer. You do
not need to install it as a service.
2. Start the VNC Server (Start > Programs > RealVNC >
Run VNC Server). If you installed VNC as a service, VNC
will already be running.
3. In the system tray (bottom right corner of the screen
where the clock is located), right-click on the VNC icon
and click on Properties.
4. In the Password field, enter password (all lower case).
5. Click OK.
To install VNC for Mac, perform the following steps:
1. Install VNC using OSXvnc1.33.dmg
2. Configure the VNC password to password (all lower
case) as described above in the Windows installation
section.
EBS-N200 Network Display Adapter 32

Open Access Session
Control Web Pages, continued
If Remote View is configured to open access, you have the ability
to share your screen with someone else without any restrictions.
The following image displays an example of the Remote View
control page configured as open access:
To connect to an open access remote view session, perform the
following steps:
1. In the IP Address field, verify the IP address is the
address of your computer.
2. In the Resolution field, select the resolution equal to the
resolution on the display of your computer. This will
display the best image possible on the display.
3. Check the Lock Session checkbox if you want to be the
only person able to disconnect yourself from the remote
view session. If you do not check the checkbox, someone
else can disconnect you from the session.
4. Click the Connect button. Your screen displays on the
display.
5. Begin your conference or presentation.
To disconnect an open access remote view session, perform the
following steps:
1. Click the Disconnect All button.
EBS-N200 Network Display Adapter 33

Hosted Session
Control Web Pages, continued
If Remote View is configured to hosted, you must log in to
participate in the conference or presentation. You can login as a
participant or as the host. If you log in as the host, you control
which participant is connected to the display. When a participant
is connected, that participant’s desktop is shared with the
audience.
The following image displays an example of the Remote View
control page configured as hosted:
EBS-N200 Network Display Adapter 34

Control Web Pages, continued
Hosted Session – Participant Login
To login to a remote view session as a participant, perform the
following steps:
1. Click the Participant button. The following screen
displays:
2. Enter your name and then click the Submit button. You
are now logged in to the conference and the following
screen displays:
EBS-N200 Network Display Adapter 35

Hosted Session – Host Login
Control Web Pages, continued
The host connects and disconnects participants from the display.
The following image displays an example of the Remote View
control page configured as hosted:
To login to a remote view session as a host, perform the following
steps:
1. Click the Host button. If you are logged in to the EBS-
N200 software application as a user, the following screen
displays. If you are logged in as an administrator or no
EBS-N200 passwords are required, proceed to step 4.
EBS-N200 Network Display Adapter 36

Control Web Pages, continued
Hosted Session – Host Login, continued
2. In the Password field, enter your host password. If you
do not have a password, you cannot log in to Remote
View as a host.
3. Click the Submit button. The following screen displays:
EBS-N200 Network Display Adapter 37

Control Web Pages, continued
Hosted Session – Host Login, continued
4. In the Resolution field, select the resolution equal to the
participant’s screen resolution. This will display the best
image possible on the display.
Note: Whenever you connect a different participant, you
should verify the resolution and change it, if necessary.
5. This screen displays the participants logged into the
session. Use the buttons at the bottom of the screen to
control the session as follows:
Connect – To display a participant’s screen on the
display, select the radio button corresponding to a
participant and then click the Connect button
Disconnect – To stop a participant’s screen from
displaying, select the radio button corresponding to
that participant and then click the Disconnect button
Remove – To delete a participant from the list of
participants on the host’s screen, select the radio
button corresponding to that participant and then click
the Remove button
Add – To add another participant to a session, select
the radio button just below Or, enter new participant
manually and click Add, enter the participant’s name
and IP Address, and then click the Add button
Refresh – To view a current list of all participants, click
the Refresh button
Clear – To log out all participants and clear the
screen, click the Clear button
EBS-N200 Network Display Adapter 38

Video Player
Control Web Pages, continued
The Video Player control page allows you to select an existing
set of audio or video files, called playlists, and play them on a
display. Additionally, you can select to play only a specific file in a
playlist. To create a new playlist or edit an existing playlist, use
the Playlist Setup control page.
The following image displays an example of the Video Player
control page:
Player Commands
To select a playlist file and play it, perform the following steps:
1. In the Select Playlist field, select the playlist you want to
play from the drop-down list.
2. In the Playlist Index field, if necessary, select the specific
position at which you want the playlist to start from the
drop-down list.
3. Click the Play button.
To stop a playlist from playing, perform the following steps:
1. Click the Stop button.
EBS-N200 Network Display Adapter 39

Playlist Setup
Control Web Pages, continued
The Playlist Setup control page allows you to combine video and
image files, Web pages, and commands to create playlists.
Additionally, you can edit existing playlists and remove playlists
that you no longer need. Once you create a playlist, use the
Video Player control page to play it on a display.
The following image displays an example of the Playlist Setup
control page:
EBS-N200 Network Display Adapter 40

Creating a New Playlist
Control Web Pages, continued
To create a new playlist, perform the following steps:
1. In the Select Playlist field, select Create New Playlist
from the drop-down list.
2. Click the New button. The following screen displays:
3. In the Select Entry Type field, select the entry type from
the drop-down list.
4. You will be prompted to enter additional information
associated with the entry type you select. Enter that
information, as appropriate. For example, if you select a
Schedule On entry type, you must enter the start date
and time.
5. Click the Add button. The entry will display on the left side
of the screen.
6. Repeat steps 3 through 5, as necessary, until you finish
creating a playlist.
Note: Use the Up and Down buttons to change the
position of the entries in the list, if necessary.
EBS-N200 Network Display Adapter 41

Control Web Pages, continued
Creating a New Playlist, continued
7. Click the Save As button to name and save the playlist.
The following screen displays:
8. Enter a name for the playlist.
9. Click the OK button.
EBS-N200 Network Display Adapter 42

Editing an Existing Playlist
Control Web Pages, continued
To edit an existing playlist, perform the following steps:
1. In the Select Playlist field, select the playlist you want to
edit from the drop-down list.
2. On the left side of the screen in the list of entries, select
the entry you want to edit.
3. Click the Edit button.
4. The existing details of that entry display on the right side
of the screen in the Edit Entry section. Change the
information, as necessary.
5. Click the Update button.
Note: To remove an entry from the playlist, select the
entry you want to remove and click the Remove button.
6. Repeat steps 2 through 5, as necessary, until you finish
editing the playlist.
Note: Use the Up and Down buttons to change the
position of the entries in the list, if necessary.
7. Click the Save As button to save the playlist. The
following screen displays:
8. Enter a new name for the playlist or accept the existing
name.
9. Click the OK button.
Deleting an Existing Playlist
To delete an existing playlist, perform the following steps:
1. In the Select Playlist field, select the playlist you want to
delete from the drop-down list.
2. Click the Remove button.
EBS-N200 Network Display Adapter 43

Entry Types
Control Web Pages, continued
File
When you create a new playlist or edit an existing playlist, you
must select the entry type that you want to either add to the
playlist or edit. The entry type determines the additional
information you will be prompted to enter.
When you select File from the Select Entry Type drop-down list,
it instructs the play engine to play the file on the display connected
to the RGB input. The main purpose of this is for the play engine
to determine which display method is used to present the
information.
Refer to the following table for a description of the available fields
and options:
Field/Option Description
Type path or browse for a clip Enter the file name that you
want to add to the playlist or
click the Browse to locate it.
File Type (optional) Select the file format. The play
engine determines the file
type by file extension,
however, you can select a
type from the drop-down list to
override the default handling.
Duration [sec, min, hours,
days, weeks]
Enter the time for which you
want to play the file, if
applicable.
Accelerator This box in checked by default
and allows accelerated access
of media files without setting
up user account and
password on remote server.
EBS-N200 Network Display Adapter 44

Control Web Pages, continued
Event
When you select Event from the Select Entry Type drop-down
list, it controls the internal play engine. After you select Event, you
must select the event type from the drop-down list.
Refer to the following table for a description of the available
options in the Select Event Type field drop-down list:
Event Type Description
Screen Saver
Select Screen Saver to place
the display into a screen saver
mode. Then, in the Screen
Saver Mode field, select the
mode, such as orbit, inversion,
gray, dark gray, or black.
Input
Select Input to specify the
input number you want the
display to access for video
input. Then, in the Select
Input field, select the input
number from the drop-down
list.
Power
Pause
Note: Input numbers are
mapped to actual inputs using
the Input Mapping screen on
the Configure control page.
Select Power to specify the
status of the display, such as
on or off. Then, in the Power
Command field, select Power
On or Power Off from the
drop-down list.
Select Pause to temporarily
stop the current playlist.
EBS-N200 Network Display Adapter 45

Event, continued
Control Web Pages, continued
Event Type Description
Switch
Select Switch to link playlists
and change the active playlist.
In the Switch Playlist/Index
field, enter the playlist to
which you want to switch.
Then, in the Enter Playlist
Index (optional) field, enter
the point at which you want to
begin playing the playlist (the
default is 1, which represents
the beginning)
Delay [sec, min, hours, days,
weeks]
Select Delay to enter the wait
time before executing the next
command line in the playlist.
For example, when powering
up the display, it might take
several seconds before the
picture is visible, so you could
delay the playlist and allow
time for the screen to warm
up. In the Enter Delay field,
enter the time you want to wait
before proceeding to the next
command in the playlist.
EBS-N200 Network Display Adapter 46

Event, continued
Control Web Pages, continued
Event Type Description
Resolution
Select Resolution to allow the
play engine to dynamically
change the format of the
output. For example, if an
mpeg file compressed at
1080i is followed by a
compressed 720p file, you
might want to change the
resolution in the playlist to
match the resolution to the
format of the original source.
In the Enter Resolution X
and Y field, select the
resolution from the drop-down
list.
EBS-N200 Network Display Adapter 47

Comment
Control Web Pages, continued
Playlist Initiate
Playlist Duration
Playlist Terminate
Loop
Select Comment to enter free form text into the playlist.
The Playlist Initiate time is initial time at which the playlist will
commence. A second optional parameter, Repeat Rate
(optional) is used to determine how often the playlist is to repeat (
ie once a day, once and hour, etc).
The Playlist Duration is the amount of time for which the playlist
will play for the particular session until the next Repeat Rate
interval
The Playlist Terminate time is the time at which the playlist will
terminate irregardless of the Repeat Rate interval.
Select Loop to jump to the top of the playlist, and run the playlist
from the beginning again without any interruption.
EBS-N200 Network Display Adapter 48

Control Web Pages, continued
Maintenance (Plasma only)
The Maintenance control page contains the following sections:
Energy Saving
Picture Inversion
Picture Orbit
Status
Screen Saver
Note: The options available to select in this section are
determined by the display device and model selected.
The following image displays an example of the Maintenance
control page:
Energy Saving
The Energy Saving section allows you to select the amount of
energy a display uses.
To switch from one mode to another, perform the following steps:
1. In the Energy Saving section, press the Standard button
to change the display to the standard energy setting or
press the Reduced button to reduce the amount of
energy used by the display.
EBS-N200 Network Display Adapter 49

Picture Inversion
Control Web Pages, continued
Picture Orbit
The Picture Inversion section helps protect against residual
image from still pictures. It allows you to turn the picture from a
positive to a negative. Using the original image source, picture
inversion evens out the residual picture image.
To turn on picture inversion, perform the following steps:
1. In the Picture Inversion section, press the On button to
immediately activate picture inversion. Alternately, press
the Auto button to activate picture inversion after a
predetermined amount of time. For more information on
the Auto functionality, refer to the user’s manual for the
plasma.
To turn off picture inversion, perform the following steps:
1. Press the Off button.
The Picture Orbit section helps protect against residual image
from still pictures. It allows you to determine how the picture
rotates around the screen incrementally and the amount of time it
takes to complete a full cycle. Since the video moves in small
increments, if there is a lot of motion in a video, this is almost
unnoticeable. You can select any combination of range and time
intervals.
To turn on picture orbit, perform the following steps:
1. In the Orbit Range field, select Small, Middle or Large
from the drop-down list. This determines how the screen
saver rotates around the screen. For example, if you want
the screen saver to move within a small range, select
Small.
2. In the Orbit Cycle field, select the amount of time in
which you want the screen saver to complete a full cycle
around the screen.
3. Press the On button.
To turn off picture orbit, perform the following steps:
1. Press the Off button.
EBS-N200 Network Display Adapter 50

Screen Saver (X1 only)
Control Web Pages, continued
The Screen Saver section provides three options to help prevent
screen burnout. These options are gray, dark gray, and black.
Black is the default.
To change the screen saver, perform the following steps:
1. Press the Gray, Dark Gray, or Black button
corresponding to the screen saver you want to select.
EBS-N200 Network Display Adapter 51

Playlist File Format
Appendix A
Section 1 – Control
[Control] -- Title
ScheduleOn = time[,repeatRate]
ScheduleOff = relativeTime
Image= filename
The ScheduleOn time is the time (encoded 64 bit number) at
which the playlist is to start. A second optional parameter,
repeatRate is used to determine how often this playlist is to
repeat. The default is 0, which equates to a looping playlist. The
repeat rate is preceded by a letter denoting time unit used: S for
seconds, M for minutes, H for hours, D for days, W for weeks. For
example, to specify 10 minutes, use M10.
The optional ScheduleOff time is the time to turn the playlist off
after relativeTime. The format of this value is the same as
“Repeat Rate” above.
The Image option points to a file that represents the playlist,
example DVD playlist in which this image points to a jpeg of the
cover. This is optional.
The Loop option jumps to the top of the playlist, and runs the
playlist from the beginning again without any interruption.
Section 2 – List
[List]
EntryN = FILE,filename [,duration][, type]
This entry instructs the play engine to present the file given to the
monitor connected to the RGB connection. The main purpose of
this is for the Play Engine to determine which display method is
used to present the information. The Duration, in units selectable
by the first character (S30 = 30 seconds, M10 = 10 minutes, H3 =
3 hours, D1 = one day, W2 = two weeks) , is used to determine
how long the item is to be displayed. The Type option represents
the format of the file, see Table 1 for the supported types. The
Play Engine will determine file type by file extension; the Type
option can be used to override default handling. If filename begins
with string “tcp://”, the accelerator software will be used to serve
the file.
EBS-N200 Network Display Adapter 52

Appendix A, continued
Playlist File Format, continued
EntryM = EVENT,eventType[,options]
These items are used to control the internal Play Engine. The
following table contains the supported event types.
EventType Options Description
ScreenSaver Mode Place display into screen
saver mode (1)
Input # Select input (2)
Power ON/OFF Turn display on or off – default
is ON
Pause Pauses the current playlist
Switch Playlist[,index] Execute another playlist with
an optional Index
Delay Time Waits before executing the
next entry
(1) Uses a table of supported modes
(2) Input table is valid, input mappings must be setup in the
Web site
EBS-N200 Network Display Adapter 53

Appendix A, continued
Playlist File Format, continued
Screen Saver - The Screen Saver Mode places the display into
an internal Screen Saver Mode, i.e. ORBIT, INVERSE SCREEN,
etc. The mode is an index into a ScreenSaver table that has the
various mode supported by the display. The default is ON. To
disable the Screen Saver mode the value of OFF is used as the
optional value.
Input - The Input command selects the input for which the display
used for video input. The number is an index into the Input Table
which is setup via the website.
Power - The Power command powers the display either On or Off
depending on the state of the option. The default option is ON.
Pause - This command pauses the current playlist. To resume
the playlist from this state is to receive a Trigger command from
an external source.
Switch - The Switch command allows the linking of playlists. The
execution of this command changes the active playlist. A second
option, index is used to determine the entry point, or the start of
execution of the given playlist. The default Index is 0, the
beginning of the playlist.
Delay - This commands allows the playlist to wait time described
by time unit and a number before executing the next command
line in the List Section. This is useful command for example upon
powering up the display, the picture may not be visible for several
seconds, so the playlist must be delayed for the screen to warmup.
EBS-N200 Network Display Adapter 54

Appendix A, continued
Playlist File Format, continued
Sample Play List
[Control]|
#turn Monitor On at {sometime} and repeat every week
SCHEDULEON=123456,W1
#optional section to turn monitor off after 2 hours
SCHEDULEOFF=H2
[List]
#Turn the Monitor On
ENTRY0=EVENT,POWER,ON
#Wait 2 Seconds for warm-up of the display
ENTRY1=EVENT,DELAY,S2
#play first Item
ENTRY2=FILE,\\ENTERPRISE\CLIPS\BUGSLIFE.VOB,MPEG
#play url for 3 seconds
ENTRY3=FILE,HTTP://WWW.YAHOO.COM,URL,S3
#place Display in Inversion Screen Saver Mode
ENTRY4=EVENT,SCREENSAVER, INVERSION, ON
#play JPEG for 25 seconds
ENTRY5=FILE,\\CINEMA\STILLS\MYPICTURE.JPG,S25
#exit Screen Saver Mode
ENTRY6=EVENT,SCREENSAVER,INVERSION, OFF
EBS-N200 Network Display Adapter 55
 Loading...