

Sony DVP-SR510P, DVP-SR700HP, DVP-SR700H Reference Manual

CD/DVD Player
4-169-958-32(1)
Reference Guide
DVP-SR510P/DVP-SR700HP
© 2010 Sony Corporation
GB
AR

WARNING
To reduce the risk of fire or
electric shock, do not expose
this apparatus to rain or
moisture.
To avoid electrical shock, do
not open the cabinet. Refer
servicing to qualified
personnel only.
The mains lead must be
changed only at a qualified
service shop.
Batteries or batteries
installed apparatus shall not
be exposed to excessive heat
such as sunshine, fire or the
like.
CAUTION
The use of optical instruments with
this product will increase eye
hazard. As the laser beam used in
this CD/DVD player is harmful to
eyes, do not attempt to disassemble
the cabinet.
Refer servicing to qualified
personnel only.
Precautions
• To prevent fire or shock hazard,
do not place objects filled with
liquids, such as vases, on the
apparatus.
• The player is not disconnected
from the AC power source
(mains) as long as it is connected
to the wall outlet, even if the
player itself has been turned off.
• Do not install this player in a
confined space, such as a
bookshelf or similar unit.
• Install the player so that the AC
power cord (mains lead) can be
unplugged from the wall socket
immediately in the event of
trouble.
• If the player is brought directly
from a cold to a warm location,
or is placed in a very damp room,
moisture may condense on the
lenses inside the player. Should
this occur, the player may not
operate properly. In this case,
remove the disc and leave the
player turned on for about half an
hour until the moisture
evaporates.
Lightning
For added protection for this set
during a lightning storm, or when it
is left unattended and unused for
long periods of time, unplug it
GB
2
from the wall outlet. This will
prevent damage to the set due to
lightning and power-line surges.
Note about the discs
Do not use the following discs:
– A disc that has a non-standard
shape (e.g., card, heart).
– A disc with a label or sticker on
it.
Region code
Your player has a region code
printed on the back of the unit and
only will play commercial DVDs
(playback only) labelled with
identical region codes. This system
is used to protect copyrights.
Commercial DVDs labelled
will also play on this player.
Depending on the commercial
DVD, there may be no region code
indication, even though playing the
commercial DVD is prohibited by
area restrictions.
DVP–XXXX
00V 00Hz
NO.
X
00W
0-000-000-00
Copyrights
• Manufactured under license
from Dolby Laboratories. Dolby
and the double-D symbol are
trademarks of Dolby
Laboratories.
• Manufactured under license
under U.S. Patent #: 5,451,942 &
other U.S. and worldwide
patents issued & pending. DTS
and the Symbol are registered
trademarks and DTS Digital Out
and the DTS logos are
trademarks of DTS, Inc. Product
includes software. © DTS, Inc.
All Rights Reserved.
• “DVD+RW,” “DVD-RW,”
“DVD+R,” “DVD+R DL,”
“DVD-R,” “DVD VIDEO,” and
“CD” logos are trademarks.
• MPEG Layer-3 audio coding
technology and patents licensed
from Fraunhofer IIS and
Thomson.
• This DVD player incorporates
High-Definition Multimedia
Interface (HDMI™) technology.
HDMI, the HDMI Logo, and
High-Definition Multimedia
Interface are trademarks or
registered trademarks of HDMI
Licensing LLC in the United
States and other countries.
(DVP-SR700HP only)
ALL
Region code
®
•DivX
, DivX Certified® and
associated logos are registered
trademarks of DivX, Inc. and are
used under license.
• THIS PRODUCT IS
LICENSED UNDER THE
MPEG-4 VISUAL PATENT
PORTFOLIO LICENSE FOR
THE PERSONAL AND
NONCOMMERCIAL USE OF
A CONSUMER FOR
DECODING VIDEO IN
COMPLIANCE WITH THE
MPEG-4 VISUAL STANDARD
(“MPEG-4 VIDEO”) THAT
WAS ENCODED BY A
CONSUMER ENGAGED IN A
PERSONAL AND
NONCOMMERCIAL
ACTIVITY AND/OR WAS
OBTAINED FROM A VIDEO
PROVIDER LICENSED BY
MPEG LA TO PROVIDE
MPEG-4 VIDEO. NO LICENSE
IS GRANTED OR SHALL BE
IMPLIED FOR ANY OTHER
USE. ADDITIONAL
INFORMATION INCLUDING
THAT RELATING TO
PROMOTIONAL, INTERNAL
AND COMMERCIAL USES
AND LICENSING MAY BE
OBTAINED FROM MPEG LA,
LLC. SEE
HTTP://WWW.MPEGLA.COM
About this manual
• “DVD” may be used as a general
term for commercial DVDs,
DVD+RWs/DVD+Rs/DVD+R
DLs (+VR mode) and DVDRWs/DVD-Rs/DVD-R DLs (VR
mode, video mode).
• The “HDMI,” “BRAVIA Sync”
and “PhotoTV HD” logos on the
front cover apply to the DVPSR700HP only.
Playback
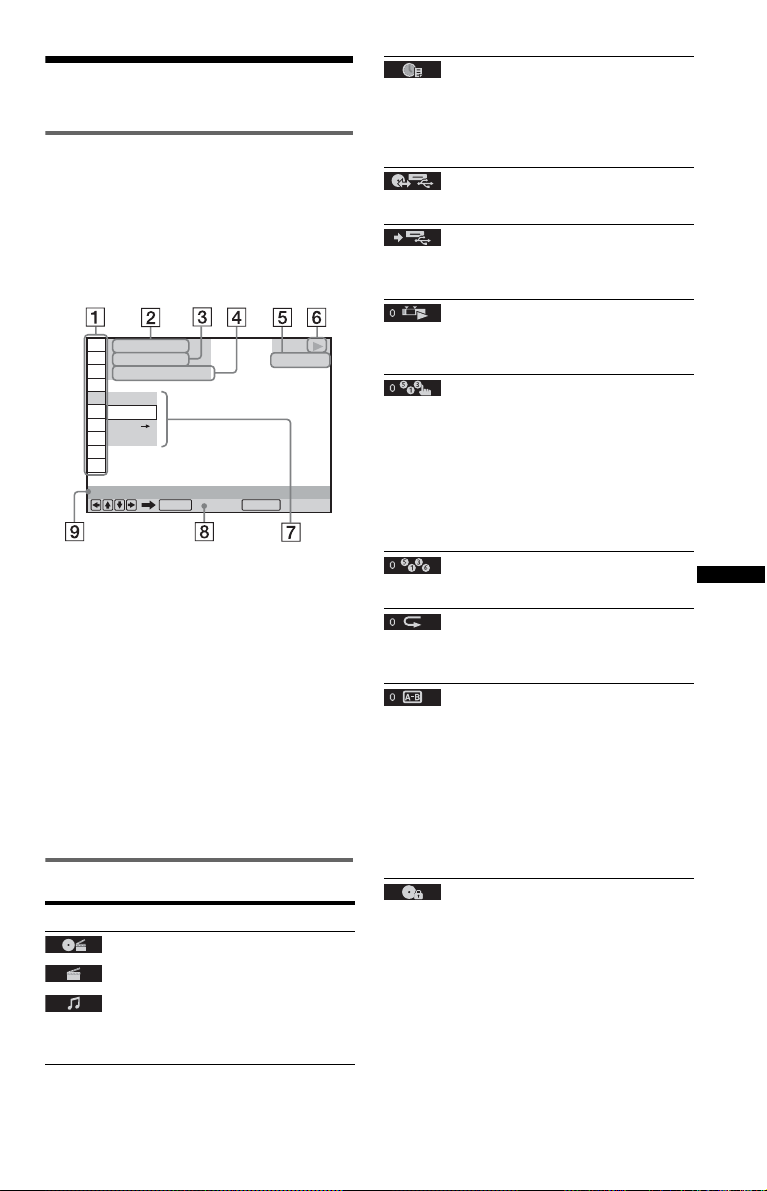
Control Menu display
Use the Control Menu to select a function and
to view related information.
Press DISPLAY.
To change the Control Menu display, press
DISPLAY again.
)
1 2 ( 2 7
)
1 8 ( 3 4
T
1 : 3 2 : 5 5
OFF
OFF
SET
ON
PROGRAM
ENTER DISPLAY
A Control Menu items
B Currently playing title/Total number of
titles
C Currently playing chapter/Total number
of chapters
D Playing time
E Selected media type
F Playback status
G Selected item icon/menu options
H Operation message
I Selected Control Menu item
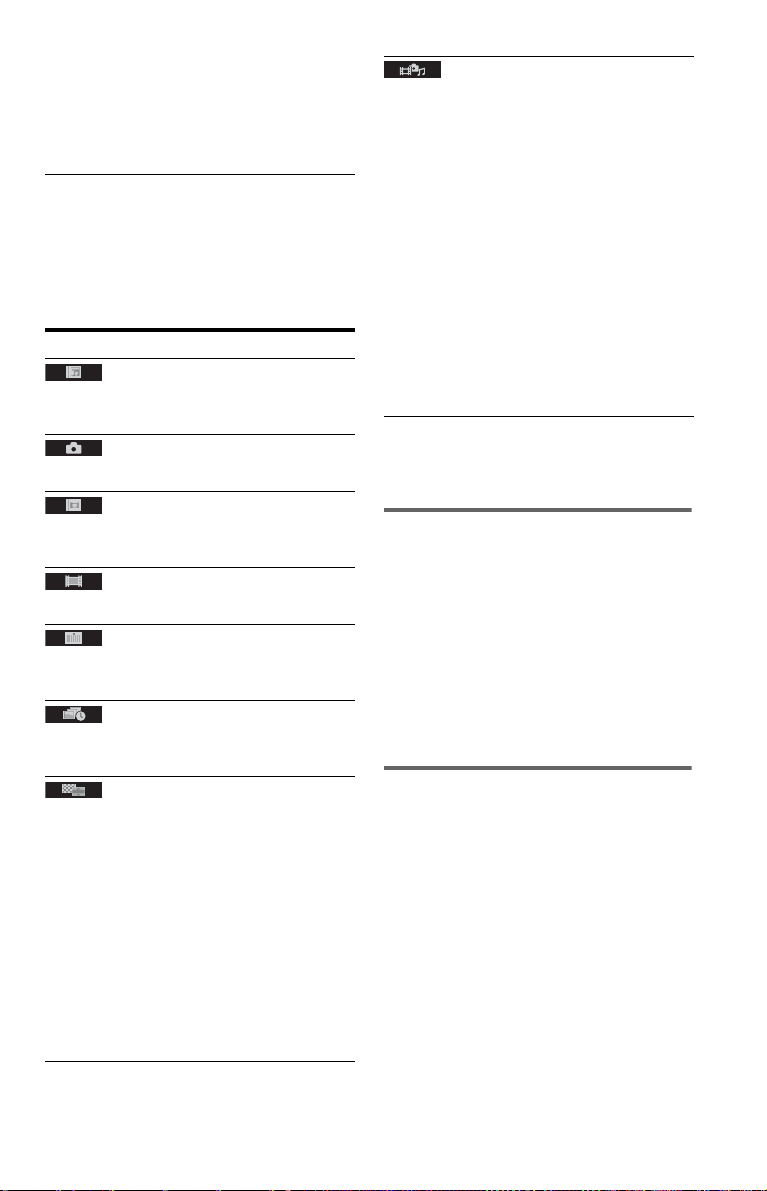
Menu list
Item Item Name, Function
TITLE/SCENE/TRACK
CHAPTER/INDEX
TRACK
Selects the title, scene, track, chapter, or index
to be played.
Quit:
PLAY
DVD VIDEO
TIME/TEXT
Checks the elapsed time and the remaining
playback time.
Input the time code for picture and music search
(DVD and DivX video files only).
DISC/USB
Selects either “USB” or “DISC” to be played.
REC TO USB
Rips a CD, or copies photo, music and video
files to a USB device (page 7).
ORIGINAL/PLAY LIST
Selects the type of title (DVD-VR mode) to be
played: ORIGINAL, or edited PLAY LIST.
PROGRAM*
1, *2
Selects the title, chapter, or track to play in the
order you want.
1 Select “SET t,” then press ENTER and
select the title (T), chapter (C), or track (T)
you want to programme, and press ENTER.
2 Repeat selecting the title, chapter, or track.
3 Press N.
SHUFFLE*
1, *2
Plays the title, chapter or track in random order.
REPEAT*
1, *2
Plays all titles/tracks/albums or a single title/
chapter/track/album/file repeatedly.
A-B REPEAT*
1, *2
Specifies the parts you want to play repeatedly.
1 During playback, select “SET t,” then
press ENTER.
The “A-B REPEAT” setting bar appears.
2 When you find the starting point (point A),
press ENTER.
3 When you reach the ending point (point B),
press ENTER again.
PARENTAL CONTROL
Set to prohibit playback on this player.
ON t: Sets the playback restrictions so that
the player will not play inappropriate discs
(Custom Parental Control).
PLAYER t: Playback of some DVD VIDEOs
can be limited according to a predetermined
level such as the age of the users. Scenes may be
blocked or replaced with different scenes
(Parental Control).
PASSWORD t: Enter a 4-digit password
using the number buttons. Also use this menu to
change the password.
GB
,continued
GB
3

OFF t: Turns off the Custom Parental Control
function.
Parental Control (limited playback)
You can set a playback limitation level.
1 Select “PLAYER t,” then press ENTER.
Enter or re-enter your 4-digit password, then
press ENTER.
2 Press X/x to select “STANDARD,” then
press ENTER.
Press X/x to select an area, then press
ENTER.
When you select “OTHERS t,” select and
enter a standard code. See “PARENTAL
CONTROL AREA CODE LIST” at the end
of this manual.
3 Press X/x to select “LEVEL,” then press
ENTER.
Press X/x to select the level, then press
ENTER.
Parental Control setting is complete.
The lower the value, the stricter the
limitation.
To turn off the Parental Control function, set
“LEVEL” to “OFF.”
If you forget your password, enter “199703” in
the password box, press ENTER, and then enter
a new 4-digit password.
SETUP
QUICK: Use Quick Setup t o choose the desired
language of the on-screen display, the aspect
ratio of the TV and the audio output signal.
CUSTOM: In addition to the Quick Setup
setting, you can adjust various other settings
(page 8).
RESET: Returns the settings in “SETUP” to the
default setting.
1
ZOOM*
Magnifies the image up to four times the
original size, scroll using C/X/x/c.
ANGLE
Changes the angle.
CUSTOM PICTURE MODE
Selects the picture quality that best suits the
programme you are watching.
STANDARD: Displays a standard picture.
DYNAMIC 1: Produces a bold dynam ic picture
by increasing the picture contrast and the colour
intensity.
DYNAMIC 2: Produces a more dynamic
picture than DYNAMIC 1 by further increasing
the picture contrast and colour intensity.
CINEMA 1: Enhances details in dark areas by
increasing the black level.
CINEMA 2: White colours become brighter
and black colours become richer, and the colour
contrast is increased.
MEMORY t: Adjusts the picture in greater
detail.
SHARPNESS
Exaggerates the outline of the image to produce
a sharper picture.
OFF: Cancels this option.
1: Enhances the outline.
2: Enhances the outline more than 1.
AV SYNC*
Adjust the delay between the picture and sound.
This function is not effective when:
– you use the DIGITAL OUT (COAXIAL)
jack, and set “DOLBY DIGITAL,” “MPEG,”
or “DTS” in “AUDIO SETUP” to “DOLBY
DIGITAL,” “MPEG,” or “ON” respectively
(page 9).
– you connect a Dolby Digital or DTS-
compliant device via the HDMI OUT jack,
and set “DOLBY DIGITAL,” “MPEG,” or
“DTS” in “AUDIO SETUP” to “DOLBY
DIGITAL,” “MPEG,” or “ON” respectively
(page 9).
1 Select “SET t,” then press ENTER.
The “AV SYNC” adjustment bar appears.
2 Press c repeatedly to adjust the delay.
Each time you press C/c, the delay is
adjusted by 10 milliseconds.
3 Press ENTER.
The selected setting takes effect.
To reset the “AV SYNC” setting, press CLEAR
in step 2.
TVS (TV Virtual Surround)
Selects surround sound effect when connecting
a stereo TV or 2 front speakers. This only works
when playing a multichannel Dolby audio
sound track. Furthermore, if the player is set up
to output the signal from the DIGITAL OUT
(COAXIAL)/HDMI OUT jack, the surround
effect will only be heard when “DOLBY
DIGITAL” is set to “D-PCM” and “MPEG” is
set to “PCM” in “AUDIO SETUP” (page 9).
OFF: Cancels the setting.
TVS DYNAMIC THEATER/
TVS DYNAMIC/
TVS WIDE: These modes are effective when
the distance between the front L and R speakers
is short, such as with built-in speakers on a
stereo TV.
3
GB
4
TVS NIGHT: This feature is useful when you
want to hear the dialogue and enjoy the
surround sound effects of “TVS WIDE” at low
volume.
TVS STANDARD: Use this setting when you
want to use TVS with 2 separate speakers.
*1To return to normal play, select “OFF” or press
CLEAR.
2
The play mode is cancelled when:
*
– you open the disc tray.
– you turn off the player.
3
DVP-SR700HP only
*
◆Items for DATA discs or USB
Item Item Name, Function
ALBUM
Selects the album that contains music and photo
files to be played.
FILE
Selects the photo file to be played.
ALBUM
Selects the album that contains video file to be
played.
FILE
Selects the video file to be played.
DATE
Displays the date the picture was taken by a
digital camera.
INTERVAL
*1
Specifies the duration for which the slides are
displayed on the screen.
EFFECT
*1
Selects the effects to be used for changing slides
during a slide show.
MODE 1: The images randomly cycle through
the effects.
MODE 2: The image sweeps in from top left to
bottom right.
MODE 3: The image sweeps in from top to
bottom.
MODE 4: The image sweeps in from left to
right.
MODE 5: The image stretches out from the
centre of the screen.
OFF: Turns off this function.
MEDIA
Selects the media type you want to play.
VIDEO: Plays video files.
PHOTO (MUSIC): Plays photo and music
files as a slide show. You can view a slideshow
with sound when music and photo files are
placed in the same album. If the playing time of
either music or photos is longer, the longer one
continues without sound or image.
PHOTO (BGM)
*2
: Plays photo files with the
player’s internal background sound. To choose
the melody of the background sound, press
AUDIO repeatedly while viewing the image.
*3
PHOTO
: Plays photo files.
MUSIC: Plays music files. Press SUBTITLE
while playing music files that contain
unsynchronized lyric information. The player
supports MP3 ID3 Lyrics only.
*1
Depending on the file, this function may not be
possible.
*2
DVP-SR700HP only
*3
DVP-SR510P only
To change the colour system
If the on-screen menu of the player does not
appear on the connected TV, switch the
player’s colour system to match the colour
system of the TV (NTSC or PAL).
First turn off the player by pressing [/1. Next
press DISPLAY, enter “0” using the number
button, and then press [/1 on the remote. The
player turns back on, and the name of the
colour system will appear on the front panel
display.
To play VIDEO CDs with PBC
functions
When you start playing a VIDEO CD with
PBC (Playback control) functions, the menu
for your selection appears.
To play without using PBC
Press ./> or the number buttons while
the player is stopped to select a track, then
press N or ENTER. To return to PBC
playback, press x twice, then press N.
,continued
GB
5

To lock the disc tray (Child Lock)
You can lock the disc tray to prevent it being
opened by mistake.
When the player is in standby mode, press in
order, O RETURN, ENTER, and [/1 on the
remote.
The player turns on and “ ” (LOCKED)
appears on the front panel display. The Z
button on the player does not work while the
Child Lock is set.
To unlock the disc tray
When the player is in standby mode, press in
order, O RETURN, ENTER, and \/1 on the
remote again.
Controlling TVs with the remote
You can control the sound level, input source,
and power switch of your Sony TV with the
supplied remote.
If your TV is listed in the table below, set the
appropriate manufacturer’s code.
When you replace the batteries of the remote,
set the appropriate code number again.
1 While holding down TV [/1, press the
number buttons to select your TV’s
manufacturer’s code.
2 Release TV [/1.
Code numbers of controllable TVs
Sony 01 (default)
Hitachi 24
JVC 33
LG/Goldstar 76
Panasonic 17, 49
Philips 06, 08, 72
Samsung 71
Sharp 29
Toshiba 38
Viewing a high quality slide
show (PhotoTV HD)
(DVP-SR700HP only)
If you have a Sony TV that is compatible with
“PhotoTV HD,” you can enjoy the best
quality images. “PhotoTV HD” is activated
when the player is connected to a TV by an
HDMI cord and “JPEG RESOLUTION” in
“HDMI SETUP” is set to “PhotoTV HD”
(page 9).
About the CONTROL FOR HDMI
functions
(DVP-SR700HP only)
You can control the player by connecting to a
TV compatible with the CONTROL FOR
HDMI function with an HDMI cord (not
supplied).
To enjoy the features
•One-Touch Play
With one touch of the N button on the
remote, the player and your TV
automatically turn on and the TV’s input is
switched to the player. Playback starts
automatically.
The TV’s input will also switch to the
player automatically, in the following cases:
–You press the N, TOP MENU, MENU,
or DISPLAY button on the remote.
Note that these buttons are not effective
when you play audio CD or music files in
“MUSIC” mode.
– If a disc with auto play function is loaded.
– If you push the disc tray to close.
• System-Power Off
When you turn the TV off by using the [/1
button on the TV’s remote, the components
compatible with CONTROL FOR HDMI
function turn off automatically.
About ‘BRAVIA Sync’ display
You can control the player by connecting to a
Sony TV (compatible with ‘BRAVIA Sync’
only) and selecting the SYNC MENU button
on the TV’s remote/option menu.
Some TVs may have other buttons available
to turn on the ‘BRAVIA Sync’ display, or
require setting on the TV. Depending on the
TV, the setting display may appear before the
‘BRAVIA Sync’ display. Refer also to the
operating instructions supplied with the TV.
The ‘BRAVIA Sync’ display will show
different items depending on the disc type.
(Example: ‘BRAVIA Sync’ display when
playing a DVD VIDEO)
Select an item using C/X/x/c and then press
ENTER.
GB
6

• When playing a DVD VIDEO: Displays
MENU and TOP MENU.
• When playing in DVD-VR mode: Displays
., >, and chapter number.
• When playing a CD, VIDEO CD or Super
VCD (without PBC): Displays ., >,
and track number.
• When playing a VIDEO CD or Super VCD
(with PBC): Displays ., > and scene
number. When the disc’s menu appears, you
can select an item by pressing X/x.
• When playing video, photo, and music files:
Displays MENU and PICT. NAVI (Picture
Navigation).
“ALBUM,” “TRACK,” or “FILE.”
If you select “DISC,” go to step 6.
5 Press C/X/x/c to select albums, tracks or
files, and press ENTER.
When selecting albums, tracks or files, the
REC LED indicator flashes.
The number of selected albums, tracks or files
is displayed in the front panel display in
recording standby mode.
6 Press
N.
When ripping a CD or copying data files, the
REC LED indicator stays lit.
Recording is started. Recording progress is
displayed. After recording finishes,
“Completed” is displayed.
To change the display
Press the SYNC MENU button on the TV’s
remote repeatedly to turn on or change the
display. ‘BRAVIA Sync’ display and Control
Menu are displayed alternately.
To turn off the display
Press the RETURN or SYNC MENU button
on the TV’s remote repeatedly.
Ripping a CD or copying data
files to a USB device
You can rip a CD or copy* data files to a USB
device. You cannot rip a CD or copy data files
while playing back a disc.
* Depending on the disc, copying may not be
possible.
REC LED
REC TO USB
USB device
1 Insert a disc into the disc tray, and then
connect a USB device to the USB jack.
2 Press DISPLAY.
The Control Menu display appears.
3 Press X/x to select “REC TO USB.”
4 Press X/x to select the items to copy, and
press ENTER.
When ripping a CD, select “DISC” or
“TRACK.”
When copying data files, select “DISC,”
To record simply
You can rip a CD or copy data files simply by
pressing the REC TO USB button. When
pressing the REC TO USB button, the display
appears. Press N according to the display.
Recording is started.
To erase “ALBUM,” “TRACK,” or “FILE”
Press CLEAR. Follow the displayed
message.
To remove the USB device
Stop playback, ripping a CD, or copying/
erasing data files, and then disconnect the
USB device from the USB jack. Do not
remove the USB device during operation, as
data corruption may occur.
To change LUN
For some devices, LUN (Logical Unit
Number) may appear. To change the LUN or
original storage, press when the list
of albums or tracks is displayed.
About supported USB devices
• This player supports USB Mass Storage
Class only.
• This player supports FAT format USB
device only.
• Some USB devices may not work with this
player.
GB
7
CUSTOM Menu
You can adjust various settings.
Press DISPLAY when the player is in stop
mode, select (SETUP), and then
select “CUSTOM.” The CUSTOM menu
appears.
Menu list
Item Item Name, Function
LANGUAGE SETUP
OSD (On-Screen Display): Switches the
display language on the screen.
1
MENU*
disc’s menu (DVD VIDEO only).
AUDIO*
track. When you select “ORIGINAL,” the
language given priority in the disc is selected.
(DVD VIDEO only)
SUBTITLE*
subtitle recorded on the DVD VIDEO. When
you select “AUDIO FOLLOW,” the language
for the subtitles changes according to the
language you selected for the sound track.
(DVD VIDEO only)
TV TYPE: Selects the aspect ratio of the
connected TV.
COLOR SYSTEM (VIDEO CD): Selects the
colour system when you play a VIDEO CD. If
your TV is the DUAL system, select “AUTO.”
SCREEN SAVER: When set to “ON,” the
screen saver appears when the player is in pause
or stop mode for 15 minutes. Press N to turn
off the screen saver.
: Selects the desired language for the
1
: Switches the language of the sound
1
: Switches the language of the
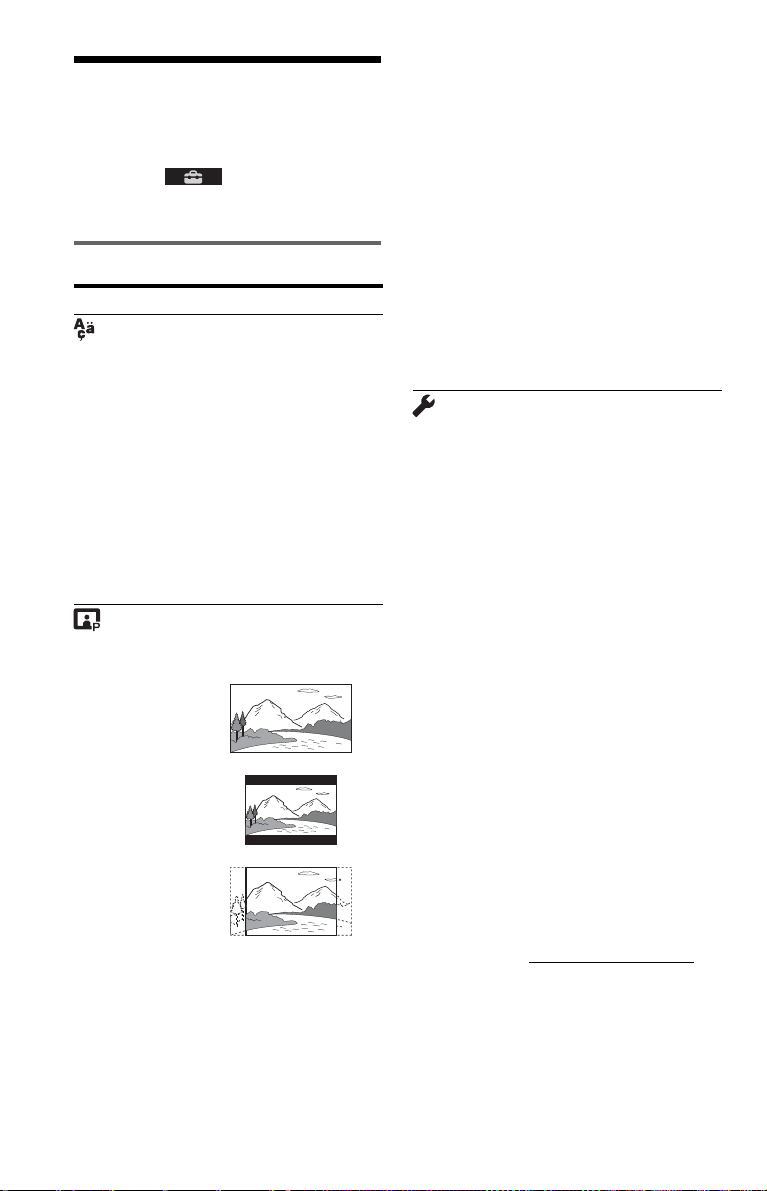
SCREEN SETUP
16:9
4:3 LETTER BOX
4:3 PAN SCAN
BACKGROUND: Selects the background
colour or picture on the TV screen. If you set
“JACKET PICTURE,” even though the disc
does not contain a jacket picture, the
“GRAPHICS” picture appears.
PROGRESSIVE (COMPONENT OUT
2
ONLY)*
progressive format signals.
MODE (PROGRESSIVE): This setting is
effective only when you set “PROGRESSIVE
(COMPONENT OUT ONLY)” to “ON.” If you
select “AUTO,” the player detects the format
(film-based or video-based), and converts to the
appropriate version.
4:3 OUTPUT: This setting is effective only
when you set “TV TYPE” to “16:9.” Select
“FULL” when you can change the aspect ratio
on your TV.
AUTO STANDBY: Sets the Auto Standby
setting on or off. If you select “ON,” the player
enters standby mode when left in stop mode for
more than 30 minutes.
AUTO PLAY: When set to “ON,” the player
automatically starts playback when the player is
turned on by a timer (not supplied).
PAUSE MODE: Selects the picture in pause
mode. Normally select “AUTO.” When the
picture is output in high resolution, set to
“FRAME.” (DVD only)
TRACK SELECTION: Gives the sound track
which contains the highest number of channels
priority when you play a DVD VIDEO on
which multiple audio formats (PCM, MPEG
audio, DTS, or Dolby Digital format) are
recorded. If you select “AUTO,” priority is
given. (DVD VIDEO only)
IMAGE QUALITY*
display to either high quality image or quick
speed. (Photo files only)
MULTI-DISC RESUME: Switches the Multidisc Resume setting on or off. Resume playback
can be stored in memory for up to 6 different
DVD VIDEOs/VIDEO CDs. If you start the
settings again, the resume point is cleared.
(DVD VIDEO/VIDEO CD only)
DivX
deactivation code for this player. For more
information, go to http://www.divx.com/vod
the Internet. You can play DivX video files as
many times as the preset number. The following
occurrences are counted:
– when the disc tray is opened.
– when another file is played.
– when a USB device is removed.
– when the “DISC/USB” or “MEDIA” setting is
: Sets to “ON” if your TV aspects
CUSTOM SETUP
3
: Selects the priority
®
VOD: Displays the registration code and
changed.
on
GB
8

– when the player is turned off(including the Auto
Standby function).
AUDIO SETUP
4
AUDIO DRC (Dynamic Range Control)*
:
Set according the surrounding environment. Set
to “TV MODE” when the smallest sounds are
indiscernible, or set to “WIDE RANGE” when
the listening environment is good, for example,
in a home movie theatre.
DOWNMIX*
4
: Switches the method for
mixing down to 2 channels when you play a
DVD which has rear sound elements (channels),
or is recorded in Dolby Digital format.
Normally select “DOLBY SURROUND.”
DIGITAL OUT: Selects if audio signals are
output via the DIGITAL OUT (COAXIAL)/
HDMI OUT jack. When you select “ON,” set
also the following “DOLBY DIGITAL,”
“MPEG,” “DTS,” or “48kHz/96kHz PCM.”
DOLBY DIGITAL: Selects the type of Dolby
Digital signal. Set to “D-PCM” when the player
is connected to an audio component without a
built-in Dolby Digital decoder.
MPEG: Selects the type of MPEG audio signal.
Set to “MPEG” when the player is connected to
an audio component with a built-in MPEG
decoder.
DTS: Selects the type of DTS audio signal. Set
to “ON” when you play a DVD VIDEO with
DTS sound tracks. Do not set to “ON” when
you connect the player to an audio component
without a DTS decoder.
48kHz/96kHz PCM: Selects the sampling
frequency of the digital audio output signal.
(DVD VIDEO only)
HDMI SETUP*
3
You can adjust items related to HDMI
connection.
HDMI RESOLUTION*
2
: Selects the type of
video signal output from the HDMI OUT jack.
If “AUTO (1920×1080p)” (default) is selected,
the player outputs video signals of the highest
resolution acceptable for your TV. If the picture
is not clear, unnatural or otherwise not to your
satisfaction, try another option that suits the
disc, TV/projector, etc. For details, refer also to
the instruction manual supplied with the TV/
projector, etc.
You cannot select this when “JPEG
RESOLUTION” is set to “PhotoTV HD.”
JPEG RESOLUTION: Selects the type of
JPEG resolution so that you can enjoy a high
picture quality via HDMI connection.
This setting is effective only when you set “TV
TYPE” to “16:9.” You cannot select this when
“HDMI RESOLUTION” is set to “720×480/
576p.” “(1920×1080i) HD ” and
“(1920×1080i) HD” are effective only when
you set “HDMI RESOLUTION” to
“1920×1080i.” If you set this setting to
“PhotoTV HD,” “(1920×1080i) HD ” or
“(1920×1080i) HD,” the effect, rotation, and
zoom functions are not available.
YC
BCR/RGB (HDMI): Selects the type of
HDMI signal output from the HDMI OUT jack.
Set to “RGB” if the playback picture is
distorted. You cannot select this when “JPEG
RESOLUTION” is set to “PhotoTV HD.”
AUDIO (HDMI): Selects the type of audio
signal output from the HDMI OUT jack. Set to
“PCM” if you connect the player to a TV that is
not compatible with DOLBY DIGITAL/DTS/
MPEG signals.
CONTROL FOR HDMI: Switches the
Control For HDMI setting on or off. Set to
“ON” when you use the Control For HDMI
function.
LANGUAGE FOLLOW: Switches the
languages of the DVD player to the same as the
current TV OSD language. You cannot select
this when “CONTROL FOR HDMI” is set to
“OFF.”
*1When you select “OTHERS t,” select and
enter a language code. See “LANGUAGE
CODE LIST” at the end of this manual.
2
If the picture does not appear normally or goes
*
blank, reset the setting. Press [/1 to turn off,
enter “369,” and then press [/1 to turn on the
player again.
3
DVP-SR700HP only
*
4
This function affects the output from the
*
following jacks:
– AUDIO OUT L/R jacks.
– DIGITAL OUT (COAXIAL)/HDMI OUT
jack only when “ DOLBY DIGITAL” is set to
“D-PCM.”
GB
9
 Loading...