

Sony DVP-SR400P User Manual
CD/DVD
Player
Operating Instructions
4-115-674-12(1)
DVP-SR400P
© 2009 Sony Corporation
WARNING
To reduce the risk of fire or
electric shock, do not expose
this apparatus to rain or
moisture.
To avoid electrical shock, do
not open the cabinet. Refer
servicing to qualified
personnel only.
The AC power cord must be
changed only at a qualified
service shop.
Batteries or batteries
installed apparatus shall not
be exposed to excessive
heat such as sunshine, fire
or the like.
CAUTION
The use of optical instruments with
this product will increase eye
hazard. As the laser beam used in
this CD/DVD player is harmful to
eyes, do not attempt to disassemble
the cabinet.
Refer servicing to qualified
personnel only.
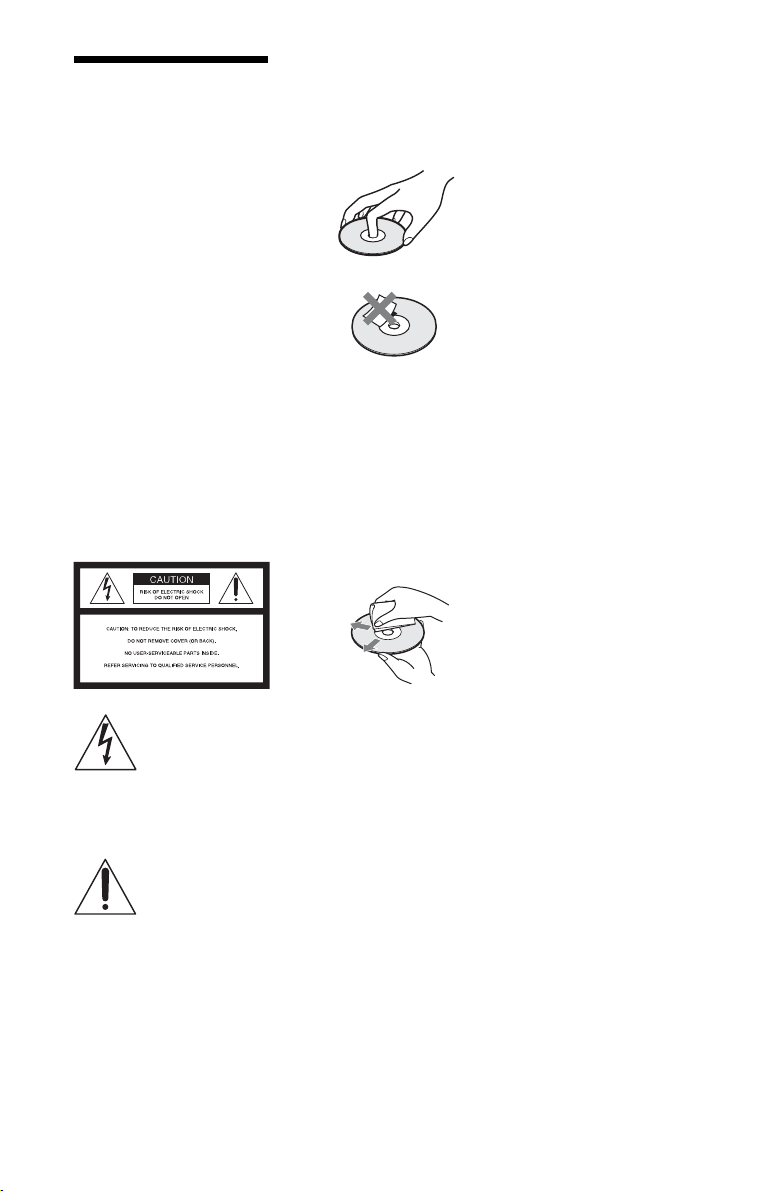
Notes about the discs
• To keep the disc clean, handle
the disc by its edge. Do not touch
the surface. Dust, fingerprints, or
scratches on the disc may cause
it to malfunction.
• Do not expose the disc to direct
sunlight or heat sources such as
hot air ducts, or leave it in a car
parked in direct sunlight as the
temperature may rise
considerably inside the car.
• After playing, store the disc in its
case.
• Clean the disc with a cleaning
cloth.
Wipe the disc from the center
out.
This symbol is
intended to alert the
user to the presence
of uninsulated
within the product’s enclosure that
may be of sufficient magnitude to
constitute a risk of electric shock to
persons.
maintenance (servicing)
instructions in the literature
accompanying the appliance.
Lightning
For added protection for this set
during a lightning storm, or when it
is left unattended and unused for
long periods of time, unplug it
from the wall outlet. This will
prevent damage to the set due to
lightning and power-line surges.
“dangerous voltage”
This symbol is
intended to alert the
user to the presence
of important
operating and
2
• Do not use solvents such as
benzine, thinner, commercially
available cleaners, or anti-static
spray intended for vinyl LPs.
• If you have printed the disc’s
label, dry the label before
playing.

Precautions
On safety
• To prevent fire or shock hazard, do not
place objects filled with liquids, such as
vases, on the apparatus.
• Should any solid object or liquid fall into
the cabinet, unplug the player and have it
checked by qualified personnel before
operating it any further.
On power sources
• The player is not disconnected from the AC
power source as long as it is connected to
the wall outlet, even if the player itself has
been turned off.
• If you are not going to use the player for a
long time, be sure to disconnect the player
from the wall outlet. To disconnect the AC
power cord, grasp the plug itself; never pull
the cord.
On placement
• Place the player in a location with adequate
ventilation to prevent heat build-up in the
player.
• Do not place the player on a soft surface
such as a rug.
• Do not place the player in a location near
heat sources, or in a place subject to direct
sunlight, excessive dust, or mechanical
shock.
• Do not install the player in an inclined
position. It is designed to be operated in a
horizontal position only.
• Keep the player and the discs away from
equipment with strong magnets, such as
microwave ovens, or large loudspeakers.
• Do not place heavy objects on the player.
• Do not install this player in a confined
space, such as a bookshelf or similar unit.
• Install the player so that the AC power cord
can be unplugged from the wall socket
immediately in the event of trouble.
On operation
• If the player is brought directly from a cold
to a warm location, or is placed in a very
damp room, moisture may condense on the
lenses inside the player. Should this occur,
the player may not operate properly. In this
case, remove the disc and leave the player
turned on for about half an hour until the
moisture evaporates.
• When you move the player, take out any
discs. If you don’t, the disc may be
damaged.
On adjusting volume
Do not turn up the volume while listening to
a section with very low level inputs or no
audio signals. If you do, the speakers may be
damaged when a peak level section is played.
On cleaning
Clean the cabinet, panel, and controls with a
soft cloth slightly moistened with a mild
detergent solution. Do not use any type of
abrasive pad, scouring powder or solvent
such as alcohol or benzine.
On cleaning discs, disc/lens cleaners
Do not use cleaning discs or disc/lens
cleaners (including wet or spray types).
These may cause the apparatus to
malfunction.
On replacement of parts
In the event that this unit is repaired, repaired
parts may be collected for reuse or recycling
purposes.
IMPORTANT NOTICE
Caution: This player is capable of holding a
still video image or on-screen display image
on your television screen indefinitely. If
you leave the still video image or on-screen
display image displayed on your TV for an
extended period of time you risk permanent
damage to your television screen. Plasma
display panel televisions and projection
televisions are susceptible to this.
If you have any questions or problems
concerning your player, please consult your
nearest Sony dealer.
3

Table of Contents
WARNING . . . . . . . . . . . . . . . . . . . . . . . . . . . . . . . . . . . . . . . . . . . . . . . . . . . . 2
Precautions . . . . . . . . . . . . . . . . . . . . . . . . . . . . . . . . . . . . . . . . . . . . . . . . . . . 3
About This Manual. . . . . . . . . . . . . . . . . . . . . . . . . . . . . . . . . . . . . . . . . . . . . . 5
Guide to Parts and Controls. . . . . . . . . . . . . . . . . . . . . . . . . . . . . . . . . . . . . . . 6
Hookups. . . . . . . . . . . . . . . . . . . . . . . . . . . . . . . . . . . . . . . . . . . 9
Step 1: Connecting to Your TV . . . . . . . . . . . . . . . . . . . . . . . . . . . . . . . . . . . . 9
A Audio/video input jacks. . . . . . . . . . . . . . . . . . . . . . . . . . . . . . . . . . . . . 9
B Component video input jacks (Y, PB, PR) . . . . . . . . . . . . . . . . . . . . . . . 9
Step 2: Connecting the Power Cord . . . . . . . . . . . . . . . . . . . . . . . . . . . . . . . 10
Step 3: Preparing the Remote . . . . . . . . . . . . . . . . . . . . . . . . . . . . . . . . . . . . 10
Controlling your TV with the supplied remote . . . . . . . . . . . . . . . . . . . . . 11
Step 4: Quick Setup. . . . . . . . . . . . . . . . . . . . . . . . . . . . . . . . . . . . . . . . . . . . 12
Playback . . . . . . . . . . . . . . . . . . . . . . . . . . . . . . . . . . . . . . . . . 14
Playing Discs . . . . . . . . . . . . . . . . . . . . . . . . . . . . . . . . . . . . . . . . . . . . . . . . . 14
Control Menu display (DISPLAY). . . . . . . . . . . . . . . . . . . . . . . . . . . . . . . 16
List of Control Menu items. . . . . . . . . . . . . . . . . . . . . . . . . . . . . . . . . . . . 17
Various Play Mode Functions . . . . . . . . . . . . . . . . . . . . . . . . . . . . . . . . . . . . 19
Creating your own program (Program Play) . . . . . . . . . . . . . . . . . . . . . . 19
Playing in random order (Shuffle Play) . . . . . . . . . . . . . . . . . . . . . . . . . . 20
Playing repeatedly (Repeat Play) . . . . . . . . . . . . . . . . . . . . . . . . . . . . . . 20
Repeating a specific portion (A-B Repeat Play). . . . . . . . . . . . . . . . . . . . 21
Customizing the Playback Configuration. . . . . . . . . . . . . . . . . . . . . . . . . . . . 22
Adjusting the playback picture
Sharpening the picture (SHARPNESS) . . . . . . . . . . . . . . . . . . . . . . . . . . 22
Locking discs (PARENTAL CONTROL) . . . . . . . . . . . . . . . . . . . . . . . . . 22
Playing MP3 Audio and JPEG Images . . . . . . . . . . . . . . . . . . . . . . . . . . . . . 23
Selecting a JPEG image file . . . . . . . . . . . . . . . . . . . . . . . . . . . . . . . . . . 24
Setting the pace for a slide show (INTERVAL) . . . . . . . . . . . . . . . . . . . . 25
Selecting the slides’ appearance (EFFECT) . . . . . . . . . . . . . . . . . . . . . . 25
Playing DivX Video Files . . . . . . . . . . . . . . . . . . . . . . . . . . . . . . . . . . . . . . . . 26
(CUSTOM PICTURE MODE) . . . . . . . . . 22
Settings and Adjustments . . . . . . . . . . . . . . . . . . . . . . . . . . . . . . 27
Using the Setup Display. . . . . . . . . . . . . . . . . . . . . . . . . . . . . . . . . . . . . . . . . 27
LANGUAGE SETUP . . . . . . . . . . . . . . . . . . . . . . . . . . . . . . . . . . . . . . . . . . . 27
SCREEN SETUP . . . . . . . . . . . . . . . . . . . . . . . . . . . . . . . . . . . . . . . . . . . . . . 28
CUSTOM SETUP . . . . . . . . . . . . . . . . . . . . . . . . . . . . . . . . . . . . . . . . . . . . . 30
AUDIO SETUP. . . . . . . . . . . . . . . . . . . . . . . . . . . . . . . . . . . . . . . . . . . . . . . . 31
Setting the digital output signal . . . . . . . . . . . . . . . . . . . . . . . . . . . . . . . . 31
4
Additional Information . . . . . . . . . . . . . . . . . . . . . . . . . . . . . . . . 33
Troubleshooting . . . . . . . . . . . . . . . . . . . . . . . . . . . . . . . . . . . . . . . . . . . . . . . 33
Self-diagnosis Function (When letters/numbers appear on the screen) . . . . 35
Playable Discs . . . . . . . . . . . . . . . . . . . . . . . . . . . . . . . . . . . . . . . . . . . . . . . . 35
Specifications. . . . . . . . . . . . . . . . . . . . . . . . . . . . . . . . . . . . . . . . . . . . . . . . . 37
Language Code List. . . . . . . . . . . . . . . . . . . . . . . . . . . . . . . . . . . . . . . . . . . . 38
Parental Control Area Code List . . . . . . . . . . . . . . . . . . . . . . . . . . . . . . . . . . 38
Index . . . . . . . . . . . . . . . . . . . . . . . . . . . . . . . . . . . . . . . . . . . . . . . . . . . . . . . 39
About This Manual
• Instructions in this manual describe the controls on the remote. You can also use the controls
on the player if they have the same or similar names as those on the remote.
• “DVD” may be used as a general term for commercial DVDs, DVD+RWs/DVD+Rs/DVD+R
DLs (+VR mode) and DVD-RWs/DVD-Rs/DVD-R DLs (VR mode, video mode).
• NEED-to-know information (to prevent incorrect operation) is listed under the
to-know information (tips and other useful information) is listed under the
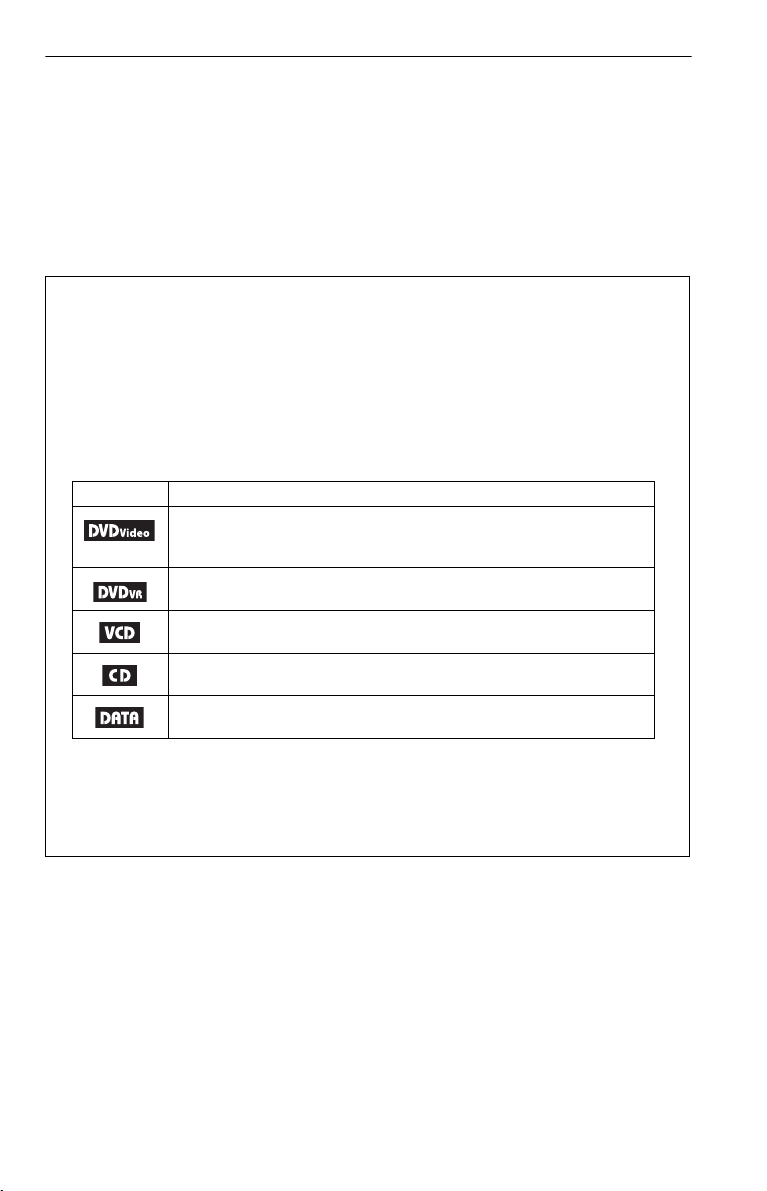
• The meaning of the icons used in this manual is described below:
Icons Meaning
Functions available for commercial DVDs and DVD+RWs/DVD+Rs/
DVD+R DLs in +VR mode or DVD-RWs/DVD-Rs/DVD-R DLs in video
mode
Functions available for DVD-RWs/DVD-Rs/DVD-R DLs in VR (Video
Recording) mode
Functions available for VIDEO CDs (including Super VCDs or CD-Rs/
CD-RWs in video CD format or Super VCD format)
Functions available for music CDs or CD-Rs/CD-RWs in music CD format
z
b
icon.
icon. NICE-
1
Functions available for DATA discs containing MP3*
image files, and DivX*
*1 MP3 (MPEG-1 Audio Layer III) is a standard format defined by ISO (International Organization for
Standardization)/IEC (International Electrotechnical Commission) MPEG which compresses audio
data.
MPEG Layer-3 audio coding technology and patents licensed from Fraunhofer IIS and Thomson.
2
DivX® is a video file compression technology, developed by DivX, Inc.
*
DivX, DivX Certified, and associated logos are trademarks of DivX, Inc. and are used under license.
2
video files
audio tracks, JPEG
5
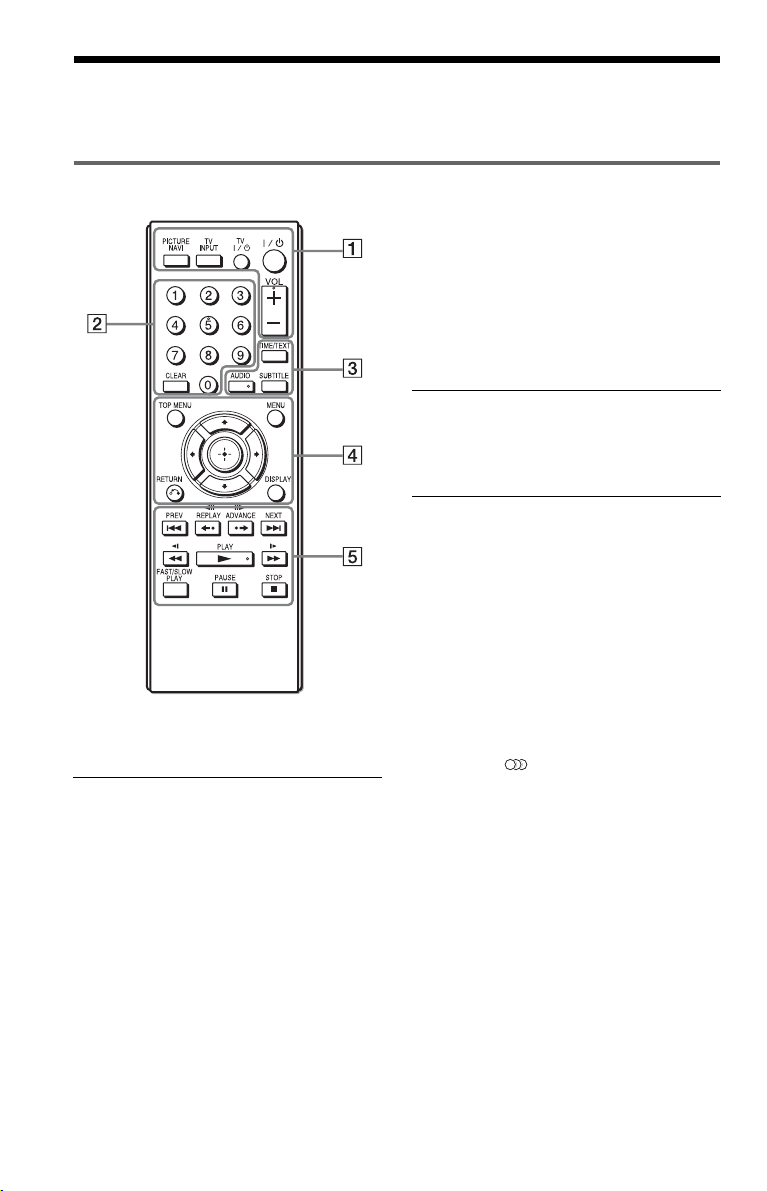
Guide to Parts and Controls
For more information, see the pages indicated in parentheses.
Remote
TV [/1 (on/standby) (11)
Turns the TV on or to standby mode.
[/1 (on/standby) (12)
Turns on, or sets the player to standby
mode.
VOL +/– (11)
Adjusts the TV volume.
B Number buttons
Enters the title/chapter numbers, etc.
CLEAR (17)
Clears the entry field.
C TIME/TEXT (23, 26)
Displays the playing time and
remaining time. Press repeatedly to
change the displayed information.
CD/DVD text appears only when text
is recorded on the disc.
If an MP3 audio track has an ID3 tag,
the player will display the album
name/track title from the ID3 tag
VOL +, number 5, AUDIO, and N buttons have a
tactile dot. Use the tactile dot as a reference when
operating the player.
A PICTURE NAVI (24)
Divides the screen into 9 subscreens
so you can choose the desired scene
quickly.
Each time you press the button, the
display changes as follows:
• CHAPTER VIEWER
• TITLE VIEWER
• TRACK VIEWER
The JPEG image files in the album
appear in 16 subscreens.
TV INPUT (input select) (11)
Switches the TV’s input source
between the TV and other input
sources.
information. This player supports ID3
versions 1.0/1.1 and 2.2/2.3.
AUDIO ( )
Changes the audio language or audio
channel.
When 4 digits are displayed, they
indicate a language code. See
“Language Code List” on page 38 to
see which language the code
represents.
The format of the current audio signal
(Dolby Digital, DTS, PCM, etc.)
appears as shown on page 7.
6
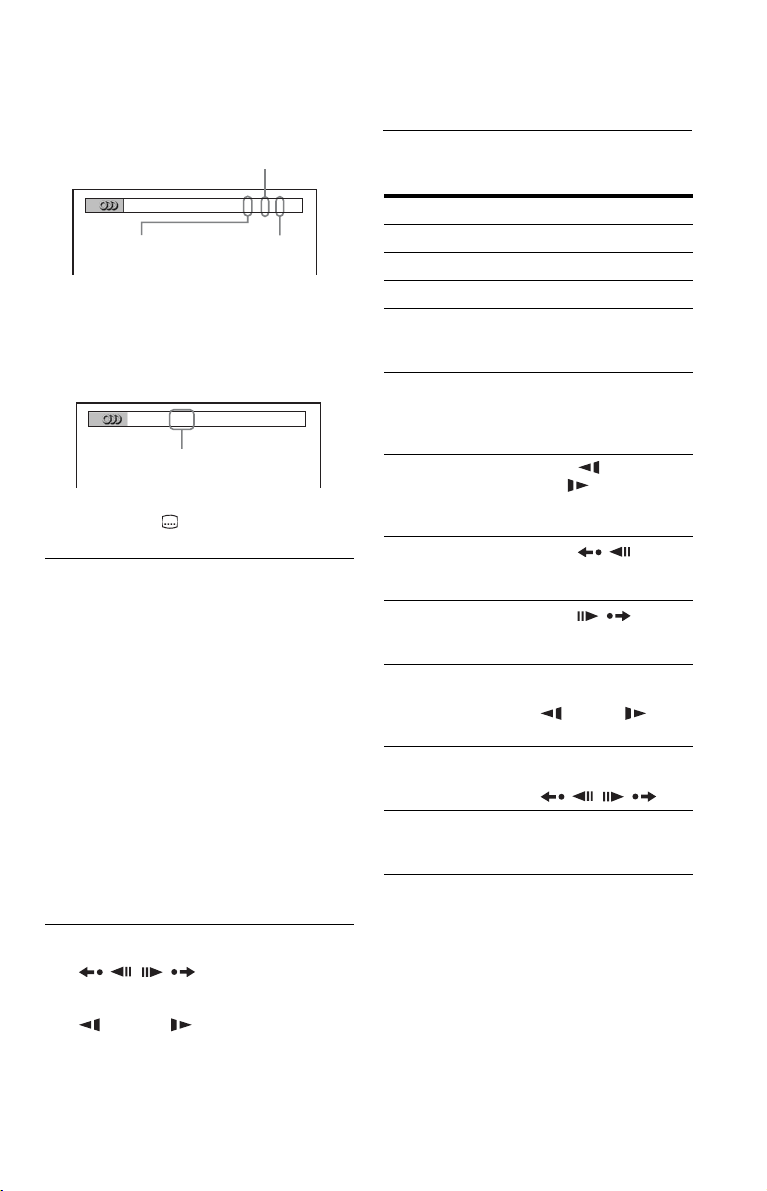
◆ When playing a DVD VIDEO
Example:
Dolby Digital 5.1 ch
FAST/SLOW PLAY
See “Basic operations” (page 7) for the
function of each button.
Rear (L/R)
1:ENGLISH DOLBY DIGITAL
Front (L/R)
+ Center
LFE (Low Frequency
Effect)
3 / 2 .1
◆ When playing a DivX video file on a
DATA disc
Example:
MP3 audio
1:
MP3 128k
Bit rate
SUBTITLE ( ) (25)
Changes the subtitles.
D TOP MENU
Displays the DVD’s top menu.
MENU (23)
Displays the menu.
O RETURN (15)
Returns to the previous display.
DISPLAY (16)
Displays the playback information on
the screen.
C/X/x/c (12)
Moves the highlight to select a
displayed item.
Center button (ENTER) (12)
Enters the selected item.
E ./> PREV/NEXT
/ REPLAY/STEP/
STEP/ADVANCE
m/M (scan/slow)
N PLAY
X PAUSE
x STOP
Basic operations
To Operation
Play Press
Stop Press x.
Pause Press X.
Go to the next chapter,
track, or scene in
continuous play mode
Go back to the
previous chapter,
track, or scene in
continuous play mode
Scan backward/
forward
Replay the previous
1*3
scene*
Briefly fast forward
the current scene*
Play backward*
forward*
5
in slow
2*3
4
/
motion
4
5
one frame
/
Play backward*
forward*
at a time
Play in various speed
with sound*
*1For all DVDs except for DVD+RWs/DVD+Rs/
2
*
3
*
4
*
5
*
6
*
6
DVD+R DLs and DivX video files.
For DVDs and DivX video files only.
These functions may not work with some
scenes.
For DVD VIDEOs and DVD-VR mode only.
For DVDs, VIDEO CDs and DivX video files
only.
For DVDs, VIDEO CDs, Super VCDs and
DVD-VR mode only.
N.
Press >.
Press ..
Press m/
M .
Press repeatedly to
change the speed.
Press
REPLAY during
playback.
Press
ADVANCE during
playback.
Press X during
playback, then press
m/M
repeatedly.
Press X during
playback, then press
/.
Press FAST/SLOW
PLAY repeatedly
during playback.
,continued
7
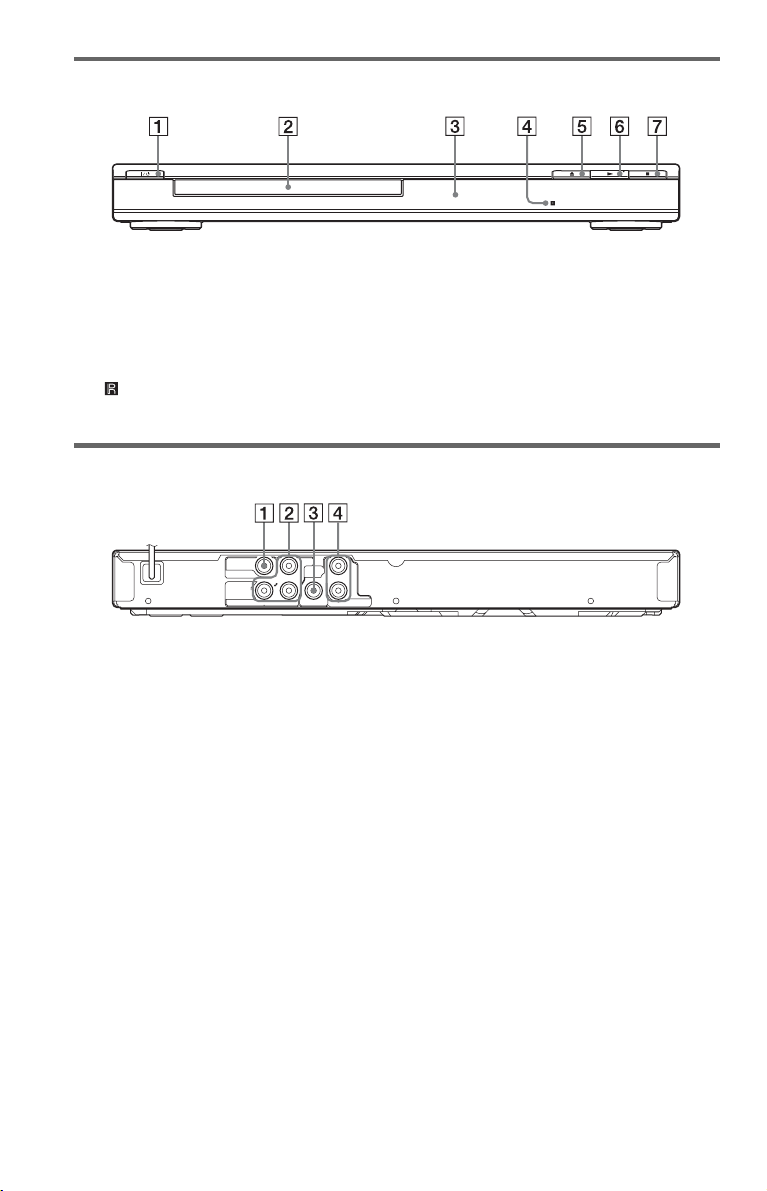
Front panel
A [/1 (on/standby) button (12)
B Disc tray (14)
C Front panel display (15)
D (remote sensor) (10)
Rear panel
P
B
VIDEO
VIDEO OUT
COMPONENT
VIDEO OUT
Y
P
R
A VIDEO OUT jack (9)
B COMPONENT VIDEO OUT jacks (9)
DIGITAL
COAXIAL
L
OUT
R
AUDIO OUT
E Z (open/close) button (14)
F N (play) button (14)
G x (stop) button (14)
C DIGITAL OUT (COAXIAL) jack (10)
D AUDIO OUT L/R jacks (9)
8
Hookups
When unpacking, check the supplied accessories by referring to page 37.
b
• Plug cables securely to prevent unwanted noise.
• Refer to the instructions supplied with the components to be connected.
• Be sure to disconnect the power cord of each component before connecting.
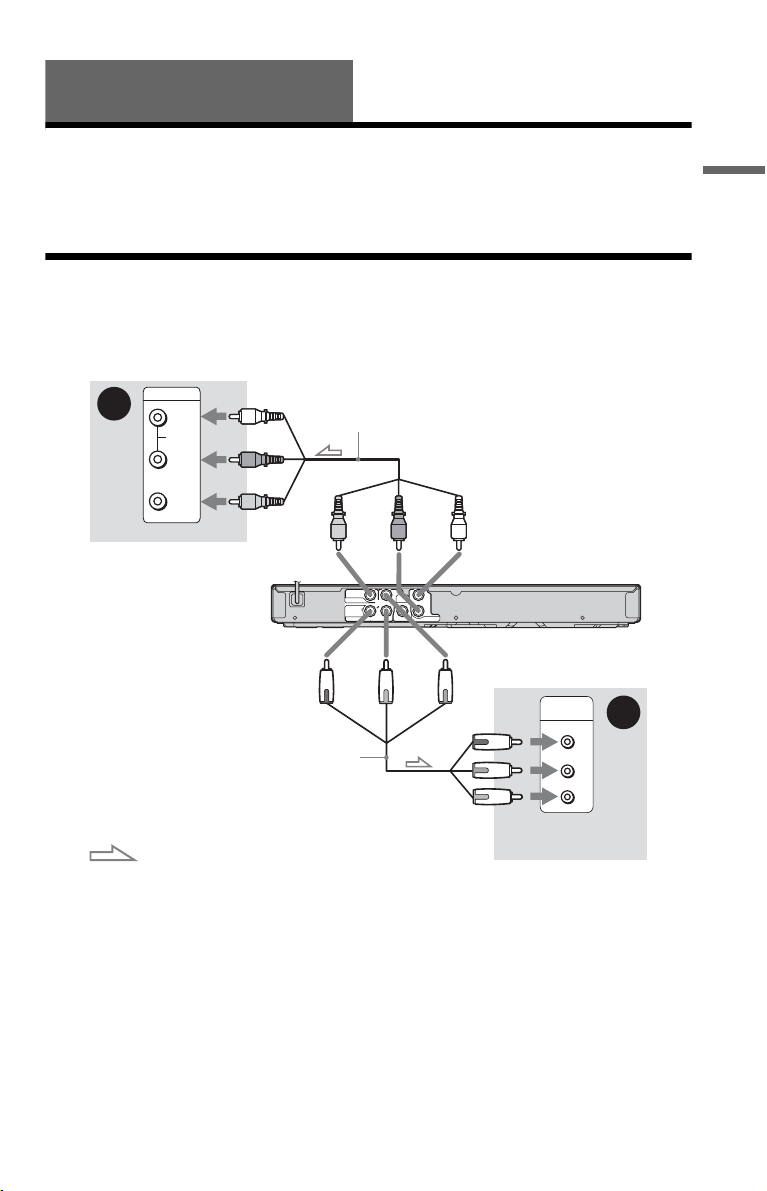
Step 1: Connecting to Your TV
Connect this player to your TV monitor using a video cable. Select pattern A or B, according
to the input jack on your TV monitor, projector, or audio component.
Hookups
A
INPUT
L
AUDIO
R
(white)
Audio/video cable (supplied)
(red)
(yellow)
VIDEO
TV
to VIDEO OUT
to COMPONENT
VIDEO OUT
Component video
cable (not supplied)
: Signal flow
A Audio/video input jacks
You will enjoy standard quality images.
B Component video input jacks
B, PR)
(Y, P
You will enjoy accurate color reproduction
and high quality images.
b
Connect the supplied audio cable to audio input
jacks (L/R) on your TV.
(yellow)
(white)(red)
to AUDIO OUT
B
P
VIDEO OUT
COMPONENT
VIDEO OUT
VIDEO
L
DIGITAL
OUT
R
COAXIAL
Y
P
R
AUDIO OUT
CD/DVD player
(green)
(red)
(blue)
COMPONENT
VIDEO IN
Y
PB
PR
TV
When connecting to a wide screen TV
Depending on the disc, the image may not fit
your TV screen. To change the aspect ratio,
see page 28.
b
Do not connect a VCR, etc., between your TV and
the player. If you pass the player signals via the
VCR, you may not receive a clear image on the TV
screen. If your TV has only one audio/video input
jack, connect the player to this jack.
B
(green)
(blue)
(red)
,continued
9
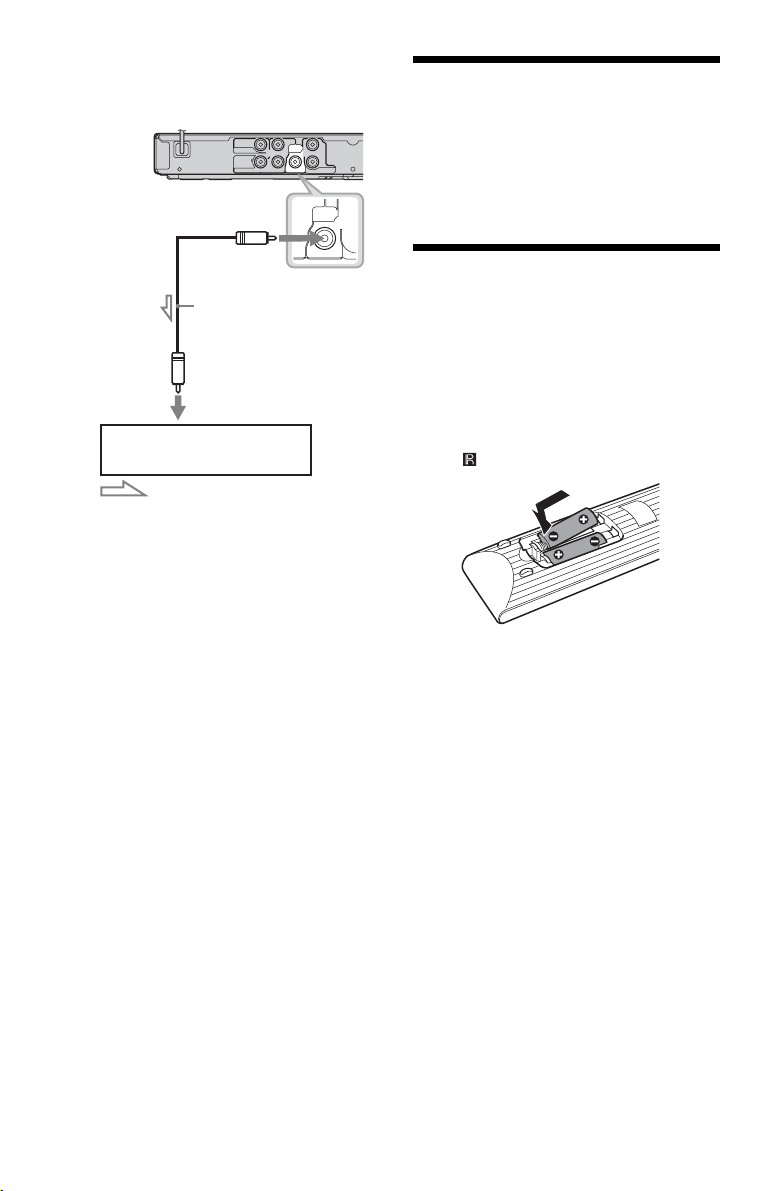
To connect to your audio component
Use the following pattern.
CD/DVD player
to DIGITAL OUT
(COAXIAL)
Coaxial digital cable
(not supplied)
to coaxial
digital input
Audio component
with a decoder
: Signal flow
z
For correct speaker location, see the operating
instructions supplied with the connected
components.
If your audio component has a Dolby*1
Digital or DTS*
2
decoder and a digital input
VIDEO OUT
COMPONENT
VIDEO OUT
P
B
VIDEO
Y
L
DIGITAL
OUT
R
COAXIAL
P
R
AUDIO OUT
DIGITAL
OUT
COAXIAL
jack, use this connection. You can enjoy
Dolby Digital (5.1ch) and DTS (5.1ch)
surround effect.
*1
Manufactured under license from Dolby
Laboratories.
Dolby, Pro Logic, and the double-D symbol are
trademarks of Dolby Laboratories.
*2
Manufactured under license under U.S. Patent #:
5,451,942 & other U.S. and worldwide patents
issued & pending. DTS and DTS Digital Out are
registered trademarks and the DTS logos and
Symbol are trademarks of DTS, Inc. © 19962007 DTS, Inc. All Rights Reserved.
b
• After you have completed the connection, make
the appropriate settings in Quick Setup (page 12).
Otherwise, no sound or a loud noise will come
from your speakers.
• The TVS effects of this player cannot be used
with this connection.
• In order to listen to DTS sound tracks, you must
use this connection. DTS sound tracks are not
output through the AUDIO OUT L/R jacks, even
if you set “DTS” to “ON” in Quick Setup
(page 12).
Step 2: Connecting the Power Cord
Plug the player and TV power cords into an
AC outlet.
Step 3: Preparing the Remote
You can control the player using the supplied
remote. Insert two Size AA (R6) batteries by
matching the 3 and # ends on the batteries
to the markings inside the compartment.
When using the remote, point it at the remote
sensor on the player.
b
• Do not leave the remote in an extremely hot or
humid place.
• Do not drop any foreign object into the remote
casing, particularly when replacing the batteries.
• Do not expose the remote sensor to direct light
from the sun or a lighting apparatus. Doing so
may cause a malfunction.
• If you do not use the remote for an extended
period of time, remove the batteries to avoid
possible damage from battery leakage and
corrosion.
10

Controlling your TV with the supplied remote
You can control the sound level, input source,
and power switch of your Sony TV with the
supplied remote.
TV INPUT TV
Number
buttons
You can control your TV using the buttons
below.
By pressing You can
TV [/1 Turn the TV on or off
VOL +/– Adjust the volume of the TV
TV INPUT
(input select)
b
Depending on the connected unit, you may not be
able to control your TV using all or some of the
buttons on the supplied remote.
TVTV
PICTURE
NAVI
VOL +/–
TIME/TEXT
CLEAR
AUDIO SUBTITLE
TOP MENU MENU
RETURN
DISPLAY
Switch the TV’s input source
between the TV and other
input sources
To control other TVs with the remote
You can control the sound level, input source,
and power switch of non-Sony TVs as well.
If your TV is listed in the table below, set the
appropriate manufacturer’s code.
1 While holding down TV [/1, press the
number buttons to select your TV’s
manufacturer’s code (see the table
below).
2 Release TV [/1.
◆Code numbers of controllable TVs
If more than one code number is listed, try
entering them one at a time until you find the
one that works with your TV.
Manufacturer Code number
Sony 01 (default)
Hitachi 02
LG/Goldstar/NEC 04
MGA/Mitsubishi 13
Panasonic 19
Philips 21
Pioneer 16
RCA 10
Samsung 20
Sharp 18
Toshiba 07
Hookups
b
• When you replace the batteries of the remote, the
code number you have set may be reset to the
default setting. Set the appropriate code number
again.
• Depending on the connected unit, you may not be
able to control your TV using all or some of the
buttons on the supplied remote.
11
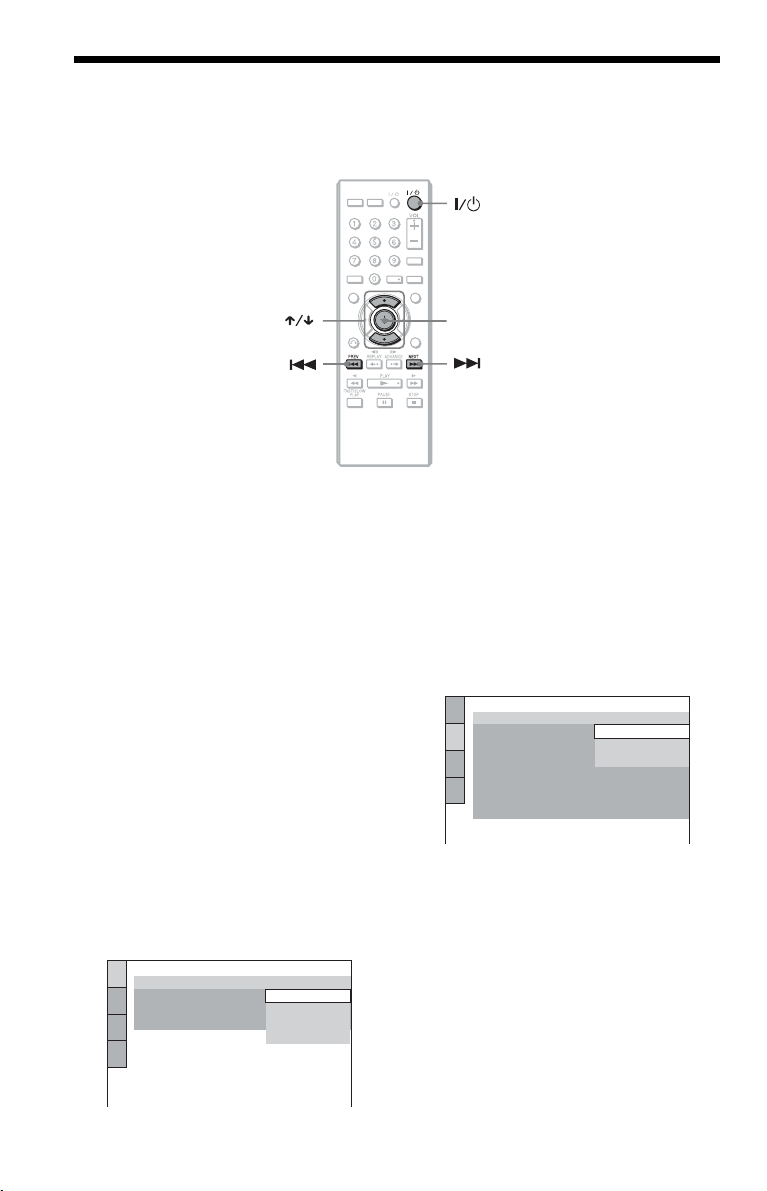
Step 4: Quick Setup
Follow the steps below to make the minimum number of basic adjustments for using the player.
To skip an adjustment, press >. To return to the previous adjustment, press ..
TV
PICTURE
NAVITVINPUT
TIME/TEXT
AUDIO SUBTITLE
CLEAR
TOP MENU MENU
ENTER
RETURN
DISPLAY
1 Turn on the TV.
2 Press [/1.
The player turns on.
3 Switch the input selector on your
TV so that the signal from the
player appears on the TV screen.
“Press [ENTER] to run QUICK SETUP”
appears at the bottom of the screen. If this
message does not appear, select
“QUICK” under “SETUP” in the Control
Menu to run Quick Setup (page 17).
4 Press ENTER without inserting a
disc.
The Setup Display for selecting the
language used in the on-screen display
appears.
LANGUAGE SETUP
OSD:
MENU:
AUDIO:
SUBTITLE:
ENGLISH
ENGLISH
FRENCH
SPANISH
PORTUGUESE
5 Press X/x to select a language.
The player displays the menu and
subtitles in the selected language.
6 Press ENTER.
The Setup Display for selecting the
aspect ratio of the TV to be connected
appears.
SCREEN SETUP
TV TYPE:
SCREEN SAVER:
BACKGROUND:
BLACK LEVEL:
BLACK LEVEL
PROGRESSIVE
MODE
(PROGRESSIVE)
4:3 OUTPUT: FULL
4:3 LETTER BOX
4:3 LETTER BOX
4:3 PAN SCAN
(COMPONENT OUT)
(COMPONENT OUT ONLY)
:
:
16:9
OFF
:
OFF
AUTO
7 Press X/x to select the setting that
matches your TV type.
◆ If you have a 4:3 standard TV
• 4:3 LETTER BOX or 4:3 PAN SCAN
(page 28)
◆ If you have a wide-screen TV or a 4:3
standard TV with a wide-screen mode
• 16:9 (page 28)
12
 Loading...