


4-126-489-21(1)
Portable
CD/DVD Player
Operating Instructions
Mode d’emploi
DVP-FX735
© 2009 Sony Corporation
US
FR

WARNING
To reduce the risk of fire or
electric shock, do not
expose this apparatus to
rain or moisture.
To avoid electrical shock,
do not open the cabinet.
Refer servicing to qualified
personnel only.
The AC power cord must be
changed only at a qualified
service shop.
Batteries or batteries
installed apparatus shall
not be exposed to
excessive heat such as
sunshine, fire or the like.
CAUTION
The use of optical instruments
with this product will increase
eye hazard. As the laser beam
used in this CD/DVD player is
harmful to eyes, do not attempt to
disassemble the cabinet.
Refer servicing to qualified
personnel only.
This label is located on the
bottom of the unit.
This symbol is
intended to alert the
user to the presence
of important
maintenance (servicing)
instructions in the literature
accompanying the appliance.
Precautions
• Install this system so that the
AC power cord can be
unplugged from the wall socket
immediately in the event of
trouble.
• The player is not disconnected
from the AC power source as
long as it is connected to the
wall outlet, even if the player
itself has been turned off.
• To prevent fire or shock
hazard, do not place objects
filled with liquids, such as
vases, on the apparatus.
For customers in Canada
If this product is not working
properly, please call 1-877-6022008 for Peace of Mind Warranty
Replacement service.
For other product related questions
please contact our Customer
Information Service Center at 1877-899-7669 or write to us at:
Customer Information Service 115
Gordon Baker Road, Toronto,
Ontario, M2H 3R6
operating and
RECYCLING LITHIUMION BATTERIES
Lithium-Ion
batteries are
recyclable.
You can help
preserve our
environment by
returning your used rechargeable
batteries to the collection and
recycling location nearest you.
For more information regarding
recycling of rechargeable
batteries, call toll free
1-800-822-8837, or visit
http://www.rbrc.org/
Caution: Do not handle damaged
or leaking Lithium-Ion batteries.
Do not take apart or remodel the
player. Doing so can result in
electric shock. Consult your
nearest Sony dealer or Sony
Service Center for exchange of
rechargeable batteries, internal
checks or repair.
IMPORTANT NOTICE
Caution: This player is capable
of holding a still video image
or on-screen display image on
your television screen
indefinitely. If you leave the
still video image or on-screen
display image displayed on
your TV for an extended period
of time you risk permanent
damage to your television
screen. Plasma display panel
televisions and projection
televisions are susceptible to
this.
This symbol is
intended to alert the
user to the presence
of uninsulated
voltage” within the product’s
enclosure that may be of
sufficient magnitude to constitute
a risk of electric shock to
persons.
US
2
“dangerous
If you have any questions or
problems concerning your
player, please consult your
nearest Sony dealer.

Copyrights, lic ensing and
trademarks
• This product incorporates
copyright protection
technology that is protected by
U.S. patents and other
intellectual property rights.
Use of this copyright
protection technology must be
authorized by Macrovision,
and is intended for home and
other limited viewing uses only
unless otherwise authorized by
Macrovision. Reverse
engineering or disassembly is
prohibited.
• Manufactured under license
from Dolby Laboratories.
Dolby and the double-D
symbol are trad emarks of
Dolby Laboratories.
• “DVD+RW,” “DVD-RW,”
“DVD+R,” “DVD+R DL,”
“DVD-R,” “DVD VIDEO,”
and “CD” logos are
trademarks.
• MPEG Layer-3 audio coding
technology and patents
licensed from Fraunhofer IIS
and Thomson.
• DivX, DivX Certified, and
associat ed logos are
trademarks of DivX, Inc. and
are used under license.
• THIS PRODUCT IS
LICENSED UNDER THE
MPEG-4 VISUAL PATENT
PORTFOLIO LICENSE FOR
THE PERSONAL AND NONCOMMERCIAL USE OF A
CONSUMER FOR
DECODING VIDEO IN
COMPLIANCE WITH THE
MPEG-4 VISUAL
STANDARD (“MPEG-4
VIDEO”) THAT WAS
ENCODED BY A
CONSUMER ENGAGED IN
A PERSONAL AND NONCOMMERCIAL ACTIVITY
AND/OR WAS OBTAINED
FROM A VIDEO PROVIDER
LICENSED BY MPEG LA TO
PROVIDE MPEG-4 VIDEO.
NO LICENSE IS GRANTED
OR SHALL BE IMPLIED
FOR ANY OTHER USE.
ADDITIONAL
INFORMATION
INCLUDING THAT
RELATING TO
PROMOTIONAL,
INTERNAL AND
COMMERCIAL USES AND
LICENSING MAY BE
OBTAINED FROM MPEG
LA, LLC. SEE HTTP://
WWW.MPEGLA.COM
About this manual
• In this manual, “disc” is used as
a general reference for the
DVDs or CDs unless otherwise
specified by the text or
illustrations.
• Icons, such as , listed at
the top of each explanation
indicate what kind of media
can be used with the function
being explained.
For details, see “Playable
Media” (page 26).
• NEED-to-know information
(to prevent incorrect operation)
is listed under the
NICE-to-know information
(tips and other useful
information) is listed under the
z icon.
b icon.
US
US
3

Table of Contents
WARNING . . . . . . . . . . . . . . . . . . . . . . . . . . . . . . . . . . . . . . . . . . . . . . 2
Guide to Parts and Controls . . . . . . . . . . . . . . . . . . . . . . . . . . . . . . . . . 5
Preparations . . . . . . . . . . . . . . . . . . . . . . . . . . . . . . . . . . . . 9
Checking the Accessories . . . . . . . . . . . . . . . . . . . . . . . . . . . . . . . . . . 9
Charging the Rechargeable Battery . . . . . . . . . . . . . . . . . . . . . . . . . . . 9
Using the Car Battery Adaptor . . . . . . . . . . . . . . . . . . . . . . . . . . . . . . 10
Connecting to a TV . . . . . . . . . . . . . . . . . . . . . . . . . . . . . . . . . . . . . . . 11
Playback . . . . . . . . . . . . . . . . . . . . . . . . . . . . . . . . . . . . . .12
Playing Discs . . . . . . . . . . . . . . . . . . . . . . . . . . . . . . . . . . . . . . . . . . . 12
Playing MP3, JPEG, and Video Files . . . . . . . . . . . . . . . . . . . . . . . . . 15
Adjusting the Picture Size and Quality
Settings and Adjustments . . . . . . . . . . . . . . . . . . . . . . . . . . .18
Using the Setup Display . . . . . . . . . . . . . . . . . . . . . . . . . . . . . . . . . . . 18
Additional Information . . . . . . . . . . . . . . . . . . . . . . . . . . . . .21
Troubleshooting . . . . . . . . . . . . . . . . . . . . . . . . . . . . . . . . . . . . . . . . . 21
Precautions . . . . . . . . . . . . . . . . . . . . . . . . . . . . . . . . . . . . . . . . . . . . . 23
Playable Media . . . . . . . . . . . . . . . . . . . . . . . . . . . . . . . . . . . . . . . . . . 26
Specifications . . . . . . . . . . . . . . . . . . . . . . . . . . . . . . . . . . . . . . . . . . . 28
Index . . . . . . . . . . . . . . . . . . . . . . . . . . . . . . . . . . . . . . . . . . . . . . . . . . 29
. . . . . . . . . . . . . . . . . . . . . . . . 16
US
4

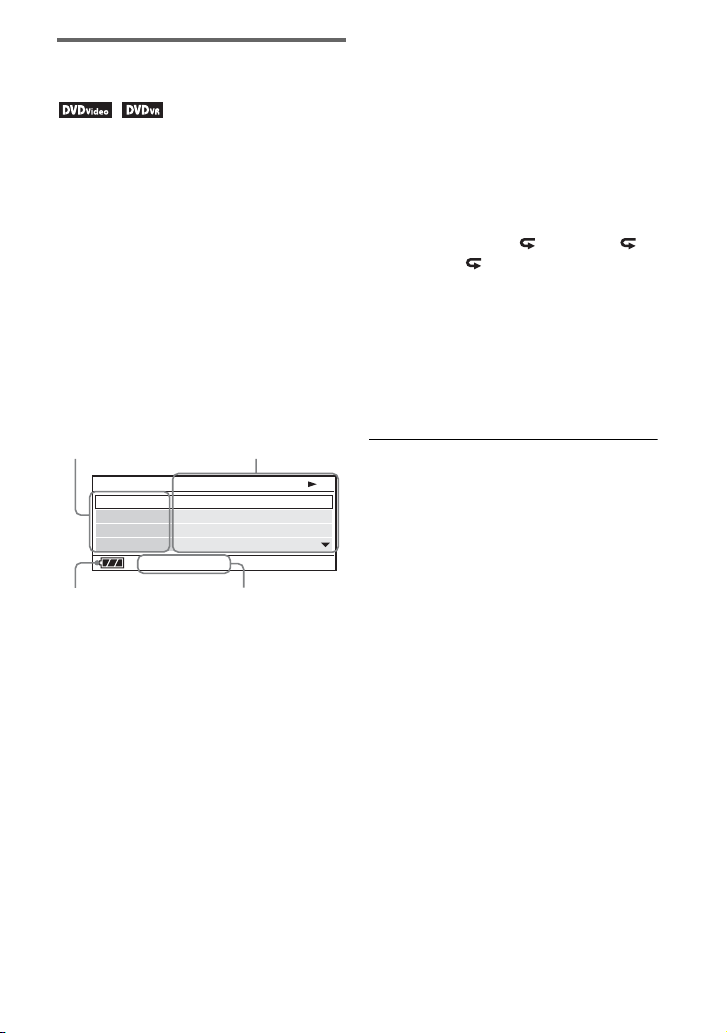
Guide to Parts and
DC IN 9.5V
VIDEO OUTAUDIO OUT
A PHONES B
POWER
ONOFF
Controls
A LCD panel (page 12)
B Speaker
For more information, see the pages
indicated in parentheses.
Player
TOP MENU
DISPLAY MENU
ENTER
RETURN
OPTIONS
VOLUME
PUSH CLOSE
POWER CHARGE
Buttons C D E and F are the same in
function as those on the remote.
The VOLUME+ and N (play) buttons
have a tactile dot. Use the tactile dot as a
reference when operating the player.
OPEN
C TOP MENU button
Displays the menu or changes the
playback mode.
• When playing a DVD VIDEO:
Displays the top menu.
• When playing a DVD VR: Switches
between “Original” and “Play List”
on the disc created Playlist. During
playback, you cannot switch. Press
x twice, and press TOP MENU.
D DISPLAY button
Displays the playback information.
• When playing a DVD: Displays the
playback information and changes
the playback mode. See page 14.
• When playing a CD: Each time you
press the button, the time
information switches.
• When playing a video file: Each time
you press the button, the time
information switches.
MENU button
Displays the menu or changes the
playback mode.
• When playing a DVD: Displays the
menu.
• When playing a CD: Each time you
press the button, switches Repeat
Play, Random Play, and Play.
• When playing a JPEG file: Displays
the list of thumbnails and plays a
slideshow. See page 16.
C/X/x/c button
Moves the highlight to select a
displayed item.
• When playing a DVD or CD: C/c on
the player works as the same as m/
M on the remote.
,continued
US
5

ENTER button
Enters the selected item.
• When playing a DVD or CD:
ENTER on the player works as the
same as N.
RETURN button
Returns to the previous display.
OPTIONS button
Displays the menu for adjusting the
LCD screen (page 16) and using the
setup display (page 18).
E VOLUME (sound volume) +/–
button
Adjusts the volume.
K CHARGE indicator (page 9)
L (remote sensor)
When operating by the remote, point it
at the remote sensor .
M POWER switch (page 12)
Turns the player on or off.
N HOLD switch
To avoid accidental button operation
of the player, set the HOLD switch to
the direction of the arrow.
All the buttons on the player are
locked, while the buttons on the
remote remain operable.
F N (play) button (page 12)
Starts or re-starts playback.
X (pause) button (page 12)
Pauses or re-starts playback.
x (stop) button (page 12)
Stops playback.
. (previous) button
Skips to the beginning of the current
chapter/track/scene.
To go to the beginning of the previous
chapter/track/scene, press twice.
> (next) button
Skips to the next chapter/track/scene.
G Disc Lid (page 12)
H OPEN button (page 12)
Opens the disc lid.
I PUSH CLOSE (page 12)
Closes the disc lid.
J POWER indicator (page 12)
O PHONES (headphone) jack A, B
P AUDIO OUT jack (page 11)
Q VIDEO OUT jack (page 11)
R DC IN 9.5V jack (page 9, 10)
Connect the AC power adaptor or car
battery adaptor.
US
6

Remote
123
456
7809
Buttons C D E and F are the same in
function as those on the player.
The number 5, N and AUDIO buttons
have a tactile dot. Use the tactile dot as a
reference when operating the player.
S Number buttons
Enters the title/chapter numbers, etc.
• When playing a DVD VIDEO or
CD: Search directly by entering the
title/chapter/track number using the
number buttons, and press ENTER.
To switch a title or chapter, press C/
c.
CLEAR button
Clears the entry field.
T m/M (scan/slow) buttons
Fast reverses/ fast forwards when
pressed during playback. Press
repeatedly to change the speed.
• When playing a DVD: Slow
reverses/ slow forwards when
pressed during pause. Press
repeatedly to change the speed.
• When playing a video file: Slow
forwards when pressed during pause.
Press repeatedly to change the speed.
U ADVANCE button
Briefly fast forwards the current scene
(DVD only).
V AUDIO button
Changes the audio signal.
• When playing a DVD VIDEO: Each
time you press the button, the
language of the sound track
switches. Depending on the disc, the
choice of language varies.
• When playing a DVD VR: Each time
you press the button, the type of
sound tracks recorded on a disc
switches between main, sub and
main/sub sound.
• When playing a CD: Each time you
press the button, the mode switches
between stereo and monaural (left/
right).
• When playing a DivX video file:
Each time you press the button, the
audio signal switches. If “No Audio”
appears, the player does not support
the audio signal.
,continued
US
7

SUBTITLE button
Changes the subtitle.
• When playing a DVD: Each time
you press the button, the subtitle
switches. Depending on the disc, the
choice of language varies.
• When playing a DivX video file:
Press the button during playback.
Press X/x and ENTER while
displaying subtitle information.
ANGLE button
Changes the angle. When “ ”
(Angle Mark) appears, you can change
angles. Depending on the disc, you
may not be able to change the angle.
(DVD VIDEO only)
US
8

Preparations
Checking the
Accessories
Check that you have the following items:
• AC power adaptor (1)
• Car battery adaptor (1)
• Audio/video cord (mini plug × 2 y
phono plug × 3) (1)
• Remote (with battery) (1)
Charging the
Rechargeable Battery
Charge the rechargeable battery before
using the player for the first time, or when
the battery is depleted.
1 Connect the AC power adaptor.
When charging begins, the CHARGE
indicator lights up in orange.
POWER
ONOFF
A PHONES B
DC IN 9.5V
VIDEO OUTAUDIO OUT
Preparations
To replace the remote battery
When the battery becomes depleted,
operation is not possible. Change the
battery.
1 Prepare a new battery (lithium battery
CR2025).
2 Pull out the battery holder (2) while
pressing the lock lever (1).
3 Remove the old battery.
4 Insert the new battery in the battery
holder with the 3 side up and then
push the holder until it clicks.
CAUTION
Danger of explosion if battery is incorrectly
replaced.
Replace only with the same or equivalent
type.
DC IN 9.5V
To a wall outlet
AC power Adaptor (supplied)
When charging ends, the CHARGE
indicator lights off.
Disconnect the AC power adaptor.
z
If the POWER indicator lights up instead of the
CHARGE indicator, the POWER switch is set to
“ON.” Set the POWER switch to “OFF,” and
make sure that the CHARGE indicator lights up.
b
Charge the battery in an ambient temperature of
between 5°C to 35°C (41°F to 95°F).
,continued
US
9

Charging time and playing time
Charging time: approx. 5 hours
Playing time: approx. 5 hours
Times indicated are under the following
conditions:
– Moderate temperature (20°C (68°F))
– Headphone use
– Backlight set to minimum
Depending on the ambient temperature or
rechargeable battery condition, charging time
may be longer, or playing time may be reduced.
To check the battery level
When the player is stopped, the battery
indicator is displayed. When the battery is
empty, is displayed or the CHARGE
indicator flashes. Set the POWER switch
to “OFF,” connect the AC power adaptor,
and recharge the battery.
Using the Car Battery
Adaptor
The car battery adaptor (supplied) is for a
12V car battery, negative earth (do not use
it with a 24V car battery, positive earth).
1 Start the engine.
2 Connect the car battery adaptor.
POWER
ONOFF
A PHONES B
DC IN 9.5V
DC IN 9.5V
VIDEO OUTAUDIO OUT
Full Empty
US
10
To cigarette
lighter socket
Car battery adaptor (supplied)
3 Turn on the player.
b
• The driver should not connect or disconnect
the car battery adaptor while driving.
• Arrange the cord so as not to interfere with the
driver. Also, do not place the LCD panel where
the driver can watch.
• Clean the cigarette lighter socket. If it is dirty,
it may cause contact failure or malfunction.
• Use the car battery adaptor with the car engine
running. If it is used with the car engine off, the
car battery may become depleted.

After using the player in a car
1 Turn off the player.
2 Disconnect the car battery adaptor.
3 Turn off the engine.
b
• Do not disconnect the car battery adaptor or
turn off the car engine before you turn off the
player. Doing so may damage the player.
• Disconnect the car battery adaptor after use. If
it is left connected, the car battery may become
depleted.
• Do not leave the player or accessories in the
car.
Connecting to a TV
By connecting the player to your TV or
monitor, you can increase your viewing
options.
1 Connect the player to your TV or
monitor using the audio/video
cord (supplied).
POWER
A PHONES B
ONOFF
z
The player can connect to an AV amplifier in the
same way as a TV. Although connecting is the
same as a TV, the yellow plug of the audio/video
cord is not used.
DC IN 9.5V
VIDEO OUTAUDIO OUT
VIDEO OUTAUDIO OUT
To AUDIO/
VIDEO input
jacks of a TV or
monitor
Audio/video cord
(supplied)
Preparations
b
• Refer to the instructions supplied with the
equipment to be connected.
• Before connecting, turn off the player and the
equipment to be connected, then unplug from
their wall sockets.
11
US

Playback
HOLD
POWER
ONOFF
Playing Discs
Depending on the disc, some operations
may be different or restricted. Refer to the
operating instructions supplied with the
disc.
Connect the AC power adaptor.
N
X
ENTER
OPTIONS
x
VOLUME
OPEN
OPEN
PUSH
CLOSE
TOP MENU
DISPLAY MENU
RETURN
PUSH CLOSE
4 Insert the disc to be played.
Place with the playback side down and
push gently until it clicks.
Playback side facing down
5 Push the PUSH CLOSE on the
disc lid to shut the disc lid.
6 Press N.
The player starts playback.
Depending on the disc, a menu may
appear. Press C/X/x/c to select the
item, and press ENTER.
POWER
1 Open the LCD panel.
2 Slide the POWER switch to
“ON.”
The player turns on and the POWER
indicator lights up in green.
3 Press OPEN to open the disc lid.
US
12
To stop playback
Press x.
To pause playback
Press X.
b
• Discs created on DVD recorders must be
correctly finalized to play on the player. For
more information about finalizing, refer to the
operating instructions supplied with the DVD
recorder.
• The disc may be stil l spinning when the disc lid
is opened. Wait until the spinning stops before
removing the disc.

To resume playback from the point
where you stopped the disc (Resume
Play)
When you press N again after you stop
playback, the player starts playback from
the point when you pressed x.
z
• To play from the beginning of the disc, press
x twice, and press N.
• When turning power on again after power off,
resume play starts automatically.
b
• Depending on the stop point, Resume play
may not start from exactly the same point.
• The resume point is cleared when:
– you turn off the player (including standby
mode) for a DVD (VR mode).
– you open the disc lid.
Notes on the screen saver
• A screen saver image appears when you
leave the player in pause or stop mode
without operation for more than 15
minutes. The image disappears when you
press N. For the setup of “Screen
Saver,” see page 19.
• The player goes to standby, 15 minutes
after starting the screen saver function.
Press N to come out of standby mode.
About various playback operations
To Operation
Change the LCD
picture size
Display the DVD
menu
Check the DVD
playback
information
Play DVDs*
repeatedly
(Repeat Play)
Play DVDs in
fast reverse or
fast forward
(Scan Play)
Switch between
original and
Playlist in DVD
(VR mode)
Change the CD
playback
information
Play CDs
repeatedly
(Repeat Play)
Play CDs
randomly
(Random Play)
* DVD VIDEO only
Press OPTIONS to
select “LCD Mode”
(page 16).
Press MENU or TOP
MENU (page 5).
Press DISPLAY
(page 14).
Press DISPLAY to
select “Repeat”
(page 14).
Press C/c repeatedly on
the player to select the
speed (page 5).
Press TOP MENU
repeatedly (page 5).
Press DISPLAY
repeatedly (page 5).
Press MENU
repeatedly (page 5).
Press MENU
repeatedly (page 5).
Playback
,continued
13
US
Using the Playback
Information Display
While playing a DVD, you can check the
current playback information. The
playback information display also allows
you to set a title/chapter or change sound/
subtitle, and so on.
When entering the numbers, operate the
number buttons on the remote.
1 Press DISPLAY while playing a
DVD.
The current playback information
appears.
Example: When playing a DVD
VIDEO
Current playback
Items
Menu
Title
Chapter
Audio
Subtitle
information*
02/07
03/20
02 2CH DOLBY DIGITAL English
01 English
Title Elapsed 00:12:01
Elapsed or remaining timeBattery status
• T.Time: Time appears while playing
a title. “00:00:00” will appear by
pressing ENTER. Enter the desired
time code by pressing the number
buttons.
• C.Time: Time appears while playing
a chapter. “00:00:00” will appear by
pressing ENTER. Enter the desired
time code by pressing the number
buttons.
• Repeat: Select “ Chapter,” “
Title,” “ All,” or “Off” by
pressing X/x.
• Time Disp.: “Title Elapsed” is
displayed. Select “Title Elapsed,”
“Title Remain,” “Chapter Elapsed,”
or “Chapter Remain” by pressing X/
x.
3 Press ENTER.
To turn off the display
Press DISPLAY or RETURN.
b
Depending on the disc, you may not be able to
set some items.
* When a DVD (VR mode) is played, “PL”
(playlist) or “ORG” (original) is displayed
next to the title number.
2 Press X/x to select items and press
ENTER.
• Title: Select the title number by
pressing X/x or number buttons.
• Chapter: Select the chapter number
by pressing X/x or number buttons.
• Audio: Select the sound by pressing
X/x.
• Subtitle: Select the subtitle by
pressing X/x.
• Angle: Select the angle by pressing
X/x.
US
14

Playing MP3, JPEG,
and Video Files
You can play MP3, JPEG, and video files.
For details on playable files, see “Playable
Media” (page 26).
When you set a DATA media, a list of
albums appears.
DATA CDs recorded in KODAK Picture
CD format automatically start playing
when inserted.
C/X/x/c
ENTER
TOP MENU
DISPLAY MENU
MENU
ENTER
RETURN
OPTIONS
./>
VOLUME
x
OPEN
PUSH CLOSE
X
N
1 Press X/x to select the album,
and press ENTER.
The list of files in the album appears.
Example: The list of MP3 files
Dir:001
MY BEST
. .
01 Stardust
02 Fire
03 Wing
• To go to the next or previous page,
press > or ..
• To return to the list of albums, press
X/x to select and press ENTER.
To go to the next or previous file
Press > or ..
To stop playback
Press x.
The display will return to the list of files.
To pause playback (MP3 only)
Press X.
To restart playback, press X again.
z
If the number of viewing times is preset, you can
play the DivX video files as many times as the
preset number. The following occurrences will
be counted as one time:
– when x is pressed.
– when the player is turned off (including
standby mode).
– when the disc lid is opened.
– when another file is played.
b
Depending on the file, playback ma y take time to
start or may not be able to start. For details on
playable files, see “Playable Media” (page 26).
Selecting a JPEG file
To rotate a JPEG image
Press C/X/x/c while viewing the image
file. Rotate every file.
c: Rotates the image 90 degrees
clockwise.
C: Rotates the image 90 degrees counter
clockwise.
X: Reverses the image vertically (up and
down).
x: Reverses the image horizontally (left
and right).
Playback
2 Press X/x to select the file, and
press ENTER.
Playback starts from the selected file.
,continued
15
US

To display the list of thumbnails
Press MENU when an image file is
displayed.
The image files in the album appear in 12
sub-screens with the displayed file in the
lead.
Adjusting the Picture
Size and Quality
1234
5678
910
11 12
Slide Show
Prev Next
• To go to the previous or next list of
thumbnails, select “bPrev” or
“NextB” at the bottom of the screen,
and press ENTER.
• To exit the list of thumbnails, press
MENU.
Playing a Slide Show
1 While displaying the image file you
want to start a slideshow, press
MENU.
The list of thumbnails appears.
2 Press C/X/x/c to select “Slide
Show” at the bottom of the screen,
and press ENTER.
A slideshow starts from the displayed
file.
To stop slideshow
Press x to return to the list of files.
Press MENU to return to the list of
thumbnails.
To pause slideshow
Press X.
You can adjust the picture displayed on the
LCD screen.
C/X/x/c
TOP MENU
DISPLAY MENU
ENTER
ENTER
OPTIONS
RETURN
OPTIONS
VOLUME
RETURN
PUSH CLOSE
OPEN
1 Press OPTIONS.
The menu display appears.
2 Press X/x to select “LCD
Mode” and press ENTER.
The “LCD Mode” display appears.
items
LCD Mode
LCD Aspect
Backlight 10
Contrast
Hue
Default
Select: Cancel:
Full
10
0
10Color
ENTER RETURN
3 Press X/x to select items and
press ENTER.
• LCD Aspect: Change the picture size.
Select “Normal” or “Full” by pressing
X/x
*.
• Backlight: Adjust the brightness by
pressing C
• Contrast: Adjust the difference
between light and dark areas by
pressing C
/
c.
/
c.
16
US

• Hue: Adjust the red and green color
balance by pressing C
/
c.
• Color: Adjust the richness of colors
by pressing C
/
c.
• Default: Return all settings to the
factory defaults.
4 Press ENTER.
* In “Normal,” pictures are displayed in their
original configuration, retaining the aspect
ratio. 4:3 pictures are displayed with black
bands on both sides of the screen. 4:3 letter box
pictures are displayed with bands on all sides
of the screen.
In “Full,” pictures are adjusted to fill the entire
screen. 16:9 pictures are displayed in their
original configuration. (Black band recorded
in a 16:9 picture cannot be erase d.) 4:3 pictures
appear stretched.
To turn off the menu display
Press OPTIONS or RETURN twice.
b
Depending on the disc, the screen size you can
select differs.
Playback
17
US

Settings and Adjustments
Using the Setup Display
By using the setup display, you can make
various settings to items such as picture
and sound.
Some discs have stored playback settings,
which take priority.
C/X/x/c
TOP MENU
DISPLAY MENU
ENTER
ENTER
OPTIONS
RETURN
OPTIONS
VOLUME
RETURN
OPEN
PUSH CLOSE
x
: General Setup (page 18)
Makes the player-related settings.
: Audio Setup (page 19)
Makes the audio settings according to
playback conditions.
: Language Setup (page 19)
Makes the language settings for the
on-screen display or sound track.
: Parental Control (page 20)
Sets the parental control limit.
4 Select and adjust each of the
following items by pressing X/x
and ENTER.
To turn off the setup display
Press OPTIONS or RETURN twice.
1 Press OPTIONS when the player
is in stop mode.
The menu display appears.
During Resume Play, you cannot use
the setup display. Press x twice to
clear Resume Play, and press
OPTIONS.
2 Press X/x to select “Setup,”
and press ENTER.
The setup display appears.
setup category items
General Setup
Select:
TV Display
Angle Mark
DivX
Default
ENTER RETURN
Cancel:
16 : 9
On
OnScreen Saver
3 Press X/x to select the setup
category and press ENTER.
US
18
General Setup
The default settings are underlined.
◆ TV Display (DVD only)
Selects the aspect ratio of the connected
TV.
4:3
Pan Scan
4:3
Letter Box
16:9
Select this when you connect
a 4:3 screen TV.
Automatically displays a
wide picture on the entire
screen and cuts off the
portions that do not fit.
Select this when you connect
a 4:3 screen TV. Displays a
wide picture with bands on
the upper and lower portions
of the screen.
Select this when you connect
a wide-screen TV or a TV
with a wide mode function.

4:3 Pan Scan
◆ Default
Each function returns to its original factory
settings. Note that all of your settings will
be lost.
4:3 Letter Box
16:9
b
Depending on the disc, “4:3 Letter Box” may be
selected automatically instead of “4:3 Pan Scan”
or vice versa.
◆ Angle Mark (DVD VIDEO only)
Displays the angle mark when you can change
the viewing angles during playback of DVDs
recorded with multi-angles.
On Display the angle mark.
Off Hide the angle mark.
◆ Screen Saver
The screen saver image appears when you
leave the player in pause or stop mode for
15 minutes. The screen saver will help
prevent your display equipment from
becoming damaged (ghosting). Press N
to turn off the screen saver.
On
Off Deactivates the screen saver
Activates the screen saver
function.
function.
◆ DivX
Displays the registration code for the
player. For more information, go to
http://www.divx.com
on the Internet.
Audio Setup
The default setting is underlined.
◆ Audio DRC (Dynamic Range Control)
(DVD only)
Makes the sound clear when the volume is
turned down when playing a DVD that
conforms to “Audio DRC.”
Standard Standard sound.
TV Mode
Wide Range Gives you the feeling of
Makes low sounds clear even
if you turn the volume down.
being at a live performance.
Language Setup
◆ OSD (On-Screen Display)
Switches the display language on the
screen.
◆ Disc Menu (DVD VIDEO only)
Switches the language for the disc’s menu.
When you select “Original,” the language
given priority in the disc is selected.
◆ Subtitle (DVD VIDEO only)
Switches the subtitle language.
When you select “Off,” no subtitle is
displayed.
◆ Audio (DVD VIDEO only)
Switches the language of the sound track.
When you select “Original,” the language
given priority in the disc is selected.
b
If you select a language in “Disc Menu,”
“Subtitle,” or “Audio” that is not recorded on the
disc, one of the recorded languages will be
automatically selected.
Settings and Adjustments
,continued
19
US

Parental Control
You can limit playback of a DVD that has
the parental control function.
When you operate this setting, use the
remote.
◆ Password (DVD VIDEO only)
Enter or change a password. Set the
password for the parental control function.
Enter your 4-digit password using the
number buttons on the remote.
To change the password
1 Press X/x to select “Password,” and
press ENTER.
2 Check “Change” is selected and press
ENTER.
The display for entering the password
appears.
Parental Control
Old Password
New Password
Verify Password
OK
Enter password, then press .
ENTER
3 Enter your current password in “Old
Password,” your new password in
“New Password” and “Verify
Password,” and press ENTER.
◆ Parental Control (DVD VIDEO only)
Set the limitation level. The lower the
value, the stricter the limitation.
To set the parental control, you need to set
the password first.
To set the parental control (limited
playback)
1 Press X/x to select “Parental Control,”
and press ENTER.
2 Press X/x to select the limitation level,
and press ENTER. The lower the
value, the stricter the limitation.
The display for entering the password
appears.
Parental Control
Password
OK
Enter password, then press .
ENTER
3 Enter your password, and press
ENTER.
To play a disc for which Parental
Control is set
Insert the disc and press N, the display
for entering your password appears. Enter
your password using the number buttons
on the remote, and press ENTER.
If you make a mistake entering your
password
Press CLEAR, or press C to return one by
one before pressing ENTER in step 3, and
re-enter the password.
If you forget your password
Enter “1369” in “Old Password,” and enter your
new password in “New Password” and “Verify
Password.”
US
20
b
• When you play discs which do not have the
Parental Control function, playback cannot be
limited on the player.
• Depending on the disc, you may be asked to
change the parental control level while playing
the disc. In this case, enter your password, then
change the level. If the Resume Play mode is
canceled, the level returns to the previous
level.

Additional Information
Troubleshooting
If you experience any of the following
difficulties while using the player, use this
troubleshooting guide to help remedy the
problem before requesting repairs. Should
any problem persist, consult your nearest
Sony dealer.
Power
The power is not turned on.
, Check that the AC power adaptor is
connected securely (page 9).
, Check that the rechargeable battery is
sufficiently charged (page 9).
Sound
There is no sound.
, The player is in pause mode or in slow
play mode.
, The player is in fast forward or fast
reverse mode.
The sound volume is low.
, The sound volume is low on some
DVDs. The sound volume may improve
if you set “Audio DRC” in “Audio
Setup” to “TV Mode” (page 19).
Operation
Nothing happens when buttons are
pressed.
,
The HOLD switch is not set in the
direction of the arrow (
page 6
).
Additional Information
The rechargeable battery cannot be
charged.
, You cannot charge the rechargeable
battery when power is turned on. Set the
POWER switch to “OFF” (page 9).
Picture
There is no picture/picture noise
appears.
, The disc is dirty or flawed (page 25).
, The brightness is set at minimum. Set the
brightness in “LCD Mode” (page 16).
The black points appear and the red,
blue, green points remain on the LCD.
, This is a structural property of the LCD
and not malfunction.
The disc does not play.
, If the disc is turned over, a “No Disc” or
“Cannot play this disc.” message
appears. Insert the disc with the playback
side facing down (page 12).
, The disc is not set until it clicks
(page 12).
, The disc that cannot be played is
inserted. Check the region code matches
the player, and that the disc has been
finalized (page 26).
, Parental Control has been set. Change
the setting (page 20).
, M oisture has condensed inside the player
page 24).
(
The player starts and stops playing the
disc automatically.
, The disc features an auto playback
function.
, While playing discs with an auto pause
signal, the player stops playback at the
auto pause signal.
,continued
US
21

The disc does not start playing from the
beginning.
, Repeat Play or Random Play is selected
(page 13).
, Resume play has taken effect (page 13).
, The Playlist of the created disc is
automatically played. To play original
titles, press TOP MENU to set
“Original” (page 5).
Playback may take time to start.
, Playback may take time to start in DVD
(VR mode).
Playback freezes.
,
When the playback layer of a DVD+R DL/
-R DL disc changes, playback may freeze.
C/c does not work on menu display.
, Depending on the disc, you may not be
able to use C/c on the player for the disc
menu. In this case, use C/c on the remote.
The remote does not function.
, The battery in the remote is weak.
, There are obstacles between the remote
and the player.
, The distance between the remote and the
player is too far.
, The remote is not pointed at the remote
sensor on the player.
, Direct sunlight or strong illumination is
striking the remote sensor.
, When the AUDIO/SUBTITLE/ANGLE
buttons do not work, select and operate it
from the DVD menu.
The subtitles disappear.
, When you change playback speed, or
skip scenes during playback, the subtitles
may disappear temporarily.
“ ” or “ ” appears and the player
does not function according to the
button pressed.
, Depending on the disc, you may not be
able to perform certain operations. Refer
to the operating instructions supplied
with the disc.
“Copyright Lock” appears and the
screen turns blue when playing a DVD
(VR mode) disc.
, Images taken from digital broadcasts,
etc., may contain copy pro tection signals,
such as complet e copy protection signals,
single copy signals, and restriction-free
signals. When images that contain copy
protection signals are played, a blue
screen may appear instead of the images.
It may take a while when looking for
playable images. (For player that cannot
play images that contain a copy
protection only.)
US
22
The MP3, JPEG, or video file cannot be
played (page 27).
, The file format does not conform.
, The extension does not conform.
, The file is damaged.
, The file size is too large.
, When the selected file is not supported,
“Data Error” appears and the file will not
be played.
, Because of the compression technology
used for DivX/MPEG-4 video files,
playback may take time to start.
The file or album names are not
displayed correctly.
, The player can only display numbers and
alphabet. Other characters are displayed
as “*” (page 27).
The player does not operate properly or
the power does not turn off.
, When static electricity, etc., causes the
player to operate abnormally, set the
POWER switch to “OFF” and d isconnect
the adaptor and press ENTER on the
player.

Hookup
There is no picture or sound on the
connected equipment.
, Re-connect the connecting cord securely
(page 11).
, The connecting cord is damaged.
, Check the setting of a connected TV or
amplifier.
Precautions
Road safety
Do not use the monitor unit and
headphones while driving, cycling, or
operating any motorized vehicle. Doing so
may create a traffic hazard and is illegal in
some areas. It can also be potentially
dangerous to play your headsets at high
volume while walking, especially at
pedestrian crossings. You should exercise
extreme caution or discontinue use in
potentially hazardous situations.
On safety
Should any solid object or liquid fall into
the cabinet, unplug the player and have it
checked by qualified personnel before
operating it any further.
On power sources
• If you are not going to use the player for
a long time, be sure to disconnect the
player from the wall outlet. To
disconnect the AC power adaptor, grasp
the plug itself; never pull the cord.
• Do not touch the AC power adaptor with
wet hands. Doing so may cause shock
hazard.
• Do not connect the AC power adaptor to
a traveler’s electric transformer, which
may generate heat and cause a
malfunction.
Additional Information
On temperature increases
Heat may build up inside the player during
charging or if it is being used for a long
time. This is not a malfunction.
,continued
23
US

On placement
• Do not place the player in a confined
space such as a bookshelf or similar unit.
• Do not cover the ventilation of the player
with newspapers, tablecloths, curtains,
etc. And do not place the player on a soft
surface, such as a rug.
• Do not place the player and adaptors in a
location near heat sources, or in a place
subject to direct sunlight, excessive dust,
sand, moisture, rain, or mechanical
shock, or in a car with its windows
closed.
• Do not place the player in an inclined
position. It is designed to be operated in
a horizontal position only.
• Keep the player and discs away from
equipment with strong magnet, such as
microwave ovens, or large loudspeakers.
• Do not drop or apply strong shock.
Do not place heavy objects on the player
and accessories.
On operation
• If the player is brought directly from a
cold to a warm location, or is placed in a
very damp room, moisture may condense
on the lenses inside the player. Should
this occur, the player may not operate
properly. In this case, remove the disc
and leave the player for about half an
hour until the moisture evaporates. Wipe
off moisture attached to the LCD surface
with tissue etc. Turn on the power again
later.
• Keep the lens on the player clean and do
not touch it. Touching the lens may
damage the lens and cause the player to
malfunction. Leave the disc lid closed
except when you insert or remove discs.
• Turn off the power before disconnecting
the AC power adaptor, the car battery
adaptor. Failure to do so may cause a
malfunction.
On Liquid Crystal Display
• Although manufactured with high
precision technology, the LCD may
occasionally display dots of various
colors. That is not a malfunction.
• Do not place or drop any object onto the
LCD surface. Also, do not apply pressure
from hands or elbows.
• Do not damage the LCD surface with a
sharp edged tool.
On rechargeable battery
• Certain countries may regulate disposal
of the battery used to power this product.
Please consult with your local authority.
• Because of the battery’s limited life, its
capacity gradually deteriorates over time
and repeated use. Exchange a new one
when the battery holds about only half
the normal period.
• The battery may not be charged to its
fullest capacity when charged for the first
time, or when it has not been used for a
long time. The capacity recovers after
being charged and discharged several
times.
On AC power adaptor and car battery
adaptor
• Use the supplied adaptors for the player,
as other adaptors may cause a
malfunction.
• Do not disassemble or reverse-engineer.
• Do not touch the metal parts, as it may
cause a short and damage the adaptors,
especially if touched by other metal
objects.
On adjusting volume
Do not turn up the volume while listening
to a section with very low level inputs or
no audio signals. If you do, the speakers
may be damaged when a peak level section
is played.
24
US

On headphones
• Preventing hearing damage: Avoid using
headphones at high volumes. Hearing
experts advice against continuous, loud,
and extended play. If you experience a
ringing in your ears, reduce the volume
or discontinue use.
• Showing consideration for others: Keep
the volume at a moderate level. This will
allow you to hear outside sounds and still
be considerate to the people around you.
Notes About the Discs
• To keep the disc clean, handle the disc by
its edge. Do not touch the surface.
On cleaning
• Clean the cabinet, panel, and controls
with a soft cloth slightly moistened with
a mild detergent solution. Do not use any
type of abrasive pad, scouring powder or
solvent such as alcohol or benzine.
• Wipe the LCD surface with the soft dray
cloth lightly. To prevent dirt buildup,
wipe it frequently.
Do not wipe the LCD surface with a wet
cloth. If water enters, a malfunction may
result.
• If picture/sound is distorted, the lens may
be covered with dust. In this case, use a
commercially-available blower brush for
camera lenses to clean the lens.
Avoid touching the lens directly during
cleaning.
On cleaning discs, disc/lens cleaners
Do not use cleaning discs or disc/lens
cleaners (including wet or spray types).
These may cause the apparatus to
malfunction.
Additional Information
• Do not expose the disc to direct sunlight
or heat sources such as hot air ducts, or
leave it in a car parked in direct sunlight
as the temperature may rise considerably
inside the car.
• After playing, store the disc in its case.
• Clean the disc with a cleaning cloth.
Wipe the disc from the center out.
• Do not use solvents such as benzine,
thinner, disc/lens cleaners, or anti-static
spray intended for vinyl LPs.
• If you have printed the disc’s label, dry
the label before playing.
• Do not use the following discs:
– A disc that has a non-standard shape
(e.g., card, heart).
– A disc with a label or sticker on it.
– A disc that has cellophane tape or
sticker adhesive on it.
25
US

Playable Media
Type Disc Logo Icon Characteristics
DVD • Commercial DVD
• DVD+RWs/DVD+Rs/
DVD+R DLs in +VR
mode
• DVD-RWs/DVD-Rs/
DVD-R DLs in video
mode
DVD-RWs/DVD-Rs/DVDR DLs in VR (Video
Recording) mode
•Music CDs
CD
• CD-Rs/CD-RWs in music
CD format
DATA CD/DATA DVD
DATA disc —
containing MP3, JPEG, or
video files.
b
• Notes about recordable media
Some recordable media cannot be played on
the player due to the recording quality or
physical condition of the media, or the
characteristics of the recording device and
authoring software.
The disc will not play if it has not been
correctly finalized. For more information,
refer to the operating instructions for the
recording device. Note that some playback
functions may not work with some
DVD+RWs/+Rs/+R DLs, even if they have
been correctly finalized. In this case, view the
disc by normal playback.
• For player that cannot play images that
contain a copy protection only
Images in DVD (VR mode) with CPRM*
protection may not be played if they contain a
copy protection signal. “Copyright Lock”
appears.
* CPRM (Content Protection for Recordable
Media) is a coding technology that protects
the copyright of images.
26
US

Notes on MP3, JPEG, and video
files
The player can play the following files:
• MP3 files with the extension “.mp3”*
• JPEG files with the extension “.jpg”*
• JPEG image files that conform to the
DCF (Design rule for Camera File
system) image file format.
• DivX video files with the extension
“.avi” or “.divx.”
• MPEG-4 video files (simple profile) with
the extension “.mp4”*
3
.
• DATA CDs must be recorded according
to ISO 9660 Level 1, or its extended
format, Joliet.
• DATA DVDs must be recorded
according to UDF (Universal Disk
Format).
*1Files in mp3PRO format cannot be played.
2
Files with the extension “.jpe” or “.jpeg” can
*
play to change the extension “.jpg.”
3
Files with copyright protection (Digital Right
*
Management) cannot be played. Files in
MPEG-4 AVC format cannot be played.
z
• To play a complex hierarchy of folders may
take some time. Create albums with no more
than two hierarchies.
• The player plays the file in an album in the
order the media was recorded.
b
• The player will play any file in the above table,
even if the file format differs. Playing such
data may generate noise that can result in
speaker damage.
• Some DATA discs created in Packet Write
format cannot be played.
• Some DATA discs cr eated in multiple sessions
may not be playable.
• Some JPEG files cannot be played.
• The player cannot play the JPEG file that is
larger than 3078 (width) x 2048 (height) in
normal mode, or larger than 2000 (width) x
1200 (height) in progressive JPEG. (Some
progressive JPEG files cannot be displayed
1
2
.
even if the size is within this specified
capacity.)
• The player may not play a combination of two
or more DivX/MPEG-4 video files.
• The player cannot play a DivX/MPEG-4 video
file of size more than 720 (width) × 576
.
(height)/2 GB.
• The player may not play certain DivX/MPEG4 video files that are longer than 3 hours.
• Depending on the DivX/MPEG-4 video file,
normal playback may not be possible. The
picture may be unclear, playback may not
appear smooth, the sound may skip, etc. You
are recommended to create the file at a lower
bit rate. If the sound is still noisy, check the
audio format. (MP3 is recommended for DivX
video files, and MPEG-4 video file should be
AAC LC.) Note, however, the player does not
conform to WMA (Windows Media Audio)
format.
• The player may not playback the high bit rate
video file on the DATA CD smoothly. You are
recommended to playback using DATA DVD.
• The player can recognize up to 299 albums.
The player will not play beyond the 299th
album.
• The player can recognize a combined total of
up to 648 files and albums. The player will not
play beyond the 648th file or album.
• Depending on the writing condition of the
media, the total number of files and albums
recognizable may be fewer than 648.
• The player can display a file or album name up
to 14 characters. Special character appears as
“*.”
• The player can display only the currently
playing album name. Any album located on
the upper layer is displayed as “\..\.”
• Playback information of some files may not be
displayed correctly.
Additional Information
,continued
27
US

Notes on commercial discs
Region code
It is the system that is used to protect
copyrights. The region code is shown on
the DVD VIDEO packages according to
the region of sale. DVD VIDEOs labeled
“ALL” or “1” will play on the player.
ALL
DVD playback operations
Some playback operations of DVDs may
be intentionally set by software producers.
Since the player plays DVDs according to
the disc contents the software producers
designed, some playback features may not
be available. Also, refer to the instructions
supplied with the DVDs.
Music discs encoded with copyright
protection technologies
This product is designed to playback discs
that conform to the Compact Disc (CD)
standard.
Various music discs encoded with
copyright protection technologies are
marketed by some record companies.
Please be aware that among those discs,
there are some that do not conform to the
CD standard and may not be playable by
this product.
Audio material side of DualDiscs
A DualDisc is a two-sided disc product
which mates DVD recorded material on
one side with digital audio material on the
other side.
However, since the audio material side
does not conform to the Compact Disc
(CD) standard, playback on this product is
not guaranteed.
Specifications
System
Laser: Semiconductor laser
Signal format system: NTSC
Outputs
VIDEO (video output):
Minijack
Output 1.0 Vp-p/75 ohms
AUDIO (audio output)
Stereo minijack
Output 2.0 Vrms/47 kilohms
Recommended load impedance over
47 kilohms
PHONES (headphones) A/B:
Stereo minijack
Liquid Crystal Display
Panel size: 7 inches wide (diagonal)
Driving system: TFT active matrix
Resolution: 480 × 234 (effective pixel rate:
more than 99.99%)
General
Power requirements:
DC 9.5 V (AC power Adaptor/Car battery
adaptor)
DC 7.4 V (rechargeable battery)
Power consumption (DVD VIDEO Playback):
7 W (when used with a headphone)
Dimensions (approx.):
200 × 39.5 × 155 mm (7
1
6
/8 inches) (width/height/depth) incl.
projecting parts
Mass (approx.): 840 g (1.85 lbs)
Operating temperature: 5 °C to 35 °C (41°F to
95°F)
Operating humidity: 25 % to 80 %
AC Power Adaptor: 110-240 V AC, 50/60 Hz
Car Battery Adaptor: 12 V DC
Supplied accessories
See page 9.
Specifications and design are subject to change
without notice.
7
/8 × 19/16 ×
28
US

Index
Numerics
16:9
18
4:3 Letter Box
4:3 Pan Scan
A
Angle Mark
Audio
Audio DRC
Audio Setup
C
CD
12, 26
Charging time and playing time
D
DATA
Disc Menu
DivX (video file)
DVD
G
General Setup
J
JPEG
L
Language Setup
LCD Aspect
LCD Mode
M
MP3
MPEG-4 (video file)
O
OSD (On-Screen Display)
P
Parental Control
Password
Playable Media
Playback Information Display
R
Random Play
Region code
Remote battery
Repeat Play
Resume Play
18
18
8, 19
7, 19
19
19
15, 26
19
15, 27
12, 26
18
15, 27
19
16
16
15, 27
15, 27
19
20
20
26
13
28
9
13
13
14
10
S
Screen Saver
Setup
Slide Show
Subtitle
13, 19
18
16
8, 19
T
Troubleshooting
TV Display
21
18
V
Video file (DivX/MPEG-4)
15, 27
Additional Information
29
US

AVERTISSEMENT
Pour réduire les risques
d’incendie ou
d’électrocution, n’exposez
pas cet appareil à la pluie ou
à l’humidité.
Pour prévenir les risques
d’électrocution, ne pas
ouvrir le boîtier. Confier la
réparation de l’appareil à un
technicien qualifié
uniquement.
Le cordon d’alimentation
doit être remplacé
uniquement dans un centre
de service après-vente
agréé.
N’exposez pas des batteries
ou des appareils où sont
installées des batteries à
une chaleur excessive telle
que rayons directs du soleil,
feu, etc.
ATTENTION
L’utilisation d’instruments
optiques avec cet appareil
augmente les risques de lésions
aux yeux. Ne tentez pas de
démonter le boîtier, car le
faisceau laser utilisé par ce
lecteur CD/DVD pourrait être
dangereux pour vos yeux.
Pour l’entretien, adressez-vous à
un personnel qualifié
uniquement.
Cette étiquette se trouve sur le
bas de l’appareil.
Ce symbole indique
à l’utilisateur la
présence de
« tension électrique
isolée (dans le boîtier électrique)
pouvant être d’une amplitude
suffisante pour constituer un
risque d’électrocution.
d’utilisation et d’entretien
importantes dans la
documentation qui accompagne
l’appareil.
Précautions
• Installez ce système de telle
manière que le cordon
d’alimentation CA puisse être
débranché de la prise murale
immédiatement en cas de
problème.
• Le lecteur n’est pas déconnecté
de l’alimentation secteur (CA)
tant qu’il reste branché à la
prise secteur, même si le
lecteur luimême a été mis hors
tension.
• Pour éviter des risques
d’incendie ou d’électrocution,
ne posez pas de récipients
remplis de liquides (p. ex. un
vase) sur l’appareil.
Pour les clients résidants
au Canada
Si ce produit s’avère défectueux,
prière d’appeler le
remplacement en garantie
Tranquillité d’esprit
1-877-602-2008.
Pour tout autre renseignement au
sujet du produit, prière d’appeler le
Centre de service
d’information à la clientèle
au 1-877-899-7669 ou nous écrire
au Centre d’information à la
clientèle, 115 Gordon Baker Road,
Toronto, Ontario, M2H 3R6
dangereuse » non
Ce symbole indique
à l’utilisateur la
présence
d’instructions
(entretien)
Service de
au
RECYCLAGE DES
ACCUMULATEURS AUX
IONS DE LITHIUM
Les accumulateurs
aux ions de
lithium sont
recyclables. Vous
pouvez contribuer
à préserver
l’environnement en rapportant
les piles usées dans un point de
collection et recyclage le plus
proche.
Pour plus d’informations sur le
recyclage des accumulateurs,
téléphonez le numéro gratuit
1-800-822-8837 (Etats-Unis et
Canada uniquement), ou visitez
http://www.rbrc.org/
Avertissement : Ne pas utiliser
des accumulateurs aux ions de
lithium qui sont endommagées
ou qui fuient.
Ne démontez et ne modifiez pas
le lecteur, car cela pourrait causer
un choc électrique. Consultez le
détaillant Sony ou centre de
service Sony le plus proche pour
remplacer les batteries
rechargeables et faire les
réparations ou vérifications
internes.
IMPORTANT
Attention : Ce lecteur est
capable de maintenir
indéfiniment l’affichage d’une
image vidéo fixe ou d’un menu
sur l’écran de votre téléviseur.
En laissant une image vidéo
fixe ou un menu écran affiché
sur votre téléviseur pendant
une période prolongée, vous
risquez de provoquer des
dommages irréversibles à votre
écran. Les téléviseurs à écran à
plasma et les téléviseurs à
projection sont sensibles à ce
phénomène.
Pour toute question ou tout
problème concernant votre
lecteur, n’hésitez pas à consulter
votre revendeur Sony le plus
proche.
FR
2

Droits d’auteur, licences
et marques de commerce
• Ce produit intègre une
technologie de protection des
droits d’auteur protégée par des
brevets américains et d’autres
droits de propriété
intellectuelle. L’utilisation de
cette technologie de protection
des droits d’auteur doit être
autorisée par Macrovision. Elle
est conçue uniquement pour un
usage domestique et d’autres
utilisations de visionnement
limitées, sauf si une
autorisation a été obtenue de
Macrovision. Toute ingénierie
inverse ou tout désassemblage
est interdit.
• Fabriqué sous licence de Dolby
Laboratories.
Dolby et le symbole double D
sont des marques de commerce
de Dolby Laboratories.
• Les logos « DVD+RW »,
« DVD-RW », « DVD+R »,
« DVD+R DL », « DVD-R »,
« DVD VIDEO » et « CD »
sont des marques de
commerce.
• Brevets et technologie de
codage audio MPEG Layer-3
sous licence Fraunhofer IIS et
Thomson.
• DivX, DivX Certified et les
logos associés sont des
marques de commerce de
DivX, Inc. et sont utilisés sous
licence.
• Ce produit est utilisé en vertu
de la licence de portefeuille de
brevets MPEG-4 VISUAL
pour tout usage personnel et
non commercial par un
consommateur pour le
décodage de fichiers vidéo
conformes à la norme
MPEG-4 VISUAL (« MPEG-4
VIDEO ») préalablement
encodés par un consommateur
engagé dans une activité
personnelle et non
commerciale et/ou obtenus
d’un fournisseur de fichiers
habilité par MPEG LA pour
offrir des fichiers MPEG-4
VIDEO. Aucune licence
expresse ou tacite n’est
accordée pour tout autre usage.
Des informations
supplémentaires, comme celles
relatives aux licences et usages
promotionnels, internes et
commerciaux, peuvent être
obtenues auprès de MPEG LA,
LLC. Consultez le site
http://www.mpegla.com
À propos de ce manuel
• Dans ce manuel, « disque » est
utilisé comme terme général
pour désigner les DVD et CD,
sauf en cas d’indication
contraire dans le texte ou les
illustrations.
• Les icônes telles que
qui apparaissent au-dessus des
explications servent à indiquer
le type de support pouvant être
utilisé avec la fonction
présentée.
Pour plus de détails, consultez
la section « Supports pouvant
être lus » (page 28).
• Les informations
IMPORTANTES (pour éviter
toute utilisation incorrecte)
apparaissent sous l’icône
Les informations
COMPLÉMENTAIRES
(conseils et renseignements
pratiques) apparaissent sous
.
l’icône
z
b.
FR
FR
3

Table des matières
AVERTISSEMENT . . . . . . . . . . . . . . . . . . . . . . . . . . . . . . . . . . . . . . . . 2
Présentation des pièces et réglages . . . . . . . . . . . . . . . . . . . . . . . . . . 5
Préparations . . . . . . . . . . . . . . . . . . . . . . . . . . . . . . . . . . . . 9
Vérification des accessoires . . . . . . . . . . . . . . . . . . . . . . . . . . . . . . . . . 9
Chargement de la batterie rechargeable . . . . . . . . . . . . . . . . . . . . . . . 9
Utilisation avec l’adaptateur pour batterie de voiture . . . . . . . . . . . . . 10
Raccordement à un téléviseur . . . . . . . . . . . . . . . . . . . . . . . . . . . . . . 11
Lecture . . . . . . . . . . . . . . . . . . . . . . . . . . . . . . . . . . . . . . .12
Lecture de disques . . . . . . . . . . . . . . . . . . . . . . . . . . . . . . . . . . . . . . . 12
Lecture de fichiers MP3, JPEG et vidéo . . . . . . . . . . . . . . . . . . . . . . . 15
Réglage du format et de la qualité de l’image . . . . . . . . . . . . . . . . . . 17
Paramètres et réglages . . . . . . . . . . . . . . . . . . . . . . . . . . . .18
Utilisation de l’écran de réglage . . . . . . . . . . . . . . . . . . . . . . . . . . . . . 18
Informations supplémentaires . . . . . . . . . . . . . . . . . . . . . . . .22
Dépannage . . . . . . . . . . . . . . . . . . . . . . . . . . . . . . . . . . . . . . . . . . . . . 22
Précautions . . . . . . . . . . . . . . . . . . . . . . . . . . . . . . . . . . . . . . . . . . . . . 24
Supports pouvant être lus . . . . . . . . . . . . . . . . . . . . . . . . . . . . . . . . . . 28
Spécifications . . . . . . . . . . . . . . . . . . . . . . . . . . . . . . . . . . . . . . . . . . . 30
Index . . . . . . . . . . . . . . . . . . . . . . . . . . . . . . . . . . . . . . . . . . . . . . . . . . 31
FR
4

Présentation des
DC IN 9.5V
VIDEO OUTAUDIO OUT
A PHONES B
POWER
ONOFF
pièces et réglages
Les touches VOLUME+ et N (lecture)
sont munies d’un point tactile. Utilisez ce
point tactile comme référence lors de
l’utilisation du lecteur.
Pour plus d’informations, consultez les
pages indiquées entre parenthèses.
Lecteur
TOP MENU
DISPLAY MENU
ENTER
RETURN
OPTIONS
VOLUME
PUSH CLOSE
POWER CHARGE
OPEN
A Afficheur LCD (page 12)
B Haut-parleur
C Touche TOP MENU
Affiche le menu ou change le mode de
lecture.
• Pendant la lecture d’un DVD
VIDEO : Affiche le top menu.
• Pendant la lecture d’un DVD VR :
Permet d’alterner entre les modes
« Original » et « Liste De Lecture »
sur la liste de lecture créée pour le
disque. Pendant la lecture, vous ne
pouvez pas alterner entre ces modes.
Appuyez sur x à deux reprises, puis
appuyez sur TOP MENU.
D Touche DISPLAY
Affiche l’information de lecture.
• Pendant la lecture d’un DVD :
Affiche l’information de lecture et
change le mode de lecture. Voir
page 14.
• Pendant la lecture d’un CD : Chaque
fois que vous appuyez sur cette
touche, l’information temporelle est
commutée.
• Pendant la lecture d’un fichier
vidéo : Chaque fois que vous
appuyez sur cette touche,
l’information temporelle est
commutée.
Les touches C D E et F fonctionnent
de la même façon que celles de la
télécommande.
,suite
FR
5

Touche MENU
Affiche le menu ou change le mode de
lecture.
• Pendant la lecture d’un DVD :
Affiche l’écran du menu.
• Pendant la lecture d’un CD : Les
fonctions de lecture, lecture aléatoire
et lecture répétée sont commutées
chaque fois que vous appuyez sur la
touche.
• Pendant la lecture d’un fichier
JPEG : Affiche la liste des vignettes
et un diaporama. Voir page 16.
Touche C/X/x/c
Permet de placer une option affichée
en surbrillance pour la sélectionner.
• Pendant la lecture d’un DVD ou
CD : C/c sur le lecteur fonctionnent
de la même façon que m/M de la
télécommande.
Touche ENTER
Permet d’accéder à l’option
sélectionnée.
• Pendant la lecture d’un DVD ou
CD : La touche ENTER du lecteur
fonctionne de la même façon que la
touche N.
Touche RETURN
Permet de retourner à l’affichage
précédent.
Touche OPTIONS
Affiche le menu permettant de régler
l’afficheur LCD (page 17) et d’utiliser
l’affichage de configuration (page 18).
E Touche VOLUME (volume
sonore) +/–
Permet de régler le volume.
F Touche N (lecture) (page 12)
Démarre ou redémarre la lecture.
Touche X (pause) (page 12)
Fait une pause ou redémarre la lecture.
Touche x (arrêt) (page 12)
Arrête la lecture.
Touche . (précédent)
Permet de revenir au début du chapitre
ou de la piste/scène en cours.
Pour revenir au début du chapitre ou
de la piste/scène précédent(e),
appuyez sur à deux reprises.
Touche > (suivant)
Permet de passer au chapitre ou à la
piste/scène suivant(e).
G Couvercle du disque (page 12)
H Touche OPEN (page 12)
Permet d’ouvrir le couvercle du
disque.
I PUSH CLOSE (page 12)
Permet de fermer le couvercle du
disque.
J Indicateur POWER (page 12)
K Indicateur CHARGE (page 9)
L (capteur infrarouge)
Lorsque vous utilisez la
télécommande, pointez-la vers le
capteur infrarouge .
M Interrupteur POWER (page 12)
Permet d’allumer ou éteindre le
lecteur.
FR
6

N Interrupteur HOLD
Pour éviter d’appuyer
accidentellement sur une touche du
lecteur, glissez l’interrupteur HOLD
dans le sens de la flèche.
Toutes les touches du lecteur sont
alors verrouillées, mais celles de la
télécommande demeurent toujours
fonctionnelles.
O Prise PHONES (casque
d’écoute) A, B
P Prise AUDIO OUT (page 11)
Q Prise VIDEO OUT (page 11)
R Prise DC IN 9.5V (page 9, 10)
Connectez l’adaptateur CA ou
l’adaptateur pour batterie de voiture.
Télécommande
123
456
7809
Les touches C D E et F fonctionnent
de la même façon que celles du lecteur.
La touche numérotée 5, N et les touches
AUDIO sont munies d’un point tactile.
Utilisez ce point tactile comme référence
lors de l’utilisation du lecteur.
S Touches numérotées
Permettent d’entrer les numéros de
titre/chapitre, etc.
• Pendant la lecture d’un DVD
VIDEO ou CD : Pour effectuer une
recherche directement, entrez le
numéro de titre/chapitre/piste à
l’aide des touches numérotées, puis
appuyez sur ENTER. Pour passer
d’un titre ou chapitre à un autre,
appuyez sur C/c.
Touche CLEAR
Permet d’effacer la zone d’entrée.
,suite
FR
7

T Touches m/M (balayage/
ralenti)
Contrôlent les fonctions d’avance/
retour rapide pendant la lecture.
Appuyez à plusieurs reprises pour
changer la vitesse.
• Pendant la lecture d’un DVD :
Contrôlent les fonctions d’avance/
retour au ralenti pendant les pauses.
Appuyez à plusieurs reprises pour
changer la vitesse.
• Pendant la lecture d’un fichier
vidéo : Contrôlent la fonction
d’avance au ralenti lorsque la lecture
est en pauses. Appuyez à plusieurs
reprises pour changer la vitesse.
U Touche ADVANCE
Avance brièvement la scène en cours
(DVD seulement).
V Touche AUDIO
Permet de sélectionner le signal audio.
• Pendant la lecture d’un DVD
VIDEO : Appuyez sur cette touche
pour faire alterner les langues
enregistrées. Selon le type de disque
utilisé, le choix des langues peut
varier.
• Pendant la lecture d’un DVD VR :
Appuyez sur cette touche pour
alterner entre les pistes sonores
principales, secondaires et
principales/secondaires enregistrées
sur le disque.
• Pendant la lecture d’un CD :
Appuyez sur cette touche pour
alterner entre les modes stéréo et
mono (gauche/droite).
• Pendant la lecture d’un fichier
vidéo DivX: Appuyez sur cette
touche pour faire alterner les types
de signaux audio. « Pas De Fichier
Audio » apparaît lorsque le lecteur
n’est pas compatible avec le signal
audio.
Touche SUBTITLE
Permet de sélectionner les sous-titres.
• Pendant la lecture d’un DVD :
Appuyez sur cette touche pour faire
alterner les sous-titres. Selon le type
de disque utilisé, le choix des
langues peut varier.
• Pendant la lecture d’un fichier
vidéo DivX: Appuyez sur la touche
pendant la lecture. Appuyez sur X/x
et ENTER pendant que l’information
de sous-titres est affichée.
Touche ANGLE
Permet de changer d’angle. Lorsque
« » (Marque Angle) apparaît,
vous pouvez changer les angles. Selon
le disque utilisé, il peut être impossible
de modifier l’angle. (DVD VIDEO
seulement)
FR
8

Préparations
Vérification des
accessoires
Assurez-vous d’avoir les articles suivants :
• Adaptateur CA (1)
• Adaptateur pour batterie de voiture (1)
• Câble audio-vidéo (mini-prise × 2 y
prise phono × 3) (1)
• Télécommande (avec pile) (1)
Pour remplacer la pile de la
télécommande
La télécommande ne peut pas fonctionner
lorsque la pile est vide. Remplacez alors la
pile.
1 Préparez une nouvelle pile (pile au
lithium CR2025).
2 Tirez sur le support de pile (2) tout en
appuyant sur le levier de verrouillage
(1).
Chargement de la
batterie rechargeable
Chargez la batterie rechargeable avant
d’utiliser le lecteur pour la première fois,
ou lorsque la batterie est vide.
1 Connectez l’adaptateur CA.
Lorsque le chargement commence,
l’indicateur CHARGE s’allume en
orange.
POWER
A PHONES B
ONOFF
DC IN 9.5V
Lorsque le chargement se termine,
l’indicateur CHARGE s’éteint.
Déconnectez l’adaptateur CA.
DC IN 9.5V
VIDEO OUTAUDIO OUT
Vers la prise de
courant
Adaptateur CA (inclus)
Préparations
3 Retirez la pile usée.
4 Insérez la nouvelle pile dans le support
avec le côté 3 vers le haut, puis
poussez le support jusqu’à ce qu’il
s’enclenche.
ATTENTION
La pile pourrait exploser si elle n’est pas
remplacée correctement.
Remplacez-la uniquement par une pile d’un
type identique ou équivalent.
z
L’indicateur POWER s’allume à la place de
l’indicateur CHARGE lorsque l’interrupteur
POWER est réglé sur « ON ». Réglez alors
l’interrupteur POWER sur « OFF » et assurezvous que l’indicateur CHARGE s’allume.
b
Chargez la batterie à une température ambiante
de 5°C à 35°C (41°F à 95°F).
,suite
FR
9

Durées de chargement et de lecture
Durée de chargement : environ 5 heures
Durée de lecture : environ 5 heures
Ces durées sont valides dans les conditions
suivantes :
– Température modérée (20 °C (68 °F))
– Utilisation d’un casque d’écoute
– Rétroéclairage réglé au minimum
Selon la température ambiante et l’état de la
batterie rechargeable, la durée de chargement
peut être plus longue, ou la durée de lecture plus
courte.
Pour vérifier le niveau de la batterie
Lorsque le lecteur est arrêté, l’indicateur
de batterie s’affiche. Lorsque la batterie est
épuisé, s’affiche ou l’indicateur
CHARGE clignote. Réglez l’interrupteur
POWER à « OFF », connectez
l’adaptateur CA et rechargez la batterie.
Utilisation avec
l’adaptateur pour
batterie de voiture
L’adaptateur pour batterie de voiture
(inclus) est conçu pour les batteries de
voiture de 12 V avec mise à la terre sur le
négatif (ne l’utilisez pas avec une batterie
de voiture de 24 V avec mise à la terre sur
le positif).
1 Démarrez le moteur.
2 Connectez l’adaptateur pour
batterie de voiture.
POWER
A PHONES B
ONOFF
DC IN 9.5V
VIDEO OUTAUDIO OUT
Pleine Vide
FR
10
DC IN 9.5V
Vers la prise
d’allume-cigare
Adaptateur pour batterie de voiture (inclus)
3 Allumez le lecteur.

b
• Le conducteur ne doit pas connecter ou
déconnecter l’adaptateur pour batterie de
voiture pendant qu’il conduit.
• Disposez le câble de façon à ce qu’il ne gêne
pas la conduite. De plus, ne placez pas
l’afficheur LCD à un endroit où le conducteur
pourrait le regarder.
• Nettoyez la prise d’allume-cigare. Les saletés
peuvent empêcher le raccordement ou causer
un problème de fonctionnement.
• Utilisez l’adaptateur pour batterie de voiture
pendant que le moteur fonctionne. En
l’utilisant pendant que le moteur est éteint,
vous risquez de vider la batterie.
Raccordement à un
téléviseur
Préparations
En raccordant le lecteur à un téléviseur ou
moniteur, vous pouvez accroître le nombre
d’options de visionnement.
1 Raccordez le lecteur au
téléviseur ou moniteur en
utilisant le câble audio-vidéo
(inclus).
Après avoir utilisé le lecteur dans une
voiture
1 Éteignez le lecteur.
2 Déconnectez l’adaptateur pour batterie
de voiture.
3 Éteignez le moteur.
b
• Ne déconnectez pas l’adaptateur pour batterie
de voiture ou n’éteignez pas le moteur avant
d’avoir éteint le lecteur. Ceci pourrait
endommager le lecteur.
• Déconnectez l’adaptateur pour batterie de
voiture après l’utilisation. En le laissant
connecté, vous risquez de vider la batterie de la
voiture.
• Ne laissez pas le lecteur ou les accessoires
dans la voiture.
POWER
A PHONES B
ONOFF
z
Le lecteur peut être raccordé à un amplificateur
AV de la même façon. Bien que le raccordement
soit le même que pour le téléviseur, la fiche
jaune du câble audio-vidéo n’est pas utilisée.
b
• Reportez-vous aux instructions fournies avec
l’appareil à raccorder.
• Avant le raccordement, éteignez le lecteur et
l’appareil à raccorder, puis déconnectez-les de
la prise de courant.
DC IN 9.5V
VIDEO OUTAUDIO OUT
VIDEO OUTAUDIO OUT
Câble audiovidéo (inclus)
Vers les prises
d’entrée AUDIO/
VIDEO d’un
téléviseur ou
moniteur
11
FR

Lecture
HOLD
POWER
ONOFF
Lecture de disques
Selon le type de disque utilisé, certaines
opérations peuvent être différentes ou
restreintes. Consultez les instructions
d’utilisation fournies avec le disque.
Connectez l’adaptateur CA.
N
X
ENTER
OPTIONS
x
VOLUME
OPEN
OPEN
PUSH
CLOSE
PUSH CLOSE
POWER
TOP MENU
DISPLAY MENU
RETURN
4 Insérez le disque devant être lu.
Placez le disque avec la face de lecture
vers le bas, puis poussez-le doucement
pour qu’il s’enclenche.
Face de lecture vers le bas
5 Appuyez sur la touche PUSH
CLOSE du couvercle du disque
pour le fermer.
6 Appuyez sur N.
Le lecteur démarre alors la lecture.
Selon le type de disque utilisé, un
menu peut apparaître. Appuyez sur C/
X/x/c pour sélectionner une option,
puis appuyez sur ENTER.
1 Ouvrez l’afficheur LCD.
2 Glissez l’interrupteur POWER
sur « ON ».
Le lecteur se met alors en marche et
l’indicateur POWER s’allume en vert.
3 Appuyez sur OPEN pour ouvrir le
couvercle du disque.
FR
12
Pour arrêter la lecture
Appuyez sur x.
Pour mettre la lecture en pause
Appuyez sur X.
b
• Les disques créés avec les enregistreurs de
DVD doivent être finalisés correctement avant
d’être utilisés dans ce lecteur. Pour plus
d’informations sur la finalisation, reportezvous aux instructions d’utilisation fournies
avec l’enregistreur de DVD.
• Le disque peut continuer de tourner lorsque
vous ouvrez le couvercle du disque. Attendez
qu’il cesse de tourner avant de le retirer.

Pour reprendre la lecture à partir de
l’endroit où vous avez arrêté le disque
(reprise de lecture)
Lorsque vous appuyez à nouveau sur N
après avoir arrêté la lecture, le lecteur
démarre la lecture à partir de l’endroit où
vous avez appuyé sur x.
z
• Pour démarrer la lecture à partir du début du
disque, appuyez à deux reprises sur x, puis
appuyez sur N.
• Lorsque vous rallumerez le lecteur après
l’avoir éteint, la lecture reprendra
automatiquement.
b
• Selon l’emplacement du point d’arrêt, la
reprise de la lecture peut ne pas commencer
exactement au même endroit.
• Le point de reprise de lecture est effacé
lorsque :
– vous éteignez le lecteur (y compris le mode
de veille) pendant la lecture d’un DVD
(mode VR).
– vous ouvrez le couvercle du disque.
Remarques au sujet de l’économiseur
d’écran
• L’image de l’économiseur d’écran
s’affiche lorsque le lecteur est en mode
de pause ou d’arrêt et qu’il demeure
inutilisé pendant 15 minutes. L’image
disparaît lorsque vous appuyez sur N.
Pour régler la fonction « Economiseur
D’Ecran », consultez la page 19.
• Le lecteur passe en mode de veille
15 minutes après l’activation de
l’économiseur d’écran. Appuyez sur N
pour quitter le mode de veille.
À propos des diverses opérations de
lecture
Pour Opération
Modifier le
format de l’ image
sur l’afficheur
LCD
Afficher le menu
du DVD
Vérifier
l’information de
lecture du DVD
Lire le DVD* en
continu (lecture
répétée)
Lire des DVD en
mode d’avance/
retour rapide
(lecture par
balayage)
Alterner entre
l’original et la
liste de lecture du
DVD (mode VR)
Modifier
l’information de
lecture du CD
Lire le CD en
continu (lecture
répétée)
Lire le CD de
façon aléatoire
(lecture aléatoire)
* DVD VIDEO seulement
Appuyez sur OPTIONS
pour sélectionner
« Mode LCD »
(page 17).
Appuyez sur MENU ou
TOP MENU (page 6).
Appuyez sur DISPLAY
(page 14).
Appuyez sur DISPLAY
pour sélectionner
« Répéter » (page 14).
Appuyez sur C/c à
plusieurs reprises sur le
lecteur pour
sélectionner la vitesse
(page 6).
Appuyez sur TOP
MENU à plusieurs
reprises (page 5).
Appuyez sur DISPLAY
à plusieurs reprises
(page 5).
Appuyez sur MENU à
plusieurs reprises
(page 6).
Appuyez sur MENU à
plusieurs reprises
(page 6).
Lecture
,suite
13
FR

Utilisation de l’affichage
d’information de lecture
Pendant la lecture d’un DVD, vous pouvez
vérifier l’information de lecture en cours.
L’affichage d’information de lecture
permet également de sélectionner un titre/
chapitre, de changer la piste sonore ou les
sous-titres, etc.
Pour entrer les numéros, utilisez les
touches numérotées de la télécommande.
1 Appuyez sur DISPLAY pendant la
lecture d’un DVD.
L’information de lecture en cours
s’affiche alors.
Exemple : Pendant la lecture d’un
DVD VIDEO
Information de
Options
Menu
Titre
Chapitre
Audio
Sous-Titre
batterie
* Pendant la lecture d’un DVD (mode VR),
« PL » (liste de lecture) ou « ORG » (original)
s’affiche près du numéro de titre.
lecture en cours*
02/07
03/20
02 2CH DOLBY DIGITAL Anglais
01 Anglais
Titre Écoulé 00:12:01
Durée écoulée ou restanteÉtat de la
2 Appuyez sur X/x pour sélectionner
les options, puis appuyez sur
ENTER.
• Titre : Sélectionnez le numéro de
titre en appuyant sur X/x ou les
touches numérotées.
• Chapitre : Sélectionnez le numéro de
chapitre en appuyant sur X/x ou les
touches numérotées.
• Audio : Sélectionnez la piste sonore
en appuyant sur X/x.
• Sous-Titre : Sélectionnez un soustitre en appuyant sur X/x.
• Angle : Sélectionnez un angle en
appuyant sur X/x.
• Durée T. : La durée apparaît pendant
la lecture d’un titre. « 00:00:00 »
apparaît lorsque vous appuyez sur
ENTER. Entrez le code temporel
souhaité en appuyant sur les touches
numérotées.
• Durée C. : La durée apparaît pendant
la lecture d’un chapitre. « 00:00:00 »
apparaît lorsque vous appuyez sur
ENTER. Entrez le code temporel
souhaité en appuyant sur les touches
numérotées.
• Répéter : Sélectionnez «
Chapitre », « Titre », « Tout »
ou « Non » en appuyant sur X/x.
• Affi. Durée : « Titre Écoulé »
s’affiche. Sélectionnez « Titre
Écoulé », « Titre Restant »,
« Chapitre Écoulé » ou « Chapitre
Restant » en appuyant sur X/x.
3 Appuyez sur ENTER.
Pour quitter l’affichage
Appuyez sur DISPLAY ou RETURN.
b
Selon le type de disque utilisé, il est possible que
certaines options ne soient pas accessibles.
14
FR

Lecture de fichiers
MP3, JPEG et vidéo
• Pour accéder à la page suivante ou
précédente, appuyez sur > ou
..
• Pour retourner à la liste d’albums,
appuyez sur X/x pour sélectionner
, puis appuyez sur ENTER.
Cet appareil peut lire les fichiers MP3,
JPEG et vidéo. Pour plus de détails sur les
fichiers pouvant être lus, consultez la
section « Supports pouvant être lus »
(page 28).
Lorsque vous utilisez un support de
données (DATA), une liste d’albums
apparaît.
Les CD DATA enregistrés au format de
CD d’images KODAK sont lus
automatiquement lorsqu’ils sont insérés.
C/X/x/c
ENTER
TOP MENU
DISPLAY MENU
MENU
ENTER
RETURN
OPTIONS
./>
VOLUME
x
OPEN
PUSH CLOSE
X
N
1 Appuyez sur X/x pour
sélectionner l’album, puis
appuyez sur ENTER.
La liste des fichiers de l’album
apparaît alors.
Exemple : La liste de fichiers MP3
Dir:001
MY BEST
. .
01 Stardust
02 Fire
03 Wing
2 Appuyez sur X/x pour
sélectionner le fichier, puis
appuyez sur ENTER.
La lecture démarre à partir du fichier
sélectionné.
Pour accéder au fichier suivant ou
précédent
Appuyez sur > ou ..
Pour arrêter la lecture
Appuyez sur x.
L’écran retournera à la liste des fichiers.
Pour mettre la lecture en pause (MP3
seulement)
Appuyez sur X.
Pour reprendre la lecture, appuyez à
nouveau sur X.
z
Lorsque le nombre de visionnements est
préréglé, les fichiers vidéo DivX peuvent être lus
autant de fois que le nombre préréglé. Les
occurrences suivantes comptent pour une fois :
– lorsque vous appuyez sur x.
– lorsque le lecteur est éteint (incluant en mode
veille).
– lorsque le couvercle du disque est ouvert.
– lorsqu’un autre fichier est lu.
b
Selon le type de fichier, la lecture peut prendre
un certain temps à démarrer, ou ne pas démarrer
du tout. Pour plus de détails sur les fichiers
pouvant être lus, consultez la section « Supports
pouvant être lus » (page 28).
Lecture
,suite
15
FR

Sélection d’un fichier JPEG
Pour faire pivoter une image JPEG
Appuyez sur C/X/x/c pendant le
visionnement du fichier d’image. Rotation
de tous les fichiers.
c : Fait pivoter l’image de 90 degrés dans
le sens des aiguilles d’une montre.
C : Fait pivoter l’image de 90 degrés dans
le sens inverse des aiguilles d’une montre.
X : Inverse l’image dans le sens vertical
(de haut en bas).
x : Inverse l’image dans le sens horizontal
(de gauche à droite).
Pour afficher la liste des vignettes
Appuyez sur MENU pendant qu’un fichier
d’image est affiché.
Les fichiers d’image de l’album
apparaissent dans 12 sous-écrans, avec le
fichier affiché en tête.
1234
5678
Lecture d’un diaporama
1 Pour démarrer un diaporama à
partir du fichier d’image affiché,
appuyez sur MENU.
La liste des vignettes s’affiche alors.
2 Appuyez sur C/X/x/c pour
sélectionner « Slide Show » dans le
bas de l’écran, puis appuyez sur
ENTER.
Un diaporama commence à partir du
fichier affiché.
Pour arrêter le diaporama
Appuyez sur x pour retourner à la liste des
fichiers.
Appuyez sur MENU pour retourner à la
liste des vignettes.
Pour mettre le diaporama en pause
Appuyez sur X.
910
Slide Show
• Pour accéder à la liste de vignettes
précédente ou suivante, sélectionnez
« bPrev » ou « NextB » dans le bas
de l’écran, puis appuyez sur ENTER.
• Pour quitter la liste des vignettes,
appuyez sur MENU.
FR
16
11 12
Prev Next

Réglage du format et de
la qualité de l’image
Vous pouvez régler les caractéristiques de
l’image affichée sur l’afficheur LCD.
C/X/x/c
TOP MENU
DISPLAY MENU
ENTER
ENTER
OPTIONS
RETURN
OPTIONS
VOLUME
RETURN
OPEN
PUSH CLOSE
1 Appuyez sur OPTIONS.
Le menu s’affiche.
2 Appuyez sur X/x pour
sélectionner « Mode LCD »,
puis appuyez sur ENTER.
L’écran « Mode LCD » s’affiche.
options
Mode LCD
Aspect LCD
Retroeclairage 10
Contraste
Teinte
Par Défaut
Sélectionner : Annuler :
Plein Ecran
10
0
10Couleur
ENTER RETURN
3 Appuyez sur X/x pour
sélectionner les options, puis
appuyez sur ENTER.
• Aspect LCD : Permet de modifier le
format de l’image. Sélectionnez
« Normal » ou « Plein Ecran » en
appuyant sur X/x*.
• Retroeclairage : Permet de régler la
luminosité en appuyant sur C
/
c.
• Contraste : Permet de régler le
contraste entre les zones claires et
sombres en appuyant sur C
/
c.
• Teinte : Permet de régler l’équilibre
de couleur rouge/vert en appuyant
sur C
/
c.
• Couleur : Permet de régler la
richesse des couleurs en appuyant
sur C
/
c.
• Par Défaut : Permet de rétablir tous
les réglages sur leur valeur par
défaut.
4 Appuyez sur ENTER.
* En m ode « Normal », les images sont affichées
avec leur configuration originale, en
conservant leur rapport de format. Les images
au format 4:3 sont affichées avec des bandes
noires des deux côtés de l’écr an. Les images au
format boîte à lettres 4:3 sont affichées avec
des bandes sur tous les côtés de l’écran.
En mode « Plein Ecran », les images sont
ajustées pour remplir la totalité de l’écran. Les
images au format 16:9 sont affichées avec leur
configuration originale. (Les bandes noires
enregistrées dans les images au format 16:9 ne
peuvent pas être supprimées.) Les images au
format 4:3 apparaissent étirées.
Pour quitter l’affichage du menu
Appuyez sur OPTIONS ou RETURN à
deux reprises.
b
Selon le type de disque utilisé, le format d’écran
sélectionné peut être différent.
Lecture
17
FR

Paramètres et réglages
Utilisation de l’écran
de réglage
L’écran de réglage vous permet de
modifier diverses options des éléments
comme l’image et le son.
Certains disques possèdent des réglages de
lecture mémorisés qui ont la priorité sur
ces options.
C/X/x/c
TOP MENU
DISPLAY MENU
ENTER
ENTER
OPTIONS
RETURN
OPTIONS
VOLUME
RETURN
OPEN
PUSH CLOSE
x
1 Appuyez sur OPTIONS pendant
que le lecteur est en mode
d’arrêt.
Le menu s’affiche.
L’écran de réglage ne s’affiche pas
pendant la reprise de lecture. Appuyez
sur x à deux reprises pour annuler la
reprise de lecture, puis appuyez sur
OPTIONS.
2 Appuyez sur X/x pour
sélectionner « Reglage », puis
appuyez sur ENTER.
L’écran de réglage s’affiche.
catégorie de réglage options
Général
Afficher TV
Marque Angle
DivX
Par Défaut
é
lectionner : Annuler :
S
16 : 9
Oui
OuiEconomiseur D'Ecran
ENTER RETURN
3 Appuyez sur X/x pour
sélectionner la catégorie de
réglage, puis appuyez sur
ENTER.
: Général (page 19)
Permet de modifier les réglages
relatifs au lecteur.
: Reglage Audio (page 20)
Permet de modifier les réglages audio
en fonction des conditions de lecture.
: Choix De La Langue (page 20)
Permet de sélectionner la langue pour
l’affichage à l’écran ou la piste
sonore.
: Controle Parental (page 20)
Permet de régler la limite du contrôle
parental.
18
4 Sélectionnez et réglez chacune
des options suivantes en
appuyant sur X/x et ENTER.
Pour quitter l’écran de réglage
Appuyez sur OPTIONS ou RETURN à
deux reprises.
FR

Général
Les réglages par défaut sont soulignés.
◆ Afficher TV (DVD seulement)
Permet de sélectionner le rapport de format
du téléviseur raccordé.
4:3
Pan Scan
4:3
Letter Box
16:9
4:3 Pan Scan
4:3 Letter Box
Sélectionnez cette option
lorsque vous raccordez un
téléviseur avec écra n 4:3. Une
image large s’affiche
automatiquement sur la
totalité de l’écran, et les
parties qui dépassent sont
coupées.
Sélectionnez cette option
lorsque vous raccordez un
téléviseur avec écra n 4:3. Une
image large s’a ffiche avec des
bandes dans le haut et le bas
de l’écran.
Sélectionnez cette option
lorsque vous raccordez un
téléviseur à écran large ou
avec fonction de mode large.
◆ Marque Angle (DVD VIDEO
seulement)
Affiche la marque angle lorsque vous pouvez
changer les angles de visionnement pendant la
lecture de DVD enregistrés avec plusieurs
angles.
Oui Affiche la marque angle.
Non Masque la marque angle.
◆ Economiseur D’Ecran
L’image de l’économiseur d’écran
s’affiche lorsque le lecteur demeure en
mode de pause ou d’arrêt pendant
15 minutes. L’économiseur d’écran
permet d’éviter d’endommager le
dispositif d’affichage (image fantôme).
Appuyez sur N pour désactiver
l’économiseur d’écran.
Oui
Non Désactive l’économiseur
Active l’économiseur
d’écran.
d’écran.
◆ DivX
Affiche le code d’enregistrement du
lecteur. Pour plus d’informations,
consultez le site http://www.divx.com
sur
Internet.
◆ Par Défaut
Ramène toutes les fonctions sur leurs
réglages par défaut. Veuillez noter que
tous vos réglages sont alors perdus.
Paramètres et réglages
16:9
b
Selon le type de disque utilisé, l’option « 4:3
Letter Box » peut être sélectionnée
automatiquement au lieu de « 4:3 Pan Scan », ou
vice-versa.
,suite
19
FR

Reglage Audio
Le réglage par défaut est souligné.
◆ Audio DRC (contrôle de plage
dynamique) (DVD seulement)
Éclaircit le son lorsque vous diminuez le
volume pendant la lecture d’un DVD
permettant d’utiliser l’option « Audio
DRC ».
Standard Son standard.
TV
Large Plage Option donnant l’impression
Éclaircissement des sons
faibles même lorsque le
volume est réduit.
d’assister à un spectacle.
Choix De La Langue
◆ Affichage A L’Ecran
Permet de sélectionner la langue affichée à
l’écran.
◆ Menu Du Disque (DVD VIDEO
seulement)
Permet de sélectionner la langue du menu
du disque.
Lorsque vous sélectionnez « Original », la
langue prioritaire du disque est utilisée.
◆ Sous-Titre (DVD VIDEO seulement)
Permet de sélectionner la langue des soustitres.
Lorsque vous sélectionnez « Non », aucun
sous-titre n’est affiché.
◆ Audio (DVD VIDEO seulement)
Permet de sélectionner la langue de la piste
sonore.
Lorsque vous sélectionnez « Original », la
langue prioritaire du disque est utilisée.
b
Si vous sélectionnez une langue de l’option
« Menu Du Disque », « Sous-Titre » ou
« Audio » qui n’est pas enregistrée sur le disque,
une des langues enregistrées sera sélectionnée
automatiquement.
Controle Parental
Vous pouvez limiter la lecture d’un DVD à
l’aide de la fonction de contrôle parental.
Pour utiliser ce réglage, servez-vous de la
télécommande.
◆ Mot De Passe (DVD VIDEO
seulement)
Entrez ou modifiez un mot de passe. Créez
un mot de passe pour la fonction de
contrôle parental. Entrez le mot de passe à
4 chiffres en vous servant des touches
numérotées de la télécommande.
Pour modifier le mot de passe
1 Appuyez sur X/x pour sélectionner
« Mot De Passe », puis appuyez sur
ENTER.
2 Veillez à ce que l’option
« Changement » soit sélectionnée,
puis appuyez sur ENTER.
L’écran permettant d’entrer le mot de
passe s’affiche.
Controle Parental
Ancien Mot De Passe
Nouveau Mot De Passe
Confirmer Mot De Passe
OK
Tapez le mot de passe, puis appuyez sur .
ENTER
3 Entrez le mot de passe en cours dans la
case « Ancien Mot De Passe », entrez
le nouveau mot de passe dans les cases
« Nouveau Mot De Passe » et
« Confirmer Mot De Passe », puis
appuyez sur ENTER.
20
FR

Si vous faites une erreur lors de l’entrée
du mot de passe
Appuyez sur CLEAR ou C pour revenir en
arrière (un espace à la fois) avant
d’appuyer sur ENTER à l’étape 3, puis
entrez le mot de passe à nouveau.
Si vous avez oublié le mot de passe
Entrez « 1369 » dans la case « Ancien Mot De
Passe », puis entrez votre nouveau mot de passe
dans les cases « Nouveau Mot De Passe » et
« Confirmer Mot De Passe ».
◆ Controle Parental (DVD VIDEO
seulement)
Détermine le niveau de limitation. Plus la
valeur est faible, plus la limitation est
stricte.
Pour régler le contrôle parental, vous
devez d’abord entrer le mot de passe.
Pour régler le contrôle parental (lecture
limitée)
1 Appuyez sur X/x pour sélectionner
« Controle Parental », puis appuyez
sur ENTER.
2 Appuyez sur X/x pour sélectionner le
niveau de limitation, puis appuyez sur
ENTER. Plus la valeur est faible, plus
la limitation est stricte.
L’écran permettant d’entrer le mot de
passe s’affiche.
Controle Parental
Pour lire un disque limité par le
contrôle parental
Insérez le disque et appuyez sur N.
L’écran permettant d’entrer le mot de
passe s’affiche. Entrez votre mot de passe
en utilisant les touches numérotées de la
télécommande, puis appuyez sur ENTER.
b
• Lorsque vous utilisez des disques qui ne
possèdent pas de fonction de contrôl e parental,
la lecture ne peut pas être limitée par le lecteur.
• Selon le type de disque utilisé, un message
peut vous indiquer de changer le niveau de
contrôle parental pendant la lecture. Dans ce
cas, entrez votre mot de passe, puis changez le
niveau. Lorsque le mode de reprise de lecture
est désactivé, le niveau retourne sur le niveau
précédent.
Paramètres et réglages
Mot De Passe
OK
Tapez le mot de passe, puis appuyez sur .
ENTER
3 Entrez votre mot de passe, puis
appuyez sur ENTER.
21
FR

Informations supplémentaires
Dépannage
Si l’un des problèmes suivants devait
survenir, consultez ce guide de dépannage
pour tenter de le résoudre avant de
demander une réparation. Si le problème
persiste, contactez le détaillant Sony le
plus proche.
Alimentation
L’appareil ne se met pas en marche.
, Vérifiez si l’adaptateur CA est connecté
solidement (page 9).
, Vérifiez si la batterie rechargeable est
suffisamment chargée (page 9).
La batterie rechargeable ne peut pas
être chargée.
, Vous ne pouvez pas charger la batterie
rechargeable lorsque l’appareil est en
marche. Réglez l’interrupteur POWER
sur « OFF » (page 9).
Image
Il n’y a pas d’image/l’image est floue.
, Le disque est sale ou endommagé
(page 26).
, La luminosité est réglée au minimum.
Réglez la luminosité dans le « Mode
LCD » (page 17).
Les points noirs s’affichent et les points
rouges, bleus et verts demeurent sur
l’afficheur LCD.
, Il s’agit d’une propriété structurelle de
l’afficheur LCD. Ce n’est pas un
problème de fonctionnement.
Son
Il n’y a pas de son.
, Le lecteur est en mode de pause ou de
lecture au ralenti.
, Le lecteur est en mode d’avance ou de
retour rapide.
Le volume sonore est faible.
, Le volume sonore est faible sur certains
DVD. Vous pouvez améliorer le volume
sonore en réglant l’option « Audio
DRC » du menu « Reglage Audio » sur
« TV » (page 20).
Opération
Rien ne se produit lorsque vous
appuyez sur les touches.
, L’interrupteur HOLD n’est pas réglé
dans le sens de la flèche (page 7).
Le disque n’est pas lu.
, Lorsque le disque est inséré à l’envers, le
message « Pas de disque » ou « Lecture
de ce disque impossible. » s’affiche.
Insérez le disque avec la face de lecture
vers le bas (page 12).
, Le disque n’est pas inséré jusqu’à ce
qu’il soit enclenché (page 12).
, Le disque inséré n’est pas compatible.
Assurez-vous que le code de région du
disque correspond à celui du lecteur, et
que le disque a été finalisé (page 28).
, Le contrôle parental a été activé.
Modifiez le réglage (page 20).
, De la condensation d’humidité s’est
formée à l’intérieur du lecteur
(
page 25).
22
FR

Le lecteur démarre et arrête
automatiquement la lecture du disque.
, Le disque possède une fonction de
lecture automatique.
, Pendant la lecture de disques comportant
un signal de pause automatique, le
lecteur arrête la lecture lorsqu’il détecte
ce signal.
La lecture du disque ne commence pas
à partir du début.
, La fonction de lecture répétée ou
aléatoire est sélectionnée (page 13).
, La reprise de lecture a été activée
(page 13).
, L a liste de lecture créée pour le disque e st
lue automatiquement. Pour lire les titres
originaux, appuyez su r TOP MENU pour
sélectionner « Original » (page 5).
La lecture peut prendre quelques
instants à démarrer.
, La lecture peut prendre quelques instants
à démarrer avec un DVD (mode VR).
« Copyright Lock » s’affiche et l’écran
devient bleu pendant la lecture d’un
DVD (mode VR).
, Les images provenant de diffusions
numériques, etc., peuvent contenir des
signaux de protection contre la copie,
comme des signaux de protection
complète contre la copie, des signaux de
copie simple et des signaux sans
restriction. Lorsque des images
contenant des signaux de protection
contre la copie sont lues, un écran bleu
peut s’afficher à la place de l’image. La
recherche d’images pouvant être lues
peut prendre quelques instants. (Pour les
lecteurs ne permettant pas la lecture
d’images contenant uniquement une
protection contre la copie.)
C/c ne fonctionnent pas pour le menu.
, Selon le type de disque utilisé, vous
pourriez ne pas pouvoir utiliser les
touches C/c du lecteur pour le menu du
disque. Dans ce cas, utilisez les touches
C/c de la télécommande.
Informations supplémentaires
La lecture gèle.
, Lors des changements de couche de
lecture d’un disque DVD+R DL/-R DL,
la lecture peut geler.
Les sous-titres disparaissent.
, Lorsque vous modifiez la vitesse de
lecture ou sautez des scènes pendant la
lecture, les sous-titres peuvent
disparaître temporairement.
Le symbole « » ou « » apparaît et
le lecteur ne fonctionne pas
correctement lorsque vous appuyez sur
les touches.
, Selon le type de disque utilisé, il est
possible que certaines opérations ne
soient pas disponibles. Consultez les
instructions d’utilisation incluses avec le
disque.
La télécommande ne fonctionne pas.
, La pile de la télécommande est faible.
, Des obstacles séparent la télécommande
du lecteur.
, La télécommande est trop éloignée du
lecteur.
, La télécommande n’est pas pointée vers
le capteur infrarouge du lecteur.
, L’ensoleillement direct ou un éclairage
puissant atteint le capteur infrarouge.
, Lorsque les touches AUDIO/
SUBTITLE/ANGLE ne fonctionnent
pas, sélectionnez les options et réglez-les
à partir du menu du DVD.
,suite
23
FR

Le fichier MP3, JPEG ou vidéo ne peut
pas être lu (page 29).
, Le format de fichier n’est pas conforme.
, L’extension n’est pas conforme.
, Le fichier est corrompu.
, La taille du fichier est trop importante.
, Lorsque le fichier sélectionné n’est pas
compatible, « Erreur De Données »
s’affiche et le fichier ne peut pas être lu.
, En raison de la technologie de
compression utilisée par les fichiers
vidéo DivX/MPEG-4, la lecture peut
prendre quelques instants à démarrer.
Les noms de fichiers ou d’albums ne
s’affichent pas correctement.
, Le lecteur affiche uniquement les
chiffres et les lettres de l’alphabet. Les
autres caractères sont remplacés par
«*» (page 29).
Le lecteur ne fonctionne pas
normalement ou l’alimentation ne
s’éteint pas.
, Lorsque l’électricité statique, etc., cause
des problèmes de fonctionnement, réglez
l’interrupteur POWER à « OFF »,
débranchez l’adaptateur et appuyez sur
ENTER sur le lecteur.
Raccordement
L’appareil raccordé ne produit aucun
son ou image.
, Reconnectez solidement le câble de
raccordement (page 11).
, Le câble de raccordement est
endommagé.
, Vérifiez la configuration du téléviseur ou
de l’amplificateur raccordé.
Précautions
Sécurité sur la route
N’utilisez pas le moniteur et le casque
d’écoute pendant que vous conduisez,
faites du vélo ou opérez un véhicule
motorisé. Cela pourrait être dangereux et
constitue une infraction dans certaines
régions. Il peut également être
potentiellement dangereux d’utiliser le
casque d’écoute à un volume élevé lorsque
vous marchez, et plus particulièrement aux
passages pour piétons. Lors de situations
potentiellement dangereuses, soyez
extrêmement prudent ou cessez d’utiliser
l’appareil.
Sécurité
Si un objet ou un liquide devait pénétrer
dans le boîtier, déconnectez le lecteur et
faites-le vérifier par un technicien qualifié
avant de le remettre en marche.
Sources d’alimentation
• Si vous prévoyez ne pas utiliser le lecteur
pendant une longue période, assurezvous de le déconnecter de la prise de
courant. Pour déconnecter l’adaptateur
CA, saisissez la prise; ne tirez jamais sur
le cordon.
• Ne touchez pas à l’adaptateur CA lorsque
vous avez les mains mouillées. Vous
pourriez vous électrocuter.
• Ne connectez pas l’adaptateur CA à un
transformateur électrique de voyage car
ce dernier pourrait surchauffer et causer
un problème de fonctionnement.
Augmentations de température
La chaleur peut s’accumuler à l’intérieur
du lecteur pendant le chargement ou les
périodes d’utilisation prolongées. Il ne
s’agit pas d’un problème de
fonctionnement.
24
FR

Installation
• N’installez pas le lecteur dans un endroit
confiné, comme une bibliothèque ou un
emplacement semblable.
• Ne bloquez pas les ouvertures de
ventilation du lecteur avec des journaux,
une nappe, des rideaux, etc. Évitez
également de placer le lecteur sur une
surface molle, comme un tapis.
• N’installez pas le lecteur ou les
adaptateurs dans un endroit se trouvant à
proximité de sources de chaleur ou
soumis au rayonnement direct du soleil, à
une poussière excessive, au sable, à
l’humidité, à la pluie ou au choc
mécanique. Ne le laissez pas non plus
dans une voiture aux vitres fermées.
• Ne placez pas le lecteur dans une position
inclinée. Il est conçu pour être utilisé
uniquement dans une position
horizontale.
• Éloignez le lecteur et les disques des
équipements munis d’un aimant puissant,
comme les micro-ondes ou les enceintes.
• Ne laissez pas tomber le lecteur et ne le
soumettez pas à des chocs violents.
Ne placez pas d’objets lourds sur le
lecteur ou les accessoires.
Fonctionnement
• Lorsque le lecteur est transporté
directement d’un endroit froid à un
endroit chaud ou qu’il est placé dans une
pièce très humide, de l’humidité peut se
condenser sur la lentille à l’intérieur du
lecteur. Lorsque ceci se produit, le
lecteur risque de ne pas fonctionner
correctement. Dans ce cas, retirez le
disque et laissez le lecteur pendant
environ une demi-heure, jusqu’à ce que
l’humidité s’évapore. Essuyez l’humidité
formée sur l’afficheur LCD à l’aide d’un
papier-mouchoir, etc. Rallumez le
lecteur un peu plus tard.
• Maintenez la lentille du lecteur propre et
ne la touchez pas. En touchant la lentille,
vous risquez de l’endommager et de
causer un problème de fonctionnement.
Laissez le couvercle du disque fermé,
sauf lorsque vous insérez ou retirez les
disques.
• Éteignez le lecteur avant de déconnecter
l’adaptateur CA ou l’adaptateur pour
batterie de voiture. Le fait de ne pas
suivre cette consigne peut causer un
problème de fonctionnement.
Afficheur à cristaux liquides
• Bien qu’il soit fabriqué à l’aide d’une
technologie de haute précision, il est
possible que des points de diverses
couleurs apparaissent occasionnellement
sur l’afficheur LCD. Il ne s’agit pas d’un
problème de fonctionnement.
• Ne déposez pas d’objet sur la surface de
l’afficheur LCD et ne laissez rien tomber
sur celui-ci. De plus, n’y appliquez pas
de pression avec les mains ou les coudes.
• N’endommagez pas la surface de
l’afficheur LCD avec un outil coupant.
Batterie rechargeable
• Certains pays peuvent réglementer la
mise au rebut de la batterie utilisée pour
alimenter ce produit. Veuillez consulter
votre administration locale.
• Comme la durée de vie de la batterie est
limitée, sa capacité se détériore
progressivement avec le temps et
l’utilisation répétée. Si l’autonomie de la
batterie est réduite de moitié, remplacezla par une nouvelle.
• Il est possible que la batterie ne se charge
pas complètement lorsqu’elle est chargée
pour la première fois ou qu’elle demeure
inutilisée pendant une longue période. La
capacité est rétablie après plusieurs
chargements et décharges.
Informations supplémentaires
,suite
25
FR

Adaptateur CA et adaptateur pour
batterie de voiture
• Utilisez uniquement les adaptateurs
inclus avec le lecteur car les autres
adaptateurs pourraient causer un
problème de fonctionnement.
• Ne démontez pas les adaptateurs et ne
faites pas d’ingénierie inverse.
• Ne touchez pas aux pièces métalliques
car cela pourr ait causer un court-circuit et
endommager les adaptateurs, et plus
particulièrement en cas de contact avec
des objets métalliques.
Réglage du volume
N’augmentez pas le volume lorsque vous
écoutez un passage avec niveau d’entrée
faible ou absence de signal audio. Sinon,
les haut-parleurs pourraient être
endommagés lors des passages avec
niveau sonore élevé.
Casque d’écoute
• Prévention des dommages auditifs :
Évitez d’utiliser le casque d’écoute à
volume élevé. Les experts déconseillent
l’écoute continue et prolongée à un
volume élevé. Si vous entendez un
bourdonnement dans vos oreilles,
réduisez le volume ou cessez
l’utilisation.
• Courtoisie envers les autres : Gardez le
volume à un niveau modéré. Ceci vous
permettra d’entendre les sons extérieurs
et de faire preuve de courtoisie envers les
gens qui vous entourent.
• Essuyez légèrement la surface de
l’afficheur LCD en utilisant un chiffon
doux. Pour éviter l’accumulation de
saletés, essuyez-le régulièrement.
N’essuyez pas la surface de l’afficheur
LCD avec un chiffon humide. En
pénétrant dans le lecteur, l’eau pourrait
causer un problème de fonctionnement.
• Si l’image/le son est distordu, il est
possible que la lentille soit couverte de
poussière. Lorsque ceci se produit,
nettoyez la lentille en utilisant une brosse
soufflante pour lentille de caméra
(disponible sur le marché).
Évitez de toucher la lentille directement
pendant le nettoyage.
Nettoyage des disques et nettoyants
pour disque/lentille
N’utilisez pas de disque de nettoyage ou de
nettoyant pour disque/lentille (humide ou
en aérosol). Ils pourraient causer des
problèmes de fonctionnement.
Remarques sur les disques
• Pour que les disques restent propres,
tenez-les par les bords. Ne touchez pas la
surface des disques.
Nettoyage
• Nettoyez le boîtier, le panneau et les
réglages avec un chiffon doux
légèrement imbibé d’une solution
détergente douce. N’utilisez pas de
tampons abrasifs, de poudre à récurer ou
de solvants tels que l’alcool ou le
benzène.
FR
26
• N’exposez pas les disques au
rayonnement direct du soleil ou à des
sources de chaleur telles que des conduits
d’air chaud, et ne les laissez pas dans un
véhicule stationné en plein soleil car la
température pourrait augmenter
considérablement à l’intérieur.

• Rangez les disques dans leur boîtier
après la lecture.
• Nettoyez les disques avec un chiffon de
nettoyage. Nettoyez-les en partant du
centre vers l’extérieur.
• N’utilisez pas de solvant comme le
benzène, de diluant, de nettoyant pour
disque/lentille ou de vaporisateur
antistatique conçu pour les disques en
vinyle.
• Si vous avez imprimé une étiquette pour
le disque, séchez-la avant de lire le
disque.
• N’utilisez pas les disques suivants :
– disques de forme non-conventionnelle
(ex. : carte, coeur).
– disques avec étiquette ou autocollant.
– disques recouverts de la surface
adhésive d’un ruban ou autocollant.
Informations supplémentaires
27
FR

Supports pouvant être lus
Type Logo du disque Icône Caractéristiques
DVD • DVD commercial
• DVD+RW/DVD+R/
DVD+R DL en mode
+VR
• DVD-RW/DVD-R/
DVD-R DL en mode
vidéo
DVD-RW/DVD-R/
DVD-R DL en mode VR
(enregistrement vidéo)
•CD musicaux
CD
Disque
DATA
b
• Remarques à propos des supports
enregistrables
Certains supports enregistrables ne peuvent
pas être lus sur ce le cteur en raison de la qualité
d’enregistrement et de l’état du support, ou des
caractéristiques du périphérique
d’enregistrement et du logiciel de gravure.
Le disque ne sera pas lu s’il n’a pas été
correctement finalisé. Pour plus
d’informations, consultez les instructions
d’utilisation du périphériq ue d’enregistrement.
Veuillez noter que certaines fonctions de
lecture peuvent ne pas fonctionner avec
certains DVD+RW/+R/+R DL même s’ils ont
été correctement finalisés. Dans ce cas,
visionnez le disque en lecture normale.
—
• Pour les lecteurs qui ne peuvent pas lire les
images contenant uniquement une
protection contre la copie
Les images des DVD (mode VR) avec
protection CPRM* peuvent ne pas être lues si
elles contiennent un signal de protection contre
la copie. « Copyright Lock » s’affiche alors.
* La technologie de codage CPRM (protection
de contenu des supports enregistrables)
protège les droits d’auteur des images.
• CD-R/CD-RW au format
CD musical
CD/DVD de données
contenant des fichiers MP3,
JPEG ou vidéo.
28
FR

Remarques à propos des
fichiers MP3, JPEG et vidéo
Le lecteur peut lire les fichiers suivants :
• Fichiers MP3 avec extension « .mp3 ».*
• Fichiers JPEG avec extension « .jpg ».*
• Les fichiers d’image JPEG conformes au
format de fichier d’image DCF (norme
de conception pour les fichiers
d’appareils photo numériques).
• Fichiers vidéo DivX avec extension
«.avi» ou «.divx».
• Fichiers vidéo MPEG-4 (simple profile)
avec extension « .mp4 ».*
• CD DATA enregistrés conformément à
la norme ISO 9660 Niveau 1, ou son
format d’extension, Joliet.
• DVD D ATA enregistrés conform ément à
la norme UDF (format de disque
universel).
*1Les fichiers au format mp3PRO ne peuvent
pas être lus.
2
Les fichiers avec extension « .jpe » ou
*
« .jpeg » peuvent être lus avec l’extension
«.jpg».
3
Les fichiers avec protection des droits
*
d’auteur (gestion des droits numériques) ne
peuvent pas être lus. Les fichiers au format
MPEG-4 AVC ne peuvent pas être lus.
z
• La lecture d’une hiérarchie de dossiers
complexe peut prendre quelques instants.
Créez des albums contenant un maximum de
deux hiérarchies.
• Le lecteur lit les fichiers de l’album en
respectant l’ordre d’enregistrement sur le
support.
b
• Le lecteur lira n’importe quel fichier de la liste
ci-dessus, même si le format de fichier est
différent. La lecture de certaines données peut
générer du bruit risquant d’endommager le
haut-parleur.
• Certains disques DATA créés au format
Packet Write ne peuvent pas être lus.
• Certains disques DATA créés lors de sessions
multiples peuvent ne pas être lus.
• Certains fichiers JPEG ne peuvent pas être lus.
3
• Le lecteur ne peut pas lire les fichiers JPEG
dont la taille est supérieure à 3 078 (largeur) x
2 0 48 (hauteur) en mode normal, ou supérieure
à 2 000 (largeur) x 1 200 (hauteur) en mode
JPEG progressif. (Certains fichiers JPEG
progressifs ne peuvent pas être affichés même
1
si leur taille est comprise dans les valeurs
2
spécifiées.)
• Le lecteur peut ne pas lire une combinaison de
deux ou plusieurs fichiers vidéo DivX/
MPEG-4.
• Le lecteur ne peut pas lire les fichiers vidéo
DivX/MPEG-4 dont la taille est supérieure à
720 (largeur) × 576 (hauteur)/2 Go.
• Le lecteur peut ne pas lire certains fichiers
vidéo DivX/MPEG-4 dont la durée est
supérieure à 3 heures.
• Selon le fichier vidéo DivX/MPEG-4, la
lecture normale peut ne pas être possible. Il est
possible que l’image soit floue, que la lecture
ne semble pas fluide, que le son soit saccadé,
etc. Nous vous recommandons de créer un
fichier avec un débit binaire inférieur. Si le son
est toujours distordu, vérifiez le format audio.
(Le format MP3 est recommandé pour les
fichiers vidéo DivX, et le fichier vidéo
MPEG-4 doit être au format AAC LC.)
Veuillez noter le lecteur n’est pas conforme au
format WMA (Windows Media Audio).
• Le lecteur peut ne pas lire correctement le
fichier vidéo à débit binaire élevé d’un CD
DATA. Nous vous recommandons d’utiliser
un DVD DATA pour la lecture.
• Le lecteur peut reconnaître un maximum de
299 albums. Il ne lira pas de fichier au-delà du
299ième album.
• Le lecteur peut reconnaître un nombre
combiné total de 648 fichiers et albums. Il ne
lira pas de fichier/album au-delà du 648ième
fichier ou album.
• Selon les conditions d’écriture du support, le
nombre total de fichiers et d’albums reconnus
peut être inférieur à 648.
• Le lecteur peut afficher un nom de fichier ou
d’album contenant un maximum de
14 caractères. Les caractères spéciaux sont
remplacés par «*».
• Le lecteur peut afficher uniquement le nom de
l’album en cours de lecture. Tout album se
trouvant sur la couche supérieure est indiqué
par « \..\. ».
• Le lecteur peut ne pas afficher correctement
l’information de lecture de certains fichiers.
,suite
29
Informations supplémentaires
FR

Remarques sur les disques
commerciaux
Code de région
Il s’agit du système utilisé pour protéger
les droits d’auteur. Le code de région est
affiché sur l’emballage des DVD VIDEO,
selon la région où ils sont achetés. Les
DVD VIDEO étiquetés « ALL » ou « 1 »
peuvent être lus par ce lecteur.
ALL
Opérations de lecture de DVD
Certaines opérations de lecture de DVD
peuvent être réglées intentionnellement
par les producteurs de logiciel. Comme ce
lecteur lit les DVD conformément au
contenu de disque conçu par les
producteurs de logiciel, certaines fonct ions
de lecture peuvent ne pas être disponibles.
Consultez également les instructions
incluses avec les DVD.
Disques musicaux codés avec des
technologies de protection des droits
d’auteur
Cet appareil est conçu pour lire des disques
conformes à la norme Compact Disc (CD).
Plusieurs disques musicaux codés avec des
technologies de protection des droits
d’auteur sont distribués par certaines
compagnies de disque. Veuillez noter que
parmi ces disques, il en existe certains qui
ne sont pas conformes à la norme CD. Ces
disques peuvent ne pas être lus par ce
lecteur.
Côté du contenu audio des DualDisc
Un DualDisc est un disque à deux faces qui
comprend un contenu DVD enregistré sur
un côté, et un contenu audionumérique sur
l’autre.
Cependant, comme le côté du contenu
audio n’est pas conforme à la norme
Compact Disc (CD), la lecture n’est pas
garantie avec ce produit.
Spécifications
Système
Laser : Laser à semi-conducteur
Système de format de signal : NTSC
Sorties
VIDEO (sortie vidéo) :
Mini-prise
Sortie 1,0 V c-c/75 ohms
AUDIO (sortie audio)
Mini-prise stéréo
Sortie 2,0 V efficace/47 kilohms
Impédance de charge recommandée
supérieure à 47 kilohms
PHONES (casque d’écoute) A/B :
Mini-prise stéréo
Afficheur à cristaux liquides
Dimension du panneau : 7 pouces (17,8 cm) de
largeur (à la diagonale)
Système de pilotage : Matrice active TFT
Résolution : 480 × 234 (taux de pixel effectif :
supérieur à 99,99 %)
Généralités
Alimentation :
9,5 V CC (adaptateur CA/adaptateur pour
batterie de voiture)
7,4 V CC (batterie rechargeable)
Consommation électrique (lecture de DVD
VIDEO) :
7 W (utilisation avec casque d’écoute)
Dimensions (approximatives) :
200 × 39,5 × 155 mm (7
1
6
/8 pouces) (largeur/hauteur/profondeur)
incluant les pièces saillantes
Poids (approximatif) : 840 g (1,85 lb)
Température de fonctionnement : 5 °C à
35 °C (41 °F à 95 °F)
Humidité de fonctionnement : 25 % à 80 %
Adaptateur CA : 110-240 V CA, 50/60 Hz
Adaptateur pour batterie de voiture :
12 V CC
Accessoires inclus
Voir page 9.
La conception et les caractéristiques sont sujettes
à modifications sans préavis.
7
/8 × 19/16 ×
30
FR

Index
Nombres
16:9
19
4:3 Letter Box
4:3 Pan Scan
A
Affichage A L’Ecran
Affichage d’information de lecture
Afficher TV
Aspect LCD
Audio
Audio DRC
B
Batterie de la télécommande
C
CD
12, 28
Choix De La Langue
Code de région
Controle Parental
D
DATA
Dépannage
Diaporama
DivX (fichier vidéo)
Durées de chargement et de lecture
DVD
E
Economiseur D’Ecran
F
Fichier vidéo (DivX/MPEG-4)
G
Général
J
JPEG
L
Lecture aléatoire
Lecture répétée
M
Marque Angle
Menu Du Disque
Mode LCD
Mot De Passe
MP3
MPEG-4 (fichier vidéo)
19
19
20
19
17
8, 20
20
9
20
30
20
15, 28
22
16
15, 29
12, 28
13, 19
15, 29
19
15, 29
13
13
8, 19
20
17
20
15, 29
15, 29
14
10
R
Reglage
18
Reglage Audio
Reprise de lecture
20
13
S
Sous-Titre
Supports pouvant être lus
8, 20
28
Informations supplémentaires
31
FR

4-126-489-21(1)
Sony Corporation Printed in China
 Loading...