


IT
2-661-941-02 (1)
7819901257B
Video Recordable
DVD Drive
Operating Instructions
JP
FR
DE
ES
IT
CS
VRD-MC1
© 2005 Sony Corporation
Safety Regulations
WARNING
You are cautioned that any changes or
modifications not expressly approved in this
manual could void your authority to operate
this equipment.
To reduce the risk of fire or electric shock, do
not expose this apparatus to rain or moisture.
To avoid electrical shock, do not open the
cabinet. Refer servicing to qualified personnel
only.
CAUTION:
As the laser beam in the VRD-MC1 is harmful
to the eyes, do not attempt to disassemble the
cabinet. Refer servicing to qualified personnel
only.
The use of optical instruments with this
product will increase eye hazard.
The use of controls or adjustments or
performance of procedures other than those
specified herein may result in hazardous
radiation exposure.
The VRD-MC1 is classified as a CLASS 1
LASER PRODUCT.
The CLASS 1 LASER PRODUCT notice is
located on the enclosure.
CLASS 1
LASER PRODUCT
LASER KLASSE 1
PRODUKT
reception, which can be determined by turning
the equipment off and on, the user is
encouraged to try to correct the interference by
one or more of the following measures:
• Reorient or relocate the receiving antenna.
• Increase the separation between the
equipment and receiver.
• Connect the equipment into an outlet on a
circuit different from that to which the
receiver is connected.
• Consult the dealer or an experienced radio/
TV technician for help.
The shielded interface cable recommended in
this manual must be used with this equipment
in order to comply with the limits for a digital
device pursuant to Subpart B of Part 15 of FCC
Rules.
Notes:
If you have any questions about this product,
you may call the telephone number listed on
the “Support Overview” on page 54. The
telephone number below is not for customer
service but only for official purposes.
Declaration of Conformity
Trade Name: SONY
Model No.: VRD-MC1
Responsible Party: Sony Electronics Inc.
Address: 16530 Via Esprillo,
Telephone No.: 858-942-2230
This device complies with Part 15 of the FCC
Rules. Operation is subject to the following two
conditions:
(1) This device may not cause harmful
interference, and
(2) This device must accept any interference
received, including interference that may
cause undesired operation.
San Diego, CA 92127
U.S.A.
FCC Compliance:
This equipment has been tested and found to
comply with the limits for a Class B digital
device, pursuant to Part 15 of the FCC Rules.
These limits are designed to provide reasonable
protection against harmful interference in a
residential installation. This equipment
generates, uses, and can radiate radio
frequency energy and, if not installed and used
in accordance with the instructions, may cause
harmful interference to radio communications.
However, there is no guarantee that
interference will not occur in a particular
installation. If this equipment does cause
harmful interference to radio or television
2
CAUTION:
The mains plug on this equipment must be used
to disconnect mains power.
Please ensure that the socket outlet is installed
near the equipment and shall be easily
accessible.

Table of Contents
Safety Regulations ........................2
Introducing DVDirect
Features .........................................6
Package Contents ..........................7
Parts and Controls ........................ 8
Using DVDirect without a
Computer
About Auto Setup and the Main
Menu ............................................11
To display the main menu .......11
Creating a Video DVD ...............12
One touch recording and video
recording .................................12
Writable discs that can be
used .........................................12
Video Recording .........................13
One Touch Recording
(DV Full Dubbing) ......................17
Previewing a Video DVD ...........20
Creating a Photo DVD ...............22
Photo DVD to be created ........22
Writable discs that can be
used .........................................22
Storage location of photos in the
photo DVD ..............................23
Photo Recording .........................24
Viewing and Printing Photos ..... 28
Using the Setup Menu ................32
DV Full Dubbing ....................33
Rec Quality .............................33
Auto Stop Timer .....................33
Auto Chaptering ...................... 34
Slide show BGM .....................35
Color system ...........................35
Finalize disc ............................ 36
Erase disc ................................ 39
System .................................... 40
Using DVDirect with a
Computer
System Requirements ................. 41
Setting Up the Computer ........... 42
Installing the software ............ 42
Connecting DVDirect to a
computer ................................. 43
Disconnection ......................... 44
Using Memory Card slots ....... 44
Using the Bundled Software ...... 45
Launching
“Nero StartSmart” .................. 45
Notes on using other software
with DVDirect ........................ 45
Maximizing Performance .......... 46
Reaching the highest possible data
transfer rate ............................. 46
Updating the system
software .................................. 46
Using 48x read/write speed for
CDs ......................................... 46
Additional Information
About Discs ................................. 47
Compatible writable discs ...... 47
Recommended writable
discs ........................................ 48
Writable discs and
compatibility ........................... 48
Precautions on writing/playing
discs ........................................ 49
About Memory Cards ................ 51
About “Memory Stick” ........... 51
3

About the CompactFlash/SD/
xD-Picture Cards .....................52
Precautions .................................. 53
Support Overview ....................... 54
User support web site .............. 54
Update the system software .... 54
Technical support .................... 54
Specifications ...............................55
4

• Pentium is a registered trademark of Intel Corporation.
• Microsoft and Windows are registered trademarks of Microsoft Corporation.
• Other system and product names used herein are registered trademarks or trademarks of their
respective manufacturers, although the ™ and ® marks are not used in the text.
• Manufactured under license from Dolby Laboratories.
Dolby and the double-D symbol are trademarks of Dolby Laboratories.
• Memory Stick and the memory stick logo are trademarks, or registered trademarks of Sony
Corporation.
❑ Our product warranty is valid only when the supplied accessories (including software)
are used in the specified or recommended system environment, in accordance with the
documentation, and applies only to this DVDirect. Our customer service and user
support apply only under these product warranty conditions.
❑ Please note that we cannot accept responsibility for failure of the computer or other
devices, incompatibility with special hardware, operating problems caused by improper
installation of software, loss of data, discs or other accidental or incidental damage that
might occur when using this product.
❑ The guarantee and user support for this product are valid only within the countries or
sales regions specified on the warranty card.
❑ Copyright laws prohibit the copying in part or in full of the supplied software and
documentation, or loaning the software, without obtaining permission of the copyright
holder.
❑ We cannot accept responsibility for any direct or indirect financial damage or loss of
profit that might occur when using the supplied software.
❑ The supplied software can only be used with this product.
❑ Specifications of the supplied software may be changed without notice in the interest of
product improvement.
Please Record Responsibly
Before copying anything onto a disc, please be sure that you are not violating copyright
laws. Most software companies allow you to make a backup or archive copy of software.
Check your software’s license agreement for details.
Copyrights
• Television programs, films, video tapes, discs, and other materials may be copyrighted.
Unauthorized recording of such material may be contrary to the provisions of the
copyright laws. Also, use of this product with cable television transmission may require
authorization from the cable television transmitter and/or program owner.
• This product incorporates copyright protection technology that is protected by U.S.
patents and other intellectual property rights. Use of this copyright protection
technology must be authorized by Macrovision, and is intended for home and other
limited viewing uses only unless otherwise authorized by Macrovision. Reverse
engineering or disassembly is prohibited.
5

Introducing DVDirect
Features
This DVDirect offers the following features.
Burning video DVDs
❑ You can burn videos on DVDs directly
from connected video cameras and AV
devices without using a computer.
❑ You can burn the entire contents of your
digital video camera on DVDs with onetouch of the record button when using
the i.LINK connection.
Burning photo DVDs
❑ You can archive photos on DVDs
directly from memory cards without
using a computer.
❑ You can record photos as a slide show
on DVDs playable on most DVD
players.
Direct printing operation
You can print out photos burned on DVDs or
in a memory card directly by connecting this
DVDirect to a PictBridge-compatible printer
with the supplied USB cable.
Computer-controlled operation
❑ This DVDirect can be used as a high
speed DVD/CD drive with Hi-Speed
USB (USB 2.0-compatible) interface
when connected to a computer by a USB
cable.
❑ This DVDirect supports high speed
recording to the latest format discs such
as DVD+R double layer disc or DVD-R
dual layer disc.
CFSD xD
6
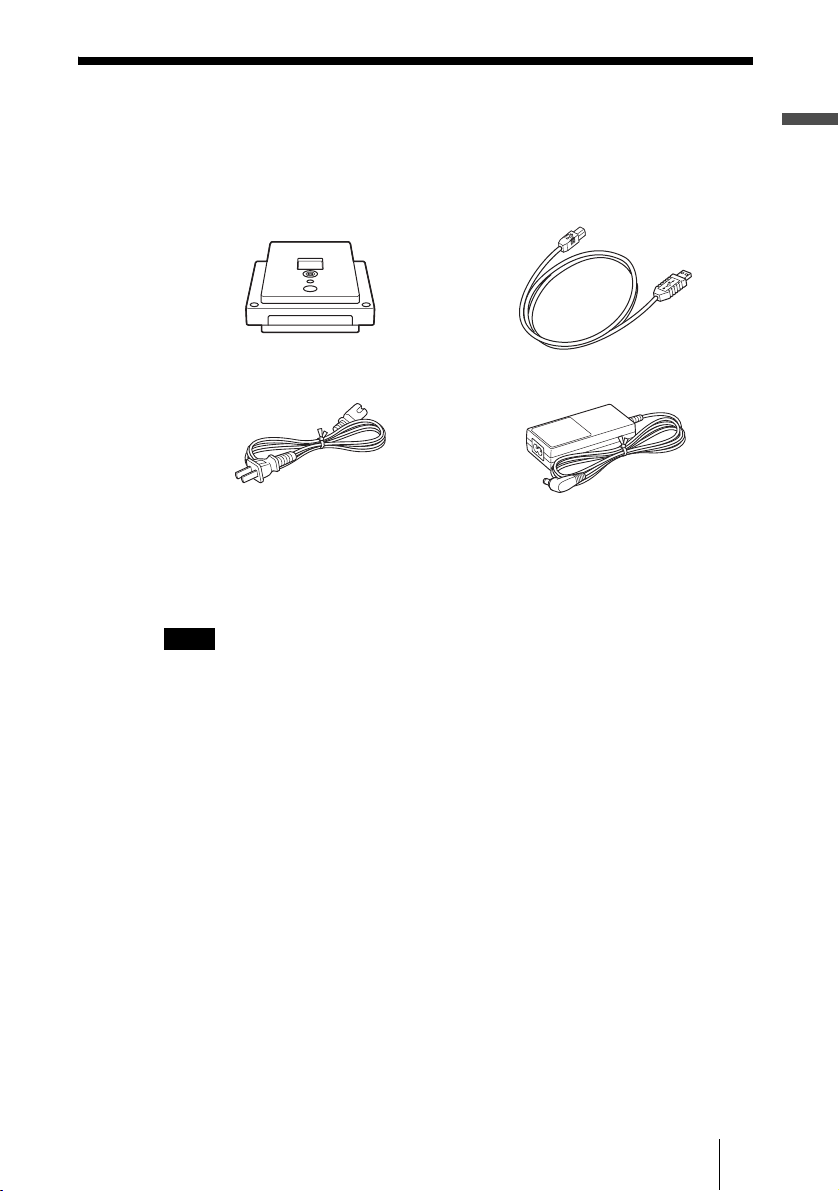
Package Contents
Please confirm that the package contains the following items. If any of these
items are missing and/or damaged, please contact your dealer.
• DVDirect • Hi-Speed USB cable
• Power cord • AC adaptor (MPA-AC1)
• Quick Start Guide
• Operating Instructions (this document)
• Software disc
• Warranty card
Note
Make sure that you back up the supplied software disc on another disc as the software disc is
not sold separately.
Introducing DVDirect
7
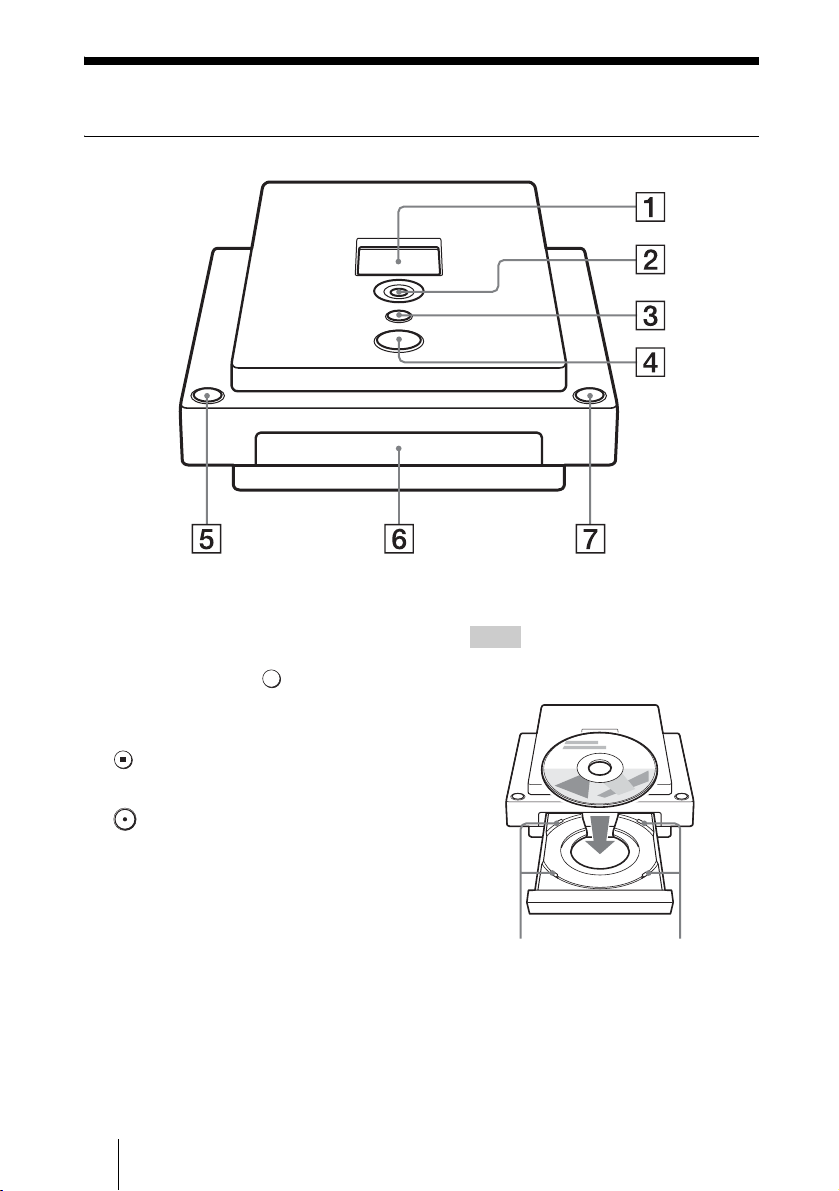
Parts and Controls
Front and top panels
A Display window
Displays a menu screen, images from a
playback device or photos from a
memory card.
B Mm<, Cursor/ Select
button
Selects a function.
C Stop button
Stops recording.
D Record button
Starts recording.
Lights in red when recording.
E Power button
Turns DVDirect on or off.
8
F Disc tray
Insert a disc here, label side up.
Hint
When you insert a disc into DVDirect, make
sure it rests flat under the four tabs.
Tabs Tabs
G Eject button
Opens and closes the disc tray.
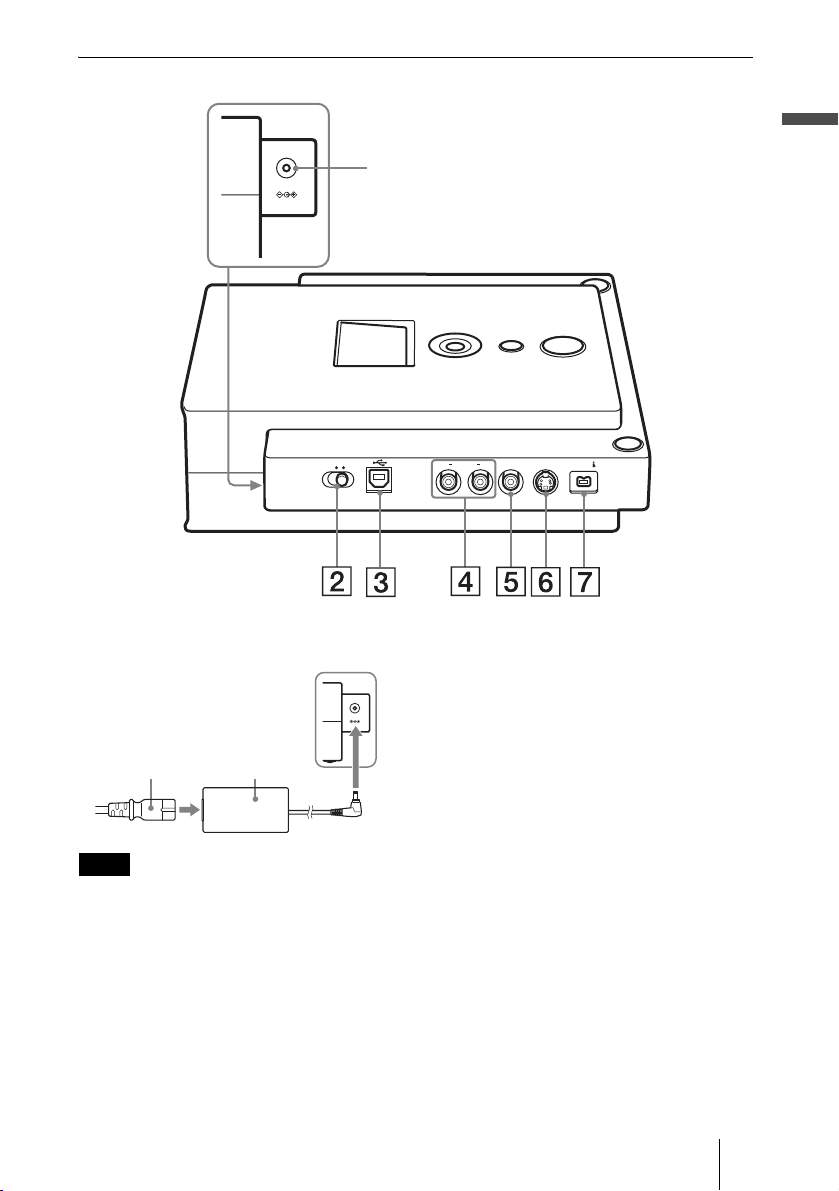
Left side panel
Introducing DVDirect
DC 12V IN
STANDALONE PC/PRINT
A DC IN jack
Connect the supplied AC power adaptor.
Power
cord
AC adaptor
DC 12V IN
1
R AUDIO IN VIDEO IN S VIDEO IN
L
DV IN
D AUDIO IN L/R connectors
Connect the audio plugs of an AV cable
(not supplied) when connecting
DVDirect to a video device, such as a
video camera or VCR.
E VIDEO IN connector
Connect the video plug of an AV cable
(not supplied) when connecting
DVDirect to a video device, such as a
video camera or VCR.
Note
• Be sure to use the supplied power cord.
• Do not use damaged cables, such as cables with
deformed connectors.
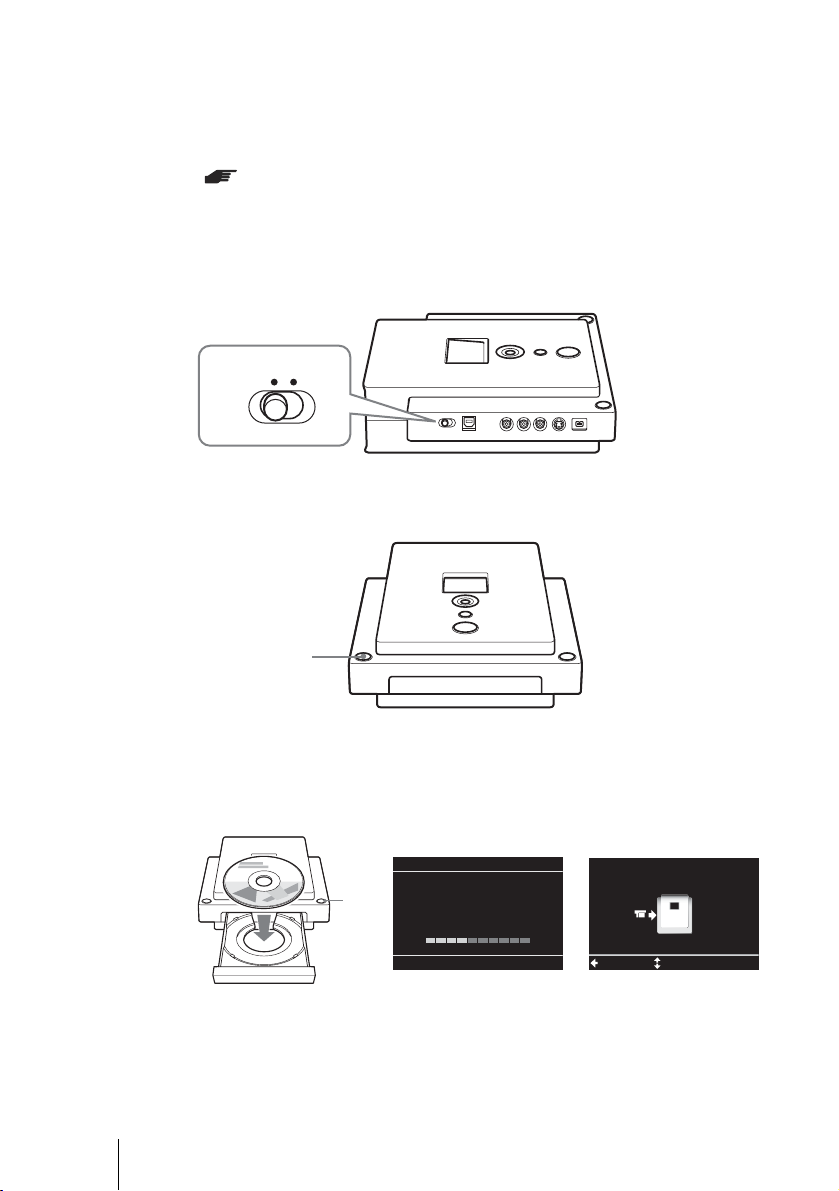
B Mode switch
Switch to [PC/PRINT] when connecting
a printer or computer.
C USB connector
Connect the supplied USB cable when
connecting DVDirect to a computer or
printer.
F S VIDEO IN connector
Connect an S VIDEO cable (not
supplied) when connecting DVDirect to
a video device with an S VIDEO jack,
such as a video camera or VCR.
G DV IN connector (4-pin)
Connect a DV (i.LINK) cable (not
supplied) when connecting DVDirect to
a digital video camera*.
* For DV/Digital8 camcorder input only.
9
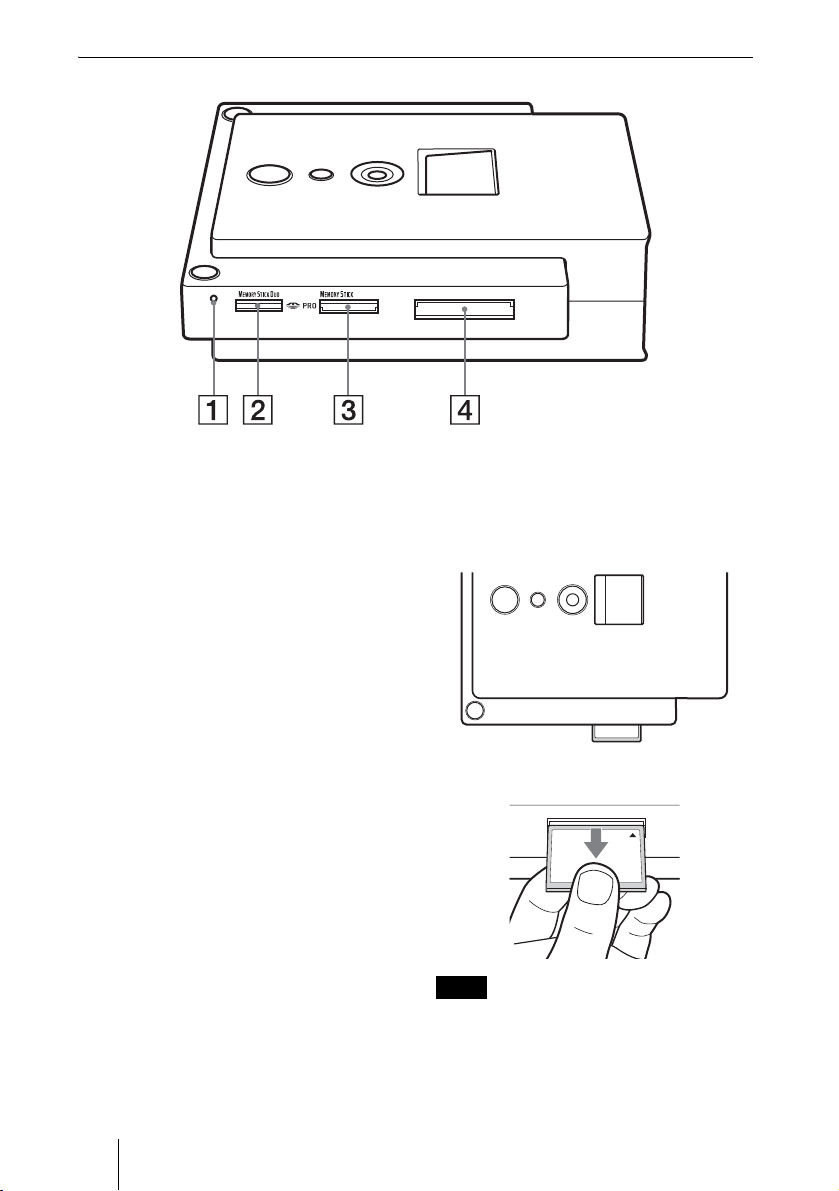
Right side panel
CFSD xD
A Memory card LED
Lights in amber when accessing the
memory card.
Never remove the memory card while
the LED is lit.
Otherwise data in the memory card may
be damaged.
B Memory Stick Duo slot
Insert a “Memory Stick Duo.”
Push the “Memory Stick Duo” into the
Memory Stick Duo slot until you hear a
click.
To remove, push the “Memory Stick
Duo” and pull out.
C Multi memory card slot
Insert a “Memory Stick,” SD Card or
xD-Picture Card.
Push each card into the multi memory
card slot until you hear a click.
To remove, push the card and pull out.
D CompactFlash Card slot
Insert a CompactFlash.
Push the CompactFlash into the
CompactFlash slot.
The CompactFlash stays half inserted.
To remove, pull out the CompactFlash.
CF
Note
You can use the memory card slot for both standalone or computer operation.
10
2111
Using DVDirect without a Computer
About Auto Setup and the Main Menu
DVDirect automatically detects input signals from video connection, memory
card and DVD disc right after turning on the power, and displays the
appropriate message for preparation of recording in the display window. By
following the message, you can automatically move to the recording procedure
you intended without the complicated button operation (auto setup function).
You can also perform the recording procedure manually by selecting the
option from the main menu. You can move to the setup screen (setup menu)
for various setting from the main menu.
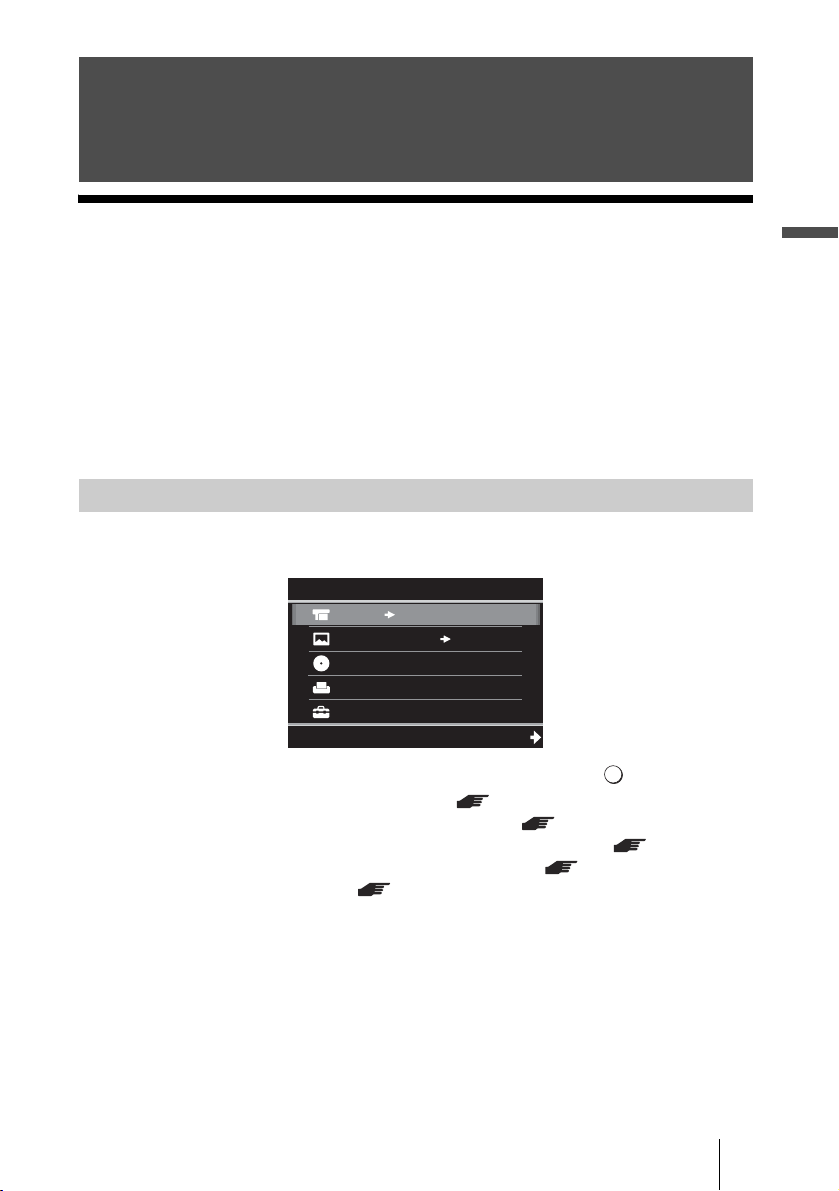
To display the main menu
Press
< when [< Menu] is displayed in the bottom left of the display
window to move to the main menu.
Menu
Video
MemoryCard DVD
DVD Video Preview
Photo View/Print
Setup
Press
Mm to select the desired operation, and press , or (Select).
, DVD: Create video DVD ( page 12)
Video
MemoryCard
DVD Video Preview: Playback the created video DVD ( page 20)
Photo View/Print: Display or print out photos ( page 28)
Setup: Various setting ( page 32)
, DVD: Create photo DVD ( page 22)
DVD
Select
Using DVDirect without a Computer
11
Creating a Video DVD
You can use this DVDirect as a stand-alone DVD recorder to burn videos on
DVDs directly from a connected video camera or video device such as VCR/
DVR/PVR.
You can play the created video DVD with other DVD devices, or the DVD
drives of computers.
One touch recording and video recording
Two types of recording are available to create video DVD; one touch recording
and video recording.
Video recording ( page 13)
Record video DVD by operating DVDirect and the connected video devices
with buttons such as (Record) and (Stop) of DVDirect, or the play,
pause and stop buttons of the video device. Any video devices with video
output jack will be recordable.
One touch recording (DV Full Dubbing feature) ( page 17)
When connecting your digital video camera* with a DV jack to DVDirect
using a DV (i.LINK) cable, you can burn the entire contents of a tape recorded
by your digital video camera on a DVD with one touch of (Record).
DVDirect controls the digital video camera for the whole process, and
completes creation of the video DVD.
* DV or Digital8 camcorder only. MICROMV camcorder is not supported.
Writable discs that can be used
To create a video DVD, you can use DVD+R, DVD+R DL (double layer disc),
DVD-R, DVD+RW, or DVD-RW disc.
See “Compatible writable discs” for details. ( page 47)
Notes on creating a video DVD
• You cannot record videos with copy protected signals (commercial DVD, VHS software,
some programs from satellite receiver or CATV receiver, etc.).
• You cannot make incremental recordings on discs that have been created using a computer
or other DVD recorder.
12
Video Recording
AV
1 Connect the supplied power cord and AC adaptor to DVDirect.
2 Connect your video device to DVDirect with an AV, S-VIDEO or
DV (i.LINK) cable (not supplied).
To LINE OUT or OUTPUT
on VCR, DVR, etc.
S video cable*
AV cable
Using DVDirect without a Computer
To analog or
digital video
camera, etc.
Signal flow
cable
or
S video
cable*
Yellow
White
Red
Yellow
White
Red
Yellow
White
Red
R AUDIO IN VIDEO IN S VIDEO INL
R AUDIO IN VIDEO IN S VIDEO INL
DV IN
Signal flow
DV (i.LINK) cable**
. Continued
13
*If th
e video camera or VCR has an S VIDEO jack, use an S VIDEO cable (not supplied)
for improved picture quality (compared to a video cable). You also need to connect audio
cables for sound.
** If the digital video camera has a DV (i.LINK) jack, use a DV (i.LINK) cable (not
supplied) for improved picture quality (compared to a video or S VIDEO cable). If you
use a DV (i.LINK) cable, you can perform one touch recording (DV Full Dubbing feature)
( page 17).
3 Turn on the video device and ready it for playback.
4 Set the mode switch on the left side of DVDirect to
[STANDALONE].
STANDALONE PC/PRINT
5 Turn on DVDirect.
The display window turns on.
14
Power
button
6 Press the eject button, and insert a disc.
A new blank disc will be formatted automatically. Wait until [Formatting the
disc.] in the display window disappears, and DVDirect becomes ready for
recording.
Check video cable
Menu
Select
Eject
button
Formatting the disc.
This may take some time.
Please wait.
t
7 Start playback on the video device.
The image from the connected video device appears in the display window.
Selected input
Check video cable
Video DVD
t
Remaining
Menu
Select
HQ
Menu
Recording mode
( page 33)
01:00:00
REC
Remaining
time
Hint
DVDirect detects a video input automatically when you play back video on the connected
video device. You can check video playback in the display window.
The selected input is displayed in the top left.
DV
B DVD : DV IN is selected.
Video
B DVD : VIDEO IN is selected.
S-Video
If a video input is not detected correctly (or if the video playback is not displayed), press
B DVD : S VIDEO IN is selected.
Mm
to select the correct input.
8 Press (Record) on DVDirect.
[Recording] appears in the display window and (Record) lights up during
recording.
Video DVD
z
Recording
HQ
Record
00:00:03
PAUSE STOP
Using DVDirect without a Computer
Note
If you stop playback on the video device during recording, (i.e. the video signal is
interrupted), DVDirect pauses and (Record) blinks.
To resume recording, restart playback on the video device. If no video signals are detected
for 2 minutes, it stops.
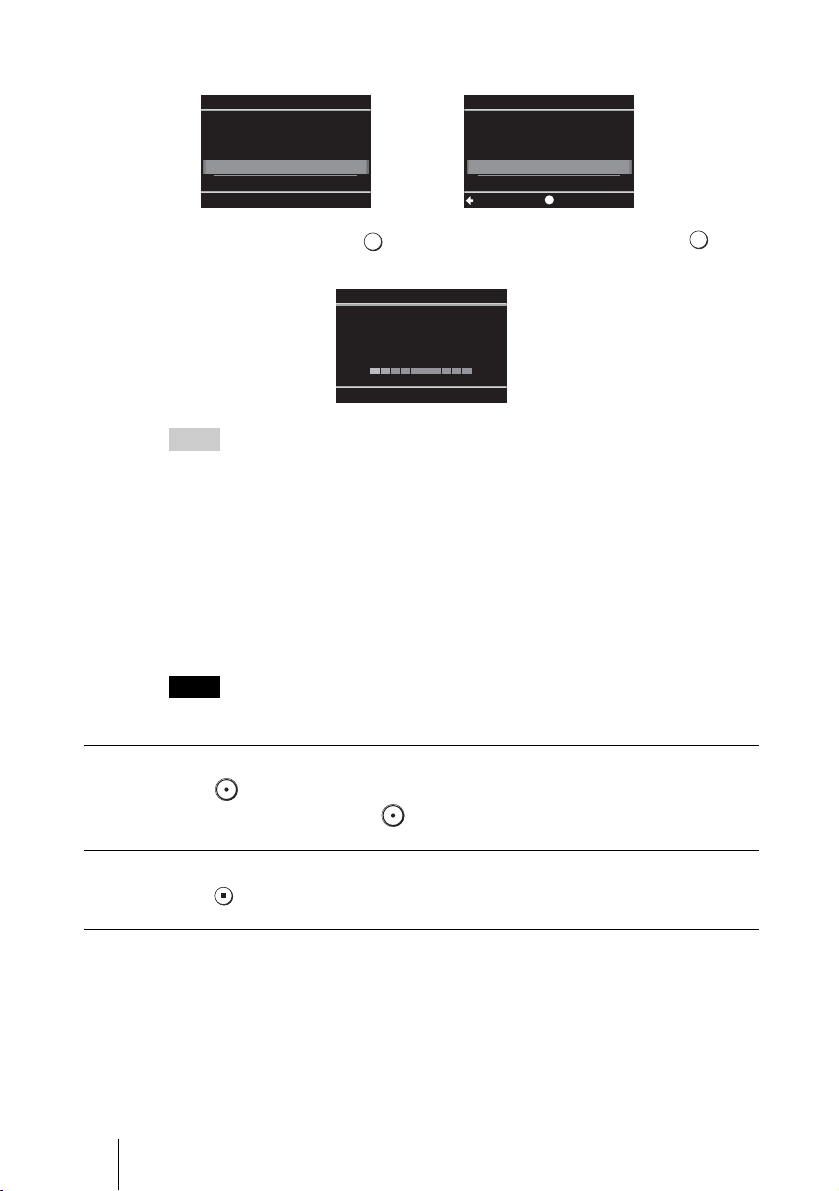
9 Press (Stop) to stop recording.
Wait a moment until the display window changes.
10
Press the eject button to eject the disc.
Hint
Repeat steps 7 to 9 to continue recording.
. Continued
15
11
The following message appears.
Eject
Do you want to
finalize the disc?
Ye s
No
t
Finalize disc
Disc will be playable,
but not recordable.
OK
Cancel
SelectSetup
Select [Yes] and press (Select), and again select [OK] and press
(Select). DVDirect starts finalizing the disc.
Finalizing...
Hints
• If you select [No], the disc is ejected without finalizing. This disc is not completed yet and
cannot be played with other DVD players or DVD drives of computers. See page 38 for
details on finalizing.
• When using a DVD+RW, this message will not appear. (The DVD+RW disc is
automatically finalized and ejected.)
12
When finalizing is completed, the disc is automatically ejected.
The video DVD is completed.
You can play the video DVD with other DVD players or DVD drive of
computers.
Note
It may take a few minutes to finalize.
To pause recording
Press (Record).
To resume recording, press (Record) again.
To stop recording
Press (Stop).
To further record videos
If you eject a disc without finalizing or DVD+RW disc after recording videos,
you can add videos on the same disc later.
Insert the disc to add videos, and then repeat steps 7 to 9.
16
One Touch Recording (DV Full Dubbing)
Note
Before you start recording, change the [DV Full Dubbing setting] to [ON] in the Setup menu.
( page 33)
1 Connect the supplied power cord and AC adaptor to DVDirect.
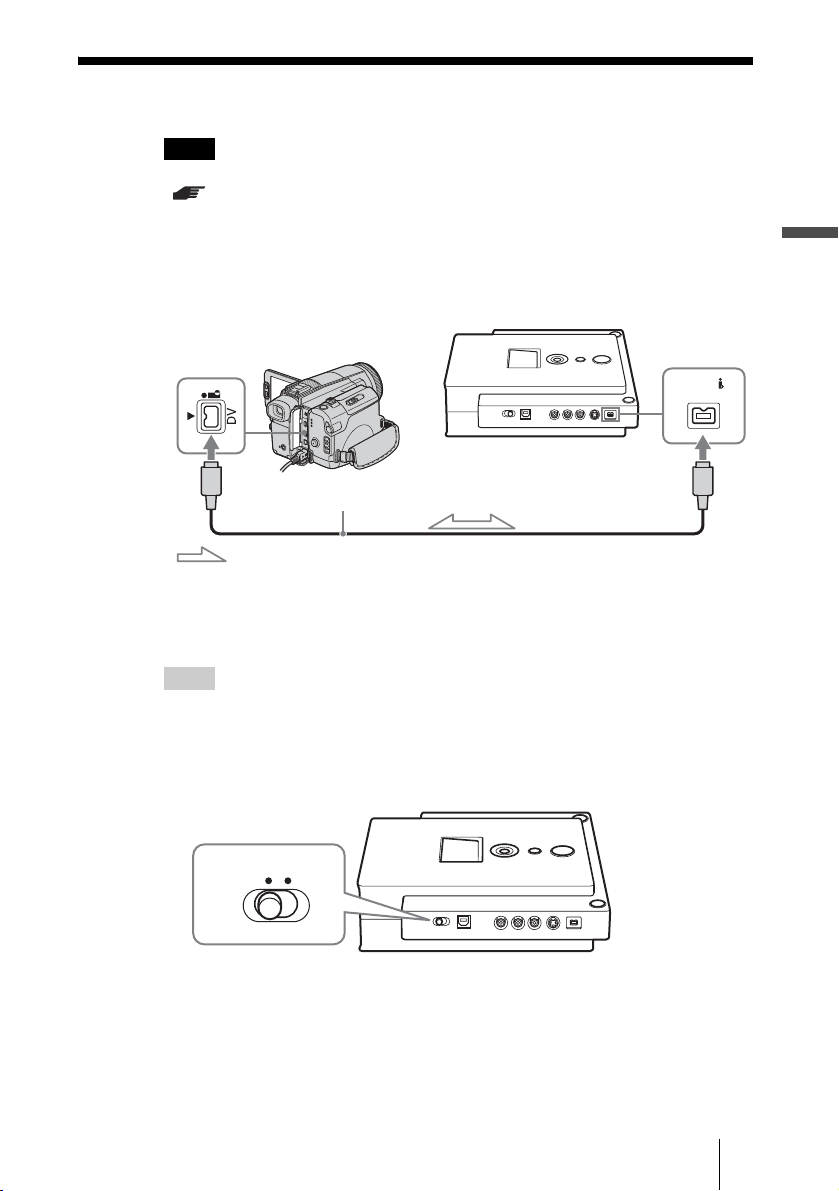
2 Connect your digital video camera* to DVDirect with a DV
(i.LINK) cable (not supplied).
DV IN
DV (i.LINK) cable
Signal flow
* DV or Digital8 camcorder only. MICROMV camcorder is not supported.
3 Turn on the digital video camera and ready it for playback.
Hint
For most digital video cameras, switch the power/mode button to the playback or “VTR”
mode to play the tape or perform dubbing.
4 Set the mode switch on the left side of DVDirect to
[STANDALONE].
Using DVDirect without a Computer
STANDALONE PC/PRINT
. Continued
17
 Loading...