

Page 1

SONY.
DV Still Image
Operating Instructions Owner's Record
The serial number is located on the board. Record the
serial number in the space provided below. Refer to
this number whenever you call upon your Sony dealer
regarding this product.
3-860-898-11(1)
Capture Board
Model No. DVBK-2000
Serial No.
__________________________
DVBK-2000/2000E
©1997 by Sony Corporation
Page 2

Table of contents
Before using this product
Overview 4
About this manual 7
Preparation
Checking the supplied items 9
Installing the capture board 10
Installing the driver (Windows) 12
Installing the DV software (Windows) 15
Installing the DV
software (Machintosh) 19
Connecting the DV (Digital Video)
equipment 20
Starting the DV software (Windows) 21
Starting the DV software (Machintosh) 22
Operation
Configuration of display 23
Names and functions of display 26
Capturing the image from the DV
equipment to PC 35
Recording the image of your PC by DV
equipment 41
Others
Specifications 45
Troubleshooting 4:6
Technical information 47
Glossary 54
This manual shows how to use the basic functions
of DV software. Regarding the functions which
are not explained in this manual, and the contents
of the commands of each menu, refer to help
menu attached to the DV software.
Page 3

For Customers in the U.S.A.
::aution
li'ou are cautioned that any changes or
nodifications not expressly approved in this
nanual could void your authority to operate
his equipment.
Compliance tests on this product were
carried out for the EU Directive, 89 / 336 /
EEC using a HP Computer model Vectra
VL 5 /100 as a representative host unit for
this product.
WARNING
rhis equipment has been tested and found to
romply with the limits for a Class B digital
levice, pursuant to Part 15 of the FCC Rules,
rhese limits are designed to provide
easonable protection against harmful
nterference in a residential installation. This
jquipment generates, yses, and can radiate
■adio frequency energy and, if not irrstalled
md used in accordance with the instructions,
nay cause harmful interference to radio
rommunications. However, there is no
pjarantee that interference will not occur in a
jarticular installation. If this equipment does
:ause harmful interference to radio' or
elevision reception, which can be determined
iy turning the equipment off and on, the user
s encouraged to try to correct the interference
>y one or more of the following measures:
- Reorient or relocate the receiving antenna.
■ Increase the separation between the
equipment and receiver.
• Cormect the equipment into an outlet on a
circuit different from that to which the
receiver is connected.
• Consult the dealer or an experienced
radio / TV technician for help.
'he shielded interface cable recommended in
his manual must be used with the equipment
n order to comply with the limits for a digital
levice pursuant to Subpart B of Part 15 of
CC Rules.
User registration
To receive the customer services, complete
and return the registration card included
in your package.
Page 4

Overview
Combination of your PC with DV Still Image Capture
Board DVBK-2000/2000E and DV equipment can give
you the following operations.
Capture still image from DV equipment
You can capture the picture input from the DV
equipment to your PC as an encoded still image. The
encoded still image you captured is stored in called
"Album" or "Library".
This function is convenient if you use it as the
followings.
• To make a homepage of internet.
• To print it out with adding title.
There is another use of captured still image. Let's find
out your use for your favorite things.
Page 5
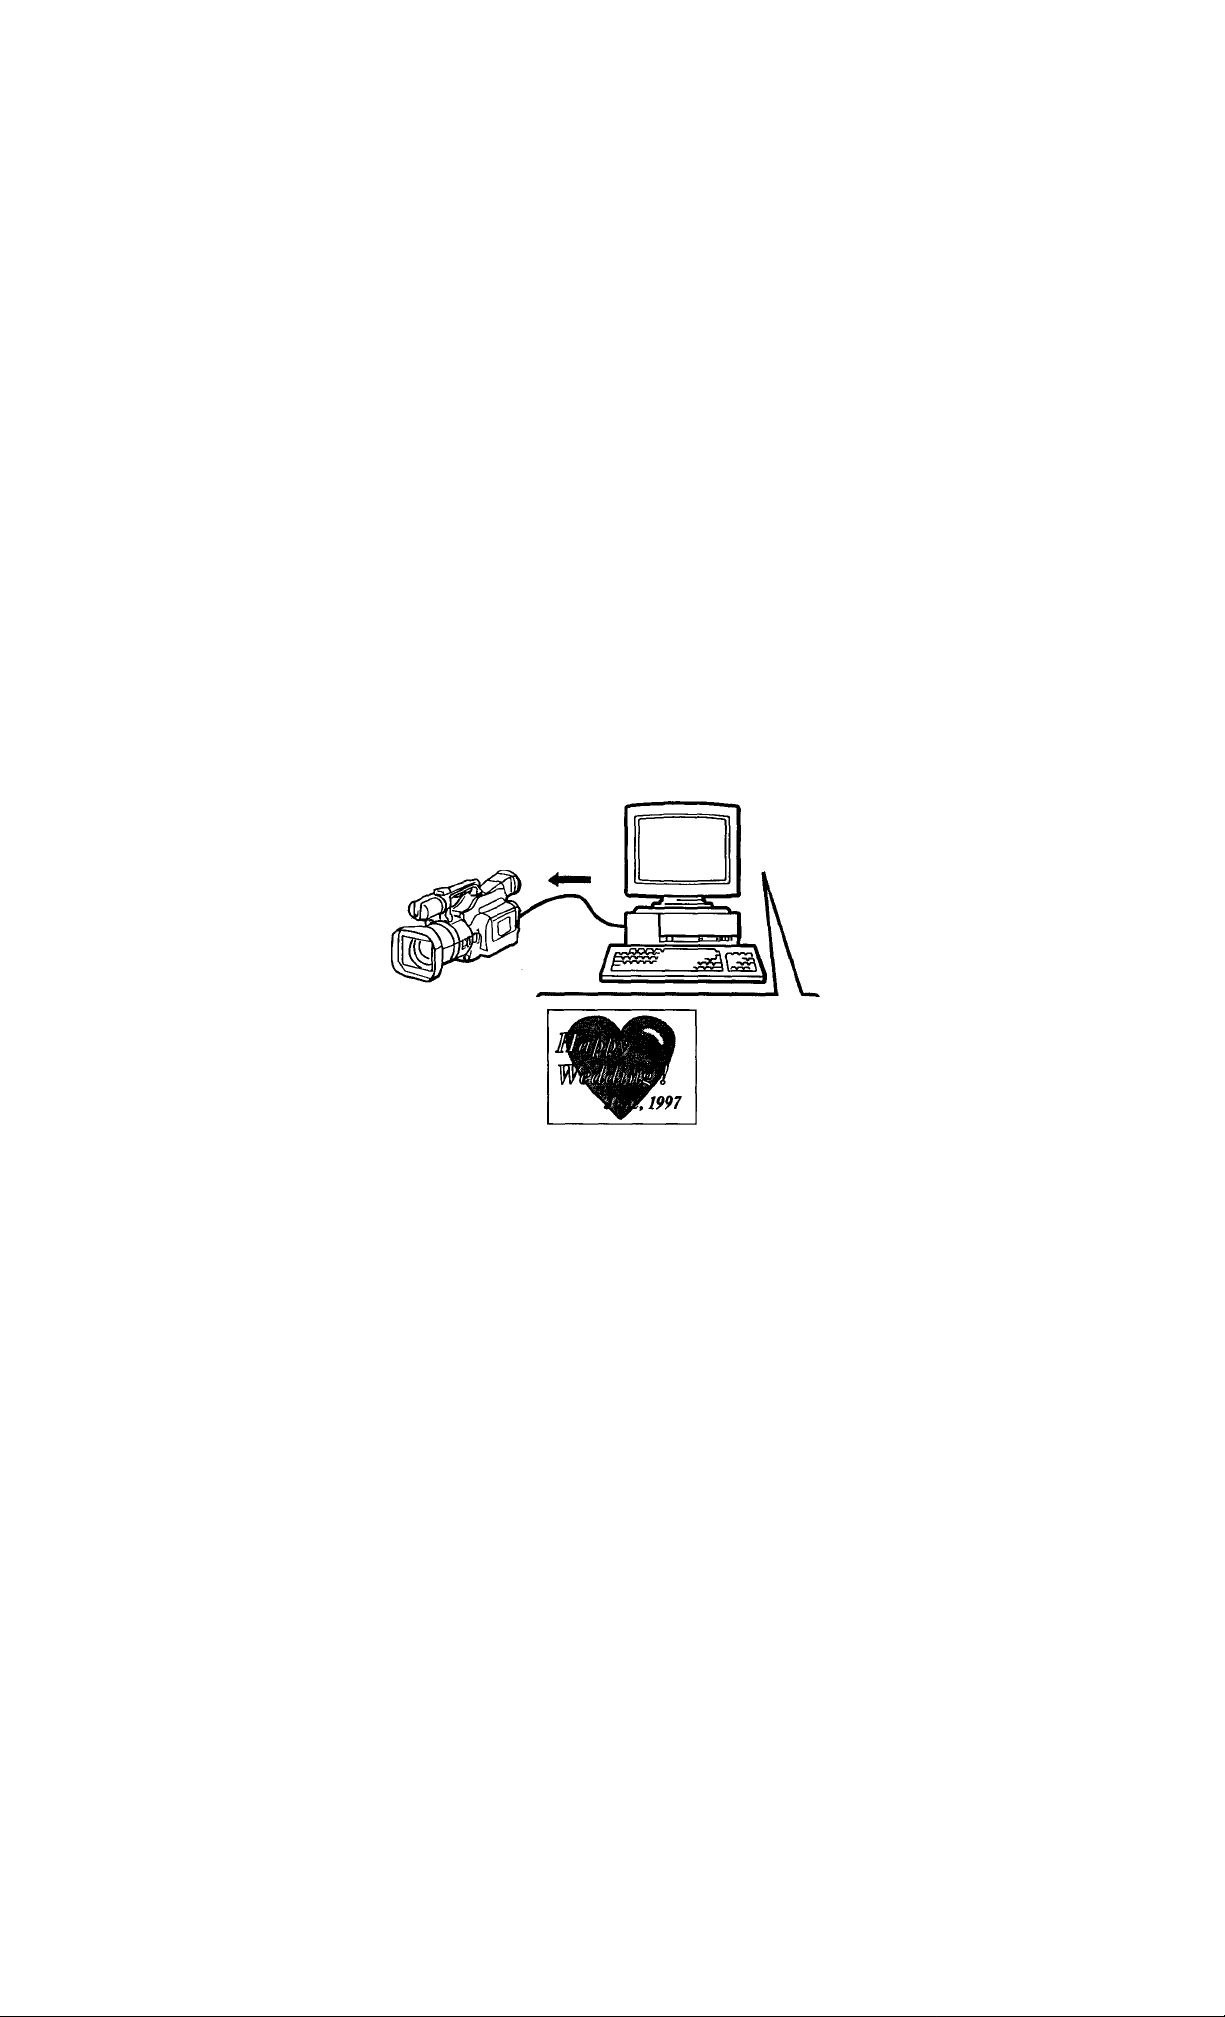
Record the still image created with your PC in DV equipment
You can record the still image created with your PC,
or the edited image captured from DV equipment,
into the DV equipment.
You can record the still image one by one, and also,
recording the whole still image at a time.
This function is convenient if you use it as follows.
• To record the title created with your PC at the
beginning of the tape.
• To re-record the captured still image with note by
PC.
There are also another use of captured still image.
Let's find out your use for your favorite things.
The created image is send.
The still
image
created with
your PC.
What kind of format of the saved still image ?
The DV software automatically saves the still image
into your hard disk in DV format at the time of
capturing the picture input and assigns a file name
(with the ".DVF" file extension for Windows but no
extension for Macintosh).
Page 6

Overview (continued)
What is DV file format ?
The DV file formatted document is an image
document compressed with the same method
(algorithm) used by DV equipment. A single image
(720 X 480 pixels, 16,770,000 colors) saved in this
format can be compressed to about 120 KB for DVB
2000 and a single image (720 x 576 pixels, 16,770,00(
colors) to about 140 KB for DVBK-2000E.
Any image displayed on the preview, album or libi
window of DV software is a simply-decoded image
You can display the original image by decoding it.
When you change the image format into BMP / PIC
the data size of a single still image becomes about 1
MB for DVBK-2000 and about 1.3 MB for DVBK2000E.
How captured images are managed ?
DV software groups and manages the captured stil
images in units called "Album" or "Library".
• Album: Each album contains the image files, whi
is exactly the same as the relation between pictui
and an album.
• Library: Each library file contains the représentai
image files picked up from a tape.
Album and library files are managed with a
management file with ".DVA" extension, (no
extension for Macintosh)
When cm Album or Library is made for the first tin
folder with the same name as the management file
made in the place where the management file is
stored. The captured images are stored in the fold
Each Album or Library can store up to 150 capture
images. (The maximum number of images depend
your system configuration.)
Page 7

About this manual
This manual explains how to install the capti
and the supplied software, and how to use tf
For the latest information on the supp software
For Windows, see "Readme.txt" file on the si
CD-ROM for the latest information on the su
software, using "NOTEPAD" program.
For Macintosh, see "Read Me" file on the sup
CD-ROM. Double-click to read it.
For the information on menu comman
For Windows, you can use the on-screen help
you want to get information on menu comma
hints. Choose "Topics" from the "Help" men
For Macintosh, refer to "Reference Guide for
Macintosh".
System requirements
Your PC and system software must meet the
minimum requirements to use the capture bo
the supplied software.
■Windows
IBM PC/AT or compatibles
CPU: Pentium 100 MHz and above (133
above is recommended.)
PCI bus: 1 slot
RAM: 16 MB or more (32 MB or more is
recommended.)
Video board and display driver:
SVGA (800 X 600 pixels with 65,53f
or better)
Memory space:
256 KB
IRQ: 1
Hard disk space:
10 MB or more
CD-ROM drive
OS: Microsoft Windows 95 (Microsoft \
3.1 and WindowsNT are invalid.)
Video monitor:
SVGA (800 x 600 pixels with 65,536
or better)
Page 8

About this manual (continued)
■ Macintosh
Macintosh or compatibles
CPU: PowerPC 601 and above
PCI bus; 1 slot
RAM; For DVBK-2000:
Video display ability:
Hard-disk space:
CD-ROM drive
OS: MacOS 7.5.2 or later
Display: 800 x 600 pixels with 32,000 colors or
Program © 1997 Sony Corporation
Documentation © 1997 Sony Corporation
• Microsoft, MS-DOS and Windows are the registered
trademarks of Microsoft Corporation.
• IBM and PC/ AT are the registered trademarks of
International Business Machines Corporation.
• Pentium is the registered trademarks of Intel Corporation.
• Macintosh is the registered trademarks of Apple Computer
Inc.
• Adobe is the registered trademark and Adobe
PhotoDeluxe is the trademark of Adobe Systems Inc.
• Other companies and product names are the trademarks or
the registered trademarks of each company.
16 MB or more (32 MB or more is
recommended.)
For DVBK-2000E:
20 MB or more (32 MB or more is
recommended.)
800 X 600 pixels with 32,000 colors or
better)
10 MB or more
better
Page 9

Checking the supplied
items
Check to make sure you have received the following
items in the carton.
If something is missing, contact the dealer from whom
you purchased the DVBK-2000/2000E or our service
facility.
Capture Board (1)
DV connecting cable VMC-2DV (1)
A CD-ROM for DV software installation
(1 disc: Windows/Macintosh hybrid)
Warranty card
Supplied software
A CD-ROM for Adobe PhotoDeluxe installation (1 disc)
Page 10

Installing the capture board
Notes on installing the board
• Turn off the power on your PC and peripheral
equipment before installation or removal. If you do
not, the DV capture board, PC and peripheral
equipment may be damaged.
• Do not directly touch the components on the board,
or they may be damaged by static electricity. If you
need to touch the board, touch a metal object to
discharge the electricity before you touch the board.
• Be sure that the current consumption of installed
board does not exceed the maximum supplied
current rating. The DV capture board requires a
current of 0.6 A at maximum. If you install other
boards on your PC, refer to each instruction manual
to check how much electrical current is required.
• Do not leave the board on a surface which is prone
to static electricity, for example, on the carpet. This
may damage the board.
• Do not directly touch the connectors on the board.
• The board incorporates sophisticated electronic
parts. Do not drop or damage the board.
• When removing the board from your PC, refer to
the instruction manual for your PC. If you
disconnect it by force, the DV capture board and PC
may be damaged.
• Do not moisten the DV capture board.
Page 11

Installing the capture board
For windows, the capture board corresponds to the
plug & play of Windows 95.
Before installing the capture board, be sure to write
down the five digit serial number from the label on
the capture board. This number is necessary for
registration during the start up procedure.
1 Turn off your PC.
2 Disconnect the power cord from the wall outlet.
Not doing so may cause malfunctions when
connecting the capture board.
3 Open your PC case and remove the cover of PCI
bus slot for inserting capture board.
For details, read the instruction manual for your
PC.
4 Insert the capture board into the slot and put on
screws.
5 Replace the case on your PC.
6 Turn on your PC.
The next procedure depends on your PC.
Read the next page of "Installing the driver" for
Windows.
For Macintosh, proceed to "Installing the DV
software (Macintosh)" (Page 19).
Page 12

Installing the driver (Windows)
when turning the power on after inserting the cap
board, Windows 95 automatically detects the capti
board, and instructs to install the needed software
Depending on the instruction of Windows 95, the
operating procedures for installing the software m
be .varied.
• If the "New Hardware Found" display is broug;
up, see the next page of
Hardware Found" window is brought up".
• If the "Update Device Driver Wizard" display ii
brought up, see page 14 of "O When the "Upd
Device Driver Wizard" window is brought up"
"0
when the "New
Page 13

□ When the "New Hardware Found'
window is brought up
1 Select "Driver from disk provided by hardware
_ manufacturer" and click "OK".
New Hardware Found
PQCaid
SekK^ which cthw you want to for you new h«dwjve:
tm
r
firiver fton fyovided by todwke
C |2or»tir»tai^a driver (\*rtrKiomwMriolprorript you again)
^ ¿elect from a of akemate driver«
OK
Hek>
The following display appears.
Instali From Disk
Insert the manUacbjrer's rstaKabon disk into
^ drrw sdected, arid dwi dk^ OK.
Co^ nvaniacturer'« files fimi:
Ok I
Cancel
”3 E'«”« ■ I
2 Insert the CD-ROM for installation into the CD-
ROM drive and specifies the CD-ROM drive for
"Copy manufacturer's files from:".
EÌ
-3 Click "OK".
The installation of software automatically starts.
When the-installation is complete, go to step on
page 15 of "Installing the DV software
(Windows)".
Page 14

Installing the driver (Windows) (continued)
m When the "Update Device Driver
Wizard" window is brought up
1 Insert the installer CD-ROM into the CD-ROM
drive and click "Next".
Update Device Driver Wizard
WirtdcKNt focvNd the loloMing updated dnver ter tht$
device
If you wait to use thn driver. eSek Fimh. If this is not the
coned dnver aid you wail to seach fa a dlRerenl divei
maiualy. click Other Locations.
Locabon of Oliver
2 Click "Finish".
"Insert Disk" warning display appears.
PteSM inserf the tStk labeled 'Soriy OV Appication/Dtivei Irvtal Disk', and then cick OK.
o
<gack |[ Fmh Cancel j
3 Click "OK".
"Copying Files..." appears.
(copying Files
The H» Dvbk.vitd on Soryi DV
fo^,.
in«^ Ap{]ieadorVDri>m IraM
ir*o #ie#ii».MlededMw. ard ciK^
¿opy Ses tool
fs 3
InAel Di could nd be
groiTNe... 1
Specifies the CD-ROM drive for "Copy files fron
and click "OK".
The installation of software automatically starts.
When the installation is complete, go to step on
next page of "Installing the DV software
(Windows)".
E3
1
..
Caned j
SfcipFfe 1
. I
Page 15

Installing the DV software (Windows)
Install DV software in your hard disk. Before
installing the software, make sure that the capture
board IS installed properly.
1 Click "Start" menu and set the pointer to
"Settings", and then click "Control Panel".
"Control Panel" window appears.
2 Double-click "Add/Remove Programs".
/ "Add/Remove Programs Properties" window
appears.
ir-jaa-T
Page 16

Installing the DV software (Windows) (continued)
Uninstalling the DV software
If you do not need the DV software, uninstall the
software as follows:
1 Click "Start" menu and set the pointer to
"Settings", and then click "Control Panel".
"Control Panel" window appears.
2 Double-click "Add/Remove Programs" of
"Control Panel", and then click "Install/Uninsti
tab.
"Add/Remove Programs Propaties" appears.
Add/Remove Piograms PropeiUes
18
3 Select "Sony DV Application" from the program
list below and click "Add/Remove...".
Uninstaller starts up and a display to confirm
deleting appears.
4 Click "OK".
Uninstall the program automatically.
Page 17

Installing the DV software (Macintosh)
Install DV software in your hard disk. Before
installing the software, make sure that the capture
board is installed properly.
1 Insert the supplied CD-ROM (DV software
installer) in the CD-ROM drive.
A folder containing the DV software appears.
m DUBK-2000 INSTRLL CD-ROM
É 2 if«ms
19 MB in disk
0 K «v«i1«b)e
■
M.
^^m1
«1 10
2 Drag the "DVCap folder" folder to the hard disk
icon.
The DV software is copied to your Macintosh.
■
Page 18

Connecting the DV (Digital Video) equipment
Connect the digital video equipment with DV
terminal to your computer using the DV connechng
cable.
Your PC with capture board
Digital Video
Camera Recorder,
etc.
(S)
To DV coimector on the
back of the capture board
DV connecting cable
(supplied)
[] <=i d]a o P “
To DV connector of DV
equipment
Notes
• Use or\ly the supplied connecting cable. Other brands of
cables may cause malfunctions.
• Insert the coimecting cable into the cormector in straight,
not doing so may cause malfunctions.
• Keep metal objects away from the coimector pins to avoid
short circuits.
Page 19

starting the DV software (Windows)
When you finish installing the DV software and
connecting DV equipment, start the DV software.
1
Click "Start" and position the pointer over
"Program", select "Sony DV Application", then
click "DV Shelf".
The DV software is activated and the initial
display appears.
Refer to page 23 about information on each display.
Refer to page 35 to 44 about information on basic
operations.
Page 20

Connecting the DV (Digital
Video) equipment
Connect the digital video equipment with DV
terminal to your computer using the DV connecHng
cable.
Your PC with capture board
' \
[(
Digital Video
Camera Recorder,
etc.
To DV connector of DV
equipment
Notes
• Use only the supplied connecting cable. Other brands of
cables may cause malfunctions.
• Insert the connecting cable into the connector in straight,
not doing so may cause malfunctions.
• Keep metal objects away from the connector pins to avoid
short circuits.
-
(S)
To DV connector on the
back of the capture board
C] C3 a[ZZI Cj» i=> D ■”
^
DV cormecting cable
(supplied)
p
p
-
-
20 I
Page 21

starting the DV software (Macintosh)
when you finish installing the DV software and
connecting DV equipment, start the DV software.
1 Double-click "DVCap" icon.
The DV software is activated and the user
registration display appears.
Clicking "DVCap" icon and clicking "Open" from
the "File" menu bring up the same display.
Please input your name, organization and the serial
number of the hardiuare.
Nome:
Organization:
Serial Number:
2 Enter your name, organization and serial number
then click "OK".
You need to enter your name, organization and
serial number only when you start the software foi
the first time. The five-digit serial number is the
number written down before installing the capture
board.
The DV software is activated and the initial
display appears.
CO
22
Refer to page 23 about information on each display
Refer to page 35 to 44 about information on basic
operations.
Page 22

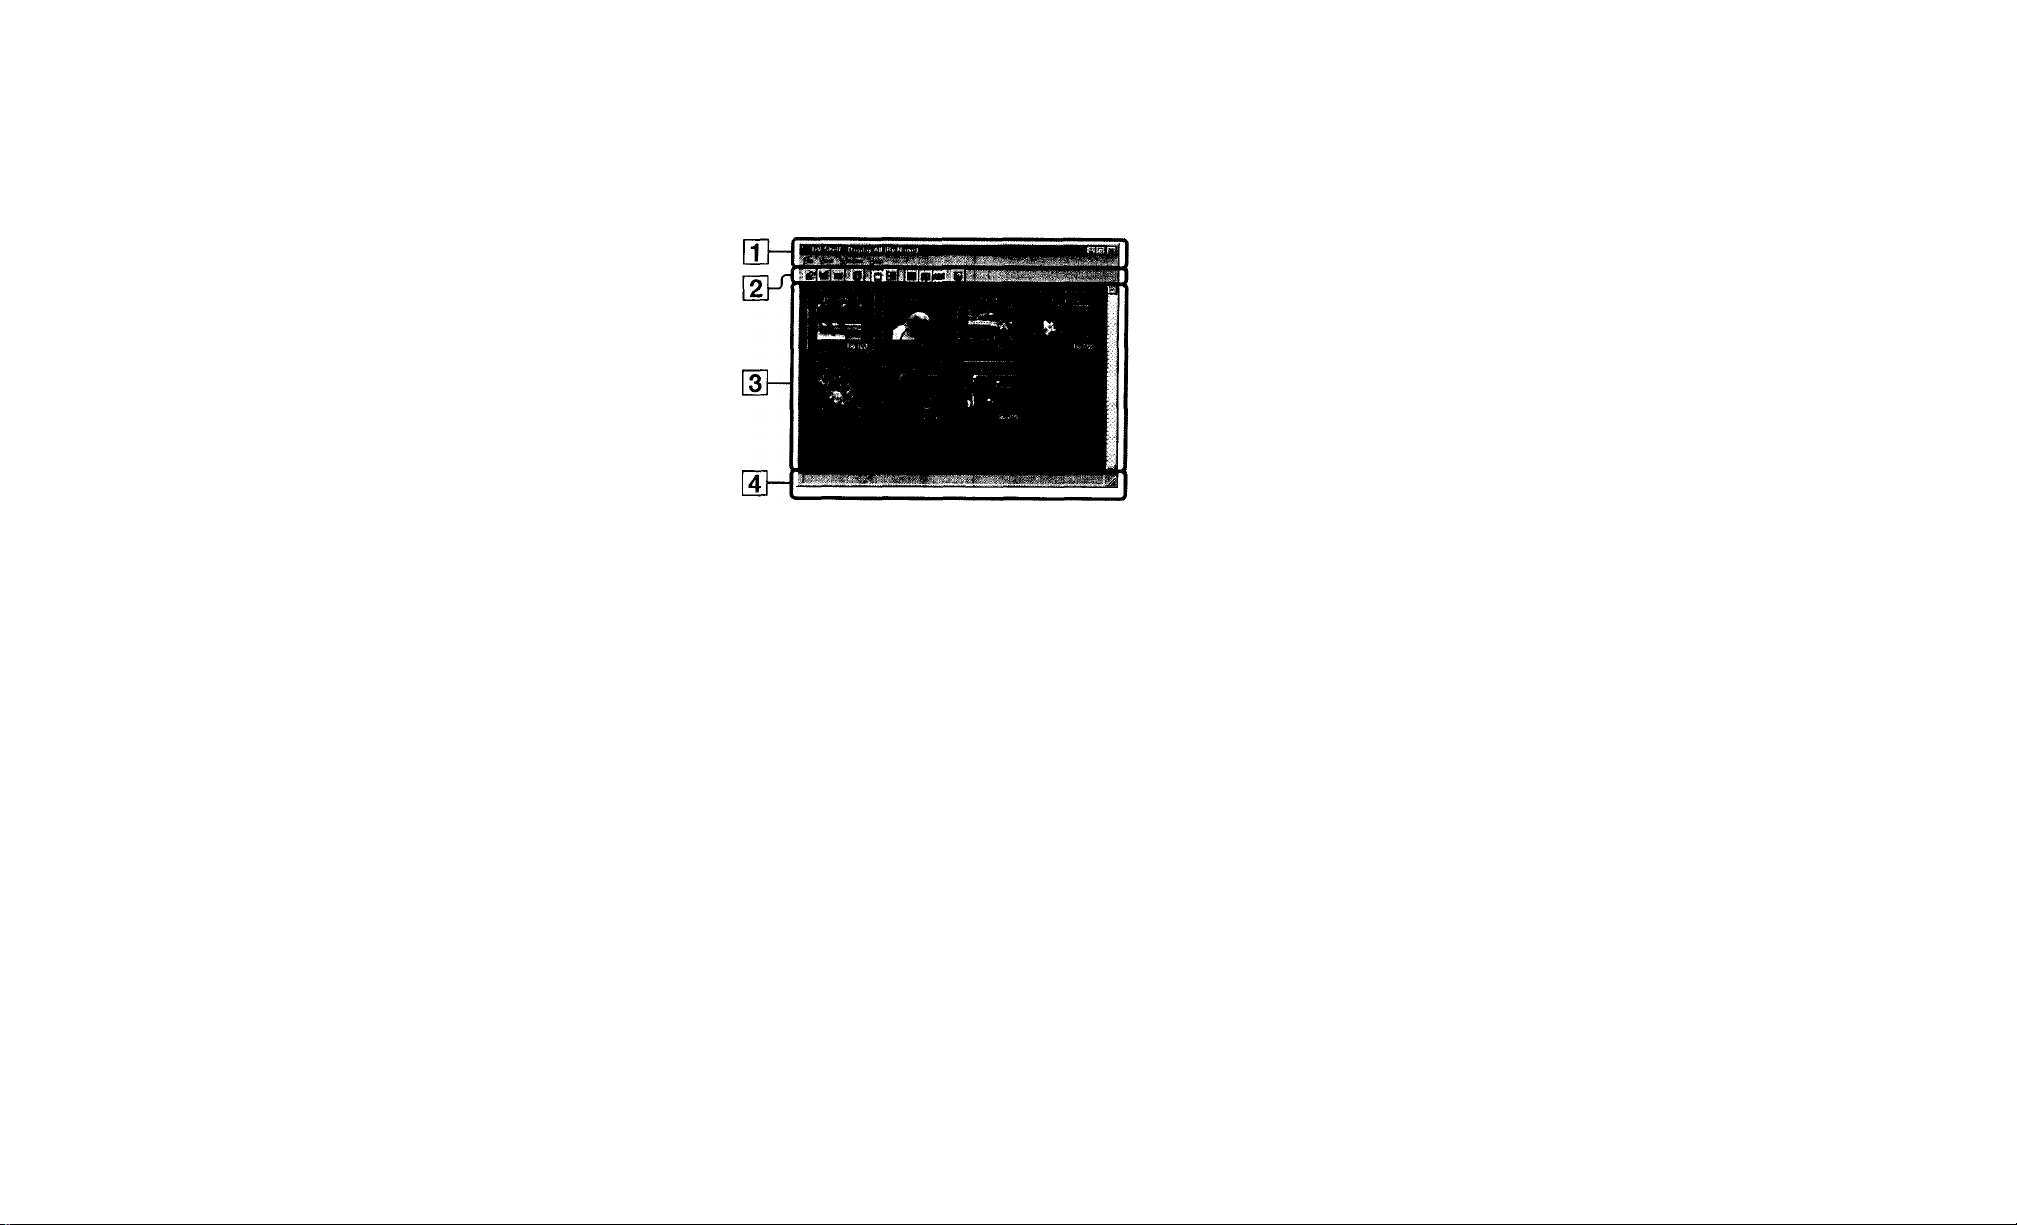
Configuration of
display
Display just after startup
Whon \'ou start the 0\' soHware, tho tcillcns ini; displa\'
appears.
E
a
Displays the video from the connected DV
equipment.
Controls the connected DV equipment. You can
cannot start recording with the DV equipment.
t T i \
(Windows display)
[T] Preview window
¡2} VCR Control window
also capture the image from this window, but
Time Code window
Displays the time code, recorded date or recorded
time of fhe video being played back on the
connected DV equipment.
S] DV Shelf window
Displays albums and libraries and manages
albums and libraries by making or deleting a file,
etc.
I 7^
Page 23

Configuration of display (continued)
Display transition
IT] DV shelf window
Displays the albums and libraries that have been
saved at present. You can open your favorite
album or library from this window and can
confirm the image in the album or library. (Album
window or Library window)
Also, this DV shelf window is used for making a
new album'or library. When starting up the DV
software, this window opens.
Library window
Displays the images that have been captured in the
selected library at present.
You can open and confirm your favorite image
(Viewer window). You can use Library as an index
of a cassette tape corresponding to the cassette
v^iith cassette memory (only available when using a
DV equipment applicable for cassette memory
writings).
[4l Viewer window
Decodes and displays the epcoded image that is
selected from the album or library window. This
window is used when saving the decoded image
as BMP/PICT or JPEG format file.
[2] Album window
Displays the images that have been captured in the
selected album at present.
You can open and confirm your favorite image
(Viewer window). You can also add the captured
image and the image created with your PC as you
like, so the album is convenient to store your
favorite images.
Page 24
Names and functions
of display
DV Shelf window
[T] Menu bar
Displays menu items for various functions. (No
menu bar for Macintosh)
[2] Tool bar
Functions frequently used are displayed as
buttons.
Open:
Displays a dialog box and opens a favorite
albqm/library.
Rescan:
Checks albums/libraries in the DV shelf
folder and updates the information.
Preferences:
Set the operation environment of the DV
software.
Information:
Displays detailed information of the selected
album/library.
Normal View:
Displays the album/library with a
representative image and title.
(Windows display)
Detailed View:
Displays the album/library with detailed
information.
Show/Hide Preview Window:
Show/Hide the preview window.
Show/Hide VCR Control Window:
Show/Hide the VCR control window.
Show/Hide Time Code Window:
Show/Hide the time code window.
Help:
Displays "Topics". (Not for Macintosh)
Album/library display area
Pisplays album or library.
[4] Status bar
Displays information. (Not for Macintosh)
Page 25

Names and functions of display (continued)
Album window
(Windows display)
[T] Title bar
Displays the Album title.
Menu bar
Displays menu items for various functions. (Not
for Macintosh)
® Tool bar
Displays the button icons for functions which you
use frequently.
Rescan:
Checks the image files in the folder of
selected album and updates the album
management information.
Preferences:
Sets the operating environment of DV
software.
Select All:
Selects all images in the album.
Select None:
Releases all selection of images in the album.
Toggle Selection:
Switches images in the album between
selected ahd non-selected.
Decode:
Decode the selected image and displays it to
the Viewer window.
Image Information:
Displays the detailed information on the
selected image, (for Macintosh only)
Rotate CCW:
Turns a selected image round in a 90-degree
arc. counterclockwise.
Rotate CW:
Turns a selected image round in a 90-degree
arc. clockwise.
Index View:
Displays image only.
Normal View:
Displays image with the name, time code
m
and recorded date.
Detailed View:
In addition to the image, the more
information is displayed in detail, such as
recorded date and time, or captured date
and time.
Show/Hide Preview Window:
Show/Hide the preview window.
Show/Hide VCR Control Window:
Show/Hide the VCR control window.
Show/Hide Time Code Window:
Show/Hide the time code window.
Help:
Displays "Topics" (Not for Macintosh).
[4] Album information display area
Displays the representative image, title name,
album number and comment.
[5] Image display area
The images saved in the album currently are
brought up in a small size.
Status bar
Displays information.
29
Page 26

Names and functions of display (continued)
Library window
(Windows display)
[T] Title bar
Displays the Library title.
Menu bar
Displays menu items for various functions. (Not
for Macintqsh)
[3] Tool bar
Displays the button icons for functions which you
use frequently.
Rescan:
Checks the image files in the folder of
selected Library and updates the Library
management information.
Preferences:
jd|
Sets the operating environment of DV
software.
Select All:
Selects all images in the Library.
Select None:
Releases all selection of images in the
Library.
Toggle Selection:
Switches images in the Library between
selected and non-selected.
Search:
Cue up the tape where the selected image is
recorded, when the DV cassette used to
capture a image to the Library is set.
Image Information:
Displays the detailed information on the
selected image, (for kjiacintosh only)
Rotate CON:
Turns a selected image round in a 90-degree
arc. counterclockwise.
Rotate ON:
Turns a selected image round in a 90-degree
arc. clockwise.
Index View:
Displays image itself only.
Normal View:
Displays image with the name, time code
and recorded data.
Detailed View:
In addition to the image, the more
information is displayed in detail, such as
recorded date and time, or captured date
and time.
Show/Hide Preview Window:
Show/Hide the preview window.
Show/Hide VCR Control Window:
Show/Hide the VCR control window.
Show/Hide Time Code Window:
Show/Hide the time code window.
Help:
Displays "Topics". (Not for Macintosh)
[3 Library information display area
Displays the representative image, title name,
cassette number and comment.
[5] Image display area
The images saved in the library currently are
brought up in a small size.
[6] Status bar
Displays information.
Page 27
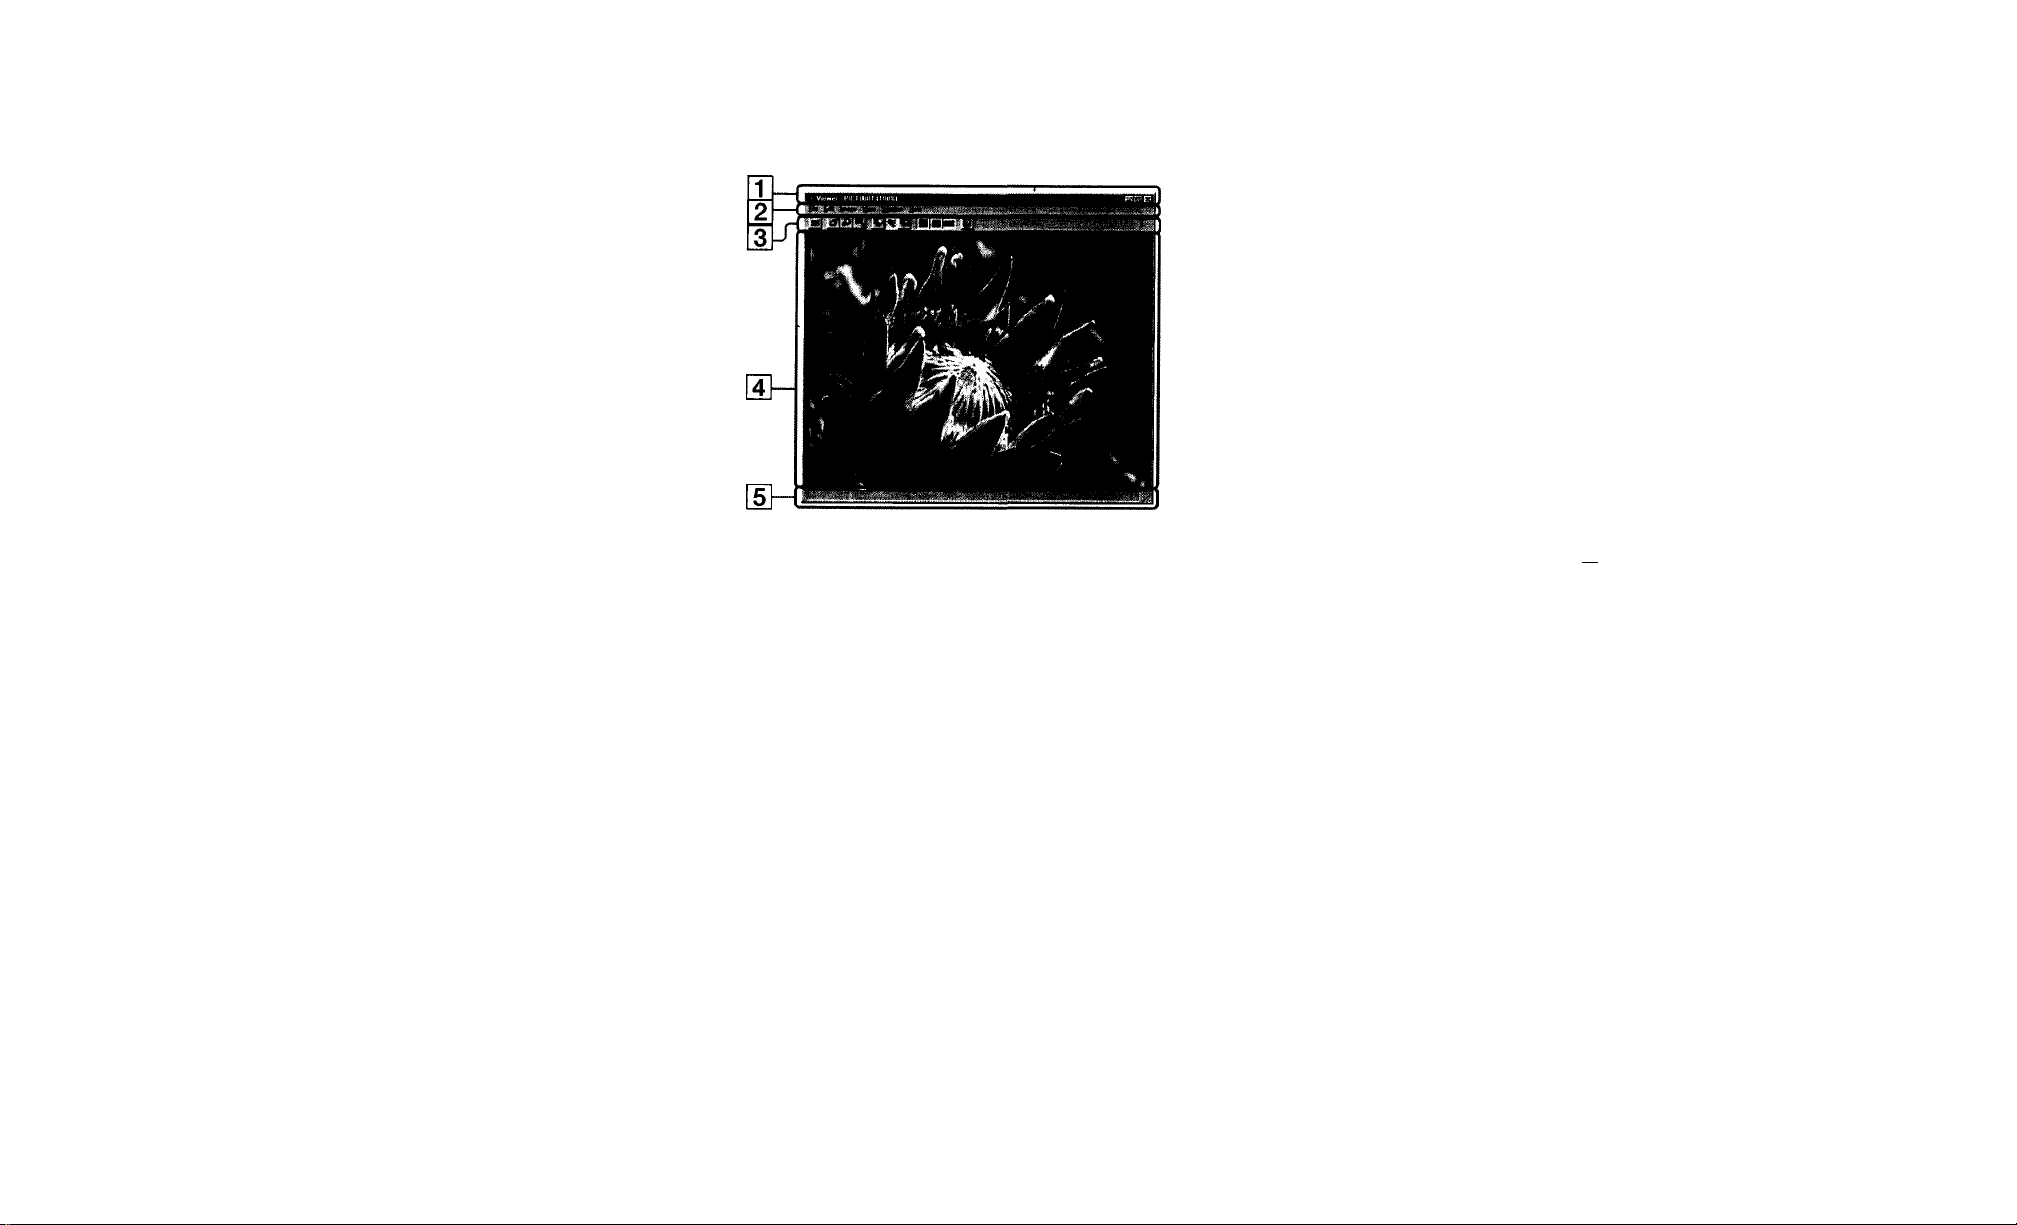
Names and functions of display (continued)
Viewer window
(Windows display)
[T] Title bar
Displays the name of the opened image.
[2] Menu bar
Displays menu items for various functions. (Not
for Macintosh)
[3] Tool bar
Displays the button icons for functions which you
use frequently.
Save as:
^
Saves the displayed image in PICT /JPEG
format, (for Macintosh only)
Preferences:
Sets the operating environment of DV
software!
Zoom Out:
Reduces and displays the image in order of
400%, 300%, 200%, 100% and 50%.
Zoom In:
Magnifies and displays the image in order of
50%, 100%, 200%, 300% and 400%.
100 %:
Displays the image in 100 % size.
No De-interlace:
Displays an image without de-interlace.
Adaptive De-interlace:
Compares two fields which composes the
image and de-interlaces by averaging only
the parts that differ.
Field De-interlace:
Interpolates and de-interlaces fields to
compose an image.
Show/Hide Preview Window:
Show/Hide the preview window.
Show/Hide VCR Control Window:
Show/Hide the VCR control window.
Show/Hide Time Code Window:
Show/Hide the time code window.
Help:
Displays "Topics" (Not for Macintosh).
m Image display area
Displays the decoded image.
[5] Status bar
Displays information (Not for Macintosh).
Í2
Page 28
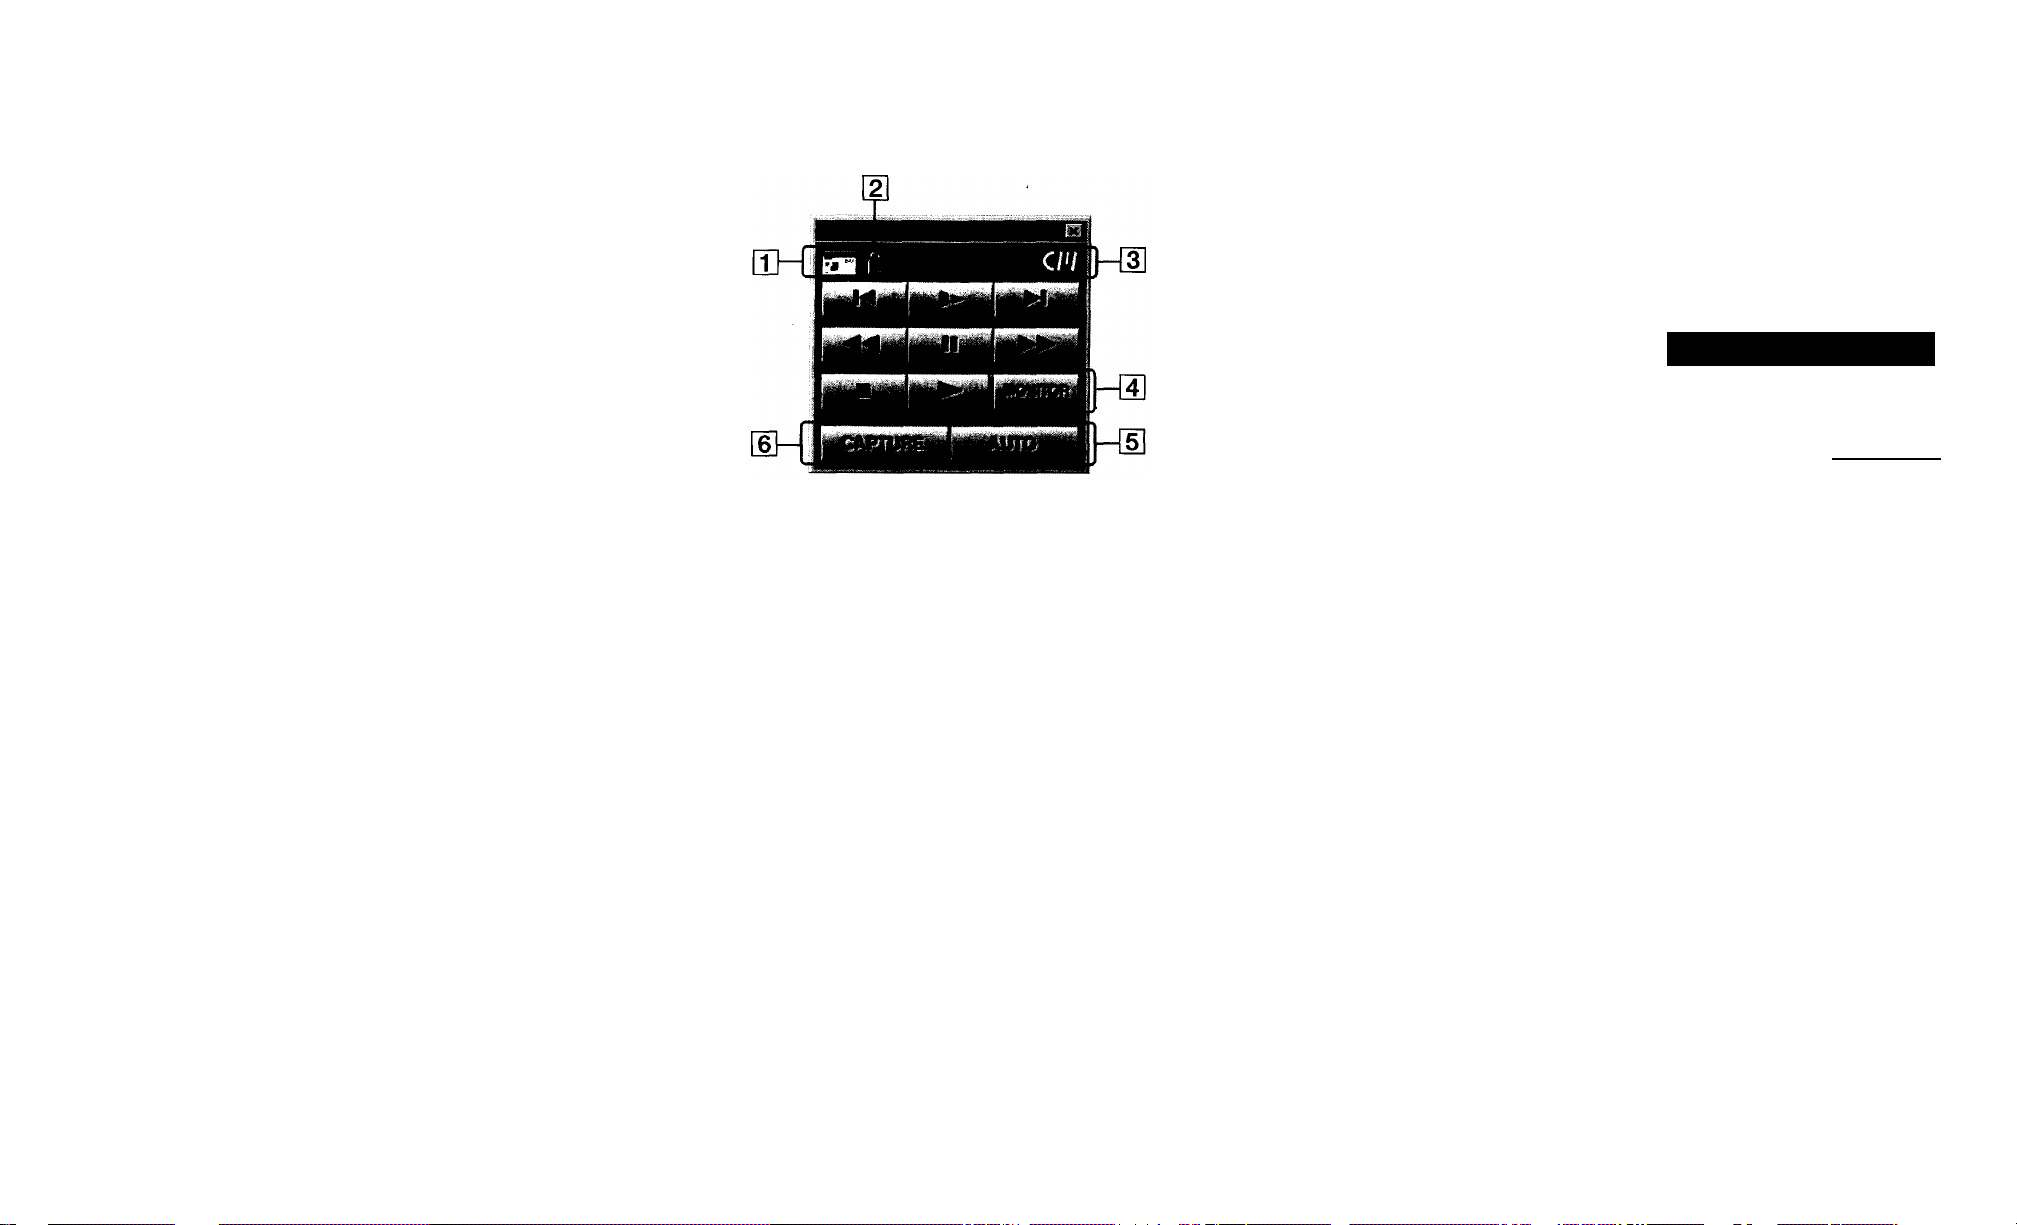
Names and functions of display (continued)
VCR control window
Q] Cassette tape display
When the cassette tape is inserted in the DV
equipment, it is brought up brightly. When not, it
is brought up darkly.
[2] Write protect display
When the cassette tape is on write protect status, it
is brought up.
(Windows display)
Capturing the image from
the DV equipment to PC
Let's exercise for captxning the image from the DV to
your PC. Capture the image and save it as a standard
image file.
Operating procedures
Create an album necessary for
capture (see page 36).
Before capturing the image, create an album to put
images in.
T
-----------
Capture images (see page 38).
ing back the tape, operating the VCR control
If, capture the images.
9;
Save the images in BMP/PICT (see
page 39).
I For various applications, save the images in standard
F
f
I image file format.
-------
34
12 Cassette memory display
When thè cassette tape with cassette memory is
inserted in the DV equipment corresponding to the
cassette ihemory, it is brought up.
S] MONITOR button
Turns the preview display on/off.
[5] AUTO button
Starts/ terminates auto-capturing images.
While transmitting the image to the DV
equipment, it is brought up darkly, and you
cannot click it.
H] CAPTURE button
Captures an image.
While transmitting the image to the DV
equipment, it is brought up darkly, and you
cannot click it.
Page 29

Capturing the image from the DV equipment to PC (continued)
Creating an album necessary for capturing
1 Set the DV equipment on playing status.
If you use a Sony's digital video camera recorder,
insert the cassette tape and set the power switch to
"VIDEO".
2 Windows: Click "Start" button to set the pointer to
"Program", select "Sony DV Application" and <
then "DV Shelf".
Macintosh: Double-click "DVCap".
The DV software starts up.
3 Windows: Click "File" menu, set the pointer to
"New" and select "Album".
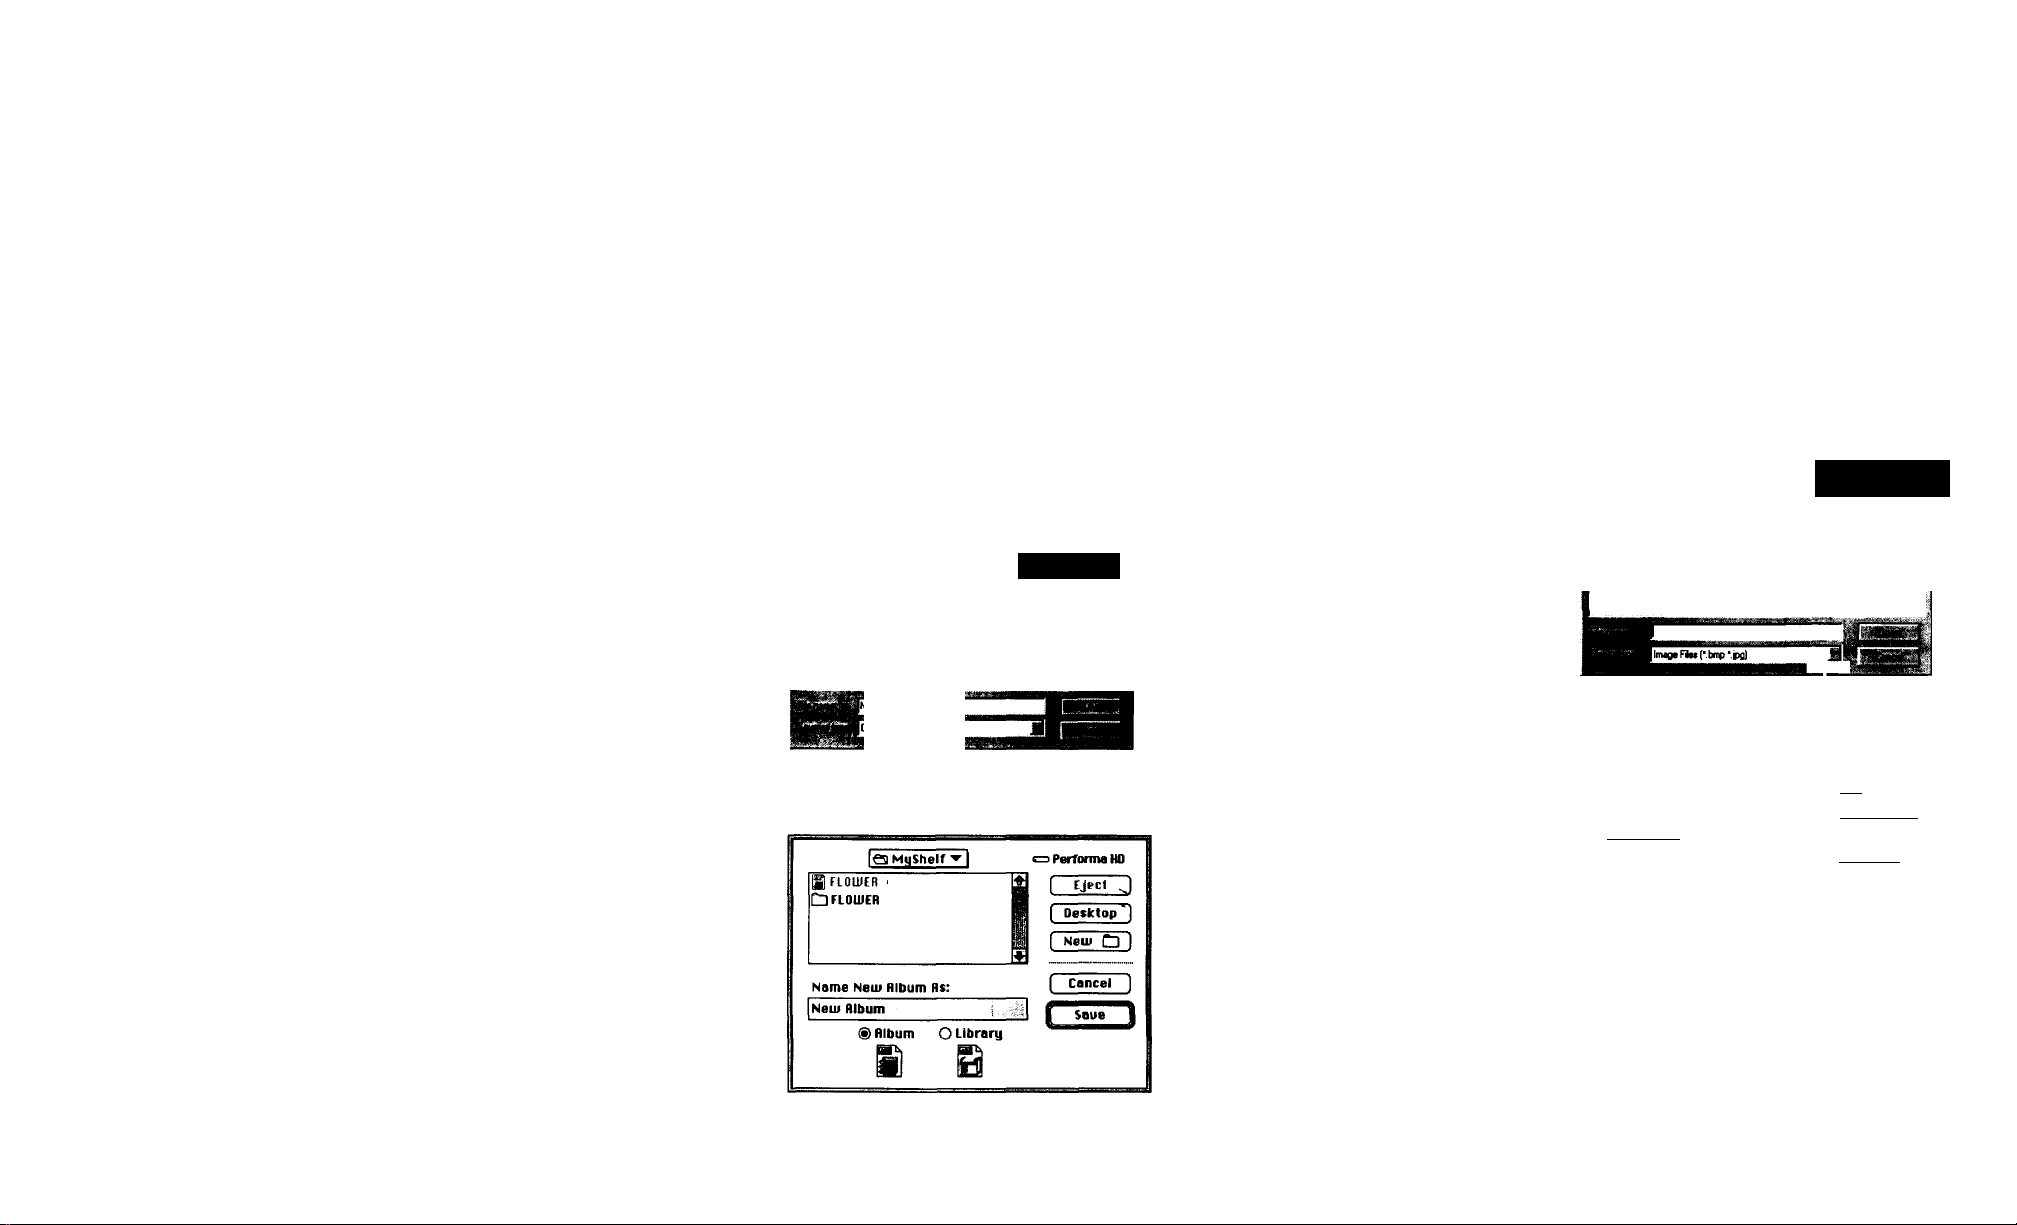
4 Windows: Enter the album name and click "Save".
Macintosh: Click "Album", enter the album name
and click "Save".
New album appears and now you can capture the
image.
AhoM |Ne»^
■V 1 . ■
iMIlto* I’VAhjml
Macintosh: Choose "New" from the "File" menu.
H. mil til
Qfloiuer
Name Neiu RIbum Hs:
New lUIium
FteCDVAl
IgSMuSheif ^
(S) RIbum O library
c=i Perfotma HO
•S'
1 )
[ Desktop ]
1 ( Neiu C3 ]
3
....................
Cancel
LA«"« i
Page 30

Capturing the image from the DV equipment to PC (continued)
Capturing images
1 Start playback using the VCR control window.
Frame (reverse)
!►
Slow
Frame (forward)
H
◄◄
Rewind •
II Pause
►►
Fast forward'
■
(Windows display)
The image being played back is displayed in the
preview window.
Click "CAPTURE" when you find a favorite
image.
When you click "CAPTURE", the selected image is
saved in your PC. The captured image is saved in
DV format in your hard disk and is added to the
album.
►
Stop
Playback
Saving the images in BMP/PICT
1 Double-click the captured image.
The viewer window appears.
(Windows display)
2 Windows: Choose "Save As" from the "File"
menu, and click "BMP".
"Save as BMP format" appears.
38
(Windows display)
Bitmap Files ^BMP)
__________
F—
3
(Windows display)
Page 31

Capturing the image from the DV equipment to PC (continued)
Macintosh: Choose "Save as" from "File" menu.
The following dialog box appears.
Q lUOHK VI
iPerfomiaHO
[ Ti»«:* ]
[ Desktop ]
( Neiu D 1
Recording the image of your PC by DV equipment
Record the imace createdRecord the image created by your PC into the DV
equipment.
Put the image that you want to record in the album,
then record it by transmitting to the DV equipment.
Operating procedures
Saue Image fls:
FILEOOOO.PICT
File Formal: ® PICT File O JPEG File
Quality: (High liompresiioo Hote)
_______
O
[ Cancel
1 j^Sau^^
OHiyh
OHighest (Loio liompresvion Rote)
3 Windows: Enter the name and click "Save".
The image is saved in BMP format.
Macintosh: Click "PICT", enter the name and click
"Save as".
The image is saved in PICT format.
Create an album to put in images to
be recorded (see page 42).
Create an album in order to put in the image which are
transmitted to the DV equipment.
Convert the image you want to record
into DV format file (see page 43).
Convert the image file in standard format into DV
format file and put it in the album.
Record it using DV equipment (see
page 44).
I Transmit the images which are put in the album one by
F
I one, and record it using DV equipment.
Page 32
Recording the image of your PC by DV equipment (continued)
Creating an album to put in images to be recorded
1 Set the DV equipment on plajnng status.
If you use a Sony's digital video camera recorder,
insert the cassette tape and set the power switch to
"VIDEO".
2 Windows: Click "Start" button, set the pointer to
'Trogram", select "Sony DV Application" ancj
then select "DV Shelf".
Macintosh: Double-click "DVCap".
The DV software starts up.
3 Windows: Click "File" menu, set the pointer to
"New" and select "Album".
The following dialog box appears.
tmsi
F F
“ “ ,ji
DVAfeunFlnCDVA)
Macintosh: Choose "New" from the "File" menu.
The following dialogue box appears.
Note
You must adjust the pixel
size of an image in BMP /
PICT or JPEG format as
follows using an image
process software.
- DVBK-2000: 640 x 480
pixel (Normal) or 852 x
480 pixel (Wide)
- DVBK-2000E: 768 X 576
pixel (Normal) or 1024
X 576 pixel (Wide)
4 Windows: Enter the album name and click "Save"
Macintosh: Click "Album", enter the name and
click "Save".
New album appears and now you can import
images to the album.
Converting the image you want to record into DV format file
Convert the image file in BMP/PICT or JPEG format
into DV format file to add it to the album.
1 Choose "Import" from the "File" menu.
The following dialogue box appears.
IJ_ ^
EFlpwtf.dt
S^BIack ThatcKbflip
Wg Blu* Riv«U.bnip
■wBubblei.biTO
ER Carvod Slono. bmp
GrdM.binp
gDUCopLiteU l.pict
g| OUCapLIteU 2.pict
gOUCapLIteU S.pict
tahiirnni Itoii 4jilct . .
jHoundrtoatKbmp gjfWavetbmp
f Piratripe.bmp
^ Setup bmp
fSbawMatbmp
] Tiet.bmp
] Trian|^e<.bmp
Iq Screen Snapz ^
HfljBM
(Windows display)
=1 Performa HO
[ 1
( Desictop 1
[ Cancel )
(Macintosh display)
42
Hint
You can copy image files
from other albums or
libraries and record them
in the DV equipment.
Select the image file you want to record by DV
equipment, then click "Open".
The selected image is saved in DV format, and it is
added to the album. (This does not affect the
original image file.)
When you want to record the two or more images,
repeat steps 1 and 2.
Page 33

Recording the image of your PC by DV equipment (continued)
Recording by DV equipment
You can record the image you select by click in the DV
equipment. Refer to help regarding how to record the
two or more images at a time.
("Help" is not displayed in Macintosh.)
1 Qioose
menu.
DV transmission mode is set and the selected
image is transmitted to the DV equipment
afterward.
2
Select an image you want to record on the album
window.
Start recording by DV equipment.
3
If you use a Sony's digital video camera recorder,
press •REC.
The image selected in step 2 is recorded by the DV
equipment. The image you click is kept until you
click the next image.
'Start DV Transmission" from the "DV"
Specifications
Capture board
Power consumption
3 W or less
Operating temp>eratuie
S'C to 35“C (-il'P to 95“F)
Operating humidity
20 % to 80 %
Input / output connector i
DV connector (IEEE1394 standard) x 1
Corresponding video format
NTSC pVBK-2000)/PAL PVBK-2000E)
Dimensions
Abóut 124 X 108 mm (4.9 x 4.3 inches)
(w/d, excluding projections)
Power requirement
5VDC,0.6A
Mass
80 g (2.8 oz)
DV software
Captiued file format
DV standard (SD specification)
Decode format
DV full decode
• DVBK-2000 (NTSC)
640 X 480 pixels (Normal)/852 x 480 pixels (Wide)
• DVBK-2000E (PAL)
768 X 576 pixels (Normal)/1024 x 576 pixels (Wide)
Qear frame filter
Movement detection/Field interpolation
Preview display
160 X120 pixels/320 x 240 pixels
Software DV monitor
• DVBK-2000 (NTSC) 640 x 480 pixels
• DVBK-2000E (PAL) 768 x 576 pixels
VCR control
Playback / Pause /Stop / Fast forward / Rewind /
Slow (forward / reverse) / Picture search (forward /
reverse) / Frame (forward / reverse)
Others
Supplied accessories
See page 9
44
Page 34

Troubleshooting
Technical information
Image input from the connected DV equipment
does not appear.
• The capture board is not mstalled properly.
•> Install the capture board properly. (See page 10)
• The DV connecting cable is not connected properly.
•> Connect the cable properly. (See page 20)
• The power of the connected DV equipment ismot
turned on.
->Tum on the power of the DV equipment. .
The decoded image has something wrong with
color tone of the image.
• The screen resolution of Windows is liot set to "High
Color (65536 colors or better)".
•> Double-click "Display" icon on the control panel,
cind open "Settings" tab to set, the "Color palette"
to "High Color (16 bit)" or better.
• "Color gradation" of the Macintosh display is not set
to "32,000" or better in "Colors".
■> Double-click "Monitor" or "Monitor & Sound" in
the control panel and set "Color gradation" to
"32,000" or better in "Colors".
Cannot convert the image file into DV format file
— DVBK-2000(NTSC)
• Attempted to convert images other than 640 x 480
pixels or 852 x 480 pixels.
^ Convert the images after adjusting to 640 x 480
pixels or 852 x 480 pixels.
— DVBK-2000E (PAL)
• Attempted to convert images other than 768 x 576
pixels or 1024 x 576 pixels.
-> Convert the images after adjusting to 768 x 576
pixels or 1024 x 576 pixels.
• Attempted to convert images other than BMP/PICT
or JPEG format files.
->Convert the images after changing format to BMP/
PICT or JPEG.
Number of pixels in the image
In 525/60 system (NTSC, DVBK-2000)
The number of pixels in the image differs for DV
equipment, IBM PC/AT (or compatibles) and
Macintosh, but the screen ratio is the same 4:3.
• DV format video: 720 x 480 pixels
• IBM PC/AT (VGA mode), Macintosh (13-inch
mode): 640 x 480 pixels
The reason why DV format has more pixels in the
horizontal direction is that each pixel in DV format is
rectangular; taller than it is wide.
However, since pixels on the PC are square, the image
overflows in the horizontal direction when the DV
software decodes and displays the image. To prevent
this, DV software converts the number of the pixels in
the horizontal direction from 720 to 640 before it
decodes and displays the image.
The image overflows
without conversion.
(Viewer converts the
number of pixels in the
horizontal direction.)
46
Page 35

Technical information (continued)
In 625/50 system (PAL, DVBK-2000E)
The number of pbcels in the image differ for DV
equipment, IBM PC/AT (or compatibles) and
Macintosh, but the screen ratio is the same 4:3.
• DV format video: 720 x 576 pixels
• IBM PC/AT (VGA mode), Macintosh (13-inch
mode): 768 x 576 pixels
The reason why DV format has less pixels in the
horizontal direction is that each pixel in DV format is
rectangular; wider than it is taller.
However, since pixels on the PC are square, the image
is insufficient in number of horizontal pixels when the
DV software decodes and displays thé image. To
prevent this, DV software converts the number of the
pixels in the horizontal direction from 720 to 768
before it decodes and displays the image.
The horizontal pixel number is
insufficient without conversion.
The image in DV format
(Rectangular pixels)
(Viewer converts the number of
pixels in the horizontal
direction.)
When you capture a picture record' in wide mode
In 525/60 system (NTSC, DVBK-2000)
The DV format video equipment records a wide
picture at 720 x 480 pixels by compressing the 16:‘
ratio image in the horizontal direction.
The DV software decodes this image after expand
the compressed image so that the DV software
displays the image at 852'x 480 pixels.
In 625/50 system (PAL, DVBK-2000E)
The DV software video equipment records a wide
picture at 720 x 576 pixels by compressing the 16:“?
ratio image in the horizontal direction.
The DV software decodes this image after expand
the compressed image so that the DV software
displays the image at 1024 x 576 pixels.
The clear frame filter
A TV image on the screen is refreshed at a rate of,
times (NTSC) or 25 times (PAL) per second. Howt
the whole image is not refreshed at a time. Usualh
there are two passes over the screen and every otb
line is painted at first time and then the rest of lint
are painted. This means that an image consisting c
every other lines is refreshed at a rate of 60 times
(NTSC) or 50 times (PAL) per second. (Interlacing
The DV software imports an image (frame image)
rate of 30 times (NTSC) or 25 times (PAL) per sect
When the successive images change drastically, th
may be a mismatch between the two images (field
image) of a rate of 60 times (NTSC) or 50 times (P/
per second, resulting in an screen image with jagg
The clear frame filter corrects the jaggies.
48
Page 36

Technical information (continued)
When "Adaptive De-interlace" is selected from
"Image" menu of the Viewer window, the clear frame
filter compares the two field's and extracts jaggies. It
creates an average image by operation and applies to
the image, thus a clear image is obtained.
Field image 1
(odd lines)
After the clear filter process
Unchanged parts are not processed
Jaggies are removed
by operation
A clear image processed by the
clear frame filter
When "Field De-interlace" is selected from "Image"
menu, one of the two fields is interpolated to make a
frame image. This method is effective to a quick
moving image. However, a less resolution is obtained
compared when the clear frame filter is used.
Jaggies (or noise)
Caution
Even though your DV
equipment is compatible
with cassette memory,
there may be some
features not available
because of the level of
compliance or difference
between manufacturer's
specification. For more
information, call the
manufacturer of your DV
equipment.
'' 1 Optional spec
The adoption of this
specification depends on
each manufacturer. It
specifies the data format
recorded in the cassette
memory to maintain the
compatibility. However,
the adoption of this and
the type of data to be
recorded (product
specification) vary from
manufacturer to
manufacturer.
Cassette memory
What is cassette memory ?
The DV cassette is equipped with a new feature f
optional spec.^ ^
The feature is as follows. An IC (Integrated circuí
called cassette memory, can be built in the DV
cassette. You can select a cassette with or without
cassette memory at a shop. (C/*/ mark is attached
DV cassette with cassette memory.)
The cassette memory can record basic data on tap
and a variety of data to provide a new usage. Wh
used together with a DV equipment for cassette
memory, the following functions are available.
• Recording index information that are used
conveniently for the instant access playback.
• Recording and playing back the camera inform
for confirmation of settings at recorded.
Functions available when used together v DVBK-2000/2000E
When you create libraries to use a DV equipment
cassette memory and a DV cassette with cassette
memory, you can link the libraries with the DV
cassette. 'This is very useful when managing man)
cassette.
Cassette memory compatibility
The level of compatibility of Sony's DV equipmer
as follows.
Model
DCR-TRV7/TRV7E Read/write
DCR-PC7/PC7E
DCR-VXIOOO/VXIOOOE
DCR-VX700/VX700E
DCR-VX9000 / VX9000E
DHR-IOOO/IOOOE
Compatibility level
Non compatible
Read only
50
Page 37

Technical information (continued)
About aspect ratio conversion
A DV formatted image file composes of 720 x 480
pixels (DVBK-2000) or 720 x 576 pixels (DVBK-2000E)
and each pixel is rectangular; taller than it is wide
(NTSC) or wider than it is tall (PAL).
However, since pixels on the PC are square, the image
overflows (NTSC) or is insufficient in number (PAL)
in the horizontal direction when displayed. To prevent
this, DV software converts the number of pixels in the
horizontal direction from 720 to 640 (DVBK-2000) or
720 to 768 (DVBK-2000E) before the image is
displayed.
And also, before image files (640 x 480 pixels for
DVBK-2000, 768 x 576 pixels for DVBK-2000E) created
by PC and saved in BMP/PICT or JPEG format are
encoded to the DV format, the number of pixels in the
horizontal direction is converted from 640 to 720
(DVBK-2000) or from 768 to 720 (DVBK-2000E).
This correction is called "Aspect Ratio Conversion".
The aspect ratio conversion during decode decreases
the data size because it decreases/increases the
number of the pixels.
Therefore, the image quality may be degraded when a
DV formatted image file is saved in BMP/PICT or
JPEG format after the aspect converted and it is
converted back to a DV formatted image file.
To prevent this, decode or encode an image file
without the aspect conversion.
For example, consider a case that an image is captured
from a DV equipment to your PC and record it as a
still image using a DV equipment after title is added.
Notice that when the image is encoded to the DV
format again, the added title is reduced in the
horizontal direction by 8/9 (DVBK-2000 NTSC) o
expanded by 16 /15 (DVBK-2000E PAL).
Therefore, it is recommended that in advance a
title is expanded in the horizontal direction by 9 /
(DVBK-2000 NTSC) or reduced by 15/16 (DVBK2000E PAL).
Select "File" from the Album window and
"Import" from "File" to import the image to whic
the title is added.
The image file of 720 x 480 pixels (NTSC) or 720 x
576 pixels (PAL) is converted to a DV format file,
not Aspect-converted.
Thus you can add a title to an image without
degrading the quality. Try this method when you
want to surpress the degration too the minimum.
52
1 Choose "Preferences" from the "File" menu, and
select "Decode".
2 Set "Aspect Ratio Conversion" to "Off" and
decode an image file without any correction.
3 Choose "Save as" from the "FUe" menu in Viewer
window and save the decoded image in BMP/
PICT or JPEG format.
4 Import the save image using the supplied Adobe
PhotoDduxe or the like and add an title.
Page 38

Glossary
DV format
An image is compressed in the same way the DV
equipment compresses.
The data size is kept rather small, otherwise large,
using compression algorithm.
BMP format (Windows)
Windows-compatible bit-mapped graphic image
format. The extension is ".bmp".
PICT format (Macintosh)
A standard file format supported by Macintosh.
JPEG format
Abbreviation for Joint Photographic Experts Group.
An image-compression standard is proposed by this
group and the group name is used to as a format type.
Image files can be made small by this compression
method. In the DV software the priority between
qualify and compression rate can be selected.
However, you carmot get exactly the same image you
originally compressed when you save the image in
this format. The extension is ".jpg" for Windows.
Decode
A DV formatted image file needs to be uncompressed
before it is displayed. In the DV software, "to decode"
means "to uncompress".
As a general, encoding means to convert based on the
specified rules and decoding means to resume the
converted data.
Cassette meniory
The DV cassette has an optional function that enables
the built-in IC called Cassette memory. You can select
a DV cassette with/without Cassette memory on
purchase.
You can store basic data on tape and a variety of data
that provides a new use in Cassette memory. When
the DV equipment compliant with Cassette memory is
Caution
Even though your DV
equipment is compliant
with Cassette memory,
some functions may not
be available due to the
used, you can;
• Store the content information convenient for quick
access when recording.
• Store / play back the camera information used to
confirm settings when recording.
level of compatibility or
manufacturer.
Contact the manufacturer
of your DV equipment
about details.
Slide show
Function than can display several images one by one
successively.
The DV software can transmit the slide show to the
DV equipment for video recording.
Page 39

DV StiU Image
Capture Board
Reference Guide for Macintosh
3-861-291-12(
DVBK-2000/2000E
©1997 by Sony Corporation
Page 40

Table of contents
Operation Guide
Capturing the Image
Capturing an image from the DV equipment 4
Capturing images from the DV equipment
Importing an image created on your computer to
Managing the Captured Image
Selecting images 6
Copying/moving images to another window 6
Deleting images 7
Saving an image in PICT or JPEG format 7
Changing the name of images 8
Searching for images by name in the album or
Adding a comment to the image 9
Changing the information display 9
Changing the display order 10
Printing the list of images in the window 10
automatically 4
the album 5
library window 8
Displaying an Image Using the Viewer
To shrink or magnify an image 11
Rotating an image 12
Improving the focus of an image 12
Printing the image displayed on the screen 13
Using captured Images
Displaying a slide show on the screen 14
Recording images in albums or libraries with DV
equipment 14
To add narration or back ground music (BGM)
afterwards 15
Recording slide show with DV equipment 15
Creating the DV cassette label 16
Page 41

Managing Album§*and Libraries
Creating a new album or library 17
Opening an album or library 17
Searching for an album or library 17
Deleting an album or library 18
Changing title of album or library 18
Editing album / library information 19
Picking title image 19
Cuing up the album or library image 20
Linking Library with cassette with memory 20
Displaying linked libraries 20
Other Functions
Using VCR control window 21
Using preview window 23
Using time code window 24
Exchanging image files in DV format between
Macintosh and Windows 24
About the DV Shelf folder 25
Command Reference
DV Shelf Window. 27
Album/Library Window 39
Viewer Window 45
Page 42

Capturing the Image
Capturing an image from the DV equipment
You can capture an image from the DV equipment
and save it to the disk as DV format image.
1 Make sure the DV equipment is ready to play..
2 Open an existing album or library, or create a new
one.
3 Play the tape using the VCR control window.
4 When you find your favorite image in the preview
window, click "CAPTURE."
The image that displayed in the preview window
when you clicked "CAPTURE" will be captured
into the album or library.
Capturing images from the DV equipment automatically
If you want to set the DV software to start capturing
automatically, click "AUTO" instead of "CAPTURE"
in the above procedure so that "AUTO " lights in red.
When you click "AUTO" once again, or the specified
number of images are captured, the automatic
capturing will be terminated.
You can capture the
image by double clicking
the preview window.
You can also capture the
image by pressing "0" in
the 10 key pad. vilien you
use "0" key, you have to
change the software
setting.
See page 34 for details.
Setting automatic capturing
You can customize some capturing settings such as the
capturing condition, the maximum number or the
interval of the capturing.
1 Select "Preferences" from the "File" menu.
The Preferences dialog appears.
2 Select "Capture" page.
3 Modify any settings.
Page 43

Importing an image created on your
computer to the album
You can add a PICT or JPEG image to your album by
converting them to the DV format image file.
1 Open an existing album or create a new one.
Notes on the size of an
importable image:
DVBK-2000 (NTSC Color
System):
You can import an
image of 640 x 480
pixels (normal) or 852 x
480 pixels (wide).
Although you can also
import a PICT or JPEG
format image of the 720
X 480 pixels (normal,
DV format original
size), the image will be
reduced to 8/9 scale
horizontally when you
display it on the PC or
the DV equipment,
since it will be
converted to the DV
format without
changing the aspect
ratio.
DVBK-2000 (PAL Color
System):
You can import an
image of 768 x 576
pixels (normal) or 1024
X
576 pixels (wide).
Although you can also
import a PICT or JPEG
format image of 720 x
576 pixels (normal, DV
format original size), it
will be expanded to 16/
15 scale horizontally
when displayed on the
PC or the DV
equipment, since it will
be converted to the DV
format without
changing the aspect
ratio.
For details, see "Technical
information" in the
operating instructions
2 Select the album window and choose "Import"
from the "File" menu.
3 Select a PICT or JPEG image and click "Open."
The image will be converted to the DV format and
added to the album.
Page 44

Managing the Captured Image
Selecting images
To select an image
Click an image that you want to select.
The selected image is highlighted in green
To select more images
While pressing the Command key, click the image that
you want to select.
To deselect one of the selected images
while pressing the Command key, click the selected
image that you want to deselect.
To select the images by specifying a range
Click the first image, and then click the last image that
you want to select while pressing the Shift key. Thus
you can select all of the images within the range.
Copying / moving images to another window
Notes
• You cannot move or
copy any image into
the album window
which doesn't show the
images in the specified
order (By Custom
Order).
• You cannot move or
copy images into the
library windows.
If you move the image
from the library
window to other album
window, the image is
copied (not moved) to
the album.
• When you move the
image to the album on
another disk, the image
is copied (not moved)
to the album.
To move an image to another album
Drag an image icon in the album window and drop it
onto the other album window.
To copy an image to another album
While pressing the Option key, drag an image icon
from the album/library window and drop it onto
another album window.
Page 45

Notes
• For the JPEG format,
the file size depends on
the image quality. If
you choose higher
image quality, the
image file size becomes
larger.
It is recommended that
you select the
compression rate based
on the priority of image
quality or file size.
• You can also save an
image without
changing the aspect
ratio.
To do this, select
"Preferences" from the
"File" menu, then
choose Decode and
turn off converting the
aspect.
For details of the aspect
ratio, refer to the
"Technical
Information" in the
operating instructions.
Deleting imagl^s
You can delete any unwanted images in the album or
library window.
1 In the album or library window, select images that
you want to delete.
2 Select "Delete Images" from the "Image" menu or
press the "delete" key.
3 When the message is displayed, click "OK".
If you do not want to delete the image, click
"CANCEL".
Saving an image in PICT or JPEG
format
To save an image in PICT format
1 In the album or library window, double-click the
image that you want to save.
The selected image is displayed in the viewer
windovv.
2 Select "Save As" from the "File" menu.
3 'Select "PICT" and enter the file name, then click
"Save."
To save an image in JPEG format
1 In the album or library window, double-click the
image that you want to save.
The selected image is displayed in the viewer
window.
2 Select "Save As" from the "File" menu.
3 Select "JPEG" and image quality, enter the file
name, then click "Save."
Page 46

Managing the Captured Image (continued)
Changing the nafhe of images
The image will be automatically named during
capturing, however, you may also change this name.
To change the name of one image
1 Select the album or library window and choose
"Normal View" from the "View" menu.
2 Click the name of the image you want to change.
The name part will be highlighted, and the cursor
will blink.
3 Enter the new name of the image, then click the
image.
To change each name of a group of images
1 In the album or library window, select images
whose name you want to change.
2 Choose "Rename Images" from the "Image" menu.
The "Rename Images" dialog appears.
3 Enter the rule for the group of images.
Image names will be represented as "the specified
characters and 1-5 digits and the specified
character."
Searching for images by name in the album or library window
You can search for images in the album or library by
specifying the name of the image.
1 Select the album or library window and choose
"Select By Name" from the "Selection" menu.
The Select By Name dialog appears.
2 Enter the character(s) to search for and click "OK."
All of the images whose name include the
specified characters will be selected.
Page 47

Adding a comment to the image
You can add a comment to each image. Also you can
see the comment of each image by selecting "Detailed
View" from the "View" menu.
1 Select the album or library window and choose an
image for which you want to add a comment.
2 Select "Image Information" from the "Image"
menu.
The "Image Informahon" window appears.
3 Enter the comment and close the window.
Changing the information display
To switch the information display, select the type of
information to display from the "View" menu.
• Index View : Displays the images ordy.
• Normal View : Displays the images with the name,
the time code, recorded date. In this view mode, you
can click the name of an image to change it.
• Detailed View : Displays the images with the name,
the time code, recorded date and time, captured
date and time, and the comment.
Page 48

Managing the Captured Image (continued)
Changing the dismay order
To switch the display order, select the type of display
order from the "View" menu.
• By Custom Order ; Displays the images by any
user-defined order. Use this mode to add an image
from another album or library.
In this mode, you can change display order by
dragging the desired image to the desired position.
• By Name : Displays the images by alphabetical
order of the name.
• By Time Code : Displays the images by the time
code.
• By Recorded Date ; Displays the images by the
recorded date.
• By Captured Date : Displays the images by the
captured date.
Printing the list of images in the
window
You can print the list of images which is displayed in
the album/library window.
1 Select the-album or library window and choose
"Page Setup" from the "File" menu.
The Page Setup dialog appears.
2 Set up any necessary options then click "OK."
3 Select "Print Album" (or "Print Library") from the
"File" menu.
The Print dialog appears
4 Click "OK" (or "Print") to start printing.
Page 49

Displaying an Image Using the Viewer
To shrink or magnify an image
To shrink an image
Select "Zoom Out" from the "View" menu.
You can shrink an image by 400%, 300%, 200%, 100%,
or 50%.
To magnify an image
Select "Zoom In" from the "View" menu.
You can magnify an image by 50%, 100%, 200%, 300%,
or 400%.
To display an image by the specified magnification
Select the magnification from the "View" menu.
You can choose the magnification from 50%, 100%,
200%,300%, or 400%.
The viewer window will automatically resize to fit the
image.
To make an image to fit in the window
Select "Fit to Window" from the "View" menu.
This allows you to automatically zoom in or out so
that the entire image fits in the viewer window.
To view an image by full screen
Select "Full Screen" from the "View" menu.
This allows you to display an image by magnifying it
to fit the screen size.
To return to the previous magnification, click the
mouse to display the menu bar and select "Restore"
from the "View" menu (you can also press the <.> key
with holding down the Command key).
Page 50

Displaying an Image Using the Viewer (continued)
Rotating an image
You can rotate an image in the viewer window. Use
this feature to correct an image taken by putting the
camera horizontally.
To rotate an image 9Q degrees clockwise
Select "Rotate CW" from the "View" menu.
To rotate an image 90 degrees counterclockwise
Select "Rotate CCW" from the "View" menu.
Improving the focus of an image
When you capture an image with a lot of movement, it
may appear slightly jaggy. You can interpolate in the
viewer window to improve the focus.
If partly jaggy
Select "Adaptive Deinterlace" from the "Image"
menu.
DV software compares the two field images
comprising an image to detect discrepancies caused by
movement, then synthesizes the two field images to
even out the differences.
This will preserve the overall image quality because
the static part of the image does not lose its quality.
If entirely jaggy
Select "Field Deinterlace" from the "Image" menu.
This interpolates frame images by compensating with
a field image. This will completely remove the jaggy,
but the image quality is lower than "Adaptive
Deinterlace" because field data is lost.
To display an image without interpolation
Select "No Deinterlace" from the "Image" menu.
This displays an image without interpolation.
Page 51

Printing"the image displayed on the screen
You can print an image which is displayed in the
viewer window.
1 Select "Page Setup" from the "File" menu.
The Page Setup dialog box appears.
2 Set up any necessary options then click "OK."
3 Select "Print" from fhe "File" menu.
The Print dialog appears.
4 Click "OK" (or "Print") to start printing.
Page 52

Using Captured
Images
Displaying a slide show on the screen
You can display the images selected in the album or
library window as a slide show on the screen.
To record the slide show on the DV equipment, see
next page.
1 Select images to display as a slide show in the
album or library window.
2 Select "Slide Show" from the "Image" menu.
Slide show displays images in the selected order.
You can control the slide
show from the Slide
Show menu.
• Full screen/Original
size: Switches the
image size between full
screen and original
size.
• Auto/Manual: Selects
whether the slide show
is played automatically
at the specified interval
or played frame by
frame manually.
• End: Terminates the
slide show.
The following four menus
are effective only in the
manual play'mode.
• Previous: Displays the
previous image.
• Next: Displays the next
image.
• First: Displays the first
image.
• Last: Displays the last
image.
If you want to change
the display interval
Select "Decode" in
"Preferences" from the
"File" menu and specify
the interval.
3 Click your mouse during the slide show to display
the menu bar.
4 To stop the slide show, select "End" from the
"Slide Show" menu.
You can also stop the slide show by pressing the
<.> key with holding down the Command key.
Recording images in albums or
libraries with DV equipment
You can transmit and record the images in an album/
library with the DV equipment.
1 Select the album or library window and choose
"Start DV Transmission" from the "DV" menu.
It starts the DV transmission mode in which you
can transmit the selected images.
2 Click images to transmit.
3 Start recording with the DV equipment.
Clicking an image transmits it to be recorded.
4 To stop recording, stop recording with the DV
equipment and select "Stop DV Transmission"
from the "DV" menu.
Page 53

To add rfarration or back ground
music (BGM) afterwards
To prevent image jaggy in the DV transmission mode,
check "Single Field Transmission" in the DV
Transmission page of the preference window. In this
case, you cannot dub the audio on the tape on which
you recorded the image.
If you want to record a jagged image for audio
dubbing, perform Adaptive Deinterlace to the image
or Deinterlace to the field first and save it as a PICT
file. Reloading the compensated image by
deinterlacing it with the DV software enables
postrecording by transmitting and recording by the
DV equipment without checking the "Single Field
Transmission."
About the DV
transmission mode
There are two modes for
DV transmission:
• DV transmission
mode: Transmits the
selected images. To
start this mode, choose
"Start DV
Transmission" from the
"DV" menu.
• DV slide transmission
mode: Transmits the
selected images as a
slide show to the DV
equipment. To start
this mode, choose
"Start DV Slide Show"
from the "DV" menu.
To stop the slide show
Select "Stop DV Slide
Show" from the "DV"
menu.
When a slide transmission
is stopped, the DV
software returns to the
DV transmission mode.
To stop transmission to
the DV equipment, select
"Stop DV Transmission"
from the "DV" menu.
Recording slide show with DV equipment
You can transmit and record the images in an album/
library as a slide show with the DV equipment.
1 • Open the album or library which contains the
images you want to record in a slide show.
Select "By Custom Order" from the "View" menu.
2
3
Drag images in the window and arrange in the
order to display.
A slide show displays images in the window from
left to right, top to bottom.
4 Choose "Start DV Transmission" from the "DV"
menu.
It starts the DV transmission mode, allowing the
selected images to be transmitted.
5 Click the image you want to record first.
6 Start recording with the DV equipment.
7 Select "Start DV Slide Show" from the "DV" menu.
A slide show is started. Displayed images are
recorded with the DV equipment one after
another.
Page 54

Using Captured Images (continued)
Creating the DV (lassette label
To make a DV cassette label, create a PICT format file
to be used to print the cassette label.
The file created here includes the label boundary, and
title image.
Before actual printing, you need to type the title for
the labels with image processing software, such as
Adobe PhotoDeluxe, which comes with the DV
software. Sticker papers are useful for printing the
label.
1 In the DV Shelf window, select an album / library
from which you can make the cassette label.
2 Select "DV Cassette Label" from the "File" menu.
This previews the cassette label.
3 Set the options for the cassette label and then click
"Save".
«Cassette type»
Select either mini cassette or standard cassette as
the cassette type.
«PICT file»
Select "Bitmapped" or "Vector."
When you-process the created label image with
Adobe PhotoDeluxe, select "Bitmapped", and
when you process the image with an application
which supports drawing objects of a PICT file
(such as MacDraw), select "Vector."
«Boundary»
You can specify whether or not a boundary is
displayed.
4 Enter name and click "Save."
Page 55

Managing Albums and
Libraries
Creating a new album or library
You need to create an album or library before
capturing images.
1 Select "New" from the "File" menu.
2 Select "Album" or "Library", type the album or
library name and click "Save."
When you create an album or library, the DV format
file is saved in a folder which is automatically created
with the same name as the album or library name
under the DV Shelf folder (by default).
Opening an album or library
Select "Open" from the "File" menu and specify the
album or library to open.
You can also open one by double-clicking the icon of
an album or library in the DV Shelf window.
Searching for an album or library
You can search for an album or library by specifying
its text.
1 Select the DV Shelf window and choose "Find"
from the "File" menu.
The Find dialog appears.
2 Type the text to find and click "OK."
The first album or library whose title contains the
specified text is selected among the displayed
albums and libraries.
3 Select "Find Again" from the "File" menu.
The next album or library whose title contains the
same text is selected. ' ''
Page 56

Managing Albums and Libraries (continued)
Deleting an alburftor library
You can delete an album or library. If you delete an
album or library, all image files in it are also deleted.
1 In the DV Shelf window, select the album or
library to delete.
Or, select the album or library window to delete.
2 Select "Delete" from the "File" menu in the DV
Shelf window, or select "Delete Album/Library"
from the "File" menu in the album/library
window.
The message appears.
3 Click "OK."
If you do not want to delete the album or library,
click "CANCEL."
Changing title of album or library
You can rename an existing album or library title.
1 In the DV Shelf window, select the album or
library to rename.
Or, select the album or library window to rename.
2 Select "Rename" from the "File" menu in the DV
Shelf window, or select "Rename Album/Library"
from the "File" menu in the album/library
window.
The Rename Album/Library dialog appears.
3 Type a new title and click "OK."
Page 57

Editing^bum/librairy information
You can make comments on an album or library.
1 In the DV Shelf window, select the album or
library to make comments on.
Or, select the album or library window to make
comments on.
2 Select “Information" from the "File" menu.
When you select the album or library window in
step 1 above, select "Album/Library Information"
from the "File" menu instead.
The Album/Library Information dialog appears.
3 Enter the comments and then click "OK."
You can number albums and libraries. These
numbers are useful to sort albums and libraries
when you display them by number.
Picking title image
You can pick a title image from the images in an
album or library. Select an representative image for
the album or library.
The title image is displayed in the information display
area of the album or library window and in the DV
Shelf window.
If there is no title image
for an album or library
A blue image appears.
If you delete the title
image or move the title
image to the other album,
a blue image also appears.
If you close the album/
library window without
the title image
The first image in an
album or library is picked
as the title image when
you close the window.
1 In the album or library window, select one image
for the htle image.
2 Select "Pick Title Image" from the "Image" menu.
The picked image is displayed in the information
display area of the album or library window and
in the DV Shelf window.
Page 58

Managing Albums and Libraries (continued)
Cuing up the album or library image
You can cue up where the selected image is recorded
by rewinding or fast-forwarding the tape in the DV
equipment.
1 In the album / library window, select the image to
search for.
2 Select "Search" from the "DV" menu.
The DV equipment start to rewind or fast-forward
the tape to cue up the selected image.
Linking library with cassette with memory
You can display only the associated libraries with the
tape by linking libraries with a tape.
1 Load a cassette in the DV equipment.
2 Open the libraries to link to the tape.
3 Select "Link" from the "DV" menu.
Once you link, you do not need to link again.
Note on cuing up
The precision for search
depends on your DV
equipment.
Note on the link option
This link option is
available only when your
equipment supports the
functions to read from
and write to cassette
memory.
Unlinking
Select "Unlink" from the "DV" menu in the library
window.
Displaying linked libraries
Use a DV cassette with cassette memory in the DV
equipment which supports it to display only those
libraries which are linked to the tape.
To use this function, you need to link the libraries to
the cassette with memory beforehand.
Select the DV Shelf window and choose "Linked
Libraries Only" from the "View" menu.
Only those libraries which are linked to the tape are
displayed.
To return to the normal view
Select "Display All" from the "View" menu.
Page 59

other Functions
Using VCR control window
Use the VCR control window to control the DV
equipment and capture images. You can also use
numeric keys to do the same thing as using the VCR
control window.
lOB VCRC»n tr«1 t
ZB t"
VCR Control window
◄◄ Rewind
• If you click this button while a tape is not rurming,
you can rewind the tape.
• If you click this button while a tape is running, you
can rewind the tape while viewing the images.
• If you click this button while a tape is being
. rewound, you can view the images while rewinding
the tape.
Cl'l
► Play
Plays a tape.
Fast-fotward
• If you click this button while a tape is not running,
you can fast-forward the tape.
• If you click this button while a tape is rurming, you
can fast-forward the tape while viewing the images.
• If you click this button while a tape is being fast-
forwarded, you can view the images while fastforwarding the tape.
II Pause
Pauses the tape.
Page 60

other Functions (continued)
■ Stop
Stops the tape.
M Frame (reverse)
If you dick this button during playback pause, you
can reverse the tape franae by frame.
M Frame (forward)
If you click this button during playback pause, you
can forward the tape frame by frame.
!► Slow
Plays the tape at 1/5 the normal speed. You can
change the direction with the M and M buttons.
MONITOR ON/OFF
Turn on the preview display. You can capture images
faster during auto capturing by turning off the
preview display. While the preview display is turned
off, a message, "MONITOR OFF" is displayed in the
preview screen.
CAPTURE
Captures images as still images.
AUTO
Captures the.spedfied number of images
automatically.
To spedfy the number of images and interval setting,
select "Preferences" from the "File" menu to display
the preference dialog and make settings in the
"Capture" page 30.
Page 61

Using ppeview window
You can view the images currently played in the DV
equipment in the preview window.
Resizing preview window
1 Click the SONY logo in the preview window.
A pop-up menu to resize the preview window
appears.
2 Select a size.
160 X 120, 320 X 240: You can preview image at
the specified size.
Software DV Monitor; You can preview image in
their actual size or full screen. If you select the
software DV monitor, you cannot capture images.
Setting the preview resolution
Select "Preferences" from the "File" menu and set the
"Preview" page in the "Preferences" dialog.
Capturing images in the preview window
You can capture an image by double clicking the
image in the preview window when an album
window or library window is active.
Previewing in full screen
You can view the images from the DV equipment in
full screen (software DV monitor function).
Click the SONY logo in the preview window to
display a pop-up menu and select "Software DV
Monitor."
To quit the software DV monitor, click a mouse button
to display the menu bar and select "End" from the
"Software DV Monitor" menu (you can also quit by
pressing the <.> key with holding down the
Command key).
Page 62

other Functions (continued)
In the time code window, you can display the Hme
code, recorded date, and recorded time of the tape
being played in the DV equipment.
Switching display
Click the icon on the left of the time code window to
display a pop-up menu and select your preference.
Using time code Dvindow
i tint» Cod* j
1
[ilfliiWiilSjy]
Time Code window
You can also switch the contents of the time code
window in the following order by double clicking:
Time Code —+ Recorded Date —♦ Recorded Time —►
Time Code —>•...
• Time Code: The time code of the tape being played
in the DV equipment
• Recorded Date: The recorded date of the tape being
played in the DV equipment
• Recorded Time: The recorded time of the tape being
played in ^e DV equipment
Exchanging image files in DV format between Macintosh and Windows
You can use DV format image files created on
Macintosh on Windows and vice versa by the
following procedure. However, you can not use
album and library files.
To exchange data between a Macintosh and a
Windows PC, you need PC Exchange (control panel
document) on the Macintosh. If you have not installed
PC Exchange, install it from the MacOS CD-ROM.
Page 63

To use a OTTformat image file on Windows
1 Change an image file name to 8 alphanumeric
characters with " .dvf" extension.
2 Save the file on a DOS formatted floppy disk.
3 Read it on a Windows PC.
To use a DV format image file created on Windows
1 Save an image file in a DOS formatted floppy disk
on a Windows PC.
2 Read the disk on a Macintosh.
About the DV Shelf folder
When you create albums and libraries, they are stored
in the DV Shelf folder by default. By initial settings,
the DV Shelf folder is specified as the MyShelf folder
in the DVCap folder.
You can open or rename albums and libraries using
their icons in the DV Shelf window. If you store
albums and libraries in other folders than the DV Shelf
folder, you can not manipulate them from the DV
Shelf window.
You can start the DV
software by double
clicking a DV format file
created with the
Windows PC
Set a type in PC
Exchange. The type of the
DV format file on
Macintosh is ".dvf."
For details, see the
Macintosh
documentation.
If you want to change the DV shelf folder
To change the DV Shelf folder to other folder^ use the
"General" page in the Preferences dialog. The change
is effective after you restart the DV Software.
Page 64

■Display All ^
Displays all albums and libraries in the DV Shelf
folder. When you select this command, a check mark
(✓ ) is displayed before the command name.
■Albums Only
Displays only albums in the DV Shelf folder. When
you select this command, a check mark {*/) is
displayed before the command name.
■Libraries Only
Displays only libraries in the DV Shelf folder. When
you select this command, a check mark (✓ ) is
displayed before the command name.
■Linked Libraries Only
Displays only libraries which are linked to the cassette
tape in the DV equipment. When you select this
command, a check mark (✓ ) is displayed before the
command name.
Window menu
■Show/Hide Preview Window
Show/Hide the preview window.
Note on “Linked
Libraries Only"
This command is
available only in
following conditions:
- The connected DV
equipment supports the
cassette memory and a
cassette with cassette
memory.
- The cassette tape has
been linked with
library.
■SKow/Ride VCR Control Window
Show/Hide the VCR control window.
■Show/Hide Time Code Window
Show/Hide the Time code window.
■Show/Hide Tool Bar
Show/Hide the tool bar.
■Show/Hide Status Bar
Show/Hide the status bar.
Page 65

About the description in the command reference
The menus and their items depend on the selected
windows type in the DV software.
Therefore, the descriptions of commands for a menu
are classified by window.
To get help about a menu command
Find the page which describes the menus in the
windows that contains the selected menu command.
Menus for each window
The menu items changes according to the active
window.
• When the DV Shelf window is active:
- File
- Edit
- View
- Window
• When the Album/Library window is active:
- File
- Edit
- Selection-
- DV
- Image
- View
- Window
• When the Viewer window is active:
- File
- Edit
- Image
- View
- Window
Page 66

DV Shelf Window
File Menu
■New
Creates a new album, or library. When you select this
command, a dialog appears. Type the file name in the
space provided, specify whether it is an album or
library, and click Save.
When you create an album or library, the DV format
file is contained in a folder which is automatically
created with the same name as the album or library
name under the MyShelf folder in the DVCap folder
(by default).
■Open
Opens an album or a library window.
Select the album or library you want to open in the
dialog and click "Open."
■Close
Hides the DV Shelf window.
■Rescan
Rescans albums and libraries in the DV Shelf folder to
update the display of the DV Shelf window if it is
different from the contents of the DV Shelf folder.
■Information
Displays information for the selected album or library.
You can edit a comment in the window or set a
number for an album or library.
■Rename
Changes the selected album or library name.
Type a new title in the Rename Album/Library
dialog.
It is displayed as the new title for the album or library
in the DV Shelf window.
Page 67

DV Shelf Window (continued)
■DV Cassette Label
Creates a PICT file which can be used to print a label
based on the information of the selected album or
library in the DV Shelf window.
• Cassette type: Select either mini or standard for the
cassette type.
• Bitmapped/Vector: When you process images with
Adobe PhotoDeluxe, select "Bitmapped", and when
you process images with an application which
supports drawing objects of a ЙСТ file (such as
MacDraw), select "Vector."
• Boundary: You can specify whether or not a
boimdary is displayed on the label.
Tyj>e the title for the labels with image processing
software, such as Adobe PhotoDeluxe, which comes
with the DV software, before actual printing. Sticker
papers are useful for printing.
■Delete
Deletes the selected album or library in the DV Shelf
window.
Select the album/library to be deleted before choosing
this command. Click "OK" when the "Delete" dialog
box appears.
If you delete an album or library, all image files in it
are also deleted.
■Find
Searches through the albums and libraries for a
specified text in their titles.
Selecting this command displays the Find dialog.
Type the text to find and then dick "OK".
The first album or library which contains the spedfied
text is selected.
■Find Again
Finds the next album or library which contains the
same text.
Page 68

■Preferences ^
Sets the system settings of the DV software. The
Preferences dialog appears. This dialog has several
pages. Select the desired page to set up your
preferences from the pop-up menu.
Preview
I Pr«t»teu»~
«Preul»iu Be«olutlon(l60Ml2D)»
O Lotv(for smooth motion)® High
«Previour Resolution(320K240)»
O Loivtfor smooth motion)® High O High on Still
«Display Size of Softtusra DU Monitor»
® Driginal O Full Scraon
«Display Colors»
O Minions OThousMits ® ROapt to Scraan
□
I C«nt»l I
• Preview Resolution (160 x 120): Selects the
resolution to display the preview window at 160 x
120 pixels.
- Low (for smooth motion); The motion looks
smooth but the image resolution is low.
- High: The image displayed in high resolution.
• Preview Resolution (320 x 240): Selects the
resolution to display the preview window at 320 x
240 pixels.
- Low (for smooth motion): The motion looks
smooth but the image resolution is low.
- High; The image displayed in high resolution.
- High on Still: You can preview in the lowresolution mode at normal speed and in the highresolution mode in slow mode and at a pause.
Page 69

DV Shelf Window (continued)
• Display Size of Software DV Monitor: Selects the
initial image size to display the image from the DV
equipment with the software DV monitor function.
- Original: Displays the image in the center of the
window at the original size.
- Full Screen: Display the image on full screen
without changing the aspect ratio.
• Display Colors: Sets number of colors to display the
images in the preview window.
- Millions: Displays in 16.7 million colors.
- Thousands: Displays in 32000 colors.
- Adapt to Screen: Displays in the specified colors
in the "Monitor" or "Monitor & Sound" control
panel.
Capture
Sets the image capture settings.
] Capture"
«Aulomsik CBptur«»
Stop urhen
Cspturt Mod#
Capture every
Add Images ® on every capture O tvhen done
i «Autamalically Oenerated File Names>
FILE
31
150
Interval O Photo
25
^4 digits
Images captured
/ 30 seconds
Automatic Capture:
- Stop when [] images captured: Specifies the
maximum number of images to be
auto-captured at once.
- Capture Mode: Select "Interval" or "Photo" when
the DV software captures images automatically.
Interval: Captures images at the specified interval.
If you wish to capture at equal intervals, select
this mode.
Photo: Captures images taken in the photo mode
(still mode). If you wish to automatically capture
only the images taken in the photo mode, select
this mode.
Page 70
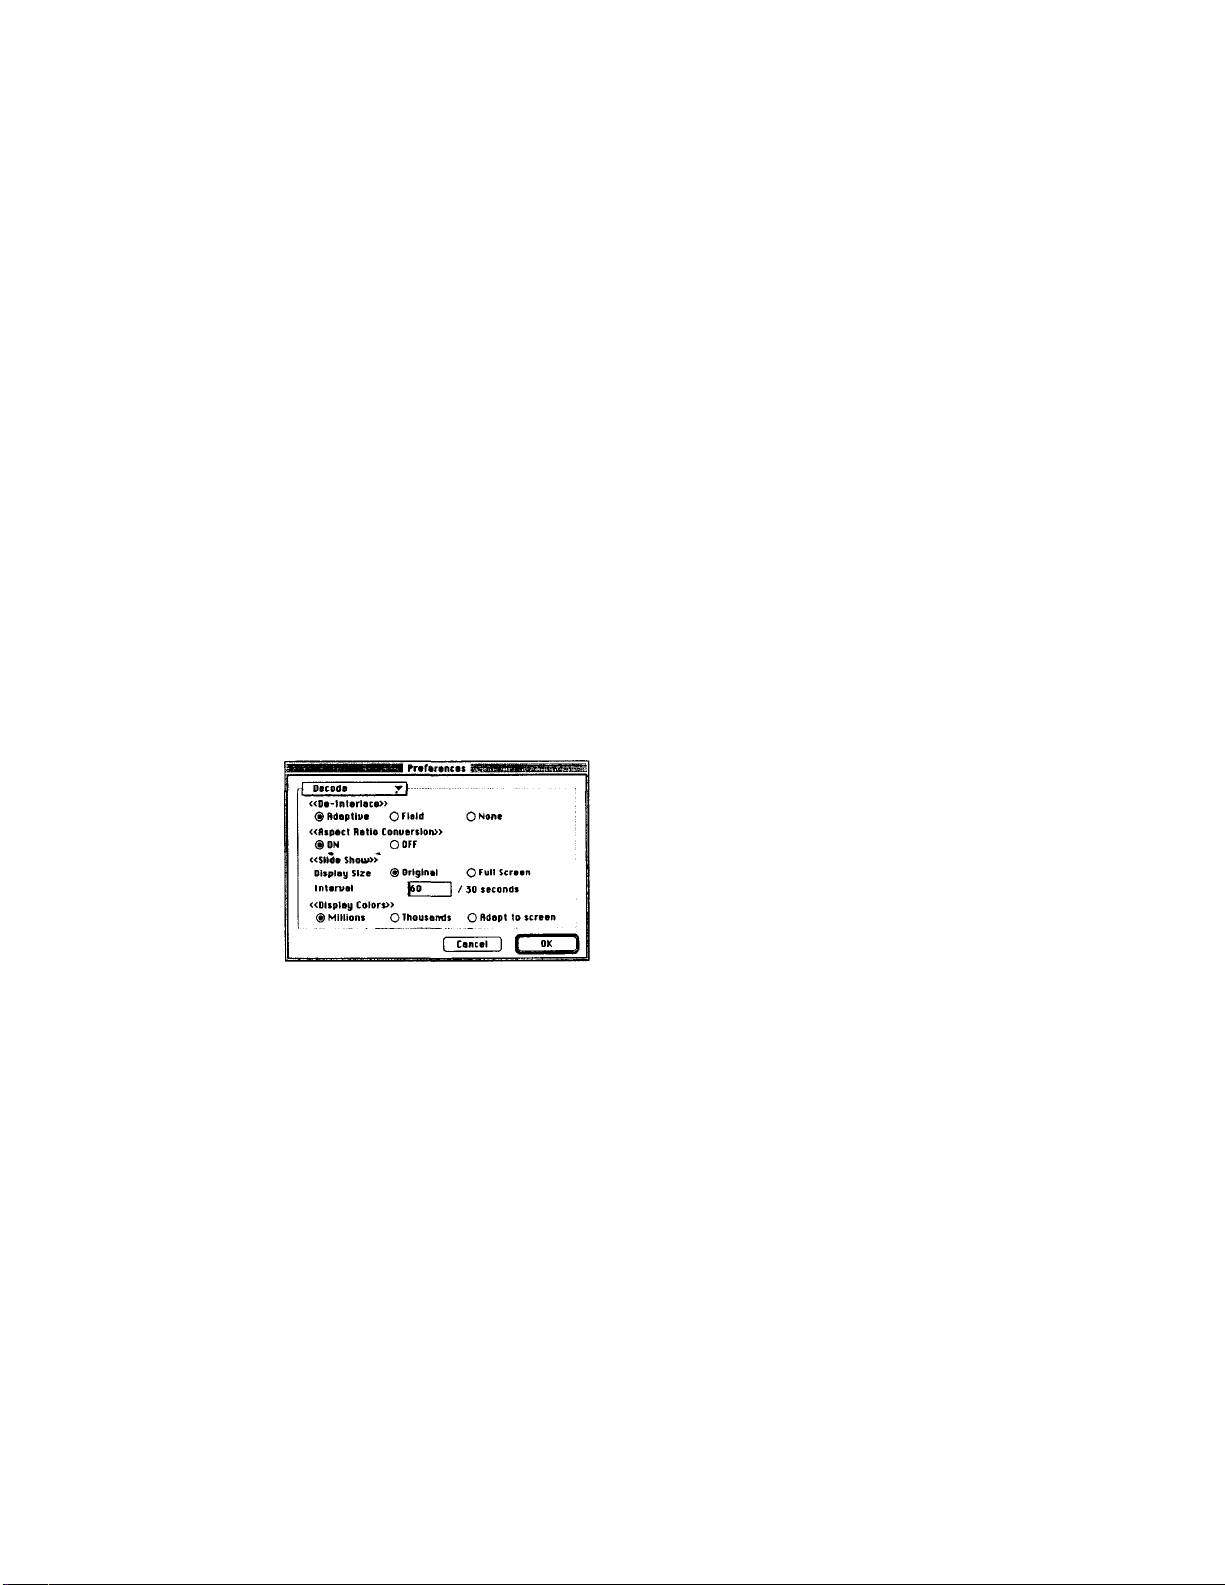
- Capture every []/lo (DVBK-2000) or 25 (DVBK2000E) seconds: Sets the minimum interval to
capture images. You can set this value only when
you select "Interval".
- Add Images: Selects when image files are
displayed in an album or library. You can set this
option only when you select "Interval".
on every capture: Displays each image after it is
captured.
when done: Displays all images after capturing.
When you specify a short interval for capturing,
this option is recommended.
Automatically Generated File Names: Type a
standard file name for the captured image.
Specify the file name. When images are captured,
four digit numbers are automahcally added to the
specified characters of a file name to make unique
file names.
Decode
De-Interlace: Selects interpolahon method for
image.
- Adaptive: Compares the two field images
comprising an image to detect discrepancies
caused by movement, then synthesizes the two
field images to even out the differences.
This will preserve the overall image quality
because the static part of the image does not lose
its quality.
- Field: Interpolates frame images by compensating
with a filed image. This will completely remove
the noise, but the image quality is lower than
"Adaptive" because field data is lost.
- None: Does not interpolate.
Page 71

DV Shelf Window (continued)
• Aspect Ratio Conversion: Selects whether or not to
• Slide Show:
• Display Colors: Sets number of colors to display the
convert the aspect ratio in decoding or displaying
images.
- Display Size; Selects how a slide show is initially
displayed.
Original: Displays the image in the center of the
window at the original size.
Full Screen: Display the image on full screen
vnthout changing die aspect ratio.
- Interval []/30 (DVBK-2000) or 25 (DVBK-2000E)
seconds; Specifies the minimum interval to
change the image by 1 /30 (DVBK-2000) or 1 /25
(DVBK-2000E) seconds.
images in a decoded DV file.
- Millions; Displays in 16.7 million colors.
- Thousands; Displays in 32000 colors.
- Adapt to screen; Displays in the specified colors in
the Monitor or Monitor & Sound control panel.
DV Transmission
tf irdnsmisilon V t
«Dal5»
□ Singla Field Transmission
(SHuta Rudio
«Slide Shoiv»
g| Emit Blue Screen after the Last image
Interval ioo I / 30 second
Data
- Single Field Transmission; Check this option
when you want to correct for flickering images.
When you record images on a tape with this
option checked, dubbing is unavailable for the
tape.
Page 72

- Mute Audio; Sound information is contained in
the captured images. If you send these images
without checking this option to a DV equipment,
the sound in the images may be heard as noise.
When you check this option, you can suppress the
noise.
• Slide Show
- Emit Blue Screen after the Last Image; Check this
option when you want to transmit a blank picture
at the end of slide transmission. When you
uncheck this option, slide transmission ends with
the last picture.
- Interval []/30 (DVBK-2000) or 25 (DVBK-2000E)
seconds; Sets the interval to change images. The
time specified in this box is the minimum interval
to switch to the next image. You can specify the
time by 1/30 (DVBK-2000) or 1/25 (DVBK-2000E)
seconds.
Do picture search only while pressing buttons;
when you check this option, the search function is
only active while you click and hold down the
mouse button on the rewind / fast-forward buttons.
When you uncheck this option, the tape does not
return to playback unless you click ►PLAY.
Page 73

DV Shelf Window (continued)
Use numeric key pad for VCR control: Checking
this option allows you to manipulate the DV
equipment by numeric key pad corresponding to
the VCR control window.
The VCR control window and
corresponding numeric key pad
Save option
j Saue Option ^
«Application that opens ewported images»
I
«Replication that opens OU Cassette Labels»
Kn Hdobe PhotoOeluMe"*
Adobe PbotoOeluHe”*
Creator: PHUT's;Select Rppiicatlon
Select Rppiication
J
c
Application that opens exported images: Selects
the application to start when you double click a
PICT or JPEG format image converted from the DV
format. Click "Select Application" to display the
application selection dialog box, select an
application and click "OK."
Application that opens DV Cassette Labels:
Selects the application to start when you double
click an image created as a DV cassette label. Click
"Select Application" to display the application
selection dialog box, select an application and click
"OK."
Page 74

• Windows initially have tool bars: If you check this
option, the tool bar is displayed when an album,
library, or viewer window is opened.
• Use hard disk for backing storage: If you check
this option, you can run the DV software even when
enough free memory space is not available by using
the hard disk as a auxiliary working space. Note
that the processing speed gets slower. This setting is
not effective before you restart the DV software.
• Show DV Shelf window at startup: If you
uncheck this option, the DV Shelf window is not
opened wheu the DV software is started.
• Buffer on capturing: If the DV software does not
work properly while capturing, check this option.
• DV Shelf Folder: Specifies a folder for the DV Shelf.
Click "Change" to display the selection dialog box
for the DV Shelf fojder. Select a folder you want to
use and click "Select (selected folder name)." This
setting is not in effect until you restart the DV
Software.
■Quit
Quits the DV software.
Page 75

DV Shelf Window (continued)
Edit menu
■Cut
Cuts the selected text and saves it into the Clipboard.
■Copy
Copies the selected text-to the Clipboard.
■Paste
Inserts the text in the Clipboard to the text box.
View menu
■Normal View
Displays albums or libraries as icons. An album is
shown as a book and a library as a cassette, and each
icon has the album or library title. When you select
this command, a check mark (✓ ) is displayed before
the command name.
■Detailed View
Lists albums or libraries as a table.
The fields in the table contain a representative image,
title, attribute (album or library), recorded date, and
comments. When you select this command, a check
mark (t<) is displayed before the command name.
■By Name
Arranges albums and-libraries to display by name.
Titles are sorted in alphabetical order. When you
select this command, a check mark (✓ ) is displayed
before the command name.
■By Recorded Date
Arranges albums and libraries by recorded date.
WTien you select this command, a check mark (✓ ) is
displayed before the command name.
■By Number
Arranges albums and libraries to display by number.
When you select this command, a check mark (✓ ) is
displayed before the command name.
Page 76

■Display All ^
Displays all albums and libraries in the DV Shelf
folder. When you select this command, a check mark
(t/) is displayed before the command name.
■Albums Only
Displays only albums in the DV Shelf folder. When
you select this command, a check mark (✓ ) is
displayed before the command name.
■Libraries Only
Displays only libraries in the DV Shelf folder. When
you select this command, a check mark (✓ ) is
displayed before the command name.
■Linked Libraries Only
Displays only libraries which are linked to the cassette
tape in the DV equipment. When you select this
command, a check mark (✓ ) is displayed before the
command name.
Window menu
■Show/Hide Preview Window
Show/Hide the preview window.
Note on "Linked
Libraries Only"
This command is
available only in
following conditions:
- The connected DV
equipment supports the
cassette memory and a
cassette with cassette
memory,
- The cassette tape has
been linked with
library.
■Sh6w/Hlde VCR Control Window
Show/Hide the VCR control window.
■Show/Hide Time Code Window
Show/Hide the Time code window.
■Show/Hide Tool Bar
Show/Hide the tool bar.
■Show/Hide Status Bar
Show/Hide the status bar.
Page 77

DV Shelf Window (continued)
■Previous Window
Displays the previous window.
■Next Window
Displays the next window.
■Arrange Windows'
Arranges the windows neatly on the Desktop.
■Close Viewers
Closes all viewer windows currently open.
■DV Shelf
Displays the DV Shelf window on top.
Page 78

Album/Library
Window
File menu
■New
Creates a new album or library.
■Open
Opens an album or library.
Note on rescanning
images
If you added or deleted
images in the album or
library with the DV
software, you do not need
to use this command. Use
this command when you
copy or move image files
on the Macintosh
desktop.
Notes on importing
images
• You can convert only
those files whose size is
640 X 480 (DVBK-2000)
or 768 X 576 (DVBK2000E) pixels (normal)
or 852 X 480 (DVBK-
2000) or 1024 X 576
(DVBK-2000E) pixels
(wide).
• You can import PICT or
JPEG image files of 720
X 480 (DVBK-2000) or
720
X 576 (DVBK-
2000E) pixels (normal,
DV format original
size), but the images in
those files are reduced
horizontally by 8 / 9
(DVBK-2000) or
expanded horizontally
by 16/15 (DVBK2000E) times because
the files are converted
without changing the
aspect ratio.
For details, see "Technical
information" in the
operating instructions.
■Close
Closes the current album or library window.
■Rescan
Rescans the image files in the current album or library
to update album or library file. It is convenient to
refresh the album/library windows after copying the
DV image files from the external drives.
■ Import (for Album window only)
Adds PICT or JPEG files to the existing album after
converting those file formats to DV format.
Select the image file to convert in the dialog box and
click "Open".
■Album/Library Information
Displays information for the current album or library.
■Rename Album/Library
Renames the htle of the current album or library.
■Delete Album/Library
Deletes the current album or library.
■Page Setup
Sets up print page.
■Print Album/Library
Prints an album and library.
■Preferences
See Preferences in the DV Shelf window. (Page 29)
■Quit
Quits the DV software
Page 79

Aibum/Library Window (continued)
Edit menu
■Cut
Cuts the selected text and saves it into the Clipboard.
■Copy
Copies the selected text to the Clipboard.
■Paste
Inserts the text in the Clipboard to the text box.
Select menu
■Select All
Selects all images.
■Select None
Deselects all images.
■Toggle Selection
Toggles the selection status between selected and
deselected.
■Select By Name
Selects an image by specifying its name.
Enter tlje text to select in the selection dialog box and
click "OK".
You can specify a condition for the selection whether
the title should match the specified text completely or
partially.
DV menu
■Single Capture
Captures a single image from the DV equipment.
■Start/Stop Auto Capture
Starts/Stops auto capturing images from the DV
equipment.
Page 80

■Start/Stop DV Transmission
Starts/Stops DV transmission.
In the DV transmission mode, the image that you
clicked is displayed in the preview window and
transmitted to the DV equipment every time you click
an image.
When you select "Start DV Slide Show" in this mode,
you can set in the DV slide transmission mode.
Select "Stop DV Transmission" to return to the normal
mode.
■Start/Stop DV Slide Show
Starts/Stops DV slide transmission.
In the DV slide transmission mode, the images in the
album or library window are transmitted as a slide
show to the DV equipment.
In this mode;
• Selecting "Stop DV Slide Show" cancels the DV slide
transmission mode and sets in the DV transmission
mode.
• Selecting "Stop DV Transmission" cancels both the
DV slide transmission mode and the DV
transmission mode.
■Search
Cue up where the selected image is recorded by
rewinding or fast-forwarding the tape in the DV
equipment.
Note on the DV
transmission mode
Recording does not
automatically start when
you start the DV
transmission mode.
You cannot operate the
DV equipment for
recording from the VCR
control window. Start
recording by operating
the DV equipment when
the images have started to
be transmitted.
■ Link (for Library window only)
Links the current library to the tape with cassette
memory in the DV equipment.
■ Unlink (for Library window only)
Unlinks the current library with the currently linked
tape.
Page 81

Album/Library Window (continued)
Image menu
■Decode
Decodes the selected image to display in the viewer
window.
You can view the image in the viewer window.
Double clicking an image does the same thing.
■Slide Show
Displays the selected images like a slide show.
To specify the interval to change the image, select
Decode in "Preferences" from the "File" menu.
■Export
Exports the selected images in PICT or JPEG format.
Specify the format and folder in the Export dialog box
and click "Save."
■Rotate CW
Rotates the image 90 degrees clockwise.
■Rotate CGA/
Rotates the image 90 degrees counterclockwise.
■Image Information
Displays detailed informahon about the selected
image, -r
You can edit the comments for the image in the
information display window.
Note on the slide show
Selecting this command
does not transmit images
to the DV equipment. To
transmit images, choose
Start/Stop DV Slide Show
from the DV menu.
■Rename Images
Renames the titles of the selected images at once.
All the titles are renamed with the specified name + 1-
5 digits numbers + suffix.
■Delete Images
Deletes the selected images.
Page 82

■Pick Title Image^
Picks the selected image as a representahve image for
an album or library. The picked image is displayed in
the information area of the album or library window
and in the DV Shelf window.
If no image is picked for an album or library, a blue
image is displayed. -
View menu
■Index View
Displays only images. When you select this
command, a check mark (✓ ) is displayed before the
command name.
■Normal View
Displays images normally.
Titles, time codes, and recorded date are displayed as
well as images. When you select this command, a
check mark (✓ ) is displayed before the command
name.
■Detailed. View
Displays images in detail. Titles, time codes, recorded
date and time, captured date and time, and comments
are displayed as well as images. When you select this
command, a check mark (✓ ) is displayed before the
command name.
■By Custom Order
Displays images in a user defined order. When you
select this command, a check mark (✓ ) is displayed
before the command name.
You can change the display order of images in this
mode by dragging them.
■By Name
Arranges the displayed images alphabetically. When
you select this command, a check mark (✓ ) is
displayed before the command name.
Page 83

Album/Library Window (continued)
■By Time Code
Arranges the displayed images in the order of time
code. When you select this command, a check mark
(✓ ) is displayed before the command name.
■By Recorded Date
Arranges the displayed images in the order of
recorded date. When you select this command, a check
mark (✓ ) is displayed before the command name.
■By Captured Date
Arranges the displayed images in the order of
captured date. When you select this command, a check
mark (✓ ) is displayed before the command name.
Window menu
■Show/Hide Preview Window
Shoe/hide the preview window.
■Show/Hide VCR Control Window
Shoe/hide the VCR control window.
■Show/Hide Time Code Window
Shoe/hide the time code window.
■Show/Hide Tool Bar
Shoe/hide the tool bar.
■Previous Window
Displays the previous window.
■Next Window
Displays the next window.
■Arrange Windows
Arranges the windows neatly on the desktop.
■Close Viewers
Closes all viewer windows currently open.
■DV Shelf
Displays the DV Shelf window on top.
Page 84

Viewer Window
File menu
■New
Creates a new album or library.
■Open
Opens an album or library.
■Close
Closes the viewer window.
■Save As
Saves the achve image as a PICT or JPEG file.
The save dialog appears after selecting this command.
Specify the file type and click "Save."
You can select image quality when you select "JPEG."
■Save Selection
Saves the selected portion of the image as a PICT file.
Selecting this command displays the save dialog.
Specify the file name and folder and click "Save."
■Page Setup
Selects paper to print. Specify paper size, orientation,
and margins. Note that the setting option depends on
your printer.
■Print Image '
Prints the current image.
The image is printed at the magnification specified in
Page Setup regardless of the view size .
To start printing, click "OK" in the print dialog box.
■Preferences
See Preferences in the DV Shelf window. (Page 29)
■Quit
Quits the DV software
Page 85

Viewer Window (continued)
Edit menu
■Cut
Cuts the selected text and saves it into the Clipboard.
■Copy
Performs two functions:
• Copies the selected text and saves it into the
Clipboard.
• Copies the selected portion of the image to the
Clipboard.
■Paste
Inserts the text in the Clipboard to the text box.
Image menu
■Rotate CW
Rotates the image 90 degrees clockwise.
■Rotate CCW
Rotates the image 90 degrees counterclockwise.
■No Deinterface
Displays an image without interpolation.
■Adaptive Deinterlace
Compares the two field images comprising an image
to detect discrepancies caused by movement, then
synthesizes the two field images to even out the
differences.
This will preserve the overall image quality because
the static part of the image does not lose its quality.
■Field Deinterlace
Interpolates frame images by compensating with a
filed image. This will completely remove the noise,
but the image quality is lower than "Adaptive
Deinterlace" because field data is lost.
Page 86

View menu ^
■Zoom In
Magnifies the view of the active image. You can zoom
in from 50%, 100%, 200%, 300%, to 400% in this order.
■Zoom Out
Reduces the view of the active image. You can zoom
out from 400%, 300%, 200%, 100%, to 50% in this
order.
■50%
Displays the current image at half the actual size.
■100%
Displays the current image in its actual size.
■200%
Displays the current image at double the actual size.
■300%
Displays the current image at three times the actual
size.
■400%
Displays thé current image at four times the actual
size.
■Full Screen/Restore
Displays the enHre image by magnifying it to fit the
screen size, or displays the image at the previous size.
■Fit To Window
Adjusts the magnification so that the entire image fits
in the current window.
■Fit Window Size
Resizes the viewer window to fit the image.
Page 87

Viewer Window (continued)
Window menu
■Show/Hide Preview Window
Show/hide the preview window.
■Show/Hide VCR Control Window
Show/hide the VCR control window.
■Show/Hide Time Code Window
Show/hide the Time code window.
■Show/Hide Tool Bar
Show/hide the tool bar in the selected window.
■Previous Window
Switches the view to the previous window.
■Next Window
Switches the view to the next window.
■Arrange Windows
Arranges the windows neatly on the desktop.
■Close Viewers
Closes all viewer windows currently open.
■DV Shelf
Displays theOV Shelf window on top.
 Loading...