

Page 1

SONY.
Operating Instructions.
Manual de instrijcdones_
3-864-904-11
Digital Television
Receiver
DTR-HD1
01999 by Sony Corporation
Page 2

WARNING
To reduce the risk of fire or shock hazard, do not expose the Digital Television
Receiver to rain or moisture.
i pi«K OF accTMC SHOCK / I \
A
I I / * \
CAUToe TO Kcoucc THC «MK OF iifcmc SMOCK.
OO NOT KUOVE COVEK (OR SACKJ.
NO USER-SCMVICCAtLI FARTS INSOE.
This symbol is intended to alert the user to the presence of uninsulated
"dangerous voltage" within the product's enclosure that may be of sufficient
A
A
Note to the CATV Installer
This reminder is provided to call the CATV system installer's attention to Article
820-40 of the NEC that provides guidelines for proper grounding and, in
particular, specifies that the cable groimd shall be connected to the grounding
system of the building as close to the point of cable entry as practical.
ll^S^^OU’afe'cautioned that ^ny dianges or modifications not expressly approved in this manual could void
.. aiithnritutn nnarata thi5 0qujp(T)0f)(,
magnitude to constitute a risk of electric shock to persons.
This symbol is intended to alert the user to the presence of important operating
and maintenance (servicing) instructions in the literature accompanying the
appliance.
. 1 use this polarized plug with an
iî(KÎÎ^^l^f^p^p|:or other«^e^ unless the blades can be fully
Manufactured under license from Dolby Laboratories. "Dolby" and the double-D
symbol are trademarks of Dolby Laboratories. Confidential Unpublished Works.
©1992-1997 Dolby Laboratories, Inc. All rights reserved.
FCC NOTIFICATION
This equipment has been tested and found to comply with the limits for a Class B digital
device, pursuant to part 15 of the FCC Rules. These limits arc designed to provide reasonable
protection against harmful interference in a residential installation. This equipment
generates, uses and can radiate radio frequency energy and, if not installed and used in
accordance with the instructicms, may cause harmful interference to radio communications.
However, there is no guarantee that interference will not occur in a particular installation. If
tiiis equipment does cause harmful interference to radio or television reception, which can be
determined by turning the equipment off and on, the user is encouraged to try to correct the
interference by one or more of die following measures: Reorient or relocate the receiving
antenna; Increase the separation between the equipment and receiver; Connect the
equipment into an outlet on a circuit different from that to which the receiver is connected;
consult the dealer or an experienced radio/TV technician for help.
Page 3

Contents
Introduction
Frequently Asked Questions
................
Connecting the DTV Receiver
Connecting the DTV Receiver to a
Standardly
Connecting the DTV Receiver to a High
Definition TV
Cormecting a VCR for Recording DTV
ProgTcuns
Using the Control S Feature
...................................
...............................
..................................
..............
10
11
Using the DTV Receiver Menus
Using the Initial Setup
Using Program Guide to Select
Subchannels................................16
.......................
13
Additional Information
Front Panel Controls
5
Rear Panel Controls
Using the Remote Control
Programming the Remote Control.... 22
Troubleshooting.................................25
8
Specifications.....................................27
9
Index
......................................
..........................
...........................
.................
17
18
19
28
Page 4

Page 5

Introduction
Congratulations on your purchase of the Sony Digital
Television Receiver!
This manual describes everything you need to know to set up
your Sony Digital Television Receiver and provides a brief
overview of digital television.
Frequently Asked Questions
What is digital TV (DTV)?
Digital television (or "DTV") refers to the new over-the-air
television broadcast standards adopted by the Federal
Communications Commission in 1996.
There eire six formats in the ATSC DTV standard that are
described as "High Definition Television." The remaining 12
video formats are described as "Standard Definition
Television."
Although the technical aspects of these standards are
transparent to television viewers, the benefits are as dramatic
as those experienced when digital music on compact disk was
introduced — probably even more so.
Your Sony DTV Receiver is capable of receiving all 18 formats
of digital TV formats, including high-definition.
What are the benefits of DTV?
For the television viewer, digital TV represents one of the most
significant advances in television since color television
replaced black and white. Here are just a few of the benefits:
• Dramatically superior picture quality, with up to six times
the picture detail of today's analog television.
• Multichannel digital sound, including Dolby® Digital
sound.
Page 6

Digital Television Receiver
• Mdescreen. If you ovm a High Definition monitor or a Rear
Projection monitor DTV can receive the same type of wide
screen presentation as you see in movie theaters.
Do I need a special antenna to receive digital channels?
No. Initially, digital television will arrive through a standard,
over-the-air VHF/UHF antenna, which means you can receive
digital broadcasts using the same terrestrial ("rooftop") antenna
you currently use to receive conventional programming. If you
currently receive your VHF/UHF programming via cable, you
will need to install a VHF/UHF antenna in order to receive
digital programming.
When is digital broadcasting being introduced?
The transition from today's analog broadcasting system to
digital television will take time to complete. In the fall of 1998,
some networks will begin broadcasting digital programs.
How can I select digital channels?
Digital charmels áre indicated by the use of a decimal or "dot" in
the subchannel munber (for example, "2.1"). This number
appears when you press the CH -(-/-buttons or press the
DISPLAY button. To select a subcharmel directly, use the 0-9
buttons, • button, and the ENTER button.
For example, to select subchannel 2.1, press:
(!)+• + © + ENTER
You can also select digital channels using an on-screen Guide.
See page 16 for details.
Page 7
Connecting the DTV Receiver
This chapter includes illustrated instructions for connecting
the DTV Receiver. It also includes information on connecting
the following:
Topic
Connecting a Standard TV
Connecting a High Definition TV
Connecting a VCR for recording Digital Programs
Using the Control S Feature
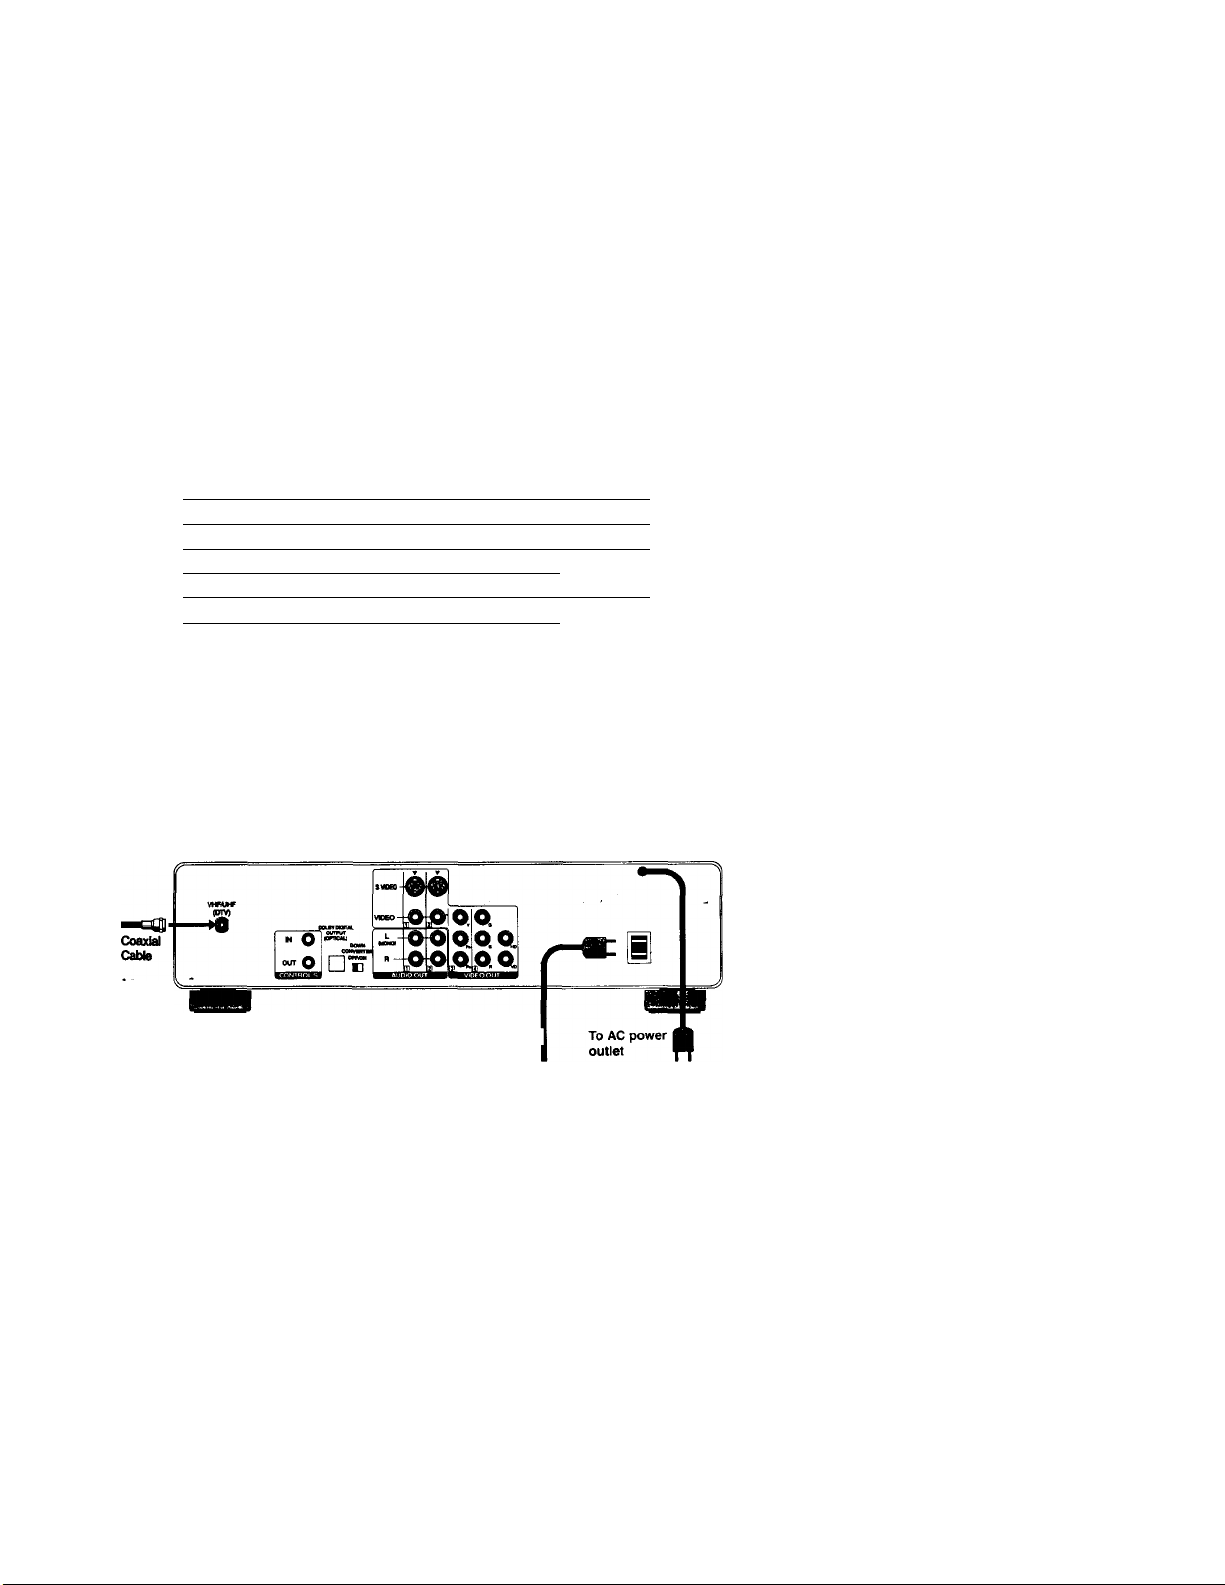
Basic Connection
You must make this basic connection before you can receive
DTV programs.
1 Cormect your VHF/UHF antenna to the DTV Receiver's
VHF/UHF (DTV) jack.
2 Plug the AC Power cord to a wall outlet after you have
finished cormecting your other components.
DTV Receiver t
Page
8
9
10
11
Optional
AC power
tor TV
You can plug your TV (or other component) into the OTV Receiver's AC
power outlet.
Page 8
Digital Television Receiver
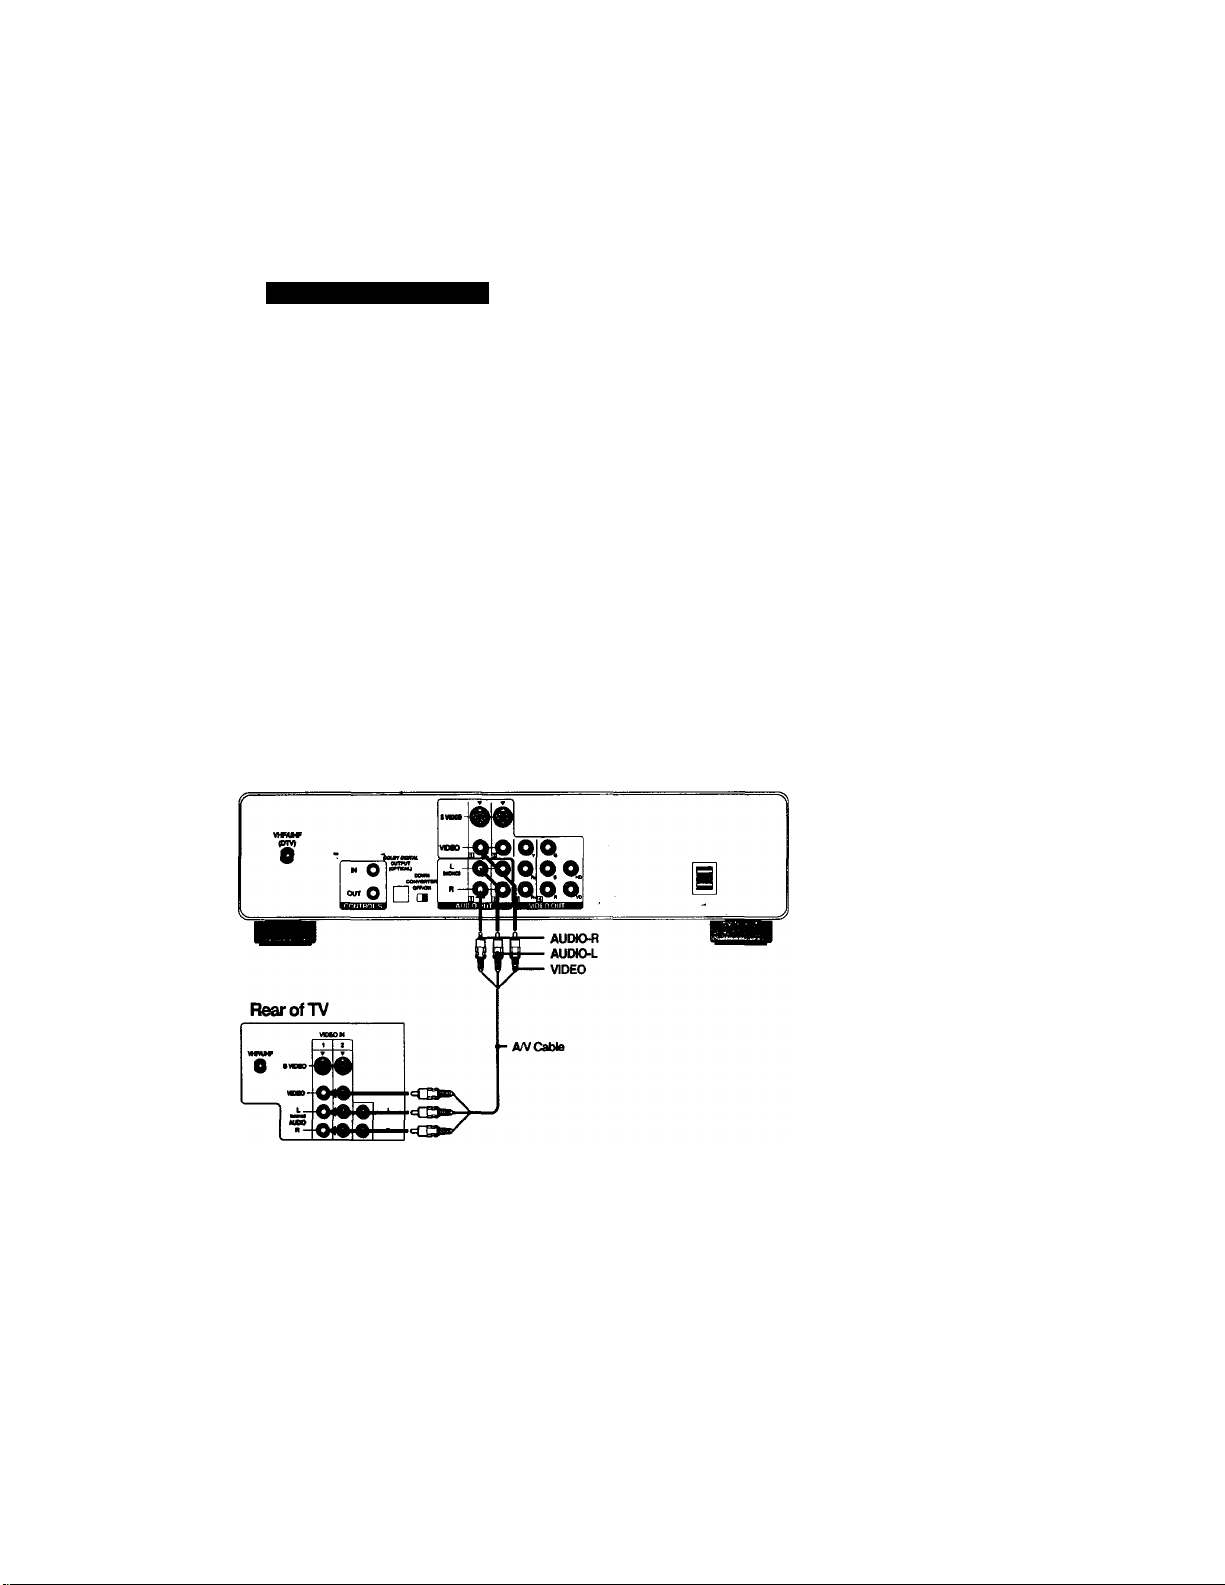
Connecting the DTV Receiver to a Standard TV
1 Complete the connection described on page 7.
2 Using an A/V cable, connect the DTV Receiver's AUDIO and
VIDEO OUT jacks to your TV's AUDIO and VIDEO IN jacks.
^ If you have an A/V receiver that can decode digital sound, connect the
Tv Receiver's Dolby Digital Output (optical) jack to the MM receiver's
DIGITAL SIGNAL (IN) jack with an optical cable (not supplied).
3 Make sure that the switch on the back panel of the DTV
Receiver is turned to "ON".
For optimum picture quality, use S Video instead of the yellow A/V
cable. S Video does not provide sound, your audio connectors must still
be connected.
Using component video jacks (Y, Pb, Pr) will give you superior video
quality, if your television is so equipped.
DTV Receiver
Page 9
Installing the DTV Receiver
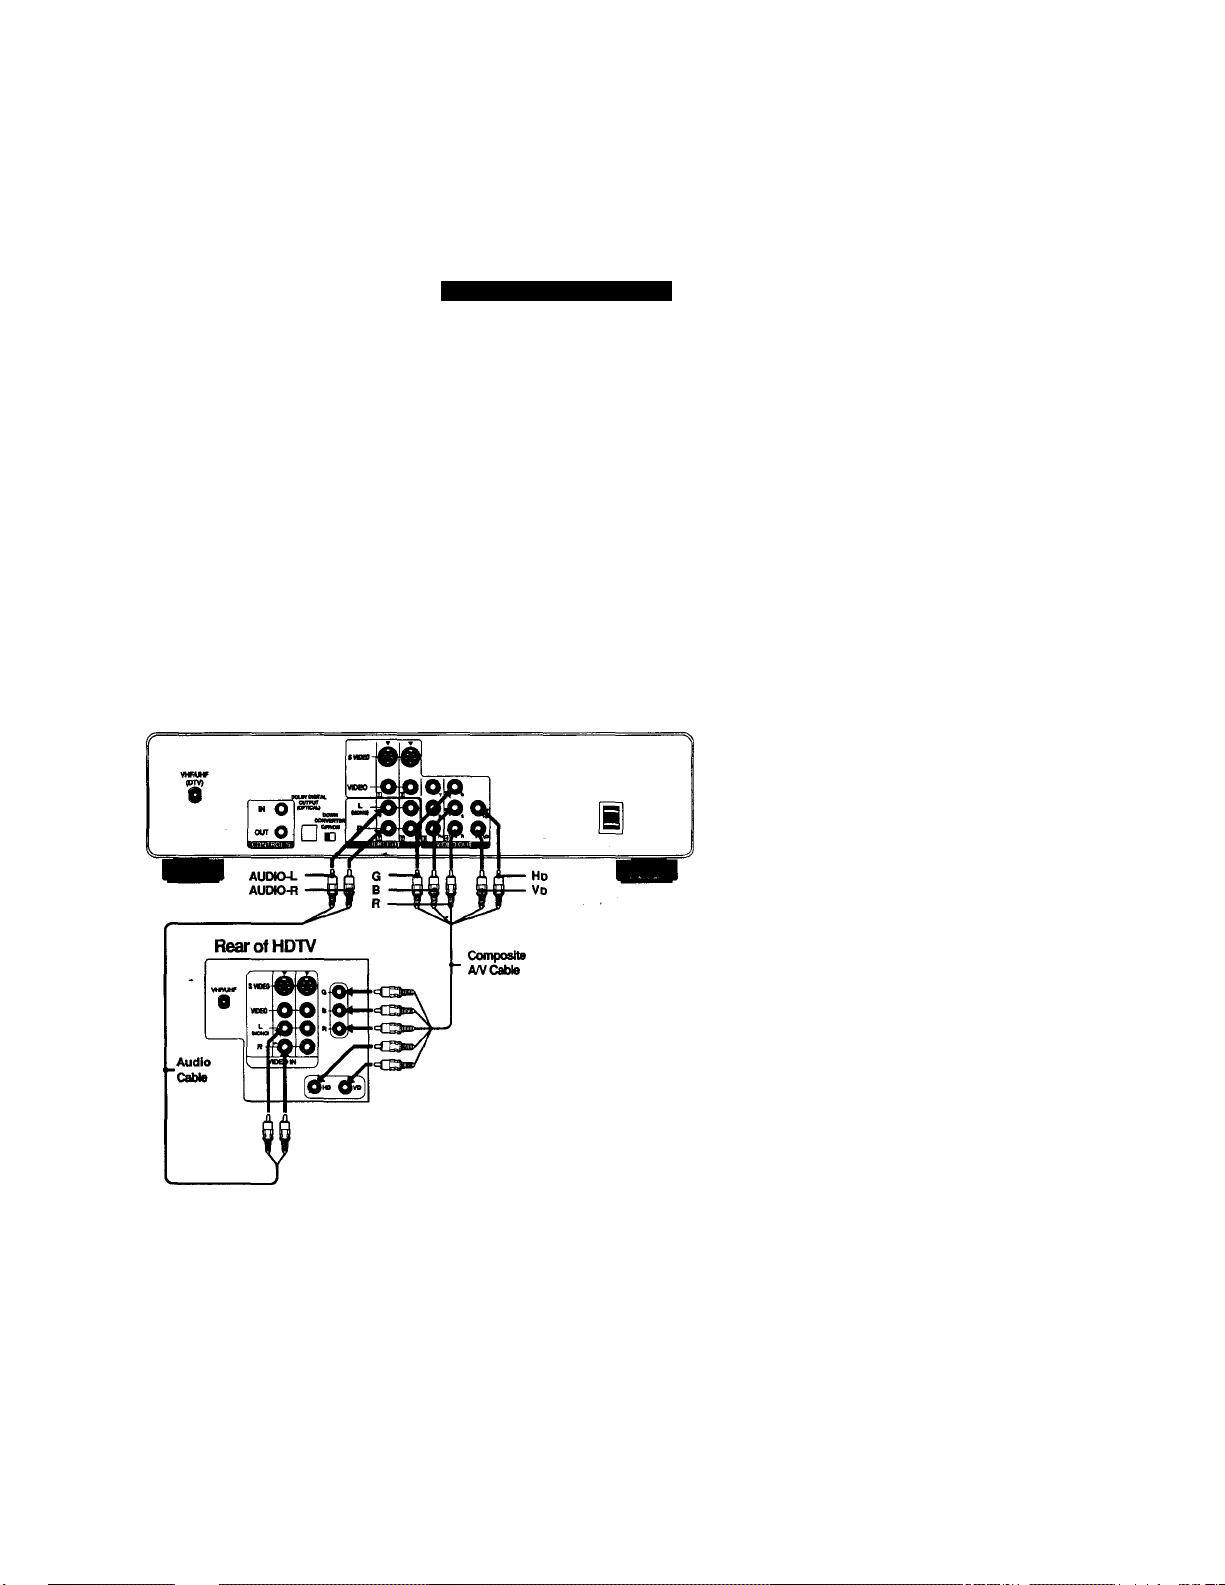
Connecting the DTV Receiver to a High
Definition TV
Complete the connection described on page 7.
1
Using a composite A/V cable, connect the DTV Receiver's
2
GBR, Hd and Vd jacks to matching jacks on the rear of the
television.
3 Using audio cables, connect the DTV Receiver's AUDIO
OUT to the TV's AUDIO IN jacks.
4 Make sure that the switch on the back panel of the DTV
Receiver is turned to "OFF".
If you have an A/V receiver that can decode digital sound, connect the
..‘^.W^Beceivsr'lDolbj^QigitalOutput (qptf^yadfr:$Q'tlw rW rec^
' ; ' DIGITAL SIGflAt(IN)^jadovvith art optical cable (not supplied).
DTV Receiver
Page 10
Digital Television Receiver
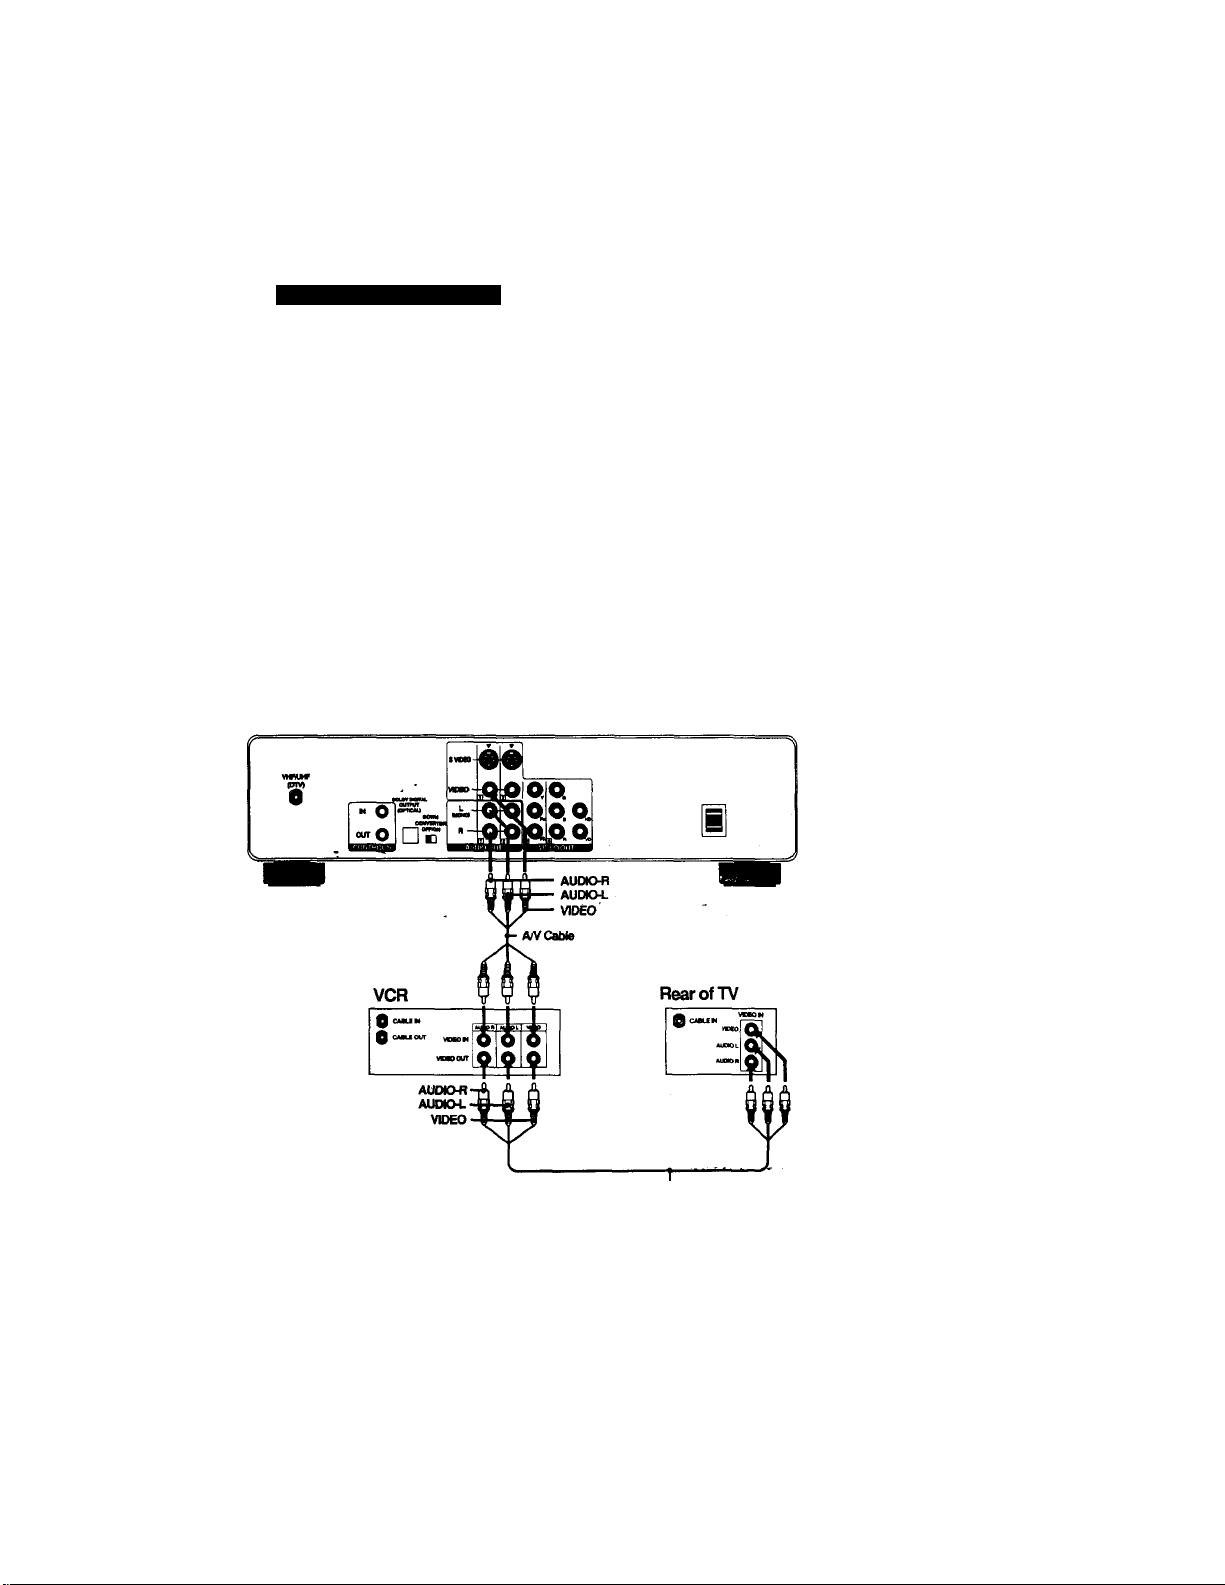
Connecting a VCR for Recording DTV
Programs
1 Complete the connection described on page 7.
2 Using an A/V cable, connect the VCR's A/V IN jacks to the
DTV Receiver's A/V OUT jacks.
3 Using cm A/V cable, connect the TV's A/V IN jacks to the
VCR's A/V OUT jacks.
ita
Uave^the Down Converter switch 'ON' if you are connected to a
-'standard T\l' sti.‘'" ' '' '
^ You should not turn the Down Converter switch to "OFF” while you are
are connected io a High Definition Television, you will need to
.. i/iwtch theiVJR Recotdincrfunction to “ON' in the Setup Menu.
DTV Receiver
10
Anr Cable
Page 11
Installing the DTV Receiver
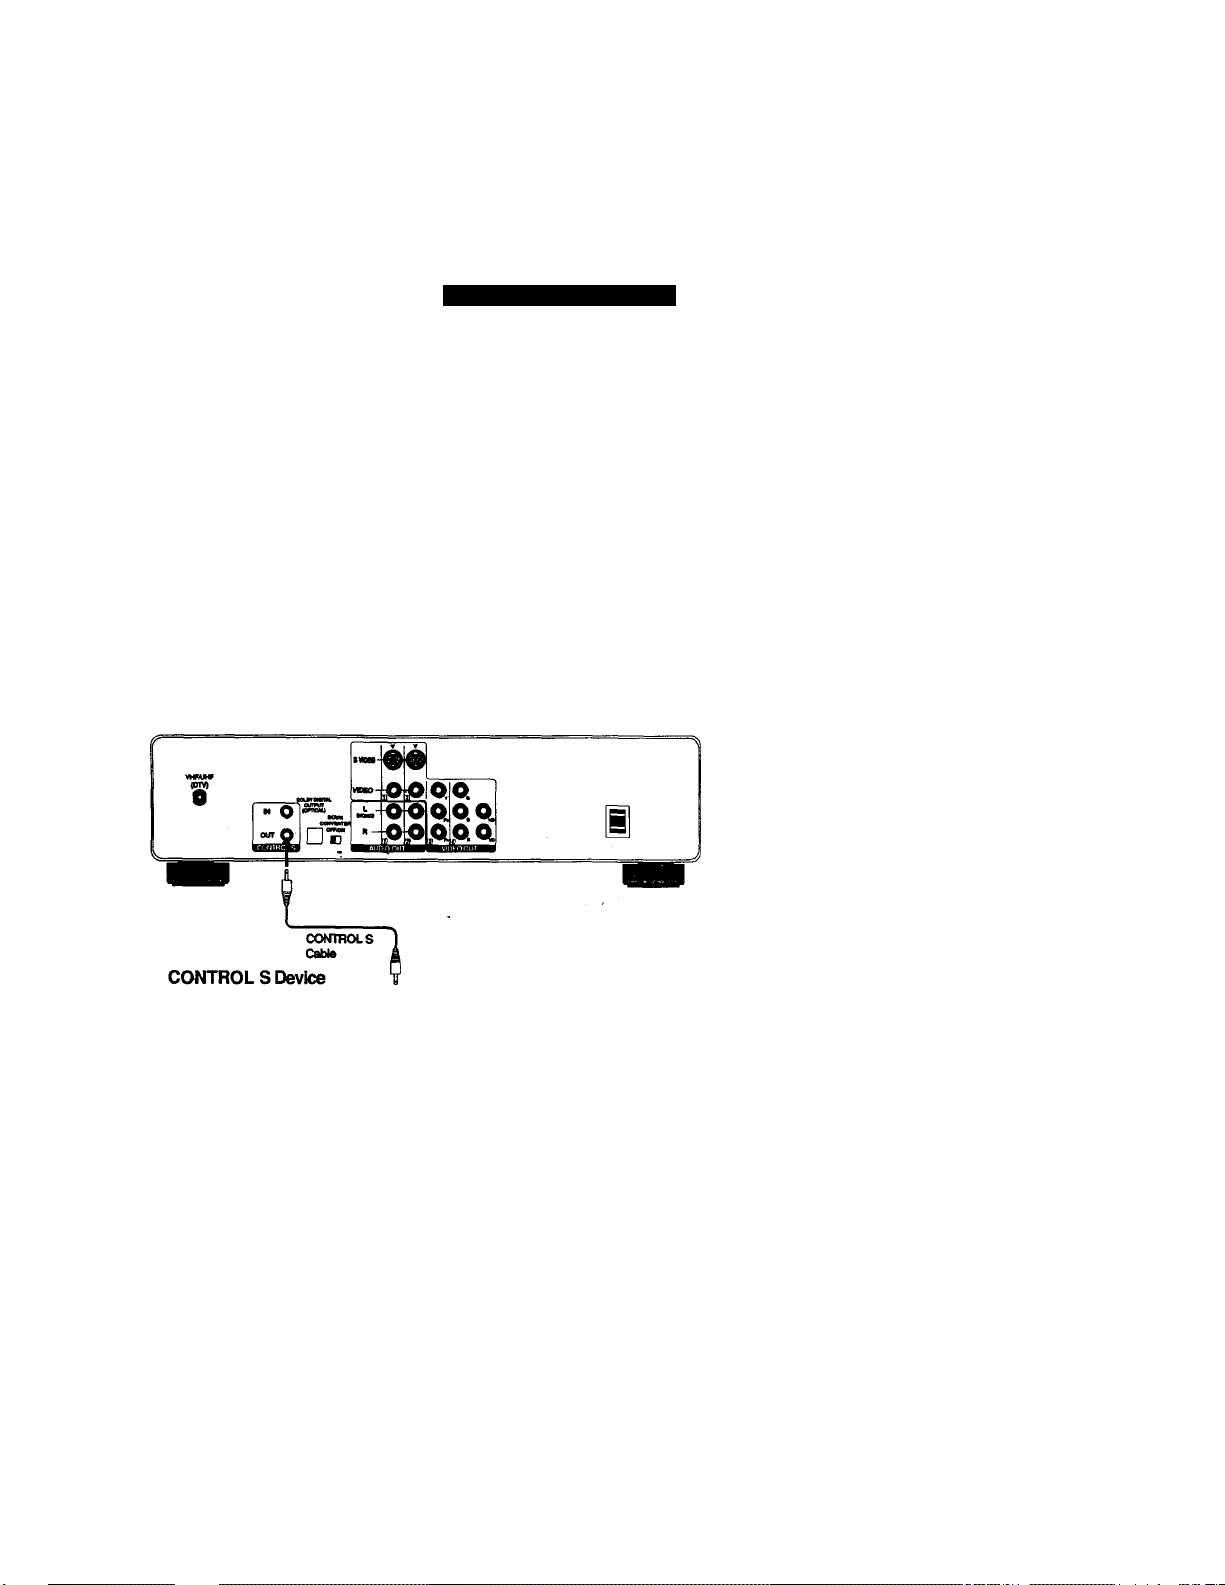
Using the Control S Feature
CONTROL S allows you to control your DTV Receiver and other
Sony components with one remote control.
To control your other Sony components with your DTV
Receiver's remote control, use the CONTROL S cable (not
supplied) to connect the component's CONTROL S IN jack to
the DTV Receiver's CONTROL S OLIT jack.
DTV Receiver
I oownioi.1
1i
Page 12

Page 13

Using the DTV Receiver Menus
Using the Initial Setup
Once you have finished making your connechons to the DTV
Receiver, you will need to setup your system before you can
receive digital prograixuning.
1 Press the remote control's POWER button for the DTV
Receiver and the TV.
2 Press the TV /VIDEO button until the video input for the
DTV Receiver appears on the screen.
3 The Welcome Screen will appear on your TV. Press MENU
to begin.
4 Select Auto Program and allow the system to program all
available DTV channels. During the auto prograimning
process, an "AUTO PROGRAMMING" message is
displayed on the front panel of the DTV Receiver as it
scans and presets available digital channels.
The Auto Program function must be allowed to finish in order to view
DTV programs.
^ Check the lime Zone setting under the Channel Setup Menu so that
■ypu can display Jhei^rrred time on youf .sgeet).
13
Page 14
Digital Television Receiver
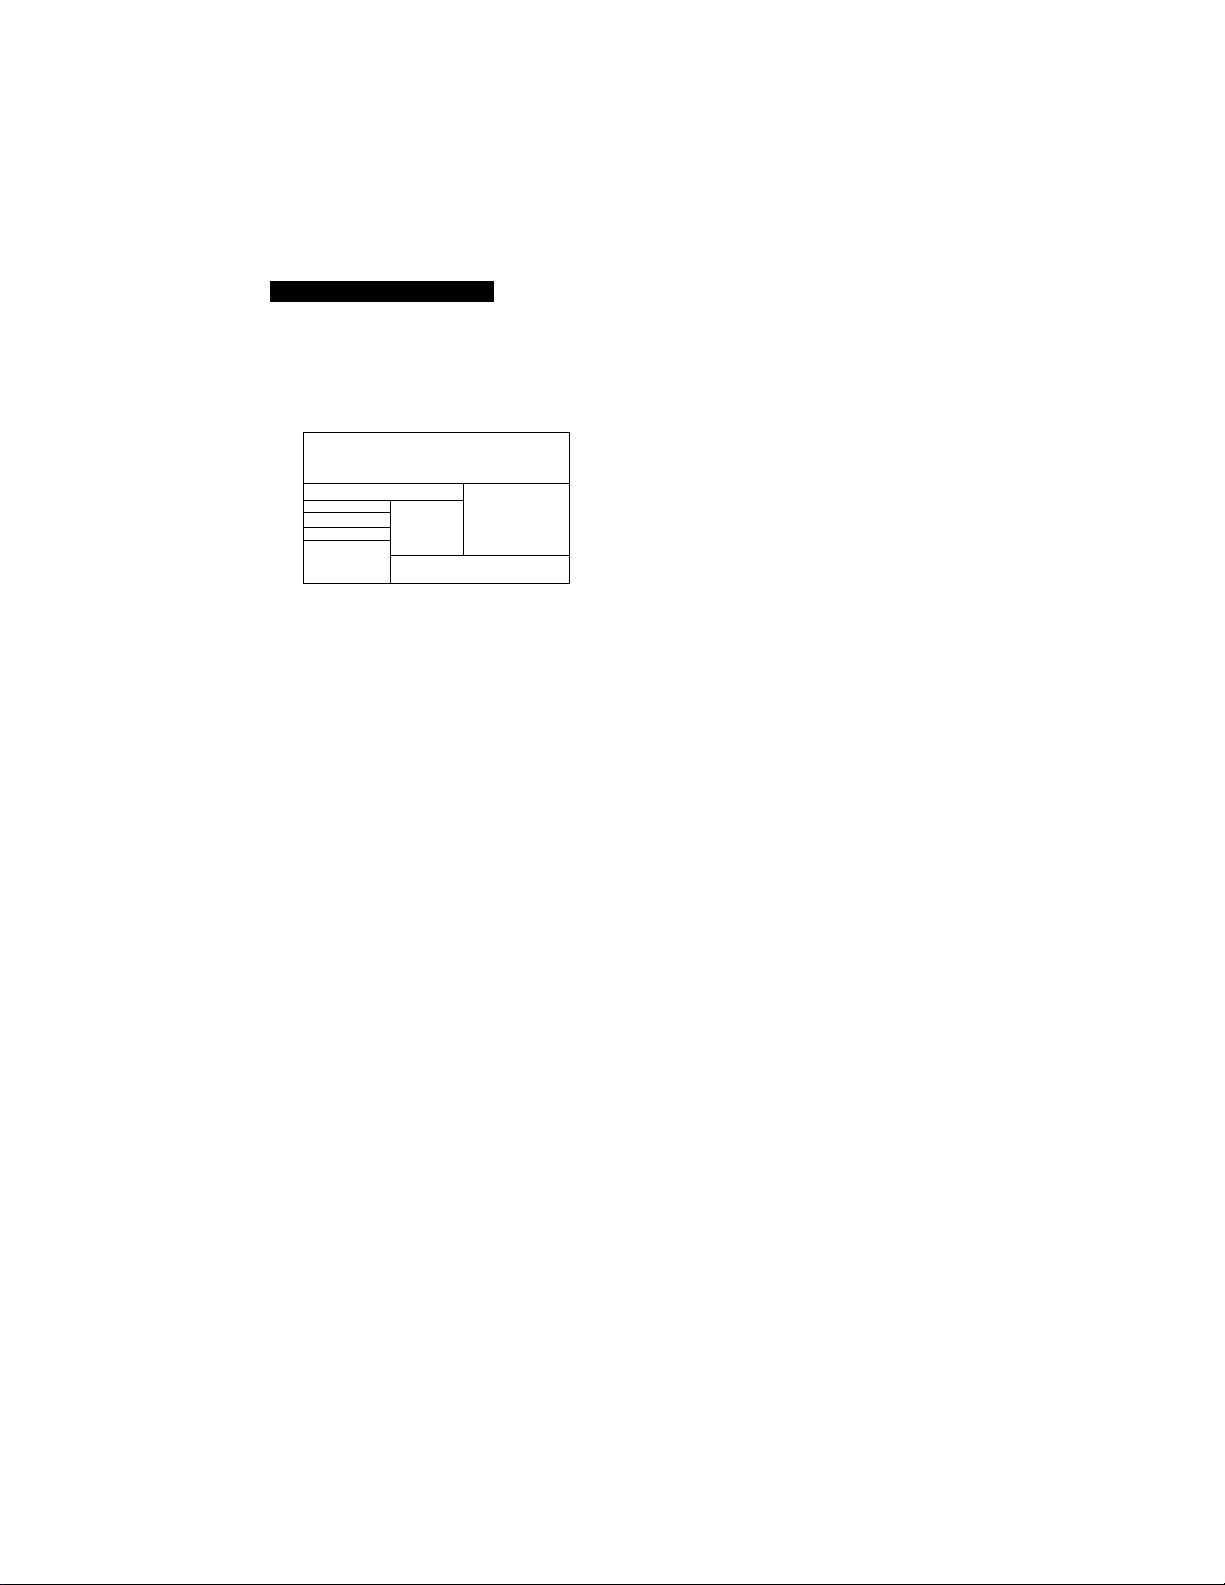
Using the Setup Menu
To select the Setup menu
1 Press MENU.
M tor
Build a channal li
^ ypur currant sattir
Chann«l SatuD |Auto Program
DTV Auto Add
Capiton VWerr
Mama & Logo
VTR Racording
Languaga
Skip/Add
Tima Zona
Selecting Setup Menu Options
The Setup Menu includes the foUowing options:
Option Description
Caption Allows you to select either English or Spaiush closed
Vision caption modes.
- Pressthe Display buttpi) until you see "CC ON' to display
.Cto^^ptioning^Me viewing programs.
Channel Allows you to Auto Program your digital channels. Also
Setup allows you to add digital channels as they become
. available using DTV Auto Add.
If you run Auto Program more than one time, you will clear your
current channel listing. Use the DTV Auto Add function to add
new digital channels without deietirig your current channel list.
DTV Auto Select to preset additional digital channels as they become
Add available (after you use Auto Program).
Channel
Skip/Add
Select to remove or add charmels from the channel list.
^ Skipped channels may only be accessed via the number keys.
Skipped channels will only appear in the Program Guide if you
igs.
VIDEO IN
☆
BACKGROUND
avalabiljty of tfi^. choices depends on the broadcaster.
Name & Select and follow the on-screen instructions if you would like
Logo to display the channel name and logo in the Program Gtiide.
^ The IND ('Independent') name/logo is assigned to every channel
Auto Programmed (or Auto Added). Please use the Name & Logo
function to assign the name/logo you prefer to each channel.
14
Page 15

Using the DTV Menus
Option Description
Time Zone Select to display the correct time on your screen.
Viewing Allows you to select from three video modes depending
Options ' on how you want to view your 16:9 HD broadcast,
for Select LETTERBOX to view programs in their proper aspect
Standard ratio. If you see a black border around all four sides of a
TV's pichue, select ZOOM to view the program full-screen.
FULL is a future feature related to horizontal compression.
Select FULL if your TV has this capability.
VTR
Recording
Allows you to record from the DTV Receiver to a VHS
video recorder.
for HDTV's
^ You must set the VCR Recording Menu to ON before recording a
digital program. This feature converts'the digital program to a
standard NTSC broadcast for recording purposes. Once you have
finished recording your digital program, you will need to turn this
feature OFF.
^ To avoid recording theiProgram Quide, Setup Menu or Display,
do not press the GUIDE, MENU prPJSPLAY button on the remote
control while recording a program.-
Language
Allows you to select English or Spanish for your Setup
Menu items.
Press theMena button to exit the Setup Menu.
15
Page 16
Digital Television Receiver
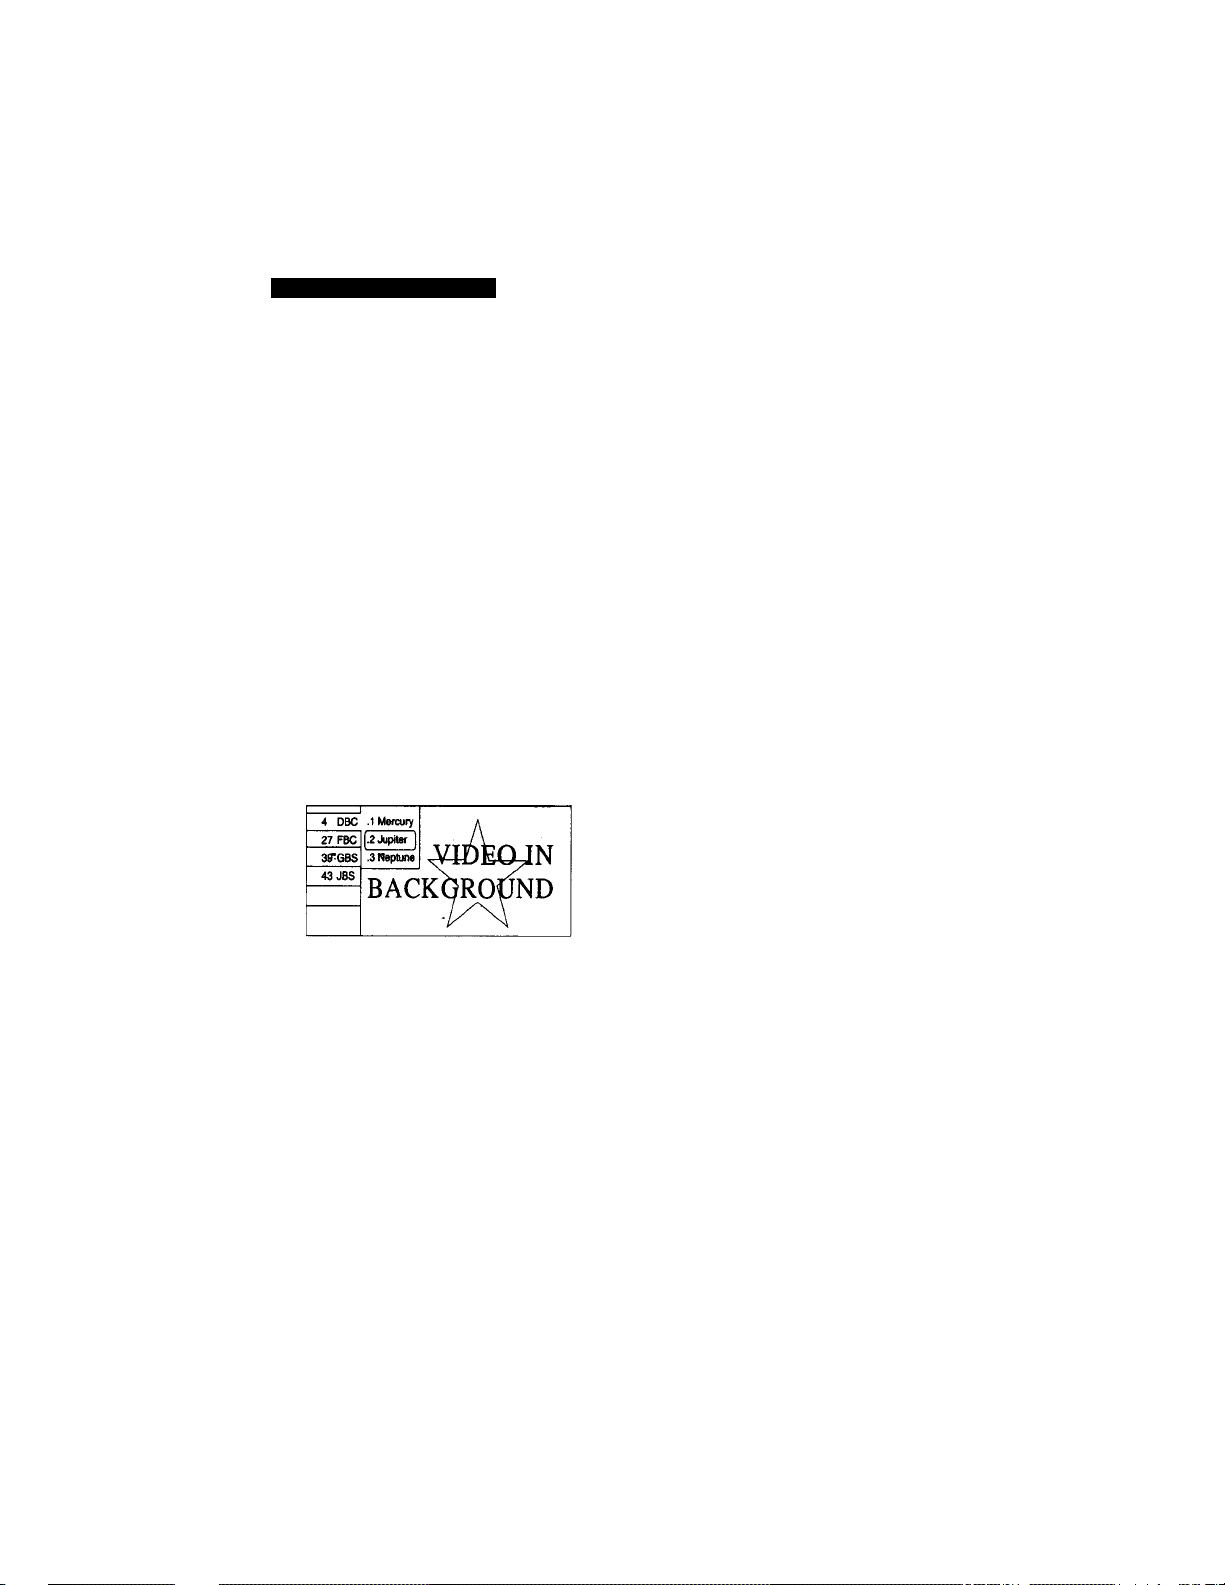
Using the Program Guide to Select Subchannels
The Program Guide lets you select subchannels from an on-screen
list. Subchannels are additional channels that are broadcast
simultaneously. For example, channel 4 (a main channel) might
include five subchannels (4.1,4.2,4.3,4.4,4.5) that are showing
different programs at the same time.
To select available channels using the guide
1
Use the remote control to time to a channel that includes
subchannels.
^.piannels that indude subchannels have a dedmal, followed by the number of
' < i-lhgsuhdian^^^ as ”4.1,” etc To check the channel number, aaivate the
2 Press GUIDE.
The Guide appears, with the currently selected program
showing in the background.
Jupiter 8:07
CH« 8:(XW:30 CCHD 16:97V-PGDLSV
SHOFITNM RobartdRacquelgotoTitanonwhat
was supposed to be Rob's honeymoon.
The Guide lists all
programs that are
currently showing on the
selected main channel
number (for example,
subchannels 4.1,4.2, etc).
If you select a channel that is not available for viewing, you will see this
message displayed on your TV screen: "No program".
Program information In the Program Guide is provided by the broadcasters.
This information includes: subchannel name, program title, program time and
description, start and end times, CC availability, v-chip rating, current rating.
As a result, the Program Guide may sometimes include only the channel
number without a program title, description, or program information icons.
To select a subchannel, press ♦ or ♦ on the remote control.
Press GUIDE to exit the Guide. ■ ^
16
Page 17
Additional Information
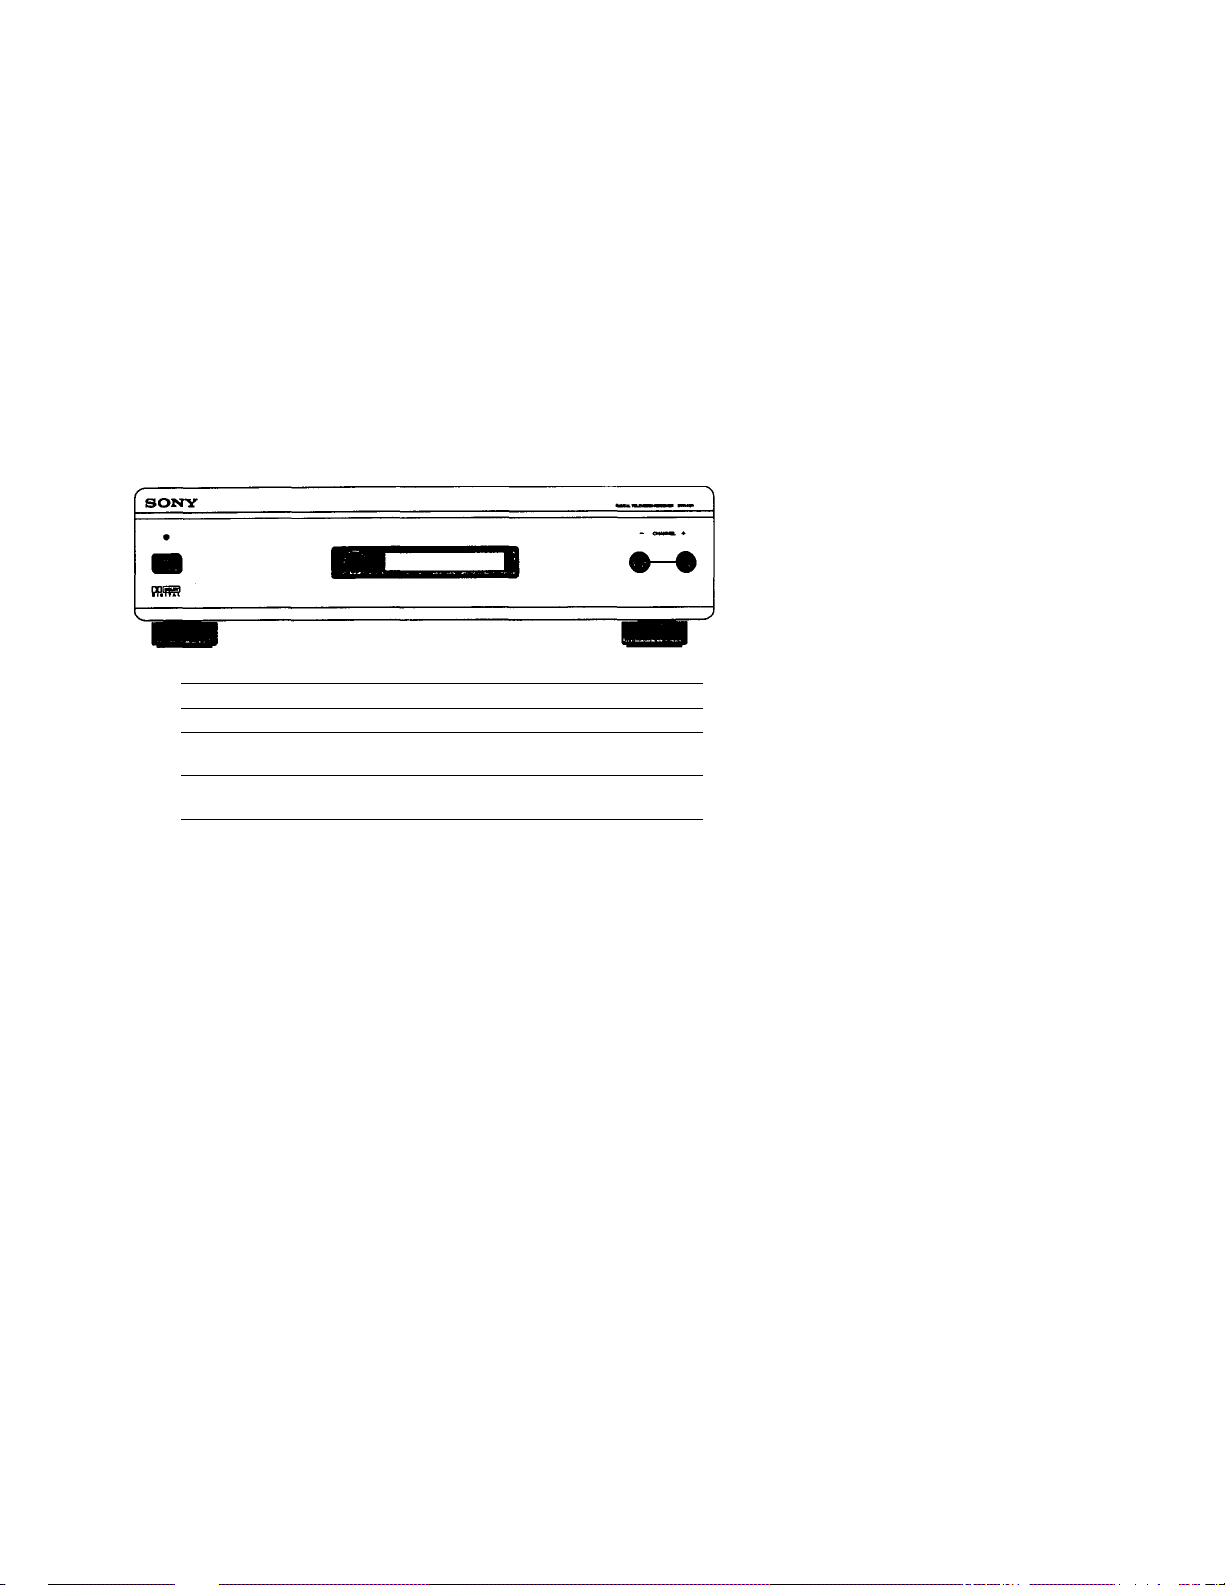
Front Panel Controls
POWER Indicator
POWER ON/OFF button
Front Panel display
Channel + and - buttons Presp to scan through the channels (+ up or
Indicates whether the DTV Receiver is on/off. ,
Press this button to turn the DTV on/off. 1
Displays the channel number and call letters
of the station you are currently watching.
- down).
17
Page 18

Digital Television Receiver
Rear Panel Controls
Connections and
Control Function
CONTROL'S IN/OUT
S-VIDEO (2)
VIDEO OUT (2)
GBR and Hd/Vd
Y, PBi Pr '
AUDIO (R) (L)
OUT (2)
Dolby Digital
OUTPUT(Optical)
AC OUT
Down Converter
ON/OFF
Description
Allows the DTV Receiver to receive (IN)
and send (OUT) remote control signals to
other Sony infrared-controlled audio or
video components.
Coimects to the S VIDEO jack of your
VCR or other Sony S VIDEO equipped
video component.
Cormects your DTV Receiver to your TV
or VCR's video input.
Connects your DTV Receiver to your
High Definition television.
■Cormects your DTV Receiver's
component video (Y, Pb, PR) to a standard
television or to a DVD player for quality
picture viewing.
Cormects your DTV Receiver to the right
and left audio inputs of your TV or VCR.
Connects your DTV Receiver to an A/V
receiver that has Digital AUDIO IN.
Connects your DTV Receiver to 120V AC
outlet.
ON: Converts high definition programs
for display on a standard TV.
OFF: Allows the DTV Receiver to display
high definition programs (as broadcast)
on an HD monitor.
Cable Type
Audio mono
or stereo
miniplug
S-Video
(4-pin mmi
DIN)
Video
(RCA-type)
Video
(Component
RGB Cable)
Component
video cable
Audio
(RCA-type)
Optical cable
AC
N/A
18
Page 19

Additional Information
Using the Remote Control
Inserting the batteries
Insert two size AA (R6) batteries (supplied) by matching the +
and - on the batteries to the diagram inside the battery
compartment.
^ Remove the batteries to avoid damage from possibie battery ieakage
whenever you anticipate that the remote control wiil not be used for an
extended period.
Handle the rerrote control with care. Avoid dropping it getting it wet or
pladng it in dired sunlight: near a heater, or inhere the humidity is high.
To begin using the remote, follow the directions below.
1 Select the component that you want to use with the
corresponding FUNCTION button.
The FUNCTION buttons flash to indicate which component the remote
control is set to o[^rate. .
2 Aim the remote control at the component.
3 Press the POWER button of the component to turn it on and
off.
To-control other functions of the component, see the table that
follows on the next page.
ГЙ1 Buttons described in the following table can operate video components other than
the DTV Receiver only if you programmed the remote control and the component
supports the function described. See page 22 for instructions on programming the
remote control.
19
Page 20

Digital Television Receiver
•Q6SCABLE TV
oeacABte tv otv
o o o
muting DISPIAY TV/VIDEO
JUMP -ALT6RNA
SOIKnf
f D{QITAL TV ]
1 RECEIVER I
Button
Description
MUTING Press to mute the sound. Press
again or press VOL + to restore
the sound.
DBS/CABLE Turns the DBS receiver or
(POWER)_____cable box on and off.
TV Turns the TV on and off. If a
(POWER) video input indication (e.g.,
VIDEO 1, VIDEO 2) appears,
press TV/VIDEO until a
channel number appears.
DBS/CABLE Activates the remote control
(FUNCTION) for use with a DBS receiver or
cable box.
TV (FUNCTION) Activates the remote control
for use with the DTV Receiver
and the TV.
VIDEO As more digital channels
(ALTERNATE) become available,
and broadcasters may provide
AUDIO additional audio and video
(ALTERNATE) mformation with a digital
program. For example, a
sporting event with various
camera angles or a movie
dubbed in multiple larjguages.
Pressing these buttons will
allow you to access these
alternate audio and video
selections when they become
available.
DISPLAY Each press scrolls through the
following indications:
Channel number, name and
logo and current time
i
Closed caption
i
Display off
20
Page 21

Additional Information
Button
ARROW BUnONS
4
♦
•
TVWIDEO
JUMP
Description
Press these buttons to navigate
through the Program Guide
and.the Setup Menu
Press to activate items in the
Setup Menu.
Press repeatedly to step
through available video
inputs: TV, VIDEO 1
through VIDEO 4.
Press to jump back and forth
between two chaimels.
0-9and ENTER Use for direct channel
selection. Press 0 - 9 to select a
channel (for example, to select
chaimel 10, press 1 and 0), the
channel changes after 2
seconds, or you can press
ENTER for immediate selection.
•
Use with 0-9 and ENTER
buttoirs to select subchannels
(for example, 2.1).
MENU Press to display the DTV
Setup Menu. For details, see
"Using the Setup Menu" on
page 14.
VOL+/- Press to adjust the volume.
CH+/- Press to scan through the
chaimels (+ up or - down).
GUIDE Press to display the Program
Guide. For details, see "Using
Program Guide to Select
Subchannels" on page 16.
21
Page 22

Digital Television Receiver
Programming the Remote Control
If you have video components other than a Sony brand that you
would like to control with the DTV Receiver's remote control,
use the following procedures to program the remote control.
^ Your component must have infrared (IR) remote control capability in order to be
used yvith the remote control.
1 Turn to "Programmable Codes" on page 24, and find the
three-digit code number for your component. If more than
one code number is listed, use the number listed first to
complete the following procedures.
Ha You'ihust perform step 3 within 10 seconds of step 2, or you must start
. again from step 2.
2 Press CODE SET.
must perform step 4 within 10 seconds of step 3, or you must start
l^ain from step 2. To cancel the operation, press the ENTER button.
3 Press the FONQION button for DBS/CABLE, or TV.
4 Enter the three-digit code number.
5 Press ENTER.
To Check if the Code Number Works
Use the following prbcedure to make sure the code you've
entered works:
1 Aim the DTV's remote control at the component and press
the POWER button that corresponds to that component.
2 For TVs and cable boxes: If the component responds, try the
CH+ and CH- buttons. If the component responds, you're
done.
22
Page 23

Additional Information
If the code doesn't work for your component:
□ Try progrartuning the remote control using the other
codes listed for your component.
□ If you cannot get your component to respond to the
DTV Receiver's remote control — even after trying all
the code numbers for your component — your
component may not be compatible with the DTV
Receiver's remote control. If this happens, you must use
your component's own remote control to operate it.
Tips
□ If more than one code number is listed, try entering them
one by one until you come to the correct code for your
component.
If you enter a new code niunber, the code number you
previously entered at that setting is erased.
In some rare cases, you may not be able to operate your
component with the supplied remote control. If this
happens, you must use your component's own remote
control to operate it.
Whenever you remove the batteries to replace them, for
example if too much time is taken, the code numbers may
revert to the factq^ setting and must be reset.
23
Page 24

Digital Television Receiver
Programmable Codes
TV Codes
Sony
Admiral (M. Ward)
ABC
Bell-& Howell
101
102,114,109 '
112
114,109,138
Panasonic 118,116,117,107
Philco 111, 118,109
Philips
Pilot 103
(M. Ward)
Broksonic 103,112
Craig
Croslex
122,123,120,121
111
Curtis Mathes 103,119,123
Daewoo 135,136,103
Daytron 113
Emerson 122,113,120,121,
Pioneer
Portland 103,108
Quasar no, 107
Radio Shack
RCA/Proscan
Samsung 126,112,113,103
Sanyo
123,103,115
Rsher 125
General Electric 102,118,103,107
Goldstar 103,113,112,130
Scott 123,112
Sharp
Signature 2000
(M.Ward)
Hitachi 131,113,103,132
JC Penney 103,102,130,107
JVC 128,129
KTV 133,113,103,123,
Sylvania
Symphonic 123,139
Tenika
Toshiba
134
LXI (Sears) 102,103, 111, 125,
Vidtech 131,103,112
119,112
Magnavox 111, 112,113,107
Mitsubishl/MGA
124,102,112 Zenith
Wards 113,103,115,112
NEC 103,112
Cable Box Codes
Hamlin/Regal
222,223,224,225,
Pioneer 214,215
228
Jerrold/G.I.
201,202,203,204,
205,206,207,208,
Scientific
Atlanta
218
Oak
227,228,229
Tocom 216, 217
Panasonic 219,220,221 Zenith
DBS (Satellite) Codes
Sony
801
RCA 802
24
111
137,118,119
102,112,124,123
102,103,104,105,
106,107,108
125
114,113,115
114,109
111, 112,108
109
119,114
108, no
209, 210, 211
212
Page 25

Troubleshooting
Additional Information
Problem
No picture
(screen not lit),
no sound
Remote control
does not operate
Good picture, no
sound
Cannot receive
upper channels
(UHF) when using
an antenna
Only snow and
noise appear on
the screen
Resolution
Make sure the power cord is plugged in.
Check to see if the TV /VIDEO setting is
correct: when watching TV, set to TV,
and when watching video tapes, set to
VIDEO 1,2,3 or 4.
Check antenna connection.
Check video cable connection.
Try another channel. It could be station
trouble.
Batteries could be weak. Replace the
batteries.
Press the DTV Receiver's power button
off, wait for a few seconds, and then
power on again.
Press TV (FUNCTION) when operating
your TV.
Make sure the DTV Receiver's power
cord is connected securely to the wall
outlet.
Keep the DTV Receiver at least 3-4 feet
away from fluorescent lights.
Check the orientation of the batteries.
Press MUTING so that "MUTING"
disappears from the screen.
Check audio cable connection.
Use DTV AUTO ADD in the Setup Menu to
add receivable channels that are not
presently in DTV Receiver's memory. ■
Check the antenna/cable cormections.
Make sure the channel is broadcasting
programs.
25
Page 26

Digital Television Receiver
Problem
Dotted lines or
stripes
Resolution
• Adjust the antenna.
• Keep the DTV Receiver away from
noise sotuces such as cars, neon signs.
or hair-dryers.
TV is fixed to one •
channei
Use DTV AUTO ADD in the Setup Menu to
add receivable channels that are not
presently in DTV memory.
Double images or
ghosts
Use a highly directional outdoor
antenna or a cable (when the problem is
caused by reflections from nearby
mountains or tall buildings).
Cannot operate • Press the DTV Receiver's Power button
Setup Menu or off and wait for a few seconds before
Program Guide turning it back on.
Cannot receive • Make sure that an analog terrestrial
digital channels antenna is coimected to the DTV
Receiver. You caimot receive digital
channels unless you connect an analog
terrestrial antenna. This is true even if
you normally receive your
programming through cable or satellite.
. , • Use DTV AUTO ADD in the Setup menu to
add receivable DTV channels that are
not presently in DTV memory.
Unable to select a
digital channei
Use DTV AUTO ADD in the Setup menu to
add receivable DTV channels that are
not presently in DTV memory.
Try using the Program Guide, number
keys, CH+/- or Jump.
No picture on a • Switch to a different digital channel,
digital channel • Check the video cable connection.
26
Page 27

Additional Information
Specifications
Power requirements
Number of inputs/outputs
Video
SVIDEO
Audio
Audio out
CONTROLS (IN/ 1
OUT)
Y,PB,PRforDVD
Y,PB,PRfor
Standardly^' PB: 0.7 Vp-p, 75 ohm
Power cortsiunption (W)
In use (Max.) 300W In standby 2W
Dimensions (W/H/D)
(mm) 430 (W) X 103 (H) X 300.5 (D)
(in.) 17 (W) X 4 3/4 (H) X 11 7/8 (D)
Mass (kg)
(lbs) 11
Television system
Channel Coverage
Supplied Accessories
Optional Accessories
120V, 60Hz
2 1 Vp-p, 75 ohms unbalanced, sync
negative
2 Y: 1 Vp-p, 75 ohms unbalanced, sync
negative
C: 0.286 Vp-p (Burst signal), 75 ohms
2 500 mltois (100% modulation).
Impedance: 47kilohms
2 More than 408 mVrms at the
maximum volume setting (variable)
More than 408 mVrms (fix)
Impedance (output): 2kilohms
1 Y: 1.0 Vp-p, 75 ohms, sync negative
PB: 0.7 Vp-p, 75 ohms
PR: 0.7 Vp-p, 75 ohms
fH: 15.734 kHz, fr: 59.94 Hz
1 Y: 1.0 Vp-p, 75 ohm, Tri level sync
• PR: 0.7 Vp-p, 75 ohm
fH: 33.75 kHz, fr: 60 Hz
5
American TV Standard, NTSC, ATSC
12 - 69 Main channels
1- 99 Subchannels
Remote control to come
Batteries (2) size AA (R6)
Connecting cables RK-74A, RK-G69HG, VMClOHG, VMC-720M, VMC-810/820S, YC-15V/30V
U/V mixer EAC-66, Component (RGB)
27
Page 28

Digital Television Receiver
Index
Auto Program 14,15
c
cable, presetting channels 14,15
CONTROL S12,18
D
digital channels
adding 15
minor channels 16
presetting 14,15
problems receiving 26
using the Guide 16
G
Guide
tising 16
I
IND15
M
minor channels 16
presetting channels 14,15
remote control
described 19-21
programming 22-23
s
specifications 27
U
UHF/VHF, presetting channelsl4,15
V
VCR
with cable, connecting 10
28
Page 29

Page 30

índice alfabético
Auto Programación 14,15
c
cable
programación de canales 14,15
canales
agregar 15
subcanales 16
problemas con la recepción 25
programación 14,15
liso de la Guia 16
control remoto
descripción 19 a 21
programación 22 y 23
CONTROL S 12,18
especificaciones 27
Guía, uso de la 16
IND16
Subcanales 16
U
UHF/VHF, selecion de canales 14,15
videocasetera, conectar, con cable 10
Printed in U.S.A.
Page 31

Indice
Introducción
Preguntas frecuentes
............................
Conexión del receptor de
televisión digital
Para conectar el receptor de televisión
digital con un televisor normal.... 8
Para conectar el receptor de televisión
digital con un televisor de alta
definición......................................9
Para conectar una videocasetera con el
fin de grabar programas
digitales
.......................................
Para usar la función Control S
............
Uso de los menús del receptor
de televisión digital
Para usar el menú de Preferencias.... 14
Para usar la Guía de Programas a fin de
seleccionar subcanales
.........'......
Información adicional
Controles en la parte delantera del
5
receptor.......................................17
Controles en la parte posterior del
receptor
......................................
Uso del control remoto
Programación del control remoto
Resolución de problemas
Especificaciones.................................27
índice alfabético
10
11
16"
......................
........
...................
....................
18
19
22
25
28
Page 32

Introducción
¡Reciba nuestras felicitaciones por su compra del receptor de
televisión digital Sony!
Este manual describe todo lo que necesita saber para instalar su
receptor de televisión digital Sony y explica brevemente lo que
es la televisión digital.
Preguntas frecuentes
¿Qué es la televisión digital?
Televisión digital se refiere a las nuevas normas para
transmisiones televisivas adoptadas por la Comisión Federal de
Comianicadones de EE.UU. en 1996.
Seis de los formatos que abarca la norma ATSC DTV se refieren a
la televisión de alta defiitídón. Los 12 formatos de video
restantes se refieren a la televisión de definidón normal.
Aun cuando los asp>ectos técnicos de estas normas pasan
desaperdbidos por el televidente, los benefidos de esta
tecnología son tan dramáticos como cuando apareció la música
digital en disco compado... probablemente aun más
impresionantes.
Su receptor Sony de televisión digital-puede redbir los 18
formatos de la televisión digital, incluyendo los de alta
definidón.
¿Cuáles son los beneficios de la televisión digital?
Para el televidente, la televisión digital representa uno de los
adelantos más significativos desde que la televisión a color
reemplazó a la de blanco y negro. He aquí sólo algunos de los
benefidos:
• Una calidad de imagen dramáticamente superior, con una
resolución hasta seis veces más detallada que la de la
televisión analógica actual.
Page 33

Receptor de televisión digital
Múltiples canales de sonido digital, incluyendo el soiüdo
Digital Dolby*.
Imagen de pantalla ancha. Si se cuenta con monitor de alta
definición o monitor de retroproyección, la televisión digital
recibirá el mismo tipo de imagen de pantalla ancha que se ve
en los cines.
¿Necesito antena especial para recibir la televisión digital?
No. Inicialmente, la televisión digital llegará a través de ima
antena normal de VHF/UHF, lo cual significa que podrá recibir
las transmisiones digitales con la misma antena terrestre (de
azotea) que emplea actualmente para captar programas
comunes y corrientes. Si actualmente recibe programas de
VHF/UHF mediante cable, tendrá que instalar una antena de
VHF/UHF para recibir los programas digitales.
¿Cuándo empezarán las transmisiones digitales?
Tardará algún tiempo la transición del sistema de transmisión
analógica actual a la televisión digital. Se espera que para el
otoño de 1998 algunas cadenas comiencen a transmitir
programas digitales.
¿Cómo podré seleccionar los canales digitales?
Los canales digitales se identifican mediante el uso de un punto
decimal en el número del subcanal (p.ej., "2.1"). Este número
aparecerá en la pantalla cuando se opriman las teclas CH+/- o
DISPLAY. Para seleccionar un subcanal directamente, utilice las
teclas 0 a 9, • y ENTER.
Por ejemplo, para seleccionar el subcanal 2.1, oprima:
©+•+© + ENTER
También podrá seleccionar los canales digitales utilizando la
Guía de Programas en pantalla. Para mayores detalles, consulte
la página 16.
Page 34

ADVERTENCIA
Para redudr el riesgo de incendio o descarga eléctrica, no exponga el receptor de
televisión digital a la lluvia ni a la humedad.
Este símbolo señala al usuano la presencia de tensión peligrosa sin aislamiento
en el intenor del aparato, de tal intensidad que podría presentar riesgo de
A
A
Nota para el técnico que instale el sistema de cable
Se le recuerda que el Artículo 820-40 del Código Eléctrico Nacional contiene
normas para la puesta a tierra y, en particular, dispone que la tierra del sistema de
cable debe conectarse con el sistema de puesta a tierra del edificio en el punto más
próximo que sea factible a la entrada del cable. -
descaiga eléctrica.
Este símbolo indica al usuario que el material impreso que acompaña a este
aparato contiene instrucciones importantes referentes al funcionamiento y
mantenimiento del producto.
i'.
Fabricado bajo licencia de Dolby Laboratories. "Dolby" y el símbolo de doble d
son marcas comerciales de Dolby Laboratories. Obras inéditas confidenciales.
01992-1997 Etolby Laboratories, Inc. Reservados todos los desechos.
NOTinCAClÓN EXIGIDA POR LA FCC
Este aparato ha sido debidamente probado, comprobándose que cumple con los
impuestos a dispositivos digitales Clase B de acuerdo con la Acción 15 de las normas
Comisión Federal de Comunicaciones (FCC) de EE.UU. Estos límites se establecieron para
ofrecer protección razonable contra interferencias perjudiciales en las instalaciones
residenciales. Este aparato genera, usa y puede emitir energía radioeléctnca. De no instalarse
y utilizaise dé acuerdo con las instruccianes correspondientes, podría producir interferencias
perjudiciales en las radiocomunicaciones. No obstante, no puede garantizarse que no se
produzcan estas interferencias en una instalación determinada. Si este aparato llega a
interferir en la recepción por radio o televisión, lo que podrá comprobarse encendirado y
apagaivlo el aparato, se recomienda al usuario intentar corregir la interferencia meante ^
o más de las siguientes medidas: cambie la orientación o ubicación de la antena receptora;
aumente la distanda que separa este aparato y el receptor afectado; enchufe el aparato en ^
toma de corriente de un dicuito distinto al que esté enchufado el receptor afectado; consulte
con el distribuidor o solíate los servidos de un técnico capacitado en radio y televisión.
astér^vi
ítiíl
Page 35

Receptor de televisión digital
Para conectar el receptor de televisión digital con un televisor normal
1 Efectúe la conexión descrita en la página 7.
Z Con un cable de audio y video, conecte las salidas AUDIO
OUT y VIDEO OUT del receptor de televisión digital a las
entradas AUDIO IN y VIDEO IN de su televisor.
Si tiene usted un receptor de audio y vídeo que descodifica el sonido
digital, conecte, con un cable óptico (no se suministra), la salida Dolby
Digital Output (optical) del receptor de televisión digital a la entrada
DIGITAL SIGNAL (IN) del receptor de audio y video.
3 Asegúrese que el interruptor en la parte posterior del receptor
de televisión digital se encuentre en ON (encendido).
^ Para una imagen óptima, utilice S-Video en vez del cable amarillo de
audio y video. S-Video no lleva sonido; deberán coneaarse por
separado los conectores de audio.
Sta Si su televisor cuenta con enchufes Y, Pb y Pr, utilícelos, ya que le
brindarán una.calidad de imagen superior.
Receptor de televisión digital
Page 36

Instalación del receptor de televisión digital
Para conectar el receptor de televisión digital con un televisor de alta definición
1 Efectúe la conexión descrita en la página 7.
2 Con un cable mixto de audio y video, conecte los enchufes
GBR, Hd y Vd del receptor de televisión digital con los
enchufes correspondientes en la parte posterior del televisor.
3 Con cables de audio, conecte las salidas AUDIO OUT del
receptor de televisión digital a las entradas AUDIO IN del
televisor.
4 Asegúrese que el interruptor en la parte posterior del
receptor de televisión digital se encuentre en OFF (apagado).
Si tiene usted un receptor de audio f video que descodifica el sonido
' >.. digital, conecte,.con un cable óptico (no sesuminbtra), la salida Dolby
; Digitpl Output(optlcal) del receptor de televisión digitál a la entrada
DIGITAL SIGNAL (IN) del receptor de audio y video.
Receptor de televisión digital
VWWP
(WV>
-
_ Cable de
ó
Farte posterior del
televisor de alta definición
audio
«
o '
1
lowO
AUDIO-L
AUDIOS
oinw
■mou
DOMI
nis 1
VBCO-l-A
-----------------------------
-
é
«
1
I
i
_______________^
Cable mixto de
audio y video
Page 37

Receptor de televisión digital
Para conectar una videocasetera con el fin de grabar programas digitales
1 Efectúe la conexión descrita en la página 7.
2 Con nn cable de audio y video, conecte las entradas A/V IN
de la videocasetera con las salidas A/V OUT del receptor de
televisión digital.
3 Con un cable de audio y video, conecte las entradas A/V IN
del televisor con las salidas A/V OUT de la videocasetera.
^ Deje prendido (en ON) el interruptor del convertidor reductor (Down
■Converter switch) si está conectado un televisor normal.
Ä) No se debe apagar (poner en OFF) el interruptor del convertidor
r reductor mientras se usa la videocasetera.
está conectado un televisor de alta definición, será necesario
^r’cambiar a 'Activada' la fundón de Videograbación en el menú de
Preferendas.'
Receptor de televisión digital
10
Cable de audio y video
Page 38

Instalación del receptor de televisión digital
Para usar la función Control S
CONTROL S le permite accionar su receptor de televisión digital
y otros aparatos Sony con im solo control remoto.
Para accionar otros aparatos Sony con el control remoto del
receptor de televisión digital, use el cable CONTROL S para
conectar la entrada CONTROL S IN del otro aparato con la
salida CONTROL S OUT del receptor.
Receptor de televisión digital
11
Page 39

Page 40

Uso de los menús del receptor de
televisión digital
Para usar el menú de Preferencias Inicíales
Una vez conectado su receptor de televisión digital, necesitará
señalar sus preferencias antes de poder recibir programas
digitales.
1 Oprima en el control remoto la tecla de POWER (encendido)
correspondiente al receptor de televisión digital y al
televisor.
2 Oprima la tecla TV/VIDEO hasta que aparezca en pantalla
el nombre de la entrada de video a la que conectó su
receptor de televisión digital.
3 Aparecerá en el televisor la pantalla de bienvenida. Para
empezar, oprima MENU.
4 Seleccione Autoprogramación y deje que el sistema
programe todos los canales digitales disponibles. Durante
la autoprogramación, aparecerá en la pantalla del receptor
de televisión digital la palabra AUTO PROGRAMACIÓN
mientras busca y programa todos los canales digitales
disponibles.
Welcome to OTV!
Before you can view DTV programs,
run Auto Program in the Setup Menu.
Press
^ La autoprogramación tendrá que terminar antes de que se puedan ver
programas mediante el receptor de televisión digital.
^ Para poder ver la hora correcta en la pantalla, revise el huso horario
que está seleccionado en el menú de Programación de canales.
13
Page 41

Receptor de televisión digital
Para usar el menú de Preferencias
Para ver el menú de Preferencias
1 Oprima MENU.
Build a channel it
<1 3 your currant sattlr
Chennai Setup (Auto Program
Caotlon Vielen
VTR Recording
Lartouage
DTV Auto Add
Name & Logo
Skip/Add
Time Zorte
Selección de sus preferencias
El menú de Preferencias incluye las siguientes opciones:
Opción
Caption Le permite seleccionar inglés o español para los subtítulos.
Vision ÍÍJU Estastipdones dependen de la emisora.
(subtítulos) Oprima la teda DISPLAY para que aparezcan los subtítulos de
Programadón Le permite programar automáticamente los carrales digitales,
de canales Tanibién le permite, mediante Autoagregar, añadir nuevos
Autoagregar Seleccione Autoagregar para añadir nuevos canales
Channel
Skip/Add
Nombre y
logo
14
Descripción
. Caption Vision cuando vea los programas.
canales digitales a medida que inicien sus transmisiones. Vea
. la siguiente página para una explicación más detallada.
Ä1 Si utiliza Auto Programadón más de una vez, borrará su lista
digitales a medida que inicien sus transmisiones (después
de haber usado Auto Programación).
Use esta opción para quitar o agregar canales a su lista de
canales.
^ Los canales que no forman parte de la lista podrán seleccionarse
' Programas sólo mientras estén en pantalla.
Si quiere que aparezcan en la Guía de Programas el
nombre y el logotipo de un canal, use esta opción y siga la
instrucciones que verá en la pantalla.
^ La Autoprogramadón y Autoagregar se-alan como "INO." --
St for
*0*-
VIDEO IN
☆
BACKGROUND
actual de canales. Use la función Autoagregar para añadir
nuevos canales digitales.
sólo mediante las tedas numéricas y aparecerán en la Guía de
(independiente) cada canal que agregan a la lista de canales. Use
la fundón de Nombre y logo para dar a cada canal la designación
que usted prefiera.
Page 42

Uso de los mentis del receptor de televisión digital
Opción
Descripción
Imagen Le permite seleccionar entre dos modalidades de video,
ancha para según prefiera ver una transmisión de alta definición de
televisores 16 x 9. Seleccione NORMAL si quiere ver la imagen a
normales todo lo ancho.
Seleccione ACERCAMIENTO si quiere ver la parte central
de la imagen. Con ACERCAMIENTO, la imagen llena
completamente su pantalla de 4 x 3, de manera que no
aparezcan franjas negras arriba y abajo de la imagen.
Videograba- Le permite grabar en videocasetera VHS las señales
ción captadas por el receptor de televisión digital.
^ Ya que no existen videocaseteras digitales en la anualidad,
deberá activar la función de Videograbadón antes de grabar un
programa digital. Esta fundón convierte el programa digital en
una transmisión normal NTSC para.fines de la grabación. Una
vez tennínada la grabadón, tendrá que desactivar esta fundón
(sólo si tiene televisor de alta definición).
Ä) Para evitar grabar la Guía de Programas, el menú de Preferencias
o los subtítulos, no oprima las tedas GUIDE, MENU o DISPLAY en
el control remoto mientras grabe un programa.
Idioma Le permite seleccioirar inglés o español para todas las
indicaciones que aparecen en pantalla.
Para salir del menú de Preferencias, oprima el
botón MENU.-
15
Page 43

Receptor de televisión digital
Para usar la Guía de Programas a fin de seleccionar subcanales
La Guía de Programas le permite seleccionar entre los subcanales
señalados en la pantalla. Subcanales son canales adicionales de
programación que se transmiten simultáneamente. Por ejemplo, el
canal 4, im canal primario, podría incluir cinco subcanales (4.1,4.2,
4.3,4.4,4.5) que simultáneamente llevan programas.
Para usar la Guía con el fin de seleccionar los canales disponibles
1 Use el control remoto para sintonizar un canal que incluya
subcanales.
^ Et,númeró de un canal que induye sulxanales tiene un punto seguido por el
" número del subcanal, p.ej., "4.1 ",'etc. Para ver en pantalla el número de un
cañal, oprima DISPLAY,
2 Oprima GUIDE.
Aparece en pantalla la Guía, con el programa actual visible al
fondo.
Jupiter. ■ 8:07
☆
CH4Z 8:00-8:30 CX:HD16:9TV-PGDLSV
SHORTNM Rob and Racquel go to Titan on what
was supposed to be Rob's honeymoon.
La Guía indica todos los
programas que
actualmente se transmiten
mediante el canal
primario seleccionado
(p.ej., en los subcanales
4.1,4.2, etc.). '
Si se selecdona un canal que no puede verse, aparecerán en la pantalla del
televisor las palabras "No program*.
^ Los datos que aparecen en la Gula de Programas pueden incluir el nombre del
subcanal, el nombre, duradón, desalpdón y hora de inicio y fin y
dasificadones del programa y la disponibilidad de subtítulos. Ya que estos
datos son propordonados por las emisoras, a veces se indicará sólo el número
del canal, sin el título, descripdón u otros datos sobre el programa.
Para seleccionar un subcanal, oprima ♦ o ♦ en el control reWioto. ^
Para salir de la Guía, oprima GUIDE.
16
Page 44

Información adicional
Controles en la parte delantera del receptor
SONY
Indicador POWER
Teda POWER Oprima esta tecla para encender y apagar el pj
Pantalla del receptor
Teclas Channel + y - Oprima estas teclas para pasar por los canales
Indica si el receptor de televisión digital está
encendido o apagado.
receptor de televisión digital. Bi
Indica el número y siglas del canal
actualmente sintonizado.
en orden (+ para subir, - para bajar).
17
Page 45

Receptor de televisión digital
Controles en la parte posterior del receptor
Conexión
CONTROL'S IN/
OUT
S-VIDEO (2) Se conecta con el enchufe S VIDEO de su
VIDEO OUT (2)
i GBR y Ho/Vd
Y, PB, PR
AUDIO (der.) (Izq.)
OUT (2)
Dolby Digital
OUTPUT(Optical)
AC OUT
Down Converter
ON/OFF
Descripción
Permite que el receptor de televisión digital
reciba (IN) y transmita (OUT) señales de
control remoto a otros aparatos Sony de
audio o video accionados por luz infrarroja.
videocasetera o de otro aparato Sony que
cuente con S VIDEO.
Conecta el receptor de televisión digital con
la entrada de video de un televisor o
videocasetera.
Conecta el receptor de televisión digital con
im televisor de alta definición.
Conecta el aparato de video (Y, Pb, Pr)
enchufado al receptor de televisión digital
con un televisor normal o con un aparato
para discos de video digital (DVD).
Conecta el receptor de televisión digital con
las entradas derecha e izquierda a un
televisor o videocasetera.
Conecta el receptor de televisión digital con
un receptor de audio y video que cuente con
AUDIO IN digital.
Conecta el receptor de televisión digital con
una toma de corriente de 120V.
ON; Convierte los programas de alta
definición para que puedan verse en
televisor normal.
OFF: Permite que los programas de alta
definición captados por el receptor se vean
en monitor de alta definición.
Tipo de cable
Minienchufe
de audio
monofónico o
estereofónico
S-Video
(mini-DIN de
4 espigas)
Video (tipo
RCA)
Video (cable
RGB del
aparato)
Cable del
aparato de
video
Audio thpo
RCA)
Cable óptico
Corriente
alterna
N/C
18
Page 46

Información adicional
Uso del control remoto
Instalación de las pilas
Inserte dos pilas tamaño AA (R6) (se incluyen), asegurándose
que los signos + y - en las mismas concuerden con el diagrama
dentro del compartimiento de pilas.
Cuando el control remoto no vaya a utilizarse durante ún período prolongado,
6' retire las pilas pa^ evitar da-os provocados por fugas de electrólito.
^ Maneje el control remoto con cuidado. No lo deje caer n¡ permita que se
;, moje. No Ip coloque bajo la luz solar directa, cerca de un calentador o en
¡í: lugares húmedos
Para usar el control remoto, siga las instrucciones a continuación.
1 Utilizando la respectiva tecla de FUNCTION, seleccione el
aparato que quiere accionar mediante el control remoto.
Las tedas de FUNCTION centellean para señalar el aparato que el control
. remoto acdonará.
2 Apunte el control remoto hacia el aparato.
3 Oprima la tecla de POWER correspondiente al aparato, para
encender el aparato o apagarlo.
Para activar otras funciones del aparato, consulte la tabla que
aparece en la página siguiente.
^ Las teclas descritas en la tabla que aparece a continuación accionarán aparatos
distintos al receptor de televisión digital sólo si usted programa el control remoto
con ese fin y el aparato cuenta con la función de que se trate. Consulte la página
22 para instrucdones referentes a la programadón del control remoto.
19
Page 47

Receptor de televisión digital
Tecla Descripción
MUTING
m
POWER
0eS«A8LE TV OTV
o o o
MUTTNQ OtSPLPY TV/VI060
í%l
DBS/CABLE
(POWER)
TV
(POWER)
DBS/CABLE
(FUNQION)
SET MENU OUIOE
TV (FUNCTION) Activa el control remoto para su uso
VIDEO
(ALTERNATE)
y
AUDIO
(ALTERNATE)
DISPLAY Al oprimirse esta tecla
fDIGITALTVl
RECEtVER 1
FLECHAS
4
4 4
4
Oprima esta tecla para enmudecer el
televisor. Vuelva a oprinürla u
oprima VOL+ para reactivar el
sonido.
Enciende o apaga el receptor de
televisión digital o el descodifícador
del cable.
Enciende o apaga el televisor. Si
aparece en pantalla una indicación
de entrada de video (p.ej., VIDEO 1 o
VIDEO 2), oprima TV/VIDEO hasta
que aparezca un número de canal.
Activa el control remoto para su uso
con un receptor satelital o un
descodificador de cable.
con el receptor de televisión digital y
el televisor.
A medida que aumente el número
de canales digitales, es posible que
las emisoras ofrezcan más opciones
de video y audio con los programas
digitales, por ejemplo, un evento
deportivo con tomas desde varios
ángulos 0 una película con pistas
sonoras en varios idiomas. Estas
teclas le perrnitirán seleccionar
estas opciones cuando se ofrezcan.
sucesivamente:
Se verá el número, nombre y
logotipo del canal y la hora actual
i
Aparecerán los subtítulos
i
Se desactivará esta función
Oprima estas teclas para
desplazarse dentro de la Guía de
Programas y el menú de
Preferencias
20
Page 48

Información adicional
Teda
•
TV/VIDEO
JUMP
0o9y ENTER
•
Descripción
Oprima esta tecla para activar
hmdones en el menú de Preferencias.
Oprima repetidamente esta tecla
para pasar por los diversos tipos de
entrada de video: televisor y
videocasetera 1 a videocasetera 4.
Oprima esta tecla para alternar
rápidamente entre dos canales
selecdonados con la Guía de
Programas o con las teclas CH+/-.
E1 receptor de televisión digital
también alternará entre el canal
actual y el último canal seleccionado
con las teclas 0 a 9.
Use estas teclas para seleccionar
canales por sus números. Por
ejemplo, para selecdonar el canal 10,
oprima 1 y 0. El canal cambiará en 2
segundos, o se puede oprimir
ENTER para que el cambio sea
inmediato. |
• Use esta tecla, las de 0 a 9 y ENTER
para selecdonar subcaiuiles (p.ej., 2.1).
MENU Oprima esta tecla para ver el menú de
piefeiendas del receptor de televisión
digital. Para mayores detalles,
consulte "Para usar el menú de
Preferencias" en la página í4.
VOL +/- Oprima estas teclas para ajustar el
volumen.
CH+/- Oprima estas teclas para pasar por
los canales en orden (+ para subir, para bajar).
GUIDE Oprima esta tecla para ver la Guía de
Programas. Para mayores detalles,
consulte "Para usar la Guía de
Programas" en la página 16.
21
Page 49

Receptor de televisión digital
Programación del control remoto
Si usted quiere accionar un aparato de video de una marca que no sea
Sony con el control remoto del receptor de televisión digital, lleve a
cabo el siguiente procedimiento para programar el control remoto.
Para usarse con el control remoto, el aparato tiene que contar con un dispositivo
infrarrojo para control remoto.
1 Consulte "Códigos programables" en la página 24 y
encuentre el código de tres dígitos correspondiente a su
aparato. En caso de indicarse más de un código, use el
primer código para llevar a cabo el siguiente procedimiento.
ita El paso 3 tiene que efectuarse dentro de 10 segundos del paso 2. De lo
contrario, será necesario volver a empezar con el paso 2.
2 Oprima CODE SET (programar código).
ita El paso 4 tiene que efectuarse dentro de 30 segundos del paso 3. De lo
cotittario, será necesario volver a empezar con el paso 2. Para cancelar la
operadón, oprima la tecla ENTER.
3 Oprima la tecla de FUNCTION correspondiente a DBS/
CABLE o TV.
4 Teclee el código de tres dígitos.
5 Oprima ENTER.
Para confirmar que funciona el código
Lleve a cabo el siguiente procedimiento para verificar que
efectivamente funciona el código que programó;
1 Apunte el control remoto del receptor de televisión digital
hacia el aparato y oprima la tecla de POWER que
corresponde a ese aparato.
2 Para televisores y descodificadores de cable: Si el aparato
reacciona, oprima las teclas CH+ y CH-. Si el aparato
reacciona, el código está correctamente programado.
22
Page 50

Información adicional
3 Si el código no funciona con el aparato:
□ Programe el control remoto con otro código de los que
corresponden al aparato.
□ Si no logra que el aparato reaccione al control remoto del
receptor de televisión digital — aun habiendo probado
todos los códigos señalados para el aparato — es posible
que el aparato no esté compahble con el control remoto
del receptor de televisión digital. En ese caso, será
necesario utilizar el control remoto suministrado con el
aparato para accionarlo.
Sugerencias
□ De señalarse más de im código para determinado aparato,
prográmelos uno tras otro hasta dar con el que funcione con
el aparato.
□ Al programar un código nuevo, queda borrado el código
anteriormente programado.
□ En unos cuantos casos, es posible que no pueda accionar el
aparato con el control remoto suministrado con el receptor
de televisión digital. De ser así, utilice el control remoto del
aparato.
□ Si se tarda demasiado al quitar las pilas del control remoto,
por ejemplo para poner pilas nuevas, es posible que los
códigos programados cambien a los que originalmente se
programaron en la fábrica, en cuyo caso será necesario
volver a programarlos.
23
Page 51

Receptor de televisión digital
Códigos programables
Códigos para televisores
Sony
Admiral (M. Ward)
ABC
Bell'& Howell
(M. Ward)
Broksonic
Craig
Croslex 111
Curtis Mathes
Daewoo 135,136,103
Daytron 113
Emerson
Rsher 125
General Electric 102,118,103,107
Goldstar
Hitachi 131,113,103,132
JC Penney
JVC 128,129
iOV 133,113,103,123, Toshiba
LXI (Sears) 102,103, 111, 125,
Magnavox 111, 112,113,107 Wards
Mitsubishi/MGA 124,102,112 Zenith 108, no
NEC
Códigos para descodificadores de cable
Hamlin/Regal
Jerrold/G.l. 201,202,203,204,
Oak
Panasonic 219,220,221 Zenith 212
Códigos para DBS (Satellite)
Sony
101
102,114,109 '
112 Philips
114,109,138
103,112
122,123,120,121
103,119,123
122,113,120,121,
123,103,115
103,113,112,130
103,102,130,107
134
119,112
103,112
222,223,224,225,
228
205,206,207,208,
218
227,228,229 Tocom
801
Panasonic
Philco
Piiot
Pioneer
Portland
Quasar 110,107
Radio Shack
RCA/Proscan
Samsung
Sanyo 125
Scott 123,112
Sharp 114,113,115
Signature 2000
(M. Ward)
Syivania
Symphonic 123,139
Tenika 109
Vidtech 131,103,112
Pioneer 214,215
Scientific 209,210,211
Atianta
RCA
118,116,117,107
111, 118,109
111
103
137,118,119
103,108
102,112,124,123
102,103,104,105,
106,107,108
126,112,113,103
114,109
111, 112,108
119,114
113,103,115,112
216, 217
802
24
Page 52

Resolución de problemas
Información adicional
Problema
Ausencia de
imagen (pantalla
apagada) y de
sonido
El control remoto
no funciona
Buena imagen,
ausencia de sonido
-No se reciben los
canales superiores
(UHF) mediante la
antena
Aparece en pantalla
sólo nieve
acompañada de
ruido
Solución
Asegúrese de que el cable de corriente esté
bien enchufado.
Compruebe si el ajuste TV /VIDEO es el
correcto: TV para ver televisión y VIDEO 1,2,
3 ó 4 para ver videocassettes.
Verifique que la antena esté conectada
correctamente.
Verifique que el cable de video esté conectado
correctamente.
Pruebe otro canal. Es posible que el problema
se deba a la eiiüsora.
Las pilas podrían estar agotadas. Sustituyalas.
Apague la corriente del receptor, espere unos
segundos y vuelva a encenderla.
Oprima TV (FUNCTION) al utilizar el
televisor.
Compruebe que el cable de corriente del
receptor de televisión digital esté firmemente
enchufado en la tomacorriente de la pared.
Coloque el receptor de televisión a cuando menos
un metro de distancia de lámparas fluorescentes.
Compruebe que las pilas están colocadas
correctamente.
Oprima la tecla MUTING hasta que la palabra
"MUTING” desaparezca de la pantalla.
Verifique que el cable de audio esté conectado
correctamente.
Utilice AUTOAGREGAR DTVen el menú de
Preferencias para añadir canales que no se
encuentren en la memoria del receptor de
televisión digital.
Revise las conexiones de la antena y del
sistema de cable.
Compruebe si el canal transmite en este
momento.
25
Page 53

Receptor de televisión digital
Problema
Estrías o rayas
No se puede
cambiar el canal
Imágenes dobles o
‘fantasmas*
No puede utilizarse
el menú
Solución
Ajuste la antena.
Aleje el receptor de televisión de fuentes de
interferencia como automóviles, letreros de
neón o secadores de pelo.
Utilice AUTOAGREGAR DTV en el menú de
Preferencias para añadir canales que no se
encuentren en la memoria del receptor de
televisión digital.
Una antena exterior de gran diiectividad o
una conexión a sistema de cable puede
mejorar la imagen (si el problema se debe a
reflejos de montañas o edificios cercanos).
Apague la corriente del receptor, espere unos
segundos y vuelva a encenderla.
No se reciben • Confirme que una antena terrestre analógica
canales digitales se encuentra conectada con el receptor de
televisión digital. No pueden recibirse canales
digitales sin una antena terrestre analógica,
inclusive si se capta la demás programación
mediante cable o satélite.
• Utilice AUTOAGREGAR DTV en el menú
de Preferencias para a-adir canales que no se
encuentren en la memoria del receptor de
televisión digital.
No se puede
sintonizar un canal
digital
No aparece la •
imagen de un canal •
digital
Utilice AUTOAGREGAR DTV en el menú de
Preferencias para añadir canales que no se
encuentren en la memoria del receptor de
televisión digital.
Sintorúce el canal con la Guía de Programas,
las teclas numéricas, CH+/- o Jump.
Cambie a otro canal digital.
Verifique que el cable de video esté
conectado correctamente.
26
Page 54

Especificaciones
Información adicional
Alimentación
Número de entradas y salidas
Video 2
S VIDEO 2
Audio 2
Audio out 2
CONTROL S(Ent,/ 1
Sal.)
Y,PB,PRparaDVD 1
X PB, PR para televisor 1
normal
ConsumofW)
En uso (Máx.)
En espero
Dimerrsiones (an/al/prf)
(mm)
(m.)
Peso (kg)
(Ibs)
_____________
Sistema de televisión
Cobertura de canales
Accesorios suministrados
Accesorios opcionales
Üables conectores RK-74A, RK-G69HG, VMC-
120V, 60Hz
1 Vp-p, 75 ohms asimétrica,
sincronismo negativo
Y: 1 Vp-p, 75 asimétrica, sincronismo
negativo
C: 0.286 Vp-p(señal de sincronización
cromática), 75 ohms
500 mVrms tensión eficaz (modulación
al 100%), Impedancia: 47 kilohms
Más de 408mV tensión eficaz al
volumen máximo (variable)
Más de 408mV teirsión eficaz (fija)
Impedanda (salida): 2k kilohms
Y: 1.0 Vp-p, 75 ohms, sincronismo negativo
PB: 0.7 Vp-p, 75 ohms
PR: 0.7 Vpp, 75 ohms
fH: 15.734 kHz, fr: 59.94 Hz
Y: 1.0 Vp-p, 75 ohm, asimétrica
PB; 0.7 Vp-p, 75 ohm
PR; 0.7 Vp-p, 75 ohm
fH: 33.75 kHz, fr: 60 Hz
30OW
2W
430 (an) X 103 (al) x 300.5 (prf)
17 (an) X 4 3/4 (al) x 11 7/8 (prO
5
11
Normas de televisión americanas, NTSC, ATSC
Canales principales 12 a 69
Subcanales 1 a 99
Control remoto por entregarse
Pilas (2) tamaño AA (R6)
lOHG, VMC-720M, VMC-810/820S, YC-15V/30V
Mexclador U/V EAC-66, Componente (RGB)
27
 Loading...