

Page 1
Digital Audio
Tape Deck
4-231-062-11(1)
Operating Instructions
Mode d’emploi
Manual de instrucciones
Manual de Instruções
EN
F
ES
P
DTC-ZE700
1996 by Sony Corporation
Page 2
WARNING
To prevent fire or shock
hazard, do not expose the unit
to rain or moisture.
To avoid electrical shock, do
not open the cabinet. Refer
servicing to qualified
personnel only.
For the customers in the
United States
This symbol is intended to alert the user
to the presence of uninsulated
“dangerous voltage” within the
product’s
enclosure that may be of sufficient
magnitude to constitute a risk of electric
shock to persons.
This symbol is intended to alert the user
to the presence of important operating
and maintenance (servicing) instructions
in the literature accompanying the
appliance.
Owner’s Record
The model and serial numbers are
located on the rear of the unit.
Record the serial number in the space
provided below. Refer to them
whenever you call upon your Sony
dealer regarding this product.
INFORMATION
This equipment has been tested and
found to comply with the limits for a
Class B digital device, pursuant to
Part 15 of the FCC Rules.
These limits are designed to provide
reasonable protection against harmful
interference in a residential
installation. This equipment
generates, uses, and can radiate radio
frequency energy and, if not installed
and used in accordance with the
instructions, may cause harmful
interference to radio communications.
However, there is no guarantee that
interference will not occur in a
particular installation. If this
equipment does cause harmful
interference to radio or television
reception, which can be determined
by turning the equipment off and on,
the user is encouraged to try to
correct the interference by one or
more of the following measures:
— Reorient or relocate the receiving
antenna.
— Increase the separation between
the equipment and receiver.
— Connect the equipment into an
outlet on a circuit different from
that to which the receiver is
connected.
— Consult the dealer or an
experienced radio/TV technician
for help.
CAUTION
You are cautioned that any changes
or modifications not expressly
approved in this manual could void
your authority to operate this
equipment.
For the customers in
Canada
CAUTION
TO PREVENT ELECTRIC SHOCK,
DO NOT USE THIS POLARIZED AC
PLUG WITH AN EXTENSION
CORD, RECEPTACLE OR OTHER
OUTLET UNLESS THE BLADES
CAN BE FULLY INSERTED TO
PREVENT BLADE EXPOSURE.
Welcome!
Thank you for purchasing the Sony
Digital Audio Tape Deck. Before
operating the unit, please read this
manual thoroughly and retain it for
future reference.
The DTC-ZE700 has the following
features:
• High-density linear converters
A pulse A/D converter that produces
clear, elegant sound quality and
theoretically zero cross distortion, and
a pulse D/A converter with a newly
developed digital filter and a full
feedforward format that reduces
quantizing noise in the audible
bandwidth, thus expanding the range
of spatial expression.
• SBM (Super Bit Mapping) function
(see page 21)
• The Serial Copy Management System
(see page 22)
• Three sampling frequencies (48 kHz,
44.1 kHz, 32 kHz)
• Recording and playback in long-play
mode.
• Analog recording at 44.1 kHz
• Sub codes
Start IDs, program numbers and other
sub codes written to the tape allow
you to locate tracks quickly.
• See-through cassette compartment lid
A see-through cassette compartment
lid that allows you to view tape
operations during playback and
recording.
About This Manual
The instructions in this manual are for
DTC-ZE700.
Conventions
Instructions in this manual describe the
controls on the deck.
The following icons are used in this
manual:
Indicates useful information or
z
tips that make a task easier.
Model No. DTC-ZE700
Serial No.
EN
2
Indicates a task that requires use
Z
of the remote.
Page 3

TABLE OF CONTENTS
Getting Started
Unpacking 4
Hooking Up the System 4
Recording on a DAT 6
Playing a DAT 8
Recording Operations
Things You Should Know Before Recording 9
Adjusting the Recording Level for Analog Recording 10
Locating the End of the Recorded Portion (End Search) 10
Setting the Recording Mode 11
Using the SBM (Super Bit Mapping) Function 11
Inserting a Sound-Muted Section While Recording (Record Muting) 12
Recording Using a Timer (Timer Recording) 12
Playback Operations
About the Display 13
Locating a Track (AMS/Direct Access) 14
Playing Tracks Repeatedly (Repeat Play) 14
Playback Using a Timer (Timer Playing) 15
EN
Writing Sub Codes
About Sub Codes 15
Writing Start IDs During Recording 15
Writing Start IDs During Playback 16
Adjusting the Position of an Existing Start ID 17
Erasing Start IDs 17
Renumbering the Program Numbers Automatically (Renumbering) 18
Additional Information
Precautions 18
Cleaning 19
Display Messages 19
Troubleshooting 20
Specifications 21
SBM (Super Bit Mapping) Function 21
Guide to the Serial Copy Management System 22
Index 24
EN
3
Page 4
Getting Started
ANALOG
OUT
ANALOG
IN
DIGITAL
COAXIAL OUT
DIGITAL
OPTICAL OUT
DIGITAL
OPTICAL IN
IN
COAXIAL
IN IN OUT
OPTICAL
ANALOG IN/OUT
DIGITAL IN/OUT
LRL
R
OUT
Getting Started
Unpacking
Check that you have received the following supplied
items:
• Pin-plug audio connecting cords (2)
• Remote commander (remote) RM-D757 (1)
• Size-AA (R6) batteries (2)
• Operating instructions (1)
• Warranty card (Canadian model only) (1)
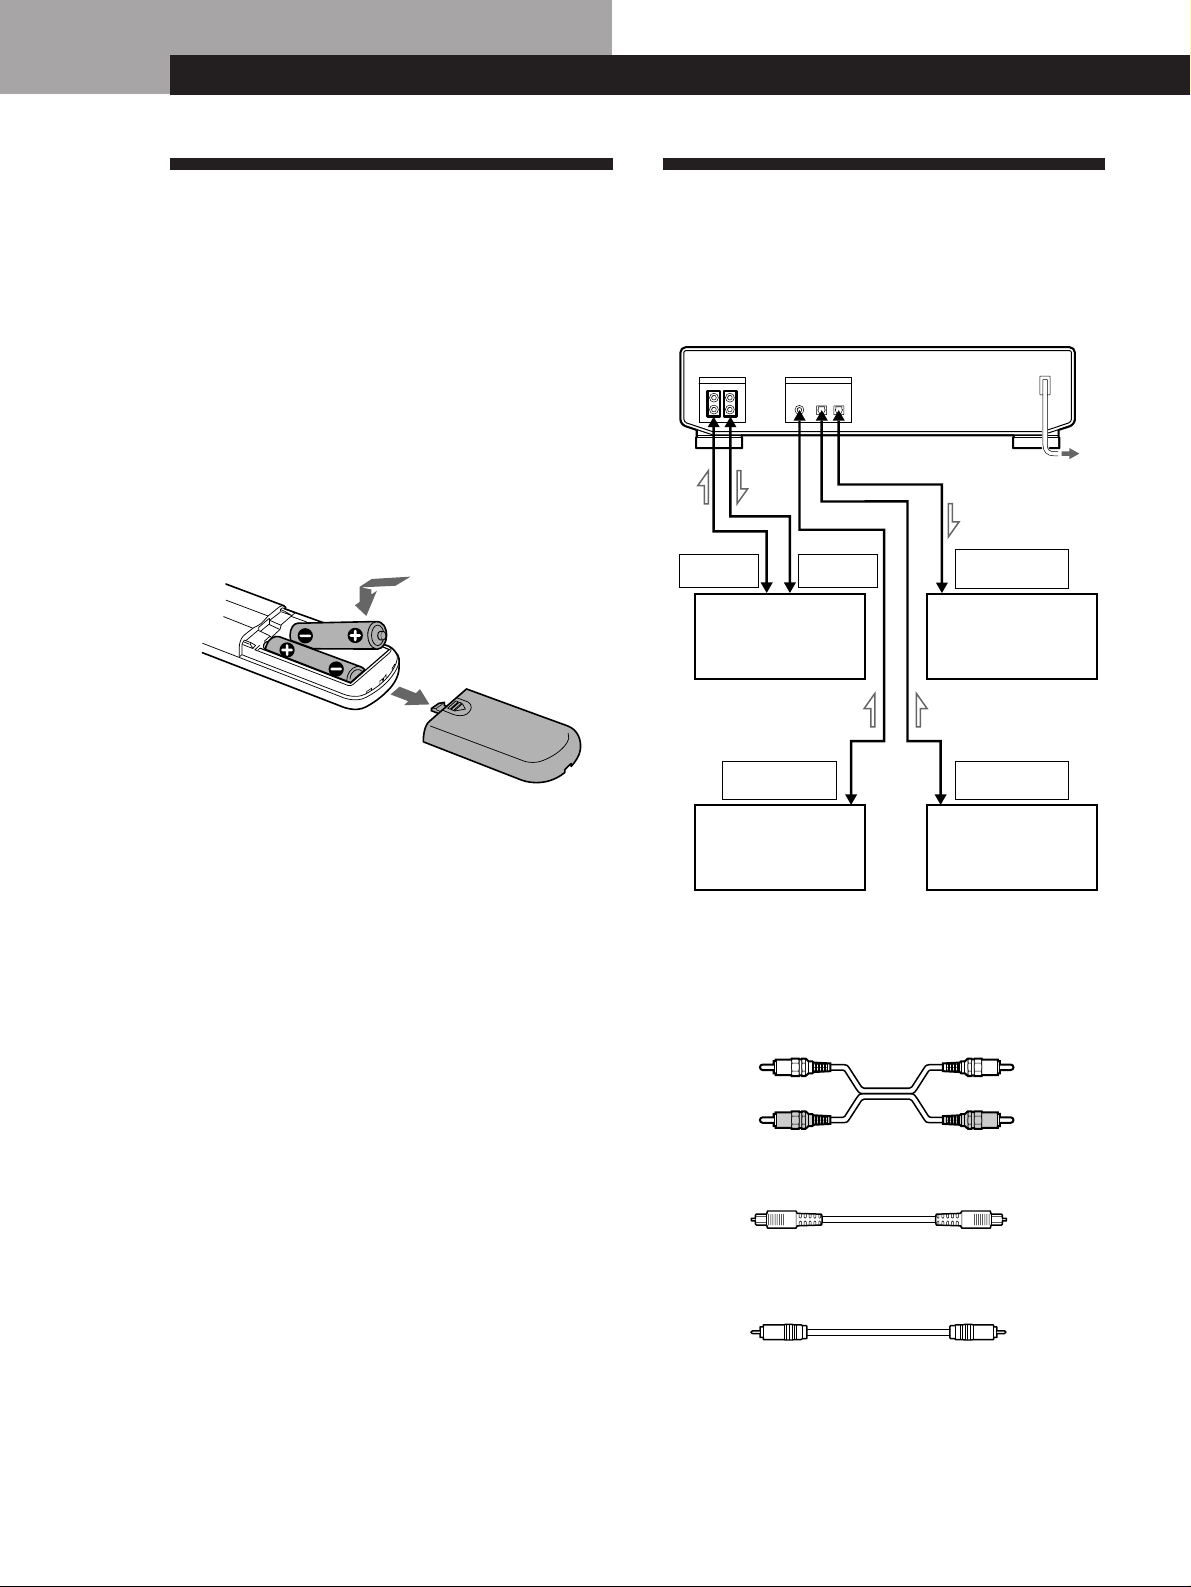
Inserting batteries into the remote
Insert two size-AA(R6) batteries, matching the + and –
on the batteries with the markings inside the
battery compartment.
Hooking Up the System
This section describes how to hook up your deck to an
amplifier, CD player, MD deck, or other audio
components. Be sure to turn off the power to each
component before making the connections.
to a wall outlet
Amplifier
etc.
CD player, DAT
deck, or MD deck,
etc.
z When to replace the batteries
With normal use, batteries should last for about 6
months. When the remote no longer operates the deck,
replace both batteries.
Notes
• Do not leave the remote near an extremely hot or humid
place.
• Do not drop any foreign matter into the remote casing,
particularly when replacing the batteries.
• Do not expose the remote sensor to direct sunlight or
illumination as doing so may cause malfunction.
• When not using the remote for an extended period of time,
remove the batteries to avoid possible damage from
battery leakage and corrosion.
CD player, DAT
deck, or MD deck,
etc.
CD player, DAT
deck, or MD deck,
etc.
ç: Signal flow
What cords will I need?
• Audio connecting cords (supplied) (2)
White
(L)
Red
(R)
• Optical cables (POC-15 etc.) (not supplied) (2)
• Coaxial digital connecting cable (VMC-10G etc.)
(not supplied) (1)
White
(L)
Red
(R)
EN
4
Page 5
Getting Started
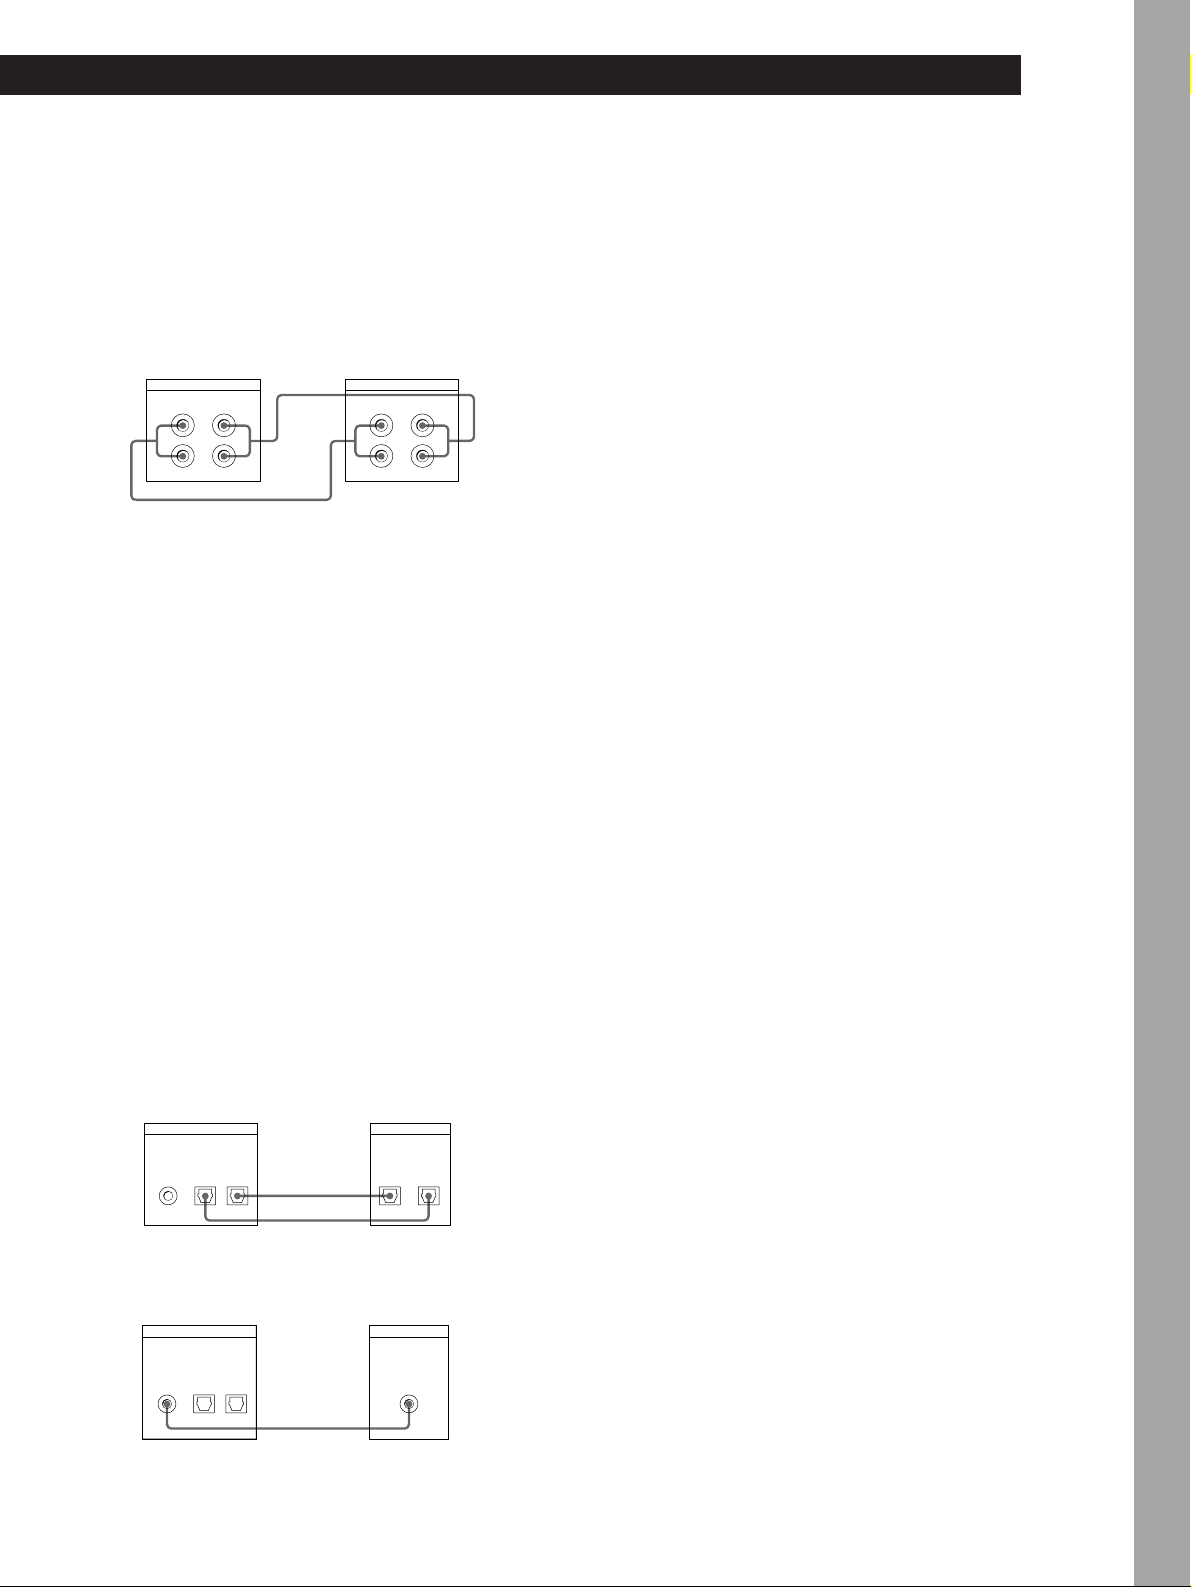
Hookups
p Connecting the deck to an amplifier
Use the supplied audio connecting cords to connect
the deck to an amplifier. Be sure to match each
color-coded plug to the appropriate jack: red (right)
to red and white (left) to white. To prevent hum and
noise, be sure the connections are firmly made.
DAT deck Amplifier
ANALOG IN/OUT
L
R
OUTIN
ç
L
R
Ç
LINE IN/OUT
OUT IN
L
R
L
R
z When recording with a microphone
Connecting the analog output jakcs on the stereo
microphone amplifier to the ANALOG IN jacks of the
deck.
p Connecting the deck to a digital audio component
A digital audio signal from a digital audio
component such as a digital amplifier, DAT deck,
CD player, MD deck or BS tuner can be recorded on
the DAT deck by connecting the digital output
connectors on the component to the digital input
connectors (DIGITAL OPTICAL IN or DIGITAL
COAXIAL IN) on the deck.
A digital audio signal from the deck can be recorded
by connecting the digital output connector
(DIGITAL OPTICAL OUT) on the deck to the digital
input connector on a digital audio component such
as a digital amplifier, DAT deck or MD deck.
Use optical cables (POC-15A or equivalent) (not
supplied) or a coaxial digital connecting cable
(VMC-10G or equivalent) (not supplied).
Note
If “PROHIBIT” appears in the display, recording through the
digital jack is not possible.
In this case, set the INPUT switch to ANALOG and record
the program source through the ANALOG IN jacks.
Connecting the AC power cord
Connect the AC power cord to a wall outlet.
Where do I go next?
Now you’re ready to use your deck.
For basic operations, go to pages 6 to 8; for advanced
operations, go to the sections starting from page 9.
Basic Operations
• Connection with optical cables
DAT deck
DIGITAL IN/OUT
COAXIAL
IN
OPTICAL
OUTIN
Digital audio component
ç
Ç
OPTICAL
IN OUT
• Connection with coaxial digital connecting cable
DAT deck
DIGITAL IN/OUT
COAXIAL
IN
OPTICAL
OUTIN
Digital audio component
Ç
COAXIAL
OUT
EN
5
Page 6
Basic Operations
Basic Operations
Recording on a DAT
OPEN/CLOSE
POWER
MODE
RESET
TIMER
g
OFFREC PLAY
START ID
REHEARSALRENUMBER
AUTO
MARGIN
RESETERASEWRITE
2 68
73 45
••
REC MUTE
SBM
ON
OFF
R)0±≠
REC
REC LEVEL
5
•
406
•
3
•
28
•
1
•
PHONE LEVEL
PHONES
REC MODE
INPUT
STANDARD
ANALOG
48 kHz
•••
•••
OPTICAL
§
AMS
pPr
44.1 kHz
COAXIAL
LONG
·
L R
•
•
7
•
•
9
•
10
100
See pages 4 and 5 for hookup
information.
Turn on the amplifier and play the program source you want
1
to record.
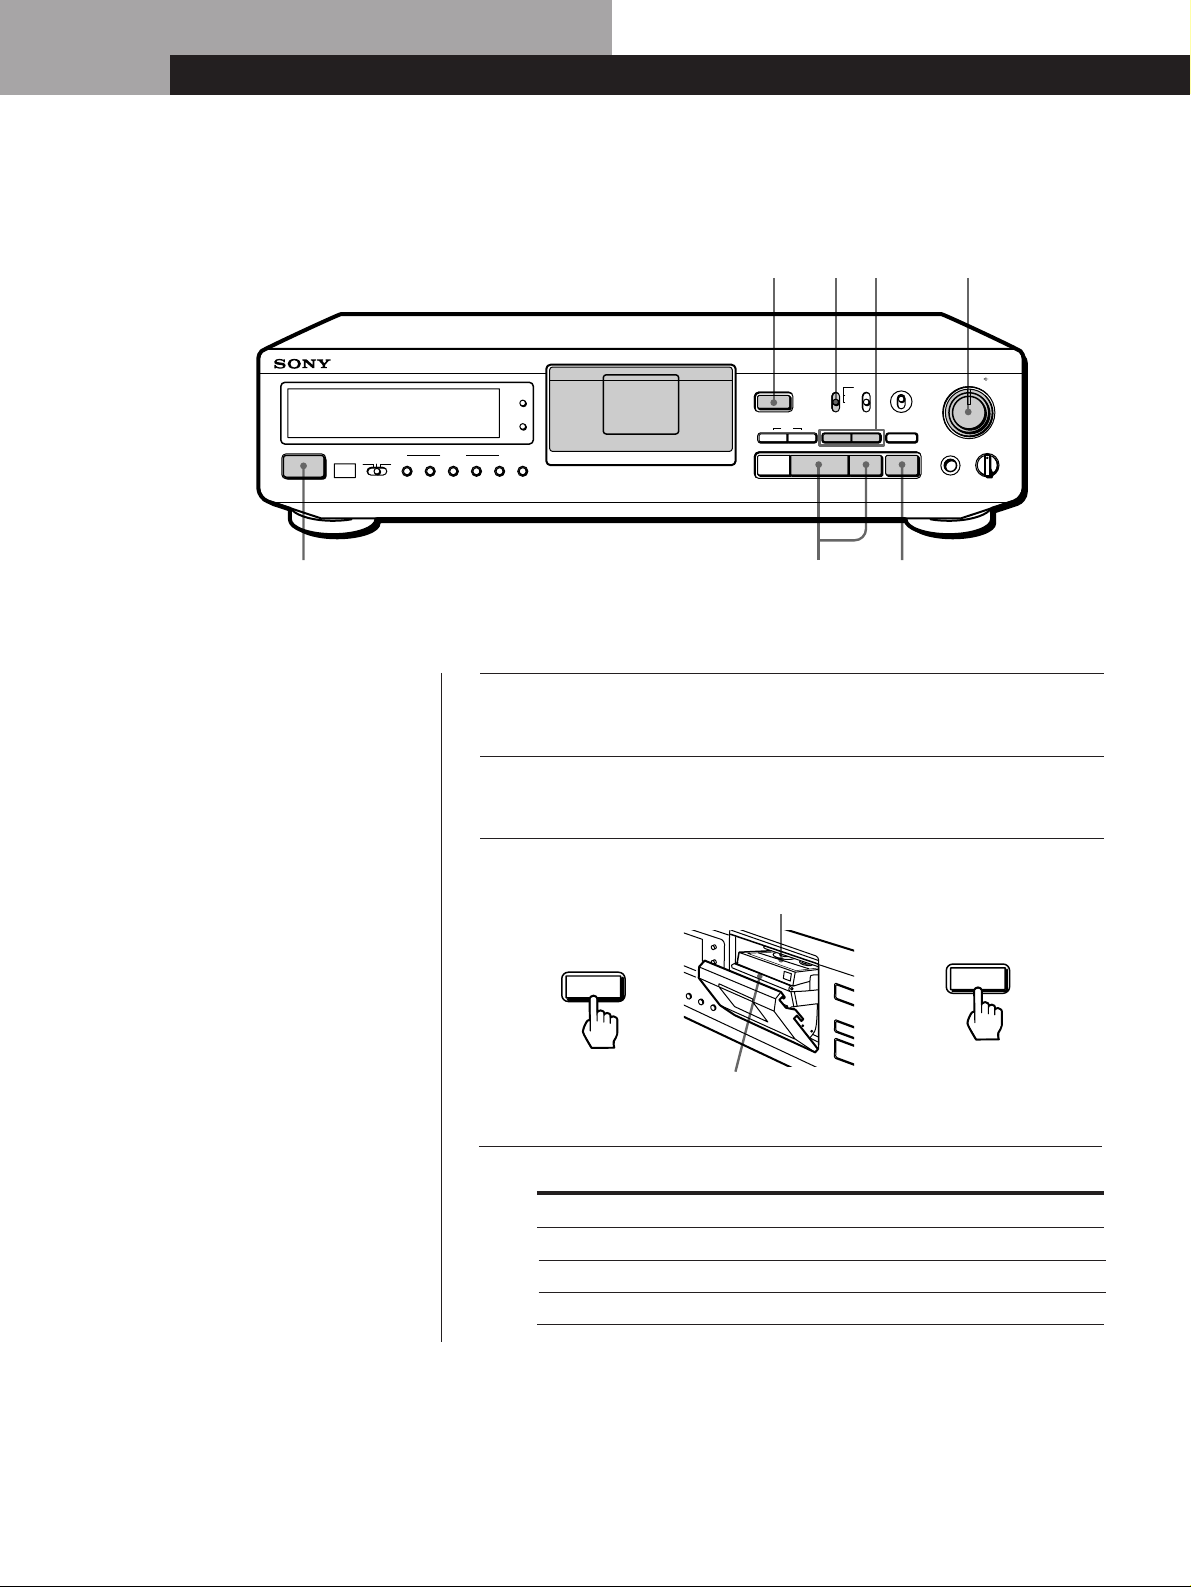
Press POWER.
2
Press OPEN/CLOSE § and insert a cassette.
3
Window side up
OPEN/CLOSE
§
bb
Insert the cassette
beyond the silver
bar.
Set INPUT to the corresponding input connector.
4
To record through Set INPUT to
ANALOG IN ANALOG
DIGITAL OPTICAL IN OPTICAL
DIGITAL COAXIAL IN COAXIAL
OPEN/CLOSE
Close the cassette
holder by pressing
OPEN/CLOSE §.
§
EN
6
Page 7
Basic Operations
Locate the position where you want to start recording.
5
To record from the beginning of the tape
Press 0 to rewind the tape to its beginning.
To record from the end of the recorded portion
1 Press 0 to rewind the tape to its beginning.
2 Press ).
The deck locates the end of the recorded portion on the tape
and stops automatically.
Press r REC.
6
The deck becomes ready to record.
When recording the analog input signal, adjust the recording
7
level with REC LEVEL.
The recommended recording level is 3. For details, refer to
“Adjusting the Recording Level for Analog Recording” on
page 10.
Basic Operations
z If “UNLOCK” appears in the
display
The program source is not
connected to the deck
properly or is not turned on.
Make sure that the program
source is properly connected
or turned on.
Press P or ·.
8
Recording starts.
Start playing the program source.
9
When the tape reaches the end, the deck rewinds it
automatically to its beginning and stops (Auto Rewind).
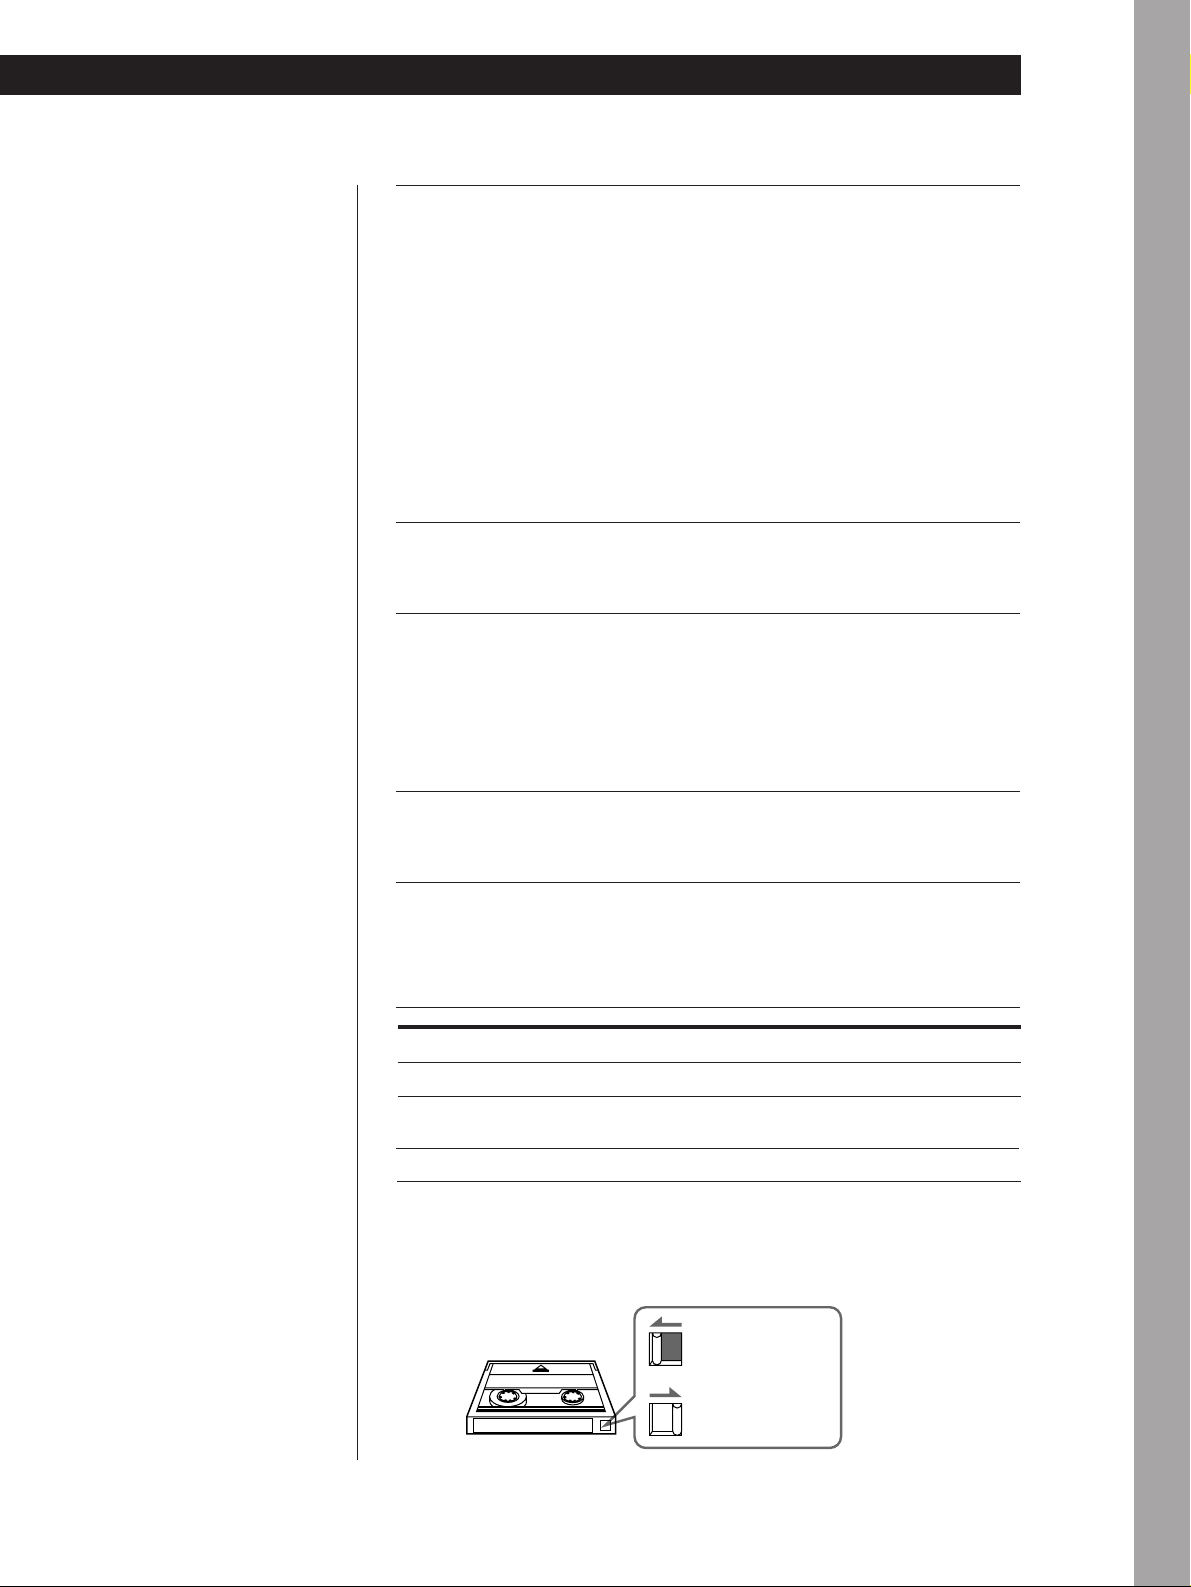
To
Stop recording
Pause recording P. Press the button again to resume
Take out the cassette
To prevent accidental erasure
Slide the record-protect tab to the left as shown in the illustration below.
Press
p
recording.
OPEN/CLOSE § after stopping recording
Recording is
impossible (the
hole is open).
Recording is
possible (the
hole is closed).
EN
7
Page 8
Basic Operations
Playing a DAT
MODE
RESET
POWER
TIMER
g
OFFREC PLAY
START ID
REHEARSALRENUMBER
AUTO
MARGIN
RESETERASEWRITE
2 4
3
SBM
ON
••
28
OFF
REC MUTE
R)0±≠
PHONES
REC
REC LEVEL
3
•
•
1
REC MODE
INPUT
ANALOG
OPTICAL
COAXIAL
·
•••
48 kHz
44.1 kHz
LONG
STANDARD
•••
OPEN/CLOSE
§
AMS
pPr
406
•
•
5
•
L R
•
10
PHONE LEVEL
•
7
•
•
9
•
100
See pages 4 and 5 for hookup
information.
z To use headphones
Connect them to the PHONES
jack. Use PHONE LEVEL to
adjust the volume.
Turn on the amplifier and set the source selector to the position
1
for DAT.
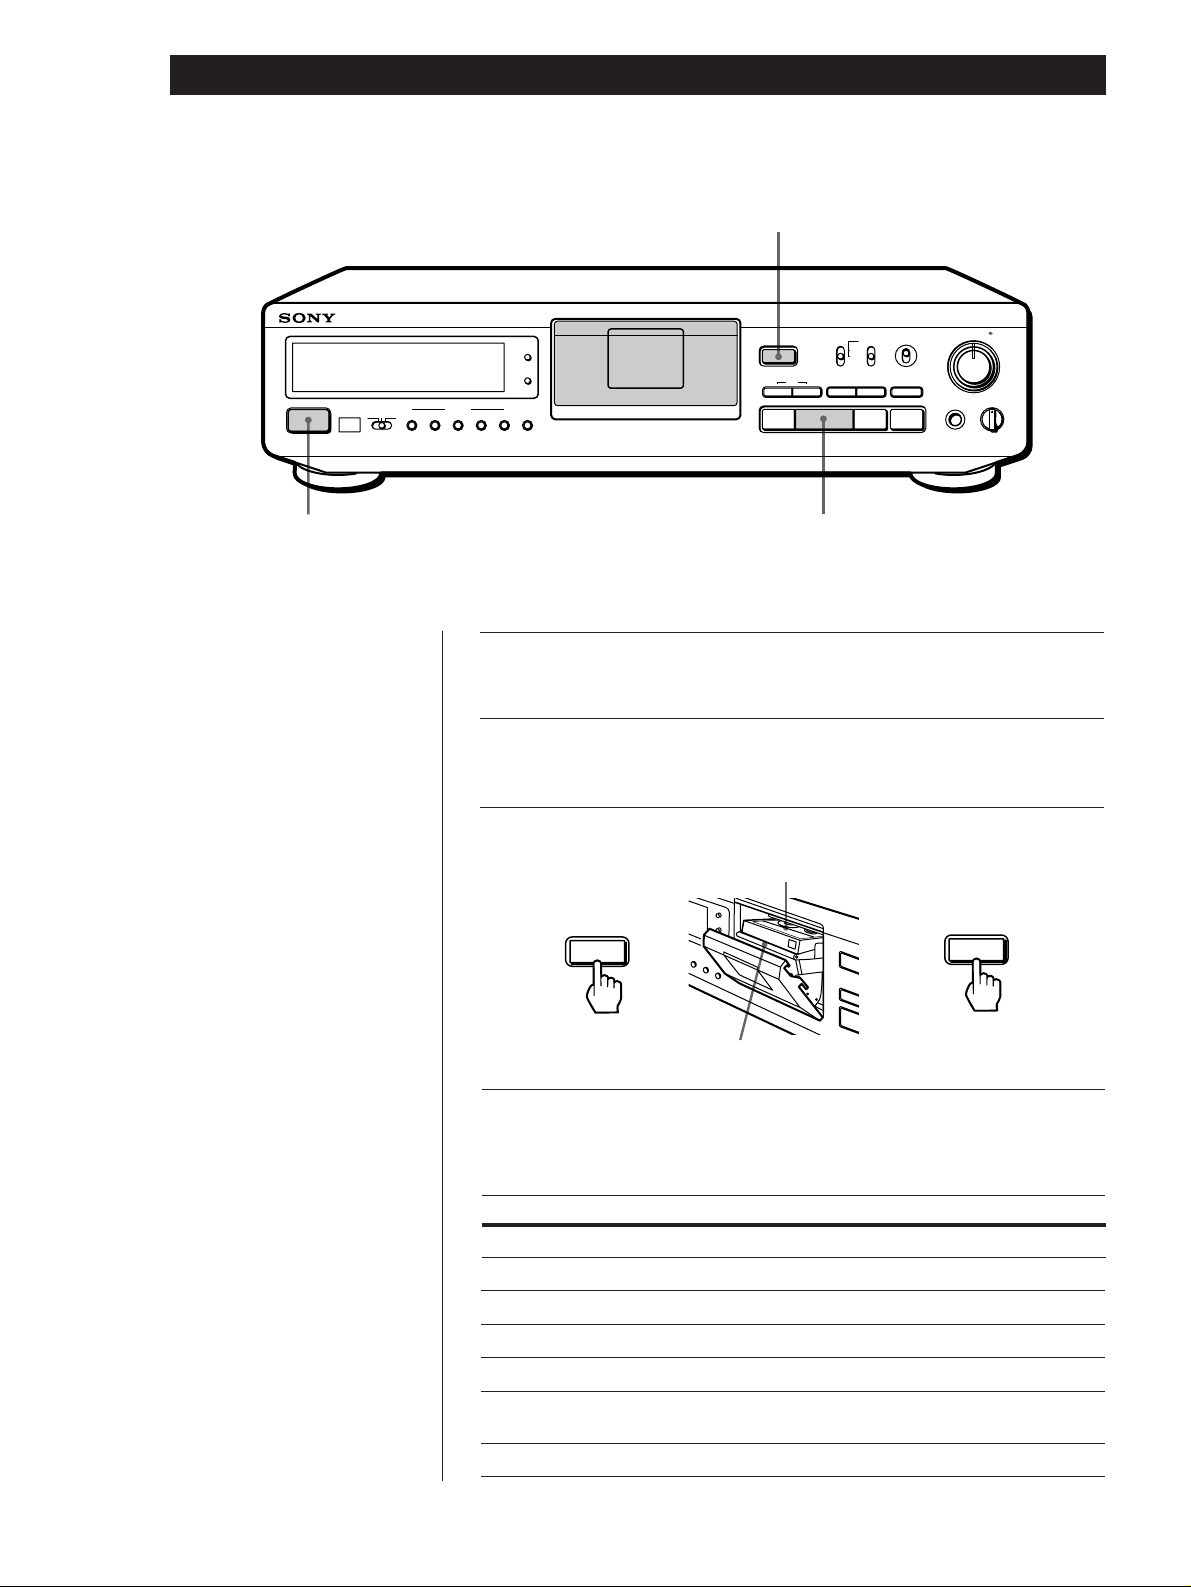
Press POWER.
2
Press OPEN/CLOSE § and insert a cassette.
3
OPEN/CLOSE
§
Press ·.
4
The deck starts playing. Adjust the volume on the amplifier.
bb
Window side up
Insert the cassette
beyond the silver bar.
OPEN/CLOSE
§
Close the cassette
holder by pressing
OPEN/CLOSE §.
To Press
pStop playing
Go to the next track ±
Go to the preceding track
Fast-forward or rewind
Fast-forward or rewind while monitoring
the sound
Take out the cassette OPEN/CLOSE § after stopping playing
EN
8
≠
) or 0 when the deck is stopped
) or 0 during playback. Release the
button to resume normal playback.
Page 9

Recording Operations
Recording Operations
For basic recording operations, see pages 6 and 7.
Things You Should Know Before Recording
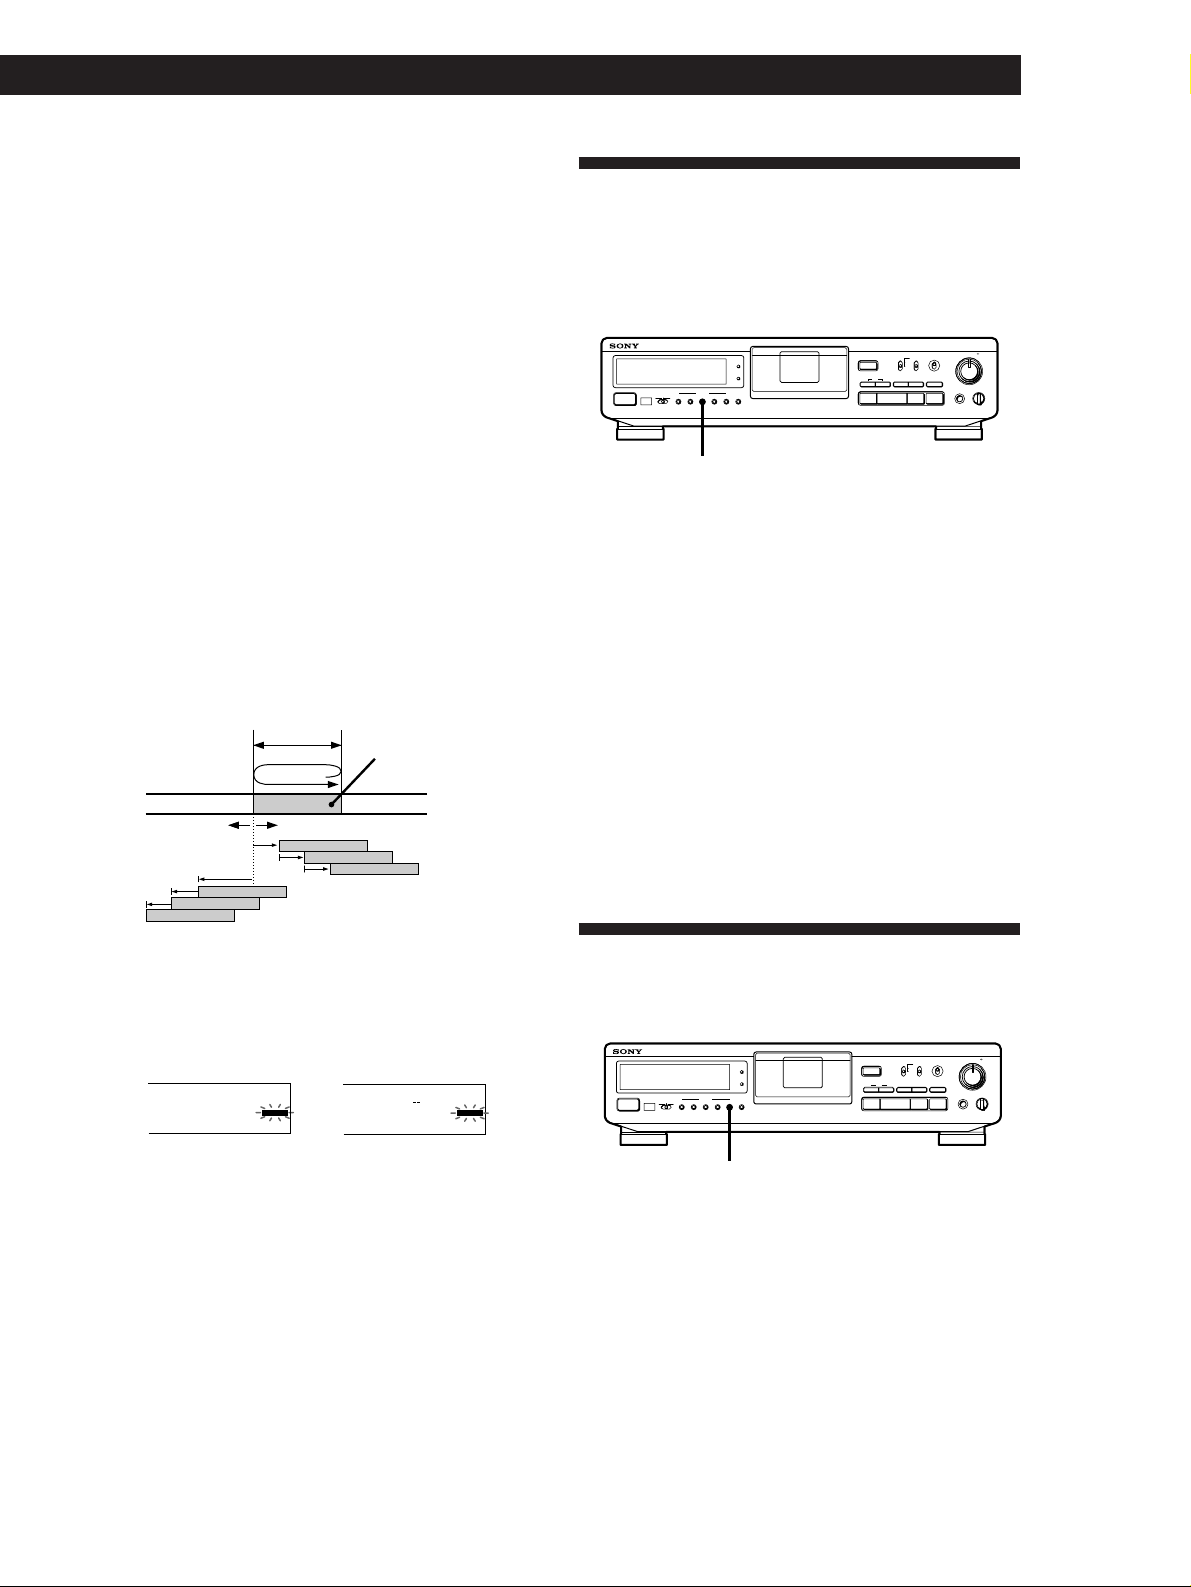
The difference between a blank section and
a sound-muted section
The deck distinguishes between two kinds of silent
sections, which are respectively called a “blank
section” or “sound-muted section”.
Blank section
This is a section on which no signal has ever been recorded.
a) a) a)a)
b) b) b) b)
Blank section
Sound-muted section
This is a section on which a signal has been recorded but at a
level that is not audible.
a)
b) b) b) b)
Sound-muted
section
a): Recording
b): Track
a): Recording
b): Track
Absolute time codes
Absolute time codes indicate the elapsed time from the
beginning of the tape. These codes are automatically
recorded. Note that once recorded, absolute time
codes cannot be re-written.
For accurate recording of absolute time codes
• If the tape is blank, make sure to start recording from the
beginning of the tape.
• Use Record Muting (see page 12) to insert spaces between
tracks. Do not advance the tape with the · or )
button.
• To start recording from the middle of a tape, use End
Search (see page 10) to locate the end of the recorded
portion. This will prevent the creation of blank sections.
If “EMPHASIS” appears in the display
The deck is recording a digital signal with emphasis (in
the higher frequencies). The recording will also
contain the same emphasis.
Basic Operations
If the deck is left in recording pause for
more than 10 minutes
Recording pause will be released automatically, the
deck will stop and “SOURCE” will appear in the
display.
To resume recording, press r REC. The deck will
change to recording pause.
When using a new tape
Before you record on a new tape, we recommend that
you fast forward the whole tape and then rewind to the
beginning to make the tape reel smoothly.
Important
Make sure no blank sections are created while you are
recording. The existence of blank sections within
recorded material will make search operations using
the ≠/± buttons impossible or destroy the
continuity of the absolute time codes.
z If you press the r REC button while in a blank
section
The deck automatically rewinds the tape to the
beginning of the blank section and changes to recording
pause (except during Timer Recording).
EN
9
Page 10

Recording Operations
Adjusting the Recording Level for Analog Recording
Before you start recording an analog source through
ANALOG IN, set INPUT to ANALOG and adjust the
recording level.
L R
REC LEVEL
REC MODE
SBM
INPUT
MODE
RESET
TIMER
g
OFFREC PLAY
POWER
MARGIN
START ID
RESETERASEWRITE
REHEARSALRENUMBER
AUTO
OPEN/CLOSE
ANALOG
48 kHz
•••
OPTICAL
44.1 kHz
§
COAXIAL
LONG
AMS
pPr
·
1 Do steps 1 to 6 of “Recording on a DAT” on pages
6 and 7.
2 Play the portion of the program source with the
strongest signal level.
3 While monitoring the sound, turn REC LEVEL to
adjust the recording level so that the peak level
meters are at maximum level without entering the
OVER (red) range.
MARGIN
indication
Maximum level
The segments of the peak level meters
corresponding to the maximum signal strength
remain lit longer than normal.
The MARGIN indication shows the margin
between maximum signal strength and 0 dB,
changing each time a stronger signal.
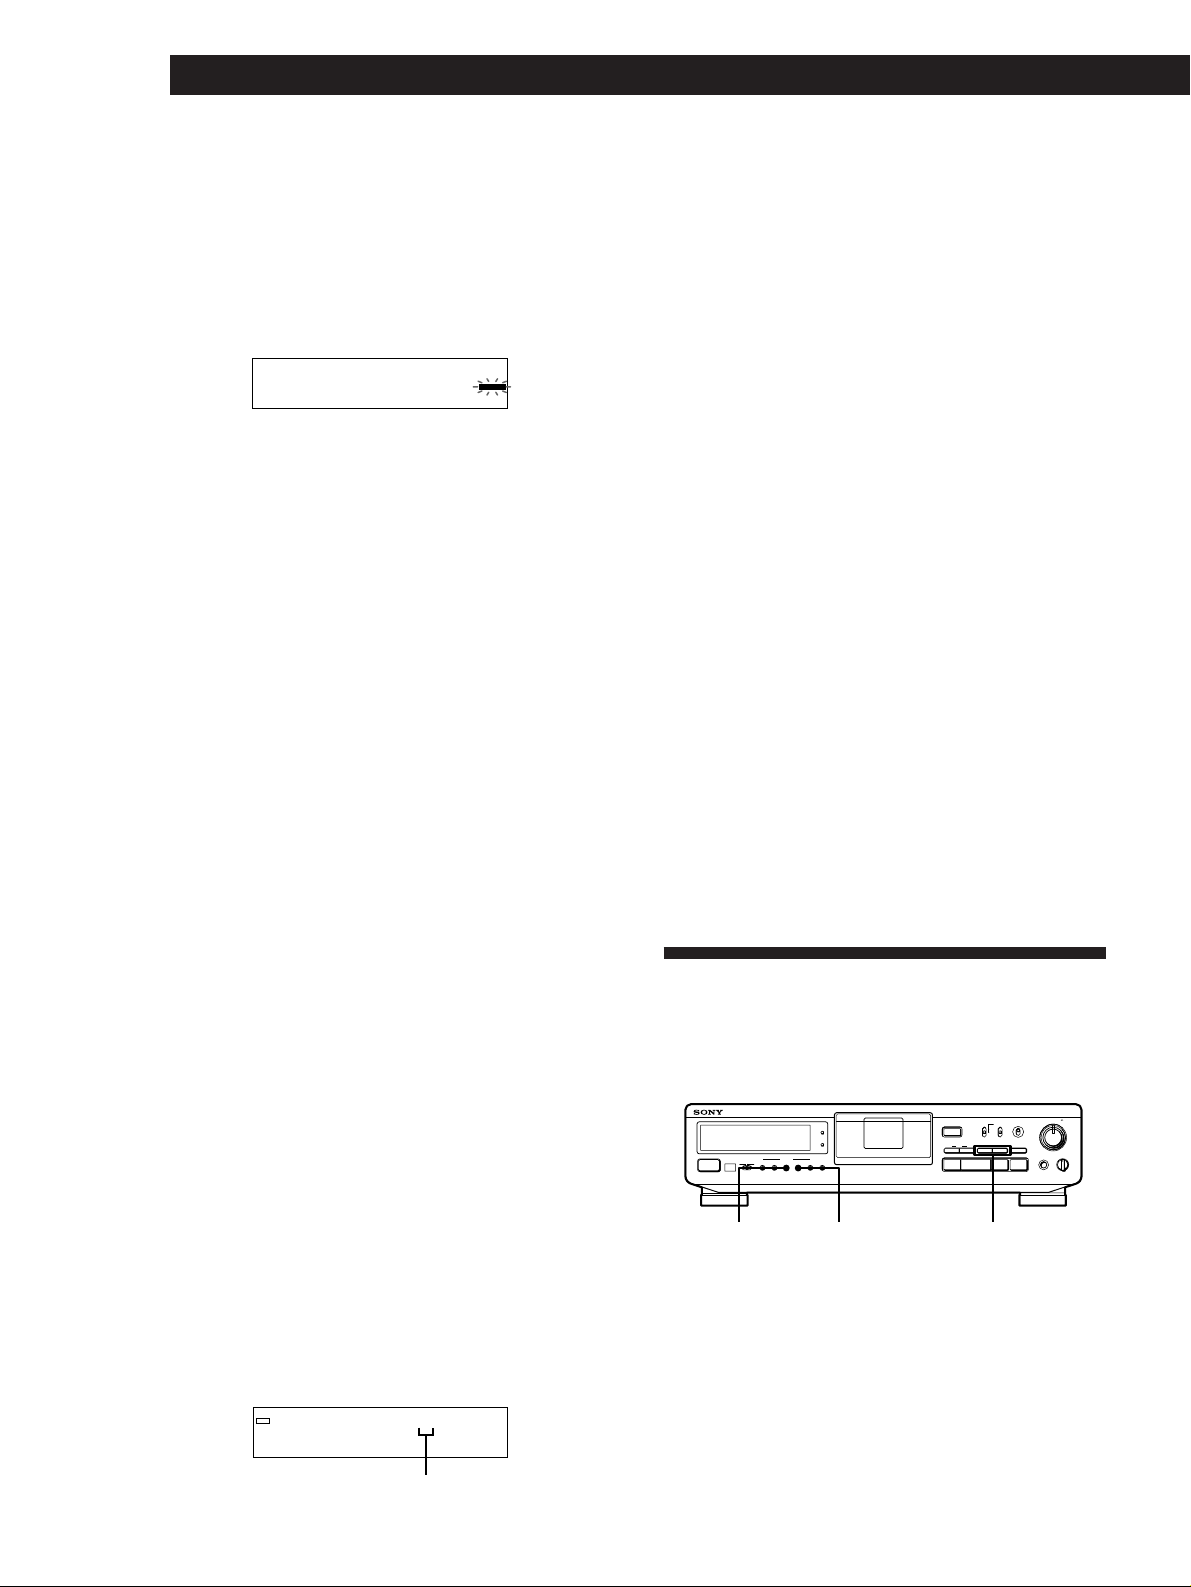
If the level exceeds 0 dB
The segments under “OVER” light up, and “0.0 dB”
flashes in the display. If these segments light steadily,
sound distortion may occur. To avoid this, keep the
recording level between –12 dB and 0 dB.
1.0
Remains unlit
5
•
•
STANDARD
ON
406
•
•
317
•••
••
OFF
REC MUTE
R)0±≠
REC
•
•
28
•
•
9
•
•
10
PHONE LEVEL
PHONES
100
REC LEVEL· PMARGIN RESET
Locating the End of the Recorded Portion (End Search)
End Search detects a blank section longer than 9
seconds, then automatically rewinds the tape to the
end of the recorded portion, then stops.
Use End Search to start recording from the end of the
recorded portion without creating a blank section on
the tape.
L R
REC LEVEL
REC MODE
SBM
INPUT
MODE
RESET
TIMER
g
OFFREC PLAY
POWER
MARGIN
START ID
RESETERASEWRITE
REHEARSALRENUMBER
AUTO
OPEN/CLOSE
ANALOG
48 kHz
•••
OPTICAL
44.1 kHz
§
COAXIAL
LONG
AMS
pPr
·
0 / )
1 With the deck stopped, press 0 to rewind the
tape to the beginning .
2 Press ).
The deck locates the end of the recorded portion,
then stops.
The deck stops at the beginning of any blank
section that is 9 seconds or longer, or fast-forwards
to the end of the tape if the tape is blank.
z If you press the r REC button while in a blank
section
The deck automatically rewinds the tape to the
beginning of the blank section and changes to recording
pause. “BLANK” and “WAIT” appear in the display
while the deck is searching for the beginning of the
blank section.
Notes
• End Search does not operate if you press the ) button
while in a blank section.
• If the tape is blank, the deck merely fast-forwards to the
end of the tape.
5
•
•
STANDARD
ON
406
•
•
317
•••
••
OFF
REC MUTE
R)0±≠
REC
•
•
28
•
•
9
•
•
10
PHONE LEVEL
PHONES
100
10
To reset the margin indication
Press MARGIN RESET. The margin indication changes
to “- - dB”.
4 Stop playing the program source.
5 To start recording, press P or ·, then start
playing the program source.
EN
Page 11
Setting the Recording Mode
You can select either of two recording modes—
standard or long—in the following cases:
• When recording an analog input signal with the
INPUT switch set to ANALOG
• When recording a digital input signal with a
sampling frequency of 32 kHz with the INPUT
switch set to OPTICAL or COAXIAL
REC MODE
SBM
INPUT
STANDARD
MODE
RESET
TIMER
g
OFFREC PLAY
POWER
MARGIN
START ID
RESETERASEWRITE
REHEARSALRENUMBER
AUTO
OPEN/CLOSE
§
AMS
pPr
ON
ANALOG
48 kHz
•••
•••
OPTICAL
44.1 kHz
••
COAXIAL
LONG
OFF
REC MUTE
R)0±≠
·
REC
L R
REC LEVEL
5
•
•
406
•
•
317
•
•
28
•
•
9
•
•
10
PHONES
PHONE LEVEL
100
Recording Operations
z The counter in long-play mode
The displayed tape running time, absolute time and
remaining time on the tape are for standard-play
mode. Double the time to obtain the corresponding
times for long-play mode.
Note
Do not change the INPUT or REC MODE setting while
recording. This may cause an error in the “PGM TIME”
(playing time of the track) display.
Using the SBM (Super Bit Mapping) Function
REC MODE
Set REC MODE to select the recording mode.
The following table shows the selectable recording
modes and corresponding REC MODE position and
sampling frequency for various input signals.
Input signal REC MODE
Recording mode
position
Analog STANDARD
(48 kHz)
STANDARD
(44.1 kHz)
LONG
Digital (32 kHz) STANDARD
(48 kHz)
STANDARD
(44.1 kHz)
LONG
Digital (44.1 kHz)
STANDARD
(48 kHz)
STANDARD
(44.1 kHz)
LONG
Digital (48 kHz) STANDARD
(48 kHz)
STANDARD
(44.1 kHz)
LONG
Standard play
(48 kHz)
Standard play
(44.1 kHz)
Long play (32 kHz)
Standard play
(32 kHz)
Long play (32 kHz)
Standard play
(44.1 kHz)
(Standard play
only)
Standard play
(48 kHz)
(Standard play
only)
You can use the SBM function to record on analog
input signal only when the INPUT switch is set to
ANALOG and the REC MODE switch to STANDARD
(either 48 kHz or 44.1 kHz). For details on the SBM
function, see “SBM (Super Bit Mapping) Function” on
page 21.
INPUT
STANDARD
MODE
RESET
TIMER
g
OFFREC PLAY
POWER
MARGIN
START ID
RESETERASEWRITE
REHEARSALRENUMBER
AUTO
OPEN/CLOSE
ANALOG
48 kHz
•••
OPTICAL
44.1 kHz
§
COAXIAL
LONG
AMS
pPr
·
•••
ON
••
OFF
REC MUTE
R)0±≠
REC
5
•
•
406
•
•
317
•
•
28
•
•
9
•
•
10
PHONE LEVEL
PHONES
100
L R
REC LEVEL
REC MODE
SBM
SBM
Set SBM to ON.
“SBM” appears in the display during recording using
the SBM function.
To turn the SBM function off
Set SBM to OFF.
The recording time in long-play mode (the REC MODE
switch set to LONG) is twice as long as standard-play
mode.
11
EN
Page 12
Recording Operations
pTIMER
PHONES
REC MUTE
REC
AMS
MODE
RESET
RESETERASEWRITE
REHEARSALRENUMBER
AUTO
MARGIN
OFFREC PLAY
TIMER
POWER
g
START ID
PHONE LEVEL
100
§
pPr
R)0±≠
·
OPEN/CLOSE
ANALOG
OPTICAL
COAXIAL
•••
REC LEVEL
INPUT
48 kHz
44.1 kHz
LONG
•••
••
REC MODE
STANDARD
SBM
ON
OFF
L R
5
406
10
317
9
28
•
•
•
•
•
•
•
•
•
•
Inserting a Sound-Muted Section While Recording (Record Muting)
Use Record Muting to insert a space of about 4 seconds
between tracks. This is recommended if you plan to
copy the DAT tape to an analog audio cassette tape
since the spaces will allow you to use automatic search
functions to locate the beginning of each track.
When you start recording from the beginning of a
blank tape and want to insert a space before the first
track, be sure to create a sound-muted section using
Record Muting only. Do not advance the tape with the
) or · button since this will create a blank section
on the tape (see page 9).
L R
REC LEVEL
REC MODE
SBM
INPUT
STANDARD
MODE
RESET
TIMER
g
OFFREC PLAY
POWER
MARGIN
START ID
RESETERASEWRITE
REHEARSALRENUMBER
AUTO
OPEN/CLOSE
ANALOG
48 kHz
•••
OPTICAL
44.1 kHz
§
COAXIAL
LONG
AMS
pPr
·
REC MUTE R · P
1 Press REC MUTE R where you want to insert a
space while the deck is recording or in recording
pause.
The deck creates a sound-muted section as “REC”
flashes in the display.
After the sound-muted section is completed,
“REC” lights up and the deck changes to recording
pause.
To insert a blank space longer than 4 seconds
Hold down REC MUTE R as long as you want. When
you release the button, the sound-muted section ends
and the deck changes to recording pause. If you keep
the button pressed longer than 4 seconds, “REC” will
begin to flash more quickly and the time elapsed after
pressing the REC MUTE R button is shown in the
display.
When you release the REC MUTE R button, P in the
display stays on and the deck changes to recording
pause.
2 Press P or · to resume recording.
The deck starts recording again.
•••
ON
••
OFF
REC MUTE
R)0±≠
REC
5
•
•
406
•
•
317
•
•
28
•
•
9
•
•
10
PHONE LEVEL
PHONES
100
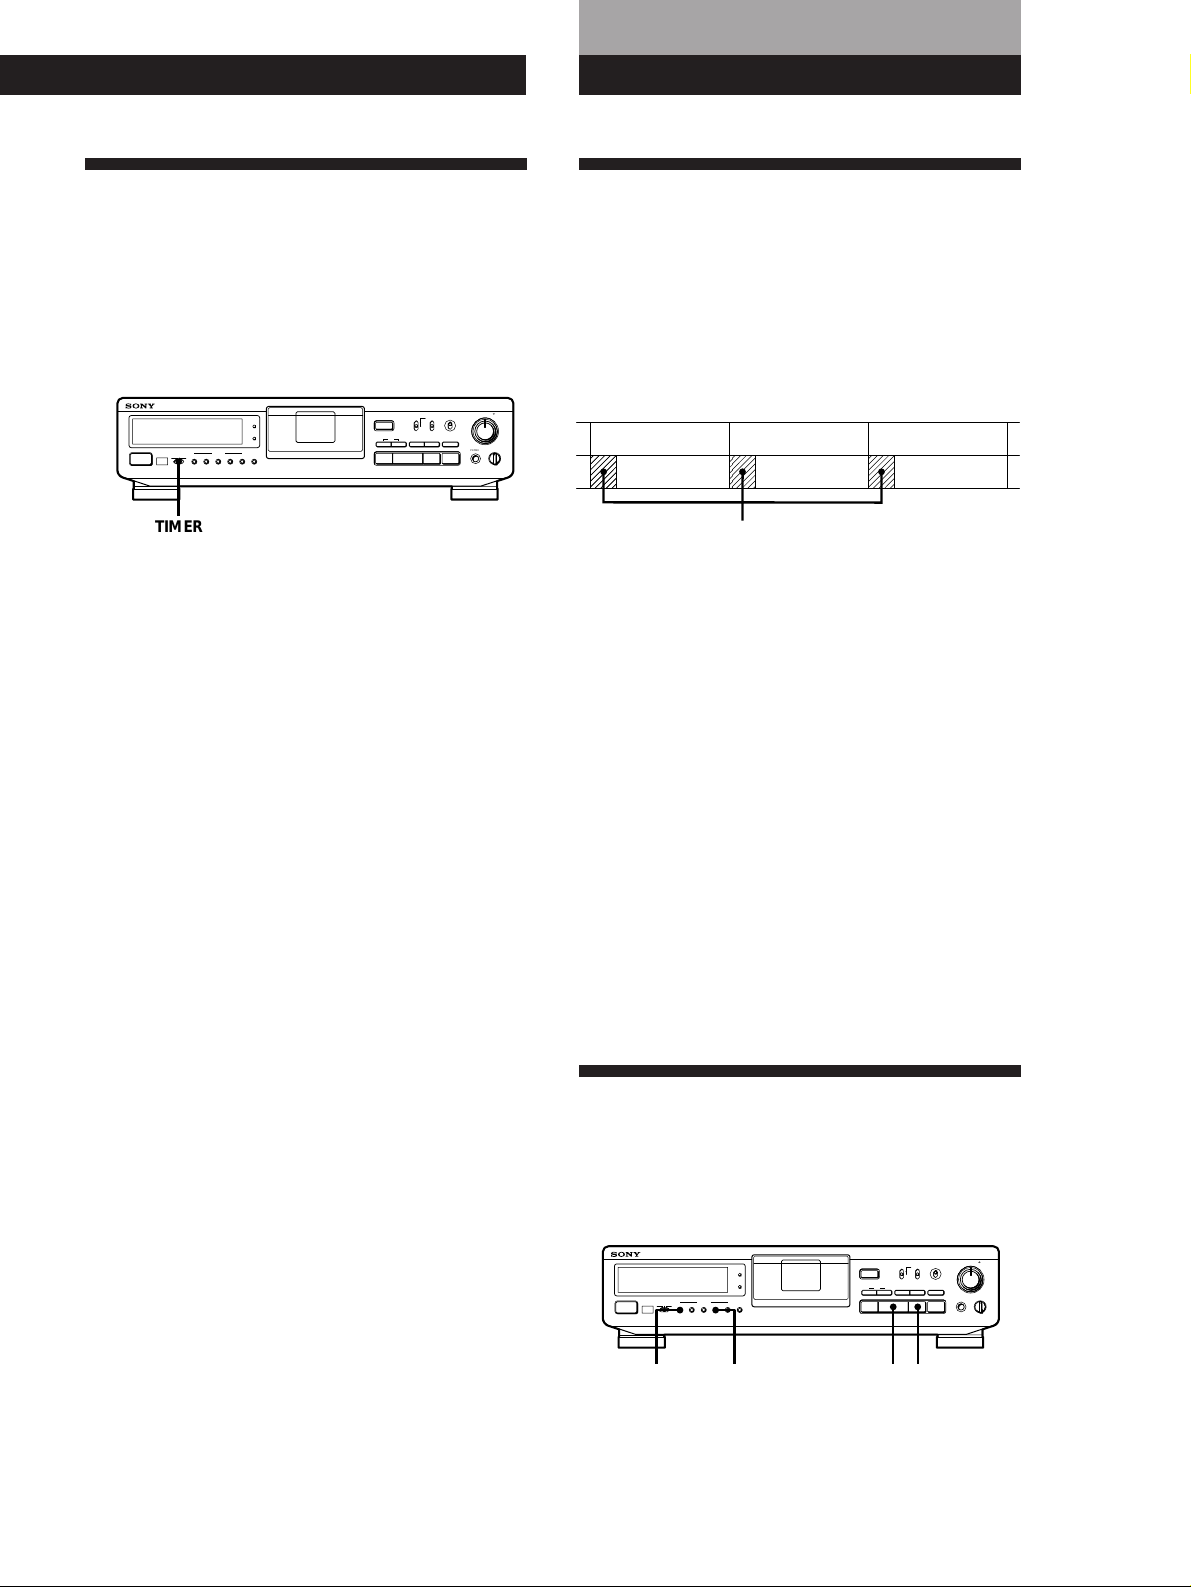
Recording Using a Timer (Timer Recording)
By connecting a timer (not supplied) to the deck, you
can start and stop recording operations at specified
times. For further information, refer to the instructions
that came with the timer.
1 Do steps 1 to 7 of “Recording on a DAT” on pages
6 and 7.
2 • To specify the time for the start of recording,
press p.
• To specify the time for the end of recording, do
steps 8 and 9 of “Recording on a DAT” on page
7.
• To specify the time for the start and end of
recording, press p.
3 Set TIMER on the deck to REC.
4 Set the timer as required.
• When you have set the time for the start of
recording, the deck turns off. When the
specified time arrives, the deck turns on and
after about 10 seconds starts recording.
• When you have set the time for the end of
recording, the deck continues recording, then
when the specified time arrives, the deck stops
recording and turns off.
• When you have set the time for both the start
and end of recording, the deck turns off. When
the starting time arrives, the deck turns on and
after about 10 seconds, recording starts. When
the ending time arrives, the deck stops
recording and turns off.
5 After using the timer, set TIMER on the deck to
OFF.
Note
If you do not create a sound-muted section at the beginning
of a tape, you may not be able to move or erase a start ID
(see page 15) that is recorded within 2 seconds from the
beginning of the tape.
12
EN
• If the TIMER switch is left at the REC position, the deck
will automatically start recording when you turn on the
deck next time.
• During Timer Recording (i.e., when the TIMER switch is
set to the REC position), Auto Rewind (see page 14) will
not function even if the tape ends during recording. This
is to prevent previously recorded material from being
recorded over.
Notes
Page 13
Playback Operations
Playback Operations
For basic playback operations, see page 8.
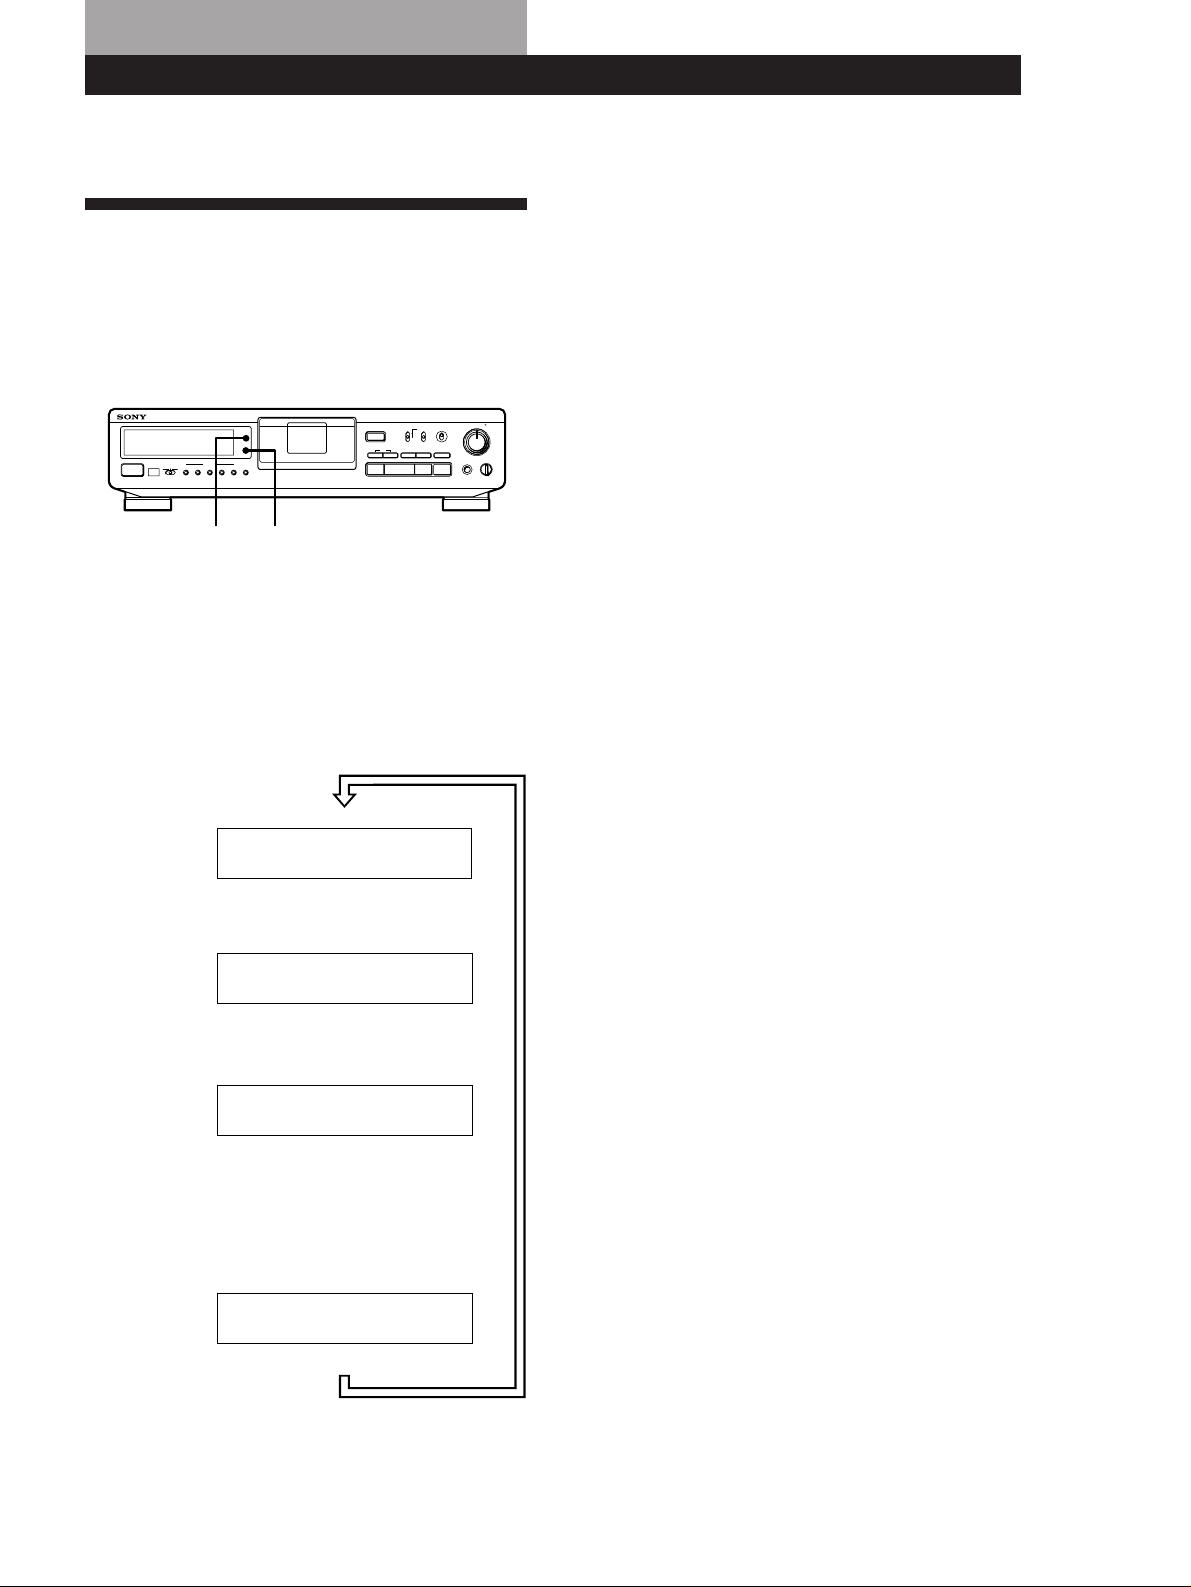
About the Display
You can use the display to show the following types of
time information:
• absolute time
• playing time of the track
• remaining time on the tape
• tape running time
L R
REC LEVEL
REC MODE
SBM
INPUT
MODE
RESET
TIMER
g
AUTO
OFFREC PLAY
POWER
MARGIN
START ID
RESETERASEWRITE
REHEARSALRENUMBER
OPEN/CLOSE
ANALOG
48 kHz
•••
OPTICAL
44.1 kHz
§
COAXIAL
LONG
AMS
pPr
·
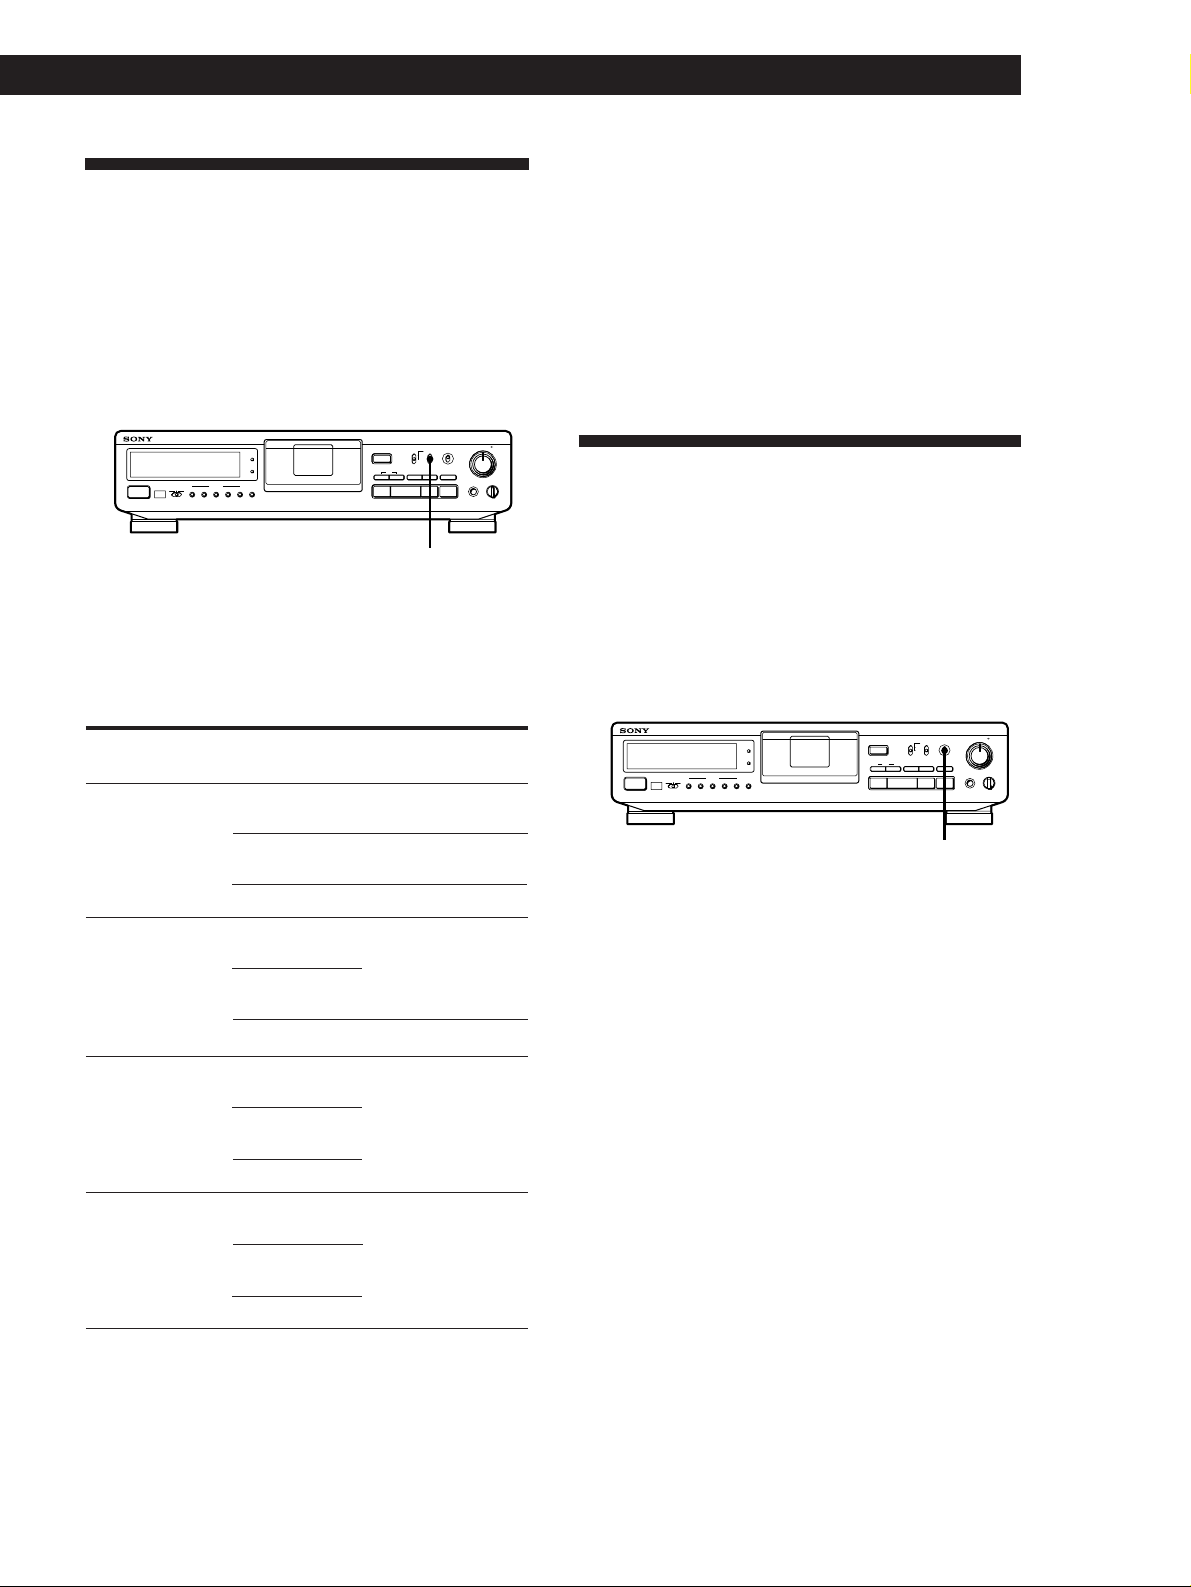
MODE RESET
Showing the absolute time, playing time of
the track, remaining time on the tape, and
tape running time.
Press MODE (or COUNTER MODE on the remote).
Each time you press the button, the displayed
information changes as follows.
5
•
•
STANDARD
ON
406
•
•
317
•••
••
OFF
REC MUTE
R)0±≠
REC
•
•
28
•
•
9
•
•
10
PHONE LEVEL
PHONES
100
Notes
• When playing certain types of premastered tapes, “BB”
may appear momentarily in the display at the beginning
of the tape.
• The playing time of the track does not appear in the
following cases
— When you start playing from the middle of the track
— During rewinding
• In standard-play mode, the remaining time on the tape
appears about 16 seconds after you start playing.
• The displayed remaining time may vary somewhat from
the actual remaining time, depending on the tape.
If “EMPHASIS” appears in the display
The deck is playing an audio signal recorded with
emphasis (in the higher frequencies). The deck,
however, plays the signal while automatically
deemphasizing it (with attenuation proportional to the
degree of emphasis).
Absolute time
Playing time of the track
Remaining time on the tape
ABS TIME
8 20
PGM TIME
3 15
REMAINING
1 00
In the case of premastered DAT, the
remaining time is to the end of the
recorded portion.
Tape running time
5 19
Press
Press
hm
Press
Press
ms
√
ms
√
√
ms
To reset the tape running time
Press RESET (or COUNTER RESET on the remote).
13
EN
Page 14
Playback Operations
Locating a Track (AMS*/Direct
Access)
You can locate the tracks in a number of ways, but only
after you have recorded start IDs on the tape (see pages
15 to 18). To use Direct Access, program numbers
must be recorded on the tape (see pages 15 and 18).
L R
REC LEVEL
REC MODE
SBM
MODE
RESET
TIMER
g
OFFREC PLAY
POWER
MARGIN
START ID
RESETERASEWRITE
REHEARSALRENUMBER
AUTO
≠ / ± ·
To locate
The beginning of the next
or succeeding tracks
(AMS)
Press
± as many times as you want
while playing. For example, to
locate the second track ahead,
press twice.
The beginning of the
≠ once while playing
current track(AMS)
The beginning of
preceding tracks (AMS)
≠ as many times as you want
while playing. For example, to
locate the second track behind,
press three times.
By specifying the
program number of a
track (Direct Access) Z
1 Enter the program number of
the track with the number
buttons.
2 Press ( (or · on the deck).
* AMS = Automatic Music Sensor.
INPUT
OPEN/CLOSE
ANALOG
48 kHz
•••
OPTICAL
44.1 kHz
§
COAXIAL
LONG
AMS
pPr
·
5
•
•
STANDARD
ON
406
•
•
317
•••
••
OFF
REC MUTE
R)0±≠
REC
•
•
28
•
•
9
•
•
10
PHONE LEVEL
PHONES
100
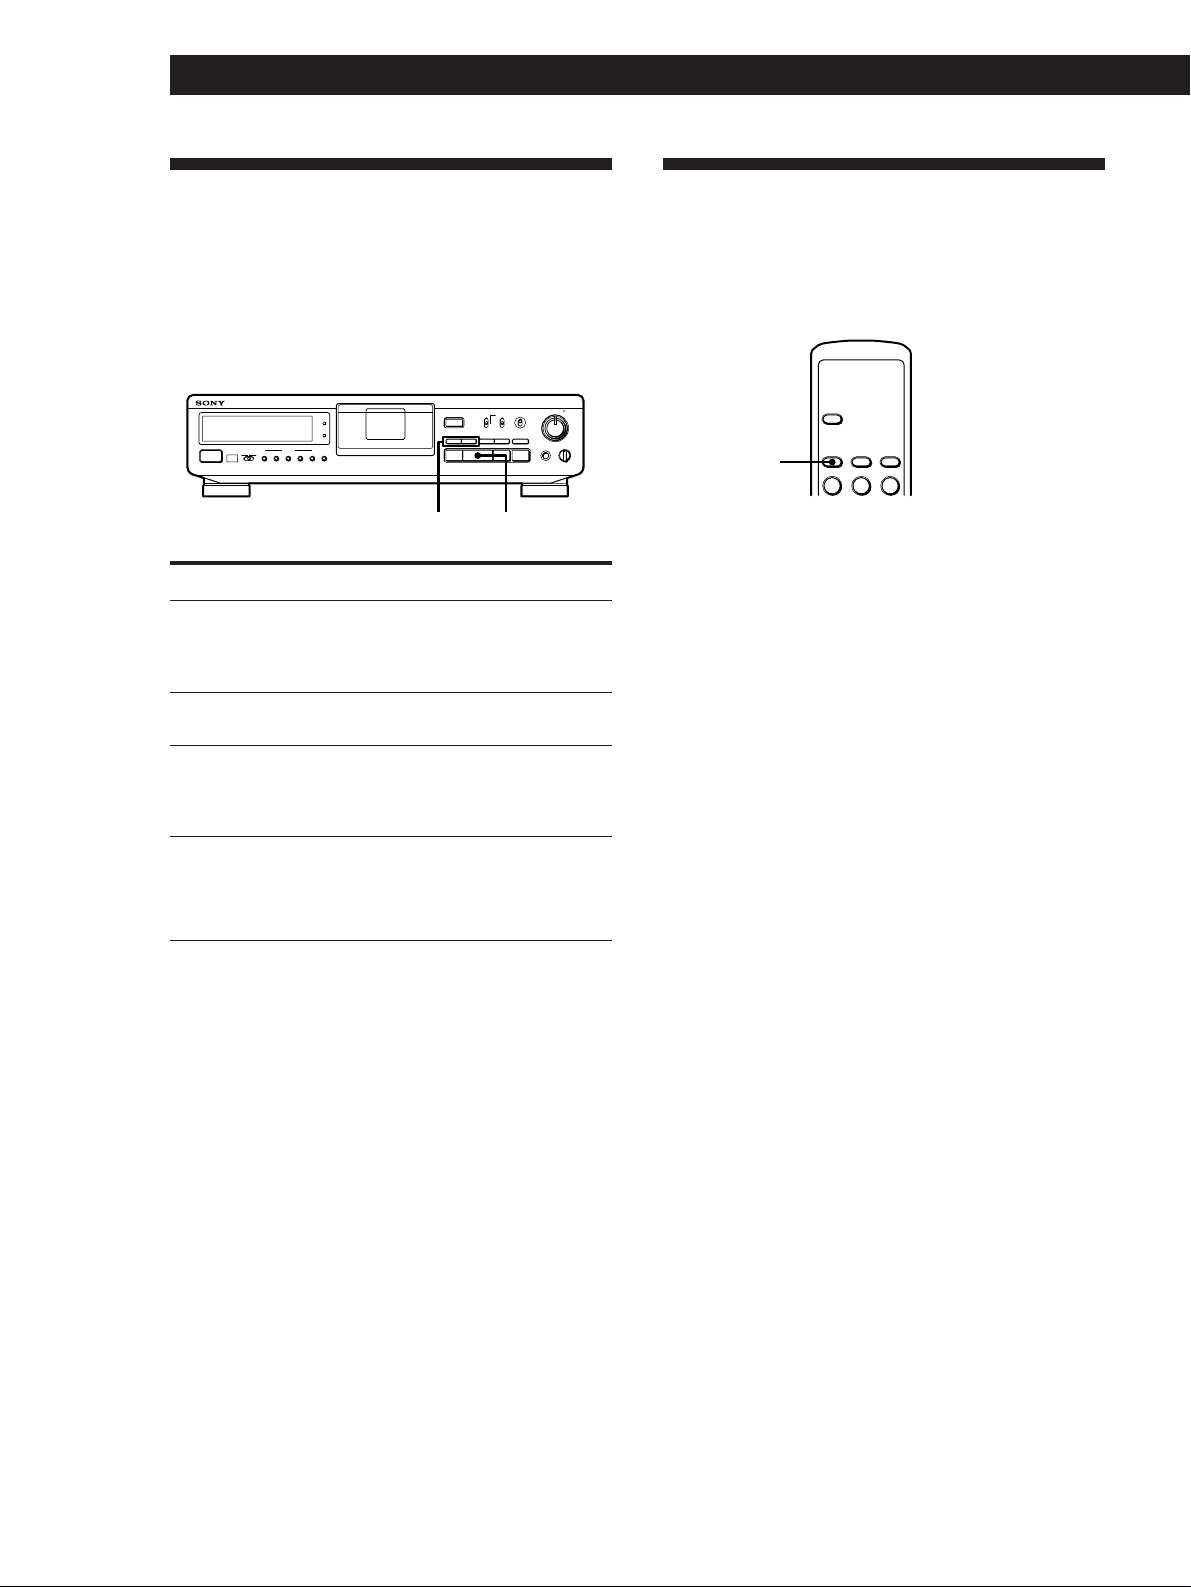
Playing T racks Repeatedly (Repeat Play) Z
You can play a specific track or all the tracks on the
tape repeatedly.
OPEN/
CLOSE
6
COUNTER
REPEAT
REPEAT
Playing all tracks repeatedly
Press REPEAT repeatedly while playing a track until
“REPEAT” appears in the display. The deck will then
play back all tracks until it detects the end of the last
track, which may be:
— a blank section of 9 seconds or more
— the end of the tape
When the deck detects either of the above, it rewinds
the tape to beginning and plays back all tracks again.
The deck repeats this cycle up to 5 times, then
automatically stops.
To stop playing all tracks repeatedly
Press REPEAT repeatedly until “REPEAT” disappears.
Note
Repeat Play of all tracks is canceled when you take out the
cassette.
RESETMODE
132
14
z If you enter the wrong program number during
Direct Access
If you haven’t pressed the ( (or · on the deck)
button, press CLEAR on the remote, then enter the
correct number. If you have already pressed the ( (or
· on the deck) button, pressing the CLEAR button
will not erase the wrong program number. Stop the
deck and reenter the program number.
z If the deck detects a blank section of 9 seconds or
more, or the end of the tape
The deck rewinds the tape automatically to its
beginning and stops (Auto Rewind).
Z
Playing a track repeatedly
Press REPEAT repeatedly while playing the track that
you want until “REPEAT 1” appears in the display.
The deck will then play back the track until its end,
which may be:
—the next start ID
—a blank section of 9 seconds or more
—the end of the tape
When the deck detects any of the above, it rewinds the
tape and starts playing from the start ID of the same
track again. The deck repeats this cycle up to 5 times,
then automatically stops.
z You can make the deck start playing automatically
from the beginning of the tape after rewinding
Press · while holding down 0.
EN
To stop playing a track repeatedly
Press REPEAT repeatedly until “REPEAT 1” disappears.
Note
Repeat Play of a single track is canceled when you take out
the cassette.
Page 15
Playback Operations
Writing Sub Codes
Playback Operations
Playback Using a Timer (Timer Playing)
By connecting a timer (not supplied) to the deck, you
can start and stop playback operations at specified
times. For further information, refer to the instructions
that came with the timer.
L R
REC LEVEL
REC MODE
SBM
INPUT
MODE
RESET
TIMER
g
OFFREC PLAY
POWER
MARGIN
START ID
RESETERASEWRITE
REHEARSALRENUMBER
AUTO
OPEN/CLOSE
ANALOG
48 kHz
•••
OPTICAL
44.1 kHz
§
COAXIAL
LONG
AMS
pPr
·
TIMER
1 • To specify the time for the start of playing, do
steps 1 to 3 of “Playing a DAT” on page 8.
• To specify the time for the end of playing, do
steps 1 to 4 of “Playing a DAT” on page 8.
• To specify the time for the start and end of
playing, do steps 1 to 3 of “Playing a DAT” on
page 8.
2 Set TIMER on the deck to PLAY.
3 Set the timer as required.
• When you have set the time for the start of
playback, the deck turns off. When the
specified time arrives, the deck turns on and
after about 10 seconds starts playing.
• When you have set the time for the end of
playback, the deck continues playing, then
when the specified time arrives, the deck stops
playing and turns off.
• When you have set the time for both the start
and end of playback, the deck turns on. When
the starting time arrives, the deck turns on and
after about 10 seconds, playback starts. When
the ending time arrives, the deck stops playing
and turns off.
5
•
•
STANDARD
ON
406
•
•
317
•••
••
OFF
REC MUTE
R)0±≠
REC
•
•
28
•
•
9
•
•
10
PHONE LEVEL
PHONES
100
About Sub Codes
In the DAT format, sub codes (i.e., control codes such
as start IDs and program numbers) can be written on
the tape along with the audio signal. These sub codes
allow you to use AMS (see page 14) or Direct Access
(see page 14). Since sub codes are written on the tape
separately from the audio signal, they have no effect on
the audio signal.
TrackTrack Track
Start ID
Start IDs
Start IDs indicate the start of a track, and therefore
allow you to locate the position of a track precisely.
The start IDs are 9 seconds in length (18 seconds in
long-play mode) to enable easy detection during fastforwarding or rewinding.
Program numbers
Program numbers serve as track numbers. Occupying
the same position as start IDs, a program numbers
allow you to locate specific tracks.
Notes
• The p and P buttons do not work during the writing of
sub codes.
• Writing and erasing of start IDs and renumbering of
program numbers are impossible if the record-protect hole
on the DAT cassette is open (see page 7).
Writing Start IDs During Recording
4 After using the timer, set TIMER on the deck to
OFF.
You can write start IDs either manually or
automatically anytime during recording.
INPUT
OPEN/CLOSE
ANALOG
OPTICAL
§
COAXIAL
AMS
pPr
·
·START ID
TIMER
g
OFFREC PLAY
POWER
START ID
AUTO
AUTO
START ID
REHEARSALRENUMBER
WRITE
MODE
RESET
MARGIN
RESETERASEWRITE
L R
REC LEVEL
REC MODE
SBM
5
•
•
STANDARD
ON
406
•
•
48 kHz
317
•••
•••
44.1 kHz
••
•
LONG
28
OFF
•
9
REC MUTE
•
•
10
R)0±≠
PHONE LEVEL
PHONES
REC
100
P
(Continued)
•
•
EN
15
Page 16
Writing Sub Codes
Manual Writing of Start IDs During
Recording
Press START ID WRITE.
“ID WRITE” appears in the display for a few seconds
and the start ID is written on the tape at the selected
position. “START ID” flashes in the display during this
time.
Start ID
ID WRI TE
START ID
Note
The interval between start IDs must be more than 18 seconds
(36 seconds in long-play mode). If the interval is less than 18
seconds (or 36 seconds), the deck may fail to detect the
second start ID during playback.
Writing the Start IDs Automatically During
Recording
Do the following procedure to automatically write
program numbers along with start IDs at the same
position.
• When recording an analog signal with the INPUT
switch at ANALOG
A start ID and program number are written whenever the
input signal rises above a given level after remaining at a
muted or low level for 3 seconds or more.
• When recording a digital signal with the INPUT
switch at OPTICAL or COAXIAL
A start ID and program number are written whenever a
new track is detected while recording a digital signal
through the COAXIAL IN or OPTICAL IN jack from a
digital source such as CD player or another DAT deck.
Start IDs and program numbers are not written, however,
for tracks that are less than 18 seconds in length.
If the last program number on the tape appears in
the display, you don’t have to specify the next
program number. If you are recording from the
beginning of a blank tape, program number “1”
appears in the display. If you forget program
numbering at this time, you can add them later
(see “Renumbering the Program Numbers
Automatically (Renumbering)” on page 18).
4 To start recording, press P or ·, then start
playing the program source.
Start IDs are written on the tape automatically
during recording.
“ID WRITE” appears for a few seconds whenever
a sub codes (a start ID and program number) are
being written.
z During digital recording from a CD player
Start recording on your deck first, then press the (
PLAY button on the CD player while it is stopped. If
you place your deck into recording pause and the CD
into play pause before you start recording, the start ID
and program number of the first track on the CD may
not be correctly written to the tape.
Note
During automatic start ID writing the positioning of some
start IDs may be inaccurately or inappropriately positioned
away from the beginning of the track. If this happens, you
can reposition or erase the start IDs later (see “Accurate
Positioning of Start IDs (Rehearsal)” and “Erasing Start IDs”
on page 17).
Writing Start IDs During Playback
16
1 Do steps 1 to 7 of “Recording on a DAT” on pages
You can write start IDs during playback.
6 and 7.
The deck changes to recording pause.
2 Press START ID AUTO repeatedly until “AUTO”
MODE
RESET
TIMER
g
OFFREC PLAY
POWER
MARGIN
START ID
RESETERASEWRITE
REHEARSALRENUMBER
AUTO
REC MODE
INPUT
STANDARD
OPEN/CLOSE
ANALOG
48 kHz
•••
•••
OPTICAL
44.1 kHz
§
COAXIAL
LONG
AMS
pPr
·
appears in the display.
3 If you are recording from the end of the recorded
portion, use the number buttons on the remote to
specify the program number after the last one
recorded.
Example: When program number 5 is the last
program number recorded on the tape.
REC
AUTO
·
∏
PGM NO.
6
START ID
REHEARSAL
WRITE
Press START ID WRITE.
“ID WRITE” appears in the display for a few seconds
and the start ID is written on the tape at the selected
position. “START ID” flashes in the display during
this time.
The next program number
EN
0 / )START ID
SBM
ON
••
OFF
REC MUTE
R)0±≠
REC
L R
REC LEVEL
5
•
•
406
•
•
317
•
•
28
•
•
9
•
•
10
PHONE LEVEL
PHONES
100
Page 17
Accurate Positioning of Start IDs
(Rehearsal)
1 During playback, press START ID REHEARSAL
when you arrive at the proper position.
“REHRSL” appears, “START ID” flashes in the
display and Rehearsal repeats a 3-second portion
starting from the selected position. Note that the
repeated portion will play back 8 times, with the
remaining number of times appearing to the right
of the “REHRSL”. After 8 times, the deck
automatically stops.
Writing Sub Codes
Adjusting the Position of an Existing Start ID
You can adjust the position of previously recorded
start IDs.
REC LEVEL
REC MODE
SBM
INPUT
MODE
RESET
TIMER
g
OFFREC PLAY
POWER
MARGIN
START ID
RESETERASEWRITE
REHEARSALRENUMBER
AUTO
OPEN/CLOSE
ANALOG
•••
OPTICAL
§
COAXIAL
AMS
pPr
·
•
STANDARD
ON
406
•
48 kHz
317
•••
44.1 kHz
••
•
LONG
28
OFF
•
REC MUTE
•
R)0±≠
PHONES
REC
L R
5
•
•
•
•
9
•
10
PHONE LEVEL
100
2 Press 0 or ) to move the beginning of the
repeated portion.
Each time you press the 0 or ) button, the
beginning of the repeated portion shifts
backwards or forwards in 0.3-second increments,
up to a maximum extent of about 2 seconds (4
seconds in long-play mode) in either direction.
Position where the START
ID REHEARSAL button is
pressed in step 1.
↓
0.3 sec
Movement with each
press of 0
The time in the display shows the shift in position
from the time the START ID REHEARSAL button
was pressed.
3 seconds
Movement with each press of )
0.3 sec
Repeated portion
START ID REHEARSAL
1 During playback, press START ID REHEARSAL
when the existing start ID you want to reposition
is displayed.
The deck rewinds to the beginning of start ID and
Rehearsal repeats a 3-second portion is displayed.
2 Do steps 1 to 3 of “Accurate Positioning of Start
IDs (Rehearsal)” on this page.
You can move the start ID to a maximum extent of
about 2 seconds (4 seconds in long-play mode) in
either direction from its original position.
Note
Start IDs written within 10 seconds from the end of the tape
may be difficult or impossible to move.
Erasing Start IDs
You can erase any start ID.
After pressing
) twice
06.
S
START ID
After pressing
0 twice
06.
3 Press START ID WRITE.
“ID WRITE” appears in the display for a few
seconds and the start ID is written on the tape at
the selected position. “START ID” flashes in the
display during this time.
INPUT
MODE
S
START ID
TIMER
g
OFFREC PLAY
POWER
RESET
MARGIN
START ID
RESETERASEWRITE
REHEARSALRENUMBER
AUTO
OPEN/CLOSE
ANALOG
48 kHz
•••
OPTICAL
44.1 kHz
§
COAXIAL
LONG
AMS
pPr
·
5
•
•
STANDARD
ON
406
•
•
317
•••
••
OFF
REC MUTE
R)0±≠
REC
•
•
28
•
•
9
•
•
10
PHONES
PHONE LEVEL
100
L R
REC LEVEL
REC MODE
SBM
START ID ERASE
Press START ID ERASE when the start ID you want to
erase is displayed.
“(ERASE)” appears in the display as the deck rewinds
to the beginning of the start ID, then “ID ERASE”
appears as the deck erases the start ID.
• It takes 9 seconds to erase a start ID.
• Program numbers are erased together with start IDs.
EN
17
Page 18
Writing Sub Codes
Additional Information
Renumbering the Program Numbers Automatically (Renumbering)
Renumbering searches for each start ID from the
beginning of the tape and assigns a new program
number to each one starting with 1. Use Renumbering
in the following cases:
• When you’ve added a start ID while playing the
tape.
• When a program number is missing due to an erased
start ID.
• When you began recording from the middle of the
tape and wrote a program number that already
exists, or when one of the the start IDs has no
program number.
L R
REC LEVEL
REC MODE
SBM
INPUT
MODE
RESET
TIMER
g
OFFREC PLAY
POWER
MARGIN
START ID
RESETERASEWRITE
REHEARSALRENUMBER
AUTO
OPEN/CLOSE
ANALOG
48 kHz
•••
OPTICAL
44.1 kHz
§
COAXIAL
LONG
AMS
pPr
·
START ID RENUMBER
Press START ID RENUMBER while the deck is playing
or stopped.
“RENUMBER” flashes in the display and the tape is
automatically rewound to its beginning. The deck then
starts searching for start IDs from the beginning of the
tape and assigns a new consecutive program number
to each track. When the deck detects a start ID, the
deck plays the track from the start ID for 2 seconds,
then writes a new program number on the tape.
During this time, “RENUMBER” lights up and
“START ID” flashes.
After Renumbering is finished, the deck rewinds the
tape automatically to its beginning, then stops.
Note
Renumbering may not function correctly when:
• A blank section exists on the tape.
• The interval between two start IDs is less than 18 seconds
(36 seconds in long-play mode).
• A start ID exists within 10 seconds from the end of the
tape.
5
•
•
STANDARD
ON
406
•
•
317
•••
••
OFF
REC MUTE
R)0±≠
REC
•
•
28
•
•
9
•
•
10
PHONES
PHONE LEVEL
100
Precautions
On safety
• Do not disassemble the cabinet as this may result in an
electric shock. Refer servicing to qualified personnel only.
• Should any solid object or liquid fall into the cabinet,
unplug the AC power cord before operating the unit any
further.
On power sources
• Before operating the unit, check that its operating voltage
is identical with your local power supply. The operating
voltage is indicated on the nameplate at the rear of the
unit.
• The unit is not disconnected from the AC power source
(mains) as long as it is connected to the wall outlet, even if
the unit itself has been turned off.
• If you are not going to use the unit for a long time, be sure
to disconnect the AC power cord (mains lead) from the
wall outlet. To disconnect the cord, grasp the plug itself;
never pull the cord.
• AC power cord must be changed only at the qualified
service shop.
On operation
If the unit is brought directly from a cold place to a warm
place, or is placed in a very damp room, moisture may
condense inside the unit, “CAUTION” may appear in the
display, and the unit may not operate. If this happens,
remove the cassette and leave the unit turned on for about
an hour until the moisture evaporates.
On placement
• Place the unit in a location with adequate ventilation to
prevent heat build-up.
• Do not place the unit:
— on a soft surface such as a rug that might block the
ventilation holes on the bottom.
— near heat sources.
— in direct sunlight.
— in an inclined position.
— in a place subject to excessive dust or mechanical
shock.
On the tapes
• After using a tape, put it into its case and keep it where it
will not be subject to sunlight, high temperature, moisture
or dust.
• The DAT cassette shell is designed to keep out dust. Do
not open the case to expose the tape.
• The hole at the back of the cassette is the detector slot. Do
not cover this slot.
18
EN
Page 19

Additional Information
Regarding tapes of over 120 minutes
Do not use thin-tape cassettes (with a playing time of over
120 minutes) to record important material since such
cassettes are subject to the following problems:
— Improper threading of the tape after repeated AMS,
rewinding, fast-forwarding, or cueing operations.
— Incorrect writing and erasing of start IDs.
— Sound distortion.
If you have any questions or problems concerning your
unit, please consult your nearest Sony dealer.
Cleaning
Cleaning the cabinet, panel and controls
Use a soft cloth slightly moistened with a mild
detergent solution. Do not use any type of abrasive
pad, scouring powder or solvent such as alcohol or
benzine.
Cleaning the head and tape path
• Prolonged operation will cause contamination of the
head. To obtain the best possible recording and
playback sound, we recommend that you use the
Sony DT-10CL cleaning cassette (not supplied) to
clean the head after every ten hours or so of
operation.
• Clean the head with the cleaning cassette when the
deck has not been used for a long period of time.
Contamination of the head may cause sound dropout during playback.
Display Messages
The following table explains the various messages that
appear in the display.
Message Meaning
BLANK The deck is searching for the beginning of the
CAUTION
CLEANING
(ERASE)
ID ERASE
ID WRITE
NO TAPE
PROHIBIT
PROTECT
REHRSL
SOURCE
blank section on the tape.
A safety mechanism is operating because of
condensation or other reasons.
Cleaning the head and tape path is
recommended. After about 10 hours of deck
use, this message appears for about 10
seconds whenever you turn on the deck .
The deck is searching for the beginning of the
start ID to be erased.
A start ID is being erased.
A start ID or program number is being
written.
A cassette is not inserted into the deck.
The program source you are about to record
cannot be recorded through the digital input
jacks or connectors. For more information,
see “Guide to the Serial Copy Management
System” (see pages 22 and 23).
The record-protect hole on the cassette is
open and recording on the tape cannot be
done.
Rehearsal is on.
The deck has been in recording pause for
about 10 minutes, or you've pressed the
r REC button while no cassette is in the deck
or the cassette is record-protected.
Using the cleaning cassette
1 Insert the cleaning cassette as you would a normal DAT
cassette.
2 Press ·. After 10 seconds, press p.
Do not press the r REC or ) button for cleaning.
3 Remove the cleaning cassette without rewinding it. You
should rewind the cleaning cassette only when it has
reached the end.
Notes on cleaning
• After 10 hours of operation, “CLEANING” appears in the
display for about ten seconds when you turn on the deck.
It is recommended that you clean the head and tape path
periodically, using this message as a guide.
• Due to the shortness of the cleaning cassette, the counter
will not show the actual running time and remaining time
of the cassette.
TAPE END
TAPE TOP
UNLOCK
WAIT
(WRITE)
The tape has come to the end of the recorded
portion.
The tape has reached its beginning.
No digital signal is being input to the jack or
connector that you selected with the INPUT
switch.
The deck is searching for the beginning of the
blank section on the tape.
This appears when the START ID WRITE
button is pressed.
19
EN
Page 20

Additional Information
Troubleshooting
If you’ve experienced any of the following difficulties
while using the deck, use this section as a guide to
remedy the problem. Should any problem persist,
consult your nearest Sony dealer.
The cassette holder does not close.
/ Check that the cassette is inserted correctly (see pages 6
and 8).
/ Insert the cassette beyond the silver bar (see pages 6 and
8).
Start ID writing is not possible during recording.
/ The start ID cannot be written within 9 seconds (18
seconds in long-play mode) after the end of the previous
start ID. Make sure at least 9 seconds (18 seconds in the
long-play mode) has passed after the last start ID and
before writing a new one.
Direct Access does not work.
/ The specified program number does not exist on the
tape. Press START ID RENUMBER to renumber the
program numbers.
/ The program numbers are out of order. Press START ID
RENUMBER to renumber the program numbers.
The function buttons do not work.
/ The deck has just been turned on and will not operate for
about 4 seconds. Wait 4 seconds (10 seconds when
“CLEANING” appears) before attempting any operation.
/ The P button is activated. Press P to cancel pause.
/ The tape has reached its end. Press 0 to rewind the
tape.
No sound.
/ Make the proper connections (see pages 4 and 5).
/ The connected amplifier is not being operated properly.
Operate the amplifier as required for the respective deck
operation. (Refer to the operating instructions of the
amplifier.)
The deck does not record.
/ The record-protect hole on the cassette is open. Slide the
record-protect tab to close the hole (see page 7).
/ The INPUT switch is incorrectly set. Set INPUT to the
correct position.
/ The REC LEVEL control is set at 0. Turn REC LEVEL
clockwise to raise the recording level (only during
analog recording).
/ The signal input to the digital input jack or connector is
protected against digital copying (only during digital
recording). Input the signal through the analog input
jack or connector.
The deck begins rewinding the tape during playback.
/ Repeat Play is on. Press REPEAT on the remote
repeatedly to turn off “REPEAT” or “REPEAT 1” in the
display and cancel Repeat Play.
The tape operation buttons do not function while writing
or erasing a start ID.
/ All buttons do not work during the 9 seconds the start ID
is being written (18 seconds in long-play mode). Wait
until the writing the start ID finishes before operation.
Absolute time codes writing is not possible.
/ Recording began within a blank section.
Rewind the tape to its beginning, or locate the end of the
recorded portion with End Search before starting
recording.
Tape transport is excessively loud during fast-forwarding
or rewinding.
/ The noise is caused by the cassette and is not a
mechanical problem.
The tape stops suddenly.
/ The cassette is defective or damaged.
Press OPEN/CLOSE § and replace the cassette with a
new one.
20
The OPEN/CLOSE § button does not work.
/ The OPEN/CLOSE § button does not function during
recording. Press p or P to stop recording first, then
press OPEN/CLOSE §.
momentarily before starting to move.
/ This is normal and is not a mechanical problem.
The deck cannot be operated with the remote (supplied).
/ The battery is weak. Change both batteries.
“CAUTION” appears and the deck cannot be operated.
When pressing 0 /) or ≠/±, the tape stops
/ A safety mechanism is operating because of
condensation. Remove the cassette and leave the deck
turned on for about an hour. Then turn the deck off,
then on again (see page 18).
Sub codes writing is not possible.
/ The record-protect hole on the cassette is open. Slide the
record-protect tab to close the hole (see page 7).
EN
“SBM” does not appear in the display even though SBM
is set to ON.
/ ”SBM” appears only during the recording of analog
input signals with a sampling frequency of 48 kHz or
44.1 kHz, not during the recording of a digital input
signal, or an analog input signal with a sampling
frequency of 32 kHz, or during playback.
Page 21

Specifications
Additional Information
General section
Power requirements
System
Tape Digital audio tape
Recording head Rotary head
Recording time Standard: 120 minutes
(when using DT-120) Long-play: 240 minutes
Tape speed Standard: 8.15 mm/s
Drum rotation Standard: 2,000 rpm
Track pitch 13.6 µm (20.4 µm)
Sampling frequency 48 kHz, 44.1 kHz, 32 kHz
Number of channels 2 channels, stereo
D/A conversion Standard: 16 - bit linear
(quantization) Long-play: 12 - bit non-linear
Frequency response* Standard: 2 - 22,000 Hz (±0.5 dB)
Signal-to-noise ratio* 90 dB or more (Standard and long-play
Dynamic range* 90 dB or more (Standard and long-play
Total harmonic Standard: 0.005% or less (1 kHz)
distortion* Long-play: 0.008% or less (1 kHz)
Wow and flutter Below measurable limit (±0.001%
* During analog input with the SBM function off.
Long-play: 4.075 mm/s
Long-play: 1,000 rpm
Long-play: 2 - 14,500 Hz (±0.5 dB)
mode)
mode)
W.PEAK)
Input connectors
ANALOG
DIGITAL
OPTICAL
Phono jacks
Optical
connector
Input impedanceJack typeConnector
47 kilohms –4 dBs
——
Rated input level
Where purchased
Canada
Europe
Power consumption 30 W
Dimensions Approx 430 × 106 × 325 mm (w/h/d)
Weight Approx 5.0 kg (11 lb 0.4 oz)
Power requirements
120 V AC, 60 Hz
230 V AC, 50/60 Hz
(17 × 4 1/4 × 12 7/8 inches)
Supplied accessories See page 4.
Design and specifications are subject to change without notice.
SBM
(Super Bit Mapping)
Function
During analog recording, the SBM function lowers
noise within the frequency band to which to the human
ear is most receptive to noise, thereby, sharply
expanding the auditory dynamic range of the recorded
signal.
High-precision pulse A/D converter
The deck uses a pulse AD converter and decimation
filter to convert an analog signal into a quantized 24-bit
digital signal. The deck, like CD players, uses 16-bit
quantization, and thus the 8-bit difference results in
more precise quantization, more signal information
and less quantizing noise than 16-bit quantization.
During conversion of the 24-bit data to a 16-bit
recording signal, the SBM function boosts sound
quality by reintegrating 4 bits of signal information
that would normally be lost into the 16-bit signal.
DIGITAL
COAXIAL
Phono jack 75 ohms
0.5 Vp-p
Output connectors
—
Rated
output
level
–4 dBs
(wavelength
660 nm)
1.2 mW
impedance
10 kilohms
or more
32 ohms
Connector Jack type Load
ANALOG
DIGITAL
OPTICAL
PHONES
jacks
Optical
connector
Stereo
phone-plug
jack
Output
impedance
470 ohmsPhono
100 ohms
—
EN
21
Page 22

Additional Information
Applying the principle of human hearing
The SBM function applies the principle of human
hearing in the reintegration of signal information. The
auditory range of the human ear is generally
considered to be 20 Hz to 20 kHz; hearing sensitivity,
however, shows greater sensitivity to the range
between 3 kHz and 4 kHz, and lower sensitivity to
frequencies above and below this range. This principle
applies also to quantizing noise as well. By reducing
quantizing noise in this particular range, signals can be
recorded to produce more expansive sound than is
possible by a uniform reduction of noise over the entire
audible range.
Noise-shaping filter
The SBM function uses a noise-shaping filter (see Fig.
A) with a frequency response similar to that of the
human ear to reduce quantizing noise within the most
sensitive frequency range, and to feed back the
quantizing error (that is normally lost) back to the
input signal, re-integrating the low-end bit information
with the high-end bit information.
Fig. A
24-bit information
input
Fig. B shows the improvement in the quantizing noise
level when the SBM switch is on (theoretical values).
Given a noise level of 0 dB when the SBM switch is off,
the improvement in noise level for sampling
frequencies lower than 3 kHz exceeds 10 dB when the
SBM is activated.
25
20
15
Noise
10
level
5
(dB)
0
-5
-10
20 10050 200 1k500 2k 15k5k 10k
Sampling frequency (Hz)
The SBM function operates only during recording. The
improved sound produced by the SBM function,
however, can be enjoyed during playback, regardless
of the SBM switch position or the DAT deck being
used.
Noise-shaping
filter
Fig. B
16-bit SBM
//
output
SBM
ON
SBM
OFF
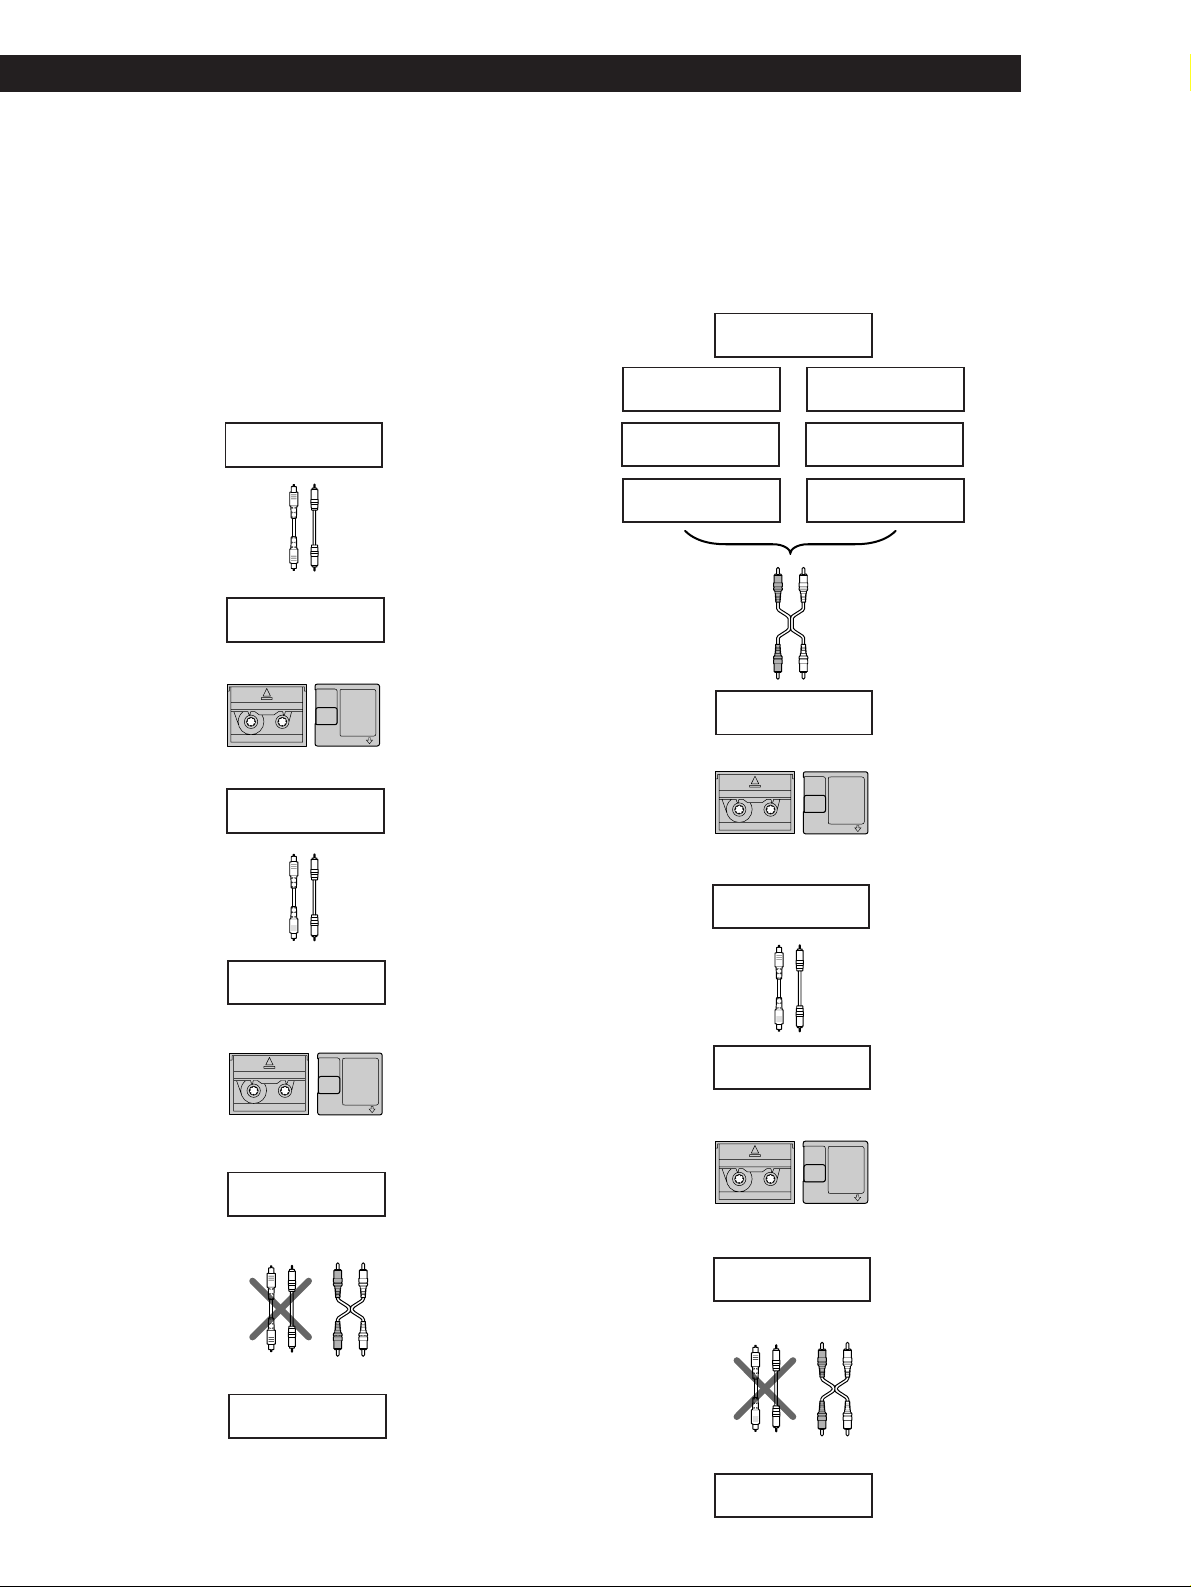
Guide to the Serial Copy
Management System
This deck uses the Serial Copy Management System,
which allows only first-generation digital copies to be
made of premastered software via the deck’s digital
input jack. An outline of this system appears below:
1 You can record from digital program sources (CDs,
premastered MDs or DATs) onto a DAT or recordable MD
via digital input jack on the DAT or MD deck. You
cannot, however, record from this recorded DAT or MD
onto another DAT or recordable MD via the digital input
jack on the DAT or MD deck.
Playing
DAT deck MD deck
Optical cable or coaxial
digital connecting
cable
Recording
DAT or MD
Playing
Digital output jack
Optical cable or
coaxial digital
connecting cable
Digital input jack Line (analog) input jack
Recording
CD player
DAT deck or
MD deck
v
v
DAT deck or
MD deck
Line (analog) output jack
DAT deck or
MD deck
Digital output jack
Digital input jack
First-generation
DAT or MD
recorded via
digital-to-digital
connection
Audio connecting
cord
22
EN
Page 23
Additional Information
2 You can record the digital input signal of a digital satellite
broadcast onto a DAT or recordable MD via the digital
input jack on the DAT or MD deck which is capable of
handling a sampling frequeny of 32 kHz or 48 kHz. You
can then record the contents of this recorded DAT or MD
(first-generation) onto another DAT or recordable MD via
digital input jack on the DAT or MD deck to create a
second-generation digital copy. Subsequent recording
from the second-generation copy onto another DAT or
recordable MD is possible only through the analog input
jack on the DAT or MD deck.
Playing
Optical cable or
coaxial digital
connecting cable
Recording
DAT or MD
Playing
Optical cable or
coaxial digital
connecting cable
Recording
DAT or MD
Playing
Digital output jack
Optical cable or
coaxial digital
connecting cable
BS tuner
DAT deck or
MD deck
v
v
DAT deck or
MD deck
DAT deck or
MD deck
v
v
DAT deck or
MD deck
Line (analog) output jack
Digital output jack
Digital input jack
First-generation
DAT or MD
recorded via
digital-to-digital
connection
Digital output jack
Digital input jack
Secondgeneration DAT
or MD recorded
via digital-todigital
connection
Audio connecting
cord
3 You can record a DAT or MD recorded via the DAT or MD
deck’s analog input jack onto another DAT or MD via the
DAT or MD deck’s digital output jack. You cannot,
however, make a second-generation DAT or MD copy via
the DAT or MD deck’s digital output jack.
Playing
Tuner
Cassette deck
DAT deck
Audio connecting cord
Recording
Turntable
CD player
Microphone
amplifier
MD deck
Line (analog) output jack
Line (analog) input jack
DAT deck or
MD deck
v
DAT or MD
DAT or MD
recorded via
analog-to-digital
connection
v
Playing
Optical cable or
Coaxial digital
connecting cable
Recording
DAT or MD
DAT deck or
MD deck
DAT deck or
MD deck
v
Digital output jack
Digital input jack
First-generation
DAT or MD
recorded via
digital-to-digital
connection
v
Playing
Digital output jack Line (analog) output jacks
DAT deck or
MD deck
Digital input jack
Recording
Line (analog) input jack
DAT deck or
MD deck
Optical cable or
coaxial digital
connecting cable
Digital input jack
Recording
Line (analog) input jacks
DAT deck or
MD deck
Audio connecting
cord
23
EN
Page 24

Index
Index
A
Absolute time 13
Absolute time codes 9
Adjusting the recording level
10
AMS (Automatic Music Sensor)
14
B
Batteries 4
Blank section 9, 10
C
Cleaning 19
Cleaning the head and tape
path 19
D
Direct Access 14
Display messages 19
E, F, G
Emphasis 9, 13
End Search 10
H
Hooking up the system 4
I, J, K, L
Inserting batteries into the
remote 4
M, N, O
Margin indication 10
P, Q
Playing a DAT 8
Playing time of the track 13
Program numbers 15, 18
S
SBM function 11, 12
Serial Copy Management
System 22
Setting the recording mode 11
Sound-muted section 9, 12
Start ID
Accurate positioning of start
IDs 17
Adjusting the position of an
existing start ID 17
Erasing start IDs 17
Manual writing of start IDs
during recording 16
Writing the start IDs
automatically during
recording 16
Sub Codes 15
T, U, V, W, X, Y, Z
Tape running time 13
Timer Playing 15
Timer Recording 12
Names of controls
Buttons
CLEAR 14
COUNTER MODE 13
COUNTER RESET 13
MARGIN RESET 10
MODE 13
OPEN/CLOSE § 6 - 8
r REC 7
REC MUTE R 12
REPEAT 14
RESET 13
START ID AUTO 15
START ID ERASE 17
START ID REHEARSAL 16, 17
START ID RENUMBER 18
START ID WRITE 15, 16
p 7, 8, 12
· 7, 8, 10, 12, 14, 15
0/) 7, 8, 10, 16
P 7, 10, 12, 15
≠/± 8, 14
Switches
INPUT 6
POWER 6, 8
REC MODE 11
SBM 11
TIMER 12, 15
Controls
PHONE LEVEL 8
REC LEVEL 10
Jacks
ANALOG IN 4, 6
ANALOG OUT 4
DIGITAL COAXIAL IN 4, 6
DIGITAL OPTICAL IN 4, 6
DIGITAL OPTICAL OUT 4
PHONES 8
24
R
Recording on a DAT 6
Record Muting 12
Record-protect tab 7
Rehearsal 16
Remaining time on the tape 13
Renumbering 18
Repeat Play
Playing a track repeatedly 14
Playing all tracks repeatedly
14
EN
Page 25

Index
25
EN
Page 26

AVERTISSEMENT
Bienvenue!
Au sujet de ce mode
Afin d’éviter tout risque
d’incendie ou d’électrocution,
ne pas exposer cet appareil à
la pluie ou à l’humidité.
Afin d’écarter tout risque
d’électrocution, garder le
coffret fermé. Ne confier
l’entretien de l’appareil qu’à
un technicien qualifié.
Pour les utilisateurs au
Canada
ATTENTION
POUR PREVENIR LES CHOCS
ELECTRIQUES, NE PAS UTILISER
CETTE FICHE POLARISEE AVEC UN
PROLONGATEUR, UNE PRISE DE
COURANT OU UNE AUTRE SORTIE
DE COURANT, SAUF SI LES LAMES
PEUVENT ETRE INSEREES A FOND
SANS EN LAISSER AUCUNE PARTIE
A DECOUVERT.
Merci d’avoir acheté cette platine à
cassette audionumérique Sony. Avant la
mise en service de la platine, veuillez
lire attentivement ce mode d’emploi et
le conserver pour toute référence.
Le modèle DTC-ZE700 comporte les
caractéristiques suivantes:
• Convertisseurs linéaires haute densité
Le convertisseur A/N à impulsion
produit un son clair et de grande
qualité avec une distorsion croisée
proche de zéro et le convertisseur N/
A à impulsion, alimenté vers l’avant
et équipé d’un filtre numérique
nouvellement conçu, réduit le bruit de
quantification dans la plage auditoire,
ce qui permet d’accroître l’amplitude
du son.
• Fonction SBM (Super Bit Mapping)
(voir page 21).
• Système de protection contre les
copies multiples (voir page 22)
• Trois fréquences d’échantillonnage
(48 kHz, 44,1 kHz, 32 kHz)
• Enregistrement et lecture en mode
longue durée
• Enregistrement analogique à 44,1 kHz
• Sous-codes
Les codes ID de départ, les numéros
de programme et autres sous-codes
inscrits sur la bande permettent de
localiser rapidement les plages.
• Volet du logement de cassette
transparent
Le volet transparent du logement de
cassette permet de voir le transport de
la bande pendant la lecture et
l’enregistrement.
d’emploi
Les instructions de ce mode d’emploi
concernent le modèle DTC-ZE700.
Conventions
Dans ce mode d’emploi, les commandes
de la platine sont utilisées dans les
instructions.
Les symboles suivants sont utilisés.
Donne des informations et des
z
conseils pour faciliter les
opérations.
Indique que vous devez utiliser la
Z
télécommande pour effectuer
cette opération.
F
2
Page 27

Table des matièr es
Préparatifs
Déballage 4
Raccordements 4
Enregistrement sur une cassette DAT 6
Lecture d'une cassette DAT 8
Enregistrement
Ce que vous devez savoir avant de commencer à enregistrer 9
Réglage du niveau d'enregistrement pour l'enregistrement analogique 10
Localisation de la fin de l’enregistrement précédent (recherche de fin) 10
Réglage du mode d'enregistrement 11
Utilisation de la fonction SBM (Super Bit Mapping) 11
Création d'un passage en sourdine pendant l'enregistrement (silencieux
d'enregistrement) 12
Enregistrement avec une minuterie (enregistrement programmé) 12
Lecture
Utilisation de l'affichage 13
Localisation d'une plage (AMS*/accès direct) 14
Répétition de plages (lecture répétée) 14
Lecture avec une minuterie (lecture programmée) 15
F
Inscription de sous-codes
Utilisation des sous-codes 15
Inscription de codes ID de départ pendant l'enregistrement 15
Inscription de codes ID de départ pendant la lecture 16
Changement de la position d'un code ID de départ préenregistré 17
Effacement de codes ID de départ 17
Renumérotation automatique des numéros de programme 18
Informations supplémentaires
Précautions 18
Nettoyage 19
Messages sur l'affichage 19
Guide de dépannage 20
Spécifications 21
Fonction SBM (Super Bit Mapping) 21
Guide pour le système de protection contre les copies multiples 22
Index 24
F
3
Page 28
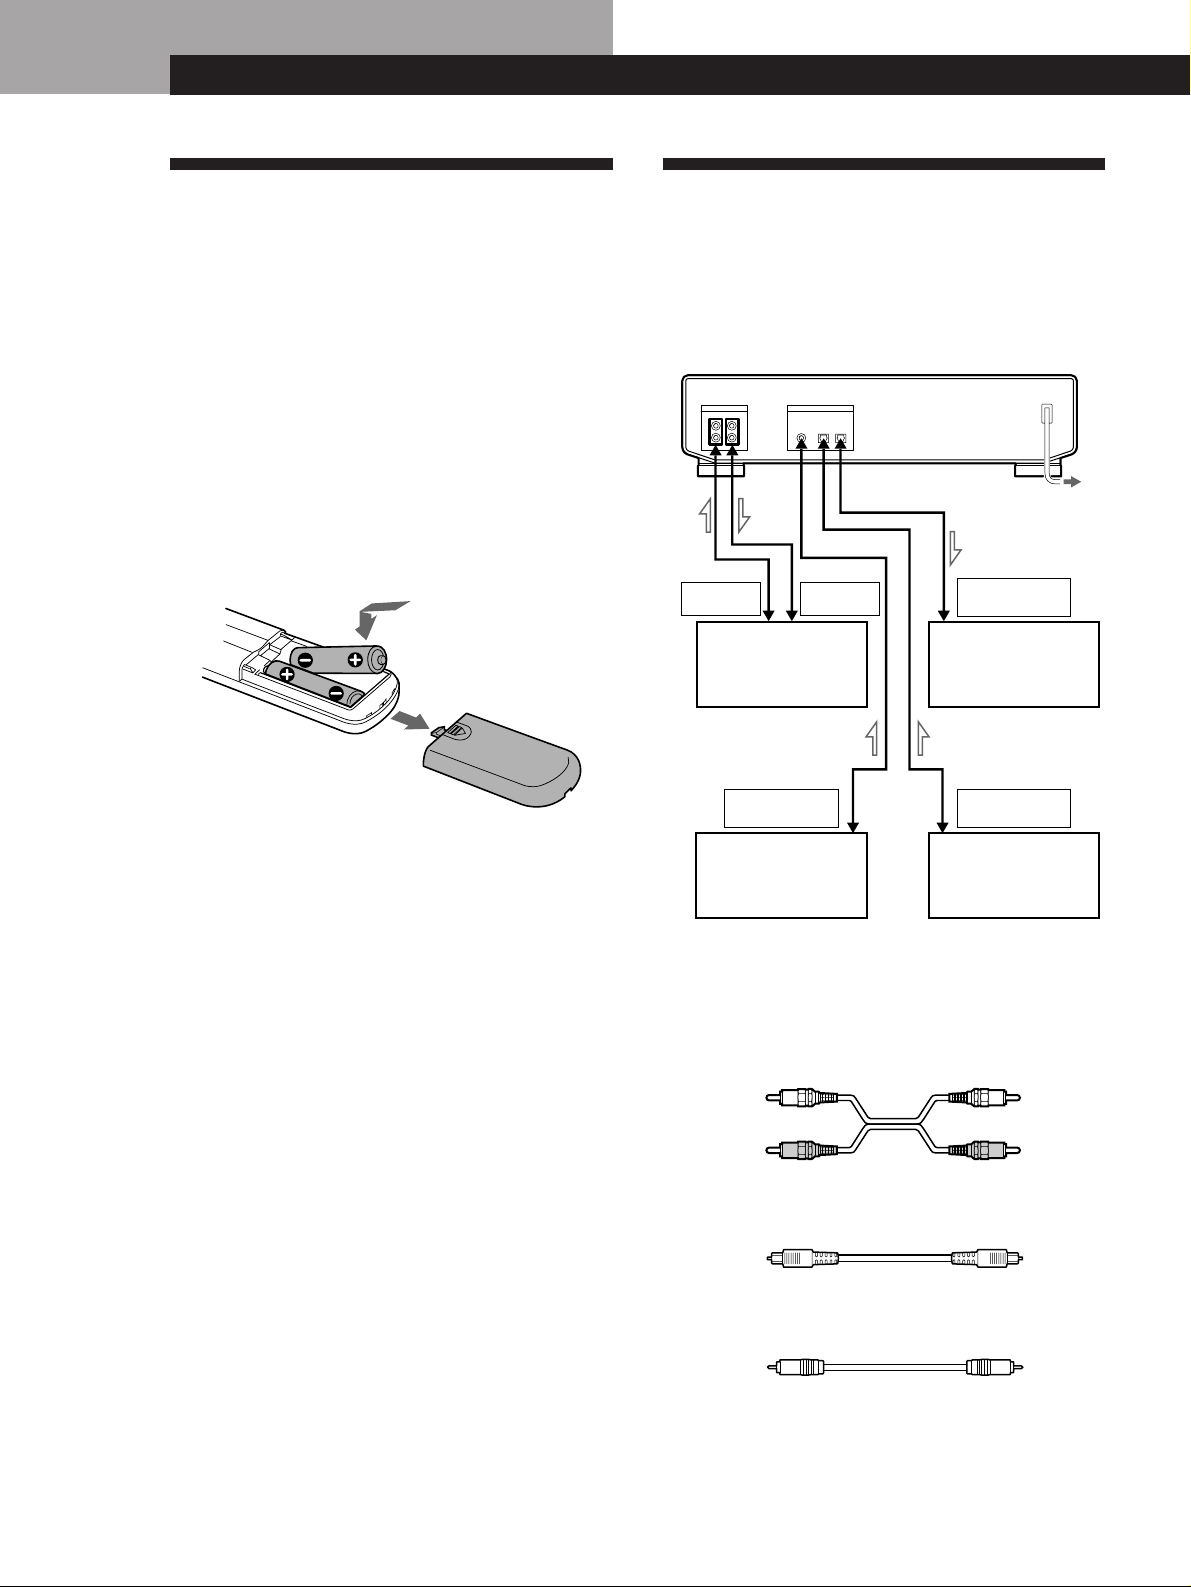
Préparatifs
ANALOG
OUT
ANALOG
IN
DIGITAL
COAXIAL OUT
DIGITAL
OPTICAL OUT
DIGITAL
OPTICAL IN
IN
COAXIAL
IN IN OUT
OPTICAL
ANALOG IN/OUT
DIGITAL IN/OUT
LRL
R
OUT
Préparatifs
Déballage
Vérifiez que les accessoires suivants se trouvent dans
l’emballage:
• Cordons de raccordement audio à fiche banane (2)
• Télécommande RM-D757 (1)
• Piles de format AA (R6) (2)
• Mode d’emploi (1)
• Carte de garantie (Canadian model only) (1)
Mise en place des piles dans la
télécommande
Installez deux piles de format AA (R6) en faisant
correspondre les pôles + et – des piles avec le schéma à
l’intérieur du logement.
Raccordements
Ce paragraphe explique comment raccorder la platine
à un amplificateur, un lecteur CD, un lecteur MD ou
autre appareil audio. N’oubliez pas de mettre tous les
appareils hors tension avant d’effectuer les
raccordements.
à une prise murale
Amplificateur, etc.
Lecteur CD, platine
DAT ou platine MD,
etc.
z Quand remplacer les piles
Le piles durent environ six mois dans des conditions
d’utilisation normales. Quand la télécommande ne peut
plus contrôler la platine, remplacez les deux piles par
des neuves.
Remarques
• Ne laissez pas la télécommande dans un endroit
extrêmement chaud ou humide.
• Faites attention que rien ne pénètre dans la télécommande
particulièrement lors du remplacement des piles.
• Ne pas exposer le détecteur infrarouge directement au
soleil ou à un éclairage puissant car un mauvais
fonctionnement pourrait s’ensuivre.
• Si vous ne comptez pas utiliser la télécommande pendant
un certain temps, enlevez les piles pour éviter tout
dommage dû à une fuite d’électrolyte et à la corrosion.
Lecteur CD, platine
DAT ou platine MD,
etc.
Lecteur CD, platine
DAT ou platine MD,
etc.
ç: Sens du signal
De quels cordons avez-vous besoin?
• Cordons de raccordement audio (fournis) (2)
Blanc
(gauche)
Rouge
(droit)
• Câbles optiques (POC-15, etc.) (non fournis) (2)
• Câble de raccordement numérique coaxial
(VMC-10G, etc.) (non fourni) (1)
Blanc
(gauche)
Rouge
(droit)
F
4
Page 29
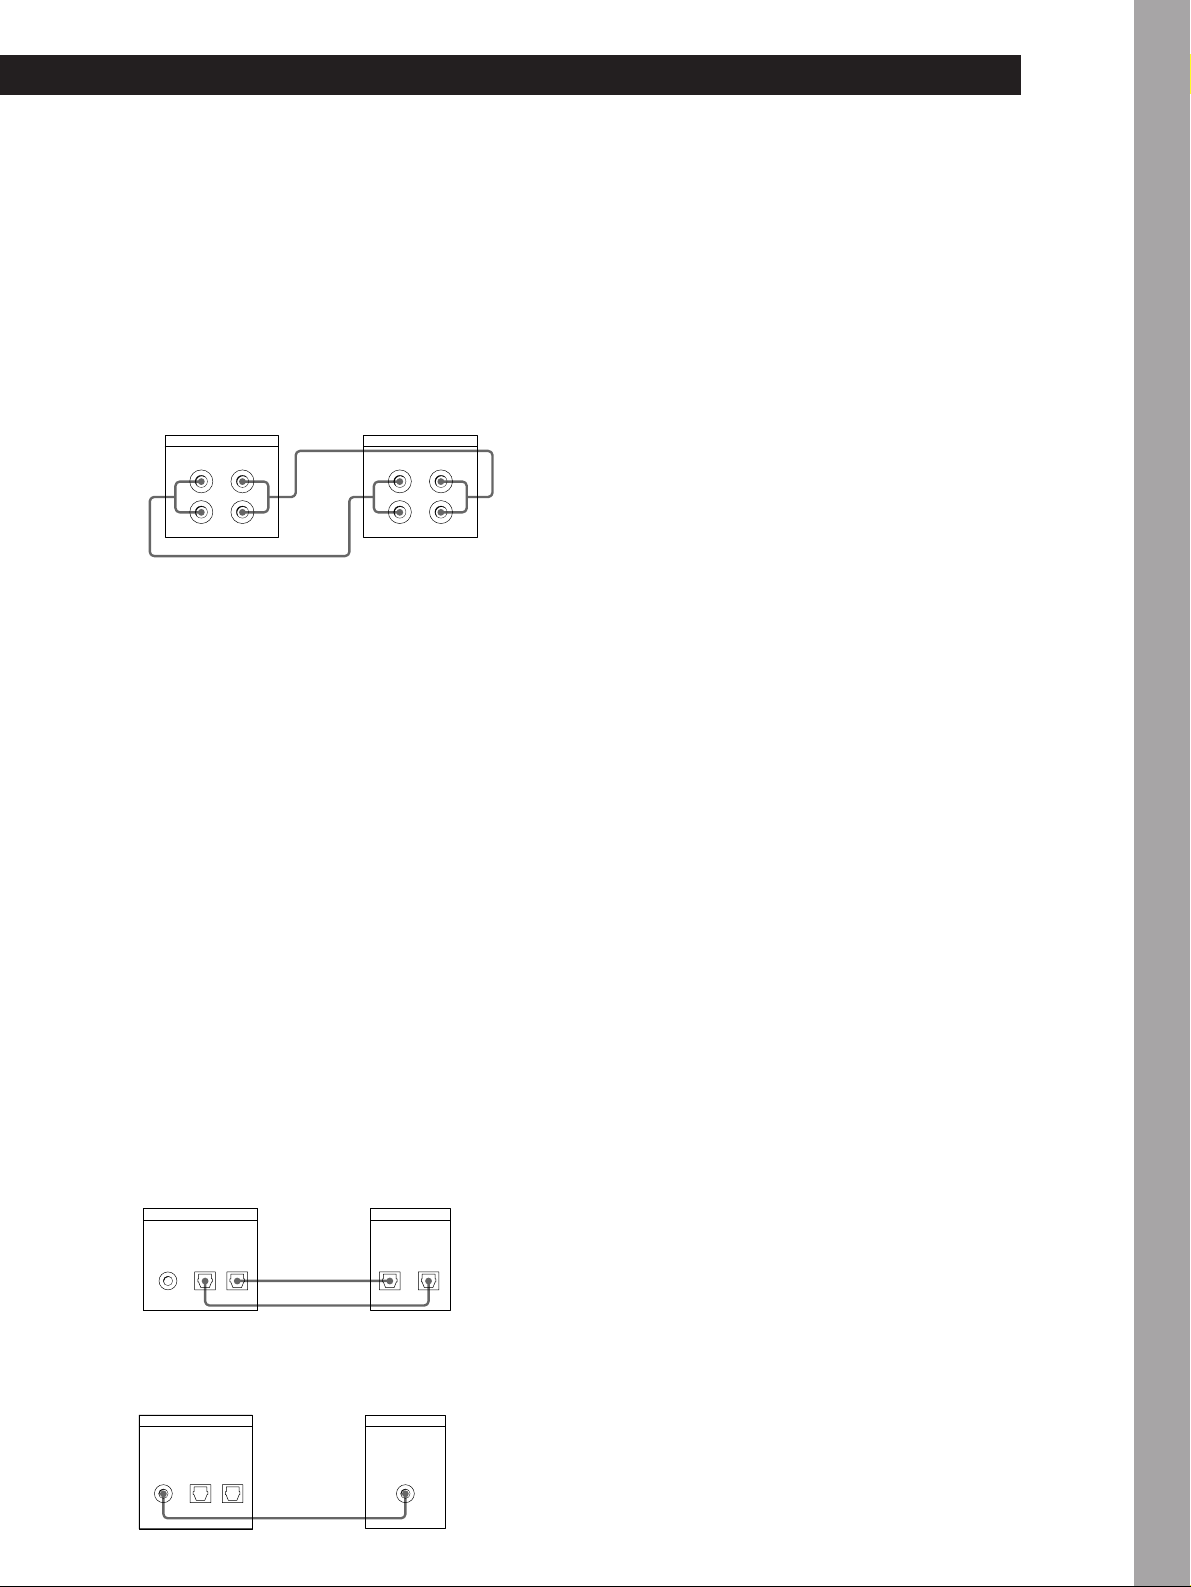
Préparatifs
Raccordements
p Raccordement de la platine à un amplificateur
Utilisez les cordons de raccordement audio fournis
pour raccorder la platine à un amplificateur. Faites
correspondre les cordons aux prises qui ont la même
couleur: rouge (droit) à rouge et blanc (gauche) à
blanc. Vérifiez que les fiches et les broches sont bien
insérées dans les prises pour éviter tout
bourdonnement ou bruit.
Platine DAT Amplificateur
ANALOG IN/OUT
L
R
OUTIN
ç
L
R
Ç
LINE IN/OUT
OUT IN
L
R
L
R
z Pour enregistrer avec un microphone
Raccordez le connecteur de sortie analogique du
microphone stéréo aux prises ANALOG IN de la
platine.
p Raccordement de la platine à un appareil
audionumérique
Vous pouvez enregistrer le signal d’un appareil
audionumérique, tel un amplificateur numérique,
une platine DAT, un lecteur CD, un lecteur MD ou
un tuner satellite, en raccordant les connecteurs de
sortie numérique de l’appareil aux connecteurs
d’entrée numérique (DIGITAL OPTICAL IN ou
DIGITAL COAXIAL IN) de la platine. Cependant,
vous ne pouvez pas enregistrer le signal
audionumérique de la platine en raccordant le
connecteur de sortie numérique (DIGITAL
OPTICAL OUT) de la platine au connecteur d’entrée
numérique d’un appareil, tel un amplificateur
numérique, une platine DAT ou un lecteur MD.
Utilisez des câbles optiques (POC-15A ou
équivalent) (non fournis) ou un cordon de
raccordement coaxial numérique (VMC-10G ou
équivalent) (non fourni).
• Utilisation de câbles optiques
Platine DAT
DIGITAL IN/OUT
OPTICAL
COAXIAL
IN
OUTIN
Appareil audionumérique
ç
Ç
OPTICAL
IN OUT
Remarque
Si “PROHIBIT” apparaît sur l’affichage, l’enregistrement est
impossible via les prises numériques.
Dans ce cas, réglez le sélecteur INPUT sur ANALOG et
enregistrez la source de programme via les prises ANALOG
IN.
Branchement du cordon d’alimentation
secteur
Branchez le cordon d’alimentation secteur sur une
prise murale.
Que faire ensuite ?
La platine est prête à fonctionner.
Pour les fonctions de base, voir les pages 6 à 8 et pour
fonctions élaborées, les paragraphes à partir de la page 9.
Opérations de base
• Utilisation d‘un câble de raccordement numérique
coaxial
Platine DAT
DIGITAL IN/OUT
OPTICAL
COAXIAL
IN
OUTIN
Appareil audionumérique
Ç
COAXIAL
OUT
F
5
Page 30

Opérations de base
Opérations de base
Enregistr ement sur une cassette DAT
73 45
L R
••
REC MUTE
SBM
ON
OFF
R)0±≠
REC
REC LEVEL
5
•
•
406
•
•
3
7
•
•
28
•
•
1
9
•
•
10
PHONE LEVEL
PHONES
100
POWER
REC MODE
INPUT
·
ANALOG
OPTICAL
COAXIAL
•••
48 kHz
44.1 kHz
LONG
STANDARD
•••
MODE
RESET
TIMER
g
OFFREC PLAY
START ID
REHEARSALRENUMBER
AUTO
MARGIN
RESETERASEWRITE
OPEN/CLOSE
§
AMS
pPr
2 68
En ce qui concerne le
raccordement, voir les
pages 4 et 5.
Mettez l’amplificateur sous tension et démarrez la lecture sur
1
la source de programme que vous souhaitez enregistrer.
Appuyez sur POWER.
2
Appuyez sur OPEN/CLOSE § et insérez une cassette.
3
OPEN/CLOSE
§
Réglez le sélecteur INPUT en fonction de la prise d’entrée
4
utilisée.
Pour enregistrer via
ANALOG IN
DIGITAL OPTICAL IN
DIGITAL COAXIAL IN
Côté avec fenêtre vers le haut
OPEN/CLOSE
bb
Appuyez sur OPEN/
CLOSE § pour fermer
Insérez la cassette
au-delà du trait
argent.
le logement de
cassette.
Réglez INPUT sur
ANALOG
OPTICAL
COAXIAL
§
F
6
Page 31

Opérations de base
Localisez l’endroit où vous souhaitez commencer
5
l’enregistrement.
Pour enregistrer depuis le début de la cassette
Appuyez sur 0 pour rebobiner la bande jusqu’au début.
Pour commencer à enregistrer à la fin de l’enregistrement
précédent
1 Appuyez sur 0 pour rebobiner la bande jusqu’au début.
2 Appuyez sur ).
La platine localise la fin de l’enregistrement précédent et
s’arrête automatiquement.
Appuyez sur r REC.
6
La platine est prête pour l’enregistrement.
Si vous enregistrez un signal d’entrée analogique, réglez le
7
niveau d’enregistrement avec la commande REC LEVEL.
Opérations de base
z Si “UNLOCK” apparaît sur
l’affichage
L’appareil de source n’est pas
raccordé correctement à la
platine ou bien il n’est pas
sous tension. Assurez-vous
que l’appareil de source est
correctement raccordé et sous
tension.
Le niveau d’enregistrement recommandé est 3. Pour plus de
détails, voir “Réglage du niveau d’enregistrement pour
l’enregistrement analogique” à la page 10.
Appuyez sur P ou ·.
8
L’enregistrement commence.
Démarrez la lecture sur la source de programme.
9
Quand la bande est finie, elle est automatiquement rebobinée
jusqu’au début et la platine s’arrête (rebobinage automatique).
Pour
Arrêter l’enregistrement
Faire une pause pendant l’enregistrement. P. Appuyez de nouveau sur la touche pour
Enlever la cassette
Pour éviter un effacement accidentel
Poussez le taquet de protection contre l’enregistrement vers la gauche
comme illustré ci-dessous.
Appuyez sur
p
poursuivre l’enregistrement.
OPEN/CLOSE § après avoir arrêté
l’enregistrement.
Enregistrement
impossible (l’orifice
est ouvert).
Enregistrement
possible (l’orifice
est fermé).
F
7
Page 32

Opérations de base
Lecture d’une cassette DAT
3
REC MODE
48 kHz
44.1 kHz
LONG
STANDARD
•••
••
REC MUTE
SBM
ON
OFF
R)0±≠
REC
3
•
28
•
1
PHONES
POWER
MODE
RESET
TIMER
g
OFFREC PLAY
START ID
REHEARSALRENUMBER
AUTO
MARGIN
RESETERASEWRITE
OPEN/CLOSE
INPUT
ANALOG
•••
OPTICAL
§
COAXIAL
AMS
pPr
·
2 4
REC LEVEL
406
•
•
5
•
PHONE LEVEL
L R
•
•
7
•
•
9
•
10
100
En ce qui concerne le
raccordement, voir les
pages 4 et 5.
z Pour écouter avec un casque
Branchez le casque sur la
prise PHONES. Réglez le
volume avec la commande
PHONE LEVEL.
Mettez l’amplificateur sous tension et réglez le sélecteur de
1
source sur la position DAT.
Appuyez sur POWER.
2
Appuyez sur OPEN/CLOSE § et insérez une cassette.
3
OPEN/CLOSE
§
Appuyez sur ·.
4
La lecture commence sur la platine. Réglez le volume sur
l’amplificateur.
Côté avec fenêtre vers le haut
bb
Appuyez sur OPEN/
Insérez la cassette
au-delà du trait
argent.
CLOSE § pour fermer le
logement de cassette.
OPEN/CLOSE
§
Pour
Arrêter la lecture
Passer à la plage suivante
Revenir à la plage précédente
Appuyez sur
p
±
≠
Avancer rapidement ou rebobiner la bande ) ou 0 quand la platine est à l’arrêt.
Avancer rapidement ou rebobiner la bande
en écoutant le son
) ou 0 pendant la lecture. Quand vous
relâchez la touche, la lecture se poursuit
normalement.
Enlever la cassette
OPEN/CLOSE § après avoir arrêté la
lecture.
F
8
Page 33

Enregistrement
Enregistrement
Pour les fonctions de base pour l’enregistrement, voir les
pages 6 et 7.
Ce que vous devez savoir avant de commencer à enregistrer
Différence entre un passage vierge et un
passage en sourdine
La platine différencie les deux types de passage
silencieux, appelés “passage vierge” et “passage en
sourdine”.
Passage vierge
C’est un passage sur lequel aucun signal n’a été enregistré.
a) a) a) a)
b)
Passage vierge
b)b) b)
a): Enregistrement
b): Plage
Codes de temps absolu
Les codes de temps absolu indiquent le temps écoulé
depuis le début de la cassette. Ils sont
automatiquement enregistrés. Une fois que les codes
de temps absolu sont enregistrés, ils ne peuvent pas
être réinscrits.
Pour enregistrer les codes de temps absolu avec
précision
• Si la cassette est vierge, commencez l’enregistrement au
début de la bande.
• Utilisez le silencieux d’enregistrement (voir page 12) pour
insérer des espaces entre les plages. Ne pas avancer la
bande avec les touches · et ).
• Si vous voulez commencer à enregistrer au milieu de la
cassette, utilisez la fonction de recherche de fin (voir page
10) pour localiser la fin de l’enregistrement précédent afin
d’éviter de laisser un passage vierge.
Si “EMPHASIS” apparaît sur l’affichage
La platine est en train d’enregistrer un signal
numérique avec accentuation (dans les fréquences
supérieures). L’enregistrement contiendra également la
même accentuation.
Opérations de base
Passage en sourdine
C’est un passage sur lequel un signal a été enregistré mais à
un niveau tellement faible qu’il n’est pas audible.
a)
b)
Passage en sourdine
b)b) b)
a): Enregistrement
b): Plage
Important
Veillez à ne pas laisser de passages vierges pendant
l’enregistrement. La présence de passages vierges au
milieu d’un enregistrement rend impossible les
opérations de recherche avec les touches
≠/± et brise la continuité des codes de temps
absolu.
z Si vous appuyez sur la touche r REC lors d’un
passage vierge
La platine rebobine automatiquement la bande jusqu’au
début du passage vierge, puis passe en pause
d’enregistrement (excepté pendant l’enregistrement
programmé).
Si vous laissez la platine en pause
d’enregistrement pendant plus de 10
minutes
La pause d’enregistrement est automatiquement
annulée, la platine entre en mode d’arrêt et “SOURCE”
apparaît sur l’affichage.
Pour poursuivre l’enregistrement, appuyez sur r REC.
La platine entre en pause d’enregistrement.
Quand une nouvelle cassette est utilisée
Avant d’enregistrer sur une cassette neuve, nous vous
conseillons d’avancer rapidement la bande jusqu à la
fin, puis de la rebobiner au début afin de grantir un
défilement stable.
F
9
Page 34

Enregistrement
Réglage du niveau
d’enregistrement pour
l’enregistrement analogique
Avant de commencer l’enregistrement d’une source
analogique via ANALOG IN, réglez INPUT à
ANALOG et ajustez le niveau d’enregistrement.
1 Effectuez les étapes 1 à 6 de “Enregistrement sur
une cassette DAT” des pages 6 et 7.
L R
REC LEVEL
REC MODE
SBM
INPUT
MODE
RESET
TIMER
g
OFFREC PLAY
POWER
MARGIN
START ID
RESETERASEWRITE
REHEARSALRENUMBER
AUTO
OPEN/CLOSE
ANALOG
48 kHz
•••
OPTICAL
44.1 kHz
§
COAXIAL
LONG
AMS
pPr
·
2 Reproduisez le passage de la source de
programme qui contient le signal le plus puissant.
3 En écoutant le son, tournez la commande REC
LEVEL pour régler le niveau d’enregistrement de
sorte que les crête-mètres indiquent le niveau
maximum sans entrer dans la plage OVER
(rouge).
Indicateur
MARGIN
STANDARD
•••
1.0
ON
••
OFF
REC MUTE
R)0±≠
REC
REC LEVEL· PMARGIN RESET
5
•
•
406
•
•
317
•
•
28
•
•
9
•
•
10
PHONES
PHONE LEVEL
100
Localisation de la fin de l’enregistrement précédent (recherche de fin)
Grâe à la recherche de fin, la platine détecte tout
passage vierge de plus de 9 secondes, rebobine
automatiquement la bande jusqu’à la fin des données
enregistrées, puis s’arrête. Utilisez cette fonction pour
commencer à enregistrer à la fin de l’enregistrement
précédent et ne pas laisser d’espace vierge sur la
bande.
L R
REC LEVEL
REC MODE
SBM
INPUT
MODE
RESET
TIMER
g
OFFREC PLAY
POWER
MARGIN
START ID
RESETERASEWRITE
REHEARSALRENUMBER
AUTO
OPEN/CLOSE
ANALOG
48 kHz
•••
OPTICAL
44.1 kHz
§
COAXIAL
LONG
AMS
pPr
·
0 / )
1 Pendant que la platine est à l’arrêt, appuyez sur
0 pour rebobiner la bande jusqu’au début.
2 Appuyez sur ).
La platine localise la fin de l’enregistrement
précédent, puis s’arrête. La platine s’arrête au
début de tout passage vierge qui dure 9 secondes
ou plus, ou bien elle avance la bande jusqu’à la fin
si la cassette est vierge.
5
•
•
STANDARD
ON
406
•
•
317
•••
••
OFF
REC MUTE
R)0±≠
REC
•
•
28
•
•
9
•
•
10
PHONE LEVEL
PHONES
100
Niveau maximum
Reste éteint
Les segments des crête-mètres correspondant à la
puissance de signal maximum restent allumés
plus longtemps.
L’indicateur MARGIN affiche la marge entre la
puissance de signal maximum et 0 dB. La marge
change en fonction de la force du signal.
Si le niveau dépasse 0 dB
Les segments de la section “OVER” s’allument et “0.0
dB” clignote sur l’affichage. Si les segments restent
allumés, le son risque de présenter des distorsions.
Essayez de maintenir le niveau d’enregistrement entre
–12 dB et 0 dB.
Pour réinitialiser la marge
Appuyez sur MARGIN RESET. L’indicateur de marge
affiche “- - dB”.
4 Arrêtez la lecture sur la source de programme.
5 Pour commencer à enregistrer, appuyez sur
P ou ·, puis démarrez la lecture sur la source
de programme.
z Si vous appuyez sur la touche r REC lors d’un
passage vierge
La platine rebobine automatiquement la bande jusqu’au
début du passage vierge et entre en pause
d’enregistrement. “BLANK” et “WAIT” apparaissent
sur l’affichage pendant que la platine recherche le début
du passage vierge.
Remarques
• La recherche de fin n’a pas lieu si vous appuyez sur la
touche ) au cours d’un passage vierge.
• Si la cassette est vierge, la platine avance la bande
pratiquement jusqu’à la fin.
10
F
Page 35

Enregistrement
Réglage du mode
d’enregistrement
Vous avez le choix entre deux modes d’enregistrement,
standard ou longue durée, dans les cas suivants.
• Quand vous enregistrez un signal analogique avec le
sélecteur INPUT réglé sur ANALOG.
• Quand vous enregistrez un signal numérique d’une
fréquence d’échantillonnage de 32 kHz avec le
sélecteur INPUT réglé sur OPTICAL ou COAXIAL.
L R
REC LEVEL
REC MODE
SBM
INPUT
MODE
RESET
TIMER
g
OFFREC PLAY
POWER
MARGIN
START ID
RESETERASEWRITE
REHEARSALRENUMBER
AUTO
OPEN/CLOSE
ANALOG
48 kHz
•••
OPTICAL
44.1 kHz
§
COAXIAL
LONG
AMS
pPr
·
REC MODE
Réglez le sélecteur REC MODE pour choisir le mode
d’enregistrement.
Le tableau suivant indique les choix possibles, la
position correspondante du sélecteur REC MODE et la
fréquence d’échantillonnage des divers signaux
d’entrée.
5
•
•
STANDARD
ON
406
•
•
317
•••
••
OFF
REC MUTE
R)0±≠
REC
•
•
28
•
•
9
•
•
10
PHONE LEVEL
PHONES
100
Le temps d’enregistrement en mode longue durée
(sélecteur REC MODE sur LONG) est deux fois plus
long qu’en mode standard.
z Compteur en mode longue durée
Le temps de défilement, le temps absolu et le temps
restant affichés représentent les valeurs du mode
standard. Multipliez les valeurs par deux pour obtenir
les temps correspondants en mode longue durée.
Remarque
Ne changez pas la position des sélecteurs INPUT et REC
MODE au cours de l’enregistrement car l’affichage “PGM
TIME” (temps de lecture de la plage) ne serait plus correct.
Utilisation de la fonction SBM (Super Bit Mapping)
Vous pouvez utiliser la fonction SBM pour enregistrer
un signal d’entrée analogique uniquement quand le
sélecteur INPUT est réglé sur ANALOG et le sélecteur
REC MODE sur STANDARD (48 kHz ou 44,1 kHz).
Voir “Fonction SBM (Super Bit Mapping)” à la page 21
pour les détails sur la fonction SBM.
Signal d’entrée Position du
sélecteur REC
MODE
Analogique STANDARD
Numérique
(32 kHz)
Numérique
(44,1 kHz)
Numérique
(48 kHz)
(48 kHz)
STANDARD
(44,1 kHz)
LONG
STANDARD
(48 kHz)
STANDARD
(44,1 kHz)
LONG
STANDARD
(48 kHz)
STANDARD
(44,1 kHz)
LONG
STANDARD
(48 kHz)
STANDARD
(44,1 kHz)
LONG
Mode
d’enregistrement
Standard (48 kHz)
Standard (44,1 kHz)
Longue durée
(32 kHz)
Standard (32 kHz)
Longue durée
(32 kHz)
Standard (44,1 kHz)
(standard
uniquement)
Standard (48 kHz)
(standard
uniquement)
REC MODE
SBM
INPUT
STANDARD
MODE
RESET
TIMER
g
OFFREC PLAY
POWER
MARGIN
START ID
RESETERASEWRITE
REHEARSALRENUMBER
AUTO
OPEN/CLOSE
§
pPr
ON
ANALOG
48 kHz
•••
•••
OPTICAL
44.1 kHz
••
COAXIAL
LONG
OFF
REC MUTE
AMS
R)0±≠
·
REC
SBM
Réglez SBM à ON.
“SBM” s’affiche durant l’enregistrement avec la
fonction SBM.
Pour annuler la fonction SBM
Réglez SBM à OFF.
L R
REC LEVEL
5
•
•
406
•
•
317
•
•
28
•
•
9
•
•
10
PHONES
PHONE LEVEL
100
11
F
Page 36

Enregistrement
Création d’un passage en
sourdine pendant
l’enregistrement (silencieux
d’enregistrement)
Utilisez le silencieux d’enregistrement pour insérer un
espace de 4 secondes environ entre les plages. Il est
conseillé d’insérer des espaces entre les plages si vous
comptez copier la cassette DAT sur une cassette
analogique afin de pouvoir utiliser les fonctions de
recherche de plages.
Si vous commencez à enregistrer depuis le début d’une
cassette vierge et que vous voulez insérer un espace
avant la première plage, utilisez le silencieux
d’enregistrement pour créer un passage en sourdine.
N’utilisez pas la touche ) ni · pour avancer la
bande car cela laisserait un passage vierge (voir page
9).
L R
REC LEVEL
REC MODE
SBM
INPUT
MODE
RESET
TIMER
g
OFFREC PLAY
POWER
MARGIN
START ID
RESETERASEWRITE
REHEARSALRENUMBER
AUTO
OPEN/CLOSE
ANALOG
48 kHz
•••
OPTICAL
44.1 kHz
§
COAXIAL
LONG
AMS
pPr
·
REC MUTE R · P
5
•
•
STANDARD
ON
406
•
•
317
•••
••
OFF
REC MUTE
R)0±≠
REC
•
•
28
•
•
9
•
•
10
PHONE LEVEL
PHONES
100
Enregistrement avec une minuterie (enregistrement programmé)
En raccordant une minuterie (non fournie) à la platine,
vous pouvez programmer l’heure de début et de fin
d’un enregistrement. Pour plus de détails, consultez le
mode d’emploi de la minuterie.
L R
REC LEVEL
REC MODE
SBM
INPUT
MODE
RESET
TIMER
g
OFFREC PLAY
POWER
MARGIN
START ID
RESETERASEWRITE
REHEARSALRENUMBER
AUTO
OPEN/CLOSE
ANALOG
48 kHz
•••
OPTICAL
44.1 kHz
§
COAXIAL
LONG
AMS
pPr
·
pTIMER
1 Effectuez les étapes 1 à 7 de “Enregistrement sur
une cassette DAT” aux pages 6 et 7.
2 • Pour désigner l’heure de début de
l’enregistrement, appuyez sur p.
• Pour désigner l’heure de fin, effectuez les
étapes 8 et 9 de “Enregistrement sur une
cassette DAT” aux page 7.
• Pour désigner l’heure de début et l’heure de fin
de l’enregistrement, appuyez sur p.
3 Réglez le sélecteur TIMER de la platine sur REC.
5
•
•
STANDARD
ON
406
•
•
317
•••
••
OFF
REC MUTE
R)0±≠
REC
•
•
28
•
•
9
•
•
10
PHONE LEVEL
PHONES
100
12
1 Pendant que la platine est en mode
d’enregistrement ou de pause d’enregistrement,
appuyez sur REC MUTE R à l’endroit où vous
voulez créer un passage en sourdine.
La platine crée un passage en sourdine pendant
que “REC” clignote sur l’affichage.
Quand le passage est inséré, “REC” s’allume et la
platine passe en pause d’enregistrement.
4 Réglez la minuterie comme requis.
• Réglez la minuterie comme requis.
Quand vous réglez l’heure de début de
l’enregistrement, la platine se met hors tension.
Quand l’heure désignée est atteinte, la platine
se met sous tension, puis l’enregistrement
commence au bout de 10 secondes environ.
• Quand vous réglez l’heure de fin de
l’enregistrement, la platine poursuit
l’enregistrement. Quand l’heure désignée est
Pour insérer un espace de plus de 4 secondes
Tenez REC MUTE R enfoncée aussi longtemps que
nécessaire. Quand vous relâchez la touche, la platine
cesse d’enregistrer un passage en sourdine et passe en
pause d’enregistrement. Si vous tenez la touche
enfoncée pendant plus de 4 secondes, “REC” se met à
clignoter plus rapidement et le temps écoulé depuis que
vous avez appuyé sur la touche REC MUTE R apparaît
sur l’affichage.
Quand vous relâchez la touche REC MUTE R, “P”
s’allume sur l’affichage et la platine entre en pause
d’enregistrement.
2 Appuyez sur P ou · pour poursuivre
l’enregistrement. L’enregistrement reprend.
Remarque
Si vous ne créez pas un passage en sourdine au début de la
bande, il sera difficile de déplacer ou d’effacer tout code ID
F
de départ (voir page 15) enregistré moins de 2 secondes
après le début de la bande.
atteinte, la platine arrête l’enregistrement et se
met hors tension.
• Quand vous réglez l’heure de début et l’heure
de fin, la platine se met hors tension. Quand
l’heure de début de l’enregistrement est
atteinte, la platine se met sous tension, puis
l’enregistrement commence au bout de 10
secondes environ. Quand l’heure de fin de
l’enregistrement est atteinte, la platine arrête
l’enregistrement et se met hors tension.
5 Quand vous n’utilisez plus la minuterie, réglez le
sélecteur TIMER de la platine sur OFF.
Remarques
• Si vous laissez le sélecteur TIMER sur la position REC, la
platine commencera automatiquement à enregistrer la
prochaine fois que vous la mettrez sous tension.
• Pendant l’enregistrement programmé (quand le sélecteur
TIMER est réglé sur REC), le rebobinage automatique
(voir page 14) ne fonctionne pas même si la bande se
termine au cours de l’enregistrement. Ceci permet d’éviter
que des données enregistrées précédemment ne soient
effacées par erreur.
Page 37

Lecture
Lecture
Pour les fonctions de base pour la lecture, voir page 8.
Utilisation de l’affichage
Observez l’affichage pour connaître les informations
suivantes:
• Temps absolu
• Temps de lecture de la plage
• Temps de lecture restant sur la cassette
• Temps de lecture écoulé
L R
REC LEVEL
REC MODE
SBM
INPUT
MODE
RESET
TIMER
g
OFFREC PLAY
POWER
MARGIN
START ID
RESETERASEWRITE
REHEARSALRENUMBER
AUTO
OPEN/CLOSE
ANALOG
48 kHz
•••
OPTICAL
44.1 kHz
§
COAXIAL
LONG
AMS
pPr
·
MODE RESET
Indication du temps absolu, du temps de
lecture de la plage, du temps de lecture
restant et du temps de lecture écoulé
Appuyez sur MODE (ou COUNTER MODE sur la
télécommande).
Chaque fois que vous appuyez sur la touche,
l’affichage change dans l’ordre suivant.
5
•
•
STANDARD
ON
406
•
317
•••
••
•
28
OFF
•
REC MUTE
•
10
R)0±≠
PHONE LEVEL
PHONES
REC
Remarques
• Lors de la lecture de certaines cassettes préenregistrées,
“BB” peut apparaître momentanément sur l’affichage au
début de la cassette.
• Le temps de lecture de la plage n’est pas affiché dans les
cas suivants:
— Quand la lecture commence au milieu de la plage.
— Pendant le rebobinage.
• En mode de lecture standard, le temps de lecture restant
apparaît au bout de 16 secondes environ après le
commencement de la lecture.
• Le temps de lecture restant affiché diffère parfois
légèrement du temps restant réel en fonction des cassettes
utilisées.
•
•
•
9
•
100
Si “EMPHASIS” apparaît sur l’affichage
La platine est en train de reproduire un signal audio
enregistré avec accentuation (dans les fréquences
supérieures). La platine reproduit le signal tout en le
désaccentuant automatiquement (l’atténuation est
proportionnelle au degré d’accentuation).
Temps absolu
ABS TIME
8 20
Appuyez sur
Temps de lecture de la plage
PGM TIME
3 15
Appuyez sur
Temps de lecture restant
REMAINING
1 00
Dans le cas des cassettes
préenregistrées, le temps restant signifie
le temps jusqu’à la fin de
l’enregistrement.
Appuyez sur
Temps de lecture écoulé
5 19
Appuyez sur
ms
√
ms
√
hm
√
ms
Pour réinitialiser le temps de lecture écoulé
Appuyez sur RESET (ou COUNTER RESET sur la
télécommande).
13
F
Page 38

Lecture
14
Localisation d’une plage
(AMS*/accès direct)
Vous pouvez localiser les plages de diverses manières
mais auparavant vous devez enregistrer des codes ID
Répétition de plages (lecture répétée) Z
Vous pouvez répéter la lecture d’une plage ou de
toutes les plages.
de départ sur la bande (voir les pages 15 à 18). Pour
l’accès direct, vous devez d’abord enregistrer des
numéros de programme sur la bande (voir les pages 15
et 18).
INPUT
MODE
RESET
TIMER
g
OFFREC PLAY
POWER
MARGIN
START ID
RESETERASEWRITE
REHEARSALRENUMBER
AUTO
OPEN/CLOSE
ANALOG
48 kHz
•••
OPTICAL
44.1 kHz
§
COAXIAL
LONG
AMS
pPr
·
5
•
•
STANDARD
ON
406
•
•
317
•••
••
OFF
REC MUTE
R)0±≠
REC
•
•
28
•
•
9
•
•
10
PHONES
PHONE LEVEL
100
REPEAT
L R
REC LEVEL
REC MODE
SBM
OPEN/
CLOSE
6
REPEAT
132
COUNTER
RESETMODE
Répétition de toutes les plages
≠ / ± ·
Pour localiser
Le début des plages
suivantes (AMS)
Appuyez sur
± autant de fois que nécessaire
pendant la lecture. Par exemple,
pour localiser la deuxième plage
suivante, appuyez deux fois.
Le début de la plage
≠ une fois pendant la lecture.
courante (AMS)
Le début des plages
précédentes (AMS)
≠ autant de fois que nécessaire
pendant la lecture. Par exemple,
pour localiser l’avant-dernière
plage, appuyez trois fois.
En désignant le numéro
de programme de la
plage (accès direct) Z
1 Entrez le numéro de
programme de la plage à
l’aide des touches
numériques.
2 Appuyez sur ( (ou · sur la
platine).
* AMS = Automatic Music Sensor (Détecteur automatique
de musique)
Appuyez plusieurs fois sur REPEAT, pendant la
lecture d’une plage, jusqu’à ce que “REPEAT”
apparaisse sur l’affichage. La platine répète la lecture
de toutes les plages jusqu’à ce qu’elle détecte la fin de
la dernière plage, soit:
—un passage vierge de 9 secondes ou plus.
—la fin de la cassette.
Lorsque la platine détecte une des deux situations cidessus, elle rebobine la bande jusqu’au début, puis
recommence la lecture de toutes les plages. La platine
répète cette opération 5 fois, puis s’arrête
automatiquement.
Pour annuler la répétition de toutes les plages
Appuyez plusieurs fois sur REPEAT jusqu’à ce que
“REPEAT” disparaisse de l’affichage.
Remarque
La répétition de toutes les plages est également annulée si
vous éjectez la cassette.
Répétition d’une plage
z Si vous entrez un numéro de programme incorrect
lors de l’accès direct Z
Si vous n’avez pas encore appuyé sur ( (ou · sur la
platine), appuyez sur CLEAR de la télécommande, puis
entrez le numéro correct. Si vous avez déjà appuyé sur
la touche ( (ou · sur la platine), la touche CLEAR
n’a aucun effet. Arrêtez la platine et entrez à nouveau le
numéro de programme.
z Si la platine détecte un passage vierge de 9
secondes au moins ou bien la fin de la bande
La bande est automatiquement rebobinée jusqu’au
début et la platine s’arrête (rebobinage automatique).
z La platine peut démarrer automatiquement la
lecture après le rebobinage de la bande
Vous devez appuyer sur · tout en tenant la touche
0 enfoncée.
F
Appuyez plusieurs fois sur REPEAT, pendant la
lecture de la plage souhaitée, jusqu’à ce que “REPEAT
1” apparaisse sur l’affichage. La platine répète la
lecture de la plage jusqu’à ce qu’elle détecte la fin, soit:
— le code ID de départ suivant.
— un passage vierge de 9 secondes ou plus.
— la fin de la cassette.
Lorsque la platine détecte une des trois situations cidessus, elle rebobine la bande, puis recommence la
lecture à partir du même code ID de départ. La platine
répète cette opération 5 fois, puis s’arrête
automatiquement.
Pour annuler la répétition de la plage
Appuyez plusieurs fois sur REPEAT jusqu’à ce que
“REPEAT 1” disparaisse de l’affichage.
Remarque
La répétition de la plage est également annulée si vous
éjectez la cassette.
Page 39

Inscription de sous-codesLecture
Lecture
Lecture avec une minuterie (lecture programmée)
En raccordant une minuterie (non fournie) à la platine,
vous pouvez programmer l’heure de début et de fin de
la lecture. Pour plus de détails, consultez le mode
d’emploi de la minuterie.
L R
REC LEVEL
REC MODE
SBM
INPUT
MODE
RESET
TIMER
g
OFFREC PLAY
POWER
MARGIN
START ID
RESETERASEWRITE
REHEARSALRENUMBER
AUTO
OPEN/CLOSE
ANALOG
48 kHz
•••
OPTICAL
44.1 kHz
§
COAXIAL
LONG
AMS
pPr
·
TIMER
1 • Pour désigner l’heure de début de la lecture,
effectuez les étapes 1 à 3 de “Lecture d’une
cassette DAT” à la page 8.
• Pour désigner l’heure de fin de la lecture,
effectuez les étapes 1 à 4 de “Lecture d’une
cassette DAT” à la page 8.
• Pour désigner l’heure de début et l’heure de fin
de la lecture, effectuez les étapes 1 à 3 de
“Lecture d’une cassette DAT” à la page 8.
2 Réglez le sélecteur TIMER de la platine sur PLAY.
3 Réglez la minuterie comme requis.
• Quand vous réglez l’heure de début de la
lecture, la platine se met hors tension. Quand
l’heure désignée est atteinte, la platine se met
sous tension, puis la lecture commence au bout
de 10 secondes environ.
• Quand vous réglez l’heure de fin de la lecture,
la platine poursuit la lecture. Quand l’heure
désignée est atteinte, la platine arrête la lecture
et se met hors tension.
• Quand vous réglez l’heure de début et l’heure
de fin, la platine se met hors tension. Quand
l’heure de début de la lecture est atteinte, la
platine se met sous tension, puis la lecture
commence au bout de 10 secondes environ.
Quand l’heure de fin de la lecture est atteinte, la
platine arrête la lecture et se met hors tension.
5
•
•
STANDARD
ON
406
•
•
317
•••
••
OFF
REC MUTE
R)0±≠
REC
•
•
28
•
•
9
•
•
10
PHONE LEVEL
PHONES
100
Utilisation des sous-codes
Le format DAT permet d’enregistrer des sous-codes
(ex. des codes de contrôle, comme les codes ID de
départ et les numéros de programme) en même temps
que le signal audio sur la bande. Ces sous-codes
permettent d’utiliser la fonction AMS (voir page 14) et
l’accès direct (voir page 14). Etant donné que ces souscodes sont inscrits séparément du signal audio, ils
n’affectent pas le son.
Plage PlagePlage
Code ID de départ
Code ID de départ
Le code ID de départ indique le début d’une plage, ce
qui permet de localiser sa position exacte. Le code ID
de départ doit durer 9 secondes (18 secondes en mode
longue durée) pour pouvoir être détecté facilement
pendant l’avance rapide ou le rebobinage.
Numéro de programme
Les numéros de programme servent de numéros de
plage. Inscrits sur la même position que les codes ID de
départ, ils permettent de localiser le début des plages.
Remarque
• Les touches p et P ne fonctionnent pas pendant
l’inscription de sous-codes.
• Si l’orifice de protection de la cassette DAT est ouvert
(voir page 7), l’inscription et l’effacement de codes ID de
départ et la renumérotation des numéros de programme
est impossible.
Inscription de codes ID de
départ pendant
l’enregistrement
Vous pouvez inscrire des codes ID de départ
automatiquement ou manuellement, à n’importe quel
moment, pendant l’enregistrement.
4 Quand vous n’utilisez plus la minuterie, réglez le
sélecteur TIMER de la platine sur OFF.
TIMER
g
OFFREC PLAY
POWER
START ID
AUTO
AUTO
START ID
REHEARSALRENUMBER
WRITE
INPUT
MODE
RESET
MARGIN
RESETERASEWRITE
OPEN/CLOSE
ANALOG
48 kHz
•••
OPTICAL
44.1 kHz
§
COAXIAL
LONG
AMS
pPr
·
·START ID
P
STANDARD
•••
ON
••
OFF
REC MUTE
R)0±≠
REC
5
•
•
406
•
•
317
•
•
28
•
•
9
•
•
10
PHONE LEVEL
PHONES
100
L R
REC LEVEL
REC MODE
SBM
(voir page suivante)
F
15
Page 40

Inscription de sous-codes
0 / )START ID
WRITE
START ID
REHEARSAL
PHONES
REC MUTE
REC
AMS
MODE
RESET
RESETERASEWRITE
REHEARSALRENUMBER
AUTO
MARGIN
OFFREC PLAY
TIMER
POWER
g
START ID
PHONE LEVEL
100
§
pPr
R)0±≠
·
OPEN/CLOSE
ANALOG
OPTICAL
COAXIAL
•••
REC LEVEL
INPUT
48 kHz
44.1 kHz
LONG
•••
••
REC MODE
STANDARD
SBM
ON
OFF
L R
5
406
10
317
9
28
•
•
•
•
•
•
•
•
•
•
Inscription manuelle des codes ID de
départ pendant l’enregistrement
Appuyez sur START ID WRITE.
“ID WRITE” apparaît sur l’affichage pendant quelques
secondes et le code ID de départ est inscrit sur la bande
à l’endroit choisi. Pendant ce temps, “START ID”
clignote sur l’affichage.
Code ID de départ
ID WRI TE
START ID
Remarque
L’intervalle entre les codes ID de départ doit être supérieur à
18 secondes (36 secondes en mode longue durée). Si
l’intervalle dure moins de 18 secondes (ou 36 secondes), la
platine risque de ne pas détecter le second code ID de départ
lors de la lecture.
Inscription automatique des codes ID de
départ pendant l’enregistrement
Effectuez les démarches suivantes pour inscrire
automatiquement les numéros de programme et les
codes ID de départ sur la même position.
• Lors de l’enregistrement d’un signal analogique avec
le sélecteur INPUT réglé sur ANALOG
Un code ID de départ et un numéro de programme sont
inscrits chaque fois que le signal d’entrée dépasse un
certain niveau juste après avoir été en sourdine ou à très
bas niveau pendant 3 secondes ou plus.
• Lors de l’enregistrement d’un signal numérique avec
le sélecteur INPUT réglé sur OPTICAL ou COAXIAL
Un code ID de départ et un numéro de programme sont
inscrits chaque fois qu’une nouvelle plage est détectée
pendant l’enregistrement d’un signal numérique
provenant d’un appareil numérique, comme un lecteur
CD ou une autre platine DAT, raccordé à la prise
COAXIAL IN ou OPTICAL IN. Toutefois, les codes ID de
départ et les numéros de programme ne sont pas inscrits
au début des plages qui durent moins de 18 secondes.
Si le dernier numéro de programme apparaît sur
l’affichage, il n’est pas nécessaire de spécifier le
numéro de programme suivant. Si vous
commencez l’enregistrement au début d’une
cassette vierge, le numéro de programme “1”
apparaît sur l’affichage. Si vous oubliez d’inscrire
les numéros de programme, vous pourrez les
inscrire par la suite (voir “Renumérotation
automatique des numéros de programme” à la
page 18).
4 Pour commencer l’enregistrement, appuyez sur P
ou ·, puis démarrez la lecture sur la source de
programme. Les codes ID de départ sont
automatiquement inscrits sur la bande pendant
l’enregistrement.
“ID WRITE” apparaît sur l’affichage pendant
quelques secondes chaque fois que des sous-codes
(code ID de départ et numéro de programme)
sont inscrits.
z Lors de l’enregistrement d’un signal numérique
provenant d’un lecteur CD
Commencez d’abord l’enregistrement sur la platine,
puis appuyez sur la touche ( PLAY du lecteur CD
pendant qu’il est arrêté. Si vous mettez la platine en
pause d’enregistrement et le lecteur CD en pause de
lecture avant de commencer à enregistrer, le code ID de
départ et le numéro de programme de la première plage
du CD risquent de ne pas être inscrit correctement sur
la cassette.
Remarque
Avec l’inscription automatique, les codes codes ID de départ
ne sont pas toujours positionnés exactement au début des
plages. Dans ce cas, vous pouvez les déplacer ou les effacer
(voir “Positionnement précis des codes ID de départ
(fonction d’essai)” et “Effacement de codes ID de départ” à
la page 17).
16
1 Effectuez les étapes 1 à 7 de “Enregistrement sur
une cassette DAT” aux pages 6 et 7.
La platine entre en pause d’enregistrement.
2 Appuyez plusieurs fois sur START ID AUTO
jusqu’à ce que “AUTO” apparaisse sur l’affichage.
Inscription de codes ID de départ pendant la lecture
Vous pouvez inscrire des codes ID de départ pendant
la lecture.
3 Si vous commencez à enregistrer à la fin de
l’enregistrement précédent, utilisez les touches
numériques sur la télécommande pour désigner le
numéro de programme juste après le dernier
numéro enregistré.
Exemple: Si le dernier numéro de programme
F
enregistré sur la bande est 5
REC
AUTO
·
∏
Le numéro de programme suivant
PGM NO.
6
Appuyez sur START ID WRITE.
”ID WRITE” apparaît sur l’affichage pendant quelques
secondes et le code ID de départ est inscrit sur la bande
à l’endroit choisi. Pendant ce temps, “START ID”
clignote sur l’affichage.
Page 41

Positionnement précis des codes ID de
départ (fonction d’essai)
1 Pendant la lecture, appuyez sur la touche START
ID REHEARSAL à l’endroit où se trouve le code
ID souhaité.
“REHRSL” apparaît, “START ID” clignote sur
l’affichage et un passage de 3 secondes à partir du
code est répété. Le passage est répété 8 fois. Le
nombre de répétitions restantes est affiché à
droite de “REHRSL”. Après 8 répétitions, la
platine s’arrête automatiquement.
2 Appuyez sur 0 ou ) pour déplacer le début
du passage répété. Chaque fois que vous appuyez
sur 0 ou ), le début du passage répété est
décalé vers l’arrière ou l’avant par incréments de
0,3 seconde, jusqu’à un maximum de 2 secondes
(4 secondes en mode longue durée) dans les deux
sens.
Mouvement
à chaque pression
sur 0
Le temps affiché indique le décalage depuis la
position où vous avez appuyé sur la touche
START ID REHEARSAL.
Après deux
pressions sur )
Position où vous avez
appuyé sur la touche START
ID REHEARSAL à l’étape 1.
↓
3 secondes
Mouvement à chaque pression
0.3 sec
0.3 sec
Après deux
pressions sur 0
S
06.
START ID
Passage répété
06.
S
START ID
sur )
Inscription de sous-codes
Changement de la position
d’un code ID de départ
préenregistré
Vous pouvez changer la position d’un code ID de
départ préenregistré sur une cassette.
INPUT
MODE
RESET
TIMER
g
OFFREC PLAY
POWER
MARGIN
START ID
RESETERASEWRITE
REHEARSALRENUMBER
AUTO
OPEN/CLOSE
ANALOG
48 kHz
•••
OPTICAL
44.1 kHz
§
COAXIAL
LONG
AMS
pPr
·
5
•
•
STANDARD
ON
406
•
•
317
•••
••
OFF
REC MUTE
R)0±≠
REC
•
•
28
•
•
9
•
•
10
PHONE LEVEL
PHONES
100
L R
REC LEVEL
REC MODE
SBM
START ID REHEARSAL
1 Pendant la lecture, appuyez sur START ID
REHEARSAL quand le code ID que vous
souhaitez changer de position est affiché.
La platine rebobine la bande jusqu’au début du
code ID de départ et un passage de 3 secondes est
répété.
2 Effectuez les étapes 1 à 3 de “Positionnement
précis des codes ID de départ (fonction d’essai)”
sur cette page.
Vous pouvez décaler le code ID de départ de 2
secondes maximum (4 secondes en mode longue
durée) dans les deux sens, à partir de la position
d’origine.
Remarque
Il peut être difficile ou impossible de décaler les codes ID de
départ inscrits sur les 10 dernières secondes de la bande.
Effacement de codes ID de départ
Vous pouvez effacer n’importe quel code ID de départ.
3 Appuyez sur START ID WRITE.
“ID WRITE” apparaît sur l’affichage pendant
quelques secondes et le code ID de départ est
inscrit sur la bande à l’endroit choisi. Pendant ce
temps, “START ID” clignote sur l’affichage.
INPUT
MODE
RESET
TIMER
g
OFFREC PLAY
POWER
MARGIN
START ID
RESETERASEWRITE
REHEARSALRENUMBER
AUTO
OPEN/CLOSE
ANALOG
48 kHz
•••
OPTICAL
44.1 kHz
§
COAXIAL
LONG
AMS
pPr
·
5
•
•
STANDARD
ON
406
•
•
317
•••
••
OFF
REC MUTE
R)0±≠
REC
•
•
28
•
•
9
•
•
10
PHONE LEVEL
PHONES
100
L R
REC LEVEL
REC MODE
SBM
START ID ERASE
Appuyez sur START ID ERASE quand le code ID de
départ à effacer est affiché.
“(ERASE)” apparaît sur l’affichage tandis que la
platine rebobine la bande jusqu’au début du code ID
de départ, puis “ID ERASE” apparaît pendant que la
platine efface le code ID de départ.
• Il faut 9 secondes pour effacer un code ID de départ.
• Les numéros de programme sont effacés en même
temps que les codes ID de départ.
17
F
Page 42

Informations supplémentaires
Informations supplémentairesInscription de sous-codes
Renumérotation automatique des numéros de programme
Avec cette fonction, la platine recherche tous les codes
ID de départ depuis le début de la bande et attribue un
nouveau numéro à chaque code en commençant par 1.
Utilisez la fonction de renumérotation dans les cas
suivants:
• Quand vous avez inscrit un nouveau code ID de
départ pendant la lecture de la cassette.
• Quand un numéro de programme a été effacé en
même temps qu’un code ID de départ.
• Quand vous avez commencé à enregistrer au milieu
de la bande et que vous avez inscrit un numéro de
programme déjà utilisé ou si un code ID de départ
n’a pas de numéro de programme.
L R
REC LEVEL
REC MODE
SBM
INPUT
MODE
RESET
TIMER
g
OFFREC PLAY
POWER
MARGIN
START ID
RESETERASEWRITE
REHEARSALRENUMBER
AUTO
OPEN/CLOSE
ANALOG
48 kHz
•••
OPTICAL
44.1 kHz
§
COAXIAL
LONG
AMS
pPr
·
START ID RENUMBER
Appuyez sur START ID RENUMBER pendant que la
platine est en mode de lecture ou à l’arrêt.
“RENUMBER” clignote sur l’affichage et la bande est
automatiquement rebobinée jusqu’au début. La platine
commence à chercher les codes ID de départ depuis le
début de la bande et attribue un nouveau numéro de
programme à chaque plage. Quand la platine détecte
un code ID de départ, elle reproduit la plage pendant 2
secondes depuis le début du code, puis inscrit un
nouveau numéro de programme sur la bande. Pendant
ce temps, “RENUMBER” s’allume et “START ID”
clignote.
Quand la renumérotation est terminée, la bande est
automatiquement rebobinée jusqu’au début, puis la
platine s’arrête.
Remarque
La renumérotation ne s’effectue pas correctement quand:
• Un passage vierge est présent sur la bande.
• L’intervalle entre deux codes ID de départ est inférieur à
18 secondes (36 secondes en mode longue durée).
• Un code ID de départ a été inscrit moins de 10 secondes
avant la fin de la bande.
5
•
•
STANDARD
ON
406
•
•
317
•••
••
OFF
REC MUTE
R)0±≠
REC
•
•
28
•
•
9
•
•
10
PHONES
PHONE LEVEL
100
Précautions
Sécurité
• Ne pas essayer de démonter le coffret car il y a risque de
choc électrique. Confiez toute réparation à un technicien
qualifié uniquement.
• Si un solide ou un liquide pénétrait dans le coffret, cessez
d’utiliser l’appareil et débranchez le cordon
d’alimentation secteur.
Sources d’alimentation
• Avant la mise en service de l’appareil, vérifiez que la
tension de fonctionnement correspond à celle du courant
secteur local. La plaque signalétique indiquant la tension
de fonctionnement se trouve à l’arrière de l’appareil.
• L’appareil n’est pas déconnecté de la source
d’alimentation secteur tant quil est branché sur une prise
murale, même si vous le mettez hors tension.
• Si vous ne comptez pas utiliser l’appareil pendant un
certain temps, débranchez le cordon d’alimentation
secteur de la prise murale. Pour le débrancher, tirez sur la
fiche et jamais sur le cordon proprement dit.
• Le cordon d’alimentation secteur doit être remplacé par
un technicien qualifié uniquement.
Fonctionnement
Si l’appareil est porté directement d’un endroit froid dans un
endroit chaud ou s’il se trouve dans une pièce très humide,
de l’humidité risque de se condenser sur la lentille à
l’intérieur de l’appareil. Dans ce cas, “CAUTION” apparaît
sur l’affichage et l’appareil ne fonctionne pas. Enlevez la
cassette et laissez l’appareil sous tension pendant environ
une heure pour que l’humidité s’évapore.
Installation
• Installez l’appareil dans un endroit bien ventilé pour
éviter une accumulation de chaleur.
• Ne pas installer l’appareil:
— sur une surface moelleuse, comme un tapis, qui
pourrait bloquer les orifices de ventilation sous
l’appareil.
— près de sources de chaleur.
— en plein soleil.
— sur une surface inclinée.
— dans un endroit exposé à de la poussière ou à des chocs
mécaniques.
Cassettes
• Après utilisation, mettez la cassette dans sa boîte et
rangez-la dans un endroit à l’abri du soleil, de
températures élevées, de l’humidité et de la poussière.
• La cassette audionumérique est conçue pour ne pas laisser
entrer la poussière. Ne pas ouvrir le boîtier et exposer la
bande.
• L’orifice à l’arrière de la cassette est une fente de
détection. Ne pas la recouvrir.
18
F
Page 43

Informations supplémentaires
A propos des cassettes de 120 minutes
N’utilisez pas de cassettes (à durée de lecture de plus de
120 minutes) pour enregistrer des matériaux importants
parce qu’elles sont sujettes aux problèmes suivants:
— Bobinage incorrect de la bande après des opérations
d’AMS, de rebobinage, d’avance rapide ou de
repérage répétées
— Inscription et effacement incorrects des identifiants
de début
— Déformation du son.
Pour toute question ou problème concernant cet
appareil, veuillez consulter votre revendeur Sony.
Nettoyage
Nettoyage du coffret, du panneau et des
commandes
Utilisez un chiffon doux légèrement imprégné d’une
solution détergente douce. Ne pas utiliser de tampon
abrasif, poudre à récurer ou solvant, comme de l’alcool
ou de la benzine.
Nettoyage de la tête et du parcours de la
bande
• Après une utilisation prolongée, la tête s’encrasse.
Pour conserver un son de lecture et d’enregistrement
optimal, nous vous conseillons de nettoyer la tête
environ toutes les dix heures de fonctionnement avec
une cassette de nettoyage Sony DT-10CL (non
fournie).
• Nettoyez la tête à l’aide de la cassette quand vous
n’avez pas utilisé la platine avant un certain temps.
Un encrassement de la tête peut provoquer des
pertes de son lors de la lecture.
Utilisation de la cassette de nettoyage
1 Installez la cassette de nettoyage de la même manière
qu’une cassette DAT.
2 Appuyez sur ·. Au bout de 10 secondes, appuyez sur p.
Ne pas appuyer sur la touche r REC ou
) lors du nettoyage.
3 Enlevez la cassette de nettoyage sans la rebobiner.
Rebobinez la cassette uniquement quand elle est terminée.
Messages sur l’affichage
Les différents messages qui apparaissent sur
l’affichage sont expliqués dans le tableau suivant.
Message
BLANK
CAUTION Un mécanisme de sécurité s’est déclenché à la
CLEANING
(ERASE) La fonction d’effacement de code ID de départ
ID ERASE Un code ID de départ est en cours d’effacement.
ID WRITE
NO TAPE
PROHIBIT
PROTECT
REHRSL
SOURCE
TAPE END La bande se trouve à la fin des données
TAPE TOP
UNLOCK
WAIT La platine recherche le début du passage vierge
(WRITE)
Signification
La platine recherche le début d’un passage vierge
sur la bande.
suite d’une condensation d’humidité ou autre
problème.
Il est conseillé de nettoyer la tête et le parcours de
la bande. Toutes les 10 heures de
fonctionnement, ce message apparaît pendant
environ 10 secondes quand vous mettez la
platine sous tension.
(ID ERASE) est activée.
Un code ID de départ, ou un numéro de
programme est en cours d’inscription.
Aucune cassette n’est installée dans la platine.
La source de programme que vous voulez
enregistrer ne peut pas être enregistrée via les
prises d’entrée numérique. Pour plus de détails,
voir le paragraphe “Guide pour le système de
protection contre les copies multiples” des pages
22 et 23.
L’enregistrement est impossible car l’orifice de
protection d’enregistrement est ouvert.
La fonction d’essai est activée.
La platine est en pause d’enregistrement depuis
10 minutes environ ou bien vous avez appuyé
sur la touche r REC et aucune cassette n’est
installée dans la platine ou l’orifice de protection
d’enregistrement de la cassette est ouvert.
enregistrées.
La bande est au début.
Aucun signal numérique n’est entré à la prise
sélectionnée par le sélecteur INPUT.
sur la bande.
La fonction d‘inscription de code ID de départ
(START ID WRITE) est activée.
Remarques sur la cassette de nettoyage
• Au bout de 10 heures de fonctionnement, “CLEANING”
apparaît sur l’affichage pendant environ dix secondes
quand vous mettez la platine sous tension. Il est conseillé
de nettoyer la tête et le parcours de la bande quand ce
message apparaît.
• En raison de la courte durée de la cassette de nettoyage, le
compteur n’indique pas le temps écoulé ni le temps
restant sur la bande.
19
F
Page 44

Informations supplémentaires
Guide de dépannage
Si vous rencontrez des difficultés lors de l’utilisation de
la platine, consultez ce guide de dépannage pour
essayer de remédier au problème. Si le problème
persiste, consultez votre revencleur Sony.
Impossible de fermer le logement de cassette.
/ Vérifiez que la cassette est correctement insérée (voir
pages 6 et 8).
/ Insérez la cassette au-delà du trait argent (voir pages 6 et
8).
Impossible d’inscrire un code ID de départ pendant
l’enregistrement
/ Un code ID de départ ne peut pas être inscrit moins de 9
secondes (18 secondes en mode longue durée) après le
code ID de départ précédent. Laissez un intervalle de 9
secondes au moins (18 secondes en mode longue durée)
entre les codes ID de départ.
Impossible de localiser une plage avec l’accès direct
/ Le numéro de programme désigné n’existe pas sur la
bande. Appuyez sur la touche START ID RENUMBER
pour renuméroter les numéros de programme.
/ Les numéros de programme ne sont pas dans l’ordre.
Appuyez sur la touche START ID RENUMBER pour
renuméroter les numéros de programme.
Les touches de fonction sont inopérantes.
/ Vous venez juste de mettre la platine sous tension.
Attendez 4 secondes (10 secondes si “CLEANING” est
affiché) avant de commencer toute opération.
/ La platine est en mode de pause.
Appuyez sur P pour annuler le mode de pause.
/ La bande est finie. Appuyez sur 0 pour rebobiner la
bande.
Pas de son.
/ Effectuez les connexions correctement (voir les pages 4 et
5).
/ L’amplificateur raccordé ne fonctionne pas correctement.
Utilisez l’amplificateur correctement. (Voir le mode
d’emploi de l’amplificateur.)
La platine n’enregistre pas.
/ L’orifice de protection de la cassette est ouvert. Poussez
le taquet de protection pour fermer l’orifice (voir la page
7).
/ Le sélecteur INPUT n’est pas réglé correctement. Réglez
le sélecteur INPUT sur la position appropriée.
/ La commande REC LEVEL est réglée sur 0. Tournez la
commande REC LEVEL vers la droite pour augmenter le
niveau d’enregistrement (uniquement pour
l’enregistrement d’un signal analogique).
/ Le signal entré par la prise d’entrée numérique est
protégé contre la copie numérique (uniquement pour
l’enregistrement d’un signal numérique). Entrez le signal
par la prise d’entrée analogique.
La platine commence à rebobiner la bande pendant la
lecture
/ La lecture répétée est sélectionnée. Appuyez plusieurs
fois sur la touche REPEAT de la télécommande pour
faire disparaître “REPEAT” ou “REPEAT 1” de
l’affichage et annuler la lecture répétée.
Les touches d’exploitation de cassette ne fonctionnent
pas pendant l’inscription ou l’effacement d’un code ID de
départ
/ Aucune touche ne fonctionne pendant les 9 secondes
durant lesquelles le code ID de départ est inscrit (18
secondes en mode longue durée). Attendez que le code
ID soit inscrit avant d’appuyer sur une touche.
Impossible d’inscrire les codes de temps absolu.
/ L’enregistrement a commencé sur un passage vierge.
Rebobinez la bande jusqu’au début ou localisez la fin de
l’enregistrement précédent avant de commencer à
enregistrer.
Le transport de la bande est extrêmement bruyant
pendant l’avance rapide ou le rebobinage.
/ Le bruit provient de la cassette. Ce n’est pas un signe de
défaillance mécanique.
La bande s’arrête brusquement.
/ La cassette est défectueuse ou endommagée. Appuyez
sur OPEN/CLOSE § et changez de cassette.
20
La touche OPEN/CLOSE § ne fonctionne pas.
/ La touche OPEN/CLOSE § ne fonctionne pas pendant
l’enregistrement. Appuyez d’abord sur la touche p ou P
pour arrêter l’enregistrement, puis sur la touche OPEN/
CLOSE §.
“CAUTION” est affiché et la platine ne fonctionne pas.
/ Le mécanisme de sécurité s’est déclenché à cause d’une
condensation d’humidité. Enlevez la cassette et laissez la
platine sous tension pendant environ une heure. Ensuite,
mettez la platine hors tension, puis de nouveau sous
tension (voir page 18).
Impossible d’inscrire des sous-codes
/ L’orifice de protection de la cassette est ouvert. Poussez
le taquet pour recouvrir l’orifice (voir la page 7).
F
Quand vous appuyez sur 0/) ou ≠/ ±, la
bande s’arrête temporairement avant de commencer à
défiler.
/ C’est normal. Ce n’est pas un signe de défaillance
mécanique.
Impossible de piloter la platine avec la télécommande
(fournie).
/ Les piles sont faibles. Remplacez les deux piles.
“SBM” ne s’affiche pas même si SBM est réglé à ON.
/ “SBM” s’affiche seulement pendant l’enregistrement de
signaux d’entrée analogiques à fréquence
d’échantillonnage de 48 kHz ou 44,1 kHz, et pas pendant
l’enregistrement d’un signal entrée numérique ou d’un
signal d’entrée analogique à fréquence d’échantillonnage
de 32 kHz, ni durant la lecture.
Page 45

Spécifications
Système
Informations supplémentaires
Généralités
Alimentation
Lieu d’achat
Alimentation
Cassette Cassette audionumérique
Tête d’enregistrement Tête rotative
Temps d’enregistrement Standard: 120 minutes
(avec DT-120) Longue durée: 240 minutes
Vitesse de bande Standard: 8,15 mm/s
Longue durée: 4,075 mm/s
Rotation du tambour Standard: 2.000 rpm
Pas de piste 13,6 µm (20,4 µm)
Fréquence 48 kHz, 44,1 kHz, 32 kHz
d’échantillonage
Nombre de canaux 2 canaux, stéréo
Conversion N/A Standard: linéaire 16 bits
(Quantification) Longue durée: Non-linéaire 12 bits
Réponse en fréquence* Standard: 2 - 22.000 Hz (±0,5 dB)
Rapport signal sur bruit* 90 dB ou plus (mode standard et longue
Plage dynamique* 90 dB ou plus (mode standard et longue
Distorsion harmonique Standard: 0,005% ou inférieure (1 kHz)
totale* Longue durée: 0,008% ou inférieure
Pleurage et scintillement Inférieurs au seuil mesurable (±0,001%
* Pendant l’entrée analogique avec la fonction SBM désactivée.
Longue durée: 1.000 rpm
Longue durée: 2 - 14.500 Hz (±0,5 dB)
durée)
durée)
(1 kHz)
au niveau de crête pondéré)
Prises d’entrée
Prise
ANALOG
OPTICAL
DIGITAL
COAXIAL
Type de prise
prises cinch
connecteur
optique
prise cinch
Impédance d’entrée
47 kilohms
—DIGITAL
75 ohms
Niveau d’entrée
nominale
–4 dBs
—
0,5 Vc-c
Canada CA 120 V, 60 Hz
Europe
Consommation électrique 30 W
Dimensions Env. 430 × 106 × 325 mm
Poids Env. 5,0 kg (11 li. 0,4 on.)
CA 230 V, 50/60 Hz
(17 × 4 1/4 × 12 7/8 po.) (l/h/p)
Accessoires fournis Voir page 4
La conception et les spécifications peuvent être modifiées sans
préavis.
Fonction SBM (Super Bit Mapping)
Pendant l’enregistrement analogique, la fonction SBM
réduit le bruit sur la bande de fréquences à laquelle
l’oreille humaine est la plus réceptive au bruit, ce qui
augmente considérablement la plage dynamique
auditive du signal enregistré.
Convertisseur A-N à impulsion de haute
précision
La platine utilise un convertisseur A-N à impulsion et
un filtre décimal pour convertir le signal analogique en
signal numérique quantifié à 24 bits. La platine, comme
les lecteurs CD, utilise la quantification à 16 bits, donc
la différence de 8 bits résulte en une quantification plus
précise, plus d’information de signal et moins de bruit
de quantification qu’en quantification à 16 bits.
Pendant la conversion des données de 24 bits en signal
d’enregistrement de 16 bits, la fonction SBM renforce la
qualité sonore en réintégrant au signal de 16 bits les 4
bits d’informations de signaux qui auraient
normalement été perdus.
Prises de sortie
Prise Niveau de
ANALOG
DIGITAL
OPTICAL
PHONES
Type de
prise
prises
cinch
connecteur
optique
fiche 6,35
stéréo
Impédance
de sortie
470 ohms
—
100 ohms
sortie
nominale
–4 dBs 10 kilohms
(longueur
d’ondes
660 nm)
1,2 mW
Impédance
de charge
ou plus
—
32 ohms
21
F
Page 46

Informations supplémentaires
Application du principe de l’oreille humaine
La Fonction SBM applique le principe de l’oreille
humaine à la réintégration de l’information du signal.
La plage auditive de l’oreille humaine est
généralement située entre 20 Hz et 20 kHz; toutefois, la
sensibilité d’écoute est généralement plus grande entre
3 et 4 kHz, et plus faible aux fréquences supérieures et
inférieures à cette plage. Ce principe s’applique
également au bruit de quantification. En réduisant le
bruit de quantification sur cette plage, les signaux
peuvent être enregistrés pour produire un son de plus
grande amplitude que lorsque le bruit est réduit de
manière uniforme sur toute la plage audible.
Filtre conformateur de bruit
La fonction SBM utilise un filtre conformateur de bruit
(voir Fig. A) à réponse de fréquence similaire à celle de
l’oreille humaine pour réduire le bruit de
quantification sur la plage de fréquences la plus
sensible, et pour retourner l’information d’erreur de
quantification (qui est normalement perdue) au signal
d’entrée, réintégrant les informations binaires des
extrémités supérieure et inférieure.
Guide pour le système de protection contre les copies multiples
Cette platine utilise le système de protection contre les
copies multiples (SCMS) qui autorise seulement une
copie d’une source numérique enregistrée via la prise
d’entrée numérique de la platine. Voici une description
du système:
1 Vous pouvez enregistrer une source de programme
numérique (CD, MD ou cassette DAT) sur une cassette
DAT ou un MD enregistrable via la prise d’entrée
numérique de la platine DAT ou de l’enregistreur MD.
Cependant, vous ne pouvez pas enregistrer de nouveau la
cassette DAT ou le MD copié sur une autre cassette DAT
ou un autre MD enregistrable via la prise d’entrée
numérique sur la platine DAT ou l’enregistreur MD.
Lecture
Platine DAT Enregistreur MD
Lecteur CD
Fig. A
Entrées
d’information
24 bits
Filtre
//
conformateur
de bruit
Sortie SBM
16 bits
La Fig. B indique l’amélioration du niveau de bruit de
quantification quand l’interrupteur SBM est activé
(valeurs théoriques). Soit un niveau de bruit de 0 dB
quand l’interrupteur SBM est désactivé, l’amélioration
du niveau de bruit pour les fréquences
d’échantillonnage inférieures à 3 kHz dépasse 10 dB
quand la fonction SBM est activée.
Fig. B
25
Niveau
de
bruit
(dB)
20
15
10
5
0
-5
-10
20 10050 200 1k500 2k 15k5k 10k
Fréquence d’échantillonnage (Hz)
La fonction SBM opère seulement pendant
l’enregistrement. Le son amélioré produit par la
fonction SBM peut seulement être apprécié pendant
la lecture, indépendamment de la position de
l’interrupteur SBM ou de la platine DAT utilisée.
SBM
ON
SBM
OFF
Câble optique ou
câble de
raccordement
numérique coaxial
Enregistrement
DAT ou MD
Lecture
Prise de sortie numérique
Câble optique ou
câble de
raccordement
numérique coaxial
Prise d’entrée numérique
Enregistrement
Platine DAT ou
enregistreur MD
Platine DAT ou
enregistreur MD
Platine DAT ou
Enregistreur MD
Prise de sortie numérique
Prise d’entrée numérique
v
v
Prise de sortie de ligne
(analogique)
Prise d’entrée de ligne
(analogique)
Cassette DAT ou
MD de première
génération
enregistrés via une
connexion
numérique à
numérique
Cordons de
raccordement audio
22
F
Page 47

Informations supplémentaires
2 Vous pouvez enregistrer le signal numérique d’une
émission satellite numérique sur une cassette DAT ou un
MD enregistrable via la prise d’entrée numérique sur la
platine DAT ou l’enregistreur MD, capable de supporter
une fréquence d’échantillonnage de 32 kHz ou 48 kHz.
Vous pouvez ensuite enregistrer le contenu de la cassette
DAT ou du MD (première génération) sur une autre
cassette DAT ou un autre MD enregistrable via l’entrée
numérique sur la platine DAT ou l’enregistreur MD pour
créer une copie numérique de seconde génération.
L’enregistrement de cette copie de seconde génération sur
une autre cassette DAT ou un autre MD enregistrable est
possible uniquement via la prise d’entrée analogique sur
la platine DAT ou l’enregistreur MD.
Lecture
Câble optique ou
câble de raccordement
numérique coaxial
Enregistrement
DAT ou MD
Lecture
Câble optique ou
câble de
raccordement
numérique coaxial
Enregistrement
DAT ou MD
Lecture
Prise de sortie numérique
Câble optique ou
câble de
raccordement
numérique coaxial
Tuner BS
Platine DAT ou
enregistreur MD
v
v
Platine DAT ou
enregistreur MD
Platine DAT ou
enregistreur MD
v
v
Platine DAT ou
enregistreur MD
Prise de sortie de ligne
(analogique)
Prise de sortie numérique
Prise d’entrée numérique
Cassette DAT ou
MD de première
génération
enregistrés via
une connexion
numérique à
numérique
Prise de sortie numérique
Prise d’entrée numérique
Cassette DAT ou
MD de seconde
génération
enregistrés via
une connexion
numérique à
numérique
Cordons de
raccordement audio
3 Vous pouvez enregistrer une cassette DAT ou un MD
enregistrés via la prise d’entrée analogique de la platine
DAT ou de l’enregistreur MD sur une autre cassette DAT
ou un autre MD via la prise de sortie numérique de la
platine DAT ou de l’enregistreur MD. Cependant, vous ne
pouvez pas copier une cassette DAT ou un MD de seconde
génération via la prise de sortie numérique de la platine
DAT ou de l’enregistreur MD.
Lecture
Platine à cassette
Platine DAT
Cordons de
raccordement audio
Enregistrement
DAT ou MD
Lecture
Câble optique ou
câble de
raccordement
numérique coaxial
Enregistrement
DAT ou MD
Lecture
Prise de sortie numérique
Câble optique ou
câble de
raccordement
numérique coaxial
Tourne-disque
Tuner
Platine DAT ou
enregistreur MD
Platine DAT ou
enregistreur MD
Platine DAT ou
enregistreur MD
Platine DAT ou
enregistreur MD
Lecteur CD
Amplificateur
Microphone
Lecteur MD
Prise de sortie de ligne
(analogique)
Prise d’entrée de ligne
(analogique)
v
v
v
v
Prises de sortie de ligne
(analogiques)
Cassette DAT ou
MD enregistrés
via une connexion
analogique à
numérique
Prise de sortie numérique
Prise d’entrée numérique
Cassette DAT ou
MD de première
génération
enregistrés via une
connexion
numérique à
numérique
Cordons de
raccordement audio
Prise d’entrée numérique
Enregistrement
Platine DAT ou
enregistreur MD
Prise d’entrée numérique Prise d’entrée
Enregistrement
Platine DAT ou
Enregistreur MD
23
F
Page 48

Index
Index
A
Accentuation 9, 13
Accès direct 14
AMS (Détecteur automatique
de musique) 14
B, C, D
Code ID de départ
Changement de la position
d’un code ID de départ
préenregistré 17
Effacement de codes ID de
départ 17
Inscription automatique de
codes ID de départ pendant
l’enregistrement 15
Inscription manuelle de
codes ID de départ pendant
l’enregistrement 16
Positionnement précis des
codes ID de départ 17
Codes de temps absolu 9
E
Enregistrement avec ure
minuterie 12
Enregistrement sur une cassette
DAT 6
F, G, H
Fonction d’essai 16, 17
Fonction de renumérotation 17
Fonction SBM 11, 21
I, J, K
Indicateur de marge 10
L
Lecture avec une minuterie 15
Lecture d’une cassette DAT 8
Lecture répétée
Répétition d’une plage 14
Répétition de toutes
les plages 14
M
Messages sur l’affichage 19
Mise en place des piles dans la
télécommande 4
N, O
Nettoyage 19
Nettoyage de la tête et du
parcours de la bande 19
Numéros de programme 15, 18
P, Q
Passage en sourdine 9, 12
Passage vierge 9, 10
Piles 4
R
Raccordements 4
Recherche de fin 10
Réglage du mode
d’enregistrement 11
Réglage du niveau
d’enregistrement 10
Renumérotation 18
S
Silencieux d’enregistrement 12
Sous-codes 15
Système de protection contre
les copies multiples 22
T, U, V, W, X, Y, Z
Taquet de protection
d’enregistrement 7
Temps absolu 13
Temps de lecture écoulé 13
Temps de lecture de la plage
13
Temps restant sur la bande 13
Nomenclature
Touches
CLEAR (annulation) 14
COUNTER MODE (mode du
compteur) 13
COUNTER RESET
(réinitialisation du compteur)
13
MARGIN RESET
(réinitialisation de la marge) 10
MODE (mode de compteur) 13
OPEN/CLOSE § (ouverture/
fermeture) 6 - 8
r REC (enregistrement) 7
REC MUTE R (silencieux
d’enregistrement) 12
REPEAT (lecture répétée) 14
RESET (réinitialisation du
compteur) 13
START ID AUTO (inscription
automatique de code ID de
départ) 15
START ID ERASE (effacement
de code ID de départ) 17
START ID REHEARSAL
(lecture d’essai de code ID de
départ) 16, 17
START ID RENUMBER
(renumérotation des codes ID
de départ) 18
START ID WRITE (inscription
de code ID de départ) 15, 16
p (arrêt) 7, 8, 12
· (lecture) 7, 8, 10, 12, 14, 15
0/) (rebobinage/avance
rapide) 7, 8, 10, 16
P (pause) 7, 10, 12, 15
≠/± (recherche vers
l’arrière/l’avant) 8, 14
Interrupteurs et sélecteurs
INPUT (sélection d’entrée) 6
POWER (alimentation) 6, 8
REC MODE (mode
d’enregistrement) 11
SBM 11
TIMER (programmation aavec
une minuterie) 12, 15
Commandes
PHONE LEVEL (volume du
casque) 8
REC LEVEL (niveau
d’enregistrement) 10
Prises
ANALOG IN 4, 6
ANALOG OUT 4
DIGITAL COAXIAL IN 4, 6
DIGITAL OPTICAL IN 4, 6
DIGITAL OPTICAL OUT 4
PHONES 8
24
F
Page 49

Index
25
F
Page 50

ADVERTENCIA
¡Bienvenido!
Información sobre
Para evitar incendios o el
riesgo de electrocución, no
exponga la unidad a la lluvia
ni a la humedad.
Para evitar descargas
eléctricas, no abra la unidad.
En caso de avería, solicite los
servicios de personal
cualificado.
Muchas gracias por la adquisición de
este deck de cinta audiodigital Sony.
Antes de utilizar la unidad, lea
detenidamente este manual y consérvelo
para futuras referencias.
El DTC-ZE700 posee las características
siguientes:
• Convertidores lineales de alta
densidad.
Convertidor A/D de pulsos que
produce sonido claro y elegante y
teóricamente con distorsión cruzada
cero, y un convertidor D/A de pulsos
con un filtro digital recientemente
desarrollado y un formato de
alimentación progresiva completa que
reduce el ruido de cuantificación en la
anchura de banda audible, para
ampliar la gama de expresión
espacial.
• Función SBM (Super Mapeo de Bits)
(vea la página 21).
• Sistema de administración de copia en
serie (consulte la página 22)
• Tres frecuencias de muestreo (48 kHz,
44,1 kHz, y 32 kHz)
• Grabación y reproducción en el modo
de reproducción (duración) larga
• Grabación analógica a 44,1 kHz
• Subcódigos
Identificadores de comienzo, números
de programa, y otros subcódigos
escritos en la cinta le permitirán
localizar rápidamente canciones.
• Tapa transparente del
compartimiento del cassette
Esta tapa le permitirá comprobar las
operaciones de la cinta durante la
reproducción y la grabación.
este manual
Las instrucciones de este manual son
para el DTC-ZE700.
Convencionalismos
Las instrucciones de este manual
describen los controles del deck.
En este manual se utilizan los iconos
siguientes:
Indica información útil o
z
sugerencias para facilitar una
tarea.
Indica una tarea que requiere la
Z
utilización del telemando.
ES
2
Page 51

ÍNDICE
Preparativos
Desembalaje 4
Conexión del sistema 4
Grabación de una cinta audiodigital 6
Reproducción de una cinta audiodigital 8
Operaciones de grabación
Cosas que deberá saber antes de grabar 9
Ajuste del nivel de grabación para grabación analógica 10
Localización del final de la parte grabada (Búsqueda de fin) 10
Ajuste del modo de grabación 11
Utilización de la función SBM (Super Mapeo de Bits) 11
Inserción de una sección con sonido silenciado durante la grabación
(Silenciamiento de la grabación) 12
Grabación utilizando un temporizador (Grabación con temporizador) 12
Operaciones de reproducción
Visualizador 13
Localización de una canción (AMS/Acceso directo) 14
Reproducción repetida de canciones (Reproducción repetida) 14
Reproducción utilizando un temporizador (Reproducción con temporizador) 15
Escritura de subcódigos
Subcódigos 15
Escritura de identificadores de comienzo durante la grabación 15
Escritura de identificadores de comienzo durante la reproducción 16
Ajuste de la posición de un identificador de comienzo existente 17
Borrado de identificadores de comienzo 17
Renumeración automática de números de programas (Renumeración) 18
Información adicional
Precauciones 18
Limpieza 19
Mensajes del visualizador 19
Solución de problemas 20
Especificaciones 21
Función SBM (Super Mapeo de Bits) 21
Guía del sistema de administración de copia en serie 22
ES
Índice alfabético 24
ES
3
Page 52

Preparativos
ANALOG
OUT
ANALOG
IN
DIGITAL
COAXIAL OUT
DIGITAL
OPTICAL OUT
DIGITAL
OPTICAL IN
IN
COAXIAL
IN IN OUT
OPTICAL
ANALOG IN/OUT
DIGITAL IN/OUT
LRL
R
OUT
Preparativos
Desembalaje
Compruebe si ha recibido los accesorios suministrados
siguientes:
• Cables de conexión de audio con clavija enchufable (2)
• Telemando RM-D757 (1)
• Pilas de tamaño AA (R6) (2)
• Manual de instrucciones (1)
Colocación de las pilas en el telemando
Inserte dos pilas de tamaño AA (R6) haciendo coincidir
+ o – de las mismas con las marcas del interior de su
compartimiento.
Conexión del sistema
En esta sección se describe cómo conectar su deck a un
amplificador, un reproductor de discos compactos, un
deck de minidiscos, u otros componentes de audio.
Antes de realizar las conexiones, desconecte la
alimentación de todos los componentes.
a una toma de la red
Reproductor de discos
Amplificador, etc.
compactos, deck de
cinta audiodigital
(DAT) o deck de
minidiscos, etc.
z Cuándo reemplazar las pilas
En utilización normal, las pilas durarán unos 6 meses.
Cuando el telemando no pueda controlar el deck,
reemplace ambas pilas.
Notas
• No deje el telemando en lugares extremadamente cálidos
o húmedos.
• No deje caer materias extrañas dentro del telemando,
especialmente cuando reemplace las pilas.
• No exponga el sensor de control remoto a la luz solar
directa ni a iluminación, ya que podría causar el mal
funcionamiento.
• Cuando no vaya a utilizar el telemando durante mucho
tiempo, extraiga las pilas para evitar el daño que podría
causar el electrólito de las mismas.
Reproductor de discos
compactos, deck de
cinta audiodigital
(DAT) o deck de
minidiscos, etc.
Reproductor de discos
compactos, deck de
cinta audiodigital
(DAT) o deck de
minidiscos, etc.
ç: Flujo de la señal
¿Qué cables se necesitan?
• Cables conectores de audio (suministrados) (2)
Blanca
(canal izquierdo)
Roja
(canal derecho)
• Cables ópticos (POC-15, etc.) (no suministrados) (2)
• Cable conector digital coaxial (VMC-10G, etc.) (no
suministrado) (1)
Blanca
(canal izquierdo)
Roja
(canal derecho)
ES
4
Page 53

Preparativos
Conexiones
p Conexión del deck a un amplificador
Para conectar el deck a un amplificador, utilice los
cables conectores de audio suministrados.
Cerciórese de hacer coincidir las clavijas codificadas
en color con las tomas apropiadas: roja (canal
derecho) a roja y blanca (canal izquierdo) a blanca.
Para evitar zumbidos y ruidos, cerciórese de realizar
conexiones firmes.
Deck de cinta
audiodigital
ANALOG IN/OUT
OUTIN
L
R
ç
L
R
Ç
Amplificador
LINE IN/OUT
OUT IN
L
R
L
R
z Para grabar con un micrófono
Conecte las tomas de salida analógicas del amplificador
de micrófono estéreo a las tomas ANALOG IN del deck.
p Conexión del deck a un componente de audio
La señal de audio digital procedente de un
componente de audio digital, como un amplificador
digital, un deck de cinta audiodigital, un
reproductor de discos compactos, un deck de
minidiscos, o un sintonizador de recepción vía
satélite podrá grabarse en el deck de cinta
audiodigital conectando los conectores de salida
digital del componente a los conectores de entrada
digital (DIGITAL OPTICAL IN o DIGITAL
COAXIAL IN) del deck.
La señal de audio digital procedente del deck podrá
grabarse conectando el conector de salida digital
(DIGITAL OPTICAL OUT) del deck al conector de
entrada digital de un componente de audio digital,
como un amplificador digital, un deck de cinta
audiodigital, o un deck de minidiscos.
Utilice cables ópticos (POC-15A o equivalente) (no
suministrados) o un cable de conexión digital coaxial
(VMC-10G o equivalente) (no suministrado).
• Conexión con cables ópticos
Deck de cinta
audio digital
DIGITAL IN/OUT
OPTICAL
COAXIAL
IN
OUTIN
Componente de
audio digital
OPTICAL
IN OUT
ç
Ç
• Conexión con un cable conexión digital coaxial
Deck de cinta
audio digital
DIGITAL IN/OUT
OPTICAL
COAXIAL
IN
OUTIN
audio digital
Ç
Componente de
COAXIAL
OUT
Nota
Si en el visualizador aparece “PROHIBIT”, la grabación a
través de la toma digital no será posible.
En este caso, ponga el selector INPUT en ANALOG y grabe
la fuente de programas a través de las tomas ANALOG IN.
Conexión del cable de alimentación de CA
Conecte el cable de alimentación de CA a una toma de
la red.
¿Qué hacer a continuación
A partir de ahora podrá utilizar su deck.
Para las operaciones básicas, vaya a las páginas 6 a 8; para
las operaciones avanzadas, pase a las secciones que empiezan
a partir de la página 9.
Operaciones básicas
ES
5
Page 54

Operaciones básicas
Operaciones básicas
Grabación de una cinta audiodigital
REC MODE
INPUT
POWER
MODE
RESET
TIMER
g
OFFREC PLAY
START ID
REHEARSALRENUMBER
AUTO
MARGIN
RESETERASEWRITE
OPEN/CLOSE
§
AMS
pPr
·
ANALOG
OPTICAL
COAXIAL
•••
48 kHz
44.1 kHz
LONG
STANDARD
•••
••
REC MUTE
SBM
ON
OFF
R)0±≠
REC
73 45
L R
REC LEVEL
5
•
•
406
•
•
3
7
•
•
28
•
•
1
9
•
•
10
PHONE LEVEL
PHONES
100
2 68
Con respecto a la información
sobre las conexiones, consulte
las páginas 4 y 5.
Conecte la alimentación del amplificador y ponga en
1
reproducción la fuente de programas que desee grabar.
Presione POWER.
2
Presione OPEN/CLOSE § e inserte un cassette.
3
OPEN/CLOSE
§
Cara de la ventanilla hacia arriba
bb
Inserte el cassette más
allá de la barra plateada.
OPEN/CLOSE
§
Cierre el
portacassette
presionando OPEN/
CLOSE §.
Ajuste INPUT de acuerdo con el conector de entrada
4
correspondiente.
Para grabar a través de
ANALOG IN
DIGITAL OPTICAL IN
DIGITAL COAXIAL IN
ES
6
ponga INPUT en
ANALOG
OPTICAL
COAXIAL
Page 55

Operaciones básicas
Localice el punto a partir del que desee iniciar la grabación.
5
Para grabar desde el comienzo de la cinta
Presione 0 para rebobinar la cinta hasta su comienzo.
Para grabar desde el final de la parte grabada
1 Presione 0 para rebobinar la cinta hasta su comienzo.
2 Presione ).
El deck localizará el final de la parte grabada de la cinta y
parará ésta automáticamente.
Presione r REC.
6
El deck habrá quedado listo para grabar.
Cuando grabe señales de entrada analógicas, ajuste el nivel de
7
grabación con REC LEVEL.
Operaciones básicas
z Si en el visualizador aparece
“UNLOCK”
La fuente de programas no
está adecuadamente
conectada al deck o su
alimentación está
desconectada. Cerciórese de
que la fuente de programas
esté adecuadamente
conectada y con la
alimentación conectada.
El nivel de grabación recomendado es 3. Con respecto a los
detalles, consulte “Ajuste del nivel de grabación para
grabación analógica” de la página 10.
Presione P o ·.
8
Se iniciará la grabación.
Inicie la reproducción de la fuente de programas.
9
Cuando finalice la cinta, el deck la rebobinará automáticamente
hasta su comienzo y la parará (Rebobinado automático).
Para
parar la grabación
realizar una pausa P. Para reanudar la grabación, vuelva a
extraer el cassette OPEN/CLOSE § después de haber parado
Para evitar el borrado accidental
Deslice la lengüeta de protección contra el borrado hacia la izquierda como
se muestra en la ilustración siguiente.
presione
p
presionarla.
la grabación.
La grabación es
imposible (orificio
abierto).
La grabación es
posible (orificio
cerrado).
ES
7
Page 56

Operaciones básicas
Reproducción de una cinta audiodigital
3
••
REC MUTE
SBM
ON
OFF
R)0±≠
REC
REC LEVEL
5
•
•
406
•
3
•
28
•
1
•
PHONE LEVEL
PHONES
POWER
REC MODE
INPUT
COAXIAL
·
ANALOG
OPTICAL
•••
48 kHz
44.1 kHz
STANDARD
LONG
•••
MODE
RESET
TIMER
g
OFFREC PLAY
START ID
REHEARSALRENUMBER
AUTO
MARGIN
RESETERASEWRITE
OPEN/CLOSE
§
AMS
pPr
2 4
Con respecto a la información
sobre las conexiones, consulte
las páginas 4 y 5.
Conecte la alimentación del amplificador y ponga el selector de
1
fuente en la posición para deck de cinta audiodigital (DAT).
L R
•
7
•
•
9
•
10
100
z Para utilizar auriculares
Conecte los auriculares a la
toma PHONES, Utilice
PHONE LEVEL para ajustar
el volumen.
Presione POWER.
2
Presione OPEN/CLOSE § e inserte un cassette.
3
OPEN/CLOSE
§
Inserte el castte más allá de la
barra plateada.
Presione ·.
4
El deck iniciará la reproducción. Ajuste el volumen del
amplificador.
Para
parar la reproducción
pasar a la canción siguiente
pasar a la canción anterior
Cara de la ventanilla hacia arriba
bb
Cierre el portacassette
presionando OPEN/CLOSE §.
presione
p
±
≠
OPEN/CLOSE
§
Hacer que la cinta avance rápidamente
) o 0 con el deck parado
o se rebobine
Hacer que la cinta avance rápidamente
o se rebobine escuchando el sonido
) o 0 durante la reproducción. Para
reanudar la reproducción normal, suelte la
tecla.
extraer el cassette
OPEN/CLOSE § después de haber parado
la reproducción
ES
8
Page 57

Operaciones de grabación
Operaciones de grabación
Con respecto a las operaciones básicas de grabación,
consulte las páginas 6 y 7.
Cosas que deberá saber antes de grabar
La diferencia entre una sección en blanco y
una sección con sonido silenciado
El deck distingue entre dos tipos de secciones
silenciosas, que se denominan respectivamente
“sección en blanco” y “sección con sonido silenciado”.
Sección en blanco
Ésta es una sección en la que no se han grabado nunca
señales.
a)
b) b) b) b)
Sección en blanco
a) a)a)
a): Grabación
b): Canción
Códigos de tiempo absoluto
Los códigos de tiempo absoluto indican el tiempo
transcurrido desde el comienzo de la cinta. Estos
códigos se registrarán automáticamente. Tenga en
cuenta que los códigos de tiempo absoluto no podrán
reescribirse.
Para la grabación precisa de códigos de tiempo absoluto
• Si la cinta está en blanco, cerciórese de iniciar la grabación
desde su comienzo.
• Utilice la función de silenciamiento de la grabación
(consulte la página 12) para insertar espacios entre las
canciones. No haga que la cinta avance con la tecla · ni
).
• Para iniciar la grabación desde el medio de una cinta,
utilice la función de búsqueda de fin (consulte la página
10) para localizar el final de la parte grabada. Esto evitará
la creación de secciones en blanco).
Si en el visualizador aparece “EMPHASIS”
El deck estará grabando una señal digital con
acentuación (en las frecuencias superiores). La
grabación contendrá también cierta acentuación.
Operaciones básicas
Sección con sonido silenciado
Ésta es una sección en la que se han grabado señales, pero a
un nivel que no es audible.
a)
b) b) b) b)
a): Grabación
Sección con sonido
silenciado
b): Canción
Importante
Cerciórese de no crear secciones en blanco mientras
grabe. La existencia de secciones en blanco dentro de
material grabado pueden hacer imposibles las
operaciones utilizando las teclas ≠ y ± o destruir
la continuidad de los códigos de tiempo absoluto.
z Si presiona la tecla r REC en una sección en blanco
El deck rebobinará automáticamente la cinta hasta el
comienzo de la sección en blanco y cambiará a
grabación en pausa (excepto durante la grabación
controlada mediante el temporizador).
Si deja el deck en grabación en pausa
durante más de 10 minutos
La grabación en pausa se desactivará automáticamente,
el deck se parará, y en el visualizador aparecerá
“SOURCE”.
Para reanudar la grabación, presione la tecla r REC.
El deck cambiará a grabación en pausa.
Cuando utilice una cinta nueva
Antes de grabar una cinta nueva, recomendamos que
la haga avanzar rapidamente hasta el final y después la
rebobine hasta el comienzo para suavizar los carretes.
ES
9
Page 58

Operaciones de grabación
Ajuste del nivel de grabación para grabación analógica
Antes de iniciar la grabación de una fuente analógica a
través de ANALOG IN, ponga INPUT en ANALOG y
ajuste el nivel de grabación.
L R
REC LEVEL
REC MODE
SBM
INPUT
MODE
RESET
TIMER
g
OFFREC PLAY
POWER
MARGIN
START ID
RESETERASEWRITE
REHEARSALRENUMBER
AUTO
OPEN/CLOSE
ANALOG
48 kHz
•••
OPTICAL
44.1 kHz
§
COAXIAL
LONG
AMS
pPr
·
1 Realice los pasos 1 a 6 de “Grabación de una cinta
audiodigital” de las páginas 6 y 7.
2 Ponga en reproducción la fuente de programas
con el nivel de señal más intenso.
3 Escuchando el sonido, gire REC LEVEL para
ajustar el nivel de grabación de forma que los
medidores de nivel de pico estén al nivel máximo
sin entrar en el margen OVER (rojo).
Indicación MARGIN
1.0
5
•
•
STANDARD
ON
406
•
•
317
•••
••
OFF
REC MUTE
R)0±≠
REC
•
•
28
•
•
9
•
•
10
PHONE LEVEL
PHONES
100
REC LEVEL· PMARGIN RESET
Localización del final de la parte grabada (Búsqueda de fin)
La búsqueda de fin detectará una sección en blanco de
más de 9 segundos, rebobinará automáticamente la
cinta hasta el final de la parte grabada, y la parará.
Utilice la búsqueda de fin para iniciar la grabación
desde el final de la parte grabada sin crear una sección
en blanco en la cinta.
L R
REC LEVEL
REC MODE
SBM
INPUT
MODE
RESET
TIMER
g
OFFREC PLAY
POWER
MARGIN
START ID
RESETERASEWRITE
REHEARSALRENUMBER
AUTO
OPEN/CLOSE
ANALOG
48 kHz
•••
OPTICAL
44.1 kHz
§
COAXIAL
LONG
AMS
pPr
·
0 / )
1 Con el deck parado, presione 0 para rebobinar
la cinta hasta su comienzo.
2 Presione ).
El deck localizará el final de la parte grabada, y
después se parará.
El deck se parará al comienzo de cualquier
sección en blanco de 9 o más segundos de
duración, o avanzará rápidamente hasta el final
de la cinta si ésta está en blanco.
5
•
•
STANDARD
ON
406
•
•
317
•••
••
OFF
REC MUTE
R)0±≠
REC
•
•
28
•
•
9
•
•
10
PHONE LEVEL
PHONES
100
Nivel máximo
Permanece
apagado
Los segmentos de los medidores de nivel de pico
correspondientes a la intensidad máxima de la
señal permanecerán encendidos más tiempo del
normal.
El indicador MARGIN mostrará el margen entre
la intensidad máxima de la señal y 0 dB,
cambiando cada vez que aparece una señal más
intensa.
Si el nivel sobrepasa 0 dB
Los segmentos de “OVER” se encenderán, y en el
visualizador parpadeará “0.0 dB”. Si estos
segmentos permanecen encendidos, es posible
que se produzca distorsión del sonido. Para
evitar esto, mantenga el nivel de grabación entre –
12 dB y 0 dB.
Para reponer la indicación del margen de indicación
Presione MARGIN RESET. La indicación del
margen cambiará a “- - dB”.
z Si presiona la tecla r REC en una sección en blanco
El deck rebobinará automáticamente la cinta hasta el
comienzo de la sección en blanco y cambiará al modo de
grabación en pausa. Mientras el deck esté buscando el
comienzo de la sección en blanco, en el visualizador
aparecerán “BLANK” y “WAIT”.
Notas
• La búsqueda de fin no trabajará si presiona la tecla ) en
una sección en blanco.
• Si la cinta está en blanco, el deck simplemente avanzará
hasta el final de dicha cinta.
10
4 Pare la reproducción de la fuente de programas.
ES
5 Para parar la grabación, presione P o ·, y
después inicie la reproducción de la fuente de
Page 59

Ajuste del modo de grabación
Usted podrá seleccionar dos modos de grabación,
estándar o larga, en los casos siguientes.
• Cuando grabe una señal de entrada analógica con el
selector INPUT en ANALOG.
• Cuando grabe una se]al de entrada digital con una
frecuencia de muestreo de 32 kHz con el selector
INPUT en OPTICAL o COAXIAL.
L R
REC LEVEL
REC MODE
SBM
INPUT
MODE
RESET
TIMER
g
OFFREC PLAY
POWER
MARGIN
START ID
RESETERASEWRITE
REHEARSALRENUMBER
AUTO
OPEN/CLOSE
ANALOG
48 kHz
•••
OPTICAL
44.1 kHz
§
COAXIAL
LONG
AMS
pPr
·
REC MODE
5
•
•
STANDARD
ON
406
•
•
317
•••
••
OFF
REC MUTE
R)0±≠
REC
•
•
28
•
•
9
•
•
10
PHONE LEVEL
PHONES
100
Operaciones de grabación
El tiempo de grabación en el modo de reproducción
larga (selector REC MODE en LONG) es el doble del
de reproducción estándar.
z Contador en el modo de reproducción larga
El tiempo de recorrido de la cinta, el tiempo absoluto, y
el tiempo restante de la cinta visualizados son para el
modo de reproducción estándar.
Para obtener los tiempos correspondientes al modo de
reproducción larga, multiplique el tiempo por dos.
Nota
No cambie el ajuste de INPUT ni REC MODE durante la
grabación. Esto podría causar un error en la visualización de
“PGM TIME” (tiempo de reproducción de la canción).
Ajuste REC MODE para seleccionar el modo de
grabación.
En la tabla siguiente se muestran los modos de
grabación seleccionables, y la posición de REC MODE
y la frecuencia de muestreo correspondientes para
varias señales de entrada.
Señal de entrada Posición de REC
Modo de grabación
MODE
Analógica STANDARD
(48 kHz)
STANDARD
(44,1 kHz)
LONG
Digital (32 kHz) STANDARD
(48 kHz)
STANDARD
(44,1 kHz)
LONG
Digital (44,1 kHz) STANDARD
(48 kHz)
STANDARD
(44,1 kHz)
LONG
Digital (48 kHz)
STANDARD
(48 kHz)
STANDARD
(44,1 kHz)
LONG
Reproducción
estándar (48 kHz)
Reproducción
estándar (44,1 kHz)
Reproducción larga
(32 kHz)
Reproducción
estándar (32 kHz)
Reproducción larga
(32 kHz)
Reproducción
estándar (44,1 kHz)
(Reproducción
estándar solamente)
Reproducción
estándar (48 kHz)
(Reproducción
estándar solamente)
Utilización de la función SBM (Super Mapeo de Bits)
Puede utilizarse la función SBM para grabar una señal
de entrada analógica sólo cuando el interruptor INPUT
está en ANALOG y el interruptor REC MODE está en
STANDARD (ya sea 48 kHz o 44,1 kHz). Para más
detalles sobre la función SBM lea la “Función SBM
(Super Mapeo de Bits)” de la página 21.
L R
REC LEVEL
REC MODE
SBM
INPUT
MODE
RESET
TIMER
g
OFFREC PLAY
POWER
MARGIN
START ID
RESETERASEWRITE
REHEARSALRENUMBER
AUTO
OPEN/CLOSE
ANALOG
48 kHz
•••
OPTICAL
44.1 kHz
§
COAXIAL
LONG
AMS
pPr
·
Active el SBM.
Aparece “SBM” en el visualizador cuando se hacen
grabaciones utilizando la función SBM.
Para desconectar la función SBM
Desactive el SBM.
STANDARD
•••
SBM
ON
••
OFF
REC MUTE
R)0±≠
REC
5
•
•
406
•
•
317
•
•
28
•
•
9
•
•
10
PHONES
PHONE LEVEL
100
11
ES
Page 60

Operaciones de grabación
Inserción de una sección con sonido silenciado durante la grabación (Silenciamiento de la grabación)
Utilice la función de silenciamiento de la grabación
para insertar un espacio de unos 4 segundos entre
canciones. Esto se recomienda si tiene planeado copiar
una cinta audiodigital en una cinta analógica, porque
los espacios le permitirán utilizar las funciones de
búsqueda automática para localizar el comienzo de
cada canción.
Cuando inicie la grabación desde el comienzo de una
cinta en blanco y desee insertar un espacio antes de la
primera canción, cerciórese de crear una sección con
sonido silenciado utilizando solamente la función de
silenciamiento de la grabación. No haga que la cinta
avance con la tecla ) ni ·, ya que esto crearía una
sección en blanco en la cinta (consulte la página 9).
L R
REC LEVEL
REC MODE
SBM
INPUT
MODE
RESET
TIMER
g
OFFREC PLAY
POWER
MARGIN
START ID
RESETERASEWRITE
REHEARSALRENUMBER
AUTO
OPEN/CLOSE
ANALOG
48 kHz
•••
OPTICAL
44.1 kHz
§
COAXIAL
LONG
AMS
pPr
·
5
•
•
STANDARD
ON
406
•
•
317
•••
••
OFF
REC MUTE
R)0±≠
REC
•
•
28
•
•
9
•
•
10
PHONES
PHONE LEVEL
100
Grabación utilizando un temporizador (Grabación con temporizador)
Conectando un temporizador (no suministrado) al
deck, podrá iniciar y parar las operaciones de
grabación a las horas especificadas. Para más
información, consulte el manual de instrucciones
suministrado con el temporizador.
L R
REC LEVEL
REC MODE
SBM
INPUT
MODE
RESET
TIMER
g
OFFREC PLAY
POWER
MARGIN
START ID
RESETERASEWRITE
REHEARSALRENUMBER
AUTO
OPEN/CLOSE
ANALOG
48 kHz
•••
OPTICAL
44.1 kHz
§
COAXIAL
LONG
AMS
pPr
·
pTIMER
1 Realice los pasos 1 a 7 de “Grabación de una cinta
audiodigital” de las páginas 6 y 7.
2 • Para especificar la hora de comienzo de la
grabación, presione p.
• Para especificar la hora de finalización de la
grabación, realice los pasos 8 y 9 de “Grabación
de una cinta audiodigital” de la página 7.
• Para especificar las horas de comienzo y
finalización de la grabación, presione p.
5
•
•
STANDARD
ON
406
•
•
317
•••
••
OFF
REC MUTE
R)0±≠
REC
•
•
28
•
•
9
•
•
10
PHONE LEVEL
PHONES
100
12
3 Ponga TIMER del deck en REC.
REC MUTE R · P
4 Programe el temporizador en la forma requerida.
1 Presione REC MUTE R cuando desee insertar un
espacio mientras el deck se encuentre en
grabación o en el modo de grabación en pausa.
El deck creará una sección con sonido silenciado
mientras en el visualizador esté parpadeando
“REC”.
Una vez finalizada la sección con sonido
silenciado, “REC” permanecerá encendido, y el
deck cambiará a grabación en pausa.
Para crear un espacio en blanco de más de 4
segundos
Mantenga presionado REC MUTE R el tiempo deseado.
Cuando suelte la tecla, la sección con sonido silenciado
finalizará, y el deck cambiará a grabación en pausa. Si
mantiene presionada la tecla durante más de 4
segundos, “REC” comenzará a parpadear con mayor
rapidez, y en el visualizador aparecerá el tiempo
transcurrido después de haber presionado la tecla REC
MUTE R.
Cuando suelte REC MUTE R, en el visualizador
permanecerá P, y el deck cambiará a grabación en
pausa.
2 Para reanudar la grabación presione P o ·.
El deck reanudará la grabación.
Nota
Si no crea una sección con sonido silenciado al comienzo de
la cinta, es posible que no pueda mover o borrar un
ES
identificador de comienzo (consulte la página 15) grabado
antes de 2 segundos del comienzo de la cinta.
• Cuando haya programado el temporizador para
iniciar la grabación, la alimentación del deck se
desconectará. Cuando llegue la hora
especificada, la alimentación del deck se
conectará, y después de unos 10 segundos, se
iniciará la grabación.
• Cuando haya programado la hora de
finalización de la grabación, el deck continuará
grabando, y cuando llegue la hora especificada,
el deck dejará de grabar y se desconectará su
alimentación.
• Cuando haya programado las horas de
comienzo y finalización de la grabación, la
alimentación del deck se desconectará. Cuando
llegue la hora de comienzo, la alimentación del
deck se conectará y, después de unos 10
segundos, se iniciará la grabación. Cuando
llegue la hora de finalización, el deck dejará de
grabar y se desconectará su alimentación.
5 Después de haber utilizado el temporizador,
ponga TIMER del deck en OFF.
Notas
• Si deja el selector TIMER en la posición REC, el deck
iniciará automáticamente la grabación la próxima vez que
conecte su alimentación.
• Durante la grabación con el temporizador (es decir,
cuando el selector TIMER esté en REC), la función de
rebobinado automático (consulte la página 14) no trabajará
incluso aunque la cinta finalice durante la grabación. Esto
evitará que se pueda grabar sobre el material previamente
grabado .
Page 61

Operaciones de reproducción
Operaciones de reproducción
Con respecto a las operaciones básicas de reproducción,
consulte la página 8.
Visualizador
Usted podrá utilizar el visualizador para que muestre
los tipos de información de tiempo siguientes:
• Tiempo absoluto
• Tiempo de reproducción de la canción
• Tiempo restante de la cinta
• Tiempo de recorrido de la cinta
L R
REC LEVEL
REC MODE
SBM
INPUT
MODE
RESET
TIMER
g
OFFREC PLAY
POWER
MARGIN
START ID
RESETERASEWRITE
REHEARSALRENUMBER
AUTO
OPEN/CLOSE
ANALOG
48 kHz
•••
OPTICAL
44.1 kHz
§
COAXIAL
LONG
AMS
pPr
·
MODE RESET
Visualización del tiempo absoluto, el
tiempo de reproducción de la canción, el
tiempo restante de la cinta, y el tiempo de
recorrido de la cinta
Presione MODE (o COUNTER MODE del telemando).
Cada vez que presione la tecla, la información
visualizada cambiará de la forma siguiente.
5
•
•
STANDARD
ON
406
•
•
317
•••
••
OFF
REC MUTE
R)0±≠
REC
•
•
28
•
•
9
•
•
10
PHONE LEVEL
PHONES
100
Notas
• Cuando reproduzca ciertos tipos de cintas pregrabadas, es
posible que en el visualizador aparezca
momentáneamente “BB” al comienzo de la cinta.
• El tiempo de reproducción de la canción no aparecerá en
los casos siguientes
— Cuando haya iniciado la reproducción desde el medio
de la canción
— Durante el rebobinado
• En el modo de reproducción estándar, el tiempo restante
de la cinta aparecerá unos 16 segundos después de haber
iniciado la reproducción.
• Dependiendo de la cinta, el tiempo restante visualizado
puede variar algo del tiempo restante actual.
Si en el visualizador aparece “EMPHASIS”
El deck estará reproduciendo una señal digital grabada
con acentuación (en las frecuencias superiores). Sin
embargo, el deck reproducirá la señal desacentuándola
automáticamente (con atenuación proporcional al
grado de acentuación).
Tiempo absoluto
Tiempo de reproducción de la canción
Tiempo restante de la cinta
ABS TIME
8 20
Presione
PGM TIME
3 15
Presione
REMAINING
1 00
ms
√
ms
√
hm
En el caso de cintas pregrabadas, el
tiempo restante es hasta el final de la
parte grabada.
Presione
Tiempo de recorrido de la cinta
5 19
√
ms
Presione
Para poner a cero el tiempo de recorrido de la cinta
Presione RESET (o COUNTER RESET del telemando).
13
ES
Page 62

Operaciones de reproducción
Localización de una canción
(AMS*/Acceso directo)
Usted podrá localizar canciones de varias formas, pero
solamente después de haber grabado identificadores
de comienzo en la cinta (consulte las páginas 15 a 18).
Para utilizar el acceso directo, en la cinta podrán
grabarse números de programa (consulte las páginas
15 y 18).
L R
REC LEVEL
REC MODE
SBM
INPUT
MODE
RESET
TIMER
g
OFFREC PLAY
POWER
MARGIN
START ID
RESETERASEWRITE
REHEARSALRENUMBER
AUTO
OPEN/CLOSE
ANALOG
48 kHz
•••
OPTICAL
44.1 kHz
§
COAXIAL
LONG
AMS
pPr
·
≠ / ± ·
Para localizar
el comienzo de la canción
siguiente o de otras
posteriores (AMS)
presione
± las veces requeridas durante
la reproducción. Por ejemplo,
para localizar la segunda canción
posterior, presiónela dos veces.
el comienzo de la canción
≠ durante la reproducción
actual (AMS)
el comienzo de canciones
anteriores (AMS)
≠ las veces requeridas durante
la reproducción. Por ejemplo,
para localizar la segunda canción
anterior, presiónela tres veces.
especificando el número
de programa de la canción
con (Acceso directo) Z
1 Introduzca el número de
programa de una canción las
teclas numéricas.
2 Presione ( (o · en el deck)
* AMS = Automatic Music Sensor: sensor automático de
canciones
5
•
•
STANDARD
ON
406
•
•
317
•••
••
OFF
REC MUTE
R)0±≠
REC
•
•
28
•
•
9
•
•
10
PHONE LEVEL
PHONES
100
Reproducción r epetida de canciones (Reproducción repetida) Z
Usted podrá reproducir repetidamente una canción
específica o todas las de una cinta.
OPEN/
CLOSE
6
COUNTER
REPEAT
REPEAT
Reproducción repetida de todas las
canciones
Presione repetidamente REPEAT durante la
reproducción de una canción hasta que en el
visualizador aparezca “REPEAT”. El deck reproducirá
todas las canciones hasta que detecte el final de la
última canción, que podrá ser:
— una sección en blanco de 9 o más segundos
— el final de la cinta
Cuando el deck detecte cualquiera de estos, rebobinará
la cinta hasta su comienzo y volverá a reproducir todas
las canciones. El deck repetirá este ciclo hasta 5 veces,
y después se parará automáticamente.
Para parar la reproducción repetida de todas las
canciones
Presione repetidamente REPEAT hasta que desaparezca
“REPEAT”.
Nota
La reproducción repetida de todas las canciones se cancelará
cuando extraiga el cassette.
RESETMODE
132
14
z Si introduce un número de programa erróneo
durante el acceso directo Z
Si no ha presionado la tecla ( (o · en el deck),
presione CLEAR del telemando, y después introduzca
el número correcto. Si ya había presionado la tecla (
(o · en el deck), al presionar la tecla CLEAR no se
borrará el número de programa erróneo.
Pare el deck y vuelva a introducir el número de
programa.
Reproducción repetida de una canción
Presione repetidamente REPEAT durante la
reproducción de la canción deseada hasta que en el
visualizador aparezca “REPEAT 1”. El deck
reproducirá la canción hasta su final, que podrá ser:
— el siguiente identificador de comienzo
— una sección en blanco de 9 o más segundos
— el final de la cinta
Cuando el deck detecta cualquiera de esto, rebobinará
la cinta y volverá a reproducir la misma canción desde
z Si el deck detecta una sección en blanco de 9 o más
segundos, o el final de la cinta
El deck rebobinará automáticamente la cinta hasta su
comienzo y se parará (Rebobinado automático).
su identificador de comienzo. El deck repetirá este
ciclo hasta 5 veces, y después se parará
automáticamente.
Para parar la reproducción repetida de una canción
z Usted podrá hacer que el deck inicie
automáticamente la reproducción desde el comienzo
después del rebobinado
Presione · manteniendo pulsada 0.
ES
Presione repetidamente REPEAT hasta que desaparezca
“REPEAT 1”.
Nota
La reproducción repetida de una sola canción se cancelará
cuando extraiga el cassette.
Page 63

Operaciones de reproducción
Escritura de subcódigos
Escritura de subcódigos
Reproducción utilizando un
temporizador (Reproducción
con temporizador)
Conectando un temporizador (no suministrado) al
deck, podrá iniciar y parar las operaciones de
reproducción a las horas especificadas. Para más
información, consulte el manual de instrucciones
suministrado con el temporizador.
REC LEVEL
REC MODE
SBM
INPUT
MODE
RESET
TIMER
g
OFFREC PLAY
POWER
MARGIN
START ID
RESETERASEWRITE
REHEARSALRENUMBER
AUTO
OPEN/CLOSE
ANALOG
•••
OPTICAL
§
COAXIAL
AMS
pPr
·
TIMER
1 • Para especificar la hora de comienzo de la
reproducción, realice los pasos 1 a 3 de
“Reproducción de una cinta audiodigital” de la
página 8.
• Para especificar la hora de finalización de la
reproducción, realice los pasos 1 a 4 de
“Reproducción de una cinta audiodigital” de la
página 8.
• Para especificar la hora de comienzo y de
finalización de la reproducción, realice los pasos
1 a 3 de “Reproducción de una cinta
audiodigital” de la página 8.
2 Ponga TIMER del deck en PLAY.
•
STANDARD
ON
406
•
48 kHz
317
•••
44.1 kHz
••
•
LONG
28
OFF
•
REC MUTE
•
R)0±≠
PHONES
REC
Subcódigos
En el formato de cinta audiodigital, los subcódigos (es
decir, códigos de control tales como identificadores de
programa y números de programa) pueden escribirse
junto con la señal de audio en la cinta. Estos
subcódigos le permitirán utilizar la función del AMS
(consulte la página 14) o la de acceso directo (consulte
la página 14). Como los subcódigos se escriben en la
cinta separadamente de la señal de audio, no tendrán
efecto sobre ella.
L R
5
•
PHONE LEVEL
•
•
•
9
•
10
100
Canción
Identificador de comienzo
Identificadores de comienzo
Los identificadores de comienzo indican el comienzo
de cada canción y, por lo tanto, le permitirán localizar
con precisión la posición de una canción.
Los identificadores de comienzo tienen 9 segundos de
duración (18 segundos en el modo de reproducción
larga) para facilitar la detección durante al avance
rápido o el rebobinado.
Números de programa
Los números de programa sirven como números de
canciones. Ocupando la misma posición que los
identificadores de comienzo, los números de programa
le permitirán localizar canciones específicas.
CanciónCanción
3 Programe el temporizador en la forma requerida.
• Cuando haya programado el temporizador para
iniciar la reproducción, la alimentación del deck
se desconectará. Cuando llegue la hora
especificada, la alimentación del deck se
conectará, y después de unos 10 segundos, se
iniciará la reproducción.
• Cuando haya programado la hora de
finalización de la reproducción, el deck
continuará reproduciendo, y cuando llegue la
hora especificada, el deck dejará de reproducir
y se desconectará su alimentación.
• Cuando haya programado las horas de
comienzo y finalización de la reproducción, la
alimentación del deck se desconectará. Cuando
llegue la hora de comienzo, la alimentación del
deck se conectará y, después de unos 10
segundos, se iniciará la reproducción. Cuando
llegue la hora de finalización, el deck dejará de
reproducir y se desconectará su alimentación.
4 Después de haber utilizado el temporizador,
ponga TIMER del deck en OFF.
Notas
• Las teclas p y P no trabajarán durante la escritura de
subcódigos.
• La escritura y borrado de identificadores de comienzo y la
renumeración de números de programa serán imposibles
si la ranura de protección contra el grabado del casete de
cinta audiodigital está abierta (consulte la página 7).
Escritura de identificadores de comienzo durante la grabación
Usted podrá escribir identificadores de comienzo
manual o automáticamente en cualquier momento
durante la grabación.
L R
REC LEVEL
REC MODE
SBM
TIMER
g
OFFREC PLAY
POWER
START ID
AUTO
AUTO
START ID
REHEARSALRENUMBER
WRITE
INPUT
MODE
RESET
MARGIN
RESETERASEWRITE
OPEN/CLOSE
ANALOG
48 kHz
•••
OPTICAL
44.1 kHz
§
COAXIAL
AMS
pPr
·
·START ID
5
•
•
STANDARD
ON
406
•
•
317
•••
LONG
••
OFF
REC MUTE
R)0±≠
REC
•
•
28
•
•
9
•
•
10
PHONE LEVEL
PHONES
100
P
(Continúa)
15
ES
Page 64

Escritura de subcódigos
Escritura de identificadores de comienzo durante la reproducción
Presione START ID WRITE.
En el visualizador aparecerá “START ID WRITE”
durante algunos segundos, y el identificador de
comienzo se escribirá en la cinta en la posición
seleccionada. Durante este tiempo, en el visualizador
parpadeará “START ID”.
Identificador de comienzo
ID WRI TE
START ID
Nota
El intervalo entre los identificadores de inicio deberá ser de
más de 18 segundos (36 segundos en el modo de larga
duración). Si el intervalo es inferior a 18 segundos (o 36
segundos), el deck puede fallar en detectar el segundo
identificador de comienzo durante la reproducción.
Escritura automática de identificadores de
comienzo durante la grabación
Para escribir automáticamente números de programa
junto con los identificadores de comienzo en la misma
posición, realice lo siguiente.
• Para grabar una señal analógica con el selector
INPUT en ANALOG
Un identificador de comienzo y un número de programa
se escribirán siempre que la señal de entrada aumente
sobre cierto nivel después de haber permanecido
silenciada o a bajo nivel durante 3 o más segundos.
• Cuando grabe una señal digital con el selector
INPUT en OPTICAL o COAXIAL
Un identificador de comienzo y un número de programa
se escribirán siempre que se detecte una nueva canción
durante la grabación de una señal digital a través de la
toma COAXIAL IN u OPTICAL IN de una fuente digital
como un reproductor de discos compactos u otro deck de
cinta audiodigital. Sin embargo, los identificadores de
comienzo y los números de programa no se escribirán con
canciones de menos de 18 segundos de duración.
Si el último número de programa de la cinta
aparece en el visualizador, no tendrá que
especificar el siguiente. Si está grabando desde el
comienzo de una cinta en blanco, en el
visualizador aparecerá el número de programa
“1”. Si se olvidó de la numeración de programas
en este momento, podrá añadir los números de
programa más tarde. (Consulte “Renumeración
automática de números de programas
(Renumeración)” de la página 18).
4 Para iniciar la grabación, presione P o ·, y
después ponga en reproducción la fuente de
programas.
Los identificadores de comienzo se escribirán
automáticamente en la cinta durante la grabación.
Cada vez que estén escribiéndose subcódigos
(identificadores de comienzo y números de
programa) aparecerá durante algunos segundos
“ID WRITE”.
z Durante la grabación digital desde un reproductor
de discos compactos
Inicie primero la grabación en su deck, y después
presione la tecla de reproducción (( PLAY) del
reproductor de discos compactos mientras se encuentre
parado. Si pone su deck en el modo de grabación en
pausa y el reproductor de discos compactos en el de
reproducción en pausa antes de iniciar la grabación, el
identificador de inicio y el número de programa de la
primera canción del disco compacto pueden no
escribirse correctamente en la cinta.
Nota
Durante la escritura automática de identificadores de
comienzo, algunos identificadores de comienzo pueden
ubicarse inadecuadamente desde el comienzo de la canción.
Cuando suceda esto, usted podrá reubicar o borrar los
identificadores de comienzo más tarde (consulte “Ubicación
precisa de subcódigos (Función de ensayo)” y “Borrado de
identificadores de comienzo” de la página 17).
16
1 Realice los pasos 1 a 7 de “Grabación de una cinta
audiodigital” de las páginas 6 y 7.
El deck cambiará al modo de grabación en pausa.
Escritura de identificadores de
comienzo durante la
2 Presione repetidamente START ID AUTO hasta
que en el visualizador aparezca “AUTO”.
3 Si se va a grabar desde el final de la parte grabada,
utilice las teclas numéricas del telemando para
especificar el número de programa después del
último grabado.
Ejemplo: Cuando el último número de programa
grabado en la cinta sea 5.
REC
AUTO
·
∏
ES
Número de programa siguiente
PGM NO.
6
reproducción
Usted podrá escribir identificadores de comienzo
durante la reproducción.
INPUT
REC MODE
SBM
STANDARD
ON
ANALOG
48 kHz
•••
•••
OPTICAL
44.1 kHz
••
COAXIAL
LONG
OFF
REC MUTE
R)0±≠
·
REC
0 / )START ID
TIMER
g
AUTO
OFFREC PLAY
POWER
START ID
REHEARSAL
START ID
REHEARSALRENUMBER
MODE
RESET
MARGIN
RESETERASEWRITE
WRITE
OPEN/CLOSE
§
AMS
pPr
L R
REC LEVEL
5
•
•
406
•
•
317
•
•
28
•
•
9
•
•
10
PHONES
PHONE LEVEL
100
Page 65

Presione START ID WRITE.
En el visualizador aparecerá “ID WRITE” durante
algunos segundos y el identificador de comienzo se
escribirá en la posición seleccionada de la cinta.
Durante este tiempo, en el visualizador parpadeará
“START ID”.
Ubicación precisa de subcódigos (Función
de ensayo)
1 Durante la reproducción, presione START ID
REHEARSAL cuando llegue al punto apropiado.
Aparecerá “REHEARSAL”, “START ID”
parpadeará en el visualizador, y la función de
ensayo repetirá una parte de 2-3 segundos
comenzando desde el punto seleccionado. Tenga
en cuenta que la parte repetida se reproducirá 8
veces, y el número restante de veces aparecerá a la
derecha de “REHEARSAL”. Después de ocho
veces, el deck se parará automáticamente.
2 Presione 0 o ) para mover el comienzo de la
parte repetida.
Cada vez que presione la tecla 0 o ), el
comienzo de la parte repetida se desplazará hacia
atrás o hacia adelante en incrementos de 0,3
segundos, hasta un máximo de unos 2 segundos
(y segundos en el modo de reproducción larga) en
cualquier sentido.
Posición en la que
presionó la tecla START ID
REHEARSAL en el paso 1
↓
3 segundos
Parte repetida
Escritura de subcódigos
Ajuste de la posición de un identificador de comienzo existente
Usted podrá ajustar la posición de los identificadores
de comienzo previamente grabados.
L R
REC LEVEL
REC MODE
SBM
INPUT
MODE
RESET
TIMER
g
OFFREC PLAY
POWER
MARGIN
START ID
RESETERASEWRITE
REHEARSALRENUMBER
AUTO
OPEN/CLOSE
ANALOG
48 kHz
•••
OPTICAL
44.1 kHz
§
COAXIAL
LONG
AMS
pPr
·
START ID REHEARSAL
1 Durante la reproducción, presione START ID
REHEARSAL cuando se visualice el identificador
de comienzo existente que desee reubicar.
El deck rebobinará la cinta hasta el principio del
identificador de comienzo y el ensayo repetirá
una parte de 3 segundos.
2 Realice los pasos 1 a 3 de “Ubicación precisa de
identificadores de comienzo (ensayo)” de esta
página.
Usted podrá mover el identificador de comienzo
un máximo de 2 segundos (4 segundos en el
modo de reproducción larga) en cualquier sentido
a partir de su posición original.
Nota
Los identificadores de comienzo escritos antes de 10
segundos del final de la cinta pueden resultar difíciles o
imposibles de mover.
5
•
•
STANDARD
ON
406
•
•
317
•••
••
OFF
REC MUTE
R)0±≠
REC
•
•
28
•
•
9
•
•
10
PHONES
PHONE LEVEL
100
Movimiento
0,3 seg
Movimiento con cada presión
con cada
presión de 0
0,3 seg
El tiempo del visualizador mostrará el
desplazamiento de la posición a partir del tiempo
en el que presionó la tecla START ID REHEARSAL.
Después de haber
presionado dos veces )
06.
S
START ID
Después de haber
presionado dos veces 0
3 Presione START ID WRITE.
En el visualizador aparecerá “ID WRITE” durante
algunos segundos, y el identificador de comienzo
se escribirá en la cinta en el punto seleccionado.
Durante este tiempo, en el visualizador
parpadeará “START ID”.
06.
de )
S
START ID
Borrado de identificadores de comienzo
Usted podrá borrar cualquier identificador de
comienzo.
L R
REC LEVEL
REC MODE
SBM
INPUT
MODE
RESET
TIMER
g
OFFREC PLAY
POWER
MARGIN
START ID
RESETERASEWRITE
REHEARSALRENUMBER
AUTO
OPEN/CLOSE
ANALOG
48 kHz
•••
OPTICAL
44.1 kHz
§
COAXIAL
LONG
AMS
pPr
·
START ID ERASE
Presione START ID ERASE cuando se visualice el
identificador de comienzo que desee borrar.
En el visualizador aparecerá “(ERASE)” mientras el
deck rebobine la cinta hasta el principio del
identificador de comienzo, y después aparecerá “ID
ERASE” cuando el deck borre dicho identificador de
comienzo.
• El borrado de un identificador de comienzo tardará 9
segundos.
• Los números de programa se borrarán junto con los
identificadores de comienzo.
5
•
•
STANDARD
ON
406
•
•
317
•••
••
OFF
REC MUTE
R)0±≠
REC
•
•
28
•
•
9
•
•
10
PHONE LEVEL
PHONES
100
17
ES
Page 66

Información adicional
Información adicionalEscritura de subcódigos
Renumeración automática de números de programas (Renumeración)
La función de renumeración buscará cada identificador
de comienzo desde el principio de la cinta y asignará
un nuevo número de programa a cada uno
comenzando por 1. Utilice la función de renumeración
en los casos siguientes.
• Cuando haya añadido un nuevo identificador de
comienzo durante la reproducción de una cinta.
• Cuando se haya perdido un número de programa
debido al borrado de un identificador de comienzo.
• Cuando haya comenzado la grabación desde el
medido de una cinta y haya escrito un número de
programa ya existente, o cuando uno de los
identificadores de comienzo no posea número de
programa.
L R
REC LEVEL
REC MODE
SBM
INPUT
MODE
RESET
TIMER
g
OFFREC PLAY
POWER
MARGIN
START ID
RESETERASEWRITE
REHEARSALRENUMBER
AUTO
OPEN/CLOSE
ANALOG
48 kHz
•••
OPTICAL
44.1 kHz
§
COAXIAL
LONG
AMS
pPr
·
START ID RENUMBER
Presione START ID RENUMBER mientras el deck esté
en reproducción o parado.
En el visualizador parpadeará “RENUMBER”, y la
cinta se rebobinará hasta su comienzo. Después, el
deck iniciará la búsqueda de los identificadores de
comienzo desde el principio de la cinta y asignará un
nuevo número de programa consecutivo a cada
canción. Cuando el deck detecte un identificador de
inicio, el deck reproducirá la canción desde el
identificador de comienzo durante 2 segundos,
después escribirá un nuevo número de programa en la
cinta. Durante este tiempo, permanecerá encendido
“RENUMBER” y parpadeará “START ID”.
Una vez finalizada la renumeración, el deck rebobinará
automáticamente la cinta hasta su comienzo y después
se parará.
Nota
La función de renumeración puede no trabajar
correctamente en los casos siguientes:
• En la cinta existe una sección en blanco.
• El intervalo entre dos identificadores de comienzo es
inferior a 18 segundos (36 segundos en el modo de
reproducción larga).
• Existe un identificador de comienzo antes de 10 segundos
del final de la cinta.
5
•
•
STANDARD
ON
406
•
•
317
•••
••
OFF
REC MUTE
R)0±≠
REC
•
•
28
•
•
9
•
•
10
PHONE LEVEL
PHONES
100
Precauciones
Seguridad
• No desarme la unidad, ya que podría recibir descargas
eléctricas. En caso de avería, solicite los servicios de
personal cualificado solamente.
• Si dentro de la unidad cae algún objeto sólido o líquido,
desenchufe el cable de alimentación de CA antes de
utilizarla nuevamente.
Fuentes de alimentación
• Antes de utilizar la unidad, compruebe si su tensión de
alimentación es idéntica a la de la red local. La tensión de
alimentación está indicada en la placa de características
del panel posterior de la unidad.
• La unidad no se desconectará de la fuente de alimentación
de CA (red) mientras permanezca enchufada en una toma
de la misma, incluso aunque haya desconectado la
alimentación en la propia unidad.
• Cuando no vaya a utilizar la unidad durante mucho
tiempo, desenchúfela de la red. Para desconectar el cable
de alimentación, tire del enchufe. No tire nunca del
propio cable.
• El cable de alimentación solamente deberá ser
reemplazado en un taller de reparaciones cualificado.
Operación
Si traslada la unidad directamente de un lugar frío a otro
cálido, o si la coloca en una sala muy húmeda, es posible que
se condense humedad en su interior, que aparezca
“CAUTION” en el visualizador, y que la unidad no funcione.
Cuando suceda esto, extraiga el cassette y deje la unidad con
la alimentación conectada durante aproximadamente una
hora hasta que se evapore esta unidad.
Ubicación
• Coloque la unidad en un lugar adecuadamente ventilado
para evitar el recalentamiento interno.
• No coloque la unidad:
— sobre una superficie suave, como una alfombra ya que
podrían bloquearse los orificios de ventilación de la
base.
— cerca de fuentes térmicas.
— a la luz solar directa.
— en posición inclinada.
— en un lugar sometido a polvo excesivo o a golpes.
Cintas
• Después de haber utilizado una cinta, colóquela en su caja
y guárdela donde no quede sometida a la luz solar directa,
altas temperaturas, humedad, o polvo.
• El casco de los cassettes de cinta audiodigital ha sido
diseñado como protección contra el polvo. No abra el
cassette dejando al descubierto la cinta.
• El orificio de la parte posterior del cassette es la ranura
detectora. No cubra esta ranura.
18
ES
Page 67

Información adicional
Cintas de más de 120 minutos
No utilice casetes de cinta fina (con un tiempo de
reproducción de más de 120 minutos) para hacer
grabaciones importantes porque estos casetes pueden
tener los siguientes problemas:
— La cinta puede enrollar mal después de utilizar
repetidamente el AMS, el rebobinado, avance rápido
o localización.
— Mal registro o borrado de los ID de inicio.
— Distorsión del sonido.
Si tiene alguna pregunta o problema en relación con su
unidad, consulte a su proveedor Sony.
Limpieza
Limpieza de la caja, el panel, y los controles
Utilice un paño ligeramente humedecido en una
solución poco concentrada de detergente. No use
ningún tipo de estropajo, polvos abrasivos, ni
disolventes como alcohol o bencina.
Limpieza de la cabeza y la trayectoria de la
cinta
• La operación prolongada de causará la
contaminación de la cabeza. A fin de lograr el mejor
sonido de grabación y reproducción posible, se
recomienda limpiar la cabeza utilizando un cassette
limpiador DT-10CL (no suministrado) cada diez
horas aproximadamente de operación.
• Cuando no haya utilizado el deck durante mucho
tiempo, limpie la cabeza con el cassette limpiador.
La contaminación de la cabeza puede causar la pérdida de
sonido durante la reproducción.
Mensajes del visualizador
En la tabla siguiente se explican varios mensajes que
aparecen en el visualizador.
Mensaje
BLANK
CAUTION El mecanismo de seguridad está en
CLEANING
(ERASE) La función de borrado de identificadores de
ID ERASE
ID WRITE Está escribiéndose un identificador de
NO TAPE
PROHIBIT
PROTECT
REHRSL
SOURCE
Significado
El deck está buscando el comienzo de una
sección en blanco de la cinta.
funcionamiento debido a la condensación de
humedad o a otras razones.
Se recomienda limpiar la cabeza y la
trayectoria de la cinta. Después de unas 10
horas de utilización del deck, este mensaje
aparecerá durante unos 10 segundos cuando
conecte la alimentación del deck.
comienzo está activada.
Está borrándose un identificador de
comienzo.
comienzo o un número de programa.
No hay cassette insertado en el deck.
La fuente de programa que está tratando de
grabar no puede grabarse a través de las
tonas de entrada digital. Para más
información, consulte “Guía del sistema de
administración de copia en serie” (páginas 22
y 23).
El orificio de protección contra el borrado del
cassette está abierto, y no es posible grabar en
la cinta.
La función de ensayo está activada.
El deck ha estado en grabación en pausa
durante unos 10 minutos, o ha presionado la
tecla r REC sin cassette insertado o con el
cassette protegido contra el borrado.
Forma de utilizar el cassette limpiador
1 Inserte el cassette limpiador como si se tratase de uno de
cinta audiodigital.
2 Presione ·. Después de unos 10 segundos, presione p.
No presione la tecla r REC ni ) para la limpieza.
3 Extraiga el cassette limpiador sin rebobinarlo. Usted
deberá rebobinar el cassette limpiador solamente después
de que haya finalizado la cinta.
Notas sobre la limpieza
• Después de 10 horas de operación, en el visualizador
aparecerá “CLEANING” durante unos diez segundos
cuando conecte la alimentación del deck. Se recomienda
limpiar periódicamente la cabeza y la trayectoria de la
cinta utilizando este mensaje como guía.
• Debido a que la cinta del cassette limpiador es corta, el
contador no mostrará el tiempo de recorrido ni el tiempo
restante reales de la cinta.
TAPE END La cinta ha llegado hasta el final de la parte
TAPE TOP
UNLOCK
WAIT
(WRITE) La función de escritura de identificadores de
grabada.
La cinta ha llegado a su comienzo.
No está entrando señal digital a través de la
toma elegida con el selector INPUT.
El deck está buscando el comienzo de una
sección en blanco de la cinta.
comienzo está activada.
19
ES
Page 68

Información adicional
Solución de problemas
Si experimenta cualquiera de las dificultades siguientes
cuando esté utilizando el deck, utilice esta sección
como guía para solucionar el problema. Si el problema
persiste, consulte a su proveedor Sony más cercano.
No es posible escribir identificadores de comienzo
durante la grabación.
/ El identificador de comienzo no puede escribirse antes
de 9 segundos (18 segundos en el modo de reproducción
larga) después del final del identificador de comienzo
anterior. Cerciórese de que hayan transcurrido 9
segundos (18 segundos en el modo de reproducción
larga) después del último identificador de comienzo
antes de escribir otro nuevo.
El portacassette no se cierra.
/ Compruebe si ha insertado correctamente el cassette
(consulte las páginas 6 y 8).
/ Inserte el cassette más aya de la barra plateada (consulte
las páginas 6 y 8).
Las teclas de función no trabajan.
/ Acaba de conectar la alimentación, pero el deck no
funciona durante unos 4 segundos. Espere 4 segundos
(10 segundos cuando haya aparecido “CLEANING”)
antes de intentar cualquier operación.
/ Ha pulsado la tecla P. Pulse P para cancelar la pausa.
/ La cinta ha finalizado. Presione 0 para rebobinar la
cinta.
No hay sonido.
/ Realice las conexiones apropiadas (consulte las páginas 4
y 5).
/ No está utilizando adecuadamente el amplificador
conectado. Utilice el amplificador en la forma adecuada
para la operación respectiva del deck. (Consulte el
manual de instrucciones del amplificador.)
El deck no graba.
/ El orificio de protección contra el borrado está abierto.
Deslice la lengüeta de protección contra el borrado para
cerrar el orificio (consulte la página 7).
/ El selector INPUT está incorrectamente ajustado. Ponga
INPUT en la posición correcta.
/ El control REC LEVEL está en 0. Gire REC LEVEL hacia
la derecha para aumentar el nivel de grabación
(solamente durante la grabación analógica).
/ La entrada de señal a través de la toma de entrada digital
está protegida contra la copia digital (solamente durante
la grabación digital). Introduzca la señal a través de la
toma de entrada analógica.
La tecla OPEN/CLOSE § no funciona.
/ La tecla OPEN/CLOSE § no funcionará durante la
grabación. Presione primero p o P para parar la
reproducción, y después presione OPEN/CLOSE §.
Aparece “CAUTION” y el deck no funciona.
/ El mecanismo de seguridad está funcionando debido a la
condensación de humedad. Extraiga el cassette y deje el
deck con la alimentación conectada durante
aproximadamente una hora. Después desconecte y
vuelva a conectar la alimentación del deck (consulte la
página 18).
No es posible escribir subcódigos.
/ El orificio de protección contra el borrado está abierto.
Deslice la lengüeta de protección contra el borrado para
cerrar el orificio (consulte la página 7).
La función de acceso directo no trabaja.
/ El número de programa especificado no existe en la
cinta. Presione START ID RENUMBER para renumerar
los números de programa.
/ Los números de programa están fuera de orden.
Presione START ID RENUMBER para renumerar los
números de programa.
El deck comienza el rebobinado de la cinta durante la
reproducción.
/ La función de reproducción repetida está activada.
Presione repetidamente REPEAT del telemando para
hacer que desaparezca “REPEAT” o “REPEAT 1” del
visualizador a fin de cancelar la reproducción repetida.
Las teclas de operación de la cinta no funcionan durante
la escritura o el borrado de un identificador de
comienzo.
/Ninguna de las teclas funcionará durante los 9 segundos
(18 segundos en el modo de reproducción larga) de
escritura de un identificador de comienzo. Espere hasta
que haya finalizado la operación de escritura del
identificador de comienzo.
No es posible escribir códigos de tiempo absoluto.
/ La grabación comenzó en una sección en blanco.
Rebobine la cinta hasta su comienzo, o localice el final de
la parte grabada con la función de búsqueda de fin antes
de iniciar la grabación.
El transporte de la cinta es excesivamente ruidoso
durante el avance rápido o el rebobinado.
/ El ruido se debe al cassette y no significa ningún
problema mecánico.
La cinta se para repentinamente.
/ El cassette está defectuoso o dañado.
Presione OPEN/CLOSE § y reemplace el cassette por
otro nuevo.
Al presionar 0/) o ≠/±, la cinta se para
momentáneamente antes de comenzar a moverse.
/ Esto es normal y no significa ningún problema mecánico.
El deck no puede controlarse con el telemando
(suministrado).
/ Las pilas están débiles. Cambie ambas pilas.
No aparece “SBM” en el visualizador aunque el SBM está
activado.
/ El “SBM” aparece sólo durante la grabación de señales
de entrada analógicas con una frecuencia de muestreo de
48 kHz o 44,1 kHz pero no durante la grabación de
títulos con una señal de entrada digital ni cuando la
señal de entrada analógica tiene una frecuencia de
muestreo de 32 kHz, ni durante la reproducción.
20
ES
Page 69

Especificaciones
Sistema
Cinta Cinta audiodigital
Cabeza grabadora Giratoria
Tiempo de grabación Estándar: 120 minutos
(utilizando DT-120) Reproducción larga: 240 minutos
Velocidad de la cinta Estándar: 8,15 mm/s
Reproducción larga: aprox. 4,075 mm/s
Información adicional
Tomas de salida
Toma Impedancia de
ANALOG
DIGITAL
OPTICAL
PHONES
Tipo de toma
Tomas fono
Conector
óptico
Toma
telefónica
estéreo
Impedancia
de salida
470 ohmios
—
100 ohmios
Nivel
nominal
de salida
–4 dBs
(longitud de
onda de 660
nm)
1,2 mW
carga
10 kiloohmios
o más
—
32 ohmios
Rotación del tambor Estándar: aprox. 2.000 rpm
Paso de pista 13,6 µm (20,4 µm)
Frecuencia de muestreo 48 kHz, 44,1 kHz, 32 kHz
Número de canales 2 canales, estéreo
Conversión D/A Estándar: lineal de 16 bitios
(Cuantificación) Reproducción larga: no lineal de 12
Respuesta en frecuencia* Estándar: 2 - 22.000 Hz (±0,5 dB)
Relación señal-ruido* 90 dB o más (modos estándar y de
Gama dinámica* 90 dB o más (modos estándar y de
Distorsión armónica Estándar: 0,005% o menos (1 kHz)
total* Reproducción larga: 0,008% o menos
Fluctuación y trémolo Inmensurables (±0,001%, ponderación
* Para una entrada analógica con la función SBM desactivada.
Reproducción larga: aprox. 1.000 rpm
bitios
Reproducción larga: 2 - 14.500 Hz (±0,5 dB)
reproducción larga)
reproducción larga)
(1 kHz)
de pico)
Tomas de entrada
Toma
ANALOG
Tipo de toma
Tomas fono
Impedancia
47 kiloohmios
Nivel nominal de
entrada
–4 dBs
Sección general
Alimentación
Lugar de adquisición
Canadá 120 V CA, 60 Hz
Europa
Consumo 30 W
Dimensiones Aprox. 430 × 106 × 325 mm (an/al/prf)
Peso Aprox. 5,0 kg
Requisitos
230 V CA, 50/60 Hz
Accesorios suministrados
Consulte la página 4.
Diseño y especificaciones sujetos a cambio sin previo aviso.
Función SBM (Super Mapeo de Bits)
En las grabaciones analógicas, la función SBM reduce
el ruido dentro de la banda de frecuencias en las que el
oído humano es más sensible al ruido, mejorando
enormemente la gama dinámica auditiva de la señal
grabada.
DIGITAL
OPTICAL
DIGITAL
COAXIAL
Conector óptico — —
Toma fono 75 ohmios
0,5 Vp-p
Convertidor A/D de impulsos de alta
precisión
El deck utiliza un convertidor AD de impulsos y un
filtro de decimación para convertir una señal analógica
en una señal digital cuantificada de 24 bitios. Otros
aparatos, como los reproductores de discos compactos,
utilizan una cuantificación de 16 bitios y esta diferencia
de 8 bitios se traduce en una cuantificación más
precisa, más información sobre la señal y menor ruido
de cuantificación comparada con la de 16 bitios.
Durante la conversión de los datos de 24 bitios a una
señal de grabación de 16 bitios, la función SBM
refuerza la calidad del sonido reintroduciendo 4 bitios
de información que de otra forma se perderían en la
señal de 16 bitios.
21
ES
Page 70

Información adicional
Aplicación de la teoría sobre la audición
humana
La función SBM aplica la teoría sobre la audición
humana para reintroducir la información sobre la
señal. La gama de audición posible del oído humano
está entre 20 Hz y 20 kHz; sin embargo la máxima
sensibilidad está entre los 3 kHz y los 4 kHz. Lo mismo
se puede decir del ruido de cuantificación. La
reducción del ruido de cuantificación en esta gama
permite grabar las señales para producir un sonido
más amplio con una reducción uniforme de los ruidos
en toda la gama audible.
Guía del sistema de administración de copia en serie
Este deck de cinta audiodigital utiliza el sistema de
administración de copia en serie (SMCS), que le
permitirá realizar solamente copias digitales de la
primera generación de software pregrabado a través de
la toma de entrada digital de su deck. A continuación
se ofrece luna descripción general de este sistema.
Nivel
de ruido
(dB)
Filtro de formación de ruido
La función SBM utiliza un filtro de formación de ruido
(vea la figura A) con una respuesta de frecuencia
similar a la del oído humano, reduciendo los ruidos de
cuantificación en la gama de frecuencias más sensible,
y realimenta el error de cuantificación (que
normalmente se perdía) a la señal de entrada,
reintegrando la información de bitio de extremo bajo
con la información de bitio de extremo alto.
Fiq. A
//
Entrada de información
de 24 bitios
Filtro de
formación
de ruido
La figura B muestra la mejora en el nivel de ruido de
cuantificación cuando se activa el interruptor SBM
(valores teóricos). Si consideramos que el nivel de
ruido es de 0 dB con el interruptor SBM desactivado, la
mejora en el nivel de ruido para las frecuencias de
muestreo por debajo de 3 kHz supera los 10 dB al
activar el interruptor SBM.
Fig. B
25
20
15
10
5
0
-5
-10
20 10050 200 1k500 2k 15k5k 10k
Frecuencia de muestreo (Hz)
La función SBM sólo influye sobre la grabación. La
mejora en el sonido de la función SBM podrá
apreciarse en el momento de la reproducción, sea cual
sea la posición del interruptor SBM o del deck DAT
utilizado.
Salida SBM
de 16 bitios
SBM
activado
SBM
desactivado
1 Usted podrá grabar de fuentes de programas digitales
(discos compactos, minidiscos pregrabados, o cintas
audiodigitales) en una cinta audiodigital a través de la
toma de entrada digital en el deck de cinta audiodigital o
en un deck de minidiscos. Sin embargo, no podrá grabar
de esta cinta audiodigital o minidisco grabado en otra
cinta audiodigital ni en otro minidisco grabable a través
de la toma de entrada digital del deck de cinta
audiodigital ni de un deck de minidiscos.
Reproducción
Deck de cinta
audiodigital
Cable conector óptico
o digital coaxial
Grabación
Cinta
audiodigital
o minidisco
Reproducción
Toma de salida
digital
Cable conector
óptico o digital
coaxial
Toma de entrada
digital
Grabación
Reproductor de
discos compactos
Deck de minidiscos
Toma de salida
digital
Toma de entrada
digital
Deck de cinta audio
digital o de minidiscos
v
v
Deck de cinta audio
digital o de minidiscos
Toma de entrada de línea
(analógica)
Deck de cinta audio
digital o de minidiscos
Cinta audiodigital
o minidisco de la
primera
generación
grabado a través
de la conexión
digital-digital
Toma de salida de línea
(analógica)
Cable conector de
audio
22
ES
Page 71

Información adicional
2 Usted podrá grabar la señal de entrada digital de un
programa de recepción vía satélite en una cinta
audiodigital o en un minidisco grabable que sea
capaz de manejar una frecuencia de muestreo de 32
kHz o 48 kHz. Usted podrá grabar después el
contenido de esta cinta audiodigital o minidisco
grabado (primera generación) en otra cinta audio
digital o minidisco grabable a través de la toma de
entrada digital del deck de cinta audiodigital o del
grabador de minidiscos para crear una copia digital
de segunda generación. La grabación siguiente de
una copia de segunda generación entra cinta
audiodigital o minidisco grabable solamente será
posible a través de la toma de entrada analógica del
deck de cinta audio digital o del deck de minidiscos.
Reproducción
Cable conector
óptico o digital
coaxial
Grabación
Cinta audio
digital o
minidisco
Reproducción
Cable conector
óptico o digital
coaxial
Grabación
Cinta audio
digital o
minidisco
Reproducción
Toma de salida digital
Cable conector
óptico o digital
coaxial
Toma de entrada digital
Grabación
Sintonizador de
recepción vía satélite
Toma de salida
digital
Toma de entrada digital
Deck de cinta audio
digital o de minidiscos
v
v
Deck de cinta audio
digital o de minidiscos
Toma de salida digital
Toma de entrada digital
Deck de cinta audio
digital o de minidiscos
v
v
Deck de cinta audio
digital o de minidiscos
Toma de salida de línea
(analógica)
Toma de entrada de línea
(analógica)
Deck de cinta audio
digital o de minidiscos
Cinta audio digital
o minidisco de la
primera generación
grabado a través
de la conexión
digital-digital
Cinta audio
digital o
minidisco de
segunda
generación Toma
de salida digital
grabado a través
de la conexión
digital-digital
Cable conector de
audio
3 Usted podrá grabar una cinta audio digital o un minidisco
grabado a través de la toma de entrada analógica del deck
de cinta audiodigital o de minidiscos en otra cinta
audiodigital o minidisco a través de la toma de salida
digital del deck de cinta audio digital o de minidiscos. Sin
embargo no podrá realizar una copia de cinta audiodigital
o minidisco de segunda generación a través de la toma de
salida digital del deck de cinta audiodigital o de
minidiscos.
Reproducción
Sintonizador
Deck de cassettes
Deck de cinta
audiodigital
Cable conector de audio
Grabación
Cinta audio
digital o
minidisco
Reproducción
Cable conector
óptico o digital
coaxial
Grabación
Cinta audio
digital o
minidiscos
Reproducción
Toma de salida
digital
Cable conector
óptico o digital
coaxial
Toma de entrada
digital
Grabación
Giradiscos
Reproductor de
discos compactos
Amplificador de
Deck de minidiscos
Toma de salida de
línea (analógica)
Toma de entrada de línea
(analógica)
Deck de cinta audio
digital o de minidiscos
v
v
Deck de cinta audio
digital o de minidiscos
Toma de salida digital
Toma de entrada
digital
Deck de cinta audio
digital o de minidiscos
v
v
Deck de cinta audio
digital o de minidiscos
Tomas de salida de línea
(analógica)
Tomas de entrada de línea
(analógicas)
Deck de cinta audio
digital o de minidiscos
micrófono
Cinta audio
digital o
minidisco
grabado a través
de la conexión
analógica-digital
Cinta audio
digital o
minidisco de la
primera
generación
grabado a través
de la conexión
digital-digital
Cable conector de
audio
23
ES
Page 72

Índice alfabético
Índice alfabético
A
Acceso directo 14
Acentuación 9, 13
Ajuste del modo de grabación
11
Ajuste del nivel de grabación
10
AMS (sensor automático de
canciones) 14
B
Búsqueda de fin 10
C, D
Códigos de tiempo absoluto 9
Colocación de las pilas en el
telemando 4
Conexión del sistema 4
E
Ensayo 16
F
Función SBM 11, 21
G, H
Grabación con temporizador
12
Grabación de una cinta
audiodigital 6
I, J, K
Identificador de comienzo
Ajuste de la posición de un
código de comienzo existente
17
Borrado de identificadores de
comienzo 17
Escritura automática de
identificadores de comienzo
durante la grabación 16
Escritura manual de
identificadores de comienzo
durante la grabación 16
Ubicación precisa de
identificadores de comienzo
17
Indicación de margen 10
L
Lengüeta de protección contra
el borrado 7
Limpieza 19
Limpieza de la cabeza y de la
trayectoria de la cinta 19
M
Mensajes del visualizador 19
N, O
Números de programas 15, 18
P, Q
Pilas 4
R
Renumeración 18
Reproducción con
temporizador 15
Reproducción de una cinta
audiodigital 8
Reproducción repetida
Reproducción repetida de
todas las canciones 14
Reproducción repetida de
una canción 14
S
Sección con sonido silenciado
9, 12
Sección en blanco 9, 10
Silenciamiento de la grabación
12
Sistema de administración de
copia en serie 22
Subcódigos 15
T, U, V, W, X, Y, Z
Tiempo absoluto 13
Tiempo de recorrido de la cinta
13
Tiempo de reproducción de la
canción 13
Tiempo restante de la cinta 13
Denominación de los
controles
Teclas
CLEAR 14
COUNTER MODE 13
COUNTER RESET 13
MARGIN RESET 10
MODE 13
OPEN/CLOSE § 6 - 8
r REC 7
REC MUTE R 12
REPEAT 14
RESET 13
START ID AUTO 15
START ID ERASE 17
START ID REHEARSAL 16, 17
START ID RENUMBER 18
START ID WRITE 15, 16
p 7, 8, 12
· 7, 8, 10, 12, 14, 15
0/) 7, 8, 10, 16
P 7, 10, 12, 15
≠/± 8, 14
Selectores
INPUT 6
POWER 6, 8
REC MODE 11
SBM 11
TIMER 12, 15
Controles
PHONE LEVEL 8
REC LEVEL 10
Tomas
ANALOG IN 4, 6
ANALOG OUT 4
DIGITAL COAXIAL IN 4, 6
DIGITAL OPTICAL IN 4, 6
DIGITAL OPTICAL OUT 4
PHONES 8
24
ES
Page 73

Índice alfabético
25
ES
Page 74

ADVERTÊNCIA
Bem-vindo ao
Acerca deste manual
Para evitar o risco de incêndio
ou de choque eléctrico, não
exponha o aparelho à chuva
nem à humidade.
Para evitar descargas
eléctricas, não abra o
aparelho. Solicite assistência
somente a técnicos
especializados.
mundo digital!
Agradecemos-lhe pela aquisição do
Deck de Cassetes de Áudio Digital da
Sony. Antes de utilizar o aparelho, leia
atentamente este manual e guarde-o
para futuras consultas.
O DTC-ZE700 possui as seguintes
características:
• Conversores lineares de alta
densidade
Um conversor A/D a pulso que
proporciona uma qualidade de som
elegante e cristalina, além de uma
distorção cruzada teoricamente igual
a zero; um conversor D/A com filtro
digital recentemente desenvolvido e
formato de alimentação avançada
total que reduz ruídos de quantização
na banda audível, expandindo, assim,
a gama de expressão espacial.
• Função SBM (Super Mapeamento de
Bits) (consulte a página 21)
• Sistema de gestão de cópias em série
(consulte a página 22)
• Três frequências de amostragem (48
kHz; 44,1 kHz; 32 kHz)
• Gravação e reprodução no modo de
reprodução prolongada
• Gravação analógica a 44,1 kHz
• Subcódigos
IDs de início, números de memória e
outros subcódigos inscritos na fita
possibilitam-lhe a localização rápida
de faixas.
• Tampa do compartimento de cassete
transparente
Uma tampa transparente no
compartimento de cassete permite-lhe
observar as operações da fita durante
a reprodução e a gravação.
As instruções neste manual destinam-se
ao DTC-ZE700.
Convenções
As instruções neste manual descrevem
os controlos no deck.
O seguinte símbolo é utilizado neste
manual:
Indica informações ou conselhos
z
úteis que facilitam as operações.
Indica operações que requerem a
Z
utilização do telecomando.
P
2
Page 75

ÍNDICE
Preparativos
Desempacotamento 4
Ligação do sistema 4
Gravação de cassetes DAT 6
Reprodução de cassetes DAT 8
Operações de gravação
O que se deve saber antes de realizar uma gravação 9
Ajuste do nível de gravação para gravações analógicas 10
Localização do final do trecho gravado (Busca do ponto de término) 10
Ajuste do modo de gravação 11
Utilização da Função SBM (Super Mapeamento de Bits) 11
Inserção de trechos silenciados durante gravações (Gravação silenciada) 12
Gravações com o temporizador (Gravação temporizada) 12
Operações de reprodução
Acerca do mostrador 13
Localização de faixas (AMS/Acesso directo) 14
Reprodução repetida de faixas (Leitura repetida) 14
Reproduções com o temporizador (Leitura temporizada) 15
P
Inscrição de subcódigos
Acerca dos subcódigos 15
Inscrição de IDs de início durante a gravação 15
Inscrição de IDs de início durante a reprodução 16
Ajuste da posição de um ID de início existente 17
Apagamento de IDs de início 17
Renumeração automática dos números de memória (Renumeração) 18
Informações adicionais
Precauções 18
Limpeza 19
Mensagens no mostrador 19
Verificação de problemas 20
Especificações 21
Função SBM (Super Mapeamento de Bits) 21
Guia para o sistema de gestão de cópias em série 22
Índice remissivo Contra-capa.
P
3
Page 76

Preparativos
ANALOG
OUT
ANALOG
IN
DIGITAL
COAXIAL OUT
DIGITAL
OPTICAL OUT
DIGITAL
OPTICAL IN
IN
COAXIAL
IN IN OUT
OPTICAL
ANALOG IN/OUT
DIGITAL IN/OUT
LRL
R
OUT
Preparativos
Desempacotamento
Certifique-se de ter recebido os seguintes itens
fornecidos:
• Cabos de ligação de audio com fichas de pino (2)
• Telecomando RM-D757 (1)
• Pilhas R6 (tamanho AA) (2)
• Manual de instruções (1)
Inserção de pilhas no telecomando
Insira duas pilhas R6 (tamanho AA), observando a
correspondência dos pólos + e – das pilhas com as
marcas no interior do compartimento de pilhas.
Ligação do sistema
Esta secção descreve como efectuar as ligações do seu
deck a um amplificador, leitor de discos compactos,
deck de minidiscos ou outros componentes de áudio.
Certifique-se de desligar a alimentação de todos os
componentes antes de efectuar as ligações.
a uma tomada da
rede
Leitor de CDs, deck
Amplificador, etc.
de DAT ou deck de
MD, etc.
z Quando substituir as pilhas
Sob condições normais de utilização, as pilhas devem
durar cerca de 6 meses. Quando o telecomando não
mais conseguir controlar o deck, substitua ambas as
pilhas.
Notas
• Não deixe o telecomando nas proximidades de locais
excessivamente quentes ou húmidos.
• Não deixe cair nenhum objecto estranho no interior do
telecomando, particularmente durante a substituição das
pilhas.
• Não exponha o sensor remoto à luz solar directa ou a
aparatos de iluminação, para evitar algum mau
funcionamento.
• Quando não for utilizar o telecomando por um período
prolongado, retire as pilhas a fim de evitar possíveis
avarias decorrentes da fuga do electrólito e posterior
corrosão das pilhas.
Leitor de CDs, deck
de DAT ou deck de
MD, etc.
Leitor de CDs, deck
de DAT ou deck de
MD, etc.
ç: fluxo do sinal
Quais os cabos necessários
• Cabos de ligação de áudio (fornecidos) (2)
Branco
(L)
Vermelho
(R)
• Cabos ópticos (POC-15, etc., venda avulsa) (2)
• Cabo de ligação digital coaxial (VMC-10G, etc.,
venda avulsa) (1)
Branco
Vermelho
(L)
(R)
P
4
Page 77

Preparativos
Ligações
p Ligação do deck a um amplificador
Utilize os cabos de ligação de áudio fornecidos para
efectuar a ligação do deck ao amplificador.
Assegure-se de combinar cada ficha codificada por
cores com a tomada apropriada: vermelho (direita)
com vermelho, e branco (esquerda) com branco. Para
evitar zumbidos ou interferências, certifique-se de
que as ligações estão firmemente efectuadas.
Deck de DAT Amplificador
ANALOG IN/OUT
L
R
OUTIN
ç
L
R
Ç
LINE IN/OUT
OUT IN
L
R
L
R
z Nas gravações com microfone
Ligue as tomadas de saída analógica para microfone
estéreo do amplificador às tomadas ANALOG IN deste
deck.
p Ligação do deck a um componente de áudio digital
Sinais de áudio digitais provenientes de um
componente de áudio digital tal como um
amplificador digital, um deck DAT, um leitor de
discos compactos, um deck de minidiscos ou um
sintonizador via satélite, podem ser gravados neste
deck DAT mediante a ligação dos conectores de
saída digital do componente aos conectores de
entrada digital (DIGITAL OPTICAL IN ou DIGITAL
COAXIAL IN) do deck.
Sinais de áudio digitais provenientes do deck podem
ser gravados mediante a ligação do conector de
saída digital (DIGITAL OPTICAL OUT) do deck ao
conector de entrada digital de um componente de
áudio digital tal como um amplificador digital, um
deck DAT ou um deck de minidiscos.
Utilize cabos ópticos (POC-15A ou equivalente;
venda avulsa) ou um cabo coaxial de ligação digital
(VMC-10G ou equivalente; venda avulsa).
• Ligação com cabos ópticos
• Ligação com o cabo de ligação digital coaxial
Componente de
Deck de DAT
DIGITAL IN/OUT
OPTICAL
COAXIAL
IN
OUTIN
áudio digital
COAXIAL
OUT
Ç
Nota
Caso a indicação «PROHIBIT» apareça no mostrador, a
gravação através da tomada digital está impossibilitada.
Neste caso, ajuste o interruptor INPUT para ANALOG e
grave a fonte sonora através das tomadas ANALOG IN.
Ligação do cabo de alimentação CA
Ligue o cabo de alimentação CA a uma tomada da
rede.
Qual é o próximo passo?
Agora, o deck está pronto para ser utilizado.
Acerca das operações básicas, consulte as páginas de 6 a 8;
quanto às operações avançadas, consulte as secções a partir
da página 9.
Operações básicas
Deck de DAT
DIGITAL IN/OUT
OPTICAL
COAXIAL
IN
OUTIN
Componente
de áudio digital
ç
Ç
OPTICAL
IN OUT
P
5
Page 78

Operações básicas
Operações básicas
Gravação de cassetes DAT
73 45
••
REC MUTE
SBM
ON
OFF
R)0±≠
REC
REC LEVEL
5
•
406
•
3
•
28
•
1
•
PHONES
POWER
REC MODE
INPUT
ANALOG
OPTICAL
COAXIAL
·
•••
48 kHz
44.1 kHz
LONG
STANDARD
•••
MODE
RESET
TIMER
g
OFFREC PLAY
START ID
REHEARSALRENUMBER
AUTO
MARGIN
RESETERASEWRITE
OPEN/CLOSE
§
AMS
pPr
2 68
L R
•
•
10
PHONE LEVEL
7
•
•
9
•
100
Consulte as páginas 4 e 5 quanto
a informações sobre as ligações.
Ligue a alimentação do amplificador e reproduza a fonte
1
sonora que deseja gravar.
Pressione POWER.
2
Carregue em OPEN/CLOSE § e insira uma cassete.
3
OPEN/CLOSE
§
bb
Janela voltada para cima
Insira a cassete para
além da barra prateada
Feche o compartimento de
cassete mediante o
pressionar de OPEN/CLOSE
§.
Ajuste INPUT para o conector de entrada correspondente.
4
Para gravar através de
ANALOG IN
DIGITAL OPTICAL IN
DIGITAL COAXIAL IN
Ajuste INPUT para
ANALOG
OPTICAL
COAXIAL
OPEN/CLOSE
§
P
6
Page 79

Operações básicas
Localize a posição onde deseja iniciar a gravação.
5
Para gravar a partir do início da fita
Pressione 0 para rebobinar a fita ao seu início.
Para gravar a partir do final de um trecho já gravado
1 Pressione 0 para rebobinar a fita ao seu início.
2 Carregue em ).
O deck localiza o final do trecho gravado na fita e cessa
automaticamente.
Pressione r REC.
6
O deck está pronto para gravar.
Em gravações de sinais de entrada analógicos, ajuste o nível de
7
gravação com REC LEVEL.
O nível de gravação recomendado é o 3. Quanto aos detalhes,
consulte «Ajuste do nível de gravação para gravações
analógicas» na página 10.
Operações básicas
z Caso «UNLOCK» apareça no
mostrador
A fonte sonora não está
correctamente ligada ao deck,
ou a sua alimentação está
desactivada.
Certifique-se de efectuar
correctamente a ligação da
fonte sonora e activar a sua
alimentação.
Carregue em P ou ·.
8
Tem início a gravação.
Inicie a reprodução da fonte sonora.
9
Quando a fita atingir o seu término, o deck a rebobinará
automaticamente até o seu início e cessará (Rebobinagem
automática).
Para
cessar a gravação
pausar a gravação P. Para retomar a gravação, carregue
retirar a cassete
Para evitar apagamentos acidentais
Deslize a lingueta de protecção de gravações para a esquerda, tal como
indicado na ilustração abaixo.
Pressione
p
novamente nesta tecla.
OPEN/CLOSE § após cessar a gravação.
Gravação
impossibilitada (o
orifício está aberto).
Gravação possível
(o orifício está
fechado).
P
7
Page 80

Operações básicas
Reprodução de cassetes DAT
3
L R
••
REC MUTE
SBM
ON
OFF
R)0±≠
REC
REC LEVEL
5
•
•
406
•
•
3
7
•
•
28
•
•
1
9
•
•
10
PHONE LEVEL
PHONES
100
POWER
REC MODE
INPUT
·
ANALOG
OPTICAL
COAXIAL
•••
48 kHz
44.1 kHz
LONG
STANDARD
•••
MODE
RESET
TIMER
g
OFFREC PLAY
START ID
REHEARSALRENUMBER
AUTO
MARGIN
RESETERASEWRITE
OPEN/CLOSE
§
AMS
pPr
2 4
Consulte as páginas 4 e 5 quanto
a informações sobre as ligações.
z Para utilizar os
auscultadores
Ligue-os à tomada PHONES.
Utilize PHONE LEVEL para
ajustar o volume.
Ligue o amplificador e ajuste o selector de fonte à posição para
1
o DAT.
Pressione POWER.
2
Carregue em OPEN/CLOSE § e insira uma cassete.
3
OPEN/CLOSE
§
Pressione ·.
4
O deck inicia a reprodução. Ajuste o volume no amplificador.
bb
Insira a cassete para além
da barra prateada.
Janela voltada para cima
OPEN/CLOSE
§
Feche o compartimento de
cassete mediante o pressionar
de OPEN/CLOSE §.
Para
cessar a reprodução
avançar à próxima faixa
retroceder à faixa precedente
Pressione
p
±
≠
avançar rapidamente ou rebobinar ) ou 0 com o deck no modo de
paragem.
avançar rapidamente ou rebobinar durante
a monitorização do som
retirar a cassete
) ou 0 durante a reprodução. Libere a
tecla para retomar a reprodução normal.
OPEN/CLOSE § após cessar a
reprodução.
P
8
Page 81

Operações de gravação
Operações de gravação
Quanto às operações básicas de gravação, consulte as
páginas de 6 a 7.
O que se deve saber antes de realizar uma gravação
Diferença entre o trecho em branco e o
trecho silenciado
O deck distingue entre dois tipos de trechos de
silêncio, respectivamente denominados «trecho em
branco» e «trecho silenciado».
Trechos em branco
Correspondem a porções onde nenhum sinal foi
anteriormente gravado.
a) a) a)a)
b) b) b) b)
Trecho em branco
Trechos silenciados
Correspondem a porções onde foi gravado um sinal, porém
a um nível não-audível.
a)
a): Gravação
b): Faixa
Códigos de tempo absoluto
Os códigos de tempo absoluto indicam o tempo
decorrido a partir do início da fita. Tais códigos são
automaticamente gravados. Note que, uma vez
gravados, os códigos de tempo absoluto não podem ser
reinscritos.
Para a gravação precisa dos códigos de tempo absoluto
• Em caso de fitas em branco, certifique-se de iniciar a
gravação a partir do início da fita.
• Utilize a função de gravação silenciada (consulte a página
12)para inserir espaços entre faixas. Não avance a fita com
a tecla · ou ).
• Para iniciar a gravação a partir do meio de uma fita, utilize
a função de busca do ponto de término (consulte a página
10) para localizar o final da porção gravada. Isto evitará a
criação de trechos em branco.
Caso «EMPHASIS» apareça no mostrador
O deck está a gravar um sinal digital com efeitos de
ênfase (nas altas frequências). A gravação também
conterá o mesmo efeito de ênfase.
Caso o deck seja deixado no modo de
gravação em pausa por mais de 10 minutos
A gravação em pausa será liberada automaticamente, o
deck cessará a operação e «SOURCE» aparecerá no
mostrador.
Para retomar a gravação, pressione a r REC. O deck
comutará ao modo de gravação em pausa.
Operações básicas
b) b) b) b)
Trecho silenciado
a): Gravação
b): Faixa
Importante
Certifique-se de que nenhum trecho em branco foi
criado durante a gravação. A existência de trechos em
branco dentro de materiais gravados impossibilita as
operações de busca com as teclas ≠/±, ou destrói
a continuidade dos códigos de tempo absoluto.
z Caso a tecla r REC seja pressionada durante um
trecho em branco
O deck rebobina automaticamente a fita até o início do
trecho em branco e comuta ao modo de gravação em
pausa (excepto durante a gravação temporizada).
Quando da utilização de uma Fita nova
Antes de gravar sobre uma fita cassete nova,
recomenda-se avançar a fita até o seu fim e então
rebobiná-la ao incio, a fim de suavizar o movimento da
fita.
P
9
Page 82

Operações de gravação
Ajuste do nível de gravação para gravações analógicas
Antes de começar a gravar uma fonte analógica através
de ANALOG IN, ajuste o interruptor INPUT para
ANALOG e ajuste o nível de gravação.
L R
REC LEVEL
REC MODE
SBM
INPUT
MODE
RESET
TIMER
g
OFFREC PLAY
POWER
MARGIN
START ID
RESETERASEWRITE
REHEARSALRENUMBER
AUTO
OPEN/CLOSE
ANALOG
48 kHz
•••
OPTICAL
44.1 kHz
§
COAXIAL
LONG
AMS
pPr
·
1 Execute os passos de 1 a 6 de «Gravação de
cassetes DAT» nas páginas 6 e 7.
2 Reproduza o trecho da fonte sonora com o nível
de sinal mais intenso.
3 Durante a monitorização do som, gire REC
LEVEL para ajustar o nível de gravação de modo
que os medidores do nível de pico estejam no seu
nível máximo sem entrar na gama OVER
(vermelha).
Indicação MARGIN
Nível máximo
Os segmentos dos medidores do nível de pico
correspondentes à intensidade máxima de sinal
permanecem acesos por mais tempo que o
normal.
A indicação MARGIN mostra a margem entre a
intensidade máxima de sinal e 0 dB, alterando-se
a cada sinal mais forte.
Caso o nível exceda 0 dB
Os segmentos sob «OVER» acendem-se, e «0.0 dB»
passa a piscar no mostrador. Caso tais segmentos se
acendam estavelmente, poderá ocorrer distorção sonora.
Para evitar que isto aconteça, mantenha o nível de
gravação entre –12 dB e 0 dB.
1.0
Permanece
apagado
5
•
•
STANDARD
ON
406
•
•
317
•••
••
OFF
REC MUTE
R)0±≠
REC
•
•
28
•
•
9
•
•
10
PHONES
PHONE LEVEL
100
REC LEVEL· PMARGIN RESET
Localização do final do trecho gravado (Busca do ponto de término)
A busca do ponto de término detecta um trecho em
branco superior a 9 segundos, a seguir rebobina
automaticamente a fita até o final do trecho gravado e
então pára.
Utilize a busca do ponto de término para iniciar a
gravação a partir do final do trecho gravado sem criar
um espaço em branco na fita.
L R
REC LEVEL
REC MODE
SBM
INPUT
MODE
RESET
TIMER
g
OFFREC PLAY
POWER
MARGIN
START ID
RESETERASEWRITE
REHEARSALRENUMBER
AUTO
OPEN/CLOSE
ANALOG
48 kHz
•••
OPTICAL
44.1 kHz
§
COAXIAL
LONG
AMS
pPr
·
0 / )
1 Com o deck no modo de paragem, carregue em
0 para rebobinar a fita até o início.
2 Pressione ).
O deck localiza o final do trecho gravado, e então
pára.
O deck pára no início de qualquer trecho em
branco com duração de 9 segundos ou mais, ou
avança rapidamente ao final da fita, caso a fita
esteja totalmente em branco.
z Caso pressione a tecla r REC durante um trecho em
branco
O deck rebobina automaticamente a fita até o início do
trecho em branco e passa ao modo de gravação em
pausa. As indicações «BLANK» e «WAIT» aparecem no
mostrador durante a busca do início do trecho em
branco.
Notas
• A função de busca do ponto de término não funciona, caso
a tecla ) seja pressionada durante um trecho em branco.
• Caso a cassete esteja em branco, o deck simplesmente
avança rapidamente a fita até o seu final.
5
•
•
STANDARD
ON
406
•
•
317
•••
••
OFF
REC MUTE
R)0±≠
REC
•
•
28
•
•
9
•
•
10
PHONE LEVEL
PHONES
100
10
Para reajustar a indicação de margem
Pressione MARGIN RESET. A indicação de margem
altera-se para « - - dB».
4 Pare a reprodução da fonte sonora.
5 Para iniciar a gravação, pressione P ou ·, e
então inicie a reprodução da fonte sonora.
P
Page 83

Ajuste do modo de gravação
Pode-se seleccionar dentre dois modos de gravação—o
padrão e o prolongado—nos casos a seguir.
• Para a gravação de sinais de entrada analógicos com
o interruptor INPUT ajustado em ANALOG.
• Para a gravação de sinais de entrada digitais com
uma frequência de amostragem de 32 kHz com o
interruptor INPUT ajustado em OPTICAL ou
COAXIAL.
L R
REC LEVEL
REC MODE
SBM
INPUT
MODE
RESET
TIMER
g
OFFREC PLAY
POWER
MARGIN
START ID
RESETERASEWRITE
REHEARSALRENUMBER
AUTO
OPEN/CLOSE
ANALOG
48 kHz
•••
OPTICAL
44.1 kHz
§
COAXIAL
LONG
AMS
pPr
·
REC MODE
5
•
•
STANDARD
ON
406
•
•
317
•••
••
OFF
REC MUTE
R)0±≠
REC
•
•
28
•
•
9
•
•
10
PHONE LEVEL
PHONES
100
Operações de gravação
O tempo de gravação no modo de reprodução
prolongada (interruptor REC MODE ajustado em
LONG) é duas vezes mais longo que o do modo de
reprodução padrão.
z O contador no modo de reprodução prolongada
As indicações do tempo decorrido, do tempo absoluto e
do tempo restante na fita correspondem ao modo de
reprodução padrão.
Duplique o tempo para obter os tempos
correspondentes ao modo de reprodução prolongada.
Nota
Não altere o ajuste de INPUT ou de REC MODE durante a
gravação. Isto pode causar um erro na indicação de «PGM
TIME» (tempo de leitura da faixa).
Utilização da Função SBM
Ajuste REC MODE para seleccionar o modo de
gravação.
A tabela a seguir mostra os modos de gravação
seleccionáveis, além da posição REC MODE e da
frequência de amostragem correspondentes aos vários
sinais de entrada.
Sinal de entrada Posição
Modo de gravação
REC MODE
Analógico STANDARD
(48 kHz)
STANDARD
(44,1 kHz)
LONG Reprodução
Digital (32 kHz) STANDARD
(48 kHz)
STANDARD
(44,1 kHz)
LONG
Digital (44,1 kHz)
STANDARD
(48 kHz)
STANDARD
(44,1 kHz)
LONG
Digital (48 kHz) STANDARD
(48 kHz)
STANDARD
(44,1 kHz)
LONG
Reprodução padrão
(48 kHz)
Reprodução padrão
(44,1 kHz)
prolongada (32 kHz)
Reprodução padrão
(32 kHz)
Reprodução
prolongada (32 kHz)
Reprodução padrão
(44,1 kHz)
(Somente
reprodução padrão)
Reprodução padrão
(48 kHz)
(Somente
reprodução padrão)
(Super Mapeamento de Bits)
É possível usar a função SBM para gravar um sinal de
entrada analógico somente quando o interruptor
INPUT está na posição ANALOG e o interruptor REC
MODE na posição STANDARD (tanto 48 kHz ou 44,1
kHz ). Para conhecer em detalhes a função SBM,
consulte «Função SBM (Super Mapeamento de Bits)»
na página 21.
L R
REC LEVEL
REC MODE
SBM
INPUT
MODE
RESET
TIMER
g
OFFREC PLAY
POWER
MARGIN
START ID
RESETERASEWRITE
REHEARSALRENUMBER
AUTO
OPEN/CLOSE
ANALOG
48 kHz
•••
OPTICAL
44.1 kHz
§
COAXIAL
LONG
AMS
pPr
·
Ajuste SBM para ON
«SBM» aparece no mostrador durante gravações que
utilizem a função SBM.
Para desligar a função SBM
Ajuste SBM para OFF.
STANDARD
•••
SBM
ON
••
OFF
REC MUTE
R)0±≠
REC
5
•
•
406
•
•
317
•
•
28
•
•
9
•
•
10
PHONE LEVEL
PHONES
100
11
P
Page 84

Operações de gravação
Inserção de trechos silenciados durante gravações (Gravação silenciada)
Utilize a função de gravação silenciada para inserir um
espaço de cerca de 4 segundos entre faixas. Isto é
recomendado, caso planeje copiar a fita DAT em uma
fita cassete de áudio analógico, visto que os espaços
possibilitam-lhe utilizar as funções de busca
automática para a localização do início de cada faixa.
Quando se inicia a gravação a partir do início de uma
cassete em branco e deseja-se inserir um espaço antes
da primeira faixa, convém assegurar-se de criar um
trecho de som silenciado somente através da gravação
silenciada. Não avance a fita com a tecla ) ou ·, do
contrário, será criado um trecho em branco na fita
(consulte a página 9).
L R
REC LEVEL
REC MODE
SBM
INPUT
MODE
RESET
TIMER
g
OFFREC PLAY
POWER
MARGIN
START ID
RESETERASEWRITE
REHEARSALRENUMBER
AUTO
OPEN/CLOSE
ANALOG
48 kHz
•••
OPTICAL
44.1 kHz
§
COAXIAL
LONG
AMS
pPr
·
REC MUTE R · P
1 Pressione REC MUTE R onde deseja inserir um
espaço com o deck no modo de gravação ou de
gravação em pausa.
O deck cria um trecho silenciado assim que
«REC» passe a piscar no mostrador.
Após completado o trecho silenciado, a indicação
«REC» acende-se e o deck altera-se para o modo
de gravação em pausa.
Para inserir um espaço em branco superior a 4
segundos
Mantenha pressionada a REC MUTE R pelo tempo
desejado. Quando esta tecla for liberada, o trecho
silenciado termina e o deck entra no modo de gravação
em pausa. Caso mantenha a tecla pressionada por mais
de 4 segundos, «REC» passa a piscar mais rapidamente
e o tempo decorrido após o pressionar da tecla REC
MUTE R é indicado no mostrador.
Quando a tecla REC MUTE R é liberada, o indicador P
permanece aceso no mostrador e o deck passa ao modo
de gravação em pausa.
5
•
•
STANDARD
ON
406
•
•
317
•••
••
OFF
REC MUTE
R)0±≠
REC
•
•
28
•
•
9
•
•
10
PHONES
PHONE LEVEL
100
Gravações com o temporizador (Gravação temporizada)
Mediante a ligação de um temporizador (venda avulsa)
ao deck, podem-se iniciar e cessar operações de
gravação em horários específicos. Quanto a
informações mais detalhadas, consulte as instruções
que acompanham o temporizador.
L R
REC LEVEL
REC MODE
SBM
INPUT
MODE
RESET
TIMER
g
OFFREC PLAY
POWER
MARGIN
START ID
RESETERASEWRITE
REHEARSALRENUMBER
AUTO
OPEN/CLOSE
ANALOG
48 kHz
•••
OPTICAL
44.1 kHz
§
COAXIAL
LONG
AMS
pPr
·
pTIMER
1 Execute os passos de 1 a 7 de «Gravação de
cassetes DAT» nas páginas 6 e 7.
2 • Para especificar a hora de início da gravação,
pressione p.
• Para especificar a hora de término da gravação,
execute os passos 8 e 9 de «Gravação de cassetes
DAT» na página 7.
• Para especificar os tempos de início e término
da gravação, carregue em p.
3 Ajuste TIMER no deck para REC.
4 Ajuste o temporizador como requerido.
• Quando a hora de início da gravação é ajustada,
o deck desliga-se. Ao chegar a hora
especificada, o deck liga-se e, após 10 segundos,
inicia a gravação.
• Quando a hora de término da gravação é
ajustada, o deck continua a gravar até tal hora, e
então pára a gravação e desliga-se.
• Quando tanto a hora de início quanto de
término são ajustadas, o deck desliga-se. Ao
chegar a hora de início, o deck liga-se e, após
cerca de 10 segundos, inicia a gravação. Ao
chegar a hora de término, o deck pára a
gravação e desliga-se.
5 Após utilizar o temporizador, ajuste TIMER no
deck para OFF.
5
•
•
STANDARD
ON
406
•
•
317
•••
••
OFF
REC MUTE
R)0±≠
REC
•
•
28
•
•
9
•
•
10
PHONE LEVEL
PHONES
100
12
2 Pressione P ou · para retomar a gravação.
O deck reinicia a gravação.
Notas
• Caso o interruptor TIMER seja deixado na posição REC, o
deck automaticamente iniciará a gravação na próxima vez
Nota
Caso não se crie um trecho silenciado no início de uma fita,
pode não ser possível deslocar ou apagar um ID de início
(consulte a página 15) gravado dentro de 2 segundos a partir
do início da fita.
P
que a sua alimentação for ligada.
• Durante a gravação temporizada (ou seja, quando o
interruptor TIMER estiver ajustado na posição REC), a
função de rebobinagem automática (consulte a página 14)
não actuará, mesmo que a fita chegue ao fim durante a
gravação. Desta forma, evita-se a regravação acidental
sobre materiais previamente gravados.
Page 85

Operações de reprodução
Operações de reprodução
Quanto às operções básicas de reprodução, consulte a
página 8.
Acerca do mostrador
Pode-se utilizar o mostrador para indicar os seguintes
tipos de informação:
• tempo absoluto
• tempo de leitura da faixa
• tempo restante da fita
• tempo decorrido da fita
L R
REC LEVEL
REC MODE
SBM
INPUT
MODE
RESET
TIMER
g
OFFREC PLAY
POWER
MARGIN
START ID
RESETERASEWRITE
REHEARSALRENUMBER
AUTO
OPEN/CLOSE
ANALOG
48 kHz
•••
OPTICAL
44.1 kHz
§
COAXIAL
LONG
AMS
pPr
·
MODE RESET
Obtenção do tempo absoluto, do tempo de
leitura da faixa, do tempo restante da fita e
do tempo decorrido da fita
Pressione MODE (ou COUNTER MODE no
telecomando).
Cada pressionar nesta tecla altera a informação no
mostrador, tal como segue:
5
•
•
STANDARD
ON
406
•
•
317
•••
••
OFF
REC MUTE
R)0±≠
REC
•
•
28
•
•
9
•
•
10
PHONE LEVEL
PHONES
100
Para reajustar o tempo decorrido da fita
Pressione RESET (ou COUNTER RESET no telecomando).
Notas
• No caso da reprodução de determinados tipos de fita
pregravada, a indicação «BB» pode aparecer
momentaneamente no mostrador, no início da fita.
• O tempo de leitura da faixa não aparece nos seguintes
casos:
— quando se inicia a reprodução a partir do meio da
faixa;
— durante a rebobinagem.
• No modo de reprodução padrão, o tempo restante da fita
aparece cerca de 16 segundos após o início da leitura.
• O tempo restante indicado pode variar um pouco do
tempo restante real, dependendo do tipo de fita.
Caso «EMPHASIS» apareça no mostrador
O deck está a reproduzir sinais de áudio gravados com
efeito de ênfase (nas altas frequências). Entretanto, ao
reproduzir os sinais, o deck automaticamente
desenfatiza-os (com atenuação proporcional ao grau de
ênfase).
Tempo absoluto
ABS TIME
Pressione
Tempo de leitura da faixa
PGM TIME
Pressione
Tempo restante da fita
REMAINING
No caso de fitas pregravadas, o tempo
restante é o final do trecho gravado.
Pressione
Tempo decorrido da fita
Pressione
8 20
ms
√
3 15
ms
√
1 00
hm
√
5 19
ms
13
P
Page 86

Operações de reprodução
14
Localização de faixas (AMS*/
Acesso directo)
É possível localizar faixas de diversas maneiras, porém
somente após terem sido gravados IDs de início na fita
Reprodução repetida de faixas (Leitura repetida) Z
Pode-se reproduzir uma faixa específica ou todas as
faixas da fita repetidamente.
(consulte as páginas de 15 a 18). Para utilizar o acesso
directo, números de memória devem ser gravados na
fita (consulte as páginas 15 e 18).
OPEN/
CLOSE
REPEAT
6
132
COUNTER
RESETMODE
INPUT
MODE
RESET
TIMER
g
OFFREC PLAY
POWER
MARGIN
START ID
RESETERASEWRITE
REHEARSALRENUMBER
AUTO
OPEN/CLOSE
ANALOG
48 kHz
•••
OPTICAL
44.1 kHz
§
COAXIAL
LONG
AMS
pPr
·
≠ / ± ·
5
•
•
STANDARD
ON
406
•
•
317
•••
••
OFF
REC MUTE
R)0±≠
REC
•
•
28
•
•
9
•
•
10
PHONE LEVEL
PHONES
100
REPEAT
Reprodução repetida de todas as faixas
L R
REC LEVEL
REC MODE
SBM
Pressione REPEAT repetidamente durante a leitura de
uma faixa, até que a indicação «REPEAT» apareça no
Para localizar
o início da faixa seguinte
ou subsequentes (AMS)
o início da faixa corrente
(AMS)
o início das faixas
precedentes (AMS)
mediante a especificação
do número de memória da
faixa (acesso directo)
* AMS = Automatic Music Sensor/sensor automático de
músicas
z Caso introduza um número de memória incorrecto
durante o acesso directo
Se a tecla ( (ou · no deck) não foi pressionada,
carregue na CLEAR no telecomando e então introduza o
número correcto. Caso já tenha pressionado a tecla (
(ou · no deck), o pressionamento da tecla CLEAR não
apagará o número de memória incorrecto. Pare o deck e
reintroduza o número de memória.
Pressione
± o número de vezes desejado
durante a leitura. Por exemplo,
para localizar a segunda faixa
subsequente, pressione-a duas
vezes.
≠ uma vez durante a leitura.
≠ o número de vezes desejado
durante a leitura. Por exemplo,
para localizar a segunda faixa
precedente, pressione-a três vezes.
1 Introduza o número de
memória da faixa com as teclas
Z
numéricas.
2 Pressione ( (ou · no deck).
Z
mostrador. O deck então reproduzirá todas as faixas,
até que detecte o final da última faixa, que pode ser:
— um trecho em branco de 9 segundos ou mais;
— o final da fita.
Quando o deck detecta um dos pontos acima, a fita é
rebobinada ao início e todas as faixas são reproduzidas
novamente. O deck repete este ciclo por até 5 vezes, e
então pára automaticamente.
Para cessar a reprodução repetida de todas as faixas
Pressione REPEAT repetidamente, até que «REPEAT»
desapareça do mostrador.
Nota
A leitura repetida de todas as faixas é cancelada quando a
cassete é retirada.
Reprodução repetida de uma única faixa
Carregue em REPEAT repetidamente durante a leitura
da faixa desejada, até que a indicação «REPEAT 1»
apareça no mostrador. O deck, então, reproduz a faixa
até o seu final, que pode ser:
— o próximo ID de início;
— um trecho em branco de 9 segundos ou mais;
— o final da fita.
Quando o deck detecta um dos pontos acima, a fita é
rebobinada e a reprodução tem início a partir do ID de
z Caso o deck detecte um trecho em branco de 9
segundos ou mais, ou o final da fita
O deck rebobina a fita automaticamente ao seu início e
pára (rebobinagem automática).
z Pode-se fazer com que o deck inicie a leitura
início da mesma faixa novamente. O deck repete este
ciclo por até 5 vezes, e então pára automaticamente.
Para cessar a reprodução repetida de uma faixa
Carregue em REPEAT repetidamente, até que a indicação
«REPEAT 1» desapareça do mostrador.
automaticamente a partir do início da fita após a
rebobinagem
Carregue em · enquanto mantém pressionada 0.
P
Nota
A leitura repetida de uma única faixa é cancelada quando a
cassete é retirada.
Page 87

Operações de reprodução
Inscrição de subcódigos
Inscrição de subcódigos
Reproduções com o temporizador (leitura temporizada)
Mediante a ligação de um temporizador (venda avulsa)
a este deck, podem-se iniciar e parar operações de
reprodução em horários específicos. Quanto a
informações mais detalhadas, consulte as instruções
que acompanham o temporizador.
L R
REC LEVEL
REC MODE
SBM
INPUT
MODE
RESET
TIMER
g
OFFREC PLAY
POWER
MARGIN
START ID
RESETERASEWRITE
REHEARSALRENUMBER
AUTO
OPEN/CLOSE
ANALOG
48 kHz
•••
OPTICAL
44.1 kHz
§
COAXIAL
LONG
AMS
pPr
·
TIMER
1 • Para especificar o tempo de início da
reprodução, execute os passos de 1 a 3 de
«Reprodução de cassetes DAT» na página 8.
• Para especificar o tempo de término da
reprodução, execute os passos de 1 a 4 de
«Reprodução de cassetes DAT» na página 8.
• Para especificar os tempos de início e término
da reprodução, execute os passos de 1 a 3 de
«Reprodução de cassetes DAT» na página 8.
2 Ajuste TIMER no deck para PLAY.
3 Ajuste o temporizador tal como requerido.
• Quando a hora de início da reprodução é
ajustada, o deck desliga-se. Ao chegar a hora
especificada, o deck liga-se e, após 10 segundos,
inicia a reprodução.
• Quando a hora de término da reprodução é
ajustada, o deck continua a reproduzir até tal
hora, e então pára a reprodução e desliga-se.
• Quando tanto a hora de início quanto de
término são ajustadas, o deck desliga-se. Ao
chegar a hora de início, o deck liga-se e, após
cerca de 10 segundos, inicia a reprodução. Ao
chegar a hora de término, o deck pára a
reprodução e desliga-se.
5
•
•
STANDARD
ON
406
•
•
317
•••
••
OFF
REC MUTE
R)0±≠
REC
•
•
28
•
•
9
•
•
10
PHONE LEVEL
PHONES
100
Acerca dos subcódigos
No formato DAT normal, os subcódigos (ou seja,
códigos de controlo tais como IDs de início e número
de memória) podem ser inscritos na fita junto com o
sinal de áudio. Tais subcódigos permitem-lhe utilizar a
função AMS (consulte a página 14) ou a função de
acesso directo (consulte a página 14). Visto que os
subcódigos são inscritos na fita separadamente do sinal
de áudio, os mesmos não afectam o sinal de áudio.
FaixaFaixa Faixa
ID de início
IDs de início
Os IDs de início indicam o início de uma faixa, e
portanto possibilitam-lhe localizar a posição de uma
faixa com precisão.
Os IDs de início possuem 9 segundos de duração (18
segundos no modo de reprodução prolongada) para
possibilitarem uma fácil detecção durante o avanço
rápido ou a rebobinagem.
Números de memória
Os números de memória funcionam como números de
faixa. Ocupando a mesma posição dos IDs de início, os
números de memória permitem a localização de faixas
específicas.
Notas
• As teclas p e P não funcionam durante a inscrição de
subcódigos.
• Não é possível inscrever e apagar IDs de início e
renumerar os números de memória, caso a abertura de
protecção de gravações na cassete DAT esteja aberta
(consulte a página 7).
Inscrição de IDs de início durante a gravação
4 Após utilizar o temporizador, ajuste TIMER no
deck para OFF.
Os IDs de início podem ser inscritos tanto manual
quanto automaticamente em qualquer momento
durante a gravação.
REC LEVEL
REC MODE
SBM
STANDARD
ON
406
•
48 kHz
317
•••
•••
44.1 kHz
••
•
LONG
28
OFF
•
REC MUTE
•
R)0±≠
PHONES
REC
P
TIMER
g
OFFREC PLAY
POWER
START ID
AUTO
AUTO
START ID
REHEARSALRENUMBER
WRITE
INPUT
MODE
RESET
MARGIN
RESETERASEWRITE
OPEN/CLOSE
ANALOG
OPTICAL
§
COAXIAL
AMS
pPr
·
·START ID
(Continua)
L R
5
•
•
•
•
•
9
•
10
PHONE LEVEL
100
P
15
Page 88

Inscrição de subcódigos
Inscrição manual de IDs de início durante a
gravação
Pressione START ID WRITE.
«ID WRITE» aparece no mostrador por alguns
segundos e o ID de início é inscrito na fita na posição
seleccionada. A indicação «START ID» pisca no
mostrador durante esse tempo.
ID de início
ID WRI TE
START ID
Nota
O intervalo entre IDs de início deve ser superior a 18
segundos (36 segundos no modo de reprodução
prolongada). Caso tal intervalo seja inferior a 18 segundos
(ou 36 segundos), o deck pode falhar na detecção do
segundo ID de início durante a reprodução.
Inscrição automática de IDs de início
durante a gravação
Execute o procedimento a seguir para inscrever
automaticamente números de memória junto com IDs
de início na mesma posição.
• Na gravação de sinais analógicos com o interruptor
INPUT ajustado em ANALOG
Um ID de início e um número de memória são inscritos
sempre que o sinal de entrada se eleva acima de um dado
nível após permanecer em um nível silencioso ou
reduzido por 3 segundos ou mais.
• Na gravação de sinais digitais com o interruptor
INPUT ajustado em OPTICAL ou COAXIAL
Um ID de início e um número de memória são inscritos
sempre que uma nova faixa é detectada durante a
gravação de sinais digitais através da tomada COAXIAL
IN ou OPTICAL IN de uma fonte digital, tal como um
leitor de CD ou outro deck de DAT. Entretanto, IDs de
início e números de memória não são inscritos para faixas
com duração inferior a 18 segundos.
Caso o último número de memória da fita apareça
no mostrador, não é necessário especificar o
próximo número de memória. Caso esteja a
gravar a partir do início de uma cassete em
branco, o número de memória «1» aparece no
mostrador. Caso se esqueça da enumeração da
memória nesse momento, poderá adicioná-la
posteriormente (consulte «Renumeração
automática dos números de memória (função de
renumeração)» na página 18).
4 Para iniciar a gravação, pressione P ou ·, e
então inicie a reprodução da fonte sonora. Os IDs
de início são inscritos automaticamente na fita
durante a gravação.
A indicação «ID WRITE» aparece por alguns
segundos sempre que subcódigos (um ID de
início e um número de memória) são inscritos.
z Durante a gravação digital de um leitor de CD
Inicie a gravação no seu deck primeiro, e então
pressione a tecla ( PLAY no leitor de discos
compactos a partir do modo de paragem. Caso coloque
o seu deck no modo de gravação em pausa e o leitor de
discos compactos no modo de reprodução em pausa
antes de iniciar a gravação, o ID de início e o número de
memória da primeira faixa no CD podem não ser
correctamente inscritos na fita.
Nota
Durante a inscrição automática de IDs de início, o
posicionamento de alguns IDs de início pode ser imprecisa
ou inapropriadamente distanciado do início da faixa. Caso
isto aconteça, poderá reposicionar ou apagar os IDs de início
posteriormente (consulte «Posicionamento preciso dos IDs
de início (função de confirmação)» e «Apagamento de IDs de
início» na página 17).
16
1 Execute os passos de 1 a 7 de «Gravação de
cassetes» nas páginas 6 e 7.
O deck entra no modo de gravação em pausa.
2 Carregue em START ID AUTO repetidamente, até
que a indicação «AUTO» apareça no mostrador.
3 Se está a gravar a partir do final do trecho
gravado, utilize os botões no telecomando para
especificar o número de programa depois do
último gravado.
Exemplo:Caso o número de memória 5 seja o último
gravado na fita
REC
AUTO
·
∏
PGM NO.
6
Inscrição de IDs de início
durante a reprodução
IDs de início podem ser inscritos durante a
reprodução.
INPUT
MODE
RESET
TIMER
g
OFFREC PLAY
POWER
MARGIN
START ID
RESETERASEWRITE
REHEARSALRENUMBER
AUTO
START ID
REHEARSAL
WRITE
Pressione START ID WRITE.
OPEN/CLOSE
ANALOG
48 kHz
•••
OPTICAL
44.1 kHz
§
COAXIAL
AMS
pPr
·
0 / )START ID
•••
LONG
••
OFF
REC MUTE
R)0±≠
REC
•
•
28
•
•
9
•
•
10
PHONE LEVEL
PHONES
100
L R
REC LEVEL
REC MODE
SBM
5
•
•
STANDARD
ON
406
•
•
317
A indicação «ID WRITE» aparece no mostrador por
O próximo número de memória
P
alguns segundos e o ID de início é inscrito na posição
seleccionada da fita. A indicação «START ID» pisca no
mostrador durante esse tempo.
Page 89

Posicionamento preciso dos IDs de início
(função de confirmação)
1 Durante a reprodução, carregue em START ID
REHEARSAL quando atingir a posição
apropriada.
A indicação «REHRSL» aparece, a indicação
«START ID» passa a piscar no mostrador e a
função de confirmação repete um trecho de 3
segundos a partir da posição seleccionada. Note
que o trecho repetido será reproduzido 8 vezes,
com o número restante de vezes indicado à direita
de «REHRSL». Após a oitava vez, o deck
automaticamente pára a operação.
Inscrição de subcódigos
Ajuste da posição de um ID de início existente
Pode-se ajustar a posição de IDs de início previamente
gravados.
L R
REC LEVEL
REC MODE
SBM
MODE
RESET
TIMER
g
OFFREC PLAY
POWER
MARGIN
START ID
RESETERASEWRITE
REHEARSALRENUMBER
AUTO
START ID REHEARSAL
INPUT
OPEN/CLOSE
ANALOG
48 kHz
•••
OPTICAL
44.1 kHz
§
COAXIAL
LONG
AMS
pPr
·
5
•
•
STANDARD
ON
406
•
•
317
•••
••
OFF
REC MUTE
R)0±≠
REC
•
•
28
•
•
9
•
•
10
PHONE LEVEL
PHONES
100
2 Carregue em 0 ou ) para deslocar o início do
trecho repetido.
A cada pressionar na tecla 0 ou ), o início do
trecho repetido desloca-se para trás ou para frente
em incrementos de 0,3 segundos, até uma duração
máxima de 2 segundos (4 segundos no modo de
reprodução prolongada) em uma das direcções.
Posição onde a tecla
START ID REHEARSAL foi
pressionada no passo 1
↓
3 segundos
Movimento a cada pressionar
Movimento a cada
pressionar de 0
0,3 seg.
0,3 seg.
O tempo no mostrador indica o deslocamento de
posição a partir do momento em que a tecla
START ID REHEARSAL foi pressionada.
Após pressionar
) duas vezes
06.
S
START ID
Trecho repetido
Após pressionar
0 duas vezes
06.
S
START ID
de )
1 Durante a reprodução, pressione START ID
REHEARSAL quando aparecer o ID de início já
existente que deseja reposicionar.
O deck rebobina ao começo do ID de início e a
confirmação repete um trecho de 3 segundos.
2 Execute os passos de 1 a 3 de «Posicionamento
preciso dos IDs de início (função de
confirmação)» nesta página.
Pode-se deslocar o ID de início por uma extensão
máxima de cerca de 2 segundos (4 segundos no
modo de reprodução prolongada) para frente ou
para trás, a partir da sua posição original.
Nota
Os IDs de início inscritos dentro de 10 segundos do término
da fita podem ser difíceis ou impossíveis de se deslocar.
Apagamento de IDs de início
Pode-se apagar qualquer ID de início.
L R
REC LEVEL
REC MODE
SBM
INPUT
MODE
RESET
TIMER
g
OFFREC PLAY
POWER
MARGIN
START ID
RESETERASEWRITE
REHEARSALRENUMBER
AUTO
OPEN/CLOSE
ANALOG
48 kHz
•••
OPTICAL
44.1 kHz
§
COAXIAL
LONG
AMS
pPr
·
5
•
•
STANDARD
ON
406
•
•
317
•••
••
OFF
REC MUTE
R)0±≠
REC
•
•
28
•
•
9
•
•
10
PHONE LEVEL
PHONES
100
3 Pressione START ID WRITE.
A indicação «ID WRITE» aparece no mostrador
por alguns segundos e o ID de início é inscrito na
posição seleccionada da fita. A indicação «START
ID» pisca no mostrador durante esse tempo.
START ID ERASE
Pressione START ID ERASE quando aparecer o ID de
início que deseja apagar.
«(ERASE)» aparece no mostrador quando o deck
rebobina a fita até o começo do ID de início, e a seguir,
«ID ERASE» aparece quando o deck apaga o ID de
início.
• O apagamento de um ID de início leva 9 segundos.
• Os números de memória são apagados junto com os
IDs de início.
17
P
Page 90

Informações adicionais
Informações adicionaisInscrição de subcódigos
Renumeração automática dos
números de memória (função
de renumeração)
A função de renumeração busca cada ID de início a
partir do começo da fita e designa um novo número de
memória para cada um, a começar com 1. Utilize a
função de renumeração nos seguintes casos:
• quando um ID de início foi adicionado durante a
reprodução da fita;
• quando se perdeu um número de memória devido
ao apagamento de um ID de início;
• quando a gravação foi iniciada a partir do meio da
fita e um número de memória já existente foi inscrito,
ou quando um dos IDs de início não possui número
de memória.
L R
REC LEVEL
REC MODE
SBM
INPUT
MODE
RESET
TIMER
g
OFFREC PLAY
POWER
MARGIN
START ID
RESETERASEWRITE
REHEARSALRENUMBER
AUTO
OPEN/CLOSE
ANALOG
48 kHz
•••
OPTICAL
44.1 kHz
§
COAXIAL
LONG
AMS
pPr
·
START ID RENUMBER
Carregue em START ID RENUMBER com o deck no
modo de reprodução ou de paragem.
A indicação «RENUMBER» passa a piscar no
mostrador e a fita é automaticamente rebobinada ao
seu início. O deck então inicia a busca de IDs de início
a partir do começo da fita e designa um novo número
de memória consecutivo para cada faixa. Quando o
deck detecta um ID de início, o mesmo reproduz a
faixa a partir do ID de início por 2 segundos, e então
inscreve um novo número de memória na fita. Durante
este tempo, a indicação «RENUMBER» acende-se e
«START ID» pisca.
Após o término da renumeração, o deck rebobina a fita
automaticamente ao seu início e então pára a operação.
Nota
A função de renumeração poderá não funcionar
correctamente quando:
• existir um trecho em branco na fita;
• o intervalo entre dois IDs de início for inferior a 18
segundos (36 segundos no modo de reprodução
prolongada);
• existir um ID de início dentro de 10 segundos a partir do
término da fita.
5
•
•
STANDARD
ON
406
•
•
317
•••
••
OFF
REC MUTE
R)0±≠
REC
•
•
28
•
•
9
•
•
10
PHONES
PHONE LEVEL
100
Precauções
Acerca da segurança
• Não desmonte o aparelho, pois isto pode ocasionar
choques eléctricos. Solicite assistência técnica somente a
pessoal qualificado.
• Se algum objecto sólido ou líquido cair dentro deste
aparelho, desligue-o da rede eléctrica e solicite uma
averiguação a técnicos qualificados antes de voltar a
utilizá-lo.
Acerca das fontes de alimentação
• Antes de utilizar o aparelho, certifique-se de que a
voltagem de funcionamento do mesmo é idêntica à tensão
da rede eléctrica local. A voltagem de funcionamento está
indicada na placa de identificação localizada na parte
posterior do aparelho.
• Mesmo quando o interruptor de alimentação estiver
desligado, o aparelho não estará desligado da rede CA
enquanto estiver ligado à tomada da parede.
• Quando este aparelho não for ser utilizado por um
período prolongado, desligue-o da tomada da rede. Para
desligar o cabo, puxe-o pela ficha; nunca pelo próprio fio.
• A troca do cabo de alimentação CA deverá ser executada
somente em serviços técnicos qualificados.
Acerca do funcionamento
Caso o aparelho seja transportado de um local frio para um
quente, ou seja instalado em um recinto muito húmido,
poderá ocorrer condensação de humidade no interior do
aparelho, poderá aparecer a indicação «CAUTION» e o
aparelho poderá não funcionar. Caso isto ocorra, retire a
cassete e deixe o aparelho ligado por cerca de uma hora, até
que a humidade evapore.
Acerca da instalação
• Instale o aparelho num local com ventilação adequada, a
fim de evitar o seu sobreaquecimento interno.
• Não instale este aparelho:
— sobre superfícies macias, tais como tapetes, que possam
bloquear os orifícios de ventilação situados na base do
aparelho;
— nas cercanias de fontes de calor;
— sob a luz solar directa;
— numa posição inclinada;
— em locais sujeitos a poeira excessiva ou choques
mecânicos.
Acerca das cassetes DAT
• Após utilizar uma fita, coloque-a de volta no respectivo
estojo e guarde-a num local que não esteja sujeito à luz
solar, a altas temperaturas, a humidade ou a poeira.
• O invólucro da cassete DAT foi projectado de modo a
proteger a fita de sujidades. Não abra o invólucro para não
expor a fita.
• O orifício na parte posterior da cassete é uma abertura de
detecção. Não cubra tal abertura.
18
P
Page 91

Informações adicionais
Acerca de cassetes de mais de 120 minutos
Não utilize cassetes de fita fina (com um tempo de leitura
superior a 120 minutos) para gravações importantes, visto
que as mesmas estão sujeitas aos seguintes problemas:
— Enrolamento impróprio da fita após repetidas
operações de AMS, rebobinagem, avanço rápido ou
monitorização de som
— Inscrição e apagamento incorrectos de IDs de início
— Distorção de som
Caso surjam quaisquer dúvidas ou problemas
concernentes a este aparelho, consulte o seu agente
Sony mais próximo.
Limpeza
Limpeza da superfície externa, dos painéis
e dos controlos
Utilize um pano macio levemente humedecido com
uma solução de detergente suave. Não utilize nenhum
tipo de escova abrasiva, pó saponáceo ou solvente, tal
como álcool ou benzina.
Limpeza da cabeça e do trajecto da fita
• Operações prolongadas causarão a contaminação da
cabeça. Para obter o melhor som de gravação e
reprodução, recomenda-se a utilização de cassetes de
limpeza Sony DT-10CL (venda avulsa) para limpar a
cabeça a cada dez horas de funcionamento.
• Limpe a cabeça com a cassete de limpeza quando o
deck não tiver sido utilizado por um longo período.
Contaminações da cabeça podem causar perdas de
som durante a reprodução.
Utilização da cassete de limpeza
1 Insira a cassete de limpeza da mesma forma que uma
cassete DAT normal.
2 Pressione ·. Após 10 segundos, carregue em p.
Não pressione a tecla r REC ou ) para a limpeza.
3 Remova a cassete de limpeza sem rebobiná-la. Rebobine a
cassete de limpeza somente quando esta atingir o seu
final.
Notas acerca da limpeza
• Após 10 horas de funcionamento, a indicação
«CLEANING» aparece no mostrador por cerca de 10
segundos quando a alimentação do deck é ligada.
Recomenda-se limpar a cabeça e o trajecto da fita
periodicamente, utilizando esta mensagem como guia.
• Devido à brevidade da fita das cassetes de limpeza, o
contador não indicará o tempo decorrido e o tempo
restante real da fita.
Mensagens no mostrador
A tabela a seguir descreve as várias mensagens que
aparecem no mostrador.
Mensagem
BLANK
CAUTION Um mecanismo de segurança está em
CLEANING
(ERASE)
ID ERASE
ID WRITE Um ID de início ou número de memória está
NO TAPE
PROHIBIT
PROTECT
REHRSL
SOURCE
TAPE END A fita atingiu o final do trecho gravado.
TAPE TOP
UNLOCK Nenhum sinal digital tem entrada pela
WAIT
(WRITE)
Significado
O deck está a buscar o início do trecho em
branco na fita.
funcionamento devido à condensação de
humidade ou outras razões.
A limpeza da cabeça ou do trajecto da fita é
recomendada. Após cerca de 10 horas de
utilização do deck, esta mensagem aparece
por cerca de 10 segundos sempre que o deck é
ligado.
A função de apagamento de IDs de início está
activada.
Um ID de início está sendo apagado.
sendo inscrito.
Não há cassete inserida no deck.
A fonte sonora que está a tentar gravar não
pode ser gravada através das tomadas ou
conectores de entrada digital. Para maiores
informações, consulte «Guia para o sistema
de gestão de cópias em série» (nas páginas 22
e 23).
O orifício de protecção de gravações na
cassete está aberto e a gravação não pode ser
realizada em tal fita.
A função de confirmação está accionada.
O deck foi deixado no modo de gravação em
pausa por cerca de 10 minutos, ou a tecla r
REC foi pressionada na ausência de cassete
no deck ou na presença de cassete protegida
contra gravações.
A fita atingiu o seu início.
tomada ou conector seleccionado com o
interruptor INPUT.
O deck está a buscar o início do trecho em
branco na fita.
A tecla START ID WRITE está accionada.
19
P
Page 92

Informações adicionais
V erificação de problemas
Na ocorrência de alguma das dificuldades a seguir
durante o funcionamento deste aparelho, utilize este
guia como auxílio para solucionar o problema. Caso o
problema persista, consulte o seu agente Sony mais
próximo.
O compartimento de cassete não se fecha.
/ Verifique se a cassete está correctamente inserida
(consulte as páginas 6 e 8).
/ Insira a cassete até além da barra prateada (consulte as
páginas 6 e 8).
Não é possível inscrever IDs de início durante a
gravação.
/ Não se pode inscrever um ID de início dentro dos 9
segundos (18 segundos no modo de reprodução
prolongada) após o final do ID de início prévio.
Certifique-se de deixar um intervalo mínimo de 9
segundos (18 segundos no modo de reprodução
prolongada) entre o último ID de início e o próximo.
A função de acesso directo não funciona.
/ O número de memória especificado não existe na fita.
Pressione START ID RENUMBER para renumerar os
números de memória.
/ Os números de memória estão fora de ordem. Pressione
START ID RENUMBER para renumerar os números de
memória.
As teclas de função não funcionam.
/ O deck acabou de ser ligado e não funcionará por cerca
de 4 segundos. Aguarde 4 segundos (10 segundos
quando a indicação «CLEANING» aparece) antes de
tentar qualquer operação.
/ A tecla P está accionada. Pressione P para cancelar a
pausa.
/ A fita atingiu o seu final. Pressione 0 para rebobiná-la.
Ausência de som.
/ Efectue correctamente as ligações (consulte as páginas de
4 e 5).
/ O amplificador conjugado não está a funcionar
apropriadamente. Opere o amplificador tal como
requerido para a respectiva operação do deck. (Consulte
o manual de instruções do amplificador.)
O deck não grava.
/ O orifício de protecção de gravações na cassete está
aberto. Deslize a lingueta de protecção de gravações para
fechar o orifício (consulte a página 7).
/ O interruptor INPUT está incorrectamente ajustado.
Ajuste INPUT para a posição adequada.
/ O controlo REC LEVEL está ajustado em 0. Gire à direita
REC LEVEL para aumentar o nível de gravação (somente
durante a gravação analógica).
/ A entrada de sinais na tomada ou conector de entrada
digital está protegida contra cópias digitais (somente
durante gravações digitais). Introduza o sinal através da
tomada ou conector de entrada analógica.
O deck começa a rebobinar a fita.
/ A leitura repetida está accionada. Carregue em REPEAT
repetidamente no telecomando para apagar a indicação
«REPEAT» ou «REPEAT 1» do mostrador e cancelar a
leitura repetida.
As teclas de operação da fita não funcionam durante a
inscrição ou o apagamento de IDs de início.
/ Nenhuma tecla funciona durante os 9 segundos de
inscrição de um ID de início (18 segundos no modo de
reprodução prolongada). Aguarde até que a inscrição do
ID de início se complete para realizar alguma operação.
Não é possível inscrever códigos de tempo absoluto.
/ A gravação começou dentro de um trecho em branco.
Rebobine a fita ao seu início ou localize o final do trecho
gravado com a função de busca do ponto de término
antes de iniciar a gravação.
O movimento da fita é excessivamente ruidoso durante o
avanço rápido ou a rebobinagem.
/ O ruído é causado pela cassete e não por um problema
mecânico.
A fita pára subitamente.
/ A cassete está defeituosa ou avariada.
Pressione OPEN/CLOSE § e substitua a cassete por
uma outra.
20
A tecla OPEN/CLOSE § não funciona.
/ A tecla OPEN/CLOSE não funciona durante gravações.
Pressione p ou P para cessar a gravação primeiro, e
então carregue em OPEN/CLOSE §.
A indicação «CAUTION» aparece e não é possível operar
o deck.
/ Um mecanismo de segurança está em funcionamento
devido à condensação de humidade. Retire a cassete e
deixe o aparelho ligado por cerca de uma hora. A seguir,
desligue o deck e volte a ligá-lo (consulte a página 18).
Não é possível inscrever subcódigos.
/ O orifício de protecção de gravações na cassete está
aberto. Deslize a lingueta de protecção de gravações para
fechar o orifício (consulte a página 7).
P
Quando a tecla 0/) ou ≠/± é pressionada, a
fita pára momentaneamente antes de iniciar o
movimento.
/ Isto é normal, não um problema mecânico.
Não é possível operar o deck com o
telecomando(fornecido).
/ As pilhas estão fracas. Substitua ambas as pilhas.
«SBM» não aparece no mostrador, embora SBM esteja na
posição ON.
/ «SBM» aparece somente em gravações de sinais de
entrada analógicos com frequência de amostragem de 48
kHz ou 44,1 kHz, não durante gravações de sinal de
entrada digital ou sinal de entrada analógico com
frequência de amostragem de 32 kHz nem tampouco
durante a reprodução.
Page 93

Especificações
Sistema
Fita Fita de áudio digital
Cabeça de gravação Cabeça rotatória
Tempo de gravação (com Padrão: 120 minutos
a utilização da DT-120) Reprodução prolongada: 240 minutos
Velocidade da fita Padrão: 8,15 mm/s
Reprodução prolongada: 4,075 mm/s
Informações adicionais
Conectores de saída
Conector Impedância de
ANALOG
DIGITAL
OPTICAL
PHONES
Tipo de
tomada
Tomadas
RCA
Conector
óptico
Tomada
universal
estéreo
Impedância
de saída
470 ohms
—
100 ohms
Nível de
saída
nominal
–4 dBs
(comprimento
de onda de
660 nm)
1.2 mW
carga
10 kohms ou
mais
—
32 ohms
Rotação do cilindro Padrão: 2.000 rpm
Largura da pista 13,6 µm (20,4 µm)
Frequência de amostragem
Número de canais Estéreo de 2 canais
Conversão D/A Padrão: 16 bits linear
(Quantização) Reprodução prolongada: 12 bits não-
Resposta em frequência* Padrão: 2 - 22.000 Hz (±0,5 dB)
Relação sinal/ruído* 90 dB ou mais (velocidade de
Amplitude dinâmica* 90 dB ou mais (velocidade de
Distorção harmónica Padrão: 0,005% ou menos (1 kHz)
total* Reprodução prolongada: 0,008% ou
Choro e flutuação Abaixo do limite mensurável (±0,001%
* Durante entrada analógica com a função SBM desligada.
Reprodução prolongada: 1.000 rpm
48 kHz, 44,1 kHz, 32 kHz
linear
Reprodução prolongada: 2 - 14.500 Hz
(±0,5 dB)
reprodução padrão ou prolongada)
reprodução padrão ou prolongada)
menos (1 kHz)
pico ponderado)
Conectores de entrada
Conector
ANALOG
DIGITAL
OPTICAL
DIGITAL
COAXIAL
Tipo de tomada
Tomadas RCA
Conector óptico — —
Tomada RCA 75 ohms
IImpedância de
entrada
47 kohms
Nível de entrada
nominal
–4 dBs
0,5 Vp-p
Generalidades
Alimentação
Local de aquisição
Canadá 120 V CA, 60 Hz
Consumo 30 W
Dimensões Aprox. 430 × 106 × 325 mm (l/a/p)
Peso Aprox. 5,0 kg
Alimentação requerida
230 V CA, 50/60 HzEuropa
Acessórios fornecidos
Consulte a página 4.
Design e especificações sujeitos a alterações sem aviso prévio.
Função SBM (Super Mapeamento de Bits)
Durante gravações analógicas, a função SBM reduz
ruídos na banda de frequência em que o ouvido
humano é mais receptivo aos mesmos. Desta forma,
expande-se nitidamente a gama auditiva dinâmica do
sinal gravado.
Conversor D/A a pulso de alta precisão
O deck utiliza um conversor D/A a pulso e filtro de
decimação para converter um sinal analógico em um
sinal digital quantizado de 24 bits. Como nos leitores
de CDs, o deck utiliza quantização de 16 bits. Assim, a
diferença de 8 bits resulta em quantização mais precisa,
mais informações de sinal e menos ruídos de
quantização do que na quantização de 16 bits. Durante
a conversão dos dados de 24 bits ao sinal de gravação
de 16 bits, a função SBM aprimora a qualidade sonora
através da reintegração dos 4 bits de informações de
sinal que seriam normalmente perdidos no sinal de 16
bits.
21
P
Page 94

Informações adicionais
Aplicação do princípio da audição humana
A função SBM aplica o princípio da audição humana
na reintegração das informações de sinal. Considera-se
geralmente que a gama auditiva do ouvido humano
está entre 20 Hz e 20 kHz; a sensibilidade de escuta
mostra-se, porém, mais acentuada entre 3 kHz e 4 kHz,
diminuindo em frequências acima e abaixo destes
limites. Esse princípio aplica-se igualmente aos ruídos
de quantização. Por meio da redução dos ruídos de
quantização nessa gama específica, os sinais podem ser
gravados de modo a que se produza um som mais
expansivo do que é possível pela redução uniforme de
ruídos em toda a gama audível.
Filtro modelador de ruídos
A função SBM utiliza um filtro modelador de ruídos
(veja a Fig. A) com uma resposta em frequência similar
à do ouvido humano para reduzir os ruídos de
quantização na gama de frequência mais sensível e
introduzir de novo o erro de quantização
(normalmente perdido) no sinal de entrada,
reintegrando as informações em bits da extremidade
inferior com as informações em bits da extremidade
superior.
Fig. A
Entrada de
informações de
24 bits
//
Filtro modelador
de ruídos
Saída SBM
de 16 bits
Guia para o sistema de gestão
de cópias em série
Este deck adopta o sistema de gestão de cópias em
série, que possibilita a realização de somente cópias de
primeira geração dos materiais pregravados através da
tomada de entrada digital do deck. Um esboço deste
sistema está ilustrado a seguir.
1 Podem-se gravar fontes sonoras digitais (discos
compactos, minidiscos pregravados ou DATs) em uma
DAT ou um minidisco gravável através da tomada de
entrada digital do deck DAT ou MD. Não é possível,
entretanto, realizar gravações desta DAT ou minidisco em
uma outra DAT ou minidisco gravável através da tomada
de entrada digital do deck DAT ou MD.
Reprodução
Deck DAT Deck MD
Cabo óptico ou cabo
de ligação digital
coaxial
Gravação
Leitor de discos
compactos
Tomada de saída
digital
Tomada de entrada
digital
Deck DAT ou
deck MD
A Fig. B mostra a melhora do nível de ruído de
quantização com o interruptor SBM ligado (valores
teóricos). Dado um nível de ruído de 0 dB com o
interruptor SBM desligado, a melhora do nível de
ruído para frequências de amostragem inferiores a 3
kHz excede 10 dB quando a função SBM é activada.
Fig. B
25
20
Nível
15
de
10
ruído
5
(dB)
0
-5
-10
20 10050 200 1k500 2k 15k5k 10k
Frequência de amostragem (Hz)
A função SBM funciona apenas durante gravações. É
possível, entretanto, desfrutar o som aperfeiçoado que
a função SBM produz durante a reprodução,
independentemente da posição do interruptor SBM ou
do deck de DAT que está em uso.
SBM
ligada
SBM
desligada
DAT ou MD
Reprodução
Tomada de saída
digital
Cabo óptico ou
cabo de ligação
digital coaxial
Tomada de entrada
digital
Gravação
v
v
Deck DAT ou
deck MD
Tomada de saída
(analógica) de linha
Tomada de entrada (analógica)
de linha
Deck DAT ou
deck MD
Cassete DAT ou
minidisco de
primeira geração
gravado através
da ligação
digital-digital
Cabos de ligação de
áudio
22
P
Page 95

Informações adicionais
2 Pode-se gravar o sinal de entrada digital de uma
transmissão satélite digital em uma DAT ou minidisco
gravável através da tomada de entrada digital do deck
DAT ou deck MD capaz de admitir uma frequência de
amostragem de 32 kHz ou 48 kHz. Pode-se, então, gravar
o conteúdo desta DAT ou minidisco gravado (primeira
geração) em uma outra DAT ou minidisco gravável
através da tomada de entrada digital do deck DAT ou
gravador MD, para criar uma segunda geração de cópias
digitais. Gravações subsequentes da cópia de segunda
geração em uma outra DAT ou minidisco gravável são
possíveis somente através da tomada de entrada analógica
do deck DAT ou deck MD.
Reprodução
Cabo óptico ou
cabo de ligação
digital coaxial
Gravação
DAT ou MD
Reprodução
Cabo óptico ou
cabo de ligação
digital coaxial
Gravação
DAT ou MD
Reprodução
Tomada de saída digital
Cabo óptico ou
cabo de ligação
digital coaxial
Tomada de entrada digital
Gravação
Sintonizador de
transmissões satélite
Tomada de saída
digital
Tomada de entrada
digital
Deck DAT ou
deck MD
v
v
Deck DAT ou
deck MD
Tomada de saída
digital
Tomada de entrada
digital
Deck DAT ou
deck MD
v
v
Deck DAT ou
deck MD
Tomada de saída
(analógica) de linha
Tomada de entrada
(analógica) de linha
Deck DAT ou
deck MD
Cassete DAT ou
minidisco de
primeira geração
gravada através
da ligação digitaldigital
Cassete DAT ou
minidisco de
segunda geração
gravada através
da ligação
digital-digital
Cabos de ligação
de áudio
3 Pode-se gravar uma DAT ou um minidisco através da
tomada de entrada analógica do deck DAT ou MD numa
outra DAT ou minidisco, através da tomada de saída
digital do deck DAT ou MD. Não é possível, entretanto,
criar uma segunda geração de cópias de DAT ou
minidiscos através da tomada de saída digital do deck
DAT ou MD.
Reprodução
Sintonizador
Deck de cassetes
Deck DAT
Cabos de ligação
de áudio
Gravação
DAT ou MD
Gira-discos
Leitor de discos
Amplificador de
Deck DAT ou
deck MD
v
compactos
microfone
Deck MD
Tomada de saída
(analógica) de linha
Tomada de entrada
(analógica) de linha
Cassetes DAT ou
minidiscos
gravados através
da ligação
analógica-digital
v
Reprodução
Cabo óptico ou
cabo de ligação
digital coaxial
Gravação
DAT ou MD
Reprodução
Tomada de saída digital
Cabo óptico ou
cabo de ligação
digital coaxial
Tomada de entrada
digital
Gravação
Deck DAT ou
deck MD
Deck DAT ou
deck MD
v
v
Deck DAT ou
deck MD
Tomadas de saída
(analógica) de linha
Tomadas de entrada
(analógica) de linha
Deck DAT ou
deck MD
Tomada de saída
digital
Tomada de entrada
digital
Cassete DAT ou
minidisco de
primeira geração
gravada através
da ligação digitaldigital
Cabos de ligação
de áudio
23
P
Page 96

Índice remissivo
Índice remissivo
A
Acesso directo 14
Ajuste do modo de gravação
11
Ajuste do nível de gravação 10
AMS (sensor automático de
músicas) 14
B
Busca do ponto de término 10
C, D
Códigos de tempo absoluto 9,
13
Confirmação 16, 17
E
Efeito de ênfase 9, 13
F
Função SBM 11, 21
G, H
Gravação de cassetes DAT 6
Gravação silenciada 12
Gravação temporizada 12
I, J, K
ID de início 15
Ajuste da posição de um ID
de início existente 17
Apagamento de IDs de início
17
Inscrição automática de IDs
de início durante a gravação
16
Inscrição manual de IDs de
início durante a gravação 16
Posicionamento preciso dos
IDs de início 17
Indicação de margem 10
Inserção de pilhas no
telecomando 4
L
Leitura repetida 14
Reprodução repetida de
todas as faixas 14
Reprodução repetida de uma
única faixa 14
Leitura temporizada 15
Ligação do sistema 4
Limpeza 19
Limpeza da cabeça e do trajecto
da fita 19
Lingueta de protecção de
gravações 7
Sony Corporation Printed in Malaysia
P
24
M
Mensagens no mostrador 19
N, O
Números de memória 15, 18
P, Q
Pilhas 4
R
Renumeração 18
Reprodução de cassetes DAT 8
S
Sistema de gestão de cópias em
série 22
Subcódigos 15
T, U, V, W, X, Y, Z
Tempo absoluto 13
Tempo decorrido na fita 13
Tempo de leitura da faixa 13
Tempo restante na fita 13
Trecho em branco 9, 10
Trecho silenciado 9, 12
Nomes dos controlos
Teclas
CLEAR de cancelamento 14
COUNTER MODE de modo do
contador 13
COUNTER RESET de
reinicialização do contador 13
MARGIN RESET de reajuste da
margem 10
MODE de modo 13
OPEN/CLOSE § de abertura/
fechamento 6 - 8
r REC de gravação 7
REC MUTE R de silenciamento
de gravação 12
REPEAT de repetição 14
RESET de reajuste 13
START ID AUTO de inscrição
automática de IDs de início 15
START ID ERASE de
apagamento de IDs de início 17
START ID REHEARSAL de
confirmação de IDs de início
16, 17
START ID RENUMBER de
renumeração de IDs de início
18
START ID WRITE de inscrição
de IDs de início 15, 16
p de paragem 7, 8, 12
· de reprodução 7, 8, 10, 12,
14, 15
0/) de rebobinagem/
avanço rápido 7, 8, 10, 16
P de pausa 7, 10, 12, 15
≠/± de retrocesso/
avanço 8, 14
Interruptores
INPUT de entrada 6
POWER de alimentação 6, 8
REC MODE do modo de
gravação 11
SBM da função SBM 11
TIMER do temporizador 12, 15
Controlos
PHONE LEVEL do nível dos
auscultadores 8
REC LEVEL do nível de
gravação 10
Tomadas
ANALOG IN de entrada de
linha analógica 4, 6
ANALOG OUT de saída de
linha analógica 4
DIGITAL COAXIAL IN de
entrada digital coaxial 4, 6
DIGITAL OPTICAL IN de
entrada digital óptima 4, 6
DIGITAL OPTICAL OUT de
saída digital óptical 4
PHONES dos auscultadores 8
 Loading...