

Sony DSLR-A390,Alpha390 Instruction Manual

5
,0
4-191-056-11 (1)
function
function
Additional infbrmation on this product and
answers to fYequently asked questions can be
iound at our Customer Support Website.
http://www.sony.net/
Printed using VO(; (\%latile Organic
(;ompound) fl'ee vegetable oil based ink.
Printed in Thailand
]
IIIIIIIIIIIII
4191056110
_390
Digital Single Lens Reflex Camera
Instruction Manual
DSLR-A390
¢_ InfoLITHIUM _
,M _ H.--iml
SERIESMEMORYSTI_KT,,, ,o,,_ ,_,,o_o_,_o,,,,......
© 2010 Sony Corporation
Viewingimagesona
computer
Printingimages
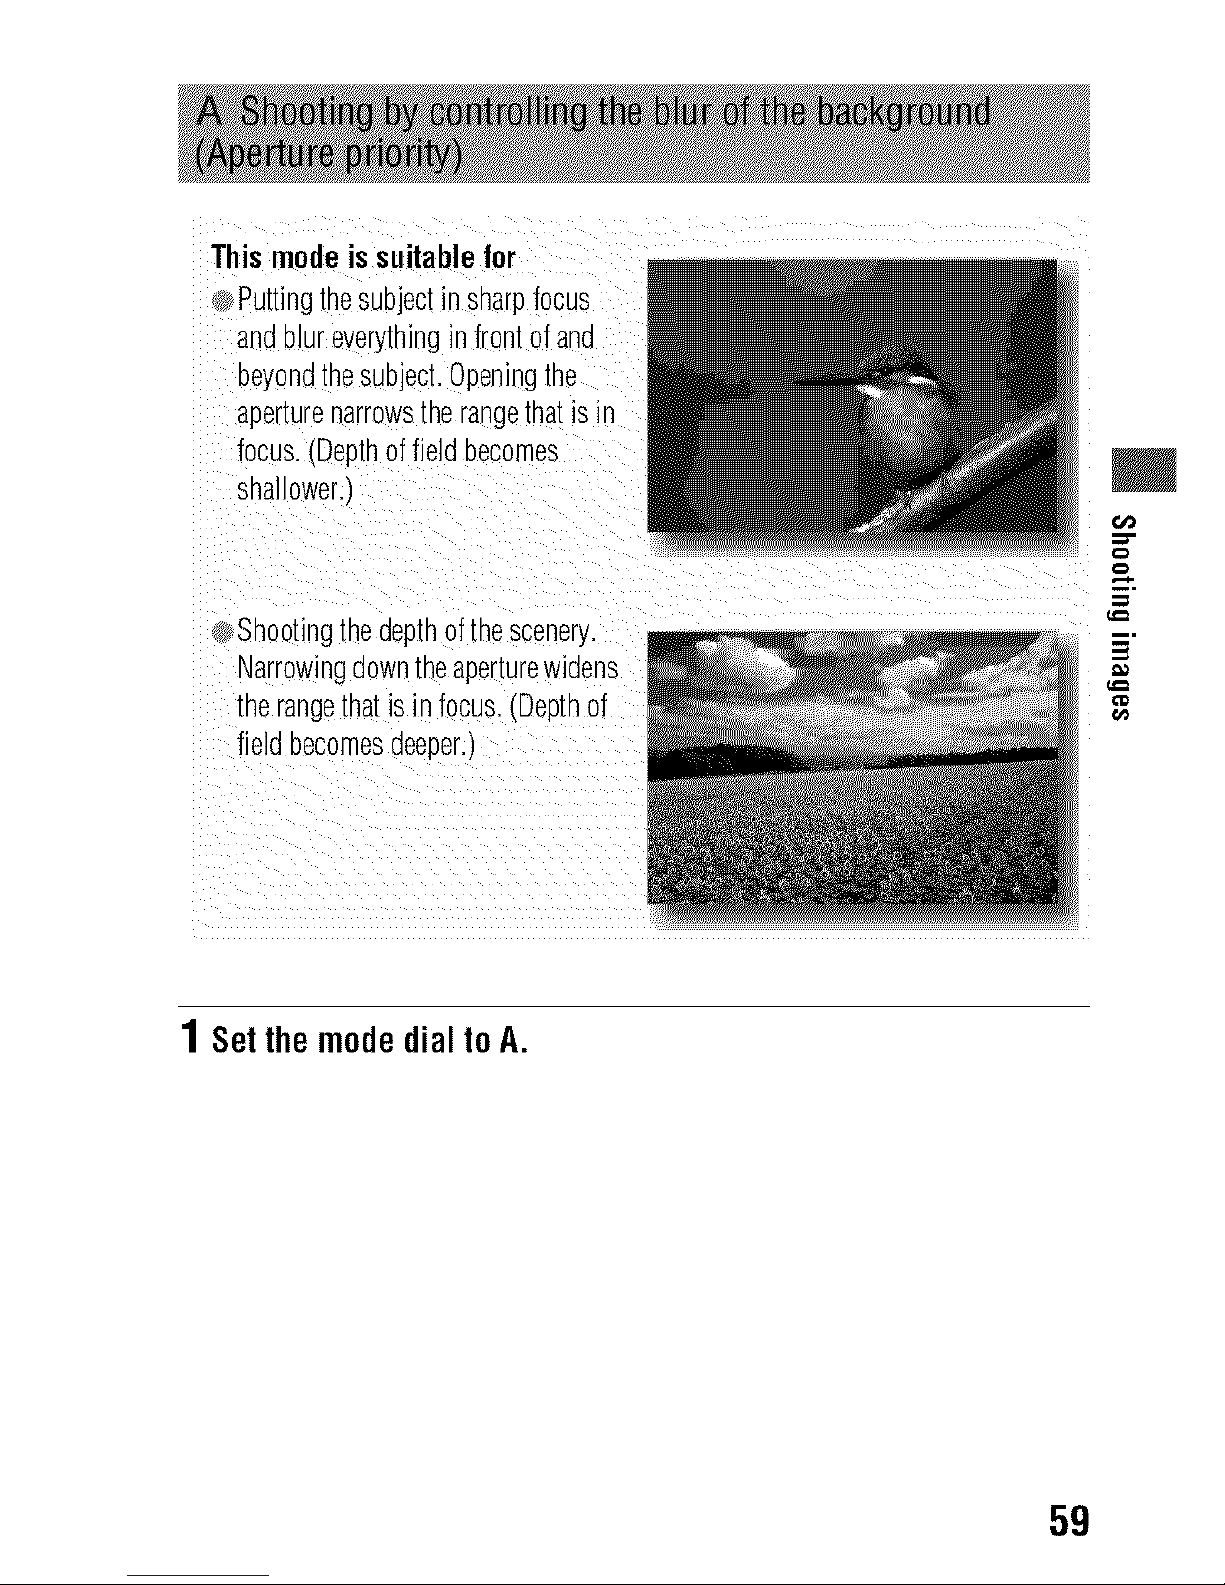
Thismodeis suitablefor
Puttingthesubjectinsharpfocus
anaD_ureverythinginfrontofand
beyondthesubject.Openingme
aperturenarrows[nerange[natisin
focus.(Depthoffieldbecomes
snallower
Shootingthedepthofthescenery.
Narrowingdowntheaperturewidens
merange[natis infocus.(Depthof
fieldbecomesdeeper.)
m,
1SetthemodedialtoA.
59
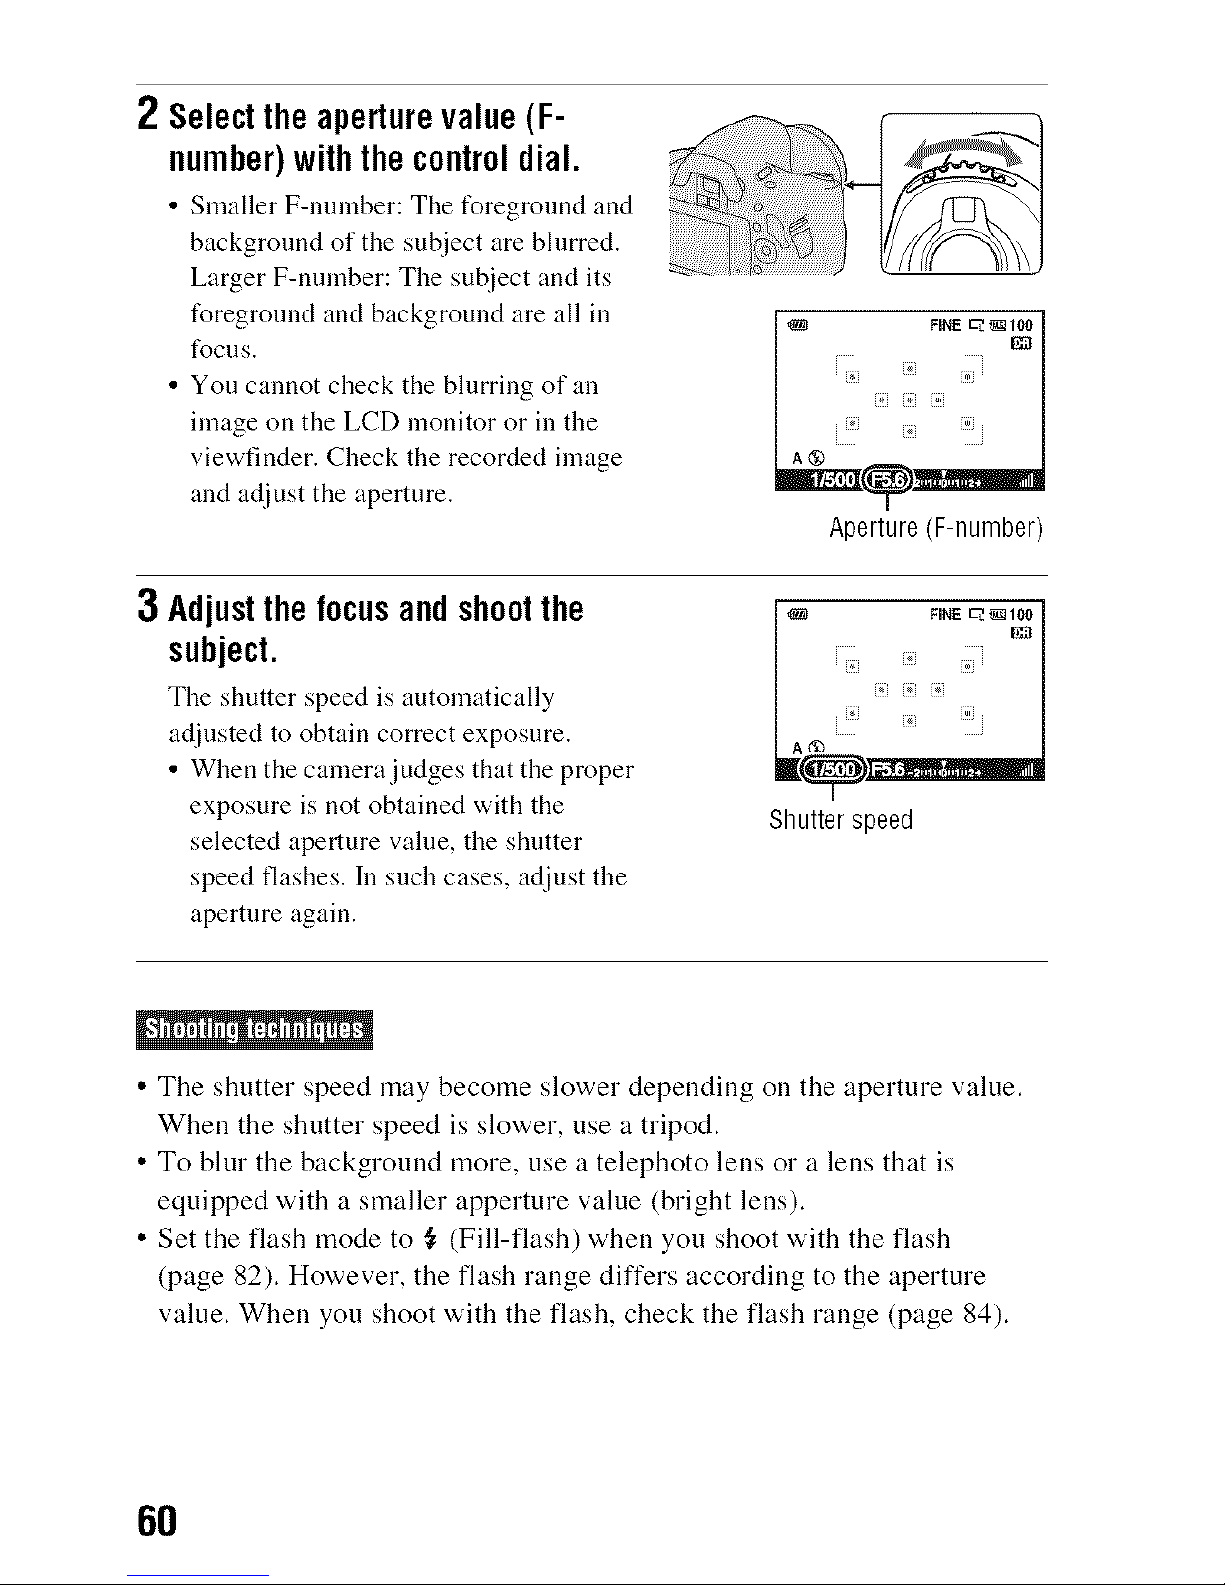
2 Selecttheaperturevalue(F-
number)withthecontroldial.
• Smaller F-nnmber: The t\_regronnd and
background of the subject are blurred.
Larger F-number: The subject and its
t_reground and background are all in
t_cus.
• Yon cannot check the blurring of an
image on the LCD monitor or in the
viewfinder. Check the recorded image
and adjust the aperture.
Aperture (F-number)
3 Adjustthefocusandshootthe
subject.
The shutter speed is automatically
adjusted to obtain correct exposure.
• When the camera judges that the proper
exposure is not obtained with the
selected aperture value, the shutter
speed flashes. In such cases, adjust the
aperture again.
Shutter speed
• The shutter speed may become slower depending on the aperture value.
When the shutter speed is slower, use a tripod.
• To blur the background more, use a telephoto lens or a lens that is
equipped with a smaller apperture value (bright lens).
• Set the flash mode to _ (Fill-flash) when you shoot with the flash
(page 82). However, the flash range differs according to the aperture
value. When you shoot with the flash, check the flash range (page 84).
6O
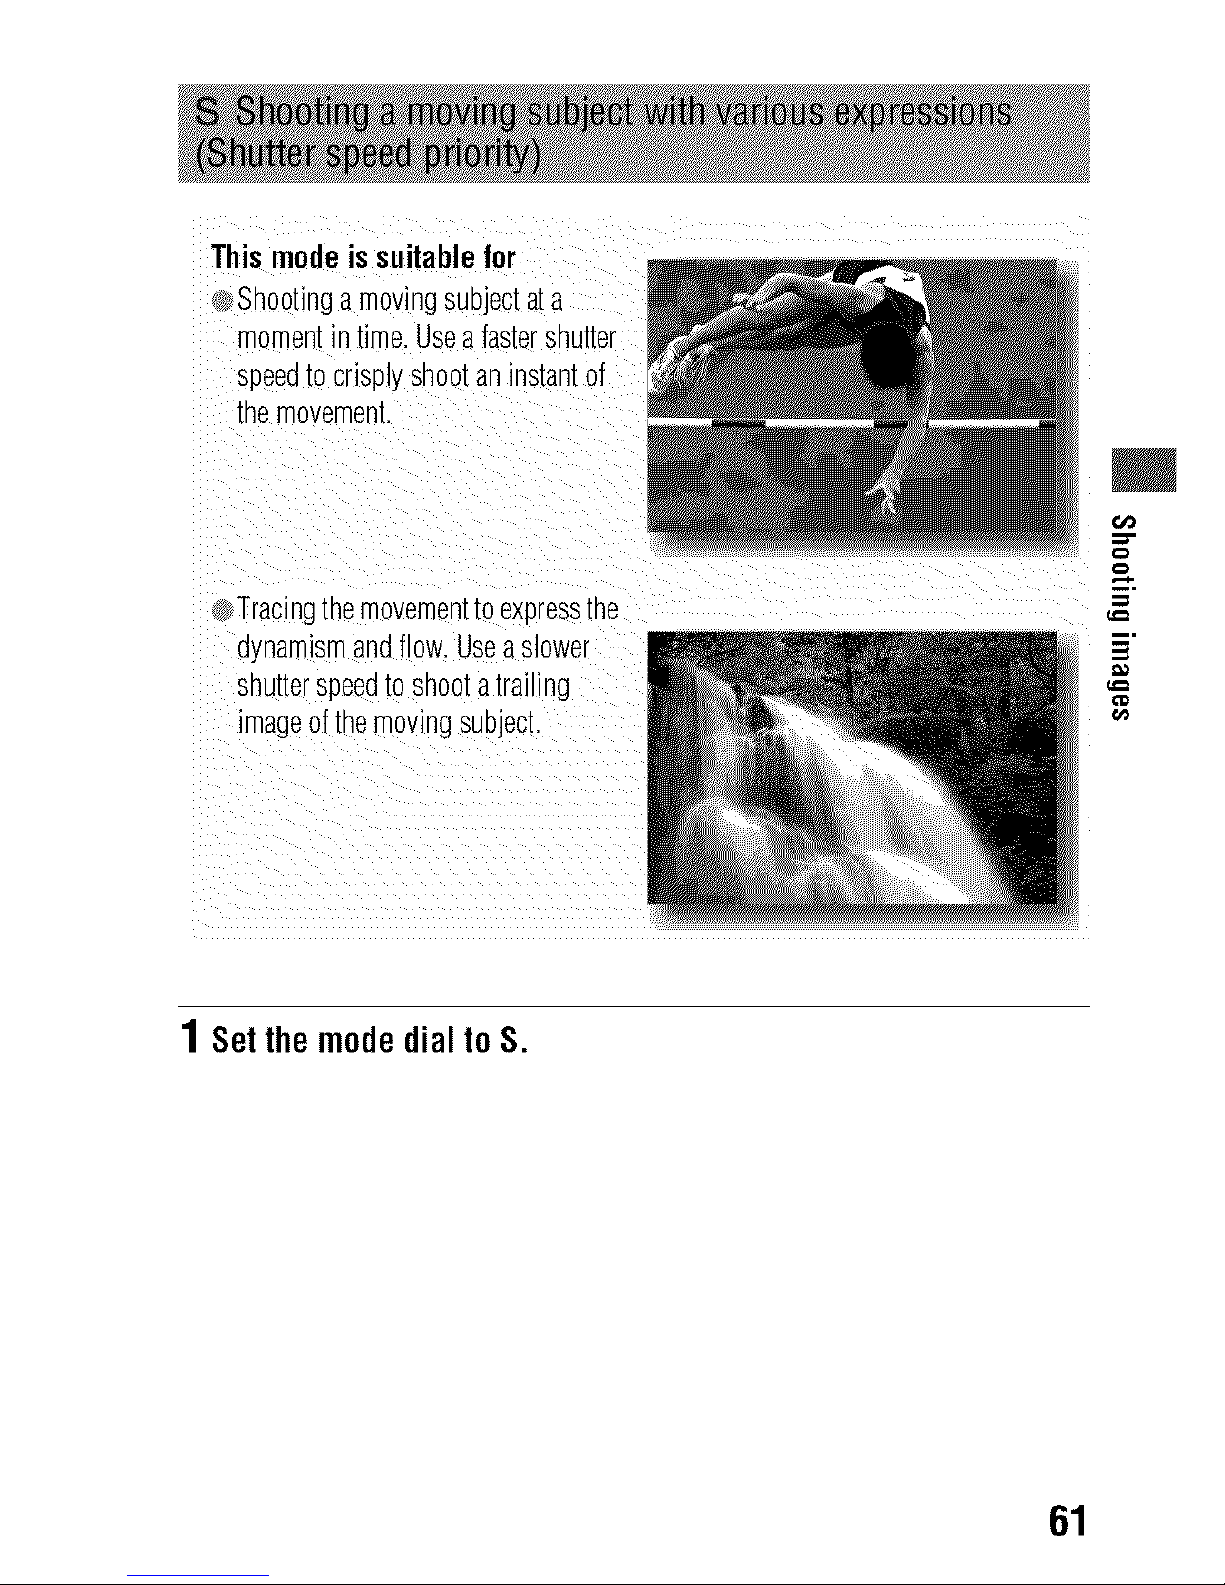
This mode is suitable for
Shootingamovingsubjectata
moment _time.Useafastershutter
speedto crisplyshooraninstantof
memovemem.
-racingmemovemen[[oexpressme
dynamismandflow.Useaslower
snu[rerspeeato snoota[rai ing
imageofthemovingsubject.
1 SetthemodedialtoS.
61
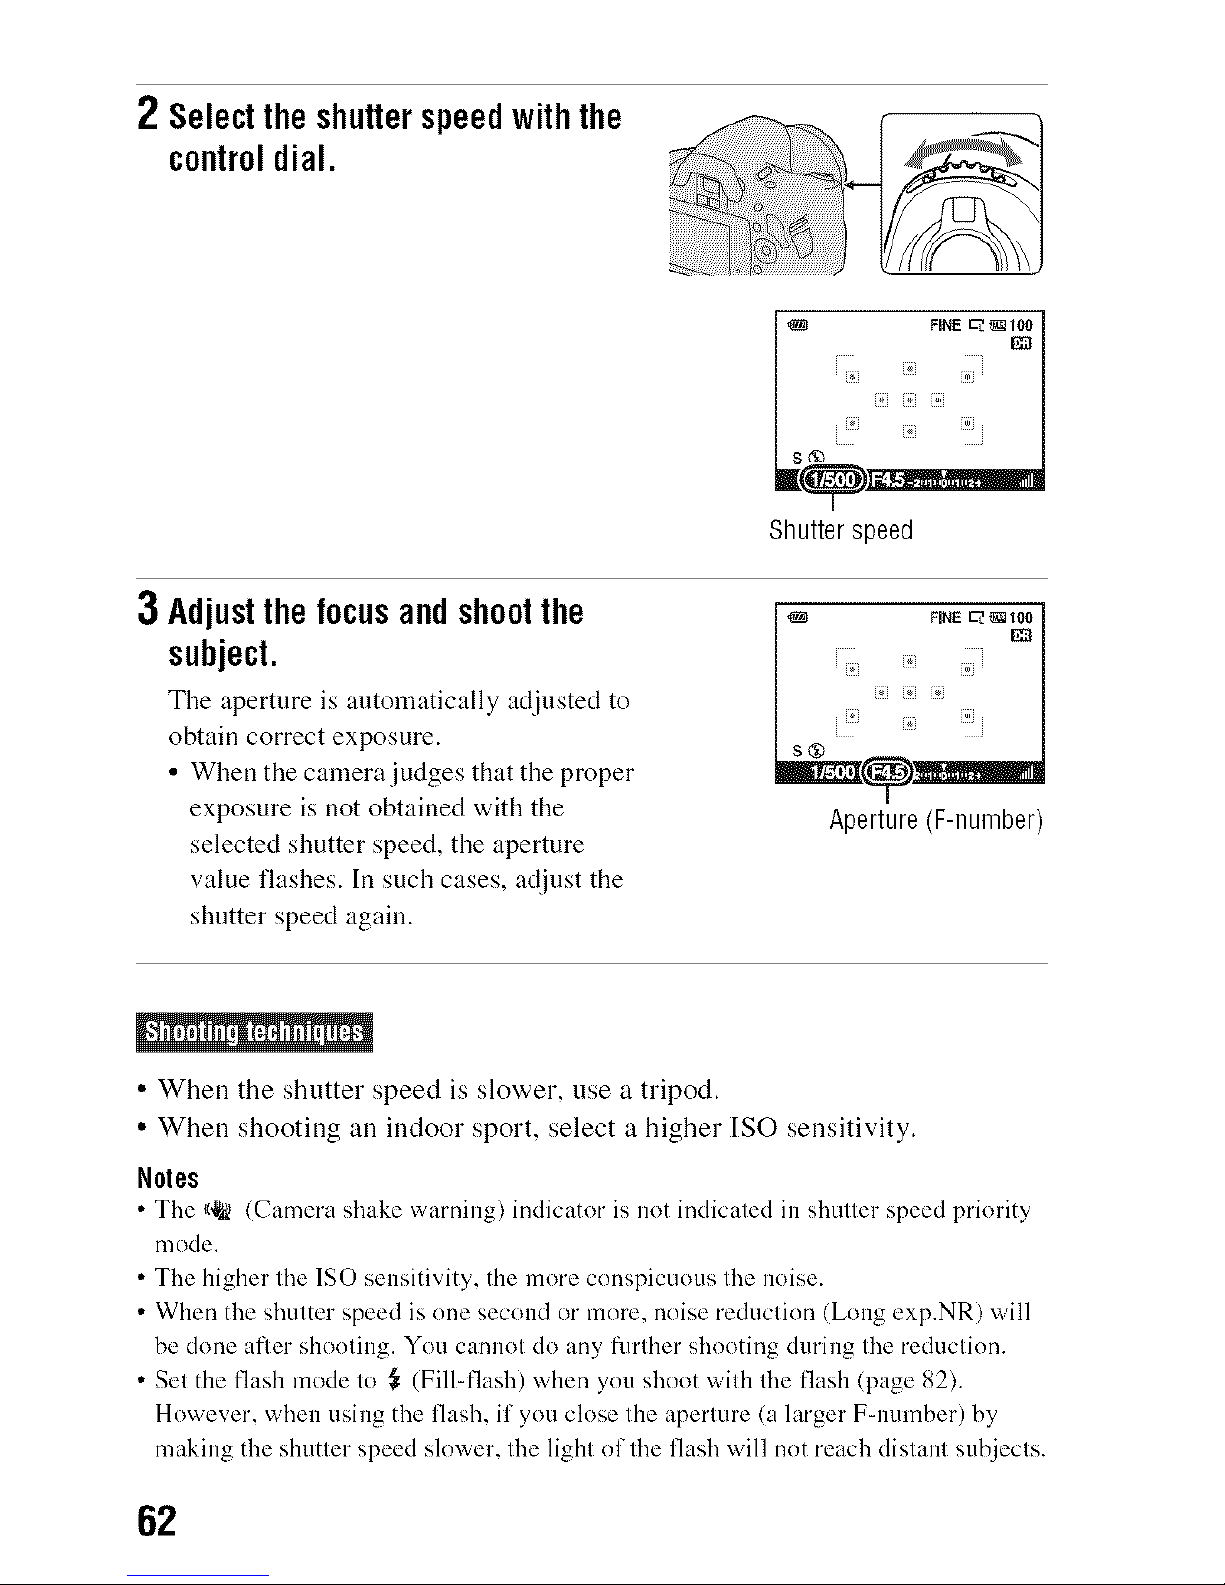
2 Selecttheshutterspeedwiththe
controldial.
Shutter speed
3Adjustthefocusandshootthe
subject.
Tile aperture is autonmtically adjusted to
obtain correct exposure.
• When the camera judges that the proper
exposure is not obtained with the
selected shutter speed, the aperture
value flashes. In such cases, adjust the
shutter speed again.
Aperture (F-number)
• When the shutter speed is slower, use a tripod.
• When shooting all indoor sport, select a higher [SO sensitivity.
Notes
• The _('@(Camera shake warning) indicator is not indicated in shutter speed priority
mode.
• The higher lhe 1SO sensitivity, the more conspicuous lhe noise.
• When the shulter speed is one second or more, noise reduclion (Long exp.NR) will
be done after shooling. You cannot do any filrlher shooting during lhe reduclion.
• Sel the flash mode lo _ (Fill-flash) when you shoot wilh lhe flash (page 82).
However, when using the flash, il you close lhe aperture (a larger F-number) by,
making the shutter speed slower, lhe lighl ollhe flash will not reach dislanl subjecls.
62
This mode is suitable for
ShootingwiththedesiredexDosure
seltingbyadjustingDOra[nesnu[ter
speeaanaaperrure.
1 SetthemodedialtoM.
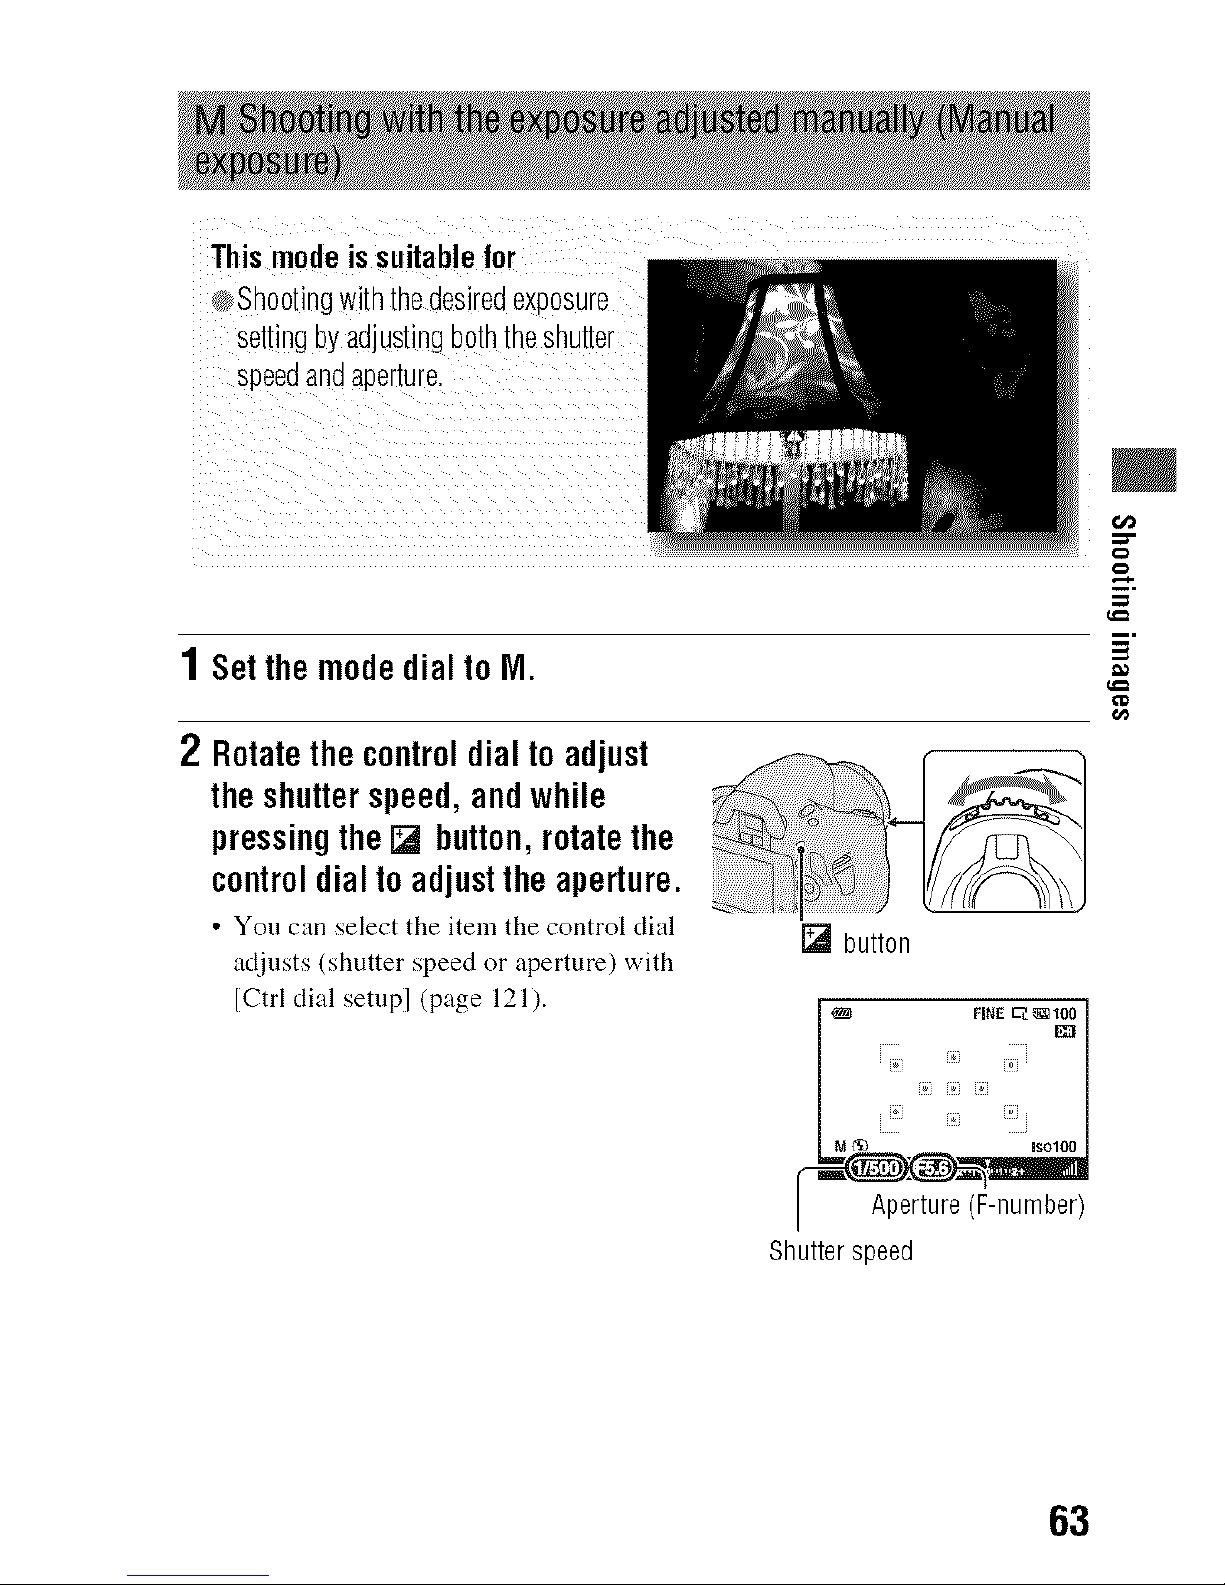
2 Rotatethecontroldialtoadjust
theshutterspeed,andwhile
pressingthe[] button,rotatethe
controldialtoadjusttheaperture.
• You can select tire item the control dial
adjusts (shutter speed or aperture) with
[Ctrl dial setup] (page 121).
[] button
_2M_
I Aperture(F-number)
Shutter speed
5
63
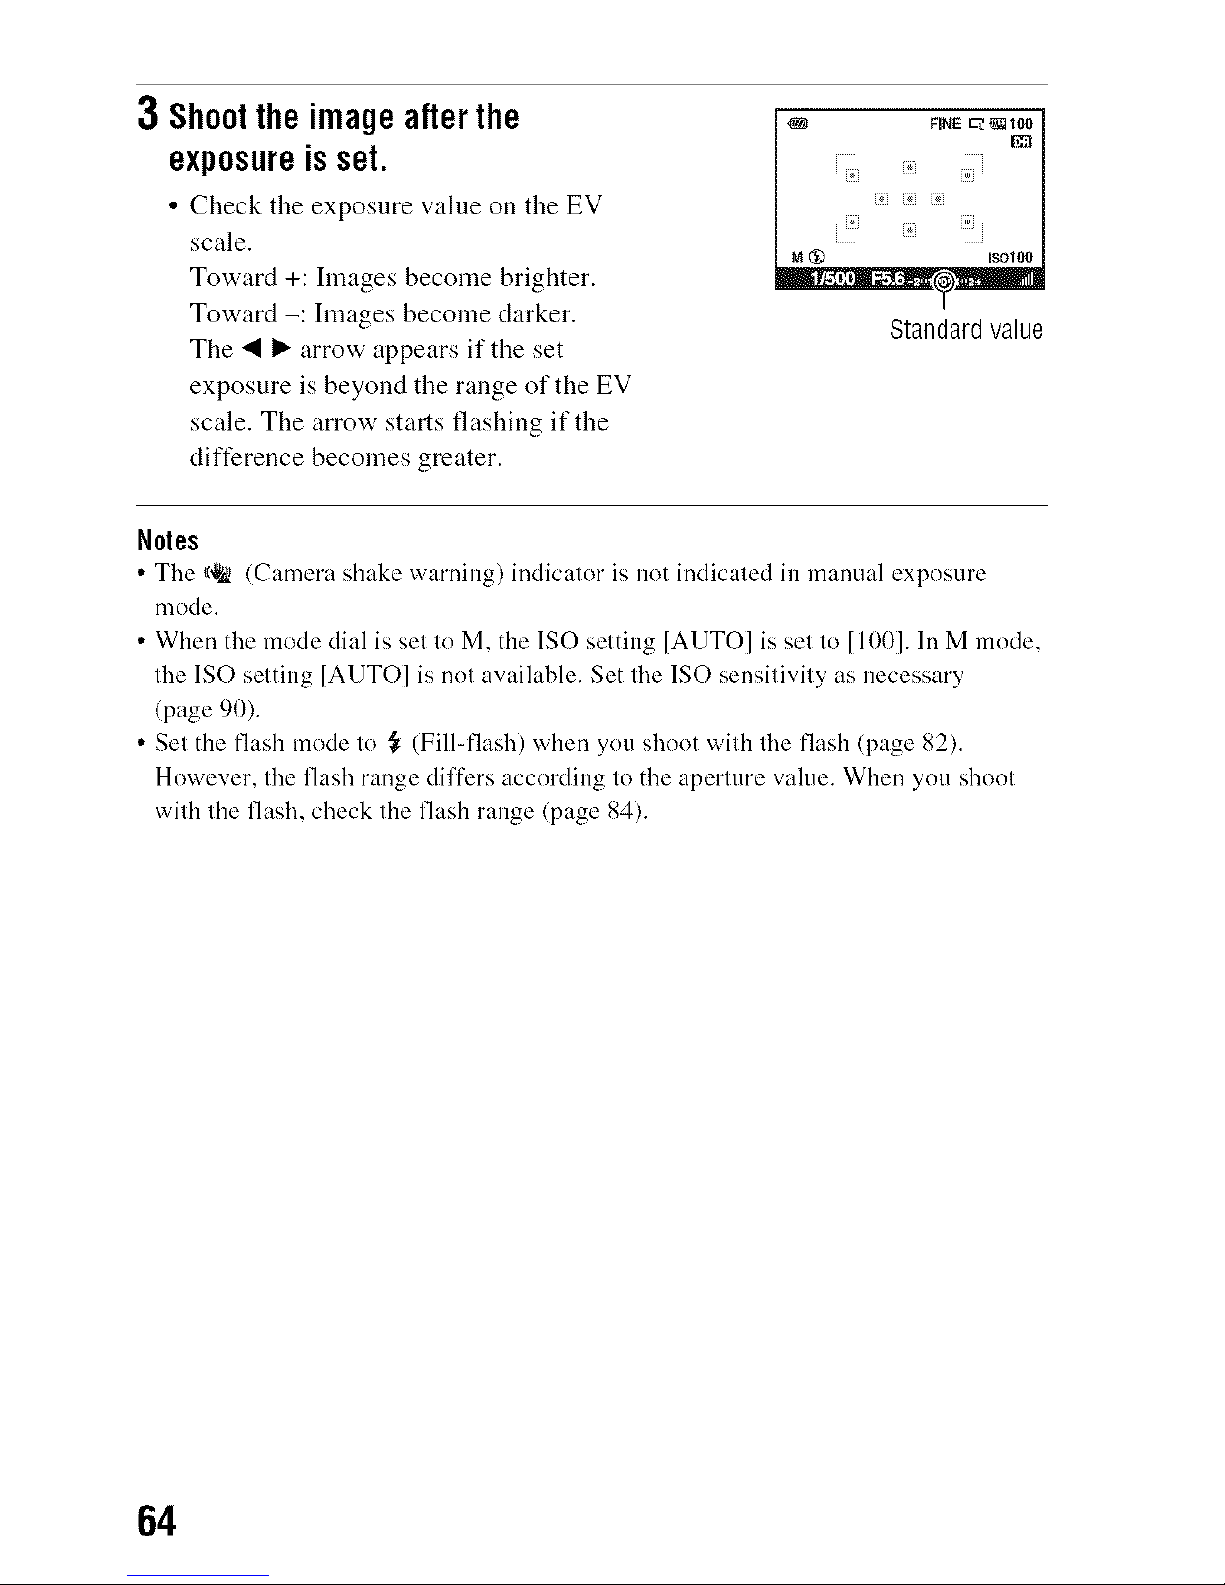
3 Shoottheimageafterthe
exposureisset.
• Check the exposure _,alue on the EV
scale.
Toward +: hnages become brighter.
Toward -: Images become darker.
The _1 _ arrow appears if the set
exposure is beyond the range of the EV
scale. The arrow starts flashing if the
difference becomes greater.
Standard value
Notes
• The _,@ (Camera shake warning) indicator is not indicated in manual exposure
mode.
• When the mode dial is set to M, the 1SO setting [AUTO] is set to [100]. In M mode,
the ISO setting [AUTO] is not available. Set the 1SO sensitivity as necessary
(page 90).
• Set the flash mode to {_(Fill-flash) when you shoot with the flash (page 82).
However, the flash range differs according to the aperture value. When you shoot
with the flash, check the flash range (page 84).
64
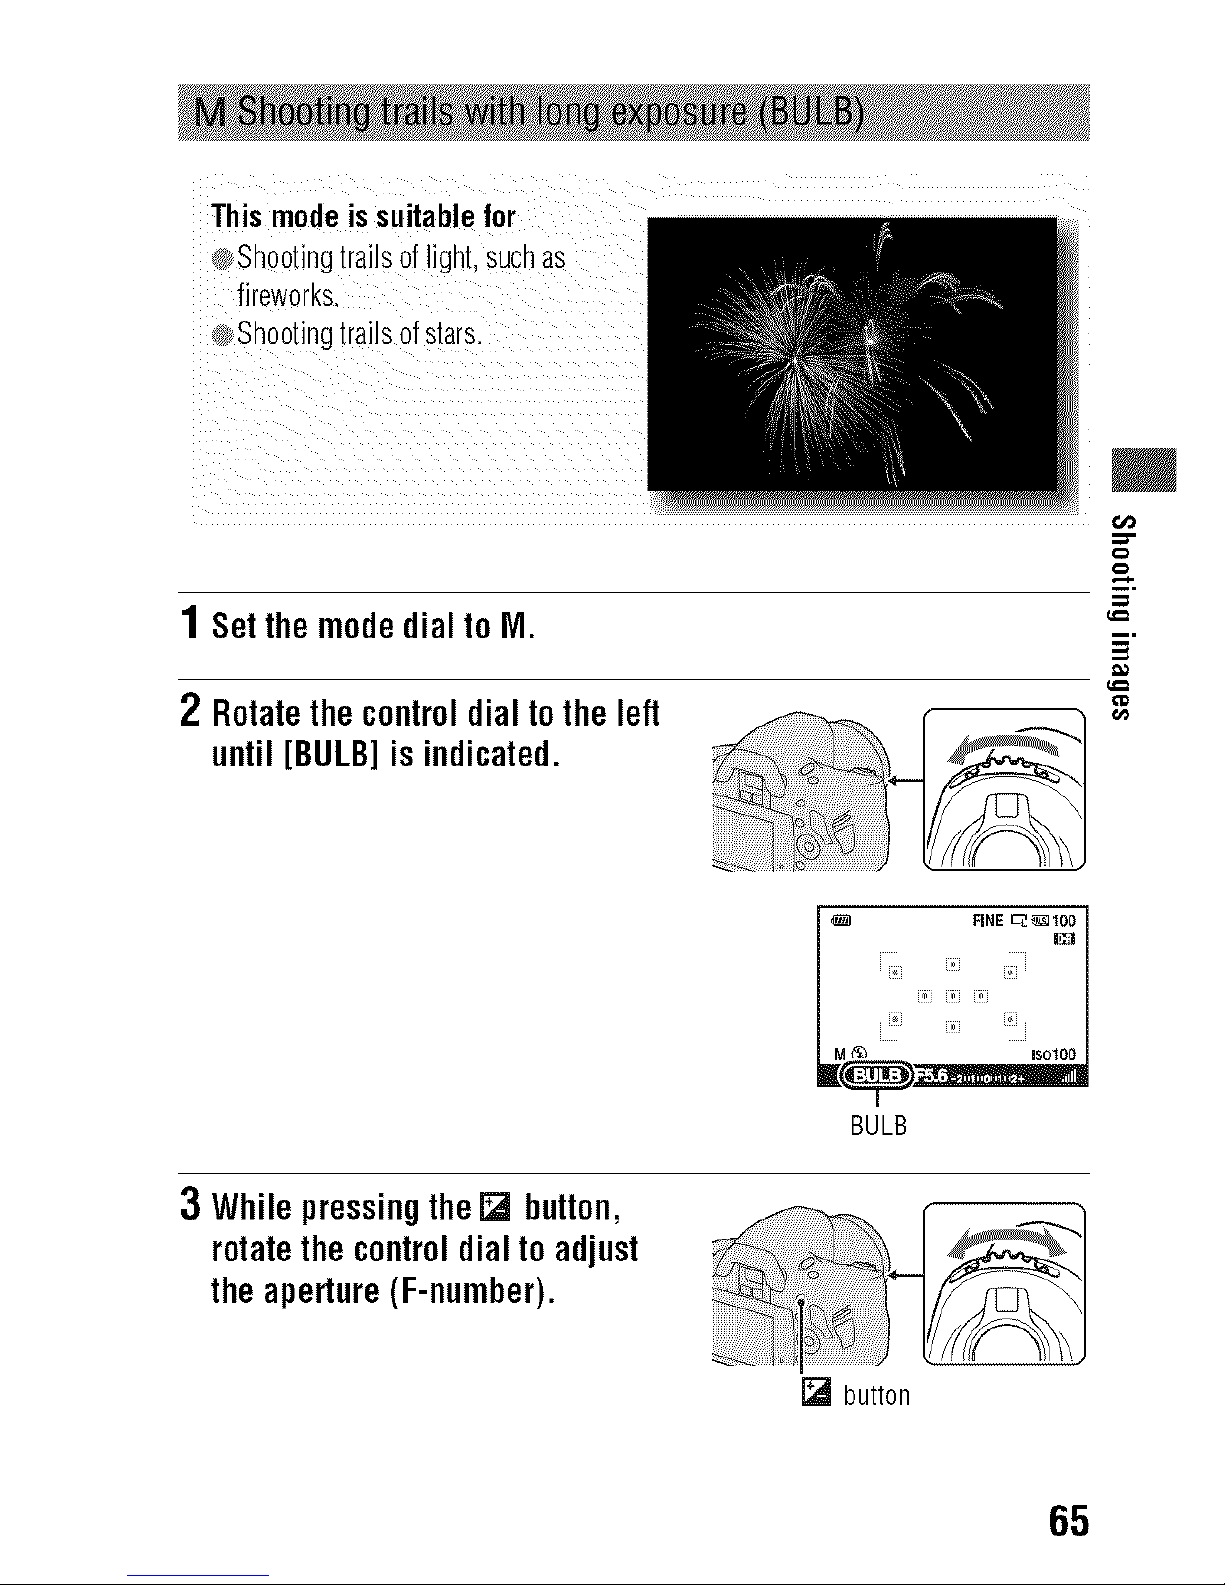
This mode is suitable for
_Shootingtrailsoflight, sucnas
fire_OrKS.
Shootingtrailsof stars
==-
1 SetthemodedialtoIVI. =
5
2 Rotatethecontroldialtotheleft '_
until[BULB]isindicated.
_] FiNE _
M_¸iii_ _J _iii
BULB
3 Whilepressingthe[] button,
rotatethecontroldialtoadjust
theaperture(F-number).
[] button
65
4Presstheshutterbuttonhalfwaydowntoadjustthefocus.
5 Pressandholdtheshutterbuttonforthedurationofthe
shooting.
As long as the shutter button is pressed, the shutter remains open.
• Use a tripod.
• Set the focus to infinity ill manual focus mode when shooting fireworks,
etc.
• Use the wireless Remote Commander (sold separately) (page 101 ).
Pressing the SHUTTER button on the Remote Commander triggers
BULB shooting and pressing it again stops BULB shooting. You do not
need to press and hold the SHUTTER button on the Remote Commander.
Noles
• When using a tripod, turn off the SteadyShot function (page 45).
• The longer the exposure time, the more conspicuous the noise on the image.
• Al:er shooting, noise reduction (Long exp.NR) will be done lot the same amount of
time that the shutter was open. You cannot do any fln'ther shooting during the
reduction.
66
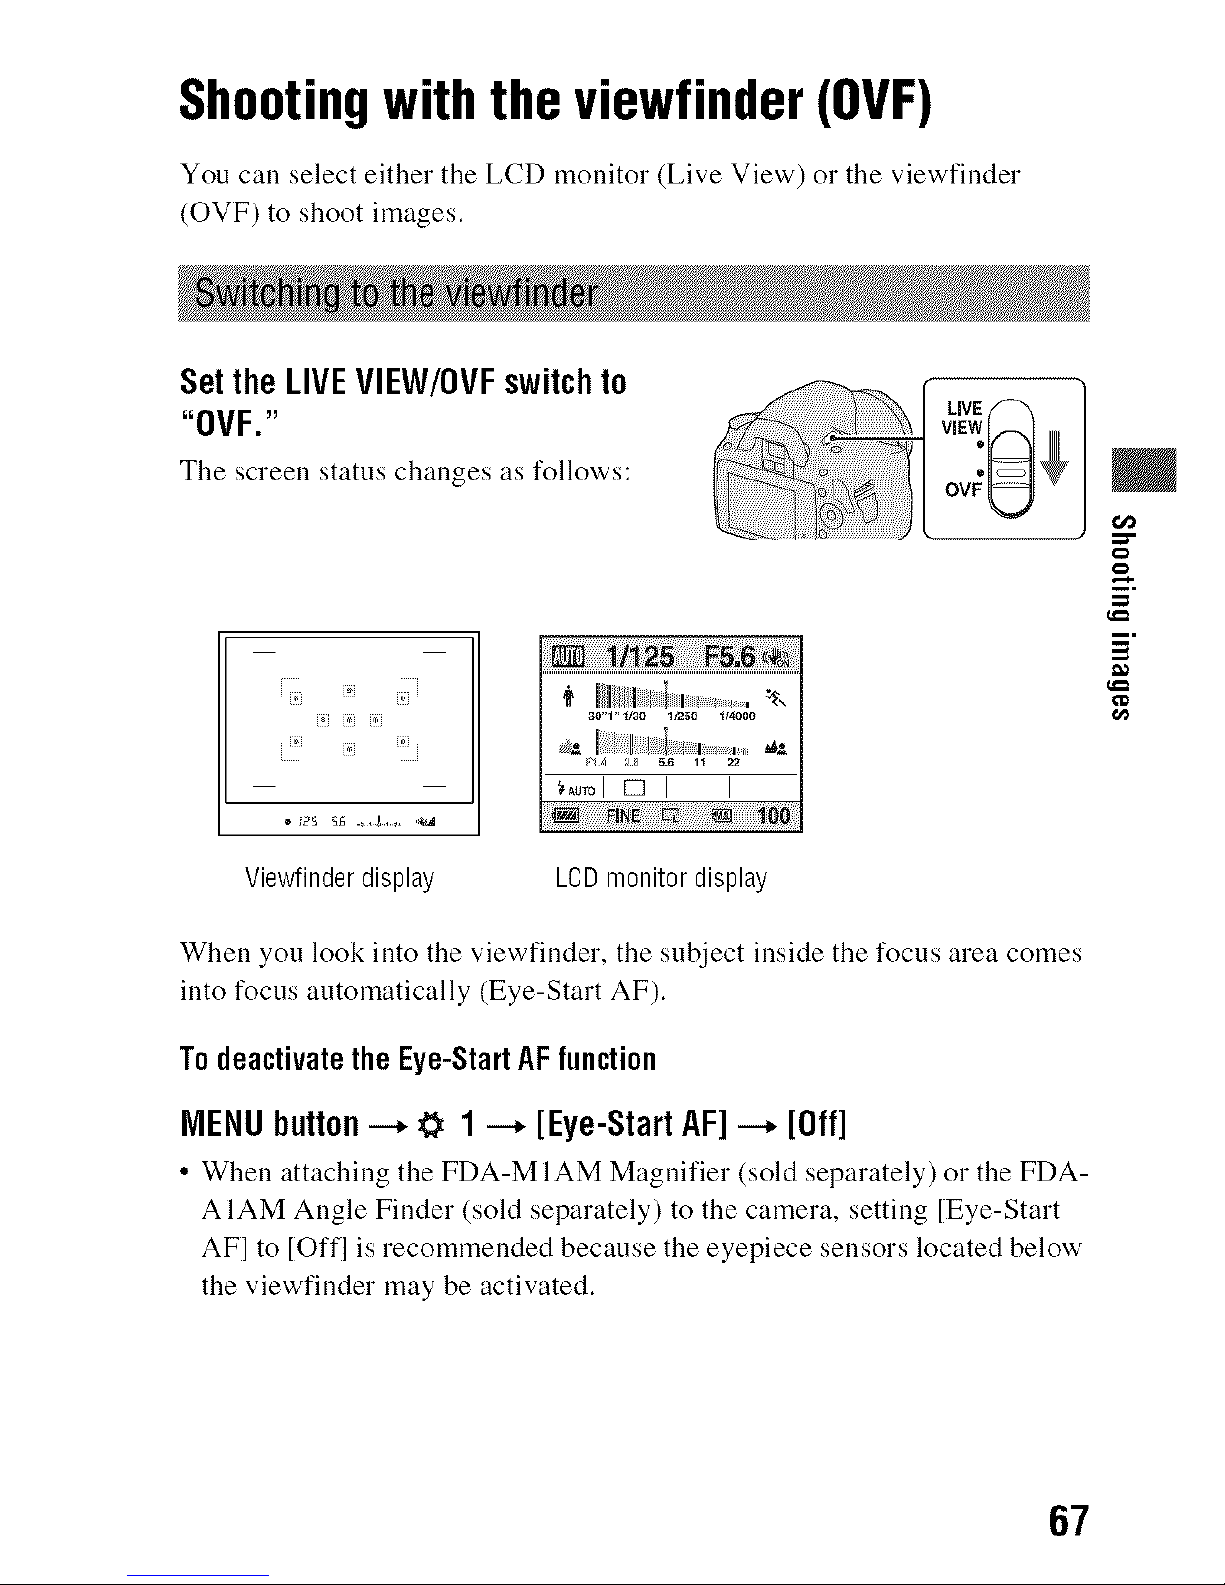
Shootingwith the viewfinder (0VF)
You call select either the LCD monitor (Live View') or the view'finder
(OVF) to shoot images,
Setthe LIVEVIEW/0VF switchto
"0VF."
The screen status changes as follows:
VmEW
OV
[i [? [;i
4' Jil;ill i _,
ao-r'v3o v25o v4ooo
_o_oI D I I
Viewfinder display LCD monitor display
When you look into the viewfinder, the subject inside the focus area comes
into focus automatically (Eye-Start AF).
To deactivatethe Eye-StartAF function
MENUbutton--, _ 1 --, [Eye-StartAF]--, [Offl
• When attaching the FDA-MIAM Magnifier (sold separately) or the FDA-
A IAM Angle Finder (sold separately) to the camera, setting [Eye-Start
AF] to [Offl is recommended because the eyepiece sensors located below'
the viewfinder may be activated.
?
€/J
67
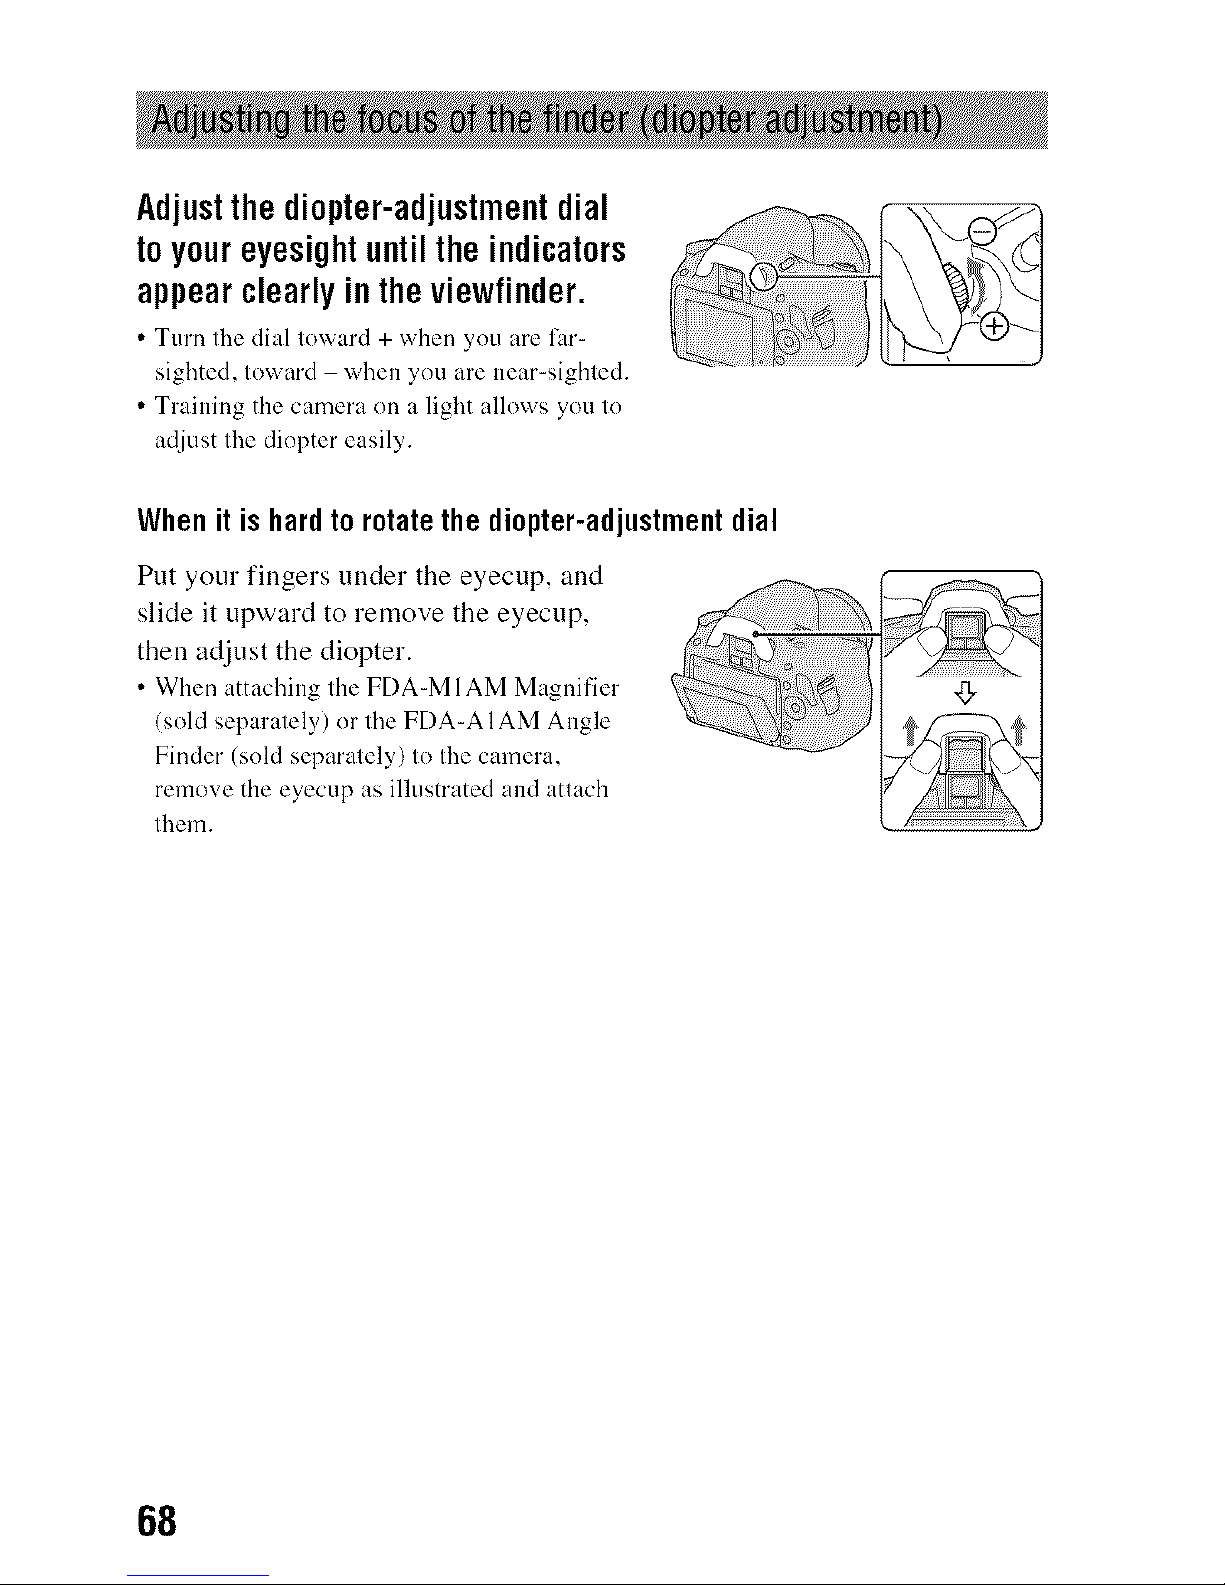
Adjustthe diopter-adjustmentdial
toyoureyesightuntiltheindicators
appearclearlyintheviewfinder.
• Turn the dial toward + when you are lhr=
sighted, toward - when you are near-sighted.
• Training the camera on a light allows you to
adjust the diopter easily.
Whenitishardto rotatethediopter-adjustmentdial
Put your fingers under the eyecup, and
slide it upward to remove the eyecup,
then adjust the diopter.
• When attaching the FDA-M 1AM Magnifier
(sold separately) or _he FDA-A1 AM Angle
Finder (sold separately) to the camera,
remove the eyecup as illustrated and attach
_hem.
68
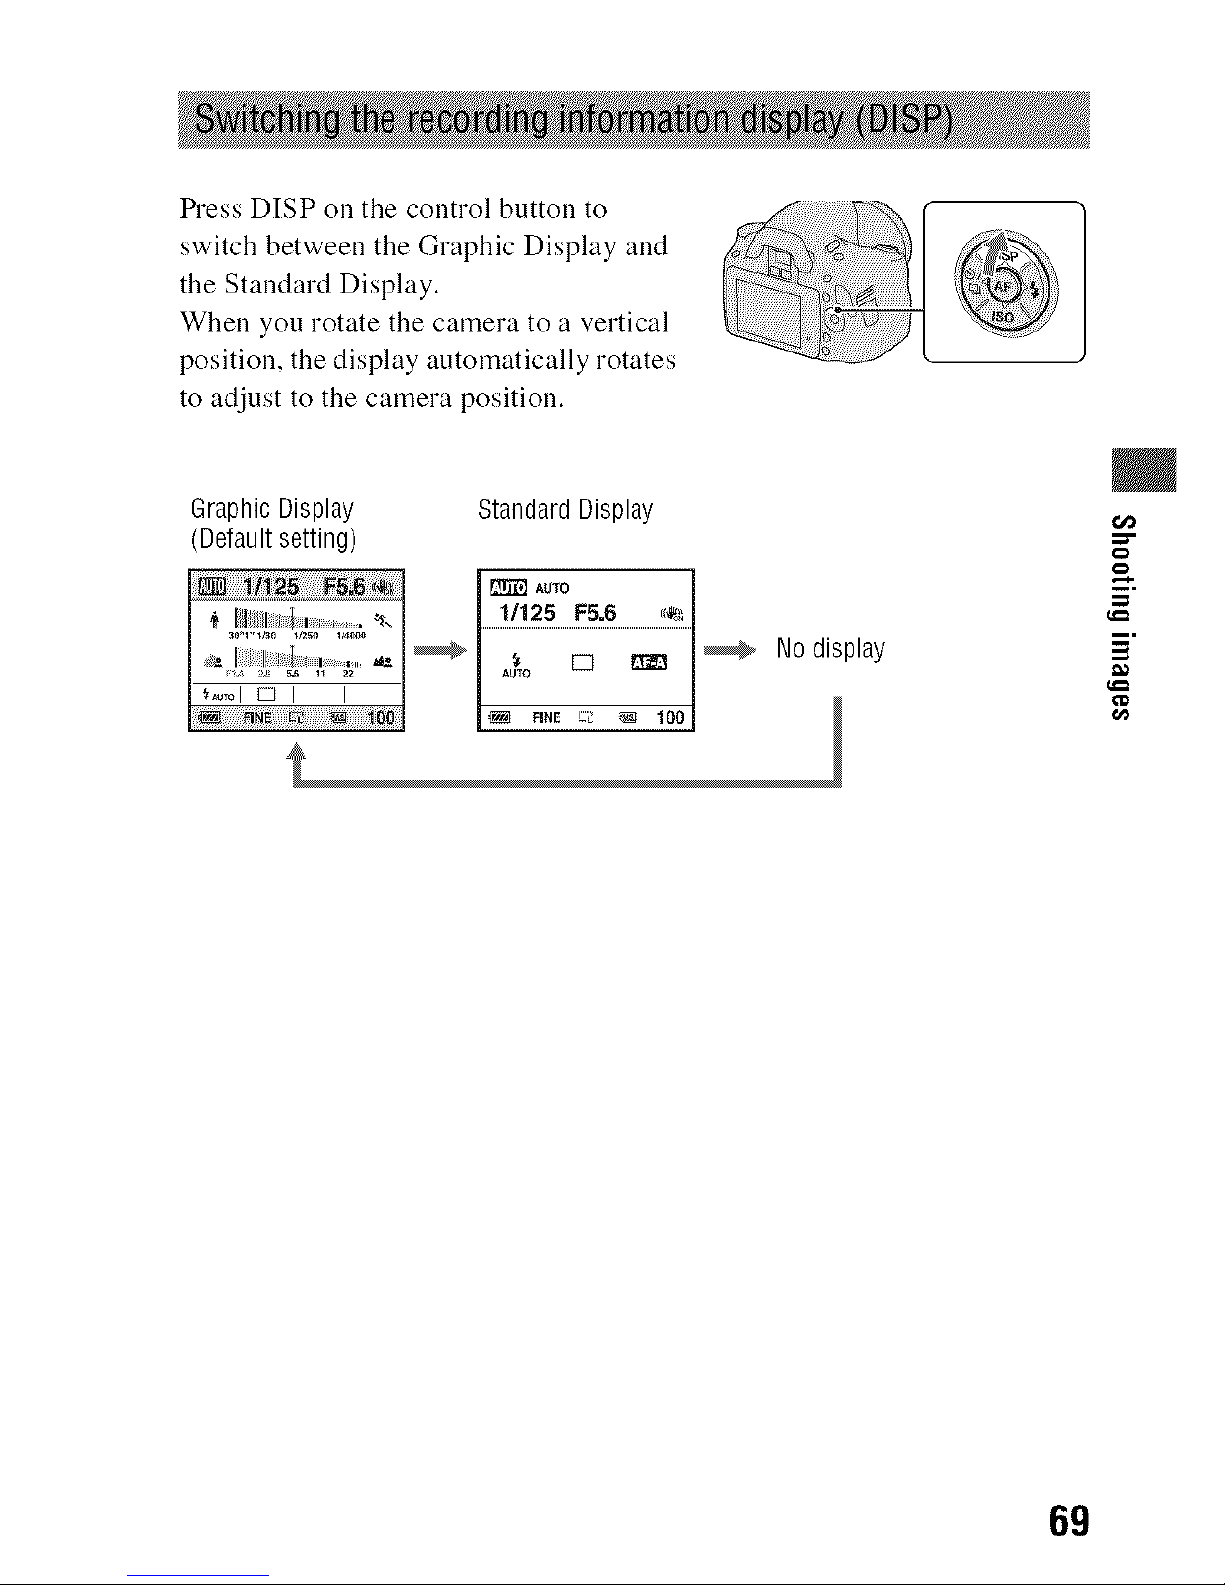
Press DISP on the control button to
switch between the Graphic Display and
the Standard Display.
When you rotate the camera to a vertical
position, the display automatically rotates
to adjust to the camera position.
GraphicDisplay StandardDisplay
(Defaultsetting)
m
iil
...._,_
g
5
t/J
69
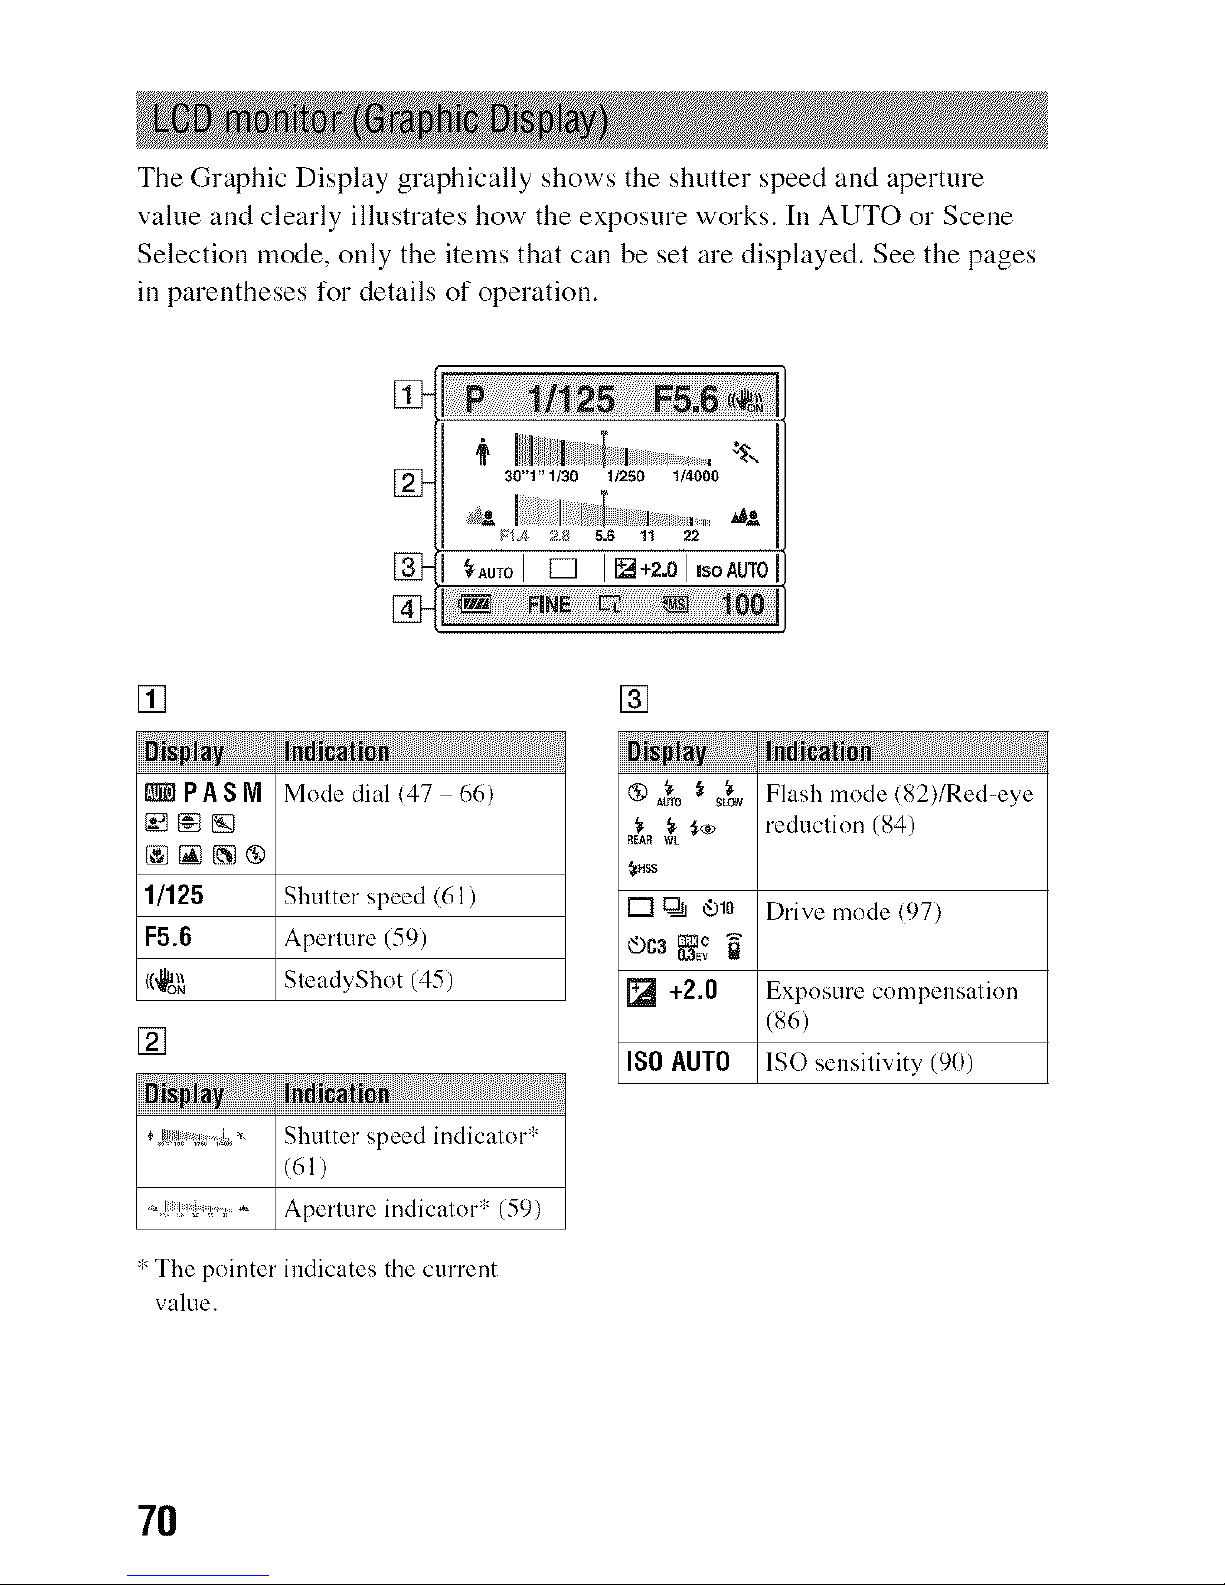
The Graphic Display graphically shows the shutter speed and aperture
value and clearly illustrates how' the exposure works. Ill AUTO or Scene
Selection mode, only the items that call be set are displayed. See the pages
ill parentheses for details of operation.
[]
i i i ! iilli iii ili;iiiii iiiliiliiliiliiliiliiliiliili....
_PASM Mode dial (47 66)
11125 Shutter speed/61 )
F5.6 Aperture (59)
((@o_ SteadyShot (45)
[]
'2_';1_,,,,=o_ Shutter speed indicator*
/61)
Apellure indicalor* (59)
The pointer indicates the current
value.
[]
@ _r0 "_s_ Flash mode/82)/Red-eye
,_, _L_® reduction (84)
[] _ O10 Drive mode (97)
[] +2.0 Exposure compens;_tion
{86)
ISO AUTO 1SO sensitivity (9(})
7O
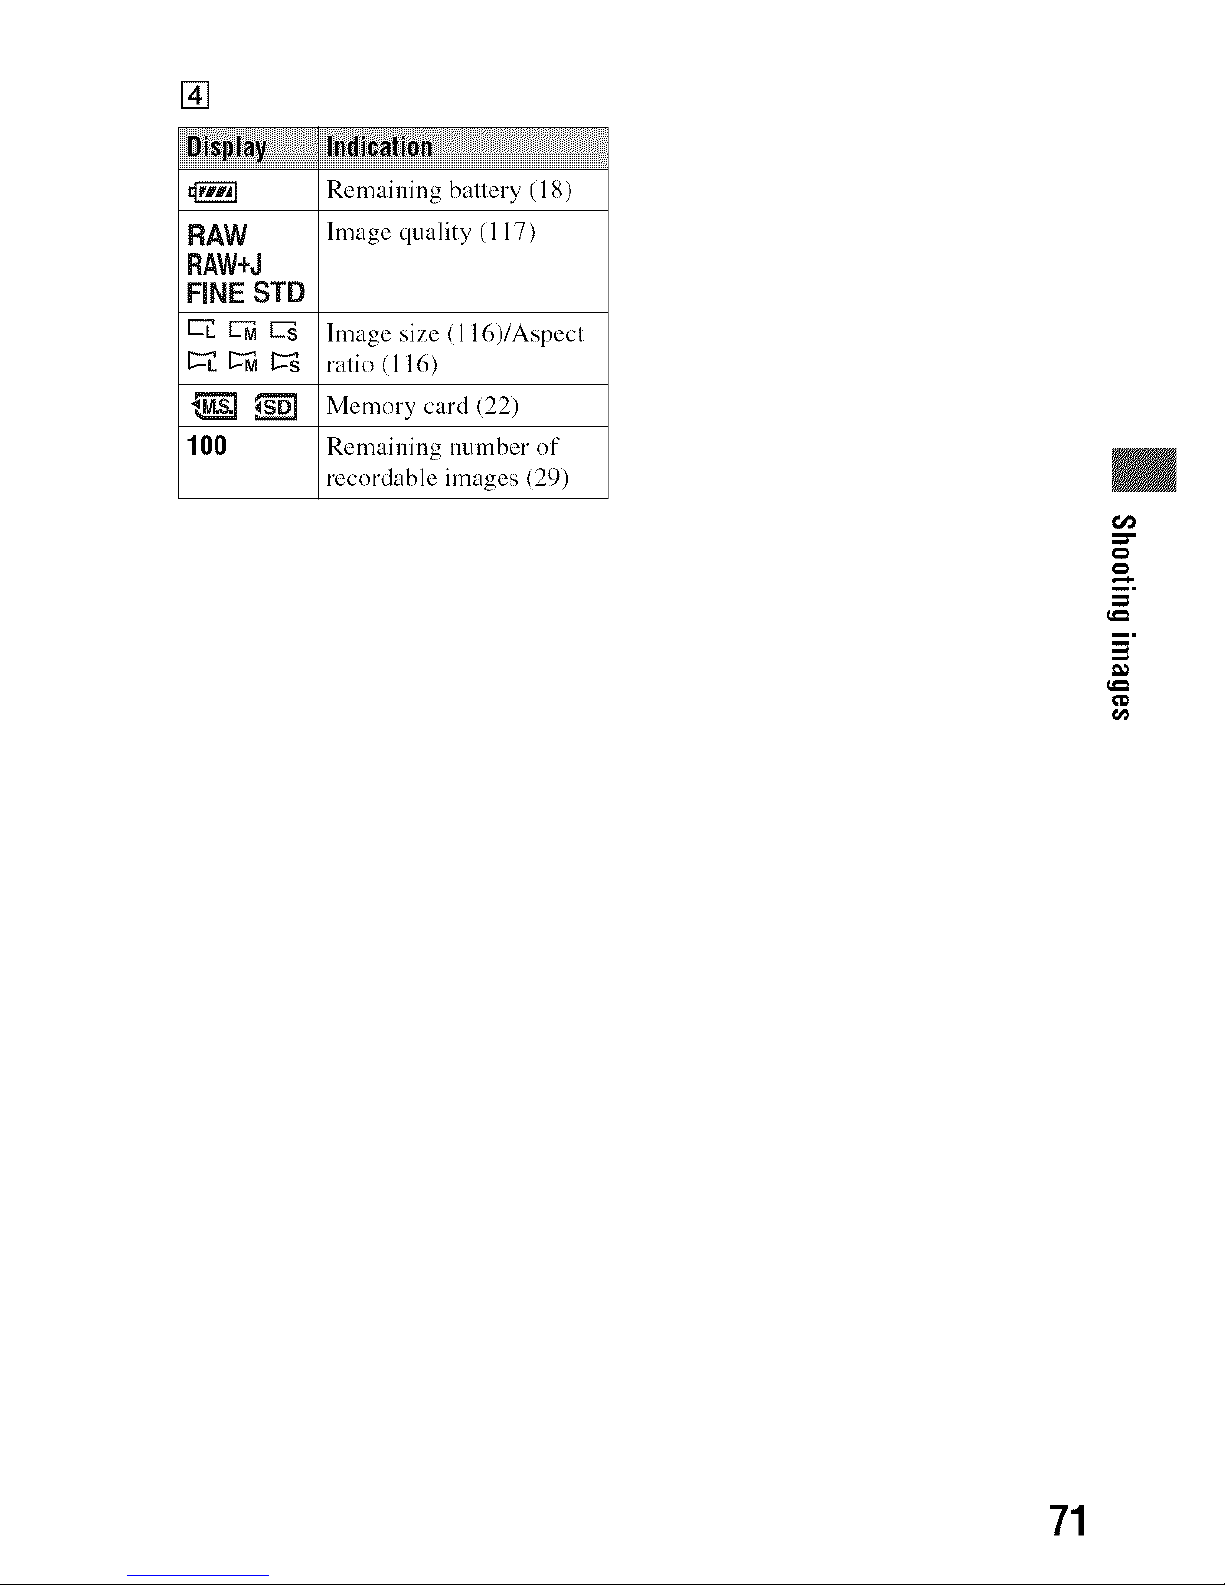
[]
iiiit ii iiiiTiiliii illliiii iiiliiliiliiliiliiliiliiliili;....
Remaining ballery (18)
RAW Image quality (117)
RAW+J
FiNE STD
L-d U_ Image size <116)/Aspecl
g'_ L-_ ralio(ll6)
_ Memory card(22)
100 Remaining nmnber of
recordable images (29)
g
71
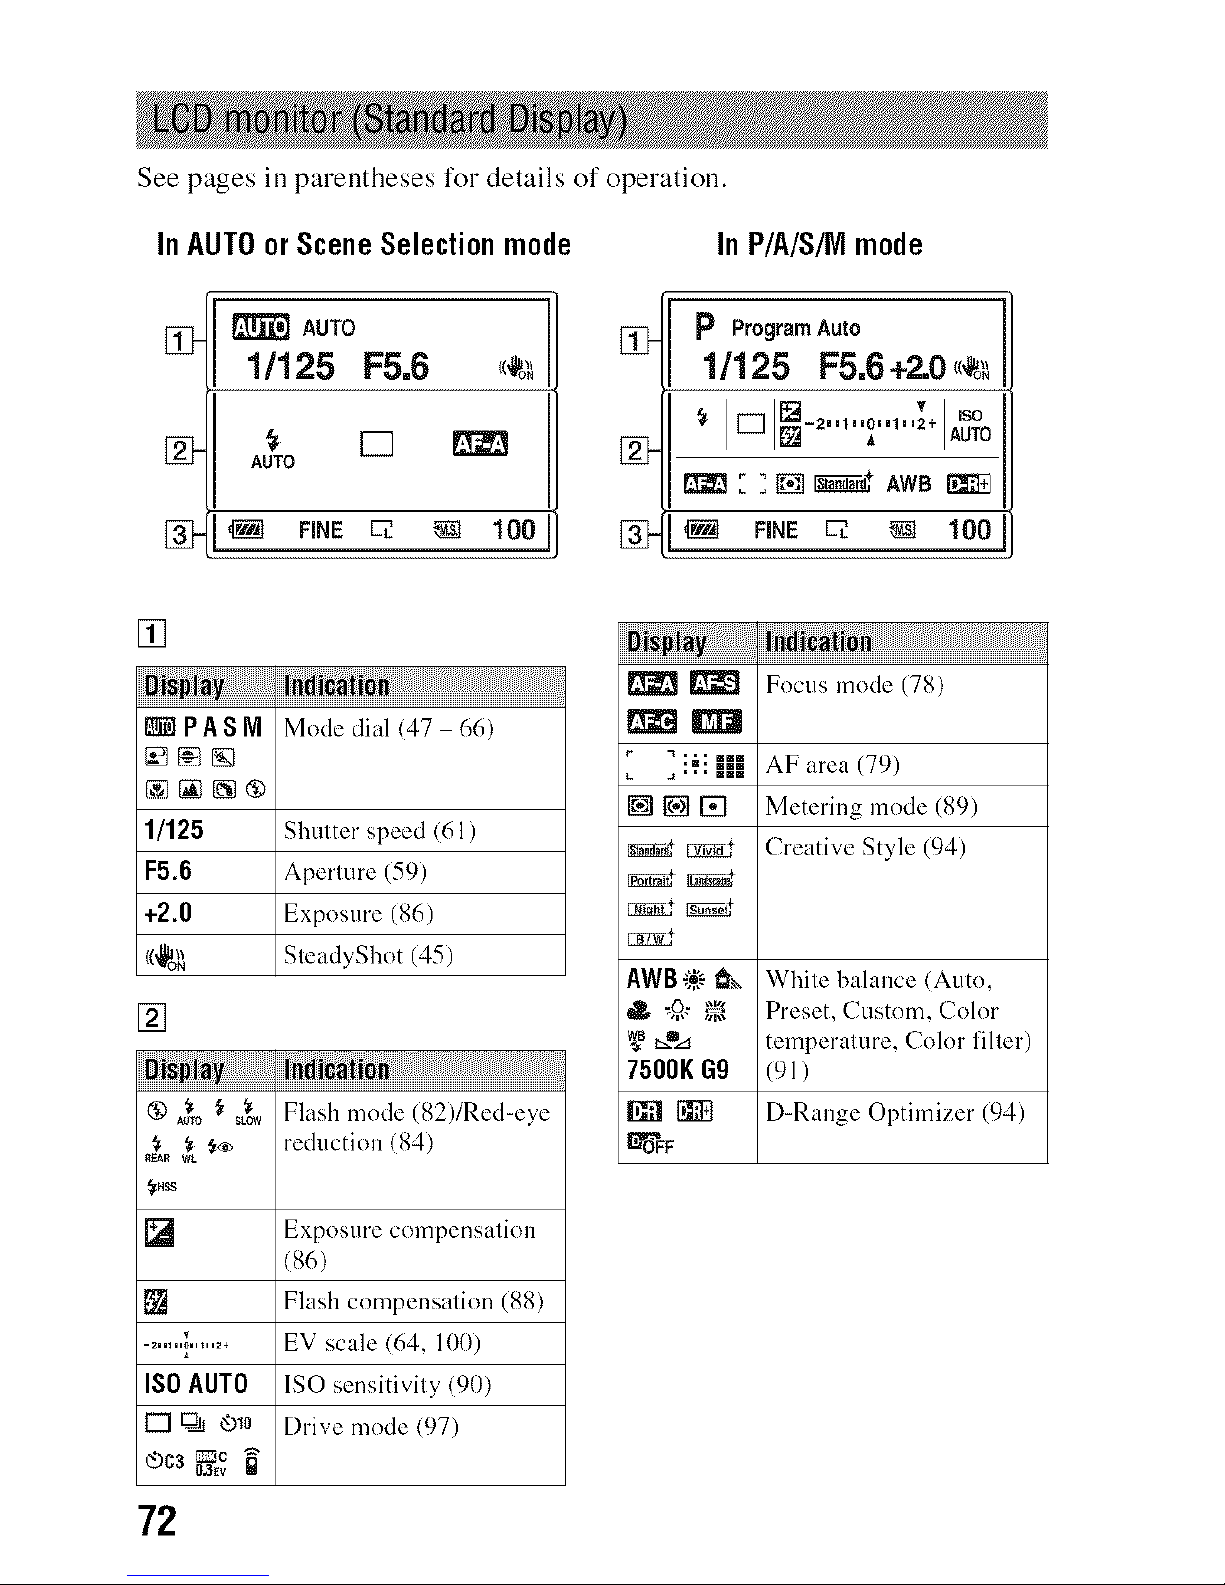
See pages ill parentheses for details of operation.
In AUTOor Scene Selection mode
InP/A/S/Mmode
1 _ AUTO
1/125 F5.6 _<_
A_TO []
FiNE _ _ 100
[]
Nt,IPASM Mode dial (47 66)
1/125 Shutter speed (61 )
F5.6 Aperture (59)
+2.0 Exposure (86)
{(_o_ SteadyShot (45)
[]
@ A_ro$ ___, Flash mode (82)/Red-eye
_. _ €,® reducti(m (84)
_Hss
] Exposure comperlsaliOll
_86)
[] Flash compensation (88)
......._'....... EV scale (64, 100)
ISOAUTO ISO sensitivity (90)
[] t:_ _o Drive mode (97)
®ca_g g
![P,Pr°ir mAu'°'
1/125 F5.6+2.0,<_
[] v
AUTO
• _1 FiNE E2L _ 100
72
_ Focus mode (78)
_i._i _.'_.'_."AF area (79)
[] [] Metering mode (89)
___* Creative Style (94)
AWB_2,_;-_ While balance {Auto,
dR, ,,.q: ,";'_;_Preset, Custom, Color
gB_=_ temperalure, Color liller)
7500K G9 (91)
_ D-Range Optimizer (94)
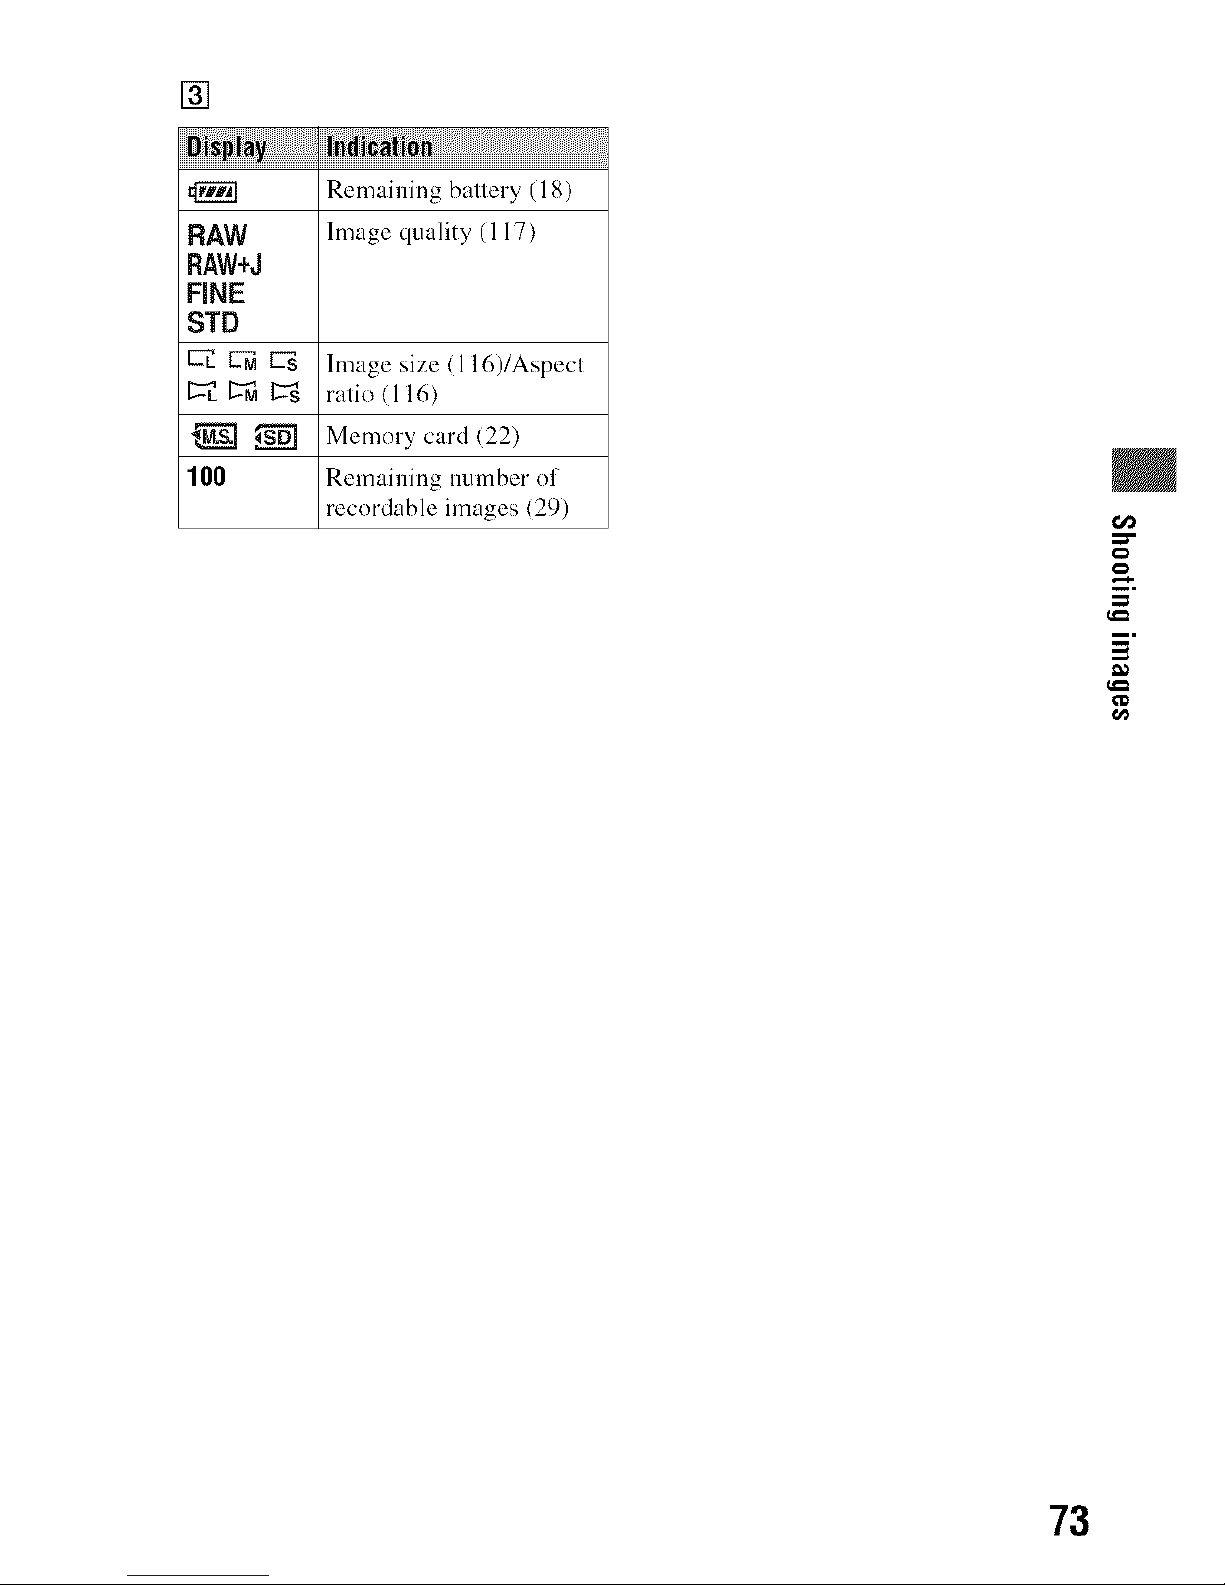
[]
iiiit_ii_iiiiTiiliii_illliiii_iiiliiliiliiliiliiliiliiliili;....
Remaining ballery (18)
RAW Image quality (117)
RAW+J
FiNE
STD
C-_ _ Image size (116)/Aspecl
L'_ _ss ralio(ll6)
_ Memory card(22)
I00 Remaining nmnber ol
recordable images (29)
==-
el=
73
[]
t25 5,6
m m
......._.......
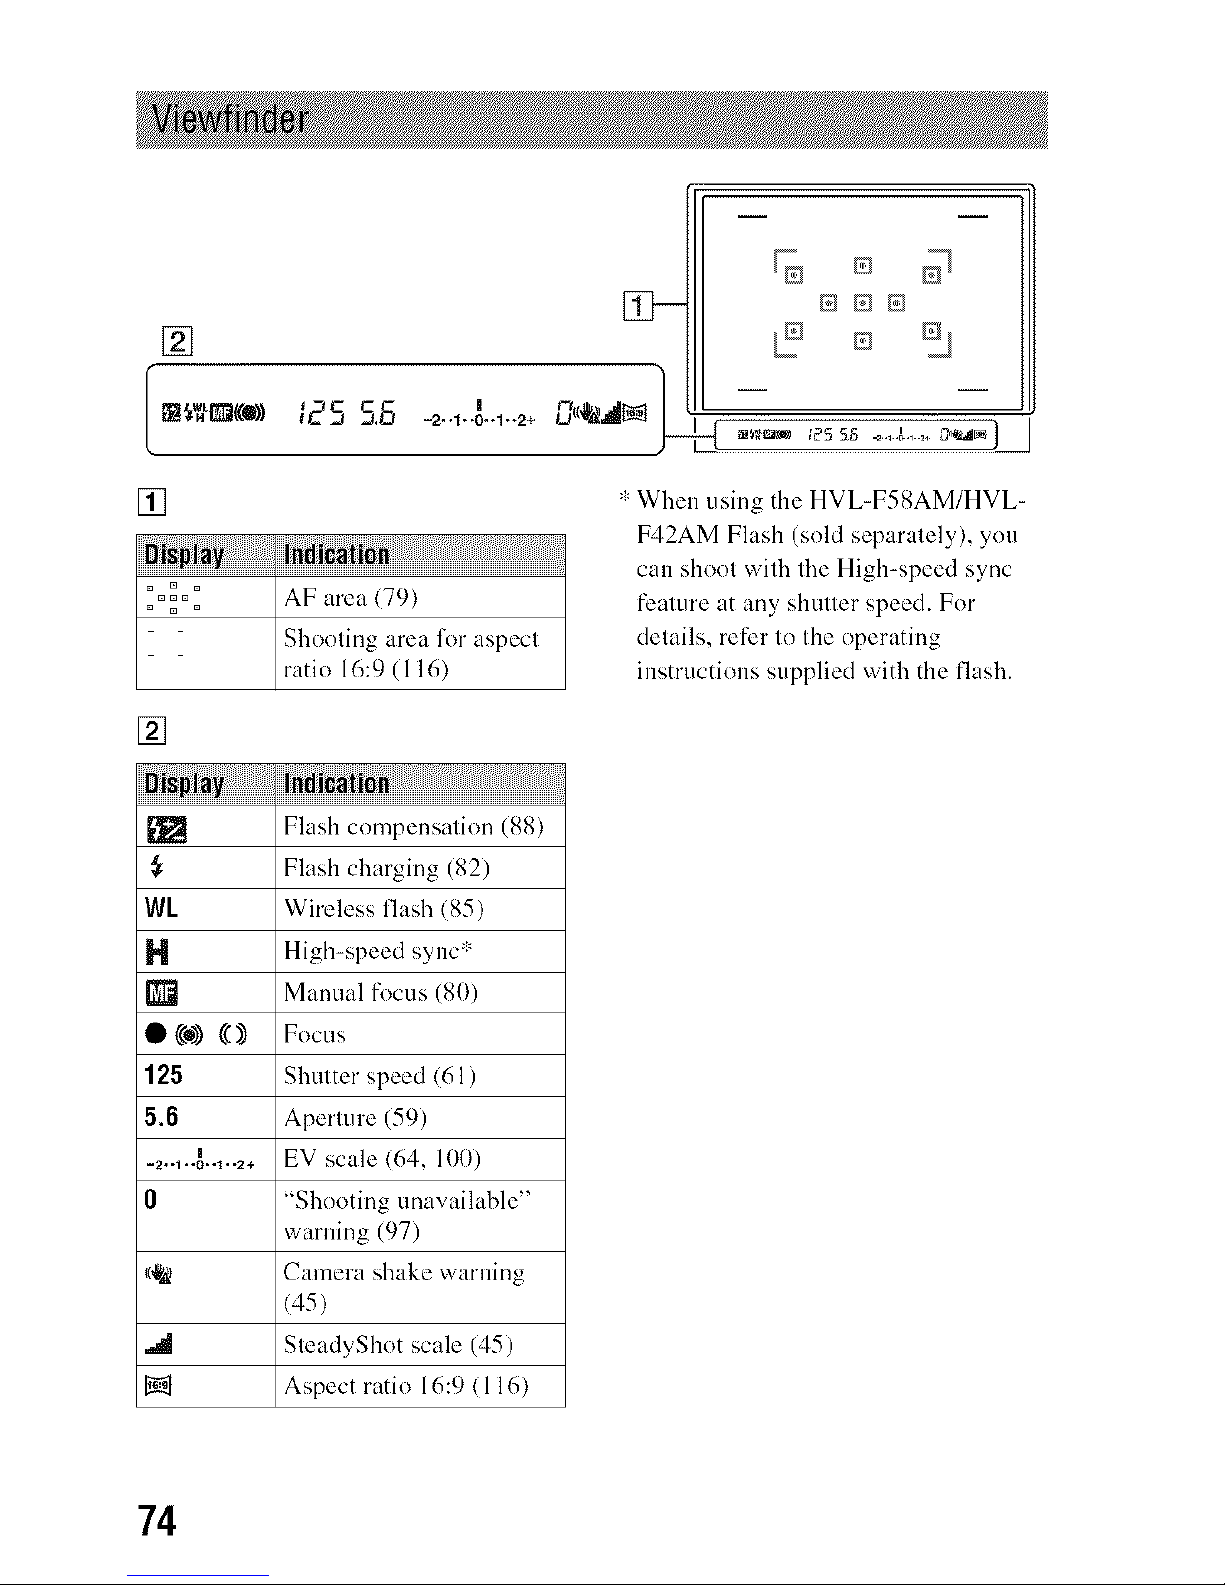
[]
AF area (79)
Shooting area for aspect
ratin 16:9 (116)
[]
[Tj_ Flash compensation (88)
,_ Flash charging (82)
W[ Wireless flash (85)
H High-speed sync :'
_]_ Manual focus (81))
• (@) g)) Focus
125 Shutter speed (61 )
5.6 Aperture (59)
_2..1..o_....... EV scale (64, 100)
0 "Shooting unavailable"
warning (97)
_ Camera shake warning
(45)
SteadyShot scale (45)
Aspect ratio 16:9 (116)
':' When using the HVL=F58AM/HVL=
F42AM Flash (sold separately), you
can shoot with the High-speed sync
featm'e at any shutter speed. For
details, re[izr to the nperating
instructions supplied with the flash.
74
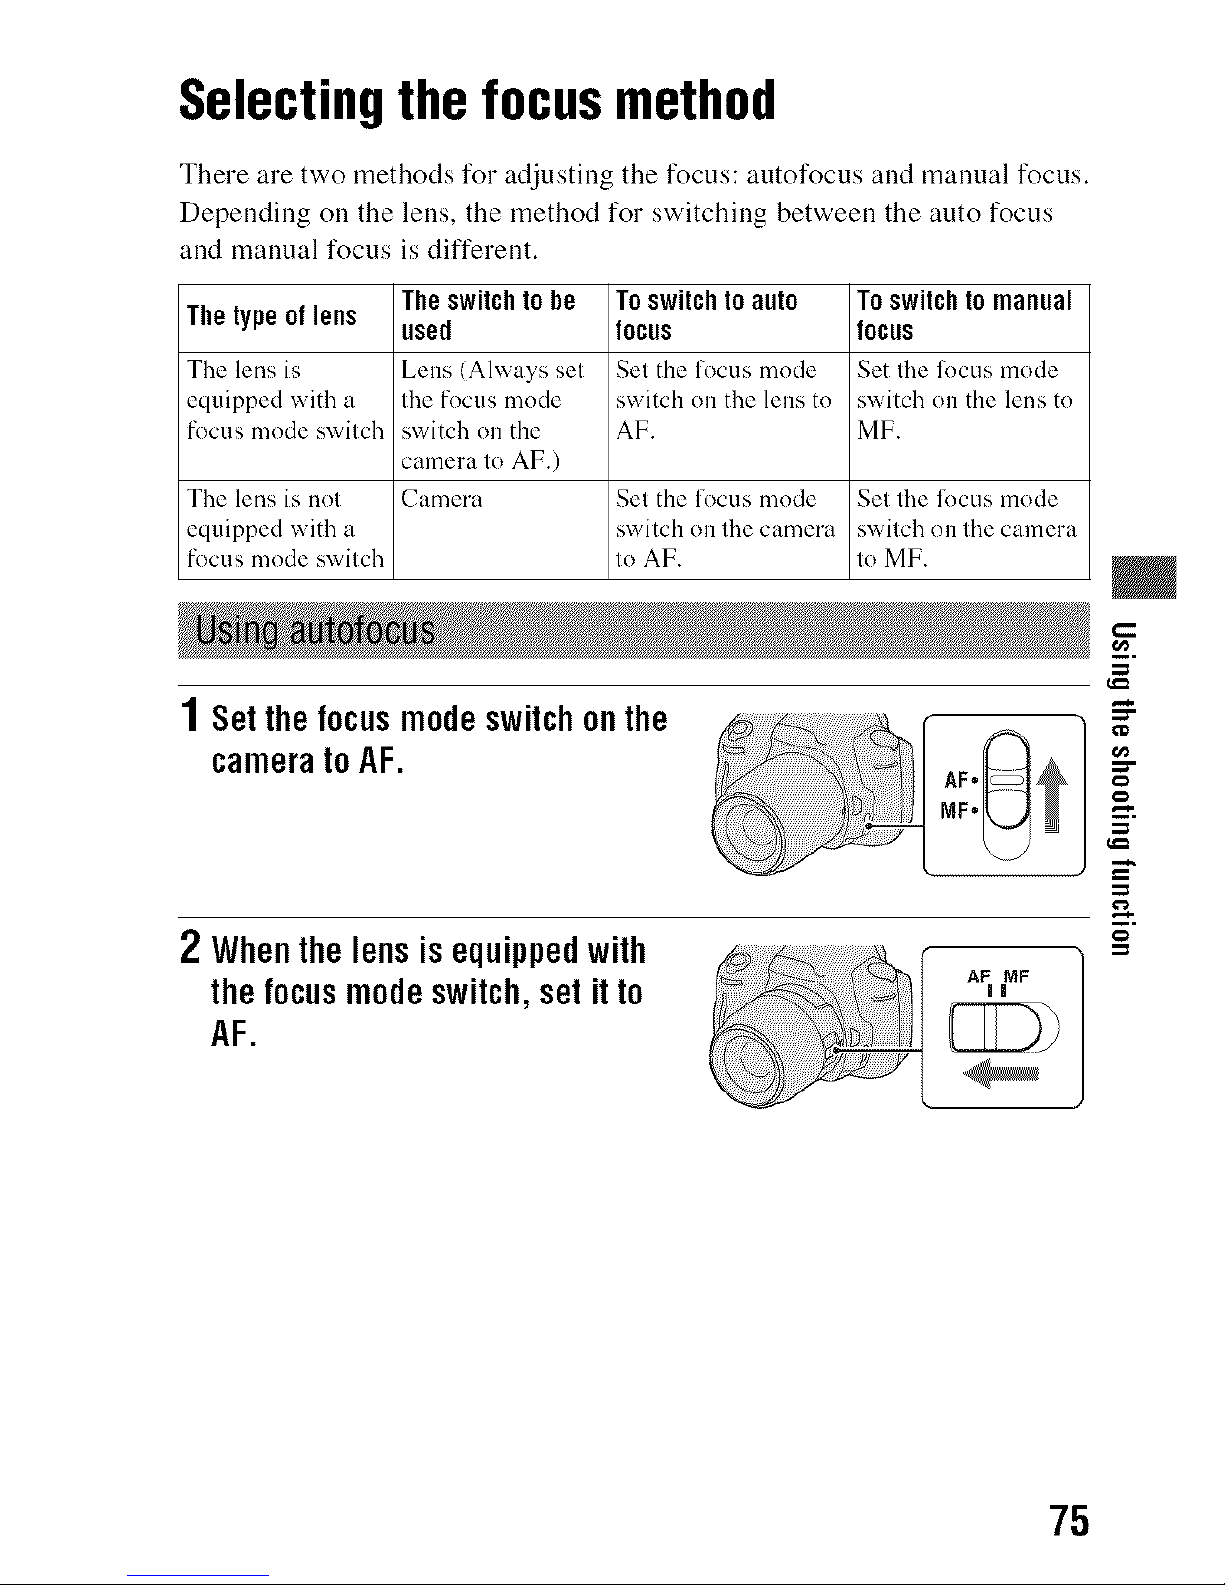
Selectingthe focusmethod
There are two methods for adjusting the focus: autofocus and manual focus.
Depending on the lens, the method for switching between the auto focus
and manual focus is different.
The switch to he To switch to auto To switch to manual
The type of lens
used locus locus
The lens is Lens (Always set Set the focus mode Set the li)cus mode
equipped with a the focus mode switch on the lens to switch on the lens to
focus mode switch switch on the AF. MF.
camera to AF.)
The lens is not Camera Set the focus mode Set the li)cus mode
equipped with a switch on the camera switch on the camera
focus mode switch to AF. to MF.
1Setthefocusmodeswitchonthe
cameratoAF.
2 Whenthelensisequippedwith
thefocusmodeswitch,setit to
AF.
75
 Loading...