

Page 1
Digital Single Lens Reflex Camera
User’s Guide/
Troubleshooting
2-681-187-11 (1)
Before your
operation
Using the shooting
functions
Using the viewing
functions
Using the menu
Using your computer
Additional information on this product and
answers to frequently asked questions can be
found at our Customer Support Website.
Printed on 100% recycled paper using VOC
(Volatile Organic Compound)-free vegetableoil based ink.
Printed in Malaysia
100
DSLR-A100
“Read This First” (separate volume)
Explains the set-up and basic operations for shooting/
playback with your camera.
Operating Instructions
Before operating the unit, please read this manual and “Read This First”
(separate volume) thoroughly, and retain it for future reference.
Owner’s Record
The model and serial numbers are located on the bottom.
Record the serial number in the space provided below.
Refer to these numbers whenever you call upon your Sony
dealer regarding this product.
Model No. DSLR-A100
Serial No. ___________________________
© 2006 Sony Corporation
Printing images
Troubleshooting
Others
Index
Page 2
WARNING
To reduce fire or shock hazard, do
not expose the unit to rain or
moisture.
For Customers in the U.S.A.
This symbol is intended to
alert the user to the presence
of uninsulated “dangerous
voltage” within the product's
enclosure that may be of
sufficient magnitude to
constitute a risk of electric
shock to persons.
This symbol is intended to
alert the user to the presence
of important operating and
maintenance (servicing)
instructions in the literature
accompanying the appliance.
2
Page 3

IMPORTANT SAFEGUARDS
For your protection, please read these safety
instructions completely before operating
the appliance, and keep this manual for
future reference.
Carefully observe all warnings, precautions
and instructions on the appliance, or the one
described in the operating instructions and
adhere to them.
Use
Power Sources
This set should be operated only from the type of
power source indicated on the marking label. If
you are not sure of the type of electrical power
supplied to your home, consult your dealer or
local power company. For those sets designed to
operate from battery power, or other sources, refer
to the operating instructions.
Polarization
This set may be equipped with a polarized ac
power cord plug (a plug having one blade wider
than the other).
This plug will fit into the p ower outlet only one
way. This is a safety feature. If you are unable to
insert the plug fully into the outlet, try reversing
the plug. If the plug should still fail to fit, contact
your electrician to have a suitable outlet installed.
Do not defeat the safety purpose of the polarized
plug by forcing it in.
Overloading
Do not overload wall outlets, extension cords or
convenience receptacles beyond their capacity,
since this can result in fire or electric shock.
Object and Liquid Entry
Never push objects of any kind into the set
through openings as they may touch dangerous
voltage points or short out parts that could result
in a fire or electric shock. Never spill liquid of any
kind on the set.
Attachments
Do not use attachments not recommended by the
manufacturer, as they may cause hazards.
Cleaning
Unplug the set from the wall outlet before
cleaning or polishing it. Do not use liquid cleaners
or aerosol cleaners. Use a cloth lightly dampened
with water for cleaning the exterior of the set.
Installation
Water and Moisture
Do not use power-line operated sets near water –
for example, near a bathtub, washbowl, kitchen
sink, or laundry tub, in a wet basement, or near a
swimming pool, etc.
Power-Cord Protection
Route the power cord so that it is not likely to be
walked on or pinched by items placed upon or
against them, paying particular attention to the
plugs, receptacles, and the point where the cord
exits from the appliance.
Accessories
Do not place the set on an unstable cart, stand,
tripod, bracket, or table. The set may fall, causing
serious injury to a child or an adult, and serious
damage to the set. Use only a cart, stand, tripod,
bracket, or table recommended by the
manufacturer.
Ventilation
The slots and openings in the cabinet are provided
for necessary ventilation. To ensure reliable
operation of the set, and to protect it from
overheating, these slots and openings must never
be blocked or covered.
– Never cover the slots and openings with a cloth
or other materials.
– Never block the slots and openings by placing
the set on a bed, sofa, rug, or other similar
surface.
– Never place the set in a confined space, such as
a bookcase, or built-in cabinet, unless proper
ventilation is provided.
– Do not place the set near or over a radiator or
heat register, or where it is exposed to direct
sunlight.
3
Page 4

Lightning
For added protection for this set during a lightning
storm, or when it is left unattended and unused for
long periods of time, unplug it from the wall
outlet and disconnect the antenna or cable system.
This will prevent damage to the set due to
lightning and power-line surges.
Service
Damage Requiring Service
Unplug the set from the wall outlet and refer
servicing to qualified service personnel under the
following conditions:
– When the power cord or plug is damaged or
frayed.
– If liquid has been spilled or objects have fallen
into the set.
– If the set has been exposed to rain or water.
– If the set has been subject to excessive shock by
being dropped, or the cabinet has been
damaged.
– If the set does not operate normally when
following the operating instructions. Adjust
only those controls that are specified in the
operating instructions. Improper adjustment of
other controls may result in damage and will
often require extensive work by a qualified
technician to restore the set to normal operation.
– When the set exhibits a distinct change in
performance – this indicates a need for service.
Servicing
Do not attempt to service the set yourself as
opening or removing covers may expose you to
dangerous voltage or other hazards.
Refer all servicing to qualified service personnel.
Safety Check
Upon completion of any service or repairs to the
set, ask the service technician to perform routine
safety checks (as specified by the manufacturer)
to determine that the set is in safe operating
condition.
Replacement parts
When replacement parts are required, be sure the
service technician has used replacement parts
specified by the manufacturer that have the same
characteristics as the original parts.
Unauthorized substitutions may result in fire,
electric shock, or other hazards.
4
Page 5

Read this first
CAUTION
Replace the battery with the specified type
only. Otherwise, fire or injury may result.
For Customers in the U.S.A. and
Canada
RECYCLING LITHIUM-ION BATTERIES
Lithium-Ion batteries are
recyclable.
You can help preserve our
environment by returning your
used rechargeable batteries to
the collection and recycling
location nearest you.
For more information regarding recycling of
rechargeable batteries, call toll free
1-800-822-8837, or visit http://www.rbrc.org/
Caution: Do not handle damaged or leaking
Lithium-Ion batteries.
For Customers in the U.S.A.
If you have any questions about this product, you
may call:
Sony Customer Information Services Center
1-800-222-SONY (7669)
The number below is for the FCC related matters
only.
Regulatory Information
Declaration of Conformity
Trade Name: SONY
Model No.: DSLR-A100
Responsible Party: Sony Electronics Inc.
Address: 16530 Via Esprillo,
San Diego, CA 92127 U.S.A.
Telephone No.: 858-942-2230
This device complies with Part 15 of the FCC
Rules. Operation is subject to the following
two conditions: (1) This device may not cause
harmful interference, and (2) this device must
accept any interference received, including
interference that may cause undesired
operation.
CAUTION
You are cautioned that any changes or
modifications not expressly approved in this
manual could void your authority to operate this
equipment.
Note:
This equipment has been tested and found to
comply with the limits for a Class B digital
device, pursuant to Part 15 of the FCC Rules.
These limits are designed to provide reasonable
protection against harmful interference in a
residential installation. This equipment generates,
uses, and can radiate radio frequency energy and,
if not installed and used in accordance with the
instructions, may cause harmful interference to
radio communications. However, there is no
guarantee that interference will not occur in a
particular installation. If this equipment does
cause harmful interference to radio or television
reception, which can be determined by turning the
equipment off and on, the user is encouraged to
try to correct the interference by one or more of
the following measures:
– Reorient or relocate the receiving antenna.
– Increase the separation between the
equipment and receiver.
– Connect the equipment into an outlet on a
circuit different from that to which the
receiver is connected.
– Consult the dealer or an experienced radio/TV
technician for help.
5
Page 6

The supplied interface cable must be used with the
equipment in order to comply with the limits for a
digital device pursuant to Subpart B of Part 15 of
FCC Rules.
Memory Stick Duo Adaptor for
CF slot
For the Customers in the U.S.A. and
Canada
THIS DEVICE COMPLIES WITH PART 15 OF
THE FCC RULES. OPERATION IS SUBJECT
TO THE FOLLOWING TWO CONDITIONS:
(1) THIS DEVICE MAY NOT CAUSE
HARMFUL INTERFERENCE, AND (2) THIS
DEVICE MUST ACCEPT ANY
INTERFERENCE RECEIVED, INCLUDING
INTERFERENCE THAT MAY CAUSE
UNDESIRED OPERATION.
THIS CLASS B DIGITAL APPARATUS
COMPLIES WITH CANADIAN ICES-003.
For Customers in Europe
This product has been tested and found compliant
with the limits set out in the EMC Directive for
using connection cables shorter than 3 meters (9.8
feet).
Attention
The electromagnetic fields at the specific
frequencies may influence the picture and sound
of this unit.
Notice
If static electricity or electromagnetism causes
data transfer to discontinue midway (fail), restart
the application or disconnect and connect the
communication cable (USB, etc.) again.
Disposal of Old Electrical & Electronic
Equipment (Applicable in the
European Union and other European
countries with separate collection
systems)
This symbol on the product or on its packaging
indicates that this product shall not be treated as
household waste. Instead it shall be handed over
to the applicable collection point for the recycling
of electrical and electronic equipment. By
ensuring this product is disposed of correctly, you
will help prevent potential negative consequences
for the environment and human health, which
could otherwise be caused by inappropriate waste
handling of this product. The recycling of
materials will help to conserve natural resources.
For more detailed information about recycling of
this product, please contact your local Civic
Office, your household waste disposal service or
the shop where you purchased the product.
Notice for customers in the
United Kingdom
A moulded plug complying with BS 1363 is fitted
to this equipment for your safety and convenience.
Should the fuse in the plug supplied need to be
replaced, a fuse of the same rating as the supplied
one and approved by ASTA or BSI to BS 1362,
(i.e., marked with an or mark) must be
used.
If the plug supplied with this equipment has a
detachable fuse cover, be sure to attach the fuse
cover after you change the fuse. Never use the
plug without the fuse cover. If you should lose the
fuse cover, please contact your nearest Sony
service station.
6
Page 7
Notes on using your camera
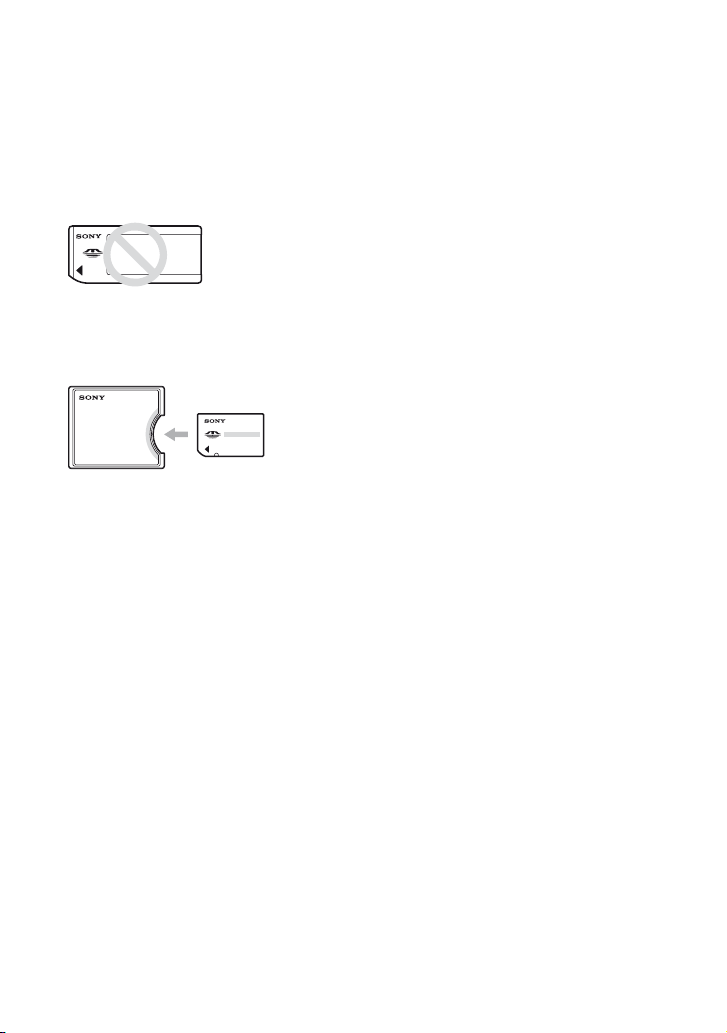
Types of “Memory Stick” that can be
used (not supplied)
There are two types of “Memory Stick”.
“Memory Stick”: you cannot use a
“Memory Stick” with your camera.
“Memory Stick Duo”: Inserting a
“Memory Stick Duo” into a Memory
Stick Duo Adaptor for CF slot
(supplied).
• When using a “Memory Stick Duo” with the
write-protect switch, set the switch to the
recording position.
• For details on “Memory Stick”, see page 139.
Notes on the battery pack
• Charge the NP-FM55H (supplied) battery pack
before using the camera for the first time.
t step 1 in “Read This First”)
(
• The battery pack can be charged even if it is not
completely discharged. Also, even if the battery
pack is not fully charged, you can use the
partially charged capacity of the battery pack as
is.
• If you do not intend to use the battery pack for a
long time, use up the existing charge and
remove it from your camera, then store it in a
cool, dry place. This is to maintain the battery
pack functions (page 142).
• For details on the battery pack, see page 142.
Back up recommendation
To avoid the potential risk of data loss, always
copy (back up) data to other medium.
Notes on recording/playback
• This camera is neither dust-proof, nor splashproof, nor water-proof. Read “Precautions”
(page 147) before operating the camera.
• Before you record one-time events, make a trial
recording to make sure that the camera is
working correctly.
• Be careful not to get the camera wet. Water
entering the inside of the camera may cause
malfunctions which in some cases may not be
repairable.
• Do not look at the sun or a strong light through a
removed lens or the viewfinder. This may cause
irrecoverable damage to your eyes. Or it may
cause a malfunction of your camera.
• Do not use the camera near a location that
generates strong radio waves or emits radiation.
The camera may not be able to record or play
back properly.
• Using the camera in sandy or dusty locations
may cause malfunctions.
• If moisture condensation occurs, remove it
before using the camera (page 147).
• Do not shake or strike the camera. In addition to
malfunctions and an inability to record images,
this may render the recording medium unusable,
or cause image data breakdown, damage or loss.
• Clean the flash surface before use. The heat of
flash emission may cause dirt on the flash
surface to become discolored or to stick to the
flash surface, resulting in insufficient light
emission.
• Keep the camera, supplied accessories, etc., out
of the reach of children. The battery pack, the
shoe cap, etc., may be swallowed. If such a
problem occurs, consult a doctor immediately.
No compensation for contents of the
recording
The contents of the recording cannot be
compensated for if recording or playback is not
possible due to a malfunction of your camera or
recording media, etc.
7
Page 8
Notes on the LCD monitor and lens
• The LCD monitor is manufactured using
extremely high-precision technology so over
99.99% of the pixels are operational for
effective use. However, there may be some tiny
black points and/or bright points (white, red,
blue or green in color) that constantly appear on
the LCD monitor. These points are normal in the
manufacturing process and do not affect the
images in any way.
Black, white, red, blue
and green points
On image data compatibility
• This camera conforms with DCF (Design rule
for Camera File system) universal standard
established by JEITA (Japan Electronics and
Information Technology Industries
Association).
• Playback of images recorded with your camera
on other equipment and playback of images
recorded or edited with other equipment on your
camera are not guaranteed.
Warning on copyright
Television programs, films, videotapes, and other
materials may be copyrighted. Unauthorized
recording of such materials may be contrary to the
provisions of the copyright laws.
• Do not expose the camera to direct sunlight. If
sunlight is focused on a nearby object, it may
cause a fire. When you must place the camera
under direct sunlight, attach the lens cap.
• Images may trail across on the LCD monitor in
a cold location. This is not a malfunction. When
turning on the camera in a cold location, the
LCD monitor may become temporarily dark.
When the camera warms up, the monitor will
function normally.
• Do not press against the LCD monitor. The
monitor may be discolored and that may cause a
malfunction.
On focal length
The picture angle of this camera is narrower than
that of a 35 mm-format film camera. You can find
the approximate equivalent of the focal length of a
35 mm-format film camera, and shoot with the
same picture angle, by increasing the focal length
of your lens by half.
For example, by using a 50 mm lens, you can get
the approximate equivalent of a 75 mm lens of a
35 mm-format film camera.
The pictures used in this manual
The photographs used as examples of pictures in
this manual are reproduced images, and are not
actual images shot using this camera.
8
Page 9

Table of contents
Notes on using your camera .....................................................................7
Basic techniques for better images .........................................................13
Focus – Focusing on a subject successfully................................................... 13
Exposure – Adjusting the light intensity .......................................................... 16
Color – On the effects of lighting..................................................................... 17
Quality – On “image quality” and “image size” ............................................... 17
Before your operation
Identifying parts.......................................................................................19
Indicators on the monitor.........................................................................22
Switching the recording information display ............................................26
Number of images ...................................................................................27
The number of images that can be recorded when using the battery pack
................................................................................................................29
Operation workflow..................................................................................30
Using the shooting functions
Using the mode dial.................................................................................31
Scene Selection............................................................................................... 32
Shooting with Program auto ............................................................................ 33
Shooting with aperture priority mode .............................................................. 34
Shooting with shutter speed priority mode ...................................................... 36
Shooting with manual exposure mode ............................................................ 37
Using the function dial.............................................................................42
How to use the function dial ............................................................................ 43
Setting ISO/Zone Matching ............................................................................. 44
Adjusting the white balance ............................................................................ 46
D-Range Optimizer.......................................................................................... 49
Selecting the color/DEC mode ........................................................................ 49
Focus mode..................................................................................................... 51
Flash ................................................................................................................ 54
Metering mode ................................................................................................ 58
Using the (Drive) button ...............................................................60
How to use the (Drive) button ............................................................. 60
Shooting continuously ..................................................................................... 61
Using the self-timer ......................................................................................... 62
Shooting three images with the exposure shifted – Exposure Bracket ........... 62
White balance bracket shooting...................................................................... 64
9
Page 10
Adjusting the exposure......................................................................65
Locking the exposure (AE lock)......................................................... 67
Slow Sync (Shooting the dark background with flash).......................69
Depth-of-field preview ............................................................................. 70
Focusing manually ..................................................................................71
Using the viewing functions
Switching the playback screen................................................................72
Displaying the histogram......................................................................... 74
Rotating an image...................................................................................76
Enlarging images ....................................................................................77
Viewing images on a TV screen ............................................................. 78
Using the menu
Using menu items ................................................................................... 80
Menu list..................................................................................................82
Recording menu 1 ............................................................................. 83
Image size
Quality
Inst.Playback
Noise reductn
Eye-Start AF
Recording menu 2 ............................................................................. 86
Red eye
Flash control
Flash default
Bracket order
Reset
Playback menu 1 ............................................................................... 88
Delete
Format
Protect
Index format
Playback menu 2 ............................................................................... 91
Slide show
DPOF set
10
Page 11

Custom menu 1..................................................................................93
Priority setup
FocusHoldButt.
AEL button
Ctrl dial set
Exp. comp. set
AF illuminator
Custom menu 2..................................................................................96
Shutter lock
Shutter lock
AF area setup
Monitor Disp.
Rec. display
Play. display
Setup menu 1 .....................................................................................98
LCDbrightness
Transfer mode
Video output
Audio signals
Language
Date/Time set
Setup menu 2 ...................................................................................100
File # memory
Folder name
Select folder
Setup menu 3 ...................................................................................102
LCD backlight
Power save
MenuSec.Memory
Delete conf.
Clean CCD
Reset default
Using your computer
Enjoying your Windows computer .........................................................105
Copying images to your computer.........................................................107
Viewing image files stored on a computer with your camera ................113
Installing the software (supplied)...........................................................114
Using the software (supplied)................................................................115
Using your Macintosh computer ............................................................120
11
Page 12

Printing images
How to print images ..............................................................................122
Printing images directly using a PictBridge compliant printer ............... 123
Troubleshooting
Troubleshooting.....................................................................................127
Warning messages ............................................................................... 137
Others
On the “Memory Stick” ..........................................................................139
On the CF card/Microdrive.................................................................... 141
On the battery pack .............................................................................. 142
On the battery charger.......................................................................... 143
Optional accessories ............................................................................ 144
Precautions...........................................................................................147
Specifications........................................................................................ 149
Reset default......................................................................................... 151
Index 155
12
Page 13
Basic techniques for better images
Focus Exposure Color Quality
This section describes the basics so you can
enjoy your camera. It tells you how to use
various camera functions such as the mode
dial (page 31), the function dial (page 42), the
menus (page 80), and so on.
Focus
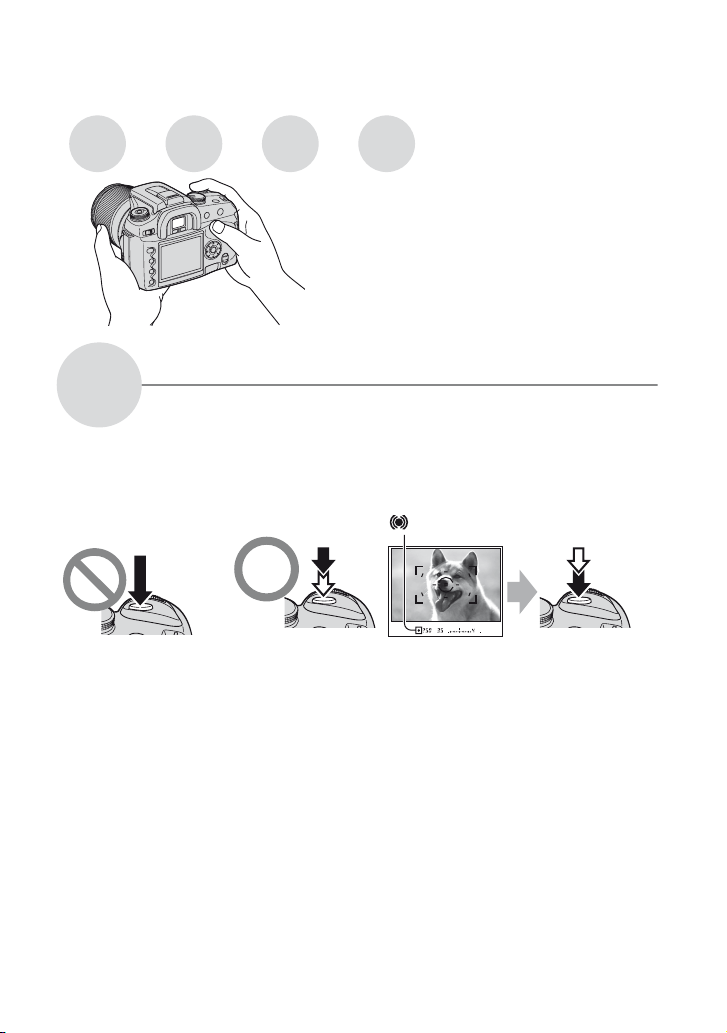
Focusing on a subject successfully
When you look into the viewfinder, or you press the shutter button halfway down, the camera
adjusts the focus automatically (Auto Focus). Make it a habit to press the shutter button only
halfway down to confirm that the subject is visually in focus.
Press the shutter
button fully down
straight away.
If the image looks blurred even after focusing, it may be because of camera shake.
Press the shutter
button halfway
down.
AE/AF lock
, z
Then press the
shutter button
fully down.
t See
“Hints for preventing blur” (as follows).
13
Page 14
Hints for preventing blur
Hold the camera steady, keeping your arms at your side and support the lens with the
palm of your left hand. Step out with one foot to stabilize your upper body, leaning
against a wall or putting your elbow on a table will also provide support. Using a tripod,
or using the Super SteadyShot function is also recommended.
In a dark location, using the flash allows you to take a bright picture even of a subject in
dim light and it also helps to prevent camera shake.
If you want to make the most of the ambient light, or if the subject is out of flash range,
you can increase the shutter speed to reduce the camera shake without firing the flash by
increasing the ISO. (However, this tends to make the image grainy or subject to noise.)
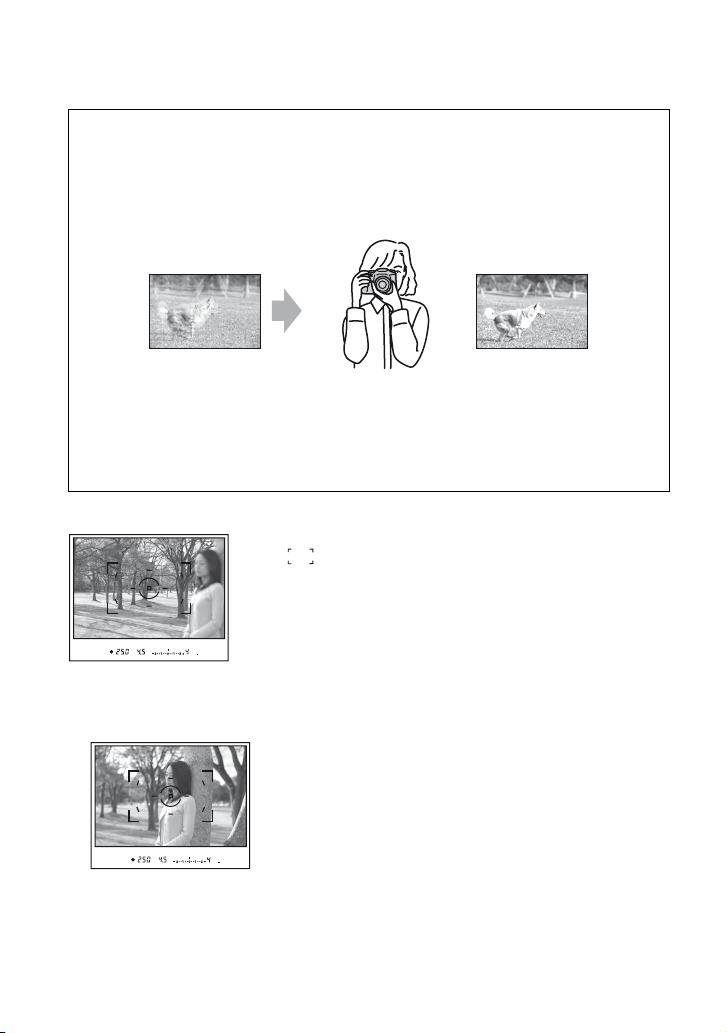
When the subject is outside the focus frame (Focus-lock)
Normally, in auto focus mode, place the subject within the focus
frame and take the picture. If the subject is off-center and
outside the focus frame, the background within the focus frame
will be in focus and the subject will be out of focus. To prevent
this, use the focus-lock function by following the steps below.
• The focus-lock function is also effective when shooting subjects with which autofocus is less effective
(page 15).
1 Place the subject within the focus frame and press the shutter button halfway down.
• The z indicator lights up in the viewfinder. A local focus frame is illuminated briefly to indicate the
point of focus.
14
Page 15
2 Keep the shutter button halfway down, and put the subject back in the original position to re-
compose the shot.
3 Press the shutter button fully down to take the picture.
• The focus-lock function will lock the exposure as well (when multi segment metering is selected
(page 58)).
• Releasing the shutter button after shooting will disengage the focus-lock. If you keep the shutter button
halfway down after shooting, you can continue shooting with the same focal point.
• If the z indicator does not light up in the viewfinder (the subject is in motion), you cannot use the focuslock function by pressing the shutter button halfway down. (See pages 53 and 71.)
Subjects that may require special focusing:
Using the auto focus, it is hard to focus on the following subjects. In such cases, use the focus lock shooting
feature or manual focus (page 71).
– A subject that is low in contrast, such as blue sky or a white wall.
– Two subjects at different distances overlapping in the focus frame.
– A subject that is composed of repeating patterns, such as the facade of a building.
– A subject that is very bright or glittering, such as the sun, the body of an automobile, or the surface of
water.
To measure the exact distance to the subject
The horizontal line in the illustration shows the location of the CCD* plane.
When you measure the exact distance between the camera and the subject,
refer to the position of the horizontal line.
* The CCD is the part of the camera that acts as the film.
15
Page 16
Exposure
You can create various images by adjusting the shutter speed and aperture. Exposure is the
amount of light that the camera will receive when you release the shutter.
Adjusting the light intensity
Shutter speed = Length of time the camera
Exposure:
Aperture = Size of the opening allowing light to pass
receives light
through
Overexposure
= too much light
Whitish image
Correct exposure
Underexposure
= too little light
Darker image
Image sensor =
The exposure is automatically set to the
proper value in the auto adjustment mode.
However, you can adjust it manually using
the functions below.
Manual exposure:
Allows you to adjust the shutter speed and
aperture value manually. t page 37
Metering Mode:
Allows you to change the part of the
subject to be measured to determine the
exposure. t page 58
Exposure compensation:
Allows you to adjust the exposure that has
been determined by the camera.
t page 65
Part that records the image
16
Page 17
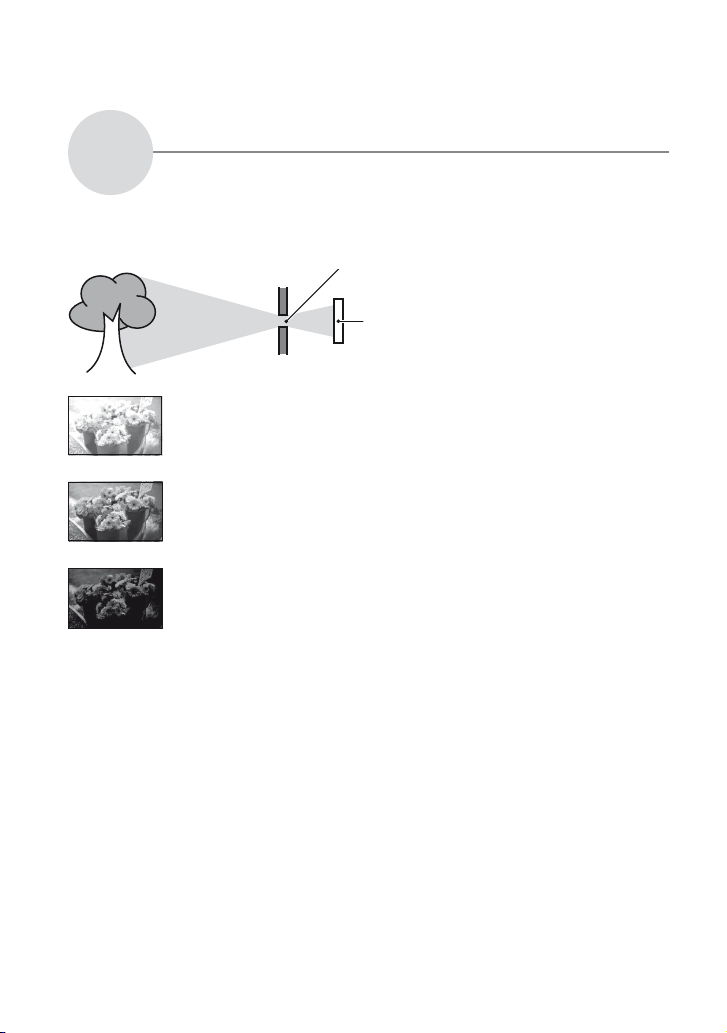
Color
The apparent color of the subject is affected by the lighting conditions.
On the effects of lighting
Example: The color of an image affected by light sources
Weather/lighting
Characteristics of
light
The color tones are adjusted automatically in the auto white balance mode.
However, you can adjust color tones manually with the white balance mode (page 46).
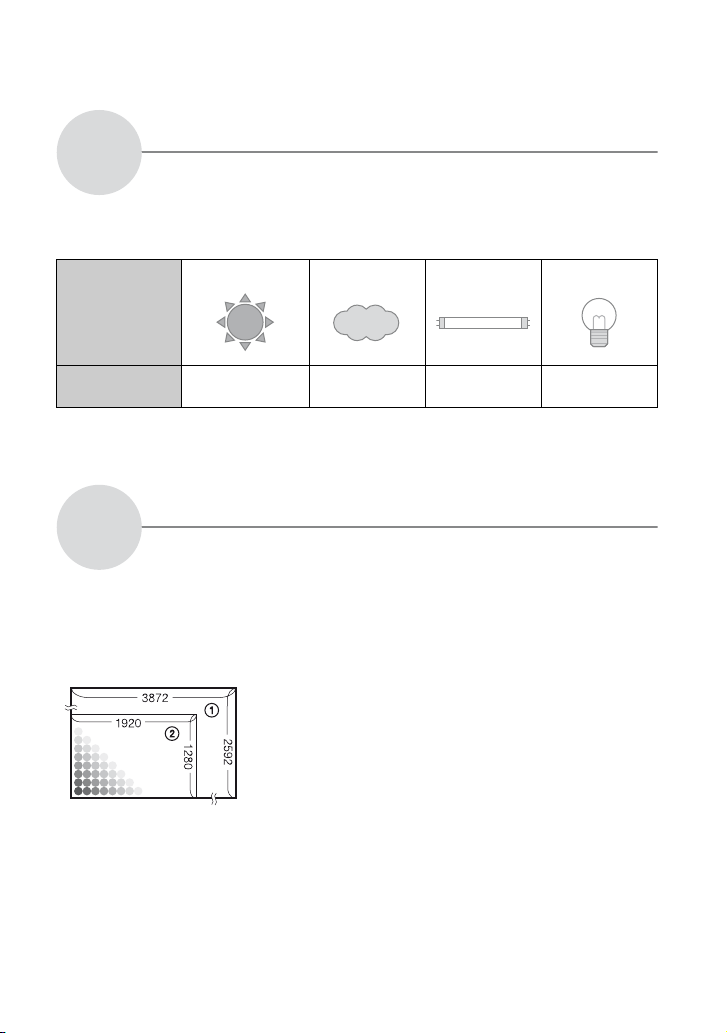
Quality
A digital image is made up of a collection of small dots called pixels.
If it contains a large number of pixels, the picture becomes large, it takes up more memory,
and the image is displayed in fine detail. “Image size” is shown by the number of pixels.
Although you cannot see the differences on the screen of the camera, the fine detail and data
processing time differ when the image is printed or displayed on a computer screen.
Description of the pixels and the image size
On “image quality” and “image size”
Pixels
Daylight Cloudy Fluorescent Incandescent
White (standard) Bluish Blue-tinged Reddish
1 Image size: L:10M
3,872 pixels × 2,592 pixels = 10,036,224 pixels
2 Image size: S:2.5M
1,920 pixels × 1,280 pixels = 2,457,600 pixels
17
Page 18
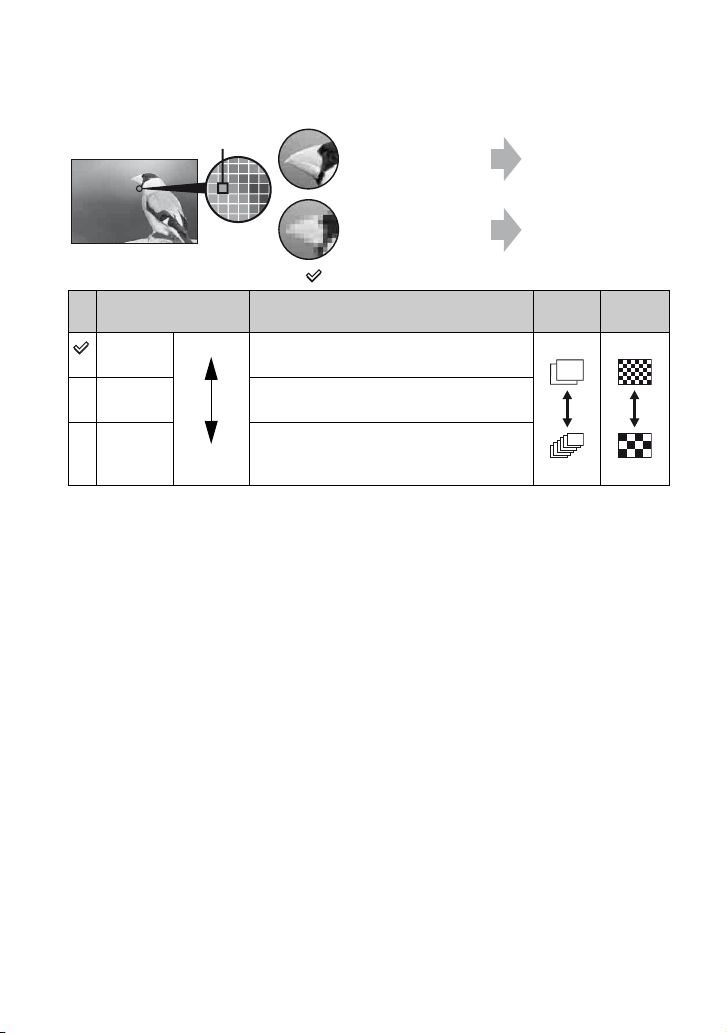
Selecting the image size for use
Pixel
Many pixels (Fine
image quality and
large file size)
Example: Printing in
up to A3/A3+** size
Few pixels (Rough
image quality but
small file size)
Example: For creating
web pages
The default settings are marked with .
Image size* Usage guidelines No. of
L:10M Larger
M:5.6M For printing in A4 size or high density
S:2.5M For recording a large number of images
Smaller
* The images recorded using the camera are the same 3:2 ratio as used photograph printing paper or
postcards, etc.
** This is a size larger than A3 size. You can print images with a margin around the A3 size image.
For storing important images or printing A3/
A3+** size or fine A4 size images.
images in A5 size
For creating web pages
images
Less
More
Printing
Fine
Rough
Selecting the image quality (compression ratio) in combination (page 83)
You can select the compression ratio when digital images are saved. When you select a high
compression ratio, the image lacks the fineness of detail, but has a smaller file size.
18
Page 19
Before your operation
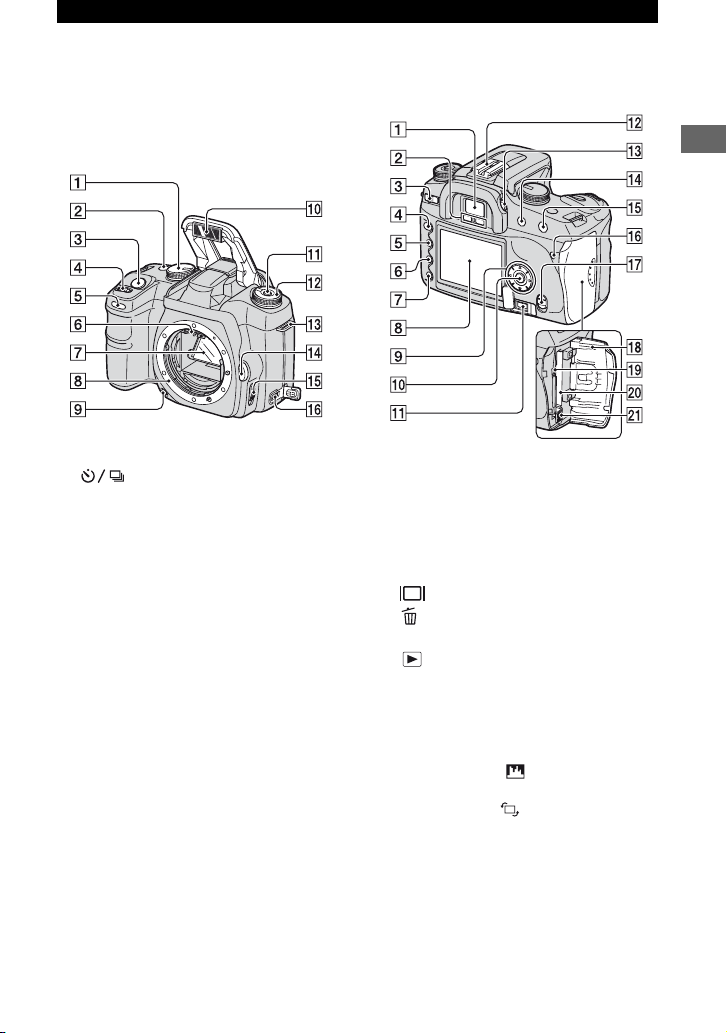
Identifying parts
* Do not directly touch these parts.
See the pages in parentheses for details of
operation.
Before your operation
A Mode dial (31)
B (Drive) button (60)
C Shutter button (
t step 5 in “Read This
First”)
D Control dial (33, 94)
E Self-timer lamp (62)
F Lens contacts*
G Mirror*
H Lens mount
I Depth-of-field preview button (70)
J Built-in flash* (
t step 5 in “Read This
First”)
K Fn (Function) button (43)
L Function dial (42)
M Hook for shoulder strap (21)
N Lens release button (
t step 2 in “Read
This First”)
O Focus mode switch (71)
P DC-IN terminal (144)
A Viewf in der (
t step 5 in “Read This
First”)
B Eyepiece sensors (97)
C POWER switch (
t step 3 in “Read This
First”)
D MENU button (80)
E (Display) button (26, 72)
F (Delete) button (
t step 6 in “Read
This First”)
G (Playback) button (
t step 6 in
“Read This First”)
H LCD monitor (22, 26)
I Controller (v/V/b/B) (
t step 3 in
“Read This First”)
For viewing: v: (Histogram) button
(74)
V: (Rotate) button (76)
J Center button (
t step 3 in “Read This
First”)/Spot-AF button (51)
K REMOTE (Remote-control) jack (144)
L Accessory shoe (145)
M Diopter-adjustment dial (
t step 5 in
“Read This First”)
19
Page 20

N For shooting: +/– (Exposure) button (37,
65)
For viewing: (Reduce) button (72,
77)
O For shooting: AEL (AE lock) button
(39, 67)
For viewing: (Enlarge) button (77)
P Access lamp (
t step 4 in “Read This
First ”)
Q (Super SteadyShot) switch (
t
step 5 in “Read This First”)
R CF card cover (
t step 4 in “Read This
First ”)
S VIDEO/USB jack (78, 108)
T CF card insertion slot (
t step 4 in
“Read This First”)
U CF card eject lever (
t step 4 in “Read
This First”)
A Tripod receptacle
• Use a tripod with a screw length of less than
5.5 mm (7/32 inch). You will be unable to
firmly secure the camera to tripods having
screws longer than 5.5 mm (7/32 inch), and
may damage the camera.
B Battery cover open lever (t step 1 in
“Read This First”)
C Lock lever (
t step 1 in “Read This
First”)
D Battery insertion slot (
t step 1 in
“Read This First”)
E Battery cover (
t step 1 in “Read This
First”)
20
Page 21
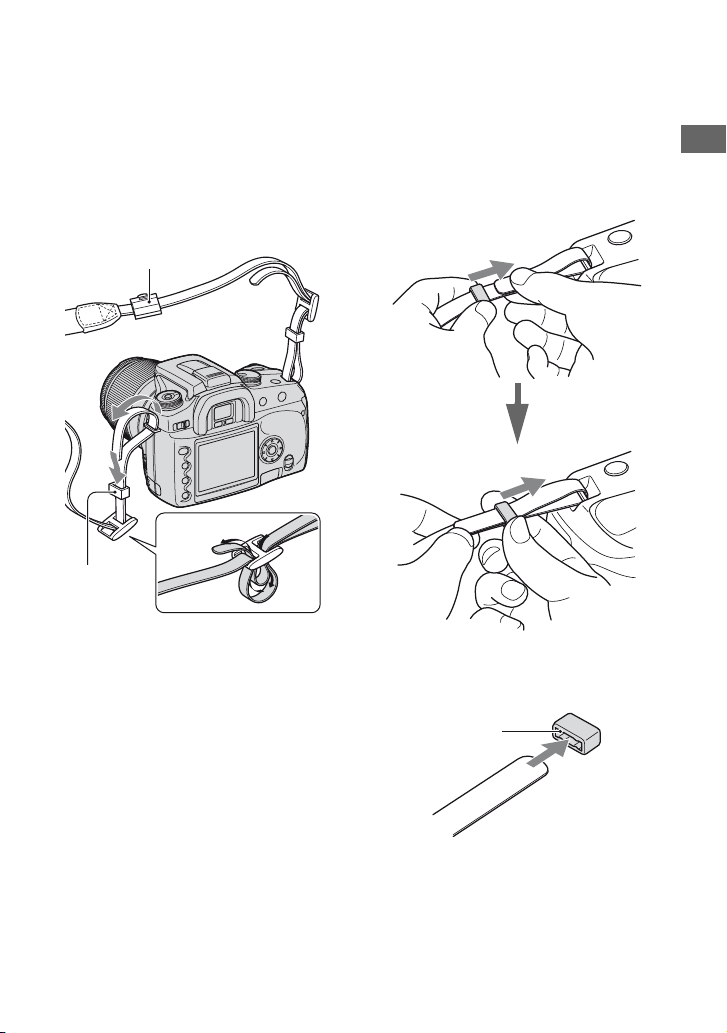
Attaching the shoulder strap
This camera has two hooks to attach the
shoulder strap. Attach the end of the strap
with the remote commander clip on the grip
side of the camera. Attach the other end of
the strap on the other side of the camera.
Remote commander clip
Holder Ring
When threading the strap through the
holder ring, hold the tip of the strap with
your finger, as shown below, and slide the
holder ring rather than the tip of the strap
into position to secure the strap.
If the holder ring comes off the strap, put it
back on the strap from the notched side.
Before your operation
Notched side
21
Page 22
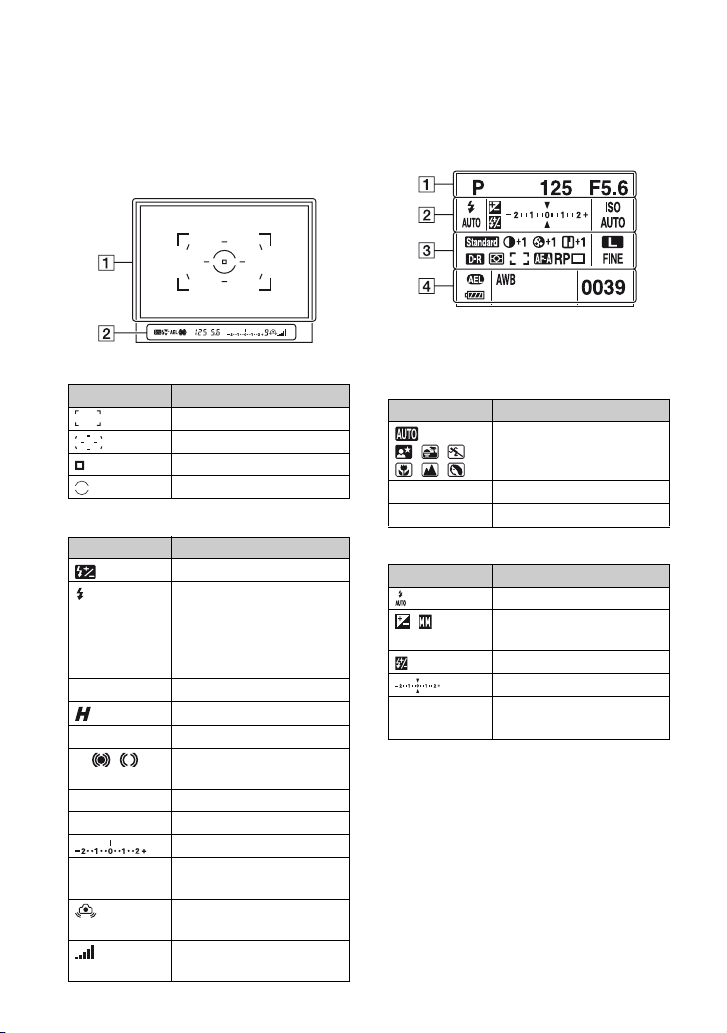
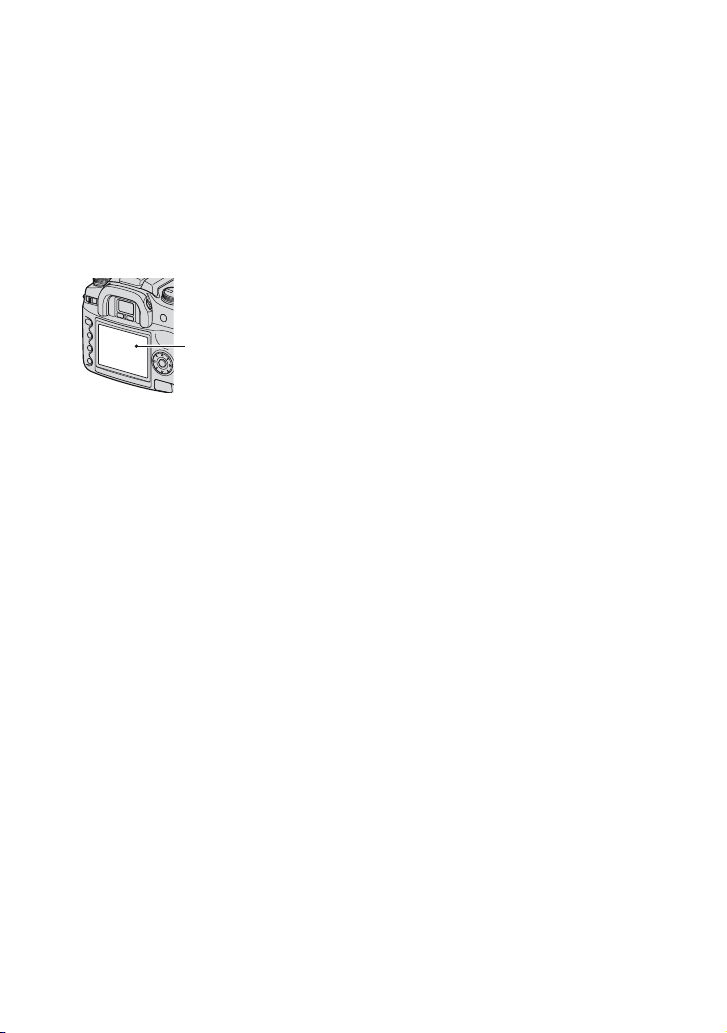
Indicators on the monitor
See the pages in parentheses for details of
operation.
Viewfinder
A
Display Indication
Wide focus frames (51)
Local focus frames (51)
Spot AF frames (51)
Spot-metering area (51)
B
Display Indication
Flash-compensation (57)
Flashing: The flash is being
charged
Lit: The flash has been
t step 5 in “Read
charged (
This First”)
WL Wireless flash (54)
High-speed sync (145)
AEL AE lock (67)
z Focus (
125 Shutter speed (36)
5.6 Aperture (34)
9 Frames-remaining counter
t step 5 in “Read
This First”)
Ev scale (38, 63, 68)
(61)
Camera-shake warning (
step 5 in “Read This First”)
Super SteadyShot scale (
step 5 in “Read This First”)
22
t
t
LCD monitor (Recording information
display)
• The illustration above is for the full display in
the horizontal position (page 26).
A
Display Indication
P A S M
125 Shutter speed (36)
F5.6 Aperture (34)
B
Display Indication
Exposure-compensation
ISO AUTO
ZONE
Mode dial (31)
Flash mode (54)
(65)/Metered Manual (38)
Flash-compensation (57)
Ev scale (38, 63, 68)
ISO sensitivity (44)/Zone
Matching (45)
Page 23
C
Display Indication
+1 Contrast (50)
+1 Saturation (50)
+1 Sharpness (50)
D-range optimizer (49)
Metering (58)
AF area (51)
AF mode (53)
RP Release priority (93)
Image size (83)
FINE STD
RAW RAW+
Color mode (49)
Drive mode (60)
Image quality (83)
D
Display Indication
AE lock (67)
Battery remaining (
1 in “Read This First”)
AWB +1
5500K M1
0039 Remaining number of
White balance (Auto,
Preset, Color temperature,
CC filter, Custom) (46)
recordable images (27)
t step
Operation guide
The next operation may be indicated on the
lower portion of the LCD monitor.
Display Indication
Controller bB
Controller vV
Controller vVbB
z Center of the controller
Control dial
Returns with MENU
Returns with (77)
Switches folder frame and
image frame in file browser
(72)
Before your operation
23
Page 24
LCD monitor (single-image playback) LCD monitor (Histogram display)
Display Indication
L:10M
Image size (83)
M:5.6M
S:2.5M
FINE STD
Image quality (83)
RAW RAW+
Battery remaining (
1 in “Read This First”)
10:30
Date of recording
2006.01.01
Protect (89)
3 DPOF set (91)
100-0003 Folder - file number (112)
[0003/0007] Frame number/total numbe r
of images
24
t step
Display Indication
Playback image (74)
Histogram (74)
L:10M
Image size (83)
M:5.6M
S:2.5M
D-range optimizer (49)
FINE STD
Image quality (83)
RAW RAW+
35mm Focal length (8)
1/125 Shutter speed (36)
–0.3 Ev scale (65)
F3.5 Aperture (34)
Flash-compensation (57)
P A S M
Mode dial (31)
Metering mode (58)
AWB +1
5500K M1
White balance (Auto,
Preset, Color temperature,
CC filter, Custom) (46)
ISO100 ISO sensitivity (ISO) (44)
Super SteadyShot (
t step
5 in “Read This First”)
100MSDCF-
Folder - file number (112)
0002
Battery remaining (
t step
1 in “Read This First”)
2006.01.01 Date of recording
Protect (89)
Page 25

Display Indication
3 DPOF set (91)
[0002/0009] File number/total number
of images
Before your operation
25
Page 26
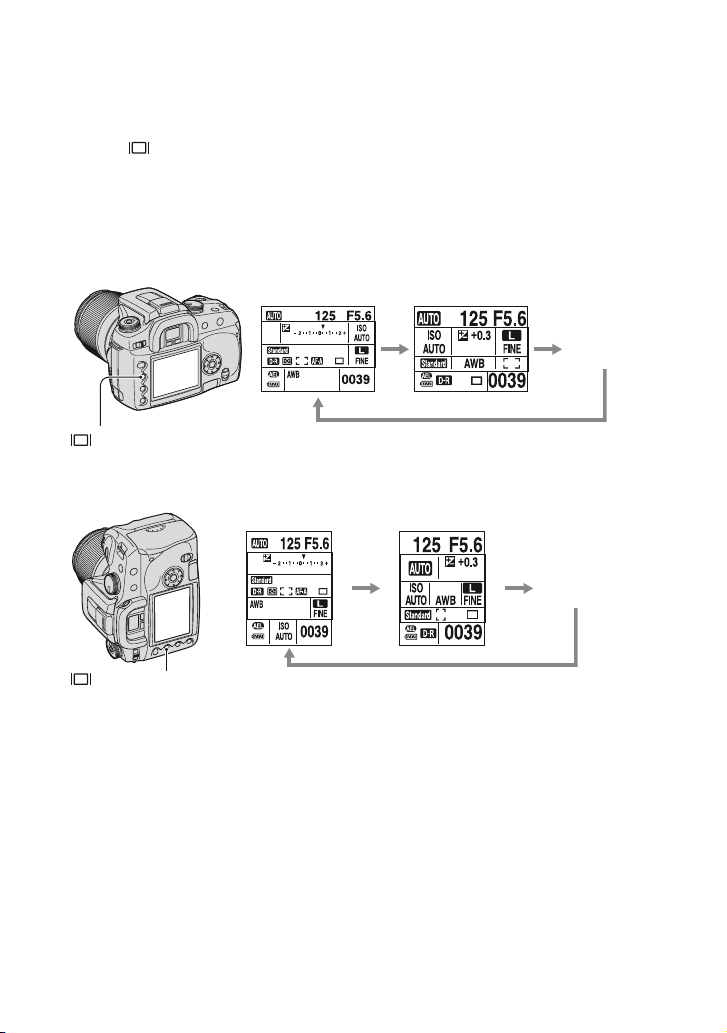
Switching the recording information display
When recording, the LCD monitor on the back of the camera displays various recording
information.
Press the (Display) button to switch between the detailed display and the enlarged display
that has less information in larger letters. You can choose to turn off the display to minimize
battery consumption.
When you rotate the camera to a vertical position, the display automatically rotates to adjust to
the camera position.
Horizontal position
Detailed display
(Display) button
Enlarged display
No display
Vertical position
Detailed display
(Display) button
• The instructions in this operating instructions are based on the detailed display in the horizontal position.
(The upper-left illustration.)
• You can choose to keep the display from rotating in the vertical position (page 97).
• For the screen displayed in playback mode, see page 72.
Enlarged display
No display
26
Page 27
Number of images
The tables show the approximate number of images that can be recorded on a recording
medium formatted with this camera. The values may vary depending on the shooting
conditions.
The number of images
“Memory Stick Duo”
Image size: L:10M (Units: Images)
Capacity
Size
Standard 22 46 85 174 358 735
Fine 14 29 54 112 229 471
RAW & JPEG 2 5 10 23 48 100
RAW
Image size: M:5.6M (Units: Images)
Capacity
Size
Standard 39 80 145 296 606 1245
Fine 25 52 95 194 397 815
Image size: S:2.5M (Units: Images)
Capacity
Size
Standard 78 158 287 586 1196 2454
Fine 53 108 197 402 822 1687
64MB 128MB 256MB 512MB 1GB 2GB
3 7 14 30 62 128
64MB 128MB 256MB 512MB 1GB 2GB
64MB 128MB 256MB 512MB 1GB 2GB
Before your operation
27
Page 28
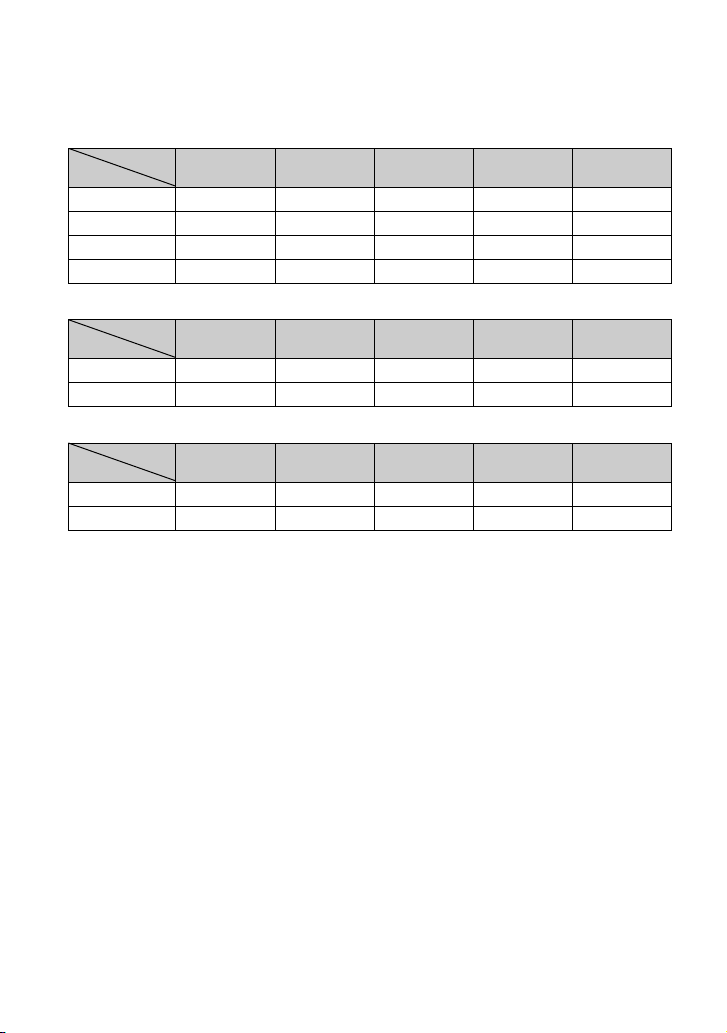
CF card
Image size: L:10M
Capacity
Size
Standard 93 188 377 755 1508
Fine 59 120 242 485 968
RAW & JPEG 12 25 51 103 207
RAW
256MB 512MB 1GB 2GB 4GB
15 32 65 132 265
(Units: Images)
Image size: M:5.6M (Units: Images)
Capacity
Size
Standard 159 319 640 1279 2553
Fine 104 208 419 838 1673
256MB 512MB 1GB 2GB 4GB
Image size: S:2.5M (Units: Images)
Capacity
Size
Standard 315 630 1262 2523 5034
Fine 216 433 867 1734 3460
256MB 512MB 1GB 2GB 4GB
28
Page 29

The number of images that can be recorded when using the battery pack
The table shows the approximate number of
images that can be recorded when you use
the camera with the battery pack (supplied)
at full capacity and at an ambient
temperature of 25°C (77°F). The numbers
of images that can be recorded take into
account changing the recording medium as
necessary.
Note that the actual numbers may be less
than those indicated depending on the
conditions of use.
Recording medium No. of images
“Memory Stick Duo” Approx. 750
CF card Approx. 750
• Shooting in the following situations:
– [Quality] is set to [Fine].
– [AF mode] is set to [Automatic AF].
– Shooting once every 30 seconds.
– The flash strobes once every two times.
– The power turns on and off once every ten
times.
• The measurement method is based on the CIPA
standard.
(CIPA: Camera & Imaging Products
Association)
• The number of shooting images does not
change, regardless of image size.
• The battery capacity decreases as the number of
uses increases and also over time (page 142).
• The number of images that can be recorded is
decreased under the following conditions:
– The surrounding temperature is low.
– The flash is used frequently.
– The camera has been turned on and off many
times.
– [AF mode] is set to [Continuous AF].
– The battery power is low.
• When using a Microdrive, the number of images
recordable may differ.
Before your operation
29
Page 30
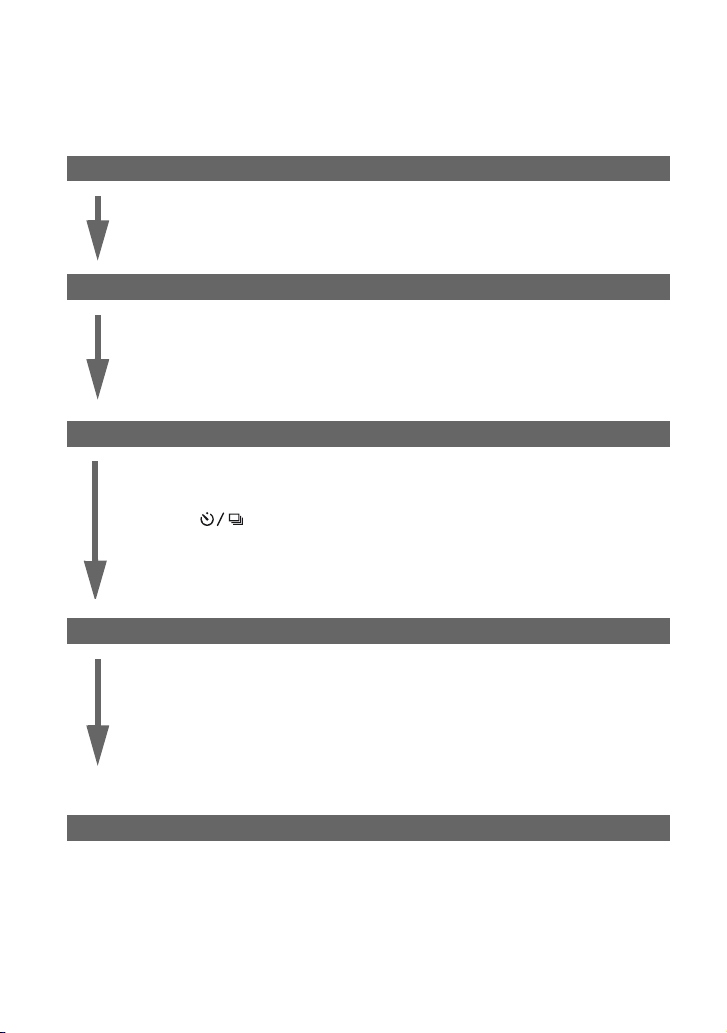
Operation workflow
The chart below shows the workflow for the following operations - preparation, shooting, and
playback. Perform the following confirmation and setup process, if necessary.
Preparation
• Prepare the battery pack (t step 1 in “Read This First”)
• Attaching a lens (t step 2 in “Read This First”)
• Set the clock (t step 3 in “Read This First”, page 99)
• Insert a recording medium (t step 4 in “Read This First”)
Confirmation before shooting
• Check the recording mode (page 31)
• Adjusting the diopter (t step 5 in “Read This First”)
• Switching the recording information display (page 26)
• Selecting the image size (page 83)
• Using the flash (t step 5 in “Read This First”)
Setup for shooting
• Using the function dial (page 42)
(ISO/Zone Matching, White Balance, D-Range Optimizer, Color Mode, Metering
mode, Focus mode, Flash)
• Using the (Drive) button (page 60)
(Single frame advance, continuous advance, self-timer, bracket, white balance bracket)
• Adjusting the exposure (page 65)
• Locking the exposure (page 67)
• Focusing manually (page 71)
Shooting
• Holding the camera (t step 5 in “Read This First”, page 14)
• Look into the viewfinder (t step 5 in “Read This First”)
• When using a zoom lens, turn the zoom ring (t step 5 in “Read This First”)
• Check the focus (t step 5 in “Read This First”)
• Check the approximate sharpness of the subject image (page 70)
• Check that the flash has been charged before you use it (t step 5 in “Read This
First”)
• Press the shutter button to take a picture (t step 5 in “Read This First”)
Confirmation of image shot
• Viewing images (t step 6 in “Read This First”)
• Deleting images (t step 6 in “Read This First”)
• Switching the playback screen (page 72)
• Displaying the histogram (page 74)
• Rotating an image (page 76)
• Enlarging images (page 77)
• Viewing images on a TV screen (page 78)
30
Page 31

Using the shooting functions
Using the mode dial
Set the mode dial to the desired function.
Recording modes
:
Auto adjustment mode
Allows easy shooting with the settings adjusted automatically, depending entirely
on the camera.
: Scene Selection mode
Allows you to shoot with preset settings according to the scene (page 32).
P: Program auto mode
Allows you to shoot with the exposure adjusted automatically (both the shutter
speed and the aperture value). The other settings can be adjusted, and your setting
values can be saved (page 33).
t step 5 in “Read This First”
Mode dial
Using the shooting functions
A: Aperture priority mode
Allows you to shoot after adjusting the aperture value manually (page 34).
S: Shutter speed priority mode
Allows you to shoot after adjusting the shutter speed manually (page 36).
M: Manual exposure mode
Allows you to shoot after adjusting the exposure manually (both the shutter speed
and the aperture value) (page 37).
In this Operating Instructions, the available mode dial setting is shown as follows.
Unavailable Available
31
Page 32

Scene Selection
P A S M
You can shoot with the following preset settings according to the scene.
• You can change any of the settings except [Color/DEC] (page 49).
Portrait
Shoots with backgrounds blur away, and the subject is sharpened.
• To blur the background more, using the telephoto position of the lens is more
effective.
• It is recommended that you use the flash when the subject is backlit. Also, when
you do not use the flash, it is recommended that you use the lens hood to prevent
unnecessary light from seeping into the lens.
Landscape
Shoots scenery with vivid and sharp colors.
• It is recommended that you push down the flash not to fire the flash.
• The shutter speed becomes slower when the subject is dark. If appears in
the viewfinder, be careful about camera shake or use a tripod. The Super
SteadyShot function is also effective.
Macro
Shoots close subjects such as flowers, insects.
You can achieve clear and sharp focus.
• When shooting with the built-in flash within the range of 1 m (39 3/8 inches),
shadows may appear on the lower part of the image. Do not use with the built-in
flash.
Sports action
Shoots moving subjects outdoors or in bright places.
• The AF mode is set to (Continuous AF) (page 53). The camera continues to
focus while the shutter button is pressed and held halfway down.
• The drive mode is set to Continuous (page 61). The camera shoots the image
continuously while the shutter button is pressed.
• Do not use the flash if the subject is out of the flash range (Push the built-in flash
back down). Flash range
t step 5 in “Read This First”
Sunset
Shoots the red of the sunset beautifully.
32
Page 33

Night view/portrait
• The shutter speed is slower, so using a tripod is recommended. The Super SteadyShot function is also
effective. (
t step 5 in “Read This First”)
Night portrait
Shoots portraits in dark places.
Pull up the flash to use it.
• The shutter speed is up to 2 seconds.
• Take care that the subject does not move to prevent the image from blurring.
Night view
Shoots night scenes at a distance without losing the dark atmosphere of
the surroundings.
Do not use the flash (Push the flash back down).
• The picture may not be taken properly when shooting a wholly dark night scene.
Using the shooting functions
Shooting with Program auto
P A S M
In program auto mode, the camera automatically adjusts the shutter speed and the aperture
according to the brightness of the subject just as in the auto adjustment mode (mode dial:
AUT O).
Program Shift
You can temporarily change the aperture value and shutter speed combination that was
adjusted by the camera.
There are two methods for the program shift function.
shift: You can choose the desired shutter speed. The aperture value is adjusted
P
S
automatically. This setting is the default setting.
shift: You can choose the desired aperture value. The shutter speed is adjusted
P
A
automatically.
• You can switch the PS shift and the PA shift with [Ctrl dial set] in the Custom menu (page 94).
Mode dial
Shutter button
Control dial
1 Set the mode dial to P.
2 Look into the viewfinder or press the shutter button halfway down until the shutter speed and
aperture value are displayed on the LCD monitor.
33
Page 34

3 Select the aperture value or the shutter speed using the control dial when the shutter speed and
the aperture value are displayed.
PS shift (The default setting) PA shift
• When the shutter speed and the aperture value are displayed, you no longer have to keep pressing the
shutter button.
• When the shutter speed and the aperture value disappear seconds later, the adjusted values also disappear.
• When the flash is pulled up, you cannot select the program shift (even if you turn the control dial, the
program shift is not turned on). When the program shift is turned on, pulling up the flash cancels the
program shift.
Shooting with aperture priority mode
P A S M
You can adjust the amount of light that passes through the lens. If you open the aperture (a
smaller F-number), the amount of light allowed into the lens increases and the in-focus range
becomes narrower. Only the main subject is then in focus. When the aperture is closed (a
larger F-number), the amount of light decreases and the in-focus range becomes wider. The
whole image is sharpened.
The shutter speed is automatically adjusted to obtain correct exposure according to the
brightness of the subject.
Open the aperture
Mode dial
Control dial
Close the aperture
34
Page 35

1 Set the mode dial to A.
2 Select an aperture value using the control dial.
• The aperture range depends on the lens.
• The aperture value is adjusted in 1/3 Ev increments.
• Before shooting, you can do a quick check on the image blur with the depth-of-field preview function
(page 70).
• If the proper exposure is not obtained after making the settings, the shutter speed on the LCD monitor and
in the viewfinder flashes when the shutter button is pressed halfway down. You can shoot at this point, but
adjusting again is recommended.
• When the flash is pulled up, the flash fires regardless of the amount of ambient light (page 54).
• When using the flash, if you close the aperture (a larger F-number), the flash light does not reach a distant
subject. Opening the aperture (a smaller F-number) is recommended.
• If you close the aperture (a larger F-number), the amount of light passing through the lens is decreased
and the shutter speed becomes slower. Using a tripod is recommended.
z Shooting techniques
The depth of field is the in-focus range. Opening the aperture makes the depth of field shallower (the infocus range becomes narrower) and closing the aperture makes the depth of field wider (the in-focus
range becomes wider).
Open the aperture
The subject is sharpened with
its background blurred.
Close the aperture
Over a wide range, both
nearby and faraway subjects
are brought into focus.
Adjust the aperture to suit your purpose, either to sharpen the specific area of image, or to focus on the
entire image.
Using the shooting functions
35
Page 36

Shooting with shutter speed priority
P A S M
mode
You can adjust the shutter speed manually. If you shoot a moving subject at a higher shutter
speed, it appears as if frozen on the image. At a lower shutter speed, the subject appears as if it
flowing.
Aperture value is automatically adjusted to attain correct exposure according to the brightness
of the subject.
High shutter speed
1 Set the mode dial to S.
2 Select a shutter speed using the control dial.
• You can adjust the shutter speed between 30 and 1/4000 second. You can adjust it between 30 and 1/
125 second (with the Super SteadyShot function activated) or 30 and 1/160 second (with the Super
SteadyShot function deactivated) when using the flash.
• The shutter speed is adjusted in 1/3 Ev increments.
• If the proper exposure is not obtained after making the settings, the aperture value on the LCD monitor
and in the viewfinder flashes when the shutter button is pressed halfway down. You can shoot at this point,
but adjusting again is recommended.
• When the flash is pulled up, the flash fires regardless of the amount of ambient light (page 54).
• When using the flash, if you close the aperture (a larger F-number) by making the shutter speed slower,
the flash light does not reach a distant subject. If you want to use the slower shutter speed, the Slow Sync
shooting is recommended (page 69).
• When the shutter speed is one second or more, the noise reduction will be done after shooting (page 85).
• The (Camera-shake warning) indicator does not appear in the shutter speed priority mode.
Slow shutter speed
Mode dial
Control dial
36
Page 37

z Shooting techniques
When shooting a moving person, car, or spindrift, etc., using the high shutter speed,
you can express moment that is beyond what the human eye can see.
When shooting a subject such as the flow of a river at a slower shutter speed, you can
create an image that captures the subject’s flowing movement. In such cases, use of a
tripod is recommended to prevent camera shake.
Shooting with manual exposure mode
P A S M
Manual exposure
You can manually adjust the shutter speed and aperture values.
This mode is useful when you maintain the setting of the shutter speed and the aperture value
or when you use an exposure meter.
Mode dial
Control dial
+/– (Exposure) button
1 Set the mode dial to M.
2 Select a shutter speed using the control dial.
Using the shooting functions
• “BULB” (Bulb shooting) is indicated next to “30” (page 40).
3 Press and hold the +/– (Exposure) button and turn the control dial to select the aperture.
37
Page 38

• In the manual exposure mode, even when [ISO] (page 44) is set to [AUTO], it is fixed to ISO 100.
• You can assign the function of the control dial with [Ctrl dial set] in the Custom menu (page 94).
• The (Camera-shake warning) indicator does not appear in the manual exposure mode.
• When the flash is pulled up, the flash fires regardless of the amount of ambient light (page 54).
z Ev scale
The Ev scale on the LCD monitor and in the viewfinder indicates the difference between the standard
exposure (0.0Ev) determined by the camera meter and the set exposure determined by the shutter speed, and
the aperture specified by the photographer. (Metered Manual)
Standard exposure 1.0Ev over exposure 2.0Ev or more over
exposure
The set exposure specified by
the photographer is the same
as the exposure determined by
the meter.
: stands for Metered Manual.
38
The set exposure specified by
the photographer is 1.0Ev
more (+) than the standard
exposure determined by the
meter.
The b B arrow appears at the
end of the scale if the set
exposure is over 2.0Ev more
(+) or less (-) than the standard
exposure. The arrow starts
flashing if the difference
becomes greater.
Page 39

z How to use the AEL button in manual mode
While you press and hold the AEL (AE Lock) button, the exposure determined by the meter is locked as the
standard exposure (0.0Ev). Changing the composition on the LCD monitor and in the viewfinder while
holding the AEL button causes the exposure within the spot metering circle to continually shift to match the
movements and the display indicates the difference between the standard exposure determined by the meter
and the exposure within the spot metering circle.
The following illustrations show a case where the set exposure specified by the photographer is 1.0Ev more
than the locked standard exposure determined by the meter. When the composition is changed in the
viewfinder, the exposure within the spot metering circle is 0.7Ev more than the set exposure, thereby
making it 1.7Ev more than the standard exposure determined by the meter.
The exposure specified
by the photographer
The exposure within the
spot metering circle
when you recompose
your shot.
Spot metering circle
Manual shift
You can change the shutter speed and aperture value combination without changing the
exposure in manual mode.
Mode dial
Control dial
AEL (AE lock) button
Using the shooting functions
1 Set the mode dial to M.
2 Select a shutter speed and aperture value (page 37).
3 Press and hold the AEL (AE lock) button and turn the control dial to select the desired shutter
speed and aperture value combination.
39
Page 40

BULB (long exposure) shooting
As long as the shutter button is pressed, the shutter remains open. You can shoot trails of light,
such as fireworks. Attach a tripod to the camera when using the bulb shooting function.
Mode dial
Control dial
Shutter button
+/– (Exposure) button
1 Set the mode dial to M.
2 Turn the control dial to the left until [BULB] is indicated.
3 Press and hold the +/– (Exposure) button and turn the control dial to select the aperture.
4 Attach the eyepiece cover (page 41).
5 Press and hold the shutter button for the duration of the shooting.
• You can shoot in bulb exposure mode up to about four hours using a fully charged battery pack.
• After shooting, the noise reduction will be done for the same amount of time that the shutter was open.
When the message “Processing...” appears, you cannot do any further shooting. To cancel this function,
see page 85.
• The Super SteadyShot function is automatically turned off.
• The higher the ISO sensitivity, or the longer the exposure time, the more outstanding the noise on the
monitor.
• To reduce camera-shake, connecting the Remote Commander (not supplied) is recommended (page 144).
40
Page 41

To attach the eyepiece cover
When the shutter is released without the use of the viewfinder, as in bulb exposure or shooting with the
self-timer, attach the eyepiece cover to prevent light from entering through the viewfinder and affecting
the exposure.
1 Carefully slide the eyecup off by pushing on each side of the eyecup.
2 Slide the eyepiece cover over the viewfinder. The cover is normally attached to the shoulder
strap.
• When attaching the eyepiece cover, the eyepiece sensors located below the viewfinder may be activated
depending on the situation, and the focus may be adjusted or the LCD monitor may continue to flash.
Setting [Eye-Start AF] to [Off] prevents this problem (page 85).
Using the shooting functions
41
Page 42

Using the function dial
Set the function dial to the desired function. You can set the focus frame, AF mode, metering
mode, flash compensation, color mode, etc.
Function dial
ISO: Setting ISO/Zone Matching (page 44)
WB: Adjusting the white balance (page 46)
D-R: D-Range Optimizer (page 49)
DEC: Selecting the color/DEC mode (page 49)
: Focus mode (page 51)
: Flash (page 54)
: Metering mode (page 58)
42
Page 43

How to use the function dial
Fn button
Function dial
Controller
Center button/Spot AF
button
1 Set the function dial to the desired position.
2 Press the Fn button so that the function screen appears.
3 Select the desired setting or value with v/V/b/B on the controller.
• You can substitute the control dial for b/B of the controller.
• For details on the setting method, see the corresponding explanation.
4 Press the center button of the controller to complete the operation.
The settings you select are set.
Using the shooting functions
43
Page 44

Setting ISO/Zone Matching
ISO WB D-R DEC
You can adjust the ISO sensitivity and switch the Zone Matching setup.
ISO
ISO is a unit of measurement of sensitivity to light. The larger the number, the higher the
sensitivity.
1 Display the ISO/Zone Matching screen with the function dial and the Fn button (page 43).
2 Select the desired value with v/V/b/B on the controller, then press the center of the controller.
• [Hi200] and [Lo80] options are used for Zone Matching (page 45).
( : The default setting)
AUTO
100
200
Automatically adjusts the ISO sensitivity.
Select a large number when shooting in dark locations or
shooting a subject moving at high speed, or select a small
number to obtain high image quality.
400
800
1600
• When [ISO] is set to [AUTO], the ISO sensitivity is automatically adjusted between ISO 100 and ISO
800, however, if the mode dial is set to M, it is fixed at ISO 100.
• The built-in flash range (the range within which the correct exposure is provided) depends on the aperture
value and ISO sensitivity. Refer to the following table to determine the shooting distance.
Aperture
F2.8 1 – 4.3 m
F4.0 1 – 3 m
F5.6 1 – 2.1 m
100 200 400 / AUTO 800 1600
(39 3/8 – 169
3/8 inches)
(39 3/8 – 118
1/8 inches)
(39 3/8 – 82
3/4 inches)
1 – 6 m
(39 3/8 – 236
1/4 inches)
1 – 4.3 m
(39 3/8 – 169
3/8 inches)
1 – 3 m
(39 3/8 – 118
1/8 inches)
ISO setting
1.4 – 8.6 m (55
1/8 – 338
5/8 inches)
1 – 6 m
(39 3/8 – 236
1/4 inches)
1 – 4.3 m
(39 3/8 – 169
3/8 inches)
2 – 12 m
(78 3/4 – 472
1/2 inches)
1.4 – 8.6 m
(55 1/8 – 338
5/8 inches)
1 – 6 m
(39 3/8 – 236
1/4 inches)
2.8 – 17 m
3/8 inches)
(78 3/4 – 472
1/2 inches)
1.4 – 8.6 m
(55 1/8 – 338
5/8 inches)
44
(110
1/4 – 669
2 – 12 m
Page 45

Zone Matching
You can keep the image from becoming overexposed or underexposed when shooting a highkeyed or low-keyed subject.
This function is also available for a RAW file.
1 Display the ISO/Zone Matching screen with the function dial and the Fn button (page 43).
2 Select [Lo80] or [Hi200] with v/V/b/B on the controller, then press the center of the controller.
• [AUTO], [100], [200], [400], [800] and [1600] options are used for ISO sensitivity (page 44).
Lo80
Hi200
• The ISO sensitivity is set to the equivalent of ISO 80 in [Lo80], and of ISO 200 in [Hi200].
• When zone matching is used, the contrast setting in the color mode is deactivated.
• Refer to the following table to determine the flash range.
Aperture
F2.8 1 – 3.8 m (39 3/8 – 149 5/8 inches) 1 – 6 m (39 3/8 – 236 1/4 inches)
F4.0 1 – 2.7 m (39 3/8 – 106 3/8 inches) 1 – 4.3 m (39 3/8 – 169 3/8 inches)
F5.6 1 – 1.9 m (39 3/8 – 74 7/8 inches) 1 – 3 m (39 3/8 – 118 1/8 inches)
This keeps the image from becoming underexposed. Use in
low-key (predominantly dark) scenes is recommended, as the
image tends to become whitish.
This keeps the image from becoming overexposed. Use in
high-key (predominantly light) scenes is recommended, as
the image tends to have heightened noise level.
Zone Matching
Lo80 Hi200
Using the shooting functions
45
Page 46

Adjusting the white balance
ISO WB D-R DEC
Normally, the camera automatically adjusts the color tones. However, you can also adjust
them according to the lighting conditions.
1 Display the White-balance mode screen with the function dial and the Fn button (page 43).
2 Select the desired white balance mode with v/V on the controller.
3 To select [AWB], press the center of the controller.
To select anything other than [AWB], go to each procedure.
AWB (Auto white balance)
(Preset white balance)
K* (Color temperature)
(Custom white balance)
*
K: stands for “Kelvin” (unit of color temperature)
Adjusts the white balance automatically.
Adjusts the white balance to a specific light source (see
below).
Adjusts color temperature. The CC (Color Compensating)
filter is also adjusted (page 47).
Memorizes the basic white color (page 48).
Preset white balance
Select an option to suit a specific light source. Use this function if you cannot get your desired
color in [AWB].
1 Display the White-balance mode screen with the function dial and the Fn button (page 43).
2 Display the Preset white balance screen with v/V on the controller, then press B.
3 Select the desired light source with b/B on the controller or the control dial, then make fine
adjustments with v/V on the controller, if necessary.
• You can adjust the white balance between +3 and -3 (in Fluorescent, between +4 and -2).
• Adjusting toward + increases the color temperature and the image turns reddish. Adjusting toward decreases the color temperature and the image turns paler.
• 1 step is equivalent to approximately 10 mired*.
* Mired: a unit to indicate the color conversion quality in color temperature filters.
46
Page 47

4 Press the center of the controller.
( : The default setting)
(Daylight)
(Shade)
(Cloudy)
(Tungsten)
(Fluorescent)
(Flash)
• For details on the white balance t page 17
• If the ambient light consists of sodium-vapor lamps or mercury-vapor lamps alone, an accurate white
balance cannot be acquired due to the properties of the light source. Use of the flash is recommended to
overpower the ambient light.
Adjusts for outdoors, sunlit subjects.
Adjusts for shady conditions on a clear day.
Adjusts for a cloudy sky.
Adjusts for places where the lighting conditions change
quickly, such as at a party hall, or under bright lighting, such
as at photography studios.
Adjusts for fluorescent lighting.
Adjusts for flash condition.
Color temperature
You can set the white balance using a color temperature.
Based on using the set color temperature as the standard, the color can be compensated from G
(Green) to M (Magenta) just like using a CC (Color Compensation) filter for photography.
• When setting the color temperature measured by the color meter, test shooting is recommended before the
actual photo is taken.
1 Display the White-balance mode screen with the function dial and the Fn button (page 43).
2 Display the Color temperature screen with V on the controller, then press B.
Using the shooting functions
3 Set the color temperature with v/V/b/B on the controller.
• Select the digit (thousand’s or hundred’s place) of the color temperature with b/B, then set the value
of the selected digit with v/V.
• The color temperature can be selected between 2500K and 9900K.
4 Select the setup area of the CC filter with B, then set the CC filter with v/V, if necessary.
47
Page 48

• Pressing v compensates toward M (Magenta), and pressing V toward G (Green). This compensation
can adjust among nine steps in each direction.
• The increment on the scale is equivalent to approximately 5CC.
5 Press the center of the controller.
• If you change the color temperature after adjusting the CC filter, the actual CC filter value reflects the
new color temperature.
Custom white balance
In a scene where the ambient light consists of multiple types of light source, use of custom
white balance is recommended in order to accurately reproduce the whiteness.
1 Display the White-balance mode screen with the function dial and the Fn button (page 43).
2 Display the Custom white balance screen with v/V on the controller, then press B.
3 Select [ SET] with B on the controller, then press the center of the controller.
The message “Use spot metering area. Press shutter to calibrate.” appears on the LCD monitor.
4 Hold the camera so that the white area fully covers the spot-metering circle and press the shutter
button down. The shutter clicks and the calibrated values (Color temperature and CC) are
displayed.
• The focus does not have to be confirmed.
5 Press the center of the controller.
The monitor returns to the recording information screen with the memorized custom white
balance setting retained.
To call the custom white balance setting
In step 2 above, select [ ] with b/B, then press the center of the controller.
• The custom white balance setting registered in this operation is effective until a new setting is registered.
(The setting is retained after the power is turned off.)
• If the flash is used when the shutter button is pressed, a custom white balance is registered with the flash
light taken into account. Take pictures with the flash in later shootings.
• The message “Custom WB error.” indicates that the value is beyond the expected range. (When the flash
is used on a subject in close proximity or a subject with a bright color is in the frame.) The value is
registered and the indicator turns yellow on the recording information display on the LCD monitor.
You can shoot at this point, but it is recommended that you set the white balance again to get a more
correct white balance value.
48
Page 49

D-Range Optimizer
ISO WB D-R DEC
The camera analyzes the shooting conditions and automatically corrects the image to improve
the image quality.
1 Display the D-Range Optimizer screen with the function dial and the Fn button (page 43).
2 Select the desired mode with b/B on the controller, then press the center of the controller.
( : The default setting)
OFF (Off)
(Standard)
(Advanced)
• There is no effect in the following cases.
– Center weighted metering
– Spot metering
– The mode dial is set to M.
– [Quality] is set to [RAW] or [RAW & JPEG].
• When using AE lock, the camera automatically corrects the locked image.
• When in Continuous advance mode, the correction is fixed onto the first image, the same correction is
used for the second or later images.
Does not correct brightness or contrast.
Adjusts the brightness and contrast of the whole screen.
Optimizes the contrast and the color reproduction of the
recorded image by area.
Using the shooting functions
Selecting the color/DEC mode
ISO WB D-R DEC
The color mode has combinations of color tone, white balance, contrast, saturation, and
sharpness that are best for various shooting conditions and purposes. This function is useful if
you want to use the effects of scene selection when the mode dial is set to P, A, S, or M.
Within the color mode, the contrast, saturation, and sharpness can be further calibrated to your
liking.
1 Display the Color/DEC screen with the function dial and the Fn button (page 43).
2 Select the desired color mode with b/B on the controller.
49
Page 50

3 When adjusting the contrast, saturation, or sharpness, move to the screen used for adjustments
with V, select the desired item with v/V, then adjust the value with b/B.
4 Press the center of the controller.
( : The default setting)
(Standard)*
(Vivid)*
(Portrait)*
(Landscape)*
(Sunset)*
(Night view)*
(B&W)
(Adobe RGB)
* Uses the sRGB color space (see below).
Reproduces various scenes with rich gradation and beautiful
color.
Reproduces memorable scenery such as blue sky, sunsets,
spring greenery, and autumn leaves with deep and vivid
colors.
Accentuates the subject and softly reproduces skin tones.
Reproduces the scenery with vivid and sharp colors.
Beautifully reproduces the red of the sunset.
Reproduces the light area vividly and the dark area crisply.
For monochrome images.
Uses the Adobe RGB color space. An ICC profile will not be
embedded in the image.
(Contrast)
(Saturation)
(Sharpness)
• Selecting auto white balance (page 46) produces a more effective color tone. Use auto white balance
especially in Sunset mode.
z About sRGB color space and Adobe RGB color space
sRGB color space
This is the standard color space of the digital camera and suitable for almost all normal conditions. As it is
the color space that accommodates the properties of the average monitor, sRGB is also suited for handling
images for use in web pages.
Adjusts the contrast in five steps, from -2 to +2. The higher the
value, the stronger the contrast, resulting in a well-modulated,
clear image. The lower the value, the weaker the contrast,
resulting in fewer instances of white out or black out.
• When setting the zone matching, only the contrast setting is
temporarily reset to 0 and cannot be changed.
Adjusts the color saturation in five steps, from -2 to +2. The
higher the value, the stronger the saturation, resulting in a vivid,
clear image. A lower value results in an understated image.
• If the color mode is set to (B&W), the saturation cannot be
adjusted.
Adjusts the sharpness of the image in five steps, from -2 to +2.
The higher the value, the sharper the outline, resulting in a vivid,
clear image. The lower the value, the softer the outline.
50
Page 51

Adobe RGB color space
Adobe RGB color space has a wide range of color reproduction, compared to sRGB. If the main purpose is
to print out the image, especially when a large part of the subject is vivid green or red, Adobe RGB is more
effective than other sRGB color modes.
• The file name of the image starts with “_DSC” (page 112).
z About color matching in Adobe RGB
To display or print the image, use software that supports color management, such as “Picture Motion
Browser” (supplied).
To display, edit, modify, or print an image captured in Adobe RGB mode, use an application such as
“Picture Motion Browser”, that supports color management and DCF2.0 option color space. Software
without color management functions, may not display or print Adobe RGB images with faithful colors. To
print the image with faithful colors, the printer needs to be DCF2.0 option color space compliant.
Using the shooting functions
Focus mode
ISO WB D-R DEC
You can set the AF area and the AF mode.
• When shooting in auto focus mode, be sure to set the focus mode switch to AF.
AF area
You can change the focus method. Change the method when it is difficult to get the proper
focus.
1 Display the focus mode screen with the function dial and the Fn button (page 43).
2 Display the AF area screen with v on the controller.
3 Select the desired mode with b/B on the controller, then press the center of the controller.
51
Page 52

(Wide AF area)
(Spot AF area)
(Focus area selection)
( : The default setting)
The camera determines which of the nine local focus frames is
used in focusing within the wide focus frame.
Wide focus frame
• When you press the shutter button halfway down, the frame
used in focusing is illuminated briefly.
• You can switch to spot focus frame if the desired frame is not
used in focusing. Press the spot AF button at the center of the
controller to focus the center of the screen, and press the shutter
button all the way down without releasing the spot AF button on
the controller to take a picture.
The camera uses the spot focus frame exclusively.
Spot focus frame
• When you look into the viewfinder, the spot focus frame is
illuminated briefly.
Choose a local focus frame from the nine frames.
Press the corresponding one of the controller, and the local focus
frame in the specified direction is used in focusing. (Eight
directions are available.) Press the spot AF button at the center to
use the spot focus frame in focusing.
52
Local focus frame
Spot focus frame
• When you look into the viewfinder, the selected focus frame is
illuminated briefly.
• After shooting, frame selection is still available. Be sure not to
press the controller unless it is necessary.
Page 53

• While the controller or the spot AF button is held down, the focus stays locked. If the controller or the
Spot AF button is kept down after shooting, you can continue shooting with the same focus.
• When multi-segment metering is used, the exposure is locked at the same time as the focus is locked.
• In wide AF area mode, you can press the controller to focus. To shoot with that focus, press the shutter
button without releasing the controller. The direction of the controller you press does not affect the frame
used in focusing.
• In spot AF area mode, you can focus by pressing either the controller or the spot AF button. If you press
any direction key of the controller, the spot focus frame is always activated. To shoot with that focus, press
the shutter button without releasing the controller or the spot AF button.
• The local focus frame may not be illuminated when continuous shooting is performed or when the shutter
button is pressed all the way down without pause.
AF mode
Selects the auto focus operation mode.
1 Display the focus mode screen with the function dial and the Fn button (page 43).
2 Display the AF mode screen with V on the controller.
3 Select the desired mode with b/B on the controller, then press the center of the controller.
( : The default setting)
(Single-shot AF)
(Direct Manual Focus)
(Automatic AF)
In this AF mode, the focus is locked when you press the
shutter button halfway down. This mode is used when
shooting a motionless subject.
In this AF mode, you can manually fine-tune the focus after
using the autofocus function. This mode is used when an
unwanted subject comes into focus in macro recording, etc.
This AF mode automatically switches between single-shot
AF and continuous AF, depending on the subject’s motion. If
the subject is in motion, the camera continues to focus while
the shutter button is pressed and held halfway down. If the
subject is motionless, the focus is locked when the shutter
button is pressed and held halfway down. This is a general
purpose AF mode suitable for portraits, group pictures,
snapshots, landscapes, etc.
Using the shooting functions
53
Page 54

(Continuous AF)
To make a fine adjustment in (Direct Manual Focus)
1 Select (Direct Manual Focus) in AF mode.
2 Press the shutter button halfway down to lock the focus.
3 Turn the focusing ring to fine-tune the focus while pressing the shutter button halfway down.
Shutter button
Focusing ring
4 Press the shutter button fully down.
• Once you release your finger from the shutter button, the focus lock operation starts again from the
beginning when you press the shutter button halfway down.
In this AF mode, the camera continues to focus while the
shutter button is pressed and held halfway down. This mode
is used when the subject is in motion.
• If the wide AF area is selected, the focus frame switches to
match the position of the subject. The frame in focus turns red
and starts flashing.
• The buzzer will not sound when the subject is in focus.
Flash
ISO WB D-R DEC
Sets up the flash mode and the flash compensation.
Flash mode
If the built-in flash is pulled up, the flash automatically fires when the surroundings are dark
(the default setting). You can intentionally change the flash mode.
1 Display the flash mode screen with the function dial and the Fn button (page 43).
2 Display the Flash mode screen with v on the controller.
3 Select the desired mode with b/B on the controller, then press the center of the controller.
54
Page 55

• The flash indicator is displayed only when the flash is pulled up.
(Autoflash)
(Fill-flash)
(Rear sync.)
Fires if it is dark or against light.
• This is not selectable when the mode dial is set to A, S, or M.
Fires whenever the built-in flash is pulled up.
Ordinarily, the flash is fired right after the shutter has been
released, then objects illuminated by other light sources are
captured. This causes certain subjects, such as trailing light,
to appear unnatural when the slower shutter speed is used.
In rear sync mode, the objects illuminated by other light
sources are captured first, then the flash is fired. You can
capture a flowing light or the trail of a moving subject in a
more realistic way when shooting a moving subject using a
slower shutter speed with the flash.
( : The default setting)
Using the shooting functions
(Wireless)
Using the built-in flash or an external flash (not supplied)
mounted on the camera may make certain pictures appear too
flat. In such a case, an off-camera flash in a proper position
can create more contrast, resulting in a more threedimensional picture.
Generally, this type of shooting requires the camera and an
off-camera flash to be connected with a cable. This camera
can do this without a cable because it uses the flash light
instead of the cable to transmit the signal. This is called
wireless flash shooting. The exposure is automatically
adjusted to the optimal exposure.
• Wireless flash shooting requires the flash HVL-F56AM or
HVL-F36AM (not supplied).
To perform wireless flash shooting
1 Attach the external flash to the camera (page 145) and turn on the camera and the external flash.
2 Select (Wireless).
3 Remove the external flash from the camera and pull up the built-in flash on the camera.
“WL” appears in the viewfinder and on the LCD monitor.
4 Determine the position of the camera and the external flash.
5 Make sure the built-in flash and the external flash are fully charged.
• The built-in flash is fully charged when appears in the viewfinder.
• The external flash is fully charged when appears on the back of the external flash and the red lamp
flashes on the front of the flash.
55
Page 56

6 Press the AEL (AE Lock) button on the camera to test fire the flash.
• If the flash does not fire, change the camera, external flash, or subject position.
7 Check both flashes again to make sure they are fully charged. Press the shutter button to take a
picture.
• Turn off the wireless flash mode after wireless flash shooting. (You can either deactivate the camera and
the external flash separately, or you can attach the external flash to the camera and select a different flash
mode, as shown on page 54). If the built-in flash is used while the wireless flash mode is still active,
inaccurate flash exposures will result.
• You can select the wireless setting on the camera and the external flash separately. See page 54 to set the
camera. To set the external flash, refer to the operating instructions supplied with it.
If the operation and the function of the AEL (AE Lock) button has been changed
When using the wireless flash, it is recommended that you set [AEL button] (page 93) to [AE hold] or [
AE hold] in the Custom menu.
If you select a setting that is retained after the button has been released ([AE toggle]/[ AE toggle]) the
camera is in slow sync recording mode while “AEL” appears in the viewfinder and on the LCD monitor.
Every test fire will cause the slow sync recording mode to switch on and off.
About the position of the camera and the flash
This camera uses the flash light of its built-in flash to send a signal to the off-camera flash to fire. Take note
of the following points to ensure proper transmission of the signal.
• Wireless flash shooting should be performed in a dark environment such as indoors, etc.
• Place the external flash in the grey area as illustrated below.
A
A: The distance between the camera and the subject
B: The distance between the external flash and the subject
Do not place the external flash directly behind the subject.
56
B
Page 57

Specifications with wireless flashes at ISO 100
Camera-to-
subject
distance
Shutter Speed
Aperture
F2.8
All shutter
speeds
1.4 – 5 m
(55 1/8 –
196 7/8 inches)
F4.0
1 – 5 m
(39 3/8 –
196 7/8 inches)
F5.6
1 – 5 m
(39 3/8 –
196 7/8 inches)
• The camera’s flash sync speed is 1/125 second with the Super SteadyShot function on and 1/160 second
with the Super SteadyShot function off.
• Double the maximum distance when using the camera sensitivity at ISO 400. The maximum distance is
5 m (16.4 ft.).
z About the wireless flash channels
As soon as the wireless flash is selected, the channel information of the external flash is transferred to the
camera. Change the channel of the external flash when another photographer is using a wireless flash
nearby and his/her built-in flash light triggers firing of your flash.
To change the channel of the external flash, refer to the operating instructions supplied with it.
Flash-to-subject distance B
A
Up to sync
speed
1 – 5 m
(39 3/8 –
196 7/8 inches)
1 – 5 m
(39 3/8 –
196 7/8 inches)
1 – 5 m
(39 3/8 –
196 7/8 inches)
HVL-F56AM
1/250 1/1000
1 – 5 m
(39 3/8 –
196 7/8 inches)
1 – 3.5 m
(39 3/8 –
137 7/8 inches)
1 – 2.5 m
(39 3/8 –
98 1/2 inches)
1 – 2.5 m
(39 3/8 –
98 1/2 inches)
1 – 1.7 m
(39 3/8 –
67 inches)
1 – 1.2 m
(39 3/8 –
47 1/4 inches)
Flash-to-subject distance B
HVL-F36AM
Up to sync
speed
1 – 5 m
(39 3/8 –
196 7/8 inches)
1 – 5 m
(39 3/8 –
196 7/8 inches)
1 – 5 m
(39 3/8 –
196 7/8 inches)
1/250 1/1000
1 – 4 m
(39 3/8 –
157 1/2 inches)
1 – 3 m
(39 3/8 –
118 1/8 inches)
1 – 2 m
(39 3/8 –
78 3/4 inches)
1 – 2 m
(39 3/8 –
78 3/4 inches)
1 – 1.5 m
(39 3/8 –
59 1/8 inches)
–
Flash compensation
When shooting with the flash, you can adjust the amount of flash light alone, without
changing the exposure compensation. You can change the exposure of a subject which is
within the flash range, while leaving the exposure of the background, which is out of the flash
range, as it is.
1 Display the Flash mode screen with the function dial and the Fn button (page 43).
2 Select the Flash compensation with V.
Using the shooting functions
3 Select the desired value with b/B on the controller, then press the center of the controller.
57
Page 58

( : The default setting)
to +2.0 EV
0 EV
to –2.0 EV
• You can set the degree of compensation in 1/3 increments.
• When the built-in flash is pulled up, the set flash compensation value is displayed below the Ev scale on
the LCD monitor.
• When you press the shutter button halfway down, appears in the viewfinder.
• When performing flash compensation with the built-in flash, the positive effect may not be visible due to
the limited amount of flash light, if the subject is at or around the maximum distance for the flash. If the
subject is very close, the negative effect may not be visible.
z Exposure compensation and Flash compensation
Exposure compensation changes the shutter speed, aperture, and ISO sensitivity (when [AUTO] is selected)
to perform the compensation. If the flash is used, the amount of flash light is also changed.
On the other hand, Flash compensation only changes the amount of flash light, thereby controlling the
relative effect of the flash light on the whole picture. For instance, if you want to reduce the flash light, you
can set the flash compensation on the slightly negative side and at the same time set the exposure
compensation on the positive side to adjust the brightness of the entire picture.
• You can keep the amount of flash light from changing with the exposure compensation (page 95).
Toward +: Makes the flash level higher.
The amount of flash light that the camera adjusts
automatically.
Toward –: Makes the flash level lower.
Metering mode
ISO WB D-R DEC
You can select a metering mode (a method whereby the camera measures the brightness of a
subject) from the following three methods.
1 Display the Metering mode screen with the function dial and the Fn button (page 43).
2 Select the desired mode with b/B on the controller, then press the center of the controller.
( : The default setting)
(MultiSegment)
(Center weighted)
This divides the whole screen into 40 segments to measure
light (40-segment honeycomb pattern metering).
While emphasizing the central area of the screen, this mode
measures the average brightness of the entire screen. If you
shoot directly into the sun light or the subject is not in the
center of the image, you must use exposure compensation
(page 65).
58
Page 59

(Spot)
This mode measures light only in the spot metering circle in
the center of the frame. This is suitable for shooting a subject
with strong contrast or measuring the light of a specific area
of the screen. If the area to be measured is not in the center of
the screen, use AE lock to take the picture (page 67).
Spot metering area
Position of the subject.
z Multi-segment metering (40-segment honeycomb pattern metering)
This camera divides the screen into 40 segments to measure light; 39
honeycomb shaped metering elements and one metering element that covers
the surrounding area. These elements work in sync with autofocus, allowing
the camera to accurately measure the position and brightness of the subject no
matter where it is on the screen in order to determine the exposure. This
metering method enables the camera to measure light in a way most similar to
that of the human eye, which is ideal for general shooting, including shooting
into direct sunlight.
• In multi-segment metering (40-segment honeycomb pattern metering), if the focus is locked by
pressing and holding the shutter button halfway down, the exposure (the shutter speed and the aperture)
is locked simultaneously (only when autofocus is used and the AF mode is set to either (Singleshot AF) or (Automatic AF)).
Using the shooting functions
59
Page 60

Using the (Drive) button
How to use the (Drive) button
You can use continuous shooting, self-timer, bracket, white balance bracket with the
(Drive) button.
(Drive) button
Controller
Center button
1 Press the (Drive) button.
2 Select the desired mode with b/B on the
controller.
• You can substitute the control dial for b/B of the controller.
3 Select the desired mode with v/V on the
controller.
• This setup is not required in single-frame or continuous
advance.
4 Press the center button of the controller to complete the operation.
• If you press the button or press the shutter button halfway down, the setting is completed.
60
Page 61

For details on the operation 1 page 60
( : The default setting)
Single-frame advance
• Also used as the cancel button for other drive modes.
Continuous advance (see below)
Self-timer (page 62)
Continuous bracket (page 62)
Single bracket (page 63)
White balance bracket (page 64)
Shooting continuously
When you press and hold the shutter button, the camera records the images continuously at a
maximum of three images per second.
• The number of frames that can be shot continuously is indicated in the viewfinder, and when shooting
continuously, this number decreases.
After the images have been recorded on the recording medium, the number returns to the original number,
depending on the camera memory buffer.
Using the shooting functions
• When the built-in flash is fired, images are shot after the flash has been charged.
• When [AF mode] is set to (Continuous AF) or (Automatic AF), the focus is set separately on
each image. When set to (Single-shot AF), the focus is fixed on the first image.
• The last image is displayed in instant playback.
• The number of continuous shooting images obtainable has an upper limit.
The maximum number of continuous shots
Fine/Standard No limit* (Until the
RAW & JPEG 3 images
RAW 6 images
* When [Image size] is set to [M:5.6M] or [S:2.5M], the shooting speed is slightly slower when shooting
the fourth and following images.
• These numbers depend on the writing speed of a recording medium, the condition of the subject, etc. So,
use the table only as a guide.
recording medium is full)
61
Page 62

For details on the operation 1 page 60
Using the self-timer
After you press the shutter button, the shutter will be released either about ten seconds or two
seconds later. The 10-second self-timer is convenient when the photographer appears in a
photo and the 2-second self-timer is convenient to reduce the camera-shake because the mirror
is pulled up beforehand.
Check that the focus is confirmed on the subject, then press the shutter button.
( : The default setting)
(10s self-timer)
(2s self-timer)
• When using the 10-second self-timer, the self-timer lamp located on the front side flashes and lights up
right before the shutter is released. The self-timer indicator located on the LCD monitor is highlighted.
The countdown sound also starts.
• To cancel the activated 10-second self-timer, press the (Drive) button. The self-timer is canceled
when the power is turned off. You can also cancel it when the shooting is completed. You cannot cancel
the 2-second self-timer in the middle.
• When there is bright lighting, a reflector or something similar behind the camera, and you press the shutter
button without looking into the viewfinder, use the eyepiece cover attached on the shoulder strap to
prevent unnecessary lighting from seeping through the viewfinder and affecting the exposure (page 41).
After you press the shutter button, the shutter will be released
about 10 seconds later.
After you press the shutter button, the shutter will be released
about 2 seconds later.
Shooting three images with the exposure shifted – Exposure Bracket
An accurate exposure setting is required for some shooting. In such cases, a photographer
continuously shoots some images with the exposure shifted, aside from the correct exposure
image. The camera shoots images with the exposure shifted automatically.
Correct
Continuous bracket
62
– direction + direction
(Bracket:0.3Ev cont.)
(Bracket:0.7Ev cont.)
( : The default setting)
Shoots images continuously with the exposure value shifted
by plus or minus 0.3 step. Press and hold the shutter button
until the recording stops.
Shoots images continuously with the exposure value shifted
by plus or minus 0.7 step. Press and hold the shutter button
until the recording stops.
Page 63

For details on the operation 1 page 60
Single bracket
( : The default setting)
(Bracket:0.3Ev single)
Shoots images frame by frame with the exposure value
shifted by plus or minus 0.3 step. Press the shutter button
frame by frame.
(Bracket:0.7Ev single)
Shoots images frame by frame with the exposure value
shifted by plus or minus 0.7 step. Press the shutter button
frame by frame.
• When using the flash, press the shutter button frame by frame regardless of the setting.
• The image is shot in the order of 0 (correct), - (under), and + (over). The order can be changed in [Bracket
order] in the Recording menu (page 87).
• The base exposure is set at the first frame in the bracket. The base exposure moves if exposure
compensation is used.
• Normally, the focal point changes in every shooting. The focal point is fixed only in continuous bracket
shooting when AF mode is set to [Single-shot AF] or [Automatic AF] with an still subject.
• When the flash is not used, ambient bracket shooting is performed and the shutter speed and aperture are
changed to accommodate bracket shooting. When the flash is used, flash bracket shooting is performed
and the flash light is changed.
• In ambient bracket shooting, the shutter speed and aperture change in program auto mode, the shutter
speed changes in aperture priority mode, and aperture changes in shutter speed priority mode. Normally,
the shutter speed changes in manual mode. You can change the aperture by pressing and holding the AEL
(AE Lock) button while taking a picture.
Ambient light: Any light other than the flash light that shines on the scene for an extended period of time,
such as natural light, a light bulb, or a fluorescent light.
The Ev scale in bracket shooting
When bracket shooting is selected, the Ev scale is changed
LCD
monitor
Ambient bracket
0.3 steps
Exposure compensation 0
Ambient bracket
0.3 steps
Exposure compensation
1.0
Flash bracket
0.7 steps
Flash compensation -1.0
Using the shooting functions
Shown in the top row. Shown in the top row. Shown in the bottom row.
Viewfin der
• In ambient bracket shooting, the Ev scale appears in the viewfinder, too, but it does not appear in flash
bracket shooting.
• When the bracket shooting starts, the indexes that indicate already recorded images start to disappear one
by one.
63
Page 64

For details on the operation 1 page 60
• When Single bracket is selected, if the shutter button is pressed halfway down and released, “br 1” appears
for the ambient light bracket and “Fbr 1” appears for the flash bracket in the viewfinder. When bracket
shooting starts, it indicates what number the next frame is, for instance, “br 2”, “br 3”.
White balance bracket shooting
Based on the selected white balance, and color temperature/CC filter, three pictures are taken
while automatically shifting the color temperature. One shot records three frames of an image
in the order of “an image with normal white balance”, “- side (an image with paler colors)”,
and “+ side (an image with reddish colors.)”
( : The default setting)
(Bracket: WB (L))
(Bracket: WB (H))
* Mired: a unit to indicate the color conversion quality in color temperature filters.
• Only the image recorded last is displayed in instant playback (page 84).
Shifts the white balance by 10 mired* when taking a picture.
Shifts the white balance by 20 mired* when taking a picture.
64
Page 65

Adjusting the exposure
You can manually shift the exposure value determined by the camera. Use this mode when you
do not get the proper exposure, for instance, the subject and its background have high contrast
(light and dark).
Control dial
+/– (Exposure) button
Press the +/– (Exposure) button and turn the control dial to adjust the exposure.
Toward +: Brightens an image.
0:The exposure is determined automatically by
the camera.
Toward –: Darkens an image.
Towar d – Towa rd +
The compensation level is displayed in the Ev scale on the LCD monitor and in the viewfinder.
• For details on the exposure t page 16
• The exposure is compensated by 1/3 of a step between ±2.0EV.
• You can check the result of the exposure compensation using the histogram display (page 74).
Using the shooting functions
65
Page 66

z Shooting techniques
While shooting images, the camera automatically determines the exposure. When shooting a whitish
overall image such as a backlit subject or a snowy scene, the camera judges that the subject is bright and
may set a darker exposure for the image. In such cases, adjustment of the exposure in the + plus direction
is effective.
Adjust in the + direction
When shooting a darker overall image, the camera judges that the subject is dark and may set a brighter
exposure for the image. In such cases, adjustment of the exposure in the – minus direction is effective.
Adjust in the – direction
You can try to adjust the exposure to suit your taste.
66
Page 67

Locking the exposure (AE lock)
You can fix the exposure before deciding on the composition when taking a picture. This is
effective when the metering object and focusing object are different, or when you want to
shoot continuously while keeping the same exposure value.
Shutter button
AEL (AE lock) button
1 Target the subject for which you want to meter the exposure.
• Adjust the focus (you do not need to lock the focus.)
2 Press the AEL (AE lock) button.
• “AEL”* lights up in the viewfinder and on the LCD monitor to indicate that the exposure is locked.
* AEL: Stands for Auto Exposure Lock
3 While pressing the AEL (AE lock) button, recompose the image, if necessary, and press the
shutter button to take the picture.
• If the AEL (AE lock) button is kept down after a shot, you can continue to shoot with the same exposure
value. The setting is canceled when the button is released.
• When the flash is fired in a mode other than shutter speed priority mode or manual mode, slow sync
control is activated and AE Lock is performed (page 69).
• You can set the camera to keep the exposure value after releasing the AEL (AE lock) button (page 93).
• Regardless of the type of metering mode selected, you can set the camera to temporarily fix the exposure
using the spot metering (Spot AEL) by pressing the AEL (AE lock) button (page 93).
About the Ev scale when the AEL (AE lock) button is pressed
When you lock the exposure by pressing the AEL (AE lock) button, the locked exposure value
is set as the standard (0). After recomposing, the Ev scale displays the metered light level
within the spot metering circle. This tells you the difference in brightness among the segments
of the screen.
• If the light level within the spot metering circle exceeds 2.0Ev more/less than the standard value, gG
appears at the end of the Ev scale. The gG starts flashing if the difference becomes any greater.
Using the shooting functions
67
Page 68

Example: When the composition is determined in the scene below and the AEL (AE lock)
button is pressed
2 Bright area
Spot metering circle
1 Slightly darker area
The indicator displays are as follows when the AEL (AE lock) button is pressed.
AEL (AE lock) button is
pressed
Multi-segment/Center metering
The locked exposure
The light level within the spot
metering circle is 0.3Ev less
than the locked exposure
(varies according to the
recomposition of the shot)
Spot metering
The locked exposure is equal
to the light level within the
spot metering circle
Recompose on 1 while
holding the AEL (AE lock)
button down
Turn the camera on 1 and
the light level of 1 is
displayed. The locked
exposure (0) stays the same.
The light level of 1 is 1.3Ev
less than the locked exposure
(varies according to the
recomposition of the shot)
Turn the camera on 1 and
the light level of 1 is
displayed. The locked
exposure (0) stays the same.
Recompose on 2 while
holding the AEL (AE lock)
button down
Turn the camera on 2 and
the light level of 2 is
displayed. The arrow
indicates 2 will white out.
68
The light level of 1 is 1.0Ev
less than the locked exposure
(varies according to the
recomposition of the shot)
Page 69

Slow Sync (Shooting the dark background
with flash)
When you shoot a portrait outdoors at night with a dark background, a normal use of flash will
capture a clear image of the subject, but the background is out of flash range and will be too
dark. In such a case, slow sync shooting (shooting with the flash and a slow shutter speed)
allows you to capture a clear image of both the subject and the background.
Flash
AEL (AE lock) button
1 Pull up the built-in flash.
2 Shoot with the AEL (AE lock) button pressed.
“AEL” in the viewfinder and on the LCD monitor lights up to indicate the exposure is locked.
• Use of a tripod is recommended because of the slower shutter speed.
• When the flash is not used, you can fix the exposure by pressing the AEL (AE lock) button (page 67).
• In shutter speed priority mode or manual mode, slow sync shooting is not available using the AEL (AE
lock) button.
• You can set the camera to keep the slow sync mode after the AEL (AE lock) button is released (page 93).
Using the shooting functions
69
Page 70

Depth-of-field preview
The viewfinder shows an image captured with the widest aperture. The change in aperture
affects the sharpness of the subject image, creating a discrepancy between the sharpness seen
in the viewfinder and in the actual picture. The preview function enables you to see the image
with the aperture used in the actual shooting, allowing you to check the approximate sharpness
of the subject image before the actual shooting.
Depth-of-field preview
Press the depth-of-field preview button after the subject is in focus.
While the button is held down, the aperture is narrowed to match the aperture value displayed in the
viewfinder.
• About aperture and blurred images, t aperture priority mode (page 34)
• The image in the viewfinder will be darker because the aperture is narrowed (aperture value is greater.)
• The aperture value can be changed during preview.
• When the focus is not fixed and the preview button is pressed, you cannot take a picture. To take a picture,
press the depth-of-field preview button with z lit in the viewfinder.
• With a lens equipped with a focus hold button, you can set the camera to perform the preview function
using the focus hold button (page 93).
button
70
Page 71

Focusing manually
When it is difficult to get the proper focus in auto focus mode, you can adjust the focus
manually.
Focusing ring
Focus mode switch
1 Set the focus mode switch to MF*.
* MF: stands for Manual Focus.
2 Turn the focusing ring of the lens to achieve a sharp focus.
• In the case of a subject that can be focused in auto focus mode, the z indicator lights up in the viewfinder
when the focus is confirmed. When the wide focus frame is used, the center frame is used, and when the
local focus frame is used, the frame that is selected with the controller is used.
• To obtain steady exposure in manual focus mode, the camera uses the distance information to determine
the exposure. To improve the precision of the distance information, the camera resets the focal length to
(infinity) when the POWER switch is set to ON.
Using the shooting functions
71
Page 72

Using the viewing functions
Switching the playback screen
During playback, each time you press the (Display) button, the screen changes between
the index screen and the single-image screen.
(Reduce) button
(Display) button
(Playback) button
Controller
Single-image screen
(with recording data)
Single-image screen
(without recording
data)
Index screen
In index mode (File browser)
The folder containing the
images now displayed
First three digits of the folder
name (Folder number)
In each folder, six frames of image are displayed on
the LCD monitor (File browser index). You can move
frames around with v/V/b/B on the controller. This is
useful when you want to scan the images to find the
one you want.
• You can display all the images other than by the folder. The
images can be displayed four images at a time, nine images
at a time, or 16 images at a time (page 90).
To select the folder
1 Press (Reduce) to highlight the folder name.
2 Select the desired folder with b/B on the controller.
3 Press (Reduce) to move to the images area and select the desired image with v/V/b/B on the
controller.
72
Page 73

To delete all the images in the folder
You can delete all the images in the folder when the file browser index screen is displayed.
1 Select the folder you want to delete with b/B on the controller.
2 Press the (Delete) button.
The message “Delete folder and its contents?” appears.
3 Select “Yes” with b, then press the center of the controller.
The selected folder is deleted.
• You can continue to delete folders.
• You can set the confirmation screen to [Yes], as previously selected in the Setup menu (page 103).
• When you want to delete selected images, see page 88.
• It may take a long time to delete a lot of images. It is recommended that you delete images on a computer
or format the recording medium using the camera.
• Once you have deleted an image, you cannot restore it.
• Protected images cannot be deleted.
• If you delete the recording folder currently selected with [Select folder], select a recording folder again
with [Select folder] in the Setup menu (page 101).
Using the viewing functions
73
Page 74

Displaying the histogram
The histogram and recording data of the displayed image can be displayed.
(Enlarge) button
Controller
Press v on the controller to display the histogram in single-image playback. Press v on the
controller again to return to single-image playback.
• You can select images with b/B.
• You can enlarge images with the (Enlarge) button.
When the image has a high-key or low-key portion, that portion is
illuminated on the histogram display (Luminance limit warning).
74
Page 75

z About Histogram
Dark Light
Number of pixels
A histogram is the luminance distribution that shows how many
pixels of a particular brightness exist in the picture. The
histogram display of this camera shows the brightness on the
horizontal axis (left side is black, right side is white) and the
number of pixels on the vertical axis. The exposure
compensation will change the histogram accordingly. Below is
an example.
For details on pixels t page 17.
Use the exposure
compensation on
the positive side.
Shooting with the
exposure
compensation on the
positive side brightens
the whole picture,
making the entire
histogram shift to the
bright side (right side).
If the exposure
compensation is used
on the negative side,
the histogram will
shift to the other side.
Both ends of the histogram consist only of data of 100% black or white*. Therefore, when the data is
transferred to a PC later in order to compensate it, it is impossible to restore the area that has been
blacked/whitened out. Checking the histogram allows you to know the status of the image beforehand.
* To be exact, a color image is expressed with RGB. Thus, the white is equal to R255, G255, B255, and
the black is equal to R0, G0, B0.
Using the viewing functions
75
Page 76

Rotating an image
You can rotate a playback image.
Controller
1 Display the image you want to rotate in single-image playback.
2 Each time you press V on the controller, the image is rotated as illustrated above.
• Once you rotate the image, the image rotation information is retained, even if you display other images or
turn off the power. The image is played back in the rotated position next time.
• When you copy rotated images to a computer, “Picture Motion Browser” (supplied) can display the
rotated images correctly. However, the images may not be rotated depending on the software.
• You can rotate an image when using a write-protected recording medium, however, the image will not be
rotated on the next playback.
76
Page 77

Enlarging images
An image can be enlarged for closer examination.
(Reduce) button
(Enlarge) button
(Display) button
(Playback) button
1 Press the (Enlarge) button in single-image (or index) playback mode.
The center of the image is enlarged.
• You can scale up or down with the (Enlarge) button or the (Reduce) button.
2 Select the portion you want to enlarge with v/V/b/B on the controller.
• You can select the image with the control dial.
• Each time you press the center of the controller, the screen changes between the enlarged screen and
the whole screen.
Controller
Using the viewing functions
The portion to be
enlarged if the center
button is pressed
The map of the enlarged portion
3 Press the (Playback) button so that enlarged playback is canceled and the screen returns to
single-image (or index) playback mode.
The scaling range is as follows. (The scale is not displayed)
Image size Scaling range
L:10M Approx. ×1.1 – ×12
M:5.6M Approx. ×1.1 – ×9
S:2.5M Approx. ×1.1 – ×6
• Pressing the (Display) button clears the indications on the screen during enlarged playback.
77
Page 78

Viewing images on a TV screen
You can view images on a TV screen by
connecting the camera to a TV.
Turn off both your camera and the TV
before connecting the camera and the TV.
1 Connect the camera to the TV.
3 Turn on the camera, and press
(Playback).
1 To video input jack
Video cable
2 To the VIDEO
jack
2 Turn on the TV and set the TV/
video input switch to “video.”
• For details, see the operating instructions
supplied with the TV.
button
Controller
Images shot with the camera appear on
the TV screen.
Press b/B on the controller to select the
desired image.
• When using your camera abroad, it may be
necessary to switch the video signal output
to match that of your TV system (page 98).
• When you display the images recorded in
Adobe RGB mode on the camera or sRGB
devices, such as on TVs/LCD monitors that are
not compatible with Adobe RGB (DCF2.0/
Exif2.21), the images are displayed by lower
intensity level.
• The LCD monitor on the rear of the camera does
not turned on.
• The image quality displayed on a TV screen is a
little deteriorated comparing to images
displayed on a PC monitor.
78
Page 79

On TV color systems
If you want to view images on a TV screen,
you need a TV with a video input jack and
the video cable. The color system of the TV
must match that of your digital still camera.
Check the following lists for the TV color
system of the country or region where the
camera is used.
NTSC system
Bahama Islands, Bolivia, Canada, Central
America, Chile, Colombia, Ecuador,
Jamaica, Japan, Korea, Mexico, Peru,
Surinam, Taiwan, the Philippines, the
U.S.A., Venezuela, etc.
PAL system
Australia, Austria, Belgium, China, Czech
Republic, Denmark, Finland, Germany,
Holland, Hong Kong, Hungary, Italy,
Kuwait, Malaysia, New Zealand, Norway,
Poland, Portugal, Singapore, Slovak
Republic, Spain, Sweden, Switzerland,
Thailand, United Kingdom, etc.
PAL-M system
Brazil
PAL-N system
Argentina, Paraguay, Uruguay
SECAM system
Bulgaria, France, Guiana, Iran, Iraq,
Monaco, Russia, Ukraine, etc.
Using the viewing functions
79
Page 80

Using the menu
Using menu items
MENU button
1 Turn on the power.
2 Press MENU to display the menu.
3 Select the desired menu with b/B on the
controller, then press the center of the
controller.
Recording menu Custom menu
Playback menu Setup menu
• When the desired menu is already displayed (the menu icon is
displayed on the extreme left), skip this step.
4 Select the page with b/B on the controller.
Controller
Center of the controller
Menu now
selected
Menus not
selected
5 Select the desired item with v/V on the
controller.
80
Page 81

6 Display the options with B on the controller.
• To return to the menu options, press b.
7 Select the desired option v/V on the controller,
then press the center of the controller.
8 Press MENU to turn off the menu.
• The menu is also turned off if you press the shutter button halfway down.
• When setting the menu, you can substitute the control dial for b/B on the controller.
• During operation, if you press MENU, the setup is canceled and the camera returns to the recording (or
playback) mode.
• When you display a menu, you can display the previously selected menu first (page 102).
Using the menu
81
Page 82

Menu list
Recording menu (pages 83 to 87)
12
Image size
Quality
Inst.Playback
Noise reductn
Eye-Start AF
Playback menu (pages 88 to 92)
12
Delete
Forma t
Protect
Index format
Custom menu (pages 93 to 97)
12
Priority setup
FocusHoldButt.
AEL button
Ctrl dial set
Exp. comp. set
AF illuminator
For details on the operation 1 page 80
Red eye
Flash control
Flash default
Bracket order
Reset
Slide show
DPOF set
• Date imprint
• Index print
• Cancel print
Shutter lock
Shutter lock
AF area setup
Monitor Disp.
Rec. display
Play. display
Setup menu (pages 98 to 104)
123
LCDbrightness
Transfer mode
Video output
Audio signals
Language
Date/Time set
82
File # memory
• Reset
Folder name
Select folder
• New folder
LCD backlight
Power save
MenuSec.Memory
Delete conf.
Clean CCD
Reset default
Page 83

Recording menu 1
Recording menu
For details on the operation 1 page 80
The default settings are marked with .
Image size
For details, see page17.
L:10M
M:5.6M
S:2.5M
• For details on the number of images that can be taken when the image size is changed, see page 27.
• When [Quality] is set to [RAW] or [RAW & JPEG], image size is fixed to [L:10M].
3872 × 2592 pixels
2896 × 1936 pixels
1920 × 1280 pixels
Quality
The image compression rate determines the image quality. As the file size (page 17) of the
uncompressed image will be larger, it is common for a digital camera to compress the
recorded image.
RAW (RAW)
RAW & JPEG (RAW+)
Fine (FINE)
Standard (STD)
File format: RAW (raw data)
A RAW file is the raw material to be processed on the
computer for professional purposes. The file can be opened
with the “Image Data Converter SR” provided on the CDROM (supplied) (page 119).
• The image size is fixed to [L:10M]. The image size is not
displayed on the LCD monitor.
File format: RAW (raw data) + JPEG
When the shutter button is pressed, a RAW image and a JPEG
image are created at the same time. This is suitable when you
need two image files, a JPEG for viewing, and a RAW for
editing. The size of the JPEG image is fixed to [L:10M] and
the image quality is fixed to [Fine].
File format: JPEG
The image is compressed in the JPEG format when recorded.
The higher the compression rate, the smaller the file size.
This will allow more files to be recorded in one recording
medium, but the image quality will be lower.
Once the image quality is lowered, it cannot be restored on a
computer afterwards. If you plan to process or edit the image
file later, consider the image quality carefully when selecting
the setting.
Recording menu
• For details on the image quality t page 17
• For details on the number of images that can be taken when the image quality is changed, see page 27.
83
Page 84

For details on the operation 1 page 80
z About RAW files
The digital camera receives the image of the subject captured by the CCD (Charge-Coupled Device), which
acts as the film for a normal camera. The RAW format file is the raw data recorded on the CCD yet to go
through any kind of digital processing. A RAW file is different from a more common file format such as
JPEG in that it is the raw material to be processed for professional purposes. You need the “Image Data
Converter SR” software included on the CD-ROM (supplied) in order to open a RAW file recorded on this
camera. With this software, a RAW file can be opened and converted to a common format, such as JPEG or
TIFF, and its white balance, color saturation, contrast, etc., can be readjusted.
• Recording a RAW format image entails the following limitations.
– The image size is fixed to the largest size (L:10M)
– The RAW file cannot be printed using a DPOF (print) designated printer or a PictBridge compliant
printer.
– Unlike a JPEG image, a RAW image does not go through any basic image processing, so its colors
cannot be accurately reproduced in playback mode or on an instant playback screen. If the data is
correctly recorded, accurate colors can be reproduced on a computer.
Inst.Playback
After an image is recorded, you can display it on the LCD monitor for two, five, or 10
seconds. You can also delete it during instant playback.
10 sec.
5 sec.
2 sec.
Off
To delete the image during instant playback
Press (Delete), then select [Yes] on the confirmation screen with b on the controller, then press the
center of the controller.
• During instant playback, you can switch the recording information on and off (page 72), choose to display
the histogram (page 74), or enlarge the image (page 77). If a local focus frame is selected when an image
is enlarged, the image is enlarged centering around the selected frame.
• Instant playback of continuous shooting, continuous bracket, and white balance bracket shows only the
image recorded last. If you delete the image following the process above, only the displayed image is
deleted.
• In instant playback, the image will not be displayed in the vertical position even if you set [Play. display]
to [Auto rotate] (page 97).
Displays the image on the LCD monitor for 10 seconds.
Displays the image on the LCD monitor for five seconds.
Displays the image on the LCD monitor for two seconds.
Does not display the image.
84
Page 85

For details on the operation 1 page 80
Noise reductn
Long exposure makes noise conspicuous. When the shutter speed is one second or slower,
noise reduction is activated to reduce the grainy noise that is common in long exposures.
On
Off
• Noise reduction is not performed on continuous shooting or continuous bracketing regardless of this
setting.
When a long exposure of one second or longer takes place,
the noise reduction process is performed for the duration that
the shutter was open. While the noise reduction is being
performed, the message “Processing...” appears on the LCD
monitor. You cannot take the next picture until the process is
over.
This mode does not perform noise reduction. This is suitable
when timing of shooting takes precedence. However, this
makes the noise more conspicuous. It is recommended that
you activate the noise reduction if you use long exposure.
Eye-Start AF
The focus is confirmed when you look into the viewfinder, and the shutter speed and aperture
are adjusted automatically.
On
Off
Automatically adjusts the focus.
• This mode uses up the battery charge faster than [Off].
Does not adjust the focus.
Recording menu
85
Page 86

Recording menu 2
For details on the operation 1 page 80
The default settings are marked with .
Red eye
Reduces the red-eye phenomenon by providing low-flash light a few times before shooting
when using the flash.
On
Off
• Red-Eye reduction is available only with the built-in flash. (When using an external flash (not supplied),
the red-eye phenomenon rarely occurs.)
Reduces the red-eye phenomenon.
Does not use Red-Eye Reduction.
Flash control
You can select the flash control mode to set the amount of flash light.
ADI flash
Pre-flash TTL
ADI: stands for “Advanced Distance Integration”
P-TTL: stands for “Pre-flash, Through the lens”
• When the distance between the subject and the external flash (not supplied) cannot be determined,
(wireless flash shooting using an external flash (not supplied), shooting with an off-camera flash using a
cable, shooting with a macro twin flash or ring light, etc.) the camera automatically selects Pre-flash TTL
mode.
• Select [Pre-flash TTL] in the following cases, as the camera cannot obtain accurate distance information
with ADI flash.
– A wide panel is attached to the HVL-F36AM flash.
– A diffuser is attached to the surface of the flash.
– A filter with an exposure factor, such as an ND filter, is used.
– A close-up lens is used.
• ADI flash is only available in combination with the lens that is provided with a distance encoder. To
determine the lens is equipped with a distance encoder, refer to the operating instructions supplied with
the lens.
A pre-flash is fired right before shooting, and the camera sets
the amount of flash light by measuring the amount of
reflected light from the pre-flash and the associated distance
information.
A pre-flash is fired right before shooting, and the camera sets
the amount of flash light by measuring only the amount of
reflected light from the pre-flash. The distance information is
not used in the calculation.
Flash default
When the mode dial is set to AUTO, P, or Scene Selection, the flash mode is set to autoflash
(default setting) automatically. When the flash is pulled up, if you want to make sure the flash
fires without fail, you can set it to Fill-flash. In either case, you can change the flash mode
with the function dial and the Fn button.
86
Page 87

For details on the operation 1 page 80
Autoflash
Fill-flash
When the mode dial is set to AUTO, P, or Scene Selection,
and the flash is pulled up, the flash fires automatically only
when the flash is necessary.
When the mode dial is set to AUTO, P, or Scene Selection,
and the flash is pulled up, the flash fires every time.
Bracket order
The order in bracket shooting (page 62) can be selected. The order is common to both ambient
light bracket and flash light bracket.
• This does not apply to white balance bracket.
0 t – t +
– t 0 t +
Use 0Ev in shooting the first picture which presents the best
shooting opportunity.
Example: 0Ev t
Ordered from low to high exposure.
Example:
–0.3Ev t +0.3Ev
–0.7Ev t 0Ev t +0.7Ev
Reset
You can reset the main functions of the recording mode.
1 Select [Enter] in [ Reset].
The message “Reset recording mode?” appears on the LCD monitor.
2 Select [Yes] with b on the controller, then press the center of the controller.
The main functions of the recording mode are reset.
• For details on the items to be reset, see “Reset default” (page 151).
Recording menu
87
Page 88

Playback menu 1
Playback menu
For details on the operation 1 page 80
The default settings are marked with .
Delete
You can delete unnecessary images.
MarkedImages
All images
• Once you have deleted an image, you cannot restore it.
• Protected images cannot be deleted.
• Use the (Delete) button to quickly delete images frame by frame (
• You can delete all the images in the folder collectively (page 73).
Deletes only the selected images.
Follow the procedure below.
Deletes all the images on the recording medium.
Follow the procedure below.
t step 6 in “Read This First”).
To delete selected images
1 Select [MarkedImages] in [Delete].
2 Select the image you want to delete with b/B on the controller, then press v.
A mark appears on the selected image.
• To cancel a selection, press V.
3 To delete other images, repeat step 2.
4 Press the center of the controller.
The message “Delete marked images?” appears.
5 Select [Yes] with b on the controller, then press the center of the controller.
The selected images are deleted, and the screen returns to the menu screen.
To delete all images
1 Select [All images] in [Delete].
The message “Delete all images on card?” appears.
2 Select [Yes] with b on the controller, then press the center of the controller.
All the images are deleted, and the screen returns to the menu screen.
• It may take a long time to delete a lot of images by selecting [All images]. It is recommended that you
delete images on a computer or format the recording medium using the camera.
88
Page 89

For details on the operation 1 page 80
Format
Formats the recording medium.
• Note that formatting irrevocably erases all data on a recording medium, including protected images.
1 Select [Enter] in [Format].
The message “All data will be deleted. Format?” appears.
2 Select [Yes] with b on the controller, then press the center of the controller.
The format is completed.
• During the format, the access lamp lights up. Do not eject the recording medium while the lamp is lit.
• Formatting may take several minutes depending on the recording medium.
• Format the recording medium using the camera. If you format it on a computer, the recording medium
may not be usable with the camera, depending on the format type used.
Protect
Protects images against accidental erasure.
MarkedImages
All images
Cancel all
Protects only the selected images.
Follow the procedure below.
Protects all the images on the recording medium.
Cancels the protection of all the images on the recording
medium.
To protect selected images
1 Select [MarkedImages] in [ Protect].
2 Select the image you want to protect with b/B on the controller, then press v.
A mark appears on the selected image.
Playback menu
• To cancel a selection, press V.
3 To protect other images, repeat step 2.
4 Press the center of the controller.
The image is protected, and the screen returns to the menu screen.
89
Page 90

For details on the operation 1 page 80
Index format
You can select the index screen format from the following settings.
16 image
9 image
4 image
File browser
Displays 16 images on the screen.
Displays nine images on the screen.
Displays four images on the screen.
Displays six images on the screen from folder to folder.
16 images
9 images 4 images
File browser
90
Page 91

Playback menu 2
For details on the operation 1 page 80
The default settings are marked with .
Slide show
Plays back recorded images in order with a 5-second interval (Slide show).
Select [Enter] in [Slide show].
The slide show starts.
To end the slide show, press V on the controller or MENU.
• During a slide show, you can display the previous/next image with b/B.
• You can pause/play back the slide show with the center of the controller.
• You can switch the recording data on/off with the (Display) button.
DPOF set
Using the camera, you can specify the images and the number of images to print before you
print images at a shop or with your printer.
MarkedImages
All on card
• You cannot mark RAW data files.
• To print an image recorded in Adobe RGB with faithful color, the printer needs to be DCF2.0 option color
space compliant.
• You can specify any number up to 9.
Prints only the selected images.
Follow the procedure below.
Prints all the images in the recording medium.
Follow the procedure below.
Playback menu
To mark selected images
1 Select [MarkedImages] in [ DPOF set].
2 Select the image you want to mark with b/B on the controller, then select the number of sheets
with v/V (increases with v and decreases with V).
A (DPOF set) mark appears on the selected image, and the number of sheets is selected.
• To cancel a selection, press V repeatedly to remove the (DPOF set) mark.
3 To mark other images, repeat step 2.
4 Press the center of the controller.
A (DPOF set) mark appears on the selected image, and the screen returns to the menu screen.
91
Page 92

For details on the operation 1 page 80
To mark all the images
1 Select [All on card] in [ DPOF set].
2 Select the number of sheets with v/V on the controller (increases with v and decreases with V).
You cannot separately set the number of images.
3 Press the center of the controller.
A (DPOF set) mark appears on all the images, and the screen returns to the menu screen.
• When a DPOF-marked image is played back, and its number are inserted onto the image.
• If you insert a recording medium that contains DPOF-marked images specified with other cameras into
this camera, then specify images to which to attach a DPOF-mark, the DPOF specifications made with
other cameras are canceled.
Date imprint
You can impose the date onto images when printing images. The position of the date (inside or
outside the image, character size, etc.) depends on your printer.
On
Off
• Normally, only the date is inserted, however, imposed items may be different depending on the printer.
This function may not be provided, depending on the printer.
Imposes the date.
Does not impose the date.
Index print
You can create an index print of all the images in the folder (Index print). This camera can
specify an index print, as well as frame by frame printing.
On
Off
Specifies an index print.
Does not specify an index print.
• The number of images to print on a sheet and the format depend on the printer. RAW images do not print
in index print.
• The images you shot after setting the index print are not included in the index print. It is recommended
that you create the index print just before printing it.
Cancel print
You can clear the (DPOF) marks. When you do so, the index print is also canceled. Since
the (DPOF) marks are left on after printing, it is recommended that you just clear the
marks.
1 Select [Enter] in [Cancel print].
The message “Cancel all?” appears.
2 Select [Yes] with b on the controller, then press the center of the controller.
The (DPOF) marks of all the images are cleared.
92
Page 93

Custom menu 1
Custom menu
For details on the operation 1 page 80
The default settings are marked with .
Priority setup
Select a setting for shutter release.
AF
Release (RP*)
* RP: Stands for Release Priority.
• When [Release] is selected, “RP” appears on the recording information display. It is recommended that
you shoot after confirming the focus in the viewfinder.
The shutter cannot be released when the focus is not
confirmed.
The shutter can be released even when the focus is not
confirmed. Select this setting if the shooting opportunity
takes precedence.
FocusHoldButt.
If you use a lens equipped with a focus hold button, you can change the function of the button
to preview a shot.
Focus hold
D.O.F.preview
Use the button as the focus hold button.
Use the focus hold button as the depth-of-field preview
button.
AEL button
Custom menu
The function and the mode of operation of the AEL (AE Lock) button can be changed.
The AEL (AE Lock) button has two functions; an “AEL” function that locks the exposure
value (shutter speed and aperture) in any metering mode, and a “ (Spot) AEL” function that
temporarily performs spot metering and locks the acquired exposure value. The AEL button
has two modes of operation; “hold” that functions only when the button is held down, and
“toggle” that switches between activation and deactivation each time the button is pressed. Of
these, the following combinations are available.
AE hold
AE toggle
While the button is held down, the exposure value in the
selected metering mode is locked.
Press the shutter button to take a picture while keeping the
AEL (AE Lock) button pressed down. This is suitable when
the exposure needs to be maintained at the same level.
Press the button once and release it, and the exposure value in
the selected metering mode stays locked. Press the button
again, and the lock is released.
There is no need to hold the AEL (AE Lock) button down
when the shutter button is pressed. This is suitable when the
exposure needs to be maintained at the same level.
93
Page 94

For details on the operation 1 page 80
AE hold
AE toggle
• While the exposure value is locked, “AEL” appears on the LCD monitor and in the viewfinder. Be sure to
remember to release the lock when “AE toggle” is selected.
• Except for the shutter speed priority mode and the manual mode, slow sync is selected and AE lock is
performed when the flash is used (page 69).
• The “hold” and “toggle” settings affect the manual shift (page 39) in the manual mode.
While the button is held down, the camera temporarily
performs spot metering regardless of the metering mode
previously selected and locks the acquired exposure value.
Press the shutter button to take a picture while keeping the
AEL (AE Lock) button pressed down. This is suitable if you
normally use multi-segment or center weighted metering but
need to temporarily use spot metering because of the type of
subject.
Press the button once and release it, and the camera
temporarily performs spot metering regardless of the
metering mode previously selected and locks the acquired
exposure value. Press the button again, and the lock is
released.
There is no need to hold the AEL (AE Lock) button down
when the shutter button is pressed. This is suitable if you
normally use multi-segment or center weighted metering but
need to temporarily use spot metering because of the type of
subject.
Ctrl dial set
You can change the function of the control dial in manual and program shift mode.
Shutter speed
Aperture
Manual Mode Control dial: Shutter speed
+/– (Exposure) button + Control dial: Aperture
Program Shift P
Manual Mode Control dial: Aperture
Program Shift P
shift (The control dial changes the shutter
S
speed.)
+/– (Exposure) button + Control dial: Shutter
speed
shift (The control dial changes the aperture.)
A
94
Page 95

For details on the operation 1 page 80
Exp. comp. set
In the default setting, if exposure compensation is selected when the flash is used, shutter
speed, aperture, ISO sensitivity (only in AUTO mode), and amount of flash light all change in
order to perform exposure compensation (page 65). By fixing the amount of flash light, you
can limit the effect of exposure compensation to the background that is illuminated only by
ambient light (light other than the flash.)
Ambient&flash
Ambient only
• With the flash compensation, you can limit the compensation to flash light range by fixing the exposure of
ambient light range that the flash light does not reach (page 57).
Values that change: amount of flash light
Values that do not change: shutter speed, aperture, ISO
Exposure compensation is performed on both the ambient
light range (the background that the flash light does not
reach) and the flash light range.
• Values that change: shutter speed, aperture, ISO (only in AUTO
mode), amount of flash light
• Values that do not change: none
The exposure compensation is limited to the ambient light
range (the background), while the exposure of the flash light
range is fixed.
• Values that change: shutter speed, aperture, ISO (only in AUTO
mode)
• Values that do not change: amount of flash light
AF illuminator
Custom menu
When you press the shutter button halfway down using the flash under dark lighting, the flash
light may be fired. This is AF fill light to help easily focus a subject in auto focus mode. You
can set the AF illuminator to on or off.
On
Off
• When AF illuminator is set to [Off], the AF illuminator of an external flash (not supplied) is not triggered.
Fills the AF illuminator.
Does not fill the AF illuminator.
95
Page 96

Custom menu 2
The default settings are marked with .
For details on the operation 1 page 80
Shutter lock
You can set the shutter lock to keep the shutter from releasing when no recording medium is
inserted in the camera.
On: no card
Off: no card
The shutter cannot be released when no recording medium is
inserted in the camera.
The shutter can be released when no recording medium is
inserted in the camera.
Shutter lock
You can set the shutter lock to keep the shutter from releasing when no lens is mounted on the
camera. When attaching the camera to an astronomical telescope, for example, select [Off: no
lens] so the shutter can be released.
On: no lens
Off: no lens
The shutter cannot be released when no lens is mounted on
the camera.
The shutter can be released when no lens is mounted on the
camera.
AF area setup
When the shutter button is pressed halfway down, the local focus frame in focus is briefly
illuminated in red. You can change the duration of illumination or turn off the illumination.
0.6s. display
0.3s. display
Display off
The local focus frame is illuminated for 0.6 seconds.
The local focus frame is illuminated for 0.3 seconds.
No illumination.
• When [Display off] is selected, the local focus frame is illuminated only when the controller or the spot
AF button is pressed.
96
Page 97

For details on the operation 1 page 80
Monitor Disp.
The eyepiece sensors located right below the viewfinder determines whether the photographer
is looking into the viewfinder or not. The LCD monitor can be set to turn off automatically
when you are looking into the viewfinder.
Automatic
Manual
• Regardless of the setting in this menu, the recording information display automatically turns off after a set
duration (five seconds in the default setting (page 102)).
The LCD monitor turns off automatically when you look into
the viewfinder.
The LCD monitor stays on when you look into the
viewfinder.
Rec. display
You can set the recording information display to rotate automatically when the camera is in a
vertical position.
Auto rotate
Horizontal
The display rotates automatically to a vertical position when
the camera is in a vertical position.
The display does not rotate when the camera is in a vertical
position.
Play. display
The image orientation can be recorded with the image which allows images recorded in a
vertical position to be automatically displayed in the vertical position.
Auto rotate
Man. rotate
The image orientation is recorded with the image.
The image orientation is not recorded with the image.
Custom menu
• When [Auto rotate] is selected, an image loaded on a computer will be displayed in the vertical position
with “Picture Motion Browser”/“Image Data Converter SR” (supplied). The image may not be displayed
in a vertical position, depending on the software employed.
• To rotate the displayed image manually, see page 76.
97
Page 98

Setup menu 1
Setup menu
The default settings are marked with .
For details on the operation 1 page 80
LCDbrightness
You can adjust the brightness of the LCD monitor.
1 Select [Enter] in [LCDbrightness].
2 Adjust the brightness with b/B on the controller or with the control dial, then press the center of
the controller.
Transfer mode
Selects the USB mode to be used when connecting the camera to a computer, etc., using a
USB cable.
Mass Storage
PTP
Used for copying images to the computer. The camera is
recognized as a USB mass storage device.
Prints the images with a PictBridge compliant printer or
copies images to PTP (Picture Transfer Protocol) compliant
devices.
• For details on printing with a PictBridge compliant printer, see
page 123.
Video output
Sets the video signal output according to the TV color system of the connected video
equipment. Different countries and regions use different TV color systems. If you want to
view images on a TV screen, check page 79 for the TV color system of the country or region
where the camera is used.
NTSC
PAL
Sets the video output signal to NTSC mode (e.g., for the USA,
Japan).
Sets the video output signal to PAL mode (e.g., for Europe).
98
Page 99

For details on the operation 1 page 80
Audio signals
Selects the sound produced when the shutter is locked, during self-timer countdown, etc.
On
Off
Turns on the sound.
Turns off the sound.
Language
Select the language to be used to display the menu items, warning, and messages.
1 Select [ Language], then press B on the controller.
2 Select the desired language with v/V on the controller, then press the center of the controller.
Date/Time set
Sets the date and time.
Select [Enter] in [Date/Time set]. Then, perform the procedure explained in “Set the clock”
t step 3 in “Read This First”).
(
Setup menu
99
Page 100

Setup menu 2
The default settings are marked with .
For details on the operation 1 page 80
File # memory
Selects the method used to assign file numbers to images.
On
Off
Assigns numbers to files in sequence even if the recording
folder or the recording medium is changed, or all of the
images are deleted.
Starts from 0001 each time the folder is changed or each time
a recording date changes when using a date form folder.
When the recording folder contains a file, a number one
higher than the largest number is assigned.
Reset
Resets the file number. The number returns to “0001”. When the recording folder contains a
file, a number one higher than the largest number is assigned.
Select [Enter] in [Reset].
Folder name
The default standard form folder (100MSDCF, etc.) can be changed to a date form folder to
classify the folders by date for storage and playback.
Std. form
Date form
Selects the standard form folder.
Selects the date form folder. A new folder will be created
automatically every time a recording date changes.
• The folders and images saved in the standard form folder will retain their names.
• If the [Date form] is selected, the folder name will be displayed as follows.
Example:
AB
A: Folder number
B: Y (the last digit) / MM / DD
100
 Loading...