

Page 1
Printed in China
© 2010 Sony Corporation
GB
SK
FR
SE
IT
FI
ES
NO
PT
DK
DE
HR
NL
RO
PL
TR
CZ
GR
HU
4-194-692-52(1)
DSC-WX5
GB Digital Still Camera/Instruction Manual
FR Appareil photo numérique/Mode d’emploi
IT Fotocamera digitale/Istruzioni per l’uso
ES
Cámara fotografía digital/Manual de instrucciones
PT
Câmara fotográfica digital/Manual de instruções
DE Digitale Fotokamera/Gebrauchsanleitung
NL Digitale camera/Gebruiksaanwijzing
PL
Cyfrowy aparat fotograficzny/Instrukcja obsługi
CZ Digitální fotoaparát/Návod k obsluze
HU Digitális fényképezőgép/Használati útmutató
SK Digitálny fotoaparát/Návod na používanie
SE Digital stillbildskamera/Handledning
FI Digitaalikamera/Käyttöopas
NO Digitalt stillkamera/Bruksanvisning
DK
Digitalt stillbilledkamera/Betjeningsvejledning
HR Digitalni fotoaparat/Priručnik za upotrebu
RO Aparat foto digital/Manual de instrucţiuni
TR
GR
Page 2
English
Owner’s Record
The model and serial numbers are located on the bottom. Record the serial number in the
space provided below. Refer to these numbers whenever you call your Sony dealer
regarding this product.
Model No. DSC-WX5
Serial No. ______________________________
WARNING
To reduce fire or shock hazard, do not expose the unit to rain or
moisture.
If the shape of the plug does not fit the power outlet, use an attachment plug adaptor of the
proper configuration for the power outlet.
CAUTION
[ Battery pack
If the battery pack is mishandled, the battery pack can burst, cause a fire or even chemical
burns. Observe the following cautions.
• Do not disassemble.
• Do not crush and do not expose the battery pack to any shock or force such as
hammering, dropping or stepping on it.
GB
• Do not short circuit and do not allow metal objects to come into contact with the battery
terminals.
2
Page 3

• Do not expose to high temperature above 60°C (140°F) such as in direct sunlight or in a
car parked in the sun.
• Do not incinerate or dispose of in fire.
• Do not handle damaged or leaking lithium ion batteries.
• Be sure to charge the battery pack using a genuine Sony battery charger or a device that
can charge the battery pack.
• Keep the battery pack out of the reach of small children.
• Keep the battery pack dry.
• Replace only with the same or equivalent type recommended by Sony.
• Dispose of used battery packs promptly as described in the instructions.
[ Battery charger
Even if the CHARGE lamp is not lit, the battery charger is not disconnected from the AC
power source (mains) as long as it is connected to the wall outlet (wall socket). If some
trouble occurs while using the battery charger, immediately shut off the power by
disconnecting the plug from the wall outlet (wall socket).
The power cord (mains lead), if supplied, is designed specifically for use with this camera
only, and should not be used with other electrical equipment.
For Customers in Europe
[ Notice for the customers in the countries applying EU Directives
The manufacturer of this product is Sony Corporation, 1-7-1 Konan Minato-ku Tokyo,
108-0075 Japan. The Authorized Representative for EMC and product safety is Sony
Deutschland GmbH, Hedelfinger Strasse 61, 70327 Stuttgart, Germany. For any service or
guarantee matters please refer to the addresses given in separate service or guarantee
documents.
This product has been tested and found compliant with the limits set out in the EMC
Directive for using connection cables shorter than 3 meters (9.8 feet).
[ Attention
The electromagnetic fields at the specific frequencies may influence the picture and sound
of this unit.
[ Notice
If static electricity or electromagnetism causes data transfer to discontinue midway (fail),
restart the application or disconnect and connect the communication cable (USB, etc.)
again.
GB
GB
3
Page 4

[ Disposal of Old Electrical & Electronic Equipment (Applicable in
the European Union and other European countries with separate
collection systems)
This symbol on the product or on its packaging indicates that this product
shall not be treated as household waste. Instead it shall be handed over to
the applicable collection point for the recycling of electrical and electronic
equipment. By ensuring this product is disposed of correctly, you will help
prevent potential negative consequences for the environment and human
health, which could otherwise be caused by inappropriate waste handling
of this product. The recycling of materials will help to conserve natural
please contact your local Civic Office, your household waste disposal service or the shop
where you purchased the product.
resources. For more detailed information about recycling of this product,
GB
4
Page 5

[ Disposal of waste batteries (applicable in the European Union
and other European countries with separate collection systems)
This symbol on the battery or on the packaging indicates that the battery
provided with this product shall not be treated as household waste.
On certain batteries this symbol might be used in combination with a
chemical symbol. The chemical symbols for mercury (Hg) or lead (Pb) are
added if the battery contains more than 0.0005% mercury or 0.004% lead.
potentially negative consequences for the environment and human health which could
otherwise be caused by inappropriate waste handling of the battery. The recycling of the
materials will help to conserve natural resources.
In case of products that for safety, performance or data integrity reasons require a
permanent connection with an incorporated battery, this battery should be replaced by
qualified service staff only. To ensure that the battery will be treated properly, hand over
the product at end-of-life to the applicable collection point for the recycling of electrical
and electronic equipment.
For all other batteries, please view the section on how to remove the battery from the
product safely.
Hand the battery over to the applicable collection point for the recycling of waste batteries.
For more detailed information about recycling of this product or battery, please contact
your local Civic Office, your household waste disposal service or the shop where you
purchased the product.
By ensuring these batteries are disposed of correctly, you will help prevent
Notice for customers in the United Kingdom
A moulded plug complying with BS 1363 is fitted to this equipment for your safety and
convenience.
Should the fuse in the plug supplied need to be replaced, a fuse of the same rating as the
supplied one and approved by ASTA or BSI to BS 1362, (i.e., marked with an or
mark) must be used.
If the plug supplied with this equipment has a detachable fuse cover, be sure to attach the
fuse cover after you change the fuse. Never use the plug without the fuse cover. If you
should lose the fuse cover, please contact your nearest Sony service station.
GB
GB
5
Page 6

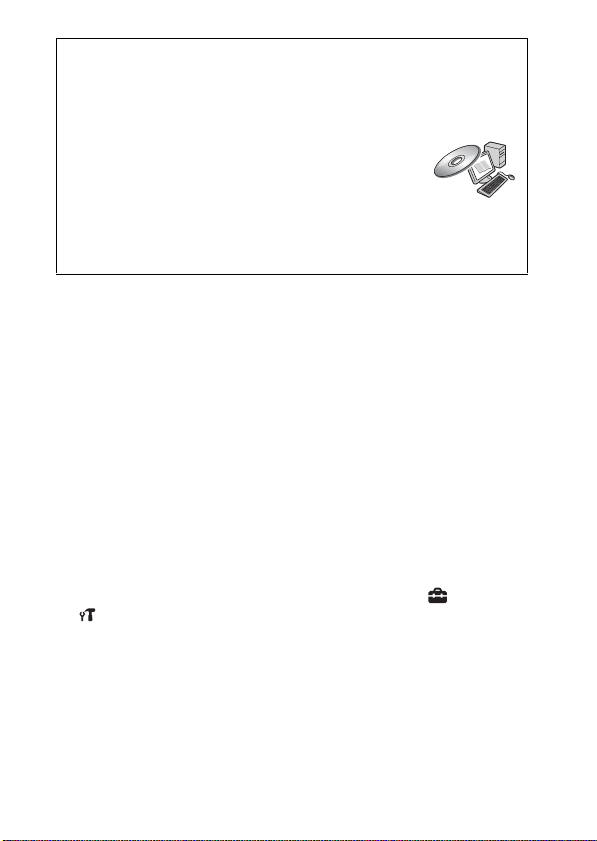
Refer to “Cyber-shot Handbook” (PDF) on supplied CD-ROM
For details on advanced operations, please read “Cybershot Handbook” (PDF) on the CD-ROM (supplied) using
a computer.
Refer to “Cyber-shot Handbook” for in-depth instructions
on shooting or viewing images and connecting the camera to your
computer, printer or TV (page 22).
Checking the accessories supplied
• Battery charger BC-CSN/BC-CSNB (1)
• Power cord (mains lead) (not supplied in the USA and Canada) (1)
• Rechargeable battery pack NP-BN1 (1)
• USB, A/V cable for multi-use terminal (1)
• Wrist strap (1)
•CD-ROM (1)
– Cyber-shot application software
– “Cyber-shot Handbook”
• Instruction Manual (this manual) (1)
Notes on using the camera
Changing the language setting
The screen language can be changed if necessary.
To change the language setting, press MENU t (Settings) t (Main
Settings) t [Language Setting].
Internal memory and memory card back up
Do not turn off the camera, remove the battery pack, or remove the memory
card while the access lamp is lit. Otherwise, the internal memory data or the
memory card may be damaged. Be sure to make a backup copy to protect your
data.
GB
6
Page 7

Functions built into this camera
• This manual describes each of the functions of TransferJet-compatible/
incompatible devices, 1080 60i-compatible devices and 1080 50i-compatible
devices.
To check if your camera supports the TransferJet function, and whether it is
a 1080 60i-compatible device or 1080 50i-compatible device, check for the
following marks on the bottom of the camera.
TransferJet-compatible device: (TransferJet)
1080 60i-compatible device: 60i
1080 50i-compatible device: 50i
• Do not watch 3D images shot with this camera for extended periods of time
on 3D-compatible monitors.
• When you view 3D images shot with this camera on a 3D-compatible
monitors, you may experience discomfort in the form of eye strain, fatigue,
or nausea. To prevent these symptoms, we recommend that you take regular
breaks. However, you need to determine for yourself the length and
frequency of breaks you require, as they vary according to the individual. If
you experience any type of discomfort, stop viewing the 3D images until you
feel better, and consult a physician as necessary. Also refer to the operating
instructions supplied with the device or software you have connected or are
using with this camera. Note that a child’s eyesight is still at the development
stage (particularly children below the age of 6). Consult a pediatrician or
ophthalmologist before letting your child view 3D images, and make sure he/
she observes the above precautions when viewing such images.
On database files
When you insert a memory card without a database file into the camera and
turn on the power, part of the memory card capacity is used to automatically
create a database file. It may take some time until you can perform the next
operation.
Notes on recording/playback
• To ensure stable operations of the memory card, we recommend that you use
this camera to format any memory card being used with this camera for the
first time. Note that formatting will erase all data recorded on the memory
card. This data cannot be restored. Be sure to backup any important data to a
PC or other storage location.
• If you repeatedly record/delete images, fragmentation of data may occur on
the memory card. Movies may not be able to be saved or recorded. In such a
case, save your images to a PC or other storage location, then [Format].
• Before you start recording, make a trial recording to make sure that the
camera is working correctly.
• The camera is neither dust-proof, nor splash-proof, nor water-proof.
GB
GB
7
Page 8

• Avoid exposing the camera to water. If water enters inside the camera, a
malfunction may occur. In some cases, the camera cannot be repaired.
• Do not aim the camera at the sun or other bright light. It may cause the
malfunction of the camera.
• Do not use the camera near a location that generates strong radio waves or
emits radiation. Otherwise, the camera may not properly record or play back
images.
• Using the camera in sandy or dusty locations may cause malfunctions.
• If moisture condensation occurs, remove it before using the camera.
• Do not shake or strike the camera. It may cause a malfunction and you may
not be able to record images. Furthermore, the recording media may become
unusable or image data may be damaged.
• Clean the flash surface before use. The heat of flash emission may cause dirt
on the flash surface to become discolored or to stick to the flash surface,
resulting in insufficient light emission.
Notes on the LCD screen and lens
• The LCD screen is manufactured using extremely high-precision technology
so over 99.99% of the pixels are operational for effective use. However,
some tiny black and/or bright dots (white, red, blue or green) may appear on
the LCD screen. These dots are a normal result of the manufacturing process,
and do not affect the recording.
• When the battery level becomes low, the lens might stop moving. Insert a
charged battery pack and turn on the camera again.
On camera’s temperature
Your camera and battery may get warm due to continuous use, but it is not a
malfunction.
On the overheat protection
Depending on the camera and battery temperature, you may be unable to
record movies or the power may turn off automatically to protect the camera.
A message will be displayed on the LCD screen before the power turns off or
you can no longer record movies.
On image data compatibility
• The camera conforms with DCF (Design rule for Camera File system)
universal standard established by JEITA (Japan Electronics and Information
Technology Industries Association).
• Sony does not guarantee that the camera will play back images recorded or
edited with other equipment, or that other equipment will play back images
recorded with the camera.
GB
8
Page 9

Importing AVCHD movies into a computer
When importing movies recorded in AVCHD format into a computer, for
Windows use the “PMB” software on the CD-ROM (supplied) or for
Macintosh use the “iMovie” software bundled with Macintosh computers.
Notes when playing movies on other devices
This camera uses MPEG-4 AVC/H.264 High Profile for AVCHD format
recording. Movies recorded in AVCHD format with this camera cannot be
played by the following devices.
– Other devices compatible with AVCHD format that does not support High
Profile
– Devices incompatible with the AVCHD format
This camera also uses MPEG-4 AVC/H.264 Main Profile for MP4 format
recording. For this reason, movies recorded in MP4 format with this camera
cannot be played on devices other than those that support MPEG-4 AVC/
H.264.
Discs recorded with HD (high definition) image quality
This camera captures high definition footage in the AVCHD format. DVD
media containing AVCHD footage should not be used with DVD based
players or recorders, as the DVD player/recorder may fail to eject the media
and may erase its contents without warning. DVD media containing AVCHD
footage may be played on a compatible Blu-ray Disc™ player/recorder or
other compatible device.
Warning on copyright
Television programs, films, videotapes, and other materials may be
copyrighted. Unauthorized recording of such materials may be contrary to the
provisions of the copyright laws.
No compensation for damaged content or recording failure
Sony cannot compensate for failure to record or loss or damage of recorded
content due to a malfunction of the camera or recording media, etc.
GB
GB
9
Page 10
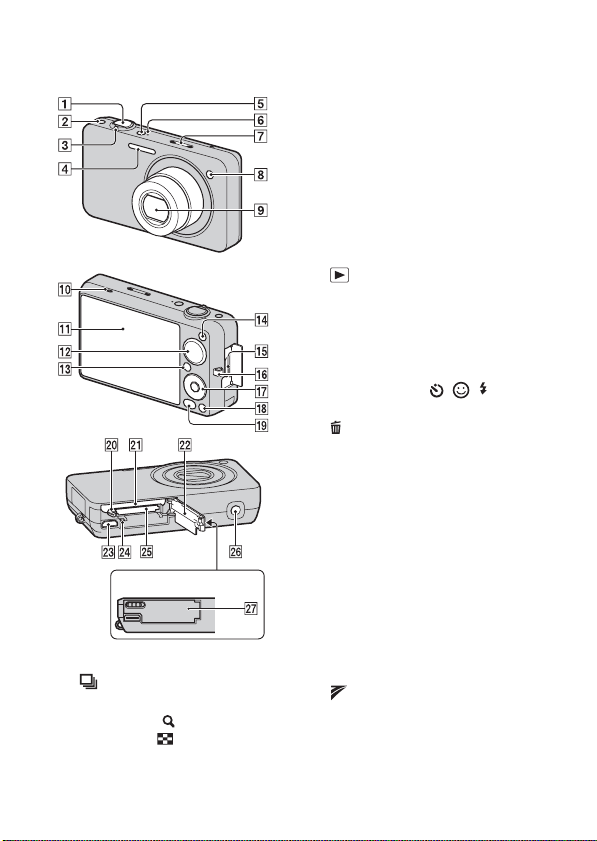
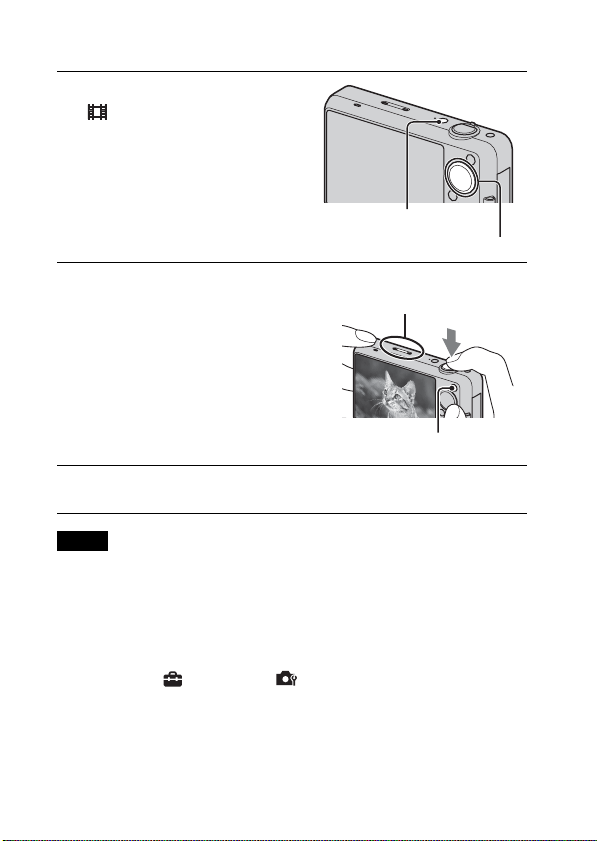
Identifying parts
Camera
Cover panel
A Shutter button
B (Burst) button
C For shooting: W/T (zoom) lever
For viewing: (Playback
zoom) lever/ (Index) lever
GB
10
D Flash
E ON/OFF (Power) button
F Power lamp
G Microphone
H Self-timer lamp/Smile Shutter
lamp/AF illuminator
I Lens
J Speaker
K LCD screen
L Mode dial
M (Playback) button
N MOVIE (Movie) button
O HDMI connector
P Hook for wrist strap
Q Control button
Menu on: v/V/b/B/z
Menu off: DISP/ / / /
Tracking focus
R (Delete) button
S MENU button
T Battery eject lever
U Battery insertion slot
V Battery/Memory card cover
W Multi connector
X Access lamp
Y Memory card slot
Z Tripod receptacle
• Use a tripod with a screw less
than 5.5 mm (7/32 inches) long.
Otherwise, you cannot firmly
secure the camera, and damage to
the camera may occur.
wj (TransferJet™) mark
Page 11
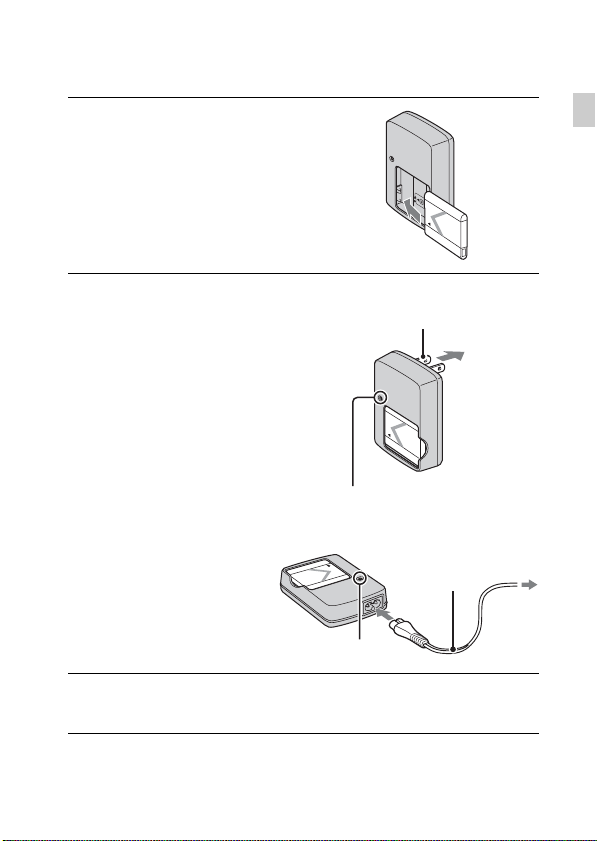
Battery charging and the number of images/time that can be recorded
Insert the battery pack into the
1
battery charger.
• You can charge the battery even when it is
partially charged.
GB
Battery
pack
Connect the battery
2
charger to the wall
For customers in the USA and Canada
Plug
outlet (wall socket).
If you continue charging the
battery pack for about one
more hour after the
CHARGE lamp turns off,
the charge will last slightly
longer (full charge).
CHARGE lamp
Lit: Charging
Off: Charging finished
(normal charge)
When charging is finished, disconnect the battery
3
charger.
CHARGE lamp
For customers in countries/regions
other than the USA and Canada
Power cord
(mains lead)
CHARGE lamp
GB
11
Page 12

x
Charging time
Full charge time Normal charge time
Approx. 245 min. Approx. 185 min.
Notes
• The table above shows the time required to charge a fully depleted battery pack at
a temperature of 25°C (77°F). Charging may take longer depending on conditions
of use and circumstances.
• Connect the battery charger to the nearest wall outlet (wall socket).
• When charging is finished, disconnect the power cord (mains lead) and the battery
charger from the wall outlet (wall socket), and remove the battery pack from the
battery charger.
• Be sure to use the battery pack or the battery charger of the genuine Sony brand.
x
Battery life and number of images you can record/
view
Battery life (min.) No. of Images
Shooting still images Approx. 115 Approx. 230
Viewing still images Approx. 190 Approx. 3800
Shooting movies Approx. 60 —
Notes
• The number of images that can be recorded is an approximate number when
shooting with a fully charged battery pack. The number may be less depending on
the circumstances.
• The number of images that can be recorded is when shooting under the following
conditions:
– Using Sony “Memory Stick PRO Duo” media (sold separately).
– When a fully charged battery pack (supplied) is used at an ambient temperature
of 25°C (77°F).
• The number of still images that can be recorded is based on the CIPA standard,
and is for shooting under the following conditions.
(CIPA: Camera & Imaging Products Association)
– DISP (Screen Display Settings) is set to [Normal].
– Shooting once every 30 seconds.
– The zoom is switched alternately between the W and T ends.
– The flash strobes once every two times.
– The power turns on and off once every ten times.
GB
12
Page 13

• The battery life for movies is when shooting under the following conditions:
– Recording mode: AVCHD HQ
– When continuous shooting ends because of set limits, press the shutter button
down again and continue shooting. Shooting functions such as the zoom do not
operate.
z Using the camera abroad
You can use the camera and the battery charger (supplied) in any country or
region where the power supply is within 100 V to 240 V AC, 50/60 Hz.
An electronic transformer (travel converter) is unnecessary. Do not use an
electronic transformer, as this may cause a malfunction.
GB
GB
13
Page 14
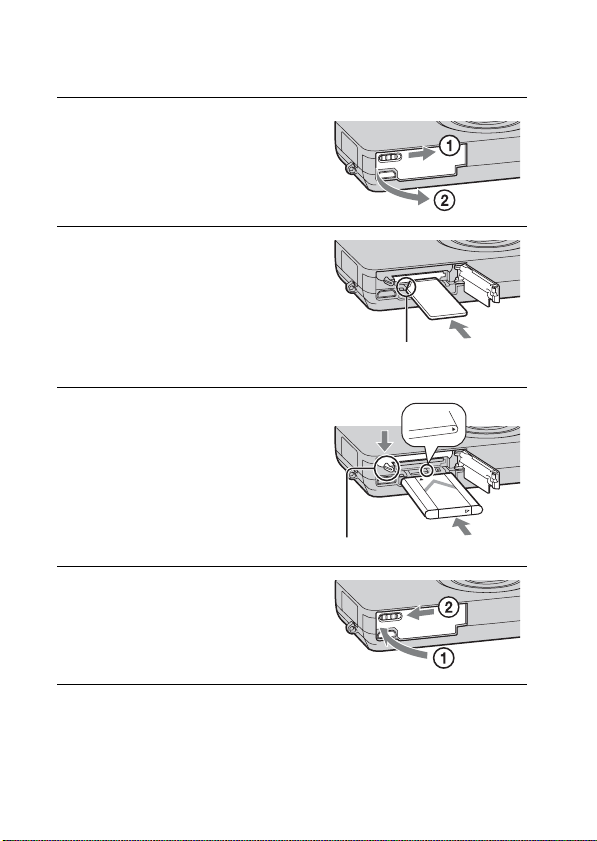
Inserting the battery pack/a memory card (sold separately)
Open the cover.
1
Insert a memory card (sold
2
separately).
With the notched corner facing as
illustrated, insert the memory card
until it clicks into place.
Note the notched corner facing
the correct direction.
Insert the battery pack.
3
Align the battery pack with the guide
arrow inside the battery insertion slot.
Then, insert the battery pack until the
battery eject lever locks into place.
Battery eject lever
Close the cover.
4
• Closing the cover with the battery
inserted incorrectly may damage the
camera.
14
GB
Page 15
x
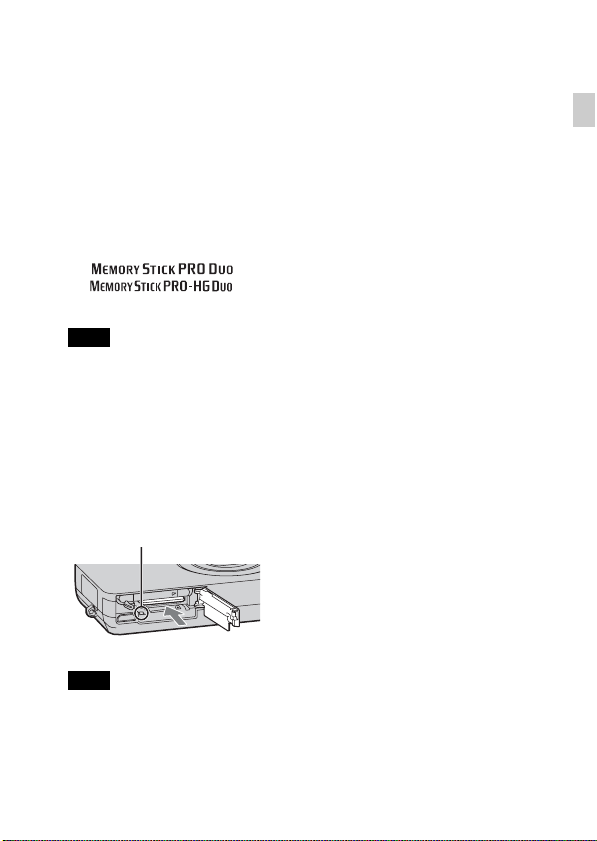
Memory card that you can use
The following memory cards are compatible with this camera: “Memory Stick
PRO Duo” media, “Memory Stick PRO-HG Duo” media, “Memory Stick
Duo” media, SD memory card, SDHC memory card and SDXC memory card.
However, all memory cards are not guaranteed to work with this camera.
MultiMediaCard cannot be used.
• In this manual, the term “Memory Stick Duo” media is used to refer to “Memory
Stick PRO Duo” media, “Memory Stick PRO-HG Duo” media and “Memory
Stick Duo” media, and the term “SD card” is used to refer to SD memory card,
SDHC memory card and SDXC memory card.
• When recording movies, it is recommended that you use the following memory
cards:
– (Mark2) (“Memory Stick PRO Duo” (Mark2) media)
– (“Memory Stick PRO-HG Duo” media)
– SD memory card, SDHC memory card or SDXC memory card (Class 4 or faster)
Note
• Images recorded on an SDXC memory card cannot be transferred or played back
on computers or AV devices that are not exFAT-compatible, even when the
camera is connected to the computer or AV device using a USB cable. Before
connecting, make sure that the device is exFAT-compatible. If connected to a
device that is not exFAT-compatible, a format drive request may appear. Do not
format the drive, or all data will be lost. (exFAT is the file system used by SDXC
memory cards.)
x
To remove the memory card
Access lamp
Make sure that the access lamp is not lit,
then push the memory card in once.
GB
Note
• Never remove the memory card/the battery pack when the access lamp is lit. This
may cause damage to data or the memory card.
GB
15
Page 16
x
When there is no memory card inserted
Images are stored in the camera’s internal memory (approximately 32 MB).
To copy images from the internal memory to a memory card, insert a memory
card in the camera, then select MENU t (Settings) t (Memory
Card Tool) t [Copy].
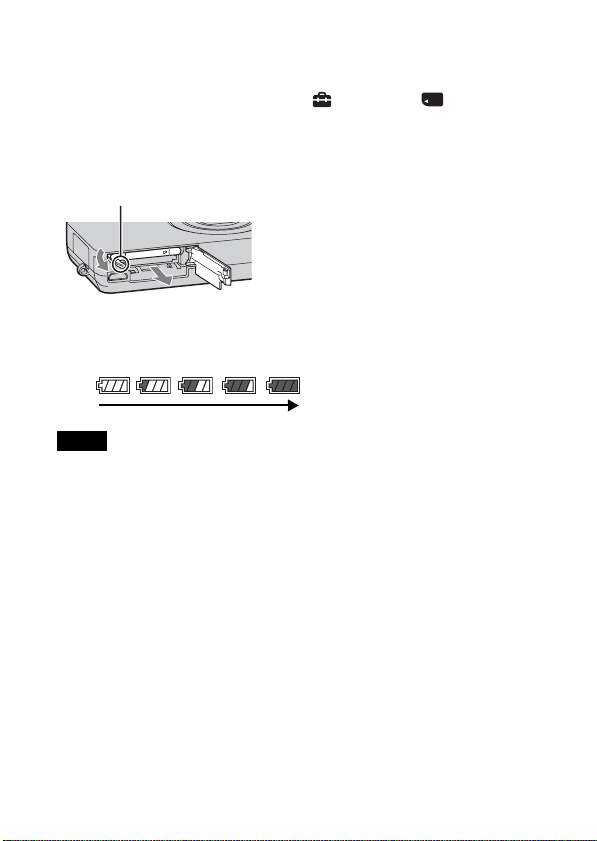
x
To remove the battery pack
Battery eject lever
x
Checking the remaining battery charge
A remaining charge indicator appears on the LCD screen.
High
Notes
• It takes about one minute until the correct remaining charge indicator appears.
• The remaining charge indicator may not be correct under certain circumstances.
• When [Power Save] is set to [Standard] or [Stamina], if you do not operate the
camera for a certain period of time while the power is on, the LCD screen becomes
dark, then the camera turns off automatically (Auto power-off function).
• To keep clean battery pack terminal and prevent short-circuiting, place the battery
pack in a plastic bag, etc. when carrying and storing to isolate it from other metal
objects, etc.
Slide the battery eject lever. Be sure not
to drop the battery pack.
Low
16
GB
Page 17
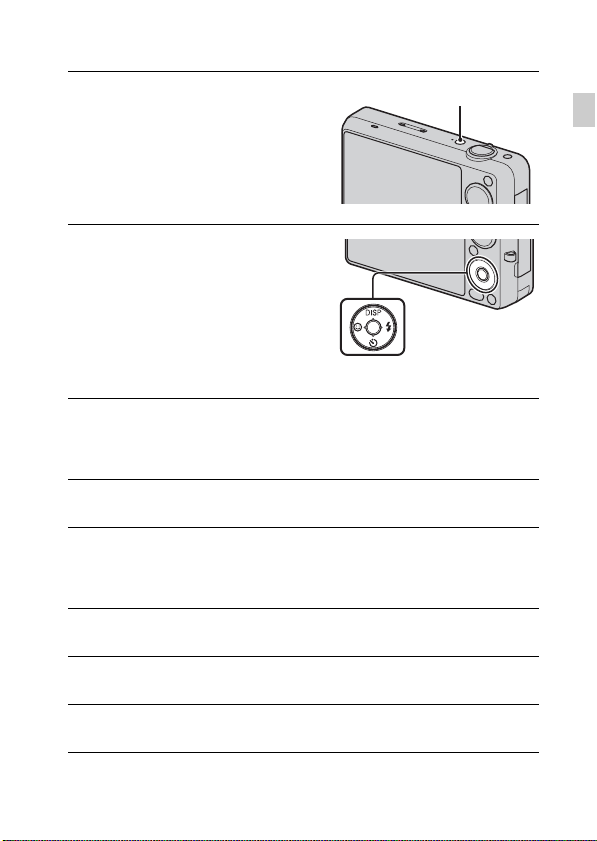
Setting the date and time/display color
Press the ON/OFF (Power)
1
button.
The camera is turned on. The power
lamp lights up only when the camera
starts up.
• It may take time for the power to
turn on and allow operation.
Select a setting item with
2
v/V on the control button,
then press z.
Date & Time Format: Selects the
date and time display format.
Daylight Savings: Selects Daylight
Savings On/Off.
Date & Time: Sets the date and time.
Set the numeric value and desired settings with v/V/
3
b/B, then press z.
• Midnight is indicated as 12:00 AM, and noon as 12:00 PM.
Select [OK], then press z.
4
Follow the instructions on the screen. Select your
5
desired area with b/B on the control button, then
press z.
Select [OK], then press z.
6
ON/OFF (Power) button
Control button
GB
Select desired display color, then press z.
7
Select [OK], then press z.
8
GB
17
Page 18

x
Superimposing the date on the images
The camera does not have a feature for superimposing dates on images. By
using “PMB” in the CD-ROM (supplied), you can print or save images with
the date. For details, see the “PMB Help”.
x
Setting the date and time again
The date and time setup screen appears automatically only when the power is
turned on the first time. To reset the date and time, display the date and time
setup screen by pressing MENU t (Settings) t (Clock Settings) t
[Date & Time Setting].
18
GB
Page 19

Shooting still images
Set the mode dial to
1
(Intelligent Auto
Adjustment), then press the
ON/OFF (Power) button.
Hold the camera steady as
2
illustrated.
• Turn the W/T (zoom) lever to the T
side to zoom in, and to the W side to
zoom out.
GB
ON/OFF (Power) button
Mode dial
Press the shutter button
3
halfway down to focus.
When the image is in focus, a beep
sounds and the z indicator lights.
Press the shutter button
4
fully down.
Shutter
button
AE/AF
lock
GB
19
Page 20
Shooting movies
Set the mode dial to
1
(Movie Mode), then
press the ON/OFF
(Power) button.
ON/OFF (Power) button
Mode dial
Press the shutter button to
2
start recording.
• You can also record movies by
pressing the MOVIE (Movie) button.
• Do not cover the microphone.
Press the shutter button again to stop recording.
3
Notes
• The operating sound of the lens is recorded when the zoom function operates
while shooting a movie.
• The continuous shooting time of movies is possible for approximately 29 minutes
at one time, and may vary depending on shooting conditions.
x
Changing the Movie format
Press MENU t (Settings) t (Shooting Settings) t [Movie
format].
GB
Do not cover with
your fingers.
MOVIE (Movie) button
20
Page 21
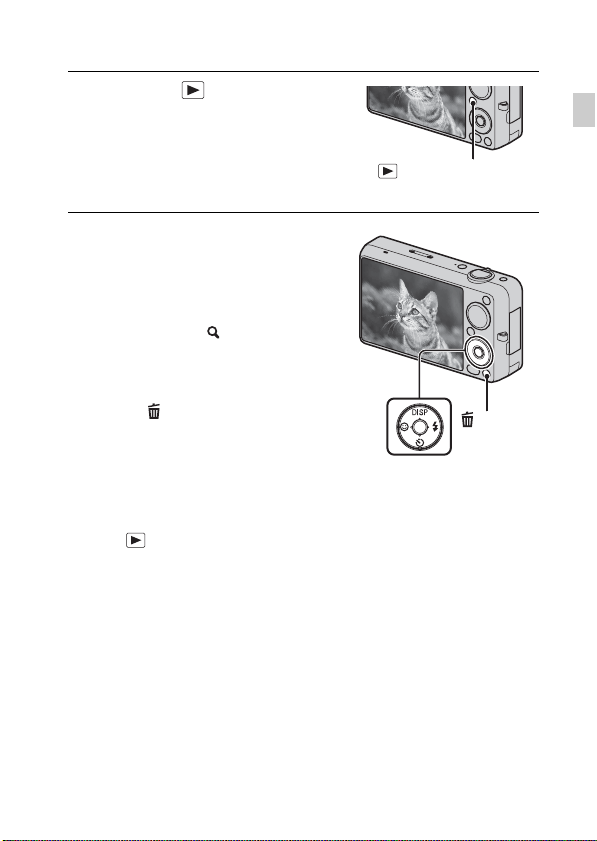
Viewing images
Press the (Playback)
1
button.
• When you play back images on a
memory card that were recorded on
other cameras, the database file
registration screen appears.
x
Selecting next/previous image
Select an image using B (next)/b (previous)
on the control button.
• To play back movies, press z on the
control button.
• To zoom in, turn the (Playback zoom)
lever to the T side.
x
Deleting an image
1 Press the (Delete) button.
2 Select [This Image] using v, then press
z.
x
Returning to shooting images
Press the (Playback) button.
• You can also return to shooting mode by pressing the shutter button halfway
down.
x
Turning off the camera
Press the ON/OFF (Power) button.
(Playback) button
(Delete)
button
Control button
GB
GB
21
Page 22

Learning more about the camera (“Cyber-shot Handbook”)
“Cyber-shot Handbook”, which explains how to use the camera in detail, is
included on the CD-ROM (supplied). Refer to it for in-depth instructions on
the many functions of the camera.
x
For Windows users
Turn on your computer, and insert the CD-ROM
1
(supplied) into the CD-ROM drive.
Click [Handbook].
2
Click [Install].
3
Start “Cyber-shot Handbook” from the shortcut on
4
the desktop.
x
For Macintosh users
Turn on your computer, and insert the CD-ROM
1
(supplied) into the CD-ROM drive.
Select the [Handbook] folder and copy
2
“Handbook.pdf” stored in the [GB] folder to your
computer.
After copying is complete, double-click
3
“Handbook.pdf”.
GB
22
Page 23

Specifications
Camera
[System]
Image device: 7.81 mm (1/2.3 type)
Exmor R CMOS sensor
Total pixel number of camera:
Approx. 12.8 Megapixels
Effective pixel number of camera:
Approx. 12.2 Megapixels
Lens: Sony G 5× zoom lens
f = 4.25 mm – 21.25 mm (24 mm –
120 mm (35 mm film equivalent)),
F2.4 (W) – F5.9 (T)
While shooting movies (16:9):
28 mm – 140 mm
While shooting movies (4:3):
34 mm – 170 mm
Exposure control: Automatic exposure,
Scene Selection (14 modes)
White balance: Auto, Daylight,
Cloudy, Fluorescent 1/2/3,
Incandescent, Flash, One Push
Signal format:
For 1080 50i: PAL color, CCIR
standards HDTV 1080/50i
specification
For 1080 60i: NTSC color, EIA
standards HDTV 1080/60i
specification
File format:
Still images: JPEG (DCF Ver. 2.0,
Exif Ver. 2.3, MPF Baseline)
compliant, DPOF compatible
3D still images: MPO (MPF
Extended (Disparity Image))
compliant
Movies (AVCHD format):
AVCHD Ver. 1.0 compliant
Video: MPEG-4 AVC/H.264
Audio: Dolby Digital 2ch,
equipped with Dolby Digital Stereo
Creator
• Manufactured under license from
Dolby Laboratories.
Movies (MP4 format):
Video: MPEG-4 AVC/H.264
Audio: MPEG-4 AAC-LC 2ch
Recording media: Internal Memory
(Approx. 32 MB), “Memory Stick
Duo” media, SD card
Flash: Flash range (ISO sensitivity
(Recommended Exposure Index)
set to Auto):
Approx. 0.2 m to 5.1 m (W)
(7 7/8 inches to 16 ft 8 3/4 inches)
Approx. 0.9 m to 2.1 m (T)
(2 ft 11 3/8 inches to 6 ft 10 5/8
inches)
GB
GB
23
Page 24

[Input and Output connectors]
HDMI connector: HDMI mini terminal
Multi use terminal: Type3
(AV-out (SD/HD Component)/
USB/DC-in):
Video output
Audio output (Stereo)
USB communication
USB communication: Hi-Speed USB
(USB 2.0 compliant)
[LCD screen]
LCD panel: 7.0 cm (2.8 type) TFT
drive
Total number of dots: 460 800 (960 ×
480) dots
[Power, general]
Power: Rechargeable battery pack
NP-BN1, 3.6 V
AC-LS5 AC Adaptor (sold
separately), 4.2 V
Power consumption (during shooting):
1.0 W
Operating temperature: 0°C to 40°C
(32°F to 104°F)
Storage temperature: –20°C to +60°C
(–4°F to +140°F)
Dimensions: 91.7 × 51.9 × 21.5 mm
(3 5/8 × 2 1/8 × 7/8 inches)
(W/H/D, excluding protrusions)
Mass (including NP-BN1 battery pack
and “Memory Stick Duo” media):
Approx. 146 g (5.2 oz)
Microphone: Stereo
Speaker: Monaural
Exif Print: Compatible
PRINT Image Matching III:
Compatible
BC-CSN/BC-CSNB battery
charger
Power requirements: AC 100 V to
240 V, 50/60 Hz, 2 W
Output voltage: DC 4.2 V, 0.25 A
Operating temperature: 0°C to 40°C
(32°F to 104°F)
Storage temperature: –20°C to +60°C
(–4°F to +140°F)
Dimensions: Approx. 55 × 24 × 83 mm
(2 1/4 × 31/32 × 3 3/8 inches)
(W/H/D)
Mass: Approx. 55 g (1.9 oz)
Rechargeable battery pack
NP-BN1
Used battery: Lithium-ion battery
Maximum voltage: DC 4.2 V
Nominal voltage: DC 3.6 V
Maximum charge voltage: DC 4.2 V
Maximum charge current: 0.9 A
Capacity:
typical: 2.3 Wh (630 mAh)
minimum: 2.2 Wh (600 mAh)
Design and specifications are subject to
change without notice.
24
GB
Page 25
Trademarks
• The following marks are trademarks
of Sony Corporation.
, “Cyber-shot,”
“Memory Stick,” , “Memory
Stick PRO,” ,
“Memory Stick Duo,”
, “Memory
Stick PRO Duo,”
, “Memory
Stick PRO-HG Duo,”
, “Memory
Stick Micro,” “MagicGate,”
, “BRAVIA,”
“PhotoTV HD,” “DVDirect,”
TransferJet and the TransferJet logo
• “Blu-ray Disc” and the logo are
trademarks.
• “AVCHD” and “AVCHD” logotype
are trademarks of Panasonic
Corporation and Sony Corporation.
• Dolby and the double-D symbol are
trademarks of Dolby Laboratories.
• HDMI, the HDMI logo and HighDefinition Multimedia Interface are
trademarks or registered trademarks
of HDMI Licensing LLC.
• Microsoft, Windows, DirectX and
Windows Vista are either registered
trademarks or trademarks of
Microsoft Corporation in the United
States and/or other countries.
• Macintosh, Mac OS and “iMovie”
are trademarks or registered
trademarks of Apple Inc.
• Intel and Pentium are trademarks or
registered trademarks of Intel
Corporation.
• SDXC and SDHC logos are
trademarks of SD-3C, LLC.
• MultiMediaCard is a trademark of th e
MultiMediaCard Association.
• “PlayStation” is a registered
trademark of Sony Computer
Entertainment Inc.
• Adobe and Reader are either
trademarks or registered trademarks
of Adobe Systems Incorporated in the
United States and/or other countries.
• The OBEX word mark and logo are
registered trademarks and are owned
by Infrared Data Association
®
(IrDA
).
• Eye-Fi is a trademark of Eye-Fi, Inc.
• In addition, system and product
names used in this manual are, in
general, trademarks or registered
trademarks of their respective
developers or manufacturers.
However, the ™ or ® marks are not
used in all cases in this manual.
Additional information on this
product and answers to frequently
asked questions can be found at
our Customer Support Website.
Printed on 70% or more recycled paper
using VOC (Volatile Organic
Compound)-free vegetable oil based
ink.
GB
GB
25
Page 26

Français
Aide-mémoire
Les numéros de modèle et de série se situent sous l’appareil. Prendre en note le numéro de
série dans l’espace prévu ci-dessous. Se reporter à ces numéros lors des communications
avec le détaillant Sony au sujet de ce produit.
Modèle no DSC-WX5
No de série _____________________________
AVERTISSEMENT
Afin de réduire les risques d’incendie ou de décharge électrique,
n’exposez pas cet appareil à la pluie ou à l’humidité.
IMPORTANTES INSTRUCTIONS DE SECURITE
- CONSERVEZ CES INSTRUCTIONS
DANGER
AFIN DE REDUIRE LE RISQUE D’INCENDIE OU DE
DECHARGE ELECTRIQUE, SUIVEZ EXACTEMENT CES
INSTRUCTIONS
Si la forme de la fiche ne correspond pas à la prise secteur, utilisez un adaptateur de fiche
accessoire de configuration correcte pour la prise secteur.
ATTENTION
[ Batterie
Toute erreur de manipulation de la batterie peut provoquer son explosion, entraîner un
incendie, voire même des brûlures de substances chimiques. Respectez les précautions
suivantes :
• Ne démontez pas la batterie.
• N’écrasez et n’exposez pas la batterie à des chocs ou à une force extérieure. Vous ne
devez pas la frapper avec un marteau, la laisser tomber ou marcher dessus.
• Ne court-circuitez pas les bornes de la batterie et maintenez-les à l’écart de tout contact
avec des objets métalliques.
• N’exposez pas la batterie à des températures supérieures à 60 °C (140 ° F), notamment les
rayons directs du soleil ou l’habitacle d’un véhicule garé au soleil.
• N’incinérez pas la batterie et ne la jetez pas au feu.
• Ne manipulez jamais des batteries lithium ion qui sont endommagées ou présentent une
FR
fuite.
2
Page 27

• Veillez à recharger la batterie à l’aide d’un chargeur Sony authentique ou d’un appareil
capable de la recharger.
• Tenez la batterie hors de la portée des petits enfants.
• Gardez la batterie au sec.
• Remplacez-la uniquement par une batterie de même type ou d’un type équivalent
recommandé par Sony.
• Mettez les batteries au rebut sans attendre, de la manière décrite dans les instructions.
[ Chargeur de batterie
Même si le témoin CHARGE n’est pas allumé, le chargeur de batterie n’est pas isolé du
secteur tant qu’il reste branché à la prise murale. En cas de problème lors de l’utilisation du
chargeur de batterie, coupez immédiatement l’alimentation en débranchant la fiche de la
prise murale.
Le cordon d’alimentation, s’il est fourni, est conçu spécifiquement pour une utilisation
exclusive avec cet appareil et il ne doit pas être utilisé avec un autre appareil électrique.
Note pour les clients européens
[ Avis aux consommateurs des pays appliquant les Directives UE
Le fabricant de ce produit est Sony Corporation, 1-7-1 Konan Minato-ku Tokyo, 108-0075
Japon. Le représentant agréé pour la compatibilité électromagnétique et la sécurité du
produit est Sony Deutschland GmbH, Hedelfinger Strasse 61, 70327 Stuttgart, Allemagne.
Pour toute question relative à la garantie ou aux réparations, reportez-vous à l’adresse que
vous trouverez dans les documents ci-joints, relatifs à la garantie et aux réparations.
Cet appareil a été testé et jugé conforme aux limites établies par la directive EMC visant
l’utilisation de câbles de connexion de moins de 3 mètres.
[ Attention
Le champ électromagnétique à des fréquences particulières peut avoir une incidence sur
l’image et le son de cet appareil.
[ Avis
Si l’électricité statique ou les champs électrostatiques entraînent une interruption lors du
transfert des données (échec), redémarrez l’application ou débranchez, puis rebranchez le
câble de connexion (USB, etc.).
FR
FR
3
Page 28
[ Traitement des appareils électriques et électroniques en fin de
vie (Applicable dans les pays de l’Union Européenne et aux
autres pays européens disposant de systèmes de collecte
sélective)
Ce symbole, apposé sur le produit ou sur son emballage, indique que ce
produit ne doit pas être traité avec les déchets ménagers. Il doit être remis
à un point de collecte approprié pour le recyclage des équipements
électriques et électroniques. En s’assurant que ce produit est bien mis au
rebut de manière appropriée, vous aiderez à prévenir les conséquences
négatives potentielles pour l’environnement et la santé humaine. Le
recyclage des matériaux aidera à préserver les ressources naturelles. Pour
pouvez contacter votre municipalité, votre déchetterie ou le magasin où vous avez acheté le
produit.
toute information supplémentaire au sujet du recyclage de ce produit, vous
[ Elimination des piles et accumulateurs usagés (Applicable dans
les pays de l’Union Européenne et aux autres pays européens
disposant de systèmes de collecte sélective)
Ce symbole, apposé sur les piles et accumulateurs ou sur les emballages,
indique que les piles et accumulateurs fournis avec ce produit ne doivent
pas être traités comme de simples déchets ménagers.
Sur certains types de piles, ce symbole apparaît parfois combiné avec un
symbole chimique. Les symboles pour le mercure (Hg) ou le plomb (Pb)
0,004% de plomb.
En vous assurant que ces piles et accumulateurs sont mis au rebut de façon appropriée,
vous participez activement à la prévention des conséquences négatives que leur mauvais
traitement pourrait provoquer sur l’environnement et sur la santé humaine. Le recyclage
des matériaux contribue par ailleurs à la préservation des ressources naturelles.
Pour les produits qui pour des raisons de sécurité, de performance ou d’intégrité de
données nécessitent une connexion permanente à une pile ou à un accumulateur, il
conviendra de vous rapprocher d’un service technique qualifié pour effectuer son
remplacement. En rapportant votre appareil électrique en fin de vie à un point de collecte
approprié vous vous assurez que la pile ou l’accumulateur incorporée sera traitée
correctement.
Pour tous les autres cas de figure et afin d’enlever les piles ou accumulateurs en toute
sécurité de votre appareil, reportez-vous au manuel d’utilisation.
Rapportez les piles ou accumulateurs usagés au point de collecte approprié pour le
recyclage.
Pour toute information complémentaire au sujet du recyclage de ce produit ou des piles et
accumulateurs, vous pouvez contacter votre municipalité, votre déchetterie locale ou le
point de vente où vous avez acheté ce produit.
sont rajoutés lorsque ces piles contiennent plus de 0,0005% de mercure ou
FR
4
Page 29

Pour les utilisateurs au Royaume-Uni
Une fiche moulée conforme à BS 1363 est installée sur cet équipement pour votre sécurité
et commodité.
Si le fusible dans la fiche fournie doit être remplacé, un fusible de même ampérage que
celui fourni et approuvé par ASTA ou BSI à BS 1362, (c’est-à-dire portant une marque
ou ) doit être utilisé.
Si la fiche fournie avec cet équipement comporte un couvercle de fusible détachable,
assurez-vous de remettre en place le couvercle de fusible après avoir remplacé le fusible.
N’utilisez jamais la fiche sans le couvercle de fusible. Si vous perdez le couvercle de
fusible, veuillez contacter le service après-vente Sony le plus proche.
FR
FR
5
Page 30
Reportez-vous au « Guide pratique de Cyber-shot » (PDF) se trouvant sur le CD-ROM fourni
Pour plus d’informations sur les opérations avancées, lisez
le « Guide pratique de Cyber-shot » (PDF) se trouvant sur
le CD-ROM (fourni) à l’aide d’un ordinateur.
Reportez-vous au « Guide pratique de Cyber-shot » pour
des instructions plus approfondies sur la prise de vue ou la visualisation
d’images et le raccordement de l’appareil à votre ordinateur, imprimante
ou téléviseur (page 23).
Vérification des accessoires fournis
• Chargeur de batterie BC-CSN/BC-CSNB (1)
• Cordon d’alimentation (non fourni aux États-Unis et au Canada) (1)
• Batterie rechargeable NP-BN1 (1)
• Câble USB, A/V pour borne multi-usage (1)
• Dragonne (1)
•CD-ROM (1)
– Logiciel d’application Cyber-shot
– « Guide pratique de Cyber-shot »
• Mode d’emploi (ce manuel) (1)
Remarques sur l’utilisation de l’appareil
Changement du réglage de la langue
Il est possible de changer, si nécessaire, la langue sur écran.
Pour changer le réglage de la langue, appuyez sur MENU t (Réglages)
t (Paramètres princip.) t [Language Setting].
Sauvegarde de la mémoire interne et de la carte mémoire
Ne mettez pas l’appareil hors tension, ne retirez pas la batterie ni ne retirez la
carte mémoire pendant que le témoin d’accès est allumé. Sinon, les données de
la mémoire interne ou la carte mémoire peuvent être endommagées. Protégez
toujours vos données en effectuant une copie de sauvegarde.
FR
6
Page 31

Fonctions incorporées dans cet appareil
• Ce manuel décrit chacune des fonctions des dispositifs compatibles/
incompatibles TransferJet, des dispositifs compatibles 1080 60i et des
dispositifs compatibles 1080 50i.
Pour vérifier si votre appareil prend en charge la fonction TransferJet et si
c’est un dispositif compatible 1080 60i ou dispositif compatible 1080 50i,
vérifiez les marques suivantes sur la face inférieure de l’appareil.
Dispositif compatible TransferJet : (TransferJet)
Dispositif compatible 1080 60i : 60i
Dispositif compatible 1080 50i : 50i
• Ne regardez pas pendant longtemps des images 3D prises avec cet appareil
sur des écrans compatibles 3D.
• Lorsque vous visualisez des images 3D prises avec cet appareil sur un écran
compatible 3D, vous pouvez ressentir une gêne sous forme de tension des
yeux, fatigue ou nausée. Pour éviter ces symptômes, nous vous
recommandons de faire des pauses régulières. Vous devez toutefois
déterminer par vous-même la longueur et la fréquence des pauses dont vous
avez besoin, car elles varient en fonction de l’individu. Si vous ressentez un
type de gêne quelconque, arrêtez de visualiser les images 3D jusqu’à ce que
vous vous sentiez mieux et consultez un médecin si nécessaire. Consultez
aussi le mode d’emploi fourni avec le dispositif ou le logiciel que vous avez
raccordé ou utilisez avec cet appareil. Notez que la vue d’un enfant est
encore au stade du développement (en particulier chez les enfants de moins
de 6 ans). Consultez un pédiatre ou un ophtalmologiste avant de laisser votre
enfant regarder des images 3D et assurez-vous qu’il/elle respecte les
précautions ci-dessus lors de la visualisation de ces images.
Fichiers base de données
Lorsque vous insérez une carte mémoire sans fichier base de données dans
l’appareil et le mettez sous tension, une partie de la capacité de la carte
mémoire est utilisée pour créer automatiquement un fichier dans la base de
données. Il se peut qu’il faille un certain temps avant que vous puissiez
effectuer l’opération suivante.
Remarques sur l’enregistrement/lecture
• Pour garantir un fonctionnement stable de la carte mémoire, nous vous
recommandons d’utiliser cet appareil pour formater toute carte mémoire
utilisée pour la première fois avec cet appareil. Notez que le formatage efface
toutes les données enregistrées sur la carte mémoire. Il n’est pas possible de
restaurer ces données. Veillez à sauvegarder toutes données importantes sur
une ordinateur ou autre dispositif de stockage.
FR
FR
7
Page 32

• Si vous enregistrez/supprimez plusieurs fois des images, une fragmentation
des données peut se produire sur la carte mémoire. Il est possible que des
films ne puissent pas être sauvegardés ou enregistrés. Dans ce cas,
sauvegardez vos images sur un ordinateur ou un autre support de stockage,
puis exécutez [Formater].
• Avant de commencer à enregistrer, effectuez un essai d’enregistrement pour
être sûr que l’appareil fonctionne correctement.
• L’appareil n’est ni étanche à la poussière, ni étanche aux projections
liquides, ni étanche à l’eau.
• Évitez d’exposer l’appareil à l’eau. Si de l’eau pénètre dans l’appareil, il peut
se produire un dysfonctionnement. Dans certains cas, l’appareil ne pourra
pas être réparé.
• Ne dirigez pas l’appareil vers le soleil ou une forte lumière. Ceci pourrait
entraîner un dysfonctionnement de l’appareil.
• N’utilisez pas l’appareil près de sources de fortes ondes radioélectriques ou
de radiations. À défaut, l’appareil risquerait de ne pas pouvoir enregistrer ou
lire correctement les images.
• L’utilisation de l’appareil dans des endroits sablonneux ou poussiéreux peut
provoquer des dysfonctionnements.
• Si une condensation d’humidité se produit, éliminez-la avant d’utiliser
l’appareil.
• Ne secouez pas et ne heurtez pas l’appareil. Ceci pourrait provoquer un
dysfonctionnement et empêcher l’enregistrement des images. En outre, le
support d’enregistrement pourrait devenir inutilisable ou les données
d’image être endommagées.
• Nettoyez la surface du flash avant l’utilisation. La chaleur de l’émission du
flash peut décolorer ou coller la saleté à la surface du flash et rendre ainsi
l’émission de lumière insuffisante.
Remarques sur l’écran LCD et l’objectif
• L’écran LCD a été fabriqué avec une technologie de très haute précision et
plus de 99,99 % des pixels sont opérationnels pour une utilisation effective.
Il se peut, toutefois, que des petits points noirs et/ou brillants (blancs, rouges,
bleus ou verts) apparaissent sur l’écran LCD. Ces points sont un résultat
normal du procédé de fabrication et n’affectent pas l’enregistrement.
• Lorsque le niveau de la batterie est faible, il se peut que l’objectif ne bouge
plus. Insérez une batterie chargée et mettez à nouveau l’appareil sous
tension.
Température de l’appareil
Votre appareil et la batterie peuvent chauffer du fait d’une utilisation continue,
mais ceci n’est pas un dysfonctionnement.
FR
8
Page 33

Protection contre la surchauffe
Selon la température de l’appareil et de la batterie, il se peut que vous ne
puissiez pas enregistrer de films ou que l’alimentation se coupe
automatiquement pour protéger l’appareil.
Un message s’affiche sur l’écran LCD avant que l’alimentation se coupe ou
que vous ne puissiez plus enregistrer de films.
Compatibilité des données d’image
• L’appareil est conforme à la norme universelle DCF (Design rule for Camera
File system) établie par JEITA (Japan Electronics and Information
Technology Industries Association).
• Sony ne garantit pas que l’appareil lira les images enregistrées ou éditées
avec un autre appareil, ou que les autres appareils pourront lire les images
enregistrées avec cet appareil.
Importation de films AVCHD sur un ordinateur
Lors de l’importation de films enregistrés en format AVCHD sur un
ordinateur, pour Windows utilisez le logiciel « PMB » se trouvant sur le
CD-ROM (fourni) ou pour Macintosh utilisez le logiciel « iMovie » intégré
aux ordinateurs Macintosh.
Remarques lors de la lecture de films sur d’autres dispositifs
Cet appareil utilise MPEG-4 AVC/H.264 High Profile pour l’enregistrement
en format AVCHD. La lecture des films enregistrés en format AVCHD avec
cet appareil n’est pas possible par les dispositifs suivants.
– Autres dispositifs compatibles avec le format AVCHD qui ne prennent pas
en charge High Profile
– Dispositifs incompatibles avec le format AVCHD
Cet appareil utilise aussi MPEG-4 AVC/H.264 Main Profile pour
l’enregistrement en format MP4. Pour cette raison, la lecture des films
enregistrés en format MP4 avec cet appareil n’est pas possible sur des
dispositifs autres que ceux prenant en charge MPEG-4 AVC/H.264.
Disques enregistrés avec une qualité d’image HD (haute
définition)
Cet appareil prend des films haute définition en format AVCHD. Un support
DVD contenant des films AVCHD ne doit pas être utilisé avec des lecteurs ou
enregistreurs DVD, car il se peut que le lecteur/enregistreur DVD n’éjecte pas
le support et efface son contenu sans aucun avertissement. Un support DVD
contenant des films AVCHD peut être lu sur un lecteur/enregistreur
compatible Blu-ray Disc™ ou un autre dispositif compatible.
FR
FR
9
Page 34

Avertissement sur les droits d’auteur
Les émissions de télévision, films, cassettes vidéo et autres œuvres peuvent
être protégés par des droits d’auteur. L’enregistrement non autorisé de telles
œuvres peut constituer une infraction à la loi sur les droits d’auteur.
Pas d’indemnisation en cas de contenu endommagé ou
d’enregistrement manqué
Sony ne saurait offrir d’indemnisation dans le cas où l’enregistrement serait
impossible ou que le contenu enregistré serait perdu ou endommagé, en raison
d’un dysfonctionnement de l’appareil ou d’une anomalie du support
d’enregistrement, etc.
10
FR
Page 35

Identification des pièces
Appareil photo
Panneau couvercle
A Déclencheur
B Touche (Rafale)
C Pour la prise de vue :
Levier W/T (zoom)
Pour la visualisation :
Levier (Zoom de lecture)/
Levier (Index)
D Flash
E Touche ON/OFF (Alimentation)
F Témoin d’alimentation
G Micro
H Témoin de retardateur/Témoin
I Objectif
J Haut-parleur
K Écran LCD
L Sélecteur de mode
M Touche (Lecture)
N Touche MOVIE (Film)
O Connecteur HDMI
P Crochet pour dragonne
Q Touche de commande
R Touche (Supprimer)
S Touche MENU
T Levier d’éjection de la batterie
U Fente d’insertion de la batterie
V Couvercle de batterie/carte
W Multiconnecteur
X Témoin d’accès
Y Fente de carte mémoire
Z Douille de trépied
wj Marque (TransferJet™)
FR
de détection de sourire/
Illuminateur d’assistance AF
Menu activé : v/V/b/B/z
Menu désactivé : DISP/ / /
/Mise au point continue
mémoire
• Utilisez un trépied ayant une
longueur de vis inférieure à
5,5 mm (7/32 po). Sinon vous ne
pouvez pas fixer fermement
l’appareil et il peut être
endommagé.
FR
11
Page 36

Charge de la batterie et nombre d’images/durée pouvant être enregistrés
Insérez la batterie dans le
1
chargeur de batterie.
• Vous pouvez charger la batterie même
lorsqu’elle est partiellement chargée.
Batterie
Branchez le
2
chargeur de batterie
Pour les utilisateurs aux États-Unis et
au Canada
à une prise murale.
Si vous continuez à charger
la batterie pendant encore
environ une heure après que
le témoin CHARGE
s’éteint, la charge durera
légèrement plus longtemps
(charge complète).
Témoin CHARGE
Allumé : Charge
Désactivé : Charge
terminée (charge normale)
Lorsque la charge est terminée, débranchez le
3
chargeur de batterie.
FR
Témoin CHARGE
Pour les utilisateurs de pays/régions
autres que les États-Unis et le Canada
Témoin CHARGE
12
Fiche
Cordon
d’alimentation
Page 37

x
Durée de charge
Durée de charge complète Durée de charge normale
245 min environ 185 min environ
Remarques
• Le tableau ci-dessus indique la durée nécessaire pour charger une batterie
complètement déchargée à une température de 25 °C (77 °F). Selon les conditions
d’utilisation et les circonstances, la charge peut prendre plus longtemps.
• Raccordez le chargeur de batterie à la prise murale la plus proche.
• Lorsque la charge est terminée, débranchez le cordon d’alimentation et le chargeur
de batterie de la prise murale, et retirez la batterie du chargeur de batterie.
• Veillez à utiliser une batterie ou un chargeur de batterie garanti d’origine Sony.
x
Autonomie de la batterie et nombre d’images que
vous pouvez enregistrer/visualiser
Autonomie de la
batterie (min)
Prise de vue d’images fixes Environ 115 Environ 230
Visualisation d’images fixes Environ 190 Environ 3800
Enregistrement de films Environ 60 —
Remarques
• Le nombre d’images pouvant être enregistrées est un nombre approximatif lors
d’une prise de vue avec une batterie complètement chargée. Selon les
circonstances, ce nombre peut être inférieur.
• Le nombre d’images pouvant être enregistrées est celui lors d’une prise de vue
dans les conditions suivantes :
– Utilisation d’un « Memory Stick PRO Duo » Sony (vendu séparément).
– Lorsqu’une batterie (fournie) complètement chargée est utilisée à une
température ambiante de 25 °C (77 °F).
• Le nombre d’images fixes pouvant être enregistrées est basé sur la norme CIPA et
il correspond à une prise de vue dans les conditions suivantes.
(CIPA : Camera & Imaging Products Association)
– DISP (Réglages affichage sur écran) est placé sur [Normal].
– prise de vue une fois toutes les 30 secondes.
– zoom commuté alternativement entre le côté W et le côté T.
– flash déclenché toutes les deux fois.
– mise sous et hors tension toutes les dix fois.
Nombre d’images
FR
FR
13
Page 38

• L’autonomie de la batterie pour les films est celle lors d’une prise de vue dans les
conditions suivantes :
– Mode d’enregistrement : AVCHD HQ
– Lorsque la prise de vue continue se termine du fait de limites spécifiées,
enfoncez à nouveau le déclencheur et continuez la prise de vue. Les fonctions de
prise de vue telles que le zoom ne sont pas opérantes.
z Utilisation de l’appareil à l’étranger
Vous pouvez utiliser l’appareil et le chargeur de batterie (fourni) dans tout pays
ou région où l’alimentation électrique est de 100 V à 240 V CA, 50/60 Hz.
Un transformateur électronique (convertisseur de voyage) n’est pas nécessaire.
N’utilisez pas de transformateur électronique car cela pourrait provoquer un
dysfonctionnement.
14
FR
Page 39

Insertion de la batterie/d’une carte mémoire (vendue séparément)
Ouvrez le couvercle.
1
Insérez une carte mémoire
2
(vendue séparément).
Le coin entaillé étant dans le sens
illustré, insérez la carte mémoire
jusqu’à ce qu’elle se mette en place
avec un déclic.
Insérez la batterie.
3
Alignez la batterie avec la flèche guide
à l’intérieur de la fente d’insertion de
la batterie. Puis insérez la batterie
jusqu’à ce que le levier d’éjection de
la batterie se verrouille en place.
Fermez le couvercle.
4
• La fermeture du couvercle alors que
la batterie est incorrectement insérée
peut endommager l’appareil.
Vérifiez que le coin entaillé est
dans le bon sens.
Levier d’éjection de la batterie
FR
FR
15
Page 40

x
Cartes mémoire que vous pouvez utiliser
Les cartes mémoire suivantes sont compatibles avec cet appareil : « Memory
Stick PRO Duo », « Memory Stick PRO-HG Duo », « Memory Stick Duo »,
carte mémoire SD, carte mémoire SDHC et carte mémoire SDXC. Il n’est
toutefois pas garanti que toutes les cartes mémoire fonctionnent avec cet
appareil. Il n’est pas possible d’utiliser une MultiMediaCard.
• Dans ce manuel, le terme « Memory Stick Duo » est utilisé pour faire référence
aux « Memory Stick PRO Duo », « Memory Stick PRO-HG Duo » et « Memory
Stick Duo », et le terme « carte SD » est utilisé pour faire référence aux carte
mémoire SD, carte mémoire SDHC et carte mémoire SDXC.
• Pour l’enregistrement de films, il est recommandé d’utiliser les cartes mémoire
suivantes :
– (Mark2) (« Memory Stick PRO Duo » (Mark2))
– (« Memory Stick PRO-HG Duo »)
– Carte mémoire SD, carte mémoire SDHC ou carte mémoire SDXC (Classe 4 ou
plus rapide)
Remarque
• Il n’est pas possible de transférer ou d’afficher des images enregistrées sur une
carte mémoire SDXC sur des ordinateurs ou dispositifs AV qui ne sont pas
compatibles exFAT, même lorsque l’appareil est raccordé à l’ordinateur ou au
dispositif AV à l’aide d’un câble USB. Assurez-vous que le dispositif est
compatible exFAT avant de le raccorder. Si l’appareil est raccordé à un dispositif
qui n’est pas compatible exFAT, une demande de formatage du lecteur peut
apparaître. Ne formatez pas le lecteur sous peine de perdre toutes les données.
(exFAT est le système de fichier utilisé par les cartes mémoire SDXC.)
x
Pour retirer la carte mémoire
Témoin d’accès
Assurez-vous que le témoin d’accès n’est
pas allumé, puis enfoncez une fois la
carte mémoire.
Remarque
• Ne retirez jamais la carte mémoire/la batterie lorsque le témoin d’accès est allumé.
Cela pourrait endommager les données ou la carte mémoire.
FR
16
Page 41

x
Lorsqu’une carte mémoire n’est pas insérée
Les images sont enregistrées dans la mémoire interne de l’appareil (environ
32 Mo).
Pour copier des images de la mémoire interne vers une carte mémoire, insérez
une carte mémoire dans l’appareil, puis sélectionnez MENU t
(Réglages) t (Outil carte mémoire) t [Copier].
x
Pour retirer la batterie
Levier d’éjection de la batterie
x
Vérification de la charge restante de la batterie
Un indicateur de charge restante apparaît sur l’écran LCD.
Pleine
Remarques
• Il faut environ une minute pour que l’indicateur de charge restante correct
apparaisse.
• Dans certaines circonstances, l’indicateur de charge restante peut ne pas être
correct.
• Lorsque [Économie d'énergie] est placé sur [Standard] ou [Autonomie], si vous
n’utilisez pas l’appareil pendant un certain temps alors qu’il est sous tension,
l’écran LCD s’assombrit, puis l’appareil s’éteint automatiquement (fonction de
mise hors tension automatique).
• Pour que les bornes de la batterie restent propres et pour éviter de les court-
circuiter, glissez la batterie dans un sachet en plastique, par exemple, lorsque vous
la transportez et la rangez, afin d’éviter tout contact avec des objets métalliques,
notamment.
Faites glisser le levier d’éjection de la
batterie. Veillez à ne pas faire tomber la
batterie.
Faible
FR
FR
17
Page 42

Réglage de la date et de l’heure/de la couleur d’affichage
Appuyez sur la touche ON/
1
OFF (Alimentation).
L’appareil se met sous tension. Le
témoin d’alimenta tion ne s’allume que
lorsque l’appareil se met en marche.
• La mise sous tension peut prendre
un certain temps avant que
l’utilisation soit possible.
Sélectionnez un paramètre
2
de réglage avec v/V de la
touche de commande, puis
appuyez sur z.
Format date&heure : Permet de
sélectionner le format d’affichage de
la date et de l’heure.
Heure d'été : Permet de sélectionner
l’Heure d’été activée/désactivée.
Date&heure : Permet de régler la date et l’heure.
Spécifiez la valeur numérique et les réglages
3
souhaités avec v/V/b/B, puis appuyez sur z.
• Minuit est indiqué par 12:00 AM et midi par 12:00 PM.
Sélectionnez [OK], puis appuyez sur z.
4
Suivez les instructions sur l’écran. Sélectionnez la
5
zone souhaitée avec b/B de la touche de
commande, puis appuyez sur z.
Touche ON/OFF (Alimentation)
Touche de
commande
Sélectionnez [OK], puis appuyez sur z.
6
FR
18
Page 43

Sélectionnez la couleur d’affichage souhaitée, puis
7
appuyez sur z.
Sélectionnez [OK], puis appuyez sur z.
8
x
Horodatage des images
L’appareil ne comporte pas de fonction pour superposer des dates sur les
images. Vous pouvez imprimer ou sauvegarder des images avec la date en
utilisant « PMB » se trouvant sur le CD-ROM (fourni). Pour plus
d’informations, voir l’« Aide PMB ».
x
Nouveau réglage de la date et de l’heure
L’écran de paramétrage de la date et de l’heure apparaît automatiquement
seulement lors de la première mise sous tension. Pour régler à nouveau la date
et l’heure, affichez l’écran de paramétrage de la date et de l’heure en appuyant
sur MENU t (Réglages) t (Réglages horloge) t [Régl.
date&heure].
FR
FR
19
Page 44

Prise de vue d’images fixes
Placez le sélecteur de
1
mode sur (Réglage
auto intelligent), puis
appuyez sur la touche ON/
OFF (Alimentation).
Touche ON/OFF
(Alimentation)
Tenez l’appareil immobile,
2
comme illustré.
• Tournez le levier W/T (zoom) vers
le côté T pour faire un zoom avant et
vers le côté W pour faire un zoom
arrière.
Enfoncez le déclencheur
3
à mi-course pour effectuer
la mise au point.
Lorsque l’image est mise au point,
un bip se fait entendre et l’indicateur
z s’allume.
Enfoncez complètement
4
le déclencheur.
Sélecteur de
mode
Déclencheur
Verrouillage
AE/AF
20
FR
Page 45

Enregistrement de films
Placez le sélecteur de
1
mode sur (Mode Film),
puis appuyez sur la touche
ON/OFF (Alimentation).
Touche ON/OFF
(Alimentation)
FR
Sélecteur
de mode
Enfoncez le déclencheur
2
pour commencer
Ne couvrez pas
avec les doigts.
l’enregistrement.
• Vous pouvez aussi enregistrer des
films en appuyant sur la touche
MOVIE (Film).
• Ne couvrez pas le microphone.
Touche MOVIE (Film)
Enfoncez à nouveau le déclencheur pour arrêter
3
l’enregistrement.
Remarques
• Le son de fonctionnement de l’objectif est enregistré lorsque la fonction de zoom
s’active pendant la prise de vue d’un film.
• La prise de vue continue de films est possible pendant une durée d’environ
29 minutes par séance, et elle peut être différente selon les conditions de prise de
vue.
x
Changement du Format Film
Appuyez sur MENU t (Réglages) t (Réglages Pr de vue) t
[Format Film].
FR
21
Page 46

Visualisation d’images
Appuyez sur la touche
1
(Lecture).
• Lors de la lecture d’images sur une
carte mémoire qui ont été enregistrées
sur un autre appareil, l’écran
d’enregistrement de fichier dans la
base de données apparaît.
x
Sélection de l’image suivante/
précédente
Sélectionnez une image à l’aide de B
(suivante)/b (précédente) de la touche de
commande.
• Pour effectuer la lecture de films, appuyez
sur z de la touche de commande.
• Pour faire un zoom avant, tournez le levier
(Zoom de lecture) vers le côté T.
x
Suppression d’une image
1 Appuyez sur la touche (Supprimer).
2 Sélectionnez [Cette img] à l’aide de v,
puis appuyez sur z.
x
Retour à la prise d’images
Appuyez sur la touche (Lecture).
• Vous pouvez aussi retourner en mode de prise de vue en enfonçant le déclencheur
à mi-course.
Touche (Lecture)
Touche
(Supprimer)
Touche de
commande
x
Mettre l’appareil hors tension
Appuyez sur la touche ON/OFF (Alimentation).
FR
22
Page 47

Meilleure connaissance de l’appareil (« Guide pratique de Cyber-shot »)
Le « Guide pratique de Cyber-shot », qui explique en détails comment utiliser
l’appareil, se trouve sur le CD-ROM (fourni). Consultez-le pour des
instructions spécifiques sur les nombreuses fonctions de l’appareil.
x
Pour les utilisateurs de Windows
Mettez l’ordinateur sous tension et insérez le
1
CD-ROM (fourni) dans le lecteur de CD-ROM.
Cliquez sur [Handbook].
2
Cliquez sur [Installation].
3
Lancez le « Guide pratique de Cyber-shot » depuis
4
le raccourci sur le bureau.
x
Pour les utilisateurs d’un Macintosh
Mettez l’ordinateur sous tension et insérez le
1
CD-ROM (fourni) dans le lecteur de CD-ROM.
Sélectionnez le dossier [Handbook] et copiez le
2
fichier « Handbook.pdf » se trouvant dans le dossier
[FR] sur votre ordinateur.
FR
Après la copie, double-cliquez sur
3
« Handbook.pdf ».
FR
23
Page 48

Spécifications
Appareil photo
[Système]
Dispositif d’image : 7,81 mm Capteur
CMOS Exmor R (type 1/2,3)
Nombre total de pixels de l’appareil :
Environ 12,8 mégapixels
Nombre de pixels utiles de l’appareil :
Environ 12,2 mégapixels
Objectif : Objectif zoom Sony G 5×
f = 4,25 mm – 21,25 mm (24 mm –
120 mm (équivalant à un film
35 mm))
F2,4 (W) – F5,9 (T)
Pendant la prise de vue de films
(16:9) : 28 mm – 140 mm
Pendant la prise de vue de films
(4:3) : 34 mm – 170 mm
Contrôle de l’exposition : Exposition
automatique, sélection de scène
(14 modes)
Balance des blancs : Auto, Lumière
jour, Nuageux, Eclairage
fluorescent 1/2/3, Eclairage
incandescent, Flash, Pression
unique
Format du signal :
Pour 1080 50i : Couleur PAL,
normes CCIR spécifications
HDTV 1080/50i
Pour 1080 60i : Couleur NTSC,
normes EIA spécifications HDTV
1080/60i
Format de fichier :
Images fixes : Conformes à JPEG
(DCF Ver. 2.0, Exif Ver. 2.3, MPF
Baseline), compatibles DPOF
Images fixes 3D : Conformes à
MPO (MPF Extended (Disparity
Image))
Films (format AVCHD) :
Conformes à AVCHD Ver. 1.0
Vidéo : MPEG-4 AVC/H.264
Audio : Dolby Digital 2 can.,
équipé avec Dolby Digital Stereo
Creator
• Fabriqué sous licence de Dolby
Laboratories.
Films (format MP4) :
Vidéo : MPEG-4 AVC/H.264
Audio : MPEG-4 AAC-LC 2 can.
Support d’enregistrement : Mémoire
interne (environ 32 Mo),
« Memory Stick Duo », Carte SD
Flash : Portée du flash (Sensibilité ISO
(Indice de lumination
recommandé) réglée sur Auto) :
0,2 m à 5,1 m (W)
(7 7/8 po à 16 pi 8 3/4 po) environ
0,9 m à 2,1 m (T)
(2 pi 11 3/8 po à 6 pi 10 5/8 po)
environ
24
FR
Page 49

[Connecteurs d’entrée et de sortie]
Connecteur HDMI : Mini borne HDMI
Borne multi-usage : Type3
(Sortie AV (composant SD/HD)/
USB/entrée DC) :
Sortie vidéo
Sortie audio (Stéréo)
Communication USB
Communication USB : Hi-Speed USB
(compatible USB 2.0)
[Écran LCD]
Panneau LCD : Matrice active TFT
7,0 cm (type 2,8)
Nombre total de points : 460 800
(960 × 480) points
[Alimentation, caractéristiques
générales]
Alimentation : Batterie rechargeable
NP-BN1, 3,6 V
Adaptateur secteur
AC-LS5 (vendu séparément),
4,2 V
Consommation (pendant la prise de
vue) : 1,0 W
Température de fonctionnement : 0 °C
à 40 °C (32 °F à 104 °F)
Température de stockage : –20 °C à
+60°C (–4°F à +140°F)
Dimensions : 91,7 × 51,9 × 21,5 mm
(3 5/8 × 2 1/8 × 7/8 po)
(L/H/P, parties saillantes non
comprises)
Poids (batterie NP-BN1 et « Memory
Stick Duo » compris) : Environ
146 g (5,2 oz)
Micro : Stéréo
Haut-parleur : Monaural
Exif Print : Compatible
PRINT Image Matching III :
Compatible
Chargeur de batterie BC-CSN/
BC-CSNB
Alimentation requise : 100 V à 240 V
CA, 50/60 Hz, 2 W
Tension de sortie : 4,2 V CC, 0,25 A
Température de fonctionnement : 0 °C
à 40 °C (32 °F à 104 °F)
Température de stockage : –20 °C à
+60°C (–4°F à +140°F)
Dimensions : Environ 55 × 24 × 83 mm
(2 1/4 × 31/32 × 3 3/8 po)
(L/H/P)
Poids : 55 g (1,9 oz) environ
Batterie rechargeable
NP-BN1
Batterie utilisée : Batterie Lithium-ion
Tension maximale : 4,2 V CC
Tension nominale : 3,6 V CC
Tension de charge maximale :
4,2 V CC
Courant de charge maximal : 0,9 A
Capacité :
type : 2,3 Wh (630 mAh)
minimum : 2,2 Wh (600 mAh)
La conception et les spécifications sont
susceptibles de modifications sans
préavis.
FR
FR
25
Page 50

Marques
• Les marques suivantes sont des
marques commerciales de Sony
Corporation.
« Memory Stick », , « Memory
Stick PRO », ,
« Memory Stick Duo »,
Stick PRO Duo »,
« Memory Stick PRO-HG Duo »,
Stick Micro », « MagicGate »,
« PhotoTV HD », « DVDirect »,
TransferJet et le logo TransferJet
• « Blu-ray Disc » et son logo sont des
marques commerciales.
• « AVCHD » et le logotype
« AVCHD » sont des marques
commerciales de Panasonic
Corporation et Sony Corporation.
• Dolby et le symbole Double D sont
des marques commerciales de Dolby
Laboratories.
• HDMI, le logo HDMI et « HighDefinition Multimedia Interface »
sont des marques commerciales ou
marques déposées de HDMI
Licensing LLC.
• Microsoft, Windows, DirectX et
Windows Vista sont des marques
déposées ou des marques
commerciales de Microsoft
Corporation aux États-Unis et/ou
dans d’autres pays.
• Macintosh, Mac OS et « iMovie »
sont des marques commerciales ou
marques déposées d’Apple Inc.
• Intel et Pentium sont des marques
commerciales ou marques déposées
d’Intel Corporation.
FR
, « Cyber-shot »,
, « Memory
, « BRAVIA »,
26
,
, « Memory
• Les logos SDXC et SDHC sont des
marques commerciales de SD-3C,
LLC.
• MultiMediaCard est une marque
commerciale de MultiMediaCard
Association.
• « PlayStation » est une marque
déposée de Sony Computer
Entertainment Inc.
• Adobe et Reader sont soit des
marques commerciales soit des
marques déposées d’Adobe Systems
Incorporated aux États-Unis et/ou
dans d’autres pays.
• La lettre de marque et le logo OBEX
sont des marques déposées et sont la
propriété d’Infrared Data Association
®
(IrDA
).
• Eye-Fi est une marque commerciale
d’Eye-Fi, Inc.
• Les noms de système et de produit
utilisés dans ce manuel sont
généralement des marques
commerciales ou des marques
déposées de leurs créateurs ou
fabricants respectifs. Notez que les
marques ™ ou ® ne sont pas toujours
utilisées dans ce manuel.
Des informations co mplémentaires
sur ce produit et des réponses à des
questions fréquemment posées
sont disponibles sur notre site Web
d’assistance client.
Imprimé sur papier recyclé à 70 % ou
plus avec de l’encre à base d’huile
végétale sans COV (composés
organiques volatils).
Page 51

FR
FR
27
Page 52

Italiano
AVVERTENZA
Per ridurre il pericolo di incendi o scosse elettriche, non esporre
l’apparecchio alla pioggia o all’umidità.
ISTRUZIONI IMPORTANTI PER LA SICUREZZA
-SALVARE QUESTE ISTRUZIONI
PERICOLO
PER RIDURRE IL RISCHIO DI INCENDI O SCOSSE
ELETTRICHE, SEGUIRE ATTENTAMENTE QUESTE
ISTRUZIONI
Se la forma della spina non si adatta alla presa di corrente, usare un adattatore accessorio
per spina con la configurazione corretta per la presa di corrente.
AVVERTENZA
[ Batteria
Se trattato in modo improprio, è possibile che il blocco batteria esploda, causi incendi o
provochi bruciature causate da sostanze chimiche. Attenersi alle precauzioni riportate di
seguito.
• Non smontare il prodotto.
• Non danneggiare o esporre il blocco batteria a scosse o urti eccessivi, ad esempio non
schiacciarlo con un martello, non lasciarlo cadere o calpestarlo.
• Non cortocircuitare o lasciare che eventuali oggetti metallici entrino in contatto con i
terminali della batteria.
• Non esporre a temperature elevate superiore a 60 °C, ad esempio alla luce solare diretta o
all’interno di un’auto parcheggiata al sole.
• Non bruciare o gettare nel fuoco.
• Non utilizzare pile agli ioni di litio danneggiate o con perdite di elettrolita.
• Assicurarsi di caricare il blocco batteria con un caricabatterie originale Sony o un
dispositivo in grado di caricare il blocco batteria stesso.
• Conservare il blocco batteria lontano dalla portata dei bambini.
• Non bagnare il blocco batteria.
• Sostituirlo esclusivamente con un blocco batteria dello stesso tipo o di tipo equivalente
consigliato da Sony.
• Smaltire i blocchi batteria il prima possibile come descritto nelle istruzioni.
IT
2
Page 53

[ Caricabatterie
Anche se la spia CHARGE non è accesa, il caricabatterie non è scollegato dalla rete di
alimentazione CA per tutto il tempo che è collegato alla presa a muro. Se si verifica
qualche problema durante l’uso del caricabatterie, disattivare immediatamente
l’alimentazione scollegando la spina dalla presa a muro.
Il cavo di alimentazione, se in dotazione, è progettato specificatamente solo per l’uso con
questa fotocamera e non deve essere usato con altre apparecchiature elettriche.
Attenzione per i clienti in Europa
[ Avviso per i clienti residenti nei paesi che applicano le direttive
UE
Questo prodotto è realizzato da Sony Corporation, 1-7-1 Konan Minato-ku Tokyo, 1080075 Giappone. Il Rappresentante autorizzato per la conformità alle direttive EMC e per la
sicurezza dei prodotti è Sony Deutschland GmbH, Hedelfinger Strasse 61, 70327 Stuttgart,
Germania. Per qualsiasi questione relativa all’assistenza o alla garanzia, consultare gli
indirizzi forniti a parte nei relativi documenti.
Il presente prodotto è stato testato ed è risultato conforme ai limiti stabiliti dalla Direttiva
EMC relativa all’uso dei cavi di collegamento di lunghezza inferiore a 3 metri.
[ Attenzione
Il campo elettromagnetico alle frequenze specifiche può influenzare l’immagine e il suono
di questa unità.
[ Nota
Se l’elettricità statica o interferenze elettromagnetiche causano l’interruzione del
trasferimento dei dati, che pertanto non avviene, è necessario riavviare l’applicazione
oppure scollegare, quindi ricollegare il cavo di comunicazione (USB e così via).
[ Trattamento del dispositivo elettrico o elettronico a fine vita
(applicabile in tutti i paesi dell’Unione Europea e in altri paesi
europei con sistema di raccolta differenziata)
dettagliate circa il riciclaggio di questo prodotto, potete contattare l’ufficio comunale, il
servizio locale di smaltimento rifiuti oppure il negozio dove l’avete acquistato. In caso di
smaltimento abusivo di apparecchiature elettriche e/o elettroniche potrebbero essere
applicate le sanzioni previste dalla normativa applicabile (valido solo per l’Italia).
Questo simbolo sul prodotto o sulla confezione indica che il prodotto non
deve essere considerato come un normale rifiuto domestico, ma deve
invece essere consegnato ad un punto di raccolta appropriato per il riciclo
di apparecchi elettrici ed elettronici. Assicurandovi che questo prodotto
sia smaltito correttamente, voi contribuirete a prevenire potenziali
conseguenze negative per l’ambiente e per la salute che potrebbero
altrimenti essere causate dal suo smaltimento inadeguato. Il riciclaggio dei
materiali aiuta a conservare le risorse naturali. Per informazioni più
IT
IT
3
Page 54

[ Trattamento delle pile esauste (applicabile in tutti i paesi
dell’Unione Europea e in altri paesi Europei con sistema di
raccolta differenziata)
Questo simbolo sul prodotto o sulla confezione indica che la pila non deve
essere considerata un normale rifiuto domestico.
Su alcuni tipi di pile questo simbolo potrebbe essere utilizzato in
combinazione con un simbolo chimico. I simboli chimici del mercurio
(Hg) o del piombo (Pb) sono aggiunti, se la batteria contiene più dello
Assicurandovi che le pile siano smaltite correttamente, contribuirete a prevenire potenziali
conseguenze negative per l’ambiente e per la salute che potrebbero altrimenti essere
causate dal loro inadeguato smaltimento. Il riciclaggio dei materiali aiuta a conservare le
risorse naturali.
In caso di prodotti che per motivi di sicurezza, prestazione o protezione dei dati richiedano
un collegamento fisso ad una pila interna, la stessa dovrà essere sostituita solo da personale
di assistenza qualificato. Consegnare il prodotto a fine vita al punto di raccolta idoneo allo
smaltimento di apparecchiature elettriche ed elettroniche; questo assicura che anche la pila
al suo interno venga trattata correttamente.
Per le altre pile consultate la sezione relativa alla rimozione sicura delle pile.
Conferire le pile esauste presso i punti di raccolta indicati per il riciclo.
Per informazioni più dettagliate circa lo smaltimento della pila esausta o del prodotto,
potete contattare il Comune, il servizio locale di smaltimento rifiuti oppure il negozio dove
l’avete acquistato.
0,0005% di mercurio o dello 0,004% di piombo.
IT
4
Page 55

Consultare la “Guida all’uso Cybershot” (PDF) sul CD-ROM in dotazione
Per i dettagli sulle operazioni avanzate, leggere la “Guida
all’uso Cyber-shot” (PDF) sul CD-ROM (in dotazione)
usando un computer.
Consultare la “Guida all’uso Cyber-shot” per le istruzioni
approfondite sulla ripresa o visione delle immagini e sul collegamento
della fotocamera al computer, alla stampante o al televisore (pagina 22).
Verifica degli accessori in dotazione
• Caricabatterie BC-CSN/BC-CSNB (1)
• Cavo di alimentazione (non in dotazione negli Stati Uniti e in Canada) (1)
• Pacco batteria ricaricabile NP-BN1 (1)
• Cavo USB, A/V per terminale multiuso (1)
• Cinturino da polso (1)
•CD-ROM (1)
– Software applicativo per Cyber-shot
– “Guida all’uso Cyber-shot”
• Istruzioni per l’uso (questo manuale) (1)
Note sull’uso della fotocamera
Cambiamento di impostazione della lingua
La lingua sullo schermo può essere cambiata se è necessario.
Per cambiare l’impostazione della lingua, premere MENU t (Impost.)
t (Impostaz. principali) t [Language Setting].
Copia di riserva della memoria interna e della scheda memoria
Non spegnere la fotocamera, né rimuovere il pacco batteria o la scheda
memoria mentre la spia di accesso è illuminata. Altrimenti i dati nella memoria
interna o la scheda memoria potrebbero essere danneggiati. Assicurarsi di
effettuare una copia di riserva per proteggere i dati.
IT
IT
5
Page 56

Funzioni incorporate in questa fotocamera
• Questo manuale descrive ciascuna delle funzioni delle periferiche
compatibili/incompatibili con TransferJet, delle periferiche compatibili con
1080 60i e delle periferiche compatibili con 1080 50i.
Per controllare se la fotocamera supporta la funzione TransferJet e se è una
periferica compatibile con 1080 60i o una periferica compatibile con 1080
50i, controllare i seguenti contrassegni sul fondo della fotocamera.
Periferica compatibile con TransferJet: (TransferJet)
Periferica compatibile con 1080 60i: 60i
Periferica compatibile con 1080 50i: 50i
• Non guardare le immagini 3D riprese con questa fotocamera per lunghi
periodi di tempo sui monitor compatibili con 3D.
• Quando si guardano le immagini 3D riprese con questa fotocamera su un
monitor compatibile con 3D, si potrebbe verificare un disagio nella forma di
sforzo degli occhi, stanchezza o nausea. Per evitare questi sintomi, si
consiglia di fare pause regolari. Tuttavia, è necessario determinare per se
stessi la durata e la frequenza delle pause richieste, poiché variano secondo
l’individuo. Se si verifica qualsiasi tipo di disagio, smettere di guardare le
immagini 3D finché ci si sente meglio e rivolgersi ad un medico se
necessario. Inoltre consultare le istruzioni per l’uso in dotazione con la
periferica o il software collegato o che si sta usando con questa fotocamera.
Tenere presente che la capacità visiva di un bambino è ancora in fase di
sviluppo (particolarmente i bambini al di sotto dell’età di 6 anni). Rivolgersi
ad un pediatra o un oculista prima di lasciar guardare le immagini 3D ad un
bambino e accertarsi che osservi le suddette precauzioni quando si guardano
tali immagini.
File di database
Quando si inserisce nella fotocamera una scheda memoria senza un file di
database e si accende la fotocamera, una parte di capacità della scheda
memoria è usata per creare automaticamente un file di database. Potrebbe
volerci un po’ di tempo finché viene eseguita l’operazione successiva.
Note sulla registrazione/riproduzione
• Per garantire operazioni stabili della scheda di memoria, si consiglia di usare
questa fotocamera per formattare qualsiasi scheda di memoria che viene
usata con questa fotocamera la prima volta. Tenere presente che la
formattazione cancellerà tutti i dati registrati sulla scheda di memoria. Questi
dati non possono essere ripristinati. Assicurarsi di fare un copia di riserva dei
dati importanti su un PC o su altra posizione di memorizzazione.
IT
6
Page 57

• Se si registrano/cancellano ripetutamente le immagini, sulla scheda memoria
potrebbe verificarsi la frammentazione dei dati. I filmati potrebbero non
essere in grado di essere salvati o registrati. In tal caso, salvare le immagini
su un PC o su un’altra posizione di memorizzazione, quindi [Formatta].
• Prima di iniziare a registrare, effettuare una registrazione di prova per
accertarsi che la fotocamera funzioni correttamente.
• La fotocamera non è né a tenuta di polvere, né di spruzzi e non è neanche
impermeabile.
• Evitare di sottoporre la fotocamera all’acqua. Se l’acqua penetra nella
fotocamera, si verifica un malfunzionamento. In alcuni casi, la fotocamera
non può essere riparata.
• Non puntare la fotocamera verso il sole o un’altra luce luminosa. Ciò può
causare un malfunzionamento della fotocamera.
• Non usare la fotocamera vicino ad un luogo che genera forti radioonde o
emette radiazioni. Altrimenti la fotocamera potrebbe non registrare o
riprodurre correttamente le immagini.
• Usando la fotocamera in luoghi sabbiosi o polverosi si possono causare dei
malfunzionamenti.
• Se si forma della condensa, eliminarla prima di usare la fotocamera.
• Non scuotere né urtare la fotocamera. Potrebbe causare un
malfunzionamento e si potrebbe non essere in grado di registrare le
immagini. Inoltre, il supporto di registrazione potrebbe diventare
inutilizzabile o i dati di immagine potrebbero essere danneggiati.
• Pulire la superficie del flash prima dell’uso. Il calore dell’emissione del flash
può far sì che la sporcizia presente sulla superficie del flash la faccia
scolorire o vi si appiccichi, provocando un’emissione insufficiente di luce.
Note sullo schermo LCD e sull’obiettivo
• Lo schermo LCD è stato fabbricato usando la tecnologia ad altissima
precisione, perciò oltre il 99,99% dei pixel sono operativi per l’uso effettivo.
Tuttavia, dei minuscoli punti neri e/o luminosi (bianchi, rossi, blu o verdi)
potrebbero apparire sullo schermo LCD. Questi punti sono un risultato
normale del processo di fabbricazione e non influiscono sulla registrazione.
• Quando il livello della batteria diventa basso, l’obiettivo potrebbe smettere di
muoversi. Inserire un pacco batteria carico e riaccendere la fotocamera.
Temperatura della fotocamera
La fotocamera e il pacco batteria potrebbero riscaldarsi a causa dell’uso
continuato, ma non si tratta di un malfunzionamento.
IT
IT
7
Page 58

Protezione contro il surriscaldamento
Secondo la temperatura della fotocamera e del pacco batteria, si potrebbe non
essere in grado di registrare i filmati o la fotocamera potrebbe spegnersi
automaticamente per essere protetta.
Un messaggio si visualizzerà sullo schermo LCD prima che la fotocamera si
spenga o che non si possa più registrare i filmati.
Compatibilità dei dati di immagine
• La fotocamera è conforme allo standard universale DCF (Design rule for
Camera File system) stabilito da JEITA (Japan Electronics and Information
Technology Industries Association).
• Sony non garantisce che la fotocamera riproduca le immagini registrate o
modificate con un altro apparecchio o che l’altro apparecchio riproduca le
immagini registrate con la fotocamera.
Importazione dei filmati AVCHD in un computer
Quando si importano i filmati registrati nel formato AVCHD in un computer,
per Windows usare il software “PMB” sul CD-ROM (in dotazione) o per
Macintosh usare il software “iMovie” venduto con i computer Macintosh.
Note per la riproduzione dei filmati su altre periferiche
Questa fotocamera usa il MPEG-4 AVC/H.264 High Profile per la
registrazione di formato AVCHD. I filmati registrati nel formato AVCHD con
questa fotocamera non possono essere riprodotti dalle seguenti periferiche.
– Altre periferiche compatibili con il formato AVCHD che non supporta High
Profile
– Periferiche incompatibili con il formato AVCHD
Questa fotocamera usa anche il MPEG-4 AVC/H.264 Main Profile per la
registrazione di formato MP4. Per questo motivo, i filmati registrati nel
formato MP4 con questa fotocamera non possono essere riprodotti sulle
periferiche diverse da quelle che supportano MPEG-4 AVC/H.264.
Dischi registrati con la qualità di immagine HD (alta definizione)
Questa fotocamera cattura i filmati ad alta definizione nel formato AVCHD. Il
supporto DVD contenente i filmati AVCHD non deve essere usato con i lettori
o registratori DVD, poiché il lettore/registratore DVD potrebbe non riuscire ad
espellere il supporto e potrebbe cancellare il suo contenuto senza
avvertimento. Il supporto DVD contenente i filmati AVCHD potrebbe essere
riprodotto su un lettore/registratore Blu-ray Disc™ compatibile o su un’altra
periferica compatibile.
IT
8
Page 59

Avvertimento sui diritti d’autore
I programmi televisivi, i film, le videocassette ed altri materiali possono essere
protetti dai diritti d’autore. La registrazione non autorizzata di tali materiali
può essere contraria ai provvedimenti di legge sui diritti d’autore.
Nessuna compensazione per il contenuto danneggiato o la
mancata registrazione
Sony non può compensare per la mancata registrazione, la perdita o i danni al
contenuto registrato a causa di un malfunzionamento della fotocamera o del
supporto di registrazione, ecc.
IT
IT
9
Page 60

Identificazione delle parti
Fotocamera
Pannello del coperchio
A Pulsante di scatto
B Tasto (Raffica)
C Per la ripresa: Leva dello zoom
(W/T)
Per la visione: Leva (Zoom di
riproduzione)/leva (Indice)
IT
10
D Flash
E Tasto ON/OFF (Alimentazione)
F Spia di alimentazione
G Microfono
H Spia dell’autoscatto/Spia
dell’otturatore sorriso/
Illuminatore AF
I Obiettivo
J Altoparlante
K Schermo LCD
L Manopola del modo
M Tasto (Riproduzione)
N Tasto MOVIE (Filmato)
O Connettore HDMI
P Gancio per cinturino da polso
Q Tasto di controllo
Menu attivato: v/V/b/B/z
Menu disattivato: DISP/ / /
/Messa a fuoco con inseguim.
R Tasto (Cancellazione)
S Tasto MENU
T Leva di espulsione della batteria
U Slot di inserimento della batteria
V Coperchio della batteria/della
scheda di memoria
W Connettore multiplo
X Spia di accesso
Y Slot della scheda di memoria
Z Attacco per treppiede
• Usare un treppiede con una vite
di lunghezza inferiore a 5,5 mm.
Altrimenti non è possibile fissare
saldamente la fotocamera e
potrebbero verificarsi dei danni
alla fotocamera.
wj Contrassegno
(TransferJet™)
Page 61

Carica del pacco batteria e il numero di immagini/il tempo che è possibile registrare
Inserire il pacco batteria nel
1
caricabatterie.
• È possibile caricare il pacco batteria anche
quando è parzialmente carico.
Pacco
batteria
IT
Collegare il
2
caricabatterie alla
Per i clienti negli Stati Uniti e in
Canada
presa a muro.
Se si continua a caricare il
pacco batteria per ancora
un’ora circa dopo che la
spia CHARGE si spegne, la
carica durerà leggermente
più a lungo (carica
completa).
Spia CHARGE
Illuminata: Carica
Spenta: La carica è
terminata (carica normale)
Quando la carica è terminata, scollegare il
3
caricabatterie.
Spia CHARGE
Per i clienti in paesi/regioni diversi
dagli Stati Uniti e Canada
Spia CHARGE
Spina
Cavo di
alimentazione
IT
11
Page 62

x
Tempo di carica
Tempo di carica completa Tempo di carica normale
Circa 245 min. Circa 185 min.
Note
• La suddetta tabella mostra il tempo necessario per caricare un pacco batteria
completamente esaurito ad una temperatura di 25°C. La carica potrebbe richiedere
più tempo a seconda delle condizioni d’uso e delle circostanze.
• Collegare il caricabatterie alla presa a muro più vicina.
• Quando la carica è terminata, scollegare il cavo di alimentazione e il caricabatterie
dalla presa a muro e rimuovere il pacco batteria dal caricabatterie.
• Assicurarsi di usare il pacco batteria o il caricabatterie del marchio autentico Sony.
x
Durata della batteria e numero di immagini che è
possibile registrare/vedere
Durata della batteria
(min.)
Ripresa di fermi
immagine
Visione dei fermi
immagine
Si riprendono i filmati Circa 60 —
Note
• Il numero di immagini che è possibile registrare è un numero approssimativo
quando si riprende con un pacco batteria completamente carico. Il numero
potrebbe essere inferiore a seconda delle circostanze.
• Il numero di immagini che è possibile registrare si riferisce a quando si riprende
nelle seguenti condizioni:
– Uso del “Memory Stick PRO Duo” Sony (in vendita separatamente).
– Quando un pacco batteria completamente carico (in dotazione) viene usato ad
una temperatura ambiente di 25°C.
• Il numero di fermi immagine che è possibile registrare si basa sullo standard CIPA
ed è per la ripresa nelle seguenti condizioni.
(CIPA: Camera & Imaging Products Association)
– DISP (Impost. display schermo) è impostato su [Normale].
– Si riprende una volta ogni 30 secondi.
– Lo zoom viene cambiato alternamente tra le estremità W e T.
– Il flash lampeggia una volta ogni due.
IT
– La fotocamera si accende e si spegne una volta ogni dieci.
12
Circa 115 Circa 230
Circa 190 Circa 3800
Numero di immagini
Page 63

• La durata del pacco batteria per i filmati si riferisce a quando si riprende nelle
seguenti condizioni:
– Modo di registrazione: AVCHD HQ
– Quando la ripresa continua termina a causa dei limiti impostati, premere di
nuovo il pulsante di scatto e continuare la ripresa. Le funzioni di ripresa come lo
zoom non funzionano.
z Uso della fotocamera all’estero
È possibile usare la fotocamera e il caricabatterie (in dotazione) in qualsiasi
paese o regione in cui la fonte di alimentazione è compresa tra 100 V e 240 V
CA, 50/60 Hz.
Un trasformatore elettronico (convertitore da viaggio) non è necessario. Non
usare un trasformatore elettronico, poiché potrebbe causare un
malfunzionamento.
IT
IT
13
Page 64

Inserimento del pacco batteria/di una scheda memoria (in vendita separatamente)
Aprire il coperchio.
1
Inserire una scheda
2
memoria (in vendita
separatamente).
Con l’angolo dentellato rivolto come è
illustrato, inserire la scheda memoria
finché scatta in posizione.
Inserire il pacco batteria.
3
Allineare il pacco batteria con la
freccia di guida all’interno dello slot di
inserimento della batteria. Quindi
inserire il pacco batteria finché la leva
di espulsione della batteria si blocca in
posizione.
Fare attenzione che l’angolo
dentellato sia rivolto nella
direzione corretta.
Leva di espulsione della
batteria
Chiudere il coperchio.
4
• Se si chiude il coperchio con il pacco
batteria inserito in modo sbagliato si
potrebbe danneggiare la fotocamera.
IT
14
Page 65

x
Scheda memoria utilizzabile
Le seguenti schede memoria sono compatibili con questa fotocamera:
“Memory Stick PRO Duo”, “Memory Stick PRO-HG Duo”, “Memory Stick
Duo”, scheda di memoria SD, scheda di memoria SDHC e scheda di memoria
SDXC. Tuttavia tutte le schede memoria non sono garantite per funzionare con
questa fotocamera. La scheda MultiMediaCard non può essere usata.
• In questo manuale il termine “Memory Stick Duo” viene usato per riferirsi al
“Memory Stick PRO Duo”, al “Memory Stick PRO-HG Duo”, al “Memory Stick
Duo” e il termine “Scheda SD” viene usato per riferirsi alla scheda di memoria
SD, alla scheda di memoria SDHC e alla scheda di memoria SDXC.
• Quando si registrano i filmati, si consiglia di usare le seguenti schede di memoria:
– (Mark2) (“Memory Stick PRO Duo” (Mark2))
– (“Memory Stick PRO-HG Duo”)
– Scheda di memoria SD, scheda di memoria SDHC o scheda di memoria SDXC
(Classe 4 o più veloce)
Nota
• Le immagini registrate su una scheda memoria SDXC non possono essere
trasferite o riprodotte su computer o periferiche AV che non sono compatibili con
exFAT, anche quando la fotocamera è collegata al computer o alla periferica AV
usando un cavo USB. Prima del collegamento, accertarsi che la periferica sia
compatibile con exFAT. Se si collega ad una periferica che non è compatibile con
exFAT, potrebbe apparire una richiesta di formattazione del drive. Non formattare
il drive o tutti i dati saranno persi. (exFAT è il sistema di file usato dalle schede
memoria SDXC.)
x
Per rimuovere la scheda memoria
Spia di accesso
Accertarsi che la spia di accesso non sia
illuminata, quindi spingere dentro una
volta la scheda memoria.
IT
Nota
• Non rimuovere mai la scheda memoria/il pacco batteria quando la spia di accesso
è illuminata. Questa operazione potrebbe causare danni ai dati o alla scheda
memoria.
IT
15
Page 66

x
Quando non c’è la scheda di memoria inserita
Le immagini vengono memorizzate nella memoria interna della fotocamera
(circa 32 MB).
Per copiare le immagini dalla memoria interna su una scheda memoria,
inserire una scheda memoria nella fotocamera, quindi selezionare MENU t
(Impost.) t (Str. scheda memoria) t [Copia].
x
Per rimuovere il pacco batteria
Leva di espulsione della batteria
x
Controllo della carica rimanente della batteria
Sullo schermo LCD appare un indicatore di carica rimanente.
Alta
Note
• Ci vuole circa un minuto finché appare l’indicatore di carica rimanente corretta.
• L’indicatore di carica rimanente potrebbe non essere corretto in certe circostanze.
• Quando [Risparmio energia] è impostato su [Standard] o [Resistenza], se non si
usa la fotocamera per un certo periodo di tempo mentre è accesa, lo schermo LCD
diventa scuro, quindi la fotocamera si spegne automaticamente (Funzione di
spegnimento automatico).
• Per mantenere pulito il terminale del pacco batteria ed evitare cortocircuiti,
trasportare e conservare il pacco batteria in una bustina di plastica o simili per
isolarlo da altri oggetti in metallo, ecc.
Far scorrere la leva di espulsione della
batteria. Assicurarsi di non lasciar cadere
il pacco batteria.
Bassa
16
IT
Page 67

Impostazione della data e dell’ora/del colore di visualizzazione
Premere il tasto ON/OFF
1
(Alimentazione).
La fotocamera si accende. La spia di
alimentazione si illumina solo quando
la fotocamera si avvia.
• La fotocamera potrebbe impiegare
un po’ di tempo per accendersi e
consentire il funzionamento.
Selezionare una voce di
2
impostazione con v/V sul
tasto di controllo, quindi
premere z.
Formato data & ora: Seleziona il
formato di visualizzazione della data e
dell’ora.
Risp. luce giorno: Seleziona Risp.
luce giorno Attivato/Disattivato.
Data & ora: Imposta la data e l’ora.
Impostare il valore numerico e le impostazioni
3
desiderate con v/V/b/B, quindi premere z.
• Mezzanotte è indicata con 12:00 AM e mezzogiorno con 12:00 PM.
Selezionare [OK], quindi premere z.
4
Seguire le istruzioni sullo schermo. Selezionare
5
l’area desiderata con b/B sul tasto di controllo,
quindi premere z.
Tasto ON/OFF (Alimentazione)
Tasto di
controllo
IT
Selezionare [OK], quindi premere z.
6
IT
17
Page 68

Selezionare il colore di visualizzazione desiderato,
7
quindi premere z.
Selezionare [OK], quindi premere z.
8
x
Sovrimpressione della data sulle immagini
La fotocamera non è dotata di una funzione per la sovrimpressione delle date
sulle immagini. Usando “PMB” nel CD-ROM (in dotazione), è possibile
stampare o salvare le immagini con la data. Per ulteriori informazioni, vedere
la “Guida di PMB”.
x
Reimpostazione della data e dell’ora
La schermata di impostazione della data e dell’ora appare automaticamente
solo quando si accende la fotocamera la prima volta. Per reimpostare la data e
l’ora, visualizzare la schermata di impostazione della data e dell’ora premendo
MENU t (Impost.) t (Impostaz. orologio) t [Impost. data & ora].
18
IT
Page 69

Ripresa di fermi immagine
Impostare il selettore del
1
modo su (Regolaz.
autom. intelligente), quindi
premere il tasto ON/OFF
(alimentazione).
Tenere ferma la
2
fotocamera come illustrato.
• Girare la leva W/T (zoom) sul lato T
per zumare e sul lato W per zumare
all’indietro.
Tasto ON/OFF
(Alimentazione)
IT
Manopola
del modo
Premere parzialmente il
3
pulsante di scatto per
mettere a fuoco.
Quando l’immagine è a fuoco, un
segnale acustico suona e l’indicatore
z si illumina.
Premere completamente
4
il pulsante di scatto.
Pulsante
di scatto
Blocco
AE/AF
IT
19
Page 70

Si riprendono i filmati
Impostare il selettore del
1
modo su (Modo
filmato), quindi premere il
tasto ON/OFF
(alimentazione).
Tasto ON/OFF
(Alimentazione)
Manopola
del modo
Premere il pulsante di scatto
2
per avviare la registrazione.
• È anche possibile registrare i filmati
premendo il tasto MOVIE (Filmato).
• Non coprire il microfono.
Premere di nuovo il pulsante di scatto per
3
interrompere la registrazione.
Note
• Il rumore di funzionamento dell’obiettivo viene registrato quando la funzione
dello zoom è operativa durante la ripresa di un filmato.
• Il tempo di ripresa continua dei filmati è possibile per circa 29 minuti in una volta
sola e potrebbe variare a seconda delle condizioni di ripresa.
x
Cambiamento del formato di filmato
Premere MENU t (Impost.) t (Impostazioni ripresa) t
[Formato del filmato].
IT
Non coprire con le dita.
Tasto MOVIE (Filmato)
20
Page 71

Visione delle immagini
Premere il tasto
1
(Riproduzione).
• Quando si riproducono le immagini su
una scheda memoria che sono state
registrate su altre fotocamere, appare la
schermata di registrazione del file di
database.
x
Selezione dell’immagine
successiva/precedente
Selezionare un’immagine usando B
(successivo)/b (precedente) sul tasto di
controllo.
• Per riprodurre i filmati, premere z sul tasto
di controllo.
• Per zumare, girare la leva (Zoom di
riproduzione) sul lato T.
x
Cancellazione di un’immagine
1 Premere il tasto (Cancellazione).
2 Selezionare [Qs. imm.] usando v, quindi
premere z.
x
Ritorno alla ripresa delle immagini
Premere il tasto (Riproduzione).
• È anche possibile tornare al modo di ripresa premendo parzialmente il pulsante di
scatto.
Tasto (Riproduzione)
Tasto
(Cancellazione)
Tasto di controllo
IT
x
Spegnimento della fotocamera
Premere il tasto ON/OFF (Alimentazione).
IT
21
Page 72

Per ottenere maggiori informazioni sulla fotocamera (“Guida all’uso Cyber-shot”)
La “Guida all’uso Cyber-shot”, che spiega dettagliatamente come usare la
fotocamera, è inclusa sul CD-ROM (in dotazione). Consultarla per le
istruzioni approfondite sulle numerose funzioni della fotocamera.
x
Per gli utenti Windows
Accendere il computer ed inserire il CD-ROM (in
1
dotazione) nel drive del CD-ROM.
Cliccare su [Handbook].
2
Cliccare su [Installa].
3
Avviare “Guida all’uso Cyber-shot” dalla scelta
4
rapida sul desktop.
x
Per gli utenti Macintosh
Accendere il computer ed inserire il CD-ROM (in
1
dotazione) nel drive del CD-ROM.
Selezionare la cartella [Handbook] e copiare sul
2
computer “Handbook.pdf” che è memorizzato nella
cartella [IT].
Al completamento della copia, fare doppio clic su
3
“Handbook.pdf”.
IT
22
Page 73

Dati tecnici
Fotocamera
[Sistema]
Dispositivo per immagine: Sensore
Exmor R CMOS da 7,81 mm
(di tipo 1/2,3)
Numero totale di pixel della
fotocamera:
Circa 12,8 megapixel
Numero effettivo di pixel della
fotocamera:
Circa 12,2 megapixel
Obiettivo: Obiettivo con zoom 5×
Sony G
f = 4,25 mm – 21,25 mm
(24 mm – 120 mm (equivalente ad
una pellicola da 35 mm)),
F2,4 (W) – F5,9 (T)
Durante la ripresa dei filmati
(16:9): 28 mm – 140 mm
Durante la ripresa dei filmati (4:3):
34 mm – 170 mm
Controllo dell’esposizione:
Esposizione automatica, Selezione
della scena (14 modi)
Bilanciamento del bianco: Automatico,
Luce giorno, Nuvoloso,
Fluorescente 1/2/3, Incandescente,
Flash, Singola pressione
Formato del segnale:
Per 1080 50i: Colore PAL,
standard CCIR HDTV specifica
1080/50i
Per 1080 60i: Colore NTSC,
standard EIA HDTV specifica
1080/60i
Formato di file:
Fermi immagine: Conforme a
JPEG (DCF Ver. 2.0, Exif Ver. 2.3,
MPF Baseline), compatibile con
DPOF
Fermi immagine 3D: Compatibile
con MPO (MPF Esteso (Immagine
di disparità))
Filmati (formato AVCHD):
Conforme a AVCHD Ver. 1.0
Video: MPEG-4 AVC/H.264
Audio: Dolby Digital a 2 canali,
dotato di Dolby Digital Stereo
Creator
• Prodotto su licenza dei Dolby
Laboratories.
Filmati (Formato MP4):
Video: MPEG-4 AVC/H.264
Audio: MPEG-4 AAC-LC 2 canali
Supporto di registrazione: Memoria
interna (circa 32 MB), “Memory
Stick Duo”, scheda SD
Flash: Raggio d’azione del flash
(sensibilità ISO (indice di
esposizione consigliato) impostata
su Autom.):
Circa da 0,2 m a 5,1 m (W)
Circa da 0,9 m a 2,1 m (T)
IT
IT
23
Page 74

[Connettori di ingresso e uscita]
Connettore HDMI: Miniterminale
HDMI
Terminale multiuso: Type3
(Uscita AV (Componente SD/HD)/
USB/ingresso CC):
Uscita video
Uscita audio (Stereo)
Comunicazione USB
Comunicazione USB: Hi-Speed USB
(conforme a USB 2.0)
[Schermo LCD]
Pannello LCD: Drive TFT da 7,0 cm
(di tipo 2.8)
Numero totale di punti: 460 800 (960 ×
480) punti
[Alimentazione, generali]
Alimentazione: Pacco batteria
ricaricabile
NP-BN1, 3,6 V Alimentatore CA
AC-LS5 (in vendita
separatamente), 4,2 V
Consumo (durante la ripresa): 1,0 W
Temperatura di utilizzo: Da 0°C a 40°C
Temperatura di deposito: Da –20°C a
+60°C
Dimensioni: 91,7 × 51,9 × 21,5 mm
(L/A/P, escluse le sporgenze)
Peso (inclusi il pacco batteria NP-BN1
e il “Memory Stick Duo”):
Circa 146 g
Microfono: Stereo
Altoparlante: Monofonico
Exif Print: Compatibile
PRINT Image Matching III:
Compatibile
Caricabatterie BC-CSN/BCCSNB
Alimentazione: Da 100 V a 240 V CA,
50/60 Hz, 2 W
Tensione in uscita: CC 4,2 V, 0,25 A
Temperatura di utilizzo: Da 0°C a 40°C
Temperatura di deposito: Da –20°C a
+60°C
Dimensioni: Circa 55 × 24 × 83 mm
(L/A/P)
Peso: Circa 55 g
Pacco batteria ricaricabile
NP-BN1
Batteria usata: Batteria agli ioni di litio
Tensione massima: CC 4,2 V
Tensione nominale: CC 3,6 V
Tensione massima di carica: 4,2 V CC
Corrente massima di carica: 0,9 A
Capacità:
tipica: 2,3 Wh (630 mAh)
minima: 2,2 Wh (600 mAh)
Il formato e i dati tecnici sono soggetti
a modifiche senza preavviso.
24
IT
Page 75

Marchi di fabbrica
• I seguenti marchi sono marchi di
fabbrica della Sony Corporation.
, “Cyber-shot”,
“Memory Stick”, , “Memory
Stick PRO”, ,
“Memory Stick Duo”,
, “Memory
Stick PRO Duo”,
, “Memory
Stick PRO-HG Duo”,
, “Memory
Stick Micro”, “MagicGate”,
, “BRAVIA”,
“PhotoTV HD”, “DVDirect”,
TransferJet e il logo TransferJet
• “Blu-ray Disc” e il relativo logo sono
marchi di fabbrica registrati.
• “AVCHD” e il logo di “AVCHD”
sono marchi di fabbrica di Panasonic
Corporation e Sony Corporation.
• Dolby e il simbolo della doppia D
sono marchi di fabbrica di Dolby
Laboratories.
• HDMI, il logo di HDMI e HighDefinition Multimedia Interface sono
marchi di fabbrica o marchi di
fabbrica registrati di HDMI
Licensing LLC.
• Microsoft, Windows, DirectX e
Windows Vista sono marchi di
fabbrica registrati o marchi di
fabbrica di Microsoft Corporation
negli Stati Uniti e/o in altri paesi.
• Macintosh, Mac OS e “iMovie” sono
marchi di fabbrica o marchi di
fabbrica registrati di Apple Inc.
• Intel e Pentium sono marchi di
fabbrica o marchi di fabbrica
registrati della Intel Corporation.
• I loghi SDXC e SDHC sono marchi
di fabbrica di SD-3C, LLC.
• MultiMediaCard è un marchio di
fabbrica della MultiMediaCard
Association.
• “PlayStation” è un marchio di
fabbrica registrato di Sony Computer
Entertainment Inc.
• Adobe e Reader sono marchi di
fabbrica o marchi di fabbrica
registrati di Adobe Systems
Incorporated negli Stati Uniti e/o in
altri paesi.
• Il marchio denominativo e il logo di
OBEX sono marchi di fabbrica
registrati e sono di proprietà della
Infrared Data Association (IrDA
• Eye-Fi è un marchio di fabbrica di
Eye-Fi, Inc.
• Inoltre i nomi del sistema e dei
prodotti usati in questo manuale sono
generalmente marchi di fabbrica o
marchi di fabbrica registrati dei loro
elaboratori o produttori. Tuttavia, i
simboli ™ o ® non sono usati in tutti
i casi in questo manuale.
®
Ulteriori informazioni su questo
prodotto e risposte alle domande
più comuni sono reperibili sul
nostro sito Web di Assistenza
Clienti.
Stampato su carta riciclata al 70% o
più con inchiostro a base di olio
vegetale senza COV (composto
organico volatile).
IT
).
IT
25
Page 76

Español
Nombre del producto: Cámara Digital
Modelo: DSC-WX5
POR FAVOR LEA DETALLADAMENTE ESTE MANUAL DE INSTRUCCIONES
ANTES DE CONECTAR Y OPERAR ESTE EQUIPO.
RECUERDE QUE UN MAL USO DE SU APARATO PODRÍA ANULAR LA
GARANTÍA.
AVISO
Para reducir el riesgo de incendio o descarga eléctrica, no
exponga la unidad a la lluvia ni a la humedad.
INSTRUCCIONES DE SEGURIDAD IMPORTANTES
-GUARDE ESTAS INSTRUCCIONES
PELIGRO
PARA REDUCIR EL RIESGO DE INCENDIO O DESCARGA
ELÉCTRICA, SIGA ATENTAMENTE ESTAS INSTRUCCIONES
Si la forma de la clavija no encaja en la toma de corriente, utilice un accesorio adaptador de
clavija de la configuración apropiada para la toma de corriente.
PRECAUCIÓN
[ Batería
Si la batería se manipula indebidamente, puede explotar y causar un incendio o provocarle
quemaduras químicas. Tenga en cuenta las siguientes precauciones.
• No desmonte el producto.
• No aplaste ni exponga la batería a impactos tales como golpes o caídas, ni la deje caer o
la pise.
• No provoque un cortocircuito en la batería ni permita que objetos metálicos entren en
contacto con sus terminales.
• No exponga la batería a temperaturas superiores a 60 °C como a la luz solar directa, o en
el interior de un automóvil estacionado al sol.
• No la incinere ni la arroje al fuego.
• No manipule baterías de iones de litio dañadas o con fugas.
• Asegúrese de cargar la batería con un cargador de baterías original de Sony o con un
dispositivo que pueda cargarla.
• Mantenga la batería fuera del alcance de niños pequeños.
ES
• Mantenga la batería seca.
2
Page 77

• Sustitúyala únicamente por otra del mismo tipo o equivalente recomendada por Sony.
• Deshágase de la baterías usada lo antes posible según el procedimiento que se describe
en las instrucciones.
[ Cargador de batería
Aunque la lámpara CHARGE no esté encendida, el cargador de batería no estará
desconectado de la fuente de alimentación de ca en tanto que el mismo esté conectado a la
toma de corriente de la pared. Si ocurre algún problema mientras utiliza el cargador de
batería, interrumpa inmediatamente la alimentación desconectando la clavija de la toma de
corriente de la pared.
El cable de alimentación, si se ha suministrado, está diseñado de manera específica para
utilizarse únicamente con esta cámara y no debería utilizarse con ningún otro equipo
eléctrico.
Atención para los clientes en Europa
[ Aviso para los clientes de países en los que se aplican las
directivas de la UE
El fabricante de este producto es Sony Corporation, 1-7-1 Konan Minato-ku Tokyo,
108-0075, Japón. El representante autorizado en lo referente al cumplimiento de la
directiva EMC y a la seguridad de los productos es Sony Deutschland GmbH, Hedelfinger
Strasse 61, 70327 Stuttgart, Alemania. Para resolver cualquier asunto relacionado con el
soporte técnico o la garantía, consulte las direcciones que se indican en los documentos de
soporte técnico y garantía suministrados por separado.
Este producto se ha probado y cumple con la normativa que establece la Directiva EMC si
se utiliza un cable de conexión de menos de 3 metros de longitud.
[ Atención
Los campos electromagnéticos a frecuencias específicas podrán influir en la imagen y el
sonido de esta unidad.
[ Aviso
Si la electricidad estática o el electromagnetismo interrumpen la transmisión de datos
(fallo), reinicie la aplicación o desconecte el cable de comunicación (USB, etc.) y vuelva a
conectarlo.
ES
ES
3
Page 78

[ Tratamiento de los equipos eléctricos y electrónicos al final de
su vida útil (aplicable en la Unión Europea y en países europeos
con sistemas de recogida selectiva de residuos)
Este símbolo en el equipo o el embalaje indica que el presente producto no
puede ser tratado como residuos domésticos normales, sino que debe
entregarse en el correspondiente punto de recogida de equipos eléctricos y
electrónicos. Al asegurarse de que este producto se desecha
correctamente, Ud. ayuda a prevenir las consecuencias negativas para el
medio ambiente y la salud humana que podrían derivarse de la incorrecta
manipulación en el momento de deshacerse de este producto. El reciclaje
información detallada sobre el reciclaje de este producto, póngase en contacto con el
ayuntamiento, el punto de recogida más cercano o el establecimiento donde ha adquirido el
producto.
de materiales ayuda a conservar los recursos naturales. Para recibir
[ Tratamiento de las baterías al final de su vida útil (aplicable en la
Unión Europea y en países europeos con sistemas de recogida
selectiva de residuos)
Este símbolo en la batería o en el embalaje indica que la batería
proporcionada con este producto no puede ser tratada como un residuo
doméstico normal.
En algunas baterías este símbolo puede utilizarse en combinación con el
símbolo químico. El símbolo químico del mercurio (Hg) o del plomo (Pb)
0,004% de plomo.
Al asegurarse de que estas baterías se desechan correctamente, Ud. ayuda a prevenir las
consecuencias negativas para el medio ambiente y la salud humana que podrían derivarse
de la incorrecta manipulación en el momento de deshacerse de la batería. El reciclaje de
materiales ayuda a conservar los recursos naturales.
En el caso de productos que por razones de seguridad, rendimiento o mantenimiento de
datos, sea necesaria una conexión permanente con la batería incorporada, esta batería solo
deberá ser reemplazada por personal técnico cualificado para ello. Para asegurarse de que
la batería será tratada correctamente, entregue el producto al final de su vida útil en un
punto de recogida para el reciclado de aparatos eléctricos y electrónicos.
Para las demás baterías, vea la sección donde se indica cómo quitar la batería del producto
de forma segura.
Deposite la batería en el correspondiente punto de recogida para el reciclado.
Para recibir información detallada sobre el reciclaje de este producto o de la batería,
póngase en contacto con el ayuntamiento, el punto de recogida más cercano o el
establecimiento donde ha adquirido el producto.
se añadirá si la batería contiene más del 0,0005% de mercurio o del
ES
4
Page 79

Consulte la “Guía práctica de Cybershot” (PDF) en el CD-ROM
suministrado
Para más detalles sobre las operaciones avanzadas, lea la
“Guía práctica de Cyber-shot” (PDF) en el CD-ROM
(suministrado) utilizando un ordenador.
Consulte la “Guía práctica de Cyber-shot” para ver
instrucciones más detalladas sobre la toma o visionado de imágenes y la
conexión de la cámara a su ordenador, impresora o televisor (página 22).
Comprobación de los accesorios suministrados
• Cargador de batería BC-CSN/BC-CSNB (1)
• Cable de alimentación (no suministrado en EE.UU. y Canadá) (1)
• Batería recargable NP-BN1 (1)
• Cable USB, A/V para terminal de usos múltiples (1)
• Correa para muñeca (1)
•CD-ROM (1)
– Software de aplicación del Cyber-shot
– “Guía práctica de Cyber-shot”
• Manual de instrucciones (este manual) (1)
Notas sobre la utilización de la cámara
Cambio del ajuste de idioma
El idioma de pantalla se puede cambiar si es necesario.
Para cambiar el ajuste de idioma, pulse MENU t (Ajustes) t
(Ajustes principales) t [Language Setting].
Copia de seguridad de la memoria interna y tarjeta de memoria
No apague la cámara, extraiga la batería, ni retire la tarjeta de memoria
mientras está encendida la lámpara de acceso. De lo contrario, podrán dañarse
los datos de la memoria interna o la tarjeta de memoria. Asegúrese de hacer
una copia de seguridad para proteger sus datos.
ES
ES
5
Page 80

Funciones incorporadas en esta cámara
• Este manual describe cada una de las funciones de los dispositivos
compatibles/incompatibles con TransferJet, dispositivos compatibles con
1080 60i y dispositivos compatibles con 1080 50i.
Para comprobar si su cámara permite la función TransferJet, y saber si es un
dispositivo compatible con 1080 60i o dispositivo compatible con 1080 50i,
busque las siguientes marcas en la parte inferior de la cámara.
Dispositivo compatible con TransferJet: (TransferJet)
Dispositivo compatible con 1080 60i: 60i
Dispositivo compatible con 1080 50i: 50i
• No vea imágenes 3D tomadas con esta cámara durante periodos de tiempo
prolongados en monitores compatibles con 3D.
• Cuando vea imágenes 3D tomadas con esta cámara en monitores
compatibles con 3D, es posible que note molestias en forma de cansancio de
la vista, fatiga, o nauseas. Para evitar estos síntomas, recomendamos que
haga descansos regulares. Sin embargo, necesitará determinar por sí mismo
la duración y la frecuencia de los descansos que requiere, porque éstos varían
de una persona a otra. Si nota cualquier tipo de molestia, detenga el
visionado de imágenes 3D hasta que se sienta mejor, y consulte con un
médico si lo cree necesario. Además, consulte los manuales de instrucciones
suministrados con el dispositivo o software que ha conectado o está
utilizando con esta cámara. Tenga en cuenta que la vista de un niño aún está
en estado de desarrollo (particularmente los niños de menos de 6 años).
Consulte con un médico u oculista antes de permitir que su niño vea
imágenes 3D, y asegúrese de que él/ella observa las precauciones de arriba
cuando vea tales imágenes.
Acerca de los archivos de base de datos
Cuando inserta una tarjeta de memoria sin archivo de base de datos en la
cámara y conecta la alimentación, parte de la capacidad de la tarjeta de
memoria se utiliza para crear automáticamente un archivo de base de datos. Es
posible que lleve algún tiempo hasta que pueda realizar la siguiente operación.
Notas sobre la grabación/reproducción
• Para asegurar operaciones correctas de la tarjeta de memoria, le
recomendamos que utilice esta cámara para formatear cualquier tarjeta de
memoria que vaya a utilizar con esta cámara por primera vez. Tenga en
cuenta que al formatear se borrarán todos los datos grabados en la tarjeta de
memoria. Estos datos no se pueden recuperar. Asegúrese de hacer una copia
de seguridad de cualquier dato importante en un PC u otro lugar de
almacenaje.
ES
6
Page 81

• Si graba/elimina imágenes repetidamente, podrá producirse una
fragmentación de datos en la tarjeta de memoria. Es posible que las películas
no se puedan guardar o grabar. En tal caso, guarde sus imágenes en un PC u
otro lugar de almacenamiento, después [Formatear].
• Antes de comenzar a grabar, haga una grabación a modo de prueba para
asegurarse de que la cámara está funcionando correctamente.
• La cámara no está hecha a prueba de polvo, ni a prueba de salpicaduras, ni a
prueba de agua.
• Evite exponer la cámara al agua. Si entra agua dentro de la cámara, podrá
ocurrir un mal funcionamiento. En algunos casos, la cámara no podrá ser
reparada.
• No dirija la cámara hacia el sol ni hacia otras luces intensas. Podrá ocasionar
un mal funcionamiento de la cámara.
• No utilice la cámara cerca de un lugar que genere ondas de radio fuertes o
emita radiación. De lo contrario, es posible que la cámara no pueda grabar o
reproducir imágenes correctamente.
• La utilización de la cámara en lugares arenosos o polvorientos podrá
ocasionar un mal funcionamiento.
• Si se produce condensación de humedad, elimínela antes de utilizar la
cámara.
• No agite ni golpee la cámara. Podría ocasionar un mal funcionamiento y no
poder grabar imágenes. Además, el soporte de grabación podría quedar
inutilizable o dañarse los datos de imagen.
• Limpie la superficie del flash antes de utilizarlo. El calor de la emisión del
flash podrá hacer que la suciedad en la superficie del flash se descolore o se
adhiera en ella, ocasionando una insuficiente emisión de luz.
Notas sobre la pantalla LCD y el objetivo
• La pantalla LCD está fabricada utilizando tecnología de muy alta precisión
por lo que más del 99,99% de los píxeles son operativos para uso efectivo.
Sin embargo, es posible que aparezcan algunos puntos diminutos negros y/o
brillantes (blancos, rojos, azules o verdes) en la pantalla LCD. Estos puntos
son un resultado normal del proceso de fabricación, y no afectan a la
grabación.
• Cuando el nivel de la batería sea bajo, es posible que el objetivo deje de
moverse. Inserte una batería cargada y encienda la cámara otra vez.
Acerca de la temperatura de la cámara
La cámara y la batería pueden calentarse debido a una utilización continua,
pero esto no es un defecto de funcionamiento.
ES
ES
7
Page 82

Acerca de la protección contra el recalentamiento
Dependiendo de la temperatura de la cámara y de la batería, es posible que no
pueda grabar películas o que la alimentación se desconecte automáticamente
para proteger la cámara.
Se visualizará un mensaje en la pantalla LCD antes de que se desconecte la
alimentación o ya no podrá grabar películas.
Acerca de la compatibilidad de los datos de imagen
• La cámara cumple con la norma universal DCF (Design rule for Camera File
system) establecida por la JEITA (Japan Electronics and Information
Technology Industries Association).
• Sony no garantiza que la cámara pueda reproducir imágenes grabadas o
editadas con otro equipo, ni que otros equipos puedan reproducir imágenes
grabadas con la cámara.
Importación de películas AVCHD a un ordenador
Cuando importe películas grabadas en formato AVCHD a un ordenador, para
Windows utilice el software “PMB” del CD-ROM (suministrado) o para
Macintosh utilice el software “iMovie” que viene con los ordenadores
Macintosh.
Notas para cuando reproduzca películas en otros dispositivos
Esta cámara utiliza MPEG-4 AVC/H.264 High Profile para grabación en
formato AVCHD. Las películas grabadas en formato AVCHD con esta cámara
no se pueden reproducir con los siguientes dispositivos.
– Otros dispositivos compatibles con el formato AVCHD que no admitan High
Profile
– Dispositivos no compatibles con el formato AVCHD
Esta cámara también utiliza MPEG-4 AVC/H.264 Main Profile para grabación
en formato MP4. Por esta razón, las películas grabadas en formato MP4 con
esta cámara no se pueden reproducir en otros dispositivos aparte de los que
permiten MPEG-4 AVC/H.264.
Discos grabados con calidad de imagen HD (alta definición)
Esta cámara captura secuencias en alta definición en el formato AVCHD. Los
soportes DVD que contengan secuencias AVCHD no deberán ser utilizados
con reproductores/grabadoras basados en DVD, porque es posible que los
reproductores/grabadoras de DVD no puedan expulsar el soporte y que borren
su contenido sin previa advertencia. Los soportes DVD que contengan
secuencias AVCHD se pueden reproducir en un reproductor/grabadora
compatible con Blu-ray Disc™ u otros dispositivos compatibles.
ES
8
Page 83

Aviso sobre los derechos de autor
Los programas de televisión, películas, cintas de vídeo y demás materiales
pueden estar protegidos por copyright. La grabación no autorizada de tales
materiales puede ir en contra de los artículos de las leyes de copyright.
No hay compensación por daño del contenido o fallo de grabación
Sony no compensará por no poder grabar o por la pérdida o daño del contenido
grabado debido a un mal funcionamiento de la cámara o el soporte de
grabación, etc.
ES
ES
9
Page 84

Identificación de las partes
Cámara
Panel de la tapa
A Botón del disparador
B Botón (Ráfaga)
C Para tomar imagen: Palanca W/T
(zoom)
Para visualizar: Palanca
(Zoom de reproducción)/
ES
Palanca (Índice)
10
D Flash
E Botón ON/OFF (Alimentación)
F Lámpara de alimentación
G Micrófono
H Lámpara del autodisparador/
Lámpara del captador de
sonrisas/Iluminador AF
I Objetivo
J Altavoz
K Pantalla LCD
L Dial de modo
M Botón (Reproducción)
N Botón MOVIE (Película)
O Conector HDMI
P Gancho para correa de muñeca
Q Botón de control
Menú visualizado: v/V/b/B/z
Menú no visualizado: DISP/ /
/ /Enfoque seguido
R Botón (Eliminar)
S Botón MENU
T Palanca de expulsión de la
batería
U Ranura de inserción de la batería
V Tapa de la batería/tarjeta de
memoria
W Conector múltiple
X Lámpara de acceso
Y Ranura de tarjeta de memoria
Z Rosca para trípode
• Utilice un trípode con un tornillo
de menos de 5,5 mm de longitud.
De lo contrario, no podrá sujetar
firmemente la cámara, y es
posible que se dañe la cámara.
wj Marca (TransferJet™)
Page 85

Carga de la batería y el número de imágenes/tiempo que se puede grabar
Inserte la batería en el cargador
1
de batería.
• Puede cargar la batería incluso cuando esté
parcialmente cargada.
Batería
ES
Conecte el cargador
2
de batería a la toma
Para clientes en EE.UU. y Canadá
Clavija
de corriente de
pared.
Si continúa cargando la
batería durante
aproximadamente una
h (hora) más después de
haberse apagado la lámpara
CHARGE, la carga durará
un poco más (carga
completa).
Lámpara CHARGE
Iluminada: Cargando
Apagada: Ha finalizado la
carga (carga normal)
Cuando se haya completado la carga, desconecte el
3
cargador de batería.
Lámpara CHARGE
Para clientes en países/regiones
distintos de EE.UU. y Canadá
Cable de
alimentación
Lámpara CHARGE
ES
11
Page 86

x
Tiempo de carga
Tiempo de carga completa Tiempo de carga normal
Aprox. 245 min (minuto) Aprox. 185 min (minuto)
Notas
• La tabla de arriba muestra el tiempo requerido para cargar una batería
completamente descargada a una temperatura de 25 °C
La carga podrá llevar más tiempo dependiendo de las condiciones de utilización y
las circunstancias.
• Conecte el cargador de batería a la toma de corriente de la pared más próxima.
• Cuando finalice la carga, desenchufe el cable de alimentación y el cargador de
batería de la toma de corriente de la pared, y extraiga la batería del cargador de
batería.
• Asegúrese de utilizar la batería o el cargador de batería de la marca Sony genuina.
x
Duración de la batería y número de imágenes que se
pueden grabar/ver
Duración de la
batería (min (minuto))
Toma de imágenes fijas Aprox. 115 Aprox. 230
Visionado de imágenes fijas Aprox. 190 Aprox. 3 800
Toma películas Aprox. 60 —
Notas
• El número de imágenes que se puede grabar es un número aproximado cuando las
tomas se hacen con una batería completamente cargada. El número podrá ser
inferior dependiendo de las circunstancias.
• El número de imágenes que se puede grabar es cuando las tomas se hacen en las
condiciones siguientes:
– Utilización de “Memory Stick PRO Duo” de Sony (se vende por separado).
– Cuando se utiliza una batería (suministrado) completamente cargada a una
temperatura ambiente de 25° C
N°. de Imágenes
12
ES
Page 87

• El número de imágenes fijas que se pueden grabar está basado en el estándar
CIPA, y es para tomar imágenes en las condiciones siguientes.
(CIPA: Camera & Imaging Products Association)
– DISP (Config. Visualización pantalla) está ajustado a [Normal].
– Tomando una imagen cada 30 s (segundo)
– Se cambia el zoom alternativamente entre los extremos W y T.
– El flash destella una de cada dos veces.
– La alimentación se activa y desactiva una vez cada diez veces.
• La duración de la batería para películas es cuando las tomas se hacen en las
condiciones siguientes:
– Modo de grabación: AVCHD HQ
– Cuando finalice la toma continua debido a los límites establecidos, pulse el
botón del disparador otra vez y continúe tomando. Las funciones de toma tal
como el zoom no responderán.
z Utilización de la cámara en el extranjero
Puede utilizar la cámara y el cargador de batería (suministrado) en cualquier
país o región donde el suministro de corriente sea de entre 100 V a 240 V ca,
50/60 Hz
No es necesario utilizar un transformador electrónico (convertidor para usar en
viajes). No utilice un transformador electrónico, porque es posible que ocasione
un mal funcionamiento.
ES
ES
13
Page 88

Inserción de la batería/una tarjeta de memoria (se vende por separado)
Abra la tapa.
1
Inserte una tarjeta de
2
memoria (se vende por
separado).
Con la esquina cortada orientada como
en la ilustración, inserte la tarjeta de
memoria hasta encaje en su sitio con
un chasquido.
Inserte la batería.
3
Alinee la batería con la flecha guía
dentro de la ranura de inserción de la
batería. Después, inserte la batería
hasta que la palanca de expulsión de la
batería se bloquee en su sitio.
Cierre la tapa.
4
• El cerrar la tapa con la batería
insertada incorrectamente podrá
dañar la cámara.
Observe la orientación en la
dirección correcta de la
esquina cortada.
Palanca de expulsión de la
batería
14
ES
Page 89

x
Tarjeta de memoria que puede utilizar
Las siguientes tarjetas de memoria son compatibles con esta cámara: “Memory
Stick PRO Duo”, “Memory Stick PRO-HG Duo”, “Memory Stick Duo”,
tarjeta de memoria SD, tarjeta de memoria SDHC y tarjeta de memoria SDXC.
Sin embargo, no se garantiza que todas las tarjetas de memoria funcionen con
esta cámara. La MultiMediaCard no se puede utilizar.
• En este manual, el término “Memory Stick Duo” se utiliza para referirse a
“Memory Stick PRO Duo”, “Memory Stick PRO-HG Duo” y “Memory Stick
Duo”, y el término “tarjeta SD” se utiliza para referirse a la tarjeta de memoria SD,
tarjeta de memoria SDHC y tarjeta de memoria SDXC.
• Cuando grabe películas, se recomienda que utilice las tarjetas de memoria
siguientes:
– (Mark2) (“Memory Stick PRO Duo” (Mark2))
– (“Memory Stick PRO-HG Duo”)
– Tarjeta de memoria SD, tarjeta de memoria SDHC o tarjeta de memoria SDXC
(Clase 4 o más rápida)
Nota
• Las imágenes grabadas en una tarjeta de memoria SDXC no se pueden transferir ni
reproducir en ordenadores ni dispositivos de audio y vídeo que no sean
compatibles con exFAT, aun cuando la cámara sea conectada al ordenador o
dispositivo de audio y vídeo utilizando un cable USB. Antes de conectar,
asegúrese de que el dispositivo es compatible con exFAT. Si conecta a un
dispositivo que no es compatible con exFAT, es posible que aparezca un solicitud
de formateo de la unidad. No formatee la unidad, porque perderá todos los datos.
(exFAT es un sistema de archivo utilizado para las tarjetas de memoria SDXC.)
x
Para extraer la tarjeta de memoria
Lámpara de acceso
Asegúrese de que la lámpara de acceso
no está encendida, después empuje hacia
dentro la tarjeta de memoria una vez.
ES
Nota
• No extraiga nunca la tarjeta de memoria/batería cuando esté encendida la lámpara
de acceso. Esto podría ocasionar daño a los datos de la tarjeta de memoria.
ES
15
Page 90

x
Cuando no hay tarjeta de memoria insertada
Las imágenes se almacenan en la memoria interna de la cámara
(aproximadamente 32 MB)
Para copiar imágenes de la memoria interna a una tarjeta de memoria, inserte
una tarjeta de memoria en la cámara, después seleccione MENU t
(Ajustes) t (Her tarjeta memoria) t [Copiar].
x
Para extraer la batería
Palanca de expulsión
de la batería
x
Comprobación de la carga de batería restante
Aparece un indicador de carga restante en la pantalla LCD.
Alta
Notas
• La aparición del indicador de carga restante correcto lleva aproximadamente un
min (minuto).
• Es posible que el indicador de carga restante no sea correcto en ciertas
circunstancias.
• Cuando [Ahorro de energía] está ajustado a [Estándar] o [Estamina], si no utiliza
la cámara durante un cierto periodo de tiempo mientras está conectada la
alimentación, la pantalla LCD se oscurecerá, después la cámara se apagará
automáticamente (Función de apagado automático).
• Para mantener limpio el terminal de la batería y evitar que se produzcan
cortocircuitos, coloque la batería en una bolsa de plástico, etc. para transportarla y
almacenarla, para aislarla de otros objetos metálicos, etc.
Deslice la palanca de expulsión de la
batería. Asegúrese de no dejar caer la
batería.
Baja
16
ES
Page 91

Ajuste de la fecha y la hora/color de la visualización
Pulse el botón ON/OFF
1
(Alimentación).
La cámara se enciende. La lámpara de
alimentación solamente se ilumina al
encenderse la cámara.
• Es posible que lleve algún tiempo en
conectarse la alimentación y
permitir realizar operaciones.
Seleccione un ajuste con
2
v/V del botón de control,
después pulse z.
Format fecha y hora: Selecciona el
formato de visualización de fecha y
hora.
Horario verano: Selecciona Horario
de verano Activado/Desactivado.
Fecha y hora: Establece la fecha y
hora.
Establezca el valor numérico y los ajustes deseados
3
con v/V/b/B, después pulse z.
• Medianoche se indica como 12:00 AM, y mediodía como 12:00 PM.
Seleccione [OK], y después pulse z.
4
Siga las instrucciones de la pantalla. Seleccione el
5
área deseada con b/B del botón de control, después
pulse z.
Botón ON/OFF (Alimentación)
Botón de control
ES
Seleccione [OK], y después pulse z.
6
Seleccione el color de visualización deseado,
7
después pulse z.
ES
17
Page 92

Seleccione [OK], y después pulse z.
8
x
Sobreposición de la fecha en las imágenes
La cámara no tiene una función para superponer fechas en imágenes.
Utilizando “PMB” del CD-ROM (suministrado), puede imprimir o guardar
imágenes con la fecha. Para más detalles, consulte la “Ayuda de PMB”.
x
Ajuste de la fecha y la hora otra vez
La pantalla de ajuste de la fecha y la hora aparece solamente cuando se conecta
la alimentación por primera vez. Para volver a ajustar la fecha y la hora,
visualice la pantalla de ajuste de la fecha y la hora pulsando MENU t
(Ajustes) t (Ajustes del reloj) t [Config.fecha y hora].
18
ES
Page 93

Toma de imágenes fijas
Ajuste el dial de modo en
1
(Ajuste automát.
inteligente) y, a
continuación, pulse el
botón ON/OFF
(Alimentación).
Sujete la cámara sin
2
moverla como se muestra
en la ilustración.
• Gire la palanca W/T (zoom) hacia el
lado T para acercar con zoom y
hacia el lado W para alejar con
zoom.
Botón ON/OFF
(Alimentación)
Dial de modo
ES
Pulse el botón del
3
disparador hasta la mitad
para enfocar.
Cuando la imagen está enfocada,
suena un pitido y se ilumina el
indicador z.
Pulse el botón del
4
disparador a fondo.
Botón del
disparador
Bloqueo
AE/AF
ES
19
Page 94

Toma películas
Ajuste el dial de modo en
1
(Modo película) y, a
continuación, pulse el
botón ON/OFF
(Alimentación).
Botón ON/OFF
(Alimentación)
Dial de modo
Pulse el botón del
2
disparador para iniciar la
No cubra con
sus dedos.
grabación.
• También puede grabar películas
pulsando el botón MOVIE (Película).
• No cubra el micrófono.
Botón MOVIE (Película)
Pulse el botón del disparador otra vez para detener
3
la grabación.
Notas
• El sonido de operación del objetivo se graba cuando se acciona la función de zoom
mientras se toma una película.
• El tiempo de toma continua de película es de aproximadamente 29 min (minuto)
de una vez, y puede variar dependiendo de las condiciones de la toma.
x
Cambio del formato de película
Pulse MENU t (Ajustes) t (Ajustes de toma) t [Formato de
película].
ES
20
Page 95

Visualización de imágenes
Pulse el botón
1
(Reproducción).
• Cuando reproduzca imágenes de una
tarjeta de memoria que hayan sido
grabadas con otras cámaras, aparecerá
la pantalla de registro del archivo de
base de datos.
x
Selección de la imagen
siguiente/anterior
Seleccione una imagen utilizando B
(siguiente)/b (anterior) del botón de control.
• Para reproducir películas, pulse z del
botón de control.
• Para acercar con zoom, gire la palanca
(Zoom de reproducción) hacia el lado T.
x
Eliminación de una imagen
1 Pulse el botón (Eliminar).
2 Seleccione [Esta ima] utilizando v,
después pulse z.
x
Para volver a la toma de imágenes
Pulse el botón (Reproducción).
• Puede también volver al modo de toma de imagen pulsando el botón del
disparador hasta la mitad.
Botón (Reproducción)
Botón
(Eliminar)
Botón de
control
ES
x
Para apagar la cámara
Pulse el botón ON/OFF (Alimentación).
ES
21
Page 96

Para saber más sobre la cámara (“Guía práctica de Cyber-shot”)
La “Guía práctica de Cyber-shot”, que explica cómo utilizar la cámara en
detalle, está incluida en el CD-ROM (suministrado). Consúltela para ver
instrucciones exhaustivas sobre las muchas funciones de la cámara.
x
Para usuarios de Windows
Encienda su ordenador e inserte el CD-ROM
1
(suministrado) en la unidad de CD-ROM.
Haga clic en [Handbook].
2
Haga clic en [Instalación].
3
Inicie la “Guía práctica de Cyber-shot” desde el
4
acceso directo del escritorio.
x
Para usuarios de Macintosh
Encienda su ordenador e inserte el CD-ROM
1
(suministrado) en la unidad de CD-ROM.
Seleccione la carpeta [Handbook] y copie el
2
“Handbook.pdf” almacenado en la carpeta [ES] a su
ordenador.
Después de haberse completado el copiado, haga
3
doble clic en “Handbook.pdf”.
ES
22
Page 97

Especificaciones
Cámara
[Sistema]
Dispositivo de imagen: Sensor de
7,81 mm (tipo 1/2,3) Exmor R
CMOS
Número total de píxeles de la cámara:
Aprox. 12,8 Megapíxeles
Número efectivo de píxeles de la
cámara:
Aprox. 12,2 Megapíxeles
Objetivo: Objetivo zoom 5× Sony G
f = 4,25 mm – 21,25 mm (24 mm –
120 mm (equivalente a película de
35 mm))
F2,4 (W) – F5,9 (T)
Mientras se toman películas (16:9):
28 mm – 140 mm
Mientras se toman películas (4:3):
34 mm – 170 mm
Control de exposición: Exposición
automática, Selección de escena
(14 modos)
Balance del blanco: Automático, Luz
diurna, Nublado, Fluorescente
1/2/3, Incandescente, Flash, Una
pulsación
Formato de señal:
Para 1080 50i: Color PAL, normas
CCIR, especificación HDTV 1080/
50i
Para 1080 60i: Color NTSC,
normas EIA, especificación HDTV
1080/60i
Formato de archivo:
Imágenes fijas: Compatible con
JPEG (DCF Ver. 2,0, Exif Ver. 2,3,
MPF Baseline), compatible con
DPOF
Imágenes fijas 3D: Compatible con
MPO (MPF Extendido (Imagen
con disparidad))
Películas (Formato AVCHD):
Compatible con AVCHD Ver. 1,0
Vídeo: MPEG-4 AVC/H.264
Audio: Dolby Digital 2 canales,
equipado con Dolby Digital Stereo
Creator
• Fabricado bajo licencia de Dolby
Laboratories.
Películas (Formato MP4):
Vídeo: MPEG-4 AVC/H.264
Audio: MPEG-4 AAC-LC
2 canales
Soporte de grabación: Memoria interna
(aprox. 32 MB), “Memory Stick
Duo”, tarjeta SD
Flash: Alcance del flash (sensibilidad
ISO (Índice de exposición
recomendado) ajustado a Auto):
Aprox. 0,2 m a 5,1 m (W)
Aprox. 0,9 m a 2,1 m (T)
ES
ES
23
Page 98

[Conectores de entrada y salida]
Conector HDMI: Mini terminal HDMI
Terminal de usos múltiples: Type3
(salida de AV (componente SD/
HD)/USB/entrada de cc):
Salida de video
Salida de audio (Estéreo)
Conmunicación USB
Comunicación USB: Hi-Speed USB
(compatible con USB 2.0)
[Pantalla LCD]
Panel LCD: 7,0 cm (tipo 2,8) unidad
TFT
Número total de puntos: 460 800 (960
× 480) puntos
[Alimentación, general]
Alimentación: Batería recargable
NP-BN1, cc 3,6 V
Adaptador de ca AC-LS5 (se vende
por separado), cc 4,2 V
Consumo (durante la toma de imagen):
1,0 W
Temperatura de funcionamiento:
0 °C a 40 °C
Temperatura de almacenamiento:
–20 °C a +60 °C
Dimensiones: 91,7 × 51,9 × 21,5 mm
(An/Al/Pr, excluyendo los
salientes)
Peso (incluyendo la batería NP-BN1 y
“Memory Stick Duo”):
Aprox. 146 g
Micrófono: Estéreo
Altavoz: Monoaural
Exif Print: Compatible
PRINT Image Matching III:
Compatible
Cargador de batería BC-CSN/
BC-CSNB
Requisitos de alimentación: ca 100 V a
240V 50/60Hz 2W
Tensión de salida: cc 4,2 V 0,25 A
Temperatura de funcionamiento:
0 °C a 40 °C
Temperatura de almacenamiento:
–20 °C a +60 °C
Dimensiones: Aprox. 55 × 24 × 83 mm
(An/Al/Pr)
Peso: Aprox. 55 g
Batería recargable
NP-BN1
Batería utilizada: Batería de litio-ión
Tensión máxima: cc 4,2 V
Tensión nominal: cc 3,6 V
Tensión de carga máxima: cc 4,2 V
Corriente de carga máxima: 0,9 A
Capacidad:
típica: 2,3 Wh (630 mAh)
mínima: 2,2 Wh (600 mAh)
El diseño y las especificaciones están
sujetos a cambios sin previo aviso.
24
ES
Page 99

Marcas comerciales
• Las marcas siguientes son marcas
comerciales de Sony Corporation.
, “Cyber-shot”,
“Memory Stick”, , “Memory
Stick PRO”, ,
“Memory Stick Duo”,
, “Memory
Stick PRO Duo”,
, “Memory
Stick PRO-HG Duo”,
, “Memory
Stick Micro”, “MagicGate”,
, “BRAVIA”,
“PhotoTV HD”, “DVDirect”,
TransferJet y el logotipo TransferJet
• “Blu-ray Disc” y su logotipo son
marcas comerciales.
• “AVCHD” y el logotipo “AVCHD”
son marcas comerciales de Panasonic
Corporation y Sony Corporation.
• Dolby y el símbolo de la doble D son
marcas comerciales de Dolby
Laboratories.
• HDMI, el logotipo de HDMI y High
Definition Multimedia Interface son
marcas comerciales o marcas
comerciales registradas de HDMI
Licensing LLC.
• Microsoft, Windows, DirectX y
Windows Vista son marcas
comerciales o bien marcas
comerciales registradas de Microsoft
Corporation en los Estados Unidos de
América y/u otros países.
• Macintosh, Mac OS e “iMovie” son
marcas comerciales o marcas
comerciales registradas de Apple Inc.
• Intel y Pentium son marcas
comerciales o marcas comerciales
registradas de Intel Corporation.
• Los logotipos SDXC y SDHC son
marcas comerciales de SD-3C, LLC.
• MultiMediaCard es una marca
comercial de la MultiMediaCard
Association.
• “ PlayStation” es una marca comercial
registrada de Sony Computer
Entertainment Inc.
• Adobe y Reader son marcas
comerciales o bien marcas
comerciales registradas de Adobe
Systems Incorporated en los Estados
Unidos y/u otros países.
• La marca de la palabra OBEX y el
logotipo son marcas comerciales
registradas y pertenecen a Infrared
Data Association (IrDA
• Eye-Fi es una marca comercial de
Eye-Fi, Inc.
• Además, los nombres de sistemas y
productos utilizados en este manual
son, en general, marcas comerciales o
marcas comerciales registr adas de sus
respectivos desarrolladores o
fabricantes. Sin embargo, las marcas
™ o ® no se utilizan en todos los
casos en este manual.
®
).
En la página Web de atención al
cliente puede encontrar
información adicional sobre este
producto y respuesta a las
preguntas hechas con más
frecuencia.
Impreso en papel reciclado en un 70%
o más utilizando tinta hecha con aceite
vegetal exento de compuesto orgánico
volátil (COV).
ES
ES
25
Page 100

Português
AVISO
Para reduzir o risco de incêndio ou choque eléctrico, não exponha
a unidade à chuva ou à humidade.
INSTRUÇÕES DE SEGURANÇA IMPORTANTES
-GUARDE ESTAS INSTRUÇÕES
PERIGO
PARA REDUZIR O RISCO DE INCÊNDIO OU CHOQUE
ELÉCTRICO, SIGA CUIDADOSAMENTE ESTAS
INSTRUÇÕES
Se a forma da ficha não encaixar na tomada de alimentação, use um acessório adaptador de
ficha com configuração adequada para a tomada de alimentação.
ATENÇÃO
[ Bateria
Se a bateria for indevidamente utilizada, a mesma pode rebentar, provocar um incêndio ou
queimaduras químicas. Tenha em atenção as seguintes precauções.
• Não desmonte.
• Não esmague nem exponha a bateria a nenhum choque ou força como martelar, deixar
cair, ou pisar a bateria.
• Não cause curto-circuitos e não toque com objectos metálicos nos terminais da bateria.
• Não exponha a uma temperatura superior a 60 °C como, por exemplo, à luz solar directa
ou dentro de um automóvel estacionado ao sol.
• Não proceda à incineração nem queime.
• Não manuseie baterias de iões de lítio danificadas ou que estejam a derramar líquido.
• Certifique-se de que carrega a bateria, utilizando um carregador de bateria Sony
autêntico ou um dispositivo que possa fazê-lo.
• Mantenha a bateria fora do alcance das crianças.
• Não molhe a bateria.
• Substitua-a apenas por outra do mesmo tipo ou por um tipo equivalente recomendado
pela Sony.
• Desfaça-se imediatamente de baterias usadas, tal como descrito nas instruções.
PT
2
 Loading...