

Page 1

contents
Search
Search
Table of
Operation
MENU/Settings
Cyber-shot Handbook
DSC-WX5/WX5C
Index
© 2010 Sony Corporation 4-194-687-12(1)
GB
Page 2
How to use this handbook
Click on a button at upper right to jump to the corresponding page.
This is convenient when searching for a function you want to view.
contents
Table of
Search for information by function.
Operation
Search
MENU/Settings
Search
Index
Marks and notations used in this handbook
Search for information by operation.
Search for information in a listing of
MENU/Settings items.
Search for information by keyword.
In this handbook, the sequence of
operations is shown by arrows (t).
Operate the camera in the order indicated.
Marks are shown as they appear in the
camera’s default setting.
contents
Search
Search
Table of
Operation
MENU/Settings
Index
The default setting is indicated by .
Indicates cautions and limitations relevant
to the correct operation of the camera.
z Indicates information that is useful to
know.
GB
2
Page 3
Notes on using the camera
contents
Table of
Notes on the types of memory cards
that you can use (sold separately)
The following memory cards are compatible
with this camera: “Memory Stick PRO Duo”
media, “Memory Stick PRO-HG Duo”
media, “Memory Stick Duo” media, SD
memory card, SDHC memory card and
SDXC memory card.
MultiMediaCard cannot be used.
In this manual, the term “Memory Stick Duo”
media is used to refer to “Memory Stick PRO
Duo” media, “Memory Stick PRO-HG Duo”
media and “Memory Stick Duo” media, and
the term “SD card” is used to refer to SD
memory card, SDHC memory card and
SDXC memory card.
• “Memory Stick Duo” media with a capacity up
to 32 GB and SD card up to 64 GB have been
confirmed to operate properly with the camera.
• When recording movies, it is recommended that
you use the following memory cards:
– (Mark2) (“Memory
Stick PRO Duo” (Mark2) media)
– (“Memory Stick PRO-
HG Duo” media)
– SD memory card, SDHC memory card or
SDXC memory card (Class 4 or faster)
• For details on “Memory Stick Duo” media, see
page 158.
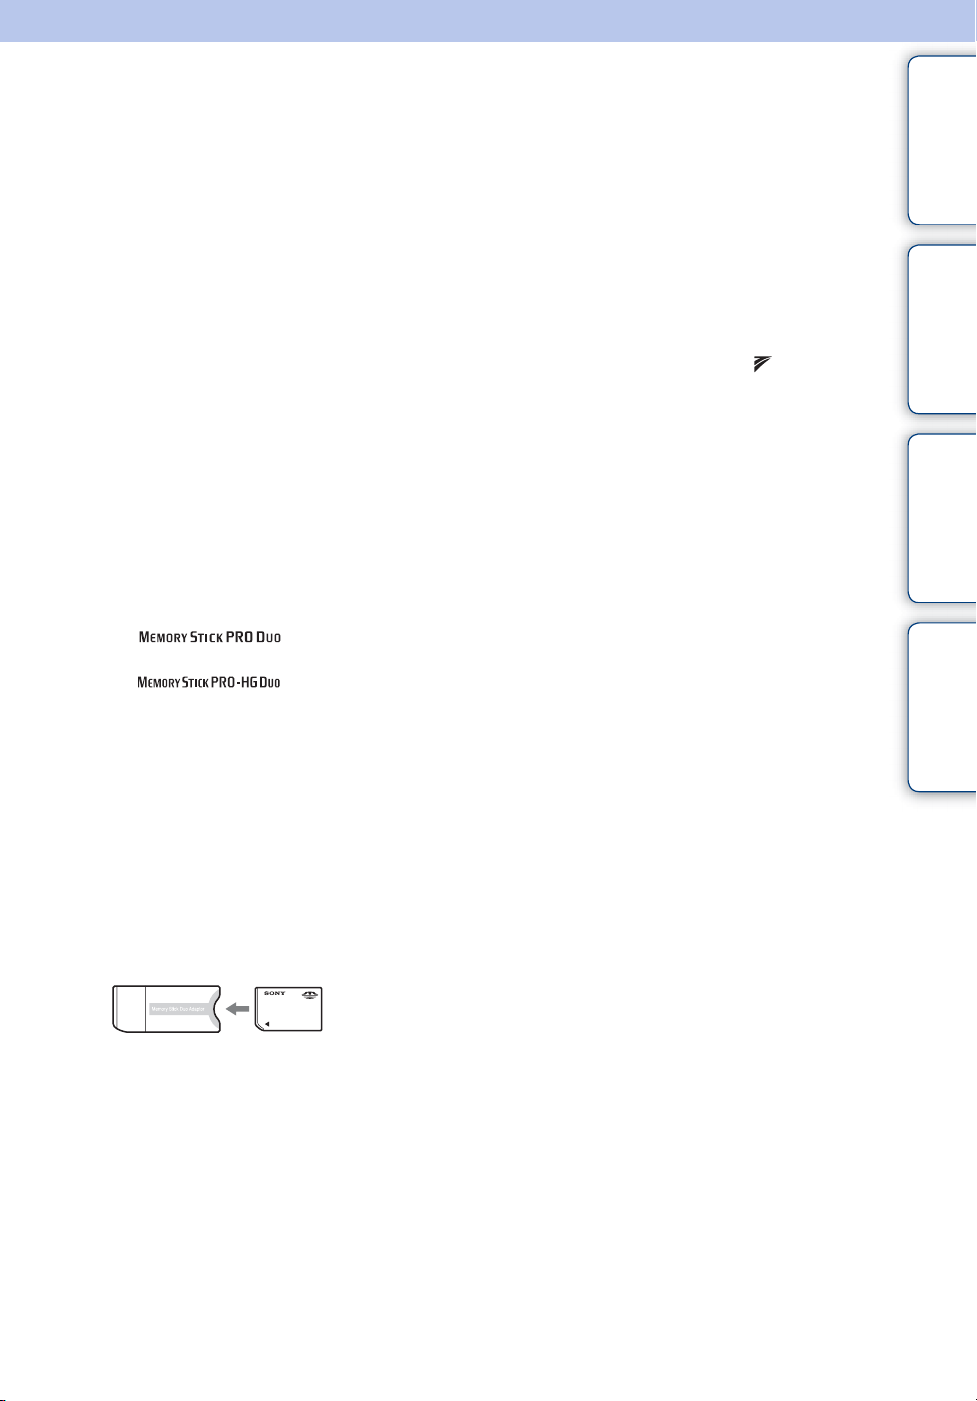
When using a “Memory Stick Duo”
media with standard sized “Memory
Stick” media slot
You can use the “Memory Stick Duo” media
by inserting it into the “Memory Stick Duo”
media Adaptor (sold separately).
“Memory Stick
Duo” media
Adaptor
Functions built into this camera
• This manual describes each of the functions of
TransferJet-compatible/incompatible devices,
1080 60i-compatible devices and 1080 50icompatible devices.
To check if your camera supports the
TransferJet function, and whether it is a
1080 60i-compatible device or 1080 50icompatible device, check for the following
marks on the bottom of the camera.
TransferJet-compatible device: (TransferJet)
1080 60i-compatible device: 60i
1080 50i-compatible device: 50i
• Do not watch 3D images shot with this camera
for extended periods of time on 3D-compatible
monitors.
• When you view 3D images shot with this
camera on a 3D-compatible monitors, you may
experience discomfort in the form of eye strain,
fatigue, or nausea. To prevent these symptoms,
we recommend that you take regular breaks.
However, you need to determine for yourself the
length and frequency of breaks you require, as
they vary according to the individual. If you
experience any type of discomfort, stop viewing
the 3D images until you feel better, and consult
a physician as necessary. Also refer to the
operating instructions supplied with the device
or software you have connected or are using
with this camera. Note that a child’s eyesight is
still at the development stage (particularly
children below the age of 6). Consult a
pediatrician or ophthalmologist before letting
your child view 3D images, and make sure he/
she observes the above precautions when
viewing such images.
Notes on the battery pack
• Charge the battery pack (supplied) before using
the camera for the first time.
• You can charge the battery pack even if it is not
completely discharged. In addition, even if the
battery pack is not fully charged, you can use the
partially charged capacity of the battery pack as
is.
• If you do not intend to use the battery pack for a
long time, use up the existing charge and
remove it from the camera, then store it in a
cool, dry place. This is to maintain the battery
pack functions.
• For details on the usable battery pack, see
page 160.
Search
Search
Operation
MENU/Settings
Index
Continued r
GB
3
Page 4

Notes on the LCD screen and lens
• The LCD screen is manufactured using
extremely high-precision technology so over
99.99% of the pixels are operational for
effective use. However, some tiny black and/or
bright dots (white, red, blue or green) may
appear on the LCD screen. These dots are a
normal result of the manufacturing process and
do not affect the recording.
Black, white, red, blue or
green dots
• Exposing the LCD screen or the lens to direct
sunlight for long periods may cause
malfunctions. Be careful when placing the
camera near a window or outdoors.
• Do not press against the LCD screen. The screen
may be discolored and that may cause a
malfunction.
• Images may trail across on the LCD screen in a
cold location. This is not a malfunction.
• Be careful not to bump the movable lens, and be
careful not to apply force to it.
Note when playing movies on other
devices
This camera uses MPEG-4 AVC/H.264 High
Profile for AVCHD format recording.
Movies recorded in AVCHD format with this
camera cannot be played by the following
devices.
– Other devices compatible with AVCHD format
that do not support High Profile
– Devices incompatible with the AVCHD format
This camera also uses MPEG-4 AVC/H.264
Main Profile for MP4 format recording.
For this reason, movies recorded in MP4
format with this camera cannot be played on
devices other than those that support MPEG4 AVC/H.264.
contents
Search
Search
Table of
Operation
MENU/Settings
Index
On moisture condensation
• If the camera is brought directly from a cold to a
warm location, moisture may condense inside or
outside the camera. This moisture condensation
may cause a malfunction of the camera.
• If moisture condensation occurs, turn off the
camera and wait about an hour for the moisture
to evaporate. Note that if you attempt to shoot
with moisture remaining inside the lens, you
will be unable to record clear images.
The images used in this Handbook
The images used as examples in this
Handbook are reproduced images, and are not
actual images shot using this camera.
GB
4
Page 5

Table of contents
Notes on using the camera
How to use this handbook····································· 2
Notes on using the camera ··································· 3
Operation Search·················································· 9
MENU/Settings Search ······································· 12
Identifying parts··················································· 16
List of icons displayed on the screen ·················· 17
Using the internal memory ·································· 19
Shooting
Using the mode dial ············································ 20
Intelligent Auto Adjustment ································· 21
Superior Auto Adjustment ··································· 22
Background Defocus··········································· 24
Program Auto ······················································ 25
Scene Selection ·················································· 26
Intelligent Sweep Panorama ······························· 29
Movie Mode························································· 31
Zoom ··································································· 32
Tracking focus·······················································33
DISP (Screen Display Settings) ····························34
Flash ··································································· 36
Smile Shutter······················································· 37
Self-Timer···························································· 38
Burst button························································· 40
MOVIE (Movie) button········································· 41
contents
Search
Search
Table of
Operation
MENU/Settings
Index
GB
5
Page 6

Viewing
Viewing still images············································· 42
Playback zoom···················································· 43
Image Index ························································ 44
Delete·································································· 45
Viewing burst images·········································· 47
Viewing movies ··················································· 49
contents
Search
Table of
Operation
3D images
3D Functions ······················································· 51
3D Shooting ························································ 53
Viewing images shot in Sweep Multi Angle
mode stereoscopically········································· 55
Viewing an image on a 3D TV····························· 56
MENU (Shooting)
MENU items (Shooting) ······································ 12
MENU
(Viewing)
MENU items (Viewing) ········································ 13
MENU/Settings
Search
Index
Settings
Setting items ······················································· 14
GB
6
Page 7

TV
Computer
Viewing an image on a Standard Definition
(SD) TV ····························································· 127
Viewing an image on a High Definition (HD)
TV······································································ 128
Viewing an image on a “BRAVIA”
Sync-compatible TV ·········································· 131
Using with your computer·································· 133
Using the software ············································ 134
Connecting the camera to a computer··················136
Uploading images to a media service ···················138
Creating a disc of movies ······································140
contents
Search
Search
Table of
Operation
MENU/Settings
Printing
Printing still images ··········································· 143
Troubleshooting
Troubleshooting ················································ 144
Warning indicators and messages ···················· 152
Index
GB
7
Page 8

Others
Index
Using the camera abroad·································· 157
Memory card ····················································· 158
Battery pack ······················································ 160
Battery charger·················································· 161
Intelligent Pantilter············································· 162
AVCHD format ·················································· 163
TransferJet standard········································· 164
Number of still images and recordable time of
movies······························································· 165
Precautions ······················································· 167
Index ································································· 168
contents
Search
Search
Table of
Operation
MENU/Settings
Index
GB
8
Page 9

Operation Search
contents
Table of
Leaving the settings to
the camera
Shooting movies
Shooting 3D images
Shooting portraits
Intelligent Auto Adjustment······························· 21
Superior Auto Adjustment································· 22
Scene Selection··················································· 26
Scene Recognition ·············································· 74
Movie Mode··························································· 31
MOVIE (Movie) button ······································· 41
Movie format ························································· 95
3D Sweep Panorama ········································· 53
Sweep Multi Angle ·············································· 53
Background Defocus·········································· 24
Soft Skin································································· 26
Soft Snap ······························································· 26
Anti Motion Blur···················································· 26
Twilight Portrait ···················································· 26
Smile Shutter ························································ 37
Scene Recognition ·············································· 74
Face Detection····················································· 78
Anti Blink ································································ 80
Red Eye Reduction ··········································· 100
Search
Search
Operation
MENU/Settings
Index
Shooting panoramic
images
Shooting moving
objects
Intelligent Sweep Panorama ···························· 29
Movie Mode··························································· 31
Tracking focus······················································ 33
Burst Settings ······················································· 65
GB
9
Page 10

Shooting without blur
Anti Motion Blur···················································· 26
Hand-held Twilight ·············································· 26
High Sensitivity····················································· 27
2-second delay self-timer·································· 38
ISO··········································································· 68
contents
Table of
Shooting with backlight
Shooting in dark places
Changing focus
position
Changing image size/
quality
Changing screen
display
Backlight Correction HDR································· 26
Forced Flash························································· 36
Scene Recognition ·············································· 74
Anti Motion Blur···················································· 26
High Sensitivity····················································· 27
Slow Synchro························································ 36
ISO··········································································· 68
Tracking focus······················································ 33
Focus ······································································ 71
Face Detection····················································· 78
Image Size/Panorama Image Size/
Quality····································································· 62
DISP (Screen Display Settings) ······················ 34
Function Guide··················································· 104
Search
Search
Operation
MENU/Settings
Index
Deleting images
Displaying enlarged
images
Editing images
Playing back a series of
images in order
Delete································································ 45, 90
Format ·································································· 119
Playback zoom····················································· 43
Trimming (Resize)··············································· 89
Retouch ·································································· 89
Slideshow ······························································ 81
10
GB
Page 11

Viewing 3D images
Viewing images shot in Sweep Multi Angle
mode stereoscopically
······································· 55
contents
Table of
Printing images with
the date
Changing date and
time settings
Initializing settings
Printing images
Viewing on TVs
Creating AVCHD
format movie disc
“PMB (Picture Motion Browser)” ·················· 134
Area Setting ························································ 125
Date & Time Setting·········································· 126
Initialize································································· 107
Printing still images ··········································· 143
Viewing an image on a 3D TV························· 56
Viewing an image on a Standard Definition
(SD) TV································································· 127
Viewing an image on a High Definition
(HD) TV ································································ 128
Creating a disc of movies································ 140
Search
Search
Operation
MENU/Settings
Index
Information about
optional accessories
Intelligent Pantilter············································· 162
11
GB
Page 12
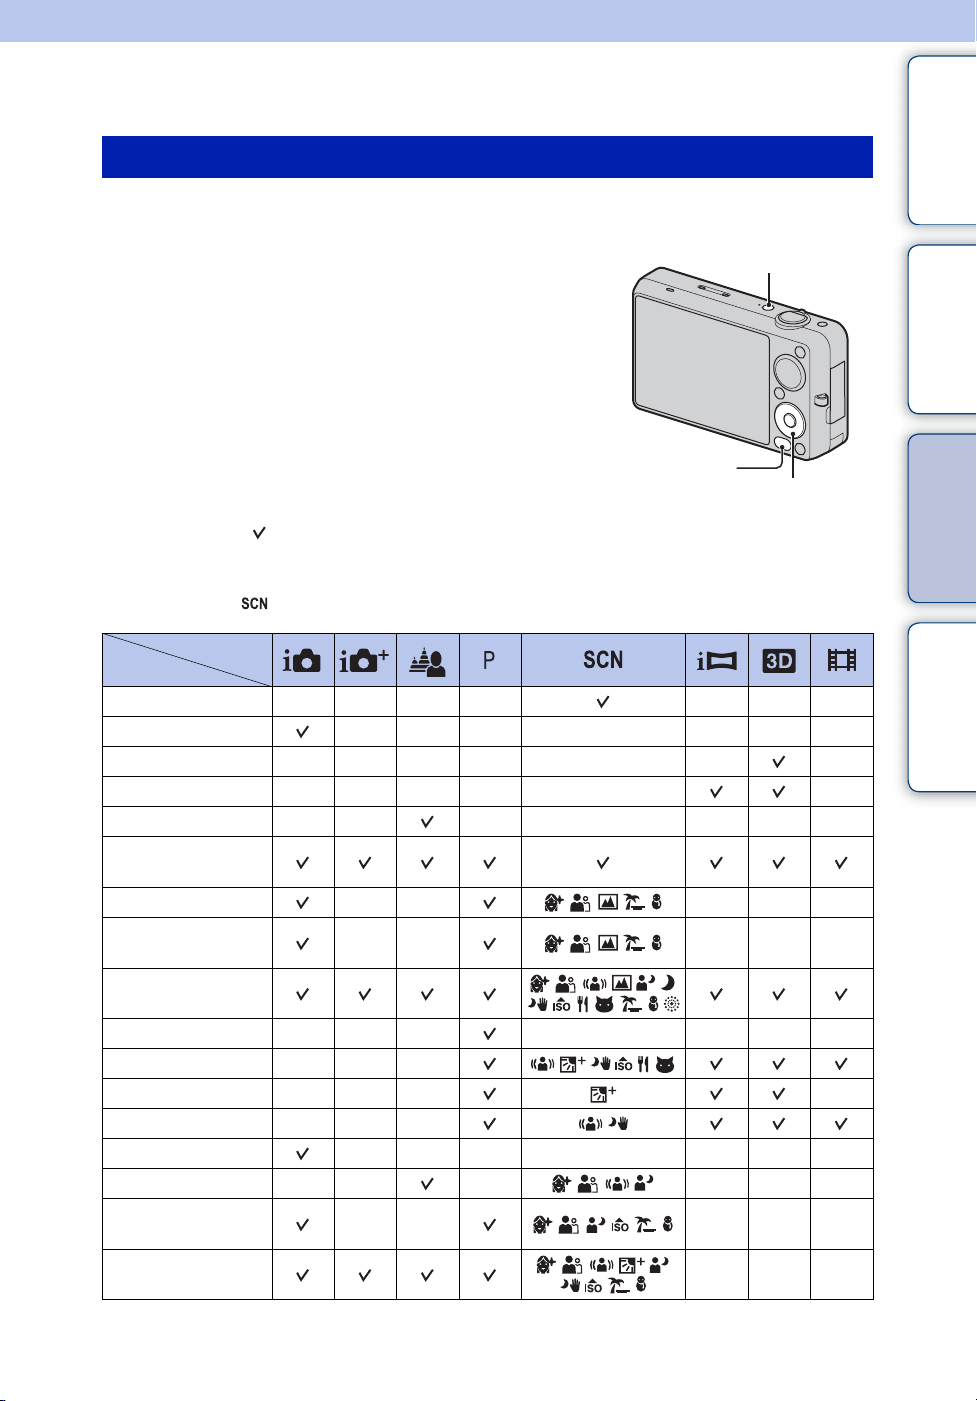
MENU/Settings Search
MENU items (Shooting)
You can select the various shooting functions easily from the MENU button.
contents
Table of
1 Press the ON/OFF (Power) button and set the
ON/OFF (Power) button
camera to shooting mode.
2 Press the MENU button to display the Menu
screen.
3 Select the desired menu item with v/V/b/B on
the control button.
4 Press the MENU button to turn off the Menu
screen.
In the table below, indicates settings that can be changed, while – indicates settings that cannot
be changed. A setting may be fixed or restricted depending on the shooting mode. For details,
see the page for each item.
The icons below indicate the available modes.
Mode dial
Menu items
Scene Selection
Easy Mode
3D Shooting
Shooting Direction
Defocus Effect
Image Size/Panorama
Image Size/Quality
Burst Settings
Burst Shooting
Interval
EV
ISO
White Balance
Focus
Metering Mode
Scene Recognition
Soft Skin Effect
Smile Detection
Sensitivity
Face Detection
———— ———
——— — ———
———— — — —
———— — —
—— — — ———
—— ———
—— ———
——— — ———
———
——— —
———
——— — ———
—— — ———
—— ———
MENU button
Control button
———
Search
Search
Operation
MENU/Settings
Index
Continued r
12
GB
Page 13
Mode dial
Menu items
Anti Blink
(Settings)
———— ———
Notes
• [Quality] is displayed only when [Movie format] is set to [AVCHD].
• Only the items that are available for each mode are displayed on the screen.
MENU items (Viewing)
You can select the various viewing functions easily from the MENU button.
contents
Search
Table of
Operation
1 Press the (Playback) button to switch to
Control button
playback mode.
2 Press the MENU button to display the Menu
screen.
3 Select the desired menu item with v/V/b/B on
the control button.
4 Press z on the center of the control button.
In the table below, indicates settings that can be changed, while – indicates settings that cannot
be changed.
View Mode
Menu items
(Slideshow)
(3D Viewing) ——
(Send by TransferJet) ———
(View Mode) —
(Display Burst Group) ————
(Retouch)
(Delete)
(Protect)
DPOF
(Rotate)
(Select Folder)
(Settings)
Date View Folder view
———
Memory card
(Still)
Folder view
(MP4)
——
——
———
——
(Playback)
button
AVCHD
view
MENU button
Internal
Memory
Folder View
MENU/Settings
Search
Index
Note
• Only the items that are available for each mode are displayed on the screen.
13
GB
Page 14
Setting items
You can change the settings on the (Settings) screen.
contents
Table of
1 Press the MENU button to display the Menu
screen.
2 Select (Settings) with V on the control button,
then press z on the center of the control button to
display the setup screen.
3 Select each item with v/V/b/B, then z.
4 Select the desired setting, then press z.
Categories Items
Shooting Settings
Main Settings
Movie format
AF Illuminator
Grid Line
Digital Zoom
Auto Orientation
Red Eye Reduction
Blink Alert
Beep
Language Setting
Function Guide
Display color
Demo Mode
Initialize
HDMI Resolution
CTRL FOR HDMI
COMPONENT
USB Connect
LUN Settings
Download Music
Format Music
Power Save
TransferJet
Eye-Fi*
Control button
MENU button
Search
Search
Operation
MENU/Settings
Index
Continued r
14
GB
Page 15

Categories Items
Memory Card Tool
Internal Memory Tool
Clock Settings
* [Eye-Fi] appears only when an Eye-Fi card (commercially available) is inserted in the camera.
Notes
• [Shooting Settings] appears only when settings have been entered from shooting mode.
• [Memory Card Tool] appears only when a memory card is inserted in the camera, while [Internal
Memory Tool] appears only when a memory card is not inserted.
Format
Create REC.Folder
Change REC.Folder
Delete REC.Folder
Copy
File Number
Format
File Number
Area Setting
Date & Time Setting
contents
Search
Search
Table of
Operation
MENU/Settings
Index
15
GB
Page 16
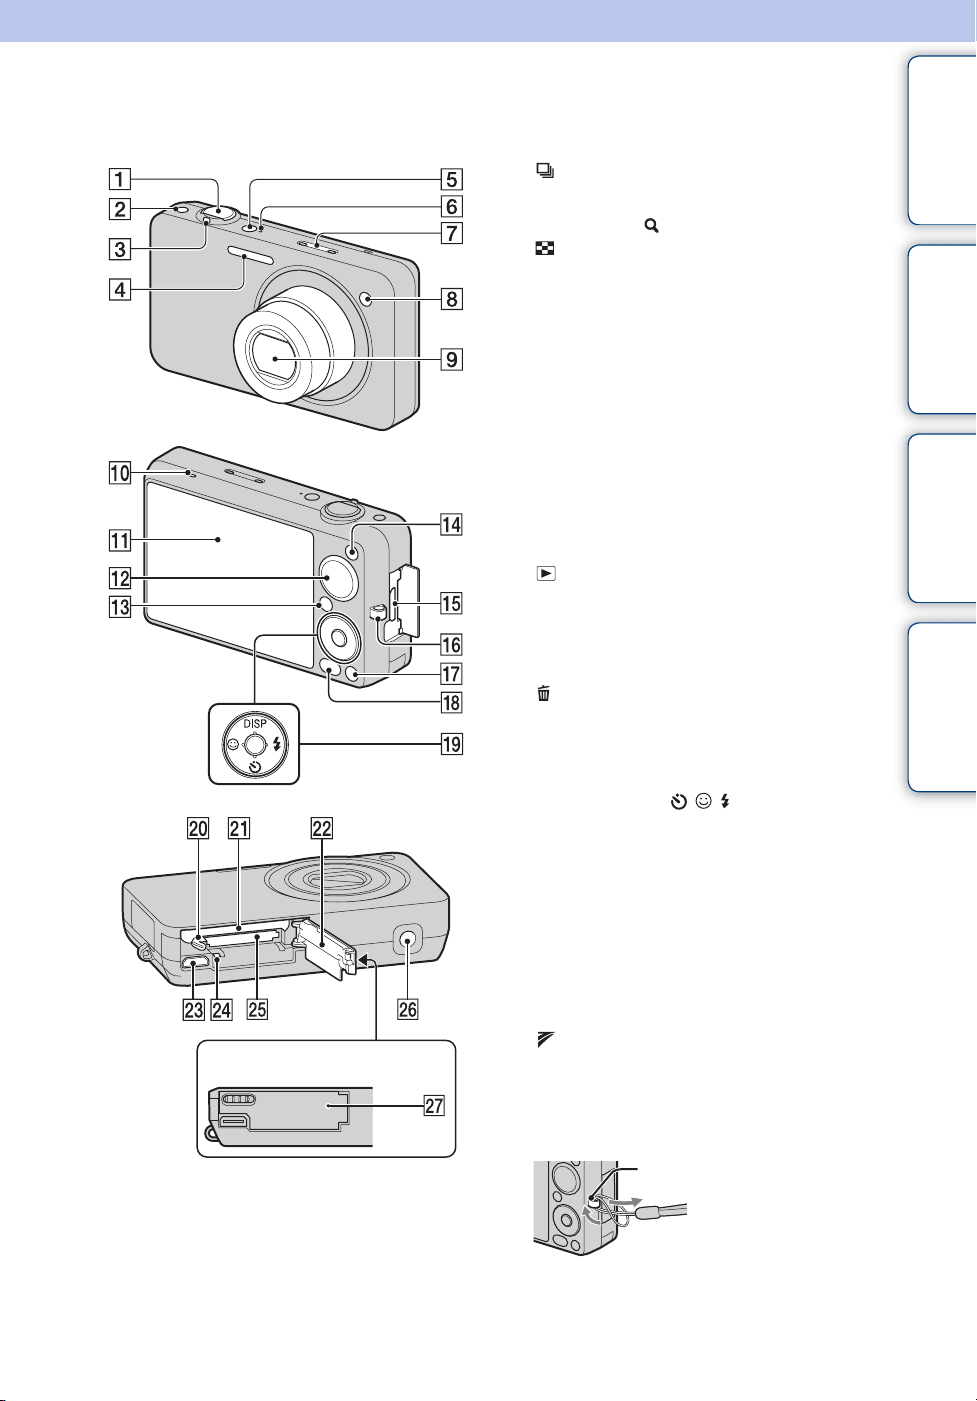
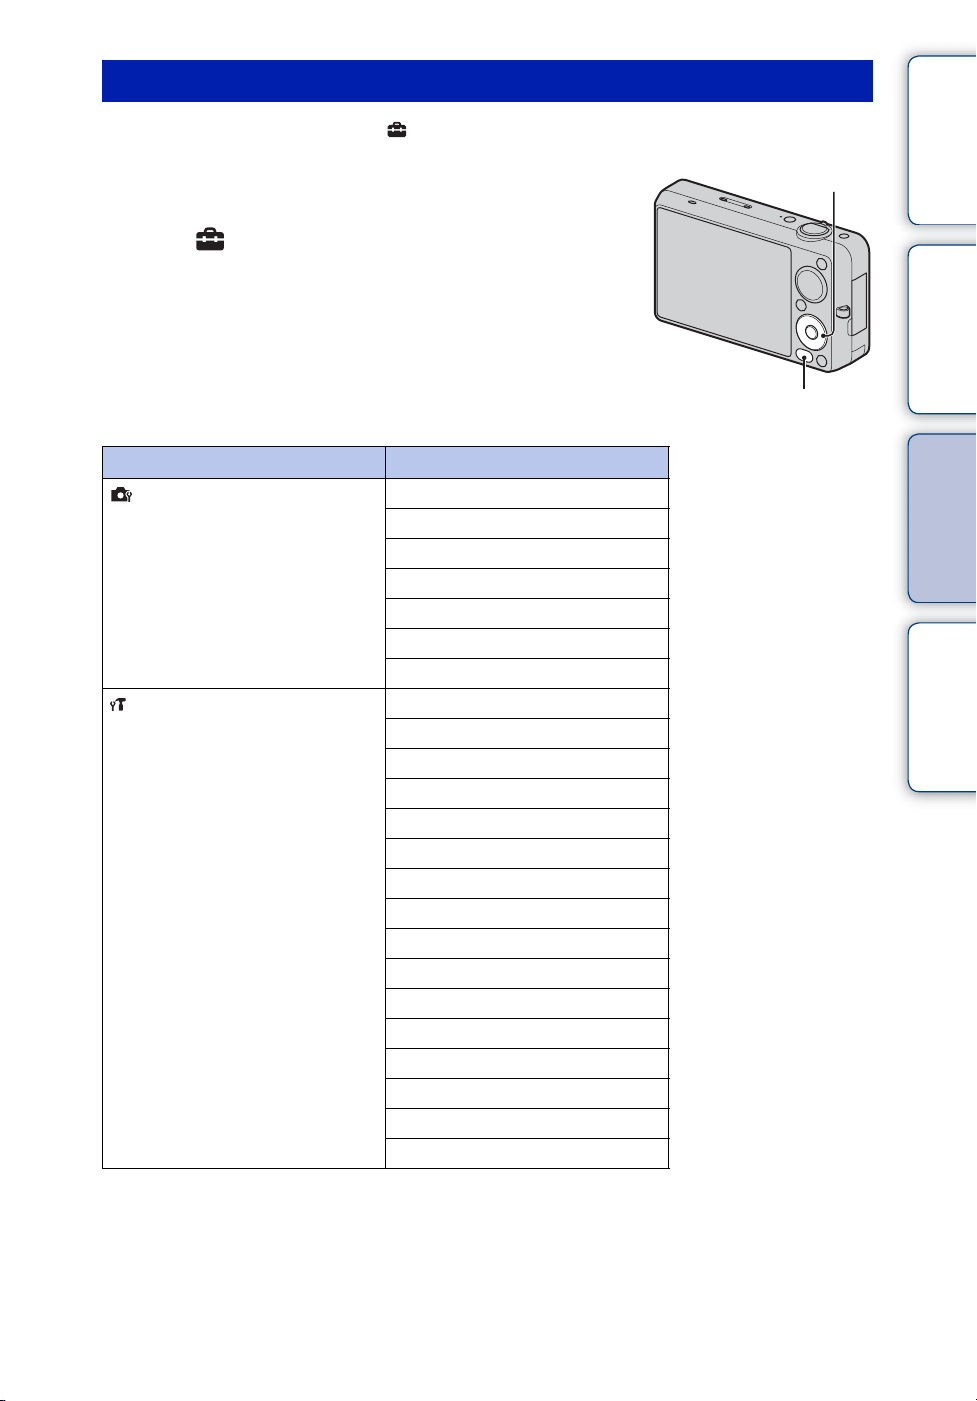
Identifying parts
Camera A Shutter button
B (Burst) button
C For shooting: W/T (zoom) lever (32)
For viewing: (Playback zoom) lever/
(Index) lever (43, 44)
D Flash
E ON/OFF (Power) button
F Power lamp
G Microphone
H Self-timer lamp/Smile Shutter lamp/AF
illuminator
I Lens
J Speaker
K LCD screen
L Mode dial (20)
M (Playback) button (42)
N MOVIE (Movie) button (41)
O HDMI connector
P Hook for wrist strap*
Q (Delete) button (45)
R MENU button (12)
S Control button
Menu on: v/V/b/B/z
Menu off: DISP/ / / /Tracking focus
T Battery eject lever
U Battery insertion slot
V Battery/Memory card cover
W Multi connector
X Access lamp
Y Memory card slot
Z Tripod receptacle
wj (TransferJet™) mark (85, 116)
Cover panel
* Using the wrist strap
Attach the strap and place your hand through the
loop to prevent the camera from being dropped.
Hook
contents
Search
Search
Table of
Operation
MENU/Settings
Index
16
GB
Page 17
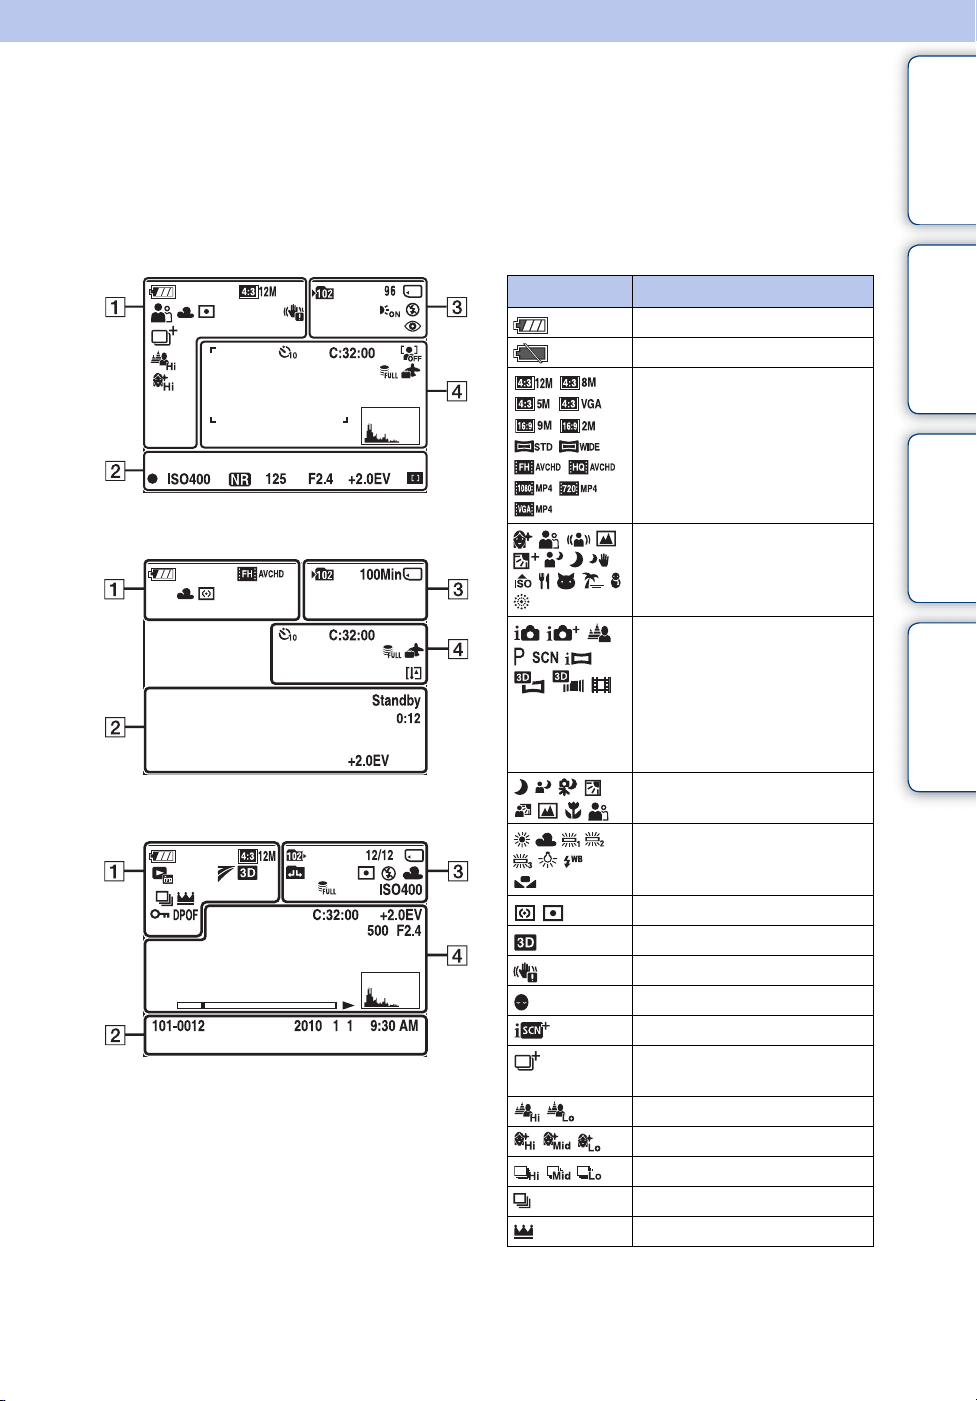
List of icons displayed on the screen
Icons are displayed on the screen to indicate the camera status.
You can change the screen display using DISP (Screen Display Settings) on the control button.
contents
Table of
When shooting still images
When shooting movies
When playing back
A
Display Indication
Battery remaining
Low battery warning
Image Size/Panorama image
size/Quality
Scene Selection
Shooting mode (Intelligent
Auto Adjustment/Superior
Auto Adjustment/Background
Defocus/Program Auto/Scene
Selection/iSweep Panorama/3D
Sweep Panorama/Sweep Multi
Angle/Movie Mode)
Scene Recognition icon
White Balance
Search
Search
Operation
MENU/Settings
Index
Metering Mode
3D images
Vibration warning
Anti Blink
Scene Recognition
Overlay icon for Superior Auto
Adjustment
Defocus Effect
Soft Skin Effect
Burst Shooting Interval
Burst Images
Main image in the burst group
Continued r
17
GB
Page 18
Display Indication
Smile Detection Sensitivity
indicator
Zoom scaling
Protect
Print order (DPOF)
Playback zoom
View mode
TransferJet settings
B
Display Indication
z
ISO400
125
F2.4
+2.0EV
Focus
REC
Standby
0:12
101-0012
2010 1 1
9:30 AM
C
AE/AF lock
ISO number
NR slow shutter
Shutter speed
Aperture value
Exposure value
Recording a movie/Standby
Recording time (m:s)
Folder-file number
Recorded date/time of the
playback image
Display Indication
Recording folder
Playback folder
96
12/12
100Min
Recording/Playback Media
Changing folder
Number of recordable images
Image number/Number of
images recorded in date range,
selected folder
Recordable time
(Memory card, internal memory)
Eye-Fi Mode display
AF Illuminator
Display Indication
Red-eye reduction
Metering Mode
Flash mode
Flash charging
White Balance
ISO400
ISO number
Database file full/Database file
error warning
D
Display Indication
Self-timer
C:32:00
Face Detection
Database file full/Database file
+2.0EV
500
F2.4
N
00:00:12
Self-diagnosis display
Overheating warning
error warning
Destination
AF range finder frame
Spot metering cross-hairs
Exposure value
Shutter speed
Aperture value
Playback
Playback bar
Counter
Histogram
• appears when histogram
display is disabled.
Volume
18
contents
Search
Search
GB
Table of
Operation
MENU/Settings
Index
Page 19
Using the internal memory
The camera has approximately 32 MB of internal memory. This memory is not removable. Even
when there is no memory card inserted in the camera, you can record images using this internal
memory.
When a memory card is inserted
[Recording]: Images are recorded on the memory card.
[Playback]: Images on the memory card are played back.
B
B
On image data stored in the internal memory
Internal
memory
[Menu, Settings, etc.]: Various functions can be
performed on images on the memory card.
When there is no memory card inserted
[Recording]: Images are recorded using the internal
memory.
• You cannot record movies to the internal memory with the
following movie quality or movie image size:
– [AVC HD 17M FH], [AVC HD 9M HQ]
– [MP4 12M], [MP4 6M]
[Playback]: Images stored in the internal memory are played
back.
[Menu, Settings, etc.]: Various functions can be
performed on images in the internal memory.
contents
Search
Search
Table of
Operation
MENU/Settings
Index
We recommend that you copy (back up) data using one of the following methods.
To copy (back up) data on a hard disk of your computer
Perform the procedure on page 136 without a memory card inserted in the camera.
To copy (back up) data on a memory card
Prepare a memory card with sufficient free capacity, then perform the procedure explained in
[Copy] (page 123).
Notes
• You cannot import image data on a memory card to the internal memory.
• By making a USB connection between the camera and a computer with a cable, you can import data
stored in the internal memory to a computer. However you cannot export data on a computer to the
internal memory.
19
GB
Page 20
Using the mode dial
Set the mode dial to the desired function.
Mode dial
contents
Search
Table of
Operation
(Intelligent Auto
Adjustment)
(Superior Auto
Adjustment)
(Background
Defocus)
(Program Auto)
(Scene Selection)
(iSweep Panorama)
(3D Shooting)
(Movie Mode)
Allows you to shoot still images with the setting adjusted
automatically.
Allows you to shoot still images in higher quality than with
Intelligent Auto Adjustment mode.
Allows you to shoot an image with background defocus and define
the subject.
Allows you to shoot with the exposure adjusted automatically (both
the shutter speed and the aperture value). Also you can select various
settings using the menu.
Allows you to shoot with preset settings according to the scene.
Allows you to shoot a panoramic image after composing images.
Allows you to shoot 3D images by composing images.
Allows you to record movies.
MENU/Settings
Search
Index
20
GB
Page 21

Intelligent Auto Adjustment
Allows you to shoot still images with the setting adjusted automatically.
1 Set the mode dial to (Intelligent Auto Adjustment).
2 Shoot with the shutter button.
contents
Table of
Note
• Flash mode is set to [Auto] or [Off].
zOn Scene Recognition
Scene Recognition operates in Intelligent Auto Adjustment mode. This function lets the
camera automatically recognize the shooting conditions and shoot the image.
Scene Recognition icon and guide
• The camera recognizes (Twilight), (Twilight Portrait), (Twilight using a tripod),
(Backlight), (Backlight Portrait), (Landscape), (Macro) or (Portrait), and displays
the corresponding icon and guide on the screen when the scene is recognized.
For details, see page 74.
zIf you shoot a still image of a subject that is difficult
to focus on
• The shortest shooting distance is approximately 5 cm (2 inches) (W), 90 cm (2 ft 11 3/8 inches) (T)
(from the lens).
• When the camera cannot focus on the subject automatically, the AE/AF lock indicator changes to
flash slowly and the beep does not sound. Either recompose the shot or change the focus setting
(page 71).
• Focusing may be difficult in the following situations:
– It is dark and the subject is distant.
– The contrast between the subject and the background is poor.
– The subject is seen through glass.
– The subject is moving quickly.
– There is reflective light or shiny surfaces.
– The subject is backlit or there is a flashing light.
Search
Search
Operation
MENU/Settings
Index
21
GB
Page 22

Superior Auto Adjustment
The camera combines Scene Recognition and high-quality image technology to automatically
shoot the images with the optimal settings.
1 Set the mode dial to (Superior Auto Adjustment).
2 Press the shutter button.
The camera shoots burst images when needed and overlays the multiple images. By
overlaying the images, the camera records an image with less subject blur and noises.
Notes
• [Flash] is fixed to [Auto] or [Off]. In low light conditions such as night scenes, set [Flash] to [Off] to
achieve the optimal effect of the overlaid images.
• The effect of reduced subject blur and noises is less effective in the following situations:
– Subjects are moving
– Subjects are too close to the camera
– Images with little contrast, such as sky, sandy beach or lawn
– Images with constant changes, such as waves or waterfalls
contents
Search
Search
Table of
Operation
MENU/Settings
Index
Continued r
22
GB
Page 23
zWhat is the difference between Superior Auto
Adjustment mode and Intelligent Auto Adjustment
mode?
In [Superior Auto Adjustment] mode, the camera shoots burst images based on the
recognized scene.
After shooting, the camera creates a composite of the burst images to produce a higherquality image. However, it may take longer to record images than in Intelligent Auto
Adjustment mode.
Backlight Correction HDR
Twilight
Twilight Portrait
Prevents over and under
exposure.
contents
Search
Table of
Operation
MENU/Settings
Twilight using a
tripod
Backlight
Overlaying shooting
Backlight Portrait
Landscape
Macro
Portrait
The camera selects the optimal overlay mode based on the recognized scene.
• In Backlight Correction HDR or overlaying shooting mode, (the overlay icon) appears on the
LCD screen.
Reduces noises.
Shooting an image
Search
Index
23
GB
Page 24

Background Defocus
The camera focuses only on the subject, leaving the background out of focus, so that the subject
stands out.
1 Set the mode dial to (Background Defocus).
2 Press the shutter button.
Notes
• When shooting, hold the camera still to reduce camera shake.
• The background may not be defocused in the following situations:
– The scene is too bright or too dark.
– The subject is moving.
– The subject is too far from the camera. (The recommended shooting distance has been exceeded.)
– The subject is too close to the background.
• The Background Defocus effect may not work effectively in the following situations:
– The subjects are too small.
– The subject is the same color as the background.
– You moved the camera after setting the AE/AF lock.
• If you are unable to defocus effectively, try the following steps:
– Turn the W/T (zoom) lever to the T side.
– Approach the subject until you are within the recommended shooting distance.
– Separate the subject and the background.
– Shoot after focusing on the subject.
contents
Search
Search
Table of
Operation
MENU/Settings
zTips for defocusing the background
• Shoot from the recommended shooting distance indicated on the LCD screen.
• Before shooting, select MENU t [Defocus Effect] t [High], [Mid] or [Low] to change
the intensity of the background defocus effect.
Index
24
GB
Page 25

Program Auto
Allows you to shoot with the exposure adjusted automatically (both the shutter speed and the
aperture value). Also you can select various settings using the menu.
1 Set the mode dial to (Program Auto).
2 Press the shutter button.
contents
Search
Search
Table of
Operation
MENU/Settings
Index
25
GB
Page 26
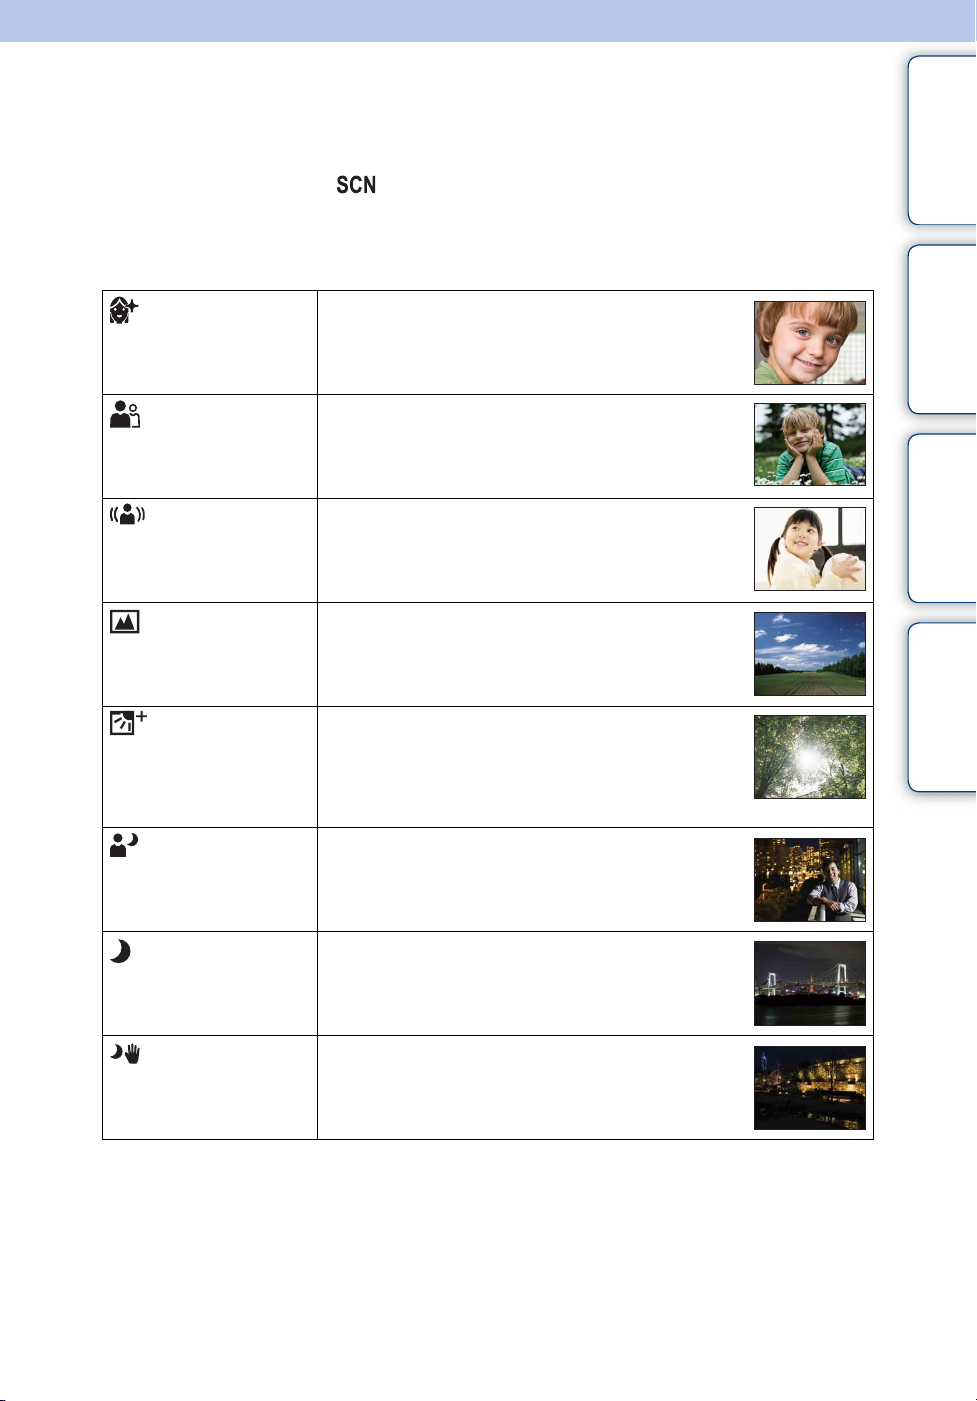
Scene Selection
Allows you to shoot with preset settings according to the scene.
1 Set the mode dial to (Scene Selection).
2 Select the desired mode t z on the control button.
If you want to switch to another scene, press the MENU button.
(Soft Skin)
Allows you to shoot faces for smoothness.
contents
Search
Table of
Operation
(Soft Snap)
(Anti Motion
Blur)
(Landscape)
(Backlight
Correction HDR)
(Twilight Portrait)
(Twilight)
Allows you to shoot images with a softer atmosphere for
portraits and flowers, etc.
Allows you to shoot indoor shots without using the flash
to reduce subject blur.
Allows easy shooting of distant scenes by focusing in
the distance. Shoots the clear sky and trees and flowers
in vivid colors.
Allows you to shoot two images having different
exposures to create a single image with a greater range
of gradation. The camera combines the dark parts of an
image taken with a bright exposure setting and the bright
parts of an image taken with a dark exposure setting.
Allows you to shoot sharp images of people with the
night view in the background without compromising the
atmosphere.
Allows you to shoot night scenes at far distance without
losing the dark atmosphere of the surroundings.
MENU/Settings
Search
Index
(Hand-held
Twilight)
Allows you to shoot night scenes with less noise without
using a tripod.
Continued r
26
GB
Page 27
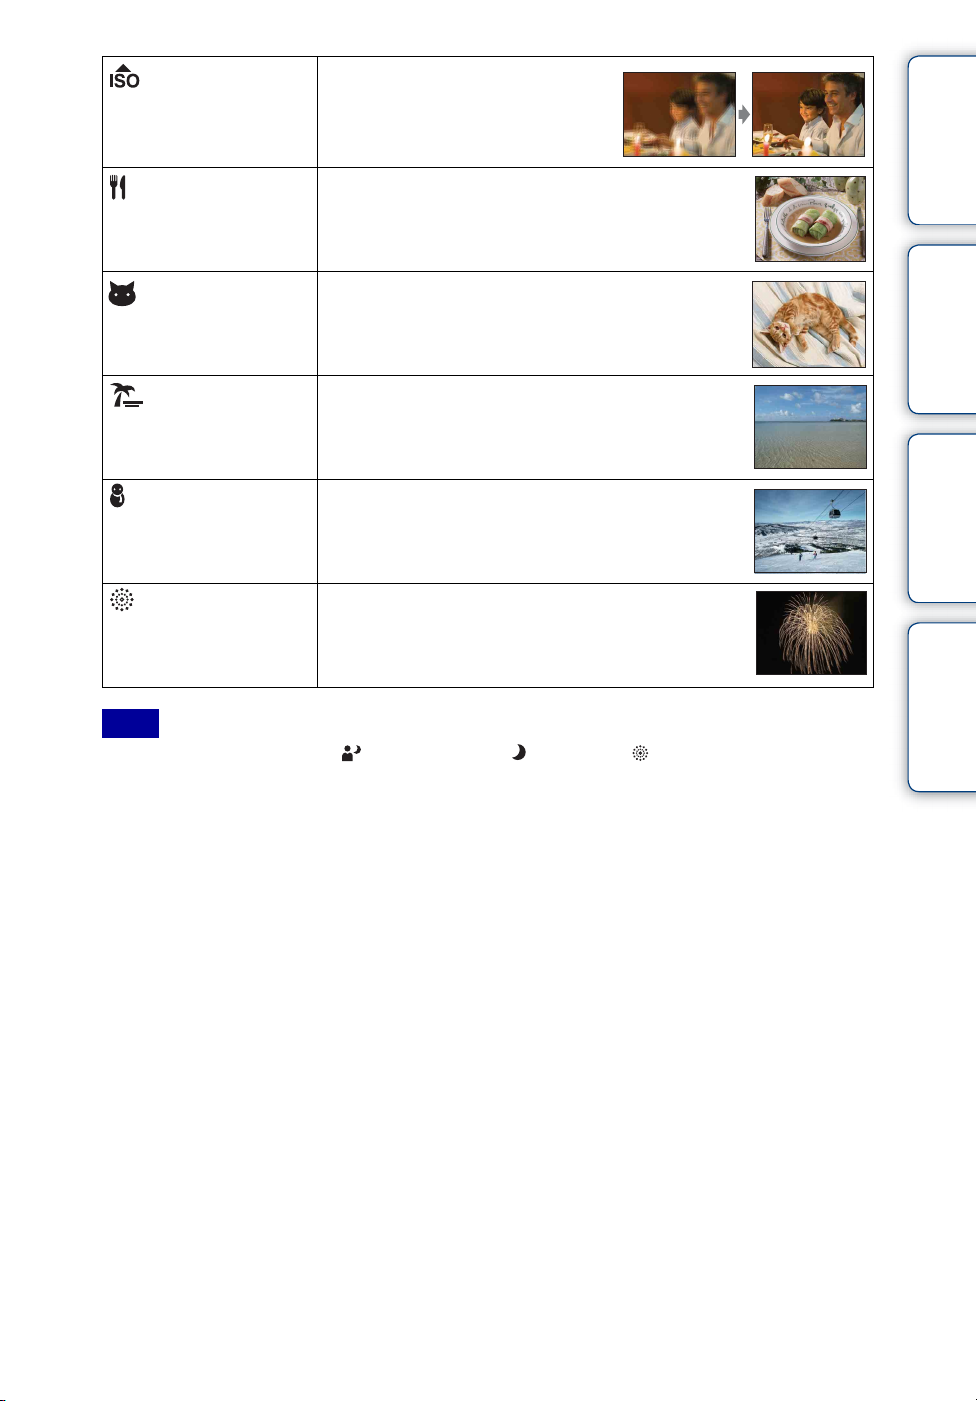
(High Sensitivity)
Allows you to shoot images without a
flash under low light conditions,
reducing blur.
contents
Table of
(Gourmet)
(Pet)
(Beach)
(Snow)
(Fireworks)
Note
• When you shoot images using (Twilight Portrait), (Twilight) or (Fireworks) mode, the shutter
speed is slower and the images tend to blur. To prevent blurring, the use of a tripod is recommended.
Allows you to shoot food arrangements in delicious and
bright colors using Macro mode.
Allows you to shoot images of your pet with the best
settings.
Allows you to shoot images with the proper settings for
seaside or lakeside scenes.
Allows you to record clear images preventing sunken
colors in snowy scenes or other places where the whole
screen appears white.
Allows you to record fireworks in all their splendor.
Search
Search
Operation
MENU/Settings
Index
27
GB
Page 28
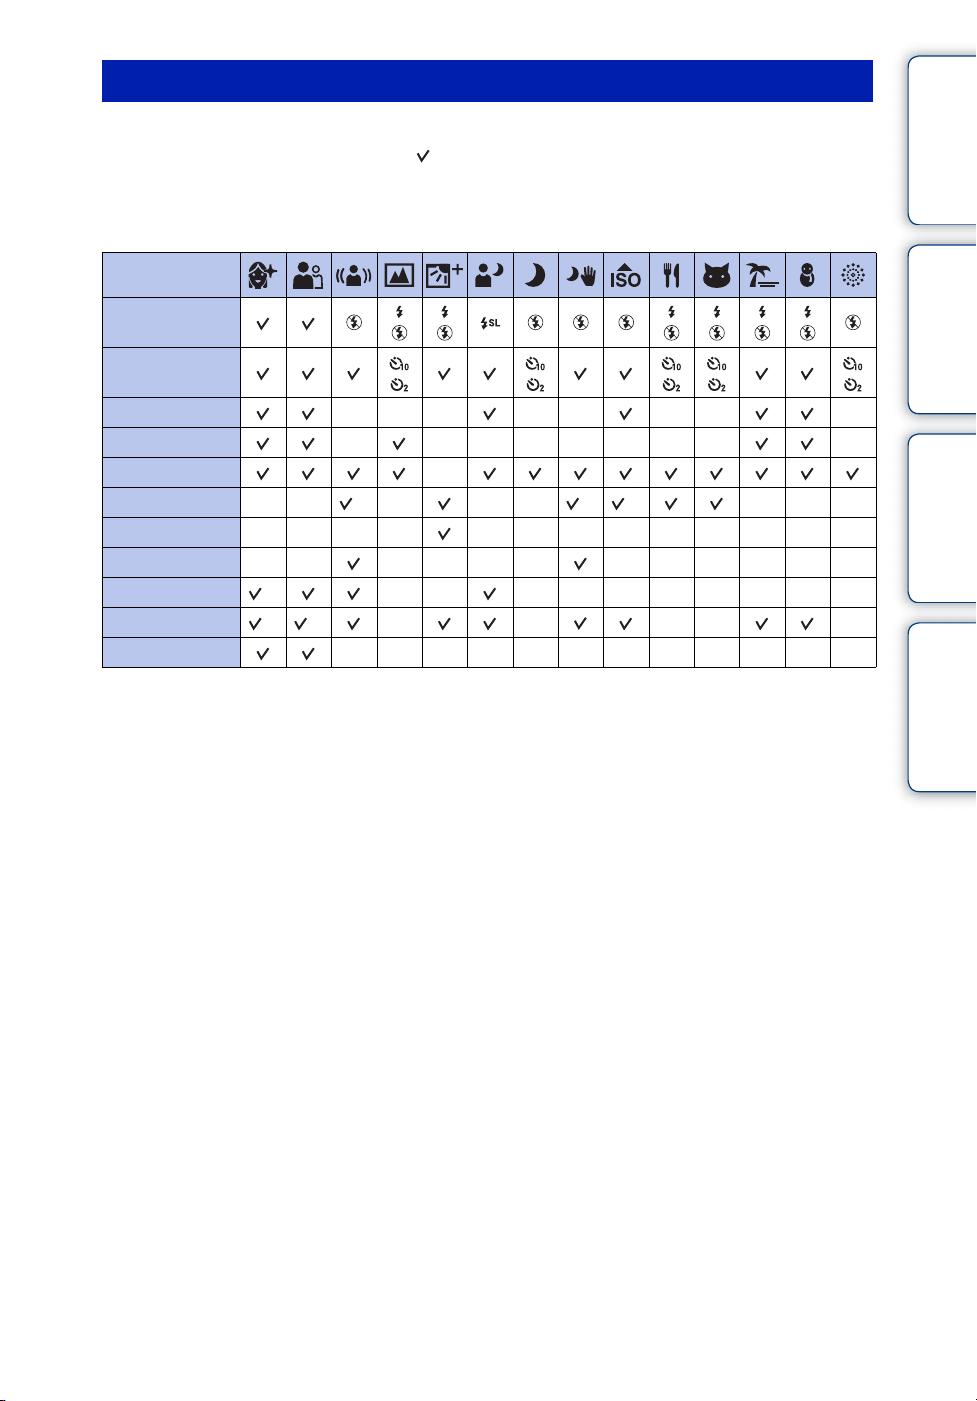
Functions you can use in Scene Selection
For shooting an image appropriately according to the scene condition, a combination of
functions is determined by the camera. indicates settings that can be changed, while –
indicates settings that cannot be changed.
For “Flash” and “Self-Timer,” the icons indicate modes that are available. Some functions are
not available, depending on the Scene Selection mode.
Flash
Self-Timer
contents
Search
Table of
Operation
Smile Shutter
Burst Settings
EV
White Balance
Focus
Metering Mode
Soft Skin Effect
Face Detection
Anti Blink
*1[Flash] for [White Balance] cannot be selected.
2
[Off] for [Soft Skin Effect] is not available.
*
3
[Off] for [Face Detection] cannot be selected.
*
—— *1———*1*
———— —————————
—— ———— ——————
2
*
*3*
——— —— —— —
— ——————— —
—
—— ————————
3
—————
————————————
MENU/Settings
Search
1
———
Index
28
GB
Page 29
Intelligent Sweep Panorama
Allows you to create a panoramic image from composite images. The camera also automatically
detects people’s faces or moving subjects.
1 Set the mode dial to (iSweep Panorama).
2 Align the camera with the end of the subject to be
shot and press the shutter button.
This part will not be taken
3 Pan the camera to the end of the guide,
following the indication on the LCD screen.
contents
Search
Search
Table of
Operation
MENU/Settings
Guidance
bar
Notes
• If you cannot pan the camera across the entire subject within the given time, a gray area occurs in the
composite image. If this happens, move the camera faster to record a full panoramic image.
• Since several images are stitched together, the stitched part will not be recorded smoothly.
• Under low light conditions, panoramic images may be blurred or the shooting may not be successful.
• Under lights that flicker, such as fluorescent lights, the brightness or color of the combined image will
not always be the same.
• When the whole angle of panoramic shooting and the AE/AF locked angle are very different in
brightness, color and focus, the shooting will not be successful. If this happens, change AE/AF locked
angle and shoot again.
• Intelligent Sweep Panorama is not suitable for the following situations:
– Subjects are too close to the camera
– Images with little contrast, such as sky, sandy beach or lawn
– Images with constant changes, such as waves or waterfalls
• You cannot create panoramic images in the following situations:
– You pan the camera too quickly or too slowly.
– There is too much camera shake.
Index
Continued r
29
GB
Page 30
zChanging the shooting direction or image size of a
panoramic image
Shooting Direction: MENU t [Shooting Direction] t select [Right], [Left], [Up]
and [Down] t z
Panorama Image Size: MENU t [Panorama Image Size] t select [Standard] or
[Wide] t z
zTips for shooting a panoramic image
Pan the camera in an arc at a constant velocity in the direction indicated on the LCD screen.
Subjects at rest are more suited for panorama shots than moving subjects.
Radius as short
Vertical direction Horizontal direction
as possible
contents
Search
Search
Table of
Operation
MENU/Settings
Index
• First, press the shutter button halfway so that you can lock the focus, exposure and white balance.
Then, press the shutter button fully down and pan or tilt the camera.
• If a section with greatly varied shapes or scenery is concentrated along a screen edge, the image
composition may fail. In such case, adjust the frame composition so that the section is in the center
of the image, then shoot again.
zScrolling the panoramic images for display
You can scroll panoramic images by pressing z on the control button while panoramic
images are being displayed. Turn the W (zoom) lever to display the whole image again.
Control button/lever Action
z on the control button Scrolling playback/pauses
scrolling images
v/V/b/B on the control
button
Shows the displayed area of
the whole panoramic image
• Panoramic images can also be played back using the supplied software “PMB” (page 134).
• Panoramic images recorded using another camera may not scroll correctly when played.
W (zoom) lever Displays the whole image
Scrolls images
30
GB
Page 31

Movie Mode
Allows you to record movies.
1 Set the mode dial to (Movie Mode).
2 Press the shutter button.
contents
Table of
3 To stop recording, press the shutter button again.
zChanging the Movie Format, Image Quality or Image
Size
Movie format: MENU t (Settings) t (Shooting Settings) t [Movie
format] t [AVCHD] or [MP4] t z on the control button
Quality (AVCHD): MENU t (Quality) t [AVC HD 17M FH] or [AVC HD 9M
HQ]
Image Size (MP4): MENU t (Image Size) t [MP4 12M], [MP4 6M] or [MP4
3M]
zTo shoot a movie quickly
In other than Easy Mode, you can start movie recording simply by pressing the MOVIE
(Movie) button.
MOVIE (Movie) button
To end movie recording, press the MOVIE (Movie) button
again.
The menu and setting items used for recording are those enabled
when you set the mode dial to (Movie Mode).
Search
Search
Operation
MENU/Settings
Index
31
GB
Page 32

Zoom
You can enlarge the image when shooting. The camera’s optical zoom function can enlarge
images up to 5×.
contents
Table of
1 Turn the W/T (zoom) lever.
Turn the W/T (zoom) lever to (T) to zoom in, and to (W) to
zoom out.
• When the zoom scale exceeds 5×, see page 98.
Notes
• Zoom is locked to the W side in the following situations:
– In Intelligent Sweep Panorama mode
– In 3D shooting mode
• The operating sound of the lens is recorded when the zoom function operates while shooting a movie.
T side
W side
Search
Search
Operation
MENU/Settings
Index
32
GB
Page 33

Tracking focus
The camera tracks the subject and adjusts focus automatically until you press the shutter button
halfway down, even if the subject is moving.
1 Press z on the control button.
The target frame appears.
2 Place the target frame over the subject you want
to focus on, and press z.
Tracking begins.
3 Press the shutter button half way down.
The position of the subject, focus and exposure are locked.
4 Press the shutter button fully down to shoot the
image.
5 To stop the tracking focus function before shooting, press z again.
Notes
• Tracking focus is not available in the following situations:
– In Intelligent Sweep Panorama mode
– In 3D shooting mode
– In Movie Mode
–In Easy Mode
– When the Smile Shutter function is activated
– When (Landscape), (Twilight) or (Fireworks) is selected in Scene Selection
– When [Self-Timer] is set to [Self-portrait One Person] or [Self-portrait Two People]
– When you use [Digital Zoom]
• Tracking focus may fail to lock the focus, lose the subject or track different subject in the following
situations:
– The subject moves too quickly.
– The subject is too small or too large.
– The subject is the same color as the background.
– Under low light conditions.
– Under conditions where the brightness varies.
• Tracking focus will automatically be canceled when the subject disappears from the screen or has failed
to be tracked.
Target frame
contents
Search
Search
Table of
Operation
MENU/Settings
Index
33
GB
Page 34

DISP (Screen Display Settings)
1 Press DISP (Screen Display Settings) on the control button.
2 Select the desired mode with the control button.
(Image Only) In Movie Mode, sets screen to standard
brightness and displays only images.
contents
Search
Table of
Operation
(Bright +
Image Only)
(Bright +
Exposure Data)
(Bright) Sets screen brighter and displays the
(Normal) Sets screen to standard brightness and displays
Note
• If you view images in bright outside light, adjust the screen brightness up. However, the battery power
may decrease faster under such condition.
Sets screen brighter and displays only images.
Sets screen brighter and displays the
information.
Exif data and a histogram for the recorded
image are also displayed.
information.
the information.
MENU/Settings
Search
Index
34
GB
Page 35

Histogram
A histogram is a graph showing the brightness of an image. The graph display indicates a bright
image when skewed to the right side, and a dark image when skewed to the left side.
A Number of pixels
B Brightness
A
B
BrightDark
1 Press DISP (Screen Display Settings) on the control button, then select
[Bright + Exposure Data].
Notes
• The histogram also appears when playing back a single image, but you cannot adjust the exposure.
• The histogram does not appear when:
– Recording 3D images
– Playing back 3D images shot in other than [16:9] image size
– Recording movies
– Playing back movies
– Viewing vertical orientation images
– Rotating still images
– Shooting with iSweep Panorama
– Viewing images shot with iSweep Panorama
– When [Display Burst Group] is set to [Display Main Image Only]
• A large difference in the histogram displayed during shooting and playback may occur when:
– The flash strobes.
– The shutter speed is slow or fast.
• The histogram may not appear for images recorded using other cameras.
contents
Search
Search
Table of
Operation
MENU/Settings
Index
35
GB
Page 36

Flash
1 Press (Flash) on the control button.
2 Select the desired mode with the control button.
(Auto) Flash automatically operates when shooting in low light or backlit
conditions.
(On) Flash always operates.
(Slow
Synchro)
(Off) Flash does not operate.
Notes
• The flash strobes twice. The first flash adjusts the light quantity.
• While charging the flash, is displayed.
• You cannot use the flash during burst shooting.
• [On] or [Slow Synchro] is not available when the camera is in Intelligent Auto Adjustment mode or in
Superior Auto Adjustment mode.
• [Flash] is set to [Off] in the following situations:
– In Intelligent Sweep Panorama mode
– In 3D shooting mode
– In Background Defocus mode
• When shooting with the flash and the zoom is set to W, the shadow of the lens may appear at the bottom
left of the screen, depending on the shooting conditions. If this happens, set the zoom to T and shoot with
the flash again.
Flash always operates.
The shutter speed is slow in a dark place to clearly shoot the
background that is out of flash light.
contents
Search
Search
Table of
Operation
MENU/Settings
Index
zWhen the “White circular spots” appears in flash
photos
This is caused by particles (dust, pollen, etc.) floating close to the lens. When they are
accentuated by the camera’s flash, they appear as white circular spots.
Camera
Subject
Particles (dust, pollen, etc.)
in the air
How can the “White circular spots” be reduced?
• Light the room and shoot the subject without a flash.
• Select (Anti Motion Blur) or (High Sensitivity) mode in Scene Selection. ([Flash] is set to
[Off].)
36
GB
Page 37

Smile Shutter
When the camera detects a smile, the shutter is released automatically.
1 Press (Smile) on the control button.
2 Wait for a smile to be detected.
When the smile level exceeds the b point on the indicator, the
camera records images automatically.
If you press the shutter button during Smile Shutter, the camera
shoots the image, and then returns to Smile Shutter mode.
3 To stop shooting, press (Smile) again.
Smile Detection Sensitivity
indicator
Face Detection frame
contents
Search
Table of
Operation
MENU/Settings
Notes
• Shooting using the Smile Shutter ends automatically when either the memory card or internal memory
becomes full.
• Smiles may not be detected correctly depending on the conditions.
• You cannot use the digital zoom function.
• The Smile Shutter function is not available in the following situations:
– In Intelligent Sweep Panorama mode
– In Superior Auto Adjustment mode
– In Background Defocus mode
– In 3D shooting mode
– In Movie Mode
zHints for better capturing of smiles
1 Do not cover the eyes with the bangs.
Do not obscure the face by hat, masks, sunglasses, etc.
2 Try to orient the face in front of the camera and be as
level as possible. Keep the eyes narrowed.
3 Give a clear smile with an open mouth. The smile is
easier to detect when the teeth are shown.
• The shutter operates when any person whose face is being detected smiles.
• You can select or register the priority subject for face detection with [Face Detection]. When the
selected face is registered in the camera memory, Smile Detection is performed only for that face
(page 78).
• If the camera cannot detect a smile, set the Smile Detection Sensitivity to [Slight Smile].
Search
Index
37
GB
Page 38

Self-Timer
1 Press (Self-Timer) on the control button.
2 Select the desired mode with the control button.
(Off) Does not use the self-timer.
(10sec) Sets the self-timer to a 10-second delay.
When you press the shutter button, the self-timer lamp flashes and a
beep sounds until the shutter operates.
To cancel, press again.
(2sec) Sets the self-timer to a 2-second delay.
(Self-portrait
One Person)
(Self-portrait
Two People)
Notes
• In Movie Mode, [Self-portrait One Person] or [Self-portrait Two People] is not available.
• The self-timer is not available in the following situations:
– In Intelligent Sweep Panorama mode
– In 3D shooting mode
Sets the self-timer to Self-portrait timer.
When the camera detects the specified number of faces, a beep
sounds, and the shutter operates 2 seconds later.
contents
Search
Search
Table of
Operation
MENU/Settings
zAutomatic shooting with Self-portrait timer
Point the lens at yourself so your face is reflected in the LCD screen. The camera detects the
subjects, and then the shutter operates. The camera determines the optimal composition and
prevents faces from being cut out of the LCD screen. Do not move your camera after the
beep sounds.
• You can also shoot an image by pressing the shutter button during this
operation.
Index
Continued r
38
GB
Page 39

zHints for preventing blur
If your hands or body moves while holding the camera and pressing the shutter button,
“Camera shake” occurs. Camera shake occurs frequently under low-light or slow shutter
speed conditions, such as those encountered in (Twilight Portrait) or (Twilight) mode.
In such a case, shoot with the below tips in mind.
• Shoot with a 2-second delay self-timer and stabilize
the camera by holding your arms firmly at your side
after pressing the shutter button.
• Use a tripod or place the camera on a flat surface to
hold the camera steady.
contents
Search
Search
Table of
Operation
MENU/Settings
Index
39
GB
Page 40

Burst button
You can select Single (single-image) or Burst as the shooting mode.
You can also select Single (single-image) or Burst in [Burst Settings] (page 65).
1 Select a desired mode with the (Burst) button.
When you press the (Burst) button, the setting switches.
contents
Table of
Single The camera shoots a single image.
Burst The camera shoots up to 10 continuous frames in one burst when you
hold down the shutter button.
You can set the burst shooting speed in [Burst Shooting Interval]
(page 66).
Note
• The Burst button is not available in the following situations:
– In iSweep Panorama mode
– In Superior Auto Adjustment mode
– In Background Defocus mode
– In 3D shooting mode
– In Movie Mode
– When the Smile Shutter function is activated
Search
Search
Operation
MENU/Settings
Index
40
GB
Page 41

MOVIE (Movie) button
You can quickly start shooting movies from all REC modes.
1 Press the MOVIE (Movie) button.
2 To stop recording, press the MOVIE (Movie) button again.
contents
Table of
Note
• MOVIE (Movie) button is not available in the following situations:
– When the Smile Shutter function is activated
–In Easy Mode
– When using [Self-Timer]
zChanging the Movie Format, Image Quality or Image
Size
Movie format: MENU t (Settings) t (Shooting Settings) t [Movie
format] t [AVCHD] or [MP4] t z on the control button
Quality (AVCHD): MENU t (Quality) t [AVC HD 17M FH] or [AVC HD
9M HQ]
Image Size (MP4): MENU t (Image Size) t [MP4 12M], [MP4 6M] or [MP4
3M]
Search
Search
Operation
MENU/Settings
Index
41
GB
Page 42

Viewing still images
1 Press the (Playback) button to switch to playback mode.
2 Select an image with the control button.
zViewing images taken with a different camera
This camera creates an Image Database File on the memory card for recording and playing
images. If the camera detects images not registered in the Image Database File on the
memory card, a registration screen with the message “Files found which were not
recognized Import files” will be displayed. To view unregistered images, register them by
selecting [OK].
• Use a sufficiently charged battery to register images. If a battery with a low charge is used to
register images, it may not be possible to register all of the data or the data may be corrupted if the
battery charge runs out.
contents
Search
Search
Table of
Operation
MENU/Settings
Index
42
GB
Page 43

Playback zoom
Plays back the enlarged image.
1 Turn the (Playback zoom) lever to (T) during still
image playback.
The image is enlarged to twice the previous size, at the center of the
image.
2 Adjust the position with the control button.
contents
Search
Table of
Operation
3 Change the zoom scale with the (Playback zoom)
lever.
Turn the lever to (T) to zoom in, to (W) to zoom out.
Press z to cancel playback zoom.
zTo save enlarged images
You can save an enlarged image by using the trimming function.
Press MENU t [Retouch] t [Trimming (Resize)].
Shows the displayed
area of the whole
image
MENU/Settings
Search
Index
43
GB
Page 44

Image Index
Displays multiple images at the same time.
1 Press the (Playback) button to switch to playback mode.
2 Turn the (Index) lever to (W) to display the image index screen.
Turn the lever again to display an index screen with more images. Turn the lever yet again to
view images with the Calendar while playing back in [Date View].
3 To return to the single-image screen, select an image with the control
button, then press z.
zDisplaying images of the desired date/folder
Select the left side bar with the control button, then select the
desired date/folder with v/V.
contents
Search
Search
Table of
Operation
MENU/Settings
zViewing images with the Calendar
When [View Mode] is set to [Date View], turn the (Index) lever to view images with the
Calendar, while the index displays more images.
• To select the month you want to display, select / with the
control button, then the desired month.
• To view images in selected date in index mode, select the date with
the control button and press z.
• To exit the Calendar, select with the control button, then press
z.
Index
44
GB
Page 45

Delete
Allows you to select unwanted images for deletion. You can also delete images from the MENU
button (page 90).
1 Press the (Playback) button to switch to playback mode.
2 (Delete) button t desired mode t z on the control button
All Images on This Date
All in This Folder
All AVCHD files
Multiple Images Allows you to select and delete multiple images.
This Image Deletes the currently displayed image in single-image mode.
All Imgs in This Burst
Group
All but This Image Deletes burst group images other than the selected image in
Cancel Cancels the deletion.
Deletes all images in the selected date range or folder, or all
AVCHD movies at once.
Press [OK] t z after step 2.
Do as the following after step 2.
1Select an image then press z.
Repeat the above step until there are no more images to be
deleted. Select an image with a mark again to release the
mark.
2MENU t [OK] t z
Deletes all images in the selected burst group at once.
Press [OK] t z after step 2.
Display Burst Group mode.
Press [OK] t z after step 2.
contents
Search
Search
Table of
Operation
MENU/Settings
Index
Notes
• In Easy Mode, you can select from [1 image] or [All] to delete images.
• When the internal memory is used to record images, View Mode is set to Folder View and still images
and movies are displayed in the same folder.
Continued r
45
GB
Page 46

zYou can switch between index and single-image
mode when selecting images
Turn the lever to (T) of the W/T (zoom) lever in index mode
to return to single-image mode, and turn the (Index) lever to
(W) in single-image mode to return to index mode.
• You can also switch between index and single-image modes in
[Protect], [Send by TransferJet] or [DPOF].
contents
Search
Search
Table of
Operation
MENU/Settings
Index
46
GB
Page 47

Viewing burst images
Plays back burst images.
1 Press the (Playback) button to switch to playback mode.
2 Select burst images using b/B on the control button.
contents
Table of
3 Press the desired button according to the playback
mode.
Operation method Action
Press V on the control button. Displays the burst images in index mode.
The display switches between single image display and thumbnail
image display each time you press z on the control button.
Press z on the control button. You can view the burst images as a movie by tilting the camera to
the right or left.
Note
• You can view the burst images as a movie only when you set [View Mode] to [Date View] and [Display
Burst Group] to [Display Main Image Only].
zDisplaying grouped burst images side by side
Only the main image is displayed if [Display Main Image Only] has been set. You can
display images in the index by following the procedure below.
Main image Thumbnail image
display
Single image display
Search
Search
Operation
MENU/Settings
Index
The image being displayed
above
1 Display the main image in playback mode, then press V on the control button.
The images are displayed in the index.
2 Press b/B to display each image in a burst group.
3 The display switches between single image display and thumbnail image display each time you
press z.
4 To cancel the display, press V.
Continued r
47
GB
Page 48

zViewing the burst images as a movie by tilting the
camera to the right or left
To view the burst images smoothly as a movie, press z on the control button, then tilt the
camera to the right or left, as illustrated.
contents
Search
Table of
Operation
Tilt the camera to the right or left, with the
center of the camera as the axis.
MENU/Settings
Search
Index
48
GB
Page 49

Viewing movies
1 Press the (Playback) button to switch to playback mode.
2 Select a movie with the control button.
3 Press z.
Movie playback starts.
Control button Action
z
B
b
V
Note
• You may not be able to play back some images shot using other cameras.
zTo display only movies on the index screen
You can view only movie thumbnails on the index screen by pressing MENU t (View
Mode) t (Folder view (MP4)) or (AVCHD view).
Stop
Fast forward
Fast rewind
Displays the control panel
contents
Search
Search
Table of
Operation
MENU/Settings
(Folder view (MP4))
(AVCHD view)
• When a movie file is played back to the end, the camera automatically starts playing back the next
movie file.
Displays MP4-format movie thumbnails on the index screen.
Displays AVCHD-format movie thumbnails on the index screen.
Displaying the control panel
Display the control panel, you can control slow movie playback and adjust the volume.
1 Press V on the control button.
The control panel appears.
2 Select a desired button with b/B, and press z.
Button Action
Fast rewind
Playback/Stop
Fast forward
Slow playback
Volume control
Close the control panel
Continued r
49
Index
GB
Page 50

zOn the movie viewing screen
Select the image you want to display using b/B on the control button, and press z.
The Playback bar appears, you can check a playback position of a movie.
, , , or appears on the movie viewing
screen.
The icon displayed may vary depending on image size and quality.
Playback bar
contents
Search
Search
Table of
Operation
MENU/Settings
Index
50
GB
Page 51

3D Functions
This camera is compatible with 3D functions. The 3D functions installed on this camera are [3D
Sweep Panorama] and [Sweep Multi Angle]. 3D images shot in [3D Sweep Panorama] mode can
be played back only on a 3D TV, while the images shot in [Sweep Multi Angle] mode can be
played back both on this camera and on a 3D TV.
This section describes the difference between [3D Sweep Panorama] mode and [Sweep Multi
Angle] mode.
For more details, see the following pages:
– 3D Shooting (page 53)
– Viewing images shot in Sweep Multi Angle mode stereoscopically (page 55)
– Viewing an image on a 3D TV (page 56)
contents
Search
Table of
Operation
Shooting
To shoot 3D images, sweep the
camera as illustrated.
Images shot in [3D Sweep
Panorama] mode
Playing back
images on the
camera
The recorded images are played
back as normal still images. You
cannot view 3D images.
Images shot in [Sweep Multi Angle]
mode
You can view stereoscopic images
shot in [Sweep Multi Angle] mode by
tilting the camera to the right or left.
For details, see page 55.
MENU/Settings
Search
Index
Playing back
images on a
3D TV
3D images shot in (Standard) and
(Wide) image size can be played
and scrolled on a 3D TV. For details,
see page 56.
For details, see page 56.
Continued r
51
GB
Page 52

zFile name of the 3D image
A 3D image consists of both JPEG and MPO files.
If you import images shot in [3D Sweep Panorama] and [Sweep Multi Angle] modes into a
computer, the image data is stored on the computer as follows.
File name on the computer Usage
3D Sweep Panorama DSC0ffff.JPG
DSC0ffff.MPO
Sweep Multi Angle DSC0aaaa.JPG
DSC0aaaa.MPO
DSC0ssss.JPG
DSC0ssss.MPO
• If you shoot 3D images in [Sweep Multi Angle] mode, the following files are stored on the
computer.
– JPEG files and MPO files (for playing back on the camera)
– JPEG files and MPO files (for playing back on a 3D TV)
• If you delete either the JPEG file or the MPO file comprising a 3D image, that 3D image may not be
played back successfully.
For playing back the 3D images on
a 3D TV
For playing back the 3D images on
a 3D TV
For playing back the 3D images on
the camera
contents
Search
Search
Table of
Operation
MENU/Settings
Index
52
GB
Page 53

3D Shooting
Multiple images are shot while the camera is moving, and these images are compiled into a 3D
image.
1 Set the mode dial to (3D Shooting).
2 Select (3D Sweep Panorama) or (Sweep Multi Angle) t z on the
control button.
3 Align the camera with the end of the subject to be
shot and press the shutter button.
For (3D Sweep Panorama), press MENU t
(Shooting Direction) to change the shooting direction.
This part will not be taken
4 Pan the camera to the end of the guide,
following the indication on the LCD
screen.
Guidance
bar
contents
Search
Search
Table of
Operation
MENU/Settings
(3D Sweep
Panorama)
(Sweep Multi
Angle)
Notes
• In [Sweep Multi Angle] mode, you can select only the [16:9(2M)] panoramic image size.
• 3D shooting is not suitable for the following situations:
– When there is a large subject
– Moving subjects
– When the main subject is too close to the camera
– Images with little contrast, such as the sky, a sandy beach, or lawn
• 3D images consist of a JPEG file and an MPO file. If either file is deleted on your PC, the camera may
not operate correctly.
• If you cannot pan the camera across the entire subject within the given time, a gray area occurs in the
composite image. If this happens, move the camera faster to record a full 3D image.
• Since several images are stitched together, the stitched part will not be recorded smoothly.
• Under low light conditions, the images may be blurred.
• Under lights that flicker, such as fluorescent lights, the 3D shot may not be successful.
• If the entire angle of view of the 3D shot and the angle of view when the AE/AF was locked are
extremely different in brightness, color or focus, the shot will not be successful. If this happens, change
the location of the AE/AF lock and try again.
• 3D shooting may be canceled in the following situations:
– You pan the camera too quickly or too slowly.
– There is too much camera shake.
Shoots an image that can be played back on a 3D TV.
Shoots an image that can be played back as a stereoscopic image by
tilting the camera to the right or left, and an image that can be
played back on a 3D TV.
Index
Continued r
53
GB
Page 54

zTips for shooting a 3D image
Pan the camera in an arc at a constant velocity in the
direction indicated on the LCD screen.
Subjects at rest are best suited for 3D shots.
• Determine the scene and press the shutter button halfway, so that you can lock the focus, exposure
and white balance. Then, press the shutter button fully down and pan the camera.
contents
Search
Table of
Operation
zShootable range in Sweep Multi Angle mode
Image
Sweep the camera approximately 45 degrees to the left and right of the subject you want to
focus on.
MENU/Settings
Search
Index
54
GB
Page 55

Viewing images shot in Sweep Multi Angle mode stereoscopically
You can view the stereoscopic images shot in [Sweep Multi Angle] mode by tilting the camera
to the right or left.
1 Press the (Playback) button to switch to playback mode.
2 Select an image shot in (Sweep Multi Angle) mode using b/B on the
control button.
contents
Search
Table of
Operation
3 Press z.
4 Tilt the camera to the right or left.
5 Press z again to end playback.
Note
• 3D images shot in [3D Sweep Panorama] mode cannot be played back in 3D on the camera.
zTilting the camera to the right or left
To view images shot in [Sweep Multi Angle] mode
stereoscopically, tilt the camera to the right or left as
illustrated.
MENU/Settings
Search
Index
55
GB
Page 56

Viewing an image on a 3D TV
You can view 3D images recorded on the camera in 3D format by connecting the camera to a 3D
TV using an HDMI Cable (sold separately).
Refer also to the operating instructions supplied with the TV.
1 Connect the camera to the TV using an HDMI Cable (sold separately).
(Playback) button
HDMI jack
contents
Search
Table of
Operation
1 To the HDMI jack
HDMI Cable
2 To the HDMI connector
2 Turn on the TV and set the input.
3 Press the (Playback) button to turn on the camera.
4 MENU t (3D Viewing) t z on the control button
Images shot with the camera appear on the TV.
5 Press b/B on the control button to select images and set the desired
mode.
Control button Action
z
v
b
B
V
Scroll Playback
• Plays back scrolling images shot in 3D Sweep Panorama mode.
• Press b/B to move the direction of scrolling.
• When playing back a 3D image shot in [16:9] image size, [Scroll Playback] is
not available.
Continuous Playback
• Continuously plays back only 3D images.
Displays the previous image.
Displays the next image.
Ends 3D playback.
MENU/Settings
Search
Index
Continued r
56
GB
Page 57

Notes
• When you select (3D Viewing) mode, only 3D images are displayed.
• If you play back an image shot in [3D Sweep Panorama] mode with [Shooting Direction] set to [Up] or
[Down], the image is played back horizontally on the TV.
• Press MENU t (Settings) t (Main Settings) to select [Auto] or [1080i] for [HDMI Resolution].
• The beep sound is fixed to [Shutter].
• Do not connect the camera and equipment to be connected using output terminals. When the camera and
TV are connected using output terminals, no video and sound are produced. Such a connection can also
cause trouble of the camera and/or connected equipment.
• This function may not work properly with some TVs. For example, you may not be able to view a video
on your TV, output in 3D mode or hear sound from the TV.
• Use an HDMI Cable with the HDMI logo.
• When connecting the camera to a TV, use an HDMI Cable that can be connected to the mini jack on the
camera end and to the TV jack.
• Recording may automatically stop to protect the camera after a period of time when you shoot movies in
the condition where the camera and TV are connected by an HDMI Cable (sold separately).
contents
Search
Search
Table of
Operation
MENU/Settings
Index
57
GB
Page 58

Easy Mode
Allows you to shoot still images using the minimum necessary functions.
The text size increases and indicators become easier to see.
1 Set the mode dial to (Intelligent Auto Adjustment).
2 MENU t (Easy Mode) t z on the control button.
3 [OK] t z
4 Shoot with the shutter button.
Note
• The battery power may decrease faster because the screen brightness increases automatically.
zFunctions available in Easy Mode (Shooting)
Image Size: MENU t [Image Size] t z on the control button t desired
mode t z
Select between [Large] or [Small] size.
Self-Timer: on the control button t desired mode
Select between [10sec] or [Off] mode.
Flash: on the control button t desired mode
Select between [Auto] or [Off] mode.
Smile Shutter: on the control button
contents
Search
Search
Table of
Operation
MENU/Settings
Index
zOn Scene Recognition
Scene Recognition operates in Easy Mode. This function lets the camera automatically
recognize the shooting conditions and shoot the image.
Scene Recognition icon
• The camera recognizes (Twilight), (Twilight Portrait), (Twilight using a tripod),
(Backlight), (Backlight Portrait), (Landscape), (Macro) or (Portrait), and displays
an icon on the LCD screen when the scene is recognized.
For details, see page 74.
Continued r
58
GB
Page 59

zViewing in Easy Mode
When you press the (Playback) button in Easy Mode, the playback screen text becomes
larger and easier to see. In addition, only the deletion function becomes available.
Delete: (Delete) button t [OK] t z on the control button
You can delete the currently displayed image.
MENU t [Delete] t z on the control button t desired mode t z
Select between [1 image] or [All].
You can delete the currently displayed image with [1 image] and delete all
images in the selected date range or internal memory (if selected) with [All].
• When a memory card is inserted in the camera, [View Mode] is set to [Date View].
contents
Search
Search
Table of
Operation
MENU/Settings
Index
59
GB
Page 60

Shooting Direction
Set the direction in which the camera will be panned when shooting in Intelligent Sweep
Panorama or 3D Sweep Panorama modes.
1 MENU t (Shooting Direction) t desired direction
(Right) Pan from left to right.
(Left) Pan from right to left.
(Up) Pan from down to up.
(Down) Pan from up to down.
Notes
• You cannot select [Up] and [Down] when you have selected [16:9] in [3D Sweep Panorama] mode.
• You can select only the right direction in [Sweep Multi Angle] mode.
contents
Search
Search
Table of
Operation
MENU/Settings
Index
60
GB
Page 61

Defocus Effect
Sets the level of background defocus effect when shooting in Background Defocus mode.
1 Set the mode dial to (Background Defocus).
2 MENU t (Defocus Effect) t desired mode
contents
Table of
(Low)
(Mid)
(High)
Adds a slight Background Defocus effect.
Adds an average Background Defocus effect.
Adds a strong Background Defocus effect.
Search
Search
Operation
MENU/Settings
Index
61
GB
Page 62

Image Size/Panorama Image Size/ Quality
The image size determines the size of the image file that is recorded when you take an image.
The larger the image size, the more detail will be reproduced when the image is printed on largeformat paper. The smaller the image size, the more images can be recorded.
1 MENU t (Image Size), (Panorama Image Size) or (Quality) t
desired size
When shooting still images
contents
Search
Table of
Operation
Image size Usage guidelines No. of
images
(4000×3000) For prints up to A3+ size
(3264×2448) For prints up to A3 size
(2592×1944) For prints up to L/2L/A4 size
(640×480) For e-mail attachments
(4000×2248) For viewing on a high-definition TV
and printing up to A4 size
(1920×1080) For viewing on a high-definition TV
Less
More
Less
More
Printing
Fine
Rough
Fine
Rough
MENU/Settings
Search
Index
Note
• When you print still images recorded at a 16:9 aspect ratio or panoramic images, both sides may be cut
off.
In Easy Mode
Large Shoots images in [12M] size.
Small Shoots images in [5M] size.
62
GB
Page 63

When shooting in Intelligent Sweep Panorama/3D
shooting modes
(16:9) Shoots at 1920 × 1080 (Horizontal).
[16:9] is available only for 3D shooting.
(Standard) Shoots at 4912 × 1080 (Horizontal).
Shoots at 3424 × 1920 (Vertical).
(Wide) Shoots at 7152 × 1080 (Horizontal).
Shoots at 4912 × 1920 (Vertical).
When shooting movies
contents
Search
Table of
Operation
The larger the size of the movie image, the higher the image quality. The higher the amount of
data used per second (average bit-rate), the smoother the playback image.
Select a movie recording format by pressing MENU t (Settings) t (Shooting
Settings) t [Movie format] in shooting mode (page 95).
Movie recording format (AVCHD)
Movies shot with this camera are recorded in AVCHD format, at approximately 60 fields/sec
(for 1080 60i-compatible devices) or 50 fields/sec (for 1080 50i-compatible devices), in
interlaced mode, with Dolby Digital audio, AVCHD format.
Movie quality Average bit-rate Description
AVC HD 17M FH 17 Mbps Shoots at a maximum picture quality of
1920×1080 size
AVC HD 9M HQ 9 Mbps Shoots at a high picture quality of
1440×1080 size
Movie recording format (MP4)
Movies shot with this camera are recorded in MPEG-4 format, at approximately 30 frames/sec
(for 1080 60i-compatible devices) or approximately 25 frames/sec (for 1080 50i-compatible
devices), in progressive mode, with AAC audio, mp4 format.
Movie image size Average bit-rate Description
MP4 12M 12 Mbps Shoots at 1440×1080 size
MP4 6M 6 Mbps Shoots at 1280×720 size
MP4 3M 3 Mbps Shoots at VGA size
MENU/Settings
Search
Index
Note
• A telephoto image is produced when [MP4 3M] image size is selected.
Continued r
63
GB
Page 64

zOn “image quality” and “image size”
A digital image is made up of a collection of small dots called pixels.
If it contains a large number of pixels, the image becomes large, it takes up more memory,
and the image is displayed in fine detail. “Image size” is shown by the number of pixels.
Although you cannot see the differences on the screen of the camera, the fine detail and data
processing time differ when the image is printed or displayed on a computer screen.
contents
Table of
Description of the pixels and the image size
1 Image size: 12M
4000 pixels × 3000 pixels = 12,000,000 pixels
2 Image size: VGA
Pixels
Pixel
640 pixels × 480 pixels = 307,200 pixels
Many pixels
(Fine image quality and large file size)
Few pixels
(Rough image quality but small file size)
Search
Search
Operation
MENU/Settings
Index
64
GB
Page 65

Burst Settings
You can select Single (single-image) or Burst as the shooting mode.
1 MENU t (Burst Settings) t desired mode
(Single) The camera shoots a single image.
(Burst) The camera shoots up to 10 continuous frames in one burst when
you hold down the shutter button.
contents
Search
Table of
Operation
Notes
• [Burst Settings] is not available in the following situations:
– In Intelligent Sweep Panorama mode
– In Superior Auto Adjustment mode
– In Background Defocus mode
– In 3D shooting mode
– In Movie Mode
– When the Smile Shutter function is activated
–In Easy Mode
• [Flash] is set to [Off].
• When recording with the self-timer, a series of up to 10 images is recorded.
• The recording interval becomes longer, depending on the setting for the image size.
• [Focus], [White Balance], and [EV] are adjusted for the first image, and these settings are also used for
the other images.
• [VGA] image size will be set while recording on internal memory.
• When the battery level is low, or when the internal memory or a memory card is full, the burst stops.
• In slow shutter speed conditions, the burst of shots per second may be decreased.
zAbout the recording of burst shooting images
After shooting burst images, the shot images are displayed in frames on the LCD screen.
When all the images are fitted in the frames, recording is completed.
You can stop the recording by pressing z on the control button.
When stopped, the image displayed in index and images in the image processing are
recorded.
MENU/Settings
Search
Index
65
GB
Page 66

Burst Shooting Interval
Selects the number of images taken per second for Burst shooting.
1 MENU t (Burst Shooting Interval) t desired mode
(High) Shoots up to 10 images per second in succession.
(Mid) Shoots up to 5 images per second in succession.
(Low) Shoots up to 2 images per second in succession.
contents
Search
Search
Table of
Operation
MENU/Settings
Index
66
GB
Page 67

EV
You can adjust the exposure manually in 1/3 EV steps in a range of –2.0 EV to +2.0 EV.
1 MENU t (EV) t desired EV setting
Note
• If you shoot a subject in extremely bright or dark conditions, or when you use the flash, the exposure
adjustment may not be effective.
zAdjusting the exposure for better looking images
Overexposure = too much light
Whitish image
contents
Search
Table of
Operation
MENU/Settings
Lower EV setting –
Correct exposure
Higher EV setting +
Underexposure = too little light
Darker image
Search
Index
67
GB
Page 68

ISO
Sets the luminous sensitivity when the camera is in Program Auto mode.
1 MENU t (ISO) t desired mode
(Auto) Sets the ISO sensitivity automatically.
///
//
Note
• You can select only from [ISO AUTO], [ISO 125] to [ISO 800] when the shooting mode is set to burst
mode.
zAdjusting ISO Sensitivity (Recommended Exposure
Index)
ISO sensitivity is a speed rating for recording media that incorporates an image sensor that
receives light. Even when the exposure is the same, images differ depending on the ISO
sensitivity.
You can reduce image blurring in dark locations or with moving
subjects by increasing the ISO sensitivity (select a larger number).
High ISO sensitivity
Records a bright image even in dark locations while increasing
shutter speed to reduce blur.
However, the image tends to become noisy.
contents
Search
Search
Table of
Operation
MENU/Settings
Index
Low ISO sensitivity
Records a smoother image.
However, when the exposure is insufficient, the image may become
darker.
zHints for preventing blur
Even though the camera is steady, the subject moves during the exposure and is captured
blurred when the shutter button is pressed. Camera shake is reduced automatically,
however, the function does not effectively reduce subject blur.
Subject blur occurs frequently under low-light or slow shutter speed conditions.
In such a case, shoot with the below tips in mind.
• Select a higher ISO sensitivity so that the shutter
speed is faster.
• Select (High Sensitivity) mode in Scene
Selection.
68
GB
Page 69

White Balance
Adjusts color tones according to the surrounding light conditions. Use this function if image
color appears unnatural.
1 MENU t (White Balance) t desired mode
contents
Table of
(Auto) Adjusts the white balance automatically so that the colors appear
natural.
(Daylight) Adjusts for outdoors conditions on a fine day, evening views, night
scenes, neon signs, fireworks, etc.
(Cloudy) Adjusts for a cloudy sky or a shady location.
(Fluorescent
White Balance 1)
(Fluorescent
White Balance 2)
(Fluorescent
White Balance 3)
n
(Incandescent)
(Flash) Adjusts for the flash conditions.
(One Push) Adjusts the white balance depending on the light source. The white
(One Push
Set)
Notes
• [White Balance] is not available in the following situations:
– In Intelligent Auto Adjustment mode
– In Superior Auto Adjustment mode
– In Background Defocus mode
–In Easy Mode
• [Flash] in [White Balance] is not available in the following situations:
– In Intelligent Sweep Panorama mode
– In 3D shooting mode
– In Movie Mode
– When Scene Selection is set to (Anti Motion Blur), (Hand-held Twilight), (High
Sensitivity) mode
• Under fluorescent lights that flicker, the white balance function may not work correctly even though you
select [Fluorescent White Balance 1], [Fluorescent White Balance 2], or [Fluorescent White Balance 3].
• When shooting with a flash in other than [Flash] mode, [White Balance] is set to [Auto].
• When [Flash] is [On] or [Slow Synchro], the white balance can only be adjusted to [Auto], [Flash], [One
Push], or [One Push Set].
• [One Push Set] cannot be selected while charging the flash.
[Fluorescent White Balance 1]: Adjusts for white fluorescent
lighting.
[Fluorescent White Balance 2]: Adjusts for natural white
fluorescent lighting.
[Fluorescent White Balance 3]: Adjusts for day white fluorescent
lighting.
Adjusts for places under incandescent lamp, or under bright
lighting, such as in a photo studio.
color memorized in [One Push Set] mode becomes the basic white
color. Use this mode when [Auto] and other settings don’t provide
accurate colors.
Memorizes the basic white color which will be used in [One Push]
mode.
Search
Search
Operation
MENU/Settings
Index
69
GB
Page 70

To capture the basic white color in [One Push
Set] mode
1 Frame a white object such as a piece of paper filling the screen under the
same lighting conditions as you will shoot the subject.
2 MENU t (White Balance) t [One Push Set] t z on the control
button
The screen momentarily turns black, and when the white balance has been adjusted and stored
in the memory, the recording screen is displayed again.
Notes
• If the indicator flashes while shooting, the white balance is either not set or cannot be set. Use
automatic white balance.
• Do not shake or strike the camera while [One Push Set] is in progress.
• When flash mode is set to [On] or [Slow Synchro], the white balance is adjusted to the condition with the
flash emitting.
zEffects of lighting conditions
The apparent color of the subject is affected by the lighting conditions.
The color tones are adjusted automatically, but you can adjust color tones manually using
the White Balance function.
contents
Search
Search
Table of
Operation
MENU/Settings
Weather/lighting
Characteristics of
light
Daylight Cloudy Fluorescent Incandescent
White (standard) Bluish Green-tinged Reddish
Index
70
GB
Page 71

Focus
You can change the focus method. Use the menu when it is difficult to get the proper focus in
auto focus mode.
AF stands for “Auto Focus,” a function that adjusts the focus automatically.
1 MENU t (Focus) t desired mode
contents
Table of
(Multi AF) Focuses on a subject in all ranges of the
finder frame automatically.
When you press the shutter button halfway
down in still image shooting mode, a green
frame is displayed around the area that is in
focus.
• When the Face Detection function is active, AF
operates with priority on faces.
(Center AF) Focuses on a subject in the center of the
finder frame automatically. Using the AF
lock function together, you can compose the
image the way you want.
(Spot AF) Focuses on an extremely small subject or a
narrow area automatically. Using the AF
lock function together, you can compose the
image the way you want. Hold the camera
steady so as not to misalign the subject and
the AF range finder frame.
Notes
• When you use [Digital Zoom] or [AF Illuminator], the AF range finder frame setting is disabled and AF
range finder frame is displayed as a dotted line instead. In this case, the camera works to focus on the
subjects at the center of the screen.
• When the focus mode is set to other than [Multi AF], you cannot use the Face Detection function.
• [Focus] is set to [Multi AF] in the following situations:
– In Intelligent Auto Adjustment mode
– In Superior Auto Adjustment mode
– In Background Defocus mode
– In Movie Mode
– When the Smile Shutter function is activated
–In Easy Mode
– When [Self-Timer] is set to [Self-portrait One Person] or [Self-portrait Two People]
• If Tracking focus is activated, the camera focuses with priority on the subject to be tracked.
AF range finder frame
AF range finder frame
AF range finder frame
Search
Search
Operation
MENU/Settings
Index
Continued r
71
GB
Page 72

zFocusing on subjects near the edge of the screen
If the subject is out of focus, do as follows:
1Recompose the shot so that the subject is centered
AF range finder
frame
AE/AF lock
indicator
in the AF range finder, and press the shutter
button halfway to focus on the subject (AF lock).
2When the AE/AF lock indicator stops flashing and
remains on, return to the fully composed shot, and
press the shutter button fully down.
• As long as you do not press the shutter button fully
down, you can retry the procedure as many times as
necessary.
contents
Search
Search
Table of
Operation
MENU/Settings
Index
72
GB
Page 73

Metering Mode
Selects the metering mode that sets which part of the subject to measure to determine the
exposure.
1 MENU t (Metering Mode) t desired mode
contents
Table of
(Multi) Divides into multiple regions and measures each region. The
camera determines a well-balanced exposure (Multi-pattern
metering).
(Center) Measures the center of the image, and determines the exposure
based on the brightness of the subject there (Center-weighted
metering).
(Spot) Measures only a part of the subject
(Spot metering). This function is useful
when the subject is backlit or when
there is strong contrast between the
subject and the background.
Spot metering crosshairs
Positions on the subject
Notes
• In Movie Mode, [Spot] cannot be selected.
• If you set [Metering Mode] to other than [Multi], the Face Detection function cannot be used.
• [Metering Mode] is set to [Multi] in the following situations:
– In Intelligent Auto Adjustment mode
– In Superior Auto Adjustment mode
– In Background Defocus mode
– When the Smile Shutter function is activated
–In Easy Mode
– When [Self-Timer] is set to [Self-portrait One Person] or [Self-portrait Two People]
Search
Search
Operation
MENU/Settings
Index
73
GB
Page 74

Scene Recognition
The camera automatically detects shooting conditions, and then takes the shot. When a motion is
detected, the ISO sensitivity is increased according to the movement to reduce subject blur
(Motion Detection).
Example of an image when
(Backlight) is activated.
1 Set the mode dial to (Intelligent Auto Adjustment).
2 MENU t (Scene Recognition) t desired mode
(Auto) When the camera recognizes the scene, it switches to the optimal
settings and shoots the image.
(Advanced)
When the camera recognizes the scene, it switches to the optimal
settings. When the camera recognizes (Twilight), (Twilight
Portrait), (Twilight using a tripod), (Backlight) or
(Backlight Portrait), it automatically changes the setting and
shoots another image.
• When you shoot two images consecutively, the + mark on the icon
will turn green.
• When two frames are shot, the two images are displayed side by side
immediately after shooting.
• When [Anti Blink] is displayed, 2 images are taken automatically and
the image with the eyes open is selected automatically. For details on the
Anti Blink function, see “What is the Anti Blink function?”.
Scene Recognition icon and guide
The camera recognizes the following types of scenes.
When the camera determines the optimal scene, it
displays the corresponding icon and guide.
(Twilight), (Twilight Portrait), (Twilight
using a tripod), (Backlight), (Backlight
Portrait), (Landscape), (Macro), (Portrait)
contents
Search
Search
Table of
Operation
MENU/Settings
Index
Notes
• The Scene Recognition function does not operate when you shoot images using digital zoom.
• [Scene Recognition] is set to [Auto] in the following situations:
– In Superior Auto Adjustment mode
–In Easy Mode
– When the Smile Shutter function is activated
– When [Self-Timer] is set to [Self-portrait One Person] or [Self-portrait Two People]
– During burst shooting
• In Tracking focus mode, (Portrait), (Twilight Portrait) or (Backlight Portrait) are not
recognized.
• The available flash settings are [Auto] and [Off].
• (Twilight using a tripod) scenes sometimes cannot be recognized in an environment where vibrations
are transferred to the camera even though it is fixed on a tripod.
• Sometimes a slow shutter results when a scene is recognized as a (Twilight using a tripod). Keep the
camera still during shooting.
• These scenes may not be recognized depending on the situation.
Continued r
74
GB
Page 75

zShooting two images with different settings and
selecting the one you like (Advanced mode)
In [Advanced] mode, the camera shoots two images consecutively with the settings
differing as follows when it recognizes (Twilight), (Twilight Portrait), (Twilight
using a tripod), (Backlight) or (Backlight Portrait) scenes, which tends to blur.
You can select the desired image from the two images shot.
First Image* Second Image
Shoots in Slow Synchro Shoots with sensitivity increased and shake
reduced
Shoots in Slow Synchro with the face
which the flash strobes on as guide
Shoots in Slow Synchro Shoots with even slower shutter speed without
Shoots with the flash Shoots with the brightness and contrast of the
Shoots with the face which the flash
strobes on as guide
* When [Flash] is set to [Auto].
Shoots with sensitivity increased with the face as
guide and shake reduced
increasing sensitivity
background adjusted
Shoots with the brightness and contrast of the
face and the background adjusted
contents
Search
Search
Table of
Operation
MENU/Settings
zWhat is the Anti Blink function?
When set to [Advanced], the camera automatically shoots two images consecutively* when
it recognizes (Portrait). The camera will select, display, and record the image which the
eyes are not blinked automatically. If the eyes are closed in both images, the message
“Blinked eye detected” is displayed.
* except when the flash strobes/when the shutter speed is slow
Index
75
GB
Page 76

Soft Skin Effect
When the Face Detection function is activated, sets whether to use the Soft Skin effect, and the
effect level.
1 MENU t (Soft Skin Effect) t desired mode
contents
Table of
(Off) Does not use the Soft Skin Effect.
(Low) Adds light Soft Skin Effect.
(Mid) Adds moderate Soft Skin Effect.
(High) Adds strong Soft Skin Effect.
Notes
• [Off] is not available when Scene Selection is set to (Soft Skin) mode.
• The [Soft Skin Effect] may not be visible depending on the subject.
Search
Search
Operation
MENU/Settings
Index
76
GB
Page 77

Smile Detection Sensitivity
Sets the sensitivity of the Smile Shutter function for detecting smiles.
1 MENU t (Smile Detection Sensitivity) t desired mode
(Big Smile) Detects a big smile.
(Normal
Smile)
(Slight Smile) Detects even a slight smile.
Notes
• Smiles may not be detected correctly depending on the conditions.
• [Smile Detection Sensitivity] cannot be adjusted in the following situations:
– In Intelligent Sweep Panorama mode
– In Superior Auto Adjustment mode
– In Background Defocus mode
– In 3D shooting mode
– In Movie Mode
–In Easy Mode
Detects a normal smile.
contents
Search
Search
Table of
Operation
MENU/Settings
Index
77
GB
Page 78

Face Detection
Detects the faces of your subjects and adjusts the focus, flash, exposure, white balance and redeye reduction settings automatically.
Face Detection frame (Orange)
When the camera detects more than one subject, the camera will judge
which is the main subject and set focus by priority. The Face Detection
frame for the main subject will change to an orange-colored
for which the focus is set will turn green when the shutter button is pressed
halfway down.
Face Detection frame (White)
1 MENU t (Face Detection) t desired mode
. The frame
contents
Search
Table of
Operation
(Off) Cannot use Face Detection.
(Auto) Selects the face the camera is to automatically focus on.
(Child
Priority)
(Adult
Priority)
Notes
• [Face Detection] is not available in the following situations:
– In Intelligent Sweep Panorama mode
– In 3D shooting mode
– In Movie Mode
–In Easy Mode
• [Off] is not available when [Self-Timer] is set to [Self-portrait One Person] or [Self-portrait Two People].
• You can select [Face Detection] only when the focus mode is set to [Multi AF] or the metering mode is
set to [Multi].
• The Face Detection function does not work when using the digital zoom.
• Up to 8 faces of your subjects can be detected.
• Adults and children may not be recognized correctly depending on the conditions.
• During Smile Shutter shooting, [Face Detection] is automatically set to [Auto] even if it is set to [Off].
Detects and shoots with priority on child’s face.
Detects and shoots with priority on adult’s face.
MENU/Settings
Search
Index
Continued r
78
GB
Page 79

zRegistering the priority face (Selected-face Memory)
Normally the camera automatically selects the face to focus on according to the [Face
Detection] setting, but you can also select and register a face to be given priority.
1Press z on the control button during Face Detection.
The target frame appears.
2Place the target frame over the detected face, and press z.
The selected face is registered as the priority face, and the frame
changes to an orange-colored .
3To cancel face registration, press z again.
• When you remove the battery from the camera or leave the power turned off for a few days, the face
registration is reset.
• If Tracking focus is activated, Face Registration settings are reset.
• When the registered face disappears from the LCD screen, the camera returns to the setting selected
by [Face Detection]. When the registered face is shown on the LCD screen again, the camera
focuses on the registered face.
• It may not be possible to detect the registered face correctly depending on the surrounding
brightness, the subject’s hairstyle, etc.
• When the Smile Shutter function is used with the Face Detection frame registered, Smile Detection
is performed only on the registered face.
• In Easy Mode or when [Self-Timer] is set to [Self-portrait One Person] or [Self-portrait Two
People], the priority face cannot be registered.
contents
Search
Search
Table of
Operation
MENU/Settings
Index
79
GB
Page 80

Anti Blink
When Scene Selection is set to (Soft Skin) or (Soft Snap) while you are shooting an
image, the camera automatically shoots two images consecutively. The camera will select,
display and record the image which the eyes are not blinked automatically.
1 Set the mode dial to (Scene Selection).
contents
Table of
2 Select (Soft Skin) or (Soft Snap).
3 MENU t (Anti Blink) t desired mode
(Auto)
(Off)
Notes
• Anti Blink does not function in the following situations:
– When using the flash
– During burst shooting
– When the Face Detection function does not work
– When the Smile Shutter function is activated
• Sometimes the Anti Blink function does not work depending on the situation.
• When the Anti Blink function is set to [Auto] but only images with the subject’s eyes closed are
recorded, the message “Blinked eye detected” is displayed on the LCD screen. Shoot again as necessary.
When Face Detection is active, the Anti Blink function operates so
that images with the subject’s eyes open are recorded.
Does not use the Anti Blink function.
Search
Search
Operation
MENU/Settings
Index
80
GB
Page 81

Slideshow
Images are automatically played back in succession.
1 Press the (Playback) button to switch to playback mode.
2 MENU t (Slideshow) t desired slideshow t z on the control
button
(Continuous Playback) Plays back all the images in succession from the displayed
image to the very last image.
(Slideshow with music) Plays back still images in succession along with effects and
music.
contents
Search
Table of
Operation
Note
• [Slideshow] is not available when [View Mode] is set to [Folder view (MP4)] or [AVCHD view].
Continuous Playback
1 Select the desired image for playing with the control button.
2 MENU t (Slideshow) t [Continuous Playback] t z
Control button Action
z
v
V
b
B
Note
• When [Display Burst Group] is [Display Main Image Only], only the main image is displayed.
Stop
Sets the display settings.
Displays the volume control screen.
• Adjust the volume with v/V on the control button, then press
z.
Rewinds image.
Forwards image.
zViewing panoramic images during continuous
MENU/Settings
Search
Index
playback
The whole panoramic image is displayed for 3 seconds.
You can scroll a panoramic image by pressing z.
81
GB
Page 82

Slideshow with music
1 MENU t (Slideshow) t [Slideshow with music] t z on the control
button
Displays the setting screen.
2 Select a desired setting.
contents
Table of
3 [Start] t z
4 Press z to end the slideshow.
Note
• [Slideshow with music] is not available for the following images:
– Panoramic images
– 3D images recorded in [Standard] or [Wide]
Image
Selects the group of images to be shown. This setting is fixed to [Folder] when the internal
memory is used to record images.
All Plays a slideshow of all the images in order.
This Date Plays a slideshow of images with the currently selected date range
when View Mode is [Date View].
Folder Plays a slideshow of images in the currently selected folder in
Folder View.
Effects
Selects the playback speed and mood for slideshows. If the playback time of a movie is long,
an image is taken from it and displayed.
Simple A simple slideshow switching images at a preset interval.
The playback interval is adjustable in [Interval] and you can
thoroughly enjoy your images.
Nostalgic A moody slideshow reproducing the atmosphere of a movie scene.
Stylish A stylish slideshow proceeding at a middle tempo.
Active A high-tempo slideshow suitable for active scenes.
Search
Search
Operation
MENU/Settings
Index
Note
• When [Display Burst Group] is set to [Display Main Image Only], the burst images are displayed as
follows.
– When [Effects] is set to [Simple], only the main image is displayed.
– When [Effects] is set to other than [Simple] and there are two or fewer burst images, only the main
image is displayed.
– When [Effects] is set to other than [Simple] and there are three or more burst images, three images
including the main image are displayed.
Continued r
82
GB
Page 83

Music
Specifies the music to be played during slideshows. You can select more than one background
music track. Press V on the control button to display the volume control screen, then press
v/V to adjust the volume.
Music1 The default setting for a [Simple] slideshow.
Music2 The default setting for a [Nostalgic] slideshow.
Music3 The default setting for a [Stylish] slideshow.
Music4 The default setting for an [Active] slideshow.
Mute Does not use BGM.
Note
• The movies are played back without their audio.
contents
Search
Table of
Operation
Interval
Sets the screen switching interval. The setting is fixed to [Auto] when [Simple] is not selected
as the [Effects].
1 sec Sets the display interval of images for a [Simple] slideshow.
3 sec
5 sec
10 sec
Auto The interval is set to suit the selected [Effects] item.
Note
• The interval setting is invalid for movie playback.
Repeat
Turns slideshow repeat on or off.
On Plays back images in a continuous loop.
Off After all the images have been played back, the slideshow ends.
zSelecting background music
You can transfer a desired music file from your CDs or MP3 files to the camera to play back
during slideshow. To transfer music, install the “Music Transfer” software (supplied) to
your computer. For details, see pages 134 and 135.
• You can record up to four pieces of music on the camera. (The 4 preset pieces (Music1 – Music4)
can be replaced with the ones you transferred.)
• The maximum length of each music file for music playback of the camera is about 5 minutes.
• If you cannot play back a music file due to damage or other malfunctions of the file, execute
[Format Music] (page 114) and transfer the music again.
MENU/Settings
Search
Index
83
GB
Page 84

3D Viewing
Select [3D Viewing] when you want to play back images shot in 3D mode on the 3D TV.
Connect the camera and the 3D TV using an HDMI Cable (sold separately) (page 56).
1 Press the (Playback) button to switch to playback mode.
2 MENU t (3D Viewing) t z on the control button
contents
Search
Search
Table of
Operation
MENU/Settings
Index
84
GB
Page 85

Send by TransferJet
TransferJet is a close-up, wireless transfer technology that allows data to be transferred by
closely aligning two products that you want to communicate with each other.
To find out whether your camera is equipped with the TransferJet function, check for the
(TransferJet) mark on the bottom of the camera.
Using a Memory Stick with TransferJet (sold separately) allows images to be transferred
between TransferJet-compatible devices.
For more details on TransferJet, see the operating instructions supplied with Memory Stick with
TransferJet.
1 Insert a Memory Stick with TransferJet into the camera, and press the
(Playback) button.
contents
Search
Table of
Operation
2 MENU t (Send by TransferJet) t desired mode t z on the control
button
3 Transfer images by closely aligning the (TransferJet) marks on the
camera and other device.
A notification sound is emitted when connection is made.
(This Image) Sends the currently displayed image in single-image mode.
(Multiple
Images)
Notes
• Only still images can be transferred.
• Up to 10 images can be transferred at once. However, for 3D images, both the MPO file and the JPEG
file are transferred. Depending on the receiving device, up to 20 images are received.
• Set [TransferJet] to [On] in (Settings) (page 116).
• On an airplane, set [TransferJet] to [Off] in (Settings) (page 116). In addition, follow the rules of the
place where you use.
• The connection is cut if transfer cannot be made within about 30 seconds. If this happens, select [Yes]
and realign the two (TransferJet) marks on the camera and another device.
• Memory Stick with TransferJet and camera models with TransferJet are not sold in some countries and
regions due to local laws and regulations.
• Set the [TransferJet] function to [Off] in countries and regions other than where you purchased your
camera. Depending on the country or region, if you use the TransferJet function, you may be liable due to
local restrictions on transmission of electromagnetic waves.
You can select and send multiple images.
After step 2, perform the following.
1Select an image then press z.
Repeat the above step until there are no more images to be sent.
Select an image with a mark to release the mark.
2MENU t [OK] t z
MENU/Settings
Search
Index
85
GB
Page 86

Receiving images using TransferJet
1 Press the (Playback) button to switch to playback mode.
2 Closely align the (TransferJet) marks on the camera and sending
device to receive images.
A notification sound is emitted when connection is made.
contents
Table of
Notes
• Only images that can be played back on the camera can be sent or received.
• This camera can receive only JPEG and MPO files.
• If an Image Database File error occurs during saving, a Recover Image Database File screen will appear.
• Play images that cannot be registered in the Image Database File using [Folder view (Still)].
zTips for sending and receiving data successfully
Closely align the (TransferJet) mark on the camera and other device.
• The transfer rate and range differ depending on the angle at which
the (TransferJet) marks are aligned.
• It may be necessary to alter the position/angle of the camera until
communication can be obtained.
• Sending and receiving data is easier if the (TransferJet) marks
are aligned with both cameras parallel to each other as shown in
the figure.
zUsing separately sold TransferJet-compatible
devices
Search
Search
Operation
MENU/Settings
Index
Using separately sold TransferJet-compatible devices allows you to transfer images to a PC
and can broaden your enjoyment of transferring data.
For details, see the operating instructions supplied with your TransferJet-compatible device.
• Note the following points when using TransferJet-compatible devices.
– Before use, set the camera to playback mode.
– If no image is displayed, press MENU t (Settings) t (Main Settings) t [LUN
Settings] t [Single].
– While connected, data cannot be written to or deleted from the camera.
– Do not disconnect while importing images to “PMB”.
86
GB
Page 87

View Mode
Allows you to select the display format for images.
1 Press the (Playback) button to switch to playback mode.
2 MENU t (View Mode) t desired mode t z on the control button
contents
Table of
(Date View) Displays images by date.
(Folder view
(Still))
(Folder
view (MP4))
(AVCHD
view)
Note
• When the internal memory is used to record images, View Mode is set to Folder View and still images
and movies are displayed in the same folder.
Displays still images.
Displays MP4-format movies.
Displays AVCHD-format movies.
Displaying the Calendar
1 MENU t (View Mode) t [Date View] t z on the control button
2 Turn the (Index) lever repeatedly until the Calendar is displayed.
Use the control button to select / , then select the month you want to display. Select the
date and press z to view images of the selected date in index mode.
zViewing images taken with a different camera
This camera creates an Image Database File on the memory card for recording and playing
images. If the camera detects images not registered in the Image Database File on the
memory card, a registration screen with the message “Files found which were not
recognized Import files” will be displayed. To view unregistered images, register them by
selecting [OK].
• Use a sufficiently charged battery to register images. If a battery with a low charge is used to
register images, it may not be possible to transfer all of the data or the data may be corrupted if the
battery charge runs out.
Search
Search
Operation
MENU/Settings
Index
87
GB
Page 88

Display Burst Group
You can select to display burst images in groups or display all images during playback.
1 Press the (Playback) button to switch to playback mode.
2 MENU t (View Mode) t [Date View] t z on the control button
contents
Table of
3 MENU t (Display Burst Group) t desired setting t z
(Display Main
Image Only)
(Display All) Plays back all burst images one at a time.
Groups burst images, then plays back the main image only.
• When Face Detection is performed in burst mode, the camera determines
and displays the optimum image as the main image. When Face
Detection is not performed, the first image in the burst group is displayed
as the main image.
zDisplaying burst images
When [Display Burst Group] is set to [Display Main Image Only], only the main image of
the burst group is displayed.
When the camera displays the main image, you can play back the images in the following
ways.
Operation method Action
Press z on the control button. The burst images are displayed as a movie by tilting the camera to
the right or left.
Press V on the control button. The burst images are displayed in the index. The display switches
between single image display and thumbnail image display each
time you press z on the control button.
Search
Search
Operation
MENU/Settings
Index
88
GB
Page 89

Retouch
Retouches a recorded image and records it as a new file. The original image is retained.
1 Press the (Playback) button to switch to playback mode.
2 MENU t (Retouch) t desired mode t z on the control button
contents
Table of
3 Perform retouching according to the operation method in each mode.
(Trimming
(Resize))
(Red Eye
Correction)
(Unsharp
masking)
Records the zoomed playback
image.
1 Turn the lever to (T) to zoom in
and turn to (W) to zoom out.
2 Set the zoom point with the control
button.
3 MENU t select an image size to save t z
4 [OK] t z
• The quality of trimmed images may deteriorate.
• The image size that you can trim may vary depending on the image.
Corrects the red-eye phenomenon
caused by flash.
1 Select [OK] with the control
button t z.
• You may not be able to correct the
red-eye phenomenon depending on the image.
Sharpens the image within a
chosen frame.
1 Select the area (frame) of the
desired image to retouch with the
control button t MENU.
2 [OK] t z
• Depending on the image, sufficient
correction may not be applied and
the image quality may deteriorate.
Search
Search
Operation
MENU/Settings
Index
Note
• You cannot retouch the following images:
– Panoramic images
– 3D images
–Movies
– Images displayed in a burst group
89
GB
Page 90

Delete
Allows you to select unwanted images for deletion.
You can also delete images using the (Delete) button (page 45).
1 Press the (Playback) button to switch to playback mode.
2 MENU t (Delete) t desired mode t z on the control button
3 [OK] t z
(All but This Image) Deletes burst group images other than the selected image in
Display Burst Group mode.
Press [OK] t z after step 2.
(All Imgs in This Burst
Group)
(This Image) Deletes the currently displayed image in single-image
(Multiple Images) Allows you to select and delete multiple images.
(All Images on This
Date)
(All in This Folder)
(All AVCHD files)
Deletes all images in the selected burst group at once.
Press [OK] t z after step 2.
mode.
Do as the following after step 2.
1Select an image then press z.
Repeat the above step until there are no more images to
be deleted. Select an image with a mark again to
release the mark.
2MENU t [OK] t z
Deletes all images in the selected date range or folder, or
all AVCHD movies at once.
Press [OK] t z after step 2.
contents
Search
Search
Table of
Operation
MENU/Settings
Index
Notes
• In Easy Mode, you can select from [1 image] or [All] to delete images.
• When the internal memory is used to record images, View Mode is set to Folder View and still images
and movies are displayed in the same folder.
90
GB
Page 91

Protect
Protects recorded images against accidental erasure.
The mark is displayed for registered images.
1 Press the (Playback) button to switch to playback mode.
2 MENU t (Protect) t desired mode t z on the control button
(This Image) Protects the currently displayed image in single-image mode.
(Multiple
Images)
Notes
• When the internal memory is used to record images, View Mode is set to Folder View and still images
and movies are displayed in the same folder.
• When [Display Burst Group] is set to [Display Main Image Only], only the main image in the burst group
is protected. If you want to protect all images, set [Display Burst Group] to [Display All] first, then apply
the protection (page 88).
zTo cancel the protection
You can select and protect multiple images.
After step 2, perform the following.
1Select an image then press z.
Repeat the above step until there are no more images to be
protected. Select an image with a mark to release the
mark.
2MENU t [OK] t z
contents
Search
Search
Table of
Operation
MENU/Settings
Index
Select the image for which you want to cancel protection, and unlock it by pressing z on
the control button as the same procedure to protect it.
The indicator disappears, and the protection is released.
91
GB
Page 92

DPOF
DPOF (Digital Print Order Format) is a function that allows you to specify the images of the
memory card that you want to print out later.
The (Print order) mark is displayed for registered images.
1 Press the (Playback) button to switch to playback mode.
contents
Table of
2 MENU t t desired mode t z on the control button
(This Image) Orders printing the currently displayed image in single-image
mode.
(Multiple
Images)
Notes
• The (Print order) mark cannot be added to the following images:
–Movies
– Images in the internal memory
• You can add a (Print order) mark to a maximum 999 images.
You can select and order printing multiple images.
After step 2, perform the following.
1Select an image then press z.
Repeat the above step until there are no more images to be
printed. Select an image with a mark to release the mark.
2MENU t [OK] t z
zClearing the DPOF mark
Select the image to clear the DPOF registration, then press z on the control button in the
same procedure as when making a mark.
The mark disappears and the DPOF registration is cleared.
Search
Search
Operation
MENU/Settings
Index
92
GB
Page 93

Rotate
Rotates a still image. Use this function to display a horizontal orientation image in vertical
orientation.
1 Press the (Playback) button to switch to playback mode.
2 MENU t (Rotate) t z on the control button
contents
Search
Table of
Operation
3 Rotate the image with [ / ] t b/B.
4 [OK] t z
Notes
• You cannot rotate the following images:
– 3D images
–Movies
– Images displayed in a burst group
– Protected still images
• You may not be able to rotate images shot with other cameras.
• When viewing images on a computer, the image rotation information may not be reflected depending on
the software.
MENU/Settings
Search
Index
93
GB
Page 94

Select Folder
When multiple folders are created in a memory card, this function selects the folder containing
the image you want to play back.
1 Press the (Playback) button to switch to playback mode.
2 MENU t (View Mode) t [Folder view (Still)] or [Folder view (MP4)]
t z on the control button
3 MENU t (Select Folder) t z
4 Select the folder with b/B.
5 [OK] t z
contents
Search
Table of
Operation
Note
• This item is not displayed when the internal memory is used to record images.
zViewing images across multiple folders
When multiple folders are created and the first or last image in the folder is displayed, the
following indicators appear.
: Moves to the previous folder
: Moves to the next folder
: Moves to either the previous or next folders
MENU/Settings
Search
Index
94
GB
Page 95

Movie format
You can set the recording method used to record movies.
1 Set the camera to shooting mode.
2 MENU t (Settings) t (Shooting Settings) t [Movie format] t
desired mode t z on the control button
AVCHD Sets the recording method to AVCHD, which is suitable for
viewing smooth video images on a high-definition television.
AVCHD movies are recorded.
MP4 Sets the recording method to MP4, which is suitable for WEB
uploads and e-mail attachments.
MP4 (AVC) movies are recorded.
contents
Search
Search
Table of
Operation
MENU/Settings
Index
95
GB
Page 96

AF Illuminator
The AF illuminator supplies fill light to focus more easily on a subject in dark surroundings.
The AF illuminator emits red light allowing the camera to focus easily when the shutter button is
pressed halfway, until the focus is locked. The indicator appears at this time.
1 Set the camera to shooting mode.
contents
Table of
2 MENU t (Settings) t (Shooting Settings) t [AF Illuminator] t
desired mode t z on the control button
Auto Uses the AF illuminator.
Off Does not use the AF illuminator.
Notes
• Focus is achieved as long as the AF illuminator light reaches the subject, regardless of whether light fails
to reach the center of the subject.
• You cannot use the AF illuminator in the following situations:
– In Intelligent Sweep Panorama mode
– In 3D shooting mode
– When (Landscape), (Twilight), (Pet) or (Fireworks) mode is selected in Scene Selection.
– When [Self-Timer] is set to [Self-portrait One Person] or [Self-portrait Two People].
• When you use the AF illuminator, the normal AF range finder frame is disabled and a new AF range
finder frame is displayed by a dotted line. AF operates with priority on subjects located near the center of
the frame.
• The AF illuminator emits very bright light. Although there is no health hazard, do not look directly into
the AF illuminator emitter at close range.
Search
Search
Operation
MENU/Settings
Index
96
GB
Page 97

Grid Line
With reference to the grid lines, you can easily set a subject in a horizontal/vertical position.
1 Set the camera to shooting mode.
2 MENU t (Settings) t (Shooting Settings) t [Grid Line] t
desired mode t z on the control button
On Displays the grid lines. The grid lines are not recorded.
Off Does not display the grid lines.
contents
Search
Search
Table of
Operation
MENU/Settings
Index
97
GB
Page 98

Digital Zoom
Selects the Digital Zoom mode. The camera enlarges the image using optical zoom (up to 5×).
When the zoom scale is exceeded, the camera uses either smart or precision Digital Zoom.
1 Set the camera to shooting mode.
2 MENU t (Settings) t (Shooting Settings) t [Digital Zoom] t
desired mode t z on the control button
Smart ( ) Enlarges the image digitally within the range where the image will
not be distorted, according to the image size. (Smart zoom)
Precision ( ) Enlarges all image sizes by the total zoom scale of approximately
10×, including the optical zoom 5×. However, note that the image
quality deteriorates when the optical zoom scale is exceeded.
(Precision digital zoom)
Off Does not use the Digital Zoom.
Notes
• The Digital Zoom function does not operate in the following situations:
– In Intelligent Sweep Panorama mode
– In Superior Auto Adjustment mode
– In Background Defocus mode
– In 3D shooting mode
– In Movie Mode
– When (Backlight Correction HDR) mode is selected in Scene Selection.
– When the Smile Shutter function is activated.
– When [Self-Timer] is set to [Self-portrait One Person] or [Self-portrait Two People].
• The smart zoom is not available when the image size is set to [12M] or [16:9(9M)].
• The Face Detection function does not work when using the Digital Zoom.
contents
Search
Search
Table of
Operation
MENU/Settings
Index
Total zoom scale when using Smart zoom
(including optical zoom 5×)
The supported zoom ratio differs depending on the image size.
Size Total zoom scale
8M
5M
VGA
16:9(2M)
Approx. 6.1×
Approx. 7.7×
Approx. 31×
Approx. 10×
98
GB
Page 99

Auto Orientation
When the camera is rotated to shoot a portrait (vertical) image, the camera records its position
change and displays the image in the portrait position.
1 Set the camera to shooting mode.
2 MENU t (Settings) t (Shooting Settings) t [Auto Orientation]
t desired mode t z on the control button
On Records the image with the correct orientation.
Off Does not use Auto Orientation.
Notes
• Black is displayed to the left and right of vertical orientation images.
• Depending on the shooting angle of the camera, the orientation of the image may not be recorded
correctly.
• You cannot use [Auto Orientation] in the following situations:
– In 3D shooting mode
– In Movie Mode
zRotating images after recording
If the orientation of an image is incorrect, you can use the [Rotate] on the Menu screen to
display the image in portrait position.
contents
Search
Search
Table of
Operation
MENU/Settings
Index
99
GB
Page 100

Red Eye Reduction
The flash strobes two or more times before shooting to reduce the red-eye phenomenon when
using the flash.
1 Set the camera to shooting mode.
2 MENU t (Settings) t (Shooting Settings) t [Red Eye
Reduction] t desired mode t z on the control button
Auto When the Face Detection function is activated, the flash strobes
automatically to reduce the red-eye phenomenon.
On The flash always strobes to reduce the red-eye phenomenon.
Off Does not use Red Eye Reduction.
Notes
• To avoid blurring of images, hold the camera firmly until the shutter is released. It usually takes a second
until the shutter is released, and also be sure not to allow the subject to move during this period.
• Red Eye Reduction may not produce the desired effects. It depends on individual differences and
conditions, such as distance to the subject, or if the subject looked away from the pre-strobe.
• If you do not use the Face Detection function, Red Eye Reduction does not work, even when you select
[Auto].
• [Red Eye Reduction] is set to [Off] in the following situations:
– In Background Defocus mode
– In 3D shooting mode
– When (Anti Motion Blur), (Hand-held Twilight) or (High Sensitivity) mode is selected in
Scene Selection.
– When the Smile Shutter function is activated.
contents
Search
Search
Table of
Operation
MENU/Settings
Index
zWhat causes the red-eye phenomenon?
Pupils become dilated in dark environments. Flash light is reflected off the blood vessels at
the back of the eye (retina), causing the “red-eye” phenomenon.
Camera
Other ways to reduce red-eye
• Select (High Sensitivity) mode in Scene Selection. (The flash is set to [Off] automatically.)
• When the eyes of the subject turn out red, correct the image with [Retouch] t [Red Eye
Correction] on the viewing menu or with the supplied software “PMB”.
Eye
Retina
100
GB
 Loading...