

Page 1
Help Guide
Digital Still Camera
DSC-HX95
Use this manual if you encounter any problems, or have any questions about your product.
How to transfer images to smartphone
You can transfer images shot with this camera to smartphone. The application PlayMemories Mobile
must be installed in advance.
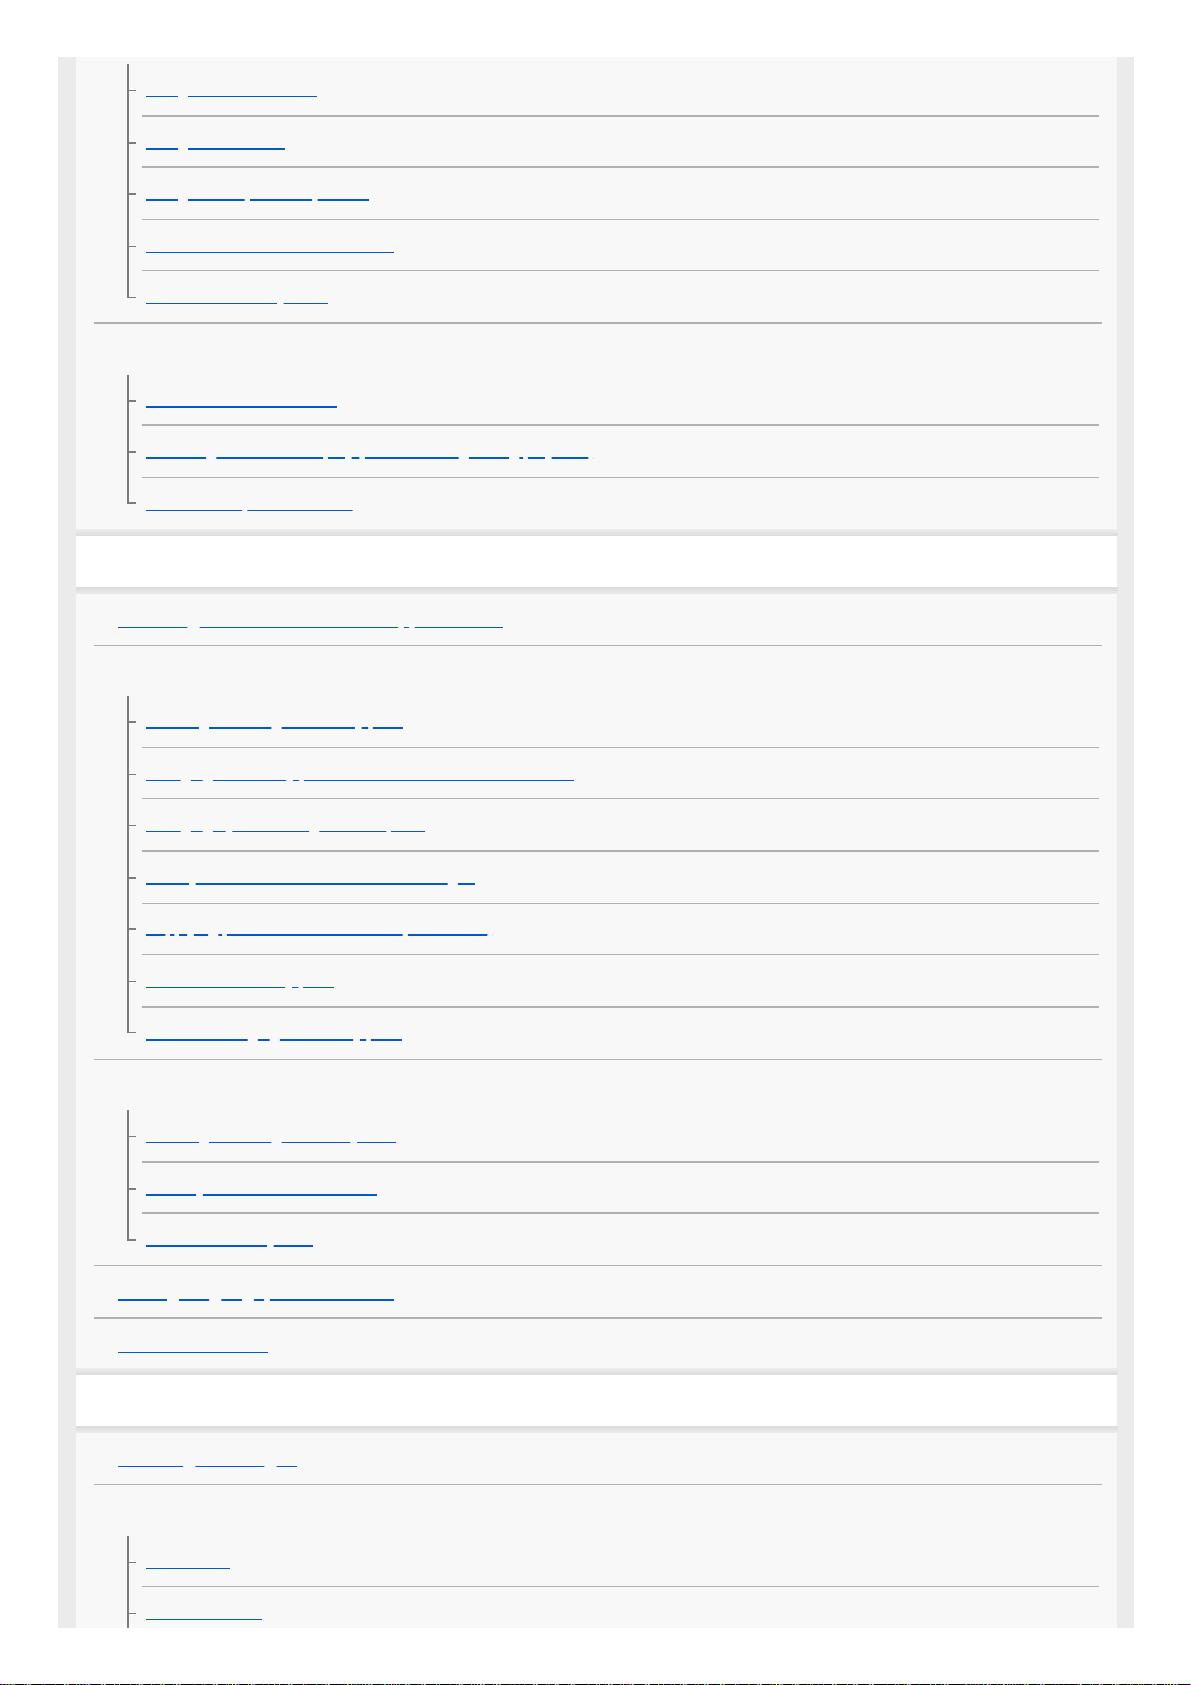
Zoom Assist
This function helps you compose your shot by zooming out temporarily when you lose track of the
subject, so that you can relocate the subject quickly.
DSC-HX95: Accessories compatibility information
This website provides the accessories compatibility information. (Another window will open.)
Names of parts/Icons and indicators
Identifying parts
Basic operations
1
Page 2
Using the control wheel
Using MENU items
Using the Fn (Function) button
How to use the Quick Navi screen
How to use the keyboard
Icons and indicators
List of icons on the screen
Switching the screen display (while shooting/during playback)
DISP Button (Monitor/Finder)
Preparing the camera
Checking the camera and the supplied items
Charging the battery pack
Inserting/removing the battery pack
Charging the battery pack while it is inserted in the camera
Charging by connecting to a computer
Battery life and number of recordable images
Supplying power from a wall outlet (wall socket)
Notes on the battery pack
Notes on charging the battery pack
Inserting a memory card (sold separately)
Inserting/removing a memory card
Memory cards that can be used
Notes on memory card
Setting language, date and time
In-Camera Guide
Shooting
Shooting still images
Auto focus
Focus Area
Focus Standard
2
Page 3

Eye AF
Set. Face Prty in AF
Center Lock-on AF
Pre-AF (still image)
AF Illuminator (still image)
Selecting a drive mode (Continuous shooting/Self-timer)
Drive Mode
Cont. Shooting
Spd Priority Cont.
Self-timer
Self-timer(Cont)
Cont. Bracket
Single Bracket
Indicator during bracket shooting
WB bracket
DRO Bracket
Bracket Settings
Taking pictures of yourself by monitoring the screen
Self-portrait/ -timer
Selecting still image size/image quality
JPEG Image Size (still image)
JPEG Quality (still image)
Aspect Ratio (still image)
File Format (still image)
Panorama: Size
Panorama: Direction
Selecting a shooting mode
List of mode dial function
Intelligent Auto
Superior Auto
3
Page 4

Switching the auto mode (Auto Mode)
About Scene Recognition
Program Auto
Aperture Priority
Shutter Priority
Manual Exposure
Sweep Panorama
Scene Selection
Recall (Camera Settings1/Camera Settings2)
Movie: Exposure Mode
Controlling the exposure/metering modes
Exposure Comp.
Exposure Set. Guide
Metering Mode
Face Prty in Mlti Mtr
AE lock
Zebra Setting
Correcting brightness and contrast automatically
D-Range Opt. (DRO)
Auto HDR
Selecting the ISO sensitivity
ISO
Using the zoom
The zoom features available with this product
Zoom
Zoom Setting
About zoom scale
Zoom Assist
Rng. of Zoom Assist
Zoom Speed
4
Page 5
White balance
White Balance
Priority Set in AWB
Capturing a basic white color in [Custom Setup] mode
Setting how to process images
Photo Creativity
Creative Style
Picture Effect
Soft Skin Effect (still image)
Auto Obj. Framing (still image)
Color Space (still image)
Shutter settings
Release w/o Card
Reducing blur
SteadyShot (still image)
Noise reduction
High ISO NR (still image)
Face detection
Regist. Faces Priority
Smile Shutter
Face Registration (New Registration)
Face Registration (Order Exchanging)
Face Registration (Delete)
Using the flash
Using flash
Red Eye Reduction
Flash Mode
Flash Comp.
Recording movies
Shooting movies
5
Page 6
Movie w/ shutter
Movie recording formats
File Format (movie)
Record Setting (movie)
Proxy Recording
Audio Recording
Micref Level
Wind Noise Reduct.
Auto Slow Shut. (movie)
SteadyShot (movie)
TC/UB Settings
TC/UB Disp. Switch
MOVIE Button
Marker Display (movie)
Marker Settings (movie)
4K Output Sel. (movie)
Viewing
Viewing images
Playing back still images
Enlarging an image being played back (Enlarge Image)
Rotating recorded images automatically (Display Rotation)
Rotating an image (Rotate)
Playing back panoramic images
Enlarge Init. Mag.
Enlarge Initial Pos.
Playing back movies
Motion Shot Video
Motion Interval ADJ
Volume Settings
Photo Capture
6
Page 7

Playing back images on the image index screen (Image Index)
Switching between still images and movies (View Mode)
Disp Cont Shoot Grp
Playing back images using slideshow (Slide Show)
Protecting data
Protecting images (Protect)
Setting Rating function
Rating
Rating Set(Cust Key)
Designating images for printing (DPOF)
Specifying images to be printed (Specify Printing)
Deleting images
Deleting a displayed image
Deleting multiple selected images (Delete)
Delete confirm.
Viewing images on a TV
Viewing images on a TV using an HDMI cable
Customizing the camera
Registering frequently used functions
Memory (Camera Settings1/Camera Settings2)
Assigning selected functions to the button
Custom Key (still image/movie/playback)
Function Menu Set.
Customizing MENU (My Menu)
Add Item
Sort Item
Delete Item
Delete Page
Delete All
Checking images before/after recording
7
Page 8
Auto Review
Monitor/viewfinder settings
Grid Line
FINDER/MONITOR
Monitor Brightness
Viewfinder Bright.
Finder Color Temp.
Function for VF close
Display Quality
Auto Monitor OFF
Memory card settings
Format
File Number
Set File Name
Display Media Info.
Select REC Folder
New Folder
Folder Name
Recover Image DB
Camera settings
Audio signals
Write Date (still image)
Tile Menu
Mode Dial Guide
Pwr Save Start Time
Auto Pwr OFF Temp.
NTSC/PAL Selector
HDMI Settings: HDMI Resolution
HDMI Settings: 24p/60p Output (movie) (Only for 1080 60i compatible models)
HDMI Settings: HDMI Info. Display
8
Page 9
HDMI Settings: TC Output (movie)
HDMI Settings: REC Control (movie)
HDMI Settings: CTRL FOR HDMI
HDMI Settings: HDMI Audio Out. (movie)
USB Connection
USB LUN Setting
USB Power Supply
PC Remote Settings: Still Img. Save Dest.
PC Remote Settings: RAW+J PC Save Img
Language
Date/Time Setup
Area Setting
Version
Demo Mode
Initializing the camera
Setting Reset
Using network functions
Connecting this product and a Smartphone
PlayMemories Mobile
Controlling the camera using an Android smartphone (NFC One-touch remote)
Controlling the camera using an Android smartphone (QR Code)
Controlling the camera using an Android smartphone (SSID)
Controlling the camera using an iPhone or iPad (QR Code)
Controlling the camera using an iPhone or iPad (SSID)
Transferring images to a Smartphone
Snd to Smrtphn Func: Send to Smartphone
Snd to Smrtphn Func: Sending Target (proxy movies)
Sending images to an Android smartphone (NFC One-touch Sharing)
Transferring images to a computer
Send to Computer
9
Page 10
Transferring images to a TV
View on TV
Reading location information from a smartphone
Loc. Info. Link Set.
Changing the network settings
Airplane Mode
Wi-Fi Settings: WPS Push
Wi-Fi Settings: Access Point Set.
Wi-Fi Settings: Disp MAC Address
Wi-Fi Settings: SSID/PW Reset
Edit Device Name
Reset Network Set.
Using a computer
Recommended computer environment
Software for Mac computers
Importing images for use on a computer
PlayMemories Home
Installing PlayMemories Home
Connecting to a computer
Importing images to the computer without using PlayMemories Home
Disconnecting the camera from the computer
Developing RAW images/Remote shooting (Imaging Edge)
Imaging Edge
Creating a movie disc
Selecting a disc to be created
Creating Blu-ray Discs from high-definition image quality movies
Creating DVD discs (AVCHD recording discs) from high-definition image quality movies
Creating DVD discs from standard image quality movies
List of MENU items
Using MENU items
10
Page 11

Camera Settings1
File Format (still image)
JPEG Quality (still image)
JPEG Image Size (still image)
Aspect Ratio (still image)
Panorama: Size
Panorama: Direction
High ISO NR (still image)
Color Space (still image)
Switching the auto mode (Auto Mode)
Scene Selection
Drive Mode
Bracket Settings
Memory (Camera Settings1/Camera Settings2)
Focus Area
AF Illuminator (still image)
Center Lock-on AF
Set. Face Prty in AF
Pre-AF (still image)
Exposure Comp.
ISO
Metering Mode
Face Prty in Mlti Mtr
Flash Mode
Flash Comp.
Red Eye Reduction
White Balance
Priority Set in AWB
D-Range Opt. (DRO)
Auto HDR
11
Page 12
Creative Style
Picture Effect
Soft Skin Effect (still image)
Face Registration (New Registration)
Face Registration (Order Exchanging)
Face Registration (Delete)
Regist. Faces Priority
Smile Shutter
Auto Obj. Framing (still image)
Self-portrait/ -timer
Camera Settings2
Movie: Exposure Mode
File Format (movie)
Record Setting (movie)
Proxy Recording
Auto Slow Shut. (movie)
Audio Recording
Micref Level
Wind Noise Reduct.
SteadyShot (movie)
Marker Display (movie)
Marker Settings (movie)
Movie w/ shutter
Release w/o Card
SteadyShot (still image)
Rng. of Zoom Assist
Zoom Setting
Zoom Speed
DISP Button (Monitor/Finder)
FINDER/MONITOR
12
Page 13
Zebra Setting
Grid Line
Exposure Set. Guide
Auto Review
Custom Key (still image/movie/playback)
Function Menu Set.
MOVIE Button
Audio signals
Write Date (still image)
Network
Snd to Smrtphn Func: Send to Smartphone
Snd to Smrtphn Func: Sending Target (proxy movies)
Send to Computer
View on TV
Ctrl w/ Smartphone
Airplane Mode
Wi-Fi Settings: WPS Push
Wi-Fi Settings: Access Point Set.
Wi-Fi Settings: Disp MAC Address
Wi-Fi Settings: SSID/PW Reset
Bluetooth Settings
Loc. Info. Link Set.
Edit Device Name
Reset Network Set.
Playback
Protecting images (Protect)
Rotating an image (Rotate)
Deleting multiple selected images (Delete)
Rating
Rating Set(Cust Key)
13
Page 14
Specifying images to be printed (Specify Printing)
Photo Capture
Enlarging an image being played back (Enlarge Image)
Enlarge Init. Mag.
Enlarge Initial Pos.
Motion Interval ADJ
Playing back images using slideshow (Slide Show)
Switching between still images and movies (View Mode)
Playing back images on the image index screen (Image Index)
Disp Cont Shoot Grp
Rotating recorded images automatically (Display Rotation)
Setup
Monitor Brightness
Viewfinder Bright.
Finder Color Temp.
Volume Settings
Tile Menu
Mode Dial Guide
Delete confirm.
Display Quality
Auto Monitor OFF
Pwr Save Start Time
Function for VF close
NTSC/PAL Selector
Auto Pwr OFF Temp.
Demo Mode
TC/UB Settings
HDMI Settings: HDMI Resolution
HDMI Settings: 24p/60p Output (movie) (Only for 1080 60i compatible models)
HDMI Settings: HDMI Info. Display
14
Page 15
HDMI Settings: TC Output (movie)
HDMI Settings: REC Control (movie)
HDMI Settings: CTRL FOR HDMI
HDMI Settings: HDMI Audio Out. (movie)
4K Output Sel. (movie)
USB Connection
USB LUN Setting
USB Power Supply
PC Remote Settings: Still Img. Save Dest.
PC Remote Settings: RAW+J PC Save Img
Language
Date/Time Setup
Area Setting
Format
File Number
Set File Name
Select REC Folder
New Folder
Folder Name
Recover Image DB
Display Media Info.
Version
Setting Reset
My Menu
Add Item
Sort Item
Delete Item
Delete Page
Delete All
Precautions/This product
15
Page 16
4-745-581-11(1) Copyright 2018 Sony Corporation
Precautions
On cleaning
Number of recordable images
Recordable movie times
Using the AC Adaptor/battery charger abroad
AVCHD format
License
Specifications
Trademarks
If you have problems
Troubleshooting
Self-diagnosis display
Warning messages
16
Page 17
Help Guide
Digital Still Camera
DSC-HX95
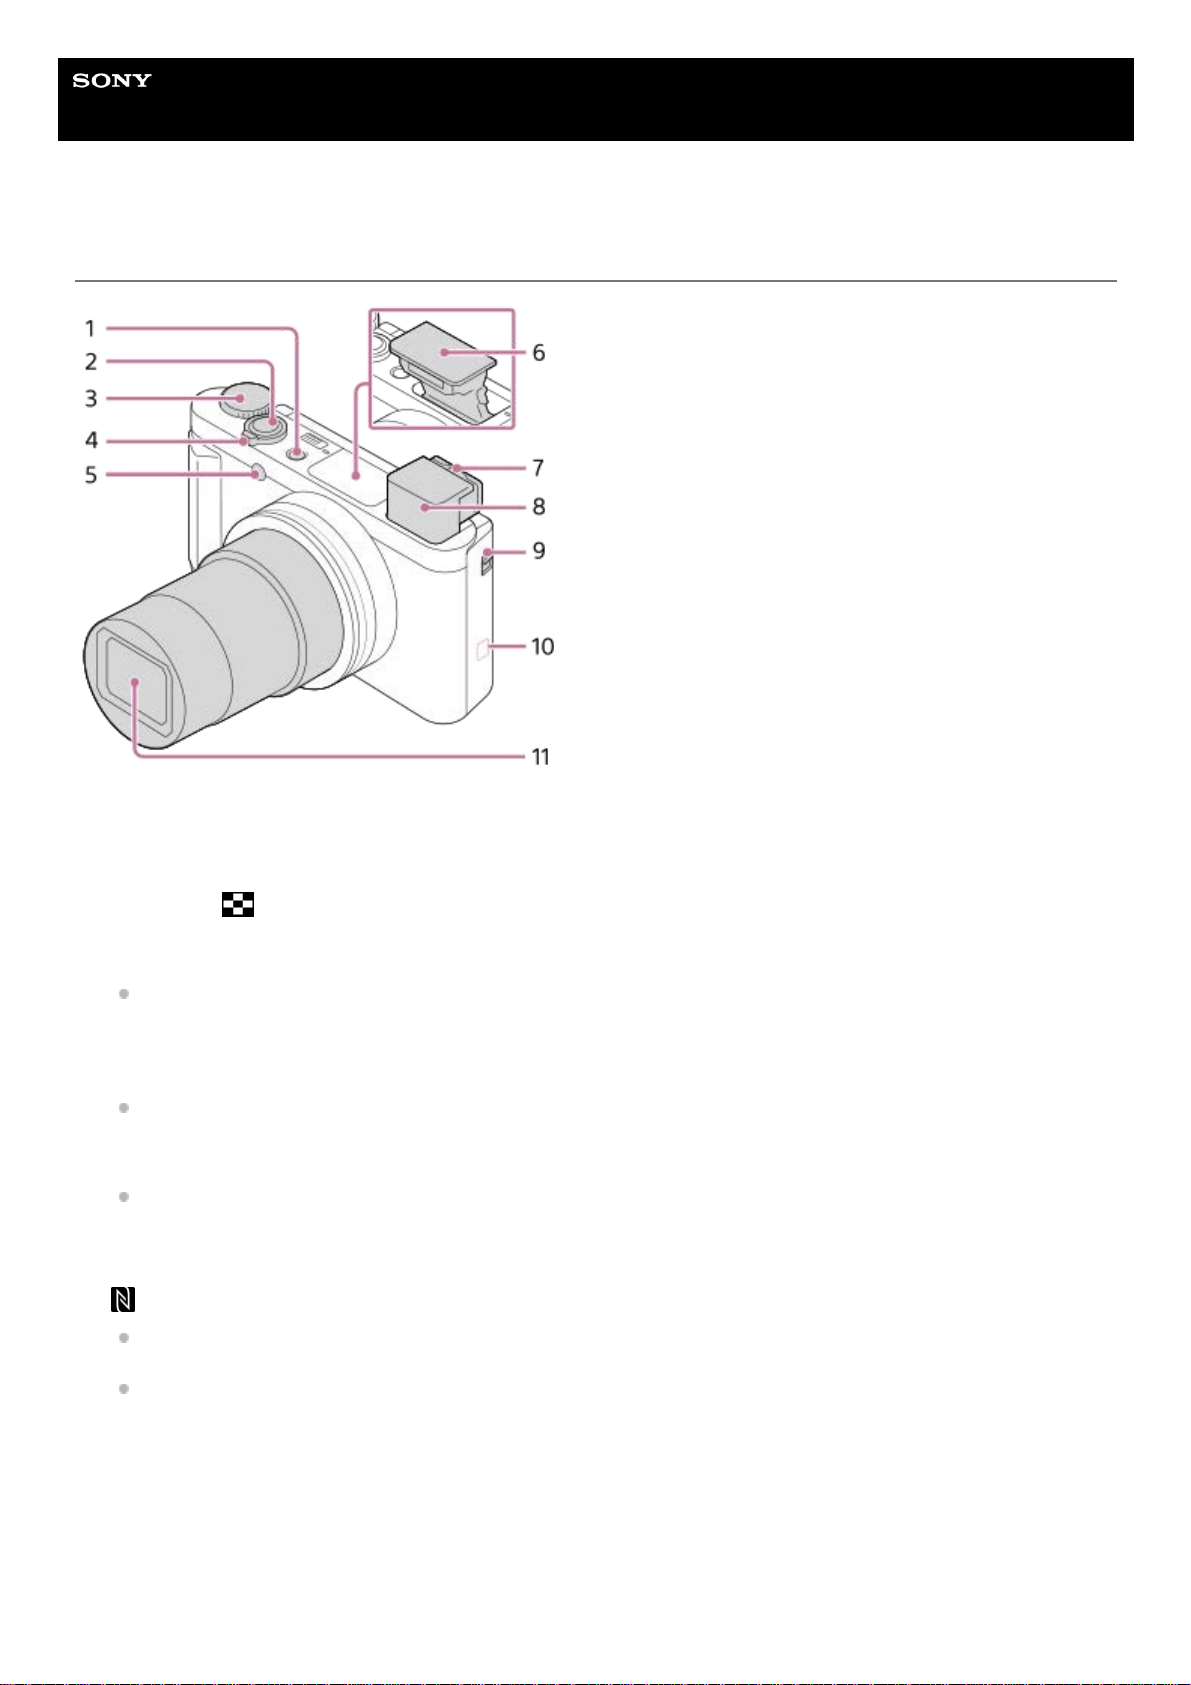
Identifying parts
ON/OFF (Power) button1.
Shutter button2.
Mode dial3.
For shooting:W/T (zoom) lever
For viewing:
(Index) lever/Playback zoom lever
4.
Self-timer lamp/AF illuminator5.
Flash
Do not cover the flash with your finger.
If not using the flash, press it down manually.
6.
Diopter-adjustment lever
Move the diopter-adjustment lever until the image is clear in the viewfinder.
7.
Viewfinder
When you look into the viewfinder, the viewfinder mode is activated, and when you take your face away from the
viewfinder, the viewing mode returns to the monitor mode.
8.
Viewfinder pop-up switch9.
(N mark)
Align this mark when you connect the camera to a smartphone with an NFC function. For details, refer to the
operating instructions supplied with your smartphone.
NFC (Near Field Communication) is an international standard of the short-range wireless communication
technology.
10.
Lens11.
17
Page 18

Microphone1.
(Flash pop-up) switch
When using the flash, slide the
(Flash pop-up) switch.
2.
Monitor
When shooting from low angles or shooting self-portraits, adjust the monitor angle.
3.
Eye sensor4.
For shooting: Fn (Function) button
For viewing:
(Send to Smartphone) button
5.
MOVIE (Movie) button6.
MENU button7.
Charge lamp8.
Multi/Micro USB Terminal
This terminal supports Micro USB-compatible devices.
9.
Wi-Fi/Bluetooth antenna (built-in)10.
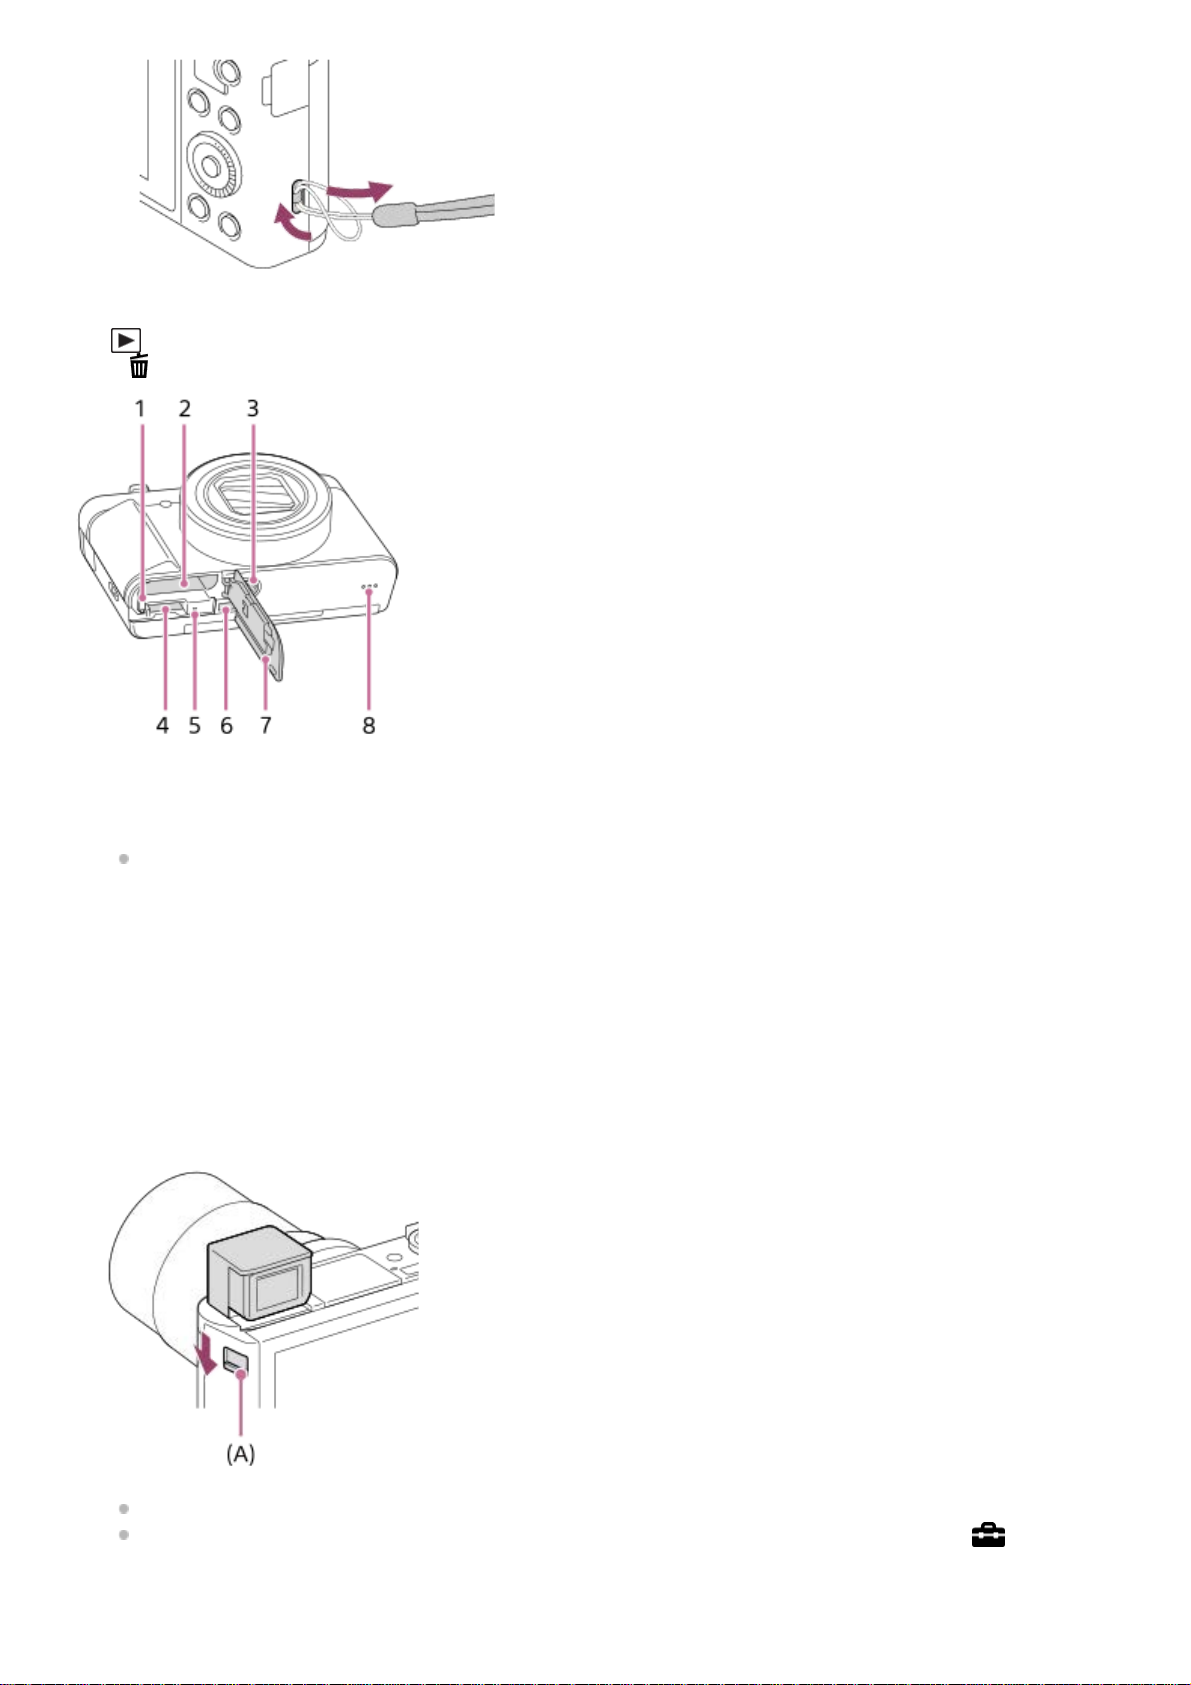
Hook for strap
Attach the wrist strap and place your hand through the loop to prevent damage caused by dropping the product.
11.
18
Page 19
When using the viewfinder
Control wheel12.
(Playback) button13.
C/
(Custom/Delete) button14.
Battery lock lever1.
Battery insertion slot2.
Tripod socket hole
Use a tripod with a screw less than 5.5 mm (7/32 inches) long. Otherwise, you cannot firmly secure the camera,
and damage to the camera may occur.
3.
Memory card slot4.
Access lamp5.
HDMI micro jack6.
Battery/Memory card cover7.
Speaker8.
Slide down the viewfinder pop-up switch (A).
If you slide the viewfinder pop-up switch when the power is off, the camera turns on.
To choose whether or not to turn the camera off when the viewfinder is stowed, select MENU →
(Setup) →
[Function for VF close].
1.
Grasp both sides of the eyepiece (B) and pull it towards the monitor side until it clicks.2.
19
Page 20

To store the viewfinder
Grasp both sides of the eyepiece and push it back into the viewfinder until it clicks. Then push down the viewfinder.
Note
Be careful not to push down on the viewfinder when it is being raised.
Be sure that the eyepiece is stored in the viewfinder unit before attempting to push down the viewfinder. If it is not stored and you
try to force the viewfinder down, a malfunction may result.
4-745-581-11(1) Copyright 2018 Sony Corporation
Adjust the diopter-adjustment lever to your eyesight until the display appears clearly in the viewfinder.3.
20
Page 21

Help Guide
Digital Still Camera
DSC-HX95
Using the control wheel
You can select setting items by turning or pressing the top/bottom/left/right side of the control wheel. Your selection is
determined when you press the center of the control wheel.
The DISP (Display Setting),
(Exposure Comp./Photo Creativity), / (Drive Mode), and (Flash
Mode) functions are assigned to the top/bottom/left/right side of the control wheel. In addition, you can assign
selected functions to the left/right side and the center of the control wheel.
During playback, you can display the next/previous image by pressing the right/left side of the control wheel or by
turning the control wheel.
Related Topic
Focus Standard
Custom Key (still image/movie/playback)
4-745-581-11(1) Copyright 2018 Sony Corporation
21
Page 22
Help Guide
Digital Still Camera
DSC-HX95
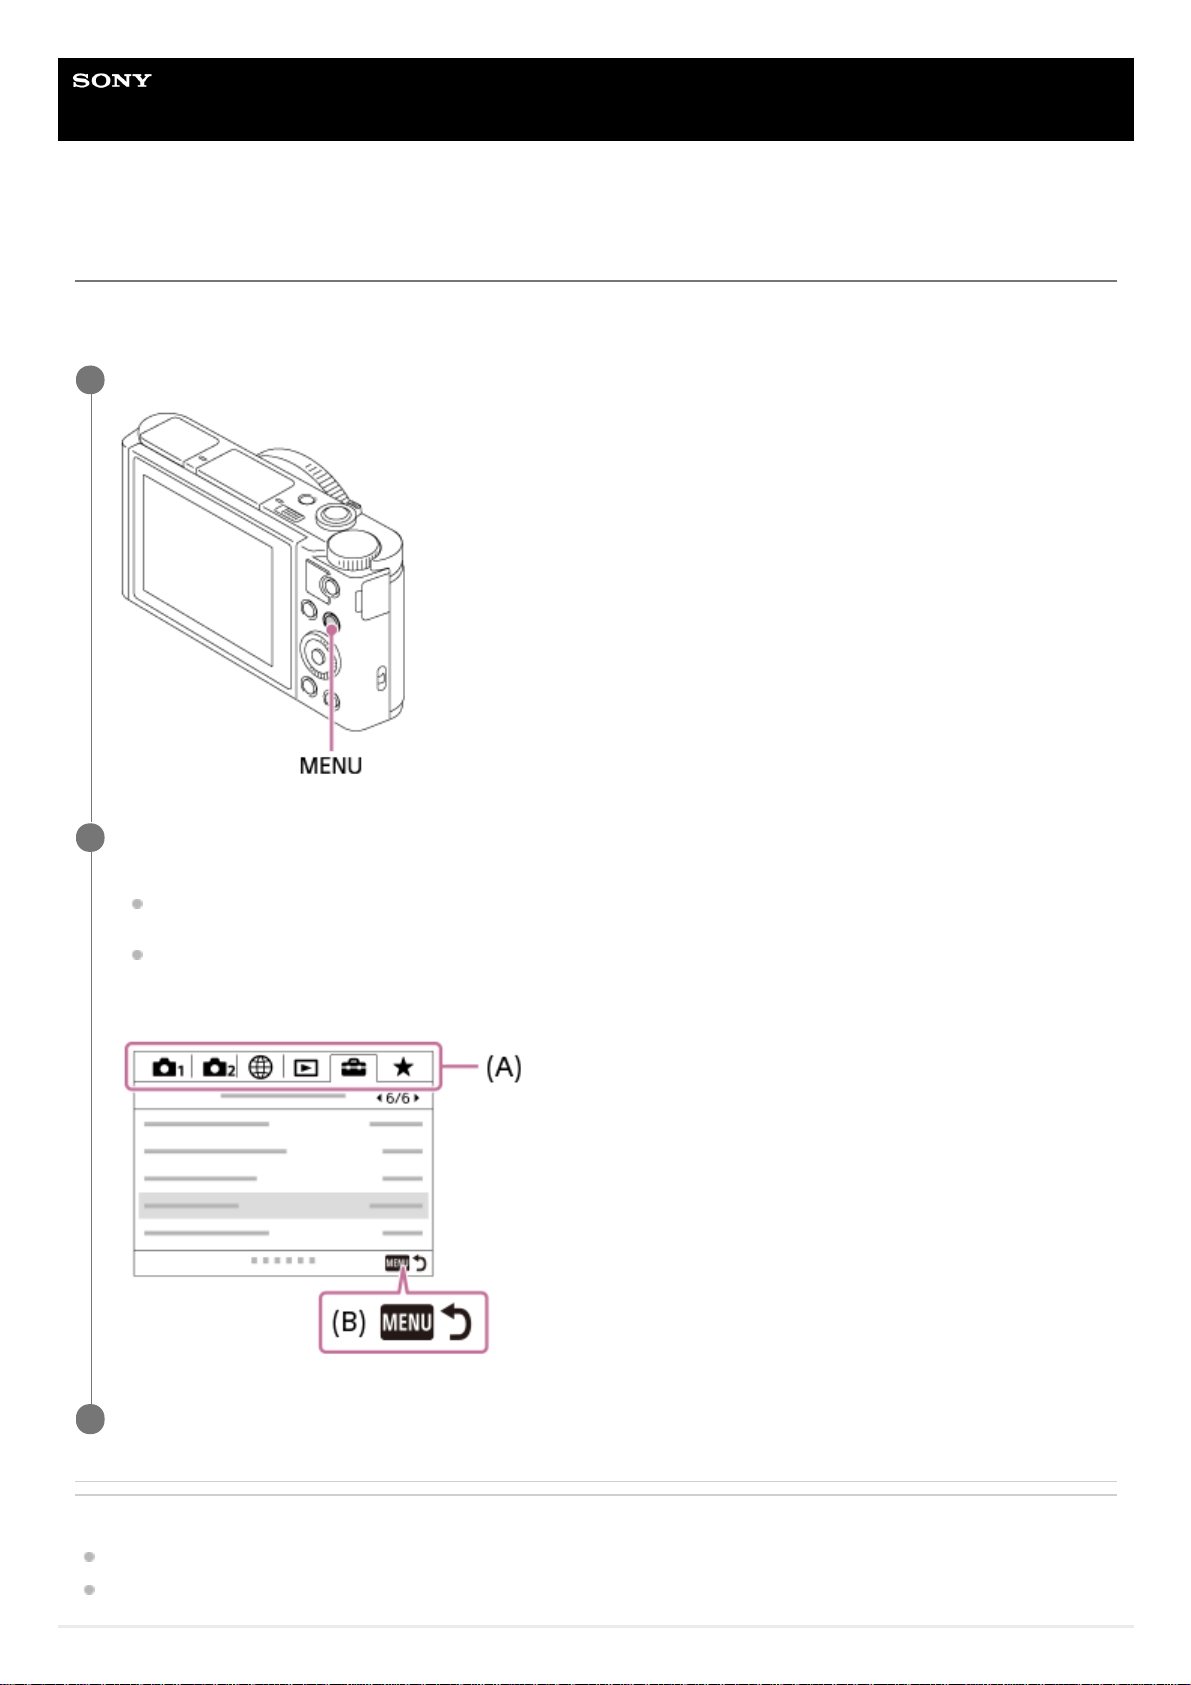
Using MENU items
You can change settings related to all the camera operations including shooting, playback, and operating method. You
can also execute camera functions from the MENU.
Related Topic
Tile Menu
Add Item
Press the MENU button to display the menu screen.
1
Select the desired setting you want to adjust using the top/bottom/left/right sides of the control wheel or by
turning the control wheel, and then press the center of the control wheel.
Select an icon at the top of the screen (A) and press the left/right side of the control wheel to move to another
MENU item.
You can go back to the previous screen by pressing the MENU button (B).
2
Select the desired setting value, and press the center to confirm your selection.
3
22
Page 23

4-745-581-11(1) Copyright 2018 Sony Corporation
23
Page 24
Help Guide
Digital Still Camera
DSC-HX95
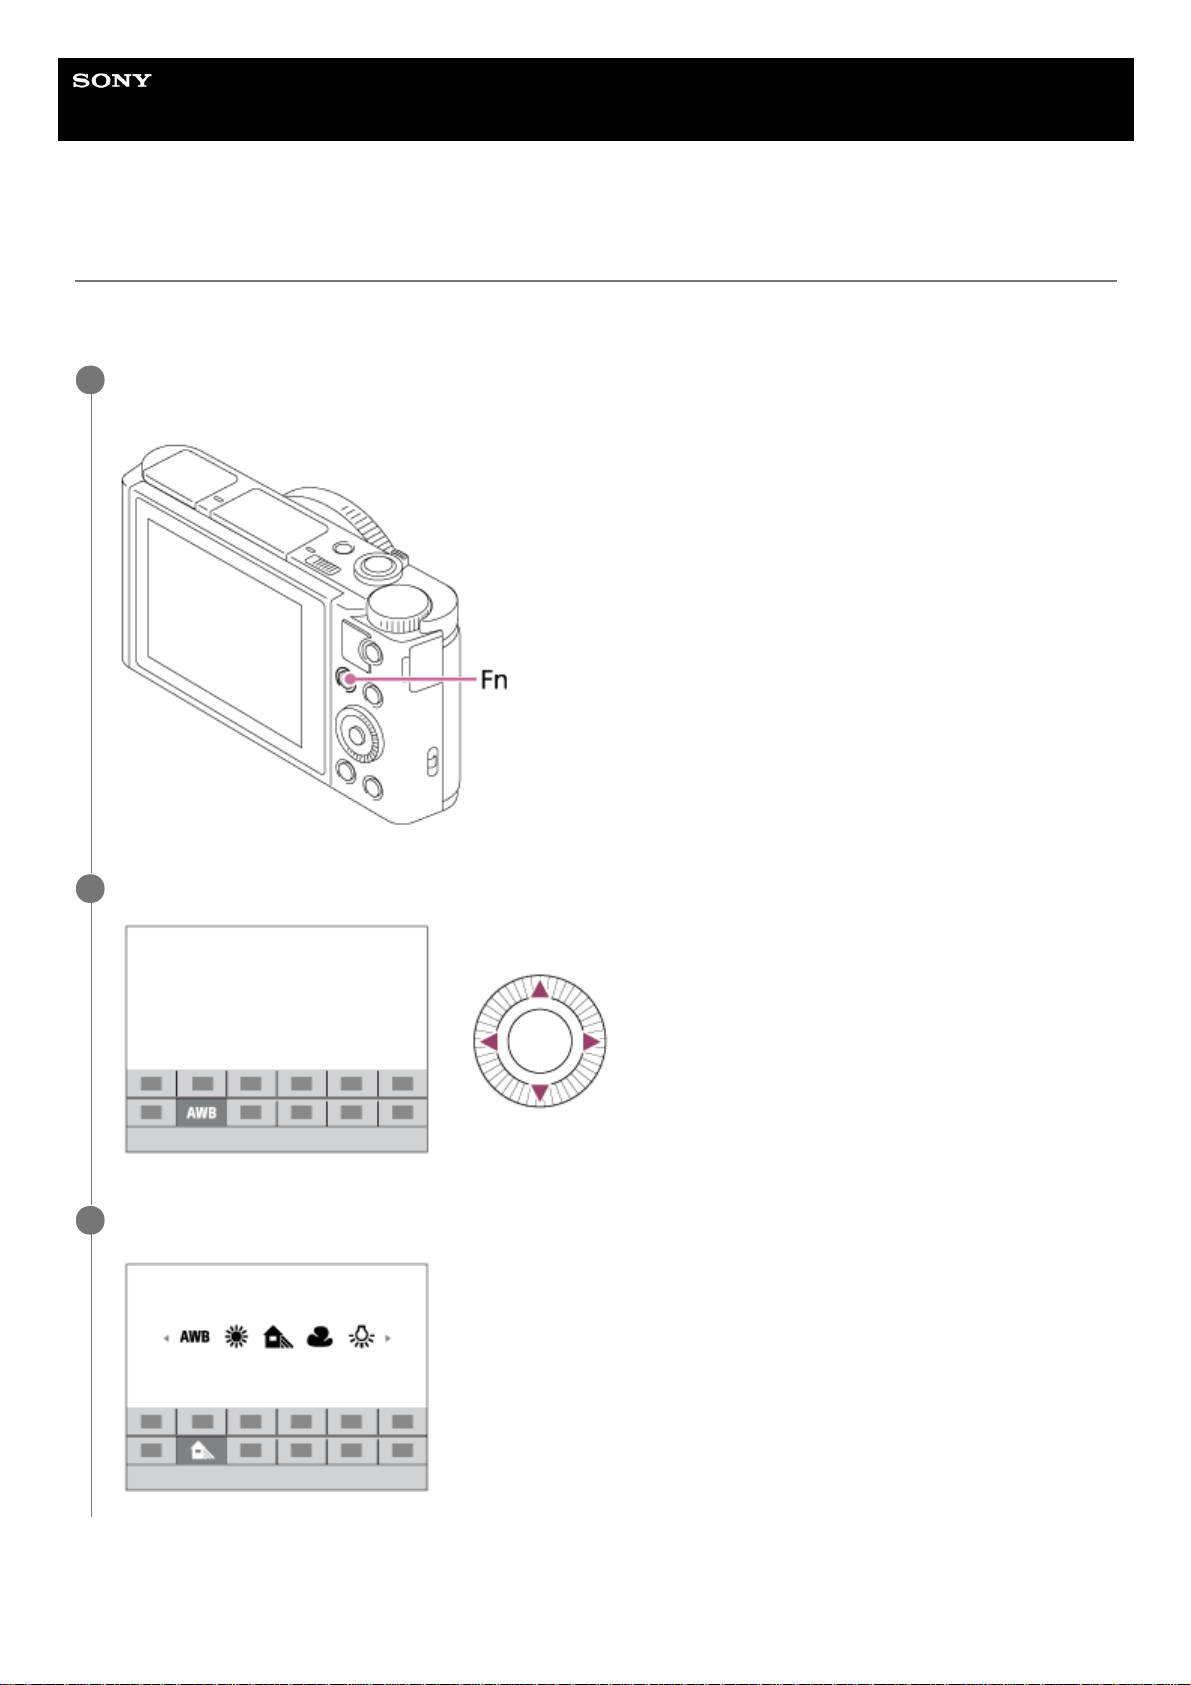
Using the Fn (Function) button
You can register frequently used functions to the Fn (Function) button and recall them while shooting. Up to 12 frequently
used functions can be registered to the Fn (Function) button.
To adjust settings from the dedicated setting screens
Press the DISP on the control wheel repeatedly to display a screen mode other than [For viewfinder], and
then press the Fn (Function) button.
1
Select the desired function by pressing the top/bottom/left/right side of the control wheel.
2
Select the desired setting by turning the control wheel, and press the center of the control wheel.
3
24
Page 25

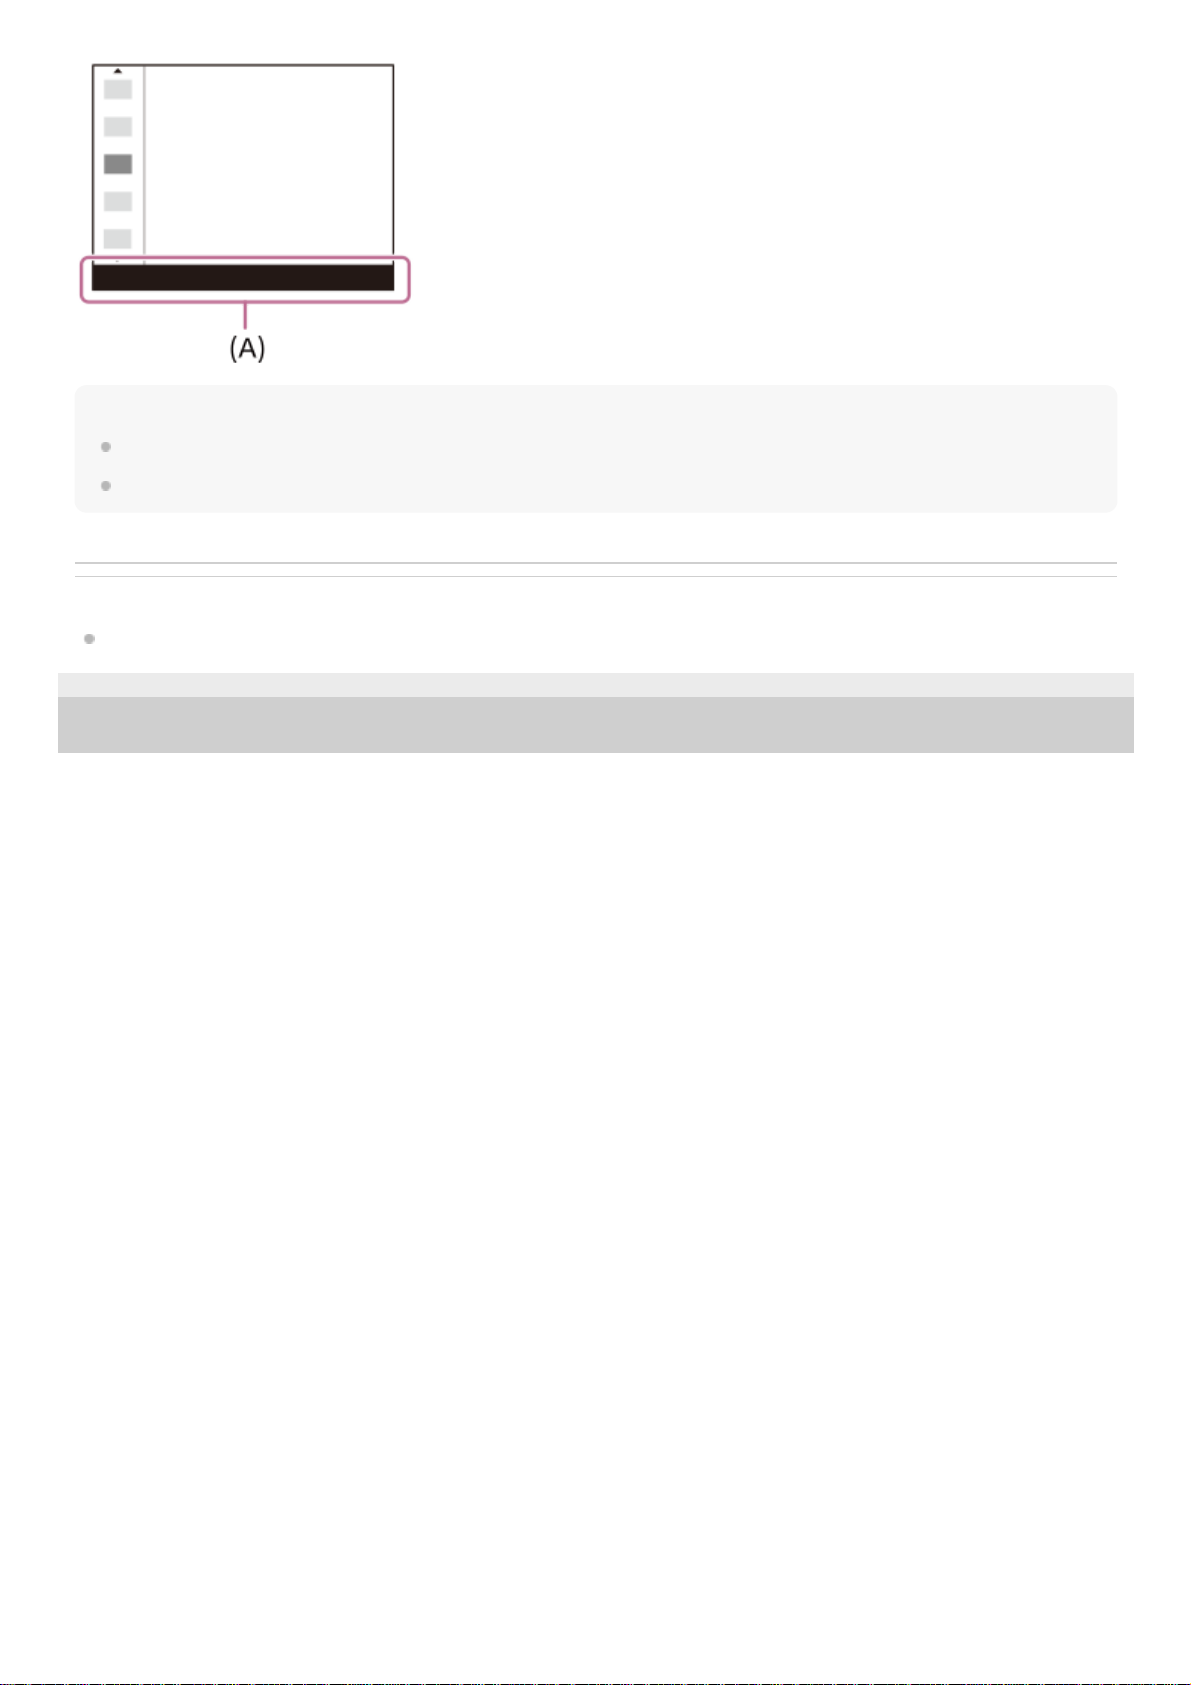
Select the desired function in step 2, then press the center of the control wheel. The dedicated setting screen for the
function will appear. Follow the operating guide (A) to adjust settings.
Related Topic
Function Menu Set.
4-745-581-11(1) Copyright 2018 Sony Corporation
25
Page 26
Help Guide
Digital Still Camera
DSC-HX95
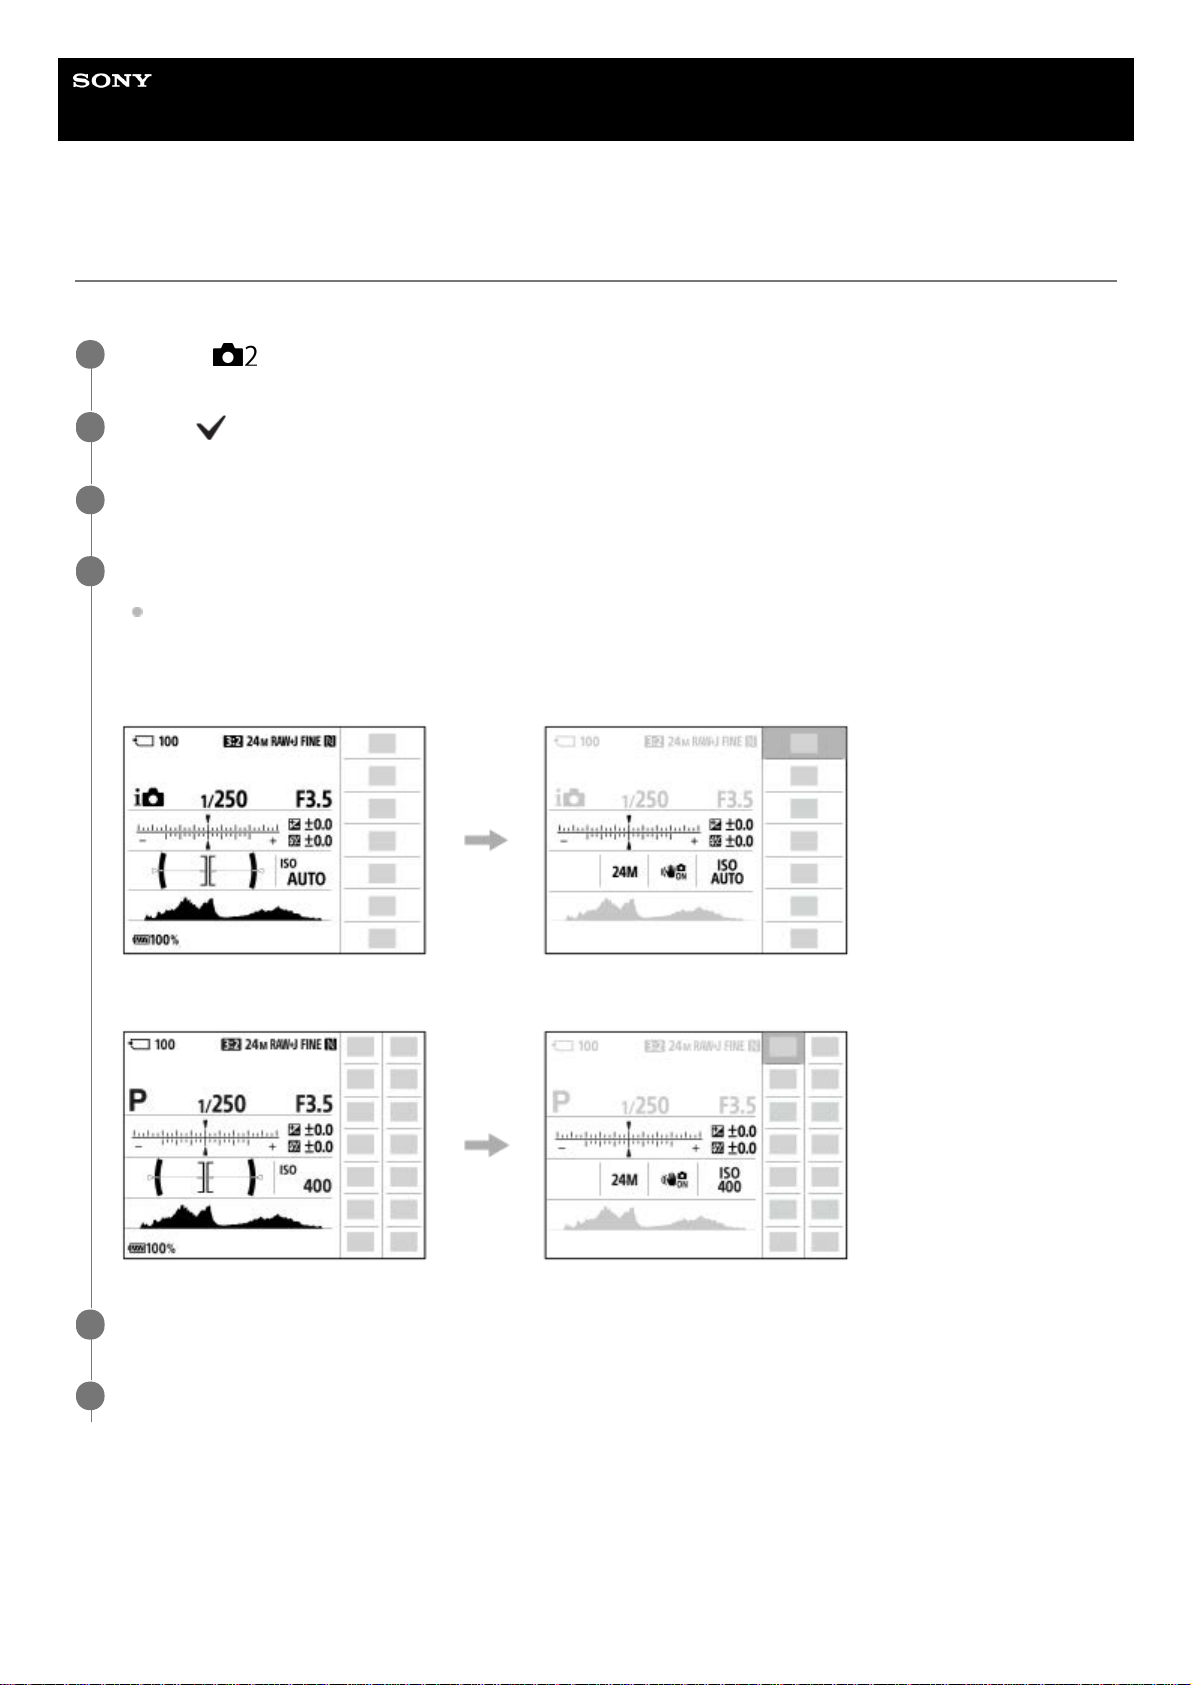
How to use the Quick Navi screen
The Quick Navi screen is a function optimized for shooting with the viewfinder, that lets you control settings directly.
To adjust settings from the dedicated setting screens
Select the desired function in step 5, then press the center of the control wheel. The dedicated setting screen for the
function will appear. Follow the operating guide (A) to adjust settings.
MENU →
(Camera Settings2) → [DISP Button] → [Monitor].
1
Place a
mark on [For viewfinder] and then select [Enter].
2
Press the DISP on the control wheel to set the screen mode to [For viewfinder].
3
Press the Fn button to switch to the Quick Navi screen.
The displayed contents and their positions in the illustrations are just guidelines, and may differ from the actual
displays.
Auto mode/Scene Selection mode
P/A/S/M/Sweep Panorama mode
4
Select the desired function by pressing the top/bottom/left/right side of the control wheel.
5
Turn the control wheel to select the desired setting.
6
26
Page 27
Note
Items that are gray on the Quick Navi screen are not adjustable.
When using [Creative Style], some of the setup tasks can only be accomplished on a dedicated screen.
Related Topic
Switching the screen display (while shooting/during playback)
4-745-581-11(1) Copyright 2018 Sony Corporation
27
Page 28
Help Guide
Digital Still Camera
DSC-HX95
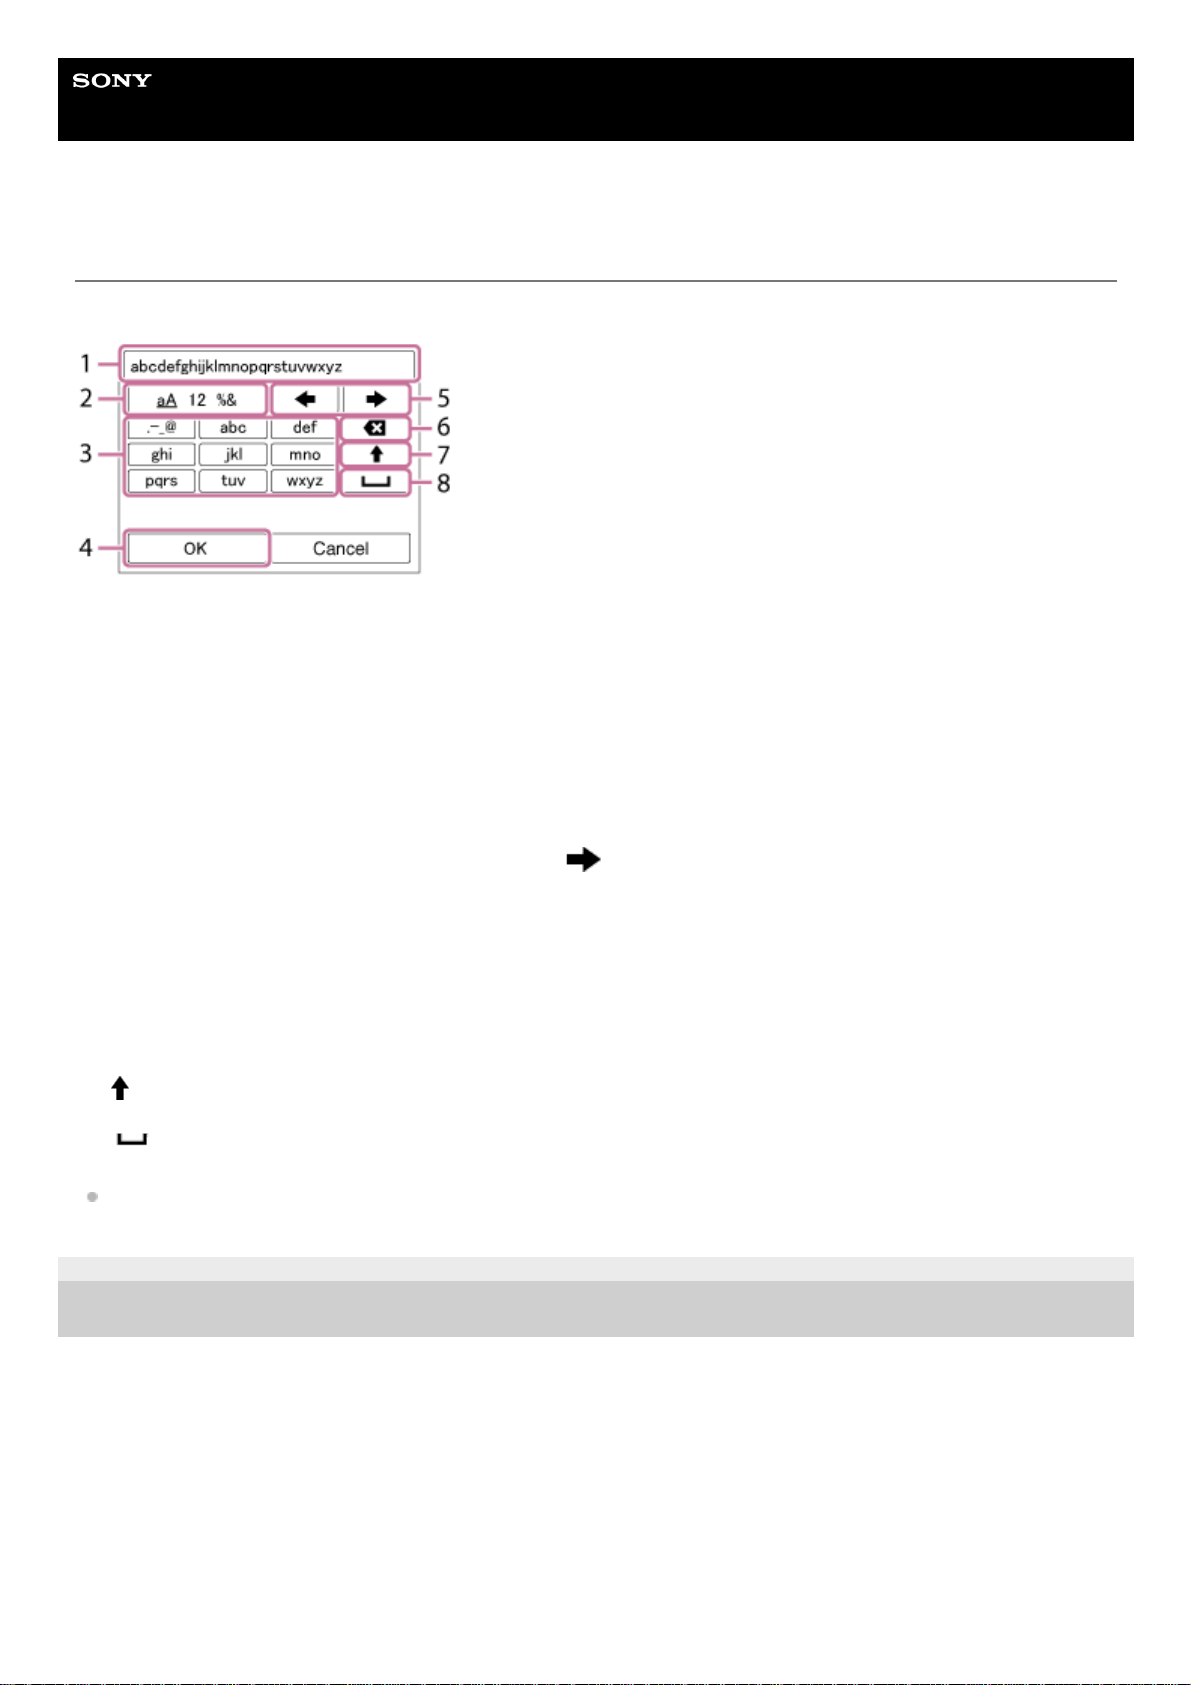
How to use the keyboard
When manual character entry is required, a keyboard is displayed on the screen.
Move the cursor on desired key using the control wheel, then press the center to enter.
To cancel input, select [Cancel].
4-745-581-11(1) Copyright 2018 Sony Corporation
Input box
The characters you entered are displayed.
1.
Switch character types
Each time you press this key, the character type will switch between alphabet letters, numerals and symbols.
2.
Keyboard
Each time you press this key, the characters corresponding to that key will be displayed one-by-one in order.
For example: If you want to enter “abd”
Press the key for “abc” once to display “a” → select “
”((5) Move cursor) and press the key for “abc” twice to
display “b” → press the key for “def” once to display “d.”
3.
Finalize
Finalizes the entered characters.
4.
Move cursor
Moves the cursor in the input box to the right or left.
5.
Delete
Deletes the character preceding the cursor.
6.
Switches the next character to a capital or lowercase letter.
7.
Enters a space.
8.
28
Page 29

Help Guide
Digital Still Camera
DSC-HX95
List of icons on the screen
The displayed contents and their positions shown below are just a guideline, and may differ from the actual display.
Icons on the shooting screen
Monitor mode
Viewfinder mode
Shooting mode/Scene recognition
P P* A S M
Shooting mode
Register number
Scene Recognition icons
Scene Selection
1.
Camera settings
NO CARD
Memory card status
100
Remaining number of recordable images
Writing data / Number of images left to write
Aspect ratio of still images
2.
29
Page 30

18M / 16M / 13M / 10M / 8.9M / 7.5M / 5.0M / 4.5M / 3.7M / 2.1M / VGA
Image size of still images
RAW
RAW recording
X.FINE FINE STD
JPEG Quality
XAVC S 4K XAVC S HD AVCHD
File format of movies
Record setting of movies
120p 100p 60p 50p 60i 50i 30p 25p 24p
Frame rate of movies
Proxy Recording
Flash charge in progress
AF Illuminator
SteadyShot Off/On, Camera shake warning
Smart Zoom/ Clear Image Zoom/Digital Zoom
PC Remote
Overlay icon
No audio recording of movies
Micref Level Low
Wind Noise Reduct.
NFC active
Bluetooth connection available / Bluetooth connection unavailable
Connected to smartphone / Not connected to smartphone
Obtaining location information / Location information cannot be obtained
Airplane Mode
Overheating warning
20 sec
Remaining recordable time when overheating warning is displayed
Database file full / Database file error
Battery
Remaining battery
Remaining battery warning
3.
30
Page 31

USB power supply
Shooting settings
Drive Mode
Flash Mode/Red Eye Reduction
±0.0
Flash Comp.
Focus Mode
Focus Area
JPEG RAW RAW+J
File Format
Metering Mode
7500K A5 G5
White Balance (Auto, Preset, Custom, Color temperature, Color filter)
D-Range Opt. /Auto HDR
+3 +3 +3
Creative Style /Contrast, saturation, and sharpness
Smile detection sensitivity indicator
Picture Effect
Face Priority in AF
Soft Skin Effect
4.
Focus indicator/exposure settings
Focus indicator
1/250
Shutter speed
F3.5
Aperture value
Exposure compensation/Metered Manual
ISO400
ISO AUTO
ISO sensitivity
AE lock
5.
Guides/other
Lock-on AF
6.
31
Page 32

Icons on the playback screen
Single-image playback
Histogram display
Lock-on AF Cancel
Guide display for Lock-on AF
Select Focus Point On/Off
Guide display for setting the focus area
Switch Av/Tv
Guide display for switching aperture value and shutter speed
Bracket indicator
Spot metering area
C:32:00
Self-diagnosis display
Exposure Setting Guide
Shutter speed indicator
Aperture indicator
Histogram
Digital level gauge
STBY REC
Movie recording standby/Movie recording in progress
0:12
Movie recording time (minutes: seconds)
Control wheel function
REC Control
00:00:00:00
Time code (hours: minutes: seconds: frames)
00 00 00 00
User Bit
32
Page 33

Basic information
View Mode
Rating
Protect
DPOF
DPOF set
Auto object framing image
3/7
File number/Number of images in the view mode
NFC active
Remaining battery
Continuous shooting group
Proxy movie included
1.
Camera settings
Refer to “Icons on the shooting screen.”
2.
Shooting settings
Picture Effect error
Auto HDR error
Refer to “Icons on the shooting screen” for other icons displayed in this area.
3.
Image information
Latitude/longitude information
2018-1-1 10:37PM
Date of recording
100-0003
Folder number - file number
Histogram (Luminance/R/G/B)
4.
33
Page 34

4-745-581-11(1) Copyright 2018 Sony Corporation
34
Page 35

Help Guide
Digital Still Camera
DSC-HX95
Switching the screen display (while shooting/during playback)
You can change the display contents on the screen.
Press the DISP (Display Setting) button.
To switch the information displayed on the viewfinder, press the DISP button while looking into the viewfinder.
Each time you press the DISP button, the screen display changes.
The displayed contents and their position are just a guideline, and may differ from the actual display.
During shooting (Monitor)
Display All Info. → No Disp. Info. → Histogram → Level → For viewfinder → Display All Info.
During shooting (Viewfinder)
Level → No Disp. Info. → Histogram → Level
During playback (Monitor/Viewfinder)
1
35
Page 36

Histogram display
A histogram shows the luminance distribution, displaying how many pixels there are by luminance. It shows darker
toward the left and brighter toward the right.
The histogram changes depending on the exposure compensation.
A peak at the right or left end of the histogram indicates that the image has an overexposed or underexposed area,
respectively. You cannot correct such defects using a computer after shooting. Perform exposure compensation before
shooting as necessary.
(A): Pixel count
(B): Brightness
Note
The viewfinder display and the monitor display for shooting can be set separately. Look through the viewfinder to set the display
settings for the viewfinder.
[Histogram] is not displayed during panorama shooting.
The information in the histogram display does not indicate the final photograph. It is information about image displayed on the
screen. The final result depends on the aperture value, etc.
The histogram display is extremely different between shooting and playback in the following cases:
When the flash is used
When shooting a low luminance subject such as a night scene
In movie mode, [For viewfinder] cannot be displayed.
Hint
Display Info. → Histogram → No Disp. Info. → Display Info.
If the image has an overexposed or underexposed area, the corresponding section will blink on the histogram
display (overexposed/underexposed warning).
The settings for playback are also applied in [Auto Review].
36
Page 37

The following are not displayed in the default settings.
Graphic Display
Monitor Off
Display All Info. (when using the viewfinder)
To change the display modes that are switched when you press the DISP button, select MENU →
(Camera Settings2) →
[DISP Button] and change the setting.
Related Topic
DISP Button (Monitor/Finder)
4-745-581-11(1) Copyright 2018 Sony Corporation
37
Page 38

Help Guide
Digital Still Camera
DSC-HX95
DISP Button (Monitor/Finder)
Allows you to set the screen display modes that can be selected using DISP (Display Setting) in shooting mode.
Menu item details
Graphic Display :
Shows basic shooting information. Graphically shows the shutter speed and aperture value.
Display All Info. :
Shows recording information.
No Disp. Info. :
Does not show recording information.
Histogram :
Displays the luminance distribution graphically.
Level :
Indicates whether the product is level in both the front-back (A) and horizontal (B) directions. When the product is level in
either direction, the indicator turns to green.
For viewfinder*:
Displays only shooting information on the monitor, not the subject. This setting is a display setting for shooting with the
viewfinder.
Monitor Off*:
Always turns the monitor off when shooting images. You can use the monitor when playing back images or operating
MENU. This setting is a display setting for shooting with the viewfinder.
Note
If you tilt the product forward or backward by a large degree, the level error will be great.
The product may have a margin of error of almost ±1° even when the inclination is corrected by the level.
MENU →
(Camera Settings2) → [DISP Button] → [Monitor] or [Finder] → desired setting → [Enter].
The items marked with
are available.
1
These screen modes are available only in the setting for [Monitor].
*
38
Page 39

Related Topic
Switching the screen display (while shooting/during playback)
4-745-581-11(1) Copyright 2018 Sony Corporation
39
Page 40

Help Guide
Digital Still Camera
DSC-HX95
Checking the camera and the supplied items
The number in parentheses indicates the number of pieces.
Camera (1)
Power cord (mains lead) (1)
(supplied in some countries/regions)
Rechargeable Battery Pack NP-BX1 (1)
Micro USB cable (1)
AC Adaptor (1)
The type of the AC Adaptor may differ depending on the country/region.
Wrist strap (1)
Startup Guide (1)
Reference Guide (1)
4-745-581-11(1) Copyright 2018 Sony Corporation
40
Page 41

Help Guide
Digital Still Camera
DSC-HX95
Inserting/removing the battery pack
Open the battery/memory card cover.
1
Insert the battery pack while pressing the lock lever (A) with the tip of the battery until the battery locks into
place.
2
Close the cover.
3
41
Page 42

To remove the battery pack
Make sure that the access lamp is not lit, and turn off the camera. Then, slide the lock lever (A) and remove the battery
pack. Be careful not to drop the battery pack.
4-745-581-11(1) Copyright 2018 Sony Corporation
42
Page 43

Help Guide
Digital Still Camera
DSC-HX95
Charging the battery pack while it is inserted in the camera
Note
If the charge lamp flashes when the battery pack is not fully charged, remove the battery pack or disconnect the USB cable from
the camera and then re-insert it to recharge.
If the charge lamp on the camera flashes when the AC Adaptor is connected to the wall outlet (wall socket), this indicates that
charging is temporarily stopped because the temperature is outside the recommended range. When the temperature gets back
within the appropriate range, the charging resumes. We recommend charging the battery pack at an ambient temperature of
between 10°C to 30°C (50ºF to 86ºF).
Use a nearby wall outlet (wall socket) when using the AC Adaptor/Battery Charger. If any malfunction occurs, disconnect the plug
from the wall outlet (wall socket) immediately to disconnect from the power source.
If you use the product with a charge lamp, note that the product is not disconnected from the power source even when the lamp
turns off.
If you turn on the camera, power will be supplied from the wall outlet (wall socket) and you will be able to operate the camera.
However, the battery pack will not be charged.
When you use a completely new battery pack or a battery pack that has not been used for a long time, the charge lamp may flash
quickly when the battery is charged. If this happens, remove the battery pack or disconnect the USB cable from the camera and
then re-insert it to recharge.
Do not continuously or repeatedly charge the battery pack without using it if it is already fully charged or close to fully charged.
Doing so may cause a deterioration in battery performance.
When charging is finished, disconnect the AC Adaptor from the wall outlet (wall socket).
Turn the power off.
1
Connect the camera with the battery pack inserted to the AC Adaptor (supplied) using the micro USB cable
(supplied), and connect the AC Adaptor to the wall outlet (wall socket).
Charge lamp on the camera (A) (orange)
Lit: Charging
Off: Charging finished
Flashing: Charging error or charging paused temporarily because the camera is not within the proper temperature
range
Charging time (Full charge): The charging time is approximately 230 min.
The above charging time applies when charging a fully depleted battery pack at a temperature of 25 °C (77 °F).
Charging may take longer depending on conditions of use and circumstances.
The charge lamp turns off when charging is completed.
If the charge lamp lights up and then immediately turns off, the battery pack is fully charged.
2
43
Page 44

Be sure to use only genuine Sony brand battery packs, micro USB cables (supplied) and AC Adaptors (supplied).
Related Topic
Notes on the battery pack
Notes on charging the battery pack
Using the AC Adaptor/battery charger abroad
4-745-581-11(1) Copyright 2018 Sony Corporation
44
Page 45

Help Guide
Digital Still Camera
DSC-HX95
Charging by connecting to a computer
The battery pack can be charged by connecting the camera to a computer using a micro USB cable.
Note
If the product is connected to a laptop computer that is not connected to a power source, the laptop battery level decreases. Do
not leave the product connected to a laptop computer for an extended period of time.
Do not turn on/off or restart the computer, or wake the computer from sleep mode when a USB connection has been established
between the computer and the camera. Doing so may cause a malfunction. Before turning on/off or restarting the computer, or
waking the computer from sleep mode, disconnect the camera from the computer.
Proper operation cannot be guaranteed on all types of computers.
Charging cannot be guaranteed with a custom-built computer, modified computer, or a computer connected through a USB hub.
The camera may not operate correctly when other USB devices are used at the same time.
Related Topic
Notes on the battery pack
Notes on charging the battery pack
4-745-581-11(1) Copyright 2018 Sony Corporation
Turn off the product, and connect to the USB terminal of the computer.
1
45
Page 46

Help Guide
Digital Still Camera
DSC-HX95
Battery life and number of recordable images
Note
The above estimates for battery life and number of recordable images apply when the battery pack has been fully charged. The
battery life and number of images may decrease depending on the conditions of use.
The battery life and number of recordable images are estimates based on shooting with the default settings under the following
conditions:
Using the battery pack at an ambient temperature of 25°C (77°F).
Using a Sony microSDXC memory card (UHS-I U3) (sold separately)
The numbers for “Shooting (still images)” are based on the CIPA standard and shooting under the following conditions:
(CIPA: Camera & Imaging Products Association)
One picture is taken every 30 seconds.
The power is turned on and off once every ten times.
The flash strobes once for every two pictures.
The zoom is switched alternately between the W and T ends.
The number of minutes for movie shooting is based on the CIPA standard and shooting under the following conditions:
The image quality is set to XAVC S HD 60p 50M /50p 50M.
Actual shooting (movies): Battery life based on repeated shooting, zooming, shooting stand-by, turning on/off, etc.
Continuous shooting (movies): Battery life based on non-stop shooting until the limit (29 minutes) has been reached, and then
continued by pressing the MOVIE (Movie) button again. Other functions, such as zooming, are not operated.
4-745-581-11(1) Copyright 2018 Sony Corporation
Battery life Number of images
Shooting (still images)
Screen mode —
Approx. 370
Approx. 460 (Auto Monitor OFF (2 Sec))
Viewfinder mode — Approx. 300
Actual shooting (movies)
Screen mode Approx. 55 min. —
Viewfinder mode Approx. 55 min. —
Continuous shooting (movies)
Screen mode Approx. 95 min. —
Viewfinder mode Approx. 100 min. —
46
Page 47

Help Guide
Digital Still Camera
DSC-HX95
Supplying power from a wall outlet (wall socket)
Use the supplied AC adaptor to shoot and play back images while power is supplied from a wall outlet (wall socket). This
conserves the camera's battery power.
Note
The camera will not activate if there is no remaining battery. Insert a sufficiently charged battery pack into the camera.
If you use the camera while power is being supplied from a wall outlet (wall socket), make sure that the icon that shows that
powering via USB is in progress (
) is displayed on the monitor.
Do not remove the battery pack while power is supplied from a wall outlet (wall socket). If you remove the battery pack, the
camera will be turned off.
Do not remove the battery pack while the access lamp is lit. The data in the memory card may be damaged.
As long as the power is on, the battery pack will not be charged even if the camera is connected to the AC Adaptor.
Under certain conditions, power may be supplied from the battery pack supplementarily even if you are using the AC adaptor.
Do not remove the Micro USB cable while power is supplied from a wall outlet (wall socket). Before you remove the Micro USB
cable, turn off the camera.
Depending on the camera and battery temperature, the continuous recording time may be shortened while power is supplied from
a wall outlet (wall socket).
When using a mobile charger as a power source, confirm that it is fully charged before use. Also, be careful of the remaining
power on the mobile charger during use.
4-745-581-11(1) Copyright 2018 Sony Corporation
Insert the battery pack into the camera.
1
Connect the camera to the wall outlet (wall socket) with a micro USB cable (supplied) and an AC adaptor
(supplied).
2
47
Page 48

Help Guide
Digital Still Camera
DSC-HX95
Notes on the battery pack
Notes on using the battery pack
Be sure to use only battery packs specified for this product.
The correct remaining battery indicator may not be displayed under some operating or environmental conditions.
Do not expose the battery pack to water. The battery pack is not water-resistant.
Do not leave the battery pack in extremely hot places, such as in a car or under direct sunlight.
Charging the battery pack
Charge the battery pack (supplied) before using the product for the first time.
The charged battery pack will discharge little by little even if you do not use it. Charge the battery pack each time
before you use the product so that you do not miss any opportunities to shoot images.
Do not charge battery packs except battery packs specified for this product. Doing so can result in leaks,
overheating, explosions, electric shocks, burns, or injuries.
If the charge lamp flashes when the battery pack is not fully charged, remove the battery pack or disconnect the USB
cable from the camera and then reinsert it to recharge.
We recommend charging the battery pack in an ambient temperature of between 10 °C and 30 °C (50 °F and 86 °F).
The battery pack may not be effectively charged in temperatures outside this range.
When you connect this product and a laptop computer that is not connected to a power source, the laptop’s battery
charge may decrease. Do not charge this product using the laptop computer for too long.
Do not turn on/restart a computer, wake a computer from sleep mode, or turn off a computer while this product is
connected to the computer via USB cable. Doing so may cause a malfunction of this product. Disconnect the product
and the computer before performing the above operations.
We do not guarantee charging if you are using a self-built or modified computer.
When charging is finished, disconnect the AC Adaptor from the wall outlet (wall socket) or disconnect the USB cable
from the camera. Not doing so may result in a shorter battery life.
Remaining battery indicator
The remaining battery indicator appears on the screen.
A: Battery level high
B: Battery exhausted
It takes about one minute for the correct remaining battery indicator to appear.
The correct remaining battery indicator may not be displayed under some operating or environmental conditions.
If you do not operate the product for a certain period of time while the power is on, the product turns off automatically
(Auto power-off function).
If the remaining battery indicator does not appear on the screen, press the DISP (Display Setting) button to display it.
Charging time (Full charge)
The charging time is approximately 230 minutes using the AC adaptor (supplied).
The above charging time applies when charging a fully depleted battery pack at a temperature of 25 °C (77 °F). Charging
may take longer depending on conditions of use and circumstances.
Effective use of the battery pack
48
Page 49

Battery performance decreases in low temperature environments. So in cold places, the operational time of the
battery pack is shorter. To ensure longer battery pack use, we recommend putting the battery pack in your pocket
close to your body to warm it up, and insert it in the product immediately before you start shooting. If there are any
metal objects such as keys in your pocket, be careful of causing a short-circuit.
The battery pack will run down quickly if you use the flash or continuous shooting function frequently, turn the power
on/off frequently, or set the monitor very bright.
We recommend preparing spare battery packs and taking trial shots before taking the actual shots.
If the battery terminal is dirty, you may not be able to turn on the product or the battery pack may not be properly
charged. In that case, clean the battery by lightly wiping off any dust using a soft cloth or a cotton swab.
How to store the battery pack
To maintain the battery pack’s function, charge the battery pack and then fully discharge it in the camera at least once a
year before storing it. Store the battery in a cool, dry place after removing it from the camera.
On battery life
The battery life is limited. If you use the same battery repeatedly, or use the same battery for a long period, the
battery capacity decreases gradually. If the available time of the battery is shortened significantly, it is probably time
to replace the battery pack with a new one.
The battery life varies according to how the battery pack is stored and the operating conditions and environment in
which each battery pack is used.
4-745-581-11(1) Copyright 2018 Sony Corporation
49
Page 50

Help Guide
Digital Still Camera
DSC-HX95
Notes on charging the battery pack
The supplied AC Adaptor is dedicated to this product. Do not connect with other electronic devices. Doing so may
cause a malfunction.
Make sure to use a genuine Sony AC Adaptor.
If the product's charge lamp flashes while charging, remove the battery pack being charged, and then insert the
same battery pack firmly back into the product. If the charge lamp flashes again, this may indicate a faulty battery or
that a battery pack other than the specified type has been inserted. Check that the battery pack is the specified type.
If the battery pack is the specified type, remove the battery pack, replace it with a new or different one and check that
the newly inserted battery is charging correctly. If the newly inserted battery is charging correctly, the previously
inserted battery may be faulty.
If the charge lamp flashes even if the AC Adaptor is connected to the product and the wall outlet (wall socket), this
indicates that charging has stopped temporarily and is on standby. Charging stops and enters standby status
automatically when the temperature is outside of the recommended operating temperature. When the temperature
returns to the appropriate range, charging resumes and the charge lamp lights up again. We recommend charging
the battery pack in an ambient temperature of between 10°C to 30°C (50°F to 86°F).
4-745-581-11(1) Copyright 2018 Sony Corporation
50
Page 51

Help Guide
Digital Still Camera
DSC-HX95
Inserting/removing a memory card
Explains how to insert a memory card (sold separately) to the product.
Open the battery/memory card cover.
1
Insert the memory card.
microSD memory card/microSDHC memory card/microSDXC memory card: Insert the card straight with the
terminal side facing the monitor side of the camera as illustrated (A).
Memory Stick Micro: Insert the card with the terminal side facing the lens side of the camera as illustrated (B).
2
Close the cover.
3
51
Page 52

Hint
When you use a memory card with the camera for the first time, it is recommended that you format the card on the camera for
more stable performance of the memory card.
To remove the memory card
Open the memory card cover and make sure that the access lamp (A) is not lit, then push in the memory card lightly
once to remove it.
Related Topic
Memory cards that can be used
Notes on memory card
Format
4-745-581-11(1) Copyright 2018 Sony Corporation
52
Page 53

Help Guide
Digital Still Camera
DSC-HX95
Memory cards that can be used
SD memory cards
Memory Stick media
Note
When an microSDHC memory card is used to record an XAVC S movie over extended periods of time, the recorded movies will
be divided into files 4 GB in size. The divided files can be handled as a single file by importing them to a computer using
PlayMemories Home.
Fully charge the battery pack before attempting to recover the database files on the memory card.
Related Topic
Notes on memory card
Number of recordable images
Recordable movie times
4-745-581-11(1) Copyright 2018 Sony Corporation
Recording format Supported memory card
Still image microSD/microSDHC/microSDXC card
AVCHD microSD/microSDHC/microSDXC card (Class 4 or faster, or U1 or faster)
XAVC S
4K 60Mbps*
HD 50Mbps or lower*
HD 60Mbps
microSDHC/microSDXC card (Class 10, or U1 or faster)
4K 100Mbps*
HD 100Mbps
microSDHC/microSDXC card (U3)
Including when recording proxy movies at the same time
*
Recording format Supported memory card
Still image
Memory Stick Micro (Mark2)
AVCHD
XAVC S
4K 60Mbps*
HD 50Mbps or lower*
HD 60Mbps
—
4K 100Mbps*
HD 100Mbps
Including when recording proxy movies at the same time
*
53
Page 54

Help Guide
Digital Still Camera
DSC-HX95
Notes on memory card
If you repeatedly shoot and delete images for a long time, fragmentation of data in a file in the memory card may
occur, and movie recording may be interrupted in the middle of shooting. If this happens, save your images to a
computer or other storage location, then execute [Format] using this camera.
Do not remove the battery pack or the memory card, disconnect the USB cable, or turn the camera off while the
access lamp is lit up. This may cause the data on the memory card to become damaged.
Be sure to back up the data for protection.
Not all memory cards are guaranteed to operate correctly.
Images recorded on an microSDXC memory card cannot be imported to or played on computers or AV devices that
are not compatible with exFAT when connected using a USB cable. Make sure that the device is compatible with
exFAT before connecting it to the camera. If you connect your camera to an incompatible device, you may be
prompted to format the card. Never format the card in response to this prompt, as doing so will erase all data on the
card. (exFAT is the file system used on microSDXC memory cards.)
Do not expose the memory card to water.
Do not strike, bend or drop the memory card.
Do not use or store the memory card under the following conditions:
High temperature locations such as in a car parked under the sun
Locations exposed to direct sunlight
Humid locations or locations with corrosive substances present
If the memory card is used near areas with strong magnetization, or used in locations subject to static electricity or
electrical noise, the data on the memory card may become damaged.
Do not touch the terminal section of the memory card with your hand or a metal object.
Do not leave the memory card within the reach of small children. They might accidentally swallow it.
Do not disassemble or modify the memory card.
The memory card may be hot just after it has been used for a long time. Be careful when you handle it.
Memory card formatted with a computer is not guaranteed to operate with the product. Format the memory card
using this product.
Data read/write speeds differ depending on the combination of the memory card and the equipment used.
Do not attach a label on the memory card itself nor on a memory card adaptor.
4-745-581-11(1) Copyright 2018 Sony Corporation
54
Page 55

Help Guide
Digital Still Camera
DSC-HX95
Setting language, date and time
The setting screen for language, date and time is displayed automatically when you turn on this product for the first time,
initialize this product or when the internal rechargeable backup battery has discharged.
On maintaining the date and time
This camera has an internal rechargeable battery for maintaining the date and time and other settings regardless of
whether the power is on or off, or whether the battery pack is charged or discharged.
To charge the internal rechargeable backup battery, insert a charged battery pack into the camera, and leave the product
for 24 hours or more with the power off.
If the clock resets every time the battery pack is charged, the internal rechargeable backup battery may be worn out.
Consult your service facility.
Hint
To set the date and time or geographic location again after the date and time setting is finished, select MENU →
(Setup) →
[Date/Time Setup] or [Area Setting].
Note
If the date and time setting is canceled halfway, the setting screen for the date and time appears every time you turn on the
camera.
Related Topic
Date/Time Setup
Turn on the camera.
The language setting screen will appear and then setting screen for date and time will appear.
1
Select your language, and then press the center of the control wheel.
2
Check that [Enter] is selected on the screen, then press the center.
3
Select your desired geographic location, and then press the center.
4
Select a setting item using the top/bottom side of the control wheel or by turning the control wheel, then
press the center.
5
Set [Daylight Savings], [Date/Time], and [Date Format] using the top/bottom/left/right sides, then press the
center.
Midnight is indicated as 12:00 AM, and noon as 12:00 PM when you set [Date/Time].
Change the values using the top/bottom when you set [Date/Time].
6
Repeat Steps 5 and 6 to set other items, then select [Enter] and press the center.
7
55
Page 56

Area Setting
Using the control wheel
4-745-581-11(1) Copyright 2018 Sony Corporation
56
Page 57

Help Guide
Digital Still Camera
DSC-HX95
In-Camera Guide
The [In-Camera Guide] displays descriptions of MENU items, Fn (Function) items, and settings.
Assign the [In-Camera Guide] function to the desired key in advance using [
Custom Key] or [ Custom Key].
Related Topic
Custom Key (still image/movie/playback)
4-745-581-11(1) Copyright 2018 Sony Corporation
MENU → (Camera Settings2) → [ Custom Key] or [ Custom Key] → desired key, then assign
the [In-Camera Guide] function to the key.
The [In-Camera Guide] function cannot be assigned to some keys.
1
Select the MENU or Fn item of which you want to see descriptions, then press the button to which the [InCamera Guide] function is assigned.
The descriptions of the item are displayed.
2
57
Page 58

Help Guide
Digital Still Camera
DSC-HX95
Shooting still images
To shoot images with the focus locked on the desired subject (Focus-lock)
Shoots images with the focus locked on the desired subject.
Select the desired shooting mode by turning the mode dial.
1
Adjust the monitor angle, and hold the camera. Or look through the viewfinder and hold the camera.
2
Enlarge images with the W/T (zoom) lever when shooting.
3
Press the shutter button halfway down to focus.
When the image is in focus, a beep sounds and the indicator (
) lights up.
The shortest shooting distance is approximately 5 cm (0.16 ft.) (W), 250 cm (8.20 ft.) (T) (from the lens).
4
Press the shutter button fully down.
5
Place the subject within the AF area and press the shutter button halfway down.1.
58
Page 59

Hint
When the product cannot focus automatically, the focus indicator flashes and the beep does not sound. Either recompose the
shot or change the focus setting.
An icon indicating that data is being written is displayed after shooting. Do not remove the memory card while the icon is
displayed.
Related Topic
List of mode dial function
Zoom
Playing back still images
Auto Review
Focus Area
4-745-581-11(1) Copyright 2018 Sony Corporation
The focus is locked.
If it is difficult to focus on the desired subject, set [Focus Area] to [Center] or [Flexible Spot].
Keep pressing the shutter button halfway down, and place the subject back in the original position to re-compose the
shot.
2.
Press the shutter button down fully to take the picture.3.
59
Page 60

Help Guide
Digital Still Camera
DSC-HX95
Focus Area
Selects the focusing area. Use this function when it is difficult to focus properly in the auto focus mode.
Menu item details
Wide :
Focuses on a subject covering the whole range of the screen automatically. When you press the shutter button halfway
down in the still image shooting mode, a green frame is displayed around the area that is in focus.
Center :
Focuses automatically on a subject in the center of the image. Use together with the focus-lock function to create the
composition you want.
Flexible Spot :
Allows you to move the focusing frame to a desired point on the screen and focus on an extremely small subject in a
narrow area.
On the Flexible Spot shooting screen, you can change the size of the focusing frame by turning the control wheel.
Expand Flexible Spot :
If the product cannot focus on a single selected point, it uses focus points around the flexible spot as a secondary priority
area for focusing.
To move the focus area
When [Focus Area] is set to [Flexible Spot] or [Expand Flexible Spot], if pressing the button to which [Focus
Standard] is assigned, you can shoot while moving the focusing frame using the top/bottom/left/right sides of the
control wheel. To return the focusing frame to the center of the monitor, press the C/
button while moving the
frame. To change the shooting settings using the control wheel, press the button to which [Focus Standard] is
assigned.
Note
[Focus Area] is locked to [Wide] in the following situations:
[Intelligent Auto]
[Superior Auto]
[Scene Selection]
During Smile Shutter mode
The focus area may not light up during continuous shooting or when the shutter button is pressed all the way down at once.
You cannot execute functions assigned to the control wheel or the custom button while moving the focusing frame.
4-745-581-11(1) Copyright 2018 Sony Corporation
MENU →
(Camera Settings1) → [Focus Area] → desired setting.
1
60
Page 61

Help Guide
Digital Still Camera
DSC-HX95
Focus Standard
If you assign [Focus Standard] to the desired custom key, you can recall useful functions such as moving the focusing
frame quickly, etc., depending on the focus area settings.
When [Focus Area] is set to [Flexible Spot] or [Expand Flexible Spot]:
Pressing the key moves the position of the focusing frame using the top/bottom/left/right sides of the control wheel.
When [Focus Area] is set to [Wide] or [Center]:
When [Center Lock-on AF] is set to [On], [Center Lock-on AF] is activated by pressing the key. The camera detects
the subject positioned in the center of the screen and starts tracking by pressing the center of the control wheel. If
you press the key while the subject is being tracked, tracking will be canceled.
Note
You cannot set the [Focus Standard] function to [Left Button] or [Right Button].
Related Topic
Custom Key (still image/movie/playback)
Focus Area
Center Lock-on AF
4-745-581-11(1) Copyright 2018 Sony Corporation
MENU → (Camera Settings2) → [ Custom Key] → desired key, then assign the [Focus Standard]
function to the key.
To use the [Focus Standard] function while shooting movies, select MENU →
(Camera Settings2) → [
Custom Key] → the desired button, and then assign [Focus Standard] to the key.
1
Press the key to which [Focus Standard] is assigned.
What you can do by pressing the key varies depending on the settings for [Focus Area] and [Center Lock-on
AF].
2
61
Page 62

Help Guide
Digital Still Camera
DSC-HX95
Eye AF
The camera focuses on the subject's eyes while you keep the button pressed.
Hint
When the camera focuses on the eyes, a detection frame is displayed over the eyes. The detection frame over the eyes turns into
the face detection frame after a certain period of time. However, [Eye AF] remains active. The camera continues tracking the
eyes unless the distance of the subject changes.
Note
Depending on the circumstances, the camera may not be able to focus on the eyes. In such cases, the camera detects a face
and focuses on the face.
If the camera cannot detect a person’s face, you cannot use [Eye AF].
The [Eye AF] function may not function very well in the following situations:
When the person is wearing sunglasses.
When the front hair covers the person’s eyes.
In low-light or back-lit conditions.
When the eyes are closed.
When the person is in the shade.
When the person is out of focus.
When the person is moving too much.
If the person is moving too much, the detection frame may not display correctly over their eyes.
When the mode dial is set to
(Movie), or during movie recording, [Eye AF] is unavailable.
Related Topic
Custom Key (still image/movie/playback)
Set. Face Prty in AF
4-745-581-11(1) Copyright 2018 Sony Corporation
MENU →
(Camera Settings2) → [ Custom Key] → desired key, then assign the [Eye AF] function to
the key.
1
Point the camera at a person's face, and press the button to which you have assigned the [Eye AF]
function.
2
Press the shutter button while pressing the button.
3
62
Page 63

Help Guide
Digital Still Camera
DSC-HX95
Set. Face Prty in AF
Sets whether the camera focuses on detected faces with higher priority in the auto-focus mode.
Menu item details
On:
The camera focuses on detected faces with higher priority.
Off:
The camera focuses without face detection.
Face Dtct Frame Dsp
Sets whether to display the face detection frame when [Face Priority in AF] is set to [On].
On:
Displays the face detection frame when [Face Priority in AF] is set to [On].
Off:
Does not display the face detection frame.
Face Detection frame
When the product detects a face, the gray face detection frame appears. When the product determines that
autofocus is enabled, the face detection frame turns white.
In case you have registered the priority order for each face using [Face Registration], the product automatically
selects the first prioritized face and the face detection frame over that face turns white. The face detection frames of
other registered faces turn reddish-purple.
Hint
When [Set. Face Prty in AF] is set to [On], a detection frame is displayed over the eyes when the camera focuses on eyes. The
frame displayed over the eyes will disappear after a period of time.
Note
You cannot use the face detection function with the following functions:
Other zoom functions than the optical zoom
[Sweep Panorama]
[Posterization] under [Picture Effect]
MENU →
(Camera Settings1) → [Set. Face Prty in AF] → [Face Priority in AF] → desired setting.
1
MENU →
(Camera Settings1) → [Set. Face Prty in AF] → [Face Dtct Frame Dsp] → desired setting.1.
63
Page 64

[Landscape], [Night Scene], [Sunset], [Pet], [Gourmet] or [Fireworks] under [Scene Selection]
Movie shooting with [
Record Setting] set to [120p]/[ 100p].
Up to 8 faces of your subjects can be detected.
Even if [Face Dtct Frame Dsp] is set to [Off], a green focusing frame will be displayed over faces that are in focus.
When the shooting mode is set to [Intelligent Auto] or [Superior Auto], [Face Priority in AF] is set to [On].
The product may not detect faces at all or may accidentally detect other objects as faces in some conditions.
Related Topic
Face Registration (New Registration)
Face Registration (Order Exchanging)
4-745-581-11(1) Copyright 2018 Sony Corporation
64
Page 65

Help Guide
Digital Still Camera
DSC-HX95
Center Lock-on AF
When you press the center of the control wheel, the camera detects the subject positioned in the center of the screen
and continues to track the subject.
Hint
If you assign the [Focus Standard] function to the key of your choice, you can activate [Center Lock-on AF] or detect a subject
again by pressing the key when [Focus Area] is set to [Wide] or [Center].
Note
The [Center Lock-on AF] function may not function very well in the following situations:
The subject is moving too quickly.
The subject is too small, or too large.
The contrast between the subject and the background is poor.
It is dark.
The ambient light changes.
Lock-on AF does not work in the following situations:
[Sweep Panorama]
When [Scene Selection] is set to [Hand-held Twilight], [Anti Motion Blur] or [Fireworks].
When using the digital zoom
When the shooting mode is set to Movie, and [
SteadyShot] is set to [Intelligent Active].
When shooting movies with [
Record Setting] set to [120p]/[100p]
Related Topic
Focus Standard
MENU →
(Camera Settings1) → [Center Lock-on AF] → [On].
1
Align the target frame (A) over the subject and press the center of the control wheel.
Press the center again to stop tracking.
2
Press the shutter button fully down to shoot the image.
3
65
Page 66

4-745-581-11(1) Copyright 2018 Sony Corporation
66
Page 67

Help Guide
Digital Still Camera
DSC-HX95
Pre-AF (still image)
The product automatically adjusts focus before you press the shutter button halfway down. During focusing operations,
the screen may shake.
Menu item details
On:
Adjusts focus before you press the shutter button halfway down.
Off:
Does not adjust focus before you press the shutter button halfway down.
4-745-581-11(1) Copyright 2018 Sony Corporation
MENU →
(Camera Settings1) → [ Pre-AF] → desired setting.
1
67
Page 68

Help Guide
Digital Still Camera
DSC-HX95
AF Illuminator (still image)
The AF illuminator supplies fill light to focus more easily on a subject in dark surroundings. In the time between pressing
the shutter button halfway down and locking the focus, the AF illuminator lights up to allow the camera to focus easily.
Menu item details
Auto:
The AF illuminator lights up automatically in dark surroundings.
Off:
Does not use the AF illuminator.
Note
You cannot use [
AF Illuminator] in the following situations:
In movie mode
Sweep Panorama
When [Scene Selection] is set to the following modes:
[Landscape]
[Night Scene]
[Pet]
[Fireworks]
The AF illuminator emits a very bright light. Although there is no health hazard, do not look directly into the AF illuminator at close
range.
4-745-581-11(1) Copyright 2018 Sony Corporation
MENU →
(Camera Settings1) → [ AF Illuminator] → desired setting.
1
68
Page 69

Help Guide
Digital Still Camera
DSC-HX95
Drive Mode
Select the appropriate mode for the subject, such as single shooting, continuous shooting or bracketing shooting.
Menu item details
Single Shooting:
Normal shooting mode.
Cont. Shooting:
Shoots images continuously while you press and hold down the shutter button.
Spd Priority Cont.:
Shoots images continuously at high speed while you press and hold down the shutter button.
Self-timer:
Shoots an image using the self-timer after a designated number of seconds have elapsed since the shutter button was
pressed.
Self-timer(Cont):
Shoots a designated number of images using the self-timer after a designated number of seconds have elapsed since
the shutter button was pressed.
Cont. Bracket:
Shoots images while holding the shutter button down, each with different degrees of exposure.
Single Bracket:
Shoots a specified number of images, one by one, each with a different degrees of exposure.
WB bracket:
Shoots a total of three images, each with different color tones according to the selected settings for white balance, color
temperature and color filter.
DRO Bracket:
Shoots a total of three images, each at a different degree of D-Range Optimizer.
Related Topic
Cont. Shooting
Spd Priority Cont.
Self-timer
Self-timer(Cont)
Cont. Bracket
Single Bracket
WB bracket
DRO Bracket
4-745-581-11(1) Copyright 2018 Sony Corporation
Select / (Drive Mode) on the control wheel → desired setting.
You can also set the drive mode by selecting MENU →
(Camera Settings1) → [Drive Mode].
1
Select the desired mode using the right/left side of the control wheel.
2
69
Page 70

Help Guide
Digital Still Camera
DSC-HX95
Cont. Shooting
Shoots images continuously while you press and hold down the shutter button.
Hint
The focus, exposure, and white balance are locked to their values in the first shot.
Note
Continuous shooting is unavailable in the following situations:
The shooting mode is set to [Sweep Panorama].
[Picture Effect] is set to one of the following: [Soft Focus] [HDR Painting] [Rich-tone Mono.] [Miniature] [Watercolor] [Illustration]
[DRO/Auto HDR] is set to [Auto HDR].
[ISO] is set to [Multi Frame NR].
[Smile Shutter] is being used.
4-745-581-11(1) Copyright 2018 Sony Corporation
Select / (Drive Mode) of the control wheel → [Cont. Shooting].
You can also set the continuous shooting by selecting MENU →
(Camera Settings1) → [Drive Mode].
1
70
Page 71

Help Guide
Digital Still Camera
DSC-HX95
Spd Priority Cont.
The product continues to shoot as long as the shutter button is pressed. You can continuously shoot at a rate faster than
that of [Cont. Shooting].
Note
Between continuous shooting frames, an image of each frame is immediately displayed.
Continuous shooting is unavailable in the following situations:
The shooting mode has been set to [Sweep Panorama].
The [Picture Effect] is set to [Soft Focus], [HDR Painting], [Rich-tone Mono.], [Miniature], [Watercolor], or [Illustration].
The [DRO/Auto HDR] is set to [Auto HDR].
[ISO] is set to [Multi Frame NR].
[Smile Shutter] is being used.
Hint
The focus, exposure, and white balance are locked to their values in the first shot.
4-745-581-11(1) Copyright 2018 Sony Corporation
Press / (Drive Mode) of the control wheel → [Spd Priority Cont.].
You can also set the drive mode by selecting MENU→
(Camera Settings1) → [Drive Mode].
1
71
Page 72

Help Guide
Digital Still Camera
DSC-HX95
Self-timer
Shoots an image using the self-timer after a designated number of seconds have elapsed since the shutter button was
pressed. Use the 5-second/10-second self-timer when you are going to be in the picture, and use the 2-second self-timer
to reduce camera-shake caused by pressing the shutter button.
Menu item details
The mode determines the number of seconds until a picture is taken after the shutter button is pressed.
Self-timer: 10 Sec
Self-timer: 5 Sec
Self-timer: 2 Sec
Hint
Press the shutter button again or press
/ on the control wheel to stop the count of the self-timer.
Press
/ on the control wheel and select (Single Shooting) to cancel the self-timer.
Set [Audio signals] to [Off] to turn off the beeping sound during the self-timer countdown.
To use the self-timer in bracket mode, select bracket mode under drive mode, then select MENU →
(Camera Settings1) →
[Bracket Settings] → [Selftimer during Brkt].
Note
The self-timer is unavailable in the following situations:
The shooting mode is set to [Sweep Panorama].
[Smile Shutter]
Related Topic
Audio signals
4-745-581-11(1) Copyright 2018 Sony Corporation
Press / (Drive Mode) of the control wheel → [Self-timer].
You can also set the drive mode by selecting MENU→
(Camera Settings1) → [Drive Mode].
1
Select the desired mode using the right/left side of the control wheel.
2
Adjust the focus and shoot the image.
The self-timer lamp flashes, a beep sounds, and a picture is taken after the designated number of seconds have
elapsed.
3
72
Page 73

Help Guide
Digital Still Camera
DSC-HX95
Self-timer(Cont)
Shoots a designated number of images using the self-timer after a designated number of seconds have elapsed since
the shutter button was pressed. You can choose the best from multiple shots.
Menu item details
For example, three images are shot when 10 seconds have elapsed after the shutter button is pressed when [Selftimer(Cont.): 10 Sec. 3 Img.] is selected.
Self-timer(Cont.): 10 Sec. 3 Img.
Self-timer(Cont.): 10 Sec. 5 Img.
Self-timer(Cont.): 5 Sec. 3 Img.
Self-timer(Cont.): 5 Sec. 5 Img.
Self-timer(Cont.): 2 Sec. 3 Img.
Self-timer(Cont.): 2 Sec. 5 Img.
Hint
Press the shutter button again or press
/ on the control wheel to stop the count of the self-timer.
Press
/ on the control wheel and select (Single Shooting) to cancel the self-timer.
4-745-581-11(1) Copyright 2018 Sony Corporation
Press / (Drive Mode) of the control wheel → [Self-timer(Cont)].
You can also set the drive mode by selecting MENU→
(Camera Settings1) → [Drive Mode].
1
Select the desired mode using the right/left side of the control wheel.
2
Adjust the focus and shoot the image.
The self-timer lamp flashes, a beep sounds, and pictures are taken after the designated number of seconds has
elapsed. The designated number of pictures are taken continuously.
3
73
Page 74

Help Guide
Digital Still Camera
DSC-HX95
Cont. Bracket
Shoots multiple images while automatically shifting the exposure from base to darker and then to lighter. You can select
an image that suits your purpose after recording.
Menu item details
For example, the camera shoots a total of three images continuously with an exposure value shifted by plus or minus 0.3
EV when [Cont. Bracket: 0.3EV 3 Image] is selected.
Note
The last shot is shown on the auto review.
When [ISO AUTO] is selected in [Manual Exposure] mode, the exposure is changed by adjusting the ISO value. If a setting other
than [ISO AUTO] is selected, the exposure is changed by adjusting the shutter speed.
When the exposure is compensated, the exposure is shifted based on the compensated value.
Bracket shooting is unavailable in the following shooting modes:
[Intelligent Auto]
[Superior Auto]
[Scene Selection]
[Sweep Panorama]
When the flash is used, the product performs flash bracket shooting, which shifts the amount of flash light even if [Cont. Bracket]
is selected. Press the shutter button for each image.
Related Topic
Bracket Settings
Indicator during bracket shooting
4-745-581-11(1) Copyright 2018 Sony Corporation
Press / (Drive Mode) of the control wheel → [Cont. Bracket].
You can also set the drive mode by selecting MENU→
(Camera Settings1) → [Drive Mode].
1
Select the desired mode using the right/left side of the control wheel.
2
Adjust the focus and shoot the image.
The base exposure is set at the first shot.
Keep pressing and holding the shutter button until bracket shooting is finished.
3
74
Page 75

Help Guide
Digital Still Camera
DSC-HX95
Single Bracket
Shoots multiple images while automatically shifting the exposure from base to darker and then to lighter. You can select
the image that suits your purpose after recording.
Since a single picture is taken each time you press the shutter button, you can adjust the focus or the composition for
each shot.
Menu item details
For example, when [Single Bracket: 0.3EV 3 Image] is selected, three images are shot one at a time with the exposure
value shifted up and down in increments of 0.3 EV.
Note
When [ISO AUTO] is selected in [Manual Exposure] mode, the exposure is changed by adjusting the ISO value. If a setting other
than [ISO AUTO] is selected, the exposure is changed by adjusting the shutter speed.
When the exposure is compensated, the exposure is shifted based on the compensated value.
Bracket shooting is unavailable in the following shooting modes:
[Intelligent Auto]
[Superior Auto]
[Scene Selection]
[Sweep Panorama]
Related Topic
Bracket Settings
Indicator during bracket shooting
4-745-581-11(1) Copyright 2018 Sony Corporation
Select / (Drive Mode) of the control wheel → [Single Bracket].
You can also set the drive mode by selecting MENU →
(Camera Settings1) → [Drive Mode].
1
Select the desired mode using the right/left side of the control wheel.
2
Adjust the focus and shoot the image.
Press the shutter button for each image.
3
75
Page 76

Help Guide
Digital Still Camera
DSC-HX95
Indicator during bracket shooting
Viewfinder
Ambient light* bracketing
3 images shifted by 0.3 EV steps
Exposure compensation ±0.0 EV
Monitor (Display All Info. or Histogram)
Ambient light* bracketing
3 images shifted by 0.3 EV steps
Exposure compensation ±0.0 EV
Flash bracketing
3 images shifted by 0.7 EV steps
Flash compensation -1.0 EV
Monitor (For viewfinder)
Ambient light* bracketing (upper indicator)
3 images shifted by 0.3 EV steps
Exposure compensation ±0.0 EV
Flash bracketing (lower indicator)
3 images shifted by 0.7 EV steps
Flash compensation -1.0 EV
Note
During bracket shooting, guides equal to the number of images to be shot are displayed over/under the bracket indicator.
When you start single bracket shooting, the guides will disappear one by one as the camera records images.
4-745-581-11(1) Copyright 2018 Sony Corporation
Ambient light: A generic term for non-flash light including natural light, electric bulb and fluorescent lighting. Whereas the flash light blinks for a
moment, ambient light is constant, so this kind of light is called "ambient light."
*
76
Page 77

77
Page 78

Help Guide
Digital Still Camera
DSC-HX95
WB bracket
Shoots a total of three images, each with different color tones according to the selected settings for white balance, color
temperature and color filter.
Menu item details
White Balance Bracket: Lo:
Records a series of three images with small changes in the white balance (within the range of 10MK
-1*
).
White Balance Bracket: Hi:
Records a series of three images with large changes in the white balance (within the range of 20MK
-1*
).
*
MK-1 is the unit that indicates the capability of color temperature conversion filters and indicates the same value as
"mired."
Note
The last shot is shown on the auto review.
Related Topic
Bracket Settings
4-745-581-11(1) Copyright 2018 Sony Corporation
Select / (Drive Mode) of the control wheel → [WB bracket].
You can also set the drive mode by selecting MENU→
(Camera Settings1) → [Drive Mode].
1
Select the desired mode using the right/left side of the control wheel.
2
Adjust the focus and shoot the image.
3
78
Page 79

Help Guide
Digital Still Camera
DSC-HX95
DRO Bracket
You can record a total of three images, each at a different degree of D-Range Optimizer value.
Menu item details
DRO Bracket: Lo:
Records a series of three images with small changes in the D-Range Optimizer value (Lv 1, Lv 2, and Lv 3).
DRO Bracket: Hi:
Records a series of three images with large changes in the D-Range Optimizer value (Lv 1, Lv 3, and Lv 5).
Note
The last shot is shown on the auto review.
Related Topic
Bracket Settings
4-745-581-11(1) Copyright 2018 Sony Corporation
Select / (Drive Mode) of the control wheel → [DRO Bracket].
You can also set the drive mode by selecting MENU→
(Camera Settings1) → [Drive Mode].
1
Select the desired mode using the right/left side of the control wheel.
2
Adjust the focus and shoot the image.
3
79
Page 80

Help Guide
Digital Still Camera
DSC-HX95
Bracket Settings
You can set the self-timer in bracket shooting mode, and the shooting order for exposure bracketing and white balance
bracketing.
Menu item details
Selftimer during Brkt:
Sets whether to use the self-timer during bracket shooting. Also sets the number of seconds until the shutter is released
if using the self-timer.
(OFF/2 Sec/5 Sec/10 Sec)
Bracket order:
Sets the order of exposure bracketing and white balance bracketing.
(0→-→+/-→0→+)
Related Topic
Cont. Bracket
Single Bracket
WB bracket
DRO Bracket
4-745-581-11(1) Copyright 2018 Sony Corporation
Select / (Drive Mode) of the control wheel → select bracket shooting mode.
You can also set the drive mode by selecting MENU →
(Camera Settings1) → [Drive Mode].
1
MENU →
(Camera Settings1) → [Bracket Settings] → desired setting.
2
80
Page 81

Help Guide
Digital Still Camera
DSC-HX95
Self-portrait/ -timer
You can change the angle of the monitor and shoot images while watching the monitor.
Hint
If you want to use another Drive Mode than the 3-second self-timer mode, first set [Self-portrait/ -timer] to [Off], then tilt the
monitor upward approx. 180 degrees.
4-745-581-11(1) Copyright 2018 Sony Corporation
MENU →
(Camera Settings1) → [Self-portrait/ -timer] → [On].
1
Tilt the monitor approximately 180° upward, and then point the lens at yourself.
2
Press the shutter button.
The product starts the self-timer shooting after three seconds.
3
81
Page 82

Help Guide
Digital Still Camera
DSC-HX95
JPEG Image Size (still image)
The larger the image size, the more detail will be reproduced when the image is printed on large-format paper. The
smaller the image size, the more images can be recorded.
Menu item details
Note
When [
File Format] is set to [RAW] or [RAW & JPEG], the image size for RAW images corresponds to “L.”
Related Topic
Aspect Ratio (still image)
MENU →
(Camera Settings1) → [ JPEG Image Size] → desired setting.
1
When [ Aspect Ratio] is set to 3:2
L: 16M 4896×3264 pixels
M: 8.9M 3648×2432 pixels
S: 4.5M 2592×1728 pixels
When [ Aspect Ratio] is set to 4:3
L: 18M 4896×3672 pixels
M: 10M 3648×2736 pixels
S: 5.0M 2592×1944 pixels
VGA 640×480 pixels
When [ Aspect Ratio] is set to 16:9
L: 13M 4896×2752 pixels
M: 7.5M 3648×2056 pixels
S: 2.1M 1920×1080 pixels
When [ Aspect Ratio] is set to 1:1
L: 13M 3664×3664 pixels
M: 7.5M 2736×2736 pixels
S: 3.7M 1920×1920 pixels
82
Page 83

4-745-581-11(1) Copyright 2018 Sony Corporation
83
Page 84

Help Guide
Digital Still Camera
DSC-HX95
JPEG Quality (still image)
Selects the JPEG image quality when [
File Format] is set to [RAW & JPEG] or [JPEG].
Menu item details
Extra fine/Fine/Standard:
Since the compression rate increases from [Extra fine] to [Fine] to [Standard], the file size decreases in the same order.
This allows more files to be recorded on one memory card, but the image quality is lower.
Related Topic
File Format (still image)
4-745-581-11(1) Copyright 2018 Sony Corporation
MENU →
(Camera Settings1) → [ JPEG Quality] → desired setting.
1
84
Page 85

Help Guide
Digital Still Camera
DSC-HX95
Aspect Ratio (still image)
Menu item details
3:2:
Same aspect ratio as 35 mm plate film
4:3:
An aspect ratio suitable for viewing on a TV that does not support high definition
16:9:
An aspect ratio suitable for viewing on a TV that supports high definition
1:1:
The horizontal and vertical ratio is equal.
4-745-581-11(1) Copyright 2018 Sony Corporation
MENU →
(Camera Settings1) → [ Aspect Ratio] → desired setting.
1
85
Page 86

Help Guide
Digital Still Camera
DSC-HX95
File Format (still image)
Sets the file format for still images.
Menu item details
RAW:
Digital processing is not performed on this file format. Select this format to process images on a computer for
professional purposes.
RAW & JPEG:
A RAW image and a JPEG image are created at the same time. This is suitable when you need two image files, a JPEG
for viewing, and a RAW for editing.
JPEG:
The image is recorded in the JPEG format.
About RAW images
To open a RAW image file recorded with this camera, the software Imaging Edge is needed. With Imaging Edge, you
can open a RAW image file, then convert it into a popular image format such as JPEG or TIFF, or readjust the white
balance, saturation or contrast of the image.
You cannot apply [Auto HDR] or [Picture Effect] functions with RAW images.
RAW images shot by the camera are recorded in the compressed RAW format.
Note
If you do not intend to edit the images on your computer, we recommend that you record in JPEG format.
You cannot add DPOF (print order) registration marks to RAW images.
Related Topic
JPEG Image Size (still image)
4-745-581-11(1) Copyright 2018 Sony Corporation
MENU →
(Camera Settings1) → [ File Format] → desired setting.
1
86
Page 87

Help Guide
Digital Still Camera
DSC-HX95
Panorama: Size
Sets the image size when shooting panoramic images. The image size varies depending on the [Panorama: Direction]
setting.
Menu item details
When [Panorama: Direction] is set to [Up] or [Down]
Standard: 3872×2160
Wide: 5536×2160
When [Panorama: Direction] is set to [Left] or [Right]
Standard: 8192×1856
Wide: 12416×1856
Related Topic
Sweep Panorama
Panorama: Direction
4-745-581-11(1) Copyright 2018 Sony Corporation
MENU →
(Camera Settings1) → [Panorama: Size] → desired setting.
1
87
Page 88

Help Guide
Digital Still Camera
DSC-HX95
Panorama: Direction
Sets the direction to pan the camera when shooting panoramic images.
Menu item details
Right:
Pan the camera from the left to the right.
Left:
Pan the camera from the right to the left.
Up:
Pan the camera from the bottom to the top.
Down:
Pan the camera from the top to the bottom.
Related Topic
Sweep Panorama
4-745-581-11(1) Copyright 2018 Sony Corporation
MENU →
(Camera Settings1) → [Panorama: Direction] → desired setting.
1
88
Page 89

Help Guide
Digital Still Camera
DSC-HX95
List of mode dial function
You can switch the shooting mode according to the subject or purpose of shooting.
Available functions
(Auto Mode):
Allows you to shoot still images of any subject under any condition with good results by setting the values determined
appropriate by the product.
P (Program Auto):
Allows you to shoot with the exposure adjusted automatically (both the shutter speed and the aperture value (F value)).
Also you can select various settings using the menu.
A (Aperture Priority):
Allows you to adjust the aperture and shoot when you want to blur the background, etc.
S (Shutter Priority):
Allows you to shoot fast-moving subjects etc., by manually adjusting the shutter speed.
M (Manual Exposure):
Allows you to shoot still images with the desired exposure by adjusting the exposure (both the shutter speed and the
aperture value (F value)).
1/2(Memory recall):
Allows you to shoot an image after recalling often-used modes or numeric settings registered in advance.
(Movie):
Allows you to change the exposure mode for movie recording.
(Sweep Panorama):
Allows you to shoot a panoramic image by compositing the images.
SCN (Scene Selection):
Allows you to shoot with preset settings according to the scene.
Related Topic
Intelligent Auto
Superior Auto
Program Auto
Aperture Priority
Shutter Priority
Turn the mode dial to select the desired shooting mode.
1
89
Page 90

Manual Exposure
Recall (Camera Settings1/Camera Settings2)
Movie: Exposure Mode
Sweep Panorama
Scene Selection
4-745-581-11(1) Copyright 2018 Sony Corporation
90
Page 91

Help Guide
Digital Still Camera
DSC-HX95
Intelligent Auto
The camera shoots with automatic scene recognition.
Note
The product will not recognize the scene when you shoot images with zoom functions other than optical zoom.
The product may not properly recognize the scene under certain shooting conditions.
For [Intelligent Auto] mode, most of the functions are set automatically, and you cannot adjust the settings on your own.
Related Topic
Switching the auto mode (Auto Mode)
About Scene Recognition
Mode Dial Guide
4-745-581-11(1) Copyright 2018 Sony Corporation
Set the mode dial to
(Auto Mode).
1
MENU→
(Camera Settings1)→[Auto Mode]→[Intelligent Auto].
2
Point the camera at the subject.
When the camera recognized the scene, the icon for the recognized scene appears on the screen.
3
Adjust the focus and shoot the image.
4
91
Page 92

Help Guide
Digital Still Camera
DSC-HX95
Superior Auto
The camera shoots with automatic scene recognition. This mode takes clear images of dark or backlit scenes.
For low-lit or backlit scenes, if necessary the camera may shoot multiple images and create a composite image, etc., to
record higher quality images than in Intelligent Auto mode.
Note
When the product is used to create composite images, the recording process takes longer than usual. In this case, the
(overlay icon) is displayed and the shutter sound is heard multiple times, but only one image is recorded.
When the
(overlay icon) is displayed, be sure not to move the camera before the multiple shots are recorded.
The product will not recognize the scene when you use zoom functions other than optical zoom.
The product may not properly recognize a scene under some shooting conditions.
When [
File Format] is set to [RAW] or [RAW & JPEG], the product cannot create a composite image.
For [Superior Auto] mode, most of the functions are set automatically, and you cannot adjust the settings on your own.
Related Topic
Switching the auto mode (Auto Mode)
Mode Dial Guide
About Scene Recognition
Set the mode dial to
(Auto Mode).
1
MENU →
(Camera Settings1) → [Auto Mode] → [Superior Auto].
2
Point the camera to the subject.
When the camera recognizes a scene, scene recognition icon appears on the screen. If necessary,
(overlay
icon) may appear.
3
Adjust the focus and shoot the image.
4
92
Page 93

4-745-581-11(1) Copyright 2018 Sony Corporation
93
Page 94

Help Guide
Digital Still Camera
DSC-HX95
Switching the auto mode (Auto Mode)
This camera is equipped with the following two automatic shooting modes: [Intelligent Auto] and [Superior Auto]. You can
switch the auto mode to shoot according to the subject and your preferences.
Menu item details
Intelligent Auto:
Allows you to shoot with automatic scene recognition.
Superior Auto:
Allows you to shoot with automatic scene recognition. This mode takes clear images of dark or backlit scenes.
Note
In [Superior Auto] mode, the recording process takes longer, since the product creates a composite image. In this case, the
(overlay icon) is displayed and the shutter sound is heard multiple times, but only one image is recorded.
In [Superior Auto] mode and when the
(overlay icon) is displayed, be sure not to move the camera before the multiple shots
are recorded.
For [Intelligent Auto] and [Superior Auto] mode, most of the functions are set automatically, and you cannot adjust the settings on
your own.
Related Topic
Intelligent Auto
Superior Auto
Program Auto
4-745-581-11(1) Copyright 2018 Sony Corporation
Set the mode dial to
.
1
MENU →
(Camera Settings1) → [Auto Mode] → desired setting.
2
94
Page 95

Help Guide
Digital Still Camera
DSC-HX95
About Scene Recognition
Scene Recognition operates in [Intelligent Auto] mode and [Superior Auto] mode.
This function allows the product to automatically recognize the shooting conditions and shoot the image.
Scene Recognition
When the product recognizes certain scenes, the following icons and guides are displayed on the first line:
(Portrait)
(Infant)
(Night Portrait)
(Night Scene)
(Backlight Portrait)
(Backlight)
(Landscape)
(Macro)
(Spotlight)
(Low Light)
When the product recognizes certain conditions, the following icons are displayed on the second line:
(Tripod)
(Walk)
*
(Move)
(Move (Bright))
(Move (Dark))
* The condition
(Walk) is recognized only when [ SteadyShot] is set to [Active] or [Intelligent Active].
Related Topic
Intelligent Auto
Superior Auto
4-745-581-11(1) Copyright 2018 Sony Corporation
95
Page 96

Help Guide
Digital Still Camera
DSC-HX95
Program Auto
Allows you to shoot with the exposure adjusted automatically (both the shutter speed and the aperture value).
You can set shooting functions such as [ISO].
Program Shift
When you are not using a flash, you can change the shutter speed and aperture (F-value) combination without changing
the appropriate exposure set by the camera.
Turn the control wheel to select the aperture value and shutter speed combination.
“P” on the screen changes to “P*” when you turn the control wheel.
To cancel program shift, set the shooting mode to other than [Program Auto], or turn off the camera.
Note
According to the brightness of the environment, the program shift may not be used.
Set the shooting mode to another one than “P” or turn off the power to cancel the setting you made.
When the brightness changes, the aperture (F-value) and shutter speed also change while maintaining the shift amount.
Related Topic
Switching the auto mode (Auto Mode)
4-745-581-11(1) Copyright 2018 Sony Corporation
Set the mode dial to P (Program Auto).
1
Set the shooting functions to your desired settings.
2
Adjust the focus and shoot the subject.
3
96
Page 97

Help Guide
Digital Still Camera
DSC-HX95
Aperture Priority
You can shoot by adjusting the aperture and changing the range in focus, or by defocusing the background.
Note
The brightness of the image on the screen may differ from the actual image being shot.
4-745-581-11(1) Copyright 2018 Sony Corporation
Set the mode dial to A (Aperture Priority).
1
Select the desired value by turning the control wheel.
Smaller F-value: The subject is in focus, but objects in front of and beyond the subject are blurred.
Larger F-value: The subject and its foreground and background are all in focus.
If the aperture value you have set is not suitable for appropriate exposure, the shutter speed on the shooting
screen will blink. If this happens, change the aperture value.
2
Adjust the focus and shoot the subject.
The shutter speed is automatically adjusted to obtain proper exposure.
3
97
Page 98

Help Guide
Digital Still Camera
DSC-HX95
Shutter Priority
You can express the movement of a moving subject in various ways by adjusting the shutter speed, for example, at the
instant of the movement with high speed shutter, or as a trailing image with low speed shutter.
Hint
Use a tripod to prevent camera-shake when you have selected a slow shutter speed.
When you shoot indoor sports scenes, set the ISO sensitivity to a higher value.
Note
The SteadyShot warning indicator does not appear in shutter speed priority mode.
When the shutter speed is 1/3 second(s) or longer, noise reduction will be done after shooting for the same amount of time that
the shutter was open. However, you cannot shoot any more while noise reduction is in progress.
The brightness of the image on the screen may differ from the actual image being shot.
4-745-581-11(1) Copyright 2018 Sony Corporation
Set the mode dial to S (Shutter Priority).
1
Select the desired value by turning the control wheel.
If proper exposure cannot be obtained after setup, the aperture value on the shooting screen blinks. If this
happens, change the shutter speed.
2
Adjust the focus and shoot the subject.
The aperture is automatically adjusted to obtain proper exposure.
3
98
Page 99

Help Guide
Digital Still Camera
DSC-HX95
Manual Exposure
You can shoot with the desired exposure setting by adjusting both the shutter speed and aperture.
Hint
By assigning [AEL hold] or [AEL toggle] to a desired key using [
Custom Key] or [ Custom Key] and turning the control
wheel while pressing that key, you can change the shutter speed and aperture (F-value) combination without changing the set
exposure value. (Manual shift)
Note
The Metered Manual indicator does not appear when [ISO] is set to [ISO AUTO].
When the amount of ambient light exceeds the metering range of the Metered Manual, the Metered Manual indicator flashes.
The SteadyShot warning indicator does not appear in manual exposure mode.
The brightness of the image on the screen may differ from the actual image being shot.
4-745-581-11(1) Copyright 2018 Sony Corporation
Set the mode dial to M (Manual Exposure).
1
Press the down side of the control wheel to select the shutter speed or aperture value, then turn the control
wheel to select a value.
You can also set [ISO] to [ISO AUTO] in manual exposure mode. The ISO value automatically changes to
achieve the appropriate exposure using the aperture value and shutter speed you have set.
When [ISO] is set to [ISO AUTO], the ISO value indicator will blink if the value you have set is not suitable for
appropriate exposure. If this happens, change the shutter speed or aperture value.
When [ISO] is set to other than [ISO AUTO], use MM (Metered Manual)* to check the exposure value.
Toward +: Images become brighter.
Toward -: Images become darker.
0: Appropriate exposure analyzed by the product.
2
Indicates under/over for appropriate exposure.
*
It is displayed using a numerical value on the monitor and with a metering indicator on the viewfinder.
Adjust the focus and shoot the subject.
3
99
Page 100

Help Guide
Digital Still Camera
DSC-HX95
Sweep Panorama
Allows you to create a single panoramic image from multiple images shot while panning the camera.
Set the mode dial to (Sweep Panorama).
1
Point the camera at the subject.
2
While pressing the shutter button halfway down, aim the camera at one end of the desired panoramic
composition.
You can change the shooting direction prior to shooting using the control wheel.
(A) This part will not be shot.
3
Press the shutter button fully down.
4
Pan the camera to the end of the guide in the direction of the arrow on the monitor.
5
100
 Loading...