

Page 1
4-529-918-41(1)
Digital Still Camera / Instruction Manual GB
Цифровой фотоаппарат / Инструкция по эксплуатации
Цифровий фотоапарат / Посібник з експлуатації UA
RU
DSC-HX60/HX60V
Page 2
English
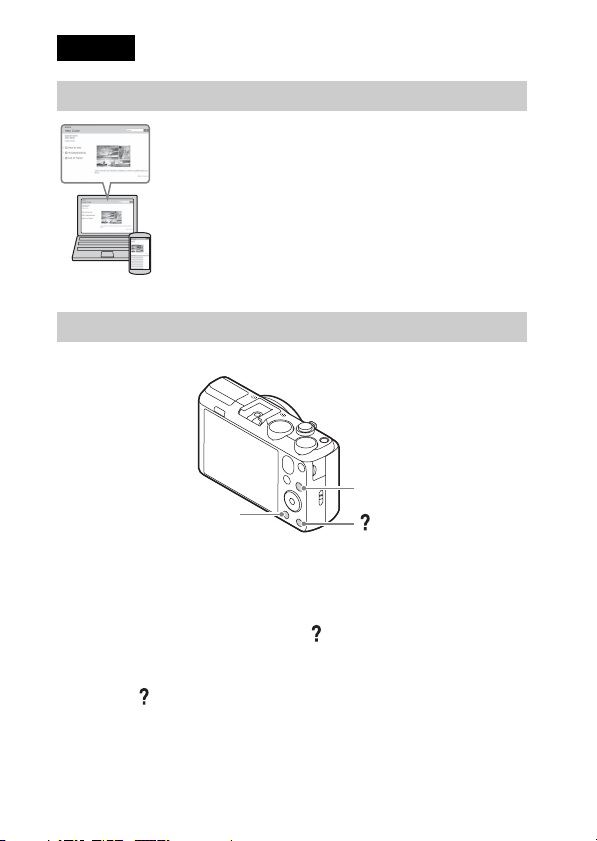
Learning more about the camera (“Help Guide”)
“Help Guide” is an on-line manual. Refer to it for in-depth
instructions on the many functions of the camera.
1 Access the Sony support page.
http://www.sony.net/SonyInfo/Support/
2 Select your country or region.
3 Search for the model name of your camera within the
support page.
• Check the model name on the bottom of your camera.
Viewing the Guide
This camera is equipped with a built-in instruction guide.
Fn (Function)
MENU
In-Camera Guide
The camera displays explanations for MENU/Fn (Function) items and the
setting values.
1 Press the MENU button or the Fn (Function) button.
2 Select the desired item, then press the (In-Camera Guide) button.
Shooting Tip
The camera displays shooting tips for the shooting mode selected.
1 Press the (In-Camera Guide) button in shooting mode.
2 Select the desired shooting tip, then press z on the control wheel.
The shooting tip is displayed.
• You can scroll the screen using v/V and change shooting tips using b/B.
GB
(In-Camera Guide)
2
Page 3

Owner’s Record
The model and serial numbers are located on the bottom. Record the serial number in the
space provided below. Refer to these numbers whenever you call your Sony dealer
regarding this product.
Model No. DSC-HX60/DSC-HX60V
Serial No. _____________________________
Model No. AC-UB10C/AC-UB10D
Serial No. _____________________________
WARNING
To reduce fire or shock hazard, do not expose the unit to rain or
moisture.
IMPORTANT SAFETY INSTRUCTIONS
-SAVE THESE INSTRUCTIONS
DANGER
TO REDUCE THE RISK OF FIRE OR ELECTRIC
SHOCK, CAREFULLY FOLLOW THESE
INSTRUCTIONS
If the shape of the plug does not fit the power outlet, use an attachment plug adaptor of the
proper configuration for the power outlet.
CAUTION
[ Battery pack
If the battery pack is mishandled, the battery pack can burst, cause a fire or even chemical
burns. Observe the following cautions.
• Do not disassemble.
• Do not crush and do not expose the battery pack to any shock or force such as
hammering, dropping or stepping on it.
• Do not short circuit and do not allow metal objects to come into contact with the battery
terminals.
• Do not expose to high temperature above 60°C (140°F) such as in direct sunlight or in a
car parked in the sun.
• Do not incinerate or dispose of in fire.
• Do not handle damaged or leaking lithium ion batteries.
GB
GB
3
Page 4

• Be sure to charge the battery pack using a genuine Sony battery charger or a device that
can charge the battery pack.
• Keep the battery pack out of the reach of small children.
• Keep the battery pack dry.
• Replace only with the same or equivalent type recommended by Sony.
• Dispose of used battery packs promptly as described in the instructions.
[ AC Adaptor
Use the nearby wall outlet (wall socket) when using the AC Adaptor. Disconnect the AC
Adaptor from the wall outlet (wall socket) immediately if any malfunction occurs while
using the apparatus.
For Customers in the U.S.A. and Canada
[ RECYCLING LITHIUM-ION BATTERIES
Lithium-Ion batteries are recyclable.
You can help preserve our environment by returning your used
rechargeable batteries to the collection and recycling location nearest
you.
For more information regarding recycling of rechargeable batteries,
call toll free
1-800-822-8837, or visit http://www.call2recycle.org/
Caution: Do not handle damaged or leaking Lithium-Ion batteries.
[ Battery pack
This device complies with Part 15 of the FCC Rules. Operatio n is subject to the following
two conditions:
(1) This device may not cause harmful interference, and (2) this device must accept any
interference received, including interference that may cause undesired operation.
CAN ICES-3 B/NMB-3 B
This equipment complies with FCC/IC radiation exposure limits set forth for an
uncontrolled environment and meets the FCC radio frequency (RF) Exposure Guidelines
in Supplement C to OET65 and RSS-102 of the IC radio frequency (RF) Exposure rules.
This equipment has very low levels of RF energy that are deemed to comply without
testing of specific absorption ratio (SAR).
GB
4
Page 5

For Customers in the U.S.A.
If you have any questions about this product, you may call:
Sony Customer Information Center
1-800-222-SONY (7669)
The number below is for the FCC related matters only.
[ Regulatory Information
Declaration of Conformity
Trade Name: SONY
Model No.: DSC-HX60V
Responsible Party: Sony Electronics Inc.
Address: 16530 Via Esprillo,
Telephone No.: 858-942-2230
This device complies with Part15 of the FCC Rules. Operation is subject to the
following two conditions: (1) This device may not cause harmful interference, and (2)
this device must accept any interference received, including interference that may cause
undesired operation.
This equipment must not be co-located or operated in conjunction with any other antenna
or transmitter.
[ CAUTION
You are cautioned that any changes or modifications not expressly approved in this manual
could void your authority to operate this equipment.
[ Note:
This equipment has been tested and found to comply with the limits for a Class B digital
device, pursuant to Part 15 of the FCC Rules.
These limits are designed to provide reasonable protection against harmful interference in
a residential installation. This equipment generates, uses, and can radiate radio frequency
energy and, if not installed and used in accordance with the instructions, may cause
harmful interference to radio communications. However, there is no guarantee that
interference will not occur in a particular installation. If this equipment does cause harmful
interference to radio or television reception, which can be determined by turning the
equipment off and on, the user is encouraged to try to correct the interference by one or
more of the following measures:
– Reorient or relocate the receiving antenna.
– Increase the separation between the equipment and receiver.
– Connect the equipment into an outlet on a circuit different from that to which the
receiver is connected.
– Consult the dealer or an experienced radio/TV technician for help.
San Diego, CA 92127 U.S.A.
GB
The supplied interface cable must be used with the equipment in order to comply with the
limits for a digital device pursuant to Subpart B of Part 15 of FCC Rules.
GB
5
Page 6

For Customers in Canada
This device complies with Industry Canada licence-exempt RSS standard(s).
Operation is subject to the following two conditions: (1) this device may not cause
interference, and (2) this device must accept any interference, including interference that
may cause undesired operation of the device.
For Customers in Europe
[ Notice for the customers in the countries applying EU Directives
Manufacturer: Sony Corporation, 1-7-1 Konan Minato-ku Tokyo, 108-0075 Japan
For EU product compliance: Sony Deutschland GmbH, Hedelfinger Strasse 61, 70327
Stuttgart, Germany
Hereby, Sony Corporation, declares that this equipment is in compliance with the essential
requirements and other relevant provisions of Directive 1999/5/EC. For details, please
access the following URL:
http://www.compliance.sony.de/
[ Notice
If static electricity or electromagnetism causes data transfer to discontinue midway (fail),
restart the application or disconnect and connect the communication cable (USB, etc.)
again.
This product has been tested and found compliant with the limits set out in the EMC
regulation for using connection cables shorter than 3 meters (9.8 feet).
The electromagnetic fields at the specific frequencies may influence the picture and sound
of this unit.
GB
6
Page 7

[ Disposal of waste batteries and electrical and electronic
equipment (applicable in the European Union and other
European countries with separate collection systems)
This symbol on the product, the battery or on the packaging indicates that
the product and the battery shall not be treated as household waste. On
certain batteries this symbol might be used in combination with a
chemical symbol. The chemical symbols for mercury (Hg) or lead (Pb) are
added if the battery contains more than 0.0005% mercury or 0.004% lead.
will help prevent potentially negative consequences for the environment and human health
which could otherwise be caused by inappropriate waste handling. The recycling of the
materials will help to conserve natural resources.
In case of products that for safety, performance or data integrity reasons require a
permanent connection with an incorporated battery, this battery should be replaced by
qualified service staff only. To ensure that the battery and th e electrical and electronic
equipment will be treated properly, hand over these products at end-of-life to the
applicable collection point for the recycling of electrical and electronic equipment. For all
other batteries, please view the section on how to remove the battery from the product
safely. Hand the battery over to the applicable collection point for the recycling of waste
batteries. For more detailed information about recycling of this product or battery, please
contact your local Civic Office, your household waste disposal service or the shop where
you purchased the product or battery.
By ensuring these products and batteries are disposed of correctly, you
For Customers in Singapore
Checking the supplied items
The number in parentheses indicates the number of pieces.
• Camera (1)
• Rechargeable Battery Pack NP-BX1 (1)
• Micro USB Cable (1)
• AC Adaptor AC-UB10C/UB10D (1)
• Power Cord (mains lead) (not supplied in the USA and Canada) (1)
• Wrist Strap (1)
• Shoe Cap (1) (Attached on the camera)
• Instruction Manual (this manual) (1)
• Wi-Fi Connection/One-touch (NFC) Guide (1)
This guide explains the functions that require a Wi-Fi connection.
GB
GB
7
Page 8

Identifying parts
A Exposure compensation dial
B ON/OFF (Power) button
C Shutter button
D For shooting: W/T (zoom) lever
For viewing: (Index) lever/
(Playback zoom) lever
E Self-timer lamp/AF illuminator
F Mode dial
(Intelligent Auto)/
(Superior Auto)/
(Program Auto)/
(Aperture Priority)/
(Shutter Priority)/
(Manual Exposure)/
(Memory recall)/
(Movie)/ (iSweep
Panorama)/ (Scene
Selection)
G Multi interface shoe*
H Flash
• Press the (Flash pop-up)
button to use the flash. The flash
does not pop up automatically.
• When not using the flash, press it
back into the camera body.
GB
I Microphone
8
J Speaker
K Lens
A (Flash pop-up) button
B (N Mark)
• Touch the mark when you
connect the camera to a
smartphone equipped with the
NFC function.
• NFC (Near Field
Communication) is an
international standard of the
short-range wireless
communication technology.
C LCD screen
D MOVIE (Movie) button
E (Playback) button
F Control wheel
G GPS receiver (built-in, DSC-
HX60V only)
H Charge lamp
I Multi/Micro USB Terminal*
• Supports Micro USB compatible
device.
J Wi-Fi sensor (built-in)
K Hook for Wrist Strap
Page 9

L MENU button
M (In-Camera Guide)/
(Delete) button
N For shooting: Fn (Function)
button
For viewing: (Send to
Smartphone) button
A Battery insertion slot
B Memory card slot
C Access lamp
D Battery eject lever
E Battery/Memory card cover
F HDMI micro jack
G Tripod socket hole
• Use a tripod with a screw less
than 5.5 mm (7/32 inches) long.
Otherwise, you cannot firmly
secure the camera, and damage to
the camera may occur.
* For details on compatible accessories
for the multi interface shoe and the
Multi/Micro USB Terminal, visit the
Sony web site, or consult your Sony
dealer or local authorized Sony
service facility. You can also use
accessories that are compatible with
the accessory shoe. Operations with
other manufacturers’ accessories are
not guaranteed.
GB
GB
9
Page 10
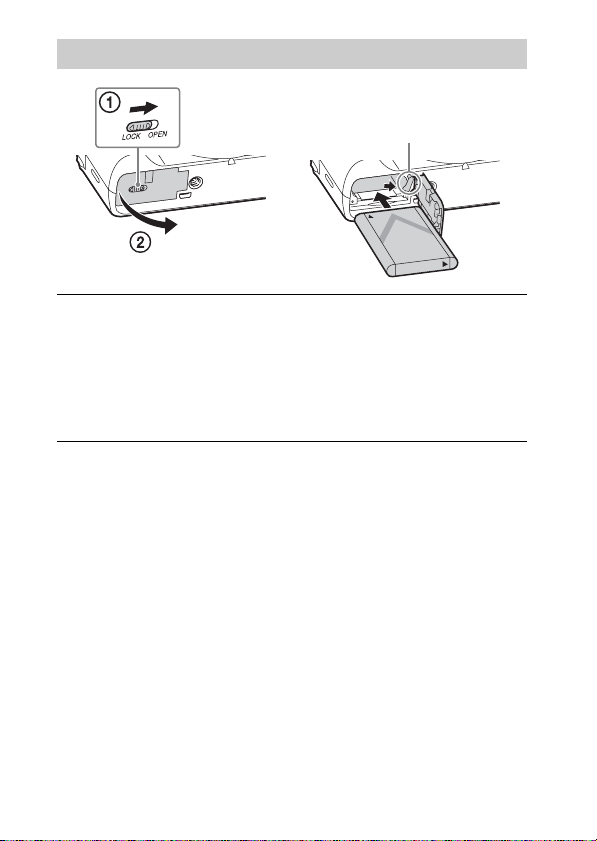
Inserting the battery pack
Battery eject lever
Open the cover.
1
Insert the battery pack.
2
• While pressing the battery eject lever, insert the battery pack as
illustrated. Make sure that the battery eject lever locks after insertion.
• Closing the cover with the battery inserted incorrectly may damage the
camera.
10
GB
Page 11

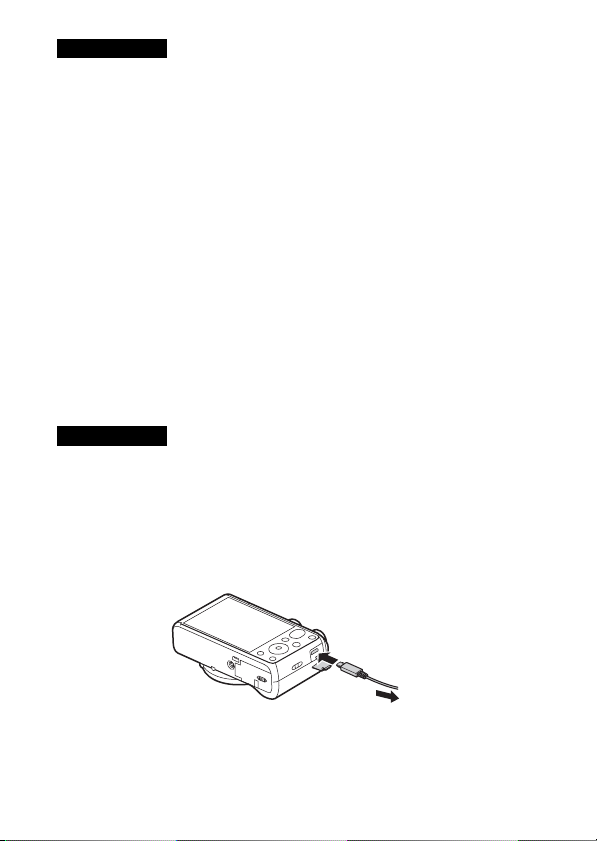
Charging the battery pack
For customers in the USA and Canada
Power cord
(Mains lead)
For customers in countries/
regions other than the USA
and Canada
Connect the camera to the AC Adaptor (supplied),
1
using the micro USB cable (supplied).
Connect the AC Adaptor to the wall outlet (wall socket).
2
The charge lamp lights orange, and charging starts.
• Turn off the camera while charging the battery.
• You can charge the battery pack even when it is partially charged.
• When the charge lamp flashes and charging is not finished, remove and
re-insert the battery pack.
Charge lamp
Lit: Charging
Off: Charging finished
Flashing:
Charging error or charging paused
temporarily because the camera is not
within the proper temperature range
GB
GB
11
Page 12
Notes
• If the charge lamp on the camera flashes when the AC Adaptor is connected to the
wall outlet (wall socket), this indicates that charging is temporarily stopped
because the temperature is outside the recommended range. When the temperature
gets back within the appropriate range, the charging resumes. We recommend
charging the battery pack in an ambient temperature of between 10°C to 30°C
(50ºF to 86ºF).
• The battery pack may not be effectively charged if the terminal section of the
battery is dirty. In this case, wipe any dust off lightly using a soft cloth or a cotton
swab to clean the terminal section of the battery.
• Connect the AC Adaptor (supplied) to the nearest wall outlet (wall socket). If
malfunctions occur while using the AC Adaptor, disconnect the plug from the wall
outlet (wall socket) immediately to disconnect from the power source.
• When charging is finished, disconnect the AC A daptor from the wall outlet (wall
socket).
• Be sure to use only genuine Sony brand battery packs, micro USB cable (supplied)
and AC Adaptor (supplied).
x
Charging time (Full charge)
The charging time is approximately 230 minutes using the AC Adaptor
(supplied).
Notes
• The above charging time applies when charging a fully depleted battery pack at a
temperature of 25°C (77°F). Charging may take longer depending on conditions of
use and circumstances.
x
Charging by connecting to a computer
The battery pack can be charged by connecting the camera to a computer using
a micro USB cable.
• If you connect the camera to a computer when power is turned on, the battery
To a USB jack
is not charged but the camera will be powered by the computer, which allows
GB
you to import images to a computer without worrying about the battery
12
running out.
Page 13
Notes
• Note the following points when charging via a computer:
– If the camera is connected to a laptop computer that is not connected to a power
source, the laptop battery level decreases. Do not charge for an extended period
of time.
– Do not turn on/off or restart the computer, or wake the computer to resume from
sleep mode when a USB connection has been established between the computer
and the camera. That may cause the camera to malfunction. Before turning on/
off, or restarting the computer or waking the computer from sleep mode,
disconnect the camera and the computer.
– No guarantees are made for charging using a custom-built computer or a
modified computer.
x
Battery life and number of images that can be
recorded and played back
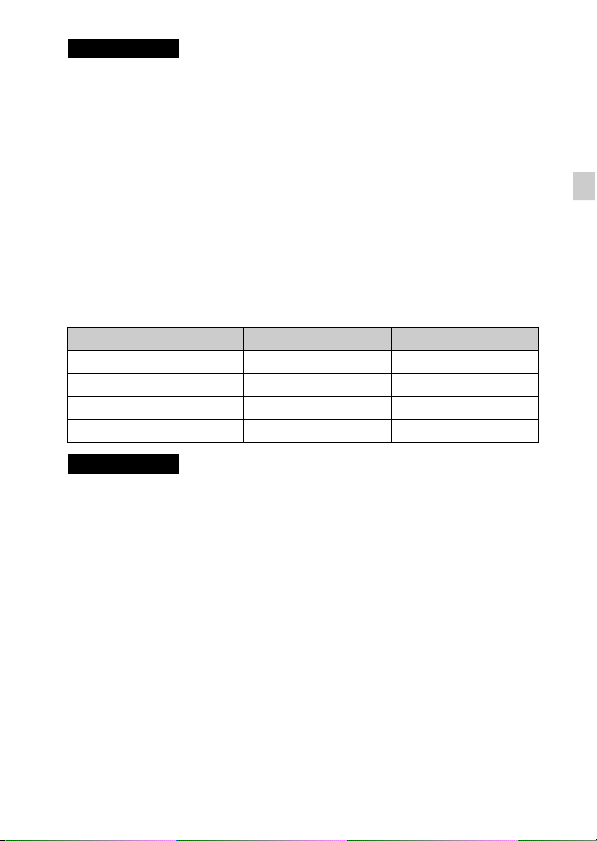
Battery life Number of images
Shooting (still images) Approx. 190 min. Approx. 380 images
Typical movie shooting Approx. 55 min. —
Continuous movie shooting Approx. 90 min. —
Viewing (still images) Approx. 310 min. Approx. 6200 images
Notes
• The above number of images applies when the battery pack is fully charged. The
number of images may decrease depending on the conditions of use.
• The number of images that can be recorded is for shooting under the following
conditions:
– Using a Sony Memory Stick PRO Duo™ (Mark2) media (sold separately).
– The battery pack is used at an ambient temperature of 25°C (77°F).
– [GPS On/Off] is set to [Off] (DSC-HX60V only)
– [Display Quality] is set to [Standard]
• The number for “Shooting (still images)” is based on the CIPA standard, and is for
shooting under the following conditions:
(CIPA: Camera & Imaging Products Association)
– DISP is set to [Display All Info.].
– Shooting once every 30 seconds.
– The zoom is switched alternately between the W and T ends.
– The flash is used once every two times.
– The power is turned on and off once every ten times.
GB
GB
13
Page 14
• The number of minutes for movie shooting is based on the CIPA standard, and is
for shooting under the following conditions:
– [ Record Setting]: 60i 17M(FH)/50i 17M(FH).
– Typical movie shooting: Battery life based on repeatedly starting/stopping
shooting, zooming, turning on/off, etc.
– Continuous movie shooting: Battery life based on non-stop shooting until the
limit (29 minutes) has been reached, and then continued by pressing the MOVIE
button again. Other functions, such as zooming, are not operated.
x
Supplying power
You can use the AC Adaptor AC-UD10 (sold separately) or AC-UD11 (sold
separately) for shooting and playback to supply power when shooting or
playing back images.
Notes
• If you shoot or play back images when the camera is connected to the
supplied AC Adaptor, power will not be supplied through the AC Adaptor.
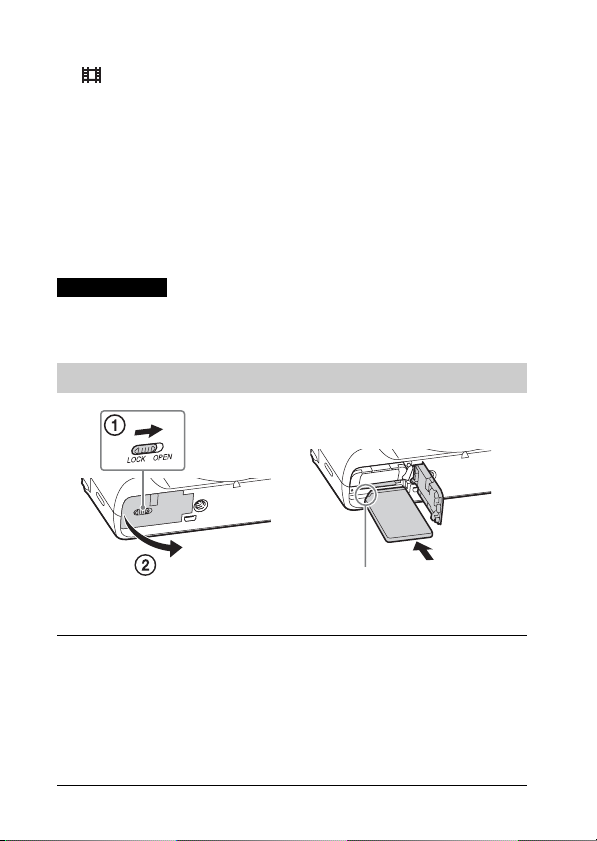
Inserting a memory card (sold separately)
Ensure that the notched
corner is faced correctly.
Open the cover.
1
Insert the memory card (sold separately).
2
• With the notched corner facing as illustrated, insert the memory card
until it clicks into place.
Close the cover.
GB
3
14
Page 15

x
Memory cards that can be used
Memory card For still images For movies
Memory Stick XC-HG Duo™
A
Memory Stick PRO Duo™ (Mark2 only)
Memory Stick PRO-HG Duo™
B Memory Stick Micro™ (M2) (Mark2 only)
SD memory card (Class 4 or faster)
C
SDHC memory card (Class 4 or faster)
SDXC memory card (Class 4 or faster)
microSD memory card (Class 4 or faster)
D
microSDHC memory card (Class 4 or faster)
microSDXC memory card (Class 4 or faster)
• In this manual, the products in the table are collectively referred to as follows:
A: Memory Stick PRO Duo media
B: Memory Stick Micro media
C: SD card
D: microSD memory card
Notes
• When using Memory Stick Micro media or microSD memory cards with this
camera, make sure to use with the appropriate adaptor.
x
To remove the memory card/battery pack
Memory card: Push the memory card in once to eject the memory card.
Battery pack: Slide the battery eject lever. Be sure not to drop the battery pack.
Notes
• Never remove the memory card/battery pack when the access lamp (page 9) is lit.
This may cause damage to data in the memory card.
GB
GB
15
Page 16

Setting the clock
ON/OFF (Power)
Control wheel
Select items: v/V/b/B//
z
Set:
Press the ON/OFF (Power) button.
1
The Date & Time setting is displayed when you turn on the camera for the
first time.
• It may take some time for the power to turn on and allow operation.
Check that [Enter] is selected on the screen, then press
2
z on the control wheel.
Select a desired geographic location by following the
3
on-screen instructions, then press z.
Set [Daylight Savings], [Date/Time] and [Date Format],
4
then press z.
• When setting [Date/Time], midnight is 12:00 AM, and noon is
12:00 PM.
Check that [Enter] is selected, then press z.
5
16
GB
Page 17
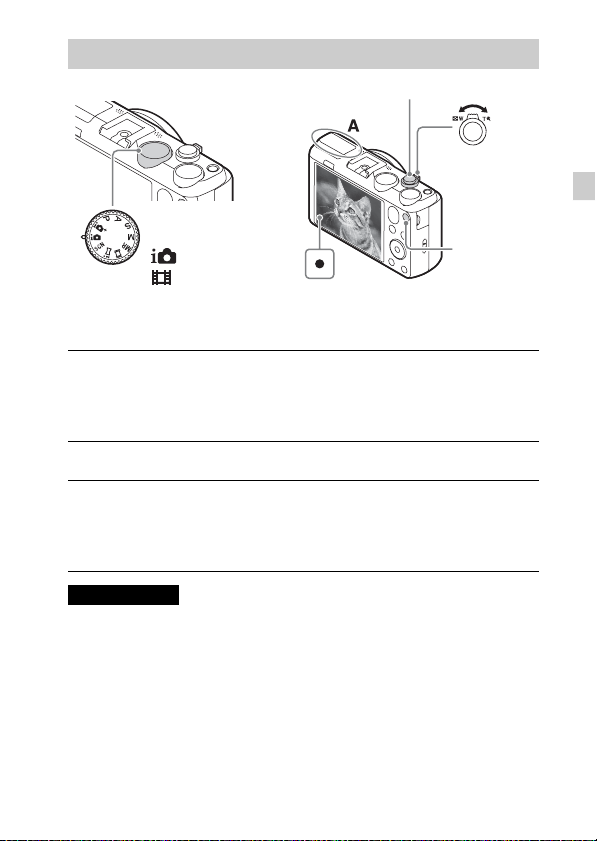
Shooting still images/movies
Shutter button
W/T (zoom)
lever
W: zoom out
Mode dial
: Intelligent Auto
: Movie
Shooting still images
Press the shutter button halfway down to focus.
1
When the image is in focus, a beep sounds and the z indicator lights.
Press the shutter button fully down to shoot an image.
2
Shooting movies
Press the MOVIE (Movie) button to start recording.
1
• Use the W/T (zoom) lever to change the zoom ratio.
Press the MOVIE button again to stop recording.
2
Notes
• Do not pull up the flash manually. This may cause a malfunction.
• When using the zoom function while shooting a movie, the sound of the camera
operating will be recorded. The sound of the MOVIE button operating may also be
recorded when movie recording is finished.
• The panoramic shooting range may be reduced, depending on the subject or the
way it is shot. Therefore even when [360°] is set for panoramic shooting, the
recorded image may be less than 360 degrees.
Do not cover the flash (A).
T: zoom in
MOVIE
GB
GB
17
Page 18
• Continuous movie shooting is possible for approximately 29 minutes at one time
with the camera’s default settings and when the ambient temperature is
approximately 25°C (77°F). When movie recording is finished, you can restart
recording by pressing the MOVIE button again. Recording may stop to protect the
camera depending on the ambient temperature.
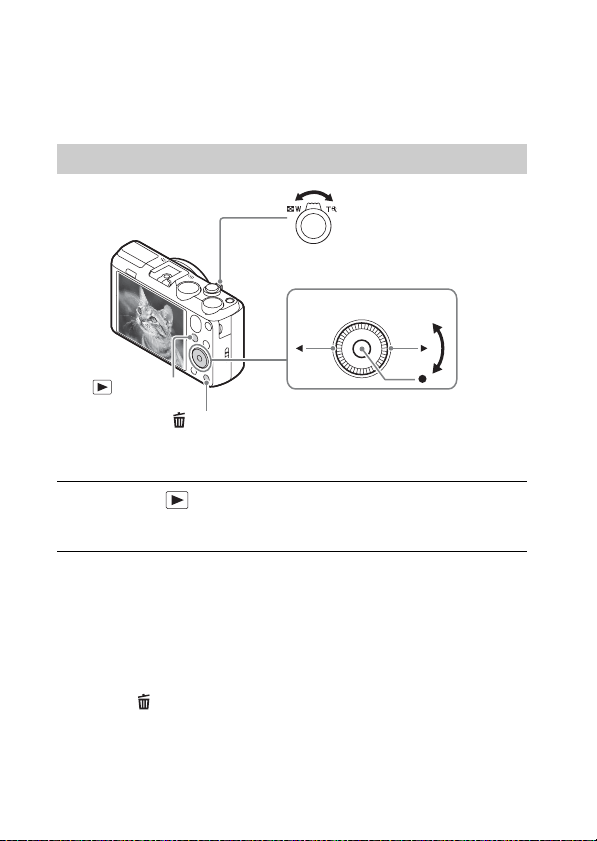
Viewing images
W: zoom out
T: zoom in
Control wheel
(Playback)
(Delete)
Press the (Playback) button.
1
• When images on a memory card recorded with other cameras are played
back on this camera, the registration screen for the data file appears.
x
Selecting next/previous image
Select an image by pressing B (next)/b (previous) on the control wheel or by
turning the control wheel. Press z in the center of the control wheel to view
movies.
x
Deleting an image
1 Press the (Delete) button.
2 Select [Delete] with v on the control wheel, then press z.
x
Returning to shooting images
GB
Press the shutter button halfway down.
18
Select images: B (next)/b (previous)
or turn the control
wheel
Set: z
Page 19

Introduction of other functions
Fn (Function)
MENU
Control wheel
x
Control wheel
DISP (Display Contents): Allows you to change the screen display.
(Drive Mode): Allows you to switch between shooting methods, such
as single shooting, continuous shooting or bracket shooting.
(Photo Creativity): Allows you to operate the camera intuitively and
shoot creative images easily.
(Flash Mode): Allows you to select a flash mode for still images.
z (Lock-on AF): The camera tracks the subject and adjusts focus
automatically even when the subject is moving.
x
Fn (Function) button
Allows you to register 12 functions and recall those functions when shooting.
1 Press the Fn (Function) button.
2 Select the desired function by pressing v/V/b/B on the control wheel.
3 Select the setting value by turning the control wheel.
GB
GB
19
Page 20
x
Menu Items
(Camera Settings)
Image Size Selects the size of still images.
Aspect Ratio Selects the aspect ratio for still images.
Quality Sets the image quality for still images.
Panorama: Size Selects the size of panoramic images.
Panorama: Direction Sets the shooting direction for panoramic images.
File Format Selects the movie file format.
Record Setting Selects the size of the recorded movie frame.
Drive Mode Sets the drive mode, such as for continuous shooting.
Flash Mode Sets the flash settings.
Flash Comp. Adjusts the intensity of flash output.
Red Eye Reduction Reduces the red-eye phenomenon when using flash.
Focus Mode Selects the focus method.
Focus Area Selects the area of focus.
AF Illuminator
ISO Adjusts the luminous sensitivity.
Metering Mode
White Balance Adjusts the color tones of an image.
DRO/Auto HDR
Creative Style Selects the desired image processing.
Picture Effect
High ISO NR
Lock-on AF
GB
Sets the AF illuminator, which provides light for a
dark scene to aid focusing.
Selects the metering mode that sets which part of the
subject to measure to determine the exposure.
Compensates automatically for brightness and
contrast.
Selects the desired effect filter to achieve a more
impressive and artistic expression.
Sets noise reduction processing for high-sensitivity
shooting.
Sets the function to track a subject and continue
focusing.
20
Page 21

Smile/Face Detect.
Selects to detect faces and adjust various settings
automatically. Sets to automatically release the
shutter when a smile is detected.
Soft Skin Effect Sets the Soft Skin Effect and the effect level.
Analyzes the scene when capturing faces, close-ups,
Auto Obj.
Framing
Scene Selection
Movie
or subjects tracked by the Lock-on AF function, and
automatically trims and saves another copy of the
image with a more impressive composition.
Selects pre-set settings to match various scene
conditions.
Selects the shooting mode to suit your subject or
effect.
SteadyShot Sets SteadyShot for shooting movies.
Auto Slow Shut.
Micref Level
Wind Noise Reduct. Reduces wind noise during movie recording.
Shooting Tip List Displays the shooting tip list.
Memory Registers the desired modes or camera settings.
Sets the function that automatically adjusts the shutter
speed following the brightness of the environment.
Sets the microphone reference level when recording
movies.
(Custom Settings)
MF Assist Displays an enlarged image when focusing manually.
Grid Line
Auto Review
Exposure Set. Guide
Zoom Setting
Write Date
Sets a grid line display to enable alignment to a
structural outline.
Sets auto review to display the captured image after
shooting.
Sets the guide displayed when exposure settings are
changed in the shooting screen.
Sets whether to use the Clear Image Zoom and Digital
Zoom when zooming.
Sets whether to record a shooting date on the still
image.
GB
GB
21
Page 22
Function Menu Set.
MOVIE Button Sets whether to always activate the MOVIE button.
Customizes the functions displayed when the Fn
(Function) button is pressed.
(Wireless)
Send to Smartphone Transfers images to display on a smartphone.
Send to Computer
View on TV You can view images on a network-enabled TV.
One-touch(NFC)
Airplane Mode
WPS Push
Access Point Set. You can register your access point manually.
Edit Device Name
Disp MAC Address Displays the MAC address of the camera.
SSID/PW Reset
Reset Network Set. Resets all network settings.
Backs up images by transferring them to a computer
connected to a network.
Assigns an application to One-touch (NFC). You can
call up the application when shooting by touching an
NFC-enabled smartphone to the camera.
You can set this device not to perform wireless
communications and GPS functions.
You can register the access point to the camera easily
by pushing the WPS button.
You can change the device name under Wi-Fi Direct,
etc.
Resets the SSID and password for the smartphone
connection.
(Application)
Application List
Introduction Displays instructions on using the application.
Displays the application list. You can select the
application you want to use.
(Playback)
Delete Deletes an image.
View Mode
GB
Sets the way in which images are grouped for
playback.
22
Page 23

Image Index Displays multiple images at the same time.
Slide Show Shows a slide show.
Rotate Rotates the image.
Enlarge Image Enlarges the playback images.
4K Still Image PB
Protect Protects the images.
Motion Interval ADJ
Specify Printing Adds a print order mark to a still image.
Outputs still images in 4K resolution to an HDMIconnected TV that supports 4K.
Adjusts the interval for showing the tracking of
subjects in [Motion Shot Video], where the tracking
of the subject’s motion will be shown when playing
back movies.
(Setup)
Monitor Brightness Sets the screen brightness.
Viewfinder Bright.
Volume Settings Sets the volume for movie playback.
Audio signals Sets the functional sounds of the camera.
GPS Settings
(DSC-HX60V only)
Upload Settings
Tile Menu
Mode Dial Guide
Display Quality Sets the display quality.
Pwr Save Start Time
PAL/NTSC Selector
(only for 1080 50i
compatible models)
When using an electronic viewfinder (sold
separately), sets the brightness of the electronic
viewfinder.
Sets the GPS function.
Sets the upload function of the camera when using an
Eye-Fi card.
Sets whether to display the tile menu every time you
press the MENU button.
Turns the mode dial guide (the explanation of each
shooting mode) on or off.
Sets the length of time until the camera turns off
automatically.
By changing the TV format of the device, shooting in
a different movie format is possible.
GB
GB
23
Page 24

Demo Mode Sets demonstration movie playback to on or off.
HDMI Resolution
CTRL FOR HDMI
USB Connection Sets the USB connection method.
USB LUN Setting
USB Power Supply
Language Selects the language.
Date/Time Setup Sets the date and time, and daylight savings.
Area Setting Sets the location of use.
Format Formats the memory card.
File Number
Select REC Folder Changes the selected folder for storing images.
New Folder
Folder Name Sets the folder name for still images.
Recover Image DB
Display Media Info.
Version Displays the camera software version.
Setting Reset Restores settings to their defaults.
Sets the resolution when the camera is connected to
an HDMI TV.
Operates the camera from a TV that supports
BRAVIA™ Sync.
Enhances compatibility by limiting the functions of
the USB connection.
Sets whether or not to supply power through USB
connection.
Sets the method used to assign file numbers to still
images and movies.
Creates a new folder for storing still images and
movies (MP4).
Recovers the image database file and enables
recording and playback.
Displays the remaining recording time of movies and
the recordable number of still images on the memory
card.
24
GB
Page 25

Features of PlayMemories Home™
The software PlayMemories Home allows you to import still images and
movies to your computer and use them. PlayMemories Home is required for
importing AVCHD movies to your computer.
Playing back importe d
images
Importing images from
your camera
GB
For Windows, the following functions are also
available:
Viewing images
on a calendar
Notes
• An Internet connection is required to install PlayMemories Home.
• An Internet connection is required to use PlayMemories Online or other network
services. PlayMemories Online or other network services may not be available in
some countries or regions.
• Use the following URL for Mac applications:
http://www.sony.co.jp/imsoft/Mac/
• If the software PMB (Picture Motion Browser), supplied with models released
before 2011, has already been installed on your computer, PlayMemories Home
will overwrite it during the installation. Use PlayMemories Home, the successor
software of PMB.
Creating
movie
discs
Uploading
images to
network services
Sharing images on
PlayMemories Online™
GB
25
Page 26
x
System requirements
You can find the system requirements for the software at the following URL:
www.sony.net/pcenv/
x
Installing PlayMemories Home on a computer
Using the Internet browser on your computer, go to the
1
following URL, and then install PlayMemories Home.
www.sony.net/pm/
• For details on PlayMemories Home, refer to the following
PlayMemories Home support page (English only):
http://www.sony.co.jp/pmh-se/
• When installation is complete, PlayMemories Home starts.
Connect the camera to your computer using the micro
2
USB cable (supplied).
• New functions may be installed in PlayMemories Home. Connect the
camera to your computer even if PlayMemories Home is already
installed on your computer.
Notes
• Do not disconnect the micro USB cable (supplied) from the camera while the
operating screen or the accessing screen is displayed. Doing so may damage the
data.
• To disconnect the camera from the computer, click on the tasktray, then click
(disconnect icon). For Windows Vista, click on the tasktray.
26
GB
Page 27

Adding functions to the camera
You can add the desired functions to your camera by connecting to the
application download website (PlayMemories Camera Apps™) via the
Internet.
http://www.sony.net/pmca
• After installing an application, you can call up the application by touching an
NFC-enabled Android smartphone to the N mark on the camera, using the
[One-touch(NFC)] function.
Number of still images and recordable time of movies
The number of still images and recordable time may vary depending on the
shooting conditions and the memory card.
x
Still images
[ Image Size]: L: 20M
When [ Aspect Ratio] is set to [4:3]*
Quality
Capacity
Standard 295 images
Fine 200 images
* When the [ Aspect Ratio] is set to other than [4:3], you can record more
pictures than shown above.
2 GB
GB
GB
27
Page 28

x
Movies
The table below shows the approximate maximum recording times. These are
the total times for all movie files. Continuous shooting is possible for
approximately 29 minutes (a product specification limit). The maximum
continuous recording time of an MP4 (12M) format movie is about 15 minutes
(limited by the 2 GB file size restriction).
(h (hour), m (minute))
Record Setting
Capacity
60i 24M(FX)/50i 24M(FX) 10 m
60i 17M(FH)/50i 17M(FH) 10 m
60p 28M(PS)/50p 28M(PS) 9 m
24p 24M(FX)/25p 24M(FX) 10 m
24p 17M(FH)/25p 17M(FH) 10 m
1440×1080 12M 15 m
VGA 3M 1 h 10 m
• The recordable time of movies varies because the camera is equipped with VBR
(Variable Bit-Rate), which automatically adjusts the image quality depending on
the shooting scene. When you record a fast-moving subject, the image is clearer
but the recordable time is shorter because more memory is required for recording.
The recordable time also varies depending on the shooting conditions, the subject
or the image quality/size settings.
2 GB
28
GB
Page 29

Notes on using the camera
Functions built into this camera
• This manual describes 1080 60i-compatible devices and 1080 50i-compatible
devices.
– To determine whether your camera supports the GPS function, check the model
name of your camera.
GPS-compatible: DSC-HX60V
GPS-incompatible: DSC-HX60
– To check whether your camera is a 1080 60i-compatible device or 1080 50i-
compatible device, check for the following marks on the bottom of the camera.
1080 60i-compatible device: 60i
1080 50i-compatible device: 50i
• This camera is compatible with 1080 60p or 50p-format movies. Unlike standard
recording modes up to now, which record in an interlacing method, this camera
records using a progressive method. This increases the resolution, and provides a
smoother, more realistic image.
• While aboard an airplane, set [Airplane Mode] to [On].
On GPS-compatible devices (DSC-HX60V only)
• Use GPS in accordance with regulations of countries and regions where you use it.
• If you do not record the location information, set [GPS On/Off] to [Off].
On use and care
Avoid rough handling, disassembling, modifying, physical shock, or impact such as
hammering, dropping, or stepping on the product. Be particularly careful of the lens.
Notes on recording/playback
• Before you start recording, make a trial recording to make sure that the camera is
working correctly.
• The camera is neither dust-proof, nor splash-proof, nor water-proof.
• Do not aim the camera at the sun or other bright light. It may cause a malfunction
of the camera.
• If moisture condensation occurs, remove it before using the camera.
• Do not shake or strike the camera. It may cause a malfunction and you may not be
able to record images. Furthermore, the recording media may become unusable or
image data may be damaged.
Do not use/store the camera in the following places
• In an extremely hot, cold or humid place
In places such as in a car parked in the sun, the camera body may become
deformed and this may cause a malfunction.
• Under direct sunlight or near a heater
The camera body may become discolored or deformed, and this may cause a
malfunction.
• In a location subject to shaking or vibration
GB
GB
29
Page 30

• Near a location that generates strong radio waves, emits radiation or is strongly
magnetic
In such locations, the camera may not properly record or play back images.
• In sandy or dusty places
Be careful not to let sand or dust get into the camera. This may cause the camera to
malfunction, and in some cases this malfunction cannot be repaired.
Notes on the screen and lens
• The screen is manufactured using extremely high-precision technology, and over
99.99% of the pixels are operational for effective use. However, some tiny black
and/or bright dots (white, red, blue or green) may appear on the screen. These dots
are a normal result of the manufacturing process, and do not affect the recording.
• Take care that your fingers or other objects are not caught in the lens when it is
operating.
Notes on the flash
• Do not carry the camera by the flash unit, or use excessive force on it.
• If water, dust or sand get into the open flash unit, it may cause a malfunction.
• Take care that your finger is not in the way when pushing the flash down.
On camera’s temperature
Your camera and battery may get hot due to continuous use, but it is not a
malfunction.
On the overheat protection
Depending on the camera and battery temperature, you may be unable to record
movies or the power may turn off automatically to protect the camera.
A message will be displayed on the screen before the power turns off or you can no
longer record movies. In this case, leave the power off and wait until the camera and
battery temperature goes down. If you turn on the power without letting the camera
and battery cool down enough, the power may turn off again or you may be unable
to record movies.
On charging the battery
• If you charge a battery that has not been used for a long time, you may be unable
to charge it to the proper capacity.
This is due to the battery characteristics. Charge the battery again.
•
Batteries which have not been used for more than a year may have become
deteriorated.
Warning on copyright
Television programs, films, videotapes, and other materials may be copyrighted.
Unauthorized recording of such materials may be contrary to the provisions of the
copyright laws.
No guarantee in the case of damaged content or recording failures
Sony cannot provide a guarantee in the case of failure to record or loss or damage of
GB
recorded content due to a malfunction of the camera or recording media, etc.
30
Page 31

Cleaning the camera surface
Clean the camera surface with a soft cloth slightly moistened with water, then wipe
the surface with a dry cloth. To prevent damage to the finish or casing:
– Do not expose the camera to chemical products such as thinner, benzine, alcohol,
disposable cloths, insect repellent, sunscreen or insecticide.
Maintaining the screen
• Hand cream or moisturizer left on the screen may dissolve its coating. If you get
any on the screen, wipe it off immediately.
• Wiping forcefully with tissue paper or other materials can damage the coating.
• If fingerprints or debris are stuck to the screen, we recommend that you gently
remove any debris and then wipe the screen clean with a soft cloth.
Notes on wireless LAN
We assume no responsibility whatsoever for any damage caused by unauthorized
access to, or unauthorized use of, destinations loaded on the camera, resulting from
loss or theft.
GB
GB
31
Page 32

Specifications
Camera
[System]
Image device: 7.82 mm (1/2.3 type)
Exmor R™ CMOS sensor
Total pixel number of camera:
Approx. 21.1 Megapixels
Effective pixel number of camera:
Approx. 20.4 Megapixels
Lens: Sony G 30× zoom lens
f = 4.3 mm – 129 mm (24 mm –
720 mm (35 mm film equivalent))
F3.5 (W) – F6.3(T)
While shooting movies (16:9):
26.5 mm – 795 mm*
While shooting movies (4:3):
32.5 mm – 975 mm*
* When [ SteadyShot] is set to
[Standard]
SteadyShot: Optical
File format:
Still images: JPEG compliant
(DCF, Exif, MPF Baseline), DPOF
compatible
Movies (AVCHD format):
AVCHD format Ver. 2.0
compatible
Video: MPEG-4 AVC/H.264
Audio: Dolby Digital 2ch,
equipped with Dolby Digital Stereo
Creator
• Manufactured under license from
Dolby Laboratories.
Movies (MP4 format):
Video: MPEG-4 AVC/H.264
Audio: MPEG-4 AAC-LC 2ch
Recording media: Memory Stick PRO
Duo media, Memory Stick Micro
media, SD cards, microSD memory
cards
GB
32
Flash: Flash range (ISO sensitivity
(Recommended Exposure Index)
set to Auto):
Approx. 0.25 m to 5.6 m
(0.82 ft. to 18.37 ft.) (W)/
Approx. 2.0 m to 3.0 m
(6.56 ft. to 9.84 ft.) (T)
[Input and Output connectors]
HDMI connector: HDMI micro jack
Multi/Micro USB Terminal*:
USB communication
USB communication: Hi-Speed USB
(USB 2.0)
* Supports Micro USB compatible
device.
[Screen]
LCD screen:
7.5 cm (3.0 type) TFT drive
Total number of dots:
921 600 dots
[Power, general]
Power: Rechargeable battery pack
NP-BX1, 3.6 V
AC Adaptor AC-UB10C/UB10D,
5V
Power consumption (during shooting):
Approx. 1.2 W
Operating temperature: 0 °C to 40 °C
(32 °F to 104 °F)
Storage temperature: –20 °C to +60 °C
(–4 °F to +140 °F)
Dimensions (CIPA compliant):
108.1 mm × 63.6 mm × 38.3 mm
(4 3/8 inches × 2 5/8 inches ×
1 9/16 inches) (W/H/D)
Page 33

Mass (CIPA compliant) (Approx.):
272 g (9.6 oz) (including NP-BX1
battery pack, Memory Stick PRO
Duo media)
Microphone: Stereo
Speaker: Monaural
Exif Print: Compatible
PRINT Image Matching III:
Compatible
[Wireless LAN]
Supported standard: IEEE 802.11 b/g/n
Frequency: 2.4GHz
Supported security protocols: WEP/
WPA-PSK/WPA2-PSK
Configuration method: WPS (Wi-Fi
Protected Setup) / manual
Access method: Infrastructure Mode
NFC: NFC Forum Type 3 Tag
compliant
AC Adaptor AC-UB10C/UB10D
Power requirements: AC 100 V to
240 V, 50 Hz/60 Hz, 70 mA
Output voltage: DC 5 V, 0.5 A
Operating temperature: 0 °C to 40 °C
(32 °F to 104 °F)
Storage temperature: –20 °C to +60 °C
(–4 °F to +140 °F)
Dimensions (Approx.):
50 mm × 22 mm × 54 mm
(2 inches × 7/8 inches ×
2 1/4 inches) (W/H/D)
Rechargeable Battery Pack
NP-BX1
Battery type: Lithium-ion battery
Maximum voltage: DC 4.2 V
Nominal voltage: DC 3.6 V
Maximum charge voltage: DC 4.2 V
Maximum charge current: 1.89 A
Capacity: 4.5 Wh (1 240 mAh)
Design and specifications are subject to
change without notice.
GB
GB
33
Page 34

Trademarks
• Memory Stick and are
trademarks or registered trademarks
of Sony Corporation.
• “AVCHD Progressive” and the
“AVCHD Progressive” logotype are
trademarks of Panasonic Corporation
and Sony Corporation.
• Dolby and the double-D symbol are
trademarks of Dolby Laboratories.
• The terms HDMI and HDMI HighDefinition Multimedia Interface, and
the HDMI Logo are trademarks or
registered trademarks of HDMI
Licensing LLC in the United States
and other countries.
• Windows and Windows Vista are
registered trademarks of Microsoft
Corporation in the United States and/
or other countries.
• Mac is a registered trademark of
Apple Inc. in the United States and
other countries.
• iOS is a registered trademark or
trademark of Cisco Systems, Inc.
• iPhone and iPad are registered
trademarks of Apple Inc. in the
United States and other countries.
• SDXC logo is a trademark of SD-3C,
LLC.
• Android and Google Play are
trademarks of Google Inc.
• Wi-Fi, the Wi-Fi logo and Wi-Fi
PROTECTED SET-UP are registered
trademarks of the Wi-Fi Alliance.
• The N Mark is a trademark or
registered trademark of NFC Forum,
Inc. in the United States and in other
countries.
• DLNA and DLNA CERTIFIED are
trademarks of Digital Living
Network Alliance.
GB
34
• Facebook and the “f” logo are
trademarks or registered trademarks
of Facebook, Inc.
• YouTube and the YouTube logo are
trademarks or registered trademarks
of Google Inc.
• Eye-Fi is a trademark of Eye-Fi, Inc.
• In addition, system and product
names used in this manual are, in
general, trademarks or registered
trademarks of their respective
developers or manufacturers.
However, the ™ or ® marks may not
be used in all cases in this manual.
Additional information on this
product and answers to frequently
asked questions can be found at
our Customer Support Website.
Page 35

GB
GB
35
Page 36

Русский
Дополнительная информация о камере (“Справочное руководство”)
“Справочное руководство” является интерактивным
руководством. Обращайтесь к нему для получения
подробных инструкций по многим функциям камеры.
1 Перейдите на страницу поддержки Sony.
http://www.sony.net/SonyInfo/Support/
2 Выберите страну или регион.
3 Найдите наименование модели камеры на
странице поддержки.
• Проверьте наименование модели на нижней
стороне камеры.
Просмотр справки
Данная камера оснащена встроенной инструкцией.
Fn (Функция)
MENU
Встроенная справка
Камера отображает пояснения для пунктов MENU/Fn (Функция) и
значений установки.
1 Нажмите кнопку MENU или кнопку Fn (Функция).
2 Выберите нужный пункт, а затем нажмите кнопку
(Встроенная справка).
(Встроенная справка)
RU
2
Page 37

Подсказка по съемке
Камера отображает подсказки по съемке для выбранного режима
съемки.
1 Нажмите кнопку (Встроенная справка) в режиме съемки.
2 Выберите нужную подсказку по съемке, а затем нажмите z на
колесике управления.
Подсказка по съемке будет отображена.
• Вы можете выполнять прокрутку экрана с помощью v/V и
переключать подсказки по съемке с помощью b/B.
ПРЕДУПРЕЖДЕНИЕ
Для уменьшения опасности возгорания или поражения
электрическим током не подвергайте аппарат воздействию
дождя или влаги.
ВАЖНЫЕ ИНСТРУКЦИИ ПО ТЕХНИКЕ
БЕЗОПАСНОСТИ
-СОХРАНИТЕ ЭТИ ИНСТРУКЦИИ
ОПАСНОСТЬ
ДЛЯ УМЕНЬШЕНИЯ ОПАСНОСТИ
ВОЗГОРАНИЯ ИЛИ ПОРАЖЕНИЯ
ЭЛЕКТРИЧЕСКИМ ТОКОМ СТРОГО
СОБЛЮДАЙТЕ ЭТИ ИНСТРУКЦИИ
ПРЕДУПРЕЖДЕНИЕ
[ Батарейный блок
Неправильное обращение с батарейным блоком может стать причиной его
взрыва, возгорания, а также химических ожогов. Соблюдайте следующие
меры предосторожности.
• Не разбирайте блок.
• Не подвергайте батарейный блок каким бы то ни было механическим
воздействиям: ударам, падениям или попаданиям под тяжелые предметы.
• Во избежание короткого замыкания не допускайте контакта металлических
предметов с контактами батарейного блока.
• Не допускайте нагрева батарейного блока до температуры выше 60 °C:
избегайте воздействия на него прямых солнечных лучей, а также не
оставляйте в припаркованном на солнце автомобиле.
• Запрещается сжигать блок или бросать его в огонь.
RU
RU
3
Page 38

• Не следует использовать поврежденные и протекшие литий-ионные батареи.
• Для зарядки батарейного блока используйте оригинальное зарядное
устройство Sony или другое совместимое зарядное устройство.
• Храните батарейный блок в недоступном для детей месте.
• Храните батарейный блок в сухом месте.
• Замену следует выполнять только на батарейный блок того же или
аналогичного типа, рекомендованный Sony.
• Утилизация использованных батарейных блоков должна производиться
надлежащим образом в соответствии с инструкциями.
WiFi функцию следует использовать исключительно внутри помещений.
ИНФОРМАЦИЯ О ДЕКЛАРИРОВАНИИ
ПРОДУКЦИИ
[ Модуль беспроводной передачи данных, модель TypeWN
зарегистрирована Федеральным Агентством Связи
(Регистрационный номер в Госреестре: Д-РД-1983 от
20.07.2012)
Декларация соответствия: Д-РД–1983
Дата принятия декларации: 12.07.2012
Декларация действительна до: 12.07.2018
Модуль беспроводной передачи
данных, модель TypeWN
соответствует требованиям
нормативных документов:
Срок службы: 6 (шесть) лет
«Правила применения
оборудования радиодоступа. Часть
1. Правила применения
оборудования радиодоступа для
беспроводной передачи данных в
диапазоне от 30МГц до 66 ГГц»
утвержденные Приказом
Министерства связи и массовых
коммуникаций РФ № 124 от
14.09.2010 (зарегистрирован
Минюстом России 12.10.2010.
Регистрационный № 18695)
RU
4
Page 39

[ Адаптер переменного тока
При использовании сетевого адаптера переменного тока воспользуйтесь
близлежащей сетевой розеткой. Если при использовании аппарата возникает
неисправность, немедленно отсоедините сетевой адаптер переменного тока от
сетевой розетки.
Только для модели предназначеных для рынков России и стран СНГ
[ Дата изготовления изделия.
Вы можете узнать дату изготовления изделия, взглянув на обозначение “P/D:”,
которое находится на этикетке со штрих кодом картонной коробки.
Знаки, указанные на этикетке со штрих кодом картонной коробки.
P/D:XX XXXX
1 2
1. Месяц изготовления
2. Год изготовления
A-0, B-1, C-2, D-3, E-4, F-5, G-6,
H-7, I-8, J-9.
Дата изготовления литий-ионного батарейного блока указаны на боковой
стороне или на поверхности с наклейкой.
RU
RU
5
Page 40

Для покупателей в Европе
[ Примечание для клиентов в странах, на которые
распространяются Директивы ЕС
Изготовитель: Sony Corporation, 1-7-1 Konan Minato-ku Tokyo, 108-0075 Japan
Для запросов относительно соответствия данного изделия законодательству
Европейского Союза: Sony Deutschland GmbH, Hedelfinger Strasse 61, 70327
Stuttgart, Germany
Настоящим Sony Corporation заявляет, что данное оборудование
соответствует основным требованиям и другим необходимым положениям
директивы 1999/5/EC. Для получения более подробной информации,
пожалуйста, обратитесь по следующему URL-адресу:
http://www.compliance.sony.de/
[ Уведомление
Если статическое электричество или электромагнитныe силы приводят к сбою
в передачe данных, перезапустите приложение или отключите и снова
подключите коммуникационный кабель (USB и т.д.).
Данное изделие было испытано и признано соответствующим диапазону,
установленному инструкцией EMC, по использованию соединительных
кабелей короче 3 метров.
Электромагнитные поля определенных частот могут влиять на изображение и
звук данного аппарата.
[ Утилизация использованных элементов питания и
отслужившего электрического и электронного
оборудования (Директива применяется в странах Евросоюза
и других европейских странах, где действуют системы
раздельного сбора отходов)
RU
6
Page 41

Проверка комплектации
Число в скобках указывает количество штук.
• Камера (1)
• Перезаряжаемый аккумулятор NP-BX1 (1)
• Кабель micro USB (1)
• Адаптер переменного тока AC-UB10C/UB10D (1)
• Сетевой шнур (не прилагается в США и Канаде) (1)
• Наручный ремень (из полиэстера, сделанный в Китае) (1)
• Крышка разъема (1) (Надевается на камеру)
• Инструкция по эксплуатации (данное руководство) (1)
• Wi-Fi Connection/One-touch (NFC) Guide (1)
Данная справка поясняет функции, требующие соединения Wi-Fi.
RU
RU
7
Page 42

Компоненты камеры
A Диск коррекции экспозиции
B Кнопка ON/OFF (Питание)
C Кнопка затвора
D Для съемки: Рычажок W/T
(зум)
Для просмотра: Рычажок
(Индексный режим)/
рычажок
(Воспроизведение
крупным планом)
E Лампочка таймера
автоспуска/Подсветка АФ
F Диск режимов
(Интеллект. Авто)/
(Супер авторежим)/
(Программное авто)/
(Приор. диафрагмы)/
(Приор. выдержки)/
(Ручной экспозиция)/
(Вызов памяти)/
(Видео)/
(iПанорамный обзор)/
(Выбор сцены)
G Многоинтерфейсный
разъем*
RU
8
H Вспышка
• Нажмите кнопку
(поднятие вспышки) для
использования вспышки.
Вспышка не поднимается
автоматически.
• Если вспышка не
используется, опустите ее в
корпус камеры.
I Микрофон
J Динамик
K Объектив
A Кнопка (поднятие
вспышки)
B (Метка N)
• При подключении камеры к
смартфону, который
оснащен функцией NFC,
прикоснитесь к метке.
• NFC (Near Field
Communication)
представляет собой
международный стандарт
технологии беспроводной
связи в коротком диапазоне.
Page 43

C ЖК-экран
D Кнопка MOVIE (Видео)
E Кнопка
(Воспроизведение)
F Колесико управления
G Приемник GPS
(встроенный, только
DSC-HX60V)
H Индикатор зарядки
I Разъема Multi/Micro USB*
• Поддерживает Micro USBсовместимое устройство.
J Датчик Wi-Fi (встроенный)
K Петля для наручного ремня
L Кнопка MENU
M Кнопка (Встроенная
справка)/ (Удалить)
N Для съемки: Кнопка
Fn (Функция)
Для просмотра: Кнопка
(Отправ. на смартф.)
A Слот для вставки
аккумулятора
B Слот карты памяти
C Индикатор доступа
D Рычажок выталкивания
аккумулятора
E Крышка отсека батареи/
карты памяти
F HDMI микрогнездо
G Отверстие гнезда для
штатива
• Используйте штатив с
винтом длиной менее 5,5 мм.
В противном случае Вы не
сможете плотно закрепить
камеру, что может привести
к ее повреждению.
* Для получения подробных
сведений о совместимых
дополнительных аксессуарах
для многоинтерфейсного
разъема и разъема Multi/Micro
USB посетите веб-сайт Sony или
обратитесь за консультацией к
дилеру Sony или в местный
уполномоченный сервисный
центр Sony. Вы также можете
использовать аксессуары,
совместимые с разъемом для
крепления аксессуаров. Работа с
аксессуарами других
производителей не
гарантируется.
RU
RU
9
Page 44

Вставка аккумулятора
Рычажок выталкивания
аккумулятора
Откройте крышку.
1
Вставьте аккумулятор.
2
• Нажимая рычажок выталкивания аккумулятора, вставьте
аккумулятор так, как показано на рисунке. Убедитесь, что
рычажок выталкивания аккумулятора защелкнулся после
вставки.
• В случае закрывания крышки с неправильно вставленным
аккумулятором можно повредить камеру.
10
RU
Page 45

Зарядка аккумулятора
Для покупателей в США и Канаде
Сетевой
шнур
Для покупателей стран/
регионов за пределами
США и Канады
Подключите камеру к адаптеру переменного тока
1
(прилагается) с помощью кабеля micro USB
(прилагается).
Подсоедините адаптер переменного тока к сетевой
2
розетке.
Индикатор зарядки горит оранжевым цветом, и начинается
зарядка.
• Выключите камеру на время зарядки аккумулятора.
• Аккумулятор можно заряжать, даже если он частично
заряжен.
• Если лампочка зарядки мигает и зарядка не завершена,
извлеките и снова вставьте аккумулятор.
Индикатор зарядки
Светится: Выполняется зарядка
Выключен: Зарядка завершена
Мигает:
Ошибка зарядки или зарядка
временно приостановлена,
поскольку камера находится за
пределами надлежащего
температурного диапазона
RU
RU
11
Page 46

Примечания
• Если индикатор зарядки на камере мигает при подключении адаптера
переменного тока к сетевой розетке, это указывает на то, что зарядка
временно остановлена из-за выхода температуры за пределы
рекомендуемого диапазона. Когда температура возвращается к
установленному диапазону, зарядка возобновляется. Рекомендуется
заряжать аккумулятор при окружающей температуре от 10°C до 30°C.
• Если участок разъема аккумулятора загрязнен, аккумулятор может не
заряжаться эффективно. В этом случае слегка протрите пыль мягкой
тканью или ватным тампоном, чтобы очистить участок разъема
аккумулятора.
• Подсоедините адаптер переменного тока (прилагается) к ближайшей
сетевой розетке. При возникновении каких-либо неисправностей во
время использования адаптера переменного тока немедленно
отключите питание, отсоединив штепсельную вилку от сетевой розетки.
• По завершении зарядки отключите адаптер переменного тока от
сетевой розетки.
• Обязательно используйте только оригинальный аккумулятор Sony,
кабель micro USB (прилагается) и адаптер переменного тока
(прилагается).
x
Время зарядки (Полная зарядка)
Время зарядки с помощ ью адаптера переменного тока (прилагается)
равно приблизительно 230 мин.
Примечания
• Указанное выше время зарядки относится к зарядке полностью
разряженного аккумулятора при температуре 25°C. Зарядка может
выполняться дольше в зависимости от условий и обстоятельств
использования.
x
Зарядка при подключении к компьютеру
Аккумулятор можно зар ядить посредством подсоединения камеры к
компьютеру с помощью кабеля micro USB.
12
RU
К гнезду USB
Page 47

• При подключении камеры к компьютеру, когда питание
включено, аккумулятор не будет заряжаться, однако камера будет
получать питание от компьютера, что позволяет импортировать
изображения в компьютер, не беспокоясь о том, что аккумулятор
разрядится.
Примечания
• Обратите внимание на следующие особенности при зарядке с помощью
компьютера:
– Если к амера подключена к ноутбуку с а втономным питанием, уровень
зарядки аккумулятора ноутбука снизится. Не выполняйте зарядку в
течение продолжительного периода времени.
– Не следует включать/отключать или перезагружать компьютер либо
переводить его в рабочий режим из спящего, когда между
компьютером и камерой установлено USB-соединение. Это может
привести к неисправности камеры. Перед включением/выключением
или перезагрузкой компьютера, или перед выводом компьютера из
спящего режима отсоедините камеру от компьютера.
– Зарядка с помощью компьютера, выполненного на заказ, или
модифицированного компьютера не гарантируется.
x
Время работы аккумулятора и количество
снимков, которые могут быть записаны и
воспроизведены
RU
Время работы
аккумулятора
Съемка (фотоснимки)
Типичная видеосъемка Приблиз. 55 мин. —
Непрерывная
видеосъемка
Просмотр (фотоснимки) Приблиз. 310 мин. Приблиз. 6200
Приблиз. 190 мин. Приблиз. 380
Приблиз. 90 мин. —
Количество
фотоснимков
изображений
изображений
RU
13
Page 48

Примечания
• Указанное выше количество снимков относится к полностью
заряженному аккумулятору. Количество снимков может уменьшитьс я в
зависимости от условий использования.
• Количество снимков, которые могут быть записаны, приведено для
съемки в следующих условиях:
– Использование карты памяти Sony Memory Stick PRO Duo™ (Mark2)
(продается отдельно).
– Аккумулятор используется при температуре окружающей среды
25°C.
– [GPS Вкл/Выкл] установлено в [Выкл] (только DSC-HX60V)
– [Качество отображ.] установлено в [Стандартный]
• Количество, указанное в графе “Съемка (фотоснимки)”, основывается
на стандарте CIPA и приведено для съемки при следующих условиях:
(CIPA: Camera & Imaging Products Association)
– Если опция DISP установлена в положение [Показ. всю инф.].
– Съемка через каждые 30 секунд.
– Зум поочередно переключается между концами W и T.
– Вспышка используется каждый второй раз.
– Питание включается и выключается через каждые десять раз.
• Количество минут для видеосъемки согласно стандарту CIPA и съемки
в следующих условиях:
– [ Параметры зап.]: 60i 17M(FH)/50i 17M(FH).
– Типичная видеосъемка: Время работы аккумулятора базируется на
повторяющемся запуске/остановке съемки, зуммировании,
включении/выключении и т.п.
– Непрерывная видеосъемка: Время работы аккумулятора базируется
на непрерывной съемке до достижения предела (29 минут), а затем
продолжающейся повторным нажатием кнопки MOVIE. Другие
функции, как зуммирование, не используются.
x
Подача питания
Вы можете использовать адаптер переменного тока AC-UD10
(продается отдельно) или AC-UD11 (продается отдельно) для
подачи питания во время съемки и воспроизведения снимков.
Примечания
• При съемке или воспроизведении снимков, когда камера
подсоединена к прилагаемому адаптеру переменного тока, питание
через адаптер переменного тока подаваться не будет.
14
RU
Page 49

Установка карты памяти (продается отдельно)
Убедитесь, что зазубренный
угол расположен правильно.
Откройте крышку.
1
Вставьте карту памяти (продается отдельно).
2
• Расположив карту памяти с зазубренным углом так, как на
рисунке, вставьте ее до щелчка.
Закройте крышку.
3
RU
RU
15
Page 50

x
Используемые карты памяти
Карта памяти Для фотоснимков Для видеосъемки
Memory Stick XC-HG
Duo™
A
Memory Stick PRO Duo™ (только Mark2)
Memory Stick PRO-HG
Duo™
B Memory Stick Micro™ (M2) (только Mark2)
Карта памяти SD (Класс 4 или
Карта памяти SDHC (Класс 4 или
C
Карта памяти SDXC (Класс 4 или
Карта памяти microSD (Класс 4 или
Карта памяти microSDHC (Класс 4 или
D
Карта памяти microSDXC (Класс 4 или
• В данном руководстве изделия в таблице именуются в собирательном
значении как:
A: Memory Stick PRO Duo
B: Memory Stick Micro
C: Карта SD
D: Карта памяти microSD
Примечания
• При использовании с данной камерой карт памяти Memory Stick Micro
или microSD, обязательно используйте их с соответствующим
адаптером.
выше)
выше)
выше)
выше)
выше)
выше)
x
Для извлечения карты памяти/аккумулятора
Карта памяти: Нажмите карту памяти один раз для ее извлечения.
Аккумулятор: Передвиньте рычаг выталкивания аккумулятора.
Следите за тем, чтобы не уронить аккумулятор.
RU
16
Page 51

Примечания
• Никогда не вынимайте карту памяти/аккумулятор, когда горит
индикатор доступа (стр. 9). Это может привести к повреждению данных
на карте памяти.
Установка часов
ON/OFF (Питание)
Колесико управления
Выбор пунктов: v/V/b/B//
Установка:
Нажмите кнопку ON/OFF (Питание).
1
При первом включении камеры будет отображена установка
даты и времени.
• Для включения питания и получения доступа к функциям
камеры может потребоваться некоторое время.
Убедитесь, что на экране выбрано [Ввод], а затем
2
нажмите z на колесике управления.
Выберите нужное географическое
3
местоположение, следуя инструкциям на экране, а
затем нажмите z.
Установите [Летнее время], [Дата/Время] и [Формат
4
даты], а затем нажмите z.
• При установке [Дата/Время] полночь обозначается как
12:00 AM, а полдень как 12:00 PM.
Убедитесь, что выбрано [Ввод], а затем нажмите z.
5
z
RU
RU
17
Page 52

Фотосъемка/видеосъемка
Кнопка затвора
Рычажок W/T
(зум)
W: уменьшение
T: увеличение
Диск режимов
: Интеллект.
Авто
: Видео
Фотосъемка
Нажмите кнопку затвора наполовину для
1
выполнения фокусировки.
Если изображение находится в фокусе, раздается звуковой
сигнал и высвечивается индикатор z.
Для выполнения съемки нажмите кнопку затвора
2
полностью вниз.
Видеосъемка
Нажмите кнопку MOVIE (Видео) для начала записи.
1
• Используйте рычажок W/T (зум) для изменения кратности
зума.
Еще раз нажмите кнопку MOVIE для прекращения
2
Не закрывайте вспышку (A).
записи.
MOVIE
Примечания
• Не выдвигайте вспышку вручную. Это может привести к
неисправности.
• При использовании функции зума во время видеосъемки будет записан
звук работы камеры. По завершении видеосъемки также может быть
записан звук срабатывания кнопки MOVIE.
RU
18
Page 53

• Диапазон съемки панорамы может быть сокращен в зависимости от
объекта или способа его съемки. Поэтому даже в случае установки
значения [360°] для панорамной съемки запи санное изображение может
охватывать меньше 360 градусов.
• Непрерывная видеосъемка возможна в течение приблизительно
29 минут за один раз с настройками камеры по умолчанию и при
температуре окружающей сре ды приблизительно 25°C. По завершении
видеозаписи можно возобнови ть запись, нажав кнопку MO VIE еще раз.
Выполнение записи может остановиться для защиты камеры в
зависимости от температуры окружающей среды.
Просмотр снимков
W: уменьшение
T: увеличение
Колесико управления
RU
(Воспроизведение)
(Удалить)
Нажмите кнопку (Воспроизведение).
1
• При воспроизведении на данной камере снимков на карте
памяти, записанных с помощью других камер, появится экран
регистрации для файла данных.
x
Выбор следующего/предыдущего снимка
Выберите снимок, нажимая B (следующий)/b (предыдущий) на
колесике управления или поверните колесико управления. Нажмите
z в центре колесика управления для просмотра видеозаписи.
Выбор снимков: B (следующий)/
b (предыдущий)
или поверните
колесико
управления
Установка: z
RU
19
Page 54

x
Удаление снимка
1 Нажмите кнопку (Удалить).
2 Выберите [Удалить] с помощью v на колесике управления, а
затем нажмите z.
x
Возврат к фотосъемке
Нажмите кнопку затвора наполовину.
Введение в другие функции
Fn (Функция)
MENU
Колесико управления
x
Колесико управления
DISP (Вид экрана): Позволяет изменять экранную индикацию.
(Режим протяжки): Позволяет переключать способы съемки,
как, например, покадровая съемка, непрерывная съемка или съемка
в режиме брекетинга.
(Творческое фото): Позволяет интуитивно управлять камерой и
легко получать творческие снимки.
(Режим вспышки): Позволяет выбирать режим вспышки для
фотоснимков.
z (Следящий AF): Камера следит за объектом и автоматически
регулирует фокус, даже если объект перемещается.
x
Кнопка Fn (Функция)
Позволяет зарегистрировать 12 функций и вызывать эти функции во
время съемки.
1 Нажмите кнопку Fn (Функция).
2 Выберите нужную функцию, нажимая кнопки v/V/b/B на
колесике управления.
3 Выберите значение установки, поворачивая колесико
RU
управления.
20
Page 55

x
Пункты меню
(Настройки съемки)
Размер изобр. Выбор размера фотоснимков.
Формат Выбор формата фотоснимков.
Качество Выбор качества изображения для фотоснимков.
Панорама: размер Выбор размера панорамных изображений.
Панорама: направ.
Выбор направления съемки панорамных
изображений.
Формат файла Выбор формата файла видео.
Параметры зап. Выбор размера кадра записанного видео.
Режим протяжки
Режим вспышки Выполнение установок вспышки.
Кор.эксп.вспыш. Регулировка количества света вспышки.
Ум.эфф.кр.глаз
Режим фокусиров. Выбор метода фокусировки.
Область фокусир. Выбор области фокусировки.
Подсветка AF
ISO Регулировка световой чувствительности.
Режим измер.
Баланс белого Регулировка цветовых тонов изображения.
DRO/Авто HDR
Творческ. стиль Выбор нужной обработки изображения.
Эффект рисунка
Установка режима привода, например, для
непрерывной съемки.
Уменьшение эффекта красных глаз при
использовании вспышки.
Установка подсветки АФ, которая используется
для фокусировки на объекте в темной
обстановке.
Выбор режима фотометрии, устанавливающего,
какую часть объекта следует использовать для
определения экспозиции.
Автоматическая компенсация яркости и
контрастности.
Выбор нужного фильтра эффекта для
получения более выразительного и
художественного снимка.
RU
RU
21
Page 56

ШП высокого
ISO
Следящий AF
Улыб./Распоз. Лиц
Эфф. мягк.
кожи
Авто кадриров.
Выбор сцены
Видео
SteadyShot
Авто медл.
затв.
Исх. ур. микрофона
Умен. шума ветра Уменьшение шума ветра во время видеозаписи.
Советы по съемке Отображение списка подсказок по съемке.
Память
Использование функции подавления шума при
съемке с высокой чувствительностью.
Установка функции для отслеживания объекта
и продолжения фокусировки.
Выбор для автоматического распознава ния лиц
и регулировки различны х установок. Установка
автоматического срабатывания затвора при
распознавании улыбки.
Установка эффекта мягкой кожи и уровня
эффекта.
Анализ сцены во время обнаружения лиц,
объектов крупным планом или объектов,
отслеживаемых функцией Следящий AF и
автоматическое обрезание и сохранение других
копий снимков с более выразительной
композицией.
Выбор предварительно отрегулированных
установок в соответствии с условиями
различных сцен.
Выбор режима съемки в зависимости от
объекта или эффекта.
Установка функции SteadyShot для
видеосъемки.
Установка функции, которая автоматически
регулирует скорость затвора в соответствии с
окружающим освещением.
Установка базового уровня микрофона во
время видеосъемки.
Сохранение нужных режимов или установок
камеры.
22
RU
Page 57

(Пользов. настройки)
Помощь для MF
Сетка
Авто.просмотр
Инстр. настр. эксп.
Настр. увеличения
Отображение увеличенного изображения при
ручной фокусировке.
Отображение линий сетки для облегчения
выравнивания кадра.
Установка автоматического просмотра для
отображения снимка сразу после съемки.
Установка отображения справки при
изменении настроек экспозиции на экране
режима съемки.
Установка необходимости использования
функций увеличения четкого изображения и
цифрового увеличения при выполнении
зуммирования.
Запись даты Установка записи даты съемки на фотоснимке.
Настр. меню функ.
Кнопка MOVIE
Настройка функций, отображаемых при
нажатии кнопки Fn (Функция).
Установка необходимости постоянной
активации кнопки MOVIE.
(Беспроводная)
Отправ. на смартф.
Отправить на комп.
Просмотр на ТВ
Одно касание(NFC)
Передача снимков для отображения на
смартфоне.
Резервное копирование снимков путем
передачи их на компьютер, подсоединенный к
сети.
Вы можете просматривать снимки на
телевизоре, подсоединенном к сети.
Назначение приложения функции в одно
касание (NFC). Вы можете вызывать
приложение при съемке путем касания NFCсовместимого смартфона к камере.
RU
RU
23
Page 58

Режим полета
Нажать WPS
Руч. настр. тчк дост.
Редакт. назв. устр.
Отобр. MAC-адрес Отображение MAC-адреса камеры.
Сбр. SSID/Пароль
Сброс. настр. сети Сброс всех сетевых настроек.
Вы можете установить, чтобы данное
устройство не осуществляло функции
беспроводной связи и GPS.
Вы можете легко зарегистрировать точку
доступа для камеры, нажав кнопку WPS.
Вы можете зарегистрировать точку доступа
вручную.
Вы можете изменить название устройства в
разделе Wi-Fi Direct и т.п.
Переустановка SSID и пароля для
подсоединения смартфона.
(Приложение)
Список приложен.
Введение
Отображение списка приложений. Вы можете
выбрать приложение, которое нужно
использовать.
Отображение инструкций по использованию
приложения.
(Воспроизведение)
Удалить Удаление изображения.
Режим просмотра
Индекс изображ.
Слайд-шоу Отображение слайд-шоу.
Повернуть Поворот изображения.
Установка способа группировки снимков для
воспроизведения.
Одновременное воспроизведение нескольких
изображений.
Увеличить Увеличение воспроизводимых снимков.
Воспр. фотосн. 4K
RU
Вывод фотоснимков с разрешением 4K через
соединение HDMI на телевизор,
поддерживающий разрешение 4K.
24
Page 59

Защита Защита изображений.
Настройка интервала отображения
отслеживания объектов в [Видеосъемка
Кор.интерв.движен.
Укажите печать
движ.], где отслеживание движения объекта
будет отображаться во время воспроизведения
видеозаписей.
Добавление метки команды печати к
фотоснимку.
(Настройка)
Яркость монитора Установка яркости экрана.
При использовании электронного
Яркость видоискат.
Параметры громк.
Звуковые сигн. Установка звуков работы камеры.
Параметры GPS
(только DSC-HX60V)
Парам. Выгрузки
Мозаичное меню
Спр. д-ка выб. реж.
Качество отображ. Установка качества дисплея.
Время нач. энергоз.
Перекл. PAL/NTSC
(только для 1080
50i-совместимых
моделей)
видоискателя (продается отдельно)
устанавливается яркость электронного
видоискателя.
Регулировка громкости звука при
воспроизведении видеозаписи.
Установка функции GPS.
Установка функции выгрузки при
использовании с камерой карты Eye-Fi.
Установка необходимости отображения
мозаичного меню пр и каждом нажатии кнопки
MENU.
Включение или выключение справки диска
режимов (пояснения для каждого режима
съемки).
Выбор интервала времени до автоматическо го
выключения камеры.
Изменяя телевизионный формат устройства,
возможно выполнять съемку в другом
видеоформате.
RU
RU
25
Page 60

Демонстр. режим
Разрешение HDMI
КОНТР. ПО HDMI
USB-соединение Выбор способа выполнения соединения USB.
Настройка USB LUN
USB питание
Язык Выбор языка.
Настр. даты/врем. Установка даты, времени и летнего времени.
Часовой пояс Установка места использования.
Форматировать Форматирование карты памяти.
Номер файла
Выбор папк. записи
Создать папку
Название папки Установка названия папки для фотоснимков.
Восстан. БД изобр.
Показ. инф. о носит
Модель Отображение версии ПО камеры.
Заводск. настройка
Включение или выключение воспроизведения
демонстрационного видео.
Установка разрешения при подсоединении
камеры к телевизору HDMI.
Управление камерой с телевизора,
поддерживающего BRAVIA™ Sync.
Повышение совместимости путем
ограничения функций USB-соединения.
Установка необходимости подачи питания
через USB-соединение.
Выбор способа нумерации файлов
фотоснимков и видеозаписей.
Изменение выбранной папки для хранения
изображений.
Создание новой папки для хранения
фотоснимков и видеозаписей (MP4).
Восстановление файла базы изображений и
возобновление возможности записи и
воспроизведения.
Отображение оставшегося времени записи
видео и количества доступных для записи
фотоснимков на карте памяти.
Возврат к значениям параметров по
умолчанию.
26
RU
Page 61

Функции PlayMemories Home™
Программное обеспечение PlayMemories Home позволяет
импортировать фотоснимки и видеозаписи в компьютер и
использовать их. Play Memories Home требуется для импортирован ия
видеозаписей AVCHD в компьютер.
Воспроизведение
импортированных
снимков
Импорт изображений
из камеры
Для Windows также доступны следующие
функции:
Совместное
использование
изображений в программе
PlayMemories Online™
RU
Просмотр
снимков по
календарю
Примечания
• Для установки PlayMemories Home необходимо Интернет-соединение.
• Для использования PlayMemories Online или других сетевых служб
необходимо Интернет-соединение. PlayMemories Online или другие
сетевые службы могут быть недоступны в некоторых странах или
регионах.
• Используйте следующий URL-адрес для приложений Mac:
http://www.sony.co.jp/imsoft/Mac/
• Если программное обеспечение PMB (Picture Motion Browser),
поставляемая с моделями, выпущенными до 2011 г., уже установлено на
компьютере, оно будет заменено приложением PlayMemories Home во
время установки. Используйте PlayMemories Home, замену
программного обеспечения PMB.
Создание
видеодисков
Загрузка
снимков в
сетевые
службы
RU
27
Page 62

x
Системные требования
Системные требования к программному обеспечению приведены по
следующему URL-адресу:
www.sony.net/pcenv/
x
Установка PlayMemories Home на компьютере
С помощью Интернет-браузера на компьютере
1
перейдите к следующему URL-адресу, а затем
установите PlayMemories Home.
www.sony.net/pm/
• Подробные сведения о приложении PlayMemories Home
приведены на следующей странице поддержки PlayMemories
Home (только на английском языке):
http://www.sony.co.jp/pmh-se/
• После завершения установки запустится приложение
PlayMemories Home.
Подключите камеру к компьютеру с помощью
2
кабеля micro USB (прилагается).
• В PlayMemories Home можно устанавливать новые функции.
Подсоедините камеру к компьютеру даже если PlayMemories
Home уже установлено на компьютере.
Примечания
• Не отсоединяйте кабель micro USB (прилагается) от камеры во время
отображения экрана управления или экрана доступа. Это может стать
причиной повреждения данных.
• Для отсоединения камеры от компьютера, щелкните по на панели
задач, а затем щелкните (значок отсоединения). Для Windows Vista
щелкните по на панели задач.
28
RU
Page 63

Добавление функций на камере
Вы можете добавлять нужн ые функции на камере, подсоединившись
к веб-сайту для загрузки приложений (PlayMemories Camera
Apps™) через Интернет.
http://www.sony.net/pmca
• После установки приложение можно вызвать с помощью функции
[Одно касание(NFC)], приложив NFC-совместимый Androidсмартфон к метке N на камере.
Количество фотоснимков и время видеозаписи
Количество фотоснимков и время записи может быть разным в
зависимости от условий съемки и носителя информации.
x
Фотоснимки
[ Размер изобр.]: L: 20M
Если [ Формат] установлено в [4:3]*
Качество
Емкость
Стандартное 295 изображений
Высокое 200 изображений
* При установке [ Формат], отличного от [4:3], можно записать
больше снимков, чем показано выше.
2 Гб
RU
RU
29
Page 64

x
Видеозаписи
В таблице внизу представлена приблизительная максимальная
продолжительность записи. Здесь указано общее время для всех
файлов видеозаписей. Непрерывная съемка возможна в течение
приблизительно 29 минут (ограничено техническими
характеристиками изделия). Максимальное непрерывное время
записи видео в формате MP4 (12M) составляет около 15 минут
(ограничено размером файла 2 Гб).
(h (часы), m (минуты))
Параметры зап.
Емкость
60i 24M(FX)/50i 24M(FX) 10 m
60i 17M(FH)/50i 17M(FH) 10 m
60p 28M(PS)/50p 28M(PS) 9 m
24p 24M(FX)/25p 24M(FX) 10 m
24p 17M(FH)/25p 17M(FH) 10 m
1440×1080 12M 15 m
VGA 3M 1 h 10 m
• Доступное время для видеосъемки может изменяться, поскольку
камера оснащена системой VBR (переменная скорость передачи
битов), которая автоматически регулирует качество изображения в
зависимости от сцены съемки. При записи быстродвижущихся
объектов изображение остается четким, однако доступное для записи
время будет меньше, так как для записи требуется больше памяти.
Доступное для записи время также изменяется в зависимости от условий
съемки, объекта или настроек качества/размера изображения.
2 Гб
30
RU
Page 65

Примечания по использованию камеры
Встроенные функции камеры
• В данном руководстве приведено описание 1080 60i-совместимых и
1080 50i-совместимых устройств.
– Чтобы определ ить, поддерживает ли камера функцию GPS, проверьте
наименование модели камеры.
GPS-совместимая: DSC-HX60V
GPS-несовместимая: DSC-HX60
– Чтобы проверить, является ли камера 1080 60i-совместимым
устройством или 1080 50i-совместимым устройством, проверьте
следующие метки на нижней стороне камеры.
1080 60i-совместимое устройство: 60i
1080 50i-совместимое устройство: 50i
• Эта камера совместима с видеозаписями в формате 1080 60p или 50p. В
отличие от стандартных режимов записи, применявшихся до
настоящего времени, в которых для записи использовался
чересстрочный метод, в этой камере для записи используется
прогрессивный метод. Это позволяет повысить разрешение и получить
более четкое и более реалистичное изображение.
• Во время нахождения на борту самолета установите функцию [Режим
полета] в [Вкл].
О GPS-совместимых устройствах (только DSC-HX60V)
• Используйте GPS в соответствии с правилами стран и регионов, где
будете его использовать.
• Если не записывается ин формация о местоположении, установите [GPS
Вкл/Выкл] в [Выкл].
Об использовании и уходе
Обращайтесь с изделием осторожно, не разбирайте и не модифицируйте
его, не подвергайте его ударным и другим нагрузкам: не стучите по нему,
не роняйте его, а также не наступайте на него. Будьте особенно
осторожны с объективом.
RU
RU
31
Page 66

Примечания по записи/воспроизведению
• Перед началом записи выполните пробную запись, чтобы убедиться в
надлежащей работе камеры.
• Данная камера не является не пылепроницаемой, ни
брызгозащищеннной, не водопроницаемой.
• Не наводите камеру на солнце или другой источник яркого света. Это
может привести к неисправности камеры.
• Если произойдет конденсация влаги, удалите ее перед использованием
камеры.
• Не трясите камеру и не подвергайте ее ударам. Это может привести к
неисправности, и запись ф отоснимков станет невозможной. Более того,
может испортиться носитель информации или могут повредиться
данные фотоснимков.
Не используйте/не храните камеру в следующих местах
• В чрезмерно жарком, холодном или влажном месте
В таких местах, как, например, в автомобиле, припаркованном под
прямыми солнечными лучами, корпус камеры может деформироваться,
что может привести к неисправности.
• Под прямым солнечным светом или возле обогревателя
Корпус камеры может обесцветиться или деформироваться, и это
может привести к неисправности.
• В месте, подверженном встряхиванию или вибрации
• Вблизи генераторов сильных радиоволн, источников радиационного
излучения, или в местах с сильными магнитными полями
В таких местах камера может неправильно выполнять запись или
воспроизведение фотоснимков.
• В местах с повышенным содержанием песка или пыли
Будьте осторожны, чтобы не допустить попадания песка или пыли в
камеру. Это может привести к неисправности камеры, и в некоторых
случаях эта неисправность не может быть устранена.
Примечания относительно экрана и объектива
• Экран изготовлен с использованием особо высокоточной технологии,
что позволяет при эксплуатации эффективно использовать свыше
99,99% пикселей. Однако на экране могут появляться маленькие
темные и/или светлые точки (белого, красного, синего или зеленого
цвета). Такие точки являются результатом произво дственного процесса
и ни в коей мере не влияют на запись.
• Соблюдайте осторожность, чтобы ваши пальцы или другие предметы
не были защемлены во время работы объектива.
32
RU
Page 67

Примечания относительно вспышки
• Не переносите камеру, держа ее за вспышку, и не прилагайте к ней
чрезмерное усилие.
• Попадание воды, пыли или песка в открытую вспышку может привести
к неисправности.
• Соблюдайте осторожность, чтобы ваши пальцы не препятствовали при
нажатии вспышки вниз.
О температуре камеры
Камера и аккумулятор могут нагреваться в результате
продолжительного использования, но это не является неисправностью.
О защите от перегрева
В зависимости от температуры камеры и аккумулятора, видеосъемка
может быть невозможна или питание может выключаться
автоматически для защиты камеры.
Перед выключением питания или перед тем, как станет невозможна
видеосъемка, на экране появится сообщение. В этом случае оставьте
питание выключенным и подождите, пока температура камеры и
аккумулятора не снизится до приемлемого уровня. При включении
питания не остывшей в достаточной степени камеры или аккумулятора,
питание может отключиться снова или выполнение видеосъемки может
стать невозможным.
О заряде аккумулятора
• При зарядке аккумулятора, который не использовался в течение
длительного времени, зарядит ь его до надлежащей емкости может быть
невозможно.
Это связано с характеристиками аккумулятора. Зарядите аккумулятор
еще раз.
•
Если не пользоваться аккумулятором больше года, это может
привести к ухудшению его характеристик.
Предупреждение об авторских правах
На телевизионные программы, фильмы, видеоленты и другие материалы
может распространяться авторское право. Неправомочная перезапись
таких материалов может противоречить положениям закона об
авторском праве.
Гарантия не предоставляется в случае повреждения
информации или сбоя при записи.
Фирма Sony не может предоставить гарантию в случае сбоя при записи,
потери или повреждения записанной информации вследствие
неисправности камеры или носителя информации и т.п.
RU
RU
33
Page 68

Чистка поверхности камеры
Очистите поверхность камеры мягкой тканью, слегка смоченной водо й, а
затем протрите поверхность сухой тканью. Чтобы не повредить
покрытие или корпус:
– Не подвергайте камеру воздействию химических веществ, таких как
разбавитель, бензин, спирт, разовы е салфетки, жидкость от насекомых,
солнцезащитный крем или инсектицид.
Уход за экраном
• Крем для рук или увлажняющее средство, оставшееся на экране, может
повредить его покрытие. При попадании чего-либо на экран,
немедленно вытрите его.
• Вытирание с нажимом с помощью салфетки или других материалов
может привести к повреждению покрытия.
• Если на экране остались отпечатки пальцев или пыль, рекомендуется
осторожно удалить их, а затем начисто вытереть экран мягкой тканью.
Примечания по беспроводной локальной сети
Мы не несем ответственности за любое повреждение, причиненное
несанкционированным доступом или несанкционированным
использованием, содержимого, загруженного на камеру, в результате
потери или кражи.
34
RU
Page 69

Технические характеристики
Камера
[Система]
Формирователь изображения:
7,82 мм (тип 1/2,3) датчик
Exmor R™ CMOS
Общее количество пикселов
камеры:
Приблиз. 21,1 мегапикселов
Число эффективных пикселей
камеры:
Приблиз. 20,4 мегапикселов
Объектив: 30-кратный зум-
объектив Sony G
f = 4,3 мм – 129 мм (24 мм –
720 мм (эквивалент
фотопленки 35 мм))
F3,5 (W) – F6,3 (T)
При видеосъемке в формате
(16:9): 26,5 мм – 795 мм*
При видеосъемке в формате
(4:3): 32,5 мм – 975 мм*
* Если [ SteadyShot]
установлена в положение
[Стандартный]
SteadyShot: Оптическая
Формат файла:
Фотоснимки: В соответствии с
JPEG (DCF, Exif, MPF
Baseline), DPOF-совместимые
Видеозапись (формат
AVCHD): Поддержка
формата AVCHD версии 2.0
Видео: MPEG-4 AVC/H.264
Аудио: Dolby Digital 2 кана ла с
встроенной технологией Dolby
Digital Stereo Creator
• Изготовлено по лицензии
компании Dolby Laboratories.
Видеозапись (формат MP4):
Видео: MPEG-4 AVC/H.264
Аудио: MPEG-4 AAC-LC
2 канала
Носитель записи: Memory Stick
PRO Duo, Memory Stick Micro,
карты SD, карты памяти
microSD
Вспышка: Диапазон действия
вспышки (чувствительность
ISO (рекомендуемая величина
экспозиции) установлен в
положение Авто):
Приблиз. от 0,25 м до 5,6 м (W)/
Приблиз. от 2,0 м до 3,0 м (T)
[Входные и выходные
разъемы]
Разъем HDMI: HDMI
микрогнездо
Разъема Multi/Micro USB*:
USB-соединение
USB-соединение: Hi-Speed USB
(USB 2.0)
* Поддерживает Micro USB-
совместимое устройство.
[Экран]
Экран ЖКД:
7,5 см (тип 3,0) схема
управления TFT
Общее количество точек:
921 600 точек
RU
RU
35
Page 70

[Питание, общая
информация]
Питание: Перезаряжаемый
аккумулятор NP-BX1, 3,6 В
Aдаптер переменного тока
AC-UB10C/UB10D, 5 В
Потребляемая мощность (во
время съемки):
Приблиз. 1,2 Вт
Температура эксплуатации:
От 0 °C до 40 °C
Температура хранения:
От –20 °C до +60 °C
Размеры (в соответствии с CIPA):
108,1 мм × 63,6 мм × 38,3 мм
(Ш/В/Г)
Все (в соответствии с CIPA)
(Приблиз.):
272 г (включая аккумулятор
NP-BX1, Memory Stick PRO
Duo)
Микрофон: Стерео
Громкоговоритель:
Монофонический
Exif Print: Совместима
PRINT Image Matching III:
Совместима
[Беспроводная локальная
сеть]
Поддерживаемый стандарт:
IEEE 802.11 b/g/n
Частота: 2,4 ГГц
Поддерживаемые протоколы
безопасности: WEP/WPA-
PSK/WPA2-PSK
Способ конфигурации: WPS
(Wi-Fi Protected Setup)/ручной
Способ доступа:
Инфраструктурный режим
NFC: В соответствии с NFC Forum
Type 3 Tag
RU
36
Адаптер переменного тока
AC-UB10C/UB10D
Требования к питанию:
100 В – 240 В переменного
тока, 50 Гц/60 Гц, 70 мА
Выходное напряжение: 5 В
постоянного тока, 0,5 А
Температура эксплуатации:
От 0 °C до 40 °C
Температура хранения:
От –20 °C до +60 °C
Размеры (Приблиз.):
50 мм × 22 мм × 54 мм (Ш/В/Г)
Перезаряжаемый
аккумулятор NP-BX1
Тип аккумулятора: Л итий-ионный
аккумулятор
Максимальное напряжение:
4,2 В постоянного тока
Номинальное напряжение:
3,6 В постоянного тока
Максимальное напряжение
зарядки: 4,2 В постоянного
тока
Максимальный ток зарядки:
1,89 A
Емкость: 4,5 Втч (1 240 мАч)
Конструкция и технические
характеристики могут быть
изменены без уведомления.
Page 71

Товарные знаки
• Memory Stick и являются
товарными знаками или
зарегистрированными
товарными знаками Sony
Corporation.
• “AVCHD Progressive” и логотип
“AVCHD Progressive” являются
товарными знаками Panasonic
Corporation и Sony Corporation.
• Dolby и символ в виде сдвоенной
буквы D являются товарными
знаками Dolby Laboratories.
• Термины HDMI и HDMI HighDefinition Multimedia Interface и
логотип HDMI являются
товарными знаками или
зарегистрированными
товарными знаками HDMI
Licensing LLC в США и других
странах.
• Windows и Windows Vista
являются зарегистрированными
товарными знаками Microsoft
Corporation в Соединенных
Штатах Америки и/или других
странах.
• Mac является
зарегистрированным товарным
знаком Apple Inc. в
Соединенных Штатах Америки
и других странах.
• iOS является
зарегистрированным товарным
знаком или товарным знаком
Cisco Systems, Inc.
• iPhone и iPad являются
зарегистрированными
товарными знаками Apple Inc. в
Соединенных Штатах Америки
и других странах.
• Логотип SDXC является
товарным знаком SD-3C, LLC.
• Android и Google Play являются
товарными знаками Google Inc.
• Wi-Fi, логотип Wi-Fi и Wi-Fi
PROTECTED SET-UP являются
зарегистрированными
товарными знаками компании
Wi-Fi Alliance.
• Метка N является товарным
знаком или зарегистрированным
товарным знаком NFC Forum,
Inc. в Соединенных Штатах
Америки и в других странах.
• DLNA и DLNA CERTIFIED
являются товарными знаками
Digital Living Network Alliance.
• Facebook и ло готип “f” являются
товарными знаками или
зарегистрированными
товарными знаками компании
Facebook, Inc.
• YouTube и логотип YouTube
являются товарными знаками
или зарегистрированными
товарными знаками компании
Google Inc.
• Eye-Fi является товарным
знаком Eye-Fi, Inc.
• Кроме того, названия систем и
изделий, исполь зуемые в данном
руководстве, являются, обычно,
товарными знаками или
зарегистрированными
товарными знаками их
соответствующих
разработчиков или
производителей. Однако знаки
™ или ® используются не во всех
случаях в данном руководстве.
RU
RU
37
Page 72

Дополнительная информация
по данному изделию и ответы
на часто задаваемые вопросы
могут быть найдены на нашем
веб-сайте поддержки
покупателей.
Импортер на территории стран
Таможенного союза ЗАО «Сони
Электроникс», Россия, 123103,
Москва, Карамышевский проезд, 6
Организация, уполномоченная
принимать претензии от
потребителей на территории
Казахстана
ЗАО «Сони Электроникс»
Представительство в Казахстане,
050059, Алматы, улица Иванилова,
д. 58
38
RU
Page 73

RU
RU
39
Page 74

Українська
Докладніше про фотоапарат («Довідковий посібник»)
«Довідковий посібник» – це інтерактивний онлайнпосібник. У ньому можна отримати детальні вказівки
до багатьох функцій фотоапарата.
1 Зайдіть на сторінку підтримки Sony.
http://www.sony.net/SonyInfo/Support/
2 Виберіть свою країну або регіон.
3 Увійшовши на сторінку підтримки, запустіть
пошук за назвою моделі свого фотоапарата.
• Назву моделі можна знайти на наклейці знизу
фотоапарата.
Перегляд посібника
У цьому фотоапараті передбачено вбудований довідник функцій
фотоапарата.
Fn (виклик функцій)
MENU
Вбудована довідка
Фотоапарат відображає пояснення елементів MENU/кнопки Fn
(виклик функцій) та значень налаштувань.
1 Натисніть кнопку MENU або Fn (виклик функцій).
2 Виберіть потрібний пункт і натисніть кнопку (Вбудована
довідка).
(Вбудована довідка)
UA
2
Page 75

Підказки щодо зйомки
Фотоапарат відображає підказки щодо вибраного режиму зйомки.
1 Натисніть у режимі зйомки кнопку (Вбудована довідка).
2 Виберіть потрібну підказку щодо зйомки і натисніть на диску
керування z.
На екрані відобразиться вибрана підказка.
• Прокручувати екран можна за допомогою кнопок v/V, а
змінювати підказки за допомогою кнопок b/B.
ПОПЕРЕДЖЕННЯ
Щоб знизити ризик займання або ураження електричним
струмом, не піддавайте виріб впливу дощової води або
вологи.
ВАЖЛИВІ ВКАЗІВКИ З ТЕХНІКИ БЕЗПЕКИ
-ЗБЕРЕЖІТЬ ЦЮ ІНСТРУКЦІЮ
НЕБЕЗПЕКА
ЩОБ ЗМЕНШИТИ РИЗИК ВИНИКНЕННЯ
ПОЖЕЖІ АБО УРАЖЕННЯ ЕЛЕКТРИЧНИМ
СТРУМОМ, СЛІД РЕТЕЛЬНО ВИКОНУВАТИ ЦІ
ВКАЗІВКИ
УВАГА!
[ Акумуляторна батарея
Якщо неправильно поводитися з акумуляторною батареєю, вона може
вибухнути, спричинити пожежу або навіть викликати хімічні опіки.
Дотримуйтеся наведених нижче застережень.
• Не розбирайте акумуляторну батарею.
• Не роздавлюйте, не бийте та не прикладайте силу до акумуляторної батареї.
Не бийте її молотком, не кидайте та не наступайте на неї.
• Не замикайте контакти акумуляторної батареї та запобігайте потраплянню
між ними металевих предметів.
• Не піддавайте акуму ляторну батарею дії температури понад 60 °C, наприклад
під впливом прямих сонячних променів у припаркованому автомобілі.
• Не підпалюйте акумуляторну батарею та не кидайте її у вогонь.
• Не торкайтеся пошкодженої літій-іонної батареї або такої, з якої витікає
рідина.
UA
UA
3
Page 76

• Заряджайте акумуляторну батарею, лише використовуючи оригінальний
зарядний пристрій Sony або пристрій, який може заряджати акумуляторні
батареї.
• Тримайте акумуляторну батарею поза досяжністю маленьких дітей.
• Тримайте акумуляторну батарею сухою.
• Замінюйте акумуляторну батарею лише на таку саму або еквівалентну, яку
рекомендує компанія Sony.
• Швидко утилізуйте використані акумуляторні батареї, як описано в
інструкціях.
[ Адаптер змінного струму
Для застосування адаптера змінного струму використовуйте розетку, яка
знаходиться поблизу. Якщо під час використання пристрою виникне збій у його
роботі, слід негайно від’єднати адаптер змінного струму від розетки.
[ Дата виготовлення виробу.
Дата виготовлення виробу зазначена на позначці «P/D:», яка знаходиться на
етикетці зі штрих-кодом на картонній коробці.
Знаки, зазначені на етикетці зі штрих-кодом на картонній коробці.
P/D:XX XXXX
1 2
1. Місяць виготовлення
2. Рік виготовлення
A-0, B-1, C-2, D-3, E-4, F-5, G-6, H-7, I-8, J-9.
Рік та місяць виробництва літієво-іонного батарейного блоку проштамповані
на боковій поверхні або на поверхні з етикеткою.
XXXXXXXXXXX
Місяць виготовлення (з 01 до 12)
Рік виготовлення
UA
4
Page 77

Для споживачів з Європи
[ Примітка для покупців у країнах, де діють директиви ЄС
Виробник: Sony Corporation, 1-7-1 Konan Minato-ku Tokyo, 108-0075 Japan
(Японія)
Для запитів щодо відповідності виробу згідно законодавчих актів ЄС: Sony
Deutschland GmbH, Hedelfinger Strasse 61, 70327 Stuttgart, Germany
(Німеччина)
Цим корпорація Sony Corporation підтверджує, що це обладнання відповідає
обов'язковим вимогам та іншим відповідним положенням Директиви 1999/5/EC.
Для отримання детальної інформації відвідайте веб-сайт:
http://www.compliance.sony.de/
[ Примітка
Якщо під впливом статичної електрики або електромагнітного поля процес
передачі даних буде перерваний, перезапустіть пристрій або від’єднайте та
повторно приєднайте кабель, що використовується для передачі даних (USB,
тощо).
Результати тестувань цього виробу демонструють його відповідність вимогам
щодо обмежень, зазначених у директиві EMC, які стосуються використання
з’єднувальних кабелів, коротших за 3 метри.
На відповідних частотах електромагнітні поля можуть впливати на якість
зображення і звука, відтворюваних виробом.
[ Переробка використаних елементів живлення, старого
електричного та електронного обладнання (застосовується
в Європейському союзі та інших європейських країнах із
системами роздільного збирання сміття)
UA
UA
5
Page 78

Інформація для споживачів в Україні
Обладнання відповідає вимогам Технічного регламенту обмеження
використання деяких небезпечних речовин в електричному та електронному
обладнанні (постанова КМУ від 03.12.2008 № 1057).
Виробник:
Sony Corporation 1-7-1, Konan, Minato-ku, Tokyo, Japan, 108-0075.
Уповноважений представник в Україні:
ТОВ «Соні Україна», вул. Спаська 30, м.Київ, 04070, Україна.
Обладнання відповідає вимогам:
– Технічного регламенту безпеки низьковольтного електричного обладнання
(постанова КМУ від 29.10.2009 № 1149)
– Технічного регламенту з електромагнітної сумісності обладнання (постанова
КМУ від 29.07.2009 № 785)
Виробник Соні Корпорейшн цим оголошує, що пристрій DSC-HX60/Цифровий
фотоапарат відповідає вимогам та іншим застосовним положенням Технічного
регламенту радіообладнання і телекомунікаційного кінцевого (термінального)
обладнання.
Отримати декларацію відповідності можна за адресою ТОВ «Соні Україна»,
вул. Спаська 30, м.Київ, 04070, Україна, e-mail info@sony.ua.
Перевірка комплектації
Число в дужках вказує на кількість штук.
• Фотоапарат (1)
• Акумуляторна батарея NP-BX1 (1)
• Кабель Micro USB (1)
• Адаптер змінного струму AC-UB10C/UB10D (1)
• Шнур живлення (не додається для моделей, призначених для США
і Канади) (1)
• Ремінець на зап’ясток (1)
• Кришка колодки (1) (встановлена на фотоапараті)
• Посібник з експлуатації (цей посібник) (1)
• Wi-Fi Connection/One-touch (NFC) Guide (1)
У цьому посібнику наведено пояснення функцій, робота яких
UA
вимагає з’єднання Wi-Fi.
6
Page 79

Визначення частин
A Диск корекції експозиції
B Кнопка ON/OFF (живлення)
C Кнопка спуску
D Для зйомки: Важіль W/T
(масштабування)
Для перегляду: Важіль
(режиму мініатюр)/
(збільшення під час
перегляду)
E Індикатор автоспуску/
підсвітка для автофокуса
F Диск перемикання режимів
(Інтелектуальне авто)/
(Супер авторежим)/
(Програмне авто)/
(Пріорит. діафрагми)/
(Пріоритет витримки)/
(Ручна експозиція)/
(Відкликан. пам'яті)/
(Фільм)/
(іПанорамна зйомка)/
(Вибір сцени)
G Багатоінтерфейсний
роз’єм*
H Спалах
• Натисніть кнопку
(підняття спалаху), щоб
користуватися спалахом.
Спалах автоматично не
піднімається.
• Якщо спалах не потрібний,
потисніть його назад у
корпус виробу.
I Мікрофон
J Гучномовець
K Об’єктив
A Кнопка (підняття спалаху)
B (позначка N)
• Торкніться цієї позначки у
разі під’єднання фотоапарата
до смартфона з підтримкою
функції NFC.
• NFC (Near Field
Communication) – це
міжнародний стандарт
технології бездротового
зв’язку малого радіусу дії.
C Рідкокристалічний дисплей
D Кнопка MOVIE
(відеозйомка)
UA
UA
7
Page 80

E Кнопка (відтворення)
F Диск керування
G Приймач GPS-сигналів
(вбудований, лише для
DSC-HX60V)
H Індикатор заряджання
I Роз’єм Multi/Micro USB*
• Підтримуються пристрої,
сумісні з роз’ємом мікроUSB.
J Сенсор Wi-Fi (вбудований)
K Гачок для ремінця на
зап’ясток
L Кнопка MENU
M Кнопка (Вбудована
довідка) / (видалити)
N Для зйомки: Кнопка
Fn (виклик функцій)
Для перегляду: Кнопка
(Надісл. на смартф.)
A Відсік для встановлення
батареї
B Гніздо для карти пам’яті
C Індикатор доступу
D Важіль виштовхування
батареї
E Кришка відсіку для батареї/
карти пам’яті
F Мікророз’єм HDMI
G Гніздо для штатива
• Використовуйте штатив із
довжиною гвинта менше
5,5 мм. На штативі з довшим
гвинтом неможливо надійно
зафіксувати фотоапарат, що
може призвести до його
ушкодження.
* Для отримання детальної
інформації про сумісне приладдя
для багатоінтерфейсного
роз’єму та Роз’єм Multi/Micro
USB відвідайте веб-сайт
компанії Sony або зверніться до
дилера Sony чи в місцевий
авторизований сервісний центр
Sony. Можна також
використовувати приладдя, яке
сумісне з роз’ємом для приладдя.
Сумісна робота з приладдям
інших виробників не
гарантується.
UA
8
Page 81

Встановлення акумуляторного блока
Важіль виштовхування
батареї
Відкрийте кришку.
1
Вставте батарею.
2
• Натискаючи на важіль виштовхування, вставте батарею, як
показано на малюнку. Встановивши батарею, переконайтеся,
що важіль виштовхування батареї зафіксовано.
• Якщо закрити неправильно встановлену батарею кришкою,
можна пошкодити фотоапарат.
UA
UA
9
Page 82

Заряджання батареї
Для споживачів у США і Канаді
Шнур
живлення
Для споживачів у інших
країнах/регі онах, ніж США
і Канада
З’єднайте фотоапарат та адаптер змінного струму
1
(додається), використовуючи кабель із роз’ємом
мікро-USB (додається).
Підключіть адаптер змінного струму до електричної
2
розетки.
Індикатор заряджання засвічується оранжевим, і заряджання
починається.
• Вимкніть фотоапарат під час заряджання батареї.
• Батарею можна заряджати, навіть якщо вона частково
заряджена.
• Якщо індикатор заряджання блимає, коли заряджання не
завершено, вийміть і встановіть батарею.
Індикатор заряджання
Світиться: Заряджання
Вимк.: Заряджання завершено
Блимання:
Збій заряджання або заряджання
тимчасово припинено через
неналежну температуру
фотоапарата
10
UA
Page 83

Примітки
• Якщо індикатор заряджання на фотоапараті блимає, коли адаптер
змінного струму під’єднано до розетки, це свідчить про те, що
заряджання тимчасово зупинено, оскільки значення температури є
більшим за рекомендоване. Коли температура повернеться в межі
відповідного діапазону, заряджання відновиться. Радимо заряджати
батарею за температури середовища від 10 °C до 30 °C.
• Батарея може не заряджатися ефективно, якщо її контакти забруднені.
У цьому випадку злегка протріть контакти батареї від пилу м’якою
ганчіркою або ватним тампоном.
• Підключіть адаптер змінного струму (додається) до електричної
розетки. Якщо під час використання адаптера змінного струму виникне
збій у роботі, слід негайно вийняти штекер із розетки, щоб від’єднати
пристрій від мережі живлення.
• По закінченні заряджання від’єднайте адаптер змінного струму від
електричної розетки.
• Слід використовувати лише оригінальні батареї, кабель із роз’ємом
Micro USB (додається) та адаптер змінного струму (додається) торгової
марки Sony.
x
Тривалість заряджання (Повна зарядка)
Час заряджання за допомогою адаптера змінного струму (додається)
становить приблизно 230 хвилин.
Примітки
• Вищезгаданий час позначає тривалість заряджання повністю
розрядженої батареї за температури 25 °C. Залежно від умов
використання та обставин заряджання може тривати довше.
x
Заряджання через підключення до комп’ютера
Батарею можна заряджати, під’єднавши фотоапарат до комп’ютера
за допомогою кабелю із роз’ємом Micro USB.
UA
До роз’єму
USB
• Якщо під’єднати фотоапарат до комп’ютера, коли увімкнено
живлення, батарея заряджатися не буде, а фотоапарат
живитиметься від комп’ютера, тому можна імпортувати
зображення на комп’ютер, не турбуючись про низький заряд
батареї.
UA
11
Page 84

Примітки
• Заряджаючи пристрій через комп’ютер, зверніть увагу на такі моменти:
– Якщо фотоапарат під’єднано до ноутбука, який не підключено до
електромережі, то рівень заряду батареї ноутбука знижуватиметься.
Не заряджайте фотоапарат довше, ніж потрібно.
– Не вмикайте, не вими кайте і не перезавантажуйте комп’ютер, а також
не вмикайте комп’ютер з режиму cну, якщо між комп’ютером та
фотоапаратом встановлено з’єднання USB. Це може призвести до
несправності фотоапарата. Перед тим як вмикати, вимикати або
перезавантажувати комп’ютер, а також вмикати його з режиму сну,
від’єднайте фотоапарат від комп’ютера.
– Заряджання через несерійний або модифікований комп’ютер не
гарантується.
x
Тривалість роботи батареї та кількість зображень,
які можна записати і відтворити
Тривалість роботи
батареї
Зйомка (фотографій) прибл. 190 хв. прибл. 380 зображень
Звичайна відеозйомка прибл. 55 хв. —
Неперервна відеозйомка прибл. 90 хв. —
Перегляд (фотографій) прибл. 310 хв. прибл. 6200 зображень
Примітки
• Вищезгадані значення дійсні, лише якщо батарею заряджено повністю.
Залежно від умов використання кількість зображень може бути
меншою.
• Згадана кількість зображень, які можна записати, стосується зйомки за
поданих нижче умов:
– використовується карта Sony Memory Stick PRO Duo™ (Mark2)
(продається окремо);
– батарея використовується за температури середовища 25 °C;
– для пункту [GPS Увімк/ Вимк] встановлено значення [Ви мк] (лише для
DSC-HX60V);
– для параметра [Якість відображен.] встановлено значення
[Стандартний].
UA
Кількість зображень
12
Page 85

• Кількість зображень у рядку «Зйомка (фотографій)» визначається на
основі стандарту CIPA і відповідає зйомці за таких умов:
(CIPA: Camera & Imaging Products Association)
– DISP налаштовано на [Відобр. всю інф.].
– зйомка кожні 30 секунд;
– функція зміни плану почергово перемикається між кінцевими
значеннями W і T;
– спалах спрацьовує кожен другий раз;
– живлення вмикається та вимикається після кожних десяти знімків.
• Тривалість відеозйомки у хвилинах обчислено за стандартом CIPA для
зйомки за поданих нижче умов:
– [ Налашт. запису]: 60i 17M(FH)/50i 17M(FH).
– Звичайна відеозйомка: Тривалість роботи від батареї залежить від
частоти запуску/припинення зйомки, масштабування, увімкнення/
вимкнення тощо.
– Неперервна відеозйомка: тривалість роботи батареї у режимі
неперервної зйомки до досягнення ліміту (29 хвилин), який потім було
продовжено натисненням кнопки MOVIE. Інші функції, зокрема
масштабування, не використовуються.
x
Живлення
Адаптер змінного струму AC-UD10 (продається окремо) або ACUD11 (продається окремо) можна використовувати для
забезпечення живлення під час зйомки або відтворення зображень.
Примітки
• Якщо ви фотографуєте чи відтворюєте зображення, коли фотоапарат
під’єднаний до адаптера змінного струму, який додається, живлення
через адаптер змінного струму не подаватиметься.
UA
UA
13
Page 86

Встановлення карти пам’яті (продається окремо)
Слідкуйте, щоб надрізаний
кут знаходився у
правильному положенні.
Відкрийте кришку.
1
Вставте карту пам’яті (продається окремо).
2
• Вставляйте карту пам’яті надрізаним кутом, як показано на
малюнку, поки не почується клацання.
Закрийте кришку.
3
14
UA
Page 87

x
Типи карт пам’яті, які можна використовувати
Карта пам’яті Для фотознімків Для відеофайлів
Memory Stick XC-HG Duo™
Memory Stick PRO Duo™ (лише для
A
Memory Stick PRO-HG
Duo™
Memory Stick Micro™ (M2) (лише для
B
Карта пам’яті SD (класу 4 або
Карта пам’яті SDHC (класу 4 або
C
Карта пам’яті SDXC (класу 4 або
Карта пам’яті microSD (класу 4 або
Карта пам’яті microSDHC (класу 4 або
D
Карта пам’яті microSDXC (класу 4 або
• У цьому посібнику користувача карти пам’яті з таблиці узагальнено
називають так:
A: Memory Stick PRO Duo
B: Memory Stick Micro
C: Карта SD
D: Карта пам’яті microSD
Примітки
• У разі використання із цим фотоапаратом карт пам’яті Memory Stick
Micro або microSD переконайтеся, що використовуєте відповідний
адаптер.
моделей Mark2)
моделей Mark2)
швидша)
швидша)
швидша)
швидша)
швидша)
швидша)
UA
x
Виймання карти пам’яті/батареї
Карта пам’яті: Щоб вийняти карту пам’яті, натисніть на неї один раз.
Батарея: Посуньте важіль виштовхування батареї. Будьте
обережними, щоб не впустити батарею.
UA
15
Page 88

Примітки
• Ніколи не виймайте карту пам’яті/батарею, якщо індикатор доступу
(стор. 8) світиться. Це може призвести до пошкодження даних на карті
пам’яті.
Налаштування годинника
ON/OFF (живлення)
Диск керування
Вибір параметрів: v/V/b/B//
Встановлення:
Натисніть кнопку ON/OFF (живлення).
1
Параметри дати й часу відображаються після першого вмикання
фотоапарата.
• Для увімкнення живлення та початку роботи може
знадобитися деякий час.
Перевірте, чи на екрані вибрано [Ввід] і натисніть z
2
на диску керування.
Виберіть потрібне географічне розташування,
3
дотримуючись вказівок на екрані, тоді натисніть z.
Налаштуйте параметри [Літній час], [Дата/Час] та
4
[Формат дати], після чого натисніть z.
• Під час налаштування параметра [Дата/Час] північ
позначається як 12:00 AM, а полудень – як 12:00 PM.
Перевірте, чи вибрано пункт [Ввід], і натисніть z.
5
UA
z
16
Page 89

Фото- та відеозйомка
Кнопка спуску
Важіль W/T
(масштабування)
W: зменшення
Диск перемикання
режимів
: Інтелектуальне
авто
: Фільм
Фотозйомка
Щоб виконати фокусування, натисніть кнопку
1
Не накривайте спалах (A).
спуску до половини.
Коли зображення сфокусовано, лунає звуковий сигнал і
засвічується індикатор z.
Повністю натисніть кнопку спуску, щоб зробити
2
знімок.
Відеозйомка
Щоб розпочати запис, натисніть кнопку MOVIE
1
(відеозйомка).
• За допомогою важеля W/T (масштабування) можна наблизити
або віддалити зображення.
Щоб зупинити запис, натисніть кнопку MOVIE ще
2
раз.
зображення
T: збільшення
зображення
MOVIE
UA
UA
17
Page 90

Примітки
• Не витягайте спалах вручну. Це може призвести до несправності.
• У разі використання функції масштабування під час відеозйомки звук,
який видає при цьому фотоапарат , буде записано. У момент завершення
запису може також бути записано звук роботи кнопки MOVIE.
• Діапазон панорамної зйомки може зменшуватися, залежно від об’єкту
та способу зйомки. Тому навіть якщо для панорамної зйомки вибрано
параметр [360°], записане зображення може бути менше, ніж на 360
градусів.
• Безпере рвна відеозйомка можлива лише приблизно протягом 29 хвилин
поспіль за стандартних налаштувань фотоапарата і температури
повітря приблизно 25 °C. Завершивши відеозйомку, можна розпочати
новий запис повторним натисненням кнопки MOVIE. Залежно від
температури середовища запис може бути зупинено для захисту
фотоапарата.
18
UA
Page 91

Перегляд зображень
W: зменшення
зображення
T: збільшення
зображення
Диск керування
(відтворення)
(видалити)
Натисніть кнопку (відтворення).
1
• Якщо зображення на карті пам’яті, записані іншими
фотоапаратами, відтворюю ться на цьому пристрої, з’являється
екран реєстрації файлу даних.
x
Вибір наступного/попереднього зображення
Виберіть зображення, натиснувши B (наступне)/b (попереднє) на
диску керування або повертаючи диск керування. Щоб переглянути
відео, натисніть z по центру диска керування.
x
Видалення зображення
1 Натисніть кнопку (видалити).
2 Виберіть пункт [Видалити] за допомогою v на диску керування,
після чого натисніть z.
x
Повернення до режиму зйомки зображень
Натисніть кнопку спуску до половини.
Вибір зображень:
B (наступне)/b (попереднє)
або повертайте диск
керування
Встановлення: z
UA
UA
19
Page 92

Знайомство з іншими функціями
Fn (виклик функцій)
MENU
Диск керування
x
Диск керування
DISP (Відображення вмісту): Зміна відображення екрана.
(Режим протягання): дає змогу перемикати методи зйомки,
наприклад режим покадрової зйомки, неперервної зйомки або
пакетної зйомки.
(Творче фото): дає змогу інтуїтивно користуватися
фотоапаратом і легко робити мистецькі знімки.
(Режим спалаху): Вибір режиму спалаху для фотозйомки.
z (Слідкуючий AF): фотоапарат відстежує об’єкт і автоматично
налаштовує фокус, навіть коли об’єкт зйомки рухається.
x
Кнопка Fn (виклик функцій)
Дає змогу налаштувати і зберегти 12 функцій для подальшого
використання під час зйомки.
1 Натисніть кнопку Fn (виклик функцій).
2 Виберіть потрібну функцію за допомогою кнопок v/V/b/B на
диску керування.
3 Обертаючи диск керування, виберіть потрібне значення.
20
UA
Page 93

x
Пункти мeню
(Налаштуван. функ. зйом.)
Розмір зображ. Вибір розміру знімків.
Формат Вибір формату знімків.
Якість Налаштування якості зображення знімків.
Панорама: Розмір Вибір розміру панорамних знімків.
Панорама: Напрям.
Налаштування напрямку зйомки для
панорамних знімків.
Формат файла Вибір формату для відеофайлу.
Налашт. запису Вибір розміру записаного відеокадру.
Режим протягання
Режим спалаху Налаштування параметрів спалаху.
Корекц. експ. спал. Регулювання інтенсивності спалаху.
Змен. еф.черв.очей
Режим фокусуван. Вибір методу фокусування.
Обл. фокусування Вибір області фокусування.
Підсвічування
AF
ISO Налаштування рівня світлочутливості.
Режим виміру
Баланс білого Налаштування гами кольорів зображення.
DRO/Авто HDR
Творчий стиль Вибір потрібної обробки зображення.
Ефект малюнка
Налаштування режиму роботи шторки,
наприклад у режимі неперервної зйомки.
Зменшення ефекту червоних очей за
допомогою спалаху.
Налаштування освітлювача AF, який
забезпечує підсвічення під час зйомки в
темряві для покращення фокусування.
Встановлення режиму, який вибирає, яку
частину об’єкта слід вимірювати для
визначення експозиції.
Автоматичне коригування яскравості та
контрастності.
Вибір фільтра потрібного ефекту, щоб
зробити фото ще більш мистецьким та
вражаючим.
UA
UA
21
Page 94

ЗШ в исо кого ISO
Слідкуючий AF
Розпізн. обл./Smile
Еф. м’якої шкіри
Авт. кадр. портр.
Вибір сцени
Фільм
SteadyShot
Авт. повіл. затв.
Вихідн. рівень мікр.
Зменш. шуму вітру Приглушення шуму вітру під час відеозйомки.
Поради по зйомці Відображення списку порад щодо зйомки.
Пам'ять
Налаштування обробки знімків для зменшення
шумів у режимі високочутливої зйомки.
Налаштування функції відстежування об’ єкта і
збереження фокусування.
Виявлення облич і налаштування різних
параметрів автоматично. Налаштування
автоматичного спуску шторки в момент
виявлення посмішки.
Встановлення ефекту вирівнювання тону
шкіри та ступеня вирівнювання.
Аналіз сцени під час знімання облич, об’єктів
крупним планом або об’єктів, які
відстежуються функцією Слідкуючий AF, та
автоматичне кадрування і збереження другої
копії зображення у виразнішій композиції
кадру.
Вибір встановлених параметрів відповідно до
різних умов зйомки.
Вибір режиму зйомки відповідно до об’єкта
зйомки або ефекту.
Налаштування параметра SteadyShot для
відеозйомки.
Налаштування функції, яка автоматично
налаштовує витримку залежно від яскравості
освітлення.
Налаштування вихідного рівня мікрофона під
час відеозапису.
Реєстрація потрібних режимів або
налаштувань фотоапарата.
22
UA
Page 95

(Налаштуван. користувача)
Допом. при MF
Сітка
Автомат. перегляд
Інстр. налашт. експ.
Налашт. масштаб.
Запис дати
Налаш. меню функ.
Кнопка MOVIE
Збільшення зображення під час ручного
фокусування.
Відображення решітки для забезпечення
вирівнювання зображення відповідно до
структурних контурів.
Налаштування автоматичного перегляду з
відображенням записаного зображення після
зйомки.
Налаштування довідки, що відображається на
екрані зйомки під час змінення налаштувань
експозиції.
Можна налаштувати, чи використовувати під
час масштабування функцію масштабування
чіткого зображення або цифрового
масштабування.
Визначає необхідність запису дати зйомки на
фотографії.
Налаштування функцій, що
відображатимуться внаслідок натиснення
кнопки Fn (виклик функцій).
Можна налаштувати, чи активувати кнопку
MOVIE завжди.
(Бездротовий)
Надісл. на смартф.
Надісл. на комп'ют.
Перегляд на ТБ
Один дотик(NFC)
Перенесення зображень для відображення на
смартфоні.
Резервне копіювання зображень шляхом
перенесення їх на комп’ютер, під’єднаний до
мережі.
Перегляд зображень на екрані телевізора,
під’єднаного до мережі.
Призначення програ ми функції одним дотиком
(NFC). Можна викликати програму під час
зйомки, якщо торкнутися фотоапарата
смартфоном із підтримкою технології NFC.
UA
UA
23
Page 96

Режим польоту
Натиснути WPS
Налаш. тчк доступу Точку доступу можна зареєструвати вручну.
Ред. назву пристр.
Відобр.MAC-адресу Відображення MAC-адреси фотоапарата.
Ск. SSID/Пароль
Скин. налашт. мер. Скидання усіх мережевих налаштувань.
Можна вимкнути виконання бездротових
підключень та функцій GPS на цьому пристрої.
Можна легко зареєструвати точку доступу на
фотоапараті за допомогою кнопки WPS.
Можна змінити назву пристрою з підтримкою
Wi-Fi Direct тощо.
Скидання ідентифікатора SSID і пароля для
під’єднання смартфону.
(Програма)
Список програм
Вступ
Відображення списку програм. Можна вибрати
програму, яку потрібно використовувати.
Відображення вказівок щодо використання
програми.
(Відтворення)
Видалити Видалення зображення.
Режим перегляду
Індекс зображень Одночасно відображаються кілька зображень.
Слайд-шоу Запуск показу слайдів.
Повернути Обертання зображення.
Налаштування способу групування зображень
для відтворення.
Збільш. зображ. Збільшення відтворюваних зображень.
Відтворення фотографій із роздільною
Відтвор. фотогр. 4K
Захистити Встановлення захисту зображень.
здатністю 4 тис. пікселів на телевізорі, який
під’єднано за допомогою кабелю HDMI і який
підтримує таку роздільну здатність.
24
UA
Page 97

Налаштування інтервалу відображення
Корекц. інтерв.руху
Вкажіть друк Додавання позначки команди друку до знімка.
відстеження об’єктів у [Відеозйомка руху], де
відстеження руху об’єкта відображатиметься
під час відтворення відео.
(Налаштуван.)
Яскравість моніт. Налаштування яскравості екрана.
Яскр. видошукача
Налаштув. гучності Налаштування гучності для відтворення відео.
Звукові сигнали
Налаштування GPS
(лише DSC-HX60V)
Налашт. завантаж.
Мозаїчне меню
Дов. диска виб.реж.
Якість відображен. Налаштування якості відображення.
Час початку е/збер.
Перем. PAL/NTSC
(лише для моделей з
підтримкою режиму
1080 50i)
Демонстр. режим
Налаштування яскравості електронного
видошукача у разі використання електронного
видошукача (продається окремо).
Налаштування функціональних звуків
фотоапарата.
Налаштування функції GPS.
Налаштування функції завантаження
фотоапарата в разі використання карти Eye-Fi.
Визначення потреби відображати мозаїчне
меню щоразу у випадку натискання кнопки
MENU.
Увімкнення/вимкнення довідки диска
перемикання режимів (пояснень щодо різних
режимів зйомки).
Налаштування часу невикористання, після
якого фотоапарат автоматично
вимикатиметься.
Якщо змінити на пристрої телевізійний
формат, стане доступною відеозйомка в
іншому відеоформаті.
Увімкнення/вимкнення відтворення
демонстраційного відео.
UA
UA
25
Page 98

Розділ. здатн. HDMI
КЕРУВАН. ПО HDMI
USB-з'єднання Налаштування способу з’єднання USB.
Налаштув. USB LUN
USB живлення
Мова Вибір мови.
Налашт. дати/часу
Часовий пояс
Форматувати Форматування карти пам’яті.
Номер файла
Вибр. папку ЗАП. Зміна папки для збереження зображень.
Нова папка
Назва папки Налаштування назви папки для фотознімків.
Віднов. БД зображ.
Показ. інф. про нос.
Версія
Скидання налашт. Відновлення стандартних налаштувань.
Налаштування роздільної здатності під час
того, як фотоапарат під’єднано до телевізора з
роз’ємом HDMI.
Керування фотоапаратом з телевізора з
підтримкою BRAVIA™ Sync.
Покращення сумісності за рахунок обмеження
функцій з’єднання USB.
Налаштування потреби постачати живлення
через з’єднання USB.
Налаштування дати, часу і переходу на літній
час.
Налаштування місця, де використовується
фотоапарат.
Налаштування способу присвоєння нумерації
фото- та відеофайлам.
Створення нової папки для збереження
фотографій та відео (MP4).
Відновлення файлу бази даних зображень для
можливості запису і відтворення.
Відображення залишкового часу запису відео
та кількості вільних знімків на карті пам’яті.
Відображення версії програмного
забезпечення фотоапарата.
26
UA
Page 99

Функції програми PlayMemories Home™
Програмне забезпечення PlayMemories Home дозволяє імпортувати
фотографії та відео на комп’ютер і використовувати їх. Програма
PlayMemories Home потрібна для імпортування відеофайлів у
форматі AVCHD на комп’ютер.
Відтворення
імпортованих
зображень
Імпортування зображень
із фотоапарата
Для Windows доступні також такі функції:
Перегляд
зображень у
режимі
календаря
Примітки
• Для встановлення PlayMemories Home необхідне під’єднання до
Інтернету.
• Для використання програми PlayMemories Online або інших мережевих
послуг потрібне підключення до Інтернету. У певних країнах чи
регіонах програма PlayMemories Online або інші мережеві послуги
можуть бути недоступними.
• Для програм Mac скористайтеся такою URL-адресою:
http://www.sony.co.jp/imsoft/Mac/
• Якщо на комп’ютері вже встановлено програмне забезпечення PMB
(Picture Motion Browser), яким комплектуються моделі, випущені до
2011 р., програма PlayMemories Home замінить його під час
встановлення. Використовуйте програмне забезпечення PlayMemories
Home, яке заміняє PMB.
Створен
ня диска
з відео
Завантаження
зображень у
мережеві
служби
Спільний доступ до
зображень через
PlayMemories Online™
UA
UA
27
Page 100

x
Системні вимоги
Системні вимоги для програмного забезпечення можна знайти за
такою URL-адресою:
www.sony.net/pcenv/
x
Встановлення PlayMemories Home на комп’ютері
За допомогою Інтернет-браузера на комп’ютері
1
перейдіть до поданої далі URL-адреси та встановіть
PlayMemories Home.
www.sony.net/pm/
• Детально про програму PlayMemories Home читайте на такій
сторінці підтримки: PlayMemories Home (лише англійською
мовою):
http://www.sony.co.jp/pmh-se/
• Після встановлення програма PlayMemories Home запуститься.
За допомогою кабелю micro USB (додається)
2
під’єднайте фотоапарат до комп’ютера.
• У програмі PlayMemories Home може бути встановлено нові
функції. Радимо підключити фотоапарат до комп’ютера,
навіть якщо програму PlayMemories Home вже встановлено на
комп’ютері.
Примітки
• Якщо відображається екран роботи або доступу, не від’єднуйте кабель
micro USB (додається) від фотоапарата. Це може призвести до
пошкодження даних.
• Щоб відключити фотоапарат від комп’ютера, клацніть на панелі
завдань, після чого клацніть піктограму (піктограма відключення).
У системі Windows Vista клацніть піктограму на панелі завдань.
28
UA
 Loading...