

Page 1

IT
2-178-481-11 (1)
7819900764
DVD/CD
Rewritable Drive
Operating Instructions
JP
FR
DE
ES
IT
CS
DRX-700UL
© 2004 Sony Corporation
Page 2

Safety
Regulations
WARNING
You are cautioned t hat any changes or
modifications not expressly approved in this
manual could void your authority to operat e
this equipment.
To prevent fire or shock hazard, do not expose
the unit to rain or moisture.
To avoid electrical shock, do not open the
cabinet. Refer servicing to q ua lif ied personnel
only.
CAUTION:
As the laser beam in the DRX-700UL is
harmful to the eyes, do not attempt to
disassemble the cabinet. Refer se rv i cing to
qualified personn el only.
The use of optical instruments with this
product will inc re ase eye hazard.
The use of controls or adjustments or
performance of procedures other than those
specified herein may result in hazardous
radiation exposure.
The DRX-700UL is classified as a CLASS 1
LASER PRODUCT.
The CLASS 1 LASER PRODUCT label is
located at the top of the enclosure.
Bei diesem DRX-700U L ha ndelt es sich um
ein Laser-Pr odukt der Klasse 1.
Das Etikett mit der Aufschrift LASER
KLASSE 1 PRODUKT befindet sich auf der
Oberseite des Geräts.
CLASS 1
LASER PRODUCT
LASER KLASSE 1
PRODUKT
LUOKAN 1 LASERLAITE
KLASS 1 LASER APPARAT
FCC Compliance:
This equipment ha s been tested and found t o
comply with the limits for a Class B digital
device, pursuant to Part 15 of the FCC Rules.
These limits are desig ned to provide rea sonable
protection against harmful interfere nc e in a
residential insta llation. T h is equipm e n t
generates, uses, and can radiate radio
frequency energy and, if not installed and used
in accordance with the inst ru ctions , may ca use
harmful interference to radio communications.
However, there is no guarantee that
interference will not occur in a particular
installation. If this equipment does cause
harmful interference to radio or television
reception, which can be determin ed by turnin g
the equipment off and on, the user is
encouraged to try to correct the interferenc e by
one or more of the following measures:
• Reorient or re locate the receivi ng antenna.
• Increase the separation between the
equipment and receiver.
• Connect the equipment into an outlet on a
circuit different from that to which the
receiver is connected.
• Consult the deal er or an experienced radio/
TV technician for hel p.
The shielded interface cable recommended in
this manual must be used with this equipment
in order to comply with the limits for a digital
device pursu ant to Subp art B of Part 15 of FCC
Rules.
Notes:
If you have any quest i ons about this product,
you may call the telephone number listed on
the “Product and Support Information” pag e.
The telephone number below is not for
customer
service but only for official purp ose.
Declaration of Conformity
Trade Name: SONY
Model No.: DRX-700UL
Responsible Party: Sony Electronics Inc.
Address: 16450 W.Bernardo Dr.,
Telephone No.: 858-942-2230
This device complies wit h Part 15 of the FCC
Rules. Operation is subject t o the foll owing two
conditions:
(1) This device may not cause harmful
interference, and
(2) This device must accept any interference
received, inclu di ng interference th at may
cause undesired opera ti on.
San Diego, CA 92127
U.S.A.
2
Page 3

CE Sicherheitsbestimmungen
Diese Ausrüstung erfüllt die Europäischen EMC-Bestimmungen für die Verwendung in
folgender / folgenden Umgebung(en):
• Wohngegenden
• Gewerbegebiete
• Leichtindustriegebiete
(Diese Ausrüstung erfüllt die Bestimmungen der Norm EN55022, Klasse B.)
CAUTION
The mains plug on this equipment must be used to disconnect mains power.
Please ensure that the socket outlet is installed near the equipment and shall be easily
Accessible.
Achtung
Zur Trennung vom Netz ist der Netz secker aus der Steckdose zu ziehen, welche sich in der
Nähe des Gerätes bef inden muß und leicht zugänlich sein soll.
3
Page 4

Table of Contents
Safety Regulations ..........................2
Introduction
Unpacking the Package Contents ...6
Features ...........................................6
System Requirements .....................7
Part Names and Functions ..............8
Setup
Placing the Drive ..........................10
Using the Drive Vertically .........10
Using the Drive Horizontally .....10
Connection through i.LINK ..........11
Before Connection .....................11
Installation .................................. 11
Disconnection ............................. 13
About i.LINK .............................14
Connection through USB .............17
Before Connection .....................17
Installation .................................. 17
Disconnection ............................. 18
About Hi-Speed USB
(USB 2.0-compliant) ..................19
Operation
Using the Drive .............................20
Supplied Software .......................20
Displaying the contents of CDs a
nd DVDs .....................................21
Using Generic Software with the
Drive ...........................................21
Compatible Discs ..........................22
Recommended Writable Discs ...24
Writable Disc Features ...............25
Precautions when Writing Data to
Disc ...............................................28
Maximizing Performance ..............30
Reaching the Highest Possible
Data Transfer Rate ......................30
Updating the Firmware ...............30
Miscellaneous
Precautions for Use .......................31
Specifications ................................32
Support Overview .........................33
User Support Web Site ...............33
Update the Drive Firmware ........33
Product and Support
Information .................................33
4
Page 5

• is a trademark of Son y C orporation.
• Pentium is a registrated trademark of Intel Corporatio n.
• Microsoft, MS, MS-DOS and Windows are registered trademarks of Microsoft Corporation.
• Other system and prod uct names used herein are registered trademarks or trademarks of the ir
respective manufacturers, although the ™ and ® marks are not used in the text.
❑ Our product warran ty i s vali d only when the su ppl ied acc esso ries (incl uding sof tware) are
used in the specified or recommended system environment, in accordance with the
documentation, and applies only to this DVD/CD rewritable drive. Our customer service
and user support apply only under these product wa rranty condit i o ns.
❑ Please note that w e cannot accept respo n s ibility for failure of t he computer or other
devices, incompatibility with special hardware, operating problems caused by improper
installation of software, loss of data, discs or other accidental or incidental damage that
might occur when using this product.
❑ The guarantee and user support for this product are valid only within the countries or sales
regions specif i ed on the warranty card.
❑ Copyright laws prohibit the copying in part or in full of the supplied software and
documentation, or loaning the software, without obtaining permission of the copyright
holder.
❑ We cannot accept responsibility for any direct or indirect financial damage or loss of profit
that might occ ur when using the supp l ied software.
❑ The supplied software can only be used with this product.
❑ Specifications of t he supplied software may be changed without no ti ce in the interest of
product improvement.
Please Record Responsibly
Before copying anything onto a disc, please be sure that you are not viol ating copyright
laws. Most software companies allow you to make a backup or archive copy of software.
Check your software’s license agreement for details.
5
Page 6

B Introduction
Unpacking the Package Contents
Please verify that the package contains the
following when unpacking.
If any of these items appear to be missing
and/or damaged, please contact your dealer.
•Drive
• i.LINK cable (6-pin to 4-pin) ×1
• Hi-Speed USB cable ×1
Features
This product offers the following features.
❑ An external DVD/CD RW drive with
i.LINK (IEEE1394) and Hi-Speed USB
(USB 2.0-compliant) interfaces for
computers.
❑ Can be used horizontally or vertically.
❑ The drive can write to DVD+R
Double Layer discs.
❑ You can write at a maximum of 8x when
using high speed DVD±R discs.
❑ The drive can write to seven types of
disc.
❑ Features the
technology to prevent buffer underrun
errors.
•Quick start guide
• Operating instru ctio ns
(this document)
•AC power cord
• AC adaptor (MPA-AC1)
• Software Quick Start Guide
•Software disc
•Stand
• Warranty card
Note
Make sure that you back up the supplied software
disc on another disc because the so ftware disc is
not distributed independen tl y.
6
Page 7

System Requirements
The drive should be used with a system that
meets the following requirem ents1).
❑ PC/AT-compatible computer
❑ CPU: Pentium III, 800 MHz or higher
(with Nero Vision Express: Pentium 4,
1.6 GHz recommended)
❑ RAM: 128 MB (Windows XP: 256 MB)
or higher
❑ 1 GB (with Nero Vision Express:
10 GB) free hard disk space
❑ Operating system:
Windows 2000 Pro fe s s ional
(referred to as Windows 2000),
Windows XP Home Edi ti on or
Windows XP Professional
(referred to as Windows XP)
❑ i.LINK or USB connector
1)
The above requ irements are the minimum
necessary requirements to write to disc
normally. Under actual operating conditions,
the requirements imposed by your software
must also be met. For details, refer to your
software documentation.
Notes
• Appropriate discs are needed when wr iting at
× speed to DVD+R/-R, 4× speed to DVD+R/
8
+RW/-R/-RW, 10
× speed to DVD-RW.
and 2
• Writing speed may automatically be adjusted
depending on the disc, specified disc speed, or
disc conditions such as weig ht i mb al ance and
eccentricity.
• System meeting the following requirements is
needed in order to use USB 2. 0 operation with
this device .
− Hi-Speed USB (USB 2.0-compliant)
interface cable (included).
− System equipped with a Hi-Speed USB (USB
2.0-compliant) conne ct or or PCI adapter
card, and running the US B 2. 0 EHCI device
1)
driver
1)
The USB 2.0 EHC I dr iver software is
supplied with currently available PCI
adapter cards that conform to USB 2.0.
Further, Microsoft has released the U SB
2.0 EHCI driver software for Windows
XP, therefo re it is also possible to use this
driver software with Windows XP.
For details, contact your USB 2.0 adapter
dealer or cons ult the Microsoft
Corporatio n Web si te.
• When connected to a pr oduct that does not
support Hi-Speed USB, the maximum transfer
rate is limited to 12 Mbps (equivalent to a USB
1.1 transfer rate).
• You cannot use the i.LINK and USB interfaces
simultaneously.
× speed or faster to CD-RW,
.
Introduction
Incompatible Sony VAIO
computers
Regardless of the version of Windows they
are running, the following models of VAIO
computers are incompatible with the DRX700UL when connected t hr ough an i.LINK
cable.
Products for USA:
PCG-F360, PCG-F350, PCG-F340,
PCG-Z505R, PCG-Z505RX
Products for Euro pe: PCG- F304 , PCG-F 305
Products for Japan:
PCG-F34/BP, PCG-Z505JL, PCG-Z505J/BP,
PCG-Z505JX
7
Page 8

Part Names and Functions
Front Panel
123
Rear Panel
4
5
6
7
8
8
Page 9

A Busy indicator
Indicates the drive status.
Lit (green) :
The power is on.
Lit (orange):
The drive is reading data,
playing a music CD, or
writing data (packet writing).
Blinking (orange):
The drive is writing data
(disc-at-once or track-atonce).
Off: The power is off.
B Eject button
Press to open and close the disc t r ay.
C Disk tray
Insert discs here, label side up.
D Power Switch
Press to turn the drive on or off.
(With some models, the power switch is
located on the fr ont panel.)
E USB Connector
Used with a USB cable to connect the
drive to a com puter or anothe r US B
device.
F i.LINK S400 Connector (6-pin)
Used with an i.LINK cable to connect
the drive to a computer or another
i.LINK device.
G i.LINK S400 Connector (4-pin)
Used with an i.LINK cable to connect
the drive to a computer or another
i.LINK device.
Introduction
Hint
When you ins ert a disc into the drive, make
sure that it is under the four pins. When using
the drive vertica lly, make sure that you set the
disc inside the two lower pins.
H DC IN Jack
Connect the supplied AC power cord to
the AC power adapter. Connect this
assembly to the DC IN jack, and then
connect the whole to the AC outl et.
9
Page 10

B Setup
Placing the Drive
Using the Driv e Vertically
Attach the supplied stand as illustrated below to use the drive vertically.
Position the drive so that the stand straddles the two anti-vibration pads on the
drive bottom and then press it into place.
Using the Drive Horizontally
10
Place the drive as illustrated below to use the drive horizontally.
Page 11

Connection through i.LINK
Note
This product including bundled soft w a re functions properly under Windows X P , Win dow s
2000.
It may not fulfill all functiona l a nd pe rformance specification under other OS (operating
system) environment.
Before Connection
• Refer to the list of contents to verify that the package contents are complete.
• If your computer is not equipped with an i.LINK connector, install an i.LINK
interface card.
• Check the type of i.LINK connector provided with your computer's i.LINK
interface and obtain a compatible i.LINK cable. This drive uses a 6-pin
i.LINK connector.
i.LINK S400 connector (4-pin)
i.LINK S400 connector (6-pin)
• Have the manual for your computer handy.
• If you connect the d rive to a computer with multiple i.LINK connectors, see
“Connection Using i.LINK” on page 15.
Setup
Installation
These instructions apply to most commonly used computers.
CAUTION
• Avoid touching any exposed electronic conductors or contacts on the circuit boards of the
drive or within the computer. These parts can be damaged by electrostatic discharges from
your body.
• Before making conne ct ion s, touch the metal chassis of your computer to discharge any
static electricity from your body.
11
Page 12
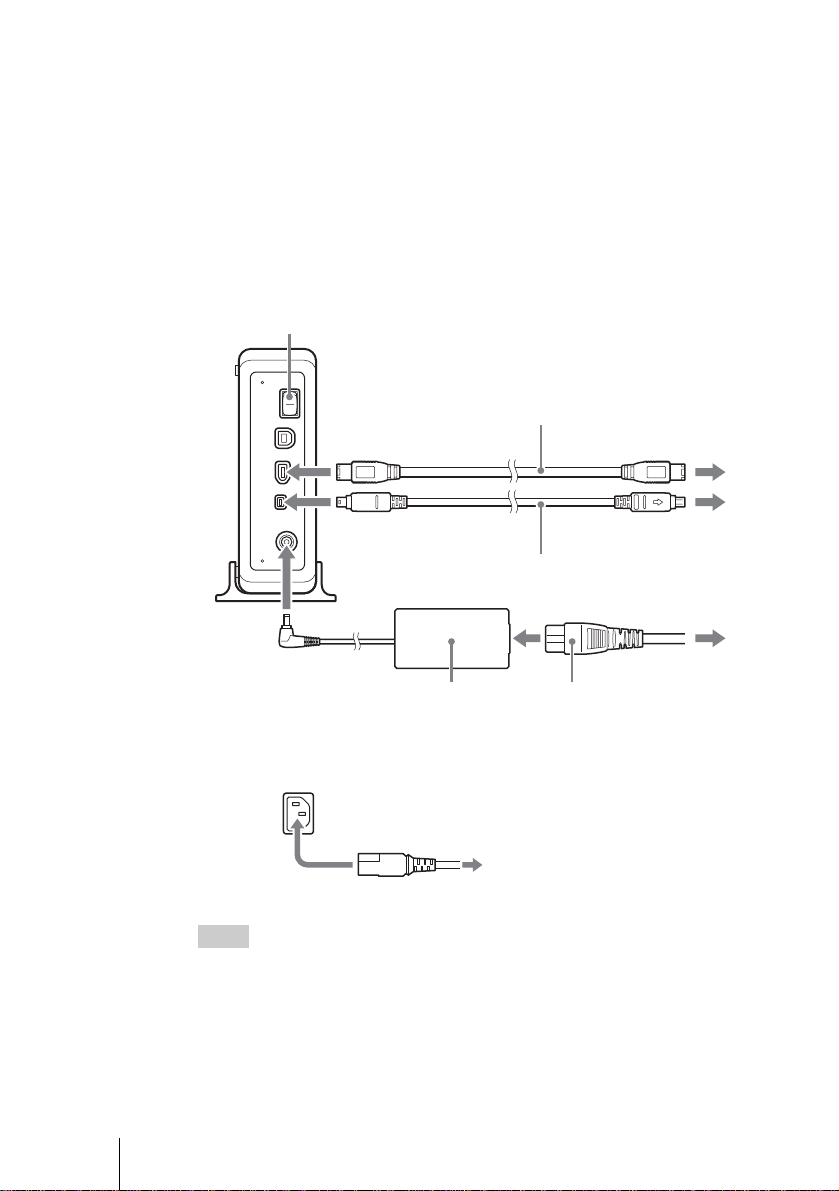
1 Start your computer.
2 Connect the necessary cables, then turn on the drive.
• Connect the i.LINK cable to the 6-pin i.LINK connector on the drive.
− For a computer's 4-pin i.LINK con nector : connect to the 6-pin i.LINK
connector on the drive.
− For a computer's 6-pin i.LINK con nector : connect to the 4-pin i.LINK
connector on the drive.
• Connect the su pplied AC power cord to the supplied AC adapter. Th en
connect the AC adapter to the drive's DC IN jack, and connect the power cord
to the power outlet.
Power Switch
i.LINK Cable (6-pin)
i.LINK Cable (4-pin)
12
AC adapter
* If your drive equipped with an AC IN connector instead of a DC IN connector, connect the
provided AC power cord directly.
AC power cord
Hints
• The i.LINK cable may be connected to either of the two i.LINK connectors on the back
of the drive.
• For more information about the serial (daisy chain) connection of i.LINK devices, see
“Connection Using i.L IN K ” on page 15.
AC power cord
To AC power outlet
Page 13
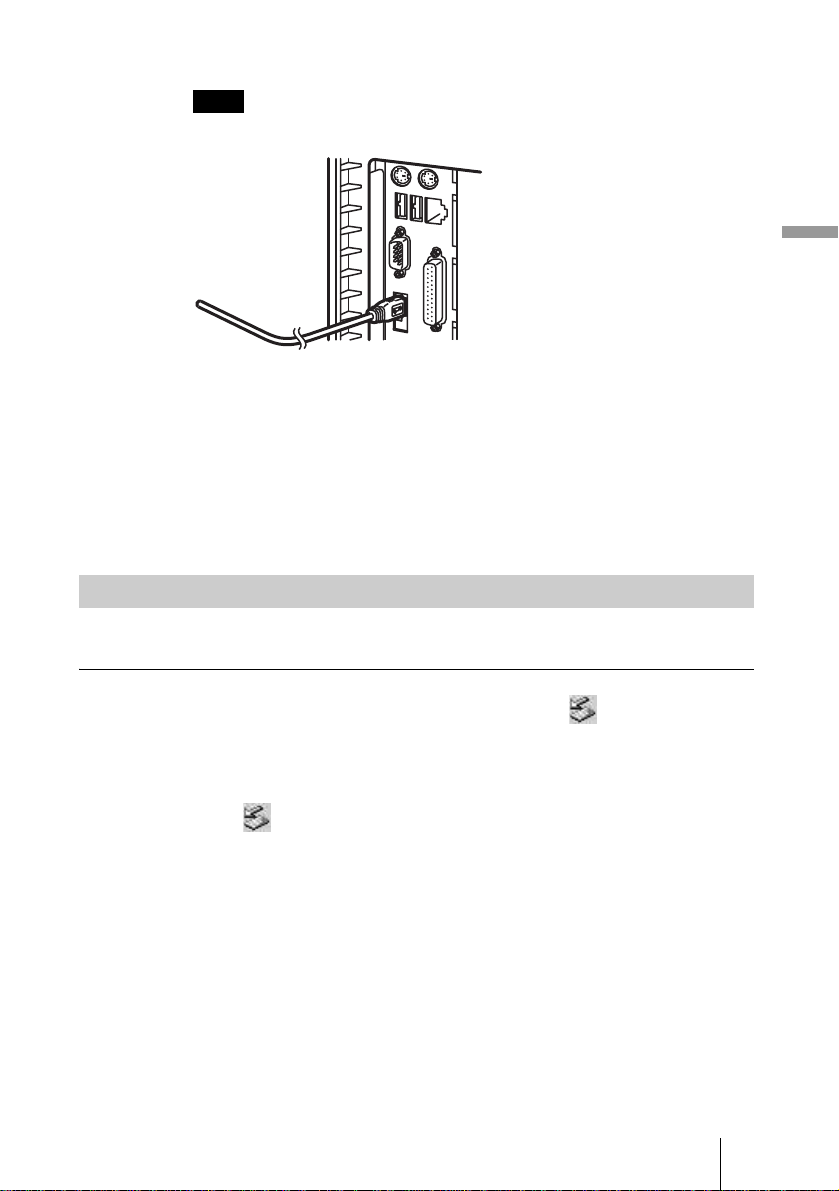
3 Connect the other end of the i.LINK cable to your computer.
Note
We recommend that you connect the drive directly to your computer's i.LINK connector.
4 When the computer is ready, confirm that the drive is detected.
On your desktop, double-click [My Computer] and confirm that a drive icon
has been added.
5 Insert the supplied software disc into the DVD/CD RW drive and
install the writing software.
Refer to the Software Quick Start Guide for details.
Disconnection
The disconnection procedure varies according to your operating system.
Setup
Windows 2000
When your computer successfully detects the drive,
Windows taskbar . Wh en you w an t to d iscon nect the d rive , you m ust first stop
it using this icon.
1 Click on the taskbar, and click [Stop IEEE 1394 CD-ROM
drive (E:)] on the shortcut menu.
The “ ‘ IEEE 1394 CD-ROM E:’ device can now be safely removed from the
system” message appears.
2 Click [OK] to close the message.
Now you are ready to disconnect the drive.
3 Disconnect the i.LINK cable.
appears on the
13
Page 14

Windows XP
With Windows XP, first confirm that there are no programs running and that
the drive's busy indicator is not lit, and then disconnect the i.LINK cable.
Note
If you disconnect the i. L I N K cable without performing the procedure outline d a bove with
Windows 2000, the operation of your computer may become erratic or data damaged. Be sure
to perform the procedure above before disconne cting the i.LINK cable.
About i.LINK
This section explains the specifications and features of i.LINK.
Restrictions that are not outlined below may apply, depending on the features
and specifications of individual device
What is i.LINK?
i.LINK is a digital serial interface that provides bi-directional communication
of digital video and audio data between devices that are equipped with i.LINK
connectors, or that allows one device equipped with an i.LINK connector to
control another dev ice t ha t is simi la r l y equi p pe d .
Two i.LINK devices are connected by means of a single i.LINK cable. Using
i.LINK, a wide variety of audio-visual devices can be connected for control or
data exchange. Use of i.LINK is expected to expand to a wider variety of
devices in the future, providing even more options for control and data
exchange.
When multiple i.LINK devices are connected in series, control and data
exchange can be extended to devices that are connected via other i.LINK
devices, as well as to those connected directly. This means that devices can be
connected in any sequence. However, whether or not data can be exchanged
with a particular device, as well as how or if that device can be controlled
depends on the characteristics and specifications of the individual device.
14
Hints
• i.LINK, the internat ionally popular name for the IEEE1394 interface standard, is a Sony
trademark.
IEEE1394 is an international standard established by the Institute of Electrical and
Electronics Engineers.
• Digital copyright prot ection is incorporated in i.LINK de vi ces with built-in author rights
protection.
Use of this technology is authorized by the DTLA (Digi tal Transmiss ion Licensin g
Administrator), the organization controlling digitally-transmitted co nte nt protection
technology.
When audio/video data is protected using DTLA copy protection, digital copying may not
be possible between i.LIN K devices.
Further, exchan ge o f prot ected audio/video data may no t be possi bl e between i.LINK
devices that are equipped with DTLA copy prot ec ti on technology and those that are not
equipped with such technology.
Page 15
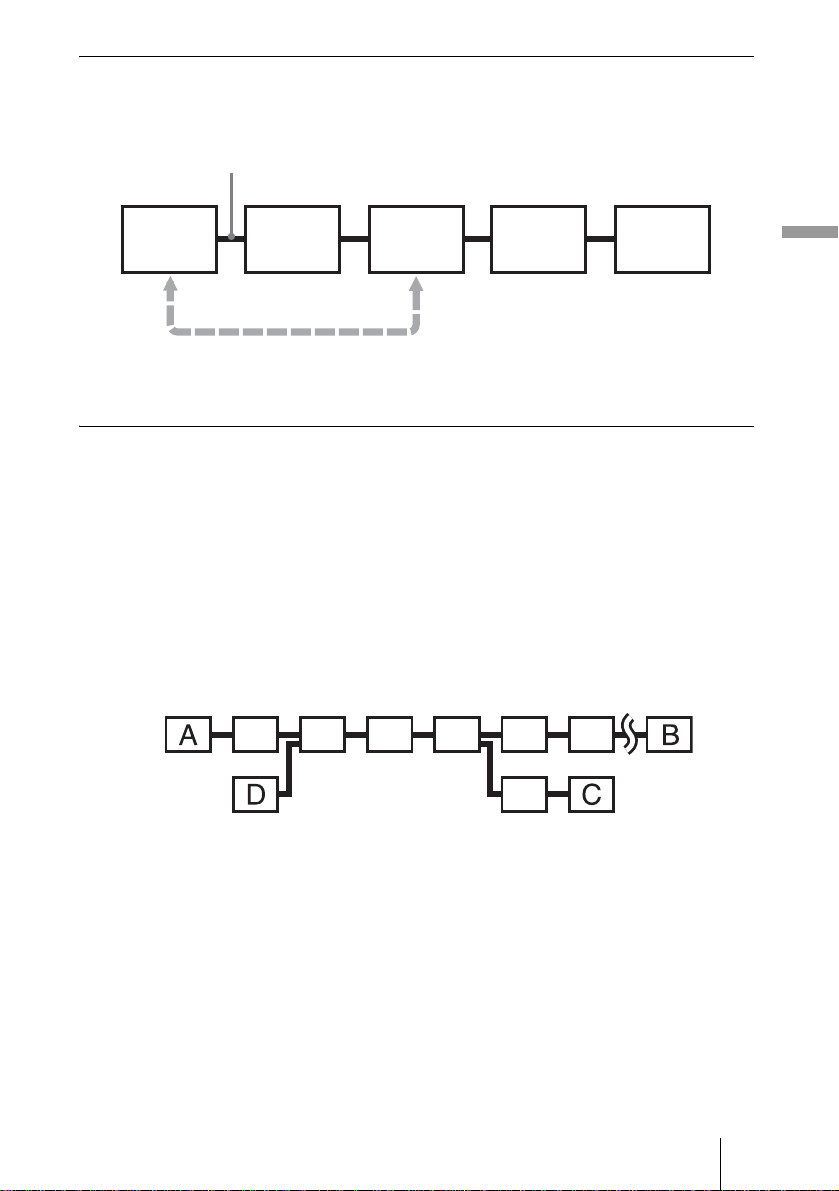
Connection Using i.LINK
i.LINK devices are connected in series using i.LINK cables. This is sometimes
referred to as “daisy chain” connection.
i.LINK cable
i.LINK
device
Data exchange and control are possible even when two i.LINK devic es are
connected through another device.
i.LINK
device
i.LINK
device
i.LINK
device
Branching also possible
• With devices that have 3 or more i.LINK connectors, it is possible to create
branches mid-way through the i.LINK device chain.
• Up to 63 i.LINK devices (including this drive) can be connected together.
However, only 17 devices can be present on the longest individual path. (Up
to 16 i.LINK cables can be used in the chain making up a path of the
maximum possible len gth.)
The length of a path is indicated in terms of the number of i.LINK cables used,
with each cable counted as one “hop.” For example, in the figure below, the
path between A and C is 6 hops, while that between A and D is 3 hops.
i.LINK
device
Setup
In any of paths A->B, A->C, A->D, B->C, B->D, and C->D, the maximum number
of devices that can be connected is 17. (A maximum of 16 hops.)
15
Page 16
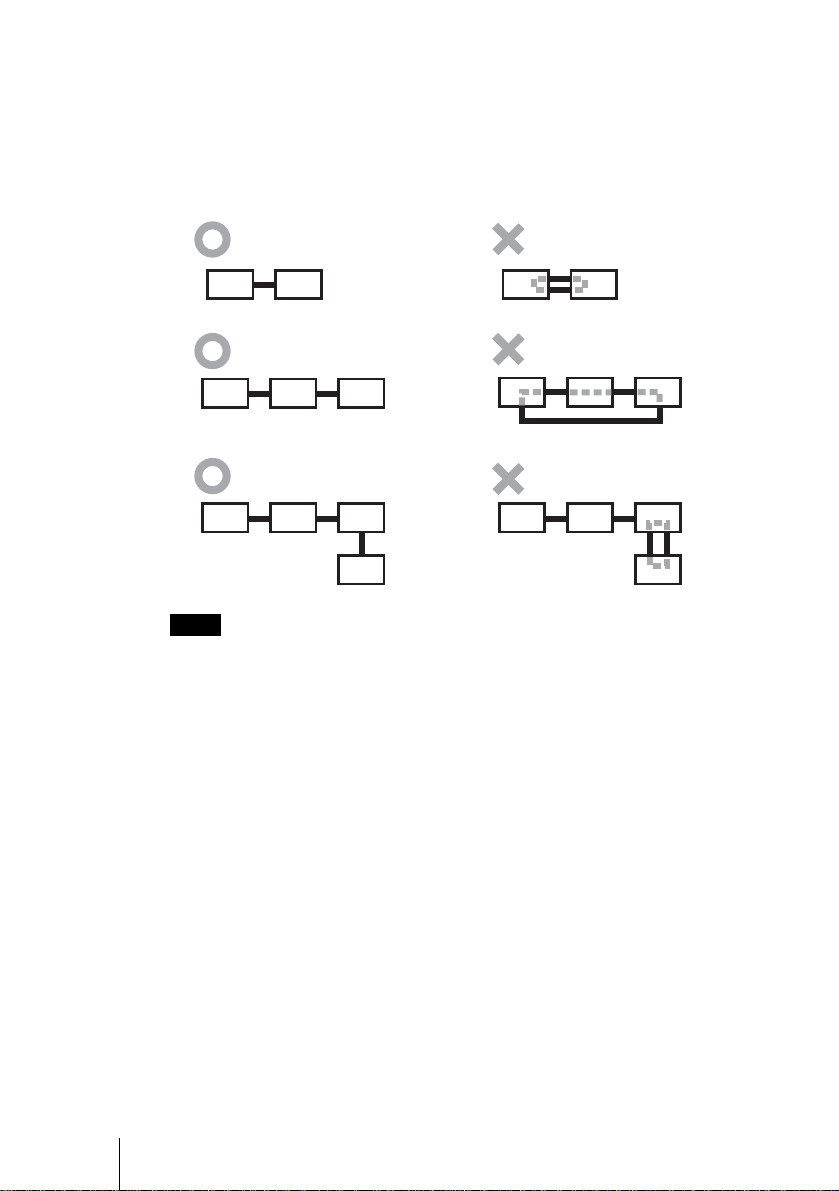
Care must be taken to ensure that no path loops back on itself.
The digital signal passes through all the connected i.LINK cables. Circular
cable connections must be avoided to prevent signals from returning to the
device from which they originated. Such circular connections are referred to as
“loops.”
Example of correct connection Example of looped connection
Notes
• Some i.LINK device s, such as c omputers, must be turned on to relay data betwe en other
i.LINK devices . When conn ecting an i .LINK dev ice, be s ure to r efer to the instr uctions that
are provided with that device.
• The maximum data transfer rate that is supported by any given i.LINK device is indicated
by markings in the vicinity of the i.LINK connector. The maximum i.LINK data transfer
rates are defined as approximately 100, 200, and 400 Mbps, which are respectively denoted
as S100, S200, and S400. When devices having different maximum data transfer rates are
connected together, rate s achie ve d by individual devices may be less than thei r rat ed
maximums.
16
Page 17
Connection through USB
Note
• This product including bundle d soft w a re functions properly under Windows XP and
Windows 2000.
It may not fulfill all functional and performance specification under other OS (operating
system) environment.
Before Connection
• Refer to the list of contents to verify that the package contents are complete.
• If your computer is not equipped with a USB connector, install a USB
interface card.
• Have the manual for your computer hand y.
Installation
These instructions apply to most commonly used computers.
For connection cautions, refer to the “Installation” section in “Connection
through i.LINK” on page 11.
1 Start your computer.
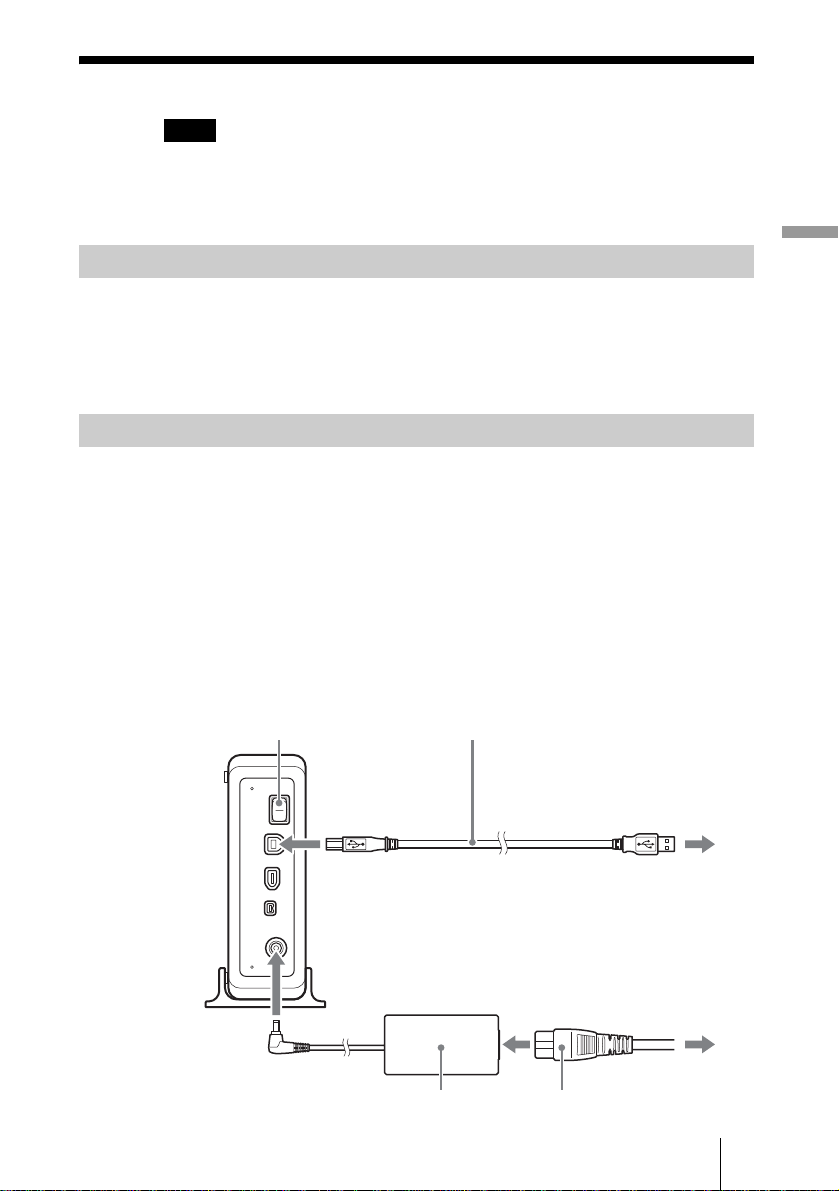
2 Connect the necessary cables, then turn on the drive.
• Connect the USB cable to the drive's USB connector.
• Connect th e supplied AC power cord to the supplied AC adapter. Then
connect the AC adapter to the drive's DC IN jack, and connect the power cord
to the power outlet.
Power Switch
USB Cable
Setup
AC adapter
AC power cord
17
Page 18
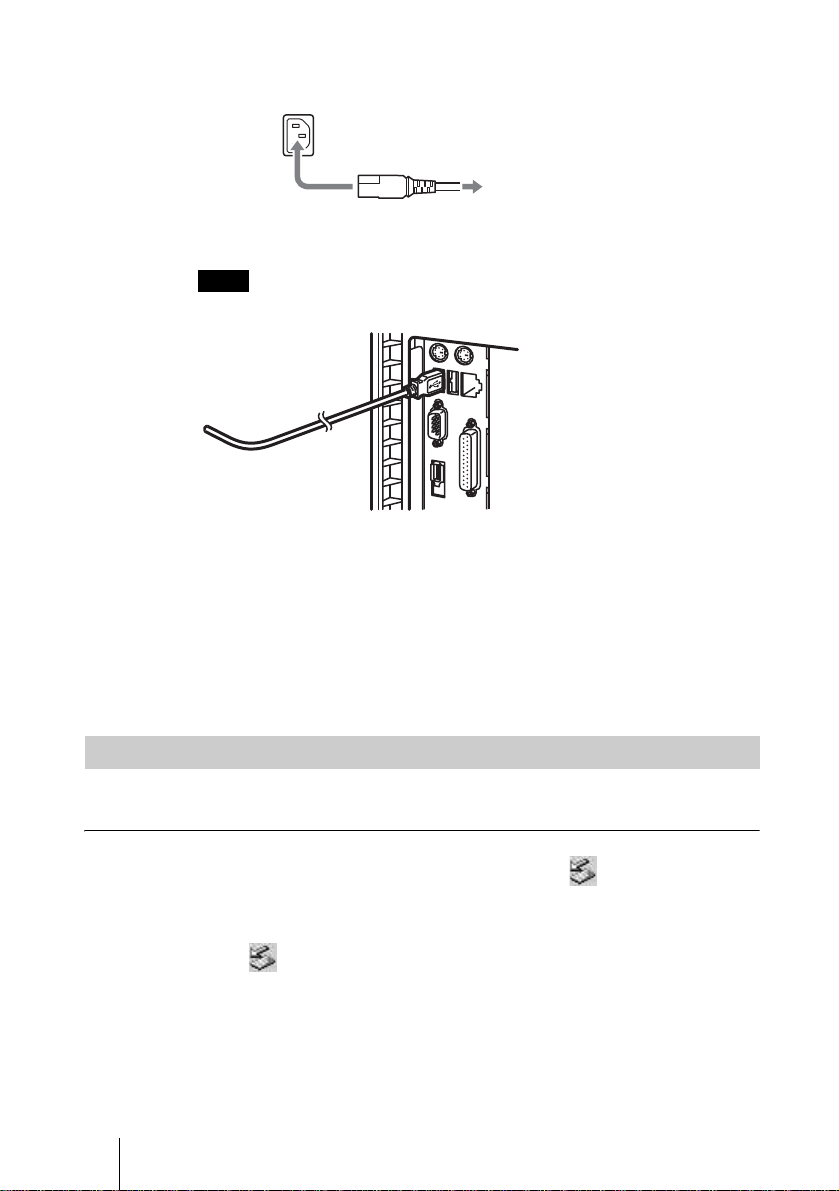
* If your drive equipped with an AC IN connector instead of a DC IN connector, connect the
provided AC power cord directly.
AC power cord
To AC power outlet
3 Connect the other end of the USB cable to your computer.
Note
Connect the drive to a USB conn ector on the comp uter.
4 When the computer is ready, confirm that the drive is detected.
On your desktop, double-click [My Computer] and confirm that a drive icon
has been added.
5 Insert the supplied software disc into the DVD/CD RW drive and
install the writing software.
Refer to the Software Quick Start Guide for details.
Disconnection
The disconnection procedure varies according to your operating system.
Windows 2000
When your computer successfully detects the drive, appears on the
Windows taskbar. W hen y ou w ant to disco nnec t th e dri ve, y ou mu st fi rst st op
it using this icon.
1 Click on the taskbar, and click [Stop USB CD-ROM drive
(E:)] on the shortcut menu.
The “ ‘USB CD-ROM E:’ device can now be safely removed from the system”
message appears.
18
Page 19

2 Click [OK] to close the message.
Now you are ready to disconnect the drive.
3 Disconnect the USB cable.
Windows XP
With Windows XP, first confirm that there are no programs running and that
the drive’s busy indicator is not lit, and then disconnect the USB cable.
Note
If you disconnect the USB cable w it hout performing the procedure outli ne d above with
Windows 2000, the operation of your computer may become erratic or data damaged. Be sure
to perform the procedure ab ove before disconnecting the USB ca ble.
About Hi-Speed USB (USB 2.0-compliant)
This device supports USB 2.0, which provides a much higher rate of data
transfer than the earlier USB 1.1 standard.
Connecting this device to a computer that is equipped with a USB 2.0compliant USB connector or PCI adapter card provides fullest possible drive
reading performance and enables high-speed data transfer.
1) DVD:16.2 MB/s (12x speed)
CD:6.0 MB/s (40x speed)
2) When connected to a product that does not support Hi-Speed USB, the maximum transfer
rate is limited to 1.5 MB/s (equ iv alent to a USB 1.1 transfer rate).
Setup
1), 2)
A system meeting the following requirements is needed in order to use HiSpeed USB (USB 2.0-compliant) with this device.
• Hi-Speed USB (USB 2.0-compliant) interface cable (supplied with the
drive).
• System equipped with a Hi-Speed USB (USB 2.0-compliant) connector or
PCI adapter card, and running the USB 2.0 EHCI device driver
3) The USB 2.0 EHCI driv er so ftwa r e is su ppli ed wi th cu rre ntly avai labl e PCI adap ter card s
that conform to USB 2.0. Further, Mic rosoft has released the USB 2.0 EHCI dri ve r
software for Windows XP, therefore it is al so possi ble to use this dri ve r softwa re w ith
Windows XP.
4) For details, contact your USB 2.0 adapter dealer or consult the Microsoft Corporation Web
site.
4)
3)
.
19
Page 20

B Operation
Using the Drive
Use the supplied software to create discs and play back DVDs. Refer to the
documentation of each software for details about their operation.
Supplied Software
The supplied software disc contains the following software.
Nero StartSmart
Nero StartSmart serves as the command center to quickly start all the software
of the Nero 6 suite.
Nero Burning ROM 6 SE
Nero Burning ROM is the CD and DVD writing software.
Nero Express
A light version of the Nero Burning ROM software. Makes it even easier job
to create CDs and DVDs.
InCD 4
InCD 4 is a packet writing software. It supports writing to DVD+RW,
DVD-RW, and CD-RW.
NeroVision Express 2
DVD-Video and video CD authoring software.
20
Nero ShowTime
DVD-Video and video CD playback software.
Nero Wave Editor 2
Audio processing software that allows you to modify and such a udio files as
WAV, MP3, and WMA.
Nero Cover Designer
CD and DVD cover and label creation software.
Nero Toolkit
The utilities of Nero Toolkit provide information about the system and more.
Nero CD-DVD Speed tests the speed of the existing drives. Nero DriveSpeed
adjusts the write speed to minimize drive noise. Nero InfoTool provides the
main characteristics of drives, the discs they contain, and the installed
software.
Page 21

Using Generic Software with the Dri v e
Using software other than the supplied software (such as generic software,
shareware, or freeware) to write data to disc with this drive is not under
warranty and Sony offers no customer service if problems arise from using
such software.
Make sure that the supplied writing software and generic writing software do
not coexist on your computer. Taking appropriate steps to avoid this situation,
especially in the case of packet writing software
operation of the software and/or computer.
If the generic software you are using does not detect the drive correctly, visit
the Web site of the software manufacturer and update the software, as this may
solve the problem.
1)
Such as Roxio’s Drag-to-Disc, BHA’s B’s CLIP, and Sonic’s DLA.
Displaying the contents of CDs and DVDs
Depending on the disc that you ins ert into the dr ive, playback may start, or you
may have to double-click its icon in the [My Computer] window to display a
list of the files and folders it contains.
Hint
You can also right-click the drive icon in the [My Computer] window, and then click [Open]
on the shortcut menu that appears to display the contents of th e disc in the drive.
1)
will help prevent erratic
Operation
21
Page 22
Compatible Discs
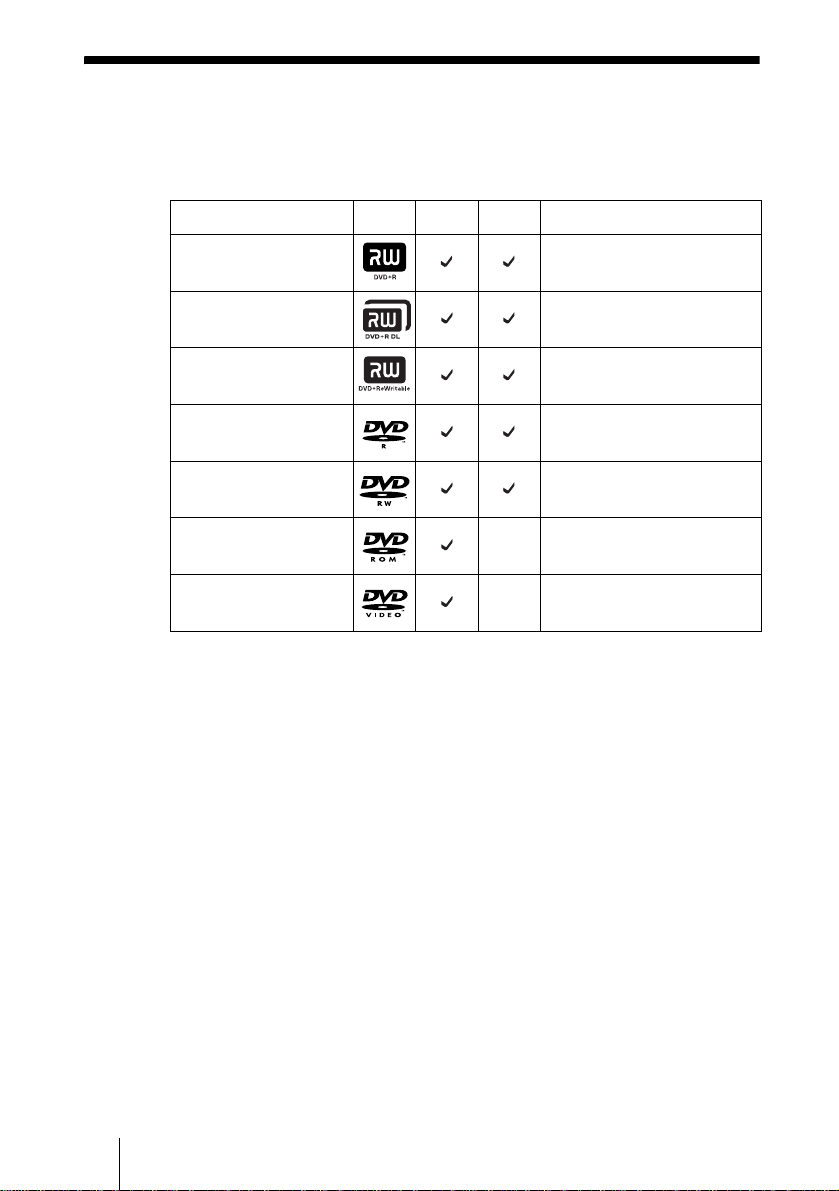
The following discs are compatible with the drive.
DVD
Disc types Logo Read Write Write speed
DVD+R 1× to 8×
1)
DVD+R DL
(Double layer)
DVD+RW 1× to 4×
DVD-R 1× to 8×
DVD-RW 1× to 4×
DVD-ROM — —
DVD-Video — —
1)
Writing speed supported by the drive. Depending on your software and media, this speed
may vary.
1× to 2.4×
22
Page 23
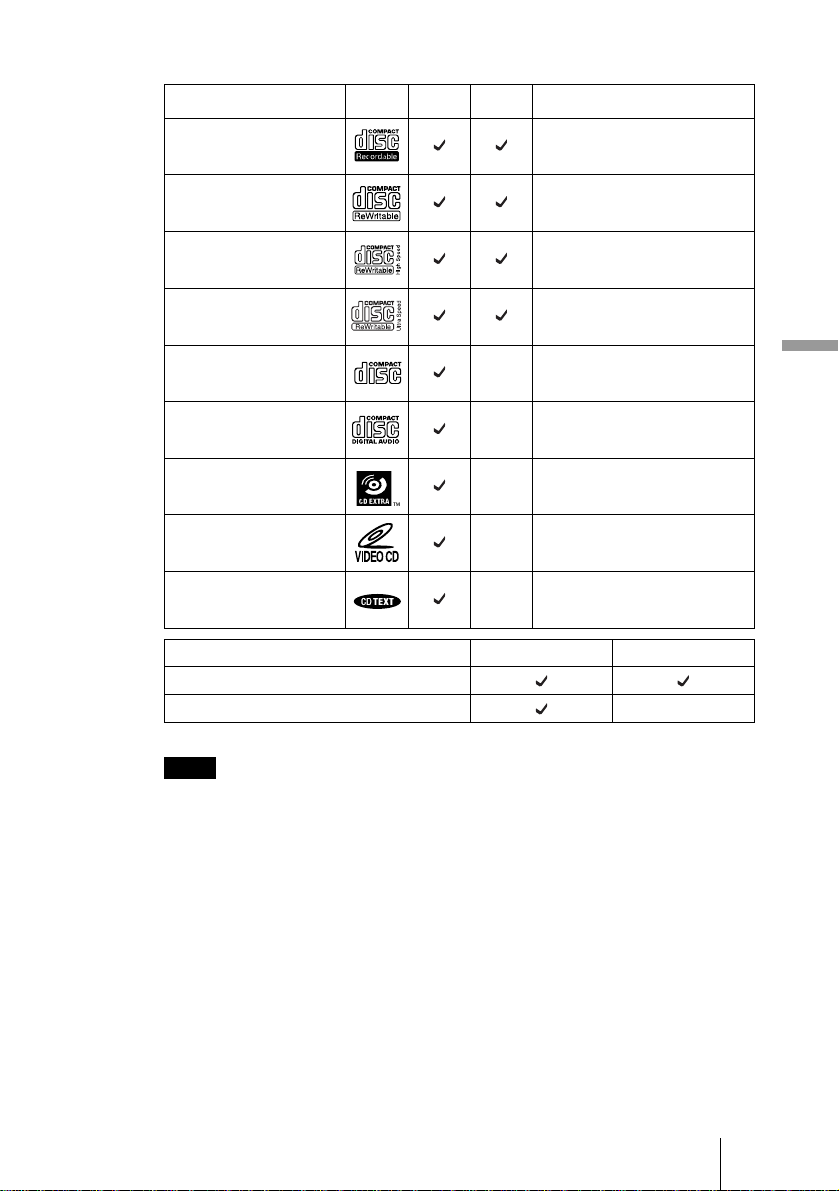
CD
Disc types Logo Read Write Write speed
CD-R
CD-RW
CD-RW
(High Speed)
CD-RW
(Ultra Speed)
CD-ROM
Speed supported by the disc
(max. 40×)
Speed supported by the disc
(max. 4×)
Speed supported by the disc
(max. 10×)
Speed supported by the disc
(max. 24×)
——
Operation
CD-DA
(audio only)
CD Extra
Video CD
CD TEXT
Disc diameters Read Write
12 cm
8 cm —
Notes
• Only round discs should be used with this dri ve . At temp ti ng t o rea d odd-shaped discs
(stars, hearts, card shape, etc.) may damage the drive.
• Operation is not guarantee d when writing to or playing back 99 minute discs.
• With 8 cm discs, you must place the dri ve hori zontally.
——
——
——
——
23
Page 24

Recommended Writable Discs
We recommend that you only us e discs for which operation has been
guaranteed. You can obtain the latest list of writable discs for which operation
with this drive has been guaranteed at the user support Web site address (see
page 33 for details).
User support Web site
Insert the supplied software disc into the drive, and in the [Menu Selection]
screen, click [User Support Web Page]. You can also directly type the user
support Web site address (see page 33 for details) in the address box of your
Web browser.
Note
You can safely use most disc formats that comply to the appropriate standards with this drive.
However, bear in m ind tha t som e g en eri c discs do not comply to quality or pe rformance
standards necessary for safe use with this drive. If you use such discs, the drive may
automatically ad ju st th e w ri ti ng speed, writing errors may occur, and discs that have been
written to may generat e reading errors, etc.
24
Page 25
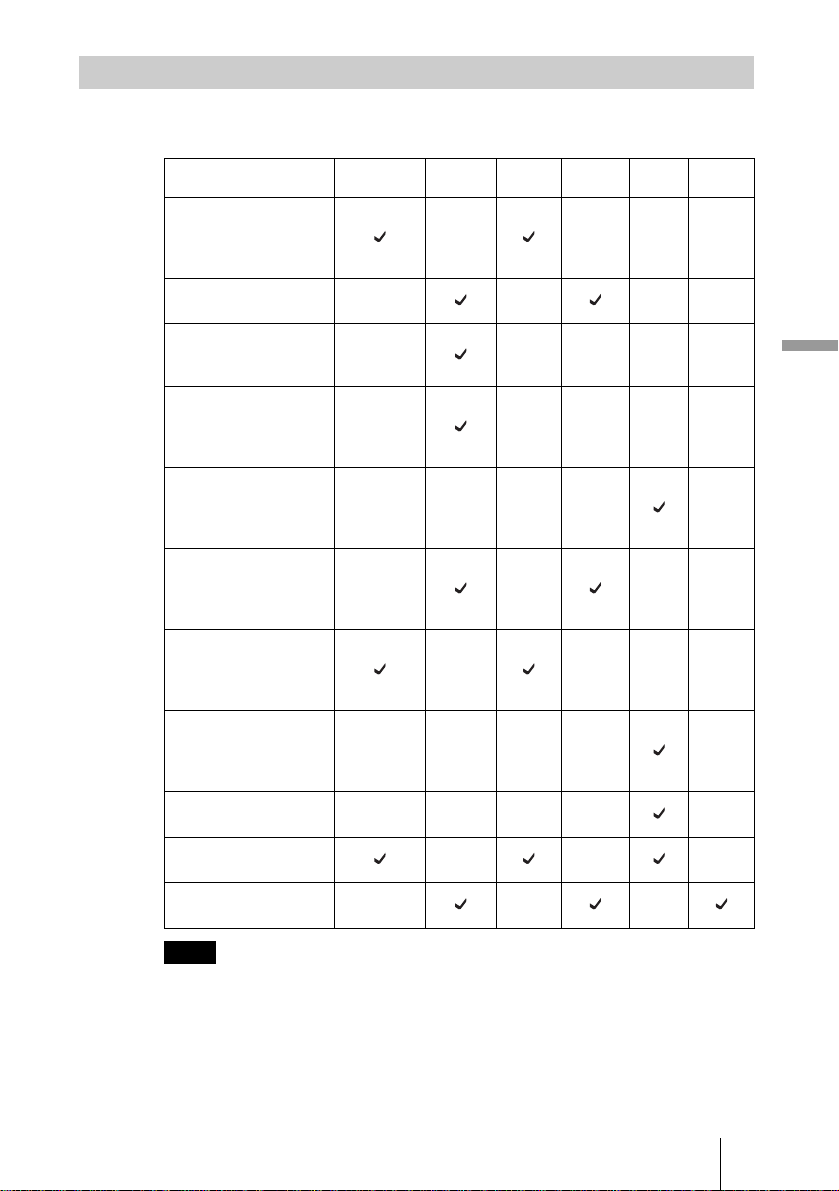
Writable Disc Features
You can use a variety of discs with the drive to write data. Refer to the table
below to find the type of disc that matches what you want to do.
Want to create DVDVideo that can be
played back by most
drive s and/or player s
Want to create DVDs
that you can modify
Want to create DVDs
to which you can ad d
to later.
Want to create video
CDs that can be played
back with most
computers
Want to use DVDs as
you would video tapes
(allowing multiple
rewrites)
Want to share 700 MB
of data or more
(W ant to create DVDROM discs)
Want to share data that
can be used on mo st
computers (Want to
create CD-ROM discs)
Want to create audio
CDs that be play ed
back by most CD
players
Want to back up your
hard disk
Want to store data
without deleting it
Want to use discs as
floppy disks
DVD+R
DVD+R DL
DVD+RW
DVD-R
DVD-RW
CD-R CD-RW
Operation
Note
You can access/play back the data w ritt en t o the di scs above with most drives/players tha t
support their formats. However, so m e combinations of drives/players and di scs (depending
on their quality and/or characteristics) may make access/playback impossible. For details,
refer to your drive/player documentation.
25
Page 26

CD-R and CD-RW Discs
The DVD/CD RW drive can write to CD-R and CD-RW discs, when used with
writing software. The ability of another model of CD-ROM drive to play (or
read data) written by the DVD/CD RW drive depends on having the
appropriate software settings when writing to the disc.
CD-R Discs
Data can be written to this type of disc only once, and once it has been written,
it cannot be erased. Music CDs created on CD-R disc media can be played in
a common CD player.
CD-RW Discs
Data can be written to and erased from this type of disc repeatedly. Typically,
a new CD-RW disc can be rewritten about 1,000 times.
Music CDs created on CD-RW disc media cannot be played in a CD player
unless it is specifically designed to be CD-RW compatible.
High Speed CD-RW Discs
The drive can write to High Speed CD-RW disc media. Data written on High
Speed CD-RW discs can be read by common CD-ROM drives other than the
drive.
Note
Drives that do not have the High Speed CD-RW logo cannot be used to write to High Speed
CD-RW discs. When writin g or appending to such discs with a drive other th an this one, be
sure that the drive has the High Spe ed CD-RW logo. Also, always set the writ in g speed to
that specified for the particular High Speed CD-RW disc media being used.
26
Ultra Speed CD-RW Discs
The drive can write to High Speed CD-RW and Ultra Speed CD-RW disc
media. Data written to these discs can be read by common CD-ROM drives
other than the drive.
Note
Drives that do not have the Ultra Speed CD-RW logo cannot be used to write to Ultra Speed
CD-RW discs. When writin g or appending to such discs with a drive other th an this one, be
sure that th e d rive has the Ultr a Speed CD-RW logo. Also, always set the writ in g speed to
that specified for the particular Ult ra Speed CD-RW disc media being used.
Writing Speed
When writing to CD-R and CD-RW discs, set the writing speed specified on
the disc. Changing the writing speed is done through the writing software.
Reading Discs
CD-R and CD-RW discs created with the DVD/CD RW drive can be read on
most CD-ROM drives. However, some older CD-ROM drives cannot read
CD-RW discs.
Also, CD-R music discs created and finalized with the DVD/CD RW drive can
be played in most CD players, but playback cannot be guaranteed for all CD
players or automobile CD players.
Page 27

Also, depending on the particular drive-disc combination, some CD-R and
CD-RW discs may not be readable in some drives due to variations in disc
quality and drive characteristics from one manufacturer to another.
Writable DVD Discs
The DVD/CD RW drive can write to DVD+R DL, DVD+R and DVD-R discs,
as well as to DVD+RW and DVD-RW discs, when used with writing software.
The playback (read) compatibility with DVD-ROM drives or DVD players of
data written by this DVD/CD RW drive depends on the capabilities of the
DVD-ROM drives or the DVD players and on the logical format selected when
the disc is recorded (written).
DVD+R DL/DVD+R/DVD-R Discs
Data can be written to this type of disc only once. Once it has been written, it
cannot be erased. Playback (read) compatibility of DVD+R and DVD-R discs
with DVD-ROM drives or DVD players depends on the capability of the
DVD-ROM drive and the DVD player and on the logical format selected when
it is recorded (written).
DVD+RW and DVD-RW Discs
Data can be repeatedly written to or erased from this type of disc. Typically, a
new DVD+RW or DVD-RW disc can be rewritten about 1,000 times.
Playback (read) compatibility of DVD+RW and DVD-RW discs with DVDROM drives or DVD players depends on the capability of the DVD-ROM
drive and the DVD player and on the logical format selected when it is
recorded (written).
Operation
Disc Playback (Reading Data)
DVD+R DL/DVD+R/DVD-R discs, as well as DVD+RW and DVD-RW
discs created and finalized with the DVD/CD RW drive can be played back on
almost all DVD-ROM drives. Ho wever depending on the type of your drive,
playback of DVD+R DL, DVD+RW, and DVD-RW discs may not be
supported.
In addition, some drives do not support multi-session (DVD+R DL/DVD+R/
DVD+RW) or multi-border (DVD-R/DVD-RW). In these cases, you can only
playback the disc in single-session (DVD+R DL/DVD+R/DVD+RW) or
single-border (DVD-R/DVD-RW).
Also, DVD-Video discs created with the DVD/CD RW drive can be played
back on many standard DVD players. However depending on the type of your
player, playback of DVD+RW and DVD-RW discs may not be supported.
Further, because of the differences in quality and characteristics between
various DVD-ROM drive, DVD player, DVD+R DL disc, DVD+R disc,
DVD+RW disc, DVD-R disc, and DVD-RW disc manufacturers, playback
may not be possible depending on the combination. (Playback compatibility is
not under warranty.)
27
Page 28

Precautions when Writing Data to Disc
Write speed and compatible discs
• When writing data to disc at high speeds, you must use the appropriate type
of disc.
• Configure the writing speed through your writing software. For details about
the setting procedures, refer to your writing software documentation.
• When writing data to disc, the drive may adjust the writing speed to the
quality of the disc in the drive. Depending on the transfer rate, there may also
be limitations on writing speeds.
DVD region codes
The playback of DVD-Video (DVD discs) is protected and controlled by a
region code 2 setting. For the drive to play back DVD-Video, the region code
on the DVD disc, the region code of the drive, and the region code of the
DVD-Video software must all match.
With this drive, the region code can be set up to five times, including the initial
assignment (RPC phase 2
1)
standard). After setting the region code five times,
the setting becomes permanent and can no longer be changed. From this point
on, you are onl y able to pla y back D VD-Video whose reg ion code m atches the
one set the fifth time.
Do not attempt to make unauthorized changes to the region code. Any
problems resulting from doing so are not covered by the warranty.
Hint
You can change the region code of the drive on it's properties dialog box accessible from the
Device Manager.
Precautions when playing back DVD-Video
DVD-Video disc playback conditions are sometimes determined by software
manufacturers. Because the drive plays back discs as determined by software
manufacturers, some drive functions may not always perform a s e xpected.
When playing back DVD-Video, refer to the documentation accompanying
each disc.
DVD copy protection technology
Most DVD-Video discs on the market are protected against unauthorized
copy. Attempting to copy pr otected discs violates copyright laws.
1)
Region Playback Control (RPC) standard.
28
Page 29

Copy controlled CDs
This product is designed to play back discs conforming to the compact disc
(CD) standard. Audio CDs encoded with copyright protection technology are
now marketed by various record companies. Be aware that some of these discs
do not conform to the CD sta ndard and you ma y not b e able to pl ay the m back
with the drive. When using the drive as an audio CD player, only use audio
CDs with the following mark. Some of these discs are encoded in such a way
as to prevent sampling and/or copy, while others can only be played back
under certain conditions. For details, refer to the documentation of your audio
CD.
Operation
29
Page 30

Maximizing Performance
Reaching the Highest Possible Data Transfer Rate
Make sure that you use High Speed discs for which this operation has been
certified by Sony. For the latest information about these discs, visit the user
support Web site. When usin g discs other than those mentioned above, the
drive may limit writing speed to preserve a good reading quality.
Updating the Firmware
We recommend using the drive with the latest firmware as some problems
encountered when using the drive can be solved simply by updating the drive
firmware. Firmware updates are available on the user support Web site. See
page 33 for details.
Hint
The firmware is the built-i n soft ware that makes the drive work.
30
Page 31
B Miscellaneous
Precautions for Use
Operation and storage conditions
Avoid using or storin g the dr iv e in a ho t or
humid location , or wh ere it might b e subje ct
to severe vibrat ion or direct sunlight.
On transportation
• Please repack the drive in its original
carton when shipping by itself.
• If the drive is to be shipped while installed
in a PC, remove any disc beforehand.
Avoiding condensation problems
As much as possible, avoid sudden
temperature changes. Do not attempt to use
the drive immediately after moving it from a
cold to a warm location, or raising the room
temperature suddenly, as condensation may
form within the drive. If the temperature
changes suddenly while using the drive , stop
using it but keep the power on for at least an
hour.
• Do not store discs in dusty, dirty or humid
locations, in direct sunligh t, or near heatgenerating devices.
• To protect important data, alwa ys kee p
discs in their protective cases.
• Do not wipe writable discs to clean them
before recording data. Instead, use a
blower to remove any dust.
• Dat a may not record properly if a scratch
or dust is present on the unrecorded area of
writable discs. Use special care when
handling.
Miscellaneous
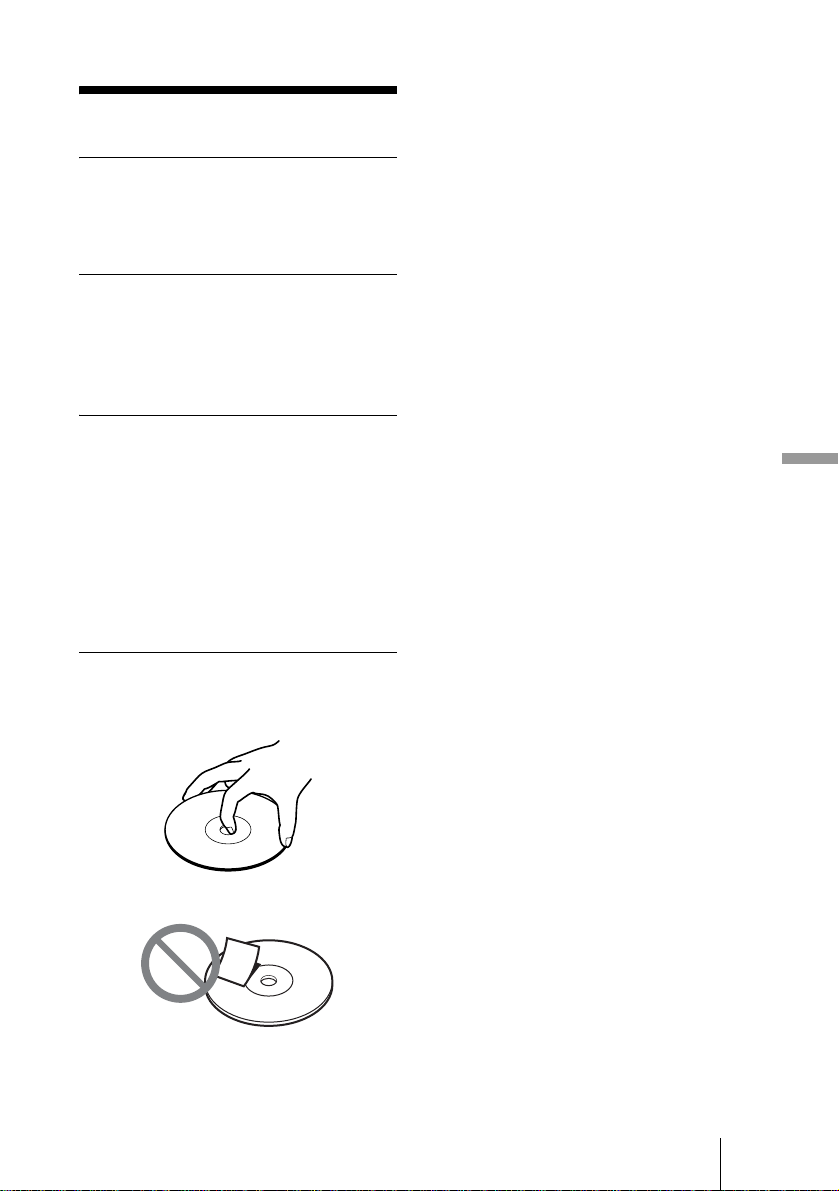
Handling discs
• Handle discs only by the edges. Never
touch the recording surface.
• Do not aff ix labels on discs.
31
Page 32

Specifications
Buffer underrun error protection
Compatible discs Read Write
DVD+R 8
DVD+R (4×)8
DVD+R (8×)8
DVD+R Double Layer 6
DVD+RW 8×-CAV 2.4
DVD+RW (4×)8
DVD-R 8×-CAV 1
DVD-R (4×)8
DVD-R (8×)8
DVD-RW 8
DVD-RW (2×)8
DVD-RW (4×)8
DVD-ROM 12×-CAV —
DVD-Video 4
CD-R 40
CD-RW 32
CD-RW (High Speed) 32×-CAV 10
CD-RW (Ultra Speed) 32×-CAV 24×-ZCLV
CD-ROM 40
CD-DA 10
CD-DA (DAE) 40
Disc diameters 12 cm
8 cm
(max.) (max.)
×
-CAV 2.4
×
-CAV 4
×
-CAV 8× ZCLV
×
-CAV 2.4
×
-CAV 4
×
×
×
×
-CAV 4
×
-CAV 8× ZCLV
×
-CAV 1
×
-CAV 2
×
-CAV 4
×
-CAV —
×
-CAV 40×-PCAV
×
-CAV 4
×
×
×
×
×
×
×
-CAV —
×
-CAV —
×
-CAV —
—
×
×
×
Writing systems
DVD
Random write
Sequential write
CD
Track-at-once
Disc-at-once
Session-at-once
Packet writing
Drive
Data transfer rate
DVD: 16.2 MB/s (12× speed
1)
)
CD: 6.0 MB/s (40× speed1))
Operating environment
Operating temperature
5 to 35 ºC
Power and miscellaneous
Power source
DC +12 V (supplied from the DC IN jack)
Consumption
Max. 3.0 A
AC adapter
AC 100 - 240 V (use a power cord
appropriate to the region or country of use)
Size
Approx. 52 × 164 × 234 mm (W ×H×D)
(excluding front panel)
Weight
Approx. 1.5 kg (drive only)
Interface
Drive interface
IEEE1394-compliant (6-pin connector) ×1
IEEE1394-compliant (4-pin connector) ×1
USB 2.0-compliant (Hi-Speed USB) ×1
Buffer capacity
2 MB
Drive product number (Inquiry)
SONY DVD RW DRU-700A
Design and specifications are subject to
change without notice.
Access time
Average random stroke
Approx. 130 ms (DVD)
Approx. 135 ms (CD)
1)
Maximum data transfer ra te de pends on the
capabilities of th e ho s t computer.
32
Page 33

Support Overview
Product and Support
Information
If you have problems with the driv e, or are
unsure of a procedure or some other details,
please contact your Sony customer support
center.
User Support Web Site
You can find the following information on
this Web site. The information is
periodically upda ted, so we r ecommend that
you visit regularly.
• Information about the drive
• Information about the soft ware supplied
with the drive
• Latest firmware
• Frequently asked questions
• Troubleshooting guide
• Certified comp atible computers
• Certified compatible discs
• Operating instructions
• Et cetera
Accessing the user support Web
site
Insert the supplied software disc into the
drive, and in the [Menu Selection] screen,
click [User Support Web Page]. You can
also directly type the user support Web site
address (see Product and Support
Information for details) in the address box of
your Web browser.
Sony Global Sites Information
(As of April, 2004)
Product purchased in the USA:*
http://sony.storagesupport.com/
Product purchased in Canada:
http://www.sony.ca/
Product purchased i n Australia or New
Zealand:
http://www.sony.com.au/
Product purchased in Europe:*
http://www.sonydvd-link.com
Product purchased in Hong Ko ng:*
http://www.sony.com.hk/Electronics/cp
Product purchased in China:*
http://www.sony.com.cn/electronics/edmh/
default1.html
Product purchased in Singapore:
http://www.sony.com.sg/asianit/
Product purchased in Taiwan:*
http://www.sony.com.tw/stwn/cpd/
index.htm
Product purchased in Korea:*
http://www.sony.co.kr/cp
Product purchased in Brazil:
http://www.sonybrasil.com.br
Miscellaneous
Update the Drive Firmware
Some problems encountered when using the
drive can be solved simply by updating the
drive firmware. Firmware updates are
available on the user support Web site.
Access the site, make sure that there i s an
update for your firmware, and follow the
instructions on the screen to proceed with
download and installation.
Product purchased in the Middle East:
http://www.sony-middleeast.com
* Local Web sites for com puter peripheral
products
About the Bundled Software
Detailed information about the supplied
software is available on the Web sites of the
software manufacturer.
http://www.nero.com
33
Page 34

Technical Support
Please consult the above source s befo re
calling with questions about using this
product, or with te ch ni ca l questions about
the drive or the supplied software. If using
telephone or e-mail support, p lease have th e
following information available:
• Model number: DRX-700UL
• Serial number
• Date and place of purchase
• Computer maker and model number
• Computer specifications (CPU speed,
memory size, OS version, etc.)
• Writing software used (version, etc.)
Local technical support is only
available in the specified sales
regions. The customers in these
regions should be provided with a
warranty card for this product. For
contact information, refer to the
warranty card.
Note that technical support
conditions may vary according to
the locality, and that charges
and/or limited service may apply in
some regions.
34
Page 35

Page 36

Sony Corporation Printed in China
 Loading...