

Page 1
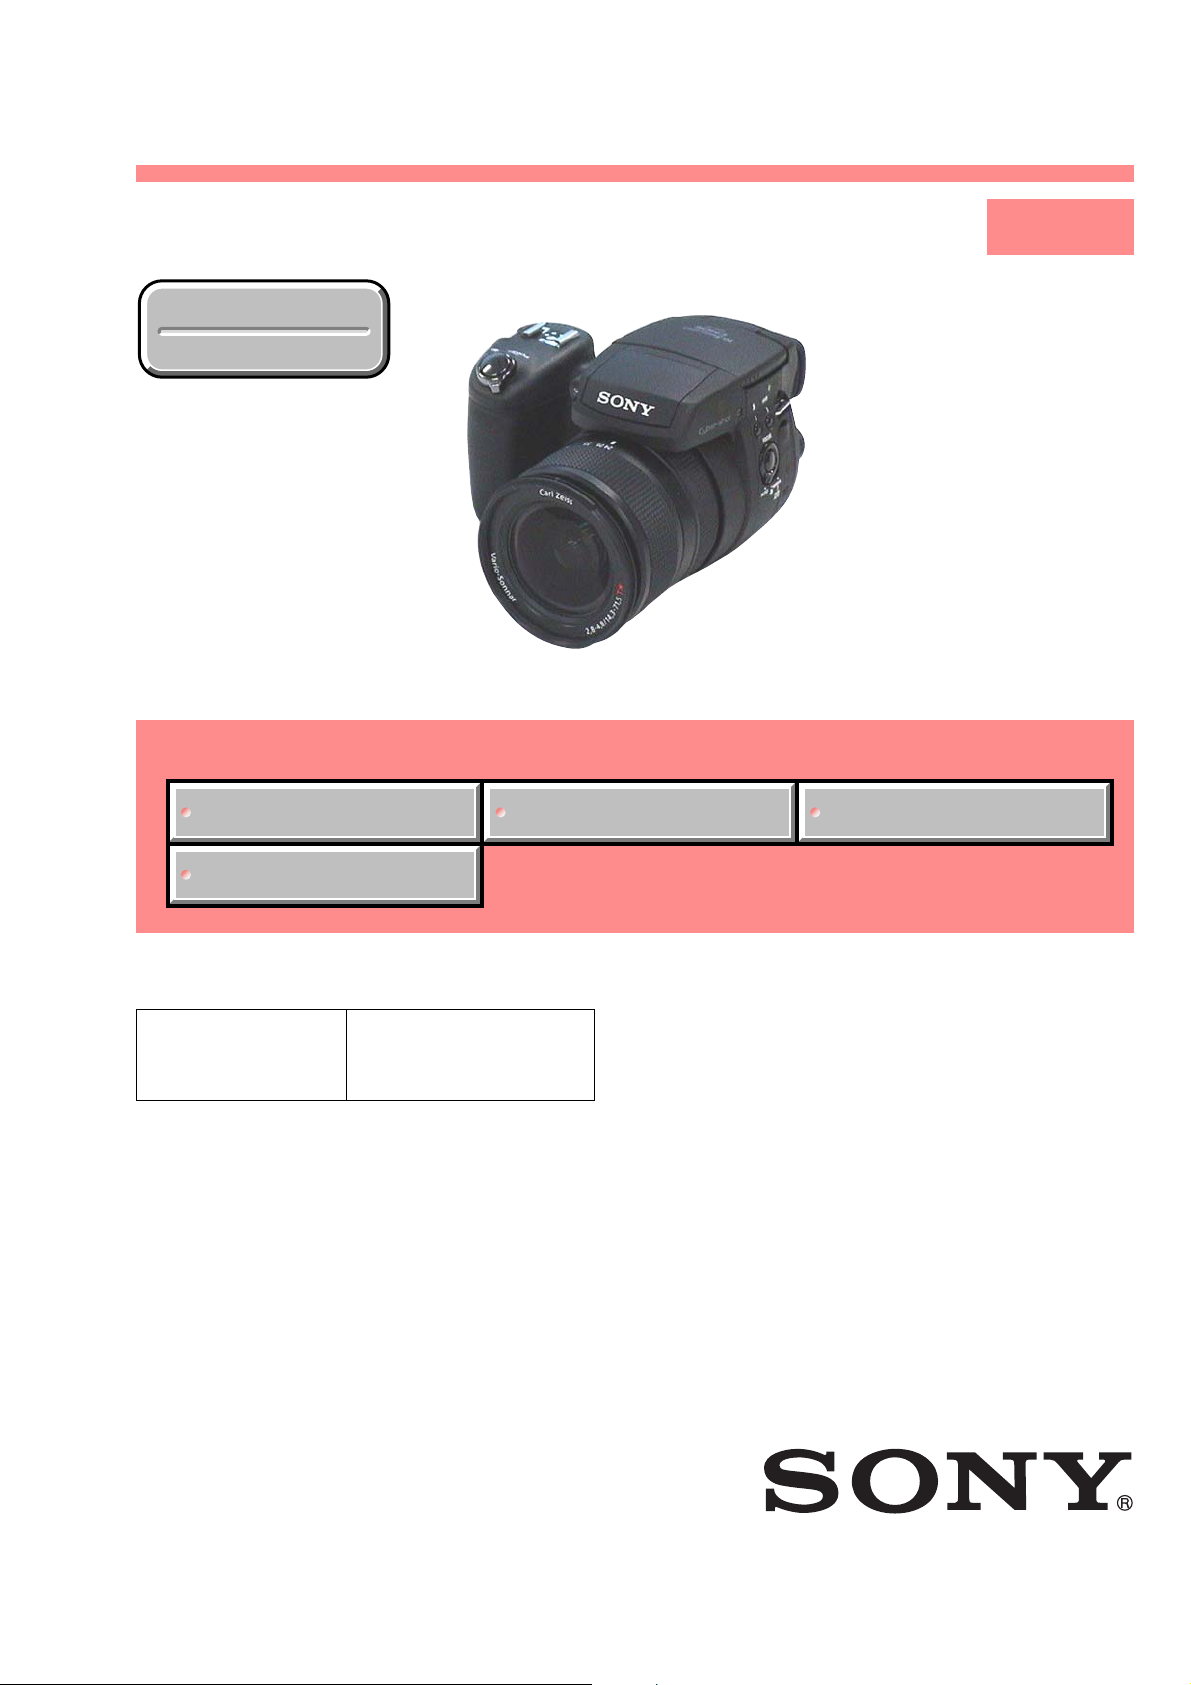
DSC-R1
SERVICE MANUAL
Ver 1.3 2006.12
Revision History
Revision History
Link
Link
SPECIFICATIONS ACCESSORIES INSTRUCTION MANUAL
LEVEL 1
US Model
Canadian Model
AEP Model
UK Model
E Model
Australian Model
Hong Kong Model
Chinese Model
Korea Model
Japanese Model
Tourist Model
SERVICE NOTE
The components identified by
mark 0 or dotted line with
mark 0 are critical for safety.
Replace only with part number
specified.
Les composants identifiés par une
marque 0 sont critiques pour la
sécurité.
Ne les remplacer que par une pièce
portant le numéro spécifié.
DIGITAL STILL CAMERA
DSC-R1_L1
Sony EMCS Co.
2006L0500-1
© 2006.12
Published by Kohda TEC9-876-898-41
Page 2

SPECIFICATIONS
Camera
[System]
Image device 21.5 × 14.4 mm color CMOS
Total pixel number of camera
Effective pix el number of camera
Lens Carl Zeiss Vario-Sonnar T*
Exposure control Automatic, Shutter speed
White balance Automatic, Daylight, Cloudy,
File format (DCF compliant)
Recording media “Memory Stick”
Flash Recommended distance (ISO
Viewfinder Electric viewfinder (color)
[Input and Output connectors]
VIDEO OUT jack
ACC jack Mini-minijack (ø 2.5 mm)
USB jack mini-B
USB communication
sensor, Primary 3-color filter
Approx. 10 784 000 pixels
Approx. 10 286 000 pixels
5× zoom lens
f = 14.3 − 71.5 mm (24 −
120mm when converted to a
35 mm still camera)
F2.8 − 4.8
Filter diameter: 67 mm
priority, Aperture priority,
Manual exposure, Scene
selection (4 modes)
Fluorescent, Incandescent,
Flash, One-push
Still images: Exif Ver. 2.21
JPEG compliant, RAW (SR2),
DPOF compatible
Microdrive
CompactFlash card (TypeI/
TypeII)
set to Auto): approx. 0.5 m to
8.5 m (1 feet 7 3/4 inches to 2 7
feet 10 3/4 inches) (W)/approx.
0.4 m to 5.0 m (1 feet 3 3/4
inches to 16 feet 47/8 inches)
(T)
Minijack
1 Vp-p, 75 Ω, unbalanced, sync
negative
Hi-Speed USB (USB 2.0
compliant)
[LCD screen]
LCD panel 5.1 cm (2.0 type) TFT drive
Total number of dots
134 000 (560 × 240) dots
[Finder]
LCD panel 1.1 cm (0.44 type) TFT drive
Total number of dots
235 200 (980 × 240) dots
[Power, general]
Used battery pack
Power requirements
Power consumption (during shooting with LCD
Operating temperature
Storage temperature
Dimensions (lens: W-end)
Mass Approx. 1047 g (2 lb 4.9 oz)
Speaker Dynamic speaker
Exif Print Compatible
PRINT Image Matching III
PictBridge Compatible
Rechargeable battery pack
NP-FM50
7.2 V
on)
1.7 W
0°C to +40°C (+32°F to
+104°F)
(When using the Microdrive:
+5°C to +40°C (41°F to
+104°F))
−20°C to +60°C (−4°F to
+140°F)
139.4 × 97.7 × 156.0 mm
(5 1/2 × 3 7/8 × 6 1/4 inches)
(W/H/D, excluding protrusions)
(including NP-FM50 battery
pack, “Memory Stick”,
shoulder strap, and lens hood,
etc.)
Compatible
AC-L15A AC Adaptor
Input rating 100 V to 240 V AC, 50/60 Hz,
Output rating 8.4 V DC*
Operating temperature range
Storage temperature range
Maximum dimensions
Mass Approx. 190 g (6.7 oz)
18 W
*See the label on the AC
Adaptor for other
specifications.
0°C to +40°C (32°F to +104°F)
-20°C to +60°C (-4°F to
+140°F)
Approx. 56 × 31 × 100 mm
(2 1/4 × 1 1/4 × 4 inches) (W/H/
D), excluding projecting parts
excluding power cord (mains
lead)
Rechargeable battery pack NP-FM50
Used battery Lithium-ion battery
Maximum voltage
Nominal voltage DC 7.2 V
Capacity 8.5 Wh (1 180 mAh)
Design and specifications are subject to change
without notice.
DC 8.4 V
DSC-R1_L1
— 2 —
Page 3

SAFETY-RELATED COMPONENT WARNING!!
COMPONENTS IDENTIFIED BY MARK 0 OR DOTTED LINE WITH
MARK 0 ON THE SCHEMATIC DIAGRAMS AND IN THE PARTS
LIST ARE CRITICAL TO SAFE OPERATION. REPLACE THESE
COMPONENTS WITH SONY PARTS WHOSE PART NUMBERS
APPEAR AS SHOWN IN THIS MANUAL OR IN SUPPLEMENTS
PUBLISHED BY SONY .
SAFETY CHECK-OUT
After correcting the original service problem, perform the following
safety checks before releasing the set to the customer.
ATTENTION AU COMPOSANT AYANT RAPPORT
À LA SÉCURITÉ!
LES COMPOSANTS IDENTIFÉS P AR UNE MARQUE 0 SUR LES
DIAGRAMMES SCHÉMA TIQUES ET LA LISTE DES PIÈCES SONT
CRITIQUES POUR LA SÉCURITÉ DE FONCTIONNEMENT. NE
REMPLACER CES COMPOSANTS QUE PAR DES PIÈSES SONY
DONT LES NUMÉROS SONT DONNÉS DANS CE MANUEL OU
DANS LES SUPPÉMENTS PUBLIÉS PAR SONY.
1. Check the area of your repair for unsoldered or poorly-soldered
2. Check the interboard wiring to ensure that no wires are
3. Look for unauthorized replacement parts, particularly
4. Look for parts which, through functioning, show obvious signs
DSC-R1_L1
connections. Check the entire board surface for solder splashes
and bridges.
"pinched" or contact high-wattage resistors.
transistors, that were installed during a previous repair. Point
them out to the customer and recommend their replacement.
of deterioration. Point them out to the customer and
recommend their replacement.
5. Check the B+ voltage to see it is at the values specified.
6. Flexible Circuit Board Repairing
• Keep the temperature of the soldering iron around 270°C
during repairing.
• Do not touch the soldering iron on the same conductor of the
circuit board (within 3 times).
• Be careful not to apply force on the conductor when soldering
or unsoldering.
— 3 —
Page 4

Description on Self-diagnosis Display
Self-diagnosis display
• C: ss: ss
You can reverse the camera
malfunction yourself. (However,
contact your Sony dealer or local
authorized Sony service facility
when you cannot recover from the
camera malfunction.)
• E: ss: ss
Contact your Sony dealer or local
authorized Sony service facility.
SERVICE NOTE
Display Code
C:32:ss
C:13:ss
E:61:ss
E:91:ss
Countermeasure
Turn the power off and on again.
Format the recording medium.
Insert a new recording medium.
Checking of lens drive circuit.
Checking of flash unit or replacement
of flash unit.
Cause
Trouble with hardware.
Unformatted recording medium is inserted.
Recording medium is broken.
When failed in the focus and zoom
initialization.
Abnormality when flash is being
charged.
Caution Display During Error
SYSTEM ERROR
FORMAT ERROR
MEMORY STICK ERROR,
CF CARD ERROR
—
DSC-R1_L1
— 4 —
Page 5
Ver 1.1 2005.11
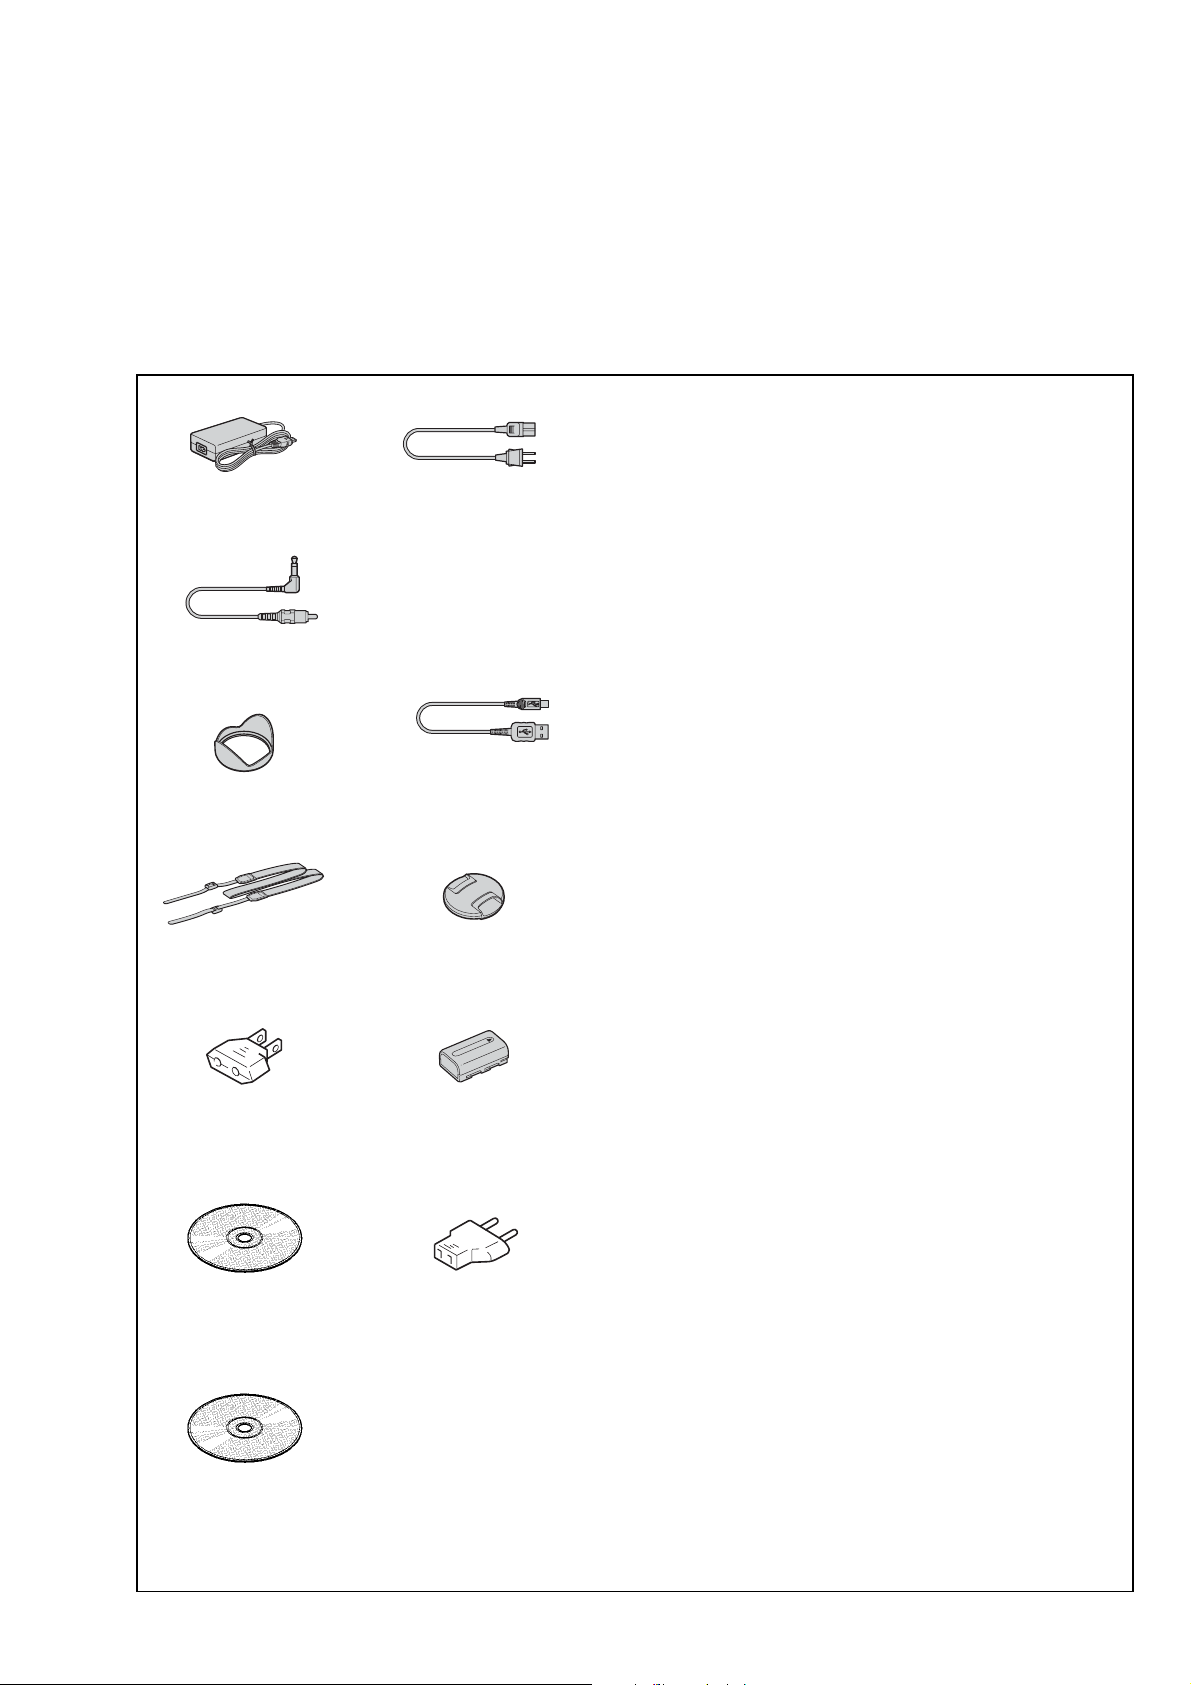
ACCESSORIES
Note:
• Items marked “*” are not stocked since they are seldom required for routine service.
Some delay should be anticipated when ordering these items.
• The parts numbers of such as a cabinet are also appeared in this section.
Refer to the parts number mentioned below the name of parts to order.
•Abbreviation
AR : Argentine model
AUS: Australian model
BR : Brazilian model
Checking supplied accessories.
AC-L15A AC Adaptor (1)
0 1-479-283-33
Video cable (1)
1-824-009-81
Lens hood (1)
2-654-799-01
Shoulder strap (1)
2-654-801-01
CH : Chinese model
CND: Canadian model
EE : East European model
Power cord (mains lead) (1)
0 1-776-985-11 (KR)
0 1-782-476-51 (CH)
0 1-783-374-11 (UK, HK)
0 1-790-107-42 (US, CND)
0 1-790-732-71 (JE, J)
0 1-823-946-12 (AEP, E)
0 1-827-945-11 (AUS)
0 1-830-518-11 (TW)
USB cable (1)
1-827-038-11
Lens cap (1)
X-2102-547-1
HK : Hong Kong model
J: Japanese model
JE : Tourist model
Other accessories
2-654-464-01 INSTRUCTION (READ THIS FIRST) (JAPANESE) (J)
2-654-464-11 INSTRUCTION (READ THIS FIRST)
2-654-464-21 INSTRUCTION (READ THIS FIRST)
2-654-464-31 INSTRUCTION (READ THIS FIRST)
2-654-464-41 INSTRUCTION (READ THIS FIRST)
2-654-464-51 INSTRUCTION (READ THIS FIRST)
2-654-464-61 INSTRUCTION (READ THIS FIRST) (RUSSIAN) (AEP)
2-654-464-71 INSTRUCTION (READ THIS FIRST)
2-654-464-81 INSTRUCTION (READ THIS FIRST)
2-654-464-91 INSTRUCTION (READ THIS FIRST)
2-654-490-11 INSTRUCTION (READ THIS FIRST)
2-654-490-21 INSTRUCTION (READ THIS FIRST)
2-654-490-31 INSTRUCTION (READ THIS FIRST)
2-654-494-01 INSTRUCTION (USER'S GUIDE) (JAPANESE) (J)
2-654-494-11 INSTRUCTION (USER'S GUIDE) (ENGLISH)
KR : Korea model
NE : North European model
TW : T aiw an model
(ENGLISH) (EXCEPT KR, CH, J)
(FRENCH, ITALIAN) (CND, AEP)
(SPANISH, PORTUGUESE) (AEP, E, JE)
(GERMAN, DUTCH) (AEP)
(TRADITIONAL CHINESE, SIMPLIFIED CHINESE)
(E, HK, CH, JE)
(ARABIC, PERSIAN) (E)
(KOREAN) (KR, JE)
(CZECH, POLISH) (AEP)
(HUNGARIAN, SLOVAKIAN) (AEP)
(SWEDISH, FINNISH) (AEP)
(NORWEGIAN, DANISH) (AEP)
(EXCEPT KR, CH, J)
Conversion adaptor (1)
0 1-569-008-21 (E)
CD-ROM
(Image Data Converter SR) (1)
2-654-855-01
CD-ROM
(Cyber-shot application software) (1)
2-655-048-01
Rechargeable battery pack
NP-FM50 (1)
(not supplied)
Conversion adaptor (1)
0 1-569-007-12 (JE)
2-654-494-21 INSTRUCTION (USER'S GUIDE)
(FRENCH, ITALIAN) (CND, AEP)
2-654-494-31 INSTRUCTION (USER'S GUIDE)
(SPANISH, PORTUGUESE) (AEP, E, JE)
2-654-494-41 INSTRUCTION (USER'S GUIDE)
(GERMAN, DUTCH) (AEP)
2-654-494-51 INSTRUCTION (USER'S GUIDE)
(TRADITIONAL CHINESE, SIMPLIFIED CHINESE)
(E, HK, CH, JE)
2-654-494-61 INSTRUCTION (USER'S GUIDE) (RUSSIAN) (AEP)
2-654-494-71 INSTRUCTION (USER'S GUIDE)
(ARABIC, PERSIAN) (E)
2-654-494-81 INSTRUCTION (USER'S GUIDE) (KOREAN) (KR, JE)
2-654-494-91 INSTRUCTION (USER'S GUIDE)
(CZECH, POLISH) (AEP)
2-654-495-11 INSTRUCTION (USER'S GUIDE)
(HUNGARIAN, SLOVAKIAN) (AEP)
2-654-495-21 INSTRUCTION (USER'S GUIDE)
(SWEDISH, FINNISH) (AEP)
2-654-495-31 INSTRUCTION (USER'S GUIDE)
(NORWEGIAN, DANISH) (AEP)
DSC-R1_L1
• Refer to the cover for mark 0.
— 5 —
Page 6
DSC-R1
LEVEL 1
US Model
SERVICE MANUAL
Ver 1.2 2006.05
SUPPLEMENT-1
File this supplement with the service manual.
• Change of Repair Parts
Canadian Model
AEP Model
UK Model
E Model
Australian Model
Hong Kong Model
Chinese Model
Korea Model
Japanese Model
Tourist Model
(PV06-003)
: Points changed portion.
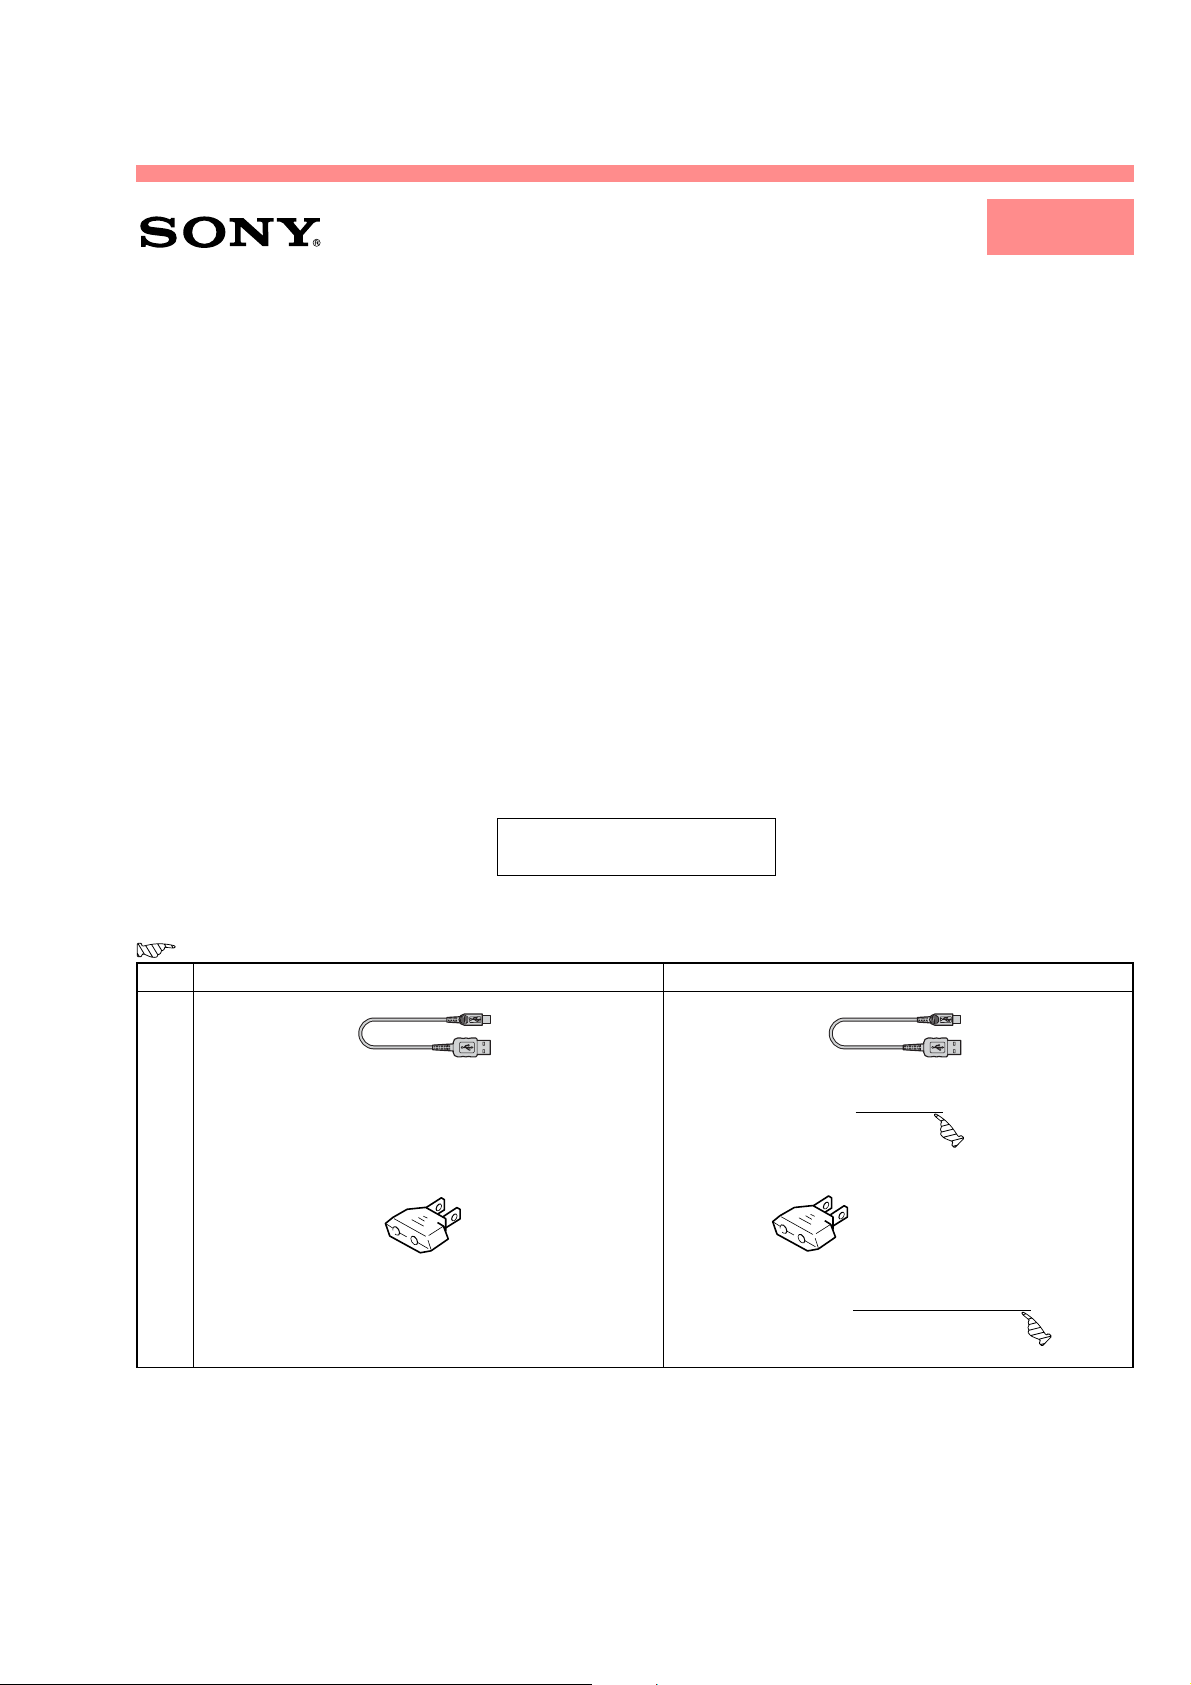
Page Former New
USB cable (1)
1-827-038-11
5
Conversion adaptor (1)
0 1-569-008-21 (E)
Conversion adaptor (1)
0 1-569-008-21 (E (Except Middle East area))
USB cable (1)
1-830-491-11
DSC-R1_L1
9-876-898-83
Sony EMCS Co.
2006E0500-1
© 2006.5
Published by DI Technical Support Department
Page 7

DSC-R1
LEVEL 1
US Model
SERVICE MANUAL
Ver 1.3 2006.12
SUPPLEMENT-2
File this supplement with the service manual.
• Change of Repair Parts
Canadian Model
AEP Model
UK Model
E Model
Australian Model
Hong Kong Model
Chinese Model
Korea Model
Japanese Model
Tourist Model
(DI06-135)
DSC-R1_L1
9-876-898-84
Sony EMCS Co.
2006L0500-1
© 2006.12
Published by Kohda TEC
Page 8
& : Points added portion.
: Points changed portion.
Checking supplied accessories.
Note: This item is supplied with the unit as an accessory,
but is not prepared as a service part.
AC-L15A AC Adaptor (1)
0 1-479-283-33
Video cable (1)
1-824-009-81
Lens hood (1)
2-654-799-01
Shoulder strap (1)
2-654-801-01
Conversion adaptor (1)
0 1-569-008-12
(E (Except Middle East area))
CD-ROM
(Image Data Converter SR) (1)
2-654-855-02
Power cord (mains lead) (1)
0 1-776-985-11 (KR)
0 1-782-476-51 (CH)
0 1-783-374-11 (UK, HK)
0 1-790-107-42 (US, CND)
0 1-790-732-71 (JE, J)
0 1-823-946-12 (AEP, E)
0 1-827-945-11 (AUS)
0 1-830-518-11 (TW)
USB cable (1)
1-827-038-11
Lens cap (1)
X-2102-547-1
Rechargeable battery pack
NP-FM50 (1)
(Note)
Conversion adaptor (1)
0 1-569-007-12 (JE)
*
Other accessories
2-654-464-01 INSTRUCTION (READ THIS FIRST) (JAPANESE) (J)
2-654-464-11 INSTRUCTION (READ THIS FIRST)
(ENGLISH) (EXCEPT KR, CH, J)
2-654-464-21 INSTRUCTION (READ THIS FIRST)
(FRENCH, ITALIAN) (CND, AEP)
2-654-464-31 INSTRUCTION (READ THIS FIRST)
(SPANISH, PORTUGUESE) (AEP, E, JE)
2-654-464-41 INSTRUCTION (READ THIS FIRST)
(GERMAN, DUTCH) (AEP)
2-654-464-51 INSTRUCTION (READ THIS FIRST)
(TRADITIONAL CHINESE, SIMPLIFIED CHINESE)
(E, HK, CH, JE)
2-654-464-61 INSTRUCTION (READ THIS FIRST) (RUSSIAN) (AEP)
2-654-464-71 INSTRUCTION (READ THIS FIRST)
(ARABIC, PERSIAN) (E)
2-654-464-81 INSTRUCTION (READ THIS FIRST)
(KOREAN) (KR, JE)
2-654-464-91 INSTRUCTION (READ THIS FIRST)
(CZECH, POLISH) (AEP)
2-654-490-11 INSTRUCTION (READ THIS FIRST)
(HUNGARIAN, SLOVAKIAN) (AEP)
2-654-490-21 INSTRUCTION (READ THIS FIRST)
(SWEDISH, FINNISH) (AEP)
2-654-490-31 INSTRUCTION (READ THIS FIRST)
(NORWEGIAN, DANISH) (AEP)
2-654-494-01 INSTRUCTION (USER'S GUIDE) (JAPANESE) (J)
2-654-494-11 INSTRUCTION (USER'S GUIDE) (ENGLISH)
(EXCEPT KR, CH, J)
2-654-494-21 INSTRUCTION (USER'S GUIDE)
(FRENCH, ITALIAN) (CND, AEP)
2-654-494-31 INSTRUCTION (USER'S GUIDE)
(SPANISH, PORTUGUESE) (AEP, E, JE)
2-654-494-41 INSTRUCTION (USER'S GUIDE)
(GERMAN, DUTCH) (AEP)
2-654-494-51 INSTRUCTION (USER'S GUIDE)
(TRADITIONAL CHINESE, SIMPLIFIED CHINESE)
(E, HK, CH, JE)
2-654-494-61 INSTRUCTION (USER'S GUIDE) (RUSSIAN) (AEP)
2-654-494-71 INSTRUCTION (USER'S GUIDE)
(ARABIC, PERSIAN) (E)
2-654-494-81 INSTRUCTION (USER'S GUIDE) (KOREAN) (KR, JE)
2-654-494-91 INSTRUCTION (USER'S GUIDE)
(CZECH, POLISH) (AEP)
2-654-495-11 INSTRUCTION (USER'S GUIDE)
(HUNGARIAN, SLOVAKIAN) (AEP)
2-654-495-21 INSTRUCTION (USER'S GUIDE)
(SWEDISH, FINNISH) (AEP)
2-654-495-31 INSTRUCTION (USER'S GUIDE)
(NORWEGIAN, DANISH) (AEP)
CD-ROM
(Cyber-shot application software) (1)
2-655-048-01
DSC-R1_L1
• Refer to page cover on the service manual f or mark 0.
— 2 —
Page 9
2-654-494-11(1)
Digital Still Camera
User’s Guide/
Troubleshooting
Operating Instructions
Before operating the unit, please read this manual and
“Read This First” (separate volume) thoroughly, and retain
them for future reference.
Owner’s Record
The model and serial numbers are located on the bottom.
Record the serial number in the space provided below.
Refer to these numbers whenever you call upon your Sony
dealer regarding this product.
Model No. DSC-R1
Serial No. ___________________________
DSC-R1
Enjoying the
camera
Using the menu
Using the Setup screen
Using your computer
Printing still images
Connecting your
camera to your TV
Troubleshooting
Additional information on this product/Image Data
Converter SR and answers to frequently asked
questions can be found at our Customer Support
Web si te .
Printed on 100% recycled paper using VOC (Volatile
Organic Compound)-free vegetable oil based ink.
Printed in Japan
“Read This First” (separate volume)
Explains the set-up and basic operations for
shooting/playback with your camera.
© 2005 Sony Corporation
Others
Index
Page 10
WARNING
To reduce fire or shock hazard, do
not expose the unit to rain or
moisture.
For Customers in the U.S.A. and
Canada
RECYCLING LITHIUM-ION BATTERIES
Lithium-Ion batteries are
recyclab le.
You can help preserve our
environment by returning your
used rechargeable batteries to
the collection and recycling
location nearest you.
For more information regarding recycling of
rechargeable batteries, call toll free
1-800-822-8837, or visit http://www.rbrc.org/
Caution: Do not handle damaged or leaking
Lithium-Ion batteries.
For Customers in the U.S.A.
This symbol is intended to
alert the user to the presence
of uninsulated “dangerous
voltage” within the product's
enclosure that may be of
sufficient magnitude to
constitute a risk of electric
shock to persons.
This symbol is intended to
alert the user to the presence
of important operating and
maintenance (servicing)
instructions in the literature
accompanying the appliance.
If you have any questions about this product, you
may call:
Sony Customer Information Services Center
1-800-222-SONY (7669)
The number below is for the FCC related matters
only.
Regulatory Information
Declaration of Conformity
Trade Name: SONY
Model No.: DSC-R1
Responsible Party: Sony Electronics Inc.
Address: 16450 W. Bernardo Dr,
San Diego, CA 92127U.S.A.
Telephone No.: 858-942-2230
This device complies with Part 15 of the FCC
Rules. Operation is subject to the following
two conditions: (1) This device may not cause
harmful interference, and (2) this device must
accept any interference received, including
interference that may cause undesired
operation.
CAUTION
You are cautioned that any changes or
modifications not expressly approved in this
manual could void your authority to operate this
equipment.
Note:
This equipment has been tested and found to
comply with the limits for a Class B digital
device, pursuant to Part 15 of the FCC Rules.
These limits are designed to provide reasonable
protection against harmful interference in a
residential installation. This equipment generates,
uses, and can radiate radio frequency energy and,
if not installed and used in accordance with the
instructions, may cause harmful interference to
radio communications. However, there is no
guarantee that interference will not occur in a
particular installation. If this equipment does
cause harmful interference to radio or television
reception, which can be determined by turning the
equipment off and on, the user is encouraged to
try to correct the interference by one or more of
the following measures:
– Reorient or relocate the receiving antenna.
– Increase the separation between the
equipment and receiver.
2
Page 11

– Connect the equipment into an outlet on a
circuit different from that to which the
receiver is connected.
– Consult the dealer or an experienced radio/TV
technician for help.
The supplied interface cable must be used with the
equipment in order to comply with the limits for a
digital device pursuant to Subpart B of Part 15 of
FCC Rules.
Disposal of Old Electrical & Electronic
Equipment (Applicable in the
European Union and other European
countries with separate collection
systems)
For Customers in Europe
This product has been tested and found compliant
with the limits set out in the EMC Directive for
using connection cables shorter than 3 meters (9.8
feet).
Attention
The electromagnetic fields at the specific
frequencies may influence the picture and sound
of this camera.
Notice
If static electricity or electromagnetism causes
data transfer to discontinue midway (fail), restart
the application or disconnect and connect the
communication cable (USB, etc.) again.
This symbol on the product or on its packaging
indicates that this product shall not be treated as
household waste. Instead it shall be handed over
to the applicable collection point for the recycling
of electrical and electronic equipment. By
ensuring this product is disposed of correctly, you
will help prevent potential negative consequences
for the environment and human health, which
could otherwise be caused by inappropriate waste
handling of this product. The recycling of
materials will help to conserve natural resources.
For more detailed information about recycling of
this product, please contact your local Civic
Office, your household waste disposal service or
the shop where you purchased the product.
Notice for customers in the
United Kingdom
A moulded plug complying with BS 1363 is fitted
to this equipment for your safety and convenience.
Should the fuse in the plug supplied need to be
replaced, a fuse of the same rating as the supplied
one and approved by ASTA or BSI to BS 1362,
(i.e., marked with an or mark) must be
used.
If the plug supplied with this equipment has a
detachable fuse cover, be sure to attach the fuse
cover after you change the fuse. Never use the
plug without the fuse cover. If you should lose the
fuse cover, please contact your nearest Sony
service station.
3
Page 12

Notes on using your camera
Types of “Memory Stick” that can be
used (not supplied)
The IC recording medium used by this
camera is a “Memory Stick”. There are two
types of “Memory Stick”.
“Memory Stick”: you can use a
“Memory Stick” with your camera.
“Memory Stick Duo”: Inserting a
“Memory Stick Duo” into a Memory
Stick Duo Adaptor.
Memory Stick Duo Adaptor
• For details on “Memory Stick”, see page 122.
Notes on the “InfoLITHIUM” battery
pack
• Charge the supplied NP-FM50 battery pack
before using the camera for the first time.
(
t step 1 in “Read This First”)
• The battery pack can be charged even if it is not
completely discharged. Also, even if the battery
pack is not fully charged, you can use the
partially charged capacity of the battery pack as
is.
• If you do not intend to use the battery pack for a
long time, use up the existing charge and
remove it from your camera, then store it in a
cool, dry place. This is to maintain the battery
pack functions (page 125).
• For details on the usable battery pack, see
page 125.
About the Carl Zeiss lens
This camera is equipped with a Carl Zeiss
lens which is capable of reproducing fine
images. The lens for this camera uses the
#
measurement system for cameras
MTF
developed jointly by Carl Zeiss, in
Germany, and Sony Corporation, and offers
the same quality as other Carl Zeiss lenses.
The lens for your camera is also T
*
-coated
to suppress unwanted reflection and
faithfully reproduce colors.
#
MTF is an abbreviation of Modulation Transfer
Function, a numeric value indicating the amount
of light from a specific part of the subject
gathered at the corresponding position in the
image.
Notes on the AC Adaptor
• Do not short the DC plug of the AC Adaptor
with a metallic object, as this may cause
malfunction.
• Clean the DC plug of the AC Adaptor with a dry
cotton swab, etc. Do not use the plug if it is
dirty. Use of a dirty plug may not properly
charge the battery pack.
No compensation for contents of the
recording
The contents of the recording cannot be
compensated for if recording or playback is not
possible due to a malfunction of your camera or
recording media, etc.
Back up recommendation
• To avoid the potential risk of data loss, always
copy (back up) data to other medium.
Notes on recording/playback
• This camera is neither dust-proof, nor splash-
proof, nor water-proof. Read “Precautions”
(page 126) before operating the camera.
• Before you record one-time events, make a trial
recording to make sure that the camera is
working correctly.
• Be careful not to get the camera wet. Water
entering the inside of the camera may cause
malfunctions which in some cases may not be
repairable.
4
Page 13

• Do not aim the camera at the sun or other bright
light. It may cause the malfunction of your
camera.
• Do not use the camera near a location that
generates strong radio waves or emits radiation.
The camera may not be able to record or play
back properly.
• Using the camera in sandy or dusty locations
may cause malfunctions.
• If moisture condensation occurs, remove it
before using the camera (page 126).
• Do not shake or strike the camera. In addition to
malfunctions and an inability to record images,
this may render the recording medium unusable,
or cause image data breakdown, damage or loss.
• Clean the flash surface before use. The heat of
flash emission may cause dirt on the flash
surface to become discolored or to stick to the
flash surface, resulting in insufficient light
emission.
Notes on the LCD screen, LCD finder
(for models with an LCD finder) and
lens
• The LCD screen and the LCD finder are
manufactured using extremely high-precision
technology so over 99.99% of the pixels are
operational for effective use. However, there
may be some tiny black points and/or bright
points (white, red, blue or green in color) that
constantly appear on the LCD screen and the
LCD finder. These points are normal in the
manufacturing process and do not affect the
recording in any way.
Black (white/red/blue/green) points
• Be careful not to bump the lens, and be careful
not to apply force to it.
On image data compatibility
• This camera conforms with DCF (Design rule
for Camera File system) universal standard
established by JEITA (Japan Electronics and
Information Technology Industries
Association).
• Playback of images recorded with your camera
on other equipment and playback of images
recorded or edited with other equipment on your
camera are not guaranteed.
Warning on copyright
Television programs, films, videotapes, and other
materials may be copyrighted. Unauthorized
recording of such materials may be contrary to the
provisions of the copyright laws.
The pictures used in this manual
The photographs used as examples of pictures in
this manual are reproduced images, and are not
actual images shot using this camera.
• Exposing the LCD screen, the finder or the lens
to direct sunlight for long periods may cause
malfunctions. Be careful when placing the
camera near a window or outdoors.
• Do not press against the LCD screen. The screen
may be discolored and that may cause a
malfunction.
• Images may trail across on the LCD screen in a
cold location. This is not a malfunction.
5
Page 14
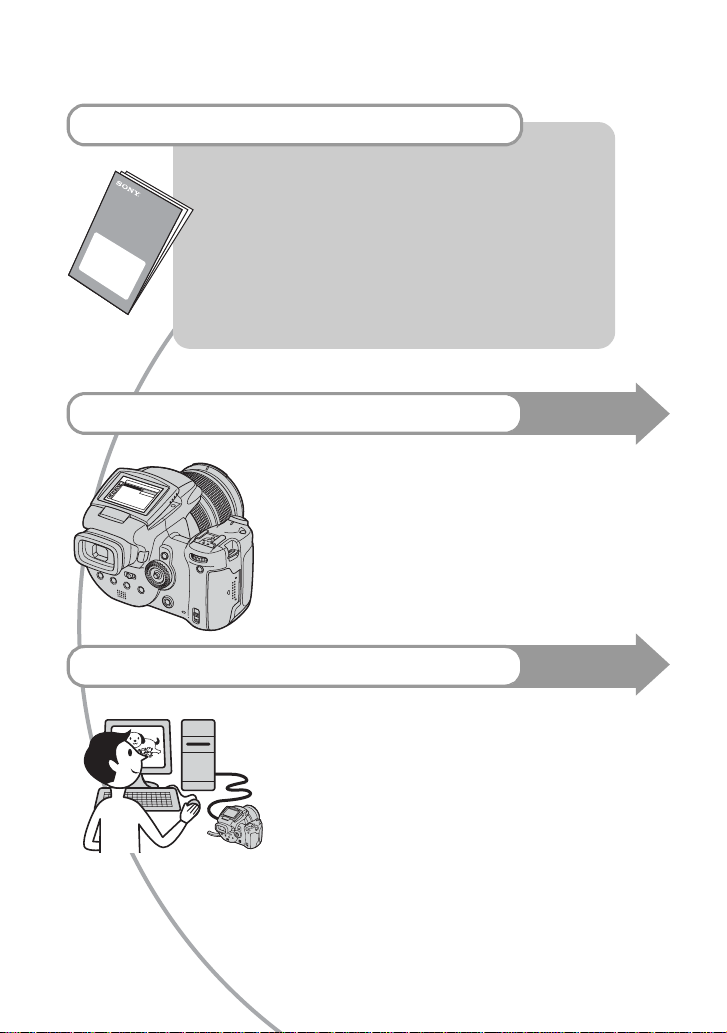
For full use of the digital still camera
Prepare the camera and shoot images easily
“Read This First” (separate volume)
1 Prepare the battery pack
2 Turn the camera on/set the clock
3 Insert a recording medium (not supplied)
4 Select the image size for use
5 Shoot images easily (Auto adjustment mode)
6 View/delete images
Get more friendly with your camera
• Shoot with your favorite settings t page 29
• Enjoy various shooting/playback using the menu t page 62
• Change the default settings t page 71
Connect your camera to a PC or a printer
• Copy your images to a computer and enjoy editing them in
various ways t page 83
• Print images by connecting your camera directly to a printer
(PictBridge compliant printers only) t page 99
This manual
This manual
6
Page 15

Table of contents
Notes on using your camera .....................................................................4
Enjoying the camera
Basic techniques for better images .........................................................11
Focus – Focusing on a subject successfully................................................... 11
Exposure – Adjusting the light intensity .......................................................... 12
Color – On the effects of lighting ..................................................................... 13
Quality – On “image quality” and “image size” ............................................... 13
Before operation
Identifying parts.......................................................................................15
Indicators on the screen..........................................................................19
Changing the screen display ...................................................................22
Number of still images.............................................................................23
Battery life and number of images that can be recorded/viewed ............25
Advanced shooting
Operation workflow..................................................................................26
Basic operation........................................................................................28
Using the command dial ................................................................................. 28
Using the mode dial ........................................................................................ 29
Using menu items............................................................................................ 31
Using the (Setup) screen .......................................................................... 32
Matching shooting features to photo-shooting situations ........................33
Exposure setting......................................................................................35
Shooting with Program auto ............................................................................ 35
Shooting with shutter speed priority mode...................................................... 36
Shooting with aperture priority mode .............................................................. 37
Shooting with manual exposure mode ............................................................ 39
Selecting the metering mode .......................................................................... 40
Adjusting the exposure – EV adjustment ........................................................ 41
Shooting with the exposure fixed – AE LOCK ................................................. 43
Shooting three images with the exposure shifted – Exposure Bracket ........... 44
Selecting the ISO sensitivity – ISO .................................................................. 45
Focus setting...........................................................................................46
Choosing an auto focus method..................................................................... 46
Focusing manually .......................................................................................... 48
7
Page 16

Flash .......................................................................................................50
Selecting a flash mode .................................................................................... 50
Using the flash manually – Pop-up Flash mode .............................................. 51
Selecting Flash Synchro .................................................................................. 52
Using an external flash .................................................................................... 52
Color setting............................................................................................ 55
Adjusting color tones – White Balance............................................................ 55
Selecting color reproduction ........................................................................... 57
Shooting continuously.............................................................................58
Burst mode ...................................................................................................... 58
Shooting in RAW mode...........................................................................59
RAW mode....................................................................................................... 59
Composing your shot.............................................................................. 60
Displaying the grid lines .................................................................................. 60
Monitor mode setting .............................................................................. 61
Reducing flicker............................................................................................... 61
Using the menu
Shooting menu........................................................................................62
(Image Size)
(P.Quality)
Mode (REC Mode)
BRK (Bracket Step)
(Flash Level)
PFX (P.Effect)
COLOR (Color)
(Saturation)
(Contrast)
(Sharpness)
(Setup)
Viewing menu ......................................................................................... 65
(Folder)
- (Protect)
DPOF
(Print)
(Slide)
(Resize)
(Rotate)
(Setup)
Trimming
8
Page 17

Using the Setup screen
Camera 1 ...........................................................................................71
1
AF Mode
Digital Zoom
Power Save
Date/Time
AF Illuminator
Auto Review
Camera 2 ...........................................................................................74
2
Expanded Focus
Flash Sync.
Flash
Pop-up Flash
Flicker Reduction
Grid Line
Memory Stick Tool .............................................................................76
Format
Create REC. Folder
Change REC. Folder
CF Card Tool ......................................................................................78
Format
Create REC. Folder
Change REC. Folder
Setup 1 ...............................................................................................80
1
LCD Backlight
EVF Backlight
Beep
Zebra
Language
Setup 2 ...............................................................................................81
2
File Number
USB Connect
Video Out
Clock Set
9
Page 18

Using your computer
Enjoying your Windows computer........................................................... 83
Copying images to your computer .......................................................... 85
Viewing image files stored on a computer with your camera.................. 92
Using the supplied software.................................................................... 93
Using your Macintosh computer .............................................................95
Printing still images
How to print still images..........................................................................98
Printing images directly using a PictBridge compliant printer .................99
Printing at a shop..................................................................................103
Connecting your camera to your TV
Viewing images on a TV screen ...........................................................105
Troubleshooting
Troubleshooting.....................................................................................107
Warning indicators and messages........................................................ 118
Others
10
On the “Memory Stick” ..........................................................................122
On the Microdrive.................................................................................. 124
On the “InfoLITHIUM” battery pack....................................................... 125
Precautions...........................................................................................126
Specifications........................................................................................ 128
Quick reference chart for shooting........................................................ 130
.................................................................................................... 132
Index
Page 19

Enjoying the camera
Basic techniques for better images
Focus Exposure Color Quality
This section describes the basics so you can
enjoy your camera. It tells you how to use
various camera functions such as the mode
dial (page 29), the menus (page 62), and so
on.
Focus
Focusing on a subject successfully
When you press the shutter button halfway down, the camera adjusts the focus automatically
(Auto Focus). Remember to press the shutter button only halfway down.
Press the shutter
button fully down
straight away.
To shoot a still image difficult to focus on
If the image looks blurred even after focusing, it may be because of camera shake.
Press the shutter
button halfway
down.
t page 48
AE/AF lock
Flashing indicator,
Indicator lit/beeps
110min
M AF
101
FINE
1M
96
30
F2.8
Then press the
shutter button
fully down.
t See
“Hints for preventing blur” (as follows).
Hints for preventing blur
Hold the camera steadily, keeping your arms at your side. Also, you can stabilize the
camera by leaning against a tree or a building beside you. Using a tripod, and using the
flash in dark places are also recommended.
Enjoying the camera
11
Page 20

Exposure
You can create various images by adjusting the exposure and the ISO sensitivity. Exposure is
the amount of light that the camera will receive when you release the shutter.
Adjusting the light intensity
Shutter speed = Length of time the camera
Exposure:
Aperture = Size of the opening allowing light to pass
through
Recording sensitivity
ISO =
receives light
Overexposure
= too much light
Whitish image
Correct exposure
Underexposure
= too little light
Darker image
The exposure is automatically set to the
proper value in the auto adjustment mode.
However, you can adjust it manually using
the functions below.
Manual exposure:
Allows you to adjust the shutter speed and
aperture value manually. t page 39
EV:
Allows you to adjust the exposure that has
been determined by the camera.
t page 41
Metering Mode:
Allows you to change the part of the
subject to be measured to determine the
exposure. t page 40
Adjusting the ISO sensitivity
ISO is unit of measurement (sensitivity), estimating how much light an image pickup device
(equivalent to photo films) receives. Even when the exposure is the same, images differ
depending on the ISO sensitivity.
To adjust the ISO sensitivity t page 45
High ISO sensitivity
Records a bright image even when shooting in a dark location.
However, the image tends to become noisy.
Low ISO sensitivity
Records a smoother image.
However, when the exposure is insufficient, the image may become darker.
12
Page 21
Color
On the effects of lighting
The apparent color of the subject is affected by the lighting conditions.
Example: The color of an image affected by light sources
Weather/lighting
Characteristics of
light
The color tones are adjusted automatically in the auto adjustment mode.
However, you can adjust color tones manually with white balance (page 55).
Quality
On “image quality” and “image size”
A digital image is made up of a collection of small dots called pixels.
If it contains a large number of pixels, the picture becomes large, it takes up more memory,
and the image is displayed in fine detail. “Image size” is shown by the number of pixels.
Although you cannot see the differences on the screen of the camera, the fine detail and data
processing time differ when the image is printed or displayed on a computer screen.
Description of the pixels and the image size
3888
1296
2
Pixels
Daylight Cloudy Fluorescent Incandescent
White (standard) Bluish Blue-tinged Reddish
1 Image size: 10M
3,888 pixels × 2,592 pixels = 10,077,696 pixels
2 Image size: 1M
1,296 pixels × 864 pixels = 1,119,744 pixels
864
1
2592
Enjoying the camera
13
Page 22

Selecting the image size for use (t step 4 in “Read This First”)
Pixel
Many pixels (Fine
image quality and
large file size)
Example: Printing in
up to A3/A3+** size
Few pixels (Rough
image quality but
small file size)
Example: For creating
web pages
The default settings are marked with .
Image size* Usage guidelines
10M (3888×2592) Larger
7M (3264×2176)
5M (2784×1856) For printing in A4 size or high density images in A5
3M (2160×1440)
1M (1296×864) For printing in postcard size
Smaller
* The images recorded using the camera are the same 3:2 ratio as used photograph printing paper or
postcards, etc.
** This is a size larger than A3 size. You can print images with a margin around the A3 size image.
For storing important images or printing A3/A3+**
size or fine A4 size images.
size
For recording a large number of images
For creating web pages
Selecting the image quality (compression ratio) in combination (page 62)
You can select the compression ratio when digital images are saved. When you select a high
compression ratio, the image lacks the fineness of detail, but has a smaller file size.
14
Page 23

Identifying parts
See the pages in parentheses for details of
operation.
1
2
3
4
5
6
7
8
9
q;
qa
qs
qd
qf
qg
qh
qj
A Advanced accessory shoe (52)
B POWER lamp (
t step 2 in “Read This
First”)
C Shutter button (
t step 5 in “Read This
First”)
D POWER switch (
t step 2 in “Read This
First”)
E Self-timer lamp (
t step 5 in “Read This
First”)/AF illuminator (73)
F Flash (
G Zoom ring (71,
t step 5 in “Read This First”)
t step 5 in “Read This
First”)
24 28 35 50 70 100 120 Equiv.135
• Converted to a 35 mm still camera.
H (Flash) button (50)
I Base point of distance mark (
t step
5 in “Read This First”)
J WB (White balance) button (55)
K PUSH AUTO button (48)
L FOCUS switch (48)
M ACC (Accessory) jack (52)
N (USB) jack (87)
O VIDEO OUT jack (105)
P DC IN jack
Q Jack cover
Enjoying the camera
15
Page 24
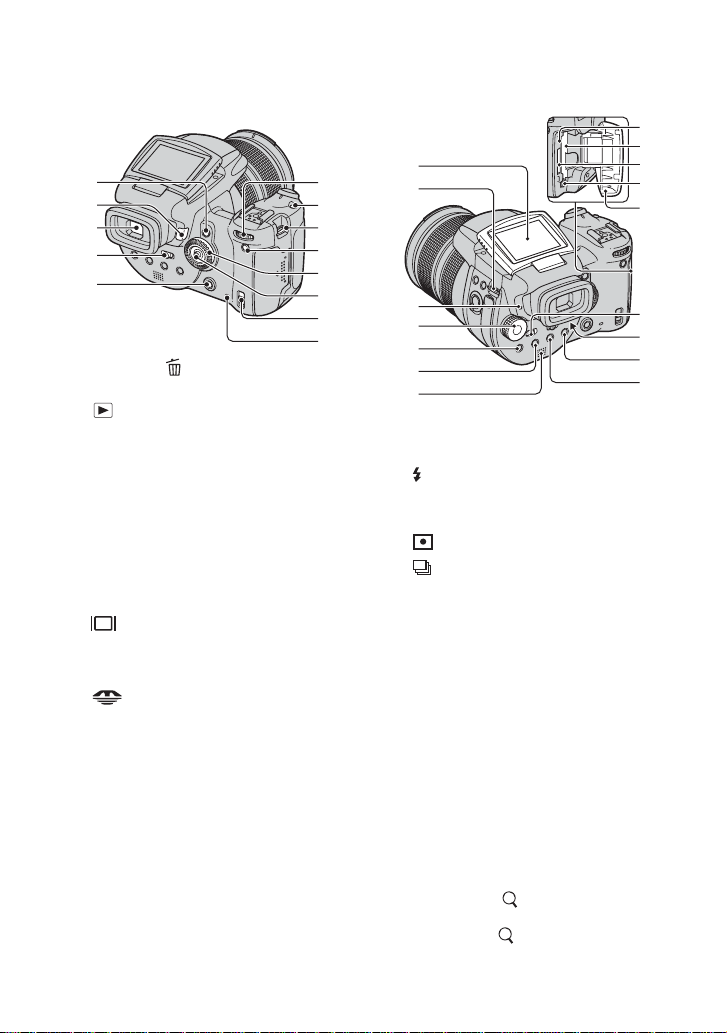
1
2
3
4
5
6
7
8
9
q;
qa
qs
qd
A AE LOCK/ (Delete) button (43, t
step 6 in “Read This First”)
B (Playback) button (
t step 6 in
“Read This First”)
C Finder (
D FINDER/AUTO/LCD switch (
t step 5 in “Read This First”)
t step 5
in “Read This First”)
E MENU button (31)
F Main command dial (28)
G ISO button (45)
H Hook for shoulder strap (18)
I (Screen status) button (22)
J Sub command dial (28)
K Multi-selector (v/V/b/B) (31)
L /CF (“Memory Stick”/CF card)
t step 3 in “Read This First”)
switch (
M Access lamp (
t step 3 in “Read This
First”)
8
9
1
2
3
4
5
6
7
q;
qa
qs
qd
qf
qg
qh
A LCD screen (22)
B Hook for shoulder strap (18)
C (Flash charge)/CHG lamp (orange)
t step 1 in “Read This First”)
(
D Mode dial (29)
E (Metering mode) button (40)
F (Burst)/BRK (Bracket) button (58,
44)
G Speaker
H RESET button (107)
I CF card insertion slot (
t step 3 in
“Read This First”)
J “Memory Stick” slot (
t step 3 in
“Read This First”)
K CF card eject lever (
t step 3 in “Read
This First”)
L “Memory Stick”/CF card cover (
t step
3 in “Read This First”)
M MONITOR switch (61)
N Finder adjustment lever (
t step 5 in
“Read This First”)
O For shooting: (Digital zoom) button
(71)
For viewing: (Playback zoom)
t step 6 in “Read This First”)
button (
16
Page 25

P (Self-timer)/ (Index) button (t
step 5 and step 6 in “Read This First”)
1
2
3
A Tripod receptacle (bottom)
• Use a tripod with a screw length of less than
5.5 mm (7/32 inch). You will be unable to
firmly secure the camera to tripods having
screws longer than 5.5 mm (7/32 inch), and
may damage the camera.
B Manual focus ring (48)
C Lens
D Battery cover (bottom)
E Battery eject lever
t step 1 in “Read This First”)
(
F Battery insertion slot
t step 1 in “Read This First”)
(
Enjoying the camera
4
5
6
17
Page 26

Attaching the shoulder strap
• You can attach the lens cap with the lens hood
attached.
• When the lens hood is attached, it may block
flashlight or AF illuminator light.
Storing the lens hood
The lens hood can be attached in the reverse
direction to store it with the camera when it
is not in use.
Position the lens hood as shown below, by
aligning the mark on the lens hood and
the mark on the lens, and attach the hood
to the lens (1). Turn the lens hood
clockwise until it clicks to align with the z
mark (2).
Attaching the lens hood
When you shoot in bright lighting
conditions, such as outdoors, we
recommend that you use the lens hood to
reduce the image quality deterioration
caused by unnecessary light.
Position the lens hood as shown below, by
aligning the mark on the lens hood and
the mark on the lens, and attach the hood
to the lens (1). Turn the lens hood
clockwise until it clicks to align with the z
mark (2).
1
2
18
1
2
Attaching a conversion lens (not
supplied)
When you want to do enhanced wide-angle
shots or zoom-in shots on distant objects,
attach a conversion lens.
1 Attach the lens adaptor (not supplied).
2 Attach a conversion lens.
• For details, see the operating instructions
supplied with your conversion lens.
Page 27
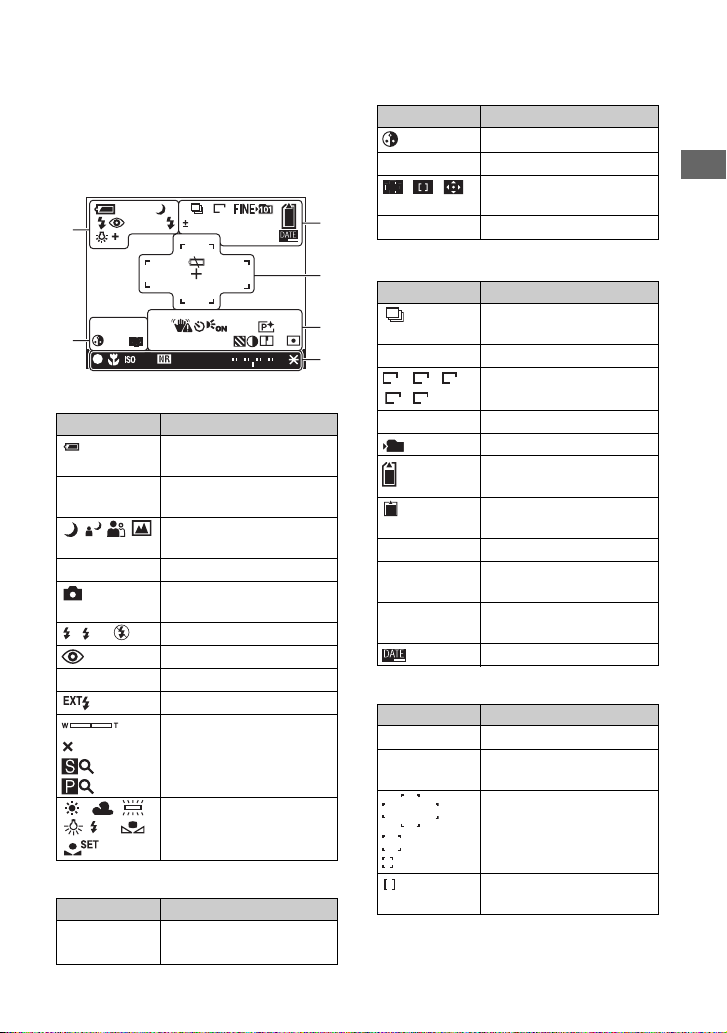
Indicators on the screen
See the pages in parentheses for details of
operation.
When shooting still images
110min
EXT
Adobe
M AF
REAR
RGB
00:00:00[00:00:00
400 125
1
2
A
Display Indication
110min
E Low battery warning (25,
P S A M Mode dial (29)
SL
REAR Flash synchro (52)
1.3
WB
1M
0.7
EV
400RAW
C:32:00
]
-2 2+1 0 1
F3.5
Battery remaining (t step
1 in “Read This First”)
118)
Mode dial (Scene
Selection) (30)
Camera mode (
t step 5 in
“Read This First”)
Flash mode (50)
Red-eye reduction (50)
External flash (52)
Zoom scaling (71,
t step 5
in “Read This First”)
White balance (55)
3
4
5
6
Display Indication
Saturation (63)
AF mode (47)
C AF
S AF M A F
AF range finder frame
indicator (46)
1.0m Manual focus distance (48)
C
Display Indication
BRK Burst/Exposure Bracket
mode (58, 44)
RAW RAW mode (59)
10M 7M
Image size (
5M
1M3M
“Read This First”)
t step 4 in
FINE STD Image quality (62)
101
Recording folder (76)
Remaining “Memory
Stick” capacity (23)
Remaining CF card
capacity (23)
±0.7EV Bracket Step value (44)
400 Remaining number of
recordable images (23)
C:32:00 Self-diagnosis display
(118)
Date/Time (73)
D
Display Indication
E Battery end (25, 118)
+ Spot metering cross hair
(40)
AF range finder frame (46)
Enjoying the camera
B
Display Indication
Adobe RGB
Color reproduction (57)
VIVID
PUSH AF/Expanded focus
frame (48)
19
Page 28

EF
Display Indication
Vibration warning (11)
• Indicates vibration may
prevent you from shooting
clear images due to
insufficient lighting. Even if
the vibration warning
appears, you can still shoot
images. However, we
recommend using the flash
for better lighting or using a
tripod or other means to
stabilize the camera.
Self-timer (t step 5 in
“Read This First”)
ON
AF illuminator (73)
Histogram (22, 41)
• appears when histogram
display is disabled.
Display Indication
z AE/AF lock (t step 5 in
“Read This First”)
t step 5 in “Read
Macro (
This First”)
ISO number (45)
NR slow shutter (37)
125 Shutter speed (36)
TIME TIME recording (39)
F3.5 Aperture value (37)
Exposure value bar (41)
White balance fine
adjustment bar (56)
AE LOCK (43)
Manual focus (48)
Manual focus LOCK (48)
(not displayed
on the screen
on the previous
page)
Picture effect (63)
00:00:00
TIME recording (39)
[00:00:00]
Zebra (42)
Contrast (64)
Sharpness (64)
Metering mode (40)
DPOF
Menu/Guide menu (31)
(not displayed
on the screen
on the previous
page)
20
Page 29

When playing back still images
1
2
110min
ISO
400 500 F3.5
BACK/NEXT
A
Display Indication
110min
- Protect (66)
1.3
B
Display Indication
WB
1M
12/12
C:32:00
Adobe
RGB
+2.0EV
Battery remaining (t step
1 in “Read This First”)
PictBridge connecting
(100)
Playback mode (
t step 6
in “Read This First”)
Print order (DPOF) mark
(103)
Change folder (65)
Zoom scaling (
t step 6 in
“Read This First”)
Do not disconnect the USB
cable (101)
Flash
White balance (55)
3
4
C
Display Indication
Image size (t step 4 in
10M 7M
101
101
5M
1M3M
“Read This First”)
Recording folder (76)
Playback folder (65)
Remaining “Memory
Stick” capacity (23)
Remaining CF card
capacity (23)
8/8 12/12 Image number/Number of
images recorded in selected
folder
C:32:00 Self-diagnosis display
(118)
D
Display Indication
Metering mode (40)
+2.0EV Exposure Value (39, 41)
Zebra
Histogram (22, 41)
• appears when histogram
display is disabled.
2005 1 1
9:30 AM
DPOF
Recorded date/time of the
playback image (73)
Menu/Guide menu (31)
(not displayed
on the screen
on the left
column)
BACK/
Select images
NEXT
Enjoying the camera
Adobe RGB
Color reproduction (57)
VIVID
ISO number (45)
500 Shutter speed (36)
F3.5 Aperture value (37)
101-0012 Folder-file number (65)
21
Page 30

Changing the screen display
Each time you press the (Screen status)
button, the display changes as follows.
During shooting
Histogram on*
-2 1 0 1
30 F2.8
Indicators off
30 F2.8
Indicators on
P
110min
1M
M AF
30 F2.8
* When [Zebra] is set to [On], diagonal stripes are
also displayed to check high brightness level
portions (page 42).
• The histogram does not appear in the following
situations:
While shooting
– The menu is displayed.
– You are shooting in the digital zoom range
During playback
– The menu is displayed.
– In index mode
– You are using playback zoom.
– You are rotating still images.
• A large difference in the histogram/zebra
displayed when shooting (an image displayed
before pressing the shutter button) and during
-2 2+1 0 1
FINE
-2 2+1 0 1
101
Histogram display
(page 41)
playback (an image displayed after pressing the
shutter button) may occur when:
– The flash strobes.
– The shutter speed is slow or high.
• The histogram may not appear for images
recorded using other cameras.
During playback
Histogram on*
R (red)
G (green)
10:30
PM
B (blue)
Y (luminance)
(page 41)
AWB
ISO160 30 F2.8
Indicators off
Indicators on
1M
110min
2005 1 1101-0003
BACK/NEXT
22
Page 31

Number of still images
The tables show the approximate number of still images that can be recorded on a recording
medium formatted with this camera. The values may vary depending on the shooting
conditions.
The number of still images (The image quality is [Fine] on the upper line and
[Standard] on the lower line.)
“Memory Stick” (Normal mode) (Units: Images)
Capacity
Size
10M 6 12 25 46 94 192 394 779
7M 8 16 32 59 121 247 506 1000
5M 12 24 49 89 181 370 759 1500
3M 20 41 82 148 302 617 1266 2501
1M 57 115 232 420 854 1743 3574 7063
32MB 64MB 128MB 256MB 512MB 1GB 2GB 4GB
12 25 51 92 188 384 789 1559
15 30 60 109 223 456 934 1847
24 49 98 178 363 741 1519 3001
40 82 164 297 605 1235 2532 5003
122 246 493 892 1815 3705 7596 15009
“Memory Stick” (RAW mode) (Units: Images)
Capacity
Size
10M 1 2 4 8 18 37 76 150
7M 1 2 5 9 19 38 79 157
5M 1 2 5 9 20 41 84 166
3M 1 2 510214288174
1M 1 2 510224492182
32MB 64MB 128MB 256MB 512MB 1GB 2GB 4GB
1 2 5 9 20 41 84 167
1 2 510204185169
1 2 510214389176
1 2 510214491180
1 3 610224593184
Enjoying the camera
23
Page 32

Microdrive (Normal mode) (Units: Images)
Capacity
Size
10M 213 405 811 1217
7M 273 520 1041 1562
5M 410 780 1561 2343
3M 684 1301 2603 3905
1M 1933 3675 7349 11026
1GB 2GB 4GB 6GB
426 811 1622 2434
505 961 1922 2883
821 1561 3123 4686
1369 2603 5206 7810
4108 7809 15618 23431
Microdrive (RAW mode) (Units: Images)
Capacity
Size
10M 41 78 156 235
7M 43 81 163 245
5M 45 86 173 259
3M 47 90 181 271
1M 49 94 189 284
• RAW mode t page 59
• When the number of remaining shootable images is greater than 9,999, the “>9999” indicator appears.
• You can resize the images later ([Resize], page 68).
• When images recorded using earlier Sony models are played back on this camera, the display may differ
from the actual image size.
1GB 2GB 4GB 6GB
45 86 173 260
46 88 176 265
48 91 183 274
49 93 187 281
50 96 192 288
24
Page 33

Battery life and number of images that can be
recorded/viewed
The tables show the approximate number of
images that can be recorded/viewed and the
battery life when you shoot images in
[Normal] mode with the battery pack
(supplied) at full capacity and at an ambient
temperature of 25°C (77°F). The numbers
of images that can be recorded or viewed
take into account changing the recording
medium as necessary.
Note that the actual numbers may be less
than those indicated depending on the
conditions of use.
• The battery capacity decreases as the number of
uses increases and also over time (page 125).
• The number of images that can be recorded/
viewed and the battery life are decreased under
the following conditions:
– The surrounding temperature is low.
– The flash is used frequently.
– The camera has been turned on and off many
times.
– The zoom is used frequently.
– [LCD Backlight] or [EVF Backlight] is set to
[Bright].
– [AF Mode] is set to [Continuous].
– The battery power is low.
• When using a CF card, the battery life and the
number of images recordable or viewable may
differ.
– The zoom is switched alternately between the
W and T ends.
– The flash strobes once every two times.
– The power turns on and off once every ten
times.
• The measurement method is based on the CIPA
standard.
(CIPA: Camera & Imaging Products
Association)
• The number of shooting images/battery life does
not change, regardless of image size.
When viewing still images
Recording
medium
“Memory
Stick”
Microdrive Approx.
• Viewing single images in order at about three
second intervals
No. of images
Approx.
11000
6600
Battery life
(min.)
Approx. 550
Approx. 330
Enjoying the camera
When shooting still images
Recording
medium
“Memory
Stick”
Microdrive LCD Approx.
• Shooting in the following situations:
– (P.Quality) is set to [Fine].
– [AF Mode] is set to [Monitor].
– Shooting once every 30 seconds.
LCD/
Finder
LCD Approx.
Finder Approx.
Finder Approx.
No. of
images
500
520
460
480
Battery life
(min.)
Approx.
250
Approx.
260
Approx.
230
Approx.
240
25
Page 34

Operation workflow
The following chart shows the workflow for the operations - preparation, shooting, and
playback. If you do not know when or how to operate a function or what you are to do, operate
the camera based on the workflow. For shooting, this workflow is designed with various
functions set.
Preparation
• Prepare the battery pack (t step 1 in “Read This First”)
• Prepare the recording medium (t step 3 in “Read This First”)
• Basic settings
Power Save (page 72)
Date/Time (page 73)
LCD Backlight (page 80)
EVF Backlight (page 80)
Beep (page 80)
• Matching shooting features to photo-shooting situations (page 33)
Confirmation before shooting
• Select your shot using the either finder or the LCD screen (t step 5 in “Read This
First” )
• Monitor mode (FRAMING/PREVIEW) (page 61)
• Select the recording medium (“Memory Stick”/CF card) (t step 3 in “Read This
First” )
• Select the image size for use (t step 4 in “Read This First”)
• Flicker reduction (page 61)
Setup for shooting
• Rec Mode (page 59)
• Focus (AF Mode/AF range finder frame) (page 46)
• Metering mode (page 40)
• White Balance (page 55)
• Burst/Exposure Bracket (pages 58, 44)
• Flash mode (page 50)
Correction right before shooting
• Zoom (page 71)
• White balance fine adjustment (page 56)
• EV adjustment (page 41)
• Flash level (page 63)
• Focus (page 48)
• Focus frame position (page 48)
26
Page 35

Setting right before shooting
• Last confirmation of the image (Histogram/Displayed information) (page 41)
• Self-timer (t step 5 in “Read This First”)
• AE LOCK (page 43)
Shooting
• Press the shutter button halfway down/press the shutter button fully down (t step
5 in “Read This First”)
Confirmation of image shot
• Auto review (page 73)
• Playback (t step 6 in “Read This First”)
• Playback zoom (t step 6 in “Read This First”)
• Index-screen (t step 6 in “Read This First”)
• Delete (t step 6 in “Read This First”)
Enjoying the camera
27
Page 36

Basic operation
K
Using the command dial
Used for setting a value or selecting options.
WB button
button
/BRK button
button
Main command dial
Increase a
value/Move
Decrease a
value/M ove
the cursor to
the left
In combination with other buttons
the cursor to
the right
WB
BR
ISO button
Main command dial
Sub command dial
Program Shift (P mode) (page 35)
Shutter speed (S mode) (page 36)
Aperture (A mode) (page 37)
Shutter speed (M mode) (page 39)
Displays a previous/next image t step 6 in “Read
This First”
Flash mode (page 50)
White Balance mode (page 55)
Metering mode (page 40)
Burst/Exposure Bracket mode (pages 58, 44)
Sub command dial
In combination with other button
WB
28
Decrease a value/Display
the previous index screen
Increase a value/Display the
next index screen
ISO (page 45)
ISO
Exposure (P/S/A/ / / / mode) (page 41)
Aperture (M mode) (page 39)
Displays the previous/next index screen
“Read This First”
Activates/cancels playback zoom
t step 6 in “Read
This First”
Changes the zoom scaling
t step 6 in “Read This
Firs t”
White balance fine adjustment (page 56)
t step 6 in
Page 37

Using the mode dial
Set the mode dial to the desired function.
Using an outline icon, the available modes for setting the function, menu, or Setup are
indicated at the right side on each title bar in the manual.
Mode dial
Still image shooting modes
: Auto adjustment mode
Allows easy shooting with the settings adjusted automatically. t step 5 in “Read
This First”
: Scene Selection mode
Allows you to shoot with preset settings according to the scene. (page 30)
P: Program auto shooting mode
Allows you to shoot with the exposure adjusted automatically (both the shutter
speed and the aperture value).
Enjoying the camera
S: Shutter speed priority shooting mode
Allows you to shoot after adjusting the shutter speed manually (page 36).
A: Aperture priority shooting mode
Allows you to shoot after adjusting the aperture value manually (page 37).
M: Manual exposure shooting mode
Allows you to shoot after adjusting the exposure manually (both the shutter speed
and the aperture value) (page 39).
29
Page 38

Scene Selection
1 Set the mode dial to the following positions.
2 Shoot the image.
Portrait Landscape Twilight portrait* Twilight*
Shoots with
backgrounds blur away,
and the subject is
sharpened.
For shooting an image appropriately according to the scene condition, a combination of
functions is determined by the camera.
Macro Flash White Balance
* The shutter speed becomes slower, so using a tripod is recommended.
** When the flash mode is (Forced flash) or (Forced flash with red-eye reduction), the setting is
canceled and it is set to auto (except when (Flash) or (One push) is selected).
Shoots landscapes, etc.,
by focusing on a distant
subject.
Shoots portraits in dark
places.
Shoots night scenes at a
distance without losing
the dark atmosphere of
the surroundings.
( : you can select the desired setting)
Burst/
Exposure Bracket
**
— / / **
/ AWB/ / —
WB
——
WB
30
Page 39

Using menu items
button
Mode dial
Multi-selector
MENU button
1 Turn on the power.
2 Menu for shooting: Set the mode dial.
Menu for playback: Press the button.
Different items are available depending on the position of the mode dial or the shooting/playback mode.
3 Press MENU to display the menu.
4 Select the desired menu item by
moving the multi-selector to b/B.
• If the desired item is invisible, keep the multi-
selector by moving to b/B until the item appears on
the screen.
• Press the center of the multi-selector after selecting
an item in playback mode.
Fine
Standard
P.Quality
FINE
Mode PFXBRK
Enjoying the camera
5 Select the setting by moving the multi-selector to v/V.
The setting you select is zoomed and is set.
6 Press MENU to turn off the menu.
To turn to the shooting mode
Press and hold the shutter button half way down so that the menu disappears.
• You cannot select items that are grayed out.
31
Page 40

Using the (Setup) screen
You can change the default settings using the (Setup) screen.
Mode dial
Multi-selector
MENU button
1 Turn on the power.
2 Press MENU to display the menu.
3 Move the multi-selector to B to select (Setup), then move the multi-
selector to B.
4 Move the multi-selector to v/V/b/B to
select the item you want to set.
The frame of the selected item turns yellow.
5 Press the center of the multi-selector to enter the setting.
To turn off the (Setup) screen, press MENU.
To return to the menu from the (Setup) screen, move the multi-selector to b repeatedly.
z When the menu is not displayed
Pressing down MENU for about 1.5 seconds turns the (Setup) screen on.
To cancel the (Setup) setting
Select [Cancel] if it appears, then press the center of the multi-selector. If it does not appear,
select the previous setting again.
• This setting is maintained even when the power is turned off.
32
Page 41

Matching shooting features to photo-shooting
situations
After you are familiar with your camera,
let’s shoot an image in various situations
with some settings changed. This section
describes some representative shooting
examples.
Q: To shoot a portrait with its
background blurred
, Shooting with aperture priority
mode (page 37)
When you want to enhance the person with
the background blurred, adjust the aperture
manually. The more the aperture is opened
(the aperture value becomes smaller), the
narrower the focus is. The background is
blurred accordingly.
Q: To shoot a portrait against
light
, Selecting a flash mode (page 50)
Shooting a human subject in a bright place
can create dim facial shadows. This occurs
when the background is brighter than the
person. In such cases, set the flash to
(Forced flash). You can shoot both the
person and the background clearly.
• You can use the flash within the reach of the
flash light.
Q: To shoot a night scene
, Shooting with shutter speed
priority mode (page 36)
Using the flash in the auto adjustment mode
restricts the shutter speed and the flash light
does not reach distant subjects. The image,
therefore, is not captured clearly. In such
cases, slow the shutter speed manually, set
the flash to (No flash), and reduce the
light using the EV adjustment. You can then
shoot a clear night scene.
Q: To shoot without flash
, Selecting the ISO sensitivity
(page 45)
When you cannot use the flash or set the
shutter speed slower, increase the ISO
rating. The higher rated ISO setting helps
maximize the effect of the surrounding light
to shoot.
We recommend that you set the ISO
sensitivity according to the shutter speed so
that the vibration warning indicator
(page 120) is not displayed.
Enjoying the camera
33
Page 42

Q: To shoot a moving subject
, Shooting with shutter speed
priority mode (page 36)
When shooting a moving person or subject,
set the shutter speed higher to freeze the
motion or set the shutter speed slower to get
the flow of motion of the subject. Adjust the
shutter speed to express a moment that is
beyond the speed of the naked eye.
Q: To shoot the beautiful
afterglow of the sunset
, Adjusting color tones (page 55)
If the image you shot is not expressed in
your favorite colors, change the white
balance mode. Setting the white balance
mode to (Daylight) enhances the
redness of the sunset.
34
Page 43

Exposure setting
Enjoying the camera
Shooting with Program auto
P S A M
In program auto mode, the camera automatically adjusts the shutter speed and the aperture
according to the brightness of the subject just as in the auto adjustment mode (mode dial: ).
In addition, the program auto mode can change the shooting settings in the menu, a feature
which the auto adjustment mode does not have (page 130).
Program Shift
You can change the aperture value and shutter speed combination while keeping the brightness
fixed.
Main command dial
1 Select the aperture value and shutter speed combination using the main command dial.
is indicated while the aperture value and shutter speed combination is shifted.
2 Shoot the image.
To cancel Program Shift, turn the main command dial to return the indication from to .
• You cannot shift the aperture value and shutter speed combination when the shutter button is pressed
halfway down.
• When the brightness changes, the aperture value and shutter speed also change while maintaining the shift
amount.
• You may not be able to change the aperture value and shutter speed combination depending on your
shooting situations.
• When the flash mode setting is changed, Program Shift is canceled.
• Setting the mode dial to other than P or turning off the power cancels Program Shift.
Enjoying the camera
35
Page 44

Shooting with shutter speed priority mode
P S A M
You can adjust the shutter speed manually. If you shoot a moving subject at a higher shutter
speed, it appears as if frozen on the image. At a lower shutter speed, the subject appears as if it
flowing.
Aperture value is automatically adjusted to attain correct exposure according to the brightness
of the subject.
High shutter speed
1 Select a shutter speed using the main command dial.
You can select following shutter speeds.
When ISO is [160] to [800]: 1/2000 to 30 seconds
When ISO is [1600] to [3200]: 1/2000 to 8 seconds
2 Shoot the image.
• Shutter speeds of one second or longer are indicated by [”], for example, 1”.
• When you set the shutter speed slower, using a tripod is recommended to prevent the effects of vibration.
• If the proper exposure is not obtained after making the settings, the setting value indicators on the screen
flash when the shutter button is pressed halfway down. You can shoot in this condition, but we
recommend that you adjust the flashing values again.
• The flash is set to (Forced flash), (Forced flash with red-eye reduction) or (No flash).
• When the shutter speed is high, the amount of flash light may be insufficient even if you fire the flash.
Slow shutter speed
Main command dial
36
Page 45

z NR slow shutter
The NR slow shutter mode reduces noise from recorded images, providing clear images.
When using certain shutter speeds*, the camera automatically works the NR slow shutter
mode and “NR” is indicated next to the shutter speed indicator.
Capturing Processing
Enjoying the camera
Press the shutter
button fully down.
Then the screen turns
black.
Finally, when
“Processing” disappears,
the image has been
recorded.
* When ISO is [160] to [400]: 1/6 second or slower
When ISO is [800] to [3200]: 1/25 second or slower
• To eliminate the effects of vibration, use of a tripod is recommended.
• When a slow shutter speed is set, the processing may take some time. This is because the camera works to
remove noise during the time set by the shutter speed setting.
z Shooting techniques
• When you hand-hold the camera, we recommend that you adjust the shutter speed in a range where
(Vibration warning indicator) is not indicated.
Shooting with aperture priority mode
When shooting a moving person, car, or spindrift, etc., using the high shutter speed,
you can express moment that is beyond what the human eye can see.
When shooting a subject such as the flow of a river at a slower shutter speed, you can
create an image that captures the subject’s flowing movement. In such cases, use of a
tripod is recommended to prevent camera shake.
P S A M
You can adjust the amount of light that passes through the lens. If you open the aperture (a
smaller F-number), the amount of light allowed into the lens increases and the in-focus range
becomes narrower. Only the main subject is then in focus. When the aperture is closed (a
larger F-number), the amount of light decreases and the in-focus range becomes wider. The
whole image is sharpened.
The shutter speed is automatically adjusted to obtain correct exposure according to the
brightness of the subject.
Open the aperture Close the aperture
37
Page 46

Main command dial
1 Select an aperture value using the main command dial.
– When the zoom is set fully to the W side, you can select an aperture from F2.8 to F16.
– When the zoom is set fully to the T side, you can select an aperture from F4.8 to F16.
2 Shoot the image.
• The shutter speed is automatically adjusted from 1/2000 to 8 seconds.
• If the proper exposure is not obtained after making the settings, the setting value indicators on the screen
flash when the shutter button is pressed halfway down. You can shoot in this condition, but we
recommend that you adjust the flashing values again.
• The flash is set to (Forced flash), (Forced flash with red-eye reduction), (Slow synchro),
(Slow synchro with red-eye reduction) or (No flash).
z Shooting techniques
The depth of field is the in-focus range. Opening the aperture makes the depth of field shallower (the infocus range becomes narrower) and closing the aperture makes the depth of field wider (the in-focus
range becomes wider).
Open the aperture
The subject is clear and its
background is blurred.
Adjust the aperture to suit your purpose, either to sharpen the specific area of image, or to focus on the
entire image.
Close the aperture
Both the subject and its
background are focused on.
38
Page 47

Shooting with manual exposure mode
P S A M
You can manually adjust the shutter speed and aperture values.
The camera maintains the setting even when the power is turned off. Once you set a value you
like, you can reproduce the same exposure by simply setting the mode dial to M.
Main command dial
Sub command dial
1 Select a shutter speed using the main command dial.
2 Select an aperture value using the sub command dial.
The difference between the settings and proper exposure judged by the camera appears on the
EV bar (page 41) on the screen. 0EV indicates the value judged as the most suitable by the
camera.
100 F3.5
-2 2+1 0 1
Underexposure
50 F3.5
-2 2+1 0 1
Correct exposure
40 F3.5
-2 2+1 0 1
Overexposure
3 Shoot the image.
• If the proper exposure is not obtained after making the settings, the setting value indicators on the screen
flash when the shutter button is pressed halfway down. You can shoot in this condition, but we
recommend that you adjust the flashing values again.
• The flash is set to (Forced flash), (Forced flash with red-eye reduction) or (No flash).
z On TIME shooting
You can expose for a desired time. For example, when shooting fireworks, press the shutter
button to start exposing at the moment the fireworks are set off and release the shutter at the
moment the fireworks explode.
Enjoying the camera
Capturing
00:00:08[00:03:00]
ISO
160
NR
TIME F
2.8
2.8
1 Select [TIME] from the shutter speed options. This is indicated next to [30"].
2 Press the shutter button so that the camera starts exposing, and press the shutter button again so
that the camera finishes exposing.
39
Page 48

• ISO is set to [160].
• For TIME shooting, the maximum time available is up to three minutes. After three minutes, the shutter
will be automatically released (when the battery is low level, the shutter is released after about 30
seconds).
• We recommend that you use a tripod (not supplied).
Selecting the metering mode
P S A M
Selects the metering mode that sets which part of the subject to measure to determine the
exposure.
Main command dial
+
Multi
30 F2.8
-2 2+1 0 1
button
Press and hold (Metering mode) and turn the main command dial to select the desired
setting.
( : The default setting)
Multi (Multi-pattern
metering)
(Center-weighted
metering)
(Spot metering)
Divides into multiple regions and measures each region. The
camera determines a well-balanced exposure.
Measures the center of the image, and determines the
exposure based on the brightness of the subject there.
Measures only a part of the subject.
P
110min
101
FINE
1M
Spot metering cross hairs
Positions on the subject.
M AF
30 F2.8
-2 2+1 0 1
• This function is useful when the subject is backlit or when there
is strong contrast between the subject and the background.
• For details on the exposure t page 12
• When using
(Center AF) is recommended to focus on the metering position (page 46).
(Spot metering) or (Center-weighted metering), setting the AF range finder frame to
40
Page 49

Adjusting the exposure – EV adjustment
P S A M
You can manually shift the exposure value determined by the camera. Use this mode when you
do not get the proper exposure, for instance, the subject and its background have high contrast
(light and dark).
P
Sub command dial
110min
101
FINE
1M
Enjoying the camera
Toward –
Tow ar d +
M AF
30 F2.8
-2 2+1 0 1
EV bar
Turn the sub command dial to select an EV adjustment value.
Toward +: Brightens an image.
0EV:The exposure is determined automatically
by the camera.
Toward –: Darkens an image.
Toward – Toward +
• For details on the exposure t page 12
• The compensation value can be set in 1/3EV increments.
• If a subject is being shot in extremely bright or dark conditions, or the flash is used, the exposure
adjustment may not be effective.
z Adjusting EV (Exposure Value) by checking the screen (Histogram/Zebra pattern)
A Number of pixels
Zebra pattern
A
B Brightness
Zebra indicator
B
BrightDark
Histogram
A histogram is a graph showing the brightness of an image. Press (Screen status)
repeatedly to display the histogram inside the screen. The graph display indicates a bright
image when skewed to the right side, and a dark image when skewed to the left side. Adjust
EV while checking the exposure with the histogram.
• The histogram also appears in the following cases, but you cannot adjust the exposure.
– When the mode dial is set to or M
– When playing back a single image
41
Page 50

Zebra pattern
When [Zebra] is set to [On] in the (Setup) menu (page 80), and the histogram is displayed,
the zebra pattern (diagonal stripes) is displayed on high brightness level portions (where
luminance exceeds a certain level and loses the tone). Adjust the exposure checking the
portions indicated by the zebra pattern.
• The zebra pattern is not recorded on an image.
z Shooting techniques
While shooting images, the camera automatically determines the exposure. When shooting a whitish
overall image such as a backlit subject or a snowy scene, the camera judges that the subject is bright and
may set a darker exposure for the image. In such cases, adjustment of the exposure in the + plus direction
is effective.
Adjust in the + direction
When shooting a darker overall image, the camera judges that the subject is dark and may set a brighter
exposure for the image. In such cases, adjustment of the exposure in the – minus direction is effective.
Adjust in the – direction
You can check the exposure referring to the histogram chart. Be careful not to overexpose or underexpose
your subject (giving a whitish or darkish image).
You can try to adjust the exposure to suit your taste.
42
Page 51

Shooting with the exposure fixed – AE LOCK
K
P S A M
You can lock the exposure before recomposing the image. This is useful when the contrast of
the subject and its background is extremely high or you shoot a backlit subject.
Shutter button
AE LOCK button
AE LOC
1 Target the subject for which you want to meter the exposure, then press AE LOCK.
The exposure is fixed and the indicator appears.
110min
P
101
FINE
1M
98
Enjoying the camera
MAF
30 F2.8
-2 2+1 0 1
2 Recompose the image and press and hold the shutter button halfway down.
The focus is automatically adjusted.
3 Press the shutter button fully down.
• AE LOCK is canceled if you release the shutter button or have shot an image. When you want to
retain the exposure for the next shot, press and hold the AE LOCK button, then shoot the next image.
z Shooting techniques
The camera automatically adjusts the exposure according to the subject. If you change the composition of
your shot, the exposure may be changed, such as by changes in the brightness of the background. In such
cases, use the AE lock function. You can shoot freely, regardless of the brightness of the subject.
1 To determine the exposure, measure the exposure of the desired portion of the subject using
either center-weighted metering or the spot metering function.
2 Press AE LOCK to lock the exposure, and then recompose the picture and shoot.
Portion of the image used to
determine the exposure
43
Page 52

Shooting three images with the exposure shifted
– Exposure Bracket
P S A M
In addition to an image with the exposure automatically set by the camera, two other images
are recorded with exposure values shifted to the + and – sides.
If you cannot shoot with the proper brightness due to the brightness of the subject, use the
Exposure Bracket mode. You can select the image that has a suitable exposure after shooting.
+ direction
Correct
– direction
/BRK button
Main command dial
BRK
+
BRK
EV
0.7
Normal BRK
30 F2.8
-2 2+1 0 1
Multi-selector
MENU button
1 Press and hold /BRK (Bracket) and turn the main command dial to select [BRK].
2 Press MENU.
3 Select [BRK] (Bracket Step) by moving the multi-selector to b/B, then select the desired
bracket step value by moving to v/V.
( : The default setting)
±1.0EV
±0.7EV
±0.3EV
• The flash is set to (No flash).
• The focus and white balance are adjusted for the first image, and these settings are also used for the other
images.
• When the exposure is manually adjusted (page 41), the exposure is shifted based on the adjusted
brightness.
• The recording interval is approximately 0.32 second.
• If the subject is too bright or too dark, you may be unable to shoot properly with the selected bracket step
valu e.
Shifts the exposure value by plus or minus 1.0EV.
Shifts the exposure value by plus or minus 0.7EV.
Shifts the exposure value by plus or minus 0.3EV.
44
Page 53

• The shutter speed is limited as follows
When ISO is [160] to [400]: 1/2000 – 1/8 second
When ISO is [800] to [3200]: 1/2000 – 1/30 second
Selecting the ISO sensitivity – ISO
P S A M
Selects a luminous sensitivity with units of ISO. The larger the number, the higher the
sensitivity.
ISO button
Main command dial
+
ISO
Press and hold ISO and turn the main command dial to select the desired setting.
3200
1600
800
400
200
160
Auto
• For details on the ISO sensitivity t page 12
• Note that the image tends to become noisier as the ISO sensitivity number increases.
• ISO is set to [Auto] in the Scene mode.
Select a large number when shooting in dark locations or
shooting a subject moving at high speed, or select a small
number to obtain high image quality.
Automatically adjusts the ISO sensitivity.
( : The default setting)
Enjoying the camera
45
Page 54

Focus setting
Choosing an auto focus method
P S A M
You can set the AF range finder frame and the AF mode.
Choosing a focus range finder frame – AF range finder
You can change the focus method. Use the menu when it is difficult to get the proper focus in
auto focus mode.
FOCUS switch
FOCUS
AUTO
MANUAL
PUSH
AUTO
1 Set the FOCUS switch to AUTO.
2 Press the center of the multi-selector repeatedly to select the desired mode.
(Multipoint AF)
Focuses automatically on a subject in all ranges of the finder
frame. When the mode dial is set to , Multipoint AF is
automatically selected.
• This mode is useful when the subject is not in the center of the
frame.
30 F2.8
1M
-2 2+1 0 1
FINE
101
98
(Center AF)
P
110min
M AF
Focuses automatically on a subject in the center of the finder
frame.
• Using this with the AF lock function lets you shoot in the
desired image composition.
30 F2.8
1M
FINE
-2 2+1 0 1
101
98
M AF
110min
P
Multi-selector
( : The default setting)
AF range finder frame
AF range finder frame
indicator
AF range finder frame
AF range finder frame
indicator
46
Page 55

(Flexible Spot AF)
Focuses on an extremely small subject or a narrow area.
Flexible Spot AF lets you shoot in the desired image
composition.
• This is useful when you shoot using a tripod and the subject is
out of the center area.
• AF stands for Auto Focus.
• When you use digital zoom or AF Illuminator, priority AF movement is given to subjects in or near the
center of the frame. In this case, the , or indicator flashes and the AF range finder frame is
not displayed.
To set the Flexible Spot AF
1 Press the center of the multi-selector repeatedly to select (Flexible Spot AF).
2 Move the AF range finder frame to the portion you want to focus on by moving the multi-
selector to v/V/b/B.
P
101
110min
FINE
1M
98
AF range finder frame
M AF
30 F2.8
-2 2+1 0 1
AF range finder frame
indicator
When you press and hold the shutter button halfway down, and the focus is adjusted, the
color of the AF range finder frame changes from white to green.
• When shooting a moving subject, take care to hold the camera steady so that the subject does not deviate
from the range finder frame.
Choosing a focus operation – AF Mode
Selects the auto focus operation mode.
Enjoying the camera
Multi-selector
MENU button
1 Display the (Setup) screen (page 32).
2 Select (Camera 1) by moving the multi-selector to v , then select [AF Mode] by moving to
1
B/v.
3 Select the desired mode by moving to B/v/V, then press the center of the multi-selector.
47
Page 56

( : The default setting)
Single (S AF)
Automatically adjusts the focus when the shutter button is
pressed and held halfway down. This mode is useful for
shooting stationary subjects.
Monitor (M AF)
Automatically adjusts the focus before the shutter button is
pressed and held halfway down. This mode shortens the time
needed for focusing.
• Battery consumption may be faster than in [Single] mode.
Continuous (C AF)
Adjusts the focus before you press and hold the shutter button
halfway down, and then continues to adjust the focus even
after AF lock is completed.
This mode allows shooting of moving subjects with
continued focus.
• Battery consumption may be faster than in any other AF mode.
On the [Continuous (C AF)]
• Focus adjustment may not be able to keep up when shooting fast moving subjects.
• The AF range finder frame is Center AF (page 46).
• The focus is not adjusted after the lock is completed in the following cases, and the “C AF” indicator
flashes. The camera operates in [Monitor] mode.
– When shooting in the dark place
– When shooting with a slow shutter speed
• There is no lock sound when the focus is achieved.
• When you press the shutter button all the way down using the self-timer, the focus is locked.
Focusing manually
P S A M
When shooting a subject through a net or through window glass, it is difficult to get the proper
focus in auto focus mode. In these cases, manually adjusting the focus is convenient.
Base point of distance mark
FOCUS
Multi-selector
Near
FOCUS switch
AUTO
Manual focus ring
MANUAL
PUSH
AUTO
PUSH AUTO
butto n
Far
48
Page 57

1 Set the FOCUS switch to MANUAL.
The (manual focus) indicator and PUSH AF/Expanded focus frame appear on the screen.
110min
P
101
FINE
1M
98
PUSH AF/Expanded focus frame
Enjoying the camera
3.5m
30 F2.8
-2 2+1 0 1
The distance from the base point of distance mark
T side: About 40 cm (15 3/4 inches)
W side: About 35 cm (13 7/8 inches)
–
–
2 Move the PUSH AF/Expanded focus frame to the portion you want to focus on by moving the
multi-selector to v/V/b/B.
Using the expanded focus function (page 74), the area around the PUSH AF/Expanded focus
frame is doubled ( turns yellow), so you can easily focus on a subject. When you stop
rotating the manual focus ring, the expanded display will be canceled after about two seconds
( turns white).
3 Turn the manual focus ring to achieve a sharp focus.
When the indicator flashes, the focus distance has reached its limit.
• Manual focus distance information is approximate.
• The PUSH AF/Expanded focus frame is not displayed when using the digital zoom.
• To cancel the expanded focus function t page 74
z Convenient focus adjustment function
Pressing the PUSH AUTO button focuses on a subject located near the PUSH AF/Expanded focus frame
( turns to ). Since this helps to achieve the focus easily, you can use this function as a preparation
before doing fine adjustment with manual focus ring.
30 F2.8
1M
FINE
-2 2+1 0 1
101
98
P
FOCUS
AUTO
MANUAL
PUSH
AUTO
110min
LOCK
Manual focus Lock indicator
Flashing indicator t Indicator lit (for about five seconds)
49
Page 58

Flash
Selecting a flash mode
P S A M
Normally, the flash automatically strobes when the surroundings are dark. You can
intentionally change the flash mode.
button
Main command dial
+
A A
SL
SL
Press and hold (Flash) and turn the main command dial to select the desired mode.
( : The default setting)
(Auto)
(Auto with red-eye
Strobes if it is dark or against light.
• In Program auto mode, the flash does not strobe even if the
subject is against light.
Reduces red-eye in Auto mode.
reduction)
(Forced flash)
(Forced flash with red-
The flash strobes regardless of the amount of ambient light.
Reduces red-eye in Forced flash mode.
eye reduction)
(Slow synchro)
(Slow synchro with
The shutter speed is slow in a dark place to clearly shoot the
background that is out of flash light.
Reduces red-eye in Slow synchro mode.
red-eye reduction)
(No flash)
The flash does not strobes.
• Note that the surface of the flash emitter may be hot right after you use the flash several times in
succession.
• The recommended distance from the base point of distance mark using the flash is about 0.5 m to 8.5 m
(1 feet 7 3/4 inches to 27 feet 10 3/4 inches) (W)/0.4 m to 5.0 m (1 feet 3 3/4 inches to 16 feet
4 7/8 inches) (T) (when ISO is set to [Auto]).
• Attaching the supplied lens hood or the optional lens adaptor blocks a flash light.
• Because the shutter speed is slower under dark conditions when (Slow synchro), (Slow synchro
with red-eye reduction) or (No flash) is selected, it is recommended that you use a tripod.
• While the flash is being charged, the /CHG lamp flashes. After charging is completed, the lamp goes
out.
• You can change the brightness of the flash using [Flash Level] in the menu settings (page 63).
• In dark surroundings, fill light is emitted to focus on a subject. When you do not use that light, set [AF
Illuminator] to [Off] (page 73).
• You can mount an external flash on this camera (page 52).
50
Page 59

On the [Red-eye reduction]
Reduces the red-eye phenomenon when using the
flash. The (Red-eye reduction) indicator
appears on the screen.
• The flash pre-strobes twice or more before shooting.
• Because it takes about a second until the shutter clicks, hold the camera firmly to prevent the effects of
vibration. Also, do not let the subject move.
• Red-eye reduction may not produce the desired effects depending on individual differences, the distance
to the subject, if the subject does not see the pre-strobe, or other conditions.
Enjoying the camera
Using the flash manually – Pop-up Flash mode
P S A M
You can strobes the flash only when you want to use it. Set [Pop-up Flash] to [Manual] in the
(Setup) menu (page 74).
Flash
button
Multi-selector
MENU button
1 Press (Flash) and pop up the flash.
2 Select the flash mode (page 50).
3 Shoot the image.
• The flash does not strobe in (Twilight) mode in the Scene mode or in Burst/Bracket mode.
• Close the flash when you do not want to use the flash.
• To set the pop-up flash to auto mode, set [Pop-up Flash] to [Auto] in the (Setup) menu.
z Shooting techniques
Making the best of the flash gives you various options.
When you set the flash mode to (Forced flash) or (Forced flash with red-eye
reduction), you can shoot a backlit subject brightly. An effect in which the flash light
reflects in the subject’s eye is also available.
When the flash mode is set to (Auto) or (Auto with red-eye reduction), the
flash may strobe regardless of your intentions. In such situations, setting the flash
mode to (No flash) slows the shutter speed automatically. This is effective when
you shoot the trail of a car, the spectrum of a light, or the sunset. We recommend you
use a tripod to prevent camera shake.
The (Slow synchro) or (Slow synchro with red-eye reduction) is effective
when you shoot a person during a sunset and the like. You can shoot the person
clearly using the flash light and the background using a long exposure. If the camera
cannot shoot clearly using the slow shutter, it automatically increases the ISO
number. We recommend you use a tripod to prevent camera shake.
51
Page 60

Selecting Flash Synchro
Select the timing that the flash strobes.
P S A M
Front
1 Display the (Setup) screen (page 32).
2 Select (Camera 2) by moving the multi-selector to v/V, then select [Flash Sync.] by moving
to B/v/V.
3 Select the desired mode by moving to B/v/V, then press the center of the multi-selector.
Rear
Multi-selector
MENU button
2
( : The default setting)
Front
Rear (REAR)
On the [Rear]
• When the shutter speed is too high, the [Rear] setting effect may not be available.
• When the red-eye reduction is selected, the red-eye reduction effect may not be available at slower shutter
speeds.
Using an external flash
Normally, use this setting. Since the flash strobes right after
the shutter is released, this allows you to get your shot closer
to the time you release the shutter.
Used for a moving subject, etc. Since the flash strobes right
before the shutter is closed, this allows you to reflect the trail
of a light or movement afterimage on a subject.
P S A M
You can mount an optional external flash. Using an external flash increases the amount of
light and that will allow you to shoot more vivid flash pictures than when using the internal
flash.
For details, refer to the operating instructions supplied with your flash.
52
Page 61

Advanced accessory
shoe
ACC
(accessory)
jack
• When an external flash is mounted, the weight prevents the lens portion from becoming steady. We
recommend supporting the lens portion with your left hand or using a tripod for recording.
• You cannot have an external flash and the built-in flash strobe at the same time.
• If you shoot with two or more external flashes connected to the advanced accessory shoe, note that the
camera may not be able to function properly, or that may cause a malfunction.
• When the proper white balance is not set using an external flash, set the flash mode to (Forced flash),
(Forced flash with red-eye reduction), (Slow synchro) or (Slow synchro with red-eye
reduction), then set the white balance using the (One push SET) (page 55).
Multi-selector
Using the Sony Flash
You can mount the following Sony flashes on the advanced accessory shoe of your camera.
• HVL-F1000
• HVL-F32X (equipped with automatic flash level adjustment and AF fill light shooting
functions)
1 Mount the external flash on the advanced accessory shoe.
2 Plug the flash into the ACC (accessory) jack.
When using the HVL-F32X, skip Step 2.
3 Turn on the external flash.
4 Shoot the image.
• Check that [Flash] is set to [Int.] in the (Setup) menu (page 74).
• When ISO is set to [800], [1600] or [3200], you cannot use the AUTO “B” mode of the HVL-F32X.
• When using the “B” mode of the HVL-F1000/F32X, the flash level (page 63) is set to the following two
options.
When [Flash Level] is between +0.3EV and +2.0EV: Strong
When [Flash Level] is between –0.3EV and –2.0EV: Weak
• When using the flash in a wider angle than a focal length of 35 mm, peripheral area may be darkened. We
recommend that you use a wide panel.
Enjoying the camera
53
Page 62

Using a commercially available external flash
You can mount a commercially available external flash that supports the advanced accessory
shoe.
1 Mount the external flash to the advanced accessory shoe.
2 Display the (Setup) screen (page 32).
3 Select (Camera 2) by moving the multi-selector to v/V, [Flash] by moving to B/v/V, [Ext.]
4 Turn on the external flash.
5 Set the mode dial to M or A.
6 Shoot the image.
• If you record with [Flash] set to [Int.] in the (Setup) menu, the built-in flash may pop up. If this
happens, return the built-in flash to its original position and set [Flash] to [Ext.] (page 74).
• When you set [Flash] to [Ext.] in the (Setup) menu, is indicated. In this case, the built-in flash is
disabled.
• Set the most appropriate aperture value according to the guide number of the flash used and the distance to
the subject.
• The flash guide number varies according to the ISO sensitivity (page 45) of the camera, so be sure to
check the ISO number.
• Note that the camera may not function properly or may malfunction when using a flash manufactured by
another company for a specific camera (generally a flash with multiple contact points on the advanced
accessory shoe), a high-voltage type flash, or a flash accessory.
• Depending on the type of commercially available external flash, you may be unable to use some functions,
and other operations may be difficult.
2
by moving to B/v, then press the center of the multi-selector.
The flash also strobes when the mode dial is not set to M or A but we recommend recording with
the mode dial set to M or A.
54
Page 63

Color setting
Adjusting color tones – White Balance
P S A M
Normally, the camera automatically adjusts the color tones. However, you can also adjust
them according to the lighting conditions.
Main command dial
WB
+
WB button
AWB
Press and hold WB (White balance) and turn the main command dial to select the desired
setting.
( : The default setting)
AWB (Auto)
(Daylight)
(Cloudy)
(Fluorescent)
n (Incandescent)
WB
(Flash)
(One push)
(One push SET)
Adjusts the White Balance automatically. (Color temperature:
about 3400-7000 K)
Adjusts for outdoors, shooting night scenes, neon signs,
fireworks, or sunrise, or conditions before and after sundown.
(Color temperature: about 5500 K)
Adjusts for a cloudy sky. (Color temperature: about 6500 K)
Adjusts for fluorescent lighting. (Color temperature: about
4000 K)
Adjusts for places where the lighting conditions change
quickly such as at a party hall, or under bright lighting such as
at photography studios. (Color temperature: about 3200 K)
Adjusts for the flash conditions. (Color temperature: about
6000 K)
Adjusts the white balance depending on the light source. The
white color memorized in (One push SET) mode
becomes the basic white color. Use this mode when AWB
(Auto) or other modes cannot set the color properly. (Color
temperature: about 2000 – 10000 K)
Memorizes the basic white color which will be used in
(One push) mode.
30 F2.8
-3 3+0
Enjoying the camera
• For details on the white balance t page 13
• Under fluorescent lights that flicker, the white balance function may not work correctly even though you
select [ ] (Fluorescent).
• Except in [ ] (Flash) or [ ] (One push) mode, white balance is set to AWB (Auto) when the flash
strobes.
• Some options are not available depending on the flash mode (page 50).
• Some options are not available depending on the Scene mode (page 30).
WB
55
Page 64

To capture the basic white color in (One push SET) mode
1 Press and hold WB (White balance) and turn the main command dial to select [ ] (One
push SET).
2 Frame a white object such as a piece of paper filling the screen under the same lighting
conditions as you will shoot the subject.
3 Press the center of the multi-selector.
The screen momentarily turns black and the indicator flashes quickly. When the white
balance has been adjusted and stored in the memory, (One push) is selected.
• If the indicator flashes slowly, the white balance has not been set or cannot be set. Use automatic
white balance.
• Do not shake or strike the camera while the indicator flashes quickly.
• When flash mode is set to (Forced flash), (Forced flash with red-eye reduction) (Slow
synchro) or (Slow synchro with red-eye reduction) the white balance is adjusted to the condition with
the flash emitting.
To make fine adjustments
Using this adjustment, you can shoot with a color conversion filter effect. The adjustment can
be set in ±3 steps and its compensation is equivalent to 10 mired for each step (see below).
This adjustment is available except for AWB (Auto).
WB
+
Main command dial
WB button
AWB
30 F2.8
-3 3+0
Sub command dial
WB
+
1 Press and hold WB (White balance) and turn the main command dial to select a mode closer to
the lighting conditions.
2 Press and hold WB (White balance) and turn the sub command dial to set the fine adjustment
value. + or - is indicated next to the selected mode icon.
• Depending on the type of fluorescent light, fine adjustment may not be achieved properly even if you
select (Fluorescent).
• When you use the flash except in (Flash) or (One push) mode, you cannot make the fine
adjustment, since the white balance is set to Auto.
z On mired
Mired is a measurement unit that multiplies the inverse number of a color temperature by 10
color temperature, regardless of its variation width, the lower the color temperature is, the larger its
temperature difference is, and vice versa. Mired expresses the variation width in the approximate proportion
and it is used as a measurement for units of color conversion filters.
56
WB
6
. As for the
Page 65

Variation width 1000 K: Difference of mired (M)
4000-3000 K: 83 M
7000-6000 K: 23 M
Selecting color reproduction
P S A M
Selects the color reproduction mode.
Multi-selector
MENU button
1 Press MENU.
2 Select COLOR (Color) by moving the multi-selector to b/B, then select the desired mode by
moving to v/V.
( : The default setting)
Adobe RGB (Adobe RGB)
This mode has a wide range of color reproduction for
faithfulness to the actual texture and color.
• The file name of the image recorded in Adobe RGB mode is
“_DSCssss.JPG”. (When in RAW mode, its file extension
is “.SR2”.)
Vivid (VIVID)
Imposing scenery is expressed by deep and vivid color, such
as blue sky, sunset, new green leaves, and colorful autumn
leaves.
Standard
z On Adobe RGB
This format has a wide range of color space and is suitable for printing.
• When you display images recorded in Adobe RGB mode on TVs/LCD monitors that are not compatible
with Adobe RGB (DCF2.0/Exif2.21), the images are displayed at a lower intensity level. Also, using
incompatible printers, the images may be printed out at a lower intensity level.
• When you record images in Adobe RGB mode, the images are displayed on the LCD/finder of the camera
at a lower intensity level. Using printers that are compatible with Adobe RGB (DCF2.0/Exif2.21), you can
print them out with faithfulness to the actual texture and color.
• For [Standard] and [Vivid], images are recorded in the sRGB (color space) format adopted by ordinary PC
monitors.
Various scenes are expressed by tone-rich and beautiful color.
Enjoying the camera
57
Page 66

Shooting continuously
Burst mode
P S A M
Records the maximum three images in succession when you press and hold down the shutter
button.
Main command dial
BRK
+
/BRK button
Normal BRK
30 F2.8
-2 2+1 0 1
Press and hold /BRK (Bracket) and turn the main command dial to select [ ].
• When “Recording” disappears, you can shoot the next image. However, if you press the shutter button
while the access lamp is lit, the maximum number of images is two.
• The flash is set to (No flash).
• The recording interval is approximately 0.32 second.
• The shutter speed is limited as follows.
When ISO is [160] to [400]: 1/2000 – 1/8 second
When ISO is [800] to [3200]: 1/2000 – 1/30 second
• When the battery level is low, or when the recording medium is full, the Burst stops.
58
Page 67

Shooting in RAW mode
RAW mode
P S A M
The camera records the data captured from the CMOS sensor directly without compression.
The file extension is “.SR2” (page 90). After copying the images to your computer, the data
can be reproduced with much less deterioration in image processing and be displayed using
the exclusive software provided. A compressed JPEG format image like the one recorded in
normal shooting is recorded at the same time.
Multi-selector
MENU button
1 Press MENU.
2 Select [Mode] (REC Mode) by moving the multi-selector to b/B, then select [RAW] by moving
to v/V.
• To reproduce the RAW data file using a computer, the exclusive software is required. Install the exclusive
software on the supplied CD-ROM (Image Data Converter SR Ver.1.0) (Windows/Macintosh) to your
computer. Since the RAW data file is a special kind of file, general software cannot open the RAW data
file (pages 94, 97).
• The JPEG image is also recorded in the image size selected by the Image Size setup (t step 4 in “Read
This First”). Since RAW data images are recorded in [10M] size, these data consume larger capacity of a
recording medium.
• Writing data takes more time than in normal recording mode.
• Digital zoom cannot be used.
• In playback mode, the JPEG image recorded at the same time is displayed, and menu operations, such as
image rotation, trimming, are done to only the JPEG image. The RAW data files cannot be played back or
modified using the camera.
Enjoying the camera
59
Page 68

Composing your shot
Displaying the grid lines
P S A M
With reference to the grid lines, you can easily set a subject in a horizontal/vertical position.
Multi-selector
MENU button
1 Display the (Setup) screen (page 32).
2 Select (Camera 2) by moving the multi-selector to v/V, [Grid Line] by moving to B/v/V.
3 Select [On] by moving to B/v/V, then press the center of the multi-selector.
2
( : The default setting)
On
Off
• The grid lines are not recorded.
z Shooting techniques
• When composing your shot, trying to use “three-way split” is effective. Display the grid lines to divide
the screen into three parts each by height and width, and position the subject at one of the points at the
intersection of the horizontal grid line with vertical one. In that way, you can get a stable and wellbalanced composition. Also, positioning two subjects at two intersection points diagonally is effective.
Displays the grid lines.
Does not display the grid lines.
60
Page 69

Monitor mode setting
Reducing flicker
P S A M
When you shoot under fluorescent light, flicker may occur on the screen depending on
regions. You can reduce that flicker.
MONITOR
FRAMING PREVIEW
MONITOR switch
Multi-selector
MENU button
Set the MONITOR switch to the desired mode.
FRAMING
PREVIEW
Reduces the flicker.
To confirm the subject, the screen is brighter while monitoring
(Auto Bright Monitoring).
Does not reduce the flicker.
Before shooting, you can confirm the depth of field (page 38).
Starting time and shutter lag time are shorter than that of
[FRAMING] mode.
When the flicker is not reduced in [FRAMING] mode
Normally, the camera automatically detects the flickering cycle and reduces the flicker.
However, if it is not detected properly, set the power supply frequency (50Hz/60Hz) of your
region beforehand. The flicker will be reduced.
1 Display the (Setup) screen (page 32).
2 Select (Camera 2) by moving the multi-selector to v/V, [Flicker Reduction] by moving to
3 Select the desired mode by moving to B/v/V, then press the center of the multi-selector.
B/v/V.
60Hz
50Hz
Auto
2
( : The default setting)
For regions where the power supply frequency is 60 Hz.
For regions where the power supply frequency is 50 Hz.
The camera automatically detects the power supply
frequency: 50 Hz or 60 Hz.
Enjoying the camera
61
Page 70

Using the menu
Shooting menu
The default settings are marked with .
For details on the operation t page 31
(Image Size)
10M (3888×2592)
7M (3264×2176)
5M (2784×1856)
3M (2160×1440)
1M (1296×864)
For details, see page14.
(P.Quality)
Selects the still image quality.
Fine (FINE)
Standard (STD)
• For details on the image quality t page 13
Records with high quality (low compression).
Records with standard quality (high compression).
Mode (REC Mode)
RAW
Normal
• For details, see page 59.
Records RAW data file in addition to the JPEG file.
Records with normal shooting.
BRK (Bracket Step)
Records a series of three images with the exposure values automatically shifted.
±1.0EV
±0.7EV
±0.3EV
For details, see page 44.
P S A M
P S A M
P S A M
P S A M
62
Page 71

For details on the operation t page 31
(Flash Level)
P S A M
Adjusts the amount of flash light.
M +2.0EV
0EV
m –2.0EV
• The flash level can be set in 1/3 EV increments.
• The value is not displayed on the screen. It is indicated as + or –.
• To change flash mode t page 50
• If the subject is too bright or dark, this adjustment may have no effect.
• When the flash mode is set to (No flash), you cannot adjust the flash level.
PFX (P.Effect)
Toward +: Makes the flash level higher.
The amount of flash light that the camera adjusts
automatically.
Toward –: Makes the flash level lower.
P S A M
Allows you to shoot an image with special effects.
B & W ( )
Sepia ( )
Off
• This setting is not maintained when the power is turned off.
COLOR (Color)
Records the image in monochrome (black and white).
Records the image in sepia (like an old photograph).
No effect.
P S A M
Selects the color reproduction mode.
Adobe RGB (Adobe RGB)
For details, see page 57.
Vivid (VIVID)
Standard
Using the menu
(Saturation)
Adjusts the saturation of the image.
+ ( )
Normal
– ( )
P S A M
Toward +: Brightens the color.
Toward –: Darkens the color.
63
Page 72

For details on the operation t page 31
(Contrast)
Adjusts the contrast of the image.
+ ( )
Normal
– ( )
A.G.C.S. (Advanced
Gradation Control System)
()
(Sharpness)
Adjusts the sharpness of the image.
+ ( )
Normal
– ( )
P S A M
Toward +: Enhances the contrast.
Toward –: Reduces the contrast.
When the subject is darkened by a backlight so that the
subject has no tone, or the subject is in uniform tone, such as
sky and clouds, this mode increases or decreases the LD ratio
according to the scene to express a wide range of tone.
• When the flash strobes, the A.G.C.S. function does not work. If
you shoot a subject beyond reach of the flash light using the
A.G.C.S. function, set the flash to (No flash).
P S A M
Toward +: Sharpens the image.
Toward –: Softens the image.
(Setup)
See pages 32, 71.
64
P S A M
Page 73

Viewing menu
For details on the operation t page 31
The default settings are marked with .
(Folder)
Selects the folder containing the image you want to play back when using the camera with
recording medium.
OK
Cancel
See the following procedure.
Cancels the selection.
1 Select the desired folder by moving the multi-selector to b/B.
Select Folder
102 2/2
102MSDCF
Folder Name:
No. Of Files:
9
Created:
2005
111::05:34
OK
Cancel
BACK/NEXT
AM
2 Select [OK] by moving to v, then press the center of the multi-selector.
z On the folder
The camera stores images in a specified folder of a recording medium (pages 76, 78). You can change the
folder or create a new one.
• To create a new folder t [Create REC. Folder] (pages 76, 78)
• To change the folder for recording images t [Change REC. Folder] (pages 77, 79)
• When multiple folders are created in the recording medium and the first or last image in the folder is
displayed, the following indicators appear.
: Moves to the previous folder.
: Moves to the next folder.
: Moves to either the previous and next folders.
Using the menu
65
Page 74

For details on the operation t page 31
- (Protect)
Protects images against accidental erasure.
Protect (-)
Exit
See the following procedure.
Exits the Protection function.
To protect images in single-image mode
1 Display the image you want to protect.
2 Press MENU to display the menu.
3 Select [-] (Protect) by moving the multi-selector to b/B, then press the center of the multi-
selector.
The image is protected and the - (protect) indicator appears on the image.
110min
1M
-
Protect
Exit
BACK/NEXT
4 To protect other images, select the desired image by moving to b/B, then press the center of the
multi-selector.
To protect images in index mode
1 Press / (Index) to display the index screen.
2 Press MENU to display the menu.
3 Select [-] (Protect) by moving the multi-selector to b/B, then press the center of the multi-
selector.
4 Select [Select] by moving to v/V, then press the center of the multi-selector.
5 Select the image you want to protect by moving to v/V/b/B, then press the center of the multi-
selector.
A green - indicator appears on the selected image.
- (green)
MENU
TO NEXT
SELECT
•
6 Repeat step 5 to protect other images.
7 Press MENU.
8 Select [OK] by moving to B, then press the center of the multi-selector.
The - indicator turns white. The selected images are protected.
66
Page 75

For details on the operation t page 31
• To protect all images in the folder, select [All In This Folder] in step 4, and press the center of the multiselector. Select [On] by moving to B, then press the center of the multi-selector.
To cancel the protection
In single-image mode
Press the center of the multi-selector in step 3 or 4 of “To protect images in single-image
mode.”
In index mode
1 Select the image for which you want to remove protection in step
index mode.”
2 Press the center of the multi-selector to turn the - indicator gray.
3 Repeat the operation above for all images to be unprotected.
4 Press MENU, select [OK] by moving the multi-selector to B, and then press the center of the
multi-selector.
5 of “To protect images in
To cancel protection of all images in the folder
Select [All In This Folder] in step 4 of “To protect images in index mode,” and press the
center of the multi-selector. Select [Off] by moving the multi-selector to
center of the multi-selector.
• Note that formatting the recording medium erases all the data stored on the recording medium, even if
images are protected, and these images cannot be recovered.
• It may take some time to protect an image.
B, then press the
DPOF
Using the menu
Adds a (Print order) mark to images you want to print (page 103).
(Print)
See page 99.
(Slide)
Plays back recorded images in order (Slide show).
67
Page 76

Interval
For details on the operation t page 31
3 sec
Sets the slide show interval.
5 sec
10 sec
30 sec
1 min
Image
Folder
All
Plays back all images in the selected folder.
Plays back all images stored on the recording medium.
Repeat
On
Off
Start
Cancel
1 Select [Interval], [Image] and [Repeat] by moving the multi-selector to v/V/b/B.
2 Select [Start] by moving to V/B, then press the center of the multi-selector.
The slide show starts.
To end the slide show, press the center of the multi-selector, select [Exit] by moving to B, then press
the center of the multi-selector.
• During a slide show, you can display the previous/next image by moving to b/B.
• The interval time is just a guideline, so it may vary depending on the image size, etc.
Plays back images in a continuous loop.
After all the images have been played back, the slide show
ends.
See the following procedure.
Cancels the slide show.
(Resize)
You can change the image size of a recorded image (Resize), and save it as a new file. The
original image is retained even after resizing.
10M
7M
The setting size is just a guideline.
t page 13
5M
3M
1M
Cancel
Cancels resizing.
68
Page 77

For details on the operation t page 31
1 Display the image you want to resize.
2 Press MENU to display the menu.
3 Select [ ] (Resize) by moving the multi-selector to b/B, then press the center of the multi-
selector.
4 Select the desired size by moving to v/V, then press the center of the multi-selector.
The resized image is recorded in the recording folder as the newest file.
• For details on [Image Size] t step 4 in “Read This First”
• You cannot change the size of RAW data files.
• When you change from a small size to a large size, the image quality deteriorates.
(Rotate)
Rotates a still image.
Using the menu
OK
Cancel
1 Display the image to be rotated.
2 Press MENU to display the menu.
3 Select [ ] (Rotate) by moving the multi-selector to b/B, then press the center of the multi-
selector.
4 Select [
5 Select [OK] by moving to v/V, then press the center of the multi-selector.
• You cannot rotate protected images, or RAW data files.
• You may not be able to rotate images shot with other cameras.
• When viewing images on a computer, the image rotation information may not be reflected depending on
the software.
] by moving to v, then rotate the image by moving to b/B.
Rotates an image. See the following procedure.
Determines the rotation. See the following procedure.
Cancels rotation.
(Setup)
See pages 32, 71.
69
Page 78

For details on the operation t page 31
Trimming
Records an enlarged image (t step 6 in “Read This First”) as a new file.
Tri mmin g
Return
1 Press MENU during playback zoom to display the menu.
2 Select [Trimming] by moving the multi-selector to B, then press the center of the multi-selector.
3 Select the image size by moving to v/V, then press the center of the multi-selector.
The image is recorded, and the original image is displayed again.
• Note that the edges of the upper and lower portions of the displayed image are cut off and their image size
ratio becomes 3:2.
• The trimmed image is recorded as the newest file in the selected recording folder, and the original image is
retained.
• The quality of trimmed images may deteriorate.
See the following procedure.
Cancels trimming.
70
Page 79

Using the Setup screen
Camera 1
1
The default settings are marked with .
AF Mode
Selects the auto focus operation mode.
Single (S AF)
Monitor (M AF)
Continuous (C AF)
For details, see page 47.
Digital Zoom
For details on the operation t page 32
Enlarges the images using digital processing. The camera uses either smart or precision digital
zoom.
Smart
(Smart zoom)
()
Precision
(Precision digital zoom)
()
• The maximum zoom scale of smart zoom/precision zoom includes the scale of the optical zoom.
• The AF range finder frame does not appear when using the digital zoom. The , or indicator
flashes, and AF operates with priority on subjects located near the center of the frame.
Enlarges the image digitally with almost no distortion. This is
not available when the image size is set to [10M].
• The maximum zoom scale of Smart zoom is shown in the
following table.
Enlarges all image sizes up to a maximum of 10×, but the
image quality deteriorates.
To do digital zooming
button
Press (Digital zoom). To cancel the digital zoom, press again. The zoom scaling
returns to the number that was in effect using the optical zoom.
Using the Setup screen
71
Page 80

For details on the operation t page 32
On the [Smart]
• The maximum zoom scale is as follows and it depends on the image size. The zoom scale displayed on the
screen is an approximate value.
10M
x1.0
x5.0
7M
x1.2 x6.0
5M
x1.4 x7.0
3M
x1.8 x9.0
1M
x3.0 x15
• When using the smart zoom, the image on the screen may look rough. However, this phenomenon has no
effect on the recorded image.
x5 x10 x15
Power Save
When shooting, set the time to turn the camera to the power save mode. When the camera is in
power save mode, the POWER lamp changes from green to red.
10 min
3 min
1 min
20 sec
Off
The camera turns to power save mode after 10 minutes.
The camera turns to power save mode after three minutes.
The camera turns to power save mode after one minute.
The camera turns to power save mode after 20 seconds.
Does not use the Power Save function.
To cancel the power save mode
Pressing the shutter button returns the camera to the shooting mode, and pressing the
(Playback) button returns the camera to the playback mode.
• During the power save mode, the battery is still consumed since the power is not turned off.
• When the camera is in playback mode or the (Setup) screen is displayed, the time is automatically set
to three minutes and you cannot set it to [Off].
• When the FINDER/AUTO/LCD switch is set to FINDER or AUTO, the camera recognizes that the
camera is not being operated if you put your face closer to the finder and leave it there. In such cases, the
camera turns to power save mode after the selected time.
• Power save mode is not available when using the AC Adaptor or Remote Commander (not supplied).
72
Page 81

For details on the operation t page 32
Date/Time
Selects how to superimpose the date or time onto the image. Select this before shooting.
• The date and time do not appear during shooting, instead, the indicator appears. The date and time
appear in red on the lower-right corner of the screen during playback only.
Day&Time
Date
Off
Superimposes the date, hour, and minute.
Superimposes the year, month and day.
• The date is inserted in the order you select. (t step 2 in “Read
This First”)
Does not superimpose the date and time.
• The date and time superimposed cannot be removed later.
AF Illuminator
The AF illuminator supplies fill light to focus more easily on a subject in dark surroundings.
The AF illuminator emits red light allowing the camera to focus easily when the shutter button
is pressed halfway, until the focus is locked. The indicator appears at this time.
Auto
Off
• If the AF illuminator light does not reach the subject sufficiently or the subject has no contrast, focus will
not be achieved. (A distance of up to approximately 2.7 m (106 1/4 inches) (zoom:W)/2.3 m
(90 1/2 inches) (zoom:T) is recommended.)
• Focus is achieved as long as the AF illuminator light reaches the subject, even if the light is slightly off the
center of the subject.
• When using manual focus (page 48), AF Illuminator does not function.
• The AF range finder frame does not appear. The , or indicator flashes, and AF operates with
priority on subjects located near the center of the frame.
• The AF illuminator does not operate when (Twilight mode) or (Landscape mode) is selected in the
Scene mode or using the PUSH AUTO function.
• The AF illuminator emits very bright light. Although there are no problems with safety, do not look
directly into the AF illuminator emitter at close range.
Uses the AF illuminator.
Does not use AF illuminator.
ON
Auto Review
Displays the recorded image on the screen for approximately two seconds immediately after
shooting a still image.
On
Off
Use the Auto Review.
Does not use Auto Review.
Using the Setup screen
• If you press the shutter button halfway down during this period, the recorded image display disappears
and you can immediately shoot the next image.
• The recorded image is displayed in Burst or Exposure Bracket mode regardless of the setting.
73
Page 82

Camera 2
2
The default settings are marked with .
For details on the operation t page 32
Expanded Focus
Expands the area around the PUSH AF/Expanded focus frame double in manual focus mode
(page 48).
On
Off
• When the precision digital zoom is activated or the smart zoom is activated with the image size set to
[1M], the expanded focus function is not available.
Enlarges double.
Does not expand.
Flash Sync.
Selects the timing that the flash strobes.
Front
Rear (REAR)
For details, see page 52.
Flash
Selects whether you use an external flash.
Ext. ( )
Int.
For details, see page 52.
Pop-up Flash
Sets the flash to pop-up automatically or to do manually.
Auto
Manual
For details, see page 51.
Flicker Reduction
Selects the power supply frequency.
60Hz
50Hz
Auto
For details, see page 61.
74
Page 83

Grid Line
Selects whether to display the grid lines or not.
On
Off
For details, see page 60.
For details on the operation t page 32
Using the Setup screen
75
Page 84

Memory Stick Tool
For details on the operation t page 32
This item appears only when the /CF switch is set to “ ”.
The default settings are marked with .
Format
Formats the “Memory Stick”. A commercially available “Memory Stick” is already formatted,
and can be used immediately.
• Note that formatting irrevocably erases all data on a “Memory Stick”, including even protected images.
OK
Cancel
See the following procedure.
Cancels the formatting.
1 Select [OK] by moving the multi-selector to v, then press the center of the multi-selector.
The message “All data in Memory Stick will be erased Ready?” appears.
2 Select [OK] by moving to v, then press the center of the multi-selector.
The format is complete.
Create REC. Folder
Creates a folder in a “Memory Stick” for recording images.
OK
Cancel
See the following procedure.
Cancels folder creation.
1 Select [OK] by moving the multi-selector to v, then press the center of the multi-selector.
The folder creation screen appears.
110min
Create REC. Folder
Creating REC. folder
102MSDCF
Ready?
OK
Cancel
2 Select [OK] by moving to v, then press the center of the multi-selector.
A new folder is created with a number incremented one higher than the largest number, and the
folder becomes the current recording folder.
• For details on the folder, see page 65.
• When not creating a new folder, the “101MSDCF” folder is selected as the recording folder.
• You can create folders designated up to “999MSDCF.”
• Images are recorded in the newly created folder until a different folder is created or selected.
• You cannot delete a folder with the camera. To delete a folder, use your computer, etc.
• Up to 4,000 images can be stored in one folder. When the folder capacity is exceeded, a new folder is
automatically created.
• For more information, see “Image file storage destinations and file names” (page 90).
76
Page 85

For details on the operation t page 32
Change REC. Folder
Changes the folder currently used for recording images.
OK
Cancel
See the following procedure.
Cancels changing the recording folder.
1 Select [OK] by moving the multi-selector to v, then press the center of the multi-selector.
The folder selection screen appears.
Select REC. Folder
102 2/2
102MSDCF
Folder Name:
No. Of Files:
0
Created:
2005
111::05:34
OK
Cancel
BACK/NEXT
AM
2 Select the desired folder by moving to b/B, and [OK] by moving to v, then press the center of
the multi-selector.
• You cannot select the “100MSDCF” folder as a recording folder.
• You cannot move recorded images to a different folder.
Using the Setup screen
77
Page 86

CF Card Tool
For details on the operation t page 32
This item appears only when the /CF switch is set to “CF”.
The default settings are marked with .
Format
Formats the Microdrive/CF card.
• Note that formatting irrevocably erases all data on a Microdrive/CF card, including even protected images.
OK
Cancel
See the following procedure.
Cancels the formatting.
1 Select [OK] by moving the multi-selector to v, then press the center of the multi-selector.
The message “All data in CF card will be erased Ready?” appears.
2 Select [OK] by moving to v, then press the center of the multi-selector.
The format is complete.
• You cannot format it using the Memory Stick Duo Adaptor that is compliant with the CompactFlash slot.
Create REC. Folder
Creates a folder in a Microdrive/CF card for recording images.
OK
Cancel
See the following procedure.
Cancels folder creation.
1 Select [OK] by moving the multi-selector to v, then press the center of the multi-selector.
The folder creation screen appears.
110min
Create REC. Folder
Creating REC. folder
102MSDCF
Ready?
OK
Cancel
2 Select [OK] by moving to v, then press the center of the multi-selector.
A new folder is created with a number incremented one higher than the largest number, and the
folder becomes the current recording folder.
• For details on the folder, see page 65.
• When not creating a new folder, the “101MSDCF” folder is selected as the recording folder.
• You can create folders designated up to “999MSDCF.”
• Images are recorded in the newly created folder until a different folder is created or selected.
• You cannot delete a folder with the camera. To delete a folder, use your computer, etc.
• Up to 4,000 images can be stored in one folder. When the folder capacity is exceeded, a new folder is
automatically created.
• For more information, see “Image file storage destinations and file names” (page 90).
78
Page 87

For details on the operation t page 32
Change REC. Folder
Changes the folder currently used for recording images.
OK
Cancel
See the following procedure.
Cancels changing the recording folder.
1 Select [OK] by moving the multi-selector to v, then press the center of the multi-selector.
The folder selection screen appears.
Select REC. Folder
102 2/2
102MSDCF
Folder Name:
No. Of Files:
0
Created:
2005
111::05:34
OK
Cancel
BACK/NEXT
AM
2 Select the desired folder by moving to b/B, and [OK] by moving to v, then press the center of
the multi-selector.
• You cannot select the “100MSDCF” folder as a recording folder.
• You cannot move recorded images to a different folder.
Using the Setup screen
79
Page 88

Setup 1
1
The default settings are marked with .
For details on the operation t page 32
LCD Backlight
Selects the brightness of the LCD backlight when using the camera with battery pack.
Bright
Normal
Dark
• Selecting [Bright] uses up the battery pack charge faster.
Brightens.
Darkens.
EVF Backlight
Selects the brightness of the finder backlight.
Bright
Normal
Dark
• Selecting [Bright] uses up the battery pack charge faster.
Brightens.
Darkens.
Beep
Selects the sound produced when you operate the camera.
Shutter
On
Off
Turns on the shutter sound when you press the shutter button.
Turns on the beep/shutter sound when you press the multiselector/ press the shutter button.
Turns off the beep/shutter sound.
Zebra
Selects whether to display the zebra pattern or not.
On
Off
For details, see page 42.
Language
Selects the language to be used to display the menu items, warnings, and messages.
80
Page 89

Setup 2
2
For details on the operation t page 32
The default settings are marked with .
File Number
Selects the method used to assign file numbers to images.
Series
Reset
Assigns numbers to files in sequence even if the recording
folder or the recording medium is changed. (When the
replaced recording medium contains a file with a number
higher than the last assigned number, a number one higher
than the largest number is assigned.)
Starts from 0001 each time the folder is changed. (When the
recording folder contains a file, a number one higher than the
largest number is assigned.)
USB Connect
Selects the USB mode to be used when connecting the camera to a computer or a PictBridge
compliant printer using the USB cable.
PictBridge
PTP
Mass Storage
Auto
Connects the camera to a PictBridge compliant printer
(page 99).
When [PTP] (Picture Transfer Protocol) is set and the camera
is connected to a computer, the images in the recording folder
on the camera are copied to the computer. (Compatible with
Windows XP and Mac OS X.)
Establishes a Mass Storage connection between the camera
and a computer or other USB device (page 87).
The camera recognizes automatically and sets up
communication with a computer or PictBridge compliant
printer (pages 87 and 99).
• If the camera and a PictBridge compliant printer cannot be
connected when set to [Auto], change the setting to
[PictBridge].
• If the camera and a computer or other USB device cannot be
connected when set to [Auto], change the setting to [Mass
Storage].
Using the Setup screen
81
Page 90

For details on the operation t page 32
Video Out
Sets the video signal output according to the TV color system of the connected video
equipment. Different countries and regions use different TV color systems. If you want to
view images on a TV screen, check page 106 for the TV color system of the country or region
where the camera is used.
NTSC
PAL
Sets the video output signal to NTSC mode (e.g., for the
USA, Japan).
Sets the video output signal to PAL mode (e.g., for Europe).
Clock Set
Sets the date and time.
OK
Cancel
Select [OK] by moving the multi-selector to v, and press the
center of the multi-selector. Then, perform the procedure
explained in “Set the clock” (
Cancels setting the clock.
t step 2 in “Read This First”).
82
Page 91

Using your computer
Enjoying your Windows computer
For details on using a Macintosh computer,
refer to “Using your Macintosh computer”
(page 95).
Copying images to your computer (page 85)
Viewing images on your
computer
Enjoying images using “PicturePackage” (page 93)
Viewing images saved on your
computer
Storing images on a CD-R
Creating a Music Video/
Slideshow
Printing images
Creating a video CD using “ImageMixer” (page 93)
Creating a video CD “ImageMixer VCD2” is
Installing the USB driver.
• Installation of the USB driver is
Installing “PicturePackage”
(page 93).
installed automatically when
“PicturePackage” is installed.
Preparation
not needed when using Windows
XP.
Using your computer
83
Page 92

Recommended computer
environment
The following environment is
recommended for a computer connected to
the camera.
Recommended environment for
copying images
OS (pre-installed): Microsoft Windows 98,
Windows 98SE, Windows 2000
Professional, Windows Millennium
Edition, Windows XP Home Edition, or
Windows XP Professional
• Operation is not assured in an environment
based on an upgrade of the operating
systems described above or in a multi-boot
environment.
CPU: MMX Pentium 200 MHz or faster
USB connector: Provided as standard
Display: 800 × 600 dots or more, High Color
(16-bit color, 65,000 colors) or more
Recommended environment for using
“PicturePackage”/“ImageMixer
VCD2”
Software: Macromedia Flash Player 6.0 or
later, Windows Media Player 7.0 or later,
DirectX 9.0b or later
Sound card: 16-bit stereo sound card with
speakers
Memory: 64 MB or more (128 MB or more is
recommended.)
Hard Disk: Disk space required for
installation—approximately 500 MB
Display: Video card (Direct Draw driver
compliant) with 4 MB of VRAM
• For automatic creation of a Music Video/
Slideshow (page 93), a Pentium III 500 MHz or
faster CPU is required.
• When using “ImageMixer VCD2,” a Pentium III
800 MHz or faster CPU is recommended.
• This software is compatible with DirectX
technology. “DirectX” must be installed for use.
• A separate software application for operating
the recording device is required in order to write
to CD-Rs.
Recommended environment for using
“Image Data Converter SR Ver.1.0”
OS (pre-installed): Microsoft Windows
2000 Professional, Windows XP Home
Edition, or Windows XP Professional
CPU: MMX Pentium III 1 GHz or faster
Memory: 256 MB or more (512 MB or more
is recommended.)
Virtual memory: 700 MB or more
Display: 1024 × 768 dots or more, High
Color (16-bit color, 65,000 colors) or more
Notes on connecting your camera to a
computer
• Operations are not guaranteed for all the
recommended computer environments
mentioned above.
• If you connect two or more USB devices to a
single computer at the same time, some devices,
including your camera, may not operate,
depending on the types of USB devices you are
using.
• Operations are not guaranteed when using a
USB hub.
• Connecting your camera using a USB interface
that is compatible with Hi-Speed USB (USB 2.0
compliant) allows advanced transfer (high speed
transfer) as this camera is compatible with HiSpeed USB (USB 2.0 compliant).
• There are three modes for a USB connection
when connecting a computer, [Auto] (default
setting), [Mass Storage] and [PTP] modes. This
section describes the [Auto] and [Mass Storage]
as examples. For details on [PTP], see page 81.
• When your computer resumes from a suspend or
sleep mode, communication between your
camera and your computer may not recover at
the same time.
84
Page 93

Copying images to your computer
This section describes the process using a
Windows computer as an example.
You can copy images from the camera to
your computer as follows.
For directly inserting the recording
medium in a computer
Remove the recording medium from the
camera and insert it in the computer and
copy the images.
For connecting the camera with the
recording medium inserted to a
computer using the USB connection
Follow Stages 1 through 5 on pages 85 to
89 to copy images.
• The screen displays shown in this section are the
examples for copying images from “Memory
Stick”.
Stage 1: Installing the USB
Driver
• A driver is software that enables equipment
connected to the computer to operate properly.
• When using Windows XP, start from Stage 2.
• When “PicturePackage” is already installed,
start from Stage 2.
NOTE: Do not connect the camera to
the computer at this time.
2 Insert the CD-ROM (Cyber-shot
application software) into the
computer, then click [USB Driver]
when the install menu screen
appears.
The “InstallShield Wizard” screen
appears.
• If the install menu screen does not appear,
double-click (My Computer)
(PICTUREPACKAGE).
3 Click [Next].
The USB driver installation starts.
When the installation is finished, the
screen informs you of completion.
4 Click the radio button next to
[Yes, I want to restart my
computer now] to select it, then
click [Finish].
t
Using your computer
1 Shut down all application
software in use.
• In Windows 2000, log on as Administrator
(authorized Administrators).
1
2
Your computer restarts. Now, you can
establish a USB connection.
Remove the CD-ROM when the installation
is completed.
85
Page 94

Stage 2: Preparing the camera
and the computer
3 Turn on the camera and the
computer.
1 Insert a recording medium with
recorded images into the camera.
• Use the /CF switch to select the
recording medium (
Firs t”).
t step 3 in “Read This
2 Connect the camera to a wall
outlet (wall socket) with the AC
Adaptor.
To a wall outlet
AC Adaptor
• When you copy images to your computer
using the battery pack, copying may fail or
image data may become corrupted if the
battery pack shuts down too soon.
ON
POWER
OFF
86
Page 95

Stage 3: Connecting the camera
and your computer
2 To the (USB)
jack
USB cable (supplied)
1 To a USB connector
• With Windows XP, the AutoPlay wizard
appears on the desktop.
“USB Mode Mass Storage” appears on the
screen of the camera.
USB Mode
Mass Storage
Memory Stick
MENU
Switch on
When a USB connection is established for
the first time, your computer automatically
runs a program to recognize the camera.
Wai t for a while .
* During communication, the access indicators
turn red. Do not operate the computer until the
indicators turn white.
• Opening the “Memory Stick”/CF card cover
cancels the USB connection. Do not open the
“Memory Stick”/CF card cover during a USB
connection.
• If “USB Mode Mass Storage” does not appear,
set [USB Connect] to [Mass Storage] (page 81).
Access
indicators*
Stage 4-A: Copying images to a
computer
• For Windows 98/98SE/2000/Me, follow the
procedure explained in “Stage 4-B: Copying
images to a Computer” on page 88.
• For Windows XP, when the wizard screen does
not appear automatically, follow the procedure
explained in “Stage 4-B: Copying images to a
Computer” on page 88.
This section describes an example of
copying images to a “My Documents”
folder.
1 After making a USB connection in
Stage 3, click [Copy pictures to a
folder on my computer using
Microsoft Scanner and Camera
Wizard]
t [OK] as the wizard
screen appears automatically on
the desktop.
1
2
The “Scanner and Camera Wizard”
screen appears.
2 Click [Next].
The images saved on the recording
medium of the camera appear.
Using your computer
87
Page 96

3 Click the check box of unwanted
images to remove the checkmark
so they are not copied, then click
[Next].
1
5 Click the radio button next to
[Nothing. I'm finished working
with these pictures] to select it,
then click [Next].
1
2
The “Picture Name and Destination”
screen appears.
4 Select a name and destination for
the images, then click [Next].
1
2
Image copying starts. When the copying
is completed, the “Other Options”
screen appears.
• This section describes an example of
copying images to the “My Documents”
folder.
2
The “Completing the Scanner and
Camera Wizard” screen appears.
6 Click [Finish].
The wizard screen closes.
• To continue copying other images,
disconnect the USB cable (page 90). Then
follow the procedure explained in “Stage 3:
Connecting the camera and your computer”
on page 87.
Stage 4-B: Copying images to a
Computer
• For Windows XP, follow the procedure
explained in “Stage 4-A: Copying images to a
computer” on page 87.
This section describes an example of
copying images to the “My Documents”
folder.
88
Page 97

1 Double-click [My Computer] t
[Removable Disk]
• If the “Removable Disk” icon is not
displayed, see page 113.
t [DCIM].
2 Double-click the folder where the
image files you want to copy are
stored.
Then, right-click an image file to
display the menu and click
[Copy].
1
2
1
2
The image files are copied to the “My
Documents” folder.
• When an image with the same file name
exists in the copy destination folder, the
overwrite confirmation message appears.
When you overwrite an existing image with
a new one, the original file data is deleted.
To copy an image file to the computer
without overwriting, change the file name to
a different name and then copy the image
file. However, note that if you change the
file name (page 92), you may not be able to
play back that image with your camera.
Stage 5: Viewing images on
your computer
This section describes the procedure for
viewing copied images in the “My
Documents” folder.
1 Click [Start] t [My Documents].
Using your computer
3 Double-click the [My Documents]
folder. Then, right-click on the
“My Documents” window to
display the menu and click
[Paste].
2
1
89
Page 98

The contents of the “My Documents”
folder are displayed.
• If you are not using Windows XP,
double-click [My Documents] on the
desktop.
3 Confirm the device on the confirmation
window, then click [OK].
4 Click [OK].
The device is disconnected.
• Step 4 is unnecessary for Windows XP.
2 Double-click the desired image
file.
The image is displayed.
• The color of an image recorded in Adobe
RGB mode may differ between the
displayed image and the printed image,
depending on the monitor.
To delete the USB connection
Perform the procedures listed below
beforehand when:
• Disconnecting the USB cable
• Removing a recording medium
• Turning off the camera
• Switching the recording medium using the
/CF switch
x For Windows 98/98SE
Confirm that the access indicators (page
87) are white. If the access indicators have
turned white, the device is disconnected
from a computer.
Image file storage destinations
and file names
The image files recorded with your camera
are grouped as folders on the recording
medium.
Example: viewing folders on Windows XP
(when using a “Memory Stick”)
A
B
x For Windows 2000/Me/XP
1 Double-click on the tasktray.
Double-click here
2 Click (Sony DSC)
90
t [Stop].
C
A Folder containing image data recorded
using a camera not equipped with the
folder creating function.
B Folder containing image data recorded
using this camera.
When no new folders are created, there is
only the “101MSDCF” folder.
Page 99

C Folder containing movie data, etc.,
recorded using a camera not equipped with
the folder creating function.
• Even when using a Microdrive/CF card, “Sony
MemoryStick” may be displayed, depending on
your computer environment.
• You cannot record any images to the
“100MSDCF” folder. The images in these
folders are available only for viewing.
• You cannot record/playback any images to the
“MSSONY” folder.
• Image files are named as follows. ssss
stands for any number within the range from
0001 to 9999. The numerical portions of the
name of a RAW data file and its corresponding
JPEG image file are the same.
– Still image files: DSC0ssss.JPG
– Adobe RGB data files: _DSCssss.JPG
– RAW data file (other than Adobe RGB):
DSC0ssss.SR2
– RAW data file (Adobe RGB):
_DSCssss.SR2
• For more information about folders, see pages
65, 76, 78.
Using your computer
91
Page 100

Viewing image files stored on a computer with
your camera
This section describes the process using a
Windows computer as an example.
When an image file copied to a computer
no longer remains on a recording medium,
you can view that image again on the
camera by copying the image file on the
computer to a recording medium.
• Step 1 is not necessary if the file name set with
your camera has not been changed.
• You may be unable to play back some images
depending on the image size.
• When an image file has been processed by a
computer or when the image file was recorded
using a model other than that of your camera,
playback on your camera is not guaranteed.
• When there is no folder, first create a folder with
your camera (pages 76, 78) and then copy the
image file.
1 Right-click the image file, then
click [Rename]. Change the file
name to “DSC0ssss.”
Enter a number from 0001 to 9999 for
ssss.
2 Copy the image file to the
recording medium folder in the
following order.
1Right-click the image file, then click
[Copy].
2Double-click [Removable Disk] or
[Sony MemoryStick] in [My
Computer].
3Right-click the [sssMSDCF] folder
in the [DCIM] folder, then click [Paste].
• sss stands for any number within the
range from 100 to 999.
1
2
• If the overwrite confirmation message
appears, enter a different number.
• An extension may be displayed depending
on the computer settings. The extension for
still images is JPG. Do not change the
extension.
92
 Loading...