

Sony Dream Machine ICF-C7iP Operating Instructions Manual
WARNING
To reduce the risk of fire or electric shock, do
not expose this apparatus to rain or
moisture.
To reduce the risk of fire, do not cover the
ventilation of the apparatus with newspapers,
tablecloths, curtains, etc. And do not place lighted
candles on the apparatus.
To reduce the risk of fire or electric shock, do not
expose this apparatus to dripping or splashing,
and do not place objects filled with liquids, such
as vases, on the apparatus.
Do not install the appliance in a confined space,
such as a bookcase or built-in cabinet.
Do not expose the batteries (battery pack or
batteries installed) to excessive heat such as
sunshine, fire or the like for a long time.
As the main plug is used to disconnect the unit
from the mains, connect the unit to an easily
accessible AC outlet. Should you notice an
abnormality in the unit, disconnect the main plug
from the AC outlet immediately.
CAUTION
Danger of explosion if battery is incorrectly
replaced. Replace only with the same or
equivalent type.
Features
Wake or sleep to iPod/Radio
Dual Alarm
FM/AM 2-band digital synthesized tuner
30 Station Presets (20 FM. 10 AM)
Brightness Control (High/Mid/Low)
Extendable Snooze system from 10 to 60 min
No Power No Problem alarm system to keep
the clock and the alarm operating during a
power interruption with a CR2032 battery
installed
Precautions
Operate the unit on the power source specified
in “Specifications.”
To disconnect the AC power cord (mains lead),
pull it out by the plug, not the cord.
The unit is not disconnected from the AC
power source (mains) as long as it is connected
to the wall outlet, even if the unit itself has been
turned off.
Since a strong magnet is used for the speaker,
keep personal credit cards using magnetic coding
or spring-wound watches away from the unit to
prevent possible damage from the magnet.
Do not leave the unit in a location near a heat
source such as a radiator or airduct, or in a
place subject to direct sunlight, excessive dust,
mechanical vibration, or shock.
Allow adequate air circulation to prevent
internal heat build-up. Do not place the unit on
a surface (a rug, a blanket, etc.) or near
materials (a curtain) which might block the
ventilation holes.
Should any solid object or liquid fall into the unit,
unplug the unit and have it checked by qualified
personnel before operating it any further.
To clean the casing, use a soft cloth dampened
with a mild detergent solution.
Never touch the wire of the external FM aerial
during a thunderstorm. Furthermore,
immediately disconnect the AC power cord
from the radio.
NOTES ON LITHIUM BATTERY
Wipe the battery with a dry cloth to assure a
good contact.
Be sure to observe the correct polarity when
installing the battery.
Do not hold the battery with metallic tweezers,
otherwise a short-circuit may occur.
If you have any questions or problems concerning
your unit, please consult your nearest Sony dealer.
Troubleshooting
Should any problem persist after you have made
the following checks, consult your nearest Sony
dealer.
The clock flashes “AM 12:00” or “0:00” due to
a power interruption.
The battery is low. Replace the battery. Remove
the old battery and install a new one.
The radio, iPod or buzzer alarm does not
sound at the preset alarm time.
Check that alarm “A” or alarm “B” is properly
displayed.
The radio or alarm of iPod is activated but no
sound comes on at the preset alarm time.
Check the alarm volume setting.
There is no sound from the iPod.
Make sure the iPod is securely connected.
Adjust the VOLUME.
The iPod cannot be operated with this unit.
Make sure the iPod is securely connected.
The iPod cannot be charged.
Make sure the iPod is securely connected.
Specifications
Time display
Model for Australia and New Zealand:
12-hour System
Model for other countries/regions:
24-hour System
Section for iPod
DC out: 5V
MAX: 500mA
Radio section
Frequency range
Model for Australia and New Zealand
Band Frequency Channel step
FM 87.5 MHz – 108 MHz 0.05 MHz
AM 531 kHz – 1 602 kHz 9 kHz
Model for other countries / regions
Band Frequency Channel step
FM 87.5 MHz – 108 MHz
87.5 MHz – 108 MHz
0.05 MHz
0.1 MHz
AM 531 kHz – 1 602 kHz
530 kHz – 1 610 kHz
9 kHz
10 kHz
General
Speaker
Approx. 3.8 cm (1 1/2 inches) dia. 8 Ω
Input
AUDIO IN jack (ø 3.5 mm stereo minijack)
Power output
0.8 W (at 10% harmonic distortion)
Power requirements
230 V AC, 50 Hz
For clock back up: 3V DC, one CR2032 battery
Dimensions
Approx. 115 mm × 124.7 mm × 97.1 mm (w/h/d)
(4 9/16 × 4 15/16 × 3 7/8 inches) not including
projecting parts and controls
Mass
Model for Australia and New Zealand:
Approx. 1 014 g (2 lb 3.8 oz) including power
supply unit
Model for other countries/regions:
Approx. 900 g (1 lb 15.7 oz) including power
supply unit
Supplied accessories
Remote commander (1)
AM loop aerial (1)
Audio connecting cable (1)
Universal Dock Adapter for iPhone (1)
Universal Dock Adapter for iPhone 3GS & iPhone
3G (1)
Universal Dock Adapter for iPhone 4S & iPhone 4
(1)
Lithium battery CR2032 (1)
Design and specifications are subject to change
without notice.
Compatible iPod/
iPhone models
Compatible iPod/iPhone models are as follows.
Update your iPod/iPhone to use the latest
software before you use it.
iPod touch (4th generation)
iPod touch (3rd generation)
iPod touch (2nd generation)
iPod touch (1st generation)
iPod nano (6th generation)*
iPod nano (5th generation)
iPod nano (4th generation)
iPod nano (3rd generation)
iPod nano (2nd generation)
iPod nano (1st generation)
iPod with video
iPod with color display
iPod with click wheel
iPod classic
iPod mini
iPhone 4S
iPhone 4
iPhone 3GS
iPhone 3G
iPhone
* The iPod nano (6th generation) cannot be
controlled by the remote when the command of
“MENU,” “,” “,” and “ENTER” is pressed.
Notes
In these Operating Instructions, “iPod” is used
as a general reference to functions of iPod on an
iPod or iPhone, unless otherwise specified by
the text or illustrations.
The connector of the unit is for sole use with an
iPod. If you use devices that do not match with
the connector, connect to the AUDIO IN
terminal of this unit with the supplied audio
connecting cable.
Sony cannot accept responsibility in the event
that data recorded to an iPod is lost or damaged
when using an iPod connected to this unit.
4-139-836-35(1)
About the backup
battery
To keep accurate time, as a backup power source,
this unit needs one CR2032 battery (supplied), in
addition to the house current.
The battery keeps the clock operating in the event
of a power interruption.
Knowing when to replace the
battery
When the battery becomes weak, “” appears in
the display.
If a power interruption occurs while the battery is
weak, the current time and alarm will be erased.
Replace the battery with a Sony CR2032 lithium
battery. Use of another battery may cause a fire or
explosion.
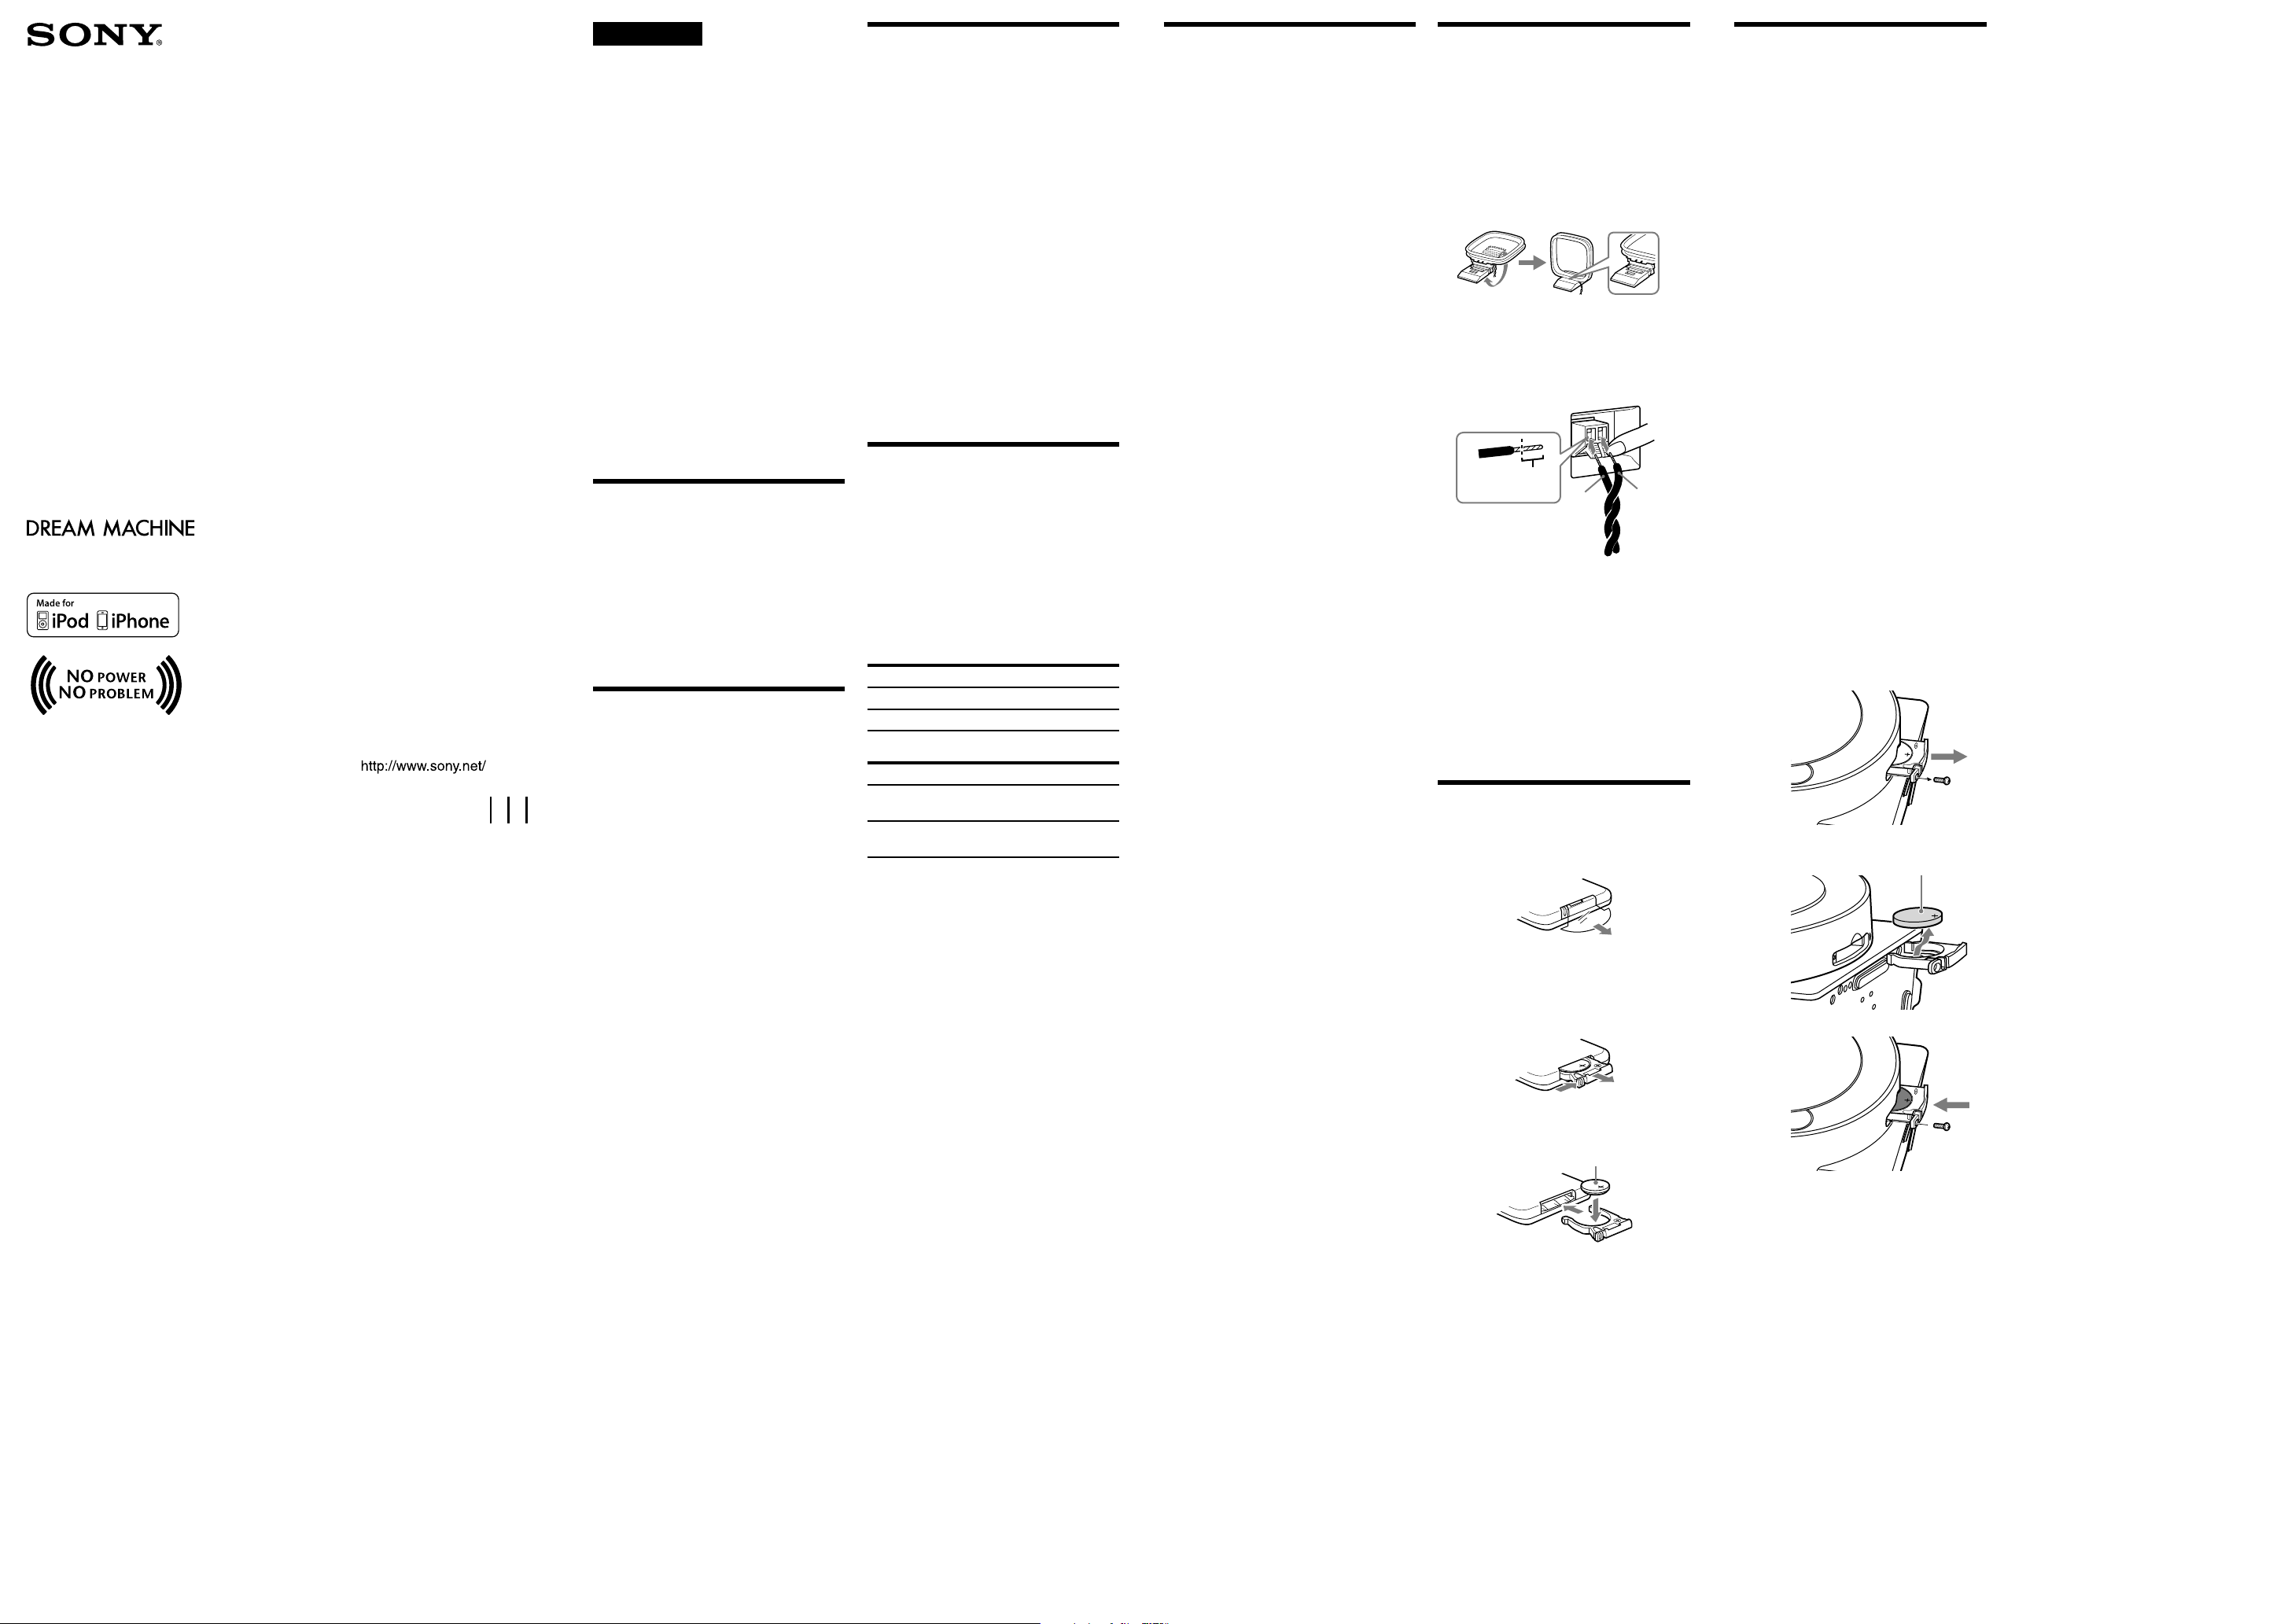
Installing and replacing the
battery
1 Keep the AC plug connected to the AC
outlet, remove the screw that secures the
battery holder at the bottom of the unit
using a screwdriver, and remove the
battery holder.
2
Replace a new battery in the battery holder
with the side facing up.
3 Insert the battery holder back into the
unit and secure it with the screw.
4 Press iPod&iPhone, RADIO BAND,
AUDIO IN or SNOOZE/DATE/SLEEP
OFF to turn “” off in the display.
Note
When you replace the battery, do not disconnect
the plug from the AC outlet. Otherwise, the
calendar, current time, alarm and station presets
will be erased.
CR2032
If the time in the display is
incorrect after the battery is
changed (Reset)
Press the Reset button with a pointed device. The
Reset button is in the small hole located near the
battery holder.
Connecting the aerial
To connect the AM loop
aerial
The shape and the length of the aerial is designed
to receive AM signals. Do not dismantle or roll up
the aerial.
1 Remove only the loop part from the
plastic stand.
2 Set up the AM loop aerial.
3 Connect the cords to the AM aerial
terminals.
Cord (A) or cord (B) can be connected to
either terminal.
A
B
Only insert up
to here.
Insert the cord while
pushing down the
terminal clamp.
4 Make sure the AM loop aerial is
connected firmly by pulling softly.
Adjusting the AM loop aerial
Find a place and an orientation that provide good
reception.
Do not place the AM loop aerial near the unit
or other AV equipment, as noise may result.
Tip
Adjust the direction of the AM loop aerial for best
AM broadcast sound.
Preparing the remote
commander
Before using the card remote commander for the
first time, remove the insulation film.
When to replace the battery
With normal use, the battery (CR2025) should
last for about six months. When the remote
commander no longer operates the unit, replace
the battery with a new one.
CR2025
Notes
Do not attempt to charge the battery.
If you are not going to use the remote
commander for a long time, remove the battery
to avoid any damage that may be caused by
leakage and corrosion.
©2009 Sony Corporation Printed in China
FM/AM
Clock Radio
Operating Instructions
ICF-C7iP
Dream Machine is a trademark of Sony Corporation.
No Power No Problem is a trademark of Sony Corporation.
The clock system varies depending on the
model you own.
12-hour system: “AM 12:00” = midnight
24-hour system: “0:00” = midnight
To display the year and date
Press SNOOZE/DATE/SLEEP OFF once for the
date, and press it again for the year.
After a while, the display will change back to the
current time automatically.
To change the display to the
summer time (daylight
saving time) indication
Press and hold CLOCK and SNOOZE/DATE/
SLEEP OFF at the same time for at least
2 seconds.
“ ” is appears in the display and the time
indication changes to the summer time (daylight
saving time).
To deactivate the summer time (daylight saving
time) adjustment, press and hold CLOCK and
SNOOZE/DATE/SLEEP OFF at the same time for
at least 2 seconds again.
Setting the brightness
of the display
Three levels of brightness are available by pressing
BRIGHTNESS.
Operating the radio
Changing the channel step
(except Australian and New
Zealand model)
The channel step differs depending on the area.
The channel step of this unit is factory-set to
9 kHz. Change the settings as shown below to be
able to listen to the radio.
1 Press RADIO BAND to turn on the radio
and select the AM band.
2 Press and hold ALARM TIME SET A,
RADIO BAND, BRIGHTNESS at the
same time for about 2 seconds.
“S:9” or “S:10” appears in the display and the
channel step is changed.
To change the channel step again, repeat step 2.
If you select “S:9”, the AM channel step will
change to 9 kHz, and the FM channel step will
change to 0.05 MHz.
If you select “S:10”, the AM channel step will
change to 10 kHz, and the FM channel step will
change to 0.1 MHz.
Note
After changing the channel step, the AM and FM
preset stations will be initialized.
–Manual tuning
1 Press RADIO BAND to turn on the radio
and select the AM or FM band.
2 Press TUNING + or – to tune in to a
desired frequency.
3 Adjust the volume using VOLUME + or
–.
Note
Even if the FM channel step is 0.05 MHz, FM
frequency display is raised or lowered by a step of
0.1 MHz. For example, frequency 88.00 and
88.05 MHz is displayed as “88.0 MHz.”
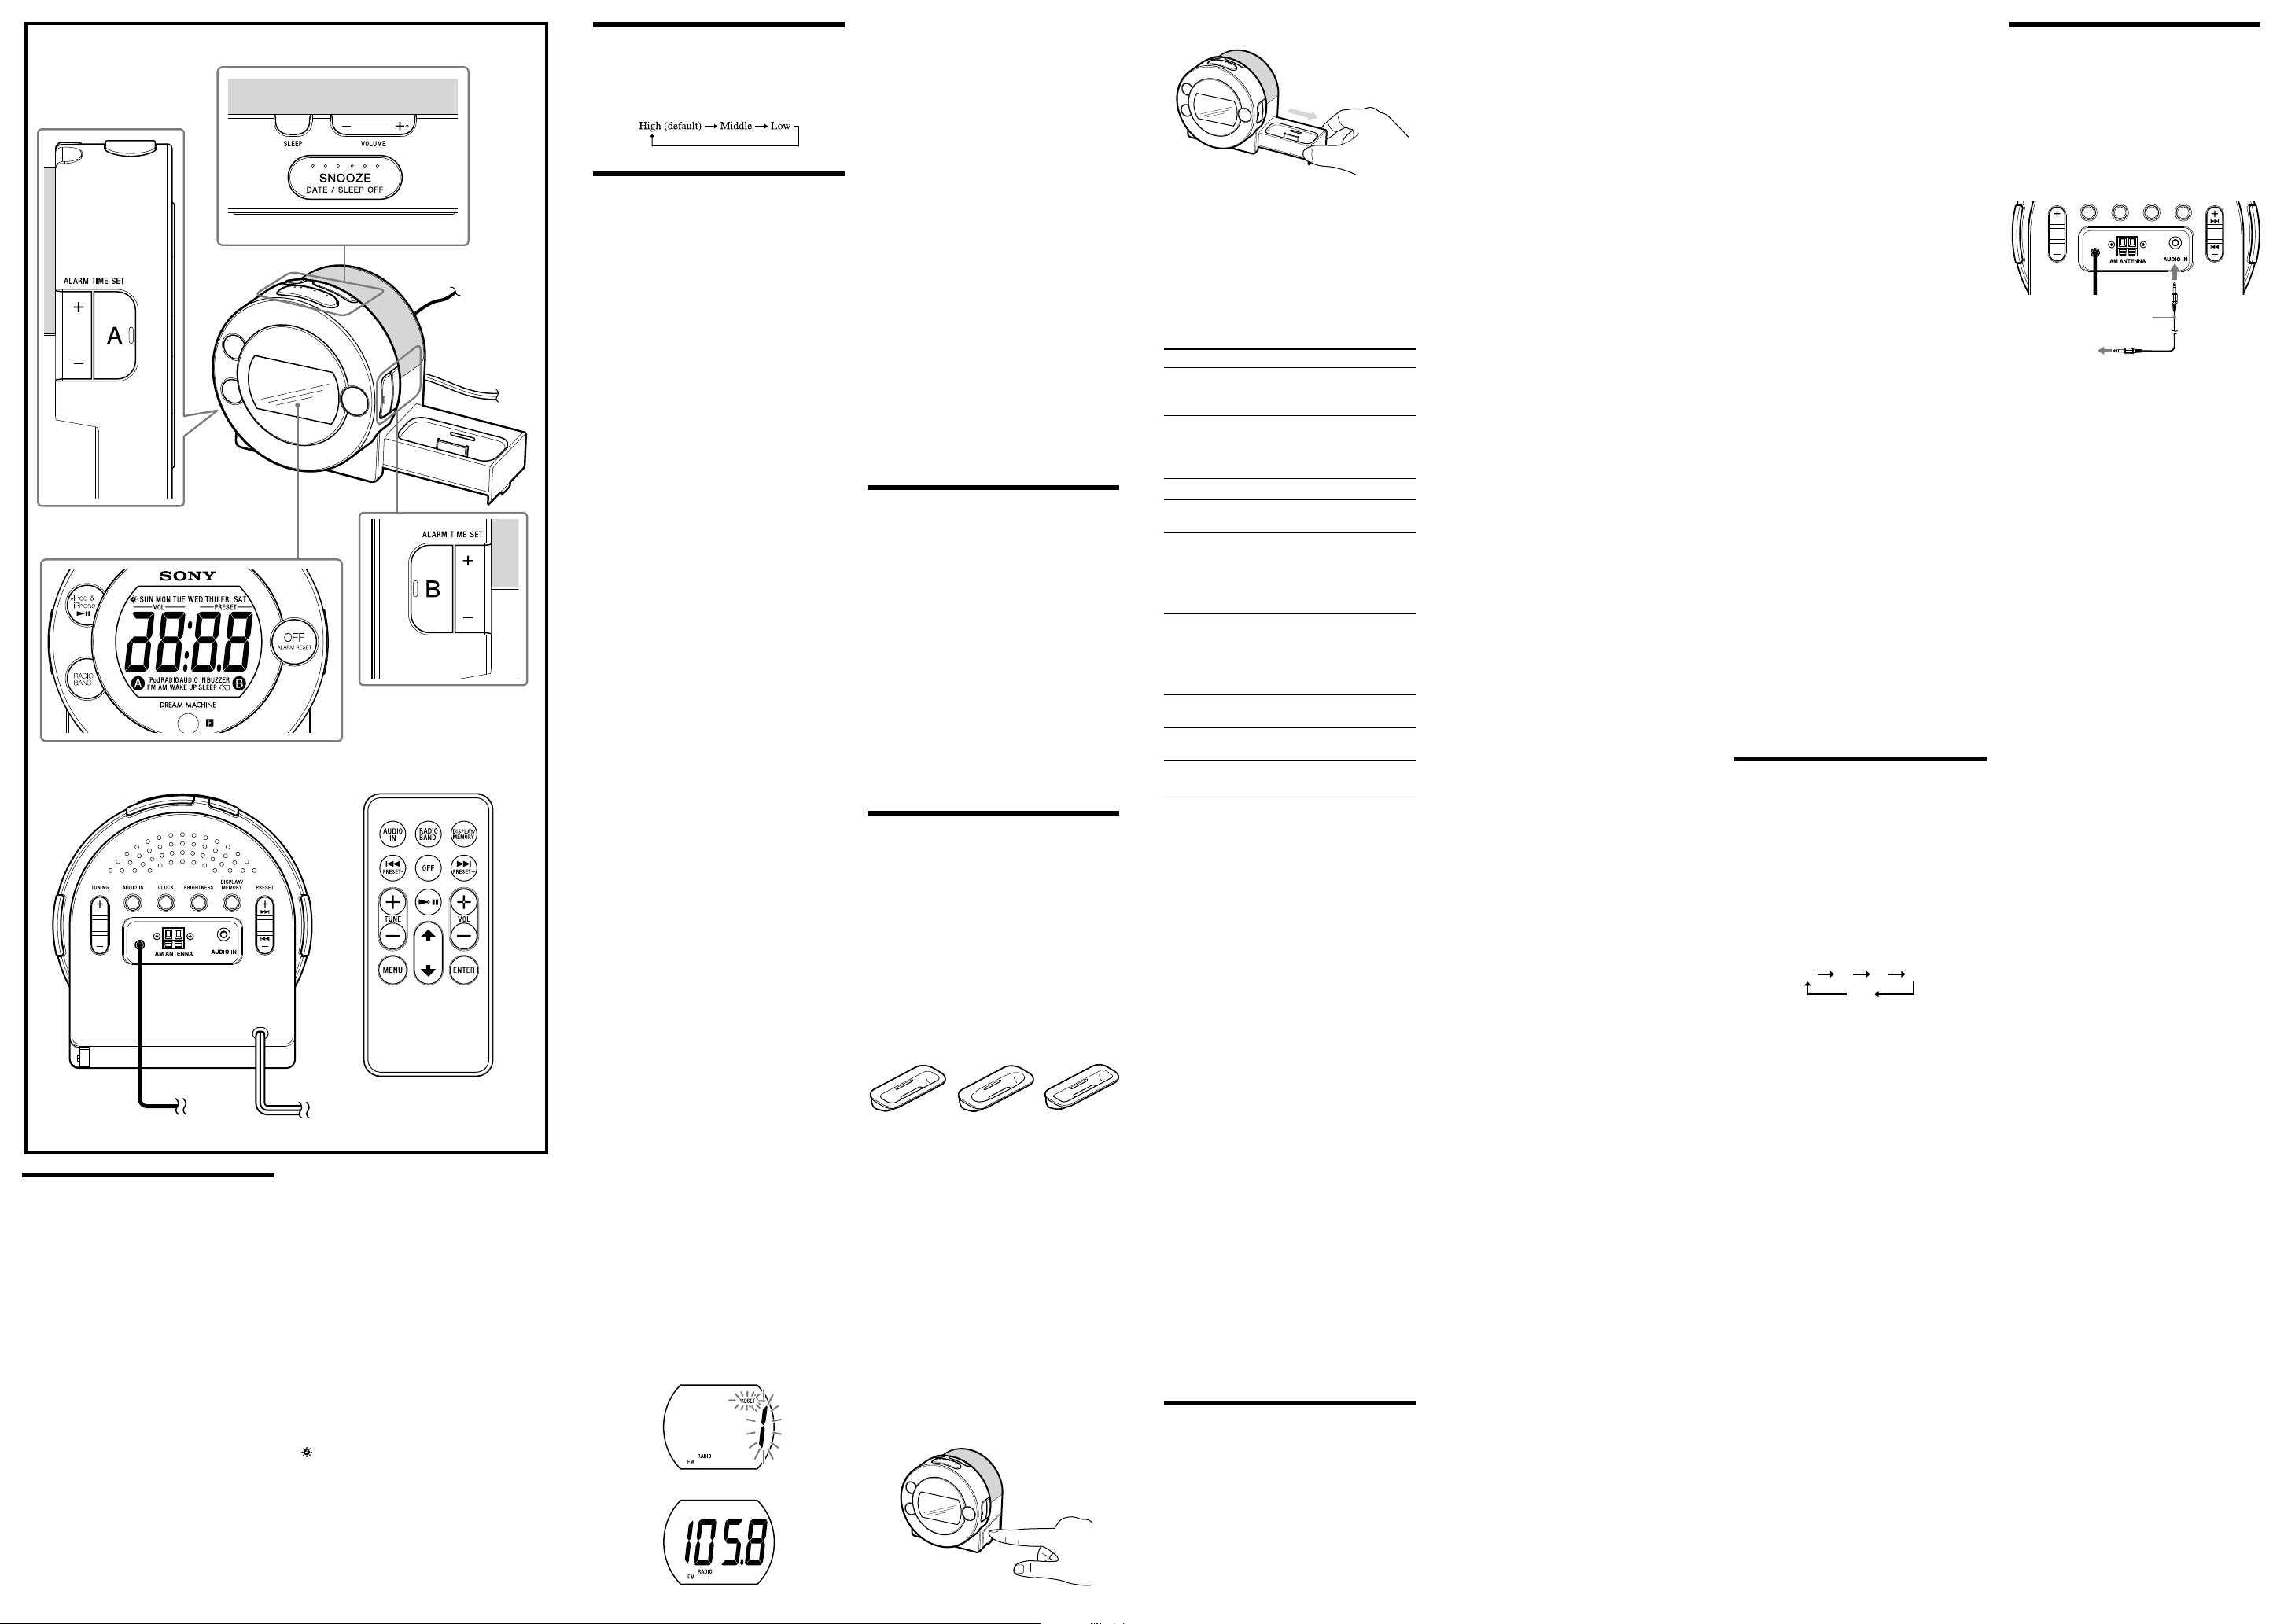
Tuning in to a station
The unit automatically scan AM or FM stations.
1 Press RADIO BAND to turn on the radio
to select the AM or FM band.
2 Press and hold TUNING + or –.
+ : scans upward through the frequency bands.
– : scans downwards through the frequency
bands.
Scanning starts from the currently-tuned
frequency. When a station is received,
scanning stops.
3 Adjust the volume using VOLUME +
or –.
–Preset tuning
You can preset 20 stations for FM and 10 stations
for AM.
Presetting a station
1 Follow steps 1 and 2 in “Manual tuning”
to tune the frequency you wish to preset.
2 Press and hold DISPLAY/MEMORY for
at least 2 seconds.
3 Press PRESET + or – to select the preset
number, then press DISPLAY/MEMORY.
The frequency is stored with the selected
preset number.
Example: The following display appears
when you preset FM 105.8 MHz to preset
number 1 for FM.
The display shows the frequency for about
10 seconds, and then returns to the current
time.
To preset another station, repeat these steps.
Note
If you try to store another station with the same
preset number, the previously stored station will
be replaced.
Tuning in to a preset station
1 Press RADIO BAND to turn on the radio
and select the AM or FM band.
2 Press PRESET + or – to select the desired
preset number.
3 Adjust the volume using VOLUME + or
–.
–Auto preset tuning
1 Press RADIO BAND to turn on the radio
and select the AM or FM band.
2 Press and hold RADIO BAND until “AP”
appears in the display.
3 Press DISPLAY/MEMORY.
The unit automatically presets the available
channels in order.
Improving the reception
FM:
Extend the FM wire aerial fully to increase
reception sensitivity.
AM:
Connect the supplied AM loop aerial to the
unit. Rotate the aerial horizontally for optimum
reception.
Notes on radio reception
Keep digital music players or mobile phones
away from the AM loop aerial or the FM aerial,
as this may lead to reception interference.
When you are listening to the radio with an
iPhone connected to the unit, interference with
radio reception may occur.
When you are listening to the radio while
charging an iPod, interference with radio
reception may occur.
Operating an iPod
You can enjoy audio from iPod by connecting to
this unit. To use an iPod, refer to the user’s guide
of your iPod.
If you are using an iPhone 4S, iPhone 4, iPhone
3GS, iPhone 3G or iPhone, attach the supplied
universal dock adapter for iPhone 4S, iPhone 4,
iPhone 3GS, iPhone 3G or iPhone before
connecting.
The adapter number, , or , is shown on
the underside of the supplied universal dock
adapters. is for the iPhone, is for the iPhone
3GS & iPhone 3G and is for the iPhone 4S &
iPhone 4. Check the adapter number before use.
Universal dock adapter
Notes
When inserting an iPod into the unit, be sure to
use the universal dock adapter supplied with
your iPod or commercially available from
Apple Inc.
The connector of the unit is exclusively for use
with an iPod. If you use a device that does not
match the connector, connect it to the AUDIO
IN terminal of this unit with the supplied audio
connecting cable.
Sony cannot accept responsibility in the event
that data recorded on an iPod is lost or
damaged when using an iPod connected to this
unit.
For details of environmental conditions for
operating your iPod, check the website of Apple
Inc.
1 Press PUSH OPEN.
The Docking Tray is ejected halfway.
Setting the clock
1 Plug in the unit.
2 Press and hold CLOCK for at least
2 seconds.
The year starts to flash in the display.
3 Press ALARM TIME SET + or –
repeatedly to set the year.
4 Press CLOCK.
5 Repeat steps 3 and 4 to set the month,
day, hour and minute, and then press
CLOCK.
The seconds start incrementing from zero.
Notes
If you do not press any button for about
1 minute while setting the clock, the clock
setting will be canceled.
A calendar is installed in this unit. When the
date is set, the day of the week is automatically
displayed.
SUN = Sunday, MON = Monday,
TUE = Tuesday, WED = Wednesday,
THU = Thursday, FRI = Friday, SAT = Saturday
2 Pull the Docking Tray all the way out.
3 Attach the adapter for your iPod/iPhone.
4 Insert your iPod/iPhone into the
connector of the unit.
5 Press iPod & iPhone .
The iPod begins to play automatically.
You can operate the connected iPod by this
unit or the buttons on iPod.
6 Adjust the volume using VOLUME + or
–.
To Press
Turn off the iPod
OFF, or press and
hold iPod &
iPhone
Pause playback
iPod & iPhone
To resume play,
press it again.
Go to the next track
Go back to the previous
track
*
Locate a point while
listening to the sound
(forward) or
(backward)
while playing and
hold it until you
find the point.
Locate a point while
observing the display
(forward) or
(backward)
in pause and hold
it until you find
the point.
Go back to the previous
menu
MENU**
Select a menu item or a
track for playback
/**
Execute the selected menu
or begin playback
ENTER**
* During playback, this operation goes back to
the beginning of the current track. To go back
to the previous track, press twice.
** These operations are available only when using
the supplied remote commander.
Notes
When placing or removing the iPod, hold the
iPod at the same angle as that of the connector
on this unit, and do not twist or bend the iPod
as connector damage may result.
Do not carry the unit with an iPod set on the
connector. Doing so may cause a malfunction.
When placing or removing the iPod, hold the
Docking Tray securely with one hand and take
care not to press the controls of the iPod by
mistake.
Before disconnecting the iPod, pause playback.
To use the unit as a battery charger
You can use the unit as a battery charger.
Charging begins when the iPod is connected to
the unit.
Charging status appears in the display of iPod. For
details, see the user’s guide of your iPod.
On copyrights
iPhone, iPod, iPod classic, iPod nano, and iPod
touch are trademarks of Apple Inc., registered in
the U.S. and other countries.
“Made for iPod,” and “Made for iPhone” mean
that an electronic accessory has been designed to
connect specifically to iPod or iPhone,
respectively, and has been certified by the
developer to meet Apple performance standards.
Apple is not responsible for the operation of this
device or its compliance with safety and
regulatory standards. Please note that the use of
this accessory with iPod or iPhone may affect
wireless performance.
Setting the alarm
This clock radio is equipped with 3 alarm
modes—iPod, radio and buzzer. Before setting the
alarm, make sure to set the clock (see “Setting the
clock”).
To set the alarm
1 Press and hold ALARM TIME SET A or
B for at least 2 seconds.
“WAKE UP” appears and the hour flashes in
the display.
2 Press ALARM TIME SET + or –
repeatedly until the desired hour appears.
To cycle the hour rapidly, press and hold
ALARM TIME SET + or –.
3 Press ALARM TIME SET A or B.
The minute flashes.
4 Repeat step 2 to set the minute.
5 Press ALARM TIME SET A or B.
The days of the week flash.
6 Repeat step 2 to set the days of the week.
You can select the days from the following
three options:
Every day: SUN MON TUE WED THU FRI
SAT
Week day: MON TUE WED THU FRI
Week end: SUN SAT
7 Press ALARM TIME SET A or B.
The alarm mode setting is entered.
8 Press ALARM TIME SET + or –
repeatedly until the desired alarm mode
flashes.
You can choose one of 3 settings: “iPod”,
“RADIO” or “BUZZER.” Set the alarm mode
as follows:
– iPod: see “ Setting the alarm for iPod.”
– RADIO: see “ Setting the radio alarm.”
– BUZZER: see “ Setting the buzzer alarm.”
Setting the alarm for iPod
1 Perform steps 1 to 8 in “To set the
alarm.”
2 Press ALARM TIME SET A or B to select
alarm mode for “iPod”.
“VOL” appears in the display.
3 Press ALARM TIME SET + or – to adjust
the volume.
4 Press ALARM TIME SET A or B.
The setting is entered.
5 If “A” or “B” does not appear in the
display, press ALARM TIME SET A or B
again.
The iPod will sound at the set time.
When using an iPod touch/iPhone
To wake up to music stored in an iPod touch/
iPhone, connect the iPod touch/iPhone to the
unit first, follow the steps above to set alarm
time, and then select the music function.
Even if the alarm setting for iPod is complete, if
you turn the power of iPod touch/iPhone off
before inserting the iPod touch/iPhone into the
unit, the alarm for iPod will not work.
Setting the radio alarm
1 Perform steps 1 to 8 in “To set the
alarm.”
2 Press ALARM TIME SET A or B to select
“RADIO” alarm mode.
“VOL” appears in the display.
3 Press ALARM TIME SET + or – to adjust
the volume.
4 Press ALARM TIME SET A or B.
Band (“FM” or “AM”) or “– –” flashes.
“– –” is the last station received.
5 Press ALARM TIME SET + or – to select
the desired band or “– –”.
If you select “– –”, jump to step 8.
6 Press ALARM TIME SET A or B.
The preset number flashes.
7 Press ALARM TIME SET + or – to select
the desired preset number.
The setting is entered.
8 If “A” or “B” does not appear in the
display, press ALARM TIME SET A or B
again.
The radio will turn on at the set time.
Setting the Buzzer Alarm
1 Perform steps 1 to 8 in “To set the
alarm.”
2 Press ALARM TIME SET A or B to select
“BUZZER” alarm mode.
The setting is entered.
3 If “A” or “B” does not appear in the
display, press ALARM TIME SET A or B
again.
The buzzer will sound at the set time.
Note
The volume cannot be set for the buzzer alarm.
To confirm an alarm time setting
Press ALARM TIME SET + or –. The setting will
be displayed for about 4 seconds.
To change an alarm setting
Press and hold ALARM TIME SET + for at least
2 seconds to move the alarm time forwards. Press
and hold ALARM TIME SET – for at least
2 seconds to move the alarm time back.
When you release the button, the changed time
will be displayed for about 2 seconds. To change
the alarm time again, press ALARM TIME SET +
or – within these 2 seconds, otherwise the setting
change will be fixed as displayed.
To doze for a few more minutes
Press SNOOZE/DATE/SLEEP OFF.
The sound turns off but will automatically come
on again after about 10 minutes.
You can change the snooze time by pressing
SNOOZE/DATE/SLEEP OFF repeatedly within
4 seconds.
The maximum length of the snooze time is
60 minutes.
To stop the alarm
Press OFF/ALARM RESET to turn off the alarm.
The alarm will sound again at the same time the
next day.
To deactivate the alarm
Press ALARM TIME SET A or B to turn off the
ALARM A or B indicator from the display.
Note on the alarm in the event of a power
interruption
In the event of a power interruption, the alarm
will work until the battery is totally discharged.
However, certain functions will be affected as
follows:
The backlight will not light up.
If the alarm mode is set to iPod or radio, it will
change to BUZZER automatically.
If a power interruption occurs while the alarm
is sounding, the alarm will stop.
If OFF/ALARM RESET is not pressed, the alarm
will sound for about 5 minutes.
If “” appears in the display, the alarm will not
sound in the event of power interruption.
Replace the battery if “” appears.
The snooze function will not work.
During a power interruption, the alarm will
sound at the set time only once.
Setting the sleep timer
You can fall asleep to the music, etc., using the
built-in sleep timer that turns off the unit
automatically after a preset duration.
1 Press SLEEP while the unit is turned on.
“SLEEP” appears and the sleep time flashes in
the display.
2 Press SLEEP to set the sleep timer
duration.
Each time you press SLEEP, the duration (in
minutes) changes as follows:
90 60 30 15
OFF
The display returns to clock mode for about
4 seconds after you have finished the duration
setting and released SLEEP, and then the sleep
timer starts.
The unit will play for the duration you set, and
then shut off.
To turn off the unit before the preset
time
Press SNOOZE/DATE/SLEEP OFF or OFF/
ALARM RESET.
To change the sleep timer setting
You can press SLEEP repeatedly to select the
desired sleep timer setting even after the sleep
timer has been activated.
To deactivate the sleep timer
Press SLEEP repeatedly to set the sleep timer to
“OFF” in step 2.
Connecting external
equipment
To listen to sound
1 Connect the AUDIO IN jack of the unit
to the line out jack or headphone jack of
the external equipment using the audio
connecting cable (supplied).
Audio connecting cable
(supplied)
To external
equipment
2 Press AUDIO IN to display “AUDIO IN.”
3 Play the equipment connected to the
AUDIO IN jack.
4
Adjust the volume using VOLUME + or –.
To return to the radio
Press RADIO BAND.
The frequency is shown in the display.
To return to the iPod
Press iPod & iPhone .
To stop listening
Press OFF, and stop playback on the connected
unit.
Notes
Refer also to the connected equipment’s manual.
The supplied audio connecting cable may not
be used with some external equipment. In this
case, use a cord suitable for the external
equipment you are using.
When you listen to the radio with external
equipment connected, turn off the connected
equipment to prevent noise. If noise occurs,
even when the equipment is turned off,
disconnect and place the external equipment
away from the unit.
Display window (24-hour system )
The display differs depending on your country.
The iPod & iPhone and VOLUME + buttons have a tactile dot.
AC power cord
FM wire aerial
The and VOL + buttons have a
tactile dot.
 Loading...