

Page 1
2-672-704-11(1)
Computer
Application Guide
DCR-SR100/SR90E/
SR100E
Getting Started
One Touch DVD Burn
Copying/viewing images
on a computer
Creating a DVD with
edited images
Others
Troubleshooting
6
9
12
18
22
25
Additional information on this product and
answers to frequently asked qu estions can be
found at our Customer Support Website.
Printed on 100% recycled paper using
VOC (Volatile Organic Compound)-free
vegetable oil based ink.
Printed in Japan
US
© 2006 Sony Corporation
See “Camera
Operating Guide”
for the operation
for recording/
viewing of the
camcorder.
Cam
O
perating G
era
uide
Page 2

Read This First
This “Computer Application Guide”
describes the basic operat ions for connecting
the camcorder to a computer by using the
software on the supplied CD-ROM. The CDROM includes “ImageMixer for HDD
Camcorder” software. For more de tails about
the software functions, refe r to the help in the
supplied software.
System requirements
When using the supplied software, you need
the following system requirements below.
OS : Windows 2000 Professional (Service
Pack 3 or later) /Windows XP Home
Edition/Windows XP Professional
• Standard installation is required. Operation is
not assured if the above OS has been
upgraded.
CPU : Intel Pentium III 800 MHz or faster
(Pentium 4 1.7 GHz or faster
recommended), or the equivalent CPU
Application : DirectX 9.0c or later (This
product is based on DirectX technology.
It is necessary to have DirectX installed.)
Sound system : 16 bit stereo sound card
and stereo speakers
Memory : For Windows 2000 Professional:
128 MB or more (256 MB or more
recommended)
For Windows XP Home Edition /
Professional Edition: 256 MB or more
(512 MB or more recommended)
Hard Disk : Available me mory required for
installation: 300 MB or more
Available free hard disk space for
operations required: 14 GB or more (for
dual layer DVD system, 28 GB or more
required)
• When copying images to a computer, more
available disk space required for saving
image data than shown above.
2
Display : 4MB VRAM video card,
Minimum 1024 × 768 dots, High color
(16 bit color, 65 000 co lors). This product
will not operate correctly at less than
800 × 600 dots, and 256 colors or less.
USB port : As standard equipment (USB
2.0 recommended)
• The camcorder is compatible with Hi-Speed
USB (USB 2.0 standard). You can transfer
data at a faster rate using a computer
compatible with High-Speed (USB 2.0).
When you connect a USB interface not
compatible with Hi-Speed USB, the data
transfer ratio will be that of USB 1.1 (USB
full speed).
Disc Drive :A DVD writable drive
• Operations are not guaranteed on any computers
fulfilling the above system requirements.
The supplied CD-ROM is not
compatible with Macintosh. The
functions offered by the software
in the supplied CD-ROM, like One
Touch DVD Burn, cannot be used
on Macintosh.
For inquires about the software
Pixela User Support Center
Pixela Home Page
ImageMixer for HDD Camcorder:
http://www.pixela.co.jp/oem/sony/e/
– North America (Los Angeles)
Telephone:
(Toll-Free) +1-800-458-4029
+1-213-341-0163
– Europe (U.K.) Telephone:
(Toll-Free) UK, Germany, France and
Spain:
+800-1532-4865
Other countries:
+44-1489-564-764
– Asia (Philippines) Telephone:
+63-2-438-0090
Page 3

Use a special caution for preventing
damages and malfunctions of the
camcorder
• When connecting your camcorder with the USB
cable or other cable, make sure you insert the
connector in the correct direction. Do not insert
the connector forcibly as it may damage the cable
or your camcorder.
• Do not delete files on the camcorder through the
computer, it may cause a malfunction.
On screenshots in this “Computer
Application Guide”
• The screenshots in this “Computer Application
Guide” are from Windows XP. The scenes may
vary depending on the operating system of the
computer.
• On screenshots in this manual, the application for
English version is used. When you install the
application, you can select other language (p.6).
On copyrights
Music works, sound recording or other third
party musical contents yo u may acquire from
CDs, the Internet or other sources (the
“Music Contents”) are the copyrighted work
of the respective owners thereof and are
protected by copyright laws and other
applicable laws of each country/region.
Except to the extent expressly permitted by
applicable laws, you are not permitted to use
(including, without limitation, copying,
modifying, reproducing, uploading,
transmitting or placing to the external
network accessible to the public,
transferring, distributing, lending, licensing,
selling and publishing) any of the Music
Contents without obtaining authorization or
approval of the respective owners thereof.
License of ImageMixer for HDD Camcorder
by Sony Corporation would no t be construed
as conferring to you by implication, estoppel
or otherwise, any license or right to use the
Music Contents.
On trademarks
• “Handycam” and are
registered trademarks of Sony Corporation.
• “ImageMixer for HDD Camcorder” is a
trademark of Pixela Corporation.
• DVD-R, DVD-RW, and DVD+RW logo are
trademarks.
• Dolby and the double-D symbol are trademarks
of Dolby Laboratories.
• Dolby Digital 5.1 Creator and Dolby Digital
Stereo Creator are trademarks of Dolby
Laboratories.
• Microsoft, Windows, and Windows Media are
either registered trademarks or trademarks of
Microsoft Corporation in the United States and/
or other countries.
• Macintosh is a trademark of Apple Computer, Inc.
in the U.S. and other countries.
• Pentium is a trademark or registered trademark
of Intel Corporation.
All other product names mentioned herein may be
the trademarks or registered trademarks of their
respective companies. Furthermore, ™ and “
not mentioned in each case in this manual.
®
” are
3
Page 4

Table of Contents
Read This First..........................................................................................2
System requirements ............................................................................2
For inquires about the software .............................................................. 2
What you can do with the camcorder by connecting to your computer .... 5
Getting Started
Installing software ..................................................................................... 6
One Touch DVD Burn
Creating a DVD with One Touch............................................................... 9
What kinds of DVD can you use?............................................................9
Saving images on a DVD with One Touch (One Touch DVD Burn)..............9
Removing the USB cable.....................................................................11
Copying/viewing images on a computer
Copying images to a computer ...............................................................12
Destination of saved images ................................................................12
Copying the last saved diff files (Easy PC Back-up)................................. 12
Copying selected images.....................................................................14
Viewing copied images on a computer ...................................................16
Printing still images.............................................................................17
Creating a DVD with edited images
Editing images ........................................................................................ 18
Creating a DVD with selected images .................................................... 20
Others
Saving images in the Playlist to a DVD...................................................22
Deleting image data from a computer..................................................... 24
Troubleshooting
Troubleshooting ...................................................................................... 25
Index ....................................................................................................... 27
4
Page 5
What you can do with the camcorder by connecting to your computer
If you install “ImageMixer for HDD Camcorder” in the supplied CD-ROM on your computer
(p.6), you can operate various functions by connecting the camcorder with your computer.
x DVD creation with One Touch (p.9)
By pressing DVD BURN button of the camcorder, you can save images recorded on the
camcorder to a DVD automatically. You can use easy DVD creation.
x Copying and viewing images on the computer (p.12)
You can view images recorded on the camcorder by copying them to your computer.
You can print still images on a computer.
x Creating a DVD with edited images (p.18)
You can edit copied movies on a computer. Also, you can create DVD by selecting the
copied images on a computer.
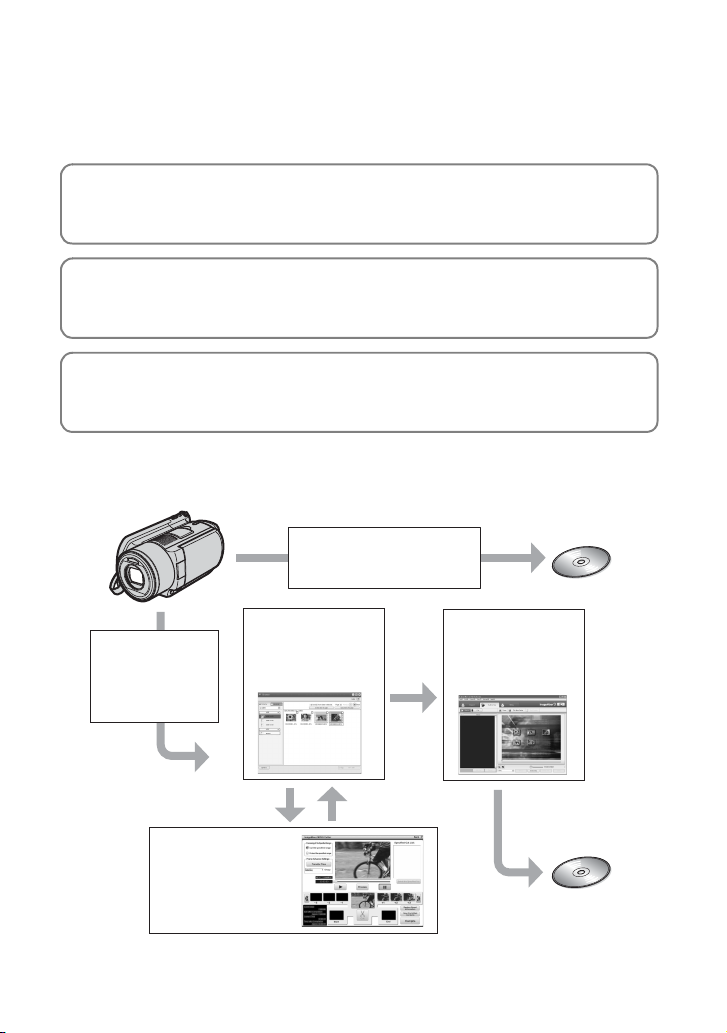
Main functions of the supplied software
• Other functions are also available other than described below. For details, see the help in the s upplied software.
Create a DVD with
One Touch
View copied
Copy images
to a computer.
Edit images
• You can also view the images on the hard disk of the camcorder on the computer.
images on a
computer
Create a DVD with
selected images
,:Image data flow
DVD
DVD
5
Page 6

Getting Started
Installing software
You need to install the software to your
Windows computer. The installation is only
required once.
1 Confirm that your camcorder is not
connected to the computer.
2 Turn on the computer.
• Log on as Administrators for installation.
• Close all the applications running on the
computer before installing the software.
3 Place th e CD-ROM (supplied) in the
disc drive of your computer.
The installation screen appears.
4 Click [Install].
5 Select the language for the
application to be installed, then
click [Next].
If the screen does not appear, follow the steps
below.
1 Click [start], then click [My Computer]
(If you are using Windows 2000, doubleclick [My Computer] on the desktop.)
2 Double-click [IMAGEMIXER (E:)]
(CD-ROM)*
* Drive names (such as (E:) vary depending
on the computer.
3 Double-click [install.exe].
6
6 Click [Next].
Page 7
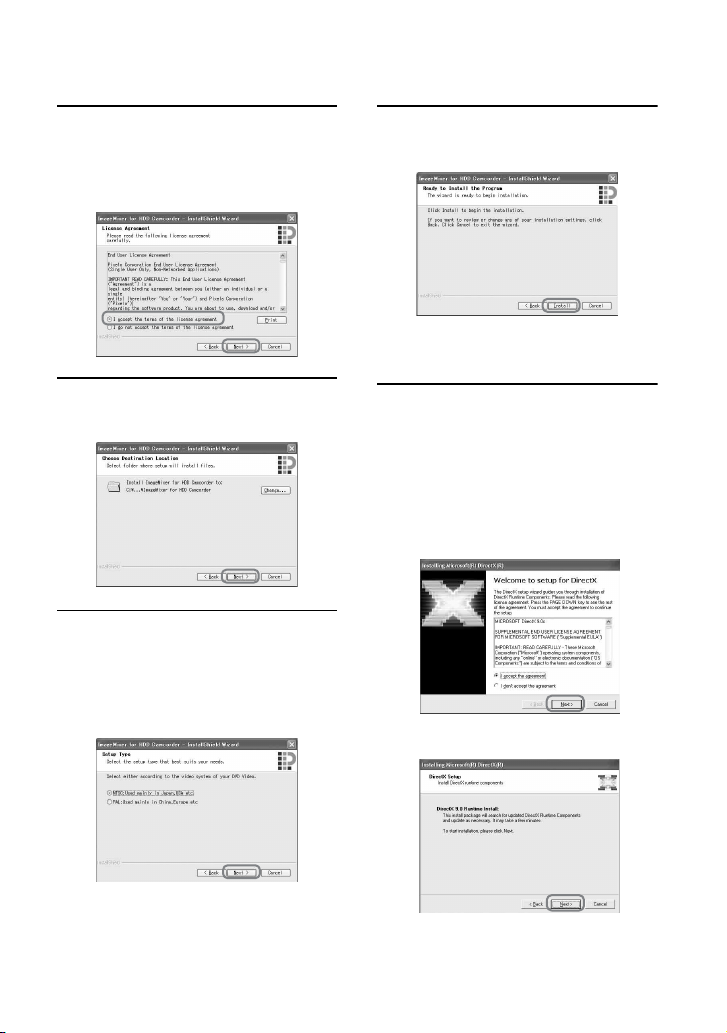
7 Read [License Agreement], check
[I accept the terms of the license
agreement] when you agree, then
click [Next].
10Click [Install] on the [Ready to
Install the Program] screen.
The installation of “ImageMixer for
HDD Camcorder” starts.
8 Select where to save the software,
then click [Next].
9 If your camcorder’s model name is
the DCR-SR100, select “NTSC”. If
your model name is the DCRSR90E/SR100E, select “PAL,” then
click [Next].
• To check the model name of your camcorder,
see the cover page of “Camera Operating
Guide”.
11If the [Installing Microsoft (R)
DirectX (R)] screen is displayed,
follow the steps below to install
DirectX 9.0c. If not, skip to step
12.
1 Read [License Agreement], then click
[Next].
2 Click [Next].
Continued
,
7
Page 8
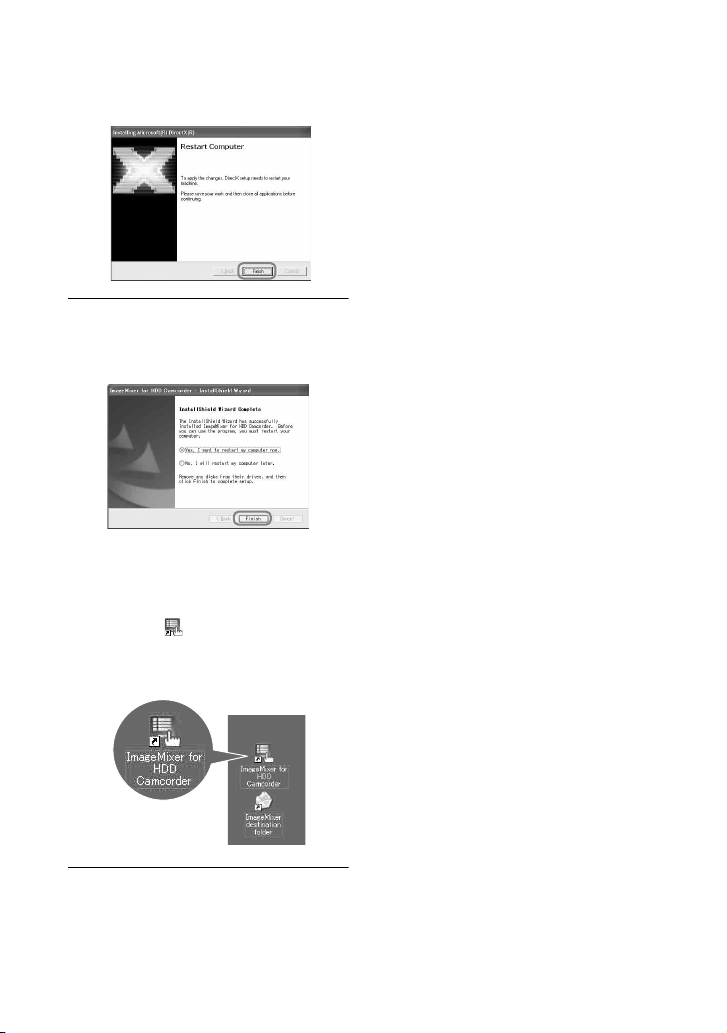
Installing software (continued)
3 Click [Finish].
12Make sure [Yes, I want to restart
my computer now.] is checked,
then click [Finish].
The computer turns off once, then starts
up again automatically (Restart).
When you complete the installation, the shortcut icons for [ImageMixer for HDD
Camcorder] and [ImageMixer destination
folder] appears on the desktop of your
computer.
13Remove the CD-ROM from the
disc drive of your computer.
8
Page 9

One Touch DVD Burn
Creating a DVD with One Touch
You can save images with ease by pressing
the DVD BURN button on your camcorder
(One Touch DVD Burn function) with out any
complex operations of your computer.
• Images that have not been saved to a DVD with
One Touch DVD Burn can automatically be
saved.
• The history of each saved image is recorded
according to the user account. If you use a
different user account, the image that has already
been saved to a DVD is recorded on the DVD
again.
• You can play back the created DVD on a DVD
player or other devices.
• Still images are recorded first on a DVD. When
you save images on several DVDs, the still images
are recorded on the first DVD.
• Still images on a DVD created by One Touch DVD
Burn function cannot be played back on a DVD
player. Play them back on a computer.
What kinds of DVD can you use?
The kinds of DVD that you can use for the
supplied software are as follows.
Available DVDs differ, depending on the
computer you use. For details on the DVDs
compatible with your computer, refer to the
supplied operational manual. Some DVD
types may not be able to be played back,
depending on the device you have. Refer to
the specifications of your playback
equipment for additional compatibility
information.
DVD compatible with the supplied
software
DVD types Characteristics
• Unrewritable
• Fairly inexpensive. Mainly
DVD-R
DVD+R
DVD+R DL
DVD-RW
DVD+RW
• Only the 12cm DVD can be used. The 8cm DVD
cannot be used.
• When creating a DVD with One Touch DVD Burn
function, there is no operational difference among
DVD types except that DVD-RW/DVD+RW are
both reusable.
• When you create a DVD by editing images copied
to your computer, some of the operations may
differ depending on the DVD type.
• When saving data on a DVD+RW, the data is
recorded in VIDEO format. You cannot add more
data on the DVD+RW.
• Use a DVD produced by a reliable manufacturer.
You may not save images correctly when using a
low quality DVD.
used for saving data
• Compatible with most DVD
players
• Unrewritable
• Using the dual layer DVD+R
system containing more
recordable capacity
• Unrewritable
• Rewritable and reusable
• Rewritable and reusable
Saving images on a DVD with One Touch (One Touch DVD Burn)
Among the image data recorded on the hard
disk of the camcorder, save the images that
have not been stored on a DVD using this
operation.
• The image data saved on DVD in this operation
cannot be saved after the second time. To save
images on the DVD after the second time, copy
the images to the computer (p.12) to create DVD.
• The sound quality remains as it is when you save
a movie recorded in 5.1ch surround sound on a
DVD.
Continued
,
9
Page 10

Creating a DVD with One Touch (continued)
• If you cannot copy all your image data on a DVD,
the image data is automatically saved on more
than one DVD. The required number of DVDs is
displayed in step 6 on the screen.
6 Connect the camcorder with a
1 Confirm that the camcorder is not
connected to a computer.
2 Turn on the computer.
• Close all applications running on the
computer.
3 Place the recordable DVD to be
saved in the disc drive of your
computer.
• It is recommended that you use a new
recordable DVD.
• If any software starts on the computer
automatically, close it.
4 Connect your camcorder to the
wall outlet using the supplied AC
Adaptor, then set the POWER
switch to turn on.
• You can perform this operation, whichever
position of the (Movie) / (Still) /
(PLAY/EDIT) is lit.
• For operating the POWER switch, see
“Camera Operating Guide”.
computer using the USB cable.
DVD creation starts up.
• During DVD creation, do not apply vibration.
The DVD creation may be terminated.
• When you insert a burned DVD-RW/
DVD+RW in the disc drive in step 3, a
message appears, asking if you want to delete
images saved on a DVD.
• Make sure no other USB devices are
connected to your computer.
• If your computer has a USB keyboard and a
USB mouse as standard equipment, leave
them connected and connect the camcorder
to an available USB jack with the USB cable.
5 Press DVD BURN button of the
camcorder.
[Check the connec ted device.] appears on
the LCD screen of the camcorder.
10
A Current status of all DVD creation
B Current status per DVD
C Number of DVD created
D Number of DVD required
Page 11

E Remaining time (approx.)
When you complete creating DVD, it is
exited automatically.
• When you cannot store all the recordable data
on a DVD, follow the on-screen instructions,
then insert a new DVD onto the disc drive.
• The maximum number of recordable movie
files is 98 regardless of the amount of data
copied to one DVD. When the movie files
exceeds 98, the rest of files is saved on a new
DVD.
• It may take more time to create DVD when
the movie file is small.
7 Once the completion dialog for
DVD creation appears, click
[Close].
• To create another DVD, click [Create another
disc set].
• You cannot record image data on the hard disk of
your computer in this operation.
• You cannot delete image data on the hard disk of
the camcorder in this operation.
• You cannot edit images on the created DVD with
a computer. When you want to edit the images
with the computer, copy the images onto the
computer (p.12).
• If DVD creation ends unexpectedly, the last
correctly saved file is completed. When you create
a DVD with One Touch DVD Burn function next
time, the image data not saved on the DVD is the
first one to be saved.
• When the created DVD is played back, the ending
of each movie pauses for a few seconds.
• The images that have been copied on your
computer using Easy PC Back-up are also saved
on a DVD with One Touch DVD Burn function.
Removing the USB cable
1 Click ([Unplug or eject
hardware]) icon on the task tray,
then click when “Safely Remove
USB Mass Storage Device”
appears.
• After creating a DVD, check that the DVD can be
played back properly on a DVD player or other
devices. When you cannot play back the DVD
properly, copy the images to the computer by
following the steps on page 12. Then save the
images on DVD by referring to “Creating a DVD
with edited images” (p.18).
• If you check that the DVD can be played back
properly, It is recommended that you delete the
image data from the camcorder using the
functions on the camcorder by following the steps
in “Camera Operating Guide”. In this way, you
can increase the free hard disk space of your
camcorder.
• To copy a created DVD, use the DVD creation
software installed on your computer. You cannot
copy created DVDs with the supplied software.
[Safe to Remove Hardware] appears.
2 Remove the USB cable from the
camcorder and the computer.
• Do not remove the USB cable while the
ACCESS lamp is lit.
• Make sure to remove the USB cable before
turning off your camcorder.
3 Touch [END] on the LCD screen of
the camcorder.
11
Page 12

Copying/viewing images on a computer
Copying images to a computer
You can view and edit images copied from
the camcorder to your computer. Also, you
can create a DVD with the copied materials.
You can choose ei ther way to copy images as
follows.
Copying the last saved diff files (Easy
PC Back-up) (p.12):
Images that have not been copied to a computer
can automatically be copied to your computer.
Copying selected images (p.14):
You can select the desired images and copy
them to your computer.
Destination of saved images
Images are saved in a new created folder
under [ImageMixer3] folder in [My
Pictures].
Folder names created by Easy PC Backup
Each time you copy images, a new folder is
created. Each folder name becomes
“YY_MM_DD (copy date) + Number of
copies (sub-numbers)”.
• Example: If you copied images on March 1, 2006:
– First Copy “'06_03_01_01”
– Second Copy “'06_03_01_02”
– Third Copy “'06_03_01_03”
Folder names created by copying the
selected images
Each day you copy images, a new folder is
created. Each folder name becomes
“YY_MM_DD (Copy date) + 00”. When you
copy images a few times on the same day,
new files are added on the folder created on
that day.
• Example: If you copied images on March 1, 2006:
– “'06_03_01_00”
• If a file name in a folder created on the same day,
and if a new file happens to have the same name,
sub-numbers are added on the new file.
Copying the last saved diff files (Easy PC Back-up)
Images that have not been copied to a
computer can automatically be copied to
your computer.
A Folders for saving images
• Movies and still images are saved on the same
folder.
• On the file names of image data, see “Camera
Operating Guide”.
• You can change the destination folders to copy
your images (p.13, 15).
• On the file/folder order in the hard disk of the
camcorder, see “Camera Operating Guide”.
12
1 Confirm that your camcorder is not
connected to the computer.
2 Turn on the computer.
• Close all applications running on the
computer.
Page 13

3 Connect your camcorder to the
wall outlet using the supplied AC
Adaptor, then turn on.
• You can perform this operation, whichever
position of the (Movie) / (Still) /
(PLAY/EDIT) is lit.
• For operating the POWER switch, see
“Camera Operating Guide”.
4 Connect the camcorder with a
computer using the USB cable.
[USB SELECT] appears on the LCD
screen of the camcorder.
60min
USB SELECT
DVD
BURN
PictBridge
PRINT
• For connecting with the USB cable, see
page 10.
• Connect the USB cable from your camcorder
to the USB jack on the computer and make
sure no other USB devices are connected.
• If your computer has a USB keyboard and
USB mouse as standard equipment, have
them connected and connect them to a
camcorder to an available USB jack with the
USB cable.
END
HDD
5 Touch [ HDD] on the LCD
screen of the camcorder.
ImageMixer Menu appears on the screen
of the computer.
• If the screen other than the ImageMixer Menu
appears, close the screen.
6 Click [Easy PC Back-up] on the
screen of the computer.
The setting screen appears.
7 Apply the settings for copying
images, then click [Start
importing].
AImages to be copied
Select if you want to copy movies and still
images individually. In the default setting,
both the movies and still images are set to be
copied.
BDestination folder
Displays the destination folders. To change
the destination, click [Browse], then select
the desired folder. Each time you copy images
to the folder displayed on the screen, a new
folder containing the copied images is created
under the folder (p.12).
Continued
,
13
Page 14

Copying images to a computer (continued)
Images that have not been copied to a
computer are automatically copied to
your computer.
• While copying images, do not apply vibration
on the camcorder. The copying may be
terminated.
8 Once the completion dialog for
copy appears, click [OK].
The copied images are displayed.
• See page 11 to remove your camcorder from
the computer.
• The images that have been saved on a DVD using
One Touch DVD Burn function are also copied
to the computer with Easy PC Back-up.
• The history of each saved image is recorded
according to the user account. If you use a
different user account, the image that has already
been imported is copied to the computer again.
• Data copy is cancelled when the free hard disk
space of the computer becomes less than 500 MB.
In this case, increase free hard disk space by
deleting some of the unnecessary files, then
perform Easy PC Back-up again.
14
• If the operation ends unexpectedly, including an
indication of insufficient free hard disk space, the
last correctly copied file is saved. When you
restart the operation, the next image data will be
copied.
Copying selected images
You can copy selected images to your
computer.
1 Confirm that your camcorder is not
connected to the computer.
2 Turn on the computer.
• Close all applications running on the
computer.
3 Connect your camcorder to the
wall outlet using the supplied AC
Adaptor, then turn on.
• You can perform this operation, whichever
position of the (Movie) / (Still) /
(PLAY/EDIT) is lit.
• For operating the POWER switch, see
“Camera Operating Guide”.
4 Connect the camcorder with a
computer using the USB cable.
[USB SELECT] appears on the LCD
screen of the camcorder.
60min
USB SELECT
DVD
BURN
PictBridge
PRINT
• For connecting with the USB cable, see
page 10.
• Connect the USB cable from your camcorder
to the USB jack on the computer and make
sure no other USB devices are connected.
END
HDD
Page 15

• If your computer has a USB keyboard and a
USB mouse as standard equipment, leave
them connected and connect the camcorder
to an available USB jack with the USB cable.
5 Touch [ HDD] on the LCD
screen of the camcorder.
ImageMixer Menu appears on the screen
of the computer.
• If the screen other than the ImageMixer Menu
appears, close the screen.
• During the operation, do not apply vibration
on the camcorder. The operation may be
terminated.
6 Click [Viewing and Editing] on the
screen of the computer.
Browser starts up.
7 Click [Handycam] tab.
8 To copy movies, click [Movies], or
to copy still images, click [Still
Images].
• If the message about Hi-Speed USB appears,
click [OK]. Then select [Preview directly
from the Hard Disk Drive Handycam] on the
displayed Option screen and click [OK].
9 Click the images you want to copy.
The selected images on which you have
clicked are marked with . Mark all the
desired images with .
• You can view images on the hard disk of the
camcorder.
• You can also click the checkbox on the
preview screen.
• You can select both the movies and still
images at the same time.
• To change the destination, click [Options],
then select the desired folder.
10Click [ Copy to computer].
The selected images are copied to the
hard disk of your computer.
• See page 11 to remove your camcorder from
the computer.
15
Page 16

Viewing copied images on a computer
You can view images copied to your
computer.
1 Double-click [ImageMixer for
HDD Camcorder] on the desktop.
ImageMixer Menu appears.
• You can also start up ImageMixer Menu by
clicking [start] t [All Programs] t
[PIXELA] t [ImageMixer for HDD
Camcorder] t [ImageMixer for HDD
Camcorder].
2 Click [Viewing and Editing].
Browser starts up.
3 Click the [Computer] tab.
4 Click the folder containing the
desired image.
• When you right-click the thumbnail, you can
view the information of the movie or still
image.
5 Double-click the desired image.
The preview screen appears.
Movie
16
You can play, stop, and pause using the
buttons at the top of the screen.
• Depending on the computer you use, the
played back image or sound may stop
temporarily.
Page 17

Still image
You can print and expand images using
the buttons at the top of the screen.
• For data compatible with Exif, click
(Exif) to display the recording conditions
such as shutter speed, exposure, aperture, etc.
Printing still images
Click (Print) in step 5.
17
Page 18

Creating a DVD with edited images
Editing images
You can delete unnecessary scenes from a
movie copied to your computer.
• The sound quality remains as it is when you edit
a movie recorded in 5.1ch surround sound.
1 Turn on the computer.
2 Double-click [ImageMixer for
HDD Camcorder] on the desktop.
ImageMixer Menu appears.
• You can also start up ImageMixer Menu by
clicking [start] t [All Programs] t
[PIXELA] t [ImageMixer for HDD
Camcorder] t [ImageMixer for HDD
Camcorder].
3 Click [Viewing and Editing].
5 Click the folder including the movie
you want to edit.
6 Double-click the movie you want to
edit.
The preview screen appears.
Browser starts up.
4 Click the [Computer] tab.
18
7 Click [ Edit].
ImageMixer MPEG Cutter starts up.
Page 19

8 Check [Cut the specified range].
9 Search the scene you want to
delete by clicking or .
11Display the last frame of the
scene to delete on the center
frame by clicking or , then
drag and drop the frame to [END].
12Click [Cut].
10Drag and drop the first frame of
the scene you want to delete to
[Start].
• When you want to delete more of the frames,
repeat the steps from step 9 to step 12.
13Click [Compile].
The new file except for deleted scenes are
created on the computer.
• The image data selected as editing materials
is saved on the computer.
14When [Save as] appears on the
screen, specify the destination
and file name, then click [Save].
• For details, refer to the help in ImageMixer MPEG
Cutter.
19
Page 20

Creating a DVD with selected images
You can create a DVD with an index menu
by putting images on your computer as
materials. You can also use edited images
(p.18) on the computer as DVD materials.
• For available DVD types, see page 9.
• The sound quality remains as it is when you save
a movie recorded in 5.1ch surround sound on a
DVD .
1 Turn on the computer.
• Close all applications running on the
computer.
5 Click the [Computer] tab, then click
the folder including the image you
want to save on a DVD.
2 Place the recordable DVD on the
disc drive of your computer.
• It is recommended that you use a new
recordable DVD.
• Close the software, if it has started on the
computer automatically.
3 Double click [ImageMixer for
HDD Camcorder] on the desktop.
ImageMixer Menu appears.
• You can also start up ImageMixer Menu by
clicking [start] t [All Programs] t
[PIXELA] t [ImageMixer for HDD
Camcorder] t [ImageMixer for HDD
Camcorder].
4 Click [Viewing and Editing].
• By clicking [Options], you can change the
settings for the DVD Drive, Writing speed,
or Temporary folder.
Browser starts up.
20
6 Click the desired image to save on
a DVD.
The selected material is marked with .
Mark all the desired materials with .
7 Click [ Burn DVD].
[Project Settings] screen appears.
• You do not need to change the setting unless
necessary.
Page 21

8 Click [OK].
11Once the completion dialog for
DVD creation appears, click [No].
• To create another DVD, click [Yes].
ImageMixer3 DVD Authoring starts up.
9 Click [ Write] tab t [Write] on
the ImageMixer3 DVD Authoring
screen.
[Write settings] screen appears.
10Click [OK].
DVD creation starts up.
• When you insert a burned DVD-RW/
DVD+RW in the disc drive in step 2,
a message appears, asking if you want to
delete images saved on a DVD.
• The maximum number of recordable movie
files is 98.
• DVD menus can be edited. For details, see
the help in the supplied software.
• After creating a DVD, check that the DVD can be
played back properly on a DVD player or other
devices.
• If you check that the DVD can be played back, it
is recommended that you delete the image data
from the camcorder by following the steps in
“Camera Operating Guide”. In this way, you can
increase the free hard disk space of your
camcorder.
• To copy a created DVD, use the DVD creation
software installed on your computer. You cannot
copy created DVDs with the supplied software.
• You cannot edit images on a created DVD with a
computer.
• When you save still images on a DVD, the still
images convert a Photomovie to a DVD
automatically. In this way, you can view still
images on a DVD player.
Photomovie 1 Glossary in “Camera Operating
Guide”
21
Page 22

Others
Saving images in the Playlist to a DVD
You can save images in a Playlist on the
camcorder to a DVD.
• For creating a Playlist, refer to “Camera
Operating Guide”.
1 Confirm that your camcorder is not
connected to the computer.
2 Turn on the computer.
• Close all applications running on the
computer.
3 Place the recordable DVD on the
disc drive.
• It is recommended that you use a new
recordable DVD.
• If any software starts on the computer
automatically, close it.
4 Connect your camcorder to the
wall outlet using the supplied AC
Adaptor, then turn on.
• You can perform this operation, whichever
position of the (Movie) / (Still) /
(PLAY/EDIT) is lit.
• For operating the POWER switch, refer to
“Camera Operating Guide”.
5 Connect the camcorder with a
computer using the USB cable.
[USB SELECT] appears on the LCD
screen of the camcorder.
• For connecting with the USB cable, see
page 10.
7 Click [Playlist DVD creation] on the
screen of the computer.
[Project Settings] screen appears.
• You do not need to change the setting unless
necessary.
• During the operation, do not apply vibration
on the camcorder. The operation may be
terminated.
8 Click [OK].
ImageMixer3 DVD Authoring starts up,
and it allows you to select images in the
Playlist created on the camcorder.
• By using ImageMixer3 DVD Authoring, you
can create the index menu or select images to
be saved on a DVD. For details, see the help
in the software.
6 Touch [ HDD] on the LCD
screen of the camcorder.
ImageMixer Menu ap pears on the screen
of the computer.
22
Page 23

9 Click [ Write] tab t [Write] on
the ImageMixer3 DVD Authoring
screen.
[Write settings] screen appears.
10Click [OK].
DVD creation starts up.
• When you insert a burned DVD-RW/
DVD+RW in the disc drive in step 3,
a message appears, asking if you want to
delete images saved on a DVD.
11Once the completion dialog for
DVD creation appears, click [No].
• To create another DVD, click [Yes].
• See page 11 to remove your camcorder from the
computer.
23
Page 24

Deleting image data from a computer
Due to limitation of the hard disk space of
the computer, it is recommended that you
delete the image data on the hard disk once
you save it to a DVD or other media.
• Before you delete images from your computer,
check that the images saved on the DVD or other
media can be played back properly.
• You cannot edit images on the created DVD with
the supplied software. If you want to edit images
after you save them on the DVD, it is
recommended that you do not delete the images
from the computer.
• The steps below show the procedures if you do
not change the destination folders for your image
data. When you have changed a destination folder,
delete the images from the last destination folder.
• Do not delete the image data on the hard disk of
the camcorder with your computer.
1 When using Windows XP, click
[start] t [My Pictures].
The contents of [My Pictures] are
displayed.
• For Windows 2000, double-click [My
Document] t [My Pictures] on the desktop
of your computer.
3 Double-click the folder containing
the unnecessary image data.
• On the folder names, see page 12.
4 Drag and drop the unnecessary
files to [Trash].
• When you delete the folder containing
unnecessary files, drag and drop the folder in
step 3.
2 Double-click [ImageMixer3] folder.
24
Page 25

Troubleshooting
Troubleshooting
Refer also to “Camera Operating Guide”.
The computer does not recognize your camcorder.
• Install the supplied software “ImageMixer for HDD Camcorder” (p.6).
• Remove the cable from the computer and camcorder, then connect it again firmly.
• Remove USB device other than the keyboard, the mouse, and the camcorder from th e computer.
• Remove the cable from the computer and camcorder, restart the computer, then connect them
again correctly.
• Check that [DVD BURN] or [ HDD] appears on the LCD screen of the camcorder. If not,
remove the USB cable from the camcorder and the computer, then repeat the operation.
An error message appears when you place the supplied CD-ROM in your
computer.
• Set the computer display as follows:
– 1024 × 768 dots or more, High Color (16 bits, 65 000 colors) or more.
You cannot use the supplied software on a Macintosh computer.
• The supplied software “ImageMixer for HDD Camcorder” is not compatible with a Macintosh
computer.
[Cannot start Easy Handycam.] or [Cannot cancel Easy Handycam.] appears on
the screen of your camcorder.
• You cannot start or cancel the Easy Handycam operation while the USB cable is connected.
Remove the USB cable from your camcorder first (p.11). Then touch [END] on t he LCD screen
of your camcorder.
You cannot view images recorded on your camcorder through your computer.
• Remove the cable from the computer and camcorder, then connect it again firmly.
• Remove the USB device other than the keyboard, mouse, and camcorder from the computer.
• Touch [ HDD], when [USB SELECT] appears on the camcorder.
You cannot copy image data from your camcorder to a computer.
• Set [USB SPEED] to [FULL SPEED] in setup item (see “Camera Operating Guide”).
25
Page 26

Troubleshooting (continued)
The image or sound on your camcorder cannot be played back correctly.
• When you connect your camcorder to a computer not compatible with Hi-Speed USB (USB
2.0), it may not be able to be played back correctly. However, it does not affect the images or
sounds copied to your computer.
• When you set [USB SPEED] to [FULL SPEED] (see “Camera Operating Guide”), it may not
be able to be played back correctly. However, it does not affect the images or sounds copied to
your computer.
• Depending on the computer you use, the played back image or sound may stop temporarily,
but this does not affect the images or sound copied to your computer.
“ImageMixer for HDD Camcorder” does not function correctly.
• Close “ImageMixer for HDD Camcorder”, then restart the computer.
An error message appears while operating “ImageMixer for HDD Camcorder”.
• Close “ImageMixer for HDD Camcorder” first, then slide the POWER switch on your
camcorder to turn on another lamp.
The actual display and message look different on your computer.
• The actual display and message may look different.
The extension of a file is not displayed on your computer.
• To display the extension, follow the steps below.
1 Click [Tool] in the window folder t [Folder option...] t [View] tab.
2 Remove the check mark from the [Hide file extensions for known file types] under Advanced
Settings.
3 Click [OK].
If you press the DVD BURN button on the camcorder, the software on the co mputer
does not run.
• After appears in the task tray on the screen of your computer, press DVD BURN again.
While performing Easy PC Back-up, [Short of free space in importing computer.]
is displayed on the computer screen.
• Delete unnecessary files from your computer to provide free hard disk space (p.24).
You cannot change the lit status of the power lamps on the camcorder.
• When using the USB connection, you cannot change the lit status of the power lamps on the
camcorder. Cancel the USB connection.
26
Page 27

Index
A
AC Adaptor.........10, 13, 14, 22
B
Browser.................................16
C
CD-ROM ........................2, 5, 6
Computer ..............5, 12, 16, 24
System requirements .......2
Copy................................12, 14
CPU ........................................2
D
Delete....................................24
Destination Folder ..........12, 15
DirectX ...................................2
Disc drive ..........2, 6, 10, 20, 22
Display....................................2
DVD........................................9
DVD BURN button ..............10
DVD type................................9
DVD+R...................................9
DVD+R DL ............................9
DVD+RW...............................9
DVD-R....................................9
DVD-RW................................9
E
Easy PC Back-up..................12
Edit........................................18
Extension ..............................26
F
Folder....................................12
H
Hard Disk................................2
HDD..........................13, 15, 22
Hi-Speed USB ........................2
I
ImageMixer Menu
................13, 15, 16, 18, 20, 22
ImageMixer MPEG Cutter ...18
ImageMixer3 DVD
Authoring........................21, 22
Inquire ....................................2
Install......................................6
M
Macintosh...............................2
Memory ..................................2
My Computer .........................6
My Pictures........................... 24
O
One Touch DVD Burn ...........9
OS........................................... 2
P
Pixela User Support Center .... 2
Playlist..................................22
Preview...........................16, 18
Print ......................................17
R
Removing the USB cable.....11
S
Software..................................6
Sound card..............................2
System requirement................ 2
T
Task tray...............................11
U
USB cable..... 10, 11, 13, 14, 22
USB jack...............................10
USB SELECT...........13, 14, 22
V
View ..................................... 16
W
Windows 2000 ....................... 2
Windows XP ..........................2
27
 Loading...