

Page 1

3-267-208-11 (1)
FM/AM
Portable
CD Player
GB
Operating Instructions
FR
Mode d’emploi
Owner’s Record
The model number and the serial number are located on the bottom of the CD
player. Record the serial number in the space provided below. Refer to these
numbers whenever you call upon your Sony dealer regarding this product.
Model No. D-NS707F
Serial No. ___________________________
This manual describes how to use the CD player. For the supplied software
SonicStage, please see “Installation/Operating Guide.”
Le mode d’emploi décrit l’utilisation du lecteur CD. Pour l’utilisation
du logiciel SonicStage fourni, référez-vous au « Guide d’installation/
utilisation ».
D-NS707F
© 2004 Sony Corporation
Page 2

WARNING
3
GB
To prevent re or shock hazard,
do not expose the AC power
adaptor to rain or moisture.
Do not install the appliance in a conned
space, such as a bookcase or built-in
cabinet.
To prevent re, do not cover the ventilation
of the apparatus with newspapers, tablecloths, curtains, etc. And don’t place lighted
candles on the apparatus.
To prevent re or shock hazard, do not place
objects lled with liquids, such as vases, on
the apparatus.
CAUTION
The use of optical instruments with this
product will increase eye hazard.
Certain countries may regulate disposal
of the battery used to power this product.
Please consult with your local authority.
CAUTION
• INVISIBLE LASER RADIATION
WHEN OPEN
• DO NOT STARE INTO BEAM OR
VIEW DIRECTLY WITH OPTICAL
INSTRUMENTS
• CLASS 1M INVISIBLE LASER
RADIATION WHEN OPEN
• DO NOT VIEW DIRECTLY WITH
OPTICAL INSTRUMENTS
The validity of the CE marking is restricted
to only those countries where it is legally
enforced, mainly in the countries EEA
(European Economic Area).
ATRAC3plus and ATRAC3 are trademarks
of Sony Corporation.
“WALKMAN” is a registered trademark of
Sony Corporation to represent Headphone
Stereo products. is a
trademark of Sony Corporation.
2
GB
For customers who purchased this
product in the USA
Product registration
Please register this product on line at www.sony.com/
walkmanreg
<http://www.sony.com/walkmanreg>
Proper registration will enable us to send you periodic
mailings about software upgrades, new products,
services and other important announcements. Thank
you.
If you have any questions about this product,
you may call; Sony Customer Information
Services Center 1-866-456-7669 or
http://www.sony.com/
Declaration of Conformity
Trade Name: SONY
Model No.: D-NS707F
Responsible Party: Sony Electronics Inc.
Address: 16450 W. Bernardo Dr,
San Diego, CA 92127 U.S.A.
Telephone No.: 858-942-2230
This device complies with Part 15 of the FCC Rules.
Operation is subject to the following two conditions:
(1) This device may not cause harmful interference,
and (2) this device must accept any interference
received, including interference that may cause
undesired operation.
This equipment has been tested and found to comply
with the limits for a Class B digital device, pursuant
to Part 15 of the FCC Rules. These limits are
designed to provide reasonable protection against
harmful interference in a residential installation. This
equipment generates, uses, and can radiate radio
frequency energy and, if not installed and used in
accordance with the instructions, may cause harmful
interference to radio communications. However, there
is no guarantee that interference will not occur in a
particular installation. If this equipment does cause
harmful interference to radio or television reception,
which can be determined by turning the equipment
off and on, the user is encouraged to try to correct the
interference by one or more of the following measures:
– Reorient or relocate the receiving antenna.
– Increase the separation between the equipment and
receiver.
– Connect the equipment into an outlet on a circuit
different from that to which the receiver is
connected.
– Consult the dealer or an experienced radio/TV
technician for help.
You are cautioned that any changes or modications
not expressly approved in this manual could void your
authority to operate this equipment.
Page 3

Table of Contents
Take Lots of Songs with You Wherever
You Go....................................................4
Which discs can you play on this CD
player? ....................................................... 5
Precautions ............................................ 7
On safety .................................................... 7
On the CD player .......................................7
On handling CDs........................................7
On headphones/earphones..........................7
On the water resistance .............................. 8
Getting Started
Checking the Supplied Accessories.....9
Guide to Parts and Controls................10
Preparing a Power Source
(Dry Batteries) ..................................... 11
To remove the batteries ............................12
To check the remaining power of
the battery ................................................12
When using the AC power adaptor...........13
Playback
Playing a CD......................................... 14
Basic playback operations (Play, stop,
search) .....................................................15
Locking the controls (HOLD).................. 16
Checking CD information........................16
Changing Playback Options
(PLAY MODE)....................................... 17
Playback options (PLAY MODE) ............18
Playing your favorite tracks (Bookmark
track play)................................................19
Playing tracks in your favorite order
(PGM play)..............................................19
Playing tracks repeatedly (Repeat play) ...20
Changing Sound Quality and
Settings ................................................20
SOUND item............................................ 21
OPTION items .........................................21
Using the Radio
Listening to the Radio .........................23
Turning off the radio ................................23
Tuning in the station quickly....................23
Improving broadcast reception.................23
If it is hard to hear the FM/TV/WB
broadcast..................................................23
Protecting your hearing............................23
Turning off the radio automatically.......... 24
Presetting Radio Stations ...................24
Presetting stations manually.....................25
Playing Preset Radio Stations ............ 26
Changing the Tuning Interval ..............26
Additional Information
Troubleshooting ...................................27
Maintenance.........................................30
To clean the casing ...................................30
To clean the headphones/earphones plug .30
To remove any dust or sand from
the rubber packing ...................................30
Specications.......................................30
CD player .................................................30
Radio ........................................................30
Antenna ....................................................30
General .....................................................30
Optional Accessories ..........................31
Index .....................................................32
GB
FR
3
GB
Page 4
Take Lots of Songs with You Wherever You Go
5
GB
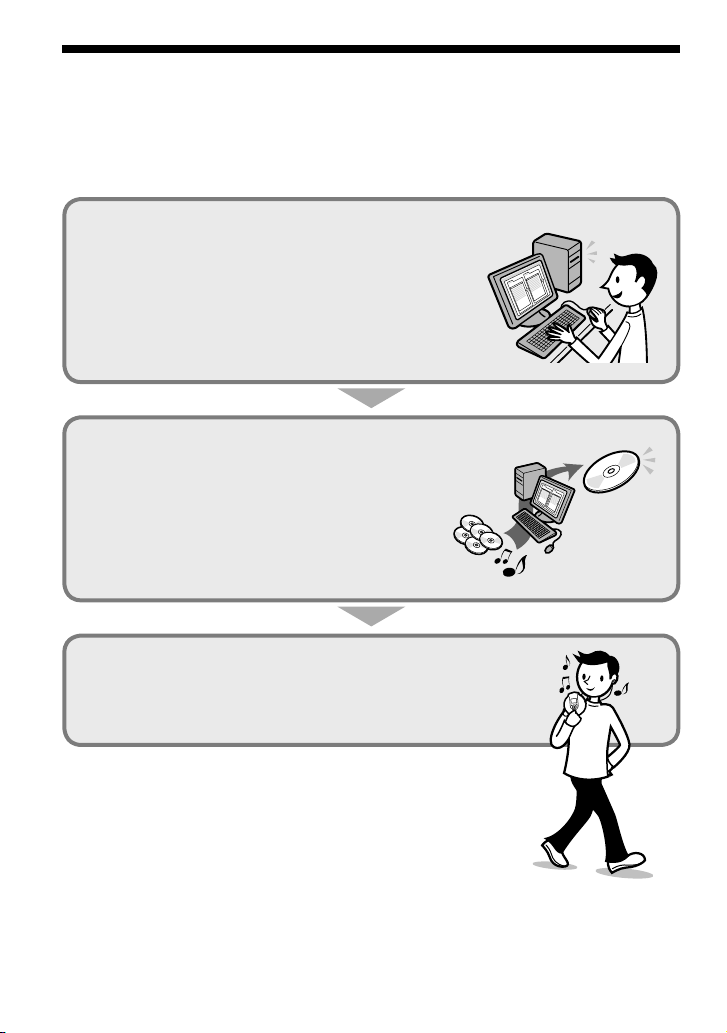
In addition to the usual audio CDs, you can play an original CD, called “ATRAC CD,” that you
create with the supplied software, SonicStage. Using SonicStage, about 30 audio CDs* can be
recorded on one CD-R or CD-RW.
The following is a quick overview of how you listen to music on your ATRAC CD.
Install SonicStage on your computer.
SonicStage is software that takes music downloaded
from audio CDs on your computer and creates original
CDs. It can be installed from the supplied CD-ROM.
Create an ATRAC CD.
After selecting your favorite songs from music stored on
your computer, record them on a CD-R/CD-RW using
SonicStage.
Listen to them with this CD player.
You can take lots of songs wherever you go on your
original CD.
Please see the supplied “Installation/Operating Guide”
for how to install SonicStage and how to create ATRAC CDs.
* When the total playing time of one CD (album) is estimated at 60
minutes and you are recording on a 700 MB CD-R/CD-RW at 48 kbps
in ATRAC3plus format.
4
GB
Audio CDs,
MP3 les
ATRAC CD
Page 5

Which discs can you play on this CD player?
Audio CDs:
CDDA format CDs
CDDA (Compact Disc Digital Audio) is a recording
standard used for Audio CDs.
ATRAC CDs:
CD-R/CD-RW on which audio data compressed in the ATRAC3plus or/and
ATRAC3 format has been recorded*
ATRAC3 (Adaptive Transform Acoustic Coding3) is audio compression technology
that satises the demand for high sound quality and high compression rates.
ATRAC3plus is audio compression technology developed from the ATRAC3 format
and can compress audio les to about 1/20 of their original size at 64 kbps.
You can create an ATRAC CD using SonicStage.
MP3 CDs:
CD-R/CD-RW on which audio data compressed in the MP3 format has
been recorded*
MP3 (MPEG-1 Audio Layer3) is audio compression technology that can compress
audio les to about 1/10 of their original size.
CD-R/CD-RW on which mixed audio data compressed in the ATRAC3plus, ATRAC3, and/or MP3
formats has been recorded by using a software other than SonicStage can also be played.
With SonicStage, you cannot create a CD on which mixed audio data is recorded.
* Only ISO 9660 Level 1/2 and Joliet extension format discs can be played.
Music discs encoded with copyright protection technologies
This product is designed to play back discs that conform to the Compact Disc (CD) standard.
Recently, various music discs encoded with copyright protection technologies are marketed by
some record companies. Please be aware that among those discs, there are some that do not
conform to the CD standard and may not be playable by this product.
Continued
5
GB
Page 6
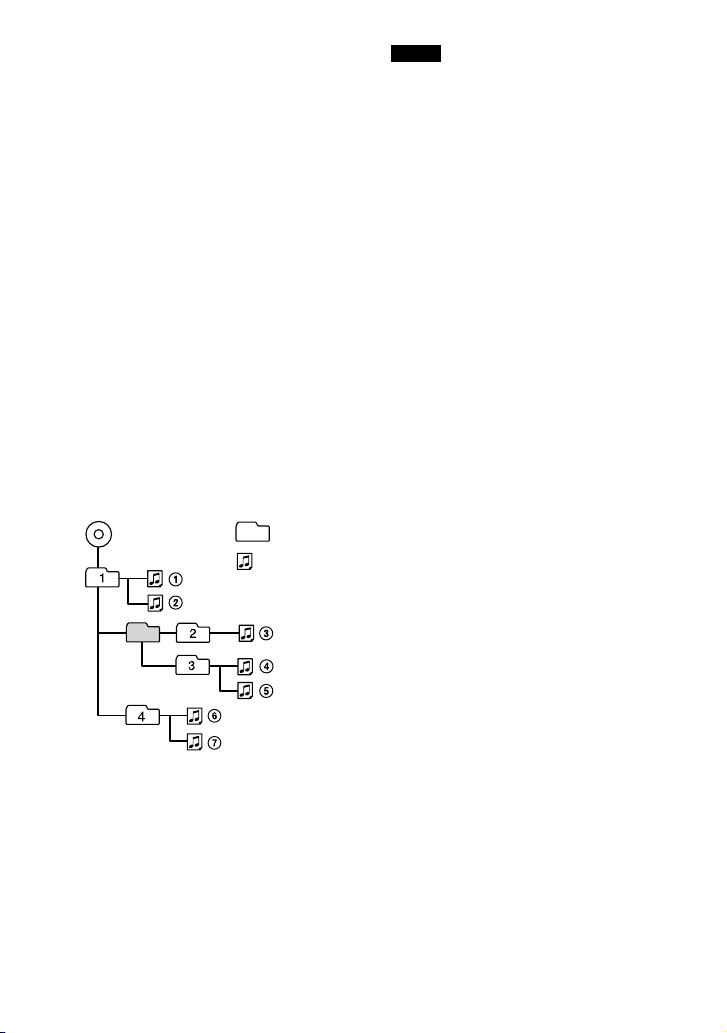
File structures of ATRAC CDs and MP3 CDs
7
GB
ATRAC CDs and MP3 CDs consist of
“les” and “groups.” A “le” is equivalent
to a “track” of an audio CD. A “group”
is a bundle of les and is equivalent to an
“album.”
For MP3 CDs, this CD player recognizes an
MP3 folder as a “group” so that ATRAC CDs
and MP3 CDs can be operated in the same
way.
The usable number of groups and les
– maximum number of groups: 255
– maximum number of les: 999
Playing order of ATRAC CDs and MP3 CDs
For ATRAC CDs, les are played in the order
selected in SonicStage.
For MP3 CDs, the playing order may differ
depending on the method used to record
MP3 les on the disc. A “play list” which
contains an MP3 le playing order can also
be recorded. In the following example, les
are played in order of to .
MP3
Group
File
Notes
• If ATRAC3plus/ATRAC3 les and MP3 les are
recorded on the same CD, this CD player plays the
ATRAC3plus/ATRAC3 les rst.
• The playback capability of this CD player may
vary depending on the quality of the disc and the
condition of the recording device.
• Acceptable characters are A to Z, a to z, 0 to 9,
and _(underscore).
• On a disc that has ATRAC3plus/ATRAC3/MP3
les, do not save les in other formats and do not
make unnecessary folders.
About ATRAC CDs
• CD-Rs/CD-RWs recorded in the ATRAC3plus/
ATRAC3 format cannot be played on your
computer.
About MP3 CDs
• Be sure to add the le extension “mp3” to the le
name. However, if you add the extension “mp3”
to a le other than an MP3 le, the player will not
be able to recognize the le properly.
• This CD player can play bit rates of 16 to 320
kbps and sampling frequencies of 32/44.1/48 kHz.
Variable Bit Rate (VBR) les can also be played.
• To compress a source in an MP3 le, we
recommend setting the compression parameters to
“44.1 kHz,” “128 kbps,” and “Constant Bit Rate.”
• To record up to the maximum capacity, set the
writing software to “halting of writing.”
• To record up to the maximum capacity at one time
on media that has nothing recorded on it, set the
writing software to “Disc at Once.”
(Maximum directory levels: 8)
6
GB
Page 7

Precautions
On safety
• Should any solid objects or liquid fall into
the CD player, unplug it and have it checked
by qualied personnel before operating it
any further.
• Do not put any foreign objects in the DC IN
4.5 V (external power input) jack.
On the CD player
• Keep the lens on the CD player clean and
do not touch it. If you do so, the lens may
be damaged and the CD player will not
operate properly.
• Do not put any heavy object on top of the
CD player. The CD player and the CD may
be damaged.
• Do not leave the CD player in a location
near heat sources, or in a place subject
to direct sunlight, excessive dust or sand,
moisture, rain, mechanical shock, unleveled
surface, or in a car with its windows closed.
• If the CD player causes interference to the
radio or television reception, turn off the
CD player or move it away from the radio
or television.
• Discs with non-standard shapes (e.g., heart,
square, star) cannot be played on this CD
player. Attempting to do so may damage
the CD player. Do not use such discs.
On headphones/earphones
Road safety
Do not use headphones/earphones while
driving, cycling, or operating any motorized
vehicle. It may create a trafc hazard and
is illegal in some areas. It can also be
potentially dangerous to play your headsets
at high volume while walking, especially at
pedestrian crossings. You should exercise
extreme caution or discontinue use in
potentially hazardous situations.
Preventing hearing damage
Avoid using headphones/earphones at high
volume. Hearing experts advise against
continuous, loud and extended play. If you
experience a ringing in your ears, reduce
volume or discontinue use.
Consideration for others
Keep the volume at a moderate level. This
will allow you to hear outside sounds and to
be considerate to the people around you.
On handling CDs
• To keep the CD clean, handle it by its edge.
Do not touch the surface.
• Do not stick paper or tape onto the CD.
• Do not expose the CD to direct sunlight or
heat sources such as hot air ducts. Do not
leave the CD in a car parked under direct
sunlight.
7
GB
Page 8

On the water resistance
• Before you open the lid, be sure to wipe off
water, dust or sand on the exterior of the
unit. Open and close the lid where water or
sand cannot fall in the unit, and make sure
that your hands are dry. If water or sand
falls in the unit, trouble may occur.
• When closing the lid, check that there is no
dust or sand on the rubber packing around
the lid. Then close the lid rmly.
• The supplied headphones are not meant to
be immersed in water or come in continuous
contact with water. If they are accidentally
dropped into water or get wet, dry them
with a soft cloth. Never use an electric hair
dryer.
• The supplied AC power adaptor is not water
resistant. To prevent shock hazard, avoid
using the player near water during AC
operation.
• Cover the DC IN 4.5 V jack and jack
with the attached rubber caps when nothing
is connected to these jacks. If the inside of
the jacks are contaminated with water or
sand, rust may develop and cause trouble.
Note
Since the unit is airtight, you may not be able to
open the lid when there is a sudden change in air
pressure inside the unit. This happens when the unit
is transported on a plane or moved from a warm
place to a cold place. In this case, open the rubber
cap on the DC IN 4.5 V jack.
8
GB
Page 9

Getting Started
Checking the Supplied
Accessories
• Headphones
• CD-ROM (SonicStage)
Do not play this CD-ROM on an audio CD player
including this player.
• Operating Instructions (This book)
• SonicStage Installation/Operating Guide
Wearing the supplied headphones
The following procedures are for wearing on
the left ear.
1 Hook the part over your left ear and the
part over your right ear as illustrated.
2 Hook the headphones around your ears, as
you would with glasses.
3 Adjust the earpieces to comfortably t
your ears.
Getting Started
Note on handling the supplied headphones
Do not put weight or pressure on the headphones as
it may cause the headphones to deform during long
storage.
9
GB
Page 10
Guide to Parts and
6 7 89
321 4 5
0
qsq
d
q
a
Getting Started
11
GB
Controls
RADIO ON/BAND•MEMORY button
( page 23 - 26)
Display ( page 11, 16 - 20, 23 - 25)
DISPLAY/MENU button ( page 16, 17,
19, 20, 23 - 26)
(group) •TUNE button (
page 15, 19, 23, 25)
(group) •TUNE button (
page 15, 19, 20, 23, 25)
VOL (volume) +*/– buttons ( page 14)
/PRESET –, /PRESET + lever
( page 15, 17 - 21, 23 - 26)
(play/pause)*/ENTER button (
page 14, 15, 17 - 20, 23 - 26)
(stop)•RADIO OFF button (
15, 23, 25)
Hand strap
page
HOLD switch ( page 16)
(headphones) jack ( page 13, 14)
DC IN 4.5 V (external power input) jack
( page 13)
* This button has a tactile dot.
To use the hand strap
During active use, use the hand strap.
1 Adjust the length of the strap.
Insert the projecting part of the strap into
the grooves rmly.
2 Put your hand between the player and the
strap.
You can hold your player with either
your right or left hand. You can invert
the characters on the display according
to which hand you use to hold the player
( page 21).
Notes on the hand strap
• Do not push on the LCD and/or the parts around it
forcibly.
• Do not twist or pull the hand strap strongly.
• Do not pull the hand strap up or down forcibly.
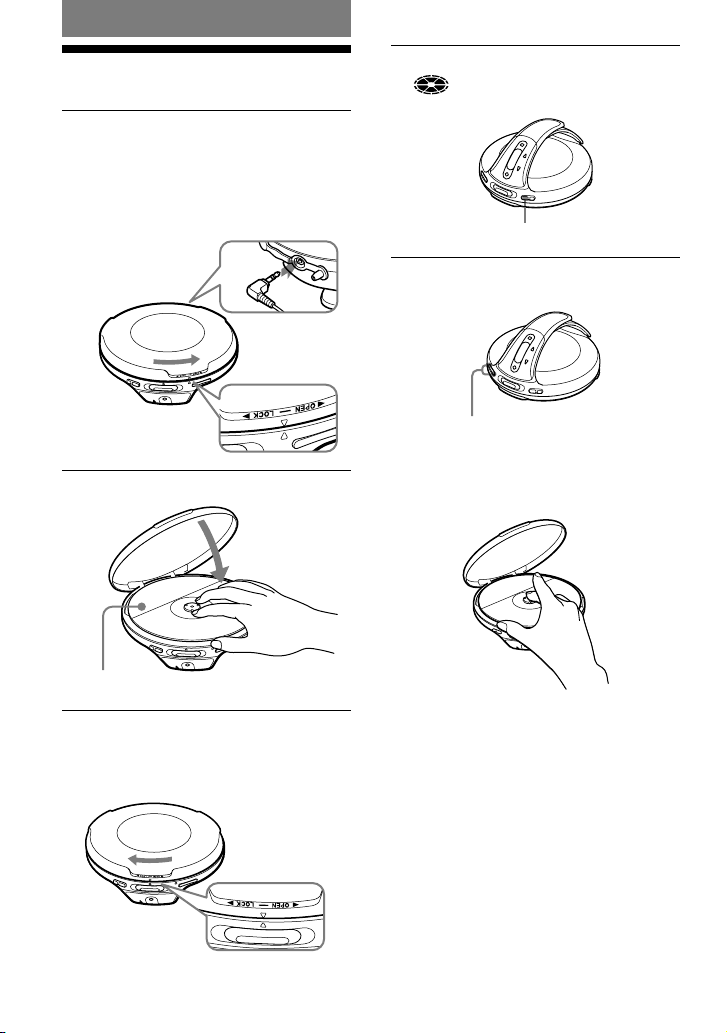
To open the lid
10
GB
Page 11

Hold the CD player with both hands as
q
h
q
f
q
g
qjqkqlw;w
a
illustrated, and turn the lid toward OPEN until
you hear a click. Open the lid when the
mark and the mark are aligned.
To close the lid, turn it toward LOCK until the
mark and the mark are aligned.
When you open or close the lid, be careful not
to pinch your ngers between the CD player
and its lid.
Notes
• If you try to open the lid forcibly without the
mark and the mark aligned correctly, the lid
might be damaged.
• If the lid is not locked, the CD will not play.
Display
Play mode indicator ( page 18)
Character information display ( page
16 - 20, 23, 24, 25)
Disc indicator ( page 14)
Play list indicator ( page 18)
Group indicator ( page 18)
Timer indicator ( page 21, 24)
Battery indicator ( page 12)
SOUND indicator ( page 21)
Note
You can invert the characters on the display ( page
21).
Preparing a Power
Source
Use only the following dry battery type for
your CD player:
• LR6 (size AA) alkaline batteries
Turn the lid of the CD player toward
1
OPEN until the mark and the
mark are aligned so that you can
open the lid.
Open the lid of the battery
2
compartment.
(Dry Batteries)
Continued
Getting Started
11
GB
Page 12
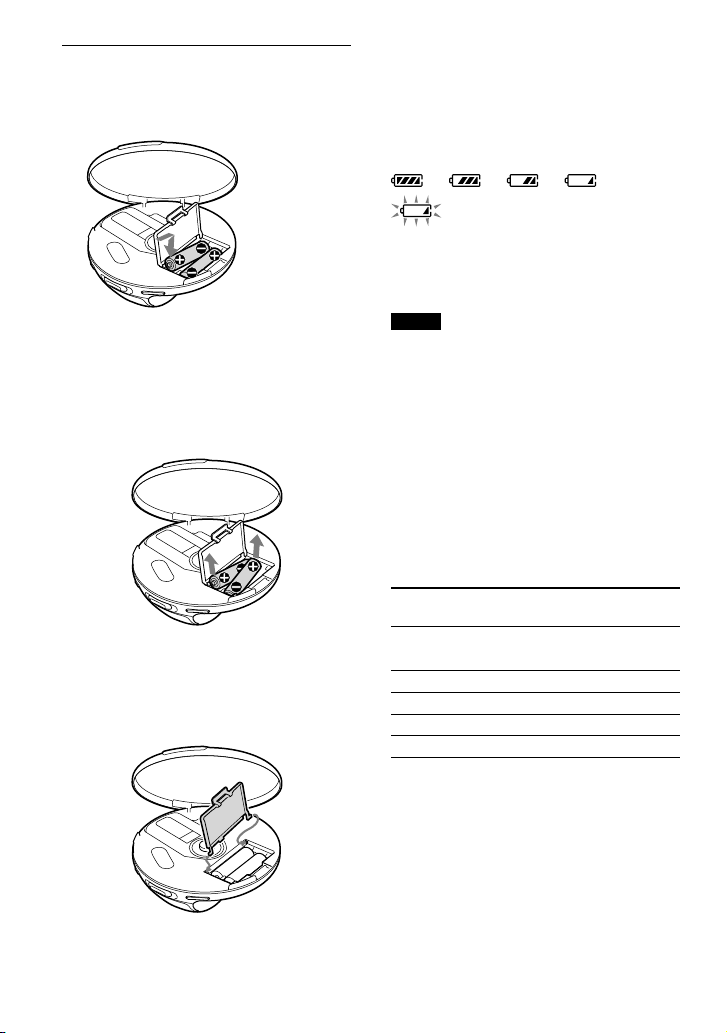
Insert two LR6 (size AA) batteries
Insert the end rst (for
both batteries).
Getting Started
13
GB
3
by matching the to the diagram in
the battery compartment and close
the lid until it clicks into place.
To remove the batteries
Remove the batteries as illustrated below.
To attach the battery compartment lid
If the battery compartment lid is detached
by an accidental drop, excessive force, etc.,
attach it as illustrated below.
To check the remaining
power of the battery
The remaining power of the battery is
indicated in the display as shown below. As
the black indicator section decreases, the
remaining power is depleted further.
“Lobatt” *
* Beep sounds.
When the batteries are depleted, replace both
batteries with new ones.
Notes
• The display shows the approximate battery power
remaining. For example, one section does not
always indicate one-fourth of the battery power.
• Depending on the operating conditions, the display
may increase or decrease relative to the actual
power remaining.
Battery life
Playing time shown is approximate hours,
when you use the player on a at and stable
surface and “SOUND” is set to “OFF” (
page 21). This value varies depending on
how the player is used.
When using two Sony alkaline batteries
LR6(SG) (produced in Japan)
Audio CD
ATRAC CD
MP3 CD
RADIO ON
1) Measured value using the JEITA standard (Japan
Electronics and Information Technology Industries
Association)
2) Recorded at 48 kbps
3) Recorded at 128 kbps
1)
G-PROTECTION
“G-PRO1” “G-PRO2”
2)
3)
47 43
75 75
60 60
65
12
GB
Page 13

Notes on dry batteries
to
(headphones)
to an AC outlet
AC power adaptor
to DC IN 4.5V
Polarity of the plug
• Do not throw the batteries into a re.
• Do not carry batteries in a pocket, etc. with coins
or other metallic objects. The battery can generate
heat if its positive and negative terminals are
accidentally allowed to come into contact with a
metallic object.
• Do not mix new batteries with old ones.
• Do not use different types of batteries together.
• When the batteries are not to be used for a long
time, remove them.
• If battery leakage occurs, wipe off any deposit
left in the battery compartment, and install new
batteries. If the deposit adheres to your skin, wash
it off thoroughly.
When using the AC power
adaptor
You can use the player powered by the
AC power adaptor (not supplied) without
batteries.
Notes on the AC power adaptor
• Disconnect all power sources when the player is
not to be used for a long time.
• Use only the AC power adaptor supplied. If your
player is not supplied with the one, use an ACE45HG AC power adaptor. If you use any other
AC power adaptor, malfunction may occur.
• Do not touch the AC power adaptor with wet
hands.
• Connect the AC power adaptor to an easily
accessible AC outlet. Should you notice an
abnormality in the AC power adaptor, disconnect it
from the AC outlet immediately.
Getting Started
13
GB
Page 14
Playback
Playback
15
GB
Playing a CD
Turn the lid of the CD player toward
1
OPEN until the mark and the
mark are aligned so that you can
open the lid.
Connect the headphones to the player
beforehand.
to (headphones)
Place the CD on the tray.
2
Press /ENTER.
4
(disc) moves, and the player starts
playback.
/ENTER
Adjust the volume by pressing the
5
VOL +/–.
Vol +/– buttons
To remove the CD
Remove the CD while pressing the pivot in
the center of the tray.
Label side up
Turn the lid of the CD player toward
3
LOCK until the mark and the
mark are aligned and the lid is
locked.
14
GB
Page 15
Basic playback operations
(Play, stop, search)
To Operation
Play
Stop
Search
1) You can operate during both play and pause.
2) You can operate during play of ATRAC CDs/MP3 CDs only.
3) You cannot operate when using an MP3 le recorded on a CD-R/CD-RW in a packet write format.
Play from a point
where you stopped
the player previously
Play from the rst
track
Pause/Resume play
after pausing
Stop playback
Find the beginning of
the current track
Find the beginning of
previous tracks
Find the beginning of
the next track
Find the beginning of
succeeding tracks
Go backwards quickly
1) 3)
Go forward quickly
1) 3)
Jump to succeeding
groups
Jump to previous
groups
1)
1)
1)
1)
2)
2)
Press /ENTER.
Playback starts from the point where you stopped.
While the CD player is stopped, press and hold /ENTER until the
play of the rst track starts.
Press /ENTER.
Press .
Flick the lever toward .
Flick the lever toward repeatedly.
Flick the lever toward .
Flick the lever toward repeatedly.
Hold the lever toward .
Hold the lever toward .
Press (group) repeatedly.
Press (group) repeatedly.
Playback
15
GB
Page 16

Locking the controls
Track01
01 01:25
Track01
01 -05:22
12 -64:30
Track015
Playback
17
GB
(HOLD)
You can prevent accidental button presses
while carrying the player by locking the
controls. “HOLD” ashes on the display
if you press any button when the HOLD
function is activated.
Slide the HOLD switch in the
1
direction of the arrow.
To unlock the controls
Slide the HOLD switch in the direction
opposite to that of arrow.
Checking CD information
You can check CD information on the display.
When you are playing an audio CD
containing text information such as
CD-TEXT, information in parentheses is
displayed. When you are playing an MP3
CD containing les with an ID3 tag*, ID3 tag
information is displayed. (When there is no
ID3 tag information, “- - - -” is displayed.)
* ID3 tag is a format for adding certain information
(track name, album name, artist name, etc.) to
MP3 les. This player conforms to Version
1.1/2.2/2.3 of the ID3 tag format (for MP3 les
only).
Notes
• The characters A-Z, a-z, 0-9, and _ can be
displayed on this player.
• Before playing a le, the player reads all le
and group (or folder) information on the CD.
“READING” is displayed. Depending on the
content of the CD, it may take some time to
accomplish this reading.
• If the le does not belong to any group, the group
name is displayed as “ROOT.”
To check information on the display
Press DISPLAY/MENU repeatedly.
Audio CD
Track number, elapsed playing time
(Track name)
Track number, remaining time of
the current track (Track name, artist name)
Number of tracks left 1),
time remaining on the CD
(Album name, artist name)
File view screen
(Track name)
1)
16
GB
Page 17
ATRAC CD/MP3 CD
Beauti
001 03:40
IS THAT
001 -02:21
Tribute
total 148
Tribute
Legend/
MENU
>REPEAT
MENU
>PLAY MODE
MENU
>GROUP
File name 2), le number, elapsed playing time
Artist name, CODEC information 3), le number,
remaining time of the current le
Group name 2), total number of les
File view screen
(Goupe name 2), le name 2))
1) The displays appear only during normal play.
2) During play, “artist name” is not displayed if the
disc does not have ID3 tag information. When
the list of group names/le names appears on the
display, “artist name” and “group name” are not
displayed.
3) Bit rate and sampling frequencies are displayed.
While an MP3 le made at VBR (variable bit rate)
is being played, “VBR” appears on the display
instead of a bit rate. In some cases, “VBR”
appears halfway through playback, rather than
from the beginning.
Changing Playback
Options
You can use various playback options such
as selecting songs you want to listen to, and
playing songs in your favorite order.
For details about playback options, see
page 18.
You can also play songs repeatedly using the
playback options you choose (repeat play,
page 20).
Press DISPLAY/MENU until the
1
MENU screen appears.
Flick the lever toward or
2
to select “PLAY MODE,” and then
press /ENTER*.
* You can also use DISPLAY/MENU
to enter the selection as well as /
ENTER.
Flick the lever toward or to
3
select the playback options.
The default setting is “ALL” (normal
play).
(PLAY MODE)
Playback
Playback options appear here.
To return to normal play
Select “ALL” in the PLAY MODE menu.
17
GB
Page 18

Playback options
Playback
19
GB
(PLAY MODE)
When you select Bookmark track play or PGM play, you need to select the songs you want to
listen to. See page 19 for how to select tracks.
Display Explanation
ALL
(Normal play)
GROUP
(Group play)
1
(Single play)
SHUFFLE
(Shufe play)
GP SHUF
(Group shufe play)
PLAY LIST
(m3u play list play)
BOOK MARK
(Bookmark track play)
AUTO RANK
(Auto ranking play)
RANK SHUF
(Auto ranking shufe play)
PROGRAM
(PGM play)
* An m3u play list is a le in which an MP3 le playing order has been encoded. To use the play list function,
record MP3 les on a CD-R/CD-RW using encoding software that supports the m3u format.
All tracks on the CD are played in a track number order.
All tracks in the selected group are played (ATRAC CD/MP3 CD
only).
The current track is played once.
All tracks on the CD are played once in random order.
All tracks in the selected group are played once in random order
(ATRAC CD/MP3 CD only).
Tracks in the selected m3u play list* are played (MP3 CD only).
After selecting “PLAY LIST,” ick the lever toward or to
select a play list, and then press /ENTER.
Tracks to which Bookmarks have been added are played ( page 19).
The tracks you have played most frequently from the CD are played
from the 10th to the rst.
After selecting “AUTO RANK,” press /ENTER.
Up to 32 tracks, which the player has automatically memorized as the
most frequently played ones, are played in random order.
After selecting “RANK SHUF,” press /ENTER.
Up to 64 tracks are played in your favorite order ( page 19).
18
GB
Page 19
Playing your favorite
001<PGM1
1 2
tracks
(Bookmark track play)
Playing tracks in your
favorite order
(PGM play)
During play of the track to where
1
you want to add a Bookmark,
press and hold /ENTER until
disappears and ashes instead.
If you want to add a Bookmark to
2
two or more tracks, repeat step 1.
You can add Bookmarks to up to 10 CDs
for audio CDs (up to 99 tracks for each
CD) and up to 5 CDs for ATRAC CDs/
MP3 CDs (up to 999 tracks for each CD).
Press and hold DISPLAY/MENU until
3
the MENU screen appears.
Flick the lever toward or
4
to select “PLAY MODE,” then press
/ENTER.
Flick the lever toward or to
5
select “BOOK MARK,” then press
/ENTER.
lights up, and the play of tracks with
Bookmarks starts in track number order,
not in the order you added the Bookmarks.
To remove Bookmarks
During play of a track with a Bookmark, press
and hold /ENTER until disappears.
Notes
• If you try to add Bookmarks to tracks on an 11th
CD (on a 6th CD when playing ATRAC CDs/MP3
CDs), the Bookmarks of the CD you played rst
will be erased.
• All Bookmarks stored in memory will be erased if
you remove all power sources.
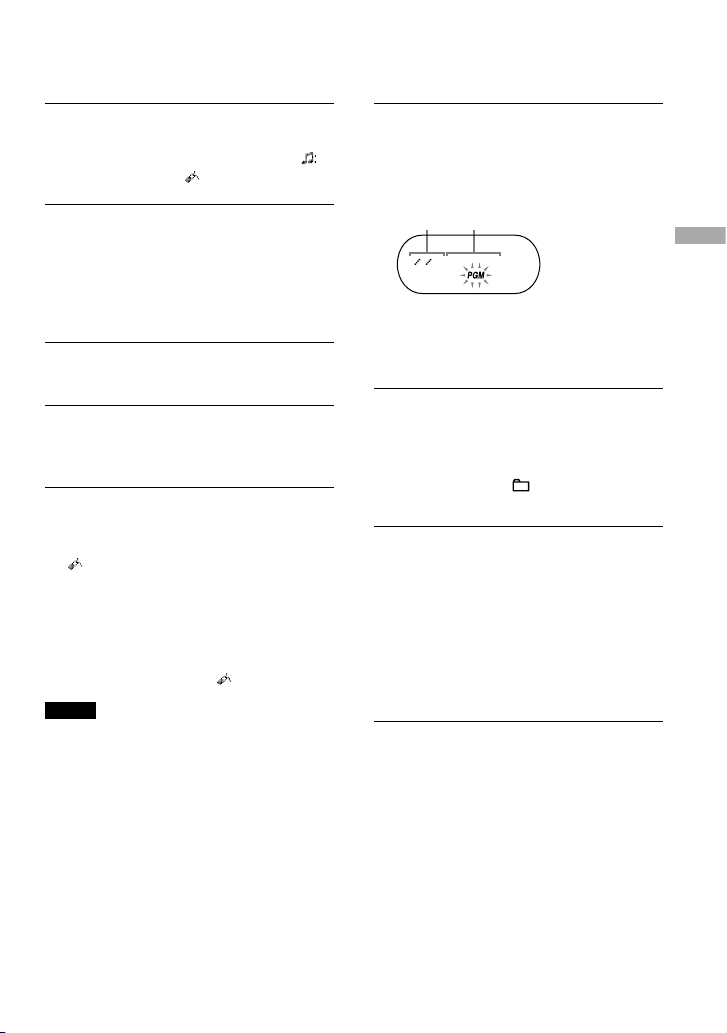
While the player is stopped, select
1
“PROGRAM” in step 3 of the player
operation for “Changing Playback
Options (PLAY MODE)” ( page 17),
and then press /ENTER.
Track number (audio CD/CD-TEXT) or
playing order (ATRAC CD/MP3 CD)
Playing order (audio CD/CD-TEXT) or le
name (ATRAC CD/MP3 CD)
Flick the lever toward or to
2
select the track and press DISPLAY/
MENU to enter the selection.
You can also select a track in another
group by pressing (group) /
when playing an ATRAC CD/MP3 CD.
Repeat step 2 to select tracks in
3
your favorite order.
You can select up to 64 tracks.
When you nish entering the 64th track,
the track number selected rst (audio
CD)/le name (ATRAC CD/MP3 CD)
appears on the display.
If you select 65 tracks or more, the tracks
selected rst are erased one by one.
Press /ENTER.
4
“PGM” lights up on the display and
playback starts in the selected order.
To check the program
While programming, press DISPLAY/MENU
repeatedly before step 4.
Playback
19
GB
Page 20

MENU
>REPEAT
Playing tracks repeatedly
Playback
21
GB
(Repeat play)
Select the playback option you want
1
to repeat ( page 18).
Press and hold DISPLAY/MENU until
2
the MENU screen appears.
Changing Sound
Quality and Settings
For details about various setting items, see
page 21.
Press DISPLAY/MENU until the
1
MENU screen appears.
Flick the lever toward or
3
to select “REPEAT,” and then press
/ENTER.
Flick the lever toward or to
4
select “ON,” then press /ENTER
to enter the selection.
To return to normal play
Select “OFF” in step 4.
Flick the lever toward or to
2
select “SOUND” or “OPTION,” and
then press /ENTER. If you select
“OPTION,” ick the lever toward
or to select the item you want to
set up, and then press /ENTER.
Flick the lever toward or
3
to select an option, and then press
/ENTER.
To return to the previous screen (except
PGM play)
Press (group) .
To cancel set up
Press .
20
GB
Page 21

SOUND item
Item
SOUND
(Sound setting)
Options (: Default setting)
OFF
Normal sound quality
SOFT For vocal, stressing middle range audio
ACTIVE Lively sounds, emphasizing high and low range audio
HEAVY Powerful sounds, further emphasizing high and low ranges
compared with ACTIVE sound
OPTION items
Items
DIRECTION
1)
(Inverting the
characters on the
display)
G-PROTECTION
(G-PRO SET)
(To prevent sound
skipping)
2)
AVLS
(Limiting volume)
TIMER
(Off timer)
1) You can set this up only while the player is stopped.
2) AVLS is an abbreviation of the Automatic Volume Limiter System.
Options (: Default settings)
NORMAL
The characters appear on the display in the normal direction.
REVERSE The characters appear on the display in the reverse direction so
that you can read them from the opposite side. The ,
lever and the • buttons operate in the opposite direction.
Play mode icons and indicators cannot be inverted.
G-PRO 1
1)
Protection against sound skipping is provided with high quality
CD sound.
G-PRO 2 Enhanced protection against sound skipping is provided.
ON The maximum volume is limited to protect your hearing.
OFF
1-99 min.
The volume changes without limiting the volume level.
lights up. You can check the remaining playback time by
selecting this option during play.
Flick the lever toward or repeatedly to increase or
decrease the length of time by 5 minutes, or hold the lever
toward or for 2 seconds or more to increase or
decrease by 1 minute. The default setting is “10 min.”
OFF
The timer does not work.
Continued
Playback
21
GB
Page 22

Items
BEEP
(Sound of
operation)
SEAMLESS
1)
(Playing tracks
continuously)
1) You can set this up only while the player is stopped. This function works only for ATRAC CDs.
Notes
• Even if “G-PROTECTION” is activated, sound may skip:
– when the CD player receives stronger continuous shock than expected,
– when a dirty or scratched CD is played, or
– for CD-Rs/CD-RWs, when a poor-quality disc is played or there is a problem with the original recording
device or application software.
• Even if “SEAMLESS” is set to “ON,” the tracks may not play continuously depending on how the source
music was recorded.
Options (: Default settings)
ON
The beep sounds when you operate the player.
OFF The beep is turned off.
ON The CD is played without space between tracks.
OFF
The CD is played as recorded on the disc, including spaces
between tracks.
22
GB
Page 23

AVLS
>LOCAL
Using the Radio
Listening to the Radio
You can enjoy FM, AM, TV and WB
programs.
Press RADIO ON/BAND to turn on
1
the radio.
Press RADIO ON/BAND until the
2
band you want appears.
Each time you press the button, the
display changes as follows:
FM AM TV WB
Press TUNE or to tune in
3
the station you want and adjust the
volume.
Note
If you connect the external power source plug to
the DC IN 4.5 V jack of your CD player, the CD
player will turn off. Turn it on by pressing RADIO
ON/BAND to continue listening to it.
Turning off the radio
Press •RADIO OFF.
Tuning in the station
quickly
Hold down TUNE or in step 3 until
the frequency digits begin to change in the
display. The CD player automatically scans
the radio frequencies and stops when it nds
a clear station.
Improving broadcast
reception
For FM, extend the headphones/earphones
cord.
For AM, reorient the CD player itself.
Note
Keep the headphones/earphones connected to the
jack of the CD player. The headphones/earphones
cord works as the FM antenna.
If it is hard to hear the FM/
TV/WB broadcast
1 While listening to the radio, press and
hold DISPLAY/MENU until the display
changes.
2 Flick the lever toward or to
select “LOCAL,” then press /ENTER.
3 Flick the lever toward or to
select “ON,” then press /ENTER to
enter the selection.
Protecting your hearing
The AVLS (Automatic Volume Limiter
System) function keeps the maximum volume
down to protect your hearing.
1 While listening to the radio, press and
hold DISPLAY/MENU until the display
changes.
2 Flick the lever toward or to
select “AVLS,” then press /ENTER.
3 Flick the lever toward or to
select “ON,” then press /ENTER to
enter the selection.
To cancel the AVLS function
Perform steps 1 - 3, changing the AVLS
setting to “OFF.”
Using the Radio
Headphones or earphones
23
GB
Page 24

Turning off the radio
FM01
87.50 MHz
Using the Radio
25
GB
automatically
You can set the radio to turn off automatically
within a range of 10 to 99 minutes at
10-minute intervals. While the timer function
is working, lights up on the display.
Presetting Radio
Stations
You can preset up to 51 stations: 7 for TV, 4
for WB, 30 for FM and 10 for AM.
1 While listening to the radio, press and
hold DISPLAY/MENU until the display
changes.
2 Flick the lever toward or to
select “TIMER,” then press /ENTER.
3 Flick the lever toward or to
select the length of time you want to set
from “10” to “99,” then press /ENTER
to enter the selection.
To check the length of time before the
radio is automatically turned off
During play, perform steps 1 - 2.
To cancel the TIMER function
The TIMER function for the radio will be
canceled:
• When you perform steps 1 - 3, changing the
TIMER setting to “OFF.”
• When you turn off the radio.
• When you start playing a CD.
Press RADIO ON/BAND to turn on
1
the radio.
Press RADIO ON/BAND to select the
2
band.
Press MEMORY for 2 seconds or
3
more.
The preset number will ash in the
display.
Press DISPLAY/MENU for 2 seconds
4
or more.
The CD player starts scanning the stations
from the lower frequencies and stops
for about 3 seconds when a station is
received.
If you want to preset the received
5
station, press DISPLAY/MENU while
the preset number is ashing.
The received station is preset on the
preset number 1 and the CD player starts
scanning for the next receivable station. If
you do not press DISPLAY/MENU within
the 3 seconds, the CD player will start
scanning for the next receivable station
without storing the station.
24
GB
Repeat step 5 until all receivable
6
stations are preset.
If the stations have already been stored,
the newly preset stations will replace the
old ones.
Page 25

Presetting stations
FM01
87.50 MHz
manually
1 Press RADIO ON/BAND to turn on the
radio.
2 Press RADIO ON/BAND to select the
band.
3 Press and hold MEMORY until the preset
number ashes in the display.
From this step on, start the next operation
within 30 seconds after you nished the
previous operation. If 30 seconds pass
with nothing done, the preset number
stops ashing which shows that the CD
player has exited the preset memory
standby mode. If this happens, start from
step 3 again.
4 Flick the lever toward /PRESET – or
/PRESET + repeatedly to select
the preset number you want to store the
station on while the preset number ashes.
5 Press TUNE or to tune in the
station you want while the preset number
ashes.
6 Press DISPLAY/MENU.
When the station is preset successfully,
the beep sounds. The new station replaces
the old one.
The preset number increases by one and
the CD player enters the preset memory
standby mode.
7 Repeat steps 4 to 6 when you preset the
stations in the same band. When you
preset the stations in the different band,
press and hold MEMORY to exit the
preset memory standby mode. Repeat
steps 2 to 6 after the preset number stops
ashing.
To exit the preset memory standby mode
When the radio is turned on, you can exit
the preset memory standby mode using one
of the following procedures. Preset stations,
however, will remain stored in the CD
player’s memory.
• Hold down MEMORY until the preset
number stops ashing.
• Do not press any button for 30 seconds. The
preset number stops ashing.
• Press /ENTER. The CD player enters
the CD playing mode.
• Press •RADIO OFF. The radio is turned
off.
To cancel all preset stations
1 While the radio is turned off and CD play
is stopped, press and hold DISPLAY/
MENU until the MENU screen appears.
2 Flick the lever toward or to
select “OPTION,” then press /ENTER.
3 Flick the lever toward or to
select “TU PRESET,” then press /
ENTER to enter the selection.
“Clear?” appears in the display. When you
press /ENTER, all the preset stations
are canceled.
Using the Radio
25
GB
Page 26

Playing Preset Radio
Stations
You can tune in the station easily by icking
the lever toward /PRESET – or /
PRESET + button.
Press RADIO ON/BAND to select the
1
band.
Flick the lever toward /
2
PRESET – or /PRESET + to tune
in a stored station.
Changing the Tuning
Interval
When using the CD player abroad, change the
AM tuning interval on the menu, if necessary.
9 kHz area: Asia and Europe
10 kHz area: the U.S.A., Canada and South
America
Change it while the radio is turned off and
CD play is stopped, as follows.
Press and hold DISPLAY/MENU until
1
the MENU screen appears.
Note
After changing the tuning interval, you need to
preset radio stations again.
Flick the lever toward or
2
to select “OPTION,” then press
/ENTER.
Flick the lever toward or
3
to select “AM STEP,” then press
/ENTER to enter the selection.
Flick the lever toward or
4
to select “9 kHz” or “10 kHz,” then
press /ENTER to enter the
selection.
The default setting is “10 kHz.”
26
GB
Page 27

Additional Information
Troubleshooting
Should any problem persist after you have checked these symptoms, consult your nearest Sony
dealer.
Sound
Symptom Cause and/or corrective action
The volume does not increase
even if you press VOL +
repeatedly.
No sound, or noise is heard.
A rustling noise is heard from
the CD.
Operation/Playback
Symptom Cause and/or corrective action
The playing time is too short. The
CD does not play.
Certain tracks cannot be played.
“Lobatt” appears on the display,
and the CD does not play.
“Hi DC in” appears on the display.
“AVLS” is set to “ON.” Set it to “OFF” ( page 21).
Connect the headphones/earphones plugs rmly.
The plugs are dirty. Clean the headphones/earphones plugs
with a dry soft cloth periodically.
Close the lid of the battery compartment rmly ( page 12).
Check that you are using alkaline batteries and not manganese
batteries.
Replace the dry batteries with new LR6 (size AA) alkaline
batteries ( page 11).
You tried to play les saved in a format that is not compatible
with this player ( page 5, 6).
Replace the dry batteries with new LR6 (size AA) alkaline
batteries ( page 11).
An AC power adaptor which is rated higher than the one
supplied or recommended is being used. Use only the supplied
AC power adaptor or the car battery cord recommended in
“Optional Accessories” ( page 31).
Additional Information
Continued
27
GB
Page 28

Symptom Cause and/or corrective action
Additional Information
29
GB
The CD does not play, or “No disc”
appears on the display when a CD
is placed in the player.
“HOLD” ashes on the display
when you press a button, and the
CD does not play.
Playback starts from the point you
stopped (resume function).
During playback of an ATRAC
CD or MP3 CD, the CD does not
rotate but you can hear the sound
normally.
“NO FILE” appears on the display
after you press /ENTER or
when the lid of the player is
locked.
The LCD display becomes hard to
see or slows down.
Play stopped abruptly.
The CD is dirty or defective. Clean it or change it.
Check that the CD is inserted with the label side up
( page 14).
Moisture condensation has occurred. Leave the CD player
aside for several hours until the moisture evaporates.
Close the lid of the battery compartment rmly ( page 12).
Make sure the batteries are inserted correctly ( page 12).
Connect the AC power adaptor to an AC outlet securely
( page 13).
Press /ENTER after one second or more has passed since
the AC power adaptor was connected.
The CD-R/CD-RW in the player is blank.
There is a problem with the quality of the CD-R/CD-RW,
recording device, or application software.
The buttons are locked. Slide the HOLD switch back
( page 16).
The resume function is working. To start play from the rst
track, press and hold /ENTER until the rst track starts
playing, or open the lid of the player ( page 14). Or, remove
all power sources, and then insert the batteries or connect the
AC power adaptor again.
This player is designed to stop the rotation of an ATRAC CD
or MP3 CD during playback to reduce the power consumption.
The player is not malfunctioning.
There are no ATRAC3plus/ATRAC3/MP3 les on the CD.
A CD-RW from which the data has been erased is being used.
The CD is dirty.
You are using your CD player at high temperatures (above
40°C/104°F) or at low temperatures (below 0°C/32°F). At
room temperature, the display will return to its normal
operating condition.
The off timer has been set. Change the setting of “TIMER” to
“OFF” ( page 21).
The dry batteries are used up completely. Replace the dry
batteies with new LR6 (size AA) alkaline batteries ( page
11).
28
GB
Page 29

Radio
Symptom Cause and/or corrective action
The audio is weak or has poor
quality.
Replace the batteries with new LR6 (size AA) alkaline
batteries. ( page 11)
Move the CD player away from electronic appliances (TVs,
PCs, etc).
Keep the AC power adaptor away from the CD player.
Others
Symptom Cause and/or corrective action
When closing the lid of the CD
player, the CD starts to rotate.
The player is reading the information on the CD, not
malfunctioning.
Additional Information
29
GB
Page 30

Maintenance
Additional Information
31
GB
Specications
To clean the casing
Use a soft cloth slightly moistened in water or
a mild detergent solution. Do not use alcohol,
benzine or thinner.
To clean the headphones/
earphones plug
Keep the plug of your headphones/earphones
clean to obtain optimum sound. Wipe it with a
dry, soft cloth.
To remove any dust or
sand from the rubber
packing
Any sand or dust on the rubber packing will
prevent the lid from shutting tightly, and
water may leak in. Brush off the dust once in
a while.
We recommend the replacement of the
rubber packing every year which is available
optionally at an authorized Sony service
facility.
CD player
System
Compact disc digital audio system
Laser diode properties
Material: GaAlAs
Wavelength: λ = 770 - 800 nm
Emission duration: Continuous
Laser output: Less than 44.6 µW
(This output is the value measured at a distance
of 200 mm from the objective lens surface on the
optical pick-up block with 7 mm aperture.)
D-A conversion
1-bit quartz time-axis control
Frequency response
20 - 20 000 Hz
Output (at 4.5 V input level)
Headphones (stereo minijack)
Approx. 5 mW + Approx. 5 mW at 16 Ω
+1–2
dB (measured by JEITA)
Radio
Frequency range
• 9 kHz step:
TV: 2 - 13 ch
WB (weather band): 1 - 7 ch
FM: 87.5 - 108.0 MHz
AM: 531 - 1 710 kHz
• 10 kHz step:
TV: 2 - 13 ch
WB (weather band): 1 - 7 ch
FM: 87.5 - 108.0 MHz
AM: 530 - 1 710 kHz
30
GB
Antenna
FM: Headphones/earphones cord antenna
AM: Built-in ferrite bar antenna
General
Power requirements
• LR6 (size AA) batteries: 1.5 V DC × 2
• AC power adaptor (DC IN 4.5 V jack):
120 V, 60 Hz
Page 31

Operating temperature
5°C - 35°C (41°F - 95°F)
Dimensions (w/h/d) (excluding projecting parts
and controls)
Approx. 136 × 30.5 × 136 mm (53⁄8 × 11⁄4 × 53⁄8 in.)
Mass (excluding accessories)
Approx. 276 g (9.8 oz.)
US and foreign patents licensed from Dolby
Laboratories.
Design and specications are subject to change
without notice.
Optional Accessories
AC power adaptor
1)
Active speaker system
Car battery cord
Car battery cord with car
connecting pack
2)
2)
Car connecting pack
Connecting cord
Earphones
1) Specications for AC power adaptors vary for
each area. Check your local voltage and the shape
of the plug before purchasing.
2) When listening to the radio using these
accessories, noise may occur. We recommend
only playing CDs when you use them.
2)
AC-E45HG
SRS-Z1
SRS-Z30
DCC-E345
DCC-E34CP
CPA-9C
RK-G129
RK-G136
MDR-E818LP
MDR-J10
Your dealer may not handle some of the
accessories listed above. Please ask the
dealer for detailed information about the
accessories in your country/region.
Additional Information
31
GB
Page 32

Index
Symbols
(Battery) 12
(Bookmark track play) 18, 19
(Group play) 18
SHUF (Gourp shufe play) 18
(m3u play list play) 18
PGM (program play) 18, 19
1 (Single play) 18
(Timer) 21
A
a00 (Auto ranking play) 18
ACTIVE 21
AC power adaptor 13
ALL (Normal play) 17, 18
Antenna 23
ATRAC3plus/ATRAC3 5
ATRAC CD 5
Auto ranking play 18
Auto ranking shufe play 18
AVLS 21
B
Battery life 12
BEEP 22
Bookmark track play 18, 19
C
CD-ROM (SonicStage) 9
CDDA format 5
D
Display 11, 16
G
G-PROTECTION 21
Group 6
Group play 18
Group shufe play 18
H
Headphones 9
HEAVY 21
HOLD function 16
I
ID3 tag 16
M
m3u play list play 18
MP3 CD 5
N
Normal play 15, 18
O
OPTION 21
P
Pause 15
PLAY LIST (m3u play list play) 18
Preset 24
Program (PGM) play 18, 19
R
RANK SHUF (Auto ranking shufe play) 18
Repeat play 20
S
SEAMLESS 22
Search 15
Shufe play 18
Single play 18
SOFT 21
SonicStage 4
SOUND 21
Stop 15
T
TIMER 21
32
GB
Page 33

Page 34

AVERTISSEMENT
3
FR
Pour prévenir tout risque
d’incendie ou d’électrocution,
ne pas exposer l’adaptateur
secteur à la pluie ou à
l’humidité.
N’installez pas l’appareil dans un espace
conné comme dans une bibliothèque ou
un meuble encastré.
An d’éviter tout risque d’incendie, ne pas
couvrir les ailettes de ventilation de cet
appareil avec des journaux, des nappes,
des rideaux, etc. Ne pas poser de bougies
allumées sur l’appareil.
An d’éviter tout risque d’incendie et
d’électrocution, ne pas poser d’objets
remplis de liquide, vases ou autre, sur
l’appareil.
INFORMATION
A pleine puissance, l’écoute prolongée
du baladeur peut endommager l’oreille de
l’utilisateur.
ATTENTION
L’utilisation d’instruments optiques avec ce
produit augmente les risques pour les yeux.
Certains pays peuvent appliquer des
dispositions différentes pour l’élimination
des piles qui alimentent ce produit. Veuillez
consulter vos autorités locales.
PRECAUTIONS
• UN RAYONNEMENT LASER
INVISIBLE EST EMIS LORSQUE
L’APPAREIL EST OUVERT
• NE PAS REGARDER LE
RAYON LASER FIXEMENT
NI DIRECTEMENT AVEC DES
INSTRUMENTS D’OPTIQUE
• UN RAYONNEMENT LASER
INVISIBLE DE CLASSE 1M EST EMIS
LORSQUE L’APPAREIL EST OUVERT
• NE PAS REGARDER DIRECTEMENT
AVEC DES INSTRUMENTS
D’OPTIQUE
La marque CE est valable uniquement dans
les pays où elle a force de loi, c’est-à-dire
principalement dans les pays de l’EEE
(Espace économique européen).
ATRAC3plus et ATRAC3 sont des marques
de Sony Corporation.
« WALKMAN » est une marque déposée
par Sony Corporation pour représenter
les produits stéréo dotés d’écouteurs.
est une marque de
Sony Corporation.
2
FR
Page 35

Table des matières
Emportez vos chansons où vous
voulez !................................................... 4
Quels disques pouvez-vous utiliser avec
votre lecteur CD ?......................................5
Précautions ............................................ 7
Sécurité ......................................................7
Utilisation du lecteur CD ...........................7
Manipulation des CD ................................. 7
Utilisation du casque/des écouteurs ........... 7
Résistance à l’eau .......................................8
Mise en service
Vérication des accessoires fournis .... 9
Guide pour les pièces et les
commandes ......................................... 10
Préparation de la source
d’alimentation (piles sèches) .............11
Pour retirer les piles .................................12
Vérication de la puissance restante des
piles .........................................................12
Utilisation de l’adaptateur secteur............13
Lecture
Lecture d’un CD
Fonctions de base en lecture (lecture,
arrêt, avance/retour rapide) ...................... 15
Verrouillage des commandes (HOLD) .....16
Vérication des informations du CD........ 16
Changement des options de lecture
(PLAY MODE)....................................... 17
Options de lecture (PLAY MODE) .......... 18
Lecture de vos pistes préférées (lecture
de pistes pourvues de signets) ................. 19
Lecture de pistes dans l’ordre de votre
choix (lecture programmée) .................... 19
Lecture de pistes répétée
(lecture répétée) .......................................20
...........................................
14
Modication de la qualité sonore et
des réglages ........................................ 20
Mode SOUND..........................................21
Mode OPTION ......................................... 21
Utilisation de la radio
Ecoute de la radio ................................ 23
Arrêt de la radio .......................................23
Syntonisation rapide de la station.............23
Amélioration de la réception
de l’émission ..................... ................................. 23
En cas de difculté d’écoute d’une
émission FM/TV/WB ..............................23
Protection de l’ouïe ..................................23
Arrêt automatique de la radio...................24
Présélection des stations de radio .....24
Présélection manuelle des stations ...........25
Ecoute de stations de radio
présélectionnées ................................. 26
Modication de l’intervalle de
syntonisation....................................... 26
Informations complémentaires
Dépannage ........................................... 27
Entretien ............................................... 30
Pour nettoyer le boîtier............................. 30
Pour nettoyer la che du casque/des
écouteurs..................................................30
Pour retirer de la poussière ou du sable
de la protection en caoutchouc ................30
Spécications.......................................30
Lecteur CD ...............................................30
Radio ........................................................30
Antenne .................................................... 30
Caractéristiques générales........................ 30
Accessoires en option .........................31
Index .....................................................32
FR
FR
3
FR
Page 36

Emportez vos chansons où vous voulez !
5
FR
En plus des CD audio habituels, vous pouvez lire des ATRAC CD originaux à réaliser vous-même
grâce au logiciel fourni, SonicStage. Ce logiciel vous permet d’enregistrer l’équivalent de 30 CD
audio* sur un CD-R ou CD-RW.
L’utilisation des ATRAC CD est présentée brièvement ci-dessous.
Installez SonicStage sur votre PC.
SonicStage est un logiciel qui vous permet de créer des
CD originaux avec les morceaux que vous téléchargez
à partir de CD audio sur votre ordinateur. Vous pouvez
l’installer depuis le CD-ROM fourni.
Créez un ATRAC CD.
Sélectionnez vos chansons préférées stockées sur votre
ordinateur, puis gravez-les sur un CD-R/CD-RW à l’aide
du logiciel SonicStage.
Vous pouvez ensuite les écouter avec
votre lecteur CD
Grâce au CD que vous avez créé, vous pouvez emporter
une multitude de chansons où vous voulez.
Reportez-vous au « Guide d’installation/utilisation » fourni pour
connaître la procédure d’installation de SonicStage et apprendre
à créer des ATRAC CD.
* Lorsque la durée totale d’un CD (album) est estimée à 60 minutes et
que vous enregistrez sur un CD-R/CD-RW 700 Mo à 48 Kbit/s au
format ATRAC3plus.
4
FR
.
CD audio,
chiers MP3
ATRAC CD
Page 37

Quels disques pouvez-vous utiliser avec votre lecteur CD ?
CD audio :
CD format CDDA
CDDA (Compact Disc Digital Audio) est un format
d’enregistrement standard des CD audio.
ATRAC CD :
Il s’agit de CD-R/CD-RW sur lesquels des données audio compressées au
format ATRAC3plus ou/et ATRAC3 ont été enregistrées*
ATRAC3 (Adaptive Transform Acoustic Coding3) est une technologie de
compression de chiers audio qui satisfait à des exigences de qualité sonore et de taux
de compression élevées. ATRAC3plus est une technologie de compression de données
audio mise au point à partir du format ATRAC3 qui permet de compresser les chiers
audio à environ 1/20 de leur taille d’origine à la vitesse de 64 Kbit/s.
Vous pouvez créer des ATRAC CD à l’aide de SonicStage.
CD MP3 :
Il s’agit de CD-R/CD-RW sur lesquels des données audio compressées au
format MP3 ont été enregistrées*
MP3 (MPEG-1 Audio Layer3) est une technologie de compression de chiers audio
qui permet de réduire leur taille à environ 1/10 de la taille d’origine.
Vous pouvez également lire les CD-R/CD-RW sur lesquels différents types de données
compressées au format ATRAC3plus, ATRAC3 et/ou MP3 ont été enregistrées en utilisant un
logiciel autre que SonicStage. Vous ne pouvez pas créer de CD comportant différents types de
données audio avec le logiciel SonicStage.
* Seuls les disques au format ISO 9660 niveaux 1 et 2 et ISO 9660-Joliet peuvent être lus.
Disques audio encodés par des technologies de protection des droits d’auteur
Cet appareil est conçu pour la lecture de disques conformes à la norme Compact Disc (CD).
Récemment, différents disques audio encodés par des technologies de protection des droits
d’auteur ont été mis en vente par certaines compagnies de disques. Notez bien que, parmi ces
disques, certains ne sont pas conformes à la norme CD et qu’il est possible qu’ils ne puissent pas
être lus sur cet appareil.
Suite
5
FR
Page 38

Structures des chiers des ATRAC CD et
7
FR
MP3
Les ATRAC CD et MP3 sont constitués
par des « chiers » et des « groupes ». Un
« chier » correspond à la « piste » d’un CD
audio. Un « groupe » est un ensemble de
chiers qui correspond à un « album ».
Pour les CD MP3, votre lecteur considère un
dossier MP3 comme un « groupe », de sorte
que les ATRAC CD et MP3 peuvent être
utilisés de la même façon.
Nombre utilisable de groupes et de chiers
– nombre maximal de groupes : 255
– nombre maximal de chiers : 999
Ordre de lecture des ATRAC CD et MP3
Pour les ATRAC CD, les chiers sont lus dans
l’ordre sélectionné avec SonicStage.
Pour les CD MP3, l’ordre de lecture peut
différer selon la méthode qui a été utilisée
pour enregistrer les chiers MP3 sur le
disque. Une « liste de sélection » qui contient
un ordre de lecture des chiers MP3 peut
également être enregistrée. Dans l’exemple
suivant, les chiers sont lus de à .
MP3
Groupe
Fichier
Remarques
• Si des chiers ATRAC3plus/ATRAC3 et MP3 sont
enregistrés sur le même CD, le lecteur CD lit les
chiers ATRAC3plus/ATRAC3 en premier.
• La capacité de lecture du lecteur CD peut varier
suivant la qualité du disque et l’état du matériel
d’enregistrement.
• Les caractères utilisables sont les suivants : A à Z,
a à z, 0 à 9, et _ (tiret bas).
• N’enregistrez pas de chiers d’un format différent
et ne créez pas de dossiers inutiles sur un disque
qui contient des chiers ATRAC3plus/ATRAC3/
MP3.
A propos des ATRAC CD
• Les CD-R/CD-RW enregistrés au format
ATRAC3plus/ATRAC3 ne peuvent pas être lus par
votre ordinateur.
A propos des CD MP3
• N’oubliez pas d’ajouter l’extension « mp3 »
au nom du chier. Cependant, si vous ajoutez
l’extension « mp3 » à un chier autre qu’un
chier MP3, le lecteur ne reconnaîtra pas le chier
correctement.
• Ce lecteur CD peut lire à une vitesse comprise
entre 16 et 320 Kbit/s et à des fréquences
d’échantillonnage de 32, 44,1 ou 48 kHz. Les
chiers à débit binaire variable (VBR, Variable Bit
Rate) peuvent également être lus.
• Pour compresser une source dans un chier MP3,
nous vous recommandons de régler les paramètres
de compression sur « 44,1 kHz », « 128 Kbit/s »,
et « débit binaire constant ».
• Pour enregistrer jusqu’à la capacité maximale,
réglez le logiciel de gravure sur « interruption de
la gravure ».
• Pour enregistrer jusqu’à la capacité maximale
en une seule fois sur un support vierge, réglez le
logiciel de gravure sur « un seul disque ».
(Niveaux maximum de répertoires : 8)
6
FR
Page 39

Précautions
Sécurité
• Si un objet solide ou liquide tombe dans
le lecteur CD, débranchez-le et faites-le
vérier par un personnel qualié avant de le
réutiliser.
• N’introduisez aucun corps étranger dans la
prise DC IN 4.5 V (prise pour l’alimentation
externe).
Utilisation du lecteur CD
• Veillez à maintenir la lentille du lecteur
propre et à ne pas la toucher. Si vous
touchez la lentille, elle pourrait être
endommagée et provoquer une altération du
fonctionnement du lecteur CD.
• Ne posez pas d’objets lourds sur le lecteur
CD. Le lecteur CD et le CD pourraient être
endommagés.
• Ne laissez pas le lecteur CD à proximité
d’une source de chaleur ou dans un endroit
directement exposé au soleil, à la poussière,
au sable, à l’humidité, à la pluie, aux chocs
mécaniques. Ne posez pas le lecteur CD
en équilibre et ne le laissez pas dans une
voiture avec les fenêtres fermées.
• Si le lecteur CD provoque des interférences
pour la réception d’émissions radio ou
télévisées, éteignez l’appareil ou éloignez-le
de la radio ou de la télévision.
• Les disques qui n’ont pas une forme
standard (par exemple en forme de cœur, de
carré ou d’étoile) ne peuvent pas être lus par
ce lecteur CD. Vous risquez d’endommager
le lecteur CD. N’utilisez pas ce type de
disque.
Manipulation des CD
• Manipulez le CD par la tranche pour ne pas
le salir. Ne touchez pas sa surface.
• Ne collez pas de papier ou de bande
adhésive sur le CD.
• N’exposez pas le CD à la lumière directe du
soleil ou à des sources de chaleur telles que
les conduits de ventilation d’air chaud. Ne
laissez pas le CD dans une voiture garée et
exposée à la lumière directe du soleil.
Utilisation du casque/des
écouteurs
Sécurité routière
N’utilisez pas le casque/les écouteurs à
vélo ou pendant la conduite d’une voiture
ou de tout autre véhicule motorisé. Cette
pratique peut être dangereuse et elle est
illégale dans de nombreux endroits. Il peut
également s’avérer dangereux d’utiliser les
écouteurs à volume élevé en marchant et plus
particulièrement lorsque vous traversez un
passage piéton. Redoublez de vigilance ou
interrompez l’écoute dans les situations à
risque.
Prévention des troubles de l’ouïe
Evitez d’utiliser le casque/les écouteurs
avec un volume sonore élevé. Les médecins
déconseillent l’écoute prolongée à volume
élevé. Si vous percevez des sifements
dans les oreilles, réduisez le volume ou
interrompez l’écoute.
Respect des autres
Maintenez le volume à un niveau modéré.
Ceci vous permettra d’entendre les sons
extérieurs et d’être attentif à votre entourage.
7
FR
Page 40

Résistance à l’eau
• Avant d’ouvrir le couvercle, veillez à
essuyer toute trace d’eau, de poussière ou
de sable à l’extérieur de l’unité. Ouvrez
et fermez le couvercle à l’abri d’eau ou
de sable et assurez-vous d’avoir les mains
sèches. La chute d’eau ou de sable dans
l’unité peut entraîner des problèmes.
• Lors de la fermeture du couvercle, vériez
l’absence de poussière ou de sable sur le
caoutchouc entourant le couvercle. Fermez
ensuite fermement le couvercle.
• Les écouteurs fournis ne doivent pas
être immergés dans l’eau ni entrer en
contact continu avec l’eau. S’ils tombent
accidentellement dans l’eau ou sont
mouillés séchez-les avec un chiffon
doux. N’utilisez jamais de sèche-cheveux
électrique.
• L’adaptateur secteur fourni n’est pas
étanche. Pour prévenir tout risque
d’électrocution, évitez d’utiliser le lecteur à
proximité de l’eau lors d’une alimentation
secteur.
• Couvrez la prise DC IN 4.5 V et la prise
avec les capuchons en caoutchouc xés
lorsque rien n’est connecté à ces prises. Si
de l’eau ou du sable pénètre à l’intérieur
des prises, de la rouille peut se former et
engendrer des problèmes.
Remarque
L’unité étant hermétique, l’ouverture du couvercle
peut s’avérer impossible en cas de changement
soudain de pression à l’intérieur de l’unité. Ceci se
produit lorsque l’unité est transportée en avion ou
déplacée d’un endroit chaud à un endroit froid. Dans
ce cas, ouvrez le capuchon en caoutchouc sur la
prise DC IN 4.5 V.
8
FR
Page 41

Mise en service
Vérication des
accessoires fournis
• Ecouteurs
• CD-ROM (SonicStage)
Ne lisez pas ce CD-ROM dans un lecteur CD
audio, y compris dans celui-ci.
• Mode d’emploi (ce guide)
• Guide d’installation/utilisation de
SonicStage
Port des écouteurs fournis
Les procédures suivantes concernent le port
sur l’oreille gauche.
1 Accrochez l’élément sur l’oreille
gauche et l’élément sur l’oreille droite
comme illustré.
Remarque concernant la manipulation des
écouteurs fournis
Ne posez pas d’objet et n’appliquez pas de pression
sur les écouteurs an de ne pas les déformer au cours
d’un stockage prolongé.
Mise en service
2 Accrochez les écouteurs autour des
oreilles, comme pour des lunettes.
3 Ajustez les écouteurs pour qu’ils
s’adaptent confortablement à vos oreilles.
9
FR
Page 42

Guide pour les pièces
6 7 89
321 4 5
0
qsq
d
q
a
Mise en service
11
FR
et les commandes
Touche RADIO ON/BAND•MEMORY
( page 23 - 26)
Afchage
( page 11, 16 - 20, 23 - 25)
Touche DISPLAY/MENU
( page 16, 17, 19, 20, 23 - 26)
Touche (groupe) •TUNE
( page 15, 19, 23, 25)
Touche (groupe) •TUNE
( page 15, 19, 20, 23, 25)
Touches VOL (volume) +*/– ( page 14)
Levier de sélection /PRESET –,
/PRESET +
( page 15, 17 - 21, 23 - 26)
Touche (lecture/pause)*/ENTER
( page 14, 15, 17 - 20, 23 - 26)
Touche (arrêt)•RADIO OFF
( page 15, 23, 25)
Dragonne
Commutateur HOLD ( page 16)
Prise (écouteurs) ( page 13, 14)
Prise DC IN 4.5 V (prise pour
l’alimentation externe) ( page 13)
* Cette touche possède un point tactile.
Pour utiliser la dragonne
Durant une utilisation active, employez la
dragonne.
1 Ajustez la longueur de la dragonne.
Insérez fermement la pièce en saillie de la
dragonne dans les rainures.
2 Placez la main entre le lecteur et la
dragonne.
Vous pouvez tenir le lecteur de la main
droite ou gauche et inverser les caractères
de l’afchage suivant la main utilisée pour
tenir le lecteur ( page 21).
Remarques concernant la dragonne
• N’appuyez pas sur l’afchage LCD et/ou les
éléments qui l’entourent.
• Ne tordez pas ou ne tirez pas fortement sur la
dragonne.
• Ne tirez pas la dragonne vers le haut ou vers le bas
en forçant.
Pour ouvrir le couvercle
10
FR
Page 43

Tenez le lecteur CD des deux mains comme
q
h
q
f
q
g
qjqkqlw;w
a
illustré et tournez le couvercle vers OPEN
jusqu’à ce que vous entendiez un clic. Ouvrez
le couvercle lorsque les repères et sont
alignés.
Pour fermer le couvercle, tournez-le vers
LOCK jusqu’à ce que les repères et
soient alignés.
Lorsque vous ouvrez ou fermez le couvercle,
prenez garde à ne pas vous pincer les doigts
entre le lecteur CD et son couvercle.
Remarques
• Si vous tentez d’ouvrir le couvercle de force sans
que les repères et soient alignés correctement,
le couvercle peut être endommagé.
• Si le couvercle n’est pas verrouillé, il est
impossible de lire le CD.
Afchage
Indicateur du mode de lecture
( page 18)
Afchage d’information par caractères
( page 16 - 20, 23, 24, 25)
Indicateur de disque ( page 14)
Indicateur de liste de sélection
( page 18)
Indicateur de groupe ( page 18)
Indicateur du programmateur
( page 21, 24)
Indicateur du niveau des piles
( page 12)
Indicateur SOUND ( page 21)
Remarque
Vous pouvez inverser les caractères sur l’afchage.
( page 21)
Préparation de la
source d’alimentation
(piles sèches)
Utilisez uniquement le type de pile sèche
suivant pour votre lecteur CD :
• Piles alcalines LR6 (format AA)
Tournez le couvercle du lecteur
1
CD dans la direction de la mention
OPEN jusqu’a ce que les repères
et soient alignés, vous permettant
ainsi d’ouvrir le couvercle.
Ouvrez le couvercle du
2
compartiment des piles.
Suite
Mise en service
11
FR
Page 44

Insérez deux piles LR6 (format AA)
Insérez d’abord le côté
(pour les deux piles).
Mise en service
13
FR
3
en ajustant le sur le schéma du
compartiment et fermez le couvercle
jusqu’au déclic.
Pour retirer les piles
Retirez les piles comme illustré ci-dessous.
Pour xer le couvercle du compartiment
des piles
Si le couvercle du compartiment des piles
s’est détaché lors d’une chute accidentelle,
en forçant l’ouverture, etc., xez-le comme
illustré ci-dessous.
Vérication de la
puissance restante des
piles
La puissance restante des piles est indiquée
sur l’afchage comme illustré ci-dessous.
Plus l’indicateur noir diminue, plus les piles
se vident.
« Lobatt » *
* Bip sonore audible.
Lorsqu’elles sont usées, remplacez les deux
piles.
Remarques
• L’afchage montre la puissance restante
approximative des piles. Par exemple, une seule
section ne signie par forcément qu’il reste un
quart de puissance.
• Selon les conditions d’utilisation, l’afchage peut
augmenter ou diminuer en fonction de la puissance
restante effective.
Durée de vie des piles
Le temps de lecture en heures indiqué
est approximatif, lorsque vous utilisez le
lecteur sur une surface plane et stable et
que « SOUND » est réglé sur « OFF »
( page 21). Cette valeur varie en fonction
de l’utilisation du lecteur.
En cas d’utilisation de deux piles alcalines
Sony LR6 (SG) (fabriquées au Japon)
CD audio
ATRAC CD
CD MP3
RADIO ON
1) Valeur mesurée conformément à la norme JEITA
2) Valeur enregistrée à 48 Kbit/s
3) Valeur enregistrée à 128 Kbit/s
2)
3)
(Japan Electronics and Information Technology
Industries Association)
1)
G-PROTECTION
« G-PRO1 » « G-PRO2 »
47 43
75 75
60 60
65
12
FR
Page 45

Remarques concernant les piles sèches
vers
(écouteurs)
vers une prise secteur
Adaptateur secteur
vers DC IN 4.5 V
Polarité de la che
• Ne jetez pas les piles usagées au feu.
• Ne transportez pas de pile dans vos poches et
ne les mettez pas en contact avec des pièces de
monnaie ou des objets métalliques. Les piles
peuvent générer de la chaleur si leurs bornes
(positive et négative) entrent en contact avec un
objet métallique par mégarde.
• Ne mélangez pas piles neuves et anciennes.
• N’utilisez pas différents types de pile ensemble.
• Retirez les piles si vous envisagez de ne pas les
utiliser pendant une période prolongée.
• En cas de fuite d’électrolyte, essuyez tout dépôt
présent dans le compartiment et installez de
nouvelles piles. Si le dépôt entre en contact avec
votre peau, nettoyez-la à grande eau.
Utilisation de l’adaptateur
secteur
Vous pouvez utiliser le lecteur alimenté par
l’adaptateur secteur (non fourni) sans pile.
Remarques sur l’adaptateur secteur
• Débranchez toutes les sources d’alimentation si
vous envisagez de ne pas utiliser le lecteur pendant
une période prolongée.
• Utilisez l’adaptateur fourni uniquement. Si
aucun adaptateur n’est fourni avec votre lecteur,
utilisez un adaptateur AC-E45HG. Si vous utilisez
tout autre adaptateur, des dysfonctionnements
pourraient survenir.
• Ne touchez pas l’adaptateur secteur si vos mains
sont mouillées.
• Branchez l’adaptateur secteur sur une prise
secteur facilement accessible. Si vous remarquez
un dysfonctionnement de l’adaptateur secteur,
débranchez-le immédiatement de la prise secteur.
Mise en service
13
FR
Page 46

Lecture
Lecture
15
FR
Lecture d’un CD
Tournez le couvercle du lecteur
1
CD vers OPEN jusqu’à ce que les
repères et soient alignés et que
vous puissiez ouvrir le couvercle.
En premier lieu, branchez les écouteurs
au lecteur.
vers (écouteurs)
Placez le CD sur le plateau.
2
Tournez le couvercle du lecteur
3
CD dans la direction de la mention
LOCK jusqu’a ce que les repères
et soient alignés et le couvercle
verrouillé.
Appuyez sur /ENTER.
4
(disque) se déplace et la lecture
démarre.
/ENTER
Ajustez le volume en appuyant sur
5
les touches VOL +/–.
Etiquette vers le haut
14
FR
Touches Vol +/–
Pour retirer le CD
Retirez le CD en appuyant sur le pivot situé
au centre du plateau.
Page 47

Fonctions de base en lecture
(lecture, arrêt, avance/retour rapide)
Pour
Lire
Reprendre la
lecture au point
de sa précédente
interruption
Lire depuis la
première piste
Opération
Appuyez sur /ENTER.
La lecture commence depuis le point où vous l’avez arrêtée
précédemment.
Le lecteur CD étant arrêté, appuyez sur /ENTER et maintenez
la touche enfoncée jusqu’à ce que la lecture de la première piste
commence.
Arrêter
la
lecture
Avance
/retour
rapide
1) Vous pouvez effectuer cette opération pendant la lecture et la pause.
2) Vous pouvez effectuer cette opération pendant la lecture d’un ATRAC CD ou d’un MP3 uniquement.
3) Vous ne pouvez pas effectuer cette opération avec un chier MP3 enregistré sur un CD-R/CD-RW avec une
Mettre en pause/
Reprendre la lecture
après une pause
Arrêter la lecture
Localiser le début de
la piste en cours
1)
Localiser le début des
pistes précédentes
Localiser le début de
la piste suivante
Localiser le début des
pistes suivantes
Revenir rapidement
en arrière
Avancer rapidement
1) 3)
Passer aux groupes
suivants
Passer aux groupes
précédents
méthode d’écriture par paquet.
1)
1)
1) 3)
2)
2)
Appuyez sur /ENTER.
Appuyez sur .
Faites glisser le levier vers .
Faites glisser le levier vers à plusieurs reprises.
1)
Faites glisser le levier vers .
Faites glisser le levier vers à plusieurs reprises.
Maintenez le levier vers .
Maintenez le levier vers .
Appuyez sur (groupe) à plusieurs reprises.
Appuyez sur (groupe) à plusieurs reprises.
Lecture
15
FR
Page 48

Verrouillage des
Track01
01 01:25
Track01
01 -05:22
12 -64:30
Track015
Lecture
17
FR
commandes
Vous pouvez éviter d’appuyer par mégarde
sur des touches pendant le transport en
verrouillant les commandes. « HOLD »
clignote sur l’afchage si vous appuyez sur
n’importe quelle touche alors que la fonction
HOLD est activée.
Faites glisser le commutateur HOLD
1
dans le sens de la èche.
Pour déverrouiller les commandes
Faites glisser le commutateur HOLD dans le
sens opposé à la èche.
(HOLD)
Pour vérier les informations sur
l’afchage
Appuyez à plusieurs reprises sur DISPLAY/
MENU.
CD audio
Numéro de la piste, temps de lecture écoulé
(titre de la piste)
Numéro de la piste, temps restant de la piste
en cours (titre de la piste, nom de l’artiste)
Vérication des
informations du CD
Vous pouvez vérier les informations du CD
sur l’afchage.
Lorsque vous lisez un CD audio contenant du
texte tel qu’un CD-TEXT, des informations
s’afchent entre parenthèses. Lorsque vous
lisez un CD MP3 contenant des chiers ayant
une étiquette ID3 tag*, les informations
de cette étiquette ID3 s’afchent (lorsque
aucune information sur l’étiquette ID3 n’est
disponible, « - - - - » s’afche).
* L’étiquette ID3 est un format permettant d’ajouter
certaines informations (titre de la piste, titre de
l’album, nom de l’artiste, etc.) aux chiers MP3.
Ce lecteur prend en charge les versions 1.1/2.2/2.3
du format d’étiquette ID3 (pour chiers MP3
uniquement).
Remarques
• Les caractères A-Z, a-z, 0-9 et _ sont pris en
charge sur l’afchage de ce lecteur.
• Avant de lire un chier, le lecteur lit toutes les
informations de chier et groupe (ou dossier)
présentes sur le CD. « READING » s’afche
ensuite. Selon le contenu du CD, il se peut que
cette lecture prenne un certain temps.
• Si le chier n’appartient à aucun groupe, le nom
de groupe apparaît sous la forme « ROOT ».
Nombre de pistes restantes1),
temps restant sur le CD1).
(titre de l’album, nom de l’artiste)
Ecran d’afchage des chiers
(titre de la piste)
16
FR
Page 49

ATRAC CD/MP3
MENU
>REPEAT
MENU
>PLAY MODE
Beauti
001 03:40
IS THAT
001 -02:21
Tribute
total 148
Tribute
Legend/
MENU
>GROUP
Nom du chier2), numéro du chier, temps de
lecture écoulé
Nom de l’artiste, informations CODEC3),
numéro du chier, temps restant sur le chier
en cours
Nom du groupe2), nombre total de chiers
Ecran d’afchage des chiers
(nom du groupe2), nom du chier2))
1) Les afchages apparaissent seulement pendant une
lecture normale.
2) Pendant la lecture, « le nom de l’artiste » n’est pas
afché si le disque ne contient pas d’informations
d’étiquette ID3. Lorsque la liste des noms de
groupes ou de chiers est présente sur l’afchage,
« le nom de l’artiste » et « le nom du groupe » ne
sont pas afchés.
3) Le débit binaire et les fréquences d’échantillonnage
s’afchent. Lorsqu’un chier MP3 créé en débit
binaire variable (VBR, Variable Bit Rate) est en
cours de lecture, « VBR » apparaît sur l’afchage
au lieu du débit binaire. Dans certains cas,
« VBR » apparaît au milieu de la lecture, et non
dès le début.
Changement des
options de lecture
(PLAY MODE)
Vous pouvez utiliser plusieurs options de
lecture comme la sélection des morceaux que
vous souhaitez écouter ou le choix de l’ordre
de lecture des morceaux.
Pour obtenir des détails sur les options de
lecture, voir page 18.
Vous pouvez également lire plusieurs fois
des morceaux grâce aux options de lecture
(lecture répétée, page 20).
Appuyez sur DISPLAY/MENU
1
jusqu’à ce que l’écran MENU
apparaisse.
Faites glisser le levier vers
2
ou pour sélectionner « PLAY
MODE », puis appuyez sur /
ENTER*.
* Vous pouvez également utiliser
DISPLAY/MENU pour entrer la
sélection ainsi que / ENTER.
Faites glisser le levier vers ou
3
pour sélectionner les options
de lecture.
Le paramètre par défaut est « ALL »
(lecture normale).
Lecture
Les options de lecture apparaissent ici.
Pour revenir en lecture normale
Sélectionnez « ALL » dans le menu PLAY
MODE.
17
FR
Page 50

Options de lecture
Lecture
19
FR
(PLAY MODE)
Lorsque vous sélectionnez la lecture de pistes pourvues de signets ou programmée, vous devez
sélectionner les morceaux que vous souhaitez écouter. Voir page 19 pour en savoir plus sur la
sélection des pistes.
Afchage Explication
ALL
(lecture normale)
GROUP
(lecture de groupe)
1
(lecture d’une seule piste)
SHUFFLE
(lecture aléatoire)
GP SHUF
(lecture de groupe aléatoire)
PLAY LIST
(lecture de liste de sélection
m3u)
BOOK MARK
(lecture de pistes pourvues
de signets)
AUTO RANK
(lecture d’ordre automatique)
RANK SHUF
(lecture d’ordre automatique
aléatoire)
PROGRAM
(lecture programmée)
* Une liste de sélection m3u est un chier dans lequel un ordre de lecture de chiers MP3 a été encodé. Pour
utiliser la fonction de liste de sélection, enregistrez des chiers MP3 sur un CD-R/CD-RW en utilisant un
logiciel de codage prenant en charge le format m3u.
Toutes les pistes du CD sont lues dans l’ordre de leur numéro.
Toutes les pistes du groupe sélectionné sont lues (ATRAC CD ou MP3
uniquement).
La piste actuelle n’est lue qu’une seule fois.
Toutes les pistes du CD sont lues de façon aléatoire.
Toutes les pistes du groupe sélectionné sont lues une fois dans un ordre
aléatoire (ATRAC CD ou MP3 uniquement).
Les pistes de la liste de sélection m3u choisie sont lues (CD MP3
uniquement).
Après avoir sélectionné « PLAY LIST », poussez le levier vers ou
pour sélectionner une liste, puis appuyez sur /ENTER.
Les pistes pourvues de signets sont lues ( page 19).
Les pistes que vous lisez le plus souvent sur le CD sont lues de la 10è
à la première.
Après avoir sélectionné « AUTO RANK », appuyez sur /ENTER.
Jusqu’à 32 pistes, que le lecteur a automatiquement enregistrées
comme les plus fréquemment jouées, sont lues de façon aléatoire.
Après avoir sélectionné « RANK SHUF », appuyez sur /ENTER.
Jusqu’à 64 pistes sont lues dans l’ordre que vous préférez
( page 19).
18
FR
Page 51

Lecture de vos pistes
001<PGM1
1 2
préférées
pourvues de signets)
(lecture de pistes
Lecture de pistes dans
l’ordre de votre choix
(lecture programmée)
Pendant la lecture de la piste à
1
laquelle vous souhaitez ajouter
un signet, appuyez sur /ENTER
et maintenez la touche enfoncée
jusqu’à ce que disparaisse et que
clignote à la place.
Si vous souhaitez ajouter un signet à
2
deux pistes ou plus, répétez l’étape 1.
Vous pouvez ajouter des signets à 10 CD
audio maximum (jusqu’à 99 pistes par
CD) et à 5 ATRAC CD ou MP3 maximum
(jusqu’à 999 pistes par CD).
Appuyez sur DISPLAY/MENU et
3
maintenez la touche enfoncée
jusqu’à ce que l’écran MENU
apparaisse.
Faites glisser le levier vers
4
ou pour sélectionner « PLAY
MODE », puis appuyez sur /ENTER.
Faites glisser le levier vers
5
ou pour sélectionner « BOOK
MARK », puis appuyez sur /
ENTER.
s’allume et la lecture des pistes avec
signets commence, dans l’ordre des
numéros de piste et non dans l’ordre dans
lequel vous avez ajouté les signets.
Pour supprimer des signets
Pendant la lecture d’une piste comportant
un signet, appuyez sur /ENTER et
maintenez la touche enfoncée jusqu’à ce que
disparaisse.
Remarques
• Si vous essayez d’ajouter un signet à des pistes
pour un 11è CD (ou un 6è pour les ATRAC CD
ou MP3), les signets du CD que vous avez lu en
premier s’effacent.
• Tous les signets stockés dans la mémoire seront
effacés si vous débranchez toutes les sources
d’alimentation.
Pendant que le lecteur est arrêté,
1
sélectionnez « PROGRAM »
à l’étape 3 de la procédure
« Changement des options de
lecture (PLAY MODE) » ( page 17),
puis appuyez sur /ENTER.
Numéro de piste (CD audio ou CD-TEXT) ou
ordre de lecture (ATRAC CD ou MP3)
Ordre de lecture (CD audio ou CD-TEXT) ou
nom du chier (ATRAC CD ou MP3)
Faites glisser le levier vers ou
2
pour sélectionner la piste et
appuyez sur DISPLAY/MENU pour
entrer la sélection.
Vous pouvez également sélectionner une
piste d’un autre groupe en appuyant sur
(groupe) / pendant la lecture
d’un ATRAC CD ou d’un MP3.
Répétez l’étape 2 pour sélectionner
3
les pistes dans l’ordre que vous
préférez.
Vous pouvez sélectionner jusqu’à 64 pistes.
Lorsque vous avez ni d’entrer la 64è piste,
le numéro de piste sélectionné en premier
(CD audio) ou le nom du chier (ATRAC
CD ou MP3) apparaît sur l’afchage.
Si vous sélectionnez 65 pistes ou plus, les
premières entrées s’effacent au fur et à
mesure.
Appuyez sur /ENTER.
4
« PGM » s’allume sur l’afchage et la
lecture commence dans l’ordre sélectionné.
Pour vérier le programme
Pendant la programmation, appuyez sur
DISPLAY/MENU à plusieurs reprises avant
l’étape 4.
Lecture
19
FR
Page 52

MENU
>REPEAT
Lecture de pistes répétée
Lecture
21
FR
(lecture répétée)
Sélectionnez l’option de lecture
1
souhaitée ( page 18).
Appuyez sur DISPLAY/MENU et
2
maintenez la touche enfoncée
jusqu’à ce que l’écran MENU
apparaisse.
Faites glisser le levier vers ou
3
pour sélectionner « REPEAT »,
puis appuyez sur /ENTER.
Modication de la
qualité sonore et des
réglages
Pour plus de détails sur les éléments de
réglage, voir page 21.
Appuyez sur DISPLAY/MENU
1
jusqu’à ce que l’écran MENU
apparaisse.
Faites glisser le levier vers ou
4
pour sélectionner « ON », puis
appuyez sur /ENTER pour entrer
la sélection.
Pour revenir en lecture normale
Sélectionnez « OFF » à l’étape 4.
Faites glisser le levier vers
2
ou pour sélectionner
« SOUND » ou « OPTION », puis
appuyez sur /ENTER. Si vous
sélectionnez « OPTION », poussez
le levier vers ou pour
sélectionner l’élément que vous
voulez congurer, puis appuyez sur
/ENTER.
Faites glisser le levier vers ou
3
pour sélectionner une option,
puis appuyez sur /ENTER.
Pour retourner à l’écran précédent (à
l’exception de la lecture programmée)
Appuyez sur (groupe) .
Pour annuler la conguration
Appuyez sur .
20
FR
Page 53

Mode SOUND
Elément
SOUND
(paramètre audio)
Options ( : paramètre par défaut)
OFF
SOFT Pour les données audio vocales, accentuées et de gamme
ACTIVE Sons entraînants, dont l’accent est sur les gammes hautes et
HEAVY Sons puissants dont l’accent est encore plus porté sur les
Qualité sonore normale
moyenne
basses
gammes hautes et basses que pour les sons ACTIVE
Mode OPTION
Eléments
DIRECTION 1)
(inversion des
caractères sur
l’afchage)
G-PROTECTION
(G-PRO SET)
(pour empêcher que
le disque ne saute)
2)
AVLS
(limitation du
volume)
TIMER
(programmateur
d’extinction)
1) Vous pouvez régler ceci uniquement quand le lecteur est arrêté.
2) AVLS est l’abréviation d’Automatic Volume Limiter System (système de limitation automatique du volume).
Options ( : paramètre par défaut)
NORMAL
REVERSE Les caractères apparaissent sur l’afchage dans le sens inverse,
G-PRO 1
1)
G-PRO 2 Protection améliorée contre les sauts du CD incluse dans ce
ON Le volume maximum est limité an de protéger votre ouïe.
OFF
1-99 min.
OFF
Les caractères apparaissent sur l’afchage dans le sens normal.
de sorte que vous pouvez les lire à partir du côté opposé.
Le levier , et les boutons • fonctionnent de
manière inversée.
Les indicateurs et icônes de mode de lecture ne peuvent pas
être inversés.
Protection contre les sauts du CD en plus d’une excellente
qualité audio de lecture.
lecteur.
Le volume se modie sans limiter son niveau.
s’allume. Vous pouvez vérier le temps de lecture restant en
sélectionnant cette option pendant la lecture.
Faites glisser le levier vers ou à plusieurs reprises
pour augmenter ou diminuer la durée de 5 minutes ou
maintenez le levier vers ou pendant 2 secondes
minimum pour l’augmenter ou la diminuer d’une minute. Le
paramètre par défaut est « 10 minutes ».
Le programmateur n’est pas activé.
Suite
Lecture
21
FR
Page 54

Eléments
BEEP
(son de
fonctionnement)
SEAMLESS
1)
(lecture de pistes en
continu)
1) Vous pouvez régler ceci uniquement quand le lecteur est arrêté. Cette fonction est disponible avec les ATRAC
CD uniquement.
Remarques
• Même si « G-PROTECTION » est activé, le CD peut sauter :
– lorsque le lecteur CD reçoit un choc continu plus important que prévu,
– lorsque le CD lu est sale ou rayé ou
– (pour les CD-R/CD-RW) lorsqu’un disque de mauvaise qualité est lu ou qu’il y a un problème avec l’appareil
ou le logiciel d’enregistrement d’origine.
• Même si « SEAMLESS » est réglé sur « ON », il se peut que les pistes ne soient pas lues en continu selon la
méthode d’enregistrement de la source.
Options ( : paramètres par défaut)
ON
Le bip sonore se fait entendre lorsque vous faites fonctionner
le lecteur.
OFF Le bip sonore est désactivé.
ON Le CD est lu sans interruption entre les pistes.
OFF
Le CD est lu tel qu’il a été enregistré, avec des blancs entre les
pistes.
22
FR
Page 55

Utilisation de la radio
AVLS
>LOCAL
Ecoute de la radio
Vous pouvez écouter des émissions FM, AM,
TV et WB.
Appuyez sur RADIO ON/BAND pour
1
allumer la radio.
Appuyez sur RADIO ON/BAND
2
jusqu’à ce que la bande souhaitée
apparaisse.
Chaque fois que vous appuyez sur cette
touche, l’afchage change comme suit :
FM AM TV WB
Appuyez sur TUNE ou pour
3
syntoniser la station souhaitée et
ajuster le volume.
Remarque
Si vous connectez la che de la source
d’alimentation externe à la prise DC IN 4,5 V de
votre lecteur CD, celui-ci s’éteint. Allumez-le en
appuyant sur RADIO ON/BAND pour continuer
l’écoute.
Arrêt de la radio
Appuyez sur •RADIO OFF.
En AM, réorientez le lecteur CD lui-même.
Remarque
Gardez le casque/les écouteurs connectés à la
prise du lecteur CD. Le cordon du casque/des
écouteurs sert d’antenne FM.
En cas de difculté
d’écoute d’une émission
FM/TV/WB
1 Tout en écoutant la radio, appuyez sur
DISPLAY/MENU et maintenez la touche
enfoncée jusqu’à ce que l’afchage
change.
2 Faites glisser le levier vers ou
pour sélectionner « LOCAL », puis
appuyez sur /ENTER.
3 Faites glisser le levier vers ou
pour sélectionner « ON », puis appuyez
sur /ENTER pour entrer la sélection.
Utilisation de la radio
Syntonisation rapide de la
station
Maintenez la touche TUNE ou
enfoncée à l’étape 3 jusqu’à ce
que la fréquence commence à changer
sur l’afchage. Le lecteur CD balaie
automatiquement les fréquences radio et
s’arrête à la réception nette d’une station.
Amélioration de la
réception de l’émission
En FM, déroulez le cordon du casque/des
écouteurs.
Casque ou écouteurs
Protection de l’ouïe
La fonction AVLS (Automatic Volume
Limiter System, système de limitation
automatique du volume) limite le volume
maximum pour protéger l’ouïe.
1 Tout en écoutant la radio, appuyez sur
DISPLAY/MENU et maintenez la touche
enfoncée jusqu’à ce que l’afchage change.
2 Faites glisser le levier vers ou
pour sélectionner « AVLS », puis appuyez
sur /ENTER.
3 Faites glisser le levier vers ou
pour sélectionner « ON », puis appuyez
sur /ENTER pour entrer la sélection.
Pour annuler la fonction AVLS
Effectuez les étapes 1 à 3, en réglant le
paramètre AVLS sur « OFF ».
23
FR
Page 56

Arrêt automatique de la
FM01
87.50 MHz
Utilisation de la radio
25
FR
radio
Vous pouvez régler la radio pour qu’elle
s’arrête automatiquement au bout de 10 à
99 minutes, par intervalles de 10 minutes.
Pendant que la fonction de programmateur est
active, s’allume sur l’afchage.
1 Tout en écoutant la radio, appuyez sur
DISPLAY/MENU et maintenez la touche
enfoncée jusqu’à ce que l’afchage change.
2 Faites glisser le levier vers ou
pour sélectionner « TIMER », puis
appuyez sur /ENTER.
3 Faites glisser le levier vers ou
pour sélectionner la durée à dénir
de « 10 » à « 99 », puis appuyez sur
/ENTER pour entrer la sélection.
Pour vérier le délai d’arrêt automatique
de la radio
Pendant la lecture, effectuez les étapes 1 et 2.
Pour annuler la fonction TIMER
La fonction TIMER de la radio sera annulée :
• si vous réglez le paramètre TIMER lors des
étapes 1 à 3 sur « OFF » ;
• lorsque vous éteignez la radio ;
• lorsque vous démarrez la lecture d’un CD.
Présélection des
stations de radio
Vous pouvez présélectionner jusqu’à
51 stations : 7 TV, 4 WB, 30 FM et 10 AM.
Appuyez sur RADIO ON/BAND pour
1
allumer la radio.
Appuyez sur RADIO ON/BAND pour
2
choisir la bande.
Appuyez sur MEMORY pendant au
3
moins 2 secondes.
Le numéro de présélection clignote dans
l’afchage.
Appuyez sur DISPLAY/MENU
4
pendant au moins 2 secondes.
Le lecteur CD commence la recherche des
stations à partir des fréquences les plus
faibles et s’arrête environ 3 secondes lors
de la réception d’une station.
Pour présélectionner la station
5
reçue, appuyez sur DISPLAY/
MENU pendant que le numéro de
présélection clignote.
La station reçue est présélectionnée sur le
numéro 1 et le lecteur CD recherche alors
la station suivante. Si vous n’appuyez pas
sur DISPLAY/MENU dans les 3 secondes,
le lecteur CD commence la recherche de
la station suivante sans mémoriser celle
en cours.
24
FR
Répétez l’étape 5 jusqu’à ce
6
que toutes les stations soient
présélectionnées.
Si les stations sont déjà mémorisées, les
stations nouvellement présélectionnées
remplacent les anciennes.
Page 57

Présélection manuelle des
FM01
87.50 MHz
stations
1 Appuyez sur RADIO ON/BAND pour
allumer la radio.
2 Appuyez sur RADIO ON/BAND pour
choisir la bande.
3 Appuyez sur MEMORY et maintenez la
touche enfoncée jusqu’à ce que le numéro
de présélection clignote sur l’afchage.
A partir de cette étape, commencez
l’opération suivante dans les 30 secondes
après la n de l’opération précédente. Si
30 secondes s’écoulent sans intervention,
le numéro de présélection s’arrête de
clignoter, indiquant que le lecteur CD a
quitté le mode de veille de la mémoire
de présélection. Si ceci se produit,
recommencez à l’étape 3.
4 Faites glisser le levier vers /
PRESET – ou /PRESET + à plusieurs
reprises pour sélectionner le numéro de
présélection de la station pendant que le
numéro clignote.
5 Appuyez sur TUNE ou pour
syntoniser la station souhaitée pendant
que le numéro de présélection clignote.
6 Appuyez sur DISPLAY/MENU.
Lorsque la station est présélectionnée avec
succès, le bip sonore se fait entendre. La
nouvelle station remplace l’ancienne.
Le numéro de présélection est incrémenté
et le lecteur CD passe en mode de veille
de la mémoire de présélection.
7 Répétez les étapes 4 à 6 lorsque vous
présélectionnez les stations dans la même
bande. Lorsque vous présélectionnez les
stations dans une autre bande, appuyez
sur MEMORY et maintenez la touche
enfoncée pour quitter le mode de veille
de la mémoire de présélection. Répétez
les étapes 2 à 6 une fois que le numéro de
présélection ne clignote plus.
Pour quitter le mode de veille de la
mémoire de présélection
Lorsque la radio est allumée, vous pouvez
quitter le mode de veille de la mémoire de
présélection à l’aide de l’une des procédures
suivantes. Les stations présélectionnées
restent cependant mémorisées dans la
mémoire du lecteur CD.
• Maintenez la touche MEMORY enfoncée
jusqu’à ce que le numéro de présélection
s’arrête de clignoter.
• N’appuyez sur aucune touche pendant
30 secondes. Le numéro de présélection
s’arrête de clignoter.
• Appuyez sur /ENTER. Le lecteur CD
passe en mode de lecture de CD.
• Appuyez sur •RADIO OFF. La radio
s’éteint.
Pour annuler toutes les stations
présélectionnées
1 Tandis que la radio est éteinte et la lecture
de CD arrêtée, appuyez sur DISPLAY/
MENU et maintenez la touche enfoncée
jusqu’à ce que l’écran MENU apparaisse.
2 Faites glisser le levier vers ou
pour sélectionner « OPTION », puis
appuyez sur /ENTER.
3 Faites glisser le levier vers ou
pour sélectionner « TU PRESET », puis
appuyez sur /ENTER pour entrer la
sélection.
« Clear? » apparaît dans l’afchage.
Lorsque vous appuyez sur /ENTER,
toutes les stations présélectionnées sont
annulées.
Utilisation de la radio
25
FR
Page 58

Ecoute de stations de
radio présélectionnées
Vous pouvez syntoniser aisément la station
en faisant glisser le levier vers la touche
/PRESET – ou /PRESET +.
Appuyez sur RADIO ON/BAND pour
1
choisir la bande.
Faites glisser le levier vers /
2
PRESET – ou /PRESET + pour
syntoniser une station mémorisée.
Modication de
l’intervalle de
syntonisation
Lors de l’utilisation du lecteur CD à
l’étranger, modiez si nécessaire l’intervalle
de syntonisation AM dans le menu.
Zone 9 kHz : Asie et Europe
Zone 10 kHz : Etats-Unis, Canada et
Amérique du Sud
Modiez-le pendant que la radio est éteinte et
que la lecture de CD est arrêtée, en procédant
comme suit.
Faites glisser le levier vers ou
4
pour sélectionner « 9 kHz »
ou « 10 kHz », puis appuyez sur
/ENTER pour entrer la sélection.
Le paramètre par défaut est « 10 kHz ».
Remarque
Après avoir modié l’intervalle de syntonisation,
vous devez présélectionner à nouveau des stations
de radio.
Appuyez sur DISPLAY/MENU et
1
maintenez la touche enfoncée
jusqu’à ce que l’écran MENU
apparaisse.
Faites glisser le levier vers ou
2
pour sélectionner « OPTION »,
puis appuyez sur /ENTER.
Faites glisser le levier sur ou
3
pour sélectionner « AM STEP »,
puis appuyez sur /ENTER pour
entrer la sélection.
26
FR
Page 59

Informations complémentaires
Dépannage
Si un problème quelconque persiste après l’avoir vérié, consultez votre revendeur Sony le plus
proche.
Son
Problème Cause et/ou action de correction
Le volume n’augmente pas même
si vous appuyez de manière
répétée sur VOL +.
Aucun son ou bruit n’est audible.
Un cliquetis se fait entendre
depuis le CD.
Utilisation/Lecture
Problème Cause et/ou action de correction
Le temps de lecture est trop court.
La lecture du CD est impossible.
Il est impossible de lire certaines
pistes.
« Lobatt » apparaît sur l’afchage
et le CD ne fonctionne pas.
« Hi DC in » apparaît dans
l’afchage.
« AVLS » est réglé sur « ON ». Réglez-le sur « OFF »
( page 21).
Connectez le casque ou les écouteurs fermement au lecteur.
Les ches sont sales. Nettoyez régulièrement les ches du
casque ou des écouteurs avec un linge propre et sec.
Fermez bien le couvercle du compartiment des piles
( page 12).
Vériez que vous utilisez des piles alcalines et non au
manganèse.
Remplacez les piles sèches par de nouvelles piles alcalines LR6
(format AA) ( page 11).
Vous essayez de lire des chiers dont le format
d’enregistrement n’est pas compatible avec ce lecteur
( page 5, 6).
Remplacez les piles sèches par de nouvelles piles alcalines LR6
(format AA) ( page 11).
Un adaptateur secteur plus puissant que celui fourni ou
recommandé est en cours d’utilisation. Utilisez uniquement
l’adaptateur secteur fourni ou le cordon d’une batterie
de voiture recommandé dans « Accessoires en option »
( page 31).
Informations complémentaires
Suite
27
FR
Page 60

Problème Cause et/ou action de correction
Informations complémentaires
29
FR
La lecture du CD est impossible ou
« No disc » apparaît sur l’afchage
lorsqu’un CD est placé dans le
lecteur.
« HOLD » clignote sur l’afchage
lorsque vous appuyez sur une
touche et le CD n’est pas lu.
La lecture commence à
l’endroit où vous l’avez arrêtée
précédemment (fonction de
reprise).
Pendant la lecture d’un ATRAC CD
ou d’un MP3, le CD ne tourne pas,
mais le son est normal.
« NO FILE » apparaît sur
l’afchage après avoir appuyé
sur /ENTER ou lorsque le
couvercle du lecteur est verrouillé.
L’afchage LCD est difcile à lire
ou ralenti.
La lecture s’est soudainement
interrompue.
Le CD est sale ou défectueux. Nettoyez-le ou changez-le.
Vériez que le CD est inséré avec l’étiquette vers le haut
( page 14).
De la condensation s’est formée. Laissez le lecteur CD de
côté pendant plusieurs heures jusqu’à ce que la condensation
s’évapore.
Fermez bien le couvercle du compartiment des piles
( page 12).
Vériez que les piles sont insérées correctement ( page 12).
Branchez l’adaptateur secteur à une prise secteur ( page 13).
Appuyez sur /ENTER une seconde ou plus après le
branchement de l’adaptateur.
Le CD-R/CD-RW placé dans le lecteur est vide.
Le problème porte sur la qualité du CD-R/CD-RW, l’appareil
d’enregistrement ou le logiciel d’application.
Les touches sont verrouillées. Faites glisser le commutateur
HOLD vers l’arrière ( page 16).
La fonction de reprise est en cours de fonctionnement.
Pour commencer une lecture depuis le début, appuyez sur
/ENTER et maintenez la touche enfoncée jusqu’à ce que
la première piste commence à être lue ou ouvrez le couvercle
du lecteur ( page 14). Vous pouvez aussi retirer toutes les
sources d’alimentation, puis insérer les piles ou brancher de
nouveau l’adaptateur secteur.
Ce lecteur est conçu pour arrêter la rotation d’un ATRAC CD
ou MP3 pendant une lecture pour optimiser la consommation
d’énergie. Le lecteur ne présente pas de dysfonctionnement.
Aucun chier ATRAC3plus/ATRAC3/MP3 n’est présent sur
le CD.
Un CD-RW dont les données ont été effacées est en cours
d’utilisation.
Le CD est sale.
Vous utilisez votre lecteur CD à des températures trop élevées
(au-dessus de 40 °C/104 °F) ou trop basses (en dessous de
0 °C/32 °F). A température ambiante, l’afchage retrouvera ses
conditions d’utilisation normales.
Le programmateur d’extinction a été activé. Paramétrez le
« TIMER » sur « OFF » ( page 21).
Les piles sèches sont complètement à plat. Remplacez les
piles sèches par de nouvelles piles alcalines LR6 (format AA)
( page 11).
28
FR
Page 61

Radio
Problème Cause et/ou action de correction
Le son est faible ou de qualité
médiocre.
Remplacez les piles par de nouvelles piles alcalines LR6
(format AA). ( page 11)
Eloignez le lecteur CD des appareils électroniques (téléviseurs,
PC, etc.).
Gardez l’adaptateur secteur à distance du lecteur CD.
Divers
Problème Cause et/ou action de correction
Lorsque vous refermez le
couvercle du lecteur CD, le CD
commence à tourner.
Le lecteur lit les informations du CD et ne présente pas de
dysfonctionnement.
Informations complémentaires
29
FR
Page 62

Entretien
Informations complémentaires
31
FR
Spécications
Pour nettoyer le boîtier
Utilisez un linge propre et légèrement
humidié avec de l’eau ou une solution
détergente douce. N’utilisez pas d’alcool,
d’essence ou de diluant.
Pour nettoyer la che du
casque/des écouteurs
Gardez la che du casque/des écouteurs
propre pour obtenir un son optimal.
Essuyez-la avec un chiffon doux et sec.
Pour retirer de la
poussière ou du sable
de la protection en
caoutchouc
Du sable ou de la poussière sur la protection
en caoutchouc empêche la bonne fermeture
du couvercle et de l’eau peut s’inltrer.
Eliminez la poussière de temps en temps.
Nous recommandons le remplacement annuel
de la protection en caoutchouc, disponible en
option dans un centre de service agréé Sony.
Lecteur CD
Système
Système audionumérique compact disc
Propriétés de la diode laser
Matière : GaAlAs
Longueur d’onde : λ = 770 - 800 nm
Durée d’émission : continue
Sortie laser : inférieure à 44,6 µW
(Cette sortie est la valeur mesurée à une distance
de 200 mm par rapport à la surface de la lentille
de l’objectif du bloc de saisie optique avec 7 mm
d’ouverture.)
Conversion N-A
Commande de temps à quartz 1 bit
Réponse en fréquence
20 - 20 000 Hz
Sortie (niveau d’entrée à 4,5 V)
Ecouteurs (miniprise stéréo)
Environ 5 mW + environ 5 mW à 16 Ω
+1
dB (mesurée par JEITA)
–2
Radio
Plage de fréquences
• Zone 9 kHz :
TV : 2 à 13 canaux
WB (bande météo) : 1 à 7 canaux
FM : 87,5 à 108 MHz
AM : 531 à 1 710 kHz
• Zone 10 kHz :
TV : 2 à 13 canaux
WB (bande météo) : 1 à 7 canaux
FM : 87,5 à 108 MHz
AM : 530 à 1 710 kHz
30
Antenne
FM : Cordon du casque/des écouteurs
AM : Antenne barre de ferrite intégrée
Caractéristiques
générales
Puissance de raccordement
• Piles LR6 (format AA) : 1,5 V CC × 2
• Adaptateur secteur (prise DC IN 4.5 V) :
120 V, 60 Hz
FR
Page 63

Température ambiante
5 °C - 35 °C (41 °F - 95 °F)
Dimensions (l/h/p) (sans les commandes ni les
pièces en saillie)
Environ 136 × 30,5 × 136 mm (53⁄8 × 11⁄4 × 53⁄8 pouces)
Poids (sans les accessoires)
Environ 276 g (9,8 oz.)
Brevets américains et internationaux sous licence de
Dolby Laboratories.
La conception et les spécications sont susceptibles
d’être modiées sans préavis.
Accessoires en option
1)
Adaptateur secteur
Système de haut-parleurs
actifs
Cordon de batterie de
2)
voiture
Cordon de batterie de
voiture avec un kit de
raccordement pour
2)
voiture
Kit de raccordement pour
2)
voiture
Cordon de connexion
Ecouteurs
1) Les spécications pour les adaptateurs secteur
varient d’une région à une autre. Vériez le
voltage de votre région et la forme de la prise
avant d’effectuer votre achat.
2) L’écoute de la radio à l’aide de ces accessoires
peut générer des interférences. Nous vous
recommandons de lire uniquement des CD
lorsque vous les utilisez.
Il se peut que votre revendeur ne dispose pas
de certains accessoires de la liste ci-dessus.
Demandez-lui la liste des accessoires
disponibles dans votre pays/région.
AC-E45HG
SRS-Z1
SRS-Z30
DCC-E345
DCC-E34CP
CPA-9C
RK-G129
RK-G136
MDR-E818LP
MDR-J10
Informations complémentaires
31
FR
Page 64

Index
Symboles
1 (lecture d’une seule piste) 18
(lecture de groupe) 18
SHUF (lecture de groupe aléatoire) 18
(lecture de liste de sélection m3u) 18
(lecture de pistes pourvues de signets) 18, 19
PGM (lecture programmée) 18, 19
(pile) 12
(programmateur) 21
A
a00 (lecture d’ordre automatique) 18
ACTIVE 21
Adaptateur secteur 13
Afchage 11, 16
ALL (lecture normale) 17, 18
Antenne 23
Arrêter la lecture 15
ATRAC3plus/ATRAC3 5
ATRAC CD 5
Avance/retour rapide 15
AVLS 21
B
BEEP 22
C
CD-ROM (SonicStage) 9
CD MP3 5
D
Durée de vie des piles 12
E
Ecouteurs 9
Etiquette ID3 16
F
Format CDDA 5
G
G-PROTECTION 21
H
HEAVY 21
HOLD (fonction) 16
L
Lecture aléatoire 18
Lecture d’ordre automatique 18
Lecture d’ordre automatique aléatoire 18
Lecture d’une seule piste 18
Lecture de groupe 18
Lecture de groupe aléatoire 18
Lecture de liste de sélection m3u 18
Lecture de pistes pourvues de signets 18, 19
Lecture normale 15, 18
Lecture programmée (PGM) 18, 19
Lecture répétée 20
M
Mettre en pause 15
O
OPTION 21
P
PLAY LIST (lecture de la liste de
sélection m3u) 18
Présélection 24
R
RANK SHUF (lecture d’ordre automatique
aléatoire) 18
S
SEAMLESS 22
SOFT 21
SonicStage 4
SOUND 21
T
TIMER 21
32
FR
Page 65

Page 66

Page 67

Page 68

This warranty is valid only in the United States.
Sony Corporation Printed in Malaysia
 Loading...