

Sony D-NE321CK User Manual
Sony Corporation Printed in China
© 2004 Sony Corporation
Atrac CD Walkman
Portable
CD Player
This warranty is valid only in the United States.
Operating Instructions
D-NE321CK/NE326CK
2-318-870-11 (1)

WARNING
To prevent fire or shock hazard,
do not expose the unit to rain
or moisture.
Do not install the appliance in a confined
space, such as a bookcase or built-in
cabinet.
To prevent fire, do not cover the ventilation
of the apparatus with newspapers, tablecloths, curtains, etc. And don’t place lighted
candles on the apparatus.
To prevent fire or shock hazard, do not place
objects filled with liquids, such as vases, on
the apparatus.
CAUTION
The use of optical instruments with this
product will increase eye hazard.
Certain countries may regulate disposal
of the battery used to power this product.
Please consult with your local authority.
CAUTION
• INVISIBLE LASER RADIATION
WHEN OPEN
• DO NOT STARE INTO BEAM OR
VIEW DIRECTLY WITH OPTICAL
INSTRUMENTS
• CLASS 1M INVISIBLE LASER
RADIATION WHEN OPEN
• DO NOT VIEW DIRECTLY WITH
OPTICAL INSTRUMENTS
The validity of the CE marking is restricted
to only those countries where it is legally
enforced, mainly in the countries EEA
(European Economic Area).
Owner’s Record
The model number and the serial number are
located at the rear of the CD player. Record these
numbers in the spaces provided below. Refer to them
whenever you call upon your Sony dealer regarding
this product.
Model No. __________________________
Serial No. __________________________
For customers who purchased this product in
the USA
Product registration
Please register this product on line at www.sony.
com/walkmanreg
<http://www.sony.com/walkmanreg>
Proper registration will enable us to send you periodic
mailings about software upgrades, new products,
services and other important announcements. Thank
you.
If you have any questions about this product,
contact:
www.sony.com/walkmansupport
Sony Network Portable Audio Support Line
1-(866)-456-7669
Sony Customer Information Services Center
12451 Gateway Blvd., Ft. Myers, FL 33913
This equipment has been tested and found to comply
with the limits for a Class B digital device, pursuant
to Part 15 of the FCC Rules. These limits are
designed to provide reasonable protection against
harmful interference in a residential installation. This
equipment generates, uses, and can radiate radio
frequency energy and, if not installed and used in
accordance with the instructions, may cause harmful
interference to radio communications. However, there
is no guarantee that interference will not occur in a
particular installation. If this equipment does cause
harmful interference to radio or television reception,
which can be determined by turning the equipment
off and on, the user is encouraged to try to correct the
interference by one or more of the following measures:
– Reorient or relocate the receiving antenna.
– Increase the separation between the equipment and
receiver.
– Connect the equipment into an outlet on a circuit
different from that to which the receiver is
connected.
– Consult the dealer or an experienced radio/TV
technician for help.
You are cautioned that any changes or modifications
not expressly approved in this manual could void your
authority to operate this equipment.
2

This manual describes how to use the CD player.
For the supplied software SonicStage, please see
“Installation/Operating Guide.”
Notice for users
On the supplied software
Depending on the type of the text and characters,
the text shown on SonicStage may not be displayed
properly on the device. This is due to:
– The limitations of the connected player.
– The player is not functionning normally.
ATRAC3plus is a trademark of Sony Corporation.
“WALKMAN” is a registered trademark of Sony
Corporation to represent Headphone Stereo
products. is a trademark of Sony
Corporation.
Table of Contents
Create Your Own ATRAC CDs ................ 4
Which discs can you play on this CD
player? .......................................................5
Precautions ............................................ 7
On safety ....................................................7
On the CD player ....................................... 7
On handling CDs ........................................ 7
On headphones/earphones .......................... 7
Getting Started
Checking the Supplied Accessories ..... 8
Guide to Parts and Controls .................. 8
Installing in a Car ................................. 10
Where to place your CD player ................ 10
Mounting your CD player ........................ 10
Replacing the fuse of the car battery cord 11
Mounting the rotary commander .............. 11
Preparing a Power Source
(Dry Battery) ........................................ 12
Checking the remaining power of the
battery ...................................................... 13
When using the AC power adaptor ...........14
Playback
Playing a CD ......................................... 15
Basic playback operations (Play, stop,
search) ..................................................... 16
Locking the controls (HOLD) ..................17
Searching for Your Favorite Track/File 17
Searching by viewing groups (File View) 17
Searching by viewing a list of groups/files
(List View) ............................................... 18
Checking CD information on the display .18
Changing Playback Options (PLAY
MODE) .................................................. 20
Playback options (PLAY MODE) ............21
Playing groups .......................................... 22
Playing your favorite tracks (Bookmark
play) ......................................................... 22
Playing your favorite play lists (m3u play
list play) ................................................... 22
Playing tracks in your favorite order (PGM
play) ......................................................... 23
Playing tracks repeatedly (Repeat play) ... 23
Changing Sound Quality ..................... 24
Selecting the sound quality ......................24
Customizing sound quality ....................... 24
SOUND items ..........................................25
Changing Optional Settings ................ 26
Setting various functions .......................... 26
OPTION items ......................................... 27
Additional Information
Troubleshooting ................................... 29
Maintenance ......................................... 32
Specifications ....................................... 32
Optional Accessories .......................... 33
Index ..................................................... 34
3
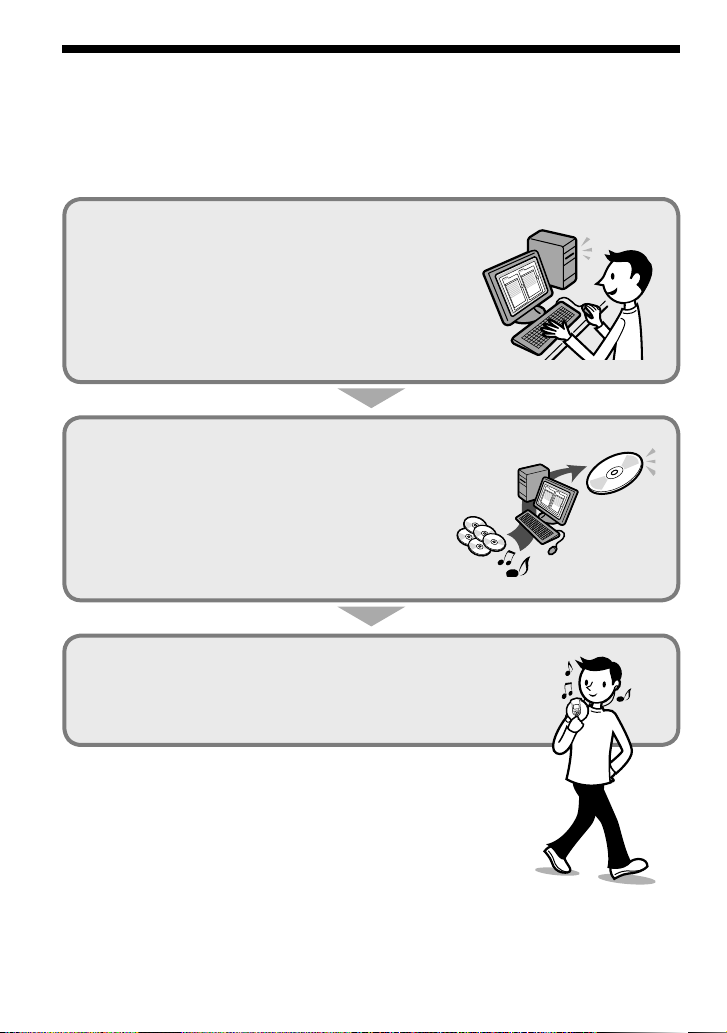
Create Your Own ATRAC CDs
In addition to the usual audio CDs, you can play an original CD, called “ATRAC CD,” that you
create with the supplied software, SonicStage. Using SonicStage, about 30 audio CDs* can be
recorded on one CD-R or CD-RW.
The following is a quick overview of how you listen to music on your ATRAC CD.
Install SonicStage on your computer.
SonicStage is software that takes music downloaded
from audio CDs on your computer and creates original
CDs. It can be installed from the supplied CD-ROM.
Create an ATRAC CD.
After selecting your favorite songs from music stored on
your computer, record them on a CD-R/CD-RW using
SonicStage.
Listen to them with this CD player.
You can take lots of songs wherever you go on your
original CD.
Please see the supplied “Installation/Operating Guide”
for how to install SonicStage and how to create ATRAC CDs.
* When the total playing time of one CD (album) is estimated at 60
minutes and you are recording on a 700 MB CD-R/CD-RW at 48 kbps
in ATRAC3plus format.
Audio CDs,
MP3 files
ATRAC CD
4
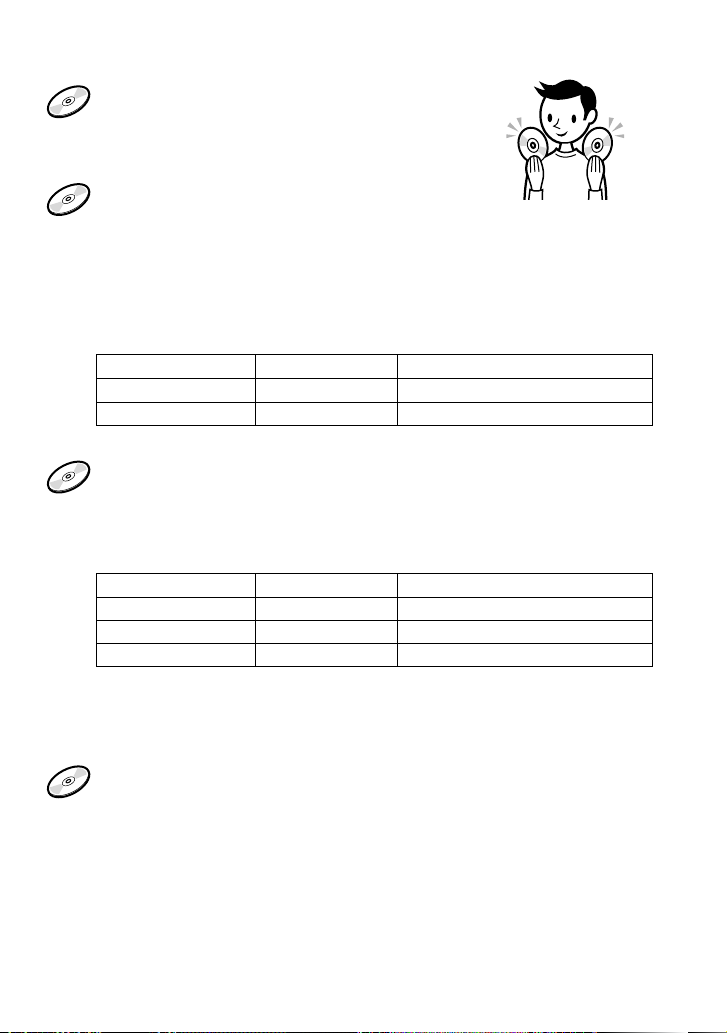
Which discs can you play on this CD player?
Audio CDs:
CD-DA format CDs
CD-DA (Compact Disc Digital Audio) is a recording
standard used for Audio CDs.
ATRAC CDs:
CD-R/CD-RW on which audio data compressed in the ATRAC3plus format
has been recorded by using SonicStage*
ATRAC3plus (Adaptive Transform Acoustic Coding3plus) is audio compression
technology that satisfies the demand for high sound quality and high compression
rates. ATRAC3plus can compress audio files to about 1/20 of their original size at 64
kbps.
Bit rates and sampling frequencies this CD player can play are:
Bit rates Sampling frequencies
ATRAC3 66/105/132 kbps 44.1 kHz
ATRAC3plus 48/64/256 kbps 44.1 kHz
Up to 62 characters can be displayed on this CD player.
MP3 CDs:
CD-R/CD-RW on which audio data compressed in the MP3 format has
been recorded by using a software other than SonicStage*
Bit rates and sampling frequencies this CD player can play are shown below. Variable
Bit Rate (VBR) files can also be played.
Bit rates Sampling frequencies
MPEG-1 Layer3 32 - 320 kbps 32/44.1/48 kHz
MPEG-2 Layer3 8 - 160 kbps 16/22.05/23 kHz
MPEG-2.5 Layer3 8 - 160 kbps 8/11.025/12 kHz
This CD player conforms to Version 1.0/1.1/2.2/2.3/2.4 of the ID3 tag format. ID3 tag
is a format for adding certain information (track name, album name, artist name, etc.)
to MP3 files. Up to 64 characters of ID3 tag information can be displayed on this CD
player.
CD-Extra and Mix-Mode CDs:
CD-R/CD-RW on which CD-DA format data and CD-ROM format data are
recorded together.*
If you cannot play your CD, change the “CD-EXTRA” setting in the OPTION menu
( page 28). Then you may play your CD.
An ATRAC CD on which audio data compressed in the MP3 format has been recorded using
software other than SonicStage can also be played.
With SonicStage, you cannot create a CD on which mixed format audio data is recorded.
* Only ISO 9660 Level 1/2 and Joliet extension format discs can be played.
Continued
5

Music discs encoded with copyright
protection technologies
This product is designed to play back
discs that conform to the Compact Disc
(CD) standard. Recently, various music
discs encoded with copyright protection
technologies are marketed by some record
companies. Please be aware that among those
discs, there are some that do not conform to
the CD standard and may not be playable by
this product.
Difference in file structures of ATRAC CDs
and MP3 CDs
ATRAC CDs and MP3 CDs consist of
"files" and "groups." A "file" is equivalent
to a "track" of an audio CD. A "group"
is a bundle of files and is equivalent to an
"album."
For MP3 CDs, this CD player recognizes an
MP3 folder as a "group" so that ATRAC CDs
and MP3 CDs can be operated in the same
way.
The usable number of groups and files
• Maximum number of groups: 256
• Maximum number of files: 999
Playing order of ATRAC CDs and MP3 CDs
For ATRAC CDs, files are played in the order
selected in SonicStage.
For MP3 CDs, the playing order may differ
depending on the method used to record MP3
files on the disc. A "play list" which contains
an MP3 file playing order can also be played.
In the following example, files are played in
order of to .
File
MP3
Group
(Maximum directory levels: 8)
Notes
• If ATRAC3plus files and MP3 files are recorded
on the same CD, this CD player plays the
ATRAC3plus files first.
• The playback capability of this CD player may
vary depending on the quality of the disc and the
condition of the recording device.
• Acceptable characters are A to Z, a to z, 0 to 9,
and _ (underscore).
• On a disc that has ATRAC3plus/MP3 files, do
not save files in other formats and do not make
unnecessary folders.
About ATRAC CDs
• CD-Rs/CD-RWs recorded in the ATRAC3plus
format cannot be played on your computer.
About MP3 CDs
• Be sure to add the file extension "mp3" to the file
name. However, if you add the extension "mp3"
to a file other than an MP3 file, the player will not
be able to recognize the file properly.
• To compress a source in an MP3 file, we
recommend setting the compression parameters to
"44.1 kHz," "128 kbps," and "Constant Bit Rate."
• To record up to the maximum capacity, set the
writing software to "halting of writing."
• To record up to the maximum capacity at one time
on media that has nothing recorded on it, set the
writing software to "Disc at Once."
6

Precautions
On safety
• Should any solid objects or liquid fall into
the CD player, unplug it and have it checked
by qualified personnel before operating it
any further.
• Do not put any foreign objects in the DC IN
3 V (external power input) jack.
On the CD player
• Keep the lens on the CD player clean and
do not touch it. If you do so, the lens may
be damaged and the CD player will not
operate properly.
• Do not put any heavy object on top of the
CD player. The CD player and the CD may
be damaged.
• Do not leave the CD player in a location
near heat sources, or in a place subject
to direct sunlight, excessive dust or sand,
moisture, rain, mechanical shock, unleveled
surface, or in a car with its windows closed.
• If the CD player causes interference to the
radio or television reception, turn off the
CD player or move it away from the radio
or television.
• Discs with non-standard shapes (e.g., heart,
square, star) cannot be played on this CD
player. Attempting to do so may damage
the CD player. Do not use such discs.
On handling CDs
• To keep the CD clean, handle it by its edge.
Do not touch the surface.
• Do not stick paper or tape onto the CD.
• Do not expose the CD to direct sunlight or
heat sources such as hot air ducts. Do not
leave the CD in a car parked under direct
sunlight.
On headphones/earphones
Road safety
Do not use headphones/earphones while
driving, cycling, or operating any motorized
vehicle. It may create a traffic hazard and
is illegal in some areas. It can also be
potentially dangerous to play your headsets
at high volume while walking, especially at
pedestrian crossings. You should exercise
extreme caution or discontinue use in
potentially hazardous situations.
Preventing hearing damage
Avoid using headphones/earphones at high
volume. Hearing experts advise against
continuous, loud and extended play. If you
experience a ringing in your ears, reduce
volume or discontinue use.
Consideration for others
Keep the volume at a moderate level. This
will allow you to hear outside sounds and to
be considerate to the people around you.
7
Getting Started
Checking the Supplied Accessories
• AC power adaptor • Earphones
(not supplied with USA/
Canadian models)
• Rotary commander • Car battery cord
• Car connecting pack
• CD-ROM (SonicStage)
Do not play this CD-ROM on an audio CD player
including this player.
• Velcro tapes for the CD player (2)
• Velcro tape for the rotary commander (1)
• Operating instructions (This book)
• Installation/Operating Guide
Note
The supplied rotaty commander should be used with
this player only.
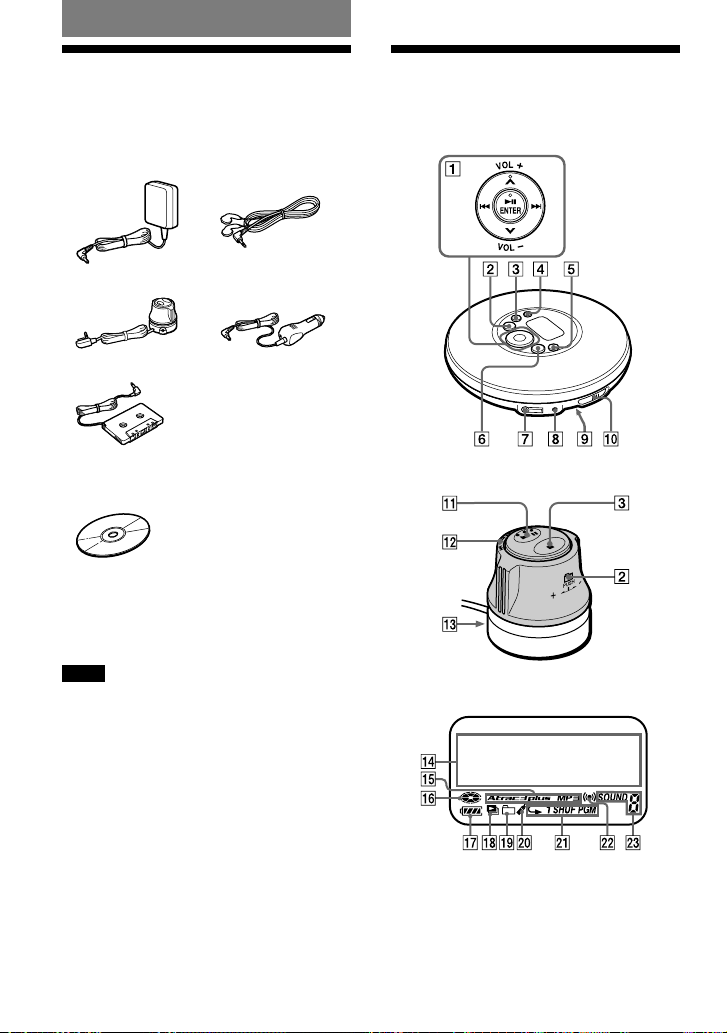
Guide to Parts and Controls
CD player
Rotary commander
Display
8

Operation button
(play/pause)
*
/ENTER
( page 15-18, 20, 22-24, 26)
/ (
page 16, 18, 22, 24)
*
/ ( page 17, 18, 20, 22-24, 26)
VOL +/– ( page 15)
CD player:
(group) – button ( page 16-18, 23)
Rotary commander:
+/– control ( page 16)
Push down and turn.
(stop) button ( page 16-18, 23-25,
27)
SEARCH button ( page 17, 18)
DISPLAY/MENU button ( page 19, 20,
22, 24)
(group) + button ( page 16, 17, 23)
(headphones) jack ( page 15)
DC IN 3 V jack ( page 14)
HOLD switch (on the back of the CD
player) ( page 17)
OPEN switch ( page 12, 15)
(play/pause) button ( page 16)
• control ( page 16)
Jack for connecting a car connecting pack
( page 10)
Character information display
( page 19)
Atrac3plus/MP3 indicator ( page 5)
Disc indicator ( page 15)
Battery indicator ( page 13)
Play list indicator
Group indicator
Bookmark indicator ( page 22)
Play mode indicator
Timer indicator ( page 27)
Sound indicator
* This button has a tactile dot.
9
Getting Started
Installing in a Car
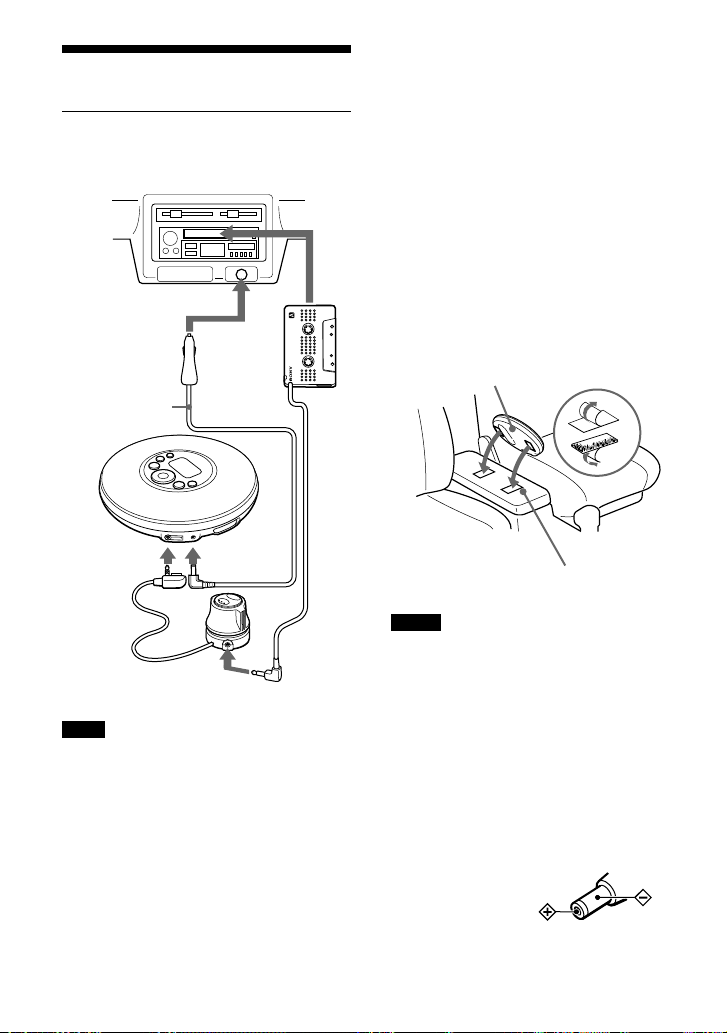
1
Connect your CD player as shown
below.
Car cassette deck
to a cigarette lighter
socket
Car battery
cord
Car
connecting
pack
to DC IN 3 V
to
(headphones)
Rotary commander
Note
Turn down the volume of the car cassette deck
before inserting the car connecting pack.
Where to place your CD player
• Install the CD player in a location which:
– does not interfere with your driving.
– is not dangerous for passengers.
– does not interfere with the glove box lid or
ashtray.
– is stable, and where nothing around it may
interfere with installation.
• Do not install the CD player near heat
sources or where subject to direct sunlight,
excessive dust, or moisture (especially on a
dashboard).
Please understand that we will not incur any
obligations for troubles caused by incorrect
installation.
If you have any questions or problems
concerning your CD player, please contact
your nearest Sony dealer.
Mounting your CD player
Attach the CD player to the console box with
the supplied Velcro tapes.
Bottom of the CD player
Console box
Notes
• Do not affix Velcro tapes to the name plate or any
control.
• When you are going to park your car for a long
period of time, remove the CD player from the
console box and place it where it will not be
exposed to direct sunlight.
Note on the car battery cord
The 3 V DC plug supplied with car battery
cord conforms to the proposed standards
of the Japan Electronics and Information
Technology Industries Association (JEITA).
Do not connect it to other players.
Polarity of the plug
(JEITA standards)
10
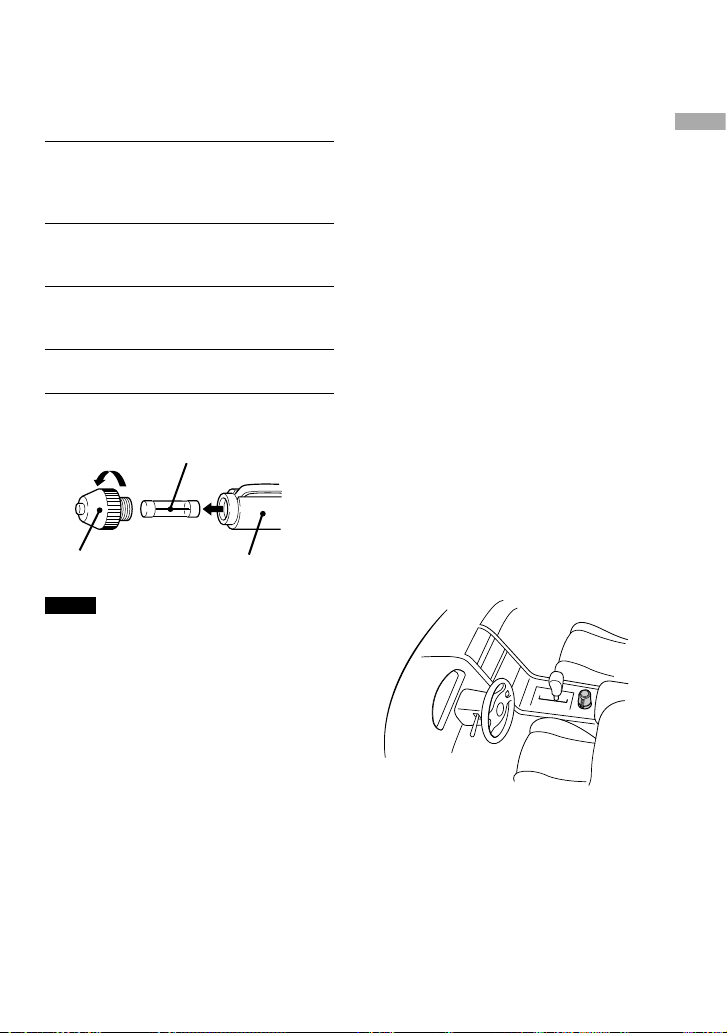
Replacing the fuse of the car battery cord
If the CD player does not operate, check the
fuse. If it is blown, replace it as follows:
1
Turn off the CD player and remove
the cigarette lighter plug from the
cigarette lighter socket.
2
Remove the plug end by turning it
counterclockwise.
3
Remove the defective fuse from the
plug.
4
Insert a new fuse into the plug.
5
Replace the plug end by turning it
clockwise.
Remove
Fuse
Plug end
Cigarette lighter plug
Notes
• Be sure to use a fuse of the same amperage and
length as the one to be replaced. Never use a piece
of wire as a substitute for the fuse.
• If the fuse is blown again after replacing it, contact
your nearest Sony dealer. In such a case, bring the
defective fuse to the dealer with you.
Notes on the car connecting pack
• If no sound is heard or the car connecting
pack is ejected, change the direction of
playback on the car cassette deck.
• Never insert the cord end of the car
connecting pack into the cassette insertion
door. Otherwise, the cord may break or the
car cassette deck may be damaged.
• You cannot use the car connecting pack
with some car cassette deck.
• The cord should be placed so that it does
not hinder driving.
• To disconnect the cord from the CD player,
pull it out by grasping the plug. Never pull
the plug out by the cord.
• With some car cassette decks, you may
hear some rattling noise from the car
connecting pack. However, this is not a sign
of malfunction.
Mounting the rotary commander
If you use the supplied rotary commander,
you can control your CD player as easily as
you would control the headlight or the wiper
switch of your car while driving.
Attach the rotary commander to a flat place
as illustrated below.
Continued
11
Getting Started
 Loading...