

Page 1
Mini Hi-Fi
Component
System
Operating Instructions
3-864-000-11 (1)
T
DHC-EX880MD
DHC-MD717
©1998 by Sony Corporation
Page 2
WARNING
To prevent fire or shock hazard, do not
expose the unit to rain or moisture.
To avoid electrical shock, do not open the cabinet.
Refer servicing to qualified personnel only.
Do not install the appliance in a confined space,
such as a bookcase or built-in cabinet.
Laser component in this product is capable of
emitting radiation exceeding the limit for Class 1.
This appliance is classified as
a CLASS 1 LASER product.
The CLASS 1 LASER
PRODUCT MARKING is
located on the rear exterior.
This caution label is located inside the unit.
IMPORTANT
Never connect two mains leads into a single mains
plug.
For TA-EX880/TA-MS717
The mains lead plug of TA-EX880/TA-MS717 is a
2-pin type designed to be connected only to
ST-EX880/ST-MS717.
Do not connect this plug to any other system or
mains supply.
US and foreign patents licensed from Dolby
Laboratories Licensing Corporation.
Table of Contents
Getting Started
Step 1: Hooking up the system............ 4
Step 2: Setting the time ....................... 12
Step 3: Presetting radio stations ........ 13
Basic Operations
Playing a CD ......................................... 15
Recording a CD on an MD .................. 17
Playing an MD ...................................... 19
Listening to the radio ........................... 21
Recording from the radio .................... 23
The CD player
Playing the CD tracks repeatedly ...... 26
Playing the CD tracks in random
order ................................................ 26
Programming the CD tracks ............... 27
Using the CD display........................... 29
Labeling a CD ....................................... 30
Checking CD text information ........... 33
The MD deck — Playback
Playing the MD tracks repeatedly ..... 34
Playing the MD tracks in random
order ................................................ 34
Programming the MD tracks .............. 35
Using the MD display.......................... 37
2
Page 3

The MD deck — Recording
Before you start recording .................. 38
Types of recording ............................... 39
Recording 3 CDs on 3 separate
MDs ................................................. 41
Recording 3 CDs in succession
on an MD ........................................ 42
Recording your favorite CD tracks
on an MD ........................................ 43
Recording only the first track
on each CD...................................... 46
Recording the current CD track ......... 47
Recording on an MD manually .......... 48
Starting recording with 6 seconds of
prestored audio data ..................... 50
Adjusting the recording level ............. 51
Marking track numbers ....................... 52
Making the space between tracks
3 seconds long ................................ 54
Monaural recording ............................. 55
The MD deck — Editing
Before you start editing ....................... 56
Labeling an MD .................................... 57
Erasing recordings ............................... 60
Moving recorded tracks ...................... 62
Dividing recorded tracks .................... 63
Combining recorded tracks ................ 65
Undoing the last edit ........................... 66
Other Features
Adjusting the sound ............................ 68
Labeling the preset stations ................ 69
Using the Radio Data System
(RDS)* .............................................. 70
Falling asleep to music ........................ 73
Waking up to music ............................. 74
Timer-recording radio programs ....... 76
Using Optional Equipment
Connecting optional antennas............ 79
Connecting optional AV
components .................................... 80
Listening to the sound of digital
components .................................... 82
Recording the sound of digital
components .................................... 83
Connecting the optional
TC-TX770 tape deck* ..................... 84
Recording a CD on a tape with the
optional TC-TX770 tape deck* .....85
Additional Information
Precautions ............................................ 87
System limitations of MDs.................. 88
Self-diagnosis display function .......... 90
Display messages ................................. 91
Troubleshooting ................................... 94
Specifications ...................................... 100
Index..................................................... 102
* DHC-EX880MD only
3
Page 4
Getting Started
Step 1: Hooking up the system
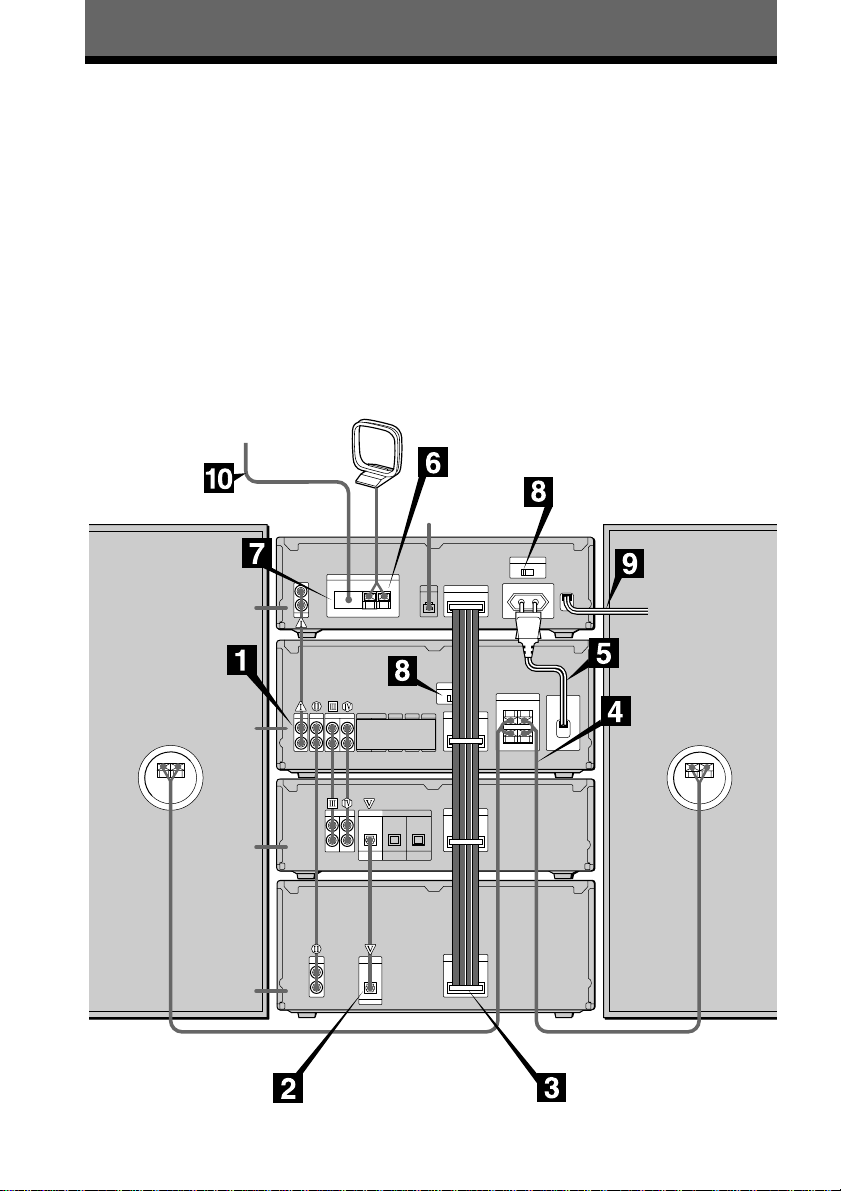
Perform the following procedure 1 to 0 to hook up your system using the supplied cords and
accessories.
This system is designed for easy connection when the components are stacked vertically as
shown below. Be sure to stack the components in the same order shown in the illustration to
prevent misconnection.
The supplied antennas are for indoor use. We recommend connecting an outdoor antenna
(optional) to ensure stable reception. See page 79 for connecting outdoor antennas and other
optional equipment.
Preparations
1 Take the transport cartridge out of the MD deck.
2 Remove the transit key on the bottom of the CD player.
3 Stack the components vertically in the order shown in the illustration below.
Speaker
(right)
FM lead antenna
Tuner
Amplifier
MD deck
CD player
AM loop antenna
*
Speaker
(left)
Rear panel
* Used to connect the optional TC-TX770 tape deck (for DHC-EX880MD only, see page 84).
4
Page 5
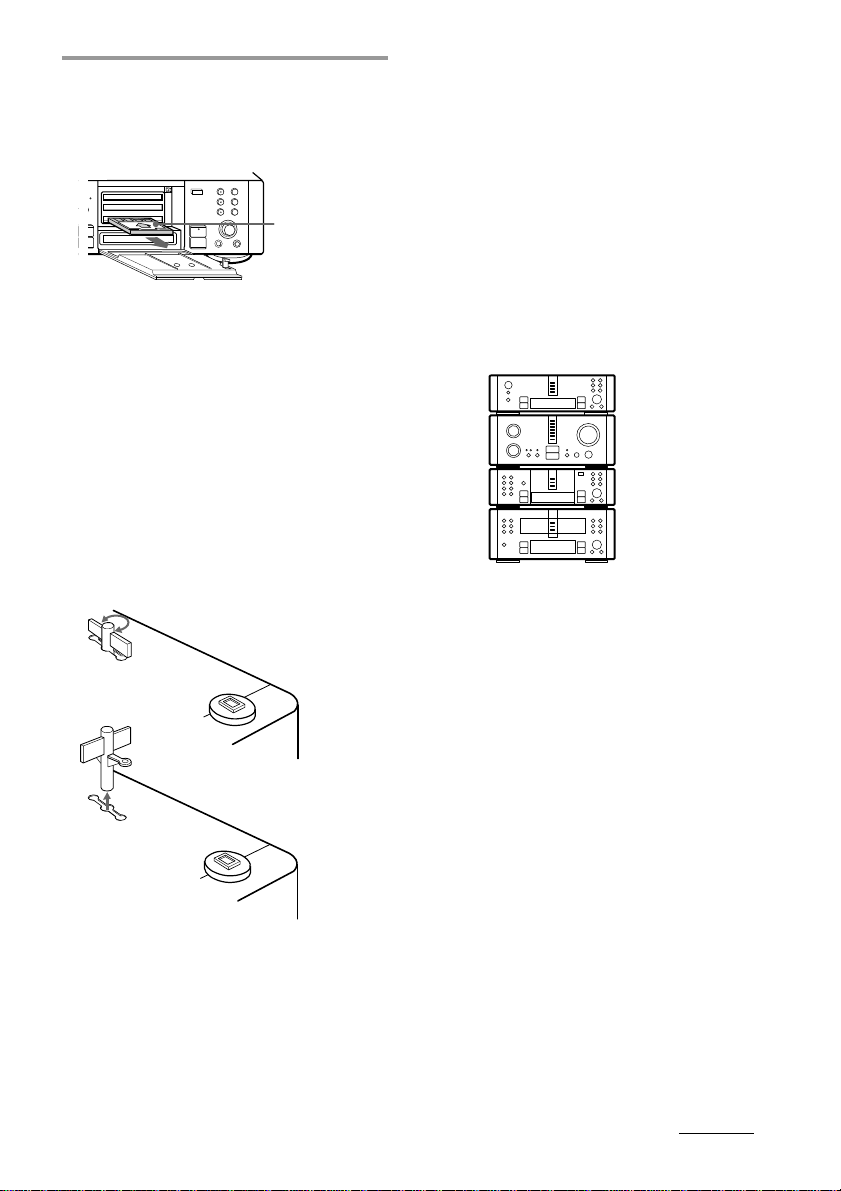
Preparations
•
1 Take the transport cartridge out of the MD
deck. (Pull the cartridge straight toward
you, then diagonally upward.)
•
•
•
•
•
•
•
•
0
10
)
n
0
N
Tip
Keep the transport cartridge for future use. When
you move the system, insert the cartridge into the
lowermost slot of the MD deck in the same manner
as when you purchased the system to prevent deck
trouble (see page 87).
Note
If you turn on the system without taking out the
cartridge, “MD MECHA ERROR” appears. Turn off
the system, wait until the clock appears in the
display, then take out the cartridge.
+=
·∏
p
Transport
cartridge
Tips
•Keep the transit key for future use. When you
move the system, insert the transit key into the
hole on the bottom of the CD player and turn it
90° in the same manner as when you purchased
the system to prevent CD player trouble
(see page 87).
•If you do not remove the transit key, the CD
player will not operate correctly.
•If you do not remove the transit key, the CD
player will rock when placed on a flat surface.
3 Stack the components vertically in the
order shown in the illustration below (in
the order of the CD player, MD deck,
amplifier and tuner).
Tuner
Amplifier
•
•
•
•
•
•
•
•
•
0
10
MD deck
2 Remove the transit key on the bottom of
CD player
the CD player.
Turn 90° to the right or
left and pull out the key.
Bottom panel
of CD player
continued
5
Page 6
Step 1: Hooking up the system
SONY
SONY
(continued)
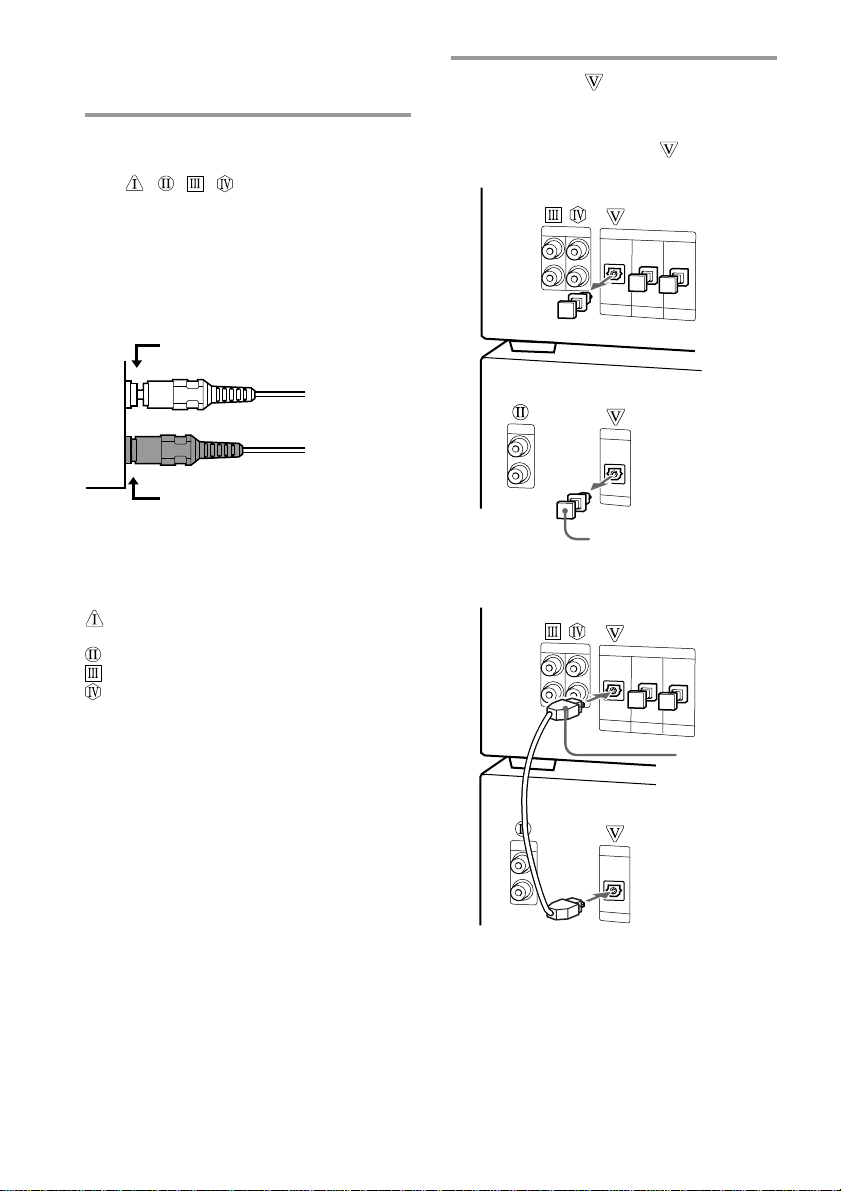
Connect the audio cords to the jacks
1
with the same Roman numerals
(
, , , ).
Connect the amplifier to the tuner, CD
player and MD deck, using the audio
cords (you have four). Match the color of
the plugs and the jacks, and insert the
plugs firmly, pushing them in all the
way.
Not pushed in all the way
Connect the connectors of the
2
MD deck and CD player, using the
optical cable.
1 Take the caps off the connectors
of the MD deck and CD player.
MD deck
N.G.
OK
Insert completely
Tip
The audio cords are used to send analog signals
between the components.
The signals are sent as follows:
jacks: Radio sound received by the tuner is sent
to the amplifier.
jacks: CD sound is sent to the amplifier.
jacks: Amplifier sound is sent to the MD deck.
jacks: MD sound is sent to the amplifier.
CD player
Pull firmly if tight.
2 Insert the cable plugs.
MD deck
Insert the
plugs firmly
with the SONY
logo facing
upward until
they click.
CD player
6
Page 7
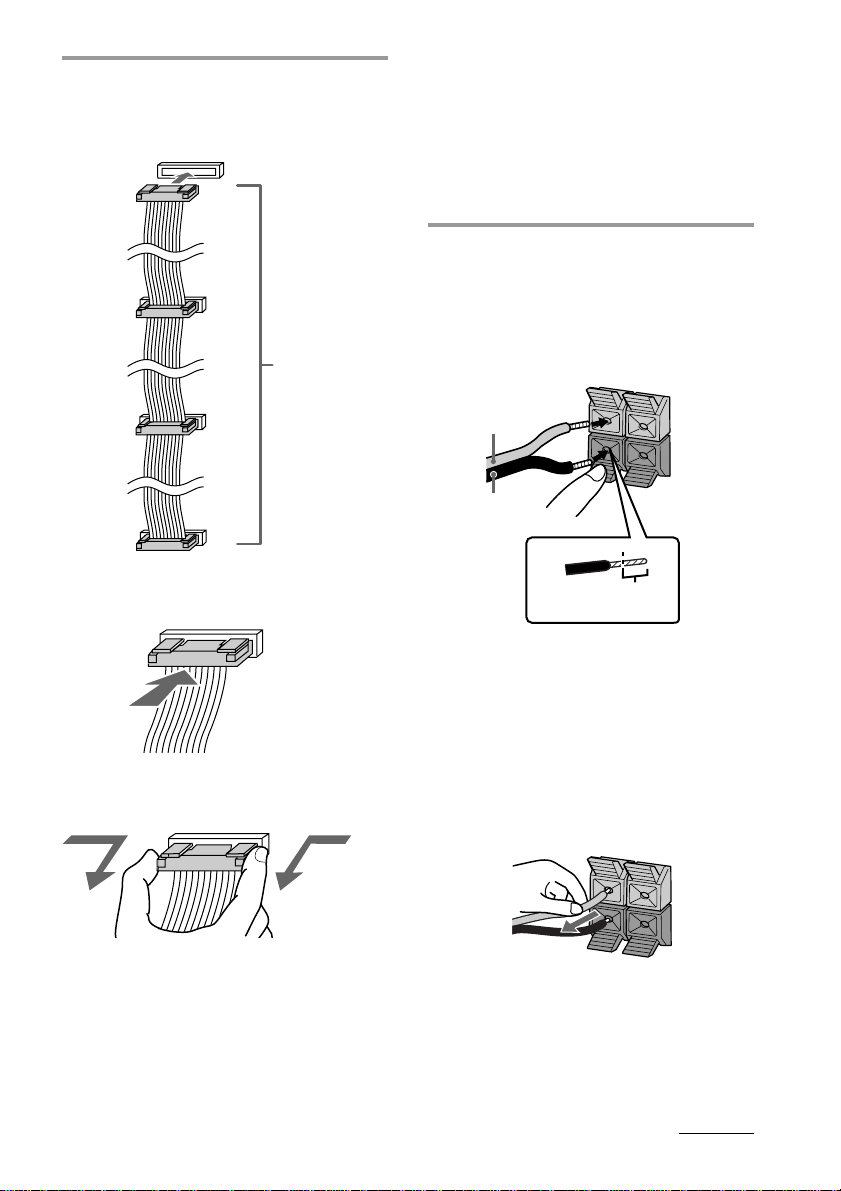
Connect the flat cord to the SYSTEM
L
R
L
R
3
CONTROL connectors on each
component with the same color.
Tuner
Blue
Amplifier
White
MD deck
Black
Connect the
flat cord from
the top in
order of the
blue, white,
black and red
connectors.
Tip
The flat cord is used to send signals and electricity
between the components for interlinked operation
such as CD Synchro Recording.
Note
Keep the flat cord away from the antennas to
prevent noise during radio reception.
Connect the speakers.
4
The supplied speakers can be used as
either the left or right speakers.
1 Connect the speaker cords to the
SPEAKER terminals of the same
color.
Gray* (‘)
CD player
To connect
To disconnect
Red
Push straight in until
the connector clicks.
Push in the
tabs on both
sides of the
connector and
pull straight
out.
Black* (’)
Insert this portion.
* The color of your speaker cords might be
different. See the manual provided with
your speaker system for details (except for
tourist model).
2 Pull gently on the speaker cord to
make sure it is connected correctly.
If the speaker cord pulls out, connect
it again.
R
L
R
L
continued
7
Page 8
Step 1: Hooking up the system
(continued)
Notes
•Keep the speaker cords away from the antennas to
prevent noise during radio reception.
•The supplied speakers can be used as either the
right or left speakers. Place the speaker connected
to the SPEAKER R terminals on the right side, and
the speaker connected to the SPEAKER L
terminals on the left side of the system.
DHC-MD717 is used for the illustration purpose.
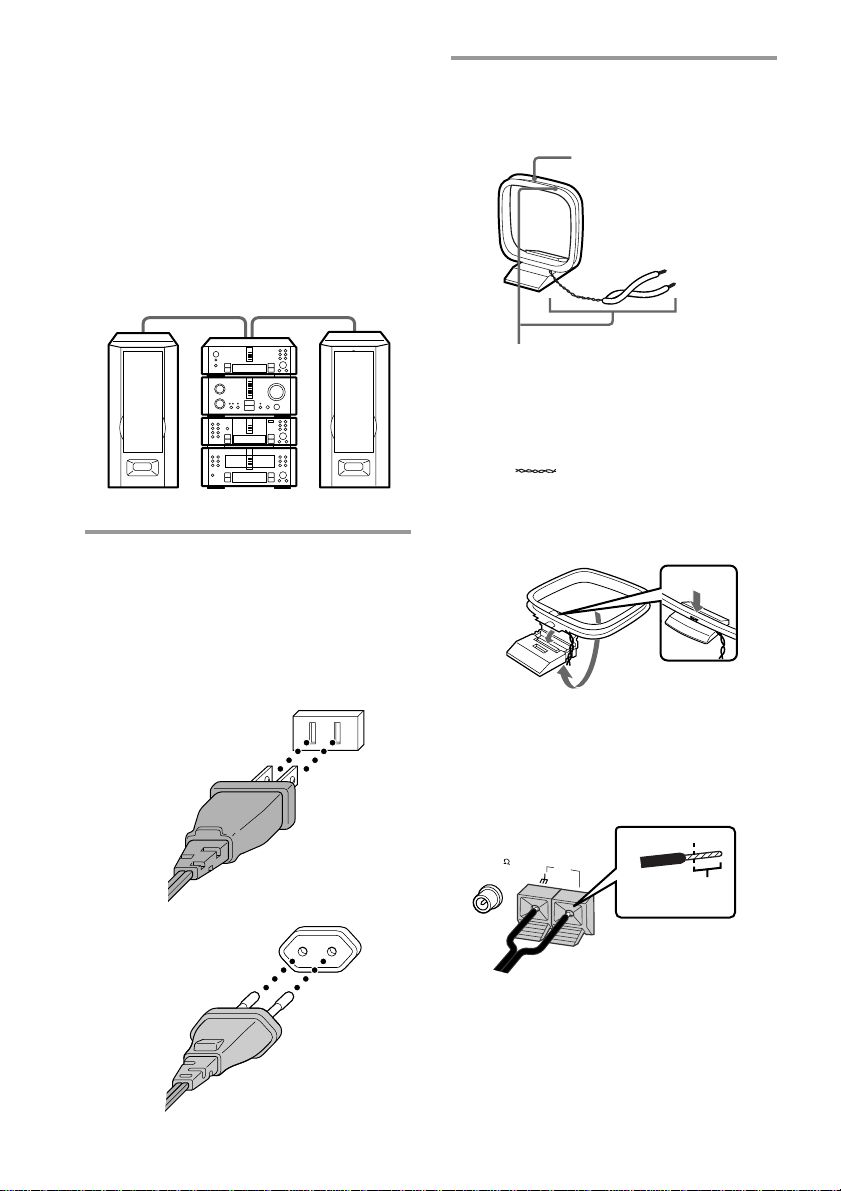
Connect the AM antenna.
6
The supplied AM antenna has the
following structure:
Plastic stand
Left
Connect the amplifier power cord to
5
the tuner.
Right
•
•
•
•
•
•
•
•
•
0
10
Connect the power cord extending from
the rear panel of the amplifier to the
power outlet on the rear panel of the
tuner.
This supplies power to the amplifier.
Tourist model
Other models
Antenna
The antenna is the proper shape
and length for receiving AM radio
waves, so do not remove or roll up
the antenna.
1 Remove only the twisted portion
(
) of the antenna from the
plastic stand.
2 Set up the stand.
3 Insert the antenna cord into the AM
antenna terminals.
For DHC-EX880MD
FM75
AM
Insert this
portion.
8
Page 9

For DHC-MD717
2 Insert the antenna cord into the FM
antenna terminal.
FM
75
AM
4 Pull gently on the antenna cord to
make sure it is connected correctly.
If the antenna cord pulls out, connect
it again.
Connect the FM antenna.
7
The supplied FM lead antenna has the
following structure:
B
A : The antenna cord receives signals
along its entire length, so do not roll
up the cord.
B : Insert this portion into the antenna
terminal.
1 Remove the cover from portion B
(for DHC-MD717 only).
Insert this
portion.
A
Cover
For DHC-EX880MD
FM75
AM
For DHC-MD717
FM
75
AM
3 Pull gently on the antenna cord to
make sure it is connected correctly.
If the antenna cord pulls out, connect
it again.
Adjust the operating voltage (for
8
DHC-MD717 only).
Before connecting the power cord, set
VOLTAGE SELECTOR on the tuner and
amplifier to the position of the local
power line voltage.
VOLTAGE SELECTOR
110-120V220-240V
continued
9
Page 10
Step 1: Hooking up the system
(continued)
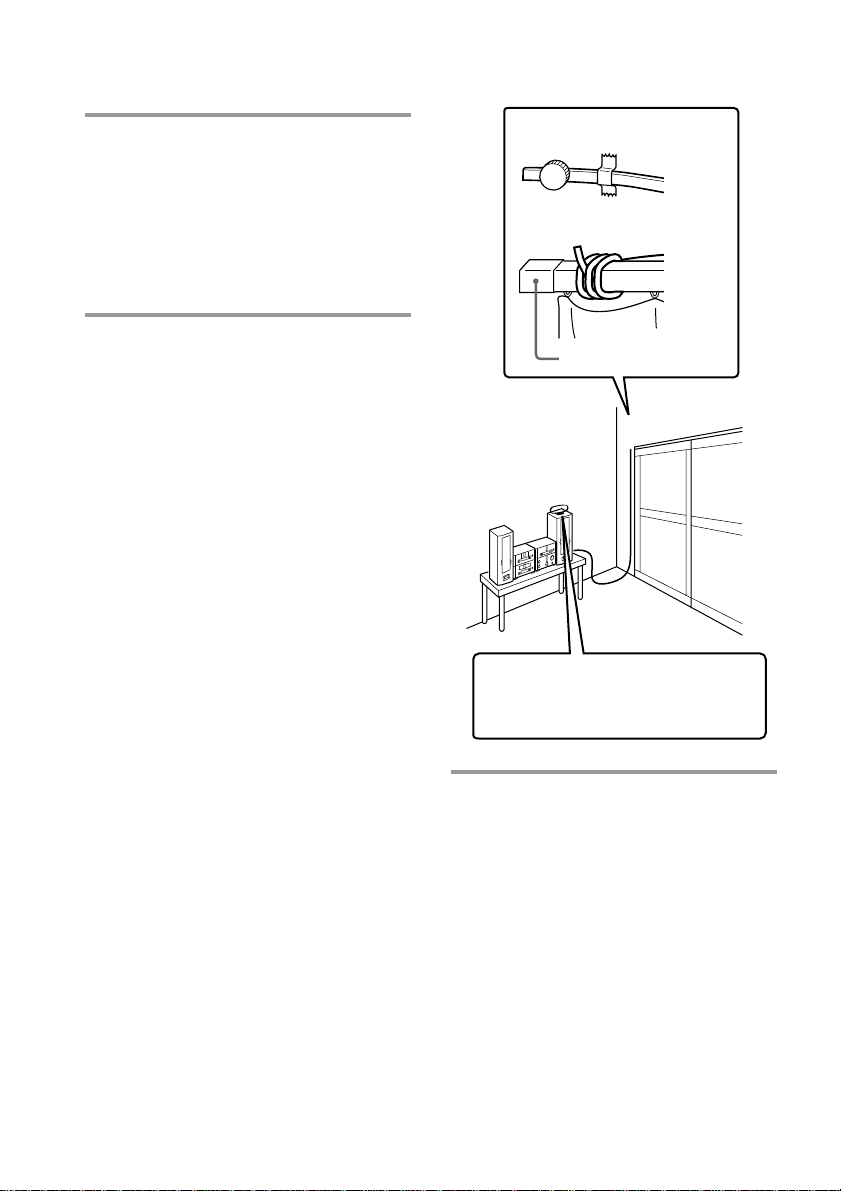
2 Fasten the antenna cord with a tack
or tape.
Connect the tuner power cord to a
9
wall outlet.
Plug Adapter (for DHC-MD717
only)
If the plug of this unit does not fit your
wall outlet, attach the supplied adapter
on to the plug.
Extend the FM antenna.
!º
After selecting and tuning in the FM
stations in step 4 of “Step 3: Presetting
radio stations” on page 13, fasten the
antenna to a wall or the ceiling as
follows:
1 Hold the tip of the antenna to find
an orientation that provides good
reception.
When fastening the antenna to a
wall, select the wall that provides the
best reception.
Fasten with a tack or tape.
OK
Do not tie the cord.
N.G.
Curtain rail
Find the AM antenna position and
orientation that provides the best
reception, such as near a window.
10
Page 11
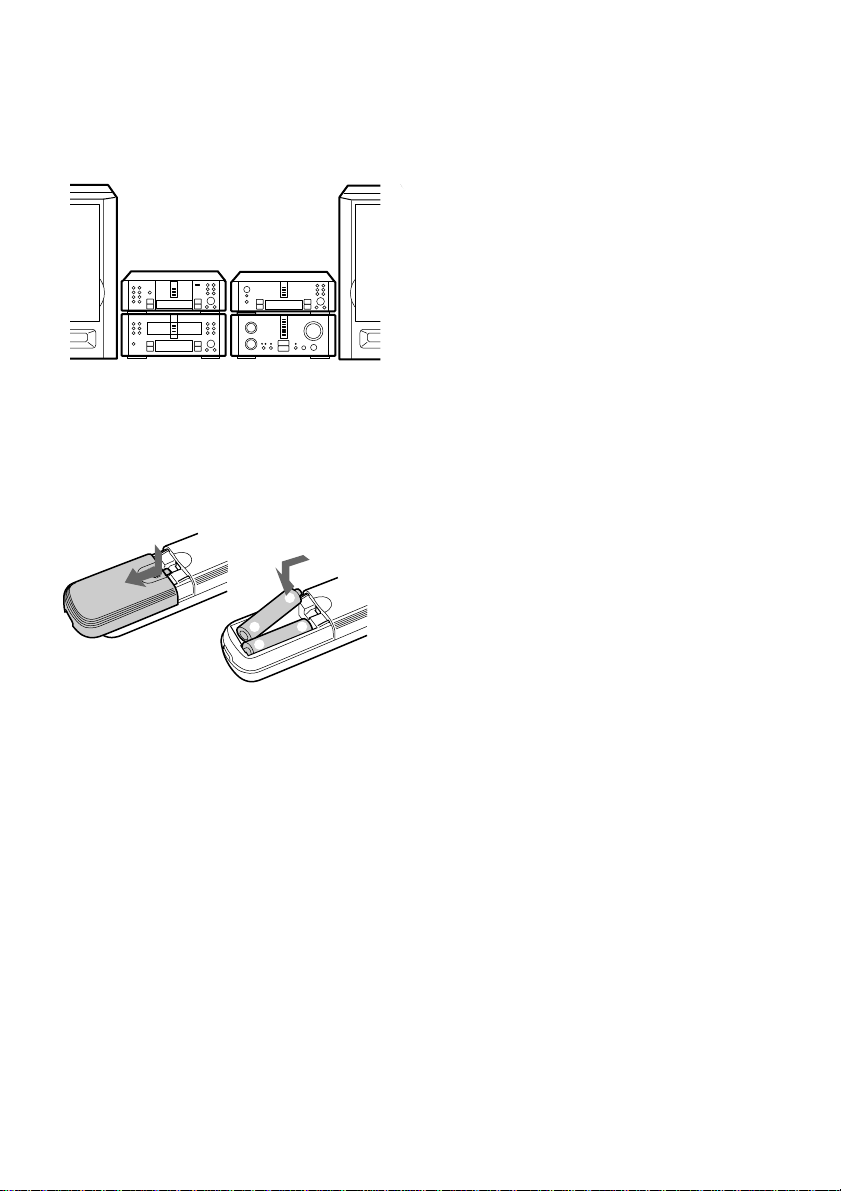
Arranging the
components side by side
Once you have finished the connections, you
can rearrange the components as desired.
•
•
•
•
•
•
•
•
•
0
10
Inserting two R6 (size AA)
batteries into the remote
Always insert the batteries from the ’ end as
shown in the illustration.
]
}
}
]
R6 (size AA) batteries
Tip
With normal use, the batteries should last for about
six months. When the remote no longer operates the
system, replace both batteries with new ones.
Note
If you do not use the remote for a long period of
time, remove the batteries to avoid possible damage
from battery leakage.
11
Page 12
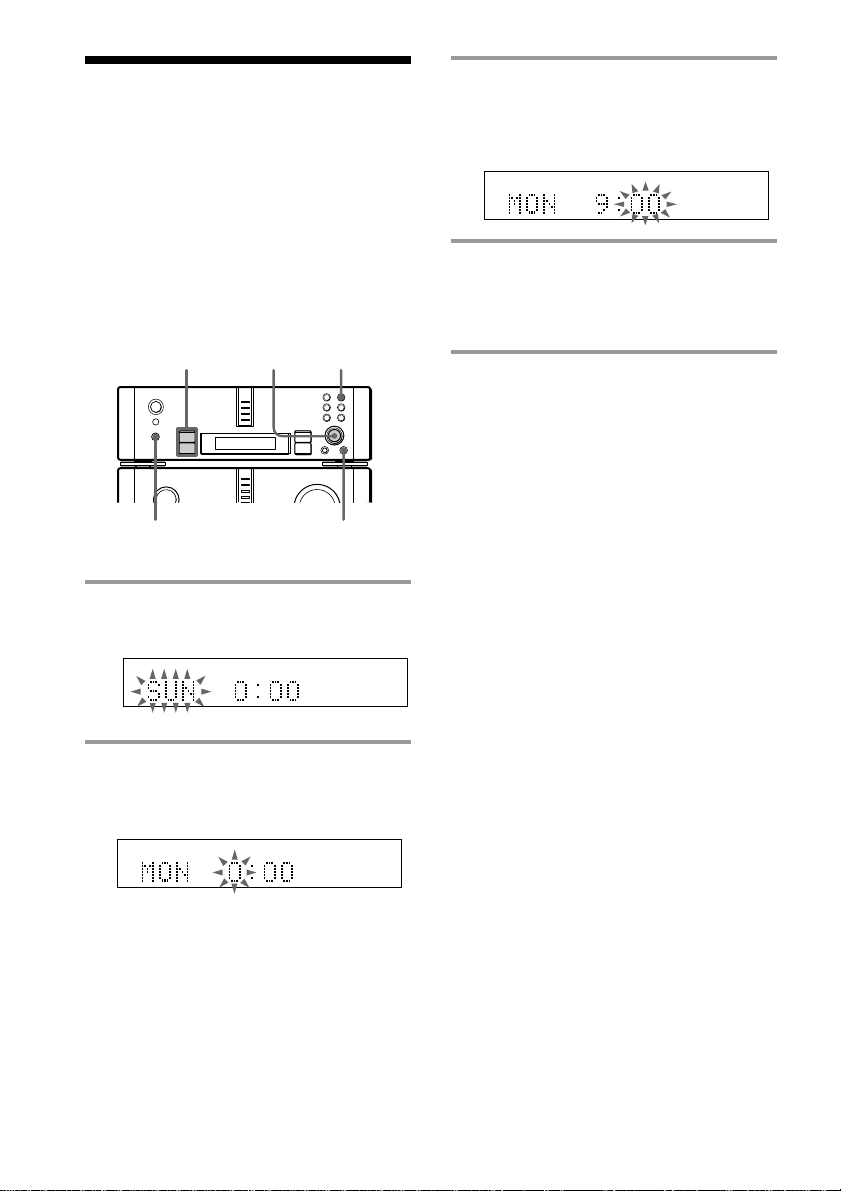
Step 2: Setting the time
You can set the time while the system is off.
You must set the time beforehand to use the
timer-recording and other timer functions.
The clock is on a 24-hour system for the
DHC-EX880MD, and a 12-hour system for
DHC-MD717.
The DHC-EX880MD is used for illustration
purpose.
N/n
DISPLAY
1 Press CLOCK/TIMER SET.
The day indication (“SUN”) flashes.
2 Turn MULTI CONTROLLER and
set the day, then press ENTER/YES.
The hour indication flashes.
n
N
2,3,4 1
2,3,4
3 Turn MULTI CONTROLLER and
set the hour, then press
ENTER/YES.
The minute indication flashes.
4 Turn MULTI CONTROLLER and
set the minute, then press
ENTER/YES.
The clock starts working.
If you made a mistake
Press N or n until the indication you wish
to change (day, hour, minute) flashes, then
change the setting.
To change the preset time
You can also set and change the time while
the system is on.
1 Press CLOCK/TIMER SET.
2 Turn MULTI CONTROLLER until
“CLOCK” appears.
3 Press ENTER/YES.
4 Perform steps 2 to 4 of “Setting the time”.
If the system is off, start over from step 1 of
“Setting the time”.
To show the time
The built-in clock constantly shows the time
in the tuner display while the system is off.
To show the time while the system is on,
press DISPLAY. Each time you press the
button, the display changes as follows:
Normal display ˜ Clock display*
* The clock display returns to the normal display
after about eight seconds. The time cannot be
displayed constantly while the system is on.
Tip
The upper dot flashes for the first half of a minute (0
to 29 seconds), and the lower dot flashes for the last
half of a minute (30 to 59 seconds).
12
Page 13
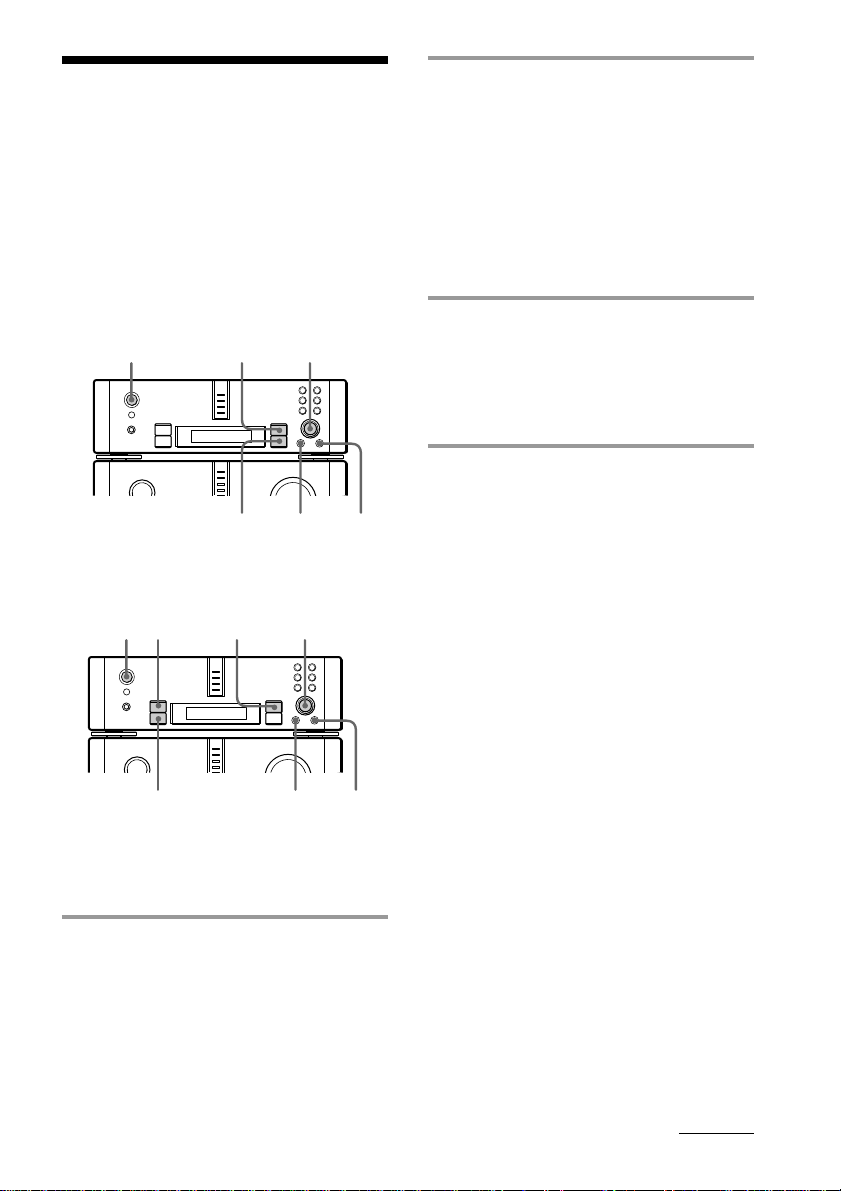
Step 3: Presetting radio stations
The bands you can receive vary depending
on the model you purchased.
The DHC-EX880MD lets you preset up to 40
stations, 20 for FM, 10 for MW and 10 for LW.
The DHC-MD717 lets you preset up to 30
stations, 20 for FM and 10 for AM.
For DHC-EX880MD
1
n
N
For DHC-MD717
1
2
3
23
4,5,7
5
4,5,7
6,8
2 Press BAND repeatedly until the
band you want appears in the
display.
Each time you press the button, the band
changes as follows:
DHC-EX880MD:
FM n MW n LW
DHC-MD717:
FM n AM
3 For DHC-EX880MD:
Press TUNING MODE repeatedly
until “AUTO TUNING” appears.
For DHC-MD717:
Press AUTO.
4 Turn MULTI CONTROLLER.
Turn MULTI CONTROLLER slightly,
then release it. The frequency indication
changes and scanning stops when the
system tunes in a station. “TUNED” and
“STEREO” (for a stereo program)
appear.
To stop scanning, press TUNING MODE
(for DHC-EX880MD) or AUTO (for
DHC-MD717).
n
N
MANUAL
5
6,8
Tuning in a radio station
you wish to preset
1 Press 1/u (power) to turn on the
system.
continued
13
Page 14
Step 3: Presetting radio stations
(continued)
Storing the radio station
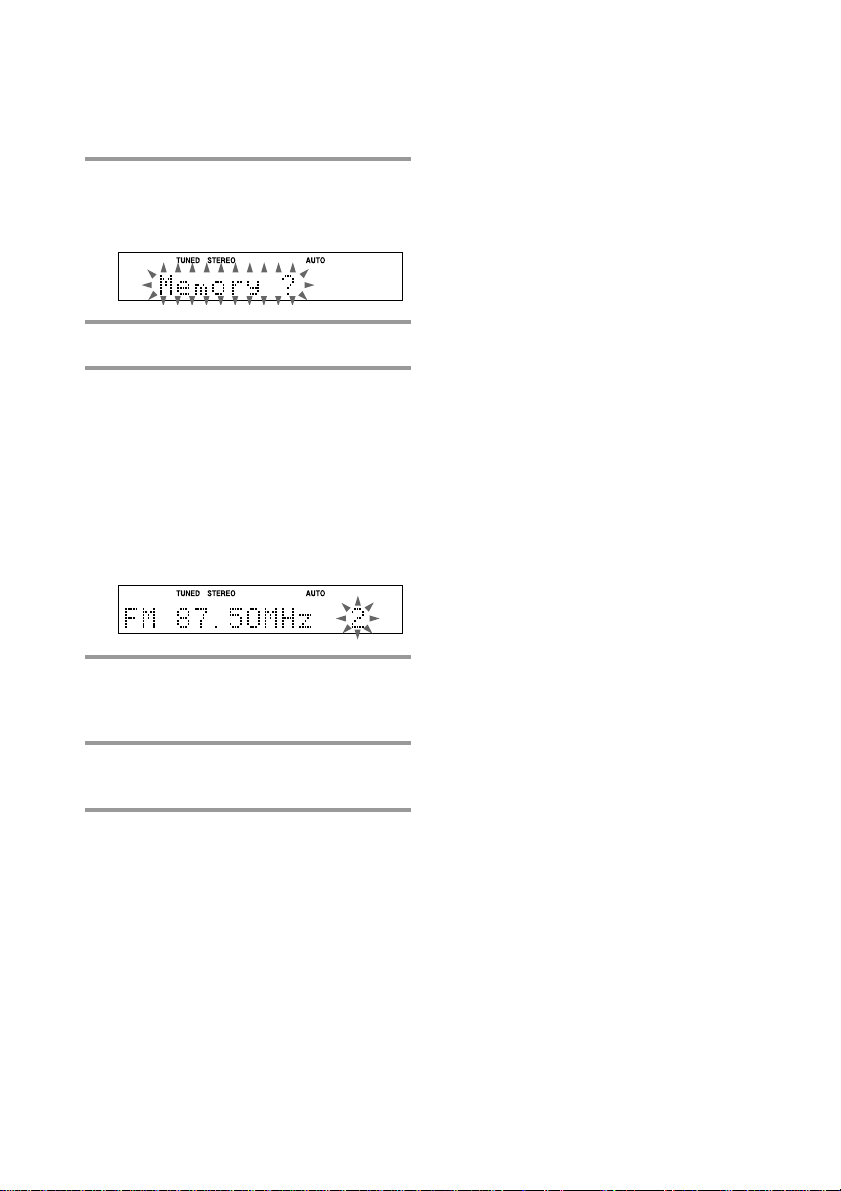
5 Press MENU/NO, then turn
MULTI CONTROLLER until
“Memory ?” appears.
6 Press ENTER/YES.
7 Turn MULTI CONTROLLER and
select the desired preset number.
For DHC-EX880MD:
Select from 1 to 20 for FM, 1 to 10 for
MW, or 1 to 10 for LW.
For DHC-MD717:
Select from 1 to 20 for FM, or 1 to 10 for
AM.
8 Press ENTER/YES.
“Complete” appears and the station is
stored.
To tune in a radio station with a
weak signal
For DHC-EX880MD:
Press TUNING MODE repeatedly until
“TUNING” appears in step 3, then turn
MULTI CONTROLLER to tune in the desired
station.
For DHC-MD717:
Press MANUAL in step 3, then turn MULTI
CONTROLLER to tune in the desired station.
When you have tuned in the station, continue
from step 5.
To change the preset number
Start over from step 2.
To change the AM tuning interval
(DHC-MD717 only)
The AM tuning interval is factory-preset to
9 kHz. To change the AM tuning interval,
tune in any AM station first, then turn off the
system. While holding down the ENTER/
YES button, turn the system back on. When
you change the interval, all the preset stations
will be erased. To reset the interval, repeat the
same procedure.
Tips
•The preset stations are retained for a day even if
you pull out the power cord or if a power
interruption occurs.
•You can label the preset stations (see page 69).
9 Repeat steps 2 to 8 to store other
stations.
14
Page 15
Basic Operations
)
n
0
N
·∏
p
+=
+=
)
n
0
N
·∏
p
§
§
§
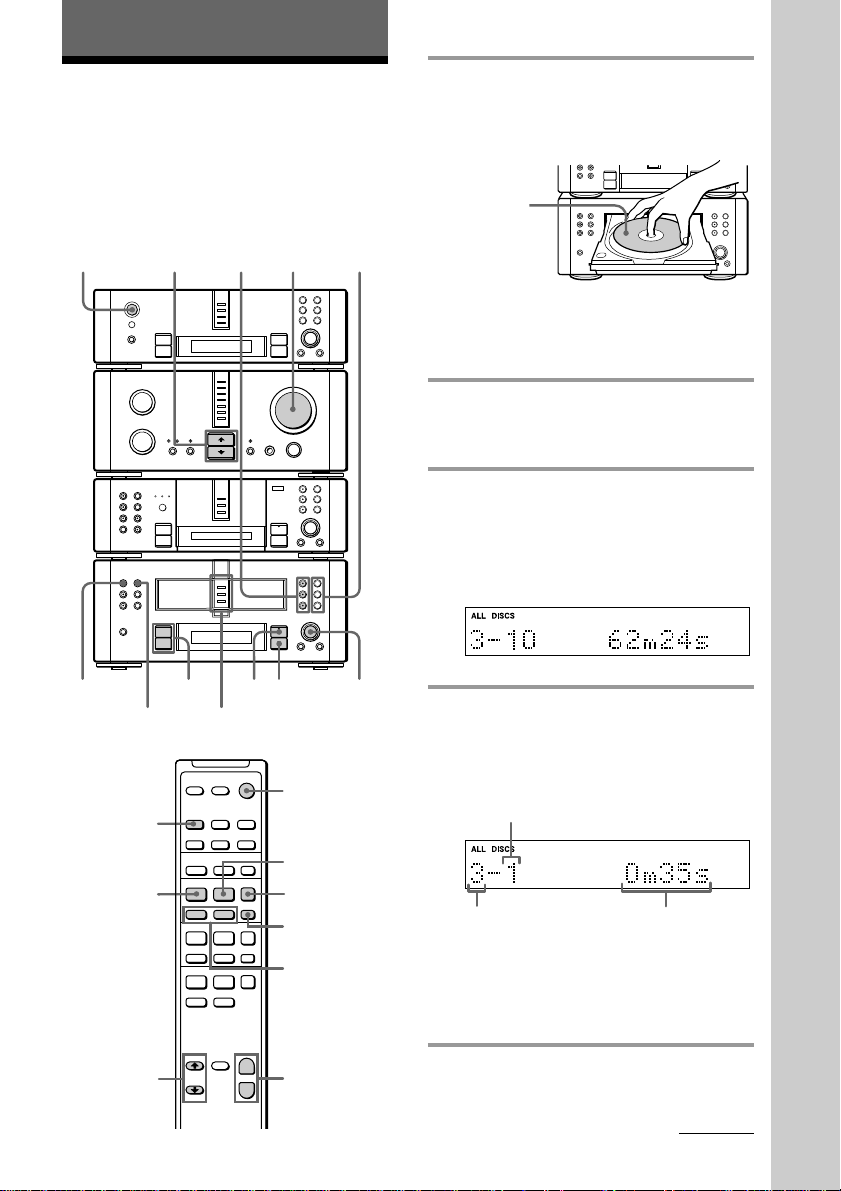
Playing a CD
You can play up to three CDs in a row.
If the power is off, first press 1/u (power) to
turn on the system.
1/u
(power)
CD 1 – 3
buttons
2
n
N
•
•
•
•
•
•
•
•
•
0
10
)
n
0
N
)
n
0
N
VOLUME
+=
·∏
p
§
§
§
+=
·∏
p
1
1 Press any § on the CD player and
place a CD on the disc tray.
The disc tray opens.
With the label
side up. When
you play a
single CD,
place it on the
inner circle of
the tray.
Press the same § again to close the tray.
To load other CDs, press a different §
and place the CD in the disc tray.
2 Press FUNCTION >/. on the
amplifier repeatedly to switch the
function to CD.
3 Press CONTINUE on the CD player
repeatedly until “ALL DISCS”
appears.
To play only one CD, press CONTINUE
until “1DISC” appears.
Basic Operations
3
0/)
DISC SKIP
3
4
2
CD indicators
–
·
·
ª·
+
P+=p
P+=p
)0
4
p
+
–
p
SELECTOR
1/u
(power)
P
p
D.SKIP
=/+
VOL (+/–)
4 Press ·∏ on the CD player (or
CD · on the remote).
The selected CD1–3 button lights green
and play starts.
Track number
Disc tray number
To start play from a different CD or to
play only one CD, press the CD1–3
button for the tray containing the desired
disc. Play starts from the CD whose
number was pressed.
Playing time
continued
15
Page 16
Playing a CD (continued)
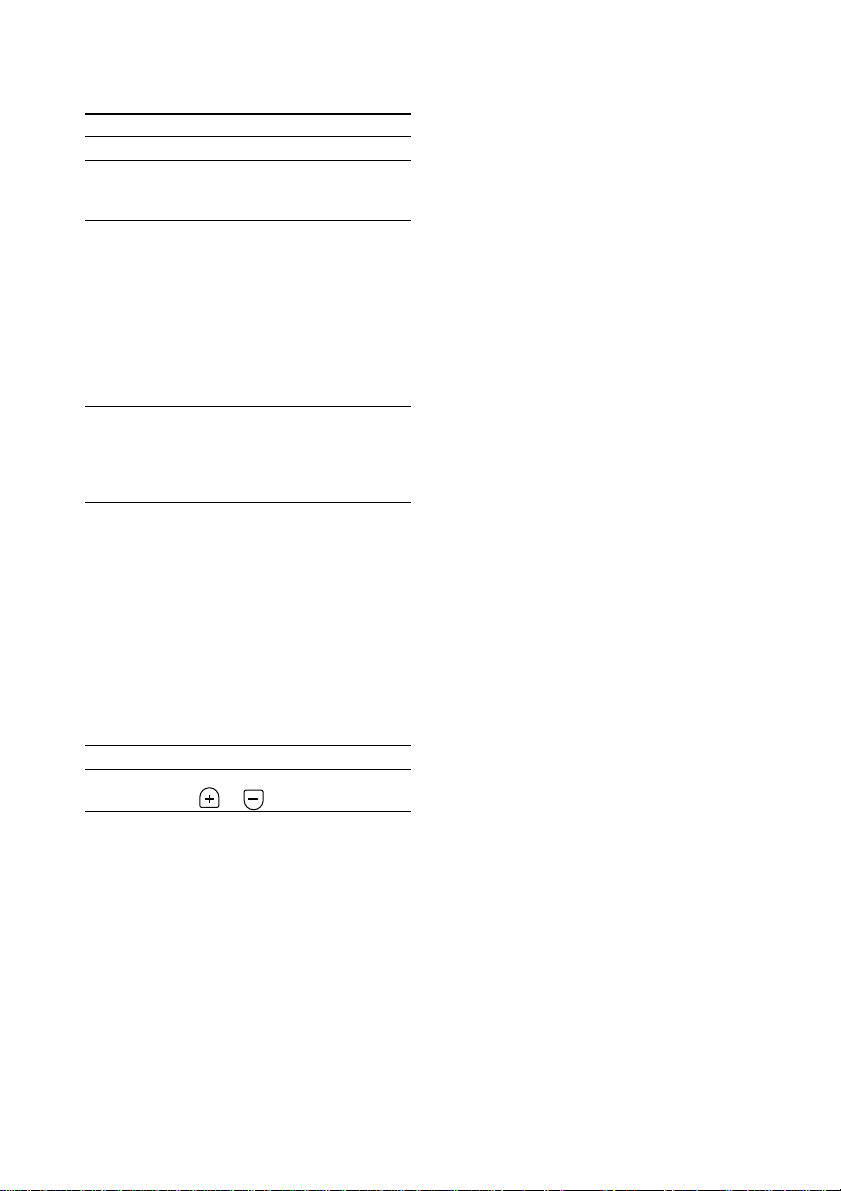
To Do this
Stop play Press p.
Pause Press ·∏ (or CD P on the
Select a track Turn SELECTOR clockwise (to
Find a point in Press 0 or ) during play
a track and release it at the desired
Select a CD • Press CD 1 – 3. Play starts
Remove a CD Press § of the desired CD1–3.
Adjust the Turn VOLUME (or press VOL
volume
remote). Press again to resume
play.
go forward) or counterclockwise (to go back) and
release it when you locate the
desired track (or press CD +
or = on the remote).
While “ALL DISCS” is selected,
turn and hold SELECTOR to
locate other discs and select
tracks.
point.
“—OVER—” appears at the end
of the CD.
when the button is pressed.
• Press DISC SKIP (or
CD D.SKIP on the remote)
repeatedly so that the
CD1–3 button is lit green.
Press ·∏ (or CD · on the
remote) to play the selected
CD.
If you press DISC SKIP (or CD
D.SKIP on the remote) during
play, the selected CD changes
and the new CD is played.
or on the remote).
Tips
•You can switch from another source to the CD
player and start playing a CD just by pressing
·∏ (or CD · on the remote) or the CD1–3
buttons if a CD is loaded on the tray (Automatic
Source Selection).
•You can also select and start playing a track in
step 4.
1Press DISC SKIP (or CD D.SKIP on the remote)
and select the desired CD.
2Turn SELECTOR (or press CD = or + on
the remote) until the desired track number
appears.
3Press ·∏ (or CD · on the remote).
•The CD 1 – 3 button indicators have the following
meanings when lit:
Green: The disc tray is selected or the CD loaded
on the tray is playing.
Orange: A CD is loaded on the tray.
•When a CD is loaded on the tray, the CD 1 – 3
indicator for the tray is lit orange.
•If a CD is not loaded to any of CD 1 – 3, “NO
DISC” appears.
Note
Do not forcibly press the disc tray closed with your
finger, as this may cause CD player trouble. Always
close the tray by pressing the § button for the tray.
16
Page 17
Recording a CD on an
)
n
0
N
·∏
p
+=
+=
)
n
0
N
·∏
p
§
§
§
MD
— CD Synchro Recording
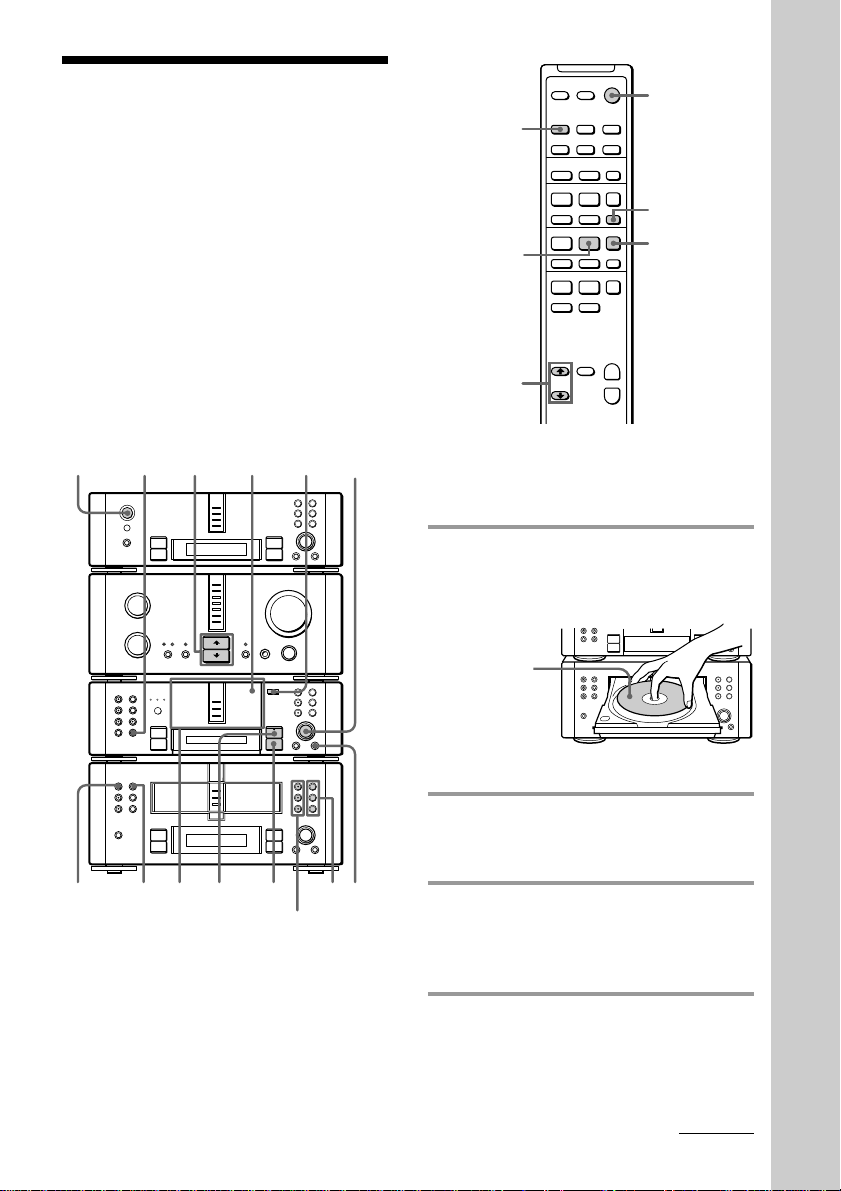
You can make a digital recording of a CD on
an MD, marking track numbers in the same
sequence as the original CD.
If the MD is partially recorded, recording
starts after the last recorded track. To erase
the recorded contents, see “Erasing
recordings” on page 60.
In addition, you can also select the recording
method to suit your purpose. (See “Types of
recording” on page 39.)
If the power is off, first press 1/u (power) to
turn on the system.
1/u
(power)
25 87
n
N
•
•
•
•
•
•
•
•
•
0
10
)
n
0
N
)
n
0
N
§
+=
·∏
p
§
§
§
+=
·∏
p
1/u
(power)
4
+
–
P+=p
·
3
P+=p
·
p
10
p
ª·
)0
2
Step 1: Preparing the CD
player
1 Press any § on the CD player and
place a CD on the disc tray.
The disc tray opens.
With the label
side up. When
you play a
single CD,
place it on the
inner circle of
the tray.
Press the same § again to close the tray.
2 Press FUNCTION >/. on the
amplifier repeatedly to switch the
function to CD.
+
–
Basic Operations
4
36
10
p
CD 1 – 3
buttons
1
9
3 Press DISC SKIP on the CD player
(or CD D.SKIP on the remote)
repeatedly until the CD 1 – 3 button
you want lights green.
4 Press CONTINUE on the CD player
repeatedly until “1DISC” appears.
continued
17
Page 18
Recording a CD on an MD
(continued)
Step 2: Recording
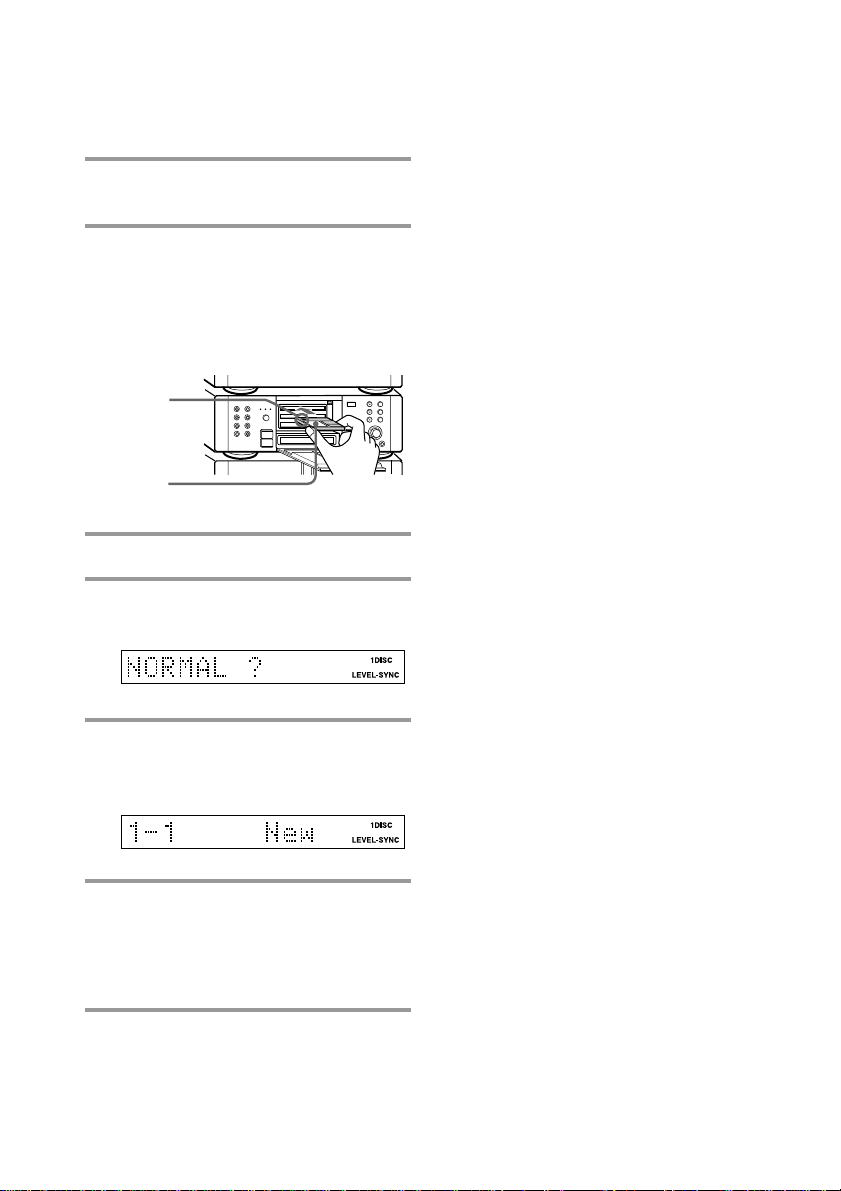
5 Press PUSH OPEN on the MD deck
and open the door.
6 Insert a recordable MD to MD 1 of
the MD deck and close the door.
Note
When using CD Synchro Recording, you can
only record the MD loaded to MD 1.
With the
arrow
pointing
toward the
deck
With the
label side up
•
•
•
•
•
•
•
•
•
0
10
)
n
0
N
+=
p
7 Press CD SYNC on the MD deck.
8 Turn SELECTOR on the MD deck
until “NORMAL ?” appears.
9 Press ENTER/YES on the MD deck.
The MD deck stands by for recording
and the CD is in pause for playback.
To cancel recording
Press p on the MD deck during steps 7 to 10.
To stop recording
Press p on the MD deck.
Ejecting an MD
If an MD is already loaded to MD 1, eject it as
follows:
1Press §.
The MD appears at the slot.
2Press PUSH OPEN and open the door of the MD
deck, then remove the MD from the slot.
When recording is completed
Press § and eject the MD. “TOC Writing” flashes
and the MD Table of Contents (TOC) is updated.
While “TOC Writing” is flashing
Do not move the deck or pull out the power cord to
ensure the complete recording. The deck is currently
updating the Table of Contents (TOC).
If the MD runs out of recording time
The CD player and MD deck both stop.
Tip
If you record on an unrecorded or completely
erased (see page 61) MD, the disc title assigned to
the CD (see page 30) is copied as it is to the MD
(Disc Memo Copy).
However, CD text information is not copied in some
cases.
Note
If the MD is record-protected, “Protected” appears
and the MD cannot be recorded.
Press § and eject the MD, then slide close the tab at
the side of the MD to cover the hole (see page 39).
10 Press ·∏ on the MD deck (or
MD P on the remote).
Recording starts.
The CD player and MD deck both stop
when the recording is completed.
18
Page 19
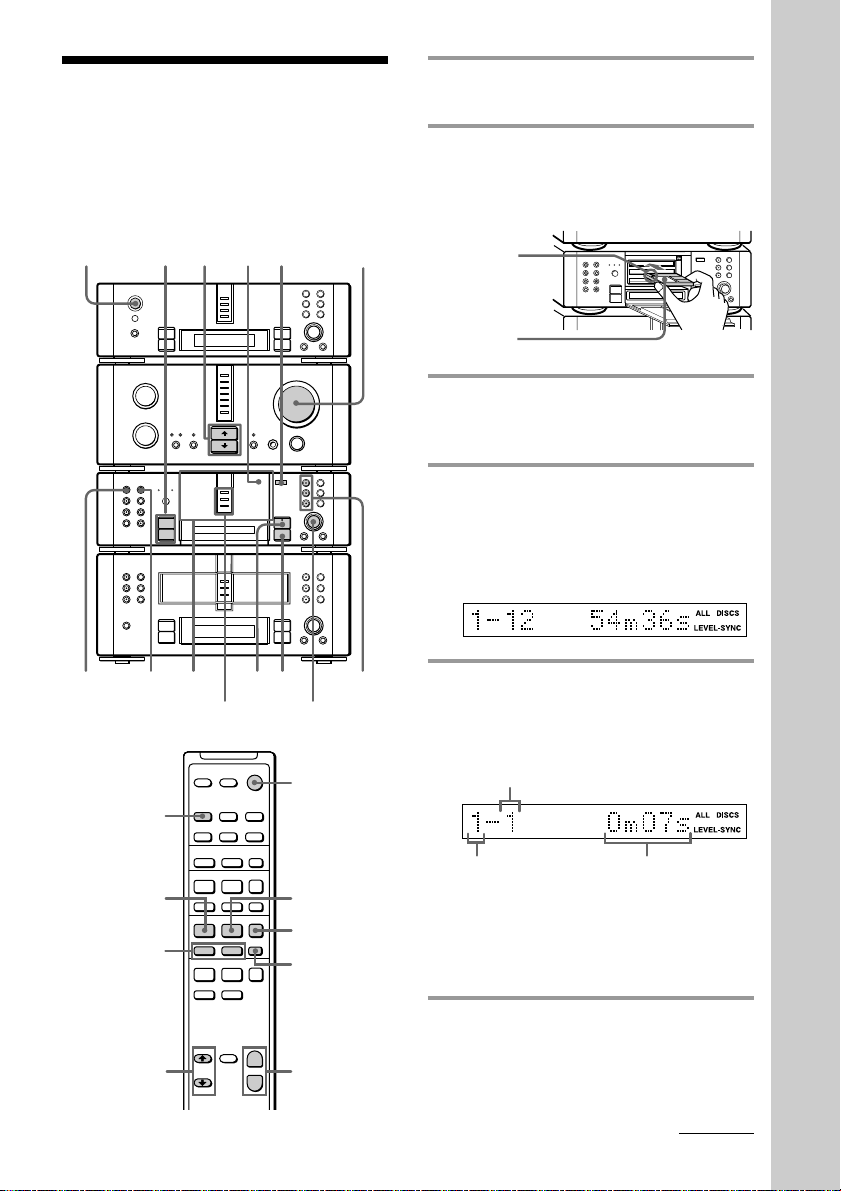
Playing an MD
1 Press PUSH OPEN and open the
door of the MD deck.
You can play up to three MDs in a row.
If the power is off, first press 1/u (power) to
turn on the system.
1/u
(power)
0/)
DISC SKIP
3
1
n
N
•
•
•
•
•
•
•
•
•
0
10
)
n
0
N
)
n
0
N
MD indicators
524
VOLUME
§
+=
·∏
p
§
§
§
+=
·∏
p
MD 1 – 3
p
buttons
SELECTOR
1/u
(power)
4
2 Insert an MD and close the door.
Insert the MD until the MD 1 – 3 button
to the right of the slot is lit orange.
With the arrow
pointing
toward the
deck
•
•
•
•
•
•
•
•
•
0
10
)
n
0
N
p
With the
label side up
3 Press FUNCTION >/. on the
amplifier repeatedly to switch the
function to MD.
4 Press CONTINUE on the MD deck
repeatedly until “ALL DISCS”
appears.
To play only one MD, press CONTINUE
until “1DISC” appears.
5 Press ·∏ on the MD deck (or
MD · on the remote).
The selected MD 1 – 3 button lights
green and play starts.
Track number
+=
Basic Operations
5
=/+
3
+
–
P+=p
·
P+=p
·
ª·
)0
p
+
–
P
p
D.SKIP
VOL (+/–)
Disc number
Playing time
To start play from a different MD or to
play only one MD, press the MD 1 – 3
button for the slot containing the desired
disc. Play starts from the MD whose
number was pressed.
continued
19
Page 20

Playing an MD (continued) Tips
•You can switch from another source to the MD
deck and start playing a MD just by pressing ·∏
To Do this
Stop play Press p.
Pause Press ·∏ (or MD P on the
remote). Press again to resume
play.
Select a track Turn SELECTOR clockwise (to
go forward) or counterclockwise (to go back) and
release it when you locate the
desired track (or press MD +
or = on the remote).
Find a point in Press 0 or ) during play
a track and release it at the desired
point.
Select an MD • Press MD 1 – 3. Play starts
when the button is pressed.
• Press DISC SKIP (or MD
D.SKIP on the remote) so
that the MD 1 – 3 button is lit
green. Press ·∏ (or
MD · on the remote) to
play the selected MD.
If you press DISC SKIP (or MD
D.SKIP on the remote) during
play, the selected MD changes
and the new MD is played.
Remove an MD 1 Press PUSH OPEN and open
the door of the MD deck.
2 Press § and remove the MD
from the slot.
Adjust the Turn VOLUME (or press VOL
volume
or on the remote).
(or MD · on the remote) or the MD 1 – 3 buttons
if an MD is loaded in the slot (Automatic Source
Selection).
•You can also select and start playing a track in
step 5.
1 Press DISC SKIP (or MD D.SKIP on the remote)
2 Turn SELECTOR (or press MD = or + on
3 Press ·∏ (or MD · on the remote).
•The MD 1 – 3 button indicators have the following
meanings when lit.
Green: The slot is selected or the MD loaded in
Orange: An MD is loaded in the slot.
•When an MD is loaded in the slot, the MD 1 – 3
indicator for the slot is lit orange.
•If an MD is not loaded to any of MD 1 – 3, “NO
DISC” appears.
and select the desired MD.
the remote) until the desired track number
appears.
the slot is playing.
20
Page 21
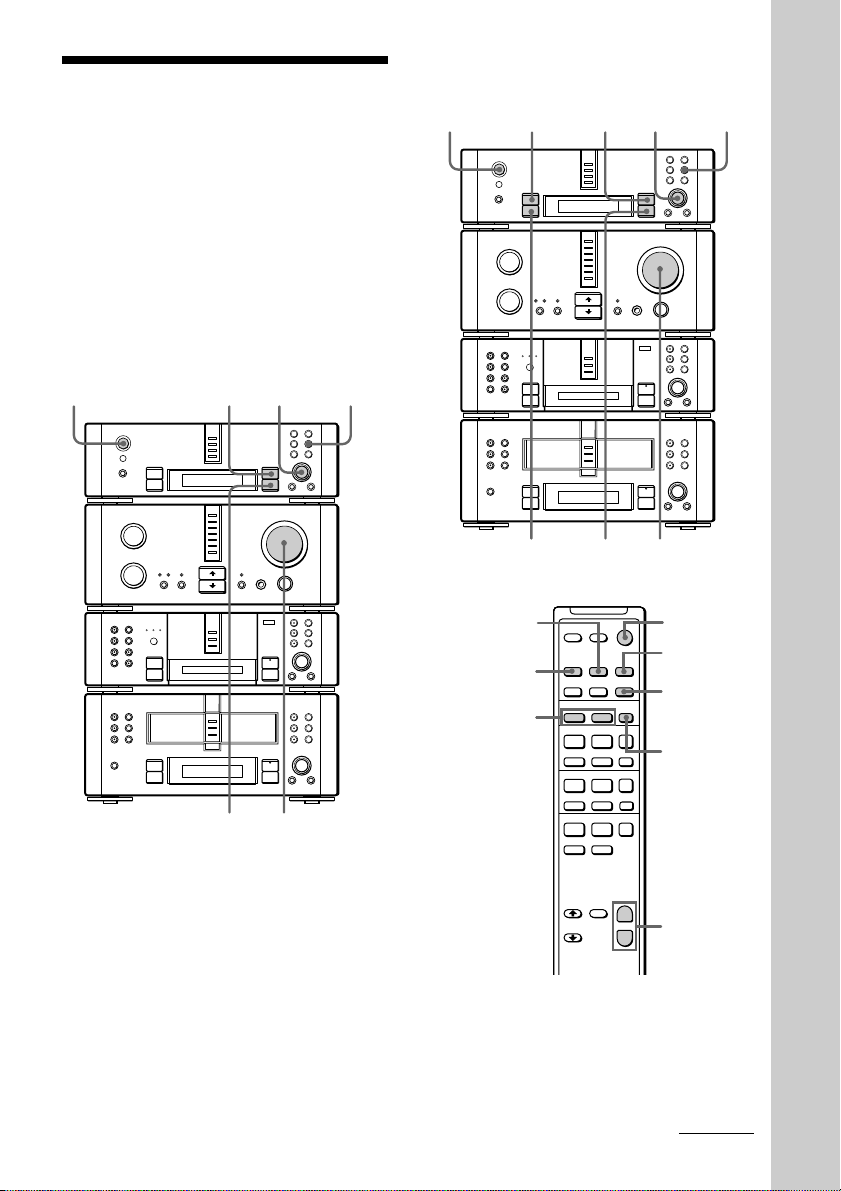
Listening to the radio
·
P+=p
·
P+=p
ª·
)0
p
–
+
+
–
1
2
3
AUTO
MANUAL
VOL (+/–)
MONO/
STEREO
— Preset Tuning
Preset radio stations in the tuner’s memory
first (see page 13).
You can also tune in the desired station
manually (see “Listening to non-preset radio
stations” on page 22).
If the power is off, first press 1/u (power) to
turn on the system.
For DHC EX880MD
1/u
(power)
1
n
N
3
STEREO/
MONO
For DHC-MD717
1/u
(power)
AUTO
n
N
•
•
•
•
•
•
•
•
•
0
10
)
n
0
N
)
n
0
N
1
·∏
p
·∏
p
3
STEREO/
MONO
+=
§
§
§
+=
Basic Operations
•
•
•
•
•
•
•
•
•
0
10
)
n
0
N
)
n
0
N
·∏
p
·∏
p
VOLUME
2
MANUAL
2
VOLUME
1/u
(power)
+=
§
§
§
+=
continued
21
Page 22

Listening to the radio (continued)
Listening to non-preset
radio stations
1 Press BAND repeatedly until the
band you want appears.
Each time you press the button, the band
changes as follows:
DHC-EX880MD:
FM n MW n LW
DHC-MD717:
FM n AM
2 For DHC-EX880MD:
Press TUNING MODE repeatedly
(or press PRESET on the remote)
until “PRESET” appears.
For DHC-MD717:
Press PRESET.
3 Turn MULTI CONTROLLER (or
press PRESET –/+ on the remote) to
tune in the desired preset station.
Station name* or
frequency
* The station name is displayed only when
you have assigned a name to the preset
station (see page 69).
To Do this
Turn off the radio Press 1/u (power).
Adjust the volume Turn VOLUME (or press
VOL
remote).
Preset number
or on the
For DHC-EX880MD:
Manual Tuning
Press TUNING MODE repeatedly (or
MANUAL on the remote) until “TUNING”
appears in step 2, then turn MULTI
CONTROLLER to tune in the desired station.
Automatic Tuning
Press TUNING MODE repeatedly (or AUTO
on the remote) until “AUTO TUNING”
appears in step 2, then turn MULTI
CONTROLLER slightly and release it.
The frequency indication changes and
scanning stops when the system tunes in a
station.
For DHC-MD717:
Manual Tuning
Press MANUAL in step 2, then turn MULTI
CONTROLLER to tune in the desired station.
Automatic Tuning
Press AUTO in step 2, then turn MULTI
CONTROLLER slightly and release it.
The frequency indication changes and
scanning stops when the system tunes in a
station.
To cancel Automatic Tuning
Press TUNING MODE (DHC-EX880MD
only) or AUTO again.
Tips
•You can switch from another source to the tuner
just by pressing BAND (Automatic Source
Selection).
•To improve broadcast reception, reorient or move
the supplied antennas near a window or outdoors.
If broadcast reception does not improve, we
recommend using an optional outdoor antenna
(see page 79).
•When an FM stereo program is noisy, press
STEREO/MONO (or press MONO/STEREO on
the remote) so that “MONO” appears. There will
be no stereo effect, but the reception will improve.
Press the button again to restore the stereo effect.
22
Page 23
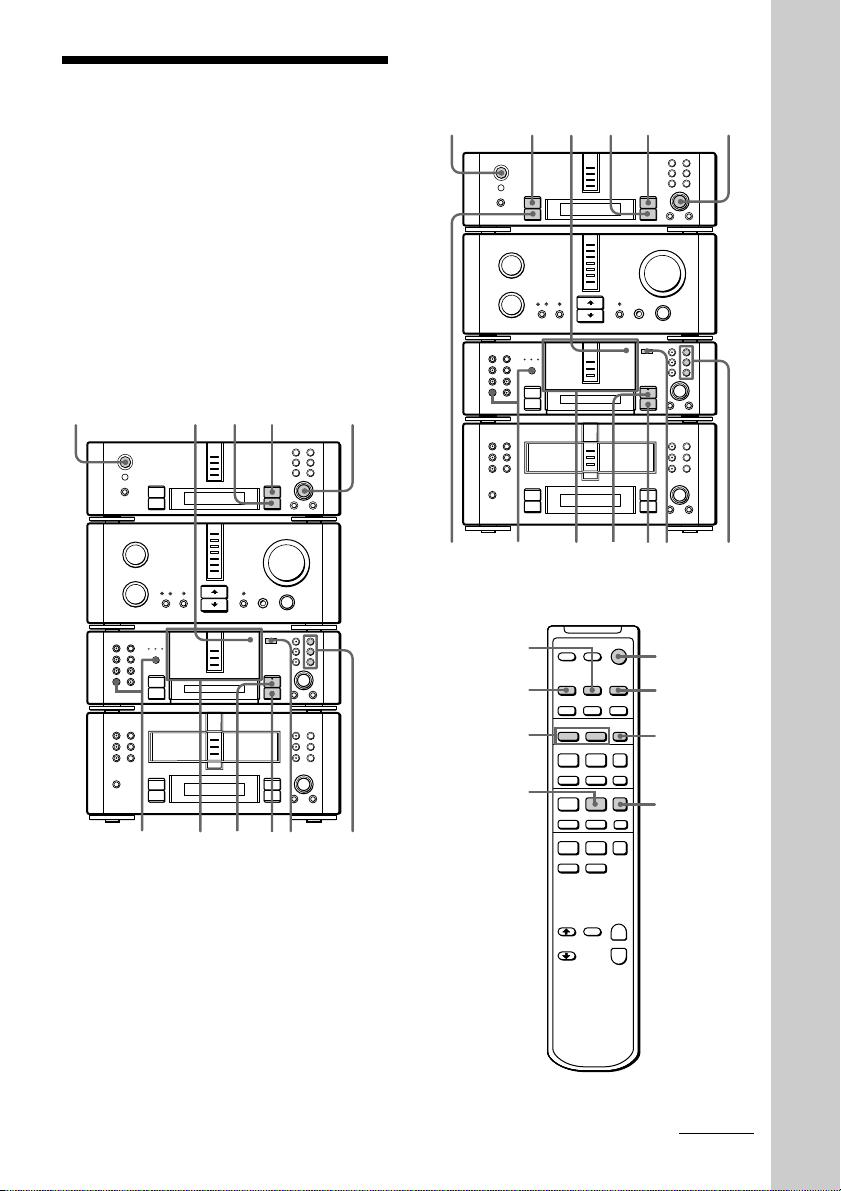
Recording from the
·
P+=p
·
P+=p
ª·
)0
p
–
+
+
–
3
5
4
8
p
AUTO
MANUAL
radio
— Manual Recording
For DHC-MD717
1/u
(power)
AUTO
1
3
4
5
You can analog record a radio program on an
MD. If the MD is partially recorded,
recording starts after the last recorded track.
To erase recorded contents, see “Erasing
recordings” on page 60.
If the power is off, first press 1/u (power) to
turn on the system.
For DHC-EX880MD
1/u
(power)
n
N
•
•
•
•
•
•
•
•
•
0
10
)
n
0
N
)
n
0
N
3514
+=
·∏
p
§
§
§
+=
·∏
p
p
§
8276
MANUAL
n
N
•
•
•
•
•
•
•
•
•
0
10
)
n
0
N
)
n
0
N
8276
+=
·∏
p
§
§
§
+=
·∏
p
p
§
Basic Operations
1/u
(power)
continued
23
Page 24
Recording from the radio
(continued)
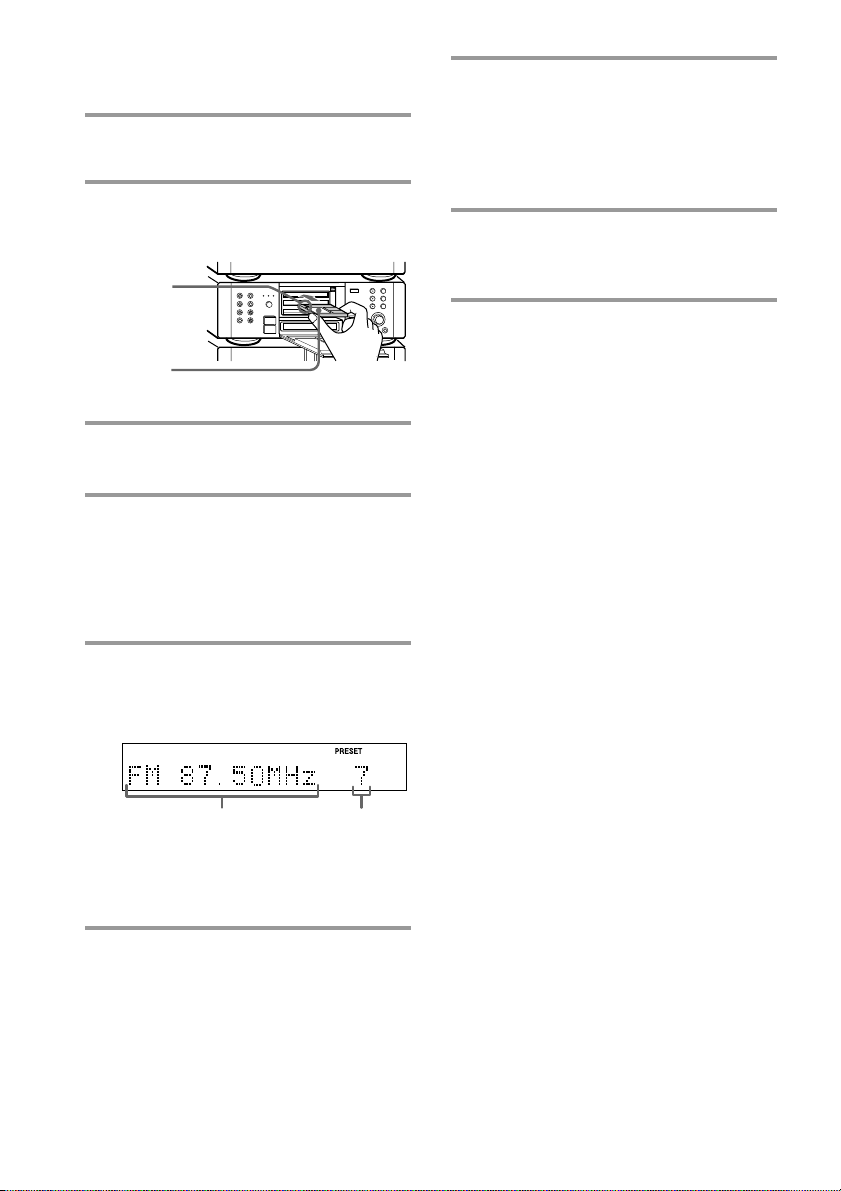
1 Press PUSH OPEN on the MD deck
and open the door.
2 Insert a recordable MD and close the
door.
With the arrow
pointing
toward the
deck
With the
label side up
•
•
•
•
•
•
•
•
•
0
10
)
n
0
N
+=
p
3 Press BAND on the tuner repeatedly
until the band you want appears.
4 For DHC-EX880MD:
Press TUNING MODE repeatedly
until “PRESET” appears.
For DHC-MD717:
Press PRESET.
5 Turn MULTI CONTROLLER (or
press PRESET –/+ on the remote) to
tune in the desired preset station.
7 Press DISPLAY on the MD deck so
that the level meter appears, then
turn REC LEVEL to adjust the
recording level.
For details, see “Adjusting the recording
level” on page 51.
8 Press ·∏ on the MD deck (or
MD P on the remote).
Recording starts.
To stop recording
Press p on the MD deck.
When recording is completed
Press § and eject the MD. “TOC Writing” flashes
and the MD Table of Contents (TOC) is updated.
While “TOC Writing” is flashing
Do not move the deck or pull out the power cord to
ensure the complete recording. The deck is currently
updating the Table of Contents (TOC).
Tip
If noise is heard while recording an AM radio
program, move the AM antenna to reduce the noise.
Note
If the MD is record-protected, “Protected” appears
and the MD cannot be recorded.
Press § to eject the MD and slide close the tab at the
side of the MD to cover the hole (see page 39).
Station name* or
frequency
* The station name is displayed only when
you have assigned a name to the preset
station (see page 69).
6 Press the REC 1 – 3 button for the
slot containing the recordable MD.
The MD deck stands by for recording.
24
Preset number
Page 25

Recording non-preset
radio stations
For DHC-EX880MD:
Manual Tuning
Press TUNING MODE repeatedly until
“TUNING” appears in step 4 (or press
MANUAL on the remote), then turn MULTI
CONTROLLER to tune in the desired station.
Automatic Tuning
Press TUNING MODE repeatedly until
“AUTO TUNING” appears in step 4 (or press
AUTO on the remote), then turn MULTI
CONTROLLER slightly and release it.
The frequency indication changes and
scanning stops when the system tunes in a
station.
For DHC-MD717:
Manual Tuning
Press MANUAL in step 4, then turn MULTI
CONTROLLER to tune in the desired station.
Automatic Tuning
Press AUTO in step 4, then turn MULTI
CONTROLLER slightly and release it.
The frequency indication changes and
scanning stops when the system tunes in a
station.
To cancel Automatic Tuning
Press TUNING MODE (DHC-EX880MD
only) or AUTO again.
Basic Operations
25
Page 26
The CD player
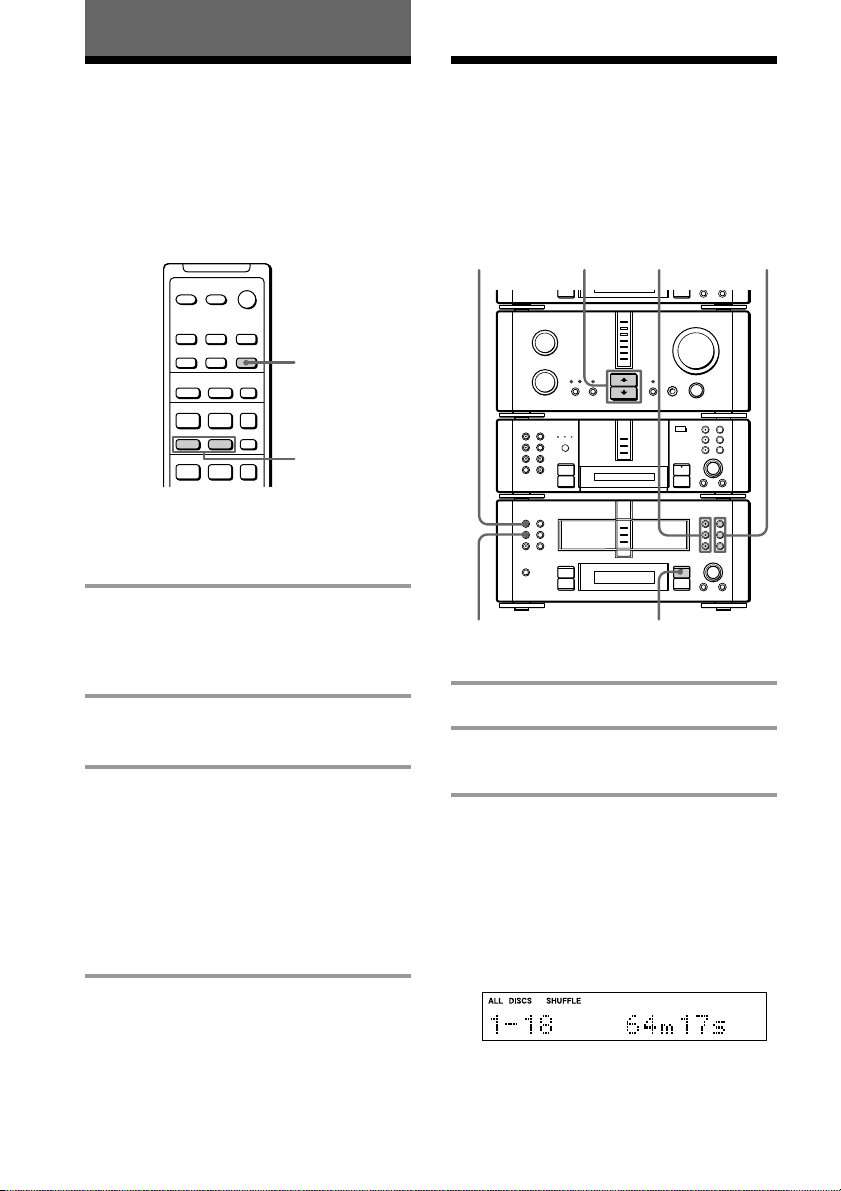
Playing the CD tracks repeatedly
— Repeat Play
This function lets you repeat a single CD or
all CDs in normal play, “1DISC” Shuffle Play
and Program Play.
REPEAT
+
–
P+=p
·
Pp
·
Playing all tracks or a
program repeatedly
/ Press REPEAT during play until
“REPEAT” appears.
You cannot perform Repeat Play for
“ALL DISCS” during Shuffle Play.
Repeating a single track
/ Press REPEAT repeatedly while
playing the track you want to repeat
until “REPEAT 1” appears.
You can change the repeated track by
pressing CD = or + on the remote
(or turning SELECTOR on the CD
player) during play.
You cannot repeat a single track during
Shuffle Play and Program Play.
=/+
Playing the CD tracks in random order
— Shuffle Play
You can play all the tracks on one CD or all
CDs in random order.
CONTINUE
24
N
•
•
•
•
•
•
•
•
•
0
10
)
n
0
N
)
n
0
N
·∏
p
·∏
p
1
+=
§
§
§
+=
34
1 Place a CD (CDs) on each disc tray.
2 Press FUNCTION >/. repeatedly
to switch the function to CD.
3 Press SHUFFLE.
Each time you press the button, the
display changes as follows:
“ALL DISCS” ˜ “1DISC”
(All the CDs play
in random order.)
(A single CD whose
CD 1 – 3 button lights
green plays in
random order.)
To cancel Repeat Play
Press REPEAT repeatedly until “REPEAT” or
“REPEAT 1” disappears.
26
Page 27
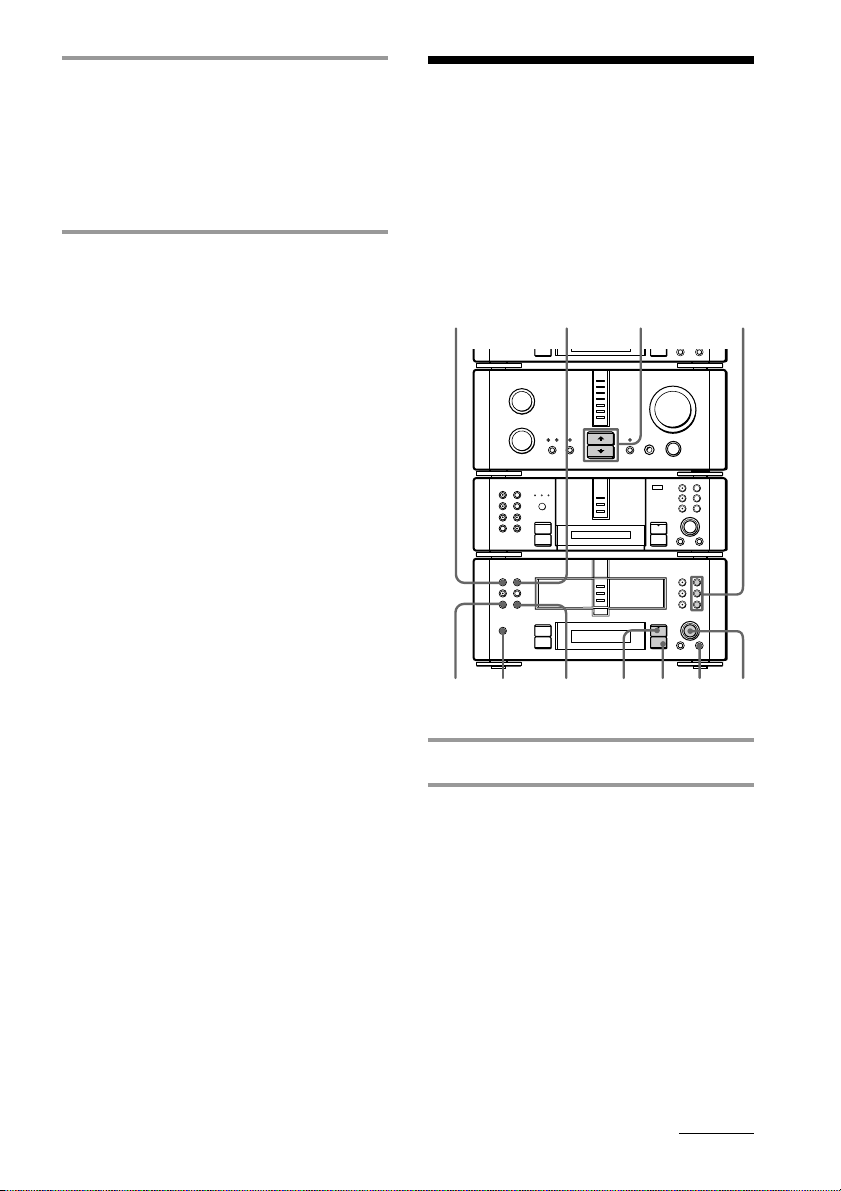
4 If you selected “ALL DISCS”, press
·∏ (or CD · on the remote).
If you selected “1DISC”, press the
CD 1 – 3 button for the tray
containing the desired CD.
J appears, then all the tracks play in
random order.
To cancel Shuffle Play
Press CONTINUE.
Tips
• You can start Shuffle Play during normal play by
pressing SHUFFLE. All tracks including those
already played on one disc (1DISC) or on all discs
(ALL DISCS) are played in random order.
• To skip a track, turn SELECTOR clockwise (or
press CD + on the remote). You cannot return
to the previous track.
Note
You cannot use Repeat Play during Shuffle Play for
“ALL DISCS”.
Programming the CD tracks
— Program Play
You can make up to three programs of up to
25 tracks each from all the CDs in the order
you want them to be played. You can also
record the programs you made (see pages 43
to 45).
CONTINUE
4
N
•
•
•
•
•
•
•
•
•
0
10
)
n
0
N
)
n
0
N
2
·∏
p
·∏
p
+=
§
§
§
+=
1
DISPLAY
CLEAR
p
863
1 Place a CD (CDs) on each disc tray.
2 Press FUNCTION >/. repeatedly
to switch the function to CD.
Notes
• You can only program CD tracks while the
CD player is in stop mode.
• Wait for the total number of tracks on the CD
and the playing time to appear, then proceed
to the next step.
continued
5
27
Page 28

Programming the CD tracks
(continued)
7 To program additional tracks,
repeat steps 4 to 6.
3 Press PROGRAM repeatedly so that
one of “PROGRAM-1” to
“PROGRAM-3” appears.
4 Press DISC SKIP (or CD D.SKIP on
the remote) to select the desired CD.
CD tray number
5 Turn SELECTOR (or press CD =
or + on the remote) until the
desired track number appears.
The selected CD and track numbers
flash.
Selected CD and
track numbers
Total playing
time
6 Press ENTER/YES (or PROGRAM
on the remote).
The track is programmed. The total
number of the programmed tracks
(steps) appears, followed by the last
programmed track number and the total
playing time of all the programmed
tracks.
If you have made a mistake, press
CLEAR to erase the last programmed
track.
8 Press ·∏ (or CD · on the
remote).
All the tracks play in the order you
selected.
To cancel Program Play
Press CONTINUE.
To cancel the programming
operation
Press p during steps 4 to 6.
To play an already prepared
program
Press PROGRAM repeatedly until the desired
program number (PROGRAM-1 to 3)
appears, then press ·∏ (or CD · on the
remote).
To clear the entire program
Press PROGRAM repeatedly in stop mode
until the desired program number
(PROGRAM-1 to 3) appears, then press p.
To check the total number of the
programmed tracks
Press PROGRAM repeatedly in stop mode
until the desired program number
(PROGRAM-1 to 3) appears, then press
DISPLAY.
The total number of the programmed tracks
and the total playing time appear.
To check the program order
Turn SELECTOR clockwise (or press CD +
on the remote) during Program Play.
The tracks appear in the order programmed,
and Program Play starts from the point where
you release SELECTOR.
28
Last track Total playing time
Page 29
To add a track to the program
·
P+=p
–
+
DISPLAY
1 Press PROGRAM repeatedly in stop mode
until the desired program number
(PROGRAM-1 to 3) appears.
2 Press DISC SKIP (or CD D.SKIP on the
remote) until the desired CD appears.
3 Turn SELECTOR (or press CD = or +
on the remote) until the track number you
want to add appears, then press
ENTER/YES (or PROGRAM on the
remote).
The selected track is added to the end of the
program.
To clear a track from the end of
the program
1 Press PROGRAM repeatedly in stop mode
until the desired program number
(PROGRAM-1 to 3) appears.
2 Press CLEAR.
Each time you press the button, a track is
cleared from the end of the program.
Tips
• To program the entire CD as one step of the
program, press ENTER/YES (or PROGRAM on
the remote) while “AL” is displayed in step 4.
• When you want to record the program, see
“Recording your favorite CD tracks on an MD”
(see page 43).
• The program you made remains after the Program
Play has finished. To play the same program
again, select the program number (PROGRAM-1
to 3), then press ·∏ (or CD · on the remote).
However, when you make a recording with the
Hit Parade feature (see page 46), PROGRAM-3 is
erased.
• If you press any § and open a disc tray, the tracks
on the CD in that tray are erased from the
programs.
• “Step Full” appears when you try to program 26
or more tracks. In addition, “--m--s” appears when
the total program time exceeds 100 minutes, or
when you select a track whose number is 21 or
over.
Using the CD display
You can check the remaining time of the
current track or that of the CD.
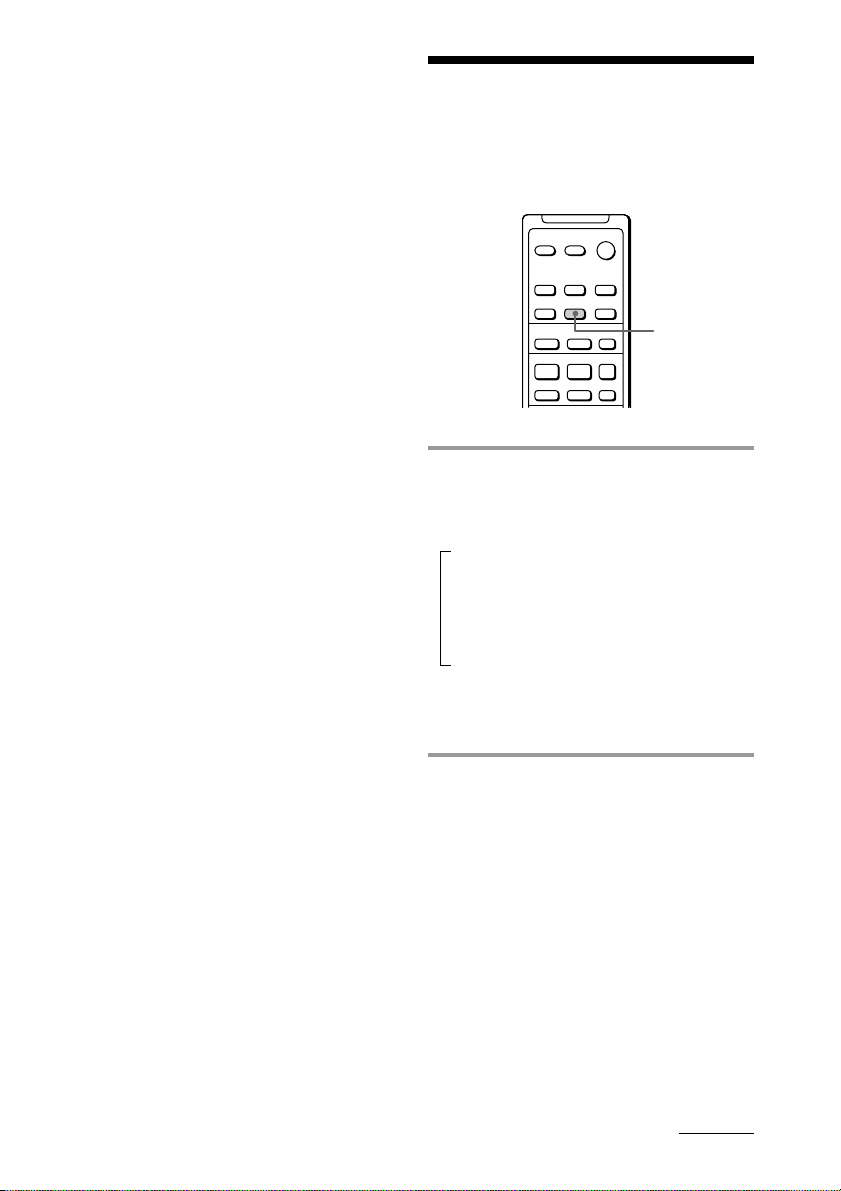
/ Press DISPLAY during play.
Each time you press the button, the
display changes as follows:
n
Elapsed playing time on the current track
Remaining time on the current track
Remaining time on the current CD*
Track title*2 (only for CDs with CD text)
*1 The remaining time on the CD is not displayed
during Program or Shuffle Play.
*2 “No Name” appears for CDs without CD text.
n
nn
1
continued
29
Page 30
Using the CD display (continued)
To check the number of tracks on
the CD and the total playing time
Press DISPLAY in normal or Shuffle Play stop
mode. Each time you press the button, the
display changes as follows:
n
Number of tracks and total playing time
n
Disc title*
* “No Name” appears, followed by “
for CDs without a disc title. In addition, if you
press DISPLAY for a CD with CD text containing
the artist name, the disc title is displayed scrolling
in the display followed by the artist name, then
the display returns to the number of tracks and the
total playing time.
Tip
“--m--s” appears when you check the remaining
time of a track whose number is 21 or over.
DISC-1 ”
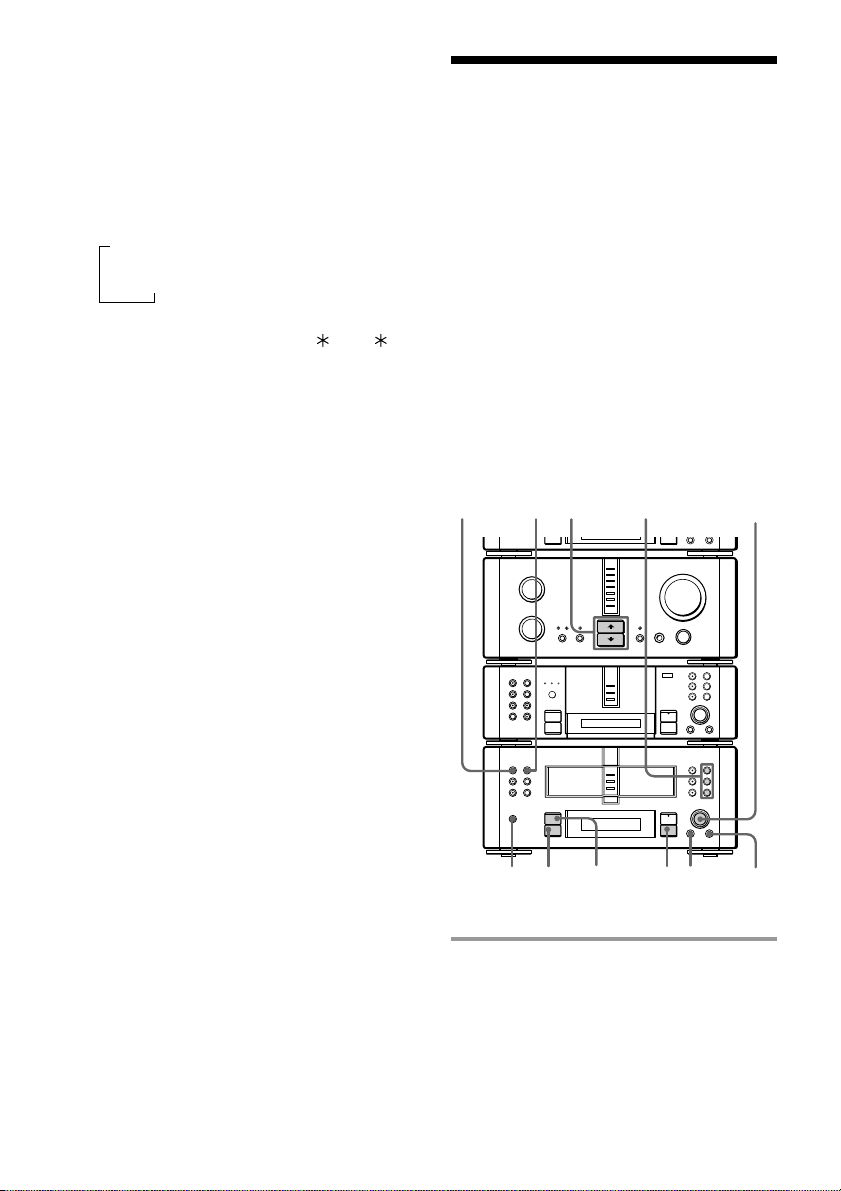
Labeling a CD
— Disc Memo
You can create disc titles of up to 20
characters and symbols each for up to 100
CDs. These titles are stored in the system
memory, and appear when the CD is loaded.
When you record a CD to an unrecorded MD,
the disc title on the CD is copied as the disc
title on the MD (Disc Memo Copy).
Notes
•If you label a CD for which “CD-TEXT” appears in
the CD player display, the disc title appears in
place of the CD-TEXT title.
• When labeling CDs for the first time, be sure to
perform the operations in “Erasing all disc titles
stored in the system memory” on page 32
beforehand.
3
2
N
1
6,94
30
•
•
•
•
•
•
•
•
•
0
8
N
10
)
n
0
N
)
n
0
N
10
+=
·∏
p
§
§
§
+=
·∏
p
p
5
7,
1 Place a CD (CDs) on each disc tray.
12
Page 31
2 Press FUNCTION >/. repeatedly
to switch the function to CD.
Note
You can input disc titles only when the CD
player is in stop mode.
9 Turn SELECTOR until the character
you want appears.
To enter a blank space, press n without
turning SELECTOR. You cannot enter a
space as the first character.
3 Press CONTINUE.
4 Press DISC SKIP (or CD D.SKIP on
the remote) until the number of the
tray containing the desired CD
appears.
Wait for the number of tracks and the
total playing time to appear, then
proceed to the next step.
5 Press MENU/NO.
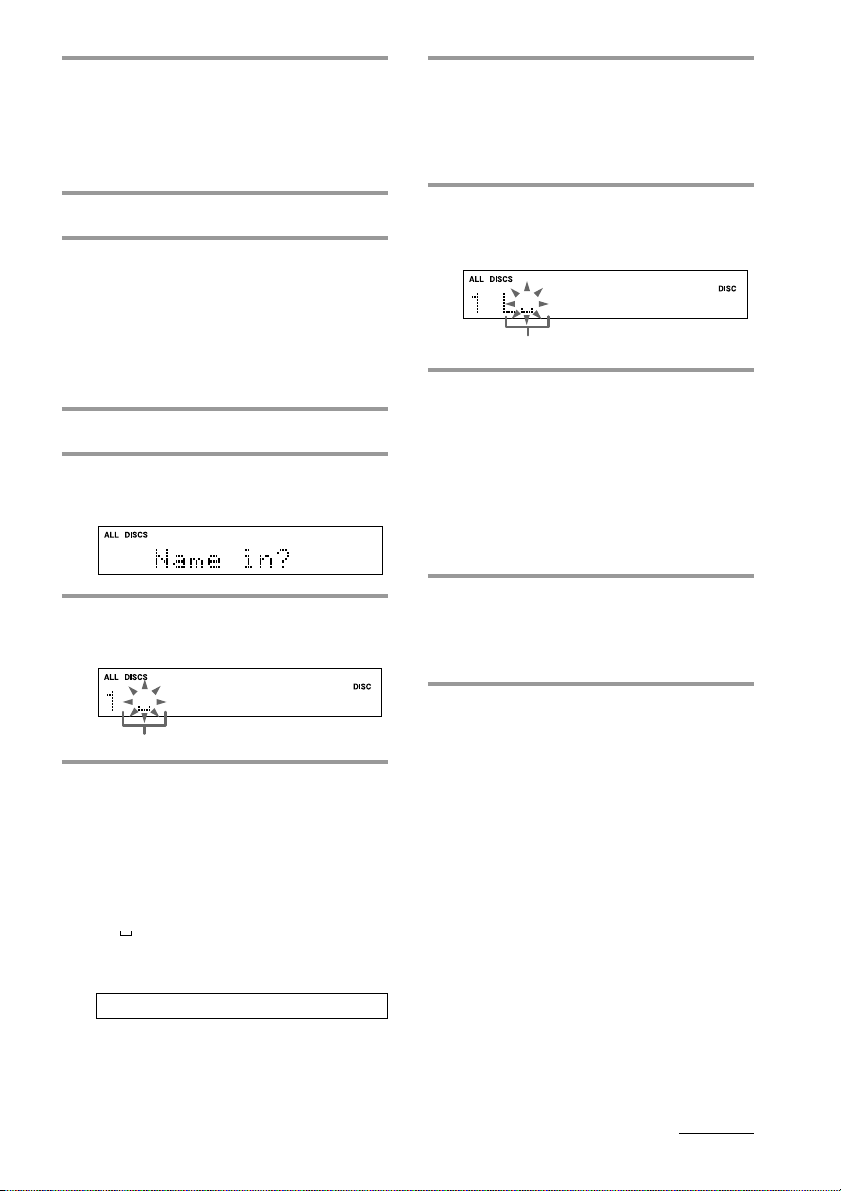
6 Turn SELECTOR until “Name in?”
appears.
7 Press ENTER/YES.
The cursor starts flashing.
Cursor
8 Press DISPLAY so that the desired
type of character appears.
Each time you press the button, the
display changes as follows:
10 Press n to enter the character.
The cursor shifts rightward and waits for
the input of the next character.
Cursor
11 Repeat steps 8 to 10 to complete the
entire title.
If you made a mistake, press N or n
until the character you want to change
flashes, then repeat steps 8 to 10.
To erase the character, press MENU/
NO. Each time you press the button, the
character at the position of the cursor is
erased. You cannot insert characters.
12 Press ENTER/YES to complete the
labeling procedure.
The disc title is stored in the system
memory.
To cancel labeling
Press p on the CD player during steps 6 to
11.
A (Upper cases) n a (Lower cases)
n 0 (Numbers) n ! (Symbols)*
n
(Blank space) n A ...
* You can use the following symbols:
! ” # $ % & ’ ( ) * + , – . / : ; < = > ? @ _ `
continued
31
Page 32

Labeling a CD (continued)
Checking a disc title
1 Turn SELECTOR in step 6 of “Labeling a
CD” until “Name Check?” appears.
2 Press ENTER/YES.
3 Turn SELECTOR until the CD 1 – 3 disc
title or the stored disc title (001 to 100) you
want to check appears.
The disc title is displayed scrolling in the
display.
To check the disc titles with the
remote
Press CD D.SKIP until the desired CD
appears, then press SCROLL.
The disc title is displayed scrolling in the
display.
Tip
You can also check the disc titles by pressing
DISPLAY in stop mode (see page 30).
Erasing a disc title
1 Turn SELECTOR in step 6 of “Labeling a
CD” until “Name Erase?” appears, then
press ENTER/YES.
2 Turn SELECTOR until the CD 1 – 3 disc
title or the stored disc title (001 to 100) you
want to erase appears.
The disc title is displayed scrolling in the
display.
3 To erase the disc title, press ENTER/YES.
The disc title is erased and “Complete”
appears.
To cancel erasing
Press p on the CD player during steps 1 or 2.
Erasing all disc titles
stored in the system
memory
1 Turn SELECTOR in step 6 of “Labeling a
CD” until “All Erase?” appears, then press
ENTER/YES.
“All Erase??” appears.
2 To erase all the disc titles, press ENTER/
YES.
All the disc titles are erased and
“Complete” appears.
To cancel erasing
Press p on the CD player during step 1.
Notes
•When you make a recording with the Hit Parade
feature (see page 46), the Disc Memo Copy feature
is not activated.
•Turn on the system power at least once every two
weeks to ensure the stored disc titles are not
erased.
32
Page 33
Checking CD text information
You can display the CD text (CD title, artist
name, track titles and other information)
when this information is recorded on the CD.
2
N
•
•
•
•
•
•
•
•
•
0
10
)
n
0
N
)
n
0
N
3
Checking a disc title
1 Place a CD (CDs) on each disc tray.
2 Press FUNCTION >/. repeatedly
to switch the function to CD.
3 Press DISC SKIP (or CD D.SKIP on
the remote) until the number of the
tray containing the desired CD
appears.
·∏
p
·∏
p
p
46
51
+=
§
§
§
+=
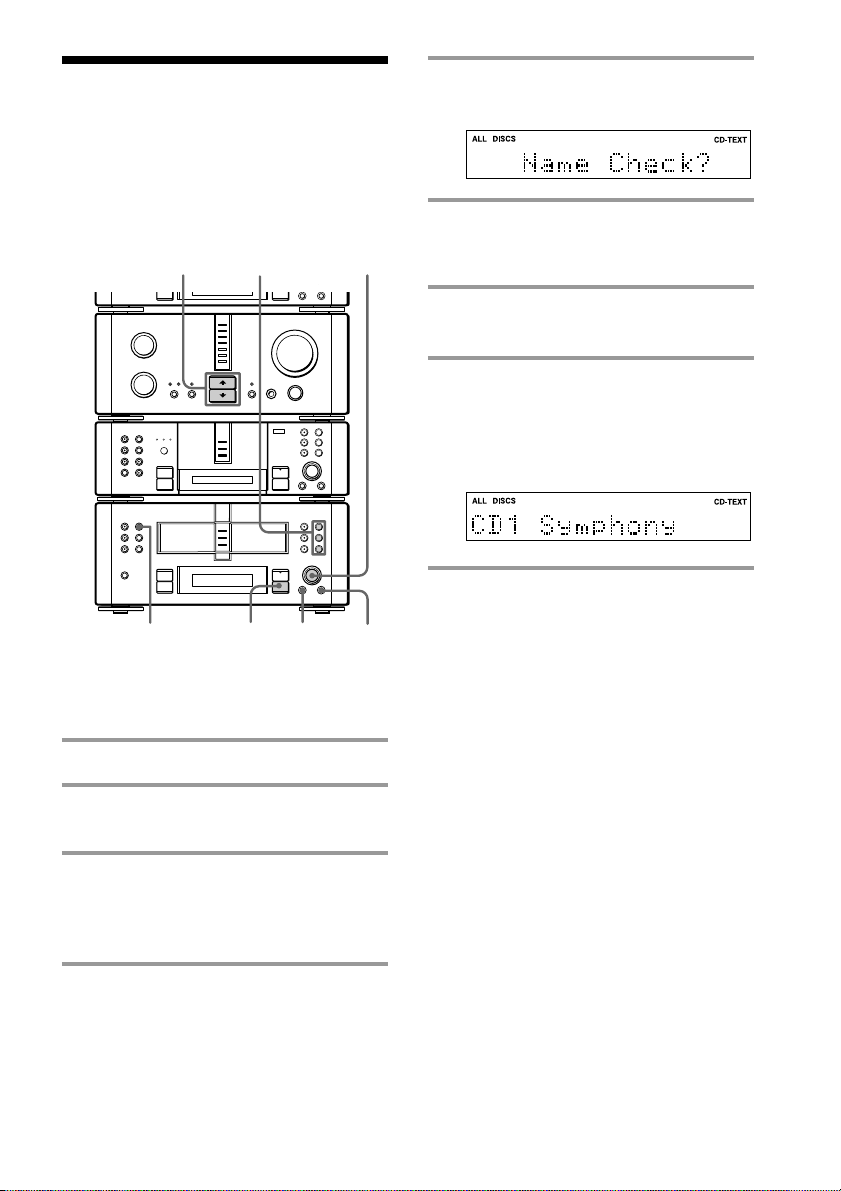
5 Turn SELECTOR until “Name
Check?” appears.
6 Press ENTER/YES.
The disc title is displayed scrolling in the
display.
Checking a track title
/ Turn SELECTOR during play or in
stop mode until the desired track
appears.
The track title is displayed scrolling in
the display.
To cancel checking
Press p on the CD player.
Viewing the CD text title
during play
1 Press MENU/NO.
2 Turn SELECTOR until “Name Check?”
appears.
3 Press ENTER/YES.
Up to 20 characters of the disc title appear.
Notes
•CD text information is not copied to MDs in some
cases.
•If the CD text exceeds 20 characters, the 21st and
subsequent characters do not scroll in the display.
4 Press MENU/NO.
33
Page 34
The MD deck — Playback
Playing the MD tracks repeatedly
— Repeat Play
You can repeat a single track or all tracks on
an MD in normal play, “1DISC” Shuffle Play
and Program Play.
REPEAT
+
–
P+=p
·
P+=p
·
=/+
ª·
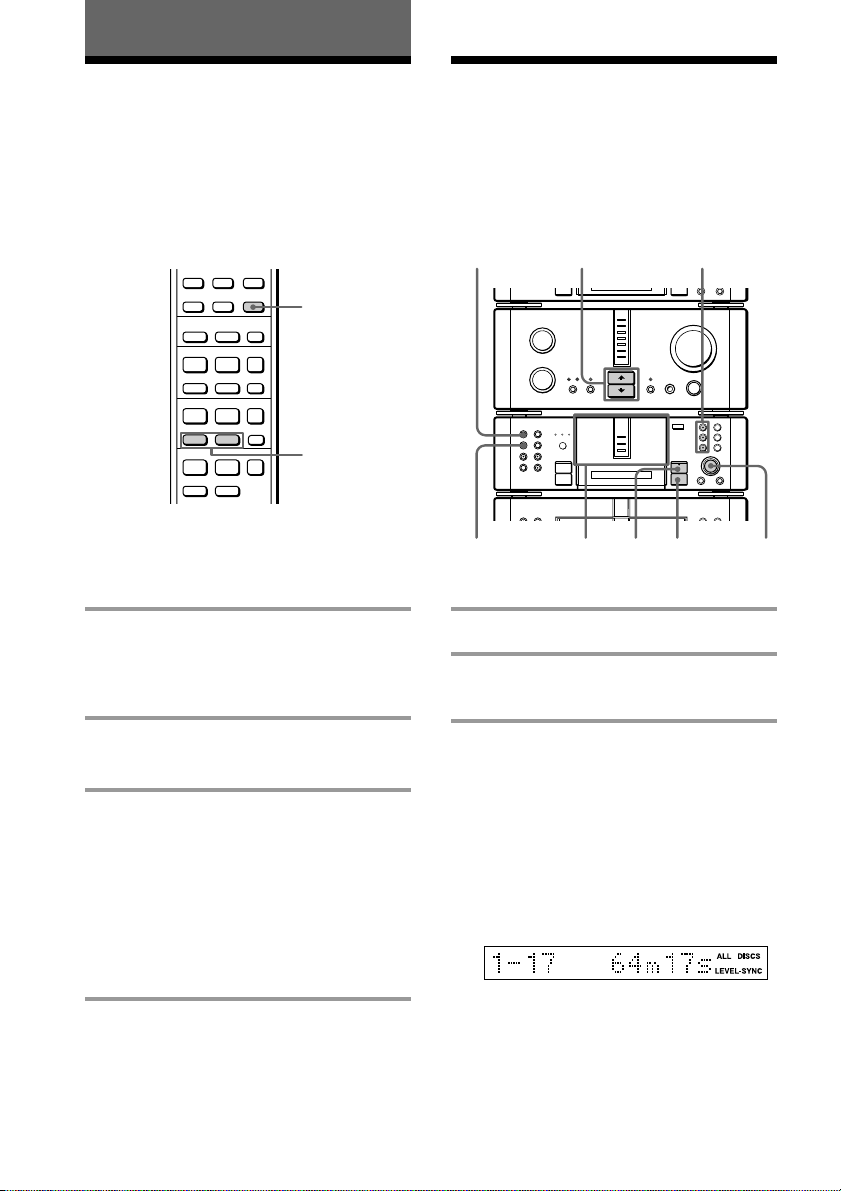
Playing all tracks or a
program repeatedly
/ Press REPEAT during play until
“REPEAT” appears.
You cannot perform Repeat Play for
“ALL DISCS” during Shuffle Play.
p
)0
Playing the MD tracks in random order
— Shuffle Play
You can play all the tracks on one MD or all
MDs in random order.
CONTINUE
3
1 Insert an MD (MDs).
2 Press FUNCTION >/. repeatedly
to switch the function to MD.
24
N
•
•
•
•
•
•
•
•
•
0
10
)
n
0
N
4
1
+=
·∏
p
§
p
SELECTOR
Repeating a single track
/ Press REPEAT repeatedly while
playing the track you want to repeat
until “REPEAT 1” appears.
You can change the repeated track by
pressing MD = or + on the remote
(or turning SELECTOR on the MD deck)
during play.
You cannot repeat a single track during
Shuffle Play and Program Play.
To cancel Repeat Play
Press REPEAT repeatedly until “REPEAT” or
“REPEAT 1” disappears.
34
3 Press SHUFFLE while the MD deck
is in stop mode.
Each time you press the button, the
display changes as follows:
“ALL DISCS” ˜ “1DISC”
(All the MDs play
in random order.)
(A single MD whose
MD 1 – 3 button
lights green plays in
random order.)
Page 35
4 If you selected “ALL DISCS”, press
·∏ (or MD · on the remote). If
you selected “1DISC”, press the
MD 1 – 3 button for the slot
containing the desired MD.
J appears, then all the tracks play in
random order.
Programming the MD tracks
— Program Play
You can make a program of up to 25 tracks
from all the MDs in the order you want them
to be played.
To cancel Shuffle Play
Press p to stop play, then press CONTINUE.
Tip
To skip a track, turn SELECTOR clockwise (or press
MD + on the remote).
You cannot return to the previous track.
Notes
• You cannot use Repeat Play during Shuffle Play
for “ALL DISCS”.
• If you press SHUFFLE or PROGRAM while
playing an MD, “Push STOP !” appears. To
change the playing mode, first press p to stop
play.
CONTINUE
3
25
N
•
•
•
•
•
•
•
•
•
0
10
)
n
0
N
4
1
8
+=
·∏
p
§
p
1 Insert an MD (MDs).
2 Press FUNCTION >/. repeatedly
to switch the function to MD.
Notes
• You can program MD tracks only while the
MD deck is stopped.
• Wait for the number of tracks and the
playing time on the MD to appear, then
proceed to the next step.
6
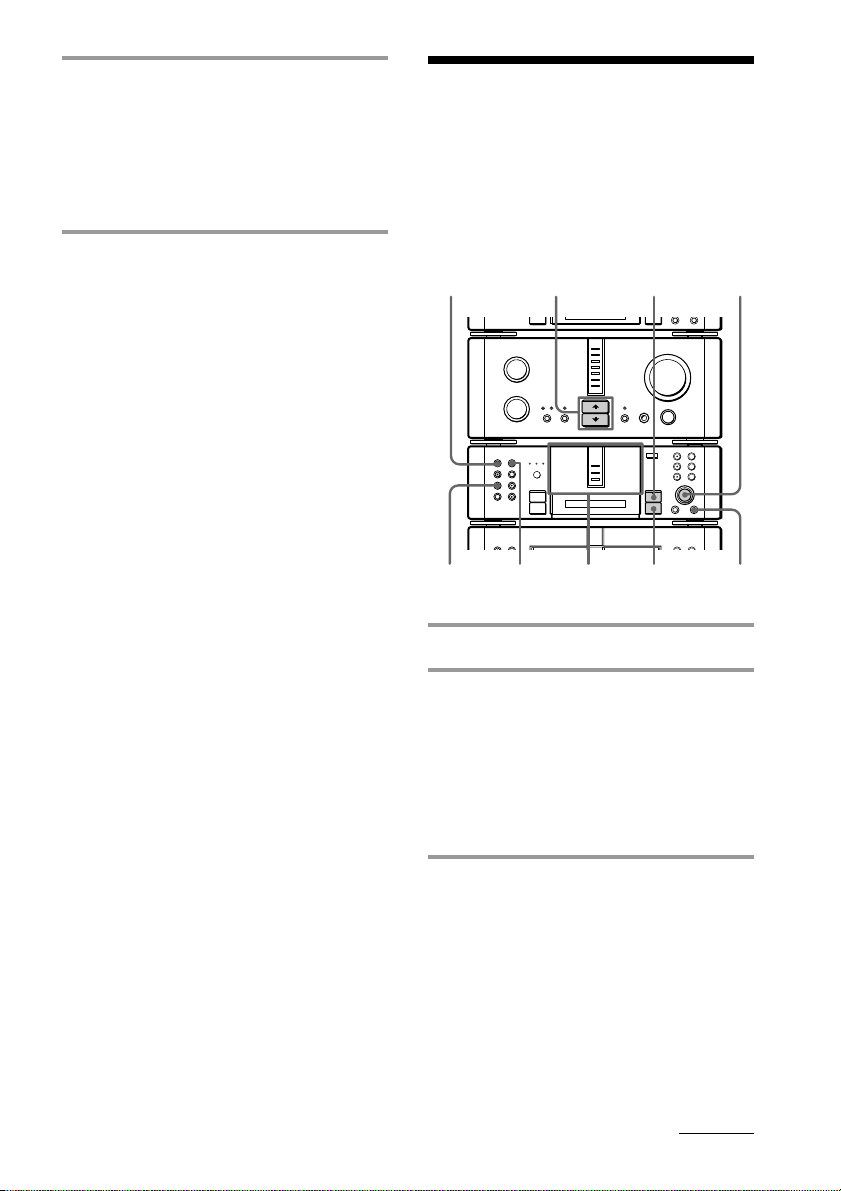
3 Press PROGRAM while the MD
deck is in stop mode.
continued
35
Page 36
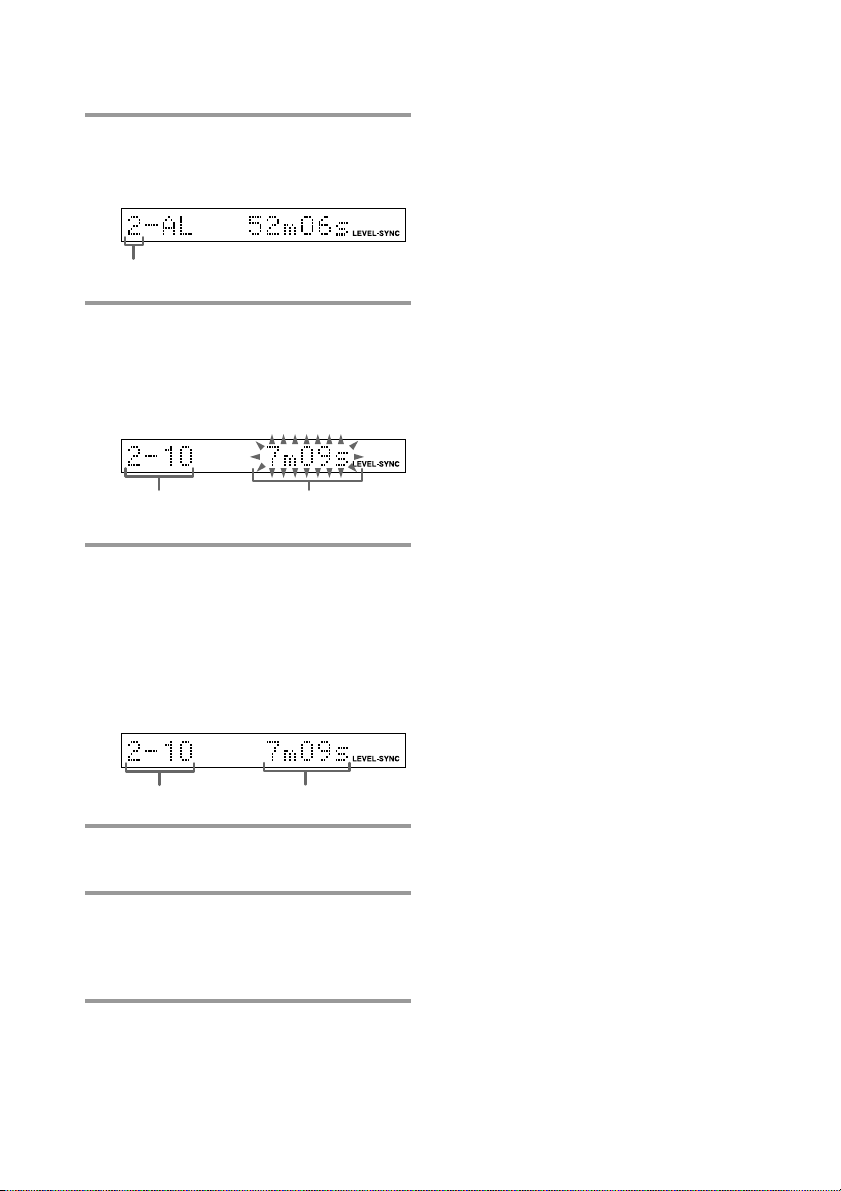
Programming the MD tracks
(continued)
4 Press DISC SKIP (or MD D.SKIP on
the remote) to select the desired
MD.
MD slot number
5 Turn SELECTOR (or press MD =
or + on the remote) until the
desired track number appears.
The selected MD and track numbers
flash.
Selected MD and
track numbers
Total playing
time
6 Press ENTER/YES (or PROGRAM
on the remote).
The track is programmed. The total
number of the programmed tracks
(steps) appears, followed by the last
programmed track number and the total
playing time of all the programmed
tracks.
To cancel Program Play
Press p to stop play, then press CONTINUE.
To cancel the programming
operation
Press p during steps 4 to 6.
To clear the entire program
Press p in Program Play stop mode.
To add a track to the program
1 Press DISC SKIP (or MD D.SKIP on the
remote) in stop mode until the desired MD
appears.
2 Turn SELECTOR (or press MD = or +
on the remote) until the track number you
want to add appears.
3 Press ENTER/YES (or press PROGRAM on
the remote).
The selected track is added to the end of the
program.
Tips
•To program the entire MD as one step of the
program, press ENTER/YES (or PROGRAM on
the remote) while “AL” is displayed in step 4.
•The program you made remains after the Program
Play has finished. To play the same program
again, press ·∏ (or MD · on the remote).
•If you remove an MD from the MD 1 – 3 slots, the
tracks on the removed MD are erased from the
program.
•“PGM FULL” appears when you try to program
26 or more tracks. In addition, “--m--s” appears
when the total program time exceeds 100 minutes.
Last track
Total playing time
7 To program additional tracks,
repeat steps 4 to 6.
8 Press ·∏ (or MD · on the
remote).
All the tracks play in the order you
selected.
36
Page 37
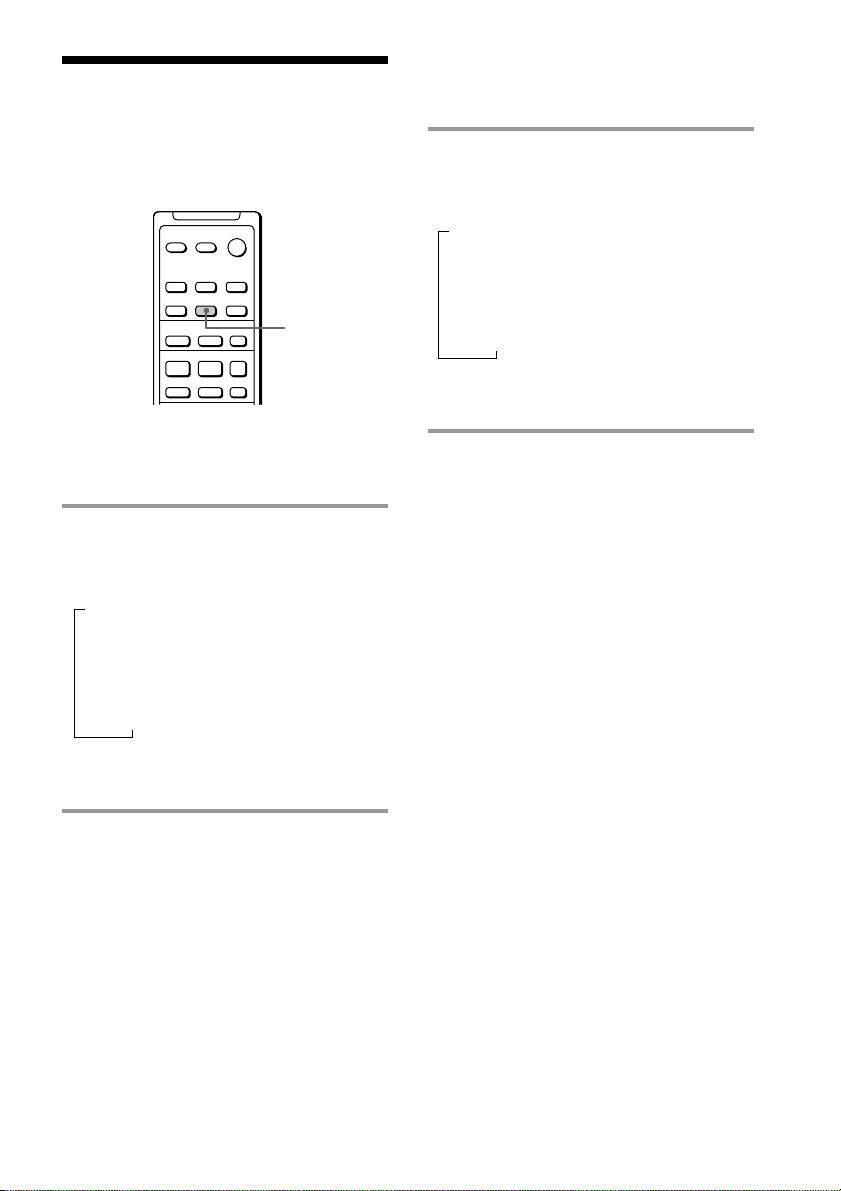
Using the MD display
Checking the remaining
time of an MD
You can check the remaining time of the
current track or that of the MD.
+
–
P+=p
·
DISPLAY
Checking the remaining
time of a track
/ Press DISPLAY during play.
Each time you press the button, the
display changes as follows:
n
Playing time and the track number on the
current track
n
Remaining time and the track number on the
current track
n
Track title on the current track*
/ Press DISPLAY in stop mode.
Each time you press the button, the
display changes as follows:
n
Total playing time and the number of tracks on
the MD
n
Remaining recordable time on the MD
(only for a recordable MD)
n
Disc title on the MD**
**“No Name” appears if no disc title is recorded.
See page 57 for assigning disc titles.
* “No Name” appears if no track title is stored.
See page 57 for assigning track titles.
37
Page 38

The MD deck — Recording
Before you start recording
MDs (MiniDisc) let you digitally record and
play back music with high quality sound.
Another feature of MDs is track marking like
that on CDs. The track marking feature lets
you quickly locate a specific point or easily
edit the recorded tracks.
Also, the way the track numbers are recorded
differs depending on the source.
When the source you want to
record from is:
• This system’s CD player
– The digital signal from the CD is recorded
as it is (digital recording*
– Track numbers are automatically marked
as on the original CD.
• Other digital components connected
to the VIDEO 1 or VIDEO 2 DIGITAL IN
jack (CS/BS or LD/DVD DIGITAL IN
jack for DHC-MD717)
(e.g., a digital satelite receiver or
DVD player)
– The digital signal from the connected
component is recorded as it is (digital
recording*
– Track numbers are marked differently
depending on the source.
• This system’s tuner or other analog
components connected to the TAPE
or VIDEO3 (VIDEO for DHC-MD717)
input jacks, etc.
(e.g., a tape deck or VCR)
– The analog signal is converted to a digital
signal and recorded (analog recording*2).
– A track number is marked at the beginning
of a recording, but when you turn on the
Level Synchro Recording function (see
page 52), track numbers are automatically
marked in sync with the level of the input
signal.
1
).
1
).
*1 For details on limitations of digital recording, see
page 88. Also, many types of DVD software
cannot be digitally recorded.
*2 If you do not connect digital components to the
VIDEO 1 or VIDEO 2 DIGITAL IN jack (CS/BS or
LD/DVD DIGITAL IN jack for DHC-MD717)
using optical cables, these sources are recorded
by analog recording.
Note on the track numbers of an MD
On an MD, the track numbers (track
sequence), track start and end point
information, etc., are recorded in the TOC*
area independent of the sound information.
You can edit recorded tracks quickly by
modifying the TOC information.
*3 TOC: Table Of Contents
3
After recording
/ Press § on the MD deck and eject
the MD, or press 1/u (power) and
turn off the system.
The TOC is updated and recording is
completed.
Note
MD recording is completed when the TOC has been
updated. If you pull out the power cord before the
TOC has been updated, the recorded contents are
not written to the MD.
The TOC is updated when you perform the
following operations. Therefore, be sure to perform
these operations before you pull out the power cord.
•Press § and eject the MD.
•Press 1/u (power) and turn off the system.
38
Page 39
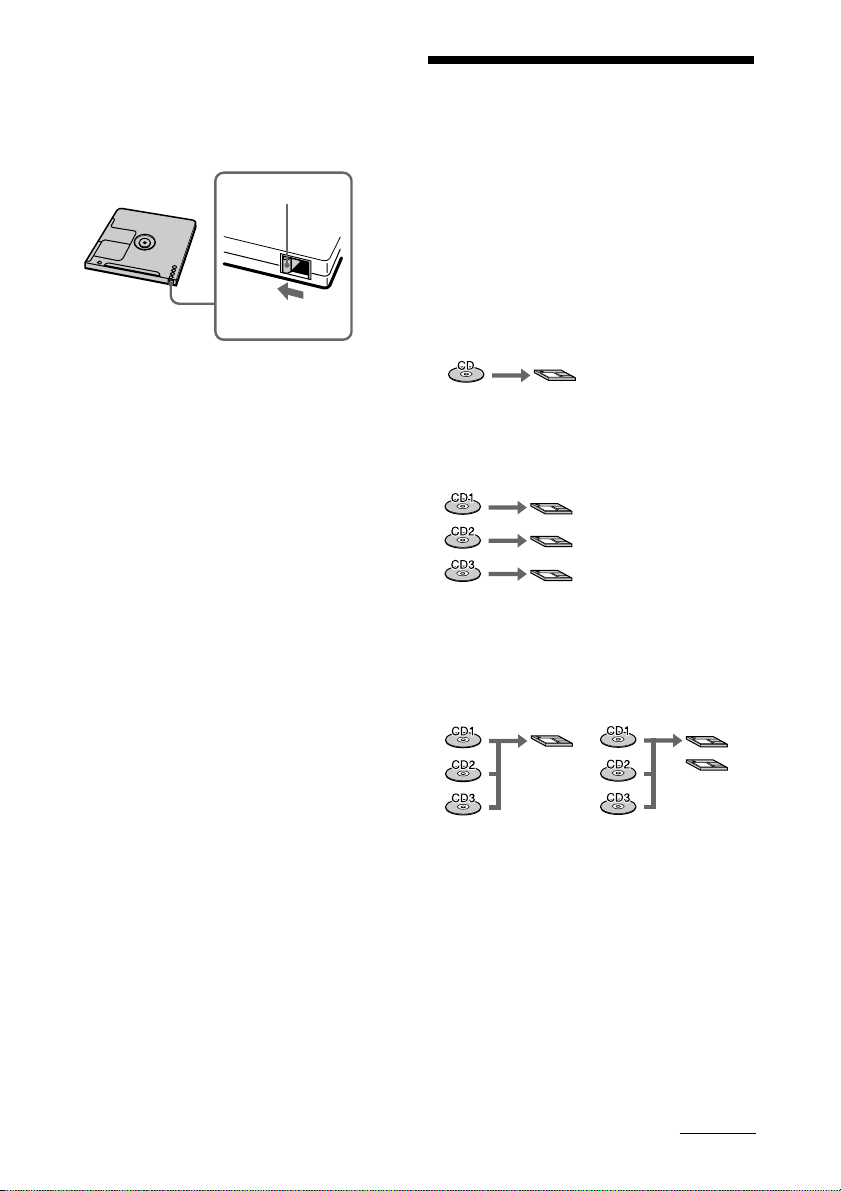
Protecting a recorded MD
MD1
MD2
• To record-protect an MD, slide open the tab at the
side of the MD so the tab is concealed.
In this position, the MD cannot be recorded. To
record on the MD, slide close the tab.
Tab
Types of recording
You can choose from the following 13 types
of recording in accordance with the purpose.
CD Synchro Recording
Tracks are recorded to the MD in the same
sequence as the original CD.
Slide open the
tab.
• If the MD is record-protected, “Protected” appears
and the MD cannot be recorded.
Press § and eject the MD, then slide close the tab
at the side of the MD to cover the hole.
• Recording a CD on an MD (NORMAL)
— page 17
MD1
CD 1, 2 or 3 is recorded to MD 1.
• Recording one to three CDs on separate
MDs (3CD
The CDs are recorded separately to the MDs in
the same slot numbers.
nn
n 3MD) — page 41
nn
MD1
MD2
MD3
• Recording one to three CDs in succession
on an MD (Seamless Recording)
— page 42
MD1
If all the tracks cannot fit on a single MD,
recording switches automatically to the next MD.
Tracks are not cut off and the space between
tracks is not lengthened.
continued
39
Page 40
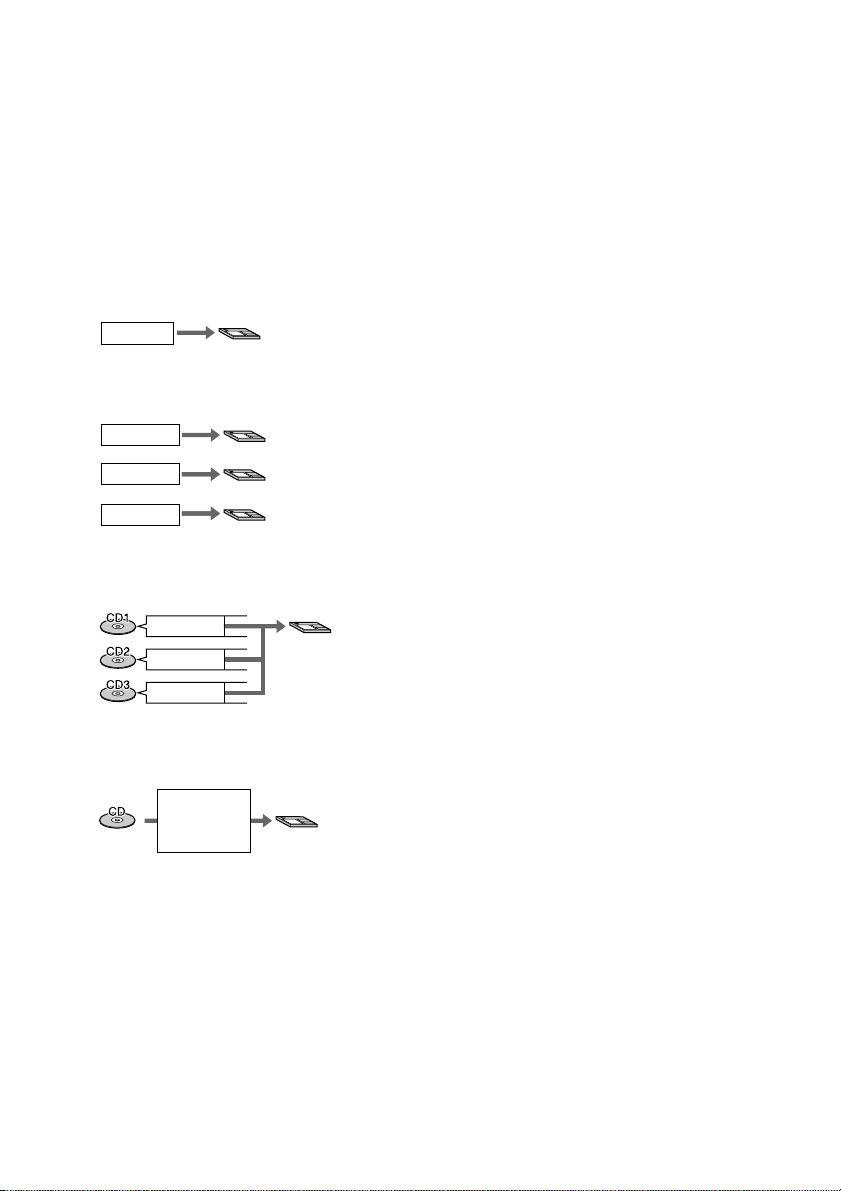
Types of recording (continued)
Recording your favorite
CD tracks on an MD
You can record your favorite tracks from up
to three CDs on an MD using the CD
Program Play function.
• Recording a single program on an MD
(NORMAL application) — page 44
PROGRAM
• Recording one to three programs on
separate MDs (3PGM
PROGRAM 1
PROGRAM 2
PROGRAM 3
• Recording only the first track on each CD
(Hit Parade) — page 46
First track
First track
First track
• Quickly recording the current CD track
(Rec It) — page 47
MD1
nn
n 3MD) — page 45
nn
MD1
MD2
MD3
MD1
Other types of recording
• Starting recording with 6 seconds of
prestored audio data (Time Machine
Recording) — page 50
This feature keeps you from losing the first few
seconds of material when recording an FM or
satellite broadcast on an MD.
• Making the space between tracks 3 seconds
long (Smart Space/Auto Cut) — page 54
You can make the blank space between tracks
three seconds long when digitally recording a
satellite broadcast on an MD.
• Marking track numbers automatically
while recording (Level Synchro
Recording) — page 52
You can mark track numbers automatically in
sync with the level of the input signal from the
sound source (except when digitally recording a
CD or MD).
• Marking track numbers at a specific point
while recording — page 53
You can mark track numbers at any time during
either analog or digital recording.
• Monaural recording — page 55
You can record FM broadcasts and other stereo
sources in monaural format. This doubles the
recording time (e.g., 120 minutes on a 60-minute
MD).
You can also move tracks, erase tracks and
edit the recorded contents (see pages 56 to
66).
Current
track
MD
• Recording on an MD manually — pages 23
and 48
40
Page 41
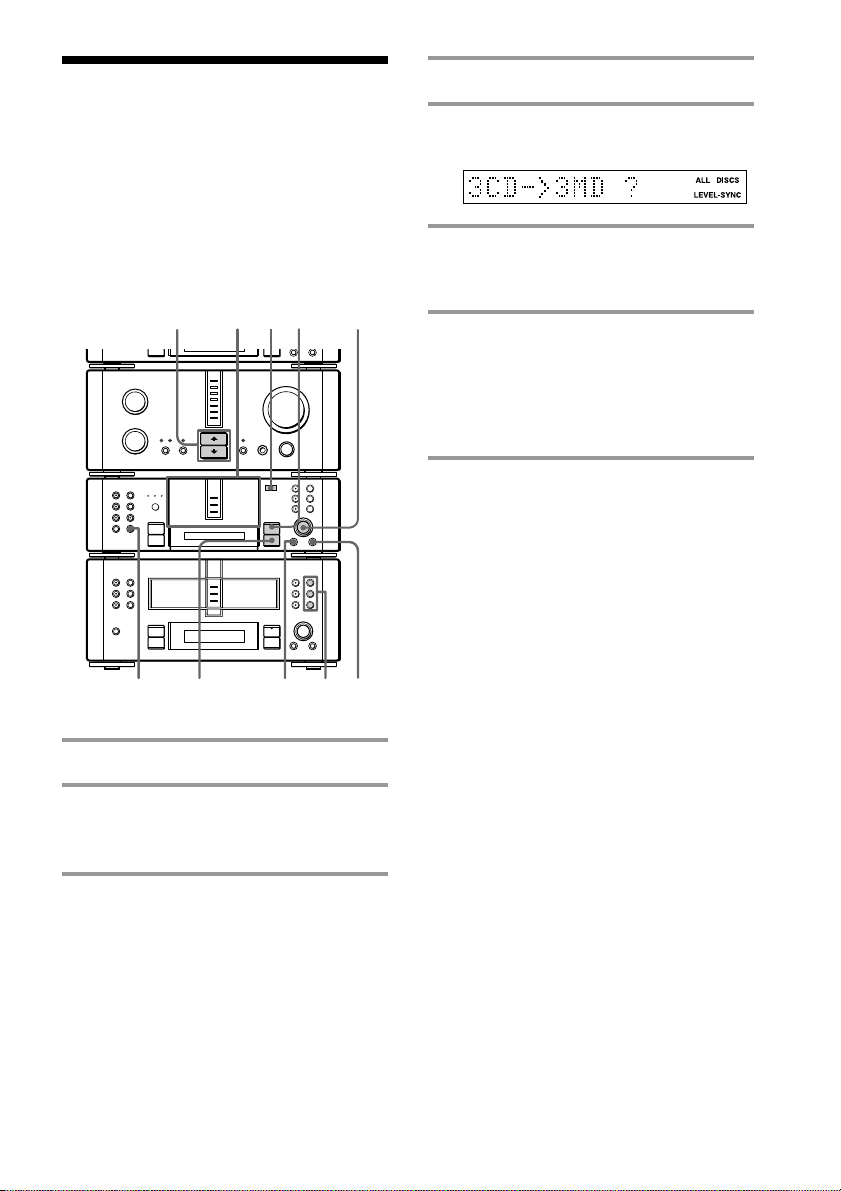
Recording 3 CDs on
4 Press CD SYNC on the MD deck.
3 separate MDs
— 3CD n 3MD
You can record from CDs to MDs of the same
number (e.g., CD 1 n MD 1, CD 2 n MD 2,
CD 3 n MD 3). Be sure to insert an MD to
the same slot number as the tray containing
the CD.
327
N
•
•
•
•
•
•
•
•
•
0
10
)
n
0
N
)
n
0
N
41
1 Place the CDs on each disc tray.
2 Insert the MDs to the slots with the
same numbers as the disc trays
containing the CDs.
3 Press FUNCTION >/. on the
amplifier repeatedly to switch the
function to CD.
p
§
·∏
p
·∏
p
MENU/NO
5
+=
§
§
§
+=
6
5 Turn SELECTOR on the MD deck
until “3CD n 3MD ?” appears.
6 Press ENTER/YES on the MD deck.
The CD is in pause for playback and the
MD deck stands by for recording.
7 Press ·∏ on the MD deck (or
MD P on the remote).
Recording starts in order from CD 1 to 3.
The CD player and MD deck stop
automatically when the recording is
completed.
To cancel recording
Press MENU/NO on the MD deck during
steps 4 to 6.
To stop recording
Press p on the MD deck.
When recording is completed
Press § and eject the MD. “TOC Writing” flashes
and the MD Table of Contents (TOC) is updated.
While “TOC Writing” is flashing
Do not move the deck or pull out the power cord to
ensure the complete recording. The deck is currently
updating the Table of Contents (TOC).
Tips
•If you record on an unrecorded or completely
erased (see page 61) MD, the disc title assigned to
the CD (see page 30) is copied as it is to the MD
(Disc Memo Copy).
However, CD text information is not copied in
some cases.
•The disc is skipped and recording continues from
the next disc when:
– The CD or MD with the same disc number is not
loaded.
– The MD is record-protected.
41
Page 42
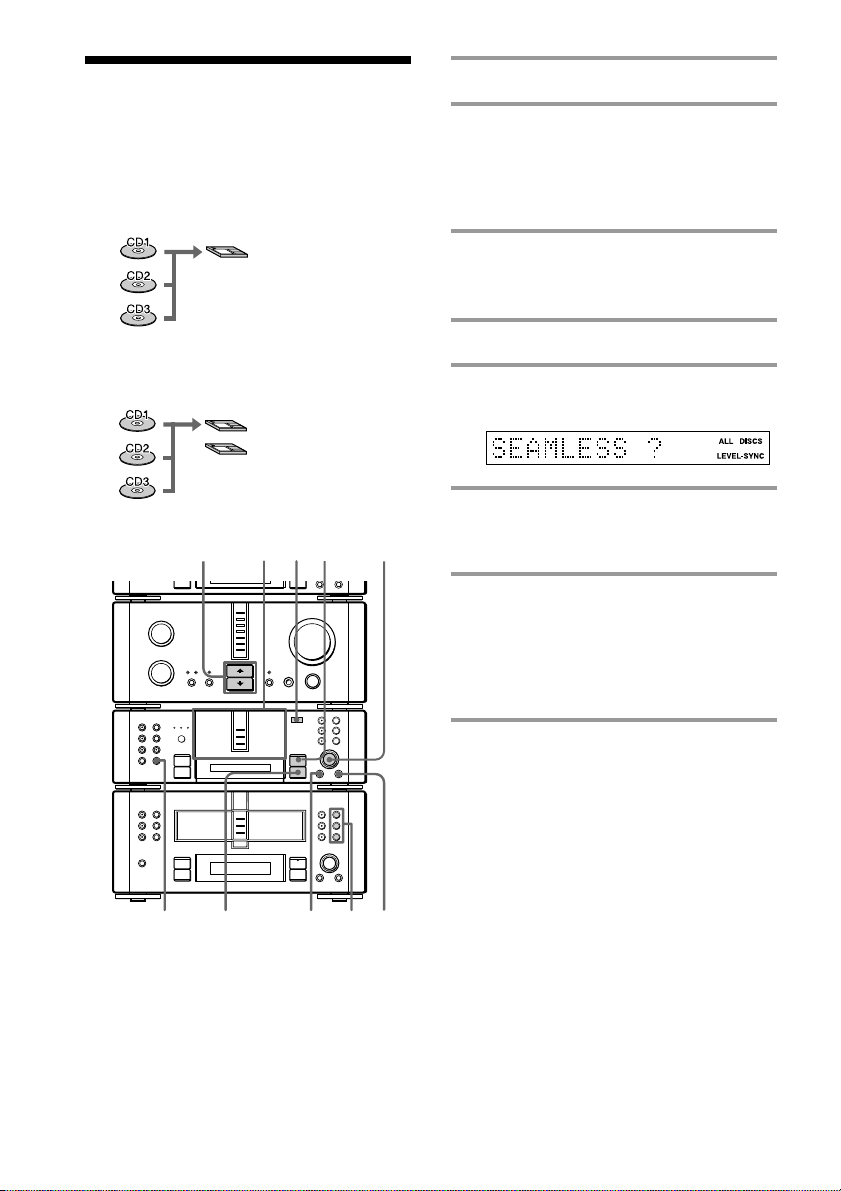
Recording 3 CDs in
1 Place the CDs on each disc tray.
succession on an MD
— Seamless Recording
For example, you can record three single CDs
in succession on an MD.
MD1
You can also record a three-disc album on
two MDs.
MD1
MD2
327
N
•
•
•
•
•
•
•
•
•
0
10
)
n
0
N
)
n
0
N
§
·∏
p
·∏
p
+=
§
§
§
+=
5
2 Insert the recordable MDs in order
from the MD 1 slot.
The MDs are recorded in order from the
MD in MD 1. Remove any unwanted
MDs from the slots.
3 Press FUNCTION >/. on the
amplifier repeatedly to switch the
function to CD.
4 Press CD SYNC on the MD deck.
5 Turn SELECTOR on the MD deck
until “SEAMLESS ?” appears.
6 Press ENTER/YES on the MD deck.
The CD is in pause for playback and the
MD deck stands by for recording.
7 Press ·∏ on the MD deck (or
MD P on the remote).
CD playback and MD recording start.
The CD player and MD deck stop
automatically when the recording is
completed.
To cancel recording
Press MENU/NO on the MD deck during
steps 4 to 6.
To stop recording
Press p on the MD deck.
42
p
MENU/NO
64
1
Page 43
When recording is completed
Press § and eject the MD. “TOC Writing” flashes
and the MD Table of Contents (TOC) is updated.
While “TOC Writing” is flashing
Do not move the deck or pull out the power cord to
ensure the complete recording. The deck is currently
updating the Table of Contents (TOC).
Notes
• The Disc Memo Copy function is not activated
during Seamless Recording.
• If all the tracks cannot fit on a single MD,
recording switches automatically to the next MD.
Be sure to insert the recordable MDs beforehand
and remove any unwanted MDs from the slots.
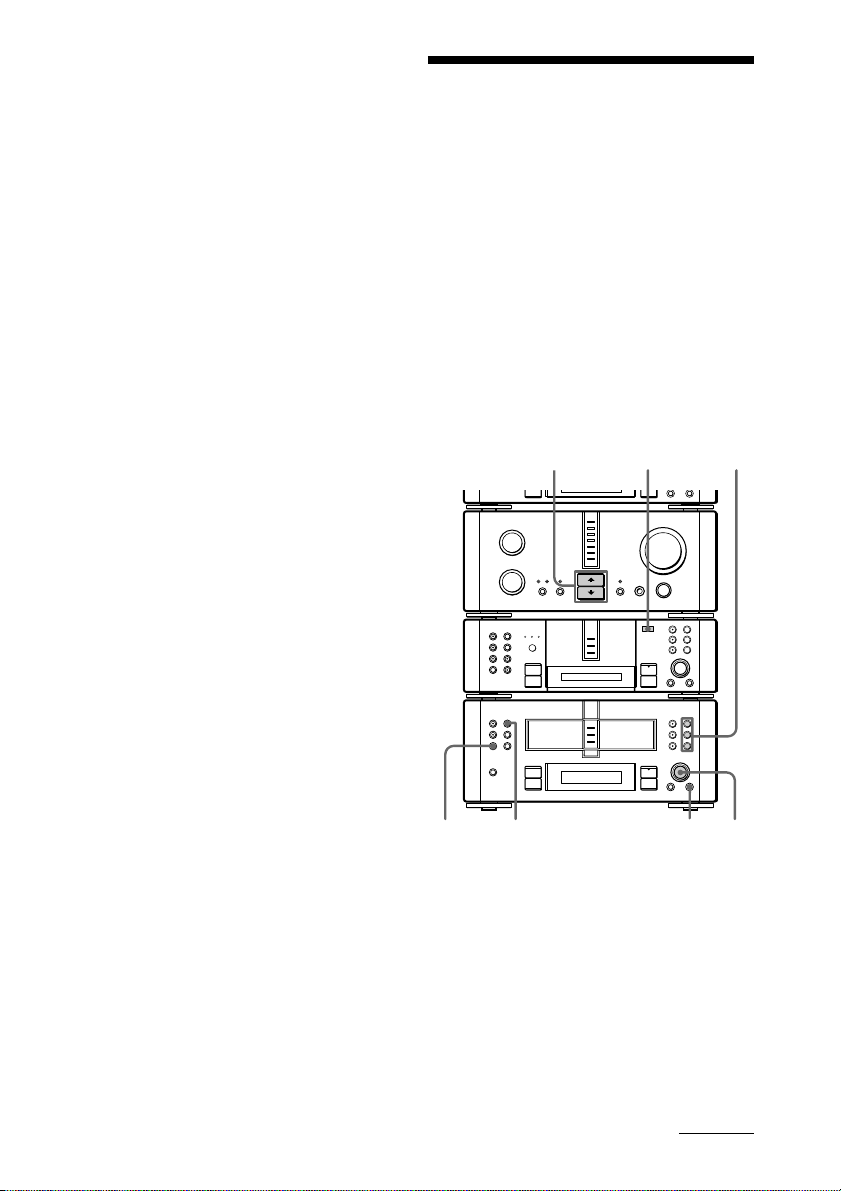
Recording your favorite CD tracks on an MD
— 3PGM n 3MD
You can select your favorite CD tracks with
the Program Play feature, then record the
program on an MD (MDs) using the CD
Synchro Recording feature.
The two options to record programs are:
• Recording a single program on an MD
(NORMAL application)
• Recording multiple programs on separate
MDs (3PGM n 3MD)
21
N
•
•
•
•
•
•
•
•
•
0
10
)
n
0
N
)
n
0
N
3
4
§
+=
·∏
p
§
§
§
+=
·∏
p
6
5
continued
43
Page 44
Recording your favorite CD tracks
•
•
•
•
•
•
•
•
•
0
10
)
n
0
N
·∏
p
+=
+=
)
n
0
N
·∏
p
§
§
§
11
10
11
12
13
9
p
§
MENU/NO
on an MD (continued)
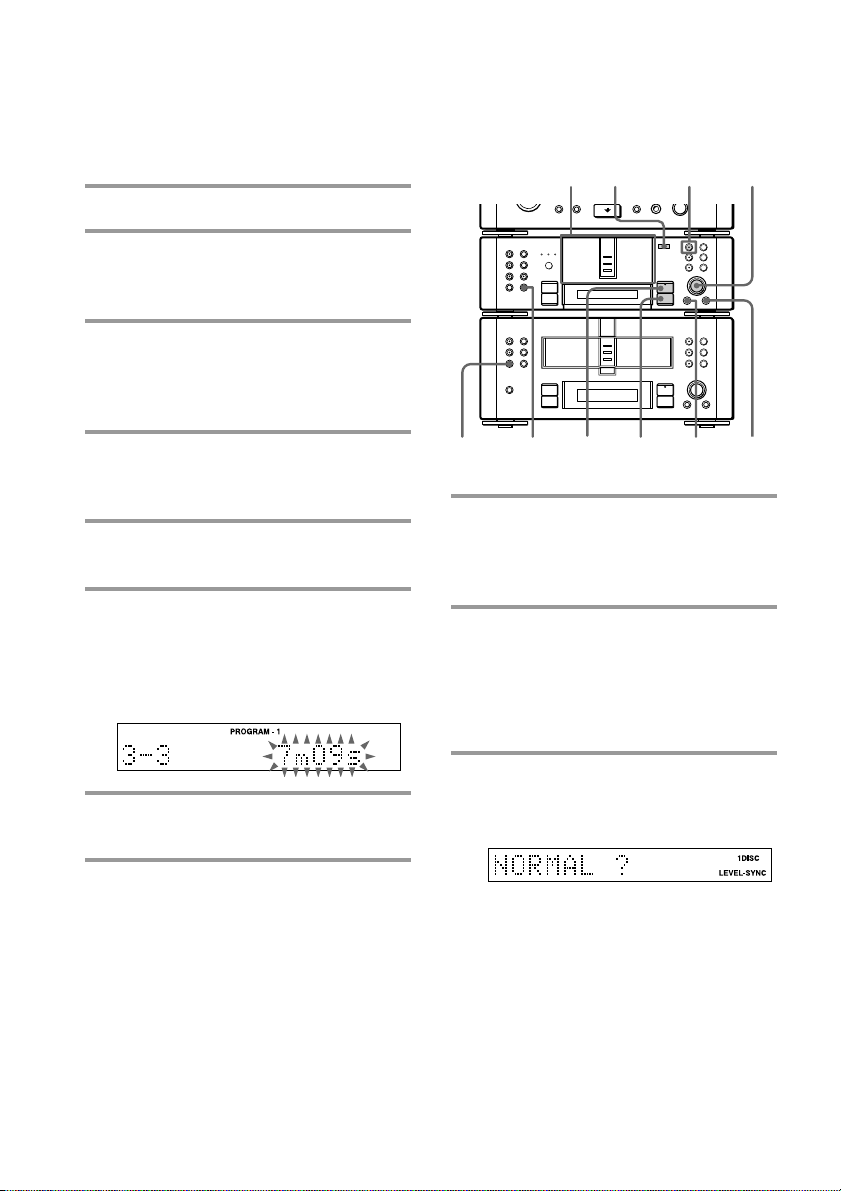
Step 1: Programming the
tracks
1 Place a CD (CDs) on each disc tray.
2 Press FUNCTION >/. on the
amplifier repeatedly to switch the
function to CD.
3 Press PROGRAM on the CD player
repeatedly so that one of
“PROGRAM-1” to “PROGRAM-3”
appears.
4 Press DISC SKIP on the CD player
(or CD D.SKIP on the remote) to
select the desired CD.
5 Turn SELECTOR on the CD player
to select the desired track.
6 Press ENTER/YES on the CD
player.
The track is programmed.
The total number of programmed steps
and the total playing time appear.
Step 2: Recording
— When recording a single
program
MD 1
button
9 Press PROGRAM on the CD player
repeatedly until the desired
program “PROGRAM-1” to
“PROGRAM-3” appears.
10 Insert a recordable MD to the MD 1
slot.
You can only record on the MD in MD 1.
When the MD 1 button is lit green, press
§ and eject the MD, then insert a
recordable MD.
7 To program additional tracks,
repeat steps 4 to 6.
8 To create multiple programs, repeat
44
steps 3 to 7.
11 Press CD SYNC on the MD deck,
then turn SELECTOR until
“NORMAL ?” appears.
Page 45
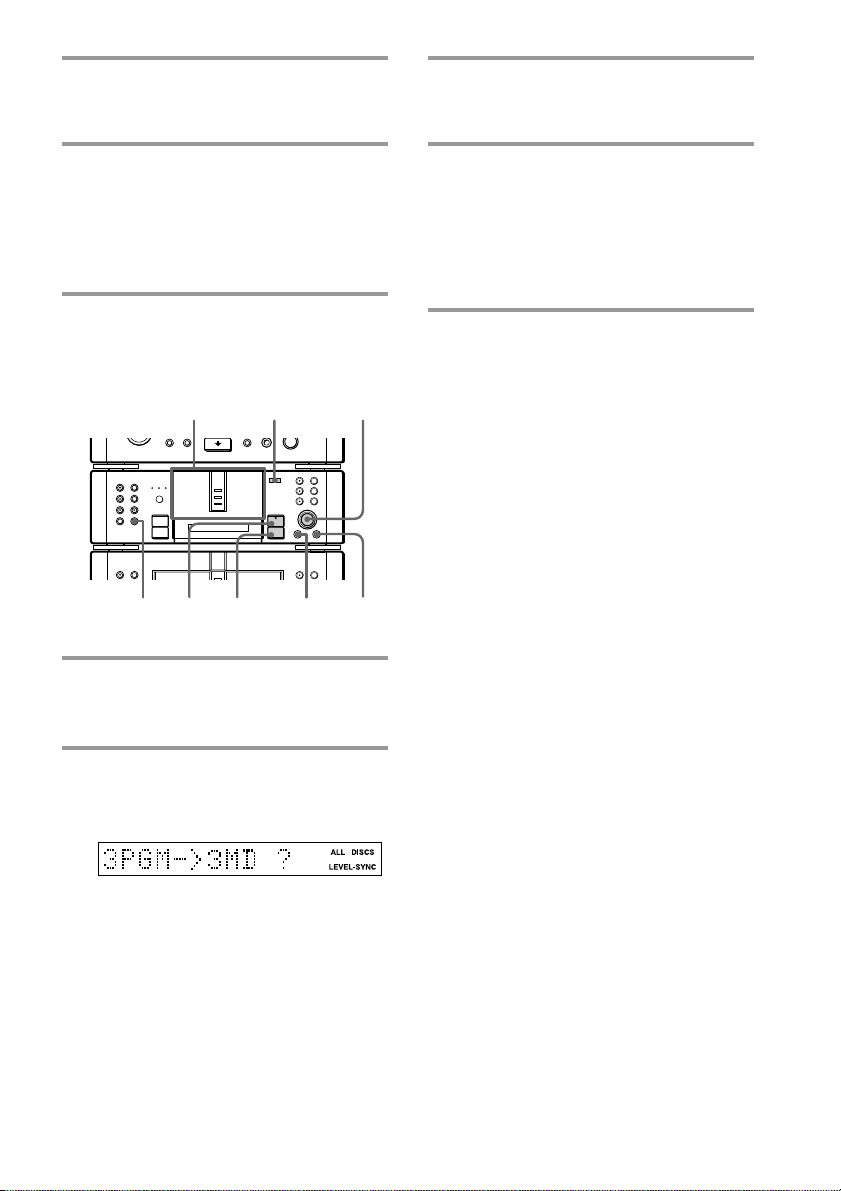
12 Press ENTER/YES on the MD deck.
The MD deck stands by for recording
and the CD is in pause for playback.
11 Press ENTER/YES on the MD deck.
The MD deck stands by for recording
and the CD is in pause for playback.
13 Press ·∏ on the MD deck (or
MD P on the remote).
Recording starts from the last recorded
portion of the MD. The CD player and
MD deck stop automatically when the
recording is completed.
— When recording multiple
programs
10
+=
§
11
10
•
•
•
•
•
•
0
10
)
n
0
N
•
•
•
12
9
·∏
p
p§MENU/NO
9 Insert MDs to the slots with the
same numbers as the programs you
want to record.
10 Press CD SYNC on the MD deck,
then turn SELECTOR until
“3PGM n 3MD ?” appears.
12 Press ·∏ on the MD deck (or
MD P on the remote).
Recording starts from the last recorded
portion in order from PROGRAM-1 to 3.
The CD player and MD deck stop
automatically when the recording is
completed.
To cancel recording
Press MENU/NO on the MD deck.
To stop recording
Press p on the MD deck.
When recording is completed
Press § and eject the MD. “TOC Writing” flashes
and the MD Table of Contents (TOC) is updated.
While “TOC Writing” is flashing
Do not move the deck or pull out the power cord to
ensure the complete recording. The deck is currently
updating the Table of Contents (TOC).
Notes
•When you record one program (NORMAL), only
the MD in the MD 1 slot is recorded.
•When you record multiple programs, only the
MDs in the slots with the same numbers as the
program numbers (PROGRAM-1 to 3) are
recorded.
•The program is skipped and recording continues
from the next program when:
– There is no MD in the slot with the same
number as the program to be recorded.
– The MD is record-protected.
•The CD player and MD deck stop if the remaining
time on the MD runs out during the recording.
45
Page 46
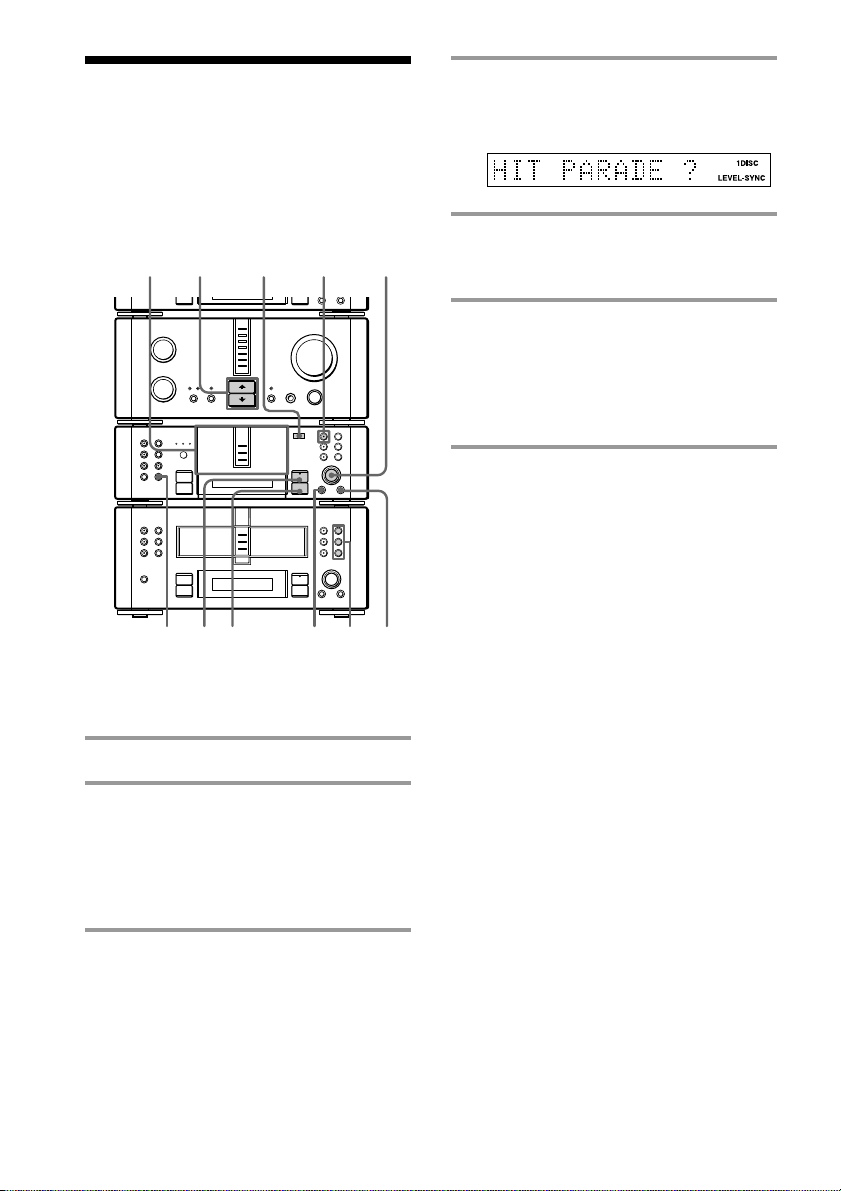
Recording only the first track on each CD
— Hit Parade
This feature is useful when you record single
CDs in succession.
MD 1
2
4
3
N
•
•
•
•
•
•
•
•
•
0
10
)
n
0
N
)
n
0
N
p
6
button
§
·∏
p
·∏
p
MENU/NO
Recording from three CDs
1 Place the CDs on each disc tray.
2 Insert a recordable MD to the MD 1
slot.
You can only record on the MD in MD 1.
When the MD 1 button is lit green, press
§ and eject the MD, then insert a
recordable MD.
§
§
§
+=
+=
1
4
5
4 Press CD SYNC on the MD deck,
then turn SELECTOR until
“HIT PARADE ?” appears.
5 Press ENTER/YES on the MD deck.
The MD deck stands by for recording
and the CD is in pause for playback.
6 Press ·∏ on the MD deck (or
MD P on the remote).
Recording starts from the last recorded
portion of the MD. The CD player and
MD deck stop automatically when the
recording is completed.
Recording from four or
more CDs
Repeat steps 1 and 4 to 6.
To cancel recording
Press MENU/NO on the MD deck.
To stop recording
Press p on the MD deck.
When recording is completed
Press § and eject the MD. “TOC Writing” flashes
and the MD Table of Contents (TOC) is updated.
While “TOC Writing” is flashing
Do not move the deck or pull out the power cord to
ensure the complete recording. The deck is currently
updating the Table of Contents (TOC).
Note
You can only record on the MD in MD 1.
3 Press FUNCTION >/. on the
amplifier repeatedly to switch the
function to CD.
46
Page 47
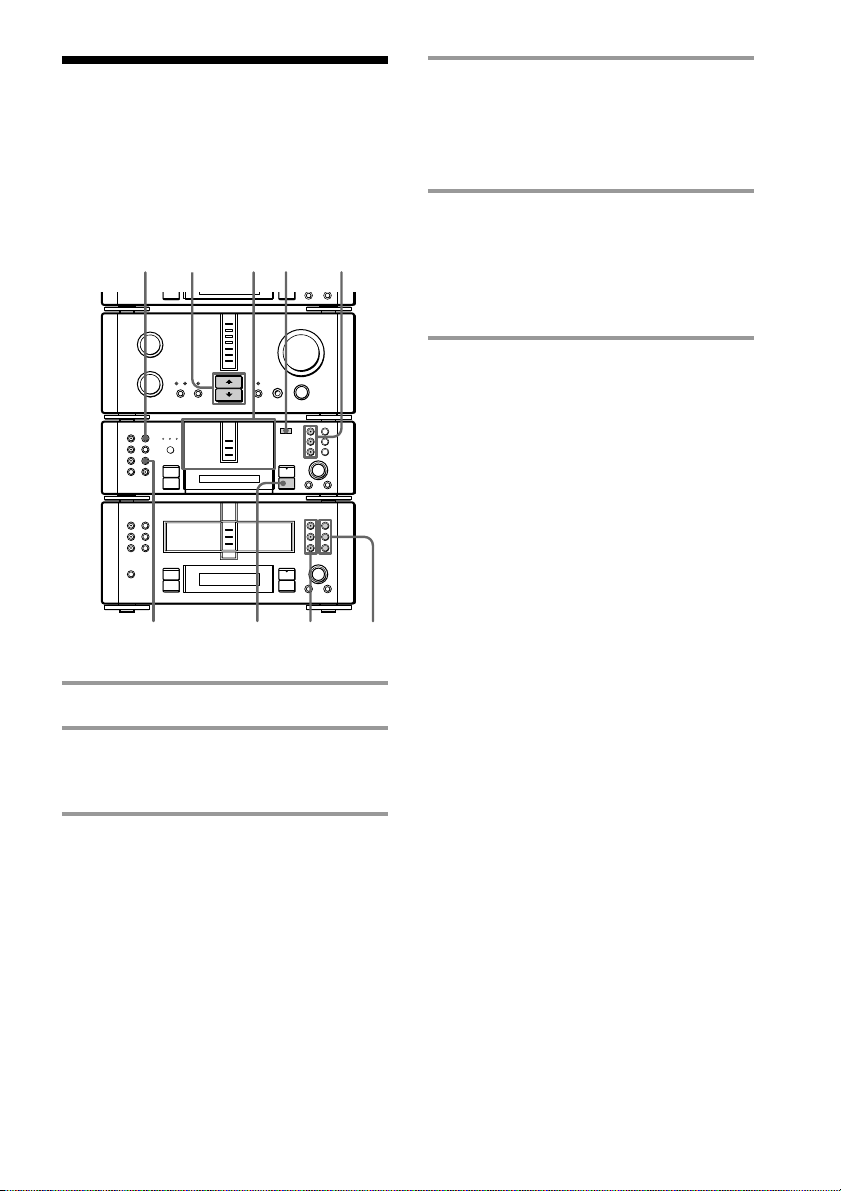
Recording the current CD track
— Rec It
You can record a track quickly while listening
to a CD.
§
·∏
p
·∏
p
MD 1 – 3
buttons
+=
§
§
§
+=
43
N
•
•
•
•
•
•
•
•
•
0
10
)
n
0
N
)
n
0
N
2
4 Press FUNCTION >/. on the
amplifier repeatedly to switch the
function to CD, then press CD 1 – 3
on the CD player.
CD play starts.
5 Press REC IT while listening to a
track you want to record.
Play returns to the start of the track and
recording starts. The MD deck stops
automatically at the end of the track, but
CD play continues.
To stop recording
Press p on the MD deck.
When recording is completed
Press § and eject the MD. “TOC Writing” flashes
and the MD Table of Contents (TOC) is updated.
While “TOC Writing” is flashing
Do not move the deck or pull out the power cord to
ensure the complete recording. The deck is currently
updating the Table of Contents (TOC).
p
45
1
1 Place a CD (CDs) on each disc tray.
2 Insert a recordable MD (MDs).
You can record on any of the MDs in
MD 1 to 3.
3 Press DISC SKIP on the MD deck (or
MD D.SKIP on the remote) so the
MD 1 to 3 button of the slot
containing the recordable MD lights
green.
47
Page 48
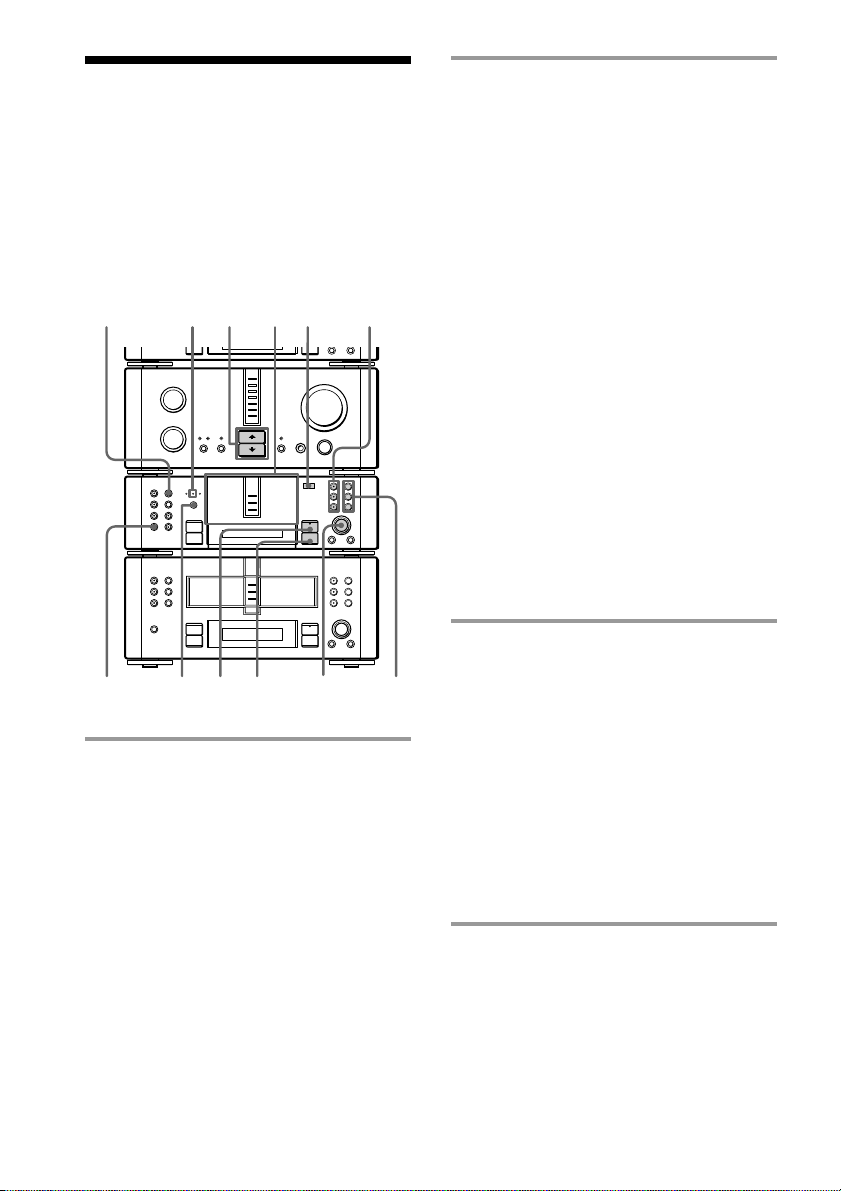
Recording on an MD manually
Use this method to record from the radio or a
connected optional component. If the MD has
been partially recorded, recording starts from
the last recorded portion. See page 23 for
recording from the radio.
ANALOG IN
1
indicator
DISPLAY SELECTOR
4
2
1
N
•
•
•
•
•
•
•
•
•
0
10
)
n
0
N
)
n
0
N
p
5
1 Insert a recordable MD (MDs), then
press DISC SKIP on the MD deck (or
MD D.SKIP on the remote) so the
MD 1 to 3 button of the slot
containing the MD lights green.
You can record on any of the MDs in
MD 1 to 3.
§
·∏
p
·∏
p
MD 1 – 3
buttons
+=
§
§
§
+=
3
2 Press FUNCTION >/. on the
amplifier repeatedly to select the
sound source (e.g., “TUNER”) you
want to record.
CD: Place a CD (CDs) on the disc tray,
then turn SELECTOR until the track you
want to record appears (see page 16).
TUNER: Tune in the radio station you
want to record (see page 21).
VIDEO 1 or 2 (CS/BS or LD/DVD for
DHC-MD717): Prepare the digital
component connected to the VIDEO 1 or
VIDEO 2 DIGITAL IN jack (CS/BS or
LD/DVD DIGITAL IN jack for
DHC-MD717) on the MD deck and the
VIDEO1 or VIDEO2 jacks (CS/BS or
LD/DVD jacks for DHC-MD717) on the
amplifier. See the operating instructions
included with the component for details.
VIDEO 3 (VIDEO for DHC-MD717):
Prepare the analog component
connected to the VIDEO3 jacks (VIDEO
jacks for DHC-MD717) on the amplifier.
See the operating instructions included
with the component for details.
TAPE: Insert a cassette tape to the
optional tape deck.
3 Press REC 1 to 3 for the slot number
containing the recordable MD.
The MD deck stands by for recording.
To make a digital recording of the sound
from the CD player or a digital
component connected to the VIDEO 1 or
VIDEO 2 DIGITAL IN jack (CS/BS or
LD/DVD DIGITAL IN jack for
DHC-MD717), go to step 5.
To make an analog recording of the
sound from the tape deck or an analog
component connected to the VIDEO3
jacks (VIDEO jacks for DHC-MD717), go
to step 4.
48
4 Adjust the analog recording level.
When you record an analog input signal
(when the ANALOG IN indicator lights
up), adjust the recording level.
For details, see “Adjusting the recording
level” on page 51.
Page 49

5 Press ·∏ on the MD deck (or
MD P on the remote).
Recording starts.
6 Start playing the source to be
recorded.
To stop recording
Press p on the MD deck.
If “Analog REC!” appears
The system is making an analog recording of
the sound from a digital component
connected to the VIDEO1 or VIDEO2 jacks
(CS/BS or LD/DVD jacks for DHC-MD717).
To make a digital recording of the sound
from a digital component, connect the
component to the VIDEO 1 or VIDEO 2
DIGITAL IN jack (CS/BS or LD/DVD
DIGITAL IN jack for DHC-MD717) using
optical cables.
Notes
• Once the system has been set to analog recording,
you must first switch the function to other than
“VIDEO 1” or “VIDEO 2” (“CS/BS” or
“LD/DVD” for DHC-MD717) to make a digital
recording.
Stop the recording and press FUNCTION >/.
repeatedly to select “VIDEO 1” or “VIDEO 2”
(“CS/BS” or “LD/DVD” for DHC-MD717) again.
• Many types of DVD software cannot be digitally
recorded. In these cases, an analog recording is
made even if the DVD player is connected using
optical cables.
Tip
Each time you press DISPLAY on the MD deck
during recording, the recording time and remaining
time of the MD appear alternately in the display.
When recording is completed
Press § and eject the MD. “TOC Writing” flashes
and the MD Table of Contents (TOC) is updated.
While “TOC Writing” is flashing
Do not move the deck or pull out the power cord to
ensure the complete recording. The deck is currently
updating the Table of Contents (TOC).
Recording over a
recorded track
Select the point at which you want to start
recording before step 3.
To record over:
• From a specific position of the track
Play the MD and press ·∏ on the MD
deck at the desired point. The system
changes to playing pause.
• From the beginning of the track
Pause MD play, then turn SELECTOR until
the desired track number appears.
All the tracks from the selected track
number onward are recorded over.
Continue the operations from step 3.
49
Page 50
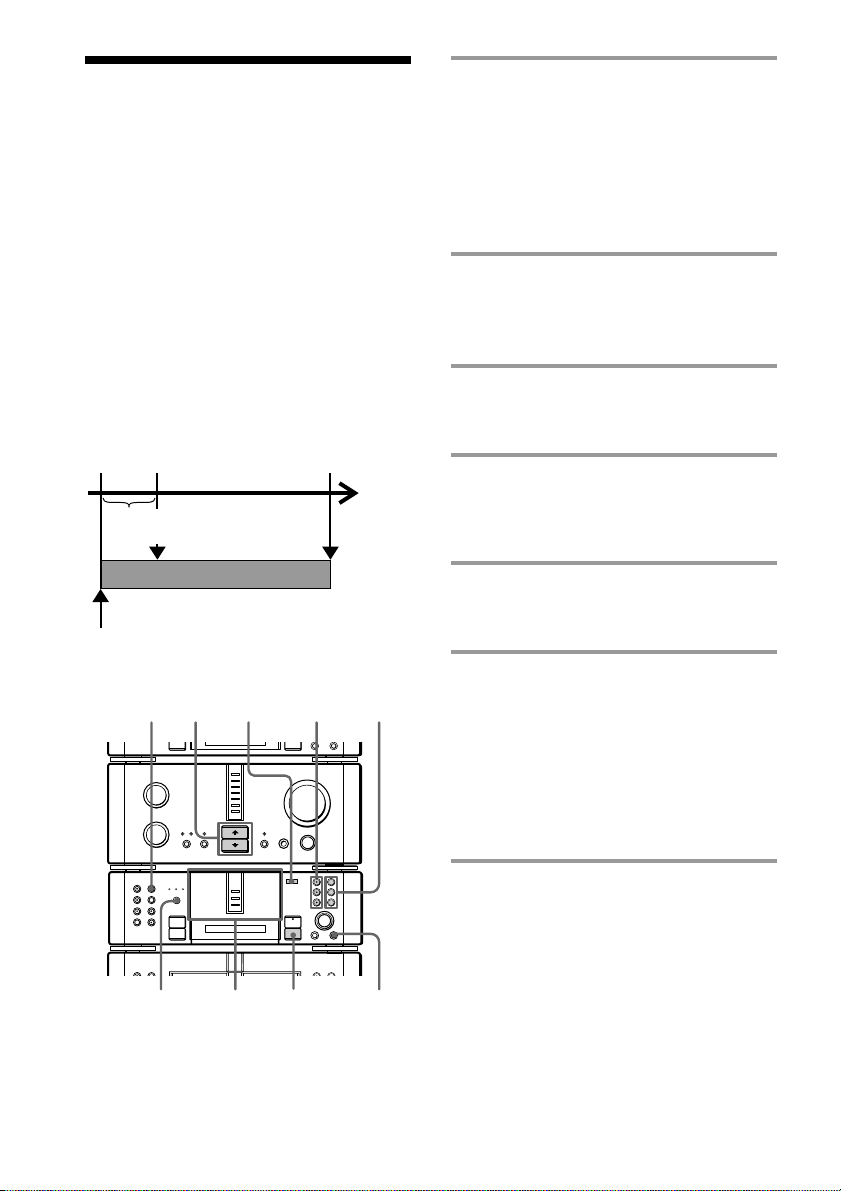
Starting recording with 6 seconds of prestored audio data
— Time Machine Recording
When recording from an FM or satellite
broadcast, the first few seconds of material
are often lost due to the time it takes you to
ascertain the contents and press the record
button. To prevent the loss of this material,
the Time Machine Recording feature
constantly stores the most recent audio data
in a buffer memory. This lets you record the
sound from 6 seconds before starting
recording, as shown in the illustration below:
When you press
ENTER/YES in step 6
Audio data in 6-second
buffer memory
Beginning of the source
to be recorded
213
N
End of the source to
be recorded
MD 1 – 3
§
buttons
Time
Recorded
portion
1 Insert a recordable MD (MDs), then
press DISC SKIP on the MD deck
(MD D.SKIP on the remote) so the
MD 1 to 3 button of the slot
containing the recordable MD lights
green.
You can record on any of the MDs in
MD 1 to 3.
2 Press FUNCTION >/. on the
amplifier repeatedly to select the
sound source (e.g., “TUNER”) you
want to record.
3 Press REC 1 to 3 for the slot number
containing the recordable MD.
The MD deck stands by for recording.
4 Start playing the source to be
recorded.
The most recent 6 seconds of audio data
is stored in the buffer memory.
5 When recording an analog input
signal, adjust the recording level
(see page 51).
6 Press ENTER/YES on the MD deck
at the point you want to start
recording.
Recording of the source starts with the
6 seconds of audio data stored in the
buffer memory.
If the MD has been partially recorded,
recording starts from the last recorded
portion.
50
•
•
•
•
•
•
•
•
•
0
10
)
n
0
N
1
+=
·∏
p
§
p
65
To stop Time Machine Recording
Press p on the MD deck.
Page 51
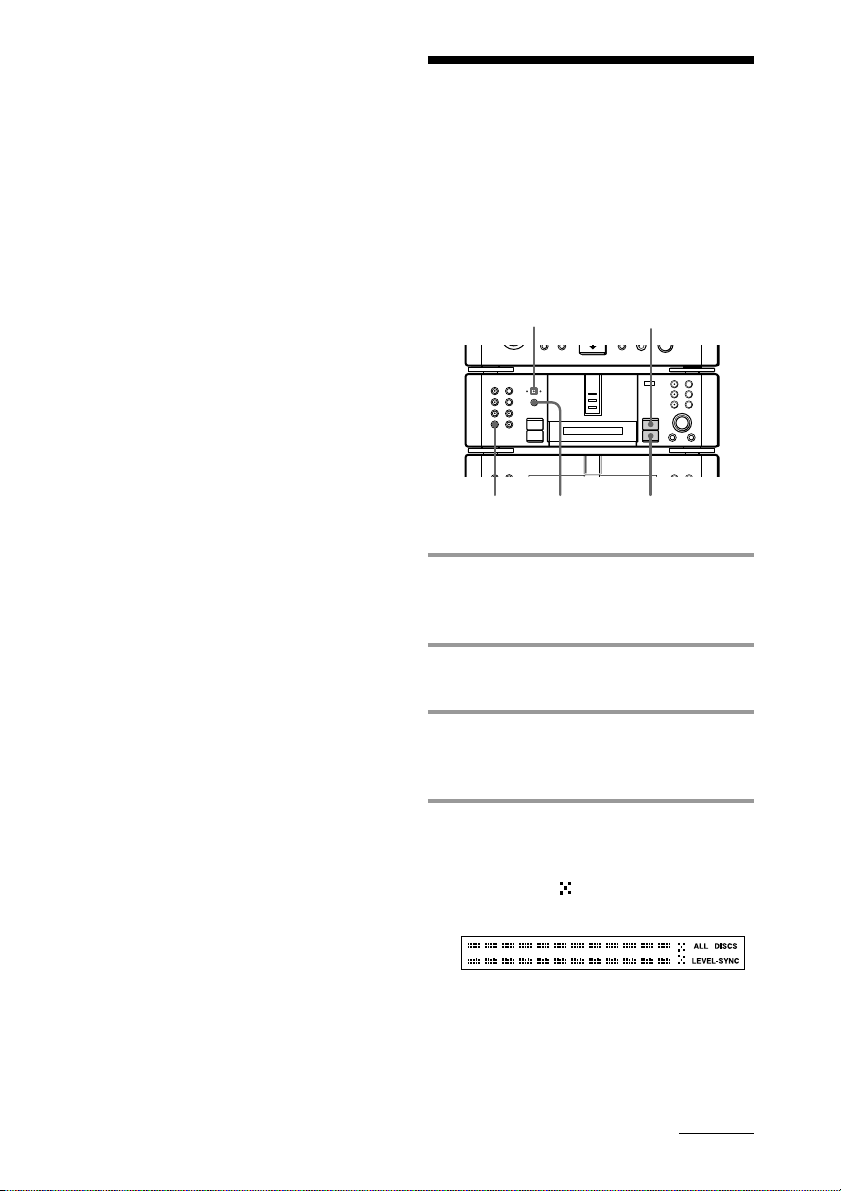
When recording is completed
Press § and eject the MD. “TOC Writing” flashes
and the MD Table of Contents (TOC) is updated.
While “TOC Writing” is flashing
Do not move the deck or pull out the power cord to
ensure the complete recording. The deck is currently
updating the Table of Contents (TOC).
Note
The MD deck starts storing audio data when the
deck stands by for recording and you start playing
the source. With less than 6 seconds of playing the
source and audio data stored in the buffer memory,
Time Machine Recording starts with less than
6 seconds of audio data.
Adjusting the recording level
When the ANALOG IN indicator lights up
(analog recording), adjust the recording level
before starting recording. You do not need to
adjust the recording level during digital
recording.
ANALOG IN
indicator
•
•
•
•
•
•
•
•
•
0
10
)
n
0
N
2
4
1 Do steps 1 to 3 in “Recording on an
MD manually” on page 48, and set
the MD deck to recording standby.
6
·∏
p
+=
p
§
2 Press DISPLAY so that the level
meter appears.
3 Play the portion of the source you
want to record with the strongest
signal level.
4 Turn REC LEVEL to adjust the
recording level.
While monitoring the sound, adjust the
level so that “
right edge of the level meter.
” does not appear at the
continued
51
Page 52
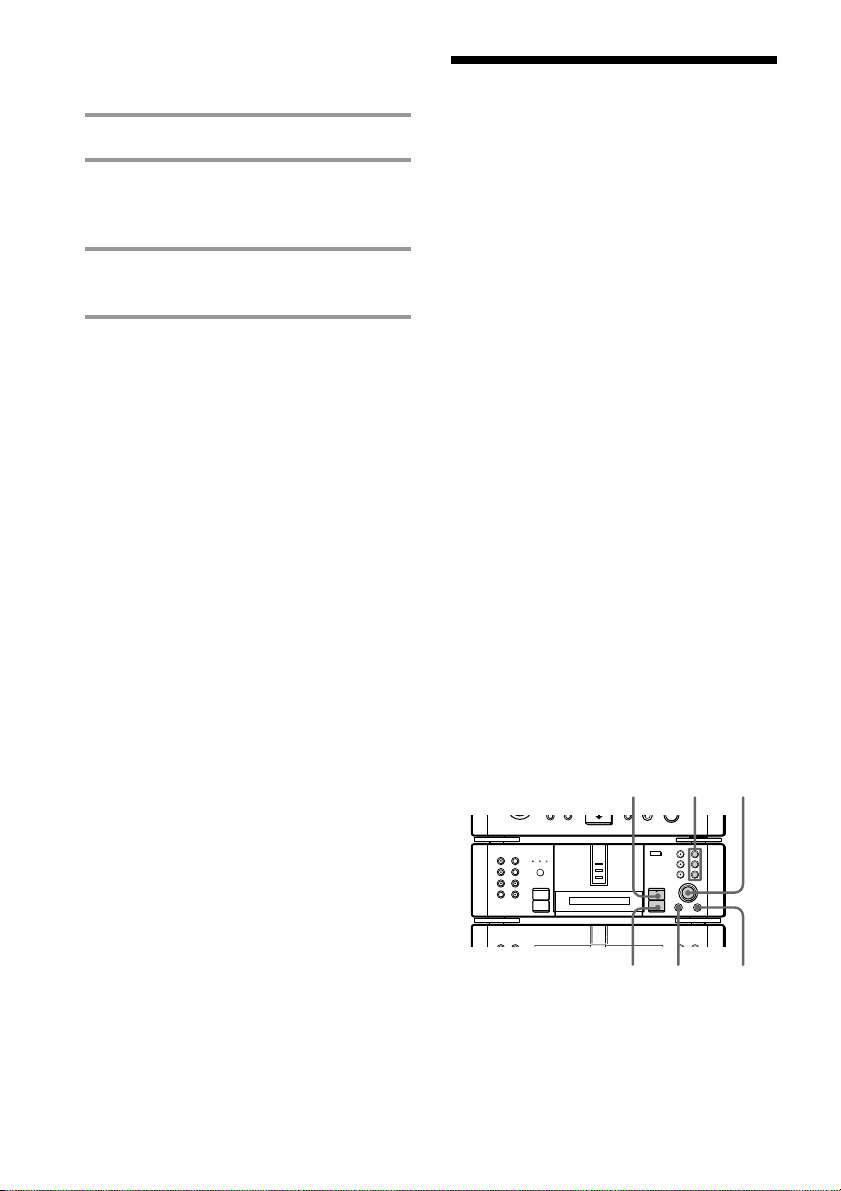
Adjusting the recording level
(continued)
Marking track
5 Stop playing the sound source.
6 Press ·∏ on the MD deck (or
MD P on the remote).
Recording starts.
7 Start playing the source to be
recorded.
To stop recording
Press p on the MD deck.
Tip
When recording from this system’s tuner (radio) or
from the optional TC-TX770 tape deck to an MD, we
recommend you set REC LEVEL to the 4th or 5th
bar of the level meter. The recorded volume is
roughly the same as the volume heard during
recording.
numbers
You can mark track numbers:
• Automatically while recording
Track numbers are automatically marked
as on the original source during CD and
MD digital recording.
Use the Level Synchro Recording feature to
automatically mark track numbers while
recording other sources.
• At any point while recording
You can mark track numbers at any time
while recording, regardless of the type of
sound source.
Marking track numbers
automatically while
recording
— Level Synchro Recording
The Level Synchro Recording feature is
factory set to on, so track numbers are
automatically marked. If “LEVEL-SYNC”
does not appear in the display during
recording, follow the procedure below and
turn on Level Synchro Recording.
Track numbers are automatically marked
when the input signal continues to be under a
certain level for more than two seconds and
then returns to the previous level.
52
5
•
•
•
•
•
•
•
•
•
0
10
)
n
0
N
·∏
p
p
2
1
2
+=
§
3,4
Page 53
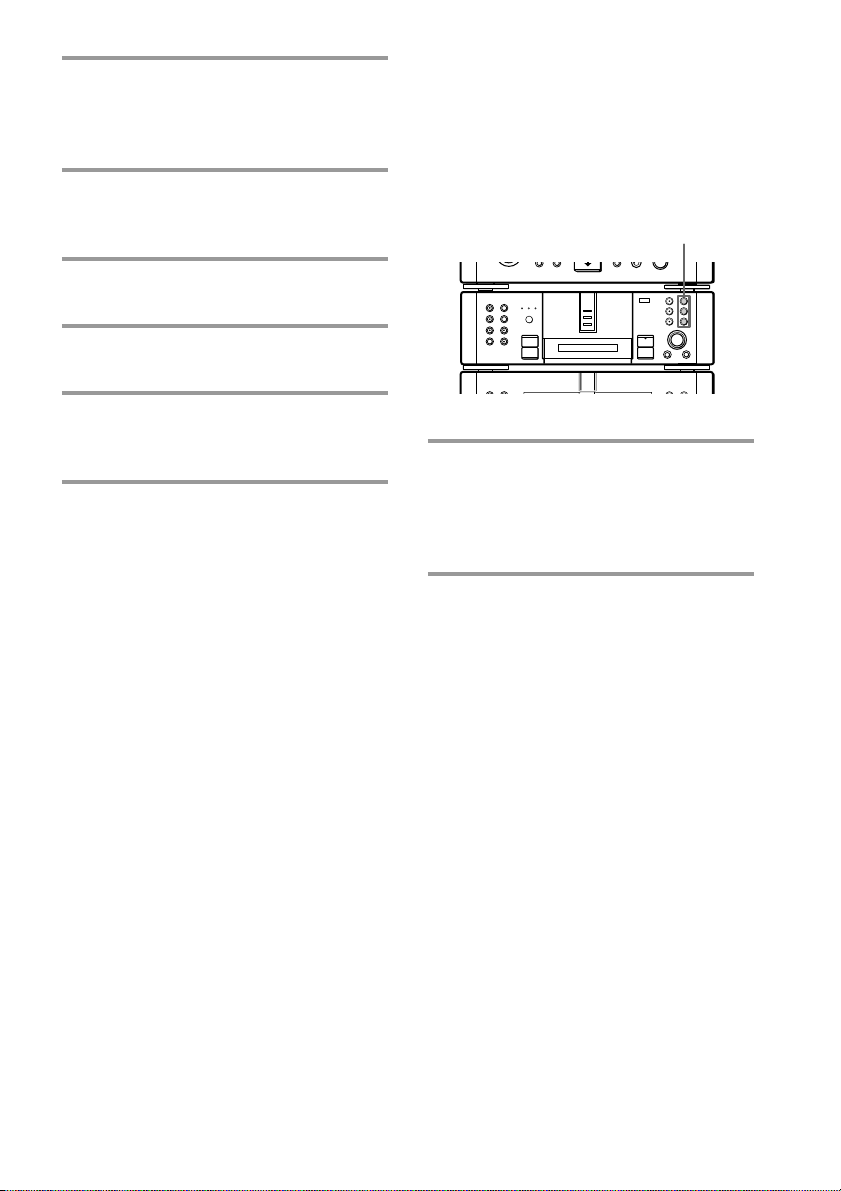
1 Press REC 1 to 3 for the slot number
containing the recordable MD, and
set the MD deck to recording
standby.
2 Press MENU/NO, then turn
SELECTOR until “LevelSync ?”
appears.
3 Press ENTER/YES.
“LevelSync ON?” appears.
4 Press ENTER/YES again.
“LEVEL-SYNC” lights up.
5 Press ·∏ on the MD deck (or
MD P on the remote).
Recording starts.
To stop recording
Press p on the MD deck.
To cancel the track marking
1 Press MENU/NO during recording pause,
then turn SELECTOR until “LevelSync ?”
appears.
2 Press ENTER/YES.
“LevelSyncOFF?” appears.
3 Press ENTER/YES again.
“LEVEL-SYNC” disappears.
When “LEVEL-SYNC” is off, a track number
is marked only at the beginning.
Note
You cannot mark track numbers automatically if the
sound source to be recorded is noisy (e.g., tapes or
radio programs).
Marking track numbers at
a specific point while
recording
You can mark track numbers at any time
while recording, regardless of the type of
sound source.
REC 1 – 3
•
•
•
•
•
•
•
•
•
0
10
)
n
0
N
/ Press REC 1 – 3 for the slot number
containing the recordable MD while
recording at the point you want to
add a track mark.
A track number is marked at that point.
+=
·∏
p
§
53
Page 54
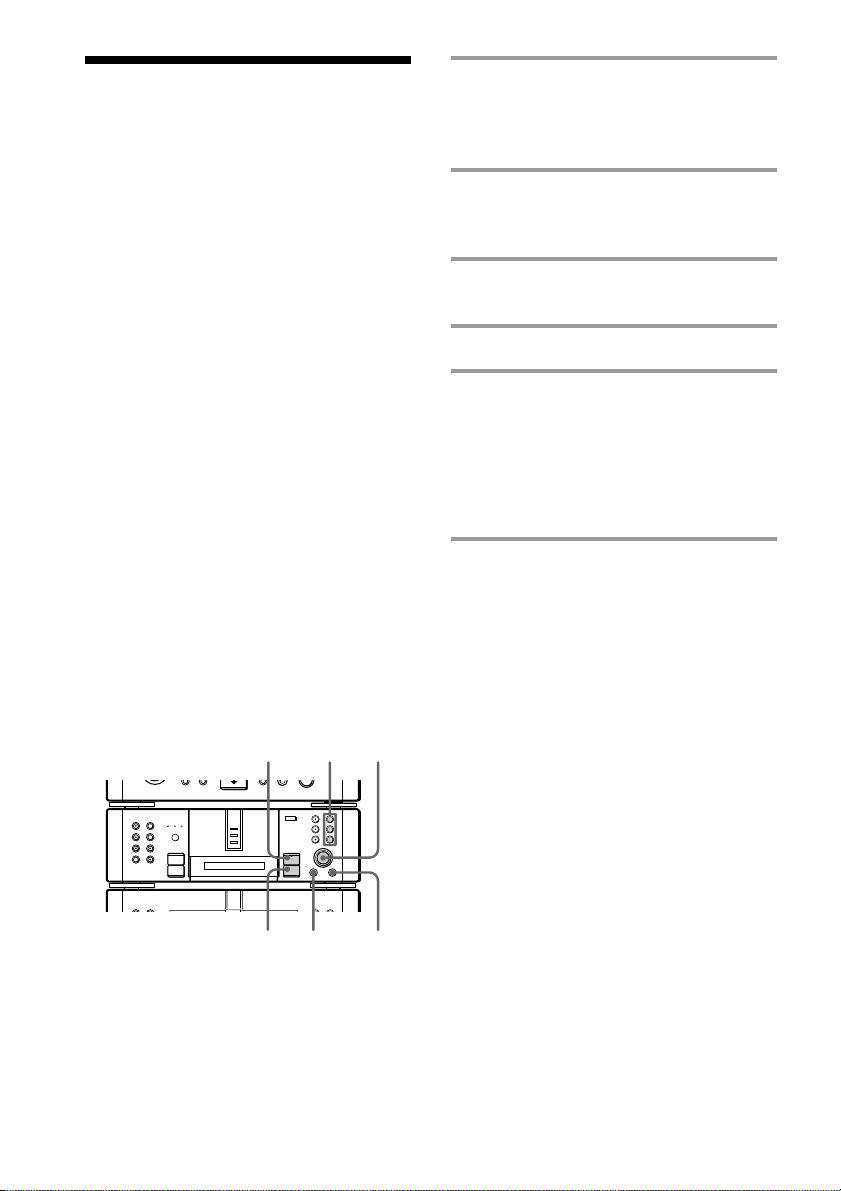
Making the space between tracks 3 seconds long
— Smart Space, Auto Cut
When you turn on Smart Space, the Smart
Space and Auto Cut functions are both
activated to make the blank space between
tracks three seconds long automatically while
making a digital recording.
Smart Space
There has been an extended silence of about
3 to 30 seconds during digital recording.
The MD deck replaces the silence with a
blank of about 3 seconds and continues
recording.
Auto Cut
There has been no sound input for 30 seconds
during digital recording.
The MD deck replaces the silence of
30 seconds with a blank of about 3 seconds
and changes to recording pause.
Press ·∏ to restart the recording.
Tip
The Smart Space and Auto Cut functions are factory
set to on. If you turn off the system or disconnect the
AC power cord, the MD deck will retain the last
setting (ON or OFF).
5
1
2
1 Press REC 1 – 3 for the slot number
containing the recordable MD, and
set the MD deck to recording
standby.
2 Press MENU/NO, then turn
SELECTOR until “S.Space ?”
appears.
3 Press ENTER/YES.
“S.Space ON?” appears.
4 Press ENTER/YES again.
5 Press ·∏ on the MD deck (or
MD P on the remote).
Recording starts.
When “Smart Space” appears during
recording, the Smart Space function is
activated. When “Auto Cut” appears, the
Auto Cut function is activated.
To stop recording
Press p on the MD deck.
To turn off the Smart Space and
Auto Cut functions
1 Press MENU/NO during recording pause,
then turn SELECTOR until “S.Space ?”
appears.
2 Press ENTER/YES.
“S.Space OFF?” appears.
3 Press ENTER/YES again.
54
•
•
•
•
•
•
•
•
•
0
10
)
n
0
N
p
+=
·∏
p
§
2
3,4
Page 55
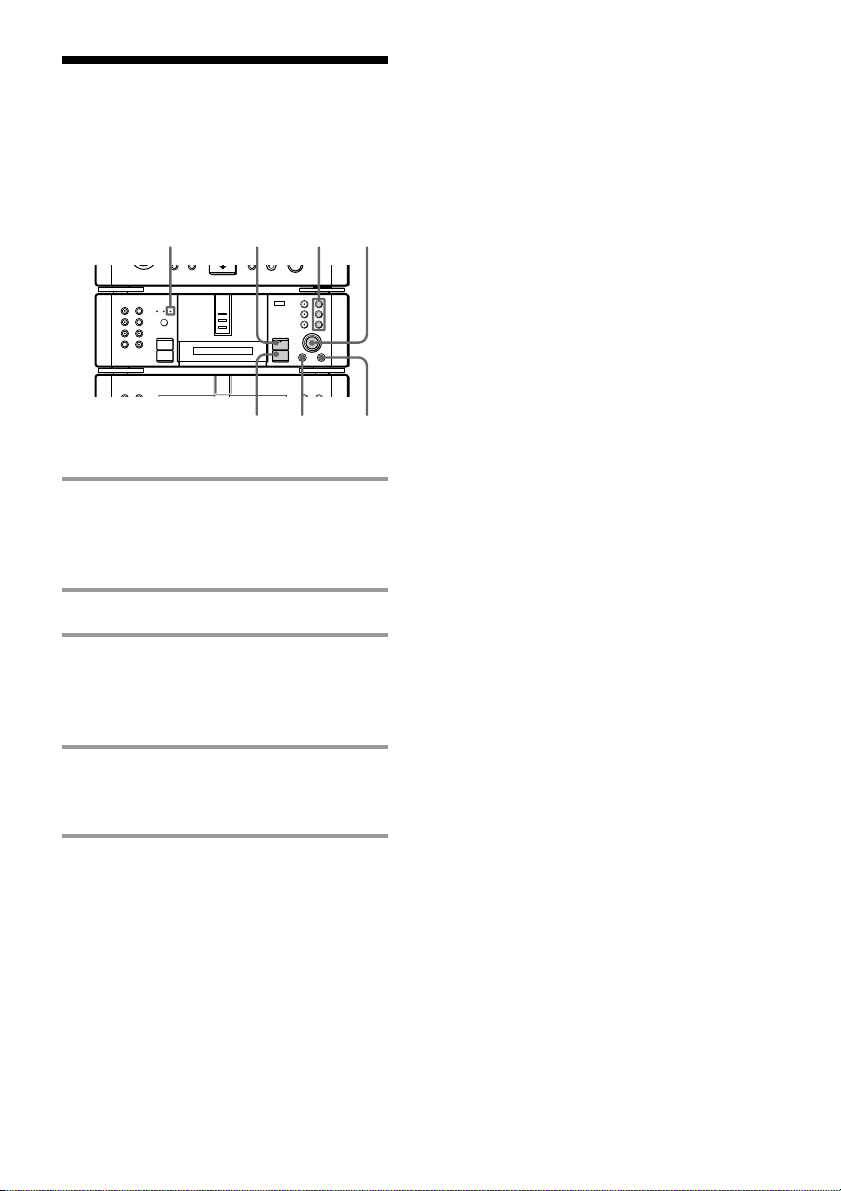
Monaural recording
You can make a monaural recording of the
stereo signal input to the MD deck.
MONO indicator
•
•
•
•
•
•
•
•
•
0
10
)
n
0
N
1 Press MENU/NO while the MD
deck is stopped, then turn
SELECTOR until “Mono Rec ?”
appears.
2 Press ENTER/YES.
4
p
3
+=
·∏
p
§
1
1
2
To cancel monaural recording
1 Press MENU/NO while the MD deck is
stopped, then turn SELECTOR until
“Stereo Rec ?” appears.
2 Press ENTER/YES.
Tips
•The MONO indicator lights up during monaural
recording.
•The MD recording time for monaural recording is
roughly double that for stereo recording.
•The recording mode is factory set to stereo
recording. When you stop monaural recording,
the setting returns to stereo recording. (The setting
is not backed up.)
Note
If you set monaural recording while recording a
stereo broadcast or other source, the monitor sound
remains in stereo.
3 Press REC 1 – 3 for the slot number
containing the recordable MD, and
set the MD deck to recording
standby.
4 Press ·∏ on the MD deck (or
MD P on the remote).
Recording starts.
To stop recording
Press p on the MD deck.
55
Page 56

The MD deck — Editing
Before you start editing
You can edit recorded MDs by moving and
erasing tracks, etc. By editing the recorded
tracks, you can create original MD albums
without dubbing between MDs.
Editing functions
• Name — Labeling MDs and tracks
You can create titles (names) for your
recorded MDs and tracks using alphabet
letters (upper and lower cases), numbers
and some symbols.
• Erase — Erasing recordings
You can erase unwanted tracks.
• Move — Moving recorded tracks
You can freely change the order of the
recorded tracks.
Before you start editing
You can edit an MD only when:
• The MD is not record-protected.
• The MD playback mode is normal play.
Be sure to check the following before starting
editing:
1 Check that the MD is not record-
protected.
Slide close the tab at the side of the MD
to cover the hole (see page 39). If the MD
is record-protected, you cannot edit the
MD.
2 Press CONTINUE on the MD deck
and select normal play.
You can edit MDs only during normal
play.
You cannot edit MDs during Shuffle or
Program Play.
After editing
• Divide — Adding track numbers to
multiple tracks that are recorded as
one track
When you divide a track, this function
adds a track number at the start of the new
track.
You can also mark track numbers in the
middle of a track, letting you easily find
your favorite phrases.
• Combine — Combining recorded
tracks
This function erases the blank space
between two tracks and join them into a
single track.
This function also lets you join separated
tracks such as the tracks 1 and 4.
• Undo — Undoing the last edit
If you erase the wrong track or change the
track order incorrectly, this function lets
you cancel the last edit and restore the
tracks and track order to the condition
before the edit.
56
/ Press § and eject the MD, or press
1/u (power) to turn off the system.
“TOC Writing” flashes. The MD Table of
Contents (TOC) is updated and editing is
completed.
Note
MD editing is completed when the TOC is updated.
If you pull out the power cord before the TOC is
updated, the edited contents are not written to the
MD.
The TOC is updated when you do the following
operations. Therefore, be sure to do these operations
before you pull out the power cord.
•Press § and eject the MD.
•Press 1/u (power) to turn off the system.
Page 57
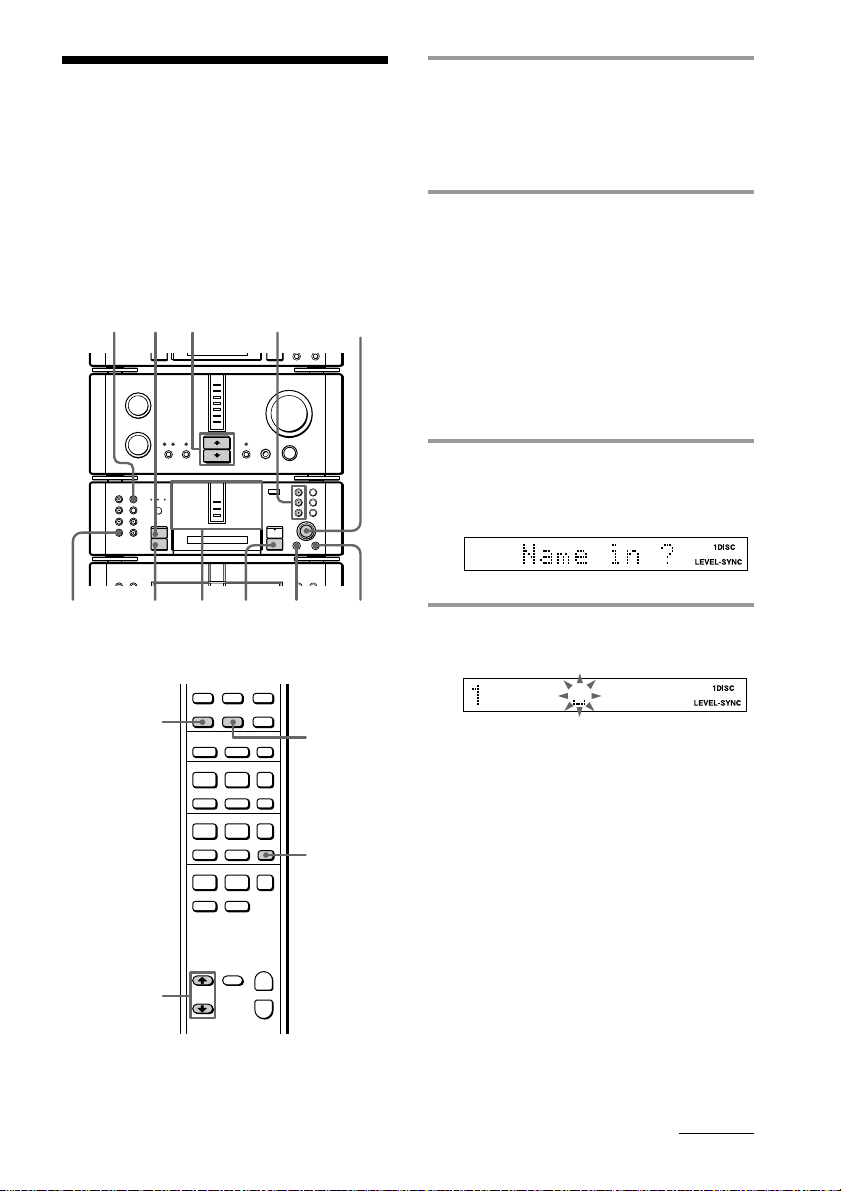
Labeling an MD
— Name Function
When a CD has a disc title (name), the same
title is assigned to the MD (Disc Memo
Copy). However, you can also create titles for
your recorded MDs and tracks.
You can use up to 1,700 characters for a disc.
MD 1 – 3
127
5
N
•
•
•
•
•
•
•
•
•
0
10
)
n
0
N
N
1
buttons
·∏
p
p
3
3,6
+=
§
4,9
1 Insert the MD you want to edit, then
press DISC SKIP on the MD deck (or
MD D.SKIP on the remote) so the
MD 1 to 3 button of the slot
containing the MD lights green.
2 Press FUNCTION >/ . on the
amplifier repeatedly to switch the
function to MD.
While playing an MD, press p to stop
play.
Wait for the total number of tracks and
the total playing time to appear, then
proceed to the next step.
To label a track, turn SELECTOR until
the track number you want to label
appears.
3 Press MENU/NO, then turn
SELECTOR until “Name in ?”
appears.
4 Press ENTER/YES.
The cursor starts flashing.
SCROLL
2
+
–
P+=p
·
P+=p
·
ª·
)0
5
1
p
+
–
continued
57
Page 58
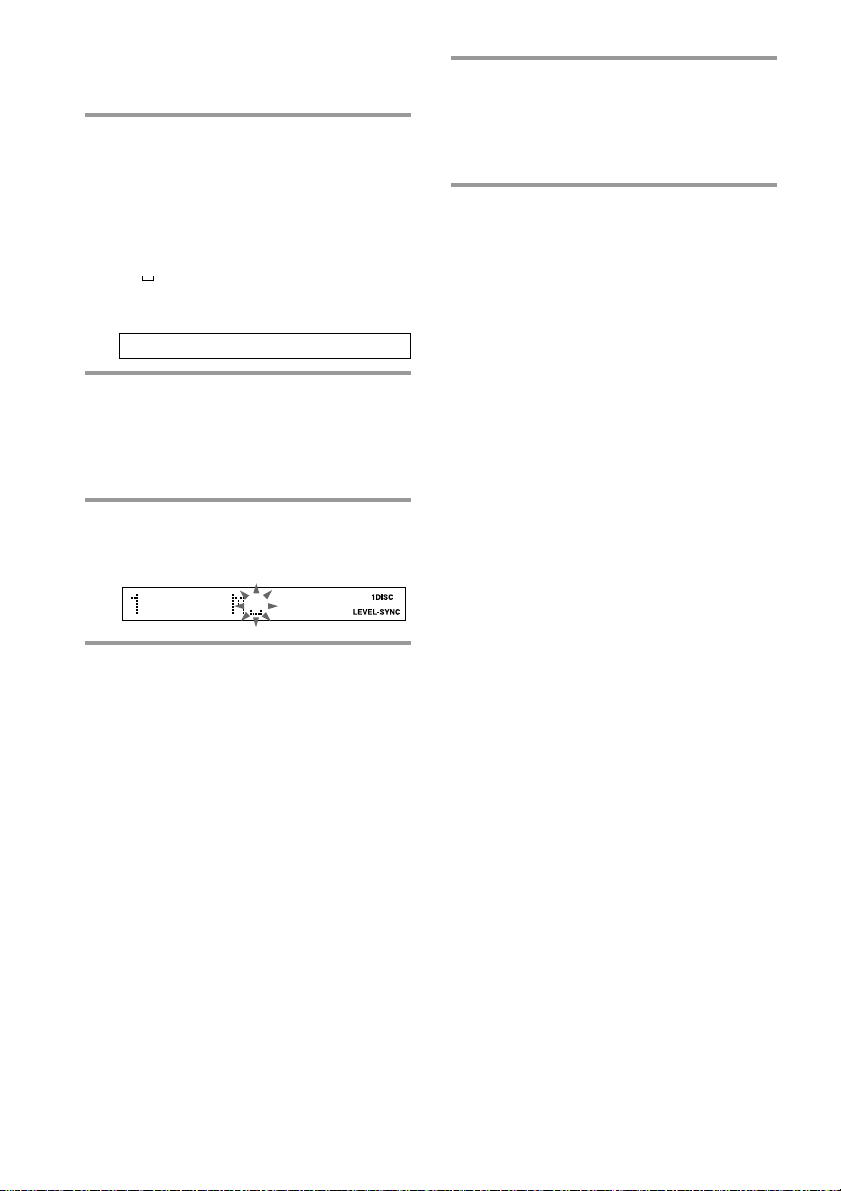
Labeling an MD (continued)
5 Press DISPLAY repeatedly until the
desired type of character appears.
Each time you press the button, the
display changes as follows:
A (Upper cases) n a (Lower cases)
n 0 (Numbers) n ! (Symbols)*
n
(Blank space) n A n ...
* You can use the following symbols:
! ” # $ % & ’ ( ) * + , – . / : ; < = > ? @ _ `
6 Turn SELECTOR until the character
you want appears.
To enter a blank space, press n without
turning SELECTOR. You cannot enter a
space as the first character.
7 Press n to enter the character.
The cursor shifts rightward and waits for
the input of the next character.
8 Repeat steps 5 to 7 to complete the
entire title.
If you made a mistake, press N or n
until the character you want to change
flashes, then repeat steps 5 to 7. To erase
the character, press MENU/NO. Each
time you press the button, the character
at the position of the cursor is erased.
You cannot insert characters.
9 Press ENTER/YES to complete the
labeling procedure.
The titles you entered appear
sequentially, then the display returns to
the display in step 1.
To cancel labeling
Press p on the MD deck during steps 3 to 8.
Checking the titles
To check the disc titles, press DISC SKIP on
the MD deck (or MD D.SKIP on the remote)
repeatedly while the deck is stopped until the
desired disc number appears.
To check the track titles, turn SELECTOR
while the deck is stopped until the desired
track number appears.
The titles are displayed scrolling in the MD
deck display.
Checking the titles with the
remote
To check the disc titles, press SCROLL while
the deck is stopped. To check the track titles,
press SCROLL while in play. The titles are
displayed scrolling in the display. To stop
scrolling, press SCROLL. Press the button
again to restart scrolling.
Notes
•You can also display disc and track titles by
pressing DISPLAY, but only the first 10 characters
of disc titles or the first 7 characters of track titles
appear. The remaining characters do not scroll in
the display.
•You can label a track title while playing or
recording, but you must complete the labeling
before the track ends.
58
Page 59

Erasing all titles
1 Turn SELECTOR in step 3 of “Labeling an
MD” until “Name AllErs?” appears, then
press ENTER/YES.
“Name AllErs??” appears.
2 To erase all the titles, press ENTER/YES.
All the disc titles and track titles are erased.
To cancel erasing
Press p on the MD deck.
Erasing a disc title
1 Turn SELECTOR in step 3 of “Labeling an
MD” until “DiscNameErs?” appears, then
press ENTER/YES.
“DiscNameErs??” appears.
2 To erase the disc title, press ENTER/YES.
The disc title is erased.
To cancel erasing
Press p on the MD deck.
Erasing a track title
1 Turn SELECTOR until the desired track
number appears.
2 Press MENU/NO, then turn SELECTOR
until “Name Ers?” appears.
3 Press ENTER/YES.
“Name Ers??” appears.
4 Press ENTER/YES again.
The title of the track selected in step 1 is
erased.
To cancel erasing
Press p on the MD deck.
Returning to the condition
before labeling/erasing
You can return to the original condition
immediately after labeling or erasing a title
(see page 66).
59
Page 60
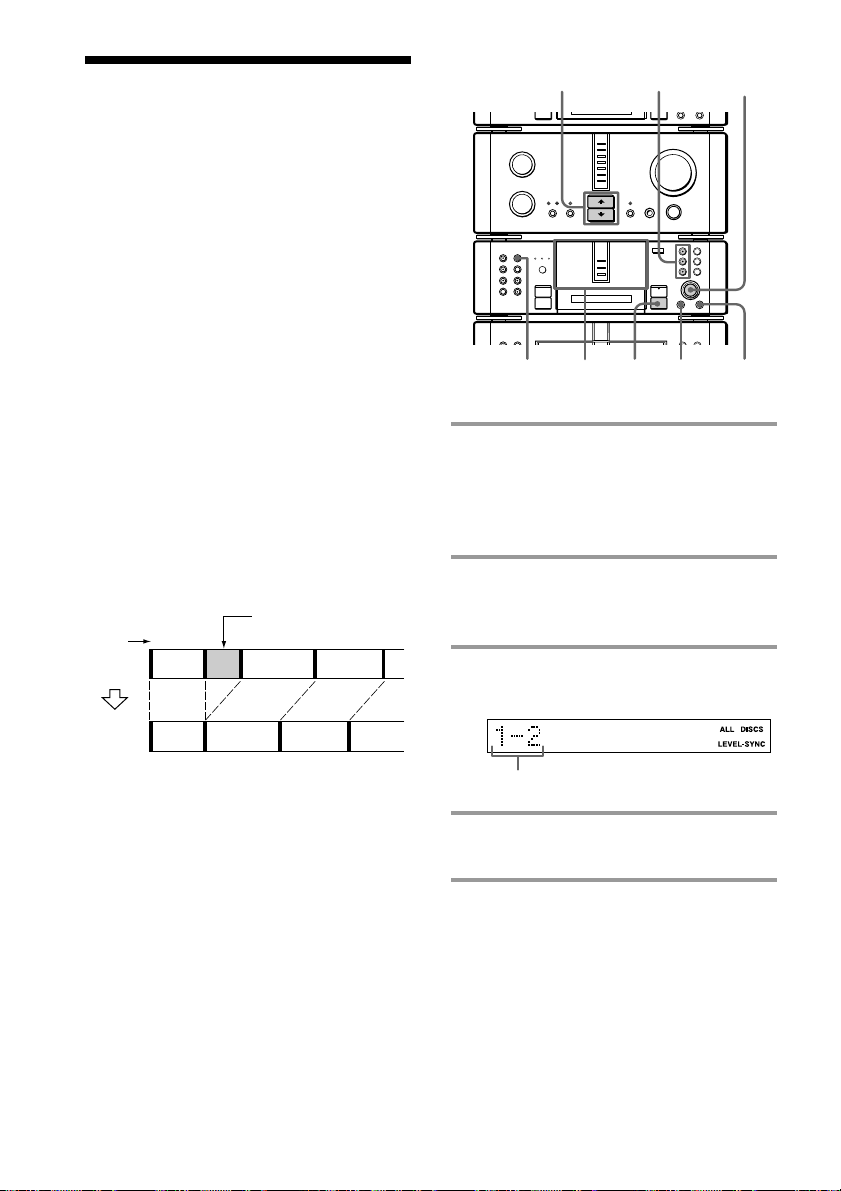
Erasing recordings
— Erase Function
The MD system lets you erase unwanted
sound quickly and easily. You can restore
erased recordings by using the Undo
Function (see page 66) immediately after the
erase operation. However, you cannot restore
erased recordings if you do other editing, so
be careful when erasing recordings.
The three options to erase recordings are:
• Erasing a single track
• Erasing all tracks
• Erasing a portion of a track
MD 1 – 3
1
buttons
·∏
p
p
3,4
+=
§
2
N
•
•
•
•
•
•
•
•
•
0
10
)
n
0
N
1 4 5,6
Erasing a single track
You can erase a track simply by specifying its
track number. When you erase a track, the
total number of tracks on the MD decreases
by one and all the tracks following the erased
one are renumbered.
Example: Erasing track 2.
Track
number
Original
tracks
123
AB C D
123
After
ERASE
AC D
All the tracks following the erased one are
renumbered, so when erasing multiple tracks
(e.g., tracks 2, 5 and 6), we recommend
erasing from the higher numbered tracks.
Erase track B.
4
1 Insert the MD you want to edit, then
press DISC SKIP on the MD deck (or
MD D.SKIP on the remote) so the
MD 1 to 3 button of the slot
containing the MD lights green.
2 Press FUNCTION >/ . on the
amplifier repeatedly to switch the
function to MD.
3 Turn SELECTOR until the track
number you want appears.
The track number you want
4 Press MENU/NO, then turn
SELECTOR until “Erase ?” appears.
5 Press ENTER/YES.
“Erase ??” appears.
60
Page 61
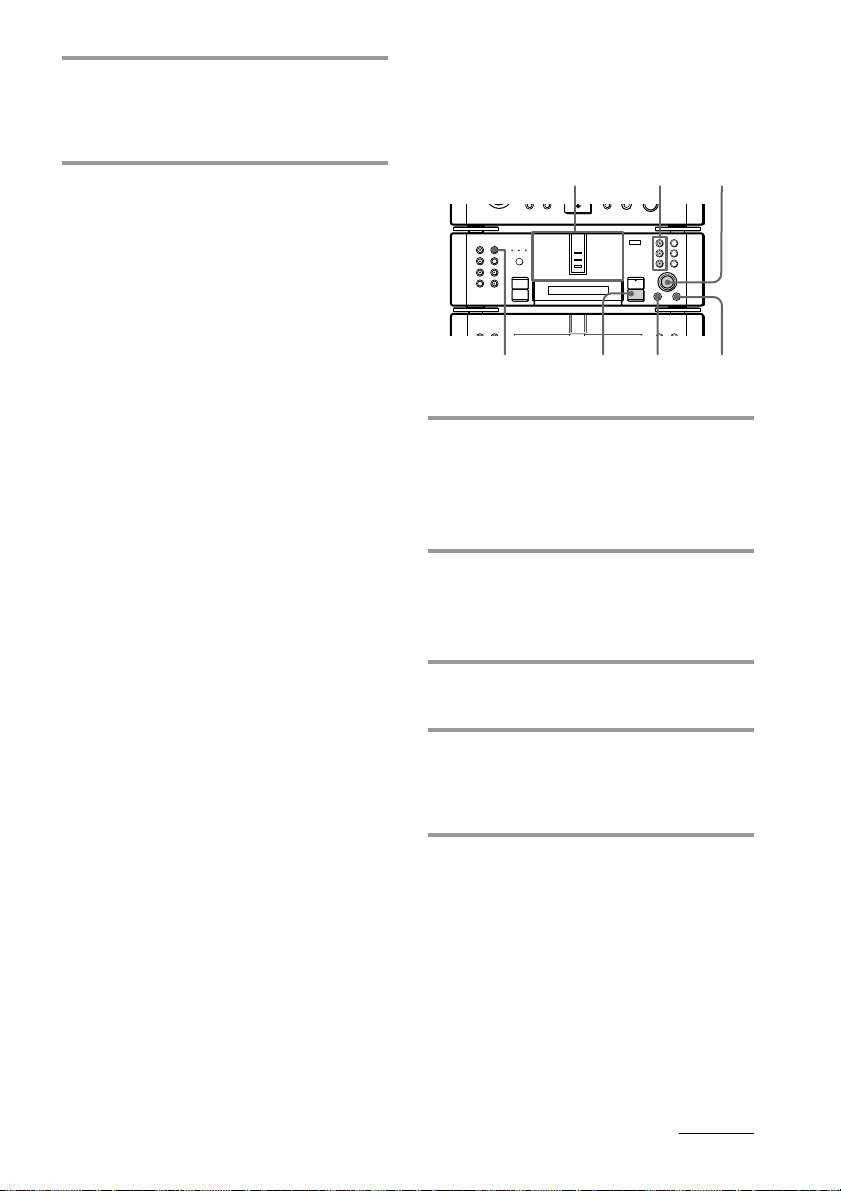
6 Press ENTER/YES again.
“Complete” appears for a few seconds
and the selected track and title are
erased.
To cancel the Erase Function
Press p on the MD deck.
Note
“Erase!! ?” appears when the track was recorded or
edited on another deck and is record protected. To
erase the track, press ENTER/YES while “Erase!! ?”
is displayed.
Erasing all tracks
You can erase the disc title, all recorded
tracks and their titles at once.
MD 1 – 3
2
+=
§
3,4
p
buttons
·∏
p
21
1
•
•
•
•
•
•
•
•
•
0
10
)
n
0
N
1 Insert the MD you want to edit, then
press DISC SKIP on the MD deck (or
MD D.SKIP on the remote) so the
MD 1 to 3 button of the slot
containing the MD lights green.
2 Press MENU/NO while the MD
deck is stopped, then turn
SELECTOR until “All Erase ?”
appears.
3 Press ENTER/YES.
“All Erase ??” appears.
4 Press ENTER/YES again.
“Complete” appears for a few seconds
and all recorded tracks and their titles
are erased.
To cancel the Erase Function
Press p on the MD deck.
continued
61
Page 62
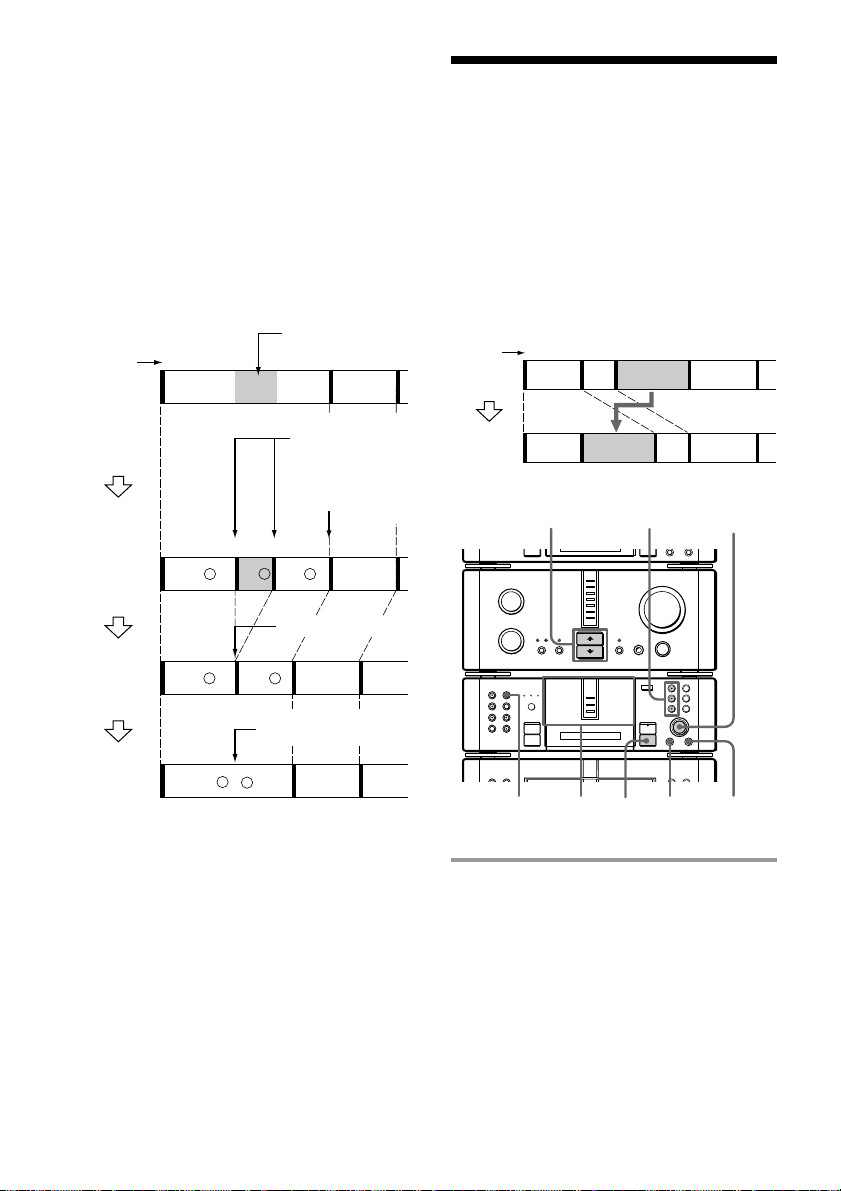
Erasing recordings (continued)
Moving recorded
Erasing a portion of a
track
By using the Divide (see page 63), Erase (see
page 60), and Combine (see page 65)
Functions, you can erase specific portions of a
track.
Example: Erasing a portion of track A.
Track
number
123
Original
tracks
After
DIVIDE
(page 63)
After
ERASE
(page 60)
After
COMBINE
(page 65)
* The tracks are renumbered.
1234
a
A- A- A-
1234
a
A-
123
a
A ( + )
Portion to be
erased.
AB
Divide track A
into three parts.*
The track is
renumbered.
c
b
B
Erase track A-b.
c
A-
B
Combine tracks A-a
and A-c.
c
B
tracks
— Move Function
By using the Move Function, you can change
the order of any track on the disc. When you
move tracks, the tracks are automatically
renumbered.
Example: Moving track 3 to position 2.
Track
number
Original
tracks
After
MOVE
123
4
AB C
12 34
ACBD
MD 1 – 3
1
2
N
•
•
•
•
•
•
•
•
•
0
10
)
n
0
N
1
buttons
·∏
p
p
+=
§
4
D
3,4,6
5,7
62
1 Insert the MD you want to edit, then
press DISC SKIP on the MD deck (or
MD D.SKIP on the remote) so the
MD 1 to 3 button of the slot
containing the MD lights green.
Page 63
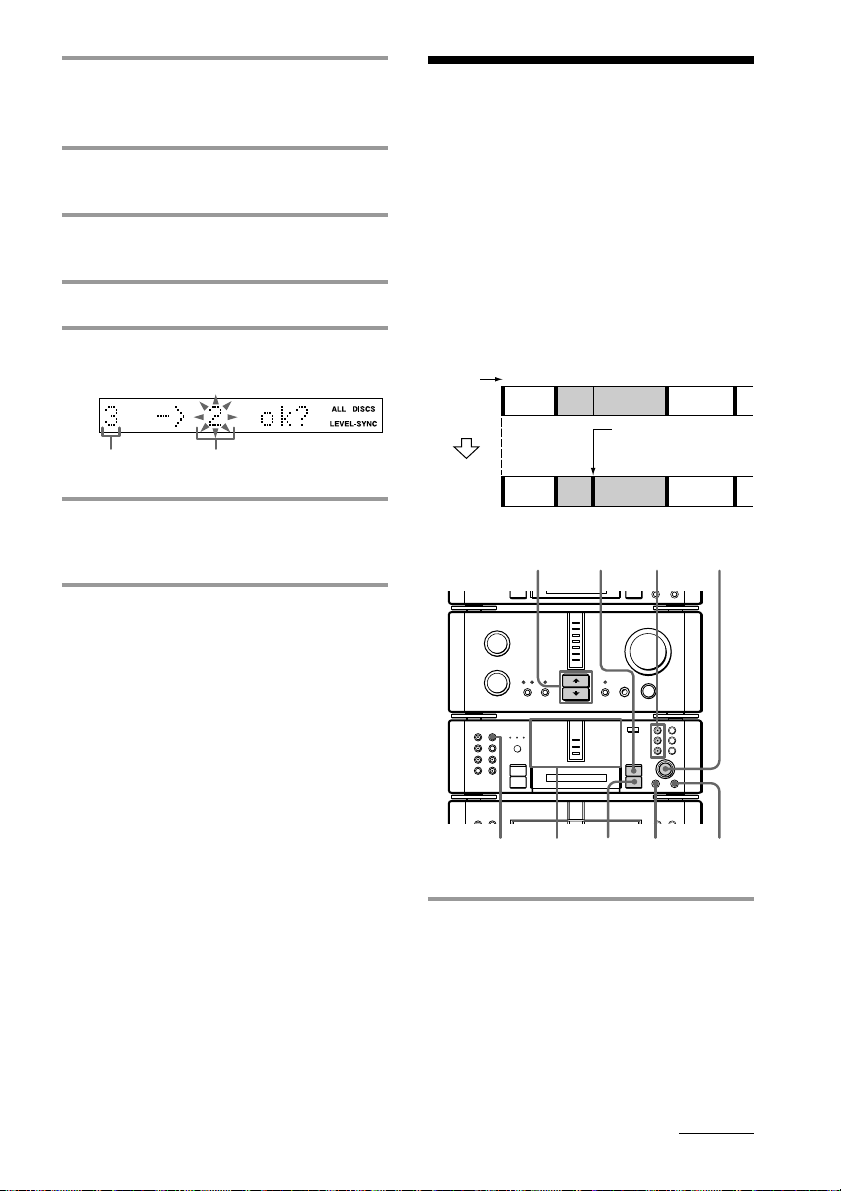
2 Press FUNCTION >/ . on the
amplifier repeatedly to switch the
function to MD.
3 Turn SELECTOR until the track
number you want to move appears.
4 Press MENU/NO, then turn
SELECTOR until “Move ?” appears.
Dividing recorded tracks
— Divide Function
The Divide Function lets you mark track
numbers after the recording ends. The total
number of tracks increases by one and all the
tracks following the divided ones are
renumbered.
5 Press ENTER/YES.
6 Turn SELECTOR until the new track
position appears.
The original
track number
The new track
position
7 Press ENTER/YES.
“Complete” appears for a few seconds
and the tracks are moved.
To cancel the Move Function
Press p on the MD deck.
Returning to the track
order before MOVE
You can return to the original track order
immediately after moving recorded tracks
(see page 66).
Example: Dividing track 2 into two tracks.
Track
number
Original
tracks
After
DIVIDE
12
AB C
123 4
AB C
1
3
p
2
N
•
•
•
•
•
•
•
•
•
0
10
)
n
0
N
1 4 5,6
3
D
Divide track 2 into
tracks B and C.
D
MD 1 – 3
buttons
·∏
p
4
+=
§
1 Insert the MD you want to edit, then
press DISC SKIP on the MD deck (or
MD D.SKIP on the remote) so the
MD 1 to 3 button of the slot
containing the MD lights green.
continued
63
Page 64
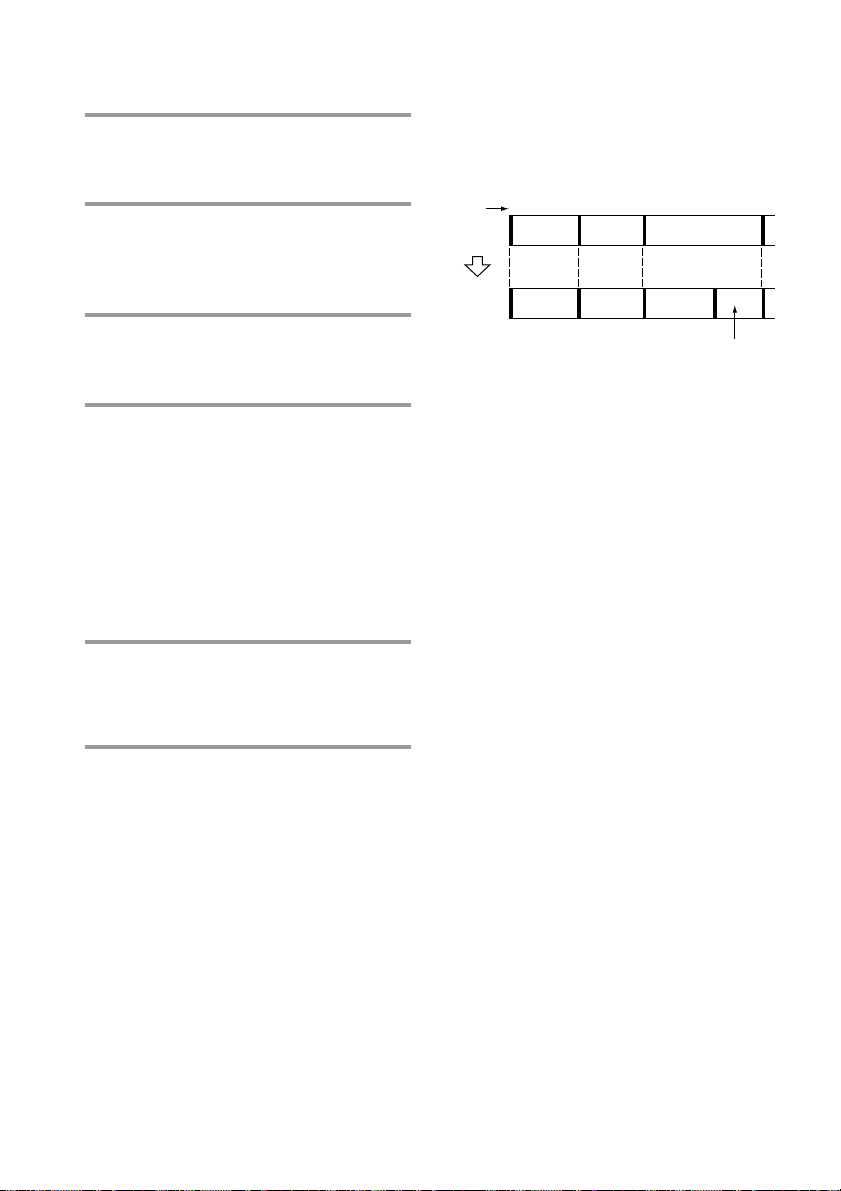
Dividing recorded tracks
(continued)
2 Press FUNCTION >/ . on the
amplifier repeatedly to switch the
function to MD.
3 While playing the MD, press ·∏
(or MD P on the remote) at the
point to be divided.
The MD deck pauses.
4 Press MENU/NO, then turn
SELECTOR until “Divide ?”
appears.
5 Press ENTER/YES.
“Rehearsal” and “Position ok?” appear
alternately and the portion to be divided
is played repeatedly.
To shift the position to be divided:
While monitoring the sound, turn
SELECTOR to the starting point to be
divided.
You can shift the point by 1/86 seconds
(1 frame) intervals.
Notes
•When you divide a labeled track (see page 57),
only the first of the two tracks retains the track
title.
Example:
Track
number
Original
tracks
After
DIVIDE
•You cannot divide the start or end of a track. If
1
Andante Adagio Allegro
1
Andante Adagio Allegro
you specify the start or end of a track as the
position to be divided, “Impossible” appears.
Turn SELECTOR to shift the position.
2
2
34
3
The new track is
untitled.
Returning to the
condition before DIVIDE
You can return to the original condition
immediately after dividing the tracks (see
page 66).
54
6 Press ENTER/YES again.
“Complete” appears for a few seconds
and the newly created track begins
playing.
To cancel the Divide Function
Press p on the MD deck.
64
Page 65
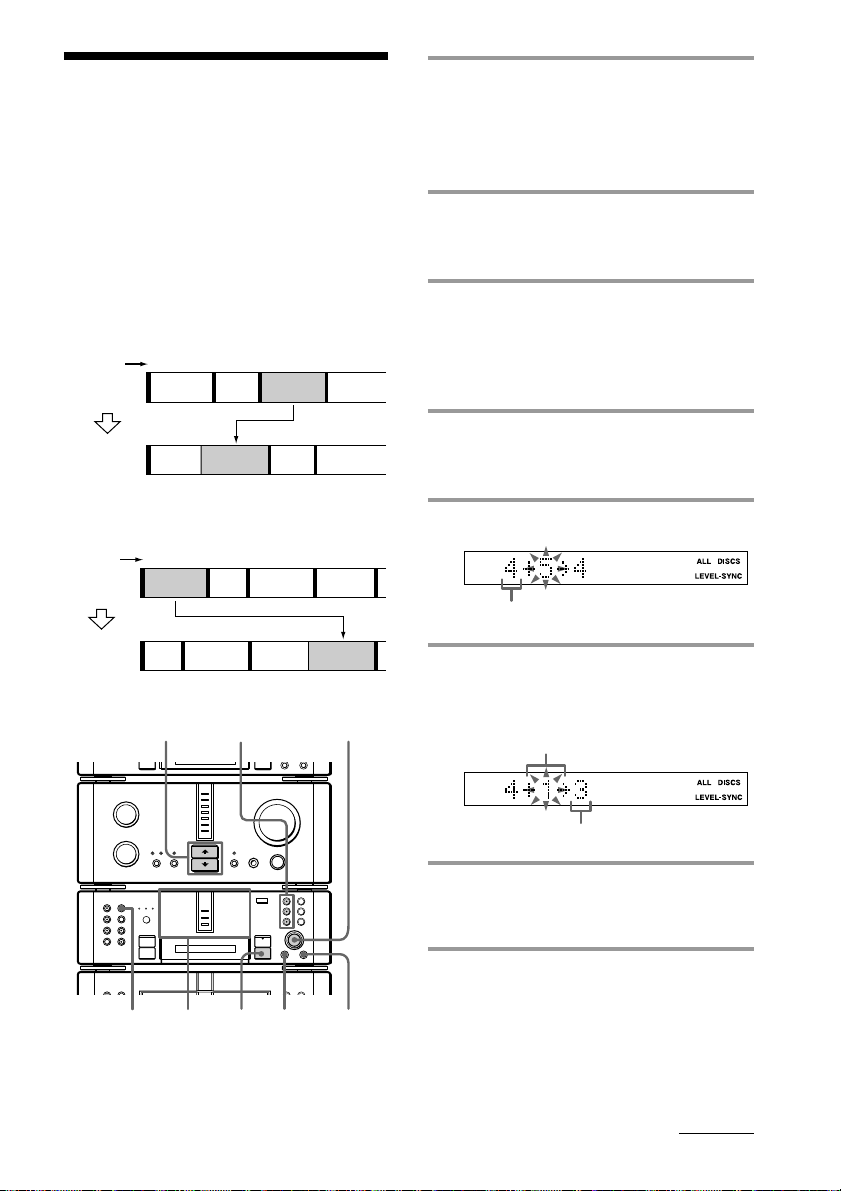
Combining recorded tracks
— Combine Function
This function lets you put several tracks or
several independently recorded portions into
a single track. The total number of tracks
decrease by one and all the tracks following
the combined ones are renumbered.
Example: Combining track 3 to track 1.
Track
number
Original
tracks
1
2
3
ABC D
4
1 Insert the MD you want to edit, then
press DISC SKIP on the MD deck (or
MD D.SKIP on the remote) so the
MD 1 to 3 button of the slot
containing the MD lights green.
2 Press FUNCTION >/ . on the
amplifier repeatedly to switch the
function to MD.
3 Turn SELECTOR until the number
of the first track of the two to be
combined appears.
For example, to combine tracks 4 and 1,
select track 4.
After
COMBINE
1
ABCD
2
3
Example: Combining track 1 to track 4.
Track
number
Original
tracks
After
COMBINE
1
ABC D
12
2
N
•
•
•
•
•
•
•
•
•
0
10
)
n
0
N
1
1
3
2
3
MD 1 – 3
buttons
+=
·∏
p
§
p
4 5,7
4
3,4,6
4 Press MENU/NO, then turn
SELECTOR until “Combine ?”
appears.
5 Press ENTER/YES.
5
4
ABC D
First track
6 Turn SELECTOR until the number
of the second track of the two to be
combined appears.
Track to be combined
New track number
7 Press ENTER/YES.
“Complete” appears for a few seconds
and the combined tracks start playing.
To cancel the Combine Function
Press p on the MD deck.
continued
65
Page 66
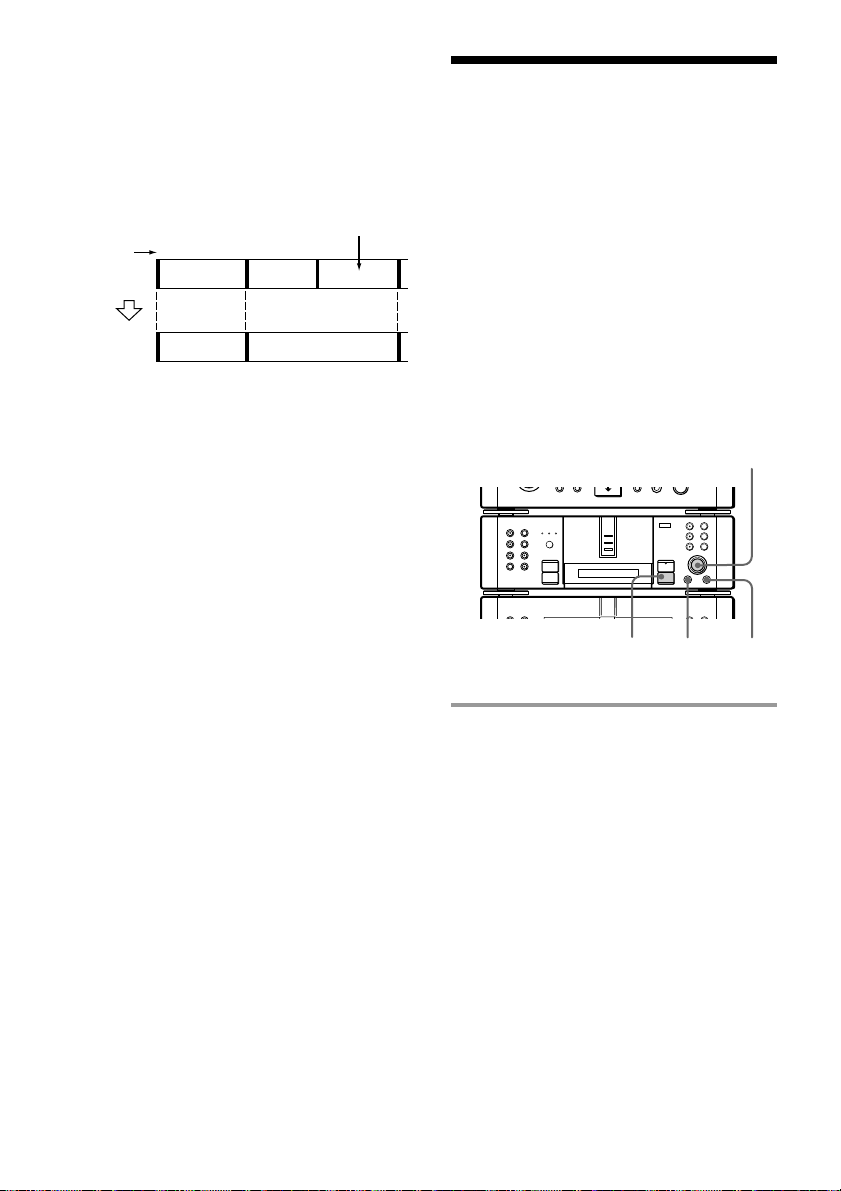
Combining recorded tracks
(continued)
Notes
•If both of the combined tracks have track titles, the
title of the second track is erased.
Example:
The second track
title is erased.Track
number
Original
tracks
After
COMBINE
12
3
Andante Adagio Allegro
1
2
Andante Adagio
4
3
•If “Impossible” appears, the tracks cannot be
combined. This happens when you have edited
the same track too many times. This is due to a
technical limitation of the MD system and is not a
mechanical error.
Returning to the
condition before COMBINE
You can return to the original condition
immediately after combining the tracks (see
this page).
Undoing the last edit
— Undo Function
You can cancel the last edit and restore the
contents of the MD to the condition before the
edit.
Note, however, that you cannot undo an edit
if you do any of the following after the edit:
• Do another edit.
• Press any of the REC 1 – 3.
• Press CD SYNC.
• Press REC IT.
• Update the TOC by turning off the system
or ejecting the MD.
• Disconnect the AC power cord.
1
•
•
•
•
•
•
•
•
•
0
10
)
n
0
N
p
+=
·∏
p
§
2,3
1
66
1 Press MENU/NO repeatedly, then
turn SELECTOR until “Undo ?”
appears.
“Undo ?” does not appear if you have
done no editing or while the MD is
playing.
Press p on the MD deck and stop play.
Page 67

2 Press ENTER/YES.
One of the following messages appears,
depending on the last edit.
Editing done: Message:
Labeling a track or
an MD
Changing an
existing title
Erasing all titles
on an MD
Erasing a single
track
Erasing all tracks
on an MD
Erasing a portion
of a track
Moving a track “Move Undo?”
Dividing a track “Divide Undo?”
Combining tracks “Combine Undo?”
“Name Undo?”
“Erase Undo?”
3 Press ENTER/YES again.
“Complete” appears for a few seconds
and the contents of the MD are restored
to the condition before the edit.
To cancel the Undo Function
Press p on the MD deck.
67
Page 68
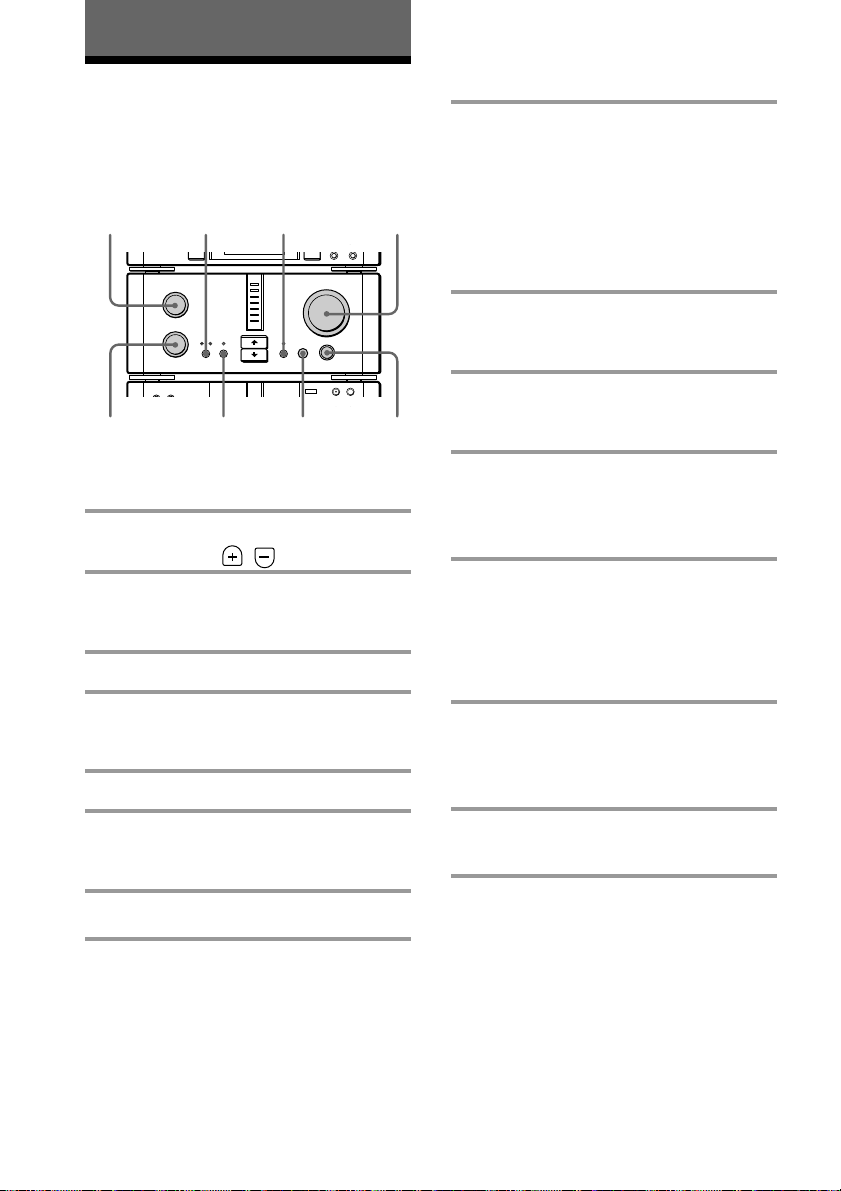
Other Features
Adjusting the sound
You can adjust the bass and treble, mute the
sound or listen to the source directly.
TREBLE
BASS
Adjusting the volume
/ Turn VOLUME.
Or press VOL / on the remote.
Adjusting the bass
/ Turn BASS.
DBFB MUTING VOLUME
N
SOURCE DIRECT
PHONES
BALANCE
Boosting the bass
/ Press DBFB*.
Each time you press the button, the
indicator lights up as follows:
“LOW” n “HIGH” n off
Press the button repeatedly until the
indicator turns off to cancel.
* DBFB: Dynamic Bass Feedback
Muting the sound
/ Press MUTING.
The indicator lights up. Press the button
again to return to the original volume.
Listening to music
without any sound effects
/ Press SOURCE DIRECT.
The indicator lights up.
The system outputs the music signals
directly without passing them through
any circuit.
Press the button again to cancel.
Adjusting the treble
/ Turn TREBLE.
Adjusting the balance
/ Turn BALANCE.
Note
When the SOURCE DIRECT indicator is lit, you
cannot adjust BASS, TREBLE or BALANCE.
Press SOURCE DIRECT to turn off the indicator.
68
Listening through the
headphones
/ Connect the headphones to
PHONES.
Page 69
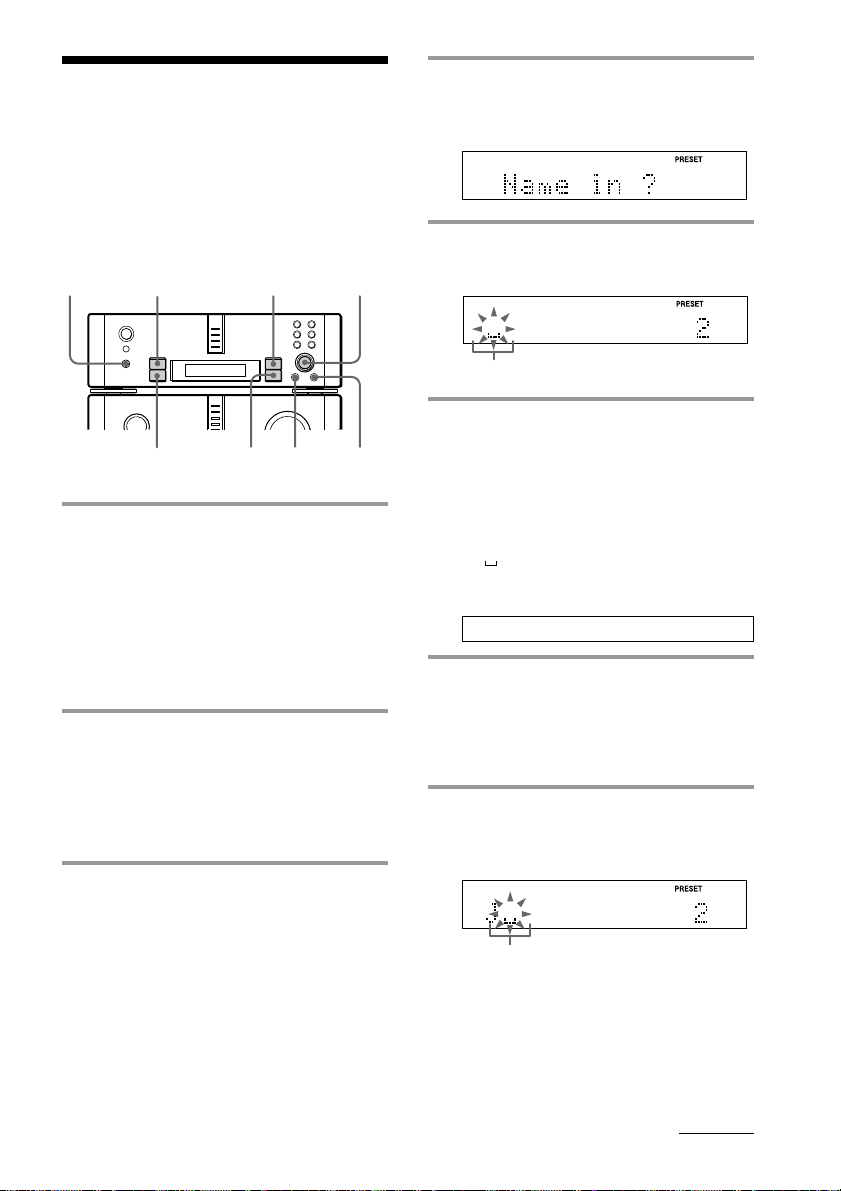
Labeling the preset stations
— Station Name
You can assign a name of up to ten characters
(Station Name) to a preset station. The Station
Name appears when you tune in the station.
6
8 1 3,4,7
4 Press MENU/NO, then turn MULTI
CONTROLLER until “Name in ?”
appears.
5 Press ENTER/YES.
The cursor starts flashing.
n
N
N
245,
1 Press BAND repeatedly until the
band you want appears.
DHC-EX880MD:
FM n MW n LW*
DHC-MD717:
FM n AM
* You cannot assign a name to an LW station.
2 For DHC-EX880MD:
Press TUNING MODE repeatedly
until “PRESET” appears.
For DHC-MD717:
Press PRESET.
3 Turn MULTI CONTROLLER until
the preset number of the station you
want to label appears.
10
Cursor
6 Press DISPLAY so that the desired
type of character appears.
Each time you press the button, the
display changes as follows:
A (Upper cases) n a (Lower cases)
n 0 (Numbers) n ! (Symbols)*
n
(Blank space) n A n ...
* You can use the following symbols:
! ” # $ % & ’ ( ) * + , – . / : ; < = > ? @ _ `
7 Turn MULTI CONTROLLER until
the character you want appears.
The selected character flashes.
To enter a blank space, press n without
turning MULTI CONTROLLER.
8 Press n to enter the character.
The cursor shifts rightward and waits for
the input of the next character.
Cursor
continued
69
Page 70
Labeling the preset stations
(continued)
Using the Radio Data
9 Repeat steps 6 to 8 to complete the
name.
If you made a mistake, press N or n
until the character you want to change
flashes, then repeat steps 6 to 8. To erase
the character, press MENU/NO. Each
time you press the button, the character
at the position of the cursor is erased.
You cannot insert characters.
10 Press ENTER/YES to complete the
labeling procedure.
“Complete” appears for a few seconds
and the name is stored in the system
memory.
To cancel labeling
Press TUNING MODE (for DHC-EX880MD)
or PRESET (for DHC-MD717).
To check the Station Name of the
current station
Each time you press DISPLAY, the display
changes as follows:
n Station Name n Frequency n Clock
To erase the name
Start over from step 1, then press MENU/NO
repeatedly after step 5 to erase the name.
System (RDS)
(DHC-EX880MD only)
What is the Radio Data
System?
Radio Data System (RDS) is a broadcasting
service that allows radio stations to send
additional information along with the regular
program signal. This tuner offers convenient
RDS features, such as monitoring traffic,
news, or information programs and locating a
station by program type (PTY). RDS is
available only on FM stations*.
Note
RDS may not work properly if the station you are
tuned to is not transmitting the RDS signal properly
or if the signal strength is weak.
* Not all FM stations provide RDS service, nor do
they provide the same types of services. If you are
not familiar with the RDS system, check with your
local radio stations for details on RDS services in
your area.
Receiving RDS broadcasts
/ Simply select a station from the FM
band.
When you tune in a station that provides
RDS services, the station name appears
in the display.
70
Page 71
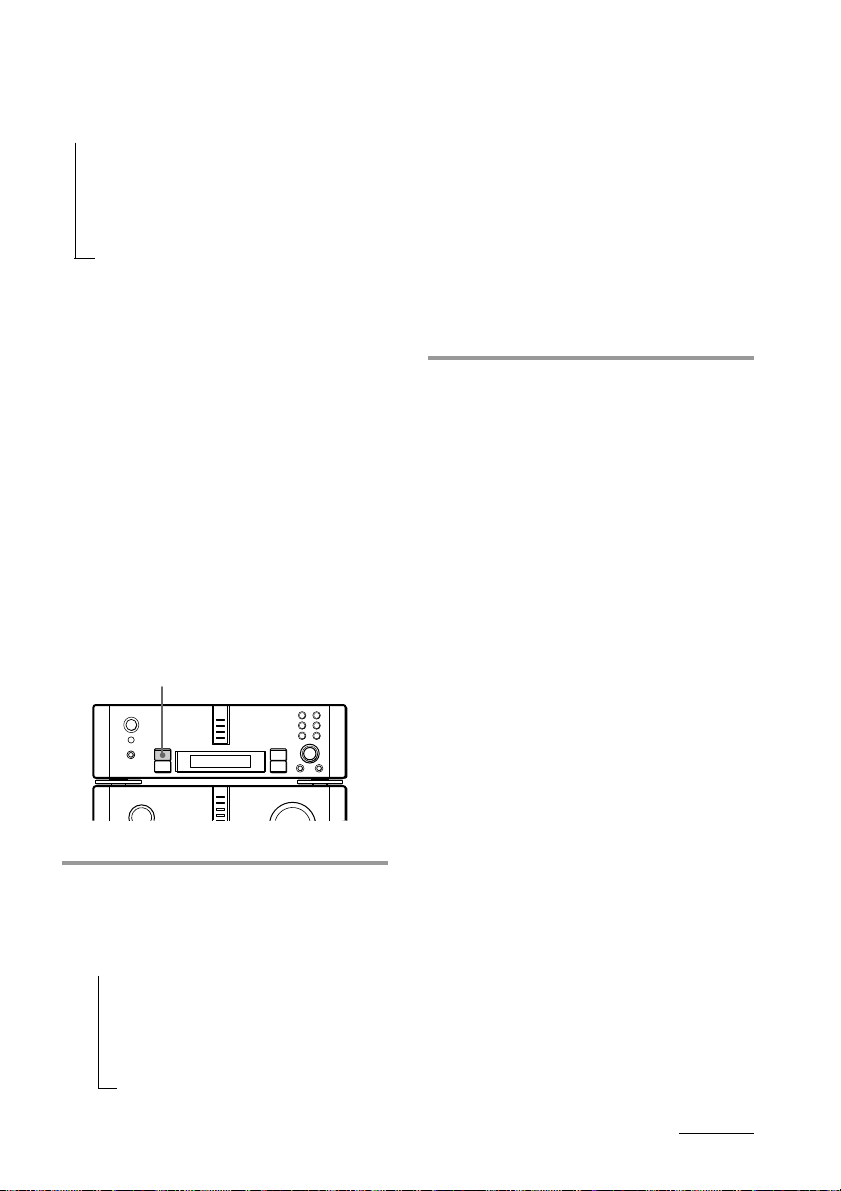
To check the RDS information
Each time you press DISPLAY on the tuner,
the display changes as follows:
n Station name
µ
Frequency
µ
Program type
µ
Radio text
Notes
• “No PTY Data” appears when the receiving
station does not broadcast the program type you
selected.
• “No Text Data” appears when the receiving
station does not broadcast the radio text data.
• “PTY Alarm” flashes when there is an emergency
announcement by governmental authorities.
Monitoring traffic, news,
or information programs
(EON)
Enhanced Other Networks (EON) allows the
tuner to automatically switch to a station
broadcasting traffic, news, or other
information. After the program ends, the
tuner switches back to the station you were
listening to (or the function you were using).
EON
n
N
The tuner enters the EON standby mode.
“No TA service”, “No News” or “No
Info” appears if there is no station that
broadcasts the program you selected.
When a station starts broadcasting the
program you selected, the tuner switches
to the station and an indication (“TA”,
“NEWS” or “INFO”) flashes. If you
select “TA”, “NOW TA Service” appears
when the station broadcasts the traffic
announcement.
After the program ends, the unit
switches back to the station you were
listening to (or the function you were
using).
To stop monitoring
Press EON once.
Tip
You can receive the incoming RDS information
while the system is turned off. After selecting the
desired EON program (TA, NEWS or INFO), press
1/u (power) to turn off the system (“EON Wait?”
and “Push EON KEY” appear alternately). Within
six seconds, press EON so that “EON WAITING”
appears.
Every time the tuner receives an EON program, the
system automatically turns on and returns to the
standby mode when the program is finished.
Notes
•The EON feature does not work while recording.
So, turn off the EON feature when you want to
record a program without interruptions, especially
when you want to do timer recording.
•Not all RDS stations provide EON service.
•The station will not switch if the current receiving
station broadcasts the program you selected.
•“Weak Signal” appears when the current EON
station cannot provide RDS data due to a weak
signal and “Returning” appears when the system
is attempting to retune the EON station.
/ Press EON to select the desired
EON program.
Each time you press EON, the display
changes as follows:
n TA (Traffic Announcement)
µ
NEWS
µ
INFO (Information)
µ
(No display)
continued
71
Page 72
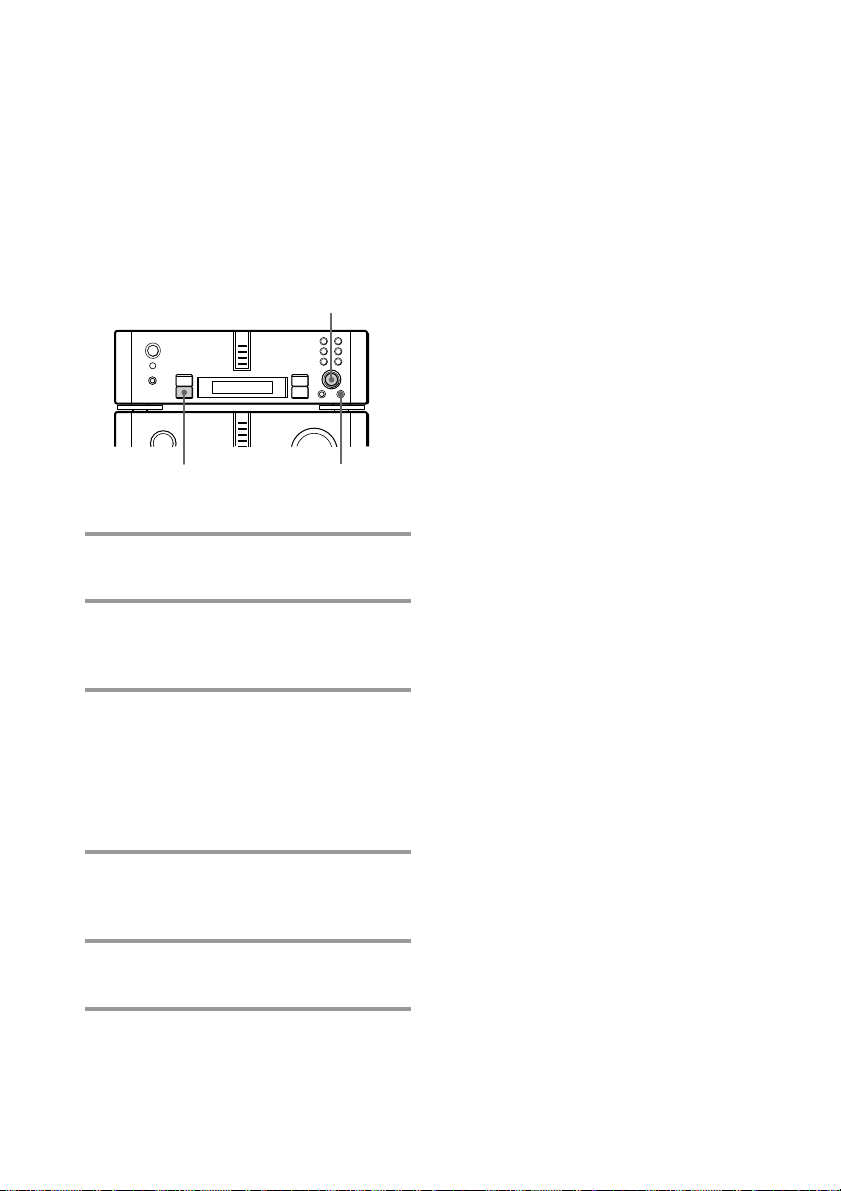
Using the Radio Data System (RDS)
(continued)
Locating a station by
program type (PTY)
You can locate a station you want by selecting
a program type. The system tunes in the type
of programs currently being broadcast from
the RDS stations stored in the tuner’s preset
memory.
2,4
n
N
3,51
1 Press PTY.
“PTY Select” appears.
2 Turn MULTI CONTROLLER until
the desired program type appears.
See “List of program types (PTY).”
3 Press ENTER/YES.
The system starts searching for the
preset RDS stations (“PTY Search” and
the selected program type appear
alternately).
When the tuner receives a program, the
preset station number flashes.
4 Turn MULTI CONTROLLER until
the desired preset station number
flashes.
List of program types (PTY)
News
News programs.
Affairs
Topical programs that expand on current
news.
Information
Programs about consumer affairs, medical
advice, and weather.
Sport
Sports programs.
Education
Educational programs, such as a “how-to”
programs and advice.
Drama
Radio plays and serials.
Culture
Programs about national or regional culture,
such as religion, language, and societal
concerns.
Science
Programs about the natural sciences.
Varied
Programs containing celebrity interviews,
panel games, and comedy.
Pop Music
Popular music programs.
Rock Music
Rock music programs.
M.O.R. Music
Easy listening (middle of the road music).
L. Classical
Classical music, such as instrumentals, and
vocal and choral works.
5 Press ENTER/YES while the preset
station number is flashing.
72
Page 73
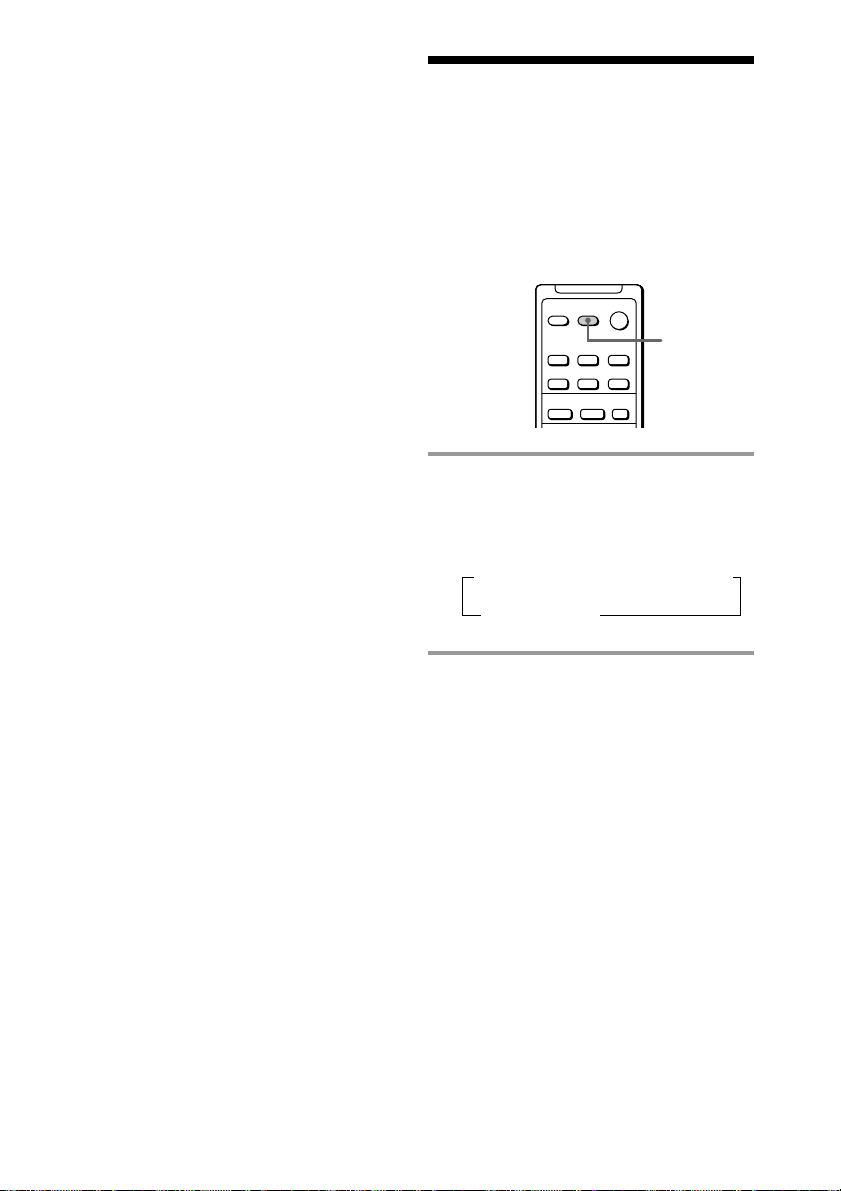
–
+
SLEEP
S. Classical
Performances of major orchestras, chamber
music, opera, etc.
Other Music
Music, such as jazz, rhythm and blues, and
reggae.
Alarm
Emergency broadcasts.
PTY undefined
Any programming not defined above.
Notes
• “PTY not found” appears when the program you
selected is not currently being broadcast.
• “PTY change” appears when the program type
you selected has ended while PTY scanning. You
will receive another station if it broadcasts the
same type of program.
• “Text waiting” appears when Radio Text Data is
not being provided.
Falling asleep to music
— Sleep Timer
You can have the system turn off at a preset
time, so you can fall asleep to music. You can
preset the time to turn off in 10 minute
intervals.
/ Press SLEEP and select the time.
Each time you press the button, the
minute display (the turn-off time)
changes as follows:
n 90min n 80min n 70min
AUTO N OFF N
...
10min
To check the remaining time
Press SLEEP once.
To change the time to turn off
Select the time you want by pressing SLEEP.
To cancel the Sleep Timer
operation
Press SLEEP repeatedly until “OFF” appears.
If you select “AUTO”
The system automatically turns off when the
current CD or MD finishes playing. When a
different sound source is selected (e.g.,
TUNER), the system turns off after
100 minutes.
The system also turns off when you press p
and stop play.
Tip
You do not have to set the clock to use the Sleep
Timer.
73
Page 74
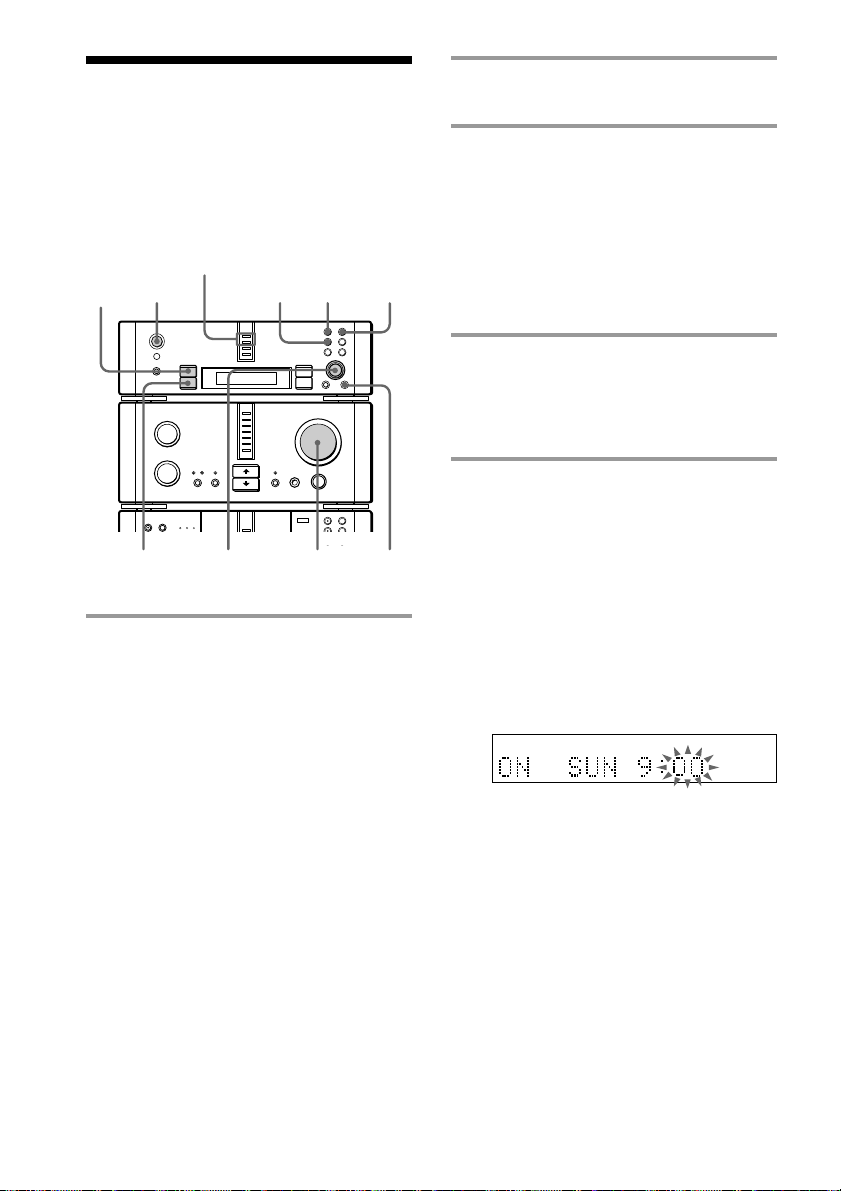
Waking up to music
— Wake-up Timer
You can wake up to music at a preset time.
Make sure you have set the clock (see
page 12).
ONCE and DAILY
indicators
5,8 3
11
DAILY ONCE
2 Turn VOLUME to adjust the
volume.
3 Press CLOCK/TIMER SET, then
turn MULTI CONTROLLER to
select “ONCE TIMER” or
“DAILY TIMER”.
If you select “ONCE TIMER”, the Wakeup Timer activates only once. If you
select “DAILY TIMER”, the Wake-up
Timer activates at the same time every
day.
n
N
•
•
•
•
•
•
•
•
•
0
10
N
3,5,7,9
2
4,5,
1 Prepare the sound source you want
to play.
• CD: Place the desired CD in the tray.
To play the tracks in a specific order,
press PROGRAM repeatedly so that
one of “PROGRAM-1” to
“PROGRAM-3” appears (see page 27).
• MD: Insert the desired MD to the slot.
To play the tracks in a specific order,
make a program (see page 35).
• Radio: Tune in the desired station (see
page 13).
• Tape: Insert a tape in the optional tape
deck.
4 Press ENTER/YES.
If you selected “ONCE TIMER”, the day
indication starts flashing. If you selected
“DAILY TIMER”, the hour indication
starts flashing.
5 Set the time to start playback.
If you selected “DAILY TIMER” in
step 3, skip step 1 below.
1 Turn MULTI CONTROLLER to set the
10
day, then press n or ENTER/YES.
The hour indication starts flashing.
The clock is on a 24-hour system for
the DHC-EX880MD, and a 12-hour
system for DHC-MD717.
2 Turn MULTI CONTROLLER to set the
hour, then press n or ENTER/YES.
The minute indication starts flashing.
3 Turn MULTI CONTROLLER to set the
minute, then press n or ENTER/YES.
The day or hour indication flashes
again.
74
Page 75
6 Set the time to stop playback
following the procedure in step 5.
The sound source indication appears.
7 Turn MULTI CONTROLLER until
the sound source you want appears.
The indications change as follows:
n CD n MD n TUNER n TAPE*
* Select “TAPE” to use the optional
component connected to the TAPE jacks as
the sound source.
8 Press n.
If you selected “TAPE”, go to step 10.
9 Turn MULTI CONTROLLER until
the desired CD (DISC1 – 3), MD
(DISC1 – 3) or radio station*
appears.
To play the CD or MD tracks in a specific
order, select “PLAY”.
When you select “PLAY” for CD or MD,
the selected (CD 1 – 3 or MD 1 – 3 button
lights green) CD or MD is played.
* DHC-EX880MD: FM1 – 20, MW1 – 10,
LW1–10
DHC-MD717: FM1 – 20, AM1 – 10
10 Press ENTER/YES.
The timer type (ONCE or DAILY)
appears, followed by the start time, the
stop time and the sound source, then the
original display appears.
11 Turn off the system.
To change the setting
Start over from step 1. Press N or n after
step 5 until the indication you want to change
flashes, then change the setting.
To set/check the timer
Press ONCE or DAILY to turn on the ONCE
or DAILY indicator.
If the indicator is already lit, press the button
once to turn off the indicator, then press it
again.
The check screen appears, then the original
display appears.
To cancel the timer operation
Press ONCE or DAILY to turn off the ONCE
or DAILY indicator.
“TIMER OFF” appears and the timer
operation is canceled.
Tip (for DHC-EX880MD)
When you connect the optional TC-TX770 tape deck
to the system with the audio bus cable (see page 84),
the deck power is also turned on automatically by
the system’s timer. This lets you wake up to the tape
without setting the deck timer.
Notes
•You cannot use the Wake-up Timer at the same
time as the Recording Timer (REC).
•Do not operate the system from the time the
system turns on until the playback starts (about
20 seconds). If you do so, the timer may not
operate correctly.
•If the power is on at the time to turn on, the set
sound source starts playing.
•Optional components other than the TC-TX770
(for DHC-EX880MD only) deck are not activated
by the Wake-up Timer. When using these
components as the sound source, make the same
timer settings on the component side.
•If the timer-on and -off settings are the same,
“OFF TIME NG !” appears and the cursor returns
to the timer-off setting. Change the time to turn
off.
75
Page 76
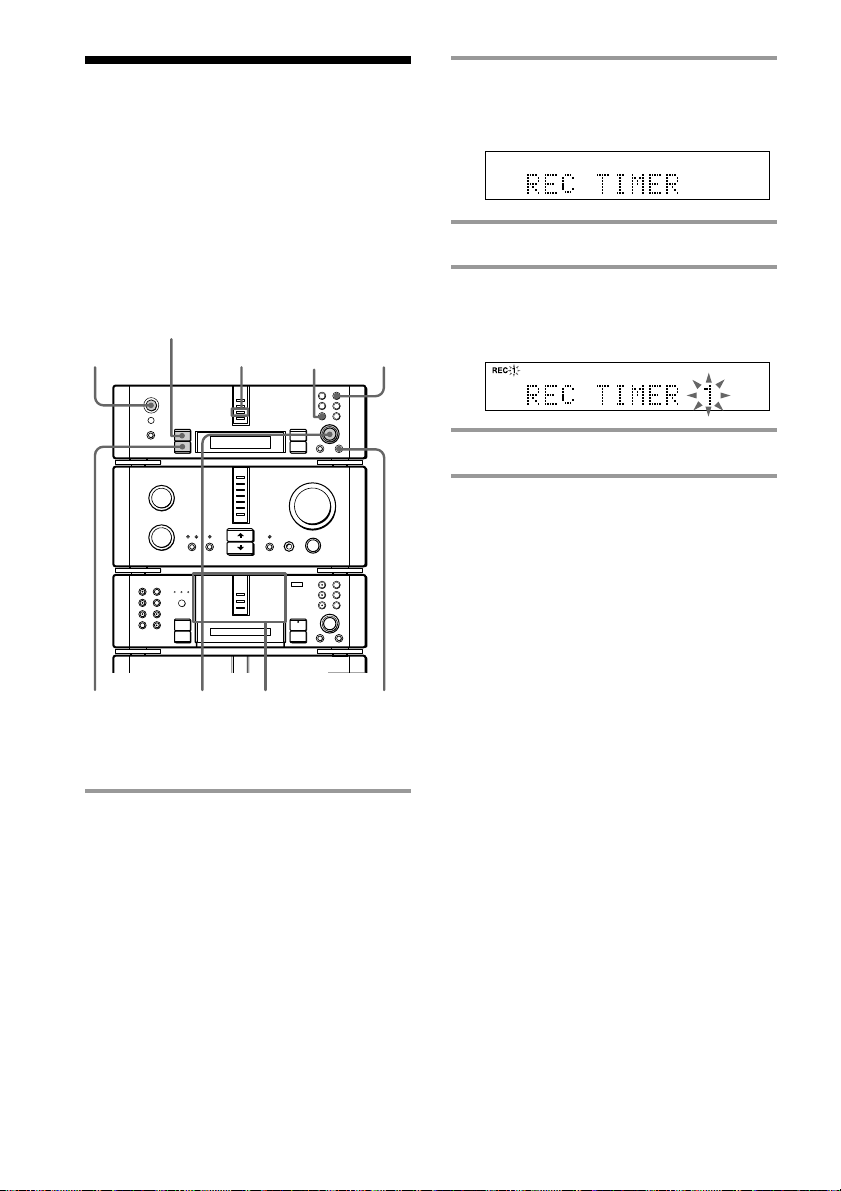
Timer-recording radio programs
This system has three recording timers, and
you can set three timers at the same time.
You can also timer-record up to three MDs,
letting you timer-record a 2-hour program.
Make sure you have preset the radio station
(see page 13) and set the clock (see page 12).
7,8,10,
16
N
2,4,6,8,
10 – 12,14
11
REC indicator
n
N
•
•
•
•
•
•
•
•
•
0
10
)
n
0
N
2
+=
·∏
1
REC
p
3,5,7,8,
10,11,13,15
2 Press CLOCK/TIMER SET, then
turn MULTI CONTROLLER until
“REC TIMER” appears.
3 Press ENTER/YES.
4 Turn MULTI CONTROLLER until
one of “REC TIMER 1” to “REC
TIMER 3” appears.
5 Press ENTER/YES.
6 Turn MULTI CONTROLLER until
“ONCE REC”, “DAILY REC” or
“WEEKLY REC” appears.
If you select “ONCE REC”, the recording
timer activates only once. If you select
“DAILY REC”, the timer activates at the
same time every day. If you select
“WEEKLY REC”, the timer activates at
the same time on the set day of every
week.
1 Insert a recordable MD (MDs) into
the slot(s).
You can record on any of the MDs in
MD 1 to 3. Insert multiple MDs to record
for long times. Recording starts in order
from MD 1.
76
Page 77
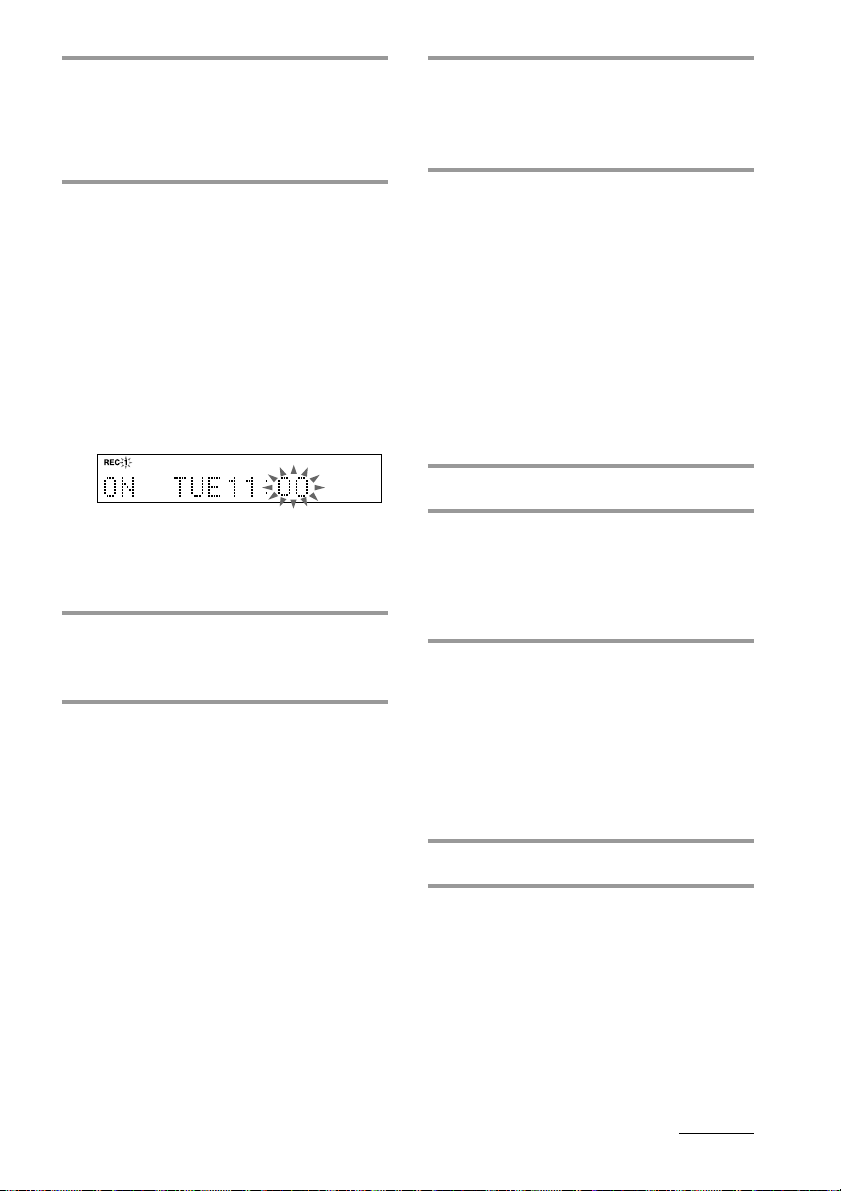
7 Press n or ENTER/YES.
If you selected “ONCE REC” or
“WEEKLY REC”, the day indication
starts flashing. If you selected “DAILY
REC”, the hour indication starts flashing.
8 Set the time to start recording.
If you selected “DAILY REC” in step 6,
skip step 1 below.
1 Turn MULTI CONTROLLER to set the
day, then press n or ENTER/YES.
The hour indication starts flashing.
The clock is on a 24-hour system for
the DHC-EX880MD, and a 12-hour
system for DHC-MD717.
2 Turn MULTI CONTROLLER to set the
hour, then press n or ENTER/YES.
The minute indication starts flashing.
11 Turn MULTI CONTROLLER to
select the preset station you want to
record, then press n or
ENTER/YES.
12 Turn MULTI CONTROLLER to
select the recording destination (MD
number).
Select the slot containing the MD you
inserted in step 1.
• “to MD DISC1”: Recording to MD 1.
• “to MD DISC2”: Recording to MD 2.
• “to MD DISC3”: Recording to MD 3.
• “to MD DISC ALL”: Recording to
MD 1, then MD 2, then MD 3.
• “to TAPE” (DHC-EX880MD only):
Recording to the optional TC-TX770
tape deck.
13 Press ENTER/YES.
3 Turn MULTI CONTROLLER to set the
minute, then press n or ENTER/YES.
The day or hour indication flashes
again.
9 Set the time to stop recording
following the procedure in step 8.
The sound source indication appears.
10 Turn MULTI CONTROLLER to
select “TUNER”, then press n or
ENTER/YES.
14 Turn MULTI CONTROLLER to
select “STEREO REC” or
“MONO REC”.
Skip this operation if you selected
“to TAPE” in step 12.
15 Press ENTER/YES.
The timer number (REC 1 – 3) appears,
followed by the timer type (ONCE,
DAILY or WEEKLY), the start time, the
stop time, the recording source, the
recording destination and the recording
method (STEREO or MONO)*, then the
original display appears.
* Only when recording on an MD.
16 Turn off the system.
continued
77
Page 78
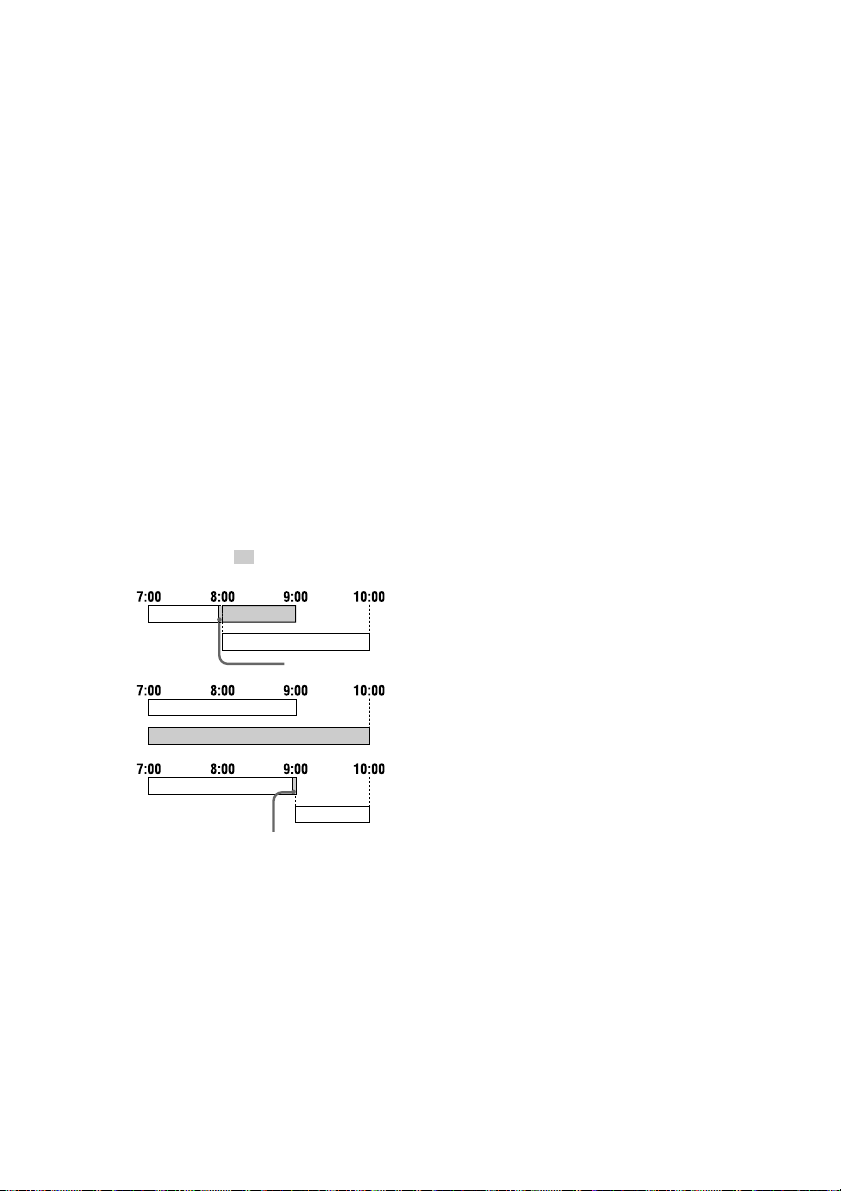
Timer-recording radio programs
(continued)
To change the setting
Start over from step 1.
If you made a mistake, press N and return to
the point you want to change, then change
the setting.
To set/check the timer
1 Press REC.
2 Turn MULTI CONTROLLER to select ON
(set) or OFF (cancel), then press
ENTER/YES.
Each time you press ENTER/YES, the set
timer numbers appear in order. Turn each
timer ON or OFF.
To cancel all timer operations at
once
Press REC to turn off the REC indicator.
“TIMER OFF” appears and all set timer
operations are canceled.
If the set times overlap
The shaded portions are not recorded.
REC 1
REC 2
Last 30 seconds
Tip
When you record from the radio, the Station Name
(see page 69, or the frequency if the station is not
labeled) is recorded on the MD along with the start
and stop times.
Notes
•When you record a long program on multiple
MDs (if you selected “to MD DISC ALL” at step
12), the sound will not be recorded while the
system is switching MDs. If all the program
cannot fit on MD 1, recording starts automatically
from the next MD. Be sure to insert a recordable
MD (MDs) beforehand and remove any unwanted
MDs from the slots.
•Do not operate the system from the time the
power turns on until the recording starts (about
one minute). If you do so, the timer may not
operate correctly.
•If the timer-on and -off settings are the same,
“OFF TIME NG !” appears and the cursor returns
to the timer-off setting. Change the time to turn
off.
•When you use a brand new MD to record, the first
30 seconds will not be recorded.
•If the power is on two minutes before the preset
time, the timer-recording may not be activated.
Make sure you finish the settings at least two
minutes before the preset time, then turn off the
system.
•The volume is reduced to minimum during
recording.
78
REC 1
REC 2
REC 1
REC 2
Last 30 seconds
Page 79
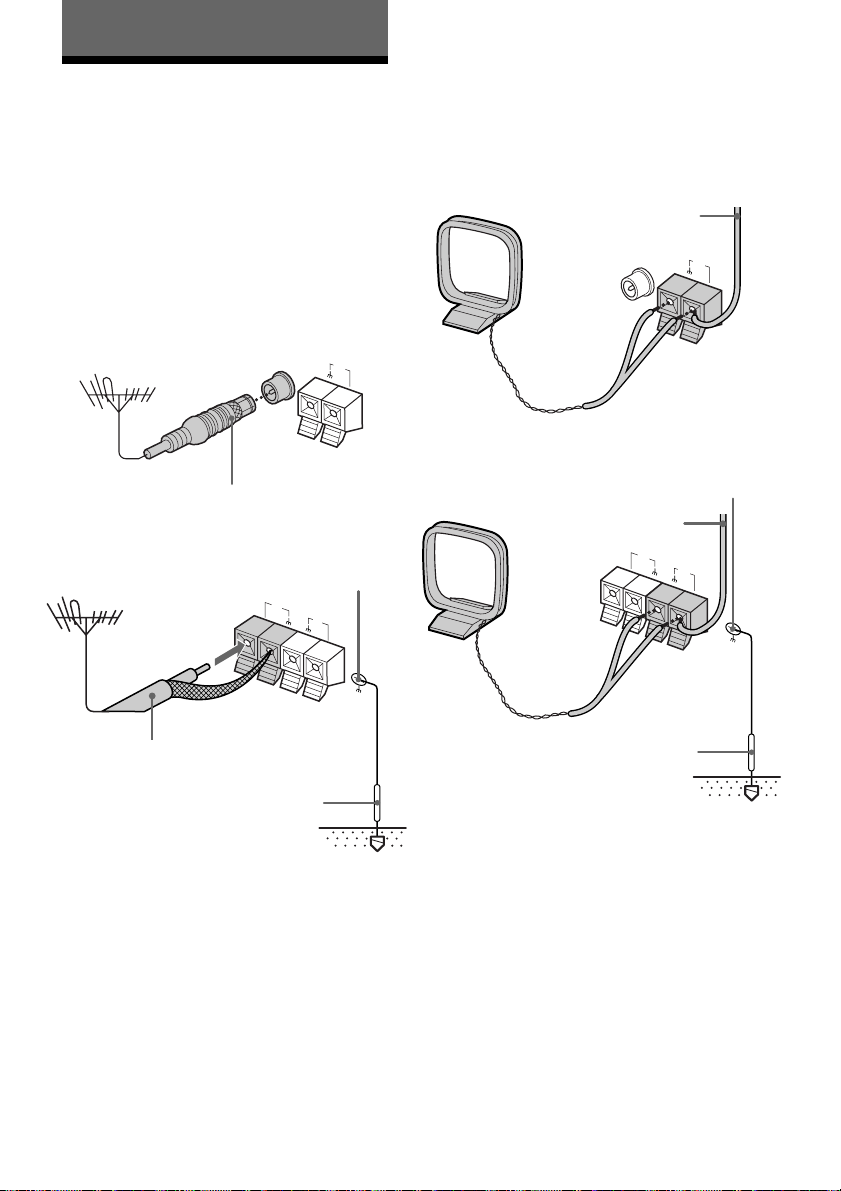
Using Optional Equipment
Connecting optional antennas
AM antenna
Connect a 6- to 15-meter insulated wire to the
AM antenna terminal. Leave the supplied
AM loop antenna connected.
Connect optional antennas to improve the
reception.
FM antenna
Connect the optional FM outdoor antenna.
You can also use the TV antenna instead.
For DHC-EX880MD
FM 75Ω
COAXIAL
IEC standard socket
connector (not supplied)
For DHC-MD717
FM
75Ω
75-ohm coaxial cable
(not supplied)
Ground wire
(not supplied)
AM
Screw clamp
AM
SIGNAL GND
For DHC-EX880MD
Insulated wire
(not supplied)
FM 75Ω
COAXIAL
For DHC-MD717
Screw clamp
Insulated wire
(not supplied)
FM
75Ω
AM
Ground wire
(not supplied)
Important
If you connect an outdoor antenna, ground it
against lightning. (For DHC-MD717, ground
from SIGNAL GND y terminal with the
screw clamp.) To prevent a gas explosion, do
not connect the ground wire to a gas pipe.
AM
SIGNAL GND
79
Page 80
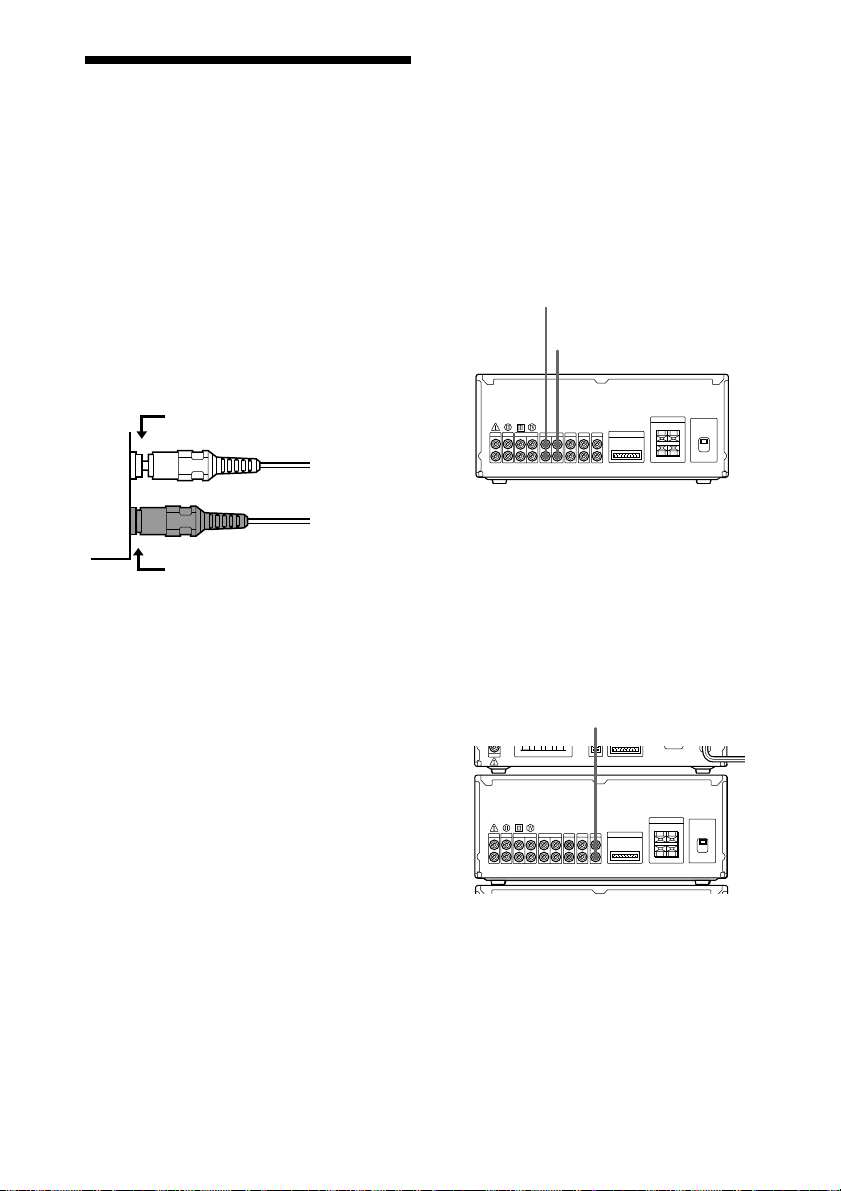
Connecting optional AV components
To enhance your system, you can connect
optional components. Refer to the
instructions of each component. Before
making connections, take the cap off the
jacks, and keep it for future use.
Connecting the audio
cords
Insert the plugs firmly, pushing them in all
the way.
Not pushed in all the way
N.G.
Connecting the tape deck
Connect the tape deck to the TAPE jacks on
the amplifier using audio cords (sold
separately).
If you connect the optional TC-TX770 tape
deck, see “Connecting the optional TC-TX770
tape deck” on page 84 (DHC-EX880MD only).
See the operating instructions included with
the tape deck for details.
To the audio input of
a tape deck
To the audio output of
a tape deck
Insert completely
OK
Connecting other analog
components
Connect the analog component to the
VIDEO3 jacks (VIDEO jacks for DHC-MD717)
on the amplifier using an audio cord (sold
separately).
To the audio output of
an analog component
80
Page 81
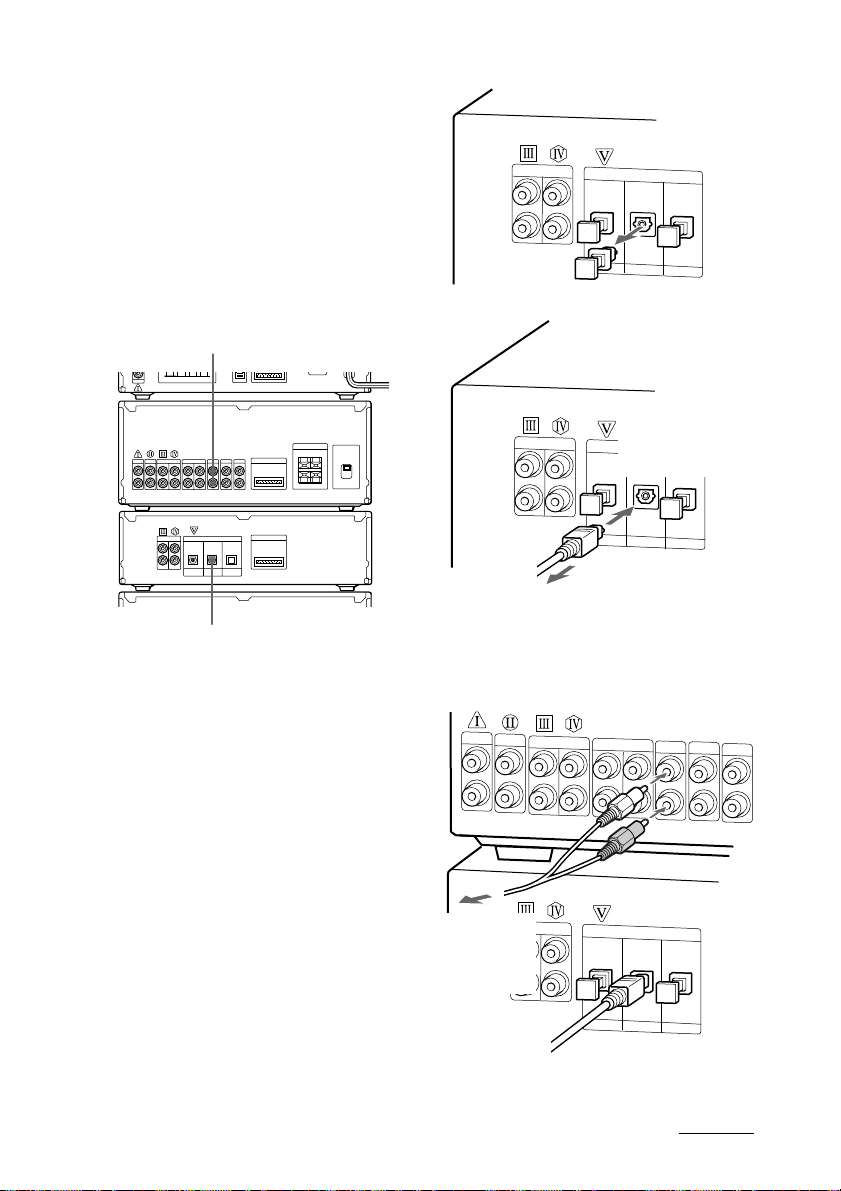
Connecting digital
components
Connect the digital component to the
VIDEO 1 DIGITAL IN jack (CS/BS DIGITAL
IN jack for DHC-MD717) (digital) on the MD
deck using an optical cable (sold separately),
and to the VIDEO1 IN jacks (CS/BS IN jacks
for DHC-MD717) (analog) on the amplifier
using an audio cord (sold separately). The
digital audio signal from the connected
component is digitally recorded to the MD.
To the audio output of
a digital component
Amplifier
MD
deck
To the digital optical output of
a digital component
1 Connect an optical cable (sold separately).
1 Take off the cap.
2Connect an optical
cable (sold
separately).
3 Connect the cable to
the digital optical
output of an optional
digital component.
2 Connect an audio cord (sold separately).
Connect the
cord to the
audio output
of an optional
digital
component.
continued
81
Page 82
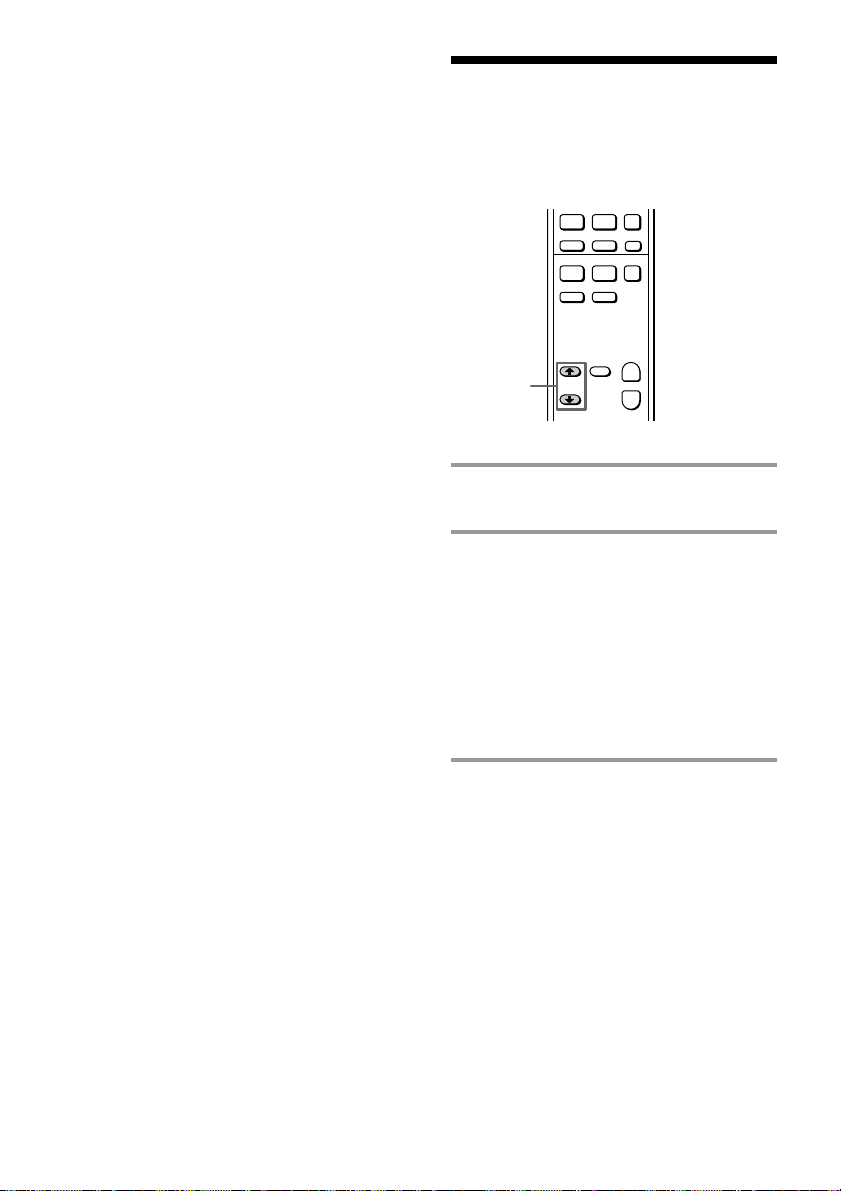
Connecting optional AV
components (continued)
Tip
You can also connect a digital component to the
VIDEO 2 DIGITAL IN jack (LD/DVD DIGITAL IN
jack for DHC-MD717) (digital) on the MD deck and
the VIDEO2 IN jacks (LD/DVD IN jacks for
DHC-MD717) (analog) on the amplifier in the same
manner.
Notes
•When you make a digital recording using an
optical cable, the recording level is automatically
adjusted. You cannot adjust the recording level.
•Many types of DVD software cannot be digitally
recorded. In these cases, an analog recording is
made even if the DVD player is connected using
optical cables.
Listening to the sound of digital components
P+=p
·
ª·
2
1 Prepare the connected digital
component (e.g., CS/BS tuner).
2 Press FUNCTION >/ . repeatedly
to select the sound source.
Select “VIDEO 1” (“CS/BS” for
DHC-MD717) to listen to the sound of a
component connected to the VIDEO1
jacks (CS/BS jacks for DHC-MD717).
Select “VIDEO 2” (“LD/DVD” for
DHC-MD717) to listen to the sound of a
component connected to the VIDEO2
jacks (LD/DVD jacks for DHC-MD717).
p
)0
+
–
82
Note
You cannot listen to the sound of a digital
component just by connecting the optical cable. You
must also connect the digital component to the
analog input jacks on the amplifier using an audio
cord.
When you connect a digital component to the
VIDEO 1 DIGITAL IN jack (CS/BS DIGITAL IN jack
for DHC-MD717), connect the audio cord to the
VIDEO1 (CS/BS) jacks. When you connect a digital
component to the VIDEO 2 DIGITAL IN jack (LD/
DVD DIGITAL IN jack for DHC-MD717), connect
the audio cord to the VIDEO2 (LD/DVD) jacks.
Page 83
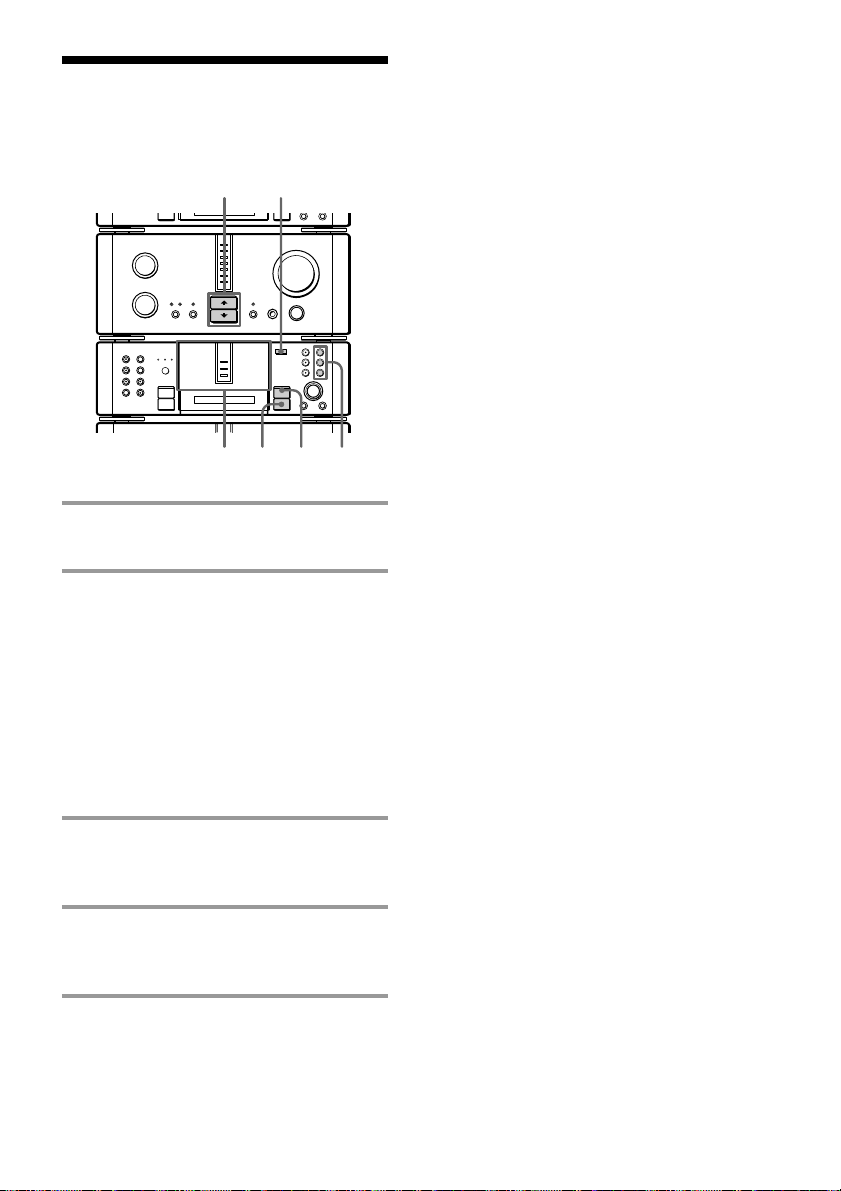
Recording the sound of digital components
2
§
N
•
•
•
•
•
•
•
•
•
0
10
)
n
0
N
p
1 Insert a recordable MD (see page
24).
2 Press FUNCTION >/ . on the
amplifier repeatedly to select the
sound source.
Select “VIDEO 1” (“CS/BS” for
DHC-MD717) to record the sound of a
component connected to the VIDEO1
jacks (CS/BS jacks for DHC-MD717).
Select “VIDEO 2” (“LD/DVD” for
DHC-MD717) to record the sound of a
component connected to the VIDEO2
jacks (LD/DVD jacks for DHC-MD717).
3 Press REC 1 – 3 for the slot
containing the recordable MD.
The MD deck stands by for recording.
+=
·∏
p
431
If “Analog REC!” appears
The optical cable is not connected, so the
system is making an analog recording of the
sound from the VIDEO1 or 2 jacks (CS/BS or
LD/DVD jacks for DHC-MD717).
Note
Once the system has been set to analog recording,
you must first switch the function to other than
“VIDEO 1” or “VIDEO 2” (“CS/BS” or “LD/DVD”
for DHC-MD717) to make a digital recording. In
such a case, stop the recording and connect the
optical cable, then press FUNCTION >/.
repeatedly to select “VIDEO 1” or “VIDEO 2” (“CS/
BS” or “LD/DVD” for DHC-MD717) again.
To record with the optional
TC-TX770 tape deck (for
DHC-EX880MD only)
Do the procedure in “Listening to the sound
of digital components” to listen to the
broadcast, then start recording with the deck.
Tips
•When you connect a digital component using an
optical cable, the system makes a digital recording
of the sound from the digital component. When
you do not connect an optical cable, the system
automatically makes an analog recording of the
sound input from the audio cord. “Analog REC!”
appears when analog recording starts.
•A built-in sampling rate converter lets you make a
digital recording of the sound from a digital
component to the MD deck regardless of the
source frequency (32 kHz, 44.1 kHz, 48.0 kHz).
When recording is completed
Press § and eject the MD. “TOC Writing” flashes
and the MD Table of Contents (TOC) is updated.
While “TOC Writing” is flashing
Do not move the deck or pull out the power cord to
ensure the complete recording. The deck is currently
updating the Table of Contents (TOC).
4 Press ·∏ on the MD deck (or
MD P on the remote).
Recording starts.
To stop recording
Press p on the MD deck.
83
Page 84
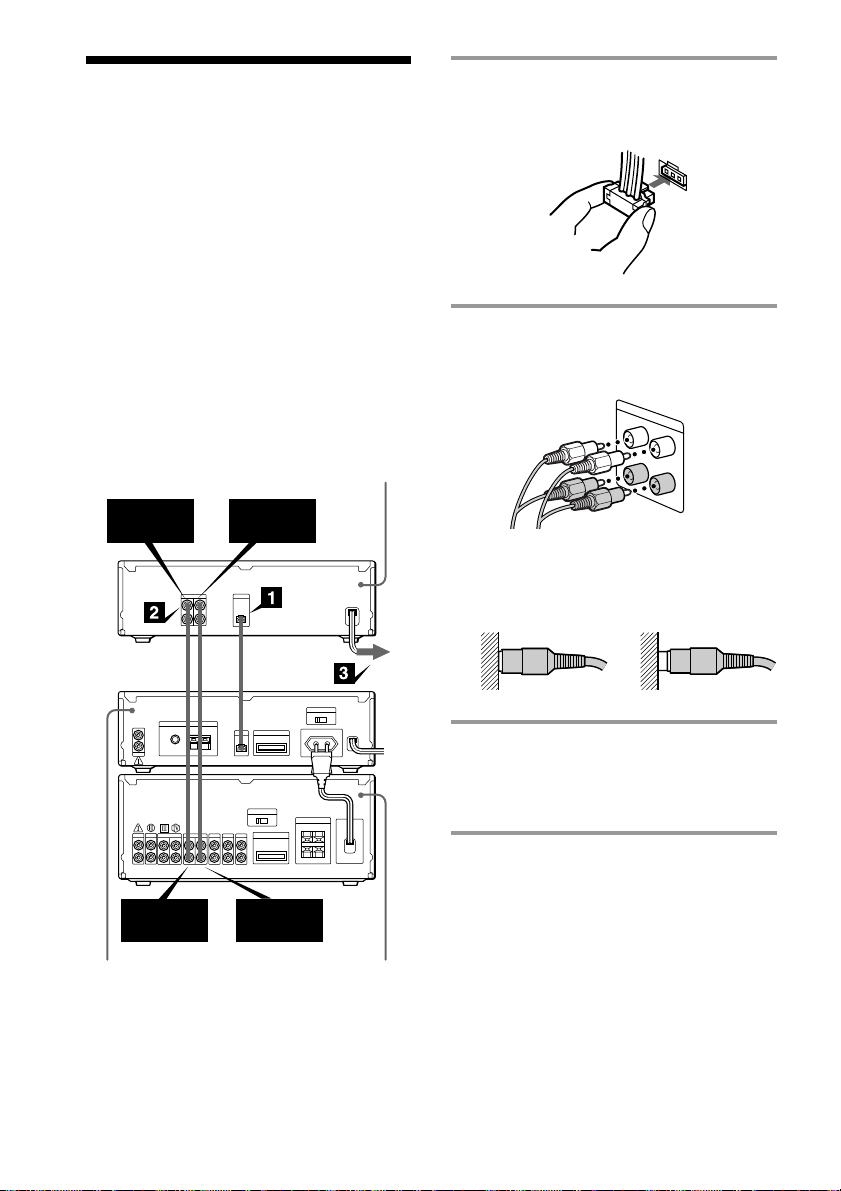
Connecting the optional TC-TX770 tape deck (DHC-EX880MD only)
You can use the optional TC-TX770 tape deck,
which is designed for use with the
DHC-EX880MD.
Perform the following procedure 1 to 3 to
connect the TC-TX770 to your system using
the cords supplied on the TC-TX770.
Note
The TAPE IN/OUT and VIDEO1 – 3 jacks on the
DHC-EX880MD are equipped with a cap to prevent
incorrect connections. Remove the cap before
making connections, and keep it for future use. You
can divide the cap into two parts. If you do not use
the VIDEO1 – 3 jacks, leave them capped.
TC-TX770 rear panel
Connect the audio bus cable to the
1
AU BUS connectors on each
component until it clicks.
Connect the audio cords.
2
Use the two audio cords, matching the
color of the plugs and the jacks.
To TAPE
IN
ç
To TAPE
OUT
Tuner
ç : Signal flow
ç
To TAPE
OUT
To TAPE
IN
Amplifier
Insert the plugs firmly, pushing them in
all the way.
OK N.G.
Connect the power cord to a wall
3
outlet after you have made all the
connections of your system and tape
deck.
84
Page 85
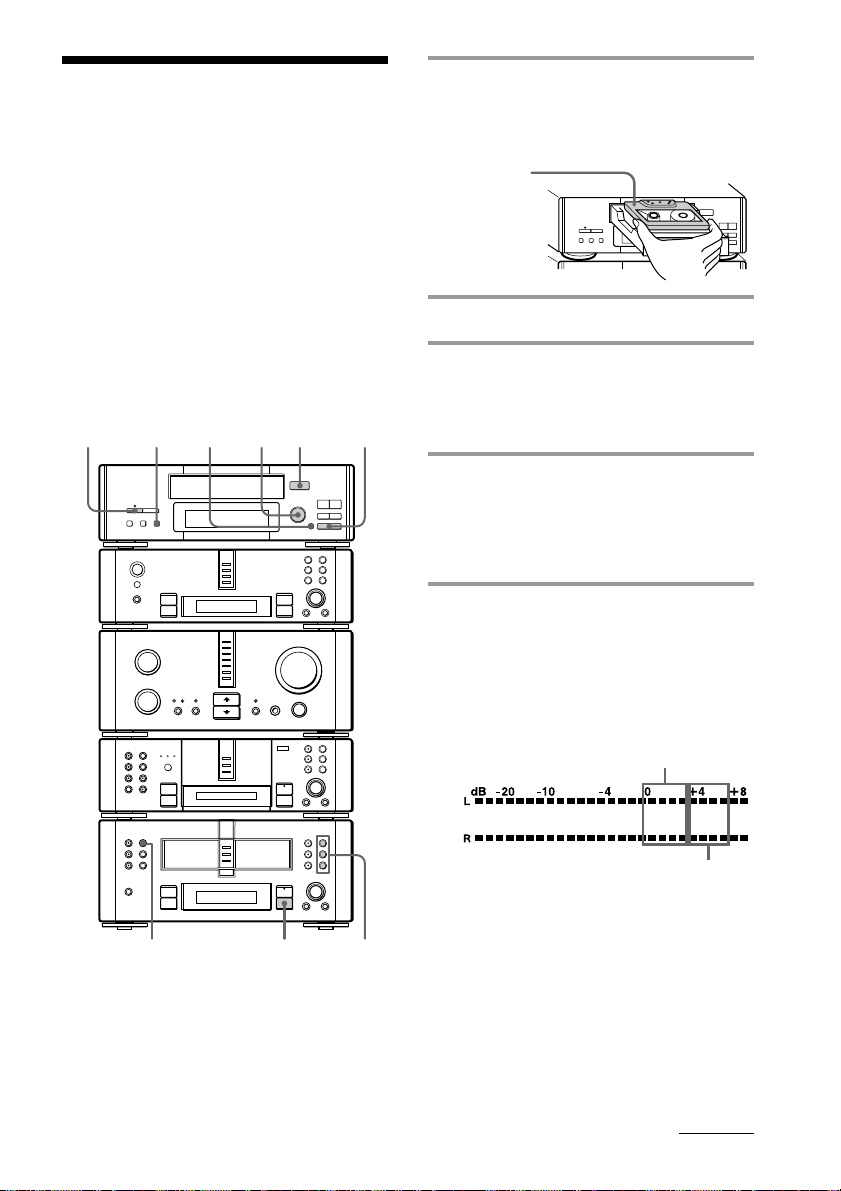
Recording a CD on a
® REC
0)
ª·
pP
§
OPEN/CLOSE
•
•
•
•
•
•
•
•
•
0
10
tape with the optional
TC-TX770 tape deck
(DHC-EX880MD only)
— CD Synchro Recording
The CD SYNC button lets you record from a
CD to a tape easily. You can use TYPE-I
(normal), TYPE-II (CrO
(metal) tapes. The deck detects the tape type
automatically.
See the operating instructions provided with
TC-TX770 for other tape deck operations.
2) and TYPE-IV
64751p
1 Press § OPEN/CLOSE on the tape
deck and insert a blank tape.
Press § OPEN/CLOSE again to close
the tray.
With the side
you want to
record on
facing up
2 Place a CD (CDs) on each disc tray.
3 Press DISC SKIP (or CD D.SKIP on
the remote) repeatedly until the
CD1–3 button you want lights
green.
n
N
•
•
•
•
•
•
•
•
•
0
10
)
n
0
N
)
n
0
N
3
§
OPEN/CLOSE
ª·
•
•
•
•
•
•
•
0)
•
•
0
10
pP
4 Press DIRECTION repeatedly to
select the side you want to record
on.
Select A to record on one side. Select
Å or a to record on both sides.
5 Turn REC LEVEL to adjust the
recording level.
While monitoring the sound at the
highest level, adjust the recording level
so that it falls within the range illustrated
below.
When using a TYPE-I (normal)
+=
·∏
p
§
§
§
+=
·∏
p
p
2
or TYPE-II (CrO
When using a TYPE-IV (metal) tape
2) tape
a
continued
85
Page 86

Recording a CD on a tape with the
optional TC-TX770 tape deck
(continued)
6 Press CD SYNC on the tape deck.
The tape deck stands by for recording
and the CD is in pause for playback. The
CD SYNC indicator lights up and
“PLAY · P {REC}” (for front side)
appears.
7 Press P on the tape deck.
Recording starts.
To stop recording
Press p on the tape deck or the CD player.
Tips
•Pressing 1/u (power) on the DHC-EX880MD
automatically turns on the TC-TX770 deck if you
connect them to each other using the audio bus
cable.
•If you want to record from the reverse side, press
ª in step 6 so that “ª PLAY P {REC}” (for
reverse side) appears.
•When you record on both sides, be sure to start
from the front side. If you start from the reverse
side, recording stops at the end of the reverse side
even though you select a.
•When you want to reduce the hiss noise in lowlevel high-frequency signals, press DOLBY NR*
repeatedly to select B or C before step 5. You
cannot switch DOLBY NR during recording.
•If the tape reaches the end of its front side while
dual-sided recording, the fadeout feature works so
that a track is not abruptly cut off at the end of the
tape (Fade Synchro). The track will be recorded
again from the beginning on the reverse side. The
Fade Synchro feature works during one-side
recording, too.
•You cannot perform CD Synchro Recording by
pressing the CD SYNC buttons on both the tape
deck and the MD deck at the same time.
Use the CD Synchro Recording feature for a tape
and record on an MD manually. This method is
recommended since on the MD deck, you can
erase the overlapping track recorded using the
Fade Synchro feature just by specifying its track
number (Erase Function).
Note
You cannot listen to other sources while recording.
* Dolby noise reduction manufactured under
license from Dolby Laboratories Licensing
Corporation.
“DOLBY” and the double-D symbol a are
trademarks of Dolby Laboratories Licensing
Corporation.
86
Page 87

Additional Information
Precautions
On operating voltage
Before operating the system, check that the
operating voltage of your system is identical with
the voltage of your local power supply.
On safety
• The unit is not disconnected from the AC power
source (mains) as long as it is connected to the
wall outlet, even if the unit itself has been turned
off.
• Unplug the system from the wall outlet (mains) if
it is not to be used for an extended period of time.
To disconnect the cord (mains lead), pull it out by
the plug. Never pull the cord itself.
• Should any solid object or liquid fall into the
component, unplug the stereo system and have
the component checked by qualified personnel
before operating it any further.
• The AC power cord must be changed only at the
qualified service shop.
On placement
• Place the stereo system in a location with adequate
ventilation to prevent heat build-up in the stereo
system.
• Do not place the system in an inclined position.
• Do not place the system in locations where it is;
– Extremely hot or cold
– Dusty or dirty
– Very humid
– Vibrating
– Subject to direct sunlight.
On operation
• If the stereo system is brought directly from a cold
to a warm location, or is placed in a very damp
room, moisture may condense on the lens inside
the CD player or the MD deck. Should this occur,
the system will not operate properly. Remove the
CD or MD and leave the system turned on for
about an hour until the moisture evaporates.
On the speaker system
For SS-EX880
This speaker system is not magnetically shielded.
Locate the speaker system further away from the TV
set. Furthermore, be sure not to place objects in
which magnets are attached or used near the TV set,
such as audio racks, TV stands, toys etc. These may
cause magnetic distortion to the picture due to their
interaction with the system.
For SS-MD717
Although this speaker system is magnetically
shielded, there may be cases where the picture on
some TV sets becomes magnetically distorted. In
such a case, turn off the power of the TV set/
personal computer set once, and after 15 to
30 minutes turn it on again.
When there seems to be no improvement, locate
the speaker system further away from the TV set.
Furthermore, be sure not to place objects in which
magnets are attached or used near the TV set, such
as audio racks, TV stands, toys etc. These may
cause magnetic distortion to the picture due to their
interaction with the system.
Precautions when moving the
system
•Make sure you remove all discs, and turn off the
system. If you move the system with the discs
inserted, you may be unable to remove the discs.
•Before you move the system, turn off the system
and make sure all operations have finished. Then
do the following:
– Insert the transport cartridge to the lowermost
slot of the MD deck with the arrow side up in
the direction of the arrow. Insert the cartridge
firmly, then close the door of the MD deck. Do
not move the MD deck without inserting the
transport cartridge, as this may cause deck
trouble.
– Insert the transit key firmly into the hole on the
bottom of the CD player, and turn it 90° to lock
it. Do not move the CD player without locking
the transit key, as this may cause CD player
trouble.
If you have any questions or problems concerning
your stereo system, please consult your nearest
Sony dealer.
continued
87
Page 88

Precautions (continued)
Notes on MDs
•Do not open the shutter to expose the MD. Close
the shutter immediately if the shutter opens.
Shutter
•Do not affix labels or seals to the shutter. The
shutter may be unable to open, resulting in
mechanical trouble.
•Wipe the disc cartridge with a dry cloth to remove
dirt.
•Do not expose the MD to direct sunlight or heat
sources such as hot air ducts, nor leave it in a car
parked in direct sunlight.
Notes on CDs
•Before playing, clean the CD with a cleaning cloth.
Wipe the CD from the center out.
•Do not use solvents such as benzene, thinner,
commercially available cleaners or anti-static
spray intended for vinyl LPs.
•Do not expose the CD to direct sunlight or heat
sources such as hot air ducts, nor leave it in a car
parked in direct sunlight.
Cleaning the cabinet
Use a soft cloth slightly moistened with mild
detergent solution. Do not use solvents such as
benzene, thinner or alcohol as these may damage
the surface.
System limitations of MDs
The recording system in your MD deck has
the limitations described below. Note,
however, that these limitations are due to the
inherent nature of the MD recording system
itself and not to mechanical causes.
“Disc Full” lights up before the
MD has reached the maximum
recording time (60 or 74 minutes)
When 255 tracks have been recorded on the MD,
“Disc Full” lights up regardless of the total recorded
time. More than 255 tracks cannot be recorded on
the MD. To continue recording, erase unnecessary
tracks or use another recordable MD.
“Disc Full” lights up before the
maximum number of tracks (255)
is reached
Fluctuations in emphasis within tracks are
sometimes interpreted as track intervals, increasing
the track count and causing “Disc Full” to light up.
The remaining recording time
does not increase even after
erasing numerous short tracks
Tracks shorter than 12 seconds long are not counted,
so erasing them may not increase the recording
time.
Some tracks cannot be combined
with others
Track combination may become impossible when
tracks are shorter than 12 seconds long.
The total recorded time and the
remaining time on the MD may
not reach the maximum recording
time (60 or 74 minutes)
Recording is done in minimum units of 2 seconds
each, no matter how short the material. The contents
recorded may thus be shorter than the maximum
recording capacity. Disc space may also be further
reduced by scratches.
88
Page 89

The sound may drop-out while
searching the edited tracks
Tracks created through editing may exhibit sound
dropout during searching because high-speed
playback takes time to search for the position on the
disc when the tracks are scattered on the disc.
Track numbers cannot be marked
When “LevelSync ON” (page 52) is displayed
during analog recording, the track numbers may not
be marked at the beginning of the track:
• if the input signal is below a certain fixed level for
less than two seconds.
• if the input signal is below a certain fixed level for
more than two seconds in the middle of the track.
Guide to the Serial Copy
Management System
Digital audio components, such as CDs, MDs, and
DATs let you copy music easily with high quality,
for these digital products process music as a digital
signal.
To protect the copyrighted music programs, this
system uses the Serial Copy Management System
which allows you to make only a single copy of a
recorded digital source through digital-to-digital
connections.
You can make only a first generation copy*
through a digital-to-digital connection.
That is:
1 You can make a copy of a commercially available
digital sound program (e.g., a CD and an MD), but
you cannot make a second copy from the firstgeneration copy.
2 You can make a copy of a digital signal from a
digitally recorded analog sound program (e.g., an
analog record and a music cassette tape) or from a
digital satellite broadcast program, but you cannot
make a second copy.
* A first-generation copy means a digital recording
of a digital signal made on digital audio
equipment. For example, if you record from this
system’s CD player to this MD deck, you would
make a first-generation copy.
Notes
•This copy management system does not apply
when you make a recording through analog-toanalog connections.
•This system’s MD deck supports the 32 kHz or
48 kHz sampling frequency of the DAT deck or
digital satellite broadcast programs as well as the
44.1 kHz sampling rate of the MD deck. You can
make a second copy from a digital recording of a
satellite broadcast program.
•Some DVD software cannot be copied through
digital-to-digital connections.
89
Page 90
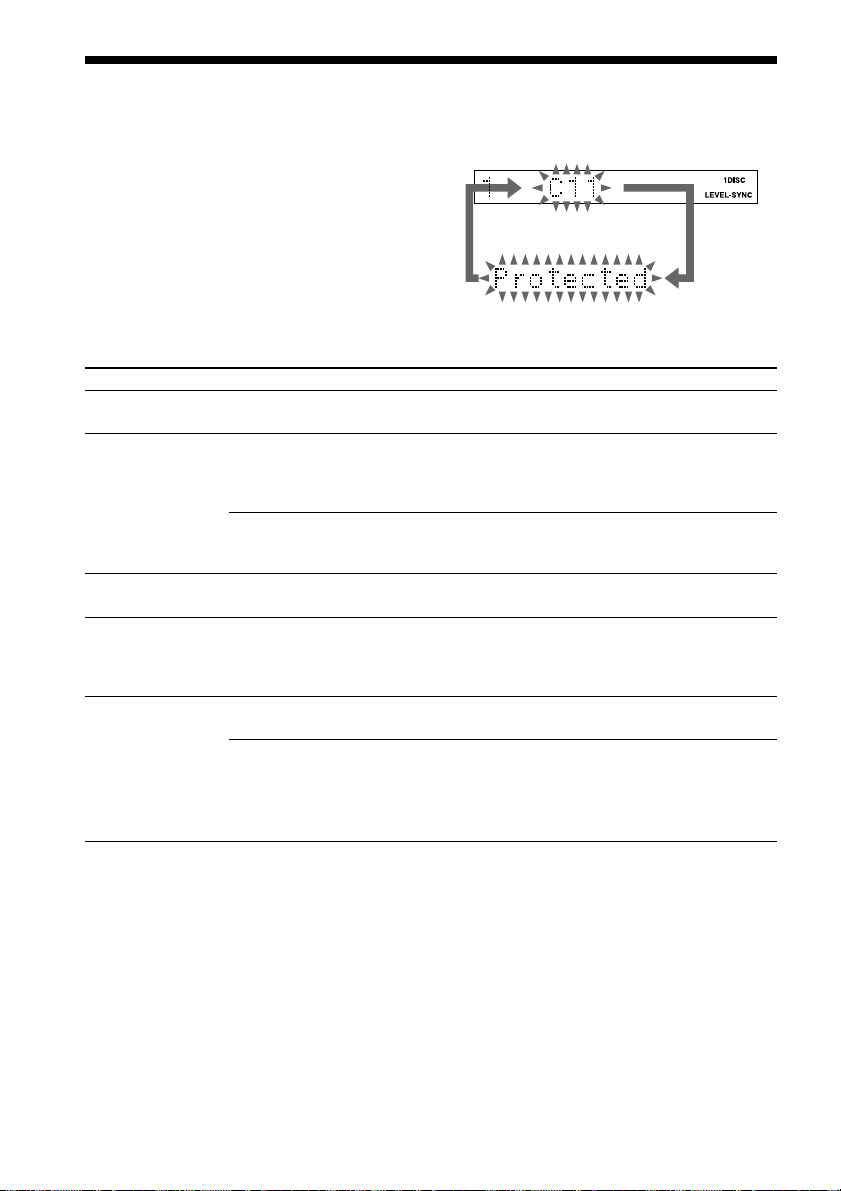
Self-diagnosis display function
(If a 3-digit code and a message appear alternately)
This system has a self-diagnosis display
function that alternately displays a 3-digit
code and a message to inform you when it is
not operating properly.
Check the display, then perform the measures
in the table below to remedy the problem.
Should any problem persist even after two or
three times, consult your nearest Sony dealer.
Code/Message Cause and countermeasure
C11/Protected
C13/REC Error
C13/Disc Error
C14/Disc Error
C71/Check OPT-IN
The inserted disc is protected against erasure.
m Eject the disc, then slide the tab to close the slot (see page 39).
Recording could not be performed properly.
m Move the system to a place without vibration, then start recording over from
the beginning (see the MD item “The sound skips” under “Troubleshooting” on
page 98).
The disc is dirty (e.g., oil film, fingerprints) or scratched, or a non-standard disc is
inserted in the deck.
m Replace the disc, then start recording over from the beginning.
The disc could not be read properly.
m Eject the disc, then insert it again.
The disc could not be read properly.
m Insert a different disc.
m If the entire contents of the disc may be erased, use the All Erase function to
erase all the recorded contents (see page 61).
This may appear momentarily and then turn off depending on the digital
broadcast signal being recorded. In such a case, there is no effect on the recording.
The optical cable was pulled out or the connected digital component was turned
off while making a digital recording from a component connected to the VIDEO 1
or VIDEO 2 DIGITAL IN jack (CS/BS or LD/DVD DIGITAL IN jack for
DHC-MD717).
m Connect the cable or turn on the digital component.
90
Page 91
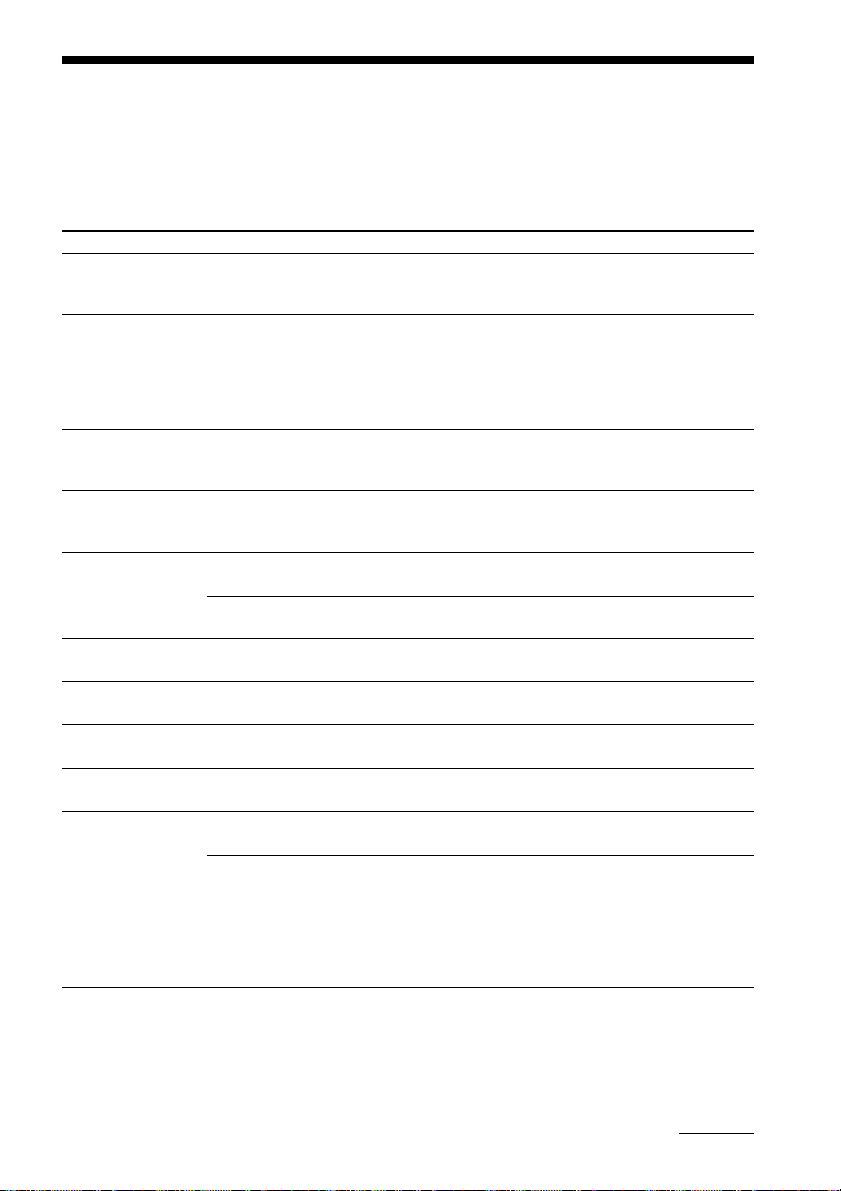
Display messages
One of the following messages may appear or flash in the display during operation.
MD
Message Cause and countermeasure
Analog REC!
Auto Cut
Blank Disc
Cannot Copy
Cannot Edit
Cannot REC
Complete
Disc Full
Eject
Impossible
The system is making an analog recording of the sound from a component
connected to the VIDEO1 or 2 jacks (CS/BS or LD/DVD jacks for DHC-MD717).
m —
Silence continued for 30 seconds or more during digital recording, so the Auto
Cut function activated to replace the silence with a blank of about 3 seconds and
pause the recording.
m Press ·∏ to restart the recording at the desired point.
If you do not want to shorten the space between tracks, turn off the Smart Space
feature (see page 54), then start recording over from the beginning.
The inserted recordable MD is brand new or all tracks on the MD have been
erased using the Erase Function.
m —
The sound source is a copy of a commercially available music software.
m The Serial Copy Management System prevents you from making a digital copy
(see page 89).
A commercially available premastered MD is inserted in the deck.
m You cannot edit a premastered MD.
The deck is in Program or Shuffle Play mode.
m Press CONTINUE to return to normal play.
A commercially available premastered MD is inserted in the deck.
m You cannot record on a premastered MD.
MD editing finished normally.
m —
There is no time remaining on the disc.
m Replace the disc with a new one.
The system is ejecting the disc.
m —
You tried to do an impossible MD editing operation.
m Start editing over from the beginning (see pages 64 and 66).
You cannot combine the track due to the system limitations of MDs.
m Editing cannot be done as specified.
MDs do not record a track continuously, but instead record the data efficiently
while searching for empty space on the disc. This lets you record and edit an
MD repeatedly. However, when you repeatedly record and edit an MD, the
track is recorded bit by bit scattered over the disc. These scattered tracks cannot
be combined with other tracks due to the system limitations of MDs.
continued
91
Page 92
Display messages (continued)
Message Cause and countermeasure
MECHA ERROR
NO DISC
Name Full
New
No Name
No Track
—OVER—
Position ok?
Push STOP !
Rehearsal
Smart Space
TOC Reading
TOC Writing
Track End
The transport cartridge is still inserted.
m Turn off the system and wait for the mechanism to come to a complete stop,
then remove the cartridge.
There is no disc in the MD deck.
m —
There is no more space to store disc or track titles (you have already input 1,700
characters).
m Erase unnecessary track titles, then input the title again.
You specified recording on a brand new MD or from the last recorded portion.
m —
You tried to show the name of an non-labeled disc or track.
m You can assign disc and track names to a recordable MD (see page 57).
The inserted disc has a disc title but no tracks.
m —
You have reached the end of the disc while pressing ) during playback pause.
m Keep pressing 0 or turn SELECTOR to return to the desired playback
position.
The portion to be divided by the Divide Function is being played back.
m Listen to the played contents to confirm or change the position to be divided
(see page 64).
You pressed CONTINUE, PROGRAM or SHUFFLE while an MD is playing.
m You cannot change the play mode during playback. Press p to stop play, then
press the desired button.
The portion to be divided by the Divide Function is being played back for
confirmation.
m Listen to the played contents to confirm the position to be divided (see
page 64).
Silence continued for 3 or more but less than 30 seconds during digital recording,
so the Smart Space function activated to replace the silence with a blank of about
3 seconds.
m If you do not want to shorten the space between tracks, turn off the Smart Space
feature (see page 54).
The deck is reading the MD Table of Contents (TOC).
m Wait until “TOC Reading” turns off.
Do not move the deck until “TOC Reading” turns off to ensure proper reading.
The MD Table of Contents (TOC) is being updated.
m Wait until “TOC Writing” turns off.
Do not move the deck until “TOC Writing” turns off to ensure the complete
recording or editing.
You have reached the end of the disc while adjusting the position to be divided.
m Change the position (see page 64).
92
Page 93

Tuner (Radio)
Message Cause and countermeasure
Name Full
There is no more space to store station names (you have already input
10 characters).
m Erase unnecessary characters, then input the name again (see page 69).
CD
Message Cause and countermeasure
File Full
LOCK ?
—OVER—
There is no more space to store disc titles (you have already input 100 disc titles).
m Erase unnecessary disc titles, then input the disc title again (see page 30).
You have not removed the transit key from the bottom of the CD player.
m Turn off the system and wait until the clock appears in the display, then
remove the transit key (see page 5) and turn on the system again.
If “LOCK ?” still appears, consult your nearest Sony dealer.
You have reached the end of the disc while pressing ) during playback pause.
m Keep pressing 0 or turn SELECTOR to return to the desired playback
position.
93
Page 94
Troubleshooting
If you run into any problem using this stereo system, use the following check list.
First, check that the power cord is connected firmly and the speakers are connected properly and
firmly. Should any problem persist, consult your nearest Sony dealer.
General
Symptom Cause and countermeasure
There is no sound.
Sound comes from
one channel or
unbalanced left
and right volume.
There is severe
hum or noise.
“0:00” (for DHCEX880MD) or
“12:00AM” (for
DHC-MD717)
flashes in the
display.
The timer cannot
be set.
The volume is too low.
m Turn VOLUME clockwise.
The headphones are connected.
m Pull out the headphones.
The speakers are not connected properly.
m Connect the speaker cords properly (see page 7).
• The speaker cords are not connected properly (+/–).
• The vinyl portion of the speaker cords is inserted into the SPEAKER terminals.
m Connect the speaker cords properly (see page 7).
The speaker placement (left/right) is reversed.
m Place the speakers properly (see page 8).
The heights and distances of the left and right speakers differ greatly.
m Place the speakers as symmetrically as possible.
Two or more speakers are connected to the same SPEAKER terminals.
m Connect only one of the supplied speakers to each set of SPEAKER terminals.
The connected speakers are not the supplied ones.
m Connect the supplied speakers.
A TV, VCR or other source of noise is placed too close to the stereo system.
m Move the system away from the source of noise.
A refrigerator or other source of noise is connected to the same wall outlet.
m Connect the system to a different wall outlet.
m Install a noise filter (sold separately) to the power line.
The power cord was unplugged or a power interruption occurred, erasing the
clock setting.
m Set the clock again (see page 12).
• The clock is not set.
• A power interruption occurred, erasing the clock setting.
m Set the clock again (see page 12).
94
Page 95
Symptom Cause and countermeasure
The timer does not
function.
The remote does
not function.
A 3-digit code and
a message appear
alternately in the
display.
The timer was not set correctly before you turned off the system.
m Press ONCE, DAILY or REC to set the timer and light up the indicator (see
pages 75 and 78).
The set time is incorrect.
m Check the set contents and set the correct time (see pages 75 and 78).
(For DHC-EX880MD only) The audio bus cable of the optional TC-TX770 tape
deck is not connected.
m Connect the audio bus cable properly (see page 84).
The timer of the connected optional component is not set.
m Refer to the operating instructions included with the connected component and
set the timer to the same time as the system’s timer.
There is an obstacle between the remote and the system.
m Remove the obstacle.
The remote is too far from the system.
m Move the remote closer to the system.
The remote is not pointing in the direction of the system’s sensor.
m Point the remote at the system’s sensor.
The remote’s batteries have run down.
m Replace the batteries (R6/size AA).
The system is near an inverter type fluorescent light.
m Locate the system away from the fluorescent light.
The self-diagnosis display function is activated.
m Take the appropriate measures (see page 90).
CD
Symptom Cause and countermeasure
The disc tray will
not open.
The disc tray will
not close.
You have not removed the transit key from the bottom of the CD player.
m Turn off the system and wait until the clock appears in the display, then
remove the transit key (see page 5) and turn on the system again.
If the disc tray still does not open, consult your nearest Sony dealer.
The disc is not placed in the center of the tray.
m Place the disc properly in the center of the tray.
You tried to forcibly press the disc tray closed.
m Always close the tray by pressing §. Trying to press the tray closed with your
fingers may cause CD player trouble.
continued
95
Page 96

Troubleshooting (continued)
Symptom Cause and countermeasure
The disc does not
eject.
The CD will not
play.
The sound skips.
The system was moved or shaken with a disc loaded, and the disc has become
lodged inside the CD player.
m Consult your nearest Sony dealer.
There is no disc in the CD player.
m Open the disc tray and check whether a disc is loaded. If you open and close
the disc tray while listening to the radio, the CD indicator lights up even when
a CD is not loaded.
The disc is dirty (e.g., oil film, fingerprints).
m Wipe the disc clean (see page 88).
The disc is scratched.
m Replace the disc.
The disc is off-center.
m Place the disc properly in the center of the tray.
The CD is inserted with the label side down.
m Place the CD in the tray with the label side up.
Moisture condensation has built up on the lens inside the CD player or on the
disc.
m Remove the disc and wipe away the moisture on the disc, then leave the system
turned on for a few hours until the moisture evaporates.
The CD player is not set to play mode.
m Press FUNCTION >/. on the amplifier to switch the function to CD, then
press ·∏ on the CD player (or CD · on the remote) to start play.
The disc is dirty (e.g., oil film, fingerprints).
m Wipe the disc clean (see page 88).
The disc is scratched.
m Replace the disc.
The disc you tried to play is a non-standard size or shape, or uses a non-standard
recording method.
m Replace the disc.
The system is subject to vibration.
m Try moving the system to a place without vibration (e.g., on top of a stable
stand).
m Try moving the speakers away from the system, or placing them on separate
stands.
When you listen to a track with bass sounds at high volume, the speaker
vibration may cause the sound to skip.
96
Page 97
Symptom Cause and countermeasure
Play does not start
from the first
track.
“—OVER—” is
displayed.
The player is in Program or Shuffle Play mode.
m Press CONTINUE to return to normal play.
You have reached the end of the disc while pressing ).
m Keep pressing 0 or turn SELECTOR to return to the desired playback
position.
Tuner (Radio)
Symptom Cause and countermeasure
Severe hum or
noise/stations
cannot be
received.
A stereo FM
program cannot
be received in
stereo.
The broadcast station band (FM, MW and LW for DHC-EX880MD, FM and AM
for DHC-MD717) or frequency are not correct.
m Set the proper band and frequency (see page 13).
The antenna is not connected properly.
m Connect the antenna properly (see pages 8 to 10).
• The antenna is set up in a place with poor reception.
• The signal strength is too weak.
m Find a place (e.g., outside a window) and an orientation that provide good
reception, then set up the antenna again.
The supplied FM lead antenna may not provide good reception inside a steel
reinforced concrete or steel-frame building. If you cannot obtain good reception
even when you place the supplied antenna outside a window, we recommend
you connect an optional outdoor antenna.
Part of the antenna is folded, tied or rolled up.
m The supplied FM lead antenna receives signals along its entire length, so make
sure you extend it fully (see pages 9 to 11).
m Fasten the tip of the supplied FM lead antenna to a wall with tape or a tack (see
page 11).
Part of the antenna is tied together with the speaker cord.
m Locate the antennas as far away from the speaker cords as possible.
The supplied AM antenna has come off the plastic stand.
m Consult your nearest Sony dealer.
The system is affected by electrical equipment.
m Try turning off the electrical equipment.
The tuner is set to MONO.
m Press STEREO/MONO until “STEREO” appears in the display.
Reception is poor.
m See “Severe hum or noise/stations cannot be received” on this page and check
the antenna condition.
continued
97
Page 98
Troubleshooting (continued)
MD
Symptom Cause and countermeasure
An incompletely
inserted disc
cannot be pulled
out.
A disc cannot be
inserted.
The controls do
not work.
Play does not
start.
The sound skips.
Play does not start
from the first
track.
“—OVER—” is
displayed.
Recording or
editing was done,
but the TOC is not
updated.
Recording is not
possible.
The disc is not inserted properly.
m Press § and pull out the disc.
The disc is upside-down or facing the wrong direction.
m Insert the disc with the arrow side up in the direction of the arrow.
• The MD is dirty or damaged.
• “Disc Error” appears in the display.
m Replace the MD with a new one.
The disc is dirty (e.g., oil film, fingerprints) or scratched.
m Replace the disc.
Nothing is recorded on the disc.
m Replace the disc with a recorded one.
Moisture condensation has built up on the lens inside the MD deck or on the disc.
m Insert the disc and leave the system turned on for a few hours until the
moisture evaporates.
The MD deck is not set to play mode.
m Press FUNCTION >/. on the amplifier to switch the function to MD, then
press ·∏ on the MD deck (or MD · on the remote) to start play.
The disc is dirty (e.g., oil film, fingerprints) or scratched.
m Replace the disc.
The system is subject to vibration.
m Try moving the system to a place without vibration (e.g., on top of a stable
stand).
m Try moving the speakers away from the system, or placing them on separate
stands.
When you listen to a track with bass sounds at high volume, the speaker
vibration may cause the sound to skip.
The inside of the system and the disc are different temperatures.
m Insert the disc and wait for 10 to 20 minutes with the system turned on.
The deck is in Program or Shuffle Play mode.
m Press CONTINUE to return to normal play.
You have reached the end of the disc while pressing ).
m Keep pressing 0 or turn SELECTOR to return to the desired playback
position.
You pulled out the power cord without ejecting the MD after recording or editing
an MD.
m MD recording and editing contents are written to the MD when the MD is
ejected, so make sure you eject the MD after recording or editing (see pages 18,
24, 38 and 56).
The MD is protected against erasure (“Protected” appears).
m Eject the disc and slide the tab to close the slot (see page 39).
An optional AV component is not connected properly.
m Connect the optional AV component properly (see page 80).
98
Page 99
Symptom Cause and countermeasure
Recording is not
possible.
The sound source is set to MD.
m Switch to another sound source.
A premastered MD is inserted in the deck.
m Replace the MD with a recordable MD.
There is no time remaining on the MD.
m Replace the disc with a recordable MD, or use the Erase Function to erase
unnecessary tracks (see page 60).
The power cord was unplugged or a power interruption occurred during
recording.
m Start recording over from the beginning.
Optional components
Symptom Cause and countermeasure
There is no sound.
The system is not set properly.
m Refer to General item “There is no sound” on page 94 and check the condition
of the system.
The optional AV component is not connected properly.
m Connect the component properly (see page 80) while checking:
• if the audio cords are connected properly.
• if the cable connectors are firmly inserted all the way.
You cannot listen to the sound of a digital component just by connecting the
optical cable (sold separately). You must also connect the digital component
using an audio cord (sold separately).
The connected component is not turned on.
m Turn on the connected component.
The connected component has not started playback.
m Refer to the operating instructions included with the connected component and
start playback.
If other troubles not described above occur, reset the system as follows:
1 With the system turned on, hold down MENU/NO and TUNING MODE (for DHC-EX880MD)
or PRESET (for DHC-MD717) on the tuner and press 1/u (power).
“COLD SET OK!” appears.
2 Press 1/u (power) again.
“OFF” appears, followed by the clock.
3 Unplug the power cord.
4 Plug the power cord into the wall outlet.
The system is reset to the factory settings. All the settings you made such as the preset stations,
clock, timer and CD disc titles are cleared. You should set them again.
99
Page 100

Specifications
The DHC-EX880MD consists of the following
components:
CD player CDP-EX880, Tuner ST-EX880,
MiniDisc deck MDS-EX880, Integrated stereo
amplifier TA-EX880, Speaker system SS-EX880.
The DHC-MD717 consists of the following
components:
CD player CDP-MS717, Tuner ST-MS717,
MiniDisc deck MDS-MS717, Integrated stereo
amplifier TA-MS717, Speaker system SS-MD717.
Amplifier section
(DHC-EX880MD: TA-EX880
DHC-MD717: TA-MS717)
TA-EX880:
DIN power output 45 + 45 watts (6 ohms at
1 kHz, DIN)
Continuous RMS power output
59 + 59 watts (6 ohms at
1 kHz, 10% THD)
Music power output 105 + 105 watts
TA-MS717:
Continuous RMS power output
55 + 55 watts (6 ohms at
1 kHz, 5% THD)
Inputs
CD IN, MD IN (phono jacks):
voltage 450 mV,
impedance 47 kilohms
TUNER IN, TAPE IN, VIDEO1 IN (CS/BS IN)*,
VIDEO2 IN (LD/DVD IN)*, VIDEO3 IN
(VIDEO IN)* (phono jacks):
voltage 250 mV,
impedance 47 kilohms
* For DHC-MD717
Outputs
MD OUT, TAPE OUT (phono jacks):
voltage 250 mV,
impedance 1 kilohm
PHONES (stereo phone jack):
accepts headphones of
8 ohms or more.
SPEAKER: accepts impedance of 6 to
16 ohms.
Dimensions (w/h/d) incl. projecting parts and
controls: Approx. 280 x 125 x
300 mm
Mass Approx. 5.0 kg
CD player section
(DHC-EX880MD: CDP-EX880
DHC-MD717: CDP-MS717)
System Compact disc and digital
audio system
Laser Semiconductor laser
(λ = 780 nm)
Emission duration:
continuous
Laser output Max. 44.6 µW*
* This output is the value
measured at a distance of
200 mm from the
objective lens surface on
the Optical Pick-up Block
with 7 mm aperture.
Frequency response 2 Hz to 20 kHz (±0.5 dB)
CD OPTICAL DIGITAL OUT
(Square optical connector jack, rear panel)
Dimensions (w/h/d) incl. projecting parts and
controls: Approx. 280 x 125 x
350 mm
Mass Approx. 3.9 kg
MD deck section
(DHC-EX880MD: MDS-EX880
DHC-MD717: MDS-MS717)
System MiniDisc digital audio
system
Laser Semiconductor laser
(λ = 780 nm)
Emission duration:
continuous
Laser output Max. 44.6 µW*
* This output is the value
measured at a distance of
200 mm from the
objective lens surface on
the Optical Pick-up Block
with 7 mm aperture.
Recording time 74 minutes max. (using
MDW-74)
Sampling frequency 44.1 kHz
Frequency response 5 Hz to 20 kHz
MD OPTICAL DIGITAL IN (CD PLAYER, VIDEO 1,
VIDEO 2 for DHC-EX880MD; CD PLAYER, CS/BS,
LD/DVD for DHC-MD717)
(Square optical connector jacks, rear panel)
Dimensions (w/h/d) incl. projecting parts and
controls: Approx. 280 x 90 x
350 mm
Mass Approx. 2.8 kg
100
 Loading...