

Page 1
SECTION 2
GENERAL
This section is extracted
from instruction manual
To Press
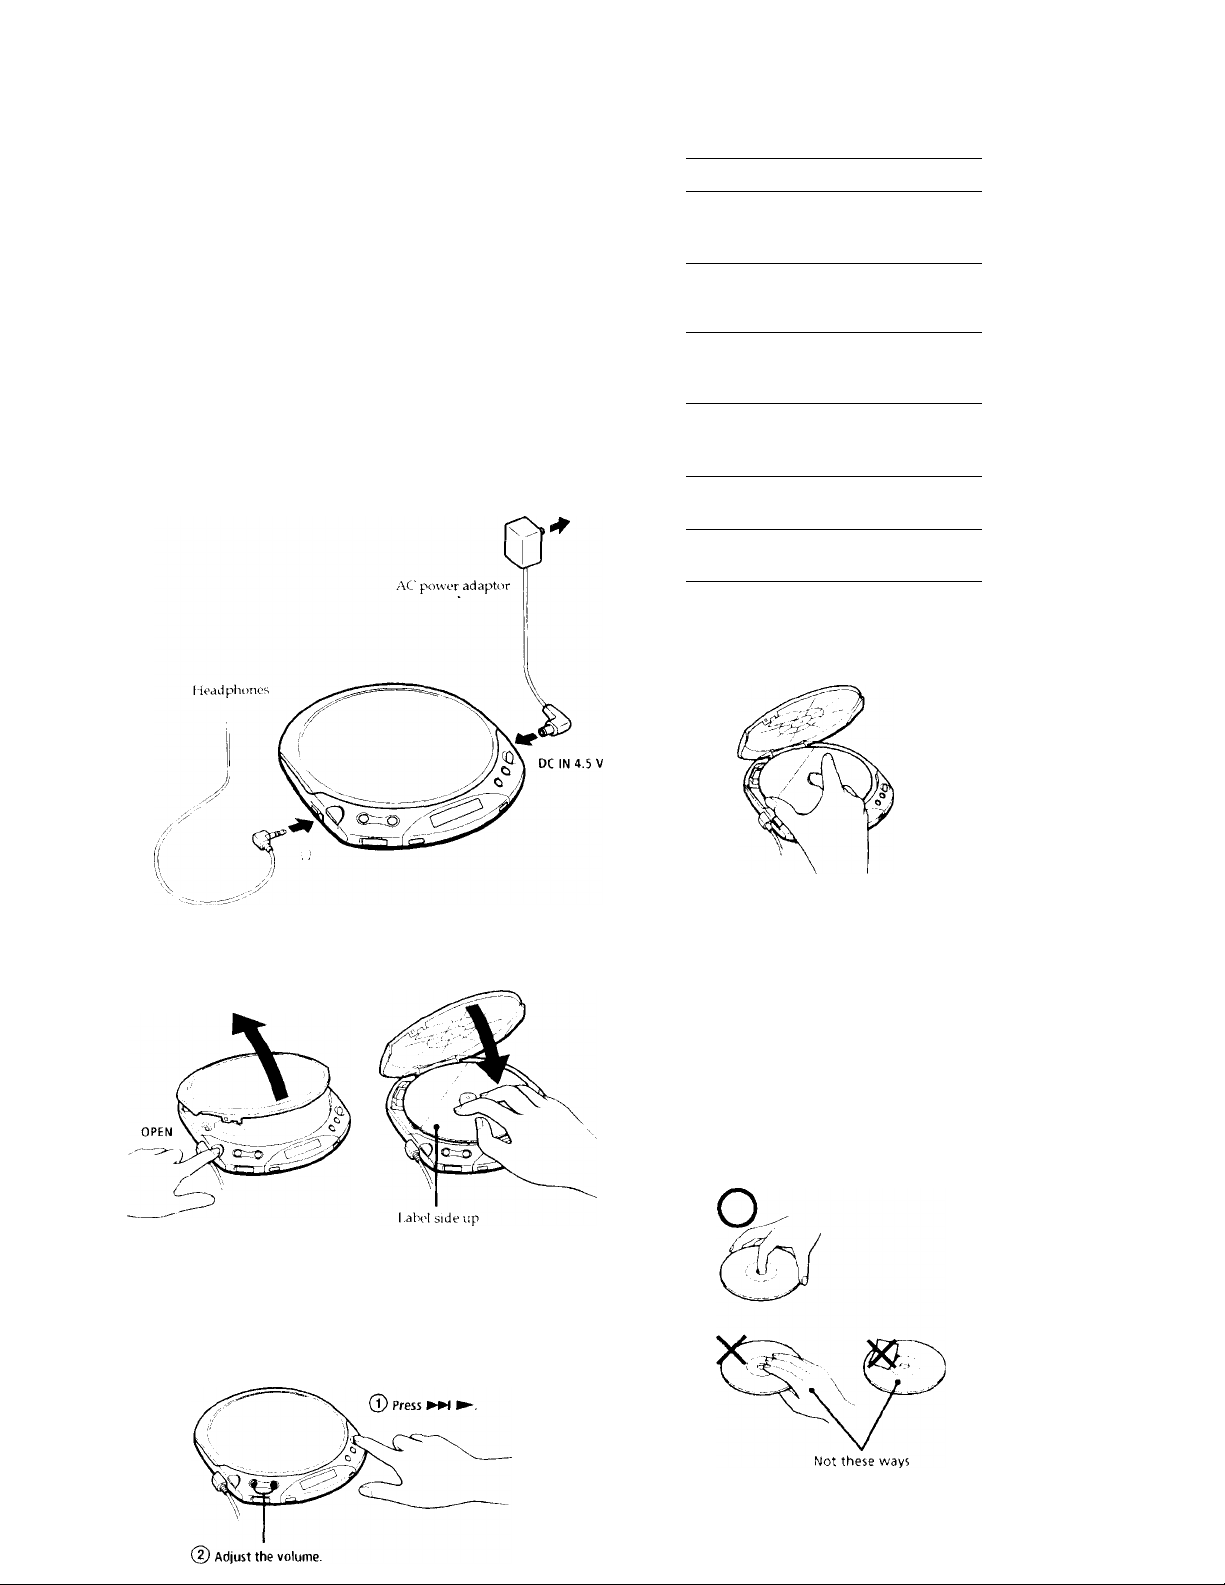
Playing a CD right away!
If you want to play a CD right now, choose to use your CD player on
house current. Other choices are the following two: dry batteries (see
"Power Sources" on the reverse side) and car battery.
o
Connect
to an AC
outlet
Find fhe beginning
of the current track
(AMS*)
Find the beginning
of previous tracks
(AMS)
Find the beginning
of the next track
(AMS)
Find the beginning
of succeeding
tracks (AMS)
Go forward
quickly
Go backwards
quickly
' AMS - .Automatic Music Sensor
To remove the CD
Remove the CL) while pressing the pivot.
once
repeatedly
►W ► once
repeatedly
Hold down
Hold down
'1
• •
O
Place a CD
(J) Press OPEN to open the lid.
Play
® Fit the CD to the pivot.
@ Close the lid.
Notes on display
• When you press the total number of
tracks in the CD and the total playing time
appear.
• During play, the track number and the
elapsed playing time of the cun'ent track
appear.
Notes on handling CDs
• To keep the C'D clean, handle it hv its edge
Do not touch the surface.
• Do not stick paper or tape onto the C'D
• Do not expose the C'D to direct sunlight or
heat sources such as hot air ducts. Do not
leave the C'D m a car parked under direct
sunlight.
• •
< •
About CD-Rs
This Cl) player is compatible with CT)-Rs
but playback capability may vary
depending on the quality of tlie disc, the
r»mrdincx ^innliration software
f •
Page 2
^Ot/ier Operations
Selecting play mode
You can enjoy the following five plav modes;
"Normal "Repeat play — all the
tracks", "Single track play", "Repeat play —
a single track" and "Rej‘>eat shuffle play".
Press MRNL' during playPach time you press the button, the play
mode indication in the display changes as
follows;
Play mode indication
±
nr is
• i S n f. t n
U Л и if t
No indication (Normal play)
The player plays all the tracks on the Cl‘>
"c^ " (Repeat play — all the tracks)*
1 he player plays all the tracks on the CY J
repeatedly.
“1" (Single track play)
I he player plays a single track you'\
selected once
"c? 1” (Repeat play — a single
track)
I'ho player plays a single track you’ve
selected repeatedly.
"ci SHUF" (Repeat shuffle play)
The player plays all the track on the Cl^
in random order repeatedly
' During Kepeat pla)’, you can locate the first
track after the last track by pressing ►
repeatedly. You can alsc' locate the last track
after first track by pressing repeatedly.
Г
♦
Using other functions
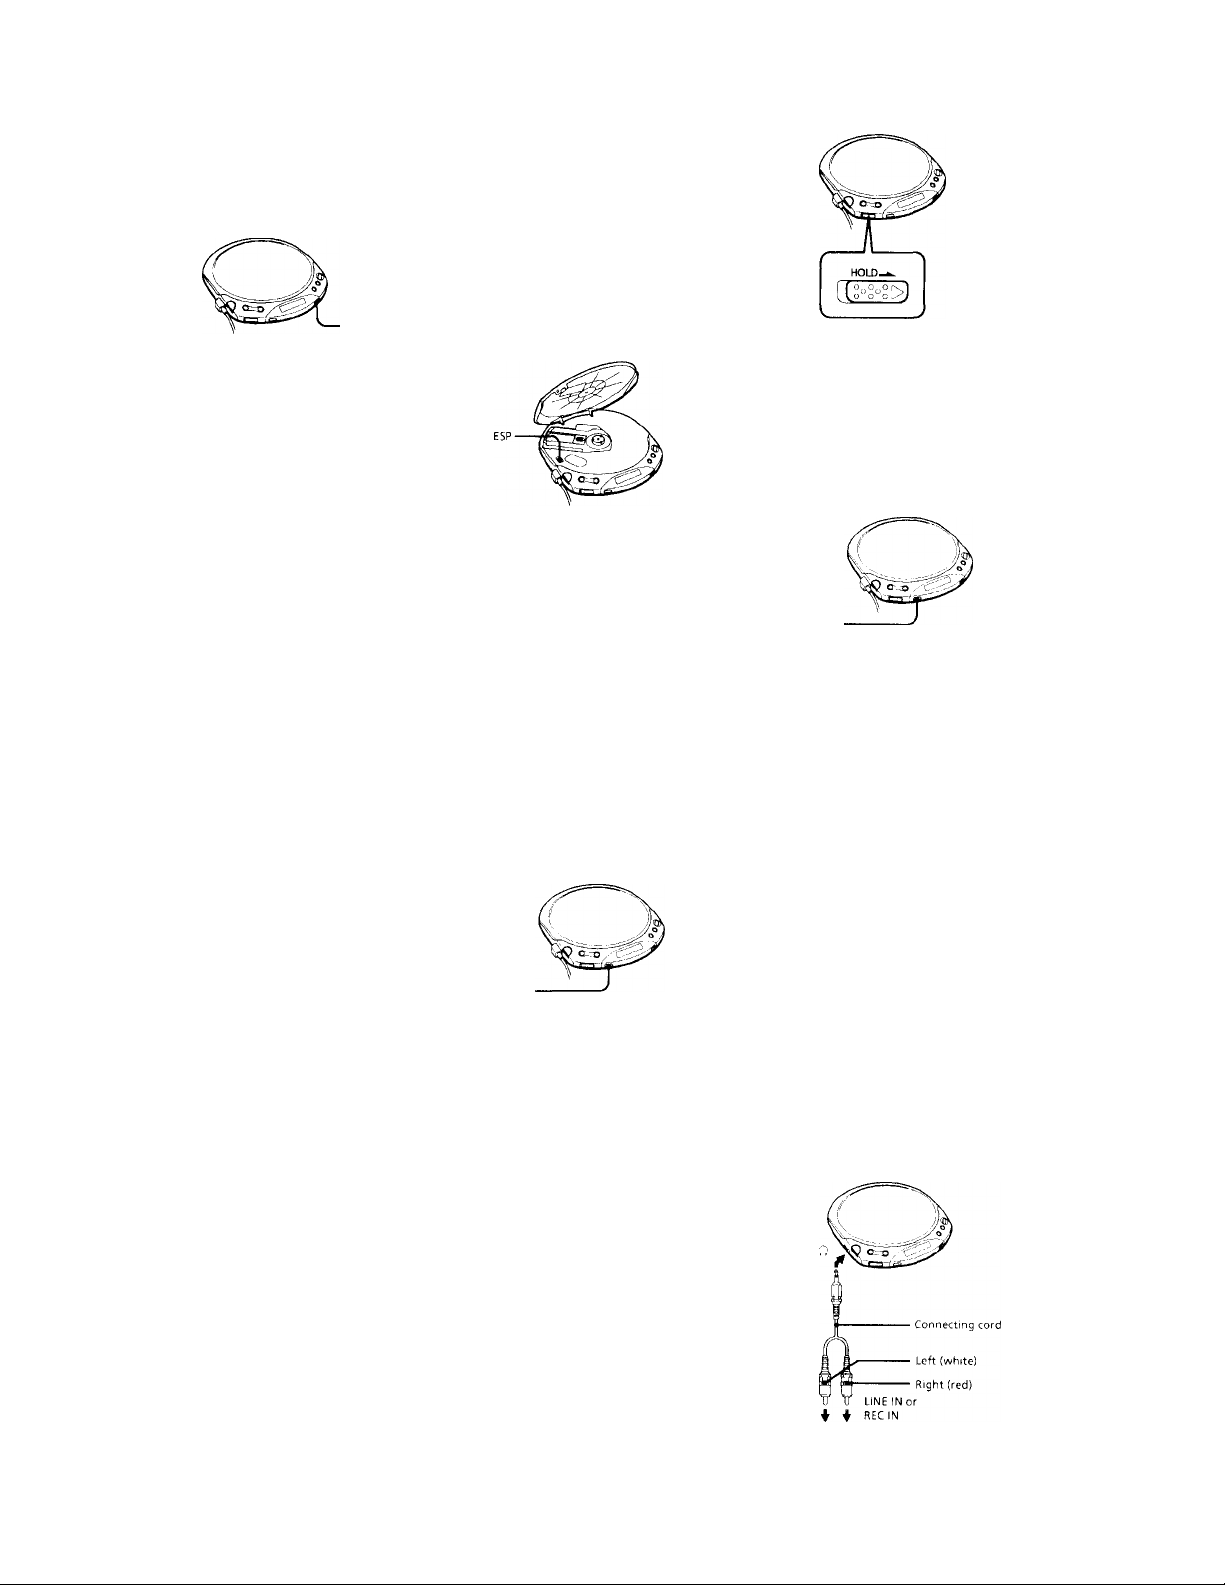
To maximize the skip protection performance (ESP MAX)
The typical ESP (Electronic Shock Protection)
function minimizes skipping by using a
buffer memory that stores music data and
plays it back in the event of a shock.
The ESP MAX system is an extremely
sophisticated technology. Due to the light
weight and improved anti-shock
characteristics of the optical block, this system
recovers from the skipping much quicker
than conventional technology such as ESP or
ESF.*
* Although ESP MAX provides excellent
protection, skipping may occasionally occur.
Set ESP to "ON,"*
I he ESP indication appears.
lo release the ESP M AX function, set ESP to
"OFE."
in t
I in n I. I n
Lf Л и f i
Notes
• Playing may stop when the CD player gels a
strong shock even with the PSP MAX function
on
• You may hear a noise or sound may skip:
— when listening to a dirty or scratched CD,
when listening to an audio test CD,
— when the player receives continuous shock or
-- when using poor-quality CD-Rs or if there is
a problem with the recording device or
application software.
To enjoy more powerful bass sound (Digital MEGA BASS)
You can emphasize the bass-boosted sound.
Press SOUND to select "BASS i
"BASS «M
• No indication
(Normal play)
BASS «
i
To lock the buttons
You can lock your CD player against any
accidental operations.
Slide UC^LD in the direction of the arrow.
When you press any button, “Hal d" appears
in the display and you cannot operate the CE>
player.
To unlock, slide HOLD in the opposite
direction of the arrow-.
To protect your hearing (AVLS)
I he AVLS (.Automatic V'olume Limiter
System) function keeps down the maximum
volume to protect your ears-
Hold down SOUND until ''.-WLS" a[ipears in
the display.
j 1^—I n (. i -*
AVLS U U H f t
If you turn up the volume to " 3 you
cannot turn up the volume any more.
-3z
If you want to turn up the volume to more
than " 3r*down SC^UND until
".AVLS" disappears from the display.
’ For the customers m France
This level is set lo "5 r ''
Note
• If you use the sound function and the AVLS
function at the same time, sound may he
distorted. If this happens, turn down the
volume.
Connecting to other stereo equipment
You can listen to the CD through other stereo
equipment or record a C'D on a cassette tape.
Refer to the instruction manual of the other
equipment for details. Before making
connections, turn off each piece of equipment.
! n I. I -I
UJuiii
The selected sound mode is displayed.
"BASS flfll " enhances the bass sound more
than "BASS • ."
Note
• If the sound is distorted w'hen using the
SOUND function, turn down the volume.
Stereo system,
cassette recorder,
radio cassette
recorder, etc,
Notes
• Before you play the C'l), turn down the volume
of the conni'cted equipment as not to
damage the connected speakers.
• If you turn up the volume to more than "Q
the sound mav he distorted
Page 3

Playing a CD in a car
You can use vour CD player in a car as
illustrated below.
►Power Sources (E220IE226CK)
Using the dry batteries
Use only the following dry battery type for
your CD player:
• LR6 (size AA) alkaline batteries
Note
Be sure to remove the AC power adaptor when
using the dry batteries.
1 Open the battery compartment lid.
To attach the battery compartment lid
If the battery compartment lid is detached by
an accidental drop, excessive force, etc., attach
it as illustrated below.
To connect your CD player to a car cassette
deck, you need the following acce.ssories:
• Car connecting pack
• Car battery cord
You can use the car mount plate for this CD
player.
Refer to the instruction manual of each
accessory tor details.
Notes
• Do not put the CD player on the dashboard.
• Do not leave the (.'D player in a car parked
under sunlight.
• If the sound is distorted, press SOUND until
the BASS indication disappears from the
display.
• Use a Sony ear connecting pack tor reducing
noise.
• Use only the car battery cord listed in the
Optional accessories. It you use any other car
batterv cord, smoke, tire or malfunction mav
Switched ignition function (when using the car battery cord)
With this feature, your CD player stops
automatically when you turn off the engine of
the car (T his function is not possible with
some cars depending on the model.)
(rear)
Insert two LR6 (size AA) alkaline
batteries by matching the @ to the
diagram in the batter\' compartment.
To remove the batteries
Remove the batteries as illustrated below.
When to replace the batteries
You can check the remaining power of the
batteries in the display.
WJ^, Battery power is full.
Battery life (approx. hours)(EIAJ*)
Battery life varies depending on how' the
player is used.
ESP OFF ESP ON
Two Sony alkaUne 25 C l
battenes LR6(SCi)
‘ Measured value by the standard of EiA]
(Electronic Industries Association of lapan).
(When the unit is used on a flat and stable
pLice.)
** Charging time vanes depending on how the
rechargeable batteiy is used.
* **
Battery power is getting low.
?
^ Battery power is low'.
i
Lo batt* Batteries are depleted.
‘Beep sounds.
When the batteries are depleted, replace both
batteries with new ones.
Notes
• The indicator sections ot roughly shows
the remaining battery pow-er. One section does
not always indicate one-fourth of the batterv
power.
• Depending on operating conditions, the
indicator sections of rnay increase or
decrease.
Page 4

Sys
D--
F-
►Power Sources (E22S)
Using the rechargeable
batteries
Charge the rechargeable battenes before
using them for the first time. You can use
only the following rechargeable batteries for
your CD player.
• NC-WMAÀ
•NII-VVM2AA
(>pen the battery compartment lid.
(rear)
i2 Insert two rechargeable batteries by
matching the © to the diagram in the
batter\' compartment and close the lid.
Connect the AC power adaptor to the DC
IN 4.5 V' jack of your C D player and an
At' outlet, then press ■/CMC to start
charging.
4
to an AC outlet
The C'D player charges the battenes. The
"Cl IC." indicator turns on in the display,
and the indicator sections of (HEHl hght
up in succession. When the batteries are
completely charged, the "CHC" and
indicators turn off.
If you press B/O 1C after the charge has
already been completed, the
indicator flashes and "1-ull" appears in
the display.
When to charge the rechargeable
batteries
You can check the remaining power of the
battenes in the display.
Battery power is full.
i ' ■
i
A Æi\ Battery power is getting low.
i ' ■
i
^ iir Battery power is low.
i
Lo batt* Battenes are depleted.
*Beep sounds,
To keep the original batter^' capacity for a
long time, charge the batteries only when
they are completely depleted.
Notes
• The indicator sections of roughly shows
the remaining battery power. One section does
not always indicafe one-fourth of the batterv
power.
• Depending on operating conditions, the
I nd icator sections of may increase or
decrease.
When to replace the rechargeable
batteries
If the battery life becomes shorter by about
half, replace the batteries with new
rechargeable batteries.
Note on the rechargeable batteries
if the batter}' is new or has not been used for
a long time, it may not be charged completely
until you charge and discharge it several
times.
Note on carrying the rechargeable
batteries
Use the supplied battery carr}-mg case to
prevent unexpected heat. If the rechargeable
batteries and the metallic objects are
contacted, heat or fire may occur due to a
short circuit.
To attach the battery compartment
lid
If the battery compartment lid is detached by
an accidental drop, excessive force, etc.,
attach it as illustrated below.
Using the dry batteries
Use only the following drv' battery type for
vour C 'D player:
• LR6 (size .AA) alkaline batteries
Note
Be sure to remove the .A(_ power adaptor when
using the dry battenes.
1 Cipen the lid of the batter}' compartment.
2 Insert hvo LR6 (size AA) alkaline
battenes by matching the © to the
diagram in the batten,' corrpartrnent.
To remove the batteries
Remove the batteries in the same way as
rechargeable batteries.
When to replace the batteries
You can check the remaining power t)f the
batteries in the display.
Batter\' power is full.
i ' •
Battor\' power is getting low.
i
a
i
:;cz3r Batten.- power is l<,'w.
r » 1
1 ,o batr Battenes are depleted
*Beep sounds.
When the batteries are depleted, replace both
batteries with new ones.
Battery life {approx. hours)(EIAJ*)
i^atterv life varies depending or how the
player IS used.
ESP OFF ESP ON
I wo NC-VVMAA
(charged for
about 3 hours**)
I vvo NH-WM2AA
(charged for
¿ibout 8 hours**)
Two Sony alkaline
batteries LR6(SC)
Measured value bv the standarc of HIAf
(Electronic Industnes .Associatu n of Japan).
(When the unit is used on a flat ind stable
place.)
* Charging time vanes dependin..^ how the
rechargeable batten, is used.
Using the supplied remote
control
You can use the remote control ss the wired
remote control.
8 8
1 W 11
25 .11
Disconnect the AC power adaptor.
To remove the rechargeable
battenes
Remove the batteries as illustrated below.
Automatic Music Sensor
'When you are not using the remote control,
slide HOI.D in the dire clion of the arrow to
arm ar,'irl^n tal
 Loading...