

Page 1

Compact AV
System
Operating Instructions
4-237-230-12(1)
DAV-C900
© 2001 Sony Corporation
Page 2

WARNING
To prevent fire or shock
hazard, do not expose the unit
to rain or moisture.
Don’t throw a
battery, dipose it
as the injurious
wastes.
This symbol is intended to
alert the user to the
presence of uninsulated
“dangerous voltage”
within the product’s enclosure that
may be of sufficient magnitude to
constitute a risk of electric shock to
persons.
This symbol is intended to
alert the user to the
presence of important
operating and
maintenance (servicing) instructions
in the literature accompanying the
appliance.
Owner’s Record
The model and serial numbers are
located at the rear of the unit.
Record the serial number in the
space provided below. Refer to them
whenever you call upon your Sony
dealer regarding this product.
Model No. DA V-C900
Serial No.______________
CAUTION
As the laser beam used in this CD/
DVD player is harmful to eyes, do
not attempt to disassemble the
cabinet. Refer servicing to qualified
personnel only.
This label is located on the Laser
protective housing inside the
enclosure.
2
WARNING
This equipment has been tested and
found to comply with the limits for a
Class B digital device, pursuant to
Part 15 of the FCC Rules. These
limits are designed to provide
reasonable protection against
harmful interference in a residential
installation. This equipment
generates, uses, and can radiate radio
frequency energy and, if not
installed and used in accordance
with the instructions, may cause
harmful interference to radio
communications. However, there is
no guarantee that interference will
not occur in a particular installation.
If this equipment does cause harmful
interference to radio or television
reception, which can be determined
by turning the equipment off and on,
the user is encouraged to try to
correct the interference by one or
more of the following measures:
- Reorient or relocate the receiving
antenna.
- Increase the separation between
the equipment and receiver .
- Connect the equipment into an
outlet on a circuit different from
that to which the receiver is
connected.
- Consult the dealer or an
experienced radio/TV technician
for help.
CAUTION
You are cautioned that any change or
modifications not expressly
approved in this manual could void
your authority to operate this
equipment.
Note on CATV system installer:
This reminder is provided to call the
CATV system installer’s attention to
Article 820-40 of the NEC that
provides guidelines for proper
grounding and, in particular,
specifies that the cable ground shall
be connected to the grounding
system of the building, as close to
the point of cable entry as practical.
ENERGY STAR
registered mark.
As an
Sony Corporation has
determined that this product
meets the
guidelines for energy efficiency.
®
is a U.S.
ENERGY STAR
ENERGY STAR
®
partner,
®
Page 3

Welcome!
Precautions
Safety
• If anything falls into the cabinet,
unplug the unit and have it
checked by qualified personnel
before operating it any further.
• The unit is not disconnected from
the mains as long as it is
connected to the mains outlet,
even if the unit itself has been
turned off.
• Unplug the unit from the wall
outlet if you do not intend to use it
for an extended period of time. To
disconnect the cord, pull it out by
the plug, never by the cord.
Installing
• Do not install the appliance in a
confined space, such as a bookcase
or built-in cabinet.
• Allow adequate air circulation to
prevent internal heat buildup.
• Do not place the unit on surfaces
(rugs, blankets, etc.) or near
materials (curtains, draperies) that
may block the ventilation slots.
• Do not install the unit near heat
sources such as radiators, or air
ducts, or in a place subject to
direct sunlight, excessive dust,
mechanical vibration, or shock.
• Do not install the unit in an
inclined position. It is designed to
be operated in a horizontal
position only.
• Keep the unit and discs away from
equipment with strong magnets,
such as microwave ovens, or large
loudspeakers.
• Do not place heavy objects on the
unit.
• If the unit is brought directly from
a cold to a warm location,
moisture may condense inside the
Compact AV System and cause
damage to the lenses. When you
first install the unit, or when you
move it from a cold to a warm
location, wait for about 30 minutes
before operating the unit.
Thank you for purchasing this Sony
Compact AV System. Before
operating this system, please read
this manual thoroughly and retain it
for future reference.
3
Page 4

Precautions
On safety
• Caution – The use of optical instruments with
this product will increase eye hazard.
• Should any solid object or liquid fall into the
cabinet, unplug the system and have it checked
by qualified personnel before operating it any
further.
• When you move the system, take out any discs.
If you don’t, the disc may be damaged.
• For power saving purposes, the system can be
completely turned off by the POWER button
on the main unit. Though the LED remains lit
for a while, the system is completely off.
On adjusting volume
Do not turn up the volume while listening to a
section with very low level inputs or no audio
signals. If you do, the speakers may be damaged
when a peak level section is played.
On power sources
• The unit is not disconnected from the AC power
source as long as it is connected to the wall
outlet, even if the unit itself has been turned off.
• AC power cord must be changed only at the
qualified service shop.
On placement
• Place the system in a location with adequate
ventilation to prevent heat build-up in the
system.
• At high volume, over long periods of time, the
cabinet becomes hot to the touch. This is not a
malfunction. However, touching the cabinet
should be avoided. Do not place the unit in a
confined space where ventilation is poor as this
may cause overheating.
• Do not block the ventilation slots by putting
anything on the system. The system is
equipped with a high power amplifier. If the
ventilation slots on the top surface are blocked,
the unit can overheat and malfunction.
• Do not place the system on a soft surface such
as a rug that might block the ventilation holes
on the bottom.
• Do not place the system in a location near heat
sources, or in a place subject to direct sunlight,
excessive dust, or mechanical shock.
On operation
• If the system is brought directly from a cold to
a warm location, or is placed in a very damp
room, moisture may condense on the lenses
inside the system. Should this occur, the
system may not operate properly. In this case,
remove the disc and leave the system turned on
for about half an hour until the moisture
evaporates.
On cleaning
Clean the cabinet, panel, and controls with a soft
cloth slightly moistened with a mild detergent
solution. Do not use any type of abrasive pad,
scouring powder or solvent such as alcohol or
benzine.
If you have any questions or problems concerning
your system, please consult your nearest Sony
dealer.
On cleaning discs
Do not use a commercially available CD/DVD
cleaning disc. It may cause a malfunction.
On your TV’s color
If the speakers should cause the TV screen to have
color irregularity, turn off the TV at once then
turn it on after 15 to 30 minutes. If color
irregularity should persist, place the speakers
further away from the set.
IMPORT ANT NOTICE
Caution: This system is capable of holding a
still video image or on-screen display image on
your television screen indefinitely. If you leave
the still video image or on-screen display image
displayed on your TV for an extended period of
time you risk permanent damage to your
television screen. Projection televisions are
especially susceptible to this.
4
Page 5

Table of Contents
WARNING.......................................................................................................... 2
Welcome!........................................................................................................... 3
Precautions........................................................................................................ 4
About this Manual .............................................................................................. 7
This system Can Play the Following Discs ........................................................ 7
Notes about the Discs........................................................................................ 9
Note on DVD 5-disc changer with EXCHANGE mechanism ........................... 10
Index to Parts and Controls ............................................................................. 11
Guide to the Control Menu Display (Magic Pad).............................................. 15
Getting Started................................................................17
Quick Overview................................................................................................ 17
Unpacking........................................................................................................ 17
Inserting Batteries into the Remote ................................................................. 18
Step 1: Speaker System Hookup ..................................................................... 18
Step 2: Antenna Hookups ................................................................................ 21
Step 3: TV and Video Component Hookups .................................................... 23
Speaker Setup ................................................................................................. 25
Presetting Radio Stations ................................................................................ 30
Playing Discs..................................................................32
Playing Discs ................................................................................................... 32
Resuming Playback from the Point Where You Stopped the Disc
(Resume Play) ........................................................................................... 34
Using the DVD’s Menu..................................................................................... 35
Playing VIDEO CDs with PBC Functions (PBC Playback) .............................. 36
Selecting the Disc Mode (One Disc or All Discs) ............................................. 37
Creating Y our Own Program (Program Play) ................................................... 37
Playing in random order (Shuffle Play) ............................................................ 39
Playing repeatedly (Repeat Play) .................................................................... 40
Searching for a Scene .......................................................41
Searching for a Particular Point on a Disc (Scan, Slow-motion Play) .............. 41
Searching for a Title/Chapter/Track/Index/Scene............................................. 42
Viewing Information About the Disc .......................................44
Viewing the Playing T ime and Remaining Time on the Front Panel Display.... 44
Checking the Playing Time and Remaining Time ............................................ 45
continued
5
Page 6

Sound Adjustments...........................................................47
Changing the Sound ........................................................................................ 47
Selecting a Sound Field................................................................................... 49
Adjusting the level parameters......................................................................... 51
Enjoying Movies ..............................................................52
Changing the Angles ....................................................................................... 52
Displaying the Subtitles ................................................................................... 53
Checking the Play Information (ADV ANCED).................................................. 54
Using Various Additional Functions ....................................... 55
Locking Discs (CUSTOM PARENTAL CONTROL, P ARENTAL CONTROL) ... 55
Other Operations .............................................................60
Controlling the TV with the Supplied Remote .................................................. 60
Watching the Video or other Unit ..................................................................... 61
Listening to the Radio ...................................................................................... 62
Naming Preset Stations ................................................................................... 63
Settings and Adjustments ................................................... 64
Using the Setup Display .................................................................................. 64
Setting the Display or Sound T rack Language (LANGUAGE SETUP)............. 65
Settings for the Display (SCREEN SETUP)..................................................... 66
Custom Settings (CUSTOM SETUP)............................................................... 67
Settings for the Speakers (SPEAKER SETUP) ............................................... 68
Additional Information....................................................... 72
Troubleshooting ............................................................................................... 72
Self-diagnosis Function (When letters/numbers appear in the display)........... 75
Glossary .......................................................................................................... 75
Specifications................................................................................................... 78
Language Code List......................................................................................... 80
DVD Setup Menu List ...................................................................................... 81
Index ................................................................................................................ 82
6
Page 7

About this Manual
• Instructions in this manual describe the
controls on the remote. You can also use
the controls on the system if they have the
same or similar names as those on the
remote.
• The icons used in this manual are
explained below:
Icon Meaning Icon Meaning
Functions
available in
DVD video
mode
Functions
available in
VIDEO
CD mode
z
Functions
available in
SACD
(Super
Audio CD)
and Audio
CD mode
More
convenient
features
This system Can Play the Following Discs
Terms for discs
• Title
The longest sections of a picture or a
music piece on a DVD; a movie, etc., for a
picture piece on a video software; or an
album, etc., for a music piece on an audio
software. Each title is assigned a title
number enabling you to locate the title you
want.
• Chapter
Sections of a picture or a music piece that
are smaller than titles. A title is composed
of several chapters. Each chapter is
assigned a chapter number enabling you to
locate the chapter you want. Depending on
the disc, no chapters may be recorded.
• Track
Sections of a picture or a music piece on a
VIDEO CD, SACD, or CD. Each track is
assigned a track number enabling you to
locate the track you want.
Disc
DVD
structure
VIDEO CD,
SACD, or
CD
structure
Title
Chapter
Disc
Track
Index
Format of discs
DVD VIDEO
Super Audio CD
VIDEO CD
Music CD
The “DVD VIDEO” logo is a trademark.
• Index (SACD, CD) / Video Index
(VIDEO CD)
A number that divides a track into sections
to easily locate the point you want on a
VIDEO CD, SACD, or CD. Depending on
the disc, no indexes may be recorded.
• Scene
On a VIDEO CD with PBC functions
(page 36), the menu screens, moving
pictures and still pictures are divided into
sections called “scenes.” Each scene is
assigned a scene number enabling you to
locate the scene you want.
continued
7
Page 8

Note on PBC (Playback Control)
(VIDEO CDs)
This system conforms to Ver. 1.1 and Ver.
2.0 of VIDEO CD standards. You can enjoy
two kinds of playback depending on the disc
type.
Disc type
VIDEO CDs
without PBC
functions
(Ver. 1.1 discs)
VIDEO CDs
with PBC
functions
(Ver. 2.0 discs)
Y ou can
Enjoy video playback
(moving pictures) as well
as music.
Play interactive software
using menu screens
displayed on the TV screen
(PBC Playback), in
addition to the video
playback functions of Ver
1.1 discs. Moreover, you
can play high-resolution
still pictures, if they are
included on the disc.
Region code
Examples of discs that the system
cannot play
The system cannot play the following discs:
• CD-ROMs (PHOTO CDs included)
• All CD-Rs other than music and VCD
format CD-Rs
• Data part of CD-Extras
• DVD-ROMs
• DVD Audio discs
• A DVD with a different region code (page
8, 76).
• A disc that has a non-standard shape (e.g.,
card, heart)
• A disc with paper or stickers on it.
• A disc that has the adhesive, cellophane
tape, or a sticker still left on it.
Note
Some CD-Rs or CD-RWs cannot be played on this
system depending upon the recording quality or
physical condition of the disc, or the characteristics
of the recording device.
Furthermore, the disc will not play if it has not been
correctly finalized. For more information, see the
operating instructions for the recording device.
Your system has a region code printed on
the back of the unit and will only play
DVDs labelled with the same region code.
DVDs labelled
ALL
will also play on this
system.
If you try to play any other DVD, the
message “Playback prohibited by area
limitations.” will appear on the TV screen.
Depending on the DVD, no region code
indication may be labelled even though
playing the DVD is prohibited by area
restrictions.
8
Note on playback operations of
DVDs and VIDEO CDs
Some playback operations of DVDs and
VIDEO CDs may be intentionally set by
software producers. Since this system plays
DVDs and VIDEO CDs according to the
disc contents the software producers
designed, some playback features may not
be available. Also, refer to the instructions
supplied with the DVDs or VIDEO CDs.
Page 9

Copyrights
This product incorporates copyright
protection technology that is protected by
method claims of certain U.S. patents, other
intellectual property rights owned by
Macrovision Corporation, and other rights
owners. Use of this copyright protection
technology must be authorized by
Macrovision Corporation, and is intended
for home and other limited viewing uses
only unless otherwise authorized by
Macrovision Corporation. Reverse
engineering or disassembly is prohibited.
Notes about the Discs
On handling discs
• To keep the disc clean, handle the disc by
its edge. Do not touch the surface.
• Do not expose the disc to direct sunlight or
heat sources such as hot air ducts, or leave
it in a car parked in direct sunlight as the
temperature may rise considerably inside
the car.
• After playing, store the disc in its case.
On cleaning
• Before playing, clean the disc with a
cleaning cloth.
Wipe the disc from the center out.
This system incorporates Dolby* Digital,
Pro Logic Surround, and the DTS** Digital
Surround System.
* Manufactured under license from Dolby
Laboratories.
“Dolby”, “Pro Logic”, and the double-D symbol
are trademarks of Dolby Laboratories.
Confidential unpublished works. © 1992-1997
Dolby Laboratories. All rights reserved.
**Manufactured under license from Digital Theater
Systems, Inc. US Pat. No. 5,451,942 and other
worldwide patents issued and pending. “DTS” and
“DTS Digital Surround” are trademarks of Digital
Theater Systems, Inc. © 1996 Digital Theater
Systems, Inc. All rights reserved.
• Do not use solvents such as benzine,
thinner, commercially available cleaners,
or anti-static spray intended for vinyl LPs.
9
Page 10

Note on DVD 5-disc changer with EXCHANGE mechanism
You can change other discs while playing a
disc (EXCHANGE mechanism).
Disc changer system
Stocker
1
2
4
4
5
3
Playing unit
The disc changer consists of a playing
unit, trays which hold the discs, and a
stocker which transports the discs on
their trays to the disc slot and the
playing unit.
For example, if you press DISC 3, the
stocker moves until the DISC 3 tray
comes to the position of the playing unit
and then moves the DISC 3 tray over the
playing unit. If you press A of DISC 4
while playing DISC 3, the stocker leaves
the DISC 3 tray over the playing unit,
moves so that the DISC 4 tray comes to
the position of the disc cover, opens the
disc cover and pushes out the DISC 4
tray (EXCHANGE mechanism).
Disc
tray
10
Note
Noise may come from the disc changer when
changing discs or turning the system on and off.
However, this is just noise produced by the
operation of the internal mechanisms and does
not indicate a malfunction.
Page 11
Index to Parts and Controls
For more information, refer to the pages indicated in parentheses.
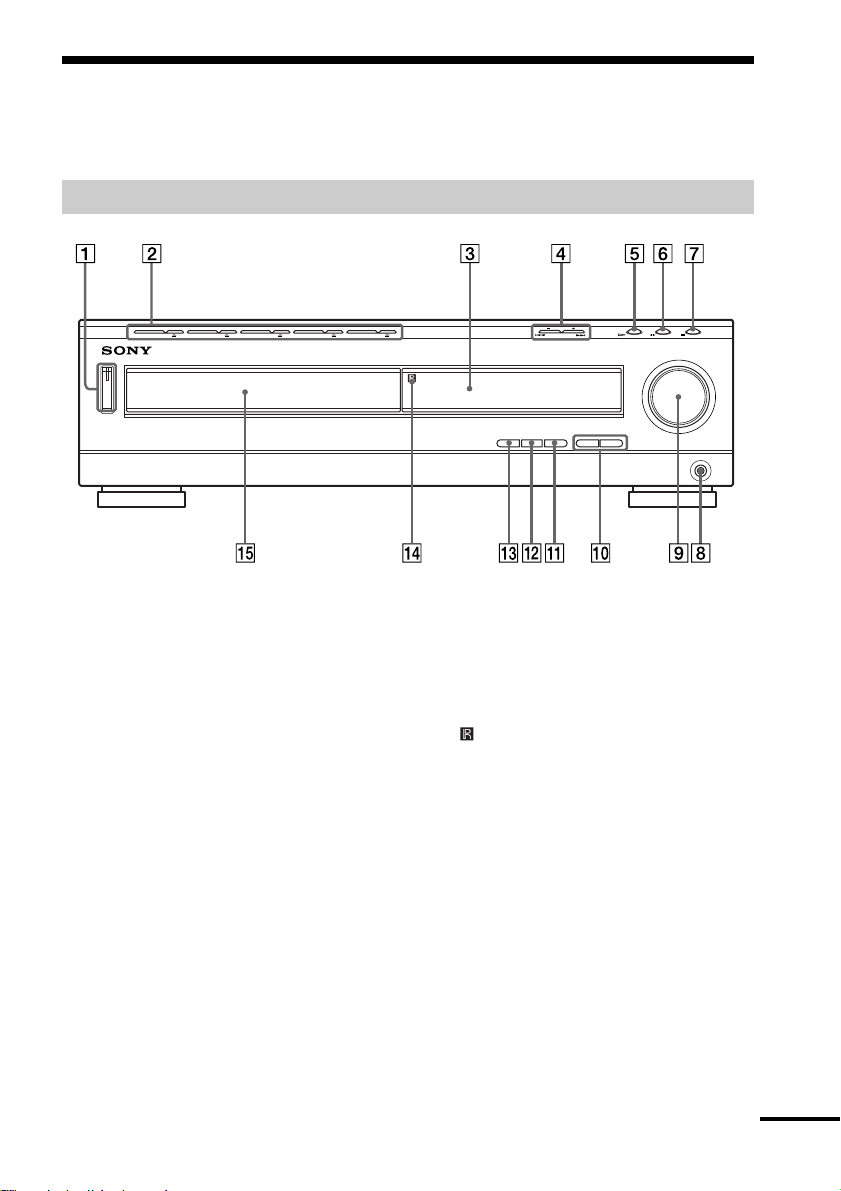
Front Panel
1 POWER switch/indicator (32)
2 DISC 1 (play) / A (open/close)-DISC 5
(play) / A (open/close) (32)
3 Front panel display (12)
4 ./> PREV/NEXT, PRESET +/–
(30, 33)
5 H (play) (32)
6 X (pause) (33)
7 x (stop) (32)
8 PHONES jack (32)
9 VOLUME control (32)
q; SOUND FIELD +/– (49)
qa DISPLAY (49, 62)
qs BAND (30)
qd FUNCTION (61)
qf
(remote sensor) (18)
qg Disc tray (32)
continued
11
Page 12

Front Panel Display
When playing back a DVD
Playing
Current title
status
number
ALL
DISC1SAUTO
PRO
LOGIC
DIGITAL
NTSC PBC ANGLE
TITLE TRACK CHAPTER INDEX H TUNED M MONO ST S
FM AM
Current chapter numberDisc mode
Current sound
dB
REPEAT 1
kHz
PROGRAM
MHz
SHUFFLE
Current
surround
format
Lights up when you
can change the angle
When playing back a SACD, CD, or VIDEO CD
Current index number
Disc mode
ALL
DISC1SAUTO
PRO
LOGIC
DIGITAL
NTSC PBC ANGLE
PBC playback
(VIDEO CD only)
Current track
number
TITLE TRACK CHAPTER INDEX H TUNED M MONO ST S
FM AM
Playing status
(The index indicator does not
appear during SACD playback.)
When listening to the radio
Preset number Monaural/Stereo effect
ALL
DISC1SAUTO
PRO
LOGIC
DIGITAL
NTSC PBC ANGLE
FM AM
TITLE TRACK
CHAPTER
INDEX H TUNED M MONO ST S
Playing time
Playing time
Current play mode
Current sound
dB
REPEAT 1
kHz
PROGRAM
MHz
SHUFFLE
Current play modeLights up during
dB
REPEAT 1
kHz
PROGRAM
MHz
SHUFFLE
12
Current band
Current station
Page 13

Rear Panel
VIDEO OUT
AM
AUDIO OUT
COAXIAL
FM
75Ω
VIDEO
AUDIO
L
R
VIDEO 1
IN
IN
VIDEO IN
AUDIO
VIDEO 2
IN
L
OPTICAL
DIGITAL
R
IN
FRONT R
REAR R
DIGITAL
(CD ONLY)
DIGITAL
OUT
CENTER
WOOFER
SPEAKER
MONITOR
FRONT L
SVIDEO
(DVD ONLY)
REAR L
VIDEO
OUT
P
B
/B-Y PR/R-Y
Y
COMPONENT VIDEO OUT
1 AM antenna (21)
2 VIDEO 1 jacks (23)
3 VIDEO 2 jacks (23)
4 DIGITAL IN (OPTICAL) jack (24)
5 DIGITAL OUT (OPTICAL) jack
6 MONITOR OUT (VIDEO/S VIDEO)
jacks (23)
7 COMPONENT VIDEO OUT jacks (23)
8 SPEAKER jacks (19)
9 FM 75Ω COAXIAL antenna jack (22)
continued
13
Page 14
Remote
123
456
89
7
>
10
10/0
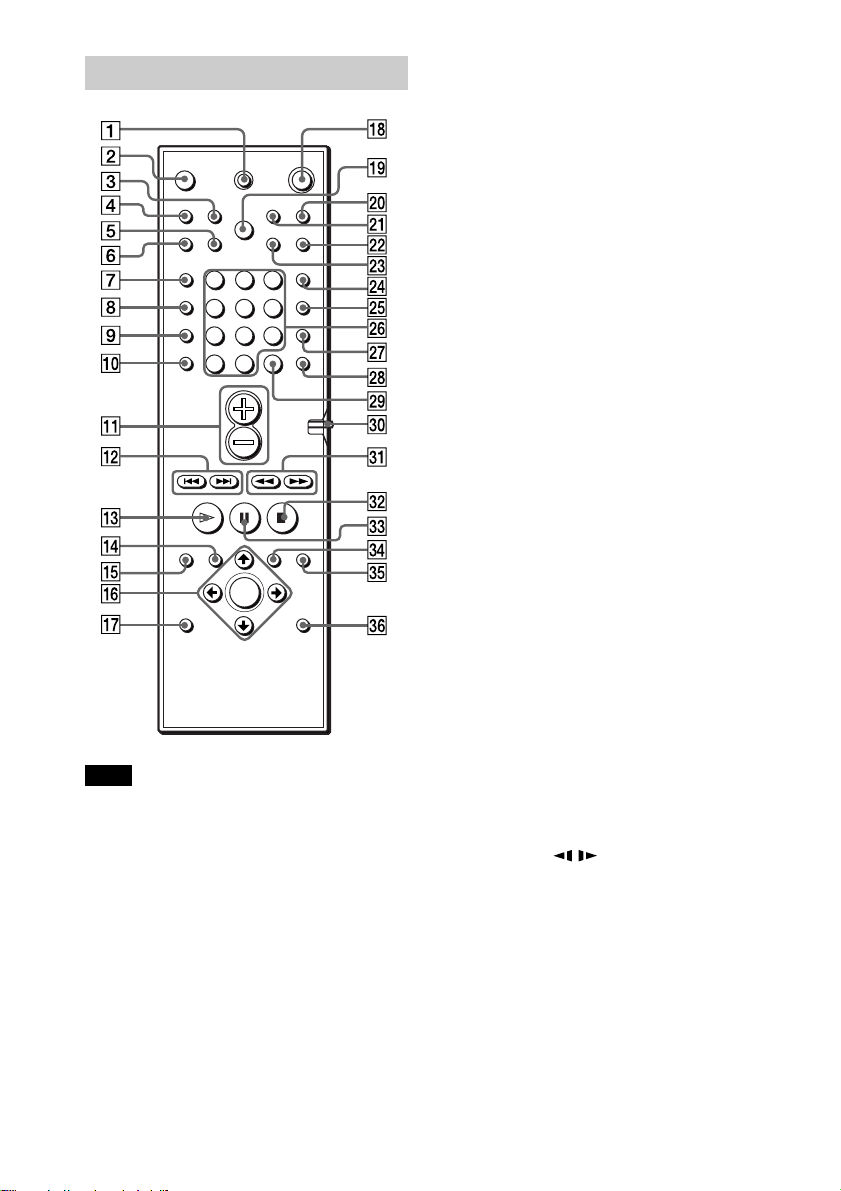
1 TV [/1 (on/standby) (60)
2 OPEN/CLOSE (32)
3 NAME (63)
4 STEREO/MONO (62)
5 MEMORY (30)
6 CLEAR (37)
7 PLAY MODE (37)
8 AUDIO (47)
9 ANGLE (52)
q; SUBTITLE (53)
qa VOL +/– (62)
qs ./> PREV/NEXT, TV/PRESET
+/– (30, 33)
qd H PLAY/SELECT (32)
qf TITLE (35)
qg DVD DISPLAY (37)
qh C/X/x/c/ENTER (26)
qj DVD SETUP (56)
qk 1 (standby) (32)
ql DISC SKIP (32)
w; TV/VIDEO (60)
wa REPEAT (40)
ws MUTING (33)
wd TIME (45)
wf FUNCTION (61)
Note
This remote control glows in the dark. However,
before glowing, the remote must be exposed to light
for awhile.
14
wg BAND (30)
wh Number buttons (35)
wj SOUND FIELD (49)
wk DISPLAY (49, 62)
wl ENTER (60)
e; CONTROL DVD/TV switch (60)
ea m/M/
/ SLOW, TUNING +/–
(30, 41)
es x STOP (32)
ed X PAUSE (33)
ef DVD MENU (35)
eg O RETURN (36)
eh AMP MENU (26)
Page 15

Guide to the Control Menu Display (Magic Pad)
Use the Control Menu to select a function that you’d like to use. The Control Menu display
appears when the DVD DISPLAY button is pressed. For details, refer to the page in
parentheses.
Control Menu
Total number of titles or tracks recorded
Current playing title number (Video
CD/SACD/CD: track number)
Current playing chapter
number (Video CD/SACD/CD:
index number)
Playing time
Icon of selected
Control Menu item
Control Menu items
Function name of selected
Control Menu item
Operation message
1 2 ( 2 7
1 8 ( 3 4
T
1 : 3 2 : 5 5
OFF
OFF
1: ENGLISH
2: FRENCH
3: SPANISH
SUBTITLE
Select: Cancel:
List of Control Menu Items
TITLE (DVD only) (page 42)/
SCENE (only VIDEO CD in PBC
playback) (page 42)/TRACK (VIDEO CD
only) (page 42)
CHAPTER (DVD only) (page
42)/INDEX (VIDEO CD only) (page 42)
TRACK (SACD/CD only)
(page 42)
INDEX (SACD/CD only) (page 42)
TIME/TEXT (page 42)
AUDIO (page 47)
Total number of chapters or indexes recorded
Playback status
(NPlayback, XPause, xStop, etc.)
)
)
ENTER RETURN
PLAY
DVD
T ype of disc being
played back
Current setting
Options
Selects the title (DVD), the scene (VIDEO
CD in PBC playback), or the track
(VIDEO CD) to be played.
Selects the chapter (DVD) or the index
(VIDEO CD) to be played.
Selects the track (SACD/CD) to be played.
Selects the index (SACD/CD) to be played.
Checks the elapsed time and the remaining
playback time.
Inputs the time code for picture and music
searching.
Displays the DVD or the SACD/CD text.
Changes the audio setting.
continued
15
Page 16

SUBTITLE (DVD only) (page
53)
ANGLE (DVD only) (page 52)
REPEAT (page 40)
Displays the subtitles.
Changes the subtitle language.
Changes the angle.
Plays the entire disc (all titles/all tracks)
repeatedly, or one title/chapter/track
repeatedly.
ONE/ALL DISCS (page 37)
ADVANCED (DVD only)
(page 54)
CUSTOM P ARENTAL
Selects play mode on one disc or all discs.
Checks the information (bit rate or layer)
on the disc while playing a DVD.
Sets the disc to prohibit playing.
CONTROL (page 55)
SETUP (page 64)
CUSTOM Setup
By using the Setup Display, you can make
various adjustments to items such as
picture and sound. You can also set a
language for the subtitles and the Setup
Display, among other things.
RESET
Returns the settings in “SETUP” to the
default setting.
z Each time you press DVD DISPLAY, the Control Menu display changes as follows:
Control Menu display
,
m
ADVANCED display (Appears if you select any setting other than “OFF.” See page 54.)
m
Control Menu display off
The Control Menu items are different depending on the disc.
z The Control Menu icon indicator lights up in green t when you select “REPEAT” except
“OFF.” The “ANGLE” indicator lights up in green only when the angles can be changed.
16
Page 17
Getting Started
Quick Overview
This chapter presents a quick overview so you can begin enjoying your new system right away.
For selecting a language used in the on-screen display, refer to the page 65.
For selecting the aspect ratio of the TV to be connected, refer to the page 66.
Unpacking
Check that you have the following items:
• Speakers (5)
• Subwoofer (1)
• AM loop antenna (1)
• FM wire antenna (1)
• Speaker cords (5m × 4, 15m × 2) (16ft. × 4, 49ft. × 2)
• Video cord (1)
• Remote commander (remote) RM-SS900 (1)
• R6 (size AA) batteries (2)
• Speakers-connection and Installation (card) (1)
• Quick reference for Remote commander (card) (1)
Getting Started
17
Page 18
Inserting Batteries into the Remote
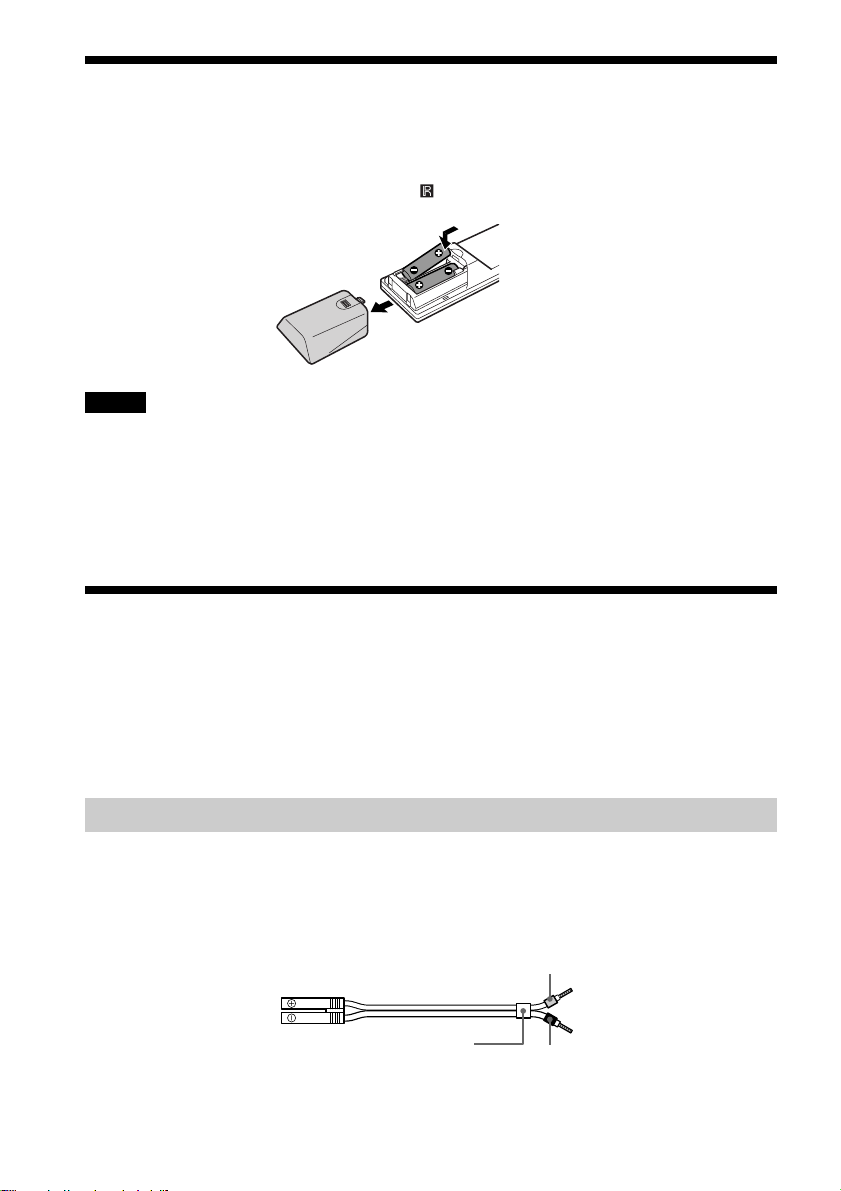
You can control the system using the supplied remote. Insert two R6 (size AA) batteries by
matching the 3 and # ends on the batteries to the markings inside the compartment. When
using the remote, point it at the remote sensor
on the system.
Notes
• Do not leave the remote in an extremely hot or humid place.
• Do not use a new battery with an old one.
• Do not drop any foreign object into the remote casing, particularly when replacing the batteries.
• Do not expose the remote sensor to direct light from the sun or lighting apparatus. Doing so may cause a
malfunction.
• If you do not use the remote for an extended period of time, remove the batteries to avoid possible damage from
battery leakage and corrosion.
Step 1: Speaker System Hookup
Connect the supplied speaker system using the supplied speaker cords by matching the colors
of the terminals to those of the cords. Do not connect any speakers other than those supplied
with this system.
To obtain the best possible surround sound, specify the speaker parameters (distance, level, etc.)
on page 25.
Required cords
Speaker cords
The connector and the color tube of the speaker cords are the same color as the label of the
terminals to be connected.
Grey
(+)
(–)
Color tube
(+)
(–)
Black
18
Page 19
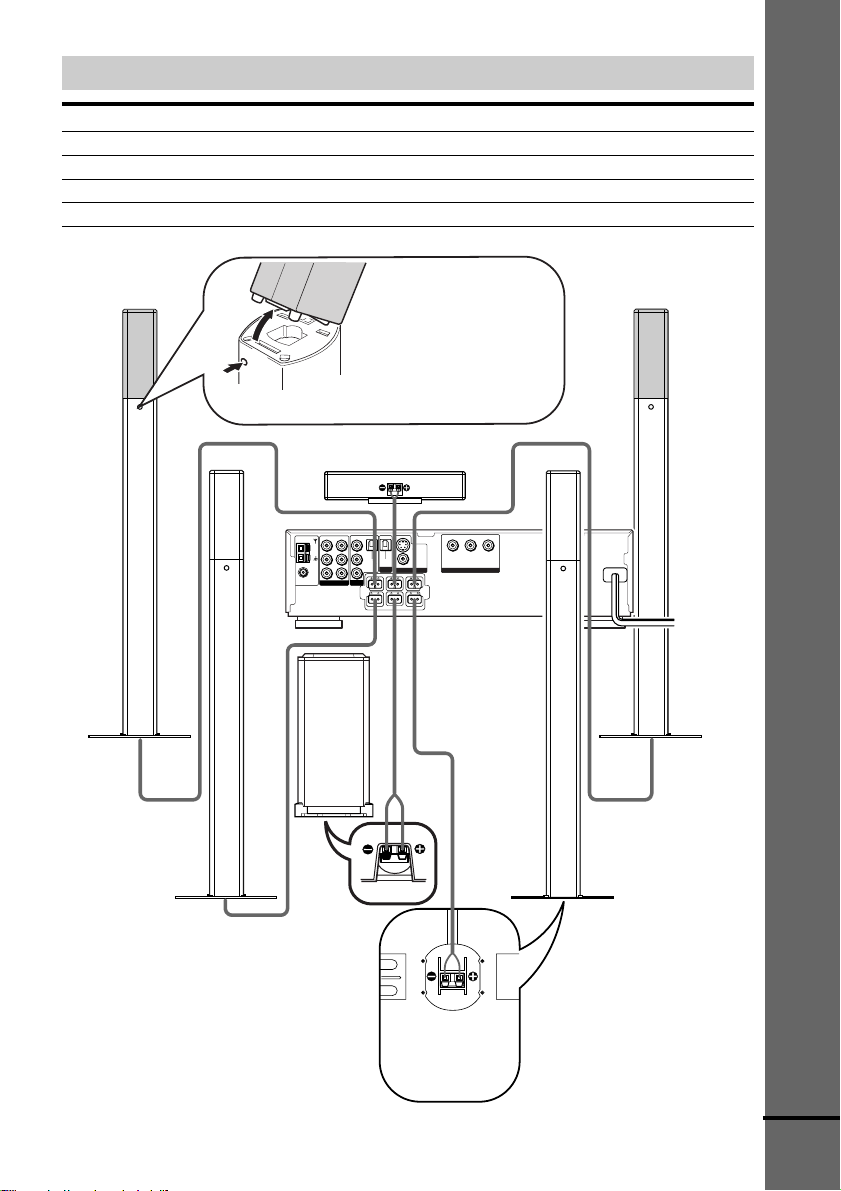
Terminals for connecting the speakers
Connect the To the
Front speakers SPEAKER FRONT L (white) and R (red) terminals
Rear speakers SPEAKER REAR L (blue) and R (grey) terminals
Center speaker SPEAKER CENTER (green) terminal
Subwoofer SPEAKER WOOFER (purple) terminal
Getting Started
Front speaker (R)
To detach the speakers
The front and rear speakers
can be detached from the
speaker stands. Push a pointed
object such as ball point pen
through the hole and tilt the
speaker as illustrated.
Center speaker
VIDEO IN
VIDEO
IN
VIDEO OUT
AM
AUDIO
IN
AUDIO
AUDIO OUT
L
COAXIAL
R
FM
75Ω
VIDEO 2
VIDEO 1
SVIDEO
(DVD ONLY)
IN
L
OPTICAL
DIGITAL
DIGITAL
(CD ONLY)
VIDEO
IN
R
DIGITAL
MONITOR
OUT
OUT
FRONT R
CENTER
FRONT L
REAR R
WOOFER
REAR L
SPEAKER
P
B
/B-Y PR/R-Y
Y
COMPONENT VIDEO OUT
Front speaker (L)
Rear speaker (R)
Subwoofer
Rear speaker (L)
The bottom face of
each front and rear
speaker
continued
19
Page 20
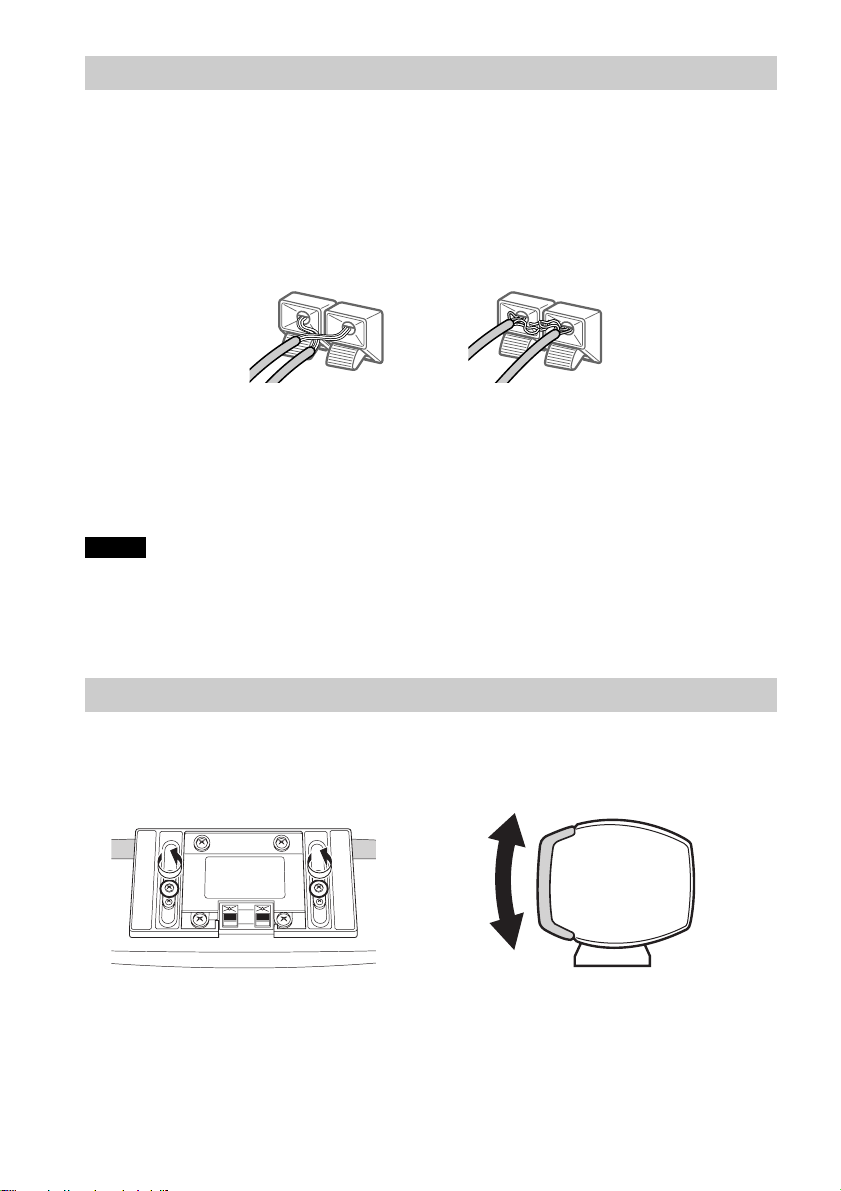
To avoid short-circuiting the speakers
Short-circuiting of the speakers may damage the system. To prevent this, be sure to follow these
precautions when connecting the speakers. Make sure the bare wire of each speaker cord does
not touch another speaker terminal or the bare wire of another speaker cord.
Examples of bad conditions of the speaker cord
Exposed end speaker cord
is touching another speaker
terminal.
Exposed end cords are
touching each other due to
sloppy removal of insulation.
After connecting all the components, speakers, and AC power cord, output a test tone to check
that all the speakers are connected correctly. For details on outputting a test tone, see page 28.
If no sound is heard from a speaker while outputting a test tone, or a test tone is output from a
speaker other than the one currently displayed on the front panel display, the speaker may be
short-circuited. If this happens, check the speaker connection again.
Notes
• Be sure to match the speaker cord to the appropriate terminal on the components: 3 to 3, and # to #. If the
cords are reversed, the sound will be distorted and will lack bass.
• If you use front speakers with low maximum input rating, adjust the volume carefully to avoid excessive output
on the speakers.
To adjust the angle of the center speaker
You can adjust the angle of the center speaker as illustrated.
the center speaker as illustrated.
Adjust the center speaker.Loosen the screws at the bottom of
20
Page 21
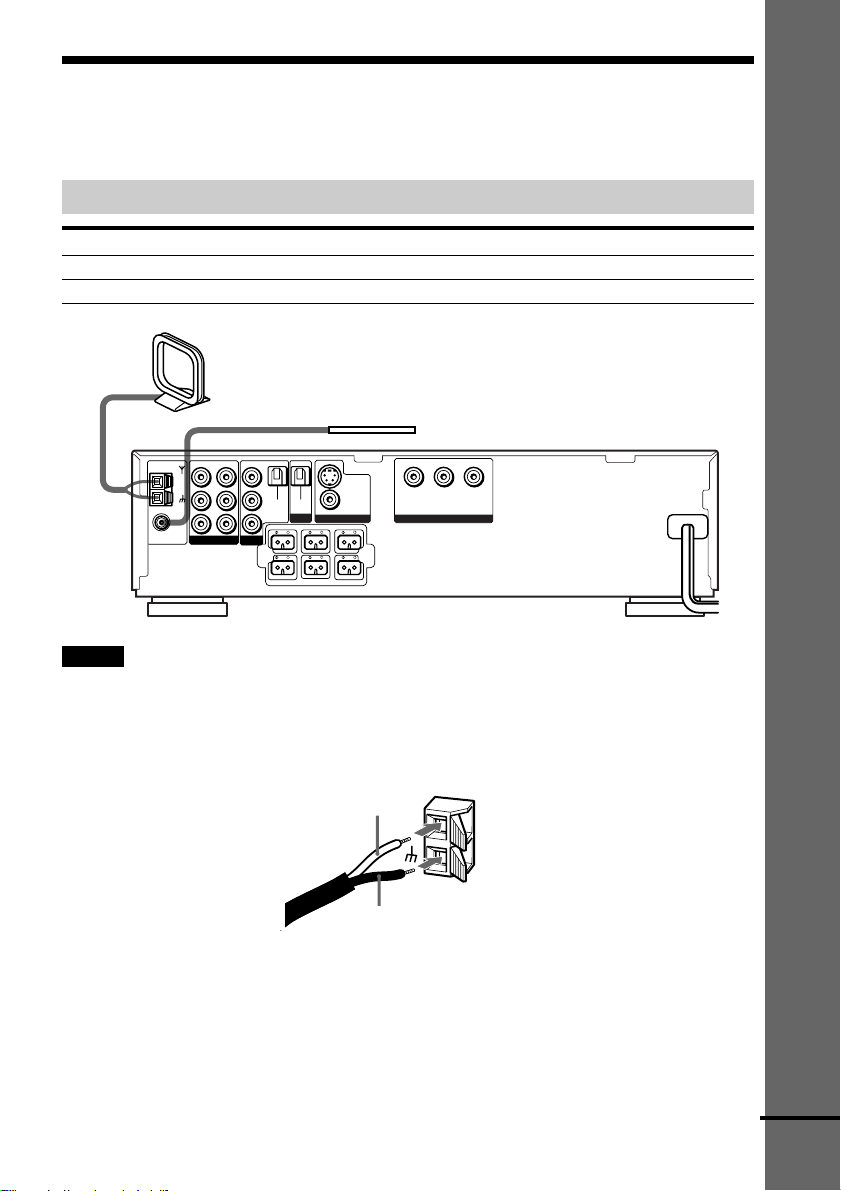
Step 2: Antenna Hookups
Connect the supplied AM/FM antennas for listening to the radio.
Terminals for connecting the antennas
Connect the To the
AM loop antenna AM terminals
FM wire antenna FM 75Ω COAXIAL terminal
AM loop antenna
FM wire antenna
VIDEO IN
IN
VIDEO
VIDEO OUT
AM
AUDIO
IN
AUDIO
L
R
VIDEO 1
VIDEO 2
IN
L
OPTICAL
DIGITAL
R
IN
FRONT R
REAR R
COAXIAL
AUDIO OUT
FM
75Ω
Notes
• To prevent noise pickup, keep the AM loop antenna away from the system and other components.
• Be sure to fully extend the FM wire antenna.
• After connecting the FM wire antenna, keep it as horizontal as possible.
• When you connect the supplied AM loop antenna, connect the black cord (B) to the U terminal, and the white
cord (A) to the other terminal.
DIGITAL
(CD ONLY)
DIGITAL
OUT
CENTER
WOOFER
SPEAKER
MONITOR
FRONT L
SVIDEO
(DVD ONLY)
REAR L
VIDEO
OUT
P
B
/B-Y PR/R-Y
Y
COMPONENT VIDEO OUT
Getting Started
A
AM
B
continued
21
Page 22
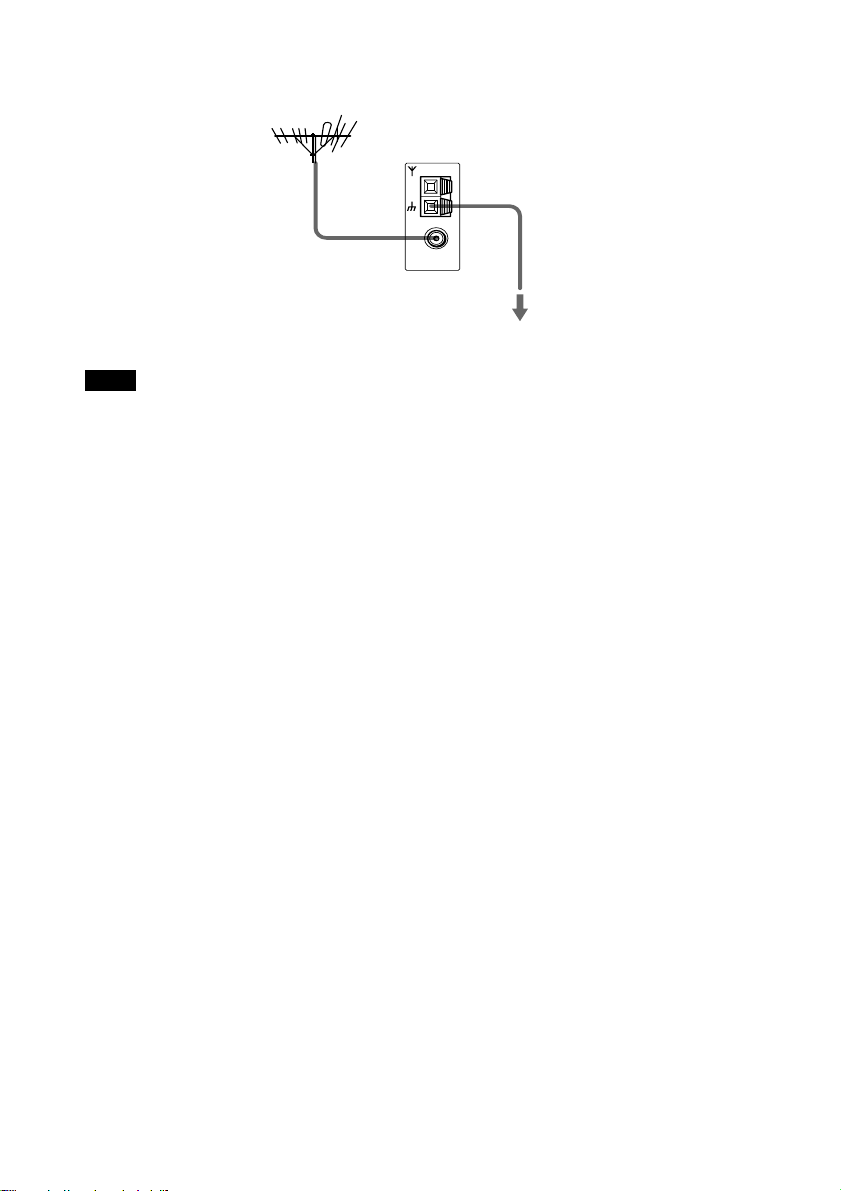
z If you have poor FM reception
Use a 75-ohm coaxial cable (not supplied) to connect the system to an outdoor FM antenna as shown below.
Outdoor FM antenna
System
AM
COAXIAL
FM
75Ω
Earth wire (not
supplied)
To earth
Note
If you connect the system to an outdoor antenna, ground it to protect against lightning. To prevent a gas explosion,
do not connect the earth wire to a gas pipe.
22
Page 23

Step 3: TV and Video Component Hookups
Required cords
Video cord for connecting a TV monitor
Getting Started
Yellow
Yellow
Audio/video cords (not supplied)
When connecting a cord, be sure to match the color-coded pins to the appropriate jacks on the
components.
Y ellow (Video)
White (L/audio)
Red (R/audio)
Y ellow (Video)
White (L/audio)
Red (R/audio)
Jacks for connecting video components
Connect a To the
TV monitor MONITOR OUT jack
VCR VIDEO 1 jacks
Digital satellite receiver VIDEO 2 jacks
z When using the S-video jack instead of the video jacks
Your TV monitor must also be connected via an S-video jack. S-video signals are on a separate bus from the video
signals and will not be output through the video jacks.
z When you are connecting the monitor, projector, or AV amplifier (receiver) having component
video input jacks (Y, PB, PR)
Connect the component via the COMPONENT VIDEO OUT jacks using a component video cord (not supplied) or
three video cords (not supplied) of the same kind and length. You will enjoy accurate color reproduction and high
quality images.
Notes
• When you select VIDEO 1 using the FUNCTION button, the signal is output from the front L/R speakers, but not
from the VIDEO 1 VIDEO OUT and AUDIO OUT L/R jacks.
• When you use the Video 1 line outputs, please set the unit to 2CH STEREO mode. If the unit is not in 2CH
STEREO mode, the line outputs may not function properly.
continued
23
Page 24

COAXIAL
AM
FM
75Ω
VIDEO OUT
AUDIO OUT
VIDEO 1
VIDEO IN
VIDEO
IN
IN
AUDIO
IN
AUDIO
L
L
OPTICAL
DIGITAL
R
R
IN
FRONT R
REAR R
DIGITAL
(CD ONLY)
DIGITAL
OUT
CENTER
WOOFER
SPEAKER
MONITOR
FRONT L
SVIDEO
(DVD ONLY)
REAR L
VIDEO
OUT
B
/B-Y PR/R-Y
P
Y
COMPONENT VIDEO OUT
IN INOUT OUT OUT IN
VIDEO
VIDEO
IN
OUT
AUDIO
AUDIO
OUT
IN
L
R
VCR
VIDEO
OUT
AUDIO
OUT
L
OUTPUT
R
OPTICAL
Digital satellite receiver TV monitor Equipment with component
INPUT
VIDEO
IN
COMPOMENT
VIDEO IN
Y
B
/B-Y
P
R
/R-Y
P
video input jacks
If you connect a digital satellite receiver with the OPTICAL jack
The digital satellite receiver can be connected to the OPTICAL jack instead of the VIDEO IN
and AUDIO IN L/R jacks of the system.
The system can accept both the digital and analog signals. Digital signals have priority over
analog signals. If the digital signal ceases, the analog signal will be processed after 2 seconds.
If you connect a digital satellite receiver without the OPTICAL jack
Connect the digital satellite receiver to the VIDEO IN and AUDIO IN L/R jacks only of the
system.
Connecting the AC Power Cord
Before connecting the AC power cord of this system to a wall outlet, connect the speakers to the
system (see page 18).
Connect the AC power cord of your TV/video components to a wall outlet.
24
Page 25

Speaker Setup
For the best possible surround sound, all the speakers other than the subwoofer should be the
same distance from the listening position (A).
However, if necessary, this system allows you to place the center speaker up to 1.6 meters (5
feet) closer (B) and the rear speakers up to 4.6 meters (15 feet) closer (C) to the listening
position.
The front speakers can be placed from 1.0 to 15.0 meters (3 to 50 feet) (A) from the listening
position.
You can place the subwoofer in any position.
You can place the rear speakers either behind you or to the side, depending on the shape of your
room, etc.
When the rear speakers are placed to the side When the rear speakers are placed behind you
Getting Started
B
A A
45°
C
20°
C
90°
B
A A
45°
CC
90°
20°
Note
Do not place the center and rear speakers farther away from the listening position than the front speakers.
Specifying the speaker parameters
To obtain the best possible surround sound, first specify the distance of the speakers from your
listening position, then set the balance and level. Use the test tone to adjust the speaker volumes
to the same level.
You may adjust the speaker parameters using SPEAKER SETUP in the setup display (page 68).
continued
25
Page 26

123
456
89
7
>
10
10/0
C/X/x/c/ENTER
AMP MENU
To specify the size, distance, position and height of the speakers
1 Press AMP MENU repeatedly to display 9 SP. SETUP on the front panel display.
2 Sit in your listening position and select the item to be set using X/x.
• Items set in 9 SP. SETUP
–Size of the rear and center speakers
–Distance of the front, rear, and center speakers
–Front and rear speakers used with speaker stands (A) or without speaker stands (B)
–Position and height of the rear speakers
3 Set the parameter using C/c.
The selected parameter will appear on the front panel display.
4 Repeat Steps 2 and 3 to set other parameters in 9 SP. SETUP.
If you do not operate the remote for a few seconds, the parameter turns off and is stored in
the system.
xSIZE
When you do not connect center or rear speakers, or move the rear speakers, set the parameters
for FRONT , CENTER and REAR accordingly (see below). Since the subwoofer settings are
fixed, you cannot change the settings. The default settings are underlined.
• FRONT (front speakers)
–
A: The speakers are used with the speaker stands.
–B: The speakers are without the speaker stands.
• CENTER (center speaker)
–
YES: Normally select this.
–NO: Select this if no center speaker is used.
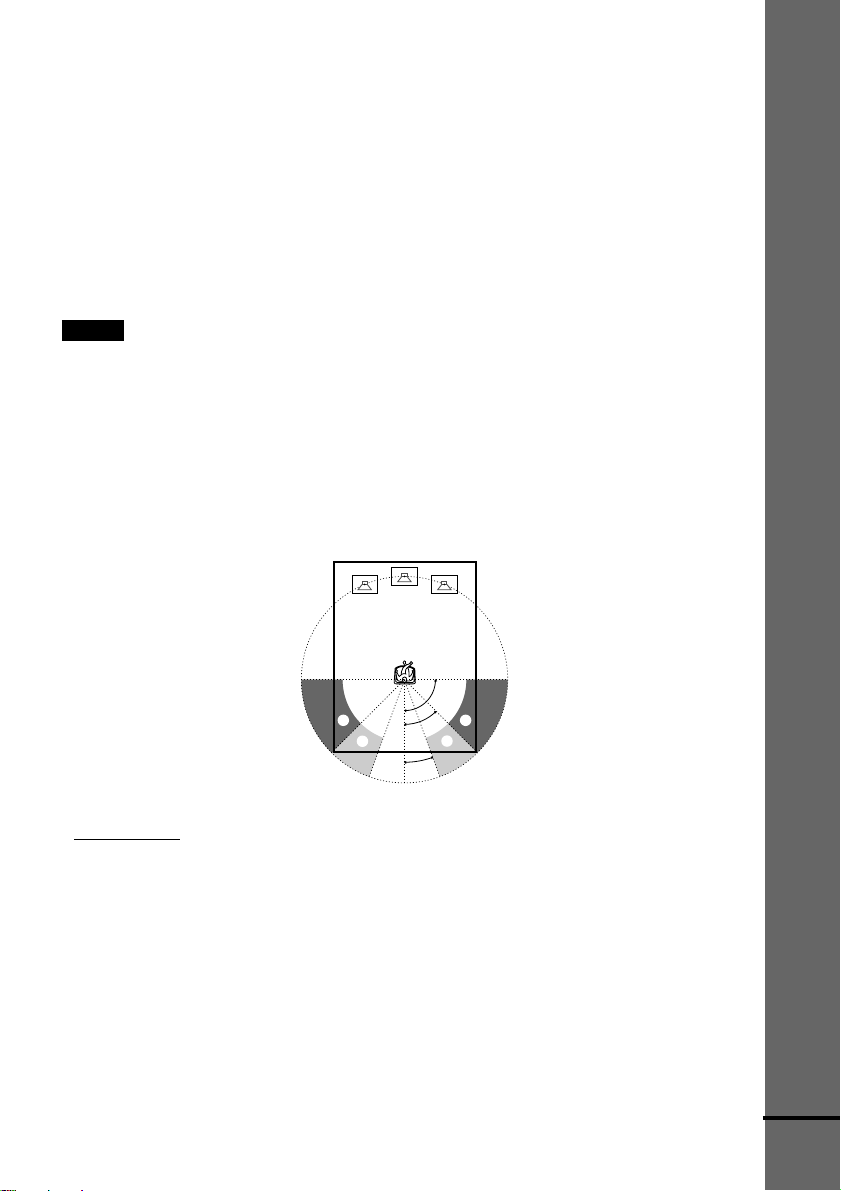
• REAR (rear speakers) See “Position diagram” on page 27 when you set this parameters.
–
BEHIND[A]: Select this if the rear speakers are used with the speaker stands and located in
section B.
–SIDE[A]: Select this if the rear speakers are used with the speaker stands and located in
section A.
26
Page 27
xDISTANCE
You can vary the distance of each speaker as follows. The default adjustments are in
parentheses.
• F. D. 5 m (17 ft) (front speakers distance)
Front speaker distance can be set in 0.2 m (1 foot) steps from 1.0 to 15.0 m (3 to 50 feet).
• C. D. 5 m (17 ft) (center speaker distance)
Center speaker distance can be set in 0.2 m (1 foot) steps from the front speaker distance to
1.6 m (5 feet) closer to your listening position.
• R. D. 3.4 m (12 ft) (rear speakers distance)
Rear speaker distance can be set in 0.2 m (1 foot) steps from a distance equal to the front
speaker distance to a distance 4.6 m (15 feet) closer to your listening position.
Notes
• If each of the front or rear speakers are not placed an equal distance from your listening position, set the distance
of the closest speaker.
• In SPEAKER SETUP, the North American model's OSD displays both metric and imperial measurements.The
other model's displays metric measurements only . The manual also shows both.
Specifying the rear speaker position and height
If you select anything other than “NONE” in “REAR,” specify the position and height of the
rear speakers. The default settings are underlined.
Position diagram
Getting Started
90
AA
45
BB
20
• R. P. BEHIND
Select this if the rear speakers are located in the section B.
• R. P. SIDE
Select this if the rear speakers are located in the section A.
continued
27
Page 28
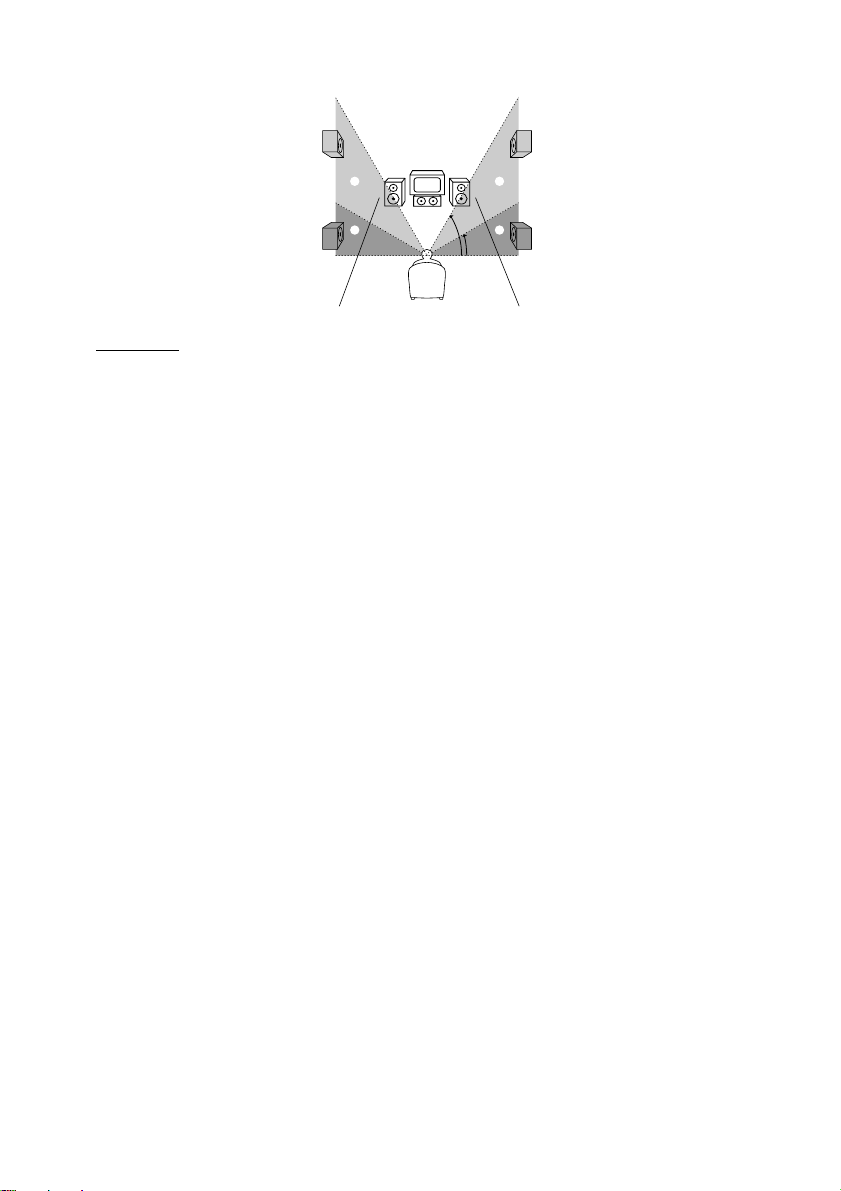
Height diagram
CC
60
DD
30
• R. H. LOW
Select this if the rear speakers are located in the section D.
• R. H. HIGH
Select this if the rear speakers are located in the section C.
These parameters are not available when “REAR“ is set to “NO”.
To specify the balance and level of the speakers
1 Press AMP MENU repeatedly to display 9 LEVEL on the front panel display.
2 Using X/x to select T.TONE and use C/c to set T.TONE to ON.
You will hear the test tone from each speaker in sequence.
3 Sit in your listening position and select the item to be adjusted using X/x.
• Items adjusted in 9 LEVEL
–Balance of the front and rear speakers
–Volume level of the center and rear speakers and subwoofer
4 Adjust the volume level so that the volume of the test tone from each speaker sounds the
same using C/c.
The adjusted value will appear on the front panel display.
5 Repeat Steps 3 and 4 to adjust other parameters in 9 LEVEL.
If you do not operate the remote for a few seconds, the value disappears from the display
and is stored in the system.
6 Using X/x to select T.TONE and use C/c to set T.TONE to OFF.
xBALANCE
You can vary the balance of each speaker as follows. The default adjustments are in the
parentheses.
• F ___I___ (center) (front speakers)
Adjust the balance between the front left and right speakers (You can adjust from center,
6 steps left or right).
• R ___I___ (center) (rear speakers)
Adjust the balance between the rear left and right speakers (You can adjust from center,
6 steps left or right).
28
Page 29

xLEVEL
You can vary the level of each speaker as follows. The default adjustments are in parentheses.
• C. LEVEL (0 dB) (center speaker level)
Adjust the level of the center speaker (–6 dB to +6 dB, 1 dB steps).
• R. LEVEL (0 dB) (rear speakers level)
Adjust the level of the rear speakers (–6 dB to +6 dB, 1 dB steps).
• S. W. LEV. (0 dB) (subwoofer level)
Adjust the level of the subwoofer (–6 dB to +6 dB, 1 dB steps).
Notes
• When you select an item, the sound cuts off for a moment.
• Depending on the settings of other speakers, the subwoofer may output excessive sound.
To adjust the volume of all the speakers at one time
Use the VOLUME control.
Other AMP MENU settings
You can control the brightness of the front panel display, clear the preset stations and the station
names, and set the speaker parameters back to the default setting. Press AMP MENU repeatedly
to display 9 CUSTOMIZE. Use X/x to select the following items.
xDIMMER
You can change the brightness of the front panel display by two steps.
xMEMO. CLR.
• N (No): Skip back to previous menu.
• Y (Yes): If you select Y by pressing ENTER, “Really? N” and “Really? Y” appears.
If you select “Really? Y,” by pressing ENTER, “ALL CLEAR!” is displayed and all settings
such as preset stations and station names will be cleared, and speaker parameters will be
defaulted.
Getting Started
29
Page 30
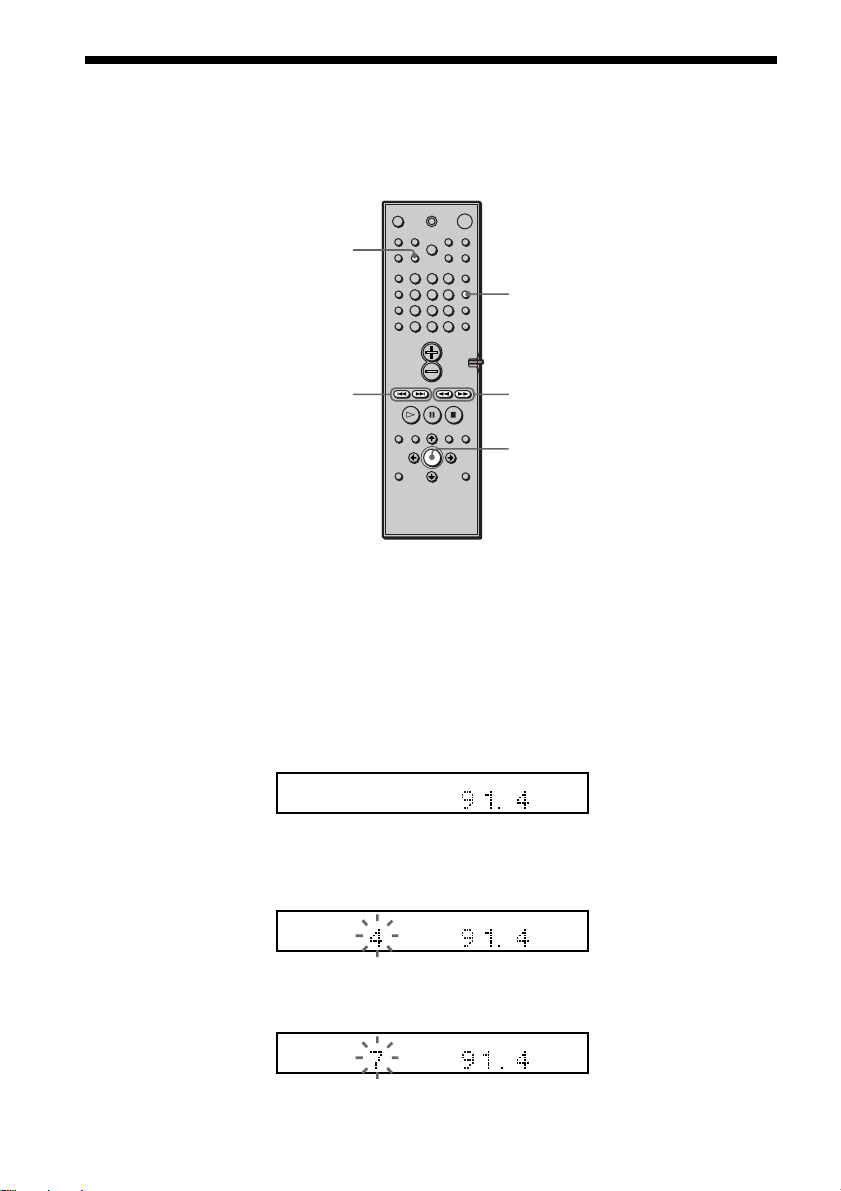
Presetting Radio Stations
You can preset 20 stations for FM and 10 stations for AM.
Before tuning, make sure to turn down the volume to minimum.
MEMORY
123
456
89
7
>
10
10/0
BAND
PRESET +/–
TUNING +/–
ENTER
1 Press BAND repeatedly until the band you want appears on the front panel
display.
Every time you press BAND, the band changes to AM or FM alternately.
2 Press and hold TUNING + or – until the frequency indication starts to change,
then release.
Scanning stops when the system tunes in a station. “TUNED” and “ST” (for stereo
program) appear on the front panel display.
ALL
DISC1SAUTO
PRO
LOGIC
DIGITAL
FM AM
NTSCPBC ANGLE
TITLE TRACK CHAPTER INDEX H TUNED M MONO ST S
dB
kHz
MHz
REPEAT 1
PROGRAM
SHUFFLE
3 Press MEMORY.
A preset number appears on the front panel display.
ALL
DISC1SAUTO
PRO
LOGIC
DIGITAL
FM AM
NTSCPBC ANGLE
TITLE TRACK CHAPTER INDEX H TUNED M MONO ST S
dB
kHz
MHz
REPEAT 1
PROGRAM
SHUFFLE
4 Press PRESET + or – to select the preset number you want.
ALL
DISC1SAUTO
PRO
NTSCPBC ANGLE
TITLE TRACK CHAPTER INDEX H TUNED M MONO ST S
LOGIC
DIGITAL
FM AM
30
dB
kHz
MHz
REPEAT 1
PROGRAM
SHUFFLE
Page 31
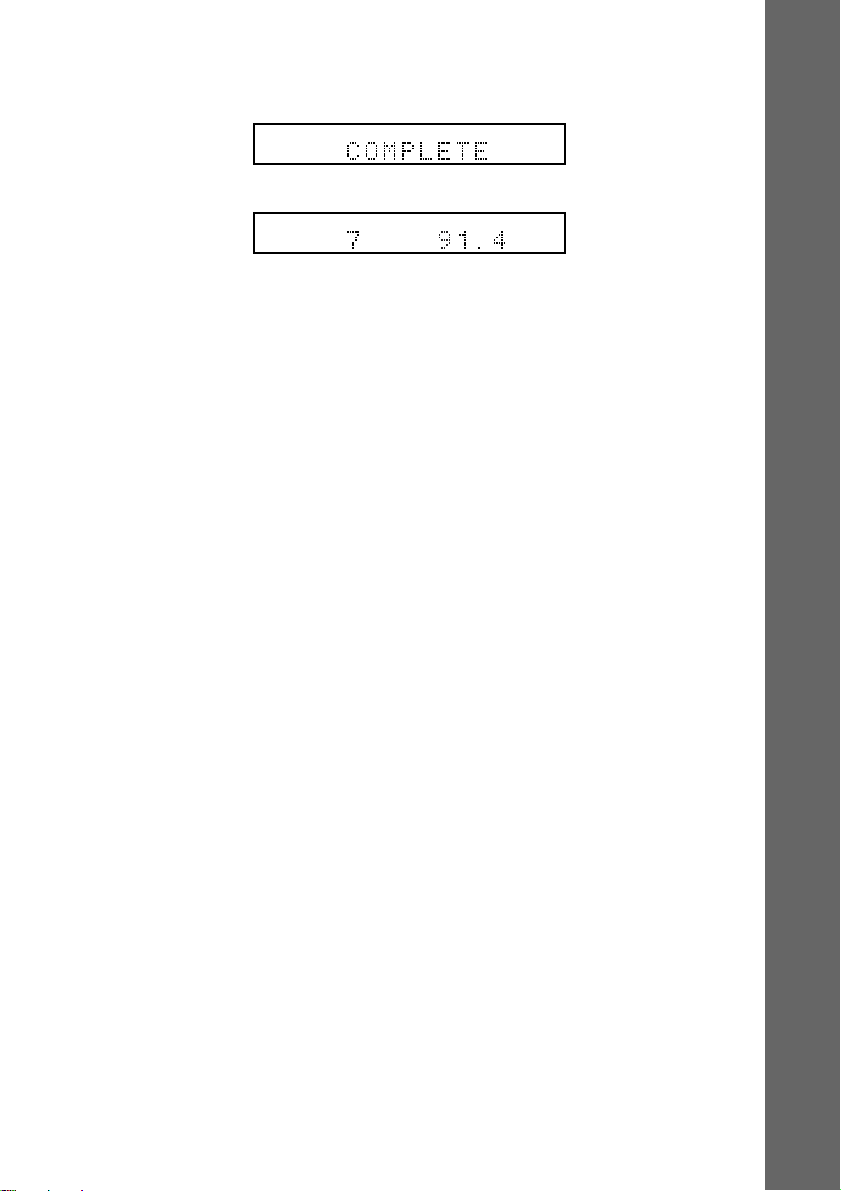
5 Press ENTER.
The station is stored.
ALL
DISC1SAUTO
PRO
LOGIC
DIGITAL
FM AM
NTSCPBC ANGLE
TITLE TRACK CHAPTER INDEX TUNEDH MONOMSTS
dB
kHz
MHz
REPEAT 1
PROGRAM
SHUFFLE
v
ALL
DISC1SAUTO
PRO
NTSCPBC ANGLE
TITLE TRACK CHAPTER INDEX H TUNED M MONO ST S
LOGIC
DIGITAL
FM AM
6 Repeat 1 to 5 to store other stations.
To tune in a station with a weak signal
Press TUNING + or – repeatedly in 2 to tune in the station manually.
To change the preset number
Start over from 1.
To change the AM tuning interval
The AM tuning interval is factory set to 9 kHz (10 kHz in some areas).
To change the AM tuning interval, tune in any AM station first, then turn off 1 on the remote.
While holding down x (on the system), turn the power back on. When you change the interval,
AM preset stations will be erased.
To reset the interval, repeat the same procedure.
dB
kHz
MHz
REPEAT 1
PROGRAM
SHUFFLE
Getting Started
31
Page 32
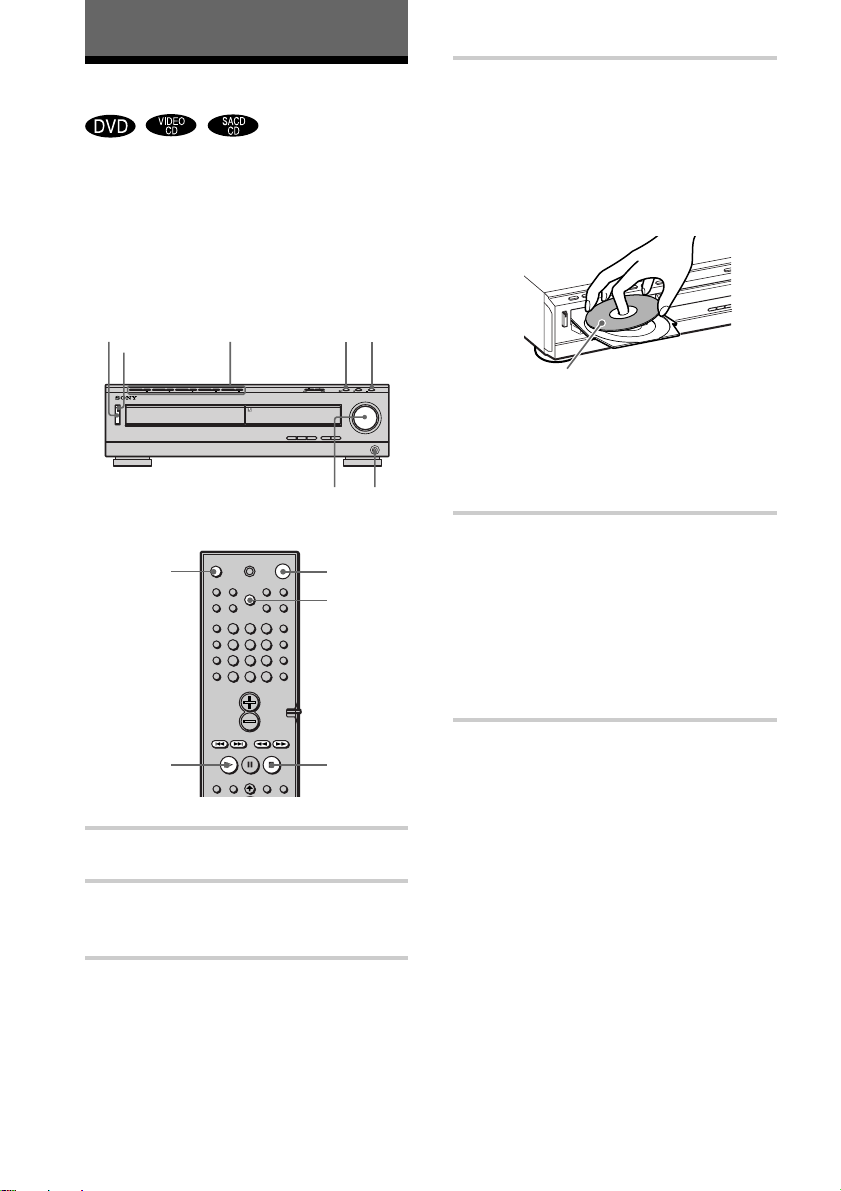
Playing Discs
Playing Discs
Depending on the DVD or VIDEO CD,
some operations may be different or
restricted.
Refer to the operating instructions supplied
with your disc.
POWER
Power indicator
OPEN/
CLOSE
DISC 1 / A-DISC 5 / A
Adjust the volume Connect
123
456
89
7
>
10
10/0
H
x
headphones
1
DISC SKIP
4 Press A of DISC 1-DISC 5 on the
system or OPEN/CLOSE on the
remote, and place a disc on the
disc tray.
The system automatically turns on and
the power indicator turns off.
With the playback side facing down
Press A of the same disc tray number
to close the disc tray.
Press other A of DISC 1-DISC 5 to
place other discs.
5 Press H.
The system starts playback
(continuous play) of the disc whose
disc tray indicator is green.
To playback other discs, press DISC
SKIP on the remote or DISC 1-DISC 5
of the system.
Adjust the volume on the system.
H
1 T urn on your TV.
2 Switch the input selector on the TV
to this system.
3 Press POWER on the system.
The system enters standby mode and
the power indicator lights up in red.
32
x
After following Step 5
Depending on the disc, a menu may appear
on the TV screen. You can play the disc
interactively by following the instructions
on the menu. DVD (page 35), VIDEO CD
(page 36).
To turn on the system
Press POWER on the system. The system
enters standby mode and the power indicator
lights up in red. Press 1 on the remote. The
system turns on and the power indicator
turns off. In standby mode, the system also
turns on by pressing A on the system or by
pressing H.
Page 33
To turn off the system
123
456
7
>
10
10/0
89
Press 1 on the remote. The system enters
standby mode and the power indicator lights
up in red. To turn off the system completely,
press POWER on the system. While playing
a disc, do not turn off the system by pressing
POWER. Doing so may cancel the menu
settings. When you turn off the system, first
press x to stop playback and then press 1
on the remote.
z
On Auto-Function
If a disc is already placed on any disc tray, you can
play it back simply by pressing the H or its
corresponding DISC 1-DISC 5, even if the previous
music source was not a DVD. The function changes
to DVD and playback starts (Auto-Function).
However, if Program Play is on, you can only start
playback by pressing the H.
z On the disc tray indicators
The disc tray indicators change their colors as
follows:
– green: the disc tray is chosen, or the disc is being
playbacked.
– off: there is no disc.
– orange: a disc is placed on the disc tray, however,
the disc tray is not chosen.
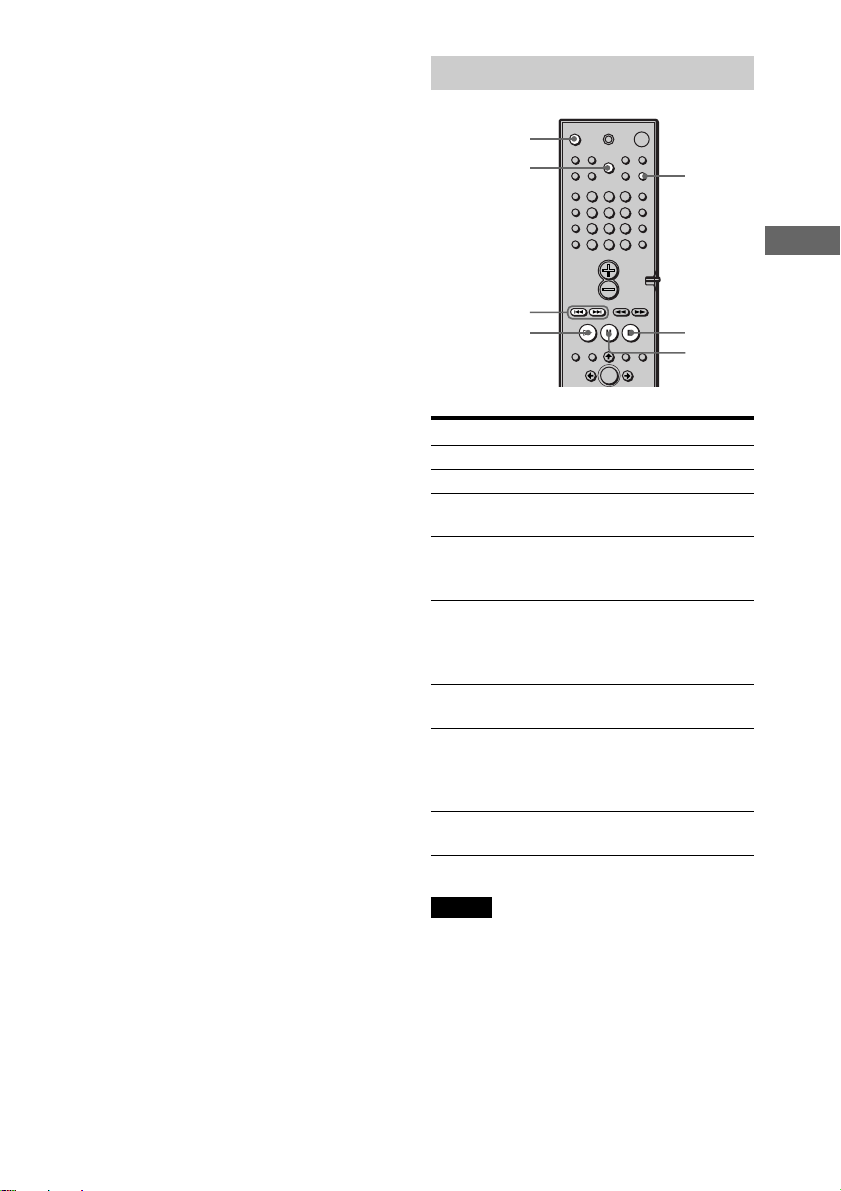
Additional operations
OPEN/CLOSE
DISC SKIP
./>
H
To Operation
Stop Press x.
Pause Press X.
Resume play after Press X or H.
pause
Go to the next chapter, Press >.
track, or scene in
continuous play mode
Go back to the Press ..
preceding chapter, track,
or scene in continuous
play mode
Stop play and remove Press OPEN/CLOSE.
the disc
Mute the sound Press MUTING. To
cancel muting, press it
again or turn up the
volume.
Change a disc while Press DISC SKIP.
playing another disc
MUTING
x
X
Playing Discs
Notes
• Do not push the disc tray when closing it. Press
OPEN/CLOSE to close the disc tray.
• If there is no disc in any disc tray, “NO DISC”
appears on the front panel display.
33
Page 34
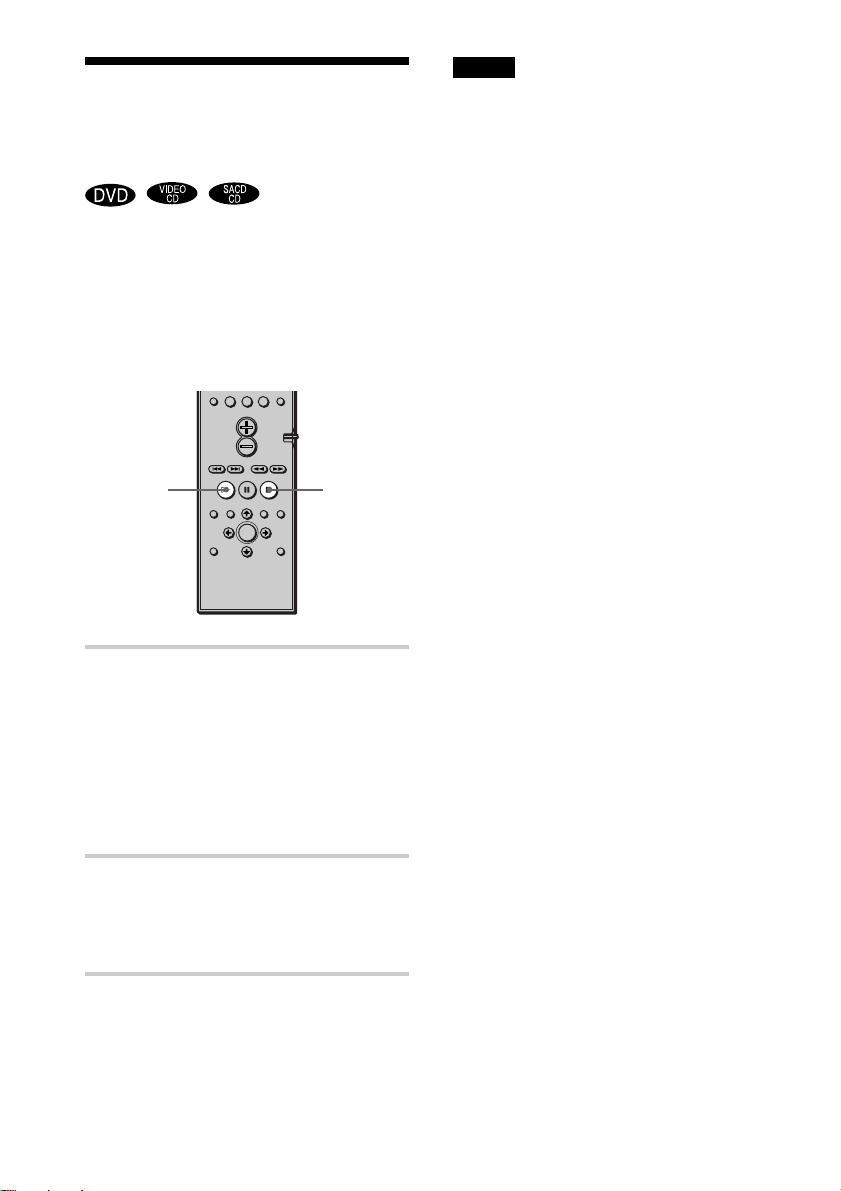
Resuming Playback from
the Point Where You
Stopped the Disc
(Resume Play)
When you stop the disc, the system
remembers the point where you pressed x
and “RESUME” appears on the front panel
display. As long as you do not open the disc
tray, Resume Play will work even if the
system enters standby mode by pressing 1.
>
10
10/0
Notes
• Depending on where you stopped the disc, the
system may not resume playback from exactly the
same point.
• The point where you stopped playing is cleared
when:
– you turn the power off by pressing POWER on
the system.
– you change the play mode.
H
x
1 While playing a disc, press x to
stop playback.
“RESUME” appears on the front panel
display, so you can restart the disc
from the point where you stopped the
disc.
If “RESUME” does not appear,
Resume Play is not available.
2 Press H.
The system starts playback from the
point where you stopped the disc in
Step 1.
z To play from the beginning of the disc, press x
twice, then press H.
34
Page 35
Using the DVD’s Menu
Some discs have a “title menu” or a “DVD
menu.” On some DVDs, this may simply be
called a “menu” or “title.”
Using the DVD menu
Some DVDs allow you to select the disc
contents using a menu. When you play these
DVDs, you can select items such as the
language for the subtitles and the language
for the sound using the DVD menu.
Using the title menu
A DVD is divided into long sections of a
picture or a music feature called “titles.”
When you play a DVD which contains
several titles, you can select the title you
want using the title menu.
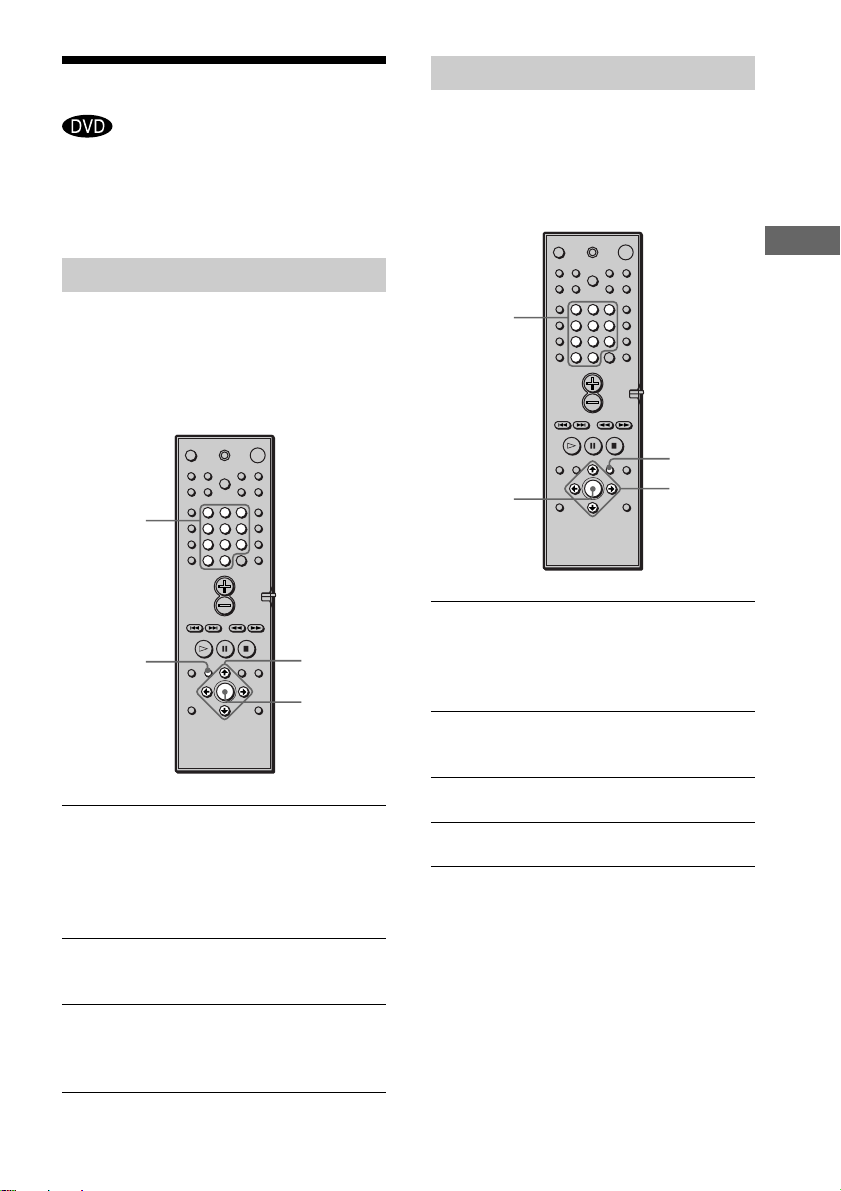
Number
buttons
TITLE
123
456
89
7
>
10
10/0
C/X/x/c
ENTER
1 Press TITLE.
The title menu appears on the TV
screen.
The contents of the menu vary from disc
to disc.
Number
buttons
ENTER
123
456
89
7
>
10
10/0
DVD MENU
C/X/x/c
1 Press DVD MENU.
The DVD menu appears on the TV
screen. The contents of the menu vary
from disc to disc.
2 Press C/X/x/c or the number buttons
to select the item you want to change.
3 To change other items, repeat Step 2.
4 Press ENTER.
Playing Discs
2 Press C/X/x/c or the number buttons
to select the title you want to play.
3 Press ENTER.
The system starts playing the selected
title.
35
Page 36
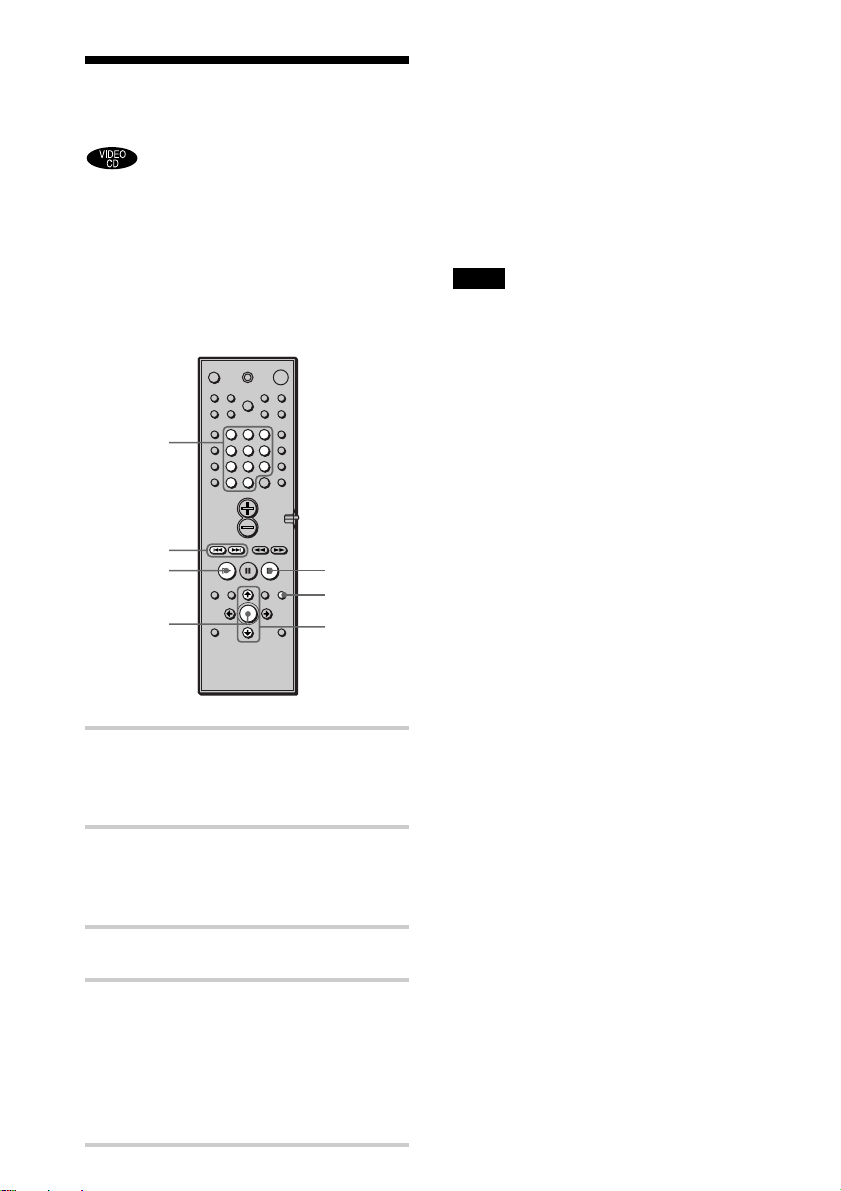
Playing VIDEO CDs with
PBC Functions
With PBC (Playback Control) functions,
you can enjoy simple interactive operations,
search functions, and other such operations.
PBC playback allows you to play VIDEO
CDs interactively by following the menu on
the TV screen.
(PBC Playback)
To go back to the menu
Press O RETURN.
z To play without using PBC, press ./> or
the number buttons while the system is stopped to
select a track, then press H or ENTER.
“Play without PBC” appears on the TV screen and
the system starts continuous play. You cannot play
still pictures such as a menu. To return to PBC
playback, press x twice then press H.
Note
Depending on the VIDEO CD, “Press ENTER” in
Step 3 may appear as “Press SELECT” in the
instructions supplied with the disc. In this case, press
H.
Number
buttons
./>
H
ENTER
123
456
89
7
>
10
10/0
1 Start playing a VIDEO CD with PBC
functions.
The menu for your selection appears.
2 Select the item number you want
by pressing X/x or the number
buttons.
3 Press ENTER.
4 Follow the instructions in the
menu for interactive operations.
Refer to the instructions supplied with
the disc, as the operating procedure
may differ according to the VIDEO
CD.
36
x
O RETURN
X/x
Page 37
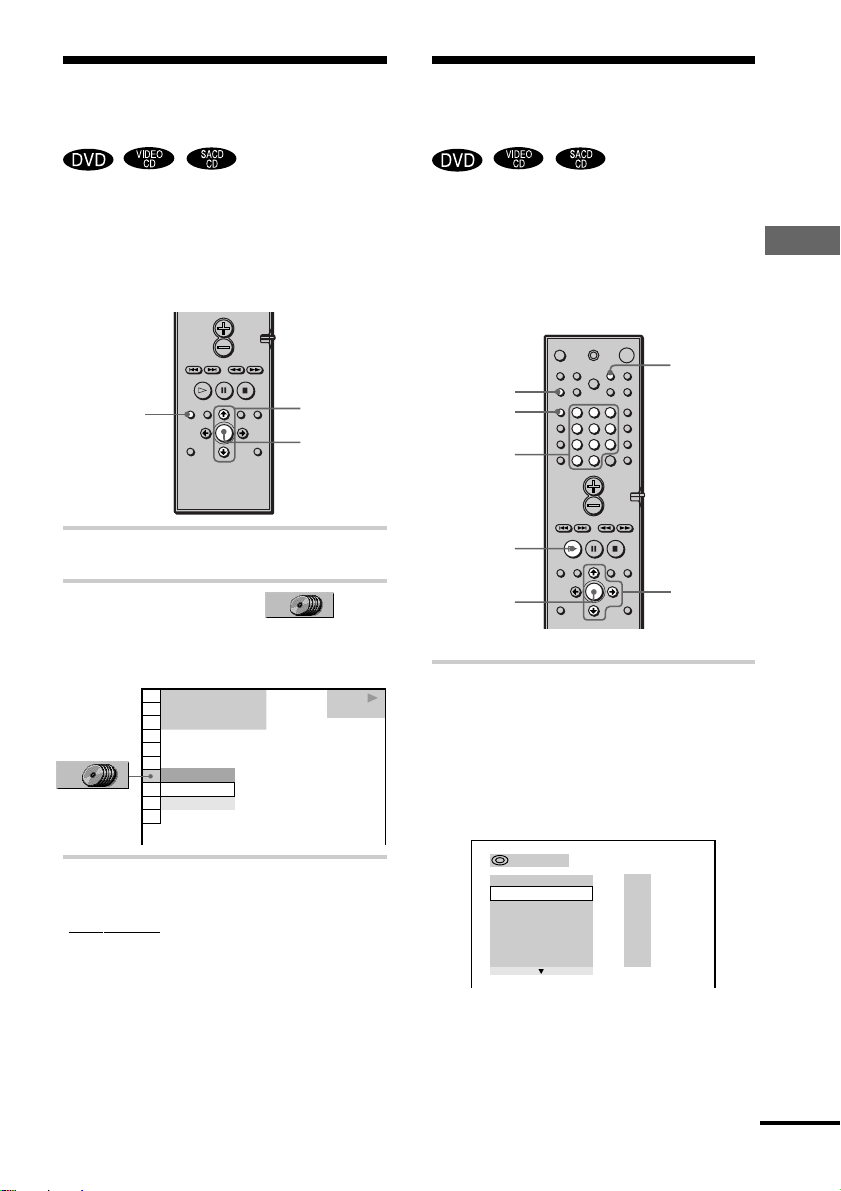
Selecting the Disc Mode
(One Disc or All Discs)
Creating Your Own
Program
(Program Play)
Before setting Program Play, Shuffle Play, or
Repeat Play, you need to select whether to
set those play modes on one disc or all discs.
DVD
DISPLA Y
X/x
ENTER
1 In stop mode, press DVD DISPLAY.
2 Press X/x to select (ONE/
ALL DISCS), then press ENTER.
1 2 ( 2 7
1 8 ( 3 4
C
0 1 : 3 2 : 5 5
ALL DISCS
ALL DISCS
ONE DISC
)
)
PLAY
DVD
You can play the contents of a disc in the
order you want by arranging the order of the
titles, chapters or tracks on the disc to create
your own program. You can program up to
25 titles, chapters, and tracks.
REPEA T
CLEAR
PLAY MODE
Number
buttons
H
ENTER
123
456
89
7
>
10
10/0
X/x/c
1 In stop mode, press PLAY MODE
repeatedly until “PROGRAM”
appears on the front panel
display.
The programming display appears on
the TV screen.
Playing Discs
xONE/ALL DISCS
•
ALL DISCS: allows you to set Program
Play, Shuffle Play, or Repeat Play for all
the discs.
• ONE DISC: allows you to set Shuffle Play
or Repeat Play for 1 disc only.
PROGRAM
–
– – – –
:
ALL CLEAR
– – – –
1.
– – – –
2.
– – – –
3.
– – – –
4.
– – – –
5.
– – – –
6.
T
ALL
continued
37
Page 38
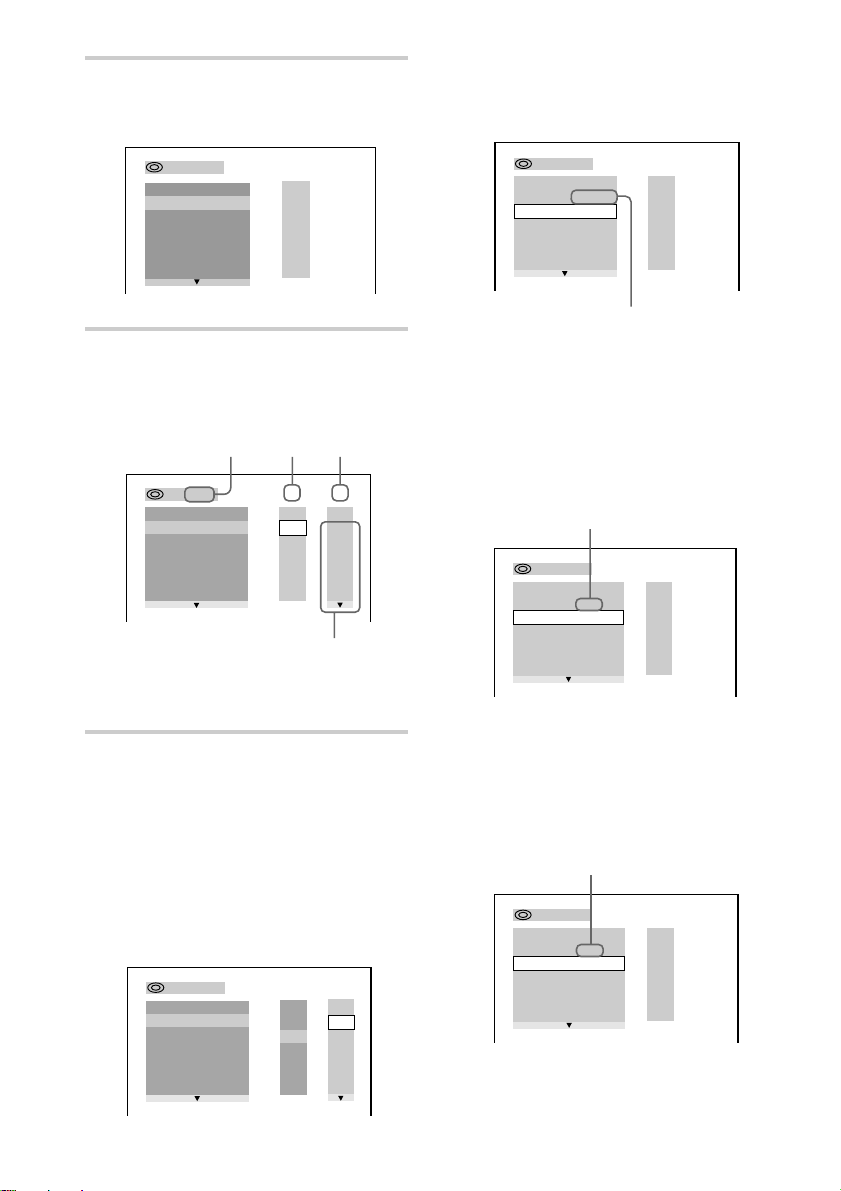
2 Press ENTER, then press X/x to
–
:
– – – –
select the disc.
Next, press X/x or the number buttons
to select “03” under “C,” then press
ENTER.
PROGRAM
– – – –
3 :
ALL CLEAR
– – – –
1.
– – – –
2.
– – – –
3.
– – – –
4.
– – – –
5.
– – – –
6.
T
ALL
3 Press c.
The cursor moves to the title or track
(in this case, “01”).
Disc type*
PROGRAM
3 : DVD
ALL CLEAR
– – – –
1.
– – – –
2.
– – – –
3.
– – – –
4.
– – – –
5.
– – – –
6.
Chapters recorded on a disc
* “?” appears when the system has not loaded
the disc information in the memory.
Title
ALL
T
01
02
03
04
05
4 Select the title, chapter, or track
you want to program.
xWhen playing a DVD
For example, select chapter “03” of
title “02.”
Press X/x or the number buttons to
select “02” under “T,” then press
ENTER.
PROGRAM
3
:
DVD
ALL CLEAR
– – – –
1.
– – – –
2.
– – – –
3.
– – – –
4.
– – – –
5.
– – – –
6.
T
ALL
01
02
03
04
05
Chapter
C
ALL
01
02
03
04
05
06
C
ALL
01
02
03
04
05
06
PROGRAM
–
– – – –
:
ALL CLEAR
1. DVD
– – – –
2.
– – – –
3.
– – – –
4.
– – – –
5.
– – – –
6.
–
–
0 2
0 3
T
ALL
Selected title and chapter
xWhen playing a VIDEO CD or
CD
For example, select track “02.”
Press X/x or the number buttons to
select “02” under “T,” then press
ENTER.
Selected track
PROGRAM
–
– – – –
:
ALL CLEAR
–
1. CD
– – – –
2.
– – – –
3.
– – – –
4.
– – – –
5.
– – – –
6.
02
T
ALL
xWhen playing a SACD
For example, select track “002.”
Press X/x or the number buttons to
select “002” under “T,” then press
ENTER.
Selected track
PROGRAM
ALL CLEAR
1. SACD – 002
– – – –
2.
– – – –
3.
– – – –
4.
– – – –
5.
– – – –
6.
T
ALL
38
Page 39
5 To program other discs, titles,
chapters, or tracks, repeat Step 2
to 4.
The programmed discs, titles, chapters,
and tracks are displayed in the selected
order.
6 Press H to start Program Play.
Program Play begins.
When the program ends, you can
restart the same program again by
pressing H.
To return to normal play
Press CLEAR during playback.
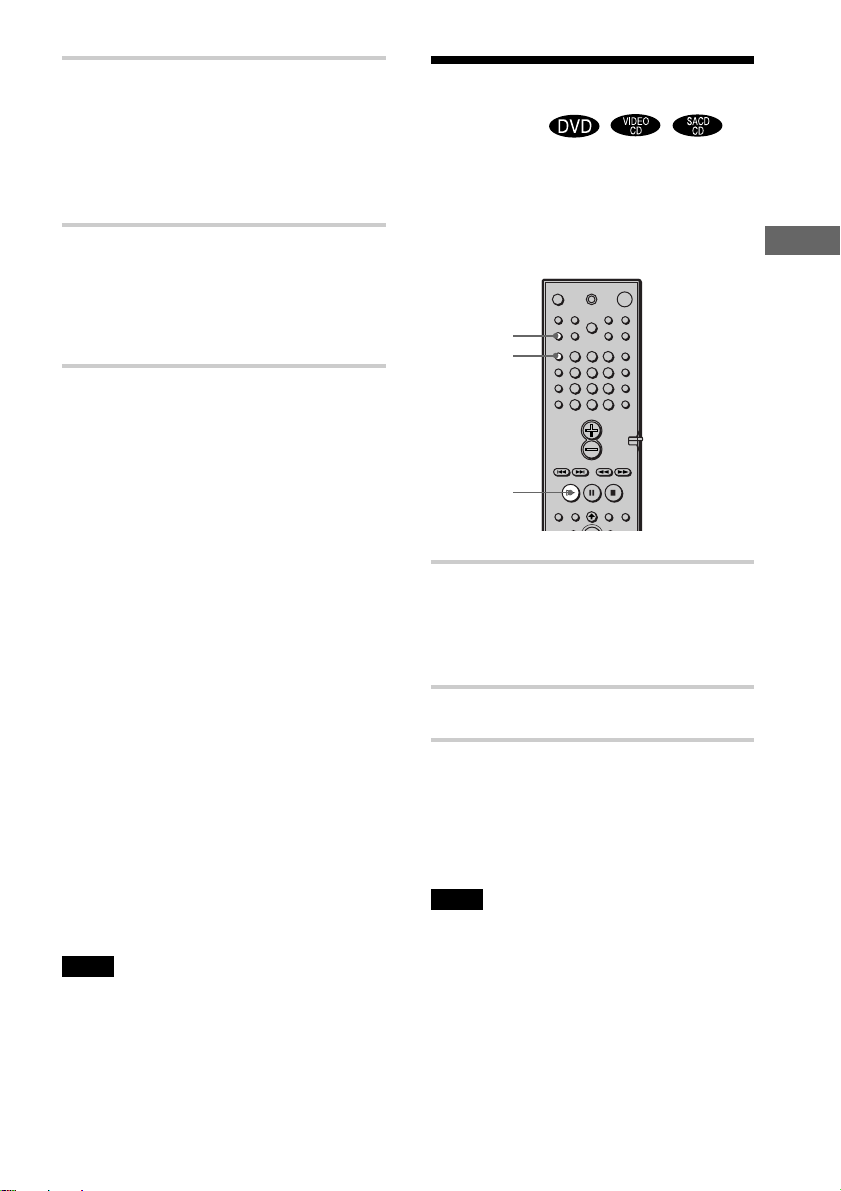
Playing in random order
(Shuffle Play)
You can have the system “shuffle” titles,
chapters, or tracks and play them in random
order. Subsequent “shuf fling” may produce
a different playing order.
CLEAR
PLAY MODE
123
456
89
7
>
10
10/0
Playing Discs
To turn off the program menu
In stop mode, press PLAY MODE to turn
off the program menu.
To change the program
To change the disc, select the program
number you want to change using X/x after
Step 1 or 4, then press ENTER.
To change the title, chapter, or track, select
the desired one in Step 4.
To cancel the programmed order
To cancel all the titles, chapters, or tracks in
the programmed order, press X, and select
“ALL CLEAR” in Step 2. To cancel the
selected program, select the program using
X/x in Step 2, then press CLEAR.
z
You can do Repeat Play of the programmed titles,
chapters, or tracks. Press REPEAT, or set “REPEAT”
to on in the Control Menu display during Program
Play.
Note
The number of titles, chapters, or tracks displayed are
the same number of titles, chapters, or tracks
recorded on a disc.
H
1 In stop mode, press PLAY MODE
repeatedly until “SHUFFLE”
appears on the front panel
display.
2 Press H.
To return to normal play
In stop mode, press PLAY MODE twice, or
during playback, press CLEAR to return to
normal play.
Note
You may not be able to do Shuffle Play depending on
the DVD.
39
Page 40
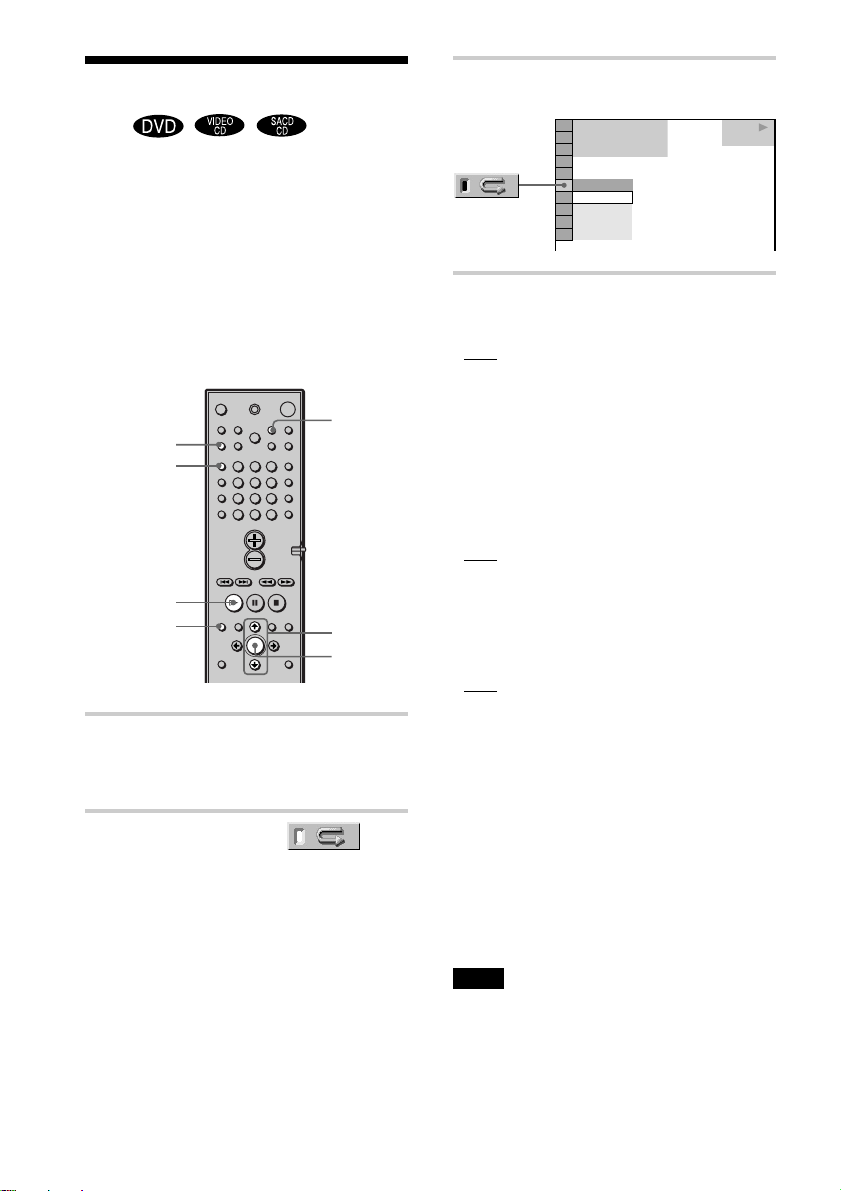
Playing repeatedly (Repeat
Play)
You can play all the titles/tracks or a single
title/chapter/track on a disc.
In Shuffle or Program Play mode, the
system repeats the titles or tracks in the
shuffled or programmed order.
You cannot perform Repeat Play during
PBC playback of VIDEO CDs (page 36).
You may not be able to perform Repeat Play
depending on the DVD.
REPEAT
CLEAR
PLAY MODE
H
DVD DISPLAY
123
456
89
7
>
10
10/0
X/x
ENTER
3 Select the Repeat Play setting.
)
1 2 ( 2 7
)
1 8 ( 3 4
T
1 : 3 2 : 5 5
OFF
OFF
DISC
TITLE
CHAPTER
When playing a DVD and when
Program Play is set to OFF
•
OFF: does not play repeatedly.
• DISC: repeats all the titles (except ALL
DISCS SHUFFLE).
• TITLE: repeats the current title on a disc.
• CHAPTER: repeats the current chapter
(except ALL DISCS SHUFFLE).
When playing a VIDEO CD/SACD/CD
and when Program Play is set to OFF
•
OFF: does not play repeatedly.
• DISC: repeats all the tracks on a disc.
(except ALL DISCS SHUFFLE)
• TRACK: repeats the current track
When Program Play is set to ON
•
OFF: does not play repeatedly.
• ON: repeats Program Play.
PLAY
DVD
1 Press DVD DISPLAY.
The Control Menu appears.
2 Press X/x to select
(REPEAT) then press ENTER.
If you do not select “OFF,” the
indicator of the “REPEAT” lights in
green.
40
To cancel Repeat Play
Press CLEAR.
z
You can set Repeat Play during stop
mode
After selecting the “REPEAT” item, press H.
The system starts Repeat Play.
z You can quickly display the “REPEA T”
status
Press REPEAT on the remote.
Note
If you set the DISC repeat or DISC repeat with
Program Play, the maximum program repetition is 5.
Page 41
Searching for a Scene
Searching for a Particular
Point on a Disc
motion Play)
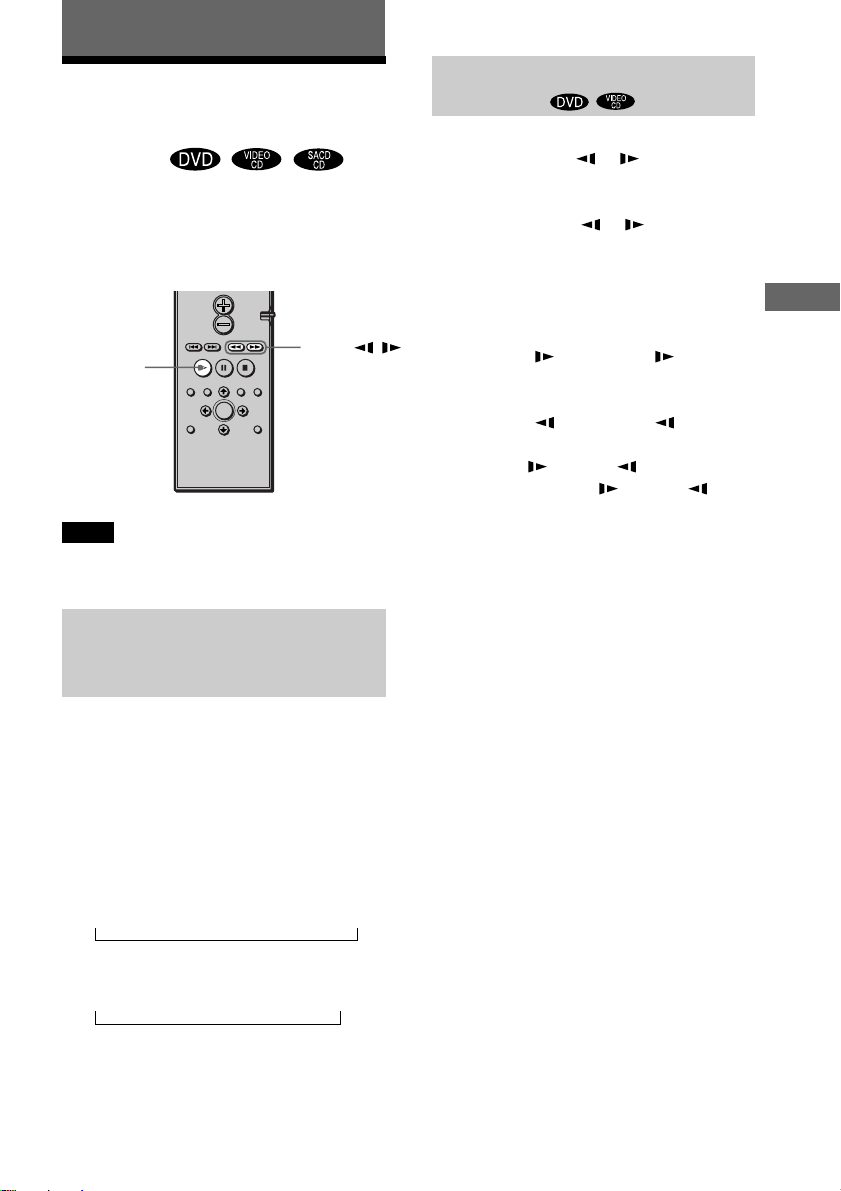
You can locate a particular point on a disc
quickly by monitoring the picture or playing
back slowly.
H
Note
Depending on the DVD/VIDEO CD, you may not be
able to do some of the operations described.
Locating a point quickly by playing
a disc in fast forward or fast
reverse (Scan)
(Scan, Slow-
SLOW /
m/M
Watching frame by frame (Slowmotion play)
You can use this function only for DVDs or
VIDEO CDs. Press
system is in the pause mode. To return to the
normal speed, press H.
Each time you press
motion play, the playback speed changes.
Two speeds are available. With each press
the indication changes as follows:
Playback direction
SLOW 2
Opposite direction (DVD only)
SLOW 2
The SLOW 2 /SLOW 2 playback speed
is slower than SLOW 1
or when the
or during Slow-
y SLOW 1
y SLOW 1
/SLOW 1 .
Searching for a Scene
Press m or M while playing a disc.
When you find the point you want, press
H to return to normal speed.
Each time you press m or M during
scan, the playback speed changes. Three
speeds are available. With each press the
indication changes as follows:
Playback direction
×2B (DVD/SACD/CD only) t FF1M t FF2M
tt
Opposite direction
×2b (DVD only) t FR1m t FR2m
The ×2B/×2b playback speed is about twice
the normal speed. The FF2M/FR2m
playback speed is faster than FF1M/
FR1m.
41
Page 42
Searching for a Title/ Chapter/Track/Index/ Scene
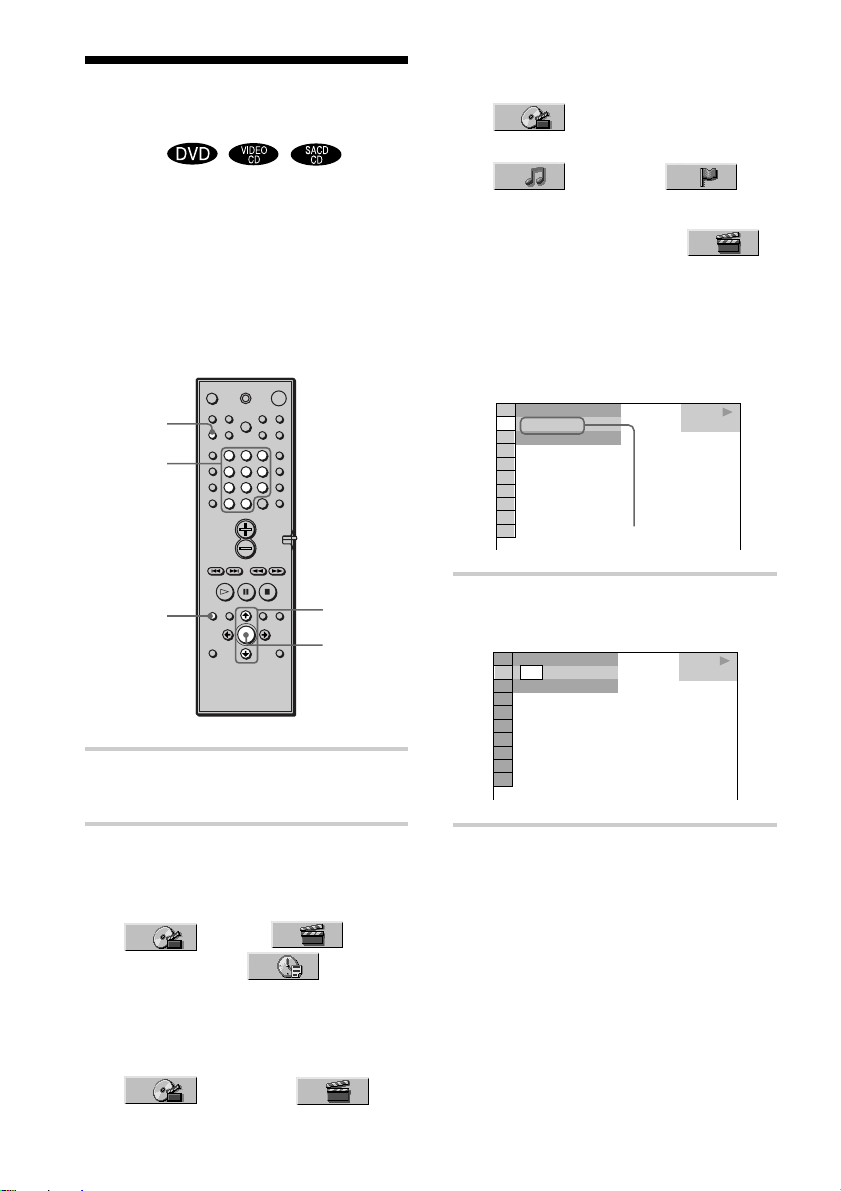
You can search a DVD disc by title or
chapter, and you can search a VIDEO CD or
CD by track, index, or scene. As titles and
tracks are assigned unique numbers on the
disc, you can select the desired one by
entering its number. Or, you can search for a
scene using the time code. (TIME SEARCH)
CLEAR
Number
buttons
123
456
89
7
>
10
10/0
xWhen playing a VIDEO CD with
PBC Playback
(SCENE)
xWhen playing a SACD/CD
(TRACK) or
(INDEX)
Example: when you select
(CHAPTER)
“** (**)” is selected (** refers to a
number).
The number in parentheses indicates
the total number of titles, chapters,
tracks, indexes, or scenes.
)
1 2 ( 2 7
1 8 ( 3 4
T
1 : 3 2 : 5 5
)
Selected row
PLAY
DVD
DVD
DISPLAY
1 Press DVD DISPLAY.
The Control Menu appears.
2 Press X/x to select the search
method.
xWhen playing a DVD
(TITLE),
(CHAPTER), or
(TIME/TEXT)
Select TIME/TEXT for TIME
SEARCH.
xWhen playing a VIDEO CD
(TRACK) or
(INDEX)
42
X/x
ENTER
3 Press ENTER.
“** (**)” changes to “— (**)”.
)
1 2 ( 2 7
(
3 4
– –
T
1 : 3 2 : 5 5
)
PLAY
DVD
4 Press X/x or the number buttons
to select the title, chapter, track,
index, or scene number you want
to search.
If you make a mistake
Cancel the number by pressing
CLEAR, then select another number.
Page 43
5 Press ENTER.
The system starts playback from the
selected number.
To turn off the Control Menu
Press DVD DISPLAY repeatedly until the
Control Menu is turned off.
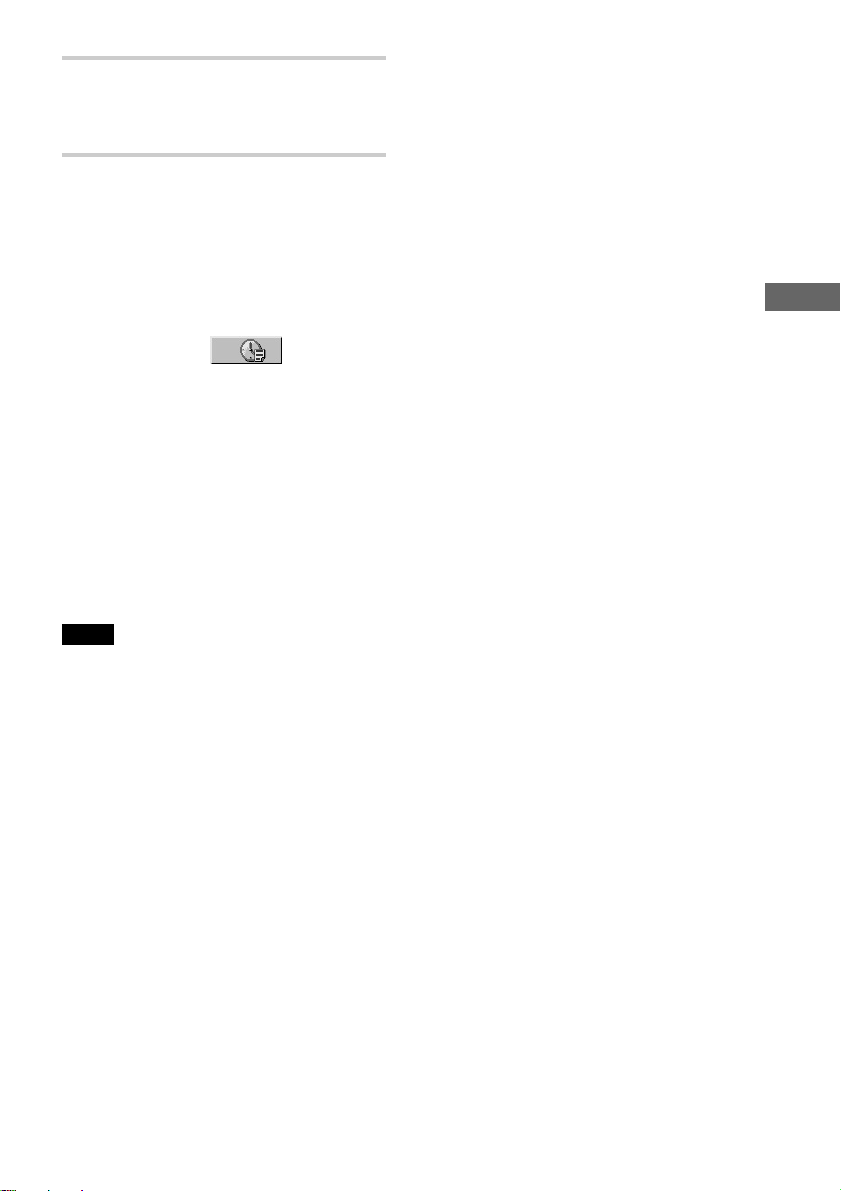
To search for a scene using the time
code (TIME SEARCH) (DVD only)
1 In Step 2, select (TIME/
TEXT).
“T **:**:**” (playing time of the
current title) is selected.
2 Press ENTER.
“T **:**:**” changes to “T --:--:--.”
3 Input the time code using the number
buttons, then press ENTER.
For example, to find the scene at
2 hours, 10 minutes, and 20 seconds
after the beginning, just enter “2:10:20.”
Note
The title, chapter or track number displayed is the
same number recorded on the disc.
Searching for a Scene
43
Page 44
Viewing Information About the Disc
Viewing the Playing Time and Remaining Time on the Front Panel Display
You can check information about the disc,
such as the remaining time, total number of
titles of a DVD, or tracks of a SACD, CD, or
VIDEO CD, using the front panel display
(page 12).
TIME
123
456
89
7
>
10
10/0
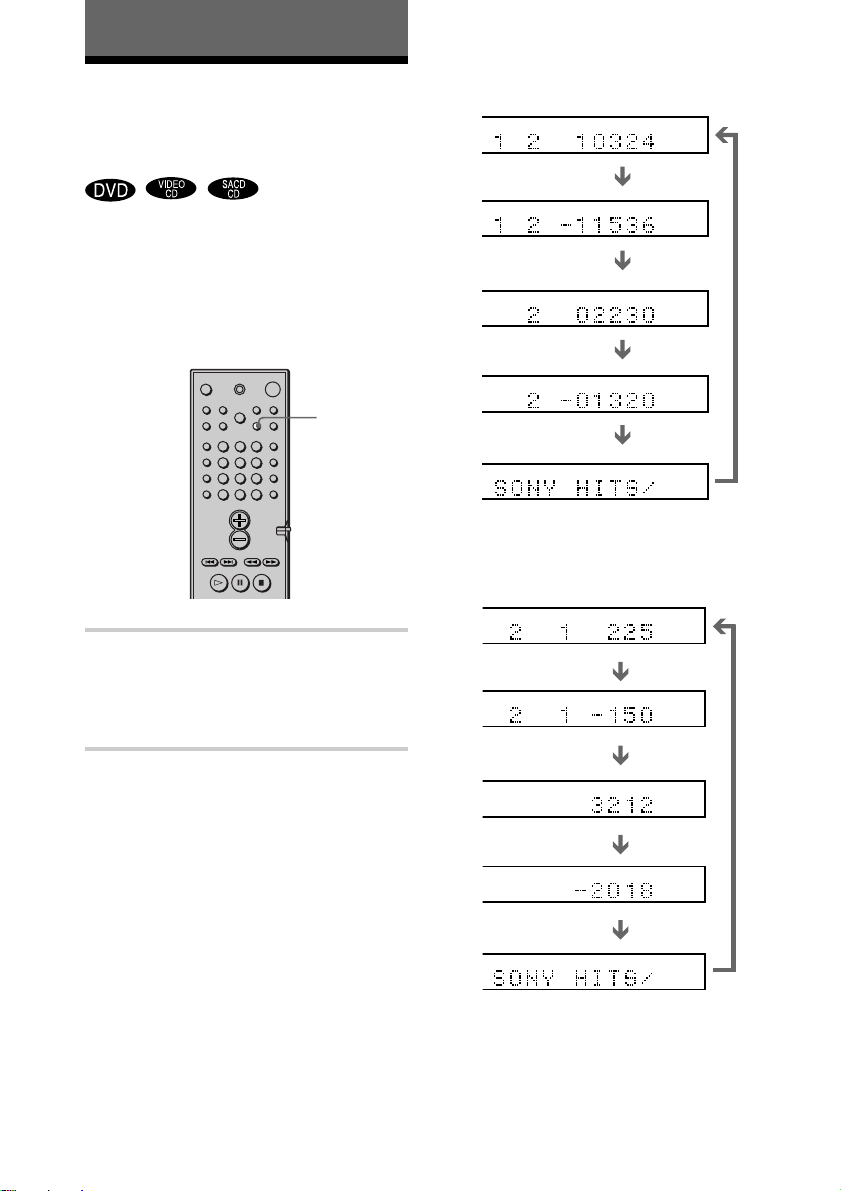
Press TIME.
Each time you press TIME while playing the
disc, the display changes as shown in the
following charts.
When playing a DVD
Playing time and number of the current title
TITLE TRACK CHAPTER INDEX TUNEDH MONOM ST S
dB
kHz
MHz
REPEAT 1
PROGRAM
SHUFFLE
Remaining time of the
current title
TITLE TRACK CHAPTER INDEX TUNEDH MONOM ST S
dB
kHz
MHz
REPEAT 1
PROGRAM
SHUFFLE
Playing time and number
of the current chapter
TITLE TRACK CHAPTER INDEX TUNEDH MONOM ST S
dB
kHz
MHz
REPEAT 1
PROGRAM
SHUFFLE
Remaining time of the
current chapter
TITLE TRACK CHAPTER INDEX TUNEDH MONOM ST S
dB
kHz
MHz
REPEAT 1
PROGRAM
SHUFFLE
T ext
TITLE TRACK CHAPTER INDEX TUNEDH MONOMSTS
dB
kHz
MHz
REPEAT 1
PROGRAM
SHUFFLE
When playing a VIDEO CD (without
PBC functions), SACD, or CD
Playing time and current track number
TITLE TRACK CHAPTER INDEX TUNEDH MONOM ST S
Remaining time of the
current track
TITLE TRACK CHAPTER INDEX TUNEDH MONOM ST S
dB
kHz
MHz
dB
kHz
MHz
REPEAT 1
PROGRAM
SHUFFLE
REPEAT 1
PROGRAM
SHUFFLE
44
Playing time of the disc
TITLE TRACK CHAPTER INDEX TUNEDH MONOM ST S
Remaining time of the
disc
TITLE TRACK CHAPTER INDEX TUNEDH MONOM ST S
T ext
TITLE TRACK CHAPTER INDEX TUNEDH MONOMSTS
dB
kHz
MHz
dB
kHz
MHz
dB
kHz
MHz
REPEAT 1
PROGRAM
SHUFFLE
REPEAT 1
PROGRAM
SHUFFLE
REPEAT 1
PROGRAM
SHUFFLE
Page 45
z When playing VIDEO CDs with PBC functions,
the scene number and the playing time are displayed.
z The playing time and remaining time of the
current chapter, title, track, scene, or disc will also
appear on your TV screen. See the following section
“Checking the Playing Time and Remaining Time”
for instructions on how to read this information.
Notes
• While playing SACD, the index indicator does not
appear on the front panel display.
• Depending on the type of disc being played and the
playing mode, the disc information may not be
displayed.
Checking the Playing Time and Remaining Time
You can check the playing time and
remaining time of the current title, chapter,
or track, and the total playing time or
remaining time of the disc. Also, you can
check the DVD/CD/SACD text recorded on
the disc.
TIME
123
456
89
7
>
10
10/0
DVD
DISPLAY
Viewing Information About the Disc
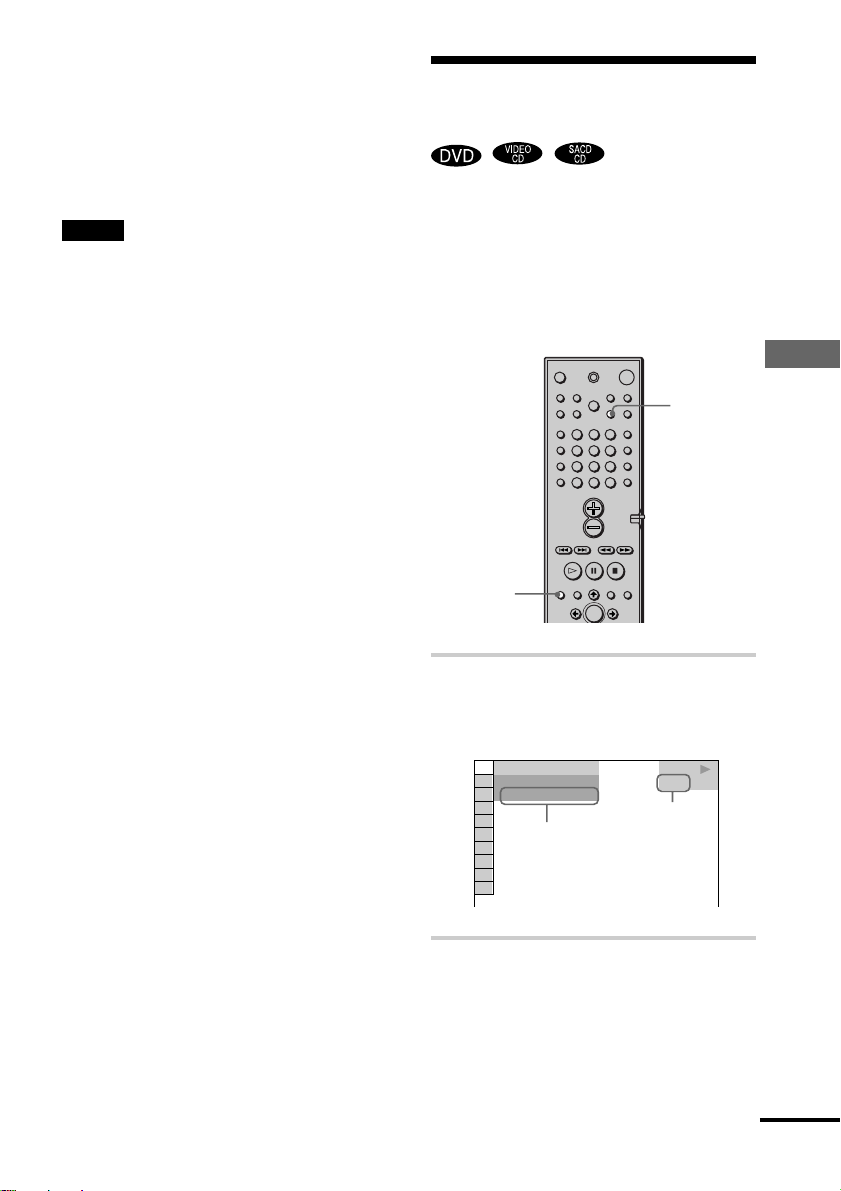
1 Press DVD DISPLAY during
playback.
The Control Menu appears.
)
1 2 ( 2 7
)
1 8 ( 3 4
T
1 : 3 2 : 5 5
Time information
PLAY
DVD
Disc type
2 Press TIME repeatedly to change
the time information.
The display and the kinds of time that
you can change depend on the disc you
are playing.
continued
45
Page 46

xWhen playing a DVD
•T **:**:
**
Playing time of the current title
•T–**:**:
**
Remaining time of the current title
•C **:**:
**
Playing time of the current chapter
•C–**:**:
**
Remaining time of the current
chapter
xWhen playing a VIDEO CD
(with PBC functions)
•**:
**
Playing time of the current scene
xWhen playing a VIDEO CD
(without PBC functions), SACD,
or CD
•T **:
**
Playing time of the current track
•T–**:
**
Remaining time of the current
track
•D **:
**
Playing time of the current disc
•D–**:
**
Remaining time of the current disc
z
If the DVD/CD/SACD text does not fit on a
single line, you can see the entire text by scrolling it
across the front display.
z You can select the time and text by pressing
TIME.
Notes
• Only letters of the alphabet can be displayed.
• This system can only display the first level of
DVD/CD/SACD text, such as the disc name or title.
• In SACD playback, the system can only display a
limited number of characters. Also, depending on
the disc, all text characters are not displayed.
To turn off the Control Menu
Press DVD DISPLAY repeatedly until the
Control Menu is turned off.
Checking the DVD/CD/SACD text
Press TIME repeatedly in Step 2 to display
the text recorded on the DVD/CD/SACD.
The DVD/CD/SACD text appears only
when the text is recorded on the disc. You
cannot change the text.
TIME/TEXT
BRAHMS SYMPHONY NO – 4
DVD/CD/SACD text
46
Page 47
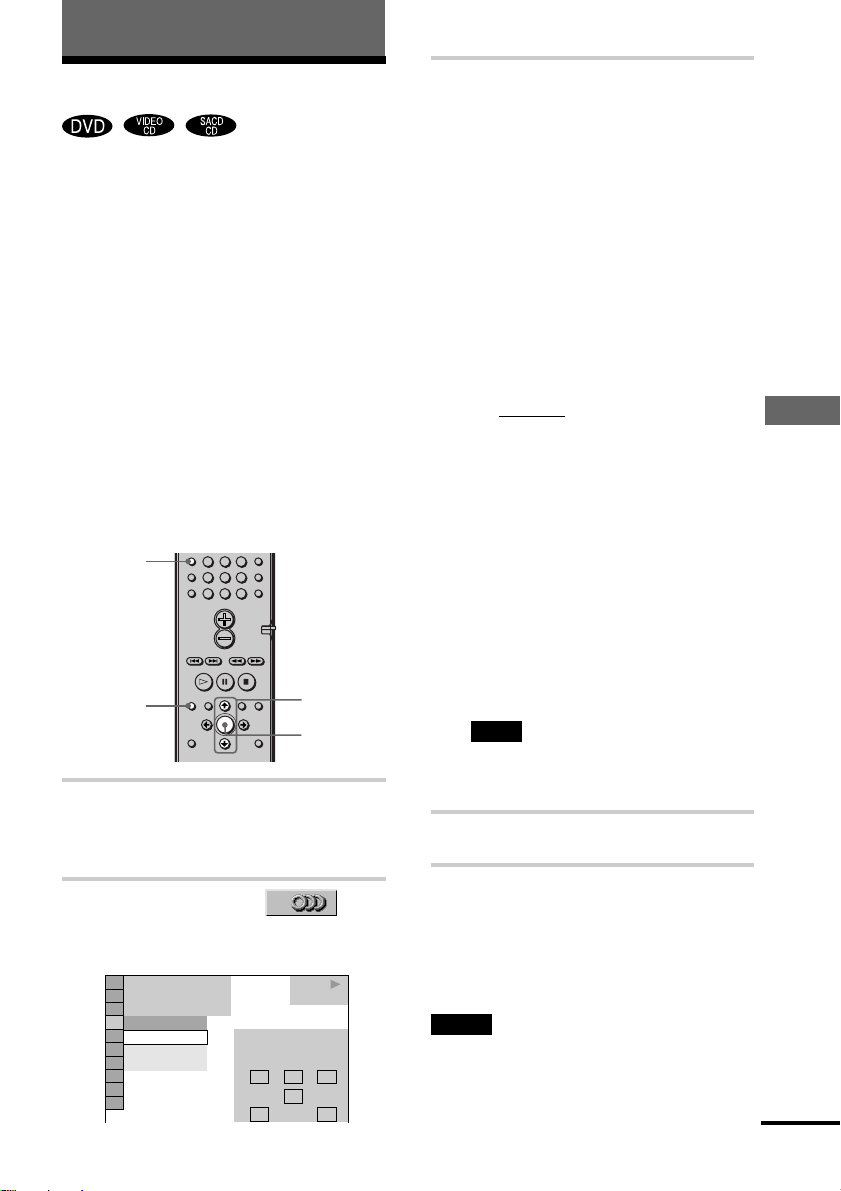
Sound Adjustments
Changing the Sound
If a DVD is recorded with multilingual
tracks, you can select the language you want
while playing the DVD.
If the DVD is recorded in multiple audio
formats (PCM, Dolby Digital, MPEG audio,
or DTS), you can select the audio format
you want while playing the DVD.
With stereo CDs or VIDEO CDs, you can
select the sound from the right or left channel
and listen to the sound of the selected channel
through both the right and left speakers. (In
this case, the sound loses its stereo effect.)
For example, when playing a disc containing
a song with the vocals on the right channel
and the instruments on the left channel, you
can select the left channel and hear only the
instruments from both speakers.
AUDIO
DVD
DISPLA Y
456
89
7
>
10
10/0
X/x
ENTER
1 Press DVD DISPLAY during
playback.
The Control Menu is displayed.
3 Press X/x to select the desired
audio signal.
xWhen playing a DVD
Depending on the DVD, the choice of
language varies.
When 4 digits are displayed, they
represent the language code. Refer to
the language code list on page 80 to
see which language the code
represents. When the same language is
displayed two or more times, the DVD
is recorded in multiple audio formats.
xWhen playing a VIDEO CD, or CD
The default setting is underlined.
•
STEREO: The standard stereo sound
• 1/L: The sound of the left channel
(monaural)
• 2/R: The sound of the right
channel (monaural)
xWhen playing a SACD
In stop mode, depending on the SACD,
the choice of settings varies.
• MULTI: The disc has multichannel playback area
• 2CH: The disc has the 2 channel
playback area.
• CD: When you want to play the
disc as a conventional CD.
Note
Not all discs give you the three choices above
when in SACD playback. It all depends on the
layer configuration of the SACD to be played.
4 Press ENTER.
Sound Adjustments
2 Press X/x to select
(AUDIO), then ENTER.
The options for AUDIO appear.
)
1 2 ( 2 7
)
1 8 ( 3 4
T
1 : 3 2 : 5 5
1: ENGLISH
1: ENGLISH
2: ENGLISH
FRENCH
3:
PROGRAM FORMAT
DOLBY DIGITAL 3/2.1
PLAY
DVD
LRC
LFE
LS RS
To turn off the Control Menu
Press DVD DISPLAY repeatedly until the
Control Menu is turned off.
Y ou can select AUDIO directly by pressing AUDIO.
z
Each time you press the button, the item changes.
Notes
• For discs not in multiple audio format, you cannot
change the sound.
• During DVD playback, the sound may change
automatically.
continued
47
Page 48
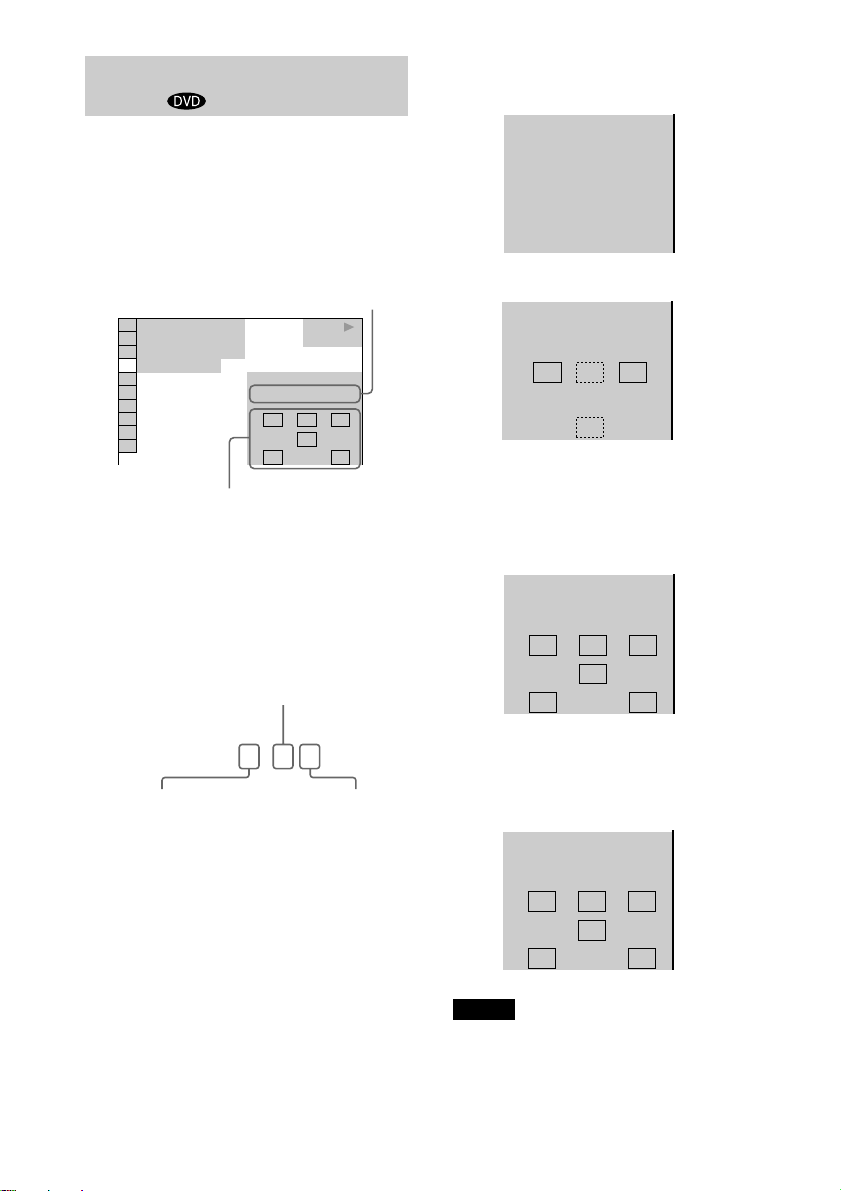
Displaying the audio information of
the disc
When you select “AUDIO,” the channels
being played are displayed on the screen.
For example, in Dolby Digital format,
multiple signals ranging from monaural to
5.1 channel signals can be recorded on a
DVD. Depending on the DVD, the number
of recorded channels may differ.
Current audio format*
)
1 2 ( 2 7
)
1 8 ( 3 4
T
1 : 3 2 : 5 5
1: ENGLISH
Current playing program format**
*“PCM,” “MPEG,” “DTS,” or “DOLBY
DIGITAL” is displayed.
For “DOLBY DIGIT AL,” the channels in
the playing track are displayed numerically
as follows:
For Dolby Digital 5.1 ch:
Rear component 2
PLAY
DVD
PROGRAM FORMAT
DOLBY DIGITAL 3/2.1
LRC
LFE
LS RS
The display examples are as follows:
• PCM (stereo)
PROGRAM FORMAT
PCM 48kHz 24bit
• Dolby Surround
PROGRAM FORMAT
DOLBY DIGITAL 2/0
DOLBY SURROUND
L RC
S
• Dolby Digital 5.1ch
When an LFE signal component is output,
“LFE” is enclosed in a solid line. When an
LFE signal component is not output,
“LFE” is enclosed in a broken line.
PROGRAM FORMAT
DOLBY DIGITAL 3/2.1
LRC
LFE
LS RS
DOLBY DIGITAL
Front component 2 +
Center component 1
3 / 2 . 1
LFE (Low Frequency
Effect) component 1
**The letters in the program format display
mean the following sound component:
L: Front (left)
R : Front (right)
C : Center
LS : Rear (left)
RS : Rear (right)
S : Rear (monaural): The rear
component of the Dolby
Surround processed signal and
the Dolby Digital signal.
LFE : LFE (Low Frequency Effect)
48
• DTS
“LFE” is always enclosed in a solid line
regardless of the LFE signal component
being output.
PROGRAM FORMAT
DTS 3/2.1
LRC
LFE
LS RS
Notes
• When the signal contains rear signal components
such as LS, RS, or S, the Surround effect is
enhanced (page 49).
• If you play MPEG AUDIO sound tracks, the
system outputs PCM (stereo) signals.
Page 49
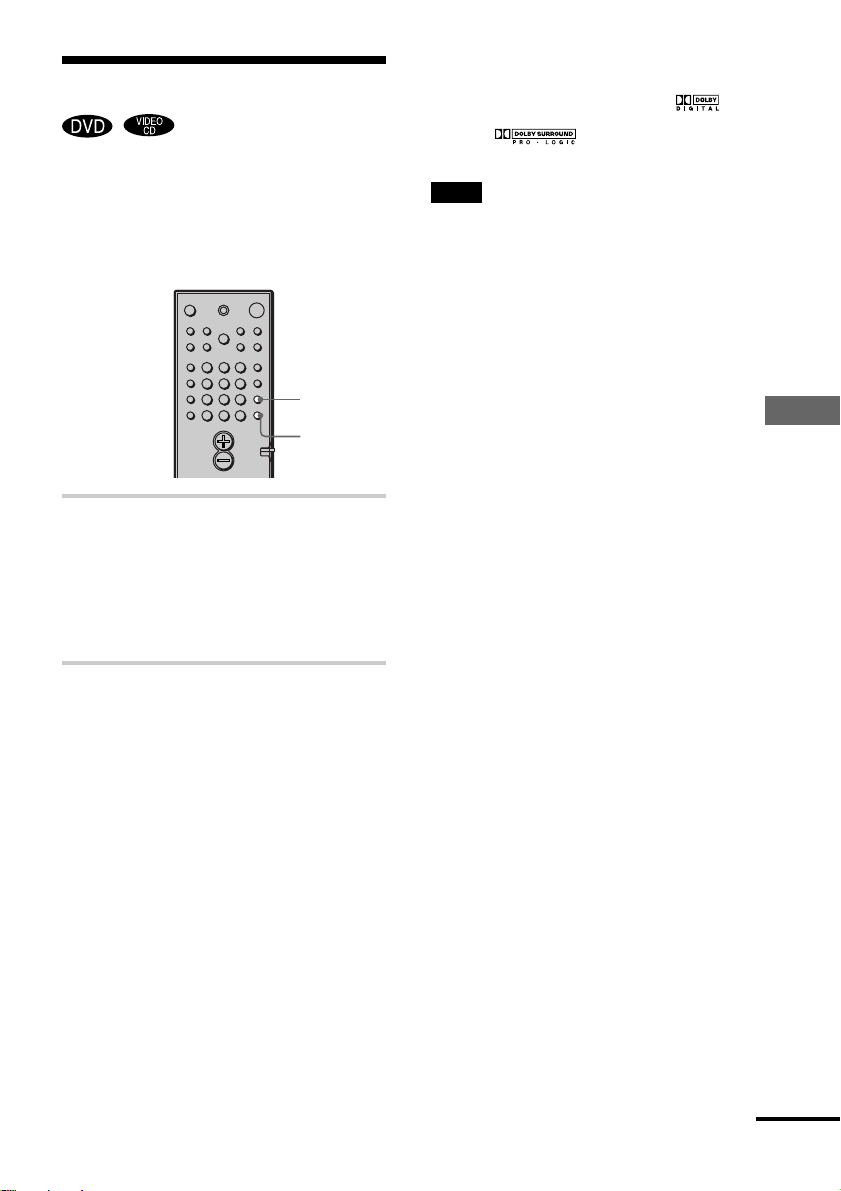
Selecting a Sound Field
You can enjoy surround sound simply by
selecting one of the pre-programmed sound
fields according to the program you want to
listen to. Surround sound can be applied to
DVD, VIDEO CD, and CD playback.
123
456
89
7
>
10
10/0
Press SOUND FIELD repeatedly until
the sound field you want appears on
the front panel display.
You can also use SOUND FIELD on the
system to select the pre-programmed sound
fields.
To check the current sound field
Press DISPLAY repeatedly.
Each time you press DISPLAY, the front
panel display switches as follows:
remaining or playing time t sound field
t remaining or playing time
z
The system memorizes the last sound
field selected for each function mode (Sound
Field Link)
Whenever you select a function such as DVD or
TUNER, the sound field that was last applied to the
function is automatically applied again. For example,
if you listen to DVD with HALL as the sound field,
then change to another function, and then return to
DVD, HALL will be applied again. W ith the tuner,
sound fields are memorized separately for all preset
stations.
SOUND
FIELD
DISPLA Y
z You can identify the encoding format of
program software by looking at its packaging
– Dolby Digital discs are labelled with the logo.
– Dolby Surround encoded programs are labelled
with the logo.
– DTS Digital Surround discs are marked with DTS.
Note
When you play sound tracks with 96 kHz sampling
frequency, the output signals will be converted to
48 kHz (sampling frequency).
CINEMA STUDIO EX A*
Reproduces the sound characteristics of the
Sony Pictures Entertainment’s classic
editing studio using the 3D sound imaging
of V. MULTI DIMENSION (page 50) to
create 5 sets of virtual speakers surrounding
the listener from a single pair of actual rear
speakers.
This is a standard mode, great for watching
most movies.
CINEMA STUDIO EX B*
Reproduces the sound characteristics of the
Sony Pictures Entertainment’s mixing studio
using the 3D sound imaging of V. MULTI
DIMENSION (page 50) to create 5 sets of
virtual speakers surrounding the listener
from a single pair of actual rear speakers.
This mode is ideal for watching sciencefiction or action movies with lots of sound
effects.
CINEMA STUDIO EX C*
Reproduces the sound characteristics of the
Sony Pictures Entertainment’s BGM
recording studio using the 3D sound
imaging of V. MULTI DIMENSION (page
50) to create 5 sets of virtual speakers
surrounding the listener from a single pair of
actual rear speakers.
This mode is ideal for watching musicals or
classic films where music is featured in the
soundtrack.
*“VIRTUAL” sound field: Sound field with
virtual speakers.
Sound Adjustments
continued
49
Page 50
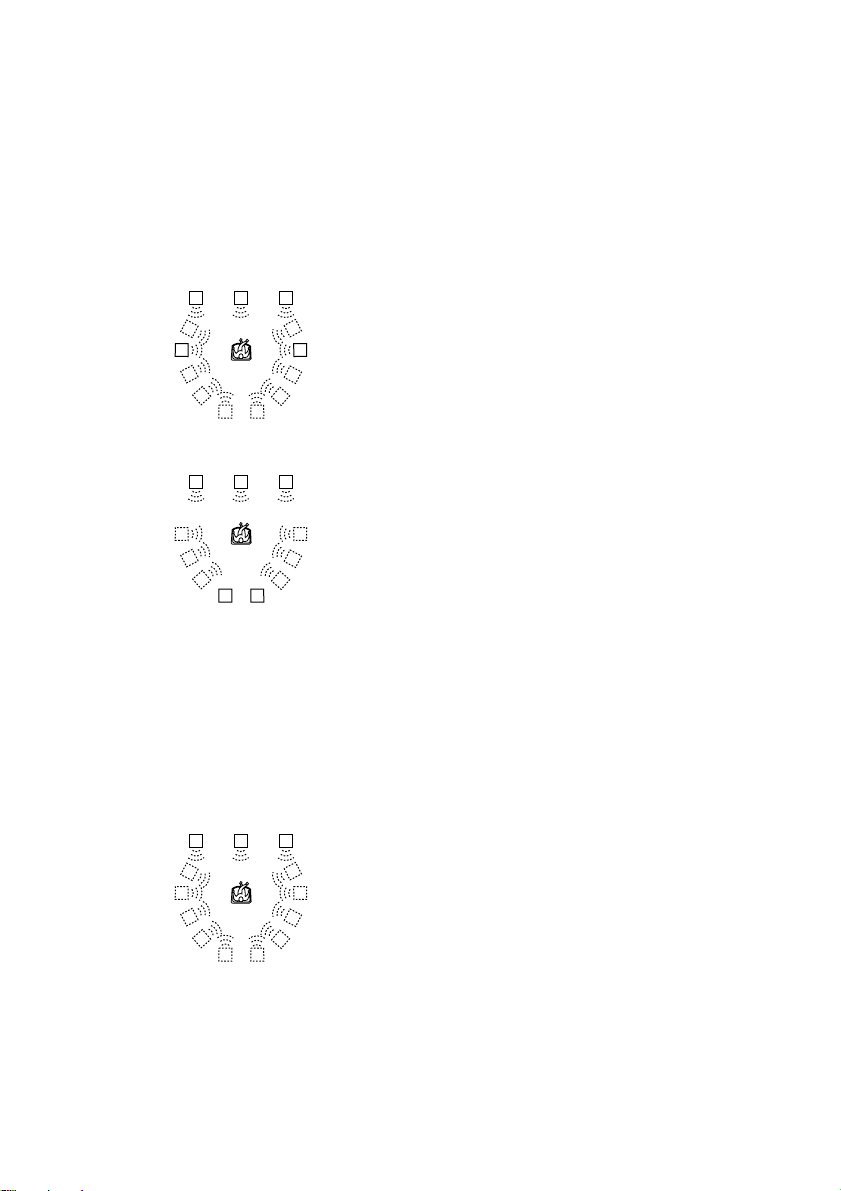
V . MULTI DIMENSION*
(Virtual Multi Dimension)
Uses 3D sound imaging to create an array of
virtual rear speakers positioned higher than
the listener from a single pair of actual rear
speakers. This mode creates 5 sets of virtual
speakers surrounding the listener at
approximately a 30° angle of elevation.
SIDE
LCR
LARGE HALL
Reproduces the acoustics of a large
rectangular concert hall.
Ideal for soft acoustic sounds.
JAZZ CLUB
Reproduces the acoustics of a jazz club.
LIVE HOUSE
Reproduces the acoustics of a 300-seat live
house.
Great for rock or pop music.
RSLS
LS
BEHIND
LCR
LS
RS
RSLS
RSLS
RS
RSLS
V . SEMI-M. DIMENSION*
(Virtual Semi Multi Dimension)
Uses 3D sound imaging to create virtual rear
speakers from the sound of the front
speakers without using actual rear speakers.
This mode creates 5 sets of virtual speakers
surrounding the listener at a 30° angle of
elevation.
LCR
RSLS
LS
RS
RSLS
SMALL HALL
Reproduces the acoustics of a small
rectangular concert hall.
Ideal for soft acoustic sounds.
GAME
Obtains maximum audio impact from video
game software.
Be sure to set the game machine to stereo
mode when using game software with stereo
sound capabilities.
AUTO FORMAT DECODE
Automatically detects the type of audio
signal being input (Dolby Digital, DTS,
Dolby Pro Logic, or standard 2 channel
stereo) and performs the proper decoding if
necessary. This mode presents the sound as
it was recorded/encoded, without adding any
effects.
You can use this mode as a reference.
NORMAL SURROUND
Software with multichannel surround audio
signals is played according to the way it was
recorded.
Software with 2 channel audio signals, is
decoded with Dolby Pro Logic to create
surround effects.
2 CH STEREO
Outputs the sound from the front left and
right speakers and subwoofer. Standard two
channel (stereo) sources completely bypass
the sound field processing. Multi channel
surround formats are downmixed to two
channels.
This allows you to play any source using
only the front left and right speakers and
subwoofer.
50
Page 51
HEADPHONE THEATER*
When you connect your headphone to the
PHONES jack of the system, the
HEADPHONE THEA TER mode allows you
to experience a theater like environment
while listening through a pair of
headphones. This mode is very effective
with 5.1 ch discreet signal sources like
Dolby Digital and DTS. Selecting any
Sound Field selections (except AUTO
FORMAT DECODE or 2 CH STEREO)
enables the mode.
*“VIRTUAL” sound field: Sound field with
virtual speakers.
Notes
• The effects provided by the virtual speakers may
cause increased noise in the playback signal.
• When listening to sound fields that employ the
virtual speakers, you will not be able to hear any
sound coming directly from the rear speakers.
• If you select AUTO FORMAT DECODE or 2 CH
STEREO when the headphones are connected,
2 channel stereo is output. If any other sound field
is selected, it is automatically changed to the
HEADPHONE THEATER mode.
Adjusting the level parameters
The level menu contains parameters that let
you adjust the balance and speaker volumes
of each speaker (page 28).
1 Start playing a program source
encoded with multichannel
surround sound.
2 Press AMP MENU repeatedly on
the remote.
9 LEVEL appears on the front panel
display.
3 Sit in your listening position and
select the item to be adjusted
using X/x.
4 Adjust the volume level using C/c.
The adjusted value will appear on the
front panel display. If you do not operate
the remote for a few seconds, the value
turned off and is stored in the system.
Sound Adjustments
Adjustable parameters for each sound field
FRONT BAL. REAR BAL. REAR LEVEL CENTER LEVEL WOOFER LEVEL
CINEMA STUDIO EX A zz z z z
CINEMA STUDIO EX B zz z z z
CINEMA STUDIO EX C zz z z z
V. MULTI DIMENSION zz z z z
V. SEMI-M. DIMENSION zzz
SMALL HALL zz z z z
LARGE HALL zz z z z
JAZZ zz z z z
LIVE zz z z z
GAME zz z z z
AUTO FORMAT DECODE zz z z z
NORMAL SURROUND zz z z z
2 CH STEREO zz
HEADPHONE THEATER z
51
Page 52
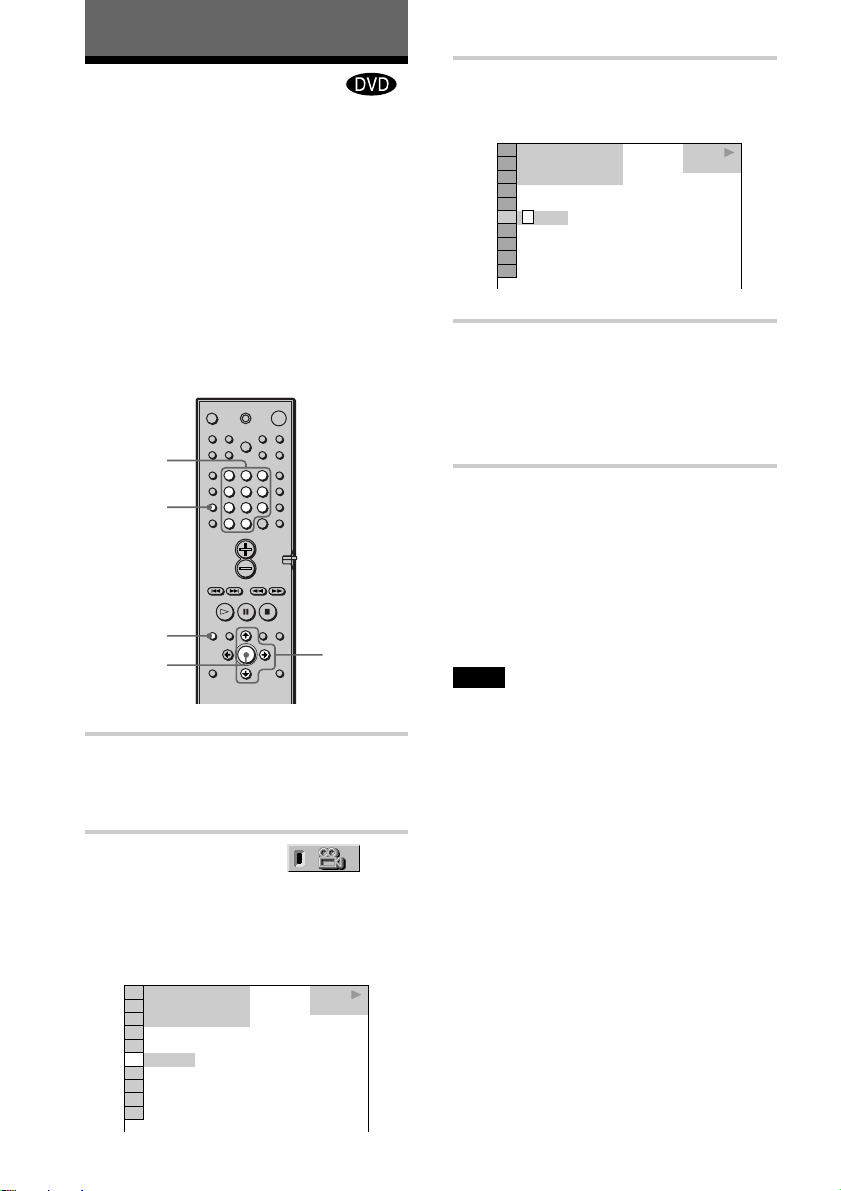
Enjoying Movies
Changing the Angles
If various angles (multi-angles) for a scene
are recorded on the DVD, “ANGLE”
appears in the front panel display. This
means that you can change the viewing
angle.
For example, while playing a scene of a
train in motion, you can display the view
from either the front of the train, the left
window of the train, or from the right
window without having the train’s
movement interrupted.
Number
Buttons
ANGLE
DVD
DISPLA Y
ENTER
123
456
89
7
>
10
10/0
X/c/x
1 Press DVD DISPLAY during
playback.
The Control Menu appears.
3 Press c or ENTER.
The angle number changes to “-.”
)
1 2 ( 2 7
1 8 ( 3 4
T
1 : 3 2 : 5 5
)
–
( 9
)
PLAY
DVD
4 Select the angle number using the
number buttons or X/x, then
press ENTER.
The angle is changed to the selected
angle.
To turn off the Control Menu
Press DVD DISPLAY repeatedly until the
Control Menu is turned off.
You can select the angle directly by pressing
z
ANGLE. Each time you press the button, the angle
changes.
Note
Depending on the DVD, you may not be able to
change the angles, even if multi-angles are recorded
on the DVD.
2 Press X/x to select
(ANGLE).
The angle number appears.
The number in parentheses indicates
the total number of angles.
1 2 ( 2 7
1 8 ( 3 4
T
1 : 3 2 : 5 5
)
1
( 9
52
)
)
PLAY
DVD
Page 53
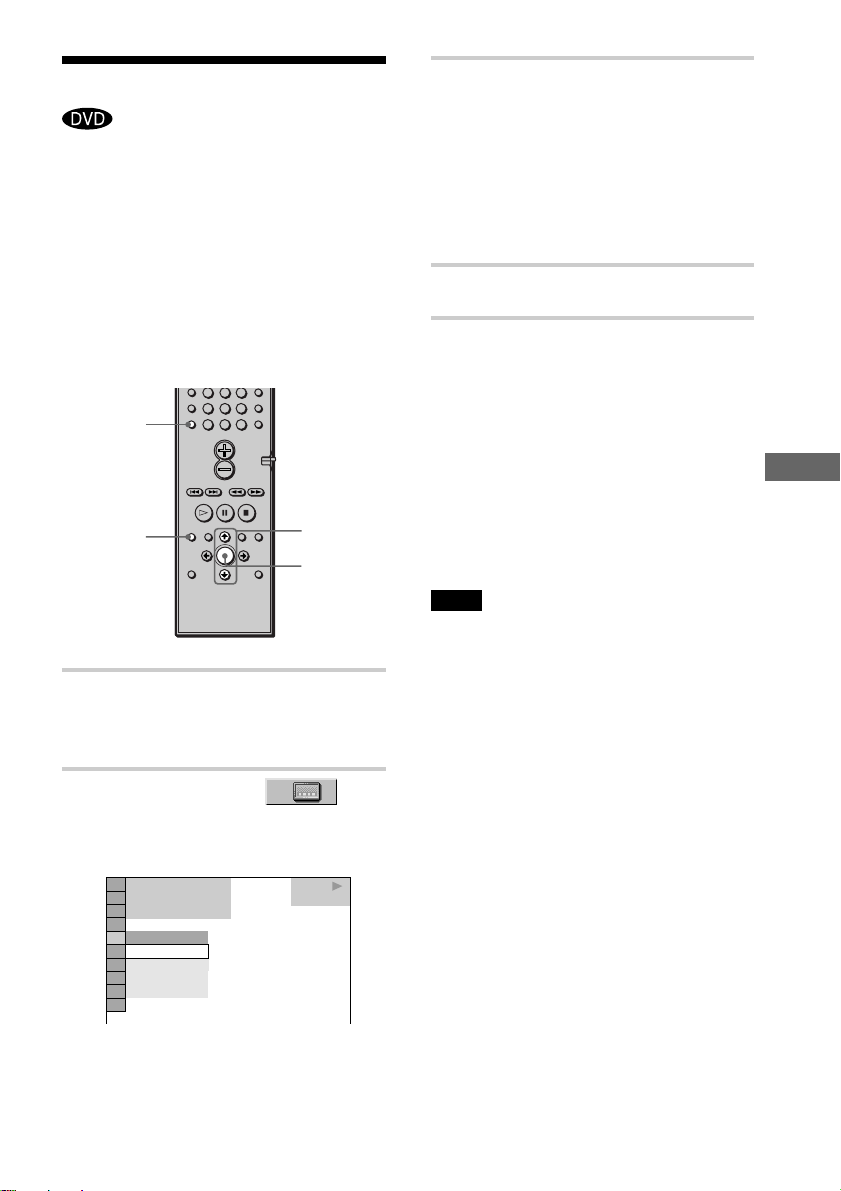
Displaying the Subtitles
If subtitles are recorded on the discs, you
can turn the subtitles on and off while
playing. If multilingual subtitles are
recorded on the disc, you can change the
subtitle language while playing, or turn the
subtitles on or off whenever you want. For
example, you can select the language you
want to practice and turn the subtitles on for
better understanding.
456
89
7
>
10
SUBTITLE
DVD
DISPLA Y
10/0
X/x
ENTER
3 Press X/x to select the language.
Depending on the DVD, the choice of
language varies.
When 4 digits are displayed, they
indicate the language code. Refer to
the language code list on page 80 to
see which language the code
represents.
4 Press ENTER.
To cancel the SUBTITLE setting
Select “OFF” in Step 3.
To turn off the Control Menu
Press DVD DISPLAY repeatedly until the
Control Menu is turned off.
z
You can select SUBTITLE directly by pressing
SUBTITLE. Each time you press the button, the item
changes.
Note
Depending on the DVD, you may not be able to
change the subtitles even if multilingual subtitles are
recorded on it.
Enjoying Movies
1 Press DVD DISPLAY during
playback.
The Control Menu appears.
2 Press X/x to select
(SUBTITLE), then press ENTER.
The options for SUBTITLE appear.
)
1 2 ( 2 7
)
1 8 ( 3 4
T
1 : 3 2 : 5 5
OFF
OFF
1: ENGLISH
FRENCH
2:
3: SPANISH
PLAY
DVD
53
Page 54
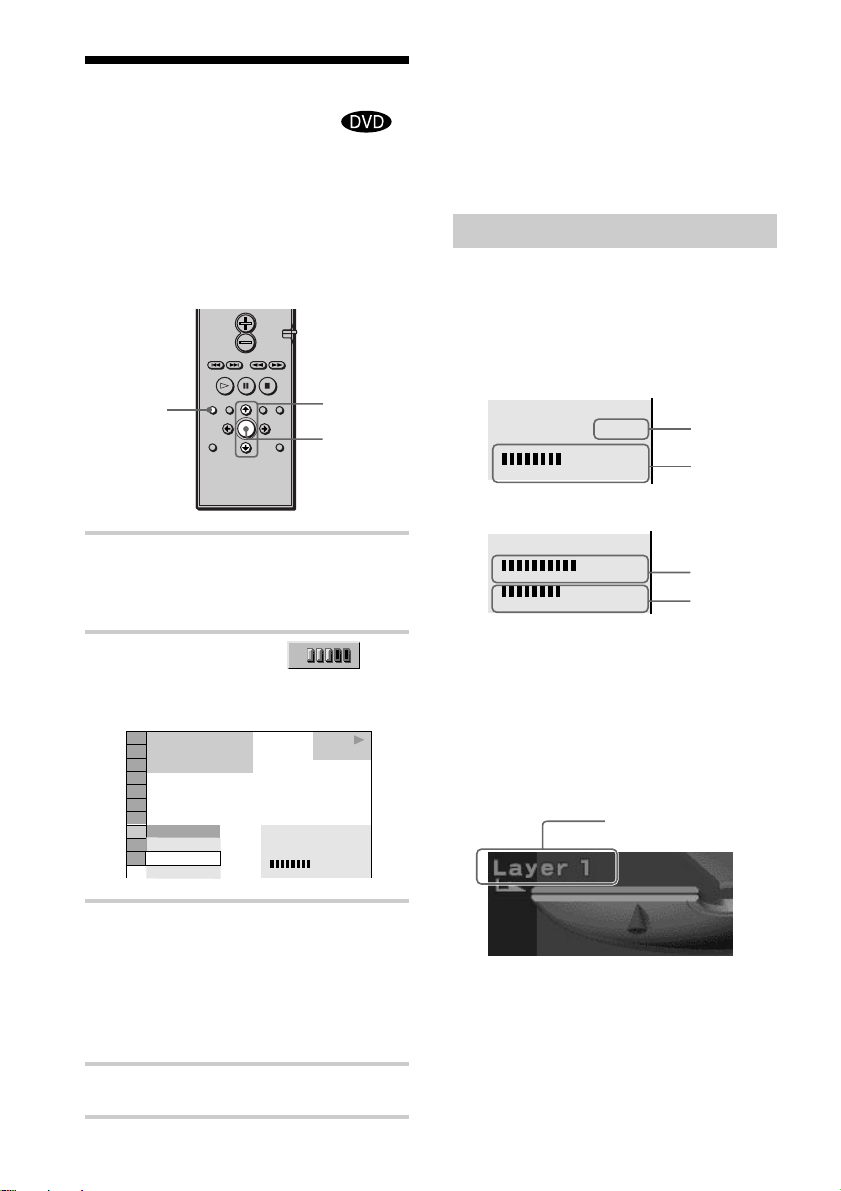
Checking the Play
Information
You can check information such as the bit
rate or the disc layer that is being played.
While playing a disc, an approximate bit
rate of the playback picture is always
displayed as Mbps (Mega bit per second)
and the audio as kbps (kilo bit per second).
DVD
DISPLAY
(ADVANCED)
X/x
ENTER
To close the ADVANCED window
Select “OFF” in Step 3.
To turn off the Control Menu
Press DVD DISPLAY repeatedly until the
Control Menu is turned off.
Displays of each item
By pressing DVD DISPLAY repeatedly, you
can display either “BIT RATE” or
“LAYER,” whichever was selected in
“ADV ANCED.”
BIT RATE
BIT RATE
05
384
10
kbps
Mbps
When playing MPEG audio sound tracks
Audio
Video
1 Press DVD DISPLAY during
playback.
The Control Menu is displayed.
2 Press X/x to select
(ADVANCED), then press ENTER.
The options for ADVANCED appear.
)
1 2 ( 2 7
)
1 8 ( 3 4
T
1 : 3 2 : 5 5
BIT RATE
OFF
BIT RATE
LAYER
3 Press X/x to select items.
For each item, please refer to
“Displays of each item.”
• BIT RATE: displays the bit rate.
• LAYER: displays the layer and the
pick-up point.
4 Press ENTER.
54
PLAY
DVD
BIT RATE
05
BIT RATE
0
05
1000
10
kbps
Mbps
Audio
Video
Bit rate refers to the amount of video/audio
data per second in a disc. The higher the bit
rate, the larger the amount of data. When the
bit rate level is high, there is a large amount
of data. However, this does not always mean
that you can get higher quality pictures or
sounds.
LAYER
384
kbps
Mbps
10
Appears when the DVD
has dual layers
Indicates the approximate point where the
disc is playing.
If it is a dual-layer DVD, the system
indicates which layer is being read (“Layer
0” or “Layer 1”).
For details on the layers, see page 76
(DVD).
Page 55
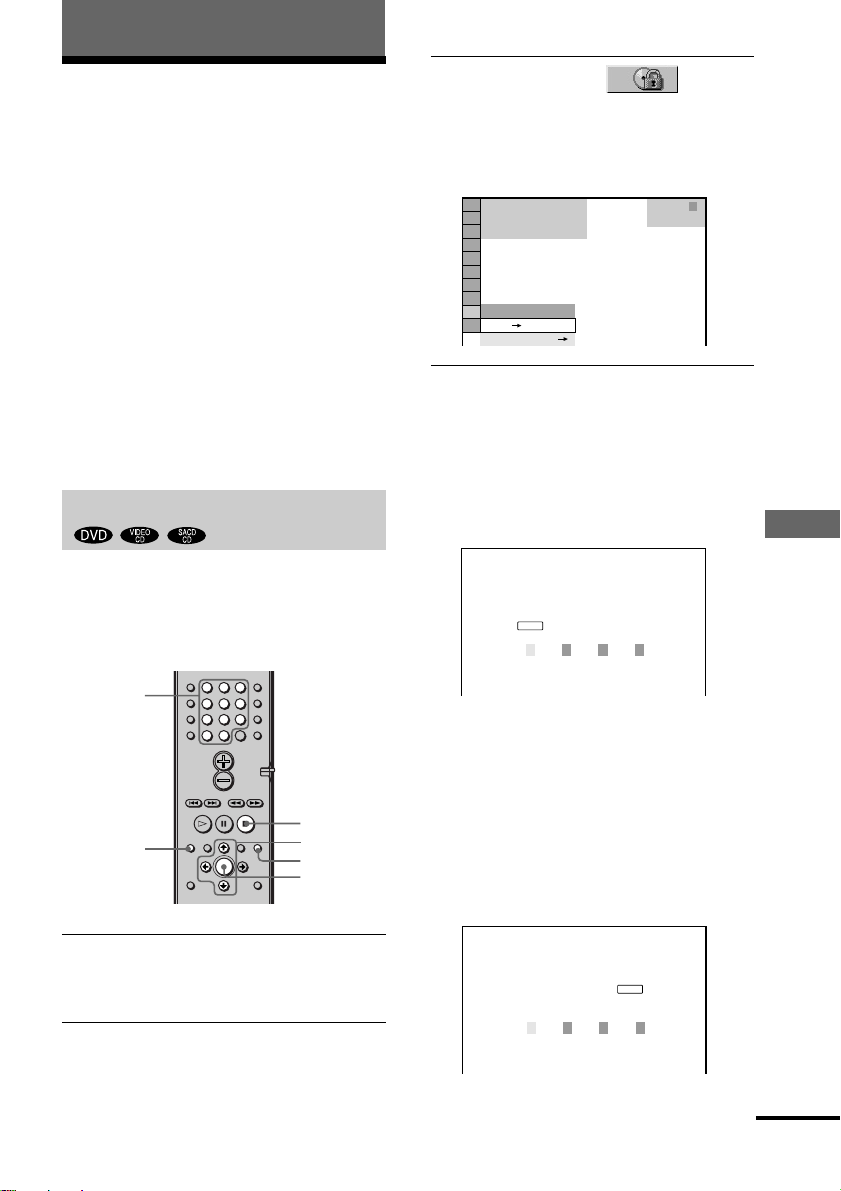
Using V arious Additional Functions
Locking Discs (CUSTOM
PARENTAL CONTROL, PARENTAL
CONTROL)
You can set two kinds of playback
restrictions for a disc.
• Custom Parental Control
You can set the playback restrictions so
that the system will not play inappropriate
discs.
• Parental Control
Playback of some DVDs can be limited
according to a predetermined level such as
the age of the users.
The same password is used for both Parental
Control and Custom Parental Control.
Custom Parental Control
You can set the same Custom Parental
Control password for up to 50 discs. When
you set the fifty-first-disc, the playback
restriction for the first disc is cancelled.
3 Press X/x to select (CUSTOM
PARENTAL CONTROL), then press
ENTER.
“CUSTOM P ARENTAL CONTROL” is
selected.
)
1 2 ( 2 7
)
1 8 ( 3 4
T
1 : 3 2 : 5 5
OFF
ON
PASSWORD
STOP
DVD
4 Press X/x to select “ON t,” then
press ENTER.
xWhen you have not entered a
password
The display for registering a new
password appears.
CUSTOM PARENTAL CONTROL
Enter a new 4-digit password, then
ENTER
.
press
Using Various Additional Functions
Number
buttons
DVD
DISPLA Y
123
456
89
7
>
10
10/0
x
C/X/x
O RETURN
ENTER
1 Insert the disc you want to lock.
If the disc is playing, press x to stop
playback.
2 In stop mode, press DVD DISPLAY.
The Control Menu appears.
Enter a 4-digit password by using the
number buttons, then press ENTER.
The display for confirming the password
appears.
xWhen you have already
registered a password
The display for entering the password
appears.
CUSTOM PARENTAL CONTROL
Enter password, then press
ENTER
.
continued
55
Page 56
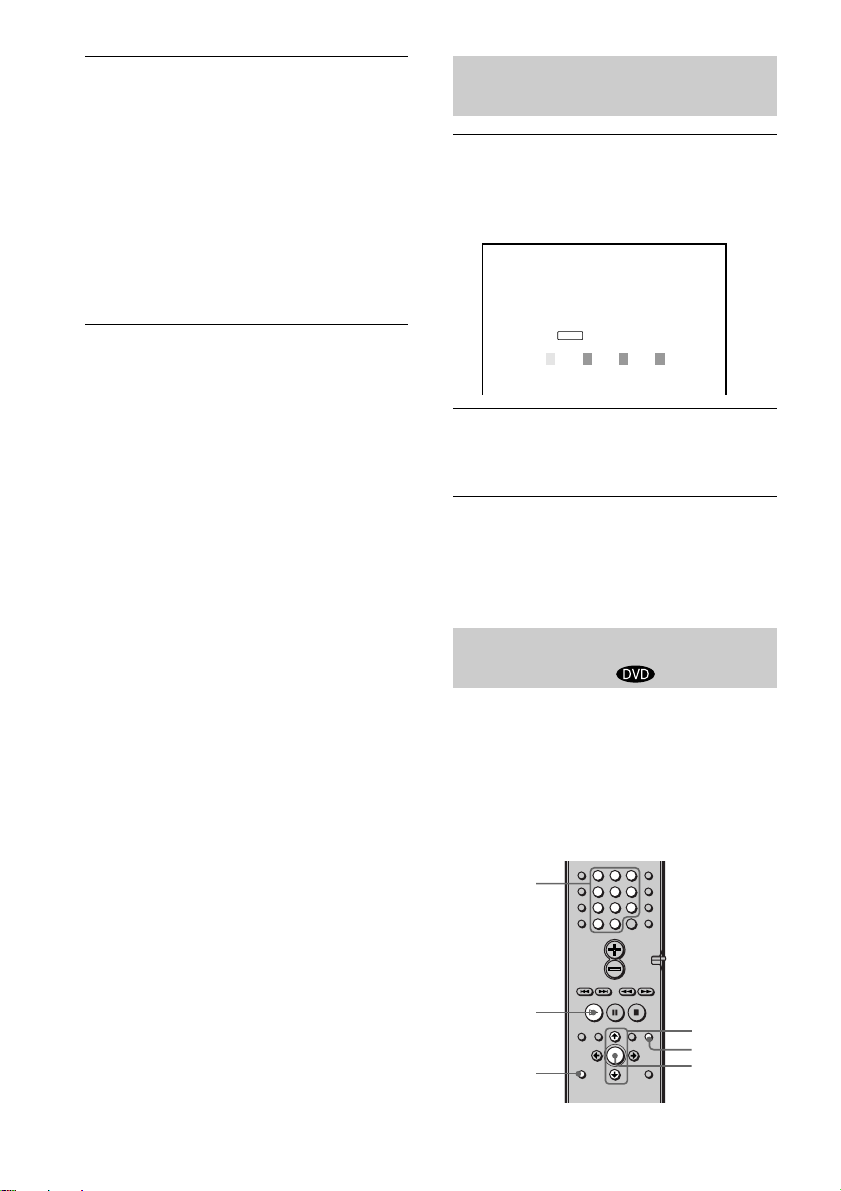
5 Enter or re-enter your 4-digit password
123
456
7
>
10
10/0
89
by using the number buttons, then
press ENTER.
“Custom parental control is set.” appears
and then the screen returns to the
Control Menu display.
If you make a mistake entering
your password
Press C before you press ENTER and
input the correct number.
If you make a mistake
Press O RETURN, then start from Step 3
again.
To turn off the Control Menu
Press O RETURN, then press DVD
DISPLAY repeatedly until the Control
Menu is turned off.
To turn off the Custom Parental
Control function
1 In Step 4, select “OFF t,” then press
ENTER.
2 Enter your 4-digit password using the
number buttons, then press ENTER.
To change the password
1 In Step 4, press X/x to select
“PASSWORD t,” then press ENTER.
The display for entering the password
appears.
2 Enter your 4-digit password using the
number buttons, then press ENTER.
3 Enter a new 4-digit password using the
number buttons, then press ENTER.
4 To confirm your password, re-enter it
using the number buttons, then press
ENTER.
Playing the disc for which Custom
Parental Control is set
1 Insert the disc for which Custom
Parental Control is set.
The CUSTOM PARENTAL CONTROL
display appears.
CUSTOM PARENTAL CONTROL
Custom parental control is already
set. To play, enter your password
ENTER
and press
.
2 Enter your 4-digit password using the
number buttons, then press ENTER.
The system is ready for playback.
z If you forget your password, enter the 6-digit
number “199703” using the number buttons when the
CUSTOM PARENTAL CONTROL display asks you
for your password, then press ENTER. The display
will ask you to enter a new 4-digit password.
Limiting playback for children
(Parental Control)
Playback of some DVDs can be limited
according to a predetermined level such as
the age of the users. The “Parental Control”
function allows you to set a playback
limitation level.
A scene that is limited is not played, or it is
replaced by a different scene.
Number
buttons
H
DVD
SETUP
X/x
O RETURN
ENTER
56
Page 57
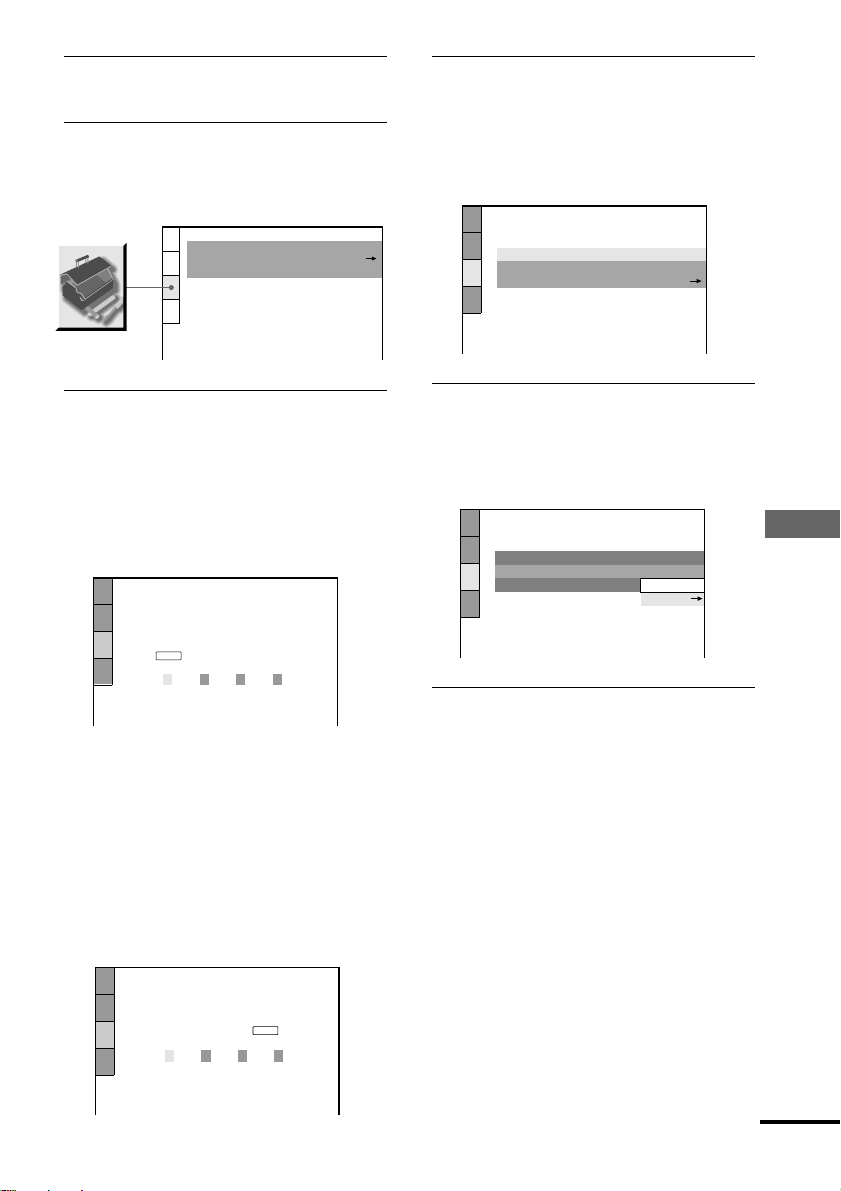
1 In stop mode, press DVD SETUP.
The Setup Display appears.
2 Press X/x to select “CUSTOM SETUP,”
then press ENTER.
“CUSTOM SETUP” is displayed.
CUSTOM SETUP
PAUSE MODE:
PARENTAL CONTROL
TRACK SELECTION
AUTO
OFF
4 Enter or re-enter your password using
the number buttons, then press ENTER.
The display for setting the playback
limitation level and changing the
password appears.
CUSTOM SETUP
PARENTAL CONTROL
LEVEL:
STANDARD:
CHANGE PASSWORD
OFF
USA
3 Press X/x to select “PARENTAL
CONTROL t,” then press ENTER.
xIf you have not entered a
password
The display for registering a new
password appears.
CUSTOM SETUP
PARENTAL CONTROL
Enter a new 4-digit password, then
ENTER
press
.
Enter a 4-digit password using the
number buttons, then press ENTER.
The display for confirming the password
appears.
xWhen you have already
registered a password
The display for entering the password
appears.
CUSTOM SETUP
PARENTAL CONTROL
Enter password, then press
ENTER
.
5 Press X/x to select “STANDARD,” then
press ENTER.
The selection items for “STANDARD”
are displayed.
CUSTOM SETUP
PARENTAL CONTROL
LEVEL:
STANDARD:
CHANGE PASSWORD
OFF
USA
USA
OTHERS
6 Press X/x to select a geographic area
as the playback limitation level, then
press ENTER.
The area is selected.
If you select “OTHERS t,” select and
enter the standard code in the table on
page 59 using the number buttons.
Using Various Additional Functions
continued
57
Page 58
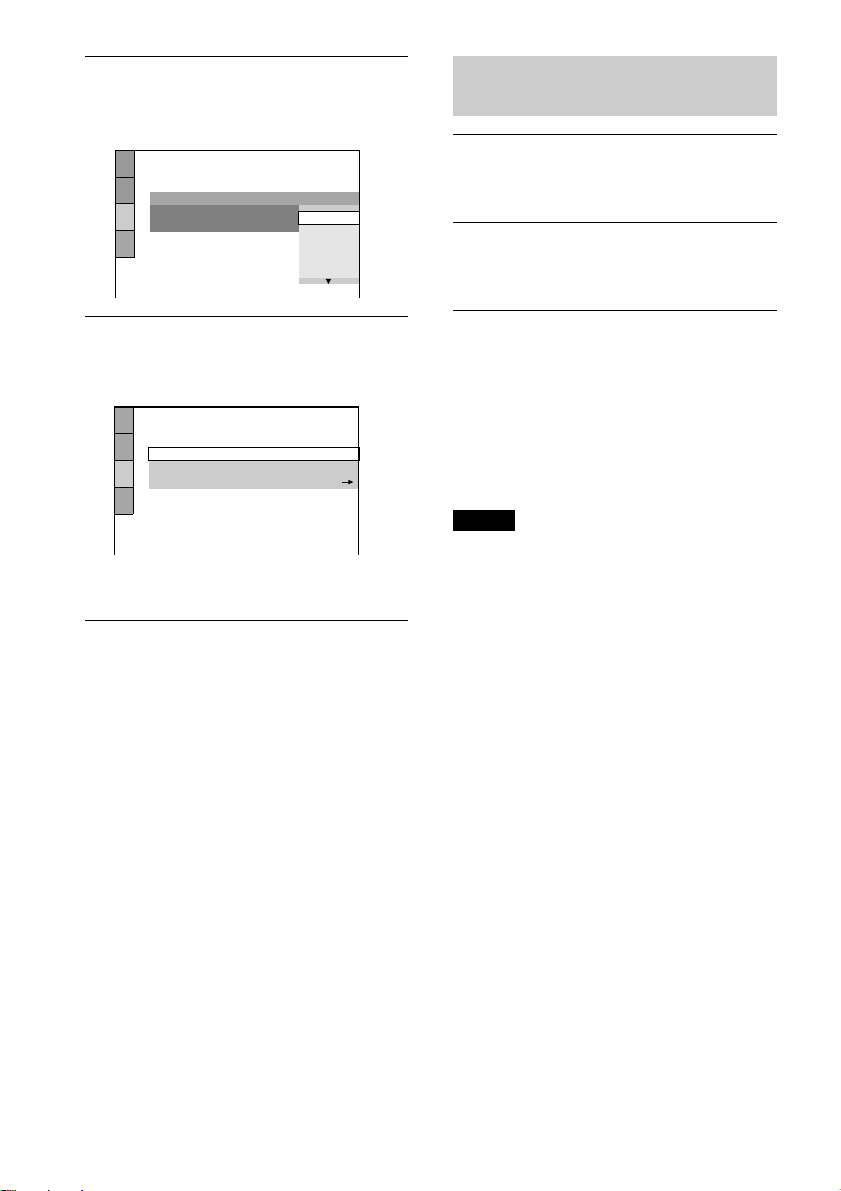
7 Press ENTER.
The selection items for “LEVEL” are
displayed.
CUSTOM SETUP
PARENTAL CONTROL
LEVEL: OFF
STANDARD:
CHANGE PASSWORD
8:
7:
6:
5:
OFF
NC17
Playing the disc for which Parental
Control is set
1 Insert the disc and press H.
The PARENTAL CONTROL display
appears.
R
2 Enter your 4-digit password using the
number buttons, then press ENTER.
The system starts playback.
8 Select the level you want using X/x,
then press ENTER.
Parental Control setting is complete.
CUSTOM SETUP
PARENTAL CONTROL
LEVEL:
STANDARD:
CHANGE PASSWORD
The lower the value, the more strict the
limitation.
If you make a mistake
Press O RETURN to go back to the
previous screen.
To turn off the Setup Display
Press DVD SETUP repeatedly until the
Setup Display is turned off.
To turn off the Parental Control
function and play the DVD after
entering your password
Set “LEVEL” to “OFF” in Step 8.
4: PG13
USA
z If you forget your password, remove the disc and
repeat Step 1 to 5 of “Limiting playback for
children.” When you are asked to enter your
password, enter “199703” using the number buttons,
then press ENTER. The display will ask you to enter
a new 4-digit password. After you enter a new 4-digit
password in Step 3, replace the disc in the system and
press H. When the PARENTAL CONTROL display
appears, enter your new password.
Notes
• When you play DVDs which do not have the
Parental Control function, playback cannot be
limited on this system.
• Depending on the DVD, you may be asked to
change the parental control level while playing the
disc. In this case, enter your password, then change
the level. If the Resume Play mode is cancelled, the
level returns to the original level.
To change the password
1 In Step 5, select “CHANGE
PASSWORD t” using x, then press
ENTER.
The display for entering the password
appears.
2 Follow Step 3 to enter a new password.
58
Page 59
Area Code
Standard Code
number
Argentina 2044
Australia 2047
Austria 2046
Belgium 2057
Brazil 2070
Canada 2079
Chile 2090
China 2092
Denmark 2115
Finland 2165
France 2174
Germany 2109
Hong Kong 2219
India 2248
Indonesia 2238
Italy 2254
Japan 2276
Standard Code
number
Korea 2304
Malaysia 2363
Mexico 2362
Netherlands 2376
New Zealand 2390
Norway 2379
Pakistan 2427
Philippines 2424
Portugal 2436
Russia 2489
Singapore 2501
Spain 2149
Sweden 2499
Switzerland 2086
T aiwan 2543
Thailand 2528
United Kingdom 2184
Using Various Additional Functions
59
Page 60
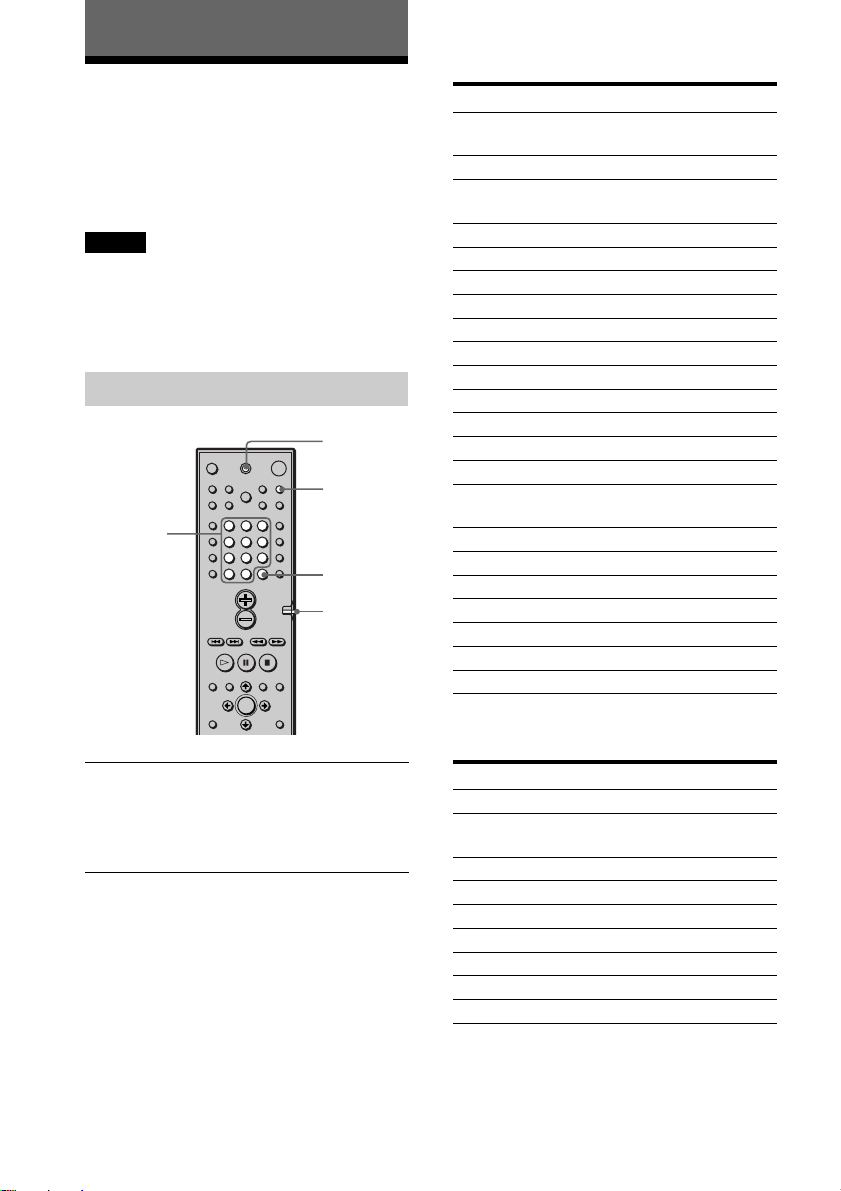
Other Operations
Controlling the TV with the Supplied Remote
By adjusting the remote signal, you can
control your TV with the supplied remote.
Notes
• If you enter a new code number, the code number
previously entered will be erased.
• When you replace the batteries of the remote, the
code number may be reset to the default (SONY)
setting. Reset the appropriate code number.
Controlling TVs with the remote
TV ?/1
TV/VIDEO
Number*
buttons
123
456
7
89
>
10
10/0
ENTER
CONTROL
DVD/TV
switch
TV
Manufacturer Code number
DAEWOO 002, 004, 005, 006, 007,
015
FISHER 008
GOLDSTAR 002, 003, 011, 012, 015,
034
DRUNDIG 017, 034
HITACHI 002, 013, 014, 015
ITT/NOKIA 021, 022
JVC 016
MAGNAVOX 002, 003, 018
MITSUBISHI/MGA 002, 003, 019
NEC 002, 003, 020
PANASONIC 009, 024
PHILIPS 015, 018
PIONEER 009, 025, 026, 040
RCA/PROSCAN 002, 010, 027, 028, 029
SAMSUNG 002, 003, 015, 031, 032,
033, 034
SANYO 008, 044, 045, 046
SHARP 035
SONY 001
TELEFUNKEN 023, 036, 037, 038
THOMSON 030, 037, 039
TOSHIBA 035, 040, 041
ZENITH 042, 043
Press and hold TV [/1 while entering your
TV’s manufacturer’s code (see the table)
using the number buttons and press ENTER.
Then release TV [/1.
Code numbers of controllable TVs
If more than one code number is listed, try
entering them one at a time until you find
the one that works with your TV.
60
CATV
Manufacturer Code number
SONY 101
JERROLD/GI 102, 103, 104, 105, 106,
107, 108, 109, 119, 131
SCIENTIFIC ATLANTA 110, 111, 112
PIONEER 115, 116
HAMLIN/REGAL 123, 124, 125, 126, 127
OAK 128, 129, 130
ZENITH 113, 114
TOCOM 117, 118, 131
PANASONIC 120, 121, 122
Page 61
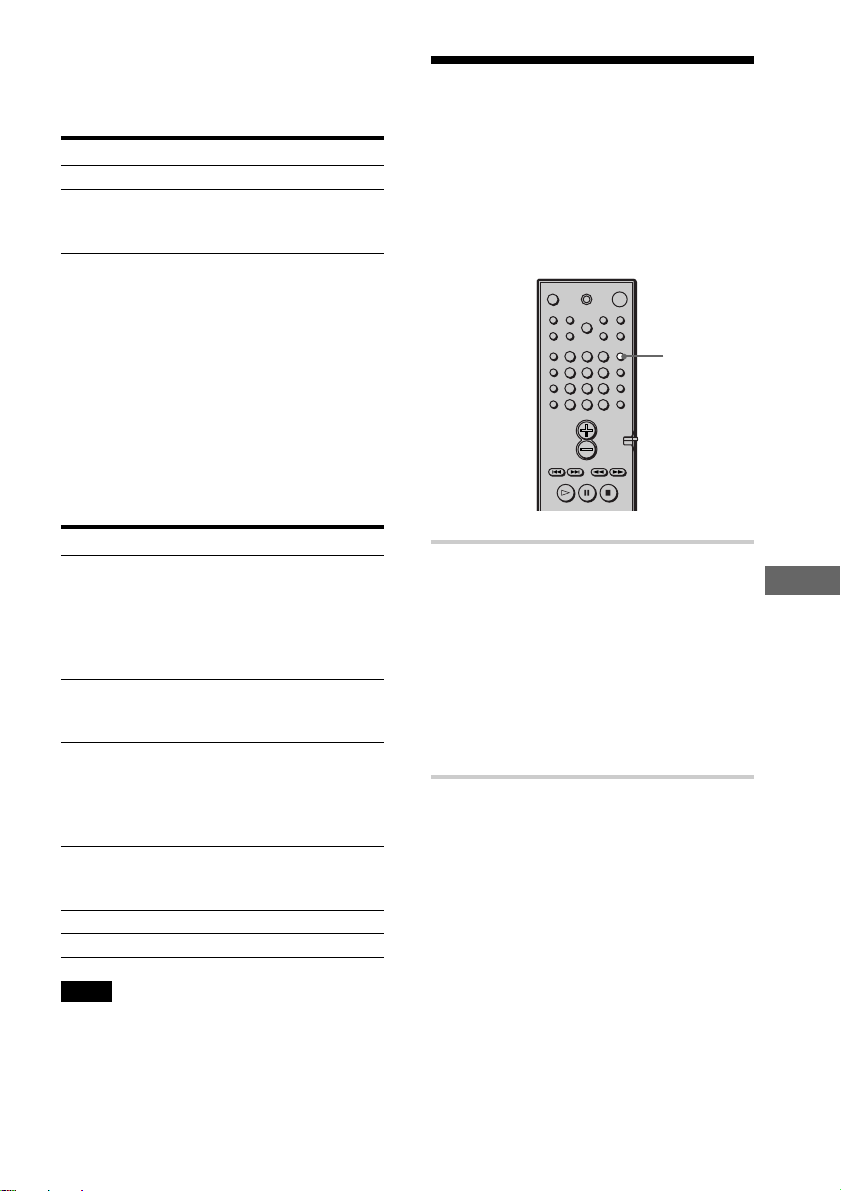
123
456
7
>
10
10/0
89
Controlling the TV
You can control your TV using the buttons
below.
By pressing You can
TV [/1 Turn the TV on or off.
TV/VIDEO Switch the TV’s input source
between the TV and other input
sources.
Switching between TV and DVD
Using the CONTROL DVD/TV switch, you
can switch the remote signal between
control of the TV and control of the DVD
unit. When you watch the DVD, ensure that
you have the CONTROL DVD/TV switch
set to DVD.
The table below shows the buttons that are
affected by the CONTROL DVD/TV switch.
Button DVD TV
1~9,** Standard number Regardless of
>10, button function the number
10/0 for DVD. button pressed,
the channel
advances in
numerical order.
ENTER Standard enter Skips to channel
function for 12.
DVD.
. Standard CH –
preceding title,
chapter skip
function for
DVD.
> Standard forward CH +
title, chapter
skip for DVD.
3 VOL + VOL +
# VOL – VOL –
Watching the Video or other Unit
You can use VCRs or other units connected
to the VIDEO 1 or VIDEO 2 jacks. Refer to
the operation manual supplied with the unit
for farther information on the operation.
FUNCTION
Press FUNCTION repeatedly until
VIDEO 1 or VIDEO 2 that you connected
the unit to appears on the front panel
display.
Each time you press FUNCTION, the mode
of the system changes in the following
sequence.
DVD t VIDEO 1 t VIDEO 2 t
TUNER t DVD...
Other Operations
Note
Depending on the TV, you may not be able to control
your TV or to use some of the buttons above.
* Use the number buttons only to enter the code
number of controllable TVs.
**For double digit number, press >10, then the
number. (For example, press >10, then 2 and 5 for
entering 25.)
61
Page 62
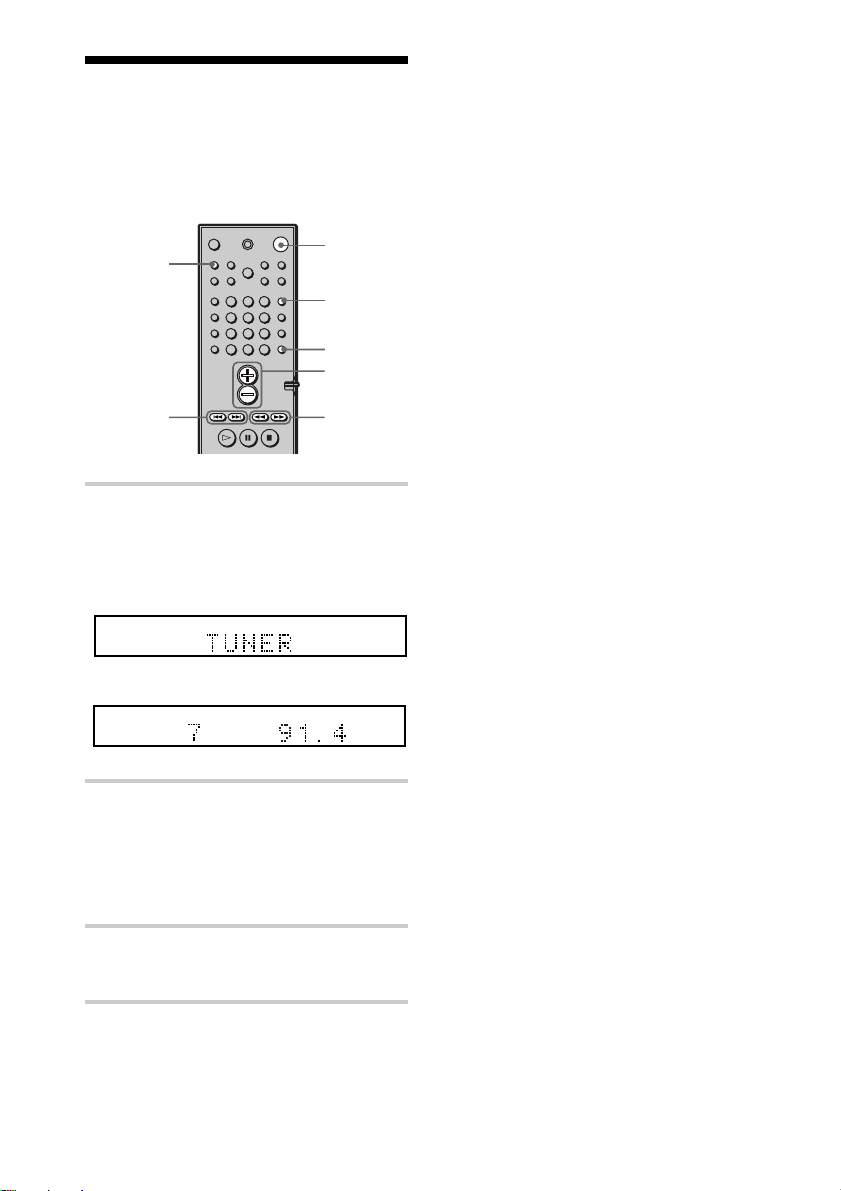
Listening to the Radio
Preset radio stations in the system’s memory
first (see “Presetting Radio Stations” on
page 30).
1
STEREO/
MONO
123
456
89
7
>
10
10/0
FUNCTION
DISPLA Y
VOL +/–
To listen to non-preset radio stations
Use manual or automatic tuning in Step 2.
For manual tuning, press m or M
(TUNING + or –) on the remote repeatedly.
For automatic tuning, press and hold m or
M (TUNING + or –) on the remote.
z
If an FM program is noisy
Press STEREO/MONO on the remote so that
“MONO” appears on the front panel display. There
will be no stereo effect, but the reception will
improve. Press the button again to restore the stereo
effect.
z To improve reception
Reorient the supplied antennas.
PRESET
+/–
TUNING
+/–
1 Press FUNCTION repeatedly until
TUNER appears on the front panel
display.
The last received station is tuned in.
ALL
DISC1SAUTO
PRO
LOGIC
DIGITAL
FM AM
NTSCPBC ANGLE
TITLE TRACK CHAPTER INDEX TUNEDH MONOMSTS
dB
kHz
MHz
REPEAT 1
PROGRAM
SHUFFLE
m
ALL
DISC1SAUTO
PRO
LOGIC
DIGITAL
FM AM
NTSCPBC ANGLE
TITLE TRACK CHAPTER INDEX H TUNED M MONO ST S
dB
kHz
MHz
REPEAT 1
PROGRAM
SHUFFLE
2 Press PRESET + or PRESET –
repeatedly to select the preset
station you want.
Each time you press the button, the
system tunes in one preset station.
3 Adjust the volume by pressing
VOL +/–.
To check the frequency or sound field
Press DISPLAY repeatedly.
Each time you press DISPLAY, the front
panel display changes as follows:
index name of the station t frequency t
sound field t index name of the station
To turn off the radio
Press 1.
62
Page 63
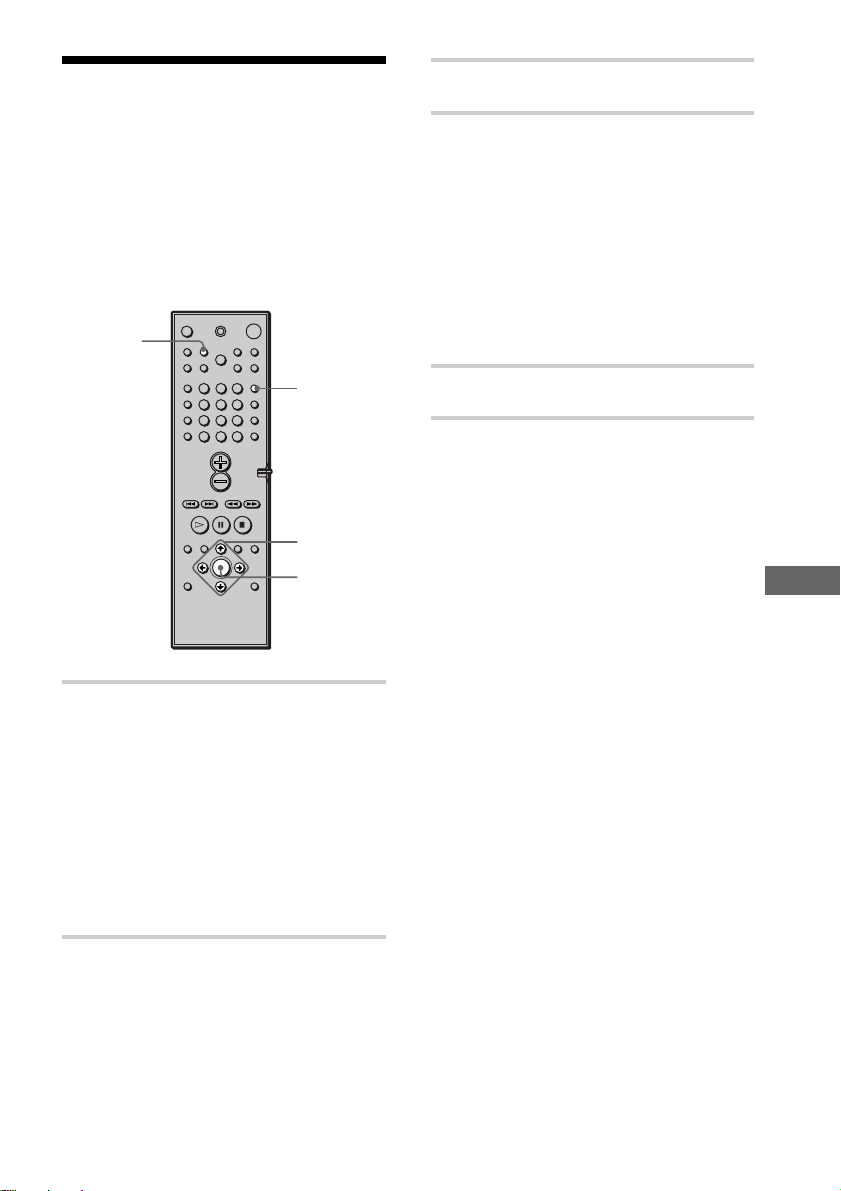
Naming Preset Stations
3 Press NAME.
You can enter a name of up to 8 characters
for preset stations. These names (for
example, “XYZ”) appear in the system’s
front panel display when a station is
selected.
Note that no more than one name can be
entered for each preset station.
NAME
123
456
89
7
>
10
10/0
FUNCTION
C/X/x/c
ENTER
1 Press FUNCTION repeatedly until
TUNER appears on the front panel
display.
The last station you received is tuned
in.
Each time you press FUNCTION, the
mode of the system changes in the
following sequence:
DVD t VIDEO 1 t VIDEO 2 t
TUNER t DVD...
4 Create an index name by using the
cursor buttons:
Press x/X to select a character, then
press c to move the cursor to the next
position.
If you make a mistake
Press C or c repeatedly until the
character to be changed flashes, then
press x/X to select the right character.
5 Press ENTER.
To assign index names to other
stations
Repeat Steps 2 to 5.
Other Operations
2 Tune in the preset station you
want to create an index name for.
If you are not familiar with how to
tune in preset stations, see “Listening
to the Radio” on page 62.
63
Page 64
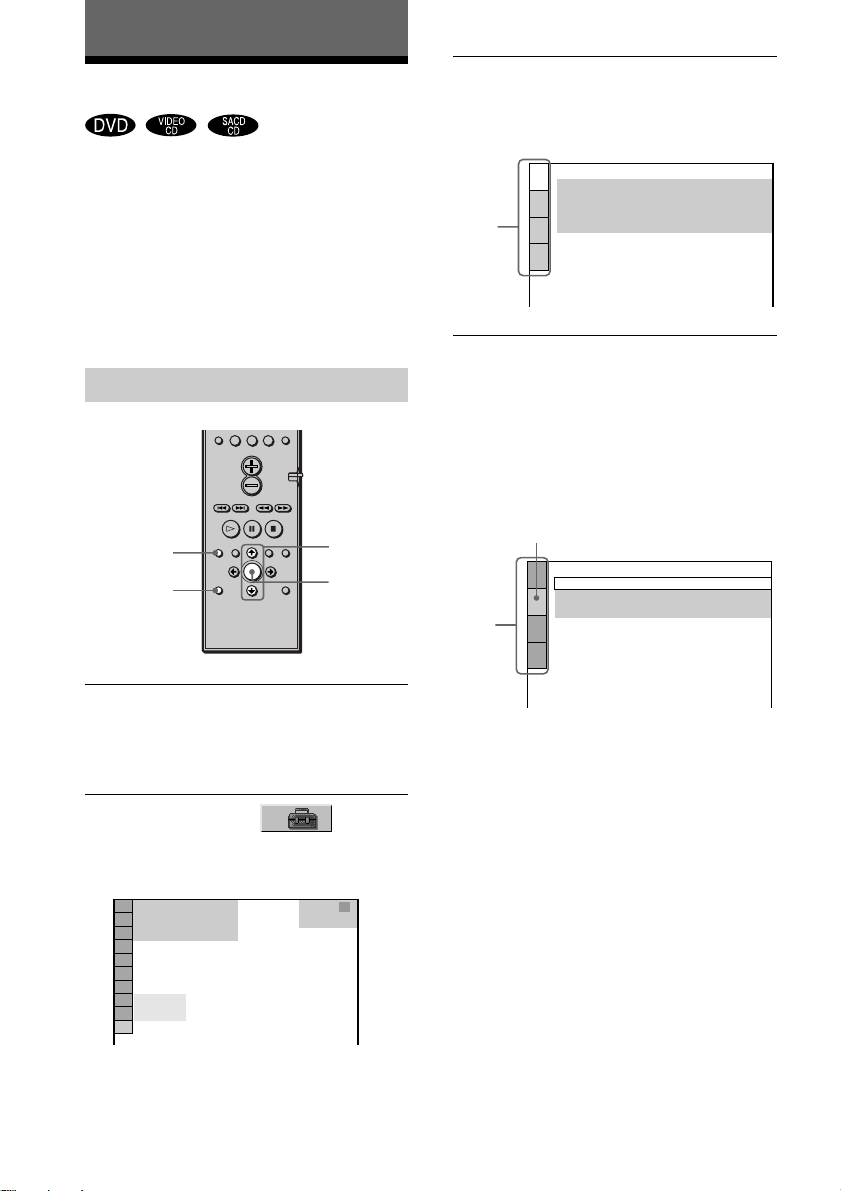
Settings and Adjustments
Using the Setup Display
By using the Setup Display, you can make
various adjustments to items such as picture
and sound. You can also set a language for
the subtitles and the Setup Display, among
other things. For details on each Setup
Display item, see pages 65-71. For an
overall list of Setup Display items, see page
81.
How to use the Setup Display
>
10
10/0
DVD
DISPLAY
DVD
SETUP
X/x
ENTER
3 Press X/x to select “CUSTOM,” then
press ENTER.
The Setup Display appears.
Main
item
LANGUAGE SETUP
OSD:
DVD MENU:
AUDIO:
SUBTITLE:
ENGLISH
ENGLISH
ORIGINAL
ENGLISH
4 Press X/x to select the setup item from
the displayed list: “LANGUAGE SETUP,”
“SCREEN SETUP,” “CUSTOM SETUP,”
and “SPEAKER SETUP.” Then press
ENTER.
The selected Setup item appears.
Example: “SCREEN SETUP”
Selected item
Setup
items
SCREEN SETUP
TV TYPE:
SCREEN SAVER:
BACKGROUND:
4:3 LETTER BOX
JACKET PICTURE
ON
1 In stop mode, press DVD DISPLAY.
The Control Menu appears.
If you press DVD SETUP, you can go to
Step 3 directly.
2 Press X/x to select (SETUP),
then press ENTER.
The options for SETUP appear.
)
( 47
: :
CUSTOM
RESET
64
STOP
DVD
Page 65
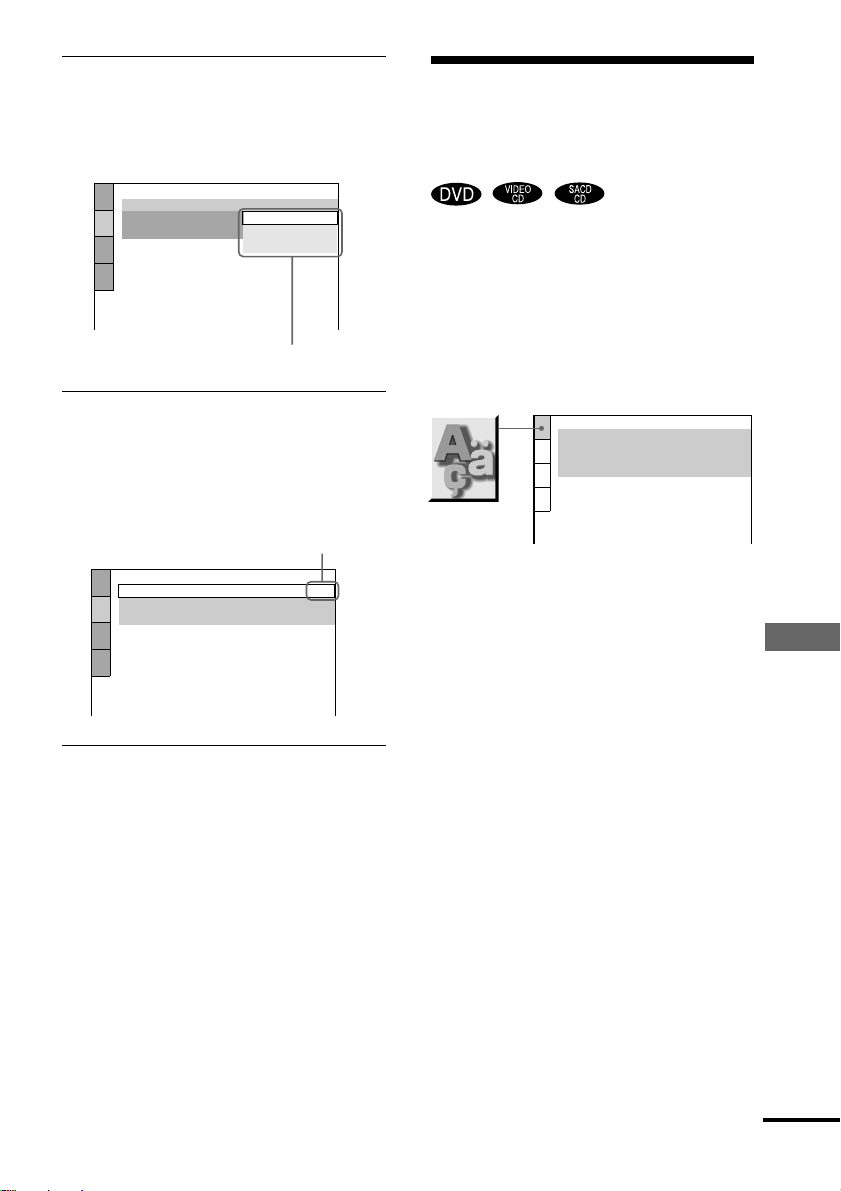
5 Select an item using X/x, then press
ENTER.
The options for the selected item appear.
Example: “TV TYPE”
SCREEN SETUP
TV TYPE:
SCREEN SAVER:
BACKGROUND:
4:3 LETTER BOX
4:3 LETTER BOX
4:3 PAN SCAN
16:9
Options
Setting the Display or
Sound Track Language
(LANGUAGE SETUP)
“LANGUAGE SETUP” allows you to set
various languages for the on-screen display
or sound track.
Select “LANGUAGE SETUP” in the Setup
Display. For details on using the display, see
“Using the Setup Display” (page 64).
6 Select a setting using X/x, then press
ENTER.
The setting is selected and setup is
complete.
Example: “16:9”
Selected setting
SCREEN SETUP
TV TYPE:
SCREEN SAVER:
BACKGROUND:
JACKET PICTURE
To turn off the Setup Display
Press DVD SETUP or DVD DISPLA Y
repeatedly until the Setup Display is turned
off.
z
If you select “RESET” in Step 2, you can reset all
of the “SETUP” settings on page 81 (except for
P ARENTAL CONTROL) to the default settings.
After you select “RESET” and press ENTER, select
“YES” to reset the settings (it takes a few seconds to
complete), or select “NO” and press ENTER to
return to the Control Menu. Do not press POWER or
1 when resetting the system.
16:9
ON
LANGUAGE SETUP
OSD:
DVD MENU:
AUDIO:
SUBTITLE:
ENGLISH
ENGLISH
ORIGINAL
ENGLISH
xOSD (On-Screen Display)
Switches the display language on the screen.
Selects the language from the displayed list.
xDVD MENU (DVD only)
Selects the desired language for the DVD
menu.
xAUDIO (DVD only)
Switches the language of the sound track.
Selects the language from the displayed list.
When you select “ORIGINAL,” the
language given priority in the disc is
selected.
xSUBTITLE (DVD only)
Switches the language of the subtitle.
Selects the language from the displayed list.
When you select “AUDIO FOLLOW ,” the
language for the subtitles changes according
to the language you selected for the sound
track.
Settings and Adjustments
continued
65
Page 66
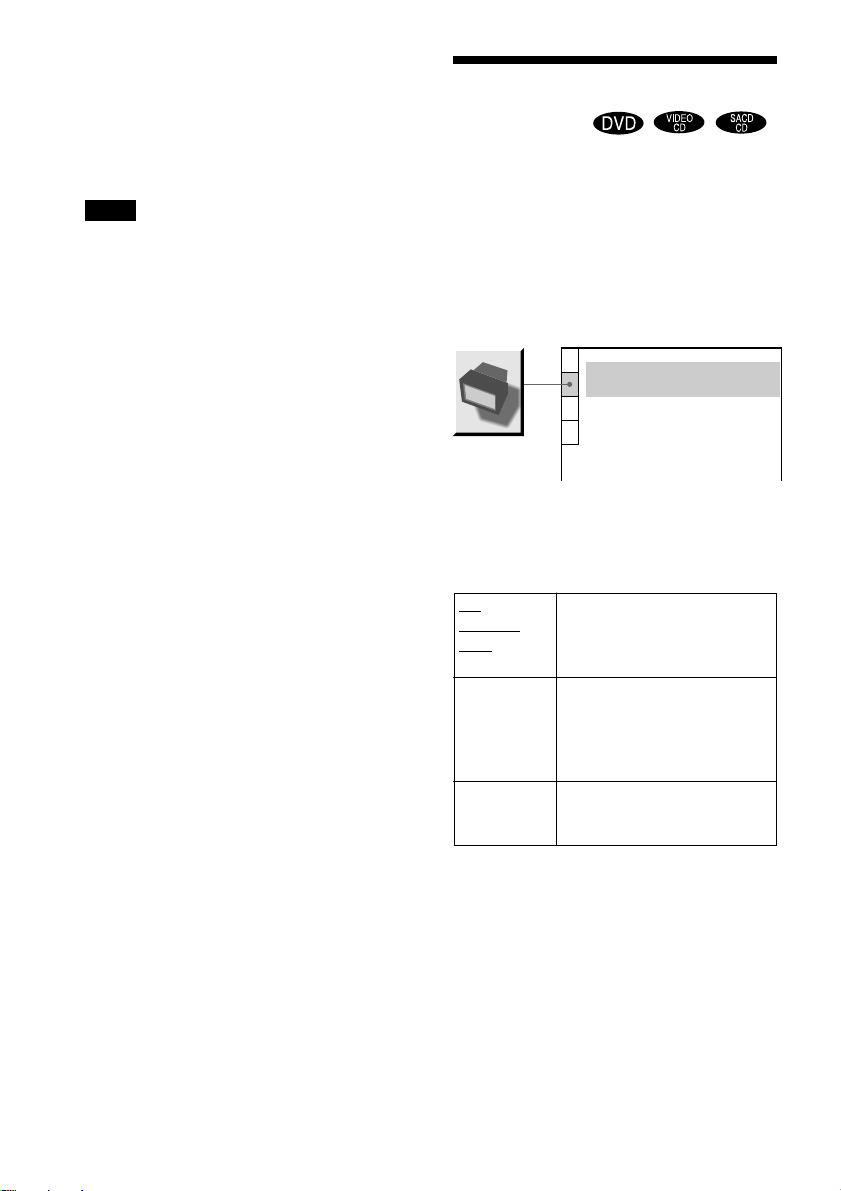
zIf you select “OTHERS t” in “DVD MENU,”
“SUBTITLE,” or “AUDIO,” select and enter the
language code from the list using the number buttons
(page 80).
After you have made a selection, the language code
(4 digits) is displayed the next time you select
“OTHERS t.”
Note
If you select a language that is not recorded on the
DVD, one of the recorded languages will be
automatically selected (except for the “OSD”).
Settings for the Display
(SCREEN SETUP)
Choose settings according to the TV to be
connected.
Select “SCREEN SETUP” in the Setup
Display. For details on using the display, see
“Using the Setup Display” (page 64).
The default settings are underlined.
SCREEN SETUP
TV TYPE:
SCREEN SAVER:
BACKGROUND:
4:3 LETTER BOX
JACKET PICTURE
xTV TYPE (DVD only)
Selects the aspect ratio of the connected TV
(4:3 standard or wide).
4:3
LETTER
BOX
4:3
PAN SCAN
16:9
Select this when you connect a
4:3 screen TV. Displays a wide
picture with bands on the upper
and lower portions of the screen.
Select this when you connect a
4:3 screen TV. Automatically
displays the wide picture on the
entire screen and cuts off the
portions that do not fit.
Select this when you connect a
wide-screen TV or a TV with a
wide mode function.
ON
66
Page 67
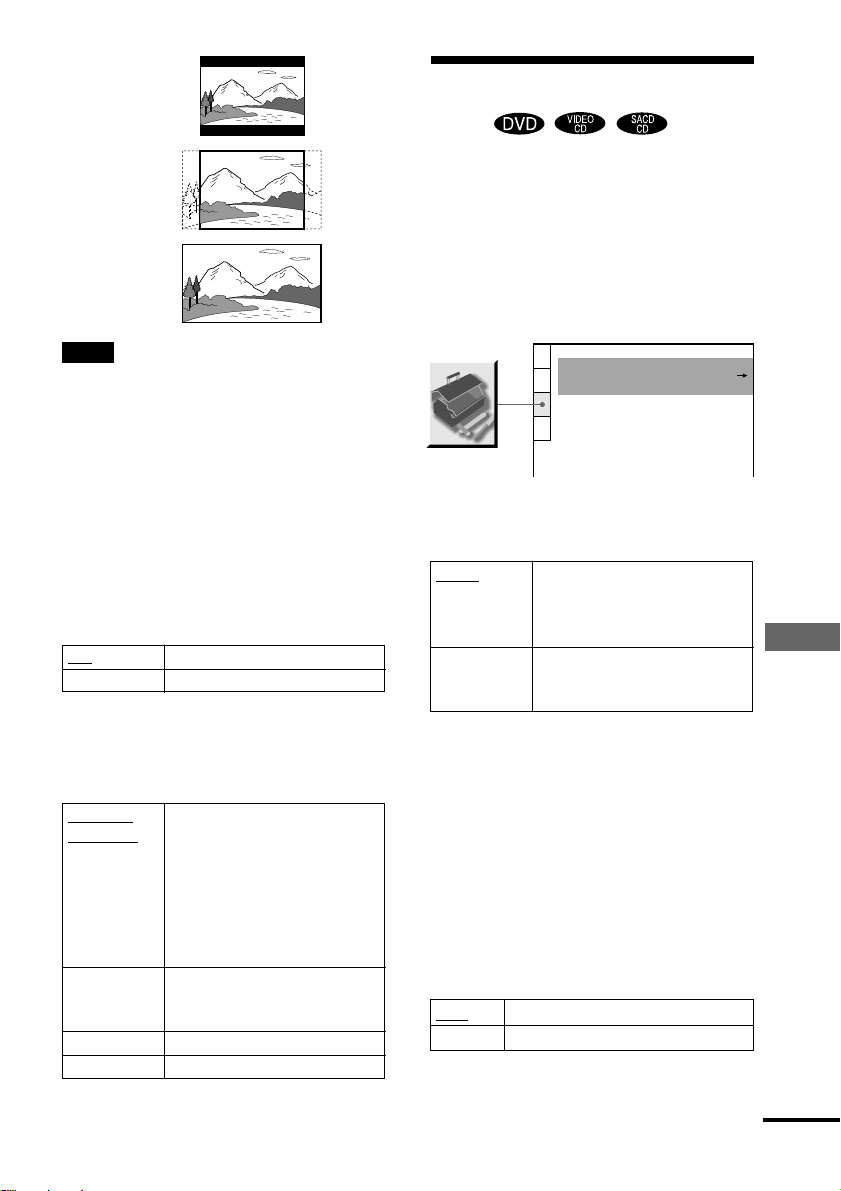
4:3 LETTER BOX
4:3 P AN SCAN
Custom Settings (CUSTOM
SETUP)
Allows setting up Parental Control and other
settings.
16:9
Note
Depending on the DVD, “4:3 LETTER BOX” may
be selected automatically instead of “4:3 PAN
SCAN” or vice versa.
xSCREEN SAVER
Turns the screen saver on and off so that the
screen saver image appears when you leave
the system in pause or stop mode for
15 minutes, or when you play back a CD for
more than 15 minutes. The screen saver will
help prevent your display device from
becoming damaged (ghosting). Press H to
turn off the screen saver.
ON Turns on the screen saver.
OFF Turns off the screen saver.
xBACKGROUND
Selects the background color or picture on
the TV screen in stop mode or while playing
a CD.
JACKET
PICTURE
GRAPHICS
BLUE
BLACK
The jacket picture (still picture)
appears in the background, but
only when the jacket picture is
already recorded on the disc
(CD-EXTRA, etc.). If the disc
does not contain a jacket
picture, the “GRAPHICS”
picture appears.
A preset picture stored in the
system appears in the
background.
The background color is blue.
The background color is black.
Select “CUSTOM SETUP” in the Setup
Display. For details on using the display, see
“Using the Setup Display” (page 64).
The default settings are underlined.
CUSTOM SETUP
PAUSE MODE:
PARENTAL CONTROL
TRACK SELECTION
AUTO
OFF
xPAUSE MODE (DVD only)
Selects the picture in pause mode.
AUTO
FRAME
x
PARENTAL CONTROL t (DVD only)
The picture, including subjects
that move dynamically, is output
with no jitter. Normally select
this position.
The picture, including subjects
that do not move dynamically, is
output in high resolution.
Sets a password and playback limitation
level for DVDs with playback limitation for
children. For details, see “Limiting playback
for children (Parental Control)” (page 56).
xTRACK SELECTION (DVD only)
Gives the sound track having the highest
number of channels priority when you play
a DVD on which multiple audio formats
(PCM, MPEG audio, DTS, or Dolby Digital
format) are recorded.
OFF
AUTO
No priority given.
Priority given.
Settings and Adjustments
continued
67
Page 68
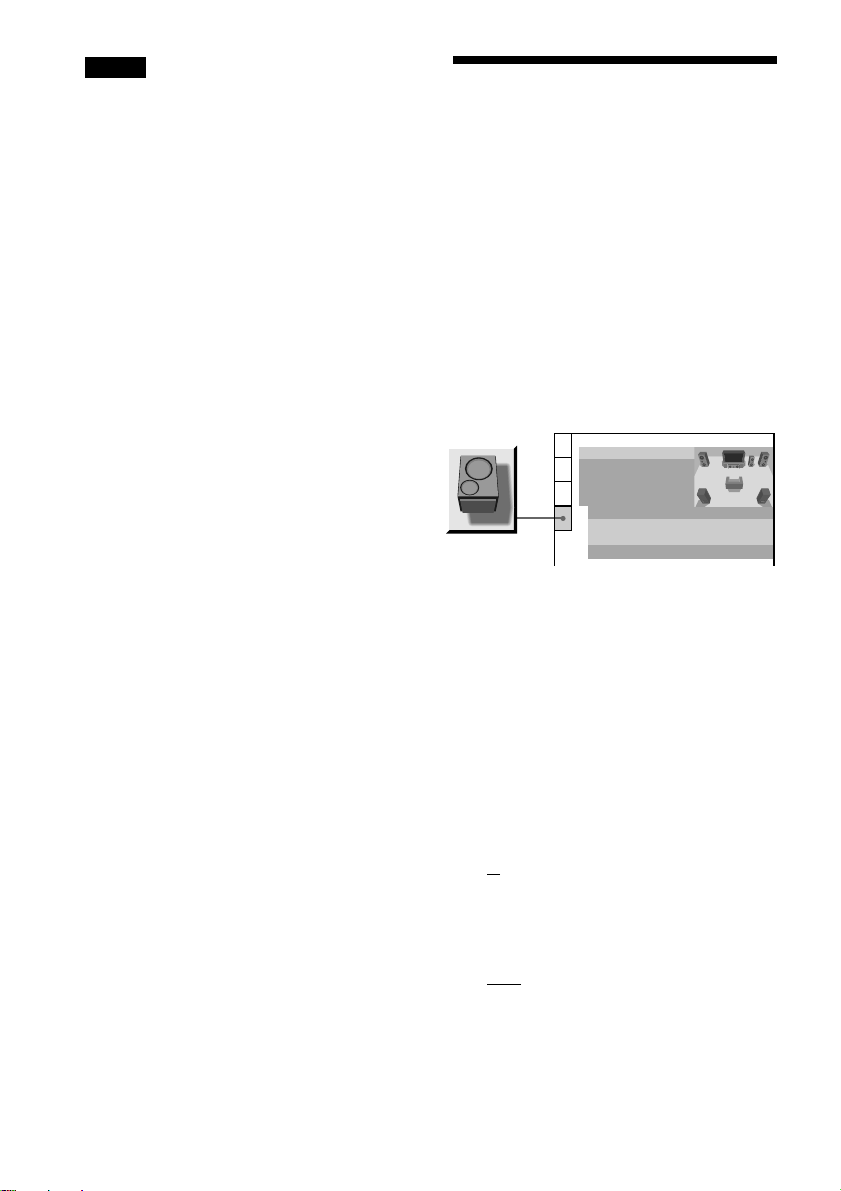
Notes
• When you set the item to “AUTO,” the language
may change. The “TRACK SELECTION” setting
has higher priority than the “AUDIO” settings in
“LANGUAGE SETUP” (page 65).
• If PCM, DTS, MPEG audio, and Dolby Digital
sound tracks have the same number of channels, the
system selects PCM, DTS, Dolby Digital, and
MPEG audio sound tracks in this order.
• Depending on the DVD, the audio channel with
priority may be predetermined. In this case, you
cannot give priority to the DTS, Dolby Digital, or
MPEG audio format by selecting “AUTO.”
Settings for the Speakers
(SPEAKER SETUP)
To obtain the best possible surround sound,
set the size of the speakers you have
connected and their distance from your
listening position. Then use the test tone to
adjust the volume and the balance of the
speakers to the same level.
Select “SPEAKER SETUP” in the setup
display. For details, see “Using the Setup
Display” (page 64).
The default settings are underlined.
SPEAKER SETUP
SIZE:
DISTANCE:
BALANCE:
LEVEL:
TEST TONE:
FRONT:
CENTER:
REAR:
SUBWOOFER:
To return to the default setting
Select the item, then press CLEAR.
OFF
BEHIND(LOW)
YES
YES
YES
68
xSIZE
When you do not connect center or rear
speakers, or move the rear speakers, set the
parameters for FRONT, CENTER and
REAR accordingly (see below). Since the
subwoofer settings are fixed, you cannot
change the settings. The default settings are
underlined.
• FRONT
—
A: The speakers are used with the
speaker stands.
— B: The speakers are used without the
speaker stands.
• CENTER
—
YES: Normally select this.
— NONE: Select this if no center speaker
is used.
Page 69
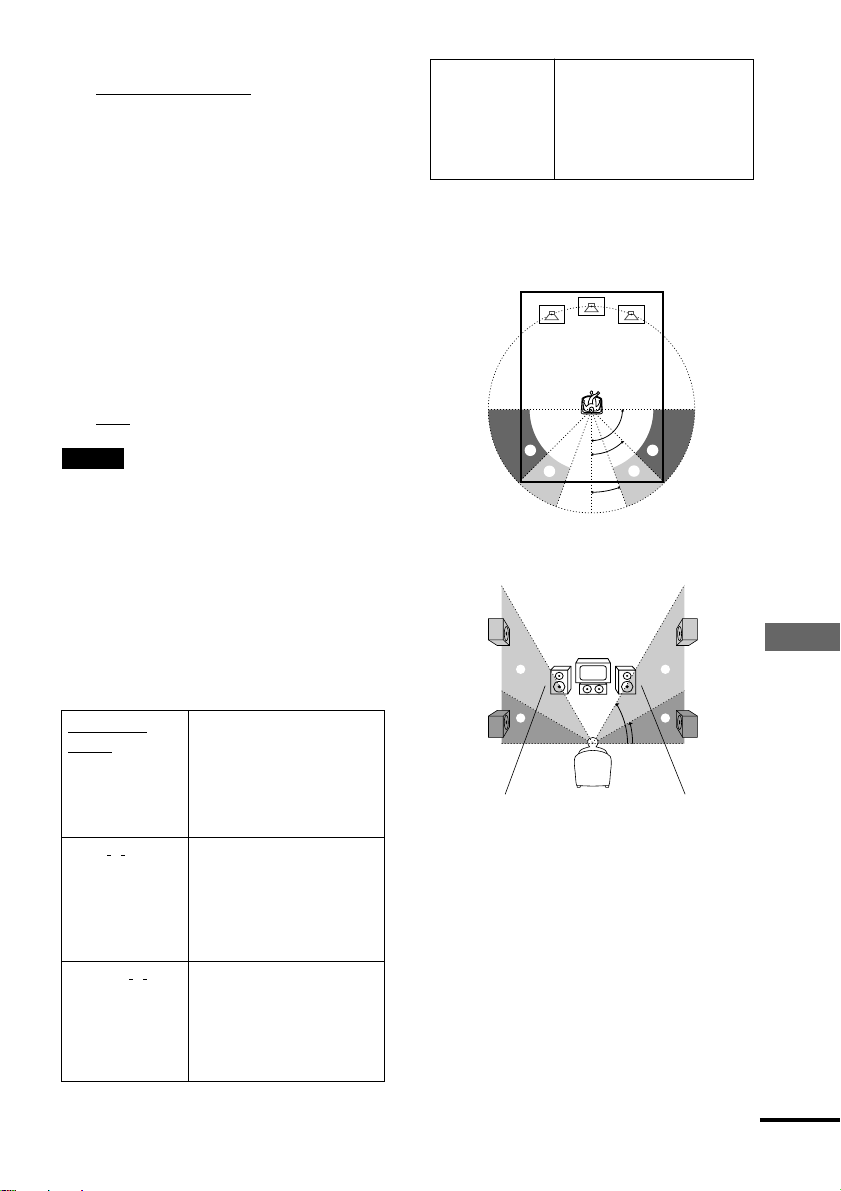
60
30
CC
DD
• REAR
—
BEHIND [A] (LOW), BEHIND [A]
(HIGH), SIDE [A] (LOW), SIDE [A]
(HIGH), BEHIND [B] (LOW),
BEHIND [B] (HIGH), SIDE [B]
(LOW), SIDE [B] (HIGH): Specify the
position, if the speakers are used with
speaker stands [A] or without the
speaker stands [B], and height to
implement the Digital Cinema
Surround modes in the “Virtual Multi
Dimension” sound field (page 49)
properly.
— NONE: Select this if no rear speaker is
used.
• SUBWOOFER
—
YES
Notes
• When you select an item, the sound cuts off for a
moment.
• Depending on the settings of other speakers, the
subwoofer may output excessive sound.
Specifying the rear speaker position
and height
If you select anything other than “NONE” in
“REAR,” specify the position and height of
the rear speakers. The default setting is
underlined.
BEHIND [A]
(LOW) or (HIGH)
SIDE [A]
(LOW) or (HIGH)
BEHIND [B]
(LOW) or (HIGH)
Select this if the rear speakers
are located in section B
attached with the speaker
stands [A], and if the height is
in section D, select (LOW) or
in C, select (HIGH).
Select this if the rear speakers
are located in section A
attached with the speaker
stands [A], and if the height is
in section D, select (LOW) or
in C, select (HIGH).
Select this if the rear speakers
are located in section B
without the speaker stands [B],
and if the height is in section
D, select (LOW) or in C,
select (HIGH).
SIDE [B]
(LOW) or (HIGH)
These parameters are not available when “REAR” is
set to “NONE.”
Position diagram
Height diagram
Select this if the rear speakers
are located in section A
without the speaker stands [B],
and if the height is in section
D, select (LOW) or in C,
select (HIGH).
90
AA
45
BB
20
continued
Settings and Adjustments
69
Page 70
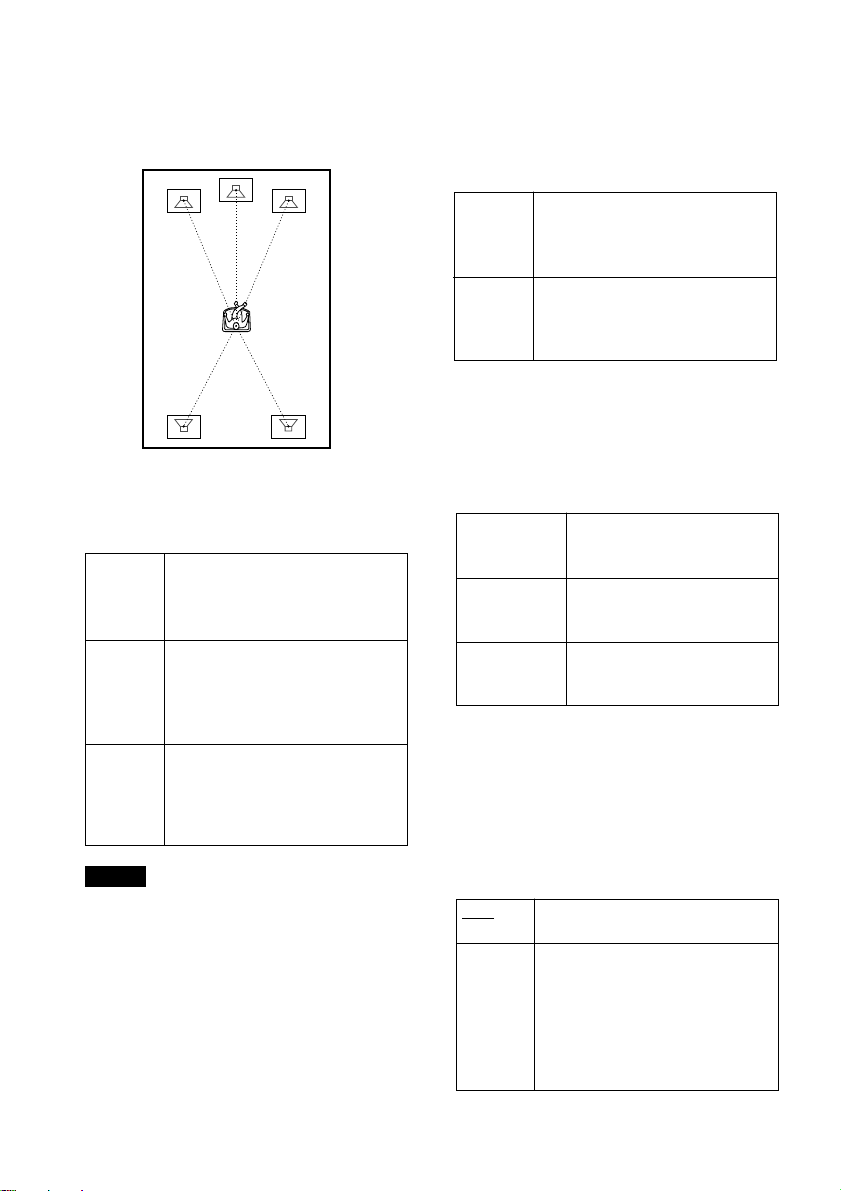
xDISTANCE
The default distance setting for the speakers
in relation to the listening position is shown
below.
xBALANCE
You can vary the balance of the left and right
speakers as follows. Be sure to set “TEST
TONE” to “ON” for easy adjustment.
The default adjustments are in parentheses.
5m
(17ft)
5m
(17ft)
3.4m
(12ft)
5m
(17ft)
3.4m
(12ft)
Be sure to change the value in the Setup
Display when you move the speakers. The
default adjustments are in parentheses.
FRONT
(5m/17ft)
CENTER
(5m/17ft)
REAR
(3.4m/12ft)
Front speaker distance from the
listening position can be set in
0.2 meter (1 ft) increments from
1 to 15 meters (3 to 50 ft).
Center speaker distance can be
moved up to 1.6 meters (5 ft)
forward closer to the listening
position, in 0.2 meter (1 ft)
increments.
Rear speaker distance can be moved
up to 4.6 meters (15 ft) closer to
your listening position from the
front speaker position, in 0.2 meter
(1 ft) increments.
Notes
• In SPEAKER SETUP, the North American model's
OSD displays both metric and imperial
measurements.The other model's displays metric
measurements only. The manual also shows both.
• When you set the distance, the sound cuts off for a
moment.
• If each of the front or rear speakers are not placed
at an equal distance from your listening position,
set the distance according to the closest speaker.
• Do not place the rear speakers farther away from
your listening position than the front speakers.
FRONT
(CENTER)
REAR
(CENTER)
Adjust the balance between the
front left and right speakers (You
can adjust from center 6 step left or
right).
Adjust the balance between the rear
left and right speakers (Y ou can
adjust from center 6 step left or
right).
xLEVEL
You can vary the level of each speaker as
follows. Be sure to set “TEST TONE” to
“ON” for easy adjustment.
The default adjustments are in parentheses.
CENTER
(0dB)
REAR (0dB)
SUBWOOFER
(0dB)
Adjusts the level of the center
speaker (–6dB to +6dB, 1dB
increments).
Adjusts the level of the rear
speakers (–6dB to +6dB, 1dB
increments).
Adjusts the level of the
subwoofer (–6dB to +6dB,
1dB increments).
To adjust the volume of all the
speakers at one time
Use the VOLUME control.
xTEST TONE
The speakers will emit a test tone to adjust
“BALANCE” and “LEVEL.”
OFF
ON
The test tone is not emitted from the
speakers.
The test tone is emitted from each
speaker in sequence while adjusting
balance or level.
When you select one of the
“SPEAKER SETUP” items, the test
tone is emitted from both left and
right speakers simultaneously.
70
Page 71
Adjusting the speaker volume and
level
1 After you stop playback, select
“SPEAKER SETUP” after pressing DVD
SETUP in the Setup Display.
2 Select “TEST TONE” and set “TEST
TONE” to “ON.”
You will hear the test tone from each
speaker in sequence.
3 From your listening position, select
“BALANCE” or “LEVEL” and adjust the
value of “BALANCE” and “LEVEL” using
X/x.
The test tone is emitted from both left
and right speakers simultaneously.
4 Select “TEST TONE” and set “TEST
TONE” to “OFF” to turn off the test
tone.
Note
When you adjust the speaker settings, the sound cuts
off for a moment.
Settings and Adjustments
71
Page 72
Additional Information
Troubleshooting
If you experience any of the following
difficulties while using the system, use this
troubleshooting guide to help remedy the
problem before requesting repairs. Should
any problem persist, consult your nearest
Sony dealer.
Power
The power is not turned on.
, Check that the AC power cord is connected
securely.
Picture
There is no picture.
, The connecting cords are not connected
securely.
, The connecting cords are damaged.
, The system is not connected to the correct TV
input jack (page 23).
, The video input on the TV is not set so that
you can view pictures from the system.
Picture noise appears.
, The disc is dirty or flawed.
, If the picture output from your system goes
through your VCR to get to your TV, the copyprotection signal applied to some DVD
programs could affect picture quality. If you
still experience problems even when you
connect your system directly to your TV, try
connecting your system to your TV’s S-video
input (page 23).
Even though you set the aspect ratio
in “TV TYPE” of “SCREEN SETUP ,” the
picture does not fill the screen.
, The aspect ratio of the disc is fixed on your
DVD.
The picture is black and white.
, Depending on the TV, the picture on the
screen becomes black and white when you
play a disc recorded in the NTSC color
system.
Sound
There is no sound.
, The connecting cord is not connected securely.
, The connecting cord is damaged.
, Press MUTING on the remote if “MUTING
ON” is displayed on the front panel display.
, The protective device on the system has been
activated because of a short circuit. Turn off
the system, eliminate the short-circuit problem
and turn on the power again.
, The audio connecting cord is damaged.
Replace it with a new one.
, The system is in pause mode or in Slow-
motion Play mode. Press H to return to
normal play mode.
, Fast forward or fast reverse is performed.
Press H to return to normal play mode.
, Check the speaker settings (pages 25, 68).
The left and right sounds are
unbalanced or reversed.
, Check that the speakers and components are
connected correctly and securely.
, Adjust the front balance parameter in the
LEVEL menu (pages 29, 68).
Severe hum or noise is heard.
, Check that the speakers and components are
connected securely.
, Check that the connecting cords are away
from a transformer or motor, and at least
3 meters (10 feet) away from a TV set or
fluorescent light.
, Move your TV away from the audio compo-
nents.
, The plugs and jacks are dirty. Wipe them with
a cloth slightly moistened with alcohol.
, Clean the disc.
72
Page 73
The sound loses stereo effect when
you play a VIDEO CD, or a CD.
, Set “AUDIO” to “STEREO” in the Control
Menu display (page 47).
, Make sure you connect the system
appropriately.
The surround effect is difficult to hear
when you are playing a Dolby Digital
sound track.
, Make sure the sound field function is on (page
49).
, Check the speaker connections and settings
(pages 25, 68).
, Depending on the DVD, the output signal may
not be the entire 5.1 channel but monaural or
stereo even if the sound track is recorded in
Dolby Digital format.
The surround effect is difficult to hear
when you are playing a Dolby Digital
or MPEG audio sound track.
, Check the speaker connections and setting
(pages 25, 68).
, Depending on the DVD, the output signal may
not be the entire 5.1 channels. It may be
monaural or stereo even if the sound track is
recorded in Dolby Digital or MPEG audio
format.
The sound comes from the center
speaker only.
, Depending on the disc, the sound may come
from the center speaker only.
No sound is heard from the center
speaker.
, Make sure the sound field function is on (page
49).
, Select a sound field containing the word
“cinema” or “virtual” (page 49).
No sound or only a very low-level
sound is heard from the rear
speakers.
, Make sure the sound field function is on (page
49).
, Select a sound field containing the word
“cinema” or “virtual” (page 49).
Operation
The disc tray indicator is on when
there is no disc inside.
, If you pressed the 1 to turn off the system
without closing the disc tray, the disc tray
indicator turns on. W ait a while for it to turn
off. If the indicator is still on, press A of
DISC 1-DISC 5 to close the disc tray.
Radio stations cannot be tuned in.
, Check that the antennas are connected
securely. Adjust the antennas and connect an
external antenna if necessary.
, The signal strength of the stations is too weak
(when tuning in with automatic tuning). Use
direct tuning.
, No stations have been preset or the preset
stations have been cleared (when tuning by
scanning preset stations). Preset the stations
(page 30).
, Press DISPLAY so that the frequency appears
in the display.
The remote does not function.
, There are obstacles between the remote and
the system.
, The distance between the remote and the
system is too far.
, The remote is not pointed at the remote sensor
on the system.
, The batteries in the remote are weak.
The disc does not play .
, There is no disc inside.
, The disc is turned over.
Insert the disc with the playback side facing
down on the disc tray.
continued
Additional Information
73
Page 74

, The disc is skewed.
, The system cannot play CD-ROMs, etc. (page
8).
, The region code on the DVD does not match
the system.
, Moisture has condensed inside the system.
Remove the disc and leave the system turned
on for about half an hour (page 4).
The disc does not start playing from
the beginning.
, Program Play, Shuffle Play, or Repeat Play has
been selected (pages 37, 39, 40).
Press CLEAR to cancel these functions before
playing a disc.
, Resume Play has been selected.
During stop, press x on the system or the
remote and then start DVD playback (page
34).
, The title, DVD or PBC menu automatically
appears on the TV screen.
The system starts playing the disc
automatically.
, The DVD features an auto playback function.
Playback stops automatically .
, Some discs may contain an auto pause signal.
While playing such a disc, the system stops
playback at the auto pause signal.
You cannot perform some functions
such as Stop, Search, Slow-motion
Play, Repeat Play, Shuffle Play, or
Program Play .
, Depending on the disc, you may not be able to
do some of the operations above. See the
operating manual that comes with the disc.
Messages do not appear on the
screen in the language you want.
, In the Setup Display, select the desired
language for the on-screen display in “OSD”
under “LANGUAGE SETUP” (page 65).
The language for the sound track
cannot be changed.
, Multilingual tracks are not recorded on the
DVD being played.
, The DVD prohibits changing the language for
the sound track.
The subtitle language cannot be
changed.
, Multilingual subtitles are not recorded on the
DVD being played.
, The DVD prohibits changing the subtitles.
The subtitle cannot be turned off.
, The DVD prohibits turning off subtitles.
The angles cannot be changed.
, Multi-angles are not recorded on the DVD
being played. The angle can be changed only
when the “ANGLE” indicator lights up on the
front panel display.
, The DVD prohibits changing the angles.
The system does not operate properly.
, If static electricity, etc., causes the system to
operate abnormally, press POWER on the
system to turn the system off and then on
again.
A 5-character service number is
displayed on the screen and on the
front panel display.
, The self-diagnosis function was activated.
(See the table on page 75.)
The disc tray does not open and
“LOCKED” appears on the front panel
display.
, Contact your Sony dealer or local authorized
Sony service facility.
“PROTECT” appears on the front
panel display.
, The speaker protection circuit is in function.
Check the speaker connection.
74
Page 75
Self-diagnosis Function
(When letters/numbers appear in the
display)
When the self-diagnosis function is
activated to prevent the system from
malfunctioning. In this case a five-character
service number (e.g., C 13 00) with a
combination of a letter and digits appears on
the screen and the front panel display. Refer
to the following table.
C:13:00
Glossary
Bit rate
Value indicating the amount of video data
compressed in a DVD per second. The unit
is Mbps (Mega bit per second). 1 Mbps
indicates that the data per second is
1,000,000 bits. The higher the bit rate is, the
larger the amount of data. However, this
does not always mean that you can get
higher quality pictures.
Chapter
Sections of a picture or a music piece on a
DVD that are smaller than titles. A title is
composed of several chapters. Each chapter
is assigned a chapter number enabling you
to locate the chapter you want.
First three
characters of
the service
number
C 13
C 31
E XX
(xx is a number)
Cause and/or Corrective
Action
The disc is dirty.
, Clean the disc with a soft
cloth (page 9).
The disc is not inserted
correctly.
, Re-insert the disc
correctly.
To prevent a malfunction, the
system has performed the selfdiagnosis function.
, Contact your nearest Sony
dealer or local authorized
Sony service facility and
give the 5-character
service number.
Example: E 61 10
Digital Cinema Sound (DCS)
This is the generic name of the surround
sound produced by digital signal processing
technology developed by Sony . Unlike
previous surround sound fields mainly
directed at the reproduction of music,
Digital Cinema Sound is designed
specifically for the enjoyment of movies.
Additional Information
Dolby Digital
This sound format for movie theaters is
more advanced than Dolby Pro Logic
Surround. In this format, the rear speakers
output stereo sound with an expanded
frequency range and a subwoofer channel
for deep bass is independently provided.
This format is also called “5.1” because the
subwoofer channel is counted as 0.1 channel
(since it functions only when a deep bass
effect is needed). All six channels in this
format are recorded separately to realize
superior channel separation. Furthermore,
since all the signals are processed digitally,
less signal degradation occurs.
continued
75
Page 76
Dolby Pro Logic Surround
As one method of decoding Dolby
Surround, Dolby Pro Logic Surround
produces four channels from two-channel
sound. Compared with the former Dolby
Surround system, Dolby Pro Logic Surround
reproduces left-to-right panning more
naturally and localizes sounds more
precisely. To take full advantage of Dolby
Pro Logic Surround, you should have one
pair of rear speakers and a center speaker.
The rear speakers output monaural sound.
DTS
Digital audio compression technology that
the Digital Theater Systems, Inc. developed.
This technology conforms to 5.1-channel
surround. The rear channel is stereo and
there is discrete subwoofer channel in this
format. DTS provides the same 5.1 discrete
channels of high quality digital audio. The
good channel separation is realized because
the all channel data is recorded discrete and
processed in digital.
DVD
A disc that contains up to 8 hours of moving
pictures even though its diameter is the same
as a CD.
The data capacity of a single-layer and
single-sided DVD, at 4.7 GB (Giga Byte), is
7 times that of a CD. Furthermore, the data
capacity of a dual-layer and single-sided
DVD is 8.5 GB, a single-layer and doublesided DVD 9.4 GB, and a dual-layer and
double-sided DVD 17 GB.
The picture data uses the MPEG 2 format,
one of the worldwide standards of digital
compression technology. The picture data is
compressed to about 1/40 of its original size.
The DVD also uses the variable rate coding
technology that changes the data to be
allocated according to the status of the
picture.
The audio data is recorded in Dolby Digital
as well as in PCM, allowing you to enjoy
more real audio presence.
Furthermore, various advanced functions
such as the multi-angle, multilingual, and
Parental Control functions are provided with
the DVD.
Multi-angle function
Various angles, or viewpoints of the video
camera, for a scene are recorded on some
DVDs.
Multilingual function
Several languages for the sound or subtitles
in a picture are recorded on some DVDs.
Parental Control
A function of the DVD to limit playback of
the disc by the age of the users according to
the limitation level in each country. The
limitation varies from disc to disc; when it is
activated, playback is completely prohibited,
violent scenes are skipped or replaced with
other scenes and so on.
Playback Control (PBC)
Signals encoded on VIDEO CDs (Version
2.0) to control playback.
By using menu screens recorded on VIDEO
CDs with PBC functions, you can enjoy
playing simple interactive programs,
programs with search functions, and so on.
Region Code
This system is used to protect copyrights. A
region number is allocated on each DVD
system or DVD disc according to the sales
region. Each region code is shown on the
system as well as on the disc packaging. The
system can play the discs that match its
region code. The system can also play discs
with the “
ALL
” mark. Even when the region
code is not shown on the DVD, the region
limit may still be activated.
76
Page 77
Title
The longest sections of a picture or a music
piece on a DVD; a movie, etc., for a picture
piece on video software; or an album, etc.,
for a music piece on an audio software.
Each title is assigned a title number enabling
you to locate the title you want.
Track
Sections of a picture or a music piece on a
CD or VIDEO CD. Each track is assigned a
track number enabling you to locate the
track you want.
VIDEO CD
A compact disc that contains moving
pictures.
The picture data uses the MPEG 1 format,
one of the worldwide standards of digital
compression technology. The picture data is
compressed to about 1/140 of its original
size. Consequently, a 12 cm VIDEO CD can
contain up to 74 minutes of moving pictures.
VIDEO CDs also contain compact audio
data. Sounds outside the range of human
hearing are compressed while the sounds we
can hear are not compressed. VIDEO CDs
can hold 6 times the audio information of
conventional audio CDs.
There are 2 versions of VIDEO CDs.
• V ersion 1.1: You can play only moving
pictures and sounds.
• V ersion 2.0: You can play high-resolution
still pictures and enjoy PBC functions.
This system conforms to both versions.
Additional Information
Super Audio CD (SACD)
This audio format is based upon the current
audio CD standards but includes a greater
amount of information which provides
higher quality sound. There are three types
of discs: single layer, double layer and
hybrid discs. The hybrid disc contains both
standard audio CD and Super Audio CD
information.
77
Page 78

Specifications
AUDIO POWER SPECIFICA TIONS
POWER OUTPUT AND TOTAL HARMONIC DISTORTION:
With 4 ohm loads, both channels driven, from 120 – 10,000 Hz; rated
70 watts per channel minimum RMS power, with no more than 10 %
total harmonic distortion from 250 milliwatts to rated output.
Amplifier section
Stereo mode 70 W + 70 W (4 ohms at 1 kHz, THD 10 %)
Surround mode Front: 70 W + 70 W
Center*: 70 W
Rear*: 70 W + 70 W (4 ohms at 1 kHz, THD 10 %)
Subwoofer*: 100 W (3 ohms at 100 Hz, THD 10 %)
* Depending on the sound field settings and the source, there may be no sound output.
Inputs (Analog) VIDEO 1, 2:
Sensitivity: 150 mV
Impedance: 50 kilohms
Inputs (Digital) VIDEO 2 (optical):
Sensitivity: –
Outputs (Analog) VIDEO 1 (AUDIO OUT):
Voltage: 2 V
Impedance: 1 kilohms
PHONES:
Accepts low- and high-impedance headphones
Outputs (Digital) DIGITAL OUT (CD)
Sensitivity: –
SACD/DVD system
Laser Semiconductor laser
(SACD: λ = 650 nm)
(CD: λ = 780 nm)
Emission duration: continuous
Frequency response (at 2 CH STEREO mode)
DVD (PCM): 2 Hz to 22 kHz (±1.0 dB)
CD: 2 Hz to 20 kHz (±1.0 dB)
Signal-to-noise ratio More than 80 dB (VIDEO 1 (AUDIO) connectors only)
Harmonic distortion Less than 0.03 %
FM tuner section
System PLL quartz-locked digital synthesizer system
Tuning range 87.5 – 108.0 MHz (100 kHz step)
Antenna FM wire antenna
Antenna terminals 75 ohms, unbalanced
Intermediate frequency 10.7 MHz
AM tuner section
System Tuner section:
Tuning range 530 – 1,710 kHz (with the interval set at 10 kHz)
Antenna Loop antenna
78
PLL quartz-locked digital synthesizer system
531 – 1,710 kHz (with the interval set at 9 kHz)
Page 79

Video section
Inputs VIDEO: 1 Vp-p 75 ohms
Outputs VIDEO: 1 Vp-p 75 ohms
S-VIDEO:
Y: 1 Vp-p 75 ohms
C: 0.286 Vp-p 75 ohms
COMPONENT:
Y: 1 Vp-p 75 ohms
PB, PR: 0.7 Vp-p 75 ohms
Speakers
Front
Speaker system Bass reflex
Speaker unit
Rated impedance 4 ohms
Dimensions (approx.) 82.7 × 1055 × 68 mm (3 3/8 × 41 5/8 × 2 3/4 inches) (w/h/d)
Mass (approx.) 3.28 kg (7 lb 4 oz)
Center
Speaker system Bass reflex
Speaker unit
Rated impedance 4 ohms
Dimensions (approx.) 260 × 86 × 82.7 mm (10 1/4 × 3 1/2 × 3 3/8 inches) (w/h/d)
Mass (approx.) 0.65 kg (1 lb 7 oz)
Rear
Speaker system Bass reflex
Speaker unit
Rated impedance 4 ohms
Dimensions (approx.) 82.7 × 1055 × 68 mm (3 3/8 × 41 5/8 × 2 3/4 inches) (w/h/d)
Mass (approx.) 3.28 kg (7 lb 4 oz)
50 mm (2 inches) dia. cone type × 2, 15 mm (5/8 inches) dia. balance dome
50 mm (2 inches) dia. cone type × 2, 15 mm (5/8 inches) dia. balance dome
50 mm (2 inches) dia. cone type × 2, 15 mm (5/8 inches) dia. balance dome
Subwoofer
Speaker system Bass reflex
Speaker unit 200 mm (7 7/8 inches) dia. cone type
Rated impedance 3 ohms
Dimensions (approx.) 230 × 433 × 410 mm (9 1/8 × 17 1/8 × 16 1/4 inches) (w/h/d)
Mass (approx.) 9.5 kg (21 lb)
General
Power requirements 120 V AC, 60 Hz
Power consumption 115 W (120 V AC)
Dimensions (approx.) 355 × 100 × 394 mm (14 × 4 × 15 5/8 inches) (w/h/d) incl. projecting
parts
Mass (approx.) 5.7 kg (12 lb 10 oz)
Operating temperature 5˚C to 35˚C (41˚F to 95˚F)
Operating humidity 5 % to 90 %
Supplied accessories See page 17.
Design and specifications are subject to change without notice.
Additional Information
79
Page 80

Language Code List
For details, see pages 47, 53, 66.
The language spellings conform to the ISO 639: 1988 (E/F) standard.
Code Language Code Language Code Language Code Language
1027 Afar
1028 Abkhazian
1032 Afrikaans
1039 Amharic
1044 Arabic
1045 Assamese
1051 Aymara
1052 Azerbaijani
1053 Bashkir
1057 Byelorussian
1059 Bulgarian
1060 Bihari
1061 Bislama
1066 Bengali;
Bangla
1067 Tibetan
1070 Breton
1079 Catalan
1093 Corsican
1097 Czech
1103 Welsh
1105 Danish
1109 German
1130 Bhutani
1142 Greek
1144 English
1145 Esperanto
1149 Spanish
1150 Estonian
1151 Basque
1157 Persian
1165 Finnish
1166 Fiji
1171 Faroese
1174 French
1181 Frisian
1183 Irish
1186 Scots Gaelic
1194 Galician
1196 Guarani
1203 Gujarati
1209 Hausa
1217 Hindi
1226 Croatian
1229 Hungarian
1233 Armenian
1235 Interlingua
1239 Interlingue
1245 Inupiak
1248 Indonesian
1253 Icelandic
1254 Italian
1257 Hebrew
1261 Japanese
1269 Yiddish
1283 Javanese
1287 Georgian
1297 Kazakh
1298 Greenlandic
1299 Cambodian
1300 Kannada
1301 Korean
1305 Kashmiri
1307 Kurdish
1311 Kirghiz
1313 Latin
1326 Lingala
1327 Laothian
1332 Lithuanian
1334
Latvian; Lettish
1345 Malagasy
1347 Maori
1349 Macedonian
1350 Malayalam
1352 Mongolian
1353 Moldavian
1356 Marathi
1357 Malay
1358 Maltese
1363 Burmese
1365 Nauru
1369 Nepali
1376 Dutch
1379 Norwegian
1393 Occitan
1403 (Afan)Oromo
1408 Oriya
1417 Punjabi
1428 Polish
1435
Pashto; Pushto
1436 Portuguese
1463 Quechua
1481 Rhaeto-
Romance
1482 Kirundi
1483 Romanian
1489 Russian
1491 Kinyarwanda
1495 Sanskrit
1498 Sindhi
1501 Sangho
1502
Serbo-Croatian
1503 Singhalese
1505 Slovak
1506 Slovenian
1507 Samoan
1508 Shona
1509 Somali
1511 Albanian
1512 Serbian
1513 Siswati
1514 Sesotho
1515 Sundanese
1516 Swedish
1517 Swahili
1521 Tamil
1525 Telugu
1527 Tajik
1528 Thai
1529 Tigrinya
1531 Turkmen
1532 Tagalog
1534 Setswana
1535 Tonga
1538 Turkish
1539 Tsonga
1540 Tatar
1543 Twi
1557 Ukrainian
1564 Urdu
1572 Uzbek
1581 Vietnamese
1587 Volapük
1613 Wolof
1632 Xhosa
1665 Yoruba
1684 Chinese
1697 Zulu
1703 Not specified
80
Page 81
DVD Setup Menu List
You can set the following items with the DVD setup menu.
The order of the displayed items may be different from the actual display.
LANGUAGE SETUP
OSD (Select the language you
want to use from the
displayed language list.)
DVD MENU (Select the language you
want to use from the
displayed language list.)
AUDIO (Select the language you
want to use from the
displayed language list.
When you select
ORIGINAL, you can
enjoy the language given
priority on the disc.)
SUBTITLE (Select the language you
want to use from the
displayed language list.
When you select AUDIO
FOLLOW, the setting is
automatically switched to
the language selected in
AUDIO.)
CUSTOM SETUP
PAUSE AUT O
MODE FRAME
PARENT AL LEVEL OFF
CONTROL 8.
STANDARD
CHANGE P ASSWORD
TRACK
SELECTION
OFF
AUTO
7. NC17
6. R
5.
4. PG13
3. PG
2.
1. G
USA
OTHERS
SCREEN SETUP
TV TYPE 4:3 LETTER
BOX
4:3 PAN SCAN
16:9
SCREEN SAVER ON
OFF
BACKGROUND JACKET
PICTURE
GRAPHICS
BLUE
BLACK
SPEAKER
SIZE
DIST ANCE
BALANCE
LEVEL
TEST
TONE
* In SPEAKER SETUP, the North American
model's OSD displays both metric and imperial
measurements.The other model's displays metric
measurements only. The manual also shows both.
FRONT A
B
CENTER YES
NONE
REAR
SUBWOOFER
BEHIND[A]
SIDE[A]
BEHIND[B]
SIDE[B]
NONE
YES
* FRONT 1 m ~15 m/
3 ft ~ 50 ft
CENTER 0 m ~15 m/
0 ft ~ 50 ft
REAR 0 m ~15 m/
0 ft ~ 50 ft
FRONT
REAR
CENTER
REAR
SUBWOOFER
OFF
ON
6 steps left or right
6 steps left or right
–6 dB ~ +6 dB
–6 dB ~ +6 dB
–6 dB ~ +6 dB
LOW
HIGH
LOW
HIGH
LOW
HIGH
Additional Information
LOW
HIGH
81
Page 82

Index
Numerics
16:9 66
4:3 LETTER BOX 66
4:3 PAN SCAN 66
A
ADVANCED 54
AMP MENU 26
ANGLE 52
Antenna Hookups 21
AUDIO 47, 65
B
BACKGROUND 67
BALANCE 28, 70
BAND 30
Batteries 18
Bit rate 54, 75
C
CD 32
CHAPTER 42
Chapter 7, 75
Continuous play
CD/VIDEO SACD CD
DVD 32
Control Menu 15
CUSTOM PARENTAL
CONTROL 55
CUSTOM SETUP 67
D
DIMMER 29
Disc changer system 10
DIST ANCE 70
Dolby Digital 75
Dolby Pro Logic Surround 76
DTS 76
DVD 35, 76
DVD MENU 35, 65
F
Front Panel 11
Fast forward 41
Fast reverse 41
Front panel display 12
82
H
Handling discs 9
I
INDEX 42
Index 7
L
LANGUAGE SETUP 65
LEVEL 29, 70
Locating
a specific Point
by watching the TV screen 41
M
MEMORY 30
Multi-angle function 52
Multilingual function 53
MUTING 33
N
NAME 63
O
One Disc or All Discs 37
On-screen display
Control Menu display 15
Setup Display 64
OSD 65
P
PARENTAL CONTROL 56, 67,
76
PAUSE MODE 67
PBC Playback 36, 76
PLAY MODE 37
Preset Station 30, 63
Program Play 37
Q
Quick Overview 17
R
Radio 62
Rear Panel 13
Region code 8, 76
Remote 14, 60
REPEAT 40
RESET 65
Resume Play 34
S
SACD 77
S VIDEO 23
Scan 41
SCENE 42
Scene 7
SCREEN SAVER 67
SCREEN SETUP 66
SHUFFLE 39
Shuffle Play 39
SIZE 68
Slow-motion Play 41
Sound Field 49
SPEAKER SETUP 68
Speaker System Hookup 18
SUBTITLE 53, 65
T
TEST TONE 70
TIME SEARCH 42
TIME 44
TIME/TEXT 43
TITLE 35, 42
Title 7, 77
Title menu 35
TRACK 42
Track 7, 77
TRACK SELECTION 68
Troubleshooting 72
TV and Video Component
Hookups 23
TV TYPE 66
U
Usable discs 7
V
VIDEO CD 36, 77
Page 83

Additional Information
83
Page 84

Sony Corporation Printed in Korea
 Loading...