

Page 1

3-866-417-11 (1)
Color Video Camera
Operating Instructions
Mode d’emploi
CVX-V18NS/V18NSP
©1999 by Sony Corporation
Page 2
Before operating the unit, please read this instruction thoroughly
and retain it for future reference.
Owner’s Record
The model and serial numbers are located on the bottom. Record
the serial number in the space provided below. Refer to these
numbers whenever you call upon your Sony dealer regarding this
product.
Model No. CVX-V18NS
Serial No.
WARNING
To prevent fire or shock hazard, do not expose the unit to rain or
moisture.
For the customers in the United States and
Canada
This symbol is intended to alert the user to the
presence of important operating and maintenance
(servicing) instructions in the literature
accompanying the appliance.
DISPOSAL OF LITHIUM ION BATTERY.
LITHIUM ION BATTERY.
DISPOSE OF PROPERLY.
You can return your unwanted lithium ion batteries to your
nearest Sony Service Center or Factory Service Center.
Note: In some areas the disposal of lithium ion batteries in
household or business trash may be prohibited.
For the Sony Service Center nearest you call 1-800-222-SONY
(United States only)
For the Sony Factory Service Center nearest you call 416-499SONY (Canada only)
2-EN
Page 3

Caution: Do not handle damaged or leaking lithium ion battery.
For the customers in the United States
CAUTION
You are cautioned that any changes or modifications not expressly
approved in this manual could void your authority to operate this
equipment.
Note:
This equipment has been tested and found to comply with the
limits for a Class B digital device, pursuant to Part 15 of the FCC
Rules. These limits are designed to provide reasonable protection
against harmful interference in a residential installation. This
equipment generates, uses, and can radiate radio frequency
energy and, if not installed and used in accordance with the
instructions, may cause harmful interference to radio
communications. However, there is no guarantee that interference
will not occur in a particular installation. If this equipment does
cause harmful interference to radio or television reception, which
can be determined by turning the equipment off and on, the user
is encouraged to try to correct the interference by one or more of
the following measures:
– Reorient or relocate the receiving antenna.
– Increase the separation between the equipment and receiver.
– Connect the equipment into an outlet on a circuit different from
that to which the receiver is connected.
– Consult the dealer or an experienced radio/TV technician for
help.
For the customers in Germany
Directive: EMC Directive 89/336/EEC. 92/31/EEC
This equipment complies with the EMC regulations when used
under the following circumstances:
• Residential area
• Business district
• Light-industry district
ATTENTION
The electromagnetic fields at the specific frequencies may
influence the picture and sound of this camera.
3-EN
Page 4

Features
• NightShot function.
• Precision CCD with 470,000 pixel for CVX-V18NS
and 570,000 pixel for CVX-V18NSP.
• Macro function 10 mm close-up shooting ability.
• The supplied adaptor allows connection to the
DSR-V10/V10P VCR.
• Video/audio and S-Video outputs allow connections
to other video equipment.
4-EN
Page 5

Table of contents
Features .................................................................................................. 4
Identifying the parts.............................................................................6
Connections ........................................................................................... 8
Connecting the camera to the main unit .................................... 8
Connecting this unit to
the Video Cassette Recorder (VCR) ........................................ 9
Using this unit as a single video camera.................................. 11
Resetting the date and time............................................................... 14
Recording ............................................................................................. 16
Recording on a VCR.................................................................... 16
Using the zoom feature .............................................................. 19
Using as the NightShot camera ................................................. 21
Using various features ....................................................................... 22
Shooting in the dark (NightShot) .............................................. 22
Adjusting the exposure............................................................... 23
Making your own title ................................................................ 24
Superimposing a title .................................................................. 25
Selecting the shutter speed......................................................... 27
Changing the mode settings ...................................................... 29
Selecting the mode setting of each item ................................... 30
Turning off the screen display except date,
time and menu ......................................................................... 32
Displaying the date ..................................................................... 32
Displaying the time ..................................................................... 32
Precautions .......................................................................................... 33
Specifications....................................................................................... 35
5-EN
Page 6
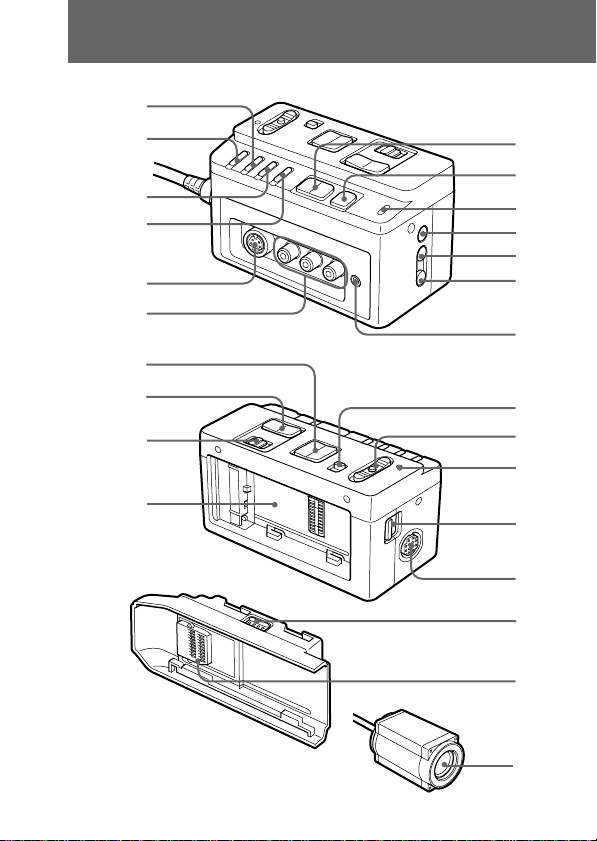
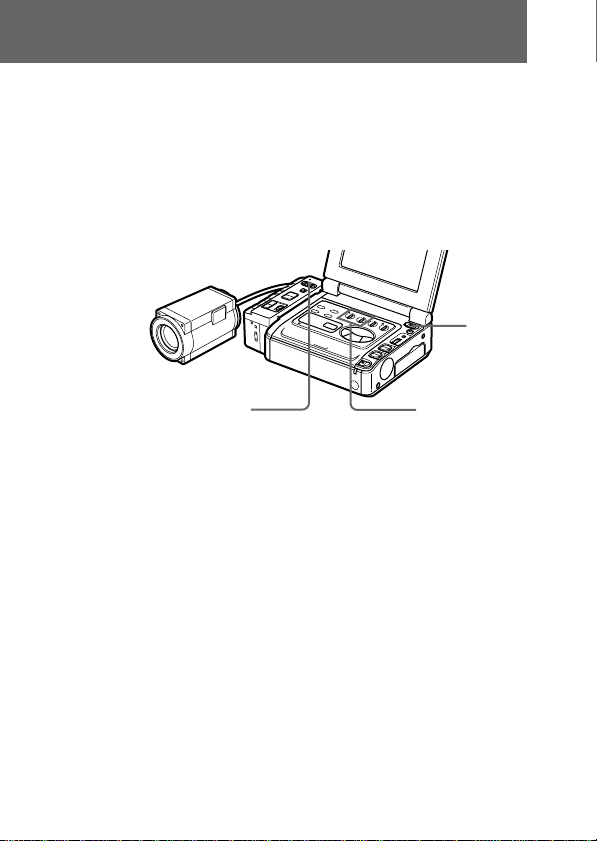
Identifying the parts
1
2
3
4
5
6
7
8
9
!¡
!™
!£
!¢
!∞
!§
!¶
!•
!ª
@º
6-EN
!º
@¡
@™
@£
@¢
@∞
Page 7

Main unit
1 SHUTTER button
2 EXPOSURE button
3 TITLE button
4 MENU button
5 S VIDEO jack
6 VIDEO/AUDIO OUTPUT
jacks
7 ZOOM button
8 NEAR/FAR button
9 FOCUS switch
!º Battery pack/adaptor
mounting surface
!¡ +/– button
!™ EXEC button
!£ BATT lamp
!¢ DISPLAY button
!∞ DATE button
!§ TIME button
!¶ MIC (PLUG IN POWER)
jack
Connect an external
microphone (not
supplied).
!• NIGHTSHOT switch
!ª POWER switch
@º POWER lamp
@¡ BATTERY RELEASE
button
@™ Connector (for the
camera cable)
Adaptor
@£ RELEASE button
@¢ Connector
Camera
@∞ Lens
7-EN
Page 8
Connections
The DSR-V10/V10P VCR can be connected to this unit.
The VCR supplies power to this unit.
When using this unit as a single video camera, connect
this unit to a TV or VCR using the A/V connecting
cable (not supplied). Refer to the operating instructions
supplied with the equipment to be connected.
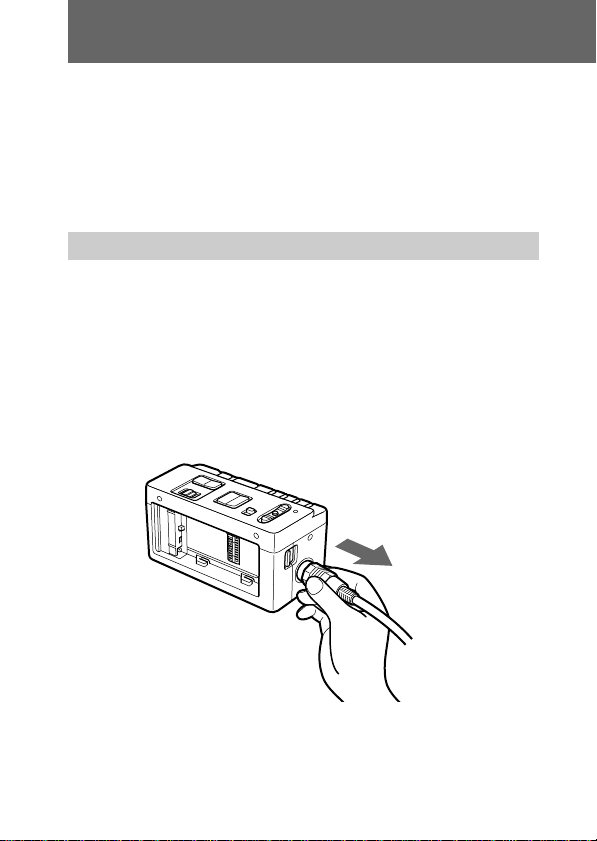
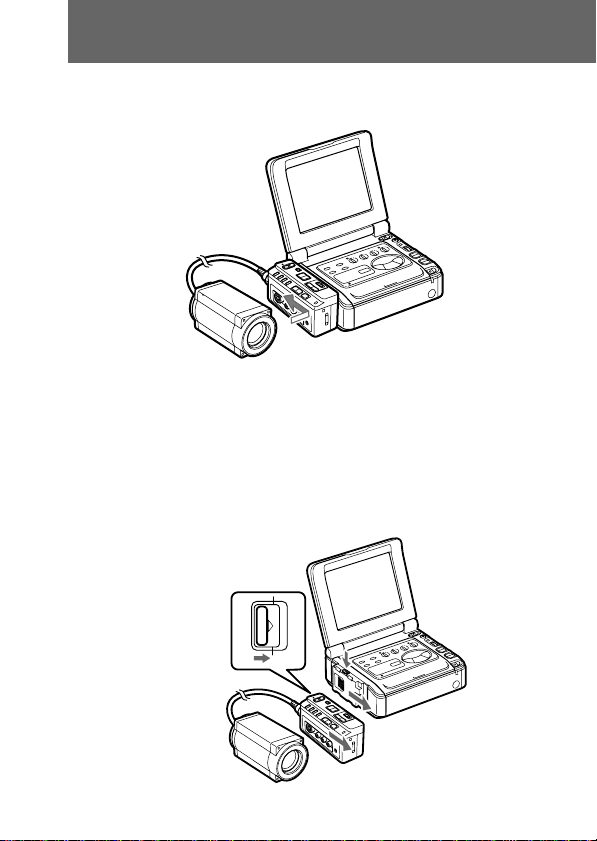
Connecting the camera to the main unit
Insert the camera plug to the connector on the main
unit while aligning the arrow mark of the camera plug
and main unit connector.
To remove the camera
Remove the camera by pulling the plug out while
holding the plug lock. If you attempt to remove the
camera without holding the plug lock, the plug and
connector will be damaged.
8-EN
Page 9
Connecting this unit to the Video Cassette
Recorder (VCR)
The recommended VCR to be connected to this unit is
the Sony DSR-V10/V10P. The DSR-V10 is used in the
sample illustration.
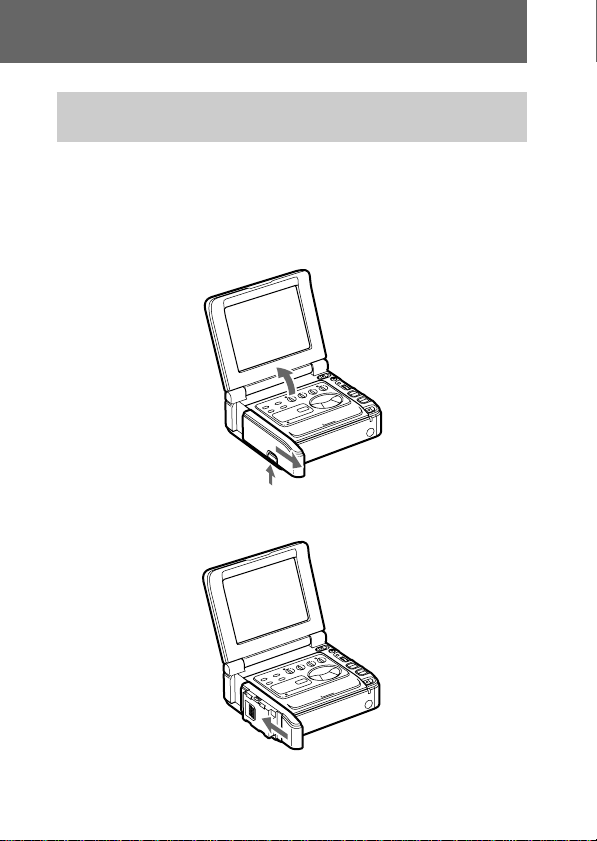
(1) Open the LCD screen on the VCR and remove
the jack cover.
(2) Attach the supplied adaptor to the VCR.
9-EN
Page 10
Connections
(3) Attach this unit to the supplied adaptor.
When removing this unit from the adaptor [a]
Slide the RELEASE button on this unit in the direction
of the arrow.
When removing the adaptor from the VCR [b]
Slide the RELEASE button on the adaptor in the
direction of the arrow.
10-EN
[a]
[b]
Page 11
Notes
• When this unit is not connected to the VCR, be sure
to attach the jack cover on the VCR for jack
protection. The procedure for attaching the jack cover
is same as the procedure for attaching the adaptor.
• The camera cable and the extension cable (not
supplied) can only be connected to this model. Never
connect to any other equipment.
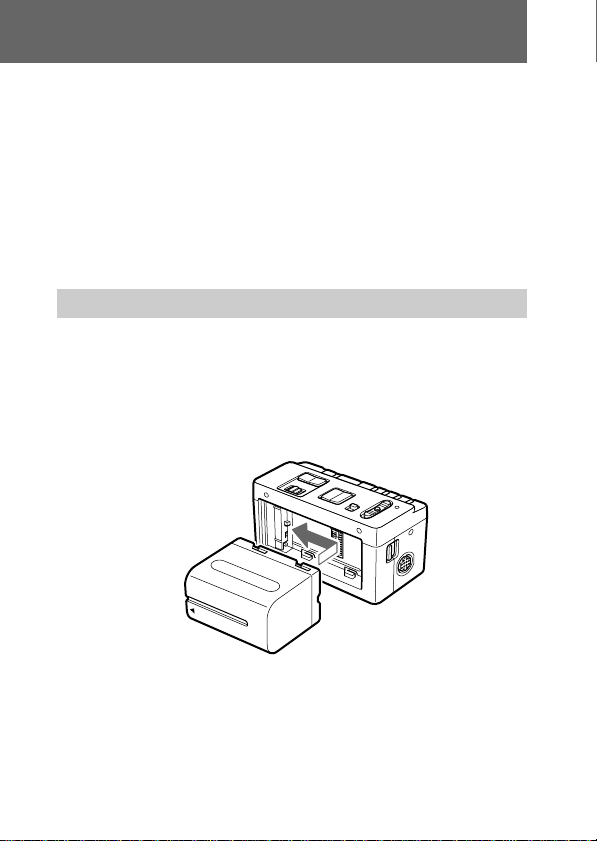
Using this unit as a single video camera
(1) Attach a charged battery pack (not supplied) to
this unit.
The AC-V700 or AC-VQ800 power adaptor can be
used to supply power from an AC power source
when using the DK-415 connecting cable.
11-EN
Page 12
Connections
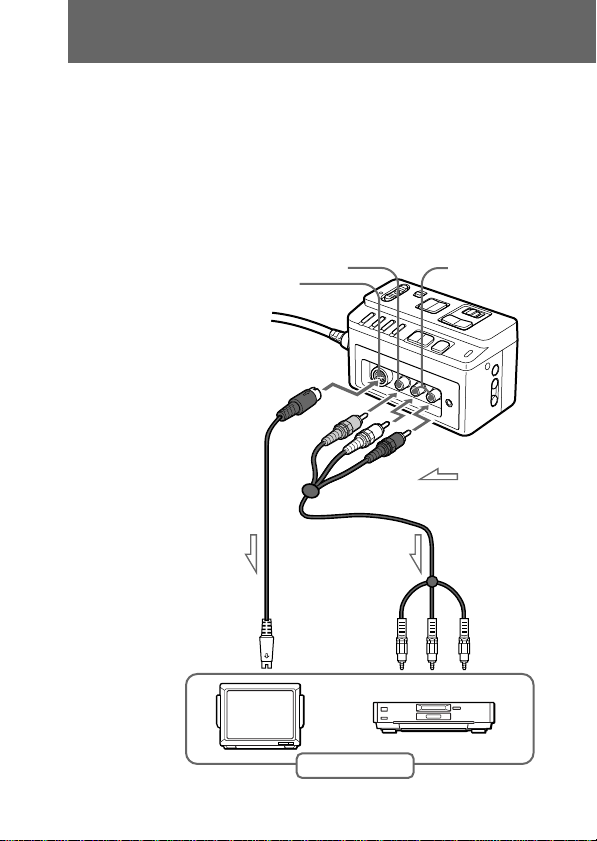
(2) Connect other video equipment using the A/V
connecting cable (not supplied).
Use an appropriate audio/video connecting cable
to connect this unit to other video equipment. If the
other video equipment has an S VIDEO jack,
connect the S VIDEO jack instead of the yellow
(video) jack. A clearer picture can then be obtained.
12-EN
VIDEO OUTPUT jack
S VIDEO jack
To the
S VIDEO
input jack
S VIDEO
connecting
cable
(not supplied)
To the
video/audio
input jacks
Other equipment
L/R AUDIO
OUTPUT jacks
: Signal flow
A/V
connecting
cable
(not supplied)
Page 13

Notes
• If howling is heard from the speakers when using an
external microphone, lower the volume level of the
connected equipment or move the microphone away
from the speakers.
• When using the extension camera cable (not
supplied), supply power with the AC power adaptor
or DC power adaptor. Do not use the battery pack.
• Up to 3 extension camera cables (1 cable: 10 m, not
supplied) can be connected together to form one
cable. The total length between the head of camera
lens and the end of extension cables is approx. 33 m.
• When removing the camera, be sure to pull the plug
out while holding the plug lock. Otherwise, the plug
and connector will be damaged.
13-EN
Page 14
Resetting the date and time
You can reset the date and time in the menu system.
(1) Press MENU to display the menu.
(2) Press +/– to select ETC, then press EXEC.
(3) Press +/– to select CLOCK SET, then press
EXEC.
(4) Press +/– to adjust the desired year, then press
EXEC.
(5) Set the month, day, hour and minute by pressing
+/– and EXEC.
(6) Press MENU to erase the menu display.
1, 6 (MENU)
2, 3, 4, 5 (+/–,
EXEC)
To correct the date and time setting
Repeat the above procedure.
14-EN
To check the preset date and time
Press DATE to display the date indicator.
Press TIME to display the time indicator.
When you press the same button again, the indicator
goes off.
Page 15

The year changes as follows:
1999 ˜ 2000 N · · · · n 2029
n
Notes on the time indicator
CVX-V18NS:
The internal clock of this unit operates on a 12-hour
cycle.
• 12:00 AM Stands for midnight.
• 12:00 PM Stands for noon.
CVX-V18NSP:
The internal clock of this unit operates on a 24-hour
cycle.
n
15-EN
Page 16

Recording
Pictures shot with this unit can be recorded onto a VCR,
etc. Refer to the operating instructions supplied with
the video equipment to be connected.
Recording on a VCR
The recommended VCR to be connected to this unit is
the Sony DSR-V10/V10P. The DSR-V10 is used in the
sample illustration.
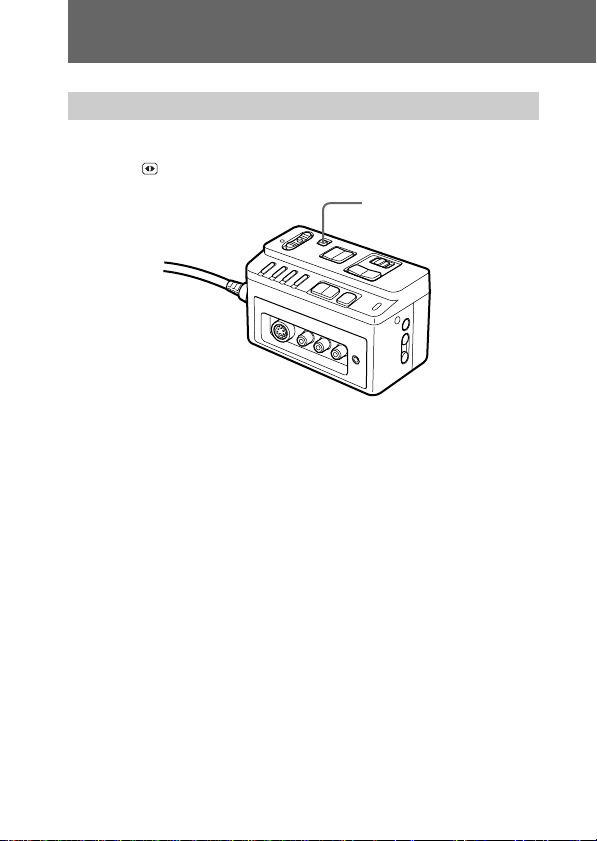
(1) When recording sound, connect an external
microphone (not supplied).
Connect an external microphone to the MIC (PLUG
IN POWER) jack.
The MIC (PLUG IN POWER) jack can also be
connected to the plug-in-power microphone.
16-EN
MIC (PLUG IN POWER)
jack
External microphone
(not supplied)
Page 17
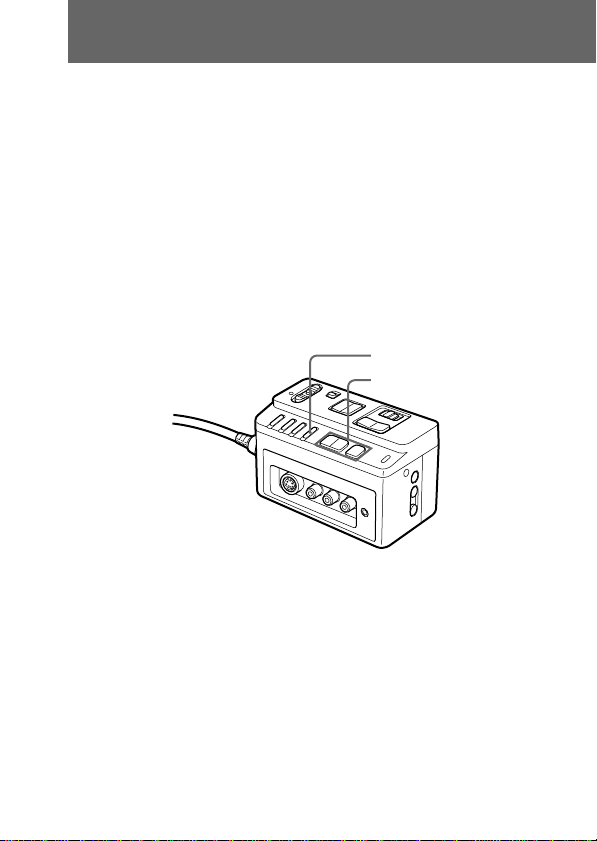
(2) Turn on the power of the DSR-V10/V10P.
The POWER lamp on the DSR-V10/V10P lights up.
(3) Turn on the power of this unit.
The POWER lamp on this unit lights up.
(4) Insert a cassette into the DSR-V10/V10P and
start recording.
2
3
Notes on recording
• Contents of the recording cannot be compensated if
recording is not made due to a malfunction of this
unit, video tape, etc.
• When using this unit connected to a VCR, note that
all the displayed characters and icons will be
recorded.
4
17-EN
Page 18
Recording
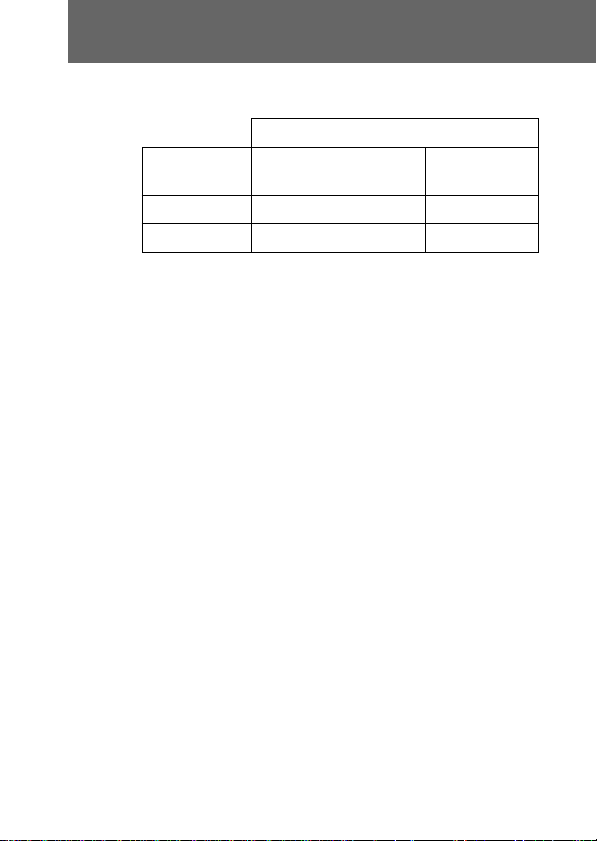
Recording time with the battery pack
Battery pack
When using a fully charged battery pack (Full charge),
the numbers indicate the remaining recording time .
When using a normally charged battery pack (Normal
charge), the numbers in parentheses indicate the
remaining recording time.
Notes on the battery pack
• When the battery runs low, the BATT lamp lights up,
• When the power of the battery pack attached to the
• When the NP-F330, NP-F530 or NP-F550 is used, the
• Depending on the type of battery, the BATT lamp
Possible usage time (min.)
Using with
the DSR-V10/V10P
NP-F750
NP-F950
and when the battery is empty, the BATT lamp goes
off.
video equipment which is connected to this unit runs
low, the POWER lamp on this unit goes off and then
the power turns off automatically.
recording time may be shorter, or recording may not
be performed. We recommend using a battery pack
with a longer battery life.
may not light even when the battery runs low.
80 (70)
130 (115)
Stand alone
use
610 (550)
930 (830)
18-EN
Page 19

Using the zoom feature
This camera is equipped with zoom. When using the
zoom, adjust manually.
“T” side: for telephoto (subject appears closer)
“W” side: for wide-angle (subject appears farther away)
When you shoot a subject using a telephoto zoom
If you cannot get a sharp focus while in extreme
telephoto zoom, move ZOOM to the “W” side until the
focus is sharp. You can shoot a subject that is at least
about 2 5/8 feet (about 80 cm) away from the lens
surface in the telephoto position, or about 1/2 inch
(about 1 cm) away in the wide-angle position.
ZOOM
19-EN
Page 20
Recording
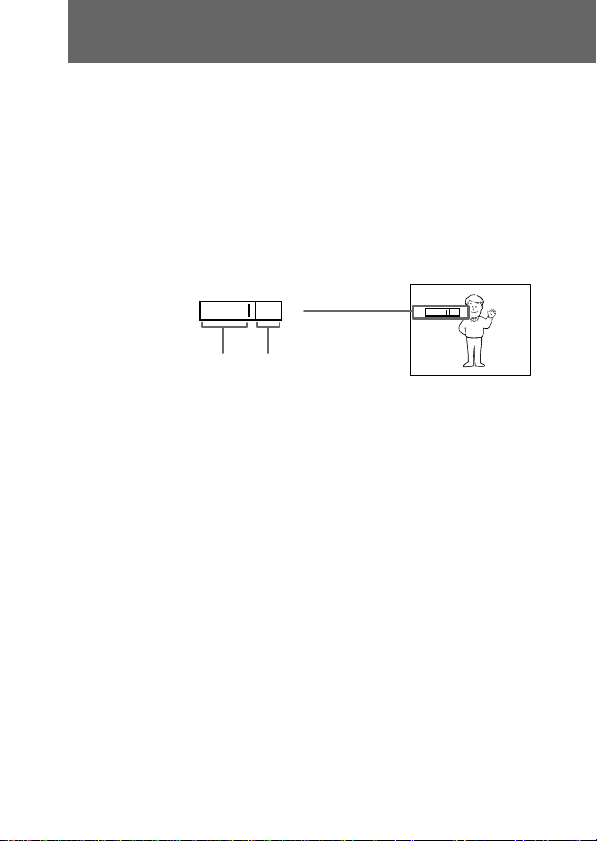
Notes on digital zoom
• More than 18x zoom is performed digitally, and the
• The right side [a] of the power zoom indicator shows
picture quality deteriorates as you go toward the “T”
side. If you do not want to use the digital zoom, set
the D ZOOM function to OFF in the menu system.
the digital zooming zone, and the left side [b] shows
the optical zooming zone. If you set the D ZOOM
function to OFF, the [a] zone disappears.
W
W
T
T
[a][b]
20-EN
Page 21

Using as the NightShot camera
The NightShot function enables you to shoot a subject
in a dark place. Use this function to record a clear
picture without light.
This function may record picture nearly in
monochrome.
Using the NightShot Light
When you set IR LIGHT to ON in the menu system, the
picture will be more clear.
IR Light rays are infrared and are therefore invisible.
The maximum range of IR Light is about 16 feet (about
5 meters) when SLOW SHTR (SHUTTER) is set to
MANUAL. When you set SLOW SHTR to AUTO in the
menu system, the range of IR light is extended.
Notes on the NightShot
• When you keep setting NIGHTSHOT to ON in
normal recording, picture may be recorded in
incorrect/unnatural color.
• If focusing is difficult with the autofocus mode when
using the NightShot function, focus manually.
21-EN
Page 22
Using various features
Shooting in the dark (NightShot)
Slide NIGHTSHOT to ON.
appears on the monitor screen.
NIGHTSHOT
To cancel the NightShot function
Slide NIGHTSHOT to OFF.
Notes on the Nightshot
• You cannot adjust the exposure while using the
Nightshot function.
• You cannot use the shutter with a shutter speed
higher than the normal speed.
(Normal shutter speed: 1/60 for NTSC or 1/50 for
PAL).
22-EN
Page 23

Adjusting the exposure
Adjust the exposure manually under the following
cases.
- The background is too bright (back lighting)
- Insufficient light: most of the picture is dark
- Bright subject and dark background
- To record the darkness faithfully
(1) Press EXPOSURE.
(2) Press +/– to adjust the brightness.
To return to automatic exposure mode
Press EXPOSURE again.
Shooting with the sun behind the subject
If the light source is behind your subject, or in the
following situations, the subject will be recorded too
dark.
• The subject is indoors and there is a window behind
the subject.
• Bright light sources are included in the scene.
• When shooting a person wearing white or shiny
clothes in front of a white background, the face will
be recorded too dark.
1 (EXPOSURE)
2 (+/–)
23-EN
Page 24

Using various features
Making your own title
You can make your own title of 20 characters.
(1) Press TITLE to display the title menu.
(2) Press +/– to select
(3) Press +/– to select the column of the desired
character, then press EXEC.
(4) Press +/– to select the desired character, then
press EXEC.
(5) Repeat step 3 and 4 until you finish the title.
(6) For finishing the titling work, press +/– to select
[SET], then press EXEC.
, then press EXEC.
1 (TITLE)
2, 3, 4, 5, 6 (+/–,
EXEC)
24-EN
Note
You can not enter over 20 characters title.
To delete a title
In step 3, press +/– to select [M] then press EXEC. The
last character is erased. Repeat this step until all
characters are deleted.
Page 25

Superimposing a title
You can select the color and position of the title to
superimpose on the screen or even make it blink.
(1) Press TITLE to display the title menu.
(2) Press +/– to select
(3) Press +/– to select the color or position, then
press EXEC.
(4) Press +/– to select the desired item, then press
EXEC.
(5) Repeat step 3 and 4 until the title is arranged as
desired.
(6) Press EXEC again to complete the setting.
(7) When you want to stop recording the title, press
TITLE.
, then press EXEC.
1, 7 (TITLE)
2, 3, 4, 5, 6 (+/–,
EXEC)
25-EN
Page 26

Using various features
Note on superimposing a title
If you have not created a custom title, “– – – – ...”
appears on the monitor screen.
Title color changes as follows :
WHITE ˜ YELLOW ˜ VIOLET ˜ RED ˜ CYAN
˜ GREEN ˜ BLUE
Title positions
You can select from among 11 positions vertically or 24
positions horizontally.
Title blinking selection changes as follows:
ON˜OFF
Notes on the title
• Depending on position of the title, both of date and
time or either of them is not displayed.
• When a long title is positioned on the right side of the
screen, the whole title may not be completely
displayed.
26-EN
Page 27

Selecting the shutter speed
The shutter speed can be selected using the SHUTTER
button.
(1) Press SHUTTER.
(2) Press +/– to select the shutter speed.
To adjust the shutter speed
automatically
Press SHUTTER again.
1 (SHUTTER)
2 (+/–)
27-EN
Page 28

Using various features
CVX-V18NS
SETTING SHUTTER SPEED
4 1/4
8 1/8
15 1/15
30 1/30
60 1/60
90 1/90
100 1/100
125 1/125
180 1/180
250 1/250
350 1/350
500 1/500
725 1/725
1000 1/1000
1500 1/1500
2000 1/2000
3000 1/3000
4000 1/4000
6000 1/6000
10000 1/10000
CVX-V18NSP
SETTING SHUTTER SPEED
3 1/3
6 1/6
12 1/12
25 1/25
50 1/50
75 1/75
100 1/100
120 1/120
150 1/150
215 1/215
300 1/300
425 1/425
600 1/600
1000 1/1000
1250 1/1250
1750 1/1750
2500 1/2500
3500 1/3500
6000 1/6000
10000 1/10000
28-EN
Page 29

Changing the mode settings
You can change the mode settings in the menu system
to further enjoy the features and functions of the
camera.
(1) Press MENU to display the menu.
(2) Press +/– to select the desired icon in the left
side of the menu, then press EXEC.
(3) Press +/– to select the desired item, then press
EXEC.
(4) Press +/– to select the desired mode, and press
EXEC. If you want to change the other modes,
repeat steps 3 and 4. If you want to change the
other items, select
then repeat steps from 2 to 4.
(5) Press MENU or select
display.
RETURN and press EXEC,
icon to erase the menu
1, 5 (MENU)
2, 3, 4 (+/–,
EXEC)
29-EN
Page 30

Using various features
Selecting the mode setting of each item
CAMERA1 SET menu
D ZOOM
• Switches the digital zoom ON or OFF.
• Switch ON when using the digital zoom.
The digital zoom will enlarge any picture which cannot
be sufficiently enlarged with the normal zoom.
However, note that the picture quality deteriorates
when using the digital zoom compared with the normal
zoom.
AF SENS.
• Switches the auto focus sensor setting to HIGH or
LOW.
• Switch to HIGH to record fast-moving subjects
clearly.
SLOW SHTR
• Switches the SLOW SHUTTER setting to MANUAL
or AUTO.
• Switch to AUTO to record subjects in dark
environments clearly.
IR LIGHT
• Switches the IR LIGHT ON or OFF.
• Switch ON to record subjects in dark environment
clearly when using the NIGHTSHOT function
without lighting.
30-EN
Page 31

CAMERA2 SET menu
STEADYSHOT
• Switches the STEADYSHOT ON or OFF.
• Switch ON to reduce camera shake even when using
the zoom function.
MIRROR
• Switches the MIRROR mode ON or OFF.
• Switch ON to reverse left and right.
16:9 WIDE
• Toggles the ratio of the monitor screen between OFF,
CINEMA and 16:9 FULL.
• CINEMA
Pictures recorded on CINEMA will appear normal on
a wide-screen TV however, when played on a
normal-screen TV, black bands will appear across the
top and bottom of the screen.
• 16:9 FULL
Pictures recorded on 16:9 FULL will appear normal
on a wide-screen TV however, when played on a
normal-screen TV, the picture will appear
horizontally compressed.
ETC menu
CLOCK SET
• Sets the built-in clock.
31-EN
Page 32

Using various features
Turning off the screen display except date,
time and menu
Press DISPLAY.
To resume the screen display
Press DISPLAY again.
Displaying the date
Press DATE.
To turn off the date
Press DATE again.
Displaying the time
Press TIME.
To turn off the time
Press TIME again.
DISPLAY
32-EN
DATE
TIME
Page 33

Precautions
On the jacks and cords
• Be sure that nothing metallic comes into contact with
the metal part of the jacks. If this happens, a short
may occur and the unit may be damaged.
• Always clean the jacks.
• Do not forcibly pull or tug on the cord.
On usage and storage
• Never leave the unit exposed to high temperatures,
such as near a heater, in a car parked in the sun or
under direct sunlight. This may cause the casing to
deform, and the unit to malfunction.
• Do not get sand or dust into the unit. When you use
the unit on a sandy beach or in a dusty place, protect
it from the sand or dust. Sand or dust may cause the
unit to malfunction, and sometimes this malfunction
cannot be repaired.
• Keep the unit away from strong magnetic fields.
Recording may not perform normally.
• Do not operate the unit for long periods of time
tightly confined, such as wrapped in a bag. Doing so
may cause heat to build up and result in malfunction
of the unit.
Brightness of the subject
If the brightness of the subject exceeds the illumination
range, the image may not be displayed clearly.
Prohibition on inappropriate usage
Do not focus on a stationary or bright subject for a long
period of time. The CCD color filter may be damaged.
Transportation
Do not aim the lens towards a strong light source, such
as the sun while transporting. The CCD color filter may
be damaged.
33-EN
Page 34

Precautions
On shooting
If you aim the lens towards a strong light source, such
as the sun, a shadow or "ghost" may appear in the
picture.
Care of this unit
Clean the unit body with a cloth lightly moistened with
water, and then wipe the moisture with a dry soft cloth.
34-EN
Page 35

Specifications
System
Video signal
CVX-V18NS: NTSC color
CVX-V18NSP: PAL colour
Image device
1/4 inch color CCD,
CVX-V18NS: 470,000 pixel (total)
CVX-V18NSP: 570,000 pixel (total)
Lens
f=4.1-73.8 mm, x18 power zoom
F1.4-2.9
filter ø37mm
Minimum illumination
0.7 lux (at 25 IRE)
0 lux (when using IR light)
Illumination range
0.7 to 100,000 lux
Recommended illumination
more than 100 lux
Power requirement
7.2 V
Power consumption
approx. 2.2 W
When using IR light: approx. 3.2 W
Operating temperature
0ºC to 40ºC (32ºF to 104ºF)
Storage temperature
–20ºC to +60ºC (–4ºF to 140ºF)
Dimensions (w x h x d)
Camera: approx. 63 x 66 x 115 mm
1
/2 x 2 5/8 x 4 5/8 in.)
(2
Main unit: approx. 50 x 59 x 110
mm (2 x 2
Cord length
approx. 3 m
Mass
Camera: approx. 343 g (12 oz)
Main unit: approx. 153 g (5 oz)
3
/8 x 4 3/8 in.)
MIC input jack
Stereo minijack 0.388 mV
Low impedance with DC 2.5 to
3.5 V, output impedance 6.8
kilohms
Output jacks
Video output
Phono jack (1)
Luminance signal:
1 Vp-p, 75 ohms, unbalanced
Audio output
Phono jacks (2: stereo L and R)
327 mV (at output impedance
47 kilohms), impedance less than
2.2 kilohms)
S video output
4-pin mini DIN (1)
Luminance signal:
1 Vp-p, 75 ohms, unbalanced
Chrominance signal:
CVX-V18NS: 0.286 Vp-p, 75 ohms,
unbalanced
CVX-V18NSP: 0.3 Vp-p, 75 ohms,
unbalanced
Supplied accessories
Adaptor (1)
Operating instructions (1)
Design and specifications are
subject to change without notice.
35-EN
Page 36

Avant d’utiliser l’appareil, veuillez lire attentivement ces
instructions et les conserver pour toute référence ultérieure.
AVERTISSEMENT
Pour éviter un incendie ou une électrocution, n’exposez pas
l’appareil à la pluie ou à l’humidité.
2-FR
Page 37

Pour les utilisateurs au Canada
DEPOT DES BATTERIES AU LITHIUM-ION
MISE AU REBUT DES BATTERIES AU LITHIUM-ION AUX
ENDROITS RECOMMANDES.
Vous pouvez rapporter les batteries au lithium-ion dans un centre
de Service Sony ou dans un point de ramassage.
Remarque: Dans certains pays, il est interdit de jeter les batteries
Pour connaître le centre de Service Sony le plus proche de chez
vous, composez le 1-800-222-SONY (Etats-Unis uniquement)
Pour connaître le point de ramassage le plus proche de chez vous,
composez le 416-499-SONY (Canada uniquement)
Avertissement: Ne pas utiliser des batteries au lithium-ion qui
au lithium-ion avec les ordures ménagères ou dans
les poubelles de bureau.
sont endommagées ou qui fuient.
ATTENTION
A certaines fréquences, les champs électriques peuvent perturber l’image et
le son de la caméra.
3-FR
Page 38

Caractéristiques
• Function NightShot pour prise de vues dans
l’obscurité.
• CCD de précision à 470 000 pixels pour la CVXV18NS et 570 000 pixels pour la CVX-V18NSP.
• Enregistrement de gros-plans jusqu’à 10 mm grâce à
la fonction Macro.
• Connexion au magnétoscope DSR-V10/V10P par
l’adaptateur fourni.
• Sorties vidéo/audio et S-vidéo pour la connexion à
d’autres appareils vidéo.
4-FR
Page 39

Table des matières
Caractéristiques .................................................................................... 4
Nomenclature........................................................................................ 6
Raccordements ...................................................................................... 8
Raccordement de la caméra à l’appareil principal ................... 8
Raccordement de cet appareil au magnétoscope...................... 9
Utilisation de l’appareil comme caméra
vidéo indépendante ................................................................ 11
Réglage de la date et de l’heure........................................................ 14
Enregistrement .................................................................................... 16
Enregistrement sur un magnétoscope ...................................... 16
Utilisation du zoom..................................................................... 19
Utilisation de la caméra pour la prise de vues nocturne ....... 21
Utilisation des autres fonctions ........................................................ 22
Enregistrement dans l’obscurité (NightShot) .......................... 22
Réglage de l’exposition ............................................................... 23
Création d’un titre personnalisé................................................ 24
Incrustation d’un titre ................................................................. 25
Sélection de la vitesse d’obturation .......................................... 27
Changement des réglages de mode .......................................... 29
Sélection du réglage de mode de chaque paramètre..............30
Extinction des indications sauf la date,
l’heure et le menu .................................................................... 32
Affichage de la date..................................................................... 32
Affichage de l’heure .................................................................... 32
Précautions .......................................................................................... 33
Spécifications....................................................................................... 35
5-FR
Page 40

Nomenclature
1
2
3
4
5
6
7
8
9
!¡
!™
!£
!¢
!∞
!§
!¶
!•
!ª
@º
6-FR
!º
@¡
@™
@£
@¢
@∞
Page 41

Appareil principal
1 Touche d’obturateur
(SHUTTER)
2 Touche d’exposition
(EXPOSURE)
3 Touche de titre (TITLE)
4 Touche de menu
(MENU)
5 Prise S-vidéo (S VIDEO)
6 Prises de sortie audio/
vidéo (VIDEO/AUDIO
OUTPUT)
7 Touche de zoom
(ZOOM)
8 Touche de réglage loin/
près (NEAR/FAR)
9 Commutateur de mise
au point (FOCUS)
!º Surface de montage de
la batterie/l’adaptateur
!¡ Touche +/–
!™ Touche de validation
(EXEC)
!£ Témoin de batterie
(BATT)
!¢ Touche d’affichage des
indications (DISPLAY)
!∞ Touche d’affichage de
la date (DATE)
!§ Touche d’affichage de
l’heure (TIME)
!¶ Prise d’alimentation à
l’enfichage (PLUG IN
POWER)
Permet de brancher un
microphone externe (non
fourni)
!• Commutateur de prise
de vues nocturne
(NIGHTSHOT)
!ª Interrupteur
d’alimentation (POWER)
@º Témoin d’alimentation
(POWER)
@¡ Bouton de libération de
la batterie (BATTERY
RELEASE)
@™ Connecteur (pour le
câble de caméra)
Adaptateur
@£ Touche de libération
(RELEASE)
@¢ Connecteur
Caméra
@∞ Objectif
7-FR
Page 42

Raccordements
Le magnétoscope DSR-V10/V10P peut être raccordé à
cet appareil. Dans ce cas, le magnétoscope alimentera
l’appareil.
Si vous utilisez cet appareil simplement comme caméra
vidéo, raccordez-le à un téléviseur ou un magnétoscope
à l’aide d’un cordon de liaison audio/vidéo (non
fourni). Pour les liaisons, reportez-vous au mode
d’emploi fourni avec l’appareil qui doit être raccordé.
Raccordement de la caméra à l’appareil
principal
Insérez la prise de caméra dans le connecteur de
l’appareil principal en alignant les flèches marquées sur
la prise de caméra et sur le connecteur de l’appareil
principal.
Pour débrancher la caméra
Tirez sur la prise en la tenant par le verrou. La prise et
le connecteur risquent d’être endommagés si vous
essayez de débrancher la caméra sans tenir le verrou.
8-FR
Page 43

Raccordement de cet appareil au
magnétoscope
Il est conseillé de raccorder le magnétoscope Sony DSRV10/V10P à cet appareil. Les illustrations représentent
le DSR-V10.
(1) Ouvrez l’écran LCD du magnétoscope et retirez
le cache-connecteur.
(2) Fixez l’adaptateur fourni au magnétoscope.
9-FR
Page 44

Raccordements
(3) Fixez cet appareil à l’adaptateur fourni.
Pour débrancher l’appareil de l’adaptateur [a]
Faites glisser la touche RELEASE de cet appareil dans le
sens de la flèche.
Pour débrancher l’adaptateur du magnétoscope [b]
Faites glisser la touche RELEASE de l’adaptateur dans
le sens de la flèche.
10-FR
[a]
[b]
Page 45

Remarques
• Veillez à remettre le cache-connecteur du
magnétoscope lorsque cet appareil n’est pas raccordé
au magnétoscope pour protéger le connecteur. Le
cache-connecteur se met en place de la même façon
que l’adaptateur.
• Le cordon de caméra et le cordon-rallonge (non
fournis) ne doivent être branchés que sur ce modèle.
Ne pas les utiliser pour raccorder d’autres appareils.
Utilisation de l’appareil comme caméra
vidéo indépendante
(1) Rattachez une batterie rechargée (non fournie) à
cet appareil.
L’adaptateur secteur AC-V700 ou AC-VQ800 peut
être utilisé pour alimenter l’appareil par une prise
secteur lorsque le cordon de liasion DK-415 est
raccordé.
11-FR
Page 46

Connections
(2) Raccordez l’autre appareil vidéo à l’aide d’un
cordon de liaison audio/vidéo (non fourni).
Utilisez un cordon de liaison audio/vidéo
approprié pour relier cet appareil à un autre
appareil vidéo. Si l’autre appareil vidéo a une prise
S VIDEO, raccordez cet appareil à la prise S VIDEO
au lieu de la prise jaune (vidéo). L’image sera plus
nette.
Prise VIDEO OUTPUT
Prise S VIDEO
Prises L/R
AUDIO OUTPUT
Sens du signal
12-FR
Vers la prise
d’entrée
S VIDEO
Cordon de liaison
S VIDEO
(non fourni)
Vers les prises
d’entrée
vidéo/audio
Autre appareil
Cordon de liaison
audio/vidéo
(non fourni)
Page 47

Remarques
• Réduisez le volume de l’appareil raccordé ou
éloignez le microphone des haut-parleurs si ceux-ci
produisent un sifflement est audible.
• Lorsque vous utilisez un cordon-rallonge de caméra
(non fourni), alimentez cet appareil par l’adaptateur
secteur ou un adaptateur de courant continu.
N’utilisez pas la batterie rechargeable.
• Vous pouvez raccorder jusqu’à 3 cordons-rallonge de
caméra (1 cordon : 10 m, non fourni) pour obtenir un
cordon plus long. La longueur totale entre l’avant de
l’objectif et l’extrémité des cordons-rallonge est
d’environ 33 m.
• Tirez sur la prise en la tenant par le verr pour
de’brancher la caméra ou. La prise et le connecteur
risquent sinon d’être endommagés.
13-FR
Page 48

Réglage de la date et de l’heure
La date et l’heure peuvent être réglées dans le menu.
(1) Appuyez sur MENU pour afficher le menu.
(2) Appuyez sur +/– pour sélectionner ETC, puis
appuyez sur EXEC.
(3) Appuyez sur +/– pour sélectionner CLOCK
SET, puis appuyez sur EXEC.
(4) Appuyez sur +/– pour ajuster l’année, puis
appuyez sur EXEC.
(5) Ajustez ensuite le mois, le jour, les heures et les
minutes de la même manière en appuyant sur
+/– et EXEC.
(6) Appuyez sur MENU pour fermer le menu.
1, 6 (MENU)
2, 3, 4, 5 (+/–,
EXEC)
Pour corriger la date et l’heure
Effectuez les opérations précédentes.
14-FR
Pour vérifier la date et l’heure
préréglées
Appuyez sur DATE pour afficher la date.
Appuyez sur TIME pour afficher l’heure.
L’indication de l’heure ou de la date s’éteint par une
nouvelle pression sur ces touches.
Page 49

L’année change de la façon suivante :
1999 ˜ 2000 N · · · · n 2029
n
Remarques sur l’indication de l’heure
CVX-V18NS :
L’horloge interne de cet appareil fonctionne selon un
cycle de 12 heures.
• 12:00 AM indique minuit.
• 12:00 PM indique midi.
CVX-V18NSP :
L’horloge interne de cet appareil fonctionne selon un
cycle de 24 heures.
n
15-FR
Page 50

Enregistrement
Les prises de vues effectuées avec cet appareil peuvent
être enregistrées sur un magnétoscope ou un autre
appareil. Pour l’enregistrement proprement dit,
reportez-vous au mode d’emploi de l’appareil vidéo qui
doit être raccordé.
Enregistrement sur un magnétoscope
Il est conseillé de raccorder le magnétoscope Sony DSRV10/V10P à cet appareil. Les illustrations représentent
le DSR-V10.
(1) Pour enregistrer le son, raccordez un
microphone externe (non fourni).
Raccordez un microphone externe à la prise MIC
(PLUG IN POWER).
La prise MIC (PLUG IN POWER) peut être reliée à
un microphone s’alimentant par une prise.
16-FR
Prise MIC (PLUG IN
POWER)
Microphone
externe
(non fourni)
Page 51

(2) Mettez le DSR-V10/V10P sous tension.
Le témoin POWER du DSR-V10/V10P s’allume.
(3) Mettez cet appareil sous tension.
Le témoin POWER de cet appareil s’allume.
(4) Insérez une cassette dans le DSR-V10/V10P et
commencez l’enregistrement.
2
3
Remarques sur l’enregistrement
• Sony n’accordera aucune compensation si pour une
raison quelconque, défaillance de l’appareil, de la
vidéocassette, etc. un enregistrement n’a pas pu être
réalisé.
• Lorsque vous raccordez cet appareil à un
magnétoscope, tous les caractères et icônes affichés
sont enregistrés.
4
17-FR
Page 52

Enregistrement
Temps d’enregistrement avec la
batterie rechargeable
Batterie
rechargeable
NP-F750
NP-F950
Ces chiffres indiquent la durée restante
d’enregistrement à l’emploi d’une batterie parfaitement
rechargée (Pleine charge). Ceux entre parenthèses
correspondent à la durée restante d’enregistrement à
l’emploi d’une batterie normalement rechargée (Charge
normale).
Remarques sur la batterie rechargeable
• Lorsque la batterie est faible, le témoin BATT
s’allume et il s’éteint lorsqu’elle est vide.
• Lorsque la batterie rattachée à l’appareil vidéo qui est
raccordé à cet appareil est faible, le témoin POWER
de cet appareil s’éteint puis l’alimentation est coupée.
• Quando si usa lo NP-F330, NP-F530 o NP-F550, il
tempo di registrazione può essere più breve o la
registrazione può non essere eseguita. Consigliamo
di usare un blocco batteria con una durata maggiore.
• Avec certains types de batterie, le témoin BATT
risque de ne pas s’allumer quand la batterie est faible.
Temps d’utilisation possible (min.)
Utilisation avec
le DSR-V10/V10P
80 (70)
130 (115)
Utilisation
autonome
610 (550)
930 (830)
18-FR
Page 53

Utilisation du zoom
Cette caméra est équipée d’un zoom. Le réglage du
zoom s’effectue manuellement.
Côté “T” : position téléobjectif (le sujet se rapproche)
Côté “W” : position grand-angle (le sujet s’éloigne)
Si vous filmez un sujet en position téléobjectif
Si vous n’obtenez pas une image nette dans la position
extrême du zoom, déplacez le levier de zoom dans le
sens de “W” jusqu’à ce que l’image soit nette. Vous
pouvez filmer un sujet à 80 cm environ (2 5/8 pieds
environ) de la surface de l’objectif en position
téléobjectif ou à 1 cm environ (1/2 pouce environ) dans
la position grand-angle.
ZOOM
19-FR
Page 54

Enregistrement
Remarques sur le zoom numérique
• Un grossissement supérieur à 18 fois l’image
s’effectue numériquement et la qualité de l’image se
dégrade lorsque vous atteignez le côté “T”. Si vous
ne voulez pas utiliser le zoom numérique, réglez la
fonction D ZOOM sur OFF dans le menu.
• Le côté droit [a] de l’indication du zoom représente
la zone du zoom numérique et le côté gauche [b]
représente la zone du zoom optique. Si vous réglez la
fonction D ZOOM sur OFF, la zone [a] disparaîtra.
W
W
T
T
[a][b]
20-FR
Page 55

Utilisation de la caméra pour la prise de
vues nocturne
La fonction NighShot (prise de vues nocturne) permet
de filmer dans un lieu sombre. Utilisez cette fonction
pour enregistrer une image nette même sans lumière.
Lorsque cette fonction est utilisée, l’image risque d’être
presque monochrome.
Utilisation de l’éclairage NightShot
Si vous réglez IR LIGHT sur ON dans le menu, l’image
sera encore plus claire.
Les rayons de l’éclairage IR sont des rayons infrarouges
donc invisibles.
La limite maximale d’utilisation de l’éclairage IR est de
5 mètres environ (16 pieds environ) lorsque SLOW
SHTR (SHUTTER) est réglé sur MANUAL dans le
menu. La plage d’éclairage IR est plus grande, lorsque
SLOW SHTR est réglé sur AUTO dans le menu.
Remarques sur la function NightShot
• Si vous laissez le réglage NIGHTSHOT sur ON
pendant la prise de vues normale, les couleurs de
l’image enregistrée risquent d’être différentes et
artificielles.
• Si la mise au point est difficile avec l’autofocus
lorsque vous utilisez la fonction NightShot, effectuezla manuellement.
21-FR
Page 56

Utilisation des autres fonctions
Enregistrement dans l’obscurité
(NightShot)
Réglez NIGHTSHOT sur ON.
apparaît sur l’écran du moniteur.
NIGHTSHOT
Pour annuler la fonction NightShot
Réglez NIGHSHOT sur OFF.
Remarques sur la fonction Nightshot
• Vous ne pouvez pas ajuster l’exposition lorsque vous
utilisez la fonction Nightshot.
• Vous ne pouvez pas utiliser l’obturateur à une vitesse
d’obturation supérieure à la vitesse normale.
(Vitesse d’obturation normale : 1/60 pour NTSC ou
1/50 pour PAL)
22-FR
Page 57

Réglage de l’exposition
Réglez l’exposition manuellement dans les cas suivants.
- Le fond est trop lumineux (contre-jour)
- La lumière est insuffisante : la plus grande partie de
l’image est sombre
- Le sujet est lumineux et le fond sombre
- Pour obtenir une image fidèle d’un sujet filmé dans
l’obscurité
(1) Appuyez sur EXPOSURE.
(2) Appuyez sur +/– pour ajuster la luminosité.
Pour revenir au mode d’exposition
automatique
Appuyez une nouvelle fois sur EXPOSURE.
Prise de vues à contre-jour
Si la source de lumière est derrière le sujet ou dans les
situations suivantes, le sujet enregistré sera trop
sombre.
• Le sujet est en intérieur, devant une fenêtre.
• Des sources très lumineuses éclairent la scène.
• Vous filmez une personne portant des vêtements
blancs et brillants devant un fond blanc. L’image
enregistrée sera donc trop sombre.
1 (EXPOSURE)
2 (+/–)
23-FR
Page 58

Utilisation des autres fonctions
Création d’un titre personnalisé
Vous pouvez créer un titre de 20 caractères au
maximum.
(1) Appuyez sur TITLE pour afficher le menu de
titre.
(2) Appuyez sur +/– pour sélectionner
appuyez sur EXEC.
(3) Appuyez sur +/– pour sélectionner la colonne
du caractère souhaité, puis appuyez sur EXEC.
(4) Appuyez sur +/– pour sélectionner le caractère
souhaité, puis appuyez sur EXEC.
(5) Répétez les étapes 3 et 4 jusqu’à ce que le titre
soit complet.
(6) Pour valider le titre, appuyez sur +/– pour
sélectionner [SET], puis appuyez sur EXEC.
1 (TITLE)
2, 3, 4, 5, 6 (+/–,
, puis
EXEC)
24-FR
Remarque
Vous ne pouvez pas enregistrer un titre de plus de 20
caractères.
Pour effacer un titre
A l’étape 3, appuyez sur +/– pour sélectionner [M], puis
appuyez sur EXEC. Le dernier caractère est effacé.
Répétez cette opération jusqu’à ce que tous les
caractères soient effacés.
Page 59

Incrustation d’un titre
Vous pouvez sélectionner la couleur et la position du
titre à incruster dans l’image ou même le rendre
invisible.
(1) Appuyez sur TITLE pour afficher le menu de
titre.
(2) Appuyez sur +/– pour sélectionner
appuyez sur EXEC.
(3) Appuyez sur +/– pour sélectionner la couleur
ou la position, puis appuyez sur EXEC.
(4) Appuyez sur +/– pour sélectionner le titre
souhaité, puis appuyez sur EXEC.
(5) Répétez les étapes 3 et 4 jusqu’à ce que le titre
soit tel que vous le voulez.
(6) Appuyez une nouvelle fois sur EXEC pour
valider le réglage.
(7) Appuyez sur TITLE pour cesser d’enregistrer le
titre.
, puis
1, 7 (TITLE)
2, 3, 4, 5, 6 (+/–,
EXEC)
25-FR
Page 60

Utilisation des autres fonctions
Remarque sur l’incrustation du titre
Si vous n’avez pas encore créé de titre
“– – – –…” apparaîtra sur l’écran du moniteur.
La couleur du titre change de la façon suivante:
WHITE (blanc) ˜ YELLOW (jaune) ˜ VIOLET
(violet) ˜ RED (rouge) CYAN ˜ GREEN (vert) ˜
Blue (bleu)
Position du titre
Vous pouvez choisir 11 positions verticales et 24
positions horizontales.
La sélection du clignotement du titre change comme
suit :
ON ˜ OFF
Remarques sur le titre
• La date et l’heure, ou les deux, n’apparaissent pas à
certaines positions du titre.
• Un titre long, placé sur le côté droit de l’écran, risque
de ne pas apparaître complètement.
26-FR
Page 61

Sélection de la vitesse d’obturation
La vitesse d’obturation peut être sélectionnée à l’aide de
la touche SHUTTER.
(1) Appuyez sur SHUTTER.
(2) Appuyez sur +/– pour sélectionner la vitesse
d’obturation.
1 (SHUTTER)
2 (+/–)
Pour revenir au réglage automatique de
la vitesse d’obturation
Appuyez une nouvelle fois sur SHUTTER.
27-FR
Page 62

Utilisation des autres fonctions
CVX-V18NS
Réglage Vitesse
d’obturation
4 1/4
8 1/8
15 1/15
30 1/30
60 1/60
90 1/90
100 1/100
125 1/125
180 1/180
250 1/250
350 1/350
500 1/500
725 1/725
1000 1/1000
1500 1/1500
2000 1/2000
3000 1/3000
4000 1/4000
6000 1/6000
10000 1/10000
CVX-V18NSP
Réglage Vitesse
d’obturation
3 1/3
6 1/6
12 1/12
25 1/25
50 1/50
75 1/75
100 1/100
120 1/120
150 1/150
215 1/215
300 1/300
425 1/425
600 1/600
1000 1/1000
1250 1/1250
1750 1/1750
2500 1/2500
3500 1/3500
6000 1/6000
10000 1/10000
28-FR
Page 63

Changement des réglages de mode
Vous pouvez changer les réglages de mode dans le
menu pour utiliser les autres fonctions et
caractéristiques de la caméra.
(1) Appuyez sur MENU pour afficher le menu.
(2) Appuyez sur +/– pour sélectionner l’icône
souhaitée sur le côté gauche du menu, puis
appuyez sur EXEC.
(3) Appuyez sur +/– pour sélectionner le paramètre
souhaité, puis appuyez sur EXEC.
(4) Appuyez sur +/– pour sélectionner le mode
souhaité, puis appuyez sur EXEC. Pour changer
les autres réglages de mode, répétez les étapes 3
et 4. Pour changer les autres paramètres,
sélectionnez
puis répétez les étapes 2 à 4.
(5) Appuyez sur MENU ou sélectionnez l’icône
pour fermer le menu.
RETURN et appuyez sur EXEC,
1, 5 (MENU)
2, 3, 4 (+/–,
EXEC)
29-FR
Page 64

Utilisation des autres fonctions
Sélection du réglage de mode de chaque
paramètre
Menu CAMERA1 SET
D ZOOM
• Sert à valider (ON) ou invalider (OFF) le zoom
numérique.
• Réglez sur ON si vous voulez utiliser le zoom
numérique.
Le zoom numérique grossit l’image qui ne peut pas être
suffisamment agrandie avec le zoom normal.
Il faut toutefois noter que la qualité de l’image se
dégrade par rapport au zoom normal, lorsque le zoom
numérique est utilisé.
AF SENS.
• Sert à régler le capteur de l’autofocus sur HIGH ou
LOW.
• Réglez l’autofocus sur HIGH pour filmer clairement
des sujets aux mouvements rapides.
SLOW SHTR
• Sert à commuter le réglage SLOW SHUTTER sur
MANUAL ou AUTO.
• Réglez-le lent sur AUTO pour filmer clairement des
sujets dans un environnement sombre.
IR LIGHT
• Sert à valider (ON) ou invalider (OFF) IR LIGHT.
• Réglez l’éclairage sur ON pour filmer clairement des
sujets dans un environnement sombre, lorsque vous
utilisez la fonction NIGHTSHOT sans éclairage.
30-FR
Page 65

Menu CAMERA2 SET
STEADYSHOT
• Sert à valider (ON) ou invalider (OFF)
STEADYSHOT.
• Réglez le stabilisateur sur ON pour réduire les
bougés de la caméra lorsque le zoom est utilisé.
MIRROR
• Sert à valider ou invalider le mode MIRROR (miroir)
(ON ou OFF).
• Réglez le mode sur ON pour inverser la gauche et la
droite.
16:9WIDE
• Sert à commuter le format de l’écran sur OFF,
CINEMA et 16:9FULL.
• CINEMA
L’image enregistrée dans le format CINEMA
apparaîtra normale sur un téléviseur grand-écran,
mais avec des bandes noires en haut et en bas de
l’écran sur un téléviseur normal.
• 16:9 FULL
L’image enregistrée dans le format 16:9 FULL
apparaîtra normale sur un téléviseur grand-écran,
mais horizontalement comprimée sur un téléviseur
normal.
Menu ETC
CLOCK SET
• Sert à régler l’horloge intégrée.
31-FR
Page 66

Utilisation des autres fonctions
Extinction des indications sauf la date,
l’heure et le menu
Appuyez sur DISPLAY.
Pour rétablir les indications
Appuyez une nouvelle fois sur DISPLAY.
Affichage de la date
Appuyez sur DATE.
Pour éteindre la date
Appuyez une nouvelle fois sur DATE.
Affichage de l’heure
Appuyez sur TIME.
Pour éteindre l’heure
Appuyez une nouvelle fois sur TIME.
DISPLAY
32-FR
DATE
TIME
Page 67

Précautions
Prises et cordons
• Veillez à ce qu’aucun objet métallique ne touche la
partie métallique des prises. Le cas échéant, un courtcircuit peut se produire et endommager l’appareil.
• Nettoyez toujours les prises.
• Ne pas tirer avec force sur le cordon.
Utilisation et rangement
• Ne jamais exposer l’appareil à de hautes
températures, comme près d’un chauffage, dans une
voiture garée au soleil ou sous la lumière directe du
soleil. Le boîtier pourrait se déformer et l’appareil de
mal fonctionner.
• Ne pas laisser pénétrer de sable dans l’appareil. Si
vous utilisez l’appareil sur une plage sableuse ou
dans un endroit poussiéreux, protégez-le du sable ou
de la poussière. Le sable et la poussière peuvent
entraîner une panne, qu’il sera éventuellement
impossible de réparer.
• Ne pas exposer l’appareil à des champs magnétiques
puissants. Il se pourrait que l’enregistrement ne
s’effectue pas normalement.
• Ne pas faire fonctionner l’appareil pendant de très
longues périodes dans un endroit clos, par ex.
enveloppé dans un sac. Une surchauffe interne peut
se produire, entraînant une défaillance de l’appareil.
Luminosité du sujet
Si la luminosité du sujet dépasse la plage
d’illumination, l’image risque de ne pas apparaître
nettement.
Emploi inadéquat
Veillez à ne pas faire la mise au point sur un sujet
stationnaire ou brillant pendant une très longue
période. Le filtre couleur du CCD pourrait être
endommagé.
33-FR
Page 68

Utilisation des autres fonctions
Transport
Ne pas diriger l’objectif vers le soleil ou une source de
lumière très puissante, lorsque vous transportez
l’appareil. Le filtre couleur du CCD pourrait être
endommagé.
Prise de vues
Si vous dirigez l’objectif vers le soleil ou une source de
lumière très puissante, une ombre ou une image
“rémanente” peut apparaître sur l’image.
Entretien de l’appareil
Nettoyez le boîtier avec un chiffon légèrement
imprégné d’eau et essuyez l’humidité avec un chiffon
doux et sec.
34-FR
Page 69

Spécifications
Système
Signal vidéo
CVX-V18NS : Couleur NTSC
CVX-V18NSP : Couleur PAL
Dispositif d’image
CCD couleur 1/4 de pouce,
CVX-V18NS : 470 000 pixels (total)
CVX-V18NSP : 570 000 pixels
(total)
Objectif
f= 4.1-73.8 mm, zoom électrique
x 18
f1.4-2.9
Filtre ø 37 mm
Illumination minimale
0,7 lux (à 25 IRE)
0 lux (l’éclairage IR)
Plage d’illumination
0,7 à 100 000 lux
Illumination recommandée
Plus de 100 lux
Alimentation
7,2 V
Consommation
approx. 2,2 W
Avec l’éclairage IR : approx. 3,2 W
Température de fonctionnement
0°C à 40°C (32°F à 104°F)
Température de rangement
–20°C à +60°C (–4°F à 140°F)
Dimensions (l x h x p)
Caméra : approx. 63 x 66 x 115 mm
1
/2 x 2 5/8 x 4 5/8 po.)
(2
Appareil principal : approx. 50 x 59
x 110 mm (2 x 2
Longueur du cordon
approx. 3 m
Poids
Caméra : approx. 343 g (12 on.)
Appareil principal : approx. 153 g
(5 on.)
3
/8 x 4 3/8 po.)
Prise d’entrée MIC
Minijack stéréo, 0,388 mV
Basse impédance de 2,5 à 3,5 V CC,
impédance de sortie de 6,8 kilohms
Prises de sortie
Sortie vidéo
Prise cinch (1)
Signal de luminance: 1 Vc-c, 75
ohms, asymétrique
Sortie audio
Prises cinch (2 : stéréo G et D)
327 mV, (à impédance de charge de
47 kilohms), impédance inférieure
à 2,2 kilohms)
Sortie S vidéo
Minijack DIN 4 broches (1)
Signal de luminance: 1 Vc-c,
75 ohms, asymétrique
Signal de chrominance:
CVX-V18NS : 0,286 Vc-c, 75 ohms,
asymétrique
CVX-V18NSP : 0,3 Vc-c, 75 ohms,
asymétrique
Accessoires fournis
Adaptateur (1)
Mode d’emploi (1)
La conception et les spécifications
peuvent être modifiées sans
préavis.
35-FR
Page 70

Page 71

Page 72

Printed in Japan
 Loading...